DigitalWay MPIO-FL300 MP3 PLAYER User Manual HD200
DigitalWay Co., Ltd. MP3 PLAYER HD200
USERS MANUAL
MPIO Player User’s Guide
DIGITALWAY Co., Ltd
Thank you for purchasing MPIO mp3 Player.
This guide gives you a full explanation about the operation method of the player, cautions in
handling and A/S procedure, which needs to be read before using this unit the player.
Experience the excellent sound quality of MPIO!
DIGITALWAY Co., Ltd will do our best to make a better product in return for your purchase.
A warranty card is appended to this guide.
Contents
1. Cautions in using mp3 player
1. Using environments
2. Product safety
3. User safety
4. Data storage
2. Introduction
1. Features
2. Specifications
3. Computer Requirements
4. Components
5. Part Name and how to use the buttons
6. Configuration of LCD window
3. Tips for MPIO Player Beginners
1. Charging the Battery
2. Installing the operational software
3. Turn ON/OFF
4. Volume control
5. Navigation
6. Music file (Play/Pause)
7. Music and data file download
1
8. Disconnecting the player from a computer
9. How to use HOLD function.
4. Using the MPIO Player functions
1. Button operational table
2. Operation methods by functions
3. Display/system setup
5. Using the MPIO UTILITY
1. Recovery to initial setup state at Format & Configuration
2. Firmware upgrade
3. Windows Media Player Plug-In Installation
1. Cautions in using mp3 player
1. Using environments
Do not keep and use the player at the places mentioned below.
○
1 Places of too high temperature
○
2 Places of too low temperature
○
3 Humid places
○
4 Places under danger of submersion
○
5 Dusty places
○
6 Places exposed to the direct rays of the sun
○
7 In a vehicle
○
8 Near a heater
○
9 Places under severe vibration
○
10 Near a magnetic substance
2. Product safety
○
1 Do not give a shock to the player.
○
2 Do not disassemble, repair and remodel this product without permission
○
3 Do not put a substance into this product.
i.e.) Clip, Paper, Water, Beverage, etc.
○
4 If the surface of this product is stained, clean it with a soft cloth or towel. Never use a
2
chemical solution.
3. User safety
○
1 Traffic-related safety
- Do not listen to Music and FM broadcasting with a headphone or an earphone while you
drive a bicycle, Motorcycle and vehicle. This may cause a dangerous accident and is
illegal depending on districts.
- Decrease the volume of a headphone or an earphone when listening to Music or FM
broadcasting while walking. This may cause a dangerous accident.
○
2 Protection of Ear
- Do not listen to music with a headphone or earphone for a long time. The possibility of
hearing damage has been pointed out by experts.
4. Data storage
○
1 The company isn’t responsible for data loss and damage that occurs in data transmission
between this product and a computer.
○
2 If you save an important data in this product, be sure to back them up. The company isn’t
responsible for the damaged data if the saved data is lost due to a mechanical trouble,
malfunction and other causes (external shock, electric discharge, etc.) Be careful.
○
3 Be sure to back up the data saved in this product before Customer Service. The company
doesn’t perform a separate backup for a received product, considering that the customer has
already backed up the data. Therefore, this company isn’t responsible for data damage that
occurs during the service.
○
4 Be sure to hold the plug when inserting and removing the USB terminal of this product from a
computer.
○
5 Do not shock or shake the jointed part when this product is connected with a computer.
2. Introduction
1. Features
○
1 The slim, small size and high Performance!
MPIO FL330 reminds the user of getting a valuable jewelry with an elegant necklace.
○
2 USB Mass Storage
When the player is connected with a PC, it is perceived automatically as a removable disk.
3

Therefore, you can upload and download data conveniently without a manager program.
○
3 Nothing is more excellent!
Basic 6 types Preset EQ and 4 types of Philips Sound Effects
- Jazz, Pop, Rock, Vocal, Classic, Normal / Pure Studio, Concert Sound, Groove,
Dynamic Bass
They are prepared for true maniac
(* But, not supported in FL330 model.)
○
4 Multi-Format Support
Supports MP3, WMA and ASF format as a multi-format player.
○
5 Graphic User Interface for user’s convenience.
A great effort has been made on GUI to enhance a user’s convenience.
This product offers graphic-oriented icon, simple menu and easy access way.
○
6 Navigation
You can save and search a music file easily by using a tree-shaped structure like Window
Explorer.
○
7 Voice Recording
(*But, not supported in FL330 model.)
○
8 Firmware upgrade
We’ll do our best to improve the performance of this product through continuous firmware
upgrade service.
2. Specifications
Size 30 x 50 x 12.8(W x H x D)mm
Weight 25g
Memory 128MB/256MB
Compressed format
support MP3(8 ~ 320kbps), WMA(5 ~ 192kbps), ASF
LCD display 2 line Negative LCD, White LED backlight
Supported language 55 languages supported
Menu language English
4

File transmit speed Max. 5 Mbps
Earphone output 6mW/channel
Signal to Noise rate 90dB
Output frequency range 20Hz ~ 20KHz
Battery Li-Polymer
Continuous playing time Max. 10 hours (128kbps MP3 file play, Volume 20)
Operating temp. 5°C ~ 40°C
!! The contents on this user’s guide may be changed without a prior notice to improve the
performance.
- The available memory capacity may be reduced by a logical file system regardless of
the memory capacity (128/256MB) of the player.
- The playing time depends on usage and menu setup.
- The data transmission speed depends on the Specification of a user’s computer.
- PC-link using extension code such as USB hub isn’t guaranteed.
- Rechargeable batteries have a limited Number or charge cycle and may eventually
need to be replaced.
- Battery life and number of charge cycle may vary by use and settings.
3. Computer Requirements
(1) IBM PC
Main: USB Interface (Rev 1.1) standard system and CD-ROM Driver mounted
CPU: Pentium 133MHz or more
Memory: 64MB or more
Hard disk margin: 20MB or more
Supported operational system: Windows 98/98SE/Me/2000/XP
(2) Macintosh
- Main: USB Interface (Rev V1.1) standard system and CD-ROM Driver mounted
ex) Power Mac G3 (Blue & White)/G4/G4 Cube, iMac/iBook, Powerbook, Powerbook G4
- Memory: 64MB or more
- Hard disk margin: 20MB or more
- Supported operational system: Mac OS 9.04~10.x
5
! Be sure to use the offered USB cable because the Player doesn’t often work when used an
extension cord for connection with a PC.
4. Compositions
○
1 Basic
Main body
Manual
Installation CD
Mini-USB
USB Extension Cable
Warranty card
○
2 Additional
* FL300
Ring-shaped earphone
Nude Case + Necklace string
* FL330
Normal Earphone
Armband + Case
! The accessories may be changed without a prior notice to improve the performance and
quality of this product.
5. Part Name and how to use the buttons
① Earphone Jack & USB Port
② Reset
③ REW button: Navigation / Move to Menu
④ FF button: Navigation / Move to Menu
⑤ MENU button: Range Repeat / Information Change
⑥ Volume key -: Volume control only in playing.
⑦ Volume key +: Volume control only in playing.
(Move to the upper folder and menu at Navigation or Menu Search Mode.)
⑧ Play / Pause button: Power ON/OFF, Music Play/Pause
⑨ LCD Window: Displays the file information and menu setup state.
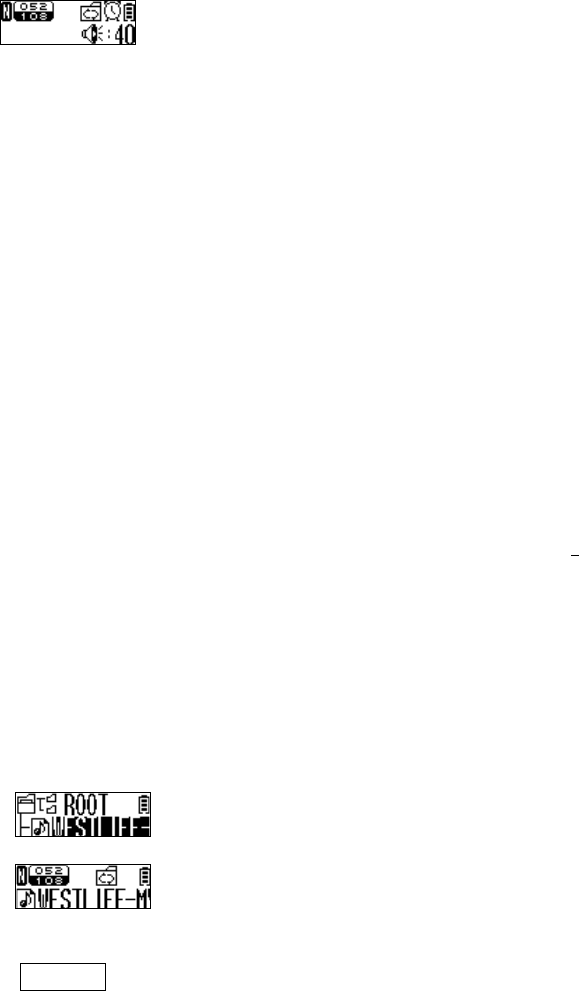
6. Configuration of LCD Window
!! * Press the MENU button to change the LCD information as follows.
6

Music information display figure 1
Music information display figure 2
(1 line)
1. PRESET EQ icon
2. The number of music being played/Total
of music saved in the player or the
folder
3. Sound effect icon (Not supported in
FL330.)
4. REPEAT icon
5. Sleep icon
6. BATTERY icon
(2 line)
① Music information display
Clock display screen
(1 line)
① day of week / day / month / year
② Play state display icon (PLAY or PAUSE)
(2 line)
① Alarm setup display icon / PM. AM display
icon
② Clock display (time, minute)
3. Tips for MPIO Player Beginners
1. Charging the battery
○
1 When the battery icon becomes empty, ‘Low Battery’ icon appears as shown below and the
player turn off, the battery should be charged.
○
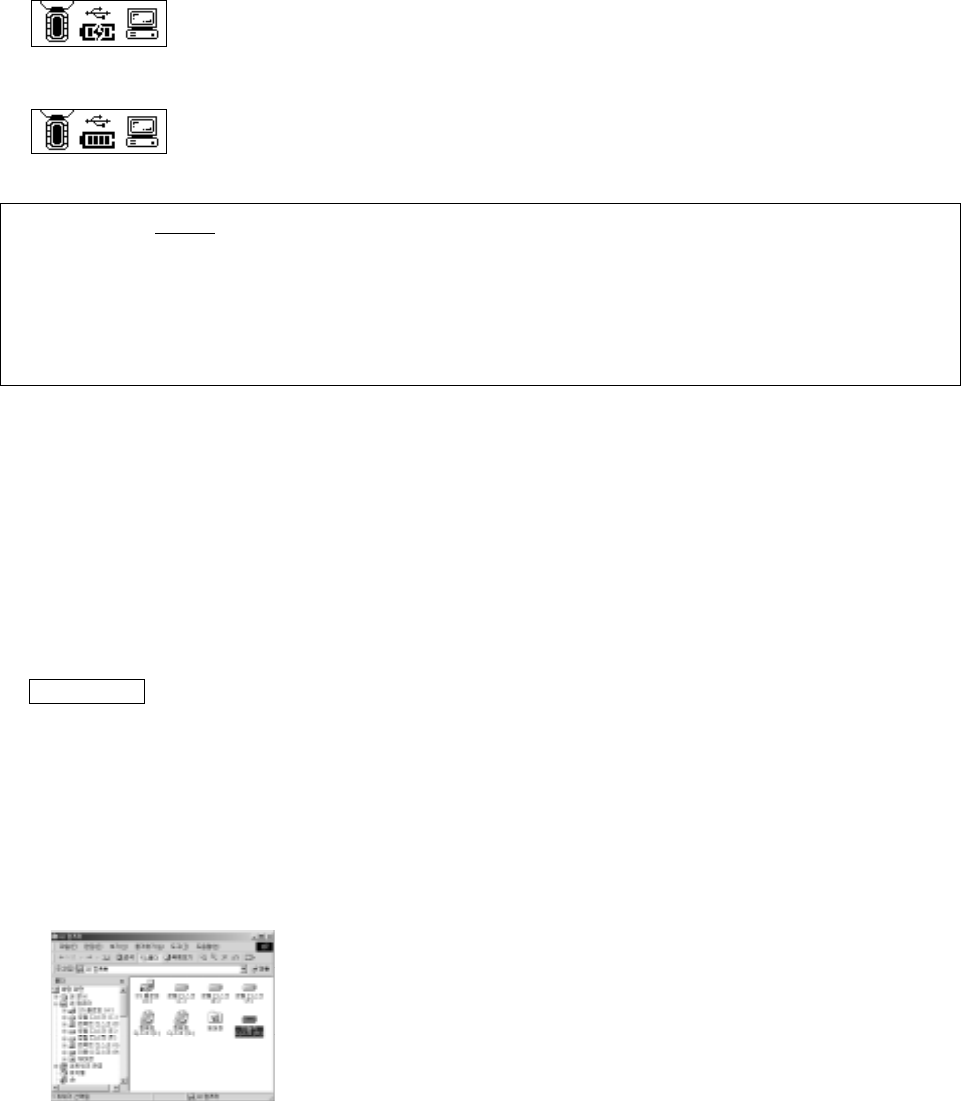
2 When the player is connected by USB cable from the earphone jack to USB port of PC,
the below USB & Charging icon appears on the LCD screen and charging begins.
7
○
3 When charging is completed, the below icon appears on the LCD screen.
Charging time: 3 hour (completely charged state based)
Playing time: Max. 10 hours
!> The charging and playing time can be different depending on the user’s using environment.
!> Always separate the USB Cable from the PC unless it is being charged or USB connection
2. Installation of operating software
The PC using Windows ME, Windows 2000 and Windows XP supports USB 1.1 Storage Device
basically and perceives the player as a removable disk without installing a manager program.
Thus, you can utilize the player by using the Windows Explorer
For a computer using Windows 98/98SE, a MPIO USB Device Driver should be installed first.
(Only if the device driver is installed, the computer can perceive the player as an external
storage.)
How to install
○
1 Connect a USB cable with a computer and a Player USB port (Earphone Jack).
○
2 “New hardware device perceived” message box appears on the PC monitor.
○
3 Insert the supplied CD in a computer, select the PLAYER3xx.INF file in the device drive
folder as a device drive and press “Confirm”. Then, the computer perceives the PLAYER as a
removable disk.
3. Power ON/OFF
- Press and hold the Play/Pause button to turn on and display MPIO Logo screen.
To skip the Logo screen, press any key during the intro MPIO logo
- Press and hold the Play/Pause button to turn off.
8
9
4. Volume control
- To increase the volume: +button
- To decrease the volume: -button
!> Press and hold the volume key to increase and decrease the volume fast.
(But, the volume control function is available only in playing.)
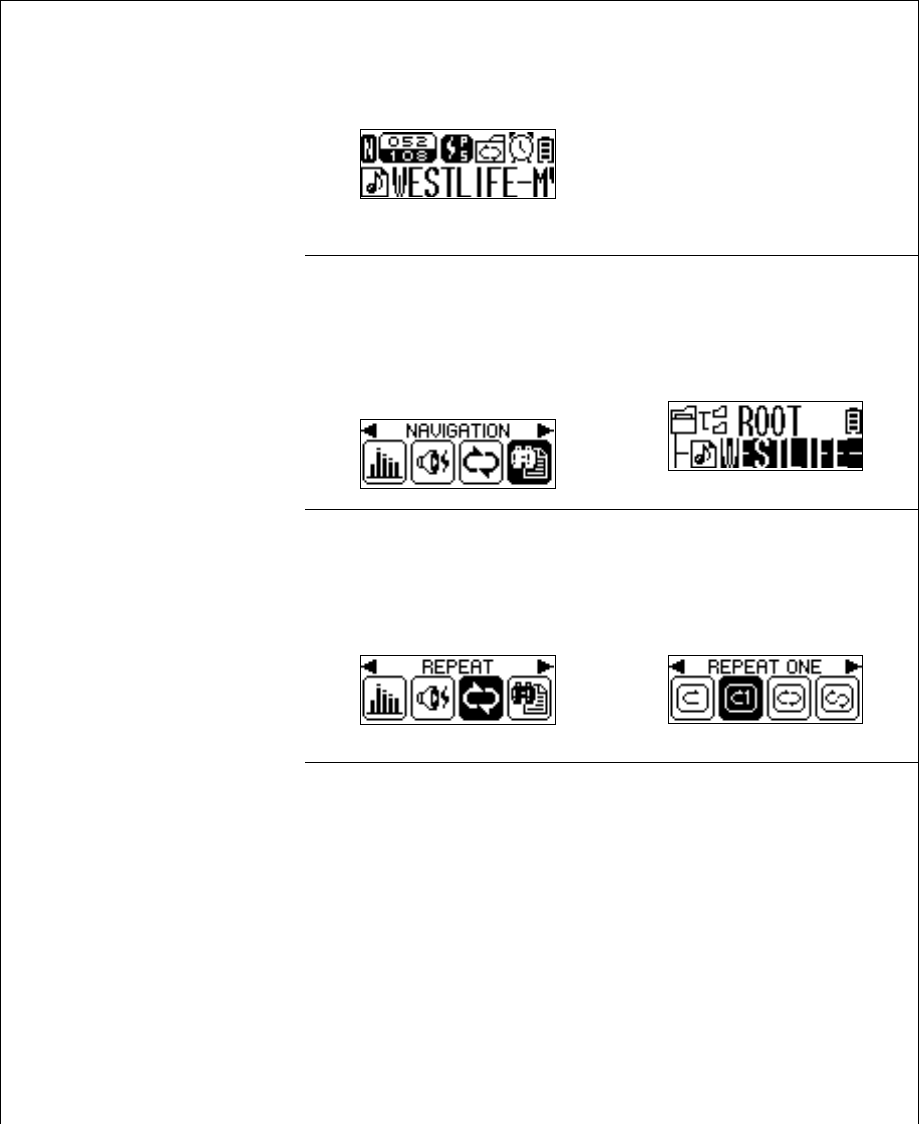
5. Navigation
- Enter the Folder: Move to the upper or lower folder by using the FF & REW button, and
select folder. Then press the Menu button
- Exit the Folder: Press the Volume + button in the folder to return to the upper folder.
6. Music File (Play/Pause)
- Select a music file and press the Play/Pause button shortly to play the file.
- Use the FF & REW button to move to the previous or the next music while listening.
- Pressing the REW button after first 10 seconds of a track will move back to beginning to the
current track.
- Pressing the REW button within 10 seconds of a track will move to the previous track (of the
current track).
- Press and Hold the FF & REW button in listening music to perform the Fast Forward/Fast
Rewind function.
- Press the Play/Pause button to pause the music.
If ‘no track’ message appears, there is no saved music. Download a music file.
No Track
7. Music and Data File Download
(1) Connect the MPIO Player with a computer.
- For a PC using Windows 98/98SE, install the USB Device Driver in an supplied CD. (Refer to
13 Page for installing method.)
10
- Turn on and connect the USB cable with a computer and the USB terminal (Earphone
terminal) of this player.
- Check the USB link message on the LCD screen of the player as follows (2 image).
<Recharging status>.
<Fully charged>
! The battery is charged automatically when USB is linked.
- To download or copy files, drag and drop files from PC to a removable disk (MPIO drive) by
using the Window Explorer.
-> -> ->
!! An illegal download and duplication of MP3 file with copyright is prohibited by law and
company isn’t responsible for any items related to the copyright.
8. Disconnecting the player from a computer
!! The followings are recommended for safe disconnection. Please follow the procedure to
present any data loss or damage on both player and PC.
① Locate the mouse on the icon for removal and disconnection of Task Tray and click the
right button of the mouse.
② Select 'Separate or Remove the Hardware' message to display the below screen.
③ When 'Remove the Hardware Safely' window appears, select ‘USB High Capacity Storage’
on the Hardware Device window and click the [Stop] button.
④ When ‘Hardware Device Stop’ window appears, check the 'USB High Capacity Storage’
item and click the [Confirm] button.
⑤ When ‘Remove the Hardware Safely’ window appears, Click the [Confirm] button and
disconnect the player from the computer.
11
!! For Windows 98 / 98 SE computer user
- To prevent the data loss during data transferring, disconnect it when the LCD screen
changes as follows.
9. How to use Hold function
① Hold On: Press the REW button with the MENU button long clicked.
② Hold Off: Press the REW button with the MENU button long clicked.
! In operating a button after hold on, KEY HOLD!! Icon appears and disappears soon.
12

4. Using the MPIO Player functions
1. Button operation table (Allocations Table -Button and Functions)
* Press (=Short Click): Means pressing a button shortly.
* Press and hold (=Long Click): Means press and holding a button more than 1 second.
KEY 명칭 Pause While playing MENU
Short Click Selected music play Pause Playing screen
PLAY/STOP Long Click Power Off Power Off Power Off
Short Click Folder move Data change/Range
repeat
Menu setup
MENU
Long Click Menu Entry Menu entry
Short Click Previous music
navigation Previous music play Menu change
REW
Long Click Fast navigation Fast Rewind
Short Click Next music navigation Next music play Menu change
FF Long Click Fast navigation Fast Forward
Short Click Upper folder Volume UP Upper menu
VOL + Long Click Fast Volume UP
Short Click Volume DOWN
VOL - Long Click Fast Volume DOWN
13
2. How to operate by functions
!! If you click the Volume + button in setting all menu states, you can move to the upper menu
without saving the set value.
(1) Listening to music
○
1 Press and hold the Play/Pause
button to turn on the player.
○
2 Find the next or previous music
by using the FF or REW button and
then click the PLAY/PAUSE button
to play.
(2) Navigation
○
1 Press and hold the MENU
button while playing to enter
the MENU and then select
NAVIGATION icon.
○
2 Find music by using the FF or
REW button and click the
PLAY/PAUSE button to play.
○
1 Press and hold the MENU
button to enter the MENU and
select the REPEAT icon.
○
2 Press the MENU button to
enter the lower MENU and select
a PLAY REPEAT state.
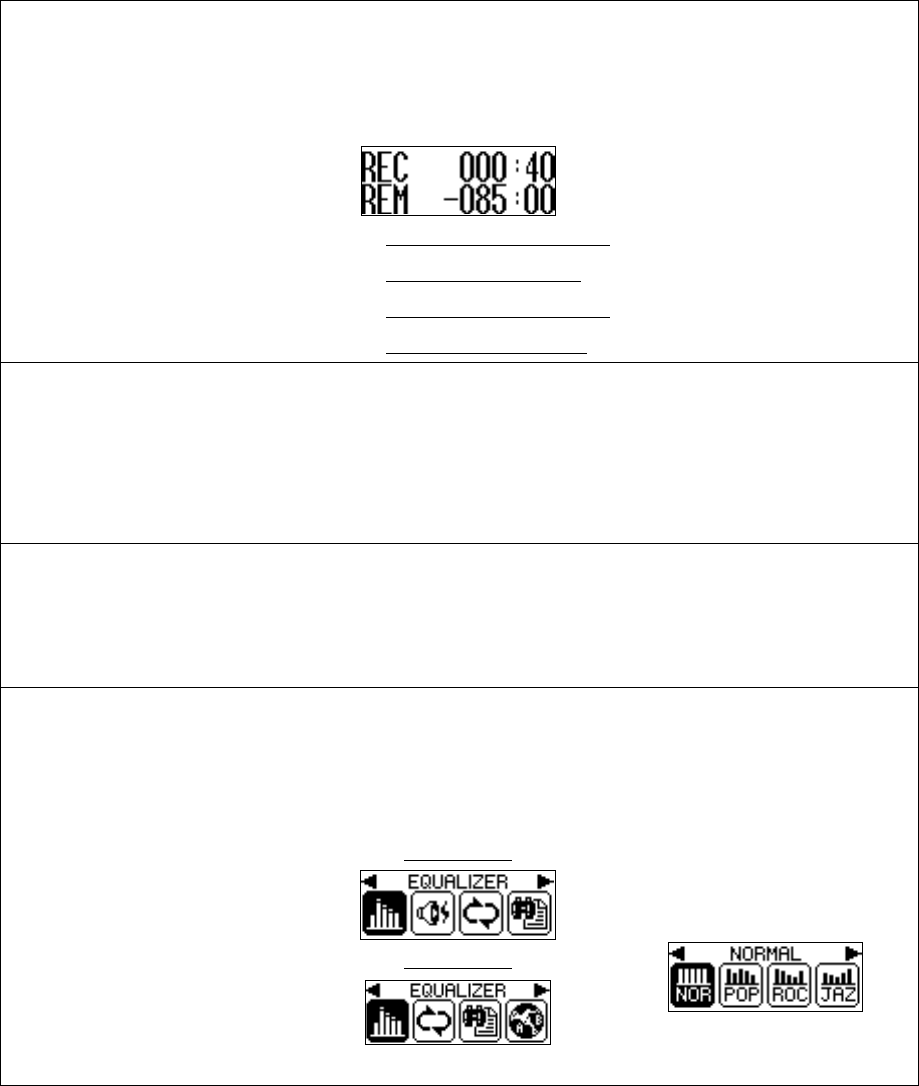
(3) REPEAT Setup
(Play Repeat)
Repeat Normal-Sequential play
Repeat one –repeat One music
Repeat All –Infinite sequential play
Random-Random play
Directory Normal- Sequential play of
music in folder
Directory All- Infinite sequential play of
music in folder
Directory Random- Random play of
music in folder
14
(4) Clock function
< Clock figure while playing >
Press the MENU button while
playing to check the bit rate and
playing time and Press once
again to display the time on the
LCD screen.
(Refer to Page 11 for details.)
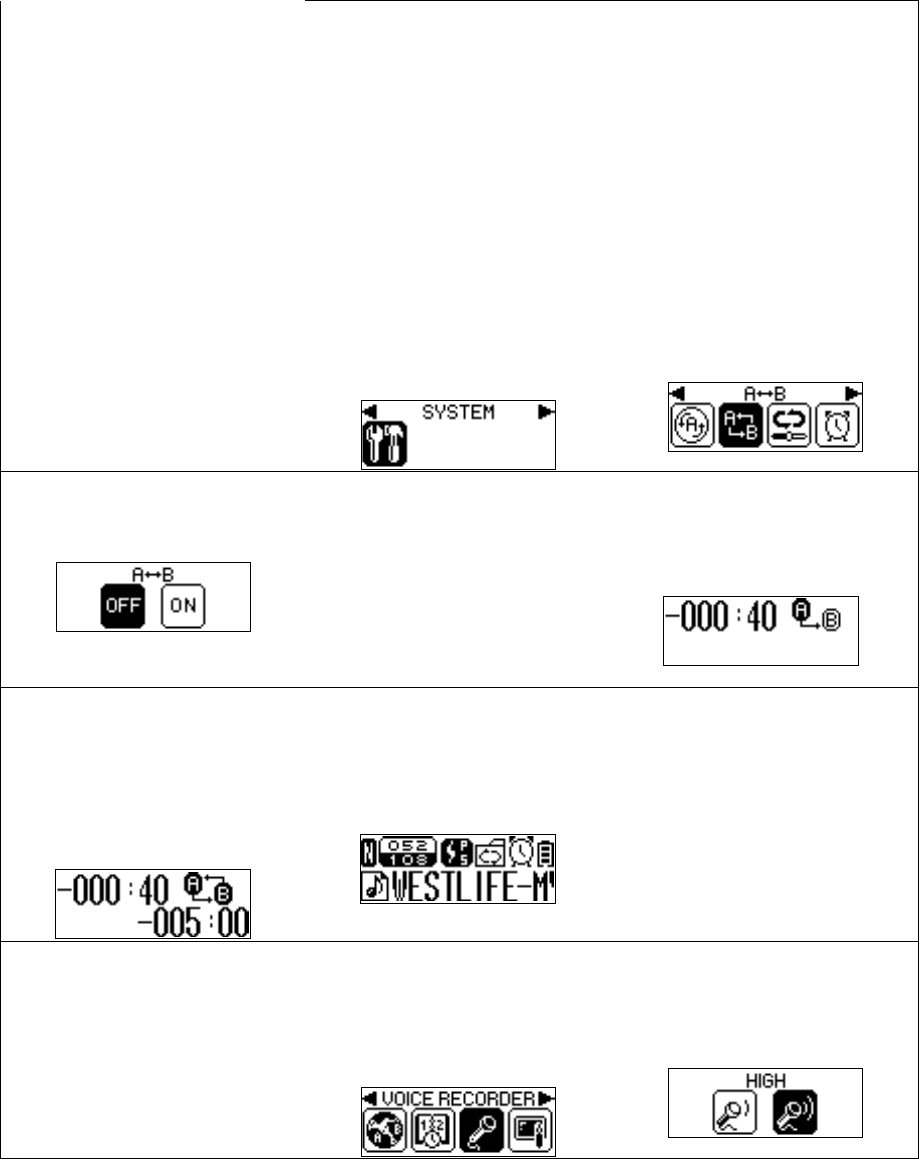
(5) A<->B Range
Repeat Setup
(Useful in studying a foreign
language)
○
1 Press and hold the MENU button
to enter the MENU and then select
the
SYSTEM icon.
○
2 Press the Menu button to
enter the lower menu and then
select A<->B icon.
○
3 Change A<->B from OFF to ON.
○
4 When A<->B is ON, the
MENU button is operated as
Range Repeat button of a file
being played.
○
5 Press the MENU button while
playing to set the starting point (A)
of Range Repeat.
.
○
6 Press the MENU button a
g
ain at
the moment to set the endin
g
p
oint
(B) of Range Repeat. Then, the
range between A and B is played
repeatedly.
○
7 Press the MENU button a
g
ain to
clear the Range Repeat between A
and B.
(6)VOICE RECORDER
(* But, FL330 model doesn’t
support this function)
○
1 Press and hold the MENU button
to enter the MENU and then
select the VOICE RECORDER
icon.
○
2 Press the Menu button to
enter the lower menu and then
select the recording quality.
15
○
3 Select LOW (general quality)
or HIGH (high quality) and press
the MENU button to start
recording.
LOW Recordin
g
Time :
396 minutes(in 128MB)
HIGH Recordin
g
Time :
200 minutes(in 128 MB)
○
4 Press the PLAY/PAUSE button
while recoding to pause and then
Press once again to resume
recoding.
○
5 Click the MENU button while
recording to finish the voice
recording and save the file in
RECORD folder.
○
6 The recorded voice files are
saved in the form of
VOICE001.MP3, VOICE002.MP3…
in RECORD folder.
<그림>
○
7 Find and select a recorded voice
file in the RECORD folder through
list search in Navigation or Pause
state and then play.
(7) EQUALIZER Setup
○
1 Press and hold the MENU button
to enter the MENU screen and
then select the EQUALIZER
icon.
FL300 Model
FL330 Model
○
2 Press the Menu button to
enter the lower menu and then
set the PRESET EQ.
(NORMAL/POP/ROCK/JAZZ/CLASSI
C/VOCAL)
16
(8) SOUND EFFECT
Setup
(* But, FL330 model
doesn’t support this
function)
○
1 Press and hold the MENU button
to enter the MENU screen and then
select the SOUND EFFECT
icon.
○
2 Press the Menu button to
enter the lower menu and then
set the SOUND EFFECT.
(OFF/PURE STUDIO
/CONCERT SOUND/
GROOVE/DYNAMIC BASS)
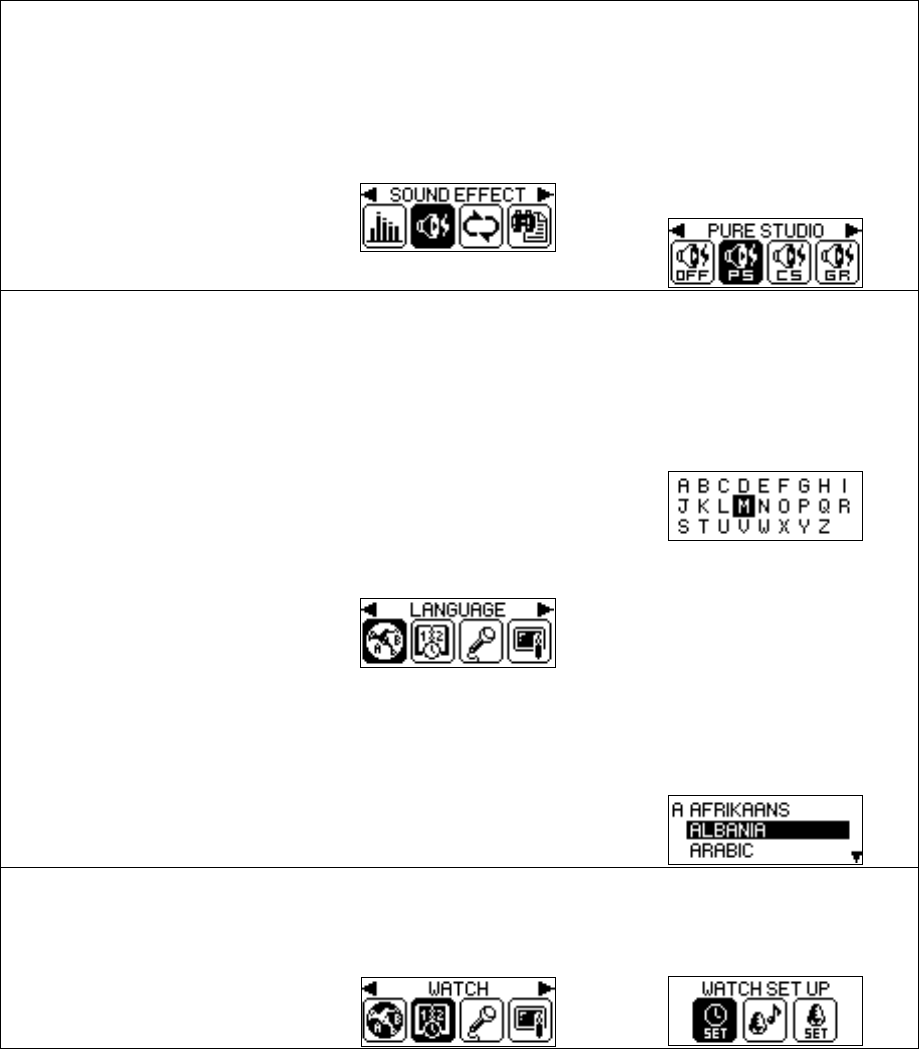
(9) LANGUAGE Setup
○
1 Press and hold the MENU button
to enter the MENU screen and then
select the LANGUAGE icon.
○
2 Press the Menu button to
enter the lower menu and then
set the language.
(55 ID3 Tag languages support
setup)
In selecting an alphabet of
saved language, the cursor
moves onto the language.
Otherwise, the cursor moves
onto the first language initiated
by the alphabet.
(10) WATCH Setup
○
1 Press and hold the MENU button
to enter the MENU screen and then
select the WATCH icon.
○
2 Press the Menu button to
enter the lower menu and then
select the WATCH SET UP icon
17
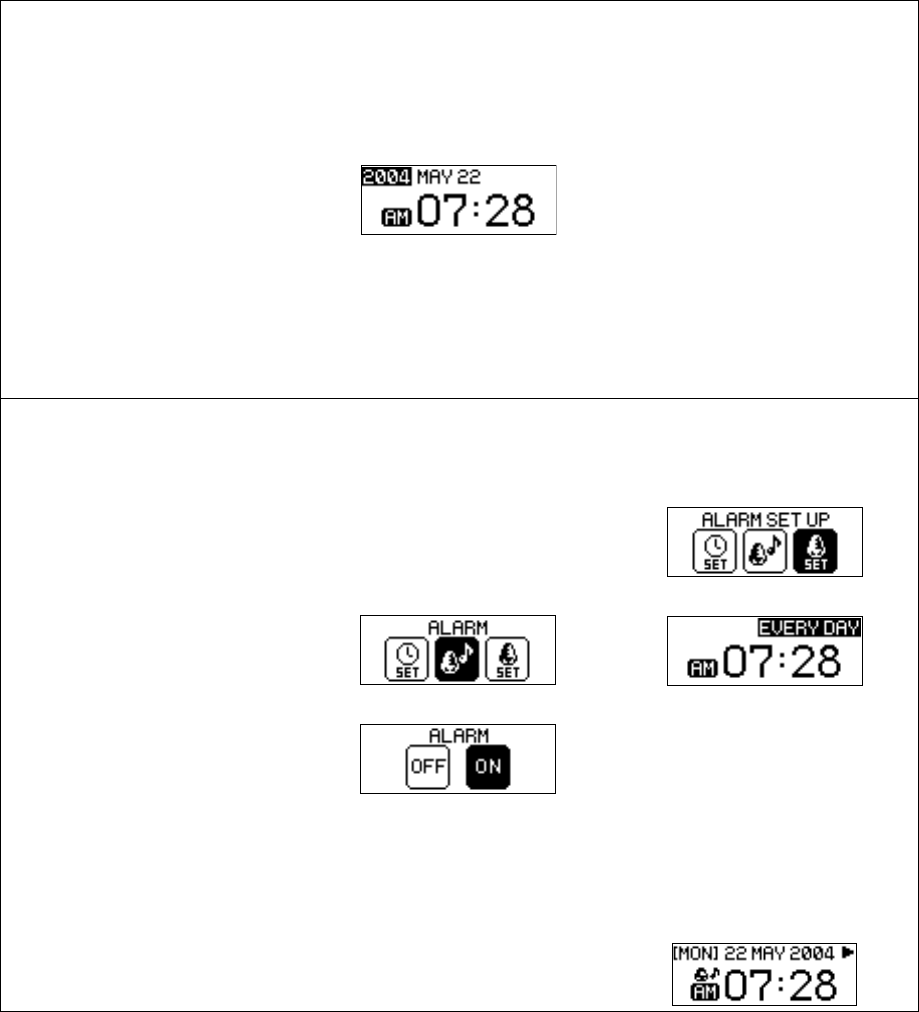
○
3 Use FF, REW button and Press
the MENU button to setting time.
Then, the value is saved and the
cursor moves to the next setup.
(Move in the order of Year, Month,
Day, Time and Minute.
! At this time, when the
y
ear is set
and the month is chan
g
ed, the date
is automaticall
y
chan
g
ed into 1.
Therefore, be sure to check the
date in setting the month.
(11) ALARM Setup
○
1 Select the ALARM icon in watch
mode and set ALARM ON or OFF.
○
2 Select the ALARM SET UP icon
under WATCH and set as the same
method as time setup.
ONE DAY/EVERYDAY – Alarm
Interval
Hour/Minute – Alarm time setup
When ALARM is set to ON, ALARM
icon appears on the clock screen.
18
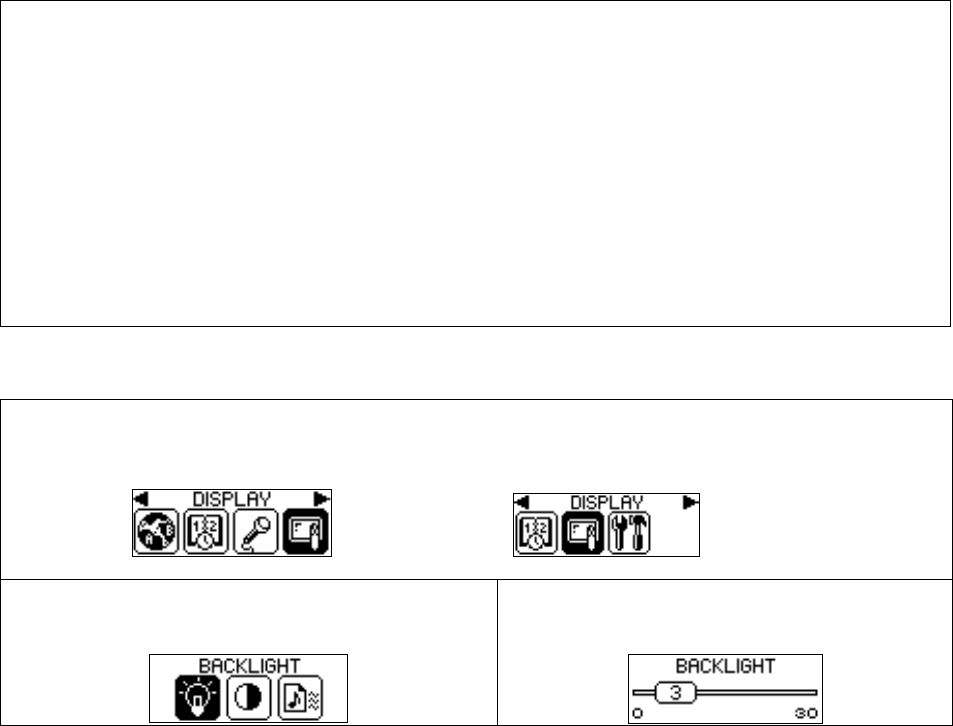
3. DISPLAY/SYSTEM Setup
○
1 Press and hold the MENU button to enter the MENU screen.
○
2 Select the DISPLAY or SYSTEM icon by using the FF, REW button and Press the MENU button
to enter the lower menu of DISPLAY or SYSTEM.
○
3 In the same method as mentioned above, enter the menu either DISPLAY or System.
And select the option by using the FF, REW button and Press the MENU button to save the settings.
DISPLAY
= BACKLIGHT, CONTRAST, FILE INFO
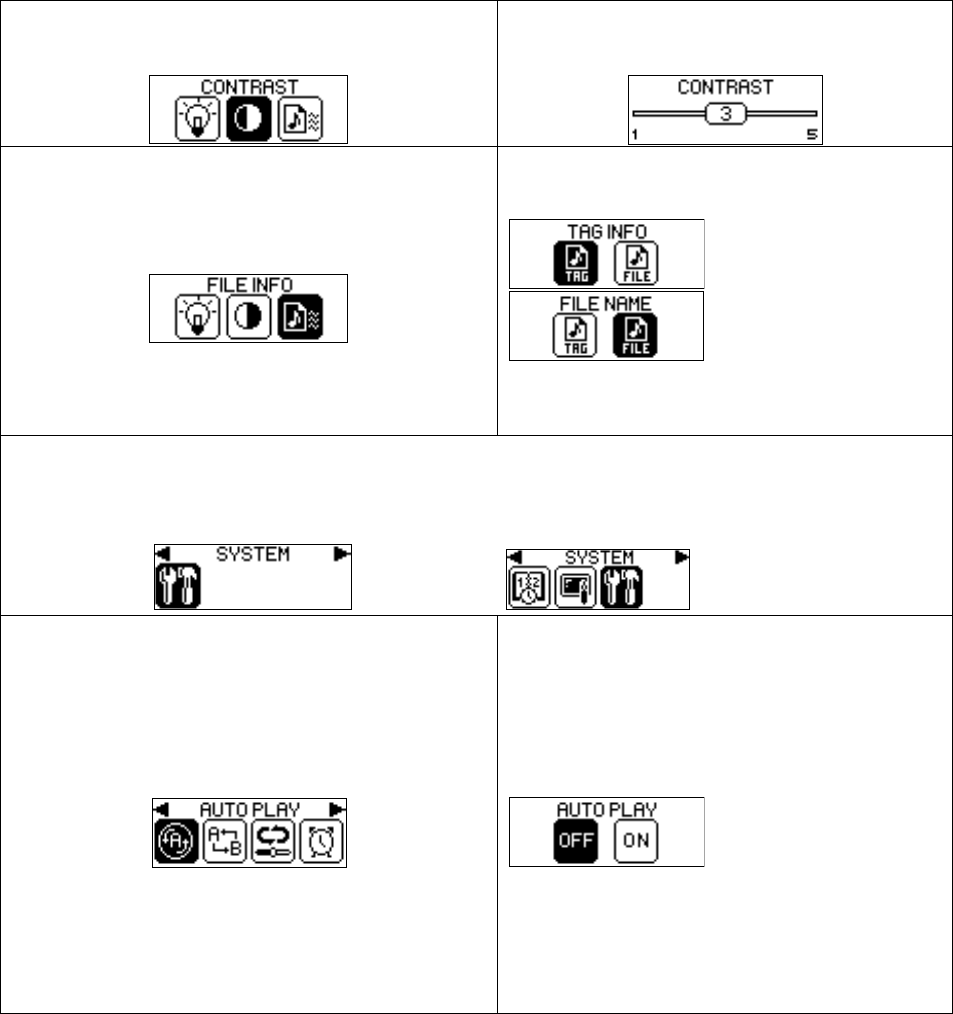
SYSTEM
= AUTO PLAY, A<->B, RESUME, SLEEP, AUTO POWER OFF, FADE, INFO
1. DISPLAY(Backlight, Contrast, File Info) Setup
* Press and hold the MENU button to enter the MENU and then select the DISPLAY icon.
FL300 Model FL330 Model
BACKLIGHT
Sets the backlight time.
0 ~ 30 sec.
19
CONTRAST
Adjusts the LCD contrast.
1 ~ 5 steps
FILE INFO
Selects the file information to be displayed at 2
Line LCD while playing a file.
* Displays TAG INFO=ID3 TAG information.
* Displays FILE NAME.
2. SYSTEM (AUTO PLAY, A<->B, RESUME, SLEEP, AUTO POWER OFF, FADE,
INFO)설정
* Press and hold the MENU button to enter the MENU and then select the SYSTEM icon.
FL300 Model FL330 Model
AUTO PLAY
<Auto Play setup at power on>
OFF: Power on and click the PLAY button to play a
file.
ON: When you power on, a file is automatically
played.
The last file which was played before power off is
automatically played. If the last file is lost, Auto
Play isn’t performed.
20
A<->B
Dual function of “Menu” Button in playing music
OFF
Press the MENU button while playing to
display the bit rate and playing time on the
LCD screen and short click once again to
display a clock on the LCD screen.
ON
Press the MENU button while playing to set
Range Repeat.
RESUME
Turn on and select to resume the music that was being played before Turn off.
INITIAL
Plays the file that was being played before turn off from
the first track.
STOPPED
Remember and play the stopped location of the file
that was being played before turn off.
SLEEP
<Power Off time reservation>
(0 ~ 60 minutes)
Auto Power OFF
<Auto Power Off time reservation>
When there is no operation of a button in Pause
state, the player turns off automatically after
standby time goes by. (0 ~ 30 minutes)
FADE
<Slow increase of volume in playing music>
OFF: Play a file in the set volume.
ON: Increase or decrease the volume slowly to the
set volume in playing music.
21
INFO
<Display of player Information>
Displays the data on Firmware Version, Used
Memory and Total Memory.
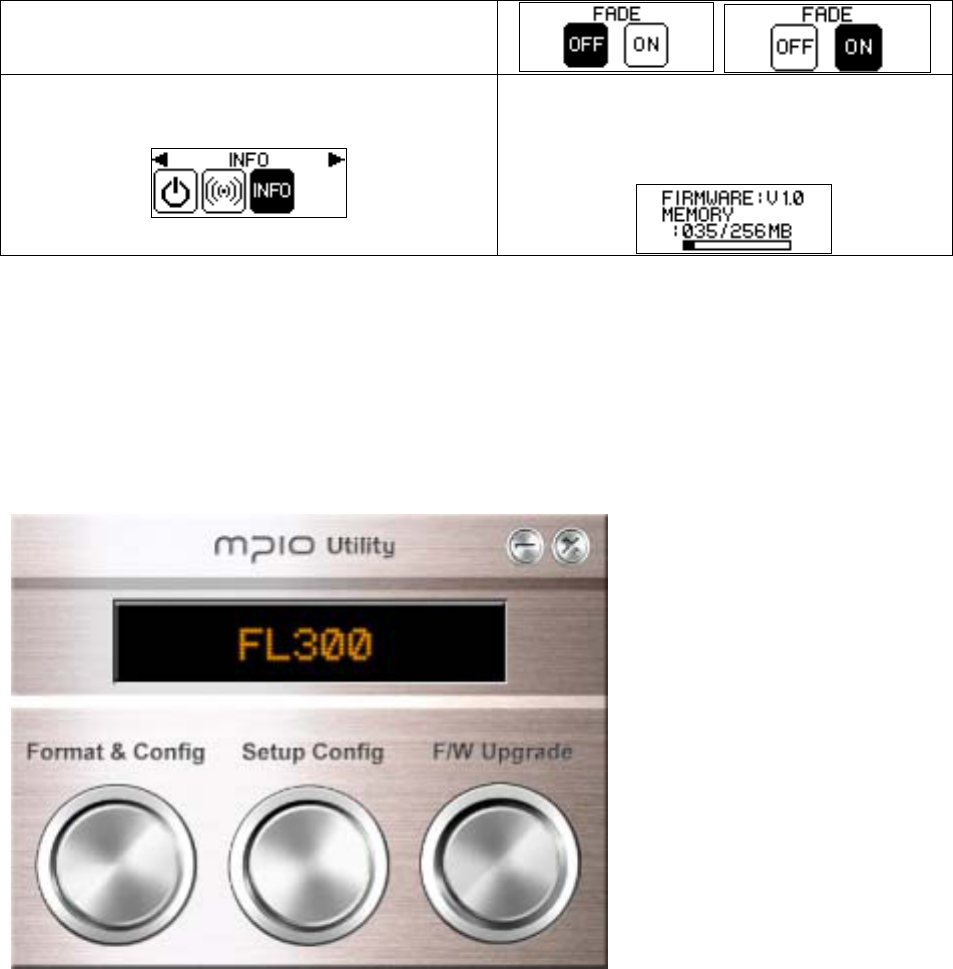
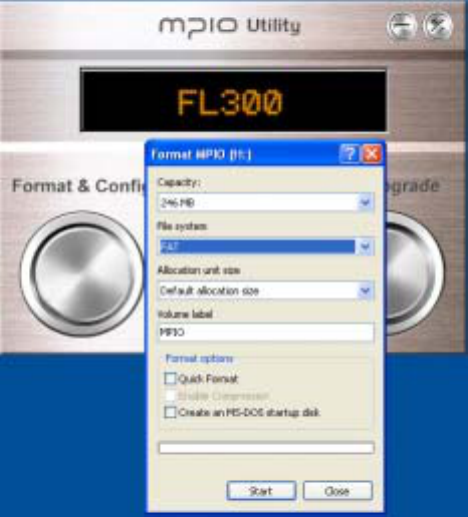
5. Using the MPIO UTILITY
1. Recovery to the initial setup state after format
(1) Connect the player with a computer.
(2) Find a MPIO Utility from the supplied CD and install to the user’s computer.
(3) Execute the MPIO Utility.
(4) Click the Format & Config. Then It will format the set and download files to backup initial
states.
(5) Format must be only done with FAT (FAT16) as in below figure.
22
(6) Click the Setup Config button to download files to backup initial states.
In this Case, Format will not happen.
2. Firmware upgrade
(1) Turn on the player and connect with a computer via the supplied USB cable.
(2) Execute the MPIO Utility.
(3) Click the Firmware Upgrade button to transmit a new firmware to the MPIO Player.
(4) Separate the USB cable after the transmission is completed. Then, the player progresses
the firmware upgrade.
(5) At this time, the progress of firmware upgrade can be checked on the LCD screen of the
player.
But, the user’s computer should be linked with Internet.
3. WMP (Windows Media Player) Plug-In Installation
(1) Power on the PC and insert a MPIO Install CD into the CD-ROM Driver.
(2) Double click the CD-ROM icon and then the Plug-In Installer icon in the folder.
(3) When ‘WMP Plug-In for MPIO Read Me’ window appears, click [CONTINUE] button.
(4) When ‘WMP Plug-In Installer’ window appears, click [INSTALL] button.
(5) When ‘Installation was successful’ message appears, click [Quit] button.
23

Note:
This equipment has been tested and found to comply with the limits for a class B digital device, pursuant
to Part 15 of the FCC Rules.
These limits are designed to provide reasonable protection against harmful interference in a residential
installation. This equipment generates, uses and can radiate radio frequency energy and if not installed
and used in accordance with the instructions, may cause harmful interference to radio communications.
However, there is no guarantee that interference will
not occur in a particular installation. If this equipment does cause harmful interference to radio or
television reception, which can be determined by turning the equipment off and on, the user is
encouraged to try to correct the interference by one or more of the following measures:
-Reorient or relocate the receiving antenna
-Increase the separation between the equipment and receiver
-Connect the equipment into an outlet on a circuit different from that to which the receiver is
connected
-Consult the dealer or an experienced radio/TV technician for help.
This device complies with Part 15 of the FCC Rules. Operation is
subject to the following two conditions: (1) this device may not cause
harmful interference, and (2) this device must accept any interference
received, including interference that may cause undesired operation.
**CAUTION: Changes or modifications not expressly approved by the
party responsible for compliance could void the user's authority to
operate the equipment.
24