DigitalWay MPIO-FY300 MP3 Player User Manual
DigitalWay Co., Ltd. MP3 Player
users manual
Cover Front
. The contents of user’s guide could be changed without prior notice, depending on updates and changes in
specification, etc.
About Copyrights
Any form of imitation, copying, reproduction or translation in part or in whole of both the product and its
accompanying documents or shrinking the product in such a form as to be read by electronic means without
Digitalway’s prior consent is prohibited by the Copyrights Act.
. Microsoft, Windows, Windows Explorer, and Windows Logo are trademarks or registered trademarks of
Microsoft Corporation.
. Intel & Pentium are registered trademarks of Intel Corporation.
. Macintosh, Macintosh Logo is trademarks or registered trademarks of Apple Computer, Inc.
. The system and products appearing in this manual are covered by trademarks or registered trademarks of
each company or organization concerned; the mark ™ or ® is not always indicated.
Warning
* You should be fully aware of the notice below, before using the product.
* The company does not take the responsibility for the defect of the product (accessory, connecting device
etc.), damage, data loss, accident & disorder etc., occurred from not fully understanding the notice below, so
please be sure to check this notice.
. Do not use the product for the other purpose except for the matters described in the manual.
. Pay attention not to hurt your hand while you touch a product box, manual, accessory etc. Keep the manual
to use at any time.
. Pay attention not to have a severe impact on the product, might cause a trouble or a damage.
. Pay attention not to use the device or leave it alone in places with high temperature and humidity or of big
thermal difference, and by the strong magnetic field.
. Do not spill any liquid (water, beverage etc.) on this device.
. The device that you discretionary disassembled or remodeled can be exempted from the free service, so
pay special attention to this.
. The company does not take the responsibility for data loss caused by the defect of the product, failed
operation and other reason, so pay attention to this.
. Pay attention not to use the earphone continuously for many hours that might cause a hearing problem.
. Please plug or unplug the earphone and cable by holding the plugs not by pulling out the earphone or cable,
to prevent internal line breaking.
. Do not give an impact to the connected part while the USB cable is connected to the device.
. Maintain and keep clean the USB connection of the device.
. When the device is covered with foreign particles, please wipe off it with soft cloth or clean towel and be
careful not to use chemicals.
Accessory
1. Earphones
2. USB Expansion Cable
3. Line-In Cable
4. Manual
5. CD
6. Warranty Card
* Accessories can be changed without notice to increase the performance or quality of the product.
Features
1. MP3, WMA File Formats Playback
2. Support 35 languages
3. FM Radio Reception & Record
4. Direct Encoding
5. Voice Record
6. Built-in Lithium Polymer Battery

Specifications
Sorts Items Specifications
FM Frequency Range 76Mhz ~ 108Mhz
FM TUNER
S/N ratio 50dB
Frequency Range 20Hz ~ 20KHz
Headphone Output 12mW(EU: 6mW)
S/N ratio 90dB
Audio
THD 0.1%
File Type of Decoding MP3. WMA
FILE Support
File Type of Recording MP3, TVF
LCD 3 lines Full Graphic LCD with Blue LED Backlight
Languages 35 languages
Battery Li-ion 3.7V 420mA
Playing time
Approx. 10hours
Condition of measuring:
1. 128Kbps MP3 repeatedly plays
2. Volume level: 15
3. EQ Setting: Flat
Operational Temperature -5˚C ~ 40˚C
Memory 128MB, 256MB
PC Interface USB 1.1
Dimension 16.8 * 26 * 89 ( H x W x L ) mm
Weight 40g
. Actual usable capacity may be less than the storage’s capacity marked on box and user’s guide.
. Data transfer rate may vary depending on the computer systems.
. Playing time may vary depending on the usage, configuration and condition.
! Connecting MPIO Player to the PC via USB Hub & Extension Cord may cause the failure of Device,
operation.

Overview
<Listening to Music>
Step 1. Charge the Battery
Insert USB terminal of player to computer’s USB port. Or connect the USB cable to the player and the
computer.
Player’s backlight will turn on when charging is complete.
! Disconnect player from computer when charging is complete.
In condition of player turn off: The built-in battery is fully charged in about 2 hours.
In condition of player turn on: The built-in Battery is fully charged in about 4 hours.
Step 2. Install the Windows 98/SE driver
It isn’t needed to install driver with windows me/2000/XP.
The software should be installed before connect player and computer.
1. Insert the player CD into your computer.
2. “USB disk software manager” run automatically.
(If it does not run automatically, run “setup.exe” file from the install CD)
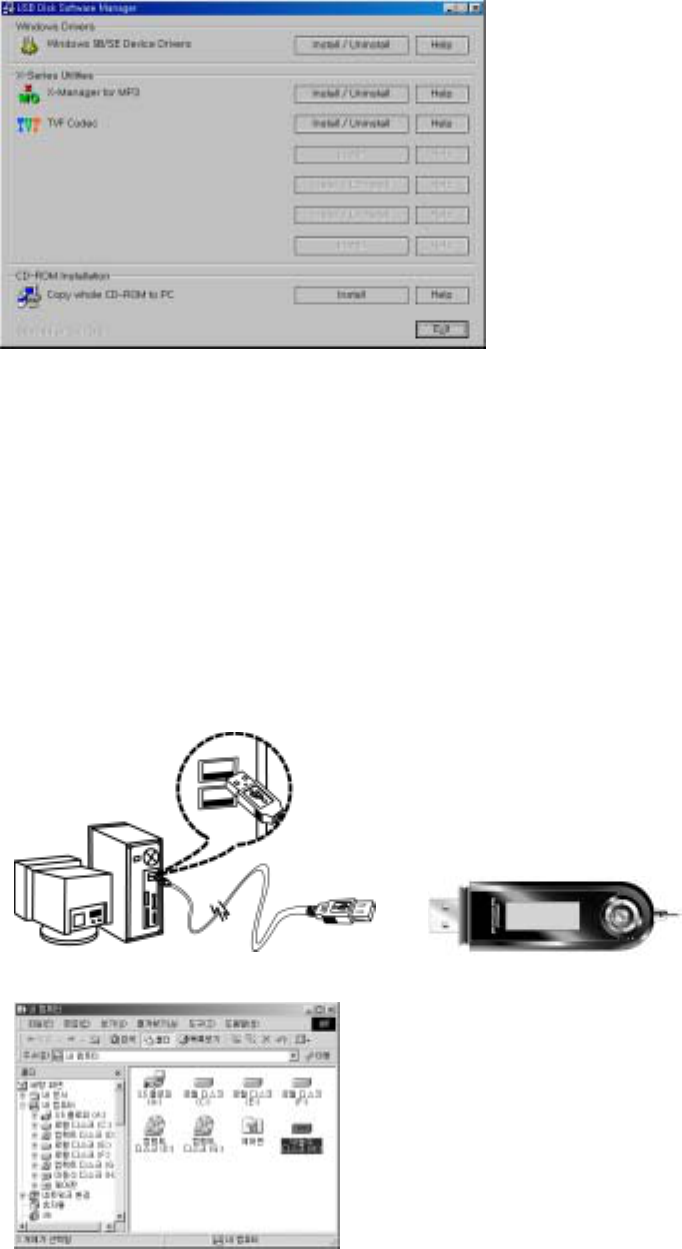
3. Click [Install/Uninstall] button with Windows Drivers.
Step 3. Transfer Music
1. Turn the player on by pressing PWR button for long.
2. When you connect your player and PC, the PC recognizes it as a removable disk that you can use to
transport music files. This means you can drag and drop files using Microsoft Windows Explorer or
save a file by selecting the player.
4. Once you're finished transferring files, be sure to Disconnect the USB Cable from the player as described
in the next section.
Step 4. Disconnect the Player and PC
1. Connect the USB cable
It is important to follow this procedure to disconnect the USB cable from your player and PC. If you do not,
you risk losing files as they are transferring to your player.
1. Click the USB icon on the Windows taskbar usually located at the bottom right of the Desktop.
2. From the popup menu, select the Stop command.
3. After a notification message displays, you may disconnect the cable from the player.
Step 5. Play Music
Tip. Enter the Folder & Escape the Folder
To move to the sub-folder, press the stick button
To move to the upper folder, push the stick button to the ◀◀ direction.
1. Connect the earphones to player.
2. Press the PWR button to turn on the player
3. Select the music file by push the stick button.
4. Press the stick button to play music. Press it again to pause.
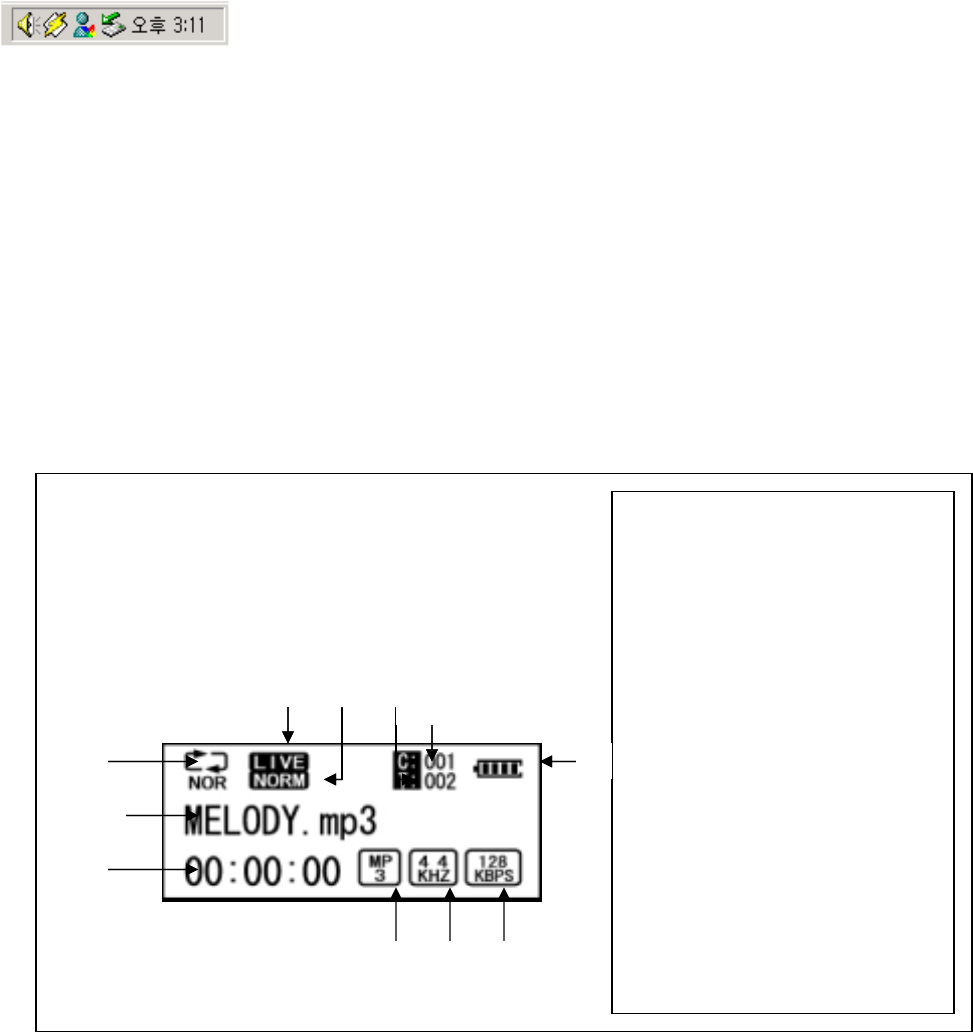
* LCD Information
`
⑫
① REPEAT Option
② File Information
③ Play Time
④ EQ Option
⑤ Playback Speed Option
⑥ Hold
⑦ Total number of music in a
folder
⑧ Playback track number in a
folder
⑨ File Format
⑩ SAMPLE RATE
⑪ BIT RATE
⑫ Battery
⑩⑨
⑧
③
②
⑪
⑦
⑥ ⑤ ④
①
①
In case of pause status:
If you push the stick button to right or left, player plays the next track or previous track.
In case of during playback:
If you push the stick button to right or left, player performs the forward or rewind function.
Volume control (Volume Level: 0 ~30):
+: To increase volume
-: To decrease volume
<Additional Functions>
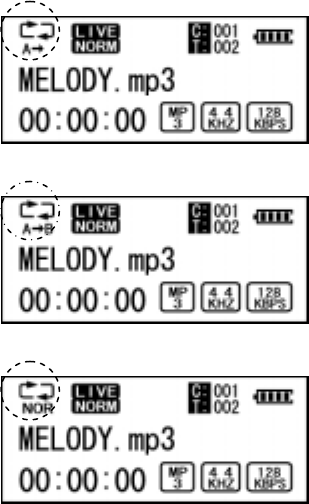
Repeat Segmentation
1. Press the function button at the start point.
2. Press the function button again at the end point.
3. If you want to cancel this function, press the function button again.
Delete the file or the folder on the player
1. Press the stick button to pause playback.
2. Select the file to delete by using the stick button.
3. Press and hold the function button. insert picture
4. Select “YES” by using the stick button to delete.
Format the memory on the player in windows.
!!! Make sure all data is deleted after format. You should be back up the data before run format.
1. Select the [Format] by right clicking the removable disk(= FY300) in windows explorer.
2. Designate [FAT] for the File System.

You are not supported the [FAT 32] and [NTFS] format.
3. Press the [Start] button.
Warning :
Removing the device from the computer while formatting is going on may cause Device damage. Please take
extra precautions.
Listen to FM Radio
Step 1. Move to FM Radio Mode
1. Press the PWR button.
2. Select the FM Radio Mode by using the stick button.
3. Press the stick button.
Step 2. Channel Control
1. Push the stick button to ◄◄ or ►► direction.
2. If you push and hold the stick button to ◄◄ or ►► direction, player performs the auto scan function.
그림삽입
<Additional Functions>
Save Channel
1. Select the channel that you want to save it by using the stick button to ◄◄ or ►► direction.
2. Press the function button, display the CH number on the LCD.
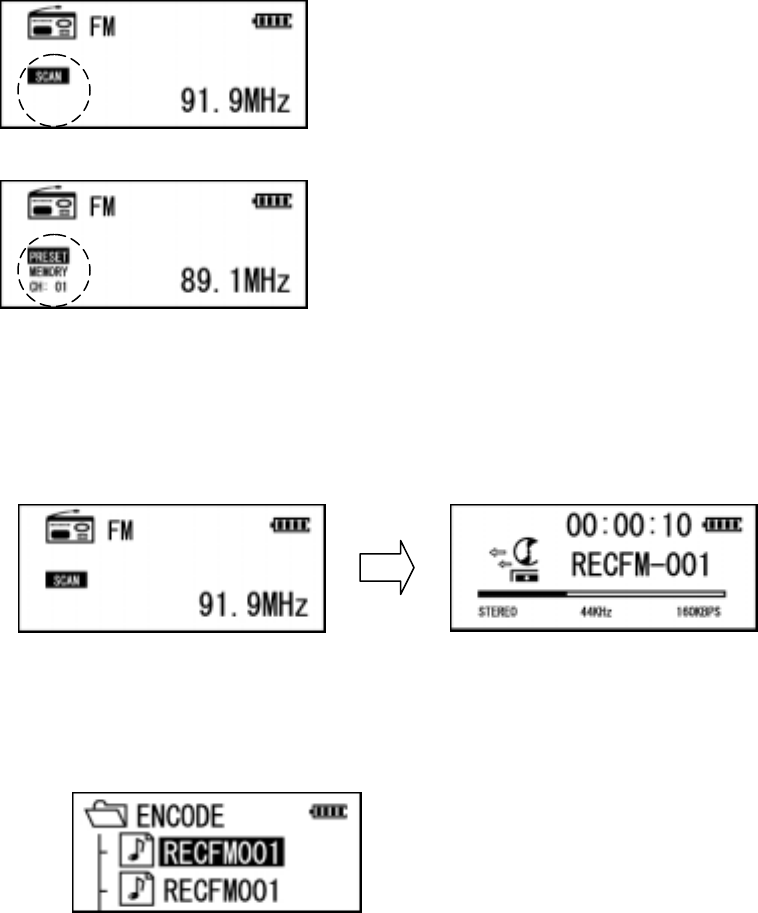
3. Press the function button after select the CH number by using the stick button to ◄◄ or ►►
direction.
Tip
If you select the CH number that you already save the channel, player will display the overwrite message.
insert picture
Tip Scan Mode & Preset Mode
Scan Mode: Move between channel by push the stick button to ◄◄ or ►► direction.
Preset Mode: Move between saved channel by push the stick button to ◄◄ or ►► direction.
Press the stick button to move between scan and preset mode.
FM radio record
Record contents that radio reception.
1. Press and hold the function button.
2. If you want to pause, press the function button.
3. If you want to keep record, press it again.
4. Press the stick button to stop record.
Save the FM radio record file in the ENCODE folder.
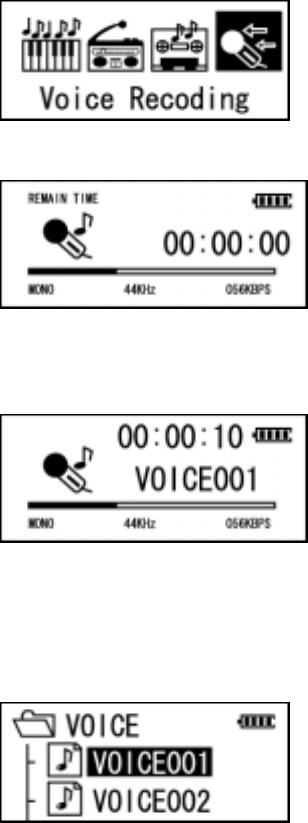
Voice Record
Step 1. Move to voice record mode
1. Press the PWR button.
2. Select the voice record by move the stick button to ◄◄ or ►► direction.
3. Press the stick button, enter the voice record mode.
Step 2. Voice record
1. Press the function button, voice recoding start.
2. If you want to pause, press the function button.
3. If you want to keep record, press it again.
4. Press the stick button, record stop.
Save the voice record file in the VOICE folder.
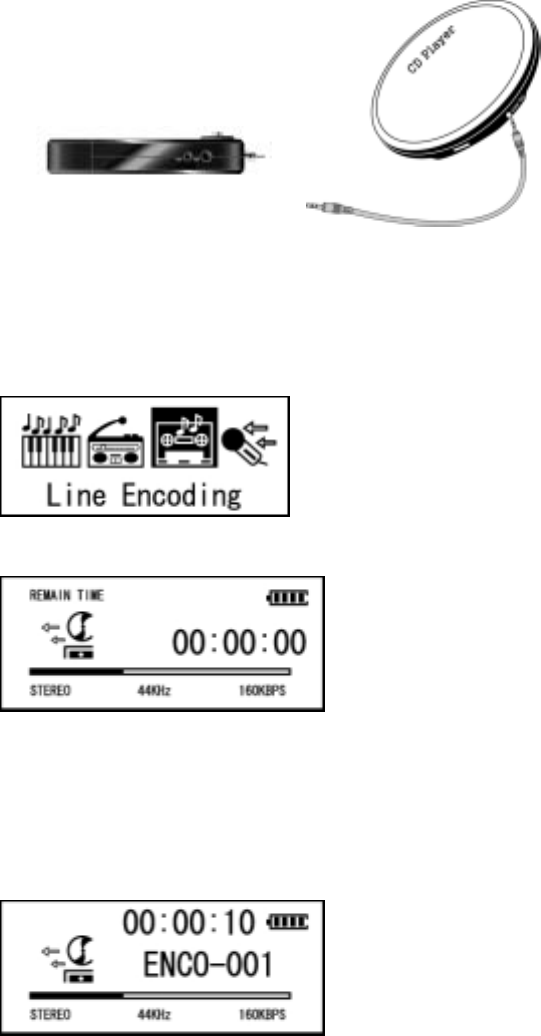
Direct Encoding (Record from the other audio source)
Step 1. Connect player to the other audio source.
1. Connect with stereo cable between line-in jack of player and line-out jack of the audio source.
2. Keep the pause status of audio source.
Step 2. Move to Line Encoding mode
1. Press the PWR button.
2. Select the Line Encoding mode by using the stick button to ◄◄ or ►► direction.
3. Press the stick button, enter the Line Encoding mode.
Step 3. Encoding
1. Play the audio source.
Volume of Encoding file is affected the audio source.
2. Press the function button.
If you want to pause, press the function button.
If you want to keep encoding, press it again.
3. Press the stick button to stop encoding.
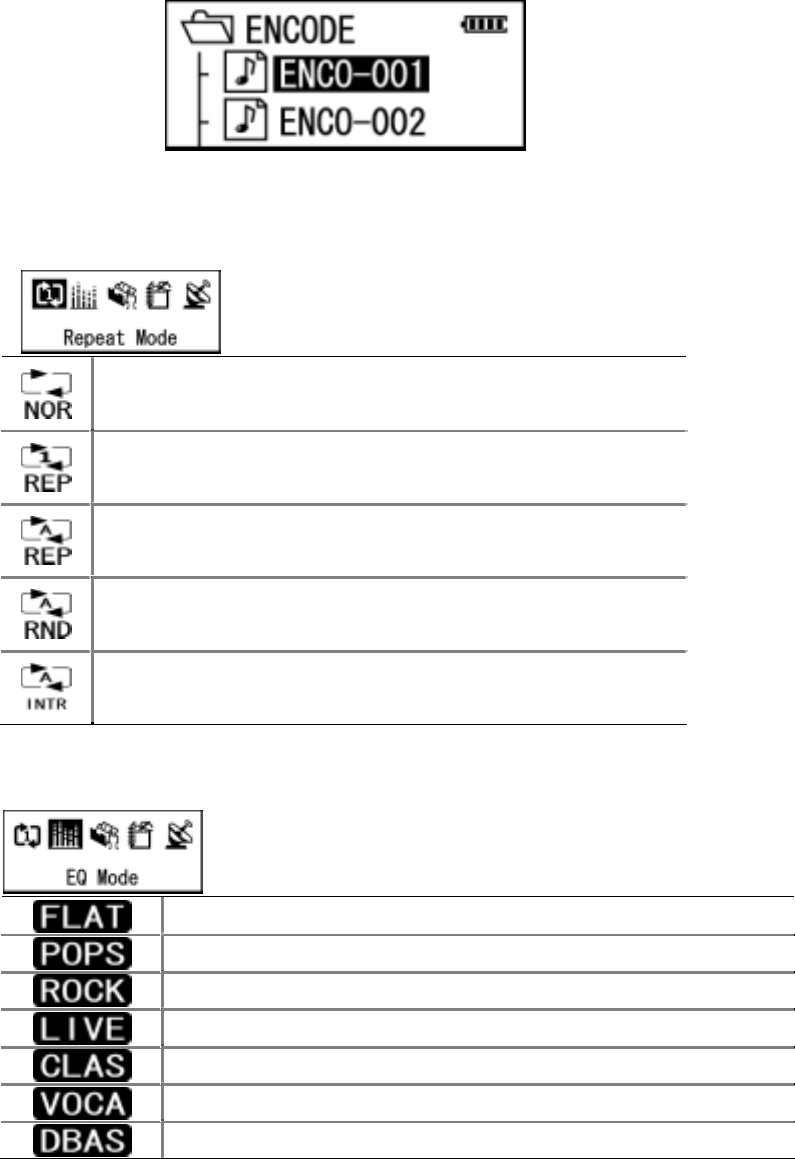
Save the encoding file in the ENCODE folder.
Menu
Repeat Option: Set a playback order.
EQ option: Select the EQ mode by music genre.
Sequentially play music in folder and pause.
Repeatedly play selected music files.
Repeatedly play all music files.
Randomly play all music files and repeat.
Sequentially play the beginning 10 seconds of each file.
Flat is an equal balance of bass and treble.
Suitable for Pop music.
Suitable for Rock music.
Play music in Live mode.
Suitable for Classic music.
Play music in vocal mode.
Play music in ultra bass mode.
Folder option:
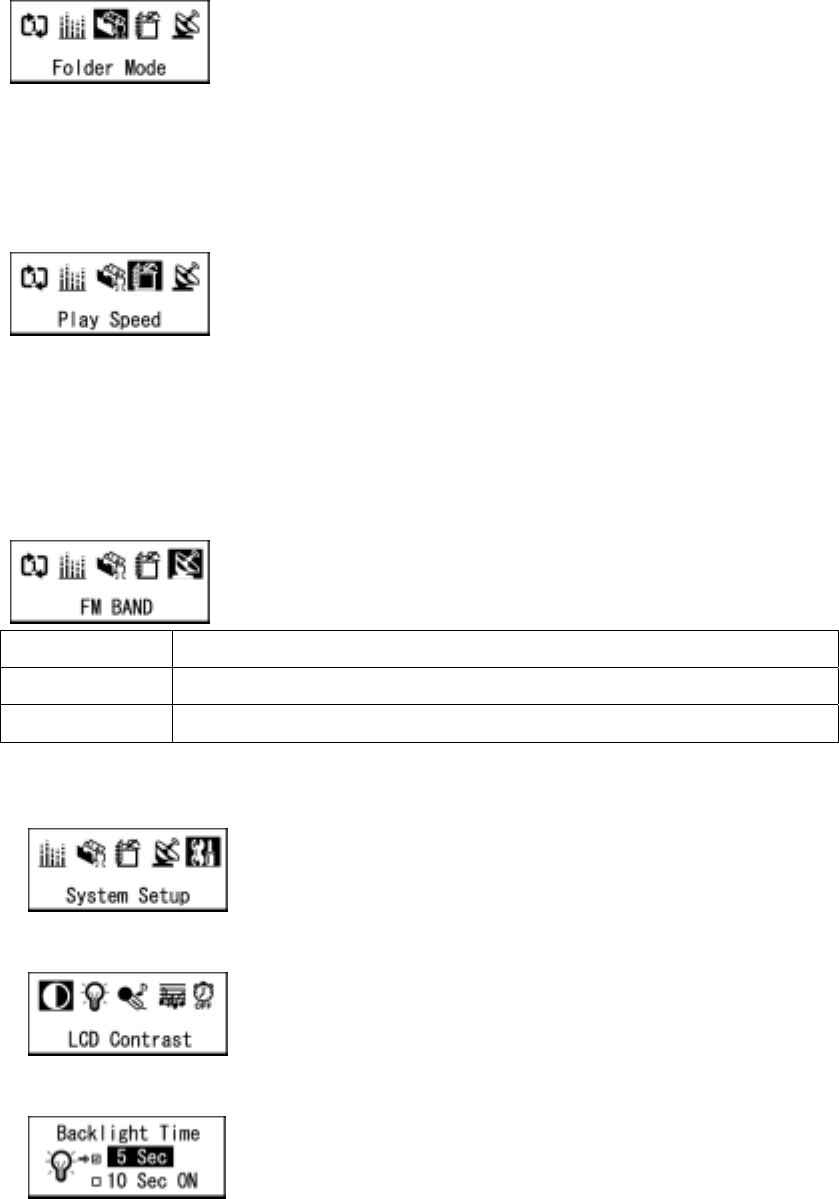
Folder 1 – Run the repeat option in selected folder.
Folder All – Run the repeat option in all folder.
Play Speed: Control the mp3 file’s playback speed.
Slow – Play the mp3 file at slow speed.
Normal – Play the mp3 file at normal speed.
Fast – Play the mp3 file at fast speed.
FM Band: Select the FM receiver band.
KOR/US Select in Korea, US and other country.
EU/CHA Select in EU and China.
JPN Select in Japan
System Setup
1. LCD Contrast: Control the LCD contrast brightness level.
2. Backlight Time: Adjust the time that backlight stays on.
3. Voice REC Setup: Set the recording quality when voice record.

4. Audio REC Setup: Set the recording quality when voice record or FM record.
5. Off Time Setup: Automatically turns power off at pause status.
6. Format: Format on the player’s memory.
Fast- delete saved file on the player.
Low level – Format on the player’s memory.
After low level format, the font file should be installed.
7. Language Select: Select the language for OS.
Music file’s information is affected on the PC OS that was used to create it.
8. Firmware Upgrade: Upgrade firmware and font file.
You should be installed the X-Manager program on the PC before run the Firmware upgrade menu.
Warning
Removing the device from the computer while firmware upgrade is going on may cause Device damage. And
you should be needed the customer service.
Change the Menu Option
Ex) Change the setting in [Off Time Setup] menu
1. Press and hold the stick button.
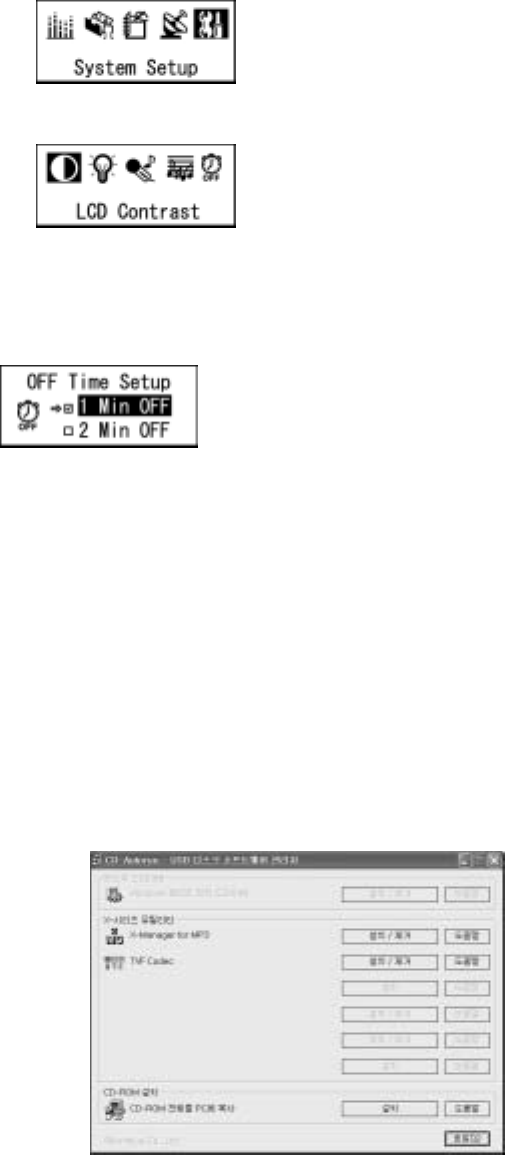
2. Select the System Setup menu by push the stick button to ◄◄ or ►► direction.
4. Press the stick button.
5. Select the Off Time Setup menu by push the stick button to ◄◄ or ►► direction.
insert picture
6. Press the stick button.
7. Press the stick button after select the item that you want to by push the + or – direction.
8. If you select the Exit, you move to upper menu.
Install the USB Disk Software
1. Insert the install CD into the CD-Rom Drive on the your PC.
2. USB Disk Software automatically runs.
( If the install CD is not run automatically, double click the setup.exe file on the install CD. )
X-Manager for MP3
Press the [Install/Uninstall] button on the X-Manager for MP3.
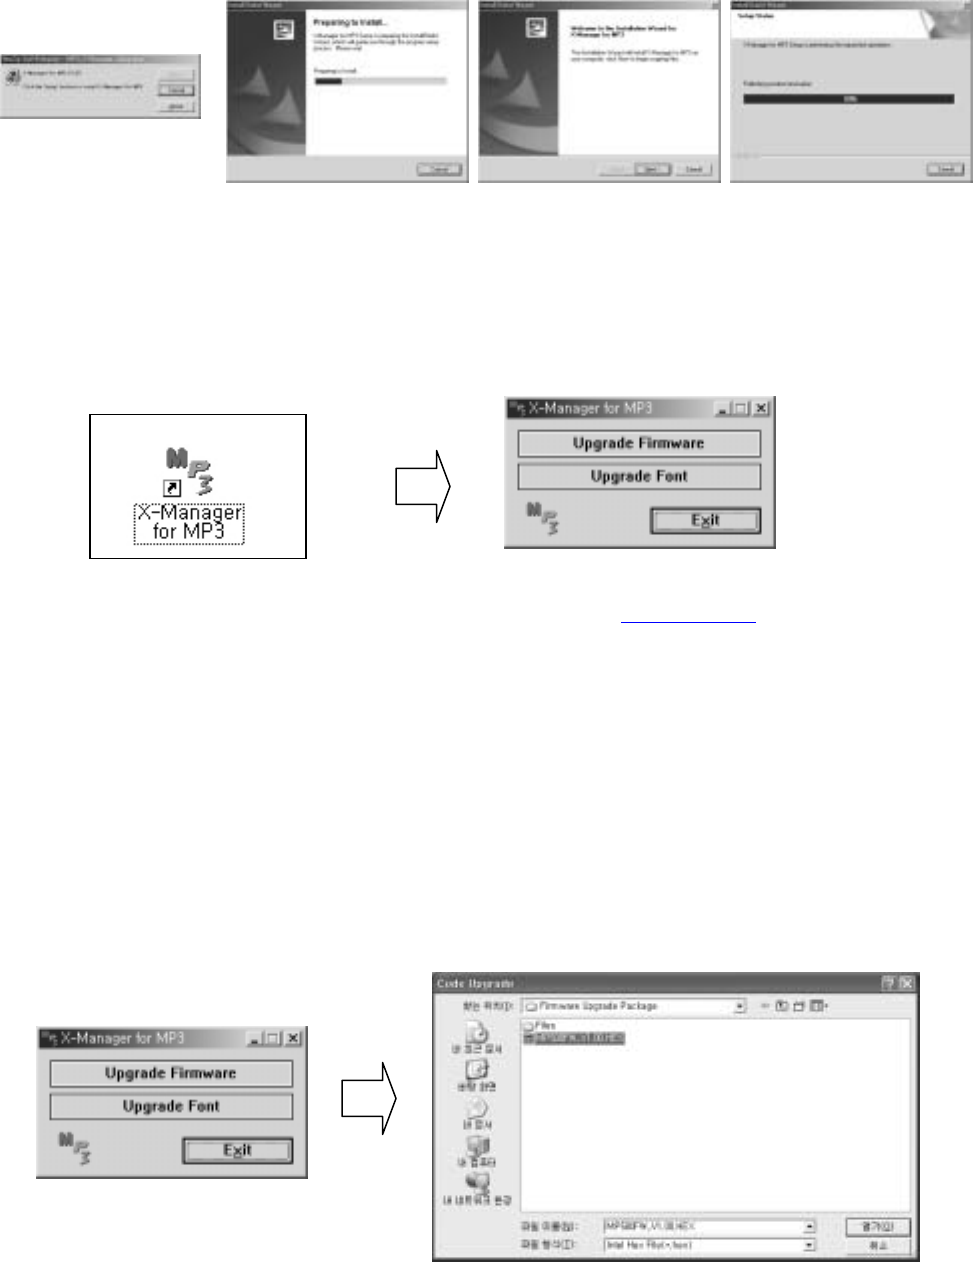
How to use the X-Manager for MP3
Double click [X-Manager for MP3] icon.
The newest Firmware / Font Data is offered from the MPIO web-site ( www.mpio.com).
[ICON] [X-Manager Program]
① Upgrade Firmware:
1. Press the [Upgrade Firmware] button.
3. Press the [Open] button after select the folder that saved firmware file.
Warning
Removing the device from the computer while firmware upgrade is going on may cause Device
damage. And you should be needed the customer service.
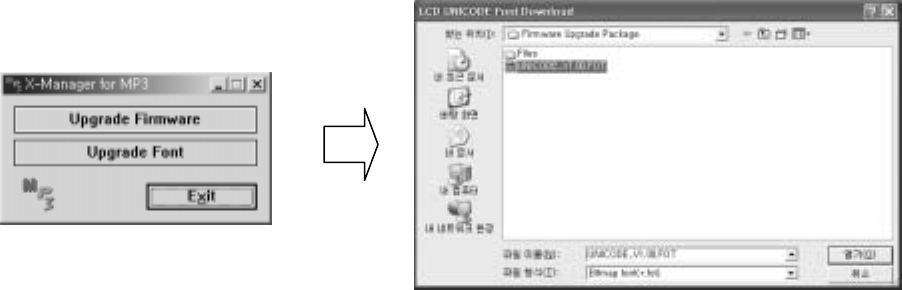
② Upgrade Font:
1. Press the [Upgrade Font] button.
2. Press the [Open] button after select the folder that saved font file.
TVF Codec
If you install the TVF Codec program, you can listen to TVF file that record on the player form the windows
media player.
Troubleshooting
Q1. The Player doesn’t power on
A1. Battery may be discharged. (Refer to charge battery section)
Q2. No sound is heard from player or distortion is heard during playback.
A2. Check whether the earphones are connected properly.
Q3. Characters on LCD are abnormal.
A3. Check the language is setting to “English” in language menu.
Q4. FM Radio doesn’t work.
A4. Adjust the position of the player and earphones. Turn off the power of other electric devices near the
player.
Q5. I can’t transfer music files (MP3 or WMA) saved in the player to PC.
A5. Transfer music files to PC are prohibited for copyright. Other files as data files and created MP3 file on
the player can be transfer to your PC.

This equipment has been tested and found to comply with the limits for a class B digital
device, pursuant to Part 15 of the FCC Rules.
These limits are designed to provide reasonable protection against harmful interference in a
residential installation. This equipment generates, uses and can radiate radio frequency
energy and if not installed and used in accordance with the instructions, may cause harmful
interference to radio communications. However, there is no guarantee that interference will
not occur in a particular installation. If this equipment does cause harmful interference to radio
or television reception, which can be determined by turning the equipment off and on, the user
is encouraged to try to correct the interference by one or more of the following measures:
-Reorient or relocate the receiving antenna
-Increase the separation between the equipment and receiver
-Connect the equipment into an outlet on a circuit different from that to which the receiver is
connected
-Consult the dealer or an experienced radio/TV technician for help
This device complies with Part 15 of the FCC Rules. Operation is
subject to the following two conditions: (1) this device may not cause
harmful interference, and (2) this device must accept any interference
received, including interference that may cause undesired operation.
**CAUTION: Changes or modifications not expressly approved by the party responsible
for compliance could void the user's authority to operate the equipment.