0001 Basic ID Editor Instructions
User Manual:
Open the PDF directly: View PDF ![]() .
.
Page Count: 4
iD Editor
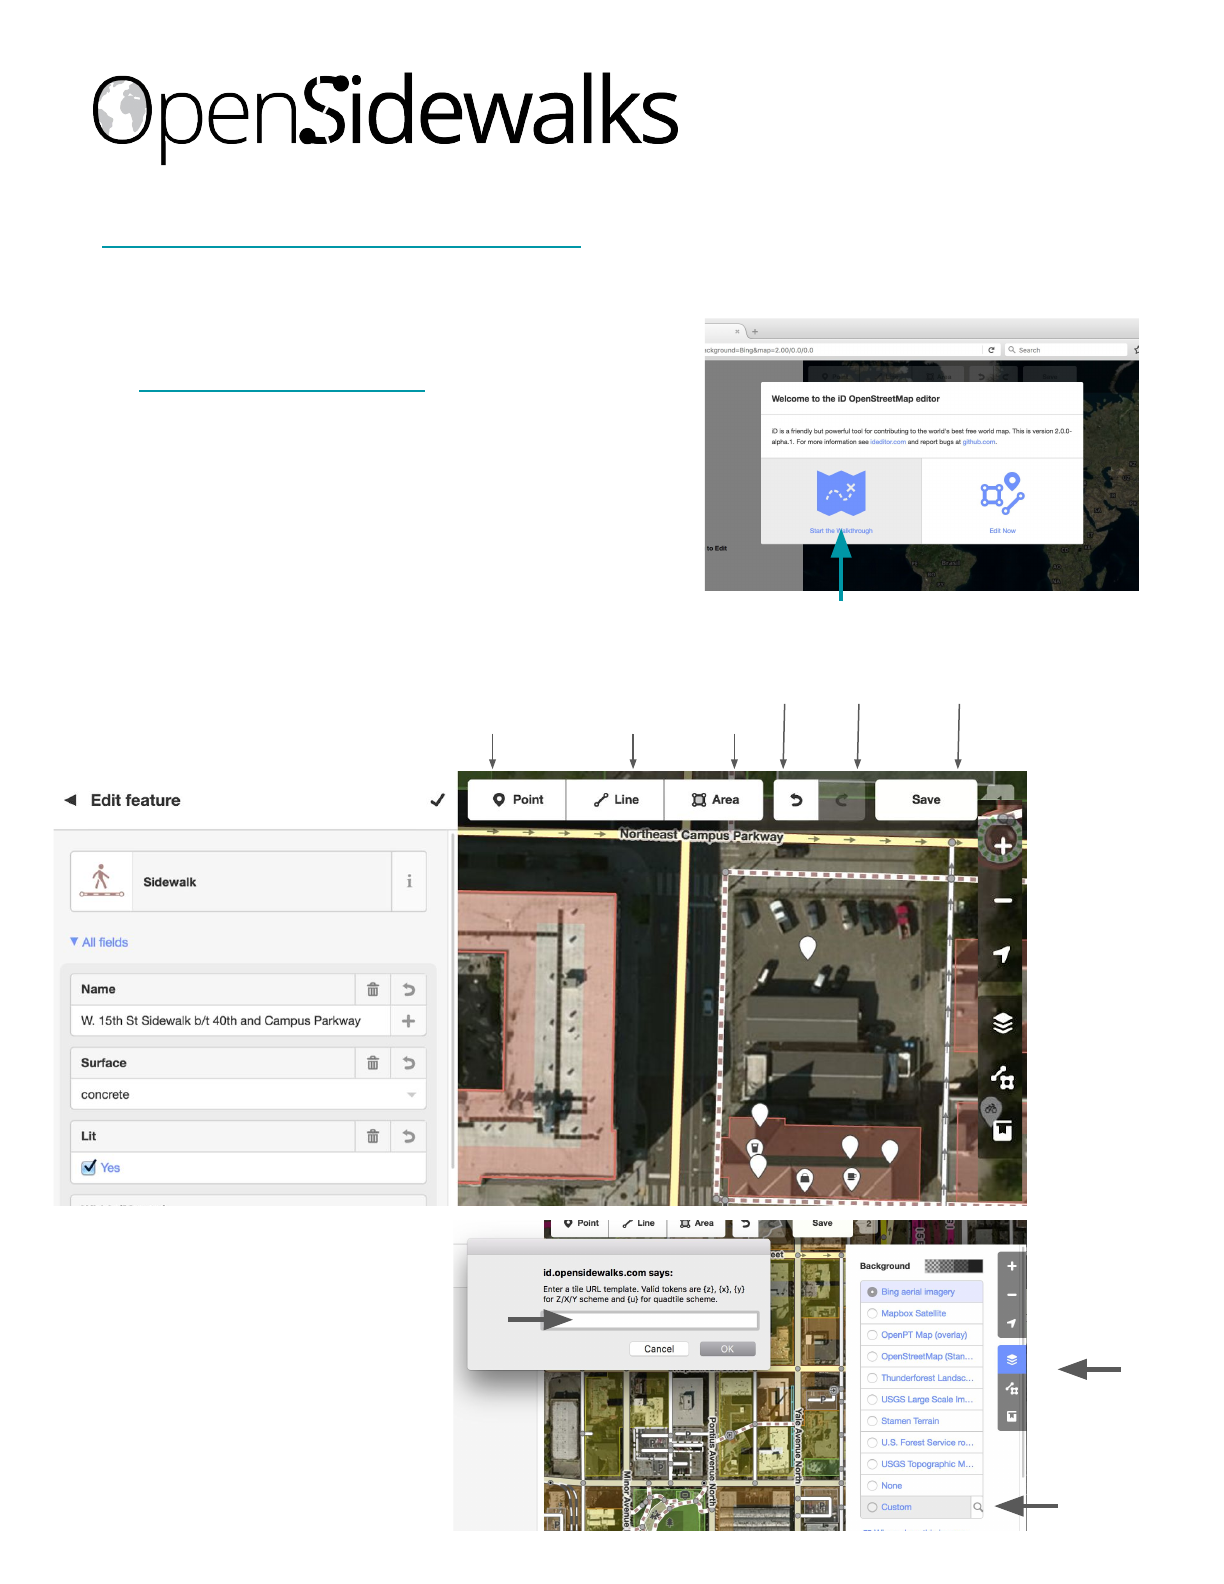
1. Setup an account at osm.org,
2. Login with your new OSM account and go to
http://id.opensidewalks.com (the custom
OpenSidewalks editor uses the same credentials as
OpenStreetMap)
3. Select Start the Walkthrough, and follow along
with the basics of how to edit using iD
4. Pan and zoom the map to the area that you wish to
edit, you can also zoom to your current location
with the white arrow
ID Interface
Shortcut keys in blue
Feature Information
Point (node)
Kerb cuts,
benches...etc
1
Line (way)
sidewalks ,
crossings…
2
Area
plazas
…
3
Undo
CTRL + Z
Redo
CTRL + Y
Save
CTRL + S
Zoom In +
Zoom Out -
Zoom to
Location
Background
Settings B
Map Info F
HELP H
1
2
3
For a more comprehensive guide visit Getting Started with OpenStreetMaps
http://learnosm.org/en/beginner/id-editor/
Custom Field
Paper Background
1. Select background settings (B)
2. Select search icon
3. Add custom field paper URL to
pop-up
*it is often useful to toggle back and
forth between aerial imagery and
custom field papers
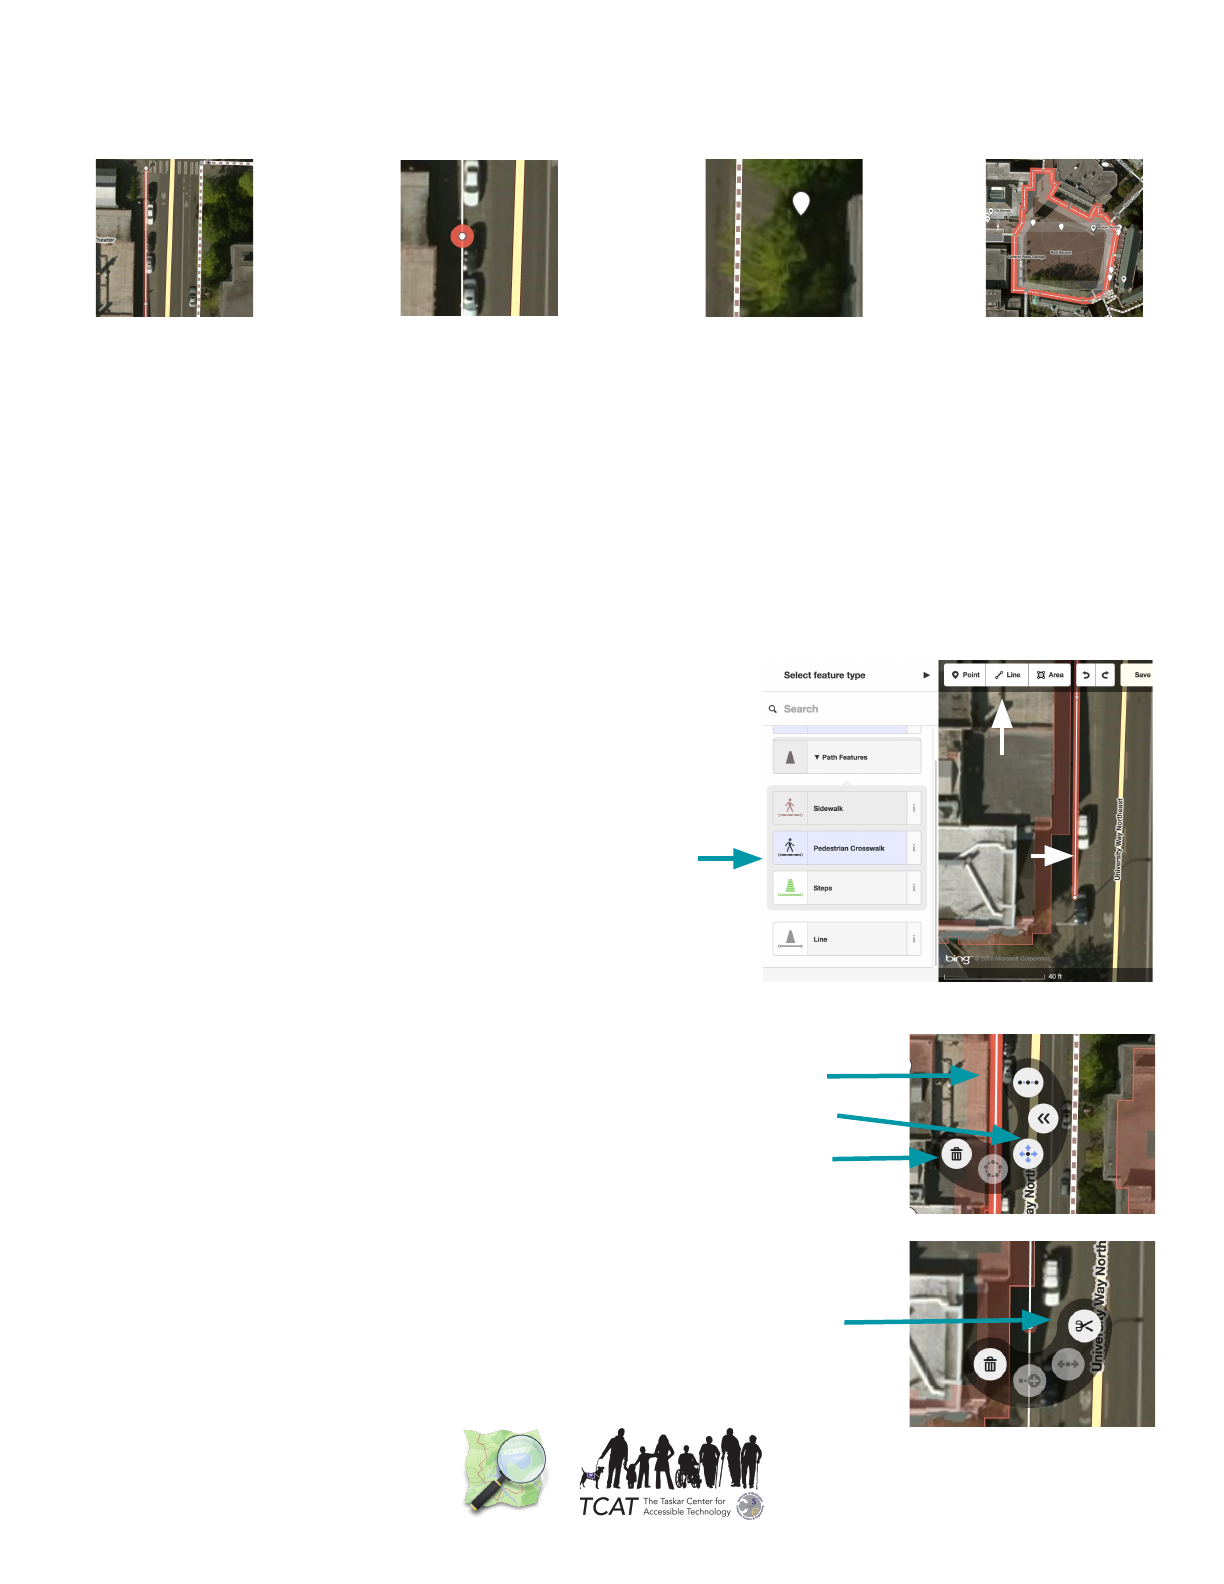
Basic Geometry for Pedestrian Mapping
Best practice note, if you aren’t sure about a feature don’t map it!
Lines (ways)*
Sidewalks
Footpaths
Stairs
Crossings**
Ramps
Points on Lines (nodes)
Curb Ramps
Elevators
Building Entrances
Crossings**
Points
Benches
Areas
Pedestrian Plazas
*Multiple line features can be drawn as a single line with several points that can then be split, add lights &
surfaces as attributes of these line features
**See next pages for details on mapping crossings
Basic Editing for Pedestrian Mapping
Drawing Lines:
1. Select the Line Button
2. Start drawing the features you want to map by tracing
aerial imagery or a custom field paper
3. Select the feature type you just mapped
4. Fill out the relevant tag information in the left sidebar
(this will provide more detailed information on what
you’ve mapped like surface and lighting)
Editing and Splitting Lines:
●Move lines by left clicking and dragging points or select
the whole line and use the move tool
●Add points to lines by double clicking on the line, these
points can then be used to mark curb cuts, elevators,
buildings entrances, and places crossings intersect with
streets and sidewalks
●Split a line by selecting a point on a line and using the
split tool, you can then designate sections of a line
differently, e.g. sidewalk-crossing-sidewalk
BE SURE TO SAVE YOUR WORK EVERY FEW MINUTES!
1
3-4
2
Straighten
Move
Delete
Split
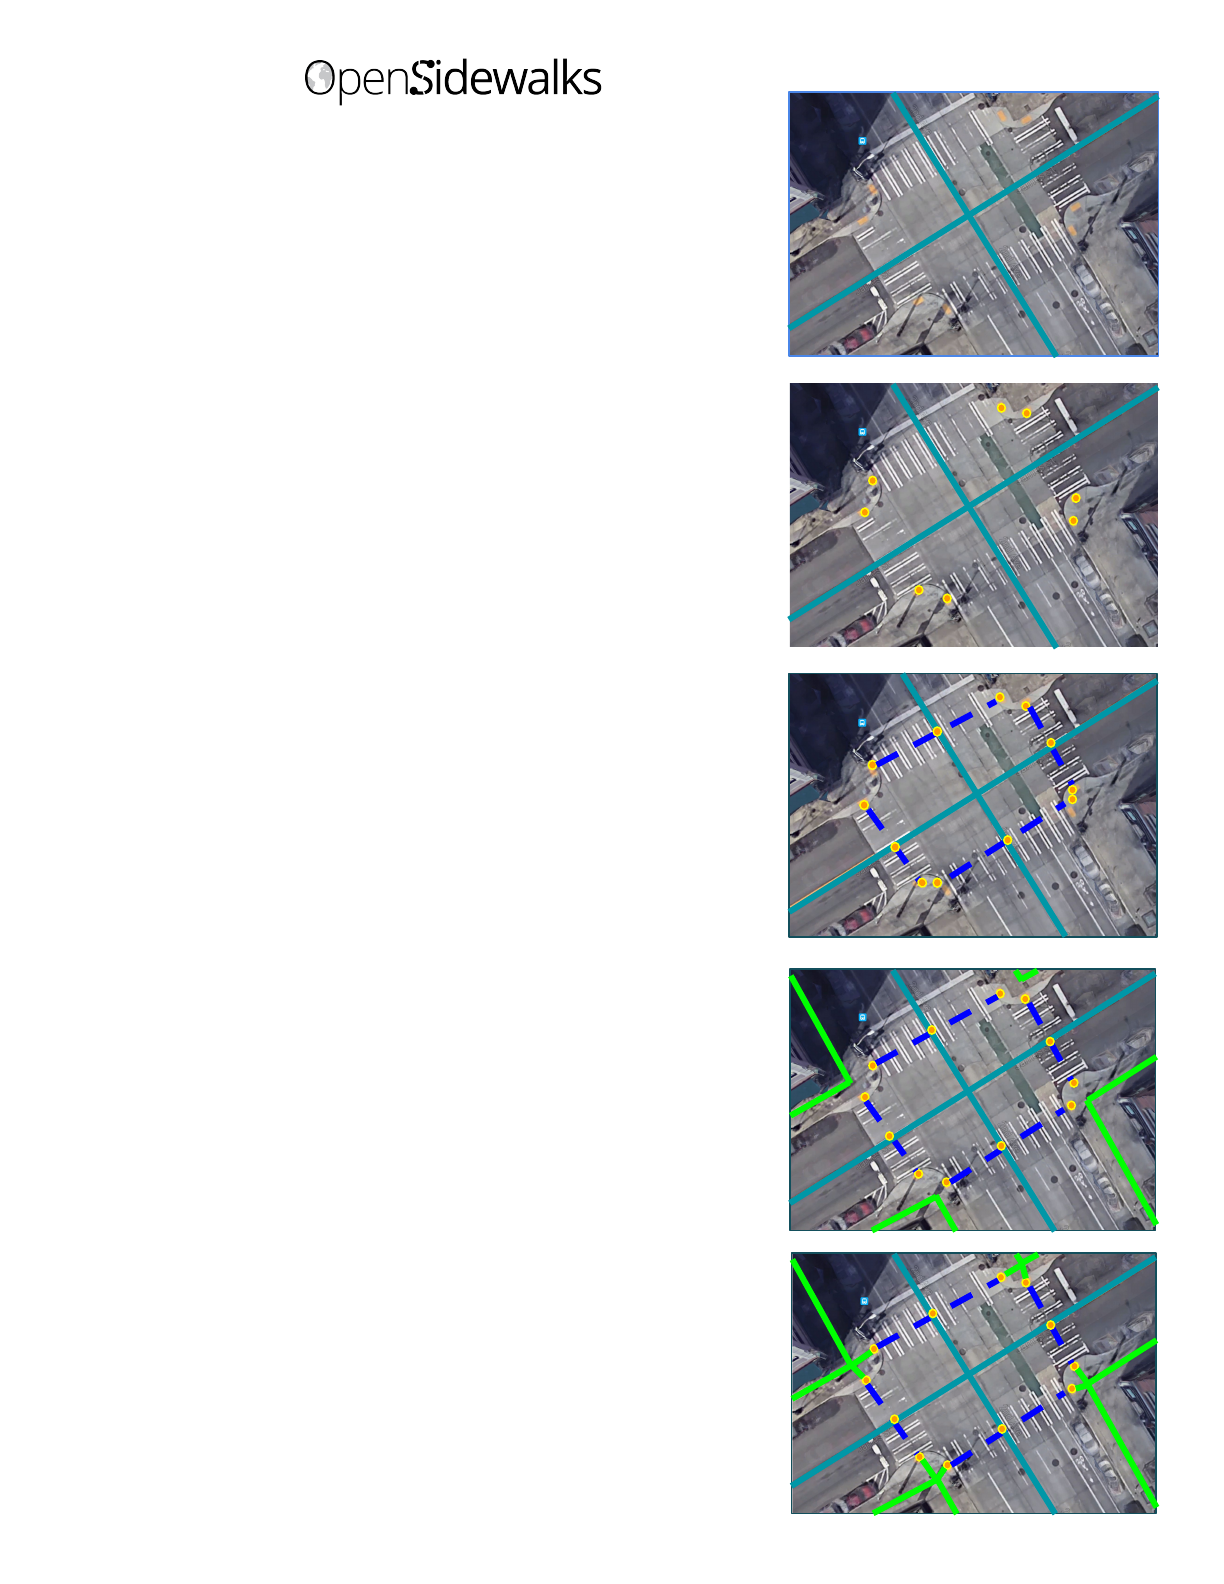
Mapping with the Schema
Intersection Data Goals:
●Accurate feature locations
●Connected features
●Detailed feature types
Curbs: understanding the street / sidewalk interface allows
us to know what pedestrian modes (like wheelchair, bike, or
visually impaired user) can cross.
●Accurate Locations
●Tag: kerb = lowered (default) / raised / flush / rolled / unknown
●Tag: tactile_paving = yes / no / unknown (default)
Crossings: ensures pedestrian network connectivity and
connections to the street network for multimodal travel.
●Connects to sidewalks or curbs
●Shares node with street
○Tag: highway = crossing
●Signal information tagged to street node
○Tag: highway = traffic_signals, traffic_signals = ...
●Tag: highway = footway, footway = crossing
●Tag: crossing = marked / unmarked (line)
Sidewalks: give us understanding of the pedestrian network
●Accurate Locations: follow sidewalk centerline
●Connected endpoints
●Tag: highway = footway, footway = sidewalk
●Tag: wheelchair_accessible=yes/no
Links: completes the connectivity of the network, allowing
routing across intersections
● Connect to crossings or curbs
● Shares a node with sidewalks
●Tag: highway = footway, footway = sidewalk

Corner Curb
Ramps
Single
Curb Cut
Complex
Intersections
Common
Mistakes
BE SURE TO SAVE YOUR WORK EVERY FEW MINUTES!
No Tactile Information
Missing Nodes
Disconnected
