PLB M04 441 Manual SPEAKA_MOTORISIERTE_TV_HALTERUNG_32_55Z Ver. 01 001220976 An En SPEAKA MOTORISIERTE TV HALTERUNG 32 55Z
User Manual: SPEAKA_MOTORISIERTE_TV_HALTERUNG_32_55Z - Ver. 01 TV wall mount 81,3 cm (32) - 139,7 cm (55) Swivelling, Motorised SpeaKa Professional Wall Premium Motor from Conrad.com
Open the PDF directly: View PDF ![]() .
.
Page Count: 6
INSTALLATION MANUAL
ISSUED: JUNE. 2013
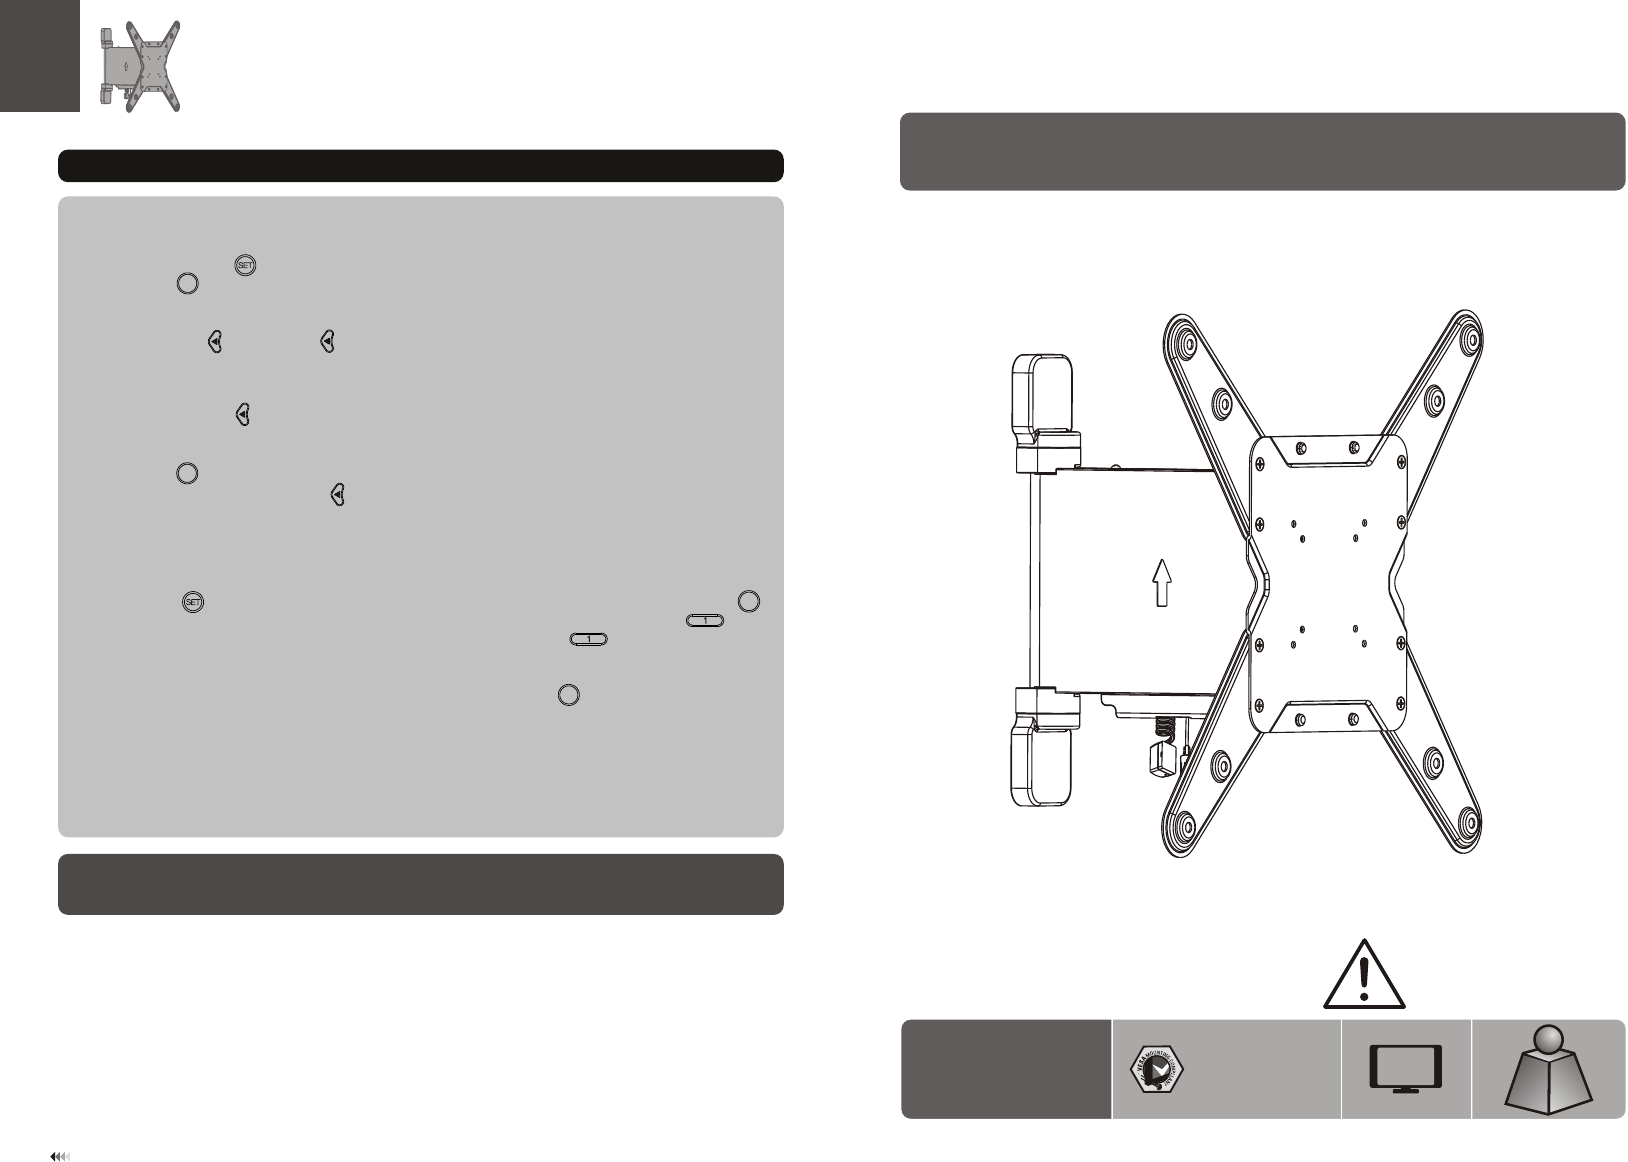
Remote Control Motorized TV Wall Mount
15
CAU T ION: DO NOT EXCEED
RATED LISTED WEIGHT. SERIOUS
INJURY OR PROPERTY DAMAGE
MAY OCCUR!
PLB-M04-441
55"
MAX
75x75/100x100
200x100/200x200
300x300/400x200
400x400
35kg
(77lbs)
RATED
35kg
(77lbs)
RATED
Maintenance
• Check that the bracket is secure and safe to use at regular intervals(at least every three months).
• Please contact your distributor if you have any questions.
OK
Press and hold for 5 seconds until LED light on the matched remote control stays on, and then
press . The buzzer will sound once, the red LED light on the IR receiver will stay on, then the
LEARN MODE will be entered.
STEP1:
• LEARN MODE instructions as shown below:
Note: When there is no activity for over 20 seconds in any step .TV remote will automatically exit from the
LEARN MODE.
STEP2: If LEARN , please press on the matched remote control until the buzzer sounds twice,
the red LED light on the IR receiver will change from being steady to a slow flash.
STEP3: Aim the TV remote at the IR receiver, and press the button on the TV remote that you need to set as
the function of button until the buzzer sounds three times. the red LED light on the IR receiver will
change from slow flash to a fast flash.
OK
STEP4: Press button on the matched remote control until the buzzer sounds four times. The red LED light
on the IR receiver will turn off. Button will be LEARNED successfully. If the buzzer only
sounds once, then a LEARN failure.(The TV remote won’t support the LEARNING function).
Learn “Power” button on the TV remote:
Press and hold for 5 seconds until LED light on the matched remote control stays on , and then press .
The buzzer will sound once, the red LED light on the IR receiver will stay on, then press and hold button
on the matched remote control until the buzzer sounds twice, then release the button. The red LED
light on the IR receiver will change from being steady to a slow flash.
Aim the TV remote at the IR receiver, and press “Power” button. The buzzer will sound three times. The red
LED light on the IR receiver will change from slow flash to a fast flash. Press button on the matched
remote control until the buzzer sounds four times. The red LED light on the IR receiver will turn off. “Power”
button will be LEARNED successfully. If press “power” button, the TV wall mount will automatically reset.
KO
OK
(Please follow step1 through step4 in turn if the user need to LEARN more buttons)
21
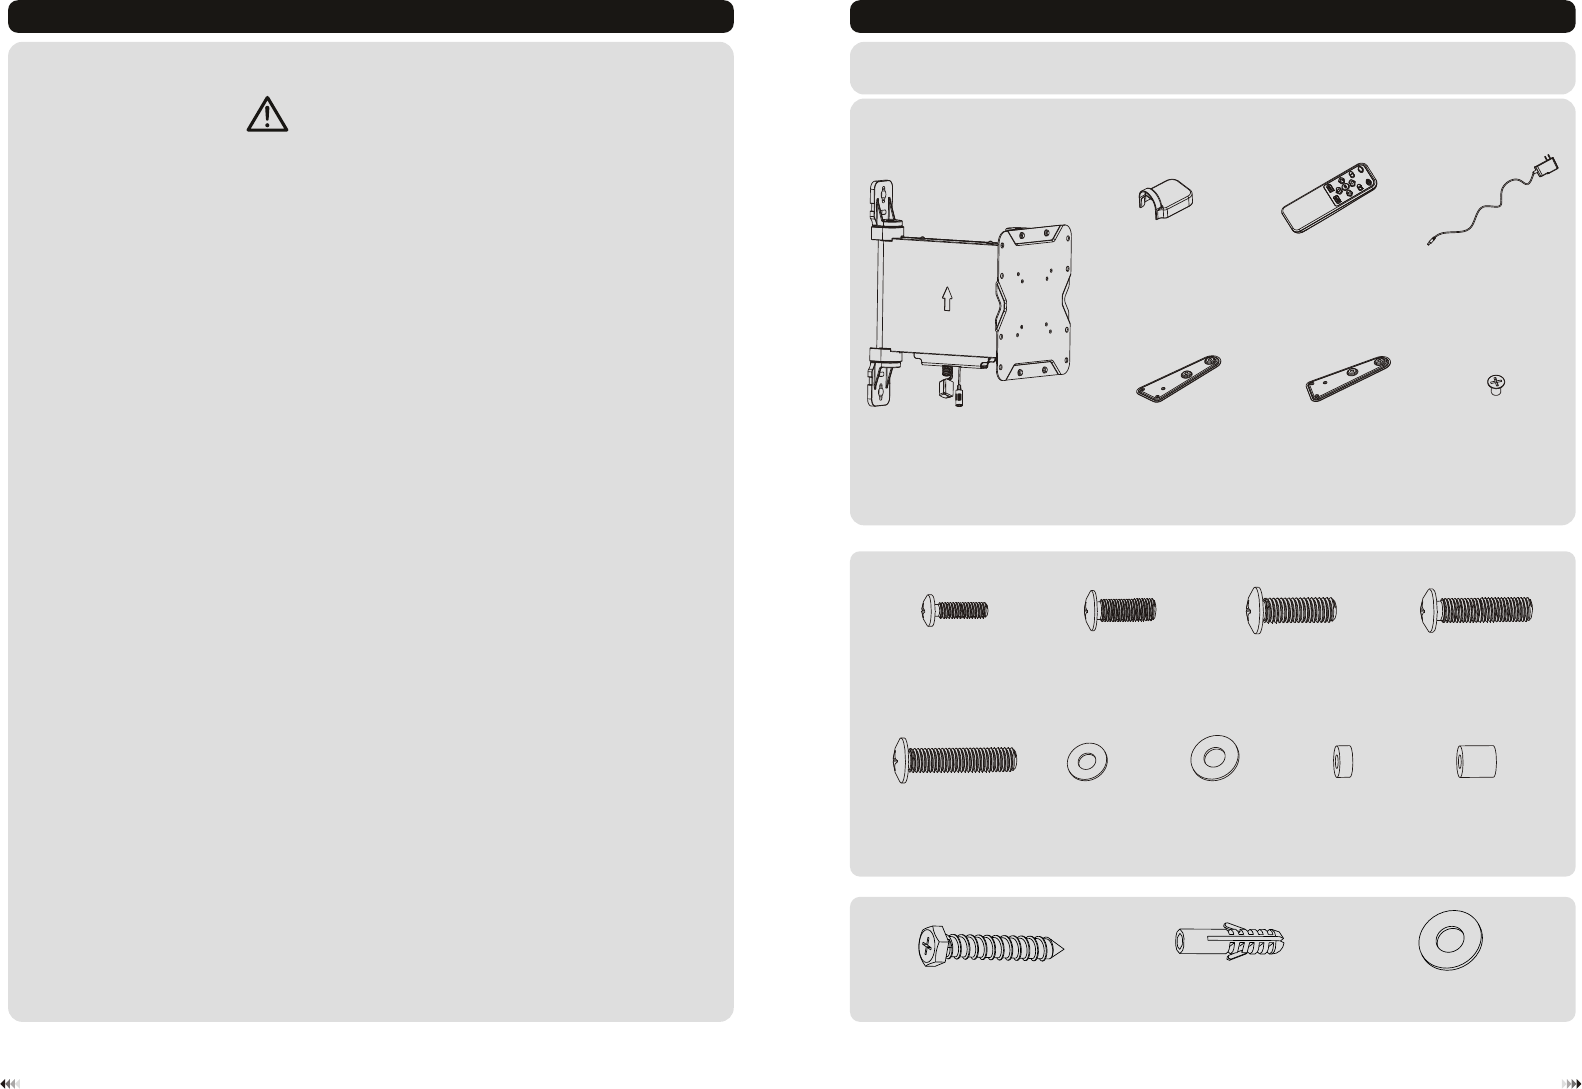
NOTE: Read the entire instruction manual before you start installation and assembly. Component Checklist
WARNING
IMPORTANT: Ensure that you have received all parts according to the component checklist prior to installation.
If any parts are missing or faulty, telephone your local distributor for a replacement.
Package M
Package W
ST6.3x55 (x4)
W-A
concrete anchor (x4)
W-B
D6 washer (x2)
W-C
• Do not begin the installation until you have read and understood all the instructions
and warnings contained in this installation sheet. If you have any questions
regarding any of the instructions or warnings, please contact your local distributor.
• This mounting bracket was designed to be installed and utilised ONLY as
specified in this manual. Improper installation of this product may cause damage
or serious injury.
• This product should only be installed by someone with good mechanical ability
who has basic building experience and fully understands this manual.
• Make sure that the supporting surface will safely support the combined weight of
the equipment and all attached hardware and components.
• If mounting to wood wall studs, make sure that mounting screws are anchored
into the center of the studs. The use of a stud finder is highly recommended.
• Always use an assistant or mechanical lifting equipment to safely lift and position
the equipment.
• Tighten screws firmly, but do not over tighten. Over tightening can cause damage
to the items, This greatly reduces their holding power.
• This product is intended for indoor use only. Using this product outdoors could
lead to product failure and personal injury.
G (x8)
motorized wall mount (x1)
A
decorative cover (x2)
B
remote control (x1)
C
adapter (x1)
D
VESA adaptor (x2)
E
VESA adaptor (x2)
F
D8 washer (x4)
M-G
D6 washer (x4)
M-F
M5x14 (x4)
M-A
M6x14 (x4)
M-B
M8x20 (x4)
M-C
big spacer (x4)
M-I
M6x30 (x4)
M-D
M8x30 (x4)
M-E
small spacer (x8)
M-H

WARNING
• Make sure that mounting screws are anchored into the center of the studs. The use of a stud
finder is highly recommended.
• Installers are responsible to provide hardware for other types of mounting situations.
• Installers must verify that the supporting surface will safely support the combined weight of the
equipment and all attached hardware and components.
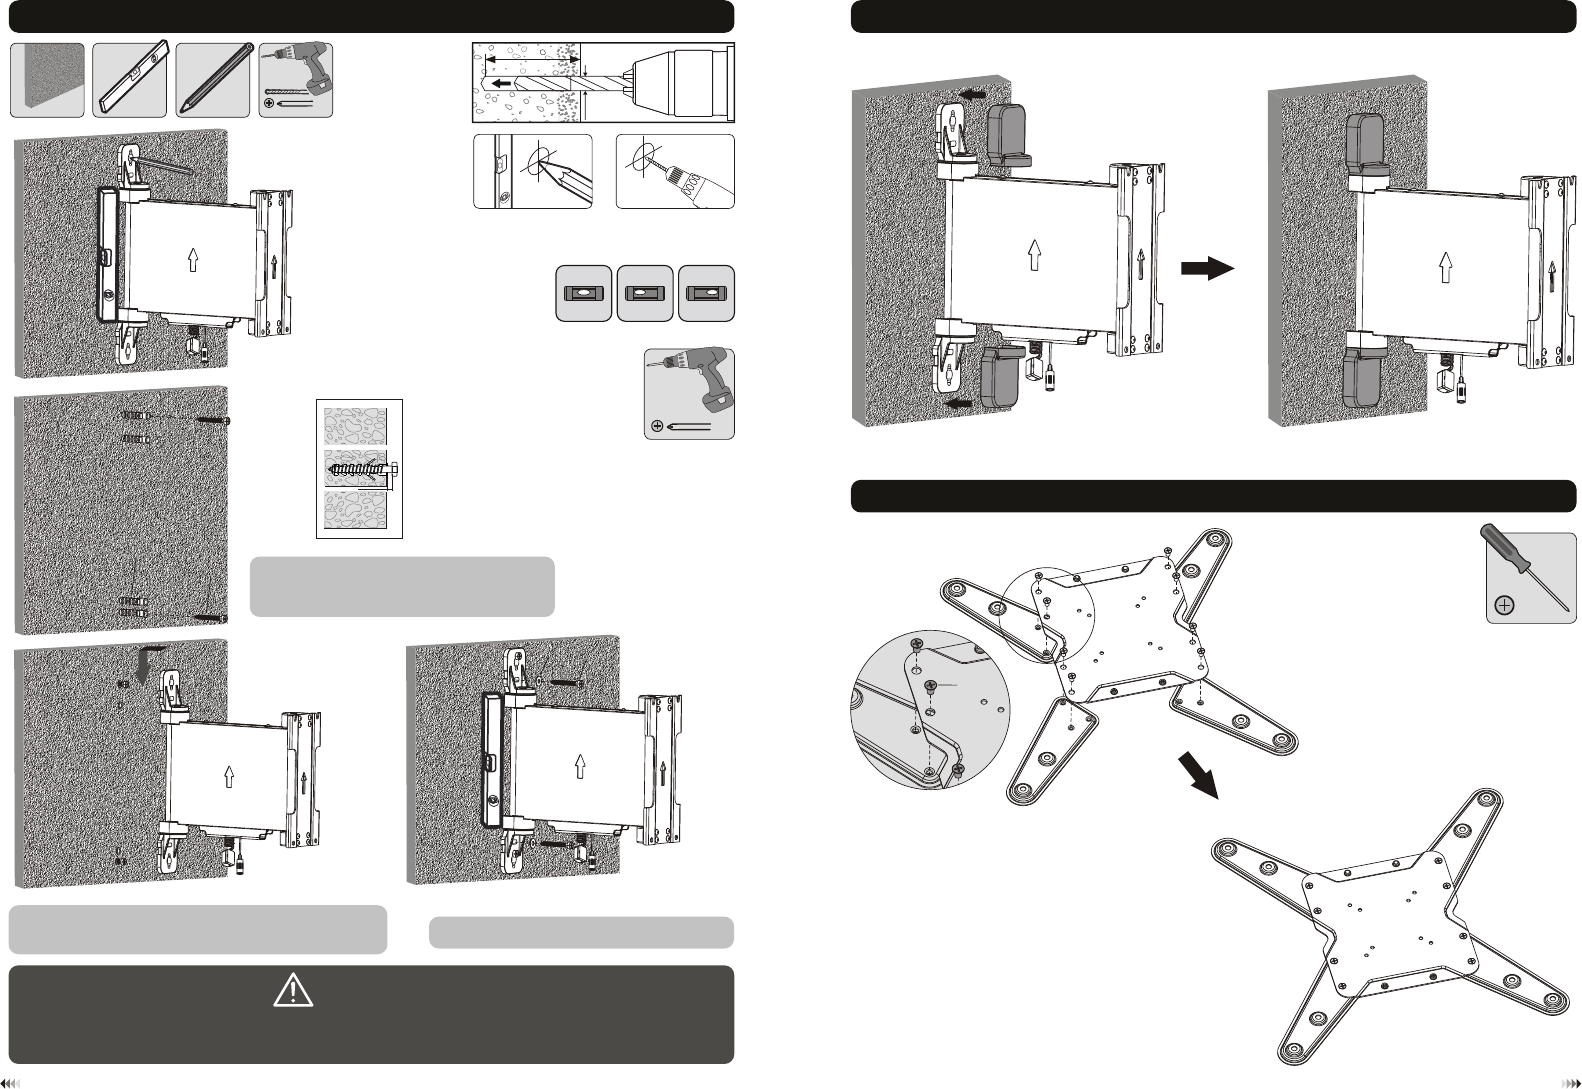
2a. For Wood Stud Wall Mounting
Drill pilot holes
3
Screw the wall
mount onto
the wall
X X
√
ø 4.5mm
(ø 3/16")
55mm
(2.2")
55mm
2.2"( )
55mm
(2.2")
2
1
Find and mark the exact
location of mounting holes
4
3
1. Removing the VESA Plate
XX
W-A
W-A
Use a phillips screwdriver to remove the both bottom screws in order to separate the VESA plate from the
wall mount.
Leave the screw head with 10mm
space from the wall.
10mm
Align the big holes on the wall
plate to the screws in the wall
and lower the wall plate.
big hole
big hole
Install the other two screws
and level the wall plate, then
tighten all screws for security.
With the arrow pointing up.
W-C
65
3. Installing the Decorative Covers
X X
√
Installers must verify that the supporting surface will safely support the combined weight of
the equipment and all attached hardware and components.
WARNING
2b. For Solid Brick and Concrete Mounting
Screw the wall
mount onto
the wall
60mm
(2.4")
60mm
2.4"( )
60mm
(2.4")
ø 10mm
(ø 3/8")
Drill pilot holes
2
1
Mark the exact
location of
mounting holes
W-C W-A
4. Assembling the VESA Adapters
W-A
W-B
Leave the screw head with 10mm
space from the wall.
10mm
Align the big holes on the wall plate to the
screws in the wall and lower the wall plate. With the arrow pointing up.
G
87
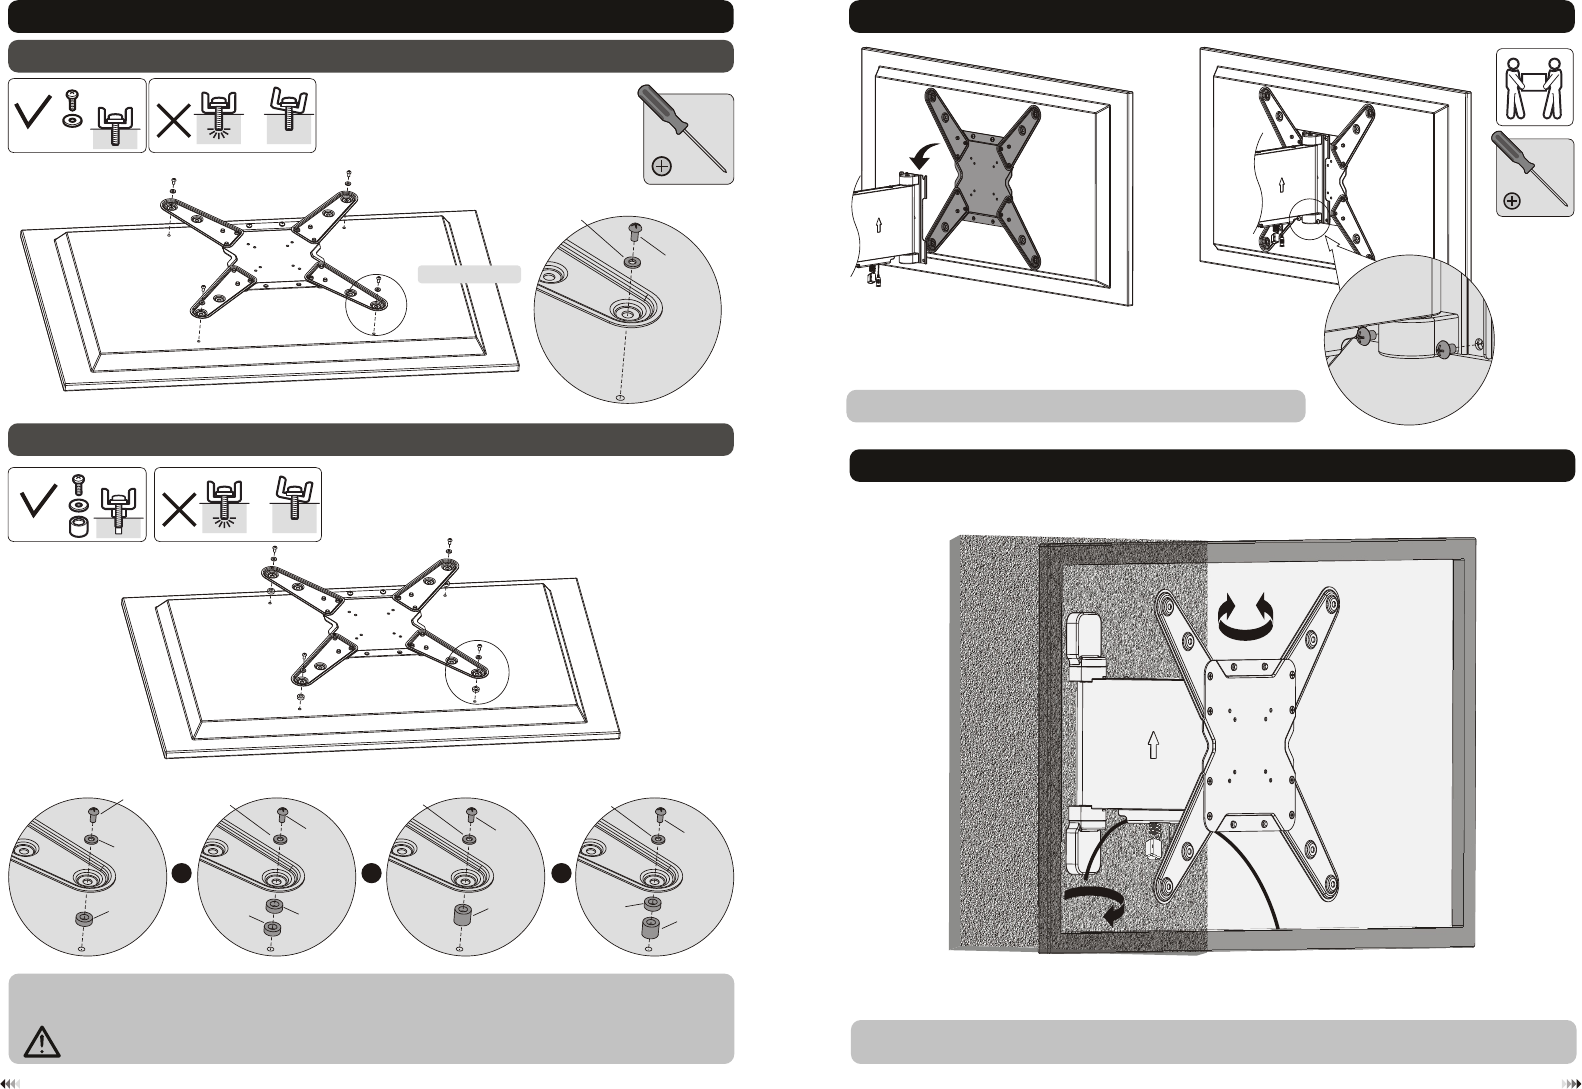
6. Hooking the TV onto the Wall Mount
7. Cable Management
Reinstall the both bottom screws to secure the TV to the mount.
Connect the cables to your TV and route through the cable clips.
Note: Leave slack in the cables for arm movement.
TV
TV
TV
5. Installing the VESA Plate
5-1. For Flat Back Screens
M-A
M-B
M-C
M-F
M-G
5-2. For Recessed Back Screens or to Access A/V Inputs
Tighten all screws but do not over tighten.
· Screw the VESA plate onto the TV.
Note: Choose the appropriate screws, washers and spacers (if necessary) according to the type of screen.
TV
TV
TV
M-F
M-G
M-C
M-D
M-E
M-H
M-H
M-F
M-G
M-D
M-E
M-I
M-C
M-G
M-H
M-D
M-E
M-I
M-H
M-F
M-G
±30°
90°
or or or
Top of the TV
10
9
Buttons function instructions
LEARN MODE operation instructions
Stop button
OK
Out button. Press and release . The TV wall mount will fully unfold.
In button. Press and release . The TV wall mount will automatically return to rest against the wall.
The left button. Press and release , the TV wall mount will swivel to the left until is pressed or the
TV wall mount swing to -30 degrees to stop.(Note:Using this button is valid only when the wall mount
fully unfolds.)
OK
The loss of matched remote control would result in TV wall mount being unusable. The LEARN MODE is used
to learn how to use TV remote (ONLY suitable for the TV remote of popular brands.) to control TV wall mount.
Note:
• TV remote can’t replace the all functions of matched remote control. Only LEARNING the five buttons functions.
With , , , and respectively.
• The user must follow the rules below when using the TV remote to control TV wall mount.
Select the alternate buttons from the TV remote, and the button that can't direct control the TV .
OK
Memory button1.Press and hold for 5 seconds, the buzzer will sound twice beep beep, LED light will turn
on for 1second, The memory is saved as location 1.
Memory button2.Press and hold for 5 seconds, the buzzer will sound twice beep beep, LED light turn on
for 1second, The memory is saved as location 2.
+Learning button, Please read the instructions below for more info.
+To recall the button(location 1). Press and release button, and then press button,
The TV wall mount will automatically swivel to the location1 after the buzzer sounds once.
+To recall the button(location 2). Press and release button, and then press button,
The TV wall mount will automatically swivel to the location2 after the buzzer sounds once.
The right button. Press and release , the TV wall mount will swivel to the right until is pressed or
the TV wall mount swing to 30 degrees to stop.(Note:Using this button is valid only when the wall mount
fully unfolds.)
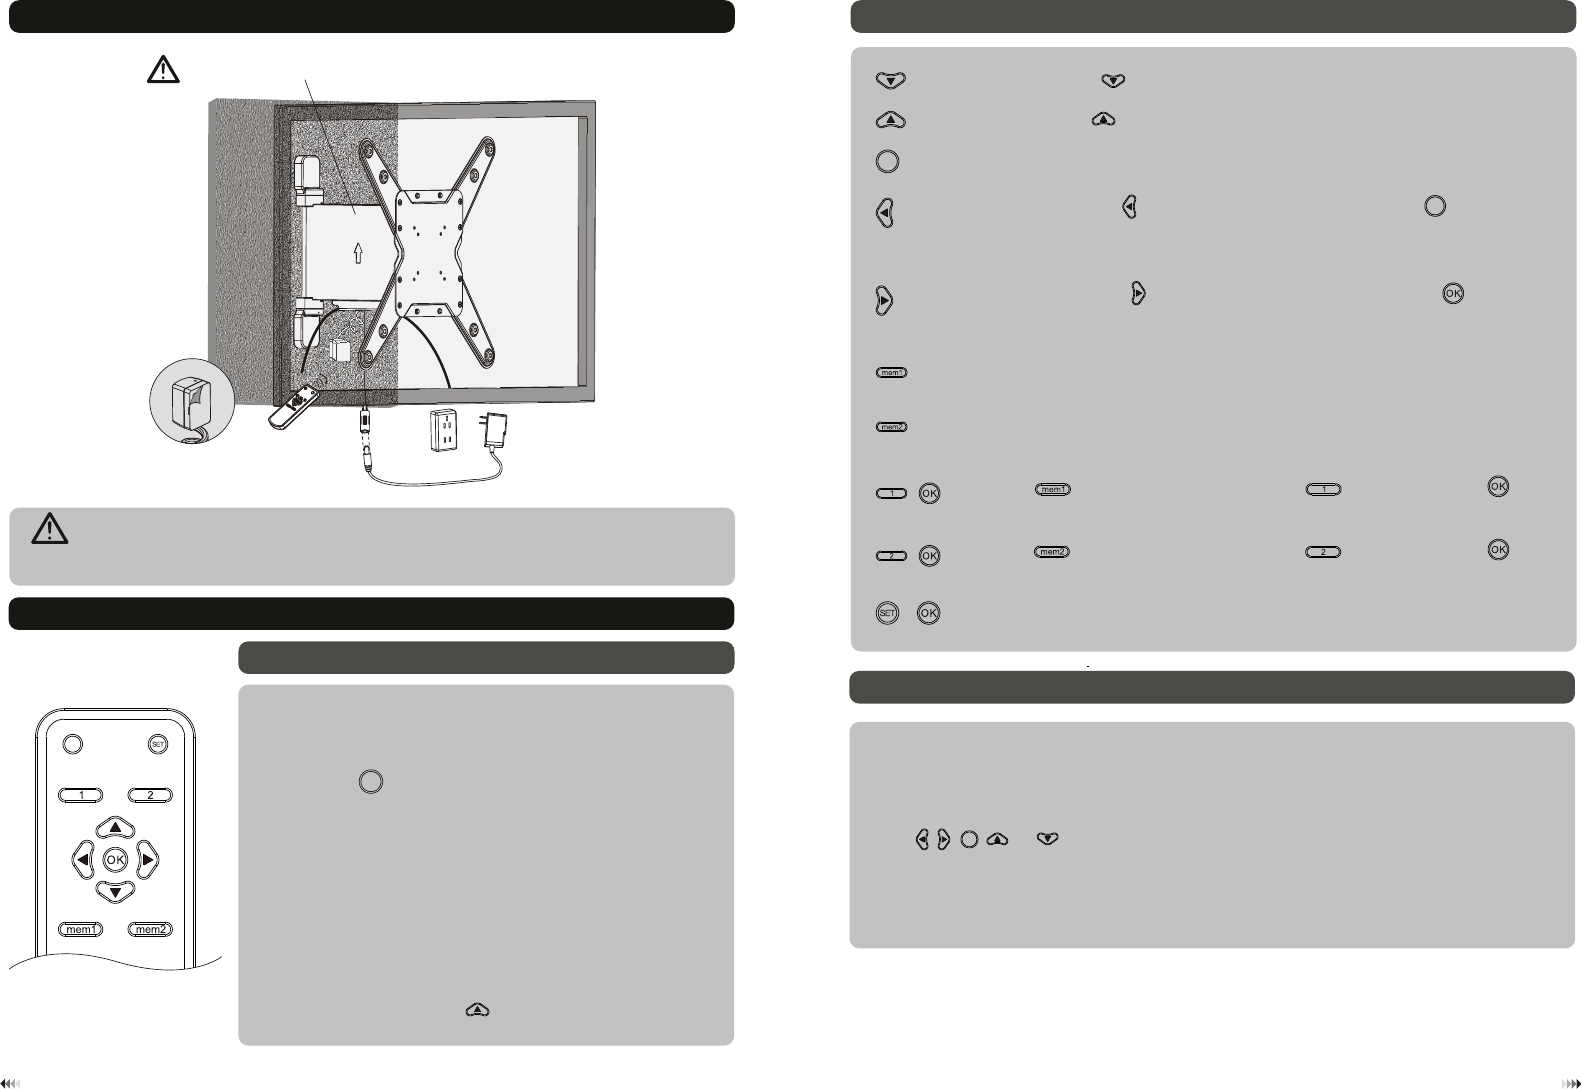
8. Placing the IR Receiver
9. The Remote Control Operating Instructions
Remote control operation instructions
Peel the backing paper. Place the IR receiver into desired position.
Make sure nothing will obstruct the transmission from where the TV will be viewed.
Do not plug into the power outlet until it is ready to be operated.
remote control
STEP 3: Follow the Key function instructions below to operate.
Note: • If TV wall mount encounters an obstacle or has some
damage of machinery part in the process, TV wall mount will
stop automatically and sound three times beep beep beep.
• When the wall mount meets with an obstacle in the process.
Please remove the obstacle and push the wall mount by
hand until returns it flat against the wall. The wall mount can
normal use after press button.
When powered, the buzzer sounds once beep, TV wall
mount will be in standby state.
STEP 1:
Press to return the TV wall mount flat against the
wall and hear one beep from the buzzer, the system will
then enter a working condition.
STEP 2: OK
Do not open the electrical cover please.
