007 1633 030
User Manual: 007-1633-030
Open the PDF directly: View PDF ![]() .
.
Page Count: 308 [warning: Documents this large are best viewed by clicking the View PDF Link!]

Impressario™ Programming Guide
Document Number 007-1633-030

Impressario™ Programming Guide
Document Number 007-1633-030
CONTRIBUTORS
Written by David Graves
Edited by Nancy Schweiger and Christina Cary
Cover design and illustration by Rob Aguilar, Rikk Carey, Dean Hodgkinson,
Erik Lindholm, and Kay Maitz
Production by Lorrie Williams and Gloria Ackley
Engineering contributions by Roger Chickering, Ken Kershner, Baron Roberts,
David Story, and Craig Upson
© Copyright 1992–1994, Silicon Graphics, Inc.— All Rights Reserved
This document contains proprietary and confidential information of Silicon
Graphics, Inc. The contents of this document may not be disclosed to third parties,
copied, or duplicated in any form, in whole or in part, without the prior written
permission of Silicon Graphics, Inc.
RESTRICTED RIGHTS LEGEND
Use, duplication, or disclosure of the technical data contained in this document by
the Government is subject to restrictions as set forth in subdivision (c) (1) (ii) of the
Rights in Technical Data and Computer Software clause at DFARS 52.227-7013 and/
or in similar or successor clauses in the FAR, or in the DOD or NASA FAR
Supplement. Unpublished rights reserved under the Copyright Laws of the United
States. Contractor/manufacturer is Silicon Graphics, Inc., 2011 N. Shoreline Blvd.,
Mountain View, CA 94039-7311.
Silicon Graphics and IRIS are registered trademarks and Impressario, IRIX, Personal
IRIS, Indigo, Magic, and WorkSpace are trademarks of Silicon Graphics, Inc.
PostScript and TranScript are registered trademarks of Adobe Systems, Inc. TIFF is a
trademark of Aldus Corporation. Apple, LaserWriter, Plus, II, IINT, IINTX, IIf, IIg,
and NTX are registered trademarks of Apple Computer, Inc. AT&T System V is a
registered trademark and Documenter’s Workbench is a trademark of AT&T. BSD is
a trademark of Berkeley Software Distribution. Centronics is a registered trademark
of Centronics Data Computer Corporation. GIFand Graphics Interchange Format are
trademarks of CompuServe Incorporated. Hewlett Packard, HP, LaserJet, IIP, IIP+,
III, IIIP, 4, 4P, 4L, DesignJet 650C, HP-GL, 7550A, DeskJet, 500C, 550C, 1200C, ScanJet,
and PaintJet XL300 are registered trademarks of the Hewlett-Packard Company.
PhotoCD s a trademark of the Eastman Kodak Company. X Window System is a
trademark of the Massachusetts Institute of Technology. OSF, Motif, Motif widget,
and OSF/Motif are trademarks of Open Software Foundation. Tektronix, Tektronix
Phaser, Tektronix Phaser II SX, and Tektronix Phaser II PXi are trademarks of
Tektronix, Inc. UNIX is a registered trademark of UNIX System Laboratories.
Versatec is a registered trademark of Versatec Corporation.

iii
Contents
Introduction xvii
Audience xviii
New Features xix
How to Use This Guide xix
Style Conventions xx
Document Overview xxi
Related Publications xxiii
Online Books xxiii
Online Release Notes xxiii
Online Man Pages xxiv
Release Identification Information xxiv
1. Impressario Architecture 1
Overview 2
Impressario Printing Architecture 3
Compliance for Printer Driver Developers 4
Printing Application Programming Interfaces 6
Printing Application Development 10
Impressario Scanning Architecture 11
Scanner Driver Development 13
Scanner Application Development 13
2. Installing Impressario Software 17
Impressario Subsystems 18
Installation Software Prerequisites 20
Disk Space Requirements 20
Installation Method 20
Installing Impressario Software 21

iv
Contents
Connecting the Printer or Scanner 21
Configuring the Impressario Software 22
Software Compatibility 23
3. Printer Drivers 27
Overview 27
Printer Driver Processing 28
Printer Driver Example 29
Program Invocation 29
Program Processing 30
Filter/Driver Specification 32
Required Options 33
Reserved Options 33
Unreserved Options 35
4. Printer Model Files 39
Overview 40
Command-Line Arguments 40
Template Model File Execution 41
Variable Declaration 42
Convenience Functions 42
Process Command-Line Arguments 43
Banner Page 43
File Processing 44
Cleanup and Exit 44
Printer-Specific Options 45
Vendor-Supplied Model File Additions 47
Printer Name 47
Device Interface 48
Printer Type 48
GUI Class 48
Printer-Specific Filter/Driver 49
Debug Routine 49

v
Cleanup Routine 49
Printer-Specific Banner Page 49
Printer-Specific Filtering Options 50
Fast Path for Text 50
5. Printer Graphical Options Panel 53
Overview 54
Graphical Options Panel Layout 54
Options Handling 56
Graphical Options Panel Development 56
Graphical Options Panel Naming 57
Graphical Options Panel Installation 57
Invocation by the PrintBox Widget 58
Standalone Invocation for Testing 59
Termination by the PrintBox Widget 59
Additional Information 59
6. Printing Libraries 63
The libspool Library 64
Compiling Programs with libspool 64
libspool Library Functions 65
The libprintui Library 67
Example Widget Configurations 68
Compiling Programs with libprintui 70
Library Functions Listed by Purpose 71
Example Program 71
The libpod Library 73
POD Files 73
Standard and Local libpod Functions 74
Compiling Programs with libpod 75
Debugging with libpod 75
Network Communications 75
Library Functions Listed by Purpose 76

vi
Contents
7. Scanner Drivers 79
Driver Template 80
Header Files 80
Data Structures 81
SCANINFO Data Structure 81
SCANPARAMS Data Structure 83
Functions You Must Write 86
Events 95
Installation 97
Testing 98
8. Scanner-Specific Options 101
Overview 101
Options Program and the Scanner Driver Interface 102
Scanner Driver's Perspective 103
Options Program's Perspective 105
Installation and Testing 108
9. Generic Scanner Interface 111
Overview 112
Coordinate System for Scanning 112
Data Structures 113
SCANNER Data Structure 113
SCDATATYPE Data Structure 113
Data Type Conventions 114
Functions 116
Diagnostic Functions 116
Application/Driver Rendezvous Functions 117
Scanning Resolution Functions 120
Scanning Area Functions 121
Scanning Functions 121
Document Feeder Functions 125
Events 128

vii
10. Testing for Impressario Compatibility 133
Testing Impressario Printing Compatibility 134
Testing an Impressario Printer 134
Testing an Impressario Printer Software Installation 136
11. Packaging Your Impressario Product 139
Overview 139
Making a Software Distribution 140
Packaging Impressario Printing Software 141
Packaging Impressario Scanning Software 144
12. Enhancing Impressario with Plug-Ins 149
How the Impressario File Conversion Pipeline Works 150
File Type Rules 150
Runtime File Type Recognition Utility 150
File Conversion Utility 151
Adding a New Filetype to Impressario 152
Writing a New Filter 152
Writing an FTR 152
Adding a CONVERT Rule 152
Installation and Testing 153
Using an Alternate PostScript RIP 156
Making the Command line Compatible 156
Writing a Dummy TYPE 157
Testing the Alternate RIP 157
Packaging the Files 158
A. Stream TIFF Data Format 161
Library Description 162
Library Access 162
Library Functions 163
Example Usage 164

viii
Contents
Printing-Specific STIFF 166
Generic STIFF File Structure 167
B. Silicon Graphics Image File Format API 175
Library Description 175
Library Access 176
Library Functions 176
IMPImage Structure 179
Image Access Functions 181
Data Packing Functions 183
Error Handling Functions 184
Image I/O Functions 185
Color Space Conversion Functions 188
Math Operation Functions 194
Zooming Functions 196
C. Printer Object Database (POD) File Formats 205
Overview 206
Printer Configuration File 206
Printer Status File 207
Printer Log File 207
General Syntax 208
Character Set 208
Field Format 208
Input Parsing Rules for libpod Files 209
Printer Configuration File Format 210
General Format 210
Config File Options 211
Printer Status File Format 220
General Format 220
Printer Status File Entries 220
Printer Log File Format 224

ix
D. Transition Notes 227
Impressario 1.1 to 1.2 228
Notes for Application Developers 228
Notes for Filter/Driver Developers 228
Impressario 1.0 to 1.2 229
Notes for Application Developers 229
Notes for Filter/Driver Developers 229
General Changes from IRIX 4 to IRIX 5 231
E. Scanner Driver Architecture 235
Overview 236
Driver Structure 236
Scanner Functions 238
Required Scanner Functions 238
Type Conversion Macros 244
Zooming and Type Conversion Functions 244
Queues and Multi-Threaded Scanner Drivers 247
Queue Manipulating Functions 249
F. Man Pages 253
Glossary 257
Index 265

xi
Figures
Figure 1-1 Impressario Printing Architecture 3
Figure 1-2 Printer Driver Development Flowchart 4
Figure 1-3 General Filter/Driver Architecture 7
Figure 1-4 System V Spooling System Interface 9
Figure 1-5 BSD Spooling System Interface 9
Figure 1-6 Scanner Run-Time Components 11
Figure 1-7 Interprocess Scanner Communication 12
Figure 3-1 Printer Driver Processing Overview 28
Figure 5-1 Graphical Printer Options Panel 55
Figure 6-1 PrintBox Widget – Default Configuration 68
Figure 6-2 PrintBox Widget – No Filename Entry Box 69
Figure 6-3 PrintBox Widget – No Options Box 69
Figure 6-4 PrintBox Widget – With a Child 70
Figure 7-1 Scanner Install Tool 97
Figure 7-2 gscan Panel 98
Figure A-1 Generic STIFF File Structure 168
Figure B-1 W Conversions 188
Figure B-2 K Conversions 189
Figure B-3 CMY Conversions 189
Figure B-4 YIQ Conversions 190
Figure B-5 YUV Conversions 190
Figure B-6 YCbCr Conversions 191
Figure B-7 CMYK Conversions 192
Figure E-1 Scanner Driver Architecture 248

xiii
Tables
Table 1-1 Printing Application Programming Interfaces 8
Table 4-1 Convenience Functions 42
Table 4-2 Reserved Option Names 45
Table 4-3 Printer Type Specifications 48
Table 5-1 Command-Line Arguments 58
Table 6-1 Summary of libspool Functions 65
Table 6-2 Summary of libprintui Functions 71
Table 6-3 Summary of libpod Functions 76
Table 7-1 Functions to Be Written by the Driver Developer 86
Table 9-1 Diagnostic Functions 116
Table 9-2 Application/Driver Rendezvous Functions 117
Table 9-3 Scanning Functions 122
Table 9-4 Document Feeder Functions 125
Table 9-5 Event Functions 128
Table 11-1 Typical Printing Product Files 142
Table 11-2 Typical Scanning Product Files 145
Table 12-1 New Filetype Pathnames 155
Table 12-2 Alternative RIP Pathnames 158
Table A-1 STIFF Generic Functions 163
Table A-2 STIFF Printing-Specific Functions 164
Table A-3 CMYK Data Format 169
Table A-4 CMY Data Format 169
Table A-5 YMC Data Format 170
Table A-6 YMCK Data Format 170
Table A-7 KCMY Data Format 171
Table B-1 Silicon Graphics Image Format File Functions 176
Table B-2 Format-Independent File Functions 177

xiv
Tables
Table B-3 Filter Functions 199
Table C-1 Config File Options 211
Table C-2 Printer Status File Entries 221
Table E-1 Scanner Driver Functions 238
Table E-2 Type Conversion Macros 244
Table E-3 Zooming and Type Conversion Functions 245
Table E-4 Queue Manipulating Functions 249
Table F-1 General Interest Man Pages 253
Table F-2 Printing Developers Man Pages 254
Table F-3 Scanning Developers Man Pages 254

The Impressario Programming Guide is
written for the following users:
• Printer driver developers
• Scanner driver developers
• Application program developers
who need to print or scan from their
applications
Introduction
Introduction


xvii
Introduction
Impressario™ is a printing and scanning environment for Silicon Graphics®
IRIS® workstations. The Impressario Developer’s Kit provides solutions for
a wide range of UNIX® audiences: printer and scanner driver developers,
application program developers, and end users.
The goal of Impressario is to provide an intuitive, friendly, and reliable
interface for end users, while increasing system capability and performance
for driver and application developers. Users can simply drag and drop a file
onto a printer icon to print the file. Other graphical tools in the end-user’s
environment provide information on the capabilities and status of any
accessible printer or scanner.
The Impressario printing environment provides two main end-user
enhancements:
• Support for a wide range of printers from high-quality color printers to
high-speed black-and-white printers
• Graphical printing tools that allow a user to submit a print job and
monitor the status of the job and the printer
Impressario enables developers of printer drivers and scanner drivers to
showcase each product’s special features and capabilities and present them
to the user via a graphical dialog box. Application programmers can greatly
reduce the development time required to support printing and scanning
functions.
Note: The Impressario Release Notes contain the most recent information
about the product. Release notes are provided online and can be read using
grelnotes(1) or relnotes(1). In addition, the directory /usr/impressario contains
information of interest to both application developers and end users.

xviii
Introduction
The Impressario printing environment is built on top of the AT&T System V®
printer spooling interface. Model files, filters, and printer drivers are
provided to convert a wide variety of file types (ISO text files, Silicon
Graphics Image files, PostScript® files, and so forth) to formats for both
raster printers and PostScript printers. Using the Impressario host-based
PostScript interpreter, it is possible to print PostScript documents to raster
printers with performance that greatly surpasses printer-based PostScript
interpreters. Impressario also includes the PrintBox Motif widget™, a
graphical user interface (GUI) for printing.
Impressario server software contains filters and drivers for sending jobs to a
printer connected directly to a host workstation. In addition, all Impressario
printer drivers maintain status information in a globally available printer
object database.
The Impressario scanning environment provides generic scanner support.
Impressario scanner application programs and Impressario scanner drivers
run as separate executables, enabling any scanning application to interact
with all scanner drivers.
Impressario gives application developers a number of valuable resources,
including:
•libspool, a printer spooling system abstraction library that enables
complex printing functions to be defined with only a few lines of code
• Application programming interfaces for easy access to the end-user’s
scanning environment
• A network-transparent version of the printer object database library
routines to inquire directly about printer configuration and status
Audience
The Impressario Programming Guide is written for the following users:
• Printer driver developers
• Scanner driver developers
• Application program developers who need to print or scan from their
applications

New Features
xix
New Features
The 1.2 release of Impressario contains the following new features:
• Networked scanner support; scan from scanners not directly attached
to your machine
• Support for large color prints (the newly added HP DesignJet 650C®
supports color plots up to 36” x 44”)
• Support for 48-bit color scanners; true 16-bits/channel color image
support
• Inclusion of the Silicon Graphics Image format library (libimp), an
ANSI-compliant, clean, and optimized library that supports all 8-bit to
48-bit Silicon Graphics Image formats
• More image file formats; automatically views and prints TIFF™, GIF™,
PBM, PGM, PPM, Silicon Graphics Image RGB, FIT, PhotoCD™, and
JPEG formats. Rotate, mirror, gamma-adjust and resize any of these
image types. Drag-and-drop them all onto your printers
Note: Be sure your server is running 1.2.
• Complete backward compatibility with IRIX™ 4.0.5 Impressario 1.1.
Support for IRIX 4.0.5 clients with IRIX 5.2 servers, IRIX 5.2 clients with
IRIX 4.0.5 servers
How to Use This Guide
Since this guide has four separate audiences, the list provided below gives
the areas of most interest to each user:
• Printer driver developers should read chapters 1–6, 10, 11, and 12.
• Printer application program developers should read chapters 1, 6,
and 12.
• Scanner driver developers should read chapters 1, 2, 7–9, 11, and 12.
• Scanner application program developers should read chapters 1, 2, 9,
and 12.

xx
Introduction
Style Conventions
The followings conventions are intended to help make information easy to
access and understand:
italic Used for arguments in a command line that you replace
with a valid value. In text it indicates an argument, button,
command, document title, filename, function, glossary
item, new term, or variable. For example:
The phandler program is an example driver.
The NAME variable identifies the printer name.
bold Used for constants in text. For example:
The SC_PROGFEED bit should be set.
Helvetica Used for callouts in a figure.
Helvetica Bold Used for callouts in a figure, labels, and notes.
Courier Used for code examples and screen displays. For instance,
the following is a code example:
int
AdvanceFeeder(SCANINFO *scan)
{
drverr = SCENOFEEDER;
return -1;
}
Courier bold Used for nonprinting keys and user input. For example:
vstiff /usr/tmp/sample.blastfile<Enter>
< > The less-than and greater-than symbols are used to enclose
arguments, parameters, and nonprinting characters (see
above).
[ ] Brackets enclose optional command arguments. Do not
enter the brackets. Example:
[optional_entry]

Document Overview
xxi
Document Overview
Chapter 1, “Impressario Architecture,” discusses Impressario’s printing and
scanning architectures and defines Impressario compliance for printer
driver and scanner driver developers.
Chapter 2, “Installing Impressario Software,” explains how to install the
Impressario software. It includes product-specific information that is
supplemental to the IRIS Software Installation Guide.
Chapter 3, “Printer Drivers,” provides an overview of printer driver
processing, plus a detailed analysis and discussion of an example printer
driver. The required printer filter/driver options are also covered.
Chapter 4, “Printer Model Files,” discusses the printer model files and
describes the modifications to be made by printer vendors to the printer
model file template.
Chapter 5, “Printer Graphical Options Panel,” discusses the graphical
options panel that visually showcases a printer’s features. The major topics
discussed are options handling, panel layout, development, naming,
installation, invocation, and termination.
Chapter 6, “Printing Libraries,” describes the libraries used by printer
drivers, filters, and applications. The libraries described are the libspool
library, the libprintui library, and the libpod library.
Chapter 7, “Scanner Drivers,” explains how to write a scanner driver. It
provides a detailed analysis of the template scanner driver. The major topics
are the driver template, header files, data structures, functions and macros,
and installation and testing.
Chapter 8, “Scanner-Specific Options,” discusses how to implement
scanner-specific options for a scanner driver. The major topics are options,
the scanner driver interface, perspectives, and installation and testing.
Chapter 9, “Generic Scanner Interface,” describes a generic interface
between a scanner driver and an application program. The major topics are
the coordinate system for scanning, data structures, and data type
conventions.

xxii
Introduction
Chapter 10, “Testing for Impressario Compatibility,” explains how to use the
programs that test printing compatibility with the Impressario environment.
It explains how to test Impressario printing compatibility, an Impressario
printer, and an Impressario printer software installation.
Chapter 11, “Packaging Your Impressario Product,” explains how to
package the Impressario software product that you have created.
Chapter 12, “Enhancing Impressario with Plug-Ins,” explains how to add
new features to the Impressario open architecture. The major topics are how
the Impressario file conversion pipeline works, how to add a new filetype to
Impressario, and how to use an alternate PostScript RIP.
Appendix A, “Stream TIFF Data Format,” describes the Stream TIFF file
format, the primary interchange file format between printer filters and
drivers, and libstiff, a C-language application programming interface used to
read and write Stream TIFF files. Stream TIFF is also used by gscan(1) to store
images in TIFF files and to scan to the screen (in conjunction with vstiff(1)).
Appendix B, “Silicon Graphics Image File Format API,” describes libimp, the
C-language API for reading and writing Silicon Graphics Image format files.
The image processing features of libimp are also described.
Appendix C, “Printer Object Database (POD) File Formats,” defines the file
formats for printer configuration, status, and log files in the POD. The major
topics are general syntax, input parsing rules for libpod files, printer
configuration file format, and printer status file format.
Appendix D, “Transition Notes,” explains how migrate from Impressario 1.1
software to 1.2 and from Impressario 1.0 software to 1.2. It also explains how
Impressario application developers and filter/driver developers can take
advantage of the new features in Impressario 1.2.
Appendix E, “Scanner Driver Architecture,” describes the architecture of a
scanner driver and discusses the template scanner driver, required and
optional functions, and queues and multi-threaded scanner drivers.
Appendix F, “Man Pages,” lists all Impressario online man pages: general
interest, printer developers, and scanner developers.

Related Publications
xxiii
Related Publications
Online Books
The following books, available online through Silicon Graphics, contain
information related to Impressario:
•IRIX Programming Guide, Volumes I and II, Silicon Graphics, Inc.
•IRIS Indigo Magic Integration Guide, Silicon Graphics, Inc
•IRIS Advanced Site and Server Administration Guide, Silicon Graphics, Inc.
•IRIX Device Drivers Programming Guide, Silicon Graphics, Inc.
•IRIX Device Drivers Reference Pages, Silicon Graphics, Inc.
•X Library Programming Guide,Volume I, O’Reilly & Associates
•X Window™ System, Volume 4, O’Reilly & Associates
•Motif™ Programmer’s Guide, Prentice-Hall, Inc.
•Motif Reference Manual, Prentice-Hall, Inc.
•Motif Style Guide, Prentice-Hall, Inc.
•Impressario Programming Guide, Silicon Graphics, Inc.
•Impressario User’s Guide, Silicon Graphics, Inc.
Online Release Notes
After installing online documentation, you can view the Impressario Release
Notes. If you have a graphics system, select “Release Notes” from the Tools
submenu of the Toolchest to display the grelnotes graphical browser. Refer to
thegrelnotes(1) man page for information on options to this command. If you
do not have a graphics system, you can use the relnotes command. Refer to
the relnotes(1) man page for accessing the online release notes.

xxiv
Introduction
Adding the product name to the relnotes command displays the table of
contents for that product’s release notes. For example:
%relnotes Impressario
The chapters for the “Impressario” product’s release notes are:
chap title
1 Introduction
2 Installation Information
3 Changes and Additions
4 Bug Fixes
5 Known Problems and Workarounds
6 Documentation Errors
Use “/usr/sbin/relnotes productname chapter” to view a chapter
Online Man Pages
Appendix F lists the man pages provided online with Impressario. To access
the online man pages, type:
man page-name
Release Identification Information
The Impressario release identification information is listed below:
• Version number: 1.2
• Product code Impressario Server: SC4-IMPS-1.2 CD
• Product code Impressario Developer’s Kit: SC4-IMPD-1.2 CD
• Additional printer copy of Impressario Programming Guide:
M4-IMPD-1.2
• System software requirements: IRIX 5.2 or later

This chapter gives an overview of
Impressario’s printing and scanning
architectures. It also explains how to
write Impressario compliant printer
drivers and scanner drivers. By
complying with Impressario guidelines,
you make your job easier, ensure a
consistent end-user experience, and
greatly improve the chances of effortless
transitions to future Impressario
releases.
Impressario Architecture
Chapter 1


1
Chapter 1
1. Impressario Architecture
This chapter discusses the Impressario printing and scanning architectures
and defines Impressario compliance for printer driver and scanner driver
developers. By complying with Impressario guidelines, you make your job
easier, you ensure a consistent end-user experience, and you greatly improve
the chances of effortless transitions to future releases of Impressario.
The topics discussed in this chapter are:
• “Impressario Printing Architecture” on page 3
• “Compliance for Printer Driver Developers” on page 4
• “Printing Application Programming Interfaces” on page 6
• “Printing Application Development” on page 10
• “Impressario Scanning Architecture” on page 11
• “Scanner Driver Development” on page 13
• “Scanner Application Development” on page 13

2
Impressario Architecture
Overview
Impressario allows files of different types to be printed on any installed
printer and images to be scanned from a scanner, an IRIS screen, or a Silicon
Graphics Image file. A visual end-user environment makes it easy for users
to add new devices and for applications to take advantage of those devices
by providing graphical interfaces for:
• Installing printers (printers)
• Modifying printer settings (PrintPanel or printers)
• Checking printer status (PrintStatus)
• Submitting print jobs from applications (PrintBox widget)
• Installing scanners (scanners)
• Using scanners (gscan)
To maintain a consistent, reliable, and easy-to-use environment, Impressario
provides the following libraries for application developers:
•libspool—a C-language application programming interface (API) to the
UNIX printer spooling system
•libprintui—a C-language graphical user interface (GUI) library for
printing that is compatible with Motif
•libpod—a C-language application programming interface to the Printer
Object Database (POD)
•libscan—a C-language application programming interface to the
Impressario scanning system
•libstiff—a C-language application programming interface for reading
and writing Stream TIFF (STIFF) files
•libimp—a C-language application programming interface for reading
and writing Silicon Graphics Image files
The following final, crucial elements must be provided by driver developers:
• For printers—a compliant printer driver that reports printer status
through libpod and,optionally, a graphical options panel
• For scanners—a scanner driver for the driver side of the generic
scanner interface and, optionally, a scanner-specific options panel
Impressario Printing Architecture
3
Impressario Printing Architecture
This section describes the steps that developers of printer drivers and
printing applications must take to comply with Impressario specifications.
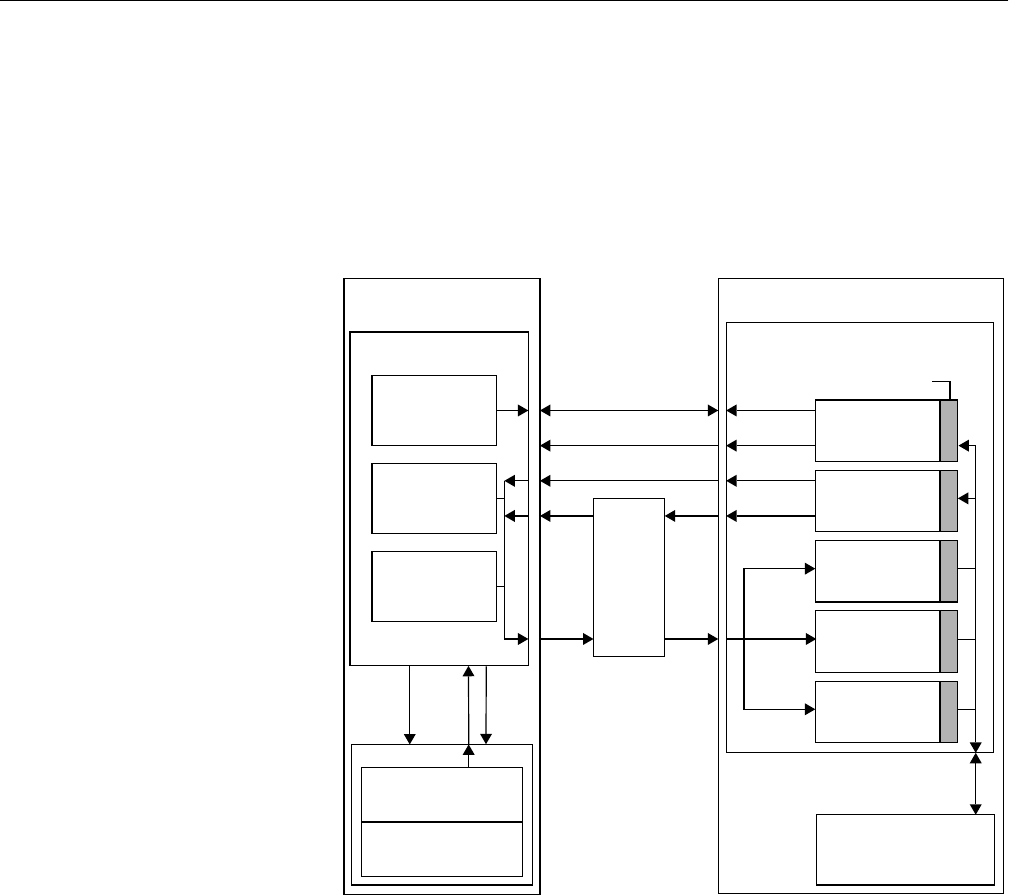
Figure 1-1 is an overview of Impressario printing components. A more
detailed version of this diagram is available online in /usr/impressario/doc.
Figure 1-1 Impressario Printing Architecture
The following sections detail the steps that should be followed to achieve
Impressario compliance for printer drivers and printing applications.
printer-specific
communication
protocol
Device Configu-
ration Database
(libpod)
job
status
device characteristics
End-User Printing Host (Server)
Spooler Interface FileEnd-User Printing
Printer Installer
Printer Status
Print Request
(printers)
Panel
(PrintPanel)
Physical
Spooling
(SVR 3)
Application
device
config print
ASCII
Bitmap
Images
Printer Filter/Driver
System
device query
device status events
job
status
job
print
(libpod) job
Printing Device
Environment
Workstation (Client)
(PrintStatus)
Panel Text
PostScript
Device and Job
Status Database
Line Printer
Display
Image File
PostScript
Emulator
Interpreter
(libpod)
job
status
job
print
Printing API
Printing GUI
(libspool)
(libprintui)
4
Impressario Architecture
Compliance for Printer Driver Developers
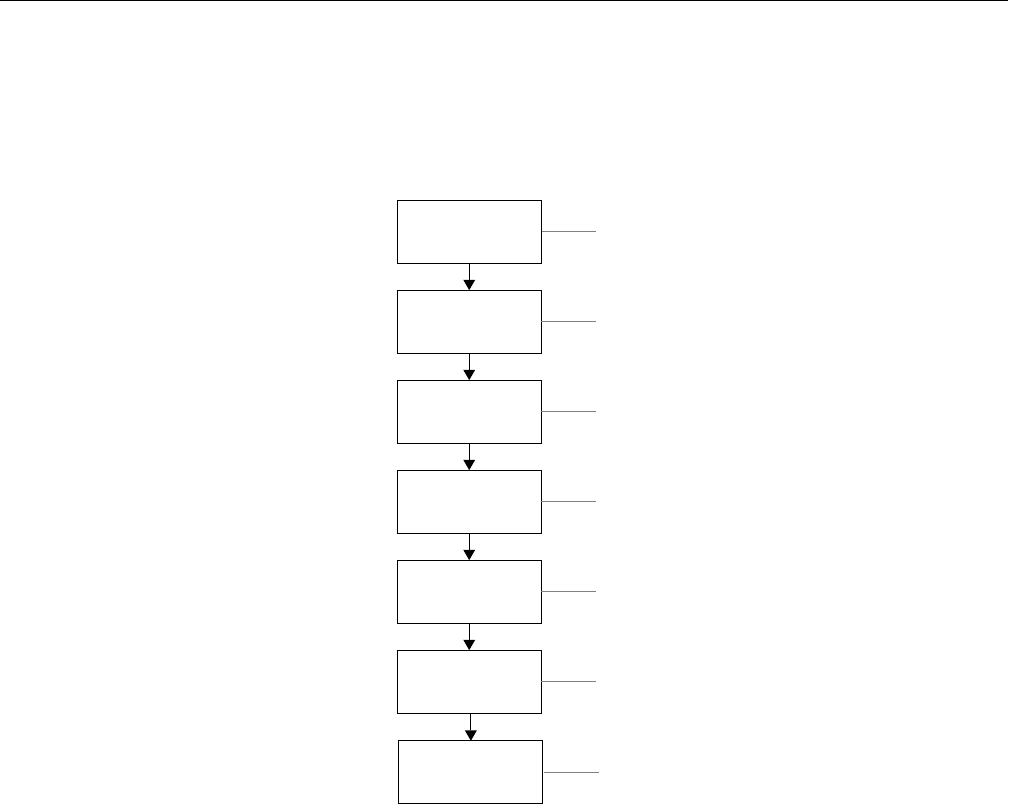
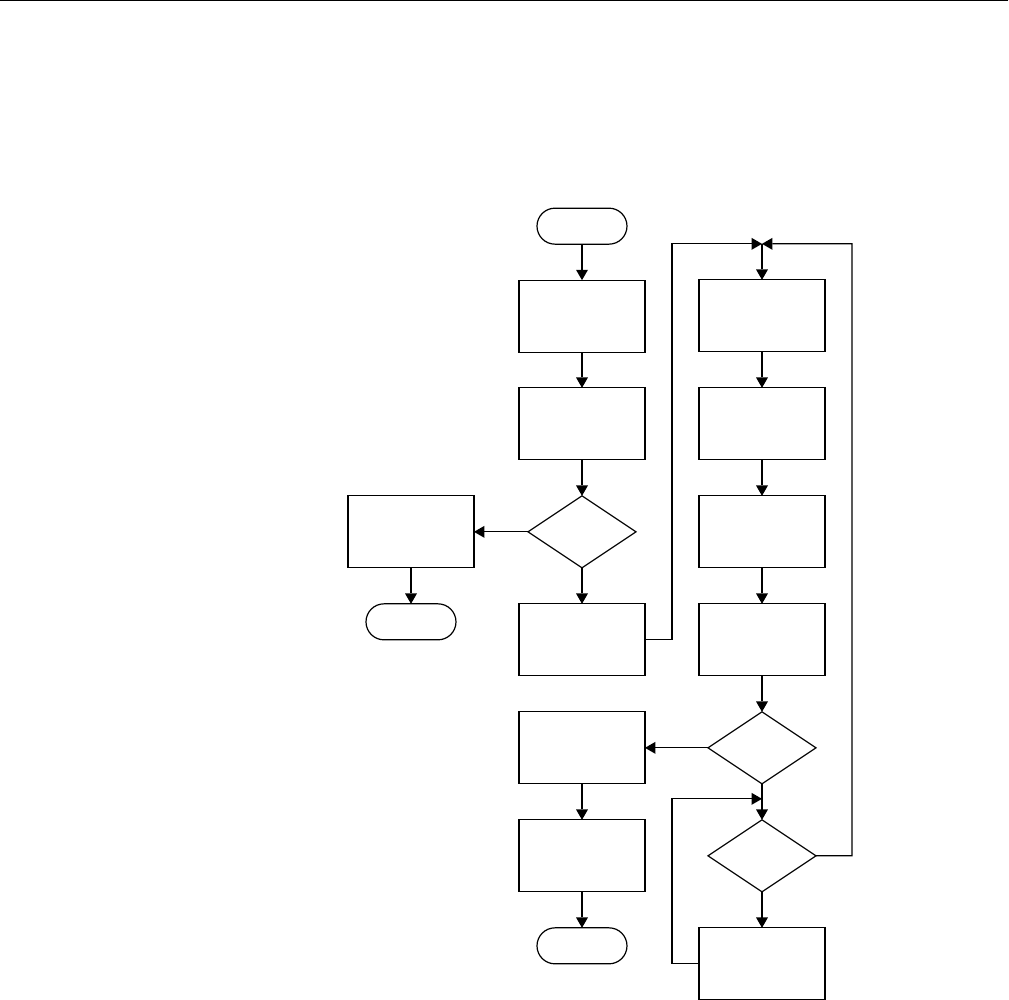
Follow the steps shown in Figure 1-2 and discussed after the flowchart to
develop and integrate a printer driver for Impressario.
Figure 1-2 Printer Driver Development Flowchart
Step 1 – Develop Printer Driver (Required)
Your printer driver must comply with the Impressario Filter/Driver
Specification (see “Filter/Driver Specification” in Chapter 3) so that a model
file that is Impressario compliant will execute the driver correctly. This
specification describes standard driver behavior and the command-line
arguments that must be processed. See /usr/impressario/src/drivers and
See Chapter 3, “Printer Drivers,”
for detailed instructions.
See Appendix C, “Printer Object Database
(POD) File Formats,” for detailed information.
See Chapter 4, “Printer Model Files,” for detailed
information and instructions.
See “Filter/Driver Specification” in Chapter 3
for more information.
See Chapter 5, “Printer Graphical Options Panel,”
for detailed information.
Package software
for distribution
Create
model file
Provide data
filters
(as needed)
Create graphical
options panel
(recommended)
step 1
step 2
step 3
step 4
step 5
step 6
(required)
(required)
Develop
printer driver
(required)
Provide
POD files
(required)
Verify product
on server
(required)
step 7
See Chapter 11, “Packaging Your Impressario Product,”
for detailed information.
See Chapter 10, “Testing for Impressario Compatibility,”
for detailed information.

Impressario Printing Architecture
5
Chapter 3 for the source code and an example driver. The driver must
update the POD files through calls to “local” functions of the library libpod.
(See Chapter 6, “Printing Libraries.”) The formats of the POD files are
described in Appendix C, “Printer Object Database (POD) File Formats.”
Step 2 – Provide POD Files (Required)
A set of POD files consists of a configuration file, a printer log file, and a
printer status file. Each POD file has the same base name as the printer
model file. The extensions on these files are: .config,.log, and .status,
respectively. To create these files, start with the example set of POD files in
the directory /usr/impressario/src/data. The POD files you create must be
installed in the directory /usr/lib/print/data when you install your software.
See Chapter 11, “Packaging Your Impressario Product,” for more
information.
Step 3 – Create Model File (Required)
Your model file must conform to the Impressario model file specification.
This is done by starting with the template model file provided with
Impressario and adding the vendor-specific processing. Model files must be
installed in /var/spool/lp/model. Follow the Impressario model file template to
create a model file that properly updates the desktop printer status icon and
interacts properly with Impressario subsystems. (See Chapter 4, “Printer
Model Files,” for more information on model files.)
Step 4 – Provide Data Filters (As Needed)
Filters must conform to the filter/driver specification. (See “Filter/Driver
Specification” in Chapter 3 for more information.) Filter programs must be
installed in /usr/lib/print. It is recommended that any data filtering be
performed directly by the driver. (Filters are programs that change the
format of a data file; drivers communicate bidirectionally with the printer.)
See chapter 12 for step-by-step instructions on adding new file conversion
filters.

6
Impressario Architecture
Step 5 – Create Graphical Options Panel (Recommended)
This step is optional, but it is strongly recommended that you showcase the
features of your printer by providing a graphical options panel program.
(See Chapter 5, “Printer Graphical Options Panel,” for details.)
Step 6 – Package Software for Distribution (Required)
Package your Impressario software product for distribution. See Chapter 11
for detailed information.
Step 7 – Verify Product on Server (Required)
Check that your product media will install the printer support files you have
developed on an Impressario server. Run the Impressario test programs
testipr(1) and testiconfig(1) to assist in verifying the installation. See
Chapter 10 for detailed information.
Printing Application Programming Interfaces
To print a document on UNIX systems, you must submit a print job to one
of the available spooling systems: the BSD spooling system (lpr command)
or the System V spooling system (lp command). The System V spooling
system is the default spooling system on all SGI workstations. Figure 1-3
shows the general Impressario spooling architecture for the lp spooler. Note
that only one of the two paths shown below (PostScript printer or raster
printer) would apply. That is, the output is either to a PostScript printer or a
raster printer.
Impressario Printing Architecture
7
Figure 1-3 General Filter/Driver Architecture
Before Impressario, a true application programming interface to the BSD
and System V spooling systems was not available. Programmers had to
create their own application programming interface or execute the lp or lpr
command from their application.
lp
PostScript
printer
printer-
specific
options
handle printer-
POD
status
database
PostScript
driver Raster
driver
STIFF
PostScript
stiff2ps, sgi2ps stiff2ps, sgi2ps, lptops,
specific options
Raster
printer
command
and psrip filtersand lptops filters
data data
PostScript, Silicon Graphics Image,
GIF, TIFF, ISO text, PBM, PGM,
PPM, RGB, FIT, PhotoCD, JPEG

8
Impressario Architecture
Impressario provides the application programming interfaces listed in
Table 1-1 and described below.
libspool API
In its simplest form, libspool allows you to submit a file or buffer to a printer.
It also gives you control of spooling system options and printer-specific
options.
libprintui API
The API libprintui is built on top of libspool. The libprintui library contains a
widget, compatible with Motif, that you can incorporate directly into your
application. If your Motif application needs printing capabilities, libprintui
will provide you with all of the basic functionality for submitting a print job
as well as access to setting and saving printer-specific options. As mentioned
earlier, libprintui interfaces only with the System V spooling system.
libpod API
The libpod library is built on top of libspool and an ancillary system daemon,
podd. The libpod library allows you to obtain detailed information about the
capabilities of the printers currently available on the system. You can also get
detailed status information about the printers. Most applications will not
need to use libpod; however, for those that do, libpod provides a very
powerful, network-transparent interface.
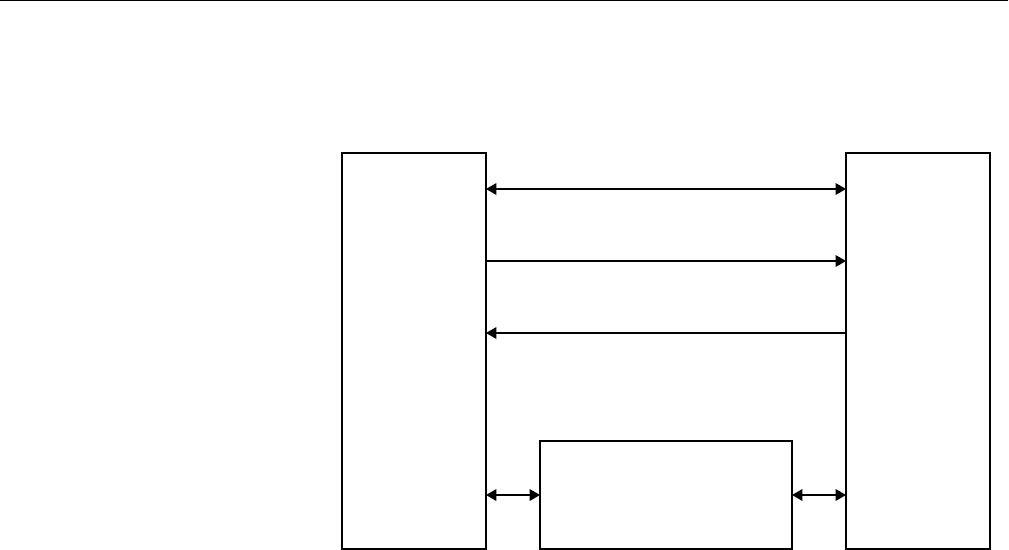
Figure 1-4 shows the relationship between an application program, the
Impressario APIs, and the System V spooling system.
Table 1-1 Printing Application Programming Interfaces
API Interfaces to Function
libspool System V, BSD Allows submittal of a file or buffer to a printer.
libprintui System V only Provides a MotifPrintBox widget for printing from your
application.
libpod System V, BSD Gets status information on the printers currently
available.

Impressario Printing Architecture
9
Figure 1-4 System V Spooling System Interface
Figure 1-5 shows the relationship between an application program, the
Impressario libspool API, and the BSD spooling system.
Figure 1-5 BSD Spooling System Interface
glp (PrintPanel)
The “print” subsystem available with the IRIX operating system contains the
programglp, a graphical standalone print job submittal tool. While not a true
API, glp can be used by your application to submit print jobs. It is a
standalone wrapper around the PrintBox Motif widget in libprintui.
System V (lp command)
libspool
libprintuilibpod
glp
Application
libspool
Application
BSD (lpr command)

10
Impressario Architecture
Printing Application Development
The following Impressario application printing solutions are available:
• Perform non-graphical print functions via libspool
Use libspool, the spooling system abstraction library, for all
non-graphical interaction with the BSD or System V spooling system.
The libspool library functions perform a large amount of work to ensure
successful spooling system interaction, work that a developer may not
wish to reproduce.
• Perform graphical print functions via libprintui
Use the PrintBox Motif widget provided by the libprintui library for
graphical print job submittal. The widget provides a consistent job
submittal dialog across all applications and greatly reduces the amount
of development effort required. If you use this library, you don’t need
to use libspool directly. libprintui encapsulates those calls.
• Obtain printer status via libpod (optional)
Use libpod library calls to get printer status, configuration, and log
information. Status queries must be made through libpod calls; attempts
to obtain this information through other means has unpredictable
results. In most cases, application developers should use the
“standard” forms of the libpod functions (the “local” forms of the
functions are for use by printer driver developers and are not
network-transparent).
• Submit graphical print jobs via glp
If you are not using Motif, you may use glp to graphical submit print
jobs from your application. If you use this method, you should have a
prerequisite on the print software package (shipped with IRIX 5.2 and
later). While this method works, it is not recommended, as it is likely to
be less efficient than using libprintui.
Impressario Scanning Architecture
11
Impressario Scanning Architecture
This section describes the steps you must follow to comply with the
Impressario specifications for scanner driver developers and scanner
application developers.
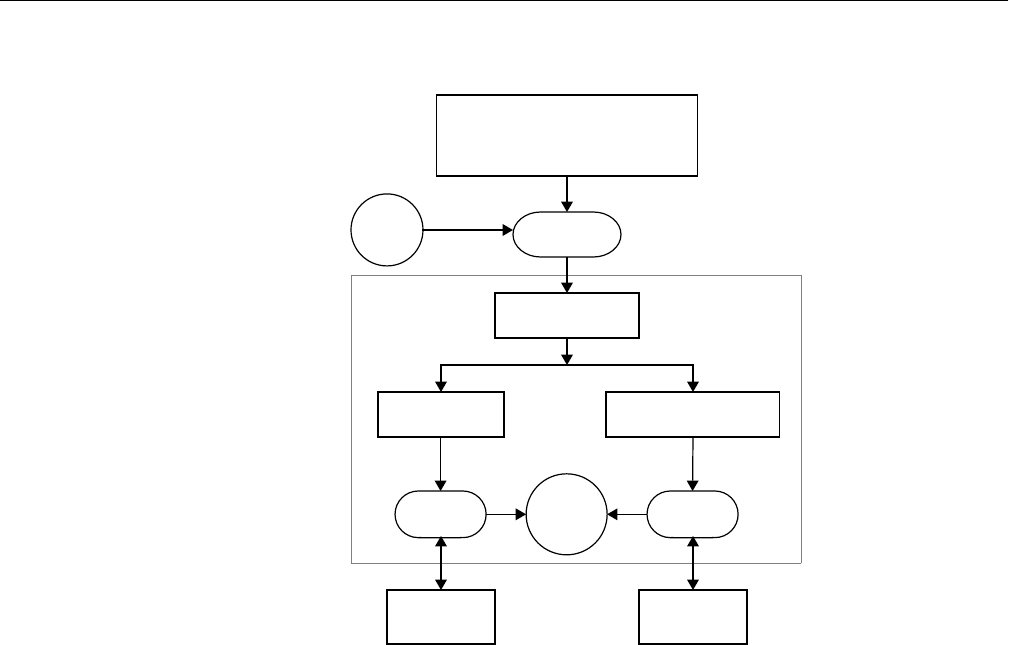
Figure 1-6 illustrates the run-time components of the Impressario scanner
architecture. Note that scanner applications, scanner-specific options
programs, and scanner drivers all link with libscan.a, which has separate
modules for scanner applications and for scanner drivers.
Figure 1-6 Scanner Run-Time Components
The main and scanner-specific modules of a scanner driver both register
callback functions with libscan.
Scanner-
specific
module
Scanner
application
Generic
scanner
API
libscan
Scanner
application
modules
Scanner
IPC
calls Scanner-
specific
options
Interprocess
communication
libscan
Scanner
driver
modules
Scanner
driver API
Main (IPC)
module
Callback
functions
12
Impressario Architecture
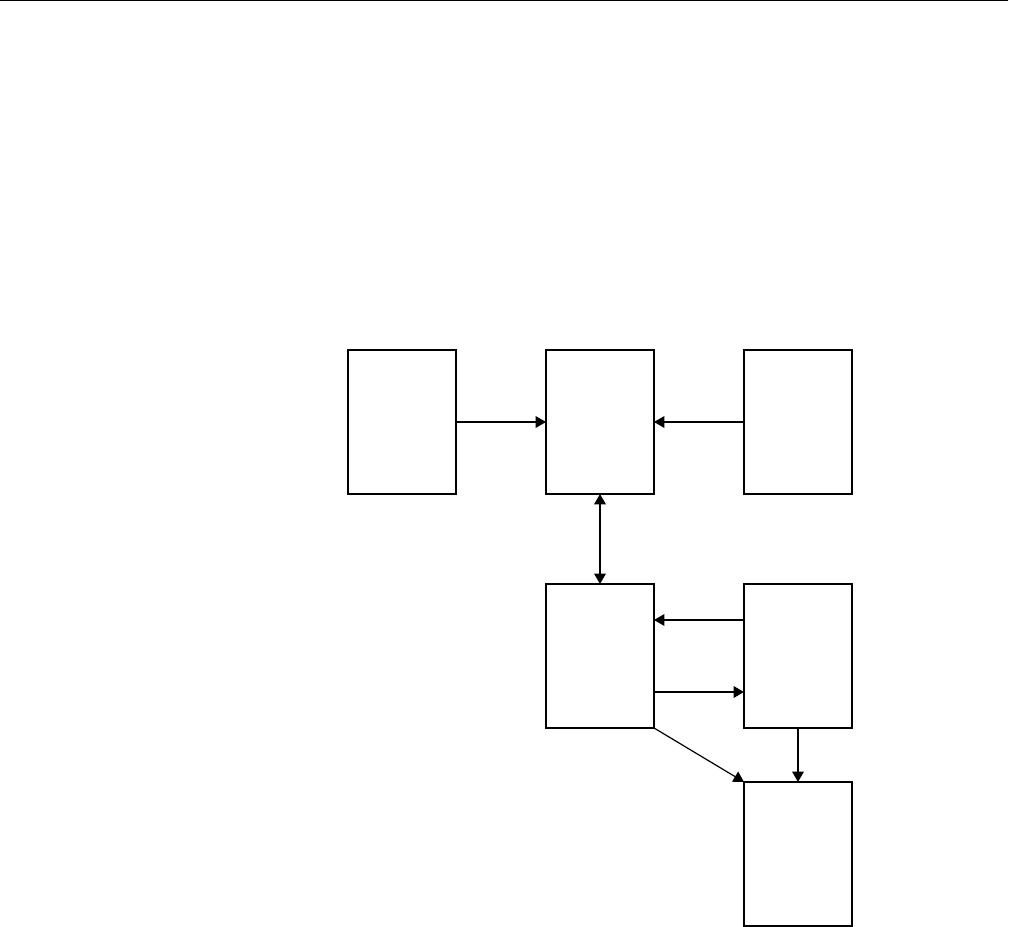
Figure 1-7 shows the interprocess communication of the Impressario
scanner architecture.
Figure 1-7 Interprocess Scanner Communication
The following sections describe the steps that should be followed to achieve
Impressario compliance for scanner drivers and applications.
Scanner
Driver
Shared Memory Area
• Access control semaphores
• Scanning status area
• Status change notification
Scan data is written by the scanner
driver to the file descriptor passed
to it by the application
Scanner
Application
Scan commands and results
Pass file descriptors
UNIX domain socketpair
UNIX domain socketpair

Impressario Scanning Architecture
13
Scanner Driver Development
Follow these steps to develop and integrate a scanner driver that complies
with Impressario:
1. Develop the scanner driver. See Chapter 7, “Scanner Drivers,” and
Chapter 8, “Scanner-Specific Options,” for detailed instructions.
2. Create a graphical options panel. This step is optional, but it is
recommended that you showcase the features of your scanner through
this mechanism. See Chapter 8, “Scanner-Specific Options,” for detailed
instructions.
3. Create distribution media that will install the driver on an Impressario
client. Be sure to check that the media will install the scanner support
files you have developed on an Impressario client. See Chapter 11 for
detailed information.
Scanner Application Development
There are two ways to interact with the scanning system: through libscan, the
scanning system abstraction library, or by using gscan as a “plug-in” module
from an application.
When given the -p option, gscan writes STIFF data to its standard output.
Using libstiff, your application can obtain scanned data by reading the
standard output of gscan. (See Appendix A for more information about
STIFF.)

This chapter explains how to install the
Impressario Developer’s Kit software. It
gives product-specific information that
supplements the IRIS Software
Installation Guide.
Installing Impressario Software
Chapter 2


17
Chapter 2
2. Installing Impressario Software
This chapter explains how to install the Impressario Developer’s Kit
software. It gives product-specific information that supplements the IRIS
Software Installation Guide. This chapter should be used in conjunction with
the IRIS Software Installation Guide to install the Impressario software.
The topics discussed in this chapter are:
• “Impressario Subsystems” on page 18
• “Installation Software Prerequisites” on page 20
• “Disk Space Requirements” on page 20
• “Installation Method” on page 20
• “Software Compatibility” on page 23
Note: See the Impressario Release Notes for the most up-to-date information
on installing the Impressario software.

18
Installing Impressario Software
Impressario Subsystems
Impressario consists of two software products: a server and a developer’s
kit. One or more of the subsystems listed below are on your distribution
media.
The Impressario server includes the following subsystems:
impr_base.man.relnotes Release notes for Impressario 1.2.
impr_base.man.impr Manual pages for the base Impressario
software.
impr_base.books.user Impressario online User’s Guide.
impr_base.sw.impr Impressario base software. Contains
general utilities used by both client and
server.
impr_base.sw.il_image PhotoCD, TIFF, and FIT image support.
impr_fonts.sw.adobe22 Additional 22 Adobe Type 1 fonts.
impr_fonts.man.gifts Manual pages for font installation tools.
impr_fonts.sw.gifts Unsupported font installation tools.
impr_scan.man.impr Manual pages for the scanner software.
impr_scan.sw.impr Impressario scanner software. Contains
end-user utilities for installing and using
scanners.
impr_scan.sw.epson Scanner driver for the Epson GT-6000®.
impr_scan.sw.hp Scanner driver for the HP ScanJet IIc® and
IIcx®.
impr_scan.sw.ricoh Scanner driver for the Ricoh FS1®.
impr_scan.sw.sharpscsi Scanner driver for the Sharp JX 320®.
impr_scan.sw.utek Scanner driver for the MicroTek ScanMaker
600ZS®.
impr_server.man.impr Manual pages for the server software.
impr_server.sw.impr Software that must be installed on the
server.

Impressario Subsystems
19
The Impressario Developer’s Kit includes all of the subsystems found on the
Impressario server plus these subsystems:
impr_server.sw.laserwriter Driver for the Apple LaserWriter® printers.
impr_rip.man.impr Manual pages for the PostScript interpreter.
impr_rip.sw.impr PostScript interpreter software and support
files.
impr_rip_printers.man.designjet Manual pages for the HP DesignJet 650C
printer.
impr_rip_printers.man.deskjet Manual pages for the HP DeskJet® and
PaintJet® printers.
impr_rip_printers.man.laserjet Manual pages for the HP LaserJet®
printers.
impr_rip_printers.sw.designjet Driver for the HP DesignJet 650C printer.
impr_rip_printers.sw.deskjet Driver for the HP DeskJet and PaintJet
printers.
impr_rip_printers.sw.laserjet Driver for the HP LaserJet printers.
impr_dev.books.developer Online Impressario Programming Guide.
impr_dev.man.impr Manual pages for the developer’s kit.
impr_dev.man.print Manual pages for the printer-specific portions of
the developer’s kit.
impr_dev.man.scan Manual pages for the scanner-specific portions of
the developer’s kit.
impr_dev.man.scan Manual pages for the scanner-specific portions of
the developer’s kit.
impr_dev.sw.impr Base developer’s kit software.
impr_dev.sw.print Printer developer’s kit software.
impr_dev.sw.scan Scanner developer’s kit software.
impr_dev.sw.tests Developer test programs.

20
Installing Impressario Software
Installation Software Prerequisites
Your workstation must be running IRIX 5.2 or later with the Indigo Magic™
desktop to use release 1.2 of Impressario. To determine the IRIX system
release, enter the command:
uname -a
impr_base.sw.il_images requires part of the il_eoe system. See the Impressario
Release Notes for a complete list of Impressario prerequisites.
Note: Thedps_eoe subsystem is provided to new Silicon Graphics customers
in the IRIX system software release. Upgrade customers might need to
obtain the Display PostScript executable option (product code SC4-DPS-1.0
for CD-ROM or ST4-DPS-1.0 for tape).
Disk Space Requirements
See the Impressario Release Notes for current disk space requirements.
If you are installing Impressario for the first time, the subsystems marked
“default” are those that are installed if you use the go command. To install a
different set of subsystems, use the install,remove,keep, and step commands
in inst to customize the list of subsystems to be installed, then select the go
command.
Installation Method
To install Impressario, do the following:
1. Install the Impressario software on your system.
2. Connect the printer or scanner to the system.
3. Configure the Impressario software for use with the printer or scanner.

Installation Method
21
Installing Impressario Software
All of the subsystems for Impressario can be installed using IRIX on a
running system. You do not need to use the miniroot. Refer to the IRIS
Software Installation Guide for complete installation instructions.
If you have Impressario 1.0.1 and PhaserPrint for Impressario 1.0 installed,
you must explicitly load the products impr_rip and impr_fonts on your
Impressario server system. These products are not installed by default.
Connecting the Printer or Scanner
To physically connect your printer or scanner, follow the instructions
provided by the manufacturer.
Printer Support
Impressario 1.2 includes support for the following printers:
• Apple LaserWriter Plus®, II®, IINT®, IINTX®, IIf®, and IIg®
• Hewlett-Packard DesignJet 650C
• Hewlett-Packard DeskJet 500C, 550C, 1200C®
• Hewlett-Packard PaintJet XL300®
• Hewlett-Packard LaserJet IIP®, IIP+®, III®, IIIP®, 4®, 4P®, and 4L®
Note: All Apple LaserWriter printers must be connected to the system using
a serial port. All Hewlett-Packard printers must be connected to the system
using a parallel port.

22
Installing Impressario Software
Scanner Support
Impressario includes support for the following scanners:
• Hewlett-Packard ScanJet IIc and IIcx
• Ricoh FS1
• MicroTek ScanMaker 600 ZS
• Sharp JX 320
• Epson GT 6000
See the Impressario Release Notes for additional information on specific
hardware installation limitations.
Configuring the Impressario Software
Printer Configuration
Impressario printer software is configured using the Printer Manager tool
that comes with the IRIS System Manager. Printer Manager can be accessed
from the Toolchest System menu. See the Personal System Administration
Guide for details on installing printers.
Note: All existing printers, including networked printers, must be deleted
and reinstalled using the Printer Manager.
Networked printers can no longer be accessed via multiple levels of
indirection. When using the Printer Manager to add a networked printer,
only the printers directly connected to the specified host machine are
displayed.
Scanner Configuration
Impressario scanner software is configured using the Scanner Manager tool
that comes with Impressario. The Scanner Manager can be accessed from
either the System Manager or a shell. See the Impressario User’s Guide for
details on installing scanners.

Software Compatibility
23
Software Compatibility
Impressario is not compatible with TranScript™ printer model files,
although you may continue to use enscript(1) to format text files to be
submitted for printing. Impressario 1.2 includes a replacement for enscript(1)
called imprint(1). We recommend you remove TranScript before installing
Impressario by typing:
versions remove trans
The Apple LaserWriter drivers included with TranScript do not comply with
the Impressario system and do not return status information about the
printer. In addition, installing Impressario moves the TranScript model file
psinterface to the directory /var/spool/lp/model/OBSOLETE, thereby removing
it from use by the Printer Manager. LaserWriters using the TranScript drivers
must be deleted with the Printer Manager and reinstalled using the
appropriate Impressario driver.

This chapter provides an overview of
printer driver processing, followed by a
detailed analysis and discussion of an
example printer driver. The required
printer filter/driver options are also
covered.
Printer Drivers
Chapter 3


27
Chapter 3
3. Printer Drivers
This chapter provides an overview of printer driver processing, followed by
a detailed analysis and discussion of an example printer driver. The required
printer filter/driver options and the reserved and unreserved printer
filter/driver options are also covered.
The topics discussed in this chapter are:
• “Printer Driver Processing” on page 28
• “Printer Driver Example” on page 29
• “Filter/Driver Specification” on page 32
Note: Printer application developers need not read chapters 3 through 5, but
can skip to chapter 6.
Overview
A printer driver must perform the following tasks:
1. Receive and process an input file.
2. Send formatted data to the printer.
3. Query and receive printer status information.
4. Read and write the printer object database (POD) files.
All printer drivers must read the POD files to determine printer-specific
defaults and to maintain the active status file of the POD so that other clients
can determine printer status. Chapter 6, “Printing Libraries,” describes
libpod, the library that provides an API to the POD. Appendix C, “Printer
Object Database (POD) File Formats,” defines the file formats for the printer
configuration file, the printer status file, and the printer log file in the POD.
28
Printer Drivers
Printer Driver Processing
Figure 3-1 is an overview of printer driver processing. Note that this is a
simplified overview; the actual steps might be more complex.
Figure 3-1 Printer Driver Processing Overview
Read and parse
Verify input file
Report empty
Connect to
Convert data to
command-line
or input stream
Input
no
yes
printer, check
Update status
Read
printer-specific
Start sending
data to printer
no
yes Printing
done?
Printer
input data error
Report printer
fault
Do necessary
Update printer
status to Idle
yes
cleanup tasks
options to Busy
file/stream
empty? format
Exit
no
Exit
Start
fault?
printer status
input data

Printer Driver Example
29
Printer Driver Example
Two example printer drivers are provided: laserjet for HP LaserJet printers
andphandler for generic parallel printers. The source code files for laserjet are
in the directory /usr/impressario/src/drivers/laserjet and the source code files
for phandler are in the directory /usr/impressario/src/drivers/phandler. Both
drivers follow the steps shown in Figure 3-1, but the laserjet driver is more
complex because it also performs data compression. Since this added
complexity is not necessary for our examples, we will focus on the phandler
driver example in this session.
The example printer driver phandler checks the status of the parallel port
while passing data through to the printer. It treats the input as a byte stream
and updates the printer status database at various stages of processing.
Among the include files in this program is pod.h, which contains printer
status error codes and other defines related to printing. The include file plp.h
contains information related to the parallel port.
Program Invocation
The command-line interface for phandler is:
phandler -P printer_name [-e] [-s] [-w] [-D...] [-L logfile]
[-R][-B bufsize] [filename]
Arguments:
-P printer_name Name of the installed printer (required).
-e Exit immediately on error. The default is not to exit on error.
-s Update printer status only and return.
-w Suppress warning messages.
-D Enable debugging. -D is the lowest level of detail, -D -D is
the second level, and -D -D -D is the highest level of detail.
The debugging information is written to the log file.
-L logfile Specify the log file for debugging information and errors.
The default log file is standard error, which is redirected to
the spooler log file by the SVR3 lp spooler.

30
Printer Drivers
-R Reset the parallel port before sending data.
-B bufsize Set the byte size of the internal transfer buffer. The default
is 1024 bytes. Larger buffers enable more page buffering,
which may free upstream filters to do more processing
while data is being sent to the printer.
filename Specify the name of the file sent to the printer. The default is
to read the data from standard input.
Program Processing
This section is a detailed discussion of the phandler driver. A more detailed
example driver is supplied in the /usr/impressario/src/drivers/laserjet directory.
Note: The Impressario guidelines strictly require drivers to retry errors.
Error exits are to be avoided whenever possible so that print jobs do not
disappear before the user has a chance to fix the error condition.
Initial Processing
1. Parse the command-line arguments with getopts.
2. Read the printer status file. If phandler cannot open the status file, it
exits with an error message.
3. Write the active status defaults to the printer status file.
Open Printer Port
1. Open the port. If there is an error and you requested exit on error when
invoking phandler, then the program writes an error message and exits.
Otherwise, when an error occurs, the program will continue trying to
open the port. It checks every n seconds (where n is the value of
error_retry_wait) and writes an error message to the .log file after each
failed attempt to open the port.
2. If phandler successfully opens the port, it updates the current printer
status to “Busy” in the printer active status file. If the command line
contained the -s option (status only), then phandler exits after updating
the status. (The kernel closes the port when it exits the program.)

Printer Driver Example
31
Reset Port If Requested
1. If the command line contained the -R option (reset the parallel port
before sending data), then reset the parallel port.
2. If any level of debugging information was requested, write the message
“Resetting parallel port...” to errfile along with the program name.
3. If an error occurs, and if exit on error was requested with the -e option,
then the program writes an error message and exits. Otherwise, the
program prints the message “Could not reset the parallel port” to errfile,
along with the program name, and waits for error_retry_wait seconds
before retrying.
Allocate and Set Up Buffer
Allocate and set up the buffer. If phandler cannot allocate the buffer, the
program exits with an error message. (We exit only because memory
allocation errors are very rarely recoverable.)
Update libpod Status
Use the fork(2) system call to create a child that updates the printer status.
Read, Process, and Send Data to Printer
1. Read status from the printer.
2. Update the printer status configuration file.
3. Begin reading from the input and sending data to the parallel port.
Your driver will probably need to process the input data into an appropriate
printable format before sending the data to the printer.
4. If an unrecoverable error occurs while writing to the parallel port, write
an error message to the log, write the faulted state to the printer status
configuration file, and exit.
5. If the input file is empty or unreadable, write an error message to the
log, update the status file, and exit.

32
Printer Drivers
The driver uses signal handling to ensure that it is not interrupted in “critical
regions,” during which an interrupt could destroy vital files or the printer
state.
Cleanup and Exit
When printing is complete, update the printer status configuration file to
“Idle,” terminate the child status process, and exit.
Filter/Driver Specification
The command-line options listed in this section must be implemented as
specified for any printing filter or driver to be compatible with Impressario.
Switch letters have been chosen to maximize the intuitive correlation with
function. Additional functionality beyond that listed here must use
unreserved switch settings. Please note the following points:
• All switches are case sensitive. That is, -P does not have the same
meaning as -p.
• Printer drivers must accept and ignore all reserved options that are not
supported.
• Printer drivers must conform to getopts conventions. (See getopts(2) for
more information.)
• Multiple options on a single line have right-to-left precedence. For
example:
-n 1 -n 2
has the same effect as
-n 2
• Drivers must accept and parse command-line options when included
as part of the STIFF image header. See the laserjet example driver and
Appendix A, “Stream TIFF Data Format,” for more details.
• A good example is the header containing a number-of-copies command,
such as would be generated by a PostScript #copies command.

Filter/Driver Specification
33
Required Options
These switches must be supported by all drivers:
-e Exit immediately on fault without waiting for faults to clear.
The default behavior is to wait indefinitely for faults to
clear, polling the device at the error-retry intervals specified
in the POD config file. This option is used when only a quick
query should be done.
-s Update the status file. Exit only after successfully updating
the status file. This switch has the highest precedence. If the
-e switch is given, exit after one try at reading status.
-w Do not report warnings in the status file. Report errors only.
-D Enable debugging information. Optionally, more -D
switches increase the level of debugging detail. For
example, entering
-D -D
enables a second level of debugging detail. At least one
level of debugging must be supported.
-P string The value of string defines the printer name. The printer
name is used to find the POD. The printer name is the name
given to the printer at installation time. See the libpod(3)
man page for more information. This option is also a
required option whenever the driver is invoked.
Impressario printer drivers must read the libpod printer object database to:
1. Determine defaults.
2. Maintain the active status portion of the POD database.
3. Enable other clients to determine printer status.
Reserved Options
The following switches are reserved and are to be implemented by drivers
whose hardware supports them, or by inline filters that process the options
before the driver is invoked. You need not implement all options, but every
driver must accept or ignore any unimplemented options on this list.

34
Printer Drivers
Raster-specific options include:
-f Flip the image, as if in a mirror. The image is rotated
horizontally about the y-axis. Useful for transparencies or
decals.
-p int Scale the image as if it were being printed on a device with
the designated resolution specified in pixels per inch. This
is a convenience switch, since the same effect can be
obtained by computing the appropriate scale factor for the
image size and destination resolution.
-r int Rotate the image counter-clockwise by an angle specified in
degrees. Values outside the range 0..359 should be accepted
and modulo converted to a value between 0..359.
-z float Zoom the image using proportional scaling, where the
floating-point argument is nonnegative. Some values are:
0.0 – do not zoom the image
0.5 – fill half of one page
1.0 – fill one page
Note that the image aspect ratio must be preserved. Future
implementations may extend this to multiple pages. For
example, 2.0 would fill a 2-by-2 page array.
Engine-specific options include:
-q int Quality mode. Set the engine-specific quality mode. This
should be a nonnegative integer, with greater values
indicating higher quality.
-n int The number of copies to be printed, a positive integer.
-t Generate a test print. The test print should confirm that all
marking media are present and functional.
-m int Manual feed request. Wait MediaWaitTimeout seconds for
manual feed. Give up after MediaWaitTimeout seconds and
print anyway on the available media. See the POD for these
values. Giving up is important for shared printers.
-o int Request a specific output media type:
0 = paper or a reflective media
1 = transparency media

Filter/Driver Specification
35
Other media types may be supported; see the libpod(4) man
pages.
Output-specific options include:
-L filename Log errors to filename instead of standard error. The file
specified should be opened in append mode. If the file
cannot be opened, errors should be reported to standard
error instead.
-O filename Output data to filename instead of the device port or standard
output. The file specified should be opened. If the file cannot
be opened, data should instead be written to the device or
standard output, as appropriate. If this option is used, all
status reporting is disabled, since the printer driver is not
communicating with the actual device.
Unreserved Options
The switches listed below are not reserved and can be used for
device-specific options:
• Lowercase: a, b, c, d, g, h, i, j, k, l, u, v, x, y
• Uppercase: A, B, C, E, F, G, H, I, J, K, M, N, Q, R, S, T, U, V, W, X, Y, Z

This chapter discusses the printer model
files and describes the modifications that
must be made by printer vendors to the
printer model file template.
Printer Model Files
Chapter 4


39
Chapter 4
4. Printer Model Files
This chapter discusses the printer model files and describes the
modifications to be made by printer vendors to the printer model file
template.
The major topics discussed in this chapter are:
• “Overview” on page 40
• “Command-Line Arguments” on page 40
• “Template Model File Execution” on page 41
• “Printer-Specific Options” on page 45
• “Vendor-Supplied Model File Additions” on page 47

40
Printer Model Files
Overview
Model files are Bourne shell scripts that form an interface between the
System VR 3 spooling system and the printer. Each printer has its own model
file, which is customized by the printer installation tools when the printer is
installed. The customized copy of the printer model file is called the interface
file. The interface file is invoked by the System VR3 spooling scheduler
lpsched(1M) when the printer is ready to accept a new print job. The interface
file sets up printer-specific options, calls filters, and invokes the printer
driver.
System V model files differ greatly from BSD /etc/printcap entries. The reader
unfamiliar with System V spooling should refer to the IRIX Advanced Site and
Server Administration Guide for more information.
Command-Line Arguments
The model file expects the following command-line arguments from lpsched
in the order listed:
1 Job sequence ID number
2 User login name
3 Job title
4 Number of copies to be printed
5-o options (printer options)
6-n Name(s) of file(s) to be printed
The end user does not invoke the model file manually; it is invoked only
throughlpsched. If you want to check for gross syntax errors, this can be done
quickly by running the model file with dummy arguments; for example:
laserjet_model a b c d e
Not all errors can be found this way, since the model file does not run to
completion, but this does provide a quick test for gross syntax errors. If
errors are found, putting the -x flag at the end of the first line in the model
file may help debug the error. See the sh(1) man pages for more details on
debugging Bourne shell scripts.

Template Model File Execution
41
Template Model File Execution
This section explains how the Impressario model files work.
The source code for the templatelaserjet_model file is located in the directory
/usr/impressario/src/models. The main steps in the template model file are
shown below and described in more detail in the following sections:
1. Define global and external variables and convenience functions.
2. Interpret and store the command-line options.
3. Verify that the prerequisites are in place.
4. Invoke the driver to update the POD status file with the current printer
state and the current job setting. This is important; all filters use the
status file to determine what parameters to use. The driver must ensure
that the POD status file is absolutely up to date before the first filter is
run, or a change in printer status between jobs could compromise the
next job.
5. Start the active icon tagging subprocess.
6. If pages stack face down, print a banner page if requested.
7. Use filters to convert the submitted file to the data type required by the
printer driver.
8. Invoke the printer driver with the converted data.
9. Repeat steps 7 and 8 for each file to be printed and report any errors
encountered to stderr.
10. If pages stack face up, print a banner page if requested.
11. Clean up after the job and exit with an appropriate exit code.

42
Printer Model Files
Variable Declaration
Note that variable names are in all uppercase letters. Those variables are
exported for use by the filters invoked when converting input files into
printable data. See the fileconvert(1) man page for more information.
1. Define NAME and TYPE. If the type is not defined, then the model file
writes an error message and exits.
2. Append all filter and driver standard error output to the spooler log
file.
3. Define file and directory paths and Boolean flags used in the model file.
4. Define locations and options for all filters. (The model file checks to
make sure that the printer-specific driver exists and that the spooler log
file is writable. If not, the model file writes an error message and exits.)
Convenience Functions
The next portion of the model file contains various convenience functions
used within the model file. The convenience functions listed in Table 4-1 are
routines contained within the model file. These routines are used for parsing
the -o options and for various utility functions.
Table 4-1 Convenience Functions
Function Name Description
BeginTagging Sets up the tagging job that begins monitoring the printer
status.
CleanUpAfterJob Does any cleanup needed at end of job.
EndTagging Ends tagging of the printer.
ParseOptions Parses the -o command-line options and sets appropriate
variables. Expects the command-line options string as
argument 1.
PrintBannerPage Prints a banner page.
PrintMessage Prints its arguments as text on the printer. Used to report
errors to the user. Accepts any number of arguments.

Template Model File Execution
43
Process Command-Line Arguments
1. Retrieve the command-line arguments.
2. Parse the options passed with the -o switch.
3. Call the printer status and communications driver to update the status
database before job filtering begins.
4. Set up the cancellation signal handler to handle SIGHUP,SIGINT, and
SIGTERM. This allows use to cater the job cancellation signal sent by
the spooler and clean up.
5. If the verbose switch is set, send a message to the spooler log that the
job has begun filtering.
6. Start the tagging subprocess to tag the printer’s workspace icon with
the appropriate print-engine type and status.
Banner Page
A banner page is printed if the banner switch is set. (The banner page may be
printed last for faceup stacking printers.)
ReportBadFile Reports unknown file type to the printer and to the
spooler log. Expects the filename as argument 1 and the
file type as argument 2.
ReportUnknownOption Reports an error message when an unknown option is
parsed. Expects the unknown option as argument 1.
SetCancelTrap Sets up the trap command for the signals SIGHUP,
SIGINT, and SIGTERM.
SetDebug Turns on debug mode for all filters and drivers.
TestExitStatus Interprets exit status from last command and sends error
message to both the spooler log and the printer if needed.
Expects the exit code of the last command as argument 1,
a string describing the last command as argument 2, and
the file in question as argument 3.
Table 4-1 (continued) Convenience Functions
Function Name Description

44
Printer Model Files
File Processing
1. fileconvert(1) automatically determines the file type of each file using the
Indigo Magic file typing rule database. (See ftr(1) and fileconvert(1).) If a
fast text path exists, and the user has not requested options that require
the slower path, then the file is converted using the fast text path.
Otherwise, the normal fileconvert path is used. See the template model
file for specifics.
2. fileconvert produces a shell command string that, when executed,
produces the requested data type on standard output.
3. If the file could not be converted, ReportBadFile is called, otherwise the
fileconvert shell program is excluded and the output piped to the printer
driver.
4. TestExitStatus is called to test whether the driver reported an error.
Cleanup and Exit
1. After printing is complete, any additional cleanup needed is
performed.
2. End the tagging subprocess.
3. Append an ending message to the log file if the debug switch is set.
4. If there were unsupported file types in the list of files to be processed,
the model file exits with a well-known error code.

Printer-Specific Options
45
Printer-Specific Options
The -o option to the spooler allows model files to accept a variety of
non-spooler options. These are the options specified with -o on the lp(1)
command line. It is these options that are produced by the graphical printer
options panel.
Impressario defines a number of general file filtering options for the
convenience of the end user, and reserves those option names.
The reserved options are listed in Table 4-2 in alphabetical order. Their
meanings may not be changed by vendors. Vendors should choose short but
understandable option names for any additional options. These options may
be seen by end users, so they should not be too verbose.
Table 4-2 Reserved Option Names
Name Description
banner Prints a banner page.
bestfit Uses the best fit orientation for image files (defaults to “on”).
bottommargin Sets the bottom margin size for text.
columns Sets the number of columns on the page for text.
debug Causes filters to report debug information (defaults to “off”).
flip Flips the image, producing a mirror image.
fontname Uses a specified font name for text.
fontsize Uses a specified font size for text.
gamma Uses a specified value for image gamma correction.
gaudy Uses a fancy page header for formatted text.
landscape Uses landscape page orientation for text.
leftmargin Sets the left margin size for text.
nobanner Sets the “do not print a banner page” option.
nogaudy Sets the “do not use fancy page header for formatted text” option.

46
Printer Model Files
noverbose Sets the “do not print verbose messages in the spooler log file”
option (same as the -h option).
numberpages Sets the number of text pages.
papersize Selects the paper size.
portrait Uses portrait page orientation for text.
ppi Scales the final image size to match the specified original image
resolution, in pixels per inch.
psevenpage Prints even pages only (PostScript).
psoddpage Prints odd pages only (PostScript).
pspagerange Prints the specified page range (PostScript).
psreversepage Reverses the PostScript page order.
resolution Sets x and y resolutions (for resolution-switchable printers).
reversepages Reverses text document page order (that is, print last page first).
rightmargin Sets right margin size for text.
rotate Rotates the image clockwise an integer number of degrees.
topmargin Sets the top margin size for text.
verbose Records debug messages in the spooler log file.
zoom Scales the image to fit the page (defaults to 1.0 scale).
Table 4-2 (continued) Reserved Option Names
Name Description

Vendor-Supplied Model File Additions
47
Vendor-Supplied Model File Additions
Printer vendors must customize the model file template supplied by Silicon
Graphics to the specifications of their printers. The template model is located
in the file /usr/impressario/src/models/template_model. This code is the same as
the code in the laserjet_model file so that developers will have a working,
debugged example from which to begin.
The following ten items must be specified by the vendor. They are listed and
explained in the order in which they appear in the model file template.
1. Printer name.
2. Device interface.
3. Printer type.
4. GUI class.
5. Printer-specific filter/driver.
6. Debug routine.
7. Cleanup routine.
8. Printer-specific banner page.
9. Printer-specific filtering options.
10. Fast path for text.
Note: All items that must be modified by the vendor have been marked with
an “#XXX” in the model file. Search for and remove these markers as you
progress to be sure all necessary modifications have been made.
Printer Name
The NAME variable identifies the real printer name, such as “HP DeskJet
500C.” It appears twice in each model file: once in the comments parsed by
the printer install tools and once in the actual interface program code. We
refer here only to the first, comment instance of NAME. The NAME is the
string that is presented to the end user in the Printer Manager’s graphical
printer install tool. Multiple NAME variables are allowed on separate lines
if the model file can support more than one printer.

48
Printer Model Files
Device Interface
The DEVICE variable identifies the hardware interface where the printer is
attached. The value is used by the printer install tool to present models by
connection type. Multiple connections are supported. (Use multiple lines for
multiple devices; that is, simply repeat the line for each different device.) The
values currently allowed are SERIAL,CENTRONICS,SCSI, and
REMOTE. Obsolete types that should not be used are VERSATEC and TEK.
Printer Type
TheTYPE variable identifies the printer type. This information is used by the
Print Manger, routeprint,libspool functions, and other system software,
including the active icons subsystem. Table 4-3 shows the values allowed for
the TYPE variable. Obsolete types are: Dumb,Color, and PostScript.
GUI Class
The value of this variable is the name of the resource file for the graphical
options panel. This value must match the GUI_CLASS define in the options
panel gui_class.h. If an options panel is not provided, do not specify a value
for this variable.
Table 4-3 Printer Type Specifications
TYPE Data Types Accepted Printer Examples
Raster At least text, SGI, PostScript HP LaserJet
ColorRaster At least text, SGI, PostScript Tektronix Phaser II SX
Plotter HP-GL only HP 7550A
ColorPostScript At least text, SGI, PostScript Tektronix Phaser II PXi
MonoPostScript At least text, SGI, PostScript LaserWriter II NTX

Vendor-Supplied Model File Additions
49
Printer-Specific Filter/Driver
The file laserjet.c contains an example of a complete printer driver. This
driver is used in the /usr/impressario/src/models/laserjet_model file. Also, see
the /usr/impressario/src/models/template_model.README file for comments
about the model file.
Debug Routine
To turn on debugging on vendor-supplied filters, modify SetDebug() to turn
on the debug switch (-D) for each vendor-supplied filter.
Cleanup Routine
Some vendors may need to perform some cleanup at the end of each job. If
needed, add this cleanup to the routine CleanUpAfterJob() in the model file.
The use of temporary or intermediate files is strongly discouraged.
Printer-Specific Banner Page
It is recommended that you do not modify this routine. However, to create a
customized banner page that uses printer features such as page counts or
graphics, modify PrintBannerPage() as required. The banner page should not
unduly slow down the printing process, and customized banner pages
should include at least as much job-specific information as the default
banner page: job ID, user name, job title, date and time, and the filename(s).
If your printer is unlikely to be shared, or has high per-page costs, you may
want to turn off banner pages by default. In this case, set the variablebanner
to zero (0). However, users can still choose to print a banner page.
Printers that stack pages face down should print the banner page before any
files, while those that stack pages face up should print the banner page last.
This is handled automatically if the faceup variable is set appropriately.

50
Printer Model Files
Printer-Specific Filtering Options
The ParseOptions() routine parses the -o command-line options and sets
appropriate global variables. This routine contains many general options,
and vendor-specific options can be added if required. However, Silicon
Graphics reserved words must not be duplicated by vendor-supplied
options. See “Printer-Specific Options” on page 45 for a complete,
alphabetized list of existing options.
It is recommended that any vendor-specific options be full-word names to
improve the readability of the stored settings files and to reduce name-space
conflicts. This also aids users who use command-line interfaces to printing.
However, option names should be kept brief.
Fast Path for Text
You should modify the path in the file filtering section of the model file to
use native text support if your printer supports native text printing that is
faster than using PostScript. Users, however, must still have access to all
PostScript formatting options. Do not disable the slower PostScript path.

This chapter explains how to implement
a graphical options panel that visually
showcases your printer’s features and
improves its usability.
Printer Graphical Options Panel
Chapter 5


53
Chapter 5
5. Printer Graphical Options Panel
This chapter discusses the graphical options panel that visually showcases a
printer’s features.
The major topics discussed in this chapter are:
• “Graphical Options Panel Layout” on page 54
• “Options Handling” on page 56
• “Graphical Options Panel Development” on page 56
• “Graphical Options Panel Naming” on page 57
• “Graphical Options Panel Installation” on page 57
• “Invocation by the PrintBox Widget” on page 58
• “Standalone Invocation for Testing” on page 59
• “Termination by the PrintBox Widget” on page 59

54
Printer Graphical Options Panel
Overview
The Impressario PrintBox widget is provided for submitting print jobs from
a Motif application. This widget is contained in the library libprintui(3X). The
PrintBox widget is used by glp (PrintPanel) and a number of other
applications to provide their printing capability. In addition to providing
graphical selection of System V print job submittal options, PrintBox
provides a mechanism for graphical selection of printer-specific options.1
This mechanism is the graphical options panel.
A graphical options panel allows the printer vendor and driver developer to
showcase the unique features of a printer in an intuitive graphical panel. The
graphical options panel program is invoked by the PrintBox widget in
applications, by the end user via glp (PrintPanel), and by the Printer
Manager. The Graphical Options Panel Specification located in the
/usr/impressario/doc directory provides the information necessary to create
and integrate a graphical options panel. Graphical options panels are
standalone executable programs. They are stored in a standard directory
known to the Impressario printing tools; therefore, the graphical options
panels are automatically available to users of Impressario printing tools. The
rules for developing a graphical options panel are straightforward and do
not require any interprocess communication or similar complex procedures.
In fact, we strongly discourage any network dependencies as not every
Impressario printer is on a network.
Graphical Options Panel Layout
A graphical options panel almost always consists of a single window. This
window usually contains two main sections, an options section and an
action area. We strongly recommend that vendors keep options panels
simple to avoid both complex code and complicated documentation.
The options section contains all printer-specific option controls. This area is
often divided into groups of option controls, where each group represents a
specific input file type. Most options sections contain controls for text files,
1The Printer Manager also provides access to the graphical option panel.
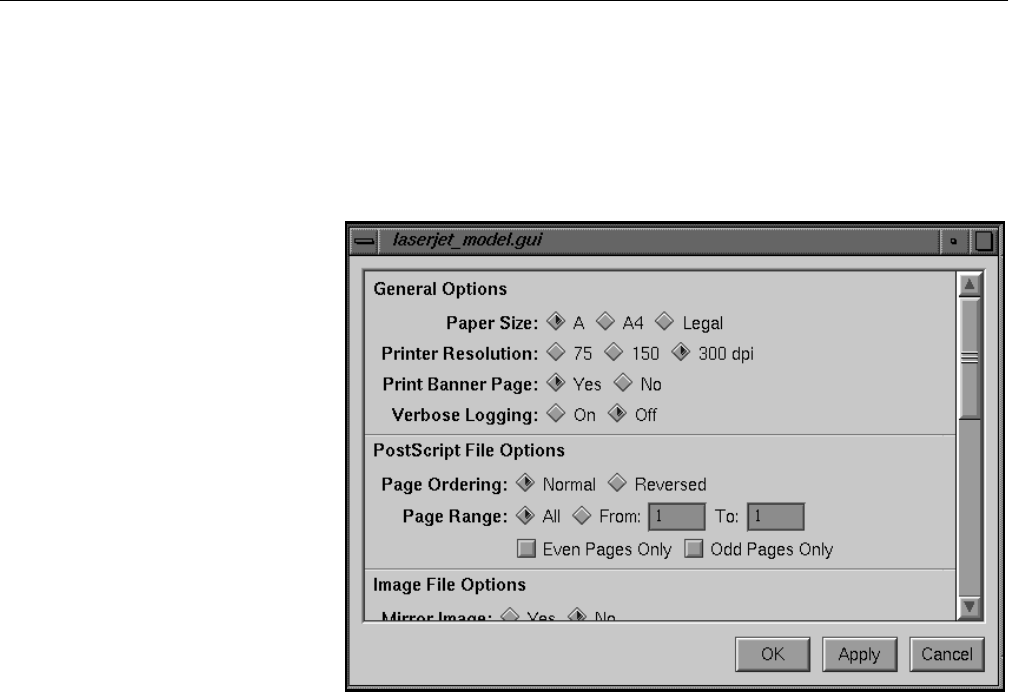
Graphical Options Panel Layout
55
bitmap image files, and PostScript files. The options section also contains a
general options section. Because there are often a large number of controls in
the options section, you should use a scrolled window to keep the graphical
options panel window to a reasonable size. Figure 5-1 shows an example of
a graphical printer options panel.
Figure 5-1 Graphical Printer Options Panel
The action area is located at the bottom of the graphical options panel
window and consists of a number of push buttons:
•OK—output option string to stdout and terminate program (required)
•Apply—output option string to stdout but do not terminate program
(required)
•Cancel—terminate program without any option string output (required)
•Help—provide printer-specific options help (may be included at your
discretion)

56
Printer Graphical Options Panel
Group buttons together on the right side of the action area. The width of all
buttons should be equal. The leftmost button should be OK followed by
Apply,Cancel, and Help. Place any additional buttons between the Apply and
Cancel buttons. Note that the supplied template makes this happen
automatically.
Note: Do not include the action area inside the scrollable options area. The
action buttons must be available to the user at all times.
Options Handling
If printer-specific options have been passed to the graphical options panel on
the command line, the program must interpret these options and initialize
its options section controls to reflect the command-line options. Those
options not recognized by the graphical options panel must be preserved
and prepended to the output option string.
When the OK or Apply button is activated, the graphical options panel
program must form a valid System V printer option string based on its GUI
settings and print this string to its standard output (stdout).
Graphical Options Panel Development
The directory /usr/impressario/src/gui_models contains example source code
for a graphical options panel. Begin with this code and add your
printer-specific options. Do not start from scratch! You will waste valuable
development time and create consistency issues. Benefit from our experience
and at least begin with the template.
Create the graphical options panel with the OSF/Motif UI™ toolkit. Starting
with Impressario 1.2, your graphical model file can have its own application
resource file. While the resource file can be given any name, it is highly
recommended that the name represent the printer model name and have its
first letter capitalized. For example, the application resource file for the HP
LaserJet graphical model file is called LaserJet. The name chosen for the
resource file must be specified in the gui_class.h header file and must also be
specified in the printer model file as the value of the GUI_CLASS variable.

Graphical Options Panel Naming
57
The resource file must be installed by your installation media in the directory
/usr/lib/X11/app-defaults.
To match the look and feel of the PrintPanel program (glp) and other
graphical options panels, the application resource file should include the
following resources:
To facilitate localization of the options panel for international customers, all
label strings and messages should be placed in the application resource file
rather than being hard-coded into the program.
The graphical model file must consist of a single executable program and its
application resource file. The graphical model files are restricted to a single
executable and resource file because the printer installation tools install only
these two files during network printer installation.
Graphical Options Panel Naming
The graphical options panel must be given the exact same name as its
printer's model file, followed by the suffix .gui. For example, if the printer
model file for an HP DeskJet 500C printer is called deskjet_model, then the
graphical options panel must be given the name deskjet_model.gui. If the
graphical options panel is given a name that differs from the model file
name, it will not be installed by the printer install tools when a new printer
is installed on a system.
Graphical Options Panel Installation
All graphical options panel programs must be installed by your installation
media in the directory /var/spool/lp/gui_model or /var/spool/lp/gui_model/ELF.
These directories are where the printer installation software searches for the
programs. COFF-executables must be installed in the directory
/usr/spool/lp/gui_model, and ELF-executables must be installed in
*useSchemes: all
*schemeFileList: SgiSpec
*sgiMode: True

58
Printer Graphical Options Panel
/usr/spool/lp/gui_model/ELF.1 The executable should be owned by lp and
should be a member of the group lp. The file permissions of the executable
should be set to 0755.
Invocation by the PrintBox Widget
The graphical options panel is invoked by the PrintBox widget or the Printer
Manager. The graphical options panel is always invoked with the
command-line arguments listed in Table 5-1. Note that the options are
almost identical to those passed to your spooler model file.
Note that any Xt options may be specified as argv[4] or greater. If there are
no printer-specific options for argv[3], the empty string ("") is passed as
argv[3]. If no filenames are specified, the empty string is also passed as
argv[2].
1All programs compiled on systems running IRIX 5.0 or greater are ELF executables.
Table 5-1 Command-Line Arguments
Argument Description
argv[0] Printer name
argv[1] User name
argv[2] Filename(s) string
argv[3] Printer-specific option string (optional)
argv[4-n]Xt options (optional)

Standalone Invocation for Testing
59
Standalone Invocation for Testing
To test a graphical options panel during development, it may be run as a
standalone executable from the UNIX command line. Invoke the graphical
options panel by entering:
[executable name] [any valid user name] ""
For example, if the executable program is called deskjet_model.gui, and “joe”
is a valid user name on the system, then the program can be executed from
the command line by typing:
deskjet500_model.gui joe ""
While debugging, it is often helpful to invoke the graphical options panel
from the shell, repeatedly testing the options string that is generated when
the Apply button is pushed. Once the options string is properly generated,
test for proper performance of input options parsing by invoking the
graphical options panel with various options strings, especially the strings
output by your panel. Be especially sure that all widgets are set properly
upon panel startup when passed a string that sets options to non-default
values.
Termination by the PrintBox Widget
Applications will terminate the graphical options panel using a SIGHUP
signal. The graphical options panel should exit promptly upon receipt of this
signal.
Additional Information
For additional information, please read the online specification found in
/usr/impressario/doc/gui_model.spec.
These panels should be very easy to create when you start from the template.
If you find them difficult, take another look at the template documentation
and the convenience routines in the support files. You may have overlooked
something we have already solved for you.

This chapter describes the printing
libraries used by Impressario printer
drivers, filters, and applications.
Printing Libraries
Chapter 6


63
Chapter 6
6. Printing Libraries
This chapter describes the printing libraries used by Impressario printer
drivers, filters, and applications.
The three printing libraries are described in this chapter:
• “The libspool Library” on page 64 is a C-language application
programming interface (API) to the UNIX printer spooling systems.
• “The libprintui Library” on page 67 is a C-language API to the PrintBox
widget that is compatible with Motif.
• “The libpod Library” on page 73 is a C-language API to the printer
object database (POD).
In addition to the above libraries, there are two libraries described in the
appendices that are also used by printer drivers and filters:
• Appendix A, “Stream TIFF Data Format,” describes libstiff, a
C-language API for reading and writing the STIFF (Stream TIFF) data
file format.
• Appendix B, “Silicon Graphics Image File Format API,” describes
libimp, a C-language API for reading and writing Silicon Graphics
Image format files.

64
Printing Libraries
The libspool Library
The libspool Library is a C-language application programming interface
(API) to the UNIX printer spooling systems. There are two common UNIX
printer spooling systems, System V and Berkeley Software Distribution
(BSD). While both of these spooling systems provide essentially the same
capabilities, each has its own command set and neither provides a
C-language API. The libspool library provides a single, common API to both
spooling systems. The functions provided by libspool include submittal and
cancellation of print jobs and control and reading of print queues.
Compiling Programs with libspool
Programs that call libspool functions must include spool.h, the header file in
the /usr/include directory. The programs must also link with the libspool.a
library located in /usr/lib. Use the following include directive:
#include <spool.h>
Here is an example of the complete cc compiler command line:
cc -o myprog myprog.c -lspool

The libspool Library
65
libspool Library Functions
Table 6-1 lists the libspool functions by purpose.
Table 6-1 Summary of libspool Functions
Purpose Function Name
Spooling System Selection
Set the default spooling system SLSetSpooler
Get the default spooling system and available
systems SLGetSpooler
Printer Information
Get the list of registered printers SLGetPrinterList
Return information about a single printer SLGetPrinterInfo
Get the name of the default printer SLGetDefPrinterName
Get spooler and printer settings information SLGetPrinterSettings
Option Management
Get System V spooler options SLSysVGetSpoolerOptions
Get System V printer options SLSysVGetPrinterOptions
Save System V spooler options SLSysVSaveSpoolerOptions
Save System V printer options SLSysVSavePrinterOptions
Print Job Submittal
Submit a print job SLSubmitJob
Submit the contents of the file specified by a file
descriptor for printing SLSubmitJobFd
Submit the contents of the specified buffer for
printing SLSubmitJobBuf
Submit a print job using default values for all
printing options SLSubmitJobSimple

66
Printing Libraries
Print Job Cancellation
Cancel a queued printer job SLCancelJob
Printer Queue Information
Report the printer queue contents SLGetQueue
Printer Queue Control
Set the spooling system printing and queueing
state SLSetSpoolerState
Get the spooling system printing and queueing
state SLGetSpoolerState
Execution Error Handling
Print a libspool execution error message to
standard error SLPerror
Obtain a libspool execution error message SLErrorString
Get spooling system error information SLGetSpoolerError
Table 6-1 Summary of libspool Functions
Purpose Function Name

The libprintui Library
67
The libprintui Library
Thelibprintui library is library implementing a graphical user interface (GUI)
for printing. This library provides PrintBox, a complete print job submittal
solution in a single widget that is compatible with Motif, for application
developers. This eliminates the need for application developers to develop a
unique printing solution for each application, thereby saving considerable
time and effort and making it easier to provide a robust and complete
printing interface for application data.
Using the PrintBox widget in an application benefits the end user in several
ways. First, PrintBox provides a consistent interface to the printer spooling
system across the variety of applications on Silicon Graphics systems.
Second, users can set print job options, such as number of copies, through a
graphical interface, rather than through obscure command-line option flags.
Finally, PrintBox uses the printer graphical options panel to provide a
mechanism for the setting and saving of printer-specific options.
ThePrintBox widget can be used in a number of different configurations and
can accept a child manager widget to allow the display of application-
specific options. The widget provides built-in System V print job submittal
via the libspool library. (See “The libspool Library” on page 64 for more
information.) The developer can also perform application-specific
processing before a job is submitted to the printing system. A variety of
callback lists provide user and spooling system feedback. A print job can be
submitted as a filename, as a file descriptor, or as a pointer to the buffer. The
default form of PrintBox includes the following items:
• A print file entry text field (for file-based jobs)
• A scrolling list of available printers
• Print option controls
• The following action-area push buttons:
Print Submits the specified file or buffer for printing by the
spooling system.
More Options ... Accesses the graphical options panel for the currently
selected printer.
Save Options ... Saves printer and spooling system options.
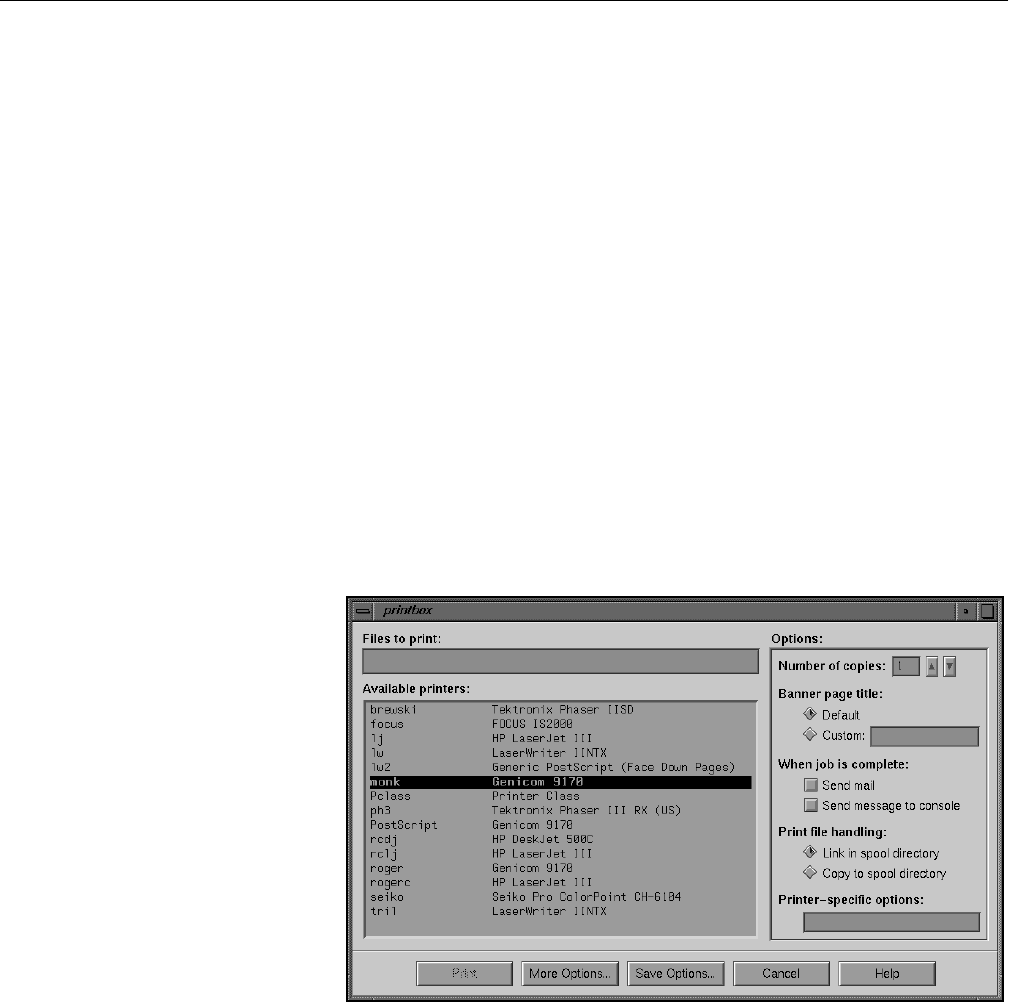
68
Printing Libraries
Cancel Normally used to pop down the PrintBox widget when
the widget is used as a pop-up dialog.
Help Calls the functions on the helpCallback list.
There are also four unmanaged buttons, User1 through User4, positioned
between the Print and More Options ... buttons. These buttons are invisible by
default; the buttons become visible when explicitly managed. The PrintBox
widget also accepts one child as a work area. This area can be used for
application-specific printing controls such as page range.
Example Widget Configurations
Figure 6-1 through Figure 6-4 illustrate four widget configurations:
• Default configuration
• No filename entry
• No options
• With a child
Figure 6-1 PrintBox Widget – Default Configuration
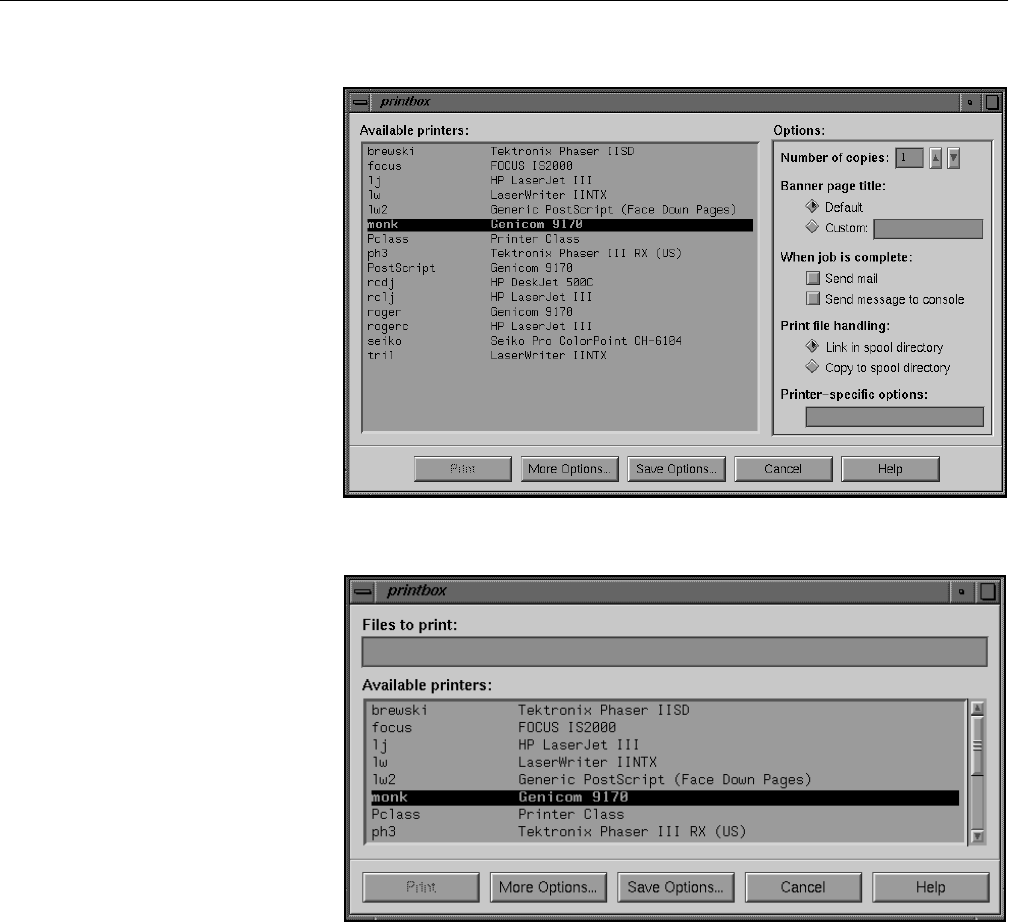
The libprintui Library
69
Figure 6-2 PrintBox Widget – No Filename Entry Box
Figure 6-3 PrintBox Widget – No Options Box
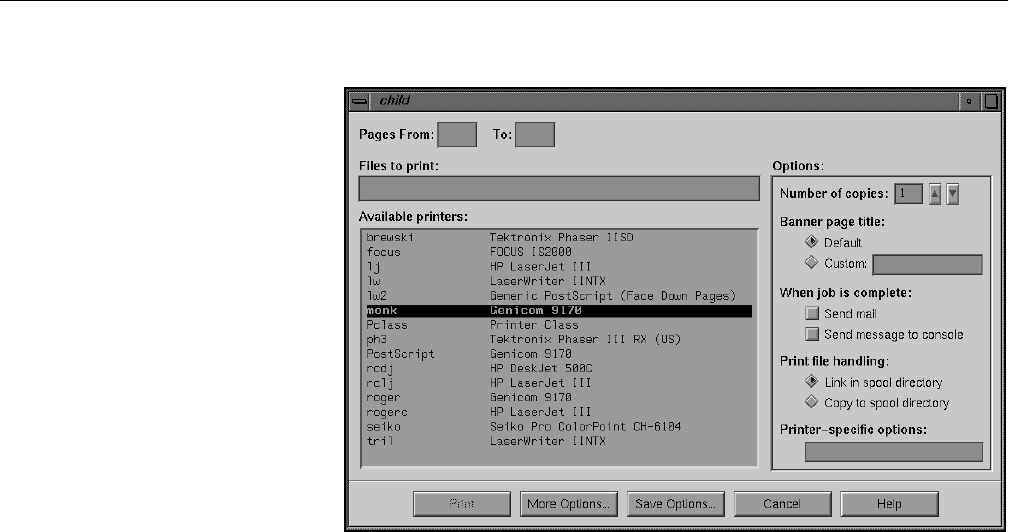
70
Printing Libraries
Figure 6-4 PrintBox Widget – With a Child
Compiling Programs with libprintui
Programs that call the libprintui functions must include the header file
/usr/include/Sgm/PrintBox.h and must link with the following libraries in the
order shown:
... -lprintui -lspool -lXm -lXt -lXll -lgen ...
The link order is important for proper link-time name resolution.
Note: Programs that subclass off the PrintBox widget must also include
/usr/include/Sgm/PrintBoxP.h.

The libprintui Library
71
Library Functions Listed by Purpose
The libprintui functions are listed in Table 6-2. The PuiPrintBox(3X) man
pages provide detailed information on the PrintBox widget.
Example Program
The example program, printbox, simply instantiates a PrintBox widget. The
directory /usr/impressario/src/examples/libprintui contains the source code for
this program, while the directory /usr/impressario/bin/examples/libprintui
contains the executable version.
To invoke the example program, type:
printbox
Initial Program Processing
The printbox program begins by setting the program instance name and
initializing the X Window System™ applications connection. Next, the
program creates the PrintBox widget with a call to the libprintui library
function PuiCreatePrintBox. This widget is then added to the parent’s
managed set.
Table 6-2 Summary of libprintui Functions
Function Name Purpose
Widget Instantiation
PuiCreatePrintBox Create a PrintBox widget
PuiCreatePrintDialog Create a PrintBox dialog
Widget Component Access
PuiPrintBoxGetChild Access a PrintBox widget component
Widget Action Functions
PuiPrintBoxDoPrint Invoke PrintBox printing

72
Printing Libraries
Add Callbacks
The program now adds the following callbacks:
• The Cancel button exit routine
• A help dialog display
• A routine to print job information and the job ID to standard output
and terminate the program
• A display of error messages from the PrintBox widget (this uses the
function SLGetSpoolerError from the libspool library)
Realize All Widgets
A call to XtRealizeWidget now realizes the parent widget from the earlier call
to PuiCreatePrintBox and all child widgets.
Process Events
The program now begins an event loop. It obtains the next event from the X
event queue then dispatches the event. If an early error has occurred, the
error is handled and the loop continues until the application exits.
Additional Examples
Refer to the directory /usr/impressario/src/examples/libprintui for additional
sample program source code.

The libpod Library
73
The libpod Library
The libpod library provides printer driver developers with an API to create
and maintain a Printer Object Database (POD) and provides application
developers with the means to acquire detailed information about a printer,
even across the network. A POD contains information on the current printer
configuration, status, and job history of a single printer. Each printer
physically installed on a system maintains its own POD on that system. All
interaction with a printer’s POD must be done through the libpod API. Do
not modify the POD files directly. To create an initial set of POD files, refer to
Appendix C, “Printer Object Database (POD) File Formats,” and the
examples provided in /usr/impressario/src/data.
POD Files
A POD consists of three separate ASCII text files. The name of each POD file
is formed from the printer name, followed by one of these suffixes: .config,
.status, or .log. The name and contents of each file are as follows:
[printer_name].config The configuration file contains detailed information
on the printer’s capabilities. Examples include the
supported paper sizes and available fonts. The initial
version of this file is manually created by the printer
driver developer, and a copy is installed when the
printer is added to the system. The contents of this
file are maintained by the system administrator
using the printer administration tools. Normally this
file is never changed.
[printer_name].status The status file contains information about the current
operational status of the printer. The information in
this file indicates whether the printer is busy, the type
of printing media installed, detailed error codes (if
errors have occurred), and so on. The contents of this
file change during the course of every print job.
[printer_name].log The log file contains the print job history for the
printer. Information for old jobs as well as the current
print job is maintained. Typically, printer filters and
drivers append information to the log file while
general applications treat the file as read-only.

74
Printing Libraries
The global variable PDpod_path indicates the location of the POD files. The
default location for POD files is /var/spool/lp/pod. If POD files are to be located
in a directory other than the default, set PDpod_path to the pathname of the
new location. PDpod_path is declared in the header file pod.h.1
See Appendix C, “Printer Object Database (POD) File Formats,” for detailed
information on libpod file formats.
Standard and Local libpod Functions
The POD files reside on the system to which the printer is physically
connected. This system is referred to as the printer host. Therefore, to
provide information about a printer located on another system, libpod must
be able to communicate across the network. The “standard” form of the
libpod functions automatically determines whether the specified printer is
located on the user’s system (a local printer) or on a remote system (a remote
printer). After determining where the printer is located, the standard libpod
functions access the POD files on the appropriate system. Typically, user
application programs such as printer status tools use the standard form of
the libpod functions, since it is likely that these programs need to work with
remote printers.
Since network communication carries a certain amount of performance
overhead,libpod also provides the “local” functions for use by programs that
are guaranteed to be run on the printer host. These functions include the
word “Local” in the function name (for example, PDLocalReadInfo,
PDLocalWriteStatus). A printer driver is an example of a program that should
use local libpod functions.
Functions that write to POD files are available only in local form. Only
printer drivers will need to write to the POD files, and printer drivers are
always located on the printer host. Thus there is no need to provide writing
capabilities to the standard libpod functions that are designed for use from
remote machines.
1The maximum string length for PDpod_path is PD_STR_MAX. This length includes the terminating NULL
character.

The libpod Library
75
There are several advantages to using the local libpod functions for programs
that will always be run on the printer host. The local libpod functions have no
networking overhead; they always go directly to the POD files on the local
machine. This reduces the size and overhead of the resulting executable.
Compiling Programs with libpod
Programs that call libpod functions must include the header file pod.h, which
is located in the directory /usr/include. The programs must also link with the
librarylibpod.a located in /usr/lib. In addition, programs that use the standard
libpod functions must link with libspool.a. Programs that use only the local
libpod functions need not link with this additional library.
The compile line for the standard case is:
cc -o myprog myprog.c -lpod -lspool
The compile line for the local case is:
cc -o myprog myprog.c -lpod
Debugging with libpod
If the global variable PDdebug is set to a nonzero value, libpod functions will
print debugging information to standard error during execution. The global
variable PDdebug is declared in the header file pod.h.
Network Communications
To provide remote printer POD information, libpod communicates over the
network with the podd(1M) daemon on the remote machine. Since the
network or remote machine may be unreachable when a libpod function is
executed, a time-out may occur and the function will return an appropriate
error code. The time-out period can be specified by setting the global
variable PDnet_timeout to a value in seconds. The default time-out period is
shown in the header file pod.h. While a larger time-out period is appropriate
when reading printer status, a much smaller time-out may be appropriate
for browsing printer configurations. For more information on the daemon,
refer to the podd(1M) man page.

76
Printing Libraries
Library Functions Listed by Purpose
The libpod functions are listed in Table 6-3. Note that a number of libpod
functions have only a single version, which is used for both standard and
local cases.
Table 6-3 Summary of libpod Functions
Task Standard Function Local Function
Detailed Information Retrieval PDReadInfo PDLocalReadInfo
PDLocalWriteInfo
Status File Manipulation PDReadStatus
PDReadOpStatus
PDLocalReadStatus
PDLocalWriteStatus
PDLocalReadOpStatus
Log File Manipulation PDReadLog PDLocalReadLog
PDLocalWriteLog
Convenience Functions PDMakeMessage
PDFindPageSize
PDGetSizeCodeByName
PDGetNameBySizeCode
PDGetCurrentResolution
n/a
n/a
n/a
n/a
n/a
n/a
Execution Error Handling PDError
PDErrorString n/a
n/a

This chapter discusses scanner driver
development. It provides a detailed
analysis of the template scanner driver.
Scanner Drivers
Chapter 7


79
Chapter 7
7. Scanner Drivers
This chapter discusses scanner driver development. It provides a detailed
analysis of the template scanner driver.
The following major topics are discussed:
• “Driver Template” on page 80
• “Header Files” on page 80
• “Data Structures” on page 81
• “Functions You Must Write” on page 86
• “Events” on page 95
• “Installation” on page 97
• “Testing” on page 98
The information presented in this chapter should be enough to write a
scanner driver. However, if you wish to know more, Appendix E, “Scanner
Driver Architecture,” is an in-depth discussion of the architecture of a
scanner driver.

80
Scanner Drivers
Driver Template
The source code files for the template scanner driver are in the directory
/usr/impressario/src/scan/template_driver. This template has code to handle all
the interprocess communication necessary for well-behaved scanner drivers
(see Chapter 9, “Generic Scanner Interface”).
To develop a new scanner driver, start by copying the template files to the
directory where you will be developing the driver. The ONLY files that you
need to modify are scan.c and Makefile; DO NOT modify any of the other files
unless you are familiar with the information in Appendix E.
This document refers to the main.c module, which implements the
interprocess communication part of a scanner driver and should not be
modified, and scan.c, which you should modify to support the scanner for
which you are writing a driver.
Header Files
There are four header files in /usr/include that scanner driver developers will
find useful:
scanner.h Defines the interface used by application programmers to
communicate with scanner drivers. Contains typedefs and
#defines needed to communicate with the application.
scandrv.h Contains the dispatch loop interface, some error messages,
and the queue utility routines.
scanipc.h Contains #defines for command numbers and the types of
arguments and results.
scanconv.h Contains prototypes for functions that convert between
data types and functions that do replicative zooming on
rows of image data.

Data Structures
81
Data Structures
The following data structures are used to communicate between scanner
driver template modules. Understanding each field is key to understanding
what your part of the driver (the code in scan.c) must do. These data
structures are defined in /usr/impressario/src/scan/template_driver/scan.h.
SCANINFO Data Structure
The SCANINFO data structure is used to store static information about a
scanner. The scan.c module uses SCANINFO to communicate with the main.c
module. The SCANINFO data structure is defined as follows:
typedef struct tag_scaninfo {
int metric; /* metric for res, page size*/
float pagex, pagey, pagewidth, pageheight; /* page size */
float minxres, maxxres, minyres, maxyres; /* resolution bounds */
float *xres, *yres; /* resolution arrays */
int nres; /* size of arrays */
int canZoom; /* 1 if scanner can zoom */
SCDATATYPE *types; /* supported types */
int ntypes; /* number of types */
SCANFUNC *options; /* scanner-specific options */
int noptions; /* number of options */
void *priv; /* private member */
SCFEEDERFLAGS feederFlags; /* feeder flags */
} SCANINFO;
Field definitions:
metric Set metric to SC_INCHES or SC_CENTIM, depending on
whether it is more convenient to have measurements and
resolutions expressed in terms of inches or centimeters.
pagex,pagey,pagewidth,pageheight
pagex and pagey are the coordinates of the upper left corner
of the scannable area (almost always 0 and 0). pagewidth and
pageheight are the width and height of the scannable area,
respectively. All four fields are expressed in the units
defined by the metric field.

82
Scanner Drivers
minxres,maxxres,minyres,maxyres
minxres is the smallest supported horizontal resolution,
maxxres is the largest supported horizontal resolution,
minyres is the smallest supported vertical resolution, and
maxyres is the largest supported vertical resolution. These
are all expressed in pixels per the unit expressed by the
metric field.
xres,yres,nres For scanners that support discrete resolutions (as opposed
to scanners that support ALL resolutions with equal quality,
within the bounds given above), xres and yres are arrays of
the supported resolutions in the horizontal and vertical
directions. nres is the number of elements in each of these
arrays.
For scanners that support arbitrary resolutions (that is,
scanners that do their own scaling), nres is 0. The main.c
module takes nres == 0 to signify that it doesn't need to do
any scaling of scan data to satisfy preview requests from
the scanning application.
canZoom This parameter specifies whether or not the scanner can
support resolutions other than those specified in the xres
and yres arrays when nres is nonzero. In this case, the
resolutions in the xres and yres arrays represent preferred
resolutions that results in superior image quality.
If nres is 0, the main.c module assumes that the scanner
itself can do zooming, regardless of the canZoom flag.
types,ntypes types is an array of SCDATATYPE structures (see Chapter 9,
“Generic Scanner Interface”), and ntypes is the number of
types supported by the scanner.
options,noptions This array of functions implements scanner-specific options
for this scanner (see Chapter 8, “Scanner-Specific Options”),
and noptions is the number of such options.
priv This parameter is used by the scan.c module (the one you
write) to store a pointer to whatever state information is
necessary to identify a particular scanner once it's been
opened. This is provided so that you can avoid the use of
global variables in the scan.c module.

Data Structures
83
feederFlags These flags indicate the presence of an automatic document
feeder. The SC_HASFEEDER bit (see /usr/include/scanner.h)
of this flag should be set if a feeder is attached to the scanner
being supported. The SC_AUTOFEED flag should be set if
each call to DoScan automatically results in the next sheet of
paper being fed. If the scanner can feed on demand, the
SC_PROGFEED bit should be set. It is not an error to have
theSC_AUTOFEED flag and the SC_PROGFEED flag both
set.
If the scanner being supported does not have a document
feeder, this member can be safely ignored and the main.c
module will not try to call any of the document feeder
functions (see below).
SCANPARAMS Data Structure
The SCANPARAMS data structure contains dynamic values used to specify
the parameters of a scanning operation, and also some administrative
details. The SCANPARAMS data structure is defined as follows:
typedef struct tag_scanparams {
float xres, yres;
float x, y, width, height;
SCDATATYPE type;
int preview;
SCQUEUE *scanq, *sfreeq;
int xpixels, ylines, xbytes;
void (*convert)(void *from, int fromx, void *to, int tox, int *zmap);
int maxmem; /* maximum amount of memory to allocate */
int readlines;
SCANINFO *s;
} SCANPARAMS;
The fields of the SCANPARAMS data structure are defined as follows:
xres,yres The scanning resolution to be used for a particular scan. The
main.c module will always ensure that these resolutions are
among those advertised in the xres and yres fields of the
SCANINFO struct, unless the canZoom field of the

84
Scanner Drivers
SCANINFO struct is nonzero or the nres field is 0. In any
case, xres and yres are always within the resolution bounds
specified in the SCANINFO struct.
xres and yres are expressed in dots per the unit specified in
the metric field of the SCANINFO struct.
x,y,width,heightThe horizontal (x) and vertical (y) coordinates of the upper
left corner of the window to be scanned and its width and
height. The main.c module ensures that this image falls
within the bounds of the pagex,pagey,pagewidth, and
pageheight fields of the SCANINFO struct.
x,y, width, and height are expressed in the units specified in
the metric field of the SCANINFO struct.
type The type of scan data expected. The main.c module ensures
that it is one of the types specified in the types field of the
SCANINFO struct.
preview This field is set to 1 if this is a preview scan, and 0 otherwise.
scanq,sfreeq sfreeq is a queue whose elements are free buffers to put
scanned data into, and scanq is a queue whose elements are
buffers that have scanned data in them.DoScan, which you
will write (see below), removes buffers from sfreeq, scans the
data into them, then adds them to scanq. The main.c module
is responsible for taking buffers from scanq, disposing of the
data appropriately, and putting them back on sfreeq.
xpixels,ylines,xbytes
The number of pixels in a scan line, the number of scan lines
in the scan, and the number of bytes in a scan line. The scan.c
module is responsible for calculating these values in
SetupScan, which you will write (see below).
void (*convert)(void *from, int fromx, void *to, int tox, int *zmap)
This function converts data from a type that the scanner
supports to the requested data type. If the scanner directly
supports all the data types that are being advertised to the
scanning application (the types field of the SCANINFO
struct), the scan.c module can ignore this field.

Data Structures
85
For example, this function can be used for color scanners
that return the red, green, and blue components of each
scan line separately; that is, a line of five pixels would have
the following layout:
RRRRRGGGGGBBBBB
This needs to be converted to “chunky” data, as shown
below:
RGBRGBRGBRGBRGB
To do this, simply set the convert field to
SCBandRGB8ToPixelRGB8 in SetupScan (see below). The
following functions are available in libscan for converting:
SCBandRGB8ToPixelRGB8
SCGrey8ToMono
SCBandRGB8ToMono
maxmem The maximum amount of memory that should be allocated
for storing scan data. This field is to be taken into account in
the calculation of readlines in SetupScan (see below).
readlines The number of lines to read at a time. readlines is the
maxmem field divided by the xbytes field if scanning is
benefited by scanning in large chunks. If there is no benefit,
the number is 1.
The problem with maxmem/xbytes is that when maxmem is
large, interactive feedback to the user of the scanning
application is limited. Ideally, the scanner buffers data
internally, so you can scan perhaps an inch at a time
without the scan head pausing. That way, the scanning
application can consume the scan data while the scan head
gets the rest of the data.
sA pointer to the SCANINFO struct that OpenScanner
returned (see below).

86
Scanner Drivers
Functions You Must Write
After copying the template to your build area, you must edit the file scan.c
and implement the functions listed in Table 7-1.
These functions are described in detail in the following sections.
OpenScanner Function
This function is called when the driver is first invoked.
Example:
SCANINFO *
OpenScanner(char *dev)
{
static SCANINFO scan;
/*
Your code here!
*/
Table 7-1 Functions to Be Written by the Driver Developer
Function Name Description
OpenScanner Opens the scanner
SetupScan Called before a scanning operation
DoScan Gets data from the scanner
SetFeederFlags Called when the scanner application calls SCFeederSetFlags(3)
AdvanceFeeder Advances feeder to next document
FeederReady Tests whether the feeder is ready to feed another document
PrintID Prints a string describing the type of scanning supported
FindScanners Prints device for supported scanners
InstallScanner Installs a new scanner
DeleteScanner Deletes a scanner

Functions You Must Write
87
if (something goes wrong) {
drverr = appropriate error code;
return NULL;
}
*/
return &scan;
}
dev is the name of the device (usually a device special file in /dev/scsi for SCSI
devices) to open in order to communicate with the scanner. The task of the
OpenScanner function is to “open” dev, make sure that it corresponds to a
device that scan.c knows how to talk to, get it into some reasonable initial
state, and fill in a SCANINFO structure for the scanner. If all goes well, a
pointer to the SCANINFO structure is returned.
If anything goes wrong, OpenScanner should set the global variable drverr
and return NULL. The value for drverr should be chosen from those in
/usr/include/sys/errno.h or /usr/include/scanner.h; that value is communicated
back to the scanning application, which can use the SCPerror or
SCErrorString functions in libscan.a to get a human-readable error message
that explains why OpenScanner failed.
Caution: If you are writing a driver for a SCSI scanner, and you are using
dslib(3X), make sure that you pass the O_EXCL flag defined in
/usr/include/fcntl.h to dsopen:
dsreq_t *dsp = dsopen(dev, O_RDONLY | O_EXCL);
If you pass the O_EXCL flag, the open will fail with errno set to EBUSY if dev
is the /dev/scsi device of a mounted disk; otherwise, the open can succeed and
you could really screw up the disk!
In addition, it is recommended that before issuing any other SCSI commands
you perform an inquiry command, and verify that the device is a scanner by
examining the Device Type code of the inquiry buffer (this field should be
set to 6. You can use the INV_SCANNER #define from /usr/include/invent.h).
It is also recommended that you examine the vendor and product identifiers
to make sure the device is a scanner of the type for which this driver is being
written.

88
Scanner Drivers
SetupScan Function
This function is called with a pointer to a SCANPARAMS struct to prepare
for a scanning operation.
Example:
int
SetupScan(SCANPARAMS *params)
{
/*
Your code to tell the scanner the resolution, scanning window,
and data type.
*/
/*
Your code to find out from the scanner how many pixels are in a scan
line, how many scan lines are in the scan, and how many bytes are
in a scan line.
*/
/*
Your code to figure out what readlines should be, taking into
consideration maxmem and xbytes.
*/
if (anything went wrong) {
drverr = an appropriate error code;
return -1; /* indicates failure */
}
return 0; /* indicates success */
}
SetupScan performs the following operations:
1. SetupScan does whatever is necessary to anticipate the scan defined by
the fields xres,yres,x,y,width,height, and type.
2. If type is not supported directly by the scanning device, then theconvert
field should be set to a function that converts data returned from the
scanner to the appropriate type.

Functions You Must Write
89
3. SetupScan queries the scanning device or does some calculations to
determine the number of pixels in a scan line, the number of scan lines
in the scan, and the number of bytes in a scan line. The xpixels,ylines,
and xbytes fields of params are set appropriately.
4. SetupScan sets the readlines field of params to the number of lines that it
expects to scan at a time, taking maxmem and xbytes into account.
5. If at any point something goes wrong, set drverr to a value from
/usr/include/sys/errno.h or /usr/include/scanner.h and return -1 to indicate
a failure. If all goes well, return 0 to indicate success.
DoScan Function
This function actually gets the data from the scanner.
Example:
void
DoScan(SCANPARAMS *params)
{
SCANINFO *s = params->s;
void *buf;
int row, toread, curline;
prctl(PR_TERMCHILD);
for (curline = 0; curline < params->ylines;
curline += params->readlines) {
toread = MIN(params->readlines,
params->ylines - curline);
buf = SCDequeue(params->sfreeq);
/*
* Get the scan data here!
*/
/*
* Chop the buffer up into scan line sized chunks
*/
while (toread--) {
SCEnqueue(params->scanq, buf);
buf = (char *)buf + params->xbytes;

90
Scanner Drivers
}
}
exit(0);
}
DoScan executes as its own process, sharing its address space with its parent,
which is the process that communicates with the scanning application. (See
the sproc(2) man page. DoScan is the entry parameter to sproc.)
Before entering the while loop, do whatever else is necessary to initialize the
scanner if there's unfinished business from SetupScan. Note the use of
params->readlines, which you set in SetupScan. In the body of the loop, the
following things happen:
1. DoScan computes how many scan lines to read this time through the
loop. This is either readlines, which we set in SetupScan, or the number
of lines remaining to scan:
toread = MIN(params->readlines,
params->ylines - curline);
2. DoScan gets a buffer from the free queue into which the data is scanned:
buf = SCDequeue(params->sfreeq);
3. DoScan transfers toread lines of data from the scanning device to buf.
This is the interesting part, that you have to write specifically for your
scanner.
4. DoScan puts the lines just scanned onto the scan queue. This involves
chopping up the buffer into chunks the size of a scan line. Don't worry,
main.c knows how to put the buffers back together before putting them
back on the free queue!
while (toread--) {
SCEnqueue(params->scanq, buf);
buf = (char *)buf + params->xbytes;
}
Since DoScan is its own process, it calls the exit(2) function instead of
returning when it finishes scanning. If everything goes OK,DoScan calls exit
with a status of 0. If anything goes wrong, DoScan sets the global variable
drverr to an appropriate value from sys/errno.h or scanner.h and calls exit with
a status of 1. (See the exit(2) man page.)

Functions You Must Write
91
SetFeederFlags Function
The SetFeederFlags function gets called when the scanner application calls
SCFeederSetFlags(3) to specify whether automatic (SC_AUTOFEED) or
programmatic (SC_PROGFEED) feeding is desired. This only happens if
the feederFlags member of the SCANINFO struct returned by OpenScanner
has all three of the SC_HASFEEDER,SC_AUTOFEED, and
SC_PROGFEED bits set.
Example:
int
SetFeederFlags(SCANINFO *scan, SCFEEDERFLAGS flags)
{
drverr = SCENOFEEDER;
return -1;
}
The template version of this function sets drverr to indicate that no feeder is
present; if a feeder is present, SetFeederFlags must set a flag so that it knows
whether to automatically feed the next document in the next call to DoScan.
AdvanceFeeder Function
The AdvanceFeeder function is called only if the SC_PROGFEED bit is set in
the feederFlags member of the SCANINFO struct returned by OpenScanner.
This function should advance the feeder to the next document. If the feeder
is empty or jammed, return -1 and set drverr to an appropriate error code
from /usr/include/scanner.h or /usr/include/sys/errno.h.
Example:
int
AdvanceFeeder(SCANINFO *scan)
{
drverr = SCENOFEEDER;
return -1;
}
FeederReady Function
This function is called only if the SC_HASFEEDER bit of the feederFlags field
of the SCANINFO struct returned by OpenScanner is set.

92
Scanner Drivers
Example:
int
FeederReady(SCANINFO *scan)
{
drverr = SCENOFEEDER;
return -1;
}
FeederReady should return 0 if there is a document in the feeder; that is, if the
next call to AdvanceFeeder should succeed. If the feeder is empty, FeederReady
should return -1 and set drverr to SCEFEEDEREMPTY.
PrintID Function
The PrintID function is used by the -query option that all scanner drivers
support. It should print a string that identifies the type of scanner supported
by this scanner driver, and one or more interface types supported.
scanners(1M), the scanner install tool, uses this information to help the end
user choose the driver that best suits a particular scanner.
Example:
void
PrintID(FILE *fp)
{
fprintf(fp, "Your Scanner Name\n"); /* String describing scanner */
fprintf(fp, "SCSI Serial Parallel\n"); /* Device type; can be list */
}
FindScanners Function
The FindScanners function is also used to implement the -query option.
Example:
void
FindScanners(FILE *fp)
{
inventory_t *inv;
char device[100];
dsreq_t *dsp;
/* int because it must be word aligned. */
int inqbuf[(sizeof(INQDATA) + 3)/sizeof(int)];

Functions You Must Write
93
INQDATA *inq = (INQDATA *)inqbuf;
/*
* This example looks for SCSI scanners; do whatever is necessary
* to find other types of scanner here.
*/
setinvent();
while ((inv = getinvent()) != NULL) {
if (inv->inv_class == INV_SCSI && inv->inv_type == INV_SCANNER) {
sprintf(device, "/dev/scsi/sc%dd%dl0", inv->inv_controller,
inv->inv_unit);
if ((dsp = dsopen(device, O_RDONLY)) == NULL) {
continue;
}
if (inquiry12(dsp, (char *)inq, sizeof *inq, 0) == 0
&& strncmp((char *)inq->vid, "Your vendor", 11) == 0 &&
strncmp((char *)inq->pid, "Your product", 12) == 0) {
fprintf(fp, "SCSI %s\n", device);
}
dsclose(dsp);
}
}
endinvent();
}
FindScanners should search the system for scanners that this driver is capable
of supporting, and for each such scanner it prints the type of device (SCSI,
Serial, Parallel, GPIB, EISA, or Other), a space, and the pathname that should
be passed to OpenScanner in order to access that scanner.
This gives scanners(1M) more information that it can use to help the end user
pick a driver for a particular scanner. It is by no means required that
FindScanners find all scanners that it is capable of supporting; it is OK to do
nothing at all here, especially if there is no hope of finding a scanner you
support in a reasonable amount of time. This is important; scanners(1M)
invokes EVERY scanner driver installed with the -query option when the
user adds a scanner, so this function should be fast!

94
Scanner Drivers
InstallScanner Function
This function is called when the scanner driver is invoked with the -install
option. InstallScanner is used by scanners(1M) when the user tries to install a
new scanner.
Example:
int
InstallScanner(char *dev)
{
printf("The template driver doesn't support %s\n", dev);
return -1;
}
The purpose of this entry point is verify that dev corresponds to a scanning
device that this driver knows how to support, and to do any scanner-specific
installation that is necessary.
The following example implementation calls OpenScanner to verify that dev
corresponds to a valid scanning device, and then changes the permissions of
dev so that users other than root can access the scanner. This is important,
since scanner drivers should not normally be setuid root programs, and users
other than root want to use scanners. When InstallScanner is called by
scanners(1M), the driver will have root permissions, which enables it to call
chmod(2) on dev or create any auxiliary files or other resources that it needs:
int
InstallScanner(char *dev)
{
SCANINFO *scan;
scan = OpenScanner(dev);
if (!scan) {
printf("Can't access %s: %s\n", dev,
SCErrorString(drverr));
return -1;
}
chmod(dev, 0666);
return 0;
}

Events
95
If an error occurs, InstallScanner should print an error message to stdout and
return -1. The main.c module exits with a nonzero exit status if InstallScanner
returns -1, and scanners(1M) reads the driver’s standard output and displays
it to the user if the main.c exits with a nonzero status. That way, the exact
cause of the error is propagated to the user.
DeleteScanner Function
The DeleteScanner function is called when the driver is invoked with the
-delete option by scanners(1M). This gives the driver the opportunity to do
any scanner-specific deletion required. This can be useful if auxiliary files
specific to this scanner were created in InstallScanner.
Example:
int
DeleteScanner(char *dev)
{
return 0;
}
If an error occurs, DeleteScanner prints an error message to stdout and returns
-1. In this case, scanners(1M) displays this error message to the user and
refuses to delete the scanner, so in most cases DeleteScanner should return 0.
Events
Impressario scanner drivers can send events to scanner applications.
Currently, the only type of event supported is an event to notify the scanner
application that the resolutions, page size, data types, or feeder flags
supported by the scanner driver have changed.
This typically happens when the user selects a new input media option from
the scanner specific options program (see chapter 8). For example, some
scanners have transparency units, and when scanning transparencies the
scanning page size is different than when scanning normal paper. So when
the user selects the option to scan a transparency, the scanner driver needs
to inform the scanning application that it must query to find out the new
page size.

96
Scanner Drivers
Events are sent to the scanner application by filling in anSCEVENT structure
and calling SCDriverSendEvent. The SCEVENT structure is defined as
follows:
typedef struct tag_infoChange {
unsigned int pageSizeChanged : 1;
unsigned int resolutionChanged : 1;
unsigned int dataTypesChanged : 1;
unsigned int feederFlagsChanged : 1;
} SCINFOCHANGE;
#define SCEVENT_INFOCHANGE 1
typedef struct tag_scevent {
unsigned int eventType;
union {
SCINFOCHANGE infoChange;
event;
} SCEVENT;
The SCDriverSendEvent function has the following prototype:
int SCDriverSendEvent(SCEVENT *event)
To inform the scanner application that it needs to query the new page size,
the driver would execute the following code:
SCEVENT event;
event.eventType = SCEVENT_INFOCHANGE;
event.event.infoChange.pageSizeChanged = 1;
event.event.infoChange.resolutionChanged = 0;
event.event.infoChange.dataTypesChanged = 0;
event.event.infoChange.feederFlagsChanged = 0;
if (SCDriverSendEvent(&event) == -1) {
handle error;
}
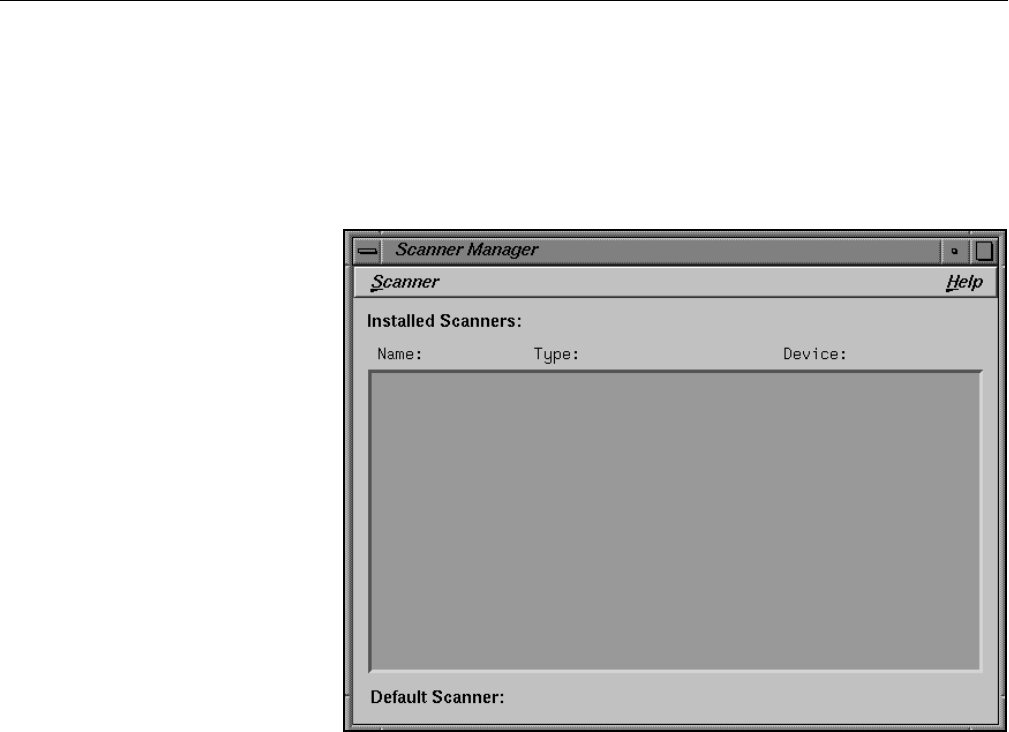
Installation
97
Installation
After the driver is built, make sure that the -query option works, then copy it
to /usr/lib/scan/drv and run scanners(1M), the scanner install tool. See
Figure 7-1.
Figure 7-1 Scanner Install Tool
When the scanners panel comes up, use the “Install...” item on the Scanner
menu to bring up the “Install New Scanner” dialog box. If you implemented
PrintID correctly, you see your scanner driver's ID string in the list. If you
implemented FindScanners, clicking on your scanner driver type should fill
in the “Device” field. Otherwise, type in the device that corresponds to your
scanner.
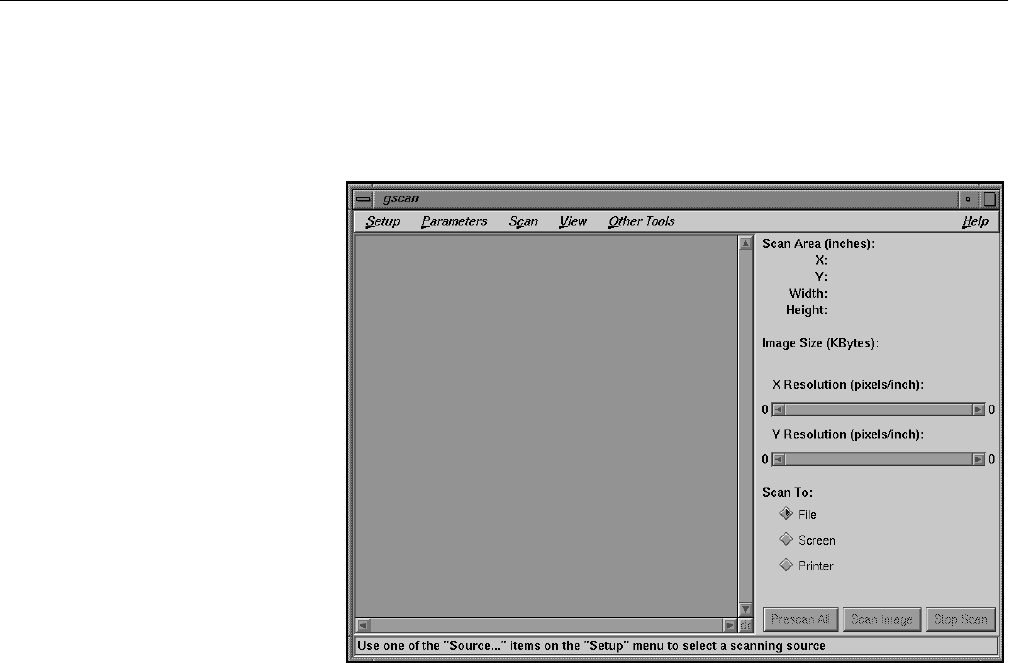
98
Scanner Drivers
Testing
Give the scanner a name and click OK, then run gscan(1). See Figure 7-2.
Figure 7-2 gscan Panel
You can either provide your scanner's name on the command line or use the
“Setup” menu to choose your scanner as the scanning source.
Severe scanner driver malfunctions can causegscan to hang. If this happens,
open a shell and type:
/etc/killall gscan

This chapter explains how to implement
a scanner-specific graphical options
panel. Doing so allows you to showcase
your scanner’s features and enhance the
overall usability and visual appeal of
your product.
Scanner-specific Options
Chapter 8


101
Chapter 8
8. Scanner-Specific Options
This chapter describes the implementation of scanner-specific graphical
options panels.
The major topics discussed are:
• “Options Program and the Scanner Driver Interface” on page 102
• “Scanner Driver's Perspective” on page 103
• “Options Program's Perspective” on page 105
• “Installation and Testing” on page 108
Overview
Most scanners have capabilities that would not be available to application
programs through the Generic Scanner API alone. A scanner-specific
graphical options panel program can be developed to provide access to these
capabilities.
A scanner-specific options program is run by a scanner application and
communicates directly with a scanner driver, bypassing the Generic Scanner
API. It should provide user interface elements (using Motif or a similar
toolkit) for the scanner features it supports that are not supported by the
Generic Scanner API. It should also communicate appropriate settings to the
scanner driver.
The scanner driver, in turn, must respond to commands from its
corresponding scanner-specific options program.

102
Scanner-Specific Options
Options Program and the Scanner Driver Interface
The options program executes driver commands by writing a command
number and the arguments to that command onto a pipe. The scanner driver
reads the command and arguments from the pipe, then calls the options
function for that command. After the options function returns, the driver
writes the results of the function back to the options program.
Developers of new scanner drivers and options programs need not worry
about the low-level communication between these programs; this is all taken
care of in libscan.a. They DO need to ensure that the scanner drivers and
options programs interpret commands and arguments consistently. This is
most easily accomplished by providing a common header file that the driver
and the scanner options program share. This header file should contain
#defines for the scanner-specific commands and typedefs for the arguments,
and return values of these commands. sclopt.h, for example, is included by
both the HP ScanJet scanner driver and the HP ScanJet options panel:
/*
* sclopt.h
* Stuff for scl scanner-specific options
*/
#define SCL_GETOPTS (SCN_SCANSPECIFIC + 0)
#define SCL_SETOPTS (SCN_SCANSPECIFIC + 1)
#define DITH_COURSE 0
#define DITH_FINE 1
#define DITH_BAYER 2
#define DITH_VERTICAL 3
typedef struct tag_sclopt {
int intensity; /* Intensity of image */
int minIntensity, maxIntensity; /* Intensity bounds; used */
/* in GETOPTS only */
int contrast; /* Image contrast */
int minContrast, maxContrast; /* Contrast bounds; used */
/* in GETOPTS only */
int bwDither; /* if nonzero, dither */
/* black and white data */
int bwDitherPattern; /* specify black & white */
/* dither pattern */
} SCLOPT;

Scanner Driver's Perspective
103
sclopt.h defines two HP ScanJet-specific commands: SCL_GETOPTS and
SCL_SETOPTS. Scanner-specific commands MUST be numbered
consecutively, starting with SCN_SCANSPECIFIC and increasing
monotomically from there. SCN_SCANSPECIFIC is #defined in
/usr/include/scanipc.h.
The SCLOPT structure is used to pass information between the HP ScanJet
scanner driver and the HP ScanJet options panel. This structure is the return
type of the SCL_GETOPTS command and the argument type of the
SCL_SETOPTS command.
“Scanner Driver's Perspective” below describes how the scanner driver uses
these #defines and typedefs. “Options Program's Perspective” on page 105
describes how the scanner-specific options program uses them.
Scanner Driver's Perspective
The scanner driver implements scanner-specific options by providing a table
of functions to the main.c module. In OpenScanner, the scan.c module should
set the options field of the SCANINFO struct to an array of functions
implementing the scanner-specific options, and the noptions field to the
number of such options. The order of the functions in the options table must
correspond to the numerical order of the commands implemented (the cmd
argument, below).
Each function in this array must have the following prototype:
void optionfunc(int cmd, SCARG *arg, SCRES *res);
cmd is the command number for this scanner-specific option. SCARG is
defined in the file /usr/include/scandrv.h as follows:
typedef struct tag_scarg {
void *data;
int len;
} SCARG;
arg->data points to the arguments passed in by the scanner-specific options
program, and arg->len is the number of bytes pointed to by arg->data.
SCRES is defined in the file /usr/include/scandrv.h as follows:

104
Scanner-Specific Options
typedef struct tag_scres {
void *data;
int len;
void *freeparam;
void (*free)(void *param, void *data);
int errno;
char *errmsg;
} SCRES;
res->data should be set to point to the results of the scanner-specific option,
and res->len should be set to point to the number of bytes in res->data. If an
error occurs, res->errno should be set to one of the values from sys/errno.h or
scanner.h. If res->free is nonzero, it is called with res->freeparam as its first
argument and res->data as its second argument, after res->data has been
transferred to the scanner-specific options program. This can be used to free
memory that was dynamically allocated to temporarily hold the results.
For example, here is the code from the ScanJet driver that implements the HP
ScanJet options:
static SCLOPT scanOptions;
static void
GetOptions(int cmd, SCARG *arg, SCRES *res)
{
res->data = &scanOptions;
res->len = sizeof scanOptions;
}
static void
SetOptions(int cmd, SCARG *arg, SCRES *res)
{
scanOptions = *(SCLOPT *)arg->data;
}
SCANFUNC opttable[] = {
GetOptions,
SetOptions,
};
InOpenScanner, the options member of the SCANINFO struct is set to opttable,
and the noptions member is set to 2. Note that the order of the functions in
opttable corresponds to the numerical order of the commands they
implement.

Options Program's Perspective
105
SCANFUNC is a typedef from /usr/include/scandrv.h:
typedef void (*SCANFUNC)(int cmd, SCARG *arg, SCRES *res);
Note: The actual code in the ScanJet driver is slightly more complex; error
checking has been eliminated from this example code so as not to obscure
the basic functionality.
The SetOptions function should verify that the options passed to it are valid
and set res->errno to a value from the /usr/include/sys/errno.h directory or
/usr/include/scanner.h if they are not. Also, the ScanJet function SetOptions
will fail if the scanner is currently scanning, because verifying that the
options are valid would interrupt the scan. So, in this case, SetOptions should
set res->errno to SCEBUSY and return.
Options Program's Perspective
The scanner-specific options program is executed by libscan.a when the
scanner application calls the function SCOptions(3). The program is executed
with command-line arguments that, when passed to the libscan.a function
SCGetScanOpt(3), enable a connection to be established with the scanner
driver.
One of the first things that a scanner-specific options program must do, then,
is call SCGetScanOpt. This function has the following prototype (from
/usr/include/scanipc.h):
SCANOPT * SCGetScanOpt(int *argc, char *argv[]);
The scanner-specific options program communicates with the scanner
driver by making calls to the function SCScanOpt(3), which has the following
prototype (from /usr/include/scanipc.h):
int SCScanOpt(SCANOPT *s, int cmd, void *args, int arglen,
void *res, int reslen);
The first argument to SCScanOpt(3) is the pointer returned by
SCGetScanOpt(3), above. The cmd argument is one of the command #defines
from the common header file shared with the scanner driver. args is a pointer
to the arguments to this command, andarglen is the number of bytes pointed

106
Scanner-Specific Options
to by args. This corresponds to arg->data and arg->len in the scanner driver
option function for cmd.
res points to space for receiving the results of the command, andreslen is the
maximum number of bytes to copy into res. The data copied into res
corresponds to res->data in the scanner driver option function for cmd.
The following example code was distilled from the ScanJet options program.
The ScanJet options program is a Motif program; please refer to the X and Xt
Motif documentation set (see “Related Publications,” in the “Introduction”
section of this manual for the full names and order numbers) for information
about the non-scanning portions of the code below.
static Widget toplevel;
static SCANOPT *scan;
static SCLOPT scanOptions;
static XtAppContext appContext;
int
main(int argc, char *argv[])
{
toplevel = XtAppInitialize(&appContext, "SJIIcOpt", NULL, 0,
(unsigned int *)&argc, argv, fallBackResources,
NULL, 0);
scan = SCGetScanOpt(&argc, argv);
if (!scan) {
InitError(toplevel, appContext,SCErrorString(SCerrno));
}
if (SCScanOpt(scan, SCL_GETOPTS, NULL, 0,
&scanOptions, sizeof scanOptions) < 0) {
InitError(toplevel, appContext, SCErrorString(SCerrno));
}
/* ... create widgets corresponding to options ... */
XtRealizeWidget(toplevel);
XtAppMainLoop(appContext);
return 0;
}

Options Program's Perspective
107
main calls XtAppInitialize(3Xt) to initialize the X toolkit, and then calls
SCGetScanOpt(3) to get the connection to the scanner driver. Then it calls
SCScanOpt(3) to get the current options settings from the scanner driver.
If anything goes wrong, main calls a function (not shown here, but part of the
ScanJet options program) called InitError, which transforms the application
into a message dialog containing the error message passed as the third
argument.
The ScanJet options program has an OK button that the user presses after
setting up the options desired. Below is an excerpt from the callback function
for that OK button.
static void
OKCallback(Widget w, XtPointer client,
XmAnyCallbackStruct *cb)
{
/* ... get settings from widgets,
put them into scanOptions
... */
if (SCScanOpt(scan, SCL_SETOPTS, &scanOptions,
sizeof scanOptions, NULL, 0) < 0) {
PostError(toplevel, SCErrorString(SCerrno), 0);
return;
}
exit(0);
}
Again note the error check; PostError is another function from the ScanJet
options program, which displays a message dialog containing an error
message.
Also note that we call exit(2) if the call to SCScanOpt succeeds. This is because
the scanner options program appears to the user to be a dialog box
associated with the scanning application that executed it. The ScanJet
options program also provides an Apply button for changing
scanner-specific settings without dismissing the scanner-specific options
program.

108
Scanner-Specific Options
Installation and Testing
After you have written your scanner driver and scanner options program,
copy your scanner driver to the directory /usr/lib/scan/drv, and the options
program to the directory /usr/lib/scan/opt. The driver and options program
must have the same base name in order for scanners(1M), the scanner
installation tool, to recognize that they go together.
Next, run scanners(1M) to install your scanner. If it was already installed
before you copied your options program to /usr/lib/scan/opt, you must delete
the scanner first (using the “Delete...” command on the “Scanner” menu).
Now you can run gscan(1) to test your driver and options program. The
“Scanner Specific Options...” command on the “Parameters” menu should
bring up your options program.

This chapter describes the interface
between a scanner driver and an
application program. Applications that
use this interface can access any scanner
that conforms to the Impressario
interface.
Generic Scanner Interface
Chapter 9


111
Chapter 9
9. Generic Scanner Interface
This chapter describes the interface between a scanner driver and an
application program.
The major topics discussed are:
• “Coordinate System for Scanning” on page 112
• “Data Structures” on page 113
• “Data Type Conventions” on page 114
• “Functions” on page 116

112
Generic Scanner Interface
Overview
The generic interface between a scanner driver and an application program
is flexible enough to accommodate a wide range of scanners and application
programs. Application programs that use this interface can use any scanner
that has a driver that supports this interface. Providing a driver for a
particular scanner allows it to be accessed by any program written to use this
interface.
The interface is implemented by a run-time library and a driver program. All
drivers must provide the entry points necessary for the run-time library to
provide the interface described in this document. In order to provide access
to scanner-specific capabilities, scanner drivers are free to expand the
interface, which is then accessed by scanner-specific programs that have
standard ways of being invoked by application programs. (See Chapter 8,
“Scanner-Specific Options.”)
For more details on the functions described in this chapter, see the online
manual pages.
Coordinate System for Scanning
When describing an area to be scanned, a coordinate system with the origin
(0,0) in the upper left corner of the scannable area is used. The x-coordinate
increases from left to right, and the y-coordinate increases from top to
bottom.
Note that this is the upper left corner of the document being scanned; in the
case of a flatbed scanner where the document is placed face down in the bed,
this is the upper right corner or lower left corner of the bed.
When functions in the interface specify measurements along the horizontal
and vertical axes of the scan area, the following units can be used to specify
distance:
•SC_INCHES—measurements specified in inches
•SC_CENTIM—measurements specified in centimeters
•SC_PIXELS—measurements specified in pixels

Data Structures
113
Data Structures
This section describes the generic scanner interface data structures.
SCANNER Data Structure
typedef struct tag_scanner {
...
} SCANNER;
The application maintains a pointer to a SCANNER data structure (obtained
from SCOpen) to specify the scanner to which operations should be applied.
SCDATATYPE Data Structure
Scanners support a variety of output data types. The SCDATATYPE struct
encapsulates the common output data types produced by scanners.
typedef struct tag_scdatatype {
unsigned int packing : 4;
unsigned int channels : 4;
unsigned int type : 8;
unsigned int bpp : 8;
} SCDATATYPE;
Arguments:
packing The packing field can take on the following values:
SC_PACKPIX All the data for each pixel is stored
together; for example., a line of 24-bit
color is stored as RGBRGBRGB.
SC_PACKBAND Each line of data is decomposed into its
channels; for example, a line of 24-bit
color is stored as RRRGGGBBB.
SC_PACKPLANE All the data for a channel is stored
separately from other channels. A page
of color data is split into three pages of
data; one for red, one for blue, and one
for green.

114
Generic Scanner Interface
channel Number of components per pixel. Legal values are 1, 3, and
4. See type below.
type Type of data. This parameter indicates how the data in the
various channels is to be interpreted:
bpp Bits Per Pixel (per channel). The number of bits per pixel in
each channel. For monochrome data, there is 1 bit per pixel.
For 24-bit RGB color, there are 8-bits per pixel (* 3 channels
== 24-bits).
Data Type Conventions
Generic scanner applications need not be written to support any particular
data type. There are four basic data types that are typically used:
1. Monochrome. ALL scanner drivers MUST support the following
monochrome format:
•packing == SC_PACKPIX
•channels == 1
•type == SC_MONO
•bpp == 1
2. 8-bit greyscale. All scanner drivers that support any type of greyscale or
color output MUST support the following 8-bit greyscale format:
•packing == SC_PACKPIX
•channels == 1
•type == SC_GREY
•bpp == 8
SC_MONO Monochrome: 1 channel and 1 bit per pixel.
SC_GREY Greyscale: 1 channel.
SC_RGB Red, green, and blue: 3 channels.
SC_CMY Cyan, magenta, and yellow: 3 channels.
SC_CMYK Cyan, magenta, yellow, and black: 4 channels.

Data Type Conventions
115
3. Planar 24-bit RGB color. The red, green, and blue channels are scanned
in three separate passes; in this case, the data type for is:
•packing == SC_PACKPLANE
•channels == 3
•type == SC_RGB
•bpp == 8
4. Packed 24-bit RGB color. This applies to a one-pass color scanner that
gets all of the data in one pass. The data type for color data from this
kind of scanner is:
•packing == SC_PACKPIX
•channels == 3
•type == SC_RGB
•bpp == 8
A scanning application that is prepared to deal with these four data types
should be able to interact well with any well-behaved scanner driver.

116
Generic Scanner Interface
Functions
Diagnostic Functions
Many of the functions specified here return 0 upon success and -1 in the
event of a failure. If a function's return value indicates failure, the reason for
the failure can be determined by examining the value of the global variable
SCerrno.SCerrno will be between 0 and LASTERRNO (defined in
/usr/include/sys/errno.h) if the failure was due to a failed system call, and
between SCEBASE and SCELAST (defined in scanner.h) if the failure was
for some other reason. #defines for the values between SCEBASE and
SCELAST can be found in /usr/include/scanner.h.
Table 9-1 lists the diagnostic functions.
SCPerror Function
void SCPerror(char *ident)
This function prints the value of ident, a colon, and a string of text
corresponding to the current value of SCerrno.
SCErrorString Function
char *SCErrorString(int err)
This function returns a character string containing a useful message
describing the error condition represented by err. If err is not in the range 0
to LASTERRNO or SCEBASE to SCELAST,SCErrorString returns a text
string containing the words “Error code err,” where err is the value passed to
SCErrorString.
Table 9-1 Diagnostic Functions
Function Description
SCPerror Prints an error string.
SCErrorString Returns a character string containing an error message.

Functions
117
Application/Driver Rendezvous Functions
Users refer to scanners by names given to them at install time. The installer
uses scanners(1M), which adds entries to a mapping from scanner names to
(driver,device,options) tuples. The mapping is contained in the file
/var/scan/scanners. The driver and device components are used to start the
right driver on the device to access the scanner given by name, and options is
the scanner-specific options program. scanners(1M) allows the specification
of a default scanner.
The application/driver Rendezvous functions are listed in Table 9-2 and
described below.
Table 9-2 Application/Driver Rendezvous Functions
Function Description
SCOpen Prepares to perform operations on the scanner named by
name.
SCOpenScreen Calls the screen scanner driver to scan from the specified
screen.
SCOpenFile Calls the file scanner driver to scan from the specified
file.
SCClose Breaks the connection between the application and the
driver.
SCSetScanEnt Opens the scanner configuration file and returns a
pointer.
SCGetScanEnt Gets a SCANENT structure for each installed scanner.
SCEndScanEnt Frees the resources used to enumerate scanners.
SCScannerName Returns the name associated with the scanner at
installation.
SCScannerEnt Returns the SCANENT structure of an open scanner.
SCDefaultScannerName Gets the default scanner name, if any.

118
Generic Scanner Interface
SCOpen Function
SCANNER *SCOpen(char *name)
The SCOpen function prepares to perform operations on the scanner named
by name by starting the appropriate driver on the appropriate device.
SCOpen performs the lookup in the name -> (driver,device,options) mapping.
If name is NULL, the default scanner is used.
SCOpen returns a pointer to a SCANNER struct if successful, or NULL if
there is an error. If name is NULL and no default scanner has been set,
SCOpen opens the first scanner found in /usr/lib/scan/scanners.
SCOpenScreen Function
SCANNER *SCOpenScreen(char *screen)
This function invokes the screen scanner driver to scan from the specified
screen. It returns a pointer to a SCANNER struct if successful, NULL if there
is an error.
SCOpenFile Function
SCANNER *SCOpenFile(char *file)
This function invokes the file scanner driver to scan from the specified file.
It returns a pointer to a SCANNER struct if successful, NULL if there is an
error.
SCClose Function
int SCClose(SCANNER *s)
This function breaks the connection between the application and the driver
program. It returns 0 on success, -1 if there is an error.
SCSetScanEnt Function
FILE *SCSetScanEnt(void)
This function opens the scanner configuration file. It returns a pointer to the
open FILE structure on success, NULL if there is an error.

Functions
119
SCGetScanEnt Function
typedef struct tag_scanent {
char *name;
char *driver;
char *device;
char *options;
} SCANENT;
SCANENT *SCGetScanEnt(FILE *fp)
To get a SCANENT structure for each scanner installed on the system, this
function should be called repeatedly until it returns NULL. The contents of
the memory pointed to by the return value of SCGetScanEnt are undefined
after any subsequent calls to this function, so copy the return value if you
need to preserve it across calls to SCGetScanEnt.
SCEndScanEnt Function
int SCEndScanEnt(FILE *fp)
This function frees the resources used to enumerate scanners. It returns 0 on
success, -1 if there is an error.
SCScannerName Function
char *SCScannerName(SCANNER *s)
This function returns the name associated with the scanner at installation.
Applications can use this to get at the name of the default scanner being used
ifSCOpen was called with NULL. It returns a pointer to a character string on
success, NULL if there is an error. The memory pointed to by the return
value of SCScannerName belongs to libscan and should not be modified or
freed.
SCScannerEnt Function
SCANENT *SCScannerEnt(SCANNER *s)
This function returns the aSCANENT structure describing an open scanner.
The memory pointed to by the returned value of SCScannerEnt belongs to
libscan and should not be modified or freed.

120
Generic Scanner Interface
SCDefaultScannerName Function
char *SCDefaultScannerName(void)
This function gets the default scanner name, if any. It returns the name of the
default scanner, or NULL if no default scanner has been set. The memory
pointed to by the returned value ofSCDefaultScannerName belongs to libscan
and should not be modified or freed.
Scanning Resolution Functions
Scanners typically support a range of resolutions (pixels per inch). Scanner
drivers should support any resolution between the minimum and maximum
resolutions supported by the scanner, decimating or replicating pixels as
necessary to support the requested resolution. This gives the application the
opportunity to preview the scanning area in an arbitrarily sized window.
It is not the scanner driver's responsibility to perform higher quality scaling
of the image data. SCGetScannerRes can be used by the scanner application
to determine which resolutions are supported directly by the scanner
without decimation or replication by the driver.
SCGetScannerRes Function
int SCGetScannerRes(SCANNER *s, int metric,
float **xres, float **yres, int *nres)
This function returns arrays of hardware-supported resolutions. The xres
and yres arrays specify supported horizontal and vertical resolutions. metric
should be one of SC_INCHES or SC_CENTIM.nres sets the number of
resolution pairs in the xres and yres arrays. SCGetScannerRes returns 0 if
successful, -1 if there is an error.
SCGetMinMaxRes Function
int SCGetMinMaxRes(SCANNER *s, int metric,
float *minx, float *miny, float *maxx, float *maxy);
This function determines the resolution bounds; that is, the minimum and
maximum horizontal and vertical resolutions that the scanner supports. It is

Functions
121
an error to call SCGetMinMaxRes with “metric == SC_PIXELS.”
SCGetMinMaxRes returns 0 if successful, -1 if there is an error.
Scanning Area Functions
A scan may be limited by the application to a subset of the scannable area
supported by the scanner. SCGetPageSize is provided so that applications can
determine the size of the scannable area supported by the scanner.
SCGetPageSize Function
int SCGetPageSize(SCANNER *s, int metric, float *x, float *y,
float *width, float *height)
This function gets the entire scannable area. It is an error to call it with
“metric == SC_PIXELS.” SCGetPageSize returns 0 if successful, -1 if there is
an error.
SCGetDataTypes Function
int SCGetDataTypes(SCANNER *s, SCDATATYPE **dt, int *ntypes)
This function sets *dt to point to an array of the data types supported by the
scanner driver. ntypes gets the number of data types supported. The memory
pointed to by *dt belongs to libscan and should not be modified or freed. It
should also not be expected to retain its values after subsequent calls to
SCGetDataTypes.
Scanning Functions
After SCOpen has been called, the scanner is idle. In order to initiate a scan,
the functions SCSetup and SCScan are called. Characteristics of the data to be
scanned can be determined with SCGetScanSize. A scan in progress can be
aborted at any time with the function SCAbort. The scanner status can be
determined by calling the function SCGetStatus.

122
Generic Scanner Interface
Table 9-3 lists the available scanning functions.
SCSetup Function
SCSetup(SCANNER *s, int preview, SCDATATYPE *type,
int rmetric, float xres, float yres,
int wmetric, float x, float y, float width,
float height)
This function is used to prepare the scanner for a scan. The type of data, the
resolution, and the scanning area are specified. preview is nonzero if this is a
“preview” scan; that is, when the driver is faced with a trade-off between
speed and image quality, it should choose speed since this is not the “real”
scan. After calling SCSetup,SCScan is called to actually initiate scanning.
SCSetup returns 0 if successful, -1 if there is an error.
Table 9-3 Scanning Functions
Function Description
SCSetup Prepares the scanner for a scan.
SCGetScanSize Determines the width, height, and number of bytes per scan
line.
SCScan Starts scanning.
SCGetScanLine Retrieves scan line data.
SCDataReady Determines whether any data is available.
SCGetFD Returns the file descriptor for scan data.
SCScanFD Starts scanning (alternative call).
SCAbort Aborts the current scan.
SCGetStatus Gets the status of the scanner.
SCGetStatusFD Returns a file descriptor for scan status.

Functions
123
SCGetScanSize Function
int SCGetScanSize(SCANNER *s, int *width, int *height,
int *bytesPerLine)
This function is called after SCSetup to determine the width, height, and
number of bytes per scan line that will be returned by the driver. It returns 0
if successful, -1 if there is an error.
SCScan Function
int SCScan(SCANNER *s)
This function tells the driver to start scanning. The driver immediately starts
to scan and buffer the data. SCScan does not fetch any scan data (see
SCGetScanLine). SCScan returns 0 if successful, -1 if there is an error.
SCGetScanLine Function
int SCGetScanLine(SCANNER *s, void *buf, int bytes)
This function retrieves scan line data. bytes should be set to the number of
bytes in a scan line as determined by SCGetScanSize.
Note that for color planar data, SCGetScanLine is called once for each line in
each plane of data. For 100 lines of 24-bit RGB planar data, SCGetScanLine is
called a total of 300 times, with the first 100 calls retrieving the red plane, the
second 100 calls retrieving the green plane, and the third 100 calls retrieving
the blue plane.
SCDataReady Function
int SCDataReady(SCANNER *s)
This function is used to determine whether any data is available for calls to
SCGetScanLine; that is, whether a call to SCGetScanLine will block waiting for
data to become available.
SCDataReady returns 1 if data is available (SCGetScanLine will not block), 0 if
no data is available (SCGetScanLine will block), or -1 if there is an error. It is
an error to call SCDataReady if scanning was started by a call to SCScanFD.

124
Generic Scanner Interface
SCGetFD Function
int SCGetFD(SCANNER *s)
This function returns the file descriptor over which scan data from the
scanner driver will be coming. Checking the state of this descriptor with the
select(2) system call is equivalent to calling SCDataReady. If SCScanFD was
called, SCGetFD returns the file descriptor that was passed to that function.
SCGetFD returns -1 if there is an error.
SCScanFD Function
int SCScanFD(SCANNER *s, int fd)
This function is an alternative to calling SCScan to start scanning and
SCGetLine to fetch the data. After SCScanFD is called, the driver writes the
scanned data to fd; this is useful if the output data format of the scanner
interface matches the input data type of another interface. SCScanFD returns
0 if successful, -1 if there is an error.
SCAbort Function
int SCAbort(SCANNER *s)
This function aborts the current scan. Data buffered by the driver is
discarded. SCAbort returns 0 if successful, -1 if there is an error.
SCGetStatus Function
enum scstate { SC_READY, SC_SCANNING, SC_ERROR };
typdef struct tag_scstatus {
enum scstate state; /* ready, scanning, error */
int errno; /* only valid if state == SC_ERROR */
long curline; /* current line being scanned */
int pass; /* current scanning pass */
} SCSTATUS;
int SCGetStatus(SCANNER *s, SCSTATUS *st)
This function gets the status of the scanner. It returns 0 if successful, -1 if
there is an error.

Functions
125
SCGetStatusFD Function
int SCGetStatusFD(SCANNER *s)
This function returns a file descriptor that can be passed to the select(2)
system call. When select(2) indicates that the file descriptor is ready for
reading, the scanner driver has updated the scanning status. Retrieve the
status by calling SCGetStatus; do NOT pass the file descriptor returned from
SCGetStatusFD to any other system call.
SCGetStatusFD provides a mechanism whereby it is not necessary for an
application to periodically call SCGetStatus in a timer loop to detect changes
in scanner status. SCGetStatusFD returns -1 if there is an error.
Document Feeder Functions
The scanner interface has provisions for the support of scanners that have
document feeders attached. This facilitates the development of applications
that can scan multiple pages without user intervention. Table 9-4 lists the
document feeder functions.
Table 9-4 Document Feeder Functions
Function Description
SCFeederGetFlags Gets the feeder flags.
SCFeederSetFlags Sets feeder flags.
SCFeederAdvance Advances the feeder to the next document.
SCFeederReady Checks if the feeder is ready for feeding.

126
Generic Scanner Interface
SCFeederGetFlags Function
typedef unsigned int SCFEEDERFLAGS;
#define SC_HASFEEDER 1
#define SC_AUTOFEED 2
#define SC_PROGFEED 4
int SCFeederGetFlags(SCANNER *s, SCFEEDERFLAGS *flags);
This function fills in the flags variable with flags appropriate for the scanner
associated with s. If SC_AUTOFEED and SC_PROGFEED are both set,
SCFeederSetFlags should be called before any calls to SCScan to establish how
the application is to interact with the feeder. The meanings of the flags are as
follows:
SCFeederGetFlags returns 0 if successful, -1 if there is an error.
SCFeederSetFlags Function
int SCFeederSetFlags(SCANNER *s, SCFEEDERFLAGS flags);
This function should be called before calling SCScan for scanners in which
SCFeederGetFlags sets both SC_AUTOFEED and SC_PROGFEED. After
callingSCFeederSetFlags(s,SC_AUTOFEED), the feeder advances to the next
document after every call to SCScan. After calling SCFeederSetFlags(s,
SC_PROGFEED), a call to SCFeederAdvance is necessary to advance to the
next document. SCFeederSetFlags returns 0 if successful, -1 if there is an error.
SC_HASFEEDER Set if there is a document feeder attached to the scanner.
SC_AUTOFEED Set if the feeder can operate such that each call to SCScan
causes the next document to be loaded.
SC_PROGFEED Set if the feeder can operate so that SCScan can be called
multiple times per document. It is necessary to call
SCFeederAdvance to load the next document.

Functions
127
SCFeederAdvance Function
int SCFeederAdvance(SCANNER *s)
This function advances the feeder to the next document. This call is valid
only if the scanner supports the SC_PROGFEED mode. For scanners that
support both the SC_AUTOFEED and SC_PROGFEED modes,
SCFeederSetFlags(s,SC_PROGFEED) must have been called previously.
SCFeederAdvance returns 0 if successful, -1 if there is an error. When
unloading the last document, this function returns -1 with SCerrno set to
SCFEEDEREMPTY.
SCFeederReady Function
int SCFeederReady(SCANNER *s)
This function checks if the feeder is ready for feeding. SCFeederReady returns
0 if the feeder is ready, -1 if not. If the feeder is empty, SCerrno is set to
SCFEEDEREMPTY; if any other error conditions exist, SCerrno is set
appropriately.
Note that this function needs to be called before SCFeederAdvance to
determine whether a document is ready to be scanned after the call to
SCFeederAdvance.

128
Generic Scanner Interface
Events
Scanner applications need to be aware that the configuration information
about a scanner obtained from SCGetMinMaxRes,SCGetScannerRes,
SCGetPageSize, and SCGetDataTypes can change. This typically happens
when the user selects a new input medium using the scanner specific options
panel. For example, some scanners support transparency options that have
a different scanning page size than the normal scanning bed. When the user
decides to scan transparencies, the driver will notify the application that it
needs to call SCGetPageSize by sending an event. See Table 9-5.
SCGetEvent
typedef struct tag_infoChange {
unsigned int pageSizeChanged : 1;
unsigned int resolutionChanged : 1;
unsigned int dataTypesChanged : 1;
unsigned int feederFlagsChanged : 1;
} SCINFOCHANGE;
#define SCEVENT_INFOCHANGE 1
typedef struct tag_scevent {
unsigned int eventType;
union {
SCINFOCHANGE infoChange;
} event;
} SCEVENT;
int SCGetEvent(SCANNER *s, SCEVENT *event)
SCGetEvent is called to receive an event from the scanner driver. The event
structure should be examined, and if the pageSizeChanged field is set, the
application should call SCGetPageSize to query the new page size; if the
Table 9-5 Event Functions
Function Description
SCGetEvent Receives an event from the scanner driver.
SCEventPending Tests whether an event is currently pending.
SCGetEventFD Obtains an event file descriptor for passing to select(2).

Events
129
resolutionChanged field is set the application should call SCGetMinMaxRes
and SCGetScannerRes to query the new resolutions; if the dataTypesChanged
field is set the application should call SCGetDataTypes to query the new data
types, and if the feederFlagsChanged field is set the application should call
SCGetFeederFlags to query the new feeder flags.
SCEventPending
int SCEventPending(SCANNER *s)
SCEventPending is called to test whether or not an event is currently pending.
If an event is pending, the application should call SCGetEvent to receive it.
SCEventPending returns 1 if any events are pending, and 0 if no events are
pending.
SCGetEventFD
int SCGetEventFD(SCANNER *s)
SCGetEventFD returns a file descriptor which can be passed to the select
system call. When select indicates that this file descriptor is ready for reading,
then an event is pending and the application should call SCGetEvent to
retrieve it.

This chapter explains how to use the
programs included in the Impressario
Developer’s kit to test the output
capabilities of an Impressario-supported
printer, and test an Impressario printer
software installation.
Testing for Impressario Compatibility
Chapter 10


133
Chapter 10
10. Testing for Impressario Compatibility
This chapter explains how to use the programs that test printing
compatibility with the Impressario environment.
The topics discussed in this chapter are:
• “Testing Impressario Printing Compatibility” on page 134
• “Testing an Impressario Printer” on page 134
• “Testing an Impressario Printer Software Installation” on page 136
Note: See the testipr(1) and testiconfig(1) man pages for command line
options and the most up-to-date information on these test programs.

134
Testing for Impressario Compatibility
Testing Impressario Printing Compatibility
The Impressario Developer’s Kit provides two programs for testing printing
compatibility with the Impressario environment. The testipr program tests
the output capabilities of an Impressario-supported printer. The testiconfig
program tests an Impressario printer software installation. Both of these
programs are located in the directory /usr/impressario/tests/print.
Note: The use of these test harnesses is not sufficient testing to ensure the
quality of your product. They are only helpful tools, not a substitute for
additional testing.
Testing an Impressario Printer
A printer supported by Impressario can print a wide range of file formats
with a large selection of printing options for each file format. Testing each
supported file format and printing option can be a laborious task if done
manually, one test case at a time. testipr automates the testing process by
printing a set of standard test files, according to a standard test plan.
testipr is in the directory /usr/impressario/tests/print and typically is run from
there. The name of a printer installed on the system is the only required
command line parameter. It is recommended that the printer be physically
connected to the system on which is testipr run. It is the responsibility of the
user to ensure that the printer is not used by other users during testing.
On startup testipr looks in the /usr/impressario/tests/print directory for test
configuration files. These files are identified by a .ipr suffix and a basename
corresponding to the test class name. There are three standard configuration
files:text.ipr,image.ipr, and postscript.ipr. These files comprise the text, image,
and PostScript test classes, respectively. Each configuration file describes a
set of tests to be run by testipr. These files should not be modified. If you wish
to create your own test cases, you can copy the existing configuration files to
a new location, modify them to suit your needs, and use the -p command line
option to tell testipr where to find the files.

Testing Impressario Printing Compatibility
135
The format of the configuration file follows that of a X Window System
resource file. For example:
! This is a comment in an example .ipr file
test.basePath: /usr/impressario/data
test.1.file: testfile.sgi
test.1.options: -rotate 90 -gamma 3.5
test.1.desc: “SGI Image File - rotated 90, gamma 3.5”
test.2.file: testfile.sgi
test.2.options: -rotate 90 -gamma 3.5
test.2.desc: “SGI Image File - rotated 90, gamma 3.5”
Each resource must start with the keyword test.basePath is an optional
resource that specifies a directory path. If it is specified, the path will be
prepended to each file resource. The file resource specifies a test file to print.
Typically, these test files are from /usr/impressario/test/data. The options
resource specifies the actual -o model file options to be used in the test. Note
that the -o should not be specified. The testipr program automatically
prepends the nobanner option to all option strings. The option string is
passed as the argument to the lp command’s -o option. The desc resource
provides a description of the test. This string will be written to the test log
file. Each test case must be numbered consecutively starting with one.
The file specified in each test is submitted for printing using the specified
printing options. A log file, called /var/tmp/testipr.<printerName>.log, is
created. This log file contains general information about the printer being
tested and its host environment. The log also contains a detailed list of all
tests performed and their corresponding spooling system print job IDs. A
complete test record consists of the printer output, the corresponding log
file, and the /var/spool/lp/log file. See the testipr(1) man page for command line
options and the most up-to-date information on this test program.
Example 1:
Run all tests on the printer hp4.
testipr hp4

136
Testing for Impressario Compatibility
Example 2:
Run only image tests on the printer hp4.
testipr -c image hp4
Example 3:
Run only image tests numbers 5 and 6 on the printer hp4.
testipr -c image -t 5,6 hp4
Testing an Impressario Printer Software Installation
An Impressario supported printer has greatly enhanced printing capabilities
over a non-Impressario printer. To provide these enhanced capabilities,
software complying with Impressario specifications must be installed in
standard locations. The testiconfig program checks that the software support
for a printer conforms to Impressario specifications. Typical users of this
program are third-party printer developers who wish to verify that their
printer support is compatible with the Impressario printing environment.
testiconfig performs a number of checks to ensure conformance to
Impressario printer support specifications. The program performs checks on
the printer model file, POD files, graphical options panel and printer driver.
All output is sent to the standard output. If the -v option is specified,
additional information is displayed during the test. The testiconfig program
requires the name of the printer model file. The printer support software
must be installed on the system on which the testiconfig is run. Note that a
printer need not be physically installed on the system or installed by the
spooling system to run this test program.
Example:
Test the installation for an HP LaserJet 4:
testiconfig -v laserjet_model
Note: See the testiconfig(1) man page for command line options and the most
up-to-date information on this program.

This chapter explains how to package
your Impressario product to make
distribution simple and consistent with
the Impressario printing and scanning
environment.
Packaging Your Impressario Product
Chapter 11


139
Chapter 11
11. Packaging Your Impressario Product
This chapter explains how to package your Impressario Product.
The topics discussed in this chapter are:
• “Making a Software Distribution” on page 140
• “Packaging Impressario Printing Software” on page 141
• “Packaging Impressario Scanning Software” on page 144
Overview
Impressario provides an open printing and scanning environment. Third
party support for printers and scanners can be plugged into the Impressario
environment by following the procedures described in this chapter.
Note: As of this writing, Silicon Graphics is in the process of making its inst
software packaging and installation technology available to its developers.
The inst software packaging mechanism is far superior to the use of tar
archives. When available, inst software packaging should be used instead of
tar archives.

140
Packaging Your Impressario Product
Making a Software Distribution
The current method for creating an Impressario software distribution uses
the tar(1) file archiving program. To create a software distribution use the
following procedure.
1. Become superuser. The creation of all tape archives and the subsequent
installation of the product by the end user must be done as superuser.
Becoming superuser is typically accomplished by either logging in as
root or executing the su(1M) command. Typically, a password must be
provided to gain superuser access to a system. Ask your system
administrator for assistance.
2. Copy the files that comprise your product from your development area
to the directories into which they will be installed. See “Packaging
Impressario Printing Software” on page 141 and “Packaging
Impressario Scanning Software” on page 144 for the files typically
installed by printing and scanning products.
3. Change the permissions and ownership of each file in accordance with
the recommendations in “Packaging Impressario Printing Software”
and “Packaging Impressario Scanning Software.” The chmod(1)
command is used to change file permissions and the chown(1)
command is used to change file ownership. For example, to give the file
foo read/write permission for the owner and read-only permission for
all others, and to specify a root owner and sys group, execute the
following commands:
chmod 0644 foo
chown root.sys foo
4. Run the tar command and specify the absolute pathname of each file that
is part of the distribution. For example, to create an archive consisting
of two files and place that archive on the default tape device, execute
the following command:
tar cvLf /dev/tape /usr/lib/print/mydriver /var/spool/lp/model/mymodel
For detailed information on the tar program, refer to the tar(1) manual
page.
5. Optionally, you may include in your distribution a shell script that
removes the files that are installed by your product. This allows
customers to reclaim the disk space used by your product if your
product is no longer being used.

Packaging Impressario Printing Software
141
Packaging Impressario Printing Software
To illustrate better the process of packaging Impressario printing support
software, let us create a fictitious product. The product will provide
Impressario support for the Blast family of printers. The Blast product line
consists of the Blast 1, Blast 2CVX, and the Blast P+. Since each of the Blast
printers is similar in functionality, support for all of them will be provided
by a single model file.
Impressario printing support products typically are named with the printer
family, the word Print and the lowest version number of Impressario that
supports the product. In keeping with this convention, we will name our
product “BlastPrint for Impressario 1.2”.
A typical Impressario printer support product consists of the following files:
Model file When the printer is registered with the spooling system,
this file is copied and becomes the printer interface file. The
spooling system executes this shell script for each print job.
Driver This executable program performs the work of
communication with the printer. The interface file invokes
the driver to do the actual printing of a file. The driver sends
data to the printer and updates the POD status file.
POD files The POD consists of three files, all with the same basename
as the model file but with the suffixes config,status, and log.
These plain text files contain static and dynamic printer
information.
Graphical options panel program
This GUI program provides users with graphical access to
printer specific options. The program is given the same
basename as the model file with the suffix gui.
Graphical options panel resource file
This is an X Window system resource file for the graphical
options panel program. The file is named with the class
name of the graphical options panel program. This name
must also match the GUI_CLASS variable in the model file.
Manual page A manual page should be created that describes the printing
product. By convention, this manual page should be named
with the product name. The manual page must be

142
Packaging Your Impressario Product
formatted using nroff(1) and must be compressed before
installation. A product manual page template and a
Makefile to perform the required formatting, compression,
and installation is provided in the directory
/usr/impressario/man.
Note: In order to create a manual page you must have the
Documenter’s Workbench product installed on the
development system.
The files listed in Table 11-1 comprise the BlastPrint product. The files are
listed with their absolute pathnames, ownership, and permissions.
Before creating the actual software distribution, the above files must be
copied to the directories indicated and given the specified ownership and
permissions. Once this is done, the Impressario test program testiconfig(1)
can be run to verify that the product conforms to Impressario product
installation specifications.
To run the testiconfig program on the BlastPrint product, execute the
following:
cd /usr/impressario/tests/print
./testiconfig blast_model
Once the product installation has been verified, a software distribution can
be created. This is done using the tar(1) command. Assuming we are making
Table 11-1 Typical Printing Product Files
Description Pathname Permiss. Owner
Model file /var/spool/lp/model/blast_model 0755 lp.lp
Driver /usr/lib/print/blaster 0755 lp.lp
POD files /usr/lib/print/data/blast_model.config
/usr/lib/print/data/blast_model.status
/usr/lib/print/data/blast_model.log
0664
0664
0664
lp.lp
lp.lp
lp.lp
Graphical
options
program
/var/spool/lp/gui_model/ELF/blast_model.gui 0755 lp.lp

Packaging Impressario Printing Software
143
a tape distribution, we would issue the following command (note the use of
the line continuation character ‘\’ to allow the command line to extend over
multiple lines):
tar cvLf /dev/tape /var/spool/lp/model/blast_model \
/usr/lib/print/blaster \
/usr/lib/print/data/blast_model.config \
/usr/lib/print/data/blast_model.status \
/usr/lib/print/data/blast_model.log \
/var/spool/lp/gui_model/ELF/blast_model.gui \
/usr/lib/X11/app-defaults/Blast \
/usr/share/catman/u_man/cat1/blastprint.z
The resulting tape archive represents the BlastPrint product.
It is recommended that the copying of the files to their installation
directories, the assigning of ownership and permissions, and the archiving
of the files all be automated in a shell script. This eliminates a large amount
of typing and provides a reproducible distribution mechanism.
Once the distribution tape has been created, it should be taken to a new
system (in other words, one that has never had BlastPrint installed) and
installed. This is done using the following command as superuser:
tar xvf /dev/tape
Once BlastPrint has been installed, the testiconfig program should again be
run to verify that the installation is complete and correct. A printer should
then be connected to the system and registered with the spooling system
using the Printer Manager (printers(1M)). The Impressario test program
testipr(1) should be run on the newly installed printer to verify that it is able
to print all supported Impressario file formats and options.
If the printer was installed with the name myblaster, it can be tested by
executing the commands:
cd /usr/impressario/tests/print
./testipr myblaster
This completes the creation of an Impressario printer support product.

144
Packaging Your Impressario Product
Packaging Impressario Scanning Software
To illustrate the process of packaging Impressario scanning software, we
will create a fictitious product to provide Impressario support for the
LowTech 100 scanner.
Impressario scanning products are typically named with the scanner family,
the word Scan, and the lowest version number of Impressario that supports
this product. We will name our product “LowTechScan for Impressario 1.2”.
A typical Impressario scanner support product consists of the following
files:
Scanner driver The executable program that gets the data from a scanner.
Graphical options program
Graphical scanner-specific options program launched from
a scanning application. The graphical options program
showcases a scanner’s features. This program must have
the same base name as the scanner driver in order to be
recognized by scanners(1M), the scanner install tool.
Graphical options resource file
X Window System resource file for the graphical options
program. This file is named with the class name of the
graphical options program. This class name must be the
same as the graphical options program name with the first
letter capitalized. If the graphical options program resource
file is not named using these conventions, the options
program will not have access to its resources when invoked
for a network scanner.
Manual page A manual page should be created that describes the
scanning product. By convention, this manual page should
be named with the product name. The manual page must be
formatted using nroff(1) and must be compressed before
installation. A product manual page template and a
Makefile to perform the required formatting, compression,
and installation is provided in the directory
/usr/impressario/man.

Packaging Impressario Scanning Software
145
Note: In order to create a manual page you must have the
Documenter’s Workbench product installed on the
development system.
The files listed in Table 11-2 comprise the LowTechScan product. The files are
listed with their absolute pathnames, ownership, and permissions
Before creating the actual software distribution, the above files must be
copied to the directories indicated and given the specified ownership and
permissions. Then the scanners(1M) tool should be run to verify that the
correct string for the LowTech 100 scanner appears in the “Install New
Scanner” dialog. The scanners tool should be used to install a LowTech 100
scanner, and gscan(1) should be able to run the graphical options program
from the “Scanner Specific Options” command on the “Parameters” menu.
Once the product installation has been verified, a software distribution can
be created. This is done using the tar(1) command. Assuming we are making
a tape distribution, we would issue the following command (note the use of
the line continuation character ‘\’ to allow the command line to extend over
multiple lines):
tar cvLf /dev/tape /usr/lib/scan/drv/lowtech \
/usr/lib/scan/opt/lowtech \
/usr/lib/X11/app-defaults/Lowtech \
/usr/share/catman/u_man/cat1/lowtech.z
Table 11-2 Typical Scanning Product Files
Description Pathname Permissions Owner
Scanner
driver /usr/lib/scan/drv/lowtech 0755 root.sys
Graphical
options
program
/usr/lib/scan/opt/lowtech 0755 root.sys
Graphical
options
resources
/usr/lib/X11/app-defaults/Lowtech 0644 root.sys
Manual
page /usr/share/catman/u_man/cat1/lowtech.z 0444 root.sys

146
Packaging Your Impressario Product
The resulting tape archive represents the LowTechScan product.
It is recommended that the copying of the files to their installation
directories, the assigning of ownership and permissions, and the archiving
of the files all be automated in a shell script. This will eliminate a large
amount of typing and provides a reproducible distribution mechanism.
Once the distribution tape has been created, it should be taken to a new
system (in other words, one that has never had LowTechScan installed) and
installed. This is done using the following command as superuser:
tar xvf /dev/tape
Once LowTechScan has been installed, the scanners and gscan programs
should again be run to verify that the installation is complete and correct.
This completes the creation of an Impressario scanner support product.

This chapter explains how to add new
features to the Impressario open
architecture. It describes how
Impressario’s automatic filetype
recognition and conversion pipeline
works, how to add new file types, and
how to add a new PostScript Raster
Image Processor (RIP).
Enhancing Impressario with Plug-Ins
Chapter 12


149
Chapter 12
12. Enhancing Impressario with Plug-Ins
This chapter explains how you can add plug-ins to Impressario to satisfy
needs that haven’t yet been integrated into the base software. This allows
you to dynamically update the feature set of Impressario.
This chapter explains:
• How Impressario’s automatic file type recognition and file conversion
pipeline works
• How to add new file types to those that Impressario printers already
recognize and print
• How to add a new PostScript Raster Image Processor (RIP) to
Impressario and switch between the standard Impressario RIP and
your new RIP

150
Enhancing Impressario with Plug-Ins
How the Impressario File Conversion Pipeline Works
The key components of the Impressario file conversion pipeline are:
• A database of File Type Rules (FTRs)
• The wstype runtime filetype recognition utility
• The fileconvert file conversion utility
File Type Rules
The file type rules of the FTR database are well-documented in the Indigo
Magic Integration Guide, which is available as an online book and is
installable from your IRIX CD.
The File Type Rules have two parts relevant to printing. The first part is a
TYPE rule for recognizing that a file is of a particular type, given the first 512
bytes of the file. The second part is a CONVERT rule for converting that type
to another type, with the eventual goal of being able to convert any file type
to a set of printable file types. Each CONVERT rule contains a pair of known
types (source and destination type), a Bourne shell command for going from
the source to the destination type, and a cost for the conversion. Impressario
builds on the standard IRIX database of filetypes, extending the FTR set to
handle additional input file types, and adding new destination file types.
Runtime File Type Recognition Utility
The wstype utility is used to determine the file type of a file or set of files. It
is similar to file(1) in basic operation, but has no hardcoded special cases and
no /etc/magic file, relying on the compiled FTR database for typing
information.
See the wstype(1) man page for additional information.

How the Impressario File Conversion Pipeline Works
151
File Conversion Utility
The fileconvert utility builds a directed acyclic graph out of all known file
types, determines the input file type, and attempts to find the lowest-cost
path from source to destination.
If a conversion path exists, fileconvert prints a Bourne shell command string
which, when executed, generates the destination file type on stdout. Most
model files simply execute this shell command string, piping the results to
the printer driver. This flexible, extensible mechanism enables Impressario
to print virtually any recognizable file type on any printer that is compliant
with Impressario.
See the fileconvert(1) man page for additional information.

152
Enhancing Impressario with Plug-Ins
Adding a New Filetype to Impressario
To extend Impressario to make a new type of file printable, you need only
perform the following steps:
1. Write a filter to convert your new type.
2. Write an FTR rule that recognizes the new filetype.
3. Add a CONVERT rule from that type to a known Impressario type.
4. Install and test your changes.
Writing a New Filter
First, write a filter to convert your new type to either STIFF or PostScript, the
two main formats for input to Impressario. Fileconvert requires that your
filter be able to accept input either on stdin or from a specified filename. It
should also be able to write output to stdout without using intermediate files,
so that the conversion can succeed, even if the converting host has low disk
space. See the Indigo Magic Integration Guide, Chapter 5, for more details. See
the gif2stiff(1) man page for an example.
Writing an FTR
Next, write an FTR that can recognize the new filetype given only the first
512 bytes of the file. See the Indigo Magic Integration Guide and the ftr(1) man
page for a description of the available primitives for matching a file’s type
and for a description of the additional parts of a good FTR.
Adding a CONVERT Rule
As part of your FTR, add a CONVERT rule from that type to a known
Impressario type. We strongly recommend that you convert image types to
the STIFF93aImage type and convert other non-image file formats to the
PostScriptFile type. Refer to Appendix A and the libstiff(3) man page for
information on writing STIFF output. Note that once you convert to either a
PostScriptFile or a STIFF93aImage, Impressario knows how to convert that
filetype to a printable format on any printer.

Adding a New Filetype to Impressario
153
Model files that are compliant with Impressario also automatically set the
proper environment variables for the options the user selected on the
spooler command line, and the standard Impressario CONVERT rules
automatically pick up the appropriate environment variables when
converting these file types to printable types. This is how user-specified
printing options are applied to the dynamically-constructed file conversion
pipeline.
Installation and Testing
The easiest way to show how to test a new filetype is by example.
Setting Up an Example
Our example makes the following assumptions:
• The new filetype is called “BlastFile.”
• The new FTR is in the directory /usr/tmp/blastfile.ftr.
• A sample BlastFile is in the directory /usr/tmp/sample.blastfile.
• All BlastFiles start with the word “blastfile.”
A sample (although incomplete) TYPE rule for our example would look like
this:
TYPE BlastFile
MATCH string(0,9) == "blastfile";
LEGEND Blast Image File
CONVERT BlastFile STIFF93aImage
COST 50
FILTER /usr/lib/print/blast2stiff $IMPR_IMG2STIFFOPTS
Testing the New Filetype
1. To test the new filetype, become root by typing:
su
and supplying a password, if necessary.

154
Enhancing Impressario with Plug-Ins
2. Copy your FTR into /usr/lib/filetype/install:
cp /usr/tmp/blastfiletype.ftr /usr/lib/filetype/install
3. Compile the FTR database:
cd /usr/lib/filetype ; make
See the ftr(1) man page if any errors occur.
4. Run wstype to verify that Impressario now recognizes your file type:
wstype /usr/tmp/sample.blastfile
You should see the following output:
/usr/tmp/sample.blastfile BlastFile
5. Try to convert that file type to a printable file type. The most printable
filetype in the Impressario database is ImpressarioPostScriptFile, so
let’s try that:
fileconvert -d ImpressarioPostScriptFile \
/usr/tmp/sample.blastfile
You should get back something like:
PRINTFILES=”/usr/tmp/sample.blastfile” ; /usr/lib/print/blast2stiff
$IMPR_IMG2STIFFOPTS $PRINTFILES | /usr/lib/print/stiff2ps $IMPR_SGI2PSOPTS
Note: The above output would appear on one line.
If fileconvert does not return a valid shell command string, check the exit
code of the filter. If you are in the C shell, type:
echo $status
If you are in the Bourne shell, type:
echo $?
If the exit code is not zero, then fileconvert was unable to convert your
filetype. Verify that your destination filetype is convertible to a
printable type by checking the CONVERT rules in the FTR database
and making sure there is a conversion path from your destination type
to the Impressario type, and try the above steps again.
6. Once the above steps work, verify that your filter produces valid
output by typing:
vstiff /usr/tmp/sample.blastfile

Adding a New Filetype to Impressario
155
This should bring up the vstiff(1) previewer, which uses the FTR
database of TYPE and CONVERT rules to convert to a screen-viewable
STIFF file. Use the “PostScript Options...” menu choice on the File
menu to choose different color spaces and depths. See the vstiff(1) man
page for more help.
Note: If your filter converts directly to STIFF93aImage, the PostScript
options in vstiff will not be applicable.
7. Finally, try printing that file to an Impressario printer. Type:
lp -dprintername /usr/tmp/sample.blastfile
Watch the spooler log file for errors and the printstatus panel for printer
messages until the file prints. If you were able to vstiff the file, then you
should to be able to print it.
When you have completed this process, you should have the files shown in
Table 12-1. These files should be installed with the permissions and the
ownerships shown and at the locations shown. The actual file basename may
change but the pathname should not. Conversion filters should be installed
in /usr/lib/print.
Table 12-1 New Filetype Pathnames
Mode Owner Group Full Pathname
-r--r--r-- root sys /usr/lib/filetype/install/blastfiletype.ftr
-rwxr-xr-x root sys /usr/lib/print/blast2stiff

156
Enhancing Impressario with Plug-Ins
Using an Alternate PostScript RIP
Using an alternate PostScript Raster Image Processor (RIP) is extremely easy
in the Impressario open architecture. You can even switch RIPs on the fly, at
the last possible moment, without losing any of the features of Impressario’s
file conversion pipeline.
The steps required to add an alternate RIP to your system are:
1. Make the new RIP command line compatible with the Impressario RIP,
psrip(1).
2. Write a dummy TYPE.
3. Test the alternative RIP.
4. Package the files.
You should be able to use this alternate RIP instead of, or in addition to, the
standard Impressario interpreter.
Note: In the example below, the new RIP is called “blastrip” and is installed
in the directory /usr/lib/print, next to Impressario’s psrip.
Making the Command line Compatible
Your new RIP must be command-line compatible with psrip. Look at the
psrip(1) man page for more information on what that means. psrip accepts
ASCII and binary PostScript either on stdin or in a disk file, and generates a
variety of sizes, colorspaces, and depths of STIFF bitmaps on stdout.
Being command-line compatible with psrip is probably the most tedious part
of adding a new interpreter, but is well worth the effort when you consider
that you gain all the advantages of Impressario:
• Plug-and-play printer drivers
• Automatic filetype recognition
• Automatic filetype conversion

Using an Alternate PostScript RIP
157
Writing a Dummy TYPE
The next step is to write a dummy TYPE and a simple CONVERT rule. First
create a new, empty TYPE definition for your output raster format. Here’s an
example:
TYPE BlastRasterBitmap
# dummy type for use in model file only
MATCH false;
CONVERT ImpressarioPostScriptFile BlastRasterBitmap
# convert from formatted, filtered ImpressarioPostScriptFile
# to a RIPped bitmap
COST 50
FILTER /usr/lib/print/blastrip $IMPR_PSRIPOPTS
Install that file in /usr/lib/filetype/install/blastrip.ftr and compile your FTR
database by typing:
su ; cd /usr/lib/filetype ; make
Now test the conversion and preview the bitmap by using vstiff:
fileconvert -d BlastRasterBitmap /etc/passwd | vstiff -stdin
If you run into problems viewing it, then save it to disk and use other tools
to verify that you have a valid STIFF file. However, if vstiff cannot view it,
then Impressario printer drivers will probably not be able to print it.
Testing the Alternate RIP
To use the alternative RIP in your printer model files instead of the default
psrip, change all references to “ImpressarioRasterBitmap” to
“BlastRasterBitmap.” The lines below were taken from the laserjet_model
template model file and the word “ImpressarioRasterBitmap” was changed
to “BlastRasterBitmap”:
# Use fileconvert to convert to the printer’s native format.
# For raster printers, it is BlastRasterBitmap.
# For PostScript printers, it is ImpressarioPostScriptFile.
#
CMD=‘$fileconvert $fileconvertopts -d BlastRasterBitmap $file 2> /dev/null‘

158
Enhancing Impressario with Plug-Ins
Packaging the Files
You are done now, and need only package these optional RIP files for
installation. The files you should be installing may have different names, but
should be installed in the following directories, with the permissions and
ownerships shown in Table 12-2.
You should modify your printer’s model file to use the new RIP whenever
you want. You can, of course, still ask for ImpressarioRasterBitmap.
Note: Test carefully to make sure that your new RIP is, in fact, compatible
with the existing psrip before shipping your product.
Table 12-2 Alternative RIP Pathnames
Mode Owner Group Full Pathname
-r--r--r-- root sys /usr/lib/filetype/install/blastrip.ftr
-rwxr-xr-x root sys /usr/lib/print/blastrip

This appendix describes the Stream TIFF
file format (STIFF), the primary
interchange file format between printer
filters and drivers. It also describes
libstiff, a C-language application
programming interface (API) used to
read and write Stream TIFF files.
Stream TIFF Data Format
Appendix A


161
Appendix A
A. Stream TIFF Data Format
This appendix describes the Stream TIFF data format (STIFF), the primary
interchange file format between printer filters and drivers, and libstiff, a
C-language application programming interface (API) used to read and write
Stream TIFF files. Stream TIFF is also used by gscan(1) to store images in TIFF
files and to scan to the screen (in conjunction with vstiff(1)).
The major topics discussed are:
• “Library Description” on page 162
• “Library Access” on page 162
• “Library Functions” on page 163
• “Printing-Specific STIFF” on page 166
• “Generic STIFF File Structure” on page 167

162
Stream TIFF Data Format
Library Description
libstiff provides a C-language application programming interface (API) to
the reading and writing of Stream TIFF files. Stream TIFF (STIFF) is a subset
of the Tag Image File Format (TIFF) Revision 6.0 originally developed by
Aldus Corporation. TIFF is an extremely flexible format, well suited for
monochrome and color bitmap images. The primary difference between
TIFF and STIFF is that while a TIFF file may require file seeking during
reading or writing, a STIFF file does not. This means that a STIFF file can be
read and written to both files and non-seekable streams such as pipes and
sockets. STIFF can be used by application developers to write TIFF 6.0
compliant files, and a STIFF file can be read by any TIFF reader that
conforms to the TIFF Revision 6.0 specifications. However, libstiff cannot be
used to read many standard TIFF files since STIFF is a subset of TIFF.
The functions provided bylibstiff greatly simplify the reading and writing of
TIFF-compatible files. Using the STIFF API, TIFF 6.0-compatible STIFF files
can be read and written without the need to understand the structure of a
TIFF file and without the need to explicitly specify TIFF tags.
Library Access
There are two sets of libstiff functions. One set comprises the generic libstiff
API. These functions are designated by an ST prefix and may be used to read
and write generic STIFF files. To access these functions, an application must
include the header file stiff.h located in the /usr/include directory. The second
set of libstiff functions is tailored to reading and writing STIFF files that are
to be passed between printing filters and drivers. These printing-related
functions are designated by the prefix PST and are accessed through the
header file printstiff.h, also located in /usr/include. If printstiff.h is used, the
header stiff.h need not be specified. The generic and printing-specific
functions may be freely intermixed within an application.
Programs that call libstiff functions must link with thelibstiff.a library located
in the directory /usr/lib. An example command line is shown below:
cc -o myprog myprog.c -lstiff

Library Functions
163
Library Functions
libstiff provides the generic functions listed in Table A-1.
Table A-1 STIFF Generic Functions
Name Description
Stream Handling
STOpen Opens a STIFF stream on the specified file descriptor
STClose Closes a STIFF stream opened by STOpen
STSkipTo Skips forward on a specified stream
Reading and Writing
STReadImageHeader Reads the STIFF image header from the specified stream
STWriteImageHeader Writes the image header to the specified stream
STRead Reads the specified amount of image data from the stream
STWrite Writes the specified amount of image data to the stream
TIFF Tag Support
STAddTag Adds the specified tag to the TIFF tag list
STRemoveTag Removes the specified tag from the output TIFF tag list
STGetTag Searches the tag list for the specified TIFF tag
STPrintTags Prints the current TIFF tag list
Execution Error Handling
STPerror Prints error messages to standard error
STErrorString Gets the error string for the specified error code

164
Stream TIFF Data Format
STIFF also provides the printing-specific functions listed in Table A-2.
Example Usage
The sequence of operations for writing a STIFF stream is as follows:
1. Obtain a writable file descriptor. Note that this descriptor can be
associated with a non-seekable stream.
2. Call STOpen with the writable file descriptor and the flag ST_WRITE.
3. Fill in the STIFF image header (STImageHeader or PSTImageHeader).
4. Optionally, add any application-specific TIFF tags to the file using
STAddTag.
5. Call the image header write function STWriteImageHeader or
PSTWriteImageHeader.
6. Write the image data using STWrite.
7. Repeat steps 3 through 6 for each page of image data.
8. Close the STIFF file using STClose.
9. Close the file descriptor.
The sequence of operations for reading a STIFF stream is as follows:
1. Obtain a readable file descriptor. Note that this descriptor can be
associated with a non-seekable stream.
2. Call STOpen with the readable file descriptor and the flag ST_READ.
3. Call the image header read function STReadImageHeader or
PSTReadImageHeader.
Table A-2 STIFF Printing-Specific Functions
Name Description
PSTReadImageHeader Reads the printing-specific STIFF image header from the
stream
PSTWriteImageHeader Writes the printing-specific STIFF image header to the
stream

Library Functions
165
4. Access the fields of the image header structure to determine the amount
of image data to be read for this page.
5. Optionally, retrieve any application-specific TIFF tags from the file
using STGetTag.
6. Read the image data using STRead.
7. Repeat steps 3 through 6 for each page of image data. The last page of
image data will be an empty page (that is, the amount of data equals
zero). An STEEOF error occurs if an attempt is made to read past the
end of the STIFF.
8. Close the STIFF stream using STClose.
9. Close the file descriptor.
If an error condition is returned by a libstiff function, STPerror can be used to
print a diagnostic error message to the standard error, and STErrorString can
be used to obtain an appropriate error message for display to the user by
other means.

166
Stream TIFF Data Format
Printing-Specific STIFF
The printing-specific functions (PST) provided by libstiff read and write
STIFF files as described above. The printing-specific aspect of these
functions is found in the image header structure. PSTImageHeader, the
printing-specific image header, contains all fields of the STImageHeader plus
printing-specific information fields such as image resolution and halftoning
method.
If a STIFF file is written using the generic functions and is read using the
printing-specific functions, default values are used for the PSTImageHeader
fields not found in the STIFF. Similarly, a STIFF file written using the
printing-specific functions can be read by the generic functions. In this case,
the additional information in the stream can be ignored or obtained using
the STGetTag function.
Refer to the header file /usr/include/printstiff.h for additional information
regarding printing-specific STIFF.
Printer driver developers should pay special attention to the command-line
options string that is part of a PST image header. See the LaserJet example
driver for an example of how to combine parsing the command-line and
image-header driver options.

Generic STIFF File Structure
167
Generic STIFF File Structure
While it is not necessary to understand the STIFF file structure to use libstiff,
this explanation is provided for those who need to know. A Stream TIFF file
is first and foremost a valid TIFF file. STIFF is derived from the TIFF 6.0
specifications available from Aldus Corporation (see below). The terms used
below to describe a STIFF file (for example, IFD) are explained in the TIFF
specifications and are not described here.
The primary restriction STIFF places on the TIFF structure is that all data
must be read from or written to the file without the need to seek within the
file. Specifically, within a STIFF file:
1. The bitmap image data must be in page-number order.
2. Data that does not fit in the value section of a tag must be located
immediately after the IFD and must occur in the same order in which
the tags are encountered. The exception to this is the image data itself,
which must come last for each page.
3. Image data must immediately follow the IFD and any offset values
associated with it.
4. A terminating, empty IFD is always added to the end of the STIFF file.
This IFD guarantees that an IFD with 0000 in its “next IFD” field
appears in the IFD chain. Note that this empty IFD is not encountered
when following IFD pointers if the last “real” IFD is written with the
last parameter set to 1. While the TIFF specifications states that IFDs
should not be empty, relaxing this restriction appears to have no impact
on TIFF compatibility.
A generic STIFF file can be represented as shown in Figure A-1.

168
Stream TIFF Data Format
Figure A-1 Generic STIFF File Structure
The libstiff functions support only the Motorola (MM) byte ordering. In
addition to supporting TIFF class R, G, and B data, libstiff supports the
CMYK color image data type (PhotoMetricInterpretation = 5 and InkSet = 1)
and four additional color image separation types: CMY, YMC, YMCK, and
KCMY.
For these additional types, PhotoMetricInterpretation = 5, InkSet = 2,
NumberOfInks = 3 or 4, and the InkNames tag is used to indicate the inks
contained in each channel.
When reading an image header, libstiff parses the ink names for these
additional types and sets the type field of the STImageHeader structure to the
appropriate value defined in stiff.h. When writing an image header, libstiff
Image data for page 1
Optional intervening space
IFD for page 1
Data for long values in IFD 1
Optional intervening space
IFD for page 2
Data for long values in IFD 2
Image data for page 2
• • •
Terminating empty IFD
TIFF header (8 bytes)

Generic STIFF File Structure
169
writes the appropriate PhotoMetricInterpretation,InkSet,NumberOfInks, and
InkNames tags based on the value of the type field of the STImageHeader
structure.
The CMYK data format is a TIFF data format extension, as shown in
Table A-3.
The CMY data class is a subset of the CMYK class and differs from the
CMYK class in a TIFF-compliant manner, as shown in Table A-4.
Table A-3 CMYK Data Format
Tag Possible Values
BitsPerSample (1,1,1,1) (4,4,4,4) (8,8,8,8)
PhotoMetricInterpretation 5
SamplesPerPixel 4
PlanarConfiguration 1,2
NumberOfInks 4
Table A-4 CMY Data Format
Tag Possible Values
BitsPerSample (1,1,1,1)(1,1,1) (4,4,4) (8,8,8)
PhotoMetricInterpretation 5
SamplesPerPixel 3 (4 or 8 bits, 1 bit planar) or 4 (1 bit chunky)
PlanarConfiguration 1,2
NumberOfInks 3

170
Stream TIFF Data Format
The YMC data class is similar to the CMY class except that data is organized
as YMC instead of CMY (see Table A-5). When using libstiff, YMC data
corresponds to the data type ST_TYPE_YMC.
The YMCK class is similar to the CMYK class except that data is organized
as YMCK instead of CMYK (see Table A-6). When using libstiff, YMCK data
corresponds to the data type ST_TYPE_YMCK.
Table A-5 YMC Data Format
Tag Possible Values
BitsPerSample (1,1,1,1)(1,1,1) (4,4,4) (8,8,8)
PhotoMetricInterpretation 5
SamplesPerPixel 3 (4 or 8 bits, 1 bit planar) or 4 (1 bit chunky)
PlanarConfiguration 1,2
NumberOfInks 3
InkSet 2
InkNames yellow, magenta, cyan
Table A-6 YMCK Data Format
Tag Possible Values
BitsPerSample (1,1,1,1) (4,4,4,4) (8,8,8,8)
PhotoMetricInterpretation 5
SamplesPerPixel 4
PlanarConfiguration 1,2
NumberOfInks 4
InkSet 2
InkNames yellow, magenta, cyan, black

Generic STIFF File Structure
171
The KCMY class is similar to the CMYK class except that the data is
organized as KCMY instead of CMYK (see Table A-7). When using libstiff,
KCMY data corresponds to the data type ST_TYPE_KCMY.
Note that for the RGB, CMY, and YMC classes with BitsPerSample values of
(1,1,1) and a PlanarConfiguration value of 1, pixels are stored two to a byte,
with the bits ordered from most-significant to least-significant.
For example, CMY data is stored as:
CMY0CMY0
Rows are padded to contain an integral number of bytes.
Refer to the header file stiff.h for additional information regarding the STIFF
file structure.
Table A-7 KCMY Data Format
Tag Possible Values
BitsPerSample (1,1,1,1) (4,4,4,4) (8,8,8,8)
PhotoMetricInterpretation 5
SamplesPerPixel 4
PlanarConfiguration 1,2
NumberOfInks 4
InkSet 2
InkNames black, cyan, magenta, yellow

This chapter describes libimp, the C-
language application programming
interface (API) for reading and writing
Silicon Graphics Image Format files.
Silicon Graphics Image File Format API
Appendix B


175
Appendix B
B. Silicon Graphics Image File Format API
This appendix describes libimp, the C-language application programming
interface (API) for reading and writing Silicon Graphics Image format files.
The major topics discussed are:
• “Library Description” on page 175
• “Library Access” on page 176
• “Library Functions” on page 176
• “IMPImage Structure” on page 179
Library Description
libimp provides a C-Language application programming interface (API) for
reading and writing Silicon Graphics Image format files and for performing
a number of format-independent image processing operations. These
operations include color space conversion and filtered image zooming.
libimp provides all functionality of the libimage library1. In addition, libimp
provides function prototypes, a documented interface, reliable error
reporting, and a number of other enhancements.
1See the rgb(4) man page for a description of libimage.

176
Silicon Graphics Image File Format API
Library Access
A program that calls libimp functions must include the header file imp.h
located in the directory /usr/include. In addition, the program must link with
the libimp.a library located in /usr/lib. The link line would look like this:
... -limp ...
Library Functions
The libimp library, which is based heavily on the libimage and libgutil
libraries, consists of two main sets of functions. The functions shown in
Table B-1 perform operations on Silicon Graphics Image format files.
The functions shown in Table B-2 perform operations on image data in a
format-independent manner.
Table B-1 Silicon Graphics Image Format File Functions
Function Description
Image Access
impOpen Opens an Silicon Graphics Image format file for reading or
writing
impOpenFd Opens an Silicon Graphics Image file format for reading or
writing
impClose Closes an Silicon Graphics Image file format for reading or
writing
impCloseFd Closes an Silicon Graphics Image Format format file for
reading or writing
Image I/O
impReadRow Reads image row
impReadRowB Reads byte image row
impWriteRow Writes image row
impWriteRowB Writes byte image row

Library Functions
177
Table B-2 Format-Independent File Functions
Function Description
Zooming
impCreateZoom Creates zoom operator
impDestroyZoom Destroys zoom operator
impResetZoom Resets zoom row cache
impZoomRow Zooms an image row
Data Packing
impPackRow Packs two-byte data into one byte
impUnpackRow Unpacks one-byte data into two bytes
Math Operations
impZeroRow Sets row to zero
impInitRow Initializes a row to a value
impCopyRow Copies a row
impSAddRow Adds a value to a row
impVAddRow Adds two rows
impSSubRow Subtracts a value from a row
impVSubRow Subtracts two rows
impSMulRow Multiplies a row by a value
impSDivRow Divides a row by a value
impClampRow Clamps row values
Color Space Conversion
impRGBtoW Converts an array from RGB format to W format
impWtoRGB Converts an array from W format to RGB format
impRGBtoK Converts an array from RGB format to K format

178
Silicon Graphics Image File Format API
impKtoRGB Converts an array from K format to RGB format
impRGBtoCMY Converts an array from RGB format to CMY format
impCMYtoRGB Converts an array from CMY format to RGB format
impRGBtoYIQ Converts an array from RGB format to YIQ format
impYIQtoRGB Converts an array fromYIQ format to RGB format
impRGBtoYUV Converts an array from RGB format to YUV format
impYUVtoRGB Converts an array from YUV format to RGB format
impRGBtoYCbCr Converts an array from RGB format to YCbCr format
impYCbCrtoRGB Converts an array from YCbCr format to RGB format
impRGBtoCMYK Converts an array from RGB format to CMYK format
impCMYKtoRGB Converts an array from CMYK format to RGB format
impRGBtoDevCMYK Converts an array from RGB format to device CMYK
format
impRGBtoHSV Converts an array from RGB format to HSV format
impHSVtoRGB Converts an array from HSV format to RGB format
impRGBtoHLS Converts an array from RGB format to HLS format
impHLStoRGB Converts an array from HLS format to RGB format
Error Handling
impPerror Prints libimp execution error messages to standard error
impErrorString Obtains libimp execution error messages
Table B-2 (continued) Format-Independent File Functions
Function Description

IMPImage Structure
179
IMPImage Structure
The IMPImage structure contains public and private information about an
Silicon Graphics image file. This structure is identical both in size and field
naming to the IMAGE structure defined in the header file image.h, included
by applications that use the libimage library. While it has been common
practice to directly modify the public fields of the image structure, this is not
recommended. Macros are defined in imp.h for manipulating the structure
fields. It is strongly recommended that these macros be used to set and get
values from the image structure. The IMPImage structure is defined as
follows:
typedef struct _impImage {
/******* Public image header information (archived) */
ushort_t imagic; /* Silicon Graphics Image file magic number */
ushort_t type; /* Raster type (e.g. verbatim, rle) */
ushort_t dim; /* Image dimension */
ushort_t xsize; /* X size (pixels) */
ushort_t ysize; /* Y size (pixels) */
ushort_t zsize; /* Number of channels (e.g. rgb = 3) */
long min; /* Minimum intensity in image */
long max; /* Maximum intensity in image */
ulong_t wastebytes; /* Padding */
char name[IMP_NAME_MAX+1]; /* Image name */
ulong_t colormap; /* Image type (e.g. colormap, normal) */
/******* Private image header information (core use only) */
long file;
ushort_t flags;
short dorev;
short x;
short y;
short z;
short cnt;
short *ptr;
short *base;
short *tmpbuf;
ulong_t offset;
ulong_t rleend;
ulong_t *rowstart;
long *rowsize;
} IMPImage;

180
Silicon Graphics Image File Format API
Note: ushort_t and ulong_t are unsigned short and unsigned long,
respectively.
Arguments:
magic Magic number identifying this file as an Silicon Graphics
Image Format file.
type Bitwise-OR combined code indicating the raster encoding
method and the number of bytes per pixel per channel.
Currently, Silicon Graphics Image files support either a
verbatim, uncompressed raster encoding or a run-length,
compressed encoding. Both of these encodings are available
at one or two bytes per pixel per channel. The header file
imp.h defines codes for all supported combinations of
encoding methods and pixel widths.
dim Number of dimensions to the image. A colormap file has
dimension one (length), a black and white image has
dimension two (height and width), and an RGB image has
dimension three (height, width, and depth).
xsize,ysize Image size in pixels.
zsize Number of color channels or depth. A black and white
image has one channel and an RGB image has three
channels.
min,max The minimum and maximum intensity values in the image.
These values are the minimum and maximum for all
channels combined.
name A descriptive name string for the image.
colormap The image type. Refer to imp.h for the supported image type
codes. The field is named colormap for compatibility with
the IMAGE structure used by the libimage library.

Image Access Functions
181
Image Access Functions
impOpen Function
This function opens the image file specified by fname. If mode is r, the file is
opened for reading. If mode is w, the file is opened for writing and created if
it does not exist, or truncated to zero length if it does exist.
impOpenFd opens the image file pointed to by the file descriptor fd. The
descriptor's permissions must permit the operations specified by mode. That
is, if mode is w, the descriptor must have write permission. In addition, it
must be possible to seek on the specified descriptor. At this time, read/write
mode is not supported for Silicon Graphics Image files. Upon successful
execution, both functions return a pointer to an Silicon Graphics Image file
structure.
Synopsis:
#include <imp.h>
IMPImage* impOpen(const char *fname, const char *mode, ...);
IMPImage* impOpenFd(int fd, const char *mode, ...);
In write mode, impOpen and impOpenFd require that these additional
parameters be specified:
uint_t rasterType, uint_t dimension, uint_t xSize,
uint_t ySize, uint_t numChannels, uint_t imageType, char *name
Note: uint_t stands for unsigned int.
Arguments:
rasterType Specifies the raster encoding method and the number of
bytes per pixel per channel. Silicon Graphics Image Format
files can be written either uncompressed or with run-length
encoding compression, and with one or two bytes per pixel
per channel. Refer to imp.h for the supported raster types.
dimension Specifies the number of dimensions in the image. A
colormap file has dimension one, a black and white image
has dimension two, and an RGB image has dimension three.
xSize,ySize Specifies the image size in pixels.

182
Silicon Graphics Image File Format API
numChannels Specifies the number of image color channels. A black and
white image has one channel and an RGB image has three
channels.
imageType Specifies how the image data is to be interpreted. Image
data is either actual color values (normal), screen colormap
indices (screen), or a colormap (colormap). Refer toimp.h for
the supported image types.
name Specifies a descriptive string for the image. Strings longer
than IMP_NAME_MAX characters are truncated. Refer to
imp.h for the value of IMP_NAME_MAX. If this parameter
is specified as NULL, the string “no name” is written into
the file. Use the empty string "" to write an empty name
string into the image.
impOpen, impOpenFd, impClose, and impCloseFd Functions
impClose closes an Silicon Graphics Image Format file previously opened by
impOpen or impOpenFd. Among other tasks, impClose closes the file
descriptor associated with an image file. If the image was opened using
impOpenFd, the file descriptor specified in that function call will be closed by
impClose.
impCloseFd performs the same function as impClose, but it leaves open the file
descriptor associated with the image and returns it in the parameter fdp. It
then becomes the responsibility of the caller to close the file descriptor when
it is no longer needed. It is essential that either impClose or impCloseFd be
called at the completion of writing an Silicon Graphics Image file so that all
buffered data can be written and the image header can be updated.
Synopsis:
#include <imp.h>
int impClose(IMPImage *image);
int impCloseFd(IMPImage *image, int *fdp);
Return Value:

Image Access Functions
183
impOpen and impOpenFd return a pointer to an image structure if execution
was successful. NULL is returned and IMPerrno is set if an execution error
has occurred.
impClose and impCloseFd return 0 if execution was successful; a -1 is returned
and IMPerrno is set if an execution error has occurred.
Execution Error Codes:
impOpen and impOpenFd fail under the following circumstances:
IMP_ERR_READWRITE
IMP_ERR_MEMALLOC
IMP_ERR_BADMAGIC
IMP_ERR_BADRASTER
IMP_ERR_BADIMAGE
In addition, impOpenFd fails under the following circumstances:
IMP_ERR_BADFD
IMP_ERR_SEEK
impClose and impCloseFd fail under the following circumstances:
IMP_ERR_WRITEFLAG
IMP_ERR_BADBPP
IMP_ERR_BADIMAGE
Note: The storage for the IMPImage structure is allocated by the image open
function. This storage is deallocated by the impClose and impCloseFd
functions. The caller should not explicitly reallocate or deallocate any
storage related to the image structure.
See also:
libimp(3), impReadRow(3), impReadRowB(3)
Data Packing Functions
impPackRow and impUnpackRow Functions
Synopsis:

184
Silicon Graphics Image File Format API
#include <imp.h>
void impPackRow(uchar_t *dptr, short *sptr, int n);
void impUnpackRow(short *dptr, uchar_t *sptr, int n);
impPackRow converts the array of short integers pointed to by sptr into the
array of unsigned char values pointed to by dptr. Source data that is too large
to fit in a character is truncated. For example, the source value 0x0B56 will
be converted into 0x56 in the destination array. impUnpackRow converts the
array of unsigned char values pointed to by sptr into the array of short
integers pointed to by dptr. For example, the source value 0x56 will be
converted into 0x0056 in the destination array. The parameter n specifies the
number of elements in the source and destination arrays.
Note: The allocation of storage for the source and destination arrays is the
responsibility of the caller.
See also:
libimp(3)
Error Handling Functions
impPerror and impErrorString Functions
Synopsis:
#include <imp.h>
void impPerror(const char *str);
char* impErrorString(int errCode);
extern int IMPerrno;
impPerror prints error messages to stderr in a format similar to the standard
C library function perror(3C). If an error occurs during a libimp function call,
the global error variable IMPerrno will be set with an error code. The error
code will be either a system error code (errno) or a libimp-specific code. The
symbolic names for the libimp error codes are defined in imp.h. The value of
IMPerrno is used by impPerror as an index to a table of error messages.

Image Access Functions
185
impPerror prints user-supplied string str followed by a colon (:), a space, and
the error message corresponding to the current value of IMPerrno.
If the string str is the NULL string (""), no colon or space will be printed, only
the error message. The error message will be either a system error message
or a libimp-specific message. To be of most use, a call to impPerror should be
made immediately following the libimp function call where an error has been
detected. impErrorString is similar to thestrerror(3C) function and returns the
error message corresponding to the error code specified by errCode.
If errCode is less than IMP_ERR_BASE, the message returned is a system
error message generated by strerror. If errCode is one of the error codes
specified in imp.h, the returned string is a libimp-specific error message.
See also:
libimp(3), perror(3C), strerror(3C)
Image I/O Functions
impReadRow, impReadRowB, impWriteRow, and impWriteRowB
Functions
Synopsis:
#include <imp.h>
int impReadRow(IMPImage *image, short *buffer,
ushort_t row, ushort_t channel);
int impReadRowB(IMPImage *image, uchar_t *buffer,
ushort_t row, ushort_t channel);
int impWriteRow(IMPImage *image, short *buffer,
ushort_t row, ushort_t channel);
int impWriteRowB(IMPImage *image, uchar_t *buffer,
ushort_t row, ushort_t channel);
impReadRow and impReadRowB each read a row of image data from the
specified channel of an Silicon Graphics Image Format file.

186
Silicon Graphics Image File Format API
impReadRow stores the row data in an array of short integers and can read
image data that is one or two bytes per pixel per channel in width.
impReadRowB stores the data in a character array and can handle only image
data that is one byte per pixel per channel wide.
If impReadRowB is called to read image data that is two bytes per pixel per
channel, an error condition is reported. impWriteRow and impWriteRowB
each write a row of image data to the specified channel of an Silicon
Graphics Image file. impWriteRow writes one or two bytes per pixel per
channel image row data. impWriteRowB writes only one byte per pixel data.
It is an error to use impWriteRowB to write to images that expect two bytes
per pixel per channel data.
The functions take the following parameters:
image Pointer to an IMPImage structure returned by a call to
impOpen or impOpenFd.
buffer Caller-allocated buffer containing the data to write to or to
be filled with the data read from the image. The amount of
storage allocated for the buffer should beimpXSize(image) *
sizeof(short) if impReadRow or impWriteRow is used and
impXSize(image) if impReadRowB or impWriteRowB is used.
row The image row to read. Rows are numbered from 0 through
impYSize(image) minus 1.
channel The image channel to read. Channels are numbered from 0
through impNumChannels(image) minus 1.
Return Value:
If execution was successful, all functions return the number of pixels (not
bytes) read or written. If an execution error occurred, -1 is returned and
IMPerrno is set.
Execution Error Codes:
impWriteRow and impWriteRowB fails under the following circumstances:
IMP_ERR_WRITEFLAG
IMP_ERR_BADBPP
IMP_ERR_BADIMAGE
IMP_ERR_SHORTWRITE

Image Access Functions
187
impReadRow and impReadRowB fails under the following circumstances:
IMP_ERR_READFLAG
IMP_ERR_BADBPP
IMP_ERR_BADIMAGE
IMP_ERR_SHORTREAD
Note: It is the caller's responsibility to allocate enough buffer storage for
image row data.
See also:
libimp(3), impOpen(3)

188
Silicon Graphics Image File Format API
Color Space Conversion Functions
These functions perform color space conversion between a given color space
and RGB. The actual transformations performed are described below.
Certain functions specify the parameter unity.unity should be set to the
value of maximum possible intensity for the arrays specified. For example,
if 8-bit data is being converted, unity would be specified as 255. If the data
makes use of the full 16 bits available in each array element, unity would be
specified as 65535. Note that the parameter n specifies the number of
elements in the arrays and not the number of bytes.
impRGBtoW, impWtoRGB Functions
Figure B-1 shows the equation for W conversions.
Figure B-1 W Conversions
Synopsis:
#include <imp.h>
void impRGBtoW(short *rbuf, short *gbuf, short *bbuf,
short *wbuf, int n);
void impWtoRGB(short *wbuf, short *rbuf, short *gbuf,
short *bbuf, int n);
impRGBtoK, impKtoRGB Functions
Figure B-2 shows the equation for K conversions.
R
W = 0.299 0.587 0.114 B
R
G
B
G
=
W
W
W
*

Image Access Functions
189
Figure B-2 K Conversions
Synopsis:
#include <imp.h>
void impRGBtoK(short *rbuf, short *gbuf, short *bbuf,
short *kbuf, short unity, int n);
void impKtoRGB(short *kbuf, short *rbuf, short *gbuf,
short *bbuf, short unity, int n);
impRGBtoCMY, impCMYtoRGB Functions
Figure B-3 shows the equation for CMY conversions.
Figure B-3 CMY Conversions
Synopsis:
#include <imp.h>
void impRGBtoCMY(short *rbuf, short *gbuf, short *bbuf,
short *cbuf, short *mbuf, short *ybuf,
short unity, int n);
void impCMYtoRGB(short *cbuf, short *mbuf, short *ybuf,
short *rbuf, short *gbuf, short *bbuf,
short unity, int n);
K = 0.299 0.587 0.114
1.0 - R
1.0 - G
1.0 - B
*
=
C
M
Y
1.0 - R
1.0 - G
1.0 - B
=
R
G
B
1.0 - C
1.0 - M
1.0 - Y

190
Silicon Graphics Image File Format API
impRGBtoYIQ, impYIQtoRGB Functions
Figure B-4 shows the equation for YIQ conversions.
Figure B-4 YIQ Conversions
Synopsis:
#include <imp.h>
void impRGBtoYIQ(short *rbuf, short *gbuf, short *bbuf,
short *ybuf, short *ibuf, short *qbuf,
int n);
void impYIQtoRGB(short *ybuf, short *ibuf, short *qbuf,
short *rbuf, short *gbuf, short *bbuf,
int n);
impRGBtoYUV, impYUVtoRGB Functions
Figure B-5 shows the equation for YUV conversions.
Figure B-5 YUV Conversions
Y
I
Q
0.299 0.587 0.114
=0.596 -0.274 -0.322
0.212 -0.523 0.311
R
G
B
R
G
B
1.000 0.955 0.622
=1.000 -0.271 -0.648
1.000 -1.107 1.702
Y
I
Q
*
*
Y
U
V
0.299 0.587 0.114
=-0.147 -0.289 0.436
0.615 -0.515 -0.100
R
G
B
R
G
B
1.000 0.000 1.140
=1.000 -0.395 -0.581
1.000 2.032 0.000
Y
U
V
*
*

Image Access Functions
191
Synopsis:
#include <imp.h>
void impRGBtoYUV(short *rbuf, short *gbuf, short *bbuf,
short *ybuf, short *ubuf, short *vbuf,
int n);
void impYUVtoRGB(short *ybuf, short *ubuf, short *vbuf,
short *rbuf, short *gbuf, short *bbuf,
int n);
impRGBtoYCbCr, impYCbCrtoRGB Functions
Figure B-6 shows the equation for YCbCr conversions.
Figure B-6 YCbCr Conversions
Synopsis:
#include <imp.h>
void impRGBtoYCbCr(short *rbuf, short *gbuf, short *bbuf,
short *ybuf, short *cbbuf, short *crbuf,
int n);
void impYCbCrtoRGB(short *ybuf, short *cbbuf, short *crbuf,
short *rbuf, short *gbuf, short *bbuf,
int n);
impRGBtoCMYK, impRGBtoDevCMYK, impCMYKtoRGB Functions
Figure B-7 shows the equation for CMYK conversions.
Y
Cb
Cr
0.299
-0.169
0.500
0.587
-0.331
-0.419
0.114
0.500
-0.081
R
G
B
=
R
G
B
1.000
1.000
1.000
-0.001
-0.344
1.772
1.402
-0.714
0.001
Y
Cb
Cr
=*
*

192
Silicon Graphics Image File Format API
Figure B-7 CMYK Conversions
Synopsis:
#include <imp.h>
void impRGBtoCMYK(short *rbuf, short *gbuf, short *bbuf,
short *cbuf, short *mbuf, short *ybug,
short *kbuf, short unity, int n);
void impRGBtoDevCMYK(short *rbuf, short *gbuf, short *bbuf,
short *cbuf, short *mbuf, short *ybug,
short *kbuf, IMPUCRFunc ucr, IMPBGFunc bg,
short unity, int n);
short (*IMPBGFunc)(short k);
short (*IMPUCRFunc)(short k);
void impCMYKtoRGB(short *cbuf, short *mbuf, short *ybuf,
short *kbuf, short *rbuf, short *gbug,
short *bbuf, short unity, int n);
Ci
Mi
Yi
K
C
M
Y
Ci
Mi
Yi
Ki
Kucr
Device C
Device M
Device Y
Device K
Ci
Mi
Yi
R
G
B
=
=
=
=
=
=
=
1.0 - R
1.0 - G
1.0 - B
Min(Ci, Mi, Yi)
Ci - K
1.0 - Min(1.0, Yi)
Mi - K
Yi - K
1.0 - R
1.0 - G
1.0 - B
Min(Ci, Mi, Yi)
UCR(Ki)
Min(1.0, Max(0.0, Ci - Kucr))
Min(1.0, Max(0.0, Mi - Kucr))
Min(1.0, Max(0.0, Yi - Kucr))
BG(Ki)
=
=
=
=
=
=
=
=
=
=
C + K
=
=
=
M + K
Y + K
1.0 - Min(1.0, Ci)=
1.0 - Min(1.0, Mi)=

Image Access Functions
193
impRGBtoHSV, impHSVtoRGB Functions
Synopsis:
#include <imp.h>
void impRGBtoHSV(short *rbuf, short *gbuf, short *bbuf,
float *hbuf, float *sbuf, float *vbuf,
int n);
void impHSVtoRGB(float *hbuf, float *sbuf, float *vbuf,
short *rbuf, short *gbuf, short *bbuf,
int n);
impRGBtoHLS, impHLStoRGB Functions
For HSV conversions, refer to Computer Graphics, Principals and Practice,
Foley and Van Dam, 2nd Edition, pages 590-592. For HLS conversions, refer
to pages 592-595.
Synopsis:
#include <imp.h>
void impRGBtoHLS(short *rbuf, short *gbuf, short *bbuf,
float *hbuf, float *lbuf, float *sbuf,
short unity, int n);
void impHLStoRGB(float *hbuf, float *lbuf, float *sbuf,
short *rbuf, short *gbuf, short *bbuf,
short unity, int n);
Note: It is the caller's responsibility to allocate all buffer storage.
See Also:
libimp(3)

194
Silicon Graphics Image File Format API
Math Operation Functions
impZeroRow, impInitRow, impCopyRow, impSAddRow, impVAddRow,
impSSubRow, impVSubRow, impSMulRow, impSDivRow,
impClampRow Functions
Synopsis:
#include <imp.h>
void impZeroRow(short *dptr, int n);
void impInitRow(short *dptr, int val, int n);
void impCopyRow(short *dptr, short *sptr, int n);
void impSAddRow(short *dptr, short *sptr, int val, int n);
void impVAddRow(short *dptr, short *sptr1, short *sptr2,
int n);
void impSSubRow(short *dptr, short *sptr, int val, int n);
void impVSubRow(short *dptr, short *sptr1, short *sptr2,
int n);
void impSMulRow(short *dptr, short *sptr, int val, int n);
void impSDivRow(short *dptr, short *sptr, int val, int n);
void impClampRow(short *dptr, short *sptr, int lov,
int hiv, int n);

Image Access Functions
195
In the following descriptions, the parameter n specifies the number of
elements in an array and not the number of bytes in the array. In addition,
functions that take a source array pointer and a destination array pointer can
specify the same array as both a source and destination.
impZeroRow Initializes to zero the array pointed to by dptr.
impInitRow Initializes the array dptr to the value val.
impCopyRow Copies the array sptr to the array dptr.
impSAddRow Adds the value val to each element of the array sptr and
stores the result in the array dptr.
impVAddRow Adds the corresponding elements of sptr1 and sptr2 and
stores the result in the array dptr.
impSSubRow Subtracts the value val from each element of the array sptr
and stores the result in the array dptr.
impVSubRow Subtracts the corresponding elements ofsptr2 from those of
sptr1 and stores the result in the array dptr.
impSMulRow Multiplies each element of the array sptr by val and stores
the result in dptr.
impSDivRow Divides each element of the array sptr by val and stores the
result in dptr.
impClampRow Clamps the values of the array sptr between the values lov
and hiv inclusive. The result is stored in the array dptr.
Note: It is the caller's responsibility to allocate all buffer storage.
Note: Since the arrays referenced by these functions are short integer arrays,
the caller should be aware of overflow/wraparound conditions.
See also:
libimp(3)

196
Silicon Graphics Image File Format API
Zooming Functions
impCreateZoom, impDestroyZoom, impResetZoom, impZoomRow
Functions
Synopsis:
#include <imp.h>
IMPZoom* impCreateZoom(ushort_t srcXSize, ushort_t srcYSize,
ushort_t dstXSize, ushort_t dstYSize,
IMPReadRowFunc readRowFunc,
int numChannels,
IMPFilterType filterType,
float blurFactor);
void impDestroyZoom(IMPZoom *zoom);
void impResetZoom(IMPZoom *zoom);
int impZoomRow(IMPZoom *zoom, short *buffer,
ushort_t row, void *clientData);
The libimp library provides an API for performing image resizing or
zooming. Images can be zoomed up or down using any of a number of
resampling methods. The resampling methods divide into two categories.
The first resampling category is non-filtered zooming (also known as
replicative zoom, decimation). The second resampling category is filtered
zooming where a filter of a given shape is applied to the data. The image
zooming is performed on a row-by-row basis using a one-pass,
two-dimensional convolution.
To zoom one or more rows of an image, first create a zoom operator by
calling impCreateZoom. One of the parameters to impCreateZoom is a pointer
to a function that will be called during the zoom to read rows of the source
image. To obtain zoomed rows, call impZoomRow. When all desired zoomed
rows have been obtained, callimpDestroyZoom to deallocate storage held by
the zoom operator. When filtered zooming is performed, a number of
contiguous rows of image data are cached. Often all rows of a given image
channel are zoomed, followed by all rows of the next channel. Since rows are
cached, the cache should be flushed when switching between image
channels. The impResetZoom function performs this row cache flushing
operation.

Image Access Functions
197
The impCreateZoom function has the following parameters:
srcXSize,srcYSize
Width and height of the source image in pixels.
dstXSize,dstYSize
Width and height of the destination (that is, zoomed) image
in pixels.
readRowFunc Pointer to a function that will be called to read a row from
the source image. The prototype for this function is:
int (*IMPReadRowFunc)(short *buffer,
ushort_t row,
void *clientData);
The function should read the image row indicated by row and place the data
in buffer. The storage for buffer is allocated and deallocated by the zoom
operator and should not be manipulated by the read row function. clientData
is a pointer to caller-specific information. The caller may specify a pointer to
client data when calling the impZoomRow function. That pointer is passed to
the read row function.
At the caller's discretion, this pointer may be set toNULL. A common use of
the client data is to pass a pointer to a structure containing the image
structure pointer and the channel number. The read row function must
return -1 if it encounters an error while obtaining the row data and must
return a value of 0 or greater if the function succeeds.
numChannels Specifies the number of channels of image data that are
packed on a single row. For example, if each row contains
data for only a single channel, then numChannels should be
specified as one. However, if each row contains RGB data
packed together as RGBRGBRGB..., numChannels should be
specified as three.
filterType Specifies the type of filter to be used for resampling the
image during zooming.

198
Silicon Graphics Image File Format API
The filter types available are:
Refer to “Filter Functions” on page 199 for detailed
information on the available filters.
blurFactor Specifies a multiplier for the width of the filter. The default
blur factor is 1.0. Higher factors increase the amount of blur
present in the image.
The impZoomRow function has the following parameters:
zoom Pointer to a zoom operator structure obtained from a call to
impCreateZoom.
buffer Caller-allocated buffer that will be filled with the zoomed
image row data. The buffer should be allocated to
accommodated dstXSize * numChannels * sizeof(short) bytes.
row The desired zoomed row. Rows are numbered from 0
through dstYSize minus 1. clientData is a pointer to client
data. This pointer is passed to the readRowFunc. A typical
use of this is for passing a pointer to a structure containing
the IMPImage pointer and the channel number.
Filter Type Category
IMPImpulse Replicative
IMPBox Filtered
IMPTriangle Filtered
IMPQuadratic Filtered
IMPMitchell Filtered
IMPGaussian Filtered

Image Access Functions
199
Filter Functions
The resampling filters available for zooming are summarized below. Note
that the span of the filter (x range) is expressed in terms of the original image,
not the zoomed image. Table B-3 list the available filter functions.
Table B-3 Filter Functions
Filter Type Function Span
IMPImpulse Not Applicable
IMPBox f(x) = 0.0 x < -0.5
f(x) = 1.0 -0.5 <= x < 0.5
f(x) = 0.0 x >= 0.5
IMPTriangle f(x) = 0.0 x < -1.0
f(x) = 1.0+x -1.0 <= x < 0.0
f(x) = 1.0-x 0.0 <= x < 1.0
f(x) = 0.0 x >= 1.0
IMPQuadratic f(x) = 0.0 x < -1.5
f(x) = 0.5*(x+1.5)^2 -1.5 <= x < -0.5
f(x) = 0.75-x^2 -0.5 <= x < 0.5
f(x) = 0.5*(x-1.5)^2 0.5 <= x < 1.5
f(x) = 0.0 x >= 1.5
IMPMitchell b = 1.0/3.0
c = 1.0/3.0
p0 = (6.0-2.0*b)/6.0
p2 = (-18.0+12.0*b+6.0*c)/6.0
p3 = (12.0-9.0*b-6.0*c)/6.0
q0 = (8.0*b+24.0*c)/6.0
q1 = (-12.0*b-48.0*c)/6.0

200
Silicon Graphics Image File Format API
Return Value:
TheimpCreateZoom function returns a pointer to a zoom operator structure if
execution was successful. NULL is returned and IMPerrno is set if an
execution error has occurred.
The impZoomRow function returns 0 if execution was successful. -1 is
returned and IMPerrno is set if an execution error occurred.
Execution Error Codes:
The impCreateZoom function fails under the following circumstances:
IMP_ERR_MEMALLOC
The impZoomRow function fails under the following circumstances:
IMP_ERR_READROW
q2 = (6.0*b+30.0*c)/6.0
q3 = (-b-6.0*c)/6.0
f(x) = 0.0 x < -2.0
f(x) = q0-x*(q1-x*(q2-x*q3)) -2.0 <= x < -1.0
f(x) = p0+x*x*(p2-x*p3) -1.0 <= x < 0.0
f(x) = p0+x*x*(p2+x*p3) 0.0 <= x < 1.0
f(x) = q0+x*(q1+x*(q2+x*q3)) 1.0 <= x < 2.0
f(x) = 0.0 x >= 2.0
IMPGaussian a(x) = 1.0/exp((1.5*x)^2)
b(x) = 1.0/exp(1.5^4)
f(x) = a(x)-b(x)
Table B-3 (continued) Filter Functions
Filter Type Function Span

Image Access Functions
201
Note: The storage for the IMPZoom structure is allocated by the zoom
operator creation function. This storage is deallocated by the
impDestroyZoom function. The caller should not explicitly reallocate or
deallocate any storage related to the image structure.
Note: The fields of the IMPZoom structure are private and should not be
modified by the caller.
See also:
libimp(3)

This appendix describes the file formats
of the ASCII text files that comprise the
Printer Object Database. The default
contents of these files and the
interpretation is also described.
Printer Object Database (POD) File
Formats
Appendix C


205
Appendix C
C. Printer Object Database (POD) File Formats
This appendix describes the file formats of the ASCII text files that comprise
the printer object database (POD).
The major topics discussed are:
• “General Syntax” on page 208
• “Input Parsing Rules for libpod Files” on page 209
• “Printer Configuration File Format” on page 210
• “Printer Status File Format” on page 220
• “Printer Log File Format” on page 224

206
Printer Object Database (POD) File Formats
Overview
The printer object database (POD) contains information on the current
configuration, status, and job history of a single printer. Each printer that is
physically installed on a system must maintain its own POD. To maintain
network-transparent, mediated access to the POD files, all interaction
between the printer driver and POD files must be through the libpod API. For
additional information, see “The libpod Library” in Chapter 6 and the
libpod(3) man pages.
The initial set of POD files created by the printer driver developer and
installed on the host server system must include:
• <printer name>.config—a configuration file representing the
capabilities of the printer
• <printer name>.status—a status file indicating a typical printing state
• <printer name>.log—an empty log file
The name of each POD file is formed from the printer name and the suffix
.config, .status, or .log, respectively. Note that the printer name must be the
same as the name of the printer model file. All POD files are copied from the
template POD files and installed in the appropriate directory.
The information contained in each POD file is summarized below and
explained in detail in subsequent sections.
Printer Configuration File
The printer configuration file (<printer name>.config) contains detailed
information on the printer's capabilities. The file is created by the printer
driver developer to characterize the printer's capabilities. For example, the
possible paper sizes, printer location, and available fonts are all specified in
this file. Typically the information in the config file does not change over
time. Printer filters and drivers treat it as a read-only file. The printer install
tools may modify the file at printer installation time to enter site-specific
data, such as printer location, or note the presence of optional equipment,
such as a duplex option or an envelope feeder.

Overview
207
Printer Status File
The printer status file (<printer name>.status) contains information about
the current operational status of the printer. The information in the file
indicates whether the printer is busy, what type of printing media is
installed, and so on. The contents of this file change during every print job.
The driver developer provides an initial copy of the status file, but it is the
job of the printer driver to update the file. Printer filter programs normally
treat this file as read-only.
Printer Log File
The printer log file (<printer name>.log) contains the print job history for the
printer. Information for old jobs as well as the current print job is
maintained. Typically, printer filters and drivers append information to the
log file, while general applications treat the file as read-only.

208
Printer Object Database (POD) File Formats
General Syntax
Character Set
<space>: 0x09, 0x20 (<sp>, <ht>)
<null>: 0x00-0x08, 0x0B, 0x0C, 0x0E-0x1F, 0x7F-0xFF
<endline>: 0x0A, 0x0D (<nl>, <cr>)
<separator>: 0x7C ('|')
<plainchar>: 0x21-0x7B, 0x7D, 0x7E
<ddigit>: 0x30-0x39 ('0'-'9')
<hdigit>: <ddigit>, 0x41-0x46, 0x61-0x66
('0'-'9', 'A'-'F', 'a'-'f')
<sign>: 0x2B, 0x2D ('+', '-')
<point>: 0x2E ('.')
Field Format
<white>: <space> [<space>...]
<word>: <plainchar> [<plainchar>...]
<keyword>: <word> with a specific sequence of <plainchar>
<keyfield>: [<white>] <keyword> [[<white> <keyword>]...]
[<white>]
<string>: [<white>] <word> [[<white> <word>]...]
[<white>]
<int>: <ddigit> [<ddigit>...]
<hbyte>: ["0x" | "0X"] [<hdigit>] <hdigit>
<float>: [<sign>] <int> [<point> [<int>]]
or
[<sign>] <point> <int>
<array>: <string> [[<separator> <string>]...]

Input Parsing Rules for libpod Files
209
Input Parsing Rules for libpod Files
The following rules apply when a POD file is parsed by the libpod API.
1. All <null> characters are ignored; their use is not recommended. This
provision is intended to avoid errors caused by nonprinting characters
appearing in the POD files.
2. All input lines are truncated to PD_STR_MAX-1, not counting <null>
characters and <endline>, which are removed on input. The value of
PD_STR_MAX is defined in the header file /usr/include/pod.h.
3. All occurrences of <white> sequences are reduced to a single <sp>
character. Any <white> at the beginning or end of a field is removed.
4. There are no quoted strings. Quotation marks are treated like any other
characters and cannot be used to force additional <white> into a field.
5. All fields are checked for correct syntax based on entry type. Failure to
provide information in the correct format results in improper parsing.
6. When scanning for <int> or <float> numbers within a field, all
characters that are not valid within an <int> or <float> are treated as
<white> (in the case of an <int>,<sign> and <point> are treated as
<white>). This allows characters to be inserted to improve readability.
For example, the following are equivalent if two <int> items are
expected:
300 300
300 x 300
300 by 300
300,300
7. Entries containing no characters other than <white> prior to the first
<separator> or <endline> are treated as null entries and discarded
without error. These lines may be used as comments simply by placing
a<separator> prior to any other information.
8. Blank lines are ignored and may be inserted to improve readability.
9. <keyfield> matching is done in a case-independent manner.
10. Fields designed to be human-readable are not modified, except to
remove <null> and excess <white>. Case and all <plainchar>
sequences are preserved.

210
Printer Object Database (POD) File Formats
11. A <keyfield> may require a long list of items (for example, Available
Fonts). To improve readability and avoid the risk of input line buffer
overflow (see 2 above), a <keyfield> may be repeated.
For example, a list of fifty Available Fonts items may be broken into two
Available Fonts entries with 25 items each. The overall number of items
that can be specified in a list is limited only by available system
memory resources.
12. There is no required entry order. The <keyfield> entries may appear in
any order within a POD file.
13. Default values are assumed for certain fields if values have not been
specified. The values of these defaults should not be relied upon and
may change in future releases.
Printer Configuration File Format
This section describes the format of the printer configuration file. The
configuration file is installed by the printer install tools with the name
<printer name>.config.
General Format
The format for an entry in the configuration file is:
<keyfield> <separator> [<infofield>] <endline>
where:
<keyfield> is one of the reserved fields described in the “Key Field”
column of Table C-1.
<separator> is the “separator” character defined in “Character Set” on
page 208.
<infofield> is one or more of the options specified in the “Info Field
Type” column of Table C-1.
<endline> is one of the “endline” characters defined in “Character Set”
on page 208.

Printer Configuration File Format
211
Config File Options
All entries in the config file are optional. Entries that are not provided or that
have no <infofield> specified are assigned default values. However, since
printer capabilities differ, it is strongly recommended that no entries be
omitted. The defaults should not be relied on, as they may change in future
releases. Table C-1 lists the config file options in alphabetical order. A
detailed explanation of the options follows the table.
Table C-1 Config File Options
Key Field Info Field Type Default
Active Status Path <word> See “Active Status Path” on
page 212
Available Fonts <array> (0 elements)
Black Substitute <keyword> No
Color Adjustment <array> (0 elements)
Cost per Page <float> 0.00
Default CA <int> 0
Default IS <int> [,gamma=<float>] 0, gamma=-1.0
Default MT <int> 0
Default QM <int> 0
Driver Path <word> See “Driver Path” on
page 215
Error Retry Wait <int> 10 seconds
Input Source <array> (0 elements)
Location Code <keyword> None
Manual Capable <keyword> No
Maximum Addr <Maximum Addrint> <int> See “Minimum Addr” on
page 216
Maximum Print Area <float> <float> See “Maximum Print Area”
on page 216

212
Printer Object Database (POD) File Formats
Active Status Path
ActiveStatusPath is the full pathname of the POD status file. The value of this
entry is not used by the libpod API. The value of this entry is always set by
the API to PDpod_path/<printer name>.status. Refer to the libpod(3) man page
for additional information.
Media Standard <keyword> American
Media Type <array> (0 elements)
Media Wait <int> 300 seconds
Minimum Addr <int> <int> See “Minimum Print Area”
on page 216
Minimum Print Area <float> <float> See “Minimum Print Area”
on page 216
Number of Colors <int> [<int>] 1 1
Physical Location <string> Unknown
Port Path <word> /dev/null
Printer Class <keyword> Dumb
Printer Model <string> Unknown
Printer Options <string> (empty string)
Quality Modes <array> (0 elements)
Resolution <int> <int> 300 dpi 300 dpi
Size Table Entry <sizeentry> See “Size Table Entry” on
page 218
Status Update Wait <int> 300 seconds
Technology <string> Unknown
Time per Page <int> [<int>] 0 0
Table C-1 (continued) Config File Options
Key Field Info Field Type Default

Printer Configuration File Format
213
Available Fonts
TheAvailable Fonts option contains a list of font names representing the fonts
available on the printer. For printers with built-in PostScript interpreters,
this list should include only those fonts built into the printer (typically a set
of 35 standard fonts). The default value is 0 elements.
For raster printers, the PostScript interpretation is performed on the printer
host machine. Thus, the fonts listed for these printers should correspond to
the names of the font outline files installed on the printer host. There are two
methods for specifying the font names: the names can be listed individually
or a full path to the directory where the outline fonts are stored can be
specified. The two methods can be mixed. When a path is specified, the
names of the files in that directory are assumed to be the names of the fonts.
To exclude filenames from the directory, specify the names of the files to be
excluded with a leading “!”. The filenames to be excluded must appear on
the same line as the directory containing the filename to be excluded. The
following is a valid Available Fonts list:
NewYearRoman | /usr/lib/DPS/outline/base | !fonts.dir
This entry indicates that the fonts available on the printer are
NewYearRoman, and all filenames are in the directory
/usr/lib/DPS/outline/base with the exception of fonts.dir. Note that font names
must not contain any white space.
Black Substitute
TheBlackSubstitute option is either yes, indicating that the printer should by
default substitute true black for composite black, or no, indicating that it
should not. The default value is no.
Color Adjustment
The Color Adjustment option is a list of color adjustment methods available
for the printer. The color adjustment methods perform color correction
between the current input source and the printer. An example entry is:
None | Fix Blue | Gamma Correct
The default value is 0 elements.

214
Printer Object Database (POD) File Formats
Cost per Page
The Cost per Page option is the cost per printed page in local currency. For
example, 0.50 for 50 cents per page. The default value is 0.00.
Default CA
The Default CA option is the index to the Color Adjustment list indicating the
default adjustment method. This index is based at one rather than zero.
Thus, the first method in the list is at position 1, the second at 2, and so on.
If there are no adjustment methods specified, this entry should either be left
empty or set to 0. The default value is 0.
Default IS
Default IS is the index to the Input Source list indicating the default input
source. This index is based at one rather than zero. Thus, the first source in
the list is at position 1, the second at 2, and so on. If there are no input sources
specified, this entry should either be left empty or set to 0.
When used for printer color correction, this entry can also be used to specify
the default device's gamma correction value. The gamma value is specified
after the default input source index as in the following example:
1, gamma = 1.0
Default MT
Default MT is the index to the Media Type list indicating the default media.
This index is based at one rather than zero. Thus, the first media in the list is
at position 1, the second at 2, and so on. If there are no media types listed,
this entry should either be left empty or set to 0. The default value is 0.
Default QM
Default QM is the index to the Quality Modes list indicating the default
quality mode. This index is based at one rather than zero. Thus, the first
quality mode in the list is at position 1, the second at 2, and so on. If there are
no quality modes specified, this entry should either be left empty or set to 0.
The default value is 0.

Printer Configuration File Format
215
Driver Path
Driver Path is the full pathname of the installed printer driver. The default is
the full pathname of the POD config file with the suffix .config removed.
Error Retry Wait
Error Retry Wait refers to the number of seconds to wait after an error has
occurred before attempting to resume printing. The default is 10 seconds.
Input Source
Input Source is a list of printer input sources. The primary use of this entry is
to list the image source devices that have been characterized for printer color
correction. A common input device is the monitor. An example entry is Sony
16” Monitor.
Location Code
The Location Code option is used to supply a site-specific keyword that
identifies the printer’s physical location. For example, 3U-924. There is no
default value. This code should be machine-readable and -sortable for use by
a location-querying browser.
Manual Capable
Manual Capable is either yes, indicating that the printer is capable of being
manually fed, or no, indicating that it is not. The default value is no. This
value should be set to yes only if the printer supports the -m option (see
“Filter/Driver Specification” in Chapter 3).
Maximum Addr
Maximum Addr is the maximum printable area dimensions expressed in
dots. The default values for this entry assume an A-size page (8.5 by 11.0
inches) in portrait orientation with 0.5-inch margins. At 300 dpi, this gives a
printable area of 2250 by 3000 dots. The minimum and maximum values are
identical in the default case. If a Page Size Table has been specified, the values
for this entry are derived from it. Also see “Minimum Addr.”

216
Printer Object Database (POD) File Formats
Maximum Print Area
MaximumPrintArea is the maximum printable area dimensions expressed in
inches. The default values for this entry assume an A-size page (8.5 by 11.0
inches) in portrait orientation with 0.5-inch margins. This gives a printable
area of 7.5 by 10.0 inches. The minimum and maximum values are identical
in the default case. If a Page Size Table has been specified, the values for this
entry are derived from it. Also see “Minimum Print Area.”
Media Standard
The Media Standard keyword indicates the paper measurement standard.
Keywords are American and Metric. The default value is American.
Media Type
Media Type is a list of the output media types supported by the printer.
Typical items are Bond Paper and Transparency Film. The default is 0
elements.
Media Wait
Media Wait is the number of seconds to wait for manual feed or print media
changes before the default media source is used. The default is 300 seconds.
Minimum Addr
MinimumAddr is the minimum printable area dimensions expressed in dots.
The default values for this entry assumes an A-size page (8.5 by 11.0 inches)
in portrait orientation with 0.5-inch margins. At 300 dpi, this gives a
printable area of 2250 by 3000 dots. The minimum and maximum values are
identical in the default case. If a Page Size Table has been specified, the values
for this entry are derived from it. Also see “Maximum Addr.”
Minimum Print Area
MinimumPrint Area is the minimum printable area dimensions expressed in
inches. The default values for this entry assume an A-size page (8.5 by 11.0
inches) in portrait orientation with 0.5-inch margins. This gives a printable
area of 7.5 by 10.0 inches. The minimum and maximum values are identical

Printer Configuration File Format
217
in the default case. If a Page Size Table has been specified, the values for this
entry are derived from it. Also see “Maximum Print Area.”
Number of Colors
Number of Colors is the minimum or, optionally, maximum number of colors
that are available on the printer. If the maximum number of colors is not
provided, it is assumed to be the same as the minimum. A monochrome
printer or printer ribbon provides one color. A CMY printer or ribbon
provides three colors.
Note that this field should contain only the number of colors available on the
printer. The colorspace,depth, and data format are provided in the Number of
Colors entry in the status file. The default value is 1.
Physical Location
Physical Location is the human-readable description of the printer's physical
location. For example, Bldg. 3 Upper, Room 924. The default value is
Unknown.
Port Path
Port Path is the full pathname of the I/O port to which the printer is
physically connected. For example, /dev/plp for a parallel printer, /dev/ttyd2
for a serial printer, and /dev/scsi/sc0d6l0 for a SCSI printer. The default value
is /dev/null.
Printer Class
The Printer Class entry is used to specify the class of printer being used.
Available values are Dumb,Raster,ColorRaster,MonoPostScript,
ColorPostScript, and Plotter. The following printer classes are obsolete and
should not be used for new development: DumbColor,PostScript, and
Color. The default value is Dumb.

218
Printer Object Database (POD) File Formats
Printer Model
The Printer Model entry is a keyword that is the manufacturer's description
of the printer. For example, Tektronix Phaser II SX or Apple LaserWriter II
NTX. The default value is Unknown.
Printer Options
Printer Options describe the standard installed printer optional equipment.
For example, 8 megabytes RAM. The default is an empty string.
Quality Modes
Quality Modes is a list of output quality modes available on the printer. For
example, draft and letter. The default value is 0 elements.
Resolution
Resolution is the horizontal or vertical printer resolution in dots per inch
(dpi). For printers that allow multiple resolutions, the status file Printer
Options entry should be parsed for the CurrentRes keyword. This keyword
indicates the current printer resolution. If the keyword is not found, the
config file Resolution entry should be used. The default values are both 300
dots per inch.
Size Table Entry
The Size Table Entry <infofield> has the format <sizeentry> defined as:
<sizeentry>: <keyword> <int> <int> <float> <float> <float>
<float> [<hbyte> [<hbyte>]]
Size Table Entry describes a particular media size that is supported by the
printer. Typically, there is one Size Table Entry per supported media size (for
example., an entry each for A size and B size), although it is ok to have
multiple entries for a particular paper size if multiple resolutions or ribbons
are supported. The media size entry has seven required fields and two
optional fields. All fields are separated by white space.

Printer Configuration File Format
219
The first required field contains the “media size” keyword (for example, A).
The list of possible media sizes can be found in the file /usr/include/pod.h. The
media size keyword is simply the media size listed in pod.h with the
PD_SIZE_ prefix removed. The size names listed in pod.h with the suffix
_LAND indicate landscape orientation and should not be used as media size
keywords. Media with landscape orientation is indicated by the width and
height fields of the size table entry.
The next two fields are the media-imageable width and height expressed in
dots. Typically, the imageable dimensions are derived by subtracting the
margins from the total media size and converting the result to dots.
The next two fields are the overall media width and height expressed in
inches.
The last two required fields are the left and top margins expressed in inches.
The first optional field specifies the printing raster direction. Refer to pod.h
for the values that may be specified in this field.
The second optional field is the media validation mask. This mask can be
used to differentiate among media entries that have the same media name
but differ in other respects (for example, resolution). The field is a bit mask
and so, to fully differentiate among similar entries, the values must be
powers of two. Refer to the PDReadInfo(3) man page for more information on
the use of this field.
A default Size Table Entry is always added to the end of the table when it is
read by libpod. This default entry is:
A 2250 3000 8.500 11.000 0.500 0.500 0x00 0xFF
Status Update Wait
Status Update Wait is the number of seconds to wait between updates of the
POD status file when no error has occurred. The default is 300 seconds.

220
Printer Object Database (POD) File Formats
Technology
The Technology option indicates the type of printing technology used in the
printer. For example, ink jet,wax transfer,dye sublimation, and color laser.
The default value is Unknown.
Time per Page
Time per Page is the average and, optionally, maximum time to print a page,
in seconds. If the maximum time is not provided, it is assumed to be the
same as the average time. The default values are both 0.
Printer Status File Format
This section describes the format of the printer status file. The status file is
installed by the printer install tools with the name <printer name>.status.
General Format
The format for an entry in the printer status file is:
<keyfield> <separator> [<infofield>] <endline>
where:
<infofield> This parameter is specified by Table C-2.
<separator> The separator defined in “Character Set” on page 208.
<endline> One of the endline characters defined in “Character Set” on
page 208.
Printer Status File Entries
All entries in the status file are optional. Entries that are not provided or that
have no <infofield> are assigned default values. However, since the status
file is the only means to indicate printer status to the user, it is strongly
suggested that a complete status file be provided by the developer and that
the printer driver update the status file to reflect the printer's current status.

Printer Status File Format
221
Table C-2 lists the printer status file entries.
Operational Status
OperationalStatus is the keyword specifying the current operational status of
the printer. The possible values are Idle, Busy, Faulted, and Unavailable.
The status Faulted indicates that there is a problem with the printer but not
with communication to the printer. The Unavailable designation is similar
to the Faulted state but indicates that communication could not be
established with the printer. The default value is Idle.
Media Size
Media Size is the keyword indicating the currently loaded media size. The
media size keywords are listed in the file pod.h. The keyword is the size name
listed with the PD_SIZE_ prefix removed. The size names listed in pod.h with
the suffix _LAND indicate landscape orientation and are specified in the
entry by the keyword Land.
Table C-2 Printer Status File Entries
Key Field Info Field Type Default
Operational Status <keyword> Idle
Media Size <keyword> [Land] A
Media Type <keyword> Paper
Number of Colors <dataentry> 1 k 1 chunky
Printer Options <string> (empty string)
Validation Mask <hbyte> 0
Error <msgentry> (no message)
Warning <msgentry> (no message)
Information <msgentry> (no message)

222
Printer Object Database (POD) File Formats
Media Type
Media Type is the keyword indicating the currently loaded media type. The
value is Paper,Transparency,Other, or Unknown. The default is Paper.
Number of Colors
This field specifies not only the number of output colors but the colorspace,
depth, and organization of the output data. There is one required field and
three optional fields. For proper operation of printing filters, it is strongly
recommended that the optional fields be specified.
The Number of Colors <infofield> has the format <dataentry> defined as:
<int> [<keyword> <int> <keyword>]
Arguments:
<int> is required and specifies the number of output colors the
printer can currently print. If only this field is present, the
following defaults apply:
<keyword> is optional. This field specifies the output colorspace and is
either k,rgb,cmy,ymc,cmyk,ymck,w, or kcmy.
<int> is optional. This field specifies the number of bits per color
component and may be 1,4, or 8.
<keyword> is optional. This field specifies the data organization of the
output data and is either chunky or planar.
An example output specification is:
3 rgb 4 planar
This specifies a three-color RGB output with four bits per component (12 bits
total) and a planar data organization. Refer to the libstiff(3) man page for
additional information on raster data output formats.
# of colors colorspace depth organization
1 k 1 chunky
3 cmy 1 chunky
4 cmyk 1 chunky

Printer Status File Format
223
Printer Options
This field is used to describe the currently available optional equipment or
configurations. The field is also used to indicate the current printer
resolution for printers that allow multiple output resolutions. To indicate the
current resolution, the string:
CurrentRes = <int> x <int>
is specified. The first integer is the horizontal resolution in dots per inch, and
the second integer is the vertical resolution in the same units. The current
resolution values are used by printing filters such as the PostScript
interpreter psrip to calculate margins for printers whose resolutions can
change, and it is very important that printer drivers update this information
field to ensure proper rendering.
Validation Mask
This field can be used to differentiate among media entries that have the
same media name but differ in other respects (for example, resolution). The
field is a bit mask and so, to fully differentiate among similar entries, the
values must be powers of two. Refer to the PDReadStatus(3) man page for
more information on the use of this field.
Error, Warning, and Information Options
Each Error, Warning, and Information message <infofield> has the format
<msgentry> defined as:
<hbyte> [<hbyte> [<hbyte>]] <separator> <string>
These three entries indicate messages written by the printer driver to
provide information to the printer user regarding the state of the printer. The
three hex bytes provide a message code. The available message codes are
listed in pod.h (PD_ERROR_*). The low-order three bytes of the codes listed
in pod.h are the codes specified in this field. The high-order byte of the code
is implied by the first field (for example., Information = 00, Warning == 01,
Error = 02). The last field is a string providing the text for the message. There
can be up to PD_MESSAGE_MAX (see pod.h) message entries in a status file.
An example of a complete message entry is:
Information | 01 00 00 | version: driver = 00.00

224
Printer Object Database (POD) File Formats
See the PDMakeMessage routine for the best method of construction these
messages. For the sake of internationalization, it is strongly recommended
that you do not customize messages.
Printer Log File Format
The log file is not currently implemented. Developers should supply an
empty file in /usr/spool/lp/pod with the name <printer name>.log, and
should not write to the log file.

This appendix explains how Impressario
application developers and filter/driver
developers can take advantage of the new
features in Impressario 1.2, and how to
migrate from Impressario 1.0 or 1.1 to
Impressario 1.2.
Transition Notes
Appendix D


227
Appendix D
D. Transition Notes
This appendix explains how Impressario application developers and
filter/driver developers can take advantage of the new features in
Impressario 1.2.
The major topics discussed are:
• “Impressario 1.1 to 1.2” on page 228
• “Notes for Application Developers” on page 228
• “Notes for Filter/Driver Developers” on page 228
• “Impressario 1.0 to 1.2” on page 229
• “Notes for Application Developers” on page 229
• “Notes for Filter/Driver Developers” on page 229
• “General Changes from IRIX 4 to IRIX 5” on page 231

228
Transition Notes
Impressario 1.1 to 1.2
Notes for Application Developers
The major changes in Impressario 1.2 for application developers are:
• The PrintBox widget now allows printer-specific options panels to be
launched.
• The new libimp library greatly eases the reading and writing of Silicon
Graphics Image files to any format, in both 8- and 16-bit per channel
formats.
Notes for Filter/Driver Developers
The major changes in Impressario 1.2 for filter/driver developers are:
• The chunky data format is obsolete. Convert your drivers to use STIFF
format.
• 16-bit per channel color and grayscale is now accepted by libimp and
libstiff.
• SCSI printer drivers should no longer be installed as setuid programs.
The Silicon Graphics printer installer tools reconfigure the device port
to be accessible to lp.
• Graphical options panels now must be installed in the directory
/var/spool/lp/gui_model/ELF and require their own application resource
file. See chapter 6 for detailed information on the creation and
installation of graphical options panels.

Impressario 1.0 to 1.2
229
Impressario 1.0 to 1.2
Notes for Application Developers
Developers incorporating printing in their application will find Impressario
1.2 backward-compatible with Impressario 1.0.
The libspool library has expanded support for printer and spooler options
handling. The libpod library now has a function to write the config file as well
as a number of new convenience functions to work with page sizes and
printer resolutions. See thelibspool(3) and libpod(3) man pages for details on
these libraries.
Notes for Filter/Driver Developers
The major changes in Impressario 1.2 concern printing filter and driver
development.
PostScript Interpreter Changes
In Impressario 1.2, the host-based PostScript interpreter is now called psrip.
The psrip program obsoletes the Impressario 1.0 interpreter called pschunky.
A shell script called pschunky is provided in Impressario 1.2 for backward
compatibility. This script simply provides a pschunky-compatible front end
to the psrip program.
Thepsrip program provides expanded output format support. Using psrip, it
is now possible to RIP to the k,w,rgb,cmy,cmyk,ymc,ymck, and kcmy
colorspaces. The raster image may be output in 1-, 4-, or 8-bits per color
component and in either planar or packed format.
The primary output image file format for psrip is Stream TIFF (STIFF). STIFF
is a streamable subset of TIFF (Tag Image File Format). STIFF output
obsoletes the Impressario 1.0 CHUNKY format. For backward compatibility,
psrip can also output Impressario 1.0-compatible CHUNKY format by
specifying colorspaces oldk,oldcmy, and oldcmyk, but this functionality will
soon go away, so you must upgrade your drivers now to use STIFF.

230
Transition Notes
New Interchange File Format
As indicated above, the primary interchange file format between printer
filters and drivers has been changed in Impressario 1.0 from the proprietary
CHUNKY format to STIFF. STIFF is a fully compatible subset of TIFF 6.0 and
therefore has many advantages over CHUNKY format. One such advantage
is the ability to export TIFF-compatible raster files to TIFF 6.0 applications.
All printer driver and filter development must use the STIFF file format
using the libstiff API.
Silicon Graphics Image to PostScript Filter Changes
The rgb2ps filter has been obsoleted by the sgi2ps program. Both programs
take Silicon Graphics image files as input and produce PostScript output.
However,sgi2ps provides expanded output capabilities. Thesgi2ps program
can output black and white (w), rgb, and cmyk PostScript in both ASCII and
binary formats. The binary output format is especially efficient when the
output of sgi2ps is piped directly to the psrip interpreter. In addition, sgi2ps
provides multi-image-per-page n-up capability.
Due to performance increases in both the Silicon Graphics Image to
PostScript file generation and the PostScript interpreter, there is no longer a
need for a filter to convert directly from Silicon Graphics image file format
to STIFF format. Conversion from Silicon Graphics image file format to
STIFF raster image format is accomplished by piping the output of sgi2ps to
the psrip interpreter using binary PostScript as the intermediate file format.
The tochunky filter is now obsolete.
New Model File Architecture
The printer model file architecture has changed for Impressario 1.1. The
Impressario 1.1 printer model files now use the programs wstype and
fileconvert to perform file typing and conversion, respectively. The programs
obsolete the use of the file command and the hard-coded filter chains found
in the Impressario 1.0 model files. Use of these programs greatly expands the
number of file types that can be printed and simplifies the model file logic.

Impressario 1.0 to 1.2
231
POD Files Enhanced
In Impressario 1.1, the POD file format has been fully documented (see
pod(4)). In addition, a number of enhancements to the POD files now allow
a wide range of printers to be fully characterized. Specific enhancements
include the ability to specify the colorspace, image format, and image depth
for the printer and the ability to handle printers that can switch resolutions
on the fly. Available fonts can now be searched for in the filesystem instead
of being hard-coded in the config file.
General Changes from IRIX 4 to IRIX 5
Compatibility Issues for Device Developers
IRIX 5 introduces support for multiple parallel ports and up to 72 serial
ports, and provides a number of new options to device developers using
SCSI. We recommend you get a copy of the IRIX Device Driver Programming
Guide if you use SCSI at all.
IRIX 5 ELF versus IRIX 4 COFF-format Options Panel
IRIX 5 uses a new, more flexible compiled format called ELF. You cannot link
ELF and COFF object files together, so you must recompile all sources on an
IRIX 5 machine. If you wish to relink your applications, you may still ship
COFF format options panels and they will continue to work.

This appendix discusses scanner driver
architecture. It provides a detailed
analysis and discussion of the template
scanner driver.
Scanner Driver Architecture
Appendix E


235
Appendix E
E. Scanner Driver Architecture
This appendix discusses scanner driver architecture. It provides a detailed
analysis and discussion of the template scanner driver.
The following major topics are discussed:
• “Overview” on page 236
• “Driver Structure” on page 236
• “Type Conversion Macros” on page 244
• “Scanner Functions” on page 238
• “Queues and Multi-Threaded Scanner Drivers” on page 247

236
Scanner Driver Architecture
Overview
Scanner drivers are programs that are executed by applications that link
with libscan.a and call SCOpen(3). They accept commands from the
application via an input pipe and return results via an output pipe.
All scanner drivers must implement the basic set of commands so that any
application using the libscan interface can have access to the functionality
offered by the scanner. Many library routines are provided for scanner
driver developers to implement functionality in software that may not be
implemented in hardware for some scanners. The support routines for
writing scanner drivers can be found in libscan.a.
Driver Structure
A scanner driver consists of a number of functions that implement the set of
commands required to drive the scanner. In the main routine, a table of these
functions, with the position of each function in the table corresponding to its
SCN #define in scanipc.h, is passed to SCDriverSetCallbacks(), then
SCDriverMainLoop() is called.
SCDriverMainLoop waits for input from the application and calls the function
in the table corresponding to each command received. Each function has the
following prototype:
void scanfunc(int cmd, SCARG *arg, SCRES *res)
Arguments:
cmd contains the SCN #define of the command to be executed.
arg is the argument to this scanning function. SCARG is defined
in scandrv.h as follows:
typedef struct tag_scarg {
void *data;
int len;
} SCARG;
arg->data points to the arguments transferred from the
application; the meaning of arg->data depends upon the
cmd (see below).

Driver Structure
237
arg->len encodes the byte length of arg->data.
res is the result of this scanning function. SCRES is defined in
scandrv.h as follows:
typedef struct tag_scres {
void *data;
int len;
void *freeparam;
void (*free)(void *param, void *data);
int errno;
char *errmsg;
} SCRES;
res->data should be set to point to the data to be returned to
the application as a result of cmd.
res->len is the byte length of res->data.
res->free is a pointer to a function that is called if it is
nonzero after res->data has been transferred to the
application. The function is called with res->freeparam as its
first argument and res->data as its second argument.
res->errno should be set to one of the SCE #defines in
/usr/include/scanner.h or one of the errno values from
/usr/include/sys/errno.h if an error occurs during the
execution of cmd. If res->errno is nonzero, the libscan
function being executed on the application side returns an
error status, and SCerrno is set to the value of res->errno.
res->errmsg is the error message pointer. If res->errno is set
to SCEDRVMSG, then res->errmsg should point to a
driver-specific error message.
Before a scanning function is called, the entire res structure is zeroed.
Scanning functions are allowed to assume that any member of the res
structure not explicitly set remains set to 0.

238
Scanner Driver Architecture
Scanner Functions
Required Scanner Functions
All scanner drivers must implement the functions listed in Table E-1.
Table E-1 Scanner Driver Functions
Function Description
SCN_INITOK Checks for successful scanner driver initialization
SCN_PAGESIZE Returns the size of the scan area that is supported by
the scanner
SCN_MINMAXRES Returns the smallest and largest horizontal and
vertical resolution
SCN_NRES Returns the number of resolution pairs supported in
hardware
SCN_RES Returns floating-point numbers representing the
supported hardware resolutions
SCN_NTYPES Returns the number of data types supported by the
driver
SCN_TYPES Returns an array of SCDATATYPE objects, one for
each of the types supported by the driver
SCN_FEEDERGETFLAGS Gets the document feeder flags
SCN_FEEDERSETFLAGS Sets the document feeder flags
SCN_FEEDERREADY Determines if the feeder is ready to be advanced
SCN_FEEDERADVANCE Advances the feeder to the next document
SCN_SETUP Sets the scanning parameters
SCN_GETSIZE Returns scan line width (in bytes and pixels) and the
number of scan lines
SCN_SCAN Tells the scanner driver to start scanning

Scanner Functions
239
SCN_INITOK Function
arg->data: NULL
res->data: NULL
This function exists as a mechanism for the application to determine
whether the scanner driver managed to initialize itself and the scanner
properly. If any problem occurred during initialization, res->errno should be
set to one of the SCE #defines in scanner.h; otherwise, no action is necessary.
SCN_PAGESIZE Function
arg->data: int * (Metric)
res->data: SCWINDOW *
typedef struct tag_scwindow {
float x, y, width, height;
} SCWINDOW;
This function returns the size of the scannable area supported by the scanner.
Fill res->data in with the x,y,width, and height of the scannable area in inches
or centimeters, depending on whether arg->data is SC_INCHES or
SC_CENTIM.
SCN_MINMAXRES Function
arg->data: NULL
res->data: SCMINMAXRES *
typedef struct tag_scminmaxres {
float minx, miny, maxx, maxy;
} SCMINMAXRES;
This function sets the smallest and largest horizontal and vertical
resolutions. res->data->minx should be set to the smallest horizontal
resolution supported in hardware by the scanner, res->data->miny the
SCN_ABORT Stops the scan and releases temporarily allocated
resources
SCN_DIE Cleans up and calls exit()
Table E-1 (continued) Scanner Driver Functions
Function Description

240
Scanner Driver Architecture
smallest vertical resolution, res->data->maxx the largest horizontal
resolution, and res->data->maxy the largest vertical resolution.
SCN_NRES Function
arg->data: NULL
res->data: int *
This function sets the number of resolution pairs supported in hardware.
*res->data should be set to the number of (xres,yres) resolution pairs
supported in hardware by the scanner.
SCN_RES Function
arg->data: int *
res->data: float *
This function sets floating-point numbers representing supported hardware
resolutions. arg->data points to the metric of the resolution; either
SC_INCHES for pixels/inch or SC_CENTIM for pixels/centimeter.
res->data should be set to point to a floating-point array that represent
supported hardware resolutions. There should be an even number of
resolutions, with all of the horizontal resolutions first, then all of the vertical
resolutions.
Note: All scanner drivers must support arbitrary resolutions; software
routines are provided to perform zoom operations. The above information is
provided so that scanner application developers can retrieve pure data from
the scanner and perform their own zooming (with filters; libscan zooming
does no filtering) to achieve the desired resolution.
SCN_NTYPES Function
arg->data: NULL
res->data: int *
This function sets the number of data types supported by the driver.
*res->data should be set to the number of data types supported by this
scanner driver.

Scanner Functions
241
SCN_TYPES Function
arg->data: NULL
res->data: SCDATATYPE *
typedef struct tag_scdatatype {
unsigned int packing : 4;
unsigned int channels : 4;
unsigned int type : 8;
unsigned int bpp : 8;
} SCDATATYPE;
The res->data of the SCN_TYPES function points to an array of
SCDATATYPE objects, one for each of the types supported by the scanner
driver.
All scanner drivers must support monochrome data; that is, the type
{SC_PACKPIX,1,SC_MONO, 1}. All scanner drivers that support any kind
of greyscale or color output must support the type { SC_PACKPIX, 1,
SC_GREY, 8 }; that is, 8-bit greyscale. All scanner drivers that support any
kind of color output must support either { SC_PACKPIX, 3, SC_RGB, 8 }
(24-bit CHUNKY color data) or { SC_PACKPLANE, 3, SC_RGB, 8 } (24-bit
planar color data).
Library routines in libscan.a exist to facilitate compliance with these
conventions.
SCN_FEEDERGETFLAGS Function
arg->data: NULL
res->data: SCFEEDERFLAGS *
typedef unsigned int SCFEEDERFLAGS;
This function returns the feeder flags for this scanner to the application. See
“Header Files” in Chapter 7.
SCN_FEEDERSETFLAGS Function
arg->data: SCFEEDERFLAGS *
res->data: NULL
This function sets the feeder flags.

242
Scanner Driver Architecture
SCN_FEEDERREADY Function
arg->data: NULL
res->data: NULL
This function determines whether or not the feeder is ready for an advance
command.
SCN_FEEDERADVANCE Function
arg->data: NULL
res->data: NULL
This function causes the feeder to advance to the next document.
SCN_SETUP Function
arg->data: SCSETUP *
res->data: NULL
typedef struct tag_scsetup {
int preview;
SCDATATYPE type;
int rmetric;
float xres, yres;
int wmetric;
float x, y, width, height;
} SCSETUP;
The SCN_SETUP function sets the scanning parameters. The upper-left x
and y coordinates, the width, and the height are specified in either pixels,
inches, or centimeters, depending on whether arg->data->wmetric is
SC_PIXELS,SC_INCHES, or SC_CENTIM.
Set the scanning horizontal and vertical resolutions, in pixels per inch or
pixels per centimeter, depending on the value of arg->data->rmetric. Set the
data type for scanning. If this is a preview, arg->data->preview will have a
nonzero value.
Note: If a resolution or combination of resolutions not supported in
hardware is specified, the driver MUST zoom the image in order to supply
the requested resolution. Library routines to aid zooming are available in
libscan.a.

Scanner Functions
243
SCN_GETSIZE Function
arg->data: NULL
res->data: SCSIZE *
typedef struct tag_scsize {
long xbytes, xpixels, ysize;
} SCSIZE;
This function returns, to the scanning application, the width of a scan line in
bytes and pixels, and the number of scan lines in the scan. This is called after
SCN_SETUP so the application will know exactly how much data to expect.
SCN_SCAN Function
arg->data: NULL
res->data: NULL
This function tells the scanner driver to initiate scanning.
SCN_ABORT Function
arg->data: NULL
res->data: NULL
This function stops the scan and releases any resources temporarily
allocated. The application has decided to stop retrieving data before
scanning has been completed. The driver should physically stop the scan
and release any resources that were temporarily allocated for the scan.
SCN_DIE Function
arg->data: NULL
res->data: NULL
This function cleans up and calls exit(2). The application has demanded that
the driver terminate. This function should not return; it should perform any
necessary cleanup and then call exit(2).

244
Scanner Driver Architecture
Type Conversion Macros
The macros listed in Table E-2 are provided to convert between data types.
GRIDTOFLOAT(int pos, int n)
FLOATTOGRID(float pos, int n)
These macros determine which destination pixel or line the pos'th source
pixel or line corresponds to. For example, if we are scanning at 120 dpi, but
the application has requested 100 dpi, and our scan height is 1 inch, we need
to skip 20 scan lines to provide the desired resolution. The following loop
obtains scan lines from the scanner and passes them on to the application:
float fy;
int imgy, scany;
while (imgy < 100) {
fy = GRIDTOFLOAT(imgy, 100);
scany = FLOATTOGRID(fy, 120);
...
/* Get the scany'th scan line from the scanner */
/* Do conversion and horizontal zooming */
/* Call SCDriverPutRow */
imgy++;
}
Zooming and Type Conversion Functions
The functions listed in Table E-3 are provided to support zooming and
converting between data types.
Table E-2 Type Conversion Macros
Macro Description
GRIDTOFLOAT Convert from grid format to floating-point format
FLOATTOGRID Convert from floating-point format to grid format

Scanner Functions
245
All conversion routines simultaneously zoom, so that only one conversion
per line should ever be necessary.
SCCreateZoomMap Function
int *SCCreateZoomMap(int anx, int bnx);
This function creates a zoom map. When zooming in the horizontal
direction, it is wasteful to use GRIDTOFLOAT and FLOATTOGRID for every
pixel of every line, since the same calculations would be repeated many
times. A zoom map is an array of bnx integers, each of which is the pixel
between 0 and anx - 1 that should be used when zooming a row of anx pixels
to a row of bnx pixels. The zooming and conversion functions all take zoom
maps for efficient zooming; for conversion functions where no zooming is to
occur, the zmap parameter can be NULL.
SCDestroyZoomMap Function
void SCDestroyZoomMap(int *zmap);
This function frees memory allocated to store a zoom map.
Table E-3 Zooming and Type Conversion Functions
Function Description
SCCreateZoomMap Creates a zoom map
SCDestroyZoomMap Frees memory allocated to store a zoom map
SCZoomRow1 Zooms a row of 1-bit pixels
SCZoomRow8 Zooms a row of 8-bit pixels
SCZoomRow24 Zooms a row of 24-bit pixels
SCZoomRow32 Zooms a row of 32-bit pixels
SCBandRGB8ToPixelRGB8 Converts a row of pixels, in three rows (R, G, and B)
of 8-bit components per pixel, to a row of 24-bit pixels
SCGrey8ToMono Converts a row of pixels from 8-bit greyscale to
monochrome

246
Scanner Driver Architecture
SCZoomRow1 Function
void SCZoomRow1(char *abuf, int anx, char *bbuf, int bnx, int *zmap);
This function zooms a row of anx pixels to a row of bnx pixels, 1 bit per pixel.
SCZoomRow8 Function
void SCZoomRow8(char *abuf, int anx, char *bbuf, int bnx, int *zmap);
This function zooms a row ofanx pixels to a row of bnx pixels, 8 bits per pixel.
SCZoomRow24 Function
void SCZoomRow24(void *abuf, int anx, void *bbuf, int bnx, int *zmap);
This function zooms a row of anx pixels to a row of bnx pixels, 24 bits per
pixel.
SCZoomRow32 Function
void SCZoomRow32(void *abuf, int anx, void *bbuf, int bnx, int *zmap);
This function zooms a row of anx pixels to a row of bnx pixels, 32 bits per
pixel.
SCBandRGB8ToPixelRGB8 Function
void SCBandRGB8ToPixelRGB8(void *frombuf, int fromx,
void *tobuf, int tox, int *zmap);
This function converts a row of fromx pixels, laid out in three rows (R, G, and
B) of 8-bit components per pixel, to a row of tox pixels, 24 bits per pixel.
SCGrey8ToMono Function
void SCGrey8ToMono(unsigned char thresh, void *frombuf,
int fromx, void *tobuf, int tox, int *zmap);
This function converts a row of pixels from 8-bit greyscale to monochrome,
thresholding each pixel with thresh.

Queues and Multi-Threaded Scanner Drivers
247
Queues and Multi-Threaded Scanner Drivers
To achieve optimal performance in a scanner driver, it is helpful to
parallelize the operations being performed. A pipeline carries data from the
scanner to the ultimate destination, often a file. One can imagine that at the
beginning of the pipeline, most of the time is spent waiting for I/O to
complete. An intermediate image processing stage is CPU-bound as it
zooms and converts rows of data. The final stage, writing to a file, is again
I/O-bound.
Rather than adding these times together, we notice that all three stages of the
pipeline can occur at the same time; that is, while the scanning stage is
waiting for I/O, the file-writing stage can also be waiting for I/O, and the
image-processing stage can be using the CPU. As you can imagine,
performance gets even better on multiprocessor systems.
To support this, a multi-threaded queue interface is included in libscan.a.
Each queue is semaphored so that the read thread can be different from the
write thread, and so that the dequeue operation on an empty queue blocks
until another thread has enqueued something.
In the driver template, separate threads implement the scanning stage and
the image-processing stage. The main thread of the driver simply starts the
two processes and waits for more commands from the application.
The driver template uses two queues: one to hold free buffers and one to
hold freshly scanned lines. The amount of concurrency is metered by the
initial size of the free queue; the scanning thread blocks when there are no
more free buffers if it gets too far ahead of the image-processing thread.
The scanning thread dequeues a buffer from the scan free queue, gets data
from the scanner, and stores it in the buffer. Then it breaks the buffer up into
scan lines, enqueueing each line on the scan queue (it is typically faster to
scan chunks of lines rather than one line at a time).
The image-processing thread dequeues a buffer from the scan queue. It then
zooms and converts it, and writes the result to a stream that the application
is reading to obtain the data. It puts the original buffer back on the scan free
queue (actually, since the scanning thread breaks its buffer up into scan
line-sized chunks, the image-processing thread has to know how to put the
chunks back together).
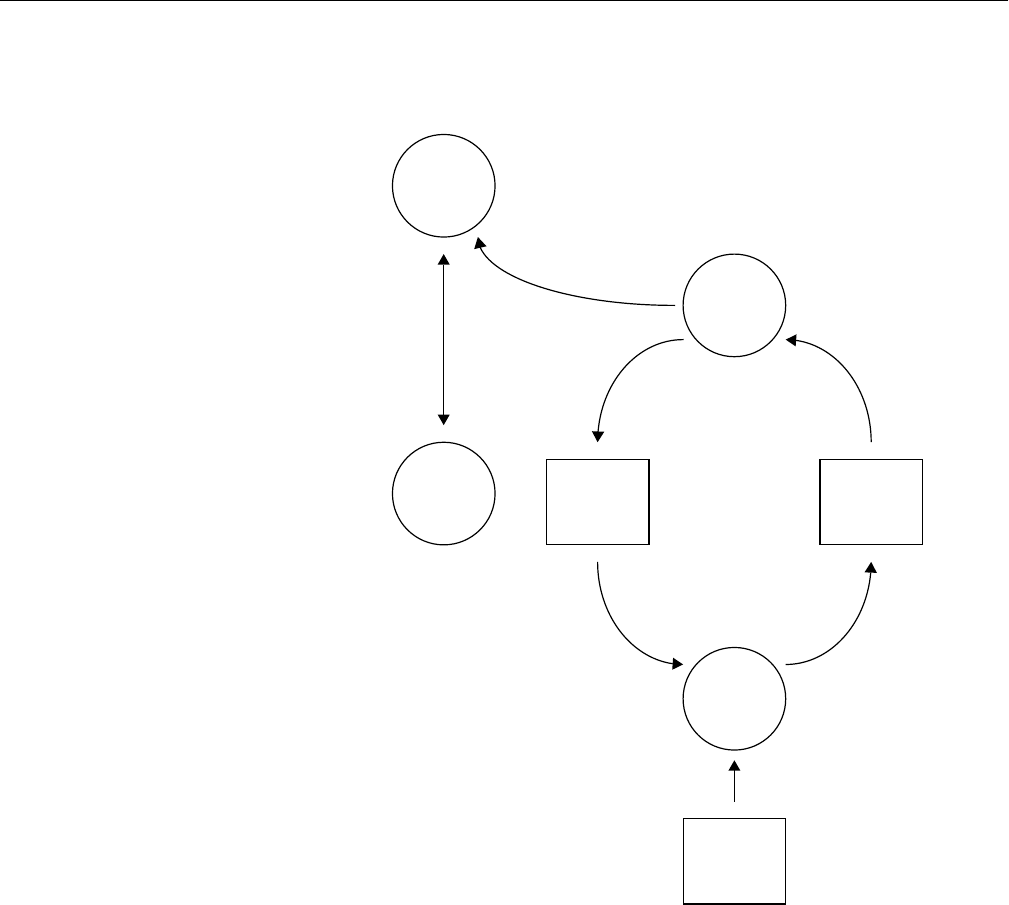
248
Scanner Driver Architecture
Figure E-1 illustrates the scanning process.
Figure E-1 Scanner Driver Architecture
performs simple zooming
Convert Process converts
from the scanner-specific
data formats to standard
formats and, if necessary,
Scan
Convert
Scanner
raw data
Scan
Scanner
Scan Process issues
the device-specific
commands to get scan
Parent
Scan Process
gets the empty
buffers from the
Scan Process
adds the buffered
scanned data to the
Convert Process gets
raw data buffers
from the head of
Scan
Queue
Free
Convert Process adds
written buffers back
to the tail of
Convert Process
writes cooked data
to the file descriptor
passed by the
Process
Process
Process
Application
Queue
data from the scanner
commands
and results
application
Scan QueueFree Queue
tail of Scan Queuehead of Free Queue

Queues and Multi-Threaded Scanner Drivers
249
Queue Manipulating Functions
The following functions are provided for manipulating queues:
typedef struct tag_scqueue SCQUEUE;
Table E-4 lists the queue manipulatingfunctions.
SCCreateQueue Function
SCQUEUE * SCCreateQueue(int nelems);
This function creates a multi-threaded safe, block-on-empty dequeue,
queue. nelems is the maximum number of elements that can be stored in the
newly created queue. Enqueue operations on full queues will block until
another thread has completed a dequeue operation.
SCDestroyQueue Function
int SCDestroyQueue(SCQUEUE *q);
This function frees the resources used by a queue.
SCEnqueue Function
void SCEnqueue(SCQUEUE *q, void *data);
This function adds an element to the tail of the queue. It unblocks a thread
waiting to dequeue or blocks it if the queue is full.
Table E-4 Queue Manipulating Functions
Function Description
SCCreateQueue Creates a multi-threaded safe, block-on-empty dequeue, queue
SCDestroyQueue Frees the resources used by a queue
SCEnqueue Adds an element to the tail of the queue
SCDequeue Removes an element from the head of a queue and returns it
SCQueueSetExit Sets a flag associated with a queue that tells all queue users to
exit

250
Scanner Driver Architecture
SCDequeue Function
void * SCDequeue(SCQUEUE *q);
This function removes an element from the head of a queue and returns it.
SCDequeue unblocks a thread waiting to enqueue or blocks it if the queue is
empty.
SCQueueSetExit Function
void * SCQueueSetExit(SCQUEUE *q);
This function sets a flag associated with a queue that tells all users of the
queue to exit. Any thread blocking in SCEnqueue or SCDequeue will be
terminated.SCQueueSetExit is used by the main thread of a scanner driver to
tell the child threads to exit when the user aborts a scan.

This appendix lists all man pages
associated with Impressario: the general
interest man pages, the printing
developers man pages, and the scanning
developers man pages.
Man Pages
Appendix F


253
Appendix F
F. Man Pages
This appendix lists all man pages associated with Impressario. Table F-1 lists
the general interest man pages.
Table F-1 General Interest Man Pages
Names Description
Impressario(1) Printing and scanning environment for SGI
systems
glp(1), PrintPanel, printpanel Graphical lp printing command
PrintStatus(1), printstatus Graphical printer status tool
gscan(1) Graphical scanning tool
scanners(1M) Scanner installation and management tool
fileconvert(1) File to printer or filetype converter
vstiff(1) Stream TIFF viewer
psrip(1) PostScript file to raster data format converter
installfoliofonts(1) PostScript font installation program for Adobe
Macintosh Font Folio™ CDROM
installpcfonts(1) PostScript font installation program for Adobe
TypeSet™ PC floppy disks
printers(1M) Printer installation and management program

254
Man Pages
Table F-2 lists the printing developers man pages and Table F-3 lists the
scanning developers man pages. The software the man pages listed below
describe all utilize the C-language application programming interface (API).
Table F-2 Printing Developers Man Pages
Name Description
libspool(3) An AP to the UNIX printer spooling systems
libpod(3) An API to the printer object database (POD)
libprintui(3X) An API to the PrintBox widget
libstiff(3) An API for reading and writing the STIFF (Stream TIFF) data file
format. It is described in detail in Appendix A
libimp(3) An API for reading and writing Silicon Graphics Image format
files. It is described in detail in Appendix B
Table F-3 Scanning Developers Man Pages
Name Description
libscan(3) An API for scanning
libstiff(3) An API for reading and writing the STIFF (Stream TIFF) data file
format. It is described in detail in Appendix A
libimp(3) An API for reading and writing Silicon Graphics Image Format
files. It is described in detail in Appendix B

Glossary


257
Glossary
API
Application programming interface; a set of function calls for achieving
some purpose.
BSD
Berkeley Software Distribution.
CHUNKY file format
The original Impressario 1.0 data format; it has been obsoleted in favor of the
Stream TIFF data format.
CMYK STIFF data format
CMYK is a TIFF data format extension. See “Generic STIFF File Structure” in
Appendix A for detailed information. CMYK stands for Cyan, Magenta,
Yellow, and blacK, the subtractive color process primaries.
CMY STIFF data format
CMY data class is a subset of the CMYK class and differs from the CMYK
class in a TIFF-compliant manner. See “Generic STIFF File Structure” in
Appendix A for detailed information.
File Type Rules (FTR)
A database that is one of the three key components of the Impressario file
conversion pipeline. These rules are well-documented in the Indigo Magic
Integration Guide, available as an online book and installable from your IRIX
CD.
filter/driver specification
See “Filter/Driver Specification” in Chapter 3.

258
Glossary
FTR
See File Type Rules.
generic scanner interface
An interface between application programs and scanner drivers. See
Chapter 9, “Generic Scanner Interface,” for additional information.
glp
A graphical end-user interface for submitting print jobs from applications.
See the glp(1) man page for additional information.
graphical options panel
See Chapter 5, “Printer Graphical Options Panel,” for additional
information.
gscan
A graphical end-user interface for using scanners. See the gscan(1) man page
for additional information.
GUI
Graphical user interface.
Impressario
A visual printing and scanning environment for IRIS workstations.
Impressario architecture
See Chapter 1, “Impressario Architecture,” for printing and scanning
architecture.
libimp
A C-language application programming interface (API) for reading and
writing Silicon Graphics Image Format files.
libpod
A C-language application programming interface to the printer object
database (POD).

259
libprintui
A graphical user interface (GUI) printing library.
libscan
A C-language application programming interface for scanning.
libspool
A C-language application programming interface to the UNIX printer
spooling system.
libstiff
A C-language API for reading and writing Stream TIFF files.
lp command
The System V release 3 command to send a print job to the printer. See the
lp(1) man page.
lpr command
The BSD command to send a print job to a printer. See the lpr(1) man page.
lpsched command
The System VR3 spooler job scheduler. Not invoked by end users.
packed data format
Bitmapped data organized by pixel, with all color components for each pixel
adjacent; for example., RGBRGBRGB . . .
planar data format
Bitmapped data organized by color “plane,” with all pixels arranged in
planes of component colors, all components of one color, then another, etc.
plotter format
A raster-based page-description language, most commonly HPGL or some
variant.
POD
See printer object database.

260
Glossary
PostScript printer
A printer with a built-in PostScript interpreter. The printer can only accept
PostScript files.
PrintBox
A graphical end-user interface for submitting print jobs from applications.
See the libprintui(3) man page for additional information.
printer device drivers
See Chapter 3, “Printer Drivers.”
printer libraries
See Chapter 6, “Printing Libraries.”
Printer Manager
A graphical end-user interface for managing and installing printers. See the
man page for additional information.
printer model file
A Bourne shell script that controls the filtering and printing of a set of files.
Invoked by the lpsched command. See Chapter 4, “Printer Model Files.”
<
printer name>.config
A configuration file representing the capabilities of the printer. The .config
file is part of the printer object database (POD).
<
printer name>.log
The printer log file for the specified printer. The .log file is part of the printer
object database (POD).
<printer name>.status
A status file indicating the current printing state. The .status file is part of the
printer object database (POD).
printer object database (POD)
The POD contains information on the current configuration, status, and job
history of a single printer. It is the central database used by all printing filters
and is maintained by each driver. See Appendix C, “Printer Object Database

261
(POD) File Formats,” for detailed information.
printers
See Printer Manager.
printing architecture
See “Impressario Printing Architecture” in Chapter 1.
PrintPanel
An alias for glp, graphical end-user interface for modifying printer settings.
See the glp(1) man page for additional information.
PrintStatus
A graphical end-user interface for checking printer status. See the
PrintStatus man page for additional information.
raster printer
A printer that only accepts bitmap image data.
scanner driver
A program that interfaces with a scanner. See Chapter 7, “Scanner Drivers,”
for additional information.
scanner-specific options
See Chapter 8, “Scanner-Specific Options.”
scanners
A graphical end-user interface for installing and managing scanners. See the
scanners(1) man page for additional information.
spooling system API
See libspool and libprintui.
STIFF
Stream TIFF is a subset of the Tagged Image File Format (TIFF) originally
developed by Aldus Corporation. See Appendix A, “Stream TIFF Data
Format,” for more information.

262
Glossary
System V spooler interface
See the lp command and lpsched command.
Tagged Image File Format
The Tagged Image File Format (TIFF) originally developed by Aldus
Corporation. See Appendix A, “Stream TIFF Data Format,” for more
information.
TIFF
See Tagged Image File Format.
YMC data format
A data class similar to the CMY class with the exception that data is
organized as YMC instead of CMY. YMC stands for Yellow, Magenta, and
Cyan.
YMCK data format
A class similar to CMYK except that data is organized as YMCK instead of
CMYK. YMCK stands for Yellow, Magenta, Cyan, and blacK.

Index


265
Index
A
active icons subsystem, 48
Active Status Path, 212
adding a CONVERT rule, 152
adding a new filetype to Impressario, 152
Adobe Systems, Inc, 2
AdvanceFeeder function, 91
Aldus Corporation, 2
API, 257
libpod, 8
libprintui, 8
libspool, 8
APIs to spooling systems, 7, 64
Apple Computer, 2
application developers
programming interface, 6, 8
application programming interface, 257
application programming interfaces, 6, 8
application/driver functions, 117
AT&T, 2
AT&T System V, 2
AT&T System V printer spooling system, xviii
audience, xviii
Available Fonts option, 213
B
banner page, 43
banner pages, 49
Berkeley Software Distribution, 2, 257
Black Substitute option, 213
bold syntax convention, xx
brackets, xx
BSD, 2, 257
BSD spooling system, 6
BSD spooling system interface, 9
C
callbacks, 72
Centronics Data Computer Corporation, 2
Centronics interfaces, 48
CHUNKY file format, 257
CMY data format, 169
CMY STIFF data format, 257
CMYK data format, 169
CMYK STIFF data format, 257
Color Adjustment option, 213
color space conversion functions, 188
ColorPostScript, 48
ColorRaster, 48
compatibility issues for device developers, 231
CompuServe, 2

266
Index
.config, 260
config file option
Active Status Path, 212
Available Fonts, 213
Black Substitute, 213
Color Adjustment, 213
Cost per Page, 214
Default CA, 214
Default IS, 214
Default MT, 214
Default QM, 214
Driver Path, 215
Error Retry Wait, 215
Input Source, 215
Location Code, 215
Manual Capable, 215
Maximum Addr, 215
Maximum Print Area, 216
Media Standard, 216
Media Type, 216
Media Wait, 216
Minimum Addr, 216
Minimum Print Area, 216
Number of Colors, 217
Physical Location, 217
Port Path, 217
Printer Class, 217
Printer Model, 218
Printer Options, 218
Quality Modes, 218
Resolution, 218
Size Table Entry, 218
Status Update Wait, 219
Technology, 220
Time per Page, 220
configuration file, 5, 73
configuring the Impressario software, 22
connecting the printer or scanner, 21
copies, number of, 40
Cost per Page option, 214
courier syntax convention, xx
creating a graphical options panel, 6
creating a model file, 5
customized banner pages, 49
D
data format
STIFF, 161
data packing functions, 183
data structure
SCANINFO, 81
SCANPARAMS, 83
data structures
scanner, 80
debug switch, 49
Default CA option, 214
Default IS option, 214
Default MT option, 214
Default QM option, 214
DeleteScanner function, 95
deskjet_model.gui, 57
developing a printer driver, 4
device interface, 48
directory
example POD files, 5
model files, 5
printer filter programs, 5
disk space requirements, 20
Display PostScript, 20
document feeder functions, 125
document introduction, xvii
Documenter’s Workbench, 2
DoScan function, 89
dps_eoe subsystem, 20
driver, 141

267
Driver Path, 215
driver see also printer drivers
development, 27
driver template
scanner, 80
E
engine-specific options, 34
enhancing Impressario with plug-ins, 149
enscript man page, 23
Epson GT-6000, 18
Error, 223
error handling functions, 184
Error Retry Wait option, 215
events, 95
F
fast path for text, 50
FeederReady function, 91
file conversion utility, 151
file extensions
.config, 5
.log, 5
.status, 5
file processing, 44
File Type Rules, 257
file type rules, 150
fileconvert, 230
fileconvert man page, 253
fileconvert utility, 151
files
Impressario Developer’s Kit, 19
filter functions, 199
filter/driver
specification, 32
filter/driver specification, 257
filtering options, 50
FindScanners function, 92
FIT, 18
FIT image file format, xix
FTR, 150, 258
Function
SCBandRGB8ToPixelRGB8, 246
SCCreateQueue, 249
SCCreateZoomMap, 245
SCDequeue, 249, 250
SCDestroyQueue, 249
SCDestroyZoomMap, 245
SCEnqueue, 249
SCGrey8ToMono, 246
SCN_ABORT, 243
SCN_DIE, 243
SCN_FEEDERADVANCE, 242
SCN_FEEDERGETFLAGS, 241
SCN_FEEDERREADY, 242
SCN_FEEDERSETFLAGS, 241
SCN_GETSIZE, 243
SCN_INITOK, 239
SCN_MINMAXRES, 239
SCN_NRES, 240
SCN_NTYPES, 240
SCN_PAGESIZE, 239
SCN_RES, 240
SCN_SCAN, 243
SCN_SETUP, 242
SCN_TYPES, 241
SCQueueSetExit, 249, 250
SCZoomRow1, 246
SCZoomRow24, 246
SCZoomRow32, 246
SCZoomRow8, 246
function
AdvanceFeeder, 91

268
Index
DeleteScanner, 95
DoScan, 89
FeederReady, 91
FindScanners, 92
impClampRow, 194
impClose, 182
impCloseFd, 182
impCMYKtoRGB, 191
impCMYtoRGB, 189
impCopyRow, 194
impCreateZoom, 196
impDestroyZoom, 196
impErrorString, 184
impHSVtoRGB function, 193
impInitRow, 194
impKtoRGB, 188
impOpen, 182
impOpenFd, 182
impPackRow, 183
impPerror, 184
impReadRow, 185
impReadRowB, 185
impResetZoom, 196
impRGBtoCMY, 189
impRGBtoCMYK, 191
impRGBtoDevCMYK, 191
impRGBtoHLS, 193
impRGBtoHSV, 193
impRGBtoK, 188
impRGBtoW, 188
impRGBtoYCbCr, 191
impRGBtoYIQ, 190
impRGBtoYUV, 190
impSAddRow, 194
impSDivRow, 194
impSMulRow, 194
impSSubRow, 194
impUnpackRow, 183
impVAddRow, 194
impVSubRow, 194
impWriteRow, 185
impWriteRowB, 185
impWtoRGB, 188
impYCbCrtoRGB, 191
impYIQtoRGB, 190
impZeroRow, 194
impZoomRow, 196
InstallScanner, 94
OpenScanner, 86
PrintID, 92
SCAbort, 124
SCBandRGB8ToPixelRGB8, 246
SCClose, 118
SCCreateQueue, 249
SCCreateZoomMap, 245
SCDataReady, 123
SCDefaultScannerName, 120
SCDequeue, 250
SCDestroyQueue, 249
SCDestroyZoomMap, 245
SCEndScanEnt, 119
SCEnqueue, 249
SCErrorString, 116
SCFeederAdvance, 127
SCFeederGetFlags, 126
SCFeederReady, 127
SCFeederSetFlags, 126
SCGetDataTypes, 121
SCGetFD, 124
SCGetMinMaxRes, 120
SCGetPageSize, 121
SCGetScanEnt, 119
SCGetScanLine, 123
SCGetScannerRes, 120
SCGetScanSize, 123
SCGetStatus, 124
SCGetStatusFD, 125
SCGrey8ToMono, 246
SCN_ABORT, 243
SCN_DIE, 243
SCN_FEEDERGETFLAGS, 241
SCN_FEEDERREADY, 242

269
SCN_FEEDERSETFLAGS, 241
SCN_GETSIZE, 243
SCN_INITOK, 239
SCN_MINMAXRES, 239
SCN_NRES, 240
SCN_NTYPES, 240
SCN_PAGESIZE, 239
SCN_RES, 240
SCN_SCAN, 243
SCN_SETUP, 242
SCN_TYPES, 241
SCOpen, 118
SCOpenFile, 118
SCOpenScreen, 118
SCPerror, 116
SCQueueSetExit, 250
SCScan, 123
SCScanFD, 124
SCScannerName, 119
SCSetScanEnt, 118
SCSetup, 122
SCZoomRow1, 246
SCZoomRow24, 246
SCZoomRow32, 246
SCZoomRow8, 246
SetFeederFlags, 91
SetupScan, 88
G
general changes from IRIX 4 to IRIX 5, 231
general filter/driver architecture, 7
general interest man pages, 253
generic scanner API, 101
generic scanner interface, 111, 258
generic STIFF file structure, 166
getopts, 30
GIF, 2
GIF image file format, xix
glossary, 257
glp, 9, 10, 258
program, 58
glp man page, 253
graphical interface
PrintBox, 2
printers, 2
PrintPanel, 2
PrintStatus, 2
scanners, 2
graphical options panel, 53, 258
action area, 55
development, 56
installation, 57
invocation, 58
layout, 54
naming, 57
options handling, 56
termination, 59
graphical options panel program, 141
graphical options panel resource file, 141
graphical user interface, xviii
Graphics Interchange Format, 2
grelnotes man page, xvii
gscan, 13, 258
gscan man page, 161, 253
GUI, xviii, 258
H
hardware interfaces, 48
header files
scanner, 80
helvetic bold syntax convention, xx
helvetic syntax convention, xx
Hewlett-Packard, 2
how the file conversion pipeline works, 150

270
Index
how to use this guide, xix
HP DesignJet 650C, 2, xix, 19
HP DeskJet, 19
HP LaserJet, 2, 19
HP PaintJet, 19
HP ScanJet IIc, 18
HP ScanJet IIcx, 18
HP-GL, 2
I
image access functions, 181
image file format
FIT, xix
GIF, xix
JPEG, xix
PBM, xix
PGM, xix
PhotoCD, xix
PPM, xix
RGB, xix
Silicon Graphics, xix
TIFF, xix
image I/O functions, 185
impClampRow function, 194
impClose function, 182
impCloseFd function, 182
impCMYKtoRGB function, 191
impCMYtoRGB function, 189
impCopyRow function, 194
impCreateZoom, 196
impCreateZoom function, 196
impDestroyZoom, 196
impDestroyZoom function, 196
impErrorString function, 184
impHLStoRGB function, 193
IMPImage structure, 179
impInitRow function, 194
impKtoRGB function, 188
impOpen function, 181, 182
impOpenFd function, 182
impPackRow function, 183
impPerror function, 184
impr_base.books.user, 18
impr_base.man.impr, 18
impr_base.man.relnotes, 18
impr_base.sw.il_image, 18
impr_base.sw.il_images, 20
impr_base.sw.impr, 18
impr_dev.books.developer, 19
impr_dev.man.impr, 19
impr_dev.man.print, 19
impr_dev.man.scan, 19
impr_dev.sw.impr, 19
impr_dev.sw.print, 19
impr_dev.sw.scan, 19
impr_dev.sw.tests, 19
impr_fonts, 21
impr_fonts.man.gifts, 18
impr_fonts.sw.adobe22, 18
impr_fonts.sw.gifts, 18
impr_rip, 21
impr_rip_printers.man.designjet, 19
impr_rip_printers.man.deskjet, 19
impr_rip_printers.man.laserjet, 19
impr_rip_printers.sw.designjet, 19
impr_rip_printers.sw.deskjet, 19
impr_rip_printers.sw.laserjet, 19
impr_rip.man.impr, 19
impr_rip.sw.impr, 19
impr_scan.man.impr, 18

271
impr_scan.sw.epson, 18
impr_scan.sw.hp, 18
impr_scan.sw.impr, 18
impr_scan.sw.ricoh, 18
impr_scan.sw.sharpscsi, 18
impr_scan.sw.utek, 18
impr_server.man.impr, 18
impr_server.sw.impr, 18
impr_server.sw.laserwriter, 19
impReadRow function, 185
impReadRowB function, 185
impResetZoom, 196
impResetZoom function, 196
Impressario, 258
APIs to spooling system, 7
application programming interfaces, 6, 8
architecture, 1
printing, 3
compliance
print driver developers, 4
compliance, scanner driver development, 13
overview, 2
printing application development, 10
printing architecture, 3
scanner application development, 13
scanner driver development, 13
subsystems, 18, 134
Impressario 1.0 to 1.2, 229
Impressario 1.1, xix
Impressario 1.1 to 1.2, 228
Impressario 1.2, xix
Impressario architecture, 258
Impressario compliance
for scanners, 11
Impressario Developer’s Kit, xvii
Impressario Developer’s Kit files, 19
Impressario Developer’s Kit software, 17
Impressario man page, 253
Impressario printing architecture, 3
Impressario release notes, xvii
Impressario subsystems, 18, 134
impRGBtoCMY function, 189
impRGBtoCMYK function, 191
impRGBtoDevCMYK function, 191
impRGBtoHLS function, 193
impRGBtoHSV function, 193
impRGBtoK function, 188
impRGBtoW function, 188
impRGBtoYCbCr function, 191
impRGBtoYIQ function, 190
impRGBtoYUV function, 190
impSAddRow function, 194
impSDivRow function, 194
impSMulRow function, 194
impSSubRow function, 194
impUnpackRow function, 183
impVSubRow function, 194
impWriteRow function, 185
impWriteRowB function, 185
impWtoRGB function, 188
impYCbCrtoRGB function, 191
impYIQtoRGB function, 190
impYUVtoRGB, 190
impYUVtoRGB function, 190
impZeroRow function, 194
impZoomRow, 196
impZoomRow function, 196
Indigo, 2
Indigo Magic desktop, 20
Information, 223
Input Source option, 215
installation

272
Index
disk space requirements, 20
software prerequisites, 20
installation method, 20
installation software prerequisites, 20
installfoliofonts man page, 253
installing Impressario software, 17, 21
installpcfonts man page, 253
InstallScanner function, 94
interfaces, 48
interprocess scanner communication, 12
IRIS, 2
IRIX, 2
IRIX 4.0.5 clients, xix
IRIX 4.0.5 servers, xix
IRIX 5 ELF versus IRIX 4 COFF-format options panel,
231
IRIX 5.2 clients, xix
IRIX 5.2 servers, xix
ISO text files, xviii
italics syntax convention, xx
J
job
sequence ID number, 40
title, 40
JPEG, xix
K
KCMY data format, 171
L
laserjet, 29
LaserWriter, 2
libimp, xix, 2, 175, 258
libimp library, 196
libimp library functions, 176
libimp man page, 254
libpod, 2, 5, 8, 10, 229, 258
libpod API, 8
libpod library, 73
compiling programs, 75
debugging, 75
file parsing rules, 209
functions, 76
local functions, 74
standard functions, 74
libpod man page, 254
libprintui, 2, 9, 10, 54, 259
libprintui API, 8
libprintui library, 8, 67
compiling, 70
example program, 71
functions, 71
libprintui man page, 254
library
libimp, xix, 2
libpod, 2
libprintui, 2, 8
libscan, 2
libspool, xviii, 2
libstiff, 2
libscan, 2, 11, 13, 259
libscan man page, 254
libscan.a, 11, 236
libspool, xviii, 2, 8, 9, 10, 229, 259
libspool API, 8
libspool library, 64

273
compiling, 64
functions, 65
libspool man page, 254
libstiff, 2, 13, 161, 254, 259
libstiff man page, 254
Location Code, 215
.log, 260
lp command, 6, 259
lpr command, 6, 259
lpsched
command-line arguments, 40
lpsched command, 259
M
making a software distribution, 140
man page
fileconvert, 253
glp, 253
grelnotes, xvii
gscan, 253
Impressario, 253
installfoliofonts, 253
installpcfonts, 253
libimp, 254
libpod, 254
libprintui, 254
libscan, 254
libspool, 254
libstiff, 254
printers, 253
PrintPanel, 253
printpanel, 253
PrintStatus, 253
printstatus, 253
psrip, 253
relnotes, xvii
scanners, 253
vstiff, 253
man pages, 253
enscript, 23
Manual Capable option, 215
manual page, 141
Massachusetts Institute of Technology, 2
Maximum Addr option, 215
Maximum Print Area option, 216
Media Size, 221
Media Standard option, 216
Media Type, 222
Media Type option, 216
Media Wait option, 216
MediaWaitTimeout, 34
MicroTek ScanMaker 600ZS, 18
Minimum Addr option, 216
Minimum Print Area option, 216
model file, 39, 141
banner pages, 49
command-line arguments, 40
debug routines, 49
device interface, 48
file processing, 44
filtering options, 50
general options, 45
printer name, 47
template, 47
MonoPostScript, 48
Motif, 2
Motif widget, 2
N
network communication, 74
new interchange file format, 230
new model file architecture, 230

274
Index
Number of Colors, 222
Number of Colors option, 217
O
online man pages, xxiv
Open Software Foundation, 2
OpenScanner function, 86, 103
Operational Status, 221
OSF, 2
OSF/Motif, 2, 56
output-specific options, 35
overview of chapters and appendices, xxi
P
packaging Impressario printing software, 141
packaging Impressario scanning software, 144
packaging your Impressario product, 139
packed data format, 259
PBM image file format, xix
PDpod_path global variable, 74
Personal IRIS, 2
PGM image file format, xix
phandler, 29
PhotoCD, 18
PhotoCD image file format, xix
Physical Location, 217
planar data format, 259
Plotter, 48
plotter format, 259
plp.h, 29
POD, 259
general syntax, 208
POD files, 5, 141
POD general syntax, 208
character set, 208
field format, 208
podd, 8
pod.h, 29
Port Path, 217
PostScript
color and mono, 48
PostScript files, xviii
PostScript interpreter changes, 229
PostScript printer, 260
PPM image file format, xix
PrintBox, 9, 54, 260
example configurations, 68
man page, 71, 76
PrintBox graphical interface, 2
printbox program, 71
PrintBox widget, xviii
printed books, xxiii
printer
Apple LaserWriter II, 21
Apple LaserWriter IIf, 21
Apple LaserWriter IIg, 21
Apple LaserWriter IINT, 21
Apple LaserWriter IINTX, 21
Apple LaserWriter Plus, 21
convenience functions, 42
Hewlett-Packard DesignJet 650C, 21
Hewlett-Packard DeskJet 500C, 21
Hewlett-Packard DeskJet 550C, 21
Hewlett-Packard LaserJet 4, 21
Hewlett-Packard LaserJet III, 21
Hewlett-Packard LaserJet IIIP, 21
Hewlett-Packard LaserJet IIP, 21
Hewlett-Packard LaserJet IIP+, 21
Hewlett-Packard PaintJet XL300, 21
host, 74
HP DesignJet 650C, xix
name, 47

275
process command-line arguments, 43
types, 48
Printer Class, 217
printer configuration, 22
printer configuration file, 73, 206
format, 210
parsing, 209
printer device drivers, 260
printer drivers
development, 27
engine-specific options, 34
example, 29
include files, 29
invocation, 29
output-specific options, 35
raster-specific options, 34
required options, 33
required switches, 33
reserved options, 33
unreserved options, 35
printer libraries, 260
printer log file, 5, 207
Printer Manager, 22, 48, 260
Printer Model, 218
printer model file, 260
printer object database, 2, 260
files, 73
printer object database (POD) file formats, 205
Printer Options, 218, 223
printer status file, 5, 73, 207
entries, 220
format, 220, 224
general format, 220
parsing, 209
printer status file entry
Error, 223
Information Options, 223
Media Size, 221
Media Type, 222
Number of Colors, 222
Operational Status, 221
Printer Options, 223
Validation Mask, 223
Warning, 223
printer status file format, 220
printer support, 21
printer-specific filter/driver, 49
printers, 261
printers graphical interface, 2
printers man page, 253
PrintID function, 92
printing application development, 10
printing architecture, 261
printing developers man pages, 254
printing environment, xviii
printing libraries, 63
printing-specific STIFF, 166
PrintPanel, 9, 261
PrintPanel man page, 253
printpanel man page, 253
PrintStatus, 261
PrintStatus man page, 253
printstatus man page, 253
providing data filters, 5
providing POD files, 5
pschunky, 229
psrip, 229
psrip man page, 253
Q
Quality Modes option, 218
queues and multi-threaded scanner drivers, 247
queues manipulating functions, 249

276
Index
R
Raster, 48
raster printer, 261
raster-specific options, 34
related publications, xxiii
online man pages, xxiv
printed books, xxiii
relnotes man page, xvii
remote interfaces, 48
required scanner functions, 238
Resolution option, 218
RGB image file format, xix
rgb2ps, 230
Ricoh FS1, 18
routeprint, 48
runtime filetype recognition utility, 150
S
SC4-DPS-1.0, 20
SCAbort function, 124
scanconv.h, 80
scandrv.h, 80
SCANINFO data structure, 81
scanipc.h, 80
Scanner
coordinate system, 112
scanner
data structures, 80
data type conventions, 114
driver template, 80
drivers, 79
Epson GT 6000, 22
header files, 80
Hewlett-Packard ScanJet IIc, 22
installation and testing, 97
MicroTek ScanMaker 600 ZS, 22
Ricoh FS1, 22
Sharp JX 320, 22
scanner configuration, 22
scanner data type
8-bit greyscale, 114
monochrome, 114
packed 24-bit RGB color, 115
planar 24-bit RGB color, 115
scanner diagnostic functions, 116
scanner driver architecture, 235, 248
scanner driver interface, 102
scanner driver interface options program, 102
scanner driver structure, 236
scanner drivers, 261
scanner functions, 238
required, 238
scanner run-time components, 11
scanner support, 22
scanner-specific options, 101, 261
scanner-specific options program, 105
scanner.h, 80
scanners, 108, 261
scanners man page, 253
scanning area functions, 121
scanning environment, xviii
scanning functions, 122
scanning resolution functions, 120
SCANPARAMS data structure, 83
SCBandRGB8ToPixelRGB8 function, 246
SCClose function, 118
SCCreateQueue Function, 249
SCCreateQueue function, 249
SCCreateZoomMap function, 245
SCDataReady function, 123
SCDATATYPE data structure, 113

277
SCDefaultScannerName function, 120
SCDequeue Function, 249
SCDequeue function, 250
SCDestroyQueue Function, 249
SCDestroyQueue function, 249
SCDestroyZoomMap function, 245
SCEndScanEnt function, 119
SCEnqueue Function, 249
SCEnqueue function, 249
SCErrorString function, 116
SCFeederAdvance function, 127
SCFeederGetFlags function, 126
SCFeederReady function, 127
SCFeederSetFlags function, 126
SCGetDataTypes function, 121
SCGetFD function, 124
SCGetMinMaxRes function, 120
SCGetPageSize function, 121
SCGetScanEnt function, 119
SCGetScanLine function, 123
SCGetScannerRes function, 120
SCGetScanOpt, 105, 107
SCGetScanSize function, 123
SCGetStatus function, 124
SCGetStatusFD function, 125
SCGrey8ToMono function, 246
SCLOPT structure, 103
sclopt.h, 102
SCN_ABORT function, 243
SCN_DIE function, 243
SCN_FEEDERADVANCE, 242
SCN_FEEDERADVANCE function, 242
SCN_FEEDERGETFLAGS function, 241
SCN_FEEDERREADY function, 242
SCN_FEEDERSETFLAGS function, 241
SCN_GETSIZE function, 243
SCN_INITOK Function, 239
SCN_MINMAXRES function, 239
SCN_NRES function, 240
SCN_NTYPES function, 240
SCN_PAGESIZE function, 239
SCN_RES function, 240
SCN_SCAN function, 243
SCN_SETUP function, 242
SCN_TYPES function, 241
SCOpen, 236
SCOpen function, 118
SCOpenFile function, 118
SCOpenScreen function, 118
SCOptions, 105
SCPerror function, 116
SCQueueSetExit Function, 249
SCQueueSetExit function, 250
SCScan function, 123
SCScanFD function, 124
SCScannerName function, 119
SCScanOpt, 107
SCSetScanEnt function, 118
SCSetup function, 122
SCZoomRow1 function, 246
SCZoomRow24 function, 246
SCZoomRow32 function, 246
SCZoomRow8 function, 246
serial interfaces, 48
server software, xviii
SetFeederFlags function, 91
SetupScan function, 88
sgi2ps, 230
Sharp JX 320, 18
Silicon Graphics filter/driver specification, 32

278
Index
Silicon Graphics Image file format, xix
Silicon Graphics Image file format API, 175
Silicon Graphics Image files, xviii
Silicon Graphics Image to PostScript filter changes,
230
Size Table Entry option, 218
software file
impr_base.books.user, 18
impr_base.man.impr, 18
impr_base.man.relnotes, 18
impr_base.sw.il_image, 18
impr_base.sw.impr, 18
impr_dev.books.developer, 19
impr_dev.man.impr, 19
impr_dev.man.print, 19
impr_dev.man.scan, 19
impr_dev.sw.impr, 19
impr_dev.sw.print, 19
impr_dev.sw.scan, 19
impr_dev.sw.tests, 19
impr_fonts.man.gifts, 18
impr_fonts.sw.adobe22, 18
impr_fonts.sw.gifts, 18
impr_rip_printers.man.designjet, 19
impr_rip_printers.man.deskjet, 19
impr_rip_printers.man.laserjet, 19
impr_rip_printers.sw.designjet, 19
impr_rip_printers.sw.deskjet, 19
impr_rip_printers.sw.laserjet, 19
impr_rip.man.impr, 19
impr_rip.sw.impr, 19
impr_scan.man.impr, 18
impr_scan.sw.epson, 18
impr_scan.sw.hp, 18
impr_scan.sw.impr, 18
impr_scan.sw.ricoh, 18
impr_scan.sw.sharpscsi, 18
impr_scan.sw.utek, 18
impr_server.man.impr, 18
impr_server.sw.impr, 18
impr_server.sw.laserwriter, 19
spooling system API, 64, 261
ST4-DPS-1.0, 20
.status, 260
status file, 73
Status Update Wait, 219
stdout, 55
STIFF, 13, 261
STIFF data format, 161
STIFF generic functions, 163
STIFF library access, 162
STIFF library description, 162, 175
STIFF library functions, 163
STIFF printing-specific functions, 164
stream TIFF, 161
style conventions, xx
notations, xx
syntax, xx
summary of libpod functions, 76
summary of libprintui functions, 71
syntax convention
bold, xx
brackets, xx
courier, xx
helvetic, xx
helvetic bold, xx
italics, xx
System V Spooler Interface, 262
System V spooler interface, 6
System V spooling system interface, 9
T
Tagged Image File Format, 262
Technology, 220
Tektronix, 2

279
Tektronix Phaser, 2
Tektronix Phaser II PXi, 2
Tektronix Phaser II SX, 2
Tektronix, Inc, 2
template model file execution, 41
testiconfig, 6, 136
testiconfig man page, 133
testing an Impressario printer, 134
testing an Impressario printer software installation,
136
testipr, 6, 134
testipr man page, 133
TIFF, 2, 18, 262
TIFF image file format, xix
Time per Page option, 220
TranScript, 2
TranScript printer model files, 23
transition notes, 227
Impressario 1.0 to 1.2, 229
compatibility issues for device developers, 231
for application developers, 229
for filter/driver developers, 229
general changes from IRIX 4 to IRIX 5, 231
IRIX 5 ELF versus IRIX 4 COFF-format options
panel, 231
new interchange file format, 230
new model file architecture, 230
POD files enhancement, 231
PostScript interpreter changes, 229
Silicon Graphics Image to PostScript filter
changes, 230
Impressario 1.1 to 1.2, 228
for application developers, 228
for filter/driver developers, 228
U
UNIX, 2
UNIX System Laboratories, 2
unreserved options, 35
user name, 40
using an alternate PostScript RIP, 156
V
Validation Mask, 223
vendor-supplied model file additions, 47
Versatec, 2
Versatec Corporation, 2
Versatec interfaces, 48
vstiff man page, 253
W
Warning, 223
widget
example configurations, 68
WorkSpace, 2
writing a new filter, 152
writing an FTR, 152
wstype, 230
wstype utility, 150
X
X and Xt Motif documentation set, 106
X applications, 71
X Window System, 2
Xt options, 58
XtAppInitialize, 107

280
Index
Y
YMC data format, 170, 262
YMCK data format, 170, 262
Z
zooming and type conversion functions, 244, 245
zooming Functions, 196


Tell Us About This Manual
As a user of Silicon Graphics products, you can help us to better understand your needs
and to improve the quality of our documentation.
Any information that you provide will be useful. Here is a list of suggested topics:
• General impression of the document
• Omission of material that you expected to find
• Technical errors
• Relevance of the material to the job you had to do
• Quality of the printing and binding
Please send the title and part number of the document with your comments. The part
number for this document is 007-1633-030.
Thank you!
Three Ways to Reach Us
• To send your comments by electronic mail, use either of these addresses:
– On the Internet: techpubs@sgi.com
– For UUCP mail (through any backbone site): [your_site]!sgi!techpubs
•Tofax your comments (or annotated copies of manual pages), use this
fax number: 650-932-0801
• To send your comments by traditional mail, use this address:
Technical Publications
Silicon Graphics, Inc.
2011 North Shoreline Boulevard, M/S 535
Mountain View, California 94043-1389
