007 2859 005
User Manual: 007-2859-005
Open the PDF directly: View PDF ![]() .
.
Page Count: 420 [warning: Documents this large are best viewed by clicking the View PDF Link!]

IRIX® Admin
System Configuration and Operation
Document Number 007-2859-005

IRIX® Admin: System Configuration and Administration
Document Number 007-2859-005
CONTRIBUTORS
Written by Charlotte Cozzetto, Jeffrey B. Zurschmeide, and John Raithel
Production by Heather Hermstad
St. Peter’s Basilica image courtesy of ENEL SpA and InfoByte SpA. Disk Thrower
image courtesy of Xavier Berenguer, Animatica.
© 1992 - 1998 Silicon Graphics, Inc.— All Rights Reserved
The contents of this document may not be copied or duplicated in any form, in whole
or in part, without the prior written permission of Silicon Graphics, Inc.
RESTRICTED RIGHTS LEGEND
Use, duplication, or disclosure of the technical data contained in this document by
the Government is subject to restrictions as set forth in subdivision (c) (1) (ii) of the
Rights in Technical Data and Computer Software clause at DFARS 52.227-7013
and/or in similar or successor clauses in the FAR, or in the DOD or NASA FAR
Supplement. Unpublished rights reserved under the Copyright Laws of the United
States. Contractor/manufacturer is Silicon Graphics, Inc., 2011 N. Shoreline Blvd.,
Mountain View, CA 94043-1389.
Silicon Graphics, the Silicon Graphics logo, CHALLENGE, Indigo, IRIS, IRIX, and
Onyx are registered trademarks, and Crimson, Extent File System, Indigo2,
IRIS FailSafe, IRIS InSight, IRIS WorkSpace, IRIX Networker, Origin, Origin2000,
POWER CHALLENGE, POWER Indigo2, POWER Onyx, and XFS are trademarks, of
Silicon Graphics, Inc. Indy is a registered trademark, used under license in the United
States and owned by Silicon Graphics, Inc. in other countries worldwide. CRAY is a
registered trademark, and CrayLink is a trademark, of Cray Research, Inc. R4000 and
R8000 are registered trademarks of MIPS Technologies, Inc. Adobe Illustrator,
FrameMaker, and PostScript are trademarks of Adobe Systems, Inc. Documenter’s
Workbench is a trademark of AT&T. Centronics is a trademark of Centronics Data
Computer Corporation. IBM 3270 is a trademark of International Business Machines
Corporation. LFS is a trademark of Platform Computing Corporation. NFS, RPC, and
Sun are trademarks of Sun Microsystems, Inc. Tektronix is a trademark of Tektronix,
Inc. Versatec is a trademark of Versatec Corporation. UNIX is a registered trademark
in the United Sates and other countries, licensed exclusively through X/Open
Company, Ltd.

iii
Contents
List of Figures xxiii
List of Tables xxv
About This Guide xxvii
IRIX Admin Manual Set xxviii
Related Manuals xxix
What This Guide Contains xxx
Conventions Used in This Guide xxxii
Audience for This Guide xxxiii
Additional Resources xxxiii
IRIX Reference Pages xxxiii
Release Notes xxxiv
IRIX Help System xxxv
Silicon Graphics World Wide Web Sites xxxv
1. Introduction to System Configuration and Operation 3
Principles of Good System Administration 4
Account Passwords 4
Superuser (root) Account Access Restriction 4
User Privacy 5
Password File Check 5
Hardware Change Check 5
Software Upgrade Check 6
System Unavailability Notification 6
Malicious Activity Policy 7
System Log Book Maintenance 8
User Request Service 9

iv
Contents
System Administrator Task List 9
Administration Tools Overview 10
2. Making the Most of IRIX 13
IRIX Shells 13
Using Regular Expressions and Metacharacters 13
C Shell Shortcuts 16
About the tcsh Shell 19
About the Bourne Shell 19
Korn Shell Shortcuts 20
Displaying Windows on Remote Workstations 21
Creating a Custom Shell Window 22
Finding and Manipulating Files 24
Locating Files With the find Command 24
Using find and cpio to Locate and Copy Files 26
About the sed Editor 26
Recursive Commands in IRIX 27
Task Scheduling With the at, batch, and cron Commands 27
Scheduling Tasks With the at Command 28
Scheduling Tasks With the batch Command 29
Scheduling Tasks With the cron Command 29
Disabling Login With the /etc/nologin File 30
Using Mouse Shortcuts 30
Copying and Pasting Text With the Mouse 31
Creating a Shell Window With the Mouse 32
Creating Reference Pages 33
Creating ASCII Reference Pages 33
System Monitoring Tools 34
About Saving a Crash Dump With savecore 34
About the icrash System Crash Analysis Utility 35
About the fru Hardware Error Analysis Tool 36
About sysmon, the System Log Viewer 38

Contents
v
About availmon, the System Availability Monitoring Tool 39
Registering availmon 40
Configuring an availmon Site Log File 41
Administering availmon 42
Using availmon With Automatic Reporting 42
Using availmon at Secure Sites With Internal Report Mailing 43
Using availmon at Secure Sites Without Report Mailing 43
About availmon Reports 44
Mailing availmon Reports With amsend 45
Viewing availmon Reports With amreport 45
3. System Startup, Shutdown, and Run Levels 49
Starting the System 49
Shutting Down the System From Multiuser Mode 50
Shutting Down the System From Single-User Mode 52
About IRIX Operating System Run Levels (System State) 52
How init Controls the System State 54
How IRIX Enters Multiuser State From System Shutdown 57
init Process: Early Initialization 57
init Process: Run-Level Preparation 57
init Process: getty 58
Changing System Run Levels 58
About Run-Level Directories 59
Modifying Run-Level Files 60
Changing From Multiuser Mode to Single-User Mode With the shutdown
Command 60
Powering Off the System Using /etc/inittab 61

vi
Contents
4. Configuring the IRIX Operating System 65
System Configuration Check 65
Checking Installed Hardware With hinv 65
Checking Installed Hardware in /hw 68
How IP Network Interfaces Are Assigned to Hardware Devices 68
Checking Installed Software With Versions 69
Checking Installed Graphics Hardware With gfxinfo 70
Checking Basic System Identification With uname 71
Getting Printer Status With lpstat 71
Checking Software Configuration Options With chkconfig 71
Configuring Software 74
Setting Software Configuration Options With chkconfig 74
Setting and Changing System Defaults 76
Changing the System Display 76
Changing Processor Assignment on Multiprocessor Systems 77
Changing the System Name 78
Setting the Network Address 79
Setting the Default Printer 80
Setting the Time Zone 80
Changing the System Date and Time 83
Changing File and Directory Access Permission 84
Directory Permissions 86
File Permissions 86
Changing Permissions 87
Setting Permissions With umask 88
Access Control Lists (ACLs) and Capabilities 89

Contents
vii
Partitioning Your System 89
Advantages of Partitioning 90
Disadvantages of Partitioning 91
Networking Setup Between Partitions 91
Connecting the System Console to the Multi-Module System Controller (MMSC) 92
Partition Setup 92
mkpart Partition Configuration Command 93
Partitioning From the PROM 94
Supported Configurations 95
Partitioning Guidelines 96
5. System Administration in a Multiuser Environment 99
User Account Administration 99
User ID Numbers 99
Group ID Numbers 100
Adding User Accounts Using Shell Commands 101
Editing the /etc/passwd File to Add a User Account 101
Editing the /etc/group File to Add a User 103
Setting Up a Home Directory for a New User 104
Verifying a New Account 105
Adding User Groups Using Shell Commands 106
Changing a User’s Group 106
Deleting a User From the System 107
Deleting a Group From the System 108
Locking a User Account 108
About Changing User Groups With newgrp and multgrps 109
Changing User Information 110
Changing a User’s Login Name 110
Changing a User’s Password With the passwd Command 111
Changing a User’s Login ID Number 112
Changing a User’s Default Group 113
Changing a User’s Comments Field 113
Changing a User’s Default Home Directory 114
Changing a User’s Default Shell 115

viii
Contents
About the User Environment 115
About Login Shells 116
About C Shell Configuration Files 117
Bourne and Korn Shell Configuration Files 119
Configurable Shell Environment Variables 121
Viewing the Shell Environment 121
Default Environment Variables 122
Defining New Environment Variables 122
Changing the Prompt in IRIX 123
About Default File Permissions (umask) 123
Changing Default File Permissions With umask 124
Special Login Shells 124
Sending Messages 125
Electronic Mail 125
Message-of-the-Day Facility 125
Remote Login Message 127
Sending Messages With the news Command 127
Sending Messages With the write Command 129
Sending Messages With the wall Command 130
6. Configuring Disk and Swap Space 133
Disk Usage Commands 133
du (Disk Usage) Command 133
df (Free Disk Blocks) Command 134
quot (Disk Usage by User) Command 134
diskusg (Disk Accounting) Command 134
Managing Disk Space 134
File Compression and Archiving 134
Disk Space Management With the quotas Subsystem 135
Disk Quota Guidelines 135
Disk Space Management With NFS 137
Disk Space Management With Disk Partitions 137
Wasted Disk Space 138

Contents
ix
Swap Space 138
Monitoring Paging and Swap Space 139
Adding Virtual Swap Space 139
Listing Swap Space With the swap -l Command 140
Checking Swap Activity With the swap -s Command 140
Negative Swap Space 141
Turning On Virtual Swapping 142
Increasing Swap Space on a One-Disk System 143
Increasing Swap Space on a Multidisk System 144
7. Managing User Processes 149
Monitoring User Processes 149
Process Monitoring With top 150
Process Monitoring on an Array 150
Process Monitoring With osview 150
Process Monitoring With sar 151
Process Monitoring With ps 151
Prioritizing Processes 152
Prioritizing Processes With nice 152
Prioritizing Processes With npri 153
Changing the Priority of a Running Process 154
Terminating Processes 154
Terminating Processes With the kill Command 155
Killing Processes by Name With the killall Command 155

x
Contents
Scheduling Processes With the Miser Batch Processing System 156
Miser Overview 156
About Logical Number of CPUs 157
The Effect of Reservation of CPUs on Interactive Processes 158
About Miser Memory Management 158
How Miser Management Affects Users 159
Miser Configuration 159
Setting Up the Miser System Queue Definition File 160
Setting Up the Miser User Queue Definition FIle 161
Setting Up the Miser Configuration FIle 163
Setting Up the Miser Command-line Options File 164
Configuration Recommendations 165
Miser Configuration Examples 165
Starting and Stopping Miser 169
Submitting Miser Jobs 169
Checking Miser Job Status 170
Checking Miser Queue Status 170
Terminating a Miser Job 170
Miser and Batch Management Systems 171
Checkpoint and Restart 171
NQE 171
Share II 172
Performance Co-Pilot 172
8. Troubleshooting the File Alteration Monitor 175
Basic fam Troubleshooting 176
Troubleshooting fam When Using a Sun NIS Master 177

Contents
xi
9. Using the Command (PROM) Monitor 181
About the PROM Monitor 182
Entering the Command (PROM) Monitor 182
Summary of Command Monitor Commands 184
Getting Help in the Command Monitor 185
Using Command Monitor Commands 186
About the Command Line Editor in the Command Monitor 186
Command Monitor Command Syntax 186
Command Monitor Filename Syntax 187
Device Names in the Command Monitor 188
ARCS PROM Filename Syntax 189
Running the Command Monitor 190
Reinitializing the Processor From the Command Monitor 190
Setting a PROM Password 190
Command Monitor Environment Variables 191
Displaying the Current Command Monitor Environment Variables 195
Changing Command Monitor Environment Variables 196
Setting the Keyboard Variable 196
Removing Environment Variables 197
Booting a Program From the Command Monitor 197
Booting the Default File With the auto Command 198
Booting a Specific Program With the boot Command 198
About the Standalone Shell (sash) 199
Booting the Standalone Shell (sash) 200
About bootp 201
Booting Across the Network With bootp 202
Booting Across a Larger Network 204
Booting From a Disk or Other Device 205

xii
Contents
10. System Performance Tuning 209
About System Performance Tuning 209
Files Used for Kernel Tuning 210
Overview of Kernel Tunable Parameters 210
Large System Tunable Parameters 211
Monitoring the Operating System 213
Receiving Kernel Messages and Adjusting Table Sizes 214
About timex, sar, and par 215
Using timex 216
Using sar 216
Using sar and timex During the Execution of a Command 217
Using par 218
Summary of sar, par, and timex 219
Disk I/O Performance 220
Checking Disk I/O 220
About Logical Volumes for Improving Disk I/O 221
About Partitions and Additional Disks for Improving Disk I/O 222
About Adding Disk Hardware to Improve Disk I/O 224
About Paging and Swapping 224
Checking for Excessive Paging and Swapping 225
Fixing Swap I/O Problems 226
CPU Activity and Memory Allocation 227
Checking the CPU 228
Increasing CPU Performance 228
Checking Available Memory 229
Determining the Amount of System Memory 230
Maximizing Memory 230

Contents
xiii
Operating System Tuning 230
Operating System Tuning Procedure 231
Operating System Tuning: Finding Parameter Values 231
Operating System Tuning: Changing Parameters and Reconfiguring the System 232
Backing Up the System 232
Copying the Kernel 232
Changing a Parameter 232
Creating and Booting a New Kernel With autoconfig 233
Recovering From an Unbootable Kernel 235
Multiple Page Sizes 236
Recommended Page Sizes 236
Tunable Parameters for Coalescing 237
Reserving Large Pages 238
A. IRIX Kernel Tunable Parameters 241
General Parameters 243
cachefs_readahead 244
cachefs_max_threads 244
nbuf 244
callout_himark 245
ncallout 246
reserve_ncallout 246
ncsize 246
ndquot 247
nproc 247
maxpmem 248
syssegsz 249
maxdmasz 249
mbmaxpages 250
ecc_recover_enable 250
vnode_free_ratio 250
utrace_bufsize 251
dump_level 251

xiv
Contents
System Limits Parameters 251
maxup 252
ngroups_max 252
maxwatchpoints 253
nprofile 253
maxsymlinks 253
Resource Limits Parameters 254
ncargs 255
rlimit_core_cur 255
rlimit_core_max 256
rlimit_cpu_cur 256
rlimit_cpu_max 256
rlimit_data_cur 257
rlimit_data_max 257
rlimit_fsize_cur 257
rlimit_fsize_max 258
rlimit_nofile_cur 258
rlimit_nofile_max 258
rlimit_rss_cur 259
rlimit_rss_max 259
rlimit_stack_cur 260
rlimit_stack_max 260
rlimit_vmem_cur 261
rlimit_vmem_max 261
rsshogfrac 262
rsshogslop 263
shlbmax 263

Contents
xv
Paging Parameters 264
bdflushr 266
gpgsmsk 266
gpgshi 267
gpgslo 267
maxlkmem 268
maxfc 269
maxsc 269
maxdc 270
minarmem 270
minasmem 270
numa_paging_node_freemem_low_threshold 271
scache_pool_size 271
tlbdrop 271
vfs_syncr 272
maxpglst 272
zone_accum_limit 272
percent_totalmem_64k_pages 273
nlpages_64k 273
IPC Parameters 273
IPC Messages Parameters 275
msgmax 276
msgmnb 276
msgmni 276
msgseg 277
msgssz 277
msgtql 278

xvi
Contents
IPC Semaphores Parameters 279
semmni 279
semmns 280
semmnu 280
semmsl 281
semopm 281
semume 282
semvmx 282
semaem 283
IPC Shared Memory Parameters 283
shmmax 283
shmmin 284
shmmni 284
sshmseg 285
Streams Parameters 285
nstrpush 286
nstrintr 286
strctlsz 286
strmsgsz 287
strholdtime 287
strpmonmax 287
Signal Parameter 288
maxsigq 288
Dispatch Parameters 288
memaff_sched 289
runq_dl_maxuse 289
runq_dl_nonpriv 290
runq_dl_refframe 290
slice_size 290

Contents
xvii
File System Parameters 291
efs_inline 292
cwcluster 292
dwcluster 292
min_file_pages 293
min_free_pages 293
autoup 293
Loadable Drivers Parameters 294
bdevsw_extra 294
cdevsw_extra 295
fmodsw_extra 295
vfssw_extra 295
munlddelay 296
CPU Actions Parameters 296
nactions 296
Switch Parameters 297
dump_all_pages 298
panic_on_sbe 298
sbe_log_errors 298
sbe_mfr_override 299
sbe_report_cons 299
corepluspid 299
r4k_div_patch 299
mload_auto_rtsyms 300
xpg4_sticky_dir 300
tty_auto_strhold 300
reset_limits_on_exec 300
ip26_allow_ucmem 301
restrict_fastprof 301
reboot_on_panic 301
svr3pipe 302
nosuidshells 302
posix_tty_default 303

xviii
Contents
restricted_chown 303
use_old_serialnum 303
subnetsarelocal 304
Timer Parameters 304
fasthz 304
itimer_on_clkcpu 305
timetrim 305
NFS Parameters 305
portmap_timeout 306
sm_timeout 306
GraceWaitTime 307
first_retry 307
normal_retry 307
lockd_grace_period 307
lock_share_requests 308
lockd_blocking_thresh 308
nfs_portmon 308
svc_maxdupreqs 309
Socket Parameters 309
mbmaxpages 311
unpst_sendspace 311
unpst_recvspace 311
unpdg_sendspace 312
unpdg_recvspace 313
udp_hashtablesz 313
tcp_sendspace 314
tcp_recvspace 315
tcp_hashtablesz 316

Contents
xix
VINO Parameters 316
vino_mtune_dmrbpages 317
Large Page Parameters 317
nlpages_256K 318
nlpages_1m 318
nlpages_4m 318
nlpages_16m 318
max_lpg_tlbslots 319
Extended Accounting Parameters 319
do_procacct 319
do_extpacct 320
do_sessacct 320
use_astbl 320
narsess 320
dfltash 321
minash 321
maxash 321
asmachid 321
dfltprid 322
NUMA Parameters 322
numa_migr_default_mode 324
numa_migr_default_threshold 324
numa_migr_threshold_reference 325
numa_migr_min_maxradius 325
numa_migr_min_distance 325
numa_zone_radius_max 325
numa_migr_vehicle 326
numa_refcnt_default_mode 326
numa_refcnt_overflow_threshold 327
numa_migr_memory_low_threshold 327
numa_migr_memory_low_enabled 327
numa_migr_freeze_enabled 327
numa_migr_freeze_threshold 327

xx
Contents
numa_migr_melt_enabled 327
numa_migr_melt_threshold 328
numa_migr_bounce_control_interval 328
numa_migr_dampening_enabled 328
numa_migr_dampening_factor 328
mem_tick_enabled 328
mem_tick_base_period 328
numa_migr_unpegging_control_enabled 329
numa_migr_unpegging_control_interval 329
numa_migr_unpegging_control_threshold 329
numa_migr_traffic_control_enabled 329
numa_migr_traffic_control_interval 329
numa_migr_traffic_control_threshold 329
Page Replication Parameters 330
numa_page_replication_enable 330
numa_kernel_replication_ratio 330
numa_repl_control_enabled 330
numa_repl_traffic_highmark_percentage 331
numa_repl_mem_lowmark 331
Migration Memory Queue Parameters 331
numa_migr_coaldmigr_mech 331
numa_migr_user_migr_mech 332
numa_migr_auto_migr_mech 332

Contents
xxi
B. Troubleshooting System Configuration Using System Error Messages 333
Disk Space Messages 334
General System Messages 336
File Permission Issues 336
IP (Network) Address Issues 336
Default Internet Address 336
Duplicate IP Address 337
Ethernet Cable Issues 337
Root Filesystem Not Found 338
login and su Issues 338
login Messages 338
su Messages 339
Network Bootup Issues 339
Operating System Rebuild Issues 339
Power Failure Detected 340
SCSI Controller Reset 340
syslogd Daemon Issues 341
System Clock and Date Issues 341
Time Server Daemon Message 342
System Restarting Information 342
Trap Held or Ignored 343
Memory and Swap Messages 344
Growreg Insufficient Memory 344
Panic Page Free 344
Physical Memory Problems 345
Recoverable Memory Errors 345
Savecore I/O Error 346
Swapping and Paging Messages 346
Other Memory Messages 349
System Panic Messages 349

xxii
Contents
C. Application Tuning 351
Checking Application Performance With timex 351
Tuning an Application 352
Guidelines for Reducing High User Time 352
Guidelines for Reducing Excessive Paging 353
Guidelines for Reducing I/O Throughput 354
Looking At/Reordering an Application 354
Analyzing Program Behavior With prof 354
Reordering a Program With pixie 356
Working Around Slow Commercial Applications 357
D. IRIX Directories and Files 359
IRIX Root Directories 359
Other Important IRIX System Directories 360
Important IRIX System Files 361
IRIX Device Special Files 363
ASCII Conversion Table 366
E. Encapsulated PostScript File v.3.0 vs. PostScript File Format 369
F. Bibliography and Suggested Reading 371
Index 375

xxiii
List of Figures
Figure 2-1 Shell PopUp Menu 32
Figure 2-2 Shell Window Cloning Submenu 32
Figure 2-3 sysmon System Log Browser 38
Figure 4-1 Partitioned System 89
Figure 4-2 Communication Between Partitions 91
Figure 9-1 ARCS System Startup Message 182


xxv
List of Tables
Table i Outline of Reference Page Organization xxxiv
Table 2-1 IRIX Metacharacters 14
Table 2-2 sysmon Priority Table 39
Table 3-1 System States 54
Table 4-1 North America Time Zones 80
Table 4-2 Europe Time Zones 81
Table 4-3 Asia Time Zones 82
Table 4-4 Middle East Time Zones 82
Table 4-5 South America Time Zones 82
Table 4-6 Australia and New Zealand Time Zones 83
Table 4-7 Supported Configurations for Partitioning 95
Table 7-1 Output Format of the ps -ef Command 151
Table 9-1 Command Monitor Command Summary 184
Table 9-2 Command Monitor Command Line Editor 186
Table 9-3 Device Names for Command Monitor Commands 188
Table 9-4 ARCS Filenames 189
Table 9-5 Variables Stored in Nonvolatile RAM 192
Table 9-6 Environment Variables That Affect the IRIX Operating System 194
Table 9-7 ARCS PROM Environment Variables 195
Table 9-8 keybd Variables for International Keyboards 196
Table 10-1 Files and Directories Used for Tuning 210
Table 10-2 Large System Tuning Parameters 212
Table 10-3 System Call Errors and Related Parameters 214
Table 10-4 Indications of an I/O-Bound System 220
Table 10-5 Disk Access of an Application 222
Table 10-6 Indicators of Excessive Swapping/Paging 225
Table 10-7 Indications of a CPU-Bound System 228

xxvi
List of Tables
Table A-1 System Call Errors and IPC Parameters to Adjust 274
Table D-1 ASCII Map to Octal Values 366
Table D-2 ASCII Map to Hexadecimal Values 367
Table D-3 ASCII Map to Decimal Values 368
xxvii
About This Guide
“About This Guide” includes brief descriptions of the contents of this guide and an
explanation of typographical conventions used, and refers you to additional sources of
information you might find helpful.
This guide explains how to perform general system configuration and operation tasks
under the IRIX operating system used with Silicon Graphics workstations and servers. It
provides descriptions of a broad range of tasks, from turning on a system, to adding
users, to tuning the operating system kernel.

xxviii
About This Guide
If you have a graphics workstation, you may find it convenient to use the System
Manager, which is described in the Personal System Administration Guide. That guide
should be your first resource for administering graphics workstations. Regardless of
whether you use the System Manager or the IRIX command-line interface, the results are
the same. The System Manager does not create any new files on your system, unlike
applications such as WorkSpace.
If you have a server, the IRIX Administration manual set (of which this guide is part) is
your primary guide to system administration, since without graphics you cannot use the
System Manager. This guide does not describe the System Manager in great detail.
Instead, it covers the traditional shell command approach to administering an IRIX
operating system.
IRIX Admin Manual Set
This guide is part of the IRIX Admin manual set, which is intended for administrators:
those who are responsible for servers, multiple systems, and file structures outside the
user’s home directory and immediate working directories. If you maintain systems for
others or if you require more information about IRIX than is in the end-user manuals,
these guides are for you. The IRIX Admin guides are available through the IRIS InSight
online viewing system. The set consists of these volumes:
•IRIX Admin: Software Installation and Licensing—Explains how to install and license
software that runs under IRIX, the Silicon Graphics implementation of the UNIX
operating system. Contains instructions for performing miniroot and live
installations using Inst, the command line interface to the IRIX installation utility.
Identifies the licensing products that control access to restricted applications
running under IRIX and refers readers to licensing product documentation.
•IRIX Admin: System Configuration and Operation—Lists good general system
administration practices and describes system administration tasks, including
configuring the operating system; managing user accounts, user processes, and disk
resources; interacting with the system while in the PROM monitor; and tuning
system performance.
•IRIX Admin: Disks and Filesystems—Explains disk, filesystem, and logical volume
concepts. Provides system administration procedures for SCSI disks, XFS and
Extent File System (EFS) filesystems, XLV logical volumes, and guaranteed-rate
I/O.

About This Guide
xxix
•IRIX Admin: Networking and Mail—Describes how to plan, set up, use, and maintain
the networking and mail systems, including discussions of sendmail, UUCP, SLIP,
and PPP.
•IRIX Admin: Backup, Security, and Accounting—Describes how to back up and restore
files, how to protect your system’s and network’s security, and how to track system
usage on a per-user basis.
•IRIX Admin: Peripheral Devices—Describes how to set up and maintain the software
for peripheral devices such as terminals, modems, printers, and CD-ROM and tape
drives.
Related Manuals
•Getting Started With Array Systems—Describes how to use, configure, manage, and
write programs for an array. An array is an aggregation of IRIX nodes that are
bound together with an high-speed network and array software (the Array Sessions
feature of the IRIX operating system and the Array Services product).
•MIPSpro Compiling and Performance Tuning Guide—Describes the MIPSpro compiler
system, other programming tools and interfaces, and ways to improve program
performance.
•Performance Co-Pilot User’s and Administrator’s Guide—Describes how to administer
the Performance Co-Pilot (PCP) software package.
•Share II for IRIX Administrator’s Guide—Describes how to configure and maintain
Share II.
•NQE Administration—Describes how to configure, monitor and control the Cray
Network Queuing Environment (NQE).
•IRIX Checkpoint and Restart Operation Guide—Describes how to use and administer
IRIX Checkpoint and Restart (CPR) and how to develop applications that can be
safely checkpointed and restarted.

xxx
About This Guide
What This Guide Contains
This guide is designed with the understanding that most readers will view it with the
IRIS InSight online viewing system or a Web browser and use it as a reference work. It is
not necessary to read this guide in a linear fashion. All information relevant to a given
topic is presented in the section of the guide devoted to the topic. There is no prerequisite
reading or knowledge other than that stated in this introductory chapter.
The IRIX Admin: System Configuration and Operation guide contains the following
chapters:
Chapter 1, “Introduction to System Configuration and Operation”
Describes the various tools available to the administrator and the
various pieces of the administration documentation.
Chapter 2, “Making the Most of IRIX”
Describes IRIX features that are useful for administrators and not
common to all operating environments.
Chapter 3, “System Startup, Shutdown, and Run Levels”
Provides short instructions on booting up and shutting down your
system.
Chapter 4, “Configuring the IRIX Operating System”
Describes the tasks and processes necessary to configure a new or
changing system.
Chapter 5, “System Administration in a Multiuser Environment”
Describes the processes of adding and deleting user accounts, user
groups, manipulating the user’s environment, and communicating with
users.
Chapter 6, “Configuring Disk and Swap Space”
Describes simple disk space management. Procedures for checking disk
space and establishing user disk usage quotas are described, along with
less intrusive strategies for maintaining reasonable disk usage. Also,
techniques for managing system swap space are provided. This chapter
does not describe the process for adding a disk or creating and
maintaining filesystems. Those topics are covered in the IRIX Admin:
Disks and Filesystems guide.
Chapter 7, “Managing User Processes”
Describes how to monitor user’s CPU usage, set process priority, and
terminate processes.

About This Guide
xxxi
Chapter 8, “Troubleshooting the File Alteration Monitor,”
Provides information about the famd alteration monitor daemon. This
program provides information to applications concerning changes to
files used simultaneously by several programs.
Chapter 9, “Using the Command (PROM) Monitor”
Describes the boot-level utilities provided to configure and test your
system. It describes the boot environment of the workstation and each
of the Command Monitor commands.
Chapter 10, “System Performance Tuning”
Describes how to analyze system performance and adjust system
parameters to influence system performance.
Appendix A, “IRIX Kernel Tunable Parameters”
Describes the various tunable parameters used in system performance
tuning.
Appendix B, “Troubleshooting System Configuration Using System Error Messages”
Provides some troubleshooting pointers related to common system
error messages.
Appendix C, “Application Tuning”
Describes tuning your applications to more closely follow your system’s
resource limits.
Appendix D, “IRIX Directories and Files”
Provides a list of the directories and files that are important in IRIX
administration.
Appendix E, “Encapsulated PostScript File v.3.0 vs. PostScript File Format”
Describes two common PostScript file formats used on IRIX systems.
Appendix F, “Bibliography and Suggested Reading”
Provides a bibliography of commonly available books that are useful for
the system administrator.

xxxii
About This Guide
Conventions Used in This Guide
These type conventions and symbols are used in this guide:
Bold—C++ class names, C++ member functions, C++ data members, function names,
language keywords and data types, literal command-line arguments (options/flags),
nonalphabetic data types, operators, and subroutines
Italics—Backus-Naur Form entries, command monitor commands, executable names,
filenames, glossary entries (online, these show up as underlined), IRIX commands,
manual/book titles, new terms, onscreen button names, program variables, tools,
utilities, variable command-line arguments, variable coordinates, and variables to be
supplied by the user in examples, code, and syntax statements
Fixed-width type—Error messages, prompts, and onscreen text
Bold fixed-width type—User input, including keyboard keys (printing and
nonprinting); literals supplied by the user in examples, code, and syntax statements
ALL CAPS—Environment variables, operator names, directives, defined constants,
macros in C programs
“”—(Double quotation marks) Onscreen menu items and references in text to document
section titles
()—(Parentheses) Following function names—surround function arguments or are
empty if the function has no arguments; following IRIX commands—surround reference
page (man page) section number
[]—(Brackets) Surrounding optional syntax statement arguments
#—IRIX shell prompt for the superuser (root)
%—IRIX shell prompt for users other than superuser
>>—Command Monitor prompt
This guide uses the standard UNIX convention for references to entries in IRIX
documentation. The entry name is followed by the section number in parentheses. For
example, rcp(1C) refers to the rcp online reference page.

About This Guide
xxxiii
Audience for This Guide
This guide is for administrators who are responsible for one or more systems beyond the
usual user responsibility for the user’s home directory structure and immediate working
directories. This guide and its companion guides provide directions for those who
maintain systems for themselves and others and who require more information about
IRIX commands and system and network configuration.
Frequently, people who consider themselves end users find themselves performing
advanced administrative tasks. This book helps both the new and experienced
administrator perform all operations necessary to configure IRIX systems. It is hoped
that people who considered themselves end users in the past can, by using this book,
gain experience and confidence in performing advanced system administration tasks.
Additional Resources
For easy reference, this section lists guides and resources provided with your system and
the specific focus and scope of each.
IRIX Reference Pages
The IRIX reference pages (often called “man” or “manual” pages) provide concise
reference information on the use of IRIX commands, subroutines, and other elements
that make up the IRIX operating system. This collection of entries is one of the most
important references for an administrator. Generally, each reference page covers one
command, although some reference pages cover several closely related commands.
The IRIX reference pages are available online through the man command if they are
installed or are mounted. To view a reference page, use the man command at the shell
prompt. For example, to see the reference page for diff, enter:
man diff
Print those reference pages you consistently use for reference and those you are likely to
need before major administrative operations and keep them in a notebook of some kind.

xxxiv
About This Guide
Each command, system file, or other system object is described on a separate page. The
reference pages are divided into seven sections, as shown in Table i. When referring to
reference pages, this document follows a standard UNIX convention: the name of the
command is followed by its section number in parentheses. For example, cc(1) refers to
the cc reference page in Section 1.
Table i shows the reference page sections and the types of reference pages that they
contain.
When viewing the guide online in IRIS InSight, command reference pages (man pages)
are followed by their section numbers in parentheses. The command name and section
number are links to the actual reference page. For example, clicking man(1) displays the
reference page for the man command.
Release Notes
A product’s release notes provide specific information about the current release,
including release-specific exceptions to the information in the administration guides.
Release notes are available online through the relnotes command. Each optional product
or application has its own set of release notes. The grelnotes command provides a
graphical interface to the release notes of all products installed on your system.
Table i Outline of Reference Page Organization
Type of Reference Page Section Number
General Commands (1)
System Calls and Error Numbers (2)
Library Subroutines (3)
File Formats (4)
Miscellaneous (5)
Demos and Games (6)
Special Files (7)

About This Guide
xxxv
IRIX Help System
Your IRIX system comes with a help system. This system provides help cards for
commonly asked questions about basic system setup and usage. The command to initiate
a help session is desktophelp.
Silicon Graphics World Wide Web Sites
The Silicon Graphics World Wide Web (WWW) sites provide current information of
interest to Silicon Graphics customers. The following URL addresses are accessible to
most commercially available web browsers on the Internet:
http://www.sgi.com—The Silicon Graphics Web site
http://www.sgi.com/MIPS—The Silicon Graphics MIPS division server
http://www.studio.sgi.com—The StudioLive site
http://www.aw.sgi.com—The Alias|Wavefront site
http://techpubs.sgi.com/library—The Technical Publications Library
From these sites, you can find all the Silicon Graphics Web-published information,
including the suite of IRIX Admin guides.


Chapter 1 introduces the basics of effective system administration. The basic
tools that you use are described here; a quick reference to each of the following
chapters and a thumbnail guide to the IRIX reference pages are also included.
The chapter contains these main sections:
•Principles of Good System Administration
•System Administrator Task List
•Administration Tools Overview
Introduction to System Configuration
and Operation
Chapter 1


3
Chapter 1
1. Introduction to System Configuration and Operation
One of the first jobs of a system administrator is to bring a system online with an existing
network (or standing alone), and to configure the system to meet the needs for which the
system was installed. This configuration usually involves installing any necessary
software and hardware, setting the name and network address of the system, creating
accounts for the expected users, and generally taking a system from “out of the box”
uniformity and customizing it to meet your preferences and your user’s needs.
The tasks of installing necessary hardware are described in the documentation for the
hardware. Software installation is described in the IRIX Admin: Software Installation and
Licensing volume. This guide describes the tasks you perform once the system has been
powered-up, to bring a system from its initial distributed state to the state in which you
or your users will use it.
This guide assists you by describing the procedure you—the system administrator—use
to configure systems and explaining the reasons why these procedures exist and why
they work the way they do. Some of these tasks are typically performed only at times of
major change—when a system is commissioned, when ownership changes, or when
there has been a significant hardware upgrade. Others are ongoing tasks or tasks that
may come up during standard usage of an installed system.
As system administrator, you should familiarize yourself with the graphical interface
tools available through the System Manager. You can conveniently perform many
common administrative tasks with this tool. This document does not describe the System
Manager, but instead discusses how to use the command-line and file interface to
perform administrative functions.
This chapter provides information on the general nature of IRIX system administration.
There are many good books on system administration listed in Appendix F,
“Bibliography and Suggested Reading” of this guide, and these are available through
computer bookstores. Silicon Graphics systems are similar to those described in many of
these books, and they are different in significant areas as well. The principles of good
system administration, though, are constant.

4
Chapter 1: Introduction to System Configuration and Operation
Principles of Good System Administration
The following sections outline basic principles of good system administration. Each
administrator must make individual decisions about the best practices for a site. The
principles discussed here are generally considered to be wise and safe practices.
Account Passwords
To make your site as secure as possible, each user should have an account, with a unique
user ID number, and each account should have a password. Users should never give out
their passwords to anyone else under any circumstances. For more information on
passwords and system security, see the IRIX Admin: Backup, Security, and Accounting
volume.
Superuser (root) Account Access Restriction
Most system administration is performed while the system administrator is logged in as
root (the superuser). This account is different from an ordinary user account because root
has access to all system files and is not constrained by the usual system of permissions
that control access to files, directories, and programs. The root account exists so that the
administrator can perform all necessary tasks on the system while maintaining the
privacy of user files and the integrity of system files. Other operating systems that do not
differentiate between users have little or no means of providing for the privacy of users’
files or for keeping system files uncorrupted. UNIX-based systems place the power to
override system permissions and to change system files only with the root account.
All administrators at your site should have regular user accounts for their ordinary user
tasks. The root account should be used only for necessary system administration tasks.
To obtain the best security on a multiuser system, restrict access to the root account. On
workstations, the primary user of the workstation can generally use the root account
safely, though most users should not have access to the root account on other user’s
workstations.
Make it a policy to give root passwords to as few people as is practical. Some sites
maintain locked file cabinets of root passwords so that the passwords are not widely
distributed but are available in an emergency.

Principles of Good System Administration
5
User Privacy
On a multiuser system, users may have access to personal files that belong to others. Such
access can be controlled by setting file permissions with the chmod(1) command. Default
permissions are controlled by the umask shell parameter. (See “About Default File
Permissions (umask)” on page 123 for information on setting umask.)
By default, it is easy for users to exchange data because permission to read files is granted
to everyone. Users can change this default for their own files. However, many users do
not set their umasks, and they forget to change the access permissions of personal files.
Make sure users are aware of file permissions and of your policy on examining other
users’ personal files. You can make this policy as lenient or stringent as you deem
necessary.
Password File Check
At least once a week, run the pwck(1M) and grpck(1M) programs to check your
/etc/passwd and /etc/group files for errors. You can automate this process using the cron(1)
command, and you can direct cron to mail the results of the checks to your user account.
For more information on using cron to automate your routine tasks, see “Task Scheduling
With the at, batch, and cron Commands” on page 27.
The pwck and grpck commands read the password and group files and report any
incorrect or inconsistent entries. Any inconsistency with normal IRIX operation is
reported. For example, if you have /etc/passwd entries for two user names with the same
user identification (UID) number, pwck reports this as an error. grpck performs a similar
function on the /etc/group file. The standard passwd file shipped with the system can
generate several errors.
Hardware Change Check
Be aware that changing hardware configurations can affect the system, even if the change
you make seems simple. Make sure you are available to help users with problems after
the system is changed in any way.

6
Chapter 1: Introduction to System Configuration and Operation
Software Upgrade Check
Changing the software also affects the system, even if the change you make is as trivial
as a small upgrade to a new version of an application. Some software installations can
overwrite customized configuration files. Users may have scripts that assume that a
utility or program is in a certain directory, and a software upgrade may move the utility.
Or the new version of the software simply may not work in the same way as the old
version.
Whenever you change the software configuration of your systems, let your users know
and be ready to perform some detective work if seemingly unrelated software suddenly
stops working as a result. Make sure you are available to help users with problems after
the system is changed in any way.
Before you upgrade a system to new software, check your user community to see which
parts of the old software they use, and if they might be inconvenienced by the upgrade.
Often users need extra time to switch from one release of an application to a newer
version.
If possible, do not strand your users by completely removing the old software. Try to
keep both versions on the system until everyone switches to the new version.
System Unavailability Notification
In general, try to provide the user community as much notice as possible about events
affecting the use of the system. When the system must be taken out of service, also tell
the users when to expect the system to be available. Use the “message of the day” file
/etc/motd to keep users informed about changes in hardware, software, policies, and
procedures.
Many administrative tasks require the system to be shut down to a run level other than
the multiuser state. This means that conventional users cannot access the system. Just
before the system is taken out of the multiuser state, users on the system are requested to
log off. You should do these types of tasks when they interfere the least with the activities
of the user community.
Sometimes situations arise that require the system to be taken down with little or no
notice provided to the users. This is often unavoidable, but try to give at least 5 to 15
minutes notice, if possible.

Principles of Good System Administration
7
At your discretion, the following actions should be prerequisites for any task that
requires the system to leave the multiuser state:
•When possible, perform service tasks during periods of low system use. For
scheduled actions, use /etc/motd to inform users of future actions.
•Check to see who is logged in before taking any actions that would affect a
logged-in user. You can use the /etc/whodo,/bin/who, or /usr/bsd/w command to see
who is on the system. You may also wish to check for large background tasks, such
as background compilations, by executing ps -ef.
•If the system is in use, provide the users advanced warning about changes in
system states or pending maintenance actions. For immediate actions, use the
/etc/wall command to send a broadcast message announcing that the system will be
taken down at a given time. Give the users a reasonable amount of time (five to
fifteen minutes) to terminate their activities and log off before taking the system
down.
Malicious Activity Policy
Set a policy regarding malicious activities that covers:
•Deliberately crashing the system
•Breaking into other accounts; for example, using password-guessing and
password-stealing programs
•Forging electronic mail from other users
•Creating and unleashing malicious programs, such as worm and virus processes
Make sure that all users at the site are aware that these sorts of activities are potentially
very harmful to the community of users on the system. Penalties for malicious behavior
should be severe and the enforcement should be consistent.
The most important thing you can do to prevent malicious damage to the system is to
restrict access to the root password.

8
Chapter 1: Introduction to System Configuration and Operation
System Log Book Maintenance
It is important to keep a complete set of records about each system you administer. A
system log book is a useful tool when troubleshooting transient problems or when trying
to establish system operating characteristics over a period of time. Keeping a hard copy
book is important, since you cannot refer to an online log if you have trouble starting the
system.
Some of the information to consider entering into the log book for each system you
administer is:
•Maintenance records (dates and actions)
•Printouts of error messages and diagnostic phases
•Equipment and system configuration changes (dates and actions), including serial
numbers of various parts (if applicable)
•Copies of important configuration files
•Output of prtvtoc(1M) for each disk on the system
•/etc/passwd file
•/etc/group file
•/etc/fstab file
•/etc/exports file
The format of the system log and the types of items noted in the log should follow a
logical structure. Think of the log as a diary that you update periodically. To a large
measure, how you use your system dictates the form and importance of maintaining a
system log.
In addition to the system log, you may find it helpful to keep a user trouble log. The
problems that users encounter fall into patterns. If you keep a record of how problems
are resolved, you do not have to start from scratch when a problem recurs. Also, a user
trouble log can be very useful for training new administrators in the specifics of your
local system, and for helping them learn what to expect.

System Administrator Task List
9
User Request Service
Provide a convenient way for your users to report problems. For example, set up a
“trouble” mail alias, so that users with problems can simply send mail to trouble for
assistance. Refer to IRIX Admin: Networking and Mail for more information on mail
aliases.
System Administrator Task List
The system administrator is responsible for all tasks that are beyond the scope of end
users, whether for system security or other reasons. The system administrator can
undoubtedly use the more advanced programs described in this guide.
A system administrator has many varied responsibilities. Some of the most common
responsibilities addressed in this guide are:
•Operations—Ensuring that systems stay up and running, scheduling preventive
maintenance downtime, adding new users, installing new software, and updating
the /etc/motd and /etc/issue files. See Chapter 4, “Configuring the IRIX Operating
System.” Also see Chapter 5, “System Administration in a Multiuser Environment.”
•Failure analysis—Troubleshooting by reading system logs and drawing on past
experience. See “System Log Book Maintenance” on page 8.
•Capacity planning—Knowing the general level of system use and planning for
additional resources when necessary. See Chapter 6, “Configuring Disk and Swap
Space,” and Chapter 10, “System Performance Tuning.”
•System tuning—Tuning the kernel and user process priorities for optimum
performance. See Chapter 10, “System Performance Tuning.”
•Application tuning—Tuning your applications to more closely follow your system’s
resource limits. See Appendix C, “Application Tuning.”
•Resource management—Planning process and disk accounting and other resource
sharing. See the IRIX Admin: Backup, Security, and Accounting guide.
•Networking— Interconnecting systems, modems, and printers. See the IRIX Admin:
Networking and Mail guide.
•Security—Maintaining sufficient security against break-ins as well as maintaining
internal privacy and system integrity. See the IRIX Admin: Backup, Security, and
Accounting guide.

10
Chapter 1: Introduction to System Configuration and Operation
•User migration—Helping users work on all workstations at a site. See the IRIX
Admin: Networking and Mail guide.
•User education—Helping users develop good habits and instructing them in the
use of the system. See Chapter 5, “System Administration in a Multiuser
Environment.”
•Backups—Creating and maintaining system backups. See the IRIX Admin: Backup,
Security, and Accounting guide.
If you are using the Array Services product, you will need to perform additional
configuration. See Getting Started With Array Systems.
Administration Tools Overview
Depending on the exact configuration of your system, you may have the following tools
available for performing system administration:
System Manager
This tool, available on graphics workstations, provides easy access to
system administration functions. It features a quick and easy method of
performing most system administration tasks. The System Manager is
available only on those systems that have graphics capability.
Command-line tools
The IRIX system provides a rich set of system administration tools that
have command-line interfaces. These are especially useful for
automatically configuring systems with shell scripts and for repairing
the system in unusual circumstances, such as when you must log in
remotely from another system.
For example, using command-line tools, a site administrator can alter
the system automatically at designated times in the future (for instance,
to distribute configuration files at regular intervals). These commands
are available on all IRIX systems.
The suite of IRIX Admin guides are primarily concerned with the
command-line interface and direct system file manipulation. Refer to
the Personal System Administration Guide for a GUI approach to system
administration tasks.

Chapter 2 describes procedures that are helpful to you as you perform your
system administration duties. These are features of IRIX that are documented
elsewhere, but are brought together here as highlights that might otherwise be
overlooked. The following features are described:
•IRIX shell shortcuts such as regular expressions and metacharacters and
other specific shell shortcuts
•IRIX shortcuts such as displaying a window on another system, creating
custom windows, and automating tasks
•Mouse shortcuts such as using the mouse to cut and paste text between
windows
•Instructions for creating your own reference pages and installing them on
your system
•System monitoring tools to assist you in debugging potential system
problems
Making the Most of IRIX
Chapter 2


13
Chapter 2
2. Making the Most of IRIX
This chapter describes features of IRIX that are useful to the system administrator.
Administrators coming to a UNIX-based system from other environments will find this
chapter valuable in reducing the amount of time necessary to perform some tasks. Others
may find hints and features that they did not previously know.
Some of the main sections include:
•“IRIX Shells” on page 13
•“Displaying Windows on Remote Workstations” on page 21
•“Creating a Custom Shell Window” on page 22
•“Finding and Manipulating Files” on page 24
•“Recursive Commands in IRIX” on page 27
•“Task Scheduling With the at, batch, and cron Commands” on page 27
IRIX Shells
The IRIX shells provide the command-line interface to the system. The following features
are provided as part of the IRIX command shells.
Using Regular Expressions and Metacharacters
Shortcuts for referencing large numbers of files or directories in your commands are
known as “regular expressions.” Regular expressions are made up of a combination of
alphanumeric characters and a series of punctuation characters that have special
meaning to the IRIX shells. These punctuation characters are called metacharacters when
they are used for their special meanings with shell commands.

14
Chapter 2: Making the Most of IRIX
These shortcuts are useful because they minimize keystrokes. While minimizing
keystrokes may seem to be a minor concern at first glance, an administrator who issues
lengthy and complex command lines repeatedly may find these shortcuts a handy and
necessary time-saving feature.
Following is a list of the IRIX metacharacters:
The asterisk (*) metacharacter is a universal wildcard. This means that the shell interprets
the character to mean any and all files. For example, the command:
cat *
tells the shell to concatenate all the files in a directory, in alphabetical order by filename.
The command
rm *
tells the shell to remove everything in the directory (so be careful with this one!). Only
files are removed—a different command, rmdir(1), is used to remove directories. Note
that the asterisk character does not always have to refer to whole files. It can be used to
denote parts of files as well. For example, the command
rm *.old
removes all files with the suffix.old on their names.
The single-character wildcard is a question mark (?). This metacharacter denotes a single
character. For example, suppose your directory contains the following files:
file1
file2
file3
file.different
Table 2-1 IRIX Metacharacters
Metacharacter Meaning
* Wildcard
? Single-character wildcard
[] Set definition marks

IRIX Shells
15
If you want to remove file1,file2, and file3, but not file.different, you could use the
command:
rm file?
If you used an asterisk in place of the question mark, all your files would be removed,
but since the question mark is a wildcard for a single space, file.different is not chosen.
Square brackets denote members of a set. For example, consider the list of files used in
the example of the single-character wildcard. If you wanted to remove file1 and file2, but
not file3 or file.different, use the following command:
rm file[12]
This command tells the shell to remove any files with names starting with file and with
the character 1 or 2 following, and no other characters in the name. Each character in the
brackets is taken separately. Thus, if the example directory had included a file named
file12, it would not have been removed by the above command.
You can also use a dash (-) to indicate a span of characters. For example, to remove file1,
file2, and file3, use the following command:
rm file[1-3]
Alphabet characters can be spanned as well, in alphabetical order. The shell distinguishes
between uppercase and lowercase letters, so to select all alphabet characters within
square brackets, use the following syntax:
[a-z,A-Z]
You can use the square brackets with other metacharacters as well. For example, the
command
rm *[23]
removes any files with names ending with a 2 or 3, but not file1 or file.different.

16
Chapter 2: Making the Most of IRIX
C Shell Shortcuts
The IRIX C shell (/sbin/csh) provides several features that can be used to minimize
keystrokes for routine tasks. Complete information about these and many other features
of the C shell is available in the csh(1) reference page. Among the features provided are:
Filename completion
This feature is activated with the command:
set filec
Filename completion allows you to enter the first character or two of a
command or filename and then press the Esc key to have the shell
complete the name. This is useful when you have long filenames with
many suffixes. If more than one file or directory or command matches
the characters you have given, the shell completes as much as possible
of the name, and then prompts you with a beep for more information.
You can also use the Ctrl+D character to select all files or directories
that match your given characters.
Shell scripts This feature allows you to create a program that will be executed by the
shell. This feature is similar to a programming language in that it has a
set syntax and set of instructions, yet it requires no compiler and
produces no object file; it is directly executed by the shell. Many
administrators use this feature for frequently performed procedures that
require some planning and complex execution, such as finding large
files and notifying the owners that such files cannot be kept on the
system for long periods of time. The shell script programming rules are
clearly presented on the csh(1) reference page.

IRIX Shells
17
Input/output redirection
This feature allows you to direct the output of a command into a file or
into another command as input. You can also direct a command to take
its input from a file. It is often used as part of a shell script, but is
generally used on the command line to string together a series of
commands. For example, consider the command line:
ps -ef | grep commandname
The pipe character directs the shell to use the output of the ps command
as the input to the grep command. The result is that all instances of the
command commandname in the process list are printed on the screen,
saving the administrator the effort of searching through the process
listing. To save the output in a file rather than have it print on the
screen, enter:
ps -ef | grep commandname > filename
Job control This feature allows you to use a single screen (or shell window) to
manage several programs running simultaneously. It is most useful for
the server administrator who manages the system from a single
character-based terminal.
Command aliasing
This feature allows you to create aliases for commonly used command
strings, saving keystrokes. For example, suppose you frequently give
the command:
ls -CF | more
This command line executes the ls command with certain options and
ensures that if the output is greater than a screenful the display stops
until you have read it. However, it would be tedious to type the whole
command each time you wanted to see a directory listing in your
preferred format. Therefore, you can create an alias. You can alias the
above command line to any series of keystrokes you like. You can even
alias it to “ls,” thus bypassing the standard meaning of the ls command.
When you create the alias, however, be aware that any command that
requires one or more arguments, or one such as ls that may or may not
receive arguments, must have a provision made in the alias for those
arguments. The standard provision made in aliases for possible
arguments is the following regular expression:
\!*

18
Chapter 2: Making the Most of IRIX
The leading backslash escapes the initial meaning of the exclamation
point to the shell and passes the exclamation point through to the
command line, where it is interpreted by the shell to refer to arguments
given on the aliased command line. The asterisk in the expression
means that all characters typed in as arguments are to be passed
through to the shell. As an example, the line you place in your .cshrc file
to create the example alias is:
alias ls ‘ls -CF \!* | more‘
Then, when you type the command:
ls filename
at a shell prompt, the command is executed as:
ls -CF filename | more
Aliases can be used freely within shell scripts, with filename
completion and full use of regular expressions and output redirection.
Command history
The shell maintains a log of past commands given during this login
session. You can repeat or edit a previously given command to save
keystrokes. The history command shows the numbered log of
commands in order. The first command given in your login session is
number 1, the second is number 2, and so on. You can set the number of
commands the shell remembers in your .cshrc file. To execute the most
recent command again, type:
!!
To execute the most recent command beginning with the letter q, use
the command line:
!q
And to execute a command by its number in the history, give the
command line:
!n
where n is the number of the command you want to reexecute.

IRIX Shells
19
About the tcsh Shell
The /usr/bin/tcsh program is an improved version of the C shell. In addition to the C shell
features listed above, this shell offers many other features. A few of the most useful to
system administrators are:
•Better command line editing using emacs and vi key commands
•Improved history mechanisms, including time stamps for each command
•Built-in mechanisms for listing directory contents and for executing commands at
specific times or intervals.
There are many more features implemented in tcsh, and all of them are covered in the
tcsh(1) reference page.
About the Bourne Shell
The Bourne shell (/sbin/bsh) provides fewer features than the C shell, but in its place offers
a level of access to the shell that contains far fewer restrictions and intervening layers of
interface. For example, you can write shell script programs directly from the shell
prompt with Bourne shell. Input and output redirection and command aliasing are
supported with the Bourne shell, but no command history, job control, or filename
completions are available. For a complete discussion of the Bourne shell and its features,
see the sh(1) reference page.

20
Chapter 2: Making the Most of IRIX
Korn Shell Shortcuts
The Korn shell was developed to provide the best features of both the C shell and the
Bourne shell. The /sbin/sh program provides the ease of shell programming found in the
Bourne shell, along with the job control, history mechanism, filename completion, and
other features found in the C shell. This shell has changed many of the ways these
features are implemented, and also provides improved command-line editing facilities.
See the ksh(1) reference page for complete information on this shell. Useful features
include:
Emacs editing This mode is entered by enabling either the emacs or gmacs option. To
edit, the user moves the cursor to the point needing correction and then
inserts or deletes characters or words as needed as if the command line
were a text file being edited using Emacs. All edit commands operate
from any place on the line (not just at the beginning).
vi editing To enter this mode, enable the vi option. There are two typing modes in
this option. Initially, when you enter a command you are in the input
mode. To edit, the user enters control mode by typing Esc, moves the
cursor to the point needing correction, then inserts or deletes characters
or words as needed as if the command line were a text file being edited
using vi.
Job control Lists information about each given process (job) or all active processes
if the job argument is omitted. The -l flag lists process ID numbers in
addition to the normal information. The -n flag displays only jobs that
have stopped or exited since last notified. The -p flag causes only the
process group to be listed. See the ksh(1) reference page for a description
of the format of the job argument.
The bg command puts each specified process into the background. The
current process is put in the background if job is not specified.
The fg command brings each process specified to the foreground.
Otherwise, the current process is brought into the foreground.

Displaying Windows on Remote Workstations
21
Displaying Windows on Remote Workstations
You can invoke a graphical utility or application on a remote networked workstation and
direct the window and all input and output to your own workstation. This is convenient
when you perform maintenance on remote workstations from your own desk. The
program you invoke runs on the remote workstation and the window is displayed on the
specified display workstation.
You must allow the remote system access to your display. To do this, you can use the xhost
command on the display workstation:
xhost +remote_workstation
Next, use rsh(1), rlogin(1), or telnet(1) to log in to the remote workstation with whatever
privilege level is required to perform the maintenance on that system. This may be as
simple as the guest account, or you may have your own user account on the system or
you may require root permission. Choose the level of access appropriate to your task.
Then, for csh and tcsh users, issue the command:
setenv DISPLAY local_workstation:0
Or, bsh and ksh users enter:
DISPLAY=local_workstation:0 ; export DISPLAY
The name of the workstation where the window is to be displayed is substituted for
local_workstation. The name of the local workstation must be found in the /etc/hosts file of
the remote system, where the program is actually running.
Now, when you invoke the desired utility or application on the remote system the
window displays on the local workstation. All input and output is handled through the
local workstation. Remember that due to restrictions of network carrying capacity,
response time in the program may be slower (in some cases, much slower) than usual.
When you are finished, exit the display program normally and log out of the remote
system.

22
Chapter 2: Making the Most of IRIX
Creating a Custom Shell Window
IRIX allows you to create a shell window using any colors you like from the palette on a
graphics workstation. You may also select any font you prefer from the font set on your
system. The xwsh command creates the shell window, and the options to this command
control the various fonts, colors, and other features available to you. The command shell
used in the window is taken by default from the /etc/passwd file entry, or it can be
specified on the command line according to the instructions in the xwsh(1) reference
page.
For a complete list of the features available with xwsh, see the xwsh(1) reference page.
The most commonly used features are described in the following examples.
To create a simple shell window with a dark gray background and yellow text, issue the
following command:
xwsh -fg yellow -bg gray40 &
The above command generates a new window and a new shell using the colors specified.
The window uses the default font selection and window size, since these attributes were
not specified. The command that created the shell was placed in the background, so the
shell does not tie up the window where you gave the command. You can always place a
command in the background by adding the ampersand character (&) to the end of the
command line. For more information on placing processes in the background, see the
csh(1) reference page.
There are 100 shades of gray available. Gray0 is the darkest, and is virtually black.
Gray100 is the lightest and is virtually white. The effect of selecting foreground (text) in
yellow and background in gray40 is similar to yellow chalk on a gray chalkboard. For a
complete list of the available colors in your palette, use the colorview command. This
brings up a window with the list of colors in a scrollable list, and a display window to
show a patch of the currently selected color.

Creating a Custom Shell Window
23
The next example changes the colors to black on a sky blue background (high contrast
between the foreground and background makes reading the screen easier), and adds a
specification for the size of the window:
xwsh -fg black -bg skyblue -geometry 80x40 &
The first number in the geometry option is 80, indicating that the new shell window
should be 80 characters wide (this is the default). The second number indicates the
desired number of lines on the screen, in this case 40. Once again, the xwsh command has
been placed in the background by adding the ampersand character to the end of the
command line.
You can make a new shell come up on your desktop as an icon by adding the -iconic flag
to any xwsh command.
To select a font other than the default, you can use the on-screen font selection utility,
xfontsel, or you can specify the font on the command line. It is a great deal easier to use
the utility, as you must specify a great number of attributes for the font on the command
line. Also, it frequently takes a great number of selections before you settle on a font, a
weight (regular or bold, condensed or normal), and a font size that appeal to you. Using
the on-screen font utility, you can preview what each selection will look like on your
windows.
Once you have made your selections, you can copy and paste the font selection
information and the rest of your xwsh command into a shell script file for convenient
future use. For example, here is an xwsh command line that specifies the IRIS-specific font
haebfix in a medium weight with normal spacing, 15 pixels tall. The remaining
information is generated by the font selection utility for the shell.
xwsh -iconic -fg yellow -bg grey40 -geometry 80x40 -fn \
-sgi-haebfix-medium-r-normal--15-150-72-72-m-90-iso8859-1 &
Remember, you may want to create an alias for this or any other IRIX command that you
use a lot. See “C Shell Shortcuts” on page 16 or your shell documentation for more
information.
Note that in the shell script, the above command appears all on one line. Due to
formatting constraints, the command is broken across two lines in this example.
For complete information on using the font selection utility in xwsh and the xfontsel
command, see Chapter 2 of the IRIS Utilities Guide.

24
Chapter 2: Making the Most of IRIX
Finding and Manipulating Files
The IRIX system provides several tools for manipulating large numbers of files quickly.
Some of the most common are described below:
•The find(1) utility locates files and can invoke other commands to manipulate them.
•The sed(1) program edits files using pre-determined commands.
•Many other programs have recursive options, with which you can quickly operate
on files that are in many levels of subdirectories.
Locating Files With the find Command
Use the find command to find files and possibly execute commands on the files found.
The command starts at a given directory and searches all directories below the starting
directory for the specified files. A basic find command line looks like this:
find . -name filename -print
This command searches the current directory and all subdirectories downward from the
current directory until it finds all filenames that match filename and then displays their
locations on your screen. The -name option indicates that the next argument is the name
of the file you are looking for, and the -print option tells find to display the pathname of
the file when the file is located.
You can also use regular expressions (see “Using Regular Expressions and
Metacharacters” on page 13) in your searches.
The following command line searches for files that have been changed after the time
/tmp/file was last modified. If you use the touch command (see touch(1)) to create /tmp/file
with an old date, this command can help you find all files changed after that date.
find / -local -newer /tmp/file -print
This example shows how to locate a file, called missingfile, in a user’s directory:
find /usr/people/trixie -name missingfile -print
You can use find to locate files and then to run another command on the found files. The
next example shows how to change the permissions on all the files in the current
directory and in all subdirectories:
find . -name ’*’ -local -exec chmod 644 {} \;

Finding and Manipulating Files
25
The option immediately following the find command is a period (.). This indicates to find
that the search is to begin in the current directory and include all directories below the
current one. The next flag, -name, indicates the name of the files that are being found. In
this case, all files in the directory structure are selected through the use of the asterisk
metacharacter (*). See “Using Regular Expressions and Metacharacters” on page 13 for
more information on metacharacters and regular expressions.
The -local option indicates to find that the search is limited to files that physically reside
in the directory structure. This eliminates files and directories that are mounted via the
Network File System (NFS). The -exec option causes find to execute the next argument as
a command, in this case chmod 644. The braces, { }, refer to the current file that find is
examining.
The last two characters in the command line are part of the chmod command that will be
executed (with the -exec option) on all files that match the search parameters. The
backslash (\) is necessary to keep the shell from interpreting the semicolon (;). The
semicolon must be passed along to the chmod process. The semicolon indicates a carriage
return in the chmod command.
The find command has many other useful options:
-inum nLocate files by their inode number (n) instead of their name.
-mtime nIdentify files that have not been modified within a certain amount of
time (n).
-perm [-]||onum
Identify files with permissions matching onum, an octal number that
specifies file permissions. See the chmod(1) reference page. Without the
minus sign (-), only file permissions that match exactly are identified.
If you place a minus sign in front of onum, only the bits that are actually
set in onum are compared with the file permission flags.
-type xIdentifies files by type, where x specifies the type. Types can be b,c,d,l,
p,f, or s for block special file, character special file, directory, symbolic
link, FIFO (a named pipe), plain file, or socket, respectively.
-links nMatches files that have n number of links.
-user uname Identifies files that belong to the user uname. If uname is a number and
does not appear as a login name in the file /etc/passwd, it is interpreted as
a user ID.

26
Chapter 2: Making the Most of IRIX
-group gname Identifies files that belong to the group gname. If gname is a number and
does not appear in the file /etc/group, it is interpreted as a group ID.
-size n [c] Identifies files that are n blocks long (512 bytes per block). If you place a
c after the n, the size is in characters.
-ok cmd Works like -exec, except a question mark (?) prompts you to indicate
whether you want the command (cmd) to operate on the file that is
found. This is useful for operations such as selectively removing files.
Using find and cpio to Locate and Copy Files
The find and cpio commands can be used to easily and safely copy a directory or a
directory hierarchy as long as the user has permission to access the directory. To copy a
directory with all its files, or an entire hierarchy of directories and their files, use
commands like the following:
mkdir new_directory_name
cd the_directory_you_want_to_copy
find . -print | cpio -pdlmv full_path_including_new_directory_name
This command sequence preserves the symbolic links in the new directory as well as
transparently crossing filesystem boundaries.
For complete information, refer to the find(1) reference page.
About the sed Editor
You can use sed, the Stream Editor, to automate file editing. The sed command follows an
editing script that defines changes to be made to text in a file. The sed command takes a
file (or files), performs the changes as defined in the editing script, and sends the
modified file to the standard output. This command is fully described in the sed(1)
reference page, as well as standard UNIX documentation.

Recursive Commands in IRIX
27
Recursive Commands in IRIX
Recursive commands can save you a lot of time. For example, to change the ownership of
all the files and directories in a directory recursively, and all of the files and directories in
all of the subdirectories below that, you can use the recursive option with chown(1):
chown -R username directory
Some of the other commands in the IRIX system that have recursive options are:
ls -R
rm -r
chgrp -R
If you want to use a particular command recursively, but it does not have a recursive
option, you can run the command using find. See “Locating Files With the find
Command” on page 24.
Note that using recursive options to commands can be very dangerous in that the
command automatically makes changes to your files and filesystem without prompting
you in each case. The chgrp command can also recursively operate up the filesystem tree
as well as down. Unless you are sure that each and every case where the recursive
command will perform an action is desired, it is better to perform the actions
individually. Similarly, it is good practice to avoid the use of metacharacters (described
in “Using Regular Expressions and Metacharacters” on page 13) in combination with
recursive commands. Note that with the rm command, you can use the -i option to
interactively prompt you for confirmation before removing any file.
Task Scheduling With the at, batch, and cron Commands
You can use the at,batch, and cron utilities to automate many of your usual tasks, both as
an administrator and as a user (unless user cron and at permissions have been disabled—
see crontab(1)). These utilities perform similar functions. All execute commands at a later
time. The difference between the commands is that at executes the given command at one
specific time; cron sets up a schedule and executes the command or commands as often
as scheduled; and batch executes the commands when system load levels permit. The
following sections provide some examples of the use of these utilities. For complete
information, refer to the at(1), batch(1), and cron(1M) reference pages.

28
Chapter 2: Making the Most of IRIX
Scheduling Tasks With the at Command
If you have a task to process once at a later point in time, use at. For example, if you wish
to close down permissions on a public directory at midnight of the current day, but you
do not need to be present when this occurs, use the command string:
at 2400
chmod 000 /usr/public
Ctrl+D
It is required that the at command itself and the date and time of the command be placed
alone on a line. When you press Enter, you do not see a prompt; at is waiting for input.
Enter the command to be executed just as you would type it at a shell prompt. After
entering the command, press Enter again and enter Ctrl+D to tell at that no more
commands are forthcoming. You can use a single at command to execute several
commands at the appointed time. For example, if you want to close the public directory
at noon on July 14th and change the message of the day to reflect this closure, you can
create the new message of the day in the file /tmp/newmesg, and then issue the following
command string:
at 1200 July 14
chmod 000 /usr/public
mv /etc/motd /etc/oldmotd
mv /tmp/newmesg /etc/motd
Ctrl+D
By default, any output of commands executed using at is mailed to the executing user
through the system electronic mail. You can specify a different location for the output by
using the standard output redirects, such as pipes (|) and file redirects (>). See your
command shell documentation for a complete description of redirecting the standard
output.
For complete information on the at command, see the at(1) reference page.

Task Scheduling With the at, batch, and cron Commands
29
Scheduling Tasks With the batch Command
The batch command works just like the at command, except that you do not specify a time
for the command or commands to be executed. The system determines when the overall
load is low enough to execute the commands, and then does so. As with all other cron
subsystem commands, the output of the commands is mailed to you unless you specify
otherwise. batch is useful for large CPU-intensive jobs that slow down the system or
cripple it during peak periods. If the job can wait until a non-peak time, you can place it
on the batch queue until the system executes it. For complete information on the batch
command, see the batch(1) reference page.
Scheduling Tasks With the cron Command
If you want a command to execute regularly on schedule, the cron command and
subsystem provide a precise mechanism for scheduled jobs. The at and batch commands
are technically part of the cron subsystem and use cron to accomplish their tasks. The cron
command itself, though, is the most configurable command of the subsystem.
You use cron by setting up a crontab file, where you list the commands you would like to
have executed and the schedule for their execution. Complete information on setting up
your crontab file is available in the cron(1M) and crontab(1) reference pages.
The cron facility is useful for scheduling network backups, checking the integrity of the
password file, and any other regular tasks that do not require interaction between you
and the system. By default, cron mails the results or output of the command to the user
who submitted the crontabs file, so if you use cron to schedule something like a pwck(1M),
the results of the test are mailed to you and you can interpret them at your convenience.
Note that you must restart cron after each change to a crontabs file, whether made through
the cron utility or the at command, for the changes to take effect.
As administrator, you can control access to the at and batch commands by using the
cron.allow,cron.deny,at.allow, and at.deny files in /etc/cron.d. Specific users or all users can
be denied use of the commands. Refer to the reference pages for at(1) and crontab(1) for
more information.

30
Chapter 2: Making the Most of IRIX
Disabling Login With the /etc/nologin File
The /etc/nologin file prevents any user from logging in. This feature of the login(1)
program is designed to allow the system administrator to have the system running in full
multiuser mode, but with no users logged in. This is useful when you want to perform
complete backups of the system or when you want to do some testing that may cause the
operating system to halt unexpectedly. Of course, it is always best to do this sort of work
during non-peak system usage hours.
To disable logins, simply create a file called nologin in the /etc directory. (You must be
logged in as root to create files in /etc.) In addition to disallowing logins, the login
program displays the contents of /etc/nologin when it denies access to the user. (Note that
/etc/nologin does not apply to the console window.)
A suggested format for the message in /etc/nologin is:
The system is unavailable for a few moments while we perform some
routine maintenance. We will be done shortly and regret any
inconvenience this may cause you. -Norton
To allow logins again, simply remove the /etc/nologin file. If the system crashes, root can
still log in on the system console, on a tty line, or on a pseudo tty attached to the console
(but not over the network) to remove /etc/nologin.
Using Mouse Shortcuts
The system hardware for graphical workstations (and some X-terminals) can provide
you with shortcuts. These may not be available to server administrators who rely solely
on character-based terminals for their administration. Using the graphics console of your
system, you can cut and paste between windows without using pulldown or popup
menus of any sort. Using the popup menu, you can manipulate windows completely.
You can customize the action of your mouse buttons. All examples in this section assume
the default mouse button meanings are used. If you have modified your mouse action,
you must allow for that modification before you use these techniques.
For complete information on using the pop-up windows, see the online Deskop User’s
Guide.

Using Mouse Shortcuts
31
Copying and Pasting Text With the Mouse
The most common mouse shortcut is to cut/copy and paste between windows on your
screen. Here is how you do it:
1. Find the cursor controlled by your mouse on your screen. It should appear as a
small arrow when it is positioned in the working area of one of your windows, or as
some other figure when it is positioned on the frame of a window or in the working
area of an application’s window. If you cannot locate the cursor immediately, move
the mouse around a bit and look for motion on your screen. You should find the
cursor easily.
2. Place the cursor at the beginning of the text you wish to paste between windows
and press the leftmost key on the top of the mouse. Now, keeping the mouse button
pressed, move the cursor to the end of the text you wish to paste. The text highlights
to show it is selected. If you are selecting a large section of text, it is not necessary to
move the cursor over every space. You may move the cursor directly to the end
point and all intervening text is selected. It is not possible to select “columns” of text
or several disconnected pieces of text at once. When you have moved the cursor to
the desired end point, release the mouse button. The text remains highlighted.
3. Now move the cursor to the window you want to paste the text into and make
certain the window is ready to receive the pasted text. For example, if you are
pasting a long command line, make certain that there is a shell prompt waiting with
no other command already typed in. If the pasted matter is text into a file, make
certain that the receiving file has been opened with an editor and that the editor is in
a mode where text can be inserted.
4. To paste the text, place the cursor in the receiving window and press the middle
mouse button once quickly. Each time you press the middle button, the selected text
is pasted into the receiving window. Sometimes it takes a moment for the text to
appear, so be patient. If you press the button several times before the text appears,
you will paste several copies of your text.
5. You can also paste your selected text in the bottom of a window (including the
window from which you selected the text). Press the rightmost mouse button while
the cursor is in that window and choose the Send option from the popup menu that
appears.
The text you originally selected remains selected until you select new text somewhere
else or until you place the cursor back in the original window and click once on the
leftmost mouse button.
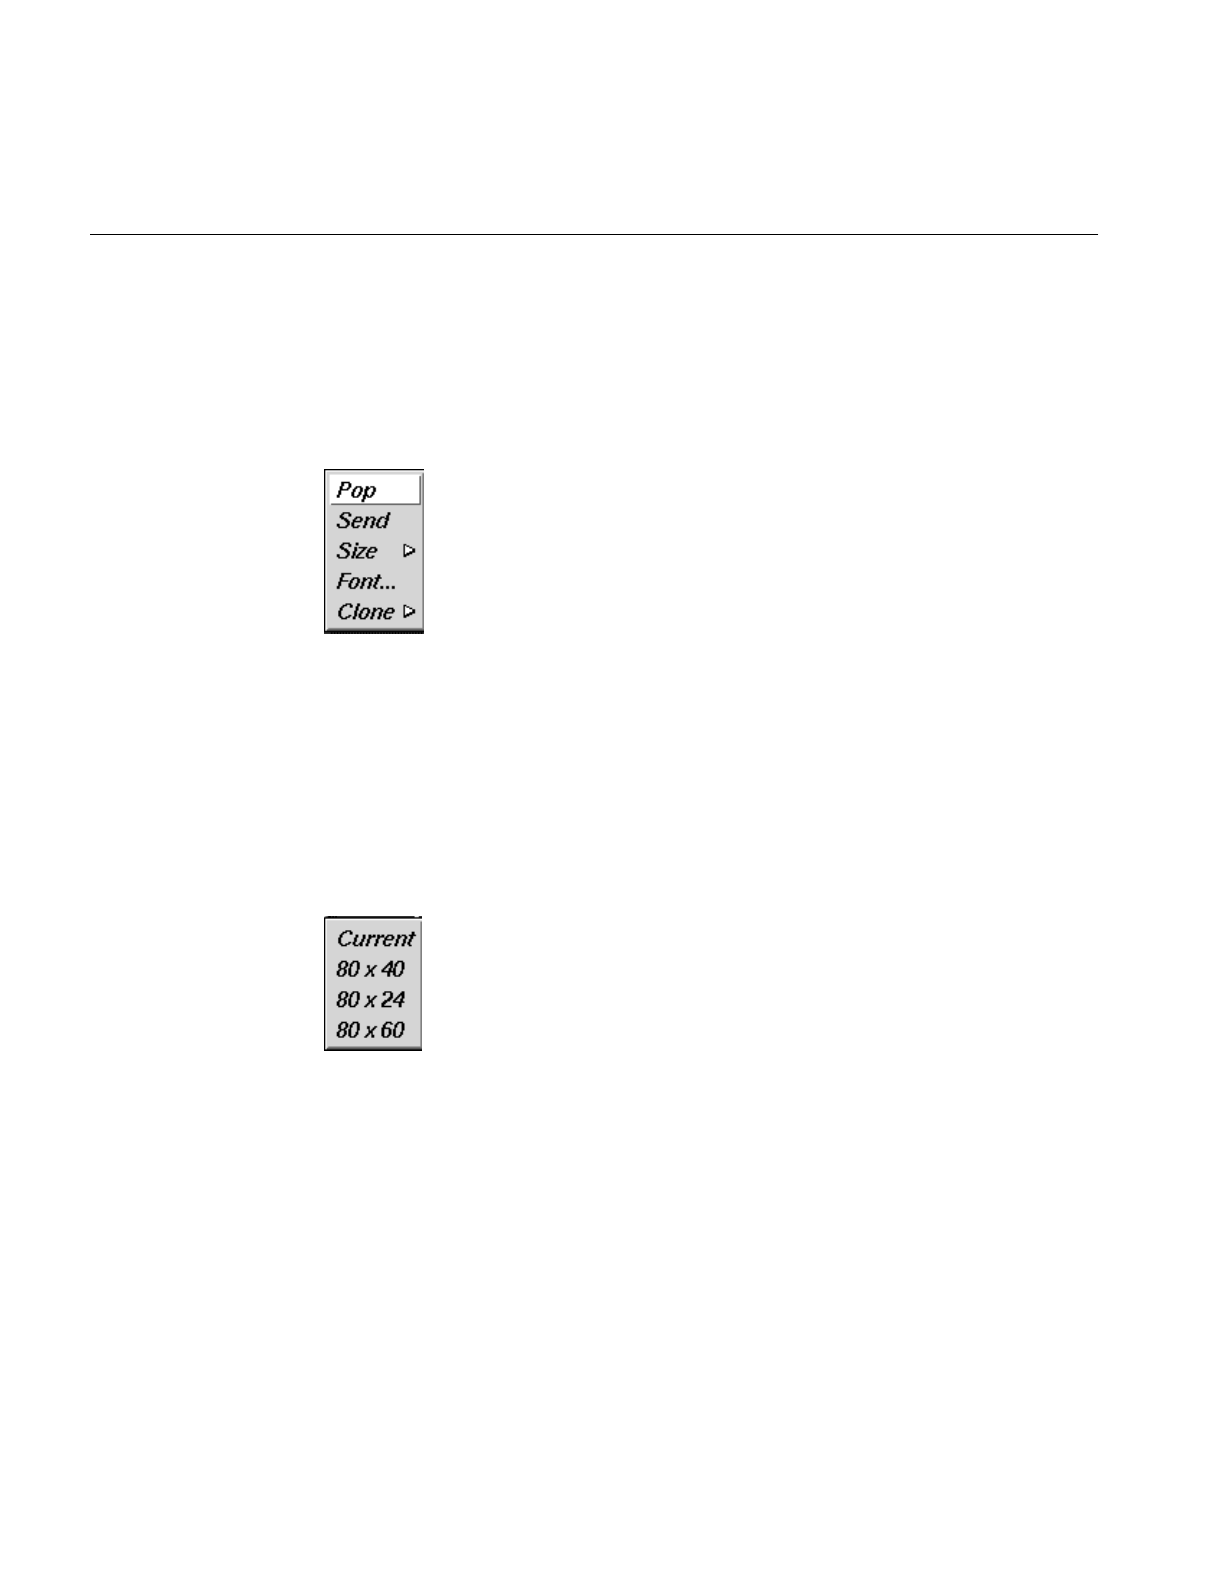
32
Chapter 2: Making the Most of IRIX
Creating a Shell Window With the Mouse
If you need a new shell window, you can use the mouse to create one. Follow these steps:
1. With the cursor in a shell window, press and hold the rightmost button on your
mouse. A popup menu appears:
Figure 2-1 Shell PopUp Menu
2. While keeping the button on the mouse pressed, move the mouse down until the
Clone option is highlighted and the submenu pops up, showing various shell
window cloning options. These options create another shell window functionally
identical to the one in use. This is why the option is called cloning. The text and
background colors of the current window are carried forward to the cloned
window, and the selections in the sub-menu specify the number of lines in the new
window. You can choose to have the same number of lines in the cloned window as
in the current window, or to have 24, 40, or 60 lines.
Figure 2-2 Shell Window Cloning Submenu
3. Choose the size you want by moving the mouse down the options and releasing the
mouse button when the option you desire is highlighted. The new window appears
on your screen. You may repeat this process as often as you like on any shell
window.

Creating Reference Pages
33
Creating Reference Pages
Reference pages are online IRIX command descriptions. A full set of reference pages for
the programs, utilities, and files in the standard IRIX distribution is provided online, and
these pages are available through the man(1) command. In addition, you can create your
own custom reference pages using the following procedure. Any time you create a script,
utility, program, or application for your users, you should also create a reference page.
This provides a convenient way for your users to learn to use your new tools, and also
makes future maintenance easier.
Not all sites have the optional Documenter’s Workbench software product installed, but
you can create a facsimile of a reference page using only the text editor of your choice.
See the following section for details.
Creating ASCII Reference Pages
To create a pure-text reference page without Documenter’s Workbench (no embedded
nroff commands that would format the text) simply use the vi editor (or the editor of your
choice) and document your script or program according to the style found in the
standard reference pages. Name your reference page file after the script or program it
documents with the suffix.l to designate the page as a local reference page.
Note: Use the letter “l” as your suffix, not the numeral one “1.”
When you have completed your reference page, you must place it in the /usr/man
directory structure for the man command to be able to display the new page. Place the
reference pages in a local directory, such as /usr/man/manl. (Again, use the l to designate
local reference pages.) If the directory does not already exist, create it with this command
(you must be logged in as root):
mkdir /usr/man/manl
Long reference pages should be packed to save disk space. Use the pack command to pack
the text file into a more compact form. For example, to pack the reference page you made
for a user script called “program,” enter:
pack program.l
mv program.l.z /usr/man/manl/program.l.z
Note: The man program automatically unpacks the pages for reading.

34
Chapter 2: Making the Most of IRIX
Test your reference page with the command:
man l program
The command should display the reference page specified (this assumes that /usr/man is
in your $MANPATH environment variable.) For more information, refer to the man(1)
reference page.
System Monitoring Tools
IRIX provides a set of detailed programs to assist you in debugging potential system
problems. This software is briefly described here. Complete documentation is available
in the relevant reference pages and through the help system files and release notes
distributed with the software. The savecore,icrash,fru, and sysmon software work together
to provide a picture of what happens to your system in an error condition that results in
an operating system crash.
About Saving a Crash Dump With savecore
Your system may or may not automatically save the image of system memory (if
possible) at the time of a crash depending on the chkconfig setting for savecore. Here is
what happens depending upon the two possible settings to savecore:
•savecore on—The system attempts to automatically save the image of system
memory at a system crash. The image is stored in /var/adm/crash/vmcore.N, where N
is a sequential number assigned to the most recent core file. A successful dump may
then be studied with the icrash utility described below.
•savecore off—A core dump is not saved by the system The icrash utility may still be
run on /unix and /dev/swap in order to get a report of what happened when the
system crashed. In this case, systems do not have to use the disk space on a core
dump in order to get a report.
To determine the current status of the savecore option, enter:
chkconfig | grep savecore
The default setting is savecore on.
Refer to savecore(1M) and the discussion of icrash below for more information.

System Monitoring Tools
35
About the icrash System Crash Analysis Utility
The icrash(1M) utility interactively generates detailed kernel information in an
easy-to-read format. The icrash command can also generate reports about system crash
dumps created by savecore.
Two report files are created when icrash runs, with N being the bounds number for the
core dump:
analysis.N An analysis of the core dump is created containing items of interest, such
as the putbuf dump, fru information, stack traces, and so on. This is a
verbose description of what happened when the system crashed, and it
is meant to be used to perform a preliminary analysis of the system
before any hardware or software changes are made. See the icrash(1M)
reference page for more information.
summary.N The summary report contains the panic string, the crash time, and the fru
information in one file for availmon. See the availmon(1M) reference
page for more information.
Depending on the type of system crash dump, icrash can create a unique report that
contains information about what happened when the system crashed. The icrash
command can be run on both live systems or with any namelist file and core file specified
on the command line. The namelist file must contain symbol table information needed
for symbolic access to the system memory image being examined.
Each version of icrash is specific to the operating system release that it came from, and
does not work on any other operating system release. Do not copy icrash to any other
IRIX system unless the operating system versions are identical (including patch levels).
Running icrash on a live system can sometimes generate random results, as the
information being viewed is volatile at the time it is displayed.

36
Chapter 2: Making the Most of IRIX
A brief list of some of the functionality that icrash offers:
•System crash reports created on system panics
•Field replacement unit (FRU) information provided with each crash on eligible
hardware
•Direct access to a broad list of kernel structures
•Disassembly of kernel functions
•Documented set of commands (see the help system within icrash)
•Command-line editing and history
About the fru Hardware Error Analysis Tool
The fru (Field Replacement Unit) command (described fully in the fru(1M) reference
page) displays field replacement unit analysis on CHALLENGE L and XL, Onyx L and
XL, and POWER CHALLENGE and POWER Onyx systems only. The program considers
the hardware state during an error situation and attempts to determine if the error results
from faulty hardware. The analysis is based on the hardware error state created in the
kernel crash dump. If no hardware error state is dumped, no fru analysis is displayed.
Each board is analyzed separately based on the hardware error state. After the analysis
is completed, the board (or boards) with the highest confidence levels is displayed.
Currently the boards analyzed include the IO4, MC3, IP19, and IP21. Note that you
should also check the version of fru output from release to release, because later versions
may report a different analysis.
When a confidence level is displayed, it is based on the amount of confidence that the fru
analyzer has in the board listed as being the problem. Note that there are only a few levels
of confidence, and it is important to recognize what the percentages mean:
10% The board was witnessed in the hardware error state only.
30% The board has a possible error, with a low likelihood.
40% The board has a possible error, with a medium likelihood.
70% The board has a probable error, with a high likelihood.
90% The board is a definite problem.
95% The board is a definite problem, an exact error match.

System Monitoring Tools
37
There is a possibility of multiple boards being reported, so the field engineer must be
cautious when deciding to replace boards. For example, if two boards are reported at
10%, that is not enough confidence that the boards listed are bad. If there is one board at
70% or better, there is a good likelihood that the board listed is a problem, and should be
replaced. Boards at 30% to 40% are questionable, and should be reviewed based on the
frequency of the failure of the specific board (in the same slot) between system crashes.
The objective of fru is to uncover real hardware problems, rather than to replace boards
at random. Each icrash report for each kernel core dump on an eligible system has a fru
analysis in it, which should be reviewed by field engineers before any boards are
replaced.
Below are some fru output examples. Please note that each fru command output below
comes from a unique core dump. Your output is likely to vary significantly:
>> fru
FRU ANALYZER (2.0.1):
++ PROCESSOR BOARD
++ IP21 board in slot 2: 40% confidence.
++ END OF ANALYSIS
>> fru
FRU ANALYZER (1.6.5):
++ MEMORY BOARD
++ MC3 board in slot 1: 70% confidence.
++ END OF ANALYSIS
>> fru
FRU ANALYZER (1.6.5):
++ CPU slice 3 (CC CHIP)
++ and/or Integral component (A CHIP)
++ on the IP19 board in slot 5: 40% confidence.
++ CPU slice 3 (CC CHIP)
++ and/or Integral component (A CHIP)
++ on the IP19 board in slot 7: 40% confidence.
++ CPU slice 2 (CC CHIP)
++ and/or Integral component (A CHIP)
++ on the IP19 board in slot 9: 40% confidence.
++ CPU slice 3 (CC CHIP)
++ and/or Integral component (A CHIP)
++ on the IP19 board in slot 11: 40% confidence.
++ END OF ANALYSIS
>> fru
FRU ANALYZER (2.0.1): No errors found.

38
Chapter 2: Making the Most of IRIX
About sysmon, the System Log Viewer
The sysmon utility allows a user to browse the system log file (/var/adm/SYSLOG). The 8
SYSLOG priorities (see the syslog(3B) reference page) are simplified into 4 priority levels.
The sysmon utility is part of the Desktop System Monitor. It can be launched from the
System menu by choosing View System Log. You see a window similar to that shown in
Figure 2-3:
Figure 2-3 sysmon System Log Browser
You can choose View, Filter and Sort options through the pulldown menus on this
window. Your selections are saved in your $HOME/.sysmonrc file. For additional
information on these options, consult the online help available through this window or
the sysmon Release Notes.

About availmon, the System Availability Monitoring Tool
39
Table 2-2 shows how SYSLOG priorities map into the sysmon simplified priority scheme:
About availmon, the System Availability Monitoring Tool
The availability monitor (described completely in the availmon(5) reference page) is a
software package that together with icrash and the FRU analyzer provides a technology
platform for system availability and diagnostic data gathering and distribution.
The availmon system collects system availability information and crash diagnosis
information. The availability information can be used to evaluate system reliability and
availability. The crash diagnosis information is an automated aid to debugging.
The availmon software is embedded in the system boot and shutdown processes. The
software is capable of differentiating controlled shutdowns, system panics, system
hangs, power cycles, and power failures. Your system’s uptime is estimated by a daemon
process, and diagnostic information is collected from icrash(1M), /usr/adm/SYSLOG, and
sysmon(1M), hinv(1M), versions(1M), and gfxinfo(1G). All aspects of availmon operation
are fully configurable.
The availmon software on your distribution may not work with some older releases of
IRIX.
Table 2-2 sysmon Priority Table
sysmon Priority SYSLOG Priority Numerical Priority
CRITICAL LOG_EMERG 0
CRITICAL LOG_ALERT 1
ERROR LOG_CRIT 2
ERROR LOG_ERR 3
WARNING LOG_WARNING 4
WARNING LOG_NOTICE 5
INFO LOG_INFO 6
INFO LOG_DEBUG 7

40
Chapter 2: Making the Most of IRIX
You can choose to participate in a system availability database that assists Silicon
Graphics support in providing reliable service. All availability and diagnostic data for
cooperating systems will be maintained in a Silicon Graphics database that provides
overall reliability data and specific histories for individual participating systems. This is
the primary function of availmon.
Registering availmon
Issue the amregister command to set up availmon configuration, turn on autoemail, and
register your system with the Silicon Graphics Availmon Database.
To register your system, log in as root and issue the command:
/usr/etc/amregister -r
Depending on your system type, you may need to enter the serial number of your system
by hand. See the amregister(1M) reference page for further information.
The availmon software is enabled through the chkconfig(1M) command, described in
“Checking Software Configuration Options With chkconfig” on page 71. The flags are:
availmon Controls the activation of the entire availmon software package. By
default, this option is on.
The other configuration flags are set using the amconfig utility, which is similar to
chkconfig, but uses a different record file. There are four flags:
autoemail Enables automatic distribution of reports. By default, this option is off,
but is turned on by amregister.
hinvupdate Enables a daemon that checks for changes reported by hinv and gfxinfo.
By default, this option is on for large systems and off for all others.
shutdownreason
Directs the system to query the Superuser for a reason for each system
shutdown. By default, this option is on for large systems and off for all
others.
tickerd Enables the daemon that monitors system uptime. By default, this
option is on for large systems and off for all others.

About availmon, the System Availability Monitoring Tool
41
There is also an e-mail list configuration file, /var/adm/avail/config/autoemail.list, used to
control the report type, e-mail format, and e-mail addresses for availmon reports. The
e-mail list is edited and maintained through the amconfig command. By default, this file
is configured to send diagnosis reports to Silicon Graphics.
For sites with multiple systems participating, the amconfig command can be executed on
one system to set up a common e-mail configuration file (/var/adm/avail/autoemail.list),
and then this file can be copied onto all participating systems. Then run amregister -r on
each system.
Configuring an availmon Site Log File
If you want a site log file for one or more systems, a pseudo e-mail alias can be created.
This alias pipes availability reports to amreceive, whose output is then appended to the
site log file. This procedure should be done before registering all the systems, because
initial availability reports are sent out when registering.
After setting up availmon,amreport can be executed on each system to view the
availability statistics and reports for that system, or it can be run with the site log file as
input to view overall availability statistics for all systems, and availability reports for any
system.
If you want a site log file, perform the following steps in order:
1. Create an e-mail alias on one system and pipe all availability reports to amreceive.
For example, if the site log file is /disk/amrlog, add this line to the mail server
system’s/etc/aliases file:
amrlog: “| /var/adm/avail/amreceive >> /disk/amrlog”
and then run the newaliases command to set up this e-mail alias.
2. Run the amconfig command on the mail server system to configure the standard
e-mail lists. For this example log file, add the entry:
availability(text): amrlog
Then, copy the resulting /var/adm/avail/config/autoemail.list on this system to the rest
of the systems at your site.

42
Chapter 2: Making the Most of IRIX
3. Run amregister to register all your systems as described in “Registering availmon”
on page 40.
4. Run the command:
amreport -s /disk/amrlog
It shows the overall statistics, system statistics, and individual availability reports
for all participating systems.
Administering availmon
Three examples are provided to illustrate the administration of availmon. One is for
general customers who send reports out automatically; the other two are for secure sites
with and without internal report sending.
Using availmon With Automatic Reporting
If availmon is installed on a single system, reboot the system after installation. Then, run
amregister without any argument to register and configure the e-mail lists. This turns on
autoemail and sends registration reports to all configured addresses. If your system does
not have an IP19, IP21, IP22, or IP25 processor, amregister prompts you to input your
system’s serial number manually.
The shutdownreason and tickerd configuration options can be turned on or off anytime.
The default autoemail.list is:
availability(compressed,encrypted):
availability(compressed):
availability(text):
diagnosis(compressed,encrypted): availmon@csd.sgi.com
diagnosis(compressed):
diagnosis(text):

About availmon, the System Availability Monitoring Tool
43
In addition, you may want to add the following entries:
availability(text): local_sysadmin
diagnosis(compressed,encrypted): local_support
In the above optional entries, replace the strings local_sysadmin and local_support with the
appropriate e-mail addresses for your system administrator and Silicon Graphics
support representative, respectively.
If encrypted data in e-mail is prohibited by law at your site, move addresses in
“(compressed,encrypted)” entries to “(compressed)” entries.
Using availmon at Secure Sites With Internal Report Mailing
If your site is under security restrictions, use the following procedures to set up and use
availmon. The setup procedure is similar to that found in “Registering availmon” on page
40, except that the addresses outside your site should be deleted.
After your system administrators receive availmon reports, they can check the latest
diagnosis report, /var/adm/crash/diagreport, on the system just rebooted, delete sensitive
data, and use amsend to mail the filtered report to availmon@csd.sgi.com and to any Silicon
Graphics support address they require. If the diagnosis report contains any icrash,syslog,
hinv,versions, or gfxinfo data, use the command:
amsend -i -z -x availmon@csd.sgi.com ...
to mail the report. If there is no such data in the report, use the command:
amsend -d -z -x availmon@csd.sgi.com ...
If encrypted data in e-mail is prohibited by law at your site, remove -x from the command
line.
Using availmon at Secure Sites Without Report Mailing
If outside report mailing is not possible at your site, no special actions need to be taken
to use availmon. However, for those platforms not using IP19, IP21, IP22, and IP25
processors, run amregister and then turn off autoemail so that reports generated on these
systems are not sent automatically. The shutdownreason and tickerd options can also be
turned on or off as you choose.

44
Chapter 2: Making the Most of IRIX
Because no external report is mailed after the system reboots, system administrators
need to check whether the system has been down, and then check the report files to
determine the reason. If the system crashes more than once before checking, old reports
are overwritten by the new ones (core dumps and icrash reports are kept until removed
explicitly). Therefore, internal report mailing is recommended for secure sites.
Diagnosis reports can be sent to Silicon Graphics using amsend. See the section titled
“Using availmon at Secure Sites With Internal Report Mailing.” Another method is to run
amconfig to configure standard e-mail lists so that when reports need to be sent, amnotify
can be used to send reports according to those lists.
About availmon Reports
There are two types of reports produced by availmon: availability and diagnosis.
Availability reports consist of system start time, stop time, stop reason, uptime, restart
time, and a summary of the likely reason for any system crash (where relevant). A
standard availability report is shown here:
------------------------------ whizkid ----------------------------
Report Version ......... 0.1
Internet Address ....... whizkid
Reason for Shutdown .... Hang
Started at ............. Mon Oct 3 16:56:08 1994
Stopped at ............. Unknown instant
Uptime ................. 4304 minutes (2 days 23 hrs 44 mins)
-------------------------------------------------------------------
Press <enter> to display summary ...
When you press Enter, you see information similar to the following:
======================= SUMMARY for whizkid ==========================
Controlled Shutdowns ... 0
Hangs .................. 1
Panics ................. 0
Average Uptime ......... 2189 minutes (1 day 12 hrs 29 mins)
Least Uptime ........... 74 minutes (1 hr 14 mins) (*)
Most Uptime ............ 4304 minutes (2 days 23 hrs 44 mins)
Availability ........... 0.7870%
Logging started at ..... Mon Oct 3 16:56:08 1994
System has been up for . 74 minutes (1 hr 14 mins)
Last boot at ........... Tue Oct 24 23:03:44 1995
======================================================================

About availmon, the System Availability Monitoring Tool
45
Diagnosis reports contain the same information as availability reports. They also contain
an icrash analysis report (including the FRU analyzer result), important syslog messages,
and system hardware/software configuration and version information.
Availability information is permanently stored in /var/adm/avail/availlog. Files in
/var/adm/avail are maintained by availmon and should not be deleted, modified, or moved.
The most recent availability and diagnostic reports are stored in /var/adm/crash/availreport
and /var/adm/crash/diagreport, and should be treated comparably to core dumps.
Mailing availmon Reports With amsend
There are two ways to configure the sending of availmon reports: automatic or manual.
If you select automatic mailing, you can configure any number of recipients for each type
of report. The recommended configuration is to send diagnosis reports to the Silicon
Graphics Availmon Database and to Silicon Graphics Field Service, and to send
availability reports to your local system administration team. You can also send copies of
all reports to a local log account.
If you select manual mailing, the two types of reports are created in the directory
/var/adm/crash. You can then edit or filter the reports, and use the amsend command to
send the approved reports.
The availmon software can be configured to compress and encode data. The receiving
agent (using the amreceive command) decodes, uncompresses, and stores the data in a
database at Silicon Graphics. Data encryption is recommended if it is not prohibited at
your site.
Viewing availmon Reports With amreport
The amreport(1M) utility is provided to review availmon reports and to provide statistical
availability information. This program can process local availability log files or received
aggregate availability reports (such as a site log file) from different systems.
The amreport utility shows the statistical reports and availability reports hierarchically
from overall statistics for all systems, a table of statistics for all systems (however, if the
input is a local log file, information for all systems is not provided), statistics for each
system, a table of all reboot instances for each system, and availability reports for each
system. See the amreport(1M) reference page for full information on this utility.


Chapter 3 covers the tasks of starting up and shutting down the IRIX operating
system. The following topics are covered:
•Starting the System
•Shutting Down the System
•IRIX Operating Levels—how to set and use the system operating levels
System Startup, Shutdown, and Run Levels
Chapter 3


49
Chapter 3
3. System Startup, Shutdown, and Run Levels
This chapter describes the procedures for starting and stopping your system, bringing
your system to the various default levels of operation, and creating your own custom
levels of operation. The main sections are:
•“Starting the System” on page 49
•“Shutting Down the System From Multiuser Mode” on page 50
•“About IRIX Operating System Run Levels (System State)” on page 52
Starting the System
To start up an IRIX system, follow these steps:
1. Make sure all cables (such as power, display monitor, and keyboard) are properly
connected. See your owner’s guide and hardware guide for complete information
about cabling your particular workstation or server.
2. Turn on the power switches on the display monitor (or console terminal) and the
computer.
When you turn on the system, it runs power-on diagnostics and displays some
copyright messages and some system startup information. These messages appear
on the console screen or on the screen of a diagnostics terminal (an ASCII terminal
connected to the first serial port) of a server. A copy of these messages is also
written to the /var/adm/SYSLOG file in case you miss them.
If you are restarting the system after a power loss or other unexpected shutdown,
you may see an error message regarding your SCSI bus or other hardware problem.
This may be a temporary condition based on the disks’ need to spin up to speed, or
the SCSI bus may need to reset itself. Wait 30 seconds and attempt to boot the
operating system again.

50
Chapter 3: System Startup, Shutdown, and Run Levels
If the operating system determines that the filesystems need checking, it checks
them with the fsck program (EFS only). fsck fixes any problems it finds before the
operating system mounts the filesystems. fsck will run if the system is not shut
down properly, such as in the event of a power failure. For information about using
fsck, see the IRIX Admin: Disks and Filesystems guide and the fsck(1M) reference
page. Note that it is not necessarily a problem if fsck runs, it is merely a precaution.
The system now comes up in multiuser mode and you can log in. You should leave
your system running at all times. The IRIX operating system works best when it is
allowed to run continuously, so that scheduled operations and “housekeeping”
processes can be performed on schedule.
Shutting Down the System From Multiuser Mode
To shut down the system from multiuser mode:
1. Use the who(1) command to determine which users are logged in to the operating
system, if any:
who
2. Notify users that the system is shutting down. Issue the wall(1M) command:
wall
Enter your message. For example, you might enter:
There is a problem with the building’s power system.
I will be shutting down the system in 10 minutes.
Please clean up and log off.
Sorry for the inconvenience,
norton
When you finish entering your message, type Ctrl+D. The message is sent to all
users on the system. They see something like this:
Broadcast Message from root Tue Oct 17 17:02:27...
There is a problem with the building’s power system.
I will be shutting down the system in 10 minutes.
Please clean up and log off.
Sorry for the inconvenience,
norton

Shutting Down the System From Multiuser Mode
51
3. Enter the /etc/shutdown command:
/etc/shutdown -y -i0 -g600
The above command specifies a 10 minute (600 second) grace period to allow users
to clean up and log off. The other flags indicate that the system will be completely
shut down (-i0) and that the system can assume that all answers to any prompts
regarding the shutdown are “yes” (-y). You see the following message:
Shutdown started. Fri Aug 28 17:10:57...
Broadcast Message from root (console) Fri Aug 28 17:10:59
The system will be shut down in 600 seconds.
Please log off now.
After ten minutes, you see this message:
INIT: New run level: 0
The system is coming down. Please wait.
The Command Monitor prompt or System Maintenance menu appears. Wait for a
Command Monitor prompt or System Maintenance menu to appear before turning
off power to the workstation or you may damage your hard disk.
4. Turn off the power.
For more information on shutting down the system, see the halt(1M) and shutdown(1M)
reference pages. Remember: Shut down the system only when something is wrong or if
modifications to the software or hardware are necessary. IRIX is designed to run
continuously, even when no users are logged in and the system is not in use.

52
Chapter 3: System Startup, Shutdown, and Run Levels
Shutting Down the System From Single-User Mode
If the system is in single-user mode, follow these steps:
1. Use the shutdown command to turn off the system and guarantee filesystem
integrity. As root, enter the command:
shutdown -y -i0 -g0
where:
-y assumes yes answers to all questions, -i0 goes to state 0 (System Maintenance
Menu), and -g0 allows a grace period of 0 seconds.
You see a display similar to this one:
Shutdown started. Fri Aug 28 17:11:50 EDT 1987
INIT: New run level: 0
The system is coming down. Please wait.
The system stops all services and the Command Monitor prompt or System
Maintenance Menu appears.
Wait for the Command Monitor prompt or System Maintenance menu to appear or
for a message that the system can be powered off before turning off power to the
computer. Doing so prematurely may damage your hard disk.
2. Turn off power to the computer.
About IRIX Operating System Run Levels (System State)
The IRIX system can run in either single-user or multiuser mode. In single-user mode,
only a few processes are active on the system, no graphics are available, and only a single
login is allowed. In multiuser mode, there can be multiple login sessions, many files open
at once, and many active processes, including numerous background daemons.
The init program controls whether the system is in the multiuser or single-user state.
Each possible state that the system can be in is assigned a label, either a number or a
letter. The shutdown state is state 0. Single-user mode is state s.
Multiuser state labeling is more complex, because there can be great variations in
multiuser states. For example, in one multiuser state, there can be unlimited logins, but
in another state there can be a restricted number of logins. Each state can be assigned a
different number.

About IRIX Operating System Run Levels (System State)
53
The state of the system is controlled by the file /etc/inittab. This file lists the possible states,
and the label associated with each.
When you bring the system to standard multiuser mode, init state 2, the following
happens:
•The filesystems are mounted.
•The cron daemon is started for scheduled tasks.
•Network services are started, if they are turned on.
•The serial-line networking functions of uucp are available for use.
•The spooling and scheduling functions of the lp package (if it is added to the
system) are available for use.
•Users can log in.
Not all activities can or should be performed in the multiuser state. Some tasks, such as
installing software that requires the miniroot and checking filesystems must be done
with the system in single-user mode.
There are many synonyms for the system state. These include:
•init state
•Run state
•Run level
•Run mode
•System state
Likewise, each system state may be referred to in a number of ways; for example,
single-user mode may be called:
•Single user
•Single-user mode
•Run level 1

54
Chapter 3: System Startup, Shutdown, and Run Levels
Table 3-1 shows the various possible states of the operating system as it is shipped. You
can, of course, create your own custom states.
How init Controls the System State
The init process is the first general process created by the system at startup. It reads the
file /etc/inittab, which defines exactly which processes exist for each run level.
In the multiuser state (run level 2), init scans the file for entries that have a tag (also 2) for
the run level and executes everything after the third colon on the line containing the tag.
For complete information, see the inittab(4) reference page.
Table 3-1 System States
Run Level Description
0 Power-off state.
1, s, or S Single-user mode is used to install/remove software utilities, run
filesystem backups/restores, and check filesystems. This state unmounts
everything except root, and kills all user processes except those that relate
to the console.
2 Multiuser mode is the normal operating mode for the system. The default
is that the root (/) and user (/usr) filesystems are mounted in this mode.
When the system is powered on, it is put in multiuser mode.
6 Reboot mode is used to bring down the system and then bring it back up
again. This mode is useful when you are changing certain system
configuration parameters.

About IRIX Operating System Run Levels (System State)
55
The system /etc/inittab looks something like this:
is:2:initdefault:
fs::sysinit:/etc/bcheckrc </dev/console >/dev/console 2>&1
mt::sysinit:/etc/brc </dev/console >/dev/console 2>&1
s0:06s:wait:/etc/rc0 >/dev/console 2>&1 </dev/console
s1:1:wait:/etc/shutdown -y -iS -g0 >/dev/console 2>&1 </dev/console
s2:23:wait:/etc/rc2 >/dev/console 2>&1 </dev/console
s3:3:wait:/etc/rc3 >/dev/console 2>&1 </dev/console
or:06:wait:/etc/umount -ak -b /proc,/debug > /dev/console 2>&1
of:0:wait:/etc/uadmin 2 0 >/dev/console 2>&1 </dev/console
RB:6:wait:echo "The system is being restarted." >/dev/console
rb:6:wait:/etc/uadmin 2 1 >/dev/console 2>&1 </dev/console
#
This display has been edited for brevity; the actual /etc/inittab file is lengthy. If /etc/inittab
is removed by mistake and is missing during shutdown, init enters the single-user state
(init s). While entering single-user state, /usr remains mounted, and processes not
spawned by init continue to run. Immediately replace /etc/inittab before changing states
again. The format of each line in inittab is:
id:level:action:process
where:
•id is one or two characters that uniquely identify an entry.
•level is zero or more numbers and letters (0 through 6, s, a, b, and c) that determine
in what level(s) action is to take place. If level is null, the action is valid in all levels.

56
Chapter 3: System Startup, Shutdown, and Run Levels
•action can be one of the following:
–sysinit
Run process before init sends anything to the system console (Console Login).
–bootwait
Start process the first time init goes from single-user to multiuser state after the
system is started. (If initdefault is set to 2, the process runs right after the
startup.) init starts the process, waits for its termination and, when it dies, does
not restart the process.
–wait
When going to level, start process and wait until it has finished.
–initdefault
When init starts, it enters level; the process field for this action has no meaning.
–once
Run process once. If it finishes, don’t start it again.
–powerfail
Run process whenever a direct power-off of the computer is requested.
–respawn
If process does not exist, start it, wait for it to finish, and then start another.
–ondemand
Synonymous with respawn, but used only with level a, b, or c.
–off
When in level, kill process or ignore it.
•process is any executable program, including shell procedures.
•# can be used to add a comment to the end of a line. init ignores all lines beginning
with the # character.
When changing levels, init kills all processes not specified for that level.

About IRIX Operating System Run Levels (System State)
57
How IRIX Enters Multiuser State From System Shutdown
When your system is up and running, it is usually in multiuser mode. It is only in this
mode that the full power of IRIX is available to your users.
When you power on your system, it enters multiuser mode by default. (You can change
the default by modifying the initdefault line in your inittab file.) In effect, going to the
multiuser state follows these stages (see Table 3-1 on page 54):
1. The operating system loads and the early system initializations are started by init.
2. The run-level change is prepared by the /etc/rc2 procedure.
3. The system is made public through the spawning of getty processes along the
enabled terminal lines and, for networked systems, network access is enabled.
init Process: Early Initialization
Just after the operating system is first loaded into physical memory through the
specialized boot programs that are resident in the PROM hardware, the init process is
created. It immediately scans /etc/inittab for entries of the type sysinit:
fs::sysinit:/etc/bcheckrc </dev/console >/dev/console 2>&1
mt::sysinit:/etc/brc </dev/console >/dev/console 2>&1
These entries are executed in sequence and perform the necessary early initializations of
the system. Note that each entry indicates a standard input/output relationship with
/dev/console. This establishes communication with the system console before the system
is brought to the multiuser state.
init Process: Run-Level Preparation
Now the system is placed in a particular run level. First, init scans the table to find an
entry that specifies an action of the type initdefault. If it finds one, it uses the run level of
that entry as the tag to select the next entries to be executed. In the example /etc/inittab,
the initdefault entry is run level 2 (the multiuser state):
is:2:initdefault:
s2:23:wait:/etc/rc2 >/dev/console 2>&1 </dev/console
co:23:respawn:/etc/gl/conslog
t1:23:respawn:/etc/getty -s console ttyd1 co_9600 #altconsole
t2:23:off:/etc/getty ttyd2 co_9600 # port 2
t3:23:off:/etc/getty ttyd3 co_9600 # port 3
t4:23:off:/etc/getty ttyd4 co_9600 # port 4

58
Chapter 3: System Startup, Shutdown, and Run Levels
The other entries shown above specify the actions necessary to prepare the system to
change to the multiuser run level. First, /etc/rc2 is executed which executes all files in
/etc/rc2.d that begin with the letter S (see “About Run-Level Directories” on page 59 for
more information). When /etc/rc2 is executed, it accomplishes (among other things) the
following:
•Sets up and mounts the filesystems
•Starts the cron daemon
•Makes uucp available for use
•Makes the line printer (lp) system available for use, if installed
•Starts accounting, if installed and configured to be on
•Starts networking, if installed and configured to be on
•Starts sar, if installed and configured on
•Starts the mail daemon
•Starts the system monitor
init Process: getty
The last step in entering multiuser mode is the getty process.
init starts a getty for the console and starts getty on the lines connected to the ports
indicated.
At this point, the full multiuser environment is established, and your system is available
for users to log in.
Changing System Run Levels
To change run levels, the system administrator can use the telinit(1M) command that
directs init to execute entries in /etc/inittab for a new run level. Then key procedures such
as shutdown,/etc/rc0, and /etc/rc2 are run to initialize the new state. The telinit command
is executed in the scripts single,multi, and reboot.
For example, to go from single-user mode to multiuser mode, enter:
multi

About IRIX Operating System Run Levels (System State)
59
Refer to multi(1M), single(1M), and reboot(1M) for more information.
Note that the preferred method of changing to a lower run state, such as single-user
mode, is described in “Changing From Multiuser Mode to Single-User Mode With the
shutdown Command” on page 60.
The new state is reached. If it is state 1 (single-user mode), the system administrator can
continue.
About Run-Level Directories
Run levels 0, 2, and 3 each have a directory of files that are executed in transitions to and
from that level. These directories are rc0.d,rc2.d, and rc3.d, respectively. All files in these
directories are linked to files in /etc/init.d. The run-level filenames look like this:
SNNname
or
KNNname
The filenames can be split into three parts:
S or K The first letter defines whether the process should be started (S) or killed
(K) upon entering the new run level.
NN The next two characters are a number from 00 to 99. They indicate the
order in which the files will be started (S00, S01, S02, and so on) or
stopped (K00, K01, K02, and so on).
name The rest of the filename is the /etc/init.d filename to which this file is
linked.
For example, the init.d file cron is linked to the rc2.d file S75cron and the rc0.d file K15cron.
When you enter init 2,S75cron is executed with the start option: sh S75cron start. When
you enter init 0,K75cron is executed with the stop option: sh K70cron stop. This
particular shell script executes /sbin/cron when run with the start option and kills the cron
process when run with the stop option.

60
Chapter 3: System Startup, Shutdown, and Run Levels
Modifying Run-Level Files
Because run-level files are shell scripts, you can read them to see what they do. You can
modify these files, though it is preferable to add your own since the delivered scripts may
change in future releases. To create your own scripts, follow these rules:
•Place the script in /etc/init.d.
•Symbolically link the script to files in appropriate run-state directories, using the
naming convention described above (that is, symbolically link the script file in
/etc/init.d with SNNfile and KNNfile in the directories corresponding to the run levels
at which you want to start and stop the script—usually /etc/rc2.d and /etc/rc0.d,
respectively).
•Be sure the script accepts the start and/or stop options to perform the start and
stop.
Note that it may prove easier to simply copy an existing script from the directory and
make appropriate changes. Look at the scripts and links in /etc/init.d,/etc/rc0.d, and
/etc/rc2.d for examples of how to write the scripts.
Changing From Multiuser Mode to Single-User Mode With the
shutdown Command
Sometimes you must perform administrative functions, such as backing up the root
filesystem, in single-user mode. To do so, use the shutdown command.
There are three recommended ways to start the shutdown to single-user mode:
1. You can enter the shutdown -i1 command (recommended). The option -g specifies a
grace period between the first warning message and the final message.
2. You can enter the single command, which runs a shell script that switches to
single-user mode and turns the getty processes off.
3. You can enter the init 1 command, which forces the init process to scan the table.
The first entry it finds is the s1 entry, and init starts the shutdown process according
to that entry.

Powering Off the System Using /etc/inittab
61
This procedure executes all the files in /etc/rc0.d by calling the /etc/rc0 procedure. The
shutdown command performs the following functions, among others:
•Closes all open files and stops all user processes
•Stops all daemons and services
•Writes all system buffers to the disk
•Unmounts all filesystems except root
The entries for single-user processing in the sample /etc/inittab are:
s1:1:wait:/etc/shutdown -y -iS -g0 >/dev/console 2>&1 </dev/console
When the system is in the single-user environment, you can perform the appropriate
administrative tasks.
Powering Off the System Using /etc/inittab
The following entries in /etc/inittab power off the system:
s0:06s:wait:/etc/rc0 >/dev/console 2>&1 </dev/console
of:0:wait:/etc/uadmin 2 0 >/dev/console 2>&1 </dev/console
Always attempt to shut the system down gracefully. You can either enter the powerdown
command, the init 0 command, or directly invoke the /etc/shutdown -i0 command.
In any case, the /etc/shutdown and /etc/rc0 procedures are called to clean up and stop all
user processes, daemons, and other services and to unmount the filesystems. Finally, the
/sbin/uadmin command is called, which indicates that the last step (physically removing
power from the system) is under firmware control.


Chapter 4 provides information on general system configuration. These tasks
include setting most system features:
•Checking your current system hardware and software configuration
•Altering the system configuration with chkconfig
•Setting the system display
•Changing processors on multiprocessor systems
•Changing the name of a system
•Setting the network address
•Setting the default printer
•Setting the time zone
•Changing the system date and time
•Setting up access control lists (ACLs) and capabilities
•Changing file and directory access permission
•Partitioning your system
Configuring the IRIX Operating System
Chapter 4


65
Chapter 4
4. Configuring the IRIX Operating System
This chapter provides information on the settings and files that need to be set and edited
to customize your system for use. It is not necessary to change all listed settings and
names on all systems. You are free to customize your systems as much or as little as
necessary to suit your purposes. The following topics are covered in this chapter.
•“System Configuration Check” on page 65 provides information on determining
what hardware and software are installed and active, and reporting the current
system software settings.
•“Configuring Software” on page 74 provides information on making changes to
basic system settings and options.
•“Partitioning Your System” on page 89 provides information on dividing a single
large machine into multiple distinct machines.
System Configuration Check
IRIX provides two commands that allow you to check your system hardware and
software configurations. The hinv(1M) and versions(1M) commands display the
hardware and software inventories, respectively. Other commands report on graphics
hardware, the system name, configured printers, and basic system settings.
Checking Installed Hardware With hinv
The hinv command displays the system’s hardware inventory table, which is created at
boot time. This command can be run from the Command (PROM) Monitor or from your
system shell prompt. Pertinent information such as the processor type, amount of main
memory, and all disks, tape drives, and other devices is included.

66
Chapter 4: Configuring the IRIX Operating System
For example, with the -v and -m options, hinv produces verbose output including board
name, part number, barcode number, and the physical location of each board as a path
under /hw (see “Checking Installed Hardware in /hw” on page 68 and the reference page
for hwgraph(4D) for more information.) A sample hinv output from the IRIX shell
prompt is:
%hinv -vm
Location: /hw/module/1/slot/n2/node
[missing mfg. info: page A data not available] Laser 0000000aacc9
Location: /hw/module/1/slot/n1/node
8P/12MIDPLANE Board: barcode CDZ039 part 013-1547-002 rev B
[missing mfg. info: page A data not available] Laser 0000000aa9ef
Location: /hw/module/1/slot/r2/router
[missing mfg. info: page A data not available] Laser 00000004da53
Location: /hw/module/1/slot/io1/xwidget
IO6P1 Board: barcode CFD979 part 030-0734-001 rev D
FPU: MIPS R10010 Floating Point Chip Revision: 0.0
CPU: MIPS R10000 Processor Chip Revision: 2.5
6 200 MHZ IP27 Processors
CPU 0 at Module 1/Slot 3/Slice 0: 200 Mhz MIPS R10000 Processor Chip (enabled)
Processor revision: 2.5. Seconday cache size: 1 MB
CPU 1 at Module 1/Slot 3/Slice 1: 200 Mhz MIPS R10000 Processor Chip (enabled)
Processor revision: 2.5. Seconday cache size: 1 MB
CPU 2 at Module 1/Slot 2/Slice 0: 200 Mhz MIPS R10000 Processor Chip (enabled)
Processor revision: 2.5. Seconday cache size: 4 MB
CPU 3 at Module 1/Slot 2/Slice 1: 200 Mhz MIPS R10000 Processor Chip (enabled)
Processor revision: 2.5. Seconday cache size: 4 MB
CPU 4 at Module 1/Slot 1/Slice 0: 200 Mhz MIPS R10000 Processor Chip (enabled)
Processor revision: 2.5. Seconday cache size: 4 MB
CPU 5 at Module 1/Slot 1/Slice 1: 200 Mhz MIPS R10000 Processor Chip (enabled)
Processor revision: 2.5. Seconday cache size: 4 MB
Main memory size: 3072 Mbytes
Memory at Module 1/Slot 3: 1024 MB (enabled)
Bank 0 contains 128 MB (Standard) DIMMS (enabled)
Bank 1 contains 128 MB (Standard) DIMMS (enabled)
Bank 2 contains 128 MB (Standard) DIMMS (enabled)
Bank 3 contains 128 MB (Standard) DIMMS (enabled)
Bank 4 contains 128 MB (Standard) DIMMS (enabled)
Bank 5 contains 128 MB (Standard) DIMMS (enabled)
Bank 6 contains 128 MB (Standard) DIMMS (enabled)
Bank 7 contains 128 MB (Standard) DIMMS (enabled)
Memory at Module 1/Slot 2: 1024 MB (enabled)
Bank 0 contains 128 MB (Standard) DIMMS (enabled)
Bank 1 contains 128 MB (Standard) DIMMS (enabled)
Bank 2 contains 128 MB (Standard) DIMMS (enabled)

System Configuration Check
67
Bank 3 contains 128 MB (Standard) DIMMS (enabled)
Bank 4 contains 128 MB (Standard) DIMMS (enabled)
Bank 5 contains 128 MB (Standard) DIMMS (enabled)
Bank 6 contains 128 MB (Standard) DIMMS (enabled)
Bank 7 contains 128 MB (Standard) DIMMS (enabled)
Memory at Module 1/Slot 1: 1024 MB (enabled)
Bank 0 contains 128 MB (Standard) DIMMS (enabled)
Bank 1 contains 128 MB (Standard) DIMMS (enabled)
Bank 2 contains 128 MB (Standard) DIMMS (enabled)
Bank 3 contains 128 MB (Standard) DIMMS (enabled)
Bank 4 contains 128 MB (Standard) DIMMS (enabled)
Bank 5 contains 128 MB (Standard) DIMMS (enabled)
Bank 6 contains 128 MB (Standard) DIMMS (enabled)
Bank 7 contains 128 MB (Standard) DIMMS (enabled)
Instruction cache size: 32 Kbytes
Data cache size: 32 Kbytes
Secondary unified instruction/data cache size: 4 Mbytes
Secondary unified instruction/data cache size: 4 Mbytes
Secondary unified instruction/data cache size: 4 Mbytes
Secondary unified instruction/data cache size: 4 Mbytes
Secondary unified instruction/data cache size: 1 Mbyte
Secondary unified instruction/data cache size: 1 Mbyte
Integral SCSI controller 0: Version QL1040B
Integral SCSI controller 1: Version unknown
Disk drive: unit 1 on SCSI controller 1
Disk drive: unit 2 on SCSI controller 1
Disk drive: unit 3 on SCSI controller 1
Disk drive: unit 4 on SCSI controller 1
Disk drive: unit 5 on SCSI controller 1
Integral Ethernet: ef0, version 1
EPC external interrupts
If a piece of peripheral hardware installed on your system does not appear in the hinv
output, it may or may not be an indication of trouble with your hardware. Some
peripherals connected to the system by a board on a VME bus are not identified when
running hinv from the Command Monitor. To list the missing peripheral, enter hinv at a
system shell prompt. If your peripheral is still not recognized, reseat the board or device
in its socket and check that it is using the correct SCSI address. If this does not relieve the
problem, the hardware itself may be defective. Note also that most devices are not
recognized by hinv until after the MAKEDEV command has been run after their
installation.

68
Chapter 4: Configuring the IRIX Operating System
Checking Installed Hardware in /hw
The contents of the /hw directory structure are updated as necessary by the ioconfig
command run from /etc/brc at boot time (see “How IRIX Enters Multiuser State From
System Shutdown” on page 57 and ioconfig(1M) for more information). All recognized
hardware should be represented by an entry under /hw, and some of these entries will
have symbolic links in other parts of the /hw structure as well as /dev.
For example, the system root partition may appear in the following entries:
/hw/scsi_ctlr/1/target/1/lun/0/disk/partition/0/block
/hw/disk/root
/dev/root
The first entry (/hw/scsi_ctlr/ and so on) represents the physical location of the board as
described in hwgraph(4D). The second and third paths shown above (/hw/disk/root and
/dev/root) are symbolic links to the long physical pathname (the first path above). The
symbolic links serve as a convenient shorthand for the various system commands that
need to reference the device.
How IP Network Interfaces Are Assigned to Hardware Devices
With each system restart (for example, after a reboot, shutdown, halt, init command, or
power off), the startup routine probes for hardware devices on all the systems connected
into the CrayLink interconnection fabric. All the slots and links in all the modules within
the fabric are probed.
The routine then creates a hierarchical filesystem, called the hardware graph, that lists all
the hardware that is located. The top of the hardware graph is visible at /hw. For complete
details, see the reference page for hwgraph(4D).
After the hardware graph is completed, the ioconfig program assigns a unit number to
each located device that needs one. Other programs (for example, hinv and the device’s
driver) read the assigned number and use it.
On an initial startup, ioconfig assigns numbers sequentially; for example, if two IRIS ATM
XIO boards are found, they are numbered unit0 (with ports 0 to 3) and unit1 (with ports
4 to 7).

System Configuration Check
69
On subsequent startups, ioconfig distinguishes between hardware that it has seen before
and new items. To previously seen items, it assigns the same unit and port numbers that
were assigned on the initial startup. To new hardware, it assigns new sequential
numbers. ioconfig never reassigns a number, even if the device that had the number is
removed and leaves a gap in the numbering.
New items are differentiated from previously-seen items based on the hardware graph
listing (that is, the path within /hw). The database of previously-seen devices is kept in
the /etc/ioconfig.conf file. For example, a replacement board (exact same name) that is
installed into the location of an old board will be assigned the old board’s numbers, while
a board that is moved from one location to another will be assigned a new unit number
and new port numbers.
For more information about the hardware graph and ioconfig, see the reference pages for
hwgraph(4D) and ioconfig(1M).
Checking Installed Software With Versions
The versions command gives you an inventory of software packages that have been
installed using inst. This command can be run only at the system shell prompt, not from
the Command Monitor. Software installed by other means is not included in the versions
output. Along with the names of the software products, the release revision level
numbers are displayed. By default, the output of versions includes all the products and
their subsystems and is typically several hundred lines long, so it is often convenient to
redirect the output to a file that you can view at your convenience. For a more general
look at the products you have installed, without the list of specific subsystems, use the -b
(brief) flag.

70
Chapter 4: Configuring the IRIX Operating System
A sample versions -b output reads as follows (an actual listing is much longer):
I = Installed, R = Removed
Name Date Description
I 4Dwm 07/18/96 Desktop Window Manager, 6.2 (based on
OSF/Motif 1.2.4)
I demos 07/18/96 Graphics Demonstration Programs, 6.2
I desktop_base 07/18/96 IndigoMagic Desktop Base Software,
6.2
I desktop_eoe 07/18/96 IndigoMagic Desktop, 6.2
I desktop_tools 07/18/96 Desktop Tools, 6.2
I dps_eoe 07/18/96 Display PostScript/X, 2.0.5 based on
PostScript Level 2
I eoe 07/22/96 IRIX Execution Environment, 6.2
I insight 07/18/96 IRIS InSight Viewer, 2.3.3
I nfs 07/18/96 Network File System, 6.2 with IMPACT
10000
Checking Installed Graphics Hardware With gfxinfo
The gfxinfo command is useful for determining the graphics hardware installed in the
system. It is in the /usr/gfx directory, which is not on any of the standard search paths.
Thus gfxinfo typically needs the full pathname to be specified for successful execution.
The command requires no arguments to run.
An sample gfxinfo output for an Indy workstation:
%/usr/gfx/gfxinfo
Graphics board 0 is "NG1" graphics.
Managed (":0.0") 1280x1024
24 bitplanes, NG1 revision 3, REX3 revision B,
VC2 revision A
MC revision C, xmap9 revision A, cmap revision C,
bt445 revision A
Display 1280x1024 @ 60Hz, monitor id 12

System Configuration Check
71
This command provides more information about the graphics system than the hinv
command (hinv would simply return “Indy 24-bit”). From the output of gfxinfo you can
determine the number of screens and their pixel resolutions, bitplane configurations,
component revision levels, and monitor types. There is no reference page for gfxinfo.
Servers without graphics capability do not have this command installed.
Checking Basic System Identification With uname
The uname command returns information such as the operating system version and
hostname. The -a option gives a complete list of the uname output. See the uname(1)
reference page for a description of all the uname options and fields.
Getting Printer Status With lpstat
lpstat with the -a option shows all the printers configured for the lp spooling system and
gives their status. See the IRIX Admin: Peripheral Devices and the lpadmin(1M) and
lpstat(1) reference pages for detailed information on printer administration.
Checking Software Configuration Options With chkconfig
You can quickly check the configuration of a workstation or server with chkconfig(1). The
/sbin/chkconfig command reports the state of various process daemons (that is, whether or
not they are supposed to be active).
For example, enter the chkconfig command:
chkconfig

72
Chapter 4: Configuring the IRIX Operating System
You see a display similar to this:
Flag State
==== =====
acct off
audit off
automount on
gated off
lockd on
mrouted off
named off
network on
nfs on
noiconlogin off
nsr on
quotacheck off
quotas off
routed on
rtnetd off
rwhod off
sar on
snmpd on
timed on
timeslave off
verbose off
visuallogin on
windowsystem off
yp on
ypmaster off
ypserv off
This example is typical for a networked workstation with the Network File System (NFS)
option installed. The left column of the output describes a system feature, and the right
column indicates whether it is on or off. The following list provides more specific
information about each system feature:
acct Detailed system accounting is turned on or off.
audit The System Audit Trail is turned on or off.
automount The NFS automount(1M) daemon is turned on or off. This configuration
option is available only if you have NFS installed on the workstation.
gated The gated(1M) daemon, which manages multiple routing protocols is
turned on or off.

System Configuration Check
73
lockd The Network File System (NFS) lock daemon is turned on or off. This
configuration option is available only if you have NFS installed on the
workstation.
mrouted The Stanford IP multicast routing daemon is turned on or off.
named named(1M), the Internet domain name server, is turned on or off.
network The network is turned on or off.
nfs NFS is turned on or off. This configuration option is available only if you
have NFS installed on the workstation.
noiconlogin The visual login program, pandora(1), displays icons that represent
users on the system. This feature does not enable or disable pandora; it
affects whether or not pandora displays icons. It is turned on or off. To
enable or disable pandora, use the visuallogin feature.
nsr IRIS NetWorker backup utility. This configuration option is available
only if you have NetWorker installed on the workstation.
quotacheck The disk space quota checker is enabled or disabled.
quotas Disk quotas are enabled or disabled.
routed routed(1M), which manages the network routing tables, is turned on or
off.
rtnetd rtnetd(1M), which allows higher priority real-time processes to preempt
processing of incoming network packets, is turned on or off.
rwhod rwhod(1M) is turned on or off.
sar sar(1), the system activity reporter, is turned on or off.
snmpd The Simple Network Management Protocol Daemon is turned on or off.
timed timed(1M), the 4.3 BSD time server daemon, is turned on or off.
timeslave The Silicon Graphics time server daemon is turned on or off. Like timed,
this attaches a workstation’s clock to a different clock, usually master
time server for a group of workstations or for the entire site.
verbose If this feature is enabled, as the system boots or is shut down, daemons
print information about their functions. If this feature is disabled, less
information is printed when the system is started and shut down.
visuallogin The visual login program, pandora(1), is turned on or off.

74
Chapter 4: Configuring the IRIX Operating System
windowsystem
The window manager is turned on or off.
yp The network information service (NIS) is on or off. This is called “yp” for
historical reasons. NIS is available with the NFS software. This
configuration option is available only if you have NFS installed on the
workstation.
ypmaster NIS master services are turned on or off. This configuration option is
available only if you have NFS installed on the workstation.
ypserv NIS server and bind processes are turned on or off. This configuration
option is available only if you have NFS installed on the workstation.
Configuring Software
The following sections describe how to set the various options available to customize
your IRIX operating system.
Setting Software Configuration Options With chkconfig
You can use the chkconfig(1M) command to change some aspects of system
configuration. To determine which aspects of a system you can alter with chkconfig, enter
the chkconfig command:
chkconfig
You see a list of configuration options, which are described in “Checking Software
Configuration Options With chkconfig” on page 71. If you use the -s option, you see a list
that is sorted by whether the configuration item is on or off.
To change a configuration option, use the chkconfig command with two arguments: the
name of the option you wish to change and the new status of the configuration (on or off).
You must have root privilege to change a system configuration.
For example, to turn on detailed process accounting, log in either as root or as the system
administrator, and enter:
chkconfig acct on

Configuring Software
75
To turn off process accounting, enter:
chkconfig acct off
Some aspects of system configuration do not take effect until the system is shut down
and rebooted because startup scripts, which are in the directory /etc/init.d, are run when
the system is booted and brought to multiuser mode. These scripts read the files that
chkconfig sets to determine which daemons to start.
Some configuration items that can be controlled by chkconfig may not be displayed by
chkconfig. These include:
nostickytmp Sets “sticky” behavior for the directory /tmp. When the directory is
sticky, (with nostickytmp set to off), users may not remove files from the
directory unless they own the files, have explicit permission to remove
the files (write permission), or have superuser privileges.
The opposite behavior allows users to remove or replace files in /tmp,
which is a publicly writable directory, even if they do not own the files.
This is handy behavior if you have users who need to create large
temporary files and you are short on disk space. But it is better to
increase disk space to avoid important files being removed.
nocleantmp Controls whether or not the directory /tmp is cleaned out each time the
system is booted. If nocleantmp is on,/tmp is not cleaned. If nocleantmp
is off, all files in /tmp are removed each time the system is started.
If you want to see these flags in the chkconfig menu, you can use the -f option to force
chkconfig to create a configuration file for the options:
chkconfig -f nocleantmp on
In this example, chkconfig creates a configuration file called nocleantmp in the directory
/etc/config, which flags the system not remove files from /tmp at reboot.

76
Chapter 4: Configuring the IRIX Operating System
Setting and Changing System Defaults
These systemwide defaults affect programs and system functions:
•System display
•Processor allocation
•Time zone
•Name of the system
•Network address
•Default system printer
•System date and time
•File access permissions
•Access control lists (ACLs) and capabilities
These defaults are described more thoroughly in specific sections of this guide, but they
are all presented here to provide an overview of the IRIX system.
Changing the System Display
You can make the output of programs and utilities running on one system appear on the
screen of another system on the same network by changing the DISPLAY environment
variable. This is useful if your network includes graphical systems and non-graphical
servers. In order to view information from the server graphically, you reset the display
to a graphics workstation.
For example, if your server has only a character-based terminal as its console and you
wish to run gr_osview to visually inspect your CPU usage, you would issue this
command on the server (for csh and tcsh shells):
setenv DISPLAY graphics_system:0
gr_osview
or this command for ksh and sh shells:
DISPLAY=graphics_system:0; export DISPLAY

Configuring Software
77
Also issue an xhost command on the graphics system to allow the server to display on it:
xhost +server_system
When you invoke gr_osview on the server, the window with the output will appear on the
graphics system name you specify. In this example, graphics_system was used in place of
the system name. The :0 used after the system name indicates that display monitor 0 (the
graphics console) should be used to display the output. When you have finished using
the graphics console, be sure to reset the display by issuing this command on the server:
setenv DISPLAY local_server:0
where local_server is the name of your server. If you logged in from the graphics system
to the server and set the DISPLAY variable that way, simply log out when you are
finished.
Changing Processor Assignment on Multiprocessor Systems
If you have a multiprocessor system, the mpadmin(1M) command and the Miser suite of
commands allow you to change the way programs are assigned to the various processors
on your system. To determine if your system is multi-processor, use the hinv(1M)
command. A multi-processor system returns information similar to the following in its
hinv output:
Processor 0: 40 MHZ IP7
Processor 1: 36 MHZ IP7
Processor 2: 40 MHZ IP7
Processor 3: 40 MHZ IP7
Processor 4: 40 MHZ IP7
Processor 5: 40 MHZ IP7
Processor 6: 40 MHZ IP7
Processor 7: 40 MHZ IP7
Or, alternately, output similar to the following:
8 40 MHZ IP7 Processors
A single-processor system returns information similar to the following for the hinv
command:
1 100 MHZ IP22 Processor
If you have only one processor on your system (and the vast majority of systems have
only one processor), this command still operates, though it has no useful purpose.

78
Chapter 4: Configuring the IRIX Operating System
The mpadmin command allows you to “turn off” processors, report various states of the
processors, and move system functions such as the system clock to specific processors.
For complete information on mpadmin(1M), see the reference page.
For partitioning of the system in a batch environment, the batch scheduling component
of Miser should be used. Miser allows for fine-grained control of memory and CPU
allocations between batch applications, and between batch and interactive applications.
For information on Miser, see “Scheduling Processes With the Miser Batch Processing
System” on page 156.
For partitioning the system between different user groups in a strictly interactive
environment, the miser_cpuset command can be used. This command allows the system
to be partitioned into different CPU sets whose access is restricted to particular user
groups. The miser_cpuset command can be used to create, destroy, and display these CPU
sets. For complete information on miser_cpuset(1M), see the reference page.
Changing the System Name
The name of the system is stored in several places. If you want to change the name of
your system, you must change the name in all the following locations, or your system
does not function correctly:
•In the file /etc/sys_id
•In the file /etc/hosts (for networking purposes)
•In a kernel data structure, which you read and set with hostname
•In an NIS map on the NIS master server, if you are running NIS
Note: Do not arbitrarily change the name of a running workstation. Many programs that
are started at boot time depend on the name of the workstation.
To display the name of the system, use the hostname command with no arguments:
hostname
This displays the name of the system. The uname command also displays the name of the
system, along with other information.

Configuring Software
79
To change the name of the workstation, follow these steps:
1. Log in as root.
2. Edit the file /etc/sys_id. Change the name of the host to the new name. Write and exit
the editor.
3. You must also change the name of the host in any network files, such as /etc/hosts,
and possibly in the NIS map on the master NIS server.
4. Reboot your system.
All programs that read the hostname when they are started at boot time now use the
correct hostname.
For information about the Internet address of a workstation, see IRIX Admin: Networking
and Mail. For more information about the name of the system, see the hostname(1) and
uname(1) reference pages.
Setting the Network Address
The system’s network address (IP address) is covered more thoroughly in the IRIX
Admin: Networking and Mail. To set the network address, follow these steps:
1. Place the network address in /etc/hosts on the same line as the system name. For
example
194.45.54.4 magnolia
2. If you use the network information service (NIS), place the name of your domain in
the file /var/yp/ypdomain, if it is installed.
3. Use the nvram(1M) command to set the variable netaddr to the IP number of the
system. For example:
nvram netaddr 194.45.54.4

80
Chapter 4: Configuring the IRIX Operating System
Setting the Default Printer
The lpadmin(1M) command sets the default printer. This command sets the default
printer to laser:
lpadmin -dlaser
Note that the printer laser must already exist and be configured. For complete
information on setting up printers, see the IRIX Admin: Peripheral Devices.
Setting the Time Zone
To set the time zone of the system, edit the file /etc/TIMEZONE. For a site on the east coast
of the United States, the file might look something like this:
# Time Zone
TZ=EST5EDT
The line TZ=EST5EDT means:
• The current time zone is Eastern Standard Time.
• It is 5 hours to the west of Greenwich Mean Time.
• Daylight saving time applies here (EDT).
The TZ environment variable is read by init(1) when the system boots, and the value of
TZ is passed to all subsequent processes. The time zone designation (such as EST) is
simply passed through for your convenience. The important parts of the designation are
the specification of the deviation from Greenwich Mean Time and the presence of the
daylight savings time indicator. The following tables provide convenient time zone
information for the majority of North America, Europe, Asia, the Middle East, South
America, and Australia and New Zealand.
Table 4-1 North America Time Zones
Region GMT Differential Abbreviation
Newfoundland -3:30 NST
Atlantic -4:00 AST
Eastern -5:00 EST

Configuring Software
81
Central -6:00 CST
Saskatchewan -6:00 CST
Mountain -7:00 MST
Pacific -8:00 PST
Yukon -9:00 YST
Alaska -10:00 AST
Hawaii -10:00 HST
Bering -11:00 BST
Baja Norte -8:00 PST
Baja Sur -7:00 MST
Mexico (General) -6:00 CST
Table 4-2 Europe Time Zones
Region GMT Differential Abbreviation
Ireland 0:00 BST
The United Kingdom 0:00 BST
Western Europe 0:00 WET
Iceland 0:00 WET
Middle Europe 1:00 MET
Poland 1:00 MET
Eastern Europe 2:00 EET
Turkey 3:00 EET
Western Russia 3:00 WSU
Table 4-1 (continued) North America Time Zones
Region GMT Differential Abbreviation

82
Chapter 4: Configuring the IRIX Operating System
Table 4-3 Asia Time Zones
Region GMT Differential Abbreviation
Rep. of China 8:00 CST
Hong Kong 8:00 HKT
Japan 9:00 JST
Rep. of Korea 9:00 ROK
Singapore 8:00 SST
Table 4-4 Middle East Time Zones
Region GMT Differential Abbreviation
Israel 2:00 IST
Egypt 2:00 EET
Table 4-5 South America Time Zones
Region GMT Differential Abbreviation
Brazil/East -3:00 EST
Brazil/West -4:00 WST
Brazil/Acre -5:00 AST
Brazil/De Noronha -2:00 FST
Chile/Continental -4:00 CST
Chile/Easter Island -6:00 EST

Configuring Software
83
For complete information about setting your time zone, see the timezone(4) reference
page.
Changing the System Date and Time
Use the date(1) command to set the date and time. For example, to set the date to April
1st, 1999, and the time to 09:00, log in as root and enter:
date 0401090099
Changing the date and time on a running system can have unexpected consequences.
Users and administrators use system scheduling utilities (at,cron, and batch) to perform
commands at specified times. If you change the effective date or time on the system, these
commands may not execute at the desired times. Similarly, if your users use the make
utility provided with the system, the commands specified in Makefiles may perform
incorrectly. Always try to keep your system date and time accurate within reason.
Random changes of the date and time can be extremely inconvenient and possibly
destructive to users’ work.
If timed is running on the system, and it is a slave system, the time is reset by timed and
not the date command. For more information, see the timed(1M) reference page.
Table 4-6 Australia and New Zealand Time Zones
Region GMT Differential Abbreviation
Australia/Tasmania 10:00 EST
Australia/Queensland 10:00 EST
Australia/North 9:30 CST
Australia/West 8:00 WST
Australia/South 9:30 CST
Australia/Victoria 10:00 EST
Australia/NSW 10:00 EST
New Zealand 12:00 NZT

84
Chapter 4: Configuring the IRIX Operating System
Changing File and Directory Access Permission
In general, IRIX file access permissions are set to allow ease of use among multiple users
while maintaining system security. This section discusses how you can change file access
permissions to permit or deny read, write, and execution permission for users, groups,
or everyone. Note that users can also configure a umask to control default access to their
own files (see “About Default File Permissions (umask)” on page 123 for more
information.)
IRIX divides permissions into three categories, and users into three relationships. The
three relationships are the owner of the file, the owner’s user group, and all users. If you
view a long listing of a directory, you see that the permissions field for each file in the
directory looks something like this:
-rwxrwxrwx
Note that the line of permissions has the string rwx repeated three times. The first
instance of rwx applies to the file owner, the next instance applies to the group members,
and the third applies to all other users on the system. The example above shows full
permissions. A more restricted permission set might look like this:
-rw-r--r--
The three categories of permissions are read,write, and execute. They are denoted as “r”
for read, “w” for write, and “x” for execute in long listings of files. To get a long listing,
enter:
ls -l
at your system prompt in any directory. Along with the permission information, the ls -l
command lists the owners and the sizes of the files and the date they were last modified.
Read permission allows you to look at the contents of a file. Write permission allows you
to make changes to or remove a file. Execute permission allows you to run the file as a
command from your shell prompt.
Each character is separately significant in the permissions listing. Starting at the left, the
first character is a dash. A dash in any other position means that no permission is granted
and the actions associated with that permission are denied. However, in the leftmost
place, the contents of that space describes whether the file is a file or a directory. If it is a
directory, a “d” appears in that space. Other characters in this place indicate that the file
is a pipe, a block or character special device file, or other type of file. See the ls(1)
reference page.

Configuring Software
85
To see the current status of a file’s permission settings, use the ls -l command. For
example, to see the status of permission on the file review, enter:
ls -l review
-rw-r--r-- 1 jones engr 1015 Aug 14 16:20 review
Permissions are shown as read (r), write (w), and execute (x), for each of user, group, and
other, respectively. That is, each of the user, group, and everyone else has some
combination of read, write, and execute access to the file. After the first character (in this
example, a dash), the next three characters give the read, write, and execute permission
for the user, the next three characters give the read, write, and execute access for the
group, and the last three characters give the read, write, and execute access for everyone
else. So in the example, user jones has read (r) and write (w), access to the file review,
while the group has only read (r) access, and other also has only read (r) access. Nobody
has execute (x) permission.
The superuser or owner of the file can change these permission settings. As superuser,
you can give everyone write access to a file with the chmod command. For example, to
add write access for the group and others to the review file, use the go+w (g for group, o
for other, and +w to permit writing) option as follows:
chmod go+w review
Now the access permissions should look like this:
-rw-rw-rw- 1 jones engr 1015 Aug 14 16:20 review
Another way of controlling permission settings is with the octal number representation
obtained by using 7 as representing read, write and execute permission (4+2+1). In this
way, to give complete read, write, and execute permissions to a file, use the chmod 777
command, and to give just read permission to the owner and no other permissions at all,
use chmod 400. For complete information on setting access permissions on files and
directories, refer to the chmod(1) reference page.
Note: If you use chmod on a device file, edit the /etc/ioperms file to reflect the change, or
the device file returns to the default access permissions after a reboot. The format of an
entry in /etc/ioperms is:
device_name owner group nnn
where device_name is the device filename, owner is the file owner, group is the group, and
nnn is the octal permission setting as described above and in the chmod(1) reference
page. Refer to the ioconfig(1M) reference page for details on device permission settings
in the /etc/ioperms file.

86
Chapter 4: Configuring the IRIX Operating System
Directory Permissions
Directories use the same permissions as files, but their meanings are slightly different.
For example, read permission on a directory means that you can use the ls command to
look at the contents of that directory. Write permission allows you to add, change, or
remove files in that directory. (However, even though you may have write permission in
that directory, you must also have write permission on the individual files to change or
remove them, unless you own the directory.) Finally, execute permission on a directory
allows you to use the cd command to change directories into that directory.
File Permissions
The first series of three places after the leftmost place in the permissions field describe
the permissions for the owner of the file. Here is an example of a long listing for a file:
-rwx------ 1 owner grp 6680 Apr 24 16:26 shell.script
The file is not a directory, so the leftmost space is blank. The characters rwx indicate that
the owner of the file, owner, has read, write, and execute permission on this file. The
second series of three spaces describe permissions for the owner’s group. In this case, the
group is grp. Suppose permissions for this file were slightly different, like this:
-rwxr-x--- 1 owner grp 6680 Apr 24 16:26 shell.script
In that case, any member of the group grp could read or execute the file, but not change
it or remove it. All members of group grp can share a pool of files that are individually
owned. Through careful use of group read and write permissions, you can create a set of
doc source files that are owned by one person, but any group member can work on them.
The third series of spaces provides for all other users on the system and is called the
public permissions. A file that is set to be readable by any user on the system is called
publicly readable.

Configuring Software
87
Here is a long listing of a sample Projects directory:
total 410
drw------- 1 owner grp 48879 Mar 29 18:10 critical
-rw-r--r-- 1 owner grp 1063 Mar 29 18:10 meeting.notes
-rw-rw-rw- 1 owner grp 2780 Mar 29 18:10 new.deal
-rwxrwxrwx 1 owner grp 8169 Jun 7 13:41 new.items
-rw-rw-rw- 1 owner grp 4989 Mar 29 18:10 response
-rw------- 1 owner grp 23885 Mar 29 18:10 project1
-rw-r----- 1 owner grp 3378 Jun 7 13:42 saved_mail
-rw-r--r-- 1 owner grp 2570 Mar 29 18:10 schedules
-rwxrwxr-x 1 owner grp 6680 Apr 24 16:26 shell.script
The files in this directory have varying permissions. Some are restricted to the owner,
some can be read only by members of the owner’s group, and some can be read, changed,
or removed by anybody. The shell script is executable by any user.
Changing Permissions
You change the permissions on a file by means of the chmod(1) command. You can use
chmod only to change files that you own. Generally, you use this command to protect files
you want to keep secret or private, to protect private directories, and to grant
permissions to files that need to be used by others. To restrict access to a file or directory
to yourself only, enter:
chmod 600 filename
chmod 700 dirname
Other permissions may be added by using the chmod command with the letter associated
with the permission. For example, to add general write permission to a file, enter:
chmod +w filename
For more examples, see the chmod(1) reference page.

88
Chapter 4: Configuring the IRIX Operating System
Setting Permissions With umask
You can decide what default permissions your files have by placing the umask command
in your .cshrc,.profile, or .login file. There is a default umask setting for the entire system
in the /etc/profile and /etc/cshrc files. By changing the setting of your umask, you can alter
the default permissions on your files and directories to any available DAC permission.
See the umask(1) reference page for more information.
A drawback to the umask command is that it makes every file you create receive the same
permissions. For most purposes, you want the files you create to be accessible by the
members of your group. For example, if an individual is suddenly called away and
another person must take over that person’s portion of a project, the source files must be
accessible by the new user. However, you might want the personal files you keep in your
home directory to be private, and if you set your umask to allow group read and write
privileges, any member of the group can access your personal files. But mechanisms are
available to prevent this access. For example, you can create a directory of private files
and alter the permissions on that directory with the chmod command to restrict all but
your own access. Then no other user would be allowed into the directory.
You can also use the IRIX utilities to change all the files in your home directory to your
chosen permission automatically at your convenience. You can set up your account so
that this action happens to any files or directories you indicate every time you log out.
For example, say you have three directories, called personal,letters, and budget. You can
set up a .logout file in your home directory with commands to be executed each time you
log out from the system. The following commands, placed in the .logout file will prevent
access to the three example directories to anyone but you:
chmod 700 budget personal letters
chmod 600 budget/* personal/* letters/*
The umask command is an important part of DAC. It allows you to maintain security and
still allow convenient access to your files. To set your account up to allow group read and
write privileges and no other privileges, place this line in your .cshrc or .profile file:
umask 006
This makes every file you create have the following permissions:
-rw-rw----
Partitioning Your System
89
With your umask set to 006, directories that you create have the following permissions:
drwxrwx---
In plainer terms, you and your group will have full use of the file or directory. No other
user, except the Superuser (root), will have access to your files.
Access Control Lists (ACLs) and Capabilities
For information on access control lists (ACLs) and capabilities, see the IRIX Admin:
Backup, Security and Accounting manual.
Partitioning Your System
Partitioning a machine involves dividing a single large machine into multiple distinct
machines, each with its own console, root filesystem, and IP network address. Each
partition can be rebooted, loaded with software, and upgraded independently. The
partitions can communicate via TCP over a CrayLink connection.
Figure 4-1 Partitioned System
Console
Console
Database server
Database server
Root filesystem
Root filesystem
Shared filesystem
TCP over
CrayLink

90
Chapter 4: Configuring the IRIX Operating System
Partitions can be of different sizes, and a particular machine can be configured in more
than one way. For example, a 128-CPU machine could be configured into four partitions
of 32 CPUs each. (See“Supported Configurations” on page 95 for a list of all the
supported configurations for system partitioning.)
Your choice of partition size and number of partitions affects fault containment and
scalability. In general, a middle-of-the-road solution may be acceptable in terms of both
fault containment and scalability.
From a fault containment perspective, if the partitions are large, more of the machine will
be lost in a failure because a failure in a partition will bring down the complete partition.
From a scalability perspective, within a single partition, a system will scale as if it were a
single system. A single application may only execute within a partition. A network
protocol is required for communication between applications in multiple partitions.
Across partitions, a system will scale as if it were a distributed operating system. If the
partitions are large, lock contention and memory latency within a partition will be high,
while there will be less inter-partition traffic due to distributed protocols. If the partitions
are small, lock contention and memory latency will be small, but the increased number
of partitions will produce higher inter-partition traffic.
Advantages of Partitioning
Fault containment is one of the major reasons for partitioning a system. A single partition
can be brought down (because of a hardware or software failure, or as part of a controlled
shutdown) without affecting the rest of the machine. A hardware memory barrier is set
up between any two partitions, thus providing higher availability for a partition than for
a single large machine.
Another advantage of partitioning is that large jobs can be run when required by
converting the system into one large machine at night, and then splitting it into multiple
systems during the day.
Partitioning Your System
91
Disadvantages of Partitioning
Disadvantages of partitioning a system include loss of the ability to run larger
applications, for example, multi-threaded applications or shared memory applications.
In addition, with a partitioned system, you lose access to all system resources such as
filesystems, disks, or networking devices outside of your own partition.
Networking Setup Between Partitions
Inter-partition communication occurs through a fault-tolerant messaging system (xpc).
The kernel in each partition is aware of all the other kernels. They communicate by using
the hardware’s block transfer engine (BTE). The xpc driver uses this hardware.
The xpc driver provides multiple (32) logical channels: some are used for kernel-to-kernel
communication, and others are used by the raw cl or network if_cl devices.
Figure 4-2 Communication Between Partitions
Each partition has one cl driver and one if_cl driver. The if_cl driver implements a TCP/IP
interface on top of xpc.if_cl is the CrayLink network interface. Applications can use BSD
sockets, for example, to communicate between partitions.
Partition 1
Applications
XPC
if_cl if_cl if_cl
if_cl
Partition 2
TCP/IP

92
Chapter 4: Configuring the IRIX Operating System
For cl devices, 16 full-duplex logical channels provide for character device user
communication to any other partition. Each device appears in the /hw filesystem when
its target partition boots. The path name is as follows (the partition_number and
device_number are specified as two-digit hexadecimal values):
/hw/xplink/raw/partition_number/device_number
The if_cl driver is configured using the ifconfig command. See the ifconfig(1M) reference
page for more information. The procedure for configuring the if_cl driver as a network
driver is essentially the same as the procedure used to to configure the Ethernet driver
(ef0).
The following steps configure the if_cl driver:
1. Log in as root.
2. Add the interface clX by editing the file /etc/config/netif.options.Write and exit the
editor.
3. Add the network address for the clX interface by editing the /etc/hosts file.Write and
exit the editor.
4. Reboot your system or restart networking.
Connecting the System Console to the Multi-Module System
Controller (MMSC)
System partitioning is an administrative function; however, if you want to control two
partitions from one serial connection, you need to connect an additional RS-232 cable
from the BASEIO (I06) of the second module to the test port in the MMSC. If you need to
configure your system’s partitioning in this manner, contact your service representative
for recabling.
Partition Setup
You can set up partitions by using the mkpart partition configuration command or by
using the setpart command from the Command Monitor in the BASEIOprom.
Caution: Using mkpart is the recommended method for setting up partitions. The setpart
command does not verify the validity of the configuration, which may cause problems
in the future.

Partitioning Your System
93
mkpart Partition Configuration Command
The mkpart partition configuration command allows you to perform the following tasks:
•List current partitions
•Save the current configuration
•Set up partitions, including:
–Split an existing system into multiple partitions
–Coalesce partitions into a larger system
–Split up existing partitions and regroup them differently
The mkpart command can be run only by the system administrator. All partitions that will
be affected by mkpart must be running IRIX. The superuser for the host system running
mkpart must have network access permission to run rsh on the remote partitions.
A typical sequence of partitioning commands may be as follows:
1. Run mkpart -l to list all partitions.
2. Run mkpart again to repartition the system.
•Partition IDs are stored in the multi-module system controllers (MMSCs).
•mkpart uses a daemon (mkpd) to write IDs on remote partition MMSCs.
3. Reboot all partitions if mkpart is successful.
You can run mkpart from the command line, by using a config file as input to mkpart, or
interactively.
The mkpart command-line syntax is as follows:
mkpart [-l] [-f cfgfile] [-reset]
mkpart [-p pno -m mno ...] [-p pno -m mno ...] ...
-l Lists current partitions.
-f Uses cfgfile as input for partition information.
-p Specifies the partition ID.
-m Indicates the module number.
-reset Coalesces all currently active partitions into a single system with a
partition ID of 0. A partition ID of 0 indicates an unpartitioned system.

94
Chapter 4: Configuring the IRIX Operating System
If you use the config file option, -f, do not specify the partition number and module
number on the command line.
The config file cfgfile consists of lines with the following format:
partition : pno = module : modnum modnum [,] modnum
partition : pno = module : modnum modnum [,] modnum
Each line in the file describes a partition. A partition consists of a partition ID or partition
number and the set of modules that comprise the partition.
You can save the current configuration in a file by redirecting the output of the mkpart -l
command. The format of the command output is the same as cfgfile and can be used as
input to mkpart.
See the mkpart(1M) reference page for detailed information on this command.
Partitioning From the PROM
You can also set up partitions by using the setpart command from the Command Monitor
in the BASEIOprom.
Caution: Using mkpart is the recommended method for setting up partitions. The setpart
command does not verify the validity of the configuration, which may cause problems
in the future.
The following steps set up or tear down partitions using the setpart command
1. Reset the machine.
2. From the System Maintenance menu, enter option 5 for the Command Monitor.
3. Run the setpart command. (The setpart -h command displays all setpart options.) The
setpart command is an interactive command that takes input from you, including a
partition number and the module numbers of the modules that comprise the
partition.
4. After finishing, reset the machine again. The machine will now come up as two or
more partitions. Each partition needs to have a BASEIO board, root disk, console,
and so on.

Partitioning Your System
95
The following steps tear down partitions and coalesce the machine back together:
1. Drop to the Command Monitor in all the partitions.
2. Run the setpart -c command in any of the partitions. This command clears all
partition information and offers to reset all partitions simultaneously. Now the
entire machine is reset and comes back up together as a single partition.
Supported Configurations
Table 4-7 shows the supported configurations for system partitioning:
The 4 ×32 modules configuration shown above requires Xpress links to make it a 4 ×1
(4 partitions of 1 module each) system.
Metarouters are needed in an 8 module system to make it a 4 ×16 CPU combination. Any
system with metarouters has the metarouters as a single point of failure.
Table 4-7 Supported Configurations for Partitioning
Valid Partitioning (Modules) Number of CPUs in Partition
1 1 module 1 to 8
21× 2 modules 2 to 16
2× 1 modules 1 to 8
41× 2 modules + 2 to 16
2× 1 modules 1 to 8
1× 4 modules 2 to 32
2× 2 modules 2 to 16
4× 1 modules 2 to 8
81× 8 modules 8 to 64
2× 4 modules 4 to 32
16 1 × 16 modules 16 to 128
4× 32 modules 8 to 32

96
Chapter 4: Configuring the IRIX Operating System
Partitioning Guidelines
Keep in mind the following guidelines when partitioning your system:
•A partition must be made up of one or more eight-CPU modules. An eight-CPU
module shares a power supply, one reset line, one NMI line, and a single system
controller.
•Each partition must have a unique ID number.
•Each partition must contain the following components:
–Sufficient node boards; that is, at least one node board per module or at least
two node boards per module to activate all of the I/O slots
–A router board in all router slots
–One system disk
–One BASEIO board (all modules are shipped with one) with console
•The console of the lowest numbered module in a partition becomes the console for
that partition. (The original console remains the console for the partition that
contains it.)
•Each partition has its own set of PROM environment variables: ConsolePath,
OSLoadPartition,SystemPartition,netaddr, and root.
Note: The following requirements are needed for the partitioning software to run.
These requirements are checked by the mkpart command. If the mkpart command
finds connectivity problems, use these requirements as guidelines to fix CrayLink
cabling.
•All modules in a partition must be directly connected to all other modules in the
partition by CrayLink cables. If the modules are not directly connected, two
modules will have to go through an unrelated partition to communicate. If that
partition goes down, any messages in progress will be lost.
•All modules in a partition must be physically contiguous. The route between any
two CPUs in the same partition must be contained within that partition, and not
route through any other partition. If the modules in a partition are not contiguous, a
partition will be affected by failures in other partitions
•At 64 processors, there are no longer enough links to connect four partitions
without adding a metarouter.

Chapter 5 describes the tasks associated with managing user accounts on your
system and dealing with your users. Topics described in this chapter include:
•Creating and deleting user accounts
•Changing user account information
•Configuring a user’s login environment
•Communicating important information to users
•Information on the user ID (UID) and group (GID)
System Administration in a Multiuser
Environment
Chapter 5


99
Chapter 5
5. System Administration in a Multiuser Environment
This chapter describes how to configure and maintain the system to support your users.
It includes a discussion of adding user accounts, configuring user environments, and
enabling communication between users.
User Account Administration
Creating and deleting user accounts are two of the most common system administration
tasks. It is recommended that you read and understand this section before you set up or
change user accounts. The graphical System Manager tool (available on graphics
workstations only) is the most convenient tool for these tasks. The System Manager is
described in the Personal System Administration Guide. The command-line method for
performing these tasks is described here.
User ID Numbers
Each user account has a user ID number. These numbers are unique on each workstation
and should be unique throughout your entire site. A user ID number for an account is
kept in the third field of the /etc/passwd file.
After you close a user account, do not reuse that account’s user ID number. It is possible
that files somewhere on a system could still be owned by the ID number, or files may be
placed on the system from an old backup tape. These files would be compromised by
associating a new user with an old ID number. In general, the rule is that the ID number
is the permanent property of the user to whom it is assigned. For more information on
user ID numbers, see the passwd(4) reference page.

100
Chapter 5: System Administration in a Multiuser Environment
Group ID Numbers
Each user account belongs to a group of users on the system. Users with similar interests
or jobs can belong to the same group. For example, members of the publications
department might belong to group pub. The benefit to this arrangement is that it allows
groups of related users to share files and resources without sharing those files or
resources with the entire system community.
Each group has a group ID number. These numbers are unique on each system and
should be unique throughout the entire site. As with user IDs, you should not reuse
group IDs.
When you create a file, it is assigned your group ID. You can change the group ID of a file
with the chgrp(1) command. By manipulating the permissions field of the file, the owner
(or someone with the effective user ID of the owner) can grant read, write, or execute
privileges to other group members.
Information about groups is kept in the /etc/group file. A sample entry from this file is
shown and explained below:
raccoons::101:norton,ralph
Each entry is one line; each line has the following fields:
group name The group name can be any length, though some commands truncate
the name to eight characters. The first character must be alphabetic.
password The password field may contain an encrypted password. An empty
field, as in the above example, indicates that no password is required.
The passwd(1M) command cannot be used to create or modify a group
password. To place a password on a group, you must use the passwd
command to encrypt a password. Use a test user account created
specifically for this purpose and then delete the test account. Then, copy
that encrypted password verbatim from the /etc/passwd file into the
/etc/group entry you want to protect with the password. Users
specifically listed as group members in the /etc/group file entry are not
required to give the password, but other users are so required when they
attempt to change groups to the protected group with the newgrp
command. Password protection, though, is rarely used on user groups.

User Account Administration
101
group ID The group ID is a number from 0 to 60,000. The number must not include
a comma. Numbers below 100 are reserved for system accounts.
login names The login names of group members are in a comma-separated list.
For complete information on user groups, see the group(4) reference page.
Adding User Accounts Using Shell Commands
Occasionally, you may have to add a user account manually; in other words, without
using the automated tools such as the System Manager. All administrators should
understand the process in case a problem develops with some part of the automated
tools or if you want to design your own scripts and programs for administering user
accounts at your site. Be sure to check your work with the pwck command.
The procedure for manually adding user accounts is
1. Edit the /etc/passwd file.
2. Edit the /etc/group file.
3. Create the user’s home directory and startup files.
4. Verify the new account.
These steps are described in the following four procedures.
Editing the /etc/passwd File to Add a User Account
To edit the /etc/passwd file:
1. Log in as root.
2. Edit the file /etc/passwd with your preferred text editor.
The file /etc/passwd has one line for each account on the system. Each line contains
seven fields, and each field is separated by a colon. The lines look similar to this:
ralph:+:103:101:Ralph Cramden:/usr/people/ralph:/bin/csh
3. Copy one of the lines (for example, the last line in the file) and add it after the last
account entry in the file.
4. Change the first field (ralph in this example) to the name of the new account; for
example, alice.

102
Chapter 5: System Administration in a Multiuser Environment
5. Remove any characters between the first colon after the account name and the
second colon. Deleting these characters removes the password from an account.
Either you or the new user can add a password later.
6. The next field (in this case “103”) is the user ID of the new account. Change it to a
number 1 greater than the current highest user ID on your system. You should not
use user ID numbers between 0 and 100, as these are reserved for system use.
7. The next field (in this case “101”) is the group ID number of the new account. Check
the file /etc/group and pick a suitable group ID for the new user account. The
/etc/group file lists all the groups on the system by group ID, followed by a list of the
current users who belong to that group.
8. Change the next field (in this case Ralph Cramden) to the name of the new user, in
this case Alice Cramden. If you want, you can add an “office” and “phone number”
to this field. After the user’s name, add a comma, then the office location, another
comma, and the phone number. For example:
:Alice Cramden, Brooklyn, (212) 555-1212:
Actually, you can put any information you want in these fields. The fields are
interpreted by the finger(1) program as “user name, office, phone number.”
9. The next field (in this case /usr/people/ralph) is the location of the user’s home
directory. Change this field to reflect the name of the new user’s account. In this
example, you would change /usr/people/ralph to /usr/people/alice.
10. The last field (in this example /bin/csh) is the user’s login shell. For most users, the C
shell (/bin/csh), Korn Shell (/bin/sh), or Bourne shell (/bin/bsh) is appropriate. Leave
this field unchanged, unless you want to use a different or special shell. Special
shells are discussed in “Special Login Shells” on page 124. Once you have selected a
shell, you are finished editing /etc/passwd.
11. Write the changes you made and exit the file.

User Account Administration
103
Editing the /etc/group File to Add a User
This procedure, which is optional, adds the new user to the file /etc/group. However, users
can be a member of a group without being listed in the /etc/group file. If you want to
maintain a list pf groups to which users belong, edit this file.
1. Open the /etc/group file with your preferred text editor. You should see some lines
similar to this:
sys::0:root,bin,sys,adm
root::0:root
daemon::1:root,daemon
bin::2:root,bin,daemon
adm::3:root,adm,daemon
mail::4:root
uucp::5:uucp
rje::8:rje,shqer
lp:*:9:
nuucp::10:nuucp
bowling:*:101:ralph
other:*:102:
2. Place the name of the new account (in this example alice) after any of the groups.
Separate the account name from any other account names with a comma, but not
with blank spaces. For example:
bowling:*:101:ralph,alice
Although adding account names to the /etc/group file is optional, it is a good way to
keep track of who belongs to the various system groups.
Also, you can assign an account to more than one group by placing the account
name after the names of the various groups in /etc/group. The user can change group
affiliations with the newgrp and multgrps commands.
3. Write your changes and exit the file.

104
Chapter 5: System Administration in a Multiuser Environment
Setting Up a Home Directory for a New User
To create the new user’s home directory and copy shell startup files over to that directory,
follow this procedure:
1. Use the mkdir(1) command to create the user’s home directory. For example, to
create a home directory for the user “alice”:
mkdir /usr/people/alice
Make the directory owned by user alice, who is in group bowling:
chown alice /usr/people/alice
chgrp bowling /usr/people/alice
Make sure the new home directory has the appropriate access permissions for your
site. For a site with relaxed security:
chmod 755 /usr/people/alice
For more information, see the reference pages for chown(1), chgrp(1), and
chmod(1).
2. Copy the shell startup files to the new user’s home directory.
If the new account uses the C shell:
cp /etc/stdcshrc /usr/people/alice/.cshrc
cp /etc/stdlogin /usr/people/alice/.login
If the new account uses the Korn or Bourne shell:
cp /etc/stdprofile /usr/people/alice/.profile
3. You can make these shell startup files owned by the user, or leave them owned by
root. Neither approach affects how the user logs in to the system, although if the
files are owned by root, the user is less likely to alter them accidentally and thereby
be unable to log in.
To give a user complete access to his or her shell startup files, use the chmod
command. For C shell:
chmod 755 /usr/people/alice/.cshrc /usr/people/alice/.login
For Korn or Bourne shell:
chmod 755 /usr/people/alice/.profile
Remember to check for any other user files that may be owned by root in the user’s
directory and change those too.

User Account Administration
105
4. It is a good idea to immediately create a password for the new user. Enter
passwd alice
and follow the prompts to create a password. Let the user know their assigned
password and advise them to change it to a password of their own choosing. Refer
to IRIX Admin: Backup, Security, and Accounting for advice to give users on choosing
passwords.
Verifying a New Account
Issue the pwck command to check your work. This command performs a simple check of
the /etc/passwd file and makes sure that no user ID numbers have been reused and that all
fields have reasonable entries. If your work has been done correctly, you should see
output similar to the following:
sysadm:*:0:0:System V Administration:/usr/admin:/bin/sh
Login directory not found
auditor::11:0:Audit Activity Owner:/auditor:/bin/sh
Login directory not found
dbadmin::12:0:Security Database Owner:/dbadmin:/bin/sh
Login directory not found
tour::995:997:IRIS Space Tour:/usr/people/tour:/bin/csh
Login directory not found
4Dgifts::999:998:4Dgifts Acct:/usr/people/4Dgifts:/bin/csh
First char in logname not lower case alpha
1 Bad character(s) in logname
Login directory not found
nobody:*:-2:-2::/dev/null:/dev/null
Invalid UID
Invalid GID
These messages are normal and expected from pwck. All errors generated by pwck are
described in detail in the pwck(1M) reference page.

106
Chapter 5: System Administration in a Multiuser Environment
Adding User Groups Using Shell Commands
Follow these steps to add a group to the system manually:
1. Log in as root.
2. Edit the file /etc/group. The file contains a list of groups on the system, one group per
line. Each line contains the name of the group, an optional password, the group ID
number, and the user accounts that belong to that group.
For example, to create a group called raccoons, with a group ID of 103, place this line
at the end of the file:
raccoons:*:103:
3. If there are users who should belong to the group, add their names in the last field.
Each name should be separated by a comma, for example:
raccoons:*:103:ralph,norton
4. Write and exit the file. Make sure the group IDs in the file /etc/passwd file match
those in the /etc/group file.
For more information on user groups, see the group(4) reference page.
Changing a User’s Group
To change a user’s group affiliation, perform these steps:
1. Log in as root.
2. Edit the file /etc/group. Place the user’s account name on the line corresponding to
the desired group. If the account name appears as a member of another group,
remove that reference unless you want the account to be a member of both groups.
3. Write and exit the file /etc/group.
4. Edit the file /etc/passwd.
5. Find the user’s entry in the file.

User Account Administration
107
6. Change the old group ID on that line to the new group ID. The group ID is the
fourth field (after the account name, password, and user ID).
7. Write and exit the file.
The user’s group affiliation is now changed. Remind the user to change the group
ownership on his or her files. If you prefer, you can perform this task yourself as root
using the find and chgrp commands. See “Locating Files With the find Command” on
page 24 for more information.
Deleting a User From the System
This procedure deletes the user’s home directory and all the files in and below that
directory. If you want only to close or disable a user account but preserve the user’s files
and other information, see “Locking a User Account” on page 108.
To delete a user’s account completely, follow these steps:
1. Log in as root.
2. If you think you might need a copy of the user’s files later on, make a backup copy
of the directory, for example, on cartridge tape using tar(1) or cpio(1).
3. Edit the /etc/passwd file and replace the encrypted password (or “+” sign if you are
using shadow passwords) with the following string:
*ACCOUNT CLOSED*
It is imperative that the asterisks shown in this example be used as shown. An
asterisk in the encrypted password field disallows all logins on that account.
Alternately, you can lock an account by using fewer than 13 characters in the
password field, but it is better to use the asterisks and an identifiable lock message.
4. Use find(1) to locate all files on the system that are owned by the user and remove
them or change their ownership. Information on the use of find is provided in
“Locating Files With the find Command” on page 24 and in the find(1) reference
page.

108
Chapter 5: System Administration in a Multiuser Environment
Deleting a Group From the System
To delete a group from the system, follow these steps:
1. Edit the /etc/group file and change the desired entry to a new but unused name. For
example, you might change the group bigproject to bigproject.closed.
2. Edit the /etc/passwd file and remove the group from the user entries wherever it
exists.
3. Use find to find all files and directories with the old group affiliation and change the
affiliation to a group that is still in use with the chgrp command.
Locking a User Account
To close an account so that nobody can log in to it or use the su command to become that
user’s ID number, follow these steps:
1. Log in as root.
2. Edit the file /etc/passwd. Find the user’s account entry.
3. Make the entry a comment by placing a number sign at the beginning of the line.
For example:
# ralph:+:103:101:Ralph Cramden:/usr/people/ralph:/bin/csh
4. As an added measure of security, you can replace the encrypted password (the
second field in the entry) with a string that cannot be interpreted as a valid
password. For example:
# ralph:*:103:101:Ralph Cramden:/usr/people/ralph:/bin/csh
Using the asterisk has the added benefit of reminding you that you deliberately
closed the account.

User Account Administration
109
5. If necessary, you can also close off the user’s home directory with the following
commands:
chown root /usr/people/ralph
chgrp bin /usr/people/ralph
chmod 700 /usr/people/ralph
The user’s account is now locked, and only root has access to the user’s home account. If
you expect that the user will again require access to the system in the near future, close
an account in the manner described below rather than removing it from the system
completely (as described in “Deleting a User From the System” on page 149).
About Changing User Groups With newgrp and multgrps
Normally users are members of only one group at a time. However, users can change
groups using the newgrp command. Changing groups is sometimes useful for
performing administrative tasks.
The superuser can belong to any group listed in the /etc/groups file. Other users must be
listed as members of a group in order to temporarily change groups with newgrp. Refer
to the newgrp(1) reference page for more information.
You can belong to multiple groups simultaneously by invoking the multgrps command.
In this case, files you create have their group IDs set to the group you were in before you
issued the multgrps command. You have group access permissions to any file whose
group ID matches any of the groups you are in. Refer to the multgrps(1) reference page
for more information.
You can change groups only to a group you are affiliated with in the /etc/groups file. To
determine which groups you belong to, use the id(1) command.

110
Chapter 5: System Administration in a Multiuser Environment
Changing User Information
This section tells you how to change the values for an individual user’s login
information. You cannot use these commands for a login you installed as an NIS-type
entry. If the login account is an NIS type, you must change the master password file on
the network server. See the NIS Administrator’s Guide for more information about NIS.
This section covers the following procedures:
•“Changing a User’s Login Name” on page 110
•“Changing a User’s Password With the passwd Command” on page 111
•“Changing a User’s Login ID Number” on page 112
•“Changing a User’s Default Group” on page 113
•“Changing a User’s Comments Field” on page 113
•“Changing a User’s Default Home Directory” on page 114
•“Changing a User’s Default Shell” on page 115
Changing a User’s Login Name
To change a user’s login name, perform the following steps:
1. Edit the /etc/passwd file and change the entry for the user’s login to reflect the new
login name. For example, to change the login name ralph to cramden, find the line:
ralph:x:103:101:Ralph Cramden:/usr/people/ralph:/bin/csh
Change the name field and the default directory field as follows:
cramden:x:103:101:Ralph Cramden:/usr/people/cramden:/bin/csh
For consistency’s sake, the home directory should always have the same name as
the user account. If your system has shadow passwords enabled, you see the letter x
in place of the encoded password in the user’s entry. For more information on
shadow passwords, see the IRIX Admin: Backup, Security, and Accounting guide.

User Account Administration
111
When you save and exit the file, you may see an error message that the file is
“read-only” or that write permission is denied. This is a protection that IRIX puts on
the /etc/passwd file. Use the command:
:w!
in the vi editor to override this protection. If you are using jot, the file can be saved
with no difficulty. For complete information, see the vi(1) reference page or the
appropriate reference page for the editor that you use.
2. If your system has shadow passwords enabled, edit the /etc/shadow file next. Look
for the line that begins with the user name you want to change. In this example, the
line looks like this:
ralph:XmlGDVKQYet5c:::::::
Change the name in the entry to “cramden” as follows:
cramden:XmlGDVKQYet5c:::::::
When you have made the change, save and exit the file. As with /etc/passwd, if you
are using vi(1), you may encounter an error message.
3. Go to the directory that contains the user’s home directory and change the name of
the home directory to match the user’s new login name. Use the command:
mv ralph cramden
4. Since IRIX identifies the files owned by the user by the user ID number rather than
by the login name, there should be no need to change the ownership.
Changing a User’s Password With the passwd Command
Occasionally, a user forgets his or her password. To solve the problem, assign that user a
temporary password, then have the user change the temporary password to something
else.
To assign a new password, perform these steps:
1. Log in as root.
2. Use the passwd command to change the password for the user’s account.
For example, if the user ralph forgets his password, enter:
passwd ralph

112
Chapter 5: System Administration in a Multiuser Environment
3. Follow the screen prompts:
New password: 2themoon
Re-enter new password: 2themoon
Note: Although a password appears in the example for clarity, it is not actually
displayed on the screen.
Because you are logged in as the superuser (root), you are not prompted for an old
password.
The user’s password is now changed to “2themoon.” The user should immediately
change the password to something else.
Changing a User’s Login ID Number
It is not recommended to change user login ID numbers. These numbers are crucial in
maintaining ownership information and responsibility for files and processes. However,
if for some reason you must change a user’s login ID number, perform the following
steps:
1. Make a complete backup tape of the user’s home directory and any working
directories the user may have on the system.
2. Lock the user’s account by placing a number sign (#) at the beginning of the line,
and an asterisk (*) in the password field of the /etc/passwd file. Do not delete the
entry, as you want to keep it as a record that the old user ID number was used and
should not be reused. When you are finished, the entry should look like this:
# ralph:*:103:101:Ralph Cramden:/usr/people/ralph:/bin/csh
3. Completely remove the user’s home directory, all subdirectories, and any working
directories the user may have.
4. Use the following command from your system’s root directory to find any other
files the user may own on the system and display the filenames on the console:
find / -user name -print
Archive and remove any files that are found.

User Account Administration
113
5. Create a new user account using the instructions provided in this chapter. It may
have the same name as the old account, but it is better to change names at the same
time, to avoid confusion. Use the new user ID number.
6. Restore the home directory, working directories, and any other files you located
from the backup you made. If necessary, use the chown and chgrp commands to set
the new user ID correctly.
Changing a User’s Default Group
A user can be a member of many different groups on your system, but only one group is
the default group. This is the group that the user begins with at login time.
To change the default group at login time, simply edit the /etc/passwd file at the
appropriate line. For example:
cramden:+:103:101:Ralph Cramden:/usr/people/cramden:/bin/csh
To change the default group from 101 to 105, simply change the field in the passwd file
entry as follows:
cramden:+:103:105:Ralph Cramden:/usr/people/cramden:/bin/csh
Be certain before you make any change, however, that group 105 is a valid group in your
/etc/groups file and that the user is a member of the group. For more information on
creating groups, see “Adding User Groups Using Shell Commands” on page 106.
Changing a User’s Comments Field
The fifth field in each entry in /etc/passwd is for comments about the user account. This
field typically contains the user’s name and possibly his or her telephone number or desk
location.
To change this information, simply edit the /etc/passwd file and change the information.
(Note only that you cannot use a colon (:) within the comments, since IRIX interprets
these as ending the comments field.) For example, consider this entry:
cramden:x:103:101:Ralph Crumdin:/usr/people/cramden:/bin/csh
When Ralph requests to have the misspelling of his name corrected, change the line to
read:
cramden:x:103:101:Ralph Cramden:/usr/people/cramden:/bin/csh

114
Chapter 5: System Administration in a Multiuser Environment
Changing a User’s Default Home Directory
The sixth field in an /etc/passwd entry specifies the user’s home directory. This is the
directory that the user is placed in at login time, and the directory that is entered in the
shell variable $HOME. The procedure for changing the home directory of a user is quite
simple. Follow these steps:
1. Log in as root.
2. Edit the /etc/passwd file and look for the user entry you want to change. For example:
cramden:x:103:101:Ralph Cramden:/usr/people/cramden:/bin/csh
In this example, the home directory is /usr/people/cramden. To change the home
directory to a recently added filesystem called disk2, change the entry to read:
cramden:x:103:101:Ralph Cramden:/disk2/cramden:/bin/csh
When you have made your changes, write and exit the file.
3. Create the directory in the new filesystem and move all of the files and
subdirectories to their new locations. When this is done, remove the old home
directory and the process is finished.
4. Be sure that you notify your users well in advance if you plan to change their home
directories. Most users have personal aliases and programs that may depend on the
location of their home directories. As with all major changes to your system’s
layout, changing home directories should not be done for trivial reasons, as it
seriously inconveniences users.
For complete information on shell variables, see the reference pages for the shell you are
using (typically csh,bsh,tcsh, or ksh). Home directories are typically placed in /usr/people,
but there is no reason why you cannot select another directory. Some administrators
select a different directory to preserve filesystem space on the /usr filesystem, or simply
because the users have a strong preference for another directory name.

About the User Environment
115
Changing a User’s Default Shell
To change the default shell, follow these steps:
1. Log in as root.
2. Edit the /etc/passwd file to change the field that names the user’s default shell. For
example, in the passwd entry:
ralph:x:103:101:Ralph Cramden:/usr/people/ralph:/bin/csh
The default shell is /bin/csh. To change Ralph’s shell to /bin/ksh, edit the line to look
like this:
ralph:x:103:101:Ralph Cramden:/usr/bin/ralph:/bin/ksh
3. Save and exit the /etc/passwd file. When the user next logs in, the new default shell
will be used.
Note that you can use any executable program as the default shell. IRIX simply
executes the given program when a user logs in. Note also that using a program
other than a command shell such as csh or sh can cause problems for the user. When
the program identified as the default shell in the passwd file exits, the user is logged
out. For example, if you use /bin/mail as the default shell, when the user exits mail,
he or she is logged out and cannot perform any other work.
About the User Environment
A user’s environment is determined by certain shell startup files. For C shell users, these
are the files /etc/cshrc and, in their home directories, .cshrc and .login. For Korn and Bourne
shell users, these are the /etc/profile file and the .profile file in their home directories.
Shell startup files configure a user’s login environment and control aspects of subshells
created during a login session.

116
Chapter 5: System Administration in a Multiuser Environment
About Login Shells
The following login shells are provided with IRIX:
/bin/csh The C shell provides a history mechanism (that is, it remembers
commands you enter); job control (you can stop processes, place them in
background, and return them to foreground); and the ability to use
wildcard characters to specify filenames. Users can construct
sophisticated commands and scripts using a C programming
language-like syntax. For a complete description of this shell, see the
csh(1) reference page.
/bin/sh,/bin/ksh The former /bin/sh shell is now a symbolic link to the Korn shell, /sbin/sh.
The Korn shell is an expansion of the best features of the Bourne shell
and the C shell, and allows for command line editing, job control,
programming from the shell prompt in the shell language, and other
features. For a complete description of this shell, see the sh(1) reference
page. In particular, refer to the section “Compatibility Issues” for
information on Bourne and Korn shell compatibility. Refer to the
discussion on /bin/bsh below for information on the Bourne shell.
/bin/bsh The Bourne is a simpler shell than csh. The Bourne shell does not contain
any kind of history mechanism and uses a different syntax from csh. It
does make use of wildcard characters and is smaller and faster to invoke
than csh. For a complete description of this shell, see the bsh(1) reference
page.
/bin/rsh This is a restricted shell, which limits the commands a user can type. The
rsh command syntax is identical to bsh, except that users cannot:
•Change directories
•Use the ls(1) command
•Set the shell search path ($PATH)
•Specify path or command names containing /
•Redirect output (> and >>)
The restrictions of /bin/rsh are enforced after .profile has been executed.
For complete information about these shells, see the ksh(1), csh(1), and bsh(1) reference
pages. The rsh restricted shell is described on the ksh(1) reference page.

About the User Environment
117
Note: Two shells called rsh are shipped with IRIX. /usr/lib/rsh is the restricted shell. The
other shell, in /usr/bsd/rsh, is the Berkeley remote shell. Be careful not to confuse the two.
The various startup files that configure these shells are described in the next sections.
About C Shell Configuration Files
When a C shell user logs in to the system, three startup files are executed in the following
order:
1. The /etc/cshrc file.
This is an ASCII text file that contains commands and shell procedures, and sets
environment variables that are appropriate for all users on the system. This file is
executed by the login process.
A sample /etc/cshrc is shown below:
# default settings for all users
# loaded <<before>> $HOME/.cshrc
umask 022
if ($?prompt) cat /etc/motd
set mail=$MAIL
if ( { /bin/mail -e } ) then
echo ’You have mail.’
endif
In the example, several commands are executed:
•The message of the day is displayed if a prompt exists.
•The location of the user’s mail file is set.
•A message informs the user if he or she has mail.

118
Chapter 5: System Administration in a Multiuser Environment
2. The individual user’s.cshrc.
This file is similar to /etc/cshrc but is kept in the user’s home directory. The .cshrc file
can contain additional commands and variables that further customize a user’s
environment. For example, use this file to set the shell prompt for the user. The
.cshrc file is executed whenever a user spawns a subshell. A sample .cshrc is shown
below:
set prompt = "Get back to work: "
set filec
set history = 20
In this example, the user’s prompt is set, automatic filename completion is turned
on, and the length of the history of recently issued commands is set to 20.
3. The .login file.
This is an executable command file that resides in the user’s home directory. The
.login also customizes the user’s environment, but is only executed once, at login
time. For this reason, use this file to set environment variables and to run shell script
programs that need be done only once per login session. A sample .login is shown
below:
eval ‘tset -s -Q‘
umask 022
stty line 1 erase ’^H’ kill ’^U’ intr ’^C’ echoe
setenv DISPLAY wheeler:0
setenv SHELL csh
setenv VISUAL /usr/bin/vi
setenv EDITOR /usr/bin/emacs
setenv ROOT /
set path = (. ~/bin /usr/bsd /bin /usr/bin /usr/sbin \ /usr/bin/X11
/usr/demos /usr/local/bin)
In this example, the user’s terminal is further initialized with tset, then the file
creation mask is set to 022. Some useful key bindings are set, using the command
stty. The user’s default display is set to be on the console screen of the system called
wheeler. Several important environment variables are set for commonly used
utilities and the filesystem point of reference. Finally, the default path is expanded
to include the user’s own binary directory and other system directories.
For information on the shell programming commands used in these examples, see the
csh(1) reference page.

About the User Environment
119
Bourne and Korn Shell Configuration Files
When a Bourne or Korn shell user logs in to the system, two startup files are executed in
the following order:
1. The /etc/profile file executes.
This is an ASCII text file that contains commands and shell procedures and sets
environment variables that are appropriate for all users on the system. This file is
executed by the login process.
A sample /etc/profile is shown below:
# Ignore keyboard interrupts.
trap "" 2 3
# Set the umask so that newly created files and directories will be
# readable by others, but writable only by the user.
umask 022
case "$0" in
*su )
# Special processing for ‘‘su -’’ could go here.
;;
-* )
# This is a first time login.
#
# Allow the user to break the Message-Of-The-Day only.
trap "trap ’’ 2" 2
cat -s /etc/motd
trap "" 2
# Check for mail.
if /bin/mail -e
then
echo "you have mail"
fi
;;
esac
trap 2 3
In the example, several commands are executed:
•Keyboard interrupts are trapped.
•The user’sumask is set to 022—full permission for the user, read and execute
permission for members of the user’s group and others on the system.
•If the user is logging in for the first time, the message of the day (/etc/motd) is
displayed, and the user is notified if he or she has mail.

120
Chapter 5: System Administration in a Multiuser Environment
2. The individual user’s.profile executes.
This file is similar to /etc/profile, but is kept in the user’s home directory. The .profile
file can contain additional commands and variables that further customize a user’s
environment. It is executed whenever a user spawns a subshell.
A sample .profile is shown below:
# Set the interrupt character to Ctrl+C and do clean backspacing.
stty intr ’’ echoe
# Set the TERM environment variable
eval ‘tset -s -Q‘
# List files in columns if standard out is a terminal.
ls() { if [ -t ]; then /bin/ls -C $*; else /bin/ls $*; fi }
PATH=:/bin:/usr/bin:/usr/sbin:/usr/bsd:$HOME/bin:.
EDITOR=/usr/bin/vi
PS1="IRIX> "
export EDITOR PATH PS1
In this example:
•The interrupt character is set to Ctrl+C.
•The TERM environment variable is set with tset.
•A function called ls is defined so that when the user enters ls to list files in a
directory, and the command is issued from a terminal or window, the ls
command is invoked with the -C option.
•The environment variables PATH and EDITOR are set.
•The user’s prompt (PS1) is set to IRIX>.
For information on the shell programming commands used in these examples, see the
ksh(1) and bsh(1) reference pages.

About the User Environment
121
Configurable Shell Environment Variables
Every shell uses a series of variables that hold information about the shell and about the
login account from which it originated. These variables provide information to other
processes as well as to the shell itself.
Collectively, these environment variables make up what is called the shell’senvironment.
The basic concepts of environment variables and an environment are the same for all
types of IRIX shells, although the exact method of creating and manipulating the
environment variables differs.
A basic set of environment variables includes where in the IRIX filesystem to search for
commands (PATH), the location of the home directory of the user’s account (HOME), the
present working directory (PWD), the name of the terminfo description used to
communicate with the user’s display screen or terminal (TERM), and some other
variables.
When a process (shell) begins, the exec system call passes it an array of strings, called the
environment.
Other processes use this information. For example, user trixie’s terminal is defined as an
iris-ansi (TERM=iris-ansi). When the user invokes the default visual editor vi,vi checks
this environment variable, then looks up the characteristics of an iris-ansi terminal.
Viewing the Shell Environment
Because login is a process, the array of environment strings is made available to it. To look
at your current shell environment, use the printenv command. A typical C shell
environment might look something like this:
LOGNAME=trixie
PWD=/usr/people/trixie
HOME=/usr/people/trixie
PATH=.:/usr/people/trixie/bin:/usr/bsd:/bin:/etc:/usr/sbin:
/usr/bin: /usr/local/bin:
SHELL=/bin/csh
MAIL=/var/mail/trixie
TERM=iris-ansi
PAGER=more
TZ=EST5EDT
EDITOR=emacs
DISPLAY=myhost:0
VISUAL=vi

122
Chapter 5: System Administration in a Multiuser Environment
Default Environment Variables
For C shell users, these variables are set in the /etc/cshrc,.cshrc, or .login startup file. For
Korn and Bourne shell users, these variables are set in either the /etc/profile or .profile
startup files.
The default environment variables that are assigned for C shell users, if no others are set
in any of the startup files, are:
•HOME
•PATH
•LOGNAME
•SHELL
•MAIL
•TZ
•USER
•TERM
Defining New Environment Variables
New variables can be defined and the values of existing variables can be changed at any
time with the setenv command (C shell only). For example, to change the PAGER variable
under C shell, enter:
setenv PAGER pg
This sets the value of the PAGER environment variable to the command pg. The PAGER
variable is used by mail.
Bourne and Korn shell users set environment variables like this:
$ PAGER=pg ; export PAGER
Environment variables can be set on the command line, or in either of the shell startup
files /etc/profile or $HOME/.profile.

About the User Environment
123
Changing the Prompt in IRIX
You may want to change the prompt that is displayed by the IRIX system. For example,
you might want to embed the machine name and current working directory in a shell
prompt. How you accomplish this depends on the login shell you are using.
Under the C shell and tcsh, enter the following series of commands to change the prompt
to indicate the machine and the current working directory:
set prompt=”‘hostname -s‘:‘echo $cwd‘% “
alias cd ‘cd \!*;set prompt=”‘hostname -s‘:‘echo $cwd‘% “‘
Under the Korn shell, you would enter the following commands:
PS1=‘hostname‘‘:${PWD}% ‘
export PS1
About Default File Permissions (umask)
A system default called umask controls the access permissions of any files or directories
that you create. The system default for IRIX, without umask set, is 022, which sets the
following permissions:
user Full access: read, write, and, if applicable, execute permission.
Directories can be executed; that is, you can “change directories” into
any of your own directories and copy files from them.
group Anyone in the same group can read and, if applicable, execute other
group members’ files. Execute permission is turned on for directories.
Write permission is turned off.
other All other users on the system have the same access permissions as group
access.
The system default umask of 022 is the same as running chmod 644 on files that you create
and chmod 755 on directories and executable files that you create. Setting your umask does
not affect existing files and directories. Like chmod,umask uses a three-digit argument to
set file permissions. However, the argument to umask works the opposite as the argument
to chmod. The argument to umask lowers the access permissions from a maximum of 666
(full access for files) and 777 (full access for directories).

124
Chapter 5: System Administration in a Multiuser Environment
Changing Default File Permissions With umask
To change the default permission, use the umask shell command.
The following command leaves permission unchanged for user, group, and other when
you create files and directories:
umask 000
This command reduces access for other users by 1 (it removes execute permission):
umask 001
This command reduces access for group by 1 (no execute permission) and for others by
2 (no write permission, but execute is allowed):
umask 012
This command removes write and execute permission for group and removes all
permissions for others:
umask 037
For more information, see the umask(1) reference page.
Special Login Shells
You may want to assign an account a login shell other than one of the system defaults.
Reasons for doing this include:
•The need for special-use accounts that require restricted or very specific access to
the system
•A user request for a special shell
You can specify any program as the login shell for an account. For example, you can use
a third-party application program as the login shell. Users with this application as a shell
log in to the system and are immediately placed in the application. All interaction with
the system is through the application, and when the users quit the application, they are
automatically logged out. To restrict access to the system, you can also use a custom shell
that you create.
Another example is the nuucp account, which uses /usr/lib/uucp/uucico as a login shell.

Sending Messages
125
Many users have favorite shells, for example the bash shell, that they might want you to
install. As with any other software, make sure it comes from a reputable source. (bash
shell is public domain software.) You may want to back up the system completely before
installing the shell, then monitor the system closely for a while to be sure there are no
problems with the shell.
For security reasons, you should not blindly accept compiled binaries and install them as
login shells on the system (or anywhere else on the system, for that matter). Start with
the source code for the shell, make sure there are no security holes in the code, then
compile it for your site.
Note that special shells should be located in a filesystem that is always mounted before
users log in to the system. If the filesystem that contains a login shell is not mounted,
people who use that shell cannot log in to their accounts.
Sending Messages
There are several ways to communicate with users in the IRIX system, including
electronic mail, the message of the day, the remote login message, news,write, and wall.
Electronic Mail
Users can send messages to one another using one of the electronic mail programs
provided with IRIX. Command-line as well as GUI implementations of various mail
applications are available. For a complete discussion of configuring electronic mail, see
the IRIX Admin: Networking and Mail guide.
Message-of-the-Day Facility
You can communicate items of broad interest to all users with the /etc/motd file. The
contents of /etc/motd are displayed on the user’s terminal as part of the login process. The
login process executes /etc/cshrc (for the C shell), which commonly contains the
command:
cat /etc/motd

126
Chapter 5: System Administration in a Multiuser Environment
Any text contained in /etc/motd is displayed for each user every time the user logs in. For
this information to have any impact on users, you must take pains to use it sparingly and
to remove outdated announcements.
A typical use for the message of the day facility might be:
5/30: The system will be unavailable from 6-11 pm Thursday, 5/30,
while we install additional hardware
Be sure to remove the message when it is no longer important.
The file /etc/motd contains the “message of the day.” This message is displayed on a user’s
screen, either by /etc/profile if the user runs Bourne shell, or by /etc/cshrc if the user runs C
shell, when the user first logs in to the system.
You can place announcements of system activity in the motd file. For example, you should
warn users of scheduled maintenance, changes in billing rates, new hardware and
software, and any changes in the system or site configuration that affect them.
Since users see this message every time they log in, change it frequently to keep it from
becoming stale. If users see the same message repeatedly, they lose interest in reading the
message of the day and can miss an important announcement.
Make sure you remove outdated announcements. If nothing new is happening on the
system, trim the file to a short “welcome to the system” message.
A typical motd file looks something like this:
Upcoming Events: ---------------
26 November -- The system will be down from 8pm until Midnight for a
software upgrade. We are installing FareSaver+, Release 3.2.2d.
Watch this space for further details.
28 November through 31 November -- We will be operating with a minimal
staff during the holiday. Please be patient if you need computer
services. Use the admin beeper (767-3465) if there is a serious
problem.

Sending Messages
127
The motd file is used more frequently on servers than on workstations, but can be handy
for networked workstations with guest accounts. You can also send electronic mail to all
people who use the system, but this method consumes more disk space, and users may
accidentally skip over the mail in their mailboxes.
Remote Login Message
The /etc/issue file is the equivalent of the /etc/motd file for users who log in over a serial
line or the network. If /etc/issue does not exist, or is empty, no message is displayed.
The /etc/issue message is displayed before the login prompt is given to someone
attempting to log in to a system over a serial line or the network. If /etc/issue does not
exist, or is empty, no message is displayed. This is essentially different from /etc/motd
because it is displayed before the login prompt. This message is often used to notify
potential users of rules about using the equipment; for example, a disclaimer that the
workstation or server is reserved for employees of a particular corporation and that
intruders will be prosecuted for unauthorized use.
Sending Messages With the news Command
You can set up a simple electronic bulletin board facility with the /usr/news directory and
the news command. With news, you can post messages of interest about the system. This
is not the same system as the publicly distributed Usenet system. Place announcements
of interest about the system in the directory /usr/news. Use one file per announcement,
and name each file something descriptive, such as downtime and new-network. Use the
news command to display the items.
You can automatically invoke news from a shell startup file, for example from the
/etc/cshrc file. It is a good idea to check for new news items only from a shell startup file,
since users may not be ready to read news immediately upon logging in. For example:
news -s
With the -s argument, news indicates how many articles there are since you last read
news.

128
Chapter 5: System Administration in a Multiuser Environment
When you read news with the news command, you can do the following:
Read everything
To read all news posted since the last time you read articles, enter the
news command with no arguments:
news
Select some items
To read selected articles, enter the news command with the names of one
or more items as arguments:
news downtime new-network
Read and delete
After you run the news command, you can stop any item from printing
by pressing Ctrl+C or Break. Pressing Ctrl+C or Break twice stops the
program.
Ignore everything
If you are too busy to read announcements at the moment, you can read
them later. Items remain in /usr/news until the administrator (root)
removes them. The list of news items is still displayed each time you log
in.
Flush all items
There are two ways to catch up with all current news items:
touch .news_time
This updates the time-accessed and time-modified fields of the
.news_time file and thus the news program no longer considers there are
articles for you to read.
This command prints all current articles, but sends the output to
/dev/null so you do not see the articles:
news > /dev/null
This brings you up to date without reading any outstanding articles.

Sending Messages
129
Sending Messages With the write Command
Use the write command to write messages to a user on the system. For example:
write ralph
User ralph sees this on his screen:
Message from root on brooklyn (console) [ Tue Feb 26 16:47:47 ] ...
You can wait for ralph to respond, or you can begin typing your message. If the other user
responds, you see a similar message on your screen.
Type your message. As you press Enter, each line of your message is displayed on the
other user’s screen.
Usually a write session is a dialogue, where each user takes turns writing. It is considered
good etiquette to finish your turn with a punctuation mark on a line by itself, for
example:
I noticed that you are using over 50 meg of disk space. Is there
anything I can do to help you reduce that?
>
Entering the greater-than symbol indicates you are through with your paragraph and are
waiting for user ralph to respond. The other user should choose a different punctuation
character to indicate when he or she is through.
You can prevent other users from writing to you with write by making your terminal or
window unwritable. Use the mesg command:
mesg n
The n argument makes your terminal or window unwritable, and the y argument makes
it writable. The superuser can write to any terminal or window, even if the user has made
his or her terminal unwritable with mesg n.
The talk utility is similar to write, and is preferred by some users. For more information,
refer to the talk(1) and write(1) reference pages.

130
Chapter 5: System Administration in a Multiuser Environment
Sending Messages With the wall Command
The superuser can use the wall command to write to all the users who are logged in on
the system. This useful when you need to announce that you are bringing the system
down.
To use wall, enter:
wall
Enter your message. Press Ctrl+D when you are finished, and wall sends the message.
You can also compose the message in a file, for example messagefile, then send it using
wall:
wall < messagefile
The wall command is not affected by a user’smesg setting. That is, a user cannot stop wall
from displaying on his or her screen. On a graphics display with multiple windows, the
message is displayed in all windows.

Chapter 6 provides information on configuring your system disk space for
maximum effectiveness, including allocating swap space for the operating
system kernel. Topics described in this chapter include:
•Disk usage information commands
•Using disk quotas
•Using NFS and disk partitions to manage disk space
•Setting and increasing system swap space
Configuring Disk and Swap Space
Chapter 6


133
Chapter 6
6. Configuring Disk and Swap Space
This chapter provides you with background information on disk usage and the tools and
options available to you to manage it. For a variety of reasons, users often accumulate
files without realizing how much disk space they are using. This is not so much a
problem for workstation users, but can be a big problem for servers, where multiple
users must share system resources. IRIX provides a number of utilities to help you
manage disk usage.
You also may need to allocate disk space for the system to use as swap space. Swap space
is disk space allocated to be used as medium-term memory for the operating system
kernel. Lack of swap space limits the number and size of applications that may run at
once on your system, and can interfere with system performance.
For specifics on setting and maintaining disk quotas, see the IRIX Admin: Disks and
Filesystems guide.
Disk Usage Commands
The commands in this section help you determine the current status of disk usage on
your system.
du (Disk Usage) Command
The du command shows specific disk usage by file or directory anywhere on the system.
The size of the files and directories can be shown in 512-byte blocks, or in 1K blocks if
you use the -k flag. For more complete information, consult the du(1) reference page.

134
Chapter 6: Configuring Disk and Swap Space
df (Free Disk Blocks) Command
The df command shows the free space remaining on each filesystem on your workstation.
Free space is shown for all filesystems, whether they are local or NFS-mounted. The
amount of free space is displayed in 512-byte blocks, or in 1KB blocks if you use the -k
option. For more complete information, consult the df(1) reference page.
quot (Disk Usage by User) Command
The quot command displays the number of kilobytes of disk usage for each user in a
specified filesystem. You can use the output of this command to mail your users,
notifying them of their disk usage. For complete information, see the quot(1M) reference
page.
diskusg (Disk Accounting) Command
Part of the system accounting package is the diskusg command. Like quot, this utility
reports the disk usage of each user on your system. The difference is that diskusg is
typically used as part of the system accounting package with dodisk rather than as a
standalone command. For complete information on using diskusg, see the diskusg(1)
reference page.
Managing Disk Space
This section describes several commands you can use to help you in managing disk
space. In particular, various techniques are discussed which allow you to maximize
available disk space.
File Compression and Archiving
One way to minimize disk usage is to encourage your users to archive or compress their
files. Compression works best for files that are rarely used but that should not be
discarded. Users can achieve some disk savings by using the compress utility.
Compressing a file allows you to leave it on the system, but can reduce the size of the file
by as much as 50%. Compressed files have the suffix.Z and should not be renamed.
Compression and archiving can be used together for maximum disk space savings.

Managing Disk Space
135
If the files in question are used infrequently, consider archiving them to tape, floppy, or
other archive media. This maintains protection if you need the files later, but regaining
them is slightly more difficult than if they are compressed.
Disk Space Management With the quotas Subsystem
The quotas subsystem allows you to deal with severe disk usage problems. Using this
subsystem, you can place a maximum disk usage quota on each user on your system. For
complete information about this subsystem, see the quotas(4) reference page.
Disk Quota Guidelines
In general, it is your job as the site administrator to set disk use policies, establishing and
enforcing quotas if necessary. You should publish clear guidelines for disk use, and
notify users who regularly exceed their quotas. It is also a good idea to impose quotas on
the use of temporary directories, such as /tmp and on all anonymous “guest” accounts,
such as guest and uucp. If your root filesystem reaches 100% capacity, your system may
shut down and inconvenience your users.
Be as flexible as possible with disk quotas. Often, legitimate work forces users to
temporarily exceed disk quotas. This is not a problem as long as it is not chronic.
Do not, under any circumstances, remove user files arbitrarily and without proper
warning.
A typical scenario is when all the users on the system know they should try to limit disk
use in their home accounts to about 20 MB (about 40,000 512-byte blocks). User norton
consistently uses more than twice this limit. To alleviate the problem of too much disk
space, follow these steps:
1. Meet with the user and find out why he or she is using this much disk space. There
may be legitimate reasons that require you to reconsider the disk use policy and
perhaps increase the amount of available disk space.
If the user is merely saving an inordinate number of outdated files, suggest that he
or she back up the files onto tape and remove them from the system. For example,
many users save electronic mail messages in enormous mailboxes for long after the
messages are useful. Saving the files to tape keeps them handy, while saving disk
space.

136
Chapter 6: Configuring Disk and Swap Space
2. If you cannot meet with the person, or cannot discuss the matter in person, try
sending electronic mail.
If you use a script that automatically checks disk use (with diskusg) and sends mail
to users who exceed their quotas, note that people get used to these messages after
some time and start to ignore them. Send the particular user a personal message,
stating that you need to discuss the situation.
3. Sometimes a user is not aware that data is available elsewhere on the system, or on
other accessible workstations at the site. A user may have personal copies of
site-specific tools and data files. Work with the user to reduce this kind of
redundancy.
4. Make sure the user is still active on the system. Sometimes people leave an
organization, and the site administrators are not immediately informed.
Also, the user may not need the account on a particular workstation any longer and
may not have cleaned up the files in that account. To see if this is the case, check the
last time the user logged in to the system with the finger(1) command:
finger norton
Among other information, finger displays the date and time the user last logged in
to the system. This information is read from /etc/wtmp, if it exists.
5. If in an extreme case you must remove a user’s files, back them up to tape before
removing them. Do not take this step lightly. Removing user files unnecessarily can
disrupt work and engender ill will from your coworkers. Make sure you give the
user plenty of advance notice that you are going to copy the files to tape and remove
them from the system.
As an added precaution, you may want to make two copies of the tape and send
one copy to the user whose files you remove. Make sure you verify that the tapes
are readable before you remove the files from the system.

Managing Disk Space
137
Disk Space Management With NFS
If your system is running the optional Network File System (NFS) software, you can use
this product to reduce disk consumption on your workstations by exporting commonly
used directories. When a system exports a directory, it makes that directory available to
all systems running the NFS software. For example, if you have 10 workstations on your
network and each workstation is storing 5 MB of online reference pages and release
notes, you can eliminate 45 MB of wasted disk space by designating one workstation to
be the reference page server and exporting the /usr/man and /usr/catman directories. All
other workstations can remove those files and mount them remotely from the server.
Since NFS mounts take up no disk space on the client workstation, that disk space is
available for other uses.
Another option is to mount free disk space from another system. This option works best
when there is an uneven load across several systems. For example, if one workstation is
using only 25% of its available space and other workstations are above 90%, it may be
useful to mount a filesystem to even out the load.
Used wisely, your network can save a tremendous amount of disk space through this
strategy. Be aware, though, that the drawback to this strategy is that if your server must
be rebooted or serviced, no one can access the files and programs that are mounted from
that server while it is offline.
Disk Space Management With Disk Partitions
An extreme method of enforcing disk use quotas is to create a disk partition and
filesystem for each user account and to mount the filesystem on an empty directory as
the user’s home directory. Then, when users run out of disk space, they will not be able
to create or enlarge any files. They can, however, still write their files to /tmp and /var/tmp,
unless those directories are also full. When users attempt to write or create a file that
takes them over their limit, they receive an error message indicating that no disk space is
left on the device.
This method of disk control is not generally recommended. It requires a great deal of
preparation and maintenance on the part of the administrator, and is not easily modified
once in place. Additionally, fragmenting your disk into many small partitions reduces
the total amount of available disk space and produces a performance overhead on your
system. In this case, the disk controller must write a user’s files within only one small
partition, instead of in the next convenient place on the disk.

138
Chapter 6: Configuring Disk and Swap Space
Consider this method of disk space control only if your system is so overloaded and your
users so obstinate that all other measures have failed. If your /usr partition is chronically
100% full, the system is halting operations daily due to lack of disk space, and there is no
way to increase your disk space, then you may want to consider this method.
Wasted Disk Space
Sometimes there is a great deal of wasted disk space on a system. When you are low on
space, check to make sure that large files have not accumulated in the temporary
directories or in the administrative directories.
The /var/adm directory structure is notorious for accumulating large log files and other
large files that are useful for debugging problems that use up a tremendous amount of
space. The /var/adm/crash directory may be storing several images of the IRIX kernel
(from past system failures) and copies of the entire core memory (vmcore). These files can
take up large amounts of space (many megabytes) and should be archived on tape and
removed from your system.
If you have system auditing enabled, be aware that this facility generates very large audit
trail record files, and these need to be archived to tape on a regular (perhaps daily) basis.
Also, check any UUCP or ftp directories you may have available, and generally look for
core files, and any other large and unnecessary files that may exist on your system.
Swap Space
The IRIX operating system uses a portion of the disk as swap space for temporarily saving
part or all of a user’s program when there is not enough physical memory to contain all
of the running programs. If you run many very large programs, you might run out of
swap space. For a complete discussion of the dynamics of paging and swapping, see
“About Paging and Swapping” on page 224.
IRIX allows programs occupying more space than the system limit to run, since each
program is only partially loaded into memory at any given time. One of the effects of this
policy is that IRIX has to preallocate swap space based on likely future usage, and
sometimes this prediction is incorrect. When the swap space is actually needed, IRIX
allocates the most convenient available space, not the specific space allocated. So the
physical allocation is separate from the accounting allocation.

Swap Space
139
If your system preallocates all your swap space, but the space has not yet been used, it
may appear that your system is running out of swap space when it is not. It is possible
that your system has simply preallocated the rights to future swap space to existing
processes, and no new processes can allocate space due to the strict swap space
accounting in IRIX.
Strict swap space accounting is always in effect, but the ability to add both physical and
virtual swap space through ordinary system files allows the administrator to add swap
space or to effectively turn off strict swap space accounting, without having to either
repartition the disk or reconfigure and reboot the system.
Monitoring Paging and Swap Space
Use sar -p,sar -w,sar -q,swap -s, and swap -l to monitor paging and swap space use. If you
find that you are running out of swap space, two solutions are available: you can add
more memory, or you can add more swap space. Adding swap space does not improve
the performance of large programs, but it permits them to run successfully.
Under sar(1), swapping of whole processes is reported with the -w flag. Performance
problems associated with swapping come from the excess or slow I/O involved in
paging.
Adding Virtual Swap Space
If processes are being denied stack growth or new processes due to a stated lack of swap
space, and you believe that there is adequate physical space, add the following entry to
your /etc/fstab file:
/usr/swap swap swap pri=4,vlength=204800 0 0
Then give the command:
mkfile -v 0b /usr/swap
The file (/usr/swap) will be zero-length, so you have added only virtual swap space and
no real swap area. Your kernel should then allow more processes to execute. However,
when an attempt is made to access more than the system limit, IRIX swaps the largest
running program out of memory.

140
Chapter 6: Configuring Disk and Swap Space
Listing Swap Space With the swap -l Command
To determine how much swap space is already configured in your workstation, use the
swap(1M) command:
swap -l
If you are running applications that require the system to swap out programs frequently,
you may also want to fine-tune the swap area of the disk used by the operating system.
For more information on this process, see “About Paging and Swapping” on page 224.
Checking Swap Activity With the swap -s Command
The swap -s command is a very useful tool for determining if you need to add swap space
of some sort. The output of the swap -s command looks something like:
total: 0 allocated + 64248 reserved = 64248 blocks used, 17400 blocks
available
where the fields displayed are as follows (see the swap(1M) reference page for more
details):
Allocated The number of 512- bytes blocks allocated to private pages (for example,
pages that contain data that is in use)
Reserved The number of 512- byte blocks currently allocated but not yet marked
as private pages (the space has been claimed, but is not yet being used)
Blocks used The number of 512- byte blocks either allocated or reserved (the total
number of allocated and reserved blocks)
Blocks available
The number of 512- byte blocks available for future reservation and
allocation (the total swap shown by the swap -l command less the
number of blocks used)

Swap Space
141
Given the following sample swap -s output:
total: 0 allocated + 34200 reserved = 34200 blocks used, 47448 blocks
available
You see that 0 swap blocks are in use, 34200 have been reserved but not used, which
leaves 47448 blocks available for reservation. So, at this point, the system is not
swapping, but the programs running on the system have requested approximately 17
megabytes of swap space, just in case they need to grow.
Note: 10000 blocks is equal to approximately 5 MB.
Many applications reserve what is known as virtual swap space. That is, they request
more memory than they will ever need. The actual size of the application is the amount
of physical system resources that the application is using. The virtual size of the
application is the amount of system resources it is using plus the amount of extra
resources requested but not in use. This is the case in the above example; space has been
reserved, but is not in use.
Negative Swap Space
Look at another example of swap -s output:
total: 41920 allocated + 58736 reserved = 100656 blocks used, -19400
blocks available
It may seem worrisome that the swap space available is a negative number. What this
means, though, is that some of the allocated/in use pages are located in main memory
(RAM). The swap -s output does not take main memory into account. The data that is
shown in the negative is actually data that is contained in system memory.
It appears that approximately 20 megabytes of physical swap space is in use, as shown
by the amount of allocated space. Therefore, the system is not out of physical swap space.
If there was no more physical swap space, the number of allocated blocks would be very
close to the number of blocks reported by the swap -l command. Approximately 30
additional megabytes of swap space has been requested, shown by the requested field,
giving a total of 50 megabytes requested and/or in use. This appears to leave an overrun
of 10 megabytes.

142
Chapter 6: Configuring Disk and Swap Space
Another way to think of that negative number is that it is the amount of physical swap
space minus the number of blocks used (allocated + requested). So, as long as that
negative number has an absolute value less than approximately the amount of physical
memory (obtained from the hinv command) that you have, you have not overrun your
system.
The following example shows swap -s output of a system that has most likely come to its
swapping limit:
total: 76920 allocated + 23736 reserved = 100656 blocks used, -19400
blocks available
Notice that the total numbers are the same, but the number of allocated blocks is much
higher. If the swap -l in this example were to report 81000 blocks of physical swap space
on the system, it is easy to see that there are only 4000 physical blocks that are not in use.
Turning On Virtual Swapping
If swap -s reports a negative number, increase virtual swap when your system is not near
its physical limits. This allows your system to allocate space to those applications that
grab more space than they actually need. To do this, you can turn on virtual swapping
by entering the following commands:
su
chkconfig vswap on
/etc/init.d/swap start
This allocates more swap space, or space that can be reserved but not allocated. See the
/etc/init.d/swap file and the swap(1M) reference page for more information.
If virtual swapping is already on (use chkconfig to find out) or if the number of allocated
blocks is approaching the number of blocks reported by the swap -l command, the only
way to remedy the situation is to add more physical memory or swap space. See the
swap(1M) reference page for more information regarding adding swap space (whether
through another disk partition or a swap file).

Swap Space
143
Increasing Swap Space on a One-Disk System
Suppose you don’t have the luxury of a multiple-disk system. This section explains how
to increase the size of the swap partition on a single disk. You can increase your available
swap space by repartitioning your disk, as described earlier in this chapter, or you can
add space with the swap command as discussed here.
The swap command allows you to designate a portion of any disk partition as additional
swap space. You can add swap space at any time and delete the new swap space when
you no longer need it. There are several options available with this command, and the
command is described completely in the swap(1M) reference page, but the most
convenient method to use is to specify a normal system file as additional swap space.
To specify a file as additional swap space, you first create an empty file of appropriate
size with the mkfile(1M) command. For example, if you want to add 10 megabytes of
swap space to your system, and you want that space to be taken from the /usr filesystem,
use the following mkfile command:
mkfile -v 10m /var/tmp/moreswap
In this command, the -v option directs mkfile to be verbose in its output to you, which
means that you see the following message as a confirmation that the file has been created:
/var/tmp/moreswap 10485760 bytes
If you do not specify the -v option, mkfile does its work silently. The second field in the
mkfile command is the size of the file. In this case, 10m specifies a file that is 10 megabytes
in size. You can use b,k, or m as a suffix to the size argument to indicate that the size
number is in bytes, kilobytes, or megabytes, respectively. For example, the following
commands all produce files of 10 megabytes:
mkfile -v 10485760b /var/tmp/moreswap
mkfile -v 10240k /var/tmp/moreswap
mkfile -v 10m /var/tmp/moreswap
Once your file is created, you can use the swap command to add it as swap space on the
system. When you make your file, be certain that the file resides in the filesystem from
which you want to take the space. The /var/tmp directory is a good place to use as it
typically has more available space than the root filesystem (/). Note, however, that you
can also use filesystems mounted remotely via NFS. Complete information on using
remote mounted filesystems for swap space is available in the swap(1M) reference page.

144
Chapter 6: Configuring Disk and Swap Space
To begin using your new file as swap space, give the following command:
/sbin/swap -a /var/tmp/moreswap
The -a option indicates that the named file is to be added as swap space immediately. To
check your new swap space, use the command:
swap -l
This command lists all current swap spaces and their status.
To make your new swap file permanent (automatically added at boot time), add the
following line to your /etc/fstab file:
/var/tmp/moreswap swap swap pri=3 0 0
Note that if you create a swap file in the /tmp directory of your root filesystem, the file is
removed when the system is booted. The /var/tmp directory of the /var filesystem is not
cleaned at boot time, and is therefore a better choice for the location of swap files. If you
want to create your swap files in the root filesystem, first create a /swap directory, and
then create your swap files within that directory.
Increasing Swap Space on a Multidisk System
Adding more swap space to a multidisk system can be done just as if you were adding
space on a single-disk system. You can always use the mkfile and swap commands to add
a swap file to your system. However, if you want to add dedicated swap space in a new
disk partition, follow the procedures in this example:
1. To double the default amount of swap space, you can use another disk drive as
follows:
Partition/slice
0 Temporary space (mount as /tmp)
1 Swap space
6 usr2
Note that the operating system continually writes onto the partition that is used as
swap space, completely destroying any data that might exist there. Be sure that the
swap partition does not overlap any user filesystem partitions. Verify the size of the
swap partition in blocks.

Swap Space
145
2. Once you choose a partition, create the file /etc/init.d/addswap to add this partition
permanently as a swap partition. Place a line of the following form in the file:
swap -a /dev/dsk/devicename 0 length
The argument devicename is the device name where the swap partition is located
(such as ips0d1s1), and length is in blocks.
3. Use the chmod command to enable execute permission on the file. The command is:
chmod +x addswap
4. Create a symbolic link to the new file with the command:
ln -s /etc/init.d/addswap /etc/rc2.d/S59addswap
The /etc/rc2.d directory controls the system activities that take place when the
system boots into multiuser mode (run level 2). The S at the beginning of the
symbolic link file that you created indicates that the commands in the file should be
started when the system initiates this run level. Symbolic link files that begin with
the letter K indicate that the commands described in the file should be killed. The
number following the S or K at the beginning of the link filename indicates the
sequence in which the commands are executed.
You can also modify the file /etc/fstab to document (in the form of a comment) that
the chosen partition is being used as a swap partition.


Chapter 7 describes the tasks you may perform to manage user processes.
Topics described in this chapter include:
•Monitoring user processes
•Prioritizing processes
•Terminating processes
•Scheduling processes with the Miser batch processing system
•Checkpoint and Restart
•NQE
•Share II
•Performance Co-Pilot
Managing User Processes
Chapter 7


149
Chapter 7
7. Managing User Processes
Just as files can use up your available disk space, too many processes going at once can
use up your available CPU time. When this happens, your system response time gets
slower and slower until finally the system cannot execute any processes effectively. If you
have not tuned your kernel to allow for more processes, the system refuses new
processes long before it reaches a saturation point. However, due to normal variations in
system usage, you may experience fluctuations in your system performance without
reaching the maximum number of processes allowed by your system.
Monitoring User Processes
Not all processes require the same amount of system resources. Some processes, such as
database applications working with large files, tend to be disk intensive, requiring a great
deal of reading from and writing to the disk as well as a large amount of space on the
disk. These activities take up CPU time. Time is also spent waiting for the hardware to
perform the requested operations. Other jobs, such as compiling programs or processing
large amounts of data, are CPU intensive, since they require a great number of CPU
instructions to be performed. Some jobs are memory intensive, such as a process that reads
a great deal of data and manipulates it in memory. Since the disk, CPU, and memory
resources are limited, if you have more than a few intensive processes running at once on
your system, you may see a performance degradation.
As the administrator, you should be on the lookout for general trends in system usage,
so you can respond to them and keep the systems running as efficiently as possible. If a
system shows signs of being overloaded, and yet the total number of processes is low,
your system may still be at or above reasonable capacity. The following sections show
four ways to monitor your system processes.

150
Chapter 7: Managing User Processes
Process Monitoring With top
The top and gr_top commands are the most convenient utilities provided with IRIX to
monitor the top CPU-using processes on your system. These utilities display the top such
processes dynamically, that is, if a listed process exits, it is removed from the table and
the next-highest CPU-using process takes its place. gr_top graphically displays the same
information as top. If you are using a non-graphics server, you cannot use gr_top locally,
but you can use it if you set the display to another system on the network that does have
graphics capability. For complete information on configuring and using top and gr_top,
consult the top(1) and gr_top(1) reference pages. For information on resetting the display,
see “Displaying Windows on Remote Workstations” on page 21.
Process Monitoring on an Array
If you are using the Array Services product, also see the Getting Started With Array
Systems and the array(1) reference page for more information on managing processes on
an array.
Process Monitoring With osview
The osview and gr_osview commands display kernel execution statistics dynamically. If
you have a graphics workstation, you can use the gr_osview(1) tool, which provides a
real-time graphical display of system memory and CPU usage. osview provides the same
information in ASCII format. You can configure gr_osview to display several different
types of information about your system’s current status. In its default configuration,
gr_osview provides information on the amount of CPU time spent on user process
execution, system overhead tasks, interrupts, and idle time. For complete information on
osview and gr_osview, see the osview(1) and gr_osview(1) reference pages.

Monitoring User Processes
151
Process Monitoring With sar
The System Activity Reporter, sar, provides essentially the same information as osview,
but it represents a “snapshot” of the system status, not a dynamic reflection. Because sar
generates a single snapshot, it is easily saved and can be compared with a similar
snapshot taken at another time. You can use sar automatically with cron to get a series of
system snapshots over time to help you locate chronic system bottlenecks by establishing
baselines of performance for your system at times of light and heavy loads and under
loads of various kinds (CPU load, network load, disk load, and so on). For complete
information on sar, see IRIX Admin: Backup, Security, and Accounting and the sar(1)
reference page. For more information on using sar to monitor system activity, see “About
timex(1), sar(1), and par(1)” on page 215.
Process Monitoring With ps
The ps -ef command allows you to look at all the processes currently running on your
system. The output of ps -ef follows the format shown in Table 7-1:
In this table, the process shown is for the user joe. In a real situation, each user with
processes running on the system is represented. Each field in the output contains useful
information.
Name The login name of the user who “owns” the process.
PID The process identification number.
PPID The process identification number of the parent process that spawned or
forked the listed process.
C Current execution priority. The higher this number, the lower the
scheduling priority. This number is based on the recent scheduling of the
process and is not a definitive indicator of its overall priority.
Time The time when the process began executing. If it began more than 24
hours before the ps command was given, the date on which it began is
displayed.
Table 7-1 Output Format of the ps -ef Command
Name PID PPID C Time TTY CPU Time Process
joe 23328 316 1 May 5 ttyq1 1:01 csh

152
Chapter 7: Managing User Processes
TTY The TTY (Terminal or window) with which the process is associated.
CPU The total amount of CPU time expended to date on this process. This
field is useful in determining which processes are using the most CPU
time. If a process uses a great deal in a brief period, it can cause a general
system slowdown.
For even more information, including the general system priority of each process, use the
-l flag to ps. For complete information on interpreting ps output, see the ps(1) reference
page.
Prioritizing Processes
IRIX provides methods for users to force their CPU-intensive processes to execute at a
lower priority than general user processes. The nice(1) and npri(1M) commands allow
the user to control the priority of their processes on the system.
Prioritizing Processes With nice
The nice command functions as follows:
nice [ -increment ] command
When you form your command line using /bin/nice, you fill in the increment field with a
number between 1 and 19. If you do not fill in a number, a default of 10 is assumed. The
higher the number you use for the increment, the lower your process’ priority will be (19
is the lowest possible priority; all numbers greater than 19 are interpreted as 19). The
csh(1) shell has its own internal nice functions, which operate differently from the nice
command, and are documented in the csh(1) reference page.
After entering the nice command and the increment on your command line, give the
command as you would ordinarily enter it. For example, if the user joe wants to make his
costly compile command happen at the lowest possible priority, he forms the command
line as follows:
nice -19 cc -o prog prog.c
If a process is invoked using nice, the total amount of CPU time required to execute the
program does not change, but the time is spread out, since the process executes less often.

Prioritizing Processes
153
The superuser (root) is the only user who can give nice a negative value and thereby
increase the priority of a process. To give nice a negative value, use two minus signs before
the increment. For example:
nice --19 cc -o prog prog.c
The above command endows that process with the highest priority a user process can
have. The superuser should not use this feature frequently, as even a single process that
has been upgraded in priority causes a significant system slowdown for all other users.
Note that /bin/csh has a built-in nice program that uses slightly different syntax from that
described here. For complete information on csh, see the csh(1) reference page.
Prioritizing Processes With npri
The npri command allows users to make their process’ priority nondegrading. In the
normal flow of operations, a process loses priority as it executes, so large jobs typically
use fewer CPU cycles per minute as they grow older. (There is a minimum priority, too.
This priority degradation simply serves to maintain performance for simple tasks.) By
using npri, the user can set the nice value of a process, make that process nondegrading,
and set the default time slice that the CPU allocates to that process. npri also allows you
to change the priority of a currently running process. The following example of npri sets
all the possible variables for a command:
npri -h 10 -n 10 -t 3 cc -o prog prog.c
In this example, the -h flag sets the nondegrading priority of the process, while the -n flag
sets the absolute nice priority. The -t flag sets the time slice allocated to the process. IRIX
uses a 10-millisecond time slice as the default, so the example above sets the time slice to
30 milliseconds. For complete information about npri and its flags and options, see the
npri(1) reference page.

154
Chapter 7: Managing User Processes
Changing the Priority of a Running Process
The superuser can change the priority of a running process with the renice(1M) or npri
commands. Only the superuser can use these commands. renice is used as follows:
renice -n increment pid [-u user] [-g pgrp]
In the most commonly used form, renice is invoked on a specific process that is using
system time at an overwhelming rate. However, you can also invoke it with the -u flag to
lower the priority of all processes associated with a certain user, or with the -g flag to
lower the priorities of all processes associated with a process group. More options exist
and are documented in the renice(1M) reference page.
The npri command can also be used to change the parameters of a running process. This
example changes the parameters of a running process with npri:
npri -h 10 -n 10 -t 3 -p 11962
The superuser can use renice or npri to increase the priority of a process or user, but this
can have a severe impact on system performance.
Terminating Processes
From time to time a process may use so much memory, disk, or CPU time that your only
alternative is to terminate it before it causes a system crash. Before you kill a process,
make sure that the user who invoked the process does not try to invoke it again. You
should, if at all possible, speak to the user before killing the process, and at a minimum
notify the user that the process was prematurely terminated and give a reason for the
termination. If you do this, the user can reinvoke the process at a lower priority or
possibly use the system’s job processing facilities (at,batch, and cron) to execute the
process at another time.

Terminating Processes
155
Terminating Processes With the kill Command
To terminate a process, use the kill command. For most terminations, use the kill -15
variation. The -15 flag indicates that the process is to be allowed time to exit gracefully,
closing any open files and descriptors. The -9 flag to kill terminates the process
immediately, with no provision for cleanup. If the process you are going to kill has any
child processes executing, using the kill -9 command may cause those child processes to
continue to exist on the process table, though they will not be responsive to input. The
wait(1) command, given with the process number of the child process, removes them.
For complete information about the syntax and usage of the kill command, see the kill(1)
reference page. You must always know the PID of the process you intend to kill with the
kill command.
Killing Processes by Name With the killall Command
The killall command allows you to kill processes by their command name. For example,
if you wish to kill the program a.out that you invoked, use the syntax:
killall a.out
This command allows you to kill processes without the time-consuming task of looking
up the process ID number with the ps command.
Note: This command kills all instances of the named program running under your shell
and if invoked with no arguments, kills all processes on the system that are killable by
the user who invoked the command. For ordinary users, these are simply the processes
invoked and forked by that user, but if invoked by root, all processes on the system are
killed. For this reason, this command should be used carefully. For more information on
killall, refer to the killall(1M) reference page.

156
Chapter 7: Managing User Processes
Scheduling Processes With the Miser Batch Processing System
Miser is a resource management facility that provides deterministic batch scheduling of
applications with known time and space requirements without requiring static
partitioning of system resources. When Miser is given a job, it searches through the
time/space pool that it manages to find an allocation that first fits the job’s resource
requirements.
Miser has an extensive administrative interface that allows most parameters to be
modified without requiring a restart. It is comprised of a trusted process and a kernel
scheduler. All communication to Miser is done through a series of Miser commands.
Miser accepts requests for process scheduling, process state changes, and configuration
control.
Miser Overview
Miser manages a set of time/space pools. The time component of the pool defines how
far into the future Miser can schedule jobs. The space component of the pool is the set of
resources against which a job can be scheduled. This component can vary with time.
A system pool represents the set of resources (number of CPUs and physical memory)
that is available to Miser. A set of user-defined pools represents resources against which
jobs can be scheduled. The resources owned by the user pools cannot exceed the total
resources available to Miser. Resources managed by Miser are available to non-Miser
applications when they are unused by a scheduled job.
Associated with each pool is a definition of the pool resources, a set of jobs allocating
resources from the pool, and a policy that controls the scheduling of jobs. The collection
of the resource pool, jobs scheduled, and policy is called a queue.
The queues allow for fine-grained resource management of the batch system. The
resources allotted to a queue can vary with time. For example, a queue can be configured
to manage 5 CPUs during the day and 20 during the night. The use of multiple queues
allows the resources to be partitioned among different users of a batch system. For
example, on a 24 CPU system, it is possible to define two queues: one that has 16 CPUs
and another that has 8 CPUs. It is possible to restrict access to queues to particular users
or groups of users on a system to enforce this resource partition.

Scheduling Processes With the Miser Batch Processing System
157
Users submit jobs to the queue using the miser_submit command, which specifies the
queue to which the job should be attached and a resource request to be made against the
queue. Each Miser job is an IRIX process group. The resource request is a tuple of time
and space. The time is the CPU wall-clock time. The space is the logical number of CPUs
and the physical memory required. The request is passed to Miser, and Miser schedules
the job against the queue’s resources using the policy attached to the queue. Miser
returns a start and end time for the job to the user.
When a job’s start time has not yet arrived, the job is in batch state. A job in batch state
has lower priority than any non-weightless process. A job in batch state may execute if
the system has idle resources; it is said to run opportunistically. When the specified
execution time arrives, the job state is changed to batch critical, and the job then has
priority over any non-realtime process. The time spent executing in batch state does not
count against the time that has been requested and scheduled. While the process is in
batch critical state, it is guaranteed the physical memory and CPUs that it requested. The
process is terminated if it exceeds its time allotment or uses more physical memory than
it had requested.
About Logical Number of CPUs
When a job is scheduled by Miser, it requests that a number of CPUs and some amount
of memory be reserved for use by the job. When the time period during which these
resources were reserved for the job arrives, Miser reserves specific CPUs and some
amount of logical swap space for the job.
There are a number of issues that affect CPU allocation for a job. When a job becomes
batch critical, Miser will try to find a dense cluster of nodes. If it fails to find such a cluster,
it will assign the threads of the job to any free CPUs that are available. These CPUs may
be located at distant parts of the system.

158
Chapter 7: Managing User Processes
The Effect of Reservation of CPUs on Interactive Processes
The way in which Miser handles the reservation of CPUs is one of its strengths. Miser
controls and reserves CPUs based on a logical number, not on physical CPUs. This
provides Miser with flexibility in how it controls CPU resources.
Interactive and batch processes that run opportunistically are allowed to use all CPUs in
a system that have not been reserved for Miser jobs. If new jobs are submitted, Miser
attempts to schedule the jobs based on the amount of logical resources still available to
Miser. As a result, CPUs could become reserved by Miser, and the interactive processes
would no longer be able to execute on the newly reserved CPUs. However, if a resource
is not being used by Miser, the resource is free to be used by any other application. Miser
will claim the resource when it needs it.
About Miser Memory Management
While Miser only reserves CPUs when they are needed, memory must be reserved before
it is needed.
When Miser is started, it is told the number of CPUs and amount of memory that it will
be able to reserve for use by jobs. The number of CPUs is a logical number. When a Miser
job becomes batch critical, it is assigned a set of CPUs. Until a Miser job requires a CPU
(in other words, until a process or thread is ready to run), the CPU is available to the rest
of the system. When a Miser job’s thread begins executing, the currently non-Miser
thread is preempted and resumes on a CPU where no Miser thread is currently running.
Memory resources are quite different than CPU resources. The memory that Miser uses
to reserve for jobs is called logical swap space. Logical swap space is defined as the sum
total of physical memory (less space occupied by the kernel) and all the swap devices.
When Miser begins, it needs to reserve memory for its jobs. However, it does not need to
reserve physical memory; it simply needs to make sure that there is enough physical
memory plus swap to move non-Miser jobs memory to. Miser does this by reserving
logical swap equal to the memory that it requires.
Only jobs that are submitted to Miser are able to use allocations of the logical swap space
that was reserved for Miser. However, any physical memory that is not being used by
Miser is free to be used by any other application. Miser will claim the physical memory
when it needs it.

Scheduling Processes With the Miser Batch Processing System
159
How Miser Management Affects Users
If a user submits a job to Miser, that job will have an allocation of resources reserved for
the requested time period. The job will not have to compete for system resources. As a
result, the job should complete more quickly and have more stable run-times than it
would if run as an interactive job. However, there is a cost. Because Miser is space sharing
the resources, the job must wait until its scheduled reservation period before the
requested resources will be reserved. Prior to that time, the job may run
opportunistically, competing with the interactive workload, but at a lower priority than
the interactive workload.
If a user is working interactively, the user will not have full access to all of the system
resources. The user’s interactive processes will have access to all of the unreserved CPUs
on the system, but the processes will only have a limited amount of logical swap space
available for memory allocation. The amount of logical swap space available is the
amount not reserved by Miser when it was started.
Miser Configuration
The central configurable aspect of Miser is the set of queues. The Miser queues define the
resources allocated to Miser.
The configuration of Miser consists of the following:
•Set up the Miser system queue definition file. Every Miser system must have a
Miser system queue definition file. This file’s vector definition specifies the
maximum resources available to any other queue’s vector definition.
•Define the queues by setting up the Miser user queue definition file.
•Enumerate all the queues that will be part of the Miser system by setting up the
Miser configuration file.
•Set up the Miser command-line options file to define the maximum CPUs and
memory that can be managed by Miser.

160
Chapter 7: Managing User Processes
Setting Up the Miser System Queue Definition File
The Miser system queue definition file (/etc/miser_system.conf) defines the resources
managed by the system pool. This file defines the maximum duration of the pool. All
other queues must be less than or equal to the system queue. It is required that a Miser
system queue be configured.
Valid tokens are as follows:
POLICY name The policy is always “none” as the system queue has no policy.
QUANTUM time
The size of the quantum. A quantum is the Miser term for an arbitrary
number of seconds. The quantum is used to specify how you want to
break up the time/space pool. It is specified in both the system queue
definition file and in the user queue definition file and must be the same
in both files.
NSEG number The number of resource segments.
SEGMENT Defines the beginning of a new segment of the vector definition. Each
new segment must begin with the SEGMENT token. Each segment must
contain at a minimum the number of CPUs, memory, and wall-clock
time.
START number The number of quantums from 0 that the segment begins at. The origin
for time is 00:00 Thursday, January 1st 1970 local time.
Miser maps the start and end times to the current time by repeating the
queue forward until the current day. For example, a 24-hour queue
always begins at midnight of the current day.
END number The number of quantums from 0 that the segment ends at.
NCPUS number The number of CPUs.
MEMORY amount
The amount of memory, specified by an integer followed by an optional
unit of k for kilobytes, m for megabytes, or g for gigabytes. If no unit is
specified, the default is bytes.
The following system queue definition file defines a queue that has a quantum of 20
seconds and 1 element in the vector definition. The start and end times of each multiple
are specified in quantums, not in seconds.

Scheduling Processes With the Miser Batch Processing System
161
The segment defines a resource multiple beginning at 00:00 and ending at 00:20, with 1
CPU and 5 megabytes of memory.
POLICY none # System queue has no policy
QUANTUM 20 # Default quantum set to 20 seconds
NSEG 1
SEGMENT
START 0
END 120 # Number of quantums
NCPUS 1
MEMORY 5m
Setting Up the Miser User Queue Definition FIle
The Miser user queue definition file (/etc/miser_default.conf) defines the CPUs, the
physical memory, the policy name, and the resource pool of the queue. The file consists
of a header that specifies the policy of the queue, the number of resource segments, and
the quantum used by the queue.
Access to a queue is controlled by the file permissions of the queue definition file. Read
permission allows a user to examine the contents of the queue using the miser_qinfo
command. Execute permission allows a user to schedule a job on a queue using the
miser_submit command. Write permission allows a user to modify the resources of a
queue using the miser_move and miser_reset commands.
The default user queue definition file can be used as a template for other user queue
definition files. Each Miser queue has a separate queue definition file, which is named in
the overall Miser configuration file (/etc/miser.conf).
Users schedule against the resources managed by the user queues, not against the system
queue. If the duration specified by a user queue is less than that specified by the system
queue, the user queue will be repeated again and again (for example, the system queue
specifies one week and the user queue specifies 24 hours). If the user queue does not
divide into the system queue (for example, the system queue is 6 and the user queue is
5), the user queue will repeat evenly.

162
Chapter 7: Managing User Processes
Valid tokens are as follows:
POLICY name The name of the policy that will be used to schedule applications on the
queue. The only current valid policy is the policy named “default”.
QUANTUM time
The size of the quantum. A quantum is the Miser term for an arbitrary
number of seconds. The quantum is used to specify how you want to
break up the time/space pool. It is specified in both the system queue
definition file and in the user queue definition file and must be the same
in both files.
NSEG number The number of resource segments.
SEGMENT Defines the beginning of a new segment of the vector definition. Each
new segment must begin with the SEGMENT token. Each segment must
contain at a minimum the number of CPUs, memory, and wall-clock
time.
START number The number of quantums from 0 that the segment begins at. The origin
for time is 00:00 Thursday, January 1st 1970 local time.
Miser maps the start and end times to the current time by repeating the
queue forward until the current day. For example, a 24-hour queue
always begins at midnight of the current day.
END number The number of quantums from 0 that the segment ends at.
NCPUS number The number of CPUs.
MEMORY amount
The amount of memory, specified by an integer followed by an optional
unit of k for kilobytes, m for megabytes, or g for gigabytes. If no unit is
specified, the default is bytes.

Scheduling Processes With the Miser Batch Processing System
163
The following user queue definition file defines a queue using the policy named
“default”. It has a quantum of 20 seconds and 3 elements to the vector definition. The
start and end times of each multiple are specified in quantums, not in seconds.
•The first segment defines a resource multiple beginning at 00:00 and ending at
00:50, with 50 CPUs and 100 MB of memory.
•The second segment defines a resource multiple beginning at 00:51.67 and ending at
01:00, with 50 CPUs and 100 MB.
•The third segment defines a resource multiple beginning at 01:02.00 and ending at
01:03.33, also with 50 CPUs and 100 MB of memory.
POLICY default
QUANTUM 20
NSEG 3
SEGMENT
START 0
END 150
NCPUS 50
MEMORY 100m
SEGMENT
START 155
END 185
NCPUS 50
MEMORY 100m
SEGMENT
START 186
END 190
NCPUS 50
MEMORY 100m
Setting Up the Miser Configuration FIle
The Miser configuration file (/etc/miser.conf) lists the names of all Miser queues and the
path name of the queue definition file for each queue. This file enumerates all the queue
names and their queue definition files.
Every Miser configuration file must include as one of the queues the Miser system queue
that defines the resources of the system pool. The Miser system queue is identified by the
queue name “system.”

164
Chapter 7: Managing User Processes
Valid tokens are as follows:
QUEUE queue_name queue_definition_file_path
The queue_name identifies the queue when using any interface to Miser.
The queue name must be between 1 and 8 characters long. The queue
name “system” is used to designate the Miser system queue.
The following is a sample Miser configuration file:
# Miser config file
QUEUE system /hosts/foobar/usr/local/data/system
QUEUE user /hosts/foobar/usr/local/data/usr
Setting Up the Miser Command-line Options File
The Miser command-line options file (/etc/config/miser.options) defines the maximum
CPUs and memory that can be managed by Miser.
The -c flag defines the maximum number of CPUs that Miser can use. This value is the
maximum number of CPUs that any resource segment of the system queue can reserve.
The -m flag defines the maximum memory that Miser can use. This value is the
maximum memory that any resource segment of the system queue can reserve. The
memory reserved for Miser comes from swap and is deducted from available swap
memory.
The following example sets the -c and -m values in the command-line options file to 1
and 5 megabytes, respectively:
-f/etc/miser.conf -v -d -c 1 -m 5m
The -v flag specifies verbose mode, which results in more output than normal.
The -d flag specifies debug mode. When this mode is specified, the application does not
relinquish control of the tty (that is, it does not become a daemon). This mode is useful
in conjunction with the -v flag to figure out why Miser may not be starting up correctly.

Scheduling Processes With the Miser Batch Processing System
165
Configuration Recommendations
The configuration of Miser is site dependent. The following guidelines may be helpful:
•The system must be balanced for interactive/batch use. One suggestion is to keep at
least two processors outside the control of Miser at all times. These two processors
will act as the interactive portion of the system when all of the Miser managed
CPUs are reserved. For an interactive load, you typically want the load average for
the CPUs to be less than 2.0. Keep this in mind as you adjust for the optimal number
of free CPUs.
•The amount of free logical swap should be balanced against the number of free
CPUs. When you have a system with N CPUs, you should also have an appropriate
amount of memory to be used by processes running on those N CPUs. Also, many
system administrators like to back up this memory with swap space. If you think of
the free CPUs as a separate system and provide memory and swap space
accordingly, interactive work should perform well. Remember that the free memory
not reserved by Miser is logical swap space (the combination of physical memory
and the swap devices).
•Be careful when using virtual swap. When no Miser application is running,
time-share processes can consume all of physical memory. When Miser runs, it
begins to reclaim physical memory and swaps out time-share processes. If the
system is using virtual swap, there may be no physical swap to move the process to,
and at that point the time-share process may be terminated.
Miser Configuration Examples
In the examples used in this section, the system has 12 CPUs and 160 MB available to user
programs.
Example 1:
In this example, the system is dedicated to batch scheduling with one queue, 24 hours a
day.
The first step is to define a system queue. You must decide how long you want the system
queue to be. The length of the system queue defines the maximum duration of any job
submitted to the system. For this system, you have determined that the maximum
duration for any one job can be 48 hours, so you define the system vector to have a
duration of 48 hours.

166
Chapter 7: Managing User Processes
# The system queue /hosts/foobar/usr/local/data/system
POLICY none # System queue has no policy
QUANTUM 20 # Default quantum set to 20 seconds
NSEG 1
SEGMENT
NCPUS 12
MEMORY 160m
START 0
END 8640 # Number of quantums (48h*60 min*60 sec/20)
The next step is to define a user queue.
# The user queue /hosts/foobar/usr/local/data/user
POLICY default # System queue has no policy
QUANTUM 20 # Default quantum set to 20 seconds
NSEG 1
SEGMENT
NCPUS 12
MEMORY 160m
START 0
END 8640 # Number of quantums (48h*60 min*60 sec/20)
The last step is to define a Miser configuration file:
# Miser config file
QUEUE system /hosts/foobar/usr/local/data/system
QUEUE user /hosts/foobar/usr/local/data/usr
Example 2:
In the following example, the system is dedicated to batch scheduling, 24 hours a day,
and split between two user groups: chemistry and physics. The system must be divided
between them with a ratio of 75% for physics and 25% for chermistry.
The system queue will be identical to the one given in Example 1.

Scheduling Processes With the Miser Batch Processing System
167
The physics user queue appears as follows:
# The physics queue /hosts/foobar/usr/local/data/physics
POLICY default # System queue has no policy
QUANTUM 20 # Default quantum set to 20 seconds
NSEG 1
SEGMENT
NCPUS 8
MEMORY 120m
START 0
END 8640 # Number of quantums (48h*60min*60sec/20)
Next, you define the chemistry queue:
# The chemistry queue /hosts/foobar/usr/local/data/chemistry
POLICY default # System queue has no policy
QUANTUM 20 # Default quantum set to 20 seconds
NSEG 1
SEGMENT
NCPUS 4
MEMORY 40m
START 0
END 8640 # Number of quantums (48h*60min*60sec/20)
To restrict access to each queue, you create the user group physics and the user group
chemistry. You then set the permissions on the physics queue definition file to execute
only for group physics and similarly for the chemistry queue.
Having defined the physics and chemistry queue, you can now define the Miser
configuration file:
# Miser configuration file
QUEUE system /hosts/foobar/usr/local/data/system
QUEUE physics/hosts/foobar/usr/local/data/physics
QUEUE chem /hosts/foobar/usr/local/data/chemistry

168
Chapter 7: Managing User Processes
Example 3:
In this example, the system is dedicated to time-sharing in the morning and to batch use
in the evening. The evening is 8:00 P.M. to 4:00 A.M., and the morning is 4:00 A.M. to 8:00
P.M.
First you define the system queue.
# The system queue /hosts/foobar/usr/local/data/system
POLICY none # System queue has no policy
QUANTUM 20 # Default quantum set to 20 seconds
NSEG 2
SEGMENT
NCPUS 12
MEMORY 160m
START 0
END 720 # (4h*60min*60sec) / 20
SEGMENT
NCPUS 12
MEMORY 160m
START 3600 # (8pm is 20 hours from UTC, so 20h*60min*60sec) / 20
END 4320
Next, you define the user queue:
# User queue
POLICY default # User queue has default policy
QUANTUM 20 # Default quantum set to 20 seconds
NSEG 2
SEGMENT
NCPUS 12
MEMORY 160m
START 0
END 720 # (4h*60min*60sec) / 20
SEGMENT
NCPUS 12
MEMORY 160m
START 3600 # (8pm is 20 hours from epoch, so 20h*60min*60sec) /20
END 4320

Scheduling Processes With the Miser Batch Processing System
169
The last step is to define a Miser configuration file:
# Miser config file
QUEUE system /hosts/foobar/usr/local/data/system
QUEUE user /hosts/foobar/usr/local/data/usr
Starting and Stopping Miser
After the Miser configuration files are modified appropriately, Miser can be selected for
boot-time startup with the chkconfig(1) command and the system can be rebooted, or
Miser can be started directly by root with the command /etc/init.d/miser start. When
starting Miser manually without rebooting, the chkconfig command must be issued first
or Miser will not start up.
To start Miser manually, use the following command sequence:
chkconfig miser on
/etc/init.d/miser start
Miser can be stopped at any time by root with the following command sequence:
/etc/init.d/miser stop
/etc/init.d/miser cleanup
Running Miser jobs are not stopped, and the current committed resources cannot be
reclaimed until the jobs are terminated. If you are going to restart Miser after stopping it,
you do not need to run the miser cleanup command.
Submitting Miser Jobs
The command to submit a job so that it is managed by Miser is as follows:
miser_submit -q queue[-f filename] -o t=time,c=cpus,m=memory command
queue Specifies the name of the queue against which to schedule the
application.
time Specifies the time either as an integer followed by a unit specifier of h for
hours, m for minutes, or s for seconds, or by a string in the format
hh:mm:ss.

170
Chapter 7: Managing User Processes
cpus Specifies the CPUs as an integer up to the maximum number of CPUs
available to the queue being scheduled against.
memory Specifies the memory as an integer followed by a unit of k for kilobyte,
m for megabyte, or g for gigabyte. If no unit is specified, the default is
bytes.
command Specifies a script or program name.
Checking Miser Job Status
The command to check the status of a Miser job is as follows:
miser_jinfo -j bid
The bid is the ID of the Miser job and is the process group ID of the job.
Note that when the system is being used heavily, Miser swapping can take some time.
Therefore, the Miser job may not begin processing mmediately after it is submitted.
Checking Miser Queue Status
The command to check the status of a Miser queue is as follows:
miser_qinfo -q queue [-j]|-Q
The queue is the name of the queue whose status you want to check.
Terminating a Miser Job
The miser_kill command is used to terminate a job submitted to Miser. This command
both terminates the process and contacts the Miser daemon to free any resources
currently committed to the submitted process. For additional information, see the
miser_kill(1) reference page.

Checkpoint and Restart
171
Miser and Batch Management Systems
This section discusses the differences between a Miser job and a batch job from a batch
management system such as the Cray Network Queuing Environment (NQE) or Load
Share Facility (LSF).
Miser and batch management systems such as NQE each lack certain key characteristics.
For Miser, these characteristics are features to protect and manage the Miser session. For
batch management systems, the ability to guarantee resources is lacking. However, these
two systems used together provide a much more capable solution, provided the batch
management system supports the Miser scheduler.
If your site does not need the job management and protection provided by a batch
management system, then Miser alone may be an adequate batch system. However, most
production-quality environments require the support and protection provided by batch
systems such as NQE or LSF. These sites should run a batch management system in
cooperation with the Miser scheduler.
Checkpoint and Restart
IRIX Checkpoint and Restart (CPR) is a facility for saving the state of running processes,
and for later resuming execution where the Checkpoint occurred. See the IRIX Checkpoint
and Restart Operation Guide and the cpr(1) reference page for how to use and administer
CPR.
NQE
Cray Network Queuing Environment (NQE) is a workload management environment
that provides batch scheduling and interactive load balancing. See NQE Adminstration
for how to configure, monitor and control NQE. Also see the following URL address:
http://www.cray.com/products/software/nqe

172
Chapter 7: Managing User Processes
Share II
Share II is a resource-centric Fair Share scheduler that provides direct administrative
control of system resource allocation. See the Share II for IRIX Administrator’s Guide for
how to configure and maintain Share II. Also see the following URL address:
http://www.softway.com.au/share2.html
Performance Co-Pilot
Performance Co-Pilot (PCP) is a software package of advanced performance
management applications. It provides a systems-level suite of tools that cooperate to
deliver distributed, integrated performance monitoring and performance management
services. See the Performance Co-Pilot User’s and Administrator’s Guide for how to
administer PCP.

Chapter 8 describes the File Alteration Monitor. This software monitors
specified files and directories for changes and reports the changes to
application software such as WorkSpace and Mailbox. Topics described in this
chapter include:
•Verifying that FAM is installed on your system
•Troubleshooting FAM
Troubleshooting the File Alteration Monitor
Chapter 8


175
Chapter 8
8. Troubleshooting the File Alteration Monitor
The File Alteration Monitor (fam) is a daemon that monitors files and directories.
Application writers can include certain function calls in their applications to let fam know
that they want to be informed of changes to whichever files and/or directories they
specify. For example, mailbox(1) uses fam to know when to indicate the arrival of new
mail.
The fam daemon runs only when applications using it are running; it exits after all
programs using it have stopped.
Sometimes, when attempting to start up an application that uses fam, an error message
is displayed:
Cannot connect with File Alteration Monitor (fam)
There are several reasons why this message appears. This chapter describes some of the
common ways to troubleshoot the problem.

176
Chapter 8: Troubleshooting the File Alteration Monitor
Basic fam Troubleshooting
If you see this message on your screen:
Can’t connect to fam
or
Cannot connect with File Alteration Monitor (fam)
Perform these steps:
1. Check to see if fam is running with the command:
ps -ef | grep fam
2. If fam is not running, verify the following things:
•Verify that /usr/etc/fam exists and is executable with the following command:
ls -l /usr/etc/fam
If the file is not found, you must reinstall the eoe.sw.unix subsystem.
If the file is found, the permissions should be:
-rwxr-xr-x 1 root sys 156484 Jan 24 18:34 /usr/etc/fam
The date and size may vary.
•Verify that fam is listed in the /etc/inetd.conf file. The fam daemon is invoked
when the system starts up the network. Even if the system is not networked to
other systems, the network software must be started. A line similar to the
following should be found in /etc/inetd.conf:
sgi_fam/1 stream rpc/tcp wait root ?/usr/etc/fam famd -t 6

Troubleshooting fam When Using a Sun NIS Master
177
•Verify that inetd is running with the command:
ps -ef | grep inetd
You should see a response similar to:
root 214 1 0 Oct 24 ? 0:01 /usr/etc/inetd
If the message
portmapper failure
is displayed, it is also a sign that the network is not active. Start the network
according to the steps outlined in the IRIX Admin: Networking and Mail guide.
•Verify that fam is registered with portmapper with the command:
rpcinfo -p | grep fam
You see output similar to the following:
391002 1 tcp 1033 sgi_fam
If you are using a foreign NIS master system, see the section “Troubleshooting
fam When Using a Sun NIS Master”.
3. If fam is running, turn on debugging mode by adding a -d flag to the entry in
/etc/inetd.conf. The finished line should be similar to the following:
sgi_fam/1 stream rpc/tcp wait root ?/usr/etc/fam famd -t 6 -d
Reboot your system for the debugging to take effect. The debugging information is
written in the file /var/adm/SYSLOG. This can be conveniently viewed with the
sysmon tool, described in “About sysmon, the System Log Viewer” on page 38.
Troubleshooting fam When Using a Sun NIS Master
If you have the optional NIS (YP) software installed at your site, and you are using a Sun
system as your NIS master, with no rpc entries for sgi_toolkitbus and sgi_fam, this section
provides the information to correct the error message.

178
Chapter 8: Troubleshooting the File Alteration Monitor
Depending on the operating system (the Sun 3.x or the Sun 4.0) on the Sun NIS (YP)
server, one of the two following solutions applies.
•Sun 3.x
If the Sun workstation is running version 3.x of Sun/OS, add two entries to the
/etc/rpc database on the Sun NIS server. They are:
•sgi_toolkitbus 391001
•sgi_fam 391002
On the NIS server, enter the command:
cd /usr/etc/yp; make rpc
This may take as much as an hour before the NIS server pushes this information to
its clients.
•Sun 4.0
If the Sun workstation is running version 4.0 of Sun/OS or later, add two entries to
the /etc/rpc database on the Sun NIS server machine. They are:
•sgi_toolkitbus 391001
•sgi_fam 391002.
On the NIS server, type:
cd /var/yp; make rpc
It may take as much as an hour before the NIS server pushes this information to its
clients.
Note: If the NIS system is neither Silicon Graphics or Sun server, the same rpc entries
must be added, but the syntax may be different.

Chapter 9 describes the Command Monitor, also known as the PROM Monitor.
Both the old-style PROM monitor and the newer ARCS PROM monitor are
described. Topics described in this chapter include:
•Entering the Command Monitor
•Summary of commands
•Getting help
•Running the Command Monitor
•The Command Monitor environment
•Booting a program or operating system from the Command Monitor
Using the Command (PROM) Monitor
Chapter 9


181
Chapter 9
9. Using the Command (PROM) Monitor
This chapter describes the Command (PROM) Monitor programs, which control the boot
environment for all Silicon Graphics workstations and servers. With the Command
Monitor, you can boot and operate the CPU under controlled conditions, run the CPU in
Command Monitor mode, and load programs (for example, the operating system kernel,
/unix or special debugging and execution versions of the kernel).
Refer to the prom(1M) reference page for detailed information on the PROM monitor.
This chapter contains information on the following topics:
•Basic instruction on entering the Command Monitor. See “Entering the Command
(PROM) Monitor” on page 182.
•A summary of the commands available through the general Command Monitor. See
“Summary of Command Monitor Commands” on page 184.
•How to get help while using the Command Monitor. See “Getting Help in the
Command Monitor” on page 185.
•Instructions for convenient use of the Command Monitor. See “Using Command
Monitor Commands” on page 186 and “Running the Command Monitor” on page
190.
•Instructions for manipulating the Command Monitor Environment. See “Command
Monitor Environment Variables” on page 191.
•Instructions for booting programs from the Command Monitor. See “Booting a
Program From the Command Monitor” on page 197.

182
Chapter 9: Using the Command (PROM) Monitor
About the PROM Monitor
PROM stands for Programmable Read-Only Memory. Most PROM chips are placed in
your computer at the factory with software programmed into them that allows the CPU
to boot and allows you to perform system administration and software installations. The
PROMs are not part of your disk or your operating system; they are the lowest level of
access available for your system. You cannot erase them or bypass them.
Since PROMs are not normally changed after the manufacture of the system, some
features may not be present on older systems. Some systems have PROM firmware that
responds to new programming when the operating system is updated. See your
hardware owner’s guide and release notes for information specific to your system.
Newer systems use a PROM called the ARCS PROM. ARCS stands for Advanced Risc
Computing Standard. This PROM provides a graphical interface and allows mouse
control of booting and execution. ARCS systems also support the use of the keyboard,
and the older key syntaxes have been retained for compatibility. Systems that use the
ARCS prom include some models of Indigo, Indy, Indigo2, CHALLENGE, Onyx, some
Crimson systems, as well as the Origin systems.
Entering the Command (PROM) Monitor
To get into the Command Monitor on most systems, follow these steps:
1. Reboot the system with the reboot command, or if the system is already off, turn it
on.
On server systems without graphics capability, you see the following prompt:
Starting up the system....
To perform system maintenance instead, press <Esc>
On systems with graphics, you see similar messages, displayed on your screen as
shown in Figure 9-1.
Figure 9-1 ARCS System Startup Message

Entering the Command (PROM) Monitor
183
The procedures are substantially the same for graphical or text usage, except that
you need not press the Escape key on graphics systems, instead you can use your
mouse cursor to click a button labeled Stop for Maintenance.
2. Press Esc or click the button. You see the following menu, or a similar menu:
System Maintenance Menu
1 Start System
2 Install System Software
3 Run Diagnostics
4 Recover System
5 Enter Command Monitor
6 Select Keyboard Layout
The menu items have the following effects:
Start System This option starts the default operating system.
Install System Software
This option brings up the standalone version of inst(1M). See IRIX
Admin: Software Installation and Licensing for further information on
this option. If your system has the ARCS PROM, it allows you to
interactively select the type of device you will use to perform the
installation (for example, tape drive, network connection, or
CD-ROM drive) and then select the specific device from those of the
specified type.
Run Diagnostics
This option runs a diagnostic program on your system hardware.
See your system owner’s guide for further information on this
option.
Recover System
This option allows you to read a previously made system backup
onto the system disk. See IRIX Admin: Backup, Security, and
Accounting for further information on this option. If your system has
the ARCS PROM, it allows you to interactively select the type of
device you will use to perform the recovery (for example, tape drive,
network connection, or CD-ROM drive) and then select the specific
device from those of the specified type.

184
Chapter 9: Using the Command (PROM) Monitor
Enter Command Monitor
This option allows you to enter the Command Monitor program,
described in this chapter.
Select Keyboard Layout
This option allows you to select from several different keyboard
layouts for common languages.
3. Enter the numeral 5 and press Enter or click on the appropriate button. You see the
Command Monitor prompt:
>>
You have entered the Command Monitor.
Summary of Command Monitor Commands
Table 9-1 summarizes the Command Monitor commands and gives each command’s
syntax. Note that not all commands work on all systems
Table 9-1 Command Monitor Command Summary
Command Description Syntax
auto Boots default operating system (no
arguments). This has the same effect as
choosing Start System from the PROM
Monitor initial menu.
auto
boot Boots the named file with the given
arguments.
boot [-f ][-n]pathname
date Displays or sets the date and time. date [mmddhhmm[ccyy|yy] [.ss]]
eaddr Prints the Ethernet address of the built-in
Ethernet controller on this system.
eaddr
exit Leaves Command Monitor and returns to
the PROM menu.
exit
help Prints a Command Monitor command
summary.
help [command]
? [command]

Getting Help in the Command Monitor
185
Getting Help in the Command Monitor
The question mark (?) command displays a short description of a specified command. If
you do not specify a command, the ? command displays a summary of all Command
Monitor commands. To get help, type either help or a question mark (?).
help [command]
? [command]
hinv Prints an inventory of known hardware on
the system. Some optional boards may not
be known to the PROM monitor.
hinv
init Partially restarts the Command Monitor,
noting changed environment variables.
init
ls List files on a specified device. ls devicename
off Turns off power to the system. off
passwd Sets PROM password. passwd
pathname Given a valid file pathname, the system
attempts to find and execute any program
found in that path.
pathname
printenv Displays the current environment variables. printenv [env_var_list]
resetenv Resets all environment variables to default. resetenv
resetpw Resets the PROM password to null (no
password required).
resetpw
setenv Sets environment variables. Using the -p flag
makes the variable setting persistent, that is,
the setting remains through reboot cycles.
setenv [-p]variable value
single Boots the system into single-user mode. single
unsetenv Unsets an environment variable. unsetenv variable
version Displays Command Monitor version. version
Table 9-1 (continued) Command Monitor Command Summary
Command Description Syntax

186
Chapter 9: Using the Command (PROM) Monitor
Using Command Monitor Commands
The following sections cover these subjects:
•The command syntax notation that this chapter uses
•The function of the commands listed in Table 9-1
About the Command Line Editor in the Command Monitor
You can edit on the command line by using the commands shown in Table 9-2.
Command Monitor Command Syntax
The Command Monitor command syntax is designed to resemble the syntax of
commands used with the IRIX operating system. This chapter uses IRIX notation for
command descriptions:
•Boldface words are literals. Type them as they are shown.
•Square brackets ([]) surrounding an argument means that the argument is optional.
•Vertical lines (|) separating arguments mean that you can specify only one optional
argument within a set of brackets.
•file means that you must specify a filename. A filename includes a device
specification as described in “Command Monitor Filename Syntax” on page 187.
Table 9-2 Command Monitor Command Line Editor
Command Description
Ctrl+h, Delete Deletes previous character
Ctrl+u Deletes entire line; question mark (?) prompts for corrected line
Ctrl+c If a command is executing, kills current command
!! Repeats the last command

Using Command Monitor Commands
187
Command Monitor Filename Syntax
When you specify filenames for Command Monitor commands, use this syntax:
device([cntrlr,[unit[,partition]]])file
•device specifies a device driver name known to the PROM.
•cntrlr specifies a controller number for devices that may have multiple controllers.
•unit specifies a unit number on the specified controller.
•partition specifies a partition number within a unit.
•file specifies a pathname for the file to be accessed.
If you do not specify cntrlr,unit, and partition, they default to zero. The notation shows
that you can specify only a cntrlr, a cntrlr and unit, or all three variables. The commas are
significant as place markers. For example, the root partition (partition 0) on a single SCSI
disk system is shown as:
dksc(0,1,0)
where:
•dksc indicates the SCSI driver.
•The first 0 indicates SCSI controller 0.
•The 1 indicates drive number 1 on SCSI controller 0
•The final 0 indicates partition 0 (root partition) on drive 1 on SCSI controller 0.
The /usr partition (partition 3) on the same disk would be written as:
dksc(0,1,3)

188
Chapter 9: Using the Command (PROM) Monitor
Device Names in the Command Monitor
The Command Monitor defines the devices shown in Table 9-3.
The PROM device notation is different from IRIX device notation. Certain environment
variables (such as root and swap) are passed to higher level programs, and often require
IRIX notation for the /dev device name. For example, in PROM notation, a SCSI disk
partition most commonly used for swap is written:
dksc(0,0,1)
In IRIX notation, the same disk is:
dksc0d0s1
Table 9-3 Device Names for Command Monitor Commands
Device Name Description
dksc SCSI disk controller (dks in IRIX)
tpsc SCSI tape controller (tps in IRIX)
tty CPU board duart
tty(0) Local console
tty(1) Remote console
gfx Graphics console
console Pseudo console, which may be one of gfx(0), tty(0), or tty(1).
bootp Ethernet controller using bootp and TFTP protocols
tpqic Quarter-inch QIC02 tape drive

Using Command Monitor Commands
189
ARCS PROM Filename Syntax
Systems that use the ARCS prom (including Indy, Indigo2, some models of Indigo,
CHALLENGE, and Onyx) use a slightly different syntax for specifying pathnames and
disk partitions.
ARCS pathnames use the same syntax as the hardware inventory. The pathnames are
written as a series of “type(unit)” components that parallel the hardware inventory
format.
Old-style pathnames are automatically converted to new-style pathnames, so the old
names can still be used. The PROM matches the first device described by the pathname,
so full pathnames are not always required. Some examples of common pathnames are
shown in Table 9-4.
Table 9-4 ARCS Filenames
ARCS Naming Convention Pathname or Device
scsi(0)disk(1)partition(1) dksc(0,1,1)
disk(1)part(1) dksc(0,1,1)
scsi(0)cdrom(5)partition(7) dksc(0,5,7)
network(0)bootp()host:file bootp()host:file
serial(0) First serial port
keyboard() Graphics keyboard
video() Graphics display

190
Chapter 9: Using the Command (PROM) Monitor
Running the Command Monitor
This section describes the commands that you use to run the Command Monitor. The
Command Monitor accepts the commands listed in Table 9-1 on page 184.
Reinitializing the Processor From the Command Monitor
The init command reinitializes the processor from PROM memory, and returns you to the
monitor program.
Setting a PROM Password
Your system has a facility that allows you to require a password from users who attempt
to gain access to the Command Monitor. To set the PROM password, perform the
following steps:
1. Select option 5 from the System Maintenance menu to enter the Command Monitor.
You see the Command Monitor prompt:
Command Monitor. Type "exit" to return to the menu.
>>
2. Enter the command:
help
3. Issue the passwd command:
passwd
You see the prompt:
Enter new password:
4. Enter the password you want for your system and press Enter. You see the prompt:
Confirm new password:
Enter the password again, exactly as you typed it before. If you typed the password
the same as the first time, you next see the Command Monitor prompt again. If you
made a mistake, the system prints an error message and you must begin again. If
you see no error message, your password is now set. Whenever you access the
Command Monitor, you will be required to enter this password.

Command Monitor Environment Variables
191
It is very important that you choose and enter your password carefully, because if it is
entered incorrectly or forgotten, you may have to remove a jumper on the CPU board of
your system. This procedure is different for each system type, and is described in your
owner’s guide. Some systems, though, allow you to reset the PROM password from IRIX
by logging in as root and issuing the following command:
nvram passwd_key ""
The quotation marks with no characters or space between them are essential to remove
the PROM password. You must be root to perform this operation.
The resetpw command within the Command Monitor also resets the PROM password.
Command Monitor Environment Variables
The Command Monitor maintains an environment, which is a list of variable names and
corresponding values (the values are actually text strings). These environment variables
contain information that the Command Monitor either uses itself or passes to booted
programs. The system stores some environment variables—those that are important and
unlikely to change frequently—in nonvolatile RAM (nvram). If you turn off power to the
machine or press the reset button, the system remembers these variables. When you
change the setting of these variables using the setenv command, the PROM code
automatically stores the new values in nonvolatile RAM.
You can also use the /etc/nvram command to set or print the values of nonvolatile RAM
variables on your system. For complete information on the nvram command, see the
nvram(1) reference page.
Table 9-5 on page 192 shows a list of the environment variables that the system stores in
nonvolatile RAM.
Several environment variables also exist that affect the operation of IRIX. These are not
stored in non-volatile RAM, but they do affect the operation of the PROM and of IRIX.
See Table 9-6.
The ARCS PROM defines some variables not found in older PROMS, and so an
additional list is provided in Table 9-7.

192
Chapter 9: Using the Command (PROM) Monitor
Table 9-5 lists nonvolatile RAM variables:
Table 9-5 Variables Stored in Nonvolatile RAM
Variable Description
netaddr Specifies the local network address for booting across the Ethernet. See the
bootp protocol.
dbaud Specifies the diagnostics console baud rate. You can change it by setting this
variable (acceptable rates include 75, 110, 134, 150, 300, 600, 1200, 2400, 4800,
9600, and 19200), or by pressing the Break key. IRIS uses the dbaud rate for the
diagnostics console during the entire system start-up. Pressing the Break key
changes the baud rate only temporarily; the baud rate reverts to the value
specified in dbaud or rbaud when you press the reset switch or issue an init
command.
rbaud Specifies the remote console baud rate. The list of acceptable baud rates is the
same as for dbaud,above.
bootfile Specifies the name of the file to use for autobooting, normally a standalone
shell (sash). This variable is valid for pre-ARCS PROMs only. ARCS PROMs
store this information in the OSLoader variable.
bootmode Specifies the type of boot in pre-ARCS PROMs. ARCS PROMs store this
information in the AutoLoad variable.
The options have these meanings:
c—performs a complete cold autoboot, using the file pointed to by the
bootfile variable to boot the kernel; boots sash, then boots kernel; runs
power-on diagnostics.
m—(default) goes straight to the Command Monitor; clears memory; runs
power-on diagnostics.
d—go straight to the Command Monitor; does not clear memory; does not
run power-on diagnostics.
boottune Selects the boot music string. A value of 0 randomizes the selection each
time. 1 is the default value. (Supported only on POWER Indigo2 systems)
autopower Allows systems with software power control to automatically reset after a
power failure if set to y.
console Specifies which console to use. The options have these meanings:
G—graphics console with the Silicon Graphics, Inc., logo in the upper left
corner.
g—(default) graphics console without the Silicon Graphics logo.

Command Monitor Environment Variables
193
keybd Specifies the type of keyboard used. The default is “df.” Available settings
depend on the exact PROM revision, but may include some or all of:
USA, DEU, FRA, ITA, DNK, ESP, CHE-D, SWE, FIN, GBR, BEL, NOR, PRT,
CHE-F.
or
US, DE, FR, IT, DK, ES, deCH, SE, FI, GB, BE, NO, PT, frCH on systems with
the keyboard layout selector.
On some systems, JP is also acceptable to specify a Japanese keyboard.
diskless Specifies that the system is diskless and must be booted over the network. On
ARCS systems, diskless system environment parameters should be set as
follows:
diskless=1
SystemPartition=bootp()host:/path
OSLoader=kernelname
monitor Specifies the monitor resolution on Indy systems when an unrecognized
brand of monitor is used. Set this variable to h or H to specify a
high-resolution monitor, the default is a low-resolution monitor.
nogfxkeybd Specifies that the keyboard is not required to be connected if set to 1.
notape Specifies that no tape drive is attached to the system. If a tape drive is
attached to the system, this variable must be set to 1 (true) in order to access
a tape drive on another system on the network.
volume Specifies the system speaker volume numerically.
pagecolor Specifies the background color of the textport using a set of 6 hexadecimal
RGB values.
prompoweroff On Indy systems only, this variable specifies that the system should return to
the PROM monitor before powering off on shutdown if set to y.
rebound Specifies that the system should automatically reboot after a kernel panic if
set to y.
sgilogo Specifies that the Silicon Graphics logo and related information is displayed
on the PROM monitor graphical screen if set to y.
diagmode Specifies the mode of power-on diagnostics. If set to v, then diagnostics are
verbose and extensive.
Table 9-5 (continued) Variables Stored in Nonvolatile RAM
Variable Description

194
Chapter 9: Using the Command (PROM) Monitor
Table 9-6 lists Command Monitor environment variables that directly affect the
operating system. Note that these variables are not stored in non-volatile RAM and are
discarded if the system is powered off.
When you boot a program from the Command Monitor, it passes the current settings of
all the environment variables to the booted program.
Table 9-6 Environment Variables That Affect the IRIX Operating System
Variable Description
showconfigPrints extra information as IRIX boots. If set through setenv, its value must be
istrue.
initstate Passed to IRIX, where it overrides the initdefault line in /etc/inittab. Permitted
values are s and the numbers 0-6. See init(1M).
swap Specifies in IRIX notation the swap partition to use. If not set, it defaults to
the partition configured into the operating system, which is normally
partition 1 on the drive specified by the root environment variable.
path Specifies a list of device prefixes that tell the Command Monitor where to
look for a file, if no device is specified.
verbose Tells the system to display detailed error messages.

Command Monitor Environment Variables
195
The environment variables specific to ARCS PROMs are described in Table 9-7.
Displaying the Current Command Monitor Environment Variables
The printenv command displays the Command Monitor’s current environment variables.
printenv [env_var_list]
To change (reset) the variables, see the next section.
Table 9-7 ARCS PROM Environment Variables
Variable Description
ConsoleIn/ConsoleOut These variables are set automatically at system startup.
OSLoadPartition The disk partition where the operating system kernel is located. This
is also used as the default root partition and is set automatically at
system startup.
OSLoader The operating system loading program. By default, this is SASH (the
stand-alone shell). This is set automatically at system startup.
SystemPartition The disk partition where the operating system loading program is
found. This is set automatically at system startup.
OSLoadFilename The filename of the operating system kernel. By default, this is /unix.
This variable is automatically set at system startup.
OSLoadOptions This variable specifies options to the boot command used to load the
operating system. For more information on boot options, see
“Booting a Program From the Command Monitor” on page 197.
AutoLoad This variable specifies whether the operating system will boot
automatically after a reset or power cycle. This variable supersedes
bootmode and can be set to yes or no.

196
Chapter 9: Using the Command (PROM) Monitor
Changing Command Monitor Environment Variables
The setenv command changes the values of existing environment variables or creates new
ones.
setenv env_var string
env_var is the variable you’re setting, and string is the value you assign to that variable.
To see the current monitor settings, use printenv.
When you use setenv to change the value of one of the stored environment variables in
Table 9-5, the system automatically saves the new value in nonvolatile RAM. You do not
need to reenter the change the next time the system is turned off and then on again.
Setting the Keyboard Variable
If the keybd variable is set to anything but the default df, the appropriate keyboard
translation table is loaded from the volume header of the hard disk. If the table is missing
or unable to load, then the default table stored in the PROMs is used. The keybd variable
can be set to any value, but the keyboard translation table should be loaded from the
volume header on the hard disk. This variable overrides the normal system mechanism
for determining the kind of keyboard installed in the system. Do not change this variable
unless you are performing keyboard diagnostics. Table 9-8 lists keybd variables suggested
for international keyboards:
Table 9-8 keybd Variables for International Keyboards
Variable Description
BEL or BE Belgian
DNK or DK Danish
DEU or DE German
DF The default
FRA or FR French
FIN or FI Finnish
ITA or IT Italian
JP Japanese

Booting a Program From the Command Monitor
197
Removing Environment Variables
The unsetenv command removes the definition of an environment variable.
unsetenv env_var
env_var is the variable whose definition you are removing (see setenv, above). Note that
variables stored in nonvolatile RAM cannot be unset.
Booting a Program From the Command Monitor
This section describes each Command Monitor boot command and shows you how to
use it. When you reboot or press the Reset button, you start up the Command Monitor.
Do not press the Reset button under normal circumstances, that is, when the workstation
is running IRIX.
NOR or NO Norwegian
PRT or PT Portuguese
CHE-F or freCH Swiss-French
CHE-D or deCH Swiss-German
ESP or ES Spanish
SE or SWE Swedish
GB or GBR United Kingdom (Great Britain)
US or USA United States (available on all models)
Table 9-8 (continued) keybd Variables for International Keyboards
Variable Description

198
Chapter 9: Using the Command (PROM) Monitor
Booting the Default File With the auto Command
The auto command reboots the operating system. It uses the default boot file as though
you were powering on the CPU. At the Command Monitor prompt (>>), type:
auto
The PROM’s environment variable bootfile specifies the default boot file. In addition, you
must set the environment variable root to the disk partition that IRIX uses as its root
filesystem. The auto command assumes that the desired image of IRIX resides on the
partition specified by root of the drive specified in the environment variable bootfile.
The bootfile name can contain no more than 14 characters. To select a different boot file,
see “Changing Command Monitor Environment Variables” on page 196.
Booting a Specific Program With the boot Command
The boot command starts the system when you want to use a specific boot program and
give optional arguments to that program. The syntax of the boot command is:
boot[-f program][-n][args]
•-f specifies the program you want to boot. The program name must contain fewer
than 20 characters. If you do not specify this option, the environment variable
bootfile specifies the default program. boot normally loads sash.
When you specify a program, you can include a device specification. If you don’t,
the Command Monitor uses the device specifications in the environment variable
path. The Command Monitor tries in turn each device that you specify in path, until
it finds the program you request, or until it has tried all the devices listed in path.
•-n means no go: it loads the specified program, but does not transfer control to it.
Instead, -n returns you to the Command Monitor command environment.
•args are variables that the Command Monitor passes to the program you’re booting.
For an arg that starts with a hyphen (-), you must prepend an additional hyphen so
that the Command Monitor doesn’t think that the argument is intended for itself.
The Command Monitor removes the extra hyphen before it passes the argument to
the booted program. For more information, see “About the Standalone Shell (sash).”

Booting a Program From the Command Monitor
199
For example, to boot the disk formatter/exerciser program (fx) from the cartridge tape
drive, use this command:
boot -f SCSI(0)tape(7)partition(0)fx
Without any arguments, boot loads the program specified in bootfile.
About the Standalone Shell (sash)
The Command Monitor has been designed to keep it independent of operating systems
and as small as possible. Therefore, the Command Monitor cannot directly boot files
residing in IRIX or other operating system file trees. However, the Command Monitor
provides a two-level boot mechanism that lets it load an intermediary program that
understands filesystems; this program can then find and load the desired boot file. The
program is called the standalone shell, and is referred to as sash.sash is a reconfigured and
expanded version of the Command Monitor program, and includes the modules needed
to handle operating system file structures. It also has enhanced knowledge about
devices.
After the system software is installed, a copy of sash is located in the volume header of
the first disk. The header contains a very simple file structure that the Command Monitor
understands. You can also boot sash from tape or across the network.

200
Chapter 9: Using the Command (PROM) Monitor
Booting the Standalone Shell (sash)
To boot sash from your disk:
1. Shut down the system
2. When you see the message:
Starting up the system...
To perform system maintenance instead, press Esc
Press the Esc key. You may have to enter your system’s Command Monitor
password, if your system has one. You see a menu similar to the following:
System Maintenance Menu
(1) Start System
(2) Install System Software
(3) Run Diagnostics
(4) Recover System
(5) Enter Command Monitor
3. Select option 5, Enter Command Monitor from the System Maintenance Menu. You
see the following message and prompt:
Command Monitor. Type "exit" to return to the menu.
>>
4. Enter the command:
boot -f sash
sash operates in interactive command mode. You see the SASH prompt:
sash:
To use the multilevel boot feature, set the PROM environment variable bootfile to refer to
a specific copy of sash. In normal configurations, setting bootfile to dksc(0,0,8)sash tells the
Command Monitor to load sash from the SCSI disk controller 0, disk unit 0, partition 8
(the volume header). Use this syntax:
setenv bootfile "dksc(0)disk(1)partition(8)sash"

Booting a Program From the Command Monitor
201
Then issue a boot command, as in this example for a SCSI drive:
boot dksc()unix initstate=s
The following actions take place:
•boot loads dksc(0)disk(0)partition(8)sash, as specified by bootfile, since the boot
command doesn’t contain a -f argument. (A -f argument overrides the default
specified by bootfile.)
•sash gets two arguments: dksc()unix and initstate=s, which brings the system up in
single-user mode. (Note that the Command Monitor removes the leading hyphen
[-] from any argument, so if you use the next layer of software, and need an
argument with a leading hyphen, put two hyphens in front of it.)
•sash loads the file specified by the first argument (dksc()unix) and passes the next
argument to that file.
Do not issue the auto command from sash with the bootfile set as shown above. If you do,
the system tries to boot sash over itself and exits with an error.
To be able to use the auto command from sash, set bootfile to refer to the kernel, for
example, dksc()unix. Even better, return to the PROM level to use the auto command.
About bootp
At the heart of the operation of diskless workstations is the bootp protocol. The bootp
protocol is a DARPA standard protocol supported on all Silicon Graphics servers and
workstations. One of the devices that the Command Monitor can use for booting is the
network. Silicon Graphics provides a TCP/IP boot protocol that lets you boot files that
reside on another host in the network, if the other host supports the booting protocol. The
network booting protocol is the bootp protocol. It is a datagram protocol that uses the
User Datagram Protocol (UDP) of TCP/IP to transfer files across the Ethernet network.

202
Chapter 9: Using the Command (PROM) Monitor
Booting Across the Network With bootp
To boot across the network:
1. Determine the Internet address of the machine you want to boot.
The Internet address is a number assigned by the network administrator of the
network to which the system is attached. The format of the number is four decimal
numbers between 0 and 255, separated by periods; for example:
194.45.54.4
2. Use the setenv command to set the netaddr environment variable to this address; for
example:
setenv netaddr 194.45.54.4
Once you have set the netaddr environment variable, you can use bootp to refer to a remote
file by using a filename of the form:
bootp()[hostname:] path
•hostname is the name of the host where the file resides. The specified host must run
the bootp server daemon, bootp. If you omit hostname,bootp broadcasts to get the file
from any of the hosts on the same network as the system making the request. The
first host that answers fills the request. Only hosts that support bootp can respond to
the request. It is safe to omit the hostname only when you know that the path is
unique to a particular host, or when you know that all the copies of the file are
interchangeable.
hostname can be the name of a host on a different Ethernet network from the
machine that you are booting, if a gateway on the local Ethernet network provides a
route to the remote host. The gateway must be running a bootp server that you have
configured to do cross-network forwarding.
For more information about booting through gateways, see bootp(1M). For more
information about the /etc/inetd.conf configuration file, see inetd(1M).
•path is the pathname of a file on the remote host. For example, this command:
boot -f bootp()wheeler:/usr/local/boot/unix
boots the file /usr/local/boot/unix from the remote host wheeler. The command:
boot -f bootp()/usr/alice/help
boots the file /usr/alice/help from any host on the network responding to the bootp
broadcast request that has a file of that name.

Booting a Program From the Command Monitor
203
To configure the gateway to permit cross-network forwarding, follow these steps:
1. Log in as root or become the superuser by issuing the su command.
2. Edit the file /etc/inetd.conf on the gateway system. This file configures the bootp
server, which is started by the inetd(1M) daemon.
3. Change the bootp description so that inetd invokes bootp with the -f flag. Find this
line:
bootp dgram udp wait root /usr/etc/bootp bootp
Add the -f flag to the final bootp on the line:
bootp dgram udp wait root /usr/etc/bootp bootp -f
4. Change the tftp configuration line in one of the following ways:
Remove the -s flag from the argument list for tftpd:
tftp dgram udp wait guest /usr/etc/tftpd tftpd -s
This allows tftpd access to all publicly readable directories. If you are concerned
about a possible security compromise, you can instead explicitly list the directories
to which tftpd needs access. In this case, you need to add /usr/etc:
tftp dgram udp wait guest /usr/etc/tftpd tftpd -s /usr/etc
See tftpd(1M) and tftp(1C) for more information.
5. Signal inetd to reread its configuration file.
killall -1 inetd

204
Chapter 9: Using the Command (PROM) Monitor
Booting Across a Larger Network
If you have access to a larger network, and the bootable file you need is sufficiently
remote on the network that the tftp and bootp timeouts and network delays are keeping
you from booting successfully, it is possible to use an intermediary host as a bootp server.
As an example, consider the following situation. You have a host named local_host that
needs to boot a kernel found on the remote system far_host. But the network is heavily
used, resulting in bootp and tftp timing out before the boot operation can take place.
However, a third host, near_host, has the optional NFS software and has automount(1M)
running, allowing access to the files on far_host. To boot through this method, perform
the following steps:
1. On near_host, the system acting as intermediary, log in as root and open the file
/etc/inetd.conf. This file configures the bootp server, which is started by the inetd(1M)
daemon.
2. Change the bootp description in the /etc/inetd.conf file so that inetd invokes bootp with
the -f flag. Find this line:
bootp dgram udp wait root /usr/etc/bootp bootp
Add the -f flag to the final bootp on the line:
bootp dgram udp wait root /usr/etc/bootp bootp -f
Change the tftp configuration line in the /etc/inetd.conf file in one of the following
two ways:
Remove the -s /usr/local/boot string from the argument list for tftpd, so that the entry
matches the following:
tftp dgram udp wait guest /usr/etc/tftpd tftpd
This allows tftpd access to all publicly readable directories.
If you are concerned about a possible security compromise, you can instead
explicitly list the directories to which tftpd needs access. In this case, you need to
add /hosts:
tftp dgram udp wait guest /usr/etc/tftpd tftpd -s /hosts
See tftpd(1M) and tftp(1C) for more information.
3. Signal inetd to reread its configuration file.
killall -1 inetd

Booting a Program From the Command Monitor
205
4. On far_host, the system on the distant subnetwork, use NFS to export the directory
containing the needed bootable kernel (in this case, the file is /usr/local/boot/unix). If
you need help exporting a directory, see the export(1M) reference page.
5. On local_host, the system you are trying to boot, give the command:
boot -f bootp()near_host:/hosts/far_host/usr/local/boot/unix
If bootp times out, try the command again, as automount may require a bit of time to
retrieve the files from the remote system.
Booting From a Disk or Other Device
To tell the Command Monitor to load standalone commands from various resources
(such as a disk or CD-ROM device), set the path environment variable. (See “Changing
Command Monitor Environment Variables” on page 196.) Set the path variable as
follows:
setenv path "device_name alternate_path"
For example, issue the following command:
setenv path "dksc(0)disk(0)partition(8)bootp()/altdir/altbootfile"
This causes the Command Monitor to boot the file
dksc(0)disk(0)partition(8)/altdir/altbootfile. If that file fails, the Command Monitor boots
bootp()/altdir/altbootfile. If that file also fails, the Command Monitor prints the message
command not found. Note that pathnames are separated with spaces. If the device
specification is contained within a command or by bootfile, the Command Monitor
ignores path. Only bootp or volume headers are understood by the PROM.


Chapter 10 describes the process by which you can improve your system
performance. Your system is configured to run as fast as possible under most
circumstances. However, you may find that adjusting certain parameters and
operating system values may improve your total performance, or you may
wish to optimize your system for some feature, such as disk access, to better
make use of the graphics features or your application software. Topics
described in this chapter include:
•Measuring system performance
•Improving general system performance
•Tuning for specific hardware and software configurations
System Performance Tuning
Chapter 10


209
Chapter 10
10. System Performance Tuning
This chapter describes the basics of tuning the IRIX operating system for the best possible
performance for your particular needs. Information provided includes the following
topics:
•General information on system tuning and kernel parameters, including
recommendations on parameter settings for large (64 processors) or greater
systems. See “About System Performance Tuning” on page 209.
•Observing the operating system to determine if it should be tuned. See “Monitoring
the Operating System” on page 213.
•Tuning and reconfiguring the operating system. See “Operating System Tuning” on
page 230.
See Appendix C, “Application Tuning,” for information on tuning applications under
development.
About System Performance Tuning
The standard IRIX system configuration is designed for a broad range of uses, and
adjusts itself to operate efficiently under all but the most unusual and extreme
conditions. The operating system controls the execution of programs in memory and the
movement of programs from disk to memory and back to disk.
The basic method of system tuning is as follows:
1. Monitor system performance using various utilities.
2. Adjust specific values (for example, the maximum number of processes).
3. Reboot the system if necessary.
4. Test the performance of the new system to see if it is improved.

210
Chapter 10: System Performance Tuning
Note that performance tuning cannot expand the capabilities of a system beyond its
hardware capacity. You may need to add hardware, in particular another disk or
additional memory, to improve performance.
Files Used for Kernel Tuning
Table 10-1 lists the files/directories used for tuning and reconfiguring a system.
Typically you tune a parameter in one of the files located in the mtune directory (for
example, the kernel file) by using the systune(1M) command.
Overview of Kernel Tunable Parameters
Tunable parameters control characteristics of processes, files, and system activity. They
set various table sizes and system thresholds to handle the expected system load. If
certain system structures are too large, they waste memory space that would be used for
other processes and can increase system overhead due to lengthy table searches. If they
are set too low, they can cause excessive I/O, process aborts, or even a system crash,
depending on the particular parameter.
This section briefly introduces some of the tunable parameters and switches.
Appendix A, “IRIX Kernel Tunable Parameters,” describes all parameters, gives default
values, provides suggestions on when to change each parameter, and describes problems
you may encounter.
Table 10-1 Files and Directories Used for Tuning
File/Directory Purpose
/var/sysgen/system/* Directory containing files defining software modules
/var/sysgen/master.d Directory containing files defining kernel switches and
parameters
/var/sysgen/mtune/* Directory containing files defining more tunable parameters
/var/sysgen/stune File defining default parameter values
/var/sysgen/boot/* Directory of object files
/unix File containing kernel image

About System Performance Tuning
211
Tunable parameters are specified in separate configuration files in the /var/sysgen/mtune
and the /var/sysgen/master.d directories. See the mtune(4) reference page for mtune
information and the master(4) reference page for information on master.d.
The default values for the tunable parameters are usually acceptable for most
configurations for a single-user workstation environment. However, if you have a lot of
memory or your environment has special needs, you may want to adjust the size of a
parameter to meet those needs. A few of the parameters you may want to adjust are listed
below.
nproc Defines the maximum number of processes, systemwide. This
parameter is typically auto-configured.
maxup Defines the maximum number of processes per UID.
rlimit-core-cur Maximum size of a core file.
rlimit-data-cur Maximum amount of data space available to a process.
rlimit-fsize-cur Maximum file size available to a process.
rlimit-nofile-cur Maximum number of file descriptors available to a process.
rlimit-rss-cur Maximum resident set size available to a process.
rlimit-vmem-cur
Maximum amount of mapped memory for a process.
sshmseg Maximum number of attached shared memory segments per process.
Large System Tunable Parameters
Table 10-2 lists the system tuning parameters recommended for large (64 processors or
greater) systems. See Appendix A, “IRIX Kernel Tunable Parameters,” for detailed
descriptions of each of these parameters.

212
Chapter 10: System Performance Tuning
Note: These parameters are highly system-dependent. The values listed are
recommended initial values. You may want to alter them for a specific system or set of
applications, and then evaluate the results of the changes. In particular, some
applications may benefit from changes to the percent_totalmem_* (large page) parameters.
The only exception to this is that the utrace_bufsize parameter must be set to 2048.
Table 10-2 Large System Tuning Parameters
Parameter Recommended Initial Value
dump_level 3
maxdmasz 0x2001
rsshogfrac 99
rlimit_stack_max (0x800000000) 11
rlimit_stack_cur (0x800000000) 11
rlimit_rss_max (0x800000000) 11
rlimit_rss_cur (0x800000000) 11
rlimit_data_max (0x800000000) 11
rlimit_data_cur (0x800000000) 11
rlimit_vmem_max (0x800000000) 11
rlimit_vmem_cur (0x800000000) 11
nlpages_1m 0
nbuf 2000
syssegsz 0xfe800
sshmseg 250
shmmax (0x4000000) 11
semmni 2000
semume 80
semopm 80
semmns 2000

Monitoring the Operating System
213
Monitoring the Operating System
Before you make any changes to your kernel parameters, learn which parameters should
be changed and why. Monitoring the functions of the operating system will help you
determine if changing parameters will help your performance, or if new hardware is
necessary.
gpgshi 2000
gpgslo 1000
maxup 8000
nproc 8000
percent_totalmem_1m_pages 0
percent_totalmem_4m_pages 0
percent_totalmem_16m_pages 0
percent_totalmem_64k_pages 0
percent_totalmem_256k_pages 0
utrace_bufsize 2048 (utrace_bufsize =2048 is
a required setting.)
Table 10-2 (continued) Large System Tuning Parameters
Parameter Recommended Initial Value

214
Chapter 10: System Performance Tuning
Receiving Kernel Messages and Adjusting Table Sizes
In rare instances, a table overflows because it isn’t large enough to meet the needs of the
system. In this case, an error message appears on the console and in /var/adm/SYSLOG. If
the console window is closed or stored, check SYSLOG periodically.
Some system calls return an error message that can indicate a number of conditions, one
of which is that you need to increase the size of a parameter. Table 10-3 lists the error
messages and parameters that may need adjustment. These parameters are in
/var/sysgen/master.d/kernel.
Be aware that there can be other reasons for the errors in the previous table. For example,
EAGAIN may appear because of insufficient virtual memory. In this case, you may need
to add more swap space. For other conditions that can cause these messages, see the
owner’s guide appendix titled “Error Messages.”
Other system calls fail and return error messages that may indicate IPC (interprocess
communication) structures need adjustment. These messages and the parameters to
adjust are listed in Appendix A, “IRIX Kernel Tunable Parameters.”
Table 10-3 System Call Errors and Related Parameters
Message System Call Parameter
EAGAIN
No more processes
fork(2) Increase nproc or swap space
ELIBMAX
linked more shared libraries than
limit
exec(2) Increase shlbmax
E2BIG
Arg list too long
shell(1),
make(1),
exec(2)
Increase ncargs

Monitoring the Operating System
215
About timex, sar, and par
Three utilities you can use to monitor system performance are timex,sar, and par. They
provide very useful information about what’s happening in the system.
The operating system has a number of counters that measure internal system activity.
Each time an operation is performed, an associated counter is incremented. You can
monitor internal system activity by reading the values of these counters.
The timex and sar utilities monitor the value of the operating system counters, and thus
sample system performance. Both utilities use sadc, the sar data collector, which collects
data from the operating system counters and puts it in a file in binary format. The
difference is that timex takes a sample over a single span of time, while sar takes a sample
at specified time intervals. The sar program also has options that allow sampling of a
specific function such as CPU usage (-u option) or paging (-p option). In addition, the
utilities display the data differently.
The par utility has the ability to trace system call and scheduling activity. It can be used
to trace the activity of a single process, a related group of processes, or the system as a
whole.
When would you use one utility over the other? If you are running a single application
or a couple of programs, use timex. If you have a multiuser/multiprocessor system
and/or are running many programs, use sar or par.
As in all performance tuning, be sure to run these utilities at the same time you are
running an application or a benchmark, and be concerned only when figures are outside
the acceptable limits over a period of time.

216
Chapter 10: System Performance Tuning
Using timex
The timex utility is a useful troubleshooting tool when you are running a single
application. For example:
timex -s application
The -s option reports total system activity (not just that due to the application) that
occurred during the execution interval of application. To redirect timex output to a file,
(assuming you use the Bourne shell, (sh(1)) enter:
timex -s application 2> file
The same command, entered using the C shell, looks like this:
timex -s application > file
Using sar
The sar utility is a useful troubleshooting tool when you’re running many programs and
processes and/or have a multiuser system such as a server. You can take a sample of the
operating system counters over a period of time (for a day, a few days, or a week).
Depending on your needs, you can choose the way in which you examine system
activity. You can monitor the system:
•during daily operation
•consecutively with an interval
•before and after an activity under your control
•during the execution of a command
You can set up the system so that sar automatically collects system activity data and puts
it into files for you. Use the chkconfig command to turn on sar’s automatic reporting
feature, which generates a sar -A listing. A crontab entry instructs the system to sample
the system counters every 20 minutes during working hours and every hour at other
times for the current day (data is kept for the last 7 days). To enable this feature, type:
/etc/chkconfig sar on
The collected data is put in /var/adm/sa in the form sann and sarnn, where nn is the date
of the report (sarnn is in ASCII format). You can use the sar(1M) command to output the
results of system activity.

Monitoring the Operating System
217
Using sar Consecutively With a Time Interval
You can use sar to generate consecutive reports about the current state of the system. On
the command line, specify a time interval and a count. For example:
sar -u 5 8
This prints information about CPU use eight times at five-second intervals.
Using sar Before and After a User-Controlled Activity
You may find it useful to take a snapshot of the system activity counters before and after
running an application (or after running several applications concurrently). To take a
snapshot of system activity, instruct sadc (the data collector) to dump its output into a file.
Then run the application(s) either under normal system load or restricted load, and when
you are ready to stop recording, take another snapshot of system activity. Then compare
results to see what happened.
Following is an example of commands that samples the system counters before and after
the application:
/usr/lib/sa/sadc 1 1 file
Run the application(s) or perform any work you want to monitor, then type:
/usr/lib/sa/sadc 1 1 file
sar -f file
If file does not exist, sadc creates it. If it does exist, sadc appends data to it.
Using sar and timex During the Execution of a Command
Often you want to examine system activity during the execution of a command or set of
commands. For example, to examine all system activity while running nroff(1), type:
/usr/lib/sa/sadc 1 1 sa.out
nroff -mm file.mm > file.out
/usr/lib/sa/sadc 1 1 sa.out
sar -A -f sa.out
By using timex, you can do the same thing with one line of code:
timex -s nroff -mm file.mm > file.out

218
Chapter 10: System Performance Tuning
Note that the timex also includes the real, user, and system time spent executing the nroff
request.
There are two minor differences between timex and sar. The sar program can limit its
output (such as, the -u option reports only CPU activity), while timex always prints the
-A listing. Also, sar works in a variety of ways, but timex only works by executing a
command—however, the command can be a shell file.
If you are interested in system activity during the execution of two or more commands
running concurrently, put the commands into a shell file and run timex -s on the file. For
example, suppose the file nroff.sh contained the following lines:
nroff -mm file1.mm > file1.out &
nroff -mm file2.mm > file2.out &
wait
To get a report of all system activity after both of the nroff requests (running concurrently)
finish, invoke timex as follows:
timex -s nroff.sh
Using par
You can use par in much as you use sar:
•During daily operation
•Consecutively with an interval
•Before and after an activity under your control
•During the execution of a command
See the par(1) reference page for specifics on usage.
Use par instead of sar when you want a finer look at a suspect or problem process. Instead
of simply telling you how much total time was used while your process was executing,
like timex,par breaks down the information so you can get a better idea of what parts of
the process are consuming time. In particular, use the following command options:
-isSSdu Check the time used by each system call and the intervening time lag.
-rQQ Check process scheduling, to see if it should be run more or less
frequently.

Monitoring the Operating System
219
When tracing system calls, par prints a report showing all system calls made by the
subject processes complete with arguments and return values. In this mode, par also
reports all signals delivered to the subject processes. In schedule tracing mode, par prints
a report showing all scheduling events taking place in the system during the
measurement period. The report shows each time a process is put on the run queue,
started on a processor, and unscheduled from a processor, including the reason that the
process was unscheduled. The events include timestamps. You can set up the system so
par automatically collects system activity data and puts it into files for you.
The par utility works by processing the output of padc(1). This can be done in two ways:
padc can be run separately and the output saved in a file to be fed to par as a separate
operation, or padc can be invoked by par to perform the data collection and reporting in
one step.
The par utility can provide different types of reports from a given set of padc data
depending on the reporting options that are specified. This is a reason why it is
sometimes desirable to run the data collection as a separate step.
Summary of sar, par, and timex
Now that you have learned when and how to use par,sar, and timex, you can choose one
of these utilities to monitor the operating system. Then examine the output and try to
determine what’s causing performance degradation. Look for numbers that show large
fluctuation or change over a sustained period; don’t be too concerned if numbers
occasionally go beyond the maximum.
The first thing to check is how the system is handling the disk I/O process. After that,
check for excessive paging/swapping. Finally look at CPU use and memory allocation.
The following sections assume that the system you are tuning is active (with
applications/benchmark executing).

220
Chapter 10: System Performance Tuning
Disk I/O Performance
The system uses disks to store data, and transfers data between the disk and memory.
This input/output (I/O) process consumes a lot of system resources, so you want the
operating system to be as efficient as possible when it performs I/O.
Checking Disk I/O
If you are going to run a large application or have a heavy system load, the system
benefits from disk I/O tuning. Run sar -A or timex -s and look at the %busy, %rcache,
%wcache, and %wio fields. To see if your disk subsystem needs tuning, check your
output of sar -A against the figures in Table 10-4. (Note that in the table, the right column
lists the sar option that prints only selected output, for example, output for disk usage
(sar -d) or CPU activity (sar -u).)
Table 10-4 lists sar results that indicate an I/O-bound system.
Notice that for the %wio figures (indicates the percentage of time the CPU is idle while
waiting for disk I/O), there are examples of two types of systems:
•A development system that has users who are running programs such as make. In
this case, if %wio > 30, check the breakdown of %wio (sar -u). By looking at the
%wfs (waiting for filesystem) and %wswp (waiting for swap), you can pinpoint
exactly what the system is waiting for.
•An NFS system that is serving NFS clients and is running as a file server. In this
case, if %wio > 80, %wfs > 90, the system is disk I/O bound.
Table 10-4 Indications of an I/O-Bound System
Field Value sar Option
%busy (% time disk is busy) >85% sar -d
%rcache (reads in buffer cache) low, <85 sar -b
%wcache (writes in buffer cache) low, <60% sar -b
%wio (idle CPU waiting for disk I/O) dev. system >30
fileserver >80
sar -u

Monitoring the Operating System
221
There are many other factors to consider when you tune for maximum I/O performance.
You may also be able to increase performance by:
•Using logical volumes
•Using partitions on different disks
•Adding hardware (a disk, controller, memory)
About Logical Volumes for Improving Disk I/O
By using logical volumes, you can improve disk I/O:
•You can increase the size of an existing filesystem without having to disturb the
existing filesystem contents.
•You can stripe filesystems across multiple disks. You may be able to obtain up to
50% improvement in your I/O throughput by creating striped volumes on disks.
Striping works best on disks that are on different controllers. Logical volumes give you
more space without remaking the first filesystem. Disk striping gives you more space
with increased performance potential, but you run the risk that if you lose one of the
disks with striped data, you lose all the data on the filesystem, since the data is
interspersed across all the disks.
Contiguous logical volumes fill up one disk, and then write to the next. Striped logical
volumes write to both disks equally, spreading each file across all disks in the volume, so
it is impossible to recover from a bad disk if the data is striped, but it is possible if the
data is in a contiguous logical volume. For information on creating a striped disk volume,
see the IRIX Admin: Disks and Filesystems guide.

222
Chapter 10: System Performance Tuning
About Partitions and Additional Disks for Improving Disk I/O
There are obvious ways to increase your system’s throughput, such as limiting the
number of programs that can run at peak times, shifting processes to non-peak hours
(run batch jobs at night), and shifting processes to another system. You can also set up
partitions on separate disks to redistribute the disk load or add disks.
Before continuing with the discussion about partitions, look at how a program uses a
disk as it executes. Table 10-5 shows various reasons why an application may need to
access the disk.
You can maximize I/O performance by using separate partitions on different disks for
some of the disk access areas. In effect, you are spreading out the application’s disk access
routines, which speeds up I/O.
By default, disks are partitioned to allow access in two ways, either:
•three partitions: partitions 0, 1 and 6, or
•one large partition, partition 7 (encompasses the three smaller partitions)
On the system disk, partition 0 is for root, 1 is for swap, and 6 is for /usr.
For each additional disk, decide if you want a number of partitions or one large one and
the filesystems (or swap) you want on each disk and partition. It is best to distribute
filesystems in the disk partitions so that different disks are being accessed concurrently.
Table 10-5 Disk Access of an Application
Application Disk Access
Execute object code Text and data
Use swap space for data, stack /dev/swap
Write temporary files /tmp and /var/tmp
Reads/Writes data files Data files

Monitoring the Operating System
223
The configuration depends on how you use the system, so it helps to look at a few
examples.
•Consider a system that typically runs a single graphics application that often reads
from a data file. The application is so large that its pages are often swapped out to
the swap partition.
In this case, it might make sense to have the application’s data file on a disk separate
from the swap area.
•If after configuring the system this way, you find that it doesn’t have enough swap
space, consider either obtaining more memory, or backing up everything on the
second hard disk and creating partitions to contain both a swap area and a data
area.
•Changing the size of a partition containing an existing filesystem may make any
data in that filesystem inaccessible. Always do a complete and current backup (with
verification) and document partition information before making a change. If you
change the wrong partition, you can change it back, providing you do not run mkfs
on it or overwrite it. It is recommended that you print a copy of the prtvtoc
command output after you have customized your disks, so that they may be more
easily restored in the event of severe disk damage.
If you have a very large application and have three disks, consider using partitions on
the second and third disks for the application’s executables (/bin and /usr/bin) and for
data files, respectively. Next, consider a system that mostly runs as a “compile-engine.”
In this case, it might be best to place the /tmp directory on a disk separate from the source
code being compiled. Make sure that you check and mount the filesystem before creating
any files on it. (If this is not feasible, you can instruct the compiler to use a directory on
another disk for temporary files. Just set the TMPDIR environment variable to the new
directory for temporary files.) Now, look at a system that mainly runs many programs at
the same time and does a lot of swapping.
In this case, it might be best to distribute the swap area in several partitions on different
disks.

224
Chapter 10: System Performance Tuning
About Adding Disk Hardware to Improve Disk I/O
If improved I/O performance still does not occur after you have tuned your system, you
may want to consider adding more hardware: disks, controllers, or memory.
If you are going to add more hardware to your system, how do you know which
disk/controller to add? You can compare hardware specifications for currently
supported disks and controllers by looking up the system specifications in your
hardware owner’s guide. By using this information, you can choose the right
disk/controller to suit your particular needs.
By balancing the most active filesystems across controllers/disks, you can speed up disk
access.
Another way to reduce the number of reads and writes that go out to the disk is to add
more memory. This reduces swapping and paging.
About Paging and Swapping
The CPU can only reference data and execute code if the data or code are in the main
memory (RAM). Because the CPU executes multiple processes, there may not be enough
memory for all the processes. If you have very large programs, they may require more
memory than is physically present in the system. So, processes are brought into memory
in pages; if there’s not enough memory, the operating system frees memory by writing
pages temporarily to a secondary memory area, the swap area, on a disk.
IRIX overcommits real memory, loading and starting many more processes than can fit
at one time into the available memory. Each process is given its own virtual section of
memory, called its address space, which is theoretically large enough to contain the entire
process. However, only those pages of the address space that are currently in use are
actually kept in memory. These pages are called the working set. As the process needs
new pages of data or code to continue running, the needed pages are read into main
memory (called “faulting in” pages or “page faults”). If a page has not been used in the
recent past, the operating system moves the page out of main memory and into the swap
space to make room for new pages being faulted in. Pages written out can be faulted back
in later. This process is called “paging” and it should not be confused with the action of
“swapping.”

Monitoring the Operating System
225
Swapping is when all the pages of an inactive process are removed from memory to
make room for pages belonging to active processes. The entire process is written out to
the swap area on the disk and its execution effectively stops. When an inactive process
becomes active again, its pages must be recovered from disk into memory before it can
execute. This is called “swapping in” the process. On a personal workstation, swapping
in is the familiar delay for disk activity, after you click on the icon of an inactive
application and before its window appears.
Checking for Excessive Paging and Swapping
When IRIX is multiprocessing a large number of processes, the amount of this swapping
and paging activity can dominate the performance of the system. You can use the sar
command to detect this condition and other tools to deal with it.
Determining whether your system is overloaded with paging and swapping requires
some knowledge of a baseline. You need to use sar under various conditions to determine
a baseline for your specific implementation. For example, you can boot your system and
run some baseline tests with a limited number of processes running, and then again
during a period of light use, a period of heavy networking activity, and then especially
when the load is high and you are experiencing poor performance. Recording the results
in your system log book can help you in making these baseline measurements.
Table 10-6 shows indicators of excessive paging and swapping on a smaller system.
Table 10-6 Indicators of Excessive Swapping/Paging
Important Field sar Option
vflt/s - page faults (valid page not in memory) sar -p
bswot/s (transfers from memory to disk swap area) sar -w
bswin/s (transfers to memory) sar -w
%swpocc (time swap queue is occupied) sar -q
rflt/s (page reference fault) sar -t
freemem (average pages for user processes) sar -r

226
Chapter 10: System Performance Tuning
You can use the following sar options to determine if poor system performance is related
to swap I/O or to other factors:
-u %wswp Percent of total I/O wait time owed to swap input. This measures the
percentage of time during which active processes were blocked waiting
for a page to be read or written. This number is not particularly
meaningful unless the wio value is also high.
-p vflt/s Frequency with which a process accessed a page that was not in
memory. Compare this number between times of good and bad
performance. If the onset of poor performance is associated with a sharp
increase of vflt/s, swap I/O may be a problem even if %vswp is low or 0.
-r freemem Unused memory pages. The paging daemon (vhand) recovers what it
thinks are unused pages and returns them to this pool. When a process
needs a fresh page, the page comes from this pool. If the pool is low or
empty, IRIX often has to get a page for one process by taking a page from
another process, encouraging further page faults.
-p pgswp/s Number of read/write data pages retrieved from the swap disk space
per second.
-p pgfil/s Number of read-only code pages retrieved from the disk per second.
If the %vswp number is 0 or very low, and vflt/s does not increase with the onset of poor
performance, the performance problem is not primarily due to swap I/O.
Fixing Swap I/O Problems
However, when swap I/O may be the cause, there are several possible actions you can
take:
•Provide more real memory. This is especially effective in personal workstations,
where it is relatively economical to double the available real memory.
•Reduce the demand for memory by running fewer processes. This can be effective
when the system load is not interactive, but composed of batch programs or
long-running commands. Schedule commands for low-demand hours, using cron
and at. Experiment to find out whether the total execution time of a set of programs
is less when they are run sequentially with low swap I/O, or concurrently with high
swap I/O.

Monitoring the Operating System
227
•Make the swap input of read-only pages more effective. For example, if pages of
dynamic shared objects are loaded from NFS-mounted drives over a slow network,
you can make page input faster by moving all or a selection of dynamic shared
objects to a local disk.
•Make swap I/O of writable pages more effective. For example, use swap(1M) to
spread swap activity across several disks or partitions. For more information on
swapping to files and creating new swap areas, see “Swap Space” on page 138.
•If you have changed process or CPU-related kernel parameters (for example, nproc),
consider restoring them to their former values.
•Reduce page faults. Construct programs with “locality” in mind (see Appendix C,
“Application Tuning”).
•Consider using shared libraries when constructing applications.
•Reduce resident set size limits with systune. See “System Limits Parameters” on
page 251 for the names and characteristics of the appropriate parameters.
Refer to “Multiple Page Sizes” on page 236 for information on dynamic tuning of page
size.
CPU Activity and Memory Allocation
After looking at disk I/O and paging for performance problems, check CPU activity and
memory allocation.

228
Chapter 10: System Performance Tuning
Checking the CPU
A CPU can execute only one process at any given instant. If the CPU becomes
overloaded, processes have to wait instead of executing. You can’t change the speed of
the CPU (although you may be able to upgrade to a faster CPU or add CPU boards to
your system if your hardware allows it), but you can monitor CPU load and try to
distribute it. Table 10-7 shows the fields to check for indications that a system is CPU
bound.
You can also use the top(1) or gr_top(1) commands to display processes having the
highest CPU usage. For each process, the output lists the user, process state flags, process
ID and group ID, CPU cycles used, processor currently executing the process, process
priority, process size (in pages), resident set size (in pages), amount of time used by the
process, and the process name. For more information, see the top(1) or gr_top(1)
reference pages.
Increasing CPU Performance
To increase CPU performance, make the following modifications:
•Off-load jobs to non-peak times or to another system, set efficient paths, and tune
applications.
•Eliminate polling loops (see select(2)).
•Increase the slice-size parameter (the length of a process time slice). For example,
change slice-size from Hz/30 to Hz/10. However, be aware that this may slow
interactive response time.
•Upgrade to a faster CPU or add another CPU.
Table 10-7 Indications of a CPU-Bound System
Field Value sar Option
%idle (% of time CPU has no work to do) <5 sar -u
runq-sz (processes in memory waiting for CPU) >2 sar -q
%runocc (% run queue occupied and processes not executing) >90 sar -q

Monitoring the Operating System
229
Checking Available Memory
“About Paging and Swapping” on page 224 described what happens when you don’t
have enough physical (main) memory for processes. This section discusses a different
problem—what happens when you don’t have enough available memory (sometimes
called virtual memory), which includes both physical memory and logical swap space.
The IRIX virtual memory subsystem allows programs that are larger than physical
memory to execute successfully. It also allows several programs to run even if the
combined memory needs of the programs exceed physical memory. It does this by
storing the excess data on the swap device(s).
The allocation of swap space is done after program execution has begun. This allows
programs with large a virtual address to run as long as the actual amount of virtual
memory allocated does not exceed the memory and swap resources of the machine.
Usually it’s evident when you run out of memory, because a message is sent to the
console that begins:
Out of logical swap space...
If you see this message these are the possible causes:
•The process has exceeded ENOMEM or UMEM.
•There is not enough physical memory for the kernel to hold the required
non-pageable data structures.
•There is not enough logical swap space.
You can add virtual swap space to your system at any time. See “Swap Space” on page
138 to add more swap space. You need to add physical swap space, though, if you see the
message:
Process killed due to insufficient memory
The following system calls return EAGAIN if there is insufficient available memory: exec,
fork,brk,sbrk (called by malloc), mpin, and plock. Applications should check the return
status and exit gracefully with a useful message.

230
Chapter 10: System Performance Tuning
To check the size (in pages) of a process that is running, execute ps -el (you can also use
top). The SZ:RSS field shows very large processes.
By checking this field, you can determine the amount of memory the process is using. A
good strategy is to run very large processes at less busy times.
Determining the Amount of System Memory
To see the amount of main memory, use the hinv(1) command. It displays data about
your system’s configuration. For example:
Main memory size: 64 Mb
Maximizing Memory
To increase the amount of virtual memory, increase the amount of real memory and/or
swap space. Note that most of the paging/swapping solutions are also ways to conserve
available memory. These include:
•Limiting the number of programs
•Using shared libraries
•Adding more memory
•Decreasing the size of system tables
However, the most dramatic way to increase the amount of virtual memory is to add
more swap space. See “Swap Space” on page 138.
Operating System Tuning
The process of tuning the operating system is not difficult, but it should be approached
carefully. Make complete notes of your actions in case you need to reverse your changes
later on. Understand what you are going to do before you do it, and do not expect
miraculous results; IRIX has been engineered to provide the best possible performance
under all but the most extreme conditions. Software that provides a great deal of graphics
manipulation or data manipulation also carries a great deal of overhead for the system,
and can seriously affect the speed of an otherwise robust system. No amount of tuning
can change these situations.

Operating System Tuning
231
Operating System Tuning Procedure
To tune a system, you first monitor its performance with various system utilities as
described in “Monitoring the Operating System” on page 213. This section describes the
steps to take when you are tuning a system.
1. Determine the general area that needs tuning (for example, disk I/O or the CPU)
and monitor system performance using utilities such as sar and osview. If you have
not already done so, see “Monitoring the Operating System” on page 213.
2. Pinpoint a specific area and monitor performance over a period of time. Look for
numbers that show large fluctuation or change over a sustained period; don’t be too
concerned if numbers occasionally go beyond the maximum.
3. Modify one value/characteristic at a time (for example, change a parameter, add a
controller) to determine its effect. It’s good practice to document any changes in a
system notebook.
4. Use the systune(1M) command to change parameter values or make the change in
the master.d directory structure if the variable is not tunable through systune.
Remake the kernel and reboot if necessary.
5. Remeasure performance and compare the before and after results. Then evaluate the
results (is system performance better?) and determine whether further change is
needed.
Keep in mind that the tuning procedure is more an art than a science; you may need to
repeat the above steps as necessary to fine tune your system. You may find that you’ll
need to do more extensive monitoring and testing to thoroughly fine-tune your system.
Operating System Tuning: Finding Parameter Values
Before you can tune your system, you need to know the current values of the tunable
parameters. To find the current value of your kernel parameters, use the systune(1M)
command. This command, entered with no arguments, prints the current values of all
tunable parameters on your system. For complete information on this command, see the
systune(1M) reference page.

232
Chapter 10: System Performance Tuning
Operating System Tuning: Changing Parameters and Reconfiguring
the System
After determining the parameter or parameters to adjust, you must change the
parameters and you may need to reconfigure the system for the changes to take effect.
The systune(1M) utility tells you when you make parameter changes if you must reboot
to activate those changes. There are several steps to the reconfiguration procedure:
1. Back up the system.
2. Copy your existing kernel to unix.save.
3. Make your changes.
4. Reboot your system, if necessary.
Backing Up the System
Before you reconfigure the system by changing kernel parameters, it’s a good idea to
have a current and complete backup of the system. See the IRIX Admin: Backup, Security,
and Accounting guide.
Caution: Always back up the entire system before tuning.
Copying the Kernel
After determining the parameter you need to change (for example, you need to increase
nproc because you have a large number of users), you must first back up the system and
the kernel. Give the command:
cp /unix /unix.save
This command creates a safe copy of your kernel. Through the rest of this example, this
is called your old saved kernel. If you make this copy, you can always go back to your
old saved kernel if you are not satisfied with the results of your tuning.
Changing a Parameter
Once your backups are complete, you can execute the systune(1M) command. Note that
you can present new values to systune in either hexadecimal or decimal notation. Both
values are printed by systune.

Operating System Tuning
233
An invocation of systune(1M) to increase nproc looks something like this:
systune -i
Updates will be made to running system and /unix.install
systune-> nproc
nproc = 400 (0x190)
systune-> nproc = 500
nproc = 400 (0x190)
Do you really want to change nproc to 500 (0x1f4)? (y/n) y
In order for the change in parameter nproc to become effective
/unix.install must be moved to /unix and the system rebooted
systune-> quit
Then reboot your system. Also, be sure to document the parameter change you made in
your system log book.
Caution: When you issue the reboot command, the system overwrites the current kernel
(/unix) with the kernel you have just created (/unix.install). This is why you should always
copy the current kernel to a safe place before rebooting.
Creating and Booting a New Kernel With autoconfig
The systune command creates a new kernel automatically. However, if you changed
parameters without using systune, or if you have added new system hardware (such as a
new CPU board on a multiprocessor system), you must use autoconfig to generate a new
kernel.

234
Chapter 10: System Performance Tuning
The autoconfig command uses some environment variables. These variables are described
in detail in the autoconfig(1M) reference page. If you have any of the following variables
set, you may need to unset them before running autoconfig:
•UNIX
•SYSGEN
•BOOTAREA
•SYSTEM
•MASTERD
•STUNEFILE
•MTUNEDIR
•WORKDIR
To build a new kernel after reconfiguring the system, follow these steps:
1. Become the superuser by giving the command:
su
2. Make a copy of your current kernel with the command:
cp /unix /unix.save
3. Give the command:
/etc/autoconfig -f
This command creates a new kernel and places it in the file /unix.install.
4. Reboot your system with the command:
reboot
Caution: When you issue the reboot command, the system overwrites the current kernel
(/unix) with the kernel you have just created (/unix.install). This is why you should always
copy the current kernel to a safe place before rebooting.

Recovering From an Unbootable Kernel
235
An autoconfiguration script, found in /etc/rc2.d/S95autoconfig, runs during system
startup. This script asks you if you would like to build a new kernel under the following
conditions:
•A new board has been installed for which no driver exists in the current kernel.
•There have been changes to object files in /var/sysgen/mtune, master files in
/var/sysgen/master.d, or the system files in /var/sysgen/system. This is determined by
the modification dates on these files and the kernel.
If any of these conditions is true, the system prompts you during startup to reconfigure
the operating system:
Automatically reconfigure the operating system? y
If you answer y to the prompt, the script runs lboot and generates /unix.install with the
new image.You can disable the autoconfiguration script by renaming
/etc/rc2.d/S95autoconfig to something else that does not begin with the letter S, for
example, /etc/rc2.d/wasS95autoconfig.
Recovering From an Unbootable Kernel
The following procedure explains how to recover from an unbootable /unix, and
describes how to get a viable version of the software running after an unsuccessful
reconfiguration attempt. If you use the systune(1M) utility, you should never have to use
this information, since systune does not allow you to set your parameters to unworkable
values.
1. If the system fails to reboot, try to reboot it again. If it still fails, interrupt the boot
process and direct the boot PROM to boot from your old saved kernel (unix.save).
2. Press the Reset button.You see the System Maintenance Menu:
System Maintenance Menu
1) Start System.
2) Install System Software.
3) Run Diagnostics.
4) Recover System.
5) Enter Command Monitor.
3. Choose option 5 to enter the Command Monitor. You see:
Command Monitor. Type "exit" to return to the menu.
>>

236
Chapter 10: System Performance Tuning
4. Now at the >> prompt, tell the PROM to boot your old saved kernel. The command
is:
boot unix.save
The system boots the old saved kernel.
5. Once the system is running, use the following command to move your old saved
kernel to the default /unix name. This method also keeps a copy of your old saved
kernel in unix.save:
cp /unix.save /unix
Then you can normally boot the system while you investigate the problem with the new
kernel. Try to figure out what went wrong. What was changed that stopped the kernel
from booting? Review the changes that you made.
•Did you increase/decrease a parameter by a large amount? If so, make the change
less drastic.
•Did you change more than one parameter? If so, make a change to only one
parameter at a time.
Multiple Page Sizes
The operating system supports multiple page sizes, which can be tuned as described in
this section.
Recommended Page Sizes
The page sizes supported depend on the base page size of the system. The base page size
can be obtained by using the getpagesize() system call. Currently IRIX supports two base
page sizes, 16K and 4K. On systems with 16K base page size the following tunable page
sizes are supported, 16K, 64K, 256K, 1M, 4M, 16M. On systems with 4K base page size,
the following tunable page sizes are supported, 4K, 16K, 256K, 1M, 4M, 16M. In general
for most applications 4K, 16K, and 64K page sizes are sufficient to eliminate tlbmiss
overhead.

Multiple Page Sizes
237
Tunable Parameters for Coalescing
The IRIX kernel tries to keep a percentage of total free memory in the system at a certain
page size. It periodically tries to coalesce a group of adjacent pages to form a large page.
The following tunable parameters specify the upper limit for the number of free pages at
a particular page size. Systems that do not need large pages can set these parameters to
zero. The tunable parameters are:
•percent_totalmem_16k_pages
•percent_totalmem_64k_pages
•percent_totalmem_256k_pages
•percent_totalmem_1m_pages
•percent_totalmem_4m_pages
•percent_totalmem_16m_pages
The parameters specify the percentage of total memory that can be used as an upper limit
for the number of pages in a specific page size. Thus setting
percent_totalmem_64k_pages to 20 implies that the coalescing mechanism tries to limit
the number of free 64K pages to 20% of total memory in the system. These parameters
can be tuned dynamically at run time. Note that very large pages (>= 1 MB) are harder
to coalesce dynamically during run time on a busy system. It is recommended these
tunables be set during boot time in such cases. Setting these tunables to a high value can
result in high coalescing activity. If the system runs low on memory, the large pages can
be split into smaller pages as needed.

238
Chapter 10: System Performance Tuning
Reserving Large Pages
It is hard to coalesce very large pages (>= 1 MB) at run time due to fragmentation of
physical memory. Applications that need such pages can set tunable parameters to
reserve large pages during boot time. They are specified as the number of pages. The
tunable parameters are:
•nlpages_64k
•nlpages_256k
•nlpages_1m
•nlpages_4m
•nlpages_16m
Thus setting nlpages_4m to 4 results in the system reserving four 4 MB pages during boot
time. If the system runs low on memory, the reserved pages can be split into smaller
pages for use by other applications. The command osview can be used to view the number
of free pages available at a particular page size (see osview(1)). The default value for all
these parameters is zero. Refer to “nlpages_64k” on page 273 for additional information.

The following appendices are provided:
•Appendix A: IRIX Kernel Tunable Parameters
•Appendix B: Troubleshooting System Configuration Using System Error
Messages
•Appendix C: Application Tuning
•Appendix D: IRIX Directories and Files
•Appendix E: Encapsulated PostScript File v.3.0 vs. PostScript File Format
•Appendix F: Bibliography and Suggested Reading
Appendices
Chapter 11


241
Appendix A
A. IRIX Kernel Tunable Parameters
This appendix describes the tunable parameters that define kernel structures. These
structures keep track of processes, files, and system activity. Many of the parameter
values are specified in the files found in /var/sysgen/mtune and /var/sysgen/master.d.
If the system does not respond favorably to your tuning changes, you may want to return
to your original configuration or continue making changes to related parameters. An
unfavorable response to your tuning changes can be as minor as the system not gaining
the hoped-for speed or capacity, or as major as the system becoming unable to boot or
run. This generally occurs when parameters are changed to a great degree. Simply
maximizing a particular parameter without regard for related parameters can upset the
balance of the system to the point of inoperability. For complete information on the
proper procedure for tuning your operating system, read Chapter 10, “System
Performance Tuning.”
The rest of this appendix describes the more important tunable parameters according to
function. Related parameters are grouped into sections. These sections include:
•General tunable parameters. See “General Parameters” on page 243.
•System limits tunable parameters. See “System Limits Parameters” on page 251.
•Resource limits tunable parameters. See “Resource Limits Parameters” on page 254.
•Paging tunable parameters. See “Paging Parameters” on page 264.
•IPC tunable parameters–including interprocess communication messages,
semaphores, and shared memory. See “IPC Parameters” on page 273, “IPC
Messages Parameters” on page 275, “IPC Semaphores Parameters” on page 279,
and “IPC Shared Memory Parameters” on page 283.
•Streams tunable parameters. See “Streams Parameters” on page 285.
•Signal parameters. See “Signal Parameter” on page 288.
•Dispatch parameters. See “Dispatch Parameters” on page 288.
•Extent File System (EFS) parameters. See “File System Parameters” on page 291.
•Loadable driver parameters. See “Loadable Drivers Parameters” on page 294.

242
Appendix A: IRIX Kernel Tunable Parameters
•CPU actions parameters. See “CPU Actions Parameters” on page 296.
•Switch parameters. See “Switch Parameters” on page 297.
•Timer parameters. See “Timer Parameters” on page 304.
•Network File System (NFS) parameters. See “NFS Parameters” on page 305.
•Socket parameters. See “Socket Parameters” on page 309.
•Indy Video parameters. See “VINO Parameters” on page 316.
•Large Page parameters. See “Large Page Parameters” on page 317.
•Extended Accounting parameters. See “Extended Accounting Parameters” on page
319.
•NUMA parameters. See “NUMA Parameters” on page 322.
•Page Replication parameters. See “Page Replication Parameters” on page 330.
•Migration Memory Queue parameters. See “Migration Memory Queue Parameters”
on page 331.
Each section begins with a short description of the activities controlled by the parameters
in that section, and each listed parameter has a description that may include:
•Name—the name of the parameter.
•Description—a description of the parameter, including the file in which the
parameter is specified, and the formula, if applicable.
•Value—the default setting and, if applicable, a range. Note that the value given for
each parameter is usually appropriate for a single-user graphics workstation.
Values may be presented in either hex or decimal notation.
•When to Change—the conditions under which it is appropriate to change the
parameter.
•Notes—other pertinent information, such as error messages.
Note that the tunable parameters are subject to change with each release of the system.

General Parameters
243
General Parameters
The following group of tunable parameters specifies the size of various system
structures. These are the parameters you will most likely change when you tune a
system.
•cachefs_readahead—specifies the number of readahead blocks for the filesystem.
•cachefs_max_threads—specifies the maximum number of asynchronous I/O
daemons per cachefs mount.
•nbuf—specifies the number of buffer headers in the filesystem buffer cache.
•callout_himark—specifies the high water mark for callouts
•ncallout—specifies the initial number of callouts
•reserve_ncallout—specifies the number of reserved callouts
•ncsize—specifies the name cache size.
•ndquot—used by the disk quota system.
•nproc—specifies the number of user processes allowed at any given time.
•maxpmem—specifies the maximum physical memory address.
•syssegsz—specifies the maximum number of pages of dynamic system memory.
•maxdmasz—specifies the maximum DMA transfer in pages.
•mbmaxpages—specifies the maximum number of one-page clusters used in network
buffers.
•ecc_recover_enable—specifies the system response to multibit errors.
•vnode_free_ratio—specifies the ratio of free vnodes to in-use vnodes.
•utrace_bufsize—selects the number of 48 byte utrace entries stored for each CPU.
•dump_level—specifies the dump level.

244
Appendix A: IRIX Kernel Tunable Parameters
cachefs_readahead
Description This parameter specifies the number of blocks to read ahead of the
current read block in the filesystem. The blocks are read asynchronously.
Value Default: 1 (0x1)
Range: 0 - 10
cachefs_max_threads
Description This parameter specifies the maximum number of asynchronous I/O
daemons that can be run per cachefs mount.
Value Default: 5 (0x5)
Range: 1 - 10
nbuf
Description The nbuf parameter specifies the number of buffer headers in the
filesystem buffer cache. The actual memory associated with each buffer
header is dynamically allocated as needed and can be of varying size,
currently 1 to 128 blocks (512 to 64KB).
The system uses the filesystem buffer cache to optimize filesystem I/O
requests. The buffer memory caches blocks from the disk, and the
blocks that are used frequently stay in the cache. This helps avoid
excess disk activity.
Buffers are used only as transaction headers. When the input or output
operation has finished, the buffer is detached from the memory it
mapped and the buffer header becomes available for other uses.
Because of this, a small number of buffer headers is sufficient for most
systems. If nbuf is set to 0, the system automatically configures nbuf for
average systems. There is little overhead in making it larger for
non-average systems.
The nbuf parameter is defined in /var/sysgen/mtune.

General Parameters
245
Value Default: 0 (Automatically configured if set to 0)
Formula: 100 + (total number of pages of memory/40)
32-bit Range: up to 6000
64-bit Range: up to 250000
When To Change
The automatic configuration is adequate for average systems. If you see
dropping “cache hit” rates in sar and osview output, increase this
parameter. Also, if you have directories with a great number of files
(over 1000), you may wish to raise this parameter.
The recommended initial value for large (64 processors or greater)
systems is 2000.
callout_himark
Description The callout_himark parameter specifies the maximum number of callout
table entries system-wide. The callout table is used by device drivers to
provide a timeout to make sure that the system does not hang when a
device does not respond to commands.
This parameter is defined in /var/sysgen/mtune and has the following
formula:
nproc + 32
where:
nproc is the maximum number of processes, system-wide.
Value Default: 0 (Automatically configured if set to 0)
Formula: nproc + 32
Range: 42 - 1100
When to Change
Increase this parameter if you see console error messages indicating that
no more callouts are available.

246
Appendix A: IRIX Kernel Tunable Parameters
ncallout
Description The ncallout parameter specifies the number of callout table entries at
boot time. The system will automatically allocate one new callout entry
if it runs out of entries in the callout table. However, the maximum
number of entries in the callout table is defined by the callout_himark
parameter.
Value Default: 40
Range: 20–1000
When to Change
Change ncallout if you are running an unusually high number of device
drivers on your system. Note that the system automatically allocates
additional entries when needed, and releases them when they are no
longer needed.
reserve_ncallout
Description The reserve_ncallout parameter specifies the number of reserved callout
table entries. These reserved table entries exist for kernel interrupt
routines when the system has run out of the normal callout table entries
and cannot allocate additional entries.
Value Default: 5
Range: 0-30
ncsize
Description This parameter controls the size of the name cache. The name cache is
used to allow the system to bypass reading directory names out of the
main buffer cache. A name cache entry contains a directory name, a
pointer to the directory’s in-core inode and version numbers, and a
similar pointer to the directory’s parent directory in-core inode and
version number.
Value Default: 0 (Automatically configured if set to 0)
Range: 268-6200

General Parameters
247
ndquot
Description The ndquot parameter controls disk quotas.
Value Default: 0 (Automatically configured if set to 0)
Range: 268-6200
nproc
Description The nproc parameter specifies the number of entries in the system
process (proc) table. Each running process requires an in-core proc
structure. Thus, nproc is the maximum number of processes that can
exist in the system at any given time.
The default value of nproc is based on the amount of memory on your
system. To find the currently auto-configured value of nproc, use the
systune(1M) command.
The nproc parameter is defined in /var/sysgen/mtune.
Value Default: 0 (Automatically configured if set to 0)
Range: 30–10000
When to Change
Increase this parameter if you see an overflow in the sar -v output for the
proc -sz ov column or you receive the operating system message:
no more processes
This means that the total number of processes in the system has reached
the current setting. If processes are prevented from forking (being
created), increase this parameter. A related parameter is maxup.
The recommended initial value for large (64 processors or greater)
systems is 8000.

248
Appendix A: IRIX Kernel Tunable Parameters
Notes If a process cannot fork, make sure that this is system-wide, and not just
a user ID problem (see the maxup parameter).
If nproc is too small, processes that try to fork receive the operating
system error:
EAGAIN: No more processes
The shell also returns a message:
fork failed: too many processes
If a system daemon such as sched,vhand,init, or bdflush can’t allocate a
process table entry, the system halts and displays:
No process slots
maxpmem
Description The maxpmem parameter specifies the amount of physical memory (in
pages) that the system can recognize. The page size is 4 Kilobytes for 32
bit IRIX version 5 or 6 kernels and 16 Kilobytes for 64 bit IRIX version 6
kernels. If set to zero (0), the system will use all available pages in
memory. A value other than zero defines the physical memory size (in
pages) that the system will recognize.
This parameter is defined in /var/sysgen/mtune.
Value Default: 0 (Automatically configured if set to 0)
Range: 1024 pages—total amount of memory
When to Change
You don’t need to change this parameter, except when benchmarks
require a specific system memory size less than the physical memory
size of the system. This is primarily useful to kernel developers. You can
also boot the system with the command:
maxpmem = memory_size
added on the boot command line to achieve the same effect.

General Parameters
249
syssegsz
Description This is the maximum number of pages of dynamic system memory.
Value Default: 0 (Autoconfigured if set to 0)
32-bit Range: 0x2000 - 0x20000
64-bit Range: 0x2000 - 0x10000000
When to Change
Increase this parameter correspondingly when maxdmasz is increased, or
when you install a kernel driver that performs a lot of dynamic memory
allocation.
The recommended initial value for large (64 processors or greater)
systems is 0xfe800.
maxdmasz
Description The maximum DMA transfer expressed in pages of memory. This
amount must be less than the value of syssegsz and maxpmem.
Value Default: 1025 (32-bit Kernels)
Default: 257 (64-bit Kernels)
32-bit Range: 1 - syssegsz (maximum 0x20000)
64-bit Range: 1 - syssegsz (maximum 0x10000000)
When to Change
Change this parameter when you need to be able to use very large read
or write system calls, or other system calls that perform large scale
DMA. This situation typically arises when using optical scanners, film
recorders or some printers.
Note that the actual DMA transfer size is one less page than the number
of pages set in this parameter. Thus, to allow a full DMA transfer of 16
Megabytes (1024 pages), set this parameter to 1025.
The recommended initial value for large (64 processors or greater)
systems is 0x2001.

250
Appendix A: IRIX Kernel Tunable Parameters
mbmaxpages
Description The maximum number of single page clusters that can be allocated to
network buffers. This limits the total memory that network buffers
(mbufs) can consume.
Value Default: 1/8 of physical memory
Range: Default - Total System Memory (in pages)
When to Change
For most workstations and small servers the default is sufficient. For
very large systems larger values are appropriate. A 0 value tells the
kernel to set the value (1/8 of physical memory) based on the amount of
physical memory configured in the hardware.
ecc_recover_enable
Description This parameter, when set to 0, directs the system not to attempt to
recover from multibit errors. If set greater than 0, the parameter value is
taken as a number of seconds. The system is directed to attempt
recovery, but not in the event of more than 32 errors in each number of
seconds specified by this parameter.
Value Default: 60 seconds (0x3c)
vnode_free_ratio
Description The ratio of free vnodes to vnodes in use that is to be maintained by the
kernel.
Value Default: 2:1
Range: 1:1 to 16:1, or 0 to auto-configure
When to Change
For most workstations and servers the default, auto-configured value is
sufficient. Increase this parameter if you have an application that opens
and closes many files frequently. When a program is opening and
closing and reopening many files, the system may overflow the file
buffer cache, even though the file contents are still in memory. Then the
files will be read in again, wasting disk activity and time. Increasing this
parameter increases the number of files that can be “remembered” by
IRIX.

System Limits Parameters
251
utrace_bufsize
Description utraces are a lightweight tracing mechanism used to collect kernel
debugging information. This parameter selects the number of 48 byte
utrace entries stored for each CPU. Setting this parameter to 0 disables
trace collection. Only buffer sizes of 0 and 2048 are supported.
Value Default: 0
Range: 0-0x7fffffff
The required value for large (64 processors or greater) systems is 2048
(0x800).
dump_level
Description This parameter specifies the dump level. Setting this parameter to 0
dumps only putbuf during a panic. 1 also dumps static kernel pages; 2
also dumps dynamic kernel pages; 3 also dumps buffer cache pages; and
4 also dumps free pages.
Value Default: 0
Range: 0-4
The recommended initial value for large (64 processors or greater)
systems is 3.
System Limits Parameters
IRIX has configurable parameters for certain system limits. For example, you can set
maximum values for each process (its core or file size), the number of groups per user,
the number of resident pages, and so forth. These parameters are listed below. All
parameters are set and defined in /var/sysgen/mtune.
•maxup—the number of processes per user
•ngroups_max—the number of groups to which a user may belong
•maxwatchpoints—the maximum number of “watchpoints’’ per process.
•nprofile—amount of disjoint text space to be profiled
•maxsymlinks—specifies the maximum number of symlinks expanded in a pathname.

252
Appendix A: IRIX Kernel Tunable Parameters
maxup
Description The maxup parameter defines the number of processes allowed per user
login. This number should always be at least five processes smaller than
nproc.
Value Default: 150 processes
Range: 15–10000 (but never larger than nproc - 5)
When to Change
Increase this parameter to allow more processes per user. In a heavily
loaded time-sharing environment, you may want to decrease the value
to reduce the number of processes per user.
The recommended initial value for large (64 processors or greater)
systems is 8000.
ngroups_max
Description The ngroups_max parameter specifies the maximum number of multiple
groups to which a user may simultaneously belong.
The constants NGROUPS_UMIN <= ngroups_max <=
NGROUPS_UMAX are defined in </usr/include/sys/param.h>.
NGROUPS_UMIN is the minimum number of multiple groups that can
be selected at lboot time. NGROUPS_UMAX is the maximum number of
multiple groups that can be selected at lboot time and is the number of
group-id slots for which space is set aside at compile time. NGROUPS,
which is present for compatibility with networking code (defined in
</usr/include/sys/param.h>), must not be larger than ngroups_max.
Value Default: 16
Range: 0-32
When to Change
The default value is adequate for most systems. Increase this parameter
if your system has users who need simultaneous access to more than 16
groups.

System Limits Parameters
253
maxwatchpoints
Description maxwatchpoints sets the maximum number of watchpoints per process.
Watchpoints are set and used via the proc(4) filesystem. This parameter
specifies the maximum number of virtual address segments to be
watched in the traced process. This is typically used by debuggers.
Value Default: 100
Range: 1-1000
When to Change
Raise maxwatchpoints if your debugger is running out of watchpoints.
nprofile
Description nprofile is the maximum number of disjoint text spaces that can be
profiled using the sprofil(2) system call. This is useful if you need to
profile programs using shared libraries or profile an address space using
different granularities for different sections of text.
Value Default: 100
Range: 100-200
When to Change
Change nprofile if you need to profile more text spaces than are currently
configured.
maxsymlinks
Description This parameter defines the maximum number of symbolic links that will
be followed during filename lookups (for example, during the open(2)
or stat(2) system calls) before ceasing the lookup. This limit is required
to prevent loops where a chain of symbolic links points back to the
original filename.
Value Default: 30
Range: 0-50
When to Change
Change this parameter if you have pathnames with more than 30
symbolic links.

254
Appendix A: IRIX Kernel Tunable Parameters
Resource Limits Parameters
You can set numerous limits on a per-process basis by using getrlimit(2), setrlimit(2), and
limit, the shell built-in command. These limits are inherited, and the original values are
set in /var/sysgen/mtune. These limits are different from the system limits listed above in
that they apply only to the current process and any child processes that may be spawned.
To achieve similar effects, you can also use the limit command within the Bourne, C, and
Korn shells (/bin/sh,/bin/csh, and /bin/ksh).
Each limit has a default and a maximum. Only the superuser can change the maximum.
Each resource can have a value that turns off any checking RLIM_INFINITY. The default
values are adequate for most systems.
The following parameters are associated with system resource limits:
•ncargs—the number of bytes of arguments that may be passed during an exec(2)
call.
•rlimit_core_cur—the maximum size of a core file.
•rlimit_core_max—the maximum value rlimit-core-cur may hold.
•rlimit_cpu_cur—the limit for maximum CPU time available to a process.
•rlimit_cpu_max—the maximum value rlimit-cpu-current may hold.
•rlimit_data_cur—the maximum amount of data space available to a process.
•rlimit_data_max—the maximum value rlimit-data-cur may hold.
•rlimit_fsize_cur—the maximum file size available to a process.
•rlimit_fsize_max—the maximum value rlimit-fsize-cur may hold.
•rlimit_nofile_cur—the maximum number of file descriptors available to a process.
•rlimit_nofile_max—the maximum value rlimit-nofile-cur may hold.
•rlimit_rss_cur—the maximum resident set size available to a process.
•rlimit_rss_max—the maximum value rlimit-rss-cur may hold.
•rlimit_stack_cur—the maximum stack size for a process.
•rlimit_stack_max—the maximum value rlimit-stack-cur may hold.
•rlimit_vmem_cur—the maximum amount of virtual memory for a process.
•rlimit_vmem_max—the maximum value rlimit-vmem-cur may hold.

Resource Limits Parameters
255
•rsshogfrac—the percentage of memory allotted for resident pages.
•rsshogslop—the number of pages above the resident set maximum that a process
may use.
•shlbmax—the maximum number of shared libraries with which a process can link.
ncargs
Description The ncargs parameter specifies the maximum size of arguments in bytes
that may be passed during an exec(2) system call.
This parameter is specified in /var/sysgen/mtune.
Value Default: 20480
Range: 5120–262144
When to Change
The default value is adequate for most systems. Increase this parameter
if you get the following message from exec(2), shell(1), or make(1):
E2BIG arg list too long
Notes Setting this parameter too large wastes memory (although this memory
is pageable) and may cause some programs to function incorrectly. Also
note that some shells may have independent limits smaller than ncargs.
rlimit_core_cur
Description The current limit to the size of core image files for the given process.
Value Default: 0x7fffffffffffffff (9223372036854775807 bytes)
Range: 0–0x7fffffffffffffff
When to change
Change this parameter when you want to place a cap on core file size.

256
Appendix A: IRIX Kernel Tunable Parameters
rlimit_core_max
Description The maximum limit to the size of core image files.
Value Default: 0x7fffffffffffffff (9223372036854775807 bytes)
Range: 0–0x7fffffffffffffff
When to change
Change this parameter when you want to place a maximum restriction
on core file size. rlimit_core_cur cannot be larger than this value.
rlimit_cpu_cur
Description The current limit to the amount of CPU time in seconds that may be used
in executing the process.
Value Default: 0x7fffffffffffffff (9223372036854775807 seconds)
Range: 0–0x7fffffffffffffff
When to change
Change this parameter when you want to place a cap on CPU usage.
rlimit_cpu_max
Description The maximum limit to the amount of CPU time that may be used in
executing a process.
Value Default: 0x7fffffffffffffff (9223372036854775807 minutes)
Range: 0–0x7fffffffffffffff
When to change
Change this parameter when you want to place a maximum restriction
on general CPU usage.

Resource Limits Parameters
257
rlimit_data_cur
Description The current limit to the data size of the process.
Value Default: 0 (auto-configured to rlimit_vmem_cur ∗ NBPP (0x20000000))
Range: 0–0x7fffffffffffffff
When to change
Change this parameter when you want to place a cap on data segment
size.
The recommended initial value for large (64 processors or greater)
systems is (0x800000000) 11.
rlimit_data_max
Description The maximum limit to the size of data that may be used in executing a
process.
Value Default: 0 (auto-configured to rlimit_vmem_cur ∗ NBPP (0x20000000))
Range: 0–0x7fffffffffffffff
When to change
Change this parameter when you want to place a maximum restriction
on the size of the data segment of any process.
The recommended initial value for large (64 processors or greater)
systems is (0x800000000) 11.
rlimit_fsize_cur
Description The current limit to file size on the system for the process.
Value Default: 0x7fffffffffffffff (9223372036854775807 bytes)
Range: 0–0x7fffffffffffffff
When to change
Change this parameter when you want to place a limit on file size.

258
Appendix A: IRIX Kernel Tunable Parameters
rlimit_fsize_max
Description The maximum limit to file size on the system.
Value Default: 0x7fffffffffffffff (9223372036854775807 bytes)
Range: 0–0x7fffffffffffffff
When to change
Change this parameter when you want to place a maximum size on all
files.
rlimit_nofile_cur
Description The current limit to the number of open file descriptors that may be used
in executing the process.
Value Default: 200
Range: 40–0x7fffffffffffffff
When to change
Change this parameter when you want to place a cap on the number of
open file descriptors.
rlimit_nofile_max
Description The maximum limit to the number of open file descriptors that may be
used in executing a process.
Value Default: 2500
Range: 0–0x7fffffffffffffff
When to change
Change this parameter when you want to place a maximum restriction
on the number of open file descriptors.

Resource Limits Parameters
259
rlimit_rss_cur
Description The current limit to the resident set size (the number of pages of memory
in use at any given time) that may be used in executing the process. This
limit is the larger of the results of the following two formulae:
physical_memory_size - 4 MB
or
physical_memory_size ∗ 9/10
Value Default: 0 (Automatically configured if set to 0)
Range: 0–(rlimit_vmem_cur ∗ NBPP) (0x7fffffffffffffff)
When to change
Change this parameter when you want to place a cap on the resident set
size of a process.
The recommended initial value for large (64 processors or greater)
systems is (0x800000000) 11.
rlimit_rss_max
Description The maximum limit to the resident set size that may be used in executing
a process.
Value Default: (rlimit_vmem_cur ∗ NBPP) (0x20000000)
Range: 0–(rlimit_vmem_cur ∗ NBPP) (0x7fffffffffffffff)
When to change
Change this parameter when you want to place a maximum restriction
on resident set size.
The recommended initial value for large (64 processors or greater)
systems is (0x800000000) 11.

260
Appendix A: IRIX Kernel Tunable Parameters
rlimit_stack_cur
Description The current limit to the amount of stack space that may be used in
executing the process.
Value Default: 64 MB (0x04000000)
Range: 0–0x7fffffffffffffff)
When to change
Change this parameter when you want to place a limit on stack space
usage.
The recommended initial value for large (64 processors or greater)
systems is (0x800000000) 11.
rlimit_stack_max
Description The maximum limit to the amount of stack space that may be used in
executing a process.
Value Default: rlimit_vmem_cur ∗ NBPP (0x20000000)
Range: 0–0x7fffffffffffffff
When to change
Change this parameter when you want to place a maximum restriction
on stack space usage.
The recommended initial value for large (64 processors or greater)
systems is (0x800000000) 11.

Resource Limits Parameters
261
rlimit_vmem_cur
Description The current limit to the amount of virtual memory that may be used in
executing the process.
Value Default: 0 (auto-configured to rlimit_vmem_cur ∗ NBPP (0x20000000))
Range: 0–0x7fffffffffffffff
When to change
Change this parameter when you want to place a cap on virtual memory
usage.
The recommended initial value for large (64 processors or greater)
systems is (0x800000000) 11.
rlimit_vmem_max
Description The maximum limit to the amount of virtual memory that may be used
in executing a process.
Value Default: 0 (aut-configured to rlimit_vmem_cur ∗ NBPP (0x20000000))
Range: 0–0x7fffffffffffffff
When to change
Change this parameter when you want to place a maximum restriction
on virtual memory usage or if your swap space is larger than the current
parameter value.
The recommended initial value for large (64 processors or greater)
systems is (0x800000000) 11.

262
Appendix A: IRIX Kernel Tunable Parameters
rsshogfrac
Description The number of physical memory pages occupied by a process at any
given time is called its resident set size (RSS). The limit to the RSS of a
process is determined by its allowable memory-use resource limit.
rsshogfrac is designed to guarantee that even if one or more processes are
exceeding their RSS limit, some percentage of memory is always kept
free so that good interactive response is maintained. The percentage of
total memory “hogged” is 100% minus rsshogfac times maximum
memory or 100 MB, whichever is less
Processes are permitted to exceed their RSS limit until either:
•one or more processes exceed their default RSS limit (thereby
becoming an “RSS hog”) and the amount of free memory drops
below rsshogfrac of the total amount of physical memory; or
•the amount of free memory drops below GPGSHI
In either of these cases, the paging daemon runs and trims pages from
all RSS processes exceeding the RSS limit.
The parameter RSSHOGFRAC is expressed as a fraction of the total
physical memory of the system. The default value is 75 percent.
This parameter is specified in /var/sysgen/mtune. For more information,
see the gpgshi,gpgslo, and rsshogslop resource limits.
Value Default: 75% of total memory
Range: 0–100% of total memory
When to Change
The default value is adequate for most systems.
The recommended initial value for large (64 processors or greater)
systems is 99.

Resource Limits Parameters
263
rsshogslop
Description To avoid thrashing (a condition where the computer devotes 100% of its
CPU cycles to swapping and paging), a process can use up to rsshogslop
more pages than its resident set maximum (see “Resource Limits
Parameters” on page 254).
This parameter is specified in /var/sysgen/mtune. For more information,
see the rsshogfrac resource limit.
Value Default: 20
When to Change
The default value is adequate for most systems.
shlbmax
Description The shlbmax parameter specifies the maximum number of shared
libraries with which a process can link.
This parameter is specified in /var/sysgen/mtune.
Value Default: 8
Range: 3–32
When to Change
The default value is adequate for most systems. Increase this parameter
if you see the following message from exec(2):
ELIBMAX cannot link

264
Appendix A: IRIX Kernel Tunable Parameters
Paging Parameters
The paging daemon, vhand, frees up memory as the need arises. This daemon uses a
“least recently used” algorithm to approximate process working sets and writes those
pages out to disks that have not been touched during a specified period of time. The page
size is 4K for 32 bit kernels and 16K for 64 bit kernels. When memory gets exceptionally
tight, vhand may swap out entire processes.
The vhand program reclaims memory by:
•stealing memory from processes that have exceeded their permissible resident set
size maximum, forcing delayed write data buffers out to disk (with bdflush) so that
the underlying pages can be reused
•calling down to system resource allocators to trim back dynamically sized data
structures
•stealing pages from processes in order of lowest-priority process first, and the
least-recently-used page first within that process
•swapping out the entire process
The following tunable parameters determine how often vhand runs and under what
conditions. Note that the default values should be adequate for most applications.
The following parameters are included:
•bdflushr—specifies how many buffers will be written to disk at a time; bdflush
performs flushes of dirty filesystem buffers once per second.
•gpgsmsk—specifies the mask used to determine if a given page may be swapped.
•gpgshi—the number of free pages above which vhand stops stealing pages.
•gpgslo—the number of free pages below which vhand starts stealing pages
•maxlkmem—The maxlkmem parameter specifies the maximum number of physical
pages that can be locked in memory (by mpin(2) or plock(2)) by a non-superuser
process.
•maxsc—the maximum number of pages that may be swapped by the vhand daemon
in a single operation.
•maxfc—the maximum number of pages that will be freed at once.
•maxdc—the maximum number of pages that will be written to disk at once.

Paging Parameters
265
•minarmem—the minimum available resident pages of memory.
•minasmem—the minimum available swappable pages of memory.
•numa_paging_node_freemem_low_threshold—when to trigger a global system memory
accounting procedure to check if vhandfs should be started.
•scache_pool_size—the amount of memory always kept in reserve for use by the
paging daemon.
•tlbdrop—number of clock ticks before a process’ wired entries are flushed.
•vfs_syncr—The rate at which vfs_syncr is run, in seconds.
•maxpglst—The maximum number of pages that can be held in each pageout queue.
•zone_accum_limit—the percentage of memory (in a node on a NUMA system) that
can be accumulated before shaked is kicked off to shake the zone of free memory
back into the global pool.
The following parameters determine page sizes as discussed in this section:
•percent_totalmem_16k_pages
•percent_totalmem_64k_pages
•percent_totalmem_256k_pages
•percent_totalmem_1m_pages
•percent_totalmem_4m_pages
•percent_totalmem_16m_pages
•nlpages_64k
•nlpages_256k
•nlpages_1m
•nlpages_4m
•nlpages_16m

266
Appendix A: IRIX Kernel Tunable Parameters
bdflushr
Description The bdflushr parameter specifies how many buffers will be examined
each time bdflush runs; bdflush performs periodic flushes of dirty
filesystem buffers. It is parallel and similar to vfs_syncr. The bdflush
daemon runs once per second.
This parameter is specified in /var/sysgen/mtune. For more information,
see the autoup kernel parameter.
Value Default: 5
Range: 1–31536000
When to Change
The default value is adequate for most systems.
gpgsmsk
Description The gpgsmsk parameter specifies the mask used to determine if a given
page may be swapped. Whenever the pager (vhand) is run, it decrements
software reference bits for every active page. When a process
subsequently references a page, the counter is reset to the limit (NDREF,
as defined in /usr/include/sys/immu.h). When the pager is looking for
pages to steal back (if memory is in short supply), it takes only pages
whose reference counter has fallen to gpgsmsk or below.
This parameter is specified in /var/sysgen/mtune.
Also see /usr/include/sys/immu.h and /usr/include/sys/tuneable.h and the
gpgshi and gpgslo kernel parameters for more information.
Value Default: 2
Range: 0–7
When to Change
This value is adequate for most systems.
Notes If the value is greater than 4, pages are written to the swap area earlier
than they would be with the default value of gpgsmsk. Thus
swapping/paging may occur before it should, unnecessarily using
system resources.

Paging Parameters
267
gpgshi
Description When the vhand daemon (page handler) is stealing pages, it stops
stealing when the amount of free pages is greater than gpgshi.
In other words, vhand starts stealing pages when there are fewer than
gpgslo free pages in the system. Once vhand starts stealing pages, it
continues until there are gpgshi pages.
If, at boot time, gpgslo and gpgshi are 0, the system sets gpgshi to 8% of
the number of pages of memory in the system, and sets gpgslo to one
half of gpgshi.
This parameter is specified in /var/sysgen/mtune. For more information,
see the kernel parameters gpgsmsk and gpgslo.
Value Default: 0 (automatically configured to 8% of memory if set to 0)
Range: 30 pages – 1/2 of memory
When to Change
This value is adequate for most systems.
The recommended initial value for large (64 processors or greater)
systems is 2000.
Notes If this parameter is too small, vhand cannot supply enough free memory
for system-wide demand.
gpgslo
Description When the vhand daemon (page handler) executes, it won’t start stealing
back pages unless there are fewer than gpgslo free pages in the system.
Once vhand starts stealing pages, it continues until there are gpgshi
pages.
This parameter is specified in /var/sysgen/mtune. For more information,
see the gpgshi and gpgsmsk kernel parameters.
Value Default: 0 (automatically configured to half of gpgshi if set to 0)
Range: 10 pages – 1/2 of memory

268
Appendix A: IRIX Kernel Tunable Parameters
When to Change
This value is adequate for most systems.
The recommended initial value for large (64 processors or greater)
systems is 1000.
Notes If this parameter is too small, vhand does not start swapping pages; thus
entire processes must be swapped. If this parameter is too large, vhand
swaps pages unnecessarily.
maxlkmem
Description The maxlkmem parameter specifies the maximum number of physical
pages that can be locked in memory (by mpin(2) or plock(2)) per
non-superuser process.
This parameter is specified in /var/sysgen/mtune.
Value Default: 2000
Range: 0 pages – 3/4 of physical memory
When to Change
Increase this parameter only if a particular application has a real need to
lock more pages in memory.
On multi-user servers, you may want to decrease this parameter and
also decrease rlimit_vmem_cur.
Notes When pages are locked in memory, the system can’t reclaim those pages,
and therefore can’t maintain the most efficient paging.

Paging Parameters
269
maxfc
Description The maxfc parameter specifies the maximum number of pages that may
be freed by the vhand daemon in a single operation. When the paging
daemon (vhand) starts stealing pages, it collects pages that can be freed
to the general page pool. It collects, at most, maxfc pages at a time before
freeing them. Do not confuse this parameter with gpgshi, which sets the
total number of pages that must be free before vhand stops stealing
pages.
This parameter is specified in /var/sysgen/mtune.
Value Default: 100
Range: 50–100
When to Change
This value is adequate for most systems.
maxsc
Description The maxsc parameter specifies the maximum number of pages that may
be swapped by the vhand daemon in a single operation. When the
paging daemon starts tossing pages, it collects pages that must be
written out to swap space before they are actually swapped and then
freed into the general page pool. It collects at most maxsc pages at a time
before swapping them out.
This parameter is specified in /var/sysgen/mtune.
Value Default: 100
Range: 8–100
When to Change
You may want to decrease this parameter on systems that are swapping
over NFS (Network File System). This is always the case for diskless
systems to increase performance.

270
Appendix A: IRIX Kernel Tunable Parameters
maxdc
Description maxdc is the maximum number of pages which can be saved up and
written to the disk at one time.
Value Default: 100 pages
Range: 1-100
When to Change
If the system is low on memory and consistently paging out user
memory to remote swap space (for example, mounted via NFS),
decrease this parameter by not more than ten pages at a time. However,
this parameter’s setting does not usually make any measurable
difference in system performance.
minarmem
Description This parameter represents the minimum available resident memory that
must be maintained in order to avoid deadlock.
Value Default: 0 (Autoconfigured if set to 0)
When to Change
The automatically configured value of this parameter should always be
correct for each system. You should not have to change this parameter.
minasmem
Description This parameter represents the minimum available swappable memory
that must be maintained in order to avoid deadlock.
Value Default: 0 (Autoconfigured if set to 0)
When to Change
The automatically configured value of this parameter should always be
correct for each system. You should not have to change this parameter.

Paging Parameters
271
numa_paging_node_freemem_low_threshold
Description This parameter specifies when to trigger a global system memory
accounting procedure to check if vhand should be started.
Value Default: 40
scache_pool_size
Description This parameter specifies the amount of memory always kept in reserve
for use by the paging daemon. The value is the number of Kbytes
reserved, which is always rounded up to the next page boundary.
Value Default: 32
When to Change
Use caution when changing this parameter. Setting it too low will result
in memory deadlocks. Setting it too high will waste memory. If the
system panics with the message scache... out of memory, then this
parameter should be increased. Otherwise, you should not have to
change this parameter.
tlbdrop
Description This parameter specifies the number of clock ticks before a process’s
wired entries are flushed.
Value Default: 100
When to Change
If sar indicates a great deal of transaction lookaside buffer (utlbmiss)
overhead in a very large application, you may need to increase this
parameter. In general, the more the application changes the memory
frame of reference in which it is executing, the more likely increasing
tlbdrop will help performance. You may have to experiment somewhat
to find the optimum value for your specific application.

272
Appendix A: IRIX Kernel Tunable Parameters
vfs_syncr
Description This parameter specifies the number of seconds between runs of the
vfs_syncr process.
Value Default: 30
Range: 1 - 31536000 (1 year)
When to Change
Under normal circumstances it is not necessary to change this
parameter.
maxpglst
Description This parameter specifies that can be held in each of the pager’s pageout
queues.
Value Default: 0 (Autoconfigured)
Range: 50 - 1000
zone_accum_limit
Description This parameter specifies the percentage of memory (in a node on a
NUMA system) that can be accumulated before shaked is kicked off to
shake the zone of free memory back into the global pool. This parameter
is set to 30%, which means if the amount of free memory kept in zones
exceeds 30%, shaked is kicked off.
Value Default: 30
Range: 0 - 100

IPC Parameters
273
percent_totalmem_64k_pages
Description This parameter specifies the percentage of total memory that can be
used as an upper limit for the number of 64 KB pages.
Value Default: 0
Range: 0-100 (%)
When to Change
Set dynamically to get 64 KB pages.
The recommended initial value for large (64 processors or greater)
systems is 0.
Note: Other possible values are discussed in “Multiple Page Sizes” on page 236.
nlpages_64k
Description Use this parameter to reserve 64 KB pages at boot time. This increases
the probability of getting large pages in a low memory system.
Value Default: 0
Range: 0-memory_size/64*1024, where memory_size is the total amount
of memory in the system.
When to Change
Not recommended unless absolutely necessary.
Note: Other possible values are discussed in “Multiple Page Sizes” on page 236.
IPC Parameters
The IPC tunable parameters set interprocess communication (IPC) structures. These
structures include IPC messages, specified in /var/sysgen/mtune/msg; IPC semaphores,
specified in /var/sysgen/mtune/sem; and IPC shared memory, specified in
/var/sysgen/mtune/shm.
If IPC (interprocess communication) structures are incorrectly set, certain system calls
will fail and return errors.

274
Appendix A: IRIX Kernel Tunable Parameters
Before increasing the size of an IPC parameter, investigate the problem by using ipcs(1)
to see if the IPC resources are being removed when no longer needed. For example,
shmget returns the error ENOSPC if applications do not remove semaphores, memory
segments, or message queues.
Note that IPC objects differ from most IRIX objects in that they are not automatically
freed when all active references to them are gone. In particular, they are not deallocated
when the program that created them exits.
Table A-1 lists error messages, system calls that cause the error, and parameters to adjust.
Subsequent paragraphs explain the details you need to know before you increase the
parameters listed in this table.
EAGAIN If IPC_NOWAIT is set, msgsnd can return EAGAIN for a number of
reasons:
•The total number of bytes on the message queue exceeds msgmnb.
•The total number of bytes used by messages in the system exceeds
msgseg * msgsz.
•The total number of system-wide message headers exceeds
msgmax.
EINVAL shmget (which gets a new shared memory segment identifier) will fail
with EINVAL if the given size is not within shmmin and shmmax. Since
shmmin is set to the lowest possible value (1), and shmmax is very large,
it should not be necessary to change these values.
Table A-1 System Call Errors and IPC Parameters to Adjust
Message System Call Parameter
EAGAIN msgsnd() see below
EINVAL msgsnd()
shmget()
msgmax
shmmax
EMFILE shmat() sshmseg
ENOSPC semget()
shmget()
msgmni
semmni, semmns,
shmmni

IPC Messages Parameters
275
EMFILE shmat will return EMFILE if it attaches more than sshmseg shared
memory segments. sshmseg is the total number of system-shared
memory segments per process.
ENOSPC shmget will return ENOSPC if:
•shmmni (the system-wide number of shared memory segments) is
too small. However, applications may be creating shared memory
segments and forgetting to remove them. So, before making a
parameter change, use ipcs(1) to get a listing of currently active
shared memory segments.
semget will return ENOSPC if:
•semmni is too small, indicating that the total number of semaphore
identifiers is exceeded.
•semmns (the system-wide number of semaphores) is exceeded. Use
ipcs to see if semaphores are being removed as they should be.
msgget will return ENOSPC if:
•msgmni is too small. Use ipcs to see if message queues are being
removed as they should be.
IPC Messages Parameters
If no one on the system uses or plans to use IPC messages, you may want to consider
excluding this module. The following tunable parameters are associated with
interprocess communication messages (see the msgctl(2) reference page):
•msgmax—specifies the maximum size of a message.
•msgmnb—specifies the maximum length of a message queue.
•msgmni—specifies the maximum number of message queues system-wide.
•msgseg—specifies the maximum number of message segments system-wide.
•msgssz—specifies the size, in bytes, of a message segment.
•msgtql—specifies the maximum number of message headers system-wide.

276
Appendix A: IRIX Kernel Tunable Parameters
msgmax
Description The msgmax parameter specifies the maximum size of a message.
This parameter is specified in /var/sysgen/mtune/msg.
Value Default: 16 ∗ 1024 (0x4000)
Range: 512-0x8000
When to Change
Increase this parameter if the maximum size of a message needs to be
larger. Decrease the value to limit the size of messages.
msgmnb
Description The msgmnb parameter specifies the maximum length of a message
queue.
This parameter is specified in /var/sysgen/mtune/msg.
Value Default: 32 * 1024 (0x8000)
Range: msgmax–1/2 of physical memory
When to Change
Increase this parameter if the maximum number of bytes on a message
queue needs to be longer. Decrease the value to limit the number of bytes
per message queue.
msgmni
Description The msgmni parameter specifies the maximum number of message
queues system-wide.
This parameter is specified in /var/sysgen/mtune/msg.
Value Default: 50
Range: 10–1000

IPC Messages Parameters
277
When to Change
Increase this parameter if you want more message queues on the system.
Decrease the value to limit the message queues.
Notes If there are not enough message queues, a msgget(2) system call that
attempts to create a new message queue returns the error:
ENOSPC: No space left on device
msgseg
Description The msgseg parameter specifies the maximum number of message
segments system-wide. A message on a message queue consists of one
or more of these segments. The size of each segment is set by the msgssz
parameter.
This parameter is specified in /var/sysgen/mtune/msg.
Value Default: 1536
When to Change
Modify this parameter to reserve the appropriate amount of memory for
messages. Increase this parameter if you need more memory for
message segments on the system. Decrease the value to limit the amount
of memory used for message segments.
Notes If this parameter is too large, memory may be wasted (saved for
messages but never used). If this parameter is too small, some messages
that are sent will not fit into the reserved message buffer space. In this
case, a msgsnd(2) system call waits until space becomes available.
msgssz
Description The msgssz parameter specifies the size, in bytes, of a message segment.
Messages consist of a contiguous set of message segments large enough
to accommodate the text of the message. Using segments helps to
eliminate fragmentation and speed the allocation of the message buffers.
This parameter is specified in /var/sysgen/mtune/msg.
Value Default: 8

278
Appendix A: IRIX Kernel Tunable Parameters
When to Change
This parameter is set to minimize wasted message buffer space. Change
this parameter only if most messages do not fit into one segment with a
minimum of wasted space.
If you modify this parameter, you may also need to change the msgseg
parameter.
Notes If this parameter is too large, message buffer space may be wasted by
fragmentation, which in turn may cause processes that are sending
messages to sleep while waiting for message buffer space.
msgtql
Description The msgtql parameter specifies the maximum number of message
headers system-wide, and thus the number of outstanding (unread)
messages. One header is required for each outstanding message.
This parameter is specified in /var/sysgen/mtune/msg.
Value Default: 40
Range: 10–4000
When to Change
Increase this parameter if you require more outstanding messages.
Decrease the value to limit the number of outstanding messages.
Notes If this parameter is too small, a msgsnd(2) system call attempting to send
a message that would put msgtql over the limit waits until messages are
received (read) from the queues.

IPC Semaphores Parameters
279
IPC Semaphores Parameters
If no one on the system uses or plans to use IPC semaphores, you may want to consider
excluding this module.
The following tunable parameters are associated with interprocess communication
semaphores (see the semctl(2) reference page):
•semmni—specifies the maximum number of semaphore identifiers in the kernel.
•semmns—specifies the number of ipc semaphores system-wide.
•semmnu—specifies the number of “undo” structures system-wide.
•semmsl—specifies the maximum number of semaphores per semaphore identifier.
•semopm—specifies the maximum number of semaphore operations that can be
executed per semop(2) system call.
•semume—specifies the maximum number of “undo” entries per undo structure.
•semvmx—specifies the maximum value that a semaphore can have.
•semaem—specifies the adjustment on exit for maximum value.
semmni
Description The semmni parameter specifies the maximum number of semaphore
identifiers in the kernel. This is the number of unique semaphore sets
that can be active at any given time. Semaphores are created in sets; there
may be more than one semaphore per set.
This parameter is specified in /var/sysgen/mtune/sem.
Value Default: 10
When to Change
Increase this parameter if processes require more semaphore sets.
Increasing this parameter to a large value requires more memory to keep
track of semaphore sets. If you modify this parameter, you may need to
modify other related parameters.
The recommended initial value for large (64 processors or greater)
systems is 2000.

280
Appendix A: IRIX Kernel Tunable Parameters
semmns
Description The semmns parameter specifies the number of ipc semaphores
system-wide. This parameter is specified in /var/sysgen/mtune/sem.
Value Default: 60
When to Change
Increase this parameter if processes require more than the default
number of semaphores.
The recommended initial value for large (64 processors or greater)
systems is 2000.
Notes If you set this parameter to a large value, more memory is required to
keep track of semaphores.
semmnu
Description The semmnu parameter specifies the number of “undo” structures
system-wide. An undo structure, which is set up on a per-process basis,
keeps track of process operations on semaphores so that the operations
may be “undone” if the structure terminates abnormally. This helps to
ensure that an abnormally terminated process does not cause other
processes to wait indefinitely for a change to a semaphore.
This parameter is specified in /var/sysgen/mtune/sem.
Value Default: 30
When to Change
Change this parameter when you want to increase/decrease the number
of undo structures permitted on the system. semmnu limits the number
of processes that can specify the UNDO flag in the semop(2) system call
to undo their operations on termination.

IPC Semaphores Parameters
281
semmsl
Description The semmsl parameter specifies the maximum number of semaphores
per semaphore identifier.
This parameter is specified in /var/sysgen/mtune/sem.
Value Default: 25
When to Change
Increase this parameter if processes require more semaphores per
semaphore identifier.
semopm
Description The semopm parameter specifies the maximum number of semaphore
operations that can be executed per semop() system call. This parameter
permits the system to check or modify the value of more than one
semaphore in a set with each semop() system call.
This parameter is specified in /var/sysgen/mtune/sem.
Value Default: 10
When to Change
Change this parameter to increase/decrease the number of operations
permitted per semop() system call. You may need to increase this
parameter if you increase semmsl (the number of semaphore sets), so that
a process can check/modify all the semaphores in a set with one system
call.
The recommended initial value for large (64 processors or greater)
systems is 80.

282
Appendix A: IRIX Kernel Tunable Parameters
semume
Description The semume parameter specifies the maximum number of “undo”
entries per undo structure. An undo structure, which is set up on a
per-process basis, keeps track of process operations on semaphores so
that the operations may be “undone” if it terminates abnormally. Each
undo entry represents a semaphore that has been modified with the
UNDO flag specified in the semop(2) system call.
This parameter is specified in /var/sysgen/mtune/sem.
Value Default: 10
When to Change
Change this parameter to increase/decrease the number of undo entries
per structure. This parameter is related to the semopm parameter (the
number of operations per semop(2) system call).
The recommended initial value for large (64 processors or greater)
systems is 80.
semvmx
Description The semvmx parameter specifies the maximum value that a semaphore
can have.
This parameter is specified in /var/sysgen/mtune/sem.
Value Default: 32767 (maximum value)
When to Change
Decrease this parameter if you want to limit the maximum value for a
semaphore.

IPC Shared Memory Parameters
283
semaem
Description The semaem parameter specifies the adjustment on exit for maximum
value, alias semadj. This value is used when a semaphore value becomes
greater than or equal to the absolute value of semop(2), unless the
program has set its own value.
This parameter is specified in /var/sysgen/mtune/sem.
Value Default: 16384 (maximum value)
When to Change
Change this parameter to decrease the maximum value for the
adjustment on exit value.
IPC Shared Memory Parameters
The following tunable parameters are associated with interprocess communication
shared memory:
•shmmax—specifies the maximum size of an individual shared memory segment.
•shmmin—specifies the minimum shared memory segment size.
•shmmni—specifies the maximum number of shared memory identifiers
system-wide.
•sshmseg—specifies the maximum number of attached shared memory segments per
process.
shmmax
Description The shmmax parameter specifies the maximum size of an individual
shared memory segment.
This parameter is specified in /var/sysgen/mtune/shm.
Value Default: (rlimit_vmem_cur ∗ NBPP) (0x20000000)
32-bit Range: 0x1000 - 0x7fffffff
64-bit Range: 0x1000 - 0x7fffffffffffffff

284
Appendix A: IRIX Kernel Tunable Parameters
When to Change
Keep this parameter small if it is necessary that a single shared memory
segment not use too much memory.
The recommended initial value for large (64 processors or greater)
systems is (0x4000000) 11.
shmmin
Description The shmmin parameter specifies the minimum shared memory segment
size.
This parameter is specified in /var/sysgen/mtune/shm.
Value Default: 1 byte
When to Change
Increase this parameter if you want an error message to be generated
when a process requests a shared memory segment that is too small.
shmmni
Description The shmmni parameter specifies the maximum number of shared
memory identifiers system-wide.
This parameter is specified in /var/sysgen/mtune/shm.
Value 32-bit Default: 100
64-bit Default: 400
Range: 10–1000
When to Change
Increase this parameter by one (1) for each additional shared memory
segment that is required, and also if processes that use many shared
memory segments reach the shmmni limit.
Decrease this parameter if you need to reduce the maximum number of
shared memory segments of the system at any one time. Also decrease
it to reduce the amount of kernel space taken for shared memory
segments.

Streams Parameters
285
sshmseg
Description The sshmseg parameter specifies the maximum number of attached
shared memory segments per process. A process must attach a shared
memory segment before the data can be accessed.
This parameter is specified in /var/sysgen/mtune/shm.
Value Default: 100
Range: 1–SHMMNI
When to Change
Keep this parameter as small as possible to limit the amount of memory
required to track the attached segments.
Increase this parameter if processes need to attach more than the
default number of shared memory segments at one time.
The recommended initial value for large (64 processors or greater)
systems is 250.
Streams Parameters
The following parameters are associated with STREAMS processing:
•nstrpush—maximum number of modules that can be pushed on a stream.
•nstrintr—maximum number.
•strctlsz—maximum size of the ctl part of message.
•strmsgsz—maximum stream message size.
•strholdtime—maximum stream hold time.
•strpmonmax—maximum private monitors.

286
Appendix A: IRIX Kernel Tunable Parameters
nstrpush
Description nstrpush defines the maximum number of STREAMS modules that can
be pushed on a single stream.
Value Default: 9 (0x9)
Range: 9-10
When to Change
Change nstrpush from 9 to 10 modules when you need an extra module.
nstrintr
Description This parameter defines the streams buffers used at interrupt time.
Value Default: 1024 (0x400)
Range: 32-4096
strctlsz
Description strctlsz is the maximum size of the ctl buffer of a STREAMS message. See
the getmsg(2) or putmsg(2) reference pages for a discussion of the ctl
and data parts of a STREAMS message.
Value Default: 1024 (0x400)
When to Change
Change strctlsz when you need a larger buffer for the ctl portion of a
STREAMS message.

Streams Parameters
287
strmsgsz
Description strmsgsz defines the maximum STREAMS message size. This is the
maximum allowable size of the ctl part plus the data part of a message.
Use this parameter in conjunction with the strctlsz parameter described
above to set the size of the data buffer of a STREAMS message. See the
getmsg(2) or putmsg(2) reference pages for a discussion of the ctl and
data parts of a STREAMS message.
Value Default: 0x8000
When to Change
Change this parameter in conjunction with the strctlsz parameter to
adjust the sizes of the STREAMS message as a whole and the data
portion of the message.
strholdtime
Description strholdtime defines the STRHOLDTIME macro in <strsubr.h>. The
purpose of this macro is to cut down on overhead on streams drivers.
This happens at a cost to system latency.
Value Default: 50 (0x32)
Range: 0-1000
strpmonmax
Description strpmonmax defines the maximum number of private streams monitors.
Value Default: 4 (0x4)
Range: 0-1024

288
Appendix A: IRIX Kernel Tunable Parameters
Signal Parameter
The following signal parameter controls the operation of interprocess signals within the
kernel:
•maxsigq—specifies the maximum number of signals that can be queued.
maxsigq
Description The maximum number of signals that can be queued. Normally,
multiple instances of the same signal result in only one signal being
delivered. With the use of the SA_SIGINFO flag, outstanding signals of
the same type are queued instead of being dropped.
Value Default: 64
Range: 32-32767
When to Change
Raise maxsigq when a process expects to receive a great number of
signals and 64 queue places may be insufficient to avoid losing signals
before they can be processed. Change maxsigq to a value appropriate to
your needs.
Dispatch Parameters
One of the most important functions of the kernel is “dispatching” processes. When a
user issues a command and a process is created, the kernel endows the process with
certain characteristics. For example, the kernel gives the process a priority for receiving
CPU time. This priority can be changed by the user who requested the process or by the
Superuser. Also, the length of time (slice-size) that a process receives in the CPU is
adjustable by a dispatch parameter. The Periodic Deadline Scheduler (PDS) is also part
of the dispatch group. The deadline scheduler is invoked via the schedctl(2) system call
in a user program and requires the inclusion of <sys/schedctl.h>. The following
parameters are included in the dispatch group:
•memaff_sched—turns the scheduler’s memory affinity preference on or off.
•runq_dl_refframe—sets a limit on the amount of the reference frame that can be
allocated.

Dispatch Parameters
289
•runq_dl_nonpriv—controls the amount of the reference frame that can be allocated
by non-privileged user processes.
•runq_dl_use—specifies the longest interval that a deadline process may request.
•slice_size—specifies the amount of time a process receives at the CPU.
memaff_sched
Description The memaff_sched parameter turns the scheduler’s memory affinity
preference on or off.
Value Default: 1
Range: 0-1
When to Change
Change this parameter when you want to turn the scheduler’s memory
affinity preference on or off.
runq_dl_maxuse
Description This parameter sets an absolute limit on the amount of the reference
frame (set by the runq_dl_refframe parameter) that can be allocated under
any circumstances.
Value Default: 700
Range: 0-100000
When to Change
If your deadline-scheduled processes require more scheduled CPU time,
increase the value of runq_dl_maxuse and runq_dl_nonpriv.

290
Appendix A: IRIX Kernel Tunable Parameters
runq_dl_nonpriv
Description This parameter controls the amount of the reference frame (set by the
runq_dl_refframe parameter) that can be allocated by non-privileged user
processes.
Value Default: 200
Range: 0-100000
When to change
If your non-privileged deadline processes require more CPU time,
increase this value.
runq_dl_refframe
Description This parameter specifies the longest interval that a deadline process may
request.
Value Default: 1000
Range: 0-100000
When to Change
If you change the values of runq_dl_nonpriv and runq_dl_use, you may
need to change this parameter as well, to expand the reference frame in
which runq_dl_nonpriv and runq_dl_use act.
slice_size
Description slice_size is the default process time slice, expressed as a number of ticks
of the system clock. The frequency of the system clock is expressed by
the constant Hz, which has a value of 100. Thus each unit of slice_size
corresponds to 10 milliseconds. When a process is given control of the
CPU, the kernel lets it run for slice_size ticks. When the time slice expires
or when the process voluntarily gives up the CPU (for example, by
calling pause(2) or by doing some other system call that causes the
process to wait), the kernel examines the run queue and selects the
process with the highest priority that is eligible to run on that CPU.
The slice_size parameter is defined in /var/sysgen/mtune/disp and has the
following formula:
#define slice_size Hz / 30 int slice_size = slice_size

File System Parameters
291
Value Default: 2 for single CPU systems, 10 for multiprocessor systems
Range: 1–100
When to Change
If you use the system primarily for compute-intensive jobs and
interactive response is not an important consideration, you can increase
slice_size. For example, setting slice_size to 10 gives greater efficiency to
the compute jobs, since each time they get control of the CPU, they are
able to run for 100 milliseconds before getting switched out.
In situations where the system runs both compute jobs and interactive
jobs, interactive response time will suffer as you increase the value of
slice_size.
File System Parameters
IRIX filesystems work closely with the operating system kernel, and the following
parameters adjust the kernel’s interface with the filesystem.
The following parameter is defined in the efs group:
•efs_inline—Whether to store symbolic link information in the inode or not.
The following parameters are set in the kernel parameter group, and are used for both EFS
and XFS filesystem tuning. They determine how many pages of memory are clustered
together into a single disk write operation. Adjusting these parameters can greatly
increase filesystem performance. Available parameters include:
•cwcluster—number of commit write pages to cluster in each push.
•dwcluster—number of delayed-write pages to cluster in each push.
•min_file_pages—specifies the minimum number of file pages to keep in the cache
when the memory gets low.
•min_free_pages—specifies the minimum number of free pages when the number of
file pages is above min_file_pages.
•autoup—specifies the age, in seconds, that a buffer marked for delayed write must
be before the bdflush daemon writes it to disk.

292
Appendix A: IRIX Kernel Tunable Parameters
efs_inline
Description If this parameter is set to any value other than 0, any symbolic link data
is stored within a file’s inode, rather than out-of-line.
Value Default: 0
Range: 0-1
When to Change
It should not be necessary to change this variable. Increasing the value
improves the lookup speed of symbolic links to some degree, however
filesystems thus treated cannot be transferred to systems running
releases of IRIX prior to version 5.3.
cwcluster
Description This parameter sets the maximum number of commit write pages to
cluster in each push. This parameters applies to NFS I/O only.
Value Default: 64
When to Change
It should not be necessary to change this parameter. The automatically
configured value is sufficient.
dwcluster
Description This parameter sets the maximum number of delayed-write pages to
cluster in each push.
Value Default: 64
When to Change
It should not be necessary to change this parameter. The automatically
configured value is sufficient.

File System Parameters
293
min_file_pages
Description This parameter sets the minimum number of file pages to keep in the
cache when memory gets low. It is autoconfigured to 3% of the system’s
memory if it is 0. When setting this parameter, remember that the page
size is 4K in 32-bit kernels and 16K in 64-bit kernels.
Value Default: 0
When to Change
It should not be necessary to change this parameter. The automatically
configured value is sufficient.
min_free_pages
Description This parameter sets the minimum number of free pages when the
number of file pages is above min_file_pages. The default value is
gpgshi*2 for systems with less than 600M of memory. For larger memory
systems, the default value is gpgshi*4.
Value Default: 0
autoup
Description The autoup parameter specifies the age, in seconds, that a buffer marked
for delayed write must be before the bdflush daemon writes it to disk.
This parameter is specified in /var/sysgen/mtune. For more information,
see the entry for the bdflushr kernel parameter.
The autoup parameter is also used to determine the age of clean data
that is marked inactive and shows up in the gr_osview rmemc
command’sfreec label. The value is computed with the following
algorithm: autoup*HZ/2, or a default of 10*100/2 = 500 seconds.
Value Default: 10
Range: 1–30
When to Change
This value is adequate for most systems.

294
Appendix A: IRIX Kernel Tunable Parameters
Loadable Drivers Parameters
IRIX allows you to load and run device drivers while the system remains up and
running. Occasionally, you may have to make adjustments to the running kernel to allow
for the extra resources these loadable drivers require. The following parameters allow
you to make the necessary adjustments:
•bdevsw_extra—specifies an extra number of entries in the block device switch.
•cdevsw_extra—specifies an extra number of entries in the character device switch.
•fmodsw_extra—specifies an extra number of entries in the streams module switch.
•vfssw_extra—specifies an extra number of entries in the virtual filesystem module
switch.
•munlddelay—specifies the timeout for auto-unloading loadable modules.
bdevsw_extra
Description This parameter specifies an extra number of entries in the block device
switch. This parameter is for use by loadable drivers only. If you
configured a block device into the system at lboot(1M) time, you will not
need to add extra entries to bdevsw.
Value Default: 21
Range: 1-254
When to Change
Change this parameter when you have more than 21 block devices to
load into dynamically the system. IRIX provides 21 spaces in the bdevsw
by default.

Loadable Drivers Parameters
295
cdevsw_extra
Description This parameter specifies an extra number of entries in the character
device switch. This parameter is for use by loadable drivers only. If you
configured a character device into the system at lboot(1M) time, you will
not need to add extra entries to cdevsw.
Value Default: 23
Range: 3-254
When to Change
Change this parameter when you have more than 23 character devices
to load dynamically into the system. IRIX provides 23 spaces in the
cdevsw by default.
fmodsw_extra
Description This parameter specifies an extra number of entries in the streams
module switch. This parameter is for use by loadable drivers only. If you
configured a streams module into the system at lboot(1M) time, you will
not need to add extra entries to fmodsw.
Value Default: 20
Range: 0-254
When to Change
Change this parameter when you have more than 20 streams modules to
load dynamically into the system. IRIX provides 20 spaces in the fmodsw
by default.
vfssw_extra
Description This parameter specifies an extra number of entries in the vnode
filesystem module switch. This parameter is for use by loadable drivers
only. If you configured a vfs module into the system at lboot time, you
will not need to add extra entries to vfssw.
Value Default: 5
Range: 0-254

296
Appendix A: IRIX Kernel Tunable Parameters
When to Change
Change this parameter when you have more than five virtual filesystem
modules to load dynamically into the system. IRIX provides five spaces
in the vfssw by default.
munlddelay
Description This parameter specifies the timeout in minutes after which to
auto-unload loadable modules.
Value Default: 5 (0x5) minutes
CPU Actions Parameters
CPU actions parameters are used in multi-processor systems to allow the user to select
the processor or processors that will be used to perform a given task.
The following parameters are defined:
•nactions—specifies the number of action blocks.
nactions
Description The nactions parameter controls the number of action blocks. An action
block lets you queue a process to be run on a specific CPU. The value of
the nactions parameter is found by the formula:
maxcpu + 60
Value Default: 0 (Auto-configured if set to 0)
Range: 60-200
When to Change
Increase the value of nactions if you see the kernel error message:
PANIC: Ran out of action blocks

Switch Parameters
297
Switch Parameters
The following parameters are simple on/off switches within the kernel that allow or
disallow certain features, such as whether shells that set the user ID to the superuser are
allowed:
•dump_all_pages—controls page dumping during kernel panics.
•panic_on_sbe—controls special factory debugging mode.
•sbe_log_errors—controls system logging of single bit errors.
•sbe_mfr_override—overrides default action of disabling single bit errors.
•sbe_report_cons—controls single bit error console reporting.
•corepluspid—controls core filenames.
•r4k_div_patch—controls patch code for r4kpp binaries.
•mload_auto_rtsyms—controls loading of the kernel symbol table.
•xpg4_sticky_dir—controls removal of files in “sticky” directories.
•tty_auto_strhold—controls the setting of STRHOLD on tty/pty lines.
•reset_limits_on_exec—controls resetting of rlimit values on new setuid processes.
•ip26_allow_ucmem—controls whether to allow access to uncached system memory
on POWER Indigo2 systems.
•restrict_fastprof—controls whether users can do fast (1ms) user level profiling.
•reboot_on_panic—specifies that the system should automatically reboot after a kernel
panic.
•svr3pipe—controls whether SVR3.2 or SVR4 pipes are used.
•nosuidshells—when set to 0, allows applications to create superuser-privileged
shells. When set to any value other than 0, such shells are not permitted.
•posix_tty_default—if the value of this switch is 0, the default Silicon Graphics line
disciplines are used. If the value is set to 1, POSIX line disciplines and settings are
used.
•restricted_chown—allows you to decide whether you want to use BSD UNIX style
chown(2) system call or the System V style.

298
Appendix A: IRIX Kernel Tunable Parameters
•use_old_serialnum—When set to 1, forces the kernel to use the old method of
calculating a 32-bit serial number for sysinfo -s. This variable affects only Onyx and
Challenge L or XL systems.
•subnetsarelocal—When set to 1, other subnets of a directly-connected subnetted
network are considered to be local.
Note that all the above listed parameters are enforced system-wide. It is not possible to
select different values on a per-process basis.
dump_all_pages
Description This parameter, when set to 1, directs the system to dump all pages,
kernel, user, and free, during a system panic. When set to 0, this feature
is disabled and kernel pages only are dumped during a panic.
Value Default: 1 (0x1)
Range: 0 or 1
panic_on_sbe
Description This parameter, when set to 1, turns on a special factory debugging
mode called Single Bit Errors. When set to 0, this feature is disabled.
Value Default: 0 (0x0)
Range: 0 or 1
sbe_log_errors
Description This parameter, when set to 1, directs the system to log single bit errors
to the SYSLOG. When set to 0, this feature is disabled.
Value Default: 0 (0x0)
Range: 0 or 1
Notes This parameter applies only to systems containing ECC memory
(R8000-based systems such as CHALLENGE/Onyx).

Switch Parameters
299
sbe_mfr_override
Description This parameter, when set to 1, overrides the default action of disabling
single bit errors if the rate of single bit errors exceeds a predetermined
limit. When set to 0, this feature is disabled.
Value Default: 0 (0x0)
Range: 0 or 1
Notes This parameter applies only to systems containing ECC memory
(R8000-based systems such as CHALLENGE/Onyx).
sbe_report_cons
Description This parameter, when set to 1, directs the system to display single bit
errors on the system console. When set to 0, this feature is disabled.
Value Default: 0 (0x0)
Range: 0 or 1
Notes This parameter applies only to systems containing ECC memory
(R8000-based systems such as CHALLENGE/Onyx)
corepluspid
Description This parameter, when set to 1, directs the system to name core files with
the process ID number appended. When set to 0, this feature is disabled.
Value Default: 0 (0x0)
Range: 0 or 1
r4k_div_patch
Description This parameter, when set to 1, enables the exec patch code for binaries
that have been processed with r4kpp for the divide in branch delay slot
problem that occurs on R4000 SC rev 2.2 and 3.0 parts. When set to 0, this
feature is disabled.
Value Default: 0 (0x0)
Range: 0 or 1

300
Appendix A: IRIX Kernel Tunable Parameters
mload_auto_rtsyms
Description This parameter, when set to 1, enables the standard automatic loading of
the kernel’s run-time symbol table. When set to 0, this feature is
disabled.
Value Default: 1 (0x1)
Range: 0 or 1
xpg4_sticky_dir
Description This parameter, when set to 1, specifies that write access to a file does not
allow that file to be removed if the “sticky bit” is set in the directory in
which it resides. When set to 0, such files can be removed.
Value Default: 1 (0x1)
Range: 0 or 1
tty_auto_strhold
Description This parameter, when set to 1, automatically sets STRHOLD on
ttys/ptys whenever the line discipline is in canonical & echo mode and
automatically clears STRHOLD otherwise. When set to 0, this feature is
under user control.
Value Default: 0 (0x0)
Range: 0 or 1
reset_limits_on_exec
Description This parameter, when set to 1, directs the kernel to reset rlimit values on
processes that run as root, in order to prevent non-root processes from
enforcing resource limits. When set to 0, this feature is disabled and
resource limits are not reset. Modifying this parameter may have
security implications.
Value Default: 1 (0x1)
Range: 0 or 1

Switch Parameters
301
ip26_allow_ucmem
Description This parameter, when set to 0, prevents users from accessing uncached
system memory on IP26 (POWER Indigo2) systems. When set to 1, this
feature is allowed.
Value Default: 0 (0x0)
Range: 0 or 1
When to Change
If this parameter is set to 0, attempts to access uncached memory will
cause a system panic. If the feature is allowed, there is a substantial
memory performance degradation.
restrict_fastprof
Description This parameter, when set to 0, allows users to do fast (1 ms) profiling of
programs with prof. When set to 1, this feature is disallowed.
Value Default: 0 (0x0)
Range: 0 or 1
reboot_on_panic
Description This parameter, when set to 1, specifies that the system should
automatically reboot after a kernel panic. This is especially useful for
servers or other systems that frequently go unattended or are used
remotely, where the user may not conveniently be able to physically
reset and reboot the system.
When set to 0, the system must be rebooted from the console. Some
systems (those with IP19, IP21, or IP22 processors, check your hinv
listing for your processor type) store an environment variable in the
PROM monitor called rebound. If you have this variable and set the
reboot_on_panic parameter to -1, your system will check the PROM
environment for instructions. If the rebound variable is set to y then the
system will reboot automatically. If the rebound variable is set to n the
system will require manual reset. If you set a system without this
environment variable to -1, it behaves as though the setting is 0 and
does not automatically reboot.

302
Appendix A: IRIX Kernel Tunable Parameters
Value Default: -1 (automatically reboot according to hardware platform
implementation) or 0, depending on processor type.
Range: -1, 0, or 1
When to Change
Change this parameter if you wish to automatically reboot after a system
panic.
svr3pipe
Description This parameter, when set to 1, specifies SVR3.2 style pipes, which are
unidirectional. When set to 0, SVR4 style pipes are specified, which are
bidirectional.
Value Default: 1 (SVR3.2 style pipes)
Range: 0 or 1
When to Change
Change this parameter if you wish to take advantage of SVR4 style
pipes. SVR3 pipes are the default because they provide faster
performance.
nosuidshells
Description Some programs are written so that they perform actions that require
superuser privilege. In order to perform these actions, they create a shell
in which the user has superuser privilege. Such shells pose a certain
manageable risk to system security, but application developers are
generally careful to limit the actions taken by the application in these
shells. The nosuidshells switch, when set to 0, allows these applications to
create superuser-privileged shells. When set to any value other than 0,
such shells are not permitted.
Value Default: 1 (setuid shells not permitted)
When to Change
Change this switch to allow setuid shells.

Switch Parameters
303
posix_tty_default
Description IRIX uses a default system of line disciplines and settings for serial lines.
These default settings are different from those specified by POSIX. If the
value of this switch is 0, the default Silicon Graphics line disciplines are
used. If the value is set to 1, POSIX line disciplines and settings are used.
Value Default: 0
Range: 0 or 1
When to Change
Change this switch if you need to use POSIX line disciplines.
restricted_chown
Description This switch allows you to decide whether you want to use a BSD UNIX
style chown(2) system call or the System V style. Under the BSD version,
only the Superuser can use the chown system call to “give away” a file—
to change the ownership to another user. Under the System V version,
any user can give away a file or directory. If the value of the switch is 0,
System V chown is enabled. If the value is not zero, BSD chown is enabled.
Value Default: 0
Range: 0 or 1
When to Change
Change this switch to choose which behavior you prefer for the
chown(2) system call.
use_old_serialnum
Description When set to 1, this parameter forces the kernel to use the old method
(before IRIX Version 5) of calculating a 32-bit serial number for sysinfo -s.
This variable affects only Onyx and CHALLENGE L or XL systems.
Value Default: 0
Range: 0 or 1
When to Change
Change this parameter on your CHALLENGE or Onyx system if you
need to use some older software that requires a 32-bit serial number.

304
Appendix A: IRIX Kernel Tunable Parameters
subnetsarelocal
Description When set to 1, all other subnets of a directly-connected subnetted
network are considered to be local.
Value Default: 0
Range: 0 or 1
When to Change
Change this parameter if no subnetted systems are directly connected to
any external network, such as the internet.
Timer Parameters
Timer parameters control the functioning of system clocks and timing facilities. The
following parameters are defined:
•fasthz—sets the profiling/fast itimer clock speed.
•itimer_on_clkcpu—determines whether itimer requests are queued on the clock
processor or on the running processor, respectively.
•timetrim—the system clock is adjusted every second by the signed number of
nanoseconds specified by this parameter.
fasthz
Description This parameter is used to set the profiling/fast itimer clock speed.
Value Default: 1000
Range: 500-2500
When to Change
Change this parameter to give a finer or coarser grain for such system
calls as gettimeofday(3B), getitimer(2) and settimer(2).

NFS Parameters
305
itimer_on_clkcpu
Description This parameter is set to either 0 or 1, to determine whether itimer
requests are queued on the clock processor or on the running processor,
respectively.
Value Default: 0
Range: 0 or 1
When to Change
If a process uses the gettimeofday(2) call to compare the accuracy of the
itimer delivery, then you should set this parameter to 1, to take
advantage of the clock processor. If the itimer request is for the purpose
of implementing a user frequency-based scheduler, then set this
parameter to 0 to queue the requests on the current running processor.
timetrim
Description The system clock is adjusted every second by the signed number of
nanoseconds specified by this parameter. This adjustment is limited to 3
milliseconds or 0.3%. The timed(1M) and timeslave(1M) utilities
periodically place suggested values in /var/adm/SYSLOG.
Value Default: 0
Range: 0-0.3% of a second (3 milliseconds)
When to Change
Change this parameter as suggested by timed and timeslave. Read the
relevant reference pages before taking any action.
NFS Parameters
The following parameters control the kernel-level functions of the Network File System
(NFS). Reducing these values is likely to cause significant performance decreases in your
system:
•portmap_timeout—sets the portmapper query timeout.
•sm_timeout—sets the status monitor timeout.
•GraceWaitTime—sets the NLM grace period wait time.

306
Appendix A: IRIX Kernel Tunable Parameters
•first_retry—sets the number of retries on the first contact with the portmapper.
•normal_retry—sets the number of retries on later attempts to contact the
portmapper.
•lockd_grace_period—sets the grace period for NMI timeouts.
•lock_share_requests—applies the corresponding IRIX file locks to share requests.
•lockd_blocking_thresh—sets the number of daemons allowed to block before a new
daemon is created.
•nfs_portmon—set to 0, clients may use any available port. If it is set to 1, clients must
use only privileged ports.
•svc_maxdupreqs—sets the number of cached NFS requests.
portmap_timeout
Description This parameter specifies the portmapper query timeout, in 1/10 second
increments.
Value Default: 5 (0x5)
Range: 1 to 200 (20 seconds)
Notes Note that decreasing timeouts can severely degrade system
performance.
sm_timeout
Description This parameter specifies the status monitor communication timeout in
1/10 second increments.
Value Default: 5 (0x5)
Range: 1 to 150 (15 seconds)
Notes Note that decreasing normal and working timeouts can severely
degrade system performance.

NFS Parameters
307
GraceWaitTime
Description This parameter specifies the NLM grace period, in seconds.
Value Default: 5 (0x5)
Range: 1 to 60 (1 minute)
Notes Note that decreasing normal and working timeouts can severely
degrade system performance.
first_retry
Description This parameter specifies the number of retries to be made for the first
contact with the portmapper.
Value Default: 1 (0x1)
Range: 0 to 10000
normal_retry
Description This parameter specifies the number of subsequent retries after
communication has once been established with the portmapper.
Value Default: 1 (0x1)
Range: 0 to 10000
lockd_grace_period
Description This parameter specifies the NLM grace period, in seconds.
Value Default: 45 (0x2d)
Range: 1 to 3600 (1 hour)

308
Appendix A: IRIX Kernel Tunable Parameters
lock_share_requests
Description This parameter determines whether or not the system will apply IRIX
file locks to share requests.
Value Default: 0 (0x0)
Range: 0 or 1
lockd_blocking_thresh
Description This parameter specifies the number of daemons allowed to block before
a new lock daemon will be spawned.
Value Default: 0 (0x0)
Range: 0 to 1000
nfs_portmon
Description This parameter determines whether or not a client must use a
“privileged” port for NFS requests. Only processes with superuser
privilege may bind to a privileged port. The nfs_portmon parameter is
binary. If it is set to 0, clients may use any available port. If it is set to 1,
clients must use only privileged ports.
Value Default: 0
Range: 0 or 1
When to Change
You should change this parameter only if it is absolutely necessary to
maintain root privilege on your NFS mounted filesystems and you have
checked each NFS client to be sure that it requests a privileged port. If
there are any clients requesting non-privileged ports, they will be unable
to mount the filesystems.
Additionally, changing the value of nfs_portmon to 1 can give a false
sense of security. A process must have root privilege in order to bind to
a privileged port, but a single “insecure” machine compromises the
security of this privilege check.

Socket Parameters
309
svc_maxdupreqs
Description This parameter sets the number of cached NFS requests.
Value Default: 409
Range: 400-4096
When to Change
This parameter should be adjusted to the service load so that there is
likely to be a response entry when the first retransmission comes in.
Socket Parameters
This section describes socket parameters. Both UDS sockets and TCP/IP sockets are
covered.
Under UNIX domain sockets, there is a pair of buffers associated with each socket in use.
There is a buffer on the receiving side of the socket, and on the sending side. The size of
these buffers represent the maximum amount of data that can be queued. The behavior
of these buffers differs depending on whether the socket is a streams socket or a
data-gram socket.
On a streams socket, when the sender sends data, the data is queued in the receive buffer
of the receiving process. If the receive buffer fills up, the data begins queueing in the
sendspace buffer. If both buffers fill up, the socket blocks any further data from being
sent.
Under data-gram sockets, when the receive buffer fills up, all further data-grams sent are
discarded and the error EWOULDBLOCK is generated. Because of this behavior, the
default receive buffer size for data-gram sockets is twice that of the send buffer.
In order to improve networking performance with a large number of connections, TCP
and UDP packet lookup is performed using a hashing scheme. The number of hash
buckets used by the lookup code is normally computed at system boot time, and is based
on the number of megabytes of available system RAM. UDP uses four buckets per
megabyte of system RAM, plus one additional bucket. TCP uses eight buckets per
megabyte of system RAM, plus one additional bucket.

310
Appendix A: IRIX Kernel Tunable Parameters
Each hash bucket requires 24 bytes of RAM on a 32-bit system, and 48 bytes of RAM on
a 64-bit system. So, for example, on a 128 MB CHALLENGE XL system, UDP would use
513 hash buckets and TCP would use 1025 hash buckets. At 48 bytes per bucket, a total
of 73824 bytes of system RAM are used hold hash table information when the default
auto-configuration is used. On a 64 MB Indy, which has less memory and a smaller word
size, the total memory consumption using the default values is 18456 bytes of system
RAM.
If the default size is not optimal for your system, the table sizes can be changed using the
udp_hashtablesz and tcp_hashtablesz parameters listed below. Note that the kernel enforces
some restrictions on the values that may be specified. The sizes do not include the
dynamic space allocation for each TCP or UDP socket during its life time. These
parameters are part of the “inpcb” parameter group, and are modified using
systune(1M).
The following parameters control sockets:
•mbmaxpages—Maximum number of single page clusters that can be allocated to
network buffers.
•unpst_sendspace—UNIX domain socket stream send buffer size.
•unpst_recvspace—UNIX domain socket stream receive buffer size.
•unpdg_sendspace—UNIX domain socket data-gram send buffer size.
•unpdg_recvspace—UNIX domain socket data-gram receive buffer size.
•udp_hashtablesz—UNIX domain socket hash table size.
•tcp_sendspace—TCP/IP socket send buffer size.
•tcp_recvspace—TCP/IP socket receive buffer size.
•tcp_hashtablesz—TCP/IP hash table size.

Socket Parameters
311
mbmaxpages
Description This parameter specifies the maximum number of single page clusters
that can be allocated to network buffers. This limits the total memory
that network buffers (mbufs) can consume.
Value Default: 1/4 of physical memory
Range: 2097152 pages
When to Change
For most workstations and small servers, the default is sufficient. For
very large systems, larger values are appropriate. A 0 value tells the
kernel to set the value (1/4 of physical memory) based on the amount of
physical memory configured in the hardware.
unpst_sendspace
Description This parameter controls the default size of the send buffer on streams
sockets.
Value Default: 0x4000 (16KB)
When to Change
It is generally recommended that you change the size of socket buffers
individually, since changing this parameter changes the send buffer size
on all streams sockets, using a tremendous amount of kernel memory.
Also, increasing this parameter increases the amount of time necessary
to wait for socket response, since all sockets will have more buffer space
to read.
See the setsockopt(2) reference page for more information on setting
specific socket options.
unpst_recvspace
Description This parameter controls the default size of the receive buffer of streams
sockets.
Value Default: 0x4000 (16 Kbytes)

312
Appendix A: IRIX Kernel Tunable Parameters
When to Change
It is generally recommended that you change the size of socket buffers
on an individual basis, since changing this parameter changes the
receive buffer size on all streams sockets, using a tremendous amount of
kernel memory. Also, increasing this parameter will increase the amount
of time necessary to wait for socket response, since all sockets will have
more buffer space to read.
See the setsockopt(2) reference page for more information on setting
specific individual socket options.
unpdg_sendspace
Description This parameter controls the size of a data-gram that can be sent over a
socket.
Value Default: 0x2000 (8 KB)
When to Change
Data-gram sockets operate slightly differently from streams sockets.
When a streams socket fills the receive buffer, all data is then sent to the
send buffer, and when the send buffer fills up, an error message is
issued. Data-gram sockets allow data-grams to fill the receive buffer,
and when the receive buffer is full, all future data-grams are discarded,
and the error EWOULDBLOCK is generated. Therefore, the
unpdg_sendspace parameter serves only to limit the size of a data-gram to
not more than can be received by the receive buffer.
Note that the default data-gram socket receive buffers are twice the size
of the default data-gram send buffers, thus allowing the process to
appear the same as the streams sockets.
It is generally recommended that you not change the size of this
parameter without also changing the default receive buffer size for
data-gram sockets. If you raise the value of this parameter
(unpdg_sendspace) without raising the receive buffer size
(unpdg_recvspace), you will allow the sending half of the socket to send
more data than can be received by the receiving half. Also it is generally
recommended that socket buffer sizes be set individually via the
setsockopt(2) system call. See the setsockopt(2) reference page for more
information on setting specific individual socket options.

Socket Parameters
313
unpdg_recvspace
Description This parameter controls the default size of data-gram socket receive
buffers.
Value Default: 0x4000 (16 Kbytes)
When to Change
It is generally recommended that you change the size of socket buffers
individually, since changing this parameter changes the receive buffer
size on all data-gram sockets, using a tremendous amount of kernel
memory. Also, increasing this parameter increases the amount of time
necessary to wait for socket response, since all sockets will have more
buffer space to read.
See the setsockopt(2) reference page for more information on setting
specific individual socket options.
udp_hashtablesz
Description This parameter controls the size of the UDP hash table.
Value Default: 0 (Auto-configure)
Range: 64-2048
When to Change
This should not normally need to be changed, but might be changed in
order to reduce the consumption of system RAM on systems that are not
used to handle large numbers of networking applications, or to increase
the number of hash buckets on systems that primarily provide
networking services.
Using a zero value specifies that the table is to be sized based on system
RAM. A non-zero value specifies the number of hash buckets to use for
UDP. The system automatically adjusts this number to support the
requirements of the hashing algorithm. For example, entering a value
of 512 will create 513 buckets.
Restrictions The system silently enforces a minimum value of 64 hash buckets and a
maximum value of 2048 hash buckets.

314
Appendix A: IRIX Kernel Tunable Parameters
tcp_sendspace
Description This parameter controls the default size of the send buffer on TCP/IP
sockets. There is a pair of buffers associated with each socket in use.
There is a buffer on the receiving side of the socket, and on the sending
side. The size of these buffers represent the maximum amount of data
that can be queued.
Value Default: 60 KB
Range: 0-512 KB
When to Change
The tcp_sendspace parameter may require tuning for slow throughput
links, and for compatibility with TCP implementations based on 4.2BSD.
For slow throughput links (such as lower speed PPP or SLIP
connections), lower the value of this and the tcp_recvspace parameters
until the best performance level is found. Very slow links such as PPP or
SLIP over modems usually find a 3 KB or 4 KB buffer size to be the most
efficient.
The tcp_sendspace parameter may require tuning for slow throughput
links, and for compatibility with TCP implementations based on
4.2BSD. For slow throughput links (such as a Wide Area Net with a
lower speed PPP or SLIP component), lower the value of this and the
tcp_recvspace parameters on systems where the connection goes from
fast (ethernet, FDDI, etc.) to slow (PPP or SLIP) until the best
performance level is found. Very slow links such as PPP or SLIP over
modems usually find a 3 KB or 4 KB buffer size to be the most efficient.
Conversely, high speed connections may profit from increasing the
buffer size incrementally from 60 KB until maximum performance is
achieved.
See the setsockopt(2) reference page for more information on setting
specific socket options.

Socket Parameters
315
tcp_recvspace
Description This parameter controls the default size of the TCP/IP receive buffer.
There is a pair of buffers associated with each socket in use. There is a
buffer on the receiving side of the socket, and on the sending side. The
size of these buffers represent the maximum amount of data that can be
queued.
Value Default: 60 KB
Range: 0-512 KB
When to Change
The tcp_recvspace parameter may require tuning for slow throughput
links, and for compatibility with TCP implementations based on 4.2BSD.
For slow throughput links (such as a Wide Area Net with a lower speed
PPP or SLIP component), lower the value of this and the tcp_sendspace
parameters on systems where the connection goes from fast (ethernet,
FDDI, and so on) to slow (PPP or SLIP) until the best performance level
is found. Very slow links such as PPP or SLIP over modems usually find
a 3 KB or 4 KB buffer size to be the most efficient.
Conversely, high speed connections may profit from increasing the
buffer size incrementally from 60 KB until maximum performance is
achieved.
See the setsockopt(2) reference page for more information on setting
specific individual socket options.

316
Appendix A: IRIX Kernel Tunable Parameters
tcp_hashtablesz
Description This parameter controls the size of the TCP hash table.
Value Default: 0 (Auto-configure)
Range: 64-8192
When to Change
This parameter should not normally need to be changed, but might be
changed in order to reduce the consumption of system RAM on systems
that are not used to handle large numbers of networking applications, or
to increase the number of hash buckets on systems that primarily
provide networking services.
Using a zero value specifies that the table is to be sized based on system
RAM. A non-zero value specifies the number of hash buckets to use for
TCP. The system automatically adjusts this number to support the
requirements of the hashing algorithm. For example, entering a value
of 512 will create 1025 buckets, since TCP uses the extra space for
processing connections in the TIME-WAIT state.
Restrictions The system silently enforces a minimum value of 64 hash buckets and a
maximum value of 8192 hash buckets.
VINO Parameters
This section describes the Indy Video In No Out tunable parameter:
•vino_mtune_dmrbpages—Limits the size of the DMA descriptor table used by the
VINO video capture.

Large Page Parameters
317
vino_mtune_dmrbpages
Description The vino_mtune_dmrbpages parameter limits the size of the DMA
descriptor table used by the VINO video capture. This in turn limits how
many pages allocated to the Digital Media Ring Buffers are usable when
capturing video. The number of pages in vino_mtune_dmrbpages is what
the DMRB size specifically for VINO is limited to when allocated.
Value Default: 0 (auto-configure)
If this parameter is set to zero, then a default based on the amount of
memory available at run time is used. If a limit of less than that is
desired, set this variable to the maximum number of pages that the ring
buffers can use. A value of -1 indicates do not preallocate any space for
VINO DMA descriptors.
Notes Note that if a DMA descriptor table size is needed that is greater than the
size specified here and cannot be allocated contiguously at run time
(possibly due to memory fragmentation), then the video transfer will
not be started, and will return an ENOMEM error. The error recovery is
to attempt the capture with a smaller DMRB.
Large Page Parameters
Large pages must be allocated early on and reserved if they are to be used. The values
specified in the nlpages_X parameters refer to the number of large pages of size X. When
these are set, the kernel will attempt to allocate these counts of pages of the appropriate
size.
Applications which use large pages have the choice of wiring the translations for the
pages into the usually random slots of the tlb when the application runs. The maximum
number of tlb slots to devote to this is specified in the max_lpg_tlbslots variable.
The following parameters pertain to large page allocation:
•nlpages_256K—The number of 256K pages to be allocated.
•nlpages_1m—The number of 1 megabyte pages to be allocated.
•nlpages_4m—The number of 4 megabyte pages to be allocated.
•nlpages_16m—The number of 16 megabyte pages to be allocated.
•max_lpg_tlbslots—The number of transaction lookaside buffer slots to be allocated.

318
Appendix A: IRIX Kernel Tunable Parameters
nlpages_256K
Description The nlpages_256K parameter specifies the number of 256 KB pages to be
allocated.
Value Default: 0
Range: 0-64
nlpages_1m
Description The nlpages_1m parameter specifies the number of 1 MB pages to be
allocated.
Value Default: 0
Range: 0-64
When to Change
The recommended initial value for large (64 processors or greater)
systems is 0.
nlpages_4m
Description The nlpages_4m parameter specifies the number of 4 MB pages to be
allocated.
Value Default: 0
Range: 0-64
nlpages_16m
Description The nlpages_16m parameter specifies the number of 16 MB pages to be
allocated.
Value Default: 0
Range: 0-64

Extended Accounting Parameters
319
max_lpg_tlbslots
Description The max_lpg_tlbslots parameter specifies the number of TLB slots for
large pages to be allocated.
Value Default: 0
Range: 0-16
Extended Accounting Parameters
The following parameters control system accounting features. The parameters are:
•do_procacct—controls BSD process accounting.
•do_extpacct—controls extended process accounting.
•do_sessacct—controls array session accounting.
•use_astbl—controls array session table.
•narsess—controls the number of entries in an array session table.
•dfltash—controls the default array session handle for special sessions.
•minash—controls the first array session handle that can be assigned by the kernel.
•maxash—controls the largest array session handle that can be assigned by the kernel
before wrapping back to minash.
•asmachid—controls the machine ID for generating global ASHs.
•dfltprid—controls the default project ID for special sessions.
do_procacct
Description The do_procacct parameter, when set to 1, directs the system to perform
BSD system accounting. When set to 0, the system does not perform the
accounting, overriding the acct(2) system call.
Value Default: 1
Range: 0-1

320
Appendix A: IRIX Kernel Tunable Parameters
do_extpacct
Description The do_extpacct parameter, when set to 1, directs the system to perform
extended process accounting. When set to 0, the system does not
perform the accounting.
Value Default: 0
Range: 0-1
do_sessacct
Description The do_sessacct parameter, when set to 1, directs the system to perform
array session accounting when a process exits. When set to 0, the system
does not perform the accounting.
Value Default: 0
Range: 0-1
use_astbl
Description The use_astbl parameter, when set to 1, directs the system to allocate
array sessions in a single preallocated table. When set to 0, the system
array sessions are allocated dynamically.
Value Default: 0 for 32-bit kernels, 1 for 64-bit kernels
Range: 0-1
narsess
Description The narsess parameter specifies the number of entries in an array session
table. When set to 0, the system auto-configures the value at 1/10th of
the value of nproc.
Value Default: 0 (autoconfigured at 1/10th nproc)
Range: 10-10000

Extended Accounting Parameters
321
dfltash
Description The dfltash parameter specifies the default array session handle for
special system sessions and other sessions that bypass ordinary session
handle assignment.
Value Default: 0
Range: 0-0x7fffffffffffffff
minash
Description The minash parameter specifies the first array session handle that can be
assigned by the kernel.
Value Default: 1
Range: 1-0x7ffffff00
maxash
Description The maxash parameter specifies the largest array session handle that can
be assigned by the kernel before wrapping back to minash.
Value Default: 65535
Range: 255 -0x7ffffffff
asmachid
Description The asmachid parameter specifies the system ID for generating global
ASHs. No other system in an array should have the same system ID. If
0 is specified, the kernel will only generate local ASHs.
Value Default: 0
Range: 0 -0x7fff

322
Appendix A: IRIX Kernel Tunable Parameters
dfltprid
Description The dfltprid parameter specifies the default project ID for special system
sessions and other sessions that bypass ordinary project ID assignment.
Value Default: 0
Range: 0 -0x7fffffffffffffff
NUMA Parameters
The following parameters are memory migration parameters that are valid only on
NUMA machines such as the Origin2000. The parameters are:
•numa_migr_default_mode—defines the default migration mode.
•numa_migr_default_threshold—defines the minimum difference between the local
and any remote counter needed to generate a migration request interrupt.
•numa_migr_threshold_reference— defines the pegging value for the memory reference
counters.
•numa_migr_min_maxradius— specifies the minimum maxradius for migration to be
turned on.
•numa_migr_min_distance — specifies the minimum distance required by the Node
Distance Filter in order to accept a migration request.
•numa_zone_radius_max— specifies the maximum radius value for use by the zone
allocator.
•numa_migr_vehicle—defines what device the system should use to migrate a page.
•numa_refcnt_default_mode—defines the default extended reference counter mode.
•numa_refcnt_overflow_threshold—defines the count at which the hardware reference
counters notify the operating system of a counter overflow in order for the count to
be transfered into the (software) extended reference counters.
•numa_migr_memory_low_threshold—defines the threshold at which the Memory
Pressure Filter starts rejecting migration requests to a node.
•numa_migr_memory_low_enabled—enables or disables the Memory Pressure Filter.
•numa_migr_freeze_enabled—enables or disables the freezing operation in the Bounce
Control Filter.

NUMA Parameters
323
•numa_migr_freeze_threshold—defines the threshold at which a page is frozen.
•numa_migr_melt_enabled—enables or disables the melting operation in the Bounce
Control Filter.
•numa_migr_melt_threshold—Unfreezes a page when a migration counter goes below
this threshold.
•numa_migr_bounce_control_interval—defines the period for the loop that ages the
migration counters and the dampening counters.
•numa_migr_dampening_enabled—enables or disables migration dampening.
•numa_migr_dampening_factor—defines the number of migration requests needed for
a page before migration is actually executed.
•mem_tick_enabled—enables or disables the loop that executes the Migration Control
Periodic Operation from clock.c/.
•mem_tick_base_period—defines the number of 10 ms system ticks in one mem_tick.
•numa_migr_unpegging_control_enabled— enables or disables the unpegging periodic
operation.
•numa_migr_unpegging_control_interval—defines the period for the loop that unpegs
the hardware memory reference counters.
•numa_migr_unpegging_control_threshold—defines the hardware memory reference
counter value at which the system considers the counter to be pegged.
•numa_migr_traffic_control_enabled—enables or disables the Traffic Control Filter.
•numa_migr_traffic_control_interval—defines the traffic control period.
•numa_migr_traffic_control_threshold—defines the traffic control threshold for kicking
the batch migration of enqueued migration requests.

324
Appendix A: IRIX Kernel Tunable Parameters
numa_migr_default_mode
Description This parameter defines the default migration mode.
Value Default: 2
Range: 0-4
0: MIGR_DEFMODE_DISABLED Migration is completely disabled.
Users cannot use migration.
1: MIGR_DEFMODE_ENABLED Migration is always enabled. Users
cannot disable migration.
2: MIGR_DEFMODE_NORMOFF Migration is normally off. Users can
enable migration for an application.
3: MIGR_DEFMODE_NORMON Migration is normally on. Users can
disable migration for an application.
4: MIGR_DEFMODE_LIMITED Migration is normally off for machine
configurations with a maximum CrayLink distance less than
numa_migr_min_maxradius (defined below). Migration is normally on
otherwise. Users can override this mode.
numa_migr_default_threshold
Description This parameter defines the minimum difference between the local and
any remote counter needed to generate a migration request interrupt.
if ( (remote_counter - local_counter) >=
((numa_migr_threshold_reference_value / 100) *
numa_migr_default_threshold)) { send_migration_request_intr(); }
Value 90
Range: 0-100

NUMA Parameters
325
numa_migr_threshold_reference
Description This parameter defines the pegging value for the memory reference
counters. It is machine configuration dependent. For Origin2000
systems, it can take the following values:
Value Default: 0
Range: 0-1
0: MIGR_THRESHREF_STANDARD = Threshold reference is 2048 (11
bit counters). This is the maximum threshold allowed for systems with
STANDARD DIMMS.
1: MIGR_THRESHREF_PREMIUM = Threshold reference is 524288
(19-bit counters). This is the maximum threshold allowed for systems
with *all* PREMIUM SIMMS.
numa_migr_min_maxradius
Description This parameter specifies the minimum maxradius for migration to be
turned on. This parameter is used if numa_migr_default_mode has been
set to mode 4 (MIGR_DEFMODE_LIMITED). For this mode, migration
is normally off for machine configurations with a maximum CrayLink
distance less than numa_migr_min_maxradius. Migration is normally on
otherwise.
Value Default: 2
numa_migr_min_distance
Description This parameter specifies the minimum distance required by the Node
Distance Filter in order to accept a migration request.
Value Default: 1
numa_zone_radius_max
Description This parameter specifies the maximum radius value for use by the zone
allocator.
Value Default: 2

326
Appendix A: IRIX Kernel Tunable Parameters
numa_migr_vehicle
Description This parameter defines what device the system should use to migrate a
page. The value 0 selects the Block Transfer Engine (BTE) and a value of
1 selects the processor. When the BTE is selected, and the system is
equipped with the optional poison bits, the system automatically uses
Lazy TLB Shootdown Algorithms.
MIGR_VEHICLE_IS_BTE 0
MIGR_VEHICLE_IS_TLBSYNC 1
Assume migr_vehicle to be BTE to start with. If the system has no BTE,
NUMA initialization code will change this to TLBsync. In addition, it
will be changed to TLBsync if the processor revision is not suitable to
use BTE.
Value Default: 1
numa_refcnt_default_mode
Description This parameter defines the default extended reference counter mode. It
can take the following values:
Value Range: 0-3
0: REFCNT_DEFMODE_DISABLED Extended reference counters are
disabled; users cannot access the extended reference counters
(refcnt(5)).
1: REFCNT_DEFMODE_ENABLED Extended reference counters are
always enabled; users cannot disable them.
2: REFCNT_DEFMODE_NORMOFF Extended reference counters are
normally disabled; users can disable or enable the counters for an
application.
3: REFCNT_DEFMODE_NORMON Extended reference counters are
normally enabled; users can disable or enable the counters for an
application.

NUMA Parameters
327
numa_refcnt_overflow_threshold
Description This parameter defines the count at which the hardware reference
counters notify the operating system of a counter overflow in order for
the count to be transfered into the (software) extended reference
counters. It is expressed as a percentage of the threshold reference value
defined by numa_migr_threshold_reference.
numa_migr_memory_low_threshold
Description This parameter defines the threshold at which the Memory Pressure
Filter starts rejecting migration requests to a node. This threshold is
expressed as a percentage of the total amount of physical memory in a
node.
numa_migr_memory_low_enabled
Description This parameter enables or disables the Memory Pressure Filter.
numa_migr_freeze_enabled
Description This parameter enables or disables the freezing operation in the Bounce
Control Filter.
numa_migr_freeze_threshold
Description This parameter defines the threshold at which a page is frozen. This
parameter is expressed as a percent of the maximum count supported by
the migration counters (7% for Origin2000 systems).
numa_migr_melt_enabled
Description This parameter enables or disables the melting operation in the Bounce
Control Filter.

328
Appendix A: IRIX Kernel Tunable Parameters
numa_migr_melt_threshold
Description Unfreezes a page when a migration counter goes below this threshold.
This parameter is expressed as a percent of the maximum count
supported by the migration counters (7% for Origin2000 systems).
numa_migr_bounce_control_interval
Description This parameter defines the period for the loop that ages the migration
counters and the dampening counters. It is expressed in terms of
number of mem_ticks (the mem_tick unit is defined by
mem_tick_base_period below). If it is set to 0, the system processes 4 pages
per mem_tick. In this case, the actual period depends on the amount of
physical memory present in a node.
numa_migr_dampening_enabled
Description This parameter enables or disables migration dampening.
numa_migr_dampening_factor
Description This parameter defines the number of migration requests needed for a
page before migration is actually executed. It is expressed as a percent of
the maximum count supported by the migration-request counters (3%
for Origin2000 systems).
mem_tick_enabled
Description This parameter enables or disables the loop that executes the Migration
Control Periodic Operation from clock.c/.
mem_tick_base_period
Description This parameter defines the number of 10 ms system ticks in one
mem_tick.

NUMA Parameters
329
numa_migr_unpegging_control_enabled
Description This parameter enables or disables the unpegging periodic operation.
numa_migr_unpegging_control_interval
Description This parameter defines the period for the loop that unpegs the hardware
memory reference counters. It is expressed in terms of number of
mem_ticks (the mem_tick unit is defined by mem_tick_base_period). If it is
set to 0, the system processes 8 pages per mem_tick. In this case, the
actual period depends on the amount of physical memory present in a
node.
numa_migr_unpegging_control_threshold
Description This parameter defines the hardware memory reference counter value at
which the system considers the counter to be pegged. It is expressed as
a percent of the maximum count defined by
numa_migr_threshold_reference.
numa_migr_traffic_control_enabled
Description This parameter enables or disables the Traffic Control Filter. This is an
experimental module, and therefore it should always be disabled.
numa_migr_traffic_control_interval
Description This parameter defines the traffic control period. This is an experimental
module.
numa_migr_traffic_control_threshold
Description This parameter defines the traffic control threshold for kicking the batch
migration of enqueued migration requests. This is an experimental
module.

330
Appendix A: IRIX Kernel Tunable Parameters
Page Replication Parameters
The following parameters control page replication. The parameters are:
•numa_page_replication_enable—specifies the mechanism to enable or disable
system-wide page replication.
•numa_kernel_replication_ratio—specifies the ratio of memory nodes to kernel text
images.
•numa_repl_control_enabled—enables or disables replication control.
•numa_repl_traffic_highmark_percentage—specifies the percentage of the full
utilization that replication traffice can use.
•numa_repl_mem_lowmark—specifies the threshold for replication.
numa_page_replication_enable
Description This parameter specifies the mechanism to enable or disable
system-wide page replication.
Value Default: 0
numa_kernel_replication_ratio
Description This parameter specifies the ratio of memory nodes to kernel text
images. There will always be a copy on the master node and also on
every other n of the other nodes. 0 means do not replicate. There is
always a copy on the master node, and for a ratio n, copies are made on
every n of the other nodes. The default value is 1, which causes copies of
the kernel text to be made on every node.
Value Default: 1
numa_repl_control_enabled
Description This parameter enables or disables replication control. Replication can
be controlled in order to avoid excessive use of resources.
Value Default: 0

Migration Memory Queue Parameters
331
numa_repl_traffic_highmark_percentage
Description This parameter specifies the percentage of the full utilization that
replication traffic can use.
Value Default: 80
Range: 0-100
numa_repl_mem_lowmark
Description This parameter specifies the threshold for replication. Replication is not
done if physical memory falls below the threshold defined by
numa_repl_mem_lowmark. This threshold is expressed in terms of
number of pages.
Migration Memory Queue Parameters
The following parameters control the migration memory queue. The parameters are:
•numa_migr_coaldmigr_mech—defines the migration execution mode for memory
coalescing migrations.
•numa_migr_user_migr_mech—defines the migration execution mode for
user-requested migrations.
•numa_migr_auto_migr_mech—defines the migration execution mode for memory
reference counter-triggered migrations.
numa_migr_coaldmigr_mech
Description This parameter defines the migration execution mode for memory
coalescing migrations. A value of 0 specifies immediate, a value of 1
specifies delayed. Only the Immediate Mode (0) is currently available.
Value Default: 0
Range: 0-1

332
Appendix A: IRIX Kernel Tunable Parameters
numa_migr_user_migr_mech
Description This parameter defines the migration execution mode for
user-requested migrations. A value of 0 specifies immediate, a value of
1 specifies delayed. Only the Immediate Mode (0) is currently available.
Value Default: 0
Range: 0-1
numa_migr_auto_migr_mech
Description This parameter defines the migration execution mode for memory
reference counter-triggered migrations. A value of 0 specifies
immediate, a value of 1 specifies delayed. Only the Immediate Mode (0)
is currently available.
Value Default: 0
Range: 0-1

333
Appendix B
B. Troubleshooting System Configuration Using System
Error Messages
This appendix lists error messages you may receive from the IRIX operating system and
offers references to appropriate areas of the documentation describing the system
functions that are likely related to the error message.
System errors are often accompanied by several error messages that together will lead
you to determining the actual problem. Read the section for each message and use your
best judgement to determine which messages reflect the core problem and which are
caused by the effects of the core problem on other parts of the system.
For error messages not covered in this guide or related IRIX Administration Guides, see
the file /usr/include/sys/errno.h, the intro(2) reference page, and the Owner’s Guide for your
system.
Some error messages are “customized” with specific information from your system
configuration. Where this is the case, the messages listed in this appendix may contain
an ellipsis (...) to indicate specific information that has been left out of the example, or the
notation is made that the message you receive may be similar to the listed message,
rather than an exact match.

334
Appendix B: Troubleshooting System Configuration Using System Error Messages
Disk Space Messages
The following messages deal with standard disk operations, such as messages indicating
you are low on or out of available disk space.
unix: <disk id>: Process ... ran out of disk space
unix: <disk id>: Process ... ran out of contiguous space
If the disk becomes completely full, you will not be able to create new files or write
additional information to existing files. If the system disk becomes full, your system may
not respond to commands.
Note: Do not shut down or restart the system until you free up some disk space. Without
free disk space, the system may not be able to restart properly.
Please release disk space in one of these ways:
1. Empty your dumpster by choosing “Empty Dumpster” from the Desktop toolchest.
2. Remove or archive old or large files or directories.
•To find old or large files, double-click the launch icon to start the Search tool,
then use its online help.
•It’s a good idea to search for files named core; these are often very large, and are
created by an application when it encounters a problem.
•If you remove the files from the desktop, empty your dumpster again.
•To archive files (copy them onto a backup tape), use the Backup & Restore tool;
start it by double-clicking the launch icon.

Disk Space Messages
335
3. If your system disk is almost full, check:
•/var/tmp and /tmp: These are public directories that often become full; delete
unwanted files or directories that you find here.
•/var/adm/SYSLOG: If this file seems very large (over 200 KB), remove all but a
few lines of it; do not remove the entire file.
•/var/adm/crash: When the system has a serious failure (crash), it places
information into two files: vmcore.<number> and unix.<number>. If you find files
with these names, back them up to tape so you can give the files to your local
support organization, then remove the files from your system.
•If you remove the files from the desktop, empty your dumpster again.
•mbox in all home directories. If these files are large, ask the owners to please
delete all but critical messages.
4. Remove optional or application software.
•To start the Software Manager, choose “Software Manager” from the System
toolchest.
If you want to be notified at a different level of disk use (for example, to be notified when
the disk is 90% full), a Privileged User can follow these steps:
1. Start the Disk Manager by double-clicking the launch icon.
2. Click the button beneath the photo of the disk whose warning threshold you want
to change (the system disk is labeled 0,1).
3. Highlight the number in the Notify when field, type 90, then click OK.
Also, see “Disk Usage Commands” on page 133.

336
Appendix B: Troubleshooting System Configuration Using System Error Messages
General System Messages
The following messages indicate general system configuration issues that should be
noted or attended to.
File Permission Issues
You may see the message:
unix: WARNING: inode 65535: illegal mode 177777
This message indicates that a program attempted to access a file to which it has no access
permission.
The find command can be used to identify the filename, permissions, and directory path
that the file resides in. Use the -inum option of find to specify the inode number in order
to locate the file. Once the file has been located, the permissions of the file can be changed
by the owner of the file or the superuser (root).
IP (Network) Address Issues
The following issues pertain to the basic configuration of your system for the network
and the immediate networking hardware.
Default Internet Address
You may see the message:
unix: network: WARNING IRIS’S Internet address is the default
The IP address is not set on this system. To set the IP address, see “Setting the Network
Address” on page 79.

General System Messages
337
Duplicate IP Address
You may see the messages:
unix: arp: host with ethernet address ... is using my IP address ...
unix: arp: host with ethernet address ... is still using my IP address ...
Your system’s IP address is the same as another system’s. Each system on the network
must have a unique IP address so the network can send information to the correct
location. Typically an address conflict occurs when a new system is added to the network
and the system’s Administrator assigns an IP address that is already in use.
Check to make certain your system is using the correct IP address and then contact the
owner of the other system to determine which system needs to change its address.
Ethernet Cable Issues
You may see the following messages:
unix: ec0: no carrier: check Ethernet cable
This message indicates that the Ethernet cable has become loose, or some connection has
been lost. This message may appear if the other systems on the network have been shut
down and turned off.
unix: ec0: late xmit collision
This message indicates that the Ethernet interface has detected a transmission by another
system on the network that was sent beyond the boundaries of the Ethernet standard
transmission timing.

338
Appendix B: Troubleshooting System Configuration Using System Error Messages
The most common causes of the late collisions are due to networks that have been
configured outside of the network specification boundaries:
•Long AUI transceiver cables. The length of the AUI cable should not exceed 50
meters.
•New or recently added network segments that extend the network’s total length.
•Faulty or failing transceivers.
•Faulty or failing Ethernet controllers.
If the problem persists, contact your network administrator or your local support
provider.
Root Filesystem Not Found
If your root filesystem is not found at boot time, check to be sure that there is not an
incorrect $root variable set in the PROM. If there is an incorrect $root variable, simply
enter unsetenv root at the monitor prompt and then reboot.
login and su Issues
These messages are typically informational. They appear when another user attempts to
log on to the system or use another account and the attempt either fails or succeeds.
login Messages
You may see the message:
login: failed: <user> as <user>
The login failures indicate that the user didn’t specify the correct password or misspelled
the login name. The /var/adm/SYSLOG file contains the hostname that the user attempted
to log in from and the account (username) the user attempted to log in to on the local
system.

General System Messages
339
su Messages
You may see the message:
su: failed: ttyq# changing from <user> to root
The su messages are typically informational. They appear when a user attempts to switch
user accounts. Typically users are attempting to become root or superuser when this
message appears.
The su failures indicate that the user didn’t specify the correct password or misspelled
the login name. The /var/adm/SYSLOG file contains the hostname, tty port number (ttyq#),
the name of the user that attempted to perform the su command, and the account the user
attempted to use.
Network Bootup Issues
This message indicates that the bootp program was remotely invoked from your system:
bootp: reply boot file /dev/null
Usually a filename that is given after the bootp command contains code that can remotely
startup a remote system. This startup file can be used to restart a diskless system, boot an
installation program (sa), boot a system into sash, or boot X-terminals. The bootp program
is a communications program that talks between the systems and the remote network
device and facilitates the reading of the startup file across the network.
Operating System Rebuild Issues
You may see the following message:
lboot: Automatically reconfiguring the operating system
This informational message indicates that there has been a change to one or more of the
operating system files or to the system hardware since the system last restarted. The
system may automatically build a new kernel to incorporate the changes, and the
changes should take place once the system has been rebooted.

340
Appendix B: Troubleshooting System Configuration Using System Error Messages
The operating system file changes that can cause this message to be displayed include
installing additional software that requires kernel modifications and additions or
changes in some kernel tunable parameters. If this message appears every time the
system boots, then check the date on one of the operating system files. The date on the
file may have been set to a date in the future.
Power Failure Detected
You may see the following message:
unix: WARNING: Power failure detected
This message indicates that the system has detected that the AC input voltage has fallen
below an acceptable level. This is an informational message that is logged to
/var/adm/SYSLOG.
Although this is an informational message, it’s a good idea to check all of the AC outlets
and connections, and check the system components for disk drive failures or overheated
boards. On CHALLENGE and Onyx systems, the system controller attempts to
gracefully shut down the system; this includes stopping all processes and synchronizing
the disk.
SCSI Controller Reset
You may see messages similar to the following:
unix: wd93 SCSI Bus=0 ID=7 LUN=0: SCSI cmd=0x12 timeout after 10 sec.
Resetting SCSI
unix: Integral SCSI bus ... reset
This message indicates that the SCSI controller has made an inquiry of the device (where
the ID number is located) and it did not respond.

General System Messages
341
This message is a notification to the user that the system has encountered a problem
accessing the SCSI device. There are several reasons why this message may have been
displayed:
•The SCSI device that was being accessed doesn’t support the type of inquiry that
the controller has made.
•There is a physical problem with the SCSI device or controller.
If this message continues to appear, look at the /var/adm/SYSLOG file and see if there are
any messages that follow this one to help isolate or identify the problem, or contact your
local support provider.
syslogd Daemon Issues
You may see the following message:
syslogd: restart
The syslogd messages are typically informational only. The messages indicate the start
and stop of the syslogd daemon. These messages are written to /var/adm/SYSLOG when
the system is shut down or rebooted.
System Clock and Date Issues
You may see this message:
unix: WARNING: clock gained ... days
This is an informational message that indicates that the system has been physically
turned off for x number of days (where x is indicated by the message found in
/var/adm/SYSLOG).
To correct this problem, you should reset the system date and time. For more information
on setting the system time, see the date(1) reference page and “Changing the System Date
and Time” on page 83 of this guide.

342
Appendix B: Troubleshooting System Configuration Using System Error Messages
You may see this message:
unix: WARNING: CHECK AND RESET THE DATE!
This message is typically preceded by several different types of time and date messages.
Some of the messages are informational, and others indicate a problem with the system
date, time, or hardware. Check the log file /var/adm/SYSLOG for other clock, date, or
time-related problems. If you don’t see any other date, time, or clock messages, try
setting the verbose option of chkconfig on.
For more information on setting the date, and tim, see the date(1) reference page and
“Changing the System Date and Time” on page 83 of this guide. For chkconfig options,
refer to the chkconfig(1M) reference page.
Time Server Daemon Message
timed: slave to gate-host-name
The time server daemon (timed) logs informational entries into /var/adm/SYSLOG. No
action is required by the user. The timed daemon will automatically perform the
necessary adjustments. Refer to the timed(1M) reference page for more information
about the time server daemon.
System Restarting Information
You may see the following messages:
INFO: The system is shutting down.
INFO: Please wait.
syslogd: going down on signal 15
syslogd: restart
unix: [WIRIX Release ...
unix: Copyright 1987-1995 Silicon Graphics, Inc
unix: All Rights Reserved.

General System Messages
343
The messages logged during system startup contain information about the operating
system environment that the system is using. The startup messages include the version
of the IRIX operating system that is loaded on the system, and Silicon Graphics copyright
information. The operating system version information can be helpful to support
providers when you report any problems that the system may encounter.
The messages that are logged during system shutdown are also sent to /var/adm/SYSLOG.
These are informational messages that are broadcast to all users who are logged onto the
system and the system console. There is no action required.
Trap Held or Ignored
You may see these messages:
unix: WARNING: Process ... generated trap, but has signal 11 held or
ignored
unix: Process ... generated trap, but has signal 11 held or ignored
This message indicates that the process is an infinite loop, therefore the signal/trap
message that followed was held or ignored.
This message is usually caused by a temporary “out of resources” condition or a bug in
the program. If it is a resource issue, you should be able to execute the program again
without seeing this message again. If the message reappears after executing the program,
you might have encountered a bug in the program.

344
Appendix B: Troubleshooting System Configuration Using System Error Messages
Memory and Swap Messages
The following messages you may see deal with issues of system memory and swap
space, and the way the system manages these resources.
Growreg Insufficient Memory
You may see this message:
unix: growreg - temporarily insufficient memory to expand region
This message indicates that there is not enough memory (both real and virtual) available
for use by programs running on your system. There is no memory available to start any
new processes or programs.
If this message continues to appear, you can correct the problem as directed in the
troubleshooting section titled “Swapping and Paging Messages” on page 346.
Panic Page Free
If you see this message:
PANIC: panic pagefree: page use 0
This indicates that the system thinks that an address of a page of memory is out of the
legal range of values, or that the system is trying to free a page of memory that is already
marked as free.
This panic message results in the system halting immediately and ungracefully. When
the system halts, it attempts to save the contents of the kernel stack and memory usage
information in a crash file. The page free panic is usually caused by a physical memory
problem or possible disk corruption. If this message occurs again, contact your local
support provider.

Memory and Swap Messages
345
Physical Memory Problems
You may see a message similar to this:
unix: CPU Error/Addr 0x301 <RD PAR>: 0xbd59838
Your system contains several modular banks of random-access memory; each bank
contains a SIMM. One or more of these SIMMs is either loose or faulty. You must correct
the problem so your system and software applications can run reliably.
Follow these steps:
1. Shut down the system.
2. Refer to your Owner’s Guide. It shows you how to visually identify a loose SIMM
and reseat it. If the SIMM is not loose, you may need to replace it. Contact your local
support organization.
If your Owner’s Guide does not contain information about SIMMs, contact your local
support organization.
Recoverable Memory Errors
The following are informational messages. They indicate that the hardware detected a
memory parity error and was able to recover from the parity condition. No action is
required unless the frequency of this message increases. Please note the hexadecimal
number, which represents the memory location in a SIMM.
unix: Recoverable parity error at or near physical address 0x9562f68
<0x308>, Data: 0x8fbf001c/0x87b00014
This message indicates that the system has tried to read a programs allotted memory
space and an error has been returned. The error that returns usually indicates a memory
parity error.
unix: Recoverable memory parity error detected by CPU at 0x9cc4960 <0x304>
code:30

346
Appendix B: Troubleshooting System Configuration Using System Error Messages
This is an informational message that indicates that the Central Processing Unit (CPU)
detected a memory parity error and is reporting it to /var/adm/SYSLOG. No action is
required unless the frequency of this message increases. Please note the hexadecimal
number, which represents the memory location in a SIMM.
unix: Recoverable memory parity error corrected by CPU at 0x9cc4960
<0x304> code:30
This is an informational message that indicates that the Central Processing Unit (CPU)
detected a memory parity error and was able to recover from the parity condition. No
action is required unless the frequency of this message increases. Please note the
hexadecimal number, which represents the memory location in a SIMM.
Savecore I/O Error
If you see this message:
savecore: read: I/O Error
This message indicates that when the system rebooted after a system crash, the program
savecore was not able to read /dev/swap in order to save the memory core image at the time
of the crash.
The program savecore is executed after the system restarts with superuser permissions. If
savecore was not able to read the memory core image (/dev/swap), then it is possible that
you have disk problems within the swap partition. This message might be followed by
disk error messages. If the problem persists, then you should contact your local support
provider.
Swapping and Paging Messages
Swapping and paging are the methods by which the operating system manages the
limited memory resources in order to accommodate multiple processes and system
activities. In general, the operating system keeps in actual RAM memory only those
portions of the running programs that are currently or recently in use. As new sections
of programs are needed, they are paged (or “faulted”) into memory, and as old sections
are no longer needed they are paged out.

Memory and Swap Messages
347
Swapping is similar to paging, except that entire processes are swapped out, instead of
individual memory pages, as in paging. The system maintains a section of hard disk for
swapping. If this space is filled, no further programs can be swapped out, and thus no
further programs can be created.
The following messages may indicate a swapping or paging problem:
Swap out failed on logical swap
For some reason, the operating system was unable to write the program to the swap
portion of the disk. No action is necessary as the process is still in memory. See “Swap
Space” on page 138.
Paging Daemon (vhand) not running - NFS server down?
The system determines that vhand is not executing, possibly because it is waiting for an
I/O transfer to complete to an NFS server (especially if the NFS filesystem is hand
mounted). No action should be necessary as the system will restart vhand when needed.
bad page in process (vfault)
The page being faulted into memory is not a recognized type. The recognized types are
demand fill, demand zero, in file, or on swap. Reboot your system and if the error
persists, check your application and your disk.
unix: WARNING: Process ... killed due to bad page read
The page being faulted into memory could not be read for some reason and the process
was killed. Restart the program or reboot the system, and if the error persists, check your
application and your disk.
unix: Process ... killed due to insufficient memory/swap
Your system uses a combination of physical memory (RAM) and a small portion of the
disk (swap space) to run applications. Your system does not have enough memory and
swap space at this time. It had to stop a program from running to free up some memory.
unix: ... out of logical swap space during fork - see swap(1M)
Your system does not have enough memory and swap space at this time. It could not
start a new process.

348
Appendix B: Troubleshooting System Configuration Using System Error Messages
If you run out of swap space or memory frequently, you should:
1. Exit from applications when you are not using them. Remember to check all your
Desks.
2. Order additional memory from your local support or sales organization.
3. Turn on virtual swap space. Refer to the swap(1M) reference page and “Swap
Space” on page 138 first.
The Administrator should log in as root and enter the command:
chkconfig
If the chkconfig listing shows a line that says vswap off, give the commands:
chkconfig vswap on
/etc/init.d/swap start
If vswap was already on, go on to the next step.
4. Create a file that the system can use for additional swap space. Note that this
decreases your available disk space by the size of the file. If you create a 10 MB
swap file, you’ll no longer have access to that 10MB of disk space.
To create a 10 MB swap file, the Administrator should log in as root and enter these
commands:
mkdir -p /var/swap
/usr/sbin/mkfile 10m /var/swap/swap1
/sbin/swap -a /var/swap/swap1
To make this permanent, so you have the swap space available every time you
restart the system, add this line to the /etc/fstab file:
/var/swap/swap1 swap swap pri=3
For more information, see the swap(1M) reference page or “Swap Space” on page
138.
5. You can permanently increase swap space by repartitioning the disk. You can find
instructions to do this in the IRIX Admin: Disks and Filesystems volume.

System Panic Messages
349
Other Memory Messages
You may see the following error messages or similar messages from time to time:
unix: Memory Parity Error in SIMM S9 (Bank 0, Byte 2)
The CPU detected a memory parity error in the listed SIMM. A parity error indicates that
some or all of the individual memory bits may have been incorrectly read or written.
Note the SIMM information and reboot the system. If the same SIMM shows repeated
errors, check the SIMM as described in “Physical Memory Problems” on page 345.
unix: Process...sent SIGBUS due to Memory Error in SIMM S9
Note the SIMM information and reboot the system. If the same SIMM shows repeated
errors, check the SIMM as described in “Physical Memory Problems” on page 345.
Ran out of action blocks
A resource used by the multiprocessor kernel for inter-CPU interrupts has run out. If this
happens frequently, use the systune(1M) command to increase the value of the parameter
nactions as described in the section titled “Operating System Tuning” on page 230.
mfree map overflow
Fragmentation of some resource (such as message queues) contributed to the loss of
some of the resource. No action is necessary.
System Panic Messages
The following messages indicate problems that should be resolved by rebooting the
system. You should not be overly concerned about these instances unless they become
frequent. There are other PANIC messages that are generated by the kernel not listed
here. Follow these instructions for all PANIC messages.
bumprcnt - region count list overflow
This message indicates an unresolvable problem with the operating system. Reboot your
system.

350
Appendix B: Troubleshooting System Configuration Using System Error Messages
PANIC: kernel fault
This message indicates that the kernel experienced an unresolvable problem and shut
itself down. By the time you see this message in the system message log, you will have
rebooted the system. Note the message exactly on paper in your system log book for
reference if it happens again.
The system is said to have panicked if the software or hardware reached a state where it
could no longer operate. If the system fails again, or if you receive an unusually large
number of error messages, please contact your local support provider. It helps the
support provider if you save this information:
•If there are any files in the /var/adm/crash directory, back them up to tape.
Double-click the launch icon to start the Backup & Restore tool.
•After you back up the files, you can remove them.
•Check the System Log Viewer and save all the messages that you see. Double-click
the launch icon to start the System Log Viewer.
•Have you changed any kernel tunable parameters recently? If so, try resetting them
to their former or default or self-configuring settings. See “Operating System
Tuning” on page 230.

351
Appendix C
C. Application Tuning
You can often increase system performance by tuning your applications to more closely
follow your system’s resource limits. If you are concerned about a decrease in your
system’s performance, first check your application software to see if it is making the best
use of the operating system. If you are using an application of your own manufacture,
you can take steps to improve performance. Even if a commercially purchased
application is degrading system performance, you can identify the problem and use that
information to make decisions about system tuning or new hardware, or even simply
when and how to use the application. The following sections explain how to examine
and tune applications. For more detailed information on application tuning, see the
MIPSpro Compiling and Performance Tuning Guide.
Checking Application Performance With timex
If your system seems slow, for example, an application runs slowly, first check the
application. Poorly designed applications can perpetuate poor system performance.
Conversely, an efficiently written application means reduced code size and execution
time.
A good utility to use to try to determine the source of the problem is the timex(1) utility.
timex reports how a particular application is using its CPU processing time. The format
is:
timex -s program
which shows program’s real (actual elapsed time), user (time process took executing its
own code), and sys (time of kernel services for system calls) time. For example:
timex -s ps -el

352
Appendix C: Application Tuning
The above command executes the ps -el command and then displays that program’s time
spent as:
real 0.95
user 0.08
sys 0.41
Tuning an Application
There are many reasons why an application spends a majority of its time in either user or
sys space. For purposes of example, suspect excessive system calls or poor locality of
code.
Typically, you can only tune applications that you are developing. Applications
purchased for your system cannot be tuned in this manner, although there is usually a
facility to correspond with the application vendor to report poor performance.
Guidelines for Reducing High User Time
If the application is primarily spending its time in user space, the first approach to take
is to tune the application to reduce its user time by using the pixie(1) and prof(1)
commands. See the respective reference pages for more information about these
commands. To reduce high user time, make sure that the program does the following:
•Makes only the necessary number of system calls. Use timex -s to find out the
number of system calls/second the program is making. The key is to try to keep
scall/s at a minimum. System calls are those like read(2) and exec(2); they are listed
in Section 2 of the reference pages.
•Uses buffers of at least 4K for read(2) and write(2) system calls. Or use the standard
I/O library routines fread(3) and fwrite(3), which buffer user data.
•Uses shared memory rather than record locking where possible. Record locking
checks for a record lock for every read and write to a file. To improve performance,
use shared memory and semaphores to control access to common data (see
shmop(2), semop(2), and usinit(3P)).

Tuning an Application
353
•Defines efficient search paths ($PATH variable). Specify the most used directory
paths first, and use only the required entries, so that infrequently used directories
aren’t searched every time.
•Eliminates polling loops (see select(2)).
•Eliminates busy wait (use sginap(0)).
•Eliminates system errors. Look at /var/adm/SYSLOG, the system error log, to check
for errors that the program generated, and try to eliminate them.
Guidelines for Reducing Excessive Paging
Run timex again. If the application still shows a majority of either user or sys time,
suspect excessive paging due to poor “locality” of text and data. An application that has
locality of code executes instructions in a localized portion of text space by using
program loops and subroutines. In this case, try to reduce high user/sys time by making
sure that the program does the following:
•Groups its subroutines together. If often-used subroutines in a loaded program are
mixed with seldom-used routines, the program could require more of the system’s
memory resources than if the routines were loaded in the order of likely use. This is
because the seldom-used routines might be brought into memory as part of a page.
•Has a working set that fits within physical memory. This minimizes the amount of
paging and swapping the system must perform.
•Has correctly ported FORTRAN-to-C code. FORTRAN arrays are structured
differently from C arrays; FORTRAN is column major while C is row major. If you
don’t port the program correctly, the application will have poor data locality.
After you tune your program, run timex again. If sys time is still high, tuning the
operating system may help reduce this time.

354
Appendix C: Application Tuning
Guidelines for Reducing I/O Throughput
You can do a few other things to improve the application’s I/O throughput. If you are on
a single-user workstation, make sure that:
•The application gains I/O bandwidth by using more than one drive (if applicable).
If an application needs to concurrently do I/O on more than one file, try to set
things up so that the files are in different filesystems, preferably on different drives
and ideally on different controllers.
•The application obtains unfragmented layout of a file. Try to arrange an application
so that there is only one file currently being written to the filesystem where it
resides. That is, if you have several files you need to write to a filesystem, and you
have the choice of writing them either one after another or concurrently, you
actually get better space allocation (and consequently better I/O throughput) by
writing these files singly, one after another.
•If you are on a multiuser server, it’s hard to control how other applications access
the system. Use a large size I/O—16K or more. You may also be able to set up
separate filesystems for different users. With high sys time output from timex, you
need to monitor the operating system to determine why this time is high.
Looking At/Reordering an Application
Many applications have routines that are executed over and over. You can optimize
program performance by modifying these heavily used routines in the source code. The
following paragraphs describe the tools that can help tune your programs.
Analyzing Program Behavior With prof
Profiling allows you to monitor program behavior during execution and determine the
amount of time spent in each of the routines in the program. Profiling is of two types:
•program counter (PC) sampling
•basic block counting

Looking At/Reordering an Application
355
PC sampling is a statistical method that interrupts the program frequently and records
the value of the program counter at each interrupt. Basic block counting, on the other
hand, is done by using the pixie(1) utility to modify the program module by inserting
code at the beginning of each basic block (a sequence of instructions containing no
branch instructions) that counts the number of times that each block is entered. Both
types of profiling are useful. The primary difference is that basic block counting is
deterministic and PC sampling is statistical. To do PC sampling, compile the program
with the -p option. When the resulting program is executed, it will generate output files
with the PC sampling information that can then be analyzed using the prof(1) utility. prof
and pixie are not shipped with the basic IRIX distribution, but are found in the optional
IRIS Development Option software distribution.
To do basic block counting:
1. Compile the program.
2. Execute pixie on it to produce a new binary file that contains the extra instructions to
do the counting.
When the resulting program is executed, it produces output files that are then used
with prof to generate reports of the number of cycles consumed by each basic block.
3. Use the output of prof to analyze the behavior of the program and optimize the
algorithms that consume the majority of the program’s time.
Refer to the cc(1), f77(1), pixie(1), and prof(1) reference pages for more information about
the mechanics of profiling.

356
Appendix C: Application Tuning
Reordering a Program With pixie
User program text is demand-loaded a page at a time (currently 4K). Thus, when a
reference is made to an instruction that is not currently in memory and mapped to the
user’s address space, the encompassing page of instructions is read into memory and
then mapped into the user’s address space. If often-used subroutines in a loaded
program are mixed with seldom-used routines, the program can require more of the
system’s memory resources than if the routines are loaded in the order of likely use. This
is because the seldom-used routines might be brought into memory as part of a page of
instructions from another routine.
Tools are available to analyze the execution history of a program and rearrange the
program so that the routines are loaded in most-used order (according to the recorded
execution history). These tools include pixie,prof, and cc. By using these tools, you can
maximize the cache hit ratio (checked by running sar -b) or minimize paging (checked by
running sar -p), and effectively reduce a program’s execution time. The following steps
illustrate how to reorganize a program named fetch.
1. Execute the pixie command, which adds profiling code to fetch:
pixie fetch
This creates an output file, fetch.pixie, and a file that contains basic block addresses,
fetch.Addrs.
2. Run fetch.pixie (created in the previous step) on a normal set or sets of data. This
creates the file named fetch.Counts, which contains the basic block counts.
3. Create a feedback file that the compiler passes to the loader. Do this by executing
prof:
prof -pixie -feedback fbfile fetch fetch.Addrs fetch.Counts
This produces a feedback file named fbfile.
4. Compile the program with the original flags and options, and add the following two
options:
-feedback fbfile
For more information, see the prof(1) and pixie(1) reference pages.

Working Around Slow Commercial Applications
357
Working Around Slow Commercial Applications
You cannot usually tune commercially available applications to any great degree. If your
monitoring has told you that a commercially purchased application is causing your
system to run at unacceptably slow levels, you have a few options:
•You can look for other areas to reduce system overhead and increase speed, such as
reducing the system load in other areas to compensate for your application. Options
such as batch processing of files and programs when system load levels permit
often show a noticeable increase in performance. See “Task Scheduling With the at,
batch, and cron Commands” on page 27.
•You can use the nice,renice,npri, and runon utilities to change the priority of other
processes to give your application a greater share of CPU time. See “Prioritizing
Processes” on page 152 and “Changing the Priority of a Running Process” on page
154.
•You can undertake a general program of system performance enhancement, which
can include maximizing operating system I/O through disk striping and increased
swap space. See the IRIX Admin: Disks and Filesystems guide.
•You can add memory, disk space, or even upgrade to a faster CPU.
•You can find another application that performs the same function but that is less
intensive on your system. (This is the least preferable option, of course.)


359
Appendix D
D. IRIX Directories and Files
This section briefly describes the directories and files that a system administrator uses
frequently. For additional information on the formats of the system files, refer to the IRIX
section 4 reference pages.
IRIX Root Directories
The main directories of the root filesystem (/) are as follows:
/Contains hardware-specific files and files required to start the system.
bin Contains publicly executable commands. (Some are root-only.)
debug Provides a link to /proc.
dev Contains special files that define all of the devices on the system.
etc Contains administrative programs and tables.
lib Contains public libraries.
lost+found Used by fsck(1M) to save disconnected files and directories.
proc Provides an interface to running processes that may be used by
debuggers such as dbx(1).
tmp Used for temporary files.
usr Used to mount the /usr filesystem and for files that are the same from
system to system. These files are not writable.
var Used for files that are specific to each system. There is typically a
symbolic link to /usr for each file in /var.

360
Appendix D: IRIX Directories and Files
Other Important IRIX System Directories
The following directories are important in the administration of your system:
/etc/init.d Contains shell scripts used in upward and downward transitions to all
system run levels. These files are linked to files beginning with S (start)
or K (kill) in /etc/rcn.d, where n is replaced by the appropriate run level
number.
/etc/configContains start-up and run-time configuration information.
/etc/rc0.d Contains files executed by /etc/rc0 to bring the system to run-level 0. Files
in this directory are linked from files in the /etc/init.d directory and begin
with either a K or an S.K indicates processes that are killed, and S
indicates processes that are started when entering run-level 0.
/etc/rc2.d Contains files executed by /etc/rc2 for transitions to system run-level 2.
Files in this directory are linked from files in the /etc/init.d directory and
begin with either a K or an S.K indicates processes that should be killed,
and S indicates processes that should be started, when entering
run-level 2.
/etc/rc3.d Contains files executed by /etc/rc3 for transitions to system run-level 3.
Files in this directory are linked from files in the /etc/init.d directory and
begin with either a K or an S.K indicates processes that should be
stopped, and S indicates processes that should be started when entering
run-level 3.
/var/adm/acct Contains information collected by the accounting subsystem.
/var/adm/crash Contains crash dumps of the system. After analysis, and if appropriate,
these dumps can safely be removed unless your support provider has
requested otherwise. See the savecore(1) reference page for more
information.
/var/adm/sa Contains information collected by sar(1).
/usr/people Contains the home directories of users of the system or network. This
directory can be a link to /var/people or a mount point for a totally
separate filesystem.
/usr/share This directory contains files that are the same on all systems.
/var/spool Contains spooling directories. The directories in this directory hold
outbound mail, print requests, and other data.

Important IRIX System Files
361
/var/spool/cron/crontabs
Contains crontab files for the adm,root, and sys logins and ordinary users
listed in cron.allow.
/var/sysgen/master.d
Contains files that define the configuration of hardware devices,
software services and utilities, and aliases.
/var/sysgen/stune
Contains files that define the default settings of all kernel tunable
parameters.
/var/sysgen/mtune
Contains files that define the current settings of all kernel tunable
parameters.
Important IRIX System Files
The following files are important in the administration of your system:
/etc/cshrc Contains the standard (default) environment for /bin/csh users.
/etc/exports Contains the list of NFS filesystems exported at boot time to NFS clients
if the optional NFS software is installed.
/etc/fstab Specifies the filesystem(s) to be mounted.
/etc/gettydefs Contains information used by getty to set the speed and terminal
settings for a line.
/etc/group Describes each group to the system.
/etc/hosts Contains information about the known hosts on the network.
/etc/hosts.equiv Contains a list of hosts trusted for non-superuser rlogin and rsh
execution.
/etc/inittab Contains the instructions to define the processes created or terminated
by init for each initialization state.
/etc/issue Displays a message to users before logging in to the system over the
network or on serial lines.
/etc/lvtab Contains information describing the logical volumes used by the
workstation. This file is read by the logical volumes utilities.

362
Appendix D: IRIX Directories and Files
/etc/motd Contains a brief “message of the day.”
/etc/passwd Identifies each user to the system.
/etc/profile Contains the standard (default) environment for /bin/sh users.
/etc/rc0 Contains a script that executes shell scripts in /etc/rc0.d to bring the
system to run-level 0.
/etc/rc2 Contains a script that executes shell scripts in /etc/rc2.d and /etc/rc.d on
transitions to system run-level 2.
/etc/shutdown Contains a shell script that gracefully shuts down the system in
preparation for system backup or for scheduled downtime.
/etc/sys_id Contains the system name.
/etc/ttytype Contains a list, ordered by terminal port, of what kind of terminal is
likely to log in to that port.
/etc/TIMEZONE
Used to set the default time zone shell variable TZ.
/etc/utmp Contains the information on the current runstate of the system.
/etc/wtmp Contains a history of system logins.
/etc/xwtmp Contains an extended history of system logins.
/var/adm/sulog Contains a history of su command usage. This file should be checked
periodically for excessive size and archived.
/var/adm/SYSLOG
Contains system and daemon error messages.
/var/yp/ypdomain
Contains the domain name if the workstation is using NIS.
/var/cron/log Contains a history of all the actions taken by cron. This file should be
checked periodically for excessive size and reduced if necessary.
/usr/lib/cron/cron.allow
Contains a list of users allowed to use crontab(1). This file cannot exist
on the system at the same time as cron.deny.
/usr/lib/cron/cron.deny
Contains a list of users who are denied access to crontab(1). It is checked
if /usr/lib/cron/cron.allow does not exist.

IRIX Device Special Files
363
IRIX Device Special Files
This section contains a listing of many of the most important device files and directories
that reside in the /dev directory structure.
dsk/ Directory containing block device files for disks; see ips(7), dks(7), and
xyl(7) for disk partition device names.
rdsk/ Directory containing raw (character) device files for disks; see ips(7),
dks(7), and xyl(7) for disk partition device names.
root Generic root partition (block device).
rroot Generic root partition (raw device).
usr Generic usr partition (block device).
rusr Generic usr partition (raw device).
swap Generic swap partition (block device).
rswap Generic swap partition (raw device).
vh Generic root volume header (block device).
rvh Generic root volume header (raw device).
mt/ directory containing block device files for tapes; see ts(7) for ISI
quarter-inch tape drive device names; see tps(7) for SCSI quarter-inch
tape drive device names; see xmt(7) for Xylogics half-inch tape drive
names.
rmt/ directory containing raw device files for tapes; see ts(7) for ISI
quarter-inch tape drive device names; see tps(7) for SCSI quarter-inch
tape drive device names; see xmt(7) for Xylogics half-inch tape drive
names.
tape Generic tape device; bytes are swapped in order to be
backward-compatible with the IRIS Series 2000 and 3000 workstations;
see mtio(7).
nrtape Generic no-rewind tape device; bytes are swapped in order to be
backward-compatible with the IRIS Series 2000 and 3000 workstations;
see mtio(7).
tapens Generic tape device; bytes are not swapped; see mtio(7).
nrtapens Generic no-rewind tape device; bytes are not swapped; see mtio(7).

364
Appendix D: IRIX Directories and Files
mem Memory; see mem(7).
mmem Mappable memory; see mmem(7).
kmem Kernel memory; see kmem(7).
null Null device (zero length on input, data sink on output); see null(7).
SA/ Block devices used by system administration tools; see sysadm(1M) and
sa(7).
rSA/ Raw devices used by system administration tools; see sysadm(1M) and
sa(7).
audio Audio interface.
dn_ll File used to create 4DDN logical links; see dn_ll(7).
dn_netman File used by 4DDN network management software; see dn_netman(7).
cent Centronics color graphics printer device.
tek Tektronix color graphics printer device.
vers Versatec color graphics printer device.
vp0 Hard link to vers.
gpib* GPIB (IEEE-488) device; see gpib(7).
gse Spectragraphics coax device; see gse(7).
plp Parallel line printer interface; see plp(7).
prf File used by operating system profiler; see prf(7).
t3270 Raw device file for IBM 3270 Cluster Controller; see t3270(7).
hl/ Directory containing files used by IRIS GTX series machines hardware
spinlock driver; see usnewlock(3P).
log Named pipe that is read by the system logging daemon; see
syslogd(1M).
ptc Clonable pseudo-tty controller; see clone(7), ptc(7).
grconc Master pseudo-teletype for the graphics console; see pty(7).
grcons Slave pseudo-teletype for the graphics console; see pty(7).

IRIX Device Special Files
365
gm Logical console device for the Graphics Manager on the IRIS GT and
GTX model machines. Messages from the software running on the 68020
on the GM board will appear as output on this device.
grin/ Directory containing the individual logical graphics input devices.
console System console device.
syscon Hard link to /dev/console.
systty Hard link to /dev/console.
queue Graphics queue device. Graphics programs call “select” on this device
in order to be notified when there is input in their graphics queue. This
device can’t be actually read or written.
dials Device for serial port connected to dial and button box.
keybd Device for serial port connected to keyboard.
mouse Device for serial port connected to mouse.
tablet Device for serial port connected to digitizing tablet.
ttyd[1-12] Serial ports 1–12.
ttyf[1-12] Serial ports 1–12 for devices that understand hardware flow control.
ttym[1-12] Serial ports 1–12 for modems.
ttyq* Pseudo tty devices; see pty(7).
zero Zero device (infinite zeros on reads); see zero(7).

366
Appendix D: IRIX Directories and Files
ASCII Conversion Table
The ASCII character set defines a 1-to-1 mapping of characters to 8-bit values. The
following tables provide an easy reference for converting the ASCII characters into their
octal, hexadecimal, and decimal equivalents. These tables are also available in the ascii(5)
reference page.
Table D-1 ASCII Map to Octal Values
000 nul 001 soh 002 stx 003 etx 004 eot 005 enq 006 ack 007 bel
010 bs 011 ht 012 nl 013 vt 014 np 015 cr 016 so 017 si
020 dle 021 dc1 022 dc2 023 dc3 024 dc4 025 nak 026 syn 027 etb
030 can 031 em 032 sub 033 esc 034 fs 035 gs 036 rs 037 us
040 sp 041! 042 “043 # 044 $ 045 % 046 & 047 ‘
050 ( 051 ) 052 * 053 + 054 , 055 - 056 . 057 /
060 0 061 1 062 2 063 3 064 4 065 5 066 6 067 7
070 8 071 9 072 : 073 ; 074 < 075 = 076 > 077 ?
100 @ 101 A 102 B 103 C 104 D 105 E 106 F 107 G
110 H 111 I 112 J 113 K 114 L 115 M 116 N 117 O
120 P 121 Q 122 R 123 S 124 T 125 U 126 V 127 W
130 X 131 Y 132 Z 133 [ 134 \ 135 ] 136 ^ 137 _
140 ` 141 a 142 b 143 c 144 d 145 e 146 f 147 g
150 h 151 i 152 j 153 k 154 l 155 m 156 n 157 o
160 p 161 q 162 r 163 s 164 t 165 u 166 v 167 w
170 x 171 y 172 z 173 { 174 | 175 } 176 ~ 177 del

ASCII Conversion Table
367
Table D-2 ASCII Map to Hexadecimal Values
00 nul 01 soh 02 stx 03 etx 04 eot 05 enq 06 ack 07 bel
08 bs 09 ht 0a nl 0b vt 0c np 0d cr 0e so 0f si
10 dle 11 dc1 12 dc2 13 dc3 14 dc4 15 nak 16 syn 17 etb
18 can 19 em 1a sub 1b esc 1c fs 1d gs 1e rs 1f us
20 sp 21 ! 22 “ 23 # 24 $ 25 % 26 & 27 ‘
28 ( 29 ) 2a * 2b + 2c , 2d - 2e . 2f /
30 0 31 1 32 2 33 3 34 4 35 5 36 6 37 7
38 8 39 9 3a : 3b ; 3c < 3d = 3e > 3f ?
40 @ 41 A 42 B 43 C 44 D 45 E 46 F 47 G
48 H 49 I 4a J 4b K 4c L 4d M 4e N 4f O
50 P 51 Q 52 R 53 S 54 T 55 U 56 V 57 W
58 X 59 Y 5a Z 5b [ 5c \ 5d ] 5e ^ 5f _
60 ` 61 a 62 b 63 c 64 d 65 e 66 f 67 g
68 h 69 i 6a j 6b k 6c l 6d m 6e n 6f o
70 p 71 q 72 r 73 s 74 t 75 u 76 v 77 w
78 x 79 y 7a z 7b { 7c | 7d } 7e ~ 7f del

368
Appendix D: IRIX Directories and Files
Table D-3 ASCII Map to Decimal Values
0 nul 1 soh 2 stx 3 etx 4 eot 5 enq 6 ack 7 bel
8 bs 9 ht 10 nl 11 vt 12 np 13 cr 14 so 15 si
16 dle 17 dc1 18 dc2 19 dc3 20 dc4 21 nak 22 syn 23 etb
24 can 25 em 26 sub 27 esc 28 fs 29 gs 30 rs 31 us
32 sp 33 ! 34 “ 35 # 36 $ 37 % 38 & 39 ‘
40 ( 41 ) 42 * 43 + 44 , 45 - 46 . 47 /
48 0 49 1 50 2 51 3 52 4 53 5 54 6 55 7
56 8 57 9 58 : 59 ; 60 < 61 = 62 > 63 ?
64 @ 65 A 66 B 67 C 68 D 69 E 70 F 71 G
72 H 73 I 74 J 75 K 76 L 77 M 78 N 79 O
80 P 81 Q 82 R 83 S 84 T 85 U 86 V 87 W
88 X 89 Y 90 Z 91 [ 92 \ 93 ] 94 ^ 95 _
96 ` 97 a 98 b 99 c 100 d 101 e 102 f 103 g
104 h 105 i 106 j 107 k 108 l 109 m 110 n 111 o
112 p 113 q 114 r 115 s 116 t 117 u 118 v 119 w
120 x 121 y 122 z 123 { 124 | 125 } 126 ~ 127 del

369
Appendix E
E. Encapsulated PostScript File v.3.0 vs. PostScript File
Format
In the course of maintaining your system, you are likely to receive files in various
versions of the PostScript format. Following are some of the main differences between
the Encapsulated PostScript File (EPSF) version 3.0 format and PostScript file format:
•EPSF is used to describe the appearance of a single page, while the PostScript
format is used to describe the appearance of one or more pages.
•EPSF requires the following two DSC (document structuring conventions) Header
comments:
%!PS-Adobe-3.0 EPSF-3.0 %%BoundingBox: llx lly urx ury
If a PS 3.0 file conforms to the document structuring conventions, it should start
with the comment:
%!PS-Adobe-3.0
A PS file does not have to contain any DSC comment statements if it does not
conform to the DS conventions.
•Some PostScript language operators, such as copypage,erasepage, or exitserver must
not be used in an EPS file.
Certain rules must be followed when some other PostScript operators, such as
nulldevice,setscreen, or undefinefont are used in an EPS file.
All PostScript operators can be used in a PS file.
•An EPS file can be (and usually is) inserted into a PS file, but a PS file must not be
inserted into an EPS file if that will violate the rules for creating valid EPS files.
•An EPS file may contain a device-specific screen preview for the image it describes.
A PS file usually contains screen previews only when EPS files are included in that
PS file.
•The recommended filename extension for EPS files is .EPS or .eps, while the
recommended filename extension for PS files is .PS or .ps.

370
Appendix E: Encapsulated PostScript File v.3.0 vs. PostScript File Format
The EPSF format was designed for importing the PostScript description of a single page
or part of a page, such as a figure, into a document, without affecting the rest of the
description of that document. EPS code should be encapsulated, i.e., it should not
interfere with the PS code that may surround it, and it should not depend on that code.
The EPSF format is usually used for the output from a program that was designed for the
preparation of illustrations or figures, (such as Adobe Illustrator) and as input into
desktop publishing programs (such as Adobe System’s FrameMaker). Most desktop
publishing programs can produce the description of a document in the PostScript format
that may include the imported EPS code.
For more information about these formats, see the book PostScript Language Reference
Manual, Second Edition, Addison-Wesley Publishing Company, Inc., Reading, MA, 1990.
You can get several documents on the EPS and PS formats from the Adobe Systems
PostScript file server by entering the following at a UNIX prompt, and then following the
instructions you get from the file server:
mail ps-file-server@adobe.com
Subject: help
Ctrl+D
You can get a description of the EPSF format in the PS format by sending the following
message to that file server:
send Documents EPSF2.0.ps

371
Appendix F
F. Bibliography and Suggested Reading
Internet Request For Comment documents are available from the Internet Network
Information Center (INTERNIC) at the following address:
Network Solutions
Attn: InterNIC Registration Services
505 Huntmar Park Drive
Herndon, VA 22070
Phone: 1-800-444-4345 or 1-703-742-4777
Bach, M., The Design of the UNIX Operating System (Englewood Cliffs, NJ: Prentice Hall,
1986).
Braden, R. “Requirements for Internet Hosts.”Internet Request For Comment 1112 (1989).
Costales, B., sendmail. (Sebastopol, CA: O’Reilly & Associates, Inc., 1993).
Deering, S. “Host Extensions for IP Multicasting.”Internet Request For Comment 1112
(1989).
Everhart, C., Mamakos, L., Ullmann, R., Mockapetris, P. “New DNS RR Definitions.”
Internet Request For Comment 1183 (1990)
Fiedler, D., Hunter, B., UNIX System V Release 4 Administration (Carmel, IN: Hayden
Books, 1991).
Frisch, A., Essential System Administration. (Sebastopol, CA: O’Reilly & Associates, Inc.,
1991).
Gilly, D., UNIX in a Nutshell. (Sebastopol, CA: O’Reilly & Associates, Inc., 1992).
Hunt, C., TCP/IP Network Administration. (Sebastopol, CA: O’Reilly & Associates, Inc.,
1992).

372
Appendix F: Bibliography and Suggested Reading
Leffler, S., The Design and Implementation of the 4.3 BSD UNIX Operating System. (Menlo
Park, CA: Addison Wesley, 1989).
Lottor, M. “Domain Administrator’s Guide.”Internet Request For Comment 1033 (1987).
Lottor, M. “TCP Port Service Multiplexer (TCPMUX).”Internet Request For Comment 1078
(1988).
Mockapetris, P. “DNS Encoding of Network Names and Other Types.”Internet Request
For Comment 1101 (1989).
Mockapetris, P. “Domain Names – Concept and Facilities.”Internet Request For Comment
1034 (1987).
Mockapetris, P. “Domain Names – Implementation and Specification.”Internet Request
For Comment 1035 (1987).
Mogul, J., Postel, J. “Internet Standard Subnetting Procedure.”Internet Request for
Comment 950 (1985).
Nemeth, E., Snyder, G., Sebass, S., UNIX System Administration Handbook (Englewood
Cliffs, NJ: Prentice Hall, 1989). Note that this book contains an excellent discussion of
the lpr printing system.
Partridge, C. “Mail Routing and The Domain System.”Internet Request For Comment 974
(1986).
Stahl, M. “Domain Administrator’s Guide.”Internet Request For Comment 1032 (1987).
Thomas, R., UNIX System Administration Guide for System V. (Englewood Cliffs, NJ:
Prentice Hall, 1989).

Index
Chapter 1


375
Index
A
Access Control Lists, 89
access permissions
setting, 123
acl, 89
adding
a group, 106
new users, 101
adding swap space, 138
administration, system
documentation,xxviii–xxix
altering system configuration, 74
applications, tuning, 209
array, 150
Array Services, 150
at command, 27
autoboot, 184
auto command, 198
automating tasks, 27
B
batch command, 27
batch processing, 27
/bin/csh,116
/bin/rsh,116
/bin/sh,116
boot,184
boot command, 198
booting
across the network, 201
command, 198
default file, 198
from a resource list, 205
from various media, 205
fx,199
prom monitor, 197
specific program, 198
through gateways, 202
with bootp,202
bootp server, 202
Bourne shell, 116
startup files, 119
broadcast message (/etc/wall), 7
C
changing
default shell, 115
groups temporarily, 109
passwords, 111
permissions, 87
system configuration, 74
user information, 110
checking system configuration, 71
Checkpoint and Restart, 171
chkconfig, 71
colors, selecting, 22

376
Index
colorview command, 22
Command Monitor, entering, 182
communication
user, 125, 127, 129, 130
console, 184
conventions, typographical, xxxii
CPR, 171
cron command, 27
C-shell, 116
startup files, 117
D
DAC
changing permissions, 87
directory permissions, 86
file permissions, 86
umask, 88
using, 84
date and time
changing, 83
default permissions
setting, 123
default shell
changing, 115
deleting a user, 107
device files, 363
device names, 188
df command, 134
directory permissions, 86
disable,184
disk free space display command, 134
disk quotas
site policy, 133
disks
formatting, 199
disk usage display command, 133, 134
diskusg command, 134
documentation conventions, xxxii
du command, 133
E
electronic mail, 125
entering the Command Monitor, 182
entering the PROM Monitor, 182
environment variables, 121
examining, 121
setting, 122
error messages, 333
/etc/group
layout of, 103
/etc/issue,127
/etc/motd,125
/etc/motd (message of the day), 6
/etc/password
layout of, 101
/etc/sys_id,78
/etc/wall (broadcast message), 7
Ethernet
booting, 201
gateway, 202
F
file permissions, 86
finding files, 24
find program, 24
font selection, 23

377
Index
G
gateway, 202
getting help, 185
group file
layout of, 103
group ID number, 100
/etc/group,100
groups
determining membership, 109
temporarily changing, 109
H
hard disk
multiple, 138
hardware graph, 68
hardware inventory, 65
hardware upgrades
cautions, 5
help
during boot up, 184
reference, xxxiv
hinv command, 65
host name, 78
hostname
changing, 78
I
iconlogin (pandora), 73
id command, 109
if/etc/issue,127
init command, 191
init command,190
inventory
hardware, 65
software, 69
IP network interfaces, 68
IRIX administration
documentation,xxviii–xxix
K
kernel tuning, 209, 241
keyboard
variables, 196
L
line disciplines, POSIX, 303
login icons, 73
login shells, 116
M
mail, 125
man command, xxxiv
man pages, xxxiv
mesg command, 129
message of the day (/etc/motd), 126
message of the day (/etc/motd), 6
message of the day file, 125

378
Index
Miser
checking job status, 170
checking queue status, 170
command-line options file setup, 164
configuration, 159
configuration examples, 165
configuration file setup, 163
configuration recommendations, 165
CPU allocation, 157
differences between Miser and batch management
systems, 171
logical number of CPUs, 157
logical swap space, 158
memory management, 158
overview, 156
pools, 156
queue, 156
starting, 169
stopping, 169
submitting jobs, 169
system pool, 156
system queue definition file setup, 160
terminating a job, 170
user queue definition file setup, 161
mpadmin(1M), 77
mtune directory, 241
multgrps command, 109
multiprocessor systems, 77
N
network booting, 201
Network Queuing Environment, 171
news system, 127
O
operating system, tuning, 209
operating system tuning, 241
P
pandora(iconlogin), 73
parameters, kernel, 209
parameters, large system tuning, 211
partitioning
advantages, 90
connecting the system console to the MMSC, 92
disadvantages, 91
from the PROM, 94
guidelines, 96
mkpart command, 92
networking setup, 91
overview, 89
partition size, 90
xpc driver, 91
partitoning
if_cl driver, 91
setup, 92
password file
layout of, 101
passwords
changing, 111
forgotten, 111
passwords, PROM, 190
passwords, system, 190
PCP, 172
Performance Co-Pilot, 172
performance tuning, 209, 241

379
Index
permissions
changing, 87
default, 5
directory, 86
file, 86
umask, 88
POSIX line disciplines, 303
printenv command, 195
processor, controlling, 77
processor assignment, changing, 77
PROM monitor
booting, 197
changing variables, 196
command line editor, 186
command syntax, 187
device names, 188
environment variables, 190
keyboard variables, 196
reinitializing, 190
PROM Monitor, entering, 182
PROM monitor prompt, 51
PROM passwords, 190
pset(1M), 77
R
RAM
non-volatile, 192
remote login message, 127
reporting trouble, 9
reset button, 197
restricted shell, 116
root directories, 359
S
sash, 199
serial line discipline, POSIX, 303
setenv command, 196
setting environment variables, 122
ShareII, 172
shell environment
examining, 121
shell variables, 121
setting, 122
shell window colors, 22
shell window font selection, 23
shutdown command, 52
shutting down the system, 50
single-user mode, 60
site policies
accounts, 4
disk quotas, 133
disk use, 133
passwords, 4
privacy, 5
root access, 4
user ID numbers, 4
software inventory, 69
software upgrades
cautions, 6
special login shells, 124
standalone shell, 199
stopping the system, 61
super user
groups, 109
swap space, 138
adding, 138
syntax
PROM monitor, 187

380
Index
sysadm
chgloginid,111
chgpasswd,111
chgshell,111
deluser,107
powerdown, 50
system administration
documentation,xxviii–xxix
system configuration
altering, 74
checking, 71
system files, 360
system log hardcopy, 8
system name
changing, 78
system passwords, 190
system shutdown, 61
multi-usermode, 50
system tuning, 241
T
timed daemon, 83
trouble
reporting, 9
troubleshooting
out of memory, 138
tuning applications, 209
tuning the kernel, 209
tuning the operating system, 241
typographical conventions, xxxii
U
umask, 88
umask,123
unsetenv command, 197
upgrading hardware
cautions, 5
upgrading software
cautions, 6
user accounts
changing passwords, 111
closing, 108
deleting, 107
login shells, 116
user environment, 115
user environment
description, 115
environment variables, 121
login shells, 116
special shells, 124
user ID number, 99
/etc/passwd,99
site policy, 4
user trouble log
maintaining, 8
/usr/news,127
V
variables
bootfile, 198
environment, 196
keyboard, 196
path, 198
removing, 197
versions command, 69

381
Index
W
wall command, 130
w command, 7
whodo command, 7
WQE, 171
write command, 129
write to all users, 130


Tell Us About This Manual
As a user of Silicon Graphics products, you can help us to better understand your needs
and to improve the quality of our documentation.
Any information that you provide will be useful. Here is a list of suggested topics:
•General impression of the document
•Omission of material that you expected to find
•Technical errors
•Relevance of the material to the job you had to do
•Quality of the printing and binding
Please send the title and part number of the document with your comments. The part
number for this document is 007-2859-005.
Thank you!
Three Ways to Reach Us
•To send your comments by electronic mail, use either of these addresses:
–On the Internet: techpubs@sgi.com
–For UUCP mail (through any backbone site): [your_site]!sgi!techpubs
•To fax your comments (or annotated copies of manual pages), use this
fax number: 650-932-0801
•To send your comments by traditional mail, use this address:
Technical Publications
Silicon Graphics, Inc.
2011 North Shoreline Boulevard, M/S 535
Mountain View, California 94043-1389

