007 3005 001
User Manual: 007-3005-001
Open the PDF directly: View PDF ![]() .
.
Page Count: 56

Performance Co-Pilot™ for ORACLE®
Administrator’s Guide
Document Number 007-3005-001

Performance Co-Pilot™ for ORACLE® Administrator’s Guide
Document Number 007-3005-001
CONTRIBUTORS
Written by Jonathan Knispel and Bill Tuthill
Engineering review by Ken McDonnell
Edited by Christina Cary
Document Production by Mike Dixon
© 1995, 1996 Silicon Graphics, Inc.— All Rights Reserved
The contents of this document may not be copied or duplicated in any form, in whole
or in part, without the prior written permission of Silicon Graphics, Inc.
RESTRICTED RIGHTS LEGEND
Use, duplication, or disclosure of the technical data contained in this document by
the Government is subject to restrictions as set forth in subdivision (c) (1) (ii) of the
Rights in Technical Data and Computer Software clause at DFARS 52.227-7013
and/or in similar or successor clauses in the FAR, or in the DOD or NASA FAR
Supplement. Unpublished rights reserved under the Copyright Laws of the United
States. Contractor/manufacturer is Silicon Graphics, Inc., 2011 N. Shoreline Blvd.,
Mountain View, CA 94043-1389.
Silicon Graphics, the Silicon Graphics logo, CHALLENGE and IRIS are registered
trademarks, and Performance Co-Pilot, IRIS Inventor, IRIS InSight, IRIX, and Origin
are trademarks of Silicon Graphics, Inc.
Cisco is a registered trademark of Cisco Systems, Inc.
NFS is a registered trademark of Sun Microsystems, Inc.
ORACLE and Oracle7 are registered trademarks of Oracle, Inc.
UNIX is a registered trademark in the United States and other countries, licensed
exclusively through X/Open Company, Ltd.

Contents
List of Figures v
List of Tables vii
About This Guide ix
What This Guide Contains ix
Conventions Used in This Guide x
Additional Resources xi
PCP Documentation xi
Reference Pages xi
Release Notes xii
Web Resources xii
1. Monitoring ORACLE Performance With PCP 1
PCP for ORACLE Requirements 1
Overview of Installation Scenarios 3
PCP Collector Systems 4
PCP Monitor Systems 4
Customized Configuration Files 4
2. Installation Instructions 5
PCP Collector Installation 5
PCP Monitor Installation 8
Upgrading an Existing Installation 10
Removing an Installation 11
3. Managing Multiple ORACLE Databases 13
Multiple Databases on One Database Server 14
Multiple Databases and Multiple Database Servers 16
Multiple ORACLE Homes on One System 19

iv
Contents
4. ORACLE Response-Time Agent 21
Installing oraping 21
Customizing oraping 22
5. ORACLE Parallel Server Visualization Tool 25
Configuring opsview 25
Understanding opsview 27
A. Abbreviated Installation Instructions 29
PCP Collector System 29
PCP Monitor System 30
B. Troubleshooting PCP for ORACLE 31
PMDA Cannot Connect to ORACLE 32
ORACLE Connection Errors 33
Cannot Find ORACLE Metrics 34
PMDA Starts but Later Stops Running 35

iii
List of Figures
Figure 1-1 Monitoring a Remote Database 2
Figure 1-2 Monitoring Databases on Several Systems 3
Figure 5-1 opsview Window 26


v
List of Tables
Table i Selected PCP Commands and Libraries iii
Table 3-1 Unique Domain Identifiers 16


i
About This Guide
This guide explains how to use the Silicon Graphics® Performance Co-Pilot™ (PCP) for
ORACLE® package to monitor ORACLE database performance. The software described
here is packaged as the Performance Co-Pilot for ORACLE product. You need to have
both Performance Co-Pilot (version 1.2 or later) and ORACLE installed on your system
or systems to take advantage of this software. For those who have installed this product
before, there are abbreviated installation instructions provided in Appendix A.
This section includes brief descriptions of the contents of this guide and an explanation
of typographical conventions used.
What This Guide Contains
This guide contains the following chapters:
• Chapter 1, “Monitoring ORACLE Performance With PCP,” provides an overview of
how to monitor ORACLE databases with PCP.
• Chapter 2, “Installation Instructions,” gives instructions for installing the necessary
subsystems to support local databases and remote databases, tells how to upgrade
existing installations, and shows how to remove PCP for ORACLE.
• Chapter 3, “Managing Multiple ORACLE Databases,” describes strategies for
monitoring multiple ORACLE databases on remote servers or local servers.
• Chapter 4, “ORACLE Response-Time Agent,” provides information on the oraping
command for measuring response time from the ORACLE database.
• Chapter 5, “ORACLE Parallel Server Visualization Tool,” provides information on
the opsview command for visualizing Oracle Parallel Server performance.
• Appendix A, “Abbreviated Installation Instructions,” gives installation instructions
similar to those in Chapter 2, except shorter.
• Appendix B, “Troubleshooting PCP for ORACLE,” provides troubleshooting help
for this product.

ii
About This Guide
Conventions Used in This Guide
These type conventions and symbols are used in this guide:
Bold Function and subroutine names, language keywords and data types,
literal command-line arguments (options), nonalphabetic data types,
and operators.
Italics BNF entries, command monitor commands, executable names,
filenames, glossary entries (online, these show up underlined), IRIX
commands, manual/book titles, new terms, onscreen button names,
program variables, tools, utilities, variable command-line arguments,
variable coordinates, and variables to be supplied by the user in
examples, code, and syntax statements.
Fixed-width Error messages, prompts, and onscreen text.
Bold Fixed-width
User input, including keyboard keys (printing and nonprinting); literals
supplied by the user in examples, code, and syntax statements.
ALL CAPS Environment variables, operator names, directives, defined constants,
macros in C programs.
Helvetica Bold Hardware labels.
““ (Double quotation marks) Onscreen menu items and references in text
to document section titles.
() (Parentheses) Following function names, surround function arguments
or are empty if the function has no arguments. Following commands,
surround the reference page (manual page) section number.
[] (Brackets) Surrounding optional syntax statement arguments.
#Shell prompt for the superuser (root).
%C shell prompt for users other than root.
This guide uses the standard UNIX® convention for referring to reference pages. The
entry name is followed by the section number in parentheses. For example, pmchart(1)
designates the online manual page for the pmchart command. If this reference page is
installed, you can click on this entry to display the information.

About This Guide
iii
Additional Resources
The following sections describe some resources for obtaining further information.
PCP Documentation
The Performance Co-Pilot User’s and Administrator’s Guide describes your PCP software in
detail. This is your main resource for using the base PCP software.
The Performance Co-Pilot Programmer’s Guide provides information on the application
programming interface (API) to PCP services, and the steps necessary to extend the
scope of performance metrics by adding new collection agents into the PCP framework.
This programming would be most useful when customizing and extending the oraping
agent described in Chapter 4.
Reference Pages
Table i shows some important reference pages for PCP commands and libraries.
Table i Selected PCP Commands and Libraries
Reference Page Summary Information
cron.pmdaily(1) administration of Performance Co-Pilot archive log files
dkvis(1) visualize disk I/O rates and performance
memvis(1) Performance Co-Pilot graphical memory usage viewer
mpvis(1) visualize CPU utilization/performance
nfsvis(1) visualize performance of NFS® statistics
opsview(1) Oracle Parallel Server performance visualization
PMAPI(3) introduction to the Performance Metrics API
pmcd(1) performance metrics collector daemon
pmchart(1) plot performance metrics against time
pmclient(1) a simple performance metrics client

iv
About This Guide
Release Notes
Release notes provide specific information about the current release. Each optional
product has its own set of release notes. Release Notes are available online through the
relnotes command, or graphically through the grelnotes command.
Web Resources
Customers with access to the World Wide Web (WWW) can find up-to-date information
about the Performance Co-Pilot at this address:
• http://www.sgi.com/Products/hardware/challenge/CoPilot/
At the same Web site, you can find additional Silicon Graphics information, including the
Technical Publications Library:
• http://www.sgi.com/Technology/TechPubs/
PMDA(3) introduction to the Performance Metrics Domain Agent support library
pmdacisco(1) Cisco® router performance metrics domain agent (PMDA)
pmdasummary(1) summary performance metrics domain agent (PMDA)
pmerr(1) translate Performance Co-Pilot error codes into error messages
pmgadgets(1) a miniature graphical performance metrics viewer
pmgirix(1) a miniature IRIX performance metrics viewer
pmie(1) inference engine for performance metrics
pminfo(1) display information about performance metrics
pmkstat(1) high-level system performance overview
pmns(4) the performance metrics name space
Table i (continued) Selected PCP Commands and Libraries
Reference Page Summary Information

1
Chapter 1
1. Monitoring ORACLE Performance With PCP
Within the collection infrastructure of Performance Co-Pilot, the pmcd process (the
Performance Metrics Collector Daemon) is responsible for gathering performance
metrics relating to the systems on which it is run. The pmcd process manages a group of
Performance Metrics Domain Agents (PMDAs, or simply agents), each of which is
responsible for gathering data within some specified domain.
ORACLE database performance metrics are collected by an agent called pmdaoracle.
See the pmcd(1) reference page for more detailed information about pmcd, agents, and
domains. Refer to the Performance Co-Pilot User’s and Administrator’s Guide for more
information on PCP in general, especially if you do not understand the terms, concepts,
or instructions presented in this document.
PCP for ORACLE Requirements
If you wish to make use of metrics from an ORACLE database (for example, using
pmchart(1) to plot the number of database block writes per second), there are certain
requirements on the system where the database resides and the system from which the
database is to be monitored.
On the system where the database (or databases) reside, there must be a pmcd process
running. In addition, the pmcd process must be configured to run a pmdaoracle7 agent for
the database (or databases) being monitored.
On the monitoring system, the Performance Metrics Namespace (PMNS) must be
augmented to include the names of the ORACLE performance metrics.

2
Chapter 1: Monitoring ORACLE Performance With PCP
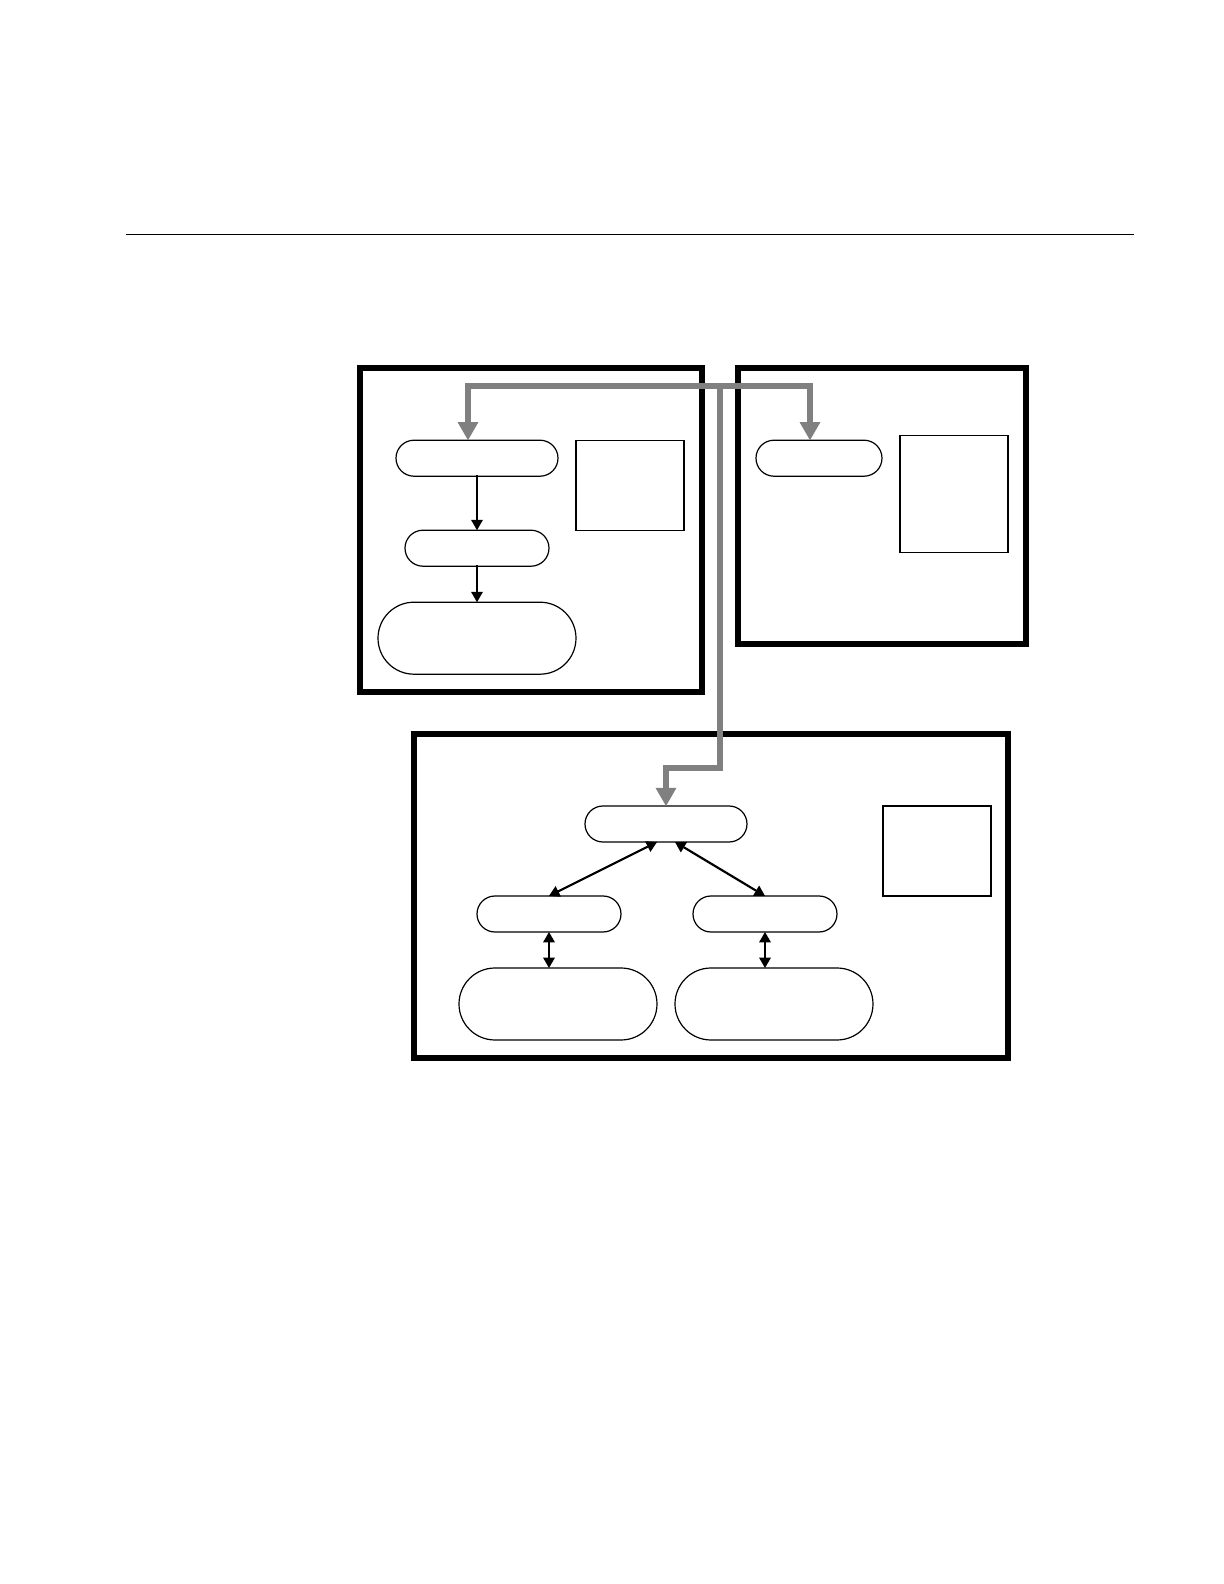
Figure 1-1 shows a typical use of the Performance Co-Pilot to monitor an ORACLE
database running on a server system. The server system often has no graphics capability,
so a graphical workstation is used to monitor the database. Notice that each system has
its own copy of the PMNS.
Figure 1-1 Monitoring a Remote Database
Figure 1-2 shows a more complicated arrangement, with multiple ORACLE servers to be
monitored. Notice once again that each system has its own distinct copy of the PMNS.
The namespace on any monitoring system need only contain entries for the specific
ORACLE databases that it monitors. For example, the monitoring system’s namespace
contains entries for all of the databases because it monitors them all. The server systems
usually contain namespace entries only for their own databases. (Although the server
systems do not seem to be monitoring themselves, administration of the Performance
Co-Pilot requires that a system’s namespace contain namespace entries for each
ORACLE database it makes available through the pmcd process.)
pmdaoracle7
PMCD
ORACLE
database
PMNS
...
oracle.*
...
PCP Monitor System
PMNS
...
oracle.*
...
pmchart
ORACLE Server System
(PCP Collector System)
PCP for ORACLE Requirements
3
.
Figure 1-2 Monitoring Databases on Several Systems
Overview of Installation Scenarios
Installation of PCP for ORACLE involves at least one PCP collector system installation,
and typically at least one PCP monitor system installation. These two installations are
performed with the Install shell script located in the /var/pcp/pmdas/oracle7 directory.The
ORACLE Server System
pmdaoracle7 A
PMCD
pmdaoracle7 B
ORACLE
database B
ORACLE
database A
PMNS
...
ORACLE Server System
pmdaoracle7 C
PMCD
ORACLE
database C
PMNS
...
oracle.C.*
...
PCP Monitor System
PMNS
...
pmchart
oracle.A.*
oracle.B.*
...
oracle.A.*
oracle.B.*
oracle.C.*
...
(PCP Collector System)
(PCP Collector System)

4
Chapter 1: Monitoring ORACLE Performance With PCP
Install script should be run once per database instance per system, after the PCP software
and PCP for ORACLE packages have been installed.
PCP Collector Systems
On a system with an ORACLE database running, you need to do the following:
1. Make and install the ORACLE agent, pmdaoracle7.
2. Alter the PMCD configuration file to run pmdaoracle7.
3. Augment the PCP namespace to include the ORACLE metrics.
4. Create an ORACLE database user for pmdaoracle7 to use.
This series of operations must be repeated for each ORACLE database instance running
on the system.
PCP Monitor Systems
On a system that does not have an ORACLE database to be monitored, but is used to
monitor the ORACLE metrics on a remote system, you only need to augment the PCP
namespace to include the ORACLE metrics.
Customized Configuration Files
The base PCP product and PCP for ORACLE both contain a number of configuration files
that can be modified to reflect the local configuration or product customizations. When
you install a new version of PCP and the installation software discovers that you have
customized a file, it performs one of two possible actions:
• It may save the customized file (by appending .O to its name) then put the new
version of the file in its place.
• It may leave the customized version of the file in place and save the new one to a
temporary name (by appending .N to the default name).
Use the following command to find conflicts, then reconcile differences as needed, using
xdiff to compare files (see xdiff(1L) for details).
$showfiles -cCH pcp\*

5
Chapter 2
2.Installation Instructions
This chapter provides you with specific installation instructions for the standard
scenarios. For more complex installations, use the instructions in this chapter together
with the information in Chapter 3, “Managing Multiple ORACLE Databases.”
PCP Collector Installation
On a PCP collector system, the procedure described below should be used once for each
ORACLE database instance that you wish to monitor. This procedure installs one PCP
agent for each ORACLE database, and ensures that the associated ORACLE performance
metrics can be exported into the PCP framework. Prerequisites are as follows:
• The pcp.sw and pcp_ora7.sw product images must have been installed, using either
swmgr or inst; see the inst(1M) reference page.
• The pmcd daemon must be running on the PCP collector system.
• You must have superuser (root) permission to run Install.
• You must know the ORACLE_HOME and ORACLE_SID environment variables for
the desired database instance.
• The ORACLE database instance must be up and running.
• You must have DBA access to the database instance as the SYS database user.
The pmdaoracle7 agent needs access to the database, so an ORACLE user must be created
on your system for it. The Install script automatically generates SQL statements to create
the ORACLE database user and grant that user suitable privileges for the database.
Before running Install you must decide on a name for this ORACLE user. You have two
options: create a conventional user with a password (such as pcp/pcp), or use a default
login (such as ops$pcp). If you are upgrading an existing PCP installation, the current
version of the pmcd control file (/etc/pmcd.conf) shows the previously specified user. See
“Upgrading an Existing Installation” on page 10 and the pmcd(1) or pmdaoracle7(1)
reference pages for details.

6
Chapter 2: Installation Instructions
If a system contains multiple ORACLE database instances, it is strongly recommended
that you use the same ORACLE database user for all of the ORACLE database instances
and corresponding instances of pmdaoracle7 on that system. If you elect to use a default
login for pmdaoracle7 (an ops$... user), then it is essential that the same user be specified
for all database instances. However, note that the ORACLE database user may differ
between systems, if necessary.
There are some security issues. Under the “user with a password” approach, the user
name and password appear on the command line of the ORACLE agent run by pmcd.
Disclosure of this information may allow unauthorized users to connect to the database
as this PCP for ORACLE user, and have read access to the performance data made
available by ORACLE. However, note that no access is granted to any other data in the
database. If possible, it is better to create an ops$... login instead, so that no password
appears on the command line. If you choose this option, you must create an IRIX user
account with the appropriate name prior to running the Install script (for example, an
account named pcpora for the ops$pcpora ORACLE user). If this account is used only
for the ORACLE agent, it is strongly recommended that you disable standard logins for
it. Refer to the book IRIX Admin: System Configuration and Operation for information on
the procedure to disable logins.
Caution: If an ORACLE database user with the same name already exists, part of the
installation process grants that user select (only) access on several of the ORACLE
dynamic performance views.
Run Install by performing the tasks outlined below. The ORACLE database must be up
and running before you can perform the following procedure:
1. Become superuser using the su command or by logging in as root.
2. Set the environment variables ORACLE_HOME and ORACLE_SID for the ORACLE
database you want.
Note: If the ORACLE_SID is not a valid PCP namespace identifier, run Install with
the -r option to specify an alternative name for this database’s ORACLE metrics in
the namespace. Valid identifiers consist of an initial letter followed by zero or more
letters, digits or underscores. For example, if your ORACLE_SID was 7.1.6 you
would specify -r inst_7_1_6.
3. Enter the following command, replacing XXX with the ORACLE database user
identification (and optional password) you chose:
#./Install XXX

PCP Collector Installation
7
For example, if you elected to use a default login of ops$pcp, you would enter:
#./Install ’ops$pcp’
The single quotes in the command above stop the shell from trying to evaluate $pcp
as a shell variable.
If instead you decided to create a user named pcpora with a password of secret9,
you would enter:
#./Install pcpora/secret9
If there are any errors, your PCP configuration is restored to its previous state before
you ran Install.
4. When finished, Install prints a few post-installation tasks that you must perform. In
the example text below, DBNAME is the name of your ORACLE database.1 You see
a message similar to the following:
You must run setup.DBNAME.sql as SYS on the ORACLE_SID database
to grant the Oracle PMDA access to the dynamic performance tables.
For example:
#$ORACLE_HOME/bin/sqldba lmode=y
SQLDBA> connect sys
Password:
SQLDBA> @setup.DBNAME.sql
Once this has been done, start the pmdaoracle7 PMDA and verify that the installation
has completed correctly:
#killall -HUP pmcd
#./Verify
When performing these tasks, make sure that you use the ORACLE_HOME and
ORACLE_SID that were in the environment when you ran Install.
Thepmcd daemon is started automatically when the system reboots. ORACLE databases
too are often started automatically when the system reboots. Because they take some
time to initialize and become available, they are often started in the background so as not
to hold up the reboot sequence. If PMCD is started before the ORACLE database is
available, the ORACLE PMDA will not be able to connect to the database.
1DBNAME should be the saMme as the ORACLE_SID of your database unless you gave it a different
name by using the -r option when you ran Install.

8
Chapter 2: Installation Instructions
The ORACLE PMDA will periodically attempt to (re)connect to the database if it has no
connection.
Note that the pmcd process does this only when ORACLE performance metrics are
requested. In addition, there is a cooling-off period between connection attempts, to
prevent a flood of requests for ORACLE metrics from generating a corresponding flood
of ORACLE database connection attempts. See the pmdaoracle7(1) reference page for
more details.
If you do not want the common prefix for the names of PCP ORACLE metrics in the
namespace to correspond with the ORACLE database instance name, the Install
command’s -r option allows you to specify an alternative. For example, the following
commands cause pmdaoracle7 to run on the demo database instance:
#ORACLE_SID=demo
#./Install -r pqo_demo ’ops$pcp’
However, the metrics would appear in the namespace under oracle.pqo_demo, as opposed
tooracle.demo. This could be useful when several databases on different systems have the
same ORACLE_SID.
PCP Monitor Installation
On a PCP monitor system, the procedure described below should be used once for each
remote ORACLE database instance that you wish to monitor.
In the descriptions below, “the database system” means the remote system that is
running the ORACLE database instance you wish to monitor, “the database instance”
refers to the database instance on the database system, and “the monitoring system”
refers to the system where the PCP monitoring tools are running.
Prerequisites for the monitoring system are as follows:
• The pcp.sw and pcp_ora7.sw product images must have been installed, using either
swmgr or inst; see the inst(1M) reference page.
• You must have superuser (root) permission to run Install.
•Install must have been run on the database system to install an ORACLE agent for
the database instance.

PCP Monitor Installation
9
• You must know the numeric domain assigned to the ORACLE agent corresponding
to the database instance on the database system. The domain occurs in three places,
and must agree in all three:
– The first number of the dotted triple (performance metric identifier) in the
output produced by running this command on the database system, where
DBNAME is the database instance name:
$pminfo -m oracle.DBNAME | head -1
– In the /etc/pmcd.conf file (on the database system), the ID number in the second
column of the pmdaoracle7 line for the database. When multiple databases are
being monitored, the last two fields of each pmdaoracle7 line specify the
ORACLE_HOME and ORACLE_SID (respectively) for each database instance.
– The number immediately following the -d option on that line in /etc/pmcd.conf.
Choose a name to be used as the common prefix for the ORACLE metrics in the PCP
namespace on the monitoring system. This should usually be the ORACLE_SID of the
database instance you wish to monitor. For example, if you wish to monitor a database
instance named demo on a remote system, you would call your ORACLE metrics demo.
The metrics would appear in the local namespace under oracle.demo. Chapter 3 discusses
multiple databases on multiple systems.
Note: The name you choose must be a valid PCP namespace identifier. Valid identifiers
consist of an initial letter followed by zero or more letters, digits, or underscores. For
example, if your ORACLE_SID were 7.1.6, you might use inst_7_1_6 as the name.
Run Install by performing the following steps:
1. Become superuser using the su command or by logging in as root.
2. Enter the following command, replacing DOM with the numeric domain assigned
to pmdaoracle7 on the database system, and DBNAME with the name you want for
the ORACLE metrics in the namespace:
#./Install -N -d DOM -r DBNAME
The -N option tells Install to update only the namespace rather than install a PMDA.
If -r is not specified, DBNAME is set from the ORACLE_SID environment variable.
For example, if you want ORACLE metrics for a database instance named demo on a
remote system to appear under oracle.demo in the namespace (and the domain of
pmdaoracle7 for the demo database on the remote system is 32), you would enter this:
#./Install -N -d 32 -r demo

10
Chapter 2: Installation Instructions
3. After you run Install, the metrics on the database system should be immediately
accessible (provided they are available on the database system itself). For example,
to test that you can access the license statistics from the demo database instance on
the remote database system pqo, you could enter this command:
$pminfo -h pqo -f oracle.demo.license
Upgrading an Existing Installation
Given the variation possible in ORACLE installations, it is not possible to automatically
upgrade an existing PCP for ORACLE installation by typing a single upgrade command.
Fortunately, upgrading is a straightforward process.
Note: The PCP for ORACLE directory moved from /usr/demos/PerfCoPilot/pmdas/oracle7
in PCP for ORACLE 1.0, to /usr/pcp/pmdas/oracle7 in PCP for ORACLE 1.1, and then to
/var/pcp/pmdas/oracle7 in this release (PCP for ORACLE 1.2). The Install and Remove
scripts described in this document should be run from this new directory.
Start by making a copy of the current /etc/pmcd.conf. Use this command:
#cp /etc/pmcd.conf /etc/pmcd.conf.old
If you have customized the flags used for pmdaoracle7, you can use the saved version as
a reference for replacing your customizations. For more information on flags, see the
pmdaoracle7(1) reference page. Even if you did not customize flags, the pmcd.conf.old file
contains all the previous domain assignments if you need to reconstruct them.
To upgrade each pmdaoracle7 you need to know the username and password it uses to
connect to its database. Use the grep command to search for the string pmdaoracle7 in
/etc/pmcd.conf. The ORACLE_HOME and ORACLE_SID appear as the last two entries on
each line. If there is a -c flag, it will be followed by the username/password pair that the
agent uses for database connections. If there is no -c flag, an ops$... login is being used;
the pmdaoracle7 executable has the setuid mode bit set, and the IRIX user who owns the
file determines the ops$... user for ORACLE. For example, if pmdaoracle7 is setuid and
owned by pcpora, as in the example below, the corresponding ORACLE username would
be ops$pcpora.
#cd /var/pcp/pmdas/oracle7
#ls -l pmdaoracle7
-rwsr-xr-x 1 pcpora sys 3119516 Nov 11 12:38 pmdaoracle7

Removing an Installation
11
Use the instructions earlier in this chapter to install the new version of PCP for ORACLE.
Use the same ORACLE username (and optional password) that the existing pmdaoracle7
uses. Remember that there are two kinds of installation: one for systems configured as
PCP collectors, and one for PCP monitor systems.
The ORACLE username and password are necessary only for PCP collector installations.
PCP collector systems must be upgraded because the agent has been enhanced to extract
new metrics. PCP monitor systems must also be upgraded so the new metrics will appear
in the PCP namespace.
If you have trouble upgrading, you may use the Remove script to delete the pmdaoracle7,
then install it from scratch by following the instructions in “PCP Collector Installation”
on page 5 and in “PCP Monitor Installation” on page 8.
Next, reapply any customizations you might have made to ORACLE agents in the
/etc/pmcd.conf file on each system running an ORACLE database. Use the saved version
(/etc/pmcd.conf.old) as a guide.
Finally, check that metrics are available from each system. For example:
$pminfo -f oracle
Remove any old PCP for ORACLE directories and their contents. For example:
#rm -rf /usr/demos/PerfCoPilot/pmdas/oracle7
#rm -rf /usr/pcp/pmdas/oracle7.0
Removing an Installation
The Remove script is the reverse of Install. The Remove script is run in the same way on
both the PCP collector systems and on the PCP monitor systems. Remove must have the
name of the ORACLE metrics in the PCP namespace (without the oracle part of the name)
as a parameter.
For example, the following sequence of Bourne shell commands installs a PCP collector
for the demo database instance:
#ORACLE_SID=demo
#export ORACLE_SID
#ORACLE_HOME=/oracle/home
#export ORACLE_HOME
#./Install ’ops$pcp

12
Chapter 2: Installation Instructions
To undo the actions of the above commands, use the following command:
#./Remove demo
The same command works on PCP monitor systems, providing that you specify the
correct name for the ORACLE metrics to be removed.
If you are not sure what ORACLE metrics are available in the namespace, the following
command produces a list of names suitable for use as parameters to Remove:
$pminfo oracle | cut -f2 -d. | sort -u
Remember that the name of the ORACLE metrics in the namespace should be used as the
parameter. If the -r option was used to override ORACLE_SID when Install added the
ORACLE metrics to the namespace, the name of the ORACLE metrics in the namespace
may not correspond to ORACLE_SID. Consider the following sequence of commands on
a PCP collector system:
#ORACLE_SID=demo
#export ORACLE_SID
#ORACLE_HOME=/oracle/home
#export ORACLE_HOME
#./Install -r pqo_demo ’ops$pcp
On a PCP monitor system, the sequence would be the same except for the last line:
#./Install -N -d 32 -r pqo_demo
To undo the effects of these installation on either system, enter the following command:
#./Remove pqo_demo
Remove checks that the corresponding entry in /etc/pmda.conf is removed, notifies pmcd to
ensure termination of the PMDA, and culls all of the associated ORACLE metrics from
the PCP namespace. If this is the only existing ORACLE PMDA, Remove also deletes the
pmdaoracle7 executable.
Remove does not remove any users added to the ORACLE database for monitoring the
ORACLE performance statistics—this must be done separately.

13
Chapter 3
3.Managing Multiple ORACLE Databases
This section contains information for organizations with multiple ORACLE databases.
Before planning a multiple database installation, it is a good idea to be thoroughly
familiar with the contents of this guide. In addition to reading this guide, try actually
installing and using PCP for ORACLE on a single database instance. Try monitoring a
database from one or more other systems. Try using -r to specify a name other than the
ORACLE_SID on one of the remote systems. Try removing PCP for ORACLE from both
the PCP collector and PCP monitor systems. There is no substitute for experience.
Each PCP performance metric has a name (for example, irix.swap.pagesout), which is
mapped to a more compact internal representation for the PCP namespace. This internal
representation is known as a PMID (performance metric identifier). The pmcd process on
each system manages a collection of Performance Metrics Domain Agents (PMDAs, or
simply agents). All requests for performance metrics on a system go to the pmcd.
Each of a pmcd’s agents is responsible for gathering performance data from some
domain, such as IRIX, ORACLE, Cisco routers, and so on. Each agent that pmcd manages
is assigned a unique numeric domain identifier. Every PMID contains a domain
identifier that tells its pmcd which agent is responsible for supplying the metric.
For example, there is only one IRIX agent on any given system, because only one copy of
IRIX runs on a system. Domain number 1 is reserved for IRIX on all systems under PCP
monitoring. So the namespace on every system maps all IRIX performance metrics to a
set of PMIDs that all have the domain number 1. Similarly, every PMCD knows that the
IRIX agent has domain 1, so any request for a PMID with a domain of 1 is for the IRIX
agent. This works because the domain in the namespace on every system agrees with the
pmcd domain for the agent on every system.
This works well provided that there is only one copy of a particular agent on a system.
Now consider a system with more than one ORACLE database. Running a single
“super” agent able to supply information from all of the ORACLE databases on a system
is not feasible for a number of reasons (performance, fault resilience, complexity, and so
on). Instead, a separate agent is created for each database instance on the system.

14
Chapter 3: Managing Multiple ORACLE Databases
Each PCP for ORACLE agent supplies performance metrics from a single database
instance. If you have multiple databases, a separate copy of the same agent program is
running for each, but with different command-line arguments. The metrics supplied by
the agents are distinguished by giving them different names in the namespace.
Consider a system with two databases named production and test. There would be one
copy of pmdaoracle7 (the PCP for ORACLE agent) running using the production database
and another using the test database. The latch miss statistics for the two databases would
be available as oracle.production.latch.misses and oracle.test.latch.misses, respectively. The
domains for these two metrics in the namespace would be different, but they must agree
with the domains used by pmcd for the two ORACLE agents. This is also the case for
remote systems wishing to monitor the production and test databases.
Multiple Databases on One Database Server
In the following example, there is a single database server system with two databases:
production and test.
On the database server system, an agent is required for each database and the namespace
must be updated to include ORACLE metrics for each database. Using the Bourne shell,
the superuser would enter the following commands:
#cd /var/pcp/pmdas/oracle7
#ORACLE_HOME=/oracle/home
#export ORACLE_HOME
#ORACLE_SID=production
#export ORACLE_SID
#./Install pcpora/pcpora
The Install command above prints instructions describing how to add the necessary
database user, and runs the Verify script for the production database. Continuing:
#ORACLE_SID=test
#export ORACLE_SID
#./Install pcpora/pcpora
Install prints instructions describing how to add the necessary database user, and runs
the Verify script for the test database. Now pminfo displays the following output:
$pminfo -m oracle | grep reqdist
oracle.production.reqdist PMID: 32.5.0
oracle.test.reqdist PMID: 33.5.0

Multiple Databases on One Database Server
15
The above command sequence prints out the PMID of one metric from each of the
databases. The first integer in the dotted triple is the domain assigned to that database
by the Install script. In this example, the production database is domain 32 and the test
database is domain 33.
These domain numbers are required to set up the namespace(s) on remote systems
wishing to monitor the production and test databases. The following sequence of
commands is required on each remote system (but not on the database server). The
superuser would enter the following commands on each monitoring system:
#cd /var/pcp/pmdas/oracle7
#./Install -N -r production -d 32
#./Install -N -r test -d 33
The -N option tells Install not to install an agent, but to update the namespace.
The -r option and its argument specify the name of the ORACLE database in the
namespace. The -d option and its argument specify the domain of the corresponding
agent on the database server system. These extra options were not necessary on the
database server system because the Install script there automatically assigned the
domain numbers.
Note: A common error when fetching metrics in a distributed environment is forgetting
to specify the host from which the metrics are to be fetched. If you don’t specify a host
when fetching metrics, localhost is used by default. The metrics may be in the namespace,
but unless you specify that they come from the database server system rather than
localhost, no meaningful values will be returned. The following example shows a typical
sequence, corrected:
$pmval -t 10 oracle.orders.all.table.scanrows
pmval: pmLookupDesc: Unknown or illegal metric identifier
$pmval -h bigboy -t 10 oracle.orders.all.table.scanrows
metric: oracle.orders.all.table.scanrows
host: bigboy
semantics: cumulative counter (converting to rate)
units: count (converting to count / sec)
samples: all
interval: 10.00 sec
53.6
103.1
87.4
97.8

16
Chapter 3: Managing Multiple ORACLE Databases
Multiple Databases and Multiple Database Servers
If your organization has several systems, each with one or more ORACLE database
instance, then you may wish to assign unique domain numbers to each database
instance. This is usually less confusing than having two ORACLE agents for the same
PCP domain on different database servers. To accomplish this, you must assign unique
domains to the databases manually. The Install script is not sophisticated enough to
search through an entire network looking for ORACLE databases.
You should create and maintain a central registry of domain numbers. This should
specify the system’s hostname, the database instance name, and the corresponding
PCP ORACLE agent’s domain number. The registry should be kept up to date and
periodically checked against all of the /etc/pmcd.conf files in your organization.
Each database you intend to monitor should be assigned a unique domain identifier. The
range of domain identifiers reserved for ORACLE databases instances is 32 to 39
inclusive. Additional numbers in the range 128 to 254 may be used if they are not already
taken by other agents.
The following example illustrates the process of configuring PCP for ORACLE support
for multiple databases on multiple systems. Assume that there are three systems:
•good, with two ORACLE databases: production and test
•bad, with three ORACLE databases: dev,proto, and test
•ugly, with one ORACLE database: demo
First, six unique domain identifiers must be allocated, as shown in Table 3-1. Although
the test databases on systems good and bad have the same name, they are different
database instances.
Table 3-1 Unique Domain Identifiers
System Database Domain
good production 32
good test 33
bad dev 34
bad proto 35
bad test 36
ugly demo 37

Multiple Databases and Multiple Database Servers
17
There are two databases named test. You must give them different names in the PCP
namespace to distinguish them. They will be called test_good and test_bad. You need only
rename them in the PCP namespace; there is no need to recreate the database with a new
name on the system.
Next, install an agent for each database running on a database system.
The-d option is used to manually specify the domain. For the test databases, -r is used to
specify an alternate name for the databases in the namespace. For example, using the
Bourne shell on system good, the superuser would enter the following commands:
#cd /var/pcp/pmdas/oracle7
#ORACLE_HOME=/oracle/home
#export ORACLE_HOME
#ORACLE_SID=production
#export ORACLE_SID
#./Install -d 32 pcpora/pcpora
Add any necessary database users and run the Verify script for the production database.
#ORACLE_SID=test
#export ORACLE_SID
#./Install -d 33 -r test_good pcpora/pcpora
Add any necessary database users and run the Verify script for the test database.
The same process would take place on the systems bad and ugly. For these, only the Install
commands are shown. After setting up the environment for the dev database on bad:
#./Install -d 34 pcpora/pcpora
After setting up the environment for the proto database on bad:
#./Install -d 35 pcpora/pcpora
After setting up the environment for the test database on bad:
#./Install -d 36 -r test_bad pcpora/pcpora
And after setting up the environment for the demo database on ugly, enter this command:
#./Install -d 37 pcpora/pcpora
The namespace on each system that is to monitor the database systems should be
augmented to include the required ORACLE metrics.

18
Chapter 3: Managing Multiple ORACLE Databases
You do not have to add all the databases to every system’s namespace. For example if a
system named dbspy is going to be used to monitor only the production database on good
plus the dev and test databases on bad, the following commands suffice. As superuser on
dbspy, you would enter the following commands after installing PCP for ORACLE:
#cd /var/pcp/pmdas/oracle7
#./Install -N -d 32 -r production
#./Install -N -d 34 -r dev
#./Install -N -d 36 -r test_bad
If you have a collection of workstations that are to be used to monitor potentially any
database, the commands required to augment the namespace on each will be identical.
Creating a shell script to perform the commands can save time.
If you want to use the system called good to monitor databases on the system called bad,
good’s namespace must be augmented to include bad’s metrics. For example, as superuser
on good, you would enter the following commands:
#cd /var/pcp/pmdas/oracle7
#./Install -N -d 34 -r dev
#./Install -N -d 35 -r proto
#./Install -N -d 36 -r test_bad
Similarly, ugly’s metrics could be added to good’s namespace. In general, there is no need
to augment the namespace in this way until you want to monitor a specific remote
database. A smaller namespace is a faster namespace.
If you need to find the domain of a database later, enter the following command on the
system where the database resides:
$pminfo -m oracle | grep reqdist
In the examples above, the hostname was appended to the database name for the test
databases. For complex ORACLE database deployments, it is a good idea to do this for
all the database names, as an aid to remembering which database resides on which
system. Remember that you must specify the correct host from which to fetch the metrics.
This is easier if the metric name actually contains the correct hostname.

Multiple ORACLE Homes on One System
19
Multiple ORACLE Homes on One System
Because pmdaoracle7 is statically linked to the ORACLE libraries in ORACLE_HOME,
different ORACLE homes (for different versions of ORACLE) produce different code in
the agent. It is unusual to have more than one version of ORACLE running on a system,
so the Install script does not support it. However, if you need to do this, perform the
following steps after you install each ORACLE agent:
1. Halt the pmcd process by entering this command as superuser:
#/etc/init.d/pcp stop
2. Determine the domain number of the agent that you installed.
3. As superuser, enter the following commands, substituting for dom the agents’s
domain number:
#cd /var/pcp/pmdas/oracle7
#mv pmdaoracle7 pmdaoracle7_dom
4. Edit the /etc/pmcd.conf file, find the line with dom in the second column, and change
/var/pcp/lib/pmdaoracle7 to /var/pcp/lib/pmdaoracle7_dom.
5. Restart the pmcd process by typing this command:
#/etc/init.d/pcp start
6. Fetch a few metrics from the agent to ensure that it is working. If it is not, check
/var/adm/pcplog/pmcd.log and /var/adm/pcplog/oracle7-*.log for error messages.
To remove an agent modified in this manner, just run the Remove script as normal.


21
Chapter 4
4.ORACLE Response-Time Agent
The PCP for ORACLE package includes a second ORACLE specific agent, oraping. The
oraping agent periodically executes an SQL query against an ORACLE database,
measures the response time from the ORACLE server, and exports that response time as
a performance metric into the PCP infrastructure.
Installing oraping
Since oraping is a PCP PMDA, it must be installed on a PCP collector system, where a
pmcd process is running. Prerequisites are as follows:
• The pcp.sw and pcp_ora7.sw product images must have been installed, using either
swmgr or inst; see the inst(1M) reference page.
• The pmcd daemon must be running on the PCP collector system.
• You must have superuser (root) permission to run Install.
• You must know the ORACLE_HOME and ORACLE_SID environment variables for
the desired database instance.
• The ORACLE database instance must be up and running.
• You must have DBA access to the database instance as the SYS database user.
• ORACLE Pro*C must be installed (oraping is supplied as Pro*C source code).
• If the database instance to be probed by oraping is remote, ORACLE SQL*Net must
be installed (oraping executes as a client of the ORACLE server instance).

22
Chapter 4: ORACLE Response-Time Agent
The installation procedure is as follows:
1. Become superuser using the su command or by logging in as root.
2. Enter the following commands:
#cd /var/pcp/pmdas/oraping
#./Install
3. Answer questions from the Install script as follows:
Use ORACLE_HOME=/oracle/home? y
ORACLE_SID is not set in the environment. Please enter it now: demo
Do you want to customize the ping interval? [n] y
How many seconds between pings? 30
The oraping agent requires an ORACLE username (and password) to
connect to the database, create a table, and add some rows to it.
Please enter the username and password for a suitable user.
ORACLE user/password: scott/tiger
Making the oraping agent...
done
You need to choose an appropriate configuration for installation
of the “oraping” Performance Metrics Domain Agent (PMDA).
collector collect performance statistics on this system
monitor allow this system to monitor local and/or remote systems
both collector and monitor configuration for this system
Please enter c(ollector) or m(onitor) or b(oth) b
Updating the Performance Metrics Name Space (PMNS)...
Installing pmchart view(s)...
Terminate PMDA if already installed...
Installing files...
make -f Makefile.ora install
Updating the PMCD control file, and notifying PMCD...
Check oraping metrics have appeared... 4 metrics and 4 values
Customizing oraping
Different deployments of oraping may be used to quantify the following ORACLE quality
of service measures:
• Local ORACLE server performance (oraping running on the same system as the
ORACLE server).

Customizing oraping
23
• ORACLE server performance as seen from remote client applications (deploy
oraping where the client applications run; for example, on a workstation connected
to the LAN, and on a system connected to the ORACLE server system by means of
the WAN).
• ORACLE server performance on platforms other than Silicon Graphics machines
(use oraping on Silicon Graphics machines to probe ORACLE on another platform).
The oraping agent is distributed in source code format to encourage the following
customizations:
• Replace the generic SQL query by something that is more representative of the
workload in the target environment.
• Add further query types and export response times for each query type.
Refer to the Performance Co-Pilot Programmer’s Guide for a complete description of how to
create and integrate new PMDAs into the PCP infrastructure.


25
Chapter 5
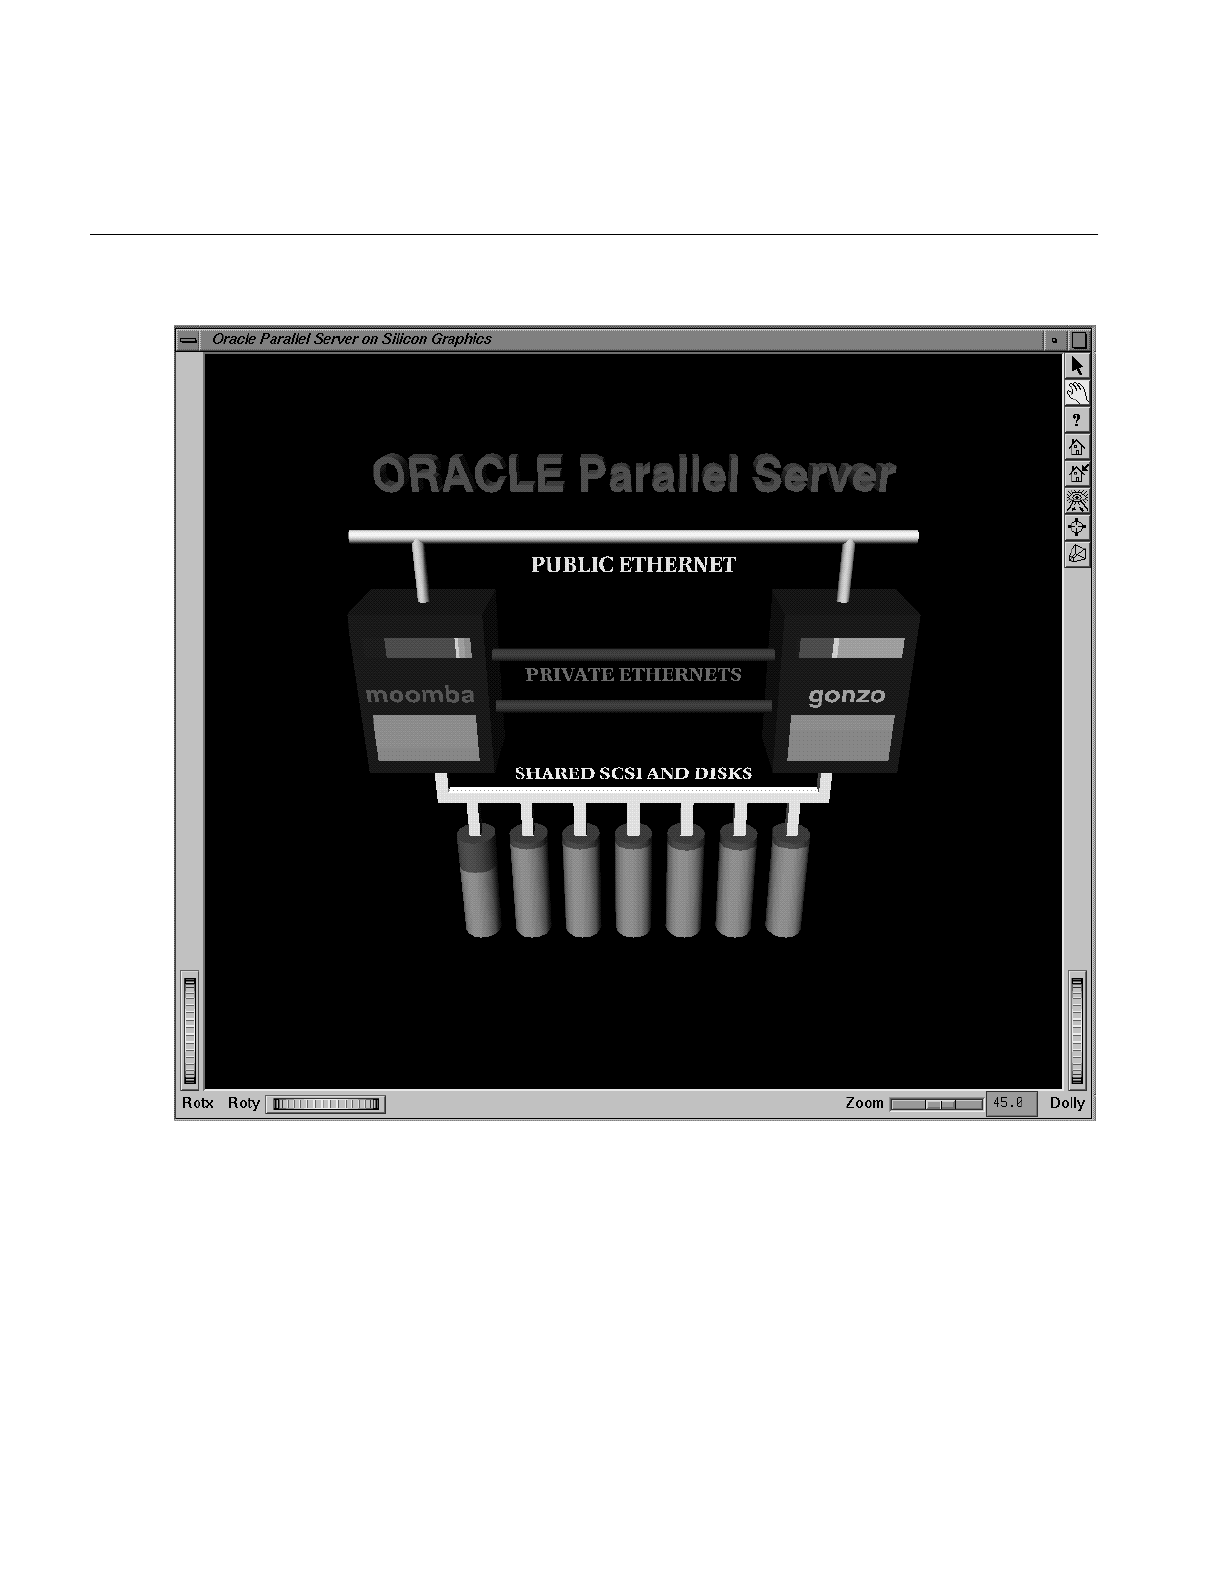
5.ORACLE Parallel Server Visualization Tool
Theopsview tool demonstrates capabilities of the Performance Metrics Collection System
(PMCS) to drive visualization tools. While the application is a prototype written
specifically to monitor a pair of server systems running the ORACLE Parallel Server
(OPS) software, the utility can provide an interesting display even for a single system.
Configuring opsview
It is necessary to configure opsview for the particular local system setup by entering the
following commands:
$cd /var/pcp/demos/opsview
$cat README
$./Configure
Once this has been done, the command
$opsview
produces a window similar to that shown in Figure 5-1.
26
Chapter 5: ORACLE Parallel Server Visualization Tool
Figure 5-1 opsview Window

Understanding opsview
27
On startup, opsview displays a three-dimensional model of two servers sharing a
common SCSI bus with attached disks, two private Ethernet connections, and a public
Ethernet connection. One of the hosts is designated as the “red” host (the front panel
hostname is “red”), the other is designated “green” (the front panel hostname is
“green”). These two primary colors are used to display data about the corresponding
hosts as detailed below.
Understanding opsview
The opsview application is based on IRIS Inventor™, like pmview, so many of the generic
scene manipulation operations described for pmview also apply to opsview.
Briefly, the scene is displayed within an Inventor examiner viewer. This viewer allows
the user to interactively change the view of the object by click-dragging the left and
middle mouse buttons in the 3D window or using the various controls along the window
border (for example, zoom). This application also allows the user to pick various objects
within the scene for a more detailed view of performance within a subsystem.
Pick mode is entered by selecting the arrow button (the topmost icon in the right window
border). Pick mode is indicated by an arrow-shaped cursor, and performed by clicking
the left mouse button while the cursor is on top of the scene object to be selected.
The following elements of the scene are driven by live performance data fetched from the
two hosts:
CPU The multi-colored horizontal bar at top of the front and back faces of
both hosts (just above the hostname) is a thumbnail display of total CPU
utilization. The thumbnail display follows the gr_osview format; see
gr_osview(1). If you select this region, the PCP tool mpvis is launched to
provide a more detailed per-CPU view; see mpvis(1).
Memory A two-colored rectangular region at the bottom of the front and back
faces of both hosts is a thumbnail display of physical memory use. The
display follows memvis format. If you select this region, the PCP tool
memvis is launched to provide a very detailed display of memory use.1
1For PCP installations on IRIX 6.2 or later, memvis is replaced by gmemusage; see gmemusage(1).

28
Chapter 5: ORACLE Parallel Server Visualization Tool
Public-Ethernet The brightness and color of the Ethernet cable part of the display is
determined by the number of packets processed by the two hosts. The
green or red color is modulated by packets on the green or red host,
respectively. If you select the Ethernet cable part of the display or its
name label, two instances of gr_osview (one for the green host and one
for the red host) are launched to display per-protocol and per-interface
network traffic on the two hosts.
Disks Total disk I/O from the red and green machine are displayed as red and
green cylinders, respectively. The number of I/O operations performed
determines the height of these colored cylinders.
ORACLE If you are running OPS software, you can select the ORACLE Parallel
Server banner text to bring up two instances of the PCP tool pmchart.
This tool allows you to display interesting OPS performance data from
the two machines.
For complete information about opsview, including how to customize the “drill-down”
actions, see the opsview(1) reference page.

29
Appendix A
A.Abbreviated Installation Instructions
This chapter contains abbreviated installation instructions for system administrators
who have experience with PCP for ORACLE. No information is presented here that is not
presented in Chapter 2, “Installation Instructions” in this book.
The following example assumes you have a single ORACLE database to monitor. It also
assumes that the ORACLE_SID is a valid namespace identifier (it must start with a letter,
followed by zero or more letters, digits, or underscores).
PCP Collector System
On the database server:
1. Make sure the pcp and pcp_ora7 images are installed and that pmcd is running.
2. Know the password for the ORACLE database’s DBA SYS user.
3. Switch user to root (superuser).
4. Set ORACLE_HOME and ORACLE_SID in the environment.
5. Enter these commands:
#cd /var/pcp/pmdas/oracle7
#./Install pcp/pcp
6. Follow the instructions printed by the Install command.
7. Enter the following and note the number it produces as output, which will be
referred to as DOMAIN in the second half of this example:
$pminfo -m oracle | head -1 | sed -e ’s/.*: //’ -e ’s/\..*//’

30
Appendix A: Abbreviated Installation Instructions
PCP Monitor System
On any system where you want to monitor ORACLE database metrics from the server
where pmdaoracle7 was just installed:
1. Make sure the pcp and pcp_ora7 images are installed.
2. Switch user to root (superuser).
3. Change directory to /var/pcp/pmdas/oracle7.
4. Replacing DOMAIN with the number you noted from the example above and
DBNAME with the ORACLE_SID for the database, enter
#./Install -N -d DOMAIN -r DBNAME

31
Appendix B
B.Troubleshooting PCP for ORACLE
Before installing an ORACLE PMDA, read this IRIS InSight book or the README file in
/var/pcp/pmdas/oracle7. It may prove necessary to run the Install or Remove scripts in that
directory to fix problems, so it would be a good idea to review the documentation to
refresh your memory before continuing.
There is one complete subtree of ORACLE metrics in the PCP namespace for each
ORACLE database instance for which you have installed an ORACLE PMDA.
One of the first things you should find out is which numeric instance domain has been
assigned to the ORACLE PMDA that is causing trouble. If the problematic PMDA is the
one for the xyz database, list the first few metric identifiers for that PMDA by entering
this command:
$pminfo -m oracle.xyz | head
A number of lines appear, similar to the following:
oracle.xyz.all.logons PMID: 32.1.0
The first number in the dotted triplet is the domain number assigned to the PMDA, in
this case 32.
There should be a line to start each PMDA in /etc/pmcd.conf. If the ORACLE instance is
called xyz and its domain number is 32, the first two things on the line are these:
ora_xyz 32
If there is no line like that in the file, see the troubleshooting symptom immediately
below. The domain number should also appear immediately after the -d option for the
PMDA’s command-line options.
The log files for ORACLE PMDAs are /var/adm/pcplog/oracle7-*.log where the wildcard is
replaced by the domain number of the PMDA. Thus the log file for an ORACLE PMDA
with domain 32 would be /var/adm/pcplog/oracle7-32.log. Take care to check the date and
time in the log files to ensure that you are not using an old log file to diagnose problems.

32
Appendix B: Troubleshooting PCP for ORACLE
There are reference pages for pmdaoracle7(1) and pmdaoraping(1).
PMDA Cannot Connect to ORACLE
Symptom: The ORACLE PMDA’s log file contains this entry:
PMDA unable to connect to ORACLE
(invalid username/password; logon denied)
Cause: The ORACLE database user account has not been created for the PMDA
or the user.
Resolution: When the script /var/pcp/pmdas/oracle7/Install was run to configure the
PMDA, a file was created containing the SQL statements that allow the
PMDA to connect to the database and access the performance data. The
file is in the /var/pcp/pmdas/oracle7 directory. For example, if the ORACLE
database instance is called xyz, the file would be named setup.xyz.sql.
Connect to the ORACLE database instance associated with the PMDA
using svrmgrl or sqldba, and run the SQL commands in the file.
If the file creates an ops$... user, make sure that a corresponding
UNIX user exists and that /var/pcp/pmdas/pmdaoracle7 exists, is owned
by that UNIX user, and has the setuid bit set. Become that UNIX user
(using su or equivalent command), set the ORACLE_HOME and
ORACLE_SID environment variables, and attempt a default login to
the database:
sqlplus /
On the other hand, if the file created a normal ORACLE user with a
password (for example, user pcp with password meter), login to the
database by typing this command:
sqlplus pcp/meter
In either case, ensure that you use the same ORACLE_HOME and
ORACLE_SID as those specified for the PMDA in the log file. If either is
wrong in the log file, you should alter them in the command line for
that PMDA in the /etc/pmcd.conf file.
Finally, send PMCD a reconfiguration request like this:
#killall -HUP pmcd
Check the log file for the PMDA again.

ORACLE Connection Errors
33
ORACLE Connection Errors
Symptom: The ORACLE PMDA’s log has errors of the form:
Error connecting to ORACLE. ORACLE not available.
smsgsg: shmget() failed...
Cause: This can be caused by a number of things, ranging from ORACLE being
unavailable or misconfigured to incorrect parameters being specified
when using the Install script to configure the PMDA.
Resolution: Make sure that the ORACLE database instance that the problematic
PMDA utilizes is available. Connect to it using the command
sqlplus
and try to fetch some data using a database user other than that of the
PMDA. A demonstration user like scott/tiger is ideal here.
If that works, connect to the database using the same ORACLE user
that the PMDA does. Before doing so, you should make absolutely
certain that the values of ORACLE_HOME and ORACLE_SID that
appear in the PMDA's log file are correct, then set both these variables
in the environment. The ORACLE user and password for the PMDA
appear on the command line for the PMDA in /etc/pmcd.conf as the
argument to the -c option. For example, if the flag -c pcp/pcp appears
on the command line, enter this command:
sqlplus pcp/pcp
If there is no -c option, the PMDA is using an ops$... logon and
/var/pcp/pmdas/pmdaoracle7 will be setuid. In this case, become the user
who owns the pmdaoracle7 file (using su or equivalent command) and
use a default login to sqlplus:
sqlplus /
Before doing this, remember to check that ORACLE_HOME and
ORACLE_SID are correct. If sqlplus says that the login is not permitted
because the username or password is invalid, see the section titled
“PMDA Cannot Connect to ORACLE” on page 32.
If sqlplus refuses to let you in, there may be a problem with your
ORACLE database configuration. In particular, ORACLE does not
handle NFS mounted ORACLE_HOME directories well, because write
permission is required to update control and log files located in
$ORACLE_HOME/dbs.

34
Appendix B: Troubleshooting PCP for ORACLE
Once you are in sqlplus, enter this command:
describe v$sysstat
A description of the v$sysstat view should appear. If it does not, you
should rerun the script to grant the PMDA access to the performance
data from the database (see the section titled “PMDA Cannot Connect
to ORACLE” on page 32).
Restart PMCD by becoming superuser or root and entering:
#/etc/init.d/pcp start
Inspect the log file for the PMDA. If it started successfully this time,
you may need to alter your database startup routine. See the section
below regarding ORACLE metrics being unavailable when the
database or machine is restarted.
Cannot Find ORACLE Metrics
Symptom: After the machine is rebooted, or after the ORACLE database is shut
down and then restarted, it is not possible to get any ORACLE metrics.
Cause: If a PMDA is unable to connect to its ORACLE database instance, it
cannot retrieve any performance metrics but will try to connect to the
database again later. If the PMDA has a connection to the database and
the database is shut down, the PMDA does not notice until the next
request for ORACLE metrics arrives. This is because a PMDA accesses
the ORACLE database only when a request is made. Thus, if a PMDA is
idle while its database is shut down and then brought back up again, the
next request to it fails because it is trying to use an old connection to the
database.
Resolution: The ORACLE PMDA periodically attempts to reconnect to the database
in response to requests for metrics. The pmdaoracle7(1) reference page
describes how you can customize reconnection behavior.
PMDA Starts but Later Stops Running
Symptom: The ORACLE PMDA pmdaoracle7 is installed and started by pmcd, but
sometime later all requests to retrieve ORACLE performance metrics
produce errors like these:

PMDA Starts but Later Stops Running
35
No PMCD agent for domain of request
or
No values
Cause: Typically this means that the pmdaoracle7 agent has been terminated by
pmcd when the agent did not respond quickly enough to a request for
performance metrics. This can sometimes happen when either the
system is very heavily loaded, or when the ORACLE DBMS is very busy
(for example, during a checkpoint).
To verify that this is really the cause of the problem, scan the tail of the
/var/adm/pcplog/pmcd.log file, looking for lines of this form:
[Mon Nov 4 15:32:26] pmcd(5024) Warning: _pmRead: timeout (after
5.000 sec) on fd=26
Cleanup "ora_production" agent (dom 32): protocol failure for fd=26
In the PMDA’s log file (/var/adm/pcplog/oracle7-*.log) should be some
messages indicating an orderly termination, such as this:
Log for /var/pcp/pmdas/oracle7/pmdaoracle7 on moomba started...
Set ORACLE_HOME=/oracle/home
Set ORACLE_SID=production
Log finished Mon Nov 4 15:40:49 1996
Resolution: The short-term solution is to restart the ORACLE PMDA by sending
pmcd a SIGHUP signal:
#killall -HUP pmcd
This tells pmcd to restart any deceased PMDAs, restarting pmdaoracle7
with a fresh connection to the database.
If the problem persists, you should consider changing the pmcd timeout
to be longer than 5 seconds in /etc/config/pmcd.options. For example, add
this line to change the default maximum timeout to 10 seconds:
-t 10

36
Appendix B: Troubleshooting PCP for ORACLE


PMDA Starts but Later Stops Running
35
No PMCD agent for domain of request
or
No values
Cause: Typically this means that the pmdaoracle7 agent has been terminated by
pmcd when the agent did not respond quickly enough to a request for
performance metrics. This can sometimes happen when either the
system is very heavily loaded, or when the ORACLE DBMS is very busy
(for example, during a checkpoint).
To verify that this is really the cause of the problem, scan the tail of the
/var/adm/pcplog/pmcd.log file, looking for lines of this form:
[Mon Nov 4 15:32:26] pmcd(5024) Warning: _pmRead: timeout (after
5.000 sec) on fd=26
Cleanup "ora_production" agent (dom 32): protocol failure for fd=26
In the PMDA’s log file (/var/adm/pcplog/oracle7-*.log) should be some
messages indicating an orderly termination, such as this:
Log for /var/pcp/pmdas/oracle7/pmdaoracle7 on moomba started...
Set ORACLE_HOME=/oracle/home
Set ORACLE_SID=production
Log finished Mon Nov 4 15:40:49 1996
Resolution: The short-term solution is to restart the ORACLE PMDA by sending
pmcd a SIGHUP signal:
#killall -HUP pmcd
This tells pmcd to restart any deceased PMDAs, restarting pmdaoracle7
with a fresh connection to the database.
If the problem persists, you should consider changing the pmcd timeout
to be longer than 5 seconds in /etc/config/pmcd.options. For example, add
this line to change the default maximum timeout to 10 seconds:
-t 10

34
Appendix B: Troubleshooting PCP for ORACLE
Once you are in sqlplus, enter this command:
describe v$sysstat
A description of the v$sysstat view should appear. If it does not, you
should rerun the script to grant the PMDA access to the performance
data from the database (see the section titled “PMDA Cannot Connect
to ORACLE” on page 32).
Restart PMCD by becoming superuser or root and entering:
#/etc/init.d/pcp start
Inspect the log file for the PMDA. If it started successfully this time,
you may need to alter your database startup routine. See the section
below regarding ORACLE metrics being unavailable when the
database or machine is restarted.
Cannot Find ORACLE Metrics
Symptom: After the machine is rebooted, or after the ORACLE database is shut
down and then restarted, it is not possible to get any ORACLE metrics.
Cause: If a PMDA is unable to connect to its ORACLE database instance, it
cannot retrieve any performance metrics but will try to connect to the
database again later. If the PMDA has a connection to the database and
the database is shut down, the PMDA does not notice until the next
request for ORACLE metrics arrives. This is because a PMDA accesses
the ORACLE database only when a request is made. Thus, if a PMDA is
idle while its database is shut down and then brought back up again, the
next request to it fails because it is trying to use an old connection to the
database.
Resolution: The ORACLE PMDA periodically attempts to reconnect to the database
in response to requests for metrics. The pmdaoracle7(1) reference page
describes how you can customize reconnection behavior.
PMDA Starts but Later Stops Running
Symptom: The ORACLE PMDA pmdaoracle7 is installed and started by pmcd, but
sometime later all requests to retrieve ORACLE performance metrics
produce errors like these:

ORACLE Connection Errors
33
ORACLE Connection Errors
Symptom: The ORACLE PMDA’s log has errors of the form:
Error connecting to ORACLE. ORACLE not available.
smsgsg: shmget() failed...
Cause: This can be caused by a number of things, ranging from ORACLE being
unavailable or misconfigured to incorrect parameters being specified
when using the Install script to configure the PMDA.
Resolution: Make sure that the ORACLE database instance that the problematic
PMDA utilizes is available. Connect to it using the command
sqlplus
and try to fetch some data using a database user other than that of the
PMDA. A demonstration user like scott/tiger is ideal here.
If that works, connect to the database using the same ORACLE user
that the PMDA does. Before doing so, you should make absolutely
certain that the values of ORACLE_HOME and ORACLE_SID that
appear in the PMDA's log file are correct, then set both these variables
in the environment. The ORACLE user and password for the PMDA
appear on the command line for the PMDA in /etc/pmcd.conf as the
argument to the -c option. For example, if the flag -c pcp/pcp appears
on the command line, enter this command:
sqlplus pcp/pcp
If there is no -c option, the PMDA is using an ops$... logon and
/var/pcp/pmdas/pmdaoracle7 will be setuid. In this case, become the user
who owns the pmdaoracle7 file (using su or equivalent command) and
use a default login to sqlplus:
sqlplus /
Before doing this, remember to check that ORACLE_HOME and
ORACLE_SID are correct. If sqlplus says that the login is not permitted
because the username or password is invalid, see the section titled
“PMDA Cannot Connect to ORACLE” on page 32.
If sqlplus refuses to let you in, there may be a problem with your
ORACLE database configuration. In particular, ORACLE does not
handle NFS mounted ORACLE_HOME directories well, because write
permission is required to update control and log files located in
$ORACLE_HOME/dbs.

32
Appendix B: Troubleshooting PCP for ORACLE
There are reference pages for pmdaoracle7(1) and pmdaoraping(1).
PMDA Cannot Connect to ORACLE
Symptom: The ORACLE PMDA’s log file contains this entry:
PMDA unable to connect to ORACLE
(invalid username/password; logon denied)
Cause: The ORACLE database user account has not been created for the PMDA
or the user.
Resolution: When the script /var/pcp/pmdas/oracle7/Install was run to configure the
PMDA, a file was created containing the SQL statements that allow the
PMDA to connect to the database and access the performance data. The
file is in the /var/pcp/pmdas/oracle7 directory. For example, if the ORACLE
database instance is called xyz, the file would be named setup.xyz.sql.
Connect to the ORACLE database instance associated with the PMDA
using svrmgrl or sqldba, and run the SQL commands in the file.
If the file creates an ops$... user, make sure that a corresponding
UNIX user exists and that /var/pcp/pmdas/pmdaoracle7 exists, is owned
by that UNIX user, and has the setuid bit set. Become that UNIX user
(using su or equivalent command), set the ORACLE_HOME and
ORACLE_SID environment variables, and attempt a default login to
the database:
sqlplus /
On the other hand, if the file created a normal ORACLE user with a
password (for example, user pcp with password meter), login to the
database by typing this command:
sqlplus pcp/meter
In either case, ensure that you use the same ORACLE_HOME and
ORACLE_SID as those specified for the PMDA in the log file. If either is
wrong in the log file, you should alter them in the command line for
that PMDA in the /etc/pmcd.conf file.
Finally, send PMCD a reconfiguration request like this:
#killall -HUP pmcd
Check the log file for the PMDA again.

31
Appendix B
B.Troubleshooting PCP for ORACLE
Before installing an ORACLE PMDA, read this IRIS InSight book or the README file in
/var/pcp/pmdas/oracle7. It may prove necessary to run the Install or Remove scripts in that
directory to fix problems, so it would be a good idea to review the documentation to
refresh your memory before continuing.
There is one complete subtree of ORACLE metrics in the PCP namespace for each
ORACLE database instance for which you have installed an ORACLE PMDA.
One of the first things you should find out is which numeric instance domain has been
assigned to the ORACLE PMDA that is causing trouble. If the problematic PMDA is the
one for the xyz database, list the first few metric identifiers for that PMDA by entering
this command:
$pminfo -m oracle.xyz | head
A number of lines appear, similar to the following:
oracle.xyz.all.logons PMID: 32.1.0
The first number in the dotted triplet is the domain number assigned to the PMDA, in
this case 32.
There should be a line to start each PMDA in /etc/pmcd.conf. If the ORACLE instance is
called xyz and its domain number is 32, the first two things on the line are these:
ora_xyz 32
If there is no line like that in the file, see the troubleshooting symptom immediately
below. The domain number should also appear immediately after the -d option for the
PMDA’s command-line options.
The log files for ORACLE PMDAs are /var/adm/pcplog/oracle7-*.log where the wildcard is
replaced by the domain number of the PMDA. Thus the log file for an ORACLE PMDA
with domain 32 would be /var/adm/pcplog/oracle7-32.log. Take care to check the date and
time in the log files to ensure that you are not using an old log file to diagnose problems.


Tell Us About This Manual
As a user of Silicon Graphics products, you can help us to better understand your needs
and to improve the quality of our documentation.
Any information that you provide will be useful. Here is a list of suggested topics:
• General impression of the document
• Omission of material that you expected to find
• Technical errors
• Relevance of the material to the job you had to do
• Quality of the printing and binding
Please send the title and part number of the document with your comments. The part
number for this document is 007-3005-001.
Thank you!
Three Ways to Reach Us
• To send your comments by electronic mail, use either of these addresses:
– On the Internet: techpubs@sgi.com
– For UUCP mail (through any backbone site): [your_site]!sgi!techpubs
•Tofax your comments (or annotated copies of manual pages), use this
fax number: 415-965-0964
• To send your comments by traditional mail, use this address:
Technical Publications
Silicon Graphics, Inc.
2011 North Shoreline Boulevard, M/S 535
Mountain View, California 94043-1389
