007 3794 001
User Manual: 007-3794-001
Open the PDF directly: View PDF ![]() .
.
Page Count: 328 [warning: Documents this large are best viewed by clicking the View PDF Link!]
NQE User’s Guide
SG–2148 3.3
Document Number 007–3794–001

Copyright © 1993, 1998 Silicon Graphics, Inc. and Cray Research, Inc. All Rights Reserved. This manual or parts thereof may not
be reproduced in any form unless permitted by contract or by written permission of Silicon Graphics, Inc. or Cray Research, Inc.
RESTRICTED RIGHTS LEGEND
Use, duplication, or disclosure of the technical data contained in this document by the Government is subject to restrictions as set
forth in subdivision (c) (1) (ii) of the Rights in Technical Data and Computer Software clause at DFARS 52.227-7013 and/or in
similar or successor clauses in the FAR, or in the DOD or NASA FAR Supplement. Unpublished rights reserved under the
Copyright Laws of the United States. Contractor/manufacturer is Silicon Graphics, Inc., 2011 N. Shoreline Blvd., Mountain View,
CA 94043-1389.
Autotasking, CF77, CRAY, Cray Ada, CraySoft, CRAY Y-MP, CRAY-1, CRInform, CRI/TurboKiva, HSX, LibSci, MPP Apprentice,
SSD, SUPERCLUSTER, UNICOS, and X-MP EA are federally registered trademarks and Because no workstation is an island, CCI,
CCMT, CF90, CFT, CFT2, CFT77, ConCurrent Maintenance Tools, COS, Cray Animation Theater, CRAY APP, CRAY C90,
CRAY C90D, Cray C++ Compiling System, CrayDoc, CRAY EL, CRAY J90, CRAY J90se, CrayLink, Cray NQS,
Cray/REELlibrarian, CRAY S-MP, CRAY SSD-T90, CRAY T90, CRAY T3D, CRAY T3E, CrayTutor, CRAY X-MP, CRAY XMS,
CRAY-2, CSIM, CVT, Delivering the power . . ., DGauss, Docview, EMDS, GigaRing, HEXAR, IOS,
ND Series Network Disk Array, Network Queuing Environment, Network Queuing Tools, OLNET, RQS, SEGLDR, SMARTE,
SUPERLINK, System Maintenance and Remote Testing Environment, Trusted UNICOS, UNICOS MAX, and UNICOS/mk are
trademarks of Cray Research, Inc.
DynaWeb is a trademark of Electronic Book Technologies, Inc. IBM is a trademark and MVS is a product of International Business
Machines Corporation. IRIS, IRIX, and Silicon Graphics are registered trademarks and IRIS InSight and Origin and the Silicon
Graphics logo are trademarks of Silicon Graphics, Inc. Motif and Open Software Foundation are trademarks of Open Software
Foundation, Inc. Solaris and Sun are trademarks of Sun Microsystems, Inc. UNIX is a registered trademark in the United States
and other countries, licensed exclusively through X/Open Company Limited. X/Open is a registered trademark of X/Open
Company Ltd.
The UNICOS operating system is derived from UNIX®System V. The UNICOS operating system is also based in part on the
Fourth Berkeley Software Distribution (BSD) under license from The Regents of the University of California.
New Features
NQE User’s Guide SG–2148 3.3
This revision of the NQE User’s Guide, publication SG–2148, supports the 3.3 release of the Network
Queuing Environment (NQE).
The NQE user documentation was revised to support the following NQE 3.3 features:
•Miser integration on Origin systems is supported. NQE will support the submission of jobs that specify
Miser resources.
•On CRAY T3E systems, NQE now supports checkpointing and restarting of jobs. This feature was
initially supported in the NQE 3.2.1 release.
•On CRAY T3E systems, NQE now supports the political scheduling feature. This includes obtaining
fair-share information by using the multilayered user fair-share scheduling environment (MUSE) and
scheduling a job for immediate execution with preferential CPU priority (prime job). (This feature was
initially supported in the NQE 3.2.1 release.)
•Distributed Computing Environment (DCE) support was enhanced as follows:
–Ticket forwarding and inheritance is now supported on selected platforms. This feature lets users
submit jobs in a DCE environment without providing passwords. Ticket forwarding is supported on
all NQE platforms except Digital UNIX systems. Ticket inheritance is supported only on UNICOS
and IRIX systems
–IRIX systems now support access to DCE resources for jobs submitted to NQE.
Support for tasks that use a password for DCE authentication is available on all NQE 3.3 platforms.
Support for tasks that use a password for DCE authentication is available on all NQE 3.3 platforms.
•The following NQE database enhancements were made:
–Increased number of simultaneous connections for clients and execution nodes to the NQE database.
–The MAX_SCRIPT_SIZE variable was added to the nqeinfo file, allowing an administrator to limit
the size of the script file submitted to the NQE database. If the MAX_SCRIPT_SIZE variable is set to
0 or is not set, a script file of unlimited size is allowed. The script file is stored in the NQE database;
if the file is bigger than MAX_SCRIPT_SIZE, it can affect the performance of NQE database and the
nqedbmgr(8) command. The nqeinfo(5) man page includes a description of this new variable.
• The Network Queuing System (NQS) sets several environment variables that are passed to a login shell
when NQS initiates a job. One of the environment variables set is LOGNAME, which is the name of the
user under whose account the job will run. Some platforms, such as IRIX systems, use the USER
environment variable rather than LOGNAME. On those platforms, csh writes an error message into the
job’sstderr file, noting that the USER variable is not defined. To accommodate this difference, NQS
now sets both the LOGNAME and USER environment variables to the same value before initiating a job.
The ilb(1) man page was revised to include this new variable.
•The new nqeinfo(5) man page documents all NQE configuration variables; the nqeinfo(5) man page
is provided in online form only and is accessible by using the man(1) command or through the NQE
configuration utility Help facility.
•Array services support was added for UNICOS and UNICOS/mk systems. Array services let you
manage related processes as a single unit, including processes running across multiple machines. Array
services use array sessions to group these related processes together through use of a unique identifier
called an array session handle (ASH). A global ASH is needed when the processes within an array
session are not all running on the local node. The NQE request node now asks for a global ASH before
initiating the job. NQE logs the global ASH associated with the job in a log message in the user’s job
log. The global ASH associated with a job is shown in a Global ASH: field in an NQE job log display.
A job log display can be requested by supplying the NQE job identifier when using the qstat -j or
cqstatl -j command, or the job log can be displayed through the NQE GUI by clicking on a specific
job within the Status display and then selecting the Actions->Job Log menu. The global ASH for a
job is also entered into the NQS log file.
•The capabilities of the NQE database scheduler (LWS) have been extended.
•The security enhancements to UNICOS/mk systems are supported with this NQE release.
•Overall performance of the Network Load Balancer (NLB) collector was increased; new information is
provided.
•NQS now supports per-request limits for CPU usage, memory usage, and the number of processors
when running on IRIX platforms. The per-request usage of these resources is displayed by the NQE GUI
and the cqstatl and qstat commands. Requests that exceed the limits will be terminated. The
periodic checkpointing of requests based on accumulated CPU time is also supported.
•The NQE_DEFAULT_COMPLIST configuration variable in the nqeinfo file has replaced the NQE_TYPE
configuration variable, which defines the list of NQE components to be started or stopped.
•The CPU and memory scheduling weighting factors were added for application PEs. The NQS
scheduling weighting factors are used with the NQS priority formula to calculate the intraqueue job
initiation priority for NQS runnable jobs. This feature also restores the user-specified priority scheduling
functionality (specified by the cqsub -p and qsub -p commands).
•The -f option was added to the qdel(1) command; this option specifies that no request output will be
returned to the user. This option behaves similarly to the -k option except that the user’s standard error,
standard output, and job log files are not returned to the user or stored at the execution node in the
NQS failed directory.
•Year 2000 support for NQE has been completed.
•The appendix that documents the NQE GUI was removed from this user’s guide.
•Man pages were revised; man pages are provided in online form only as part of the NQE release package.
For a complete list of new features for the NQE 3.3 release, see the NQE Release Overview, publication
RO–5237.

Record of Revision
Version Description
1.0 December 1993.
Original Printing. This publication describes how to use the Cray Network Queuing
Environment (NQE), release 1.0, running on UNIX or UNICOS systems.
1.1 June 1994.
Incorporates information for NQE release 1.1.
2.0 May 1995.
Incorporates information for the NQE 2.0 release. This publication also supports
Network Queuing EXtensions (NQX) that is synchronous with the UNICOS 9.0
release.
3.0 March 1996.
Incorporates information for the NQE 3.0 release.
3.1 September 1996.
Incorporates information for the NQE 3.1 release.
3.2 January 1997.
Incorporates information for the NQE 3.2 release. This document was revised and is
provided in online form only for this release.
3.3 March 1998.
Incorporates information for the NQE 3.3 release.
SG–2148 3.3 i

Contents
Page
Preface xv
Related Publications . . . .................... xvi
Ordering Cray Research Publications . . . ............... xvii
Conventions . ......................... xviii
Reader Comments ........................ xix
Seeing the Big Picture [1] 1
NQE Components and NQE Cluster Components .............. 1
NQE Components . . . .................... 2
NQE Cluster Components . .................... 3
How NQE Works ........................ 4
Work Flow ......................... 4
Flow of a Request Submitted to NQS by Using the NLB . .......... 4
Flow of a Request Submitted to the NQE Database . . .......... 6
NQS Queues ......................... 8
User Interfaces ......................... 11
NQE Graphical User Interface .................... 12
Command Line Interface . .................... 14
Preparing to Use NQE . . . .................... 15
Creating Batch Requests . . .................... 15
Submitting Requests . . . .................... 16
Monitoring Requests and Queues ................... 16
Examining Output ........................ 17
Deleting or Signaling Requests .................... 17
Transferring Files ........................ 17
SG–2148 3.3 iii

NQE User’s Guide
Page
Using the ilb Command . . .................... 18
Preparing to Use NQE [2] 21
NQE File Structure ........................ 21
Setting Environment Variables .................... 22
NQE Database Authorization . .................... 24
NQS Validation Requirements .................... 25
File Validation ......................... 26
Password Validation . . . .................... 27
File and Password Validation . .................... 27
Validation File Examples . . .................... 27
Using the Same User Name When Submitting a Request on a Single-node NQE .... 28
Using the Same User Name When Submitting a Request to the NQE Database on a
Multiple-node NQE . . . .................... 29
Using the Same User Name When Submitting a Request to NQS_SERVER on a Multiple-node
NQE Using the NLB . . .................... 32
Using an Alternative User Name When Submitting a Request to the NQE Database on a
Multiple-node NQE . . . .................... 36
Using an Alternative User Name When Submitting a Request to NQS_SERVER on a
Multiple-node NQE Using the NLB . . . ............... 39
Creating Batch Requests [3] 43
What Are Batch Requests? . .................... 43
Creating Requests ........................ 43
Deciding What to Include . . .................... 45
Specifying Request Options . .................... 45
Submitting Requests [4] 49
Submitting Batch Requests . .................... 51
Using the NQE GUI to Submit Requests . ............... 51
Using the Command Line Interface to Submit Requests . . .......... 53
iv SG–2148 3.3

Contents
Page
Using the NLB Default Queue for Submitting Requests . . . .......... 55
Submitting a Request to the NQE Database . ............... 56
Specifying a Database User Name for Your Request . . . .......... 56
Directing Your Request to the NQE Database ............... 57
Using DCE/DFS When Submitting Requests to NQE . . . .......... 57
Using Security Labels When Submitting Requests .............. 59
Security Label for NQS Requests Submitted Locally . . . .......... 59
Security Label for NQS Requests Submitted Remotely . . .......... 60
Using Request Attributes . . .................... 60
Setting Request Attributes . .................... 61
Using Request Attributes with NQS . . . ............... 62
Using Request Attributes with the NLB . . ............... 62
Using Request Attributes with the NQE Scheduler . . . .......... 62
Successful Submissions . . .................... 63
Successful Submissions to NQS ................... 63
Successful Submissions to the NQE Database ............... 64
Suppressing Informational Messages . . . ............... 64
Unsuccessful Submissions . . .................... 65
Unsuccessful Submissions to NQS . . . ............... 65
Unsuccessful Submissions to the NQE Database .............. 66
NQS System Limits ........................ 67
Using NQS Mail ......................... 69
Accessing Data Files . . . .................... 73
Obtaining Job Accounting . . .................... 75
Error Messages ......................... 77
Recovery and Restart . . . .................... 78
Checkpointing and Restarting .................... 79
Forcing a Checkpoint from within a Batch Request . . . .......... 79
SG–2148 3.3 v

NQE User’s Guide
Page
Criteria for Batch Request Recovery . . . ............... 80
Recovering a Request Terminated by a SIGRPE,aSIGUME,oraSIGPEFAILURE Signal . . 81
Forcing a Request to Be Restarted from the Beginning . . .......... 82
Preventing a Request from Being Rerun from the Beginning .......... 82
Retaining Queued Batch Requests Across Crashes and Shutdowns ........ 82
Using the Request /tmp Directory ................... 82
Customizing Requests [5] 85
Using Resource Limits . . . .................... 86
Example of Using Limits . .................... 88
Why You Use Limits . . .................... 89
Types of Limits ........................ 89
Determining Resources . . .................... 89
Consequences of Exceeding Resource Limits ............... 91
Specifying Time Limits . . . .................... 91
Specifying a Shell ........................ 94
Specifying an NQS Queue . . .................... 96
Specifying a Request Name . .................... 97
Using Password Prompting . .................... 97
Selecting an Account Name or Project Name under Which to Execute the Request .... 98
Using Alternative User Names .................... 99
Using Request Priority . . . .................... 100
Preexecution Priority . . .................... 100
Execution Priorities . . . .................... 101
Submitting Requests to the IRIX Miser Scheduler .............. 102
Miser Resource Reservation Options for the qsub and cqsub Commands . . .... 103
Effect of Specifying Miser Resource Options on Request Limits ......... 104
vi SG–2148 3.3

Contents
Page
Working with Output Files [6] 107
Naming Output Files . . . .................... 107
Redirecting Output ........................ 109
Merging Output Files . . . .................... 110
Finding Lost Output . . . .................... 110
Communicating with Requests [7] 113
Monitoring the Job Log or Event History . . ............... 113
Writing Messages to Output Files ................... 114
Monitoring Output during Execution . . . ............... 116
Using the NQE GUI . . . .................... 117
Using the Command Line Interface . . . ............... 117
Example of Monitoring Output ................... 118
Using Job Dependency [8] 121
Using Job Dependency . . . .................... 121
Using cevent ......................... 122
Job Dependency Example . . .................... 124
Customizing Your Environment [9] 127
Environment Variables Automatically Set . . ............... 127
Customizing Your NQE Environment . . . ............... 129
Configuring NQE Load Window Elements . ............... 133
Monitoring Requests [10] 137
Using the NQE GUI Status Window . . . ............... 137
Using the cqstatl and qstat Commands . ............... 141
Displaying Summaries . . .................... 142
Summary of Particular Requests . . . ............... 142
SG–2148 3.3 vii

NQE User’s Guide
Page
Summary of All Your Requests . . . ............... 142
Displaying Details . . . .................... 146
Displaying Requests on Other Servers . . ............... 149
Specifying Another User Name ................... 150
Displaying Cray MPP Information . . . ............... 151
Request Status ......................... 151
Status Codes ......................... 151
Substatus Codes ........................ 152
Monitoring Queues [11] 155
Displaying Queue Summaries .................... 155
Batch Queue Summary . . .................... 157
Pipe Queue Summary . . .................... 158
Displaying Queue Details . . .................... 159
Pipe Queue Details . . . .................... 159
Batch Queue Details . . . .................... 162
Displaying Batch Queue Limits .................... 165
Monitoring Remote Queues . .................... 166
Deleting Requests [12] 169
Deleting Your Requests . . .................... 169
Using the NQE GUI . . . .................... 170
Using the cqdel Command or the qdel Command to Delete a Request Not Executing . . 171
Using the cqdel Command or qdel Command to Delete an Executing Request .... 172
Deleting Requests on Another NQS Server . ............... 174
Deleting Another User’s Requests ................... 175
Signaling Requests [13] 177
Signaling Your Requests . . .................... 177
viii SG–2148 3.3

Contents
Page
Using the NQE GUI Status Window . . ............... 179
Using the cqdel or the qdel Command . ............... 180
Signaling Another User’s Requests ................... 182
Transferring Files [14] 183
File Transfer Terms ........................ 184
Using ftua .......................... 185
Selecting a Domain . . . .................... 186
Connecting to a Remote Host .................... 186
Selecting a Mode ........................ 187
Specifying the Type of File to Transfer . . ............... 188
Copying Files from a Host . .................... 189
Copying Files to a Host . .................... 189
Copying Multiple Files . . .................... 190
Copying Files to and from IBM MVS Systems ............... 191
Executing a get Command ................... 192
Executing a put Command ................... 192
Appending Files ........................ 194
Deleting Files ......................... 194
Displaying Queued Transfers .................... 195
Aborting Transfers . . . .................... 196
Waiting for Transfer Requests .................... 196
Closing a Connection or Ending a Session . ............... 197
ftua Examples ........................ 198
macdef Example . . . .................... 202
Transferring Files from within a Request File ............... 203
Using ftua with the UNICOS Multilevel Security (MLS) Feature or UNICOS/mk Security
Enhancements ........................ 204
Example 1: ........................ 205
SG–2148 3.3 ix

NQE User’s Guide
Page
Example 2: ........................ 206
Example 3: ........................ 207
File Naming Conventions . .................... 207
Failure Notification . . . .................... 208
Using rft .......................... 209
Using Autologin ......................... 211
Creating .netrc File Entries .................... 211
.netrc File Example . . .................... 213
Using NPPA . ......................... 213
Monitoring Machine Load [15] 215
Solving Problems [16] 223
Commands Do Not Execute . .................... 223
Requests Not Queued . . . .................... 224
Requests Not Executing . . .................... 225
Connection Failure Messages . .................... 227
Authorization Failure Messages .................... 227
NQE Database Authorization Failures . . . ............... 228
Requests Disappear ........................ 228
NQE Scheduler Not Scheduling .................... 229
-h Option Displays Error . . .................... 229
Resource Limits Exceeded . . .................... 230
Output Files Cannot Be Found .................... 230
stdout Reports no access to tty .................. 233
stderr Reports Many Syntax Errors . . . ............... 233
stderr Reports file not found ................... 233
No Licenses Are Available . .................... 234
DCE/DFS Credentials Not Obtained . . . ............... 234
x SG–2148 3.3

Contents
Page
Appendix A Man Page List 235
Appendix B Command Line Interface Tutorial 237
Creating the Batch Request . .................... 237
Exercise 1 . ......................... 238
Submitting a Batch Request for Execution . . ............... 239
Discovering the Shell to Be Used for Your Requests . . . .......... 241
Exercise 2 . ......................... 242
Confirmation of a Successful Submission . ............... 244
Exercise 3 . ......................... 245
Examining Output from a Batch Request . ............... 245
Exercise 4 . ......................... 245
Exercise 5 . ......................... 247
Specifying Resource Limitations for a Batch Request . . . .......... 248
Exercise 6 . ......................... 250
Specifying Options within the Script File . ............... 251
Exercise 7 . ......................... 252
Sending a Message to an Executing Request ............... 253
Exercise 8 . ......................... 253
Submitting a Request to a Remote Host . . ............... 255
Monitoring NQS ........................ 255
Checking the Status of Your Batch Requests ............... 255
Exercise 9 . ......................... 257
Checking the Status of Queues ................... 259
Pipe Queues ......................... 259
Exercise 10 ......................... 260
Batch Queues ......................... 261
Exercise 11 ......................... 263
Deleting a Batch Request . . .................... 263
SG–2148 3.3 xi

NQE User’s Guide
Page
Exercise 12 ......................... 264
Removing Files from Your Directory after the Tutorial . . . .......... 265
Summary . . ......................... 266
Appendix C Using FTP with NQS 269
FTP Commands ......................... 270
del Command ........................ 270
dir Command ........................ 270
get Command ........................ 271
put Command ........................ 271
quote site batch and site batch Commands . . . .......... 272
Sample Session ......................... 272
FTP Startup ......................... 273
Enabling and Disabling the FTP NQS Interface .............. 273
Submitting a Job File to NQS .................... 273
Displaying the NQS Job Status ................... 274
Deleting a Job or Output File .................... 278
Retrieving Job Output . . .................... 278
Glossary 281
Index 287
Figures
Figure 1. Work Flow through NQE Using the NLB with NQS .......... 6
Figure 2. Work Flow through NQE Using the NQE Database and Its Scheduler . .... 8
Figure 3. Detail of Work Flow through NQE When Submitting Directly to NQS .... 10
Figure 4. Detail of Work Flow When Submitting to the NQE Database . . . .... 11
Figure 5. Initial NQE GUI Button Bar Window ............... 12
Figure 6. NQE File Structure .................... 22
xii SG–2148 3.3

Contents
Page
Figure 7. Submitting Request to NQE Database on Multiple-node NQE Using Same User
Name . . . ......................... 32
Figure 8. Submitting Request to NQS_SERVER on Multiple-node NQE Using Same User Name 35
Figure 9. Submitting Request to the NQE Database on Multiple-node NQE Using an Alternative
User Name . ......................... 38
Figure 10. Submitting Request to NQS_SERVER on Multiple-node NQE Using an Alternative
User Name . ......................... 41
Figure 11. NQE GUI Submit Window . . ............... 52
Figure 12. Waiting Request Example . . . ............... 94
Figure 13. NQE GUI Status Window . . ............... 138
Figure 14. Sample Originating Host Filter Submenu . .......... 141
Figure 15. NQE GUI Status Window Example .............. 171
Figure 16. NQE GUI Status Window Example .............. 173
Figure 17. NQE GUI Status Window Example .............. 180
Figure 18. Load Window . .................... 216
Figure 19. Host Selection Filter . . . ............... 218
Figure 20. Chart Editor Window . . . ............... 219
Figure 21. Edit Chart Window ................... 219
Figure 22. Chart Formulae Display . . ............... 220
Figure 23. Load Display for Specific Host . ............... 221
Figure 24. NLB Load Summary Displayed by Host . . . .......... 222
Tables
Table 1. NQS Limits . . . .................... 67
Table 2. Commands to Display Limits . . ............... 69
Table 3. Environment Variables Set by NQS . ............... 128
Table 4. Additional Environment Variables Set by NQS . . .......... 128
Table 5. Environment Variables Set by the LWS .............. 129
Table 6. NQE Environment Variables You Can Set .............. 130
Table 7. ilb Environment Variables . . . ............... 133
SG–2148 3.3 xiii

NQE User’s Guide
Page
Table 8. NQE GUI Status Window Filter Options . . . .......... 140
xiv SG–2148 3.3

Preface
This publication describes how to use the Cray Network Queuing Environment
(NQE). NQE is a software product that lets you submit, monitor, and control
batch jobs for execution on Network Queuing System (NQS) server nodes in the
NQE cluster.
The Network Load Balancer (NLB) uses the system load information received
from NQS server nodes to offer NQS an ordered list of nodes to run a request;
NQS uses the list to distribute the request.
The NQE database provides an alternate mechanism for distributing work.
Requests are submitted and stored centrally. The NQE scheduler examines each
request and determines when and where the request is run.
The File Transfer Agent (FTA) provides asynchronous and synchronous file
transfer. You can queue your transfers so that they are retried if a network link
fails.
This manual contains the following chapters:
•Chapter 1, page 1, provides an overview of NQE components and basic
functions.
•Chapter 2, page 21, describes which environment variables you must set to
use NQE, how to set up NQE database authorization, and how NQS
authorizes you to use client commands in the group of execution nodes in
the NQE cluster.
•Chapter 3, page 43, describes how to create a request and describes basic
options you can use.
•Chapter 4, page 49, describes using the NQE GUI or command-line interface
to submit requests, using the NLB default queue, submitting requests to the
NQE database, using request attributes, and using basic options.
•Chapter 5, page 85, describes how to use limits, password prompting,
alternative user names, and several miscellaneous options in your requests.
•Chapter 6, page 107, describes how to customize where your output is
delivered and how to find it if it did not go where you expected it to go.
•Chapter 7, page 113, describes how to monitor your output when your
request is executing and how to write messages to executing requests.
SG–2148 3.3 xv

NQE User’s Guide
•Chapter 8, page 121, describes how to use the cevent(1) command to make
events in script files or requests interdependent.
•Chapter 9, page 127, describes how to use environment variables to
customize your NQS and NQE environments, and how to configure NQE
displays.
•Chapter 10, page 137, describes how to use the NQE GUI Status window
and the cqstatl(1) and qstat(1) commands to view request status.
•Chapter 11, page 155, describes the cqstatl(1) and qstat(1) command
options available for viewing queue information.
•Chapter 12, page 169, describes how to delete a request.
•Chapter 13, page 177, describes how to signal a request.
•Chapter 14, page 183, describes how to use the ftua(1) and rft(1)
commands to transfer files.
•Chapter 15, page 215, describes how to use the NQE GUI Load window to
monitor system status.
•Chapter 16, page 223, provides troubleshooting information.
This manual also includes the following appendixes and glossary:
•Appendix A, page 235, provides a list of all online user-level man pages.
•Appendix B, page 237, provides sample exercises on how to submit,
monitor, and control a batch request.
•Appendix C, page 269, provides information on how to use the ARPAnet
standard file transfer protocol (FTP) with NQS on UNICOS or UNICOS/mk
systems.
•Glossary, page 281 defines terms used in this guide.
Related Publications
The following documents contain additional information that may be helpful:
•NQE Administration, publication SG–2150, provides information on
configuring, monitoring, and controlling NQE. This publication may also be
accessed online by using the Cray DynaWeb server and through the Silicon
xvi SG–2148 3.3

Preface
Graphics Technical Publications Library World Wide Web page at the
following URL:
http://techpubs.sgi.com/library/
•Introducing NQE, publication IN–2153, provides an overview of NQE
functionality and describes how to access documentation online. This
publication also may be accessed online by using the Cray DynaWeb server
and through the Silicon Graphics Technical Publications Library World Wide
Web page at the following URL:
http://techpubs.sgi.com/library/
•NQE Installation, publication SG–5236, describes how to install or upgrade
the NQE software. This publication also may be accessed online by using
the Cray DynaWeb server and through the Silicon Graphics Technical
Publications Library World Wide Web page at the following URL:
http://techpubs.sgi.com/library/
•NQE Release Overview, publication RO–5237, provides NQE release
information. This publication also may be accessed online by using the Cray
DynaWeb server and through the Silicon Graphics Technical Publications
Library World Wide Web page at the following URL:
http://techpubs.sgi.com/library/
Ordering Cray Research Publications
The User Publications Catalog, publication CP–0099, describes the availability and
content of all Cray Research hardware and software documents that are
available to customers. Cray Research customers who subscribe to the Cray
Inform (CRInform) program can access this information on the CRInform
system.
To order a document, either call the Distribution Center in Mendota Heights,
Minnesota, at +1–612–683–5907, or send a facsimile of your request to fax
number +1–612–452–0141. Cray Research employees may send electronic mail
to orderdsk (UNIX system users).
Customers who subscribe to the CRInform program can order software release
packages electronically by using the Order Cray Software option.
Customers outside of the United States and Canada should contact their local
service organization for ordering and documentation information.
SG–2148 3.3 xvii

NQE User’s Guide
Conventions
The following conventions are used throughout this document:
Convention Meaning
command This fixed-space font denotes literal items such as
commands, files, routines, path names, signals,
messages, and programming language structures.
manpage(x) Man page section identifiers appear in
parentheses after man page names. The following
list describes the identifiers:
1 User commands
1B User commands ported from BSD
2 System calls
3 Library routines, macros, and
opdefs
4 Devices (special files)
4P Protocols
5 File formats
7 Miscellaneous topics
7D DWB-related information
8 Administrator commands
Some internal routines (for example, the
_assign_asgcmd_info() routine) do not have
man pages associated with them.
variable Italic typeface denotes variable entries and words
or concepts being defined.
user input This bold, fixed-space font denotes literal items
that the user enters in interactive sessions.
Output is shown in nonbold, fixed-space font.
[ ] Brackets enclose optional portions of a command
or directive line.
xviii SG–2148 3.3

Preface
... Ellipses indicate that a preceding element can be
repeated.
The default shell in the UNICOS and UNICOS/mk operating systems, referred
to in Cray Research documentation as the standard shell, is a version of the Korn
shell that conforms to the following standards:
•Institute of Electrical and Electronics Engineers (IEEE) Portable Operating
System Interface (POSIX) Standard 1003.2–1992
•X/Open Portability Guide, Issue 4 (XPG4)
The UNICOS and UNICOS/mk operating systems also support the optional use
of the C shell.
Reader Comments
If you have comments about the technical accuracy, content, or organization of
this document, please tell us. You can contact us in any of the following ways:
•Send us electronic mail at the following address:
techpub@sgi.com
•Contact your customer service representative and ask that an SPR or PV be
filed. If filing an SPR, use PUBLICATIONS for the group name, PUBS for the
command, and NO-LICENSE for the release name.
•Call our Software Publications Group in Eagan, Minnesota, through the
Customer Service Call Center, using either of the following numbers:
1–800–950–2729 (toll free from the United States and Canada)
+1–612–683–5600
•Send a facsimile of your comments to the attention of “Software Publications
Group”in Eagan, Minnesota, at fax number +1–612–683–5599.
We value your comments and will respond to them promptly.
SG–2148 3.3 xix

Seeing the Big Picture [1]
This chapter provides an overview of the Network Queuing Environment
(NQE). The following topics are discussed:
•A brief definition of NQE, including what is contained in the NQE cluster,
and a brief definition of the NQE components (Section 1.1, page 1)
•How NQE works, including descriptions of the components, the flow of a
request submitted to NQE, and the differences between submitting a request
to NQS or to the NQE database for processing (Section 1.2, page 4)
•Brief descriptions of the NQE graphical user interface (GUI) and command
line interface (Section 1.3, page 11)
•Brief descriptions of the following tasks:
–Preparing to use NQE (Section 1.4, page 15)
–Creating batch requests (Section 1.5, page 15)
–Submitting requests (Section 1.6, page 16)
–Monitoring requests and queues (Section 1.7, page 16)
–Examining output (Section 1.8, page 17)
–Deleting or signaling requests (Section 1.9, page 17)
–Transferring files (Section 1.10, page 17)
–Using the ilb command (Section 1.11, page 18)
The remaining chapters of this guide describe in detail all user tasks.
You also may want to read Introducing NQE, publication IN–2153, which
provides a quick overview of how to perform basic user tasks. You can access
Introducing NQE, publication IN–2153, online by using the Cray DynaWeb
server.
1.1 NQE Components and NQE Cluster Components
NQE is a set of clients and servers that lets you submit requests to be executed
across a load-balanced network of hosts. NQE supports computing with a large
number of nodes in a large network that supports two basic models:
SG–2148 3.3 1

NQE User’s Guide
•The NQE database model that supports up to 36 servers and hundreds of
clients.
•The NQS model that supports an unlimited number of NQS servers and
hundreds of clients.
The grouping of servers and clients is referred to as an NQE cluster. The servers
provide reliable, unattended processing and management of the NQE cluster.
Users who have long running requests and a need for reliability can submit
batch requests to an NQE cluster.
Batch requests are shell scripts that are executed independently from an
interactive terminal session. You submit requests from NQE clients and they are
executed at NQS server nodes. You also can log on to nodes and submit
requests. You can monitor and control the progress of a batch request through
the NQE components in the NQE cluster.
The following sections describe the NQE components and the NQE cluster
components.
1.1.1 NQE Components
NQE includes the following components:
•An NQE client provides the client user interfaces to NQE. It supports the
submission, monitoring, and control of work from the workstation for job
execution of the batch request on the nodes. NQE clients are intended to run
on every node in the NQE cluster where users need an interactive interface
to the NQE cluster. It provides the NQE GUI (accessed through the nqe
command) and a command line interface.
For a description of the user interfaces, see Section 1.3, page 11.
•The Network Queuing System (NQS) initiates requests on NQS servers. An
NQS server is the host on which NQS runs. Your default NQS server is
designated by your system administrator and is specified in the NQE
configuration file (nqeinfo); you can submit your request to a specific NQS
server by setting the NQS_SERVER environment variable, which overrides
the default value of NQS_SERVER defined by your system administrator.
•The Network Load Balancer (NLB) provides status and control of work
scheduling within the group of components in the NQE cluster. This
information is then used to load balance batch requests across NQS servers
in the NQE cluster. The NLB offers NQS a list of servers, in order of
preference, to run a request; NQS uses the list to route the request.
2 SG–2148 3.3

Seeing the Big Picture [1]
•The NQE database provides a central repository for batch requests in the
NQE cluster. The NQE scheduler uses the NQE database and an alternative
mechanism for distributing work. The NQE scheduler examines each
request and determines when and on which execution node the request will
run. The lightweight server (LWS) verifies validation, submits the copy of a
request to NQS, and obtains exit status of completed requests from NQS.
•The File Transfer Agent (FTA) provides asynchronous and synchronous file
transfer. You can queue your transfers so that they are retried if a network
link fails.
Note: If you are running NQE without a license on a Cray PVP system, only
the NQS and FTA components are accessible.
1.1.2 NQE Cluster Components
The NQE cluster can contain the following components:
•The Network Load Balancer (NLB) server, which receives and stores
information from the NLB collectors in the NLB database that it manages.
For more information on the NLB, see Chapter 15, page 215.
•The NQE database server, which serves connections from clients, the
scheduler, the monitor and lightweight server (LWS) components in the
cluster to add, modify, or remove data from the NQE database. Currently,
NQE uses the mSQL database. For more information on the NQE database
server, see Section 4.3, page 56.
•The NQE scheduler, which analyzes data in the NQE database, and makes
scheduling decisions. For more information on the NQE scheduler, see NQE
Administration, publication SG–2150.
•The NQE database monitor, which monitors the state of the database and
which NQE database components are connected. For more information on
the NQE database monitor, see NQE Administration, publication SG–2150.
•NQE clients (running on numerous machines) contain software so users can
submit, monitor, and control requests by using either the NQE graphical
user interface (GUI) or the command line interface. From clients, users also
can monitor request status, delete or signal requests, monitor machine load,
and receive request output using the FTA.
The machines in your network where you run NQS are usually machines that
have a large execution capacity. Job requests can be submitted from components
in an NQE cluster, but they will only be initiated on an NQS server node.
SG–2148 3.3 3

NQE User’s Guide
FTA can be used from any NQS server node to transfer data to and from any
node in the network by using the ftpd daemon. It also can provide file
transfer by communicating with ftad daemons that incorporate network
peer-to-peer authorization, which is a more secure method than ftp.
On NQS servers, you need to run a collector process to gather information about
the machine for load balancing and request status for the NQE GUI Status and
Load windows programs. The collector forwards this data to the NLB server.
The NLB server runs on one or more NQE nodes in a cluster, but it is easiest to
run it initially on the first node where you install NQE. Redundant NLB servers
ensure that the NLB database has a greater availability if an NLB server cannot
be reached through the cluster.
Note: The NQE database must be on only one NQE node; there is no
redundancy.
1.2 How NQE Works
This section describes how your work is processed by using NQE. It describes
the general flow of a request and how a request flows through NQS queues.
1.2.1 Work Flow
Using NQE, you can submit a request to NQS or to the NQE database. The
following sections describe the work flow of a request submitted to each of
these destinations. For more information about submitting requests, see
Chapter 4, page 49.
1.2.1.1 Flow of a Request Submitted to NQS by Using the NLB
When you submit a request to NQS, by default NQS solicits information from
the NLB to determine which NQE execution node will receive and process the
request.
Note: Your site may have changed the defaults; contact your system
administrator if your environment seems to work differently.
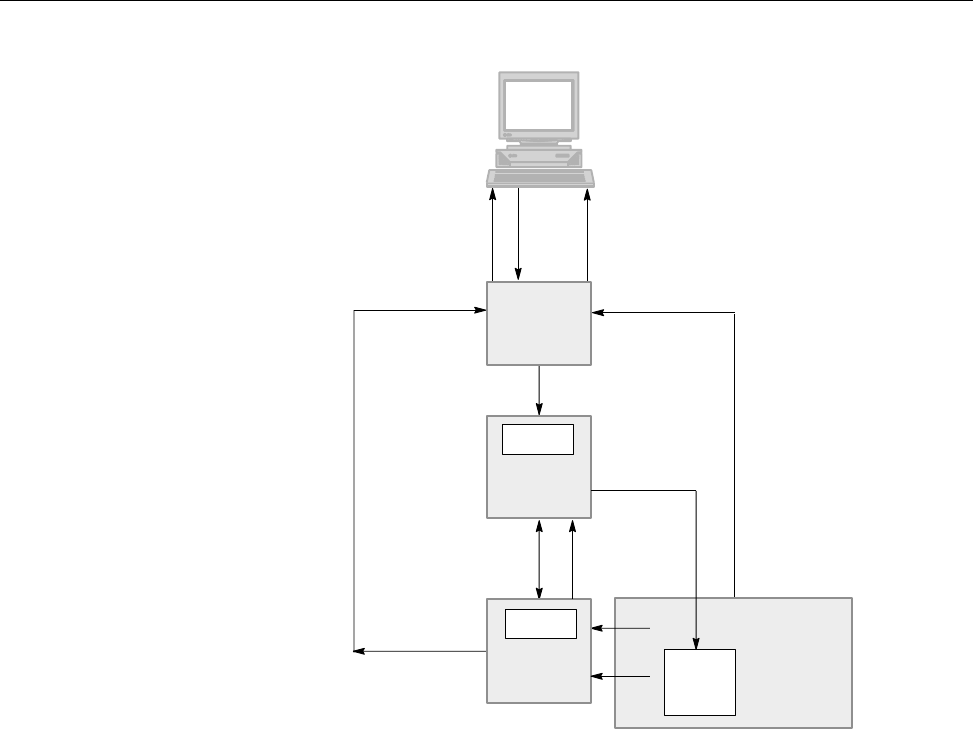
Figure 1, page 6 shows how a request flows through NQE when you send a
request directly to NQS by using the NLB. The steps are as follows:
4 SG–2148 3.3

Seeing the Big Picture [1]
1. From your client workstation, you submit your request to schedule and
initiate a batch job. For information about the user interfaces, see Section
1.3, page 11.
2. Through the NQE client, your request enters NQS on your NQS server (as
indicated by your NQS_SERVER environment variable).
3. NQS solicits information from the NLB about the most appropriate servers
and queues for your request.
4. The NLB uses the system load information received from other NQE nodes
in the network and offers NQS a list of servers, in order of preference, to
run a request.
5. Using this information, NQS sends the request to the most appropriate
destination in the NQE cluster. It may queue the request locally at your
NQS server. The request is assigned a unique NQS request identifier
(requestid).
6. From your client workstation, you monitor your request by using the NQE
GUI Status window or the cqstatl command. (From a node, you can
also use the qstat command to monitor your request.)
7. The request executes on the host selected in step 5.
8. When the job request completes, standard output and standard error files
are returned to you by default at your client workstation.
SG–2148 3.3 5
NQE User’s Guide
NQE
client
Batch
request
1
NQS
2
Node A
3
4
65
Displays
7
8Output
returned
Request
routed
NQS
batch
queue
6
6
4
Status
returned
68Output
returned
Node B
NLB
a11583
NQS server
node (selected
by the NLB)
Node C
Figure 1. Work Flow through NQE Using the NLB with NQS
1.2.1.2 Flow of a Request Submitted to the NQE Database
When you submit a request to the NQE database, it works with an
administrator-defined NQE scheduler to analyze your request and to determine
which NQS server will receive and process the request.
When the scheduler has chosen a server for your request, a copy of your
request is sent to the NQE node. The original request remains in the NQE
database. Because the original request remains in the NQE database, if a
problem occurs during execution and the copy of the request is lost, a new copy
can be submitted for processing.
6 SG–2148 3.3

Seeing the Big Picture [1]
For more information about submitting a request to the NQE database, see
Section 4.3, page 56.
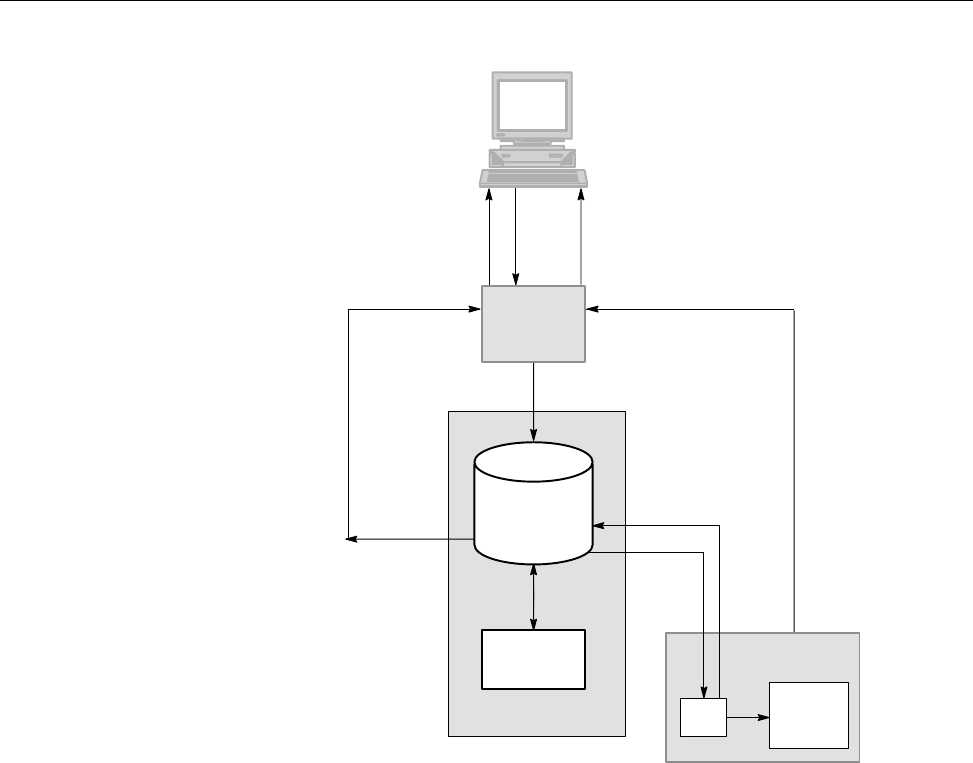
Figure 2, page 8 shows how a request flows through NQE when you send a
request to the NQE database. The steps are as follows:
1. From your client workstation, you submit your request to schedule and
initiate a batch job. For information about the user interfaces, see Section
1.3, page 11.
2. Through the NQE client, your request is sent to the NQE database. A
request submitted to the NQE database is called a task, and it is assigned a
unique task identifier (tid).
3. The NQE scheduler examines the request in the NQE database and
determines when and where the request will run. The scheduled node can
be any NQS server node in the NQE cluster.
4. The lightweight server (LWS) on the scheduled NQE node receives a copy
of the request from the NQE database.
5. The LWS submits a local request to NQS. The request is placed in a local
batch queue to run. The request is assigned a unique NQS request identifier
(requestid). The LWS updates the NQE database with this information.
6. You can monitor the status of your request by using the NQE GUI Status
window. The status information is obtained from the NQE database and
displayed on your client workstation.
7. The request executes on the host selected in 3.
8. When the job request completes, standard output and standard error files
are returned to you by default at your client workstation.
9. When the job request completes, the NQE database is updated with exit
information. However, the request is not deleted from the NQE database
immediately so that you can continue to get information about the request
and its status. Your system administrator determines how long data
remains in the NQE database after the request has completed.
SG–2148 3.3 7
NQE User’s Guide
6
NQE
client
Batch
request
1
2
NQE
scheduler
3
4
5
Client
displays
7
8Output
returned
Copy of
request
routed
NQS
batch
queue
9
6
LWS
Status
returned 6
Output
returned
8
NQE
database
a11561
Node A
Node B
Figure 2. Work Flow through NQE Using the NQE Database and Its Scheduler
1.2.2 NQS Queues
To process your request, NQE may send it through a series of queues. A queue
is a list of job requests waiting to be scheduled and initiated.
NQS has three types of queues:
•Batch queues initiate job requests. Generally, a job request in a batch queue is
executing or waiting for resources so that it can execute.
8 SG–2148 3.3

Seeing the Big Picture [1]
•Pipe queues route requests. A pipe queue sends the request to another queue
for further processing. This other queue could be on any NQS server in the
NQE cluster. It could be a batch queue that will initiate the request or a pipe
queue that will route it further. If your request cannot enter the queue to
which it was sent, NQS sends you a mail message that explains the problem.
Pipe queues are not used if you send your job request to the NQE database.
•Destination-selection queues load-balance job requests. These are pipe
queues that do not have a preset destination. Instead, destinations are
determined by load-balancing policies.
When a request enters a destination-selection pipe queue, NQS queries the
NLB for a list of destinations that could process your request. The NLB
returns a list of destinations that is ordered according to the
administrator-defined policy at your site. If for some reason the first
destination cannot accept the request, the second is tried, and so on.
Destination-selection pipe queues are not used if you send your request to
the NQE database.
Figure 3 shows an example of how requests submitted to NQS may flow from
your client workstation through NQS queues.
SG–2148 3.3 9
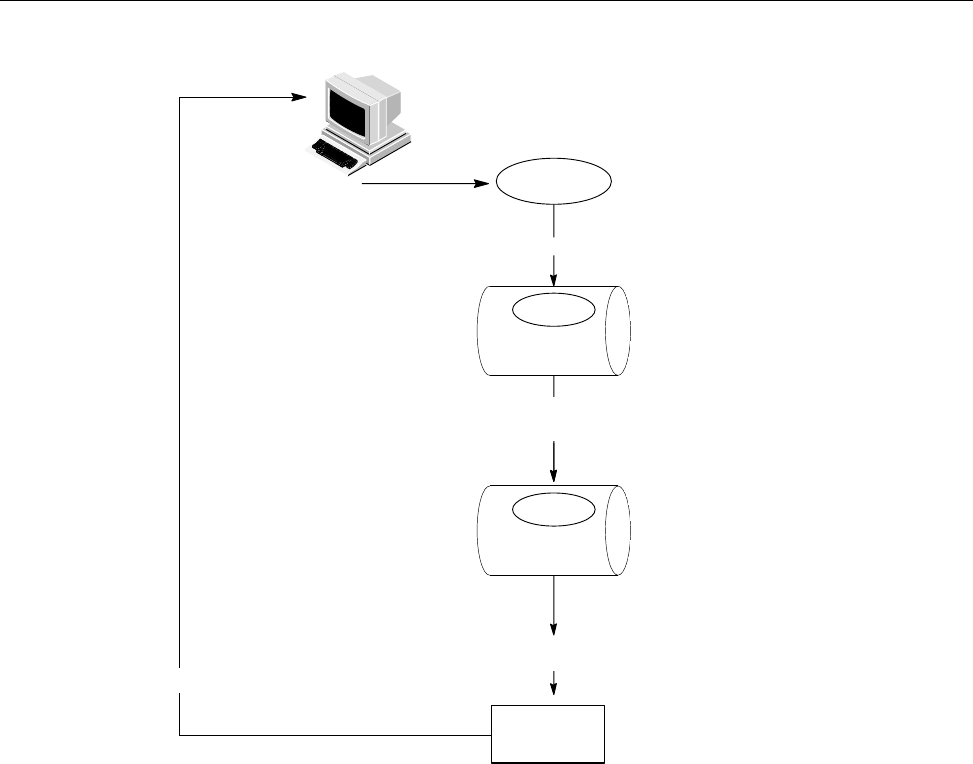
NQE User’s Guide
2. The NQE client sends the request to the default queue on your NQS server
(NQS_SERVER).
request
1. You send your job request from your client workstation.
Pipe queue
request
request
Batch queue
4. Your job request executes.
Output
files
3.
5. NQS returns your output files.
(nqebatch)
a10367
Using the NLB, NQS routes the request to a batch queue. This queue may be
on any NQS server in the NQE cluster.
Figure 3. Detail of Work Flow through NQE When Submitting Directly to NQS
Figure 4 shows an example of how requests submitted to the NQE database
flow from your client workstation through an NQS batch queue.
10 SG–2148 3.3
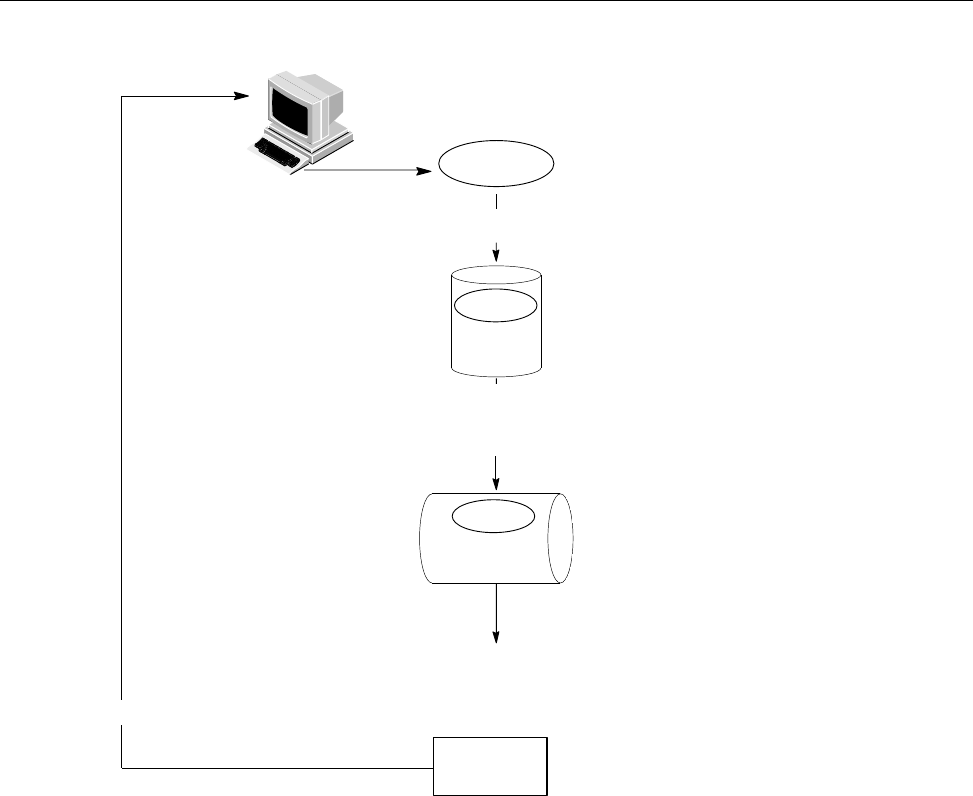
Seeing the Big Picture [1]
request
1. You send your job request from your client workstation.
NQE
database
request
request
Batch queue
4. Your job request executes.
Output
files
3.
5. NQS returns your output files.
(nqebatch)
a11584
2. The NQE client sends the job request to the NQE database.
Using the NQE scheduler, the LWS receives a copy of the request from the NQE database,
submits a request to the local NQS server, and places the request in a local or remote batch
queue. This batch queue may be on any NQS server in the NQE cluster. The original request
remains in the NQE database.
Figure 4. Detail of Work Flow When Submitting to the NQE Database
1.3 User Interfaces
You can use the NQE graphical user interface (GUI) or a command line
interface to do most of the functions described in this guide. The following
sections provide a brief overview of these functions. (You also can submit your
request by using a World Wide Web (WWW) interface; for further information,
ask your system administrator.)
SG–2148 3.3 11
NQE User’s Guide
1.3.1 NQE Graphical User Interface
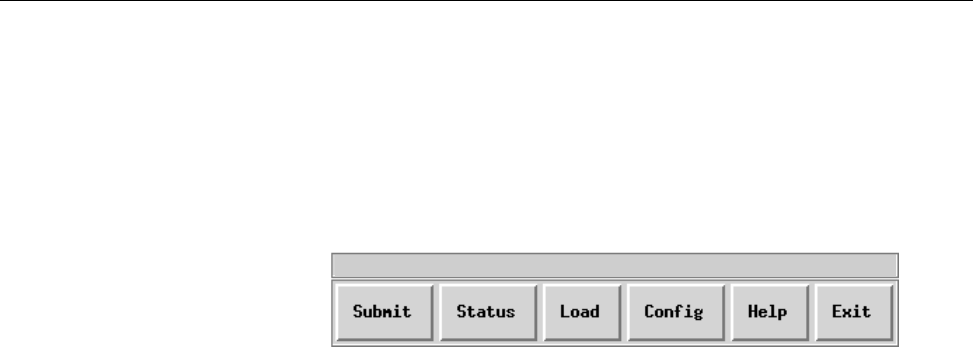
The NQE GUI is similar to a Motif interface. To access the NQE GUI, execute
the nqe command. Figure 5 shows the initial NQE GUI button bar window
that will appear:
a10935
Network Queuing Environment x.x.x.x
Figure 5. Initial NQE GUI Button Bar Window
To access a window, use the left mouse button and click on the button once.
You can use the NQE GUI for the following tasks:
•Use the Submit window to do the following:
–Open and edit a job script
–Save changes made to a job script
–Submit a request to NQE
–Launch a request on a periodic basis
–From within the Submit window, reset your configuration preferences
for the request you are submitting
–View, segment, delete, or reset your NQE GUI log
–Set or unset your password
–Configure and save your job-related options (job profile)
•Use the Status window to do the following:
–View updated status of your requests (the window is refreshed
periodically)
–View updated status of your FTA file transfers (the window is refreshed
periodically)
12 SG–2148 3.3

Seeing the Big Picture [1]
–Delete a request
–Send a specified signal to a request
–View the detailed status of a request
–Set or unset your password
Context-sensitive help is displayed as you glide your mouse cursor over a
menu or field name in the Status window; a brief description of the menu or
field appears at the bottom of the display.
•Use the Load window to do the following:
–Display continually updated system load information for machines in the
group of execution nodes in the NQE cluster
–Display data about a specific host
–Display the same data that is provided on the main Load window, but
have it grouped by host rather than by type of data
•Use the Config window to do the following:
–Set your preferences for the following: A specific NQS server, default job
profile, temporary directory, job script, job output, job profile, and NQE
GUI log directories.
–View your currently set preferences
•To display the current NQE version number and copyright information in
the Submit,Status, and Config windows, use the left mouse button and
click once on the Cray Research logo button.
•To access online help, use the left mouse button and click once on the Help
button.
•To exit the NQE GUI, use the left mouse button and click on the Exit
button.
When the mouse pointer is within a display area of a specific NQE GUI
window, you can use the ALT key and the underscored letter from the menu
bar to pop up submenus and to select more submenu options. An alternative
way to do this is to use the F10 key to activate the menu bar and then use the
cursor movement keys to select submenus and options.
For a summary of the NQE GUI displays and functions, see the nqe(1) man
page.
SG–2148 3.3 13

NQE User’s Guide
1.3.2 Command Line Interface
NQE provides a command line interface for the following user functions. Each
of the commands listed in this section is documented on a man page (man
pages are provided in online form only).
You can issue the following commands from any NQE node because all NQE
nodes contain the NQE client software:
Command Description
cevent Posts, reads, and deletes job-dependency event information
cqdel Signals a request that is either running or awaiting processing
cqstatl Displays the status of NQE work through a line-mode, static
display
cqsub Submits a script file to NQE for execution
ilb Executes a load-balanced interactive command; for an overview
of the ilb command, see Section 1.11, page 18; for detailed
information about the ilb command, see the ilb(1) man page.
You can issue the following commands only at an NQE node that has installed
the NQE components; if you issue them from an NQE client, they have no
effect. The following commands are not installed on NQE clients; they do not
recognize the NQS_SERVER environment variable:
Command Description
ftua Transfers a file interactively
qalter Alters the attributes of one or more NQS requests
qchkpnt Checkpoints an NQS request on a UNICOS, UNICOS/mk, or
IRIX system
qdel Deletes or signals an NQS request
qlimit Displays NQS batch limits for the local host
qmsg Writes messages to stderr,stdout, or the job log file of an
NQS batch request
qping Determines whether the local NQS daemon is running and
responding to requests
qstat Displays the status of NQS queues, requests, and queue
complexes
14 SG–2148 3.3

Seeing the Big Picture [1]
qsub Submits a batch request to NQS
rft Transfers a file to and from a remote system
For a list of all user-level man pages provided online, see Appendix A, page 235.
1.4 Preparing to Use NQE
To use NQE, you must set certain environment variables. For an explanation of
which environment variables you must set, see Section 2.2, page 22. For a list of
optional environment variables you can set, see Chapter 9, page 127.
To submit requests to the NQE database, you must have a database user
account (dbuser) that has user privileges. Your NQE administrator controls
who has access to the database and from which client host. For information
about how to specify your database user name, see Section 2.3, page 24, or
Section 4.3.1, page 56.
By default, NQS uses file validation to authorize users. NQS also may be
configured to use password validation or both file and password validation.
For additional information about preparing to use NQE and about validation
files, see Chapter 2, page 21.
1.5 Creating Batch Requests
Before you submit a batch request, you usually will create a script file that
contains the UNIX commands that make up the request. To create this file, use
any text editor (such as vi). You also can create a batch request from within the
NQE GUI Submit window.
A batch request can be one command, such as ls (which lists files). Usually,
however, batch requests contain several commands.
On UNICOS, UNICOS/mk, or IRIX systems, you can checkpoint an executing
request at any time during its execution by saving its current image in a restart
file by including qchkpnt(1) statements within the script file. You then can use
the restart file to restart the job from a known point if a system interrupt occurs.
For more information about creating a batch request, see Chapter 3, page 43.
For more detailed information about customizing a batch request, see Chapter
5, page 85.
SG–2148 3.3 15

NQE User’s Guide
1.6 Submitting Requests
You can submit a request to run under UNIX or under the Distributed
Computing Environment (DCE). For information about how to submit a request
to DCE, see Chapter 4, page 49.
To submit a request to NQE, you can use either the NQE GUI or the command
line interface.
To use the NQE GUI, key in the nqe command at the prompt and, using the
left mouse button, click once on the Submit button of the initial NQE GUI
button bar.
To use the command line interface to submit a batch request to NQE, use the
cqsub or qsub command. For a complete list of the options, see the cqsub(1)
or qsub(1) man page.
For more information about submitting a request for execution, see Chapter 4,
page 49.
1.7 Monitoring Requests and Queues
To view where your request is in the NQE network, use the NQE GUI Status
window or the cqstatl or qstat command.
When you use the NQE GUI Status window, the default window shows the
status of all of your requests in the NQE cluster. Using the NQE GUI has the
following advantages over using the cqstatl or qstat command:
•A display is refreshed periodically. To get new information, you do not need
to reissue a command.
•A request is easy to find. All of your requests are displayed on the main
NQE GUI Status window; you do not need to specify a specific node.
When you use the cqstatl or qstat command, you can obtain information
about all queues on that NQE node. The NQE GUI does not display any
information about queue structures; only queues that contain requests are
displayed through the NQE GUI.
For detailed information about monitoring requests, see Chapter 10, page 137.
For detailed information about monitoring queues, see Chapter 11, page 155.
16 SG–2148 3.3

Seeing the Big Picture [1]
1.8 Examining Output
After your batch request completes, NQS returns standard output and standard
error files to you. If you use the NQE GUI, the files are written to your home
directory by default. If you use the command line interface, by default the files
are written to the directory you were in when you issued the cqsub or qsub
command.
For information about working with output files, see Chapter 6, page 107. For
information about communicating with output, see Chapter 7, page 113.
1.9 Deleting or Signaling Requests
You can delete or signal a request that you have submitted to NQE. The request
may be executing or may be waiting to execute on an NQS server node.
Note: You can send any UNIX signal to a request. Your request script could
be written to trap the signal and then take some appropriate action, rather
than to abort.
To delete an executing request, you can use either the NQE GUI Status
window or the cqdel or qdel command. If you use the cqdel or qdel
command, you must send it a UNIX signal. You can send one of several signals
to a request; one of the most common is the SIGKILL signal, which aborts a
running process.
Standard output, standard error, and job log files are still produced for an
executing request that is deleted by a signal. These files record the execution of
the request up to the moment that the signal is received.
For more information about deleting a request, see Chapter 12, page 169. For
more information about sending a signal to a request, see Chapter 13, page 177.
1.10 Transferring Files
You can transfer files between remote systems on a network either from within a
batch request or interactively by using the NQE File Transfer Agent (FTA). The
ftua and rft commands transfer files. The ftua interface to FTA is similar to
the TCP/IP ftp utility. File transfers can be initiated on NQE nodes only.
You might choose to use FTA for the following reasons:
SG–2148 3.3 17

NQE User’s Guide
•You can queue your transfers. You can execute file transfers immediately or
queue them for later execution. If the transfer is queued, it is executed after
you leave the utility, letting you proceed to other tasks.
•You can display queued transfers. If you have issued a file transfer request
in queue mode, you can display details about the request. To view the status
of an FTA transfer, you can use either the NQE GUI or the qls command.
•Your transfers are retried. If your file transfer fails for some transient reason
(such as a network link failing), FTA automatically requeues the transfer.
Retries are useful in batch requests because your requests will not abort if a
transfer cannot occur when it is first tried.
•You do not have to provide passwords. FTA provides network peer-to-peer
authorization (NPPA). NPPA lets you transfer files without specifying
passwords in either batch request files or in .netrc files or by transmitting
passwords over the network. For more information on NPPA, see Section
14.5, page 213.
•It provides both synchronous and asynchronous reliable file transfer. If a
transient error condition occurs during the transfer, transfers are retried.
Retries are useful when transferring files from within an NQS request.
If you disable the synchronous feature by selecting the -nowait option, the
transfers are done in asynchronous fashion but are still reliable.
To transfer files from within a batch request, use the rft command. The rft
command has the following advantages over other file transfer commands:
•It is a one-line interface to FTA. This makes it easier to use in batch job
requests.
•rft provides an option that deletes the local file on the completion of a
transfer. This is useful when transferring files at the end of an NQS request
to the system from which you submitted the request.
For more information about using FTA, see Chapter 14, page 183.
1.11 Using the ilb Command
The ilb utility lets you execute a command on a machine chosen by the NLB.
Enter the ilb command followed by the command you wish to execute. The
NLB is then queried to determine which machine to log you into. Once the
login process is complete, the command is executed and I/O is connected to
your terminal or pipeline.
18 SG–2148 3.3

Seeing the Big Picture [1]
The .ilbrc file contains login and initialization information used during the
automated login process. The .ilbrc file must reside in your home directory
on the local host. The default system ilbrc file contains information that the
ilb utility uses to establish connections to remote systems.
The following example executes the uname command on the system chosen by
the NLB and returns the output to the user’s terminal:
$ilb uname -a
Attempting connection to pendulum...
ILB Info: Using /usr/bsd/rlogin to connect, based on PATH.
Executing uname -a...
IRIX pendulum 6.2 06101030 IP22
For detailed information about the ilb command, see the ilb(1) man page.
SG–2148 3.3 19

Preparing to Use NQE [2]
This chapter describes which environment variables you must set to use NQE,
how to set up NQE database authorization, and how to set up NQS validation.
It discusses the following topics:
•NQE file structure (Section 2.1, page 21)
•Setting environment variables (Section 2.2, page 22)
•NQE database authorization (Section 2.3, page 24)
•NQS validation requirements (Section 2.4, page 25)
•File validation (Section 2.5, page 26)
•Password validation (Section 2.6, page 27)
•File and password validation (Section 2.7, page 27)
•File validation file examples (Section 2.8, page 27)
2.1 NQE File Structure
Throughout this guide, the path /nqebase is used in place of the default NQE
path name, which is /usr/craysoft/nqe on all systems except Solaris,
UNICOS, and UNICOS/mk systems, where it is /opt/craysoft/nqe.
Figure 6 shows the NQE file structure.
SG–2148 3.3 21

NQE User’s Guide
a10527
bin etc examples include lib man src www
$NQE_VERSION
/nqebase
license.dat
nqs_config
name_map
fta.conf
cat1
cat3
cat5
cat7
cat8
cgi_src
cgi_bin
images
help
nqein
nqeout
database nqeinfo
ftaqueue
log
msqldb
nlbdir
fta_conf
config
policies
nqedb
nqedb_iddir
nqedbusers
spool
$HOST
43
1
2
4
3
1
2
directories
Symbolic links to /nqebase/$NQE_VERSION directories
/etc/nqeinfo is a symbolic link to this file
Symbolic link to $NQE_SPOOL as defined in nqeinfo file
Key
[/opt /usr]/nqebase
files
README
install.log
dependencies
news
5For UNICOS and UNICOS/mk systems only
6For UNICOS systems that run only the NQE subset (NQS and FTA components)
5
6
Figure 6. NQE File Structure
2.2 Setting Environment Variables
To use NQE, you must set the following environment variables:
•DISPLAY must be set to local_workstation_name:0 for the NQE graphical
user interface (GUI) to work.
Note: If your site has access control in place for using X Window System
applications, contact your system administrator to determine if you need
additional settings.
•PATH must include the path name of the NQE commands. The default path
name is /nqebase/bin. System administrators also must include
/nqebase/etc in their PATH environment variable to use certain NQE
administrator commands.
•MANPATH must include the path name of the NQE man pages. The default
name is /nqebase/man.
22 SG–2148 3.3

Preparing to Use NQE [2]
To verify whether your site’s path names are the NQE system default, use the
following command:
cd /nqebase/bin
If this command is not successful, ask your system administrator where the
NQE software is located and add those directories to your PATH and MANPATH
environment variables.
The commands that you use to set the environment variables depend on the
shell that you use. For UNICOS and UNICOS/mk systems, the standard shell
(or Korn shell) is the default shell.
Note: For UNICOS and UNICOS/mk systems, if you want to use the
UNICOS module(1) interface to acquire the environment variables for NQE,
check with your system administrator to see if the modules package has been
installed on your system.
For a list of other NQE environment variables that you can set to customize
your environment, see Section 9.2, page 129.
The following example uses sh syntax to set and display NQE environment
variables:
#PATH=$PATH:/nqebase/bin:/nqebase/etc; export PATH
#MANPATH=:/nqebase/man; export MANPATH
#DISPLAY=snow32:0; export DISPLAY
#env
LOGNAME=you
MAIL=/var/mail/you
USER=you
SHELL=/bin/sh
PWD=/home/snow32/you
MANPATH=:/nqebase/man
PATH=/usr/bin::/nqebase/bin:/nqebase/etc
DISPLAY=snow32:0
The following example uses csh syntax to set and display the NQE
environment variables:
SG–2148 3.3 23

NQE User’s Guide
%setenv PATH /nqebase/bin:/nqebase/etc:$PATH
%setenv MANPATH /nqebase/man:$MANPATH
%setenv DISPLAY snow32:0
%env
HOME=/home/snow32/you
SHELL=/bin/csh
TERM=xterm
USER=you
LOGNAME=you
PWD=/home/snow32/you
MANPATH=/usr/man:/opt/local/man:/nqebase/man
PATH=/usr/bin:/nqebase/bin:/nqebase/etc
DISPLAY=snow32:0
2.3 NQE Database Authorization
To submit or control a request or to get a status of a request in the NQE
database, you must have a database user dbuser account with the proper
authorization (user privileges). This database user account name can be the
same as or different from your login on the client host. Your NQE administrator
controls who has access to the database and from which client host.
Note: For information about submitting your request to the NQE database,
see Section 4.3, page 56.
If the database user name is different from your local client’s login name, you
must supply the database user name on each of your client requests.
Note: The target user name of the request will still be the same as your local
client login name.
You can specify the database user name in the following ways:
•Select General Options on the Configure menu of the NQE GUI
Submit window and enter the name in the User Name option field.
•Use the -u dbuser= command option of the cqsub,cqstatl,orcqdel
command. An example follows:
cqsub -u dbuser=henry job
•Set the NQEDB_USER environment variable. An example follows:
export NQEDB_USER=henry
cqsub job
24 SG–2148 3.3

Preparing to Use NQE [2]
The following example enables jack, who is currently logged in, to become
jjackson (the owner of the request) and to submit request job1 to the NQE
database as Chemdept (no spaces are allowed between the comma and the
name of the owner of the request):
cqsub -u dbuser=Chemdept,jjackson job1
For a complete description of the -u option syntax, see the cqsub(1) man page.
2.4 NQS Validation Requirements
NQS can perform validation when you submit, monitor, delete, or send a signal
to a request. Validation ensures that the user name associated with the request
is authorized to submit, monitor, and control the request.
Your NQE administrator specifies the validation method used in your NQS
configuration. NQS can also perform validation when the output files produced
by a remotely executed request will be returned to your local system. This
validation is done to ensure that the user name under which the request was
executed has permission to write to your file system. Usually, the same method
of validation is used for both local and remote NQS systems.
The following validation methods are possible:
•File validation, which is the default method of NQS validation
•Password validation
•File and password validation combined
•No validation is done. Your site is not likely to use this method; it is not
secure and is not recommended.
To display the current method in use, you must log on to your NQS server and
issue the following commands:
%qmgr
Qmgr: show parameters
The last line of this display shows the validation type:
Validation type = Validation files
SG–2148 3.3 25

NQE User’s Guide
2.5 File Validation
File validation is the default method of NQS validation. Validation files are
checked for valid users and hosts. This check is performed at the NQS server
when it receives a client request and prior to execution on the NQS server on
which the request will run. NQS also checks for a validation file at your NQE
client system to ensure that the user has permission to write the output files
back to your system.
For remote requests to systems running the UNICOS multilevel security feature
(MLS) or UNICOS/mk security enhancements, you may not be able to
designate the request to be run under a different name. When these features are
enabled on your system and you submit a remote request, the system might be
configured to require the /etc/hosts.equiv and .rhosts files to each
contain a match for the remote host and require that the remote user and local
user names match.
If your site uses validation files, you must have a .rhosts or .nqshosts file
in your home directory on each NQS server in the cluster that might process
your request. NQS uses these files to authorize your user name before it sends
your request to a batch queue.
At the NQS server, you must have an entry of the following format in one of
these files:
hostname username
The hostname is the network host name of the system from which you submit
the request (the NQE client system). The username is your user name on the
corresponding host.
If you have both .rhosts and .nqshosts files, NQS ignores the .rhosts
file. Unless your NQE administrator gives you different advice, use the
.rhosts file.
Note: You must have a .rhosts or a .nqshosts file in your login directory
on each NQS server on which your request can run. If your site uses aliases
for host names, you also must include those names in the .rhosts or
.nqshosts file entry. See Section 2.8.3, page 32, and Section 2.8.5, page 39,
for information about entries in the .rhosts file or .nqshosts file.
If your site uses aliases for host names, you also must include those names in
the file, as in the following example:
snow jane
snow.site.com jane
26 SG–2148 3.3

Preparing to Use NQE [2]
2.6 Password Validation
If your site uses password validation, you must supply a password each time
you submit, monitor, delete, or send a signal to a request. The password cannot
contain more than 8 characters. To ensure that you will be prompted for your
password, use one of the following (the password you supply is for the user
name under which the request will execute):
•If you use the NQE GUI, select Set Password on the Actions menu of
the Submit window; enter and "apply" your password.
•If you use the command line interface, specify the -P option when you use
the cqsub,cqstatl, and cqdel client commands.
•Set the NQS_PASSWORD_NEEDED environment variable.
When you are prompted for your password, you supply the password for
the user name at the NQS server on which the request will execute.
The NQE client sends the password in an encrypted form to the NQS server
when it sends the request. Before the request is executed, the password is
checked at the NQS server. If the password is not valid, the request is
rejected.
Note: NQS does not use password validation when sending output files
between two NQS systems.
2.7 File and Password Validation
If you use the NQE GUI, you do not need to set a password. The validation file
is then checked. If you do not supply a password, NQS checks your validation
files. If you supply a password (whether correctly or incorrectly), NQS checks
only the password and not the file.
2.8 Validation File Examples
This section describes the following possible scenarios for validation files, as
follows:
•Using the same user name when submitting a request on a single-node NQE
(Section 2.8.1, page 28)
•Using the same user name when submitting a request to the NQE database
on a multiple-node NQE (Section 2.8.2, page 29)
SG–2148 3.3 27

NQE User’s Guide
•Using the same user name when submitting a request to NQS_SERVER on a
multiple-node NQE using the NLB (Section 2.8.3, page 32)
•Using an alternative user name when submitting a request to the NQE
database on a multiple-node NQE (Section 2.8.4, page 36)
•Using an alternative user name when submitting a request to NQS_SERVER
on a multiple-node NQE using the NLB (Section 2.8.5, page 39)
2.8.1 Using the Same User Name When Submitting a Request on a Single-node NQE
In this example, snow,frost, and hail are clients submitting requests to
rain.rain is the only NQE node in this NQE cluster. User jane is using the
client commands or the NQE GUI on her workstation called snow.jane wants
to submit her job request to NQS or to the NQE database, both of which reside
on the NQE node called rain.
At a minimum, jane must have the following:
•Access to an account (a login ID) on her workstation (snow).
•Access to an account on the NQE node rain.
•jane will be submitting requests to rain from client snow only, not from
clients frost or hail. (User jane on the client workstations on frost or
hail can be someone else who is also named jane.) For NQS on rain to
accept her requests, jane must have a .nqshosts or .rhosts file in her
login directory on rain with the following entry:
snow jane
•jane will be receiving output files on snow; therefore, she must have the
file ~jane/.rhosts on snow with the following entry specifying that jane
at rain is allowed remote access:
rain jane
•Because jane also wants to submit requests to the NQE database, she must
have authentication on the NQE database (see Section 2.3, page 24).
Job output will be returned from the NQS server by default to the NQE client,
snow, by either FTA or rcp. FTA will be attempted first.
FTA may require a password for the destination host (NQE client snow) and
user (user jane at snow), which can be supplied by creating a .netrc file in
28 SG–2148 3.3

Preparing to Use NQE [2]
the login directory of user jane on rain (~jane/.netrc on rain). (For
further information, see the netrc(5) man page).
FTA can also be configured so that jane will not have to supply a password.
This configuration in FTA is called network peer-to-peer authorization (NPPA).
Check with your system administrator to see if this option is available.
rcp is used only to return output if FTA fails immediately to return the output.
rcp requires a .rhosts file at the destination host in the recipient’s home
directory (~jane/.rhosts on snow).
NQS will always try to use your .nqshosts file and will use the .rhosts file
only if the .nqshosts file does not exist. You should use .rhosts files unless
your system administrator tells you that you should not use them.
Once she has her .rhosts files in place, jane can submit requests to rain.
For example, jane could submit the request named testjob by using either
the NQE GUI or the command line interface. If she uses the command line
interface, she would enter the following command; the value for dest_type can
be nqedb (to send a request to the NQE database) or nqs (to send a request to
NQS):
cqsub -d dest_type testjob
For more information about using the cqsub -d option, see Chapter 4, page 49,
or the cqsub(1) man page.
2.8.2 Using the Same User Name When Submitting a Request to the NQE Database on a
Multiple-node NQE
In this example, user jane is using the NQE GUI or NQE client commands on
workstation snow. The NQE database resides on wind. User jane wants to
submit requests to the NQE database on wind, where the NQE scheduler will
select a target system. To submit requests to the NQE database on wind,jane
must have authentication on the NQE database (see Section 2.3, page 24).
In this example, three other NQE nodes exist in the NQE cluster that have the
names gust,storm, and rain. This means that jane can potentially run
requests on rain,gust,storm, and wind. To use all four nodes, jane must
have a .rhosts (or .nqshosts)file in her home directory on each of the four
nodes.
Since jane uses the same login ID on all of the NQE nodes, the .rhosts file
on snow would contain the following entries:
SG–2148 3.3 29

NQE User’s Guide
•On the NQE client workstation snow:
rain jane (lets jane@rain return output to snow)
gust jane (lets jane@gust return output to snow)
storm jane (lets jane@storm return output to snow)
wind jane (lets jane@wind return output to snow)
Note: This is required only if rcp is the output mechanism; also, these
entries need to be in the .rhosts file. rcp does not use the .nqshosts
file.
The .rhosts file for user jane on each NQE node must contain the following
entry (note that it is the same entry on each NQE node):
•On node wind:
snow jane (permits incoming requests from jane@snow)
•On node gust:
snow jane (permits incoming requests from jane@snow)
•On node rain:
snow jane (permits incoming requests from jane@snow)
•On node storm:
snow jane (permits incoming requests from jane@snow)
Once she has her .rhosts files in place, jane can submit requests to wind.
For example, jane could submit the request named testjob by using either
the NQE GUI or the command line interface. If she uses the command line
interface, she would enter the following command:
cqsub -d nqedb testjob
Once a target system is selected, the LWS on that node authenticates user jane.
Job output will be returned from the NQS server by default to the NQE client,
snow, by either FTA or rcp. FTA will be attempted first.
FTA may require a password for the destination host (NQE client snow) and
user (user jane at snow), which can be supplied by creating a .netrc file in
the login directory of user jane on wind (~jane/.netrc on wind) (if it is
executed there). (For further information, see the netrc(5) man page).
30 SG–2148 3.3

Preparing to Use NQE [2]
FTA can also be configured so that jane will not have to supply a password.
This configuration in FTA is called network peer-to-peer authorization (NPPA).
Check with your system administrator to see if this option is available.
rcp is used only to return output if FTA fails immediately to return the output.
rcp requires a .rhosts file at the destination host in the recipient’s home
directory (~jane/.rhosts on snow).
NQS will always try to use your .nqshosts file and will use the .rhosts file
only if the .nqshosts file does not exist. You should use .rhosts files unless
your system administrator tells you that you should not use them.
Figure 7 shows how the file validation scenario looks:
SG–2148 3.3 31
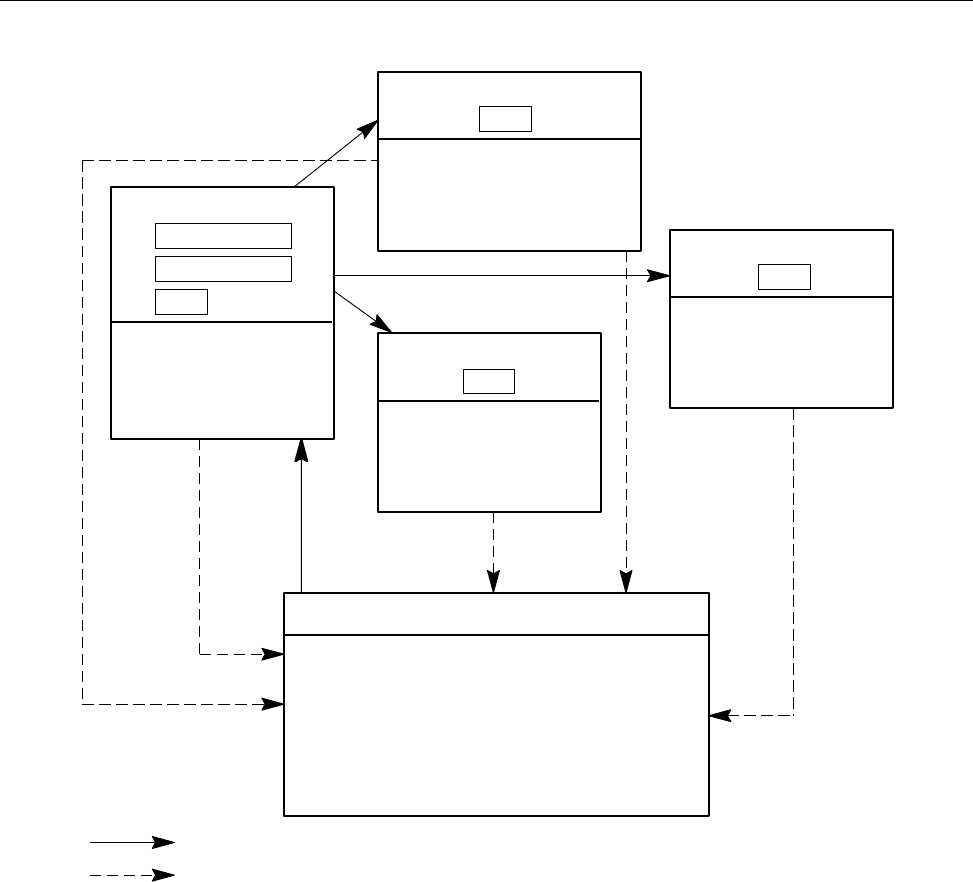
NQE User’s Guide
LWS
User Name: jane
~jane/.rhosts entry:
snow jane
LWS
User Name: jane
~jane/.rhosts entry:
snow jane
NQE scheduler
User Name: jane
~jane/.rhosts entry:
snow jane
LWS
User Name: jane
~jane/.rhosts entry:
snow jane
NQE database
LWS
Client workstation snow
User Name: jane
~jane/.rhosts entries:
rain jane
gust jane
storm jane
wind jane
(Incoming request)
(Output return) a11585
Node storm
Node wind
Node gust
Node rain
Figure 7. Submitting Request to NQE Database on Multiple-node NQE Using Same User Name
2.8.3 Using the Same User Name When Submitting a Request to NQS_SERVER on a Multiple-node
NQE Using the NLB
In this example, user jane is using the NQE GUI or NQE client commands on
workstation snow and her NQS server is rain (NQS_SERVER=rain).
32 SG–2148 3.3

Preparing to Use NQE [2]
User jane wants to submit requests to rain, using load balancing (NLB) to
select a target system.
In this example, three other NQS server nodes exist in the NQE cluster that
have the names gust,storm, and wind. This means that jane can potentially
run requests on rain,gust,storm, and wind. To use all four nodes, jane
must have entries in a .rhosts (or .nqshosts)file in her home directory on
each of the four nodes. Assuming that jane uses the same login ID on all of
the four nodes, the .rhosts files would contain the following entries:
•On the NQE client workstation snow:
rain jane (lets jane@rain return output to snow)
gust jane (lets jane@gust return output to snow)
storm jane (lets jane@storm return output to snow)
wind jane (lets jane@wind return output to snow)
Note: This is required only if rcp is the output mechanism; also, these
entries need to be in the .rhosts file. rcp does not use the .nqshosts
file.
•On node rain:
snow jane (permits incoming requests)
•On node gust:
rain jane (accepts requests from rain)
•On node wind:
rain jane (accepts requests from rain)
•On node storm:
rain jane (accepts requests from rain)
Once she has her .rhosts files in place, jane can submit requests to her
NQS_SERVER rain. For example, jane could submit the request named
testjob by using either the NQE GUI or the command line interface. If she
uses the command line interface, she would enter the following command:
cqsub -d nqs testjob
Job output will be returned from the NQS server by default to the NQE client,
snow, by either FTA or rcp. FTA will be attempted first.
SG–2148 3.3 33

NQE User’s Guide
FTA may require a password for the destination host (NQE client snow) and
user (user jane at snow), which can be supplied by creating a .netrc file in
the login directory of user jane on rain (~jane/.netrc on rain) (if it is
executed there). (For further information, see the netrc(5) man page.)
FTA can also be configured so that jane will not have to supply a password.
This configuration in FTA is called network peer-to-peer authorization (NPPA).
Check with your system administrator to see if this option is available.
rcp is used only to return output if FTA fails immediately to return the output.
rcp requires a .rhosts file at the destination host in the recipient’s home
directory (~jane/.rhosts on snow).
NQS will always try to use your .nqshosts file and will use the .rhosts file
only if the .nqshosts file does not exist. You should use .rhosts files unless
your system administrator tells you that you should not use them.
Figure 8, page 35 shows how the file validation scenario looks:
34 SG–2148 3.3
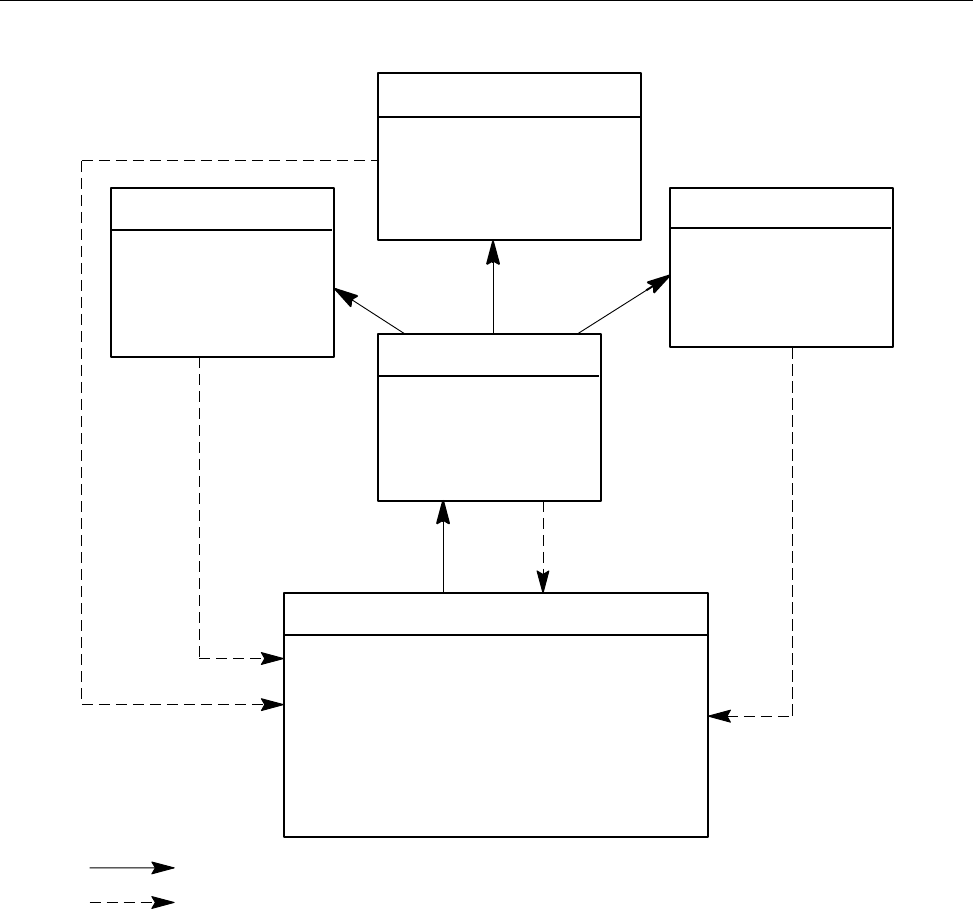
Preparing to Use NQE [2]
User Name: jane
~jane/.rhosts entry:
rain jane
User Name: jane
~jane/.rhosts entry:
rain jane
User Name: jane
~jane/.rhosts entry:
rain jane
User Name: jane
~jane/.rhosts entry:
snow jane
Client workstation snow
User Name: jane
NQS_SERVER: rain
~jane/.rhosts entries:
rain jane
gust jane
wind jane
storm jane
(Incoming request)
(Output return) a11586
Node storm
Node wind Node gust
Node rain
Figure 8. Submitting Request to NQS_SERVER on Multiple-node NQE Using Same User Name
SG–2148 3.3 35

NQE User’s Guide
2.8.4 Using an Alternative User Name When Submitting a Request to the NQE Database on a
Multiple-node NQE
By default, NQE expects that you have the same user name on all of your NQE
nodes. However, you can submit requests to execute under an alternative user
name.
In this example, user jane is using the NQE GUI or NQE client commands on
workstation snow. The NQE database resides on wind. User jane wants to
submit requests to the NQE database on wind as user fred. The NQE
scheduler will select a target system.
In this example, three other NQE nodes exist in the NQE cluster that have the
names gust,storm, and rain.
For jane to use all four NQE nodes as user fred, user fred must permit
jane to execute under his account, so fred must have a .rhosts file in his
home directory on each of the four nodes.
By default, job output will be returned from the NQS server to the workstation
host, snow, by either FTA or rcp. (FTA is the default.) User jane must allow
fred to return output to her at the workstation host, snow. User fred must
have write permission to the directory in which the output is returned.
•On the NQE client workstation snow,~jane/.rhosts would contain:
rain fred (lets rain return output to snow)
gust fred (lets gust return output to snow)
storm fred (lets storm return output to snow)
wind fred (lets wind return output to snow)
Note: These entries are required only if rcp is the output mechanism;
also, these entries need to be in the .rhosts file. rcp does not use the
.nqshosts file.
On the NQE nodes, fred must have the following entry in his .rhosts file
(note that it is the same entry on each NQE node):
•On the NQE database node wind,~fred/.rhosts would contain:
snow jane (permits incoming requests)
•On node gust,~fred/.rhosts would contain:
snow jane (permits incoming requests)
36 SG–2148 3.3

Preparing to Use NQE [2]
•On node rain,~fred/.rhosts would contain:
snow jane (permits incoming requests)
•On node storm,~fred/.rhosts would contain:
snow jane (permits incoming requests)
Once the .rhosts files are in place, jane can submit a request to the NQE
database as fred. For example, jane could submit the request named testjob
as user fred by using either the NQE GUI or the command line interface. If
she uses the command line interface, she would enter the following command:
cqsub -d nqedb -u fred testjob
Once a target system is selected, the LWS on that node authenticates user jane.
FTA may require a password for the destination host (NQE client snow) and
user (user jane at host snow), which can be supplied by creating a .netrc file
in the login directory of user jane on host wind (~jane/.netrc on wind).
(For further information, see the netrc(5) man page).
In this example of alternative user names, the job request ran as user fred and
it will be user fred trying to return the output back to user jane on host
snow. The .netrc file must then be in ~fred/.netrc on rain (if it is
executed there) and contain jane’s password on snow.
FTA can also be configured so that jane will not have to supply a password.
This configuration in FTA is called network peer-to-peer authorization (NPPA).
Check with your system administrator to see if this option is available.
rcp is used only to return output if FTA fails immediately to return the output.
rcp requires a .rhosts file at the destination host in the recipient’s home
directory (~jane/.rhosts on host snow).
Figure 9 shows how the file validation scenario looks:
SG–2148 3.3 37

NQE User’s Guide
LWS
User Name: fred
~fred/.rhosts entry:
snow jane LWS
User Name: fred
~fred/.rhosts entry:
snow jane
NQE scheduler
User Name: fred
~fred/.rhosts entry:
snow jane
LWS
User Name: fred
~fred/.rhosts entry:
snow jane
NQE database
LWS
Client workstation snow
User Name: jane
~jane/.rhosts entries:
rain fred
gust fred
storm fred
wind fred
(Incoming request)
(Output return) a11587
Node storm
Node wind Node gust
Node rain
Figure 9. Submitting Request to the NQE Database on Multiple-node NQE Using an Alternative User Name
38 SG–2148 3.3

Preparing to Use NQE [2]
2.8.5 Using an Alternative User Name When Submitting a Request to NQS_SERVER on a Multiple-node
NQE Using the NLB
By default, NQE expects that you have the same user name on your
workstation as on your NQS server node. However, you can submit requests to
execute under an alternative user name.
In this example, user jane is using the NQE GUI or NQE client commands on
workstation snow and her NQS_SERVER is rain. User jane wants to submit
requests to NQS_SERVER rain as user fred.
In this example, three other NQE nodes exist in the NQE cluster that have the
names gust,storm, and wind.
For jane to use all four NQE nodes as user fred, user fred must permit
jane to execute under his account, so fred must have a .rhosts file in his
home directory on each of the four nodes.
By default, job output will be returned from the NQS server to the workstation
host, snow, by either FTA or rcp. (FTA is the default.) User jane must allow
fred to return output to her at the workstation host, snow. User fred must
have write permission to the directory in which the output is returned.
•On the NQE client workstation snow,~jane/.rhosts would contain:
rain fred (lets rain return output to snow)
gust fred (lets gust return output to snow)
storm fred (lets storm return output to snow)
wind fred (lets wind return output to snow)
Note: These entries are required only if rcp is the output mechanism;
also, these entries need to be in the .rhosts file. rcp does not use the
.nqshosts file.
•By default, on rain, user jane must have an account to permit the
incoming request, and user fred must permit jane to execute under his
account. To allow this to occur, the following is required by NQS on rain:
~jane/.rhosts: snow jane
~fred/.rhosts: rain jane
•On node gust,~fred/.rhosts must contain:
rain fred (accepts requests from rain)
SG–2148 3.3 39

NQE User’s Guide
•On node wind,~fred/.rhosts must contain:
rain fred (accepts requests from rain)
•On node storm,~fred/.rhosts must contain:
rain fred (accepts requests from rain)
Once the .rhosts files are in place, jane can submit a request to her
NQS_SERVER rain as fred. For example, jane could submit the request
named testjob as user fred by using either the NQE GUI or the command
line interface. If she uses the command line interface, she would enter the
following command:
cqsub -d nqs -u fred testjob
FTA may require a password for the destination host (NQE client snow) and
user (user jane at host snow), which can be supplied by creating a .netrc file
in the login directory of user jane on host rain (~jane/.netrc on rain).
(For further information, see the netrc(5) man page.)
In this example of alternative user names, the job request ran as user fred and
it will be user fred trying to return the output back to user jane on host
snow. The .netrc file must then be in ~fred/.netrc on rain (if it is
executed there) and contain jane’s password on snow.
FTA can also be configured so that jane will not have to supply a password.
This configuration in FTA is called network peer-to-peer authorization (NPPA).
Check with your system administrator to see if this option is available.
rcp is used only to return output if FTA fails immediately to return the output.
rcp requires a .rhosts file at the destination host in the recipient’s home
directory (~jane/.rhosts on host snow).
Figure 10 shows how the file validation scenario looks:
40 SG–2148 3.3

Preparing to Use NQE [2]
User Name: fred
~fred/.rhosts entry:
rain fred
User Name: fred
~fred/.rhosts entry:
rain fred
User Name: fred
~fred/.rhosts entry:
rain fred
User Name: fred
~fred/.rhosts entry:
rain jane
Client workstation snow
User Name: jane
NQS_SERVER: rain
~jane/.rhosts entries:
rain fred
gust fred
storm fred
wind fred
(Incoming request)
(Output return)
User Name: jane
~jane/.rhosts entry:
snow jane
a11588
Node storm
Node wind Node gust
Node rain
Figure 10. Submitting Request to NQS_SERVER on Multiple-node NQE Using an Alternative User Name
SG–2148 3.3 41

Creating Batch Requests [3]
This chapter describes how you can create batch requests. The following topics
are covered:
•What batch requests are (Section 3.1, page 43)
•Creating requests (Section 3.2, page 43)
•Deciding what to include (Section 3.3, page 45)
•Specifying options within requests (Section 3.4, page 45)
Note: To use NQE, you must ensure that environment variables are set as
described in Chapter 2, page 21. You also must ensure that NQS
validation and NQE database authorization requirements are met as
described in Chapter 2, page 21.
3.1 What Are Batch Requests?
Abatch request is a set of commands submitted to NQE for execution. The
request is executed independently of any interactive terminal connection. The
batch request is essentially a shell script, but it also can include directions to
NQS, file transfer requests, and even your programs.
NQS directives are request submission options that tell NQS how to process
your request. They have the same format as cqsub options, except that they
are preceded by the string #QSUB. See Section 3.4, page 45, for a description of
NQS directives.
3.2 Creating Requests
You can create a batch request in one of the following ways:
•Put the commands in a file, which is called a shell script. You can submit the
file by using the NQE GUI Submit window, the cqsub command, or the
qsub command.
•Enter your commands in the job edit area of the NQE GUI Submit window,
and let NQE create the request from these commands.
SG–2148 3.3 43

NQE User’s Guide
•Enter your commands at your terminal login prompt, and let NQE create
the request from these commands.
The method that you use depends on the purpose of your request. Batch
requests often contain work that you want to reproduce. You can put such
work in a file and submit it as often as necessary.
Many sites have templates for requests that set the correct parameters for users.
To see whether this is true, check with your support personnel.
To create and edit request files, use any UNIX editor (such as vi(1)). You can
name your files whatever you choose.
To enter commands in the job edit area of the NQE GUI Submit window, enter
the nqe command at your terminal prompt to invoke the NQE GUI, and click
on the Submit button (using the left mouse button). In the job edit area of the
Submit window, enter the commands, and then click on the Submit action
button that is located at the bottom of the window. For detailed information
about submitting requests, see Chapter 4, page 49.
To enter commands at your terminal login prompt, enter the cqsub or qsub
command without a batch request file name, enter the commands, and then
press CONTROL-d, as shown in the following example:
%cqsub
ls
date
CONTROL-d
Note: When using the command line interface, if you make an error halfway
through entering a request and do not find the error until after you have
started the next line, you cannot return and correct the error. To terminate
the cqsub command and start again, press CONTROL-c.
When you submit requests by entering commands in the job edit area of the
NQE GUI Submit window or at your terminal login prompt, NQS names them
STDIN. You can change the name of your request. If you use the NQE GUI,
select General Options of the Configure menu on the NQE GUI Submit
window. If you use the command line interface, use the cqsub -r or qsub -r
command.
If you check the request status, you will see the name of your request. The
name of your request also is used in your output file names. For more
44 SG–2148 3.3

Creating Batch Requests [3]
information about monitoring the status of your requests, see Chapter 10, page
137. For more information about output file names, see Section 6.1, page 107.
3.3 Deciding What to Include
Your batch request can contain any commands that you can enter when logged
in interactively. However, you should keep the following special considerations
in mind:
•Many factors participate in determining when your request executes.
Including NQS directives in a request can help you control these factors. See
Section 3.4, page 45, for a description of the NQS directives.
•You cannot provide input to commands that require an interactive response.
Do not put such commands in a batch request, unless you redirect standard
input.
•The UNIX shell used to execute NQS batch requests may not be the same as
your interactive login shell. Therefore, the results of batch request execution
may differ from interactive execution of the commands in the request file.
For more information on NQS and shells, see Section 5.3, page 94.
3.4 Specifying Request Options
You can specify options for your request in the following ways:
•If you use the command line interface, you specify cqsub or qsub
command options on the command line. You do not have to include the
directives in your batch request file, although you must reenter the options
each time you submit the request.
•If you use a batch request file, you can embed the options at the beginning
of the file. You must prefix these options by the string #QSUB; when they
are embedded in a batch request file, these options are referred to as NQS
directives.
Note: Options specified through the NQE GUI or command line interface
override embedded #QSUB NQS directives.
•If you use the NQE GUI, you can specify these options by using the Submit
window Configure menu options and then save them to be reused as
needed. You do not have to include the directives in your batch request file.
SG–2148 3.3 45

NQE User’s Guide
To save the request-related options, select Save Current Job Profile
on the Configure menu of the Submit window.
Specifying request-related options gives you the following benefits:
•You can avoid re-specifying options. Many of the options you specify are
always required by your request. It is more convenient to define these
options once by using the NQE GUI or by embedding them at the beginning
of your batch request file so that you do not have to enter them each time
you submit the request.
Examples of such options are as follows:
•You can override these options for unique cases. For example, you may
want to specify a time to submit your request during off-peak hours because
it less expensive at your site. You can do this in the following ways:
–Your request’s resource requirements (see Section 5.1, page 86)
–Specific request attributes, such as applications it uses (see Section 4.6,
page 60)
–Which shell to use (see Section 5.3, page 94)
–The name of a queue you want to use (see Section 5.4, page 96)
–Output file names and location (see Chapter 6, page 107)
–Requests for mail when specific events occur (see Section 4.11, page 69)
–Password prompting if NQS requires it (see Section 5.6, page 97)
–Another user name for request execution (see Section 5.8, page 99)
–If you use the command line interface, use the -a option on the cqsub
or qsub command line. Options you change on the command line take
precedence over any options in the script file.
–If you use the NQE GUI, use the Submit window Configure menu
Run After option. Specify a different time, apply the change, and
submit your request. If you do not select Save Current Job Profile
on the Configure menu of the Submit window, your changes will not
be saved to be reused. Options you indicate on the Configure menu of
the Submit window take precedence over any options in the script file.
46 SG–2148 3.3

Creating Batch Requests [3]
If you embed options (NQS directives) in a request file, they must come before
the first executable line. Each directive must be on a separate line, and you
must prefix each line by the string #QSUB. The following example shows NQS
directives embedded in a request file to set the conditions indicated by the
comments:
#QSUB -eo #merge stdout and stderr
#QSUB -J m #append NQS job log to stdout
#QSUB -o "%fred@gale/nppa_latte:/home/gale/fred/eve.jjob.output"
#returnsstdout to fred as eve.jjob.output at the host gale
#QSUB -me #sends mail to submitter at completion
#QSUB #optional qsub delimiter
echo job start
date #prints date
rft -user eve -host nppa_latte -nopassword -function get jan.data nqs.data
#use FTA to transfer jan.data and name it nqs.data
cc loop.c -o prog.out #compile loop.c and name executable prog.out
./prog.out #execute prog.out
rm -f loop.c prog.out jan.data nqs.data #delete files
echo job complete
If you do not want to embed options (NQS directives) in a request file, use the
NQE GUI to select all request-related options. To save the options, select Save
Current Job Profile on the Configure menu of the Submit window. If
you have an existing file of options (job profile file), you can load the content of
that file to be used with your request by selecting Load New Job Profile on
the Configure menu of the Submit window.
SG–2148 3.3 47

Submitting Requests [4]
This chapter describes how to submit batch requests to NQS. It discusses the
following topics:
•Submitting batch requests:
–Using the NQE GUI to submit requests (Section 4.1.1, page 51)
–Using the command line interface to submit requests (Section 4.1.2, page
53)
•Using the NLB default queue for submitting requests (Section 4.2, page 55)
•Submitting a request to the NQE database:
–Specifying a database user name for your request (Section 4.3.1, page 56)
–Directing your request to the NQE database (Section 4.3.2, page 57)
•Using DCE/DFS when submitting requests to NQE (Section 4.4, page 57)
•Using security labels when submitting requests (Section 4.5, page 59)
–Security label for NQS requests submitted locally (Section 4.5.1, page 59)
–Security label for NQS submitted remotely (Section 4.5.2, page 60)
•Using request attributes:
–Setting request attributes (Section 4.6.1, page 61)
–Using request attributes with NQS (Section 4.6.2, page 62)
–Using request attributes with the NLB (Section 4.6.3, page 62)
–Using request attributes with the NQE scheduler (Section 4.6.4, page 62)
•Successful submissions:
–Successful submission to NQS (Section 4.7.1, page 63)
–Successful submissions to the NQE database (Section 4.7.2, page 64)
•Suppressing informational messages (Section 4.8, page 64)
•Unsuccessful submissions
SG–2148 3.3 49

NQE User’s Guide
–Unsuccessful submissions to NQS (Section 4.9.1, page 65)
–Unsuccessful submissions to the NQE database (Section 4.9.2, page 66)
•NQS system limits (Section 4.10, page 67)
•Using NQS mail (Section 4.11, page 69)
•Accessing data files (Section 4.12, page 73)
•Obtaining job accounting (Section 4.13, page 75)
•NQS error messages (Section 4.14, page 77)
•Recovery and restart (Section 4.15, page 78)
•Using the request /tmp directory (Section 4.16, page 82)
This chapter describes simple request submission; however, over 40 options are
available. Generally, you will use some of these options to customize your
request so that it executes most effectively.
See Chapter 5, page 85, for a description of commonly used options; Section 5.8,
page 99, describes how to specify that a request be run under another user’s
name.
See Chapter 7, page 113, for a description of how you can communicate with
your request while it is executing. See Chapter 6, page 107, for a description of
how output files are returned to you and the options you have to control their
location and content.
You also can submit DCE work when using NQE; for specific information, see
Section 4.4, page 57.
You can submit a request by using either the NQE graphical user interface (GUI)
or the command line interface commands cqsub or qsub. For a summary of
the NQE GUI options, see the nqe(1) man page. For a full description of the
cqsub and qsub command options, see the cqsub(1) and qsub(1) man pages.
You can submit a request to either NQS or to the NQE database. By default,
your request is submitted to NQS. To submit your request to the NQE database,
see Section 4.3, page 56.
Note: To use NQE, you must ensure that environment variables are set as
described in Chapter 2, page 21. You also must ensure that validation and
NQE database authorization requirements are in place as described in
Chapter 2, page 21.
50 SG–2148 3.3

Submitting Requests [4]
4.1 Submitting Batch Requests
Your system administrator defines the default NQS and NQE database servers
and whether your requests will be directed, by default, to NQS or to the NQE
database. You can use the default servers and destination, or you can override
them.
You can submit requests from your client in the following ways:
•Use the NQE GUI Submit window (to invoke the NQE GUI, execute the
nqe command).
•Use the command line interface cqsub options command.
•Use the command line interface qsub options command.
How you override a default node or destination depends on how you submit
your request. The following sections describe how to submit requests, including
how to override these defaults.
Note: If you submit a request file as a batch request, after you successfully
submit it, you can modify the original file without affecting the request that
was submitted.
When you submit a request to NQS, and the UNICOS multilevel security (MLS)
feature or UNICOS/mk security enhancements are enabled on a remote system,
you cannot submit the request to a remote host if that remote host has a
workstation access list (WAL) entry for the host of origin that restricts your
access to NQS services.
If your NQS requests are on a system that has the UNICOS MLS feature or
UNICOS/mk security enhancements enabled, you should execute within your
security environment, as defined in the user database (UDB) and the network
access list (NAL). See Section 4.5, page 59, for more information.
4.1.1 Using the NQE GUI to Submit Requests
To submit a request to NQE, access the NQE GUI by entering the nqe command.
The initial NQE GUI button bar window will appear (as shown in Figure 5,
page 12). Using the left mouse button, click once on the Submit button.
Note: The mouse button settings described in this guide are the default
settings.
The following Submit window will appear:
SG–2148 3.3 51
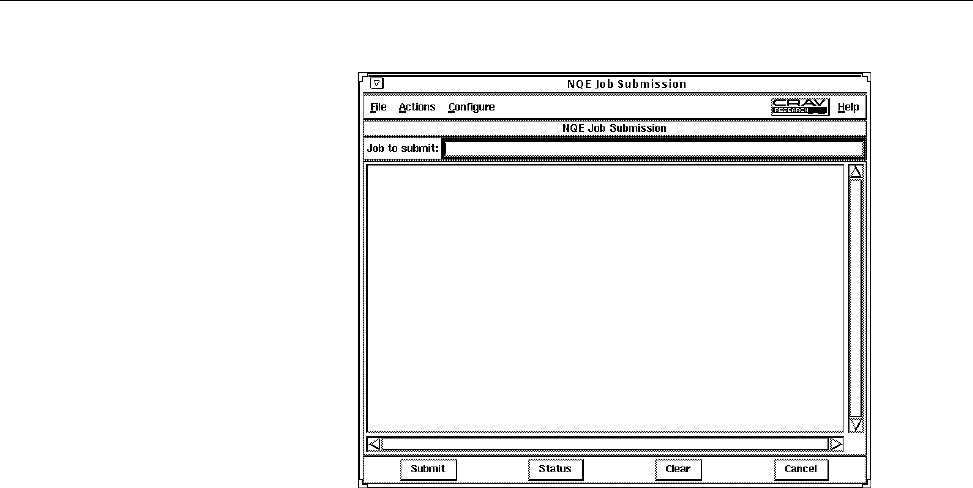
NQE User’s Guide
a10282
Figure 11. NQE GUI Submit Window
The Submit window is composed of four sections: the menu bar, the Job to
submit: line (the job script file), the job edit area, and the actions button bar.
To submit an existing job script file, do the following:
•Either enter the path name of the request file on the Job to submit: line
and press the RETURN key, or select Open from the File menu (the Open
option uses a standard Motif file selection interface) and select the request
file you want to submit. The request file text appears in the job edit area
below the Job to submit line.
You can modify the content of your request file in the job edit area of the
Submit window. To save changes for future use, select Save or Save As
on the File menu.
•You can submit a request directly to NQS or to the NQE database. To set the
destination for your request, select either the Submit to NQE or Submit
to NQS on the General Options menu, and apply the change. If you do
not select this option, the value of the NQE_DEST_TYPE environment
variable is used, which you can set to be either nqs or nqedb; otherwise,
the value of NQE_DEST_TYPE that is set in the /etc/nqeinfo file on your
NQS_SERVER is used.
52 SG–2148 3.3

Submitting Requests [4]
For additional information about customizing your environment by setting
specific environment variables, see Chapter 5, page 85.
For information about using the NLB and default queue when submitting a
request to NQS, see Section 4.2, page 55.
For information about submitting a request to the NQE database, see Section
4.3, page 56.
For information about using request attributes when submitting a request,
see Section 4.6, page 60.
For information about output options you may want to set before you
submit a request, see Chapter 6, page 107.
•If your request will run on a host that uses password validation, use the
Actions menu to enter your password.
•To submit the request file, click on the Submit button that is located at the
bottom of the Submit window.
If your request is submitted successfully, you will receive a message similar
to one of the following messages:
–For requests submitted to NQS, you will receive the following message:
Request number.host submitted to queue:queue.
–For requests submitted to the NQE database, you will receive the
following message:
Task id tnumber inserted into database nqedb.
For more information about messages received after submitting a request,
see Section 4.7, page 63, and Section 4.9, page 65. For information about
suppressing this message, see Section 4.8, page 64.
To cancel the Submit window, click on the Cancel button that is located at the
bottom of the Submit window.
4.1.2 Using the Command Line Interface to Submit Requests
To use the command line interface to submit a batch request to NQE, use the
cqsub or qsub command. For a complete list of the cqsub and qsub
command options, see the cqsub(1) and qsub(1) man pages.
SG–2148 3.3 53

NQE User’s Guide
Simple forms of the cqsub and qsub commands are as follows:
cqsub [file]
qsub [file]
The file argument is the name of the job script file to be submitted to NQE for
execution.
To submit a request directly to NQS, use the cqsub or qsub command. To
submit a request to the NQE database and scheduler, you can use only the
cqsub command. To set the destination for your request, use the -d dest_type
option; dest_type can be nqs or nqedb. If you do not use the -d dest_type
option, the value of the NQE_DEST_TYPE environment variable is used, which
you can set to be either nqs or nqedb; otherwise, the value of NQE_DEST_TYPE
that is set in the /etc/nqeinfo file on your NQS_SERVER is used.
For more information about customizing your environment by setting specific
environment variables, see Chapter 5, page 85.
For information about using the NLB and default queue when submitting a
request to NQS, see Section 4.2, page 55.
For information about submitting a request to the NQE database, see Section
4.3, page 56.
For information about using request attributes when submitting a request, see
Section 4.6, page 60.
For information about output options you may want to set before you submit a
request, see Chapter 6, page 107.
If your request is submitted successfully, you will receive a message similar to
one of the following messages:
•For requests submitted to NQS, you will receive the following message:
Request number.host submitted to queue:queue.
•For requests submitted to the NQE database, you will receive the following
message:
Task id tnumber inserted into database nqedb.
For more information about messages received after submitting a request,
see Section 4.7, page 63, and Section 4.9, page 65. For information about
suppressing this message, see Section 4.8, page 64.
54 SG–2148 3.3

Submitting Requests [4]
After you issue the cqsub or qsub command, the normal shell prompt
appears. You can continue using this session for other purposes. Or, if you
want, you can log off. Your request will execute if you are not logged on.
4.2 Using the NLB Default Queue for Submitting Requests
The NLB lets NQE balance the workload of requests across multiple NQS
servers. This process is called load balancing. To use load balancing, you must
submit requests to the destination-selection queue nqenlb, which is the system
default destination-selection queue (but may be configured differently for your
site). Usually, an NLB pipe queue named nqenlb exists on each NQS server
node.
You can let NQS select a queue for you, or you can specify a queue in which
you know you want your request to execute. If you do not specify a queue,
NQS initially sends your request to a default queue. The default queue is
usually a destination-selection queue. The queue nqenlb is the system default
destination-selection queue (but may be configured differently for your site).
When you submit a request to a destination-selection queue, NQS queries the
NLB to find the most appropriate batch queue to receive the request, based on
site-defined policies. The NLB returns a list of the most appropriate queues.
The list is ordered beginning with the most appropriate queue choice.
NQS tries to forward the request to the first queue on the list and continues
until the request is accepted or until the list is exhausted.
If your site uses file validation, you must have an .rhosts or .nqshosts file
on each system to which a request may be load-balanced. If you receive the No
account authorization at transaction peer message, you probably must edit your
validation files. For more information on validation, see Chapter 2, page 21.
The following example submits a request to be load-balanced when the default
queue is a destination-selection queue:
cqsub jobfile1
The jobfile1 file is submitted to NQS, which queries the NLB and then
forwards it to a batch queue.
To determine the name of a destination-selection queue, use the cqstatl -p
or qstatl -p command. If nothing is listed in the DESTINATIONS column,
the queue is a destination-selection queue.
You might not have a default queue; to specify one, see Section 4.9, page 65.
SG–2148 3.3 55

NQE User’s Guide
4.3 Submitting a Request to the NQE Database
A request submitted to the NQE database is called a task, and it is assigned a
unique task identifier (tid). When you submit a request to the NQE database,
the NQE database works with an administrator-defined NQE scheduler to
analyze all aspects of your request and determine which NQS server node will
receive and process the request.
When the NQE scheduler has chosen a node for your request, the NQE database
sends a copy of the request to the batch queue (by default) on the selected NQS
server node. The default batch queue is usually named nqebatch. The request
is assigned an NQS request identifier (requestid) and is executed.
Because the original request remains in the NQE database, using the NQE
database provides a cluster-wide job rerun capability. If the cluster rerun
feature is enabled on your NQE cluster, and if a problem occurs during
execution and the copy of the request is lost, a new copy can be submitted.
Your system administrator can modify the NQE scheduler to better meet user
requirements and system use needs. For example, the scheduler could be
modified so that you could indicate a certain amount of CPU units for your
request, and the scheduler can interpret units differently by machine types in
your group of NQS server nodes in the NQE cluster.
4.3.1 Specifying a Database User Name for Your Request
To submit a request to the NQE database, to control a request that was sent to
the NQE database, or to get a status of a request that is in the NQE database,
you must have a database user dbuser account (name) with the proper
authorization (user privileges). This database user name may be the same as or
different from your UNIX or UNICOS login on the client host. Your NQE
administrator controls who has access to the database and from which client
host.
If the database user name is different from your local client’s login name, you
must supply the database user name on each of your client requests.
Note: To delete, to send a signal to, or to get a status of a request, you must
have the same database user name that was used to submit the request to the
NQE database.
Specify the database user name in the following ways:
•If you use the NQE GUI, select the General Options menu in the Submit
window and enter the name in the User Name option field.
56 SG–2148 3.3

Submitting Requests [4]
•If you use the command line interface, use the -u dbuser= command
option of the cqsub command. An example follows:
cqsub -u dbuser=henry job
•Set the NQEDB_USER environment variable. An example follows:
setenv NQEDB_USER henry
To specify that a request be run under another user’s name, see Section 5.8,
page 99.
4.3.2 Directing Your Request to the NQE Database
To specify that you want your request to the NQE database, you may use one
of the following three methods:
•Set the NQE_DEST_TYPE environment variable. An example follows:
setenv NQE_DEST_TYPE nqedb
•If you use the NQE GUI, select the General Options menu in the Submit
window. Select Submit to NQE and apply your change.
Note: If you have set the NQE_DEST_TYPE environment variable to be
nqedb, you do not need to select the Submit to NQE option. The
selected NQE GUI option overrides the NQE_DEST_TYPE environment
variable or the etc/nqeinfo file variable setting.
•If you use the command line interface, use the -d dest_type command option
of the cqsub command, and specify nqedb as the dest_type (destination
type). An example follows:
cqsub -d nqedb job
Note: If you have set the NQE_DEST_TYPE environment variable to be
nqedb, do not use the -d dest_type option on the command line. The
command line option overrides the NQE_DEST_TYPE environment
variable or the etc/nqeinfo file variable setting.
4.4 Using DCE/DFS When Submitting Requests to NQE
When using the Distributed Computing Environment/Distributed File Service
(DCE/DFS) to submit requests to NQE, you should note the following:
SG–2148 3.3 57

NQE User’s Guide
•The NQE DCE/DFS feature is restricted to operating within a single DCE
cell.
•Ticket forwarding is dependent upon the use of the NQE database when
submitting tasks. If ticket forwarding is not supported, you must provide a
password with the job request if DCE credentials are desired.
•Support for tasks that use forwarded tickets for DCE authentication is
provided only on UNICOS, UNICOS/mk, IRIX, and Solaris platforms.
Support for tasks that use a password for DCE authentication is available on
all NQE 3.3 (or later) platforms. Tickets may be forwarded from any NQE
3.3 (or later) client to any NQE 3.3 (or later) server that supports forwarded
tickets as a means of DCE authentication. (Ticket forwarding for either
clients or servers is not supported for the Digital UNIX platform in the NQE
3.3 release.)
•NQE supports only the Open Software Foundation (OSF) DCE version 1.1.
•Kerberos is the authentication component of DCE.
•The user password supplied must be the same for both UNIX or UNICOS
and the DCE registry password for that user. A user may provide a different
DCE registry user name when submitting a request by using the
Submit->General Options->User Name field or by using the cqsub
-u or qsub -u command. The user password cannot contain more than 8
characters.
•Your home directory can be within DFS space on both UNIX and UNICOS
platforms. The request script file can be within DFS space.
•NQS supports DFS path name formats so request output files can be
returned to DFS. For information about DFS support for output files, see
Chapter 6, page 107.
•After a request completes, NQS uses kdestroy to destroy any credentials
obtained by NQS on behalf of the request owner.
On UNIX platforms, there is not an integrated login system feature
available. NQS on UNIX platforms obtains separate DCE credentials for
request output return. Therefore, including a kdestroy within a request
script file running on an NQE UNIX server will not affect the return of
request output files into DFS space.
!
Caution: Including the kdestroy command within a request script file
on UNICOS systems will destroy the credentials obtained by NQS and
prevent NQS from returning request output files into DFS space.
58 SG–2148 3.3

Submitting Requests [4]
•Failure to obtain DCE credentials results in a nonfatal error. The request will
be initiated even if the attempt to obtain DCE credentials for the request
owner fails. If DCE credentials are successfully obtained, the KRB5CCNAME
environment variable is set within the request process that is initiated.
You can use the klist command within a request script file to verify that
DCE credentials were obtained.
Note: A restarted job correctly gets the new credentials obtained from
NQS, but the KRB5CCNAME environment variable within the restart file is
not reset to the new cache file name. After the job is restarted, a klist
within the job script will incorrectly state that there are no credentials. As
a result, DCE services are affected but not DFS, which continues to work
with the new credentials.
4.5 Using Security Labels When Submitting Requests
If you have NQS requests that are on a system that has the UNICOS multilevel
security (MLS) feature or UNICOS/mk security enhancements enabled, you
must execute requests within your security environment as defined in the user
database (UDB) and the network access list (NAL). This security environment
remains the same for the duration of the request; that is, you cannot place the
setucmp(1) or setulvl(1) command in the NQS request to change the
environment. The request’s security label is determined by your active security
label or is set as specified by using either the cqsub -L or qsub -L command
or the cqsub -C or qsub -C command, or by selecting the NQE GUI
General Options option on the Configure menu of the Submit window.
To specify the active security level of the request, use the -L option; to specify
compartments that must be a superset of your active compartments, use the -C
option.
This section describes how security labels are determined when you submit
NQS requests locally and remotely.
4.5.1 Security Label for NQS Requests Submitted Locally
The security label of a locally submitted NQS request is determined as follows:
•If you submit the request by using the cqsub or qsub command or the NQE
GUI Submit window (without specifying the -L or -C option), the request
is assigned your active security label when cqsub or qsub executes.
SG–2148 3.3 59

NQE User’s Guide
•When using the cqsub -L or qsub -L command or specifying an active
security level in the General Options window, if you specify a security
level lower than your active security level, the request is not queued.
•When using the cqsub -C or qsub -C command or specifying an active
security compartment in the General Options window, the request is
assigned any compartments specified by the command. The specified
compartments must be part of your authorized set and must dominate your
active compartment set.
In the following example, the user tries to submit a request that has a security
level of 0; the active security level is 1. The job is not queued.
$setulvl 1
setulvl: New security label is
Level[1:level1] Compartments[none]
$qsub -L 0 -eo -o nqs.out request.file
Unanticipated transaction failure at local host.
4.5.2 Security Label for NQS Requests Submitted Remotely
The security label of a remotely submitted NQS request is determined as
follows:
•If you submit the request by using the cqsub or qsub command or the
NQE GUI Submit window (without specifying the -L or -C option), the
request is assigned your default security label as defined in the UDB.
•When using the cqsub -L or qsub -L command or specifying an active
security level in the General Options window, if you specify a security
level lower than your submission security level, the request is not executed.
•When using the cqsub -C or qsub -C command or specifying an active
security compartment in the General Options window, the request is
assigned any compartments specified by the command. The specified
compartments must be part of your authorized set and must be a superset
of your submission compartment set.
4.6 Using Request Attributes
Request attributes are ASCII strings that are to be associated with your request
and may be interpreted by the NQE scheduler, the NLB, or NQS.
60 SG–2148 3.3

Submitting Requests [4]
You may specify zero or more request attributes when submitting a request.
To provide a more efficient or site-specific scheduling, your NQE administrator
can configure the NQE database, the NLB, and NQS to interpret the attribute
names (and values). This section describes using request attributes.
4.6.1 Setting Request Attributes
Attributes have the following format:
attribute_name [=value][,attribute_name [=value]
You can set request attributes in the following ways:
•In the NQE GUI by selecting General Options on the Configure menu
of the Submit window. Enter the desired attributes (for example nastran),
and apply your changes and cancel the window. To save the changes, select
Save Current Job Profile on the Configure menu of the Submit
window.
•On a cqsub command line by using the -la option. An example follows:
cqsub -la "nastran" jobfile
•For a request being submitted to the NQE database, an example follows:
cqsub -d nqedb -la "nastran=2" jobfile
The license attribute has the value 2. The attributes are stored in the NQE
database with other request information.
The NQE scheduler can use (or ignore) the attributes. If an attribute does
not have a value, only the attribute name is stored in the NQE database.
•In a request file by using the # QSUB -la option, as follows:
# QSUB -la guassian
•In an NQSATTR environment variable, as follows:
export NQSATTR="any_scalar_system"
cqsub jobfile
SG–2148 3.3 61

NQE User’s Guide
4.6.2 Using Request Attributes with NQS
You may specify a list of request attributes when you submit a request to NQS.
For example, the following submits the request with script jobfile to NQS
with the request attributes nastran and big:
cqsub -la "nastran,big" jobfile
If you use the NQE GUI to submit a request, select General Options of the
Configure menu in the Submit window. Enter the attributes in the
Attribute(s) field and apply your change.
Note: Your administrator can configure NQS pipe queues and batch queues
to reject or accept requests with certain attributes. This gives greater control
over the types of request run at a given time.
4.6.3 Using Request Attributes with the NLB
You may specify a list of request attributes when you submit a request to an
NLB queue in NQS. For example, the following submits the request with script
jobfile to the NLB queue, nqenlb, with the request attributes nastran and
big:
cqsub -q nqenlb -la "nastran,big" jobfile
If you use the NQE GUI to submit a request, select General Options of the
Configure menu in the Submit window. Enter the attributes in the
Attribute(s) field and apply your change.
NQS passes the request attributes to the NLB, which can return a list of
destinations based on the attributes as well as system load.
Note: If an attribute is not defined in NLB, NQS ignores it. No error message
is generated. If the attribute is defined but is not an integer type, NQS
generates a log message and the attribute is ignored.
4.6.4 Using Request Attributes with the NQE Scheduler
You may specify not only a list of request attributes but also values associated
with the attributes when submitting a request to the NQE database. For
example, the following offers an attribute called nastran and an attribute
called license, which has a value of 2:
cqsub -d nqedb -la "nastran,license=2" jobfile
62 SG–2148 3.3

Submitting Requests [4]
If you use the NQE GUI to submit a request, select General Options of the
Configure menu in the Submit window. Enter the attributes in the
Attribute(s) field and apply your change.
The license attribute has the value 2. The attributes are stored in the NQE
database with other request information.
The NQE scheduler can use (or ignore) the attributes. If an attribute does not
have a value, only the attribute name is stored in the NQE database.
Note: Request attributes with explicit values (such as license=2)are
completely ignored by both NQS and NLB.
4.7 Successful Submissions
After your request has been submitted successfully, you will receive a message;
the message you receive will depend on which destination you chose for your
request (NQS or NQE database). The following sections describe the message
you receive.
4.7.1 Successful Submissions to NQS
When your batch request has been submitted successfully to NQS, you will
receive one of the following messages:
Request number.host submitted to queue:queue.
nqs-181 qsub: INFO
Request number.host: Submitted to queue queue by username(userid).
This message tells you the following:
•Your request was submitted successfully. If your request cannot enter a
queue, you receive an error message.
•Your request received request identifier number.host. NQS assigns the unique
number in sequential order. The host is the name of the NQS server that
initially processes your request. You can use the request ID to locate or even
delete your request.
•Your request entered the specified queue. If you do not specify a queue name
(see Section 5.4, page 96), your request is submitted to a default queue.
From the default queue, your requests usually go to another queue.
SG–2148 3.3 63

NQE User’s Guide
•If you used the qsub command to submit your request, this message also
displays the username, which identifies the name of the NQS user who
initially submitted the request, and the userid, which identifies the user ID of
the NQS user who initially submitted the request.
In the following example, a submitted batch request is assigned a request ID of
255.coal, and it is sent to an NQS queue called nqenlb:
Request 255.coal submitted to queue: nqenlb.
In this example, the NQS server initially processing the request is called coal.
4.7.2 Successful Submissions to the NQE Database
When your batch request has been submitted successfully to the NQS database,
you will receive the following message:
Task id tnumber inserted into database nqedb.
This message tells you the following:
•Your request was submitted successfully into the database. If your request
cannot enter a queue, you receive an error message.
•Your request received task identifier tnumber. The NQE database assigns
the unique number in sequential order. You can use the task ID to locate or
even delete your request.
In the following example, a submitted batch request is assigned a task ID of t4,
and it is sent to the default NQE database, which is called nqedb:
Task id t4 inserted into database nqedb.
4.8 Suppressing Informational Messages
To suppress the informational message when you submit a request, do one of
the following:
•Use the NQE GUI Submit window and select General Options on the
Configure menu. Ensure the Submit Silently option is selected, and
apply your change (click on the Apply button) if you need to select it. To
save your changes, select Save Current Job Profile on the
Configure menu.
•Use the cqsub -z or the qsub -z command.
64 SG–2148 3.3

Submitting Requests [4]
After you issue the cqsub or qsub command, the usual shell prompt for
your session appears. You can continue using this session for other
purposes. Or, if you want, you can log off (the request does not require you
to be logged on to execute).
Note: NQS copies the file when you submit it and uses this copy as the
batch request. After you have successfully submitted a file as a batch
request, you can modify the original file without affecting the submitted
request.
4.9 Unsuccessful Submissions
If your request is not submitted successfully, you receive an error message that
describes the problem. The message you receive will depend on which
destination you chose for your request (NQS or NQE database). The following
sections describe the message you receive.
For more information about solving problems with request submissions, see
Chapter 16, page 223.
4.9.1 Unsuccessful Submissions to NQS
Common reasons for unsuccessful submission to NQS are as follows:
•NQS is not executing. You may receive a message such as the following:
Retrying connection to NQS_SERVER host ice (111.111.11.11) ...
Retrying connection to NQS_SERVER on host ice (111.111.11.11) ...
QUESRV:ERROR: Failed to connnect to NQS_SERVER at ice
NETWORK:ERROR: NQS network daemon not responding.
For further advice, contact your local system support staff.
•No default NQS queue is defined. You may receive one of the following
messages:
CQSUB:ERROR: Failed to submit request to default queue at server ice.
QUESRV: ERROR: No default queue is defined at transaction peer.
nqs-1019 qsub: CAUTION
No request queue specified, and no local default has been defined.
nqs-1045 qsub: WARNING
Request not queued.
SG–2148 3.3 65

NQE User’s Guide
To define a default queue, do one of the following actions:
–Ask your NQE administrator to define a default queue.
–Define your own default queue by setting the QSUB_QUEUE environment
variable, depending on the shell you are using, as follows:
Users of csh or tcsh can use the following command:
setenv QSUB_QUEUE queue-name
To obtain a list of queue names, use the cqstatl command.
To change an environment variable, you can use the unset command if
you are using the sh or ksh shell, or the unsetenv command if you are
using the csh or tcsh shell.
–Alternatively, you can explicitly specify a queue by using the NQE GUI
or the command line interface (cqsub -q or qsub -q command). You
can use the -q option only to specify a queue that your NQE
administrator has defined as being able to accept requests directly.
For more information, see Section 5.4, page 96.
•Access denied at local host. Your NQE administrator can define queues so
that they cannot accept requests directly. If this has been done for the queue
you specify, your request will be rejected.
4.9.2 Unsuccessful Submissions to the NQE Database
If you are using a client command to talk to the NQE database, and the database
server is not up or does not exist, you will see a message such as the following:
Connect: Connection refused
NETWORK: ERROR: NQE Database connection failure:
Can’t connect to MSQL server on Latte
A client trying to connect to the database without the proper validation will
result in an error such as the following:
latte$ cqstatl
NETWORK: ERROR: NQE Database connection failure:
Connection disallowed.
latte$
To determine why you cannot connect, check with your database administrator.
66 SG–2148 3.3

Submitting Requests [4]
4.10 NQS System Limits
Your NQE system administrator can set limits on the NQS system that constrain
the maximum number of requests that can be processed concurrently. NQS
system limits are important to you because they may affect when (or if) your
request will run. For example, if you submit five requests in succession, the last
requests probably will not execute immediately because you have exceeded a
user run limit.
NQS limits are set on individual queues, queue complexes, and the entire NQS
system on a server. A queue complex is a set of local batch queues grouped by
the NQE system administrator to simplify NQE administration. Each queue
complex can have the same set of limits that a single batch queue can have.
global limits restrict the whole NQS system on a host.
Your NQE administrator can set the limits shown in Table 1 on individual
queues, queue complexes, and on the NQS system as a whole.
Table 1. NQS Limits
Limit
Status
subcodes Description
Run qr cr gr The number of requests that can execute
concurrently (regardless of their owner or
group) in a queue (qr), in a complex (cr), or
on this NQS server (gr).
When a queue reaches its run limit (requests
will have the substatus qr), requests are still
routed to the queue, but they remain queued
until the number of executing requests falls
below the limit.
User qu cu gu The maximum number of requests a
particular user can execute at the same time in
a queue (qu), in a complex (cu), or on this
NQS server (gu).
Group qg cg gg The maximum number of requests that users
of a particular group can execute at the same
time in a queue (qg), in a complex (cg), or on
this NQS server (gg).
SG–2148 3.3 67

NQE User’s Guide
Limit
Status
subcodes Description
Memory qm cm gm The maximum total amount of memory
available to all requests executing
concurrently in a queue (qm), in a complex
(cm), or on this NQS server (gm).
MPP
processing
elements
qe ce ge The maximum number of MPP processing
elements (PEs) that can be requested by all
requests executing concurrently in a queue
(qe), in a complex (ce), or on this NQS server
(ge).
Quickfile limit qq cq gq The maximum number of secondary data
segments that can be requested by all requests
executing concurrently in a queue (qq), in a
complex (cq), or on this NQS server (gq).
68 SG–2148 3.3

Submitting Requests [4]
To display the current limits, use the commands in Table 2:
Table 2. Commands to Display Limits
Type Command Description of display
Queue cqstatl -l or
qstat -l
Summary of batch queue limits;
information can be obtained only if the
command is issued to NQS. For an
example of this display, see Section 11.3,
page 165.
Queue cqstatl -f or
qstat -f
Details of all queues; information can be
obtained only if the command is issued
to NQS. Look at the areas RUN LIMITS
and RESOURCE USAGE. For an example
of this display, see Section 11.2, page 159.
Complex qstat -L Summary of queue complex limits. This
command works only when you are
logged on interactively to your NQS
server. To see a list of queue complexes
on the server, use qstat -c; this
command works only when you are
logged on interactively to your NQS
server.
System qmgr show
global_parameters
Global limits for your NQS server. This
command works only when you are
logged on interactively to your NQS
server.
4.11 Using NQS Mail
If you have long jobs that take several hours or more to execute, you can have
the system notify you when the request starts and/or completes execution. By
default, the mail messages are sent to the user name under which you were
logged in when you submitted the request.
SG–2148 3.3 69

NQE User’s Guide
Note: Mail is sent only by NQS. For requests submitted to the NQE database,
any mail requested is sent by the NQS running the copy of the request. If the
cluster rerun feature is enabled on your NQE cluster, it is possible that you
will receive multiple mail messages if the request is scheduled more than
once because the NQE scheduler performs network cluster rerun.
To specify that you want to receive mail when your request is routed from a
pipe queue, when it begins execution, and when it finishes execution, do one of
the following:
•Use the NQE GUI Submit window and select Mail Options on the
Configure menu. Ensure the Mail when Job is Routed,Mail at
Start of Job, and Mail at End of Job options are selected, and
apply your changes (click on the Apply button) if you need to select any of
the options. To save your changes, use the Save Current Job Profile
option.
•Use the cqsub -mt -mb -me command.
•Use the qsub -mt -mb -me command.
If you use these options, mail from NQS would appear as follows in your mail
queue (this example is from elm (1)):
N 46 Oct 12 ice_root (27) NQS request: 59.ice delivered.
N 47 Oct 12 ice_root (27) NQS request: 59.ice beginning.
N 48 Oct 12 ice_root (36) NQS request: 59.ice ended.
The mail that informs you that your request has been routed from a pipe queue
would be similar to the following:
Subject: NQS request: 59.ice delivered.
Message concerning NQS request: 59.ice delivered.
Request name: job2
Request owner: jane
Mail sent at: 09:01:55 CDT
Request sent to local queue destination.
Job log follows:
10/12 09:01:53 Arrived in <nqenlb@ice> from <ice>.
10/12 09:01:54 Arrived in <nqebatch@ice> from <nqenlb@ice>.
10/12 09:01:55 Sending <delivered> mail to <jane>.
70 SG–2148 3.3

Submitting Requests [4]
The mail that informs you that your request has begun execution in a batch
queue would be similar to the following:
Subject: NQS request: 59.ice beginning.
Message concerning NQS request: 59.ice beginning.
Request name: job2
Request owner: jane
Mail sent at: 09:01:55 CDT
Job log follows:
10/12 09:01:53 Arrived in <nqenlb@ice> from <ice>.
10/12 09:01:54 Arrived in <nqebatch@ice> from <nqenlb@ice>.
10/12 09:01:55 Sending <delivered> mail to <jane>.
10/12 09:01:55 Sending <beginning> mail to <jane>.
The job log at the end of the message records that both mail messages were sent.
The mail that informs you that your request has completed execution in a batch
queue would be similar to the following:
Subject: NQS request: 59.ice ended.
Message concerning NQS request: 59.ice ended.
Request name: job2
Request owner: jane
Mail sent at: 09:02:01 CDT
Request exited normally.
_Exit() value was: 0.
Job log follows:
10/12 09:01:53 Arrived in <nqenlb@ice> from <ice>.
10/12 09:01:54 Arrived in <nqebatch@ice> from <nqenlb@ice>.
10/12 09:01:55 Sending <delivered> mail to <jane>.
10/12 09:01:55 Sending <beginning> mail to <jane>.
10/12 09:01:56 Started, pid=<1688>, jid=<1688>, shell=<>, umask=<18>.
10/12 09:01:56 Running in queue <nqebatch>.
10/12 09:01:59 Finished.
10/12 09:01:59 Returning stderr output file.
10/12 09:02:00 Returning stdout output file.
10/12 09:02:01 Sending <ended> mail to <jane>.
SG–2148 3.3 71

NQE User’s Guide
If the UNICOS MLS feature or UNICOS/mk security enhancements are enabled
on your system, you must have your current active label set appropriately to
read mail from NQS. If your request has not yet been initiated, mail is sent to
you at the job submission label. If your request has been initiated or has
completed execution, mail is sent to you at the job execution label.
To request mail when a request is rerun, do one of the following:
•Use the NQE GUI Submit window and select Mail Options on the
Configure menu. Ensure the Mail when Job is Rerun option is
selected, and apply your change (click on the Apply button) if you need to
select it. To save your changes, use the Save Current Job Profile
option.
•Use the cqsub -mr or qsub -mr command.
To request that mail be sent to an alternative user name, do one of the following:
•Use the NQE GUI Submit window and select Mail Options on the
Configure menu. Ensure the Mail User Name option is selected, and
apply your change (click on the Apply button) if you need to select it. To
save your changes, use the Save Current Job Profile option.
•Use the cqsub -mu username or qsub -mu username command. By default,
the mail messages are sent to the user name under which you were logged
in when you submitted the request.
For a full list of mail message options available through the command line
interface, see the cqsub(1) or qsub(1) man page.
If your request does not complete successfully, you receive either an error
message in the standard error file or a mail message that describes the problem.
The following example is the mail you will receive from NQS if your validation
is not set up correctly:
Message concerning NQS request: 32.latte deleted.
Request name: STDIN
Request owner: jane
Mail sent at: 17:31:45 CDT
Request could not be routed.
The job you submitted could not be routed to any destination.
Destinations may have been explicitly requested by you, chosen for you
by static pipe queue destinations, or chosen dynamically by the NQE
network load balancer.
72 SG–2148 3.3

Submitting Requests [4]
The most typical cause for this kind of problem is account validation.
Check that you have a valid account on the target NQS system(s), and
that you have an entry there in your .rhosts and/or .nqshosts files.
See the nqe man page and User Guide for additional information.
System administrators - Check that NQS MID’s (mainframe identifiers)
are correctly set up, so that client and server NQS systems know about
each other. Also, try the nlbpolicy command to look at all of the
possible target hosts for an nqs job, given current system load and
NQE policies. And in the nqs logfile, message nqs-527 also shows what
specific destinations were tried.
Request deleted.
Last destination queue attempted: <nqebatch@telltale>
Job log follows:
.
.
.
This message indicates that the problem probably will be a validation file error.
The job log at the end of the message, however, may indicate a different error.
You should try to interpret it before calling your local support personnel.
4.12 Accessing Data Files
Your batch request may have to access a data file on the system. For example,
you may want to compile a source program file or process a file of data. When
a request begins executing, the current directory is the home directory of the
user under whom the request is being executed (just as if that user had logged
in interactively).
For example, consider the following request, which is a standard shell script
that compiles and then executes a Fortran program called loop.f:
set -x # Echo commands
ja # Enable job accounting
date
cd loopdir # Move to directory where
# loop.f is stored
SG–2148 3.3 73

NQE User’s Guide
f90 -Zu loop.f # Compile program loop.f
date./a.out # Execute program a.out
date
rm loop.o a.out # Remove files
echo job complete
ja -csft # Report job accounting
# information and disable job
# accounting
The following two lines are taken from the preceding example. The first line
changes the request’s current directory to the directory in which loop.f is
stored; the second line compiles loop.f.
cd loopdir
f90 -Zu loop.f
Another method of accessing a data file is to embed it in the shell script as a
here document. A here document has the following form:
command << ’string’
lines of input
string
The lines of input could be commands or data supplied as standard input to
command. The string line defines the end of the lines of input.
The following example shows the compilation of a Fortran program that is
created as a here document, and then the subsequent executing of the program
by using data that also comes from a here document:
cat > test.f << ’DELIMIT’
PROGRAM ADD
C Read data file to get number of data points to read
C into an array; add them up and write out the sum
DIMENSION A(100)
REAL A, SUM
INTEGER N
OPEN (5, FILE= ’DATA’)
READ (5,1) N
1 FORMAT(I3)
DO 10, I=1,N
READ (5,2) A(I)
2 FORMAT (F 10.5)
10 CONTINUE
SUM=0.0
74 SG–2148 3.3

Submitting Requests [4]
DO 20, I=1,N
SUM=SUM + A(I)
20 CONTINUE
WRITE(6,3) N, SUM
3 FORMAT (’sum of the ’,I3,’numbers is ’, G15.5)
END
DELIMIT
cat > DATA << ’*EOF*’
5
10.0
20.0
30.0
40.0
50.0
f90 test.f./a.out
In the next example, the prog program is executed twice, using two different
sets of data:
prog << ’EOT’
2.2 8.9
EOT
prog << ’EOT’
8.6 123.4
EOT
4.13 Obtaining Job Accounting
If you are running UNICOS or UNICOS/mk, and your system or user profile
does not automatically enable job accounting, you can include ja(1) commands
within your batch request. The ja command provides information about the
resources used when your request executes. The ja command can take several
options and arguments, such as the name of a file to contain the report (the
default is $TMPDIR/.jacctxxxx;xxxx is the UNICOS or UNICOS/mk job
identifier). For a full description of the ja command, see the ja(1) man page.
In the following example script, the first ja command simply turns on job
accounting, writing the information to the default file. The second ja command
(with the -s option) writes a report to the standard output file when the script
file is executed. When the request completes execution, the contents of the
temporary directory $TMPDIR (including the .jacctxxxx file) are deleted
automatically.
SG–2148 3.3 75

NQE User’s Guide
ja
sleep 45
date
pwd
ls
ja -s
To view the job accounting report, you can examine the standard output file
produced by the execution of the request. For more information about a
request’s output files, see Chapter 6, page 107. The following output file shows
the report produced by running the preceding script. (If the request ran under
the C shell, a message written to the start of the output file indicates that the
normal C shell job control facilities were not available for this job because it
was run in batch mode, rather than from a terminal (tty).)
76 SG–2148 3.3

Submitting Requests [4]
Thu Feb 19 16:09:50 CST 1998
/u/snow
testjob
testjob.e11562
testjob.o11562
tutorial
Job Accounting - Summary Report
===============================
Job Accounting File Name : /tmp/jtmp.004076a/.jacct1093
Operating System : sn1234 xyz 9.2.1bm abc.1 CRAY C90
User Name (ID) : snow (10334)
Group Name (ID) : crazy (100)
Account Name (ID) : snow (10334)
Job ID : 1093
Report Starts : 02/19/98 16:09:04
Report Ends : 02/19/98 16:09:50
Elapsed Time : 46 Seconds
User CPU Time : 0.2327 Seconds
System CPU Time : 0.0791 Seconds
I/O Wait Time (Locked) : 0.0391 Seconds
I/O Wait Time (Unlocked) : 0.1485 Seconds
CPU Time Memory Integral : 0.0223 Mword-seconds
SDS Time Memory Integral : 0.0000 Mword-seconds
I/O Wait Time Memory Integral : 0.0027 Mword-seconds
Data Transferred : 0.1786 MWords
Maximum memory used : 0.2051 MWords
Logical I/O Requests : 87
Physical I/O Requests : 108
Number of Commands : 6
Billing Units : 0.4781
logout
4.14 Error Messages
If you are running UNICOS or UNICOS/mk, you may receive an NQS error
message while you are using NQS. The NQS user error messages have a group
code of nqs. To display the explanation of a message, use the explain(1)
command. For more information, see the explain(1) man page. The following
example shows NQS error messages and the use of the explain(1) command:
SG–2148 3.3 77

NQE User’s Guide
%qmsg -j -f msg_in 10
nqs-272 qmsg: WARNING
Error opening file <abc/u0/snow/msg_in>, errno = <13>.
nqs-20 qmsg: WARNING
Errno <13> = <Permission denied>.
%explain nqs272
Error opening file <file>, errno = <errno>.
NQS tried to use the open(2) system function to open file <file>,
but failed. The reason for the failure is identified by <errno>.
%explain nqs20
Errno <errno> = <error_desc>.
The specified error <errno> has an associated description of <error_desc>.
4.15 Recovery and Restart
Note: This functionality is available only on UNICOS, UNICOS/mk, and
IRIX systems.
If the operating system is shut down or crashes before the request completes
execution, you do not necessarily have to resubmit a batch request because
NQS has job recovery capabilities. NQS uses the operating system checkpoint
facilities, as follows:
•On UNICOS and UNICOS/mk systems, the chkpnt(2) and restart(2)
facilities are used. On IRIX systems, the cpr(2) facility is used.
•When the operating system or NQS is shut down, checkpoint images of all
executing requests can be written automatically to a restart file on disk.
When the system becomes available, NQS uses the checkpoint image to try
to restart each of the requests from the point they had reached in their
execution.
•When the operating system or NQS crashes, checkpoint images cannot be
written for the executing requests. However, you can include the
qchkpnt(1) command within a request to cause NQS to write a checkpoint
image of the request at particular points in its execution. When the system
becomes available after a crash, NQS tries to restart the request from the
latest checkpoint image.
•If a request has not yet begun execution at the time of the shutdown or
crash, or if no checkpoint image is available, the request remains in its NQS
queue and is executed from the start after the system becomes available.
78 SG–2148 3.3

Submitting Requests [4]
The following two sections describe how you can ensure that your requests take
advantage of these recovery facilities, or how to ensure that your request does
not use the facilities.
4.15.1 Checkpointing and Restarting
Acheckpoint image of a request is a copy of the request as it was executing at a
particular point in time. A request can be restarted from its checkpoint image,
rather than restarting the request from the beginning. If the MLS feature on
UNICOS is enabled on your system, however, a checkpointed job cannot be
restarted if the job execution label is no longer in the valid range for the job
owner and the host of origin.
Checkpoint images can be produced in the following ways:
•NQS automatically checkpoints NQS requests when an operator brings
down NQS or the operating system in an orderly manner.
•To protect against unscheduled interrupts, you can use the qchkpnt(1)
command within a request to write an image of the request to disk when it
is executing. This action is particularly appropriate if your request will
execute a long time and you are concerned about request recovery across
unscheduled interrupts (such as a power outage or a system crash).
In either case, when NQS resumes normal operation, it automatically uses the
latest checkpoint image to restart the request if the criteria listed in Section
4.15.3, page 80, are met.
To prevent a checkpoint image being written in either of the preceding
situations, use the -nc option of the cqsub or qsub command, or select the
NQE GUI Submit->Configure->General Options->Do not
checkpoint option.
To restart the request from a checkpoint image, even if the files have been
modified since the checkpoint image was created, use the -Rf option of the
cqsub or qsub command.
4.15.2 Forcing a Checkpoint from within a Batch Request
To force a checkpoint image of a request to be made, include the qchkpnt
command within the request at suitable places. When the request is executing,
a checkpoint image of the request is written whenever the qchkpnt command
is executed.
SG–2148 3.3 79

NQE User’s Guide
The command has no options; the syntax is as follows:
qchkpnt
You can use the qchkpnt command only from within a batch request to
checkpoint that request.
The following example shows how you can use the qchkpnt command in a
request:
ja # Enable job accounting
date
cd loopdir # Move to directory where
# loop.f is stored
f90 -Zu loop.f # Compile program loop.f
qchkpnt
date./a.out # Execute program a.out
date
rm loop.o a.out # Remove files
echo job complete
ja -csft # Report job accounting
# information and disable
# job accounting
If an unscheduled interrupt in the NQS system occurs after the compilation of
the program, the request is restarted automatically by using the checkpoint
image at the line following the qchkpnt command. If the unscheduled
interrupt occurs during or before the compilation, the request is restarted from
the beginning.
If the system administrator shuts down the NQS system in an orderly way
when the request is executing, a checkpoint image is written automatically at
that time, and it is this image that is used for restarting the request, rather than
the one written by qchkpnt.
4.15.3 Criteria for Batch Request Recovery
Before NQS can create and use a checkpoint image to restart a request
automatically, the request must meet the checkpoint criteria established by the
system checkpoint facility.
80 SG–2148 3.3

Submitting Requests [4]
For more information on the UNICOS and UNICOS/mk checkpoint facilities,
see the chkpnt(2) and restart(2) man pages and General UNICOS System
Administration, publication SG–2301.
For more information on the IRIX checkpoint facility, see the cpr(1) man page
and the Checkpoint and Restart Operation Guide, Silicon Graphics publication
007–3236–xxx.
If these criteria are not met, in some cases, NQS reruns the request from the
start; a mail message is sent to you about the problem. In other cases (for
example, a process identifier or job identifier of the request has been reused),
NQS puts the request in a WAIT state and tries the restart at short intervals for a
period defined by the NQS administrator; in such cases, no mail messages are
sent. If the restart still fails, the request is rerun from the start.
4.15.4 Recovering a Request Terminated by a SIGRPE,aSIGUME,oraSIGPEFAILURE Signal
If a request is terminated through receipt of a SIGRPE,aSIGUME,ora
SIGPEFAILURE signal, NQS will requeue the request instead of deleting it, if
one of the following attributes applies to your request:
•The request is rerunnable.
•The request is restartable and has a restart file.
By default, each NQS request is both rerunnable and restartable. These defaults
can be changed by using the cqsub -nc or qsub -nc command option, the
cqsub -nr or qsub -nr command option, or the qalter -r n and qalter
-c n command options. The owner of the request can specify the cqsub(1) or
qsub(1) command options and use the qalter(1) command to modify the
request rerun and/or restart attributes. An NQS administrator can also use the
qalter(1) command to modify any request’s rerun and/or restart attributes.
If NQS requeues your request because it was terminated by either the SIGRPE,
SIGUME,orSIGPEFAILURE signal, one of the following messages is written
into the system log, the NQS log file, and the job log file:
Request <1.subzero>: Request received SIGRPE or SIGUME signal; request requeued.
Request <1.subzero>: Request received SIGPEFAILURE signal; request requeued.
A requeued request is reinitiated after it is selected by the NQS scheduler. An
NQS administrator can use the qmgr schedule request now command to
force the request to be reinitiated immediately.
SG–2148 3.3 81

NQE User’s Guide
4.15.5 Forcing a Request to Be Restarted from the Beginning
To force NQS to restart a request from the beginning rather than from a
checkpoint image, submit the request by using the cqsub -nc or qsub -nc
command option, or select the NQE GUI Submit->Configure->General
Options->Do not checkpoint option. This option prevents NQS from
taking a checkpoint image if the administrator shuts down NQS; it also
prevents any qchkpnt commands within the request from writing any
checkpoint images.
You may want to use the -nc option, for example, if you know that your
request has some inherent limitation that prevents job recovery. For a list of
possible limitations, see Section 4.15.3, page 80. Alternatively, you may want to
use the -nc option to ensure that your request starts and runs to completion
with no interrupts.
4.15.6 Preventing a Request from Being Rerun from the Beginning
If you want to prevent NQS from rerunning from the beginning a request that
had already started execution when NQS was interrupted, you must include the
-nr option of the cqsub or qsub command, or select the NQE GUI
Submit->Configure->General Options->Do not rerun option when
the request is submitted. If this option is used and if either the request could
not be checkpointed (for example, at shutdown time) or could not be restarted
(for example, when the system is rebooted), the request is terminated, thereby
preserving any partial output generated by the request.
You also can use the -nr option to preserve output from a job when an
unscheduled interrupt occurs, rather than have the job restart from the
beginning.
4.15.7 Retaining Queued Batch Requests Across Crashes and Shutdowns
If a request was not executing when the NQS system was interrupted (either in
a scheduled way by the system administrator or because of a system crash), the
request is retained in its queue and is automatically available for execution
when NQS becomes available.
4.16 Using the Request /tmp Directory
A temporary directory is available to batch requests for the duration of their
execution. Each batch request has its own unique temporary directory. When
82 SG–2148 3.3

Submitting Requests [4]
the batch request completes execution, or aborts with an error, NQS deletes the
directory, along with any files contained in the directory.
Typically, temporary directories are created within the /tmp directory, although
this depends on your site configuration. The name takes the form nqs.xxxxx
(xxxxx is any unique string). The name of the directory is available to a batch
request in the TMPDIR environment variable.
You can use the temporary directory to hold intermediate files generated by
your request that are not required when the request ends.
In the following example script file, the source program and executable file
created by the cc compilation line are written to $TMPDIR. After the request
completes execution, these files are deleted automatically, along with the
temporary directory.
cd $TMPDIR
pwd
cat <<EOF > test.c
main () {
.
program
.
}
EOF
cc -o test test.c
ls -la
./test
SG–2148 3.3 83

Customizing Requests [5]
This chapter describes the more common options you can use to customize
your request. The following topics are covered:
•Using resource limits (Section 5.1, page 86)
–Example of using limits (Section 5.1.1, page 88)
–Why you use limits (Section 5.1.2, page 89)
–Types of limits (Section 5.1.3, page 89)
–Determining resources (Section 5.1.4, page 89)
–Consequences of exceeding resource limits (Section 5.1.5, page 91)
•Specifying time limits (Section 5.2, page 91)
•Specifying a shell (Section 5.3, page 94)
•Specifying an NQS queue (Section 5.4, page 96)
•Specifying a request name (Section 5.5, page 97)
•Using password prompting (Section 5.6, page 97)
•Selecting an account name or project name under which to execute the
request (Section 5.7, page 98)
•Using alternative user names (Section 5.8, page 99)
•Using request priority (Section 5.9, page 100)
–Preexecution priority (Section 5.9.1, page 100)
–Execution priority (Section 5.9.2, page 101)
•Submitting requests to the IRIX Miser scheduler (Section 5.10, page 102)
–Miser resource reservation options for the qsub and cqsub commands
(Section 5.10.1, page 103)
–Effect of specifying Miser resource options on request limits (Section
5.10.2, page 104)
For information on options that let you customize NQS mail, see Section 4.11,
page 69.
SG–2148 3.3 85

NQE User’s Guide
For information on options that let you customize output files, see Chapter 6,
page 107.
For information on using and setting request attributes, see Section 4.6, page 60.
For information on using NQS environment variables, see Section 9.1, page 127.
Note: Options specified by using the NQE GUI or command line interface
override embedded #QSUB NQS directives.
5.1 Using Resource Limits
Each batch request receives a limited amount of system resources, such as CPU
time and memory. Certain platforms may enforce only a subset of limits. To
determine which limits are enforced on your NQS server, use the following
command:
qlimit
Note: You must issue all NQE commands that begin with qon an NQS
server; the NQE commands that begin with qare not NQE client commands.
See Section 1.3.2, page 14, for a list of the commands that are available from
remote NQE clients.
The following display shows the results of this command on a workstation:
86 SG–2148 3.3

Customizing Requests [5]
%qlimit
Per-process core file size -lc
Per-process data segment size -ld
Per-process permanent file size -lf
Per-request permanent file size -lF Not run-time enforceable
Per-process memory size -lm Not run-time enforceable
Per-request memory size -lM Not run-time enforceable
Nice value -ln
Per-process quick file size -lq Not run-time enforceable
Per-request quick file size -lQ Not run-time enforceable
Per-process stack segment size -ls
Per-process CPU time -lt
Per-request CPU time -lT Enforced per-process
Per-request tape drive type a -lUa Not run-time enforceable
Per-request tape drive type b -lUb Not run-time enforceable
Per-request tape drive type c -lUc Not run-time enforceable
Per-request tape drive type d -lUd Not run-time enforceable
Per-request tape drive type e -lUe Not run-time enforceable
Per-request tape drive type f -lUf Not run-time enforceable
Per-request tape drive type g -lUg Not run-time enforceable
Per-request tape drive type h -lUh Not run-time enforceable
Per-process temporary file size -lv Not run-time enforceable
Per-request temporary file size -lV Not run-time enforceable
Per-process working set size -lw
Per-request MPP processing elements -l mpp_p=<integer>
Not run-time enforceable
Per-process MPP time -l p_mpp_t=[[hrs:]min:]sec[:msec]
Not run-time enforceable
Per-request MPP time -l mpp_t=[[hrs:]min:]sec[:msec]
Not run-time enforceable
Per-process MPP memory size -l p_mpp_m=<integer>
Not run-time enforceable
Per-request MPP memory size -l mpp_m=<integer>
Not run-time enforceable
Per-request shared memory limit -l shm_l[imit]=<value>[<units>]
Not run-time enforceable
Per-request shared memory segments -l shm_s[egments]=<integer>
Not run-time enforceable
You can specify resource requirements for your request by using either the NQE
GUI or the command line interface.
SG–2148 3.3 87

NQE User’s Guide
If you use the NQE GUI, use the Submit window and select Job limits on
the Configure menu.
If you use the command line interface, use the options to the cqsub command
that begin with the letter l(for limit).
For an example of using limits, see Section 5.1.1, page 88.
When you specify a resource limit, NQE sends your request to a queue that can
accommodate the limits you set.
If your resource limits exceed the limits of every possible batch queue
destination, your request will not be accepted into a batch queue and therefore
will not execute. You will receive a mail message that explains the problem.
You also can send your request directly to a queue that you know has the
appropriate limits. To list the resource limits on all of the batch queues on your
NQS server, use the following command:
cqstatl -b -d nqs -f
To list resource limits on another server, use the following command:
cqstatl -b -d nqs -f -h servername
5.1.1 Example of Using Limits
The following example specifies that request bigloop be executed with a
memory requirement of 10 Mbytes and a CPU time limit of 1000 seconds:
•To specify the options by using the NQE GUI, use the Submit window and
select Job limits on the Configure menu. In the Request Limit
column, enter 10 mb for the Memory size option, enter 1000 for the CPU
Time Limit option (the default time-limit unit is seconds), and apply your
entries (click on the Apply button). To save your changes, use the Save
Current Job Profile option.
•To specify the options by using the command line interface, use the cqsub
or qsub command, as in the following example:
cqsub -lM 10mb -lT 1000 bigloop
•To specify the same options in the request, use the following NQS directive:
#QSUB -lM 10mb -lT 1000
88 SG–2148 3.3

Customizing Requests [5]
5.1.2 Why You Use Limits
You may want to specify resources for the following reasons:
•You get enough resources. If your request runs out of memory or CPU time,
it will abort.
•You get the correct priority. NQS is commonly configured so that requests
that specify less memory or CPU time have a higher priority than those
specifying more memory or CPU time. For more information about the
items that affect the priority of an NQS request, see Section 5.9, page 100.
•You can use more than the defaults. Each NQS batch queue has default
request resource limits. If you do not request resources by using options,
your request inherits the default resource limits of the batch queue it enters.
•If limits are not set on the batch queue, your request inherits the compiled
defaults of your NQS system. If the default limits do not provide adequate
memory or CPU time for your request, the request aborts.
5.1.3 Types of Limits
You can set both per-request and per-process limits. Per-request limits apply to
the sum of the resources used by all processes that the request starts. Per-process
limits apply to individual processes started by a request. These limits include
the parent shell and each command executed.
For example, the per-request memory size limit specifies the total amount of
memory used by all processes that the request starts. The per-process memory
size limit is the maximum amount of memory that each process can use.
You must specify sufficiently large limits for both the per-request and
per-process limits; otherwise, the request may be routed to a queue with
inappropriate resources. It may abort when it tries to exceed limits imposed by
the queue.
Your request may be routed inappropriately if you specify one type of limit
(per-process or per-request), but the NQS batch queues are configured based on
the other type of limit.
5.1.4 Determining Resources
To display the resource limits associated with a request, click twice on the
request in the NQE GUI Status window.
SG–2148 3.3 89

NQE User’s Guide
You also can receive the same display by using one of the following commands.
To display resource limits associated with a request in NQS, use the cqstatl
command or the qstat command, as in the following examples:
cqstatl -d nqs -f requestid
qstat -f requestid
The requestid argument is the request identifier displayed when you submitted
the request.
You can also specify these commands to monitor the actual resources used by a
request and the resources available, which enables you to determine whether
the request is close to exceeding resources or whether the resources requested
for the request greatly exceed those required.
If you do not request resources by using cqsub or qsub command options,
NQS will assign limits for most resources for the request, using the limits
defined by the UNICOS user database (UDB) or the default limits of the batch
queue in which the request executes (whichever is the most restrictive). If you
do not request any of these resources, the default limits for tapes, quickfile
spaces, MPP processing elements (PEs), and shared memory size and segment
limits is 0. To display the limits that are currently assigned to queues, use the
cqstat -f or qstat -f command (see Section 11.2.2, page 162), or select the
NQE GUI Status->Actions->Detailed Job Status option. To view
your UDB resource limits, use the udbsee(1) command.
To display resource limits associated with a request in the NQE database, use
the cqstatl command, as follows:
cqstatl -d nqedb -f tid
The resulting display includes a RESOURCE USAGE section that displays the
per-process and per-request resource limits. It also shows the resources actually
used by the request if it is running. For further information, see Section 10.2.2,
page 146.
You can obtain the same resource display from within a batch request by using
the QSUB_REQID environment variable, as follows:
qstat -f $QSUB_REQID
For further information about the NQS environment variables available to
requests, see Section 9.1, page 127.
90 SG–2148 3.3

Customizing Requests [5]
5.1.5 Consequences of Exceeding Resource Limits
If your request exceeds resource limits, errors or unexpected results can occur.
If an error occurs, your request proceeds with the next command; therefore, you
should examine the return values from commands and calls executed within a
request to check whether an error has occurred. Within a shell script, you can
check the exit status of the last command executed by examining the status
variable for scripts executing under the C shell or the ?variable for scripts
executing under the standard or Korn shell.
5.2 Specifying Time Limits
You can specify a time after which a request will run. This can be a very useful
option, especially if it is less expensive to run your requests during off-peak
hours. The request waits in an NQS queue until the time you specify is passed.
NQS schedules the request for execution as soon as possible after the specified
time.
To specify a time after which to run your request, you can use either the NQE
GUI or the command line interface, as follows:
•Use the NQE GUI Submit window and select General Options on the
Configure menu. For the Run After option, enter the date and time after
which you want your request to run, and apply your entry (click on the
Apply button). To save your changes, use the Save Current Job
Profile option.
•If you use the command line interface, use the cqsub or qsub command, as
in the following example:
cqsub -a date_time
You can specify date and time, as follows:
[date][time][time-zone]
If you omit date, the current day is assumed. The date can be the words today
or tomorrow, or an actual date.
You can specify an actual date for date in one of the following ways:
SG–2148 3.3 91

NQE User’s Guide
DD-Month MM/DD Month DD YYYY MM/DD
DD-Month-YY MM/DD/YY Month DD YYYY YYYY-MM-DD
DD-Month-YYYY MM/DD YYYY YYYY Month DD
DD-Month YYYY YYYY DD-Month
MM is the number of the month, such as 11. Month is the name of the month,
which you can abbreviate to a minimum of the first 3 characters. Month can be
in any combination of uppercase or lowercase. Any of the following are valid:
March, MARC, MaR, mar, or MAR.
DD is either the name of the day or the number of the day within the month.
You can abbreviate the name of the day to a minimum of the first 3 characters,
and it can be in uppercase or lowercase. Any of the following are valid:
MOND, mon, Mon, or 23.
YY is the last 2 digits of the year within the current century. YYYY is the full
year. Any of the following are valid: 98 or 1998.
The time can be the word noon or midnight, or an actual time, specified as
follows:
hour[:minutes[:seconds]][meridian]
Only the hour is required. A 24-hour clock is assumed, unless you specify
meridian. The meridian can be am,pm,orm(indicating noon).
The time-zone is specified as any North American time zone (such as CDT) or
Greenwich mean time (GMT). If you omit time-zone, the local time zone is used.
A change in time zones may occur from the time that you submitted the job to
the time that the job runs. For example, your time zone may change from
standard time to daylight savings time, or the job may be sent from a machine
in one time zone to a machine in another time zone. In such cases, you can
specify the desired time zone of the request. For example, to run a job at 12:00
P.M. on December 1, you can specify the time zone as follows:
"01-December-1995 noon CST"
Note: If you use the command line interface, the -a option must precede
date and time specifications; such as, cqsub -a "01-December-1995
noon CST".
92 SG–2148 3.3

Customizing Requests [5]
If the date and time specification includes space characters, you must enclose it
within single or double quotation marks.
The following are examples of valid date and time specifications:
"July 4, 2026 12:31 EDT"
"01-Jan-1995 12am, PDT"
"Tuesday, 23:00:00"
"11pm tues."
’tomorrow 23 GMT’
12:00
noon
12m
If you specify -a 12pm, your job will run at 12:00 P.M. or 24:00:00. If you want
your job to run at 12:00 A.M. or 12:00:00 (noon), use one of the following time
specifications:
-a 12:00
-a noon
-a 12m
When your request is waiting for the time you specified to pass, the Status
column in the NQE GUI Status window will indicate it is waiting with a
WAITING or a Wstatus code. Figure 12 shows an example.
SG–2148 3.3 93
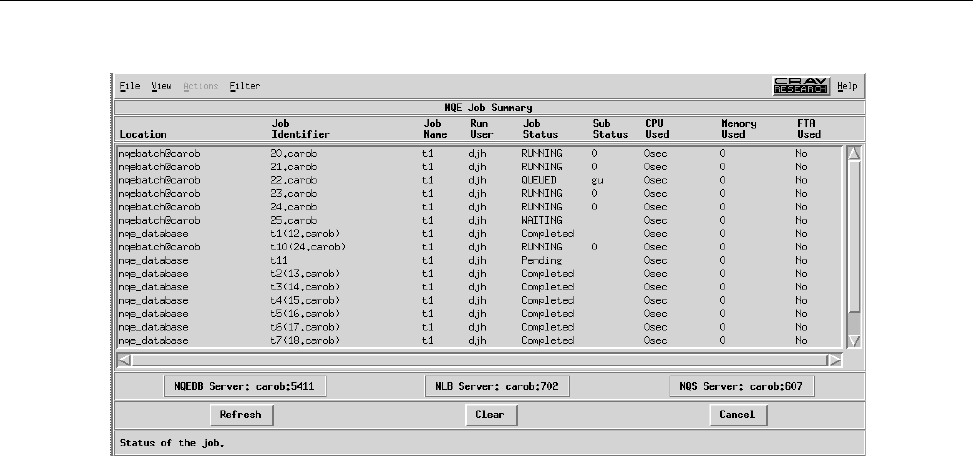
NQE User’s Guide
New snap needed for
this screen!
a10375
Figure 12. Waiting Request Example
After the time has passed, the status code will change to an R, indicating that
the request is running.
5.3 Specifying a Shell
NQS uses a two-shell invocation method by default. When you submit a batch
request to NQS, you can use the cqsub -s or qsub -s command to specify
the full path name of the first shell used to interpret your request’s shell script.
You can specify the csh,ksh,orsh shell names. If no shell is specified with
the -s option, NQS uses your default login shell. If you want to specify
another shell, you can specify it in the following two ways:
•Use the NQE GUI Submit window and select General Options on the
Configure menu. For the Shell option, enter the full path name to the
shell you want to use, and apply your entry (click on the Apply button). To
save your changes, use the Save Current Job Profile option.
•Include the following command as the first line of the request file (before
any #QSUB directives):
#! shell_path
94 SG–2148 3.3

Customizing Requests [5]
The shell_path argument is the full path name to the shell you want to use
(such as /bin/csh). You can include shell options on this line.
NQS sets the QSUB_SHELL environment variable to the shell that you were in
when you executed the -s option. NQS sets the SHELL environment variable to
the initial shell that was executed by NQS.
When NQS initiates a request, a second shell is spawned. The second shell
invoked is always /bin/sh, unless you have specified another shell. The
two-shell invocation method allows stdin read-ahead by commands such as
the remsh(1B) and cat(1) commands.
If you use csh or tcsh and do not specify the shell as the first line of the
request file, NQS will run the batch request under sh. This is normal csh
behavior and is documented in the csh(1) man page.
Note: When NQS reads your .cshrc file or your request script file, it may
encounter commands it cannot invoke and cause your request not to run.
You will see these problems reflected in your standard error file.
To specify that NQS invoke just one shell, use the following command (for each
request) to set the NQSCHGINVOKE environment variable to true or yes (this
example uses csh syntax):
setenv NQSCHGINVOKE true
If NQSCHGINVOKE is set to true or yes, and you do not request a shell by
using the -s option, NQS invokes the request owner’s UDB shell.
To export environment variables when you submit the request, use one of the
following methods:
•You can use the NQE GUI Submit window and select General Options
on the Configure menu. Ensure the Export ENV Variables option is
selected, and apply your change (click on the Apply button) if you need to
select it. To save your changes, use the Save Current Job Profile
option.
•You can use the cqsub -x or qsub -x command to export environment
variables.
For a discussion of the passing of environment variables to a batch request, see
Section 9.1, page 127.
SG–2148 3.3 95

NQE User’s Guide
Note: NQS sets an environment variable called ENVIRONMENT to value
BATCH for each NQS initiated job. This variable can be checked within a
.profile,.login,or.cshrc script and be used to differentiate between
interactive and batch sessions; this action can be used to avoid performing
terminal setup operations for a batch job. A benefit of NQS initiating the
batch job as a login shell is that .profile,.login,or.cshrc scripts are
run and your environment is set up as expected.
5.4 Specifying an NQS Queue
The NQE administrator can define a default queue that applies to all NQS users.
You also can define a default queue for your own use in the following ways:
•Use the NQE GUI Submit window and select General Options on the
Configure menu. For the Queue name option, enter the name of the
default queue you want to use, and apply your entry (click on the Apply
button). To save your changes, use the Save Current Job Profile
option.
•Use the cqsub command or the qsub command and the name of the queue.
For example, to submit the request file sleeper to an NQS queue called
big, use the following command:
cqsub -q big sleeper
•Set the QSUB_QUEUE environment variable to the name of the queue; for
example, to set the default NQS queue called big, use the following
command:
setenv QSUB_QUEUE big
To display the name of the system default queue, use the following command
on your NQS server:
%qmgr
Qmgr: show parameters
show parameters
Checkpoint directory = /nqebase/3.0/ice/database
/spool/private/root/chkpnt
Debug level = 1
Default batch_request queue = nqenlb
96 SG–2148 3.3

Customizing Requests [5]
If no default queue is defined, or if you want to use a queue other than the
default, specify the name of the queue you want to use.
Your NQE administrator can define queues so that they cannot accept requests
directly. If this has been done for the queue you specify, your request will be
rejected. To determine whether a batch queue can accept requests, you can use
the cqstatl -f command or qstat -f command, as in the following
example:
cqstatl -d nqs -f queue
The section of the display under the <ACCESS> heading lists whether the
Route is Unrestricted or Pipe Only. For details about using the cqstatl
-f command or the qstat -f command, see Section 11.2, page 159.
5.5 Specifying a Request Name
Unless you specify a request name, your request inherits the name of the
request file. To specify a name for a request, do one of the following:
•If you use the NQE GUI, enter the name of the request on the Job to
submit: line of the Submit window.
•If you use the cqsub command or the qsub command, use the -r option as
in the following example:
cqsub -r requestname
The request name is used in status displays and in naming your output files,
unless you specify another name for your output file. For information about
specifying output files, see Chapter 6, page 107.
5.6 Using Password Prompting
If your NQE administrator has used password validation as a method of
authorizing users, you can ensure that you always provide a password when
needed. You can specify that you want to be prompted for a password in the
following ways:
•Use the NQE GUI Submit window and select the Set Password option of
the Actions menu.
•Use the cqsub -P command.
SG–2148 3.3 97

NQE User’s Guide
•Set the NQS_PASSWORD_NEEDED environment variable to ensure you are
prompted. You can set the NQS_PASSWORD_NEEDED environment variable
to be any value (ON,YES,TRUE,0, etc.); the presence of the
NQS_PASSWORD_NEEDED environment variable ensures that you are
prompted for your password.
Note: If you set the NQS_PASSWORD_NEEDED environment variable
outside of the NQE GUI and then use the NQE GUI to submit a request,
you will be prompted to set your password.
5.7 Selecting an Account Name or Project Name under Which to Execute the
Request
To specify an alternative UNICOS account name or the IRIX project name under
which your request will be executed, you can use either the cqsub -A or qsub
-A command, or select the NQE GUI Submit->Configure->General
Options window. For example, if you currently are logged in as user pat, and
the current UNICOS account name of your interactive session is dept_a (as
shown by using the newacct -l command), but you want to execute the
request under the UNICOS account name dept_b, enter the following
command:
%qsub -A dept_b sleeper
nqs-181 qsub: INFO
Request <402.coal>: Submitted to queue <express> by <pat(456)>.
%
The account name is a valid UNICOS account name for the user on the host on
which the request will run. The project name is a valid IRIX project name for
the user on the host on which the request will run.
Alternatively, to run a request under a specific UNICOS account name or IRIX
project name, you can set the NQS_ACCOUNTNAME environment variable to the
required account name or project name before job submission. If you later
specify the -A option, it overrides the setting of the environment variable.
If an alternative account name or project name is not specified, and the request
executes at the local host, the request uses your account name or project name
at the time of submission. If an alternative account name or project name is not
specified, and the request executes at a remote host, the request uses your
default account name or project name at the remote host.
98 SG–2148 3.3

Customizing Requests [5]
On UNICOS systems, to find your current, default, and valid account names,
use the newacct(1) command. For more information, see the newacct(1) man
page.
On IRIX systems, to find your default and valid project names, view the
/etc/project file; the first project name on the list is your default project
name.
5.8 Using Alternative User Names
Unless you indicate otherwise, the batch request executes under the user name
used when you submitted the request. You can specify that a request will run
under another user name in the following ways:
•Use the NQE GUI Submit window and select General Options on the
Configure menu. For the NQE database User Name option, enter the user
name that you want to use, and apply your entry (click on the Apply
button). To make your change part of the request’s permanent configuration,
use the Save Current Job Profile option.
•Use the cqsub -u username command or the qsub -u username command.
You can use only the cqsub -u username command to submit a request to
the NQE database.
The following example enables you, currently logged in as user pat, to execute
the request under user name bill. You issue the following command:
cqsub -u bill job1
The following example enables jack, who is currently logged in, to become
jjackson (the owner of the request) and to submit request job1 to the NQE
database as Chemdept (no spaces are allowed between the comma and the
name of the owner of the request):
cqsub -u dbuser=Chemdept,jjackson job1
For a complete description of the -u option syntax, see the cqsub(1) or qsub(1)
man page.
Note: When you specify an alternative user name, you must ensure that you
have authorization to use the specified user name. For more information, see
Chapter 2, page 21.
SG–2148 3.3 99

NQE User’s Guide
5.9 Using Request Priority
Two priority types affect a queued NQS request:
•Apreexecution priority, which determines the order in which requests are
chosen to begin execution by NQS.
•An execution priority, which determines how much priority is given to a
particular executing request in relation to all other work on the server; for
an executing request, the priority value is its nice value.
5.9.1 Preexecution Priority
The preexecution priority of a request is set by two priority values:
•The interqueue priority assigned to each NQS queue. This priority determines
the order in which NQS scans the queues for work to be done.
Note: The NQE administrator defines the interqueue priority, and an end
user cannot change it.
To view the interqueue priority of a queue, use the cqstatl -d nqs -f
queue command or the qstat -f queue command (for details, see Section
11.2, page 159). The interqueue priority is the value shown after the label
Priority: in the top right of the display.
The priority can be an integer in the range 0 to 63. The higher the number,
the higher the priority assigned to the queue.
•The intraqueue priority assigned to each NQS request. After NQS examines a
queue to see whether any work is waiting, the intraqueue priority is used to
determine the order in which requests are selected for execution.
If more than one request that has the same priority is present in a queue, the
request that has been queued for the longest time takes precedence. The
NQE administrator can assign a default intraqueue priority. NQS assigns a
default intraqueue priority to requests when they are submitted.
The qsub -p command specifies either the user-requested priority or, for
UNICOS systems that are running the Unified Resource Manager (URM),
the URM priority increment. The priority is an integer between 0 and 63. If
you do not use this option, the default is 1.
If you are running URM, the priority increment value is passed to URM
during request registration. URM adds this value as an increment value to
the priority that it calculates for the request.
100 SG–2148 3.3

Customizing Requests [5]
To view the intraqueue priority of a queued request, use the cqstatl -d
nqs -f request command or the qstat -f queue command (see Section
10.2.2, page 146). The intraqueue priority is the value shown after the label
Priority: in the top right of the display.
The priority can be in the range from 1 to 999. The higher the number, the
higher the priority assigned to a request.
You can change the intraqueue priority in the following ways:
•Use the NQE GUI Submit window and select General Options on the
Configure menu. Enter the priority number for the Priority option, and
apply your entry (click on the Apply button). To save your changes, use the
Save Current Job Profile option.
•Use the cqsub -p priority command or the qsub -p priority command.
The qsub -p command specifies either the user-requested priority or, for
UNICOS systems that are running the Unified Resource Manager (URM),
the URM priority increment.
The interqueue and intraqueue priorities do not always determine the order in
which requests are selected for execution. If execution of a request would cause
some limit to be exceeded (for details, see Section 5.1, page 86, and Section 4.10,
page 67), NQS can make exceptions to the order.
If NQS is configured to use URM scheduling (see the qmgr set job
scheduling command), URM decides which requests are executed and in
what order they will be executed. If the UNICOS fair-share scheduler is also
running, NQS may use share priorities and weighting factors to compute the
intraqueue priority for a request. The NQS administrator assigns the weighting
factors, based on requested CPU time, requested memory, the length of time a
job has been waiting in the queue, the fair share value, the requested MPP
application CPU time, the number of requested MPP application PEs, and the
user-specified priority.
The interqueue and intraqueue priorities affect only how NQS selects a request
to begin execution. After a request has begun execution, these priorities have
no influence.
5.9.2 Execution Priorities
For an executing request, the priority value is its nice value. A nice value exists
for every executing process. The NQE administrator defines a default nice
value increment for each batch queue. This value is assigned to a request when
it is placed in the batch queue.
SG–2148 3.3 101

NQE User’s Guide
The nice value assigned to a request is the sum of the default system nice value,
the request’s nice increment, and the request owner’s nice increment on the
machine of execution.
You can override this default value in the following ways:
•Use the NQE GUI Submit window and select Job limits on the
Configure menu. Enter the nice value for the Nice Increment option,
and apply your entry (click on the Apply button). To save your changes,
use the Save Current Job Profile option.
•Use the cqsub -ln command or the qsub -ln command.
To view nice values for requests, see Section 5.1.4, page 89.
Note: If you decrease the nice value, you increase the relative execution
priority of a process. If you increase the nice value, you decrease the relative
priority of the request.
You can specify nice increments that are outside the limits for the executing
host. In such cases, NQS limits the specified nice increment to a value within
the necessary range. Any nice increment that you specify must be acceptable to
the batch queue in which the request is placed.
5.10 Submitting Requests to the IRIX Miser Scheduler
The IRIX 6.5 release introduces a new scheduler called the Miser scheduler. The
Miser scheduler (also referred to as Miser) is a predictive scheduler. As a
predictive scheduler, Miser evaluates the number of CPUs and amount of
memory a batch job will require. Using this information, Miser consults a
schedule that it maintains concerning the utilization of CPU and memory
resources on the system. Miser will determine when the batch job can be
started so that it meets its requirements for CPUs and memory. The batch job
will be scheduled to begin execution based on that time.
Miser reserves the resources that a batch job requests. As a result, when the
batch job begins to execute, it will not need to compete with other processes for
CPU and memory resources. However, Miser may require that a job wait until
its reservation period begins before it begins execution. There are some
exceptions to this process. Batch jobs must provide the Miser scheduler with a
list of resources that they will require. Currently, those resources are the
number of CPUs, the amount of memory, and the length of time required.
For a request to be successfully submitted to the Miser scheduler on an NQE
execution host, the following criteria must be met:
102 SG–2148 3.3

Customizing Requests [5]
•The job scheduling class must be miser normal (for more information, see
NQE Administration, publication SG–2150).
•The request must specify a Miser resource reservation option (for more
information, see Section 5.10.1, page 103).
•The destination batch queue must forward requests to the Miser scheduler
(for more information, see NQE Administration, publication SG–2150).
•Miser must be running on the execution host.
•The Miser queue exists and is accessible on the execution host.
•The request can be scheduled to begin execution before the scheduling
window expires. The schedule for a request depends on the resources
requests (CPU, memory, and time) (for more information, see NQE
Administration, publication SG–2150).
5.10.1 Miser Resource Reservation Options for the qsub and cqsub Commands
The syntax for the Miser resource reservation option for the qsub -X and
cqsub -X commands is:
qsub -X miser,seg,c=INT,m=INT[k|m|g][b],t=[H:M.S|INT[s|m|h]]
[,static][,mult=INT][,exc=kill][,seg,c=INT,m=INT[k|m|g][b],
t=[H:M.S|INT[s|m|h]][,static][,mult=INT][,exc=kill][...]
Currently, the Miser scheduler allows the specification of only one resource
segment request. The options for the Miser scheduler are as follows:
miser Specifies the local scheduler extension options for
the Miser scheduler; this is required.
seg Specifies that a new Miser resource segment is
being described; this is required.
c=INT Specifies the number of CPUs required for the
segment being described; this is required.
m=INT Specifies the amount of memory, in bytes, to
reserve for the segment being described; this is
required. Optionally, you can specify the byte
units as either k(or kb), m,orgfor kilobytes,
megabytes, or gigabytes, respectively.
SG–2148 3.3 103

NQE User’s Guide
t=[H:M.S|INT[s|m|h] The amount of CPU wall-clock time for the
segment being described. The time can be
specified in hours:minutes.seconds format or as an
integer with a suffix. You can specify sfor
seconds, mfor minutes, and hfor hours. The CPU
wall-clock time is the actual wall-clock time
multiplied by the number of CPUs that have been
requested. This option is required.
static Indicates that the job cannot run opportunistically.
If this option is not specified, the job may be able
to execute before its scheduled period.
mult=INT Specifies a multiple of CPUs that are allowed for
job scheduling. If this option is not specified,
mult=1.
exc=kill Specifies the action to take when the specified
time limit ends. Currently, the only action is to
kill the job.
The syntax for the cqsub command is the same as the cqsub command except
the destination for cqsub cannot be the NQE database. The destination must
be the NQS system.
If the NQS execution host is not using miser normal scheduling, or the
destination batch queue has not been specified to forward the request to the
Miser scheduler, the request will be executed, but it will not obtain resources
from the Miser scheduler.
5.10.2 Effect of Specifying Miser Resource Options on Request Limits
When you specify the Miser resource options, the request submission must
indicate the number of CPUs, the amount of memory, and the length of time
these resources will be required. A relationship between the Miser options for
CPU count, amount of memory, and length of time has been defined for the
per-request MPP PE count, the per-request memory limit, and the per-request
time limit, respectively.
If the corresponding per-request limit for a request is less than the specified
amount for the Miser resource option, the per-request limit is graduated to a
value that agrees with the Miser resource specification. If the per-request limit
for a request is greater than the amount specified for the Miser resource option,
the per-request limit is not changed.
104 SG–2148 3.3

Customizing Requests [5]
The per-request limits are changed before the job is submitted to the queuing
system.
SG–2148 3.3 105

Working with Output Files [6]
This chapter describes how output files are returned to you and the options you
have to control their location and content. The following topics are discussed:
•Naming output files (Section 6.1, page 107)
•Redirecting output (Section 6.2, page 109)
•Merging output files (Section 6.3, page 110)
•Finding lost output (Section 6.4, page 110)
For a summary of the cqsub or qsub command options that you can use to
control output, see the cqsub(1) or qsub(1) man page.
For information about viewing output files as requests are executing and
writing messages to output files, see Chapter 7, page 113.
6.1 Naming Output Files
After your batch request has completed execution, NQS returns the standard
output, standard error, and job log files that the request produced. Your NQE
administrator configures whether job log files are returned by default. If you do
not receive a job log by default, you can specify that you want one by setting
NQE GUI options or by using the appropriate cqsub or qsub command
options.
The standard output file is referred to as stdout. This file contains output
produced by your request and other system-generated information.
The standard error file is referred to as stderr. This file contains any error
messages that the request generates.
The job log file contains a record of all of the events NQS processed for your
request.
The output files are named as follows:
Standard output file: name.onumber
Standard error file: name.enumber
SG–2148 3.3 107

NQE User’s Guide
Job log file: name.lnumber
Note: NQS supports DFS path name formats for the standard output file,
standard error file, and job log options so that job output can be returned to
DFS.
The strings shown in italics can take the following values:
String Value
name The request name. If you submitted the request as standard
input, the name is STDIN. If you submitted a script file, name is
the first 7 characters of the file name.
To change these defaults by using the NQE GUI, open the
Submit window and select Output Options from the
Configure menu. Enter the alternative name (use the full path
name) after the appropriate output file option (Alt STDOUT
Path,Alt STDERR Path, and/or Alt JOBLOG Path).
To change these defaults by using the command line interface,
use the cqsub command or the qsub command -r,-o,-e, and
-j options. If you use the -r option, name is the first 7 characters
of the string you specified.
For more information on redirecting output, see Section 6.2, page
109.
number The number that NQE assigns when the request is submitted. For
a job going through the NQE database, the number is the task ID;
for a job that is not going through the NQE database, the number
is the request ID.
For example, you submitted a request that has the file name mytestjob, and
you specified that you want to receive a job log. Successful submission and
execution of the request would produce a standard output file that has the
name mytestj.o406, a standard error file that has the name mytestj.e406,
and a job log file that has the name mytestj.l406.
Request 406.coal submitted to queue: nqenlb.
%ls
mytestjob
mytestj.e406
mytestj.o406
mytestj.l406
108 SG–2148 3.3

Working with Output Files [6]
If UNICOS MLS or UNICOS/mk security enhancements are enabled on the
execution system, the output file returned to a remote host is created at the job
execution label. You must specify a remote host directory that has either a
wildcard label or a label that matches the job execution label, or that is a
multilevel directory.
6.2 Redirecting Output
By default, your output files are returned to the directory from which you
submitted the request. To specify another location and name for the files, use
the cqsub or the qsub command options.
You can specify a location for stdout,stderr, and your job log file.
If you use the NQE GUI, to change these defaults, select
Submit->Configure->Output Options. Enter the alternative name (use the
full path name) after the appropriate output file option (Alt STDOUT Path,
Alt STDERR Path, and/or Alt JOBLOG Path).
If you use the cqsub or the qsub command, the following commands or
options place your files in the locations described:
Command or
option
Location of output
cqsub or qsub
Directory from which you submitted the request. Its file name
is STDIN.orequestid_number.
-o filename
Directory from which you submitted the request. Its file name
is filename.orequestid_number.
-o host:filename
Specified server and file name. The directory is your home
directory on host. The file name is filename.
-o "%[user[/password]@]host[/domain]:pathname"
Specified user, host, and path name. The pathname can be a
simple file name or an absolute path. If the pathname is a simple
file name, the file is placed in your home directory on the
specified host. The domain specifies an FTA domain name that
SG–2148 3.3 109

NQE User’s Guide
uses network peer-to-peer authorization (NPPA) rather than a
password. If you do not use NPPA, you can provide a password.
The following three DCE/DFS file name formats are supported:
/:/your_file
/.:/fs/your_file
/.../your_cellname/fs/your_file
6.3 Merging Output Files
You can merge the standard error file and the standard output file in the
following ways:
•If you use the NQE GUI, select the Merge STDOUT and STDERR option in
the Output Options window of the Configure menu and apply your
change (click on the Apply button).
•If you use the cqsub or qsub command, the following options let you
merge your output files into one file:
Option Description
-eo Appends stderr to stdout.
-J m Appends the job log to stdout.
•To merge your output into a single file, use these options with either the
cqsub or qsub command; for example:
cqsub -eo -J m
6.4 Finding Lost Output
If your output is not in the directory you were in when you submitted the
request or in a location you specified, you first should check electronic mail. If
NQS has tried to write your output to a directory different from the one you
specified, it sends you mail.
The mail message indicates where your output files were actually placed, as
shown in the following example:
From root@cool Mon, 5 Jan 34:41 CST 1998
Date: Mon, 5 Jan 1998 12:34:41 -006
110 SG–2148 3.3

Working with Output Files [6]
From: root@cool
Subject: NQS request: 2172.coal ended
Message concerning NQS request: 2172.coal ended.
Request name: testjob
Request owner: jane
Mail sent at: 11:39:04 CDT
Request exited normally.
_Exit() value was: 0.
Stdout file staging event status:
Destination: -o coal:/home/usr/jane/testjob.o2172
Output file could not be returned to primary destination.
Output file successfully returned to backup destination
in user home directory on the execution machine.
Transaction failure reason at primary destination:
No account authorization at transaction peer.
Stderr file staging event status:
Destination: -e coal:/home/usr/jane/testjob.e2172
Output file could not be returned to primary destination.
Output file successfully returned to backup destination
in user home directory on the execution machine.
Transaction failure reason at primary destination:
No account authorization at transaction peer.
Usually, the reason your output files could not be written to your directory is
because your home directory does not contain a suitable validation file entry
authorizing NQS to write the output files. See Chapter 2, page 21.
If NQS cannot return the files to the requested directory and host, it tries to
place it in the following directories:
•Your home directory on the NQS execution server. This is the server at which
your request executed, not necessarily the one defined by NQS_SERVER.If
this placement is successful, NQS sends you a mail message indicating that
it used an alternate (secondary) output destination. The From: line of the
mail message includes the name of the host that received the output file.
SG–2148 3.3 111

NQE User’s Guide
If you submitted the request by using a different user name, NQS tries to
send the output to the home directory of that user name and sends the mail
message to you.
•A special failed directory on the NQS execution server. If you receive a
mail message telling you that this has occurred, contact your NQE
administrator.
When using DCE/DFS, note the following:
•After a request completes, NQS uses kdestroy to destroy any credentials
obtained by NQS on behalf of the request’s owner.
!
Caution: On UNICOS systems, do not put a kdestroy within a request’s
job script; it will destroy the credentials obtained by NQS and prevent
NQS from returning request output files into DFS space.
•On UNIX platforms, there is not an integrated login system feature
available. NQS on UNIX platforms obtains separate DCE credentials for
request output return. Therefore, a kdestroy placed within a request’s job
script running on an NQE UNIX server will not affect the return of request
output files into DFS space.
112 SG–2148 3.3

Communicating with Requests [7]
You can communicate with your request as it executes. This chapter discusses
the communication methods available to you. The following topics are covered:
•Monitoring the job log or event history (Section 7.1, page 113)
•Writing messages to output files (Section 7.2, page 114)
•Monitoring output during execution (Section 7.3, page 116)
7.1 Monitoring the Job Log or Event History
You can use one of the following methods to view the contents of a request’s
job log file or event history at any time that the job is running.
•If you use the NQE GUI, use the Actions menu of the NQE GUI Status
window. To use the Actions menu, first position the pointer on the desired
job line in the job summary area and highlight it by pressing the left mouse
button, then select Job Log on the Actions menu.
•For an NQS request, use the cqstatl or qstat command; for example,
you can use the following command on the server on which the request is
executing (specified by NQS_SERVER):
cqstatl -d nqs -j requestid
The output is the job log file and it will look similar to the following
example:
11/03 10:17:48 Arrived in <ice@latte> from <latte>.
11/03 10:17:53 Arrived in <batch@ice> from <latte>.
11/03 10:17:54 Arrived in <express@ice> from <batch@ice>.
11/03 10:17:56 Started, pid=<20624>, jid=<8215>, shell=<>, umask=<23>.
11/03 10:17:56 Running in queue <express>.
If your request is running on a server other than the one specified by
NQS_SERVER, you can change the value of your NQS_SERVER environment
variable or you can use the cqstatl -h or qstat -h command to specify
that host name, as in the following example:
cqstatl -d nqs -h ice -j requestid
SG–2148 3.3 113

NQE User’s Guide
•For an NQE database request, use the following command (the qstat
command cannot be used for an NQE database request):
cqstatl -d nqedb -j tid
The output includes an event history of the NQE database tasks, as shown in
the following example:
carob$ cqstatl -d nqedb -j t1
Event History for NQE Task: t1
07/25/96 07:57:42 t1: NEW_STATE state=Pending (ack=1)
07/25/96 07:57:53 t1: NEW_STATE state=Scheduled
owner=lws.carob (ack=1)
07/25/96 07:58:01 t1: NEW_STATE state=Submitted (ack=1)
07/25/96 07:58:01 t1: SUBMIT NQS Request ID 9.carob
(ack=1)
07/25/96 07:59:07 t1: NEW_STATE state=Completed
owner=scheduler.main (ack=1)
07/25/96 07:59:08 t1: NQS exit.status=0 (ack=1)
07/25/96 07:59:13 t1: NEW_STATE state=Completed
owner=monitor.main (ack=1)
You can write messages to the job log file as described in Section 7.2, page 114.
7.2 Writing Messages to Output Files
If an event has occurred, or will occur, that could affect your executing request,
you can write a message to record that event to the output files produced by
the request. To write this message, use the following command:
qmsg
Note: You must issue the qmsg command from the NQS server on which the
request is running.
By default (or if you use the qmsg -j command), the qmsg command writes
the message to the job log file of the request.
Note: You cannot write job log messages to requests in the NQE database;
you can write job log messages only to requests running on NQS.
114 SG–2148 3.3

Communicating with Requests [7]
To send a message to the standard output file of a request, use the qmsg -o
command. To send a message to the standard error file of a request, use the
qmsg -e command.
If your NQE administrator configures the default return of the job log files as
off, and your qmsg command provides no specific destination, the message is
written to the standard error file.
After entering the qmsg command line, you can enter the lines that make up
the message. To end each line, press RETURN. When you have typed in all of
the lines of the message, press CONTROL-d to end the message.
The following example shows a message being written to the standard output
file of a request:
%qmsg -o 407.coal
An important event occurred a few seconds ago.
George made the coffee.
CONTROL-d
If qmsg successfully writes the message to the request’s output file, you do not
receive a message.
You can send messages to the standard output and standard error files of only
those requests that are executing under your own user name (unless you are
defined as an NQS operator or manager). You also must be logged on to the
NQS server on which your request is executing.
If you get the following message, it means that your request has not yet started
to execute:
Request’s stderr file does not exist
Wait a few seconds and try again.
If you get the following message, it means that the request completed execution
or was sent to another system for execution:
Request 407.coal does not exist
Therefore, you cannot write to the request’s output files.
SG–2148 3.3 115

NQE User’s Guide
7.3 Monitoring Output during Execution
By default, the standard output and standard error files generated by your
request are not available to you until the request completes execution. You can
use the NQE GUI or the command options described in this section to examine
the standard output and standard error files as your request executes. If you
cannot find your standard output and standard error files, see Section 16.11,
page 230.
Through command options, NQS supports the writing of standard output and
standard error files that a request produces to a directory on the server at which
the request is executing. If the destination files are at an NQS server other than
the execution server, these options are ignored.
You must submit your request to the server on which the output files will be
written. If you do not know the server on which the output files will be written
or do not specify the server, the options described in this section are ignored,
and you cannot view your output during execution.
Note: If the UNICOS MLS feature or the UNICOS/mk security
enhancements are enabled on your system, the job output files are labeled
with the job execution label. For jobs that are submitted locally, the return of
the job output files may fail if the job submission directory label does not
match the job execution label. For example, if a job is submitted from a level
0 directory, and the job is executed at a requested level 2, the job output files
cannot be written to the level 0 directory. If the home directory of the
UNICOS user under whom the job ran is not a level 2 directory, does not
have a wildcard label, or is not a multilevel directory, the job output files
cannot be returned to that directory either. The job output files will be stored
in the NQS failed directory.
If the UNICOS MLS feature or the UNICOS/mk security enhancements on
are enabled on your system and you submitted a job remotely, the Internet
Protocol Security Options (IPSO) type and label range that are defined in the
network access list (NAL) entry for the remote host affect the job output file
return.
You can indicate a specific execution server when submitting your request in
the following ways:
•If you use the NQE GUI, open the Config window and change the NQS
Server field of the NQE User Preferences menu (the NQE User
Preferences menu is the default Config window).
116 SG–2148 3.3

Communicating with Requests [7]
•If you use the cqsub or qsub command, use the -q queue option; queue
designates a batch or a pipe queue that has a destination batch queue on the
execution server that will run your request.
•Set the NQS_SERVER environment variable to the execution server name.
The file name you specify for the output can include the name of an NQS
server and a directory path. A simple file name indicates that the file will be
written to the directory you were in when you submitted your request.
7.3.1 Using the NQE GUI
To examine the standard output and standard error files as your request
executes, use the NQE GUI Submit window and select Output Options on
the Configure menu. Ensure that the following options are selected, and apply
your change (click on the Apply button) if you need to select any of them:
•Write STDOUT during execution
•Write STDERR during execution
To save your changes, use the Save Current Job Profile menu option on
the Configure menu.
You also can merge STDOUT and STDERR by selecting the Merge STDOUT and
STDERR option and applying your change (click on the Apply button). For
additional information about working with output files, see Chapter 6, page 107.
7.3.2 Using the Command Line Interface
To examine the standard output and standard error files as your request
executes, you must submit your request to your local server only. Use the
following command when you submit the request:
qsub -o ofile -ro -e efile -re
The -ro and -re options specify that the standard output and standard error
files will be written as they are produced (rather than after the request
completes execution). NQS supports these options only for output files that are
being written to the system at which the request is being executed.
If you use the -ro and -re options, the output is placed in the file (ofile or efile)
as the request executes. The file name you specify for ofile and efile can include
the name of an NQS host and a directory path. A simple file name indicates
SG–2148 3.3 117

NQE User’s Guide
that the file will be written to the UNICOS directory that was current when you
submitted the request.
Path names specified by the -o and -e options that are not complete are
interpreted on the originating machine. Ensure (by using the complete path
name, if necessary) that the output file names are valid on the execution
machine. This is true whether or not the -ro or -re options are used.
If the -ro and -re options are used, the output may not appear immediately in
the output files due to stdio buffering (as much as 4Kb may be buffered). If
the job output is small, it may not appear until the job completes.
For UNICOS systems, do not modify or remove the files until the request has
completed execution; if a system shutdown occurs, they will be needed for
request recovery.
To ensure that your request has completed execution, use the cqstatl -a
command or the qstat -a command to display summary details of your
requests; for example:
qstat -a
To display the request’s job log file at any time, use the cqstatl -j command
or the qstat -j command; for example:
qstat -j requestid
To merge the standard error file and the standard output file, use the
cqsub -eo command or the qsub -eo command. For example, to combine
the files and to write the output file to a specificfile, you can use the following
qsub options:
qsub -ro -o ofile -eo
7.3.3 Example of Monitoring Output
In the following example, jane submits the request test to the queue gust,
which is a pipe queue that has a destination batch queue on the NQS server
gust. She specifies that she wants the standard output and standard error files
merged, and that the output file that has the name TESTOUT will be placed in
the tmp directory.
118 SG–2148 3.3

Communicating with Requests [7]
If jane uses the NQE GUI, she would to the following:
1. To set her server to be her local server gust,jane would open the Config
window and change the NQS Server field of the NQE User
Preferences window to be gust, apply her change, and cancel the
Config window. (The NQE User Preferences window is the default
Config window.)
2. Open the NQE GUI Submit window.
3. Select General Options on the Configure menu, and do the following:
•Enter test in the Request Name field.
•Enter gust in the Queue Name field.
4. Apply the changes and cancel the General Options menu.
5. Select Output Options on the Configure menu, and select the following
options:
•Write STDOUT during execution
•Merge STDOUT and STDERR
•Keep STDOUT on execution host
6. Change the output directory path and name of the output file by entering
/tmp/TESTOUT in the Alt STDOUT Path field.
7. Apply the changes and cancel the Output Options menu.
8. Submit her request test, as described in Chapter 4, page 49.
9. To save all of the changes made so she can use them in the future, jane
would use the Save Current Job Profile option on the Configure
menu.
If jane uses the cqsub or qsub command, she can do the following:
•Ensure that NQS_SERVER is set to gust.
•Enter the following command line, for example:
cqsub -eo -o gust:tmp/TESTOUT -ro -q gust test
After the request has been submitted, jane can log in to the server gust,
change to the directory she specified, and view the file, as follows:
SG–2148 3.3 119

NQE User’s Guide
Request 4636.ice submitted to queue: gust.
snow% rlogin gust
Sun Microsystems Inc. Solaris 2.5
gust% cd tmp
%tail TESTOUT
job start
/gust/u1/jane
Wed Feb 18 12:32:43 CST 1998
gust
gust%
120 SG–2148 3.3

Using Job Dependency [8]
NQE job dependency lets you specify an interdependency among events in shell
scripts or NQS requests. For example, you can ensure that one request runs
after another so that the second can use output from the first. This chapter
discusses job dependency. The following topics are covered:
•Using job dependency (Section 8.1, page 121)
•Using cevent (Section 8.2, page 122)
•Job dependency example (Section 8.3, page 124)
8.1 Using Job Dependency
Job dependency lets a client script or NQS request post, read, and wait for
events. Events are associated with the following information:
•Group. Each event is a member of a group. A group of requests or shell
scripts can communicate by using events. The group is identified by a name
that must be globally unique. Group names are limited to 1023 characters.
They must begin with a letter and contain accepted C identifier characters.
•Name. Each event has a name that must be unique within its group. Names
are limited to 1023 characters.
•Value. Optionally, events can have values. Client commands can set this
value when posting an event and can obtain the value when reading an
event. Values are limited to 4095 characters.
•Other information, such as the NQS originating user name, host, the time of
events, and so on.
exit events are unique events for tracking NQS requests. NQS sends an event
when a request completes and has the NQE_GROUP environment variable set.
The event group name is obtained from NQE_GROUP. The event name has the
form EXIT_$QSUB_REQNAME. The name is derived from the prefixEXIT_ (that
NQS automatically adds) and from the request’s name as specified (if you are
using the command line interface, the cqsub -r or qsub -r option is used to
specify a request’s name). This naming method lets the event be tested without
using the request ID. The originator of the request owns its exit event.
The following criteria determine access to events:
SG–2148 3.3 121

NQE User’s Guide
•The user name that posts an event owns the event.
•Anyone who knows the group name can read an event.
•Only root can read or delete all events.
8.2 Using cevent
To specify events and their associated actions, use the cevent(1) command.
The cevent command options let you post (-p), read (-r), clear (-c), and
list (-l) events.
To post an event with the name TAPE_HERE under the group mygroup, use the
following command:
cevent -p -g mygroup TAPE_HERE
You can then refer to the name TAPE_HERE when you read events.
The following csh command reads the event TAPE_A and stores it in a variable:
gottape=‘cevent -g mygroup -r TAPE_A’
The following ksh command reads the event TAPE_A and stores it in a variable:
set -A gottape $(cevent -g mygroup -r TAPE_A)
When you read events, you can specify a time interval to wait for the event to
occur (the -w option) and the time interval between queries to the Network
Load Balancer (NLB) database to see whether the event has occurred (the -z
option). The NLB stores information about events and reports the information
when it is queried.
The cevent -l option lists event values to standard output (stdout).
To list the events in a group named mygroup, use the following command:
%cevent -g mygroup -l
Time: Group: Name: Value:
----------------------------------------------------------------------
Mon Jan 26 10:14:14 1998 mygroup n2 specified
Fri Jan 23 08:42:30 1998 mygroup n1 <NONE>
122 SG–2148 3.3

Using Job Dependency [8]
The output tells you that you can read two events, one named n2 and the other
named n1. The event named n1 was created without a value. The event named
n2 has a value. It was created by using the following command:
cevent -g mygroup -p n2=specified
The cevent -d option specifies a delimiter between the values. You can use
delimiters to parse the output from cevent listings.
The default delimiter for -r commands is the : symbol. If you do not specify a
delimiter, your output will look like the following:
%cevent -g mygroup -r n1 n2
<NONE>:specified
If you specified the # symbol as a delimiter, your command and output would
look like the following:
%cevent -g mygroup -d ’#’ -r n1 n2
<NONE>#specified
You also can use the -d option to specify a delimiter between the events when
you list them by using the -l option. The default delimiter is a space. The
following example lists the events in the group mygroup and specifies that the
delimiter is a #symbol:
%cevent -g mygroup -d ’#’ -l
Fri Jan 23 08:42:30 1998#mygroup#n1#<NONE>
Mon Jan 26 10:14:14 1998#mygroup#n2#specified
When you are finished using the events in a group, you can clear them from the
database. To clear the events in a group named mygroup, use the following
command:
cevent -c -g mygroup
For a summary of cevent options, see the cevent(1) man page.
SG–2148 3.3 123

NQE User’s Guide
8.3 Job Dependency Example
In the following example, the user wants to submit the request JOBB after the
request JOBA successfully completes execution. The example uses ksh syntax.
#!/bin/ksh
#set NLB_SERVER (where data is stored) to host pendulum
export NLB_SERVER=pendulum
#set NQS_SERVER (where request is run) to host latte
export NQS_SERVER=latte
#set NQE_GROUP to A_THEN_B
export NQE_GROUP="A_THEN_B"
# Ensure that no events are outstanding
cevent -c
# Submit request JOBA
cqsub -r JOBA -q nqebatch <<EOF
ls -al
EOF
# Wait for completion of JOBA
done_A=‘cevent -r -w 10000 EXIT_JOBA‘
if (( $? != 0 )); then
echo "No exit event posted for JOBA"
exit 1
fi
echo "JOBA completed with exit status $done_A"
# Submit request JOBB and set its exit status to 23
cqsub -r JOBB -q nqebatch <<EOF
ls -al
exit 23
EOF
# Wait for completion of JOBB
done_B=‘cevent -r -w 10000 EXIT_JOBB‘
if (( $? != 0 )); then
echo "No exit event posted for JOBB"
exit 1
fi
echo "JOBB completed with exit status $done_B"
124 SG–2148 3.3

Using Job Dependency [8]
# List out events
echo "All events posted for group $NQE_GROUP:"
cevent -l
# Clear events
echo "Deleting events..."
cevent -c
exit 0
First the script sets up the user environment and clears all events that might be
outstanding.
Next, JOBA is submitted. NQS exports the NQE_GROUP environment variable
automatically, so you do not have to use the cqsub -x or qsub -x command.
The next cevent command waits for JOBA to complete. The event name
EXIT_JOB1 begins with the prefixEXIT_, which NQS automatically adds,
followed by the name you gave the request. The -w option specifies that you
want to wait no less than 10,000 seconds for the event to occur.
The next lines accommodate possible errors, such as a client command timing
out. When the exit status of the request returns, it is recorded to stdout, and
the script continues if the exit status is correct (that is, the exit status is 0,
indicating normal completion).
The final lines of the script submit the request JOBB and clear the events from
this script.
The output from the script would be as follows:
Request 49.latte submitted to queue: nqebatch.
JOBA completed with exit status 0
Request 50.latte submitted to queue: nqebatch.
JOBB completed with exit status 23
All events posted for group A_THEN_B:
Time: Group: Name: Value:
--------------------------------------------------------------
Mon Mar 16 15:01:16 1998 A_THEN_B EXIT_JOBB 23
Mon Mar 16 15:00:44 1998 A_THEN_B EXIT_JOBA 0
Deleting events...
SG–2148 3.3 125

Customizing Your Environment [9]
This chapter describes how you can use environment variables and default files
to customize your NQE environment. The following topics are discussed:
•Environment variables automatically set (Section 9.1, page 127)
•Customizing your NQE environment (Section 9.2, page 129)
•Configuring NQE Load window elements (Section 9.3, page 133)
9.1 Environment Variables Automatically Set
Your request begins execution with your login environment. A request is
executed under your user name unless you specify another user name. (For
information about using an alternative user name, see Section 5.8, page 99).
When a request begins execution, the following events occur:
•NQS determines the shell to use. By default, NQS uses your default login
shell. To specify a shell, modify your request file as described in Section 5.3,
page 94.
•The shell invoked by NQS executes login files. These files are the .profile
(sh or ksh shell) or .cshrc and .login (csh or tcsh shell) files of the
request owner’s user name.
•NQS saves the HOME,LOGNAME,MAIL,PATH,SHELL,TZ, and USER
environment variables and renames them with the QSUB_ prefix, as shown
in Table 3.
•NQS also sets the environment variables shown in Table 4.
•If you send your request to the NQE database, the LWS sets the
environment variables shown in Table 5.
SG–2148 3.3 127

NQE User’s Guide
Table 3. Environment Variables Set by NQS
Name NQS name Description
HOME QSUB_HOME Path name of the home directory for the user who submitted
the request
LOGNAME QSUB_LOGNAME Login ID (user name) of the user who submitted the request
MAIL QSUB_MAIL Path name of the mail box for the user who submitted the
request
PATH QSUB_PATH Search path for commands for the user who submitted the
request
SHELL QSUB_SHELL
TZ QSUB_TZ Time zone for the user who submitted the request
USER QSUB_USER User name of the user who submitted the request
Table 4. Additional Environment Variables Set by NQS
Name Description
NQE_SHEPHERD_PID Shepherd process ID (PID) of the job
QSUB_HOST Host name of the NQS server
QSUB_REQID Request identifier for the request
QSUB_REQNAME Name of the request
QSUB_WORKDIR Current directory when the request was
submitted
QSUB_NQC Host name of the NQE client
128 SG–2148 3.3

Customizing Your Environment [9]
Name Description
TMPDIR Request’s temporary directory, created by NQS,
as described in Section 4.16, page 82.
ENVIRONMENT NQS sets the ENVIRONMENT environment
variable to a value of BATCH. You can use this
variable, for example, in .profile,.login,or
.cshrc files to differentiate between interactive
and batch sessions. This environment variable
can be used to avoid performing terminal setup
operations for a batch request. A benefit of NQS
initiating the batch request as a login shell is that
.profile,.login,or.cshrc scripts are run,
and your environment is set up as expected.
Table 5. Environment Variables Set by the LWS
Name Description
NQEDB_CLIENTHOST Host from which the request was submitted
NQEDB_ID Database name and the task ID (for example,
nqedb.t123)
NQEDB_USER NQE database user name that owns the task
(usually $LOGNAME)
9.2 Customizing Your NQE Environment
In addition to setting the environment variables that you must set to use NQE
(see Section 2.2, page 22), you can also set the environment variables described
in this section.
Note: Setting any of the environment variables listed in Table 6, page 130
overrides your NQE system’s default setting, which is the value in the NQE
system configuration file.
If you use the NQE GUI, you can set the equivalent of the following
environment variables by selecting specific menu options. You can use the
Config display to set (configure) the interface to your individual preferences.
You can then specify a profile for use with a specific request during the submit
SG–2148 3.3 129

NQE User’s Guide
or job-launching process. You can also use the Config display to view how
your variables are currently set.
You can specify that all environment variables that you have set whose names
do not conflict with the automatically exported variables also be exported. If
you use the NQE GUI, select Submit->Configure->General
Options->Export ENV Variables. If you use the cqsub command or the
qsub command, use the -x option.
Table 6. NQE Environment Variables You Can Set
Name Description
QSUB_QUEUE Names a specific queue to be used, as
described in Section 4.9, page 65.
NQSATTR Lists attributes associated with the request,
as described in Section 4.6, page 60.
NQSCHGINVOKE Specifies that NQS invoke one shell
instead of two shells, as described in
Section 5.3, page 94.
NQEINFOFILE Specifies the path name of the NQE
configuration file, which is the nqeinfo
file. If this is set, the values for all
environment variables that are set within
the nqeinfo file will be used. If you use
the command line interface, this
environment variable is effective only
when using the client commands (cevent,
cload,cqdel,cqstatl, and cqsub). For
more information on the nqeinfo
variables, see the nqeinfo(5) man page.
130 SG–2148 3.3

Customizing Your Environment [9]
Name Description
NQE_GROUP Specifies a name associated with one or
more job dependency events, as described
in Section 8.1, page 121. If you do not set
this variable, you must specify a group
name on each cevent command line.
NQS automatically exports the value of the
environment variable if you have set it, so
you do not have to export all environment
variables each time you submit the
request. For information about using job
dependency, see Chapter 8, page 121. If
you use the command line interface, this
environment variable is effective only
when using the client commands (cevent,
cload,cqdel,cqstatl, and cqsub).
NQE_DEST_TYPE Designates the destination of your request
(either nqs or nqedb), as described in
Section 4.3.2, page 57, and the cqsub(1)
man page. If you use the command line
interface, this environment variable is
effective only when using the client
commands (cevent,cload,cqdel,
cqstatl, and cqsub).
NQEDB_USER Designates the NQE database user name
for a request being submitted to the NQE
database, as described in Section 4.3.1,
page 56, and the cqsub(1) man page. If
you use the command line interface, this
environment variable is effective only
when using the client commands (cevent,
cload,cqdel,cqstatl, and cqsub).
SG–2148 3.3 131
NQE User’s Guide
Name Description
NQS_PASSWORD_NEEDED Prompts for a password when you submit
requests, request status, delete requests, or
send signals to requests from the client; for
information about how to set this
environment variable, see Section 5.6, page
97. If you use the command line interface,
this environment variable is effective only
when using the client commands (cevent,
cload,cqdel,cqstatl, and cqsub).
NQS_SERVER Directs your request to run on a specified
server or to communicate with the
specified server. If you use the command
line interface, this environment variable is
effective only when using the client
commands (cevent,cload,cqdel,
cqstatl, and cqsub).
NLB_SERVER Designates a specified host in your
network on which the NLB software is
located. This environment variable is used
for system load displays. If you use the
command line interface, this environment
variable is effective only when using the
client commands (cevent,cload,cqdel,
cqstatl, and cqsub).
You can set the ilb environment variables, as described in Table 7; for
information about executing a load-balanced interactive command, see the
ilb(1) man page:
132 SG–2148 3.3

Customizing Your Environment [9]
Table 7. ilb Environment Variables
Name Description
ILB_USER Defines the login name to use on the remote
system. This variable also alters the value of
$USER in the ilbrc files. The default value is
whatever $LOGNAME is set to be in your
environment.
ILB_PROMPT A regular expression that identifies your prompt
on a remote machine. The default value is
"^.*\[%$#:\] $", which looks for any string
ending with %,$,#,or:.
Note: The NLB_SERVER environment variable can also be used when using
the ilb environment variables; NLB_SERVER defines the machine name and
port number of the NLB server.
9.3 Configuring NQE Load Window Elements
You can configure elements in the NQE GUI Load window. To configure
elements, edit the .Xdefaults files or use the nqe(1) command. For
information about the nqe command options, see the nqe(1) man page.
Some of the items you can configure are as follows:
•Creation, modification, configuration, and removal of charts
•Colors used in the displays for such things as menu bars and for indicating
different queues, requests, or old data
•How often the data in the displays is updated
•The interval during which data can remain in a display without being
updated before it is marked as old
•The chart formulae that are used in the Load displays
•The number and names of the charts in the Load displays
•Which mouse buttons cause which actions to occur
•The height, width, and location of the initial displays
SG–2148 3.3 133

NQE User’s Guide
Alternatively, you can include your preferences in your $HOME/.Xdefaults
file.
If you edit $HOME/.Xdefaults, the lines that customize your display are
prefixed by the command name, as follows:
nqe*critcolor: red
This line makes red the default color to use when a bar is displayed with a
value that is over the critical threshold.
If you create separate files, you can eliminate the name of the command.
Note: You can vary fonts in the displays, but only titles on the displays
change. The fixed portions of the display will not change. For more
information, see the nqe(1) man page.
The following is an example of an .Xdefaults file:
*server: poplar
*ident: NLB
*age: 90
*refresh: 3
*chartnames: memdem syscpu idlecpu totio
*attributes: {{NLB_HARDWARE ""} {NLB_OSNAME ""} {NLB_RELEASE ""}\
{NLB_NCPUS ""} {NLB_PHYSMEM Kbytes} {NLB_FREEMEM Kbytes}\
{NLB_SYSCPU %} {NLB_IDLECPU %} {NLB_NUMPROC ""}\
{NLB_PSWCH /sec} {NLB_IOTOTAL Kbytes/sec}\
{NLB_SWAPPING Kbytes/sec} {NLB_TMPNAME ""}\
{NLB_FREETMP Mbytes} {NLB_SWAPSIZE Mbytes}\
{NLB_SWAPFREE Mbytes}}
*regcolor: green
*critcolor: red
*memdem.title: Memory Usage
*memdem.expr: 100.0 * (NLB_PHYSMEM - NLB_FREEMEM + \
1024.0 * (NLB_SWAPSIZE - NLB_SWAPFREE)) / NLB_PHYSMEM
*memdem.min: 0
*memdem.max: 200
*memdem.log: false
*memdem.abrv: mem
*memdem.critical: 150
*memdem.suffix: %
*syscpu.min: 0
*syscpu.max: 50
134 SG–2148 3.3

Customizing Your Environment [9]
*syscpu.log: false
*syscpu.abrv: sys
*syscpu.critical: 25
*syscpu.suffix: %
*idlecpu.min: 0
*idlecpu.max: 50
*idlecpu.log: false
*idlecpu.abrv: idl
*idlecpu.critical: 25
*idlecpu.suffix: %
*idlecpu.critcolor: green
*idlecpu.regcolor: red
*totio.min: 0
*totio.max: 50
*totio.log: false
*totio.abrv: i/o
*totio.critical: 25
*totio.suffix: %
*totio.critcolor: violet
*command1: popup_hostinfo $thishost
*command2: exec xterm -title $thishost -n $thishost -e rsh $thishost &"
*command3: popup_minichart $thishost
SG–2148 3.3 135

Monitoring Requests [10]
This chapter describes how to use the NQE GUI Status window and the
cqstatl command or qstat command to display information about requests.
The following topics are covered:
•Using the NQE GUI Status window (Section 10.1, page 137)
•Using the cqstatl command or the qstat command (Section 10.2, page
141)
–Displaying summaries (Section 10.2.1, page 142)
–Displaying details (Section 10.2.2, page 146)
–Displaying requests on other servers (Section 10.2.3, page 149)
–Specifying another user name (Section 10.2.4, page 150)
–Displaying Cray MPP information (Section 10.2.5, page 151)
•Request status codes (Section 10.3, page 151)
Note: If you do not have an NQE license, you cannot access the NQE GUI
and the cqstatl command. You can access only the qstat command from
an NQS server.
If the UNICOS multilevel security (MLS) feature or the UNICOS/mk security
enhancements are enabled on your system and NQS is configured to enforce
mandatory access control (MAC), your active label must dominate the job
submission label in order for you to receive status information. To display the
job submission and execution label information for a specific job, use the qstat
-f command. NQS managers and operators bypass the MAC checks.
10.1 Using the NQE GUI Status Window
The NQE GUI Status window provides a refreshed summary of request
status. By default, you can see all of the requests in the group of execution
nodes in the NQE cluster; your NQE administrator cannot disable this display.
However, your NQE administrator can enable or disable the display that
provides the full details of the requests that you submit.
Using the NQE GUI Status window lets you do the following:
SG–2148 3.3 137
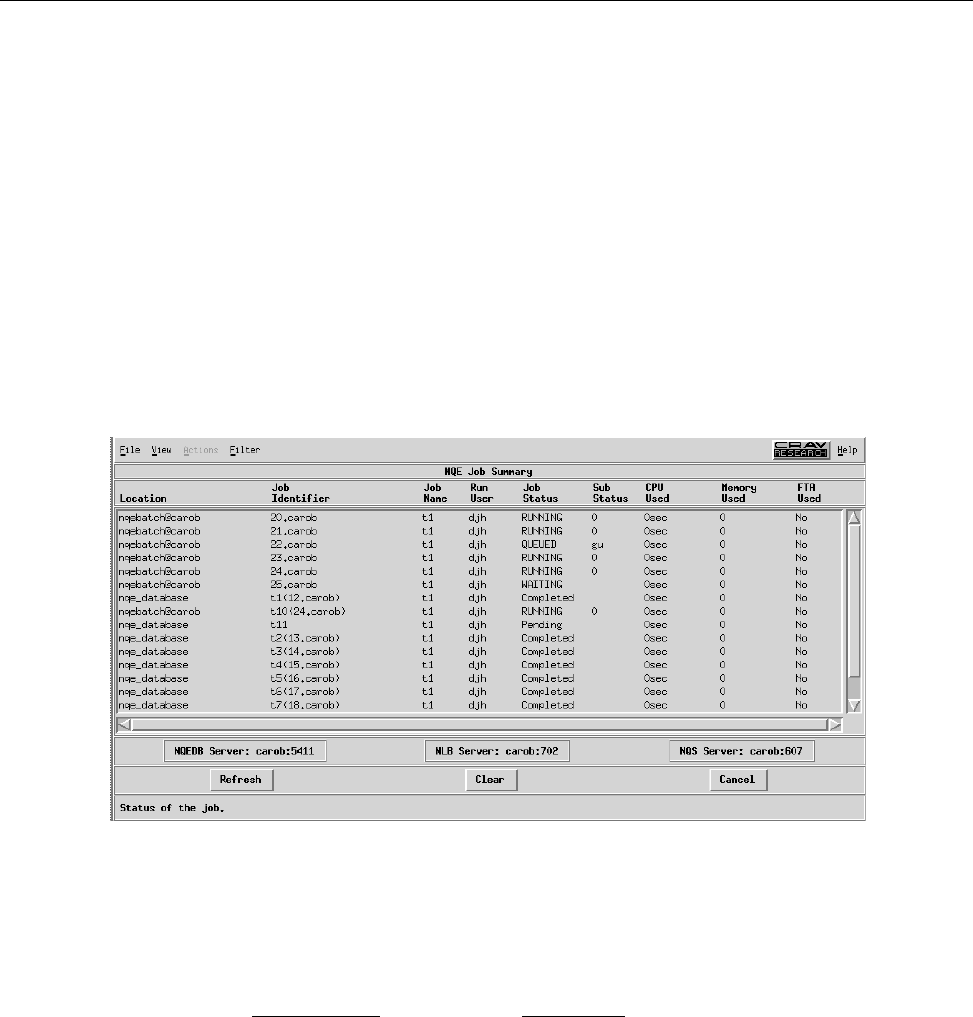
NQE User’s Guide
•Monitor status of all your requests. You do not have to know the location of
your request before you request status on it. Request status is updated
(refreshed) at configurable intervals.
•Tailor the display. You can specify how you want your display to look and
what information is displayed.
To open NQE GUI Status window, access the NQE GUI by keying in the nqe
command and, using the left mouse button, click once on the Status button of
the initial NQE GUI button bar.
Note: The mouse button settings described in this guide are the default
settings.
Figure 13 shows the Status window.
New snap needed for
this screen!
a10375
Figure 13. NQE GUI Status Window
The following data about requests is displayed by default:
Column name Description
Location The request’s location, which can be either a
queue or the NQE database.
138 SG–2148 3.3

Monitoring Requests [10]
Job Identifier The job identifier; possible identifiers are as
follows:
•NQS request ID (for example, 5703.fog).
•NQE database ID, known as the task ID or tid
(for example, t1).
•NQE database ID with the NQS request ID;
the copy of the request that is executed
receives an NQS request ID (for example,
t4(61178.rain)).
Job Name Name of the request
Run User User name with which the request was submitted.
Job Status Status of the request. For details of the
abbreviations used, see Section 10.3.1, page 151.
SubStatus Substatus of the request. For details of the
abbreviations used, see Section 10.3.2, page 152.
Some states do not have an associated substatus.
CPU Used CPU usage (in seconds) for the request. On some
platforms, a display of the amount of CPU that
the request consumes is not available, and a 0
appears in this column.
Memory Used Memory usage (in words) for the request. On
some platforms, a display of the amount of
memory that the request consumes is not
available, and a 0 appears in this column.
FTA Used FTA usage for the request; usage setting can be
Yes or No.
You can get the following online help by using the NQE GUI Status window:
•The context-sensitive help area is located in the lower left area at the bottom
of the Status window. This area shows one-line informational messages
about the area on the Status window that is directly under your mouse
pointer.
•Help menu button. The Help menu button is located in the upper right of
the window. It lets you open a window that displays help topics that you
can select and view. Use the left mouse button to select a topic.
SG–2148 3.3 139

NQE User’s Guide
From the main Status window, you can select specific requests and receive a
detailed display. To view a detailed display, do one of the following:
•Double-click on a request in the main window.
•Click once on the request in the main window, pull down the Actions
menu, and select Detailed Status.
This action can take a long time to complete, depending on network traffic.
Note: If you cannot perform this operation, you cannot perform the same
operation by using the cqstatl -f command or the qstat -f command.
Your privileges may not be set correctly.
The Filter menu lets you control the number of requests displayed. Table 8,
page 140 explains how you can use these filters. Figure 14 shows a sample
Originating Host submenu.
Note: To select an item, click on the box next to it, and then click the Apply
button. The Set All button selects all available options in the display. The
Unset All button eliminates all selected items. If you click on the Unset
All button, you can select other items you want to appear.
Table 8. NQE GUI Status Window Filter Options
Filter Description
Destination Host Displays only specified destination hosts, including the NQE
database
Run User Displays only requests currently owned by the specified user
name
Originating User Displays only requests originally submitted by the specified
user name
Originating Host Displays only requests submitted from the specified host,
including the NQE database
Location Displays only requests that are at the specified location
Job Identifier Displays only requests that have the specified NQS request
identifier or NQE database task identifier
Clear Filters Resets all filters to a cleared state
140 SG–2148 3.3
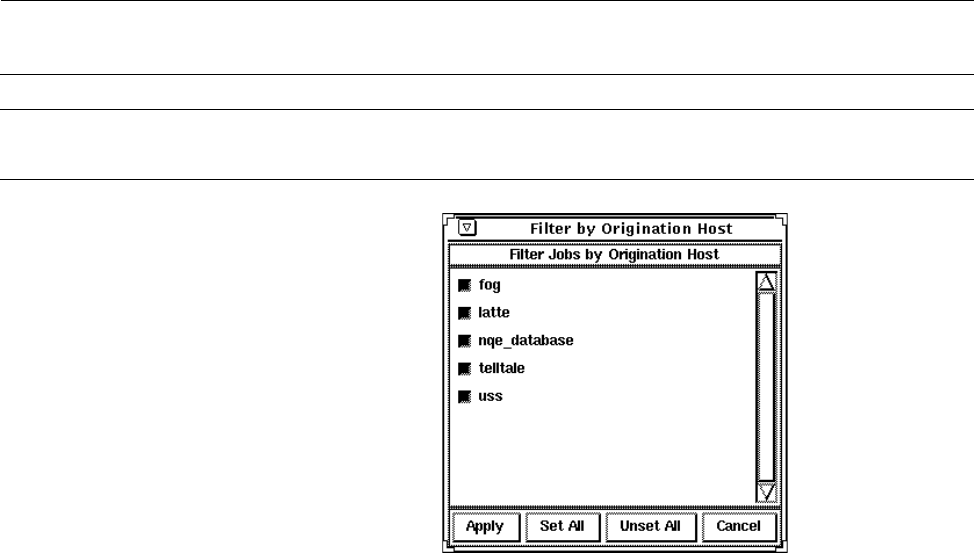
Monitoring Requests [10]
Filter Description
List Filters Lists a summary of all filters in use
Save Filters Saves all filters in use
a10377
Figure 14. Sample Originating Host Filter Submenu
10.2 Using the cqstatl and qstat Commands
The cqstatl command and the qstat command provide request status
information in an ASCII-based, static display.
For a summary of the cqstatl and qstat command options, see the
cqstatl(1) and qstat(1) man pages.
This section covers the following topics:
•Displaying summaries (Section 10.2.1, page 142)
•Displaying details (Section 10.2.2, page 146)
•Displaying requests on other servers (Section 10.2.3, page 149)
•Specifying another user name (Section 10.2.4, page 150)
•Displaying Cray MPP information (Section 10.2.5, page 151)
SG–2148 3.3 141

NQE User’s Guide
10.2.1 Displaying Summaries
You can display a summary of requests that are in batch queues, pipe queues,
and the NQE database (requests in pipe queues are not applicable for requests
sent to the NQE database).
10.2.1.1 Summary of Particular Requests
To display summary information for particular requests sent to the NQE
database, use the following command (the qstat command cannot be used for
requests sent to the NQE database):
cqstatl -d nqedb tids
The tids argument is the task identifier displayed when you submitted the
request to the NQE database. You can specify more than one task identifier.
Separate request identifiers with a space. (The tid is also displayed on the NQE
GUI Status window.)
To display summary information for particular NQS requests, you can use the
following commands:
cqstatl -d nqs requestids
qstat requestids
The requestids argument is one of the following:
•If you submitted a request to NQS, requestid is the request identifier
displayed when you submitted the request to NQS.
•If you submitted a request to the NQE database, requestid is the request
identifier of the copy of the request executing in NQS. The requestid is
displayed on the NQE GUI Status window in parentheses after the tid (for
example, t4(61178.rain)).
You can specify more than one request. Separate request identifiers with a space.
10.2.1.2 Summary of All Your Requests
To display summary details of all your requests in the NQE database, use the
following command (the qstat command cannot be used for requests sent to
the NQE database):
cqstatl -d nqedb -a
142 SG–2148 3.3

Monitoring Requests [10]
Note: If you have the NQE_DEST_TYPE environment variable set to be
nqedb, omit the -d nqedb option.
The following display shows a summary of all requests that belong to the user
who issued the cqstatl -d nqedb -a command.
carob$
carob$ cqstatl -d nqedb -a
--------------------------------
NQE Database Request Summary
--------------------------------
IDENTIFIER NAME SYSTEM-OWNER USER LOCATION/QUEUE ST
---------- ------- --------------- -------- -------------- ---
t1 STDIN monitor.main shelley NQE Database NComp
t3 STDIN monitor.main shelley NQE Database NTerm
t4 STDIN monitor.main shelley NQE Database NTerm
t5 STDIN scheduler.main shelley NQE Database NPend
Note: By default , if you use the cqstatl command without options or
arguments, the output is a summary of each NQS queue on the NQS server.
However, if you have the NQE_DEST_TYPE environment variable set to be
nqedb, and you use the cqstatl command without options or arguments,
the output is a summary of all your requests in the NQE database minus all
terminated requests. (For additional information about monitoring queues,
see Chapter 11, page 155.)
The columns in the request summary displays have the following meanings:
Column name Description
IDENTIFIER The task identifier, as displayed when you first
submitted the request. The tid is also displayed
on the NQE GUI Status window.
NAME The name of the request. If you omitted this
option when submitting the request, NAME is the
name of the script file, or STDIN if the request
was created from standard input.
SYSTEM-OWNER The NQE database component currently owning
the request.
SG–2148 3.3 143

NQE User’s Guide
USER The name under which the request will be
executed at the NQS system (either the name of
the user who submitted the request or the name
of the user specified when the request was
submitted).
LOCATION/QUEUE The request resides in the NQE database.
ST An indication of the current state of the request.
This can be composed of a state value and a
substate value (similar to major and minor status
values for requests sent to NQS). For a
description of state codes, see Section 10.3.1, page
151. For a description of substate codes, see
Section 10.3.2, page 152.
You cannot use the cqstatl or qstat command to display details about the
requests of other users unless you are an NQE administrator. For more
information, see Section 10.2.4, page 150.
To display summary details of all your requests on your NQS server (as defined
by NQS_SERVER), use the following command, for example:
cqstatl -a
Note: If you have the NQE_DEST_TYPE environment variable set to be
nqedb, the preceding command displays the output shown in Section
10.2.1.2, page 142.
The following is a summary of all NQS requests that belong to the user who
issued the cqstatl -a command:
%cqstatl -a
-------------------------------
NQS BATCH REQUEST SUMMARY
-------------------------------
IDENTIFIER NAME USER LOCATION/QUEUE JID PRTY REQMEM REQTIM ST
------------ ------- -------- -------------------- ---- ---- ------ ------ ---
1108.coal testjob us1 small@green1 3494 --- 262144 600 R
------------------------------
NQS PIPE REQUEST SUMMARY
------------------------------
IDENTIFIER NAME OWNER USER LOCATION/QUEUE PRTY ST
------------- ------- -------- -------- --------------------- ---- ---
1049.coal test2 1201 us1 gust@coal 1 R
144 SG–2148 3.3

Monitoring Requests [10]
The columns in the request summary displays have the following meanings:
Column name Description
IDENTIFIER The request identifier (as displayed when you first
submitted the request). The request identifier is
also displayed on the NQE GUI Status window.
NAME The name of the request. If you omitted this
option when submitting the request, NAME is the
name of the script file, or STDIN if the request
was created from standard input.
OWNER (Pipe queue displays only) The user ID under
which you were logged in when you submitted
the request.
USER The user name under which the request will be
executed at the NQS system.
LOCATION/QUEUE The NQS queue in which the request currently
resides.
JID (Batch queue displays only) NQS job identifier.
PRTY For a request awaiting execution, its intraqueue
priority; for an executing request, its nice value.
The priority value is not available until after the
NQS scheduler examines the queue (the priority
field displays only dashes (---) while the queue
is examined). After the scheduler examines the
queue, the requests are sorted in order of priority.
For an executing request, the priority is its nice
value; for a queued request, the priority is its
intraqueue priority, which is a value from 1
through 999. For an executing request that is
scheduled by using the qmgr schedule
request first or qmgr schedule request
next command, the priority is displayed as FRST
or NEXT, respectively. For an executing request
that is scheduled by using the qmgr schedule
request now command, the priority is
displayed as NOW.
REQMEM (Batch queue displays only) The maximum
amount of memory (in Kilowords) that the
request is allowed to use if the request has not
SG–2148 3.3 145

NQE User’s Guide
started to execute. If the request is executing,
REQMEM shows the current amount of memory
allocated to the request.
REQTIM (Batch queue displays only) The number of
seconds of CPU time remaining for the request.
You can monitor this column to determine how
your request is progressing.
ST An indication of the current state of the request.
This can be composed of a major and a minor
status value. For a description of major status
codes, see Section 10.3.1, page 151. For a
description of minor status codes, see Section
10.3.2, page 152.
You cannot use the cqstatl command or the qstat command to display
details about the requests and NQS activity of other users unless you are an
NQE administrator or unless you are authorized to execute NQS requests under
another user name. For more information, see Section 10.2.4, page 150.
10.2.2 Displaying Details
To display the full details of all your requests, use one of the following
commands.
•If you submitted a request to NQS, you can use one of the following
commands:
cqstatl -d nqs -f requestids
qstat -f requestids
The requestids argument is the request identifier displayed when you
submitted the request to NQS. You can specify more than one request.
Separate request identifiers with a space.
•If you submitted a request to the NQE database, use the following command:
cqstatl -d nqedb -f tids
Note: If you have the NQE_DEST_TYPE environment variable set to be
nqedb, omit the -d nqedb option.
146 SG–2148 3.3

Monitoring Requests [10]
For requests sent to the NQE database, the tids argument is the task
identifier of the request in the NQE database. You can specify more than
one task. Separate task identifiers with a space. When the request is in NQS,
it receives a requestid, which is displayed on the NQE GUI Status window
in parentheses after the tid (for example, t4(61178.rain)).
The following sample display shows the output if you specified request 155 in
an NQS batch queue. Some of the resource limits shown in the display are
enclosed in the < and > symbols, which indicate that you did not explicitly
specify the limit. Instead, NQS has taken the limit from either the resource limits
associated with the queue or the user database (UDB) limits associated with the
user under whom the request is executing (whichever limit is most restrictive).
Per-process and per-request limits are associated with each request. These are
shown in the PROCESS LIMIT and REQUEST LIMIT columns in the display.
For a discussion of per-process and per-request limits, see Section 5.1.3, page 89.
Note: If a request that was sent to the NQE database is executing, cqstatl
obtains status from NQS. If the request that was sent to the NQE database is
not executing, status information is obtained from the NQE database. The
detailed display of an NQE database request will be similar to the following
sample display; it also will include the request’s NQE task identifier (tid).
For more information on the display fields, see the cqstatl(1) or the qstat(1)
man page.
%cqstatl -d nqs -f 155 | more
----------------------------------
NQS BATCH REQUEST: job.latte Status: RUNNING
---------------------------------- Processes
Active
NQE Task ID: - -
NQS Identifier: 155.latte Target User: jane
Group: pubs
Account/Project: <[1201]>
Priority: ---
User Priority/URM Priority Increment: 1
Job Identifier: 16802
Local Scheduler: Requested = OS default, Using = OS default
Created: Wed Mar 18 1998 Queued: Wed Mar 18 1998
12:34:04 CST 12:34:08 CST
<LOCATION/QUEUE>
Name: nqebatch@latte Priority: 30
<RESOURCES>
SG–2148 3.3 147

NQE User’s Guide
PROCESS LIMIT REQUEST LIMIT
CPU Time Limit <unlimited> <unlimited>
Memory Size <256mw> <256mw>
Permanent File Space <100mb> <0>
Quick File Space <0> <0>
Type a Tape Drives <0>
Type b Tape Drives <0>
Type c Tape Drives <0>
Type d Tape Drives <0>
Type e Tape Drives <0>
Type f Tape Drives <0>
Type g Tape Drives <0>
Type h Tape Drives <0>
Nice Increment <0>
Temporary File Space <0> <0>
Core File Size <256mw>
Data Size <256mw>
Stack Size <256mw>
Working Set Limit <256mw>
MPP Processor Elements <0>
MPP Time Limit <10sec> <10sec>
Shared Memory Limit <0>
Shared Memory Segments <0>
MPP Memory Size <256mw> <256mw>
<FILES> MODE NAME
Stdout: spool jane@latte:/home/ice34/jane/job.o155
Stderr: spool jane@latte:/home/ice34/jane/job.e155
Job log: spool jane@latte:/home/ice34/jane/job.l155
Restart: <UNAVAILABLE>
<MAIL>
Address: jane@latte When:
<PERIODIC CHECKPOINT>
System: off Request: System Default
Cpu time: on 60 Min Cpu time: def <Default>
Wall clock: off 180 Min Wall clock: def <Default>
Last checkpoint:None
<SECURITY>
Submission level: N/A
Submission compartments: N/A
Execution level: N/A
Execution compartments: N/A
<MISC>
Rerunnable yes User Mask: 027
148 SG–2148 3.3

Monitoring Requests [10]
Restartable yes Exported Vars: basic
Shell: DEFAULT
Orig. Owner: 1201@latte
10.2.3 Displaying Requests on Other Servers
Note: Requests submitted to the NQE database do not require the cqstatl
command to view requests on other servers. The NQE GUI Status window
displays all requests submitted to the NQE database that are routed to any
location in the group of execution nodes in the NQE cluster.
If your requests are routed to queues at a remote NQS server, you can specify
the name of the remote system in one of the following ways to display details
about the requests:
•Use the cqstatl -h command or the qstat -h command and specify the
network host name of the NQS server. For example, the following command
displays a summary status of all your requests at an NQS host called sun1:
cqstatl -a -h sun1
•Include the host name when you specify a specific request identifier to
cqstatl or qstat, as follows:
request_identifier@target_host
The cqstatl command in the following example displays summary
information about a request called 1060.coal at an NQS server called green1:
%cqstatl 1060.coal@green1
-------------------------------
NQS BATCH REQUEST SUMMARY
-------------------------------
IDENTIFIER NAME USER QUEUE JID PRTY REQMEM REQTIM ST
------------- ------- -------- ------------------ ---- ---- ------ ------ ---
1060.coal testjob us1 small@green1 3494 --- 262144 600 R
If password validation is in force, you must include the cqstatl -P option or
set the NQS_PASSWORD_NEEDED environment variable to ensure that you are
prompted for a password. The password requested is for the user name at the
remote NQS server on which the request executes.
SG–2148 3.3 149

NQE User’s Guide
If both password validation and validation files are in force at the remote
system, omit the -P option on the cqstatl command line. The validation file
is then checked.
If validation files are checked, the cqstatl command is successful only if your
user name and a host are included in a validation file at the remote system. For
more information about passwords and validation files, see Chapter 2, page 21.
If the UNICOS MLS feature or the UNICOS/mk security enhancements are
enabled on a remote host, you cannot display information from that remote
host if the host has a workstation access list (WAL) entry for the host of origin
that restricts your access to NQS services.
10.2.4 Specifying Another User Name
To display information about requests submitted under another user name, use
one of the following commands:
cqstatl -u username
qstat -u username
Note: For NQE database requests, you must use the following command:
cqstatl -d nqedb -u dbuser=dbusername.
If password validation is in force, you must include the cqstatl -P option or
set the NQS_PASSWORD_NEEDED environment variable to ensure that you are
prompted for a password.
If both password and file validation are in force, you do not have to set the
environment variable or specify the cqstatl -P option. The validation file for
username is checked as described in Section 2.8, page 27.
The following example displays summary information about the requests
submitted by user name sandy that are executing at remote server sun1:
cqstatl -a -h sun1 -u sandy
If the UNICOS MLS feature or the UNICOS/mk security enhancements are
enabled on your system and you submit a remote request, the system might be
configured to require the /etc/hosts.equiv and .rhosts files to each
contain a match for the remote host and require that the remote user and local
user names match (that is, the -u option is not allowed).
150 SG–2148 3.3

Monitoring Requests [10]
10.2.5 Displaying Cray MPP Information
To display information related to the Cray MPP systems, use the cqstatl -m
command or the qstat -m command. For more information about this
command option, see the cqstatl(1) or the qstat(1) man page.
10.3 Request Status
The request status is expressed in two parts: the major status and the minor
status if the request was sent to NQS, or the state and substate if the request
was sent to the NQE database. The status codes are described in the following
sections.
10.3.1 Status Codes
The major status or state of a request can be one of the following codes:
Status/State Description
AARRIVING. The request is arriving in a queue.
CCHECKPOINTED. (UNICOS, UNICOS/mk, and IRIX systems
only.) The request in a batch queue was checkpointed and is no
longer running.
DDEPARTING. The request left a pipe queue before its arrival at a
destination queue.
EEXITING. The request in a batch queue completed execution and
is currently leaving the system.
HHELD. The request was prevented from entering another state by
operator action. If the request had already been running, a restart
file was created.
NNQE Database. The request is in the NQE database.
PPREEMPTED. The request was preempted. When a request is
preempted, a restart file is created.
QQUEUED. The request is in a queue and is eligible for routing or
running.
RROUTING. The request is being routed to another queue (no
minor status is associated with this status).
SG–2148 3.3 151

NQE User’s Guide
RRUNNING. The request is in a batch queue and is currently being
processed.
SSUSPENDED. The request is executing in a batch queue, but its
execution was suspended.
UUNKNOWN. The state of the request cannot be determined.
WWAITING. The request is prevented from proceeding by a date
and/or time constraint imposed at the time of submission (by the
cqsub -a or qsub -a command), by the inaccessibility of a
pipe queue destination, or because a license cannot be obtained.
no entry <CHANGING STATE>. The status of the request is changing. This
request status can also be displayed if the request was moved
into the running subqueue but the associated session has not yet
been created, if the NQS daemon aborted or hung while the
request was running, or if the shepherd process is taking a long
time to process the request exit.
10.3.2 Substatus Codes
The minor status or substate of a request can be one of the following codes:
Status/Substate Description
number The number of currently active processes started
by the request.
ce (Cray MPP systems only) The complex Cray MPP
processing element (PE) limit was reached.
cg The complex group run limit was reached.
cm The complex memory limit was reached.
Comp The request that was submitted to the NQE
database has completed processing.
cq The complex quickfile (SDS) limit was reached.
cr The complex run limit was reached.
cu The complex user run limit was reached.
du The pipe queue destination is currently
unavailable.
ge (Cray MPP systems only) The global Cray MPP
PE limit was reached.
152 SG–2148 3.3

Monitoring Requests [10]
gg The global group run limit was reached.
gm The global memory limit was reached.
gq The global quickfile (SDS) limit was reached.
gr The global run limit was reached.
gt The global tape drive limit was reached.
gu The global user run limit was reached.
lm A license could not be obtained for the request.
md (Cray MPP systems only) The CRAY T3D system
is not accessible.
mp (Cray MPP systems only) The CRAY T3D system
is accessible but insufficient PEs are available.
New The request is in the NQE database.
nu The NLB server is not available.
op The current major status of the request occurred
through operator action.
Pend The request in the NQE database is awaiting
scheduling (pending).
qe (Cray MPP systems only) The queue
Cray MPP PE limit was reached.
qg The queue group run limit was reached.
qm The queue memory limit was reached.
qq The queue quickfile (SDS) limit was reached.
qr The queue run limit was reached.
qs The queue in which the request resides was
stopped.
qu The queue user run limit was reached.
rj (UNICOS systems only) The Unified Resource
Manager (URM) rejected the request.
Sche The request is in the NQE database and has been
scheduled by the NQE scheduler.
sh The system was shut down.
SG–2148 3.3 153

NQE User’s Guide
Subm A copy of the request has been submitted for
processing from the NQE database.
td (UNICOS systems only) The UNICOS tape
daemon is unavailable and the request asks for
tape resources.
Term The copy of the request that was submitted for
processing from the NQE database has
terminated.
us (UNICOS systems only) The request is in the
URM scheduling pool.
?? The current status of the request is unknown.
154 SG–2148 3.3

Monitoring Queues [11]
This chapter describes how to use the cqstatl command and the qstat
command to monitor NQS queues. This information does not apply to requests
submitted to the NQE database. The following topics are covered:
•Displaying queue summaries (Section 11.1, page 155)
–Batch queue summary (Section 11.1.1, page 157)
–Pipe queue summary (Section 11.1.2, page 158)
•Displaying queue details (Section 11.2, page 159)
–Pipe queue details (Section 11.2.1, page 159)
–Batch queue details (Section 11.2.2, page 162)
•Displaying batch queue limits (Section 11.3, page 165)
•Monitoring remote queues (Section 11.4, page 166)
Note: The concept of queues does not exist in the NQE database. Only
when a copy of an NQE database request is submitted to a given NQS
does it enter a queue. This chapter assumes that the NQS_DEST_TYPE
variable is set to nqs.
Note: If you do not have an NQE license, you cannot access the NQE GUI
and the cqstatl command. You can access only the qstat command from
an NQS server.
If the UNICOS multilevel security (MLS) feature or the UNICOS/mk security
enhancements are enabled on your system and NQS is configured to enforce
mandatory access control (MAC), your active label must dominate the job
submission label for you to receive status information. To display the job
submission and execution label information for a specific job, use the cqstatl
-f or qstat -f command. NQS managers and operators bypass the MAC
checks.
11.1 Displaying Queue Summaries
NQS uses both batch and pipe queues. To display a summary of a specific type
of queue, use one of the following cqstatl or qstat command options:
SG–2148 3.3 155

NQE User’s Guide
Option Description
-b A summary of all batch queues
-p A summary of all pipe queues
To display summary information about all NQS queues at your NQS server, use
either the cqstatl command or the qstat command; for example:
cqstatl
The display produced by this command includes information about pipe and
batch queues.
Often this is a large display and will scroll off your screen. To control scrolling,
redirect the output from cqstatl or qstat to the more(1) command; for
example:
cqstatl | more
For example, the following display shows a summary of all NQS queues:
%cqstatl
-----------------------------
NQS BATCH QUEUE SUMMARY
-----------------------------
QUEUE NAME LIM TOT ENA STS QUE RUN WAI HLD ARR EXI
--------------------- --- --- --- --- --- --- --- --- --- ---
nqebatch 5 11 yes on 9 2 0 0 0 0
--------------------- --- --- --- --- --- --- --- --- --- ---
latte 5 11 9 2 0 0 0 0
--------------------- --- --- --- --- --- --- --- --- --- ---
----------------------------
NQS PIPE QUEUE SUMMARY
----------------------------
QUEUE NAME LIM TOT ENA STS QUE ROU WAI HLD ARR DEP DESTINATIONS
--------------------- --- --- --- --- --- --- --- --- --- --- -------------
nqenlb 1 0 yes on 0 0 0 0 0 0
--------------------- --- --- --- --- --- --- --- --- --- --- -------------
latte 5 0 0 0 0 0 0 0
--------------------- --- --- --- --- --- --- --- --- --- --- -------------
156 SG–2148 3.3

Monitoring Queues [11]
11.1.1 Batch Queue Summary
The last line in the batch queue summary display shows the name of the server
and the total for the server. The individual columns have the following
meanings:
Column name Description
QUEUE NAME The name of the queue.
LIM The maximum number of requests that can
execute in this queue simultaneously. When this
limit is reached, other requests in the queue will
remain queued until a request already in the
queue completes execution.
TOT The total number of requests currently in the
queue.
ENA The availability of the queue (that is, whether the
NQE administrator has enabled the queue). If the
queue is enabled (if ENA is yes), the queue can
accept requests.
STS The status of the queue (that is, whether the NQE
administrator has started the queue). If the queue
has been started (STS is on), the queue will
accept and queue requests. If the queue has not
been started (STS is off), the queue will accept
and queue requests, but it will not execute them.
QUE The number of requests in the queue that are
queued and ready to execute. Queued requests
have not begun execution because the queue has
not been started (STS is off) or because starting
any of the requests would exceed a system limit.
For a description of system limits, see Section
4.10, page 67.
RUN The number of executing requests in the queue.
WAI The number of requests in the queue that are
waiting to be executed. Requests can be waiting
for a specified time. They also can wait for a
license.
HLD The number of requests the NQE administrator
has put into the hold state.
SG–2148 3.3 157

NQE User’s Guide
ARR The number of requests currently arriving from
other queues.
EXI The number of requests currently terminating
their processing.
11.1.2 Pipe Queue Summary
The last line in the pipe queue summary display shows the name of the server,
the maximum number of requests that can be processed in all pipe queues at
one time, and the total number of requests in each state for all pipe queues. The
individual columns have the following meanings:
Column name Description
QUEUE NAME The name of the pipe queue.
LIM The maximum number of requests that can be
processed in this queue at any one time. A
request can still be placed in the queue when this
limit is reached, but it will not be processed until
the processing of a request in the queue is
complete.
TOT The total number of requests currently in the
queue.
ENA The availability of the queue (that is, whether the
NQE administrator has enabled the queue). If the
queue is enabled (if ENA is yes), the queue can
accept requests.
STS The status of the queue (that is, whether the NQE
administrator has started the queue). If the queue
has been started (STS is on), the queue will
accept and route requests. If the queue has not
been started (STS is off), the queue will accept
requests, but it will not route them.
QUE The number of requests in the queue that are
awaiting processing.
ROU The number of requests in the queue that are
being routed to another queue.
WAI The number of requests in the queue that are
waiting to be processed at a specific time.
158 SG–2148 3.3

Monitoring Queues [11]
HLD The number of requests the NQE administrator
has put into the hold state.
ARR The number of requests arriving from other
queues.
DEP The number of requests on their way to another
queue.
DESTINATIONS A list of the destination queues for this pipe
queue.
11.2 Displaying Queue Details
To display full details about NQS queues, you can use either the cqstatl -f
command or the qstat -f command ; for example:
cqstatl -f
As with the summary display, you can use the -b and -p options on the
cqstatl or qstat command line to restrict the display to a particular type of
queue. See Section 11.1, page 155.
To restrict the detailed display to a particular queue, you can use one of the
following formats:
cqstatl -f queue
qstat -f queue
11.2.1 Pipe Queue Details
The following screen shows an example of a detailed pipe queue display for a
pipe queue called nqepipe:
The fields in this display have the following meanings:
SG–2148 3.3 159

NQE User’s Guide
%cqstatl -f nqenlb
-------------------------------------
NQS PIPE QUEUE: nqenlb@pendulum Status: ENABLED/INACTIVE
-------------------------------------
Priority: 63
<ENTRIES>
Total: 0
Running: 0 Queued: 0 Waiting: 0
Holding: 0 Arriving: 0 Departing: 0
<DESTINATIONS>
nqebatch@chemcray
<SERVER>
/usr/craysoft/nqe/bin/pipeclient CRI_DS
<ACCESS>
Route: Unrestricted Users: Unrestricted
<CUMULATIVE TIME>
System Time: 0.00 secs User Time: 0.00 secs
<ATTRIBUTES>
C90
chemdept
nastran
Field Description
Initial heading The queue type (BATCH or PIPE), the name of the
queue, and the NQS server at which it is located.
Status The current status of the queue can be one of the
following:
Status Description
ENABLED Requests can be accepted into the
queue.
DISABLED Requests cannot be accepted,
although NQS is running at the
NQS server. The NQS operator has
disabled the queue.
160 SG–2148 3.3

Monitoring Queues [11]
LOADED Requests cannot be accepted,
although NQS is running at the
NQS server. The queue is a
loadonly queue that has reached
its request limit. When a request
leaves the queue, it will return to
an ENABLED status.
CLOSED Requests cannot be accepted
because NQS is not running at the
NQS server.
Priority Interqueue priority. Determines the order in
which NQS looks at the queues for work.
ENTRIES The total number of requests in the queue and
the number of requests in the following states:
running, holding, queued, arriving, waiting, and
exiting.
DESTINATIONS A list of the destination queues to which requests
in this queue may be sent. The order of the
names in this chapter is the order in which NQS
considers the queues for forwarding a request. If
no destinations are listed, the queue is a
destination-selection queue used for load
balancing.
SERVER The name of the NQS pipeclient process used to
handle routing of requests into and out of this
pipe queue. The string CRI_DS indicates that the
queue is a destination-selection queue used for
load balancing.
ACCESS Indicates any restrictions on requests entering the
queue.
The Route: subheading can have two values, as
follows:
Unrestricted A request can be
submitted to this
queue directly.
Pipeonly A request can enter
this queue only
from another pipe
SG–2148 3.3 161

NQE User’s Guide
queue. You cannot
submit a request
directly to this
queue.
The Users: subheading indicates whether any
user or group restrictions exist for this queue.
The subheading can have two values, as follows:
Unrestricted Any user’s request
can enter the queue.
Restricted Requests from only
specified users and
groups can enter
the queue. Look
under the
<ACCESS> heading
for a list of the
valid user names
and user groups
whose requests can
enter the queue.
CUMULATIVE TIME The system and user time accumulated by all
requests in the queue since NQS was initiated.
ATTRIBUTES A list of queue attributes. Queue attributes are
strings supplied by the qmgr set attribute
command. The attributes determine which
requests are accepted into this queue. If a request
specifies an attribute that the queue does not
have, that request is not accepted. If a queue has
no attributes, this field is not displayed and the
queue will accept requests with any list of
attributes.
11.2.2 Batch Queue Details
The following example shows a detailed display of an NQS batch queue called
nqebatch:
162 SG–2148 3.3

Monitoring Queues [11]
%cqstatl -f nqebatch
-------------------------------------
NQS BATCH QUEUE: nqebatch@latte Status: ENABLED/INACTIVE
-------------------------------------
Priority: 30
<ENTRIES>
Total: 11
Running: 2 Queued: 9 Waiting: 0
Holding: 0 Arriving: 0 Exiting: 0
<RUN LIMITS>
Queue: 5 User: unspecified Group: unspecified
<COMPLEX MEMBERSHIP>
<LOCAL SCHEDULER EXTENSIONS>
Miser Queue: unspecified Scheduling Window: 0:0.0
<RESOURCE USAGE>
LIMIT ALLOCATED
Memory Size unspecified (unlimited) 524288kw 0kb
Quick File Space unspecified (unlimited) 0kw 0kb
MPP Processor Elements unspecified (unlimited) 0 0
<RESOURCE LIMITS>
PER-PROCESS PER-REQUEST
type a Tape Drives unspecified (0)
type b Tape Drives unspecified (0)
type c Tape Drives unspecified (0)
type d Tape Drives unspecified (0)
type e Tape Drives unspecified (0)
type f Tape Drives unspecified (0)
type g Tape Drives unspecified (0)
type h Tape Drives
Core File Size unspecified (256mw)
Data Size unspecified (256mw)
Permanent File Space unspecified (100mb) unspecified (0b)
Memory Size unspecified (256mw) unspecified (256mw)
Nice Increment 0
Quick File Space unspecified (0b) unspecified (0b)
Stack Size unspecified (256mw)
SG–2148 3.3 163

NQE User’s Guide
CPU Time Limit unspecified (720000sec) unspecified (720000sec)
Temporary File Space unspecified (0b) unspecified (0b)
Working Set Limit unspecified (256mw)
MPP Processor Elements unspecified (0)
MPP Time Limit unspecified (10sec) unspecified (10sec)
Shared Memory Limit unspecified (0mw)
Shared Memory Segments unspecified (0)
MPP Memory Size unspecified (256mw) unspecified (256mw)
<ACCESS>
Route: Unrestricted Users: Unrestricted
<CUMULATIVE TIME>
System Time: 605.70 secs User Time: 764.03 secs
See Section 11.2.1, page 159, for a description of most of the fields in this
display. The batch queue display does not contain the DESTINATIONS field.
This display contains the following four fields that the pipe queue display does
not contain:
Field Description
RUN LIMITS The limit on the maximum number of
concurrently executing requests for the entire
queue, for one user, and for one user group.
COMPLEX MEMBERSHIP The names of the queue complexes of which this
queue is a member.
LOCAL SCHEDULER
EXTENSIONS
Information about any local scheduling
extensions that have been enabled for the queue;
typically, the name of a Miser scheduler queue
and the defined scheduling window.
RESOURCE USAGE The potential maximum and the cumulative
usage of resources by requests currently
executing in the queue. The default values are
displayed in parentheses.
RESOURCE LIMITS The maximum per-process and per-request
resource values that can be requested by a
request to enter the queue. The default values are
displayed in parentheses.
164 SG–2148 3.3

Monitoring Queues [11]
11.3 Displaying Batch Queue Limits
To display a list of the limits that the NQE administrator defined for all NQS
batch queues, you can use either the cqstatl -l command or the qstat -l
command (lowercase L); for example:
cqstatl -l
The following screen shows an example of this summary display (pendulum is
the NQS server). The last line in the display shows the global limits for the
NQS server:
% cqstatl -l
----------------------------
NQS BATCH QUEUE LIMITS
----------------------------
QUEUE NAME RUN MEMORY QUICKFL USR GRP
----------------------- --- --- ------- ------- ------- ------- --- ---
nqebatch 5/0 --/0 --/0 -- --
----------------------- --- --- ------- ------- ------- ------- --- ---
pendulum 5/0 **/0 --/0 2 --
----------------------- --- --- ------- ------- ------- ------- --- ---
Some columns in this display have two entries separated by /. The first entry is
the limit set for the queue. The second entry is the current use. The -- symbols
mean that no limit has been specified explicitly for the queue. The ** symbols
mean that the item is unlimited.
The columns in this display have the following meanings:
Column name Description
QUEUE NAME The name of the batch queue.
RUN The number of requests that can execute
simultaneously (the queue run limit), followed by
the number that are currently executing.
MEMORY The maximum amount of memory that all
requests in the queue can use at one time,
followed by the amount currently being used. A
value of 0 for the first entry means that the
amount of memory available to this queue is
unlimited. Values are expressed in units of 1024
words.
SG–2148 3.3 165

NQE User’s Guide
QUICKFL The maximum amount of quickfile secondary
data segments (SDS) space that a request can use,
followed by the amount currently being used.
Values are expressed in units of 1024 words.
USR The maximum number of requests that one user
can have executing in the queue at any one time
(the queue user run limit).
GRP The maximum number of requests that one user
group can have executing in the queue at any one
time (the queue group run limit).
11.4 Monitoring Remote Queues
NQE can route your requests to NQS queues at a server other than your NQS
server (as defined by NQS_SERVER). You can display information about remote
NQS queues by doing one of the following:
•Use either the cqstatl -h command or the qstat -h command and
supply the network host name of an NQS server. For example, the following
command displays a summary status of all NQS queues at a server called
hot:
cqstatl -h hot
•Include the host when you specify a queue, as follows:
queue@target_host
For example, the following command displays full details about the NQS
queue single at the NQS server hot:
cqstatl -f single@hot
If password validation is in force, you must include the cqstatl -P option or
set the NQS_PASSWORD_NEEDED environment variable to ensure that you are
prompted for a password.
If both password and file validation are in force, you do not have to set the
environment variable or specify the cqstatl -P command. Your validation
files are checked as described in Section 2.8, page 27.
166 SG–2148 3.3

Monitoring Queues [11]
If validation files are checked, the cqstatl or qstat command is successful
only if your user name is included in a validation file at the NQS server. For
more information on file validation, see Section 2.5, page 26.
If the UNICOS MLS feature or the UNICOS/mk security enhancements are
enabled on your system, you cannot display information from a remote host if
the execution host has a workstation access list (WAL) entry for the host of
origin that restricts your access to NQS services.
SG–2148 3.3 167

Deleting Requests [12]
This chapter describes how to delete batch requests. It discusses the following
topics:
•Deleting your requests (Section 12.1, page 169)
•Deleting requests on another NQS server (Section 12.2, page 174)
•Deleting another user’s request (Section 12.3, page 175)
Note: If you do not have an NQE license, you cannot access the NQE GUI
and the cqdel command. You can access only the qdel command from an
NQS server.
12.1 Deleting Your Requests
After submission, a request is routed to a batch queue. The request then waits
in the batch queue until the NQS system is ready to execute it. While a request
is being routed by a pipe queue or is waiting to execute in a batch queue, you
can delete it in the following ways:
•By selecting the Actions menu Delete Job option on the NQE GUI
Status window
•By using either the cqdel command or the qdel command.
•By sending a signal to it as described in Section 12.1.3, page 172.
Note: When you delete a request, the original file is not deleted, just the
request to execute the file.
To delete a request, you must be validated using the same method that is used
for submitting requests. For further information about passwords and
validation files, see Chapter 2, page 21.
If the UNICOS multilevel security (MLS) feature or the UNICOS/mk security
enhancements are enabled on your system and NQS is configured to enforce
mandatory access controls (MAC), your active label must equal the job
submission label if your job is queued; your active label must equal the job
execution label if your job is executing. If you specified the -C or -L options on
the cqsub or qsub command line or specified an alternative active security
compartment or level by selecting Submit->Configure->General Options
when the job was submitted, the job execution label may not be the same as the
SG–2148 3.3 169

NQE User’s Guide
job submission label. To display the job submission and execution label
information for a specific job, you can use either the cqstatl -f or qstat -f
command, or you can select Status->Actions->Detailed Job Status.
NQS managers and operators bypass the MAC checks.
12.1.1 Using the NQE GUI
You can use the procedure described in this section to delete a request that was
sent to NQS or a request that was sent to the NQE database. You can delete a
request by selecting Delete Job on the Actions menu of the NQE GUI
Status window.
Note: You can use the NQE GUI to delete a request whether or not the
request is executing.
If your site uses password validation, you must either set the
NQS_PASSWORD_NEEDED environment variable or, in the NQE GUI Submit
window, select Set Password on the Actions menu to ensure that you are
prompted for a password; otherwise, your request will not execute. The
password you supply is for the user name under which the request will execute.
After you submitted the request to be executed, you received a response similar
to one of the following:
•If you submitted your request to NQS, you received a response similar to
the following:
Request 46.latte submitted to queue: nqenlb
•If you submitted your request to the NQE database, you received a response
similar to the following:
Task id t4 inserted into database nqedb
To display its status, use the NQE GUI Status window. See Figure 15 for a
sample NQE GUI Status window. The Location column of the display shows
requests submitted to NQS (in the format of queue@host) and requests submitted
to the NQE database (in the format of nqe_database).
170 SG–2148 3.3
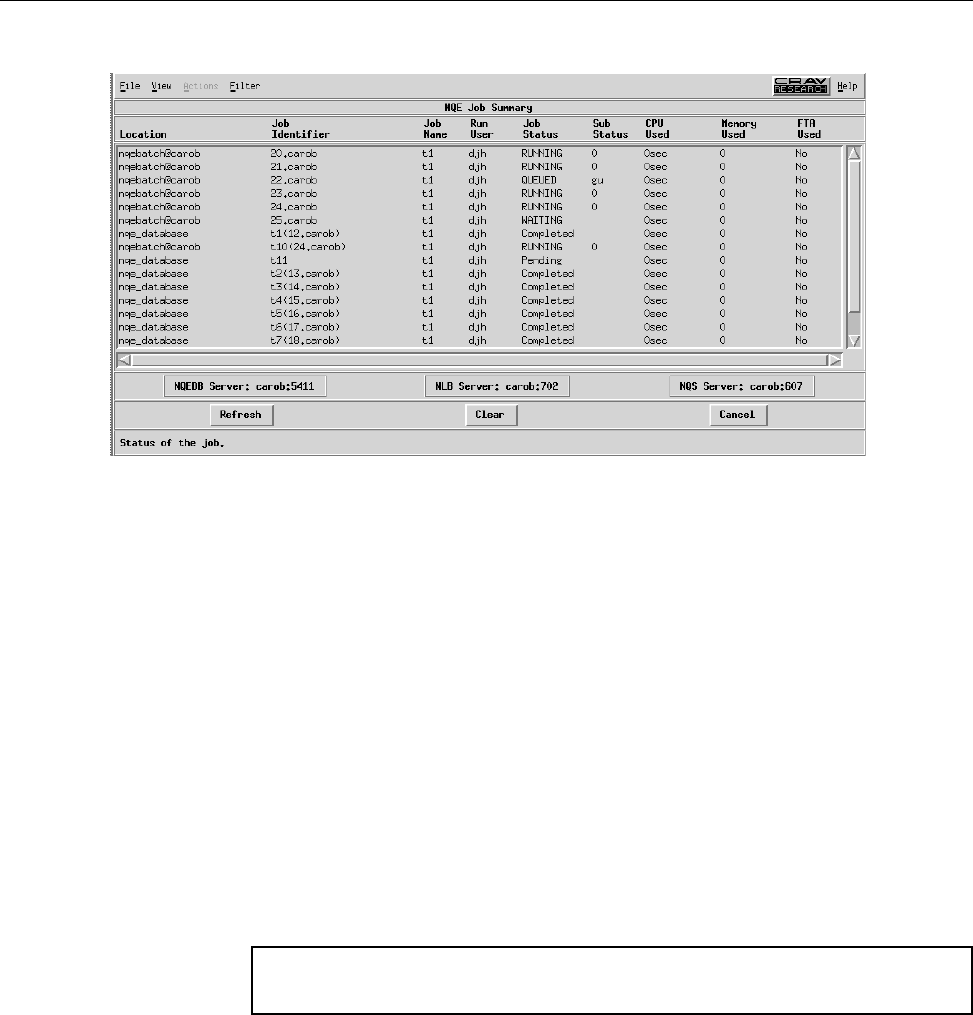
Deleting Requests [12]
New snap needed for
this screen!
a10375
Figure 15. NQE GUI Status Window Example
Highlight the request in the job summary area, select the Actions menu, and
then select Delete Job, which deletes the currently selected request from the
job summary area. You will receive a response stating that your request was
deleted.
For a summary of the NQE GUI Status options, see the nqe(1) man page.
12.1.2 Using the cqdel Command or the qdel Command to Delete a Request Not Executing
You can use only the cqdel command to delete a request from the NQE
database. To use the cqdel or qdel command to delete a request that was sent
to a specific destination, provide the NQE database task ID (for cqdel only) or
the NQS request ID on the command line. For example, to delete request
46.latte that was sent to NQS, you would enter the following command:
%cqdel -d nqs 46.latte
Request 46.latte has been deleted.
If a request has already begun execution, the following message is displayed
when you issue the cqdel command:
SG–2148 3.3 171

NQE User’s Guide
%cqdel -d nqs 5167.sequoia
QUESR: ERROR: Failed to delete request "5167.sequoia"
QUESR: ERROR: Request is running at transaction peer
The cqdel command or qdel command used without options does not affect
an executing request. You can delete the request by using the NQE GUI
Status window, as described in Section 12.1.1, page 170, or you can signal the
request by using the cqdel -k command or the qdel -k command, as
described in Section 12.1.3, page 172.
Note: If your site uses password validation, you must include the cqdel -P
option or set the NQS_PASSWORD_NEEDED environment variable to ensure
that you are prompted for a password. The password you supply is for the
user name under which the request will execute.
For a summary of the cqdel and qdel command options, see the cqdel(1)
and qdel(1) man pages.
12.1.3 Using the cqdel Command or qdel Command to Delete an Executing Request
If you use the NQE GUI, the method described in Section 13.1.1, page 179,
works whether or not the request is executing.
You can use only the cqdel command to delete a request from the NQE
database. If you use the cqdel or qdel command to delete an executing
request, you must send the request a signal by using one of the following
command formats; separate a list of NQS request identifiers (requestids) or NQE
database task identifiers (tids) with a space:
cqdel [{-k | -s sig_name |-signo }][
requestids |tids]
qdel [{-f | -k | -s sig_name |-signo }]requestids
For example, to use the cqdel -k command to delete a request from the NQE
database that has a task identifier of t135, you would enter the following
command; the command deletes the request, but the task remains in the NQE
database with a status of Terminated:
%cqdel -d nqedb -k t135
NQE Task "t135" has been signalled (Acknowledged).
172 SG–2148 3.3
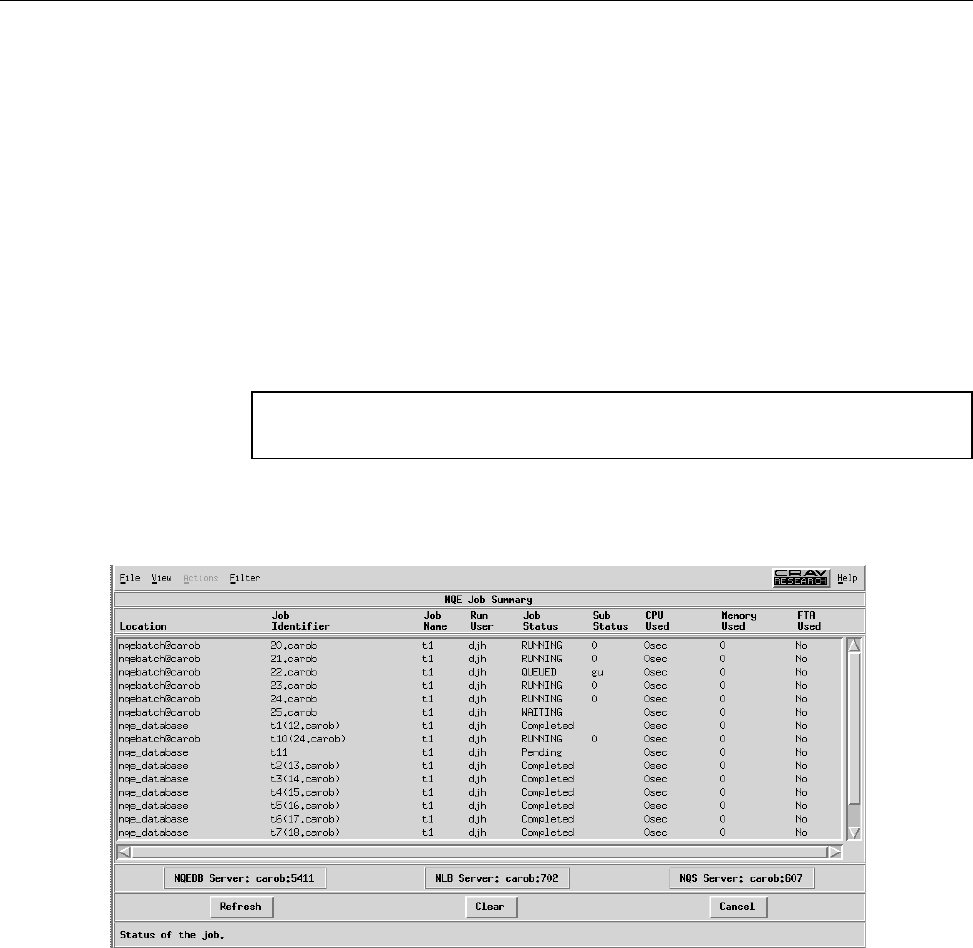
Deleting Requests [12]
Note: If your site uses password validation, you must include the cqdel -P
option or set the NQS_PASSWORD_NEEDED environment variable to ensure
that you are prompted for a password. The password you supply is for the
user name under which the request will execute.
You can specify the qdel -f command to delete both a request and the job
output.
For a summary of cqdel and qdel command options, see the cqdel(1) and
qdel(1) man pages.
The following screens show the submission and signaling of a request in an NQS
queue. In this example, the request is submitted using the cqsub command:
%cqsub -q nqebatch t1
Request 21.carob submitted to queue: nqebatch
Next, the NQE GUI Status window is used to display its status, as shown in
Figure 16:
New snap needed for
this screen!
a10375
Figure 16. NQE GUI Status Window Example
Then the executing request is signaled (deleted):
SG–2148 3.3 173

NQE User’s Guide
%cqdel -k 21.carob
Request 21.carob is running and has been signaled.
12.2 Deleting Requests on Another NQS Server
If a request has been routed to a queue at a server not on your local NQS server
(which is defined in NQS_SERVER), you can delete it by using either the NQE
GUI Status window or the cqdel command or qdel command to delete or
signal it.
Note: If your request was submitted to the NQE database, delete the request
by selecting Delete Job on the Actions menu of the NQE GUI Status
window as described in Section 12.1.1, page 170.
If you are using the NQE GUI, to delete a request on another NQS server, select
Delete Job on the Actions menu of the NQE GUI Status window as
described in Section 12.1.1, page 170.
If you use the cqdel or qdel command, you must specify the name of the
NQS server as part of the command line. You can do this by using one of the
following command options:
-h target_host requestids
request@hostname ...
For example, either of the following commands deletes a request that currently
resides on a remote server named peat but was originally submitted at a local
system called coal:
cqdel -h peat 450.coal
cqdel 450@peat
If password validation is enforced at the local system, you will be prompted for
a password. The password requested is for the user name at the remote host
under whom the request will execute. If both password validation and
validation files are in force at the remote system, you can simply press RETURN
when prompted for a password; the validation file is then checked. If validation
files are checked, the qdel command will be successful only if your user name
is included in a validation file at the remote system. For more information
about passwords and validation files, see Chapter 2, page 21.
If the UNICOS MLS feature or the UNICOS/mk security enhancements are
enabled on a remote system, you cannot delete a request at the remote host if
the host has a workstation access list (WAL) entry for the host of origin that
restricts your access to NQS services.
174 SG–2148 3.3

Deleting Requests [12]
12.3 Deleting Another User’s Requests
Deleting requests requires the same validation that is used for submitting
requests. NQS will then search for a validation file. For NQE database requests,
you can delete only requests that were submitted with your database user
name. For more information on NQS validation, see Chapter 2, page 21.
If you use the NQE GUI, you can delete a request by selecting Delete Job on
the Actions menu of the NQE GUI Status window as described in Section
12.1.1, page 170.
If you use the cqdel or qdel command to delete requests owned by another
user, you can use the following command formats:
cqdel -d dest_type -u username [requestids |tids]
qdel -u username requestids
The username is the name of the user specified by the -u option.
In the following example, the cqdel command deletes a request that has
identifier 1173.coal submitted by sandy (assuming you are authorized
correctly):
cqdel -d nqs -u sandy 1173.coal
The following cqdel command deletes a request that was sent to the NQE
database; the request has a task identifier of t100 and was submitted by the
NQE database user name sandy (assuming you are authorized correctly):
cqdel -d nqedb -u dbuser=sandy t100
In the following example, if you are logged in as user sam to a UNICOS
operating system called coal and want to delete a request submitted by a user
called sandy, the following entry must be in the .rhosts or .nqshosts file
in the home directory of sandy:
coal sam
If this entry exists, the following qdel command deletes a request submitted by
sandy that has the identifier 1173.coal :
qdel -u sandy 1173.coal
The -u option may not be valid for remote requests that use file validation on
UNICOS MLS or on UNICOS/mk security-enhanced systems. When the
UNICOS MLS feature or the UNICOS/mk security enhancements are enabled
on your system, the system might be configured to require
SG–2148 3.3 175

NQE User’s Guide
the/etc/hosts.equiv and .rhosts files to each contain a match for the
remote host and to require that the remote user and local user names match
(that is, the -u option is not allowed).
176 SG–2148 3.3

Signaling Requests [13]
This chapter describes the signaling process. The following topics are discussed:
•Signaling your requests (Section 13.1, page 177)
•Signaling another user’s requests (Section 13.2, page 182)
Note: If you do not have an NQE license, you cannot access the NQE GUI
and the cqdel command. You can access only the qdel command from an
NQS server.
For information about deleting running requests by using the cqdel -k
command or the qdel -k command, see Section 12.1.3, page 172.
13.1 Signaling Your Requests
You can send a signal to any request, whether or not the request is executing. If
the request is not yet executing, the request is deleted, no matter which signal is
sent.
You can send a signal to one or more of your requests by using either the NQE
GUI Status window or the cqdel command or the qdel command.
Standard output, standard error, and job log files are produced for an executing
request that is deleted by a signal. These files record the execution of the
request up to the moment when the signal is received. The files are returned to
the submitting user through the normal output return mechanisms.
If you submitted the request to NQS, an executing request is a request that is in
an NQS batch queue and has the letter R(running), H(held), or S(suspended)
under the Job Status field of the NQE GUI Status window or under the ST
column of the cqstatl or qstat display.
If you submitted the request to the NQE database, an executing request is a
request that is in the NQE database and has the letter N(in the NQE database),
R(running), H(held), or S(suspended) under the Job Status field of the
NQE GUI Status window or under the ST column of the cqstatl or qstat
display.
SG–2148 3.3 177

NQE User’s Guide
Note: A request in the NQE database is known as a task and is assigned a
task ID (tid). When a copy of the request is executing under NQS, it also is
assigned a request ID (requestid), and it is displayed in parentheses after the
tid in the NQE GUI Status window Job Identifier field.
Three of the most common signals that you can send to a request are as follows:
Signal Description
SIGINT Interrupts the executing request, flushes buffers, and displays a
traceback. Examples of the SIGINT command follow:
cqdel -d nqs -s SIGINT 25.pendulum
cqdel -d nqedb SIGINT t123
qdel -s SIGINT 123.abc
SIGQUIT Does the same as SIGINT, but it also writes a core file.
SIGKILL
or -k
Kills the executing request and all processes that the request
started without flushing I/O buffers, displaying a traceback, or
writing a core file.
However, you can send any valid signal. To catch some signals for error
handling or postprocessing, you can include code in the job request script.
The following Korn or standard shell example traps (using trap) the
SIGCPULIM signal and copies a data file into the user home directory from
$TMPDIR. (For SIGCPULIM, there is a small grace period before the job is
killed, during which the user can do some quick clean-up processing.)
#QSUB -s /bin/sh
set -x
postproc ()
{
echo "pp: SIGCPULIM caught"
echo "pp: copying $TMPDIR/data to $HOME/save.data"
cp $TMPDIR/data $HOME/save.data
}
trap postproc 26
echo "begin program that creates file: $TMPDIR/data"
$HOME/bin/program
178 SG–2148 3.3

Signaling Requests [13]
13.1.1 Using the NQE GUI Status Window
You can send a signal to one or more of your requests by using the NQE GUI
Status window. For each request you want to signal, highlight the request in
the job summary area, select the Actions menu, and then select Signal Job.
A dialog box appears and asks you to select a signal to send. Select the signal
you want to send by clicking on one of the signal buttons. The dialog box
disappears and the job is signaled. A second dialog box will appear with a
reply from the signal request. After you review the reply, click on the OK button
and the process is complete.
Note: If your site uses password validation, you must either set the
NQS_PASSWORD_NEEDED environment variable or, in the NQE GUI Submit
window, select Set Password on the Actions menu to ensure that you are
prompted for a password; otherwise, your request will not execute. If you do
not set the environment variable or the NQE GUI for password prompting
and you use the NQE GUI, the NQE GUI will still prompt you for your
password. The password you supply is for the user name under which the
request will execute.
The following is an example of how to signal a request using the NQE GUI.
After you submitted the request to be executed, you received a response similar
to one of the following:
•If you submitted your request to NQS, you received a response similar to
the following:
Request 46.latte submitted to queue: nqenlb
•If you submitted your request to the NQE database, you received a response
similar to the following:
Task id t4 inserted into database nqedb
To display its status, use the NQE GUI Status window. Figure 17 shows an
example of the NQE GUI Status window:
SG–2148 3.3 179

NQE User’s Guide
New snap needed for
this screen!
a10375
Figure 17. NQE GUI Status Window Example
Highlight the request in the job summary area, select the Actions menu, and
then select Signal Job. A dialog box appears and asks you to select a signal
to send. To delete the request, select the SIGKILL signal by clicking on one of
the signal buttons. The dialog box disappears and the job is signaled. A second
dialog box appears with a reply from the signal request stating that your
request was deleted. After you review the reply, click on the OK button.
For a summary of the NQE GUI Status options, see the nqe(1) man page.
13.1.2 Using the cqdel or the qdel Command
You can use only the cqdel command to signal a request from the NQE
database. To send a signal to one or more of your own requests, use one of the
following command formats; separate a list of NQS request identifiers
(requestids) or NQE database task identifiers (tids) with a space:
cqdel [{-k |-s sig_name | -signo}][requestids | tids]
qdel [{-k | -s sig_name |-signo}]requestids
180 SG–2148 3.3

Signaling Requests [13]
The -k option sends a SIGKILL signal to the running request.
The -s sig_name and -signo options both send a signal to a request. The only
difference is the way in which the signals are specified.
Because various platforms may use different numbers for a given signal, you
may want to use the -s option, rather than the signal number, to specify a
signal name. If you know the signal number for the platform on which your
request is running, however, the -signo option will work equally well.
The requestids argument specifies one or more requests executing under NQS.
The tids argument specifies one or more requests in the NQE database; a
request in the NQE database is known as a task and is assigned a task ID (tid).
Note: If your site uses password validation, you must include the cqdel -P
option or set the NQS_PASSWORD_NEEDED environment variable to ensure
that you are prompted for a password. The password you supply is for the
user name under which the signal request will execute.
To display a list of all your requests that are still in NQS queues, use the qstat
-a command. To tell whether a request is executing, use the qstat requestids
command.
To tell whether a request is executing, use the qstat command, as follows:
qstat requests
%qstat 454.coal
-------------------------------
NQS 3.1 BATCH REQUEST SUMMARY
-------------------------------
IDENTIFIER NAME USER QUEUE JID PRTY REQMEM REQTIM ST
------------- ------- -------- --------------------- ---- ---- ------ ------ ---
454.coal sleeper snow b_30_5@coal 319 23 192 30 R02
%
For a summary of the cqdel and the qdel command options, see the cqdel(1)
and the qdel(1) man pages.
SG–2148 3.3 181
NQE User’s Guide
13.2 Signaling Another User’s Requests
If your site uses both validation files and password checking, you can delete a
request without using a password. NQS will then search for a validation file.
For more information on NQS validation, see Section 2.4, page 25.
Note: For requests submitted to the NQE database, you can signal only the
requests in the NQE database that were submitted by the same database user.
If you use the NQE GUI, you can signal a request by selecting Signal Job on
the Actions menu of the NQE GUI Status window as described in Section
13.1.1, page 179.
If you use the cqdel or the qdel command to signal requests you submitted
under another user name, use one of the following command formats; separate
a list of NQS request identifiers (requestids) or NQE database task identifiers
(tids) (used only with the cqdel command) with a space:
cqdel [-k | -s sig_name |-signo]-u username -d nqs requestids
cqdel [-k |-s sig_name |-signo]-u username -d nqedb tids
qdel [-k| -s sig_name |-signo]-u username requestids
Note: If your site uses password validation, you must include the cqdel -P
option or set the NQS_PASSWORD_NEEDED environment variable to ensure
that you are prompted for a password. The password you supply is for the
user name under which the signal request will execute.
The following cqdel command signals a request that has identifier 1173.coal
submitted by sandy (assuming you are authorized correctly):
cqdel -2 -u sandy 1173.coal
You will receive the following response:
Request 1173.coal is running and has been signaled.
182 SG–2148 3.3

Transferring Files [14]
You can transfer files between remote systems on a network either from within a
batch request or interactively by using the NQE File Transfer Agent (FTA). The
ftua and rft commands transfer files. The ftua interface to FTA is similar to
the TCP/IP ftp utility. File transfers can be initiated only on NQE nodes.
This chapter discusses the following topics:
•File transfer terms (Section 14.1, page 184)
•Using ftua
–Selecting a domain (Section 14.2.1, page 186)
–Connecting to a remote host (Section 14.2.2, page 186)
–Selecting a mode (Section 14.2.3, page 187)
–Specifying the type of file to transfer (Section 14.2.4, page 188)
–Copying files from a host (Section 14.2.5, page 189)
–Copying files to a host (Section 14.2.6, page 189)
–Copying multiple files (Section 14.2.7, page 190)
–Copying files to and from IBM MVS systems (Section 14.2.8, page 191)
–Appending files (Section 14.2.9, page 194)
–Deleting files (Section 14.2.10, page 194)
–Displaying queued transfers (Section 14.2.11, page 195)
–Aborting transfers (Section 14.2.12, page 196)
–Waiting for transfer requests (Section 14.2.13, page 196)
–Closing a connection or ending a session (Section 14.2.14, page 197)
–ftua examples (Section 14.2.15, page 198)
–macdef example (Section 14.2.16, page 202)
–Transferring files from within a request file (Section 14.2.17, page 203)
SG–2148 3.3 183

NQE User’s Guide
–Using ftua with the UNICOS multilevel security (MLS) feature or
UNICOS/mk security enhancements (Section 14.2.18, page 204)
–File naming conventions (Section 14.2.19, page 207)
–Failure notification (Section 14.2.20, page 208)
•Using rft (Section 14.3, page 209)
•Using autologin (Section 14.4, page 211)
–Creating .netrc file entries (Section 14.4.1, page 211)
–.netrc file example (Section 14.4.2, page 213)
•Using NPPA (Section 14.5, page 213)
For a complete description of the ftua commands, see the ftua(1) man page.
For a complete description of the rft commands, see the rft(1) man page.
14.1 File Transfer Terms
The following terms are commonly used with the File Transfer Agent (FTA):
•Afile transfer service is a program that provides FTA with access to a
network system that uses a specificfile transfer protocol.
•A unique FTA domain_name is assigned to each of the file transfer services
that are available to FTA. A domain name is subsequently used to identify a
specific transfer service.
•network peer-to-peer authorization (NPPA) lets users transfer files without
sending a password across the network. It requires FTA on the local system
and support for network peer-to-peer authorization on the remote system. It
can be used to authorize both batch and interactive file transfers.
•Afile transfer request is an object containing information that describes the
file transfer operations to be performed by FTA on behalf of a user. Each
request is a separate file, which is located in the FTA queue directory.
•Aqueue directory is a file system directory that contains file transfer request
files.
184 SG–2148 3.3

Transferring Files [14]
14.2 Using ftua
To transfer files to and from a remote host, use the following command:
ftua
Note: You can use this command only on NQE nodes.
The ftua command uses the File Transfer Agent (FTA) component of NQE to
transfer files.
You might choose to use FTA for the following reasons:
•You can queue your transfers. You can execute file transfers immediately or
queue them for later execution. If the transfer is queued, it is executed after
you leave the utility, letting you proceed to other tasks.
•You can display queued transfers. If you have issued a file transfer request
in queue mode, you can display details about the request. To view the status
of an FTA transfer, you can use either the NQE GUI or the qls command.
•Your transfers are retried. If your file transfer fails for some transient reason
(such as a network link failing), FTA automatically requeues the transfer.
Retries are useful in batch requests because your requests will not abort if a
transfer cannot occur when it is first tried.
•You do not have to provide passwords. FTA provides network peer-to-peer
authorization (NPPA). NPPA lets you transfer files without specifying
passwords in either batch request files or in .netrc files or by transmitting
passwords over the network. For more information on NPPA, see Section
14.5, page 213.
•It provides both synchronous and asynchronous reliable file transfer. If a
transient error condition occurs during the transfer, transfers are retried.
Retries are useful when transferring files from within an NQS request.
To start the ftua utility, type ftua and press RETURN. The ftua prompt
(ftua>) appears.
$ftua
ftua>
At this point, you can execute any ftua commands that do not require a
connection to a remote host. Examples are domain,open, and help.
SG–2148 3.3 185

NQE User’s Guide
14.2.1 Selecting a Domain
The ftua utility lets you connect to any transfer service that is configured by
your administrator. To select the file transfer service to which you want to
connect, use the following command:
ftua> domain domain_name
The default value of domain_name is inet.
If you are transferring files to or from another NQE system, use nqe as the
domain_name.
If you are transferring files to or from a non-NQE system, use ftp as the
domain_name.
14.2.2 Connecting to a Remote Host
To connect to a remote host, use the following command:
ftua> open hostname
The following example shows a connection sequence to a host with verbose
mode on. Verbose mode displays all ftua messages. The domain name is nqe.
The remote host is ice, and the user ID is you.
ftua> verbose
Verbose mode on.
ftua> domain nqe
250 SITE command successful.
ftua> open host5
250 SITE command successful.
Name (ice:you):
Password:
250 PASS command successful.
ftua>
You can include your user name and password for the remote host in the
.netrc file on the system from which you issue the ftua command, as
described in Section 14.4, page 211. If you do, you are not prompted for a user
name or password.
If you are using NPPA, you can press RETURN at the password prompt. For a
description of NPPA, see Section 14.5, page 213.
186 SG–2148 3.3

Transferring Files [14]
A shortcut for establishing an ftua connection is to type ftua, a host name,
and a domain name after the operating system prompt, as shown in the
following example:
$ftua ice nqe
Name (ice:you):
Password:
ftua>
FTA inserts your user name on the local host. If you have the same user name
on the remote host, you can press RETURN and type in your password.
A connection with the remote host is established immediately, and you can
execute any ftua command.
14.2.3 Selecting a Mode
The ftua utility can execute file transfers in one of two modes:
•immediate mode transfers the file immediately after you type a command.
You cannot type any more ftua commands until the file transfer completes.
A message informs you of the success or failure of the transfer. If the file
transfer fails, you must reenter the command.
•queue mode queues the request to await execution. The queue contains
requests from all ftua users. The request is not executed until you exit
ftua. If you enter the wait command, the transfer is completed first, and
then the session is ended. Queue mode is normally used when you do not
want to wait for a transfer to complete before continuing, but you want to
be sure the transfer will complete successfully. Using queue mode, if the
communications link fails in the middle of the transfer, FTA will requeue the
transfer automatically.
If the file transfer fails with a transient error, the request remains in the
queue and can be recovered as described in Section 14.2.20, page 208.
In queue mode, by default, you are sent a mail message for each request
that fails. You can request that a mail message be sent to you to report
either the success or the failure of the file transfer request by using the
following command:
ftua> notify
SG–2148 3.3 187

NQE User’s Guide
When you first enter ftua, you are in immediate mode, unless you use the -q
command line option to change to queue mode, as follows:
ftua -q ice nqe
After you enter ftua, you also can type queue and press RETURN to enter
queue mode. To return to immediate mode, type immediate and press
RETURN. To determine your current mode, look at the last line of the display
produced by the status command, as shown in the following example:
ftua> queue
ftua> status
Connected to sun20.
No proxy connection.
Mode: stream; Type: ascii; Form: non-print; Structure: file
Verbose: off; Bell: off; Prompting: on; Globbing: on
Store unique: off; Receive unique: off
Case: off; CR stripping: on
Ntrans: off
Nmap: off
Hash mark printing: off; Use of PORT cmds: on
Queue mode: on
ftua>
14.2.4 Specifying the Type of File to Transfer
You can specify the type of file you want to transfer by using the following
command:
ftua> filetype
The type of files supported varies, depending on the domain_name you use and
the underlying file transfer protocol selected. The following filetypes are
available:
•ascii (file contains ASCII, or character, data; the line boundary structure of
the file is preserved)
•binary (file contains binary data; no interpretation is made of the data
within the file, and the remote system stores the file so that the file can be
retrieved unchanged)
•ebcdic (rft does not support this file type)
188 SG–2148 3.3
Transferring Files [14]
•image (has the same effect as binary file transfers; rft does not support
this file type)
•tenex (sets type to local byte size and has the same effect as binary file
transfers; rft does not support this file type)
For additional information about file types supported, see the ftua(1) and
rft(1) man pages.
14.2.5 Copying Files from a Host
To copy a file from a remote host to your current directory on the local system,
use the following command:
get remote_file local_file
File names can be full path names or relative to the working directory.
The following example shows the messages displayed if you are in immediate
mode with verbose mode on. If verbose mode is off, messages are not
displayed after the get command line.
ftua> get file1 file2
200 FILE command successful.
220 Command completed.
If you omit local_file,ftua uses remote_file to name the file on the local system.
14.2.6 Copying Files to a Host
To copy a file from the local system to your home directory on a remote host,
use the following command:
put local_file remote_file
File names can be full path names or relative to the working directory. The
following example shows the messages displayed if you are in immediate mode
with verbose mode on:
ftua> put file1 file2
200 FILE command successful.
220 Command completed.
SG–2148 3.3 189

NQE User’s Guide
If you omit remote_file,ftua uses local_file to name the file on the remote system.
14.2.7 Copying Multiple Files
To copy multiple files to a remote host, use the following command:
mput filenames
The filenames argument is a list of local file names; you can also designate
multiple file names by using file name globbing (that is by using wildcard
characters) to copy all files at one time. (Globbing is on by default. For
summary information on globbing, see the ftua(1) man page.) File names can
be full path names or relative to the working directory.
Note: The ftua utility has no equivalent command to copy multiple files
from a remote host to your directory on the local system.
Interactive prompting is on by default. If interactive prompting is on, you are
asked to verify whether you want each file to be transferred. The following
command opens a connection to host ice using domain nqe and turns off
interactive prompting for multiple file transfers:
ftua -i ice nqe
You can toggle prompting on or off. To see the current setting for prompting,
use the status command. To change the setting, use the prompt command, as
shown in the following example:
ftua> prompt
Interactive mode off.
ftua> prompt
Interactive mode on.
ftua>
The following example shows the transfer occurring with interactive prompting
enabled and verbose mode off. The interactive prompt lets you cancel the
transfer of one or more of the files designated on the command line.
ftua> mput file1 file2 file3
mput file1? y
mput file2? n
mput file3? y
190 SG–2148 3.3

Transferring Files [14]
14.2.8 Copying Files to and from IBM MVS Systems
The ftua block mode is primarily used to transfer Cray Research
binary-blocked files between UNICOS and IBM’s Multiple Virtual Storage
Operating System (MVS) FTP. To perform successful get and put operations,
the remote FTP server must support the FTP block transfer mode. (For text file
transfers, use the default FTP ASCII mode transfer.)
Records must be disassembled or assembled into FTP blocks to facilitate
transfer. When executing a block mode put of a file, the ftua client uses the
Cray Research flexible file input/output system (FFIO) to read each record from
the UNICOS file. The record is sent to the remote FTP server using as many
FTP blocks as necessary to complete the transfer; these FTP blocks are
reassembled into a record on the remote side. When executing a block mode
get, FTP blocks are read and stored until end-of-record is encountered; these
FTP blocks are written to a file as one record using FFIO. In either case, the
remote FTP server must perform complementary actions, assembling or
disassembling records into or from FTP blocks.
Currently, the only FTP server known to support block transfer mode in this
manner is that provided by IBM’s TCP/IP for MVS. Refer to the manuals
supplied with this product for more information on using IBM’s FTP server.
The remainder of this section assumes that this is the FTP server you are using.
To use block mode file transfers successfully, you must have knowledge about
the size of the data records to be transferred, the file structure on UNICOS, and
the dataset structure on MVS. Use sets of ftua commands to inform the FTP
client (ftua) and the MVS FTP server about the necessary file attributes and
record size, as follows:
•For the UNICOS file, use a qualifier in the local file specification on the put
or the get command to specify the FFIO attributes. (FFIO attributes are
described in the Application Programmer’s I/O Guide, publication SG–2168.)
•For the MVS dataset, use the ftua site command to send information to
the server about the dataset characteristics. (A subset of these parameters is
similar, but not identical, to a subset of the parameters on the MVS DD JCL
command.)
SG–2148 3.3 191

NQE User’s Guide
Note: To see the parameters accepted by the site command for the
remote server, enter the following:
ftua> rhelp site
You can use the verbose command to see warning messages sent by the
remote server that may help to diagnose problems with site command
parameters.
•Use the ftua blkmdsize command to specify the maximum-size FTP
block to be used by ftua when sending a file in block mode.
14.2.8.1 Executing a get Command
To receive a dataset from MVS to a UNICOS file within an ftua session, take
the following steps:
1. Use the ibmblock command to set mode to block and type to ebcdic.
Typically, you do not need to specify a site command if you want the
server to read the dataset using the attributes stored in the MVS catalog.
2. On the get command, append the FFIO attributes in parenthesis to the
local file specification to describe how the file should be written on
UNICOS. ftua uses FFIO to write a file whenever mode is block.Ifno
FFIO attribute is specified, the file is written in UNICOS binary blocked
format. (FFIO cos format as shown in the specific example.) The get
command syntax follows:
get remote_file local_file (ffio_attributes)
A specific example of the get command follows:
ftua> get mvsqual.dsn crayfile(cos)
14.2.8.2 Executing a put Command
To send a UNICOS file to an MVS dataset within an ftua session, take the
following steps:
1. Use the ibmblock command to set mode to block and type to ebcdic.
2. When creating a new MVS dataset, use the site command to specify its
characteristics.
192 SG–2148 3.3
Transferring Files [14]
3. Depending on the maximum record size of the UNICOS file, and the
blocksize and record format of the MVS dataset, you may need to use the
blkmdbsize command to specify the maximum size of each FTP block that
ftua will send to the server. The default FTP block size used by ftua is
16384 bytes.
blkmdbsize size_in_bytes
4. On the put command, you must append the FFIO attributes in parenthesis
to the local file specification to describe how the UNICOS file should be
read. ftua uses FFIO to read a file whenever mode is block. If no FFIO
attribute is specified, the file is assumed to be in UNICOS binary blocked
format (FFIO cos format). The put command syntax follows:
ftua> put local_file (ffio_attributes)remote_file
A specific example of the command follows:
ftua> put crayfile(cos) mvsqual.dsn
!
Caution: Be careful when specifying UNICOS FFIO and MVS dataset
attributes. In many cases, if you accept the default values or specify values
inconsistent with the structure of the UNICOS file or MVS dataset, the file
transfer may complete without error, but the records in the dataset may be
truncated or otherwise incorrect.
The default dataset characteristics for datasets created by the FTP server can be
customized by the MVS system administrator. Depending on your application,
you may want to explicitly specify key site parameters to minimize the
reliance on particular site defaults.
!
Caution: Use only one site command per session. Unexpected side-effects
may occur as a result of new default values overriding values specified on
previous site commands. Also, many site command parameters apply
only to datasets created by FTP; if the dataset already exists, existing
characteristics may be used without warning.
You can use the server stat command to get a listing of the current status of
many of the server’s current transfer settings.
ftua> rquote stat
SG–2148 3.3 193

NQE User’s Guide
Avoid the use of recfm=v or recfm=vbs because you may receive results that
are not valid without warning.
For files with arbitrary-sized records or records larger than 32768 bytes, use
datasets with characteristics recfm=vbs and lrecl=x. Use the blkmdbsize
command to set the FTP transfer size to be 8 bytes less than the MVS
blocksize. For example:
ftua> ibmblock
ftua> blkmdbsize 32752
ftua> site recfm=vbs lrecl=x blocksize=32768
ftua> put crayfile(cos) mvsqual.dsn
Some choices for blkmdbsize and blocksize versus record size may lead to
inefficient storage of the MVS dataset. In general, choose values such that the
smaller of the average record size or the blkmdbsize is close to but less than
(blocksize - 8). A complete discussion of UNICOS file formats, MVS dataset
characteristics, their interaction with FTP settings, and of data storage efficiency
is beyond the scope of this section.
Remember that the FFIO specification is for the UNICOS file format, not the
MVS dataset. Unless the UNICOS file is already in an IBM format, do not use
FFIO IBM format specifications.
14.2.9 Appending Files
To append a local file to a remote file, use the following command:
append local_file_name remote_file_name
The file name can be a full path name or relative to the working directory.
The following example appends the contents of the local file this to the remote
file that:
ftua> append this that
14.2.10 Deleting Files
To delete a file from the remote host, use the following command:
delete filename
194 SG–2148 3.3

Transferring Files [14]
The file name can be a full or relative path name.
The following example deletes the remote file file1:
ftua> delete file1
14.2.11 Displaying Queued Transfers
If you have issued a file transfer request in queue mode, you can display details
about the request in the following ways:
•You can use the NQE GUI. For each request that has an FTA transfer
associated with the request, the NQE GUI Status window’sView menu
Job Summary display contains a Yes in the FTA Used column.
You can view the status of an FTA transfer in the following ways:
–Using the Status window, select the View menu FTA Summary option
which displays a one-line summary of all transfers.
To display a detailed status of a specific transfer, place the pointer over
the transfer name and double-click the left mouse button. To cancel the
detailed FTA Summary display, click on the display’sCancel button by
using the left mouse button.
–Using the Status window’s default Job Summary display, highlight the
request by placing the pointer on the request line and clicking on the left
mouse button. Select the Actions menu, and then select Detailed
FTA Status. To cancel the Detailed FTA Summary display, click on
the display’sCancel button by using the left mouse button.
•You can use the qls command. To obtain a one-line list of all your file
transfer requests that are currently in the queue, use the qls command, as
shown in the following example. A unique queue identifier located in the
QID column identifies each file transfer request:
ftua> qls
--QID-- ---Queued On --- --User-- ---State--- -----Status-----
aa12972 Mon Jan 5 22:05 george Active UA connected
aa12977 Mon Jan 5 22:15 george Active UA connected
•To display details of all requests currently in the queue, use the qdir
command. To display more details about a particular request, use the qdir
identifier command, as follows:
SG–2148 3.3 195

NQE User’s Guide
ftua> qdir aa12972
--QID-- ---Queued On --- --User-- --Group--
aa12972 Mon Jan 5 22:05 george cray
State: Active
Status: UA connected
Priority: 0
Last Attempt: Never
Controlling PID: 12972
Domain: nqe
Host: sun20
Username: george
Copy (put)
LocalFile: /home/sun401/george/verse1
RemoteFile: verse1
14.2.12 Aborting Transfers
To abort a file transfer when operating in immediate mode, press the terminal
interrupt key (usually CONTROL-c), as in the following example:
ftua> get file1 file2
CONTROL-c
If you used the put,mput,orappend command, it is halted immediately. If
you used a get command, it may take a little time before it ends, depending on
the domain that you selected.
To delete a transfer in queue mode, use qdelete followed by the queue
identifier for the request, as follows:
ftua> qdelete aa12977
To obtain the queue identifier for a request, see Section 14.2.11, page 195.
14.2.13 Waiting for Transfer Requests
The wait command blocks your use of ftua until FTA completes the queued
request. After the request has completed, ftua exits, as in the following
example:
196 SG–2148 3.3

Transferring Files [14]
latte% ftua -qv ice ftp
Connected to localhost.
220 latte FTA server (Version 5.0 (11.1)) ready.
250 QMOD command successful.
250 DOMA command successful.
200 SITE command successful.
Name (ice:jane):
331 Password required for jane.
Password:
200 Login to remote fts successful.
ftua> get x.x
200 FILE command successful.
220 COPY command queued (aa000LP).
ftua> wait
Waiting for request aa000LP...
Request aa000LP completed.
latte%
The wait command does not guarantee successful file transfer. If a request fails
as a result of a transient error, it is requeued but not recovered. For information
on FTA recovery, see NQE Administration, publication SG–2150.
14.2.14 Closing a Connection or Ending a Session
To close a connection to a host but remain in ftua, use either the close or the
disconnect command, as in the following example:
ftua> close
221 Goodbye.
ftua>
To end the ftua session, use either the bye or quit command, as in the
following example:
ftua> bye
$
SG–2148 3.3 197

NQE User’s Guide
14.2.15 ftua Examples
This section provides an example of using ftua in its immediate and queue
modes. For a summary of ftua commands, see the ftua(1) man page.
•First Jane wants to access a remote host called moon. She types ftua and
the remote host name moon (moon is an NQE system), followed by the
domain name nqe.
$ftua moon nqe
Name (moon:jane):
Password:
ftua>
•Jane wants to transfer several files immediately, without having to queue
them. She does not want to be prompted for each file, so she turns off
interactive prompting.
ftua> prompt
Interactive mode off.
ftua>
•Jane is now ready to copy the files to host moon. Because all of the file
names begin with the prefixjanedata, Jane uses file name globbing (that is
uses wildcard characters) to copy all files at one time. (Globbing is on by
default. For summary information on globbing, see the ftua(1) man page.)
ftua> mput janedata*
ftua>
As you can see, no information is displayed about the actual transfers that
occurred.
If Jane wants some information about the transfers, she can turn on verbose
mode before executing mput:
198 SG–2148 3.3

Transferring Files [14]
ftua> verbose
Verbose mode on.
ftua> mput janedata*
200 FILE command successful.
220 Command completed.
200 FILE command successful.
220 Command completed.
200 FILE command successful.
220 Command completed.
ftua>
To display even more information, Jane can set the debug feature to be on,
as in the following example:
ftua> debug 1
Debugging on (debug=1).
ftua> mput janedata*
---> FILE /sub/jane/janedata1
200 FILE command successful.
---> STOR janedata1
220 Command completed.
---> FILE /sub/jane/janedata2
200 FILE command successful.
---> STOR janedata2
220 Command completed.
---> FILE /sub/jane/janedata3
200 FILE command successful.
---> STOR janedata3
220 Command completed.
•Jane closes the connection to host moon, as follows:
ftua> close
ftua>
•Jane wants to copy a file called weather.oct on her local host to host
neptune.weather.oct is a large file, and Jane does not want to wait until
it completes before continuing, but she does want to be sure the transfer will
complete successfully.
SG–2148 3.3 199

NQE User’s Guide
Because the link to neptune has a reputation for being unreliable, Jane
decides to execute the transfer in queue mode. That means she does not
have to stay in ftua until the transfer completes. However, she can still be
sure that, if the communications link fails in the middle of the transfer, FTA
will requeue the transfer automatically.
Before opening the connection to neptune, Jane enters queue mode.
Because weather.oct contains binary data, Jane selects a file transfer type
of binary before requesting the transfer.
ftua> queue
ftua> open neptune dec
Name (neptune:jane):
Password:
ftua> binary
ftua> put weather.oct
ftua>
•Jane wants to examine the queue to see whether her transfer request is there.
Because she cannot remember the command to use, however, she types
help to get a list of command names, and then she types help followed by
the command name (qdir) to ensure that she has the correct command.
200 SG–2148 3.3

Transferring Files [14]
ftua> help
Use ‘help <command>’to get help on commands.
Commands may be abbreviated. Commands are:
! dir mdir qdelete setdefault
$ disconnect mkdir qdir site
account domain mls qls status
append form mode queue struct
ascii get moveout quit trace
bell glob mput quote type
binary help nlist recv user
blkmdbsize ibmblock nmap rename umask
bye immediate notify reset verbose
cd image ntrans rmdir wait
cdup lcd open rhelp ?
close lhelp prompt rquote
delete ls put runique
debug macdef pwd send
ftua> help qdir
qdir list contents of file transfer queue (long)
ftua>
To see details about queue entries, Jane types the qdir command:
ftua> qdir
--QID-- ---Queued On --- --User-- --Group--
aa15872 Tue Jan 6 17:25 jane cray
State: Active
Status: UA connected
Priority: 0
Last Attempt: Never
Controlling PID: 15872
Domain: nqe
Host: neptune
Username: jane
Copy (put)
LocalFile: /sub/jane/weather.oct
RemoteFile: weather.oct
ftua>
•Because Jane wants to receive mail when the file transfer request succeeds,
she types the following command before ending the ftua session:
SG–2148 3.3 201

NQE User’s Guide
ftua> notify success on
ftua>
•When Jane ends the ftua session, the queued file transfer is processed. Jane
uses the following command to end the ftua session; any active ftua
connections are also closed by using this command:
ftua> bye
$
14.2.16 macdef Example
The macdef command lets you define macros within ftua. A macro definition
is in effect only for the current ftua session. To save macro definitions, put
them into the .netrc file. For more information on the .netrc file format, see
Section 14.4.1, page 211.
The following example illustrates the use of the macdef command to define a
macro called newdir. The macro newdir creates a new directory at the remote
machine by using a path name (/sub/jane/test) supplied as the first
argument on the macro command line. It then changes the current directory to
be the newly created one and displays the current directory.
Within the macro definition, a $followed by a numeral (or numerals) is
replaced by the corresponding argument on the command line when the macro
is invoked. For example, $1 is replaced with the first command line argument.
An empty line terminates the macro input mode.
$ftua chemistry nqe
Name (chemistry:jane):
Password:
ftua> macdef newdir
Enter macro line by line, terminating it with a null line
mkdir $1
cd $1
pwd
ftua> $ newdir /sub/jane/test
220 "/sub/jane/test" is current directory.
ftua>
202 SG–2148 3.3

Transferring Files [14]
Macros remain defined until you execute a close,bye,orquit command.
14.2.17 Transferring Files from within a Request File
To initiate a file transfer from within a request file, you can use here document
syntax, as in the following example:
ftua -in machine nqe << EOF
fred_bloggs
password
get remote_file
quit
EOF
The << signals the construction of the here document. The word that follows
(EOF in this case) is the string used to delimit the input, meaning that the next
occurrence of the string on a line by itself is the end of the here document.
To initiate file transfers, you can use either ftua or rft, with or without the
use of passwords.
To use ftua or rft in nopassword mode, both machines must have network
peer-to-peer authorization (NPPA) enabled as described in Section 14.5, page
213.
You can use the following syntax in the request file to transfer files to and from
a machine called aardvark that has the domain nqe. Both of the following
examples use NPPA for user authentication. If NPPA is not used, ftua or rft
requires a password.
The following example shows ftua used in a batch request:
ftua -in aardvark nqe << EOD
smith #<--- username
#<--- blank line for NPPA
get file1 #<--- ftua request
binary #<--- ftua request
get file2 #<--- ftua request
put file #<--- ftua request
quit #<--- exit ftua
EOD
The following example shows rft used in a batch request (for an explanation
of using the rft command, see Section 14.3, page 209):
SG–2148 3.3 203

NQE User’s Guide
rft -function get that_file1 new_file -user smith \
-host aardvark -domain nqe -type binary -nopassword
14.2.18 Using ftua with the UNICOS Multilevel Security (MLS) Feature or UNICOS/mk Security
Enhancements
When the UNICOS multilevel security (MLS) feature or the UNICOS/mk
security enhancements are running on your system, use the ftua command to
transfer classified files from a UNICOS MLS or UNICOS/mk security-enhanced
system to a remote node. If you use ftua on the remote node, you can transfer
only files at the active security label assigned to you at login. There is no
mechanism for changing your security label within ftua.
When you have logged into your UNICOS MLS or UNICOS/mk
security-enhanced system, set your active security label to that of the file you
wish to transfer, then execute the ftua command. You must be in a directory
that can accommodate a file created at your active security label. If the remote
node supports your security label you can transfer the file. Files that are
transferred to the UNICOS MLS or UNICOS/mk security-enhanced system are
labeled with your active security label at the time of file creation. The examples
that follow illustrate common transfer procedures under MLS and their results.
In example 1, Jill wants to transfer the file called testdata from cray to
snoopy.testdata has a security level of 1 and the test compartment. Jill
adjusts her security level and compartment settings to match the file’s security
level and compartment. She then executes the ftua command, but is denied
access because the network access list (NAL) entry for snoopy does not
support this level or compartment.
204 SG–2148 3.3

Transferring Files [14]
Example 1:
cray$ spget -f testdata
Security Values for: testdata
level: 1
level1
compartments: 010
test
class: 0
class0
categories: 0
none
flags: 0
none
cray$ setulvl 1
setulvl: New security label is Level[1:level1]
Compartments[none]
cray$ setucmp test
setucmp: New security label is Level[1:level1]
Compartments[test]
cray$ ftua snoopy
ftua: connect: Permission denied
ftua> quit
In example 2, Jill tries to transfer the file to friend. The transfer is successful
because the NAL entry for friend supports her security label.
SG–2148 3.3 205

NQE User’s Guide
Example 2:
cray$ ftua friend
Connected to friend
220 friend ftua server (Version 4.15 Fri Mar 6 14:20:46 PST 1998)
ready.
Name (friend:jill):
331 Password required for jill.
Password:
230 User jill logged in.
ftua> put testdata
200 PORT command okay.
150 Opening data connection for testdata (234.6.12.4,1035).
226 Transfer complete.
ftua> quit
In example 3, Jill tries to transfer a file to cray from friend. First, she changes
to a directory where she can create a file with a security level of 1 and the test
compartment. The transfer is successful because the NAL entry for friend
supports her security label, and the file can be created in her current directory.
206 SG–2148 3.3

Transferring Files [14]
Example 3:
cray$ cd level1/test
cray$ ftua friend
Connected to friend
220 friend ftua server (Version 4.15 Fri Mar 6 14:20:46 PST
1998) ready.
Name (friend:jill): jill
331 Password required for jill.
Password:
230 User jill logged in.
ftua> get friend.file
200 PORT command okay.
150 ASCII data connection for friend.file (128.162.82.15,1187
226 ASCII Transfer complete.
ftua> quit
211 Goodbye.
$spget -f friend.file
Security Values for: friend.file
level: 1
level1
compartments: 10
test
class: 0
class0
categories: 0
none
flags: 0
none
14.2.19 File Naming Conventions
Files specified as arguments to ftua commands are processed according to the
following rules:
•If you use wildcard characters (that is, if globbing is enabled), local file
names are expanded according to the rules used in the C shell, csh(1).
•If get commands do not specify a local file name, ftua uses the remote file
name. To alter this, use an ntrans or nmap setting.
•If you do not specify a remote file name for mput and put commands, ftua
uses the local file names. To alter this, use an ntrans or nmap setting.
SG–2148 3.3 207

NQE User’s Guide
•If you specify the file name -, the standard input (for reading) or standard
output (for writing) is used. This file naming option is not available to
Action commands, which are listed in the ftua(1) man page.
For summary information on globbing, ntrans and nmap, and a listing of the
Action commands, see the ftua(1) man page.
14.2.20 Failure Notification
Transfer requests you make in queue mode are processed after you exit ftua.
During the processing of a request, one of the following might occur:
•The request completes successfully.
•A failure occurs that prevents the request from being started. In such cases,
the request is removed from the queue.
A failure also could occur during the execution of the request. For example,
the request could involve getting two files from the remote system, but one
of the files does not exist. If possible, all valid actions in a request are
completed, but some failures could mean that the request cannot be
processed any further, and so it is removed from the queue.
•A transient error occurs. A transient error is a temporary error that prevents
the request from being processed at the current time. For example, the
remote system involved in the request could be down, but it might become
available later.
If a transient error occurs, the request remains in the queue and can be
retried. Generally, the NQE administrator sets up an automatic recovery
process that retries such requests at regular intervals. It is possible for you
to recover your own files; for further information, see NQE Administration,
publication SG–2150.
To request that a mail message be sent to you when a request completes
successfully or when a failure occurs, use the following command:
ftua> notify
By default, a mail message is sent only if a failure occurs. For failures, the mail
message includes a description of the failure that has occurred, as follows:
To: fred
From: MAILER-DAEMON (File Transfer Agent)
Subject: File transfer aa17087 (failed)
Status: R
208 SG–2148 3.3

Transferring Files [14]
File transfer request aa17087 has failed.
Diagnostic message follows:
Login incorrect.
Request description and status follows:
--QID-- ---Queued On --- --User-- --Group--
aa17087 Mon Mar 23 09:44 fred craygrp
State: Active
Status: Connected
Priority: 0
Last Attempt: Mon Mar 23 09:44:48
Controlling PID: 17091
Domain: nqe
Host: cray1
Username: fred
Copy (get)
RemoteFile: .login
LocalFile: /x/fred/.login
To determine whether a transient error has occurred, use the qls or qdir
command. The following screen shows how an example of the display
produced by qls indicates transient errors:
ftua> qls
--QID-- ---Queued On --- --User-- --State-- ----Status----
aa02497 Fri Mar 20 16:19 chris Queued Network connection timeout
aa02523 Fri Mar 20 16:29 chris Queued Network connection failure
14.3 Using rft
The rft(1) command uses one command line to copy files between the local
host and another host. You can use this command on NQE nodes only.
The rft command has the following advantages over other file transfer
commands:
•It is a one-line interface to FTA. This makes it easier to use in batch job
requests.
SG–2148 3.3 209

NQE User’s Guide
•It provides both synchronous and asynchronous reliable file transfer. If a
transient error condition occurs during the transfer, transfers are retried.
Retries are useful when transferring files from within an NQS request.
If you disable the synchronous feature by selecting the -nowait option, the
transfers are done in asynchronous fashion but are still reliable.
•rft provides an option that deletes the local file on the completion of a
transfer. This is useful when transferring files at the end of an NQS request
to the system from which you submitted the request.
For a detailed description of the command, see the rft(1) man page.
In its simplest form, rft can copy a file from a remote system to a file on the
local system. The following example transfers remfile on host2 to locfile
on the local host:
rft -user jake -password Zapx -host host2 -function get \
remfile locfile
You can abbreviate the options, such as -user, if the abbreviation is not
ambiguous. For instance, you cannot abbreviate -host as -h, because it might
be confused with the -help option. You can, however, abbreviate -host as
-ho.
Note: When you use rft within a script or batch request file, do not
abbreviate the options. New options might be implemented that begin with
the same sequence as an abbreviated option and thus introduce an ambiguity.
If you are logged on interactively, rft will prompt for a password only for the
remote host. To suppress the prompt, specify the password on the command
line by using the -password option. If you do not have to specify a password,
use the -nopassword option.
To reverse the direction of the file transfer, change the function from get to
put. The source file name is always listed first and the destination file name
second, whichever direction the transfer is going. The following command
copies locfile from the local system to remfile on host2:
rft -user jake -password ZapX -host host2 -function put \
locfile remfile
210 SG–2148 3.3

Transferring Files [14]
14.4 Using Autologin
The autologin feature lets you authenticate yourself on a remote system by
using a user ID and password that are stored in the .netrc file. The .netrc
file supports autologin for ftua commands. You cannot use the autologin
feature, however, if you have the UNICOS multilevel security (MLS) feature or
the UNICOS/mk security enhancements enabled.
The .netrc file is an authorization file that contains host and user information
that the remote system verifies before the file transfer session begins. ftp also
uses the .netrc file.
To use autologin, create the .netrc file in your home directory. If FTA finds
this file, it uses the information to log you in to the remote host automatically.
If you do not have an .netrc file, the system prompts you for your login
name and password.
The .netrc file is a simple text file. To create or modify it, you can use any
standard text editor, such as vi(1).
Although autologin is very convenient, it does present a major security threat to
the system. If .netrc contains password or account information, FTA requires
that the file permissions are set so that the owner of the file has exclusive read
and write permissions. Set the file permissions by using the chmod 600
.netrc command. If the file permissions allow any other user to read and
write the file, your transfer will fail.
14.4.1 Creating .netrc File Entries
The .netrc file can contain one or more entries. Each entry describes default
values and macros to use when connecting to a specified remote host. Each
entry is on a separate line. Each entry is composed of token pairs that include a
keyword and a value.
The recognized keywords are machine,login,password,account, and
macdef.
To separate token pairs, use any of the following characters:
•Space
•Tab
•Newline
•String of characters between two double quotation marks
SG–2148 3.3 211

NQE User’s Guide
To embed any of these special delimiter characters into a token pair, precede it
with a \ symbol.
The machine remote_hostname token pair defines the start of an entry.
All other token pairs are optional. You can specify them in any order, though
they usually are given in the order that follows. If you omit necessary
information from your .netrc file, FTA prompts you for it.
Note: The macdef macro_name token pair is different from the others. After
the macdef macro_name token pair, all characters up to a blank line are
assumed to be the definitions of a macro.
The following is a list of the permissible token pairs:
Token
pair
Description
machine remote_hostname
Identifies the name of the remote host to which a connection
will be established. When you start ftua, the .netrc file is
searched for a machine keyword that matches the remote host
name you specify. After a match is found, the subsequent
.netrc token pairs are processed until the end of the file is
reached or until another machine keyword is found.
login login_name
Specifies the name of a user at the remote host. If the login
keyword is present, the autologin process uses login_name to log
in to the remote host.
password password
Specifies a password for login_name. If the password keyword
is present and the .netrc file can be read by anyone but the
user running ftua, the autologin process aborts.
account account_name
Supplies an additional account password if required.
macdef macro_name macro
Defines a macro for the ftua session. A macro is defined with
the specified name. The macro’s contents begin with the next
.netrc line and continue until a blank line is encountered. If a
212 SG–2148 3.3

Transferring Files [14]
macro called init is defined, it is executed automatically as the
last step of the autologin process.
14.4.2 .netrc File Example
The following example .netrc file contains entries for three different remote
hosts. The line machine biology login bonnie indicates that, when
connecting to host biology, you must use the login name bonnie. Because
the password is omitted, you are prompted for the password during each login
process.
The line machine chemistry login alice indicates that, when connecting
to host chemistry, you must use the login name alice, and it also defines
two macros, lsf and pwdlsf.
The line machine blackhole login anonymous password bonnie is an
entry for anonymous ftua. The anonymous facility lets you use ftua to access
another host without having an account or password on that host. The login
name for anonymous ftua is usually anonymous. The password should be a
name that describes the user. This example uses the login name anonymous
and the password bonnie. Usually, the anonymous facility is not enabled.
When it is enabled, only a limited number of files can be accessed on that host.
# .netrc file example
machine biology login bonnie
machine chemistry login alice
macdef lsf
ls -CF
macdef pwdlsf
pwd
ls -CF
machine blackhole login anonymous password bonnie
14.5 Using NPPA
network peer-to-peer authorization (NPPA) lets you log on to a remote host
without sending a password across the network in a request script file, a
.netrc file, or from the command line. NPPA requires the use of FTA on the
local system and support for the NPPA process on the remote system. You can
use it to authorize both batch and interactive file transfers.
SG–2148 3.3 213

NQE User’s Guide
You must enter the name of your NPPA domain on the ftua command line.
Ask your NQE administrator for the name.
The following lines in a batch request file transfer a file named nqeuser.data:
1) #QSUB -x
2) ftua -n hot1 nqe << EOF
3) user nqeuser
4)
5) get nqeuser.data nqeuser.data
6) bye
7) EOF
Line Description
1Specifies that NQS environment variables are exported.
2Specifies the name of the host (hot1) on which your file is located
and the NPPA domain (nqe). The characters << begins the here
document that accepts input until the termination string (EOF)is
encountered. The -n option specifies that you want to use NPPA.
3Logs you in.
4Is blank because it sends the RETURN that you would press at the
password prompt if you were using ftua and NPPA interactively.
5Transfers the nqeuser.data file from hot1 to the execution
server.
6Logs you out of ftua.
7Signals the end of the ftua commands in the batch request file.
214 SG–2148 3.3

Monitoring Machine Load [15]
This chapter describes how to monitor machine-load information. The Network
Load Balancer (NLB) displays information about the nodes in the NQE cluster.
This information is used for load balancing, display of machine load data, and
display of request status in the cluster. For more information about cluster-wide
request status, see Section 10.1, page 137.
To access machine-load information, click on the Load button of the NQE GUI
interface. The window provides the following:
•Continually updated status that allows easy comparison of the workload of
servers
•Visual indication that a host is not providing new data
•Pop-up windows that provide information on a server
You can customize the display by editing the .Xdefaults file or using the
Chart Editor option on the Options menu of the NQE GUI Load window
(see Section 9.3, page 133, or the nqe(1) man page).
You can view data from the main window, by individual host, and through a
miniature summary display.
Figure 18 shows the default Load window:
SG–2148 3.3 215
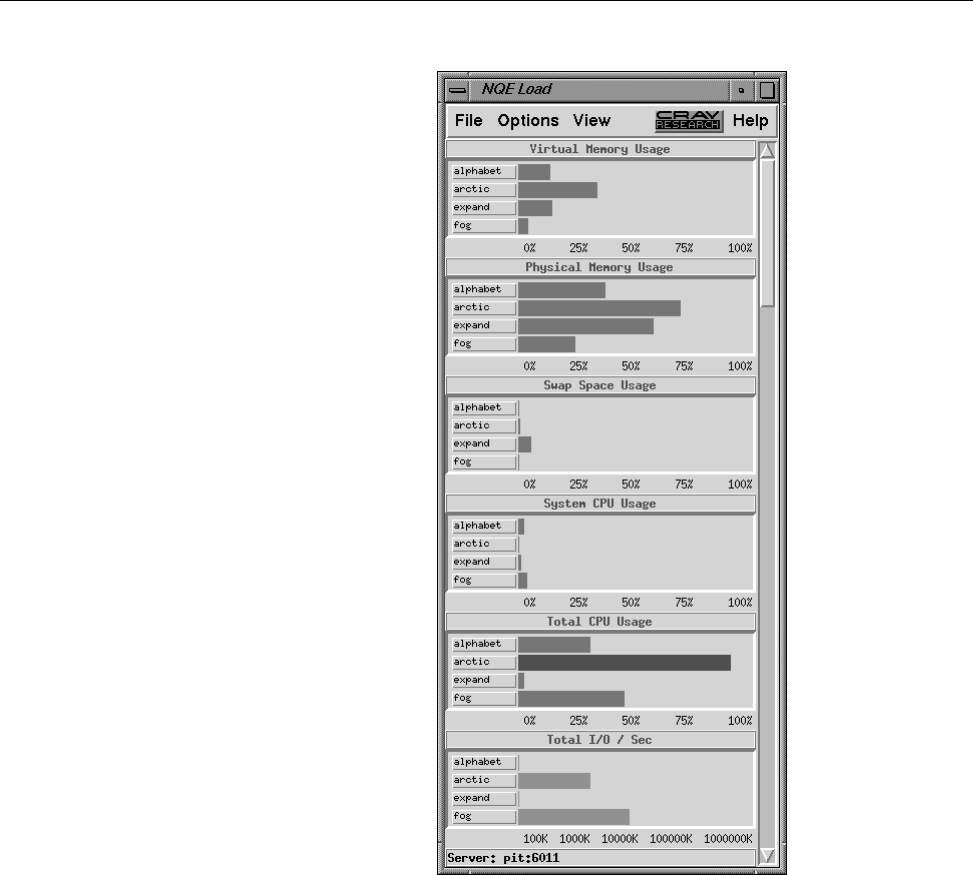
NQE User’s Guide
a11572
Figure 18. Load Window
Note: You can change the settings of the mouse buttons (see Section 9.3, page
133). The settings described in this manual are the default settings.
The Load window is composed of the menu bar, the NQE load display, and the
server name display area. Each of these segments is described as follows:
216 SG–2148 3.3

Monitoring Machine Load [15]
•Menu bar. The menu bar is located at the top of the Load window and
displays buttons that open Load menus. To open a menu window, place the
pointer on the menu name and press the left mouse button.
–File menu. The File menu contains the Exit option, which closes all
of the windows associated with the NQE load display and terminates the
program.
–The Options menu contains the Host Selection option, which
provides selections for hosts that you want displayed, and the Chart
Editor option, which creates new charts, changes the configuration of
an existing chart, and adds or removes a chart from the Load window.
–View menu. The View menu contains the Chart Formulae option,
which displays the formula used to calculate each of the charts.
–Help menu. The Help menu lets you view the nqe(1) man page or view
information about how to access this manual.
•NQE load display. The NQE load display provides continually updated
machine load data for participating machines in the cluster. Each of the
charts in the display has a title, a scale, and one button per host.
•Server name display area. The server name display area displays the name of
the server.
The system load application uses the NLB database information supplied by the
ccollect program. The ccollect program relies on the sar(1) command to
retrieve system performance data. If you are running UNICOS/mk, the sar(1)
command will not provide system performance data for memory or swapping
usage statistics. Therefore, the NQE Load window for memory demand will
display a fixed value of 96% memory demand for the UNICOS/mk platforms.
If you choose Host Selection under the Options menu, a pop-up filter lets
you select which hosts are displayed. Figure 19 shows this filter:
SG–2148 3.3 217
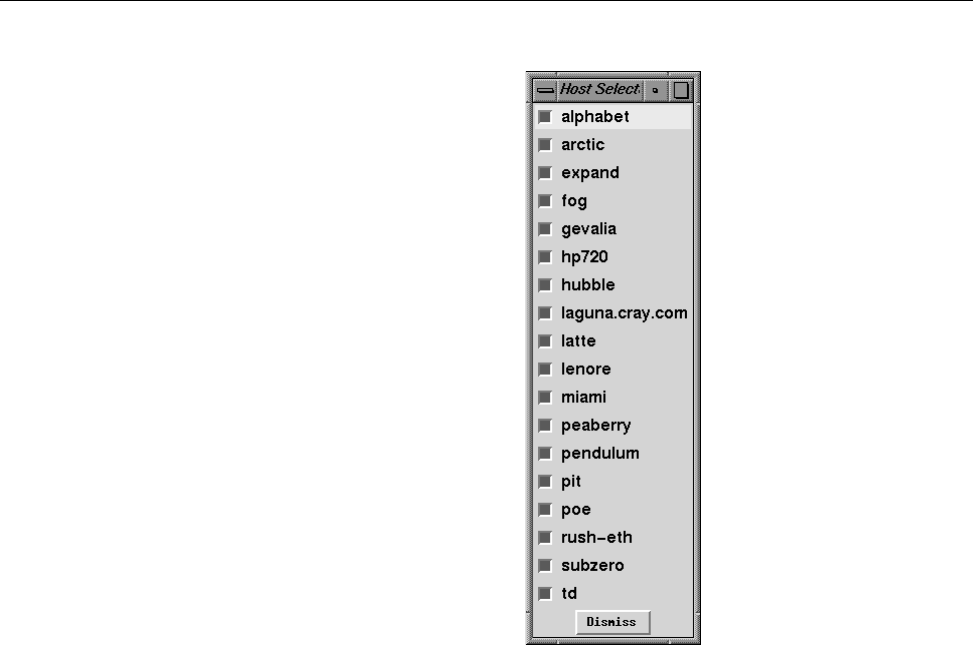
NQE User’s Guide
a11573
Figure 19. Host Selection Filter
If you choose Chart Editor under the Options menu, a pop-up window lets
you select editing options to create a new chart, change the configuration of an
existing chart, and add or remove a chart from the Load window. Figure 20
shows the Chart Editor window.
218 SG–2148 3.3
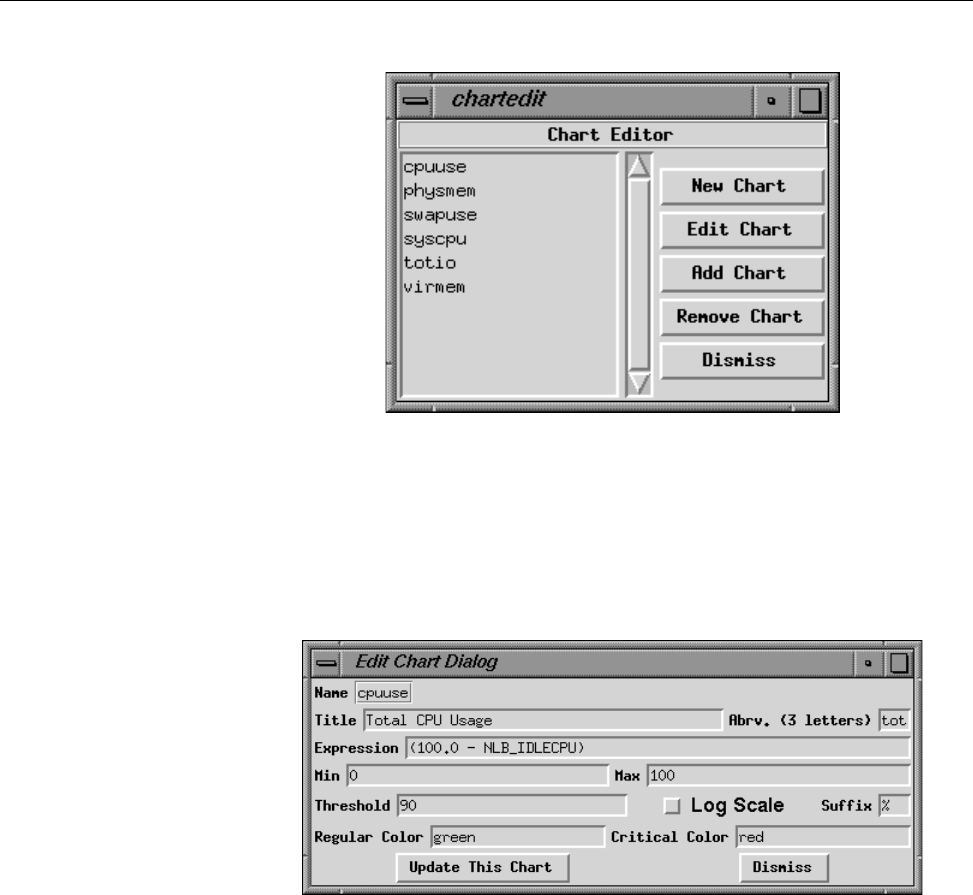
Monitoring Machine Load [15]
a11574
Figure 20. Chart Editor Window
If you choose Edit Chart in the Chart Editor window, a pop-up window
lets you select options to change the configuration of an existing chart. Figure
21, page 219 shows the Edit Chart window.
a11575
Figure 21. Edit Chart Window
If you choose Chart Formulae under the View menu, you will see the
formulae used that result in the charts displayed on the main window. Figure
22 shows this display:
SG–2148 3.3 219
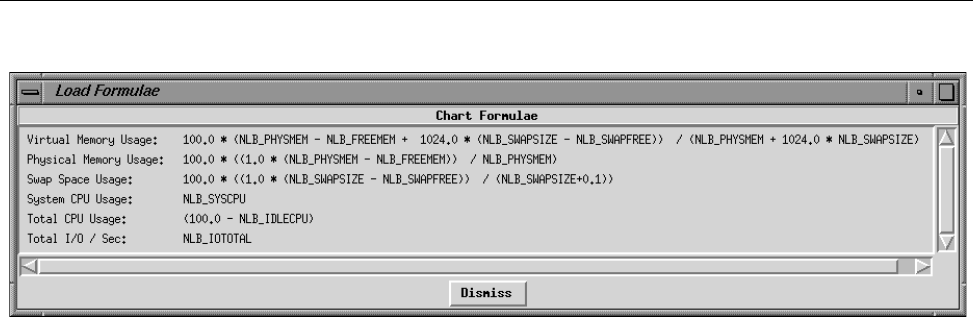
NQE User’s Guide
a11576
Figure 22. Chart Formulae Display
You can view data about a specific host as shown in Figure 23, page 221. You
also can view the same data that is provided on the Load window (memory
demand, percentage of system CPU in use, idle CPU, and total I/O per second)
grouped by host rather than by type of data (as shown in Figure 24, page 222).
To display information about a specific host, place the pointer over the button
that has the name of the host on the Load window and click the left mouse
button. You will receive a display like the one shown in Figure 23. When the
NLB receives new data, this display is updated.
220 SG–2148 3.3
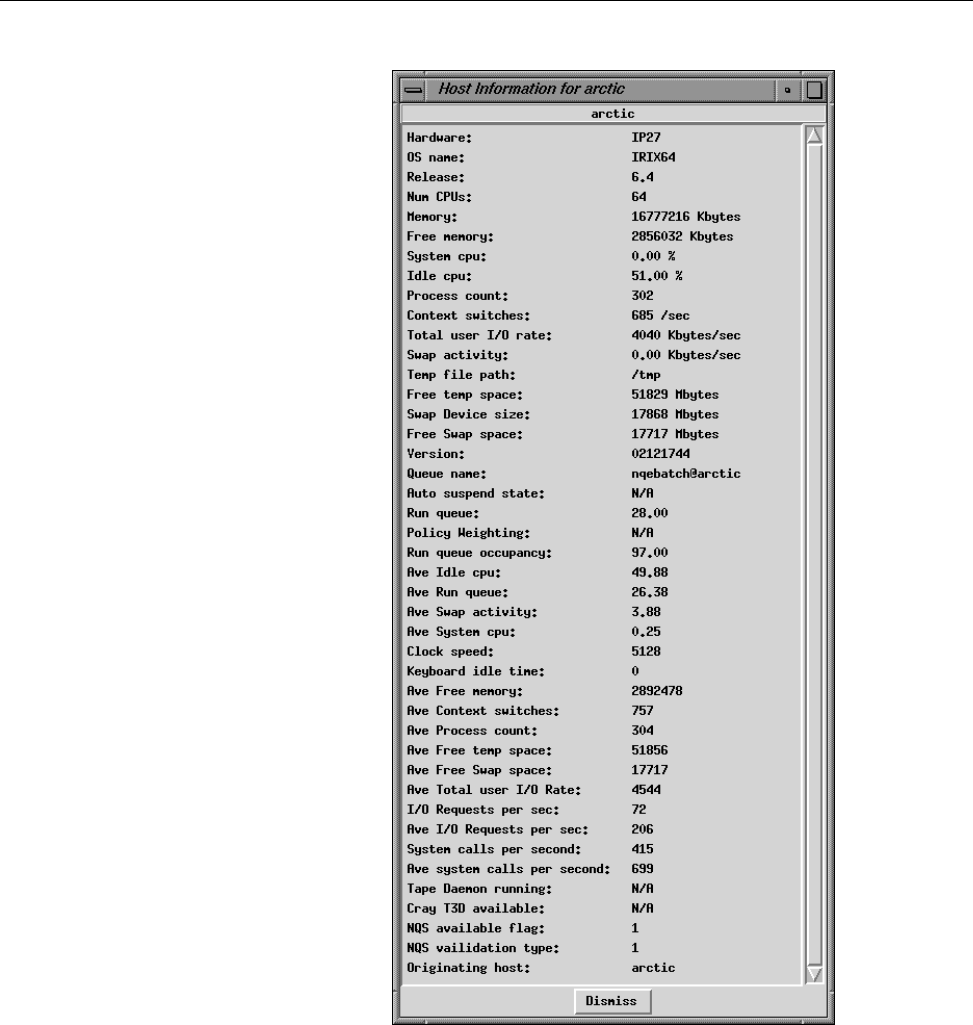
Monitoring Machine Load [15]
a11577
Figure 23. Load Display for Specific Host
SG–2148 3.3 221
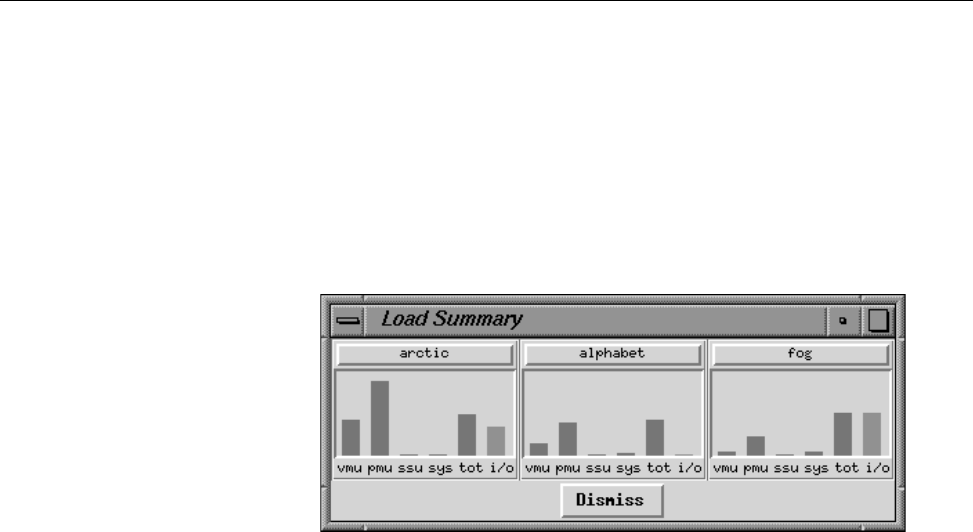
NQE User’s Guide
To cancel this window, click on the Dismiss button at the bottom of the
window or click the left mouse button over the host name in the Load window.
To display a window of data that is grouped by host rather than by type of
data, position the pointer over the host name on the Load window and click
the middle mouse button. As you select additional hosts, the window will
expand and include a display for each host you select. Figure 24 shows the
load summary displayed for four hosts that were selected individually:
a11578
Figure 24. NLB Load Summary Displayed by Host
To execute an rlogin command for a host, position the pointer over the host
name and click on the left mouse button.
To cancel a host summary display, as shown in Figure 24, click the middle
mouse button over the host name in the Load window. Repeat this action for
each host summary you want to cancel.
222 SG–2148 3.3

Solving Problems [16]
This chapter describes some problems that you may have when using NQE,
along with their possible solutions. The following problems are discussed:
•Commands do not execute (Section 16.1, page 223)
•Requests not queued (Section 16.2, page 224)
•Requests not executing (Section 16.3, page 225)
•Connection failure messages (Section 16.4, page 227)
•Authorization failure messages (Section 16.5, page 227)
•NQE database authorization failures (Section 16.6, page 228)
•Requests disappear (Section 16.7, page 228)
•NQE scheduler not scheduling (Section 16.8, page 229)
•-h option displays error (Section 16.9, page 229)
•Resource limits exceeded (Section 16.10, page 230)
•Output files cannot be found (Section 16.11, page 230)
•stdout reports no access to tty (Section 16.12, page 233)
•stderr reports many syntax errors (Section 16.13, page 233)
•stderr reports File not found (Section 16.14, page 233)
•No licenses are available (Section 16.15, page 234)
•DCE/DFS credentials not obtained (Section 16.16, page 234)
If your request does not complete successfully, you will receive either an error
message in the standard error file or a mail message that describes the problem;
your job log may also be appended to your mail, depending on which cqsub
or qsub command options are set.
16.1 Commands Do Not Execute
Before you can use the NQE commands, you must add the /nqebase/bin
directory (and the /nqebase/etc directory to use administrator commands) to
SG–2148 3.3 223

NQE User’s Guide
your search path. Before you can use the man pages (which tell you about the
NQE commands and command options) you must add the /nqebase/man
directories to your search path. For a description of how to set these variables,
see Section 2.2, page 22.
16.2 Requests Not Queued
When you try to submit a request to NQS, you may receive the following
message:
NQS local daemon is not present at local host.
Retry later.
This message indicates that the NQS system is not running. You can wait until
later or contact your NQE administrator, or you can try using a different NQS
server node. If you do not know which systems are NQS server nodes in your
NQE cluster, contact your NQE administrator.
If you try to submit a request without specifying a queue name, you may get
the following message:
No request queue specified, and no local default has been defined.
Request not queued.
The message indicates that no default queue is currently defined. You can do
any of the following:
•Ask the NQE administrator to define a default queue.
•Using the NQE GUI, select General Options on the Configure menu of
the Submit window, enter the name in the Queue name field, and apply
the change.
•Define your own default queue by using the QSUB_QUEUE environment
variable (see Section 4.9, page 65).
•Using either the cqsub or qsub command, specify a queue by using the -q
queuename option.
When you submit a request, you may get the following message:
Access denied at local host.
224 SG–2148 3.3

Solving Problems [16]
This message indicates that the queue to which you submitted the request has
access restrictions that prohibit your request entering the queue. The restriction
can be any of the following:
•The queue is pipeonly, which means that it can accept a request only from
a pipe queue.
•Only certain users or user groups can submit requests to the queue.
To determine the access restriction, use the cqstatl -f or the qstat -f
command (see Section 11.2, page 159).
If the UNICOS MLS feature or the UNICOS/mk security enhancements are
enabled on your system, and the requested label does not dominate the
submission label, you may receive the following message:
Unanticipated transaction failure at local host.
16.3 Requests Not Executing
If you find that a request remains in a queue for a long time, check the Status
column of the NQE GUI Status window or the ST column of the cqstatl or
qstat display, which lists a status code that will help you determine the
problem. The following are possible reasons:
•A letter Wcan indicate the following:
–Your request is waiting for a license (see Section 16.15, page 234).
–A pipe queue’s destination queue is disabled.
–A pipe queue’s destination is at a remote system that is not available.
NQS automatically retries sending the request at periodic intervals.
•A letter Qthat has a substatus code of qs indicates the queue has stopped.
Only the NQE administrator can start and enable NQS queues.
•A letter Qthat has a substatus code beginning with c,g,orq(except qs)
indicates that a limit has been reached for the queue complex, globally on
the NQS server, or for a queue. You can wait for resources to become
available or delete the request.
•Your request may be accepted into an NQS queue and later be deleted.
Check your electronic mail for a message such as the following:
The request could not be routed to any of the possible pipe
queue destinations because of the following reason(s) :
SG–2148 3.3 225

NQE User’s Guide
No account authorization at transaction peer;
If you receive this message, one of the following is true:
–Password checking is in use and either you did not request a password
prompt (by selecting Set Password on the Actions menu of the NQE
GUI Submit window, by using cqsub -P, or by setting the
NQS_PASSWORD_NEEDED environment variable), or you supplied a
password that is not valid.
–Validation file checking is in use and no correct entry exists in the
validation file of the user name you used to submit the request. See
Chapter 2, page 21.
–UNICOS MLS or UNICOS/mk security enhancements are enabled to run
on the remote system and the workstation access list (WAL) does not
allow access to NQS services.
See Section 16.9, page 229, for more information about troubleshooting
validation files.
Another possible reason that your request is not executing is that when NQS
reads your .cshrc file or your request script file, it may encounter commands
it cannot invoke and cause your request not to run. You will see these problems
reflected in your standard error file. Also, NQS sets an environment variable
called ENVIRONMENT to value BATCH for each NQS initiated job. This variable
can be checked within a .profile,.login,or.cshrc script and be used to
differentiate between interactive and batch sessions; this action can be used to
avoid performing terminal setup operations for a batch job. A benefit of NQS
initiating the batch job as a login shell is that .profile,.login,or.cshrc
scripts are run and your environment is set up as expected.
If the UNICOS multilevel security (MLS) feature or the UNICOS/mk security
enhancements are enabled on the remote system, you cannot submit a request
to a remote host if the remote host has a workstation access list (WAL) entry for
the host of origin that restricts your access to NQS services.
If the UNICOS MLS feature or the UNICOS/mk security enhancements are
enabled on your system, the request is deleted if a requested execution label is
not within the authorized range, and you may receive the following mail
message:
System security violation.
Request deleted.
226 SG–2148 3.3

Solving Problems [16]
Bad session security attributes.
16.4 Connection Failure Messages
If you are using a client command to talk directly to an NQS server and a
network error condition exists that can be retried, you will receive messages
such as the following:
Retrying connection to NQS_SERVER on host ice (147.111.21.90) . . .
QUESRV: ERROR: Failed to connect to NQS_SERVER at ice [port 607]
NETWORK: ERROR: NQS network daemon not responding
The server may have just come up, it may not be listening, or the network may
be busy. The client will retry the connection to the server for 30 seconds. You
also can verify that the value of the NQS_SERVER environment variable is set to
a host running NQS.
If you are using a client command or the NQE GUI to connect to the NQE
database, and the database server is not up or does not exist, you will see a
message such as the following:
Connect: Connection refused
NETWORK: ERROR: NQE Database connection failure:
Can’t connect to MSQL server on Latte
16.5 Authorization Failure Messages
The default validation type in NQS is file validation. File validation requires a
.rhosts or .nqshosts file in the login directory of your account on all of the
NQE node systems where your request may run. This applies even if your
target NQS server is your local machine.
For information about validation files, see Section 2.3, page 24.
If you encounter authorization failure messages, consider these alternatives:
•A.rhosts or .nqshosts file may not exist for the user name under which
the request will be run. This may be the case if the $HOME environment
variable points to a location that does not have these files.
•The proper hostname-username pair is not contained in a validation file. You
must have an entry in a validation file for every NQE node that the Network
Load Balancer (NLB) or the NQE database may select to run your request.
SG–2148 3.3 227

NQE User’s Guide
•A password is required and was not supplied, or the wrong password was
supplied.
•Depending on your local network configuration, host names of nodes might
have to be fully qualified (that is, you may have to include ice.site.com
rather than simply ice).
•You may have created both .rhosts and .nqshosts files, and only the
.rhosts file is correct. When the .nqshosts file exists, NQS ignores the
.rhosts file.
16.6 NQE Database Authorization Failures
A client trying to connect to the database without the proper validation will
result in an error such as the following:
latte$ cqstatl
NETWORK: ERROR: NQE Database connection failure:
Connection disallowed.
latte$
To determine why you cannot connect, check with your database administrator.
16.7 Requests Disappear
If it appears that your request has disappeared, the following procedures may
reveal its location (if these do not uncover the request, consult with your NQE
administrator):
•Enter either the cqstatl -a or the qstat -a command to display all of
your requests on the local machine; this display may reveal the location of
your request.
•If you think that your request may have been sent to a remote system for
execution, enter either the cqstatl -a -h hostname or the qstat -a -h
hostname command to display all of your requests at the remote system.
•Check to see whether you have received a mail message about the problem;
this message may help you to determine the cause of the problem.
•In the NQE GUI, display all of your requests in NQS batch queues in the
cluster by using the left mouse button to click on the Status button. For
information about interpreting this display, see Section 10.1, page 137.
228 SG–2148 3.3

Solving Problems [16]
•Check to see whether the request has completed. Look for the standard
output and standard error files that the request produced. Unless you
specified a different location for these files, they should be in the directory
from which you submitted your request. If they are not there, check your
home directory on the NQS server at which your request executed.
If you used an alternative user name, try the home directory of the user
name you used to submit the request.
If the request was executed at a remote system, try checking the remote
system in the home directory of the user under whom the request was
executed.
16.8 NQE Scheduler Not Scheduling
If the NQE scheduler is not scheduling the request, an NQS server may not be
available to accept your request.
16.9 -h Option Displays Error
You may receive the following error message when you issue a cqstatl,
cqdel,qdel,orqstat command with the -h option to specify the host name
of an NQS server, or you may receive the message if you use the NQE GUI and
try to delete or signal a request to a specified host.
When using the cqstatl or qstat command, the following message may be
displayed:
No account authorization at transaction peer.
When using the cqdel or qdel command or the NQE GUI, the following
message may be displayed:
No account authorization on target host
When you encounter the preceding message, consider these alternatives:
•A.rhosts or (.nqshosts)file may not exist for this user. This may be the
case if the $HOME environment variable points to a location that does not
have these files.
•The proper hostname-username pair is not contained in either of these files.
NQS checks the .rhosts file only when the .nqshosts file does not exist.
SG–2148 3.3 229

NQE User’s Guide
•A password is required and was not supplied, or the wrong password was
supplied.
For further information, see Chapter 2, page 21.
16.10 Resource Limits Exceeded
If your request exceeds resource limits, errors or unexpected results can occur.
If an error occurs, your request proceeds with the next command. You then
should examine the return values from commands and calls executed within a
request to check whether an error has occurred.
Within a request file, you can verify the exit status of the last command
executed by examining one of the following:
•The ?variable for requests that use sh or ksh
•The status variable for requests that use csh or tcsh
You also can look at the job log for exit status information.
Some limits violations can terminate your program, which may result in the
generation of a core file. If your job does not complete successfully and there
are no other errors indicated, you should look for a core file in the directories in
which your job was executing.
16.11 Output Files Cannot Be Found
Unless you specified a different location for the standard output, standard error,
and job log files, they should be in the directory you were working in when
you submitted your request.
The first thing you should do is check your electronic mail. If NQS has tried to
write your output to another directory, it sends you mail. For examples of mail
messages, see Section 4.11, page 69.
The most likely locations for your output are as follows:
•Your home directory on the executing NQS server
Note: For NQE database requests, the NQE database will send your
output files to your home directory on your NQE client.
•If you used the NQE GUI, or the cqsub -u or qsub -u command, the
home directory of the user name you specified
230 SG–2148 3.3

Solving Problems [16]
•The NQS failed directory
•The NQE GUI has some other output default settings that you should check,
such as the job output directory.
NQS uses the following methods, in the order listed, to return your output to
you:
1. NQS tries to send it by using NQS protocol. This method works if you
submitted the request from an NQS server.
2. NQS tries to use fta. This method works if you have a .netrc file
containing a password on the execution node or if FTA has been configured
between client and node to use NPPA (no passwords).
3. NQS tries to use rcp. This method works if you have a .rhosts entry on
your submitting system, and your .rhosts file has an entry for the NQE
node that executed your request. Depending on your local network
configuration, host names of nodes might have to be fully qualified (that is,
you may have to include ice.site.com rather than simply ice).
4. NQS sends you mail stating that it could not deliver your output to its first
destination. It places your output in your home directory on the NQS
execution server.
5. NQS delivers your output to an administrative directory. To retrieve the
files, you must contact your system administrator.
When using DCE/DFS, note the following:
•After a request completes, NQS uses kdestroy to destroy any credentials
obtained by NQS on behalf of the request’s owner.
!
Caution: On UNICOS systems, do not put a kdestroy within a request’s
job script; it will destroy the credentials obtained by NQS and prevent
NQS from returning request output files into DFS space.
•On UNIX platforms, there is not an integrated login system feature
available. NQS on UNIX platforms obtains separate DCE credentials for
request output return. Therefore, a kdestroy placed within a request’s job
script running on an NQE UNIX server will not affect the return of request
output files into DFS space.
If the UNICOS MLS feature or the UNICOS/mk security enhancements are
enabled on your system, the job output files are labeled with the job execution
label. For jobs that are submitted locally, the return of the job output files may
fail if the job submission directory label does not match the job execution label.
SG–2148 3.3 231

NQE User’s Guide
For example, if a job is submitted from a level 0 directory, and the job is
executed at a requested level 2, the job output files cannot be written to the
level 0 directory. If the home directory of the UNICOS user under whom the
job ran is not a level 2 directory, does not have a wildcard label, or is not a
multilevel directory, the job output files cannot be returned to that directory
either. The job output files will be stored in the NQS failed directory.
If the UNICOS MLS feature or the UNICOS/mk security enhancements are
enabled on your system and you submitted a job remotely, the Internet Protocol
Security Options (IPSO) type and label range, which is defined in the network
access list (NAL) entry for the remote host, affects the job output file return.
The following example shows a successful return of the job output files to a
wildcard-labeled home directory on the execution host:
Message concerning NQS request: 1262.cool ended.
Request name: STDIN
Request owner: snow
Mail sent at: 10:24:04 CST
Request exited normally.
_Exit() value was: 0.
Stdout file staging event status:
Destination: -o cool:/home/usr/snow/STDIN.o1262
Output file could not be returned to primary destination.
Output file successfully returned to backup destination
in user home directory on the execution machine.
Transaction failure reason at primary destination:
File access denied at transaction peer.
Stderr file staging event status:
Destination: -e coal:/home/usr/snow/STDIN.e1262
Output file could not be returned to primary destination.
Output file successfully returned to backup destination
in user home directory on the execution machine.
Transaction failure reason at primary destination:
File access denied at transaction peer.
For more information on locating output files, see Section 6.4, page 110.
232 SG–2148 3.3

Solving Problems [16]
16.12 stdout Reports no access to tty
The following message is always displayed at the start of the standard output
file for batch requests that have executed under the C shell:
Warning: no access to tty; thus no job control in this shell...
This message does not indicate that an error has occurred. It is simply a
warning that the usual C shell job control options are not available because this
is a batch request.
Job control is a means of controlling multiple shells or processes interactively. It
is not available with a batch request because no interactive session (referred to
as tty in the message) is associated with the job.
16.13 stderr Reports Many Syntax Errors
If the standard error file contains an excessive number of syntax errors, you
may be using the wrong shell.
For information on selecting a shell, see Section 5.3, page 94. Usually, it is shell
flow control commands (such as if,while,for, and foreach) that cause
errors when the wrong shell is used.
16.14 stderr Reports file not found
When a request begins execution, NQS assumes that any files you are trying to
access are in your home directory (or the initial working directory you are in
when you log in interactively).
To indicate that a file is somewhere else, do one of the following:
•Use the full path name
•Move to the correct directory by using the cd command in your request
before you try to access the file
SG–2148 3.3 233

NQE User’s Guide
16.15 No Licenses Are Available
When you try to submit a request and no NQE licenses are available, your
request is accepted, but it will be held in a wait state in NQS. You will see the
following status messages:
Wlm
WAITING
License Unavailable
NQE tries to obtain a license every 3 minutes.
16.16 DCE/DFS Credentials Not Obtained
Failure to obtain DCE credentials results in a nonfatal error. The request will be
initiated even if the attempt to obtain DCE credentials for the request owner
fails. If DCE credentials are successfully obtained, the KRB5CCNAME
environment variable is set within the request process that is initiated.
A restarted job correctly gets the new credentials obtained from NQS, but the
KRB5CCNAME environment variable within the restart file is not reset to the new
cache file name. After the job is restarted, a klist within the job script will
incorrectly state that there are no credentials. As a result, DCE services are
affected but not DFS, which continues to work with the new credentials.
234 SG–2148 3.3

Man Page List [A]
The man command provides online help on all NQE commands. To view a man
page online, type man commandname. You must ensure that your MANPATH is set
properly, as described in Section 2.2, page 22.
Your NQE software includes the following user-level online man pages:
User-level man
page
Description
cevent(1) Posts, reads, and deletes job-dependency event
information
cqdel(1) Deletes or signals to a specified batch request
cqstatl(1) Provides a line-mode display of requests and
queues on a specified host
cqsub(1) Submits a batch request to NQE
ftua(1) Transfers a file interactively (this command is
issued only on an NQE node that has had the
NQE components installed on it)
ilb(1) Executes a load-balanced interactive command
nqe(1) Provides a graphical user interface (GUI) to NQE
functionality
qalter(1) Alters the attributes of one or more NQS requests
(this command is issued only on an NQE node
that has had the NQE components installed on it)
qchkpnt(1) Checkpoints an NQS request on a UNICOS,
UNICOS/mk, or IRIX system (this command is
issued only on an NQE node that has had the
NQE components installed on it)
qdel(1) Deletes or signals NQS requests (this command is
issued only on an NQE node that has had the
NQE components installed on it)
SG–2148 3.3 235

NQE User’s Guide
qlimit(1) Displays NQS batch limits for the local host; this
command also displays the qsub command
options that are used to specify each resource at
the time of submission (this command is issued
only on an NQE node that has had the NQE
components installed on it)
qmsg(1) Writes messages to stderr,stdout, or the job
log file of an NQS batch request (this command is
issued only on an NQE node that has had the
NQE components installed on it)
qping(1) Determines whether the local NQS daemon is
running and responding to requests (this
command is issued only on an NQE node that
has had the NQE components installed on it)
qstat(1) Displays the status of NQS queues, requests, and
queue complexes (this command is issued only
on an NQE node that has had the NQE
components installed on it)
qsub(1) Submits a batch request to NQS (this command is
issued only on an NQE node that has had the
NQE components installed on it)
rft(1) Transfers a file in a batch request (this command
is issued only on an NQE node that has had the
NQE components installed on it)
236 SG–2148 3.3

Command Line Interface Tutorial [B]
This tutorial introduces you to the NQS commands that are used to submit,
monitor, and control an NQS batch request. Before using this tutorial, read
through Chapter 1, page 1.
The tutorial covers the following basic tasks:
•Creating a batch request
•Submitting a batch request for execution, including finding the standard
output and standard error files produced by the batch request
•Monitoring the status of your submitted requests
•Deleting a submitted batch request
You can find a complete description of the tasks you can perform in the other
chapters of this publication.
You may find it helpful to read this tutorial at your workstation because it
contains several exercises that you can perform. For a list of the commands and
options in the order in which they appear in this tutorial, see Section B.6, page
266.
Before you can submit batch requests, you must ensure that you have a valid
user name and password to enable you to log in to the operating system.
Note: The exercises in this tutorial create several files in your current
directory. You can create a new directory from which to perform the exercises
to make it easier to remove the unwanted files at the end of the tutorial. A list
of the files created is given at the end of the tutorial in Section B.5, page 265.
B.1 Creating the Batch Request
Before you can submit a batch request, you must first create a script file that
contains the commands that make up the request. You can create this file by
using any text editor (such as vi(1)).
A batch request can be one command, such as the following example:
who # list users of the CRI system
Usually, however, it contains several commands. For example, the following
batch request compiles and runs a CF90 Fortran program:
SG–2148 3.3 237

NQE User’s Guide
set -x # Echo commands into standard output
ja # Enable job accounting
date # Print current date and time
f90 loop.f # Compile a program called loop.f
segldr loop.o # Load replaceable loop.o as a.out
date # Print date and time
./a.out # Execute the program a.out
date # Print date and time
rm loop.o a.out # Remove files
echo job complete
ja -csft # Report job accounting information
# and disable job accounting
If you enter the required commands interactively, line-by-line, from standard
input (stdin), you do not have to create a file. This is done by issuing a
cqsub or qsub command without a batch request file name.
%qsub
ls
who
CONTROL-d
nqs-181 qsub: INFO
Request <365.coal>: Submitted to queue <express> by <snow(123)>.
%
When this form of cqsub or qsub is used, the request is given the name
STDIN, which is used to form the names of the standard output and standard
error files produced by the request. See Section B.2.5, page 245.
However, if you make an error halfway through entering a request and do not
find the error until after you have started the next line, you cannot return and
correct the error. You must press INTERRUPT (usually CONTROL-c)to
terminate the cqsub or qsub command and start again.
B.1.1 Exercise 1
Log on interactively to your system and create a file called testjob that
contains the following lines:
date
pwd
ls
238 SG–2148 3.3

Command Line Interface Tutorial [B]
Save this file, because it is used in exercises later in this tutorial. (The
commands in this file simply display the current date and time, display the
path to the current directory, and list the contents of the current directory.)
The shell used to execute NQS batch requests may not be the same as your login
shell; therefore, the results of batch request execution may differ from interactive
execution of the commands in the request file. See Section B.2.1, page 241.
B.2 Submitting a Batch Request for Execution
To submit a batch request for execution, use the cqsub or qsub command,
which has many options. For a complete list of the options, see the cqsub(1) or
qsub(1) man page. A simplified form of the cqsub and qsub commands are as
follows:
cqsub [-q queue]file
qsub [-q queue]file
The file argument is the name of the script file that will be submitted for
execution.
The -q queue option indicates the name of an NQS queue to which the request
will be initially sent (it does not apply to requests sent to the NQE database).
The NQS administrator may define several NQS queues that are available to
users; the definition includes a list of one or more destination queues to be
associated with each NQS queue. Usually, you would submit a request to a
pipe queue, which would then route your request to a suitable batch queue for
execution (although some systems may let you submit a request directly to a
batch queue). To display a list of the NQS queues, you can use the cqstatl(1)
or qstat(1) command.
To submit a file called testjob to an NQS queue called std, you can use the
following command line:
%qsub -q std testjob
You will receive one of the following messages:
nqs-181 qsub: INFO
Request <366.coal>: Submitted to queue <std> by <snow(123)>.
nqs_4517 qsub: CAUTION
No such queue <std> at local host.
SG–2148 3.3 239

NQE User’s Guide
If you omit the -q option, the batch request is sent to the default NQS batch
request queue (if one has been defined).
In the following example, the default queue is called express:
%qsub testjob
nqs-181 qsub: INFO
Request <367.coal>: Submitted to queue <express> by <snow(123)>.
%
You can specify the default queue in the QSUB_QUEUE environment variable. If
you have not defined that variable, the request is sent to a system default queue
(if the NQS administrator has defined such a queue). In some configurations,
the administrator may not have defined any system default queue; therefore,
you must specify a queue by using the -q option.
You can display the name of the system default queue as defined by the NQS
administrator only by using the qmgr(8) command. Many of the qmgr
subcommands can be executed only by the NQS administrator, but any user can
use the show parameters subcommand to display the default batch request
queue.
In the following example, which is a partial display, the default batch request
queue has the name batch.
240 SG–2148 3.3

Command Line Interface Tutorial [B]
%qmgr
Qmgr: show parameters
show parameters
Checkpoint directory = /usr/spool/nqs/private/root/chkpnt
Debug level = 0
Default batch_request queue = batch
Default destination_retry time = 72 hours
Default destination_retry wait = 5 minutes
Default return of a request’s job log is OFF
Global batch group run-limit: 40
Global batch run-limit: 1
Global batch user run-limit: 40
Global MPP Barrier limit: unspecified
Global MPP Processor Element limit: unspecified
Global memory limit: unlimited
Global pipe limit: 20
Global quick-file limit: 543227904w
Global tape-drive a limit: unlimited
Global tape-drive b limit: 16
Global tape-drive c limit: 16
Global tape-drive d limit: 16
Global tape-drive e limit: 16
Global tape-drive f limit: 16
Global tape-drive g limit: 16
Global tape-drive h limit: 16
Press to continue.
B.2.1 Discovering the Shell to Be Used for Your Requests
The shell used to execute your NQS batch requests may not be the same as
your login shell. When you submit a batch request to NQS, you can specify the
shell to be used for that request by using the cqsub -s or qsub -s command.
You can specify the csh,ksh,orsh shell names. The -s option overrides any
shell strategy that is configured on the execution machine. When NQS initiates
the request, it spawns a second shell. If your login shell is sh or ksh, the
request is run under that shell. If your login shell is csh and the request will
run under csh, you must include the #!/bin/csh command as the first line of
the shell script itself (before any #QSUB directives). If you do not use this
command, NQS will run the batch request under sh. This is normal csh
behavior, and it is described in the csh(1) man page.
SG–2148 3.3 241

NQE User’s Guide
To ensure that a batch request always uses a certain shell, embed the following
command line in the script file:
#QSUB -s shell_name
The shell_name argument is the full path name of the shell you want to use to
interpret the batch request shell script.
For a description of the passing of environment variables to a batch request, see
Section 9.1, page 127. You also can set individual shell variables within a batch
request.
B.2.2 Exercise 2
This exercise uses a script file called testjob that contains the following lines:
date
pwd
ls
Before proceeding with the exercise, you should check that this file exists and
has the preceding contents.
Next, find the name of an NQS pipe queue to which you can submit a request
by issuing the cqstatl or qstat command with the -p option, as shown in
the following example (this option does not apply if you are sending the
request to the NQE database). The pipe queue names are listed under the
column QUEUE NAME.
242 SG–2148 3.3

Command Line Interface Tutorial [B]
% qstat -p
-----------------------
NQS PIPE QUEUE SUMMARY
-----------------------
QUEUE NAME LIM TOT ENA STS QUE ROU WAI HLD ARR DEP DESTINATIONS
----------------------- --- --- --- --- --- --- --- --- --- --- -------------
express 2 1 yes on 0 1 0 0 0 0 b_600_96
b_1800_96
b_3600_96
b_14400_96
b_86400_96
b_max_96
big 1 0 yes on 0 0 0 0 0 0 b_large
cray02 1 0 yes off 0 0 0 0 0 0 batch@cray02
cray03 1 0 yes off 0 0 0 0 0 0 batch@cray03
----------------------- --- --- --- --- --- --- --- --- --- --- -------------
coal 5 1 0 1 0 0 0 0
----------------------- --- --- --- --- --- --- --- --- --- --- -------------
The display produced by this command shows all of the NQS pipe queues that
are available and the destinations of each queue. If the display is so big that
part of it scrolls off the screen, you can use the more(1) command to page the
display, as follows:
qstat -p | more
If you are unsure which queue to use for your requests, ask your system
administrator. Whichever queue you choose to use, check that the entry in the
ENA column is yes and that the entry in the STS column is on. If you see some
other value for the queue, ask your administrator to enable and start the queue.
To define the queue name you want to use as your default queue, set the
QSUB_QUEUE environment variable, depending on the type of login shell that
you are currently using, as follows.
For C shell users:
setenv QSUB_QUEUE queue-name
For standard or Korn shell users:
QSUB_QUEUE=queue-name
export QSUB_QUEUE
SG–2148 3.3 243

NQE User’s Guide
The following example shows how to set the default queue to big when you
are using the C shell:
%setenv QSUB_QUEUE big
%
Now send a batch request for the script file you created in exercise 1 without
specifying a queue name so that it is sent to the default queue.
%qsub testjob
nqs-181 qsub: INFO
Request <368.coal>: Submitted to queue <big> by <snow(123)>.
%
To unset an environment variable, you can use the unsetenv command (see
setenv(3)) if you are using the C shell, or the unset command if you are
using the standard or Korn shell.
B.2.3 Confirmation of a Successful Submission
If your batch request is submitted successfully, you will receive a message that
displays an identifier for the request. You can use this identifier in other
commands, for example, to monitor the progress of the request or to delete the
request. The message also contains the name of the queue in which the request
was initially placed.
For example, when you complete the preceding exercise, you should get an
NQS message similar to the following:
nqs-181 qsub: INFO
Request <368.coal>: Submitted to queue <express> by <snow(123)>.
The identifier for this request is 368.coal, which indicates that the request has
a sequence number of 368 and was submitted to an NQS server with host
name coal. In this example, the request is initially sent by user snow to a
queue called express.
To display the current status of your submitted requests, use the cqstatl -a
or qstat -a command. For more details about the cqstatl or qstat
command, see the cqstatl(1) or qstat(1) man page.
244 SG–2148 3.3

Command Line Interface Tutorial [B]
B.2.4 Exercise 3
Record the request identifier displayed when you performed exercise 2 (for use
in subsequent exercises). Check that the displayed queue is the same as the
default queue you set in the QSUB_QUEUE environment variable.
B.2.5 Examining Output from a Batch Request
After a batch request is executed, the standard output, standard error, and job
log files produced by the request are written. The standard output file contains
the messages that would have been displayed if you had issued the commands
contained in the batch request in an interactive session. The standard error file
contains any error messages that are produced during the execution of the
script. The job log file contains explanatory messages for request-related events.
By default, these files are written to the directory you were in when you issued
the cqsub or qsub command and are given the following names:
Name Description
testjob.e number The standard error file produced by the batch
request
testjob.o number The standard output file produced by the batch
request
testjob.l number The job log file produced by the batch request
The number argument is the sequence number as displayed when you submitted
the request. If you submit requests that have file names greater than 7
characters, only the first 7 characters are used in forming the output file names.
To merge the messages that would be sent to the standard error file into the
standard output file, use the qsub -eo or qsub -eo command.
The command lines that are executed are not written to the standard output or
error files unless you include an appropriate UNIX set command at the start of
the batch request (see Section B.2.7, page 247).
B.2.6 Exercise 4
If you submitted the batch request as detailed in exercise 2, after a short time
(the exact time depends on the amount of other work being done on the
system, but it could be just a few seconds), the batch request completes
SG–2148 3.3 245

NQE User’s Guide
execution and the following files are placed in the directory that you were in
when you issued the cqsub or qsub command:
testjob.enumber
testjob.onumber
testjob.lnumber
Check your current directory for these files, and check that number is the same
as the sequence number displayed when you first submitted the batch request.
Examine the contents of the standard output file (testjob.o number) by using
a command such as more(1). The file should contain output similar to that
shown in the following screen:
%more testjob.o368
Cray Research, Inc. CRAY C90 UNICOS - abc
UNICOS 9.0.10bm
CRAY C9016E/16256-4
1gw SSD
Model-E
4.167 nanosecond clock
16 - cpus 256 megawords of real memory
and a Kernel with 32 bit full memory address
Tue Jan 6 05:07:47 CST 1998
/sub/snow
fred
anoldfile
temp1
testjob
%
The pwd and ls commands indicate that the request executed with your home
directory as its current directory, even if you submitted the request from a
directory other than your home directory.
The UNIX command lines that the batch request executed are not echoed to the
standard output file.
246 SG–2148 3.3

Command Line Interface Tutorial [B]
B.2.7 Exercise 5
This exercise uses a script file called testjob that contains the following lines:
date
pwd
ls
Before proceeding with the exercise, you should check that this file exists and
has the preceding contents.
To echo the command lines in the script to the standard error file as they are
executed, edit the testjob file so that it includes one of the following lines at
the start (depending on the shell under which the script will execute).
To discover which shell your requests will use, see Section B.2.1, page 241.
For the C shell:
set echo
For the standard or Korn shell:
set -x
Save the changes and then resubmit the request by using the -eo option as
follows, specifying that any standard error messages produced by the request
will be placed in the standard output file:
%qsub -eo testjob
nqs-181 qsub: INFO
Request <369.coal>: Submitted to queue <express> by <snow(123)>.
%
When the request executes, a new standard output file is created in your
current directory; its file name includes the sequence number for this request.
No separate standard error file is created because the -eo option was used.
Because of the set command you included in the script file, the output file
contains the actual UNIX commands executed, intermingled with the output.
Examine the contents of the standard output file (testjob.o number) by using
a command such as more(1). The file should contain output similar to that
shown in the following screen:
SG–2148 3.3 247

NQE User’s Guide
%more testjob.o369
Warning: no access to tty; thus no job control in this shell...
Cray Research, Inc. CRAY C90 UNICOS - abc
UNICOS 9.0.10bm
CRAY C9016E/16256-4
1gw SSD
Model-E
4.167 nanosecond clock
16 - cpus 256 megawords of real memory
and a Kernel with 32 bit full memory address
+ date
Tue Jan 6 05:28:14 CST 1998
+ pwd
/sub/snow
+ls
fred
anoldfile
temp1
testjob
%
When a request has executed under the C shell, NQS always displays the
message that begins Warning:no access to tty; at the start of the
standard output file. The message does not indicate that an error has occurred;
it is simply a warning that the usual C shell job control options are not available
because this is a batch request. job control is a means of controlling multiple
shells or processes interactively, and is not available with a batch job because no
interactive session (referred to as tty in the message) is associated with the job.
B.2.8 Specifying Resource Limitations for a Batch Request
When you submit a batch request to NQS, you can include options to specify
the system resources that the request requires. If you do not specify any
options, resource restrictions are assigned based on the user database (UDB)
limits and the limits set by the system administrator for the batch queue in
which the request executes.
248 SG–2148 3.3

Command Line Interface Tutorial [B]
You can specify many different limits to cqsub and qsub (see Section 5.1, page
86, for a complete list of limits). Some of the more common options are as
follows:
Option Description
-a date The earliest time at which the request can be executed.
-lT time The maximum number of CPU seconds the job can use when
executing at the UNICOS system.
-lM size The maximum amount of memory the request is allowed to use
when it executes. The size is in units of bytes unless it is suffixed
by some other unit (such as Kb or Mb); see the cqsub(1) or
qsub(1) man page.
You can specify these options on the cqsub or qsub command line.
The following command submits a batch request called testjob that has the
following characteristics:
•The request is sent to the default NQS queue
•The request cannot be executed before 11 P.M. on the first Friday following
the day of submission
•The request requires a maximum of 5 CPU seconds at the UNICOS system
qsub -a "23:00 Friday" -lT 5 testjob
The batch request file name is always the last item on the cqsub or qsub
command line following any options.
Note: When specifying resource limits, be careful not to specify more
resources than the request will use, because these limits are used to schedule
work. Requests that have large resource limits (for example, a large CPU
time or memory) are generally executed less often than those with smaller
resource limits. Therefore, the larger the limits you specify, the longer it may
take to complete your work.
After a request has been submitted, you cannot change the resource limits
specified for the request. However, the system administrator can change the
limits by using the qmgr(8) command.
SG–2148 3.3 249

NQE User’s Guide
B.2.9 Exercise 6
This exercise uses a script file called testjob that contains the following lines:
set -x (standard or Korn shell only)
set echo (C shell only)
date
pwd
ls
Before proceeding with the exercise, you should check that this file exists and
has the preceding contents.
Submit a batch request specifying that it will be executed 2 minutes later than
the current time.
If it is now 9:45 A.M., you can enter the following command:
%qsub -a "9:47" testjob
nqs-181 qsub: INFO
Request <370.coal>: Submitted to queue <express> by <snow(123)>.
%
The -a option can take several different formats of date and/or time. For this
exercise, the format for the time used is hours:minutes (using a 24-hour clock).
If you do not specify a specific day, the request executes the next time the
specified time occurs (that is, today if the specified time is later than the time
the command was issued, or tomorrow if the specified time is earlier than the
time the command was issued).
The -a option does not delay the entering of a request into the initial queue, or
its routing through to the destination batch queue. This routing occurs as
normal. However, after the request reaches the final destination queue, it waits
in that queue until the time and date specified by the -a option.
You should not see in your current directory any of the output files produced
by this request for at least 2 minutes.
To display the status of the request, use the cqstatl -a or qstat -a
command; the letter Win the column headed ST indicates that the request is
waiting until the time specified by the -a option, as follows:
250 SG–2148 3.3

Command Line Interface Tutorial [B]
sn1633% qstat -a
--------------------------
NQS BATCH REQUEST SUMMARY
--------------------------
IDENTIFIER NAME USER QUEUE JID PRTY REQMEM REQTIM ST
------------- ------- -------- --------------------- ---- ---- ------ ------ ---
370.coal testjob snow express@coal --- 5120 10 W
no pipe queue entries
no device queue entries
sn1633%
NQS can notify you when a request starts execution and stops execution by
using the cqsub or qsub command options -mb and -me. See Section 4.11,
page 69.
B.2.10 Specifying Options within the Script File
An alternative method of specifying cqsub or qsub options is to supply them
at the start of the batch request file. The options must come before the first
executable line of the script (that is, before any lines that are not comments).
Each cqsub or qsub option must be on a separate line and each line must be
prefixed by the string #QSUB.
The following modified version of the shell script testjob specifies identical
executing conditions to those in the cqsub or qsub line shown in Section B.2.8,
page 248:
#QSUB -a "23:00 Friday"
#QSUB -lT 5
date
pwd
ls
If you specify an option both in the script file and on the cqsub or qsub
command line, the option on the command line is used. It is useful to specify in
the script file the conditions that do not change (such as the CPU time limit for
the request), and to specify on the cqsub or qsub command line the options
that may change with every submission of the script file (such as the time at
which the request will be executed).
SG–2148 3.3 251

NQE User’s Guide
B.2.11 Exercise 7
This exercise uses a script file called testjob that contains the following lines:
set -x (standard or Korn shell only)
set echo (C shell only)
date
pwd
ls
Before proceeding with the exercise, you should check that this file exists and
has the preceding contents.
Submit a batch request that will not be executed until 3 minutes later than the
current time, but specify this time limitation within the script file. To do this,
edit the script file and include an appropriate #QSUB line.
If it is now 11:59 A.M., you would edit the script file to include the following
line as the first line in the file:
#QSUB -a "12:02"
To display the status of the request, use the cqstatl -a or qstat -a
command; the letter Win the column headed ST indicates that the request is
waiting until the time specified by the -a option, as follows:
sn1633% qstat -a
------------------------------
NQS 3.1 BATCH REQUEST SUMMARY
------------------------------
IDENTIFIER NAME USER QUEUE JID PRTY REQMEM REQTIM ST
------------- ------- -------- --------------------- ---- ---- ------ ------ ---
370.coal testjob snow express@coal --- 5120 10 W
no pipe queue entries
no device queue entries
sn1633%
NQS can notify you when a request starts execution and stops execution by
using the cqsub or qsub command options -mb and -me. See Section 4.11,
page 69.
252 SG–2148 3.3

Command Line Interface Tutorial [B]
B.2.12 Sending a Message to an Executing Request
Occasionally, you may want to write a message to the output files produced by
a request. For example, you may want to send a message that mentions that
you are about to abort the request.
To write a message to a request’s output files, use the qmsg(1) command. The
request must be executing for the command to succeed because the output files
are not created until the request begins to execute.
Using options to qmsg, you can specify whether the message is written to the
standard output file or to the standard error file produced by the request.
%qsub sleeper
nqs-181 qsub: INFO
Request <1109.coal>: Submitted to queue <express> by <snow(123)>.
%qmsg 1109.coal
Hello request 1109.
I am about to abort you.
CONTROL-d
%
After entering the qmsg command line, you can enter lines of text, terminating
each line by pressing RETURN. When you have entered all the lines, press
CONTROL-d.
The message is written to the standard error file of the request, unless you use
the qmsg -o command to write the message to the standard output file.
B.2.13 Exercise 8
Edit the testjob script to do the following:
•Remove the #QSUB line at the start of the script if you inserted this line in
exercise 7
•Include the following line at the end of the script:
sleep 120
This line keeps the request executing for a couple of minutes to give you
time to write a message to it.
SG–2148 3.3 253

NQE User’s Guide
The testjob script file should then contain the following lines:
set -x (standard or Korn shell only)
set echo (C shell only)
date
pwd
ls
sleep 120
Before proceeding with the exercise, you should check that the script has the
preceding contents.
Submit the request by using the cqsub or qsub command. After a few
seconds, try using the qmsg command to write a message to the request’s
standard error file.
%qsub testjob
nqs-181 qsub: INFO
Request <1110.coal>: Submitted to queue <express> by <snow(123)>.
%qmsg 1110.coal
This is a test message from qmsg.
CONTROL-d
%
After you successfully enter the qmsg command, wait for about 2 minutes to
allow the request to complete execution and then examine the standard error
file of the request. This file should be returned in your current directory and
have the name testjob.exxx;xxx is the number of the request as displayed
when you submitted it. The file should contain the message you sent with
qmsg at the end of the file.
If you receive the following message when you enter the qmsg command, your
request has not yet started to execute:
Request’s stderr file does not exist
Wait a few seconds and try again.
If you get the following message when you enter the qmsg command, the
request has completed execution and therefore, you cannot write to the
request’s output files:
Request request-number does not exist
Resubmit the request and, after a few seconds, try using the qmsg command.
254 SG–2148 3.3

Command Line Interface Tutorial [B]
B.2.14 Submitting a Request to a Remote Host
Sometimes you may want to execute a request at another system other than the
one to which you are logged on. This can be done by submitting your request
to a local pipe queue that has a queue at a remote system as its destination. For
example, the screen shown in Section B.2.2, page 242, shows a local pipe queue
called cray02 that has the destination batch@cray02. This destination refers
to a queue called batch at a remote system called cray02. For further
information, see Section 4.1, page 51.
To execute requests at a remote NQS host, you may have to create some
validation files, depending on how the NQS system has been configured. For
more information, see Section 2.4, page 25. If you try to execute a request at a
remote host, and you do not have the correct validation files, NQS sends a mail
message to inform you of the problem.
When you enter the cqstatl -p or qstat -p command in Section B.3.5,
page 260, you can display pipe queues on your local system that have remote
destinations.
B.3 Monitoring NQS
The cqstatl or qstat command lets you monitor your batch requests and the
status of the NQS queues. This section introduces you to the following
commonly used options of cqstatl and qstat:
•Checking the status of your batch requests
•Checking the status of NQS pipe queues
•Checking the status of NQS batch queues
B.3.1 Checking the Status of Your Batch Requests
After your request has been submitted, you can check its status by using the
cqstatl or qstat command. You can display information only about requests
that you have submitted. You cannot display information about requests
submitted by other users unless you are an NQE administrator.
To display a summary of all your requests (irrespective of which type of queue
they are currently in), use the qstat -a or qstat -a command.
The following example shows a request in an NQS pipe queue:
SG–2148 3.3 255

NQE User’s Guide
%qstat -a
no batch queue entries
-------------------------
NQS PIPE REQUEST SUMMARY
-------------------------
IDENTIFIER NAME OWNER USER QUEUE PRTY ST
------------- ------- -------- -------- --------------------- ---- ---
372.coal testjob 1889 snow express@coal 31 Q
no device queue entries
%
Unless the system is heavily loaded, your batch requests are transferred to a
batch queue within a few seconds.
The following display shows the information displayed when your request is in
an NQS batch queue:
%qstat -a
--------------------------
NQS BATCH REQUEST SUMMARY
--------------------------
IDENTIFIER NAME USER QUEUE JID PRTY REQMEM REQTIM ST
------------- ------- -------- --------------------- ---- ---- ------ ------ ---
372.coal testjob snow standard@coal 155 30 1024 30 Qgr
no pipe queue entries
no device queue entries
%
One of the most important columns in these displays is the ST column, which
gives a brief description of the current status of your request. The first letter
displayed in this column can be one of the following:
Status Description
AArriving.
CCheckpointed. (Available only on UNICOS, UNICOS/mk, and
IRIX systems.)
DDeparting.
EExiting.
HHeld.
256 SG–2148 3.3

Command Line Interface Tutorial [B]
QQueued. (The request has not yet begun execution because the
limit for the maximum possible number of executing requests has
been reached.)
RRunning.
SSuspended.
UUnknown state.
WWaiting for the date/time specified by the cqsub -a or qsub
-a command.
The other letters in the ST column provide more detailed information about the
status of the request. For a full description of these additional characters, see
the cqstatl(1) or qstat(1) man page.
B.3.2 Exercise 9
Edit the testjob script file to remove the last line (sleep 120). The file
should then contain the following lines:
set -x (standard or Korn shell only)
set echo (C shell only)
date
pwd
ls
Before proceeding with the exercise, you should check that the script has the
preceding contents.
Submit the testjob script and use the cqstatl -a or qstat -a command
to check its status. Usually, a request remains in a pipe queue for only a short
period of time.
To see the request in an NQS pipe queue, you must enter the cqstatl or qstat
command immediately after the request is submitted, or you could include the
cqstatl or qstat command on the cqsub or qsub command line, as follows:
SG–2148 3.3 257

NQE User’s Guide
%qsub testjob; qstat -a
nqs-181 qsub: INFO
Request <373.coal>: Submitted to queue <express> by <snow(123)>.
no batch queue entries
-------------------------
NQS PIPE REQUEST SUMMARY
-------------------------
IDENTIFIER NAME OWNER USER QUEUE PRTY ST
------------- ------- -------- -------- --------------------- ---- ---
373.coal testjob 1889 snow express@coal 31 Q
no device queue entries
%
After several (fewer than 10) seconds, try reissuing the cqstatl or qstat
command to see whether the request has been transferred to a batch queue. If
your system is lightly loaded, the request may have completed execution before
you enter the cqstatl or qstat command line, and therefore, you see the
following display:
%qstat -a
no batch queue entries
no pipe queue entries
%
If this occurs, you can ensure that the request stays in a batch queue long
enough to monitor it by using the cqsub -a or qsub -a command to indicate
the request should not be executed for another 10 minutes.
If the system you are using is very heavily loaded, you also may see the
preceding display; the display would then indicate that the request had not yet
been placed in any queue.
When the current time is 2:05 P.M., you could enter the following command:
258 SG–2148 3.3

Command Line Interface Tutorial [B]
%qsub -a "14:15" testjob
nqs-181 qsub: INFO
Request <374.coal>: Submitted to queue <express> by <snow(123)>.
%qstat -a
--------------------------
NQS BATCH REQUEST SUMMARY
--------------------------
IDENTIFIER NAME USER QUEUE JID PRTY REQMEM REQTIM ST
------------- ------- -------- --------------------- ---- ---- ------ ------ ---
374.coal testjob snow standard@coal --- 30 1024 30 W
no pipe queue entries
no device queue entries
%
The Win the ST column indicates that the request is waiting until the time
specified in the -a option.
B.3.3 Checking the Status of Queues
To display a summary of the status of all NQS queues, use the cqstatl or
qstat command without arguments. (However, if you have the
NQE_DEST_TYPE environment variable set to nqedb and you use the cqstatl
command without options or arguments, the output is a summary of all your
requests in the NQE database minus all terminated requests. For additional
information about monitoring queues, see Chapter 11, page 155.) This display is
often large, and you may want to limit the display to a particular type of queue
by using one of the following cqstatl or qstat command options:
Option Description
-b A summary of all batch queues. (This option does not apply if
you are sending the request to the NQE database.)
-p A summary of all pipe queues. (This option does not apply if you
are sending the request to the NQE database.)
B.3.4 Pipe Queues
To display summary information about pipe queues, use the cqstatl -p or
qstat -p command (the -p option does not apply if you are sending a
request to the NQE database). The following display shows that four NQS pipe
queues are at the system called coal:
SG–2148 3.3 259

NQE User’s Guide
% qstat -p
-----------------------
NQS PIPE QUEUE SUMMARY
-----------------------
QUEUE NAME LIM TOT ENA STS QUE ROU WAI HLD ARR DEP DESTINATIONS
----------------------- --- --- --- --- --- --- --- --- --- --- -------------
express 2 1 yes on 0 1 0 0 0 0 b_600_96
b_1800_96
b_3600_96
b_14400_96
b_86400_96
b_max_96
big 1 0 yes on 0 0 0 0 0 0 b_large
cray02 1 0 yes off 0 0 0 0 0 0 batch@cray02
cray03 1 0 yes off 0 0 0 0 0 0 batch@cray03
----------------------- --- --- --- --- --- --- --- --- --- --- -------------
coal 5 1 0 1 0 0 0 0
----------------------- --- --- --- --- --- --- --- --- --- --- -------------
All of the queues are enabled (shown in the ENA column), therefore, you can
send requests to any of them. However, only the express and big queues are
started (shown in the STS column); therefore, only these queues will route
requests to a destination queue. The other two queues can accept requests, but
they do not route them until the queues are started (the NQE administrator
must do this).
In this example, one request is currently in queue express. This is being
routed (shown in the ROU column) to one of the batch queues under the
destination column; NQS decides which queue to use.
The destinations of the two queues, cray02 and cray03, are pipe queues at
other systems.
The final line of the display shows total figures for the system in which you are
logged (the system is called coal in the preceding example).
B.3.5 Exercise 10
To see an entry for your request in the pipe queue summary display, submit the
testjob batch request and try issuing the cqstatl -p or qstat -p
command on the command line. Usually, a request remains in a pipe queue for
only a short period of time. Therefore, if the system you are using is lightly
loaded, you may have to include the cqstatl or qstat command on the same
260 SG–2148 3.3

Command Line Interface Tutorial [B]
command line as the cqsub orqsub command to catch the request before it is
transferred to a batch queue.
%qsub testjob; qstat -p
nqs-181 qsub: INFO
Request <375.coal>: Submitted to queue <express> by <snow(123)>.
-----------------------
NQS PIPE QUEUE SUMMARY
-----------------------
QUEUE NAME LIM TOT ENA STS QUE ROU WAI HLD ARR DEP DESTINATIONS
----------------------- --- --- --- --- --- --- --- --- --- --- -------------
express 2 1 yes on 0 1 0 0 0 0 b_600_96
b_1800_96
b_3600_96
b_14400_96
b_86400_96
b_max_96
big 1 0 yes on 0 0 0 0 0 0 b_large
cray02 1 0 yes off 0 0 0 0 0 0 batch@cray02
cray03 1 0 yes off 0 0 0 0 0 0 batch@cray03
----------------------- --- --- --- --- --- --- --- --- --- --- -------------
coal 5 1 0 1 0 0 0 0
----------------------- --- --- --- --- --- --- --- --- --- --- -------------
%
Your request is displayed as an entry under the ROU column for the queue to
which you submitted the request.
If the system you are using is heavily loaded, you may not see an entry in this
display for your request because the request had not yet been placed in any
queue.
B.3.6 Batch Queues
To display summary information about batch queues, use the cqstatl -b or
qstat -b command (the -b option does not apply if you are sending a
request to the NQE database). The following display contains information
about the total NQS workload on the system:
SG–2148 3.3 261

NQE User’s Guide
% qstat -b
------------------------
NQS BATCH QUEUE SUMMARY
------------------------
QUEUE NAME LIM TOT ENA STS QUE RUN WAI HLD ARR EXI
----------------------- --- --- --- --- --- --- --- --- --- ---
b_600_96 2 2 yes on 0 1 1 0 0 0
b_1800_96 1 1 yes on 1 0 0 0 0 0
b_3600_96 1 0 yes on 0 0 0 0 0 0
b_14400_96 1 1 yes on 1 0 0 0 0 0
b_86400_96 1 1 yes on 0 0 1 0 0 0
b_max_96 1 0 yes on 0 0 0 0 0 0
----------------------- --- --- --- --- --- --- --- --- --- ---
coal 5 5 2 1 2 0 0 0
----------------------- --- --- --- --- --- --- --- --- --- ---
%
The batch queue summary display is useful if you want to check the status of
one of your requests to see why it is taking so long to execute.
The final line of the display shows total figures for the system in which you are
logged (the system is called coal in the preceding example).
In this display, some of the most important columns are those labeled LIM,QUE,
RUN, and WAI; these columns are described as follows:
Column Description
LIM The maximum number of requests that can be executed
concurrently in this queue. This limit is called the queue run limit.
QUE The number of requests in the queue that are queued and ready
to be executed. They have not yet begun execution because the
limit for the maximum possible number of executing requests has
been reached.
RUN The number of requests in the queue that are currently executing.
WAI The number of requests in the queue that are waiting to be
executed at a specific time (as specified by the cqsub -a or
qsub -a command).
The preceding example screen shows that for a batch queue called b_600_96
one request is currently executing, and one request is waiting for a specific time
262 SG–2148 3.3

Command Line Interface Tutorial [B]
to execute (that is, it was submitted using the -a time option and the specified
time has not yet occurred).
The batch queue summary display can give you an idea of the current batch
work load on the system.
B.3.7 Exercise 11
To see the current status of the queues at the system you are using, use the
cqstatl -b or qstat -b command, as in the following example:
qstat -b
To see whether your system is heavily loaded, look at the bottom line of the
display and see how much greater the figure under LIM is than that under RUN.
Look also to see the figures under the WAI and QUE columns (these indicate
how many requests are queued but not yet executing).
B.4 Deleting a Batch Request
To delete batch requests that you have submitted, but no longer want to
execute, use the cqdel(1) or qdel(1) command.
%qdel 317.coal
nqs-98 qdel: INFO
Request <317.coal>: Deleted by <snow(123)>.
%
The preceding form of the qdel command deletes requests that have not
started executing.
If a request has started executing, the following message is displayed when you
issue a cqdel or qdel command without any options:
%qdel 317.coal
nqs-462 qdel: WARNING
Request <317.coal>: is running on local host.
%
The request remains unaffected by the qdel command.
SG–2148 3.3 263

NQE User’s Guide
You can delete an executing request by sending it a signal with the cqdel -k
or qdel -k command. You can send several signals to a request; one of the
most common is the SIGKILL signal, which aborts a running process. Signals
are associated with a number; the number for the SIGKILL signal is 9.
The number of the signal to send to a batch request is specified as an option in
the cqdel or qdel command line. You can use the letter k as an alternative for
signal number 9.
Standard output, standard error, and job log files are still produced for an
executing request that is deleted by a signal. These files record the execution of
the request up to the moment that the signal is received.
%qdel -k 380.coal
nqs-98 qdel: INFO
Request <380.coal>: Deleted by <snow(123)>.
%
You can use cqdel or qdel to send signals to batch requests. You can write the
request to trap the signal and then take some appropriate action, rather than to
abort. For an example of a request that is written to trap a signal, see Section
13.1, page 177.
You can use the qdel -f command to delete both a request and the job output.
B.4.1 Exercise 12
To include the following line at the end of the script, edit the testjob script:
sleep 120
This keeps the request executing for a couple of minutes to give you time to
delete it. The file should then contain the following lines:
set -x (standard or Korn shell only)
set echo (C shell only)
date
pwd
ls
sleep 120
Before proceeding with the exercise, you should check that the script has the
preceding contents.
264 SG–2148 3.3
Command Line Interface Tutorial [B]
Submit the request, and try to delete it by using the cqdel or qdel command,
as in the following example:
qdel requestids
If the request has already begun execution, you will receive the following
message:
Request requestids is running.
In this case, reenter the cqdel or qdel command by using the -k option to
send a SIGKILL signal to the request, as follows:
qdel-k requestids
If the request is still executing when you issue this command, you will receive a
message, as follows:
Request requestids has been deleted.
To check that the request has been deleted, use the cqstatl -a or qstat -a
command, as in the following example:
%qstat -a
no batch queue entries
no pipe queue entries
B.5 Removing Files from Your Directory after the Tutorial
The exercises in this tutorial will create several files in the directory from which
you submitted the requests. You may want to remove the unwanted files from
that directory. The following files were created:
File name Description
testjob One of the scripts used in the exercises
testjob.o* Standard output files produced by the testjob
script
testjob.e* Standard error files produced by the testjob
script
SG–2148 3.3 265

NQE User’s Guide
testjob.l* Job log files produced by the testjob script
B.6 Summary
If you have completed this tutorial, you should be able to submit batch
requests, to send a message to a request, to monitor the progress of your
requests, and, if needed, to delete a batch request. The following list
summarizes the commands and features that were introduced in this tutorial:
Command
line
Description
cqdel requestids or qdel requestids
Deletes the specified request if it has not begun execution.
cqdel -k requestids or qdel -k requestids
Sends a kill signal to the specified batch request. This signal
aborts the request if it is executing; otherwise, the request is
deleted.
qmsg
Writes a message to the output file of an executing request.
cqstatl -a or qstat -a
Displays summary information about all of your requests that
are currently residing in queues.
cqstatl -b or qstat -b
Displays a summary of NQS batch queues.
cqstatl -p or qstat -p
Displays a summary of NQS pipe queues.
cqsub or qsub
(This form of the cqsub or qsub command has no options or
file names in the command line.) Lets you enter commands that
are then submitted as a batch request. The batch request is sent
to the default queue. The batch request is assigned a name of
STDIN, which is used in the names of the standard output and
standard error files produced by the request.
266 SG–2148 3.3

Command Line Interface Tutorial [B]
cqsub batch-request-file or qsub batch-request-file
Submits the name of the script file that will be submitted as a
batch request into the default queue.
cqsub -a date -lT time -lM size or qsub -a date -lT time -lM size
These cqsub and qsub options specify resource limits for the
request:
-a date Earliest time at which the request can be executed
-lT time Maximum CPU time for the request
-lM size Maximum memory available to the request
cqsub -q queue batch-request-file or qsub-q queue batch-request-file
Submits the specified file into the specified NQS queue.
#QSUB qsub-option
Options to the cqsub or qsub command can be placed within
a script file before any other commands.
QSUB_QUEUE environment variable
Sets the default queue for your session.
Other options to the commands are described in detail in the corresponding
man pages.
SG–2148 3.3 267

Using FTP with NQS [C]
This appendix describes how to use the ARPAnet standard file transfer protocol
(FTP) with the Network Queuing System (NQS) on UNICOS and UNICOS/mk
systems. FTP is the file transfer program used by the Transmission Control
Protocol/Internet Protocol (TCP/IP), which lets you transfer files to and from a
remote network host.
By providing FTP access to NQS, computer systems that support FTP can
access the NQS batch system on the UNICOS or UNICOS/mk operating
system. The FTP interface to NQS lets you submit batch jobs to a UNICOS or
UNICOS/mk system from any computer system that supports TCP/IP and lets
you run batch jobs only on a UNICOS or UNICOS/mk system. You can run
these batch jobs without logging in interactively to the UNICOS or
UNICOS/mk system or running the Remote Queuing System (RQS) tool on
your workstation. The FTP interface to NQS lets you display the status of batch
mode, enable or disable batch mode, submit jobs to NQS, display a summary of
the NQS job queues and a list of your NQS output files, delete NQS jobs, and
retrieve NQS job output from a UNICOS or UNICOS/mk system. You can use
the following FTP commands:
FTP command Description
del Deletes a job or output file
dir Displays the job status
get Retrieves the job output
put Submits a job to NQS
quote site batch
or site batch
Displays the current state of batch mode and
enables or disables batch mode
SG–2148 3.3 269

NQE User’s Guide
To use the FTP interface to NQS, you must meet the following requirements:
•Your system must be running FTP.
•You must enter the quote site batch or site batch command to
ensure that batch mode is enabled.
•You must have a valid account name and home directory on the UNICOS or
UNICOS/mk system.
C.1 FTP Commands
The following sections describe the del,dir,get,put,quote site batch,
and site batch FTP commands.
C.1.1 del Command
The del command has the following format:
del job-output |nqs-job
The del command deletes NQS job output (job-output) or NQS jobs (nqs-job)
when batch mode is on. You can delete the NQS jobs that are specified in a dir
command display. If any output exists, it also is deleted. You also can delete
the NQS output files from your $HOME/ftpnqs directory. When you specify
the del command, it is assumed that the file to be deleted is an output file in
the $HOME/ftpnqs directory. If the file name exists, it is deleted; if it does not
exist, it is assumed to be an NQS job. If no valid NQS job has that name, an
error message is displayed.
C.1.2 dir Command
The dir command has the following format:
dir [name]
The dir command displays NQS status information when batch mode is on.
When you enter the dir command, it displays a summary of the NQS jobs and
a list of your NQS output files. The summary display is the same as the NQS
cqstatl -a -u username or qstat -a -u username command display. The
270 SG–2148 3.3

Using FTP with NQS [C]
output file list is a directory listing of $HOME/ftpnqs that is displayed by
using the ls -l command. When you enter the dirname argument, a detailed
display of a queue or request name is displayed; the detailed display is the same
as the NQS cqstatl -f name or qstat -f name command display. When
batch mode is active, the ls command is not an alias for the dir command.
C.1.3 get Command
The get command has the following format:
get job-output[local-file]
When batch mode is on, the get command retrieves the NQS output files
(job-output) from the $HOME/ftpnqs directory. The job output file names have
the following formats:
jobname.eseq-number
(Standard error file)
jobname.oseq-number
(Standard output file)
The jobname is the name of the submitted file name, and seq-number is the NQS
job sequence number assigned when the file was submitted. If you specify
local-file, the job output is stored on the local system that uses that file name.
C.1.4 put Command
The put command has the following format:
put local-file [jobname]
When batch mode is on, the put command transfers a job file from your system
(local-file) to the UNICOS or UNICOS/mk system and submits the job to NQS.
The jobname is the assigned job name; the default is the local file name. When
the job is completed, the job output is spooled to a file in the ftpnqs directory
in your home directory. When you submit a job, the ftpnqs directory is
created in your UNICOS or UNICOS/mk home directory. If the directory
already exists, it will be used as it currently exists. The job file can contain
SG–2148 3.3 271

NQE User’s Guide
UNICOS or UNICOS/mk commands and, optionally, cqsub or qsub command
options. The FTP interface uses the -r option to assign this job name.
C.1.5 quote site batch and site batch Commands
The quote site batch and site batch commands have the following
formats:
quote site batch [on|off]
site batch [on|off]
The FTP quote site batch command lets you enter commands at an FTP
client that only the UNICOS or UNICOS/mk FTP server understands. The
batch subcommand of FTP is implemented as an FTP site command. The
site batch command displays the current state of batch mode, and it enables
and disables batch mode. The remote user enters this command, and the
UNICOS or UNICOS/mk FTP server interprets it.
If you do not specify an option on either command, the current state is
displayed (enabled or disabled). If the batch on command is entered on either
command, batch mode is enabled. If the batch off command is entered on
either command, batch mode is disabled. You can transfer between file mode
and batch mode within one FTP session; this lets you transfer files, switch to
batch mode, transfer NQS jobs, and return to file mode without leaving the FTP
session. The default at session startup is for the FTP interface to NQS to be
disabled. If your site has disabled batch mode and you try to enable batch
mode during an FTP session, you will receive the following message:
502 Batch command not supported
C.2 Sample Session
The following examples represent a sample session that uses the FTP interface
to NQS.
272 SG–2148 3.3

Using FTP with NQS [C]
C.2.1 FTP Startup
The FTP startup procedure does not change for NQS. You must pass standard
user authentication, just as in standard FTP. To start up FTP, enter the ftp
command. After the server is ready, you can log on to FTP.
/home/tree1/abc/nqs/ftp 20 >ftp big
Connected to big.cray.com.
220 big FTP server (Version 5.2 Fri Jan 9 14:09:58 CST 1998) ready.
Name (big:abc): abc
331 Password required for abc.
Password:
230 User abc logged in.
C.2.2 Enabling and Disabling the FTP NQS Interface
The following command sequence example shows how to enable and disable
batch mode . If you enter the quote site batch command, the current state
of batch mode is displayed. If you enter the quote site batch on
command, you will enable batch mode. If you enter the quote site batch
off command, you will disable batch mode. Batch mode remains enabled to
allow the rest of the sample session to continue in batch mode.
ftp> quote site batch
200 Batch mode currently disabled
ftp> quote site batch on
200 Batch mode enabled
ftp> quote site batch
200 Batch mode currently enabled
ftp> quote site batch off
200 Batch mode disabled
ftp> quote site batch on
200 Batch mode enabled
C.2.3 Submitting a Job File to NQS
In the following example , a file named job1 on the local machine was
submitted to the NQS batch system on the server system. The response shows
that the job was submitted and is identified as request 191.big. The job is
identified as job1 in a dir command display. The job output is in a file named
job1.o191 in the $HOME/ftpnqs directory.
SG–2148 3.3 273

NQE User’s Guide
ftp> put job1
200 PORT command successful.
150 Opening ASCII mode data connection for job1.
226 Batch: nqs-181: Request <191.big>: Submitted to queue <batch> by <snow(123)>.
95 bytes sent in 0.006000 seconds (15.46 Kbytes/s)
ftp>
The following example submits the file named job1 with the job name
testjob. The response shows that the job was submitted and is identified as
request 205.big. Because a job name was specified, it will be identified as
testjob in a dir command display. The job output is in a file named
testjob.o205 in the $HOME/ftpnqs directory.
ftp> put job1 testjob
200 PORT command successful.
150 Opening ASCII mode data connection for testjob.
226 Batch: nqs-181: Request <205.big>: Submitted to queue <batch> by <snow(123)>.
local: job1 remote: testjob
95 bytes sent in 0.022 seconds (4.3 Kbytes/s)
C.2.4 Displaying the NQS Job Status
The following example shows the dir command display when batch mode is
enabled in FTP. The dir command displays the status of NQS jobs that you
own. After the cqstatl -a -u username or qstat -a -u username command
display is shown, an ls -l command display is shown to list the NQS job
output files in the $HOME/ftpnqs directory.
274 SG–2148 3.3

Using FTP with NQS [C]
ftp> dir
200 PORT command successful.
150 Opening ASCII mode data connection for (4096 bytes).
--------------------------
NQS BATCH REQUEST SUMMARY
--------------------------
IDENTIFIER NAME USER QUEUE JID PRTY REQMEM REQTIM ST
------------- ------- -------- --------------------- ---- ---- ------ ------ ---
205.big testjob abc b_60_4@big 240 23 172 59 R02
no pipe queue entries
no device queue entries
total 9
-rw-r--r-- 1 abc abc 2176 Nov 26 14:46 job1.o191
-rw-r--r-- 1 abc abc 2145 Nov 26 15:40 longqsu.o184
-rw-r--r-- 1 abc abc 77 Nov 26 15:40 longqsubname
226 Transfer complete.
1023 bytes received in 0.7 seconds (1.4 Kbytes/s)
SG–2148 3.3 275

NQE User’s Guide
The following example shows a display generated by the dir request command
when FTP enables batch mode. When a request name or queue named is
specified, the dir command displays the full NQS status of the request or
queue. To generate the status display, you can specify the cqstatl -f name or
qstat -f name command.
ftp> dir 207.big
200 PORT command successful.
150 Opening ASCII mode data connection for 207.big (4096 bytes).
-------------------------------
NQS BATCH REQUEST: testjob.big Status: RUNNING
------------------------------- 2 Processes
Active
NQE Task ID: --
NQS Identifier: 207.big Target User: abc
Group: abc
Account/Project: <snow>
Priority: ---
User Priority/URM Priority Increment: 1
Job Identifier: 610 Nice Value: 23
Local Scheduler: Requested = OS default, Using = OS default
Created: Fri Jan 16 1998 Queued: Fri Jan 16 1998
11:14:46 CDT 11:14:47 CST
<QUEUE>
Name: b_60_4@big Priority: 55
<RESOURCES>
PROCESS LIMIT REQUEST LIMIT REQUEST USED
CPU Time Limit <55sec> <60sec> 0sec
Memory Size <4mw> <1mw> 214kw
Permanent File Space <1000gb> <unlimited> 1kw
Quick File Space <0> <0> 0kw
Type a Tape Drives <0> 0
Type b Tape Drives <0> 0
Type c Tape Drives <0> 0
Type d Tape Drives <0> 0
Type e Tape Drives <0> 0
Type f Tape Drives <0> 0
Type g Tape Drives <0> 0
Type h Tape Drives <0> 0
Nice Increment <3>
Temporary File Space <0> <0>
276 SG–2148 3.3

Using FTP with NQS [C]
Core File Size <256mw>
Data Size <256mw>
Stack Size <256mw>
Working Set Limit <256mw>
MPP Processor Elements <0> 0
MPP Time Limit <0sec> <0sec> 0sec
Shared Memory Limit <10mw> 0kw
Shared Memory Segments <2> 0
MPP Memory Size <256mw> <256mw> 0
<FILES> MODE NAME
Stdout: spool big:/w/abc/ftpnqs/testjob.o207
Stderr: spool big:/w/abc/ftpnqs/testjob.o207
Restart: <UNAVAILABLE>
<MAIL>
Address abc@big When:
<PERIODIC CHECKPOINT>
System: off Request: System Default
Cpu time: on / 60 Min Cpu time: def/<Default>
Wall clock: off/ 180 Min Wall clock: def/<Default>
Last checkpoint:None
<SECURITY>
Submission level: level0
Submission compartments: none
Execution level: level0
Execution compartments: none
<MISC>
Rerunnable yes User Mask: 022
Restartable yes Exported Vars: all
Shell: /bin/csh
Orig. Owner: 123@big
207.big: No such file or directory
226 Transfer complete.
remote: 207.big
1455 bytes received in 1.1 seconds (1.3 Kbytes/s)
SG–2148 3.3 277
NQE User’s Guide
C.2.5 Deleting a Job or Output File
The following example shows how to delete queued jobs and job output by
using the FTP interface to NQS. The first example deletes a job output file.
When you enter a del command, the $HOME/ftpnqs directory is searched for
the existence of the file name. If the file name exists, it is deleted.
ftp> del job1.o191
250 Batch: Job output job1.o191 Deleted
If no matching file name is found, it is assumed to be an NQS job, and a cqdel
-k name or qdel -k name command is specified to delete the request from
NQS.
ftp> del 192.big
250 Batch: nqs-98: Request <192.big>: Deleted by <snow(123)>.
If the name specified is not an NQS job or an NQS output file, an error message
is displayed; the specific message displayed depends on the form of the name
entered in the del command. In the following examples, a job name that is not
valid and a nonexistent job name, respectively, are trying to be deleted.
ftp> del job1.o203
250 Batch: nqs-391: Request <job1.o203>: Invalid syntax for request.
ftp> del 203
250 Batch: nqs-447: Request <203>: does not exist or isn’t running at local host.
C.2.6 Retrieving Job Output
The following example retrieves an NQS job output file by using the get
command, which searches for the file name in the NQS job output directory
$HOME/ftpnqs.
278 SG–2148 3.3

Using FTP with NQS [C]
ftp> get job1.o192
200 PORT command successful.
150 Opening ASCII mode data connection for job1.o192 (971 bytes).
226 Transfer complete.
local: job1.o192 remote: job1.o192
1004 bytes received in 0.037 seconds (26 Kbytes/s)
SG–2148 3.3 279

Glossary
account
A name for a NQS user and associated privileges. On UNICOS systems, account
can also refer to an additional user identification mechanism you must supply
when you use the cqsub -A or qsub -A command.
batch cluster
A group of interworking NQS/NQE systems with their associated
environments. Each batch cluster is a separate administrative domain with
separate security, status, and policies.
batch job
Afile of commands to be executed in batch mode. See request.
batch queue
An NQS queue in which requests are executed by the UNIX system. See queue.
batch request
Afile that contains a shell script to be processed either by the batch facility
(NQS) or cron (the UNICOS batch command also uses cron).
cluster
A group of computer systems networked together to provide increased
throughput, data availability, and automatic workload distribution.
domain
The part of a larger computing resource allocated for the sole use of a specific
user or group of users. In a hierarchy, it is a named group that has control over
all groups under it, some of which may be domains themselves. A domain is
referenced through a construct called domain addressing. In FTA, domain is
a concept that identifies a particular file transfer service provided by a network
protocol (for example, OSI, DAP, and TCP/IP). In OSI, a domain is a network
that includes smaller networks, such as local area networks, within it. An
example of a domain might be a campus network or a large corporate network.
SG–2148 3.3 281

NQE User’s Guide
execution priority
Priority type that determines how much priority is given a particular executing
request in relation to all other work on the Network Queuing System (NQS)
server.
exit events
Unique events for tracking NQS requests.
file
(1) In UNICOS terminology, the major unit of data storage and retrieval in the
operating system, consisting of a collection of data in one of several prescribed
arrangements and described by control information to which the system has
access. It is a set of related records that are treated as a unit; an object that can
be written to, or read from, or both. In Cray Research blocked format, a file is
terminated by a record control word with 168 in the mode field.
Afile has certain attributes, including access permissions and type. File types
include regular file, character special file, block special file, FIFO special file,
and directory. A file is always identified by an inode, and it has one or more
links in the file system that serve as the terminating names in paths to the file.
Afile must have at least one link; otherwise, it has no name and does not exist
(the system deallocates an inode with zero links).
file transfer request
An object that contains information that describes the file transfer operations
that FTA will perform on behalf of a user.
file transfer service
A UNICOS utility that performs file transfer operations for a particular domain.
global limits
Limits that restrict the total workload executing concurrently under control of
one NQS system.
host
An individual computer on a network; this is a domain name server host name
look up command. For more information, see the hosts(1) man page.
282 SG–2148 3.3

Glossary
hostname
The hostname is a command that prints the name of the current host system.
The system administrator also uses the hostname command to set the name of
the host system. hostname is a BSD command. The ATT equivalent command
is uname. Although these two commands are not identical, the general function
that they perform, obtaining the host identification for the computer on which
they are run, is the same.
immediate mode
Mode in which file transfer is executed immediately after a file transfer
command is typed.
job control
A means of controlling multiple shells or processes interactively.
job log file
The location to which explanatory messages for request-related events are sent.
load balancing
(1) A process that ensures that each processor involved in a job performs equal
work. (2) The process of allocating work (such as Network Queuing System
(NQS) batch requests to spread the work more evenly among the variable hosts
in a batch cluster.
network peer-to-peer authorization
The network peer-to-peer authorization (NPPA) lets you transfer files without
placing your password in job script files or transmitting passwords over the
network.
pipe queue
An NQS queue used to route a request to another queue. Each pipe queue has
one or more destinations, unless it is using destination selection. A destination
consists of a host (local or remote) and another queue (batch or pipe). A request
cannot execute until it has been routed to a batch queue. See queue.
SG–2148 3.3 283

NQE User’s Guide
preexecution priority
A priority that affects the queued NQS request; it determines the order in
which requests are chosen to begin execution by NQS.
queue
A list of jobs (such as messages to be transmitted in a data communications
system) or datasets that are waiting to be processed by the computer; the
arrangements of items determines the processing priority. NQS has batch
queues, pipe queues, and destination-selection queues (which are a type of pipe
queue). Typically, a user submits a job to a pipe queue, which then routes the
job to a suitable bath queue for execution.
queue complex
A set of local batch queues that are grouped by the NQS administrator to
simplify NQS administration. Each complex has a set of associated attributes
that provide for control of the total number of concurrently running requests in
member queues.
queue mode
Mode in which a file transfer request is added to a queue of file transfer
requests to await execution.
queue run limit
The maximum number of requests that can be executed concurrently in a queue.
remote file
The File Transfer Agent (FTA) defines a remote file as any file on a remote host.
remote host
Any host computer system, other than the local host, on a network.
request
A set of UNIX commands that has been submitted for execution in batch mode
at the UNIX system.
284 SG–2148 3.3

Glossary
shell script
(1) A program that provides the interface between the human operator and the
operating system of a computer. (2) A file that contains commands for the shell
to read and execute. Thus, you may preserve a sequence of commands for
repeated use by saving them in a file. The preferred terminology is shell
script rather than shell program,command procedure,command file,
shell procedure,orshell code; but the terminology varies according to
local preference.
signal
An electrical quantity that transfers data from one point to another. One
software component notifies another component when something significant
occurs (messages that inform processes of asynchronous events). A signal,
associated with a specific number, is a single integer number that interrupts a
process to manifest a condition; for example, SIGFPE, which is floating-point
exception, request an action (such as SIGKILL(9), one of the most common
signals which kills the receiving process), completion of I/O, occurrence of a
channel interrupt, or request to terminate an activity. The sender of the signal
must be the operating system, kernel, the administrator, or another process that
has the same owner as the receiving process.
Signals influence the way the software behaves; that is, based on the type of
signal received by a software component, a decision is made about which
thread or path to follow through the operating system. Some signals inform the
process of serious errors (exceptions). The action the process takes in response
to the signal depends on the type of signal and whether the program includes a
signal handler routine.
Signals are described and defined in the /usr/include/signal.h file in
UNICOS, and in certain text files in the IOS-E software.
task
A job request that is submitted to the NQE database.
SG–2148 3.3 285

Index
** characters
in batch queue limits display, 165
A
-a option
cqstatl command, 142, 144
cqsub command, 91
Access denied at local host message, 225
Accessing the NQE graphical user interface
(GUI), 12
Account
name for request execution, 98
Accounting
job
obtaining from within a request, 75
Alternative user name, 99
Appending files (ftua), 194
ARR
batch queue summary display, 158
pipe queue summary display, 159
Attributes
format, 61
of requests
NQSATTR environment variable, 130
Authorization
failure messages, 227
files, 211
Authorizing a user to use the NQE database, 24
Autologin, 211
Availability of NQE licenses, 234
B
-b option
cqstatl command, 156
qstat command, 156
Batch queue
description, 8
destination
determined by NQS, 88
detailed display description, 162
limits
displaying, 69, 165
setting, 67
restricting a display to show, 155
summary display description, 157
Batch request, 21
creating, 15, 43
definition, 43
deleting, 17, 169
examining output, 17
monitoring, 137
signaling, 17
submission, 16
submitting, 49, 51
summary display description, 143, 145
Binary-blocked files, 191
C
cevent command
description, 14
examples, 122
using, 122
Chart Formulae popup, 220
Checkpoint image
definition, 79
during shutdown, 78
force, 79
preventing, 79, 82
producing, 79
chkpnt(2), 78, 81
Client
SG–2148 3.3 287

NQE User’s Guide
definition, 3
Closing the ftua connection, 197
Codes
status, 151
substatus, 152
Command
problem
does not execute, 223
Command line interface, 14
Commands
cqsub
-C option, local request, 59
-L option, local request, 59
qsub
-C option, local request, 59
-L option, local request, 59
user
NQS, 14
Components of NQE, 2
Configuring displays, 133
Connecting
to a remote host, 186
to a remote host (ftua), 186
Copying files
from a remote host, 189
multiple files, 190
to a remote host, 189
cpr(1), 81
cpr(2), 78
CPU time
used or available to a submitted request
displaying, 146
cqdel command, 169
-d option, 171
description, 14
for deleting requests, 17
-h option, 174
-k option, 172, 178, 180
signaling a request, 181
-u option, 175, 182
cqstatl command
-a option, 142, 144
-b option, 156
-d option, 142
default output, 143
description, 14
displaying resource limits, 90
-f option, 146, 159
-h option, 149, 166
-l option, 165
NQE_DEST_TYPE setting, 143
options for monitoring requests, 141
-p option, 156
-u option, 150
using, 141
cqsub command
-a option, 91
-C option
remote request, 60
-C option, local request, 60
-d option, 54, 57
description, 14
-eo option, 110
-J m option, 110
-L option
remote request, 60
-L option, local request, 59
-la option, 61
-ln option, 102
-mt option, 70
-mu option, 72
-nc option, 82
-nr option, 82
-p option, 101
-q option, 66, 96
-r option, 97, 143, 145
-s option, 94, 241
successful submission message, 63, 64
suppressing, 64
-u option, 24, 57, 99
using, 21, 43, 49
-x option, 95
-z option, 64
Crash
recovery of requests in event of a, 78
288 SG–2148 3.3

Index
Cray MPP
displaying information, 151
Creating a request, 43
Creating batch requests, 15
Current directory
when request was submitted
QSUB_WORKDIR environment
variable, 128
Customizing your NQE environment, 129
D
-d option
cqdel, 171
cqstatl command, 90, 142
cqsub command, 54, 57
Data
accessing from a request, 73
DCE/DFS
file name formats supported, 110
kdestroy caution, 58, 112
KRB5CCNAME environment variable, 59
output options supported, 108
request submission, 57
Default cqstatl output, 143
Default NQE path name, 21
Default queue, 96
defining, 66
displaying the system, 96
for request submission
QSUB_QUEUE environment variable, 130
Deleting a queued file transfer request (ftua), 196
Deleting a request, 169
a request not executing, 171
an executing request, 172
another user’s request, 175
at a remote system, 174
Deleting files (ftua), 194
Deleting requests, 17
Deletion of requests, 169
Delimiters
in job dependency events, 123
DEP
pipe queue summary display, 159
Destination, setting for requests, 54
Destination-selection queues, 9
DESTINATIONS
pipe queue summary display, 159
Display
Cray MPP information, 151
DISPLAY environment variable, 22
Displaying
name in which request currently resides, 144
queued transfers, 195
resource limits, 90
Displays
load display for specific host, 221
load summary by host, 222
Domain name, definition, 184
E
-e option
qsub command, 117
Editing request file
after submission, 51, 65
ENA
batch queue summary display, 157
pipe queue summary display, 158
ENVIRONMENT environment variable, 129
Environment variables
automatically set, 127
customizing, 129
ENVIRONMENT, 129
exporting, 130
ILB_PROMPT, 133
ILB_USER, 133
NLB_SERVER, 132
NQE database LWS set, 127
NQE_DEST_TYPE, 131
NQE_GROUP, 131
NQE_SHEPHERD_PID, 128
NQEDB_CLIENTHOST, 129
SG–2148 3.3 289

NQE User’s Guide
NQEDB_ID, 129
NQEDB_USER, 129, 131
NQEDB_USER environment variable, 24
NQEINFOFILE, 130
NQS set, 127
NQS_PASSWORD_NEEDED, 27, 132, 149,
150, 166, 170, 172, 173, 179, 181, 182
NQS_SERVER, 132
NQSATTR, 130
NQSCHGINVOKE, 95, 130
QSUB_HOME, 128
QSUB_HOST, 128
QSUB_LOGNAME, 128
QSUB_MAIL, 128
QSUB_NQC, 128
QSUB_PATH, 128
QSUB_QUEUE, 66, 96, 130
QSUB_REQID, 128
QSUB_REQNAME, 128
QSUB_TZ, 128
QSUB_USER, 128
QSUB_WORKDIR, 128
set automatically, 127
setting, 15, 22, 66, 129
TMPDIR, 83, 129
unsetting, 66
using your settings, 130
-eo option
cqsub command, 110
qsub command, 110, 118
Error messages, 77
Event history
monitoring, 113
Events
job dependency
listing, 122
posting, 122
Examining output, 17
Execution priority, 100, 101
EXI
batch queue summary display, 158
Exit events
job dependency, 121
Exporting your environment variables, 130
F
-f option
cqstatl command, 146, 159
qstat command, 146, 159
FFIO, 191
file does not exist message
standard error file, 233
File name formats supported for DCE/DFS, 110
File names
specifying for NQS output files, 109
File naming conventions, 207
file not found message
standard error file, 233
File structure for NQE, 22
File transfer
abort, 196
deleting, 196
display, 18, 185, 195
failures, 208
information display, 18
initiated from a batch job
with NPPA, 214
queued transfers, 195
request
definition, 184
service, 186
definition, 184
with FTA, 17, 185
File Transfer Agent (FTA), 17, 183
File transfer information display (ftua), 185, 195
File transfer protocol (FTP), 269
commands, 270
del command, 270
delete a job or output file, 278
dir command, 270
display the NQS job status, 274
enable and disable the FTP NQS interface, 273
get command, 271
290 SG–2148 3.3

Index
put command, 271
quote site batch command, 272
requirements, 270
retrieve job output, 278
sample session, 272
site batch command, 272
startup procedure, 273
submit a job file to NQS, 273
File validation, 26, 27
Files
accessing from a request, 73
appending, 194
copying multiple, 190
deleting, 194
transfer mode, 187
types of FTA files, 188
Flexible file input/output system (FFIO), 191
Flow of request through NQE, 4
FTA, 4
advantages, 18, 185
domain name
definition, 184
file transfer request, 184
file transfer service, 184
network peer-to-peer authorization, 184
queue directory
definition, 184
specifying file type to transfer, 188
terms, 184
type of file to transfer, 188
FTP, 269
ftua
appending files, 194
block mode
get, 192
IBM MVS transfers, 191
put, 192
connecting to a remote host, 186
connection closing, 197
copying multiple files, 190
deleting files, 194
examples, 198
file transfer mode, 187
macdef example, 202
UNICOS MLS or UNICOS/mk
security-enhanced system, 204
used to transfer files, 185
utility, 185
ftua command
description, 14
used to transfer files, 17
G
Global limits, 67
displaying, 69
Group
displaying maximum number of concurrent
requests for, 166
GRP
batch queue limits display, 166
GUI access, 12
H
-h option
cqdel, 174
cqstatl command, 149, 166
qdel, 174
qstat command, 149, 166
HLD
batch queue summary display, 157
pipe queue summary display, 159
Home directory
QSUB_HOME environment variable, 128
Host name
NQEDB_CLIENTHOST environment
variable, 129
of NQE client
QSUB_NQC environment variable, 129
of NQS server
QSUB_HOST environment variable, 128
SG–2148 3.3 291

NQE User’s Guide
I
IBM MVS transfers, 191
IDENTIFIER
batch request summary display, 145
NQE database request summary, 143
Identifying current resource limits, 90
ilb command, 18
description, 14
ILB_PROMPT environment variable, 133
ILB_USER environment variable, 133
Immediate mode (FTA), 187
Interqueue priority, 100
Intraqueue priority, 100
IRIX Miser scheduler
effect of specifying Miser resource options
on request limits, 104
resource reservation option, 103
submitting requests, 102
J
-J m option
cqsub command, 110
qsub command, 110
ja(1) command
job accounting, 75
JID
batch request summary display, 145
Job accounting
obtaining from within a request, 75
Job dependency
delimiters for reading events, 123
delimiters in event lists, 123
event groups, 121
event names, 121
event values, 121
group name for events
NQE_GROUP environment variable, 131
listing events, 122
overview, 121
posting events, 122
using, 121
Job flow through NQE figure, 6, 8
Job identifier
displaying for a submitted request, 145
Job log
file
definition, 245
produced after signaling a request, 177
monitoring, 113
K
-k option
cqdel command, 178
qdel command, 178, 180
kdestroy caution, 58, 112
Keyword/values for .netrc, 211
KRB5CCNAME environment variable, 59
L
-l option
cqstatl command, 165
qstat command, 165
-la option
cqsub command, 61
License Unavailable message, 234
Licensing, 234
LIM
batch queue summary display, 157
pipe queue summary display, 158
Limits
batch queue, 67
displaying, 69, 165
exceeding resource limits, 91
global, 67
displaying, 69
NQS system, 67
queue complex, 67
displaying, 69
292 SG–2148 3.3

Index
resource, 86
time, 91
types, 89
List of user-level man pages, 235
-ln option
cqsub command, 102
qsub command, 102
Load balancing, 55
submitting requests, 55
Load display
components of, 217
Locally submitted requests, NQS, 59
LOCATION
NQE database request summary, 144
Login name to use on remote system, 133
LWS environment variables
NQEDB_CLIENTHOST, 129
NQEDB_ID, 129
NQEDB_USER, 129
M
Machine load
monitoring with cload command, 215
Mail
QSUB_MAIL environment variable, 128
receiving in event of errors, 72
receiving when a request completes
execution, 69
receiving when a request starts execution, 69
sending to another user, 72
Man pages
included online, 14
list of man pages included online, 235
list of user-level man pages, 235
MANPATH environment variable, 22
MEMORY
batch queue limits display, 165
Memory
displaying amount available to requests, 165
used or available to a submitted request
displaying, 145
Messages
error, 77
suppressing cqsub, 64
suppressing qsub, 64
Mode selection, 187
Monitoring
event history, 113
job logs, 113
output during execution, 116
command line interface, 119
queues, 16
displaying detailed information, 159
displaying summary information, 156
restricting the display to a particular
queue type, 155
requests, 16, 137
displaying detailed information, 146
displaying summary details, 142
-mt option
cqsub command, 70
qsub command, 70
-mu option
cqsub command, 72
Multiple file copy, 190
N
NAL, 51, 59
NAME
NQE database request summary, 143
-nc option
cqsub command, 82
qsub command, 79, 82
.netrc file, 211
.netrc file example, 213
Network access list (NAL), 51, 59
Network Load Balancer (NLB)
displays, 215
features, 215
Network peer-to-peer authorization, 184
Networks
SG–2148 3.3 293

NQE User’s Guide
NQS
locally submitted requests, 59
remotely submitted requests, 60
Nice value, 101
displaying for a submitted request, 145
NLB
Chart Formulae popup, 220
overview, 55, 215
pipe queue, 55
request attributes, 62
Selection popup, 218
server
environment variable, 132
using, 55, 215
NLB_SERVER environment variable, 132
and ilb environment variables, 133
No account authorization ... message, 229
No account authorization at transaction peer
message, 55, 229
No licenses available, 234
No request queue specified
error message, 65
No request queue specified .... message, 224
NPPA
definition, 184
file transfer with, 213
NQE
client definition, 3
file structure, 22
how it works, 4
nqe command, 12
NQE commands, 14
NQE components, 2
Network Load Balancer (NLB) server, 3
NQE clients, 3
NQE database monitor, 3
NQE database server, 3
NQE scheduler, 3
NQE database
authorization, 24
authorization failures, 228
connection failure messages, 227
database user name, specifying, 24
destination for request, 57
NQE scheduler not scheduling, 229
NQE_DEST_TYPE environment
variable, 52, 54, 57
NQEDB_USER environment variable, 24, 57
problems, 227–229
request attributes, 62
request submission, 56
sending requests to, 57
specifying database user name, 24
submitting requests, 56
task identifier, 53, 56
user name, 56
using the NQE GUI to delete a request, 170,
174
NQE Database connection failure:...
message, 227, 228
NQE graphical user interface (GUI), 12
NQE GUI
accessing, 12
creating requests, 43
database user name, specifying, 24
deleting requests, 170
description, 12
identifying current resource limits, 89
monitoring job log, 113, 119
monitoring output during execution, 117, 119
monitoring requests, 137
request status, 137
request submission, 51
setting password prompting, 179
SIGINT signal, 178
SIGKILL signal, 178
signaling a request, 179
SIGQUIT signal, 178
specifying request options, 45
specifying resource limits, 88
status of requests, 137
Status window
access, 138
advantages, 137
default display, 138
294 SG–2148 3.3

Index
using, 137
Status window for deleting requests, 170
submitting requests, 51
NQE GUI Status window
for deleting requests, 169
NQE job flow figure, 6, 8
NQE_DEST_TYPE environment variable, 52,
54, 57, 131, 143
NQE_GROUP environment variable, 121, 131
NQE_SHEPHERD_PID environment variable, 128
/nqebase
default NQE path name, 21
NQEDB_CLIENTHOST environment
variable, 129
NQEDB_ID environment variable, 129
NQEDB_USER environment variable, 24, 57,
129, 131
NQEINFOFILE environment variable, 130
NQS
directives, definition, 43
locally submitted requests, 59
remotely submitted requests, 60
request attributes, 62
security labels, 59
server
environment variable, 132
server, definition, 2
system limits, 67
tutorial, 237
NQS local daemon is not present ... message, 224
NQS local daemon is not present at local host
error message, 65
NQS queues
-q option, cqsub command, 96
specifying, 96
types of, 8
NQS validation
combination file and password, 27
examples, 27
file validation, 26
password validation, 27
requirements, 25
types, 25
NQS_PASSWORD_NEEDED environment
variable, 98, 132
NQS_SERVER environment variable, 132
NQSATTR environment variable, 130
NQSCHGINVOKE environment variable, 95, 130
nqshosts file, 227
format, 28
.nqshosts file, 229
validation file, 26, 227
-nr option
cqsub command, 82
qsub command, 82
O
-o option
qsub command, 117
Online man pages list, 235
Output
examining, 17
Output file could not be returned ...
mail message, 110
Output files, 107
combining into one file, 118
DCE/DFS support, 108
location for, 110
monitoring during request execution, 116
names, 107
problem with finding, 230
produced after signaling a request, 177
warning message at start of, 233
writing messages to, 114
writing to specific location, 116, 117
Overview of NQE, 1
OWNER
pipe request summary display, 145
P
-p option
SG–2148 3.3 295

NQE User’s Guide
cqstatl command, 156
cqsub command, 101
qstat command, 156
qsub command, 101
Password prompting, 97
environment variable, 132
NQE GUI, 179
Password validation, 27
for cqdel command, 170, 172, 173, 181, 182
for cqstat command, 166
for cqstatl command, 27, 149, 150
submitting a request, 27
PATH environment variable, 22
Per-process resource limit, 89
Per-request resource limit, 89
Pipe queue
description, 9
destination
determined by NQS, 88
destination-selection, 9
detailed display, 159
restricting a display to show, 155
summary display, 158
Preexecution priority, 100
Priority
execution, 100, 101
interqueue, 100
intraqueue, 100
preexecution, 100
types, 100
Problem solving, 50, 223
Problems
authorization failure messages, 227
commands do not execute, 223
connection failure messages, 227
cqdel
error message with -h option, 229
cqstatl
error message with -h option, 229
DCE/DFS credentials not obtained, 234
DCE/DFS output cannot be found, 231
file not found message in standard error
file, 233
license not available, 234
many errors in standard error file, 233
NQE database authorization failures, 228
NQE scheduler not scheduling, 229
NQS server name specified, 229
qdel
error message with -h option, 229
qstat
error message with -h option, 229
request has disappeared, 228
request not executing, 226
request not forwarded to batch queue, 225
request not queued, 224
resource limits exceeded, 230
Project name
for request execution, 98
PRTY
batch request summary display, 145
Q
-q option
cqsub command, 66, 96
qsub command, 66
qchkpnt command, 78, 79
qdel command
-h option, 174
-k option, 178, 180
signaling a request, 181
-u option, 175
qlimit command
displaying possible resource limits, 86
qmgr command
current validation method used, 25
show parameters, 25
qmsg command, 114
qstat command
-b option, 156
-f option, 146, 159
-h option, 149, 166
-l option, 165
296 SG–2148 3.3

Index
options for monitoring requests, 141
-p option, 156
-u option, 150
using, 141
qsub command
-C option
remote request, 60
-C option, local request, 59
-e option, 117
-eo option, 110, 118
-J m option, 110
-L option, local request, 59
-L option, remote request, 60
-ln option, 102
-mt option, 70
-nc option, 79, 82
-nr option, 82
-o option, 117
-p option, 101
-q option, 66
-r option, 97
-re option, 117
-Rf option, 79
-ro option, 117
-s option, 241
successful submission message, 63
suppressing, 64
-u option, 99
-x option, 95
-z option, 64
QSUB_HOME environment variable, 128
QSUB_HOST environment variable, 128
QSUB_LOGNAME environment variable, 128
QSUB_MAIL environment variable, 128
QSUB_NQC environment variable, 128
QSUB_PATH environment variable, 128
QSUB_QUEUE environment variable, 66, 96, 130
QSUB_REQID environment variable, 128
QSUB_REQNAME environment variable, 128
QSUB_TZ environment variable, 128
QSUB_USER environment variable, 128
QSUB_WORKDIR environment variable, 128
QUE
batch queue summary display, 157
pipe queue summary display, 158
QUEUE
batch request summary display, 145
NQE database request summary, 144
Queue
ability to accept requests directly, 97
batch
description, 8
complex, 67
definition, 67
displaying limits, 69
limits, 67
default, 96
displaying the system, 96
default resource limits, 89
defining default, 66
destination
determined by NQS of, 88
directory, definition, 184
displaying batch limits, 165
displaying name in which request currently
resides, 145
group run limit, 166
mode (FTA), 187
monitoring, 16
at a remote system, 166
obtaining detailed information, 159
obtaining summary information, 156
restricting the display to a particular
queue type, 155
name
batch queue limits display, 160
pipe
description, 9
destination-selection, 9
resource limit
consequence of exceeding, 88
resource limits, 89
run limit, 165
selecting, 96
specifying when submitting a request, 66
SG–2148 3.3 297

NQE User’s Guide
specifying with cqsub, 96
types of NQS, 8
user run limit, 166
using NLB, 96
QUEUE NAME
batch queue limits display, 165
batch queue summary display, 157
pipe queue summary display, 158
Quickfile
displaying amount available to requests, 166
QUICKFL
batch queue limits display, 166
R
-r option
cqsub command, 97, 143, 145
qsub command, 97
-re option
qsub command, 117
Recovery, 78
criteria for successful, 80
request, from SIGRPE, SIGUME, or
SIGPEFAILURE signal, 81
Remote hosts
connecting to, 186
copying, 189
Remote system
deleting a request, 174
login name to use, 133
monitoring a queue, 166
monitoring requests, 149
Remotely submitted requests, NQS, 60
REQMEM
batch request summary display, 145
REQTIM
batch request summary display, 146
Request
account name to run under, 98
attributes, 60
authorization needed, 21
creating, 43
criteria for recovery, 80
.cshrc file, 95, 226
DCE/DFS credentials not obtained, 234
DCE/DFS use, 57
deleting, 17, 169
a request not executing, 171
an executing request, 172
another user’s request, 175
at a remote system, 174
displaying summary details for submitted, 142
editing file after submission, 51, 65
flow through NQE, 4
if request does not run, 95, 226
IRIX project name to run under, 98
license not available, 234
monitoring, 16
at a remote system, 149
displaying detailed information, 146
monitoring event history, 113
monitoring log file, 113
monitoring output during execution, 116
NQE database request summary, 142, 143
NQE database user name environment
variable, 131
password prompting, 132
permitted commands in a batch request, 45
priorities, 100
problem
connection failure messages, 227
.cshrc content, 226
DCE/DFS credentials not obtained, 234
errors using cqdel -h, 229
errors using cqstatl -h, 229
errors using qdel -h, 229
errors using qstat -h, 229
license not available, 234
NQE database authorization failures, 228
NQE scheduler not scheduling, 229
NQS server name specified, 229
output files cannot be found, 230
request has disappeared, 228
request not forwarded to batch queue, 225
298 SG–2148 3.3

Index
request not queued, 224
request script content, 226
resource limits exceeded, 230
recovery due to SIGRPE or SIGUME or
SIGPEFAILURE signal, 81
selecting an account name to execute under, 98
selecting an IRIX project name to execute
under, 98
selecting the user to execute under, 99
sending to NQE database, 56
setting up validation, 21
signaling, 17, 172, 177
specifying a destination, 131
specifying a request name, 97
specifying an NLB server, 132
specifying an NQS server, 132
specifying when to run, 91
status, 151
status codes, 151
submitted by another user
signaling, 182
submitting, 16
for the IRIX Miser scheduler, 102
submitting under DCE, 16
substatus codes, 152
temporary directory created by NQS, 129
user name to run under, 99
Request attributes, 60
NLB, 61
Request execution, 127
environment, 127
monitoring output files during, 116
output files, 107
priority, 100, 101
receiving mail when an error occurs, 72
receiving mail when request starts or
completes, 69
shell used, 94, 241
start-up files used, 127
Request identifier
definition of, 63, 64
obtaining for a request
QSUB_REQID environment variable, 128
Request name, 97
obtaining for a request
QSUB_REQNAME environment
variable, 128
Request submission
indications of successful, 54, 63, 64
indications of unsuccessful, 65
sending to NQE database, 56
specifying a user to receive mail, 72
Rerunning
preventing a request from, 82
Resource limits, 86
consequences of exceeding, 88, 230
default for queue limits, 89
displaying possible, 86
guidelines, 89
per-process and per-request, 89
reasons for specifying, 89
requesting, 87
use by NQS to determine destination queue, 88
Resources
determining those used by a request, 89
exceeding resource limits, 91
Restart, 78, 79
Restart file, 78
restart(2), 78, 81
-Rf option
qsub command, 79
rft command
description, 15
use, 209
used to transfer files in batch requests, 18
rhosts file, 227
format, 28
.rhosts file, 229
validation file, 26, 227
-ro option
qsub command, 117
ROU
pipe queue summary display, 158
RUN
batch queue limits display, 165
SG–2148 3.3 299

NQE User’s Guide
batch queue summary display, 157
S
-s option
cqsub command, 94, 241
qsub command, 241
Scheduler
IRIX Miser, 102
effect of specifying Miser resource options
on request limits, 104
resource reservation option, 103
Script file options, 45
SDS
displaying amount available to requests, 166
Search path
QSUB_PATH environment variable, 128
QSUB_USER environment variable, 128
Secondary Data Segments, 166
Security labels
NQS, 59
Selecting
NQS queue for your request, 96
using NLB, 96
Selection popup, 217
Shell
script, 43
specifying for a request, 94, 241
strategy, 241
used by a request, 241, 241
used to execute requests, 45
Shepherd PID
of job
NQE_SHEPHERD_PID environment
variable, 128
show parameters command
qmgr, 96
SIGINT signal, 178
SIGKILL signal, 178
Signaling requests, 17, 177
Signals
common, 178
sending to a request, 177
SIGPEFAILURE signal, 81
SIGQUIT signal, 178
SIGRPE signal, 81
SIGUME signal, 81
ST
batch request summary display, 146
NQE database request summary, 144
Standard error file, 107
combining with standard output file, 118
file not found message in, 233
monitoring during request execution, 117
specifying location for, 117
syntax errors in, 233
Standard output file, 107
combining standard error file into, 118
monitoring during request execution, 117
specifying location for, 117
warning message at start of, 233
State
displaying for a submitted request, 146
NQE database request summary, 144
Status, 137
codes, 151
of request, 151
Status window (NQE GUI)
for deleting requests, 174
STDIN
request name, 143, 145
STS
batch queue summary display, 157
pipe queue summary display, 158
Submit
batch requests, 51
using the NQE GUI, 51
display
components of, 52
Submitting a request, 16, 49
authorization needed, 21
DCE/DFS, 57
for the IRIX Miser scheduler, 102
indications of failure, 65
300 SG–2148 3.3

Index
indications of success, 63, 64
setting up validation, 21
Substatus codes, 152
SYSTEM-OWNER
NQE database request summary, 143
T
Task identifier
definition, 56
NQE database, 53
Temporary directory for requests, 82
The request could not be routed ... message, 225
Time limits, 91
Time zone
how to specify, 92
QSUB_TZ environment variable, 128
TMPDIR environment variable, 83, 129
Token pairs for .netrc, 211
TOT
batch queue summary display, 157
pipe queue summary display, 158
Transferring files, 17
Tutorial, 237
Types of limits, 89
Types of NQS queues, 8
U
-u option
cqdel command, 175, 182
cqstatl command, 150
cqsub command, 24, 99
qdel command, 175
qstat command, 150
qsub command, 99
-u option, cqsub command, 57
UDB, 51, 59
nice increment
effect on a request’s execution priority, 102
UNICOS MLS or UNICOS/mk
security-enhanced system
using ftua, 204
UNICOS user database (UDB) shell, 95
UNIX environment
request execution, 127
USER
batch request summary display, 144, 145
User
commands, 14
database (UDB), 51, 59
displaying for request execution, 144, 145
displaying information for another, 150
displaying maximum number of concurrent
requests for, 166
for request execution, 99
interfaces, 11
name for NQE database requests, 56
notification of queued transfer failures, 208
signaling a request submitted by another, 182
USR batch queue limits display, 166
V
Validation
creating validation files, 26
examples, 27
methods available, 25
setting up, 25
Validation file
creating, 26
.nqshosts, 26
.rhosts, 26
use by cqdel command, 170, 172, 173, 181, 182
use by cqstat command, 166, 167
use by cqstatl command, 27, 149, 150
W
WAI
SG–2148 3.3 301

NQE User’s Guide
batch queue summary display, 157
pipe queue summary display, 158
wait command, 187
Warning: no access to tty; ...
at start of standard output file, 233
Work flow through NQE figure, 6, 8
Writing message to output files, 114
X
-x option
cqsub command, 95
qsub command, 95
Xdefaults file
used to configure displays, 133
Z
-z option
cqsub command, 64
qsub command, 65
302 SG–2148 3.3
