02 Common Data Service For Apps Lab Manual
User Manual:
Open the PDF directly: View PDF ![]() .
.
Page Count: 64

Power platform
App in a Day
Module 2: Common Data Service for Apps
Hands-on Lab Step-by-Step
November 2018
Contents
Common Data Service for Apps ................................................................................................................................................. 1
Lab Prerequisites ............................................................................................................................................................................................................... 1
Before you begin ................................................................................................................................................................................................................ 1
Overview ............................................................................................................................................................................................................................... 2
Goals for this lab ............................................................................................................................................................................................................... 2
Exercise 1: Exploring the Common Data Service (CDS) .......................................................................................................... 3
Task 1: Explore standard entities ................................................................................................................................................................................. 3
Task 2: Explore standard option sets .......................................................................................................................................................................... 8
Exercise 2: Custom Entities and Fields ..................................................................................................................................... 10
Task 1: Create a custom entity ................................................................................................................................................................................... 10
Task 2: Create custom fields ........................................................................................................................................................................................ 12
Task 3: Create a calculated field ................................................................................................................................................................................ 17
Task 4: Create a business rule .................................................................................................................................................................................... 20
Exercise 3: Connect the data from the Canvas App .............................................................................................................. 25
Task 1: Add CDS entity as a data source to the app .......................................................................................................................................... 25
Task 2: Create the edit form ........................................................................................................................................................................................ 29
Task 3: Configure the title field .................................................................................................................................................................................. 34
Task 4: Configure the price field ................................................................................................................................................................................ 38
Task 5: Configure the approval field ........................................................................................................................................................................ 40
Task 6: Configure the Comment field ...................................................................................................................................................................... 43
Task 7: Configure the Requested By field ............................................................................................................................................................... 44
Task 8: Configure the requested date field............................................................................................................................................................. 45
Task 9: Add a button to submit the form................................................................................................................................................................ 46
Task 10: Test the form ................................................................................................................................................................................................... 49
Task 11: Verify a new item was added to the Device Order entity ............................................................................................................... 53
Task 12: [Optional] Navigate to confirmation screen after the Form submit is successful .................................................................. 53
References ................................................................................................................................................................................... 61
Copyright ..................................................................................................................................................................................... 62

Power platform App in a Day Common Data Service for Apps
1 | P a g e ©2018 Microsoft Corporation
Common Data Service for
Apps
Lab Prerequisites
This is the second lab in a five-part series covering PowerApps Canvas Apps, Common Data Service for Apps, PowerApps
Model-driven Apps and Microsoft Flow. The assumption is that you have successfully completed the initial part of setting
up an environment as described in the overview document – “00-AppInADay Lab Overview.pdf”.
If you have not completed building the PowerApps Canvas App in module 1, you can use the partially completed version
of the lab package in the “\Completed\Module1” folder. Follow the instructions in the document “Importing Module 1
Completed” before proceeding with this module.
Before you begin
You must be connected to the internet.
1. System requirements: At a minimum, a computer with 2-cores and 4GB RAM running Windows 7+ or
MacOS.
2. Have a Test Environment with permission to create Common Data Service database: You should have
gone through the steps to create a new environment using the Admin center. In this lab, you will create a
database in this environment if you haven’t already created one.
3. Sign-in to PowerApps: Go to http://powerapps.com and sign in with the same account you used to
complete the first lab. Make sure you switch to the environment where you created the app.
Power platform App in a Day Common Data Service for Apps
©2018 Microsoft Corporation 2 | P a g e
Overview
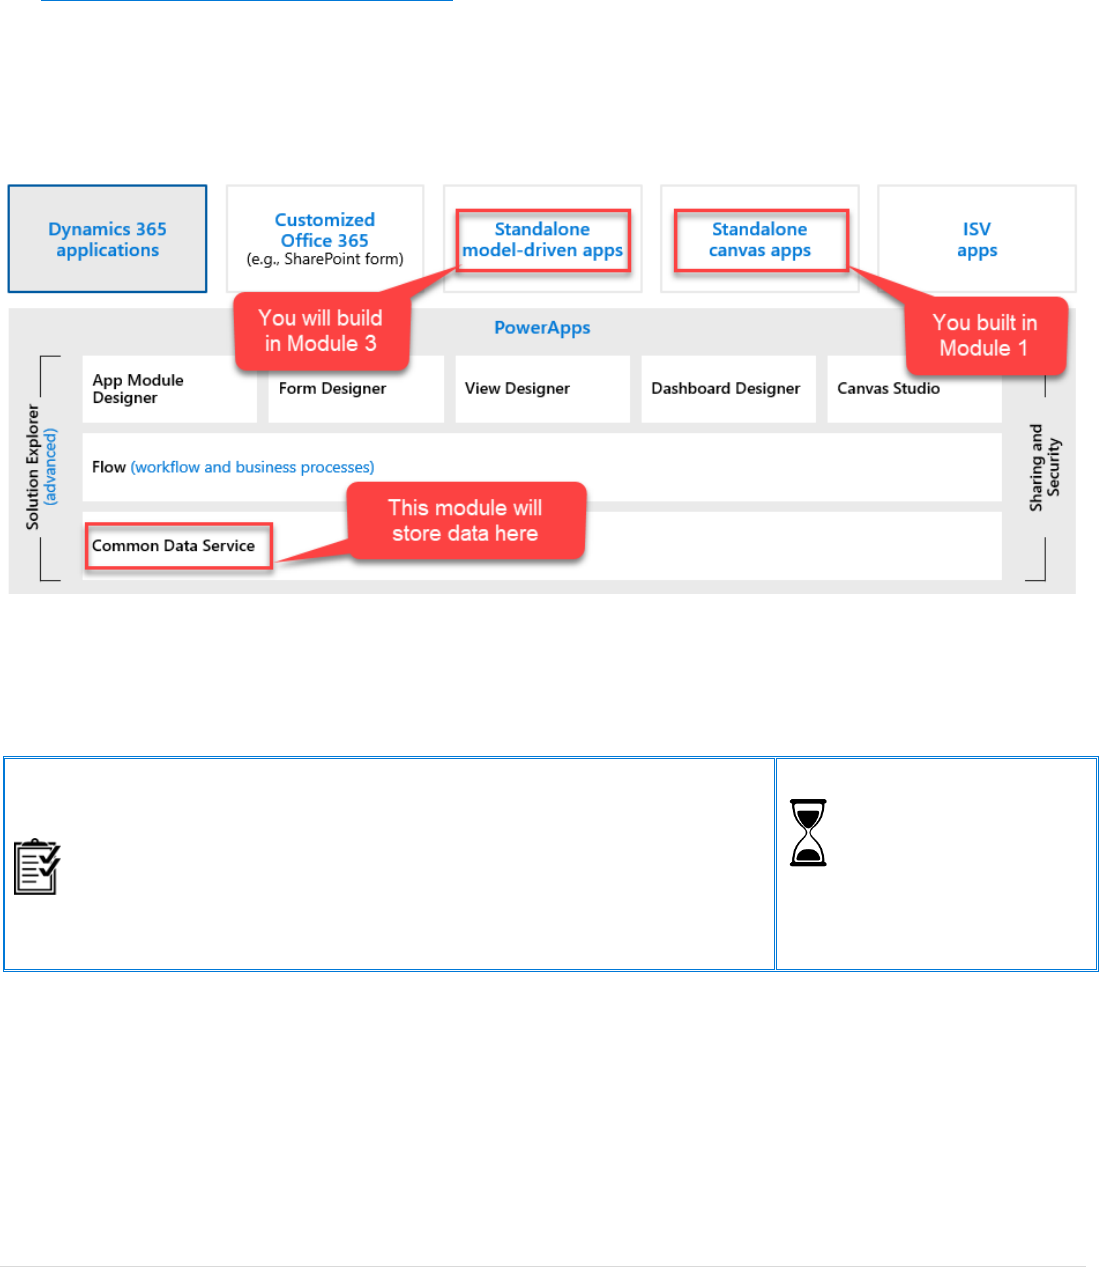
The Common Data Service for Apps (CDS for Apps) adds data storage and modeling capabilities to PowerApps that is
scalable and easy to provision. In this module, you will be using CDS for Apps to model and store the data from the device
ordering canvas app that you built in module 1. In the next module, you will be building a model-driven application using
the same CDS data that will be used by the back-office staff to process the device orders. These apps that you build on
CDS use the same technology framework (CDS for Apps) that Microsoft Dynamics 365 apps are built-on.
Goals for this lab
After this lesson you will be able to:
• Provision a Common Data Service database.
• Create a custom entity and add custom fields to it.
• Use the PowerApps Form control to populate the entity table
• View the entity data in the entity table.
• Create a calculated field.
• Implement a server-side business rule.
The time to complete
this lab is [60]
minutes.
Power platform App in a Day Common Data Service for Apps
3 | P a g e ©2018 Microsoft Corporation
Exercise 1: Exploring the Common Data
Service (CDS)
In this exercise, you will explore the Common Data Service standard entities. Entities in CDS are like tables in a database
or worksheets in Microsoft Excel. Entities can be connected together with relationships that model real world interactions
between the entities. Each entity contains multiple records (rows), each having data fields. For example, a “Project” entity
may have fields such as Name, Due Date, Status, etc. and it may be related to a “Project Owner” entity which might have
fields such as Name, Email, etc.
CDS abstracts a lot of the typical low-level database management work to make it easier for you to configure a custom
data model that fits your application.
In addition to allowing for the creation of custom entities, CDS for Apps contains a Common Data Model (CDM) currently
consisting of 100+ standard entity definitions. You can find the current CDM schema at
https://github.com/Microsoft/CDM and you can browse the CDM using the CDM Visual Entity Navigator located here
https://microsoft.github.io/CDM/. You can read more about the CDM here
https://docs.microsoft.com/powerapps/common-data-model/overview
Task 1: Explore standard entities
In this task, you will explore Common Data Service standard entities.
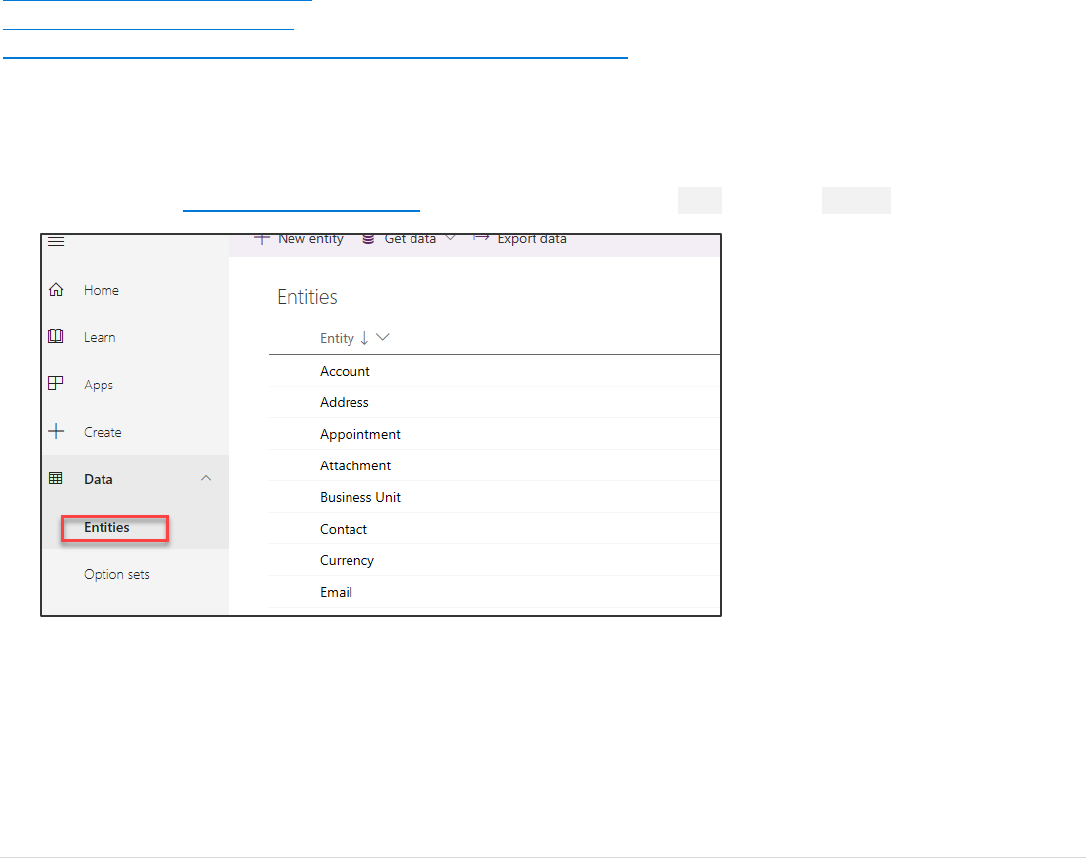
1. Navigate to http://web.powerapps.com and in the left pane, expand Data and select Entities.
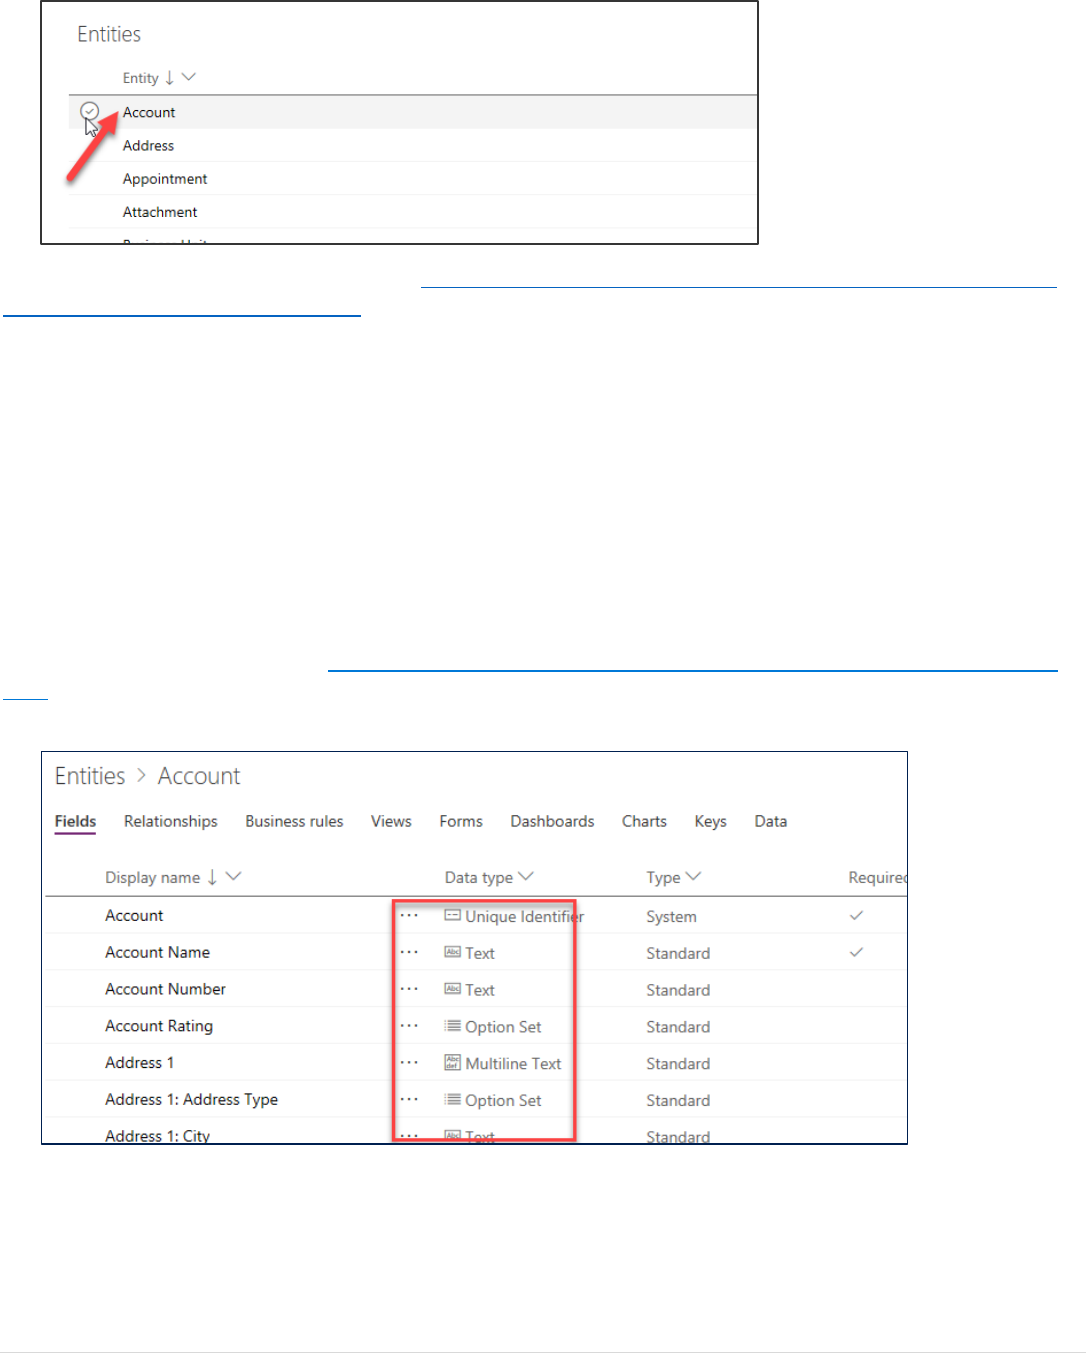
2. This will bring up the list of entities in this database instance. Click on a few of the standard entities (for example,
Account) to get familiar with some of the features of an entity.
Power platform App in a Day Common Data Service for Apps
©2018 Microsoft Corporation 4 | P a g e
For detailed documentation on CDS entities, see https://docs.microsoft.com/en-us/powerapps/developer/common-data-
service/reference/about-entity-reference
Fields:
An entity has a list of fields. In the example below, the “Account” entity has fields such as Account Name, Account
Number, etc. Each field has a data type, such as Text, Number, etc. The datatype is chosen when you create a field and is
not changeable. The data type also defines many of the characteristics and behaviors of the field when your application
runs. For example, an Option Set allows you to have a pre-defined list of values for use in your application. When this field
is used on a form in a model-driven application the visual presentation is a drop-down control. The field helps to ensure
data consistency and allows for built-in support for multi-language applications.
Fields of standard entities cannot be edited or removed, but you can extend existing entities by adding additional custom
fields.
For a list of supported data types, see https://docs.microsoft.com/dynamics365/customer-engagement/customize/types-of-
fields. Please note that a few of the field names have changed slightly in how they present in the list of choices. For example,
Single Line of Text is just Text.
Power platform App in a Day Common Data Service for Apps
5 | P a g e ©2018 Microsoft Corporation
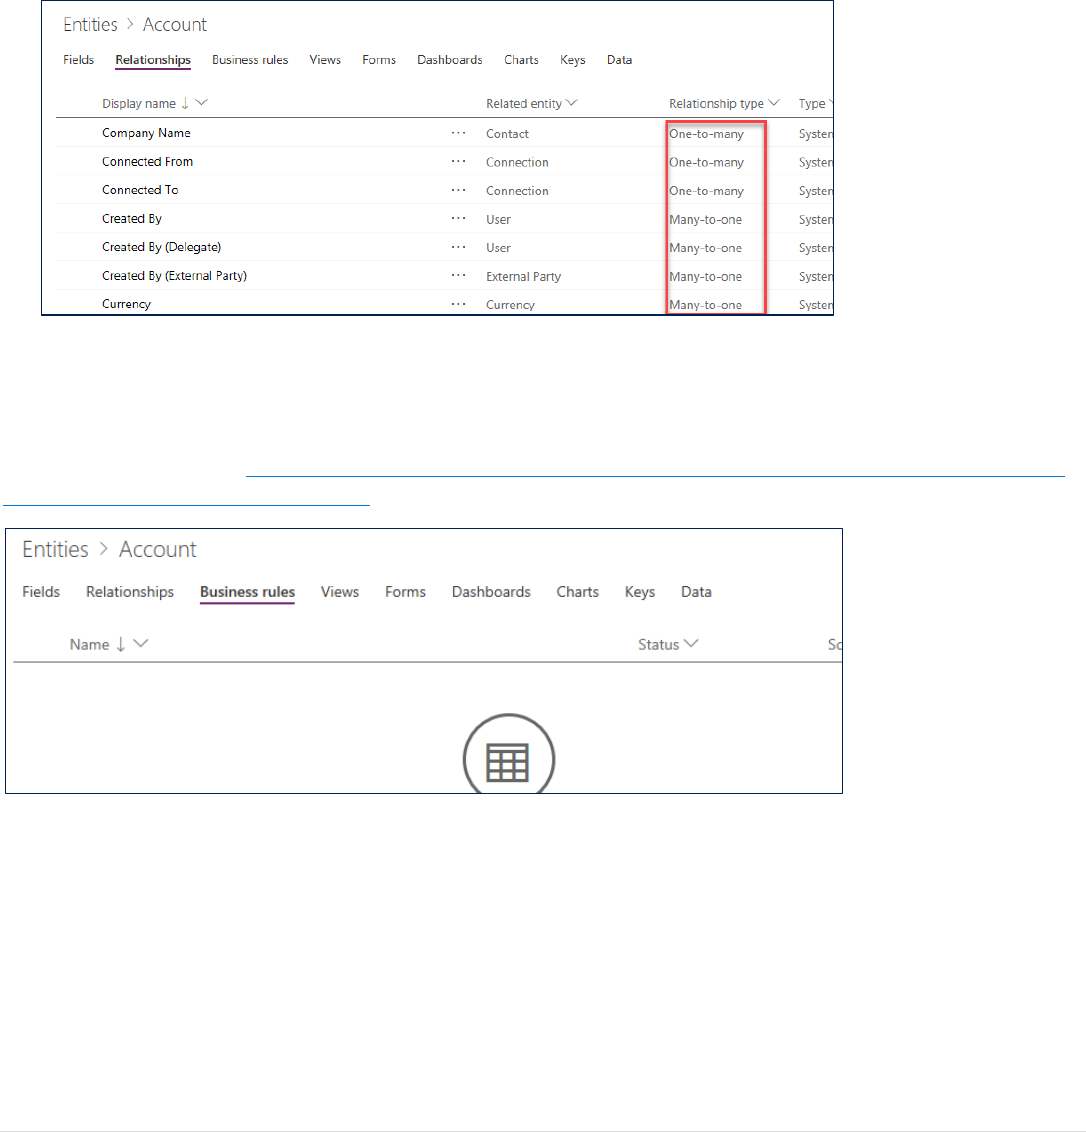
Relationships:
Allows you to manage relationships between entities. Relationships supported are One to Many (1:N), Many to One (N:1)
and Many to Many (N:N). Relationships also define the behavior that happens when actions occur on the primary record
in a 1:N relationship. For example, if the parent record is deleted you can configure the relationship behavior so that all
child records are also deleted or simply remove the reference.
Business Rules:
Building a Business Rule is like building a flowchart where you can define conditions and actions. You can find out more
about Business Rules in link below.
More about Business Rules https://docs.microsoft.com/dynamics365/customer-engagement/customize/create-business-
rules-recommendations-apply-logic-form
Power platform App in a Day Common Data Service for Apps
©2018 Microsoft Corporation 6 | P a g e
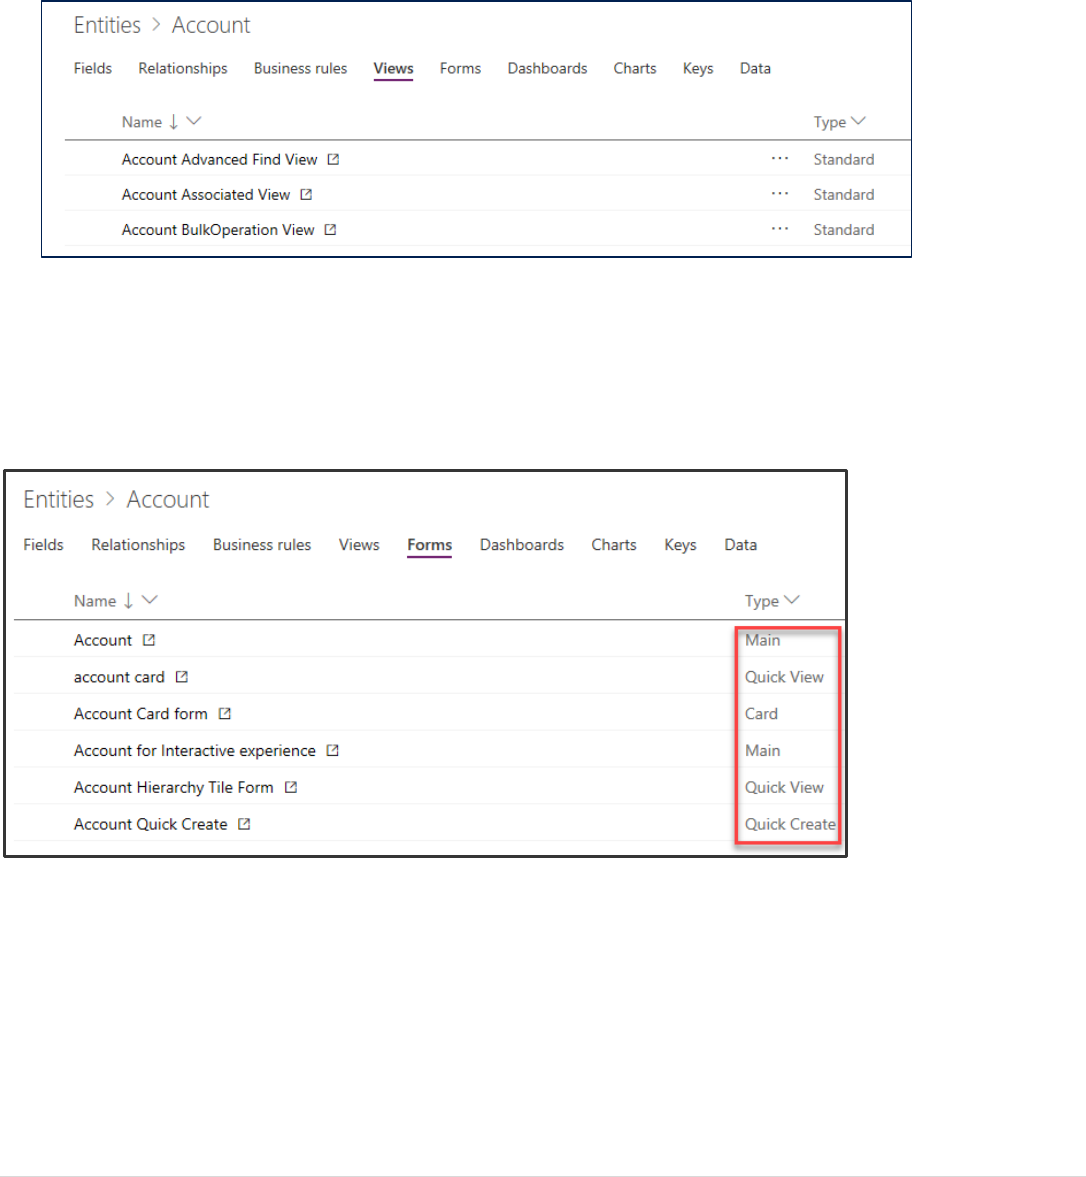
Views:
Views will let you define how a list of records are shown in the app. You can create multiple custom views, each having
their own filtering and sorting criteria. For example, you could create a view to see only the records created in the last
week and another one to see records that haven’t been updated in a year. Create views to make the application users
more productive in filtering their data.
Forms:
Forms provide the user interface that people use to interact with the data they need to do their work. It's important that
the forms people use are designed to allow them to find or enter the information they need efficiently. You can create
different types of forms like Quick Create, Quick View, Card, and a Main form.
Power platform App in a Day Common Data Service for Apps
7 | P a g e ©2018 Microsoft Corporation
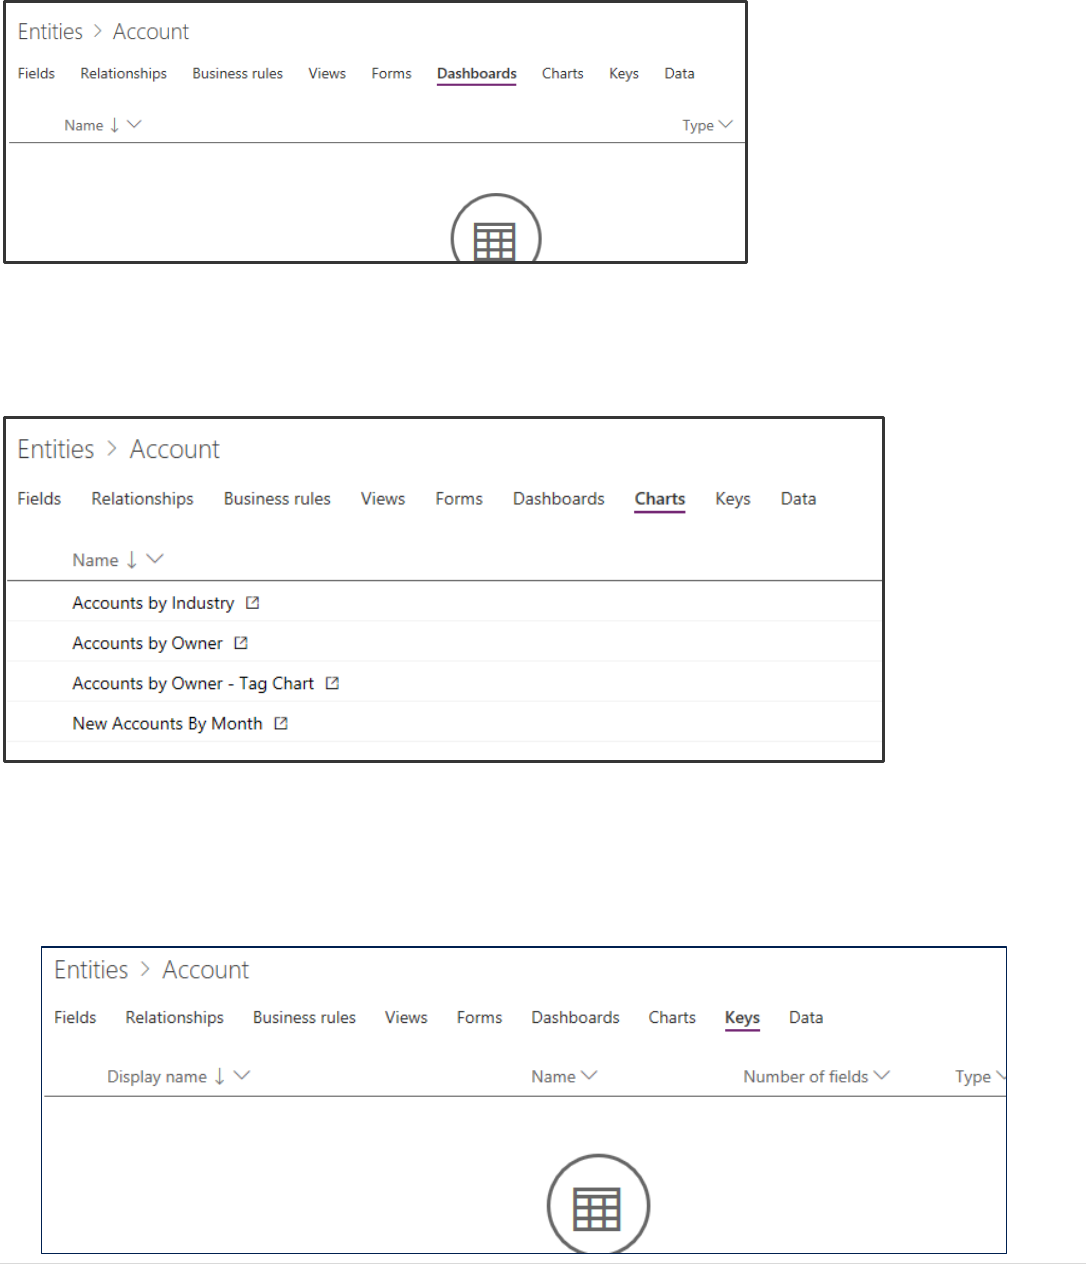
Dashboards:
Dashboards helps you bring your views, charts, and web resources together in one place.
Charts:
Use Charts to display high-level view of your data.
Keys:
Allows you to view the lookup keys for the entity. Keys can contain multiple fields to define a composite key. Keys
enforce uniqueness, so they should not be used when there is a need to store duplicate values of fields used.
Power platform App in a Day Common Data Service for Apps
©2018 Microsoft Corporation 8 | P a g e
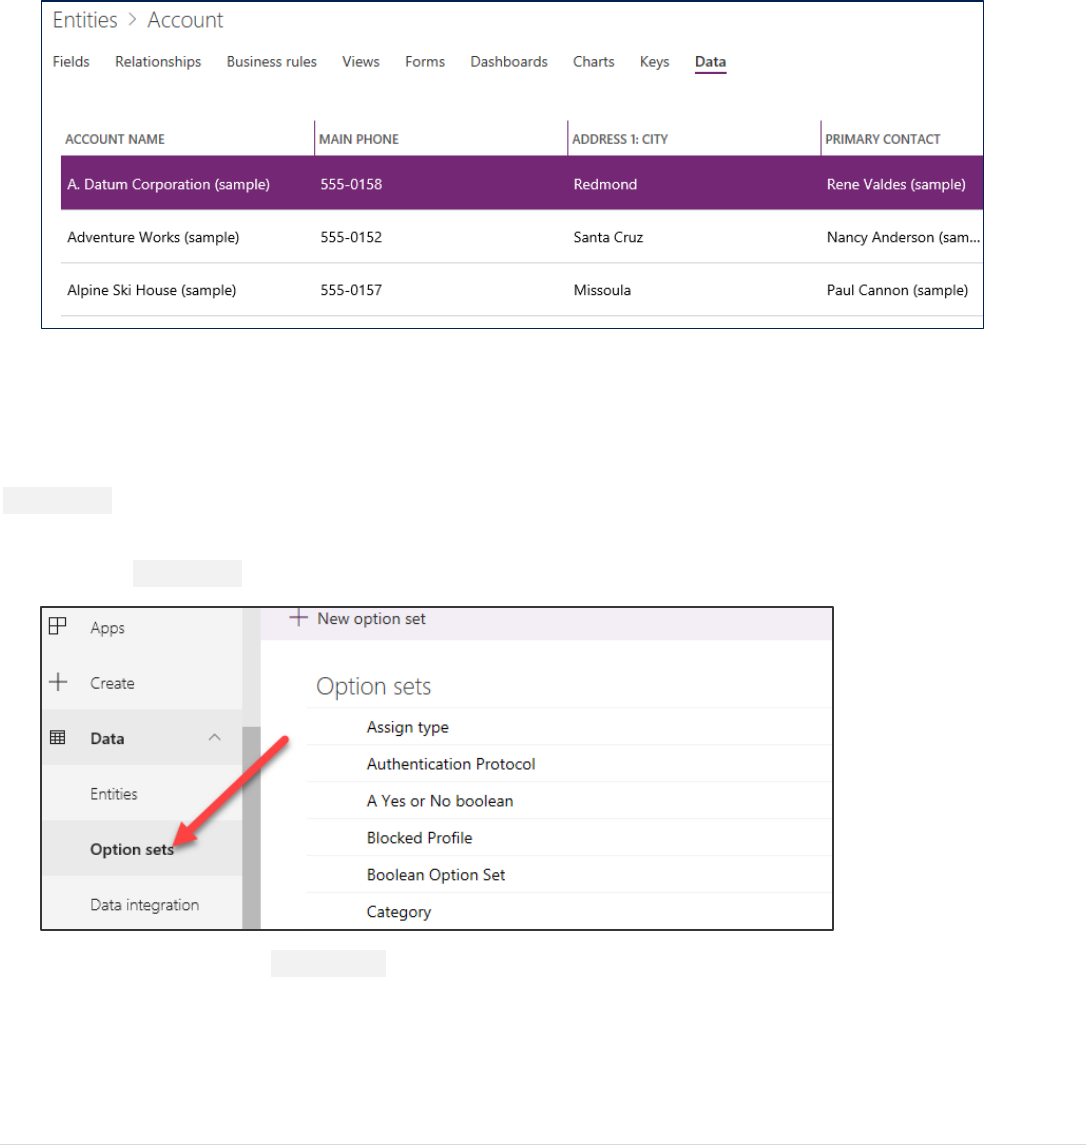
Data:
You can view and search the data in the entity table. This gives you a quick way to see some of the data for the entity
without having to jump into a specific Canvas or Model-driven app.
Task 2: Explore standard option sets
Just like standard entities, the Common Data Service includes a set of standard Option Sets. You can also create custom
Option Sets. Later in this lab, we will create a custom Option Set called ApprovalStatus to set the approval status of a
device order.
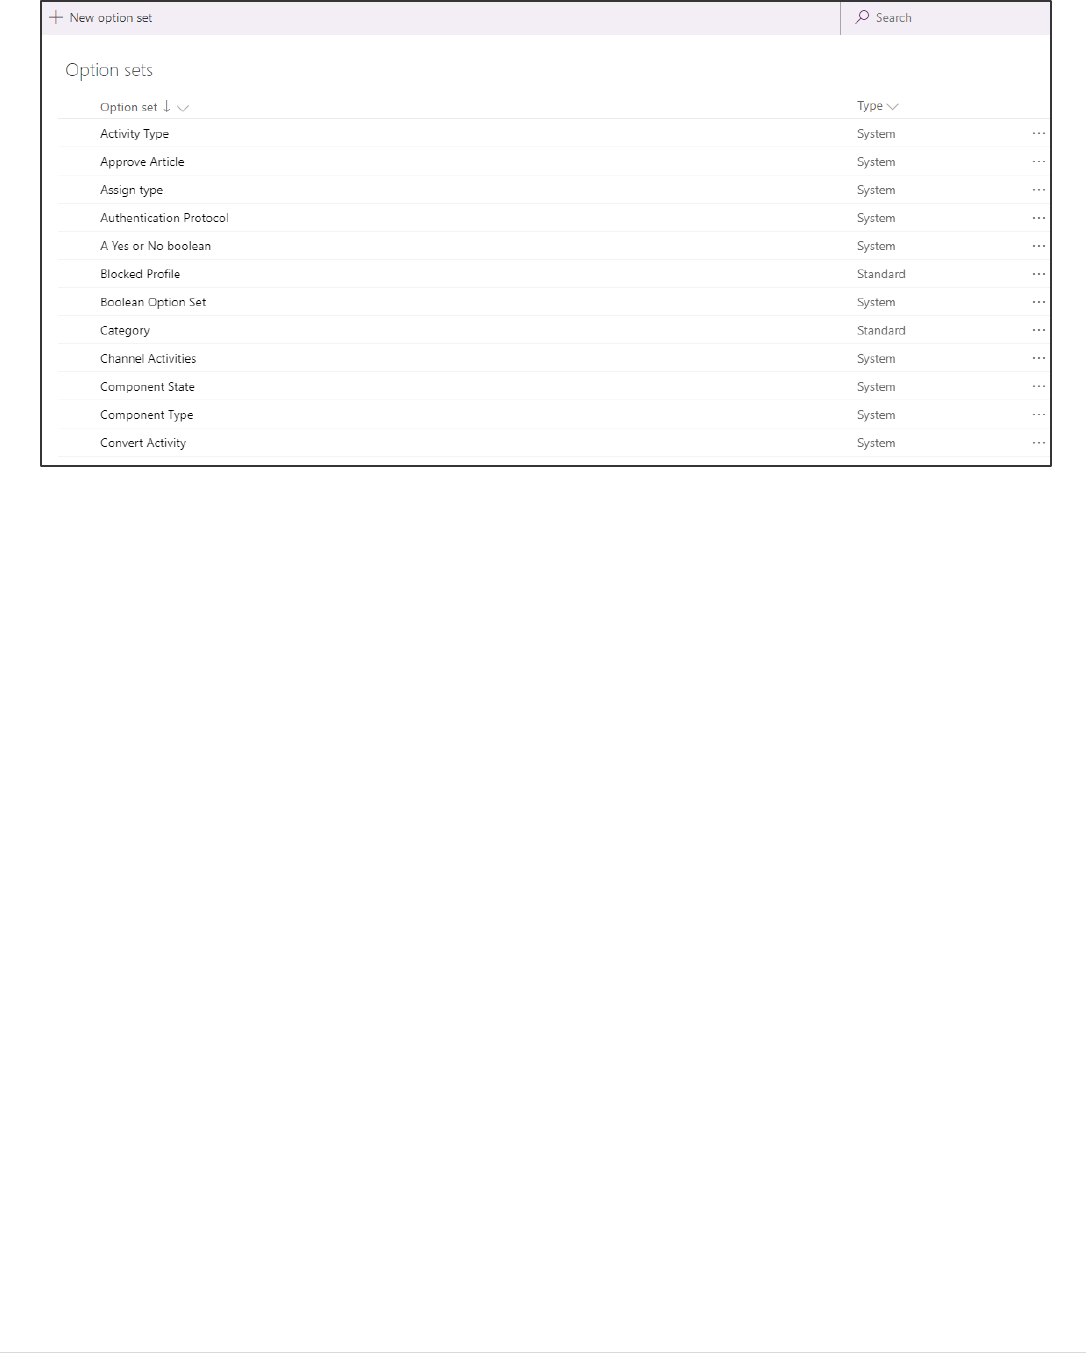
1. Select Option Sets.
2. Examine the standard Option Sets.
Power platform App in a Day Common Data Service for Apps
9 | P a g e ©2018 Microsoft Corporation
Power platform App in a Day Common Data Service for Apps
©2018 Microsoft Corporation 10 | P a g e
Exercise 2: Custom Entities and Fields
In this exercise, you will create a new custom entity named Device Order, add fields necessary to track the device requests.
You will also create a server-side Business Rule that will default the estimated ship date.
Task 1: Create a custom entity
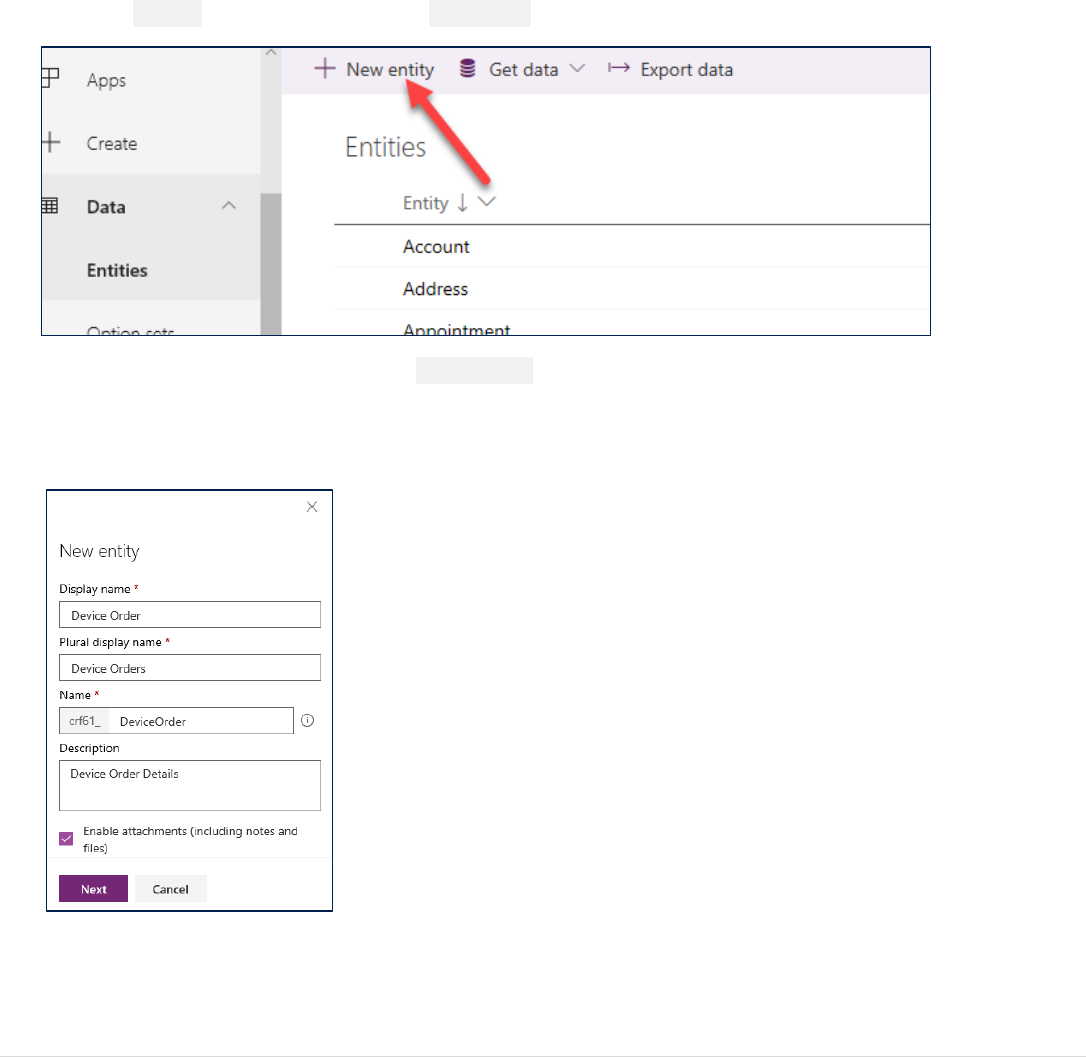
In this task, you will create a custom entity to store device order requests.
1. Select Entities in the left pane and click New Entity in the upper left corner of the page.
2. Enter Device Order for Display Name, DeviceOrder for Name, Device order details for Description. Check the
Enable attachments since this will allow creating notes on the device order. Then click Next. The Plural display
name will be populated automatically but if needed you can override the name provided. The plural name is used
by the system by default anytime a set of the records are shown.
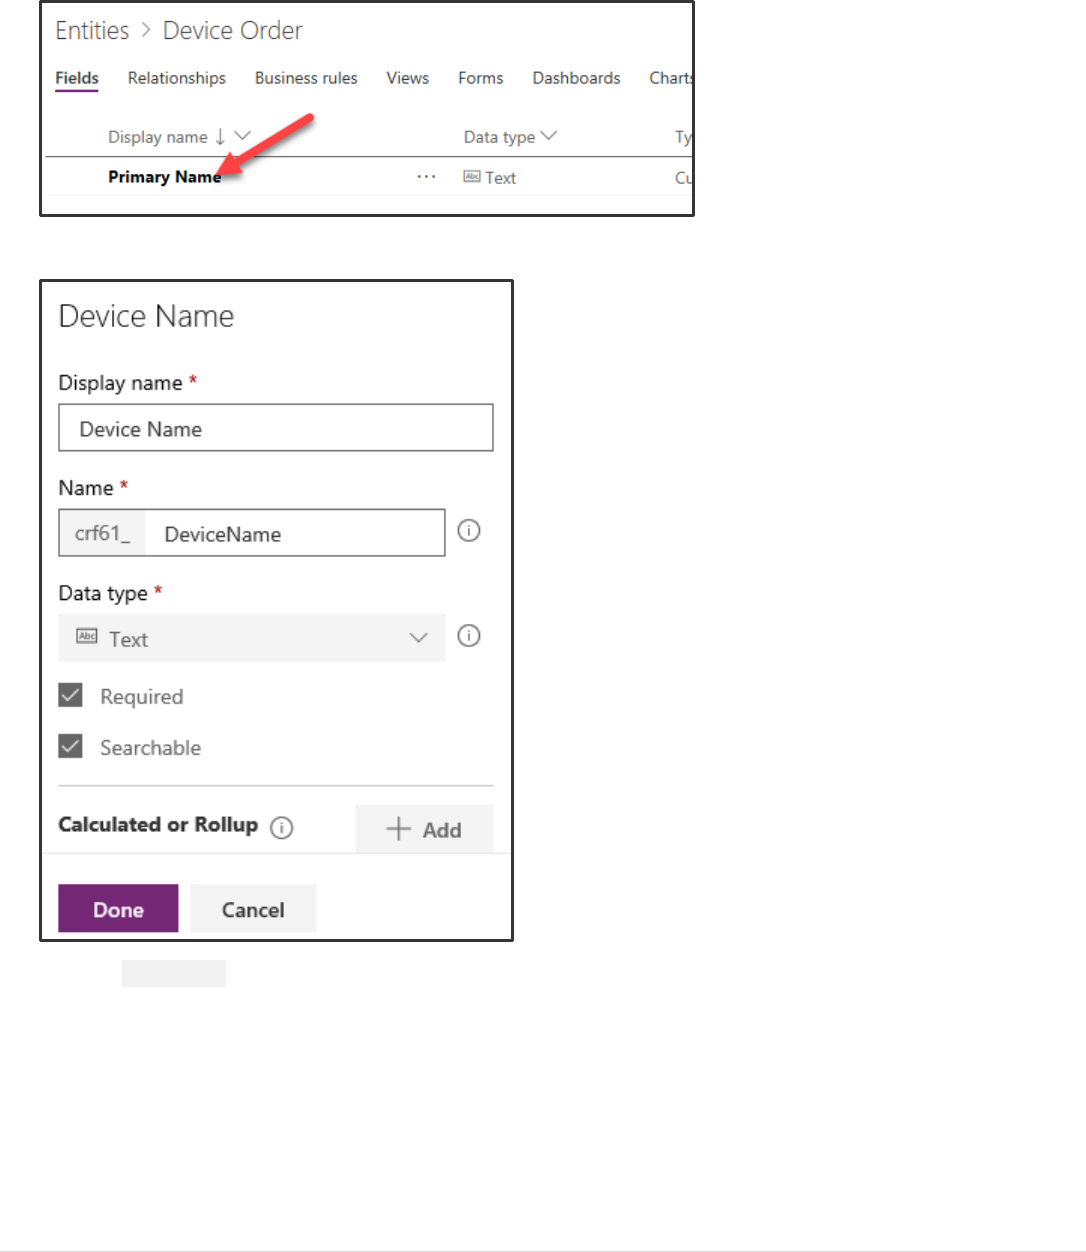
3. After you click Next you will be able to change the primary attribute (labeled as Primary Name) and create other
custom Fields prior to actually saving the entity and causing the system to create it. The primary attribute defaults
Power platform App in a Day Common Data Service for Apps
11 | P a g e ©2018 Microsoft Corporation
to being named Primary Name, for some scenarios that might not be the best label and you can customize it if
needed. The primary attribute however is always a Text field, that is not changeable.
4. Click on Primary Name.
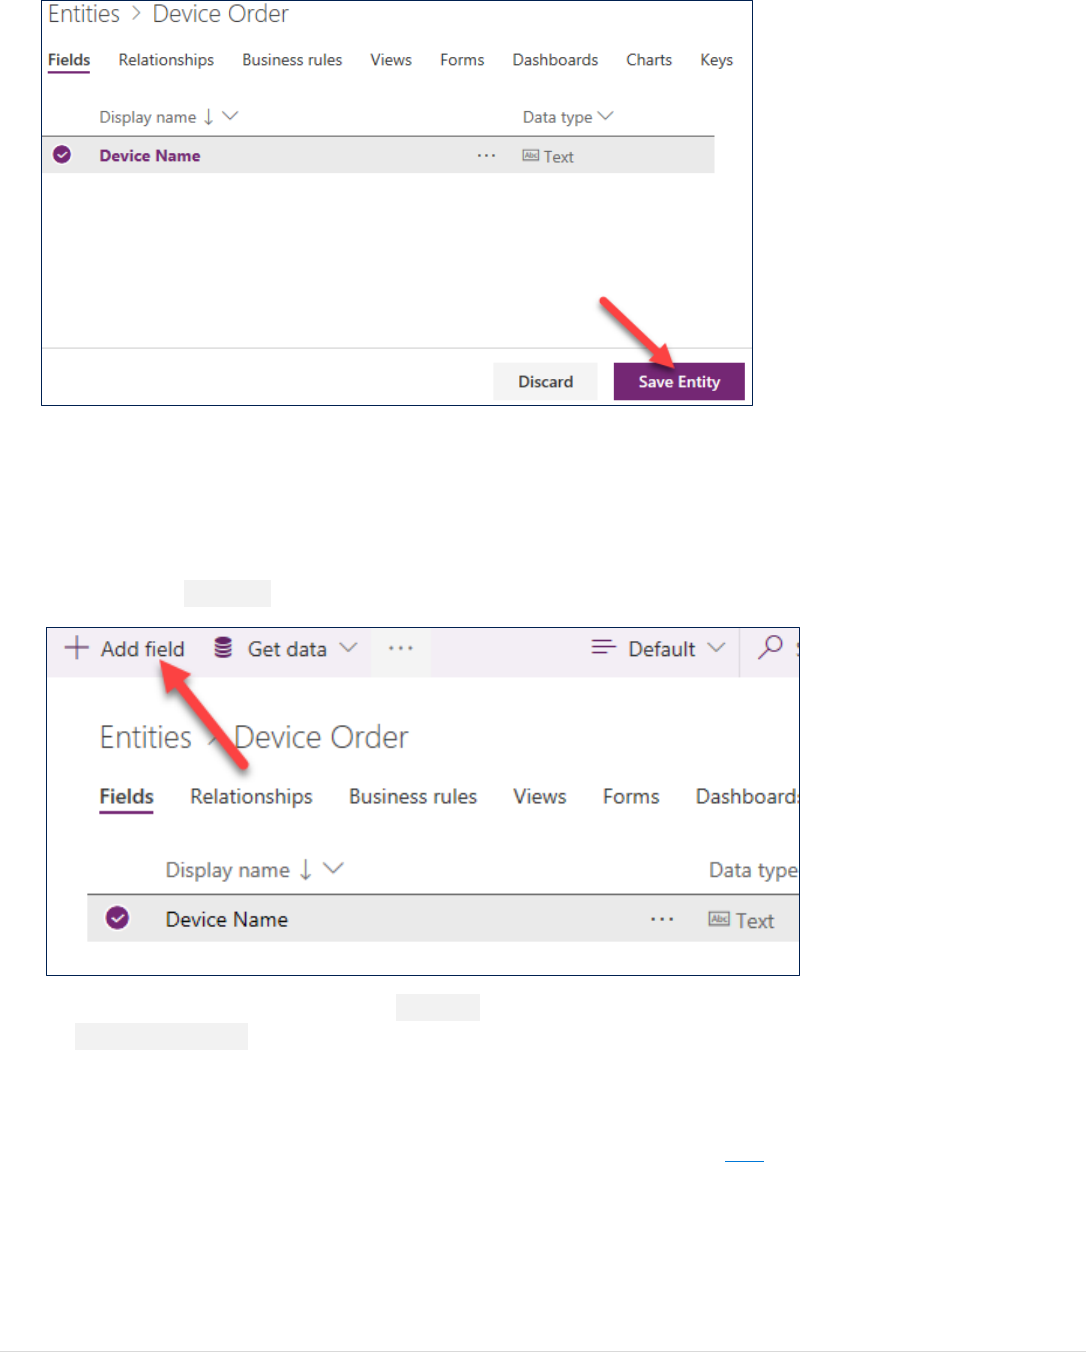
5. Change Display name to Device Name, Name to DeviceName, and click Done.
6. Click Save Entity.
Power platform App in a Day Common Data Service for Apps
©2018 Microsoft Corporation 12 | P a g e
Task 2: Create custom fields
In this task, you will create custom fields for the Device Order entity.
1. Click on the Add field button to add fields to your custom entity.
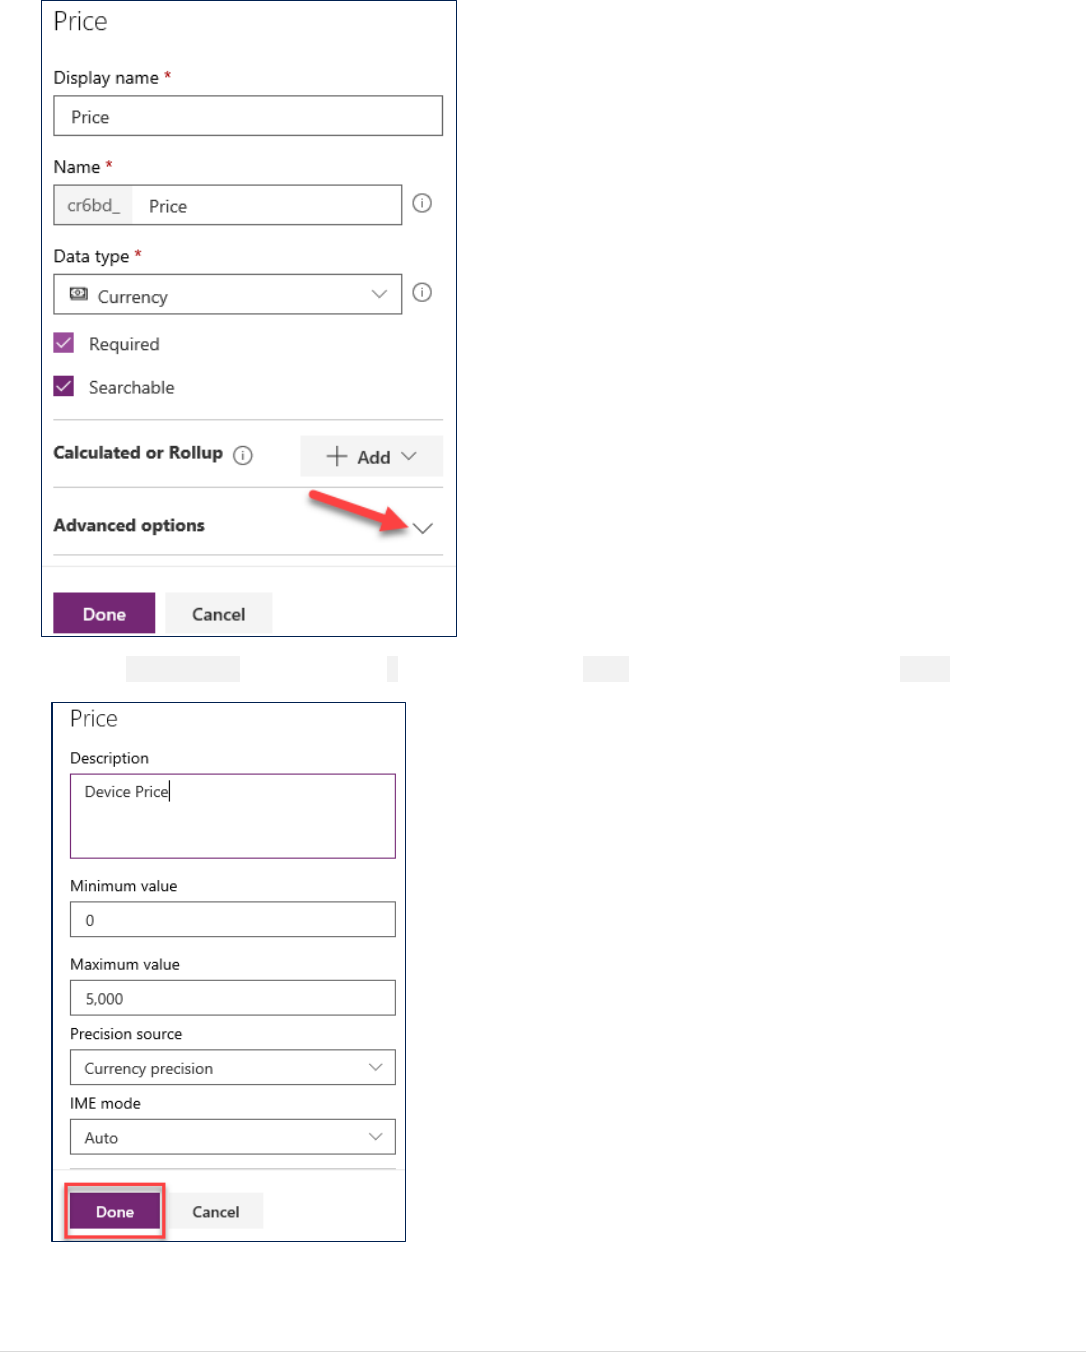
2. Enter Price for Display Name, select Currency for Data Type, make the field Required and Searchable and click
Advanced Options.
Note: Currency is a special data type. For each currency field you add, another currency field is added with the
prefix “_Base” on the name. This field stores the calculation of the value of the currency field you added and the
base currency. For additional information on using the Currency field, see here.
Power platform App in a Day Common Data Service for Apps
13 | P a g e ©2018 Microsoft Corporation
3. Enter Device Price for Description, 0 for Minimum Value, 5000 for Maximum Value, and click Done.
4. Click Add Field again.
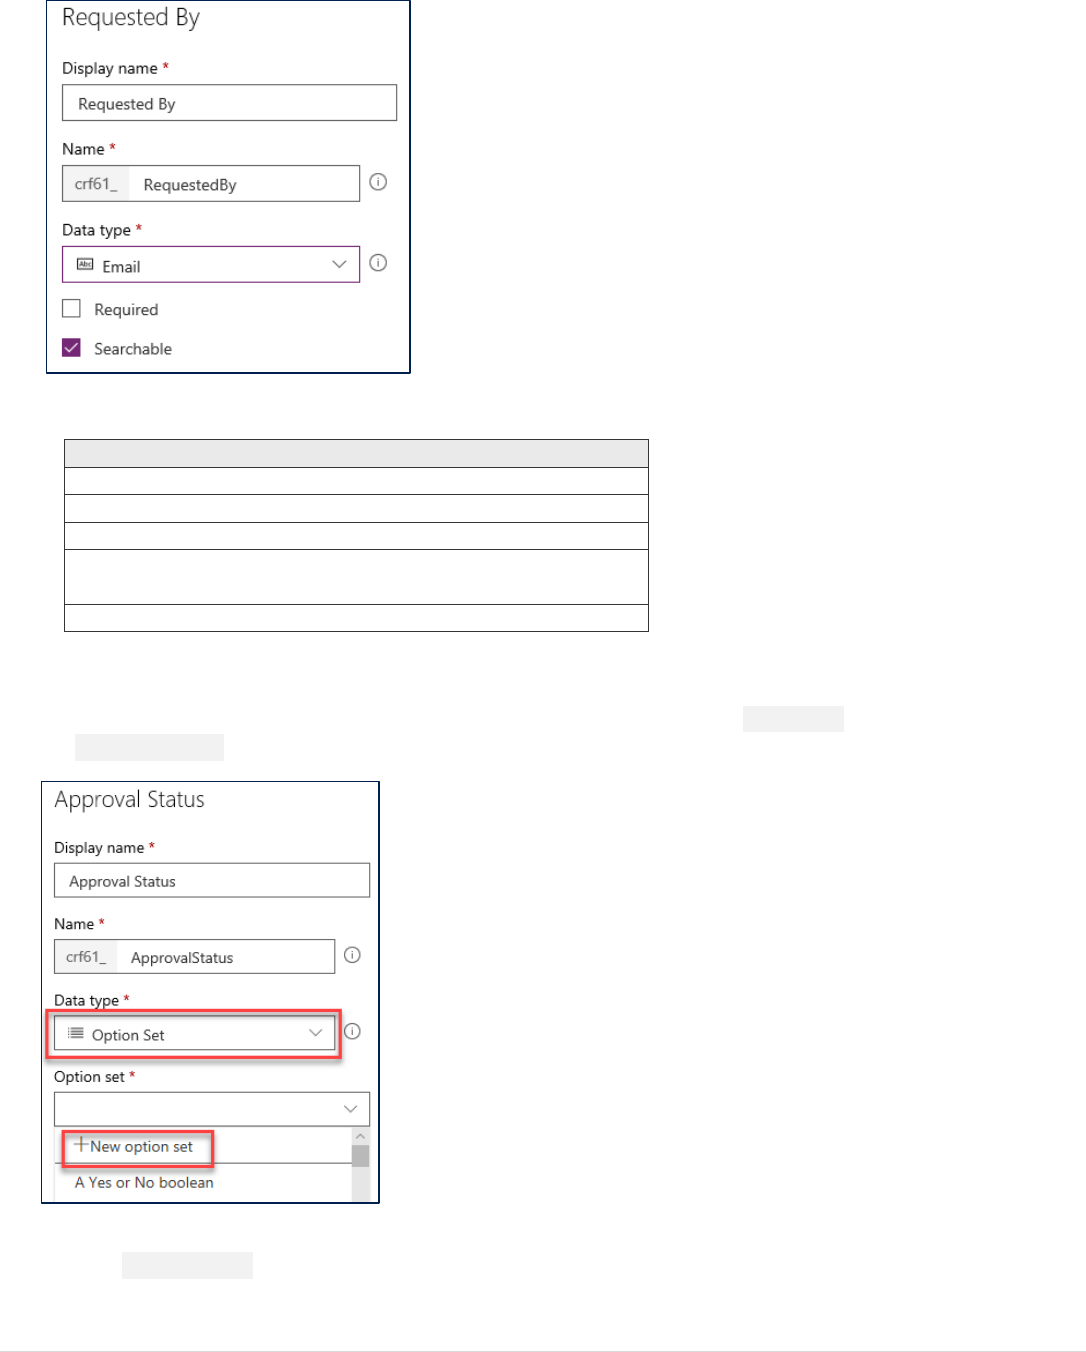
5. Enter Requested By for Display Name, RequestedBy for Name, Email for Data type, make the field Searchable
and click Done.
Power platform App in a Day Common Data Service for Apps
©2018 Microsoft Corporation 14 | P a g e
6. Now repeat the Add Field process and add the following fields
Display Name
Name
Type
Request Date
RequestDate
Date Only
Approver
Approver
Email
Comments
Comments
Multiline Text
Estimated Ship
Date
EstimatedShipDate
Date Only
Approved Date
ApprovedDate
Date Only
7. Now we are going to create the Approval Option Set. Click Add Field.
8. Enter Approval Status for Display Name, ApprovalStatus for Name, select Option Set for Data type, and select
New Option Set for Option Set.
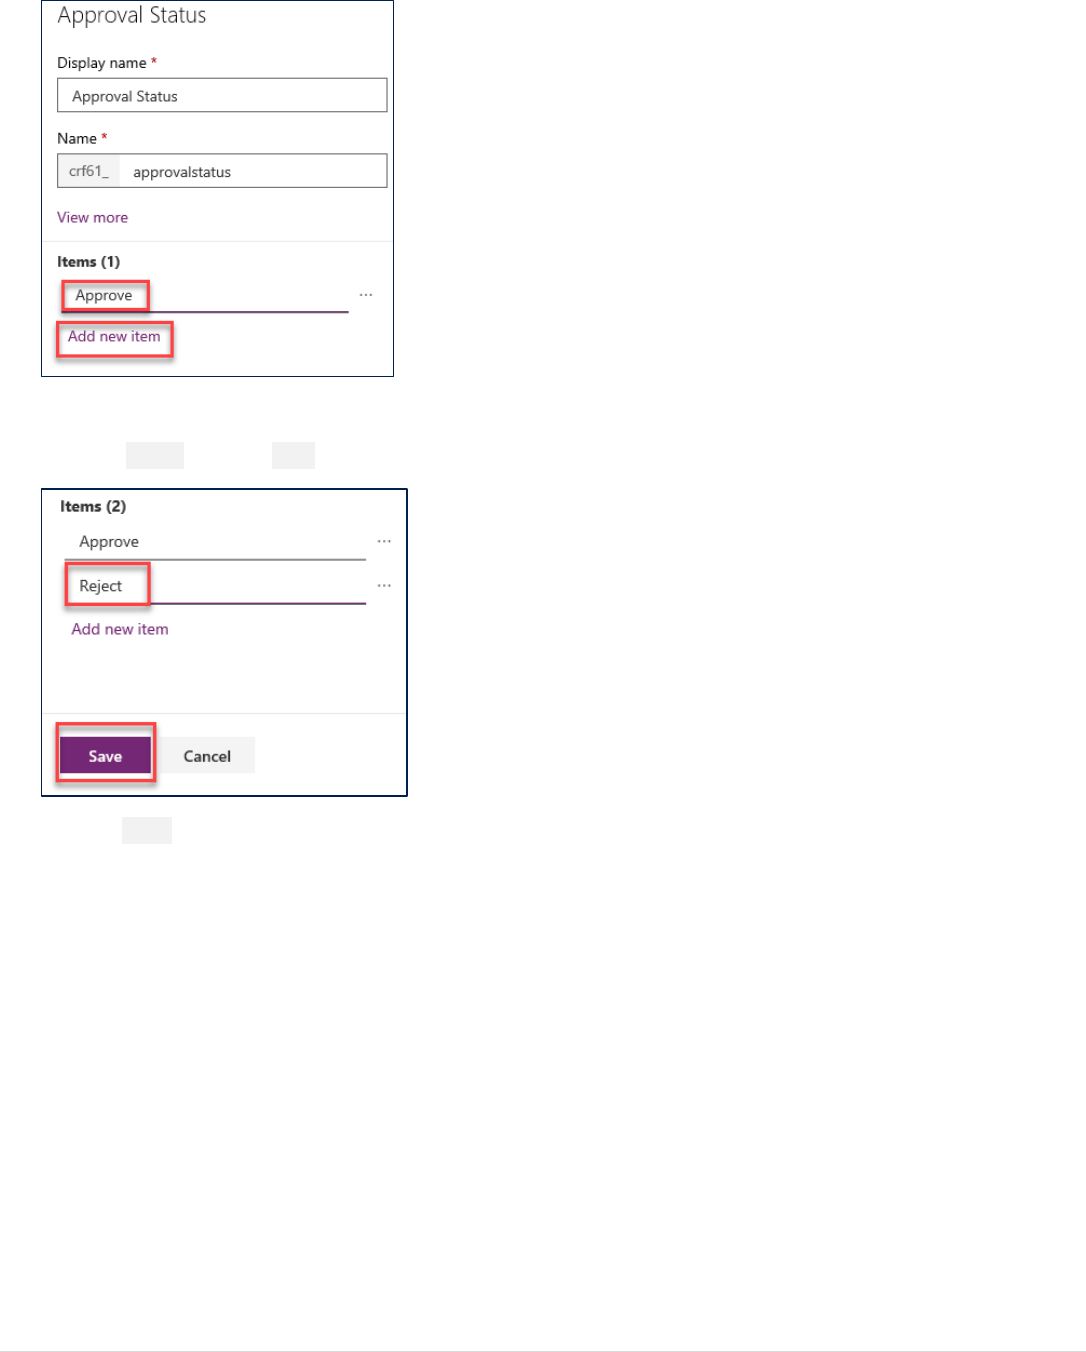
9. Change the New Item label to Approve
10. Click Add new item.
Power platform App in a Day Common Data Service for Apps
15 | P a g e ©2018 Microsoft Corporation
11. Enter Reject and click Save.
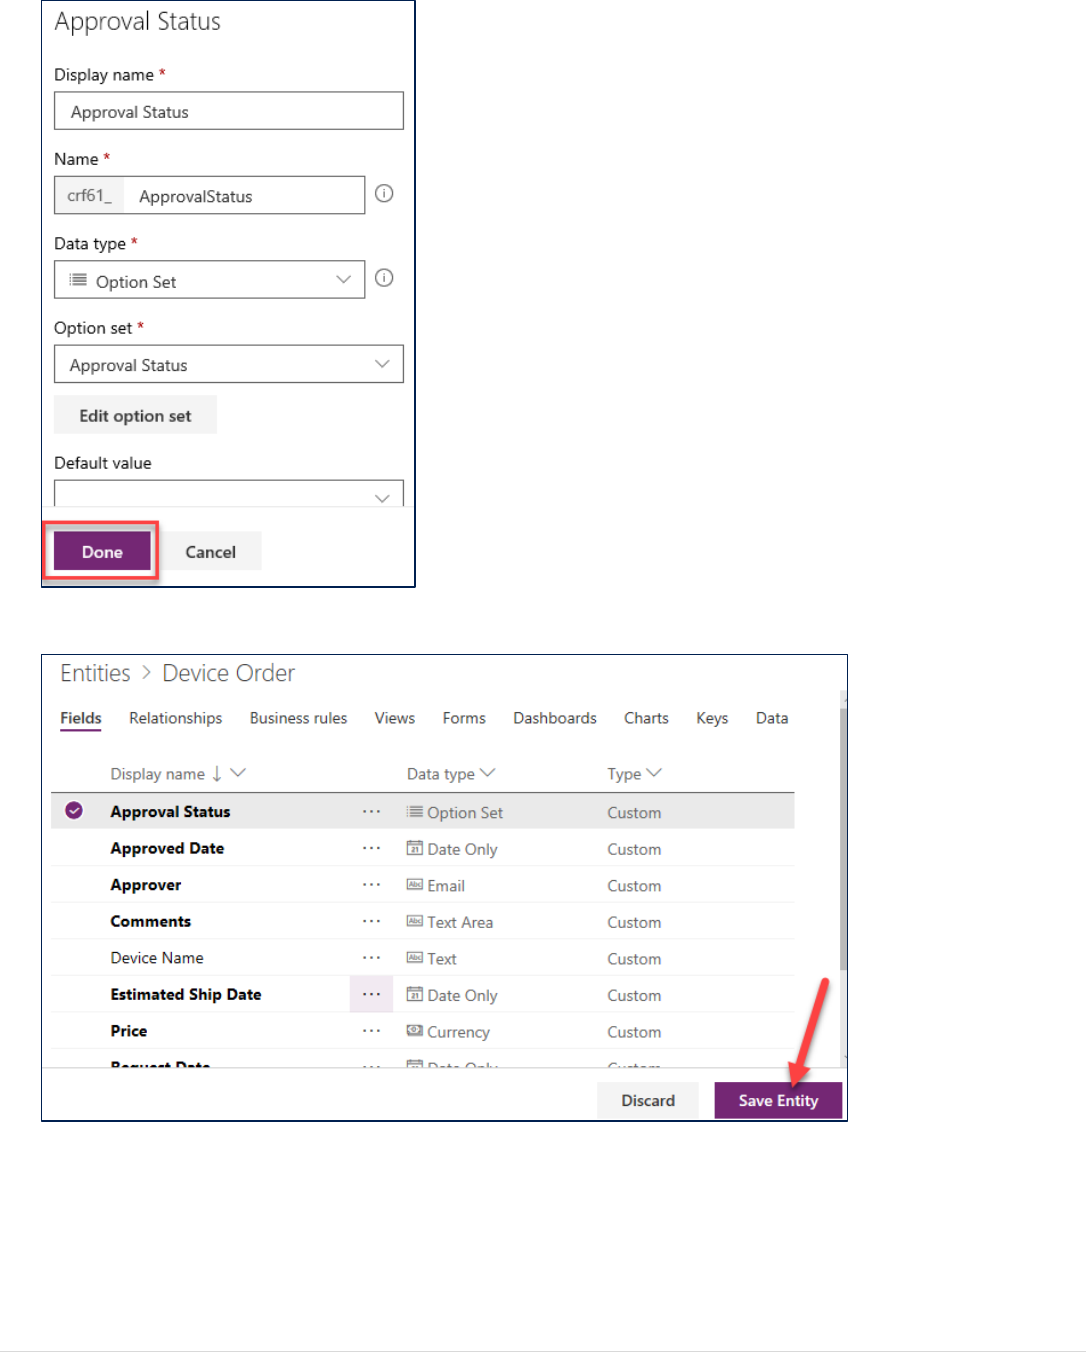
12. Click Done.
Power platform App in a Day Common Data Service for Apps
©2018 Microsoft Corporation 16 | P a g e
13. Click Save Entity.
Power platform App in a Day Common Data Service for Apps
17 | P a g e ©2018 Microsoft Corporation
Task 3: Create a calculated field
In this task, you will add a Department Contribution field and set its value to 10% of the price. In our scenario, this is the
amount that will come from the department managers budget. Calculated fields are special fields that automatically
perform the calculation when the data is retrieved. When you create or modify a calculated field you can set the formula
used in the calculation.
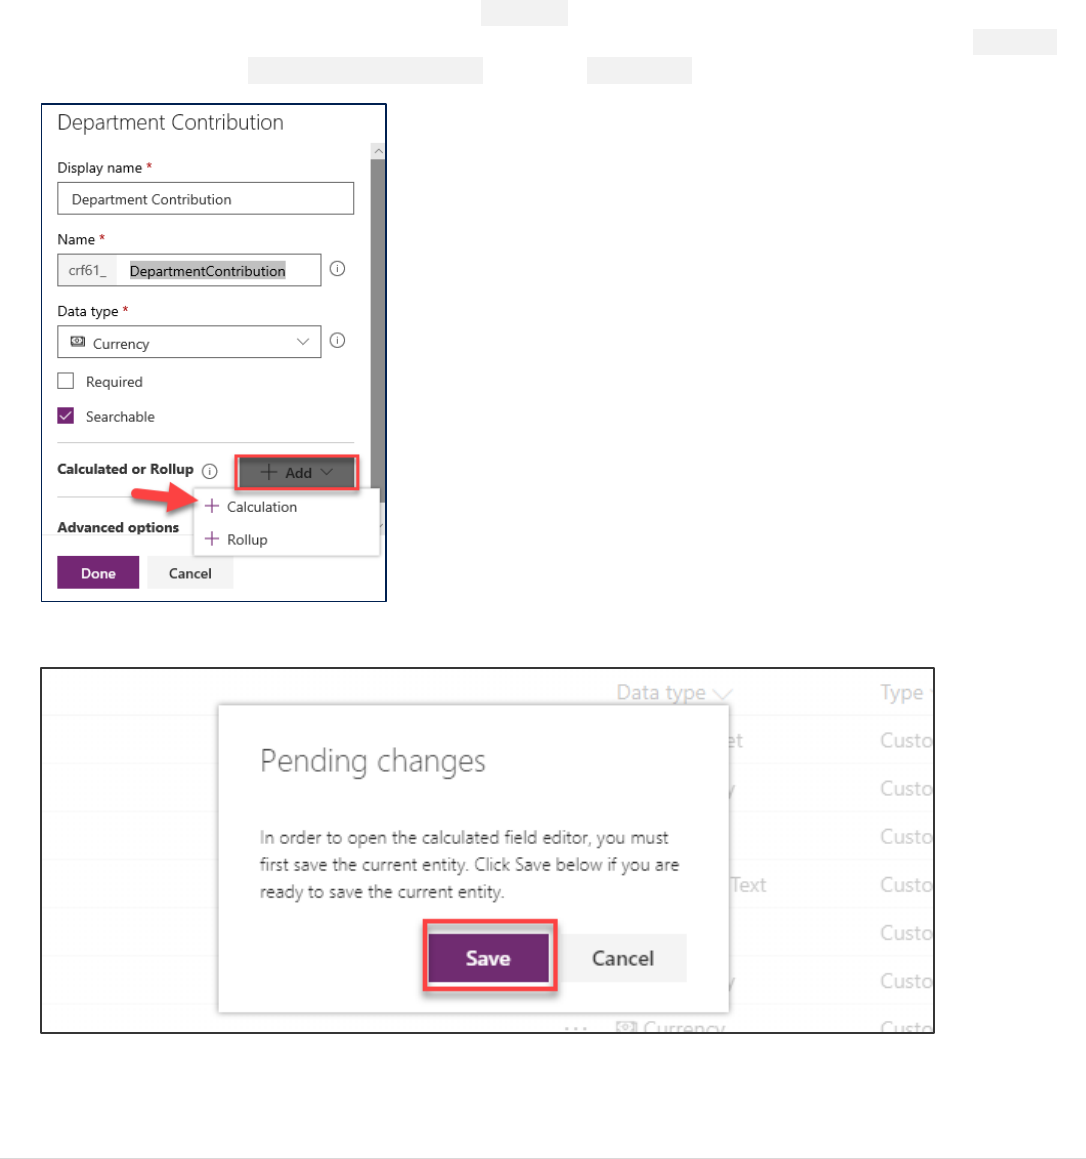
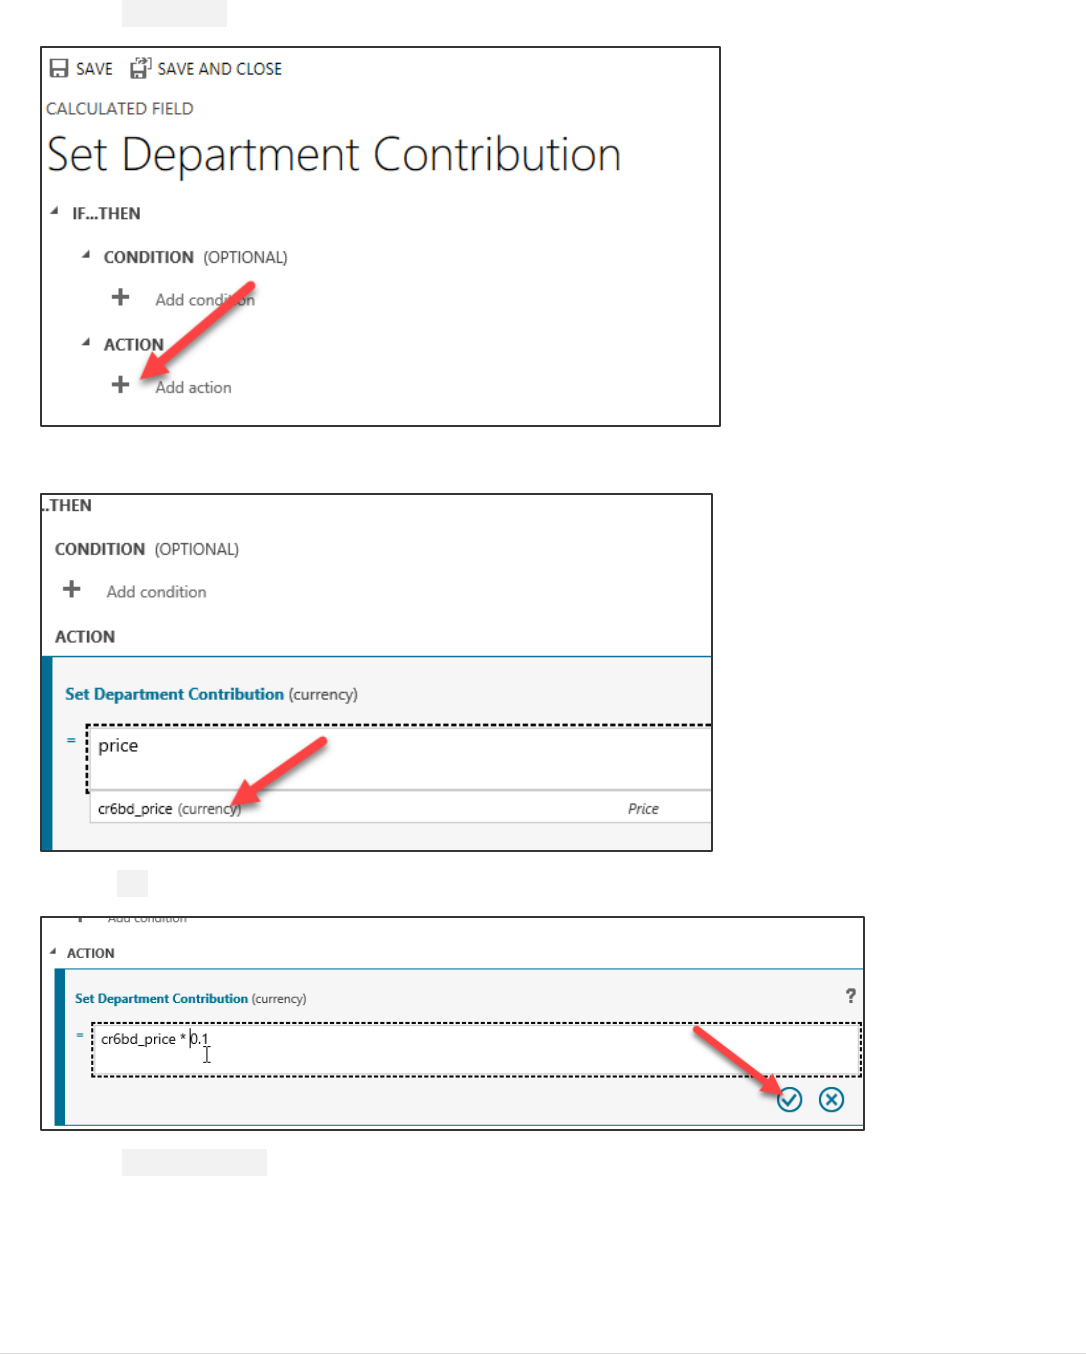
1. In the upper left corner of the screen, click on Add field to add fields to your custom entity.
2. Enter Department Contribution for Display Name, enter DepartmentContribution for Name, select Currency
for Data Type, click Add Calculated or Rollup, and select Calculation.
3. Click Save.
Power platform App in a Day Common Data Service for Apps
©2018 Microsoft Corporation 18 | P a g e
1. Click Add Action.
2. Type price and select the Price field you created.
3. Add * .1 and click the Check Mark button.
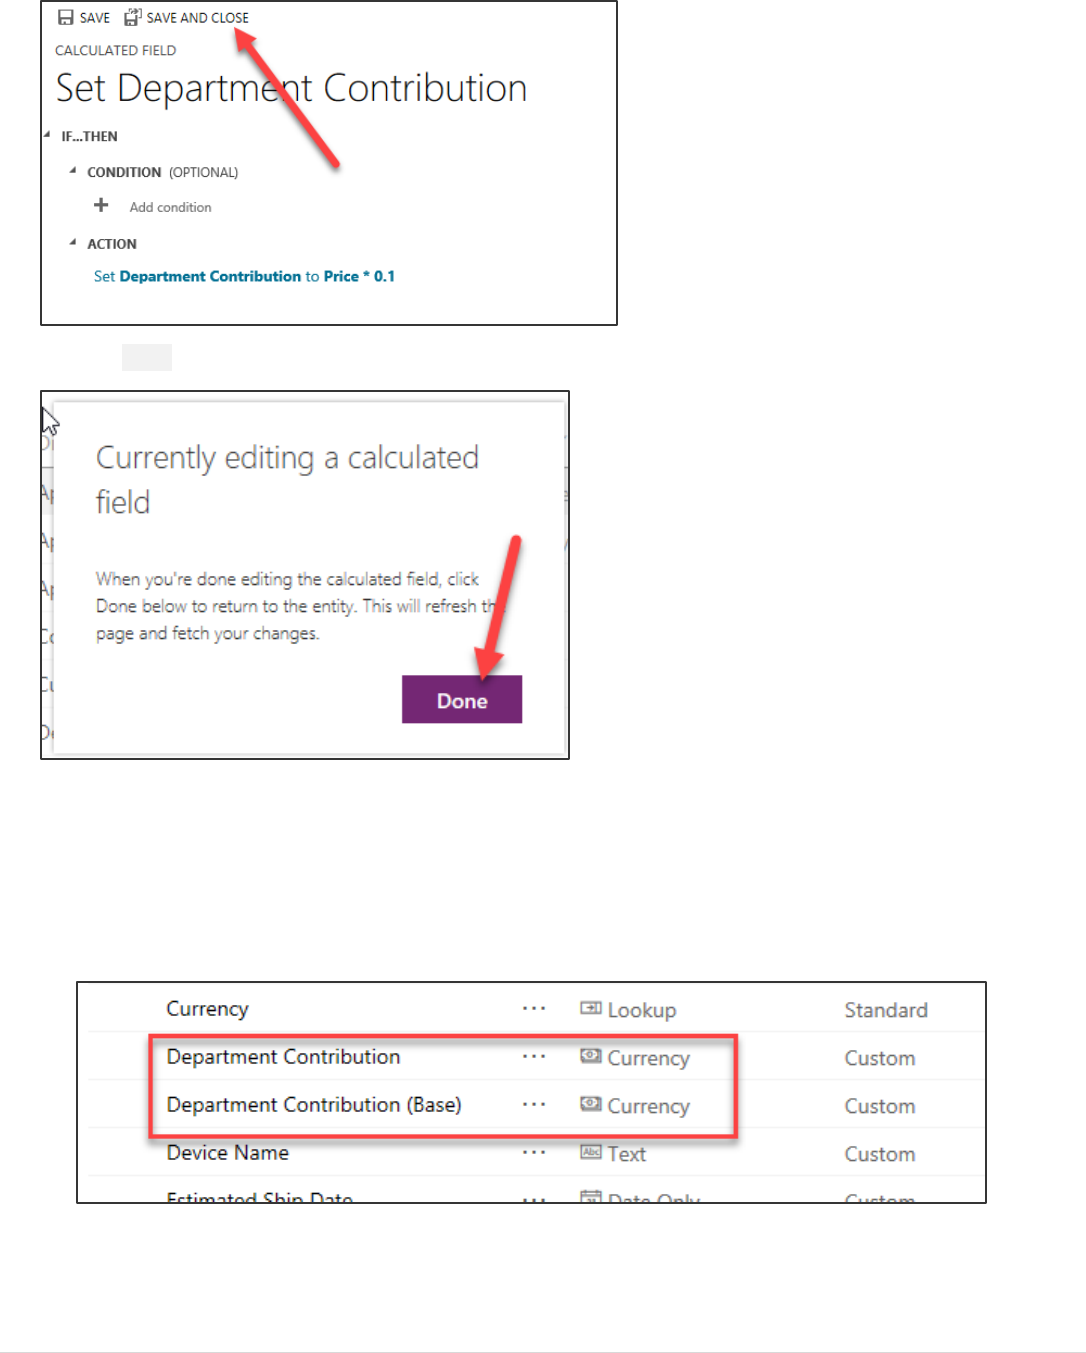
4. Click Save and Close.
Power platform App in a Day Common Data Service for Apps
19 | P a g e ©2018 Microsoft Corporation
5. Click Done.
Note on currency fields: You might notice that there are two Department Contribution fields one with (base) next
to it. Currency fields in CDS store the base currency value (this is the configured default currency for the
environment) and the transaction currency (this can be selected on a record by record basis) to allow support for
multi-currency transactions. Generally, want to make sure to pick the field with out the (base) in the name. The
(base) value is commonly used in reporting where you want to normalize multiple currencies to allow reporting on
them in the base currency value.
Power platform App in a Day Common Data Service for Apps
©2018 Microsoft Corporation 20 | P a g e
Task 4: Create a business rule
In this task, you will create a Business Rule that will set the Estimated Delivery Date to 14 days after approval of the order.
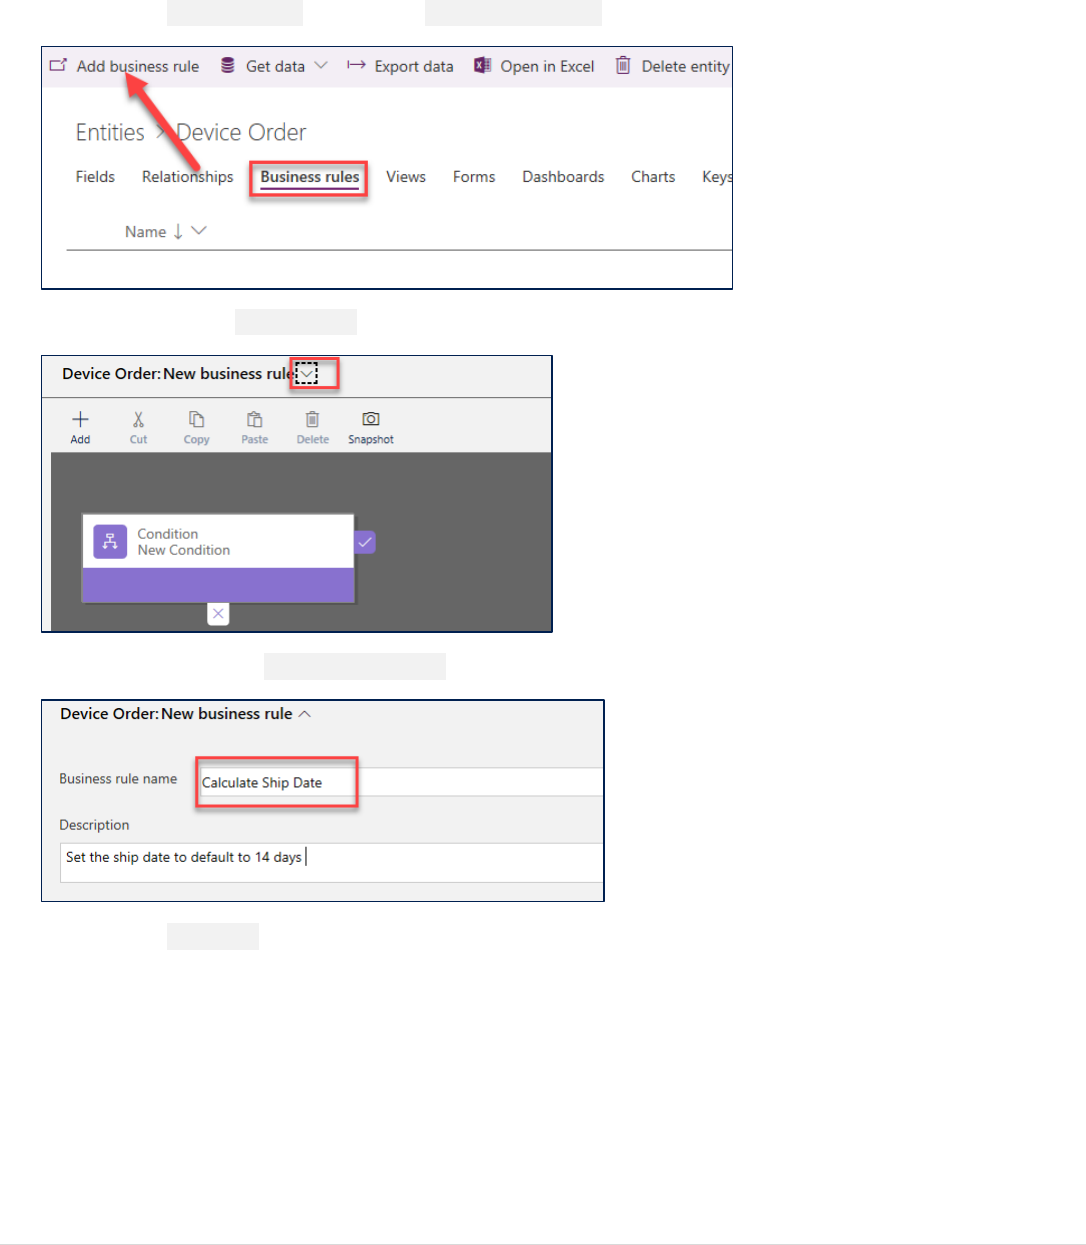
1. Select the Business Rules tab and click Add Business Rule.
2. Click the arrow to Show Details.
3. Change the Name to Calculate Ship Date and click the arrow to Hide Details.
4. Select the Condition, change the name to Check Ship Date.

Power platform App in a Day Common Data Service for Apps
21 | P a g e ©2018 Microsoft Corporation
5. In the Rule 1 section select Entity for Source, Approved Date for Field, Contains Data for Operator and click
Apply.
Note: You may need to scroll down to the bottom of all scroll bars to see the Apply button. You must click Apply after any
change to the properties otherwise they will revert to the prior value. The Business Rule (Text View) will automatically update
after you hit apply when you are done modifying the rule.
Power platform App in a Day Common Data Service for Apps
©2018 Microsoft Corporation 22 | P a g e
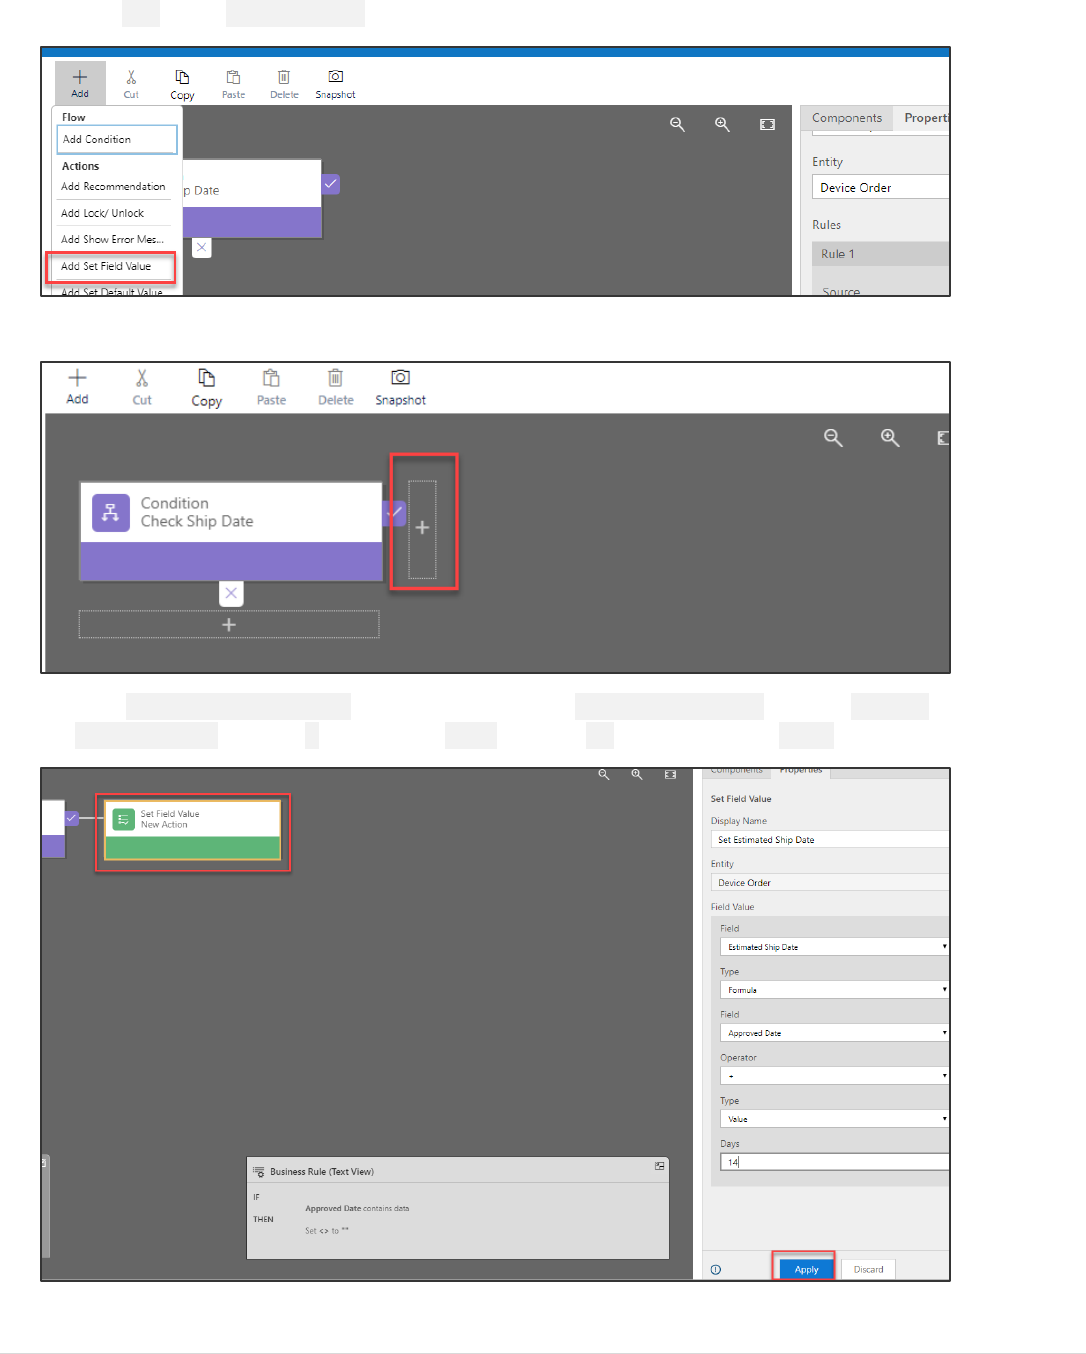
6. Click Add, select Set Field Value.
7. Select the True side of the condition.
8. Enter Set Estimated Ship Date for Display Name, select Estimated Ship Date for Field, Formula for Type,
Approved Date for Field, + for Operator, Value for Type, 14 for Days, and click Apply.
Power platform App in a Day Common Data Service for Apps
23 | P a g e ©2018 Microsoft Corporation
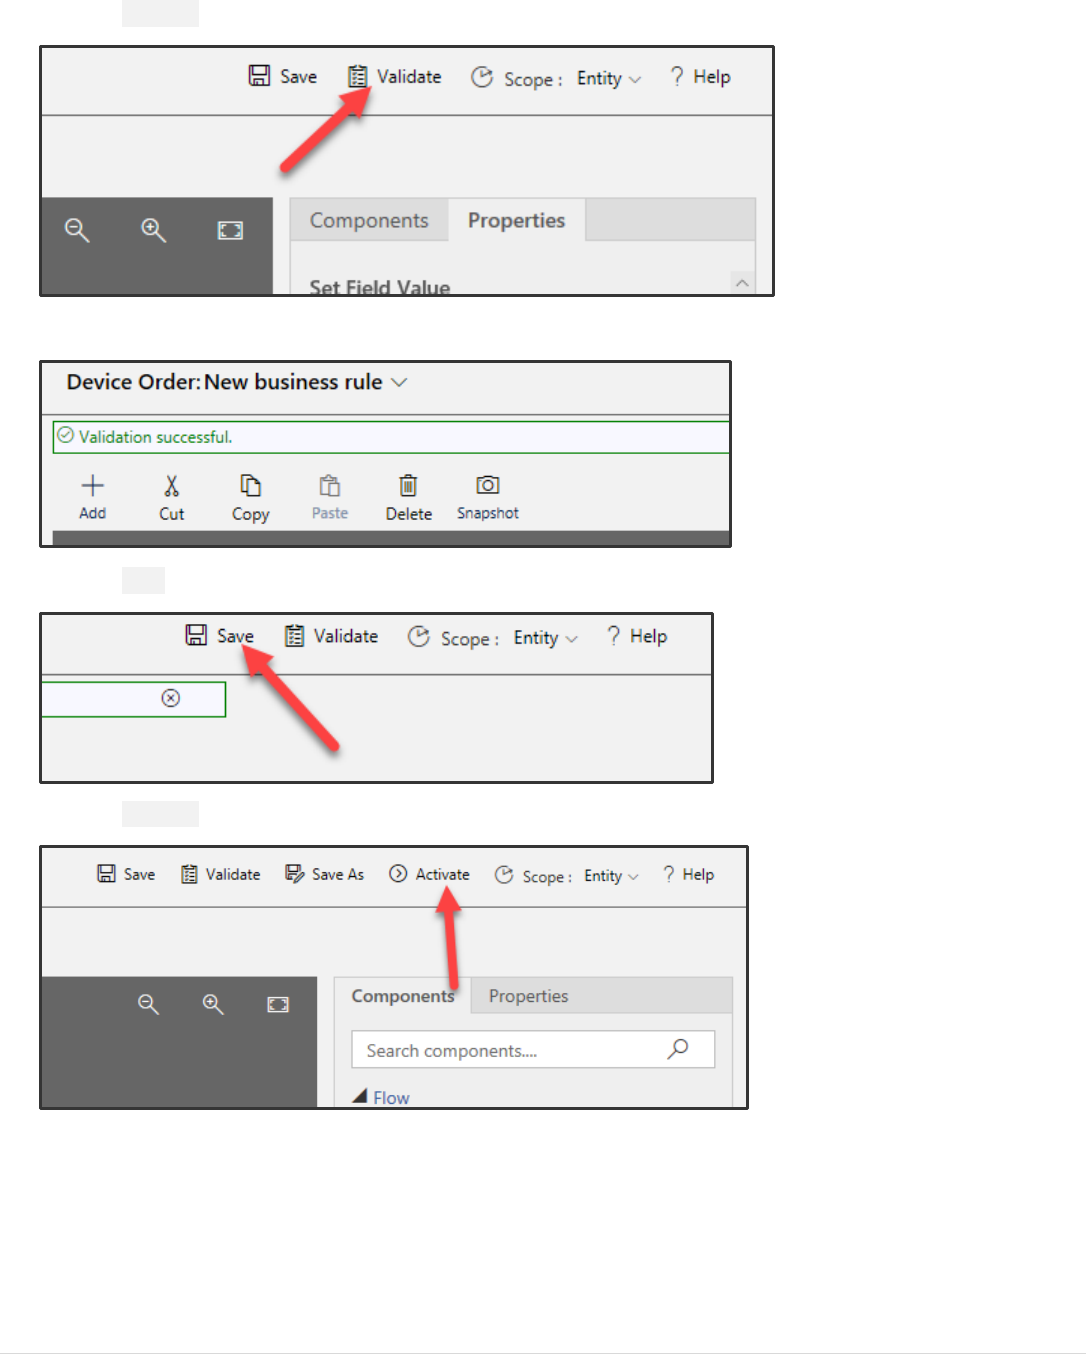
9. Click Validate.
10. Make sure validation succeeds.
11. Click Save.
12. Click Activate.
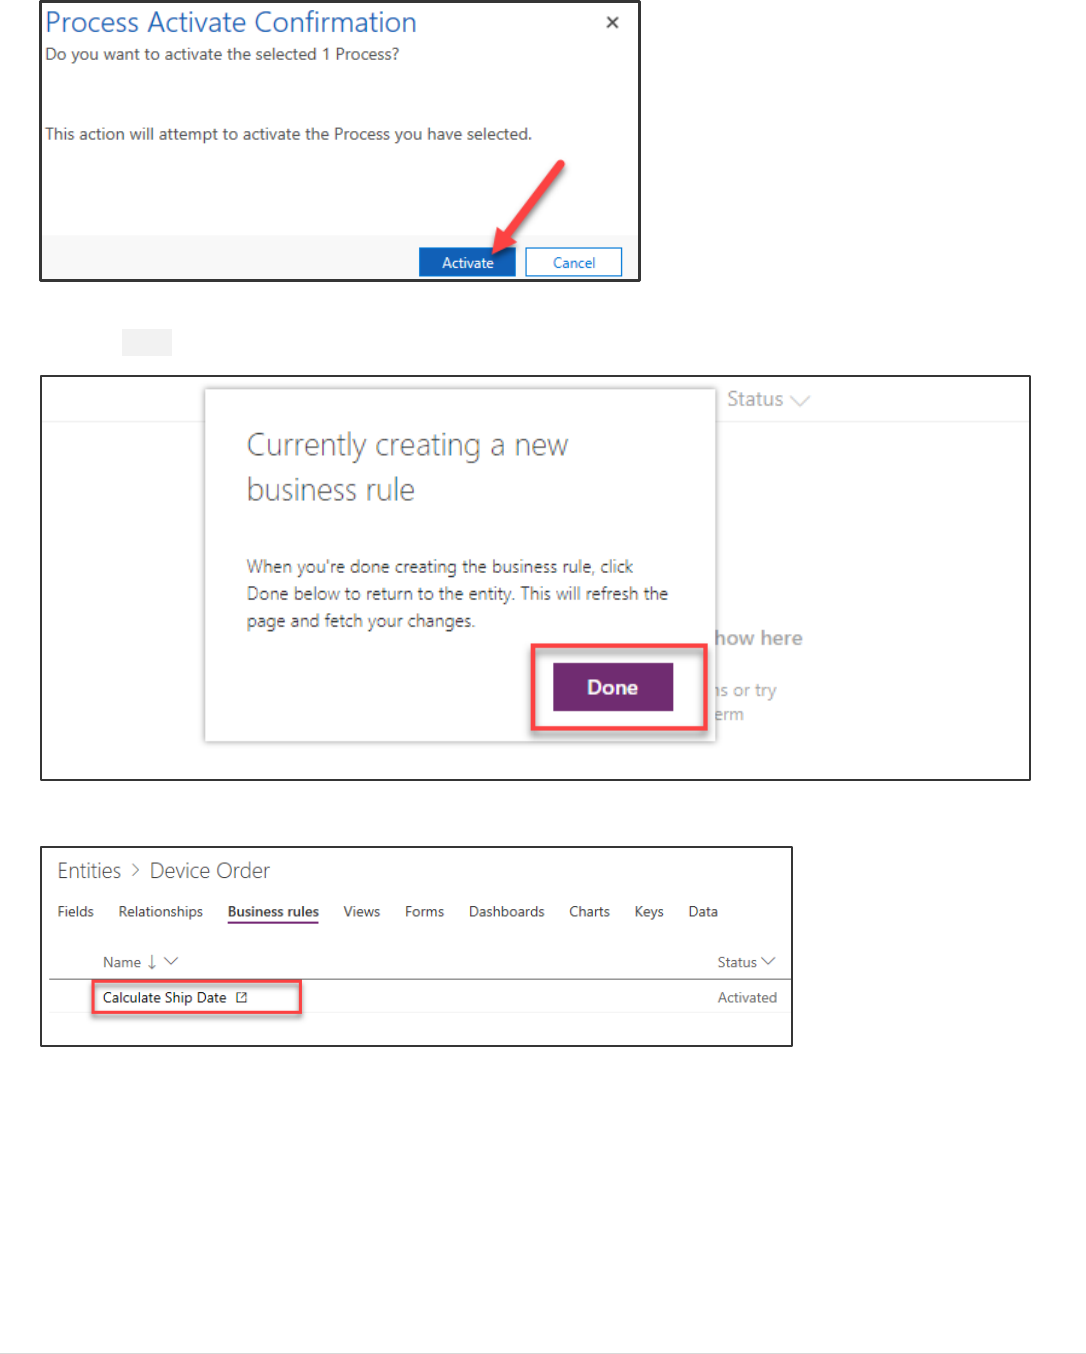
13. Confirm activation. Business rules only execute when they are activated. In the future to make changes to rules
you deactivate them, make the change, and then re-activate the rule.
Power platform App in a Day Common Data Service for Apps
©2018 Microsoft Corporation 24 | P a g e
14. Close the process editor browser window or tab.
15. Click Done. The list should refresh showing the Business Rule you just created.
16. Your Common Data Service will have one Business Rule.
Power platform App in a Day Common Data Service for Apps
25 | P a g e ©2018 Microsoft Corporation
Exercise 3: Connect the data from the Canvas
App
Now that you have created the entity to store device order requests let’s connect your Device Ordering Canvas app to this
entity and add a form to submit device approval requests.
Task 1: Add CDS entity as a data source to the app
Open the device ordering app. Make sure you are opening the version of the app that is in the newly created environment
that has the CDS database instance.
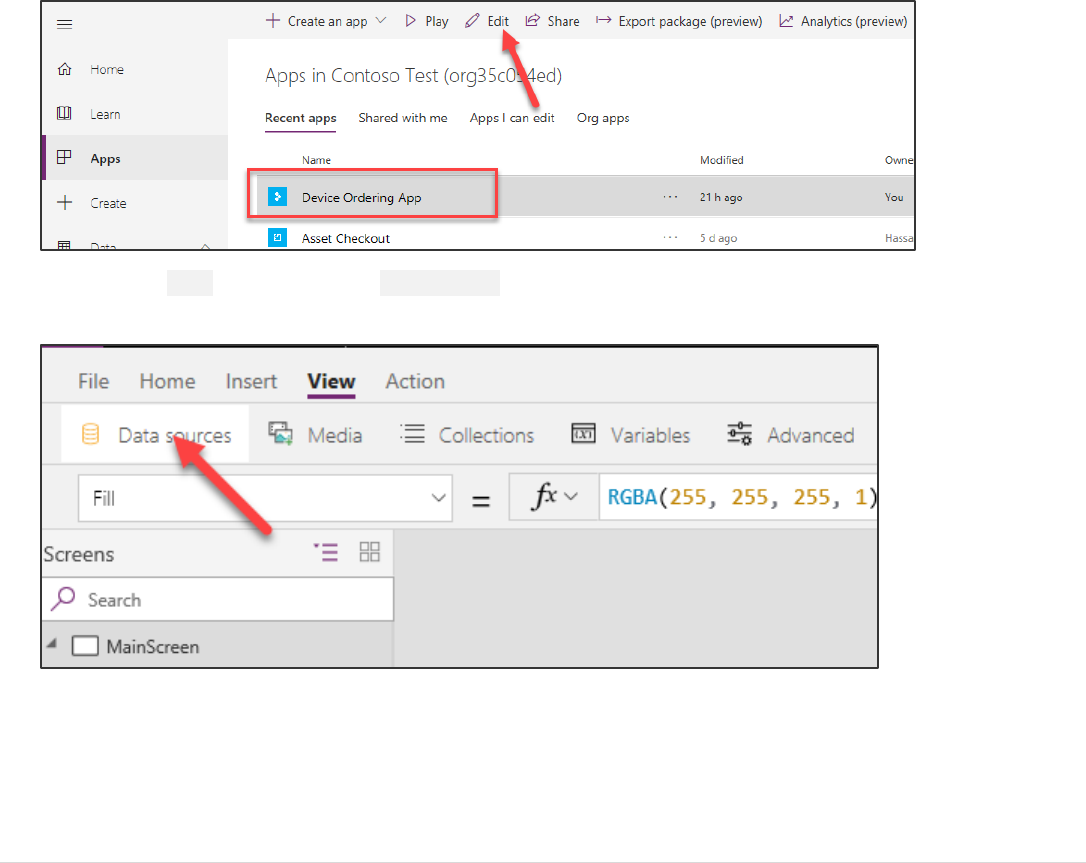
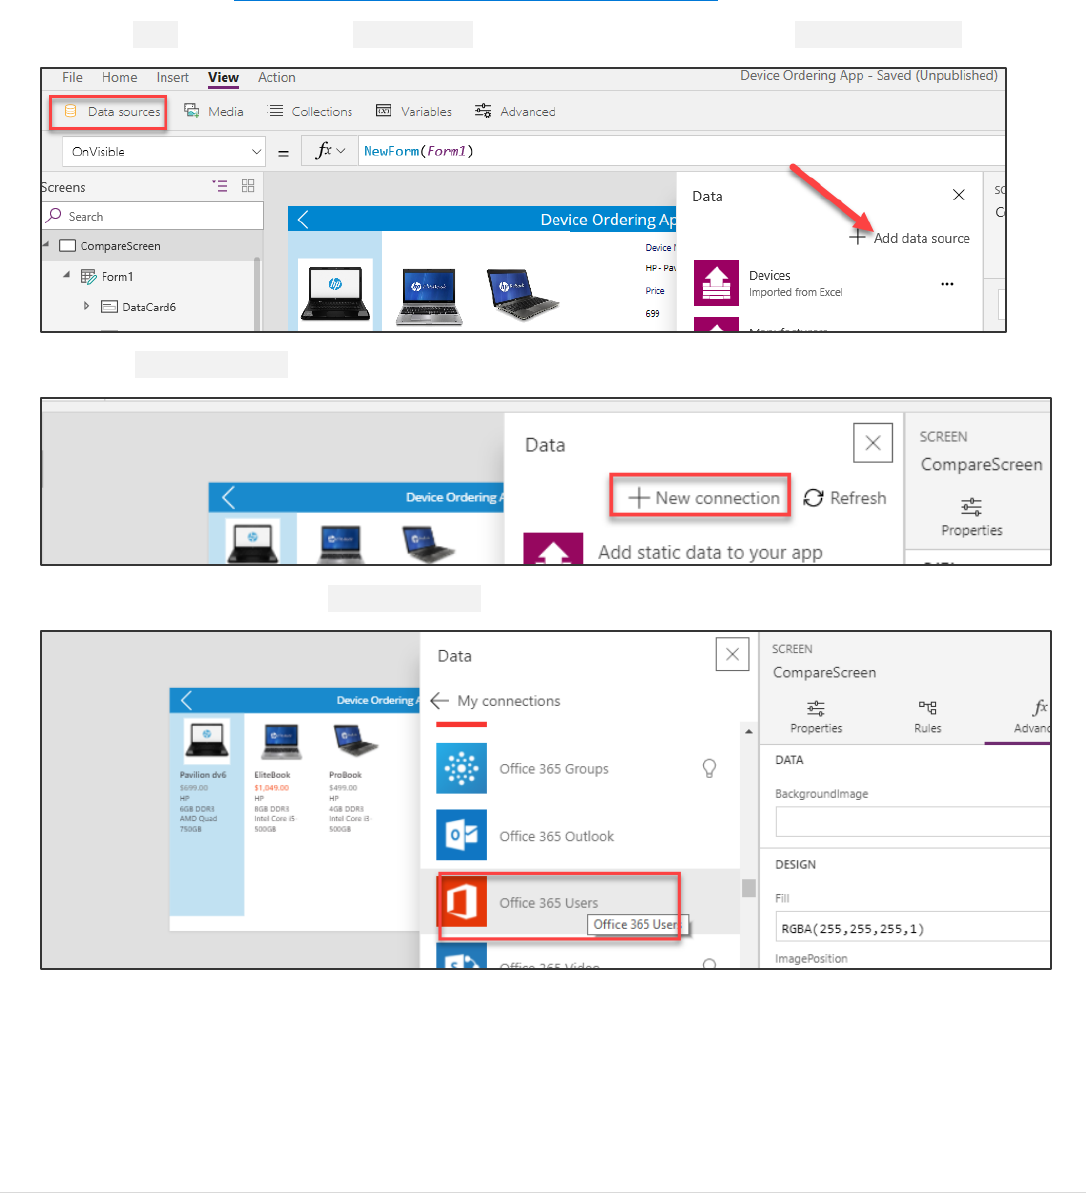
1. Navigate to the Device Order App you created in Module 1, select the App and click Edit.
2. Select the View tab and then click Data sources to display the Data sources property pane to the right of the
canvas.
Power platform App in a Day Common Data Service for Apps
©2018 Microsoft Corporation 26 | P a g e
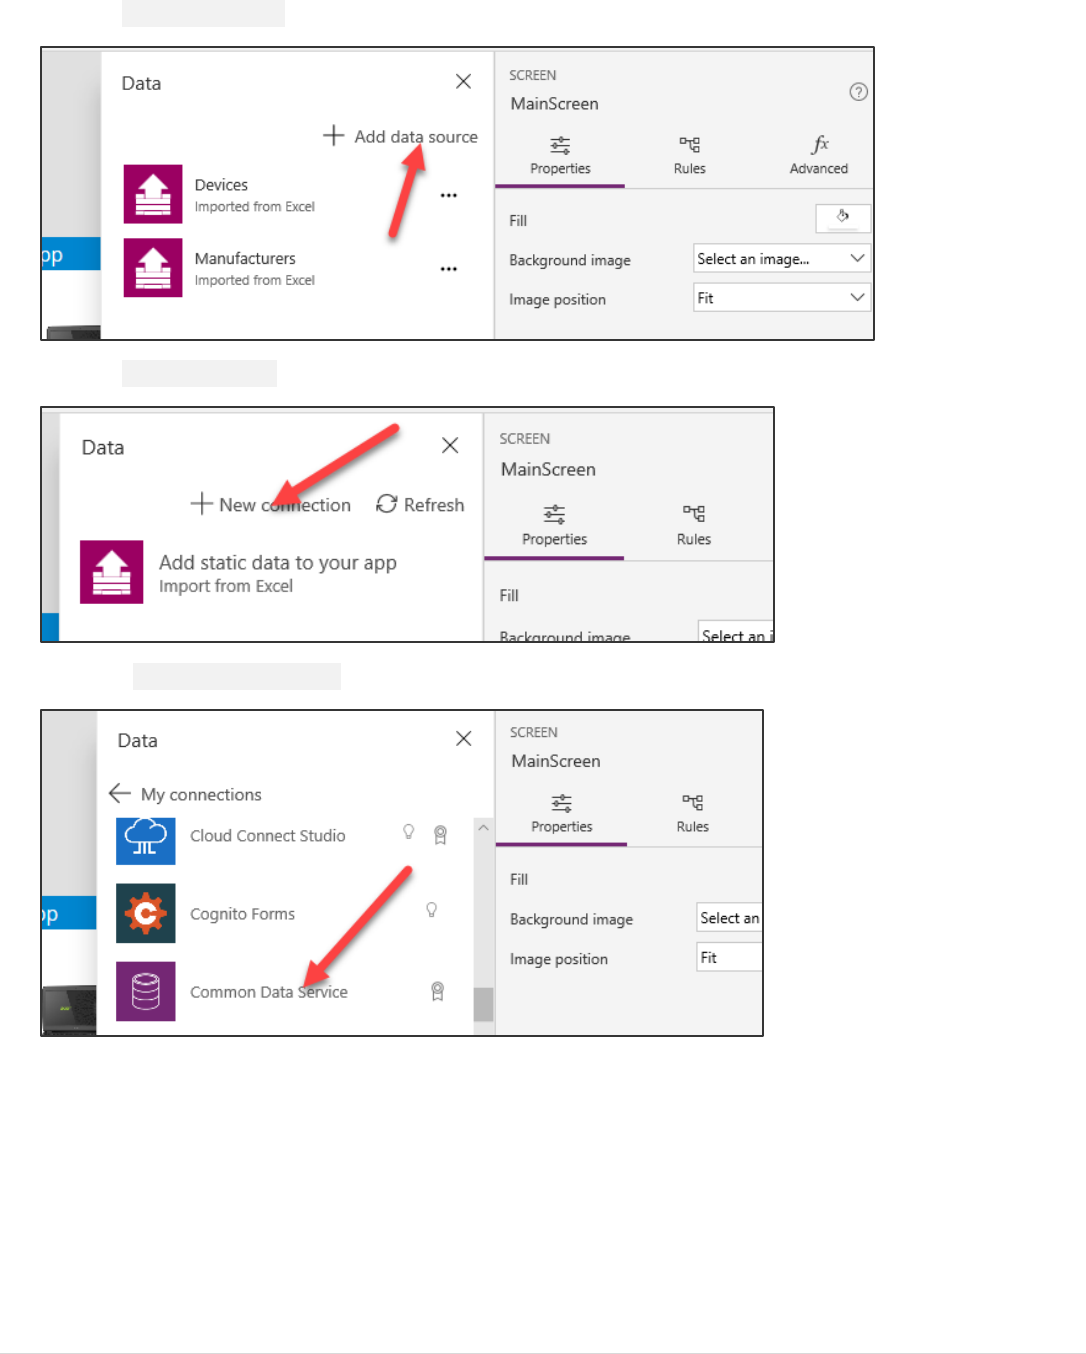
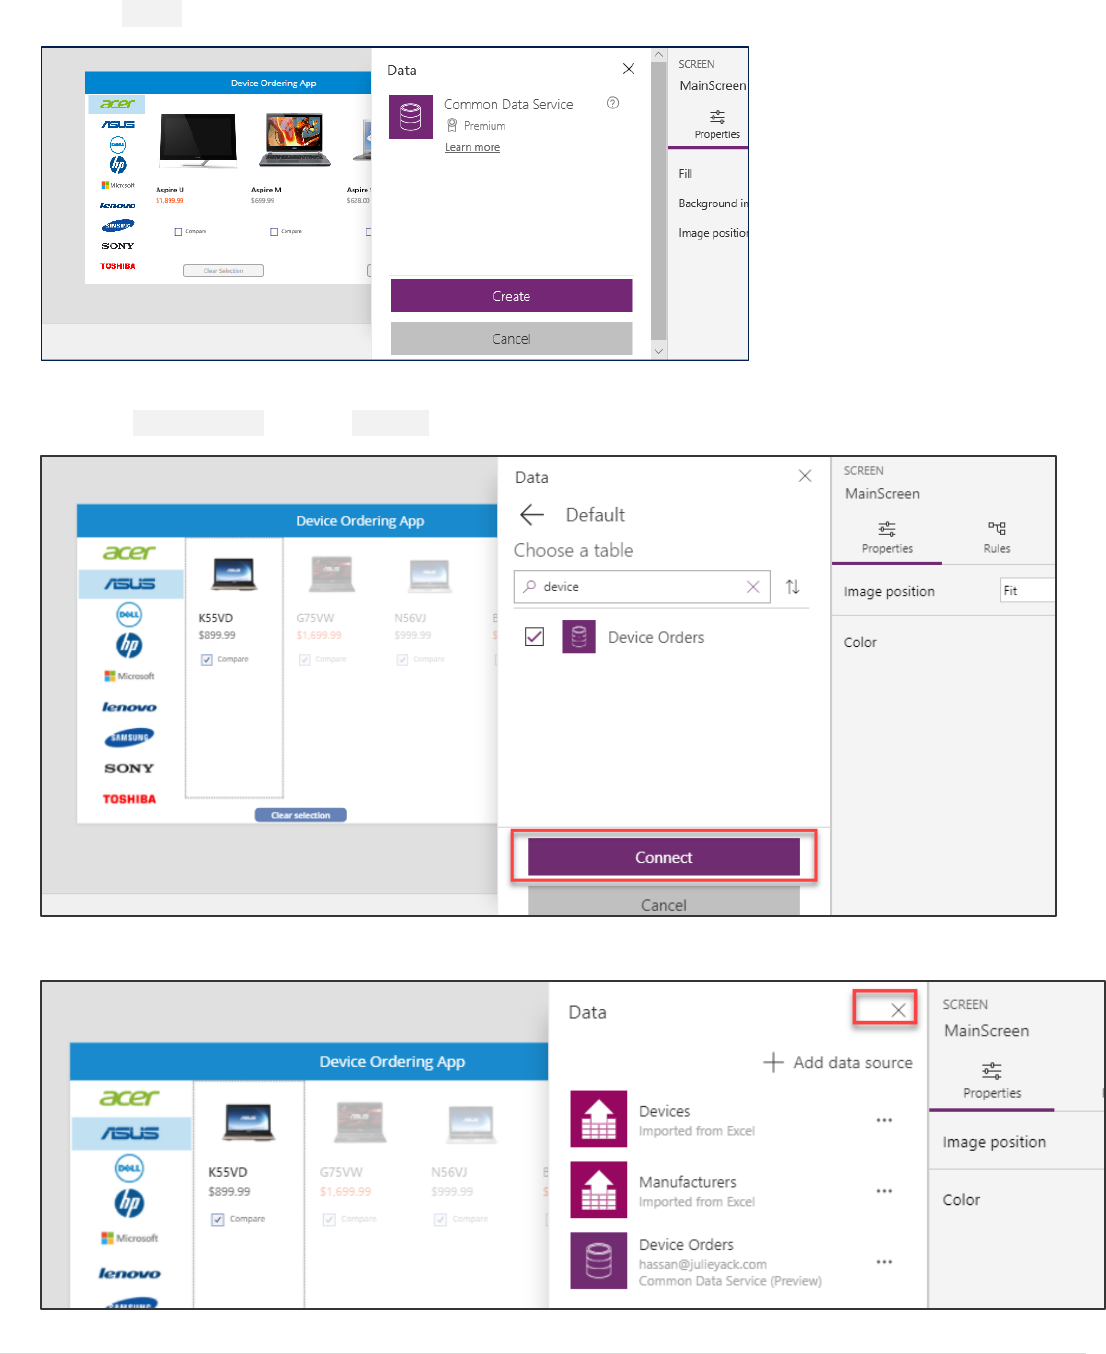
3. Click Add Data Source.
4. Click New Connection.
5. Select Common Data Service. Double check that you *did not* choose the “experimental” connector.
Power platform App in a Day Common Data Service for Apps
27 | P a g e ©2018 Microsoft Corporation
6. Click Create.
7. Type device in the search text box, this will filter the list of all entities down to just those that contain device.
Select Device Orders and click Connect.
8. Close the Data pane.
Power platform App in a Day Common Data Service for Apps
©2018 Microsoft Corporation 28 | P a g e
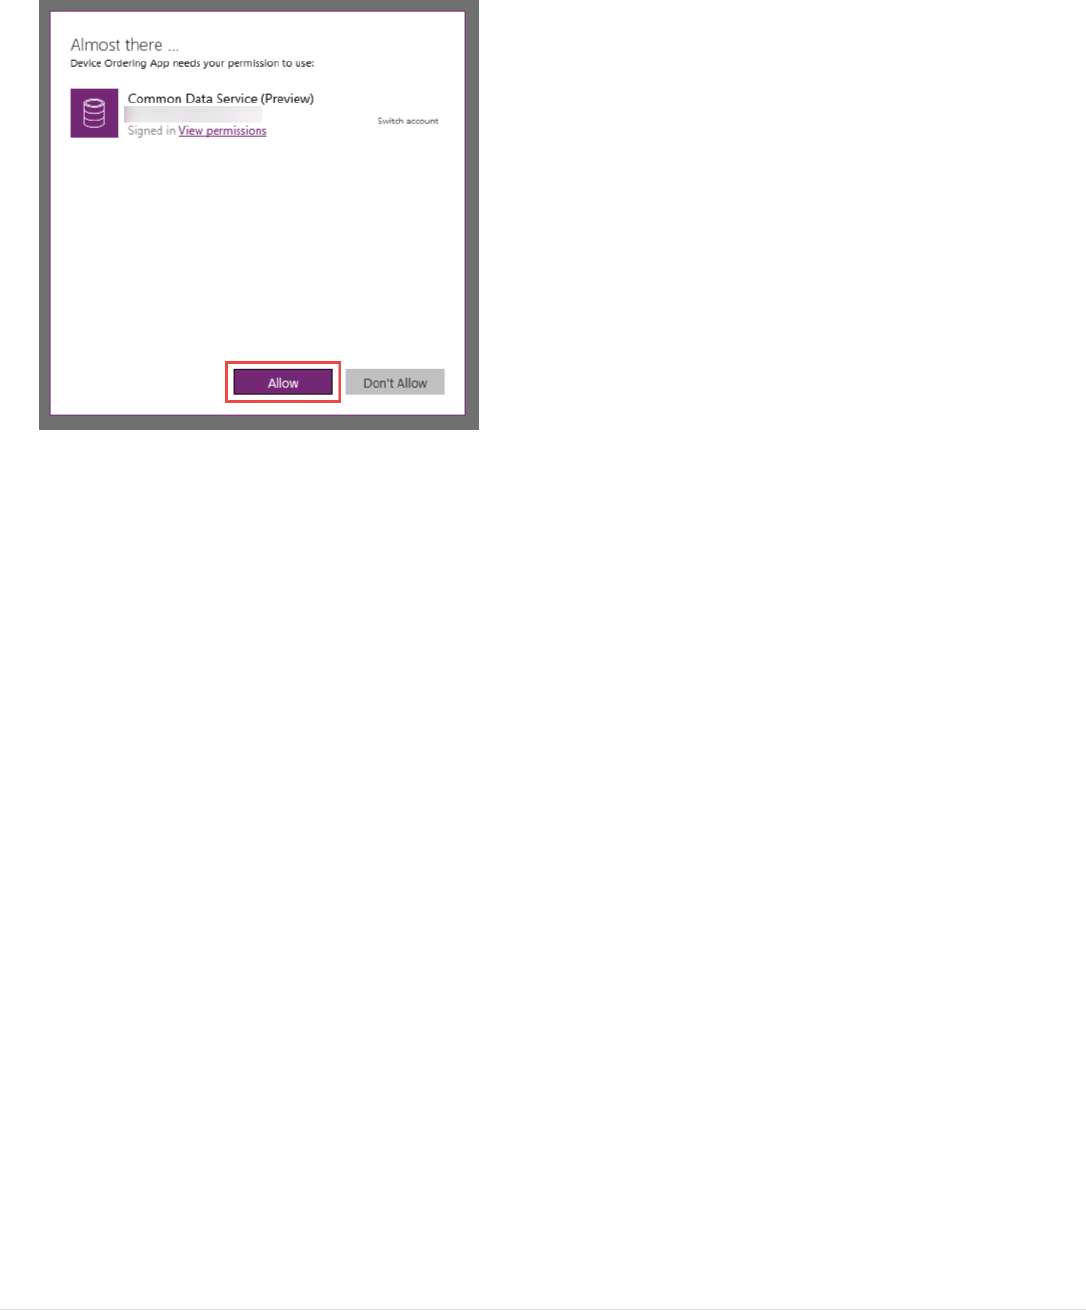
9. If prompted, click Allow to authorize the App to access the Common Data Service.
Power platform App in a Day Common Data Service for Apps
29 | P a g e ©2018 Microsoft Corporation
Task 2: Create the edit form
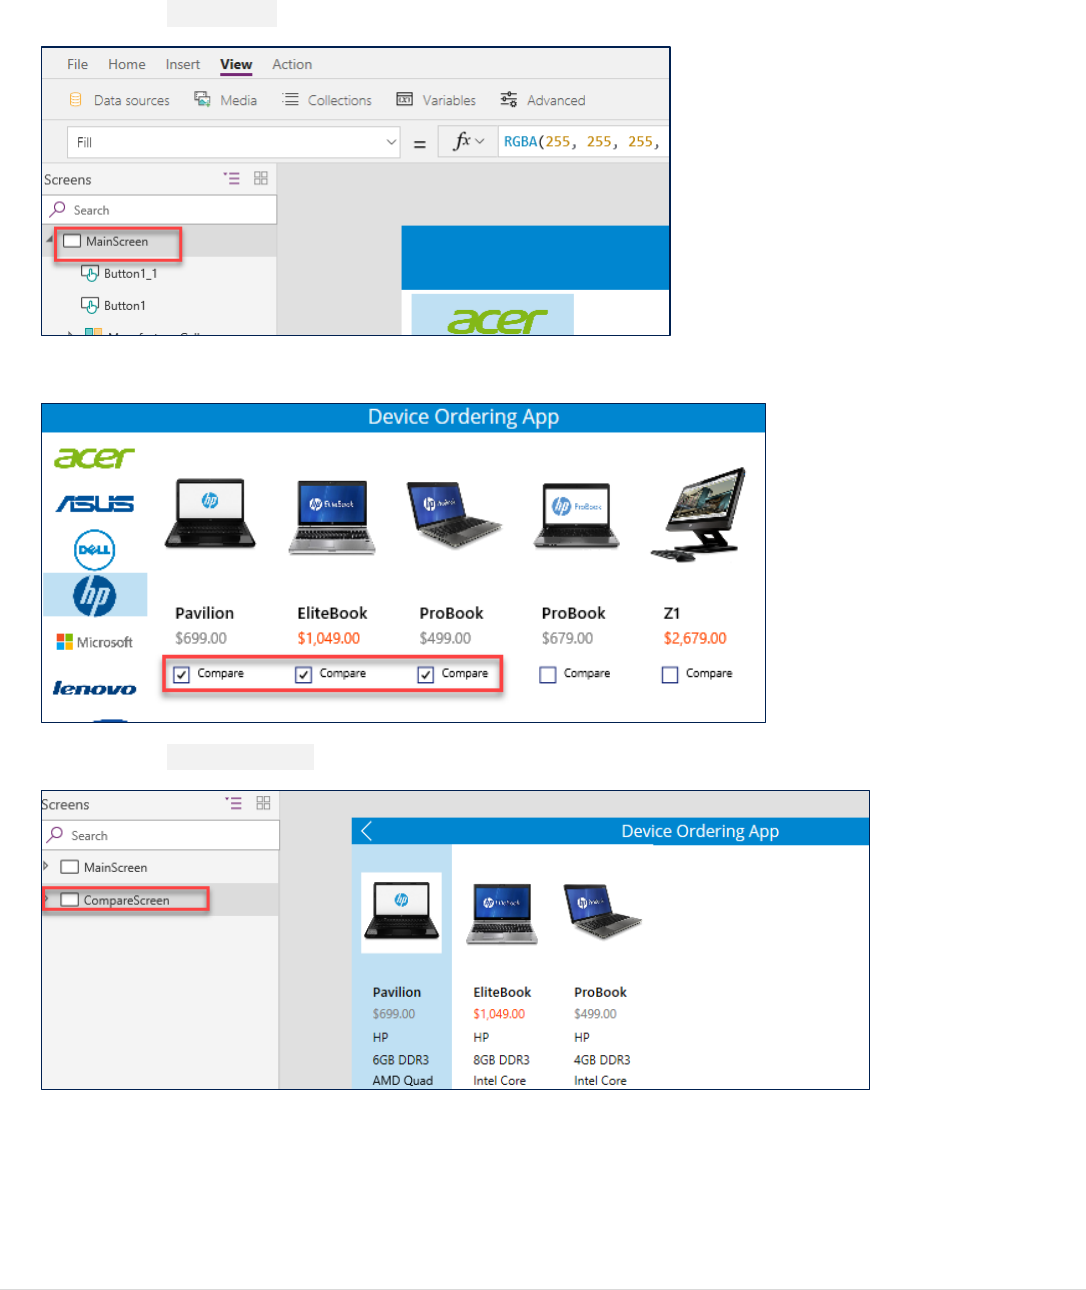
1. Select the MainScreen.
2. Select few devices. Hold the “Alt” key, and then it will allow you to check the compare on the devices
3. Select the CompareScreen. You will now have the selected devices.

Power platform App in a Day Common Data Service for Apps
©2018 Microsoft Corporation 30 | P a g e
4. Select the Insert tab, click Forms, and select Edit.
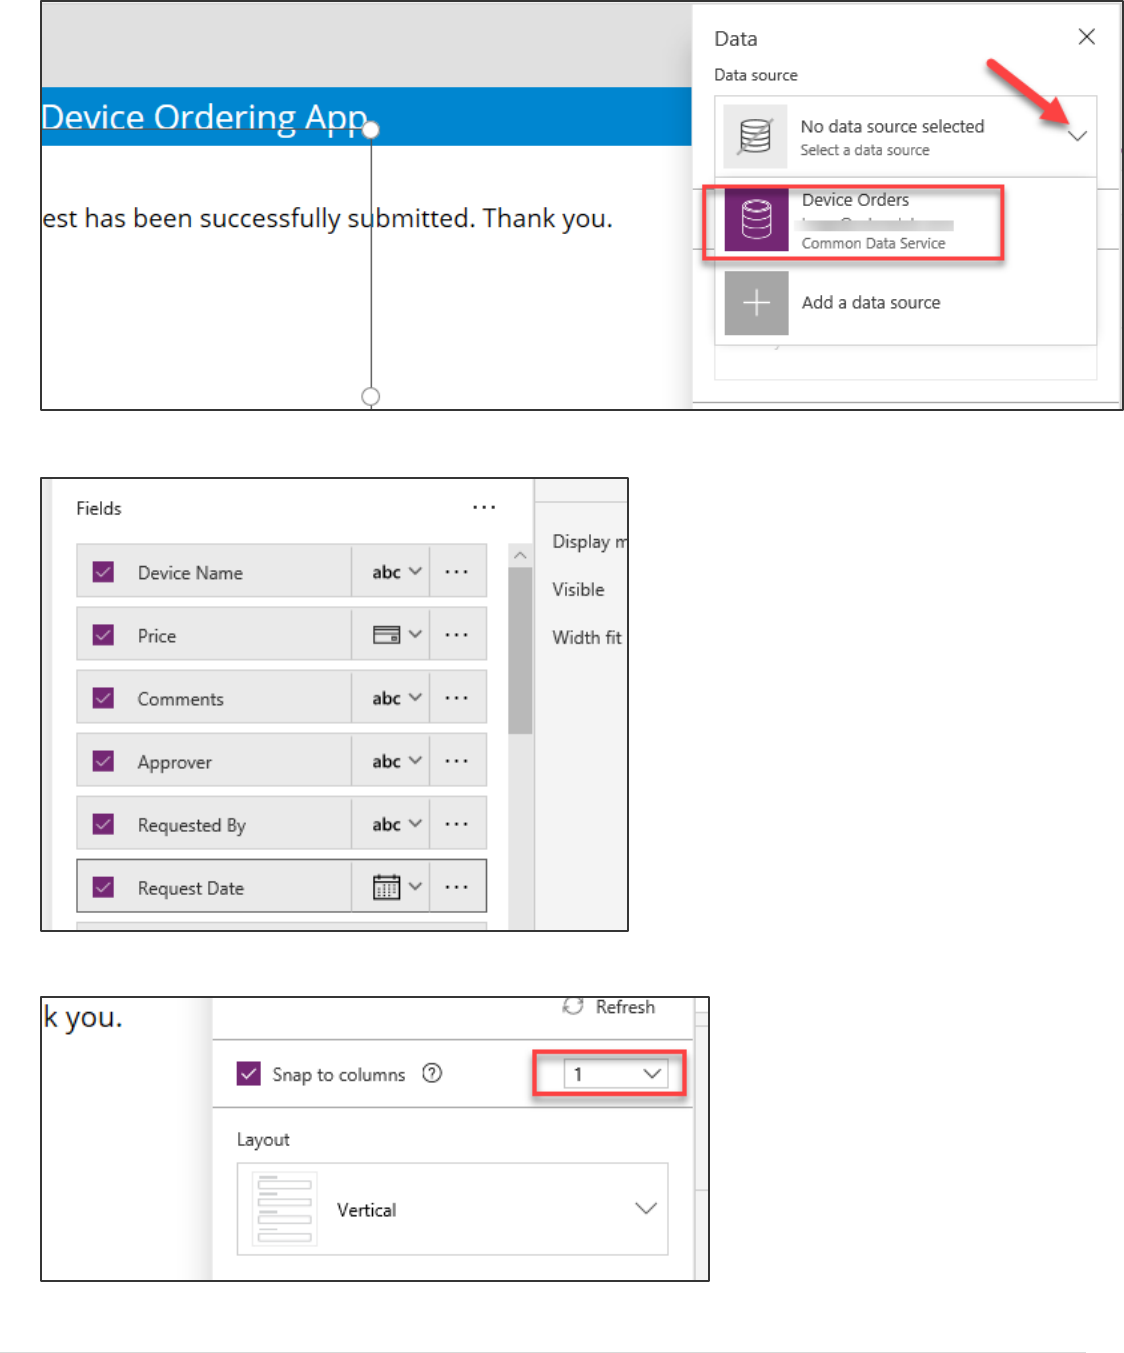
5. Click the Data source drop-down in the Data pane on the right.
6. Select the Device Orders entity as the data source.
Power platform App in a Day Common Data Service for Apps
31 | P a g e ©2018 Microsoft Corporation
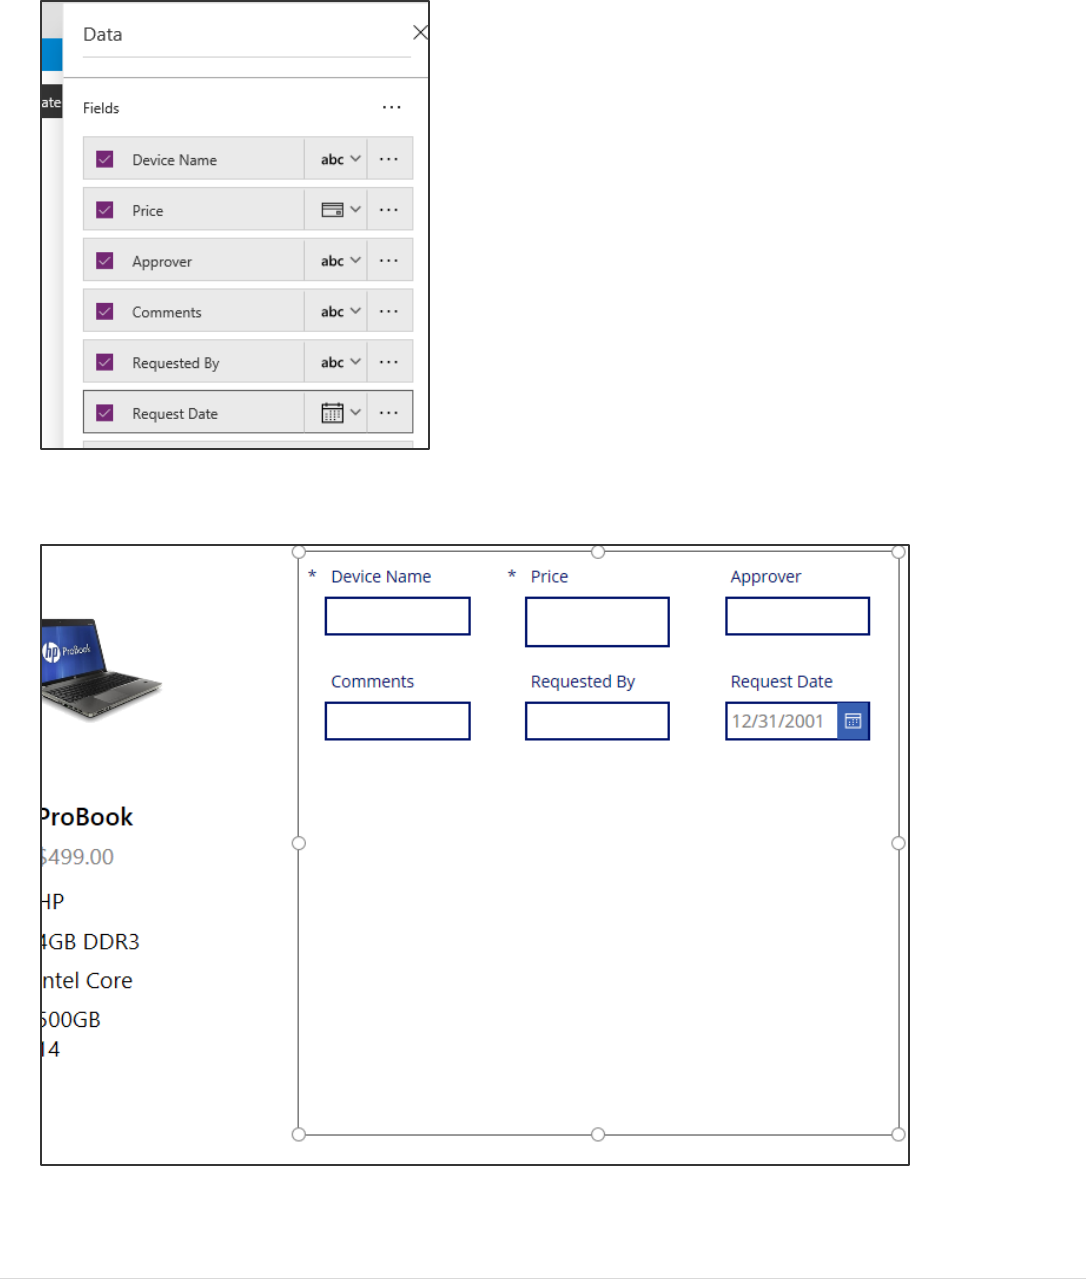
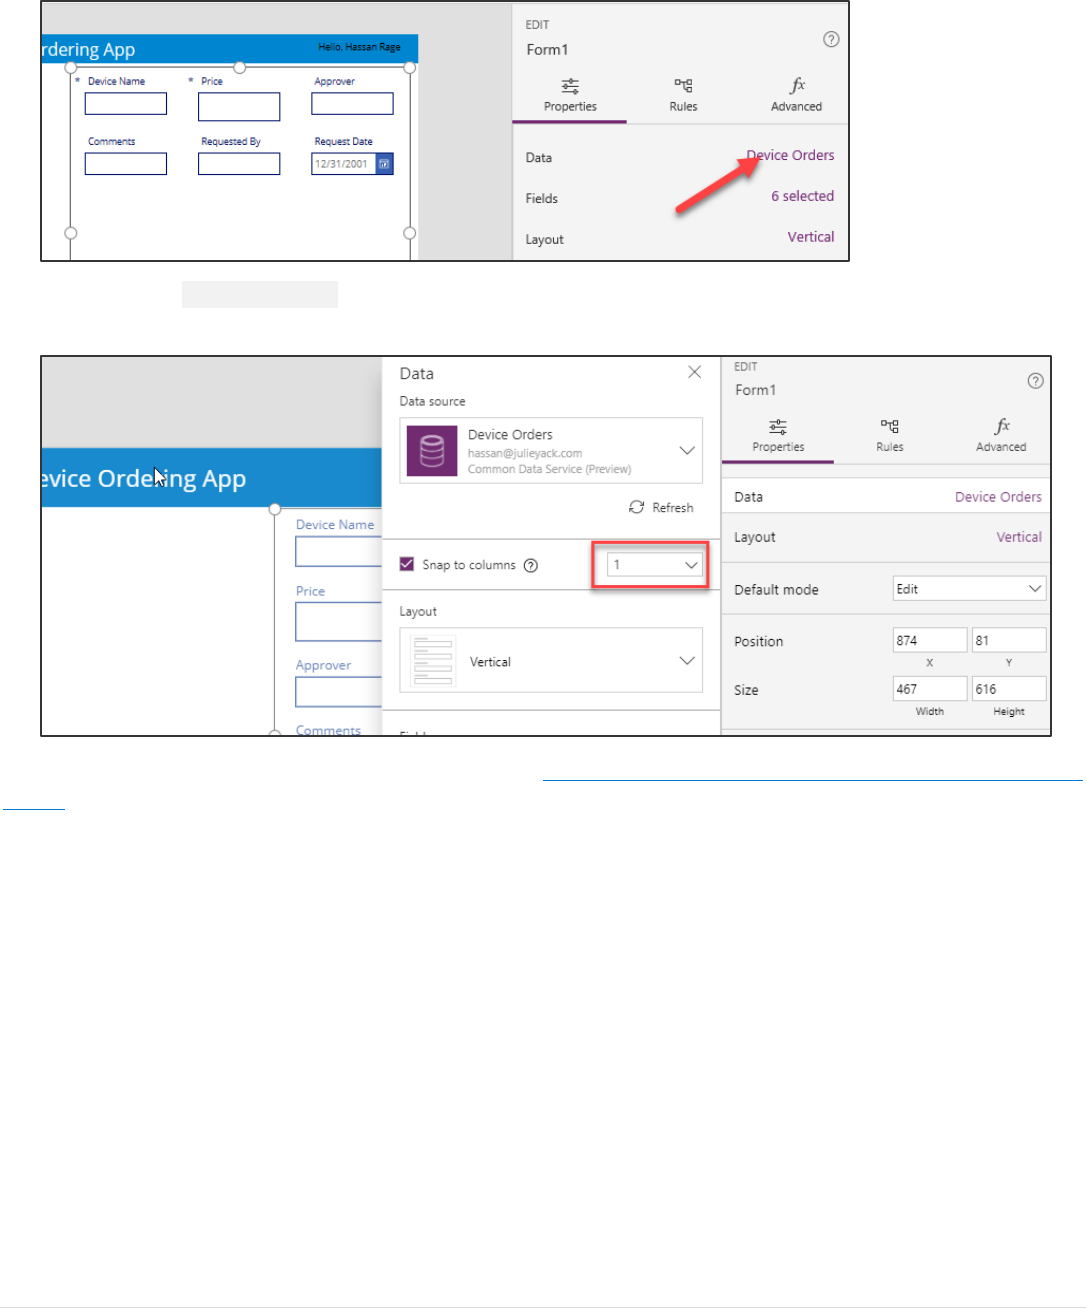
7. Select the fields shown in the image then close the Data pane. To ensure you match subsequent steps, select the
fields in the order shown in the following image
8. Move the form control Form1 to the right of the screen and resize it using the drag handles such that it fits in the
empty space. See picture on the right. Make sure there is enough space below the form to add a Submit button.
Note: You can always select controls, such as the Form1 control, from the tree view on the left to make sure you are
selecting the correct control. To move it make sure you select the Form and not a control within the form.
Power platform App in a Day Common Data Service for Apps
©2018 Microsoft Corporation 32 | P a g e
9. Click the Data link on the right to open the Data pane.
10. Change the Snap to columns setting from 3 to 1. This will modify the layout of the edit form to be single
column. Close the Data pane.
For more info on working with multi-column form layouts, see https://powerapps.microsoft.com/tutorials/working-with-form-
layout/.
Power platform App in a Day Common Data Service for Apps
33 | P a g e ©2018 Microsoft Corporation
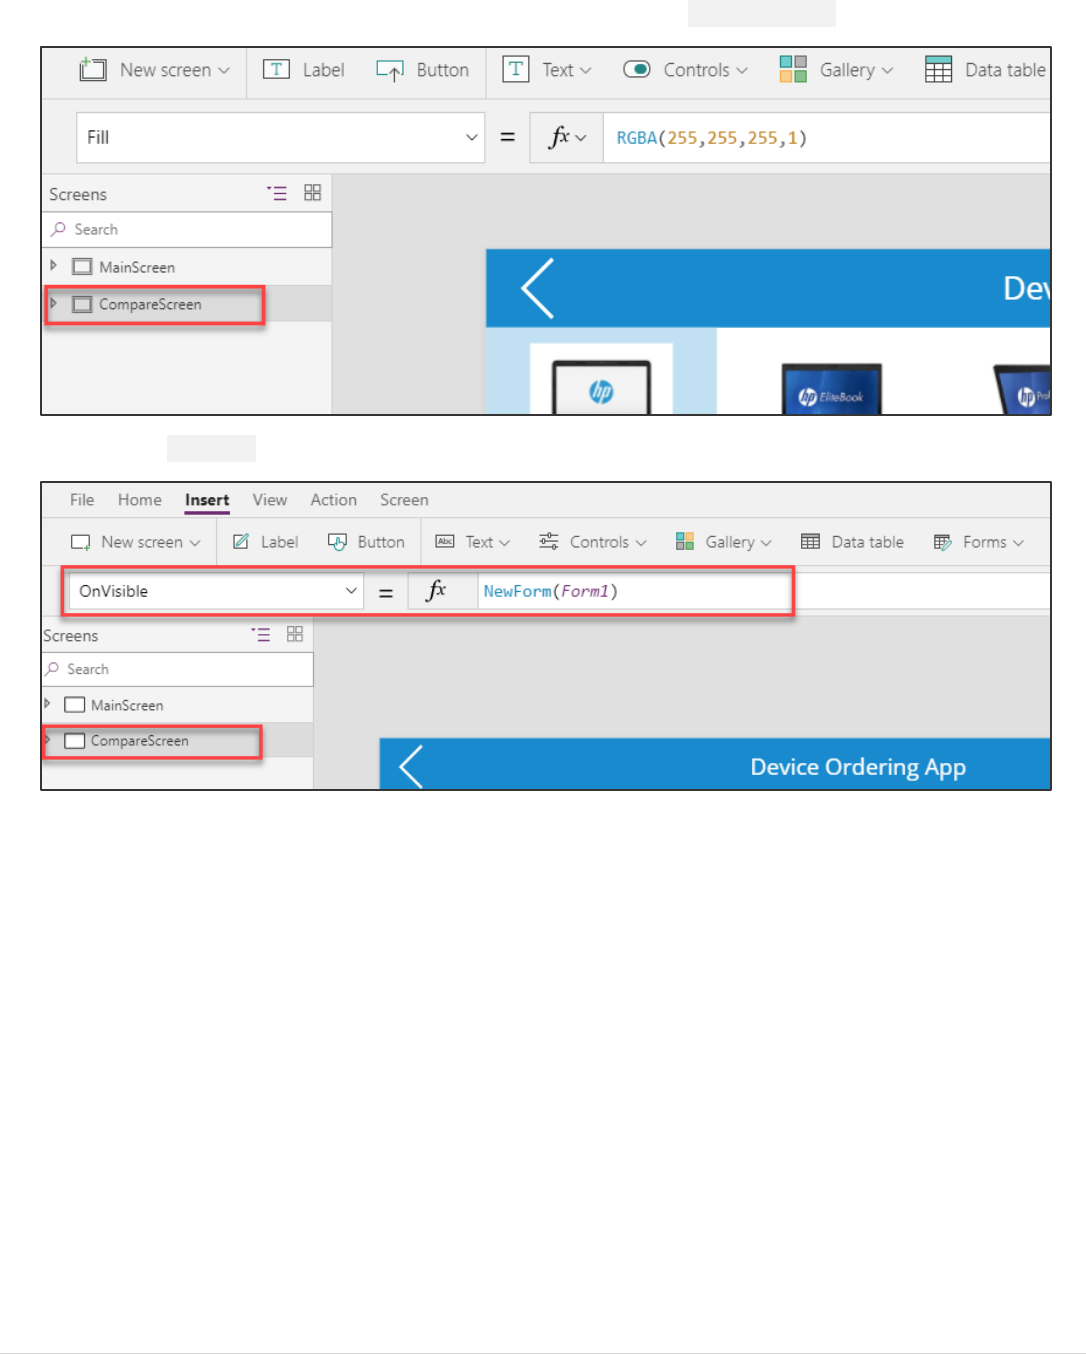
11. To create a new instance of the form when the screen is loaded. Click CompareScreen in left tree view pane.
12. Select the OnVisible property of the screen, enter: NewForm(Form1).
Power platform App in a Day Common Data Service for Apps
©2018 Microsoft Corporation 34 | P a g e
Task 3: Configure the title field
In the next few steps, you will configure each of the form fields.
Let’s start by configuring the Title to display the manufacturer and device name for the selected device. For example, if the
user selects the Surface Pro device, we want the device order to have the title: “Microsoft – Surface Pro”.
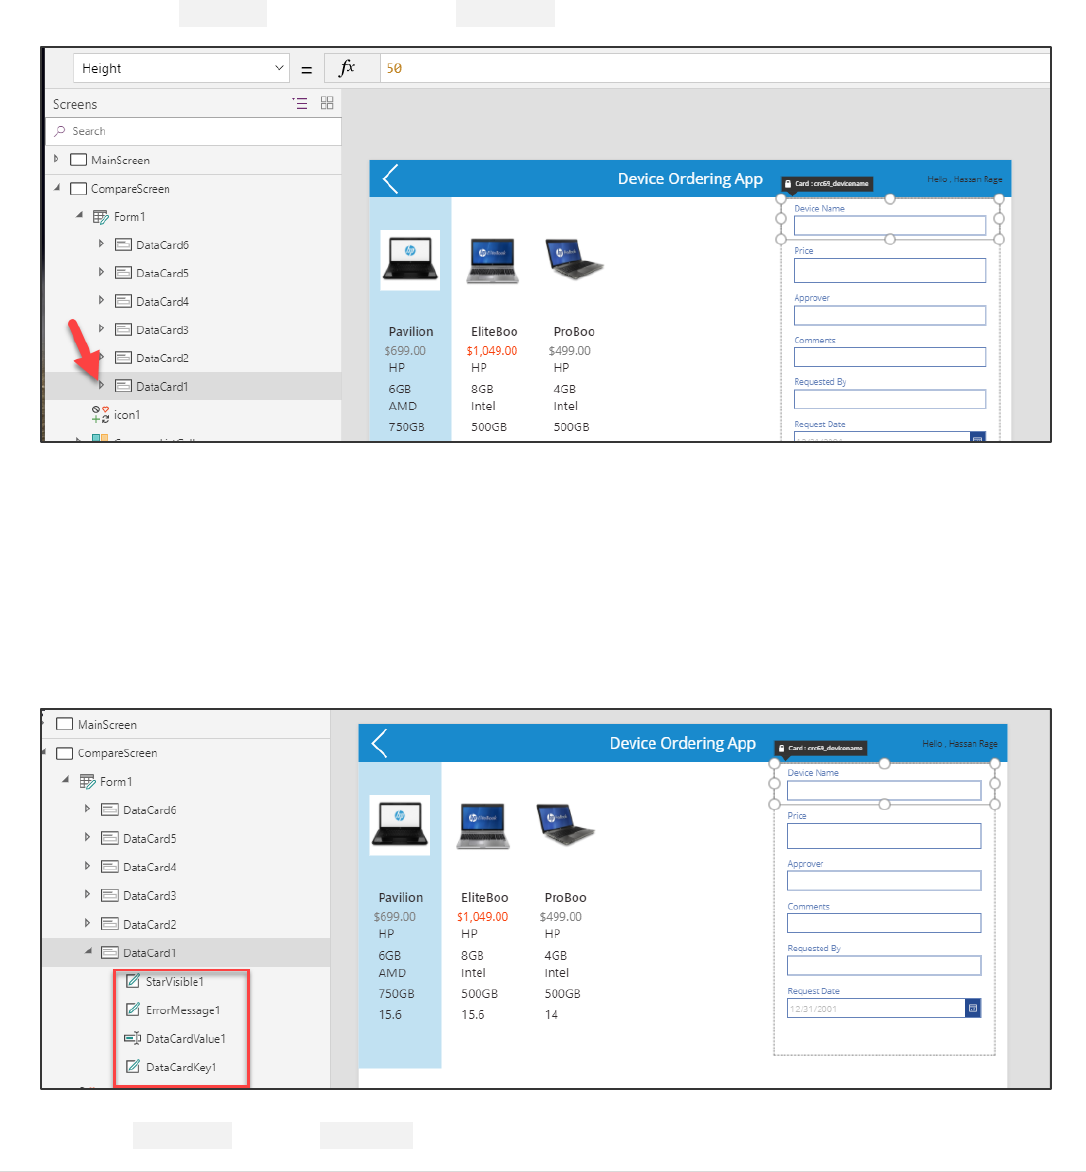
1. Expand the Title card. The control name is DataCard1.
Notice that the default card contains a few controls:
StarVisible1: This is a label control that has an asterisk (*) which has its Visible property set to true or false depending
on whether the field is Required or not. Since the Title field was marked as Required when you configured the entity,
its Required property is set to true.
ErrorMessage1: This is a label that is just below the main data entry field which displays error messages.
DataCardValue1: This is the text input control where you can enter the Title. For this scenario, we will set the title
based on the selected device.
DataCardKey1: This is the label that displays the title of the field.
2. Select DataCard1 and click Advanced.
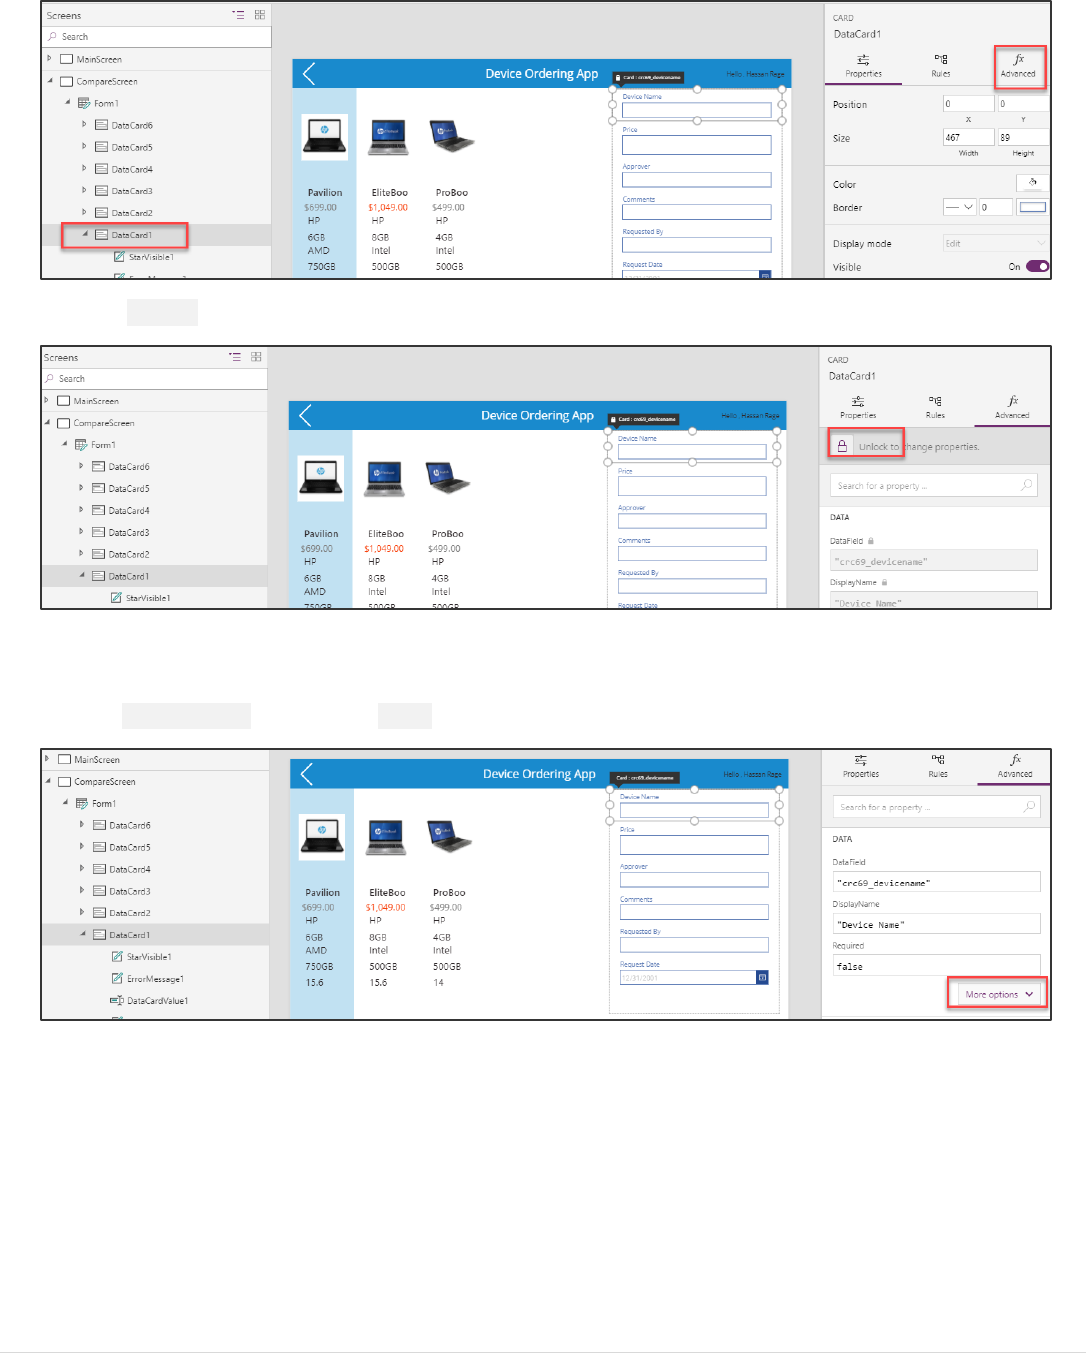
Power platform App in a Day Common Data Service for Apps
35 | P a g e ©2018 Microsoft Corporation
3. Click Unlock so you can customize the card
For the next few steps, we will use the Advanced pane to customize control properties within the form, note that you can
perform the same customizations using the property drop-down and formula bar in the top left of the studio.
4. Click More Options button in the DATA section of the Advanced pane.
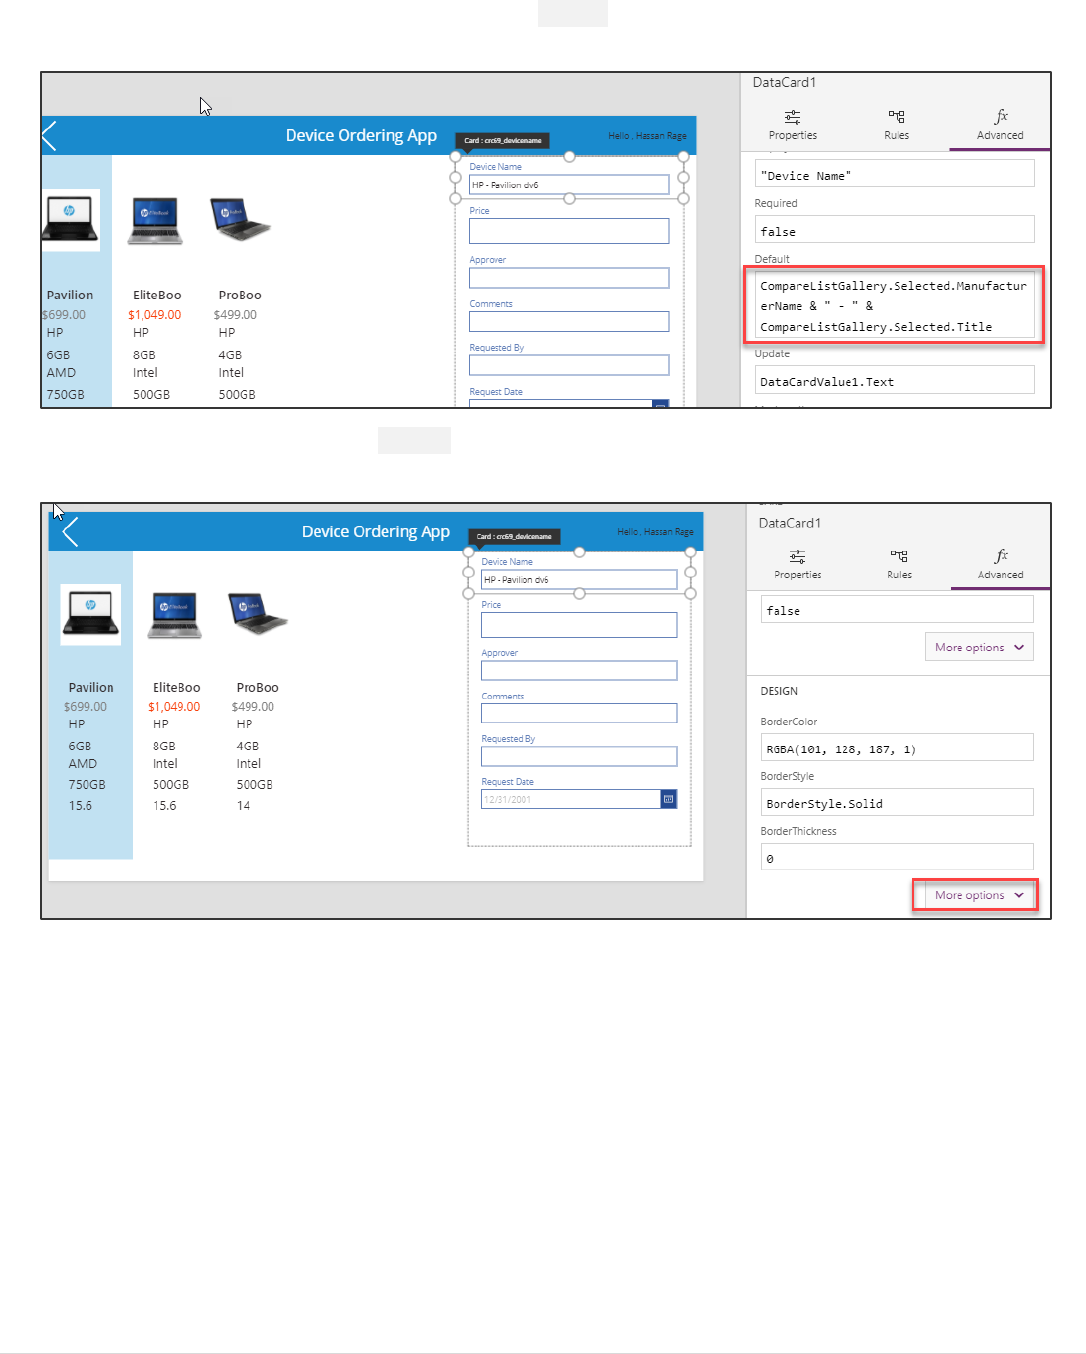
Power platform App in a Day Common Data Service for Apps
©2018 Microsoft Corporation 36 | P a g e
5. To display the selected item in the Title field, set the Default property to
CompareListGallery.Selected.ManufacturerName & " - " & CompareListGallery.Selected.Title
6. Click More Options button in the DESIGN section of the Advanced pane. We are going to change the Device
Name field to be read only so they don’t change it.
Power platform App in a Day Common Data Service for Apps
37 | P a g e ©2018 Microsoft Corporation
7. Change the DisplayMode to DisplayMode.View. This will prevent users from changing the value within the text
box.
Power platform App in a Day Common Data Service for Apps
©2018 Microsoft Corporation 38 | P a g e
Task 4: Configure the price field
In this task, we are going to set the price to the price of the item and then make it read-only.
1. Select DataCard2.
2. Select the Advanced tab and click Unlock.
3. Change the Default property to: CompareListGallery.Selected.Price
Power platform App in a Day Common Data Service for Apps
39 | P a g e ©2018 Microsoft Corporation
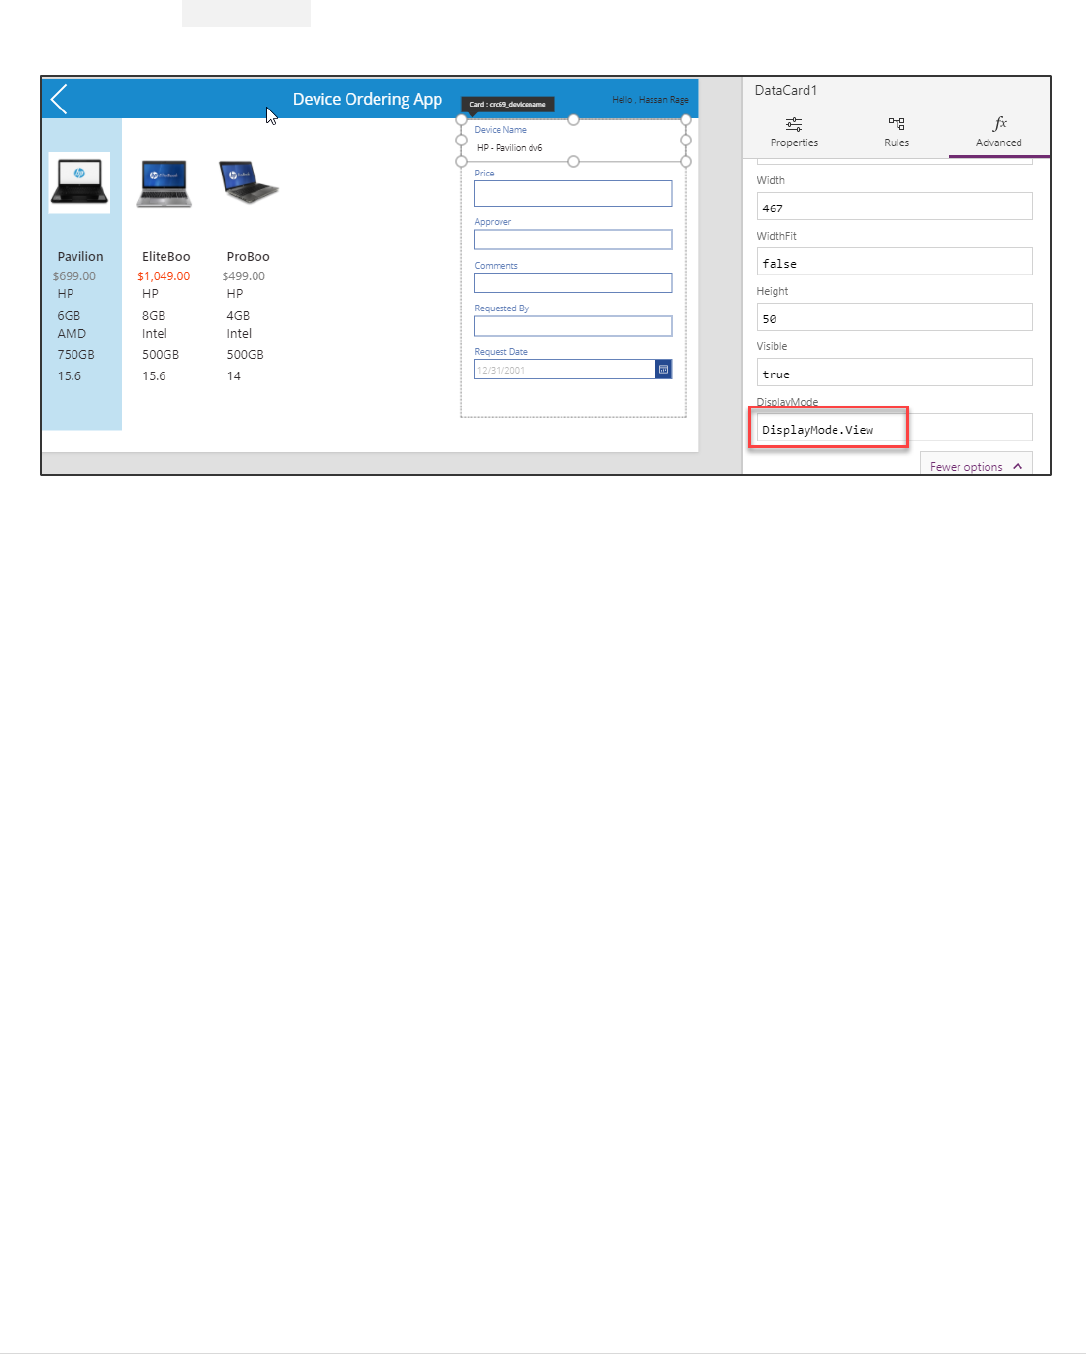
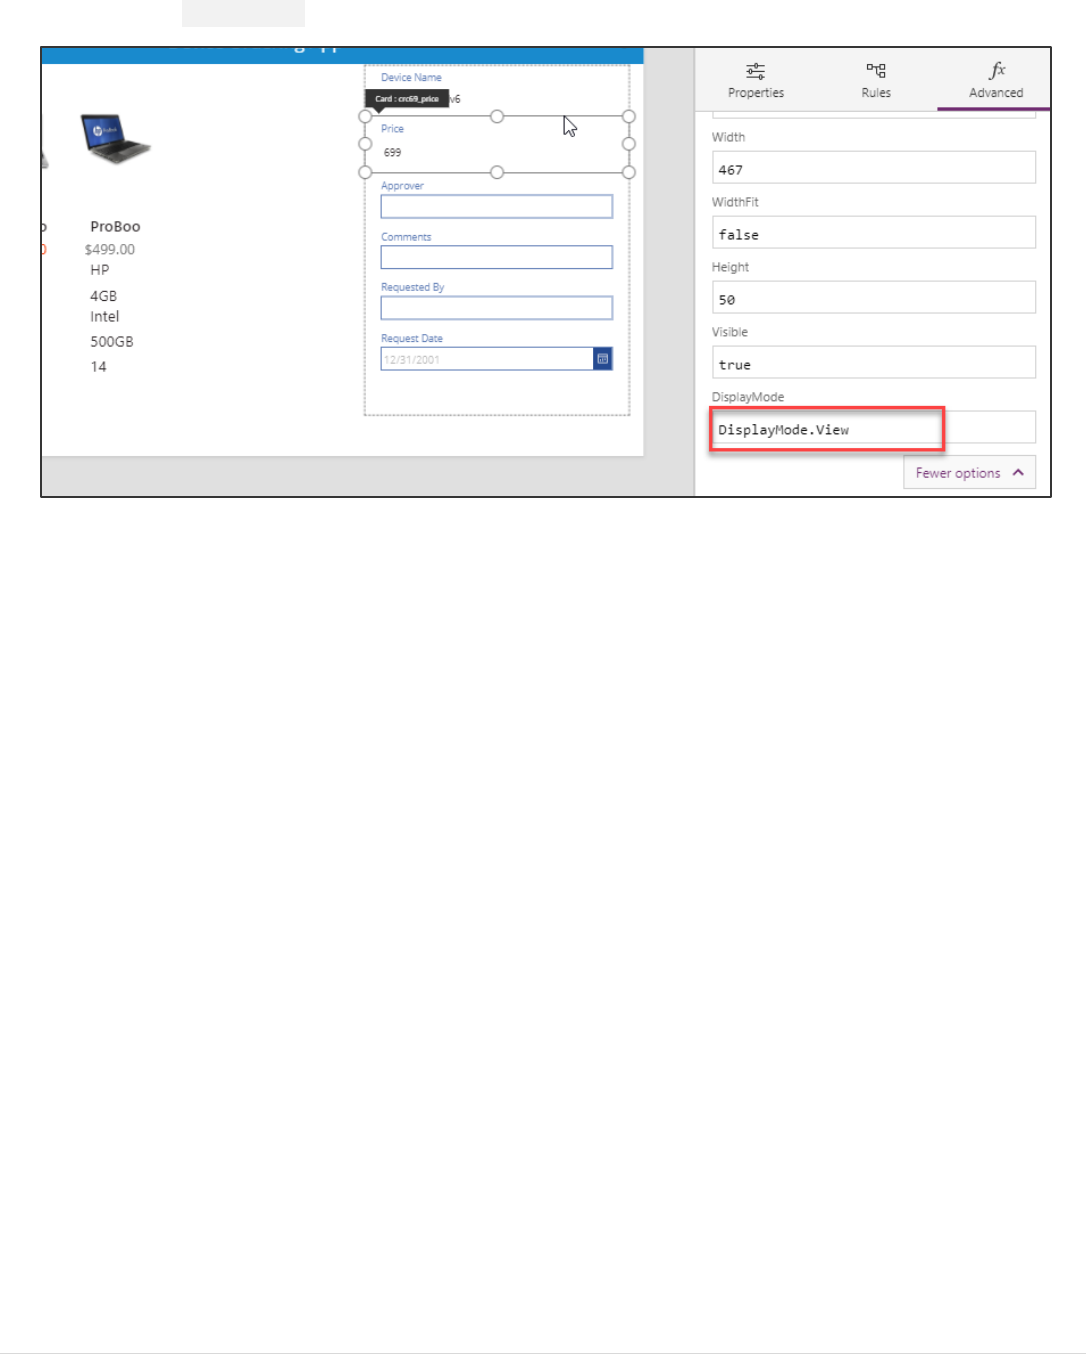
4. Change the DisplayMode property to: DisplayMode.View
Power platform App in a Day Common Data Service for Apps
©2018 Microsoft Corporation 40 | P a g e
Task 5: Configure the approval field
Let’s set the default value for the Approver to be the email address of the logged in user’s manager.
You will use the Office 365 graph to retrieve the manager’s email. You can find more about the Office 365 Users
Connection provider here https://docs.microsoft.com/connectors/office365users/
1. Select View in the ribbon, then Data sources. In the right-hand Data pane, select +Add data source.
2. Click +New connection.
3. Select the connection type - Office 365 Users.

Power platform App in a Day Common Data Service for Apps
41 | P a g e ©2018 Microsoft Corporation
4. Click Create.
5. Close the Data pane.
6. Select the Approver card also known as DataCard3.
7. Go to the Advanced pane and Unlock.

Power platform App in a Day Common Data Service for Apps
©2018 Microsoft Corporation 42 | P a g e
8. Set the Default value to: User().Email This expression will use your user’s email, so you won’t accidentally e-
mail your manager to approve your testing.
In a real application or if you wanted to try the expression to use your managers email would be
Office365Users.Manager(User().Email).Mail This would make an API call at runtime to get the manager’s
email address of the logged-on user. If you try this and hit an error when calling the Office365Users.Manager()
function, this may be because a manager is not set up in the system for the logged in Office 365 user. In that case,
you can simply go back go User().Email.
The Office 365 User connector has access to many other valuable types of information you can learn more about
the other actions and data available here https://docs.microsoft.com/en-us/connectors/office365users/
Power platform App in a Day Common Data Service for Apps
43 | P a g e ©2018 Microsoft Corporation
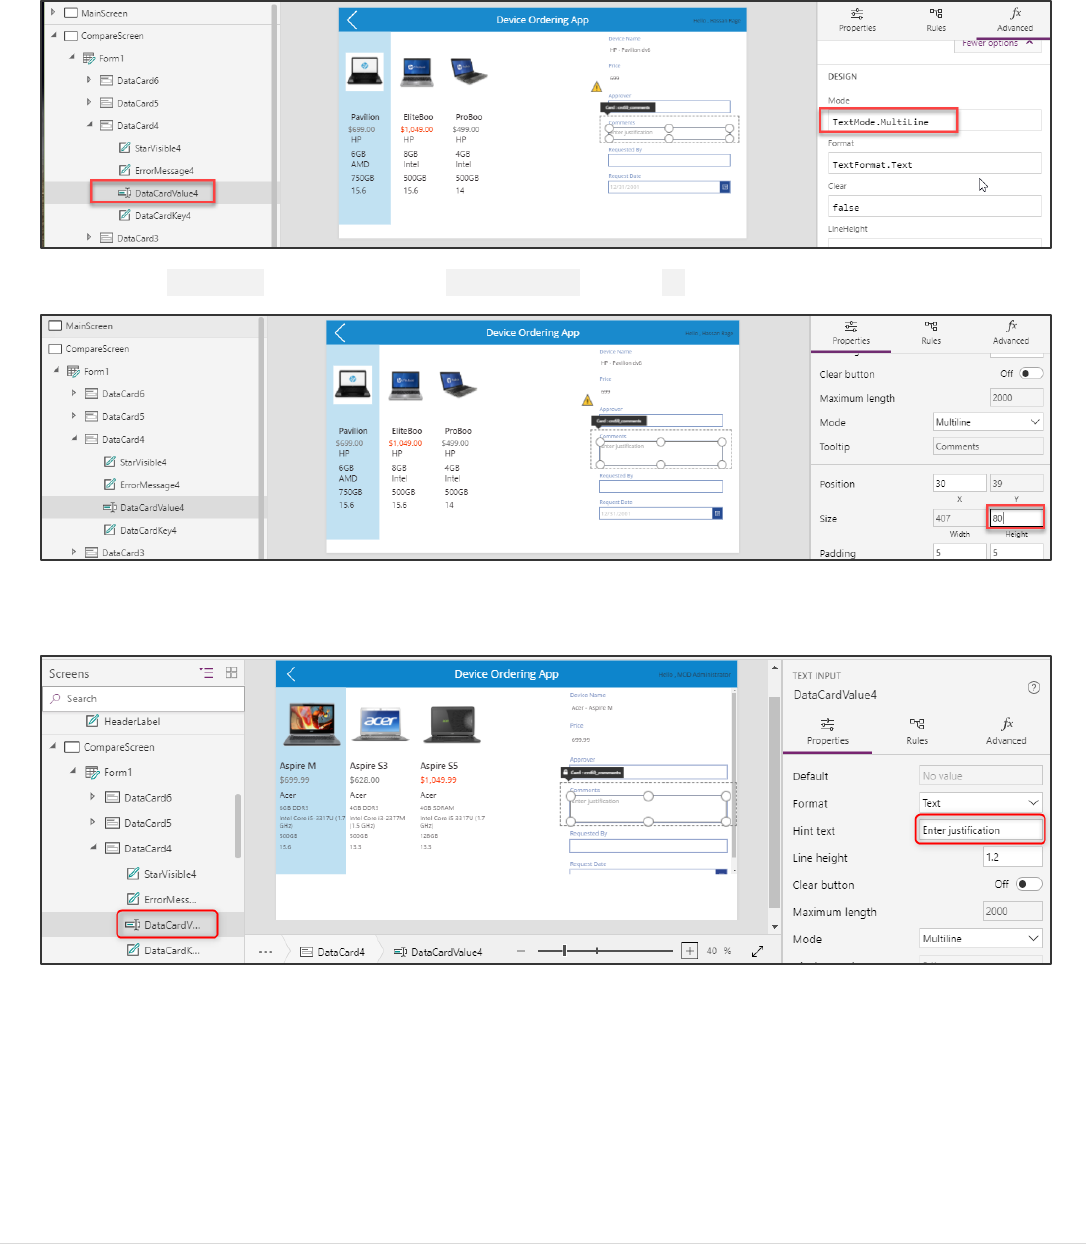
Task 6: Configure the Comment field
1. Select DataCard4 -> DataCardValue4 and change the Mode to TextMode.MultiLine
2. Select the Properties tab and change the Size -> Height value to 80.
Optionally, you may select the Text Input control DataCardValue4 and set its HintText property to: “Enter justification”
(without quotes).
Power platform App in a Day Common Data Service for Apps
©2018 Microsoft Corporation 44 | P a g e
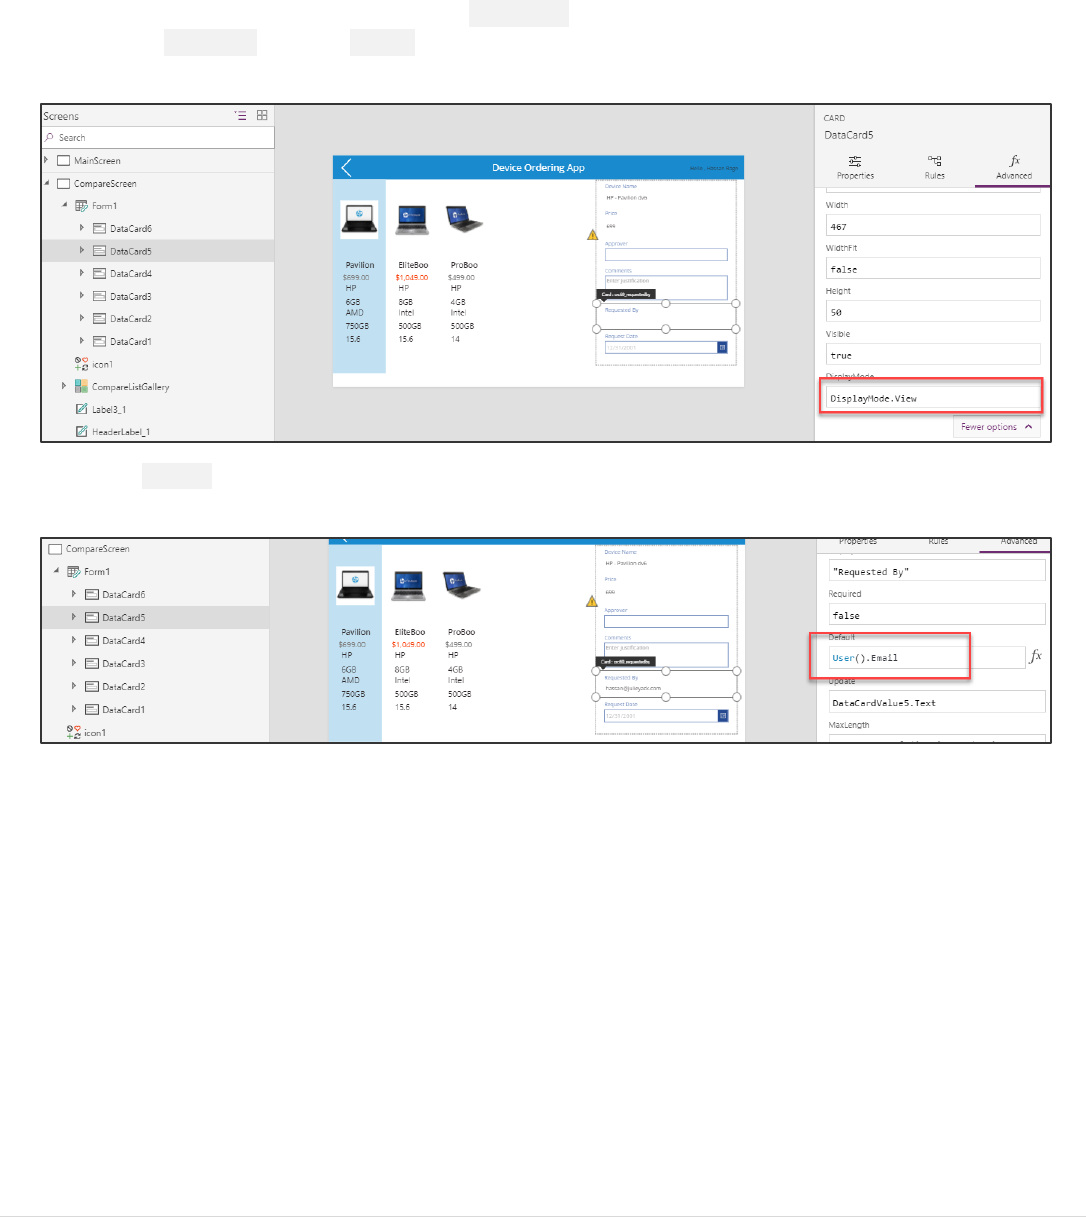
Task 7: Configure the Requested By field
Let’s set the Requested By field to be the current logged on user’s email, and disable the control so the user cannot
change this value.
1. Select the Requested By card, also known as DataCard5
2. Go to the Advanced pane and Unlock the card.
3. Change the DisplayMode property to: DisplayMode.View
4. Set the Default value to User().Email
This is the email of the currently logged in user

Power platform App in a Day Common Data Service for Apps
45 | P a g e ©2018 Microsoft Corporation
Task 8: Configure the requested date field
Let’s set the Request Date to be today’s date.
1. Select the Request Date card, also known as DataCard6.
2. Go to the Advanced pane and Unlock the card.
3. Change the Default property to Today()
Notice that the date in the calendar control will change to today’s date.
Now we will hide the Request Date card. We don’t need to show this field to the user. Since we have included it as part of
the form the field will get updated as part of the form submit.
4. Go to the Properties pane on the right.
5. Toggle the Visible property to Off.
Power platform App in a Day Common Data Service for Apps
©2018 Microsoft Corporation 46 | P a g e
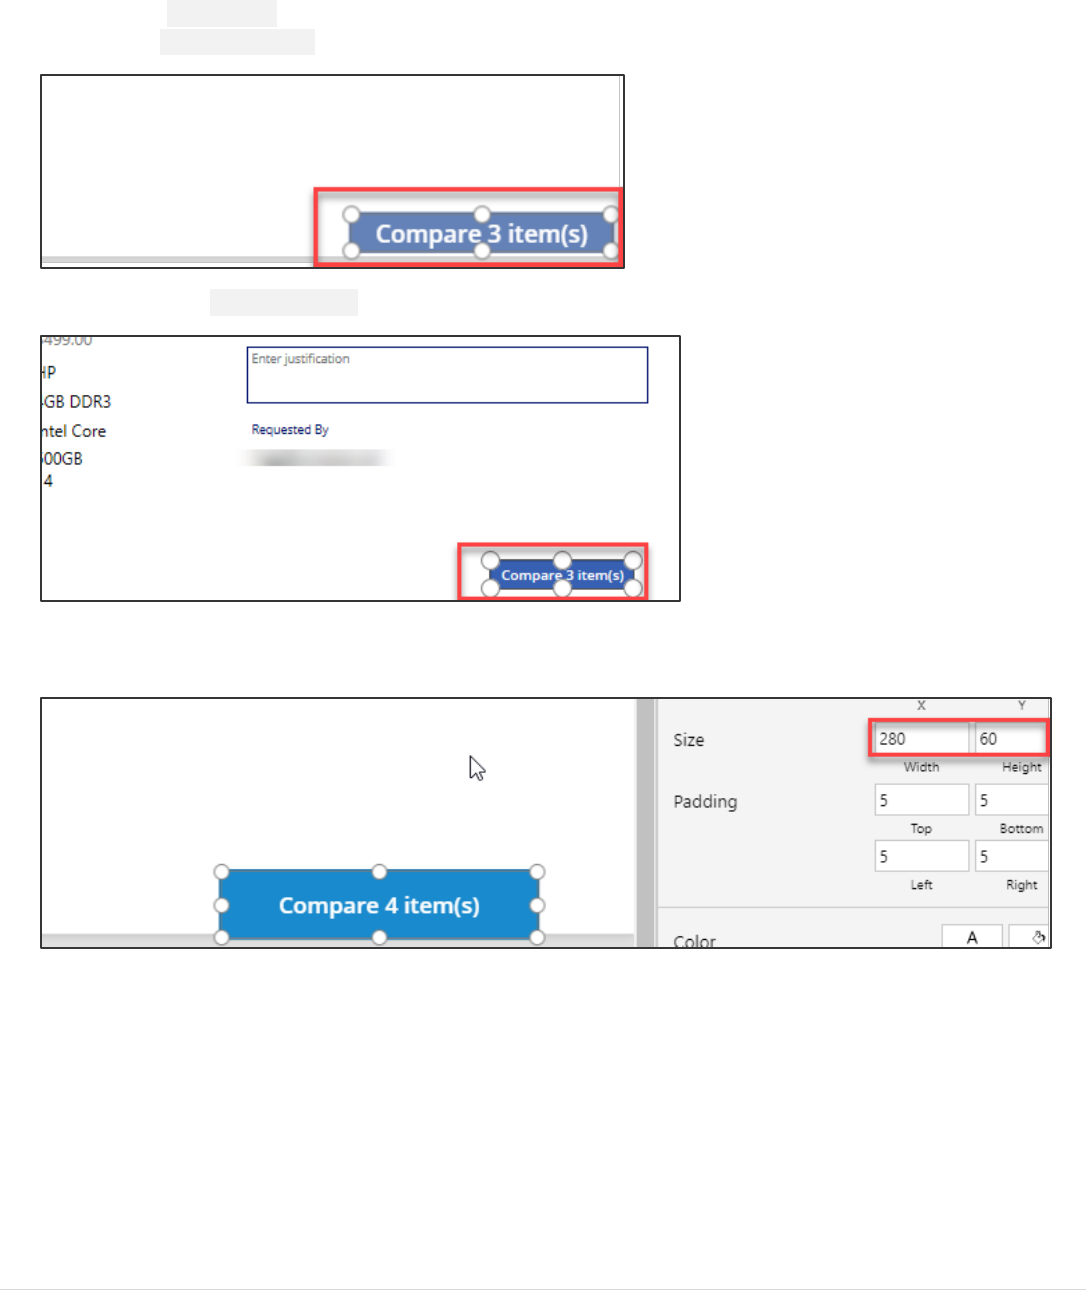
Task 9: Add a button to submit the form
1. Select the MainScreen.
2. Copy the Compare button from the first screen which has the correct color values.
3. Go back to the CompareScreen and paste (Ctrl-V) the button.
4. Position it in the bottom right of the screen, center aligned with the Form.
5. Make the button larger – you can resize to 280x60 using the Properties pane on the right.
Power platform App in a Day Common Data Service for Apps
47 | P a g e ©2018 Microsoft Corporation
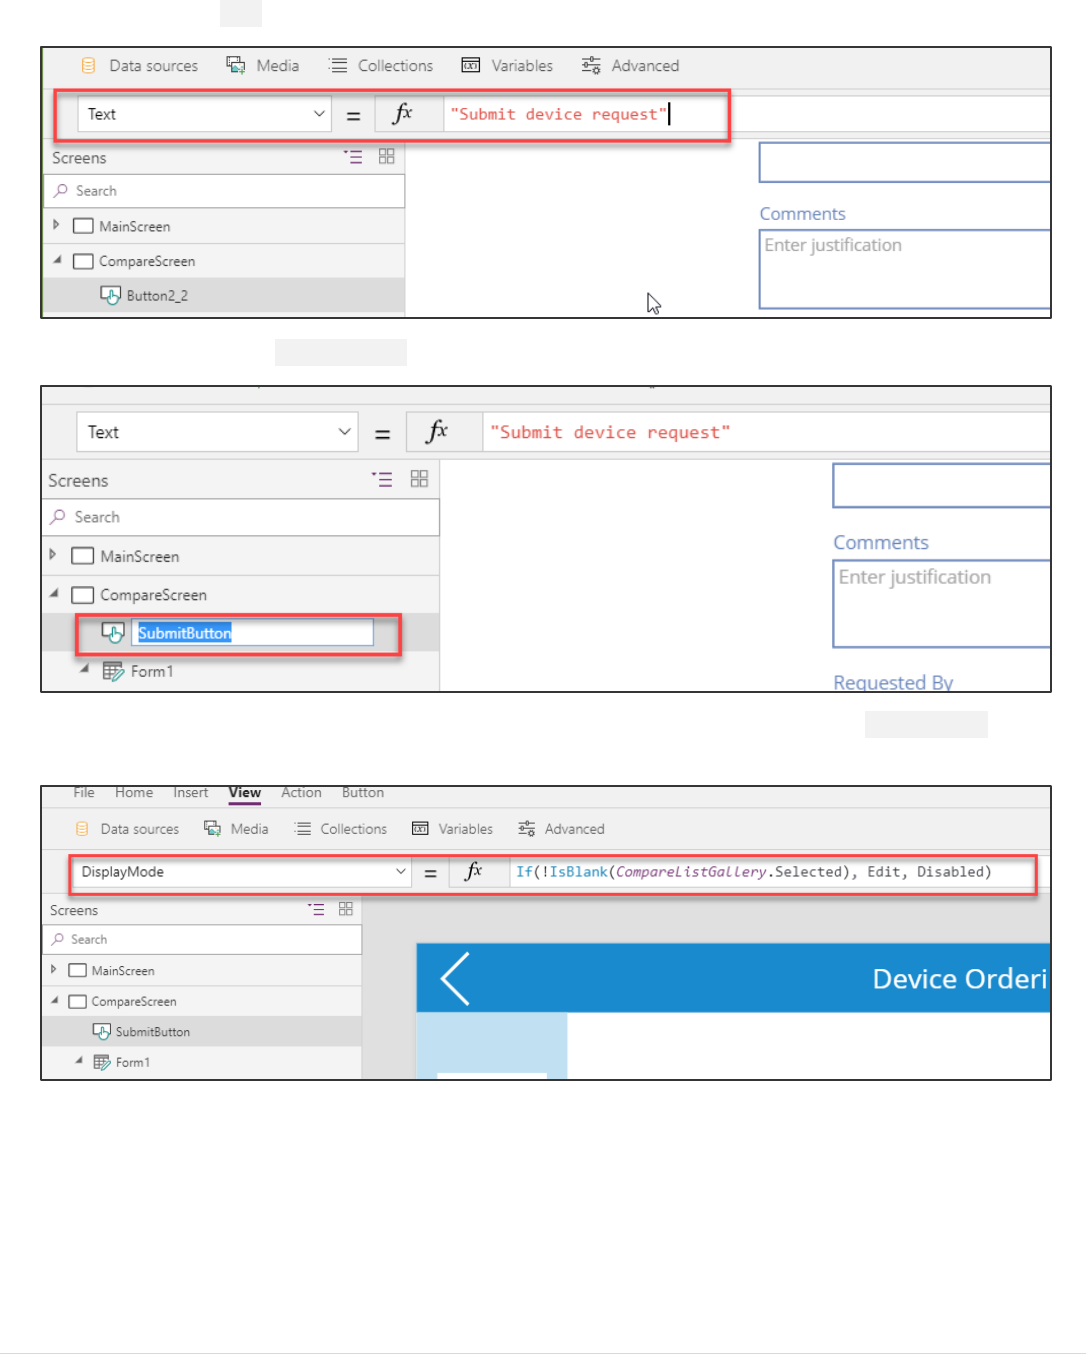
6. Set the button’s Text property to “Submit device request”
7. Rename the button to SubmitButton.
8. The button should be enabled only if a device is selected. To do this, change the button’s DisplayMode property
to: If(!IsBlank(CompareListGallery.Selected), DisplayMode.Edit, DisplayMode.Disabled)
Note: You might notice the exclamation mark (!) in the formula !IsBlank() Normally if you just have IsBlank() the
check is for blank. Adding the exclamation mark (!) in front of it changes it to check if it is NOT blank.
Power platform App in a Day Common Data Service for Apps
©2018 Microsoft Corporation 48 | P a g e
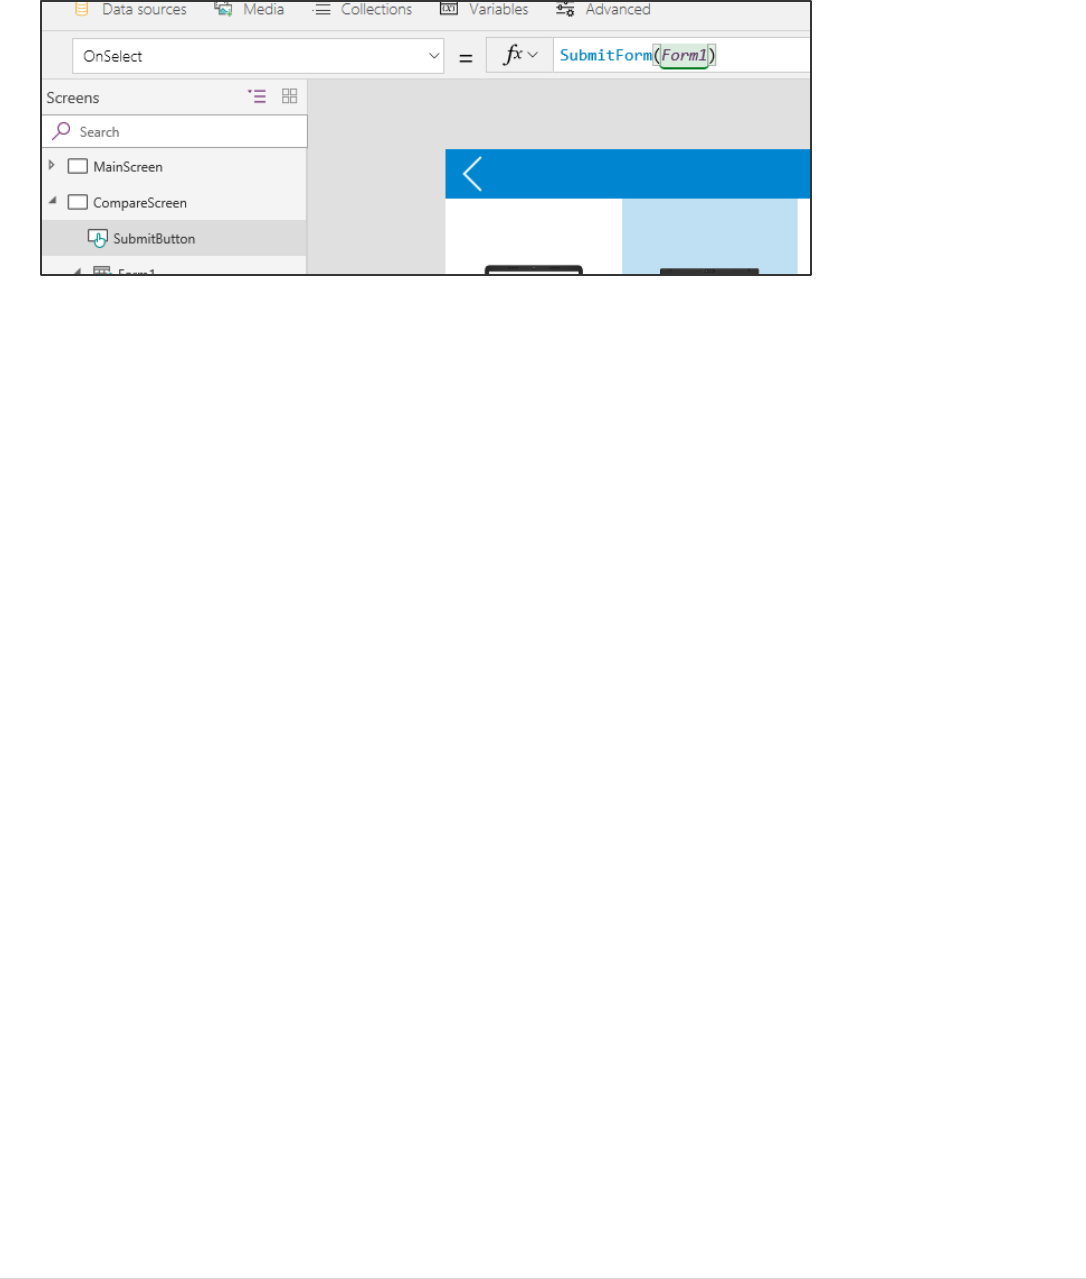
9. Next, we are going to configure what we want to happen when the button is clicked. Set the OnSelect property
to SubmitForm(Form1)
When the button is pressed, the form data will be submitted to the Common Data Service.
Power platform App in a Day Common Data Service for Apps
49 | P a g e ©2018 Microsoft Corporation
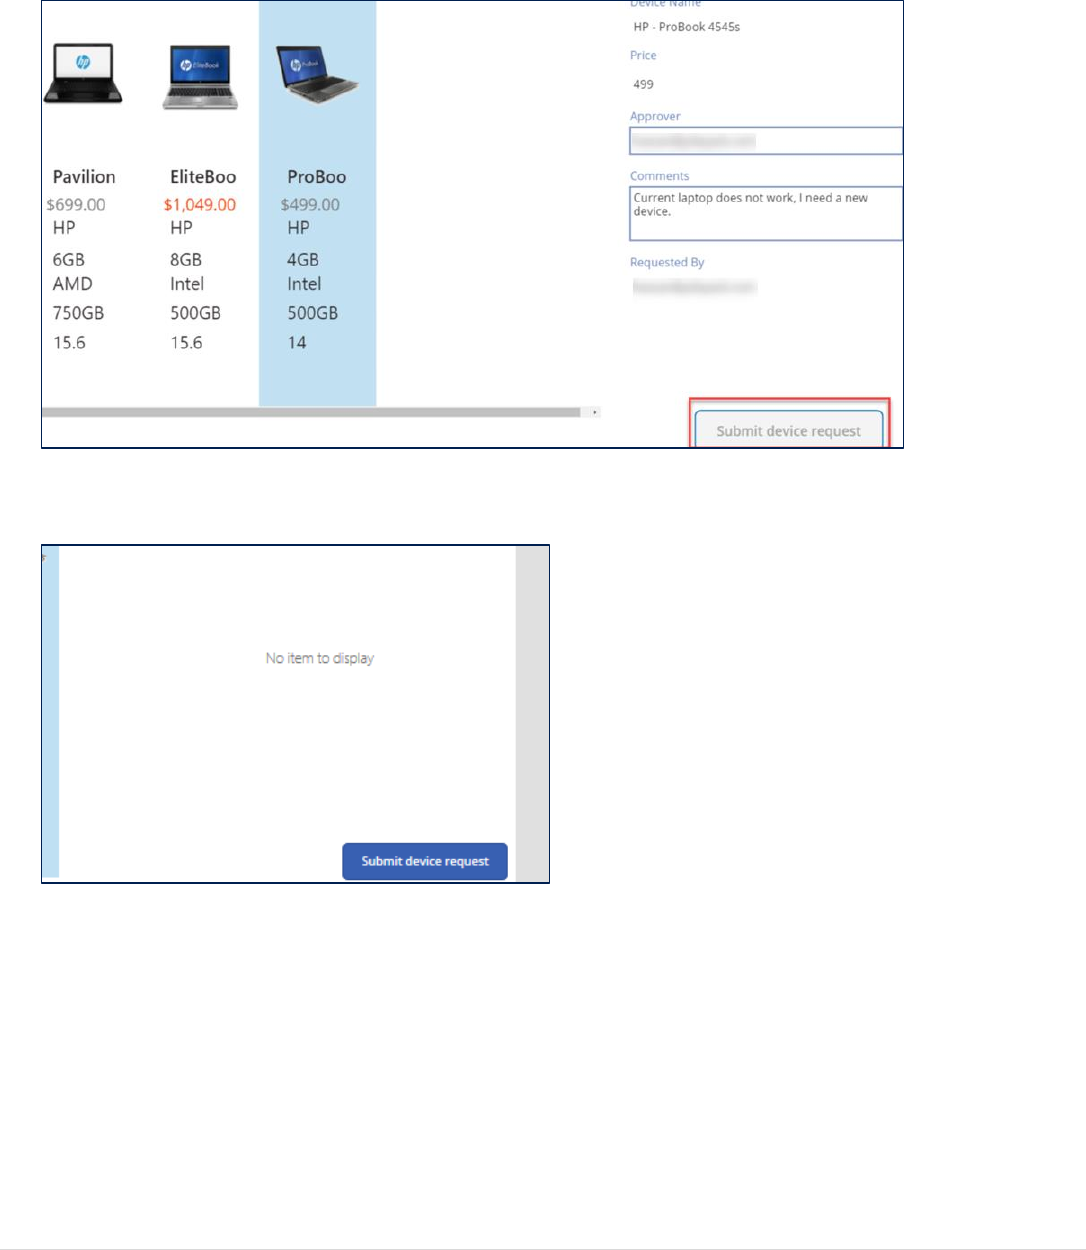
Task 10: Test the form
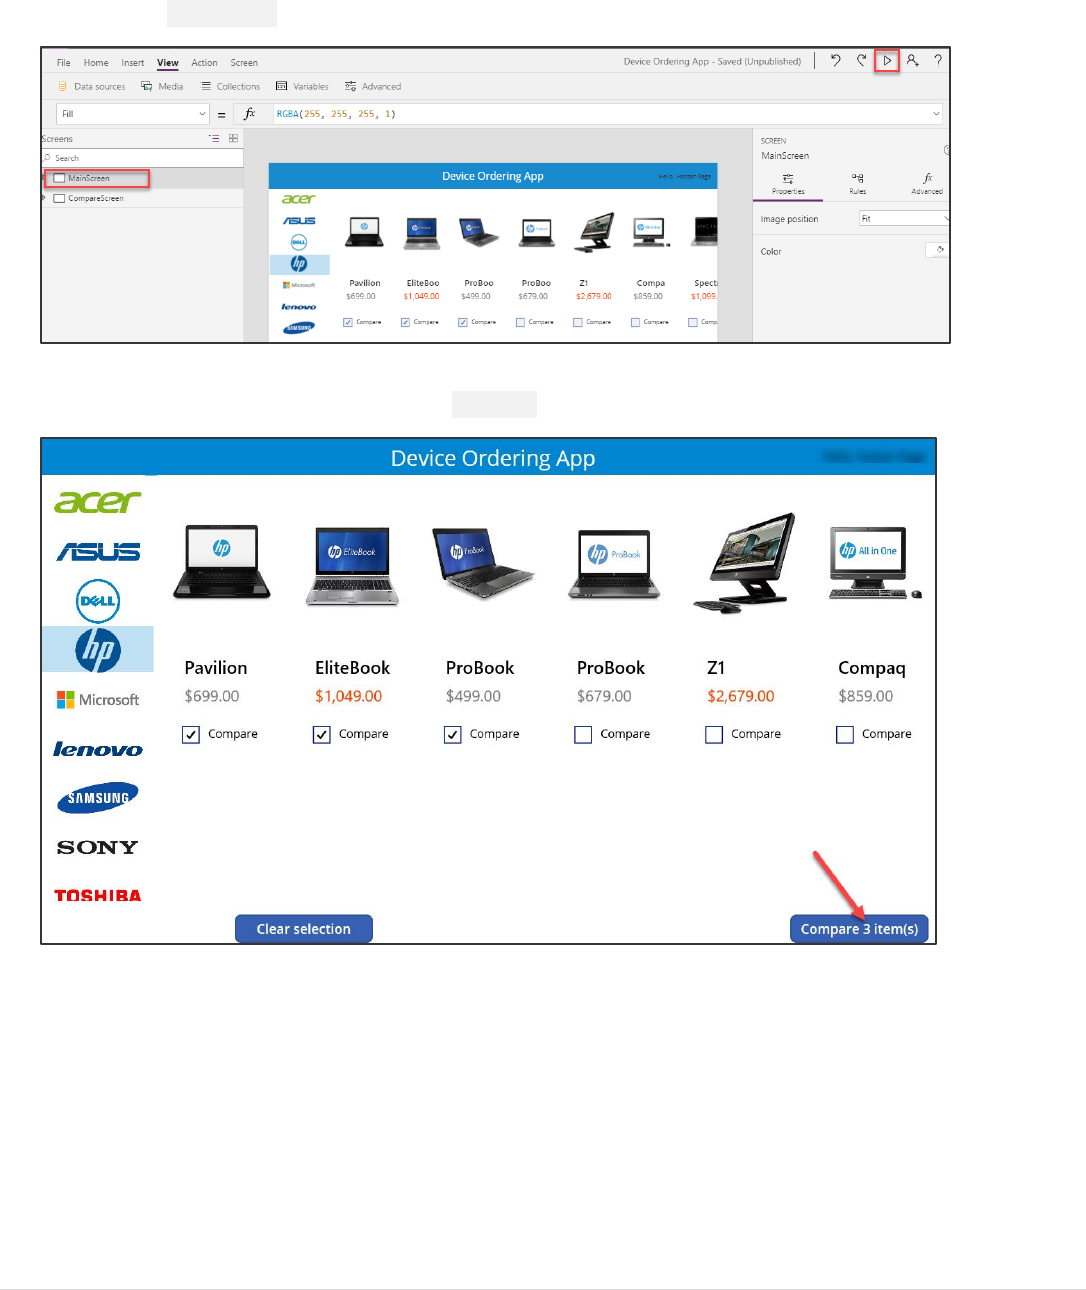
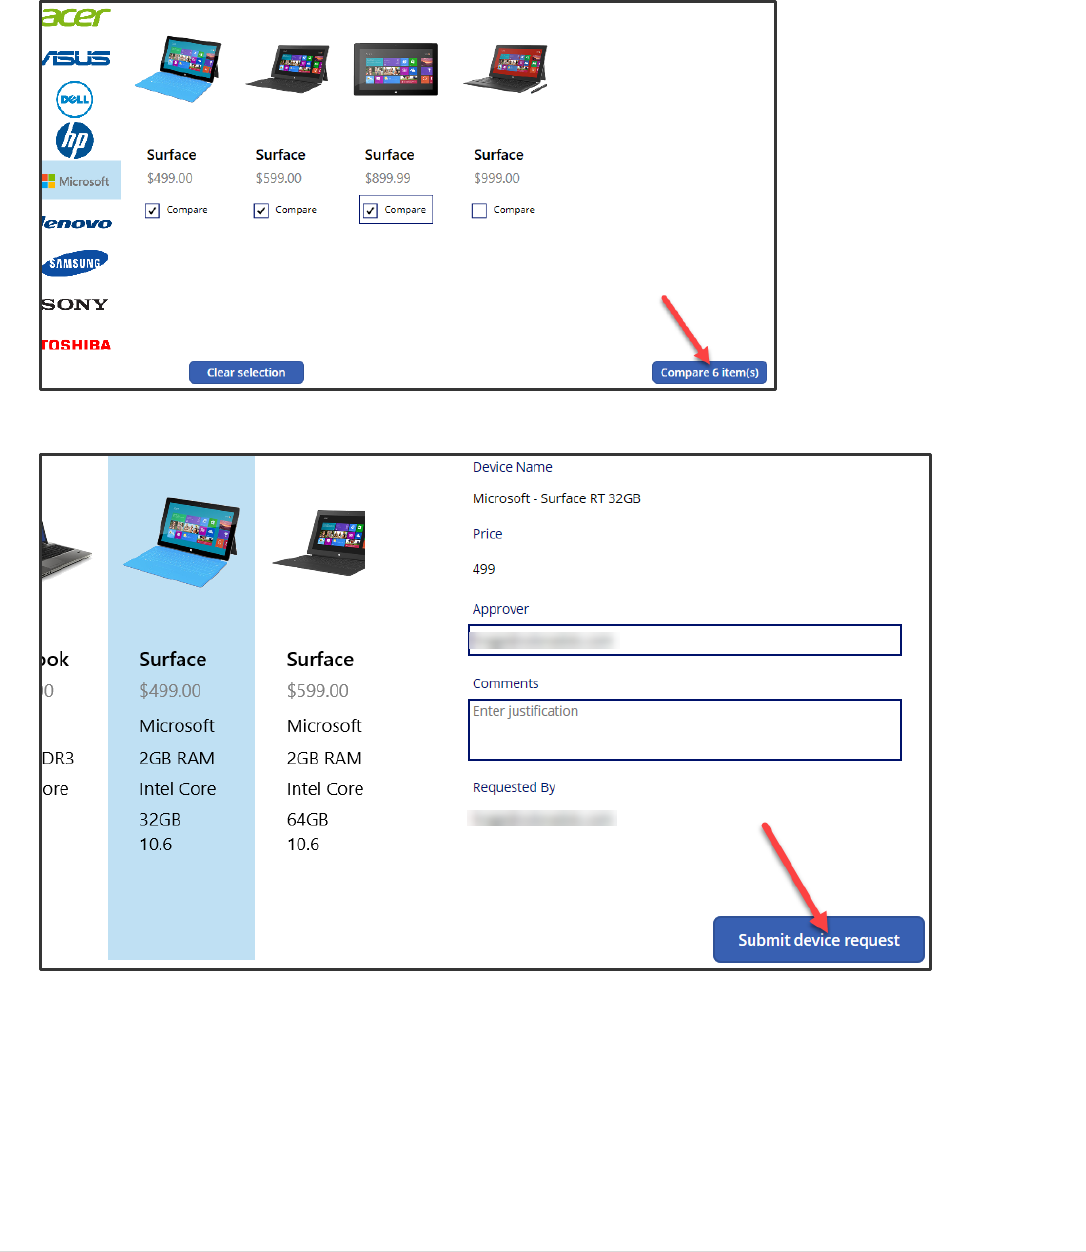
1. Select the MainScreen in the left side tree navigation and click Play.
2. Select a few devices to compare. And click Compare.
Power platform App in a Day Common Data Service for Apps
©2018 Microsoft Corporation 50 | P a g e
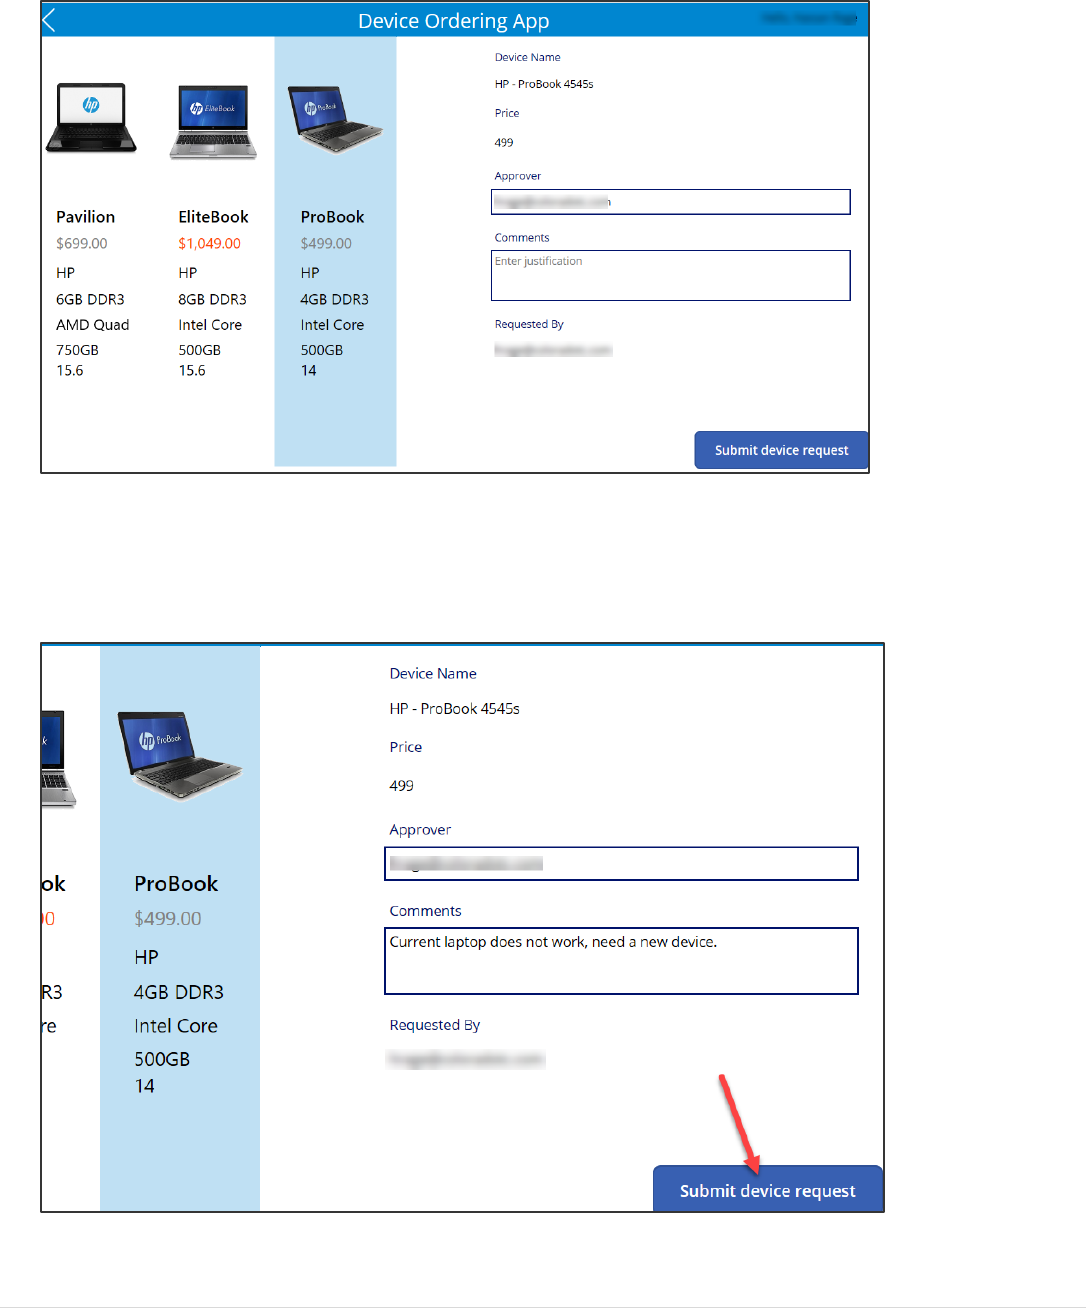
3. Select one of the devices.
Notice that the Title, Price and Requested By fields are already filled in.
4. Change the Approver email to your own email for test purposes
5. Add some Comments, such as: “Current laptop does not work, need a new device.”
6. Click Submit device request.
Power platform App in a Day Common Data Service for Apps
51 | P a g e ©2018 Microsoft Corporation
The button should turn disabled (gray) for a few seconds while it’s submitting the request. If it does not do this
there is likely an error. Click the X in top right to get back to the design mode.
If there is an error, you will see a yellow error icon next to the Submit button, hover over it to check the error.
7. The form will become empty after the record gets created, we will fix this issue in optional task. Exit the preview
mode (‘X’ in top right).
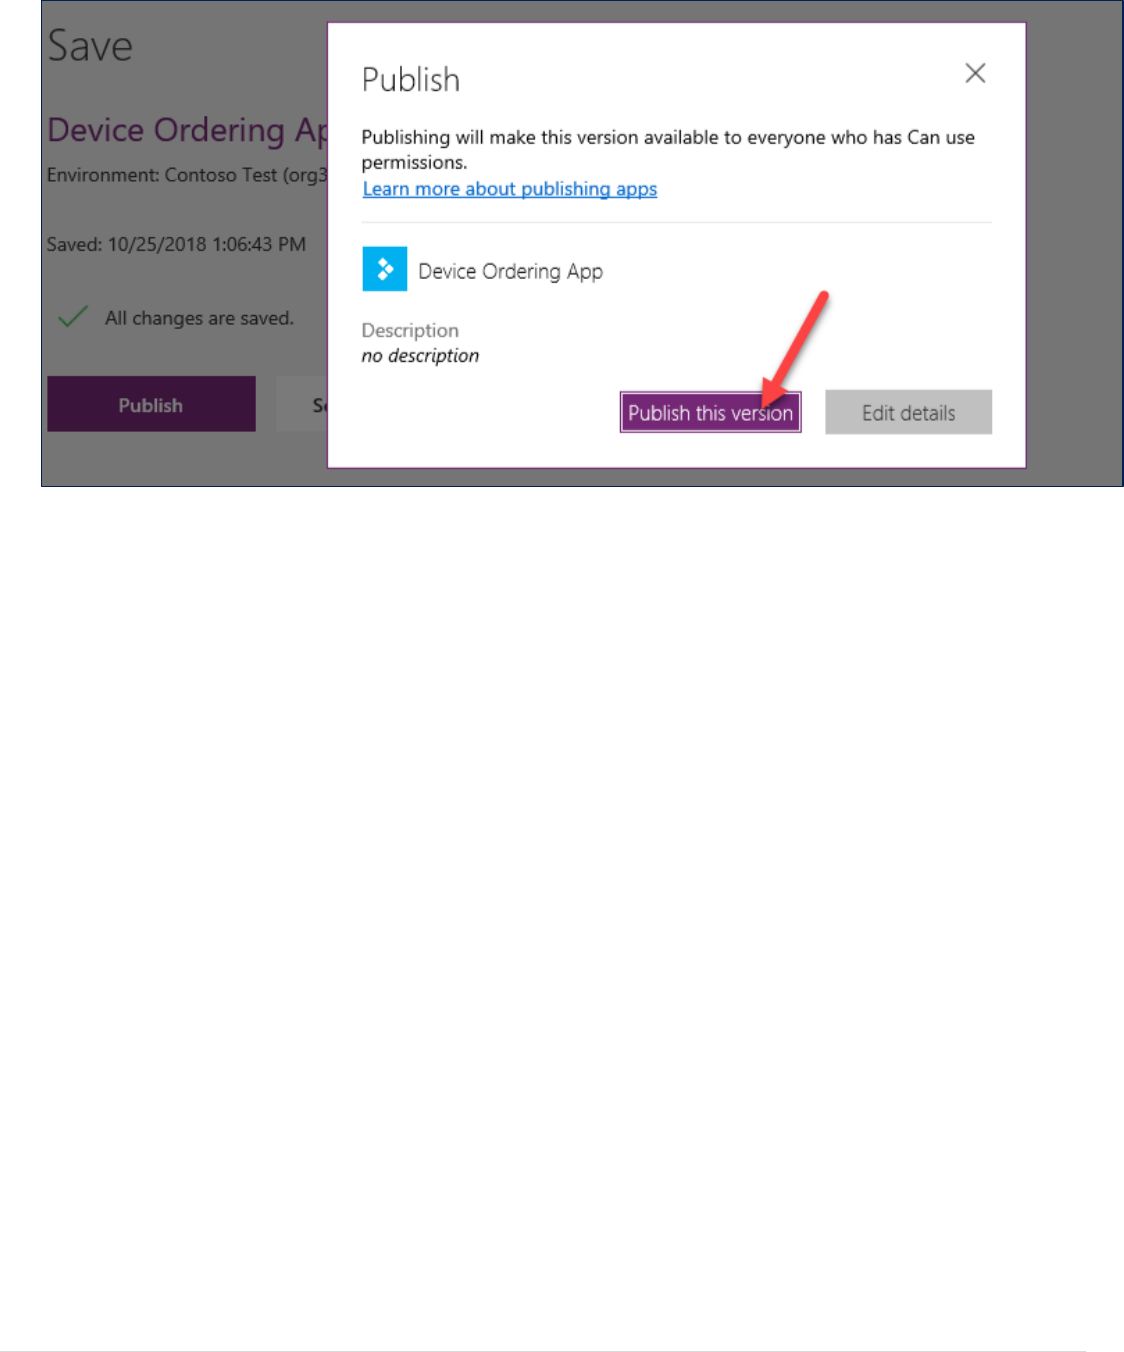
8. Save the Application and Publish
Power platform App in a Day Common Data Service for Apps
©2018 Microsoft Corporation 52 | P a g e
Power platform App in a Day Common Data Service for Apps
53 | P a g e ©2018 Microsoft Corporation
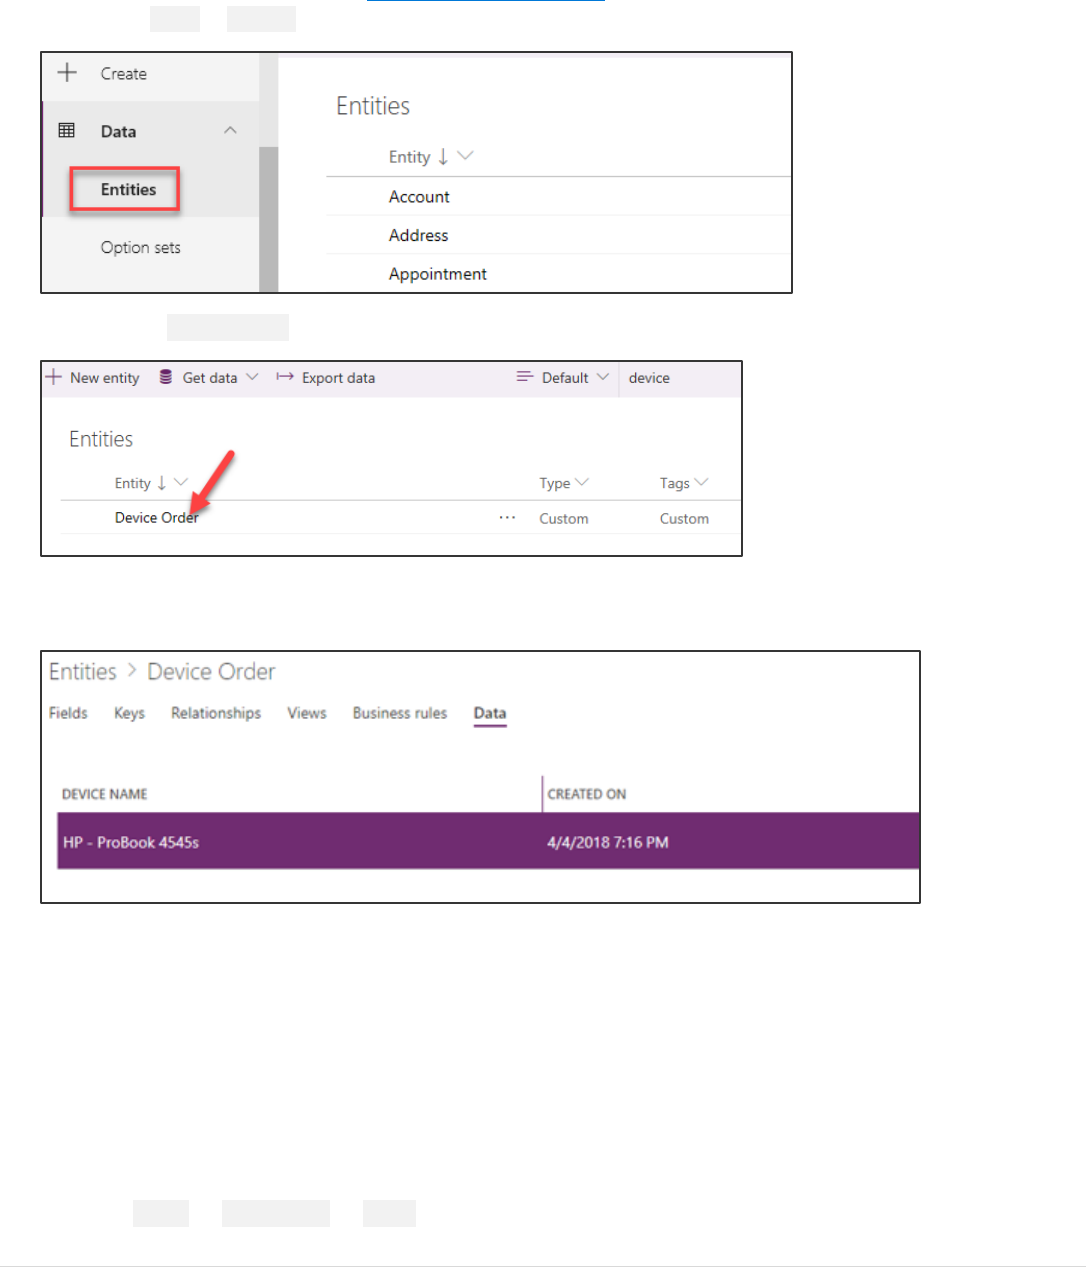
Task 11: Verify a new item was added to the Device Order entity
1. Browse a browser window, go to http://web.powerapps.com.
2. Click on Data -> Entities.
3. Select the Device Order entity.
4. Select the Data tab.
5. You should see a newly added row with your device order details. This may take a few seconds to load.
Task 12: [Optional] Navigate to confirmation screen after the Form
submit is successful
This step is optional, if you’re short on time you may skip it and continue to the next module.
Once the Form has been successfully submitted, it’s a good idea to show a confirmation screen and allow the user to
navigate back to the main screen.
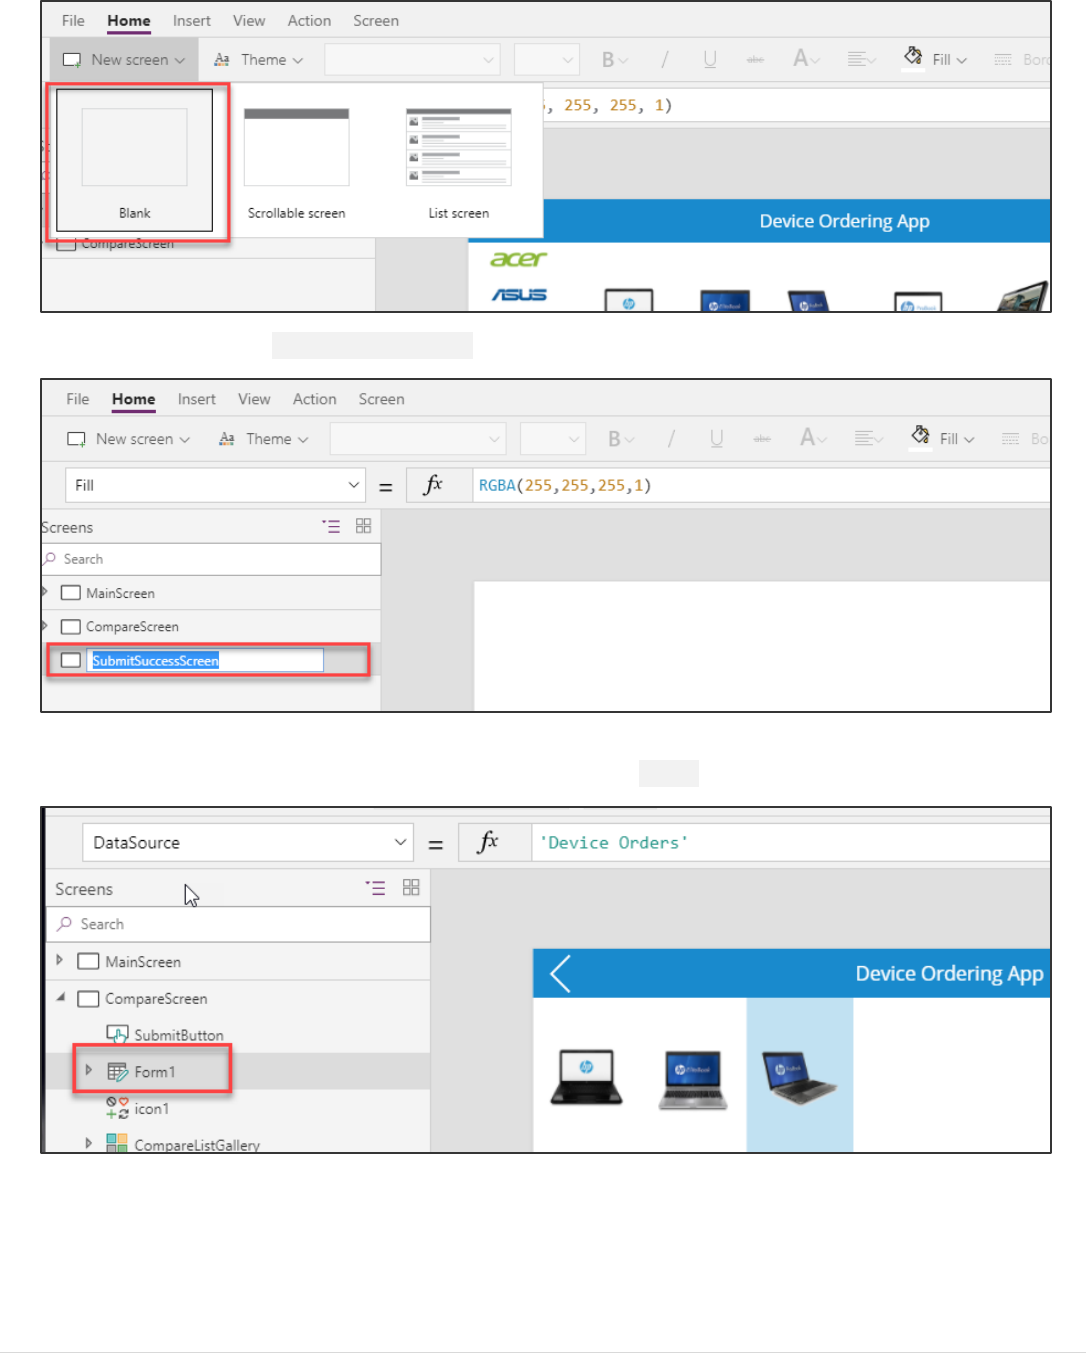
1. Select Home -> New screen -> Blank
Power platform App in a Day Common Data Service for Apps
©2018 Microsoft Corporation 54 | P a g e
2. Rename the screen to SubmitSuccessScreen
3. Expand the CompareScreen.
4. Select the Form – you can use the tree view on the left to select Form1.
6. Set the OnSuccess property to: Navigate(SubmitSuccessScreen,ScreenTransition.None)

Power platform App in a Day Common Data Service for Apps
55 | P a g e ©2018 Microsoft Corporation
7. Copy (Ctrl-C) the header label from the CmpareScreen.
8. Go to the to the SubmitSuccessScreen and paste the header label.
9. Add another label in the middle of the screen and set the Text to: "Your device request has been successfully
submitted. Thank you."
10. Increase the font size, the size of the label and center the text.
11. Add a button and set its Text to: "OK”.
12. When the button is pressed, let us remove all the items from the CompareList collection and navigate to the first
screen.

Power platform App in a Day Common Data Service for Apps
©2018 Microsoft Corporation 56 | P a g e
13. Set the OnSelect property of the button to:
Clear(CompareList);Navigate(MainScreen,ScreenTransition.None)
Note: ‘;’ is used a separator when multiple functions are called one after the other. If you are in a locale where ‘;’ is used as
a comma-separator, then use a double ‘;’ here (without the single-quotes).
14. Move the label up and add a Display Form: Insert -> Form -> Display.
15. Configure its data source to point to the ‘Device Order’ entity.
Power platform App in a Day Common Data Service for Apps
57 | P a g e ©2018 Microsoft Corporation
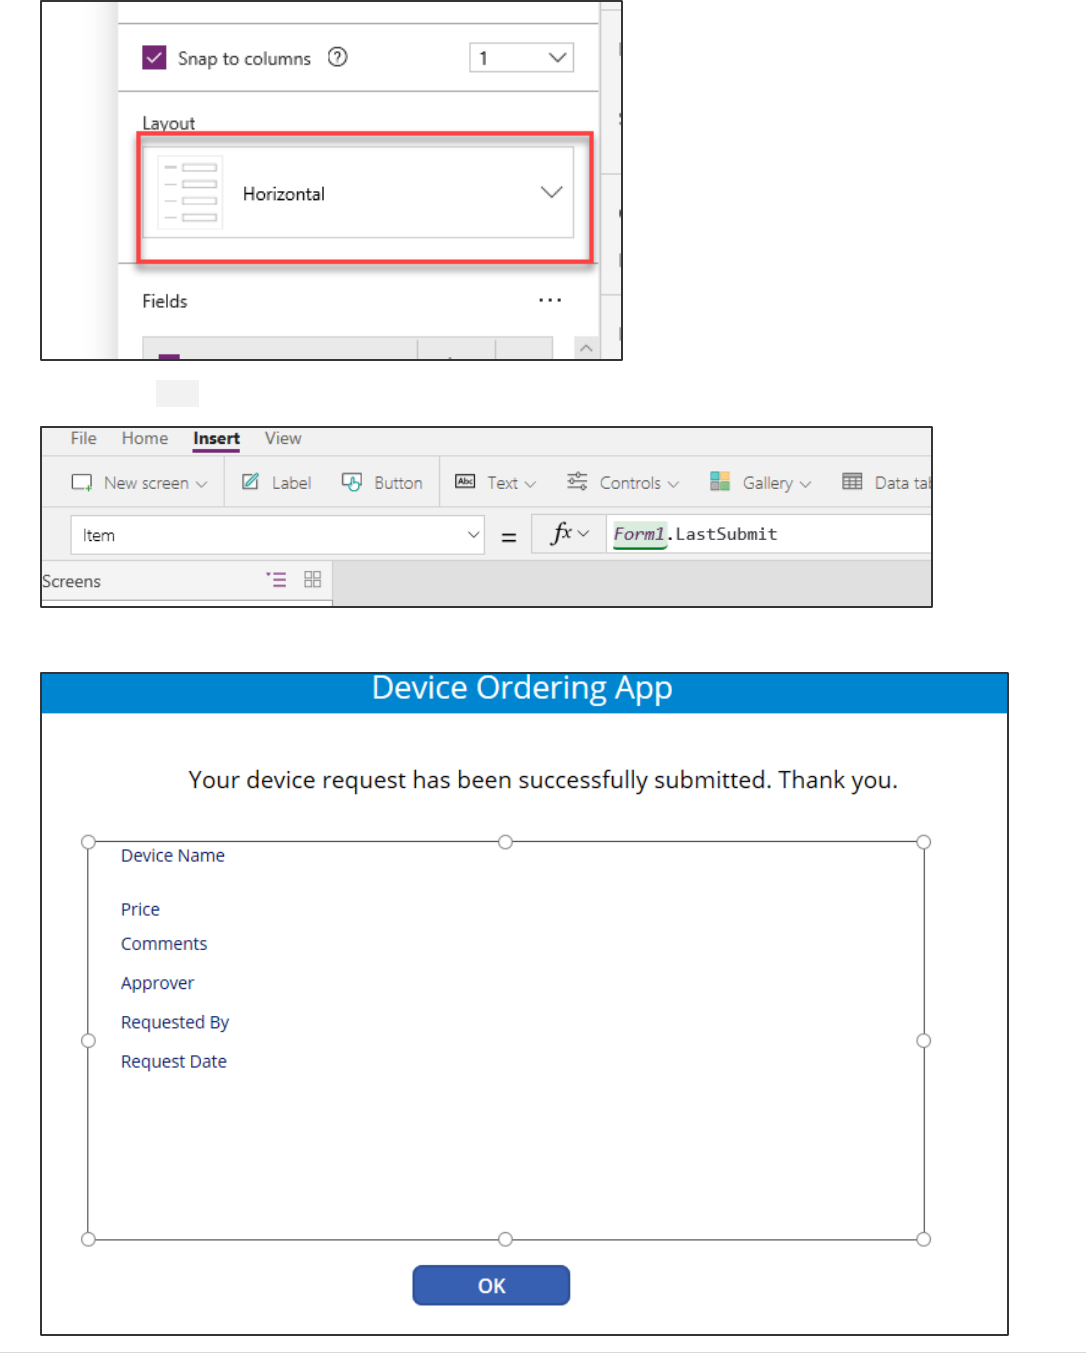
16. Select the fields to display: Device Name, Price, Comments, Approver, Requested By, Request Date.
17. Change the Snap to columns value from 3 to 1.
18. Change the Layout from Vertical to Horizontal.
Power platform App in a Day Common Data Service for Apps
©2018 Microsoft Corporation 58 | P a g e
19. Set form Item property to Form1.LastSubmit.
20. Reposition/Resize the for until it looks like the image below.
Power platform App in a Day Common Data Service for Apps
59 | P a g e ©2018 Microsoft Corporation
21. Save your Changes and Publish.
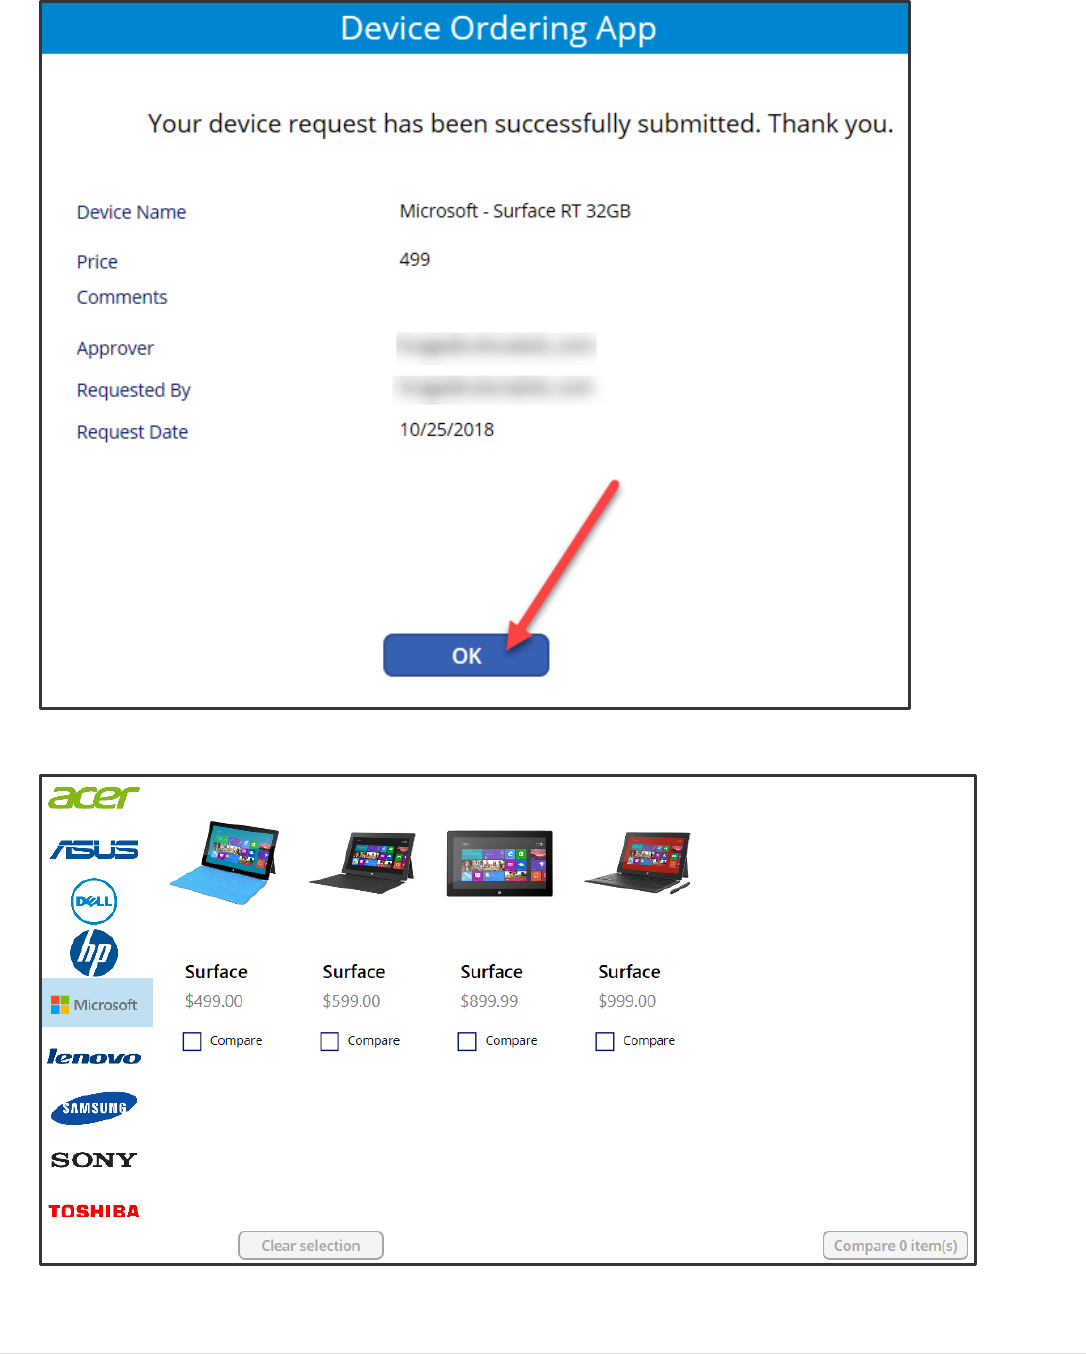
22. Select the MainScreen and click Play.
23. Select few more devices and click Compare
24. Select one of the new devices, provide a comment and click Submit.
25. Verify that the confirmation screen shows the order details. Click OK.
Power platform App in a Day Common Data Service for Apps
©2018 Microsoft Corporation 60 | P a g e
26. The application will navigate back to the main screen and the compare list will be cleared.
27. Close the application.

Power platform App in a Day Common Data Service for Apps
61 | P a g e ©2018 Microsoft Corporation
Lab survey
We would appreciate your feedback on the Power platform technologies and on this hands-on-lab, such as the quality of
documentation and the usefulness of the learning experience.
Please use the survey at http://aka.ms/appinadayLabSurvey to share your feedback.
You may provide feedback for each module as you complete it or at the end once you’ve completed all the modules.
Thank you!
References
App in a Day introduces some of the key functionalities available in PowerApps, Microsoft Flow, Power BI and the
Common Data Service. For an up to date list of learning references, see http://aka.ms/powerapps-resources and
http://aka.ms/flow-resources and http://powerbi.com.

Power platform App in a Day Common Data Service for Apps
©2018 Microsoft Corporation 62 | P a g e
Copyright
© 2018 Microsoft Corporation. All rights reserved.
By using this demo/lab, you agree to the following terms:
The technology/functionality described in this demo/lab is provided by Microsoft Corporation for purposes of obtaining
your feedback and to provide you with a learning experience. You may only use the demo/lab to evaluate such technology
features and functionality and provide feedback to Microsoft. You may not use it for any other purpose. You may not
modify, copy, distribute, transmit, display, perform, reproduce, publish, license, create derivative works from, transfer, or
sell this demo/lab or any portion thereof.
COPYING OR REPRODUCTION OF THE DEMO/LAB (OR ANY PORTION OF IT) TO ANY OTHER SERVER OR LOCATION FOR
FURTHER REPRODUCTION OR REDISTRIBUTION IS EXPRESSLY PROHIBITED.
THIS DEMO/LAB PROVIDES CERTAIN SOFTWARE TECHNOLOGY/PRODUCT FEATURES AND FUNCTIONALITY, INCLUDING
POTENTIAL NEW FEATURES AND CONCEPTS, IN A SIMULATED ENVIRONMENT WITHOUT COMPLEX SET-UP OR
INSTALLATION FOR THE PURPOSE DESCRIBED ABOVE. THE TECHNOLOGY/CONCEPTS REPRESENTED IN THIS DEMO/LAB
MAY NOT REPRESENT FULL FEATURE FUNCTIONALITY AND MAY NOT WORK THE WAY A FINAL VERSION MAY WORK.
WE ALSO MAY NOT RELEASE A FINAL VERSION OF SUCH FEATURES OR CONCEPTS. YOUR EXPERIENCE WITH USING
SUCH FEATURES AND FUNCTIONALITY IN A PHYSICAL ENVIRONMENT MAY ALSO BE DIFFERENT.
FEEDBACK. If you give feedback about the technology features, functionality and/or concepts described in this demo/lab
to Microsoft, you give to Microsoft, without charge, the right to use, share and commercialize your feedback in any way
and for any purpose. You also give to third parties, without charge, any patent rights needed for their products,
technologies and services to use or interface with any specific parts of a Microsoft software or service that includes the
feedback. You will not give feedback that is subject to a license that requires Microsoft to license its software or
documentation to third parties because we include your feedback in them. These rights survive this agreement.
MICROSOFT CORPORATION HEREBY DISCLAIMS ALL WARRANTIES AND CONDITIONS WITH REGARD TO THE DEMO/LAB,
INCLUDING ALL WARRANTIES AND CONDITIONS OF MERCHANTABILITY, WHETHER EXPRESS, IMPLIED OR STATUTORY,
FITNESS FOR A PARTICULAR PURPOSE, TITLE AND NON-INFRINGEMENT. MICROSOFT DOES NOT MAKE ANY
ASSURANCES OR REPRESENTATIONS WITH REGARD TO THE ACCURACY OF THE RESULTS, OUTPUT THAT DERIVES FROM
USE OF DEMO/ LAB, OR SUITABILITY OF THE INFORMATION CONTAINED IN THE DEMO/LAB FOR ANY PURPOSE.
DISCLAIMER
This demo/lab contains only a portion of new features and enhancements in Microsoft PowerApps. Some of the features
might change in future releases of the product. In this demo/lab, you will learn about some, but not all, new features.
