036106 003 Chloe Bassinet White_IM White IM
User Manual: 036106-003 Chloe Bassinet - White_IM
Open the PDF directly: View PDF ![]() .
.
Page Count: 18
IMPORTANT:
RETAIN FOR FUTURE REFERENCE,
READ CAREFULLY
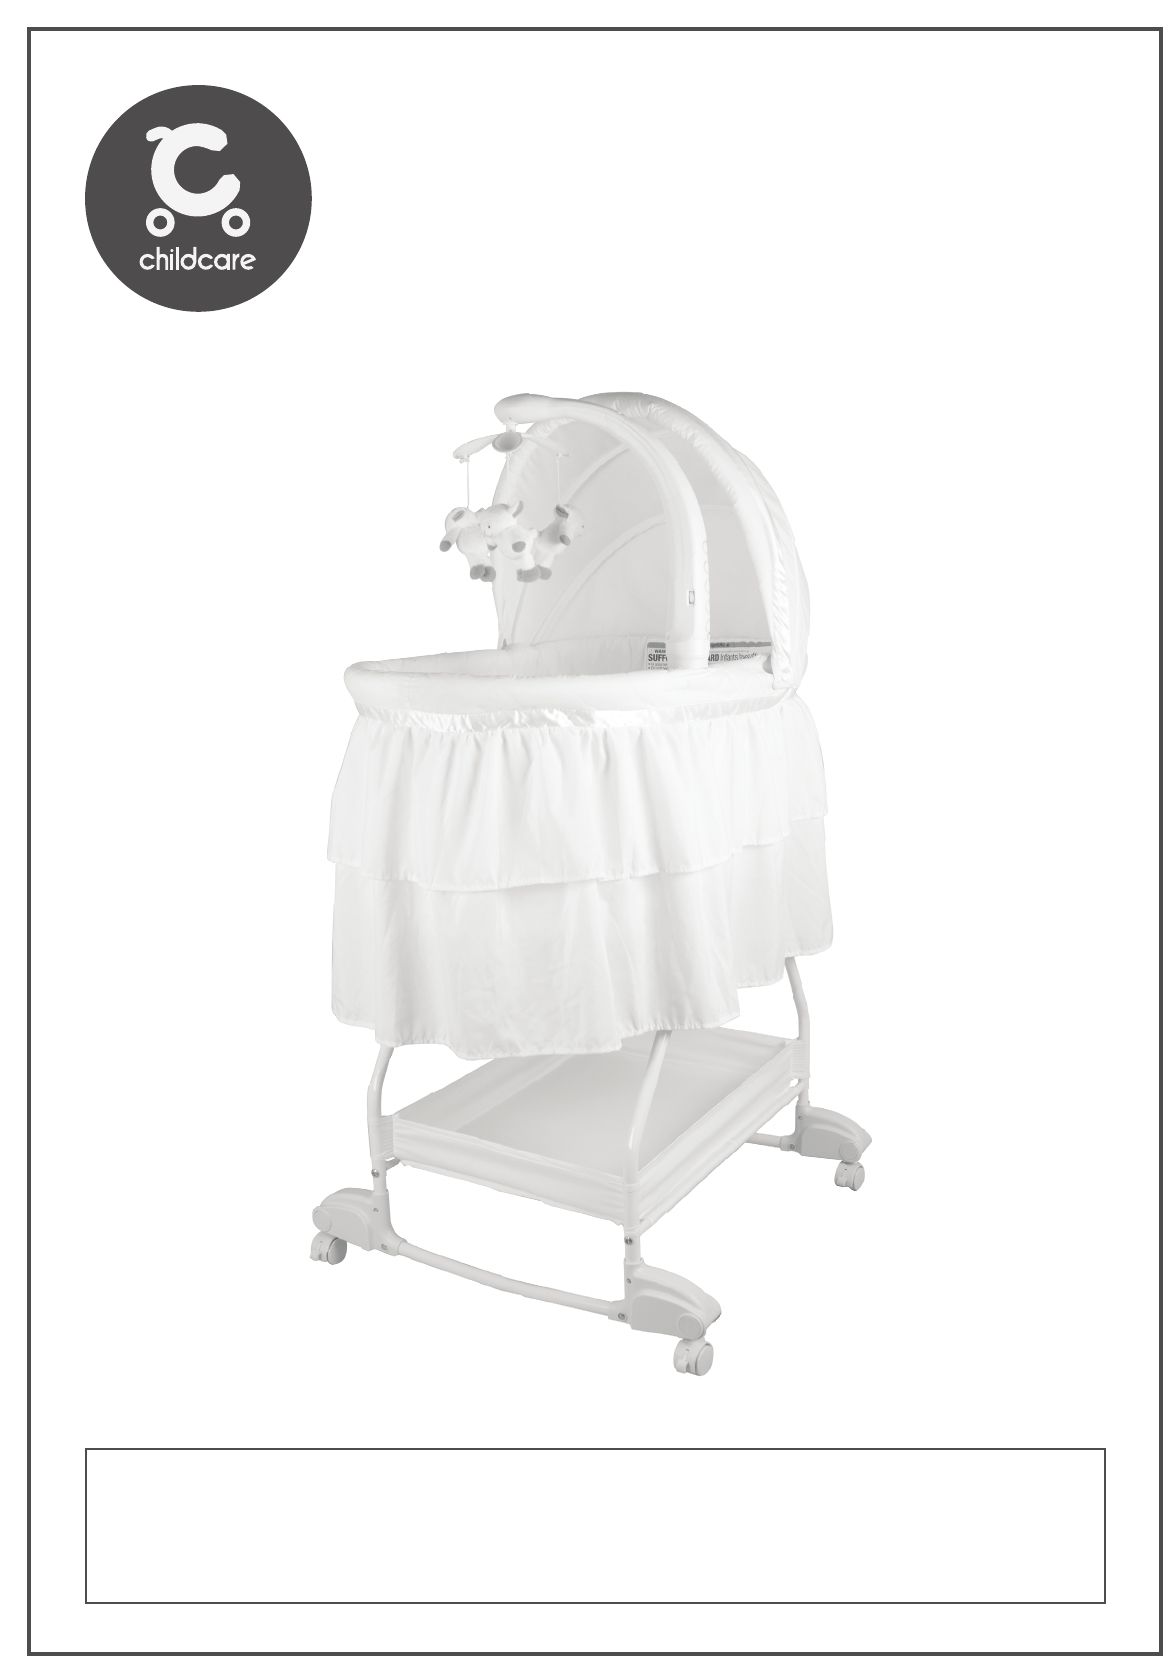
Chloe
ROCKING BASSINET “WHITE”
#036106-003
2
This product is intended for use for babies aged between 0 and 6 months, weighing up to a maximum of 8kgs.
IMPORTANT! Before assembly or each use, inspect this product for damaged hardware, loose joints,
missing parts or sharp edges.
When a child is able to sit, kneel or pull itself up, the product should not be used anymore for this child.
DO NOT leave any object inside the product that could reduce its depth.
Be aware of the risk of open res and other sources of strong heat, such as electric bar res, gas res etc.
Follow the manufacturer’s assembly instructions in detail to ensure the safety features of the bassinet/
cradle are not compromised. Failure to follow these warnings and instructions could result in serious injury
or death.
It is recommended that the mattress used in this rocking bassinet be a snug t and not exceed 38mm in
thickness.
DO NOT use if any parts are missing or broken. Contact manufacturer for replacement parts and
instructions if needed. Never substitute parts.
This is to minimise the risk of a child’s limb becoming caught in the gap.
• Read all instructions before assembly and use of the bassinet.
• Keep instructions for future use.
• Adult assembly is required.
• Tools required for assembly: (not included) Phillips Head Screwdriver and Wrench.
• Product features and styling may vary from photography.
SUFFOCATION HAZARD: Discard all packing materials immediately after opening. Plastic bags and ties may cause
suffocation or choking. For safety reasons ensure that after assembly is complete, that all tools, excess parts
including plastic packaging is removed from the bassinet vicinity to prevent from being accessed by children.
FALL HAZARD: To help prevent falls, do not use this product when infant begins to push up on hands and knees or has
reached manufacturer’s recommended maximum weight of 8kgs, whichever comes rst.
Read all instructions before assembly and use of the bassinet. Keep
instructions for future use.
FAILURE TO FOLLOW THESE WARNINGS AND INSTRUCTIONS COULD RESULT IN SERIOUS INJURY OR
DEATH.
FALL HAZARD - TO PREVENT FALLS; DO NOT USE THIS PRODUCT WHEN INFANT BEGINS TO PUSH
UP ON HANDS AND KNEES OR HAS REACHED THE MANUFACTURER’S RECOMMENDED MAXIMUM
WEIGHT OF 8KGS, WHICHEVER COMES FIRST.
SUFFOCATION HAZARD - INFANTS HAVE SUFFOCATED; IN GAPS BETWEEN AN EXTRA PAD AND THE
SIDE OF THE BASSINET/CRADLE, AND ON SOFT BEDDING.
USE ONLY THE PAD PROVIDED BY MANUFACTURER.
NEVER ADD A PILLOW, COMFORTER, OR ANOTHER MATTRESS FOR PADDING.
CAUTION: RECOMMENDED MATTRESS (SUPPLIED) SIZE IS 385MM WIDE X 765MM LONG X 22MM
IN THICKNESS MAXIMUM SIZE. IT IS RECOMMENDED THAT THE MATTRESS USED IN THIS ROCKING
BASSINET BE A SNUG FIT AND NOT EXCESS 38MM IN THICKNESS.
SAFETY PRECAUTIONS
WARNING

3
If sheet is used with the pad, use only the one provided by the bassinet manufacturer or one specically designed to t
the bassinet.
To reduce the risk of Sudden Infant Death Syndrome (SIDS), paediatricians recommend healthy infants be placed on their
backs to sleep, unless otherwise advised by your physician.
Use bassinet with only one child at a time.
Always attach all provided fasteners (strings, straps, clamps etc) tightly to the bassinet according to the
instructions. Check frequently.
Strings can cause strangulation! Do not place items with a string around a child’s neck, such as hood
strings or pacier cords. Do not suspend strings over a bassinet or attach strings to toys.
DO NOT use the body of a bassinet/cradle without its frame.
Be aware of the risk of open res and other sources of strong heat, such as electric bar res, gas res, etc. in
the near vicinity of the crib/cradle.
DO NOT leave child unattended in the bassinet. Always make sure the wheels or stands are in the locked down
position.
NEVER place bassinet near a window where cords from curtains can strangle a child.
Remove any tools or excess parts including plastic packaging from the bassinet vicinity after its assembly.
Discontinue use of the bassinet before the infant can sit up by themselves.
Padding and cushioning materials, including the mattress are to be sufciently rm to preclude conforming to
the contours of the infants face.
Ensure proper ventilation is maintained in and around the bassinet by limiting bed clothes, extra pillows or toys.
Ribbons or lace associated with the bedding may entangle the infant.
Promptly replace worn out or broken parts.
Young children should not be allowed to play unsupervised in the vicinity of the bassinet/ cradle.
SAFETY PRECAUTIONS

4
Due to variations in the style and design of our products, the photographs and illustrations shown in this
instruction manual are generic, therefore product fabrics, colour and design may vary from images shown.
CNP Brands reserves the right to alter product specications without notice as a result of our ongoing
policy of product improvement.
Contents
Assembly contents list
Assembly / Operating instructions
How to care for your Chloe Rocking Bassinet
Congratulations on your purchase of the Chloe
Rocking Bassinet.
This product has been designed and developed with safety,
comfort and functionality in mind. Please take the time to read
this manual carefully before using this product and keep it in a
safe place for future reference.
CONGRATULATIONS

5
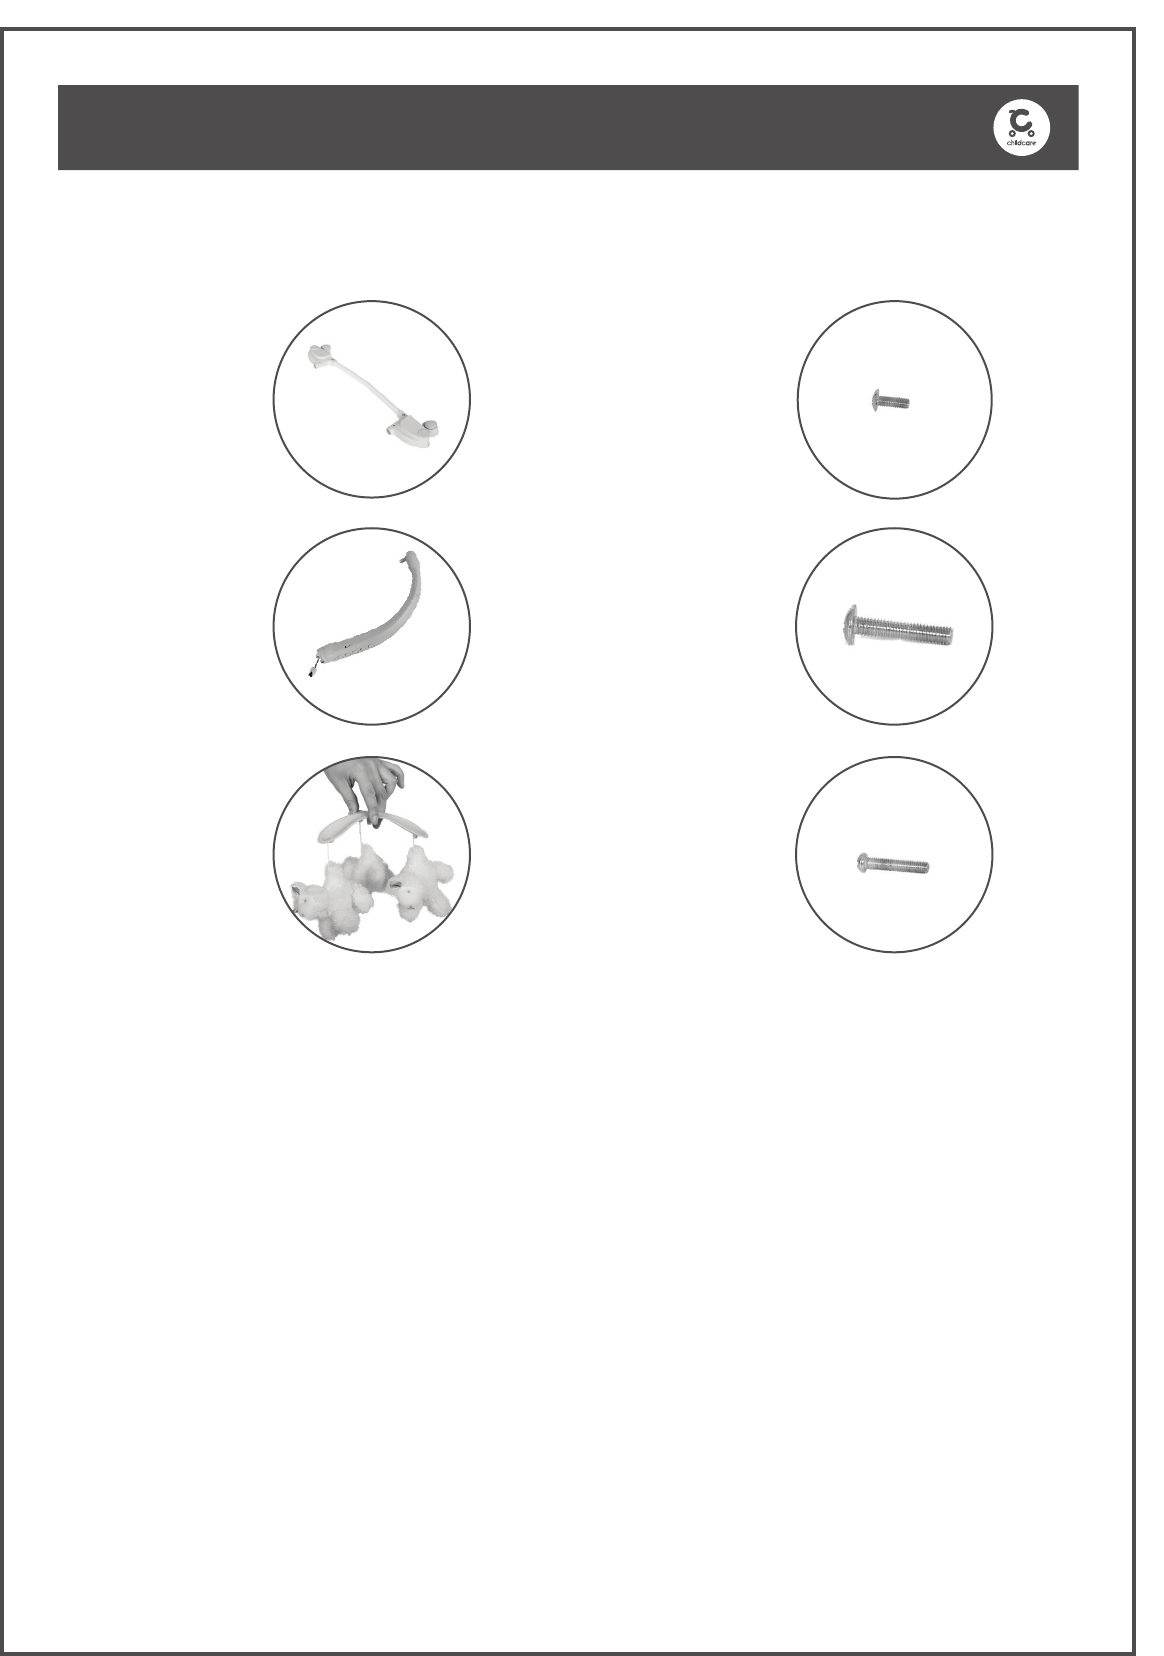
ASSEMBLY CONTENTS
Check what you have received...
You have received 1 box. Please check the contents of the
box against the list below. If anything is missing, please contact
Customer Service.
In Australia, contact CNP Brands on 1300 667 137, in New Zealand
contact Wainhouse Distribution on 0800 567 5000.
Supplied loose in box:
Top frame (do
not remove
foam)
Mattress pad
(with tted sheet)
x 1 x 1
x 4 x 1
x 2 x 1
x 1x 1
Leg frames
‘A’ x 2
‘B’ x 2
Bassinet liner
Basket crossbar Basket
Canopy
Mattress
support board
(with battery
compartment)
6
ASSEMBLY CONTENTS
Supplied loose in box (continued):
Base with wheels 8mm screwx 2 x 8
x 1 x 4
x 1 x 2
Mobile arm 33mm screw
Mobile with toys
28mm screw
(pre-assembled
on mobile arm)
There are no accessories recommended for use with this Childcare Chloe Rocking Bassinet.
7
ASSEMBLY / OPERATING INSTRUCTIONS
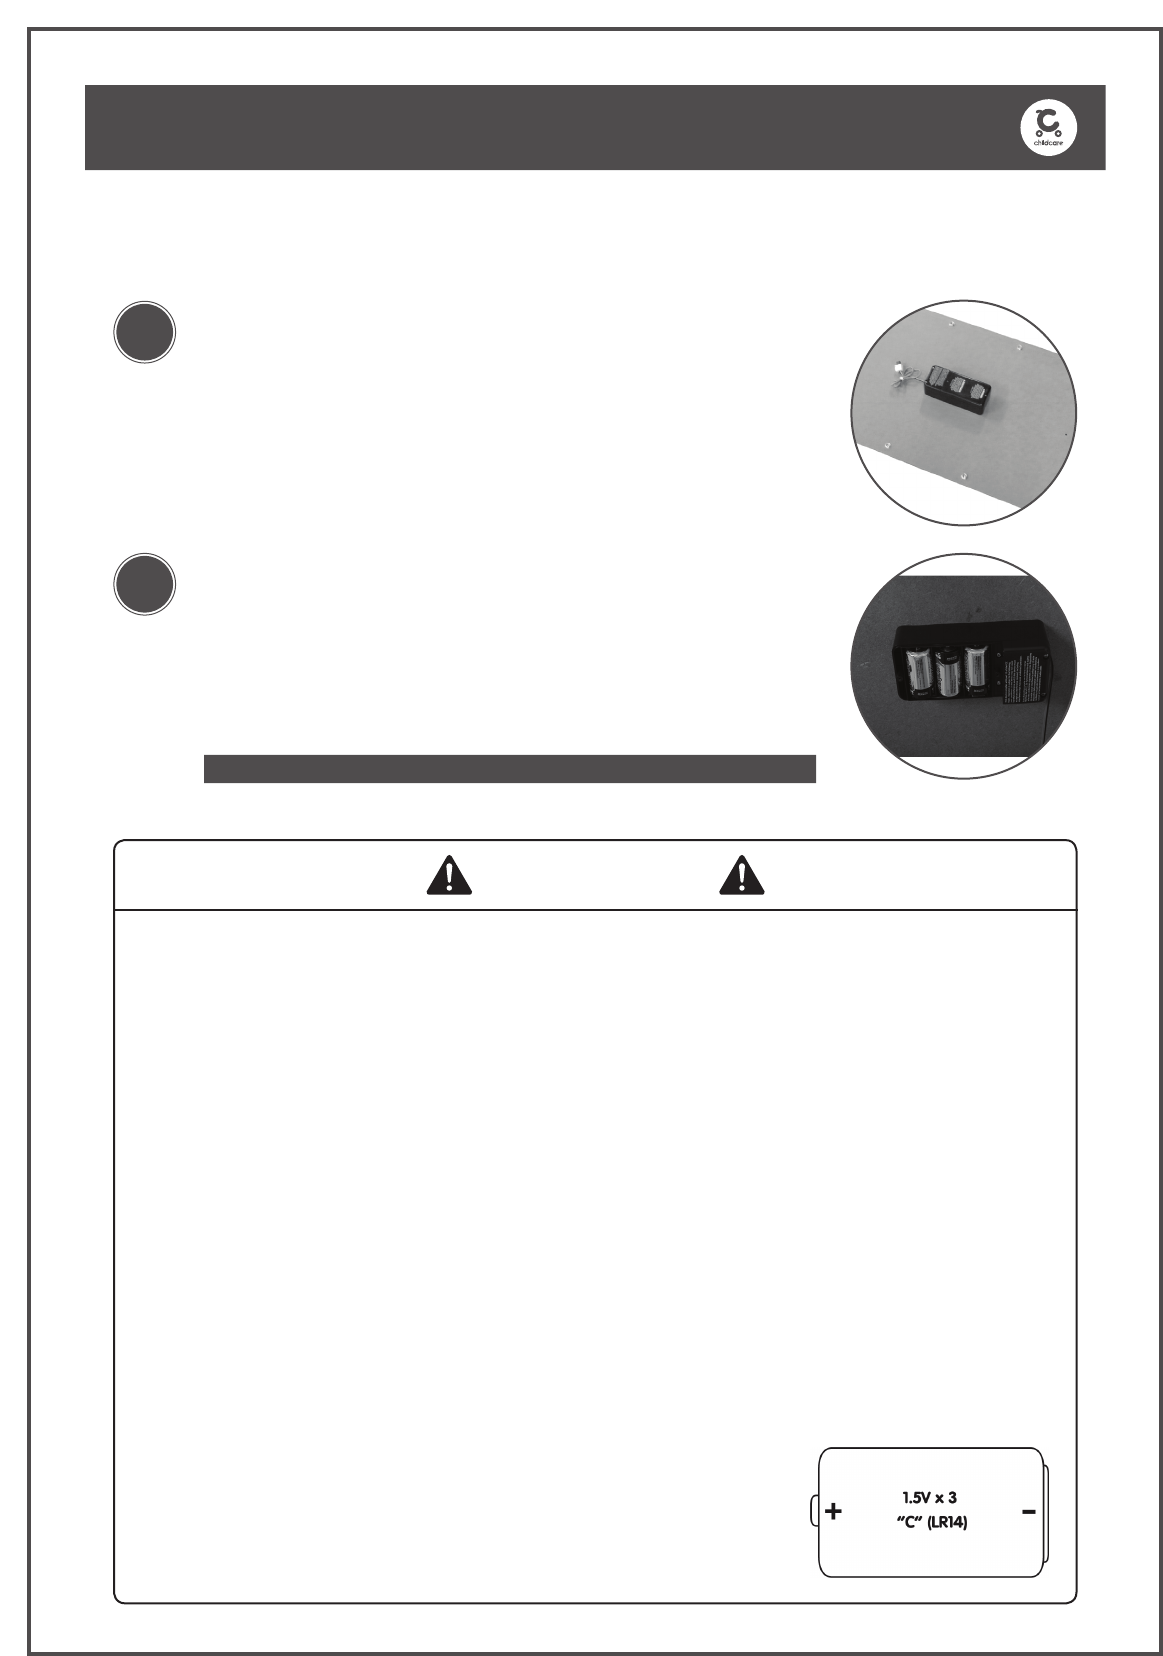
To install Battery...
1
2
Locate the battery compartment on the underside of
the mattress support board.
Loosen the screws in the battery compartment cover
with a Phillips head screwdriver.
Lift and remove.
Insert three “C” (LR14) alkaline batteries (not supplied)
into the battery compartment.
Replace the battery compartment cover and tighten
the screws.
1a.
1b.
1c.
2a.
2b.
HINT: We recommend using alkaline batteries for longer battery life.
In exceptional circumstances, batteries leak uids that can cause a chemical burn injury or
ruin your product. To avoid leakage:
DO NOT mix old and new batteries or batteries of different types: alkaline, standard (carbon
zinc) or rechargeable (nickel-cadmium).
Insert batteries as indicated inside the battery compartment.
Remove batteries during long periods of non-use.
ALWAYS remove exhausted batteries from the product. Dispose of batteries safely. DO NOT
dispose of this product in a re. The batteries inside may explode or leak.
NEVER short-circuit the battery terminals.
Use ONLY batteries of the same equivalent type, as recommended.
DO NOT charge non-rechargeable batteries.
Remove rechargeable batteries from the product before charging.
If removable, rechargeable batteries are used, they are only to be charged under adult
supervision.
WARNING
8
ASSEMBLY / OPERATING INSTRUCTIONS
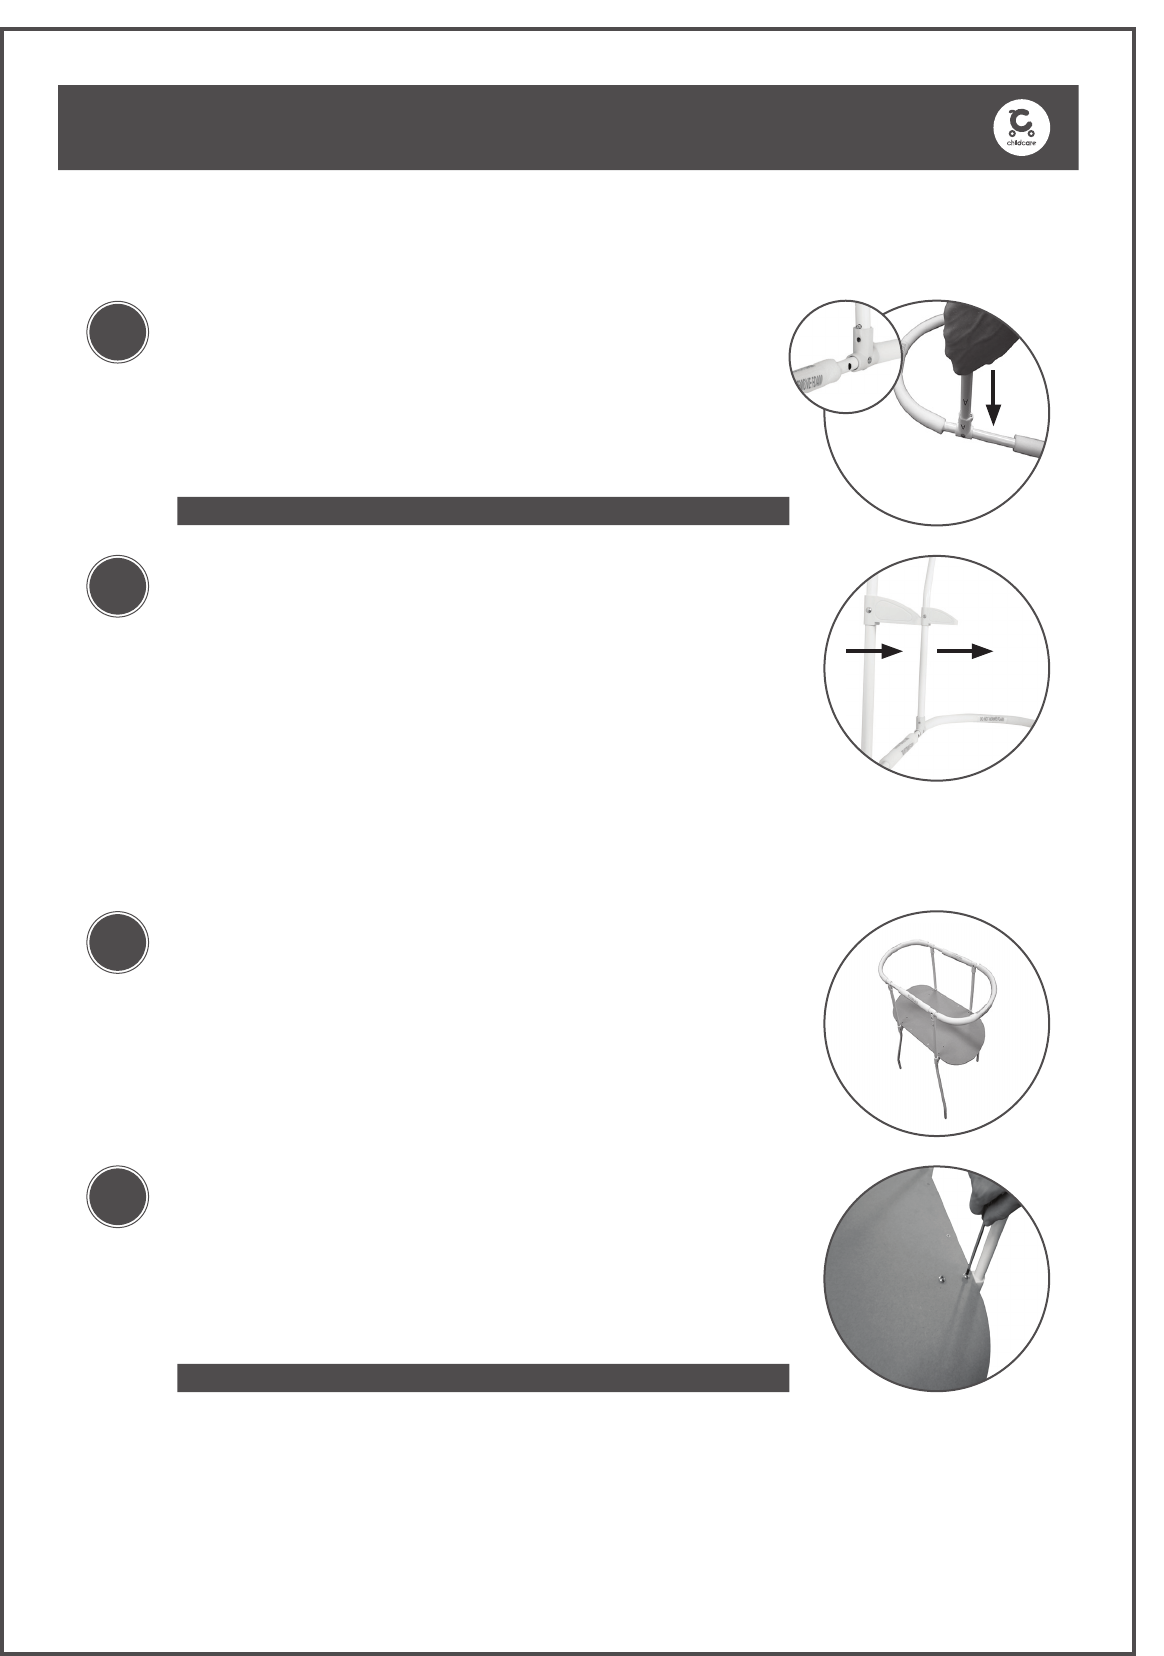
To insert Leg Frames...
To attach Base Frame...
1
2
1
2
Insert one leg marked ‘A’ into one of the joint on the top
frame marked ‘A’.
Push the pop pin in whilst inserting leg into joint,
ensuring the pop pin clicks into position.
Repeat for remaining three legs, ensuring the correct
leg is placed in the correct position according to the
corresponding letters.
Ensure the plastic supports are facing inward, as shown
in image.
Turn the frame onto it’s feet and place the mattress
board into position.
Ensure the battery box is facing downwards.
Secure the mattress support board to the frame using
the 8mm screw with a Phillips head screwdriver (not
supplied).
1a.
1b.
2a.
2b.
1a.
1b.
2a.
PLEASE NOTE: The assembly of this bassinet may require two people.
PLEASE NOTE: Do not tighten bolts completely
face inward
9
ASSEMBLY / OPERATING INSTRUCTIONS
To assemble Bassinet Frame & Basket...
1
2
Slide the basket loops over all four legs.
Ensure to pull basket down far enough as not to
obstruct cross bar holes.
Slide cross bar through basket side openings.
Attach basket cross bar using the 33mm screws.
Repeat for other side.
1a.
1b.
2a.
2b.
2c.
PLEASE NOTE: Tighten all bolts now including mattress base
To attach Wheels...
1Turn the unit upside down and line up the base with
wheels with the leg frame tubes.
Push in pop pins while pushing down on the base with
wheels until it clicks into place.
Repeat for the other side.
1a.
1b.
1c.
10
ASSEMBLY / OPERATING INSTRUCTIONS
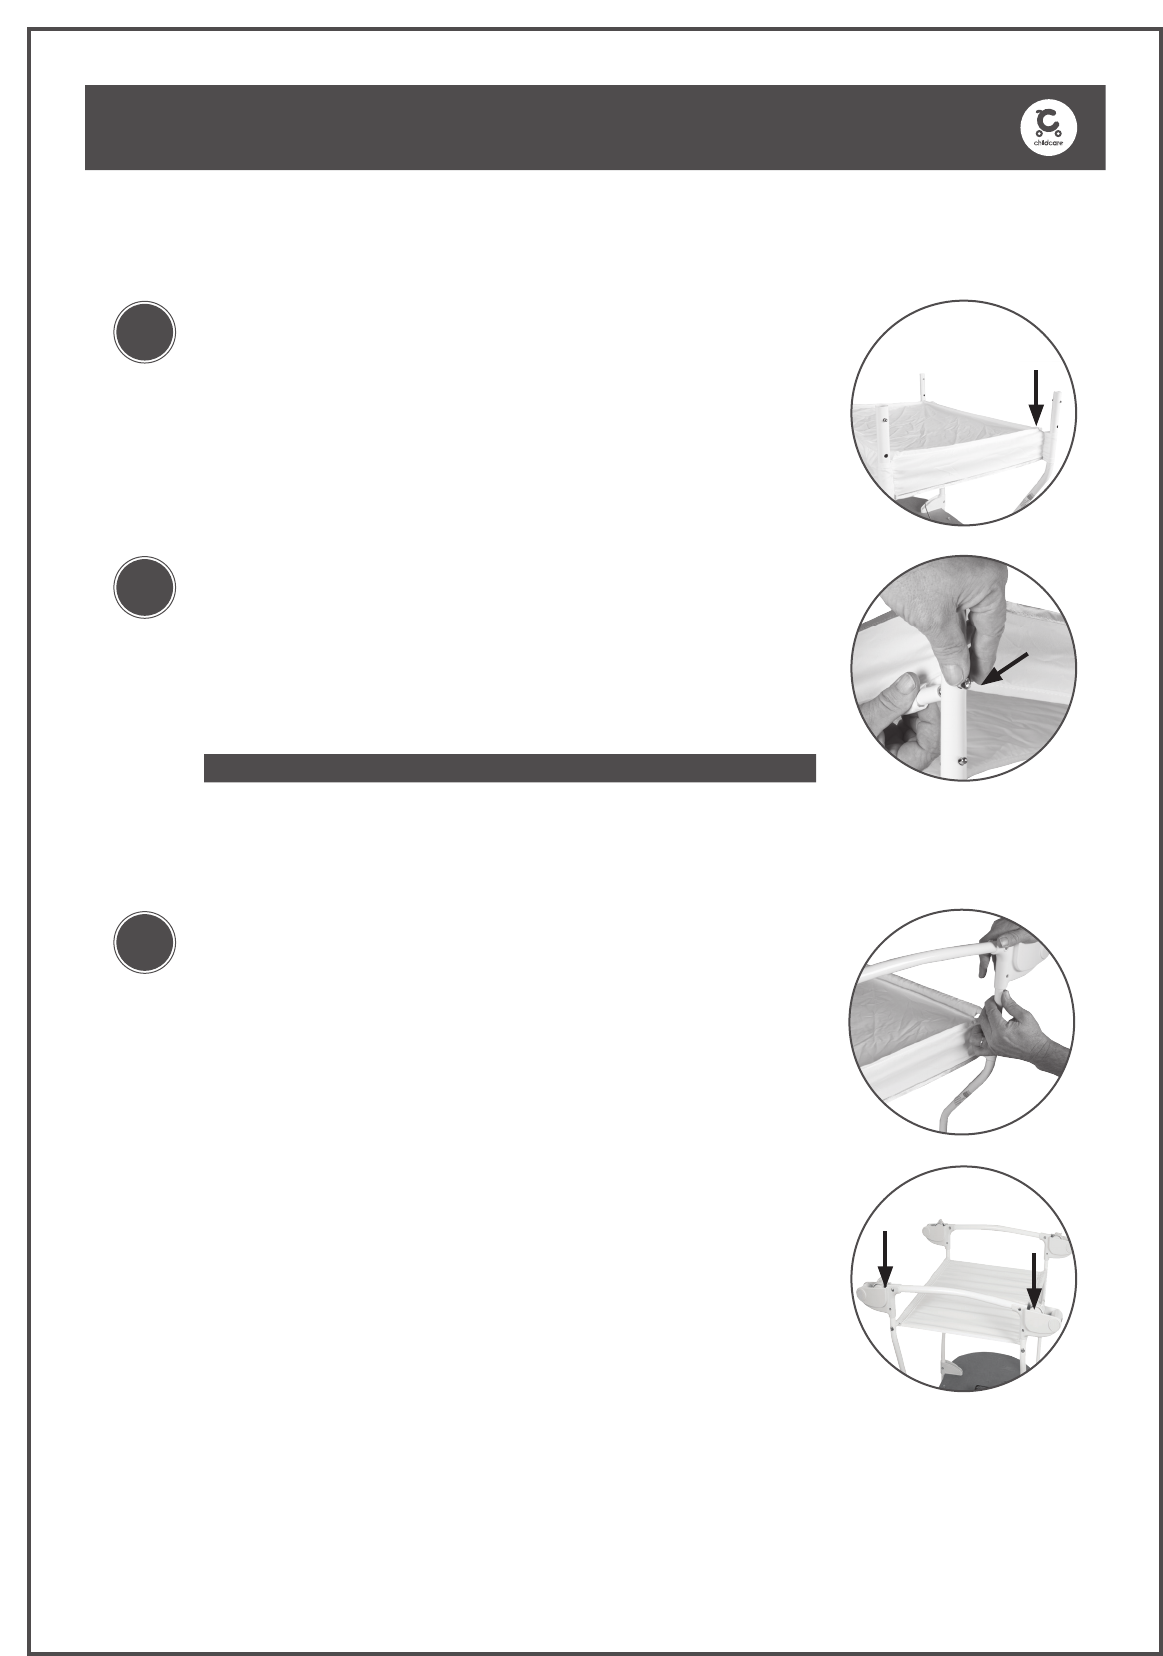
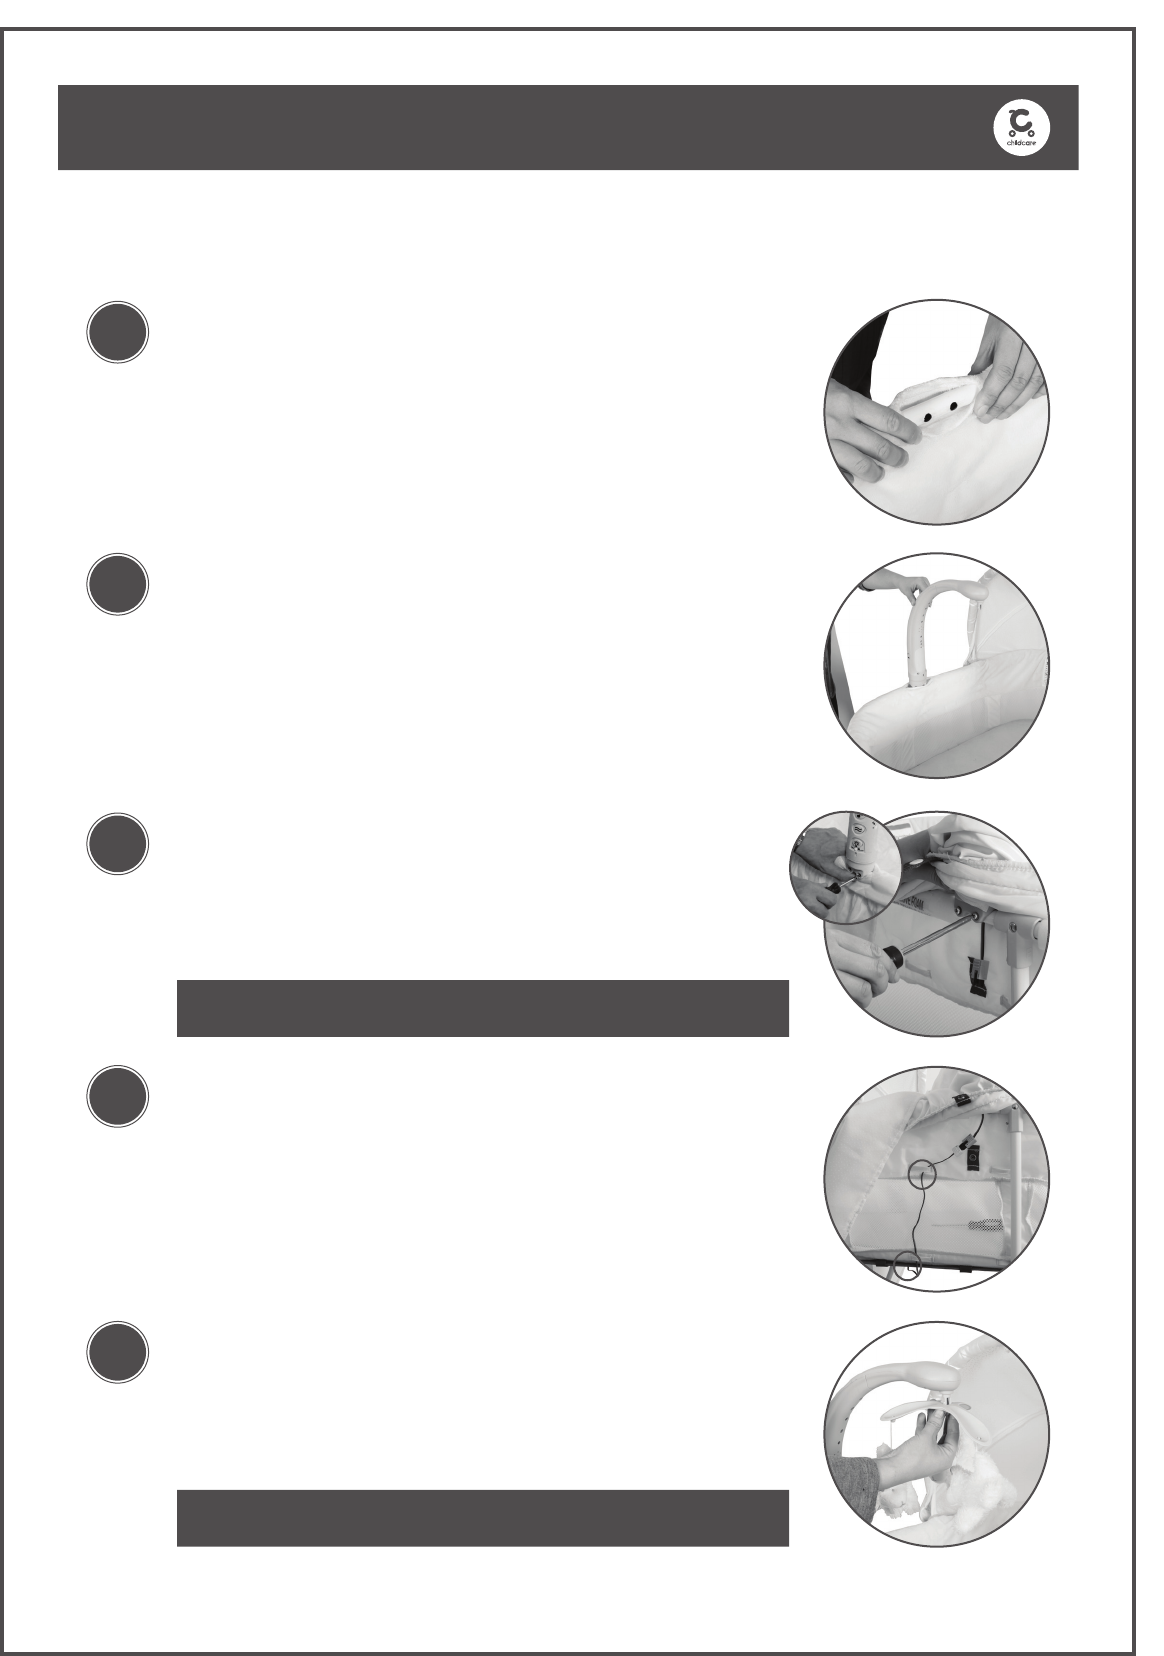
To assemble Bassinet Liner...
1
2
3
4
Turn the frame back onto it’s feet.
Place the bassinet liner into position.
Ensure the mobile arm slot is lined up with the
attachment holes as shown in the image.
Stretch the elastic pockets in the bottom of the
bassinet liner over the ends of the support board as
shown.
Attach the press studs on the bottom of the bassinet
liner to the corresponding press studs located on the
underside of the support board as shown.
There are a total of four press studs.
Ensure the press studs are secure.
Attach the press studs on the tabs of the bassinet liner
to the press studs on the outside of the bassinet liner
as shown.
There are a total of eight press studs.
Ensure the press studs are secure.
1a.
1b.
1c.
2a.
3a.
3b.
3c.
4a.
4b.
4c.
11
ASSEMBLY / OPERATING INSTRUCTIONS
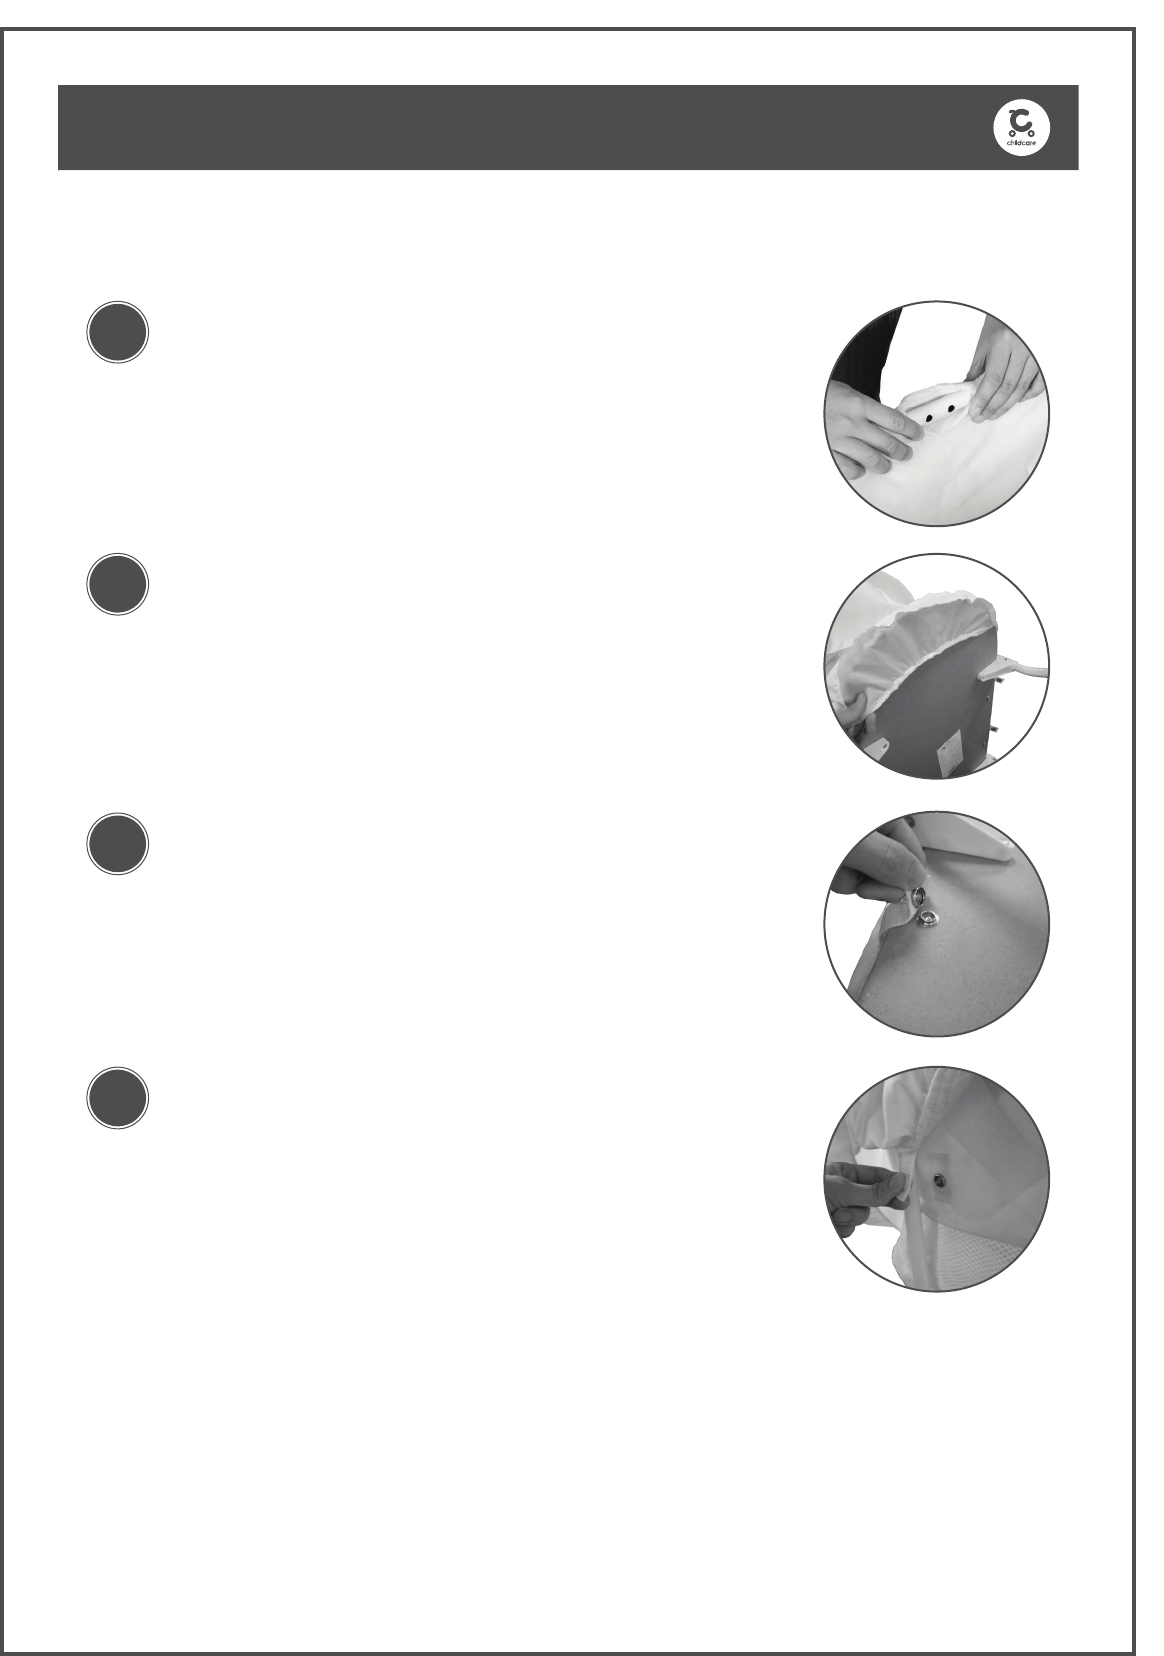
To insert Mattress Pad...
To attach Canopy...
1
1
2
3
Place mattress pad into bassinet.
Position the canopy over the top end of the bassinet
with the warning label.
Push the canopy ratchets onto the frame on both
sides of the bassinet.
Attach the Velcro on each canopy ap to the side of
the bassinet liner.
Attach the Velcro strips on the rear of the canopy liner
edge to the Velcro strips on the rear outer edge of
bassinet top rail liner.
1a.
1a.
1b.
2a.
3a.
12
ASSEMBLY / OPERATING INSTRUCTIONS
To attach Mobile Arm...
1
2
3
4
5
Remove the two pre-assembled 28mm screws from
the mobile arm.
Open the slot in the bassinet liner and position the
mobile arm on the frame.
Ensure there is no foam restricting the frame.
Position the mobile arm on the frame ensuring the
holes on the mobile arm line up with the holes in the
frame.
Re-insert two 5mm (28mm diameter) screws into the
holes and tighten with a Phillips head screwdriver.
Thread the battery wire with connector under the
frame and up through the bottom two fabric loops.
Push the mobile wire connector into the battery wire
connector.
Fit the mobile to the mobile arm by pushing it up rmly.
1a.
1b.
1c.
2a.
3a.
4a.
4b.
5a.
PLEASE NOTE! Ensure the mobile wire with connector is on the inside of the
frame.
PLEASE NOTE! Always ensure the mobile is securely attached to the bassinet
prior to each use.
13
To attach Mobile Arm (continued)...
To operate Mobile...
ASSEMBLY / OPERATING INSTRUCTIONS
Failure to follow these warnings and the instructions could result in serious injury or death.
The mobile is intended for visual stimulation and is not intended to be grasped by child.
Remove mobile when baby begins to push up on hands and knees to prevent possible injury
by entanglement.
Always attach all provided fasteners (strings, straps, clamps, etc.) tightly to the bassinet
according to the instructions. Check frequently.
DO NOT add additional strings or straps to the mobile assembly.
WARNING
1
2
3
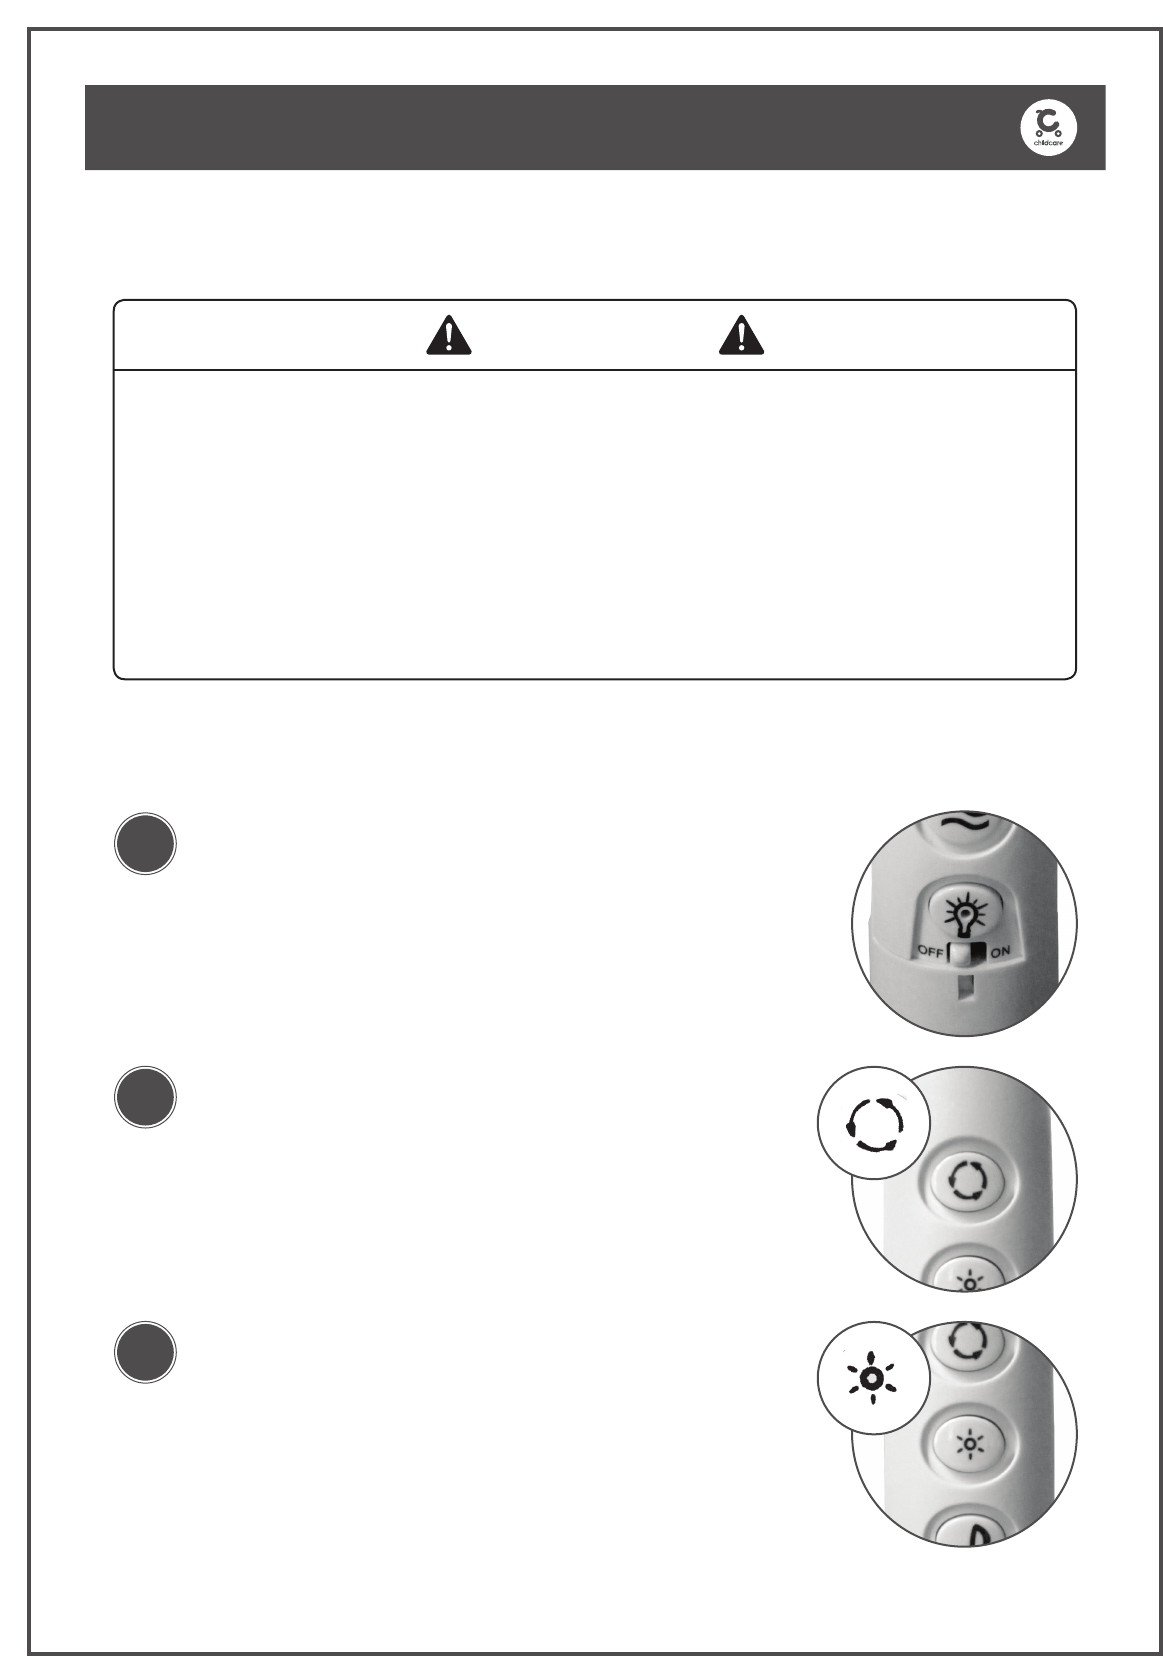
Mobile Function On/Off Switch
Slide the Mobile Functions On/Off button at the base
of the mobile arm t turn on power.
This is the main power switch to the mobile arm and
also turns on the power LED on the Night Light button.
The LED will stay on in the dark.
Rotate Mobile Toys Button
Press to begin a 5 minute cycle of rotation.
Press again to stop the mobile.
Press again to start a new 5 minute cycle. If this button
is pressed while mobile is operating, the rotation cycle
will restart.
Twinkling Lights Button
Press to start a 5 minute light show.
Press again to stop the light show.
1a.
1b.
1c.
2a.
2b.
2c.
3a.
3b.
14
To operate Mobile (continued)...
ASSEMBLY / OPERATING INSTRUCTIONS
4
5
7
6
8
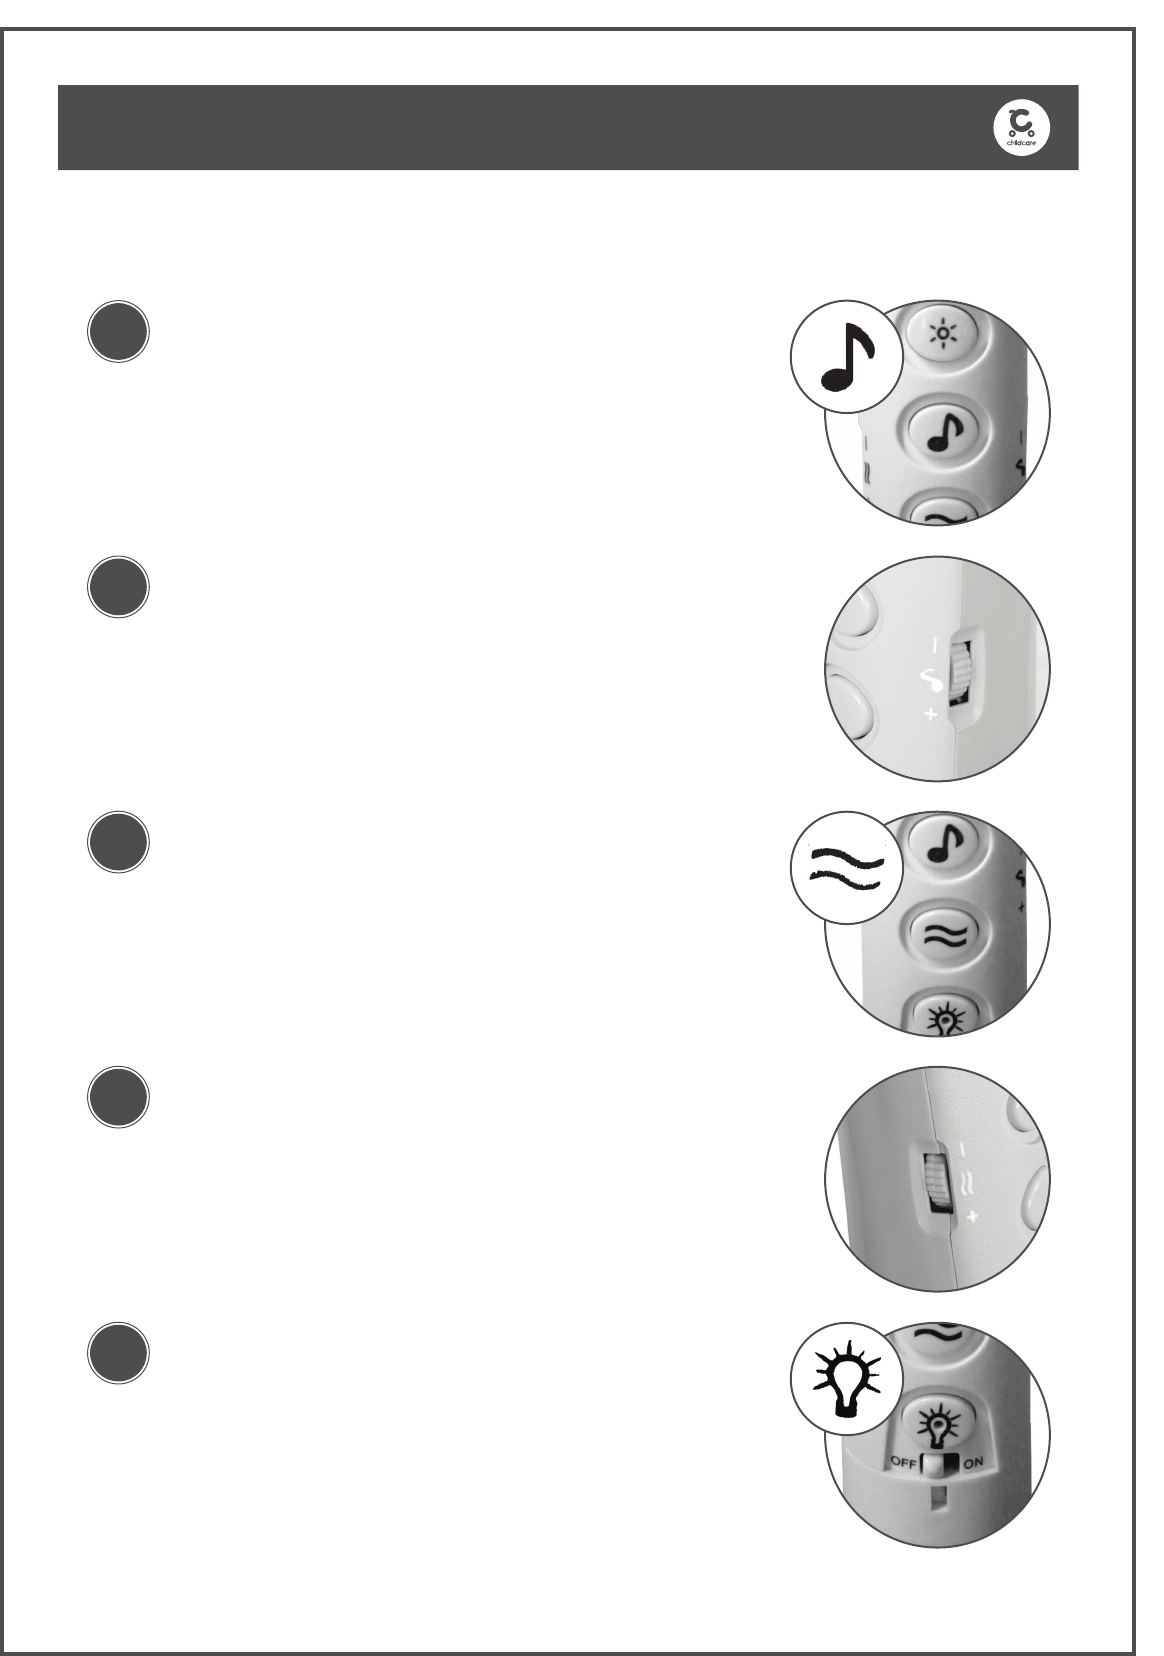
Music Button
Press to start a 5 minute cycle of music.
Press again to stop the music.
Music Volume Switch
Push toward + for high volume.
Push toward - for low volume.
Vibration Volume Switch
Push toward + for high vibration.
Push toward - for low vibration.
Vibrations Button
Press to start vibrations.
Press to stop vibrations.
Night Light
Press to turn on mobile light for 5 minutes.
Press again to turn light off.
Press to begin a 5 minute cycle of rotation.
4a.
4b.
5a.
5b.
7a.
7b.
6a.
6b.
8a.
8b.
8c.

15
ASSEMBLY / OPERATING INSTRUCTIONS
To operate Stationary and Rocking modes...
To lock and unlock Wheels...
1
2
1
2
To convert bassinet to stationary mode, extract wheel
as shown in image.
Make sure you hear a ‘click’ to ensure the wheel locks
into place.
Repeat this procedure to lower the other three wheels.
To engage Rocking mode, reverse the above steps.
Ensure the wheels are rmly pushed into the base
before engaging in rocking mode.
To lock wheels, press down rmly on the tab on the
wheel as shown in the image.
Ensure this is repeated with each wheel.
To unlock wheels, push up on the tab on the wheel as
shown in the image.
Ensure this is repeated with each wheel.
1a.
2a.
2b.
2c.
2d.
1a.
1b.
2a.
2b.

16
HOW TO CARE FOR YOUR CHILDCARE BASSINET
Cleaning
Maintenance
This product has been designed and developed with safety, comfort and functionality
in mind. Please take the time to read this manual carefully before using this product
and keep it in a safe place for future reference.
To ensure the long-lasting use of your bassinet, dry it with a soft absorbent cloth after
use. Use a damp cloth to clean the frame. Do not use abrasive cleaners. Allow it to
dry completely before folding or storing it away. Do not dry clean, or use bleach on
fabrics or trims. Do not machine wash, tumble or spin dry, unless the care labelling
on the product permits these methods. For washing fabric, carefully comply with the
instructions indicated on the label.
Always check parts regularly for tightness of screws, nuts and other
fasteners – tighten or replace if required. On a regular basis check the
condition of the product and the presence of any possible damage. In
the case of damage do not use and keep out of reach of children. To
maintain the safety of your bassinet, seek prompt repairs for bent, torn,
worn or broken parts. Use only those parts and accessories approved by
CNP Brands.
If you have any difculties in assembling the bassinet, please contact our
Service Department.
In Australia, contact CNP Brands on 1300 667 137, in New Zealand
contact Wainhouse Distribution on 0800 567 5000.

17
ABOUT US
About CNP Brands
Currently, CNP Brands boasts one of the most diverse brand portfolios
with a combination of company owned brands and distribution
agreements. These include distribution lines for 4moms, Brica, Cybex,
Eveno, Good Baby, Lascal, Maclaren, Motorola, Munchkin, OiOi
and Summer Infant.
Our own brands, including Childcare, have gone from strength to
strength in recent years. Childcare, and our premium brand bebe
care, demonstrate our commitment to quality and continuing
investment in product development.

18
Distributed in Australia by CNP Brands
20 Calarco Drive,
Derrimut, VIC, 3030
Customer Service 1300 667 137
W: www.cnpbrands.com.au
E: info@cnpbrands.com.au
F: www.facebook.com/CNPBrands
I: @cnp_baby
Distributed in New Zealand by Wainhouse
Distribution
2-6 Argyle St, Morningside,
PO Box 41-014,
St Lukes, Auckland, New Zealand
Customer Service: 0800 567 5000
E: helpline@wainhousedist.co.nz
