03 Power Apps Driven App Lab Manual
User Manual:
Open the PDF directly: View PDF ![]() .
.
Page Count: 44

Power platform
App in a Day
Module 3: PowerApps Model-driven App
Hands-on Lab Step-by-Step
November 2018
Contents
PowerApps Model-driven App ................................................................................................................................................... 1
Lab Prerequisites ............................................................................................................................................................................................................... 1
Exercise 1: Create Application and add Fields to the Device Order Entity.................................................................................................... 3
Exercise 2: Business Process Flow .............................................................................................................................................................................. 11
Exercise 3: Form and View Modification ................................................................................................................................................................. 29
Exercise 4: Test the application .................................................................................................................................................................................. 36
Lab survey .......................................................................................................................................................................................................................... 41
References .......................................................................................................................................................................................................................... 41
Copyright ..................................................................................................................................................................................... 42

Power platform App in a Day Module 3: PowerApps Model-driven app
1 | P a g e ©2018 Microsoft Corporation
PowerApps Model-driven
App
Lab Prerequisites
This is the third lab in a five-part series covering PowerApps, Common Data Service, and Flow. The assumption is that you
have successfully completed the first two modules, or at least the initial part of setting up an environment as described in
the overview – “00-AppInADay Lab Overview.pdf”.
If you have not completed the previous two modules, you can use the partially completed version of the lab package in
the “\Completed\Module2” folder. Follow the instructions in the document “Importing Module 2 Completed” before
proceeding with this module, which will provision the app, and the Common Data Service entity into your environment.
Model-driven Apps – A brief introduction
The model-driven apps are built by composing multiple page types and components built using several focused
designers. Additionally, there are designers for the entity and business logic. The page types come from the View
Designer, Form Designer, and Dashboard Designer. Visual components include the Sitemap Designer and Business
Process Flow Designer. The App Designer then composes the app by identifying the UI elements to show. The multiple
designers allow rich targeted definition of different parts of the app and its behavior.
• App Designer specifies the sitemap, global dashboards, business processes flows, and entity forms, views, and
dashboards (learn more)
• Sitemap Designer provides the application navigation that is always available (learn more)
• Business Process Designer provides stages and steps to guide users consistently through common business
processes within a form (learn more)
• Entity Designer defines the fields, relationships, and metadata for an entity (learn more)
• Business Rule Designer provides no-low business logic for an entity (learn more)
• View Designer specifies columns and filter conditions for a record list (learn more)
• Form Designer specifies the fields and controls along with layout for a single record (learn more)
• Dashboard Designer summaries one or more entities using charts, lists, etc. (learn more)
The model-driven apps are fully responsive so a single definition works from web to tablet to mobile devices. This is a
different with the canvas apps which need to choose the mobile vs. Tablet when defining the app.
Scenario for building a Model-driven app
In the first lab module, you built a PowerApps Canvas application for an organization where every three years the
employees go through a hardware refresh cycle. The application let employees place a request for a device using the
Power platform App in a Day Module 3: PowerApps Model-driven app
©2018 Microsoft Corporation 2 | P a g e
PowerApps app that you built. In the second lab module, using a custom entity you created in the Common Data Service
lab, you stored that request for processing.
From the requesting employee's point of view, after they place the order, the new device just magically shows up. But,
there is a back-office process that needs to happen to manage the procurement, setup of the device and distribution of
the device to that requesting employee. In this lab you will be building a PowerApps Model-driven app that will be used
by the two or three back office staff that manage fulfilling device requests. Using the Model-driven app style, you can take
advantage of the Business Process feature of Model-driven apps to keep the back-office staff on track for each device
request.
Model-driven apps are a new style of application you can build directly from PowerApps.com. Model-driven apps make it
easy to build forms over data applications quickly. This style of application brings together forms, views, dashboards and
charts quickly to provide a productive user experience for working with related data. These components can quickly be
customized to show only the data that is relevant for the scenario.
Entity views: Views are what users see when they look at a list of records from the Common Data Service for Apps. Views
define the columns that are visible as well as the criteria for inclusion of the records in the display.
Entity forms: Forms are used when users drill down into a record from an Entity View. Forms are created using a visual
drag-and-drop designer to place fields into the form that is structured into tabs and sections.
Business process flows: These flows are interactive visual guides to help the user through a business process. Business
process flows use the concept of stages that contain steps. Stages are milestones in the process that need to be
completed and the steps highlight to the user either data to collect or tasks to complete the stage to progress. Flows are
created using a visual designer using drag and drop to compose the flow and establish any branching conditions
(different paths in the business process) that must be handled.
For more details on Model-driven apps and the differences between Canvas apps and Model-driven apps, see the product
announcement at https://powerapps.microsoft.com/blog/powerapps-spring-announce/.
Power platform App in a Day Module 3: PowerApps Model-driven app
3 | P a g e ©2018 Microsoft Corporation
Exercise 1: Create Application and add Fields to the Device Order
Entity
In this exercise, you will be creating a standalone Model-driven application that will leverage the same Device Request
entity you created in the Common Data Service in Lab 2.
Task 1: Create an application
The first thing you will do is create a Model-driven application. This application will serve as a container to identify all the
components that make up the application. It also will include a sitemap that defines the custom navigation users will use
to navigate between the components (Entity views, Dashboards and other visual components).
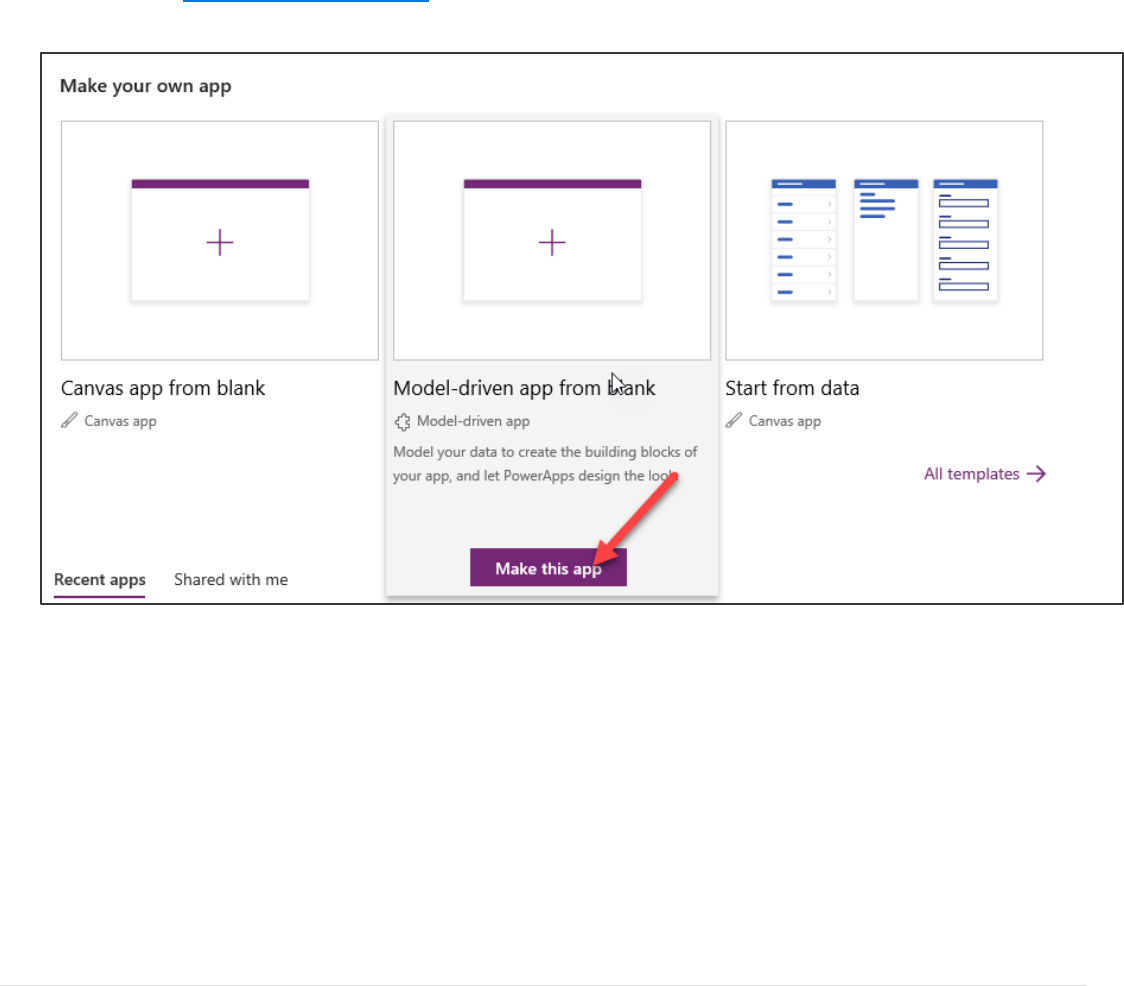
1. Navigate to https://web.powerapps.com, and select the environment you created.
2. Hover over the Model Driven App from Black and click Make this App.
Power platform App in a Day Module 3: PowerApps Model-driven app
©2018 Microsoft Corporation 4 | P a g e
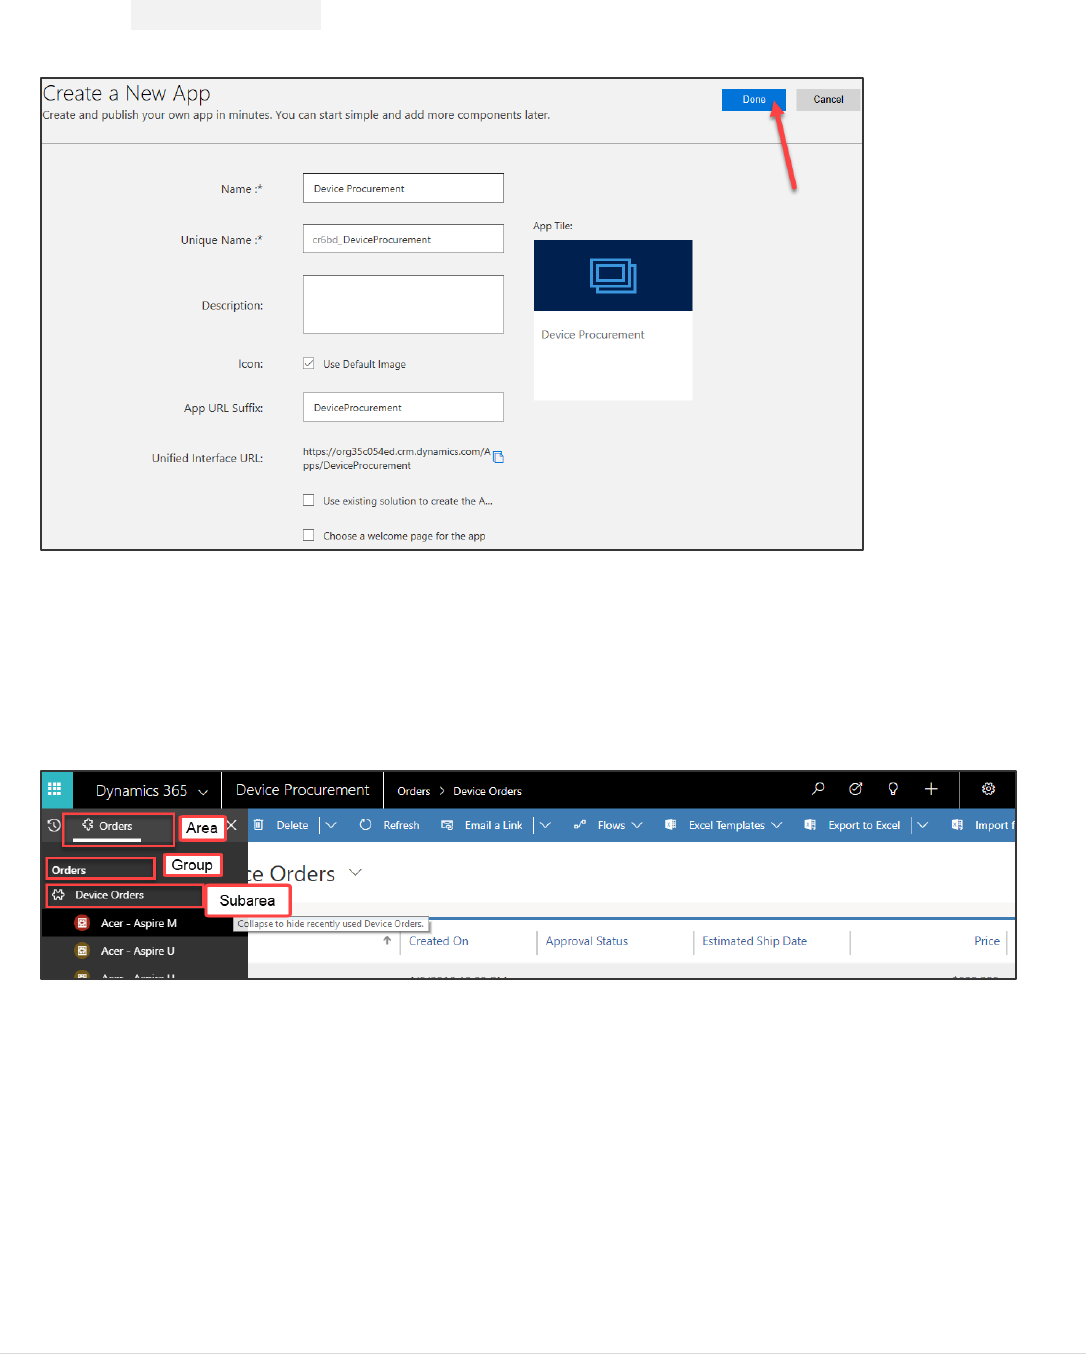
3. Enter Device Procurement for Name and click Done. You have now created the app definition and will start
adding components in to build the app.
Note: When building a real app, you would also upload an image to be used as the App Tile. The App Tile is seen by
the user in the list of all their applications.
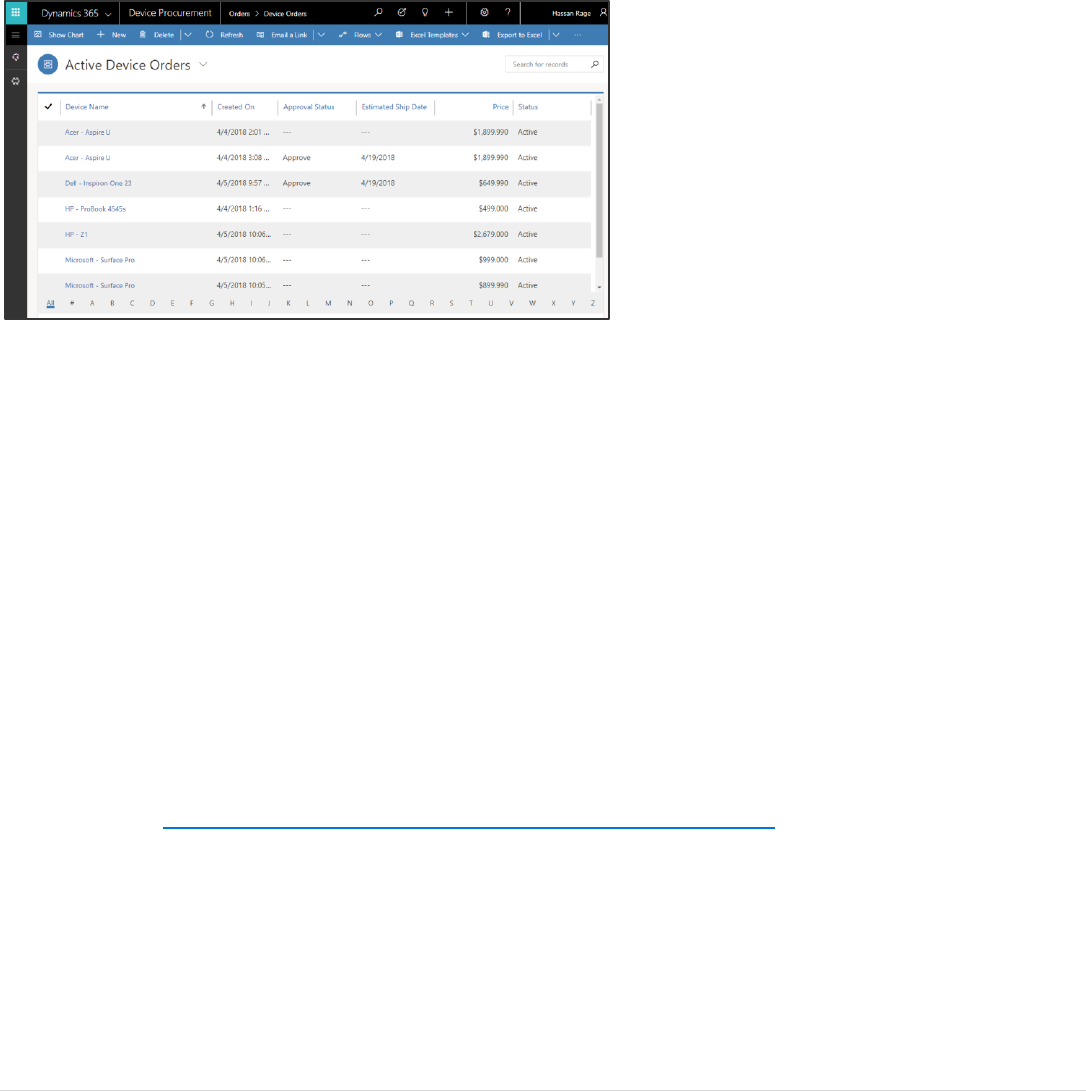
Next, you will build a Site Map for the application, the completed Site Map will look like the image
below.
Power platform App in a Day Module 3: PowerApps Model-driven app
5 | P a g e ©2018 Microsoft Corporation
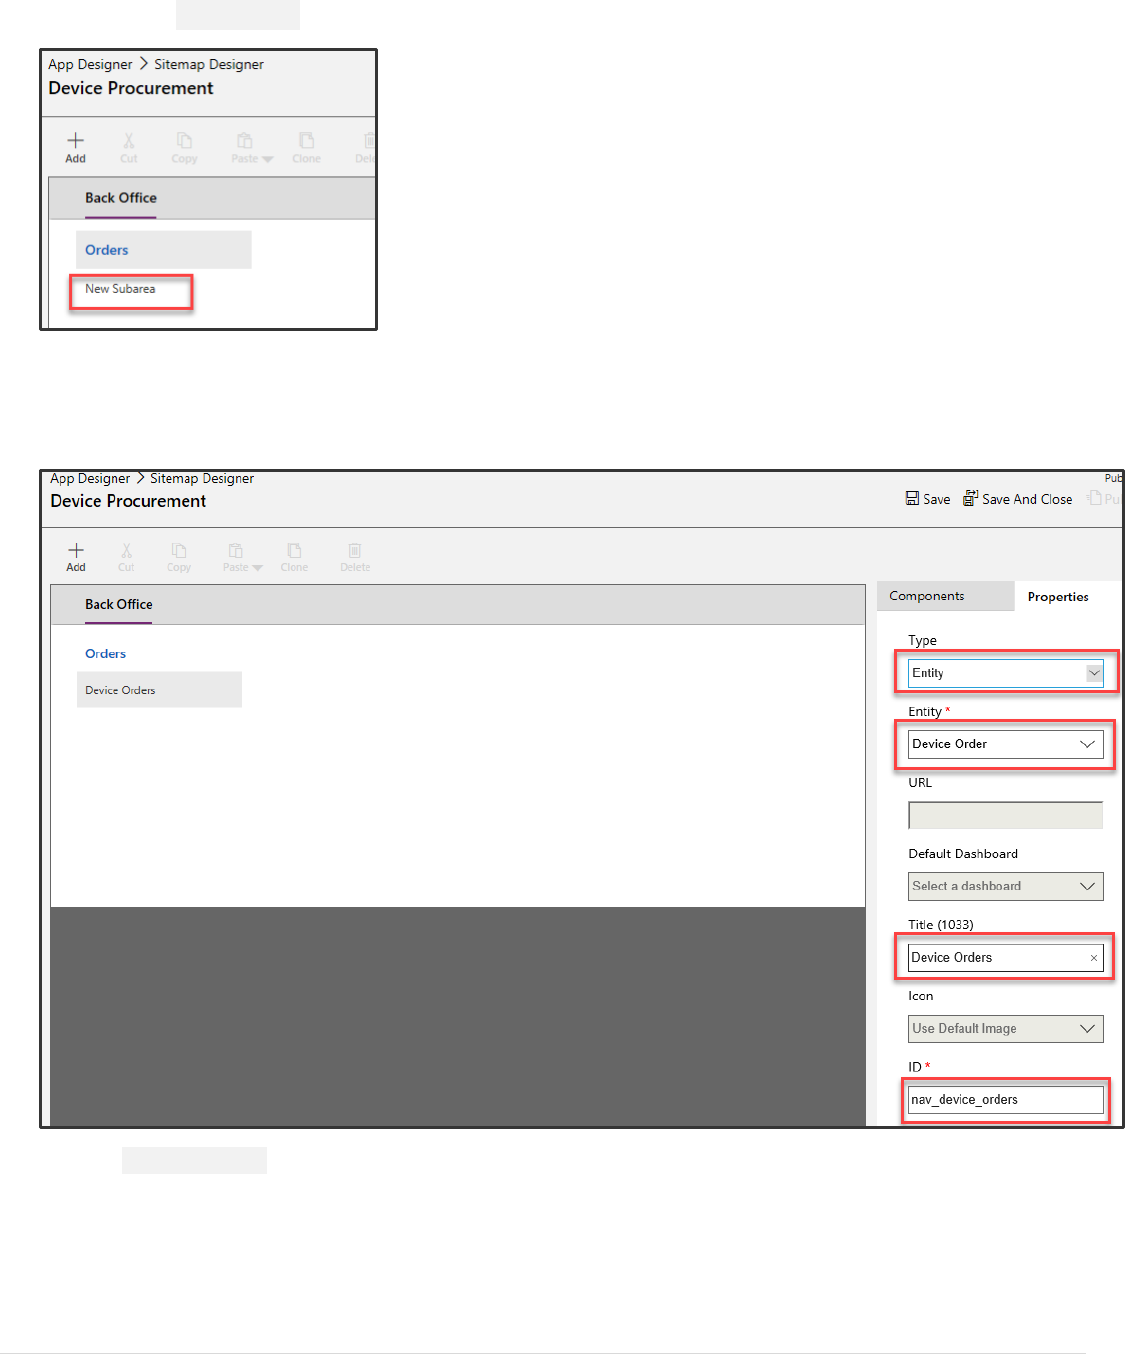
4. Click Site Map. This will launch the designer that will let you modify the App navigation.
5. Select the New Area label, in the properties rename it Back Office and enter nav_backoffice for ID. If you were
building a more complex application, you could use Areas to group together related items making it easy for the
user to navigate between the components.
Note: The properties panel on the right will only show if you click on the New Area on the left.
6. Select the New Group and provide the information shown in the image.
Note: The properties panel on the right will only show if you click on the New Group on the left.
Power platform App in a Day Module 3: PowerApps Model-driven app
©2018 Microsoft Corporation 6 | P a g e
7. Select the New Subarea.
Note: The properties panel on the right will only show if you click on the New Subarea on the left.
8. Set the Type field to Entity, select DeviceOrder for Entity, enter Device Orders for Title and enter
nav_device_orders for ID.
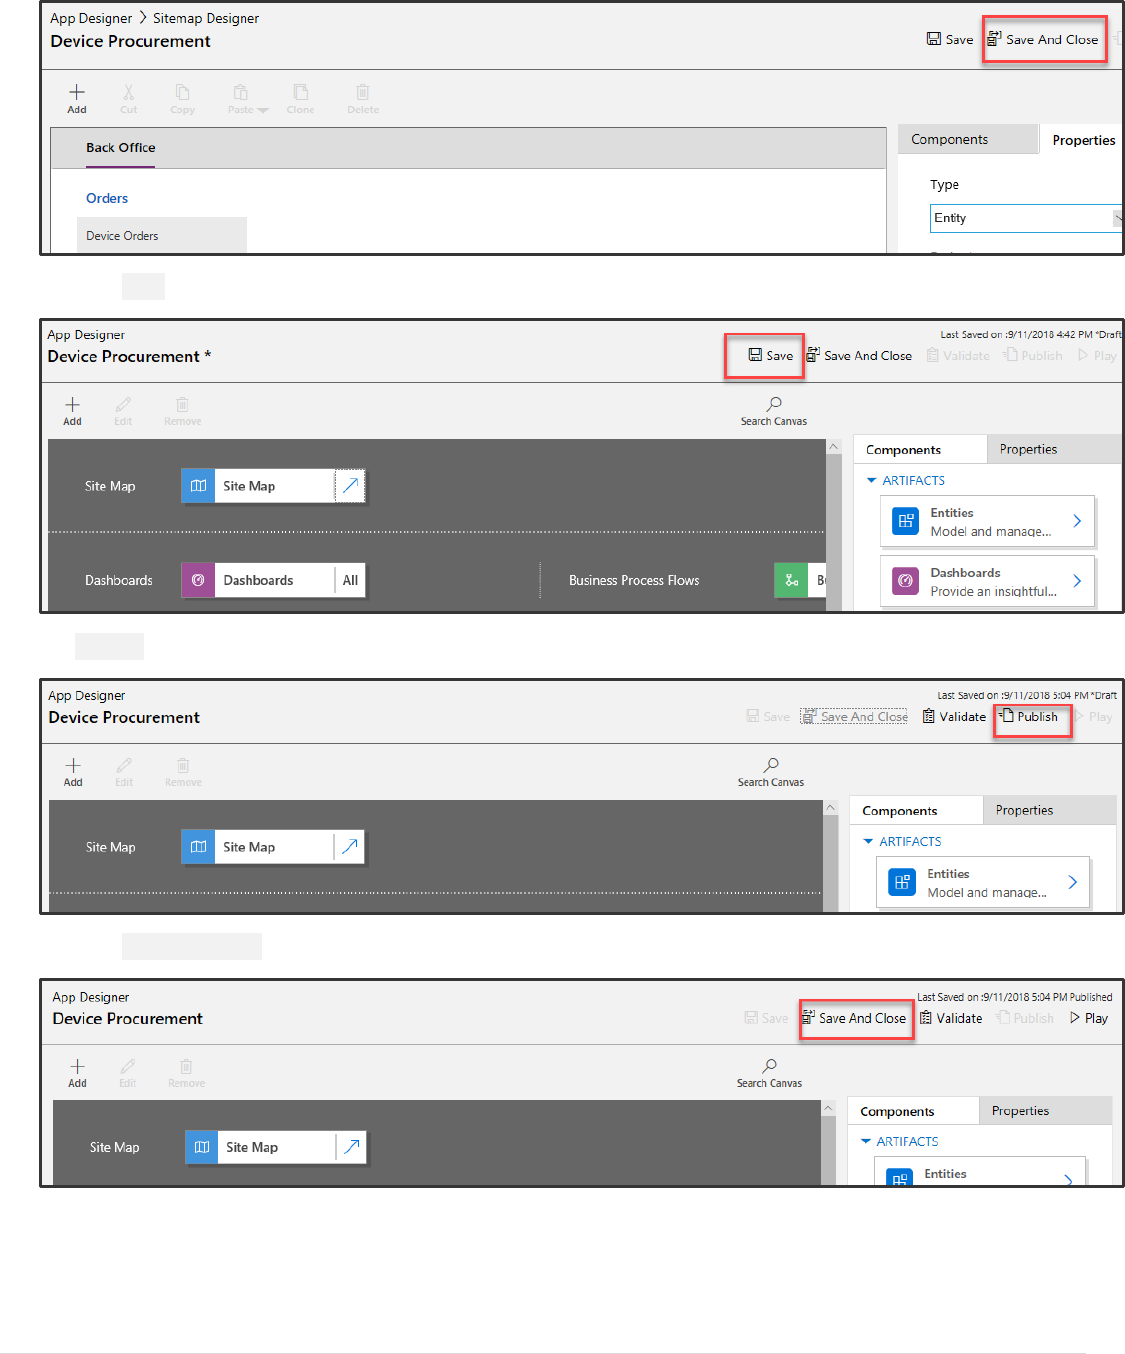
9. Click Save and Close.
Power platform App in a Day Module 3: PowerApps Model-driven app
7 | P a g e ©2018 Microsoft Corporation
10. Click Save again, this time in the App Designer.
11. Publish the application.
12. Click Save and Close.
Power platform App in a Day Module 3: PowerApps Model-driven app
©2018 Microsoft Corporation 8 | P a g e
Task 2: Add procurement fields to the Device Orders
In this task, you will add new fields to the Device Order table. The fields you are going to add here are fields that support
the Business Process Flow that we are going to build in the next exercise. When you use a Business Process, it consists of
Stages which you can think of as major milestones in completing the work. Each Stage has one or more Steps. Steps help
users keep track of what they need to do before advancing to the next Stage. Steps are just fields on the entity. To make
it quicker when we create the Business Process in this task we are going to create the fields we need.
To support our scenario, we are going to add the following fields to the entity:
Capital Approved: This field will be used in the flow to capture that the device order has received capital approval.
Send Survey: This field will be used in the final stage. Right now the team plans on manually sending a survey to see how
the user’s ordering experience was, and will manually check this once they send it, but they have a desire in a future
update to automate sending a survey in a future release.
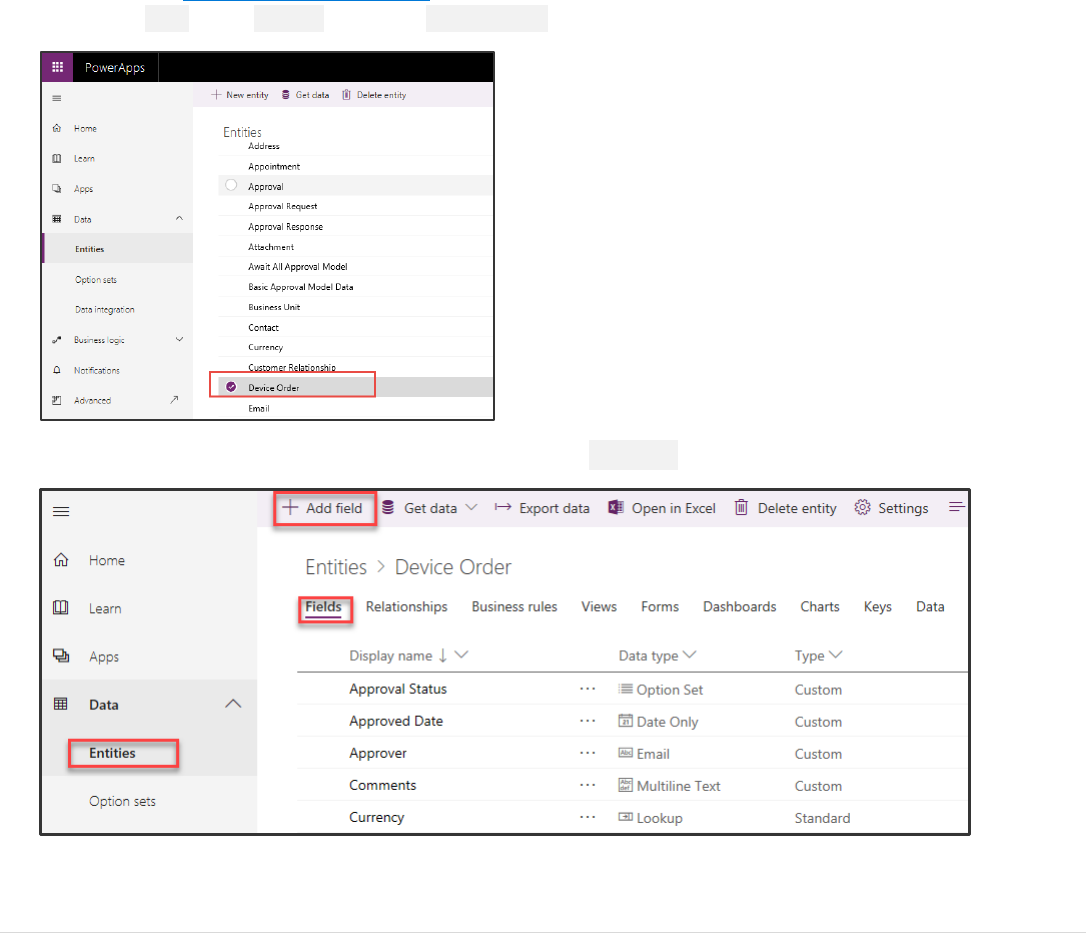
1. Navigate to https://web.powerapps.com
2. Expand Data, select Entities, search for Device Order and click on it.
3. Make sure you have the Fields tab selected and click Add Field.
Power platform App in a Day Module 3: PowerApps Model-driven app
9 | P a g e ©2018 Microsoft Corporation
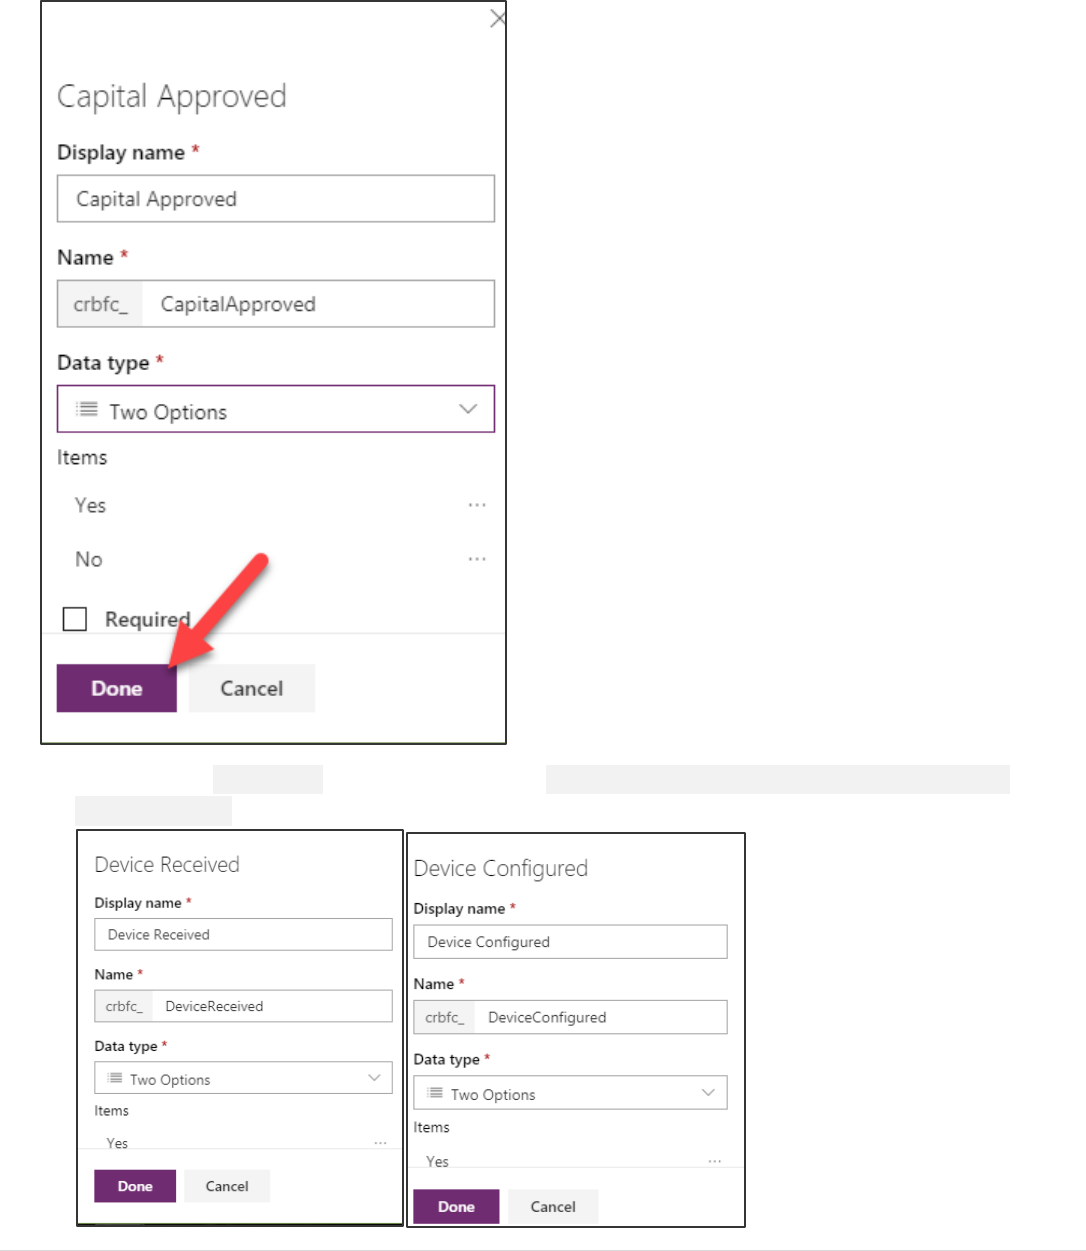
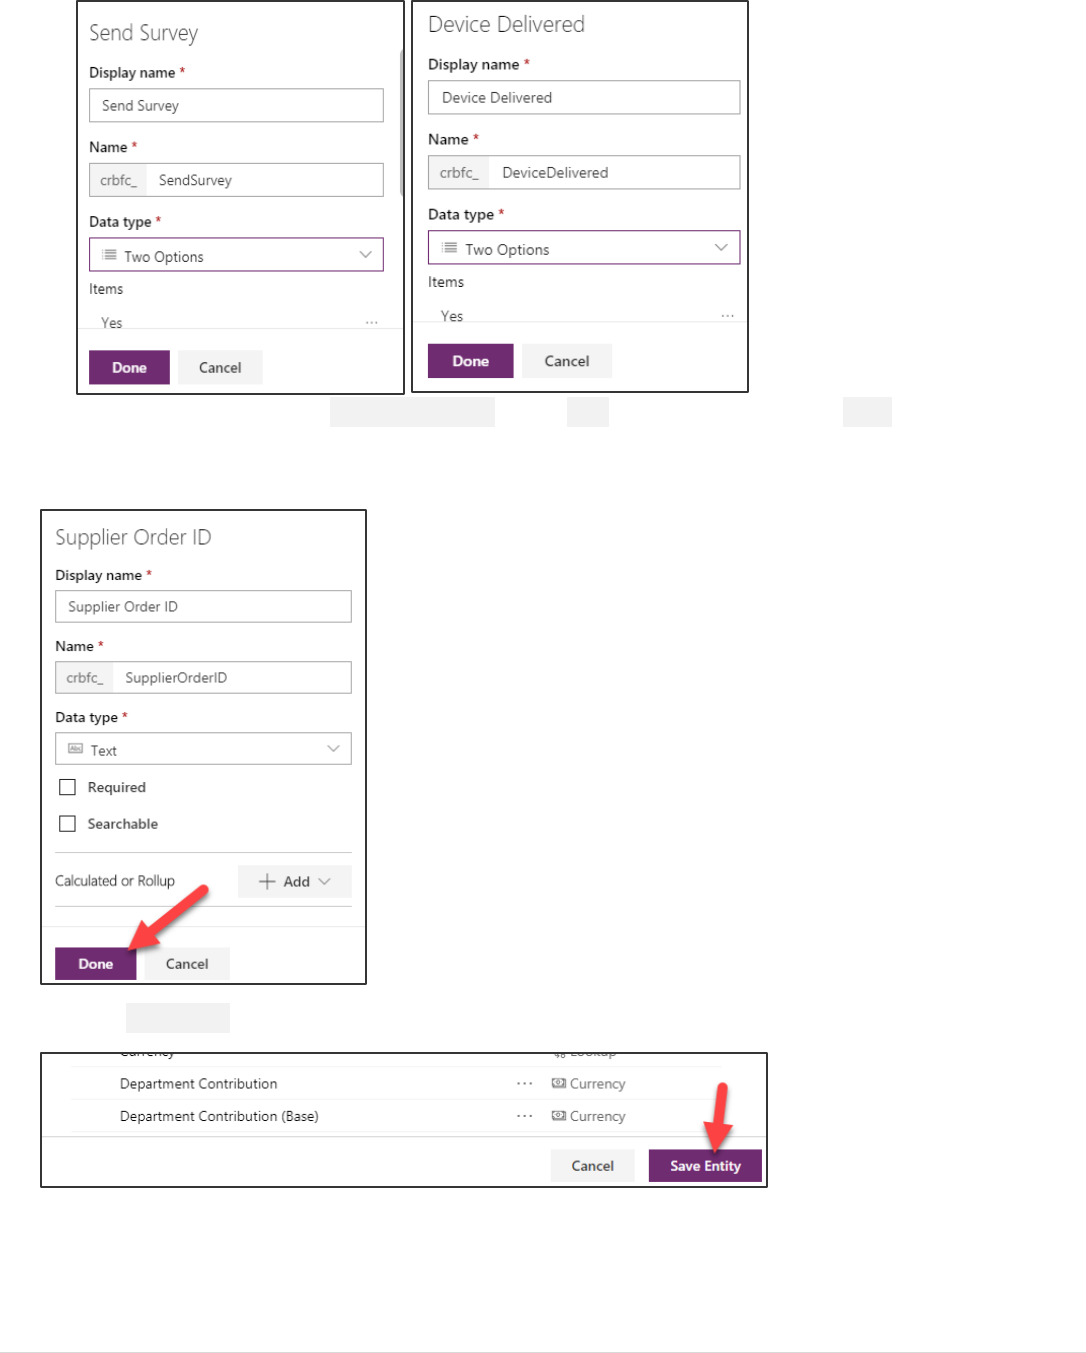
4. Enter Capital Approved for Display Name, select Two Options for Data Type and click Done. We are using a
Two Option data type here because when we use it as a Step in the Business Process, we want to be able to simply
mark it completed. Two Options are essentially a true or false field.
5. Create 4 more Two Option fields and name them Device Received, Device Configured, Send Survey, and
Device Delivered.
Power platform App in a Day Module 3: PowerApps Model-driven app
©2018 Microsoft Corporation 10 | P a g e
6. Add another field, name it Supplier Order ID, select Text for Data Type and click Done. Notice we are not
asking you to make this field required here, but we will make it a required field in the Business Process
later in the lab.
7. Click Save Entity.
Power platform App in a Day Module 3: PowerApps Model-driven app
11 | P a g e ©2018 Microsoft Corporation
Exercise 2: Business Process Flow
In this exercise, we are going to add a Business Process Flow to the Device Order to help guide the back-office worker
through the task of managing the procurement of the requested device.
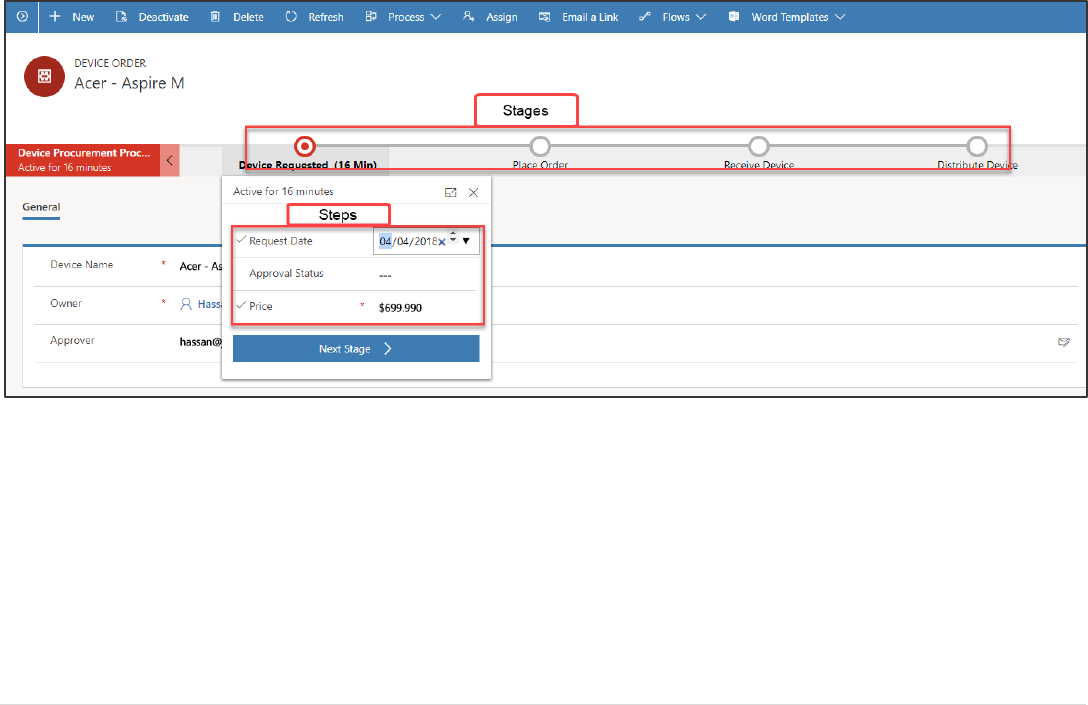
In discovery meetings with the back-office workers, we learned that a device request goes through the following tasks as
they perform the magic to get the requestor their device.
- Device Requested – Today this is an e-mail sent to them with the device request. Going forward in the new
PowerApps world this will be a Device Order record in the Common Data Service.
- Place Order – Once they receive the request, they will place an order with a supplier and get an order ID.
- Receive Device – This occurs when the device is received, and they send it to the IT staff to be configured with
the standard software.
- Distribute Device – Once configured it needs to get to the employee that requested it, and they need to survey
the employee to make sure they are happy.
Each of these represents a milestone and will become our Stages in the Business Process Flow. In a more complex
scenario, you would likely end up compressing or even possibly re-imagining the business process to make it more
optimal than the current process the staff performs with their existing process.
For this lab, the Receive Device and Distribute Device stages are marked optional. While these stages would need to be
created for a full implementation of the scenario, to save time you may skip them or do them as a take home exercise.
The completed Business Process Flow will look like the image below.
Power platform App in a Day Module 3: PowerApps Model-driven app
©2018 Microsoft Corporation 12 | P a g e
Task 1: Create business process flow
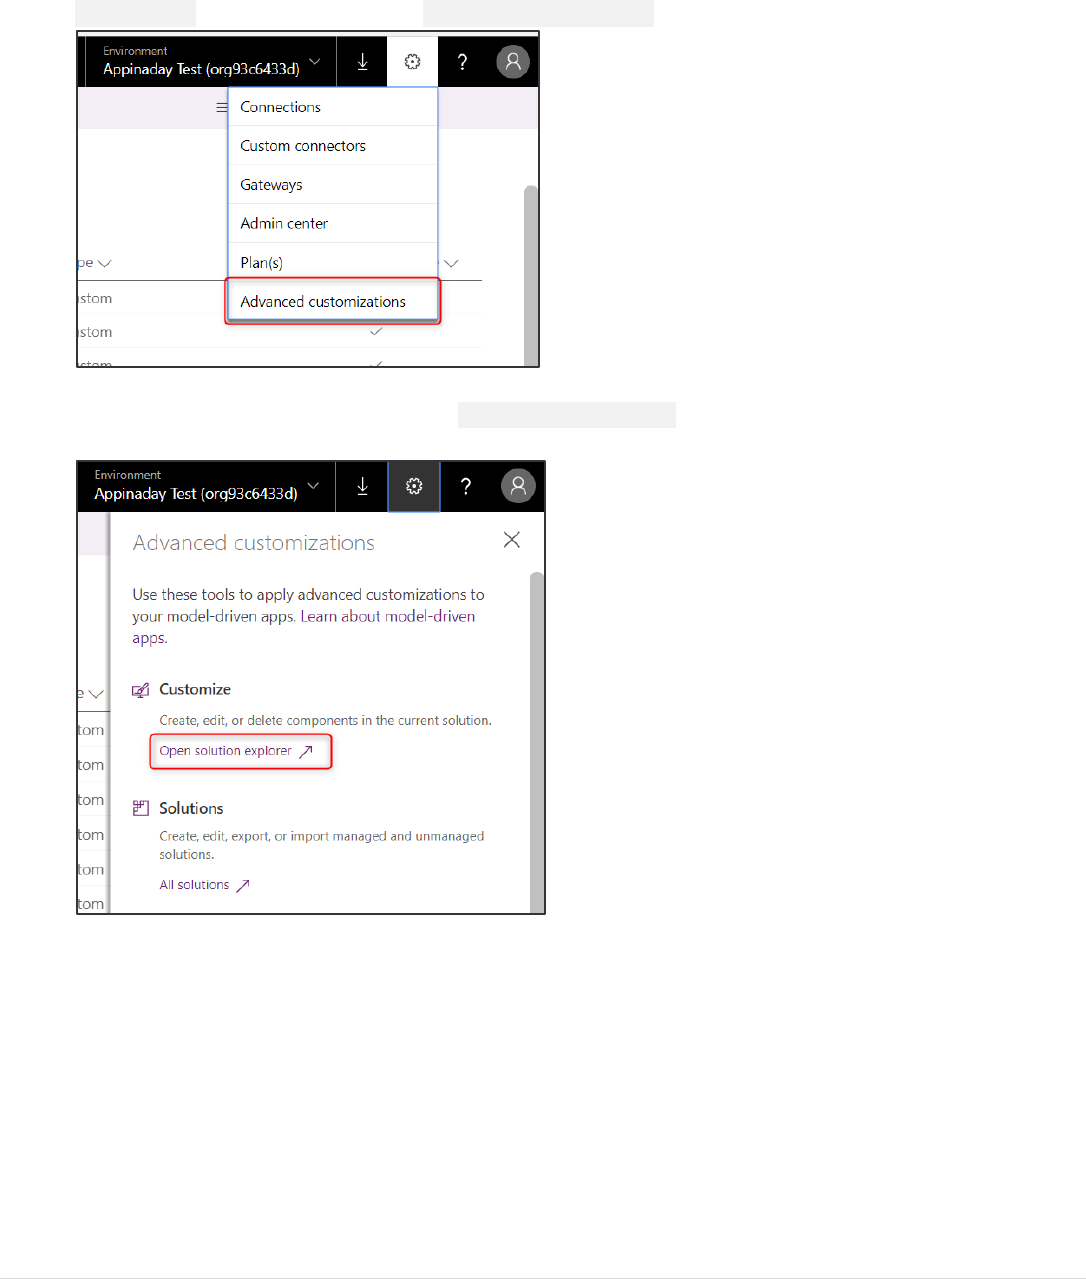
1. You need to make a one-time configuration change to enable Business Process Flows for the entity. Click on the
Settings icon in the top right and click Advanced customization.
2. In the Advanced customizations pane, click Open solution explorer. This will navigate to solution explorer in a
new tab.
Power platform App in a Day Module 3: PowerApps Model-driven app
13 | P a g e ©2018 Microsoft Corporation
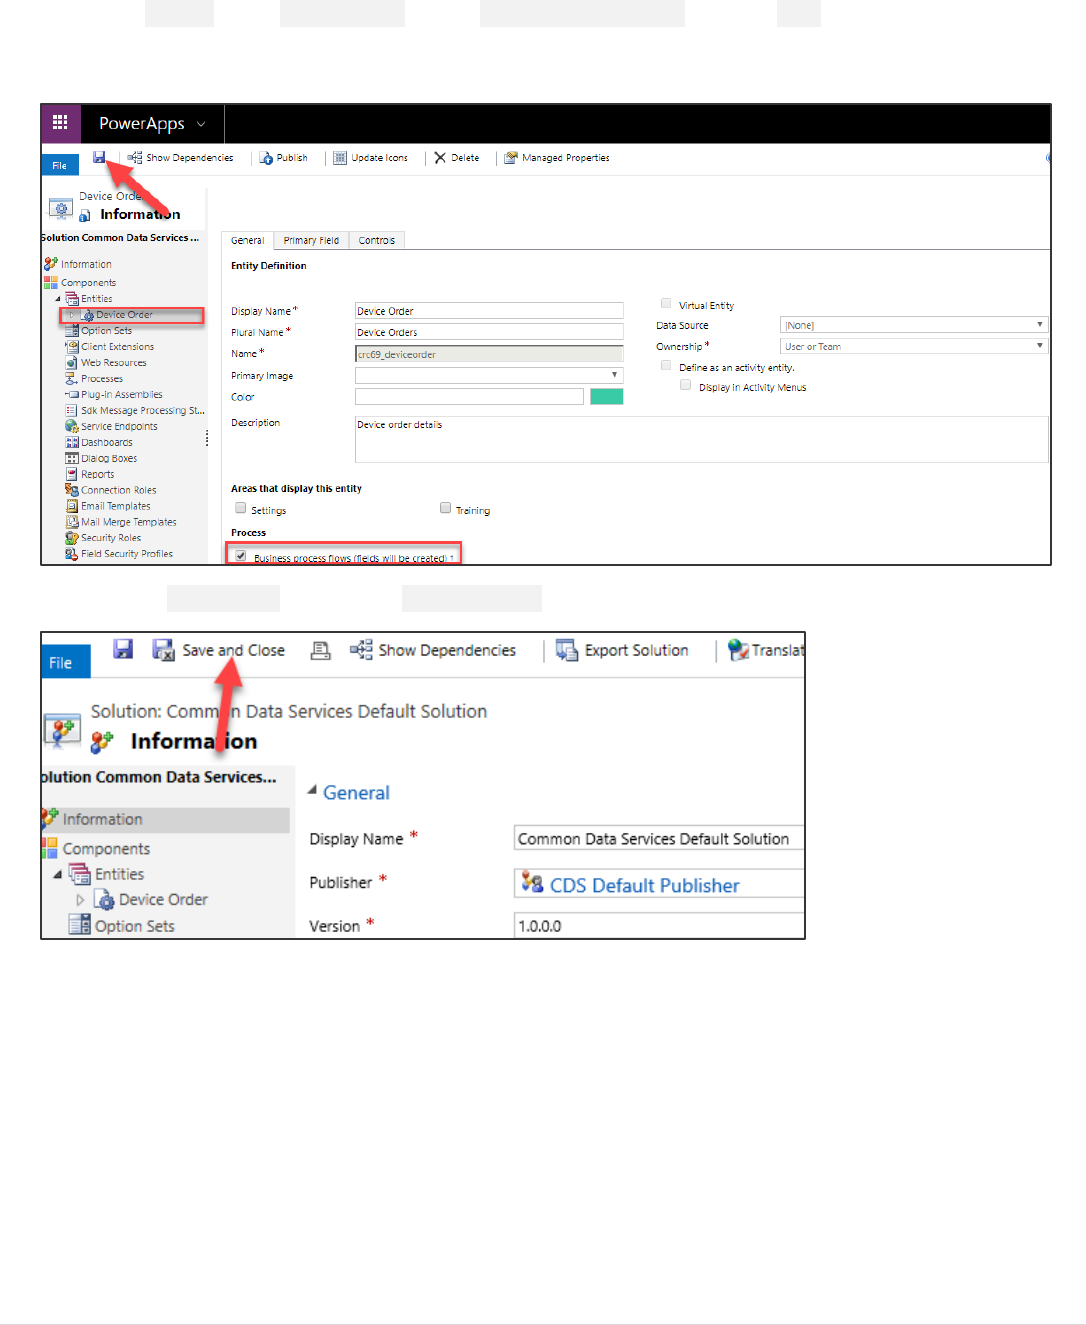
3. Expand Entities, select DeviceOrders, enable Business Process Flow, and click Save. This is a one-time change
to indicate you want to enable Business Process Flows for the entity. Once you turn this field on, it is not possible
to turn it off, so it should only be enabled when you are going to use the feature.
4. Select the Information tab and click Save and Close.
Power platform App in a Day Module 3: PowerApps Model-driven app
©2018 Microsoft Corporation 14 | P a g e
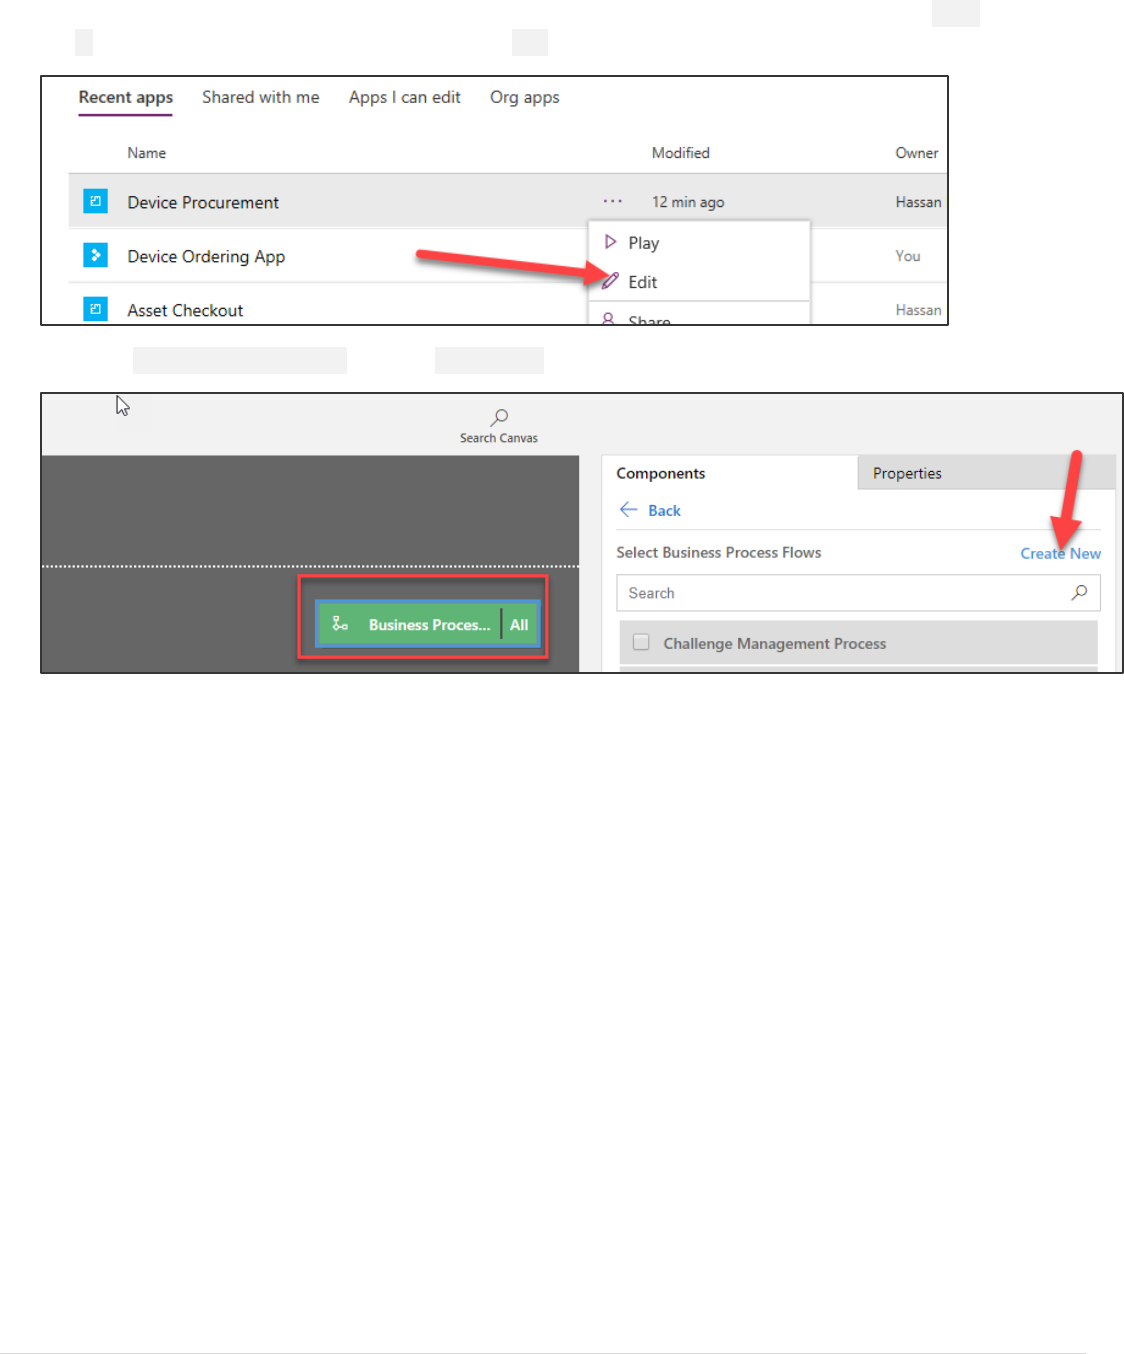
5. You will be back in the Entity view. Close the Advanced customizations pane if it still open. Select Apps, click the
… and of the Device Procurement app and select Edit.
6. Select Business Process Flows and click Create New.
Power platform App in a Day Module 3: PowerApps Model-driven app
15 | P a g e ©2018 Microsoft Corporation
7. Enter Device Procurement Process for Process Name, select Business Process Flow for Category, select
DeviceOrder for Entity, and click OK. When you create the Business Process Flow behind the scenes it
creates another entity with the same name as the Business Process Flow to track the progress of each
business process on the record. Because of this, choose your name carefully, for example, you wouldn’t
want to use the same name as your entity e.g. Device Order. Here we choose Device Procurement
Process. Note: After you click OK, a new window will be loaded with the designer. If you have popup blockers
enabled this might be blocked. The window might also not immediately have focus and you might have to
manually bring it into focus.
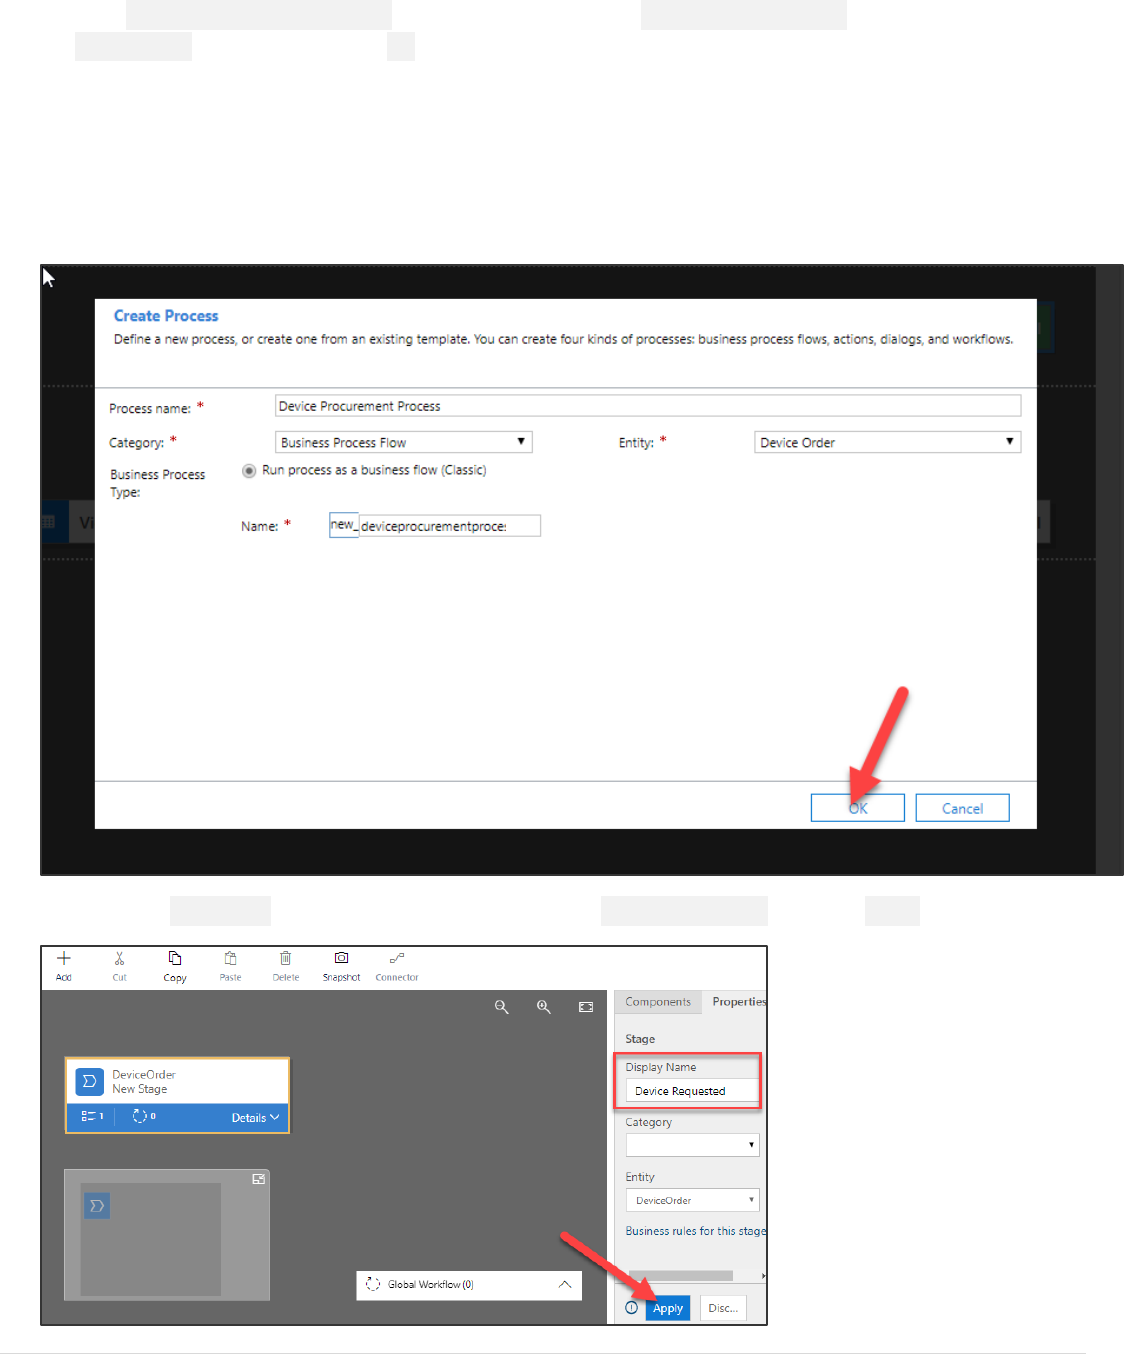
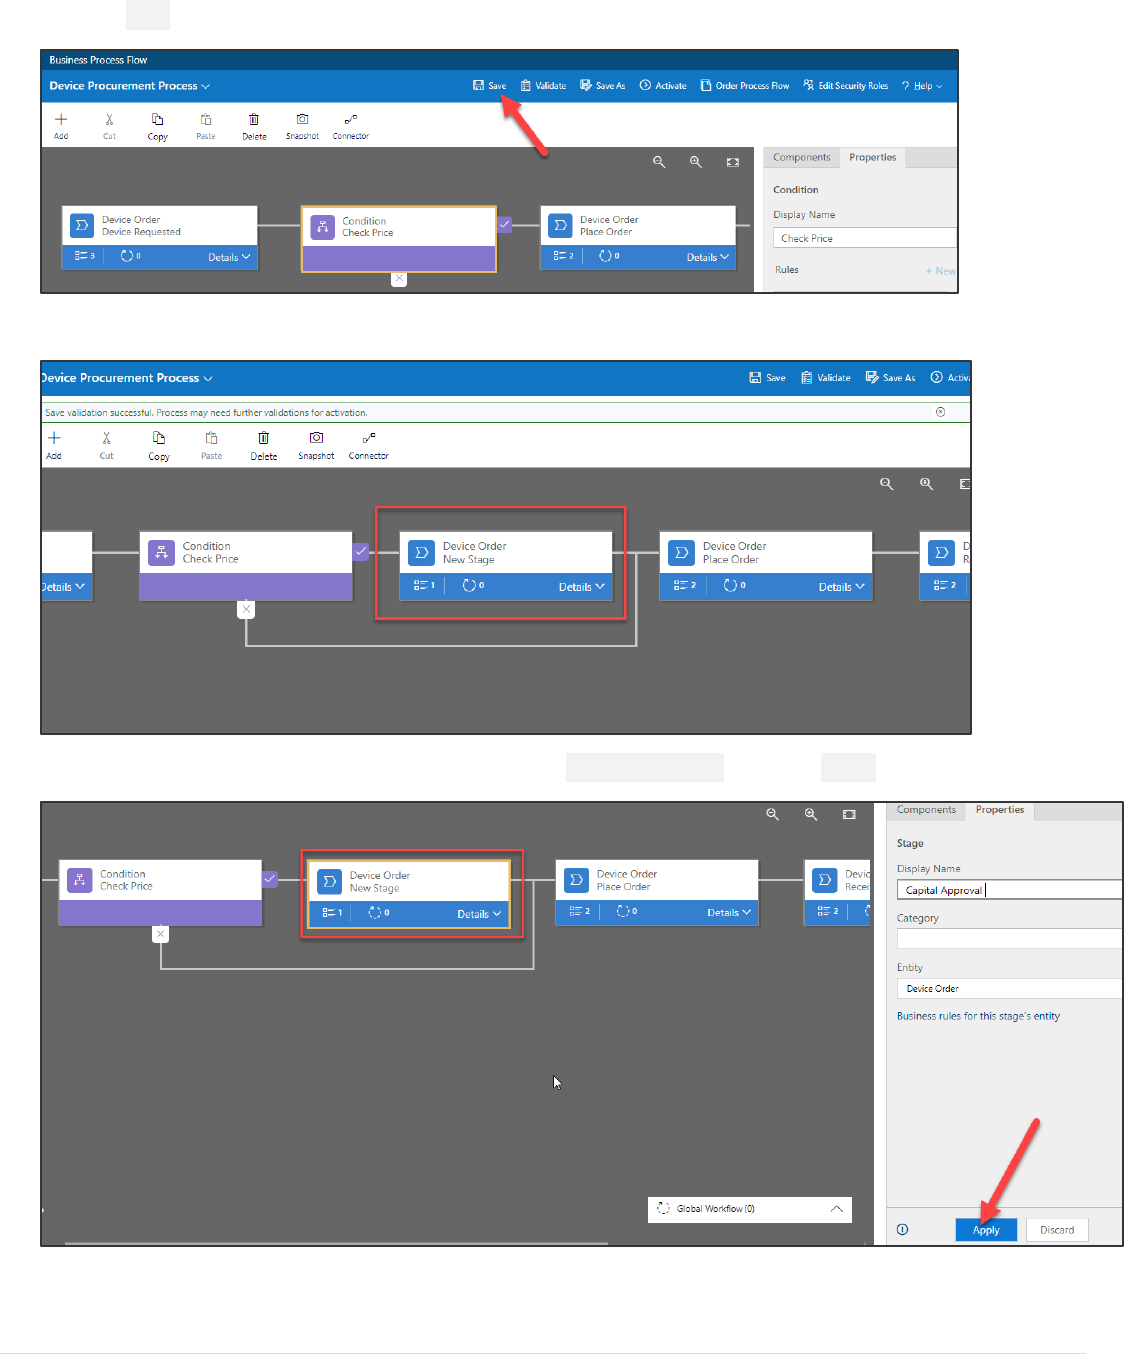
8. Select the New Stage and change the Display Name to Device Requested and click Apply.
Power platform App in a Day Module 3: PowerApps Model-driven app
©2018 Microsoft Corporation 16 | P a g e
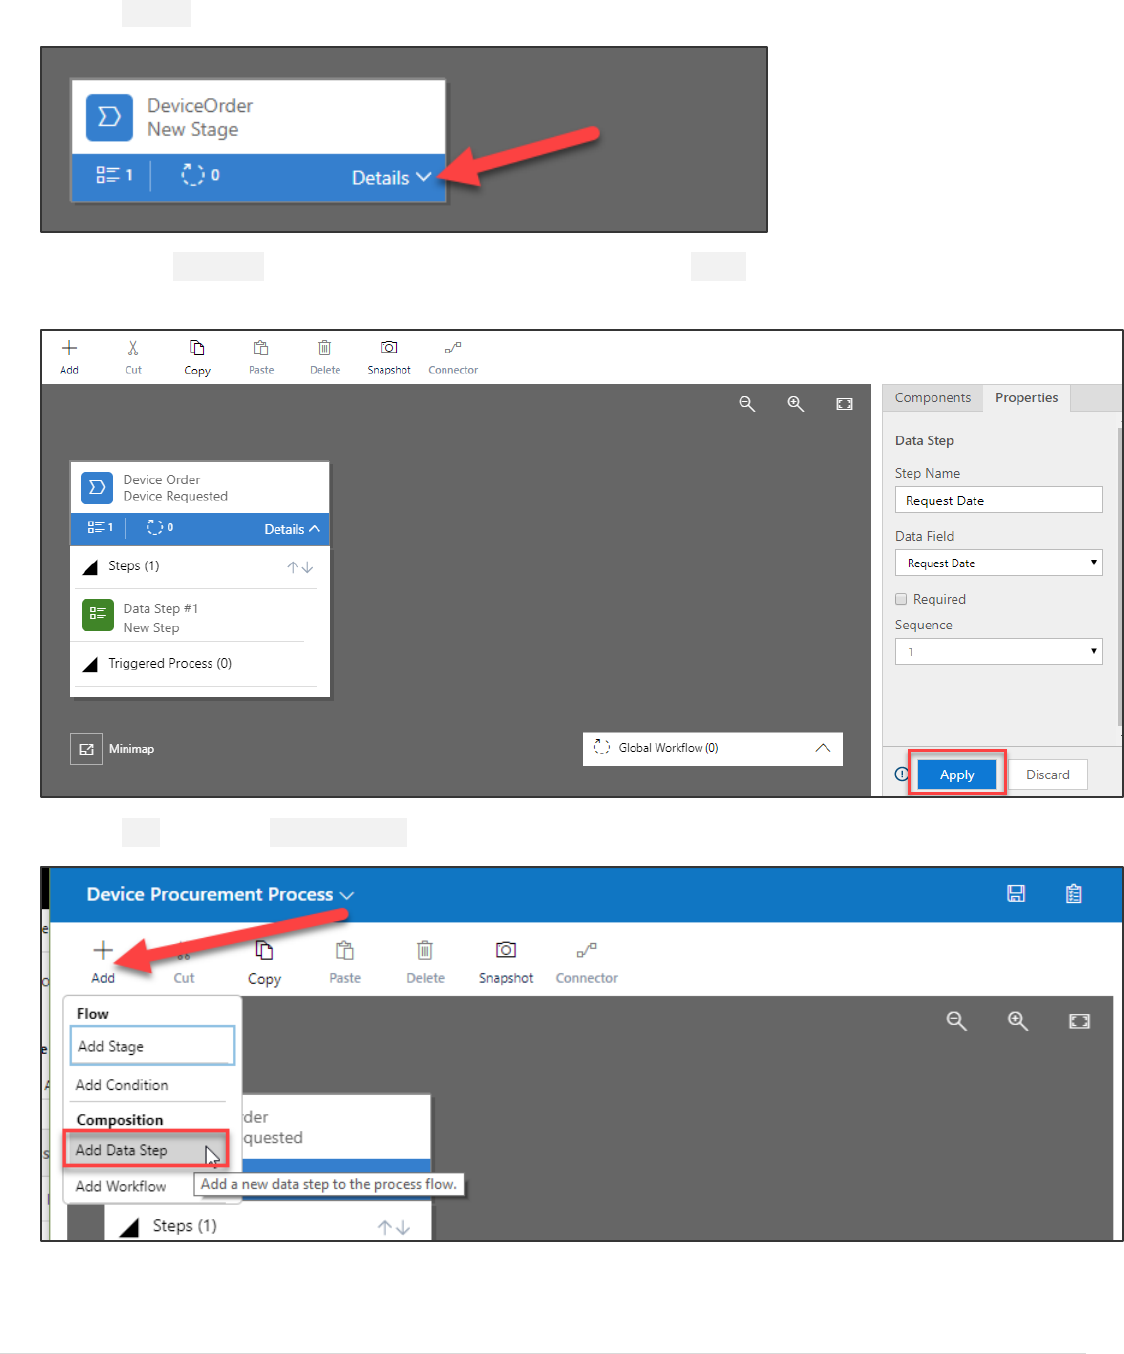
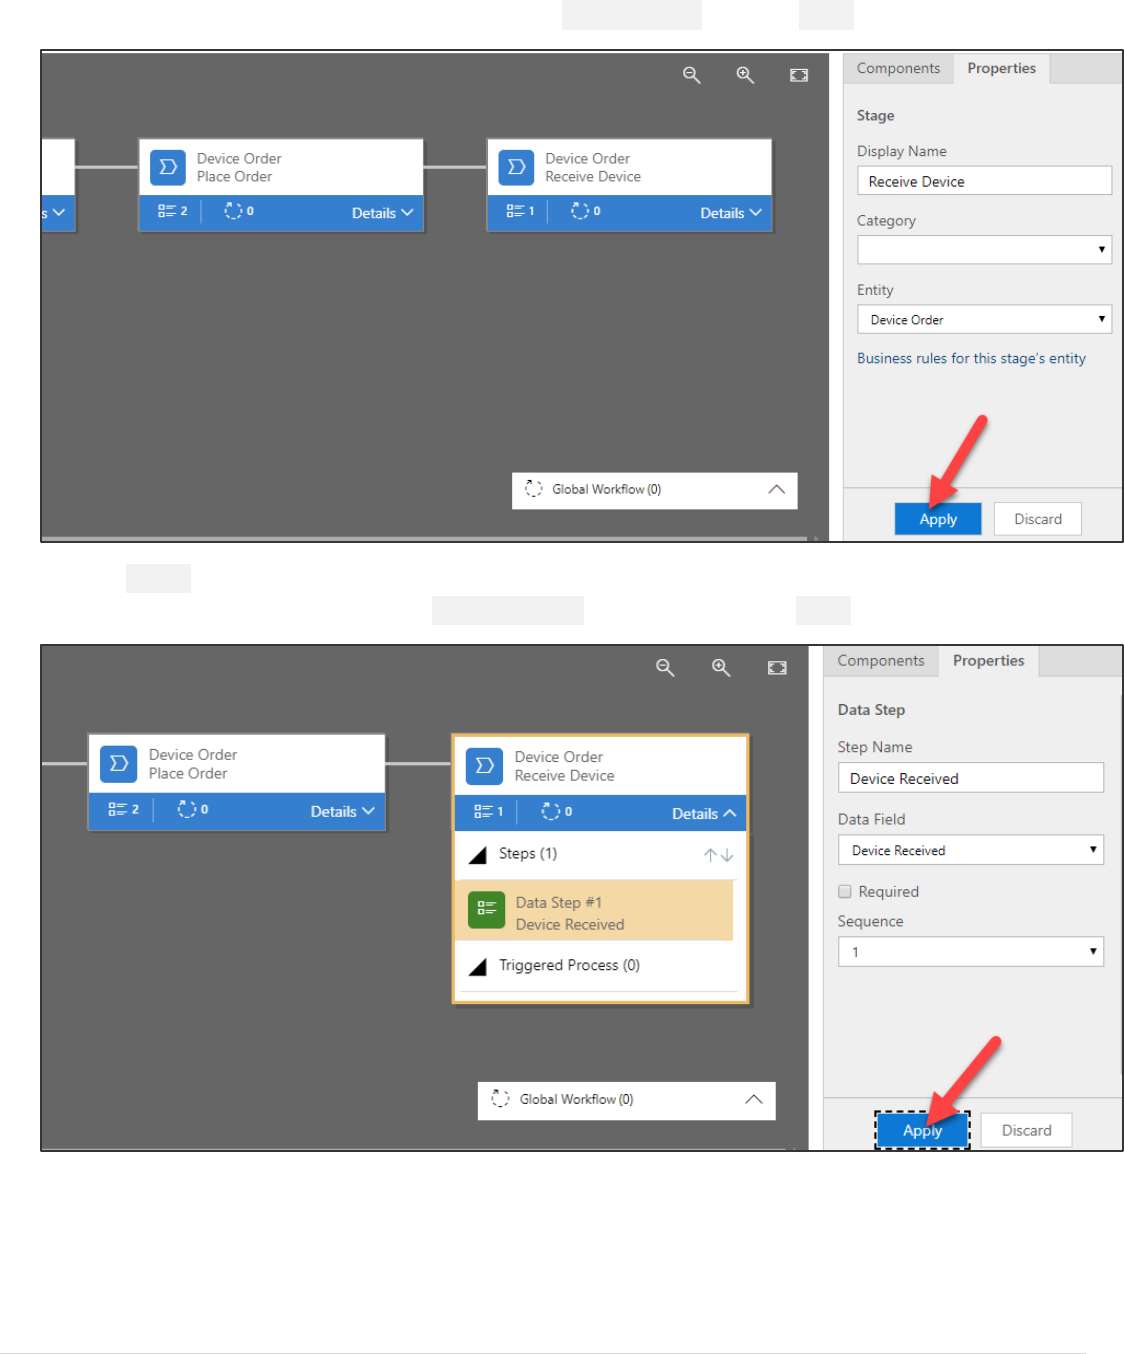
9. Click Details.
10. Select the Data Step, select Requested Date for Data Field and click Apply. The Step Name will auto-filled for
you.
11. Click Add and select Add Data Step.
Power platform App in a Day Module 3: PowerApps Model-driven app
17 | P a g e ©2018 Microsoft Corporation
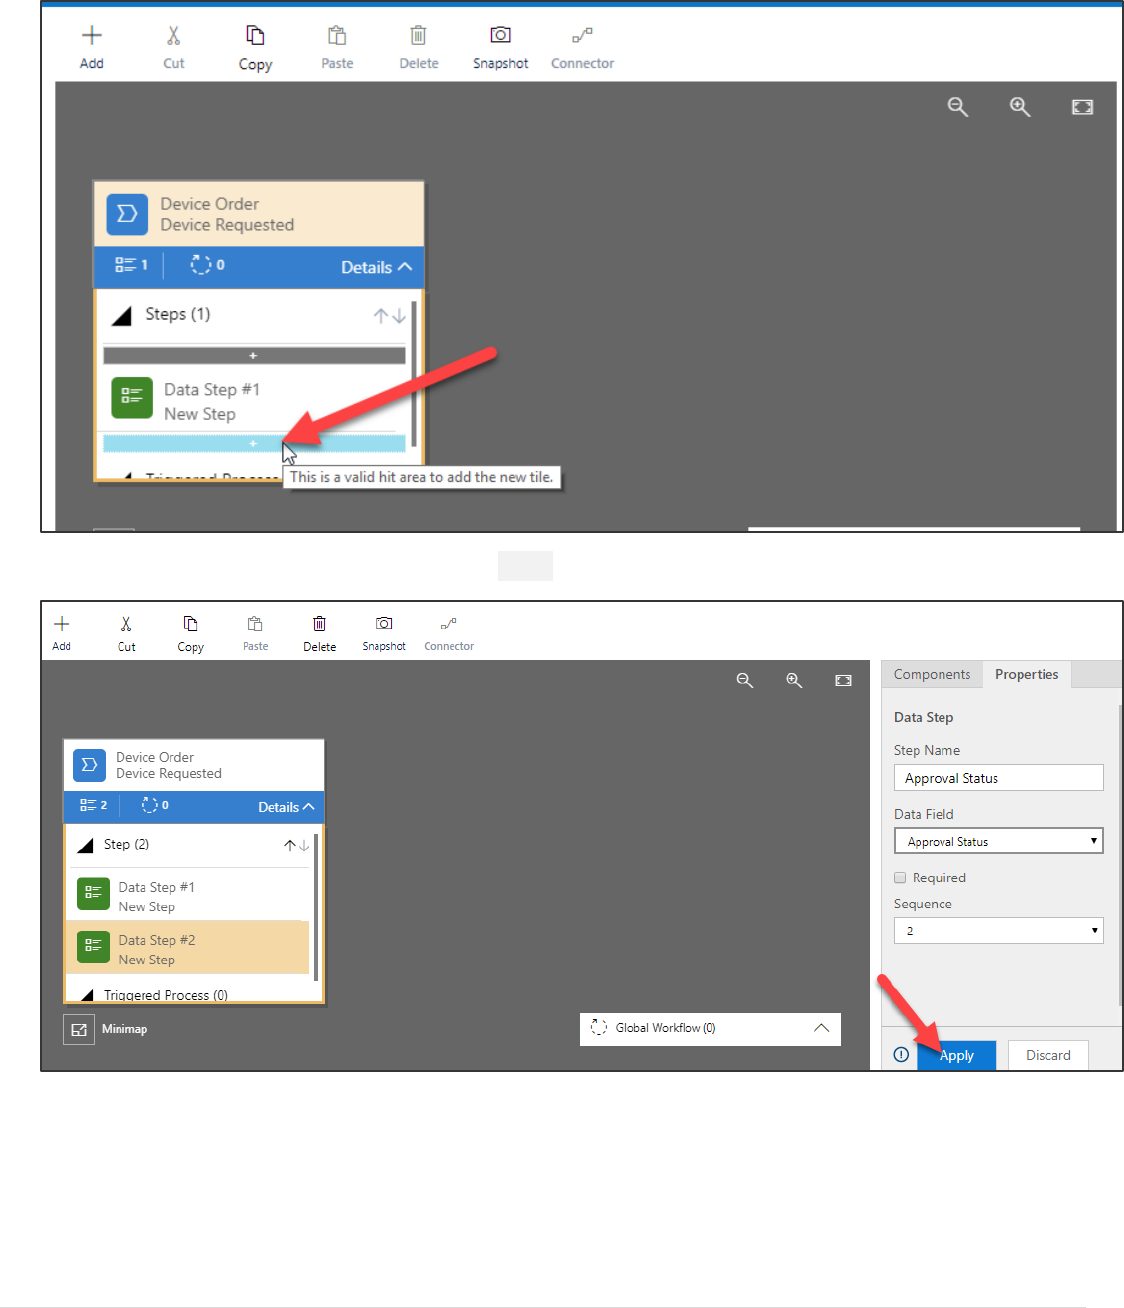
12. Click on the small + under Data Step #1.
13. Select Approval Status for Data field and click Apply.
Power platform App in a Day Module 3: PowerApps Model-driven app
©2018 Microsoft Corporation 18 | P a g e
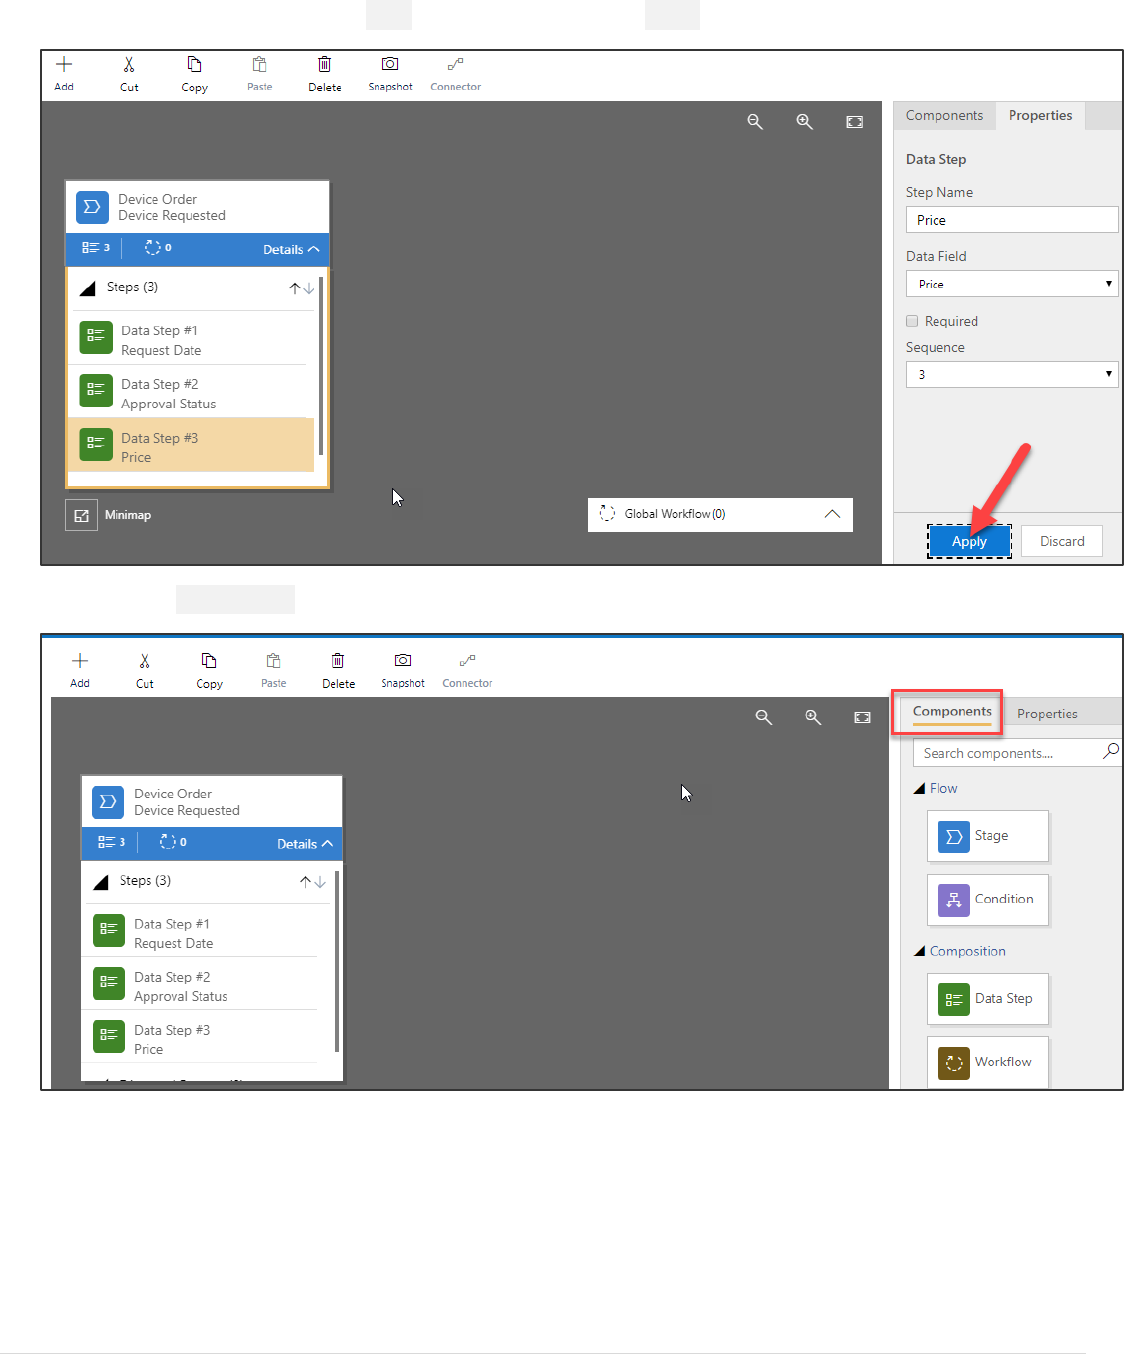
14. Add another Data Step, select Price for Data Field and click Apply.
15. Select the Components tab.
Power platform App in a Day Module 3: PowerApps Model-driven app
19 | P a g e ©2018 Microsoft Corporation
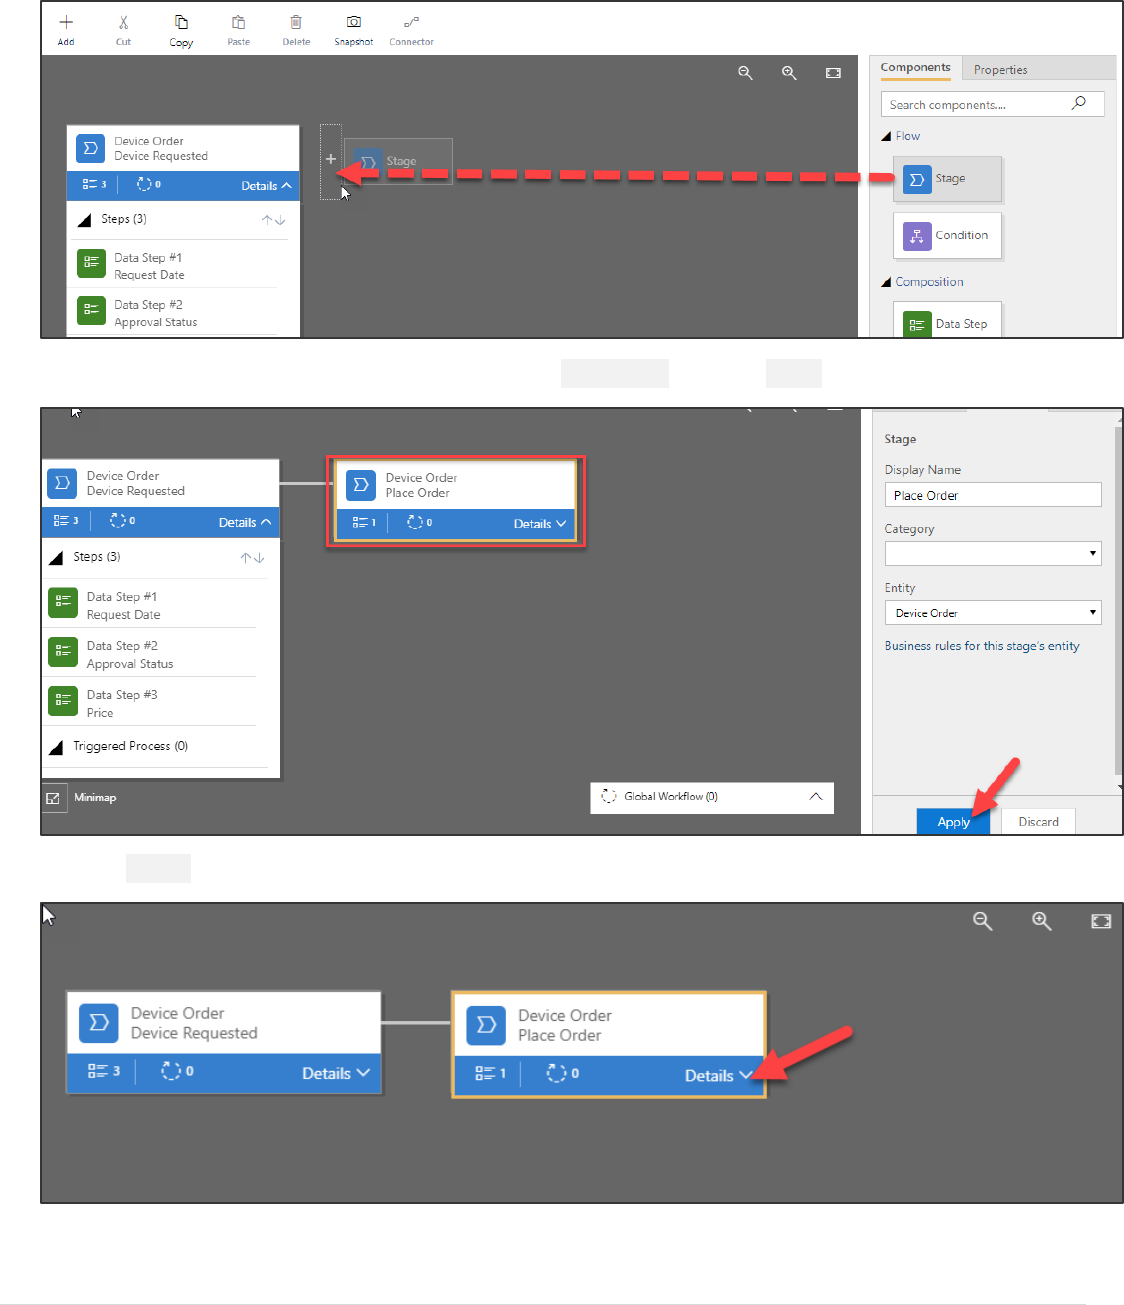
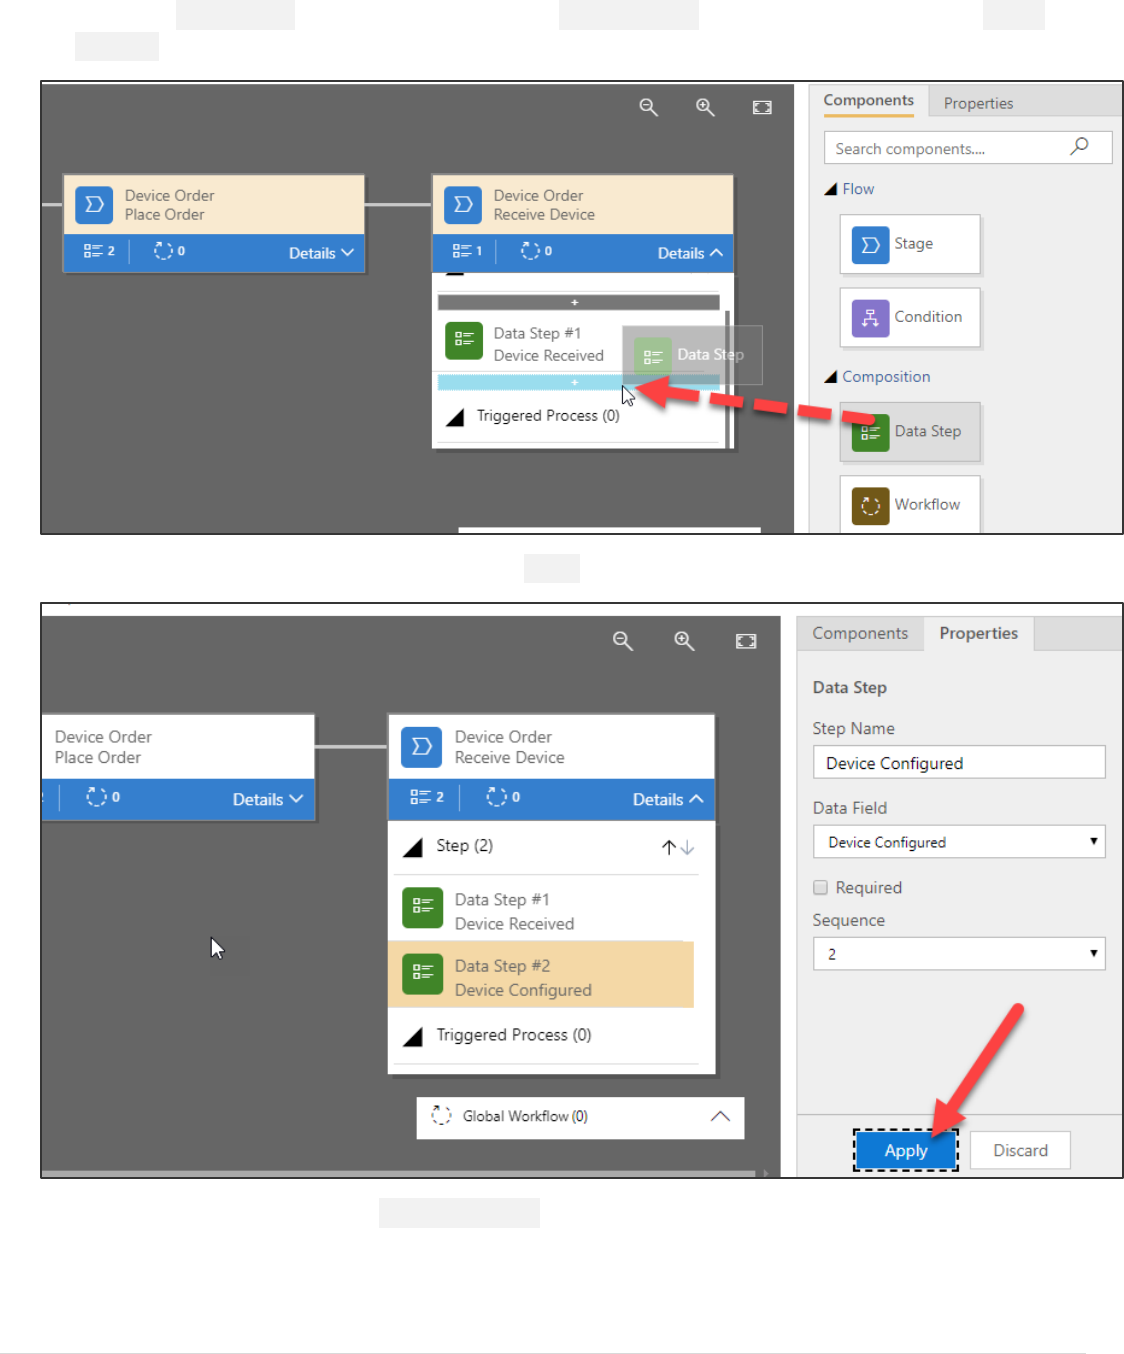
16. Drag Stage to the canvas and place to the right of the Device Requested stage.
17. Select the new stage, change the Display Name to Place Order and click Apply.
18. Click Details.
Power platform App in a Day Module 3: PowerApps Model-driven app
©2018 Microsoft Corporation 20 | P a g e
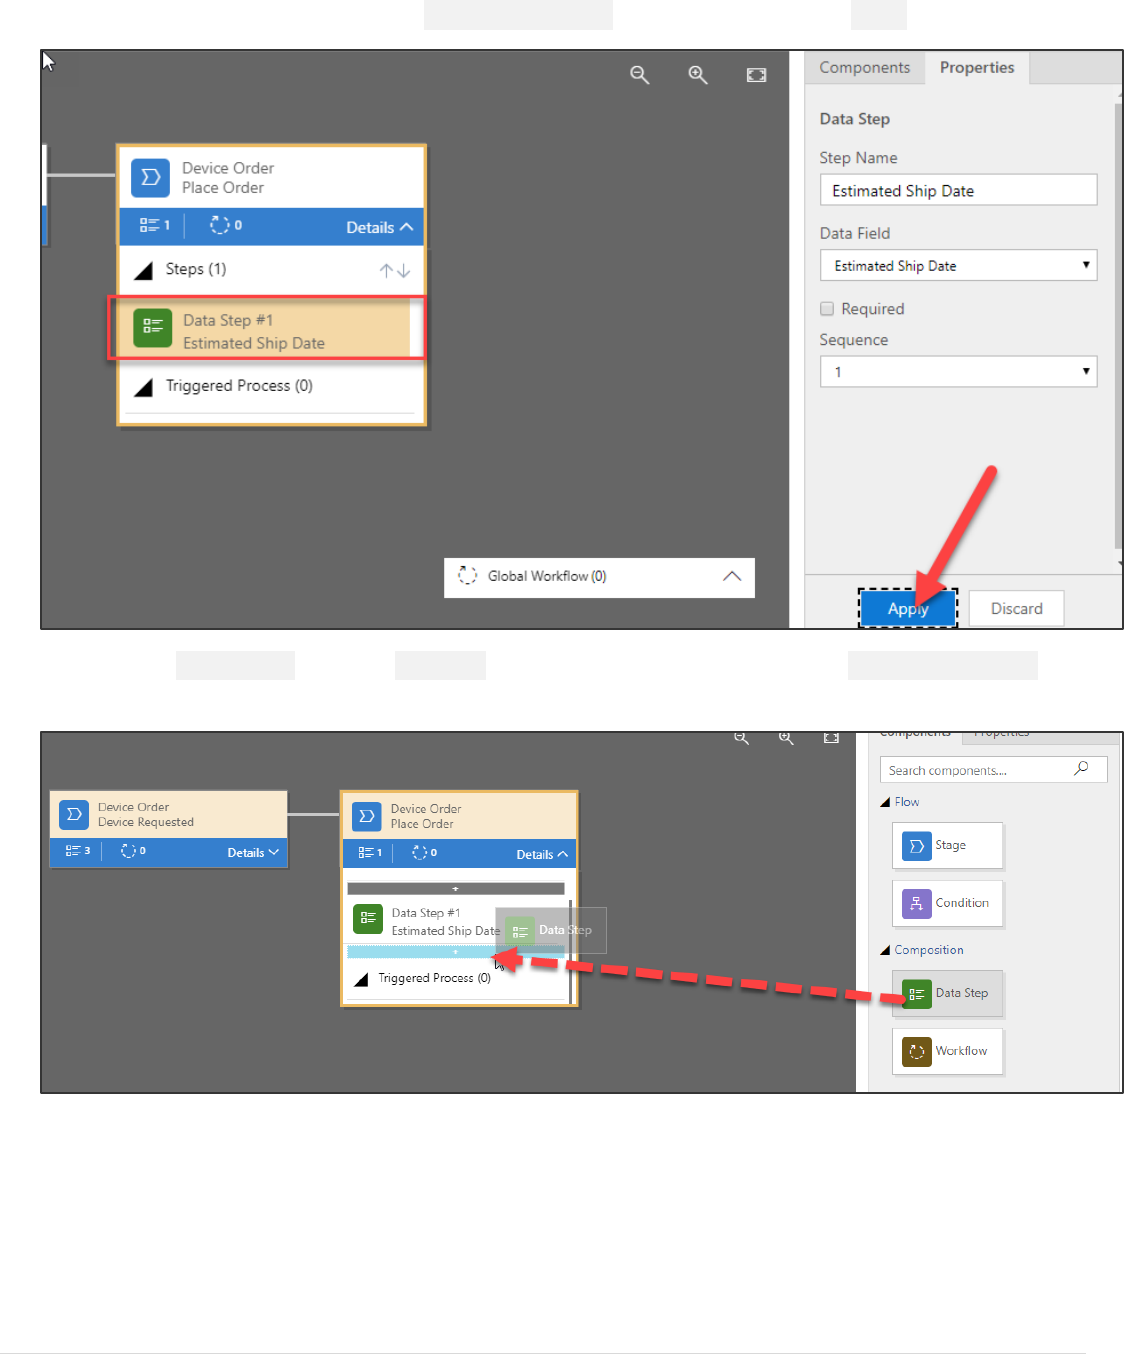
19. Select the existing Data Step, select Estimated Ship Date for Data Field, and click Apply.
20. Select the Components tab, drag Data Step to the canvas and place is under the Estimated Ship Date
step.
Power platform App in a Day Module 3: PowerApps Model-driven app
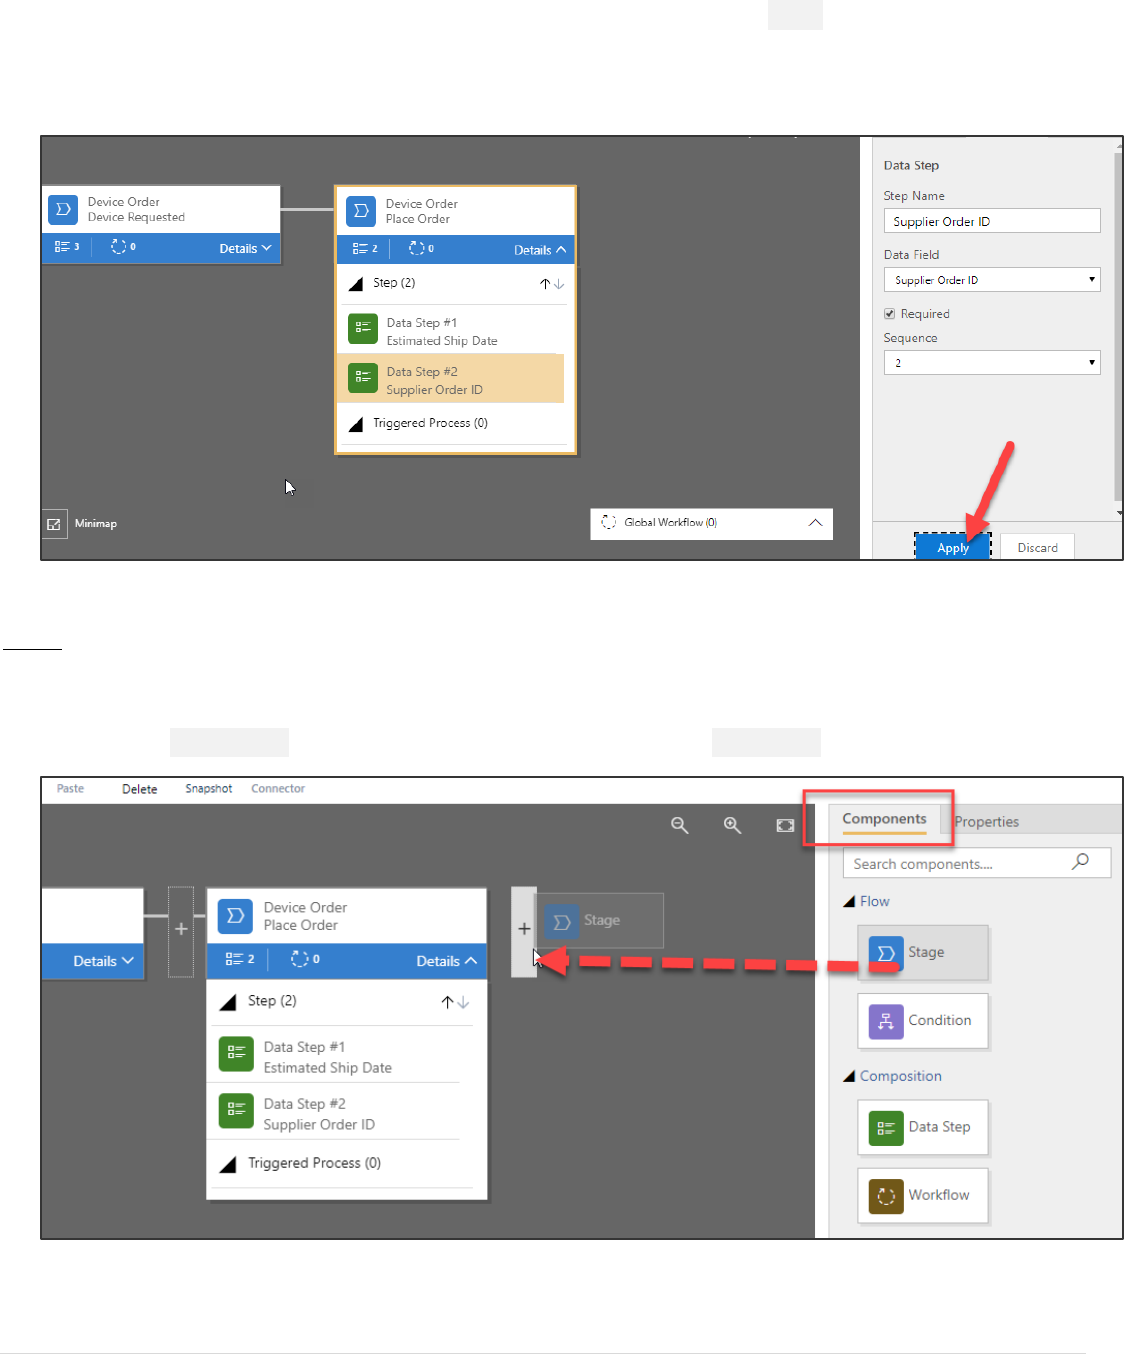
21 | P a g e ©2018 Microsoft Corporation
21. Select Supplier Order ID for Data Field, check the Required field to and click Apply. Remember from before this
field isn’t required, but by checking this here, we will require it to be filled out before they can advance to the next
stage. It won’t, however, block saving the record if there isn’t a data value populated like it would if it was marked
required on the field definition.
NOTE: All steps from here onwards until you reach Task 2 are OPTIONAL. These steps add two more stages to the
business process using the same technique you learned above. You may skip ahead to Task 2 to add a branch
condition.
22. Select the Components tab and drag Stage to the right side of the Place Order stage.
Power platform App in a Day Module 3: PowerApps Model-driven app
©2018 Microsoft Corporation 22 | P a g e
23. Select the new stage, change the Display name to Receive Device and click Apply.
24. Click Details.
25. Select the existing Data Step and select Device Received for Data Field and click Apply.
Power platform App in a Day Module 3: PowerApps Model-driven app
23 | P a g e ©2018 Microsoft Corporation
26. Select the Components tab, drag Data Step to the Receive Device stage and place it under the Device
Received step.
27. Select Device Configured for Data Filed and click Apply.
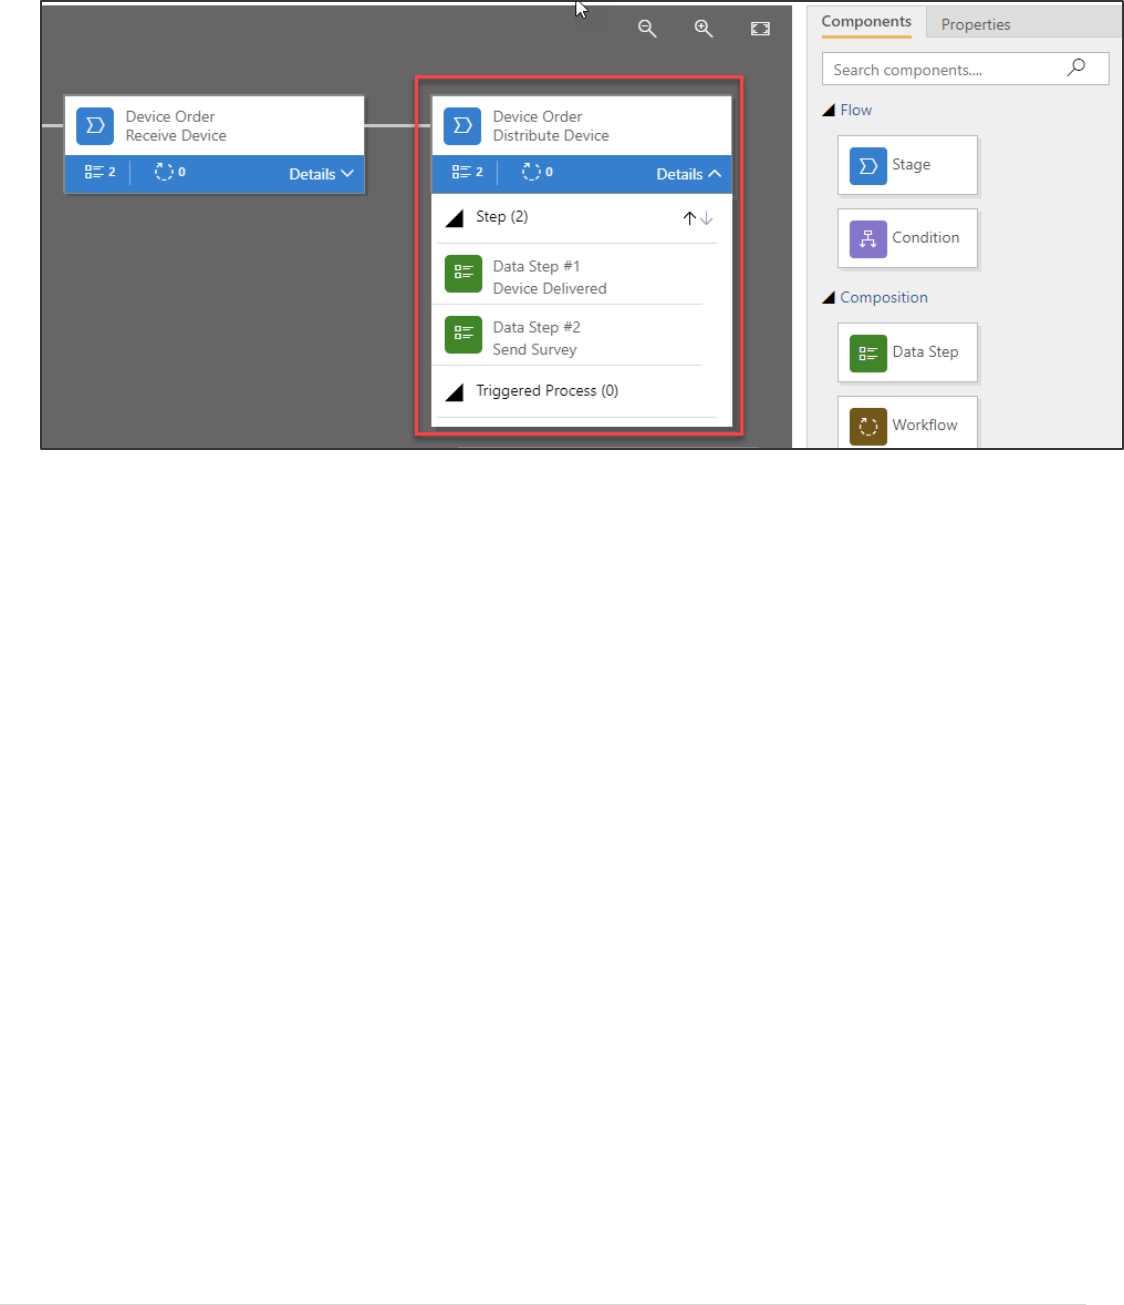
28. Add another stage and name it Distribute Device.
Power platform App in a Day Module 3: PowerApps Model-driven app
©2018 Microsoft Corporation 24 | P a g e
29. Add two data steps Device Delivered and Send Survey.
Power platform App in a Day Module 3: PowerApps Model-driven app
25 | P a g e ©2018 Microsoft Corporation
Task 2: Add a branch condition
In this task, we are going to add a conditional branch to our Business Process Flow. When we did the discovery, we
learned that if the price was greater than $1K, they had extra work they had to do to get capital approval prior to placing
the order. In this task, you will see how we can modify the flow we built to accommodate this.
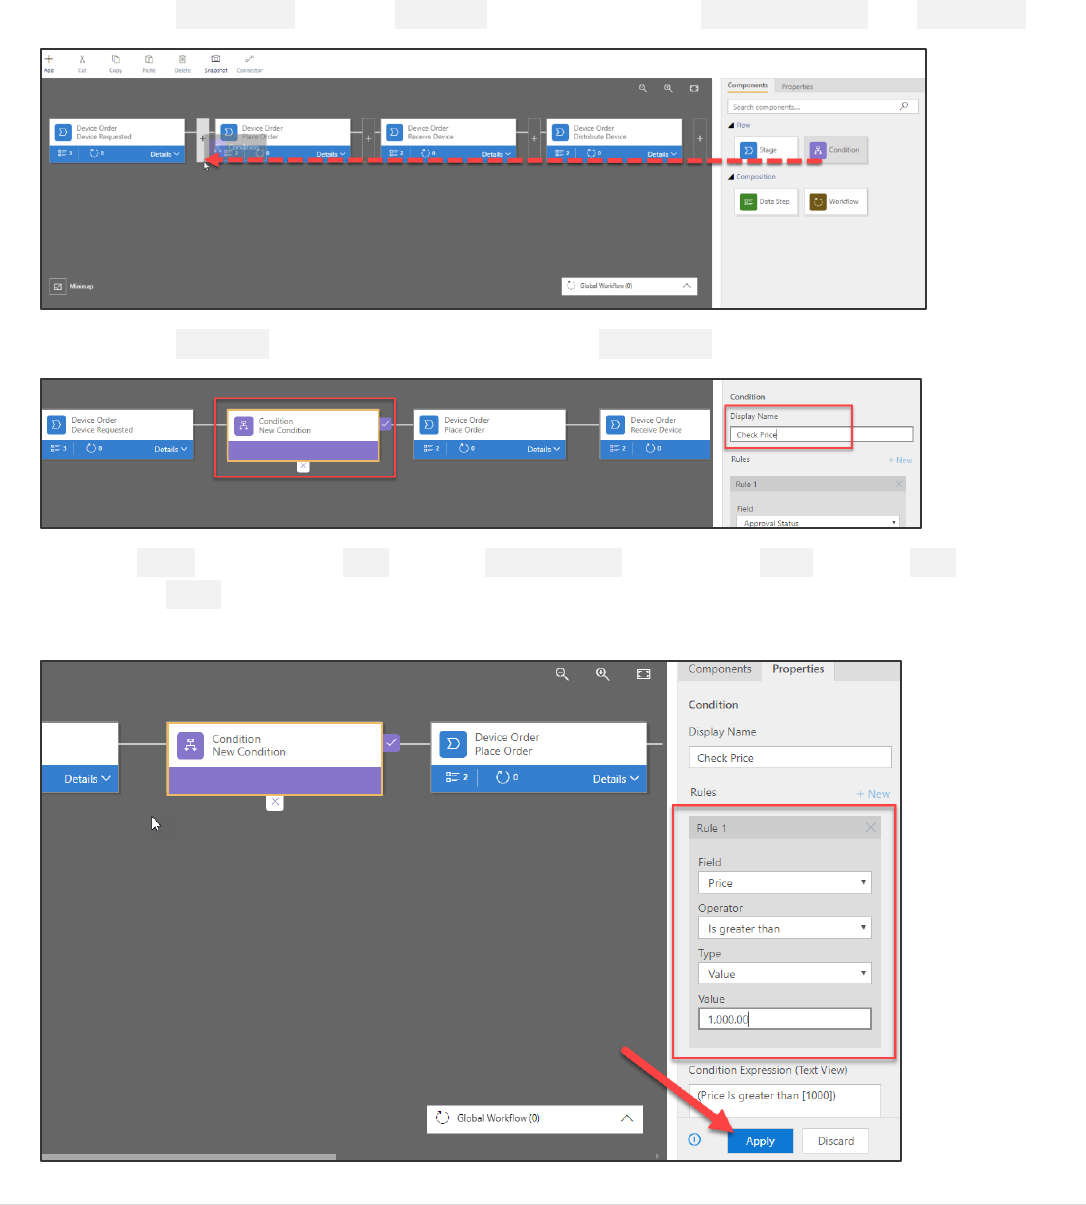
1. Select the Components tab, drag Condition and place it between Device Requested and Place Order.
2. Select the Condition and change the Display Name to Check Price.
3. In the Rule 1 section, select Price for Field, is greater than for Operator, Value for Type, 1000 for Value,
and click Apply. It’s important to note that fields you use in the rules on the condition must be in the
prior Stages steps. That is one of the reasons we put the price in there previously.
Power platform App in a Day Module 3: PowerApps Model-driven app
©2018 Microsoft Corporation 26 | P a g e
4. Click Save.
5. A new stage will be added for you.
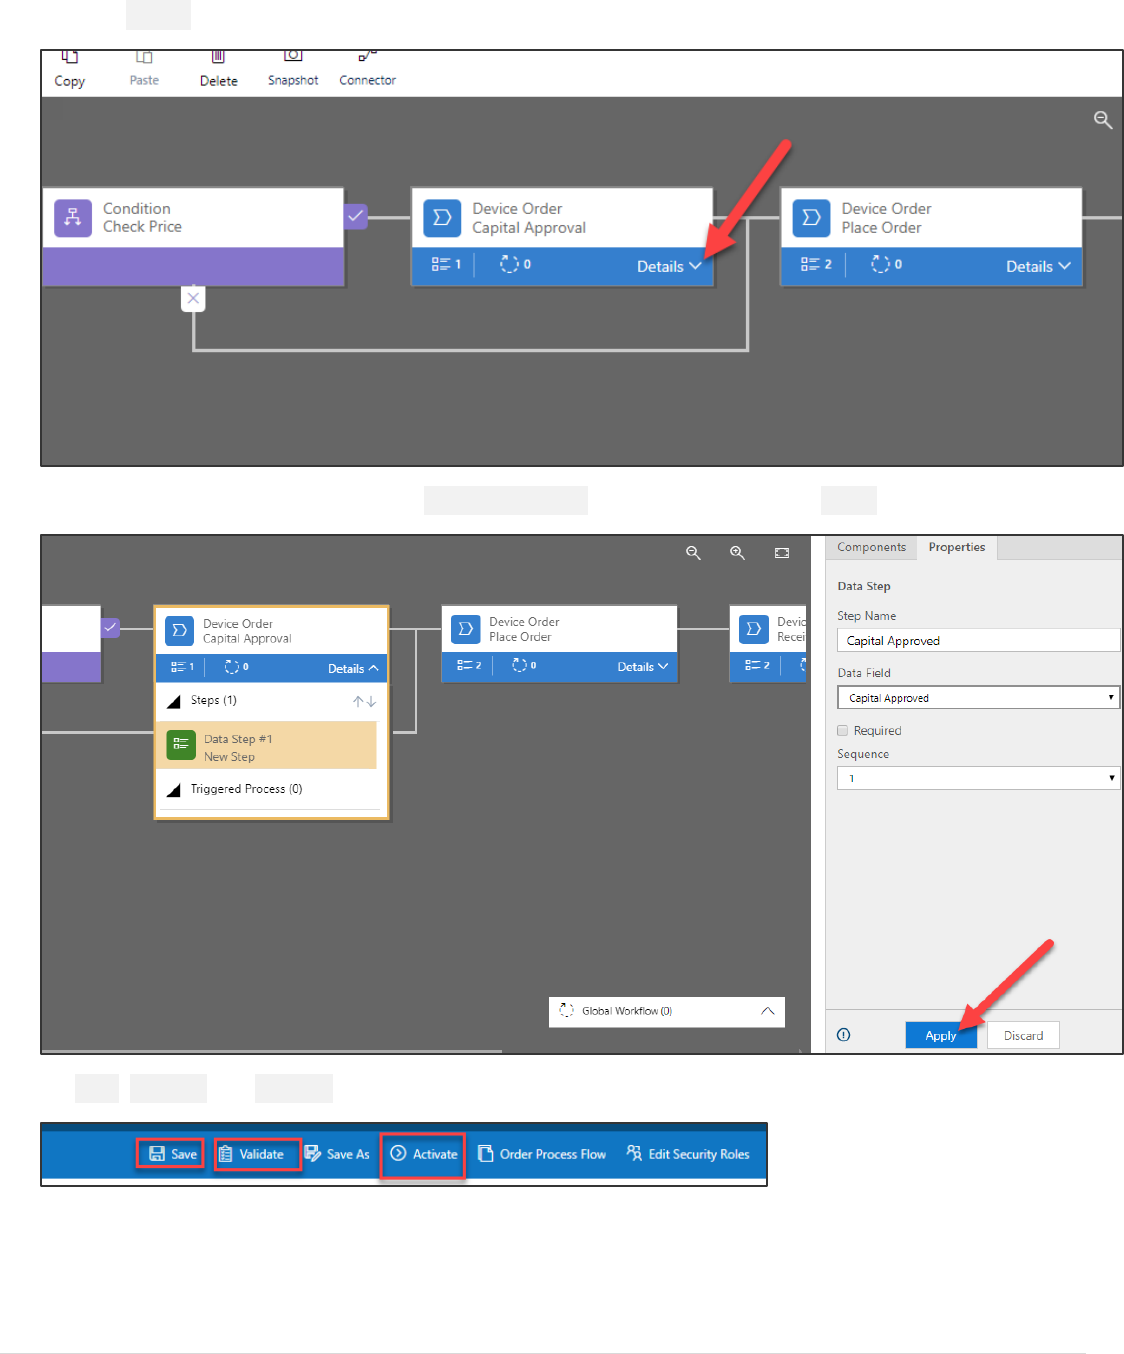
6. Select the new stage, change the Display Name to Capital Approval and click Apply.
Power platform App in a Day Module 3: PowerApps Model-driven app
27 | P a g e ©2018 Microsoft Corporation
7. Click Details.
8. Select the existing Data Step, select Capital Approved for Data Field and click Apply.
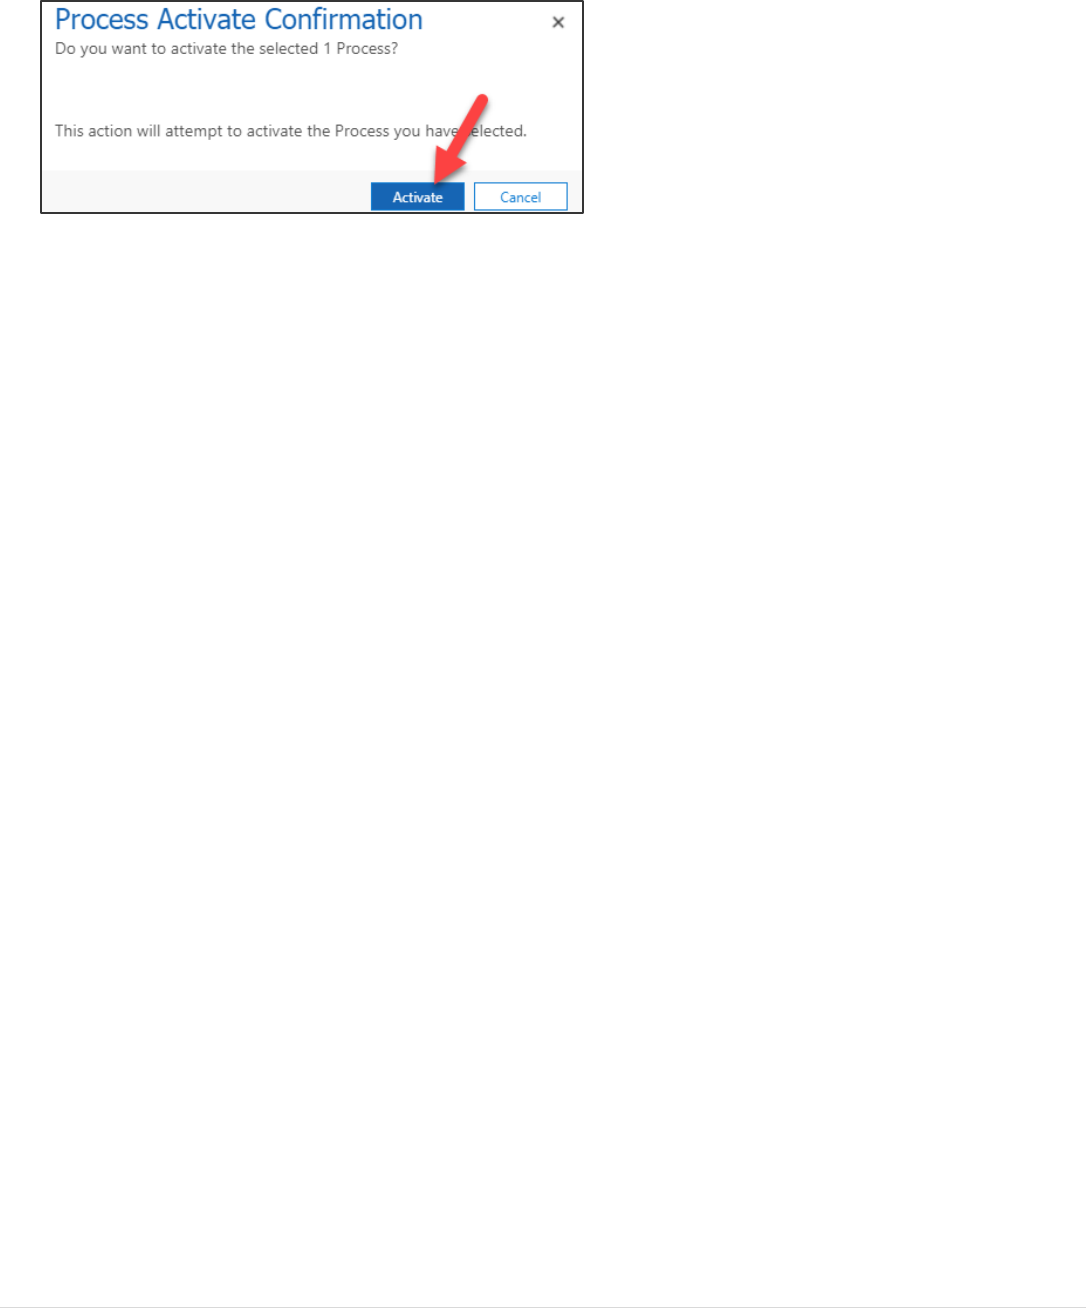
9. Save, Validate and Activate the Business Process Flow.
Power platform App in a Day Module 3: PowerApps Model-driven app
©2018 Microsoft Corporation 28 | P a g e
10. Confirm the activation.
11. Close the process editor window.
Power platform App in a Day Module 3: PowerApps Model-driven app
29 | P a g e ©2018 Microsoft Corporation
Exercise 3: Form and View Modification
In this exercise, we are going to modify the form for the Device Order to add additional fields. When you create an entity
in the Common Data Service, it also creates a main form for that entity with a few basic fields on it. In addition to the
form, views are created for the entity. Views are used in a Model-Driven app anytime a list of the entity records are
displayed. You would modify the view to add additional fields or change the placement. You can also create additional
views, for example, you might provide a few to show all device requests that are waiting to be received.
Task 1: Modify the form
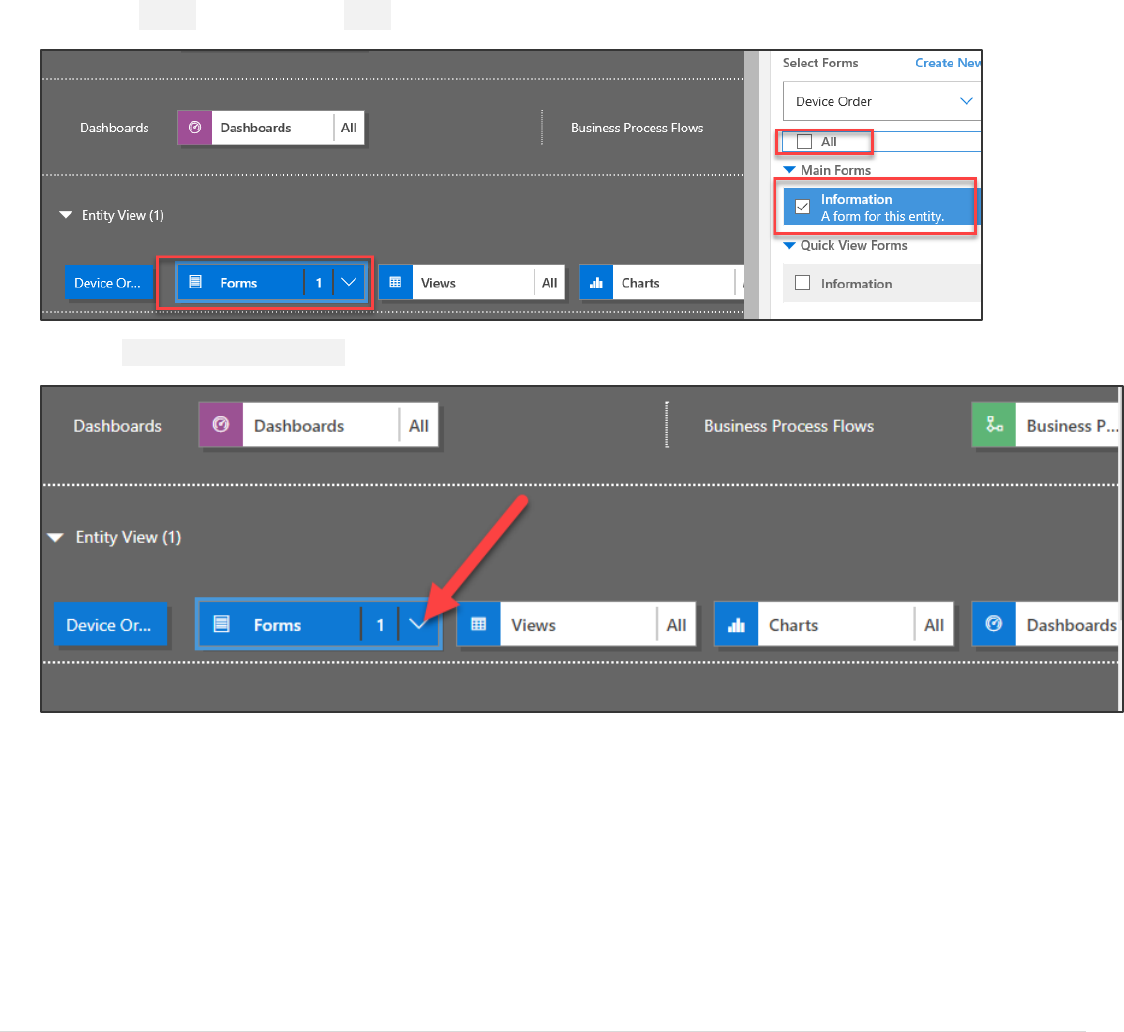
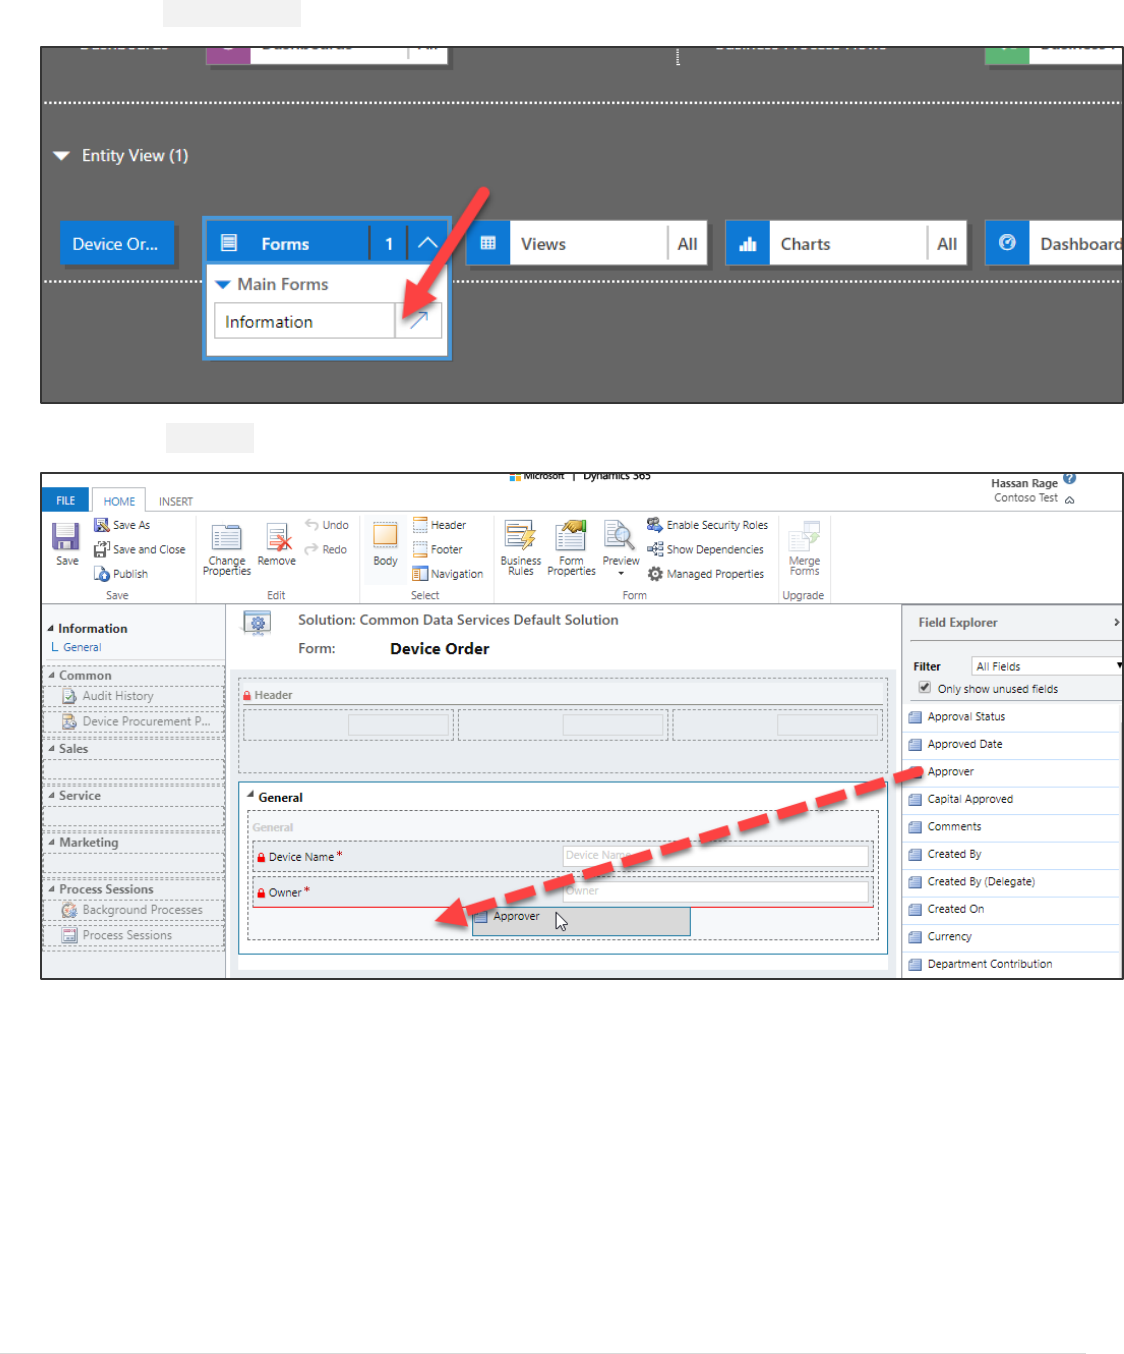
1. Select Forms and select the Main Information form.
2. Click Show List of References.
Power platform App in a Day Module 3: PowerApps Model-driven app
©2018 Microsoft Corporation 30 | P a g e
3. Open the Form Designer.
4. Drag the Approver field to the form.
Power platform App in a Day Module 3: PowerApps Model-driven app
31 | P a g e ©2018 Microsoft Corporation
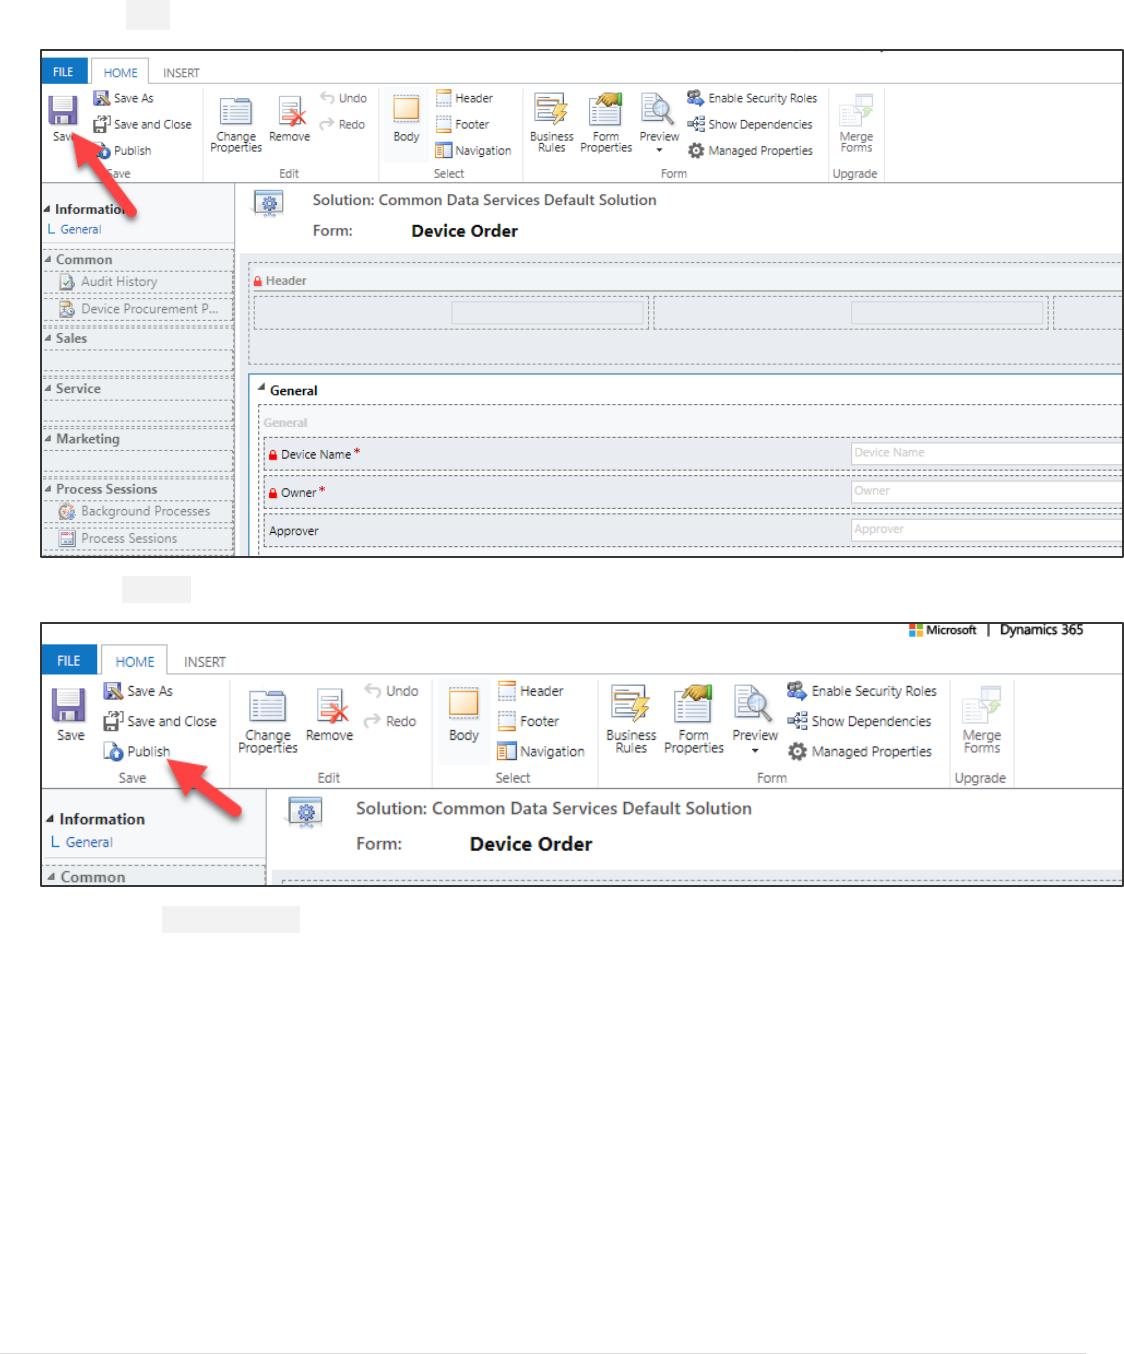
5. Click Save.
6. Click Publish.
7. Close the Form Designer.
Power platform App in a Day Module 3: PowerApps Model-driven app
©2018 Microsoft Corporation 32 | P a g e
Task 2: Modify the view
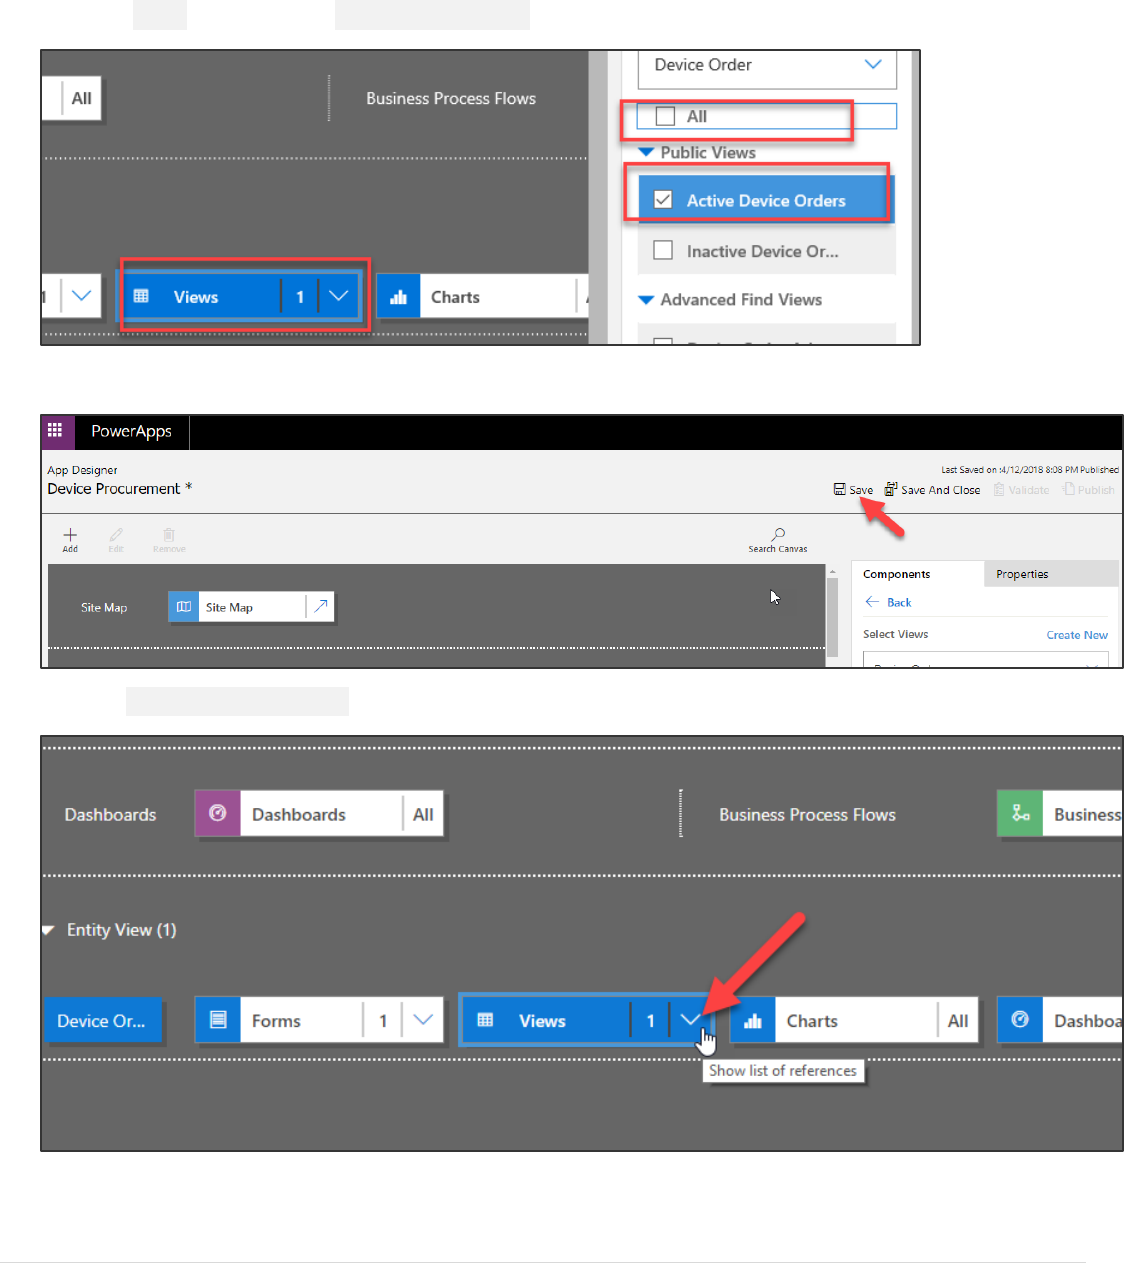
1. Select Views and select the Active Device Orders view.
2. Save the Application.
3. Click Show List of References.
Power platform App in a Day Module 3: PowerApps Model-driven app
33 | P a g e ©2018 Microsoft Corporation
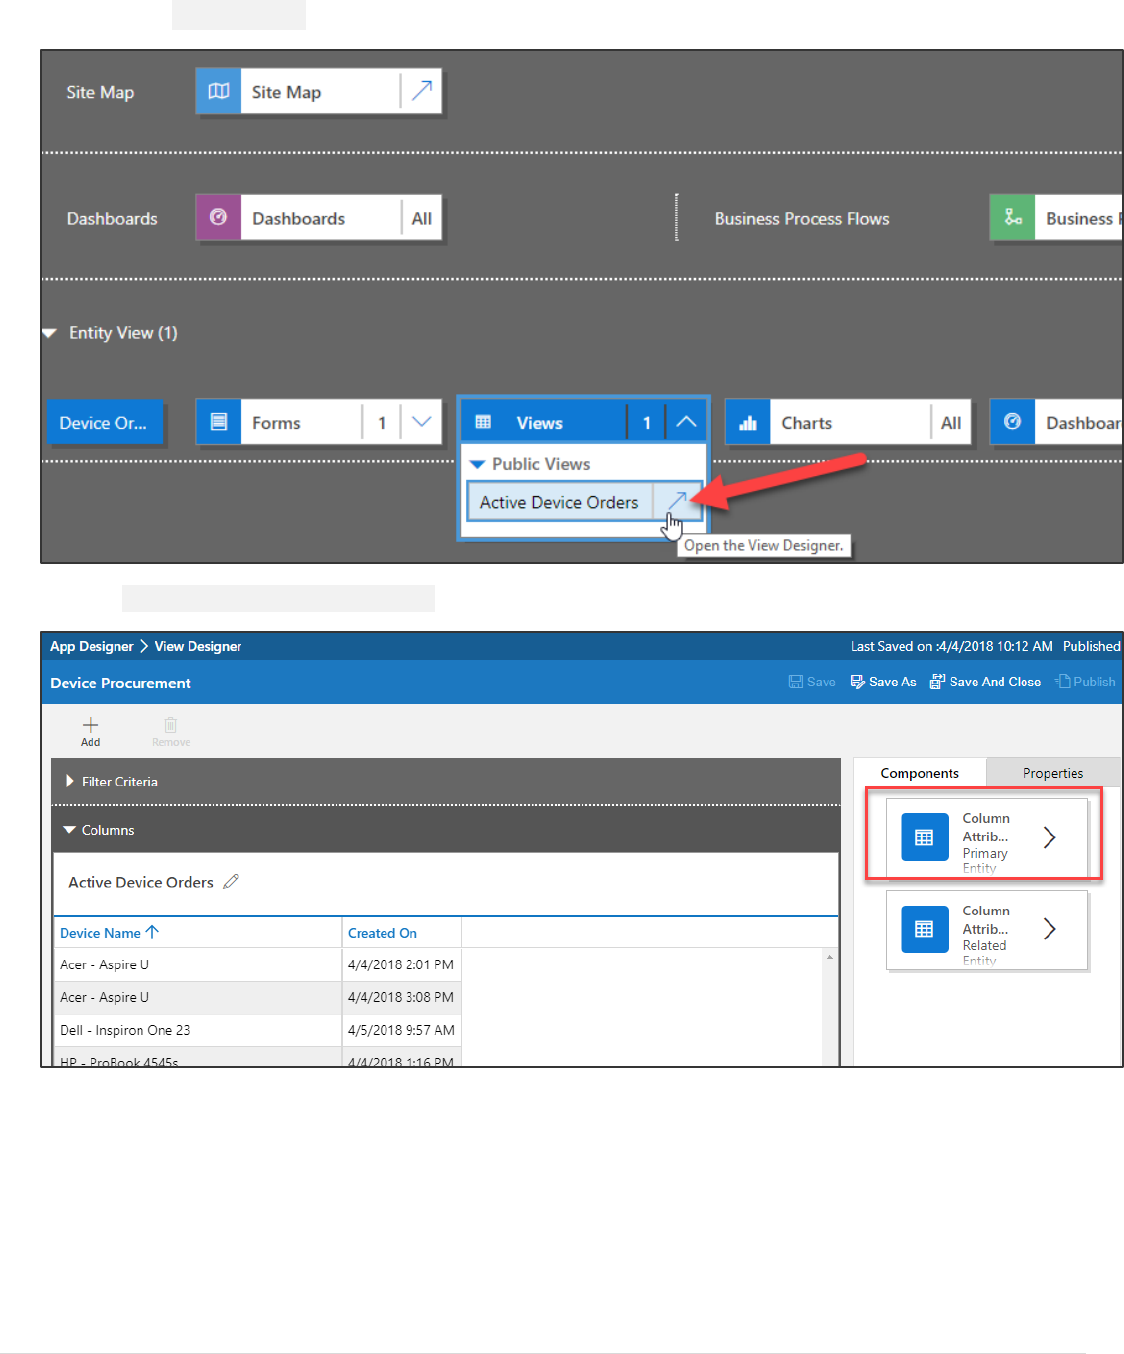
4. Open the View Designer.
5. Click Column Attributes Primary Entity.

Power platform App in a Day Module 3: PowerApps Model-driven app
©2018 Microsoft Corporation 34 | P a g e
6. Drag Approval Status and place to the right of the Created On column.
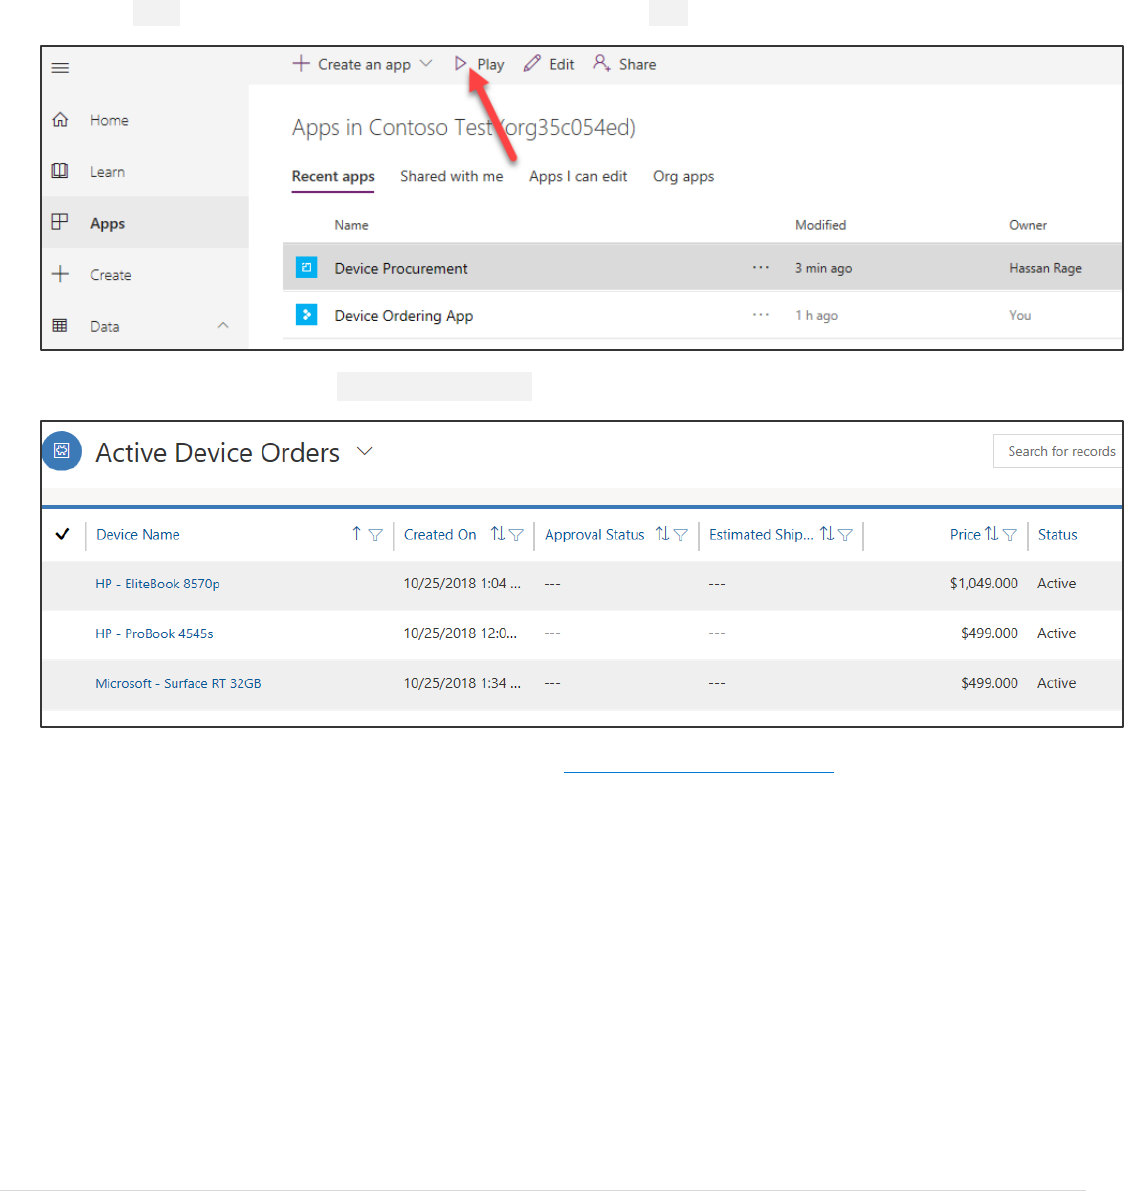
7. Add Estimated Ship date, Price, and Status columns to the View. You can also add columns by double clicking.
8. Click Save.
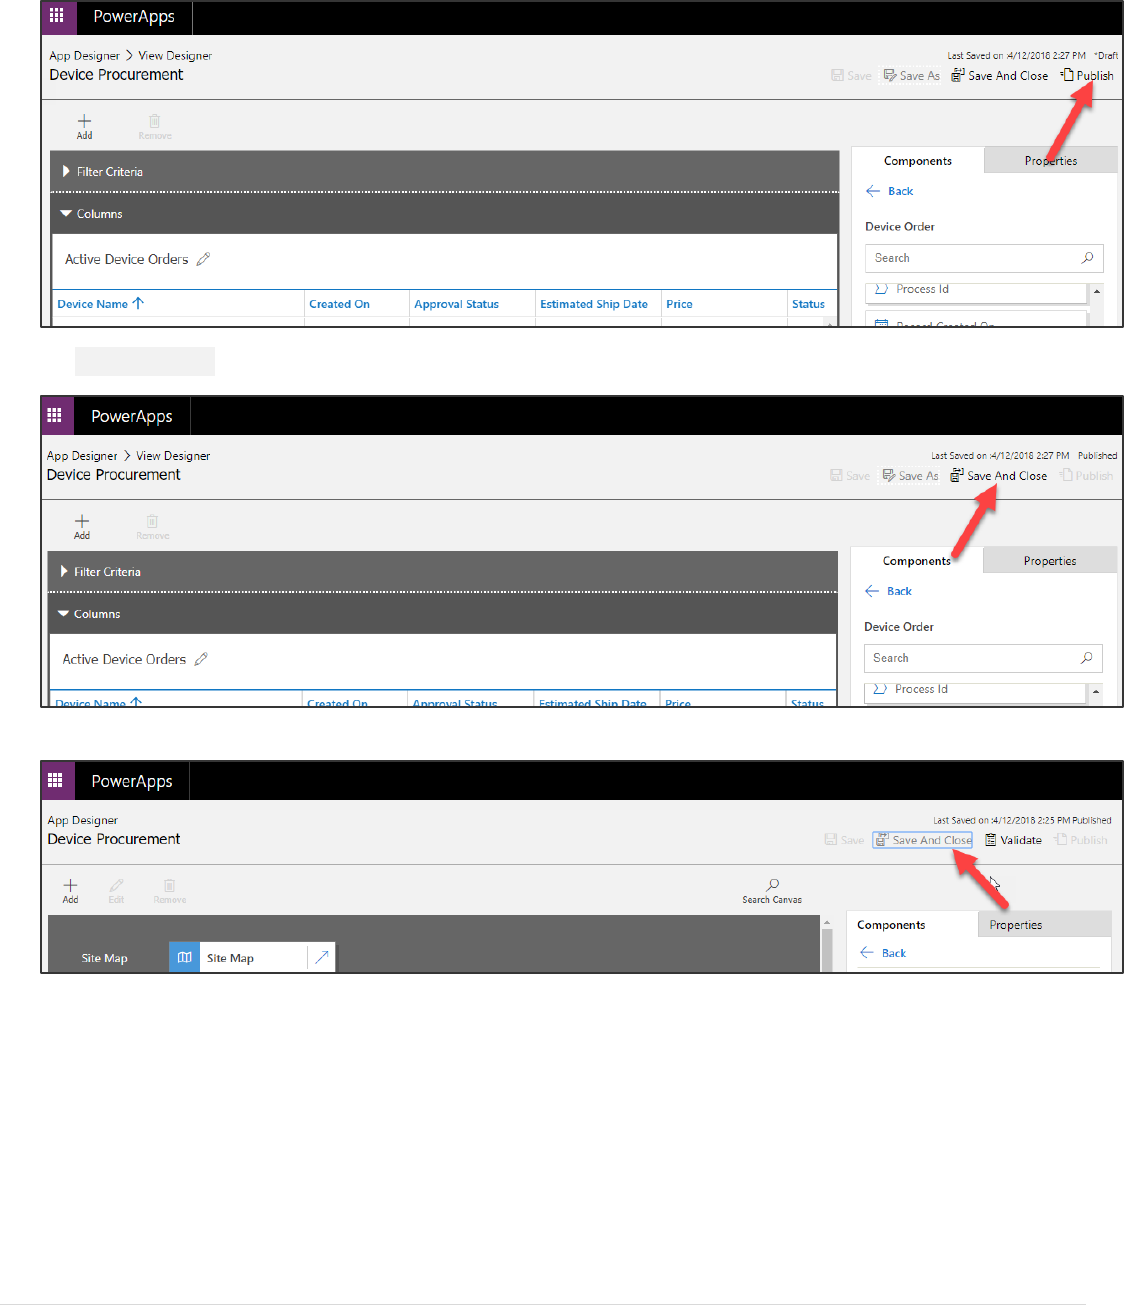
Power platform App in a Day Module 3: PowerApps Model-driven app
35 | P a g e ©2018 Microsoft Corporation
9. Publish the View Designer.
10. Save and Close the View Designer.
11. Save and Close the App Designer.
Power platform App in a Day Module 3: PowerApps Model-driven app
©2018 Microsoft Corporation 36 | P a g e
Exercise 4: Test the application
In this exercise, we are going to test the application you just built.
Task 1: Test the application
1. Select Apps, select the Device Procurement application and click Play.
2. The application will start. The Active Device Orders view will load.
3. Start a new web browser instance and navigate to https://web.powerapps.com. Do not close the Model-
driven application.

Power platform App in a Day Module 3: PowerApps Model-driven app
37 | P a g e ©2018 Microsoft Corporation
4. Select Apps, select the Device Ordering application you created in module 2, and click Play.
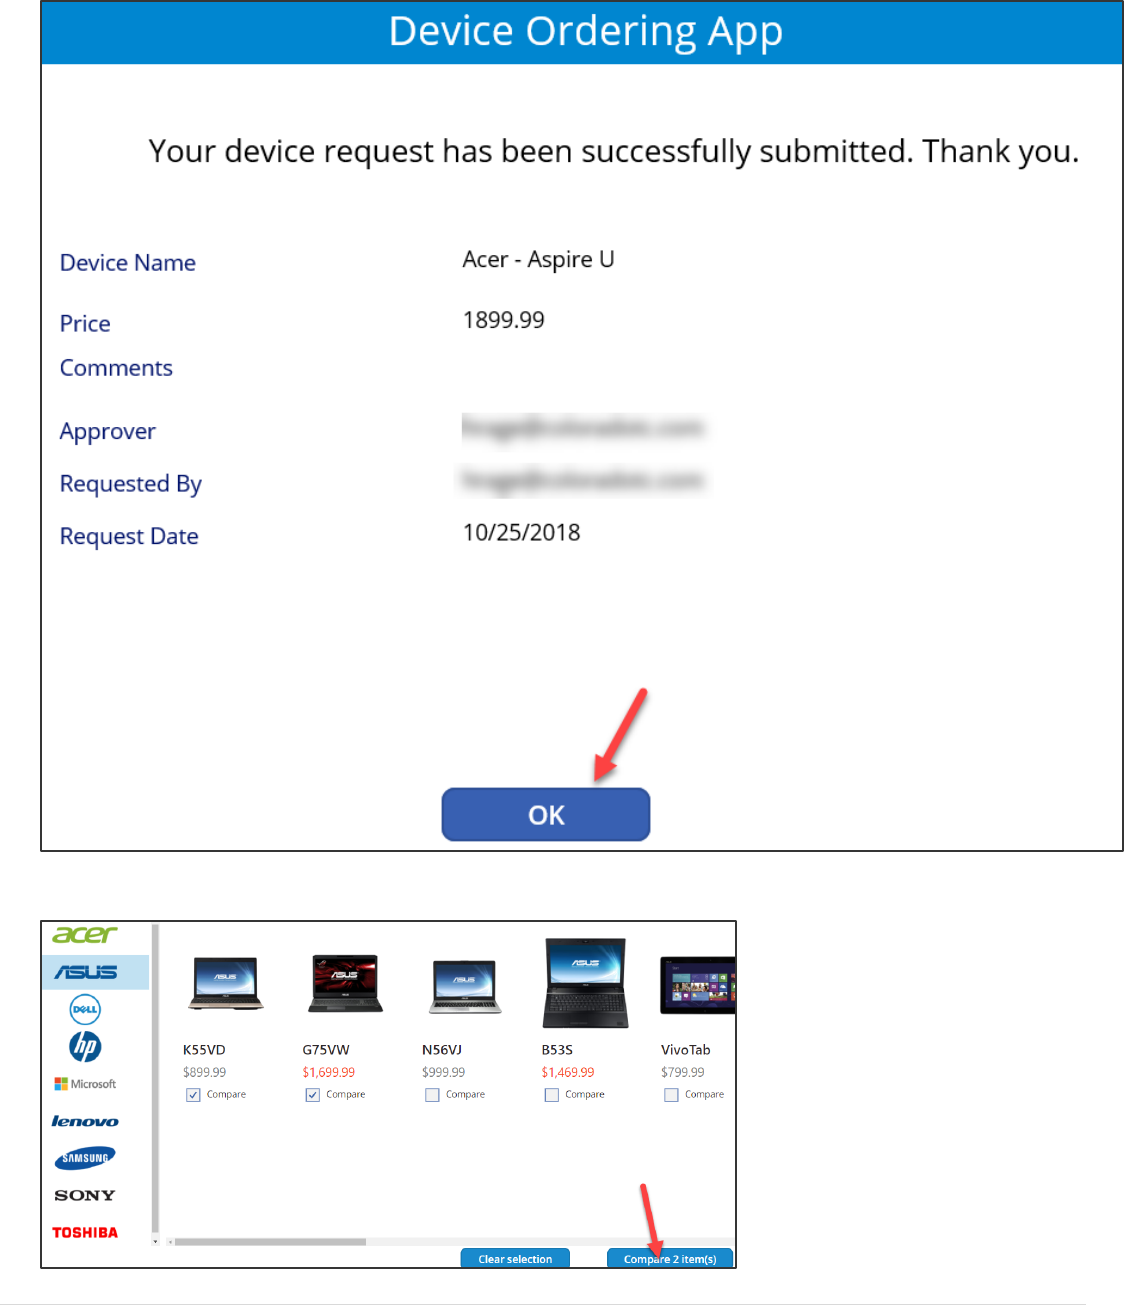
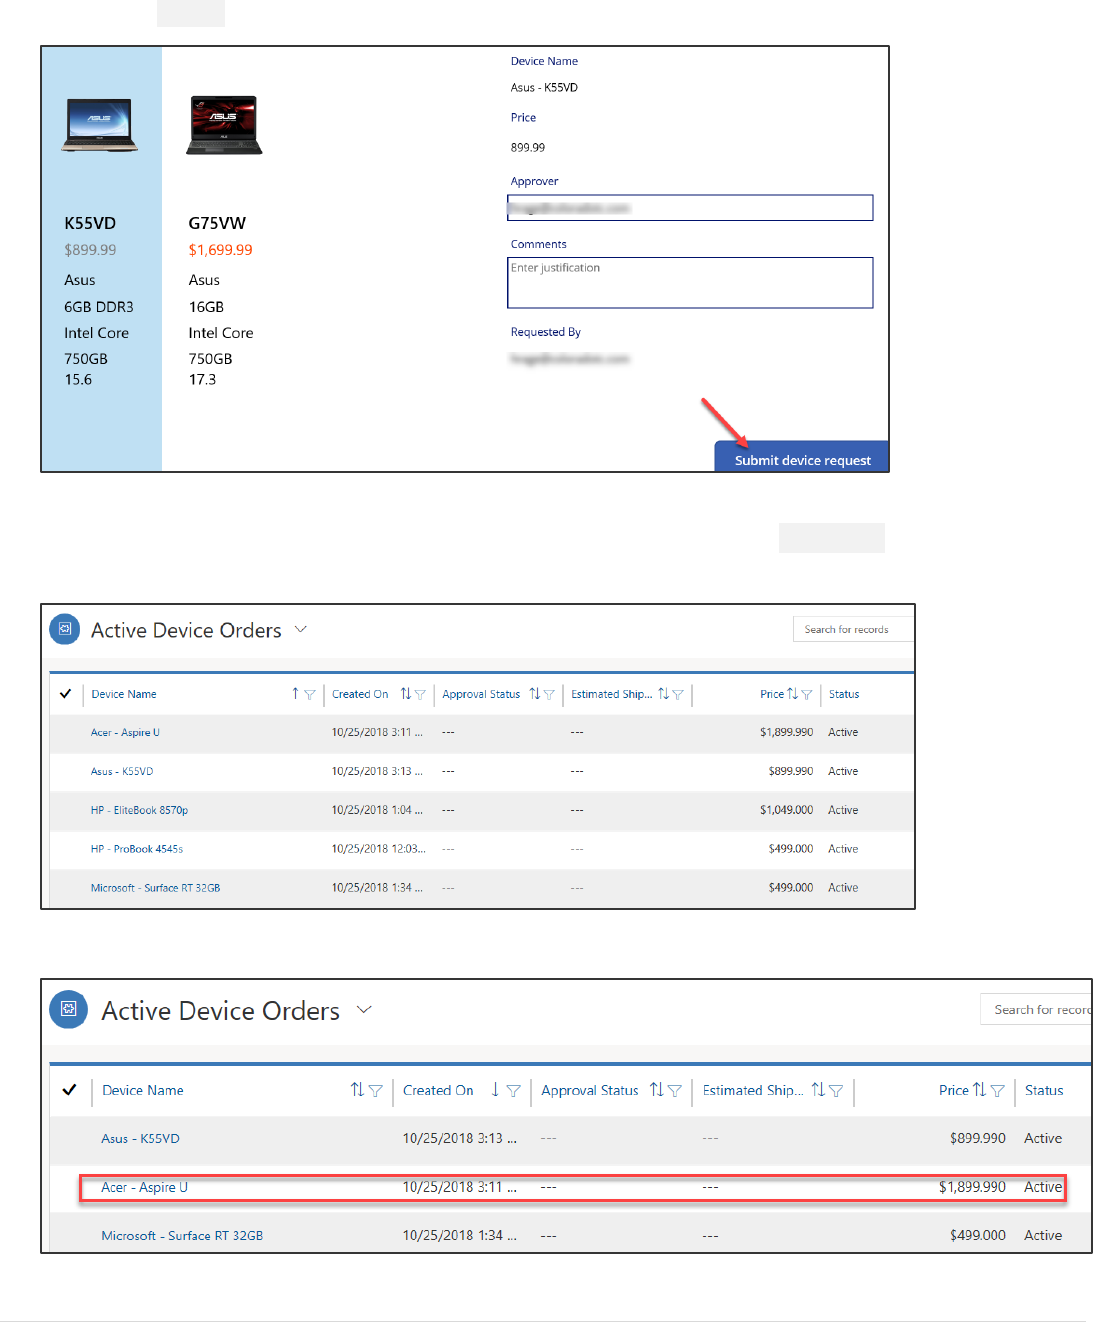
5. Select two devices, make sure one of the devices is priced over $1,000 and click Compare.
6. Select the device with the price over $1k, provide approver email and click Submit.
Power platform App in a Day Module 3: PowerApps Model-driven app
©2018 Microsoft Corporation 38 | P a g e
7. Click OK.
8. Select two more devices and click Compare.
Power platform App in a Day Module 3: PowerApps Model-driven app
39 | P a g e ©2018 Microsoft Corporation
9. Select a device with a price under $1k, provide approver email (or leave in the auto-populated manager email)
and click Submit.
10. Click OK.
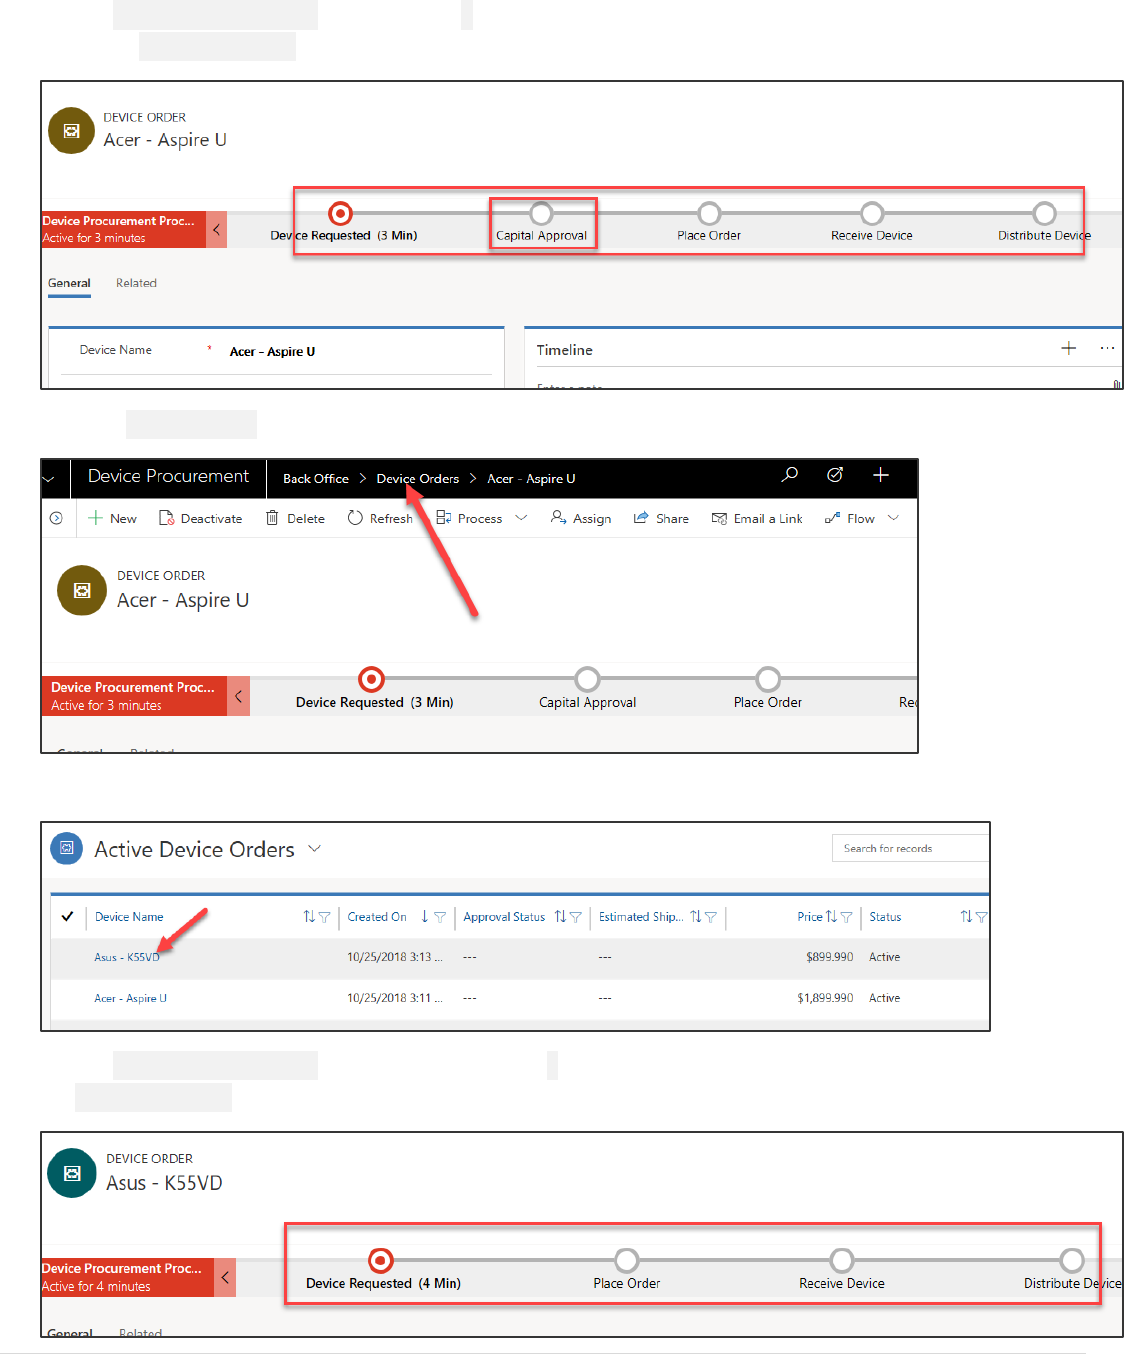
11. Go back to the Model-driven application you created, sort the orders by Created On column, and you
should see the two devices you ordered using the PowerApps Canvas App.
12. Open the one priced over $1k.
Power platform App in a Day Module 3: PowerApps Model-driven app
©2018 Microsoft Corporation 40 | P a g e
13. The Business Process Flow will now have 5 stages. This is because this order costs more than $1k and
needs Capital Approval.
14. Click Device Orders.
15. Click on the other order you created.
16. The Business Process Flow for this order will have 4 stages; this is because this order does not require
Capital Approval.

Power platform App in a Day Module 3: PowerApps Model-driven app
41 | P a g e ©2018 Microsoft Corporation
Lab survey
We would appreciate your feedback on the Business Application Platform technologies and on this hands-on-lab, such as
the quality of documentation and the usefulness of the learning experience.
Please use the survey at http://aka.ms/appinadayLabSurvey to share your feedback.
You may provide feedback for each module as you complete it or at the end once you’ve completed all the modules.
Thank you!
References
App in a Day introduces some of the key functionalities available in PowerApps, Microsoft Flow, Power BI and the
Common Data Service. For an up to date list of learning references, see http://aka.ms/powerapps-resources and
http://aka.ms/flow-resources and http://powerbi.com.

Power platform App in a Day Module 3: PowerApps Model-driven app
©2018 Microsoft Corporation 42 | P a g e
Copyright
© 2018 Microsoft Corporation. All rights reserved.
By using this demo/lab, you agree to the following terms:
The technology/functionality described in this demo/lab is provided by Microsoft Corporation for purposes of obtaining
your feedback and to provide you with a learning experience. You may only use the demo/lab to evaluate such technology
features and functionality and provide feedback to Microsoft. You may not use it for any other purpose. You may not
modify, copy, distribute, transmit, display, perform, reproduce, publish, license, create derivative works from, transfer, or
sell this demo/lab or any portion thereof.
COPYING OR REPRODUCTION OF THE DEMO/LAB (OR ANY PORTION OF IT) TO ANY OTHER SERVER OR LOCATION FOR
FURTHER REPRODUCTION OR REDISTRIBUTION IS EXPRESSLY PROHIBITED.
THIS DEMO/LAB PROVIDES CERTAIN SOFTWARE TECHNOLOGY/PRODUCT FEATURES AND FUNCTIONALITY, INCLUDING
POTENTIAL NEW FEATURES AND CONCEPTS, IN A SIMULATED ENVIRONMENT WITHOUT COMPLEX SET-UP OR
INSTALLATION FOR THE PURPOSE DESCRIBED ABOVE. THE TECHNOLOGY/CONCEPTS REPRESENTED IN THIS DEMO/LAB
MAY NOT REPRESENT FULL FEATURE FUNCTIONALITY AND MAY NOT WORK THE WAY A FINAL VERSION MAY WORK.
WE ALSO MAY NOT RELEASE A FINAL VERSION OF SUCH FEATURES OR CONCEPTS. YOUR EXPERIENCE WITH USING
SUCH FEATURES AND FUNCTIONALITY IN A PHYSICAL ENVIRONMENT MAY ALSO BE DIFFERENT.
FEEDBACK. If you give feedback about the technology features, functionality and/or concepts described in this demo/lab
to Microsoft, you give to Microsoft, without charge, the right to use, share and commercialize your feedback in any way
and for any purpose. You also give to third parties, without charge, any patent rights needed for their products,
technologies and services to use or interface with any specific parts of a Microsoft software or service that includes the
feedback. You will not give feedback that is subject to a license that requires Microsoft to license its software or
documentation to third parties because we include your feedback in them. These rights survive this agreement.
MICROSOFT CORPORATION HEREBY DISCLAIMS ALL WARRANTIES AND CONDITIONS WITH REGARD TO THE DEMO/LAB,
INCLUDING ALL WARRANTIES AND CONDITIONS OF MERCHANTABILITY, WHETHER EXPRESS, IMPLIED OR STATUTORY,
FITNESS FOR A PARTICULAR PURPOSE, TITLE AND NON-INFRINGEMENT. MICROSOFT DOES NOT MAKE ANY
ASSURANCES OR REPRESENTATIONS WITH REGARD TO THE ACCURACY OF THE RESULTS, OUTPUT THAT DERIVES FROM
USE OF DEMO/ LAB, OR SUITABILITY OF THE INFORMATION CONTAINED IN THE DEMO/LAB FOR ANY PURPOSE.
DISCLAIMER
This demo/lab contains only a portion of new features and enhancements in Microsoft PowerApps. Some of the features
might change in future releases of the product. In this demo/lab, you will learn about some, but not all, new features.
