The Liverpool Cathedral Simulator Design, Construction & Operation 05 Type 2 Configuring Virtual Belfry Guide V0.1
User Manual:
Open the PDF directly: View PDF ![]() .
.
Page Count: 16

Type 2 Liverpool
Ringing Simulator
05 – Configuring Virtual Belfry Guide
Author: Andrew Instone-Cowie
Date: 10 September 2018
Version: 0.1

Type 2 Simulator – Configuring Virtual Belfry Guide 0.1
2
Contents
Index of Figures ....................................................................................................................................... 2
No table of figures entries found.Document History ............................................................................. 3
Licence .................................................................................................................................................... 3
Documentation Map ............................................................................................................................... 4
About This Guide ..................................................................................................................................... 5
First Steps ............................................................................................................................................ 5
Next Steps ........................................................................................................................................... 5
Virtual Belfry ........................................................................................................................................... 6
Copyrights & Licensing ........................................................................................................................ 6
Sensors Configuration ......................................................................................................................... 6
Copying Sensor Groups ..................................................................................................................... 13
Delay Timer Calibration ........................................................................................................................ 16
Index of Figures
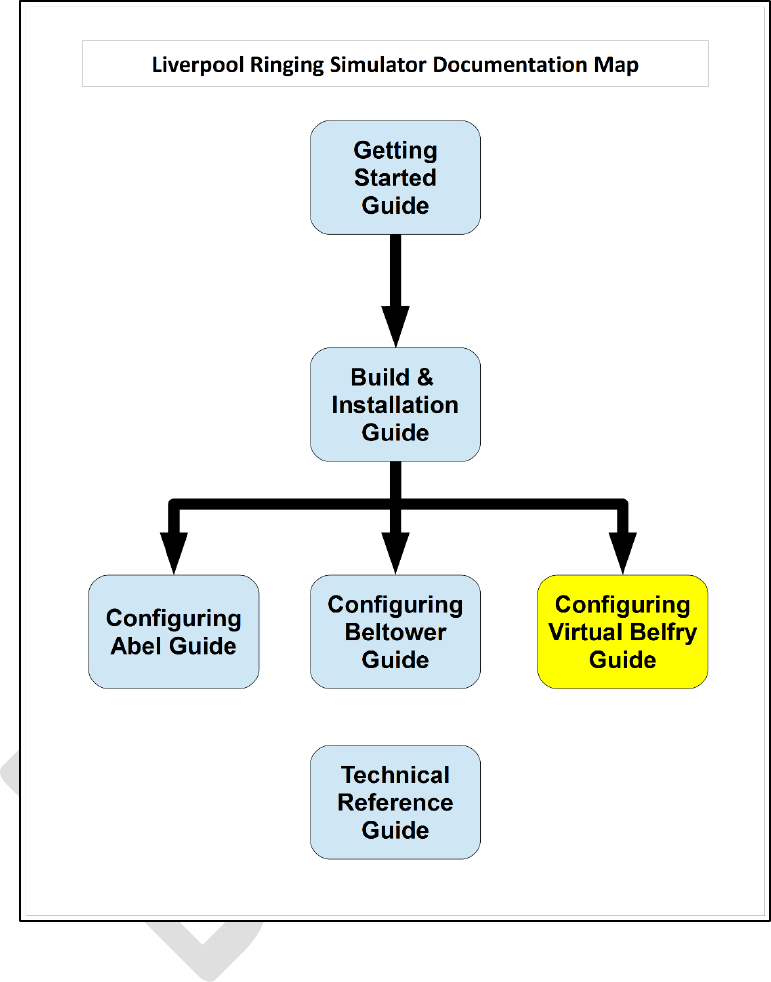
Figure 1 – Documentation Map .............................................................................................................. 4
Figure 2 – Virtual Belfry – Main Window ................................................................................................ 6
Figure 3 – Virtual Belfry – Add New Sensor Group ................................................................................. 7
Figure 4 – Virtual Belfry – New Sensor Group ........................................................................................ 7
Figure 5 – Virtual Belfry – Add New Sensor ............................................................................................ 8
Figure 6 – Virtual Belfry – First New Sensor ........................................................................................... 9
Figure 7 – Virtual Belfry – Subsequent Sensors ...................................................................................... 9
Figure 8 – Virtual Belfry – Completed Sensor Configuration Example ................................................. 10
Figure 9 – Virtual Belfry – Using Sensors .............................................................................................. 11
Figure 10 – Virtual Belfry – Monitor Function ...................................................................................... 12
Figure 11 – Virtual Belfry – Copy Sensor Group .................................................................................... 13
Figure 12 – Virtual Belfry – Confirm Copy ............................................................................................. 14
Figure 13 – Virtual Belfry – Rename Sensor Group .............................................................................. 15
Figure 14 – Virtual Belfry – Select Sensor Group .................................................................................. 15

Type 2 Simulator – Configuring Virtual Belfry Guide 0.1
3
Document History
Version
Author
Date
Changes
0.1
A J Instone-Cowie
10/09/2018
First Draft.
Copyright ©2018 Andrew Instone-Cowie.
Cover photograph: “Directions for the Steeple-Keeper”. © 2008 Keith Edkins
[CC BY-SA 2.0 (http://creativecommons.org/licenses/by-sa/2.0)], via Wikimedia Commons
Licence
This work is licensed under a Creative Commons Attribution-ShareAlike 4.0 International License.
1
Unless otherwise separately undertaken by the Licensor, to the extent possible, the Licensor offers
the Licensed Material as-is and as-available, and makes no representations or warranties of any kind
concerning the Licensed Material, whether express, implied, statutory, or other. This includes,
without limitation, warranties of title, merchantability, fitness for a particular purpose, non-
infringement, absence of latent or other defects, accuracy, or the presence or absence of errors,
whether or not known or discoverable. Where disclaimers of warranties are not allowed in full or in
part, this disclaimer may not apply to You.
To the extent possible, in no event will the Licensor be liable to You on any legal theory (including,
without limitation, negligence) or otherwise for any direct, special, indirect, incidental, consequential,
punitive, exemplary, or other losses, costs, expenses, or damages arising out of this Public License or
use of the Licensed Material, even if the Licensor has been advised of the possibility of such losses,
costs, expenses, or damages. Where a limitation of liability is not allowed in full or in part, this
limitation may not apply to You.
1
http://creativecommons.org/licenses/by-sa/4.0/
Type 2 Simulator – Configuring Virtual Belfry Guide 0.1
4
Documentation Map
Figure 1 – Documentation Map

Type 2 Simulator – Configuring Virtual Belfry Guide 0.1
5
About This Guide
The Type 2 Liverpool Ringing Simulator allows sensors, attached to one or more real tower bells or
teaching dumb bells, to be connected to a computer Simulator Software Package such as Abel
2
,
Beltower
3
or Virtual Belfry
4
. This allows you to extend and augment the teaching and practice
opportunities in your tower.
This brief Configuring Virtual Belfry Guide shows you how to configure the Virtual Belfry Simulator
Software Package to work with the Type 2 Liverpool Ringing Simulator.
Other project guides are available for the Abel and Beltower packages.
First Steps
This guide begins from the point that you have completed building and installing your Type 2
Liverpool Simulator hardware, and are now ready to configure Virtual Belfry to work with the
simulator.
For guidance on building and installing the Type 2 Liverpool Simulator, please refer to the Build &
Installation Guide. For detailed technical information, see also the Technical Reference Guide.
Next Steps
This is not a detailed guide to using Virtual Belfry. Please refer to the Virtual Belfry documentation
and help for more information on the usage and configuration of the application.
This is also not a guide to using a simulator in teaching and practice. For guidance in this area the
ART
5
publication Teaching with Simulators is recommended, available from the ART shop
6
.
2
http://www.abelsim.co.uk/
3
http://www.beltower.co.uk/
4
http://www.belfryware.com/
5
Association of Ringing Teachers
6
http://ringingteachers.org/resource-centre/shop
Type 2 Simulator – Configuring Virtual Belfry Guide 0.1
6
Virtual Belfry
Copyrights & Licensing
Virtual Belfry is a copyright software product ©Douglas Nichols, made available under the Licence
Conditions included with the software.
Please ensure your copy of Virtual Belfry is properly licensed.
Virtual Belfry can be ordered and downloaded from http://www.belfryware.com/, and requires a
Licence Key for full functionality.
Sensors Configuration
Configuration of the Virtual Belfry Simulator Software Package to use the Simulator Interface should
also only need to be done once. All settings are saved by Virtual Belfry in the Windows Registry. This
example is based on Virtual Belfry 3.5.
To configure Virtual Belfry to use the Simulator Interface, carry out the following steps. This manual
described the minimum necessary to configure Virtual Belfry to use the Simulator Interface, for full
details on the overall configuration and features of Virtual Belfry please refer to the product
documentation.
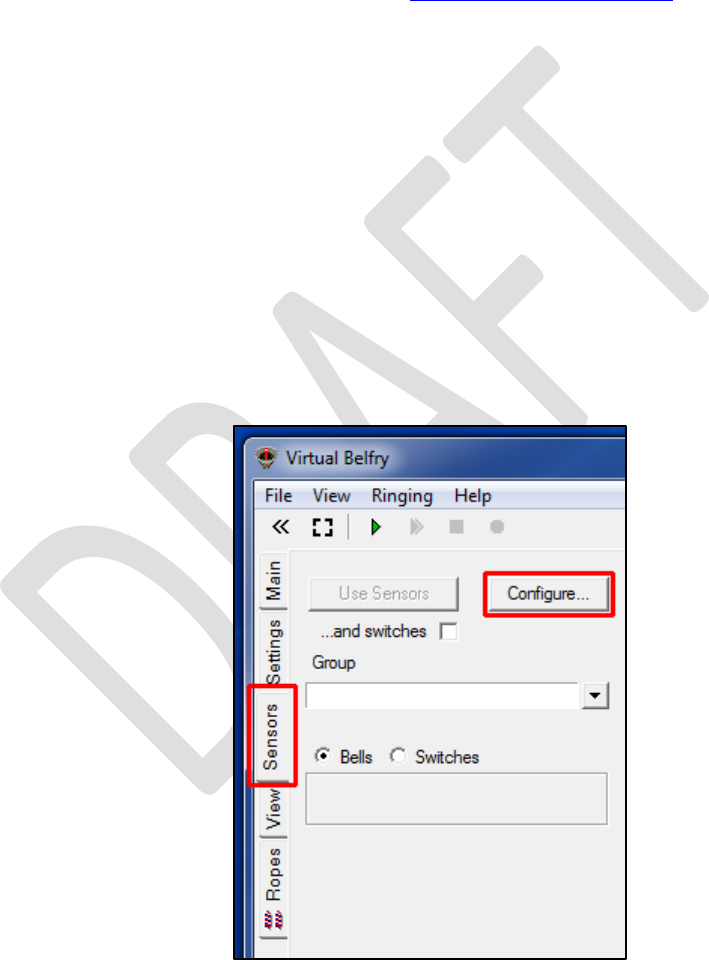
• Start Virtual Belfry on the Simulator PC, click on the Sensors vertical tab, then click the
Configure… button.
Figure 2 – Virtual Belfry – Main Window
Type 2 Simulator – Configuring Virtual Belfry Guide 0.1
7
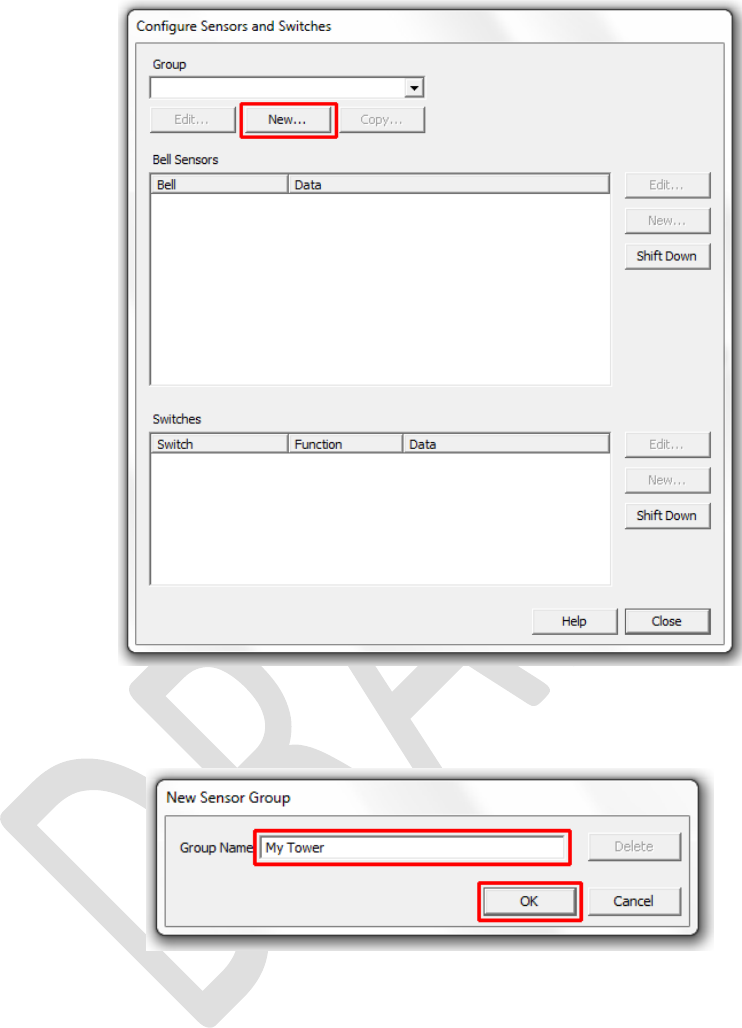
• In the Configure Sensors window, click the New… button to create a new sensor group.
Figure 3 – Virtual Belfry – Add New Sensor Group
• Give the sensor group a name, and then click OK.
Figure 4 – Virtual Belfry – New Sensor Group
Type 2 Simulator – Configuring Virtual Belfry Guide 0.1
8
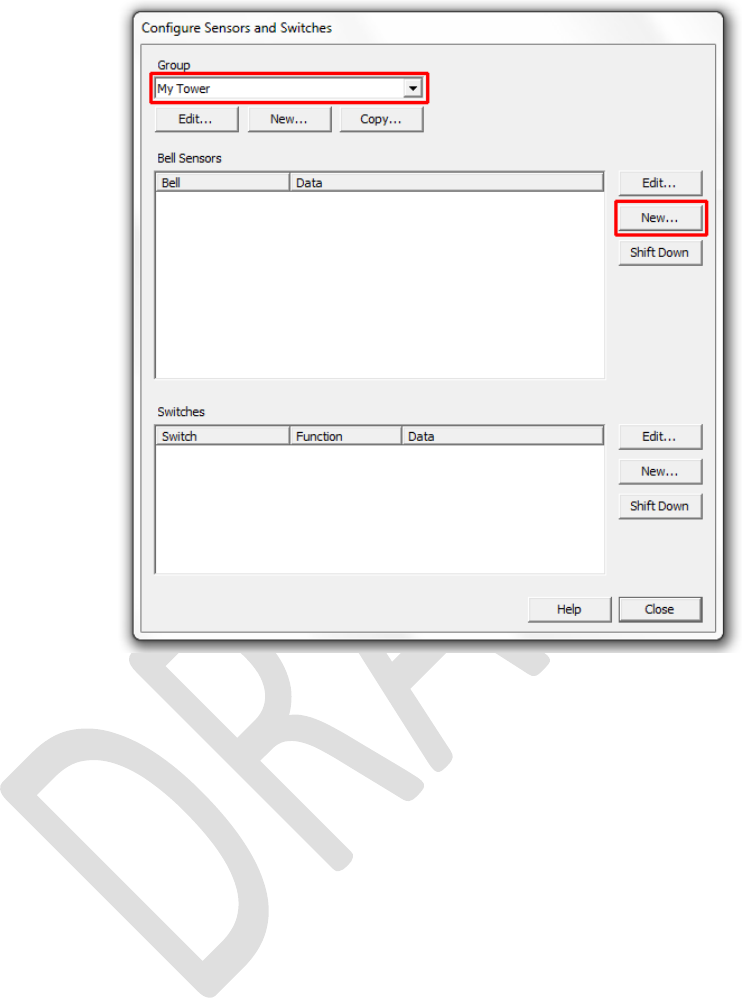
• In the Configure Sensors window, select the new sensor group in the Group dropdown, and
then click New… to create a new sensor.
Figure 5 – Virtual Belfry – Add New Sensor
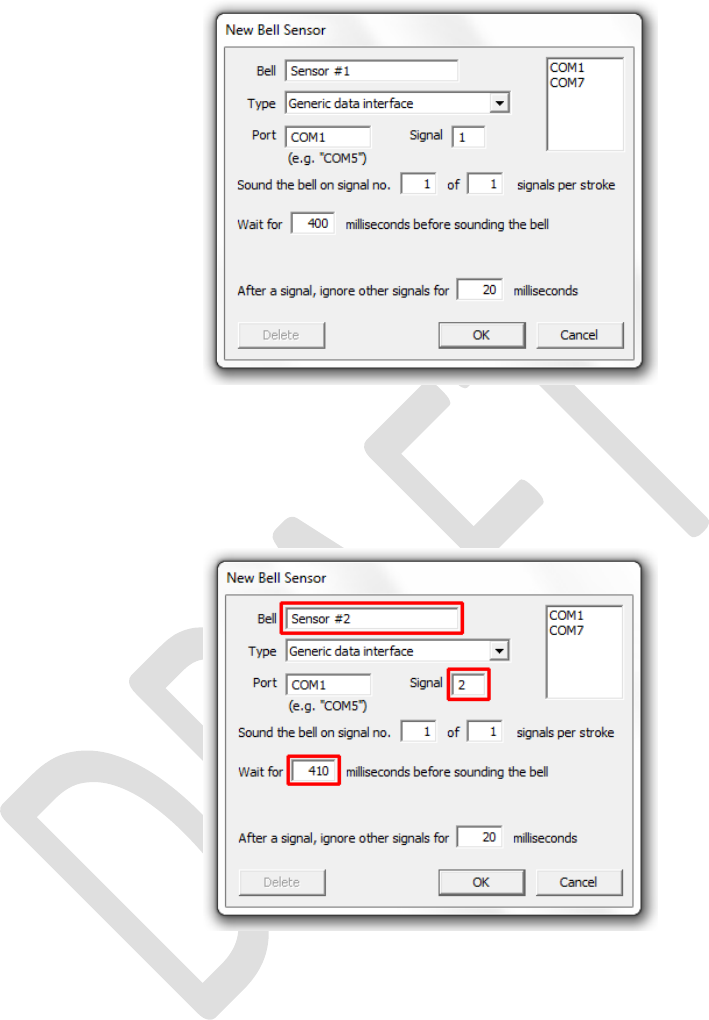
• In the New Sensor window, configure the first sensor as follows:
• In the Bell field, enter a unique name for the sensor, in this example Sensor #1.
• In the Type dropdown, select Generic Data Interface.
• In the Port field, enter the full name of the COM port to be used, in this example COM1.
Virtual Belfry displays a dynamically updated list of available COM ports in the large box
at the top right of the window, and you can populate the Port field by double-clicking a
port from this list.
• In the Signal field, select the Simulator Interface signal that corresponds to this sensor,
in this case channel 1.
• In the Wait for field, enter the delay for this bell to an appropriate value, so that the
simulated bell sounds as closely as possible to the same time as the real bell (this is best
done with the real bell un-silenced). Note that in Virtual Belfry the delay values are
specified in 1/1000ths of a second (milliseconds).
• Set the Ignore field to 20ms, and the signal number fields to 1 of 1.
Type 2 Simulator – Configuring Virtual Belfry Guide 0.1
9
• Click OK to close the New Sensor window.
Figure 6 – Virtual Belfry – First New Sensor
• Repeat steps 4 and 5 for the second and each successive sensor. Assuming that you are
configuring Sensors connected to just one interface, the only values which should be
different are the Bell, Signal and Wait for fields.
Figure 7 – Virtual Belfry – Subsequent Sensors
Type 2 Simulator – Configuring Virtual Belfry Guide 0.1
10
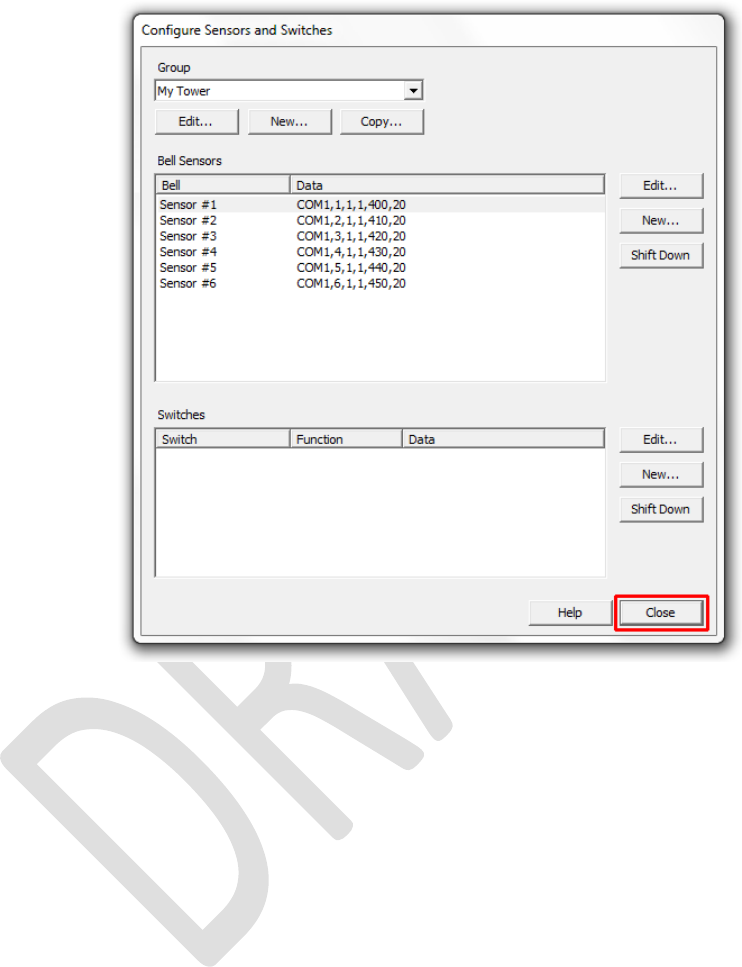
• Click Close in the Configure Sensors window to save the sensor settings and close the
window. The following example shows a completed sensor group with delay timers for a
mythical ring of six.
Figure 8 – Virtual Belfry – Completed Sensor Configuration Example
Type 2 Simulator – Configuring Virtual Belfry Guide 0.1
11
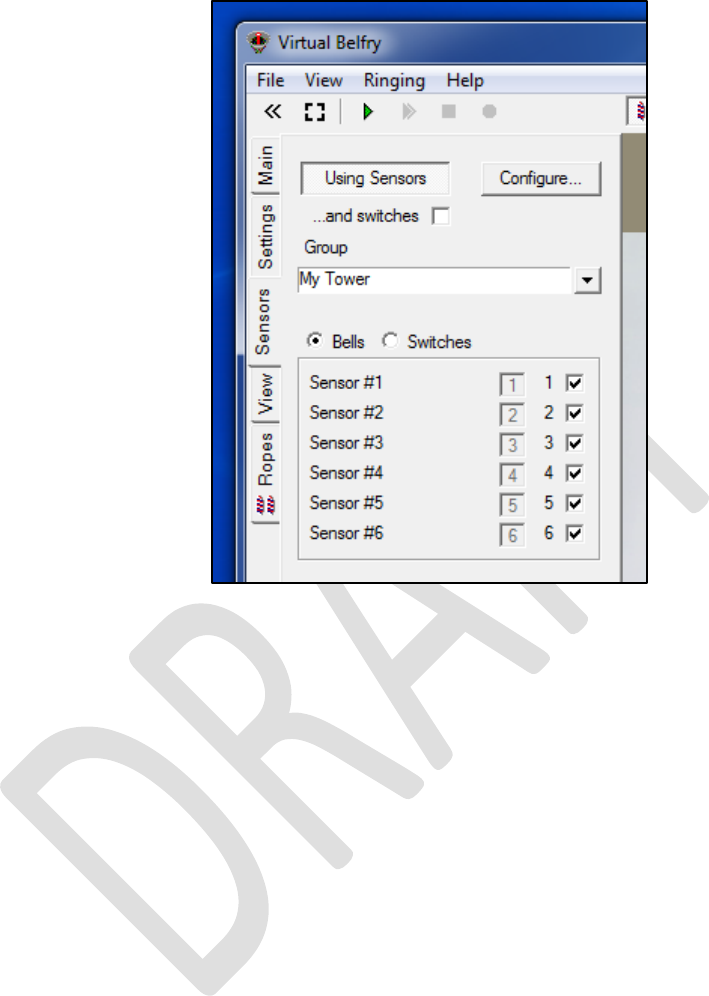
• To activate the sensor group for silent practice, click on the Using Sensors button on the
Sensors vertical tab, and tick the checkboxes for the bells in use.
Figure 9 – Virtual Belfry – Using Sensors
• Virtual Belfry should now be configured to use the Simulator Interface. Test each bell in turn
and check that the simulated bells are correctly mapped to the real bells.
• Note that the method mapping sensors to simulated bells changed considerably in Virtual
Belfry 3.5. Select Index… from the Help menu (or press F1 and click on the Index tab) and
look at the Silent Practice and Sensors Control Panel help pages for a detailed description.
Type 2 Simulator – Configuring Virtual Belfry Guide 0.1
12
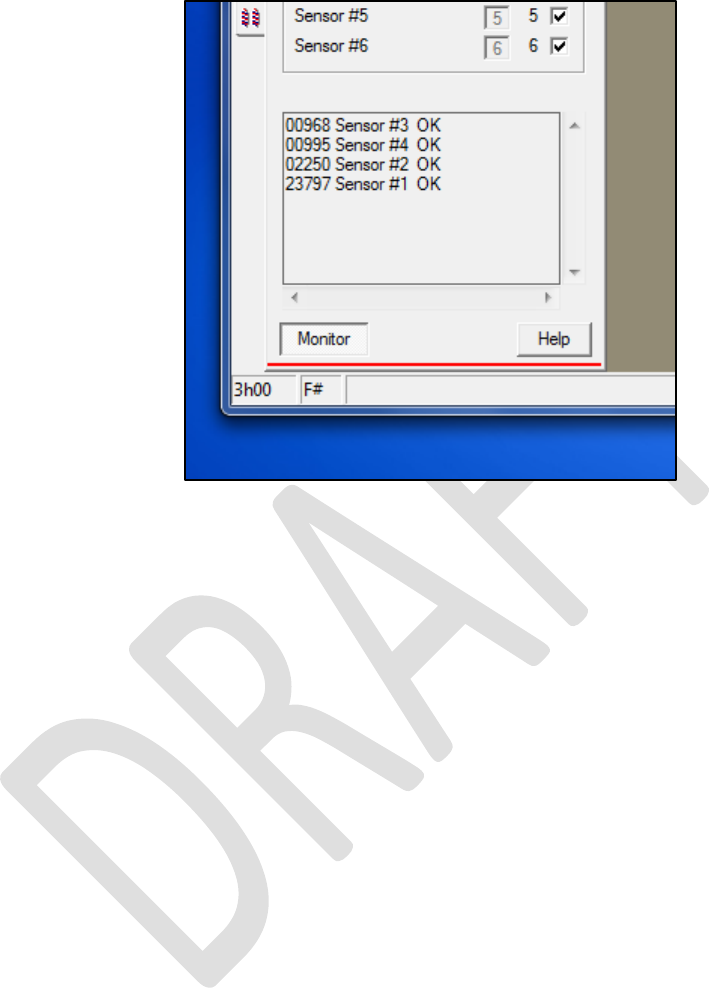
• The Monitor button on the Sensors vertical tab opens a monitor pane in which sensor inputs
can be observed in real time. New data is added at the top of the pane.
Figure 10 – Virtual Belfry – Monitor Function
Type 2 Simulator – Configuring Virtual Belfry Guide 0.1
13
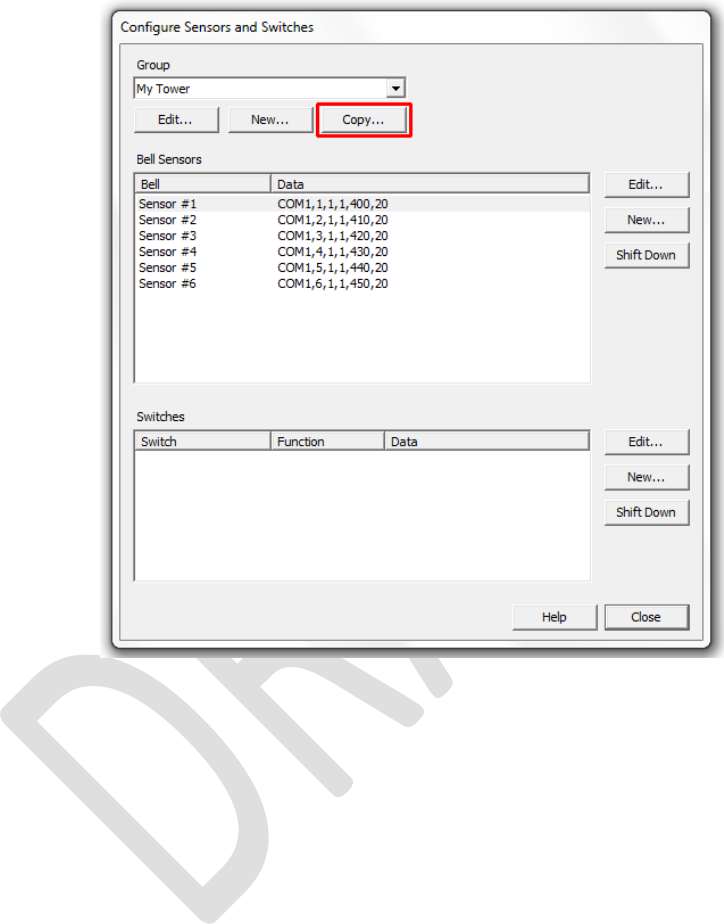
Copying Sensor Groups
• Sensor groups may be copied and edited, facilitating switching between multiple different
sensor configurations. Click the Copy… button on the Configuring Sensors and Switches
window.
Figure 11 – Virtual Belfry – Copy Sensor Group

Type 2 Simulator – Configuring Virtual Belfry Guide 0.1
14
• Then click OK to create a copy of the current group.
Figure 12 – Virtual Belfry – Confirm Copy
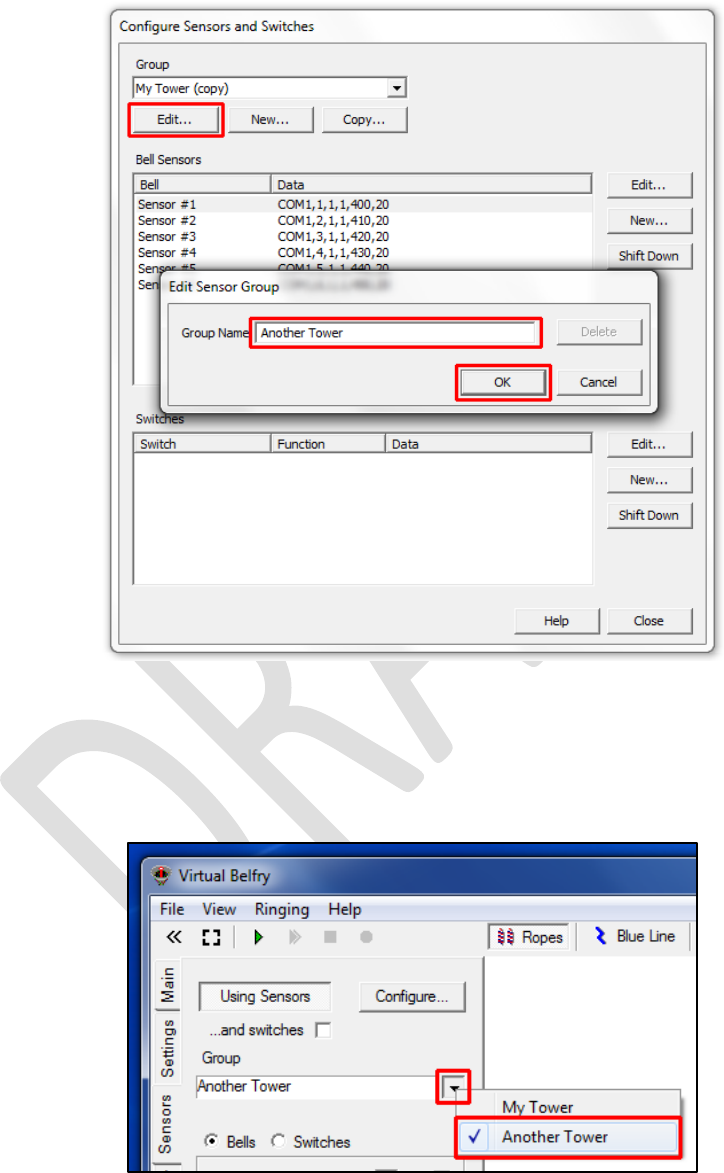
• The new sensor group will have the same name as the original, with the word (copy)
appended.
Type 2 Simulator – Configuring Virtual Belfry Guide 0.1
15
• To rename the new group, click the Edit… button, enter a new name for the group, and click
OK.
Figure 13 – Virtual Belfry – Rename Sensor Group
• Now change the configuration of the sensors in the new group as required.
• You can switch to the new sensor group by using the dropdown on the Sensor tab of the
main window.
Figure 14 – Virtual Belfry – Select Sensor Group

Type 2 Simulator – Configuring Virtual Belfry Guide 0.1
16
Delay Timer Calibration
For accurate simulation of the real bells, the simulator requires that the delay timer for each bell is
set so that the delay applied after Simulator Interface sends the strike signal to the Simulator (at
exactly the point at which the real bell passes through bottom dead centre of its swing) results in the
simulator sounding at the same time that the open bell would have struck. This delay time is specific
to each bell, but for most bells is somewhere around 0.5s (or 500 milliseconds).
The simplest method of setting the timer values is to ring each bell open alongside the simulator.
• Start Virtual Belfry on the Simulator PC.
• Ring each bell in turn, open, and compare the sound of the bell and the simulated sound
from the simulator.
• If the real bell sounds before the simulator, reduce that bell’s delay timer value.
• If the simulator sounds before the real bell, increase that bell’s delay timer value.
• Repeat this process until the sound of the real bell and the sound from the simulator are as
close to coincident as possible.
• Repeat for each of the other bells in turn.
Tip: A useful starting point for delay timer values is to measure the period of oscillation of the bell
for small swings and set the timer to ¼ of that value. Then fine tune the value as described above.
