Intramail_swg 0893422_rev1 0893422 Rev1
User Manual: 0893422_rev1
Open the PDF directly: View PDF ![]() .
.
Page Count: 120 [warning: Documents this large are best viewed by clicking the View PDF Link!]
- Table of Contents
- Chapter 1: Features
- Introduction to IntraMail Features
- IntraMail Feature Glossary
- Announcement Mailbox
- Announcement Message
- Answer Schedule Override
- Answer Tables
- Answering Machine Emulation
- Auto Attendant Do Not Disturb
- Auto Erase or Save
- Auto Time Stamp
- Automated Attendant
- Automated Attendant Transfer
- Automatic Routing for Rotary Dial Callers
- Call Forward to a Mailbox
- Call Routing Mailbox
- Caller ID
- Caller ID with Return Call
- Calling the Automated Attendant
- Conversation Record
- Dial Action Table
- Directory Dialing
- Directory Dialing Mailbox
- Erasing All Messages
- Exiting a Mailbox
- External Transfer
- Fax Detection
- Flexible Answering Schedules
- Flexible Call Routing
- Flexible Mailbox Numbering Plan
- Forced Unscreened Transfer
- Getting Recorded Help
- Go To A Mailbox
- Greeting
- Group (Shared) Mailbox
- Guest Mailbox
- Hang Up
- Instruction Menu
- Leaving a Message
- Listening to Messages
- Log Onto Voice Mail
- Mailbox Name
- Mailbox Options Menu
- Mailbox Security Code Delete
- Main Menu
- Make Call
- Master Mailbox
- Message Count Display
- Message Delete
- Message Forward
- Message Length
- Message Listen Mode
- Message Notification
- Message Playback Direction
- Message Record
- Message Reply
- Message Storage Limit
- Message Waiting Lamp
- Multiple Company Greetings
- Next Call Routing Mailbox
- Programming Voice Mail
- Quick Message
- Record and Send a Message
- Remote Programming
- Routing Mailbox
- Screened Transfer
- Security Code
- Single Digit Dialing
- Station Mailbox
- Subscriber Mailbox
- System Administrator
- System Administrator Mailbox
- System Re-initialization
- Time and Date
- Time and Date Stamp
- Transfer to a Mailbox
- Undefined Routing
- Unscreened Transfer
- Voice Mail Overflow
- Volume Control
- Chapter 2: Soft Key Glossary

1. Features
2. Soft Key Glossary
Aspire S
IntraMail
Feature Handbook
This manual has been developed by NEC Unified Solutions, Inc. It is intended for the use of its customers and service
personnel, and should be read in its entirety before attempting to install or program the system. Any comments or suggestions
for improving this manual would be appreciated. Forward your remarks to:
NEC Unified Solutions, Inc.
4 Forest Parkway
Shelton, CT 06484
www.necunifiedsolutions.com
Nothing contained in this manual shall be deemed to be, and this manual does not constitute, a warranty of, or representation
with respect to, any of the equipment covered. This manual is subject to change without notice and NEC Unified Solutions,
Inc. has no obligation to provide any updates or corrections to this manual. Further, NEC Unified Solutions, Inc. also reserves
the right, without prior notice, to make changes in equipment design or components as it deems appropriate. No
representation is made that this manual is complete or accurate in all respects and NEC Unified Solutions, Inc. shall not be
liable for any errors or omissions. In no event shall NEC Unified Solutions, Inc. be liable for any incidental or consequential
damages in connection with the use of this manual. This document contains proprietary information that is protected by
copyright. All rights are reserved. No part of this document may be photocopied or reproduced without prior written consent
of NEC Unified Solutions, Inc.
©2005 by NEC Unified Solutions, Inc. All Rights Reserved.
Printed in U.S.A.

Table of Contents
Aspire S IntraMail Feature Handbook Table of Contents
◆
i
Table of Contents
Table of Contents . . . . . . . . . . . . . . . . . . . . . . . . . . . . . . . . . . . . . . . . . . . . . . . . . . . . . . . i
Chapter 1: Features. . . . . . . . . . . . . . . . . . . . . . . . . . . . . . . . . . . . . . . . . . . . . . .1
Introduction to IntraMail Features . . . . . . . . . . . . . . . . . . . . . . . . . . . . . . . . . . . . . . . . . . . . . . . . . . 1
IntraMail Feature Glossary . . . . . . . . . . . . . . . . . . . . . . . . . . . . . . . . . . . . . . . . . . . . . . . . . . . . . . . 2
Announcement Mailbox. . . . . . . . . . . . . . . . . . . . . . . . . . . . . . . . . . . . . . . . . . . . . . . . . . . . . . . . . 11
Announcement Message . . . . . . . . . . . . . . . . . . . . . . . . . . . . . . . . . . . . . . . . . . . . . . . . . . . . . . . . 13
Answer Schedule Override . . . . . . . . . . . . . . . . . . . . . . . . . . . . . . . . . . . . . . . . . . . . . . . . . . . . . . 14
Answer Tables . . . . . . . . . . . . . . . . . . . . . . . . . . . . . . . . . . . . . . . . . . . . . . . . . . . . . . . . . . . . . . . . 15
The Default Mailbox and Routing Hierarchy . . . . . . . . . . . . . . . . . . . . . . . . . . . . . . . . . 16
Customizing an Answer Table. . . . . . . . . . . . . . . . . . . . . . . . . . . . . . . . . . . . . . . . . . . . . 16
Answering Machine Emulation . . . . . . . . . . . . . . . . . . . . . . . . . . . . . . . . . . . . . . . . . . . . . . . . . . . 18
Auto Attendant Do Not Disturb. . . . . . . . . . . . . . . . . . . . . . . . . . . . . . . . . . . . . . . . . . . . . . . . . . . 19
Auto Erase or Save. . . . . . . . . . . . . . . . . . . . . . . . . . . . . . . . . . . . . . . . . . . . . . . . . . . . . . . . . . . . . 21
Auto Time Stamp. . . . . . . . . . . . . . . . . . . . . . . . . . . . . . . . . . . . . . . . . . . . . . . . . . . . . . . . . . . . . . 22
Automated Attendant . . . . . . . . . . . . . . . . . . . . . . . . . . . . . . . . . . . . . . . . . . . . . . . . . . . . . . . . . . . 23
Automated Attendant Transfer. . . . . . . . . . . . . . . . . . . . . . . . . . . . . . . . . . . . . . . . . . . . . . . . . . . . 25
Automatic Routing for Rotary Dial Callers . . . . . . . . . . . . . . . . . . . . . . . . . . . . . . . . . . . . . . . . . . 26
Call Forward to a Mailbox. . . . . . . . . . . . . . . . . . . . . . . . . . . . . . . . . . . . . . . . . . . . . . . . . . . . . . . 27
Call Routing Mailbox. . . . . . . . . . . . . . . . . . . . . . . . . . . . . . . . . . . . . . . . . . . . . . . . . . . . . . . . . . . 28
Caller ID. . . . . . . . . . . . . . . . . . . . . . . . . . . . . . . . . . . . . . . . . . . . . . . . . . . . . . . . . . . . . . . . . . . . . 30
Caller ID with Return Call. . . . . . . . . . . . . . . . . . . . . . . . . . . . . . . . . . . . . . . . . . . . . . . . . . . . . . . 31
Calling the Automated Attendant . . . . . . . . . . . . . . . . . . . . . . . . . . . . . . . . . . . . . . . . . . . . . . . . . 32
Conversation Record . . . . . . . . . . . . . . . . . . . . . . . . . . . . . . . . . . . . . . . . . . . . . . . . . . . . . . . . . . . 33
Dial Action Table. . . . . . . . . . . . . . . . . . . . . . . . . . . . . . . . . . . . . . . . . . . . . . . . . . . . . . . . . . . . . . 34
Dial Action Table Options. . . . . . . . . . . . . . . . . . . . . . . . . . . . . . . . . . . . . . . . . . . . . . . . 35
Directory Dialing . . . . . . . . . . . . . . . . . . . . . . . . . . . . . . . . . . . . . . . . . . . . . . . . . . . . . . . . . . . . . . 36
Directory Dialing Mailbox. . . . . . . . . . . . . . . . . . . . . . . . . . . . . . . . . . . . . . . . . . . . . . . . . . . . . . . 38
Erasing All Messages. . . . . . . . . . . . . . . . . . . . . . . . . . . . . . . . . . . . . . . . . . . . . . . . . . . . . . . . . . . 39
Exiting a Mailbox. . . . . . . . . . . . . . . . . . . . . . . . . . . . . . . . . . . . . . . . . . . . . . . . . . . . . . . . . . . . . . 40
External Transfer . . . . . . . . . . . . . . . . . . . . . . . . . . . . . . . . . . . . . . . . . . . . . . . . . . . . . . . . . . . . . . 41
Fax Detection . . . . . . . . . . . . . . . . . . . . . . . . . . . . . . . . . . . . . . . . . . . . . . . . . . . . . . . . . . . . . . . . . 42
Flexible Answering Schedules. . . . . . . . . . . . . . . . . . . . . . . . . . . . . . . . . . . . . . . . . . . . . . . . . . . . 43
Flexible Call Routing. . . . . . . . . . . . . . . . . . . . . . . . . . . . . . . . . . . . . . . . . . . . . . . . . . . . . . . . . . . 44
Flexible Mailbox Numbering Plan. . . . . . . . . . . . . . . . . . . . . . . . . . . . . . . . . . . . . . . . . . . . . . . . . 45
Forced Unscreened Transfer . . . . . . . . . . . . . . . . . . . . . . . . . . . . . . . . . . . . . . . . . . . . . . . . . . . . . 46
Getting Recorded Help. . . . . . . . . . . . . . . . . . . . . . . . . . . . . . . . . . . . . . . . . . . . . . . . . . . . . . . . . . 47
Go To A Mailbox. . . . . . . . . . . . . . . . . . . . . . . . . . . . . . . . . . . . . . . . . . . . . . . . . . . . . . . . . . . . . . 48
Greeting . . . . . . . . . . . . . . . . . . . . . . . . . . . . . . . . . . . . . . . . . . . . . . . . . . . . . . . . . . . . . . . . . . . . . 49
Remote Greetings . . . . . . . . . . . . . . . . . . . . . . . . . . . . . . . . . . . . . . . . . . . . . . . . . . . . . . 49
Multiple Greetings. . . . . . . . . . . . . . . . . . . . . . . . . . . . . . . . . . . . . . . . . . . . . . . . . . . . . . 49
Group (Shared) Mailbox . . . . . . . . . . . . . . . . . . . . . . . . . . . . . . . . . . . . . . . . . . . . . . . . . . . . . . . . 51
Guest Mailbox . . . . . . . . . . . . . . . . . . . . . . . . . . . . . . . . . . . . . . . . . . . . . . . . . . . . . . . . . . . . . . . . 52
Hang Up . . . . . . . . . . . . . . . . . . . . . . . . . . . . . . . . . . . . . . . . . . . . . . . . . . . . . . . . . . . . . . . . . . . . . 53
Instruction Menu . . . . . . . . . . . . . . . . . . . . . . . . . . . . . . . . . . . . . . . . . . . . . . . . . . . . . . . . . . . . . . 54
Leaving a Message. . . . . . . . . . . . . . . . . . . . . . . . . . . . . . . . . . . . . . . . . . . . . . . . . . . . . . . . . . . . . 55
Listening to Messages . . . . . . . . . . . . . . . . . . . . . . . . . . . . . . . . . . . . . . . . . . . . . . . . . . . . . . . . . . 56
Telephone Display while Listening to a Message . . . . . . . . . . . . . . . . . . . . . . . . . . . . . . 57
Log Onto Voice Mail . . . . . . . . . . . . . . . . . . . . . . . . . . . . . . . . . . . . . . . . . . . . . . . . . . . . . . . . . . . 59
Local (On-site) Logon . . . . . . . . . . . . . . . . . . . . . . . . . . . . . . . . . . . . . . . . . . . . . . . . . . . 59

Table of Contents
ii
◆
Table of Contents
Aspire S IntraMail Feature Handbook
Remote Log On . . . . . . . . . . . . . . . . . . . . . . . . . . . . . . . . . . . . . . . . . . . . . . . . . . . . . . . . 59
Mailbox Name . . . . . . . . . . . . . . . . . . . . . . . . . . . . . . . . . . . . . . . . . . . . . . . . . . . . . . . . . . . . . . . . 60
Mailbox Options Menu . . . . . . . . . . . . . . . . . . . . . . . . . . . . . . . . . . . . . . . . . . . . . . . . . . . . . . . . . 62
Mailbox Security Code Delete. . . . . . . . . . . . . . . . . . . . . . . . . . . . . . . . . . . . . . . . . . . . . . . . . . . . 63
Main Menu. . . . . . . . . . . . . . . . . . . . . . . . . . . . . . . . . . . . . . . . . . . . . . . . . . . . . . . . . . . . . . . . . . . 64
Make Call. . . . . . . . . . . . . . . . . . . . . . . . . . . . . . . . . . . . . . . . . . . . . . . . . . . . . . . . . . . . . . . . . . . . 65
Automatic Route Selection . . . . . . . . . . . . . . . . . . . . . . . . . . . . . . . . . . . . . . . . . . . . . . . 65
Master Mailbox . . . . . . . . . . . . . . . . . . . . . . . . . . . . . . . . . . . . . . . . . . . . . . . . . . . . . . . . . . . . . . . 66
Using a Master Mailbox as an Additional Resource . . . . . . . . . . . . . . . . . . . . . . . . . . . . 66
Message Count Display . . . . . . . . . . . . . . . . . . . . . . . . . . . . . . . . . . . . . . . . . . . . . . . . . . . . . . . . . 67
Enhanced Message Key Operation . . . . . . . . . . . . . . . . . . . . . . . . . . . . . . . . . . . . . . . . . 67
Message Delete . . . . . . . . . . . . . . . . . . . . . . . . . . . . . . . . . . . . . . . . . . . . . . . . . . . . . . . . . . . . . . . 69
Message Forward . . . . . . . . . . . . . . . . . . . . . . . . . . . . . . . . . . . . . . . . . . . . . . . . . . . . . . . . . . . . . . 70
Message Length . . . . . . . . . . . . . . . . . . . . . . . . . . . . . . . . . . . . . . . . . . . . . . . . . . . . . . . . . . . . . . . 71
Message Listen Mode . . . . . . . . . . . . . . . . . . . . . . . . . . . . . . . . . . . . . . . . . . . . . . . . . . . . . . . . . . 72
Message Notification . . . . . . . . . . . . . . . . . . . . . . . . . . . . . . . . . . . . . . . . . . . . . . . . . . . . . . . . . . . 73
How Message Notification Works to Normal Telephone Numbers . . . . . . . . . . . . . . . . 73
How Message Notification Works to Digital Pager Numbers. . . . . . . . . . . . . . . . . . . . . 73
Message Playback Direction . . . . . . . . . . . . . . . . . . . . . . . . . . . . . . . . . . . . . . . . . . . . . . . . . . . . . 76
Message Record . . . . . . . . . . . . . . . . . . . . . . . . . . . . . . . . . . . . . . . . . . . . . . . . . . . . . . . . . . . . . . . 77
Message Reply . . . . . . . . . . . . . . . . . . . . . . . . . . . . . . . . . . . . . . . . . . . . . . . . . . . . . . . . . . . . . . . . 78
Message Storage Limit. . . . . . . . . . . . . . . . . . . . . . . . . . . . . . . . . . . . . . . . . . . . . . . . . . . . . . . . . . 79
Message Waiting Lamp . . . . . . . . . . . . . . . . . . . . . . . . . . . . . . . . . . . . . . . . . . . . . . . . . . . . . . . . . 80
Multiple Company Greetings. . . . . . . . . . . . . . . . . . . . . . . . . . . . . . . . . . . . . . . . . . . . . . . . . . . . . 81
Next Call Routing Mailbox . . . . . . . . . . . . . . . . . . . . . . . . . . . . . . . . . . . . . . . . . . . . . . . . . . . . . . 82
Programming Voice Mail. . . . . . . . . . . . . . . . . . . . . . . . . . . . . . . . . . . . . . . . . . . . . . . . . . . . . . . . 83
Quick Message. . . . . . . . . . . . . . . . . . . . . . . . . . . . . . . . . . . . . . . . . . . . . . . . . . . . . . . . . . . . . . . . 84
Record and Send a Message. . . . . . . . . . . . . . . . . . . . . . . . . . . . . . . . . . . . . . . . . . . . . . . . . . . . . . 85
Recording Options. . . . . . . . . . . . . . . . . . . . . . . . . . . . . . . . . . . . . . . . . . . . . . . . . . . . . . 85
Remote Programming . . . . . . . . . . . . . . . . . . . . . . . . . . . . . . . . . . . . . . . . . . . . . . . . . . . . . . . . . . 87
Routing Mailbox . . . . . . . . . . . . . . . . . . . . . . . . . . . . . . . . . . . . . . . . . . . . . . . . . . . . . . . . . . . . . . 88
Screened Transfer. . . . . . . . . . . . . . . . . . . . . . . . . . . . . . . . . . . . . . . . . . . . . . . . . . . . . . . . . . . . . . 89
Screened vs. Unscreened Transfer. . . . . . . . . . . . . . . . . . . . . . . . . . . . . . . . . . . . . . . . . . 89
Screened Transfer and Inactive Mailboxes . . . . . . . . . . . . . . . . . . . . . . . . . . . . . . . . . . . 89
Security Code. . . . . . . . . . . . . . . . . . . . . . . . . . . . . . . . . . . . . . . . . . . . . . . . . . . . . . . . . . . . . . . . . 91
Single Digit Dialing . . . . . . . . . . . . . . . . . . . . . . . . . . . . . . . . . . . . . . . . . . . . . . . . . . . . . . . . . . . . 93
Station Mailbox . . . . . . . . . . . . . . . . . . . . . . . . . . . . . . . . . . . . . . . . . . . . . . . . . . . . . . . . . . . . . . . 94
Subscriber Mailbox . . . . . . . . . . . . . . . . . . . . . . . . . . . . . . . . . . . . . . . . . . . . . . . . . . . . . . . . . . . . 95
System Administrator . . . . . . . . . . . . . . . . . . . . . . . . . . . . . . . . . . . . . . . . . . . . . . . . . . . . . . . . . . 96
System Administrator Mailbox . . . . . . . . . . . . . . . . . . . . . . . . . . . . . . . . . . . . . . . . . . . . . . . . . . . 97
System Re-initialization. . . . . . . . . . . . . . . . . . . . . . . . . . . . . . . . . . . . . . . . . . . . . . . . . . . . . . . . . 98
Time and Date . . . . . . . . . . . . . . . . . . . . . . . . . . . . . . . . . . . . . . . . . . . . . . . . . . . . . . . . . . . . . . . . 99
Time and Date Stamp. . . . . . . . . . . . . . . . . . . . . . . . . . . . . . . . . . . . . . . . . . . . . . . . . . . . . . . . . . 100
Time and Date Stamp with Caller ID . . . . . . . . . . . . . . . . . . . . . . . . . . . . . . . . . . . . . . 100
Transfer to a Mailbox. . . . . . . . . . . . . . . . . . . . . . . . . . . . . . . . . . . . . . . . . . . . . . . . . . . . . . . . . . 101
Undefined Routing. . . . . . . . . . . . . . . . . . . . . . . . . . . . . . . . . . . . . . . . . . . . . . . . . . . . . . . . . . . . 102
Unscreened Transfer . . . . . . . . . . . . . . . . . . . . . . . . . . . . . . . . . . . . . . . . . . . . . . . . . . . . . . . . . . 103
Screened vs. Unscreened Transfer. . . . . . . . . . . . . . . . . . . . . . . . . . . . . . . . . . . . . . . . . 103
Unscreened Transfer and Inactive Mailboxes . . . . . . . . . . . . . . . . . . . . . . . . . . . . . . . . 103
Voice Mail Overflow . . . . . . . . . . . . . . . . . . . . . . . . . . . . . . . . . . . . . . . . . . . . . . . . . . . . . . . . . . 105
Volume Control . . . . . . . . . . . . . . . . . . . . . . . . . . . . . . . . . . . . . . . . . . . . . . . . . . . . . . . . . . . . . . 106

Table of Contents
Aspire S IntraMail Feature Handbook Table of Contents
◆
iii
Chapter 2: Soft Key Glossary. . . . . . . . . . . . . . . . . . . . . . . . . . . . . . . . . . . . .111
Soft Key Glossary . . . . . . . . . . . . . . . . . . . . . . . . . . . . . . . . . . . . . . . . . . . . . . . . . . . . 111

Table of Contents
iv
◆
Table of Contents
Aspire S IntraMail Feature Handbook

Aspire S IntraMail Feature Handbook Chapter 1 : Features
◆
1
1
Chapter 1:
Features
Introduction to IntraMail Features
Introduction to IntraMail Features
This chapter provides detailed information on the IntraMail features. The features in this chapter are in
alphabetical order, like a dictionary. This chapter subdivides each feature definition into headings as follows:
■
Description
Read
Description
to get an overview of the feature, its benefit, any special considerations you should be
aware of, and how it works in the default system.
■
Operation
Operation
provides charts that show you how the feature operates.
If you are not familiar with the IntraMail features, review
the IntraMail Feature Glossary on page 2.

IntraMail Feature Glossary
2
◆
Chapter 1: Features
Aspire S IntraMail Feature Handbook
IntraMail Feature Glossary
Feature Glossary
Name Description Usage
Administrator Security Code
Control
■
See
Security Code
in this glossary
. Voice Mail
Alternate Next Call Routing
Mailbox
■
See
Next Call Routing Mailbox
in this Glossary. Voice Mail
Announcement Mailbox
Mailbox that allows a prerecorded greeting to play to callers.
■
See
Announcement Mailbox
on page 11 for more. Automated Attendant
Announcement Message
The message that the System Administrator records for a
specific Announcement Mailbox.
■
See
Announcement Message
on page 13 for more.
Automated Attendant
Answer Table
Determines how the Automated Attendant answers outside
calls on each trunk, according to the time of the day and
day of the week that the call is ringing.
■
See
Answer Tables
on page 15 for more.
Automated Attendant
Answering Machine Emulation
A keyset on the connected telephone system can work like
a home answering machine.
■
See
Answering Machine Emulation
on page 18 for
more.
Voice Mail
Answering Schedule Override
Enables an alternate greeting and alternate dialing options
for callers.
■
See
Answer Schedule Override
on page 14 for more.
Automated Attendant
Auto Attendant Do Not Disturb
Auto Attendant Do Not Disturb sends Automated Attendant
calls directly to an extension user’s mailbox. Their phone
will not ring for calls from the Automated Attendant.
■
See
Auto Attendant Do Not Disturb
on page 19 for
more. Also see
Greeting
in this glossary
.
Automated Attendant
Auto Erase or Save
When a
m
ailbox user completely listens to a new message
and then exits their mailbox, IntraMail will either automat-
ically save or erase the message.
■
See
Auto Erase or Save
on page 21 for more.
Auto Time Stamp
After a user listens to a message, IntraMail can optionally
announce the time and date the message was left.
■
See
Auto Time Stamp
on page 22 for more.
Voice Mail
Automated Attendant
The Automated Attendant can automatically answer the
telephone system’s incoming calls, play an Instruction
Menu message, and provide dialing options to callers.
■
See
Automated Attendant
on page 23 for more.
Automated Attendant
Automated Attendant Transfer
While on a trunk call, an extension user can transfer their
trunk call to the Automated Attendant so the caller can use
the Automated Attendant dialing options.
■
See
Automated Attendant Transfer
on page 25 for
more.
Voice Mail

IntraMail Feature Glossary
Aspire S IntraMail Feature Handbook
Chapter 1: Features
◆
3
1
Automatic Call Routing to a
Mailbox
■
See
Go to a Mailbox
in this glossary. Automated Attendant
Automatic Message Erase/Save
■
See
Auto Erase or Save
in this glossary. Voice Mail
Automatic Routing for Rotary
Dial Callers
If an Automated Attendant caller doesn’t dial any digits,
IntraMail will automatically route them to a specified
option (such as the operator or a mailbox).
■
See
Automatic Routing for Rotary Dial Callers
on
page 26 for more.
Automated Attendant
Call Forward to a Mailbox
An extension user can forward their calls to their mailbox.
■
See
Call Forward to a Mailbox
on page 27 for more. Voice Mail
Call Routing Mailbox
The mailbox associated with an Answer Table that speci-
fies which dialing options (Dial Action Table) and
announcements are available to Automated Attendant call-
ers.
■
See
Call Routing Mailbox
on page 28 for more.
Automated Attendant
Caller ID
A telephone company service that provides a caller’s number
and optional name. The telephone system can pass this infor-
mation to IntraMail to enable
Caller ID with Return Call
.
■
See
Caller ID
on page 30 for more.
System
Caller ID with Return Call
■
See
Make Call
and
Time and Date Stamp
in this glos-
sary.
Voice Mail
Calling (Logging Onto) a Mailbox
■
See
Log Onto Voice Mail
in this glossary. Voice Mail
Calling the Automated Attendant
Automated Attendant callers can use various IntraMail
features and then return to the Automated Attendant for
additional dialing options.
■
See
Calling the Automated Attendant
on page 32 for
more.
Automated Attendant
Conversation Record
Allows an extension user to record their active call as a
message in their mailbox. IntraMail will broadcast a beep
and a voice prompt to the callers as Conversation Record
begins.
■
See
Conversation Record
on page 33 for more.
Voice Mail
Day, Night, and Holiday
Greetings
■
See
Flexible Answering Schedules
in this glossary
.Automated Attendant
Deleting a Message
■
See
Message Delete
in this glossary
.Voice Mail
Deleting Mailbox Security Code
■
See
Mailbox Security Code Delete
in this glossary
. Maintenance
Dial Action Table Defines the dialing options for a Call Routing Mailbox
chosen by the active Answer Table, which in turn provides
those dialing options to Automated Attendant callers.
■See Dial Action Table on page 34 for more.
Automated Attendant
Name Description Usage

IntraMail Feature Glossary
4◆Chapter 1: Features Aspire S IntraMail Feature Handbook
Directory Dialing Directory Dialing allows an Automated Attendant caller to
reach an extension by dialing the first few letters in the
extension user’s name.
■See Directory Dialing on page 36 for more.
Automated Attendant
Erasing All Messages Lets the System Administrator delete mailbox messages
system-wide.
■See Erasing All Messages on page 39 for more.
Maintenance
Exiting a Mailbox An extension user can exit their mailbox by dialing a code
or by hanging up.
■See Exiting a Mailbox on page 40 for more.
Voice Mail
Fax Detection The Automated Attendant can detect incoming fax calls
and transfer them to a fax machine.
■See Fax Detection on page 42 for more.
System
Flexible Answering Schedules The Automated Attendant can answer outside calls with
different announcements and dialing options, depending
on the time of day and day of week.
■See Flexible Answering Schedules on page 43 for
more.
Automated Attendant
Flexible Call Routing The Automated Attendant can provide outside callers with
a wide variety of dialing (routing) options. There are 3
components to Flexible Call Routing.
Answer Table
Determines how the Automated Attendant answers outside
calls on each Voice Mail port, according to the time of the
day and day of the week that the call is ringing.
Call Routing Mailbox
The mailbox associated with an Answer Table that speci-
fies which dialing options (Dial Action Table) and
announcements are available to Automated Attendant call-
ers.
Dial Action Table
Defines the dialing options for the Call Routing Mailbox
chosen by the active Answer Table, which in turn provides
those dialing options to Automated Attendant callers.
■See Flexible Call Routing on page 44 for more.
Automated Attendant
Flexible Mailbox Numbering Plan If the telephone system extension numbers are custom-
ized, the IntraMail mailbox numbers can be customized to
match.
■See Flexible Mailbox Numbering Plan on page 45 for
more.
System
Forced Unscreened Transfer A Subscriber Mailbox can optionally convert Automated
Attendant Screened Transfers to Unscreened Transfers.
■See Forced Unscreened Transfer on page 46 for more.
Automated Attendant
Forwarding Calls to a Mailbox See Call Forward to a Mailbox in this glossary. Voice Mail
Name Description Usage

IntraMail Feature Glossary
Aspire S IntraMail Feature Handbook Chapter 1: Features ◆5
1
Getting Recorded Help If an extension user dials an incorrect code or forgets what
to dial while in their mailbox, they can request help from
the IntraMail voice prompts.
■See Getting Recorded Help on page 47 for more.
Voice Mail
Go to a Mailbox An Automated Attendant caller can dial a digit and route
directly into a mailbox.
■See Go To A Mailbox on page 48 for more.
Automated Attendant
Greeting A Subscriber Mailbox user can record a personalized
greeting for their mailbox. Caller’s to the user’s mailbox
hear the greeting.
With Remote Greeting, an extension user can call into the
Automated Attendant, access their mailbox, and remotely
record their mailbox greeting.2.64
■See Greeting on page 49 for more.
■Also see Auto Attendant Do Not Disturb in this
glossary.
Voice Mail
Group (Shared) Mailbox An extension user can share a Group Mailbox with co-
workers for receiving and sending messages.
■See Group (Shared) Mailbox on page 51 for more.
Voice Mail
Guest Mailbox An outside party can have their own mailbox for receiving
and sending messages.
■See Guest Mailbox on page 52 for more.
Voice Mail
Hang Up An Automated Attendant option that immediately hangs
up the outside call.
■See Hang Up on page 53 for more.
Automated Attendant
Help ■See Getting Recorded Help
in this glossary
.Voice Mail
Individual Trunk Greetings ■See Multiple Company Greetings in this glossary. Automated Attendant
Instruction Menu The Instruction Menu is the announcement that plays to
Automated Attendant callers. Normally, the Instruction
Menu provides callers with the Automated Attendant dial-
ing options.
■See Instruction Menu on page 54.
Automated Attendant
Leaving a Message An extension user can leave a voice message in a
co-worker’s mailbox if that extension is busy, unanswered,
or in Do Not Disturb.
■See Leaving a Message on page 55 for more.
Voice Mail
Leaving a Message at a Busy/
DND Extension ■See Leaving a Message
in this glossary
.Voice Mail
Leave a Quick Message ■See Quick Message
in this glossary
.Automated Attendant
Listening Options ■See Listening to Messages
in this glossary
.Voice Mail
Listening to Messages
While or after listening to a message, an extension user has
many message handling options from which to choose.
■See Listening to Messages on page 56 for more.
Voice Mail
Name Description Usage

IntraMail Feature Glossary
6◆Chapter 1: Features Aspire S IntraMail Feature Handbook
Local Notification ■See Message Notification
in this glossary
.Voice Mail
Log Onto Voice Mail An extension user can press a key to log onto (access)
their IntraMail mailbox.
With Remote Logon, an employee calling through the Auto-
mated Attendant can dial a single digit followed by their
own mailbox number to remotely log onto their mailbox.
■See Log Onto Voice Mail on page 59 for more.
Voice Mail
Mailbox Greeting ■See Greeting
in this glossary
.Voice Mail
Mailbox Logon ■See Log Onto Voice Mail in this glossary. Voice Mail
Mailbox Name A mailbox caller can hear the extension user’s prerecorded
name instead of their mailbox number.
■See Mailbox Name on page 60 for more.
Voice Mail
Mailbox Options Menu Sub-menu of a subscriber’s Main Menu that provides
access to the Auto Time Stamp, Mailbox Security Code
Delete, and Message Notification features.
■See Mailbox Options Menu on page 62 for more.
Voice Mail
Mailbox Security Code Delete The System Administrator can delete the security code for
any mailbox, effectively unlocking it.
■See Mailbox Security Code Delete on page 63 for
more.
■Also see Security Code in this glossary.
Maintenance
Mailbox Transfer ■See Transfer to a Mailbox
in this glossary
. Voice Mail
Main Menu The IntraMail options available to an extension user when
they log onto their mailbox.
■See Main Menu on page 64 for more.
Voice Mail
Make Call ■
A Subscriber Mailbox user can listen to a voice mes-
sage and dial
MC
to return the call without knowing
their caller’s phone number.
■See Make Call on page 65
for more
.
Voice Mail
Master Mailboxes Additional mailboxes used for Department Group over-
flow.
■See Master Mailbox on page 66 for more.
Message Count Display The telephone display can show the number of new mes-
sages waiting in a user’s mailbox.
■See Message Count Display on page 67 for more.
Voice Mail
Message Delete An extension user can delete any messages left in their
mailbox.
■See Message Delete on page 69 for more.
Voice Mail
Message Forward A subscriber can forward a message in their mailbox to a
co-worker. They can optionally record a comment before
the forwarded message.
■See Message Forward on page 70 for more.
Voice Mail
Name Description Usage

IntraMail Feature Glossary
Aspire S IntraMail Feature Handbook Chapter 1: Features ◆7
1
Message Length The System Administrator can set the maximum length of
a message that can be left in a user’s voice mailbox.
■See Message Length on page 71 for more.
Voice Mail
Message Listen Mode When a user calls their mailbox, they can dial a code to
listen to all their messages, their new messages, their
saved messages, or their held messages.
■See Message Listen Mode on page 72 for more.
Voice Mail
Message Notification Once activated by the mailbox user, dials a telephone
number to let the recipient know there are new messages
in the mailbox. Notification can call extensions, local
numbers, long distance numbers and pagers.
■See Message Notification on page 73 for more.
Voice Mail
Message Playback Direction An extension user can listen to their messages in either
LIFO (last-in-first-out) or FIFO (first-in-first-out) order.
■See Message Playback Direction on page 76 for more.
Voice Mail
Message Record ■See Record and Send a Message in this glossary. Voice Mail
Message Reply An extension user can reply to a message in their mailbox
by dialing a simple code, without knowing the caller’s
extension number.
■See Message Reply on page 78 for more.
Voice Mail
Message Send ■See Record and Send a Message in this glossary. Voice Mail
Message Storage Limit Sets how many messages a mailbox can store.
■See Message Storage Limit on page 79 for more. Voice Mail
Message Waiting Lamp An extension’s Message Waiting lamp flashes on the tele-
phone indicating that they have new messages waiting in
their mailbox.
■See Message Waiting Lamp on page 80 for more.
Voice Mail
Multiple Company Greetings By assigning a unique Answer Table to each trunk, a sin-
gle IntraMail system can provide individual greetings and
dialing options for several companies.
■See Multiple Company Greetings on page 81 for more.
Automated Attendant
Name ■See Mailbox Name in this glossary. Voice Mail
Next Call Routing Mailbox Provides callers with additional dialing options after they
leave a message in an extension’s mailbox (depending on
the setting of the Next Call Routing Mailbox Dial Mode).
■See Next Call Routing Mailbox on page 82 for more.
Voice Mail
One-Touch Forwarding ■See Call Forward to a Mailbox and Message Forward
in this glossary. Voice Mail
One-Touch Mailbox Access ■See Mailbox Logon in this glossary. Voice Mail
One-Touch Mailbox Retrieval ■See Mailbox Logon in this glossary. Voice Mail
Personal Answering Machine
Emulation ■See Answering Machine Emulation in this glossary. Voice Mail
Name Description Usage

IntraMail Feature Glossary
8◆Chapter 1: Features Aspire S IntraMail Feature Handbook
Personalized Mailbox Greeting ■See Greeting in this glossary. Voice Mail
Programmable Security Code ■See Security Code and Mailbox Security Code Delete
in this glossary. Voice Mail
Programming Voice Mail You can program (customize) IntraMail by using the
PCPro and WebPro programming applications. Limited
programming can also be done from a System Adminis-
trator’s mailbox.
■See Programming Voice Mail on page 83 for more.
■Also see System Administrator Mailbox in this glos-
sary.
Maintenance
Quick Message Automated Attendant callers can dial a digit followed by
an extension number to leave a message directly in a
user’s mailbox.
■See Quick Message on page 84 for more.
Automated Attendant
Record and Send a Message A Subscriber Mailbox user can record and send a message
to any other Subscriber Mailbox.
■See Record and Send a Message on page 85 for more.
Voice Mail
Recorded Help ■Pre-recorded voice prompts guide the user through the
Intramail features. Voice Mail
Recording a Conversation ■See Conversation Record in this glossary. Voice Mail
Recording a Message ■See Record and Send a Message in this glossary. Voice Mail
Recording Conversation Beep ■See Conversation Record in this glossary. Voice Mail
Recording Options ■See Record and Send a Message in this glossary. Voice Mail
Remote Log On ■ See Log Onto Voice Mail in this glossary. Voice Mail
Remote Greetings ■ See Greeting in this glossary. Voice Mail
Remote Message Notification ■See Message Notification in this glossary. Voice Mail
Remote Programming You can remotely program (customize) IntraMail by using
the PCPro and WebPro programming applications. You
can also do limited remote programming from the System
Administrator’s mailbox.
■See Remote Programming on page 87 for more.
Maintenance
Return Call (with Caller ID) ■See Make Call in this glossary. Voice Mail
Rotary Dial Telephones ■See Automatic Routing for Rotary Dial Callers in this
glossary. Automated Attendant
Routing Mailbox Routing Mailboxes are used to route Automated Attendant
calls. A Routing Mailbox can be either an Announcement
or Call Routing Mailbox.
■See Routing Mailbox on page 88 for more.
Automated Attendant
Name Description Usage

IntraMail Feature Glossary
Aspire S IntraMail Feature Handbook Chapter 1: Features ◆9
1
Screened Transfer Similar to telephone system screened transfers in which
the transferring party controls the transfer.
After an Automated Attendant caller dials an extension,
IntraMail calls (screens) the destination extension to see if
the transfer can go through.
■If the destination is busy or in DND, the Automated
Attendant doesn’t extend the call and immediately
provides the caller with additional options.
■If the destination is available, the Automated Attendant
rings it. If the destination answers, the call goes
through. If the destination doesn’t answer within a pre-
set interval, the Automated Attendant doesn’t extend
the call and provides the caller with additional options.
■See Screened Transfer on page 89 for more.
■Also see Unscreened Transfer in this glossary.
Automated Attendant
Security Code An extension user’s mailbox can have a security code to
protect the mailbox from unauthorized access.
■See Security Code on page 91 for more.
■Also see Mailbox Security Code Delete in this glos-
sary.
Voice Mail
Select Listen Mode ■See Message Listen Mode in this glossary. Voice Mail
Single Digit Dialing An Automated Attendant caller can press a single key to
route to an extension, route to another destination, or use
an IntraMail feature.
■See Single Digit Dialing on page 93 for more.
Automated Attendant
Subscriber Mailbox The mailbox type normally used for telephone system
extensions.
■See Subscriber Mailbox on page 95 for more.
Voice Mail
System Administrator The extension user that has IntraMail system administra-
tion capabilities.
■See System Administrator on page 96 for more.
Maintenance
System Administrator Mailbox A Subscriber Mailbox option that enables the system
administration capabilities.
■See System Administrator Mailbox on page 97 for
more.
■Also see System Administrator in this glossary.
Voice Mail
System Re-initialization Re-initializing IntraMail returns all programmed options
to their default values.
■See System Re-initialization on page 98 for more.
Maintenance
Time and Date After listening to a message, an extension user can dial a
code to hear what time the message was sent.
■See Time and Date on page 99 for more.
■Also see Auto Time Stamp in this glossary.
Voice Mail
Name Description Usage

IntraMail Feature Glossary
10 ◆Chapter 1: Features Aspire S IntraMail Feature Handbook
Time and Date Stamp With caller ID installed, an extension can listen to a mes-
sage and dial a code to hear the time the message was sent,
as well as the caller’s number.
■See Time and Date Stamp on page 100 for more.
■Also see Caller ID with Return Call and Time and
Date in this glossary.
Voice Mail
Time and Date Stamp (with Caller
ID Storage See Time and Date Stamp in this glossary.
Transfer by Extension ■See Screened Transfer and Unscreened Transfer in this
glossary. Automated Attendant
Transfer Calls to a FAX Machine ■See Fax Detection in this glossary. Automated Attendant
Transfer to a Mailbox An extension user can transfer their active call to a co-
worker’s mailbox.
■See Transfer to a Mailbox on page 101 for more.
Voice Mail
Transfer to an Extension ■See Screened Transfer and Unscreened Transfer in this
glossary. Automated Attendant
Transfer to the Automated
Attendant ■See Automated Attendant Transfer in this glossary. Voice Mail
Undefined Routing A dialpad digit for which the Automated Attendant has no
routing defined. When an Automated Attendant caller
dials a digit for which there is no routing assigned, Intra-
Mail plays a brief error message and then repeats the dial-
ing options.
■See Undefined Routing on page 102 for more.
Automated Attendant
Undefined Routing Intercept ■ See Undefined Routing in this glossary. Automated Attendant
Unscreened Transfer Similar to telephone system unscreened transfers in which
the transferring party immediately extends the call.
After an Automated Attendant caller dials an extension,
IntraMail immediately transfers the call to the destination
and hangs up. Any recalls or additional routing are han-
dled by the telephone system – just as with any other
unscreened transfer.
■See Unscreened Transfer on page 103 for more.
■Also see Screened Transfer in this glossary.
Automated Attendant
Voice Mail Overflow Ensures that IntraMail will pick up calls that don’t go
through.
■See Voice Mail Overflow on page 105 for more.
System
Volume Control A mailbox user can turn the volume up or down while lis-
tening to their messages.
■See Volume Control on page 106 for more.
Voice Mail
Name Description Usage

Announcement Mailbox
Aspire S IntraMail Feature Handbook Chapter 1: Features ◆11
1
Announcement Mailbox
Description
An Announcement Mailbox plays a pre-recorded announcement to Automated Attendant callers without
providing dialing options. The Announcement Mailbox is typically set up to provide information to callers
(such as company directions) and then route back to the Automated Attendant. For example:
■The Automated Attendant instructs the caller to dial a digit (e.g., 1) for company directions.
- Record this in the Instruction Menu message for the active Call Routing Mailbox. See Instruction
Menu on page 54 for more.
- Set the dialing options in the Dial Action Table associated with the active Call Routing Mailbox.
See Dial Action Table on page 34 for more.
■The caller dials the digit and listens to the prerecorded Announcement Mailbox message for directions.
■After playing the directions, the caller routes back to the Automated Attendant for additional dialing
options.
- See the Hang Up and Next Call Routing Mailbox options in Programming below.
By default, there are 8 Announcement Mailboxes (Routing Mailboxes 9-16). However, you can assign any of
the 16 Routing Mailboxes as an Announcement Mailbox.

Announcement Mailbox
12 ◆Chapter 1: Features Aspire S IntraMail Feature Handbook
Operation
Recording an Announcement Mailbox Message
[Super Display Soft Key] - [Keyset Soft Key]
Log onto System Administrator’s mailbox.
SA (72) Access System Administrator options.
[System Admin] - [N/A]
A (2) Select Announcement Mailbox message.
[Announcement] - [Annc]
Enter the Announcement Mailbox number.
L (5) Listen to current Announcement Mailbox message.
[Listen] - [Lstn]
# Exit listen mode.
R (7) Record a new Announcement Mailbox message.
[Record] - [Rec]
Record message.
*Pause or restart recording.
[Resume] - [Resume]
[Pause - [Pause]
E (3) Erase recording.
[Cancel] - [Cncl]
# Exit recording mode.
[Done] - [Done]
E (3) Erase the Announcement Mailbox message.
[Erase] - [Erase]
# Go back to the System Administrator options.
[Exit] - [Exit]
# Go back to the System Administrator options.
[Exit] - [Exit]
0Plays Help message.

Announcement Message
Aspire S IntraMail Feature Handbook Chapter 1: Features ◆13
1
Announcement Message
Description
The Announcement Message is the voice message that the System Administrator records for a specific
Announcement Mailbox. See Announcement Mailbox on page 11 for more.
Operation
See Announcement Mailbox on page 11.

Answer Schedule Override
14 ◆Chapter 1: Features Aspire S IntraMail Feature Handbook
Answer Schedule Override
Description
Answer Schedule Override provides alternate answering for Automated Attendant calls. When enabled,
Answer Schedule Override sends calls to the specified Override Mailbox. The Override Mailbox can be an
Announcement, Call Routing, or Subscriber mailbox. You can use Answer Schedule Override to provide
holiday and bad weather closing announcements, for example. Enable override when you want callers to
hear the special announcements; disable override to have the Automated Attendant answer normally. You can
enable Answer Schedule Override from system programming or from the System Administrator Mailbox.
■If the Override Mailbox is an Announcement Mailbox, the outside caller will hear the recorded
announcement. Depending on how the Announcement Mailbox is programmed, IntraMail will then hang
up, reroute the call, or provide additional dialing options.
■If the Override Mailbox is a Call Routing Mailbox, the outside caller will hear the instruction menu and
can dial any options allowed by the associated Dial Action Table.
■If the Override Mailbox is a Subscriber Mailbox, the outside caller hears the mailbox greeting (if
recorded) and can leave a message.
Operation
Enabling Answer Schedule Override
[Super Display Soft Key] - [Keyset Soft Key]
Log onto System Administrator’s Mailbox.
SA (72) Access System Administrator options.
[System Admin] - [N/A]
O (6) Access Answer Schedule Override.
[Schedule Override] - [N/A]
1-8 Enter the number of the Answer Table you want to override.
•You go to the Answer Schedule Override Menu.
O (6) Turn Answer Schedule Override on or off.
[On] - [On]
[Off] - [Off]
C (2) Select the Override Mailbox.
[Mailbox] - [MBOX]
Enter the Override Mailbox number.
•The Override Mailbox can be an Announcement, Call Routing,
or Subscriber Mailbox.
#
Go back to the Answer Schedule Override
Menu without entering an Override Mailbox.
[Exit] - [Exit]
0Plays Answer Schedule Override Menu Help message.
#Go back to the System Administrator Menu.
[Exit] - [Exit]
#Go back to the System Administrator Menu.
[Exit] - [Exit]
#Go back to the Main Menu.
[Exit] - [Exit]
0Plays Help message.
Answer Tables
Aspire S IntraMail Feature Handbook Chapter 1: Features ◆15
1
Answer Tables
Description
The Answer Table determines how the Automated Attendant answers outside calls on each trunk, according
to the time of the day and day of the week that the call is ringing. IntraMail provides 8 Answer Tables. The
Answer Table is an integral part of the Automated Attendant. The Automated Attendant can automatically
answer the telephone system’s incoming calls, play an Instruction Menu message, and provide dialing
options to callers.There are 3 major Automated Attendant components:
■Answer Tables
The Answer Table determines how the Automated Attendant answers outside calls on each trunk, accord-
ing to the time of the day and day of the week that the call is ringing. The Answer Table divides the time
of day and day of the week into individual schedules, which in turn assign a Call Routing Mailbox to
each call. When a specific schedule is not in effect, the Answer Table uses its Default Mailbox to deter-
mine routing.
✔By default, all trunks use Answer Table 1. Answer Table 1 has a single schedule that runs Monday
through Friday from 8:30AM to 5:00PM.
■Call Routing Mailbox (page 28)
A Call Routing Mailbox is a mailbox associated with an individual Answer Table schedule or the Default
Mailbox. It specifies which dialing options (Dial Action Table) are available to callers. It also provides
the Instruction Menu to callers which typically greets the callers and describes the dialing options.
✔By default, Answer Table 1 has a single schedule that runs Monday through Friday from 8:30AM to
5:00PM. This schedule and the Default Mailbox both use Call Routing Mailbox 1.
■Dial Action Table (page 34)
Once the Automated Attendant answers, the Dial Action Table provides the dialing options to callers.
Each digit a caller can dial is assigned a specific action (function) in the Dial Action Table. The dial
action used depends on the setting in the active Call Routing Mailbox, which in turn depends on the
Answer Table setup.
✔By default, Call Routing Mailbox 1 uses Dial Action Table 1.
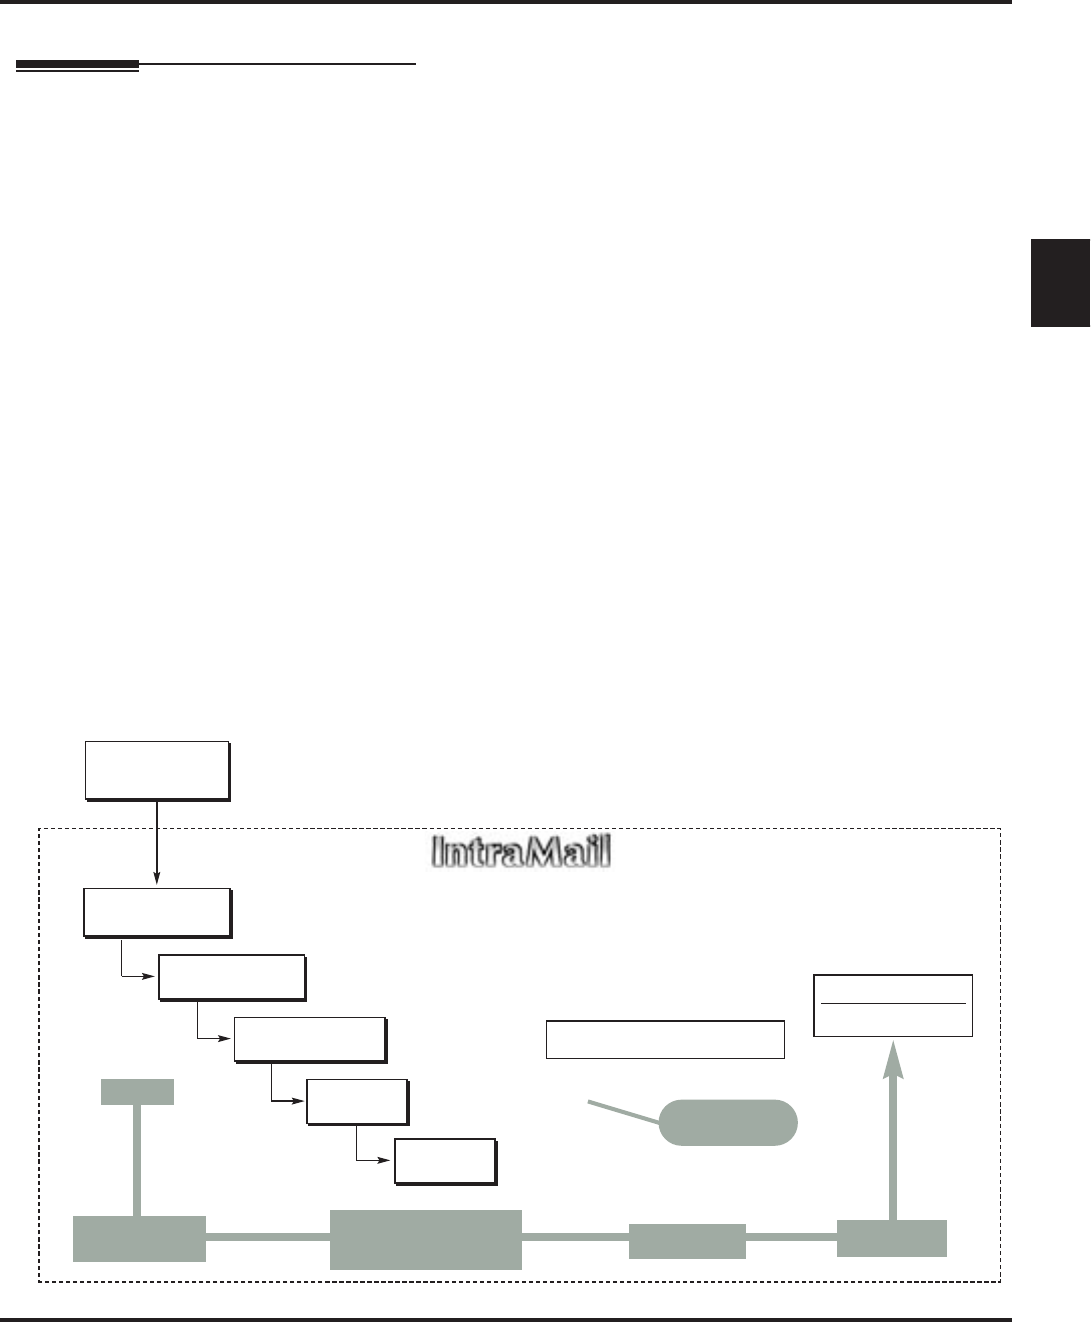
The block diagram below shows the default IntraMail Automated Attendant configuration.
DIL to Voice Mail
Master (700)
Trunks Route to
Answer Table 1
Answer Table 1
Schedule 1 or
Default Mailbox
Dial Action
Table 1
Calls always route to Call Routing Mailbox 1
-Schedule 1 active M-F 8:30AM-5:00PM.
-Default Mailbox active all other times.
Dial Action Table 1
Dialing Options
Dial an extension number, or
0 for the operator
Default Automated Attendant Answering
All trunks
Use Answer
Table 1
Which chooses Call
Routing Mailbox 1.
And Dial Action
Table 1
With these
dialing options
From a System Administrator's
mailbox, record an Instruction
Menu (SA + I) for the active Call
Routing Mailbox.
Call Routing
Mailbox 1
G 22-02-01: Incoming Call Trunk Setup
G 47-10-01: Answer Table Assignment
G 22-07-01: DIL Setup
G 47-11: IntraMail Answer Table Options
G 47-12: IntraMail Answer
Schedules
G 47-11-03: Default Mailbox
G 47-08: Call Routing Mailbox
Options
G 47-13: IntraMail Dial Action Tables

Answer Tables
16 ◆Chapter 1: Features Aspire S IntraMail Feature Handbook
The Default Mailbox and Routing Hierarchy
The Default Mailbox provides routing for an Answer Table during periods when a schedule is not in effect.
By default, for example, Answer Table 1 Schedule 1 is active Monday through Friday from 8:30 AM to 5:00
PM. The Default Mailbox for Answer Table 1 is active during all other times (i.e., evenings and weekends).
Since Schedule 1 and the Default Mailbox both use Call Routing Mailbox 1, initially the routing is the same
24 hours a day, 7 days a week. See Customizing an Answer Table below for more.
When setting up your Answer Tables, keep in mind that a more specific type of routing has priority over a
less specific type of routing. When selecting which routing to follow when there is more than one choice for
a specific time, IntraMail will choose in the following order:
■Date Schedule
■Day of Week Schedule
■Range of Days Schedule
■Default Mailbox
For example, a Date Schedule set up for Christmas day will have priority over any other schedules in effect
on December 25.
Customizing an Answer Table
Use the following examples as a guide when customizing your Answer Tables to meet specific site requirements.
Refer to Programming below for the specifics.
To set up daytime and evening/weekend answering (2 schedules):
In this example, use the Default Mailbox (Call Routing Mailbox 1) for evening/weekend answering and
specify a new Call Routing Mailbox for daytime answering.
1. Change the Call Routing Mailbox for Answer Table 1, Schedule 1.
■In 47-12: IntraMail Answer Schedules, assign Call Routing Mailbox 2 to Answer Table 1, Schedule 1.
You will use this for daytime answering.
2. From a System Administrator’s Mailbox, record an evening/weekend Instruction Menu message for Call
Routing mailbox 1.
■This message will play to callers Monday through Friday from 5:00 PM to 8:30 AM and on weekends.
3. From a System Administrator’s Mailbox, record a daytime Instruction Menu message for Call Routing
Mailbox 2.
■This message will play to callers Monday through Friday from 8:30 AM to 5:00 PM.
To set up daytime, evening, and weekend answering (3 schedules):
This example builds on the example above, but adds a third schedule that will play just on weekday evenings.
1. Change the Call Routing Mailbox for Answer Table 1, Schedule 1.
■In 47-12: IntraMail Answer Schedules, assign Call Routing Mailbox 2 to Answer Table 1, Schedule 1.
As in the 2 schedule example, you will use this for daytime answering.
2. Create a new schedule that will run only in the evenings.
■In 47-12: IntraMail Answer Schedules, create Schedule 2 for Answer Table 1 that will run Monday
through Friday from 5:00 PM to 11:00 PM. Assign Call Routing Mailbox 3 to this new schedule.
3. From a System Administrator’s Mailbox, record a late night/weekend Instruction Menu Message for Call
Routing mailbox 1.
■
This message will play Monday through Friday from 11:00 PM to 8:30 AM, as well as on weekends.
4. From a System Administrator’s mailbox, record the weekday Instruction Menu Message for Call Rout-
ing Mailbox 2.
■This message will play Monday through Friday from 8:30 AM to 5:00 PM.
5. From a System Administrator’s Mailbox, record the weekday evening Instruction Menu Message for
Call Routing Mailbox 3.
■This message will play Monday through Friday from 5:00 PM to 1:00 PM

Answer Tables
Aspire S IntraMail Feature Handbook Chapter 1: Features ◆17
1
Operation
N/A

Answering Machine Emulation
18 ◆Chapter 1: Features Aspire S IntraMail Feature Handbook
Answering Machine Emulation
Description
A user’s keyset can work like a home answering machine. This lets IntraMail screen their calls, just like their
answering machine at home. If activated, the extension’s incoming calls route to the user’s Subscriber Mail-
box. Once the mailbox answers, the user hears two alert tones followed by the caller’s incoming message.
The keyset user can then:
■Let the call go through to their mailbox, or
■Intercept the call.
Operation
Personal Answering Machine Emulation (AME)
To enable Personal Answering Machine Emulation:
1. Press idle CALL key and dial *21.
■You can optionally press your Call Forward to Station key.
2. Dial 2 to have AME pick up all calls.
OR
Dial 3 to have AME pick up just outside calls.
OR
Dial 4 to have AME pick up just Intercom calls.
3. Press SPK to hang up.
To cancel Personal Answering Machine Emulation:
1. Press idle CALL key and dial *20.
When Personal Answering Machine Emulation broadcasts your caller’s voice, you can:
■Do nothing to have the caller’s message automatically recorded in your mailbox.
■Press flashing CALL key to intercept the call.
■Press SPK to stop the broadcast and send the call directly to your mailbox.
■Lift the handset to listen privately to your caller’s message.

Auto Attendant Do Not Disturb
Aspire S IntraMail Feature Handbook Chapter 1: Features ◆19
1
Auto Attendant Do Not Disturb
Description
When a subscriber enables Auto Attendant Do Not Disturb, Automated Attendant calls to their extension go
directly to their mailbox. Their phone will not ring for calls from the Automated Attendant. You can option-
ally enable Auto Attendant Do Not Disturb from system programming. A subscriber typically turns on Auto
Attendant Do Not Disturb when they need to work uninterrupted at their desk by outside callers sent from
the Automated Attendant.
Keep in mind that Auto Attendant Do Not Disturb will not block Intercom calls from co-workers or any other
type of outside call not routed through the Automated Attendant. For example, with Automated Attendant Do
Not Disturb enabled, Direct Inwards Lines and transferred outside calls to an extension work normally.

Auto Attendant Do Not Disturb
20 ◆Chapter 1: Features Aspire S IntraMail Feature Handbook
Operation
Recording a Multiple Greeting and Setting Up Auto Attendant Do Not Disturb
[Super Display Soft Key] - [Keyset Soft Key]
Log onto Subscriber Mailbox.
G (4) Access the Mailbox Greeting options.
[Greeting] - [Greet]
IntraMail does the following:
• Plays a summary of your current settings.
• Displays the status of your active Greeting (1-3).
[GREETING n: RECORDED] - [GREETING n: RECORDED], or
[GREETING n: NOT REC] - [GREETING n: NOT REC]
• Shows the Auto Attendant Do Not Disturb status.
[AUTO-ATTENDANT DND: OFF] - [AUTO-ATTENDANT DND: OFF], or
[AUTO-ATTENDANT DND: ON] - [AUTO-ATTENDANT DND: ON]
• Provides soft keys for each of the 3 greetings.
[Greeting 1] - [Gr1]
[Greeting 2] - [Gr2]
[Greeting 3] - [Gr3]
Select a Greeting (which also makes it active).
(1)[Greeting 1] - [Gr1]
(2)[Greeting 2] - [Gr2]
(3)[Greeting 3] - [Gr3]
L (5) Listen to the active greeting (if recorded).
[Listen] - [Lstn]
R (7) Record a new greeting (if not recorded), or rerecord the
current greeting.
[Record] - [Rec]
Record at the tone, then press # when done.
*Pause or restart recording.
[Resume] - [Resume]
[Pause] - [Pause]
E (3) Erase the greeting.
[Cancel] - [Cncl]
# End the recording.
[Done] - [Done]
Erase the currently recorded greeting (if any).
[Erase] - [Erase]
#Go back to the Mailbox Greeting options.
[Exit] - [Exit]
Change Auto Attendant Do Not Disturb.
O (6) Turn Auto Attendant Do Not Disturb off or on.
[DND ON] - [N/A][AUTO-ATT DND:OFF] - [AUTO-ATTENDANT DND: ON]
[AUTO-ATT DND:OFF] - [AUTO-ATTENDANT DND: OFF]
# Go back to mailbox Main Menu.
[EXIT] - [EXIT][Exit] - [Exit]
0Plays Help message.

Auto Erase or Save
Aspire S IntraMail Feature Handbook Chapter 1: Features ◆21
1
Auto Erase or Save
Description
When a
m
ailbox user completely listens to a new message and then exits their mailbox, IntraMail will either
automatically save or erase the message. The setting of this option depends on how the subscriber would pre-
fer their mailbox to operate. When set to erase, the subscriber can review their messages and retain only those
they specifically save using the
SA
option. This is a good choice for a subscriber that receives frequent unes-
sential messages. When set to save, the subscriber has the assurance of knowing that every message they lis-
tened to was saved in their mailbox. This is a good choice for those that must carefully review and consider
each new message.
Notes:
■If a subscriber’s mailbox is set to Auto Save messages, IntraMail saves partially listened-to messages
but does not relamp the keyset for those messages. For example:
-A subscriber with new messages calls their mailbox.
- The subscriber presses L to listen to a portion of each message and then exits their mailbox.
- IntraMail saves all the messages and turns off the message waiting lamp.
■
If you hang up while listening to a new message, IntraMail automatically retains the message as a
new message.
Operation
N/A

Auto Time Stamp
22 ◆Chapter 1: Features Aspire S IntraMail Feature Handbook
Auto Time Stamp
Description
After a Subscriber Mailbox user listens to a message, IntraMail can optionally announce the time and date
the message was left. The Subscriber can enable Auto Time Stamp from their mailbox, or you can optionally
enable in from system programming. Auto Time Stamp helps if the subscriber needs to know the time and
date of each message they receive without taking any extra steps. With Auto Time Stamp turned on, Intra-
Mail automatically announces the date, time, and (optionally) the caller’s number at the end of each mes-
sage. With Auto Time Stamp turned off, the subscriber must dial TI while listening to a message to get the
same information.
Operation
Turning Auto Time Stamp On or Off
[Super Display Soft Key] - [Keyset Soft Key]
Log onto Subscriber Mailbox.
OP (67) Access the Mailbox Options Menu.
[MBOX Options] - [N/A]
AT (28) Access Auto Time Stamp.
[Time Stamp] - [Time]
IntraMail plays a summary of your Auto Time Stamp setting.
-By default, Auto Time Stamp is turned off.
O (6) Turn Auto Time Stamp on or off.
[On] - [On]
[Off] - [Off]
# Go back to the Mailbox Options Menu.
[Exit] - [Exit]
0Plays Help message.
Automated Attendant
Aspire S IntraMail Feature Handbook Chapter 1: Features ◆23
1
Automated Attendant
Description
The Automated Attendant answers outside calls on each trunk, according to the time of the day and day of
the week that the call is ringing. The Answer Table is an integral part of the Automated Attendant. The Auto-
mated Attendant can automatically answer the telephone system’s incoming calls, play an Instruction Menu
message, and provide dialing options to callers. There are 3 major Automated Attendant components:
■Answer Tables (page 15)
The Answer Table determines how the Automated Attendant answers outside calls on each trunk, accord-
ing to the time of the day and day of the week that the call is ringing. The Answer Table divides the time
of day and day of the week into individual schedules, which in turn assign a Call Routing Mailbox to
each call. When a specific schedule is not in effect, the Answer Table uses its Default Mailbox to deter-
mine routing.
✔By default, all trunks use Answer Table 1. Answer Table 1 has a single schedule that runs Monday
through Friday from 8:30AM to 5:00PM.
■Call Routing Mailbox (page 28)
A Call Routing Mailbox is a mailbox associated with an individual Answer Table schedule or the Default
Mailbox. It specifies which dialing options (Dial Action Table) are available to callers. It also provides
the Instruction Menu to callers which typically greets the callers and describes the dialing options.
✔By default, Answer Table 1 has a single schedule that runs Monday through Friday from 8:30AM to
5:00PM. This schedule and the Default Mailbox both use Call Routing Mailbox 1.
■Dial Action Table (page 34)
Once the Automated Attendant answers, the Dial Action Table provides the dialing options to callers.
Each digit a caller can dial is assigned a specific action (function) in the Dial Action Table. The dial
action used depends on the setting in the active Call Routing Mailbox, which in turn depends on the
Answer Table setup.
✔By default, Call Routing Mailbox 1 uses Dial Action Table 1.
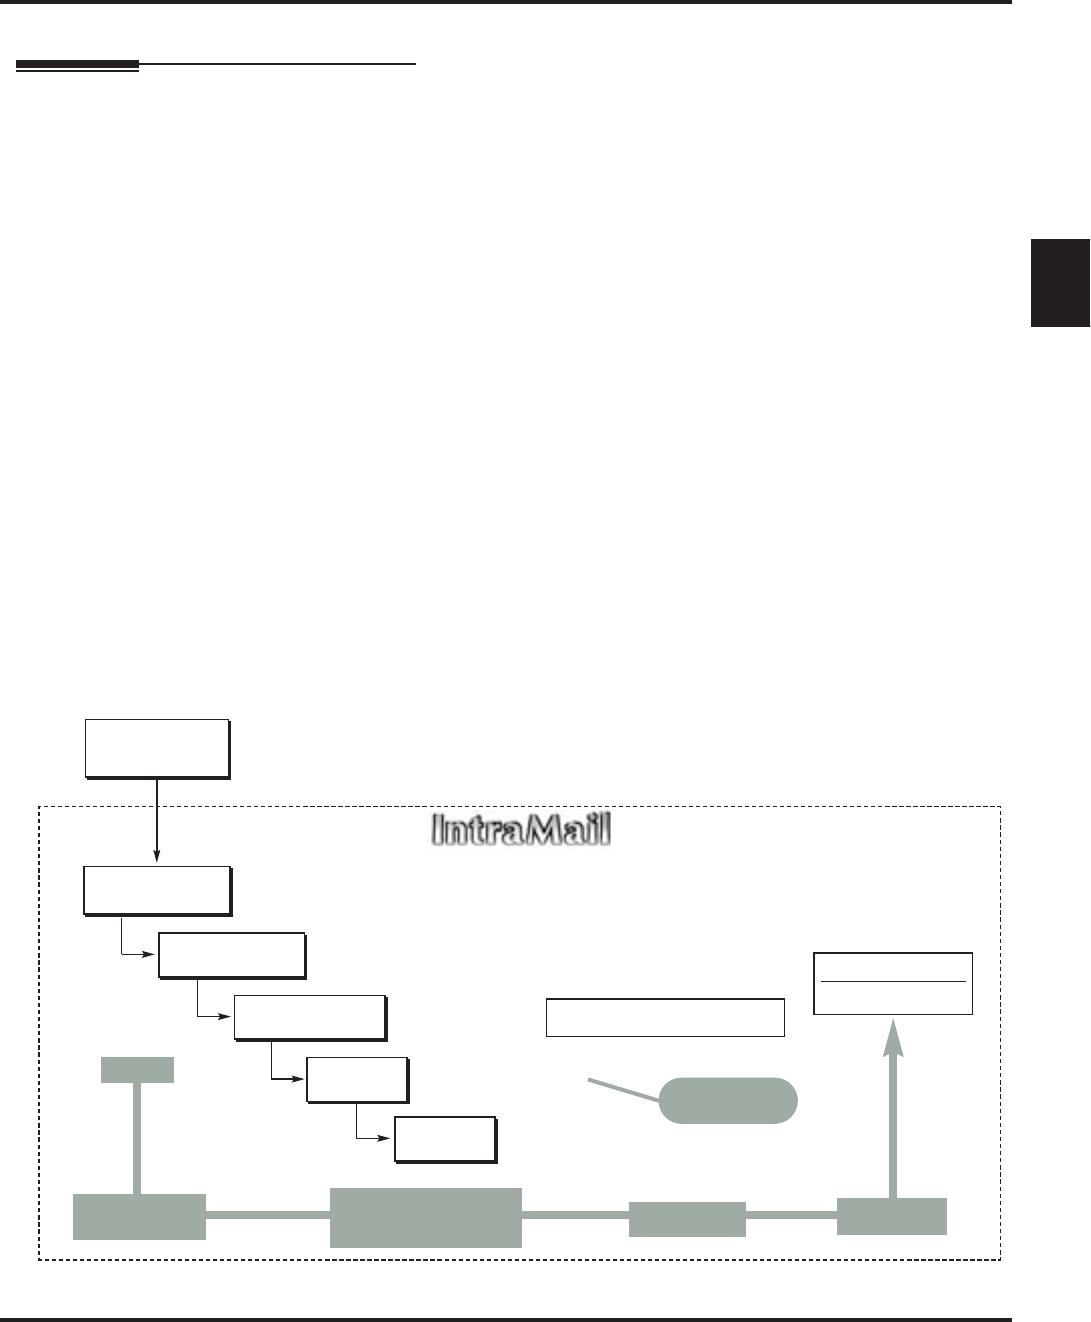
The block diagram below shows the default IntraMail Automated Attendant configuration.
DIL to Voice Mail
Master (700)
Trunks Route to
Answer Table 1
Answer Table 1
Schedule 1 or
Default Mailbox
Dial Action
Table 1
Calls always route to Call Routing Mailbox 1
-Schedule 1 active M-F 8:30AM-5:00PM.
-Default Mailbox active all other times.
Dial Action Table 1
Dialing Options
Dial an extension number, or
0 for the operator
Default Automated Attendant Answering
All trunks
Use Answer
Table 1
Which chooses Call
Routing Mailbox 1.
And Dial Action
Table 1
With these
dialing options
From a System Administrator's
mailbox, record an Instruction
Menu (SA + I) for the active Call
Routing Mailbox.
Call Routing
Mailbox 1
G 22-02-01: Incoming Call Trunk Setup
G 47-10-01: Answer Table Assignment
G 22-07-01: DIL Setup
G 47-11: IntraMail Answer Table Options
G 47-12: IntraMail Answer
Schedules
G 47-11-03: Default Mailbox
G 47-08: Call Routing Mailbox
Options
G 47-13: IntraMail Dial Action Tables

Automated Attendant
24 ◆Chapter 1: Features Aspire S IntraMail Feature Handbook
Operation
Using the Automated Attendant
For the outside caller:
1. After Automated Attendant answers, the voice prompts will instruct you on which digits to dial.

Automated Attendant Transfer
Aspire S IntraMail Feature Handbook Chapter 1: Features ◆25
1
Automated Attendant Transfer
Description
An extension user can transfer their trunk call to the Automated Attendant so the outside caller can use the
Automated Attendant dialing options. This helps an outside caller, for example, that wants to return to the
Automated Attendant so they can dial another co-worker or use a different Automated Attendant option.
Note: Extensions cannot call or be transferred to the IntraMail Automated Attendant.
Operation
Automated Attendant Transfer
To transfer an outside call to the Automated Attendant:
1. While on an outside call, press HOLD.
2. Dial the voice mail master number (e.g., 700).
3. Hang up.

Automatic Routing for Rotary Dial Callers
26 ◆Chapter 1: Features Aspire S IntraMail Feature Handbook
Automatic Routing for Rotary Dial Callers
Description
If an Automated Attendant caller doesn’t dial any digits, IntraMail will automatically route them to a speci-
fied option (such as the operator or a mailbox). This lets rotary telephone users stay on the line to leave a
message or have their call processed. Without Automatic Routing for Rotary Dial Callers, rotary callers
would not be able to use the Automated Attendant.
Operation
N/A

Call Forward to a Mailbox
Aspire S IntraMail Feature Handbook Chapter 1: Features ◆27
1
Call Forward to a Mailbox
Description
A subscriber can easily forward calls to their Subscriber Mailbox. Instead of dialing an extension as the for-
warding destination, the user just presses their
MSG
key instead. With Call Forward to a Mailbox, the sub-
scriber is assured that their calls don’t get forgotten when they are busy or unavailable to pick up their calls.
Unlike with Extension Hunting to Voice Mail, forwarding lets the subscriber choose when and how they want
their unanswered calls to go to voice mail (rather than have the telephone system reroute their calls automati-
cally).
Operation
Call Forward to your Mailbox
To forward your calls to your mailbox:
1. Press idle CALL key.
2. Dial *2.
3. Dial the Call Forwarding type:
0 = Cancel your extension’s forwarding
2 = Call Forwarding Busy/No Answer
4 = Call Forwarding Immediate
6 = Call Forwarding No Answer
4. Press MSG.
5. Dial 2 to forward all calls.
OR
Dial 3 to forward just outside calls.
OR
Dial 4 to forward just Intercom calls.
Call Routing Mailbox
28 ◆Chapter 1: Features Aspire S IntraMail Feature Handbook
Call Routing Mailbox
Description
The Call Routing Mailbox, associated with an Answer Table, specifies which dialing options (Dial Action
Table) and announcements are available to Automated Attendant callers. By default, IntraMail provides 8
Call Routing Mailboxes (1-8). However, you can assign any of the 16 Routing Mailboxes as a Call Routing
Mailbox. The Call Routing Mailbox is an integral part of the Automated Attendant. The Automated Atten-
dant can automatically answer the telephone system’s incoming calls, play an Instruction Menu message,
and provide dialing options to callers. There are 3 major Automated Attendant components:
■Answer Tables (page 15)
The Answer Table determines how the Automated Attendant answers outside calls on each trunk, according
to the time of the day and day of the week that the call is ringing. The Answer Table divides the time of day
and day of the week into individual schedules, which in turn assign a Call Routing Mailbox to each call.
When a specific schedule is not in effect, the Answer Table uses its Default Mailbox to determine routing.
✔By default, all trunks use Answer Table 1. Answer Table 1 has a single schedule that runs Monday
through Friday from 8:30AM to 5:00PM.
■Call Routing Mailbox
A Call Routing Mailbox is a mailbox associated with an individual Answer Table schedule or the Default
Mailbox. It specifies which dialing options (Dial Action Table) are available to callers. It also provides
the Instruction Menu to callers which typically greets the callers and describes the dialing options.
✔By default, Answer Table 1 has a single schedule that runs Monday through Friday from 8:30AM to
5:00PM. This schedule and the Default Mailbox both use Call Routing Mailbox1.
■Dial Action Table (page 34)
Once the Automated Attendant answers, the Dial Action Table provides the dialing options to callers.
Each digit a caller can dial is assigned a specific action (function) in the Dial Action Table. The dial
action used depends on the setting in the active Call Routing Mailbox, which in turn depends on the
Answer Table setup.
✔By default, Call Routing Mailbox 1 uses Dial Action Table 1.
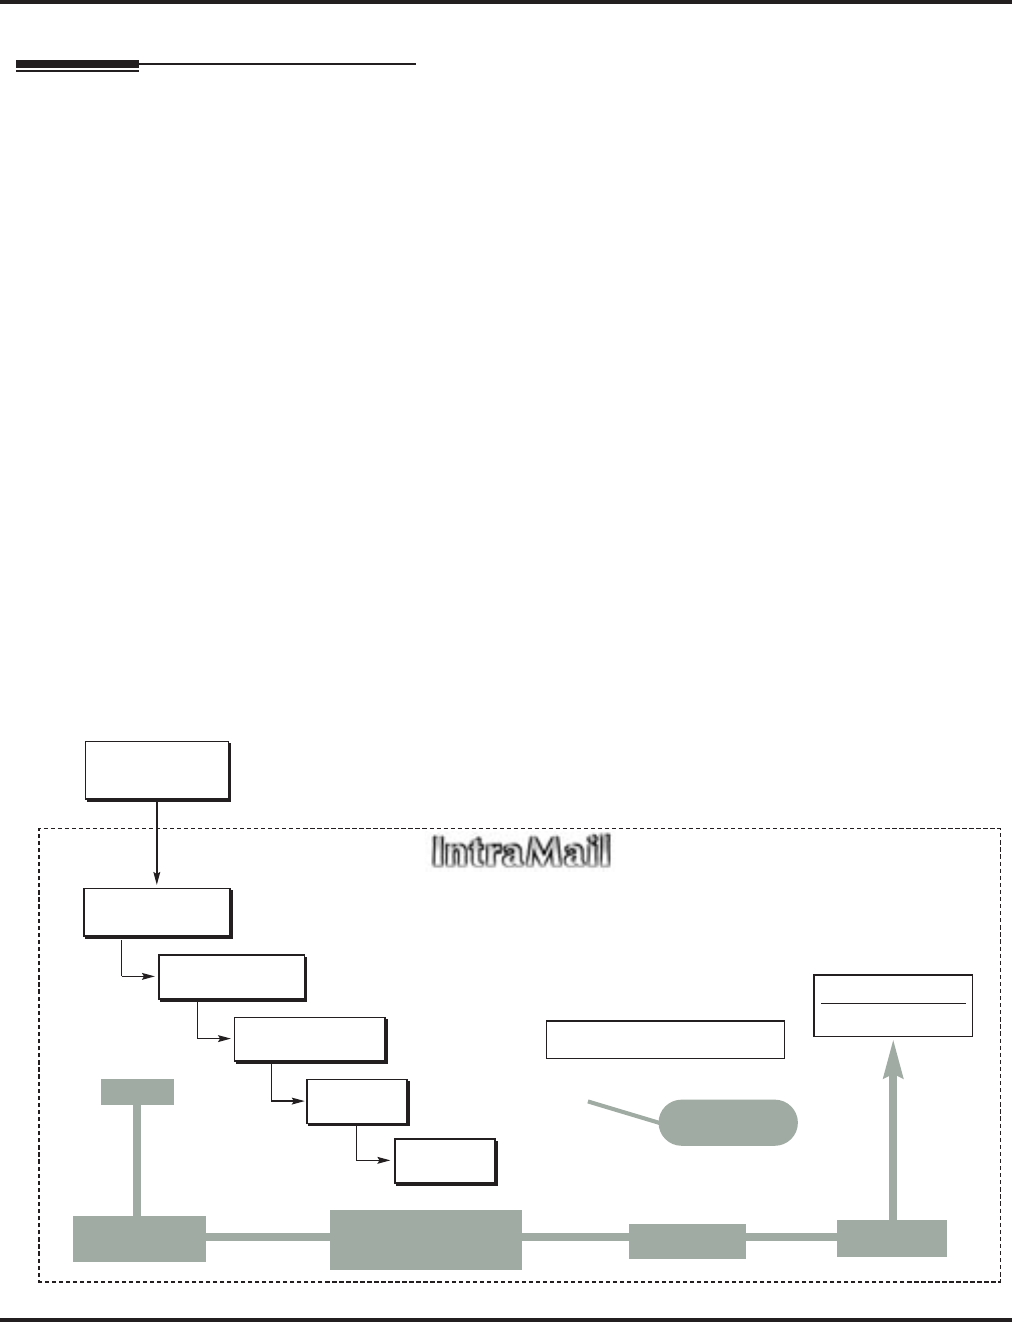
The block diagram below shows the default IntraMail Automated Attendant configuration.
DIL to Voice Mail
Master (700)
Trunks Route to
Answer Table 1
Answer Table 1
Schedule 1 or
Default Mailbox
Dial Action
Table 1
Calls always route to Call Routing Mailbox 1
-Schedule 1 active M-F 8:30AM-5:00PM.
-Default Mailbox active all other times.
Dial Action Table 1
Dialing Options
Dial an extension number, or
0 for the operator
Default Automated Attendant Answering
All trunks
Use Answer
Table 1
Which chooses Call
Routing Mailbox 1.
And Dial Action
Table 1
With these
dialing options
From a System Administrator's
mailbox, record an Instruction
Menu (SA + I) for the active Call
Routing Mailbox.
Call Routing
Mailbox 1
G 22-02-01: Incoming Call Trunk Setup
G 47-10-01: Answer Table Assignment
G 22-07-01: DIL Setup
G 47-11: IntraMail Answer Table Options
G 47-12: IntraMail Answer
Schedules
G 47-11-03: Default Mailbox
G 47-08: Call Routing Mailbox
Options
G 47-13: IntraMail Dial Action Tables

Call Routing Mailbox
Aspire S IntraMail Feature Handbook Chapter 1: Features ◆29
1
Operation
Recording an Instruction Menu for a Call Routing Mailbox
[Super Display Soft Key] - [Keyset Soft Key]
Log onto System Administrator’s mailbox.
SA (72) Access System Administrator options.
[System Admin] - [N/A]
I (4) Select Instruction Menus.
[Instruction] - [Instr]
Enter the Call Routing Mailbox number (001-008).
L (5) Listen to the current Instruction Menu (if any).
[Listen] - [Lstn]
# Exit listen mode.
R (7) Record a new Instruction Menu.
[Record] - [Rec]
Record message.
*Pause or restart recording.
[Resume] - [Resume]
[Pause - [Pause]
E (3) Erase recording.
[Cancel] - [Cncl]
# Exit recording mode.
[Done] - [Done]
E (3) Erase the Instruction Menu.
[Erase] - [Erase]
# Go back to the System Administrator options.
[Exit] - [Exit]
# Go back to the System Administrator options.
[Exit] - [Exit]
0Plays Help message.

Caller ID
30 ◆Chapter 1: Features Aspire S IntraMail Feature Handbook
Caller ID
Description
Caller ID is a telephone company service that provides an extension with a caller’s number and optional
name. With Caller ID, the display keyset user knows who’s calling before they pick up the call. When used
with IntraMail, Caller ID enables the Make Call feature for outside calls. After listening to a voice message,
the subscriber can dial MC to return the call without knowing the callers phone number.
Operation
N/A


Calling the Automated Attendant
32 ◆Chapter 1: Features Aspire S IntraMail Feature Handbook
Calling the Automated Attendant
Description
Automated Attendant callers can use various IntraMail features and then return to the Automated Attendant
for additional dialing options. This lets the caller dial other extensions, leave messages for co-workers, or
use other Automated Attendant features. The features below describe several ways to return to the Auto-
mated Attendant.
■Automated Attendant Transfer (page 25)
An extension user can transfer their trunk call to the Automated Attendant so the outside caller can use
the Automated Attendant dialing options.
■Next Call Routing Mailbox (page 82)
The Next Call Routing Mailbox provides callers with additional dialing options after they leave a mes-
sage in a mailbox (depending on the setting of the Dialing Option).
Operation
Refer to the features referenced in Description above.

Conversation Record
Aspire S IntraMail Feature Handbook Chapter 1: Features ◆33
1
Conversation Record
Description
Conversation Record allows a subscriber to record their active call as a new message in their mailbox, which
they can review later on. Conversation Record can be helpful when an extension user is on a call that
involves a lot of detail (such as a technical discussion or extensive directions). Rather than taking notes as
the call progresses, the user can record the conversation and carefully review it later on. IntraMail broadcasts
a beep and a voice prompt to the callers as Conversation Record begins. After calling their mailbox, the sub-
scriber can save, edit, or delete the recorded conversation.
Operation
Caution
The use of monitoring, recording, or listening devices to eavesdrop, monitor, retrieve, or record
telephone conversations or other sound activities, whether or not contemporaneous with trans-
mission, may be illegal in certain circumstances under federal or state laws. Legal advice should
be sought prior to implementing any practice that monitors or records any telephone conversa-
tion. Some federal and state laws require some form of notification to all parties to a telephone
conversation, such as using a beep tone or other notification methods or requiring the consent of
all parties to the telephone conversation, prior to monitoring or recording the telephone conver-
sation. Some of these laws incorporate strict penalties.
Conversation Record
[Super Display Soft Key] - [Keyset Soft Key]
To record your active call in your mailbox:
■Only one party on a call can use Conversation Record at any one time. This includes Intercom calls and
Conference calls.
1. Press your Voice Mail Record key.
■You hear 2 beeps and your Voice Mail Record key flashes. The beeps periodically repeat to remind you that
you are recording. You and your caller hear the voice prompt “recording.”
To turn conversation record off:
1. Press your Voice Mail Record key.
■Recording stops.
■There are no options available while recording (such as pause, resume, and exit).
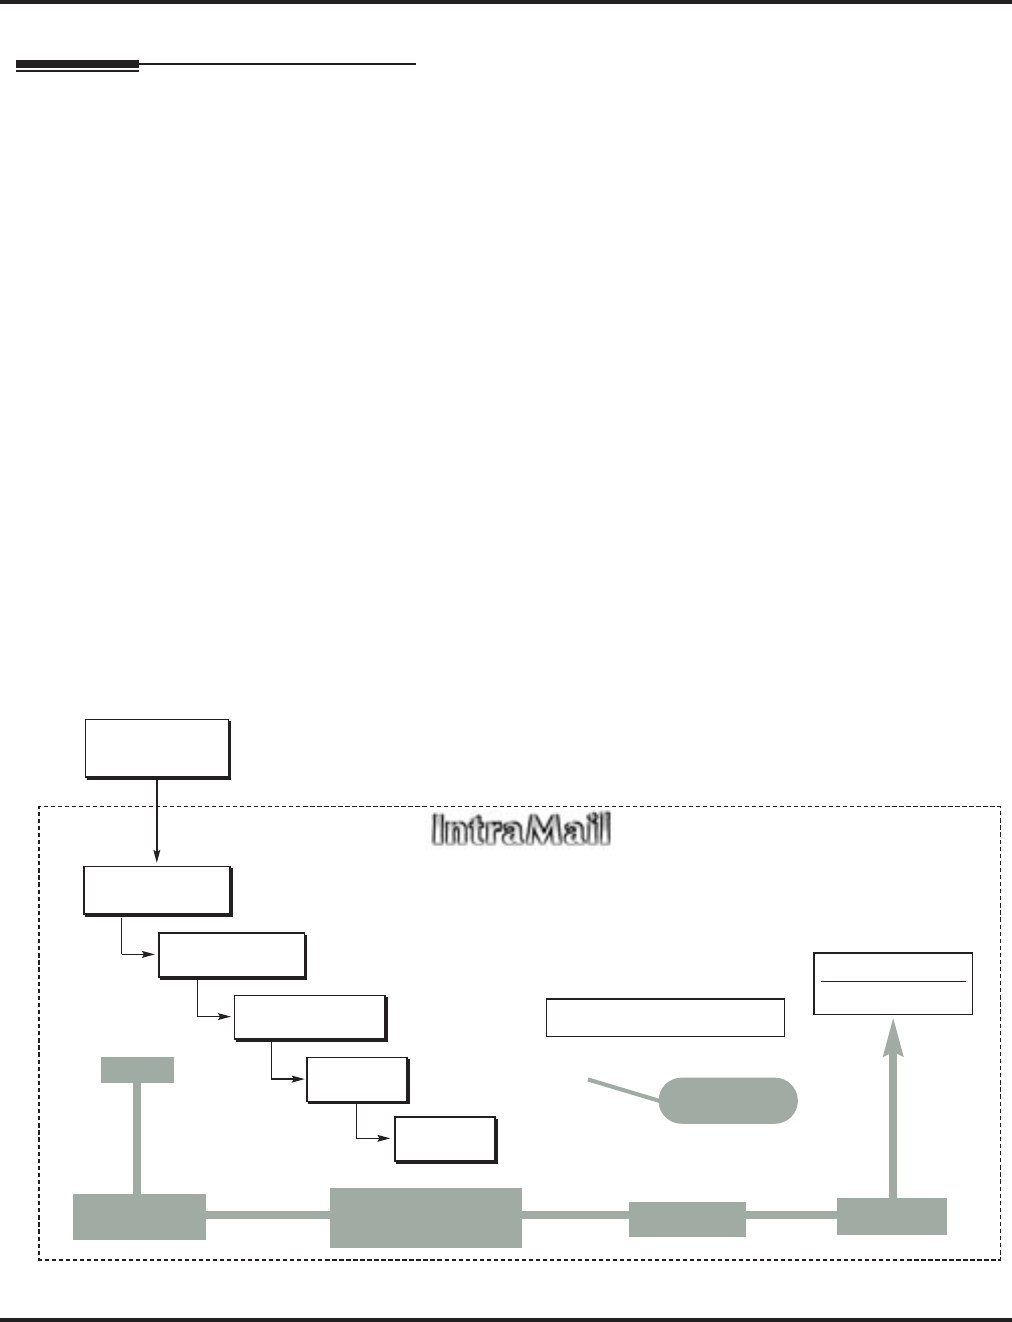
Dial Action Table
34 ◆Chapter 1: Features Aspire S IntraMail Feature Handbook
Dial Action Table
Description
The Dial Action Table defines the dialing options for the Call Routing Mailbox chosen by the active Answer
Table, which in turn provides those dialing options to Automated Attendant callers. IntraMail provides 16
Dial Action Tables. The Dial Action Table is an integral part of the Automated Attendant. The Automated
Attendant can automatically answer the telephone system’s incoming calls, play an Instruction Menu mes-
sage, and provide dialing options to callers. There are 3 major Automated Attendant components:
■Answer Tables (page 15)
The Answer Table determines how the Automated Attendant answers outside calls on each trunk, according
to the time of the day and day of the week that the call is ringing. The Answer Table divides the time of day
and day of the week into individual schedules, which in turn assign a Call Routing Mailbox to each call.
When a specific schedule is not in effect, the Answer Table uses its Default Mailbox to determine routing.
✔By default, all trunks use Answer Table 1. Answer Table 1 has a single schedule that runs Monday
through Friday from 8:30AM to 5:00PM.
■Call Routing Mailbox (page 28)
A Call Routing Mailbox is a mailbox associated with an individual Answer Table schedule or the Default
Mailbox. It specifies which dialing options (Dial Action Table) are available to callers. It also provides
the Instruction Menu to callers which typically greets the callers and describes the dialing options.
✔By default, Answer Table 1 has a single schedule that runs Monday through Friday from 8:30AM to
5:00PM. This schedule and the Default Mailbox both use Call Routing Mailbox 1.
■Dial Action Table
Once the Automated Attendant answers, the Dial Action Table provides the dialing options to callers.
Each digit a caller can dial is assigned a specific action (function) in the Dial Action Table. The dial
action used depends on the setting in the active Call Routing Mailbox, which in turn depends on the
Answer Table setup.
✔By default, Call Routing Mailbox 1 uses Dial Action Table 1.
The block diagram below shows the default IntraMail Automated Attendant configuration.
DIL to Voice Mail
Master (700)
Trunks Route to
Answer Table 1
Answer Table 1
Schedule 1 or
Default Mailbox
Dial Action
Table 1
Calls always route to Call Routing Mailbox 1
-Schedule 1 active M-F 8:30AM-5:00PM.
-Default Mailbox active all other times.
Dial Action Table 1
Dialing Options
Dial an extension number, or
0 for the operator
Default Automated Attendant Answering
All trunks
Use Answer
Table 1
Which chooses Call
Routing Mailbox 1.
And Dial Action
Table 1
With these
dialing options
From a System Administrator's
mailbox, record an Instruction
Menu (SA + I) for the active Call
Routing Mailbox.
Call Routing
Mailbox 1
G 22-02-01: Incoming Call Trunk Setup
G 47-10-01: Answer Table Assignment
G 22-07-01: DIL Setup
G 47-11: IntraMail Answer Table Options
G 47-12: IntraMail Answer
Schedules
G 47-11-03: Default Mailbox
G 47-08: Call Routing Mailbox
Options
G 47-13: IntraMail Dial Action Tables

Dial Action Table
Aspire S IntraMail Feature Handbook Chapter 1: Features ◆35
1
Dial Action Table Options
The following table summarizes the Dial Action Table dial (key) actions and their associated features.
Operation
N/A
Dial Action Table Key Action Summary
Action Description Feature Reference
TRF
Screened Transfer (1)
Allows an Automated Attendant caller to place
a Screened Transfer to an extension. IntraMail
calls (screens) the destination to see if the call
can go through.
Screened Transfer (page 89)
UTRF
Unscreened Transfer (2)
Allows an Automated Attendant caller to place
an Unscreened Transfer to an extension.Intra-
Mail transfers the call the destination and then
hangs up.
Unscreened Transfer (page 103)
REC1
Quick Message with Greeting (3)
Allows an Automated Attendant caller to leave
a Quick Message at an extension. The caller
will hear the extension’s personal greeting.
Quick Message (page 84)
REC2
Quick Message without Greeting (4)
Allows an Automated Attendant caller to leave
a Quick Message at an extension. The caller
will not hear the extension’s personal greeting
Quick Message (page 84)
LOGON
Log Onto Voice Mail (5)
Allows an Automated Attendant caller to log
onto a mailbox, either directly or one of their
choosing.
Log Onto Voice Mail (page 59)
Hang
Up Hang Up (6)
IntraMail says “Goodbye” and hangs up. Hang Up (page 53)
GOTO Go to a Mailbox, (7)
Allows an Automated Attendant caller to route
to another mailbox.
Go To A Mailbox (page 48)
UND Undefined Routing (0)
This action provides no routing. N/A

Directory Dialing
36 ◆Chapter 1: Features Aspire S IntraMail Feature Handbook
Directory Dialing
Description
Directory Dialing allows an Automated Attendant caller to reach an extension by dialing the first few letters
in the extension user’s name. With Directory Dialing, the caller does not have to remember the extension
number of the person they wish to reach — just their name. Here’s how Directory Dialing works:
1. When the Automated Attendant answers, it sends the call to a Directory Dialing Mailbox. (Optionally,
the caller may be asked to dial a digit to access Directory Dialing.)
2. The Directory Dialing Mailbox plays the Directory Dialing Message (recorded by the System Adminis-
trator) which asks the caller to dial letters for the name of the person they wish to reach.
3. The caller dials the letters for the person’s name plus #. They can dial by first name or last name, depend-
ing on how the Directory Dialing Message was recorded and the Directory Dialing Mailbox was set up.
4. IntraMail searches the list of programmed extension names for a match of the caller-entered letters.
5. Voice prompts announce the first three matches, and allow the caller to dial a digit (1-3) to reach one of
the announced matches. Additionally, the caller can dial 4 to hear additional matches (if any).
6. The caller dials the digit for the extension they wish to reach, and IntraMail sends the call to that exten-
sion. The call is sent as a Screened or Unscreened transfer, depending on programming.
For callers to use Directory Dialing, the system must have a name programmed for each extension (up to 12
characters, A-Z, using upper and lower case letters). Each extension should also have a name recorded in
their Subscriber Mailbox. In addition, each extension used by Directory Dialing must be installed and must
have their Subscriber Mailbox active.
The Directory Dialing Mailbox can be a Routing Mailbox assigned as a Directory Dialing Mailbox or a
Master Mailbox assigned as a Directory Dialing Mailbox.

Directory Dialing
Aspire S IntraMail Feature Handbook Chapter 1: Features ◆37
1
Operation
Recording a Directory Dialing Message
[Super Display Soft Key] - [Keyset Soft Key]
Log onto System Administrator’s mailbox.
SA (72) Access System Administrator options.
[System Admin] - [N/A]
I (4) Select Instruction Menus.
[instruc tion] - [Instr]
Enter the Directory Dialing Mailbox number.
L (5) Listen to the current Directory Dialing Message (if any).
[ Listen] - [Lstn]
# Exit listen mode.
R (7) Record a new Directory Dialing Message.
[Rec ord] - [Rec]
Record message.
*Pause or restart recording.
[Resume] - [Resume]
[Pause] - [Pause]
E (3) Erase recording.
[Cancel] - [Cncl]
# Exit recording mode.
[Done ] - [Done]
E (3) Erase the Directory Dialing Message.
[Erase] - [Erase]
# Go back to the System Administrator options.
[Exit] - [Exit]
# Go back to the System Administrator options.
[Exit] - [Exit]
0Plays Help message.
Using Directory Dialing
To use Directory Dialing:
1. After the Automated Attendant answers, wait for the Directory Dialing Message.
■The Automated Attendant may ask you to dial a digit for Directory Dialing.
2. Dial the letters that correspond to the name of the person you wish to reach + #.
■The Directory Dialing Message will tell you how many letters you need to dial, and whether you
should enter the person’s first name or last name.
■To exit Directory Dialing without selecting a name, just dial #.
3. The Automated Attendant will announce the name matches, and tell you which digit to dial (1-3) to
reach each of the announced names.
■To hear additional name matches (if any), dial 4 instead.
4. Once you make your selection, the Automated Attendant will route your call to the name you select.

Directory Dialing Mailbox
38 ◆Chapter 1: Features Aspire S IntraMail Feature Handbook
Directory Dialing Mailbox
Description
A Directory Dialing Mailbox is the type of mailbox required to implement Directory Dialing. A Directory
Dialing Mailbox can be either a Routing Mailbox or a Master Mailbox. The type you choose depends only
on available resources and your programming preference, since they work identically. See Directory Dialing
on page 36 for more on how to set up a Directory Dialing Mailbox.
Operation
Turn to Directory Dialing on page 36 for more on how to use Directory Dialing and record a Directory Dial-
ing Message.

Erasing All Messages
Aspire S IntraMail Feature Handbook Chapter 1: Features ◆39
1
Erasing All Messages
Description
The System Administrator can delete all messages in a Subscriber Mailbox. Erasing All Messages is an
administrator’s maintenance tool. The administrator may need to use this tool if an employee has left the
company or has an excessive number of messages stored in their mailbox. By deleting the unwanted mes-
sages, the administrator can prevent the IntraMail recording capacity from being reached (which would dis-
able many of the IntraMail messaging features).
Operation
Erasing All Messages System-Wide
[Super Display Soft Key] - [Keyset Soft Key]
Log onto System Administrator’s mailbox.
SA (72) Access System Administrator options.
[System Admin] - [N/A]
S (7) Select Subscriber Mailbox Maintenance options.
[Subscriber] - [Subs]
Enter the number of the Subscriber Mailbox you want to maintain.
EA (32) Erase all Subscriber Mailbox messages.
[Erase All Messages] - [Msgs]
#Go back to System Administrator options.
[Exit] - [Exit]
0Plays Help message.

Exiting a Mailbox
40 ◆Chapter 1: Features Aspire S IntraMail Feature Handbook
Exiting a Mailbox
Description
A Subscriber Mailbox user can exit their mailbox by dialing a code or by hanging up. After exiting, the sub-
scriber can use their extension for normal call processing.
Operation
Exiting a Mailbox
[Super Display Soft Key] - [Keyset Soft Key]
To exit your mailbox.
Log onto Subscriber Mailbox.
XX (99) Exit your mailbox.
[Exit] + [Exit] - [Exit] + [Exit]
To exit and immediately return to your mailbox:
Log onto Subscriber Mailbox.
X# (9#) Exit and return to your mailbox.
[Exit + Return] - [Exit] + [Return]
0 Plays Help message

External Transfer
Aspire S IntraMail Feature Handbook Chapter 1: Features ◆41
1
External Transfer
Description
External Transfer allows an Automated Attendant caller to automatically route to an outside telephone
number. To set this up, assign a Dial Action Table action as a UTRF to a Common Abbreviated Dialing bin
(e.g., #2000 + Pause for common bin 000). When the Automated Attendant answers, the caller dials the digit
and IntraMail automatically routes them to the outside number contained in the bin. External Transfer allows
your callers to easily reach branch offices and important off-site associates.
Operation
Operation is automatic once set up in programming.

Fax Detection
42 ◆Chapter 1: Features Aspire S IntraMail Feature Handbook
Fax Detection
Description
The Automated Attendant can detect incoming fax calls and transfer them to a fax machine. With Fax Detec-
tion enabled, after the Automated Attendant answers a call it listens for incoming fax CNG tone. If it detects
the tone, it does an unscreened transfer of the call to the specified company fax machine. The incoming fax
then prints out on the company fax machine. If you disable Fax Detection, the Automated Attendant will not
detect and route incoming fax calls.
Operation
N/A

Flexible Answering Schedules
Aspire S IntraMail Feature Handbook Chapter 1: Features ◆43
1
Flexible Answering Schedules
Description
The Automated Attendant can answer outside calls with different announcements and dialing options,
depending on the time of day and day of week. For example, a company can set up separate schedules for
weekdays, evenings, weekends, and specific holidays. Each schedule can play a different announcement to
callers, as well as provide them with unique dialing options. Once set up in programming, the schedule oper-
ation is automatic.
The Flexible Answering Schedules are determined by the set up of the IntraMail Answer Tables. See Answer
Tables on page 15 for more.
Operation
N/A

Flexible Call Routing
44 ◆Chapter 1: Features Aspire S IntraMail Feature Handbook
Flexible Call Routing
Description
The Automated Attendant can provide outside callers with a wide variety of dialing (routing) options. You
can customize the announcements and routing options to exactly meet the site requirements. Use Flexible
Call Routing to eliminate or minimize the need for an operator or receptionist to handle outside calls.
There are 3 components to Flexible Call Routing.
■Answer Tables (page 15)
Determines how the Automated Attendant answers outside calls on each trunk, according to the time of
the day and day of the week that the call is ringing.
■Call Routing Mailbox (page 28)
The mailbox associated with an Answer Table that specifies which dialing options (Dial Action Table)
and announcement are available to Automated Attendant callers.
■Dial Action Table (page 34)
Defines the dialing options for the Call Routing Mailbox chosen by the active Answer Table, which in
turn provides those dialing options to Automated Attendant callers.
Operation
N/A

Flexible Mailbox Numbering Plan
Aspire S IntraMail Feature Handbook Chapter 1: Features ◆45
1
Flexible Mailbox Numbering Plan
Description
Flexible Mailbox Numbering Plan lets you customize a site’s extension numbers and be assured that Intra-
Mail will adapt to the new configuration. When you change a port’s extension number, you can change the
number of the mailbox assigned to that port to match. There is no need to reprogram — all of the options
remain intact.
Operation
N/A

Forced Unscreened Transfer
46 ◆Chapter 1: Features Aspire S IntraMail Feature Handbook
Forced Unscreened Transfer
Description
A Subscriber Mailbox can optionally convert Automated Attendant Screened Transfers to Unscreened
Transfers. Enable this option for a mailbox if the subscriber prefers to receive all calls sent by the Automated
Attendant as Unscreened Transfers. With Unscreened Transfers,
■Calls from the Automated Attendant ring like other transferred calls and display the incoming Caller ID
data (if provided by telco and enabled in programming) as the call is ringing.
■As with Screened Transfers, unanswered calls route to the subscriber’s greeting (recorded or default) so
the caller can leave a message. However, with Unscreened Transfer the caller cannot dial 2 to reach the
Next Call Routing Mailbox options (if programmed).
Operation
N/A

Getting Recorded Help
Aspire S IntraMail Feature Handbook Chapter 1: Features ◆47
1
Getting Recorded Help
Description
If a Subscriber Mailbox user dials an incorrect code or forgets what to dial while in their mailbox, they can
request help from the IntraMail voice prompts. Recorded Help provides the user with a built-in, interactive
user’s guide. To get recorded help, the user dials 0.
Operation
Getting Recorded Help
Log onto your mailbox
0Get recorded help.
■Recorded help is always available from the Main Menu.
■Recorded help may not be available at all levels.
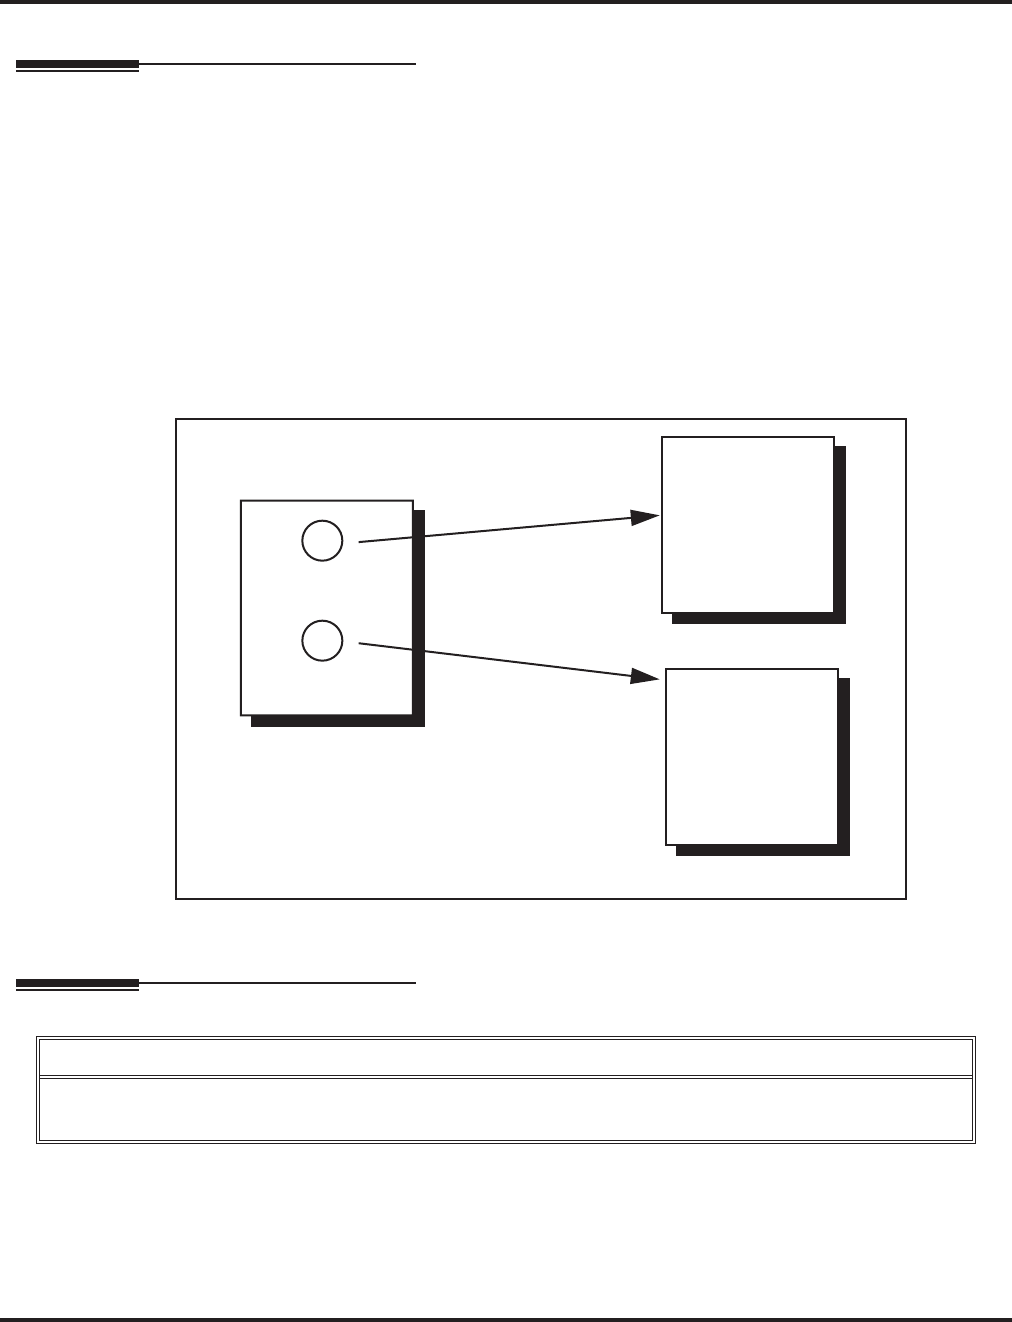
Go To A Mailbox
48 ◆Chapter 1: Features Aspire S IntraMail Feature Handbook
Go To A Mailbox
Description
An Automated Attendant caller can dial a digit to route to a Call Routing or Announcement Mailbox. This is
called the Go To (GOTO) action. The GOTO action can route directly to a specific Call Routing or
Announcement Mailbox, or allow the Automated Attendant caller to go to a mailbox of their own choosing.
Use the GOTO action to set up a “tree” of Automated Attendant options.
The block diagram below shows how the Automated Attendant can provide the caller with a “tree” of dialing
options. Dialing 1 (GOTO 9) routes to Announcement Mailbox 9, which plays the company directions. Dial-
ing 2 (GOTO 2) routes to Call Routing Mailbox 2, which is set up to give the caller single-digit dialing to
Tech Service technicians.
■The Announcement Message for Announcement Mailbox 9 tells the caller how to locate the company.
■The Instruction Menu for Call Routing Mailbox 2 instructs the caller which digits to dial for each techni-
cian. The Dial Action Table for Call Routing Mailbox 2 contains the TRF or UTRF actions to each tech-
nician’s extension.
The GOTO action can also log into a Subscriber Mailbox, although the LOGON action is normally reserved
for this function.
Operation
Using the Automated Attendant GOTO Action
For the outside caller:
1. After Automated Attendant answers, the voice prompts will instruct you on which digits to dial.
Automated Attendant
Announcement Mailbox 9
Call Routing Mailbox 2
GOTO 9
GOTO 2
Call Routing Mailbox 1
Company
Directions
Tech Service
Technicians
1
2

Greeting
Aspire S IntraMail Feature Handbook Chapter 1: Features ◆49
1
Greeting
Description
A Subscriber Mailbox user can record a personalized greeting for their mailbox. Caller’s to the user’s mail-
box hear the prerecorded personalized greeting rather than a default message. The greeting can announce the
subscriber’s name, provide a personal message (such as “Hello - I am on vacation this week”), or instruct the
caller how to leave a message or use other mailbox options. A greeting that provides mailbox instructions is
very helpful if the mailbox has a Next Call Routing Mailbox set up that provides additional dialing options.
Without the greeting, the caller would not know which digits to dial.
While listening to a mailbox greeting, a caller can dial * to immediately leave a message.
Remote Greetings
A Subscriber Mailbox user can call into the Automated Attendant, access their mailbox, and remotely record
their mailbox greeting. Following are two of the ways a user can do this:
■After the Automated Attendant answers, dial a digit (typically #) followed by their mailbox number. This
method allows outside callers to log into their Subscriber Mailboxes from outside the company. Once
they log into their mailbox, the user can dial G to record a greeting.
■If an extension has a Direct Inward Line that is forwarded to voice mail, the caller can dial # and log into
their mailbox (instead of leaving a message). Once they log into their mailbox, the user can dial G to
record a greeting. This option must be set up in the Next Call Routing Mailbox. To allow this capability,
for example:
- Program the Next Call Routing Mailbox # digit as LOGON to IXXX.
- While listening to their greeting, the subscriber can dial:
# (to route to their Next Call Routing Mailbox), then
# and their mailbox number to log onto their mailbox.
- By default, this option is provided in Call Routing Mailbox 1. Additionally, the subscriber should
enable a Security Code for their mailbox to prevent unauthorized logons.
Multiple Greetings
In systems with Multiple Greetings, the mailbox subscriber can record up to three separate greetings and
make any one of the three active. When a caller leaves a message in the subscriber’s mailbox, they hear the
active greeting. This allows the subscriber, for example, to record separate greetings for work hours, after
work, and during vacation. Instead of rerecording their greeting when they leave the office, they can just
activate the “after work” greeting instead.
If the active greeting has not been recorded, a caller leaving a message in the subscriber mailbox will hear,
“At the tone, you can leave your message for (extension number or name).”

Greeting
50 ◆Chapter 1: Features Aspire S IntraMail Feature Handbook
Operation
Recording a Multiple Greeting and Setting Up Auto Attendant Do Not Disturb
[Super Display Soft Key] - [Keyset Soft Key]
Log onto Subscriber Mailbox.
G (4) Access the Mailbox Greeting options.
[Greeting] - [Greet]
IntraMail does the following:
• Plays a summary of your current settings.
• Displays the status of your active Greeting (1-3).
[GREETING n: RECORDED] - [GREETING n: RECORDED], or
[GREETING n: NOT REC] - [GREETING n: NOT REC]
• Shows the Auto Attendant Do Not Disturb status.
[AUTO-ATTENDANT DND: OFF] - [AUTO-ATTENDANT DND: OFF], or
[AUTO-ATTENDANT DND: ON] - [AUTO-ATTENDANT DND: ON]
• Provides soft keys for each of the 3 greetings.
[Greeting 1] - [Gr1]
[Greeting 2] - [Gr2]
[Greeting 3] - [Gr3]
Select a Greeting (which also makes it active).
(1)[Greeting 1] - [Gr1]
(2)[Greeting 2] - [Gr2]
(3)[Greeting 3] - [Gr3]
L (5) Listen to the active greeting (if recorded).
[Listen] - [Lstn]
R (7) Record a new greeting (if not recorded), or rerecord the
current greeting.
[Record] - [Rec]
Record at the tone, then press # when done.
*Pause or restart recording.
[Resume] - [Resume]
[Pause] - [Pause]
E (3) Erase the greeting.
[Cancel] - [Cncl]
# End the recording.
[Done] - [Done]
Erase the currently recorded greeting (if any).
[Erase] - [Erase]
#Go back to the Mailbox Greeting options.
[Exit] - [Exit]
Change Auto Attendant Do Not Disturb.
O (6) Turn Auto Attendant Do Not Disturb off or on.
[DND ON] - [N/A][AUTO-ATT DND:OFF] - [AUTO-ATTENDANT DND: ON]
[AUTO-ATT DND:OFF] - [AUTO-ATTENDANT DND: OFF]
# Go back to mailbox Main Menu.
[EXIT] - [EXIT][Exit] - [Exit]
0Plays Help message.

Group (Shared) Mailbox
Aspire S IntraMail Feature Handbook Chapter 1: Features ◆51
1
Group (Shared) Mailbox
Description
An extension use can share a Group Mailbox with co-workers for receiving and sending messages. A Group
Mailbox is helpful, for example, in a small office where employees share telephones. The Group Mailbox has
many of the features of a Subscriber Mailbox, but it is not associated with a specific extension. In addition:
■Any messages left in the Group Mailbox are available to all members of the group.
■To log onto the Group mailbox, a member of the group just presses their Group Mailbox key.
■A Group Mailbox can have a recorded greeting and name, just like any other Subscriber Mailbox.
■Other extension extension users can record and send messages to the Group Mailbox, as well as Transfer
calls to the Group Mailbox.
■Automated Attendant callers can leave a Quick Message in the Group Mailbox.
Operation
Using a Group Mailbox
To log onto your Group Mailbox:
1. Press the Voice Mail key for your Group Mailbox.
■The key flashes fast when there a new messages in the Group Mailbox.
■If you try to log onto your Group Mailbox while a co-worker is using it, you hear, “That mailbox is busy.”
2. Enter your security code (if required).
3. Any Voice Mail processing you do while in your Group Mailbox (such as deleting messages), affects all mem-
bers of the group.
To transfer your active call to a Group Mailbox:
1. Press HOLD.
2. Press MSG or your Voice Mail key.
3. Dial the Group Mailbox number (e.g., 400).
4. Press SPK to hang up.

Guest Mailbox
52 ◆Chapter 1: Features Aspire S IntraMail Feature Handbook
Guest Mailbox
Description
An outside party can have their own Guest Mailbox mailbox for receiving and sending messages. A Guest
Mailbox is a Subscriber Mailbox that does not have an extension associated with it. It is instead associated
with a virtual extension. A Guest Mailbox has many of the IntraMail features of a Subscriber Mailbox. A
company visitor with a Guest Mailbox could, for example:
■Go to any extension, press CALL1 + 700, then dial their mailbox number.
■Review their messages, leave messages for associates, or record a new greeting for their mailbox.
■Use many other features available to a Subscriber Mailbox.
Operation
Logging Onto a Guest Mailbox
To log onto a Guest Mailbox:
1. Press an idle CALL key + Dial the IntraMail master number (e.g., 700).
2. When IntraMail answers, dial the Guest Mailbox number.
Logging Onto a Guest Mailbox from the Automated Attendant
To log onto a Guest Mailbox from the Automated Attendant:
1. After the Automated Attendant answers, dial # + The Guest Mailbox number.
■This capability may be disabled in the Automated Attendant.
■Your automated attendant may have GOTO or LOGON actions assigned to the Guest Mailbox. Check with
your Communications Manager.
Transferring your call to a Guest Mailbox
To transfer your active call to a co-worker’s mailbox:
1. Press HOLD.
2. Press MSG.
3. Dial the Guest Mailbox number.
4. Press SPK to hang up.
■To transfer a call to a co-worker’s mailbox from a single line telephone, use the following procedure:
Hookflash + Dial *8 + Dial the co-worker’s mailbox + Hang up.

Hang Up
Aspire S IntraMail Feature Handbook Chapter 1: Features ◆53
1
Hang Up
Description
Hang Up is an Automated Attendant option that immediately hangs up the outside call. When setting up a
Dial Action Table, you may want to use Hang Up for unused actions (rather than the caller hearing the stan-
dard error message). You might also want to use the Hang Up action as the Timeout destination for callers
that wait too long to dial after the Automated Attendant answers.
Operation
N/A

Instruction Menu
54 ◆Chapter 1: Features Aspire S IntraMail Feature Handbook
Instruction Menu
Description
The Instruction Menu is the announcement that plays to Automated Attendant callers. Normally, the Instruc-
tion Menu greets callers and provides them with the Automated Attendant dialing options. The Instruction
Menu is associated with the active Call Routing Mailbox. Normally, you should have the System Adminis-
trator customize (rerecord) the Instruction Menu to match the dialing options enabled in the site’s Dial
Action Table. If a custom Instruction Menu is not recorded, the Automated Attendant callers hear:
“If you are calling from a touch tone phone, please dial the extension number you wish to reach, or dial
0 for assistance. If you are calling from a rotary dial phone, please stay on the line for assistance.”
Operation
Recording an Instruction Menu for a Call Routing Mailbox
[Super Display Soft Key] - [Keyset Soft Key]
Log onto System Administrator’s mailbox.
SA (72) Access System Administrator options.
[System Admin] - [N/A]
I (4) Select Instruction Menus.
[Instruction] - [Instr]
Enter the Call Routing Mailbox number.
L (5) Listen to the current Instruction Menu (if any).
[Listen] - [Lstn]
# Exit listen mode.
R (7) Record a new Instruction Menu.
[Record] - [Rec]
Record message.
*Pause or restart recording.
[Resume] - [Resume]
[Pause - [Pause]
E (3) Erase recording.
[Cancel] - [Cncl]
# Exit recording mode.
[Done] - [Done]
E (3) Erase the Instruction Menu.
[Erase] - [Erase]
# Go back to the System Administrator options.
[Exit] - [Exit]
# Go back to the System Administrator options.
[Exit] - [Exit]
0Plays Help message.

Leaving a Message
Aspire S IntraMail Feature Handbook Chapter 1: Features ◆55
1
Leaving a Message
Description
An extension user or outside caller can leave a voice message in a co-worker’s mailbox if that extension is
busy, unanswered, or in Do Not Disturb. Leaving a voice message is a handy and efficient way to communi-
cate with co-workers that avoids post-it notes, message pads, and unnecessary email.
Operation
Leaving a Message for a Co-worker
To leave a message in the mailbox of an unanswered extension:
1. Press MSG.
2. Leave message and hang up.
OR
Leave message and dial #.
■Dialing # sends the message and hangs up.
Leaving a Message from Outside the Company
To leave a message in a mailbox:
1. Leave message and hang up.
OR
Leave message and dial #.
■Dialing # may provide you with additional dialing options. This depends on how the called mailbox’s Next
Call Routing Mailbox is set up.
To leave a message in an extension’s mailbox, you can be:
■Transferred to an extension’s mailbox by another user.
■Automatically routed to a mailbox when the called party doesn’t answer or is unavailable.
■Sent to the mailbox from the Automated Attendant after dialing * plus the called party’s mailbox number.
■Routed from the Automated Attendant after dialing a uniquely programmed digit set up to send you to an
extension’s mailbox.

Listening to Messages
56 ◆Chapter 1: Features Aspire S IntraMail Feature Handbook
Listening to Messages
Description
While or after listening to a message, a Subscriber Mailbox user has many message handling options from
which to choose. The listening options let you quickly and efficiently manage your voice mail messages,
respond to the message sender, or forward the message to a co-worker for additional handling. The following
table shows these options.
Notes:
■If a subscriber’s mailbox is set to Auto Save messages, IntraMail saves partially listened-to messages
but does not relamp the keyset for those messages. For example:
-A subscriber with new messages calls their mailbox.
- The subscriber presses L to listen to a portion of each message and then exits their mailbox.
- IntraMail saves all the messages and turns off the message waiting lamp.
■
If you hang up while listening to a new message, IntraMail automatically retains the message as a
new message.
Message Listen Options
[Super Display Soft Key] - [Keyset Soft Key]
Option Description
RE (73)
[Reply] - [N/A] Record a reply.
See Message Reply on page 78.
MF (63)
[Forward] - [N/A] Forward the message to another mailbox.
See Message Forward on page 70.
MC (62)
[Callback] - [N/A] Make a call to the message sender.
See Make Call on page 65.
TI (84)
Hear the time and date the message was sent.
■See Time and Date on page 99.
SA (72) Save the message in your mailbox.
E (3)
[Erase] - [Erase] Erase the message.
■See Message Delete on page 69 for more.
L (5)
[Next Message] - [Next] Listen to the next message.
B (2) Back up a few seconds.
BB (22)
[Repeat] - [Rpt] Back up to the beginning of the message.
G (4) Go ahead a few seconds.
*Pause/resume recording.
1N (16)
[Message List + New Messages] - [N/A] Select New Message List
■See Message Listen Mode on page 72.
1S (17)
[Message List + Saved Messages] - [N/
A]
Select Saved Message List
■See Message Listen Mode on page 72.
1A (12)
[Message List + All Messages] - [N/A] Select All Message List
■See Message Listen Mode on page 72.
#
[Exit] - [Exit] Exit the listen mode.
X (9) Exit your mailbox.
Dial 0 while listening to hear the list of options.
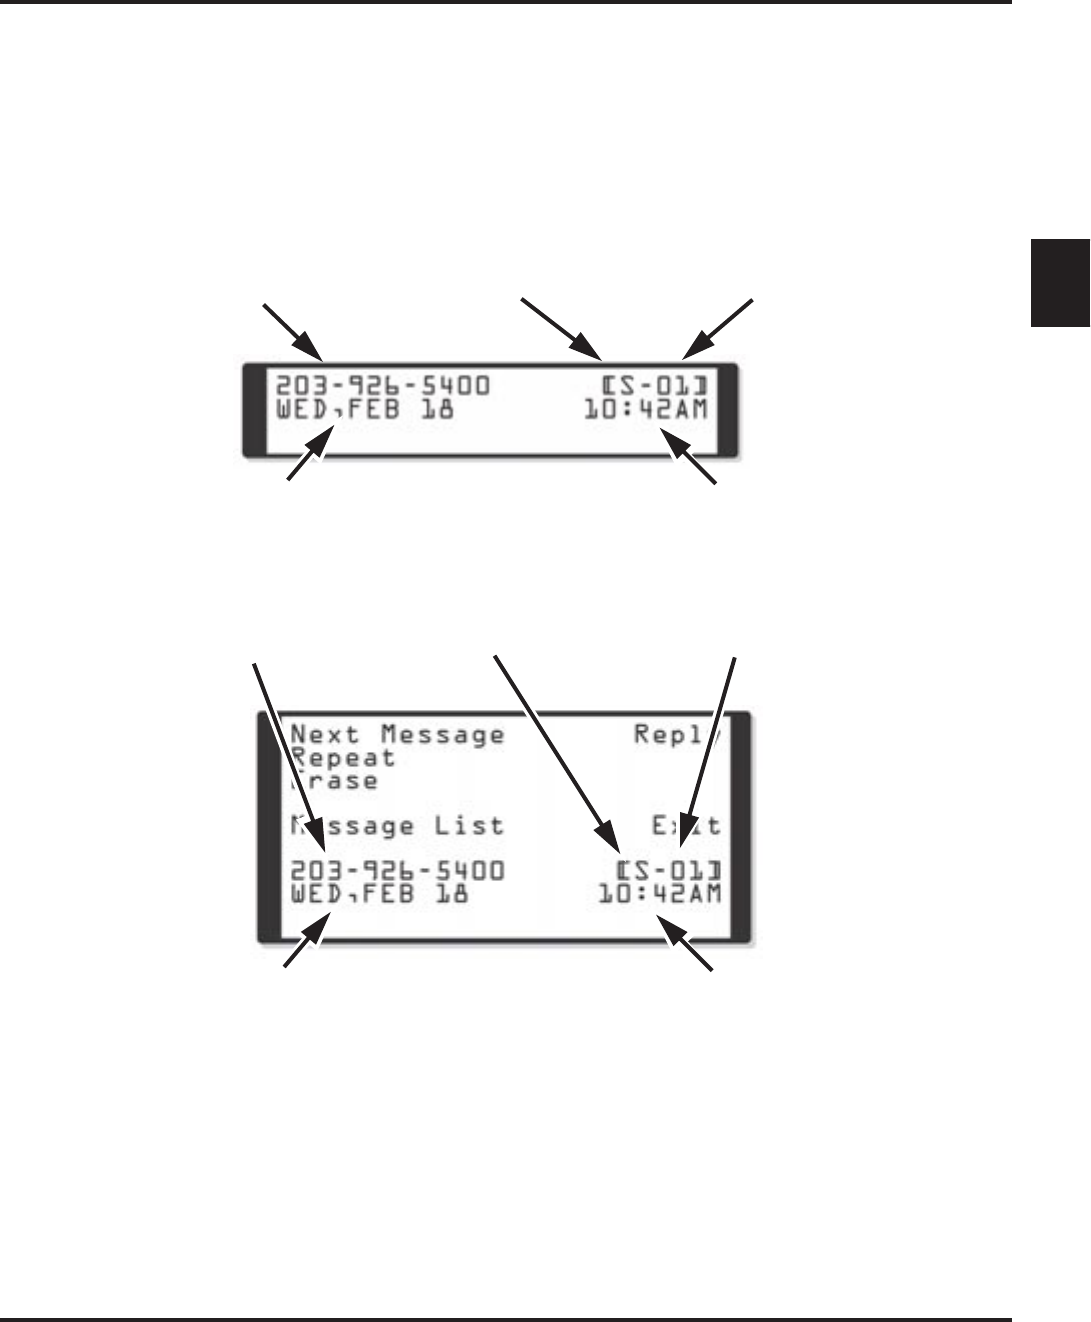
Listening to Messages
Aspire S IntraMail Feature Handbook Chapter 1: Features ◆57
1
Telephone Display while Listening to a Message
While listening to a message, your telephone display shows you important information about the message.
This includes:
■The caller’s telephone number (if available).
■The selected Message List.
■The message number in the selected list.
■The date and time the message was left.
22- and 34-Button Display
Super Display
Caller’s phone number
(requires Caller ID) Currently selected
Message List Message number (in
selected Message List)
Date message was left Time message was left
Date message was left Time message was left
Caller’s phone number
(requires Caller ID) Currently selected
Message List Message number (in
selected Message List)

Listening to Messages
58 ◆Chapter 1: Features Aspire S IntraMail Feature Handbook
Operation
Listening to Messages
[Super Display Soft Key] - [Keyset Soft Key]
Log onto Subscriber Mailbox
L (5) Access the Message Listen mode
[Listen] - [Lstn]
■See Message Listen Options on page 56 for an explanation of the available options.
■
0Plays Help message

Log Onto Voice Mail
Aspire S IntraMail Feature Handbook Chapter 1: Features ◆59
1
Log Onto Voice Mail
Description
A subscriber can log onto their mailbox using a method that best suits their needs and location. While at
their own phone, the subscriber just presses a single key to log onto their mailbox. To use their mailbox
while at a co-worker’s phone, the subscriber dials the IntraMail master number, followed by their mailbox
number (which is normally the same as their extension number). If they are away from the office, the sub-
scriber can still use their mailbox by calling in through the Automated Attendant.
Local (On-site) Logon
An extension user can log onto their mailbox in the following ways:
■Press their MSG key to log onto their Subscriber Mailbox.
■Dial the IntraMail master number (e.g., 700), followed by their mailbox number. This method is typically
used by Guest Mailbox users, as well as subscribers attempting to log into their Subscriber Mailbox from
a co-worker’s phone.
Remote Log On
A Subscriber Mailbox user can call into the Automated Attendant and log onto their mailbox. Following are
two of the ways a user can do this:
■After the Automated Attendant answers, dial a digit (typically #) followed by their mailbox number. This
method allows outside callers to log into their mailboxes from outside the company. Once they log into
their mailbox, they can use the allowed features in the mailbox main menu. To avoid unauthorized
access to their mailbox, the user should enable their own unique Security Code.
■If an extension has a Direct Inward Line that voice mail picks up, the caller can dial # during their greet-
ing to log into their mailbox (instead of leaving a message). This method allows subscribers to dial their
own number and then use the features of their mailbox. This capability must be set up in the user’s Next
Call Routing Mailbox. For example:
- Program the Next Call Routing Mailbox # digit as LOGON to IXXX.
- While listening to their greeting, the subscriber can dial:
# (to route to their Next Call Routing Mailbox), then
# and their mailbox number to log onto their mailbox.
By default, this option is provided in Call Routing Mailbox 1. Additionally, the subscriber should enable
a Security Code for their mailbox to prevent unauthorized logons.
Operation
Logging Onto Your Mailbox
To log onto your Subscriber Mailbox:
1. Press MSG.
■From an on-premise single line telephone, lift handset and dial *8.
To log onto your Guest Mailbox or your Subscriber Mailbox from a co-worker’s extension:
1. Press an idle CALL key + Dial the IntraMail master number (e.g., 700) + Dial your mailbox number.
To log onto your Subscriber Mailbox from the Automated Attendant:
1. Wait for the Automated Attendant to answer.
2. Dial # and your mailbox number.
■This option may be different in your system. Check with your Communications Manager.
■
After you remotely log onto your mailbox, you can optionally dial
9
then
*
to return to the Automated Attendant.

Mailbox Name
60 ◆Chapter 1: Features Aspire S IntraMail Feature Handbook
Mailbox Name
Description
A caller leaving a message in a Subscriber Mailbox can hear the mailbox’s prerecorded name instead of the
mailbox number. The prerecorded Mailbox Name gives the subscriber’s mailbox that personal touch. Prior
to leaving a message, caller’s will hear the name instead of the default “extension xxx” prompt. The recorded
name can be up to 10 seconds long.
Operation
Recording Your Mailbox Name
[Super Display Soft Key] - [Keyset Soft Key]
Log onto Subscriber Mailbox.
RN (76) Access the Mailbox Name Menu.
[Name] - [N/A]
L (5) Listen to the currently recorded name (if any).
[Listen] - [Lstn]
# Exit listen mode.
R (7) Record a new name.
[Record] - [Rec]
Record message.
*Pause or restart recording.
[Resume] - [Resume]
[Pause] - [Pause]
E (3) Erase recording.
[Cancel] - [Cncl]
# Exit recording mode.
[Done] - [Done]
E (3) Erase the currently recorded name.
[Erase] - [Erase]
#Go back to the Mailbox Main Menu.
[Exit] - [Exit]
0Plays Help message.

Mailbox Name
Aspire S IntraMail Feature Handbook Chapter 1: Features ◆61
1
Recording or Erasing Co-worker’s Names from a System Administrator’s Mailbox
[Super Display Soft Key] - [Keyset Soft Key]
Log onto System Administrator’s Mailbox.
SA (72) Access System Administrator options.
[System Admin] - [N/A]
S (7) Select Subscriber Mailbox Maintenance options.
[Subscriber] - [Subs]
Enter the number of the Subscriber Mailbox you want to maintain.
EN (36) Erase the mailbox name.
[Erase Name] - [Name]
N (6) Record a new mailbox name.
[Record New Name] - [N/A]
L (5) Listen to the currently recorded name (if any).
[Listen] - [Lstn]
# Exit listen mode.
R (7) Record a new name.
[Record] - [Rec]
Record message.
*Pause or restart recording.
[Resume] - [Resume]
[Pause] - [Pause]
E (3) Erase recording.
[Cancel] - [Cncl]
# Exit recording mode.
[Done] - [Done]
E (3) Erase the currently recorded name.
[Erase] - [Erase]
#Go back to the Subscriber Maintenance Menu.
[Exit] - [Exit]
#Go back to System Administrator options.
[Exit] - [Exit]
0Plays Help message.
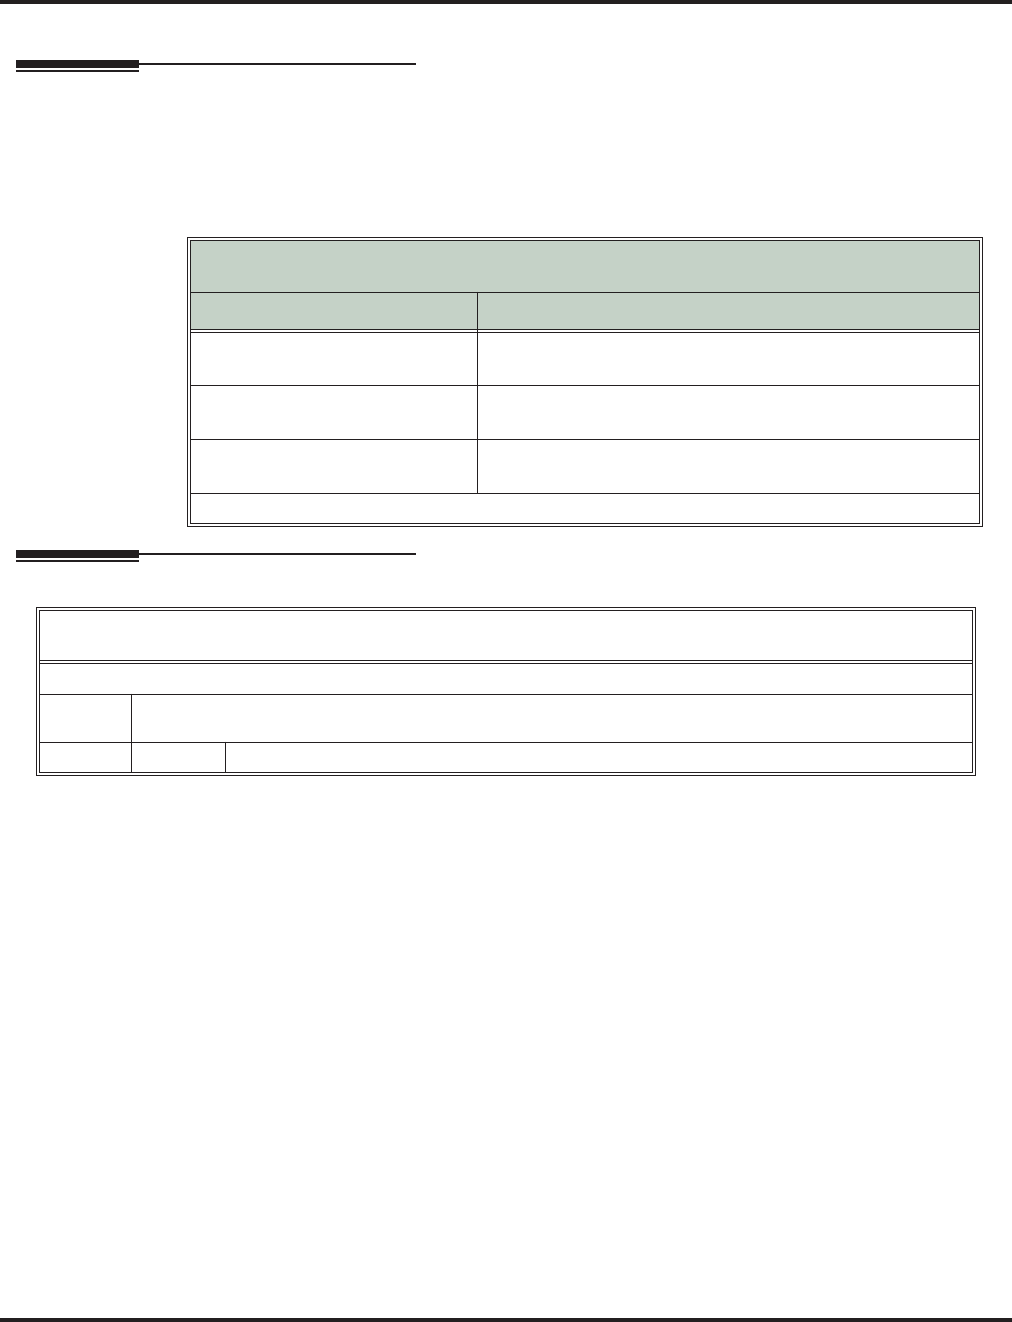
Mailbox Options Menu
62 ◆Chapter 1: Features Aspire S IntraMail Feature Handbook
Mailbox Options Menu
Description
The Mailbox Options Menu is a sub-menu of a subscriber’s Main Menu that provides access to the Auto
Time Stamp, Mailbox Security Code Delete, and Message Notification features. The chart below summa-
rizes these options. Auto Time Stamp helps if the subscriber needs to know the time and date of each mes-
sage they receive without taking any extra steps. If mailbox security is not an issue, the subscriber can delete
their security code to simplify logging onto their mailbox.
Operation
Mailbox Options Menu
[Super Display Soft Key] - [Keyset Soft Key]
Option Description
S (7)
[Sec.Code] - [Sec] Erase the mailbox’s Security Code.
■See Mailbox Security Code Delete on page 63.
N (6)
[Notification] - [Notif] Set up Message Notification.
■See Message Notification on page 73.
AT (28)
[Time Stamp] - [Time] Enable or disable Auto Time Stamp.
■See Auto Time Stamp on page 22.
To hear the list of Mailbox Options, dial 0.
Accessing the Mailbox Options Menu
[Super Display Soft Key] - [Keyset Soft Key]
Log onto Subscriber Mailbox.
OP (67) Access the Mailbox Options Menu.
[MBOX Options] - [N/A]
0Plays Help message.

Mailbox Security Code Delete
Aspire S IntraMail Feature Handbook Chapter 1: Features ◆63
1
Mailbox Security Code Delete
Description
The System Administrator can delete the security code for any Subscriber Mailbox. This effectively unlocks
the mailbox. If mailbox security is not necessary, deleting a mailbox’s security code speeds up mailbox logon.
Without a security code, the subscriber just presses their
MSG
key to immediately log onto their mailbox.
Operation
Deleting a Mailbox Security Code
[Super Display Soft Key] - [Keyset Soft Key]
Log onto System Administrator’s Mailbox.
SA (72) Access System Administrator options.
[System Admin] - [N/A]
S (7) Select Subscriber Mailbox Maintenance options.
[Subscriber] - [Subs]
Enter the number of the Subscriber Mailbox you want to maintain.
S (7) Erase the mailbox Security Code.
[Erase Security Code] - [N/A]
#Go to the System Administrator Menu.
[Exit] - [Exit]
0Plays Help message.

Main Menu
64 ◆Chapter 1: Features Aspire S IntraMail Feature Handbook
Main Menu
Description
After a Subscriber Mailbox user logs into their mailbox, IntraMail provides them with the Main Menu of
options. The Main Menu provides quick access to the most commonly used mailbox features in a central
location. It includes listening and recording options, as well as additional selections for recording mailbox
names and greetings. The chart below summarizes these options.
Operation
Mailbox Main Menu
[Super Display Soft Key] - [Keyset Soft Key]
Option Description
L (5)
[Listen] - [Lstn] Listen to messages.
■See Listening to Messages on page 56.
RS (77)
[Record] - [Rec] Record and send a message.
■See Message Record on page 77.
G (4)
[Greeting] - [Greet] Record a mailbox greeting.
■See Greeting on page 49.
RN (76)
[Name] - [N/A] Record a mailbox name.
■See Mailbox Name on page 60.
[Message List] - [N/A] Select the active Message List.
■See Message Listen Mode on page 72.
1N (16)
[Message List + New Messages] - [N/A] Select the New Message List.
■See Message Listen Mode on page 72.
1S (17)
[Message List + Saved Messages] + [N/
A]
Select the Saved Message List.
■See Message Listen Mode on page 72.
1A (12)
[Message List + All Messages] + [N/A] Select the All Message List.
■See Message Listen Mode on page 72.
OP (67)
[MBOX Options] - [N/A] Use the Mailbox Options. See the following:
■See Security Code on page 91.
■Message Notification on page 73.
■Auto Time Stamp on page 22.
SA (72)
[System Admin] - [N/A] Access the System Administrator options.
■See System Administrator on page 96.
TI (84) Check the current time and date.
■See Time and Date on page 99.
X (9)
[Exit] + [Exit] Exit your mailbox.
■See Exiting a Mailbox on page 40.
To hear the complete Main Menu of options, dial 0 while in the Main Menu.
Accessing the Mailbox Main Menu
Log onto Subscriber Mailbox.
■You automatically go to the mailbox Main Menu.
0Plays Help message which summarizes the Main Menu options.
■See Mailbox Main Menu on page 64 for the Main Menu options.

Make Call
Aspire S IntraMail Feature Handbook Chapter 1: Features ◆65
1
Make Call
Description
Make Call lets a Subscriber Mailbox user listen to a voice message and dial MC to return the call without
knowing their caller’s phone number. Make Call automates returning messages since you don’t have to dial
the message sender’s telephone number. Make Call is always available for messages received from co-work-
ers. Make call is available for messages received from outside callers if the system has Caller ID enabled
(and provided by the connected telco).
While listening to a message, the telephone display shows the callers number (or extension) in addition to
the date and time the message was left.
Automatic Route Selection
Since trunk Caller ID data is always received as 10 digits, you must set up Automatic Route Selection (ARS)
to properly process the digits dialed during a Make Call callout. For example, it may be necessary to add a
leading 1 for all long distance calls or strip the leading 1 and area code from all local calls. Refer to Auto-
matic Route Selection in the Aspire Software Manual (P/N 0893200) for more. Without ARS, all Make Call
callouts are dialed exactly as the Caller ID data is received.
Operation
Using Make Call from your Mailbox
[Super Display Soft Key] - [Keyset Soft Key]
Log onto Subscriber Mailbox.
L (5) Listen to the message for which you want to make a return call.
[Listen] - [Lstn]
MC (62) Dial this code while listening to the message you want to return.
[Callback] - [N/A]
■Make Call automatically places a return call to the co-worker that left you the message.
■If your system has Caller ID, Make Call can automatically place a return call to your
outside caller.
■If you hear “Your call cannot go through,” your system’s Caller ID is not properly set
up. You go right back to the listen mode for the message you were listening to when
you tried the Make Call.
■

Master Mailbox
66 ◆Chapter 1: Features Aspire S IntraMail Feature Handbook
Master Mailbox
Description
IntraMail uses Master Mailboxes as the overflow destination for Department Calling Group overflow. If a
trunk call to the Department Group master (pilot) number is unanswered, the call can optionally route to the
Master Mailbox. There are 16 available Master Mailboxes. Each Master Mailbox can be one of four mailbox
types: Call Routing, Announcement, Subscriber, and Directory Dialing.
■Call Routing Mailbox
This gives the Department Group caller additional dialing options if their call is unanswered.
■Announcement Mailbox
This plays a prerecorded announcement to the Department Group caller if their call is unanswered.
The Announcement Mailbox can then hang up or provide additional dialing options.
■Subscriber Mailbox
The Department Group caller can leave a message in the group’s master mailbox. A Member of the
group can then retrieve the message later on.
■Directory Dialing
If the Department Group call is unanswered, Directory Dialing allows the caller to reach an extension
by dialing the first few letters in the extension user’s name.
Master Mailboxes can be the Department Group overflow destination for the following types of calls:
■A Screened Transfer from the IntraMail Automated Attendant to the Department Group master (pilot)
number.
■An Unscreened Transfer from the IntraMail Automated Attendant to the Department Group master
(pilot) number.
■A Direct Inward Line to the Department Group master (pilot) number.
Automated Attendant Callers can also access a Master Mailbox. When the mailbox is set up as a Subscriber
Mailbox, an Automated Attendant caller can do a remote logon or leave a Quick Message in the Master
Mailbox. If the Master Mailbox is a Call Routing, Announcement, or Directory Dialing Mailbox, you can set
up a GOTO action in the active Dial Action Table to enable single-digit access to the Master Mailbox.
Using a Master Mailbox as an Additional Resource
You can also use a Master Mailbox as an additional resource (for example, as an extra Directory Dialing or
Call Routing Mailbox). When used this way, the Master Mailbox does not have to be assigned to a Depart-
ment Calling Group.
Operation
Refer to the following:
■Announcement Mailbox (page 11).
■Call Routing Mailbox (page 28).
■Directory Dialing (page 36).
■Subscriber Mailbox (page 95).
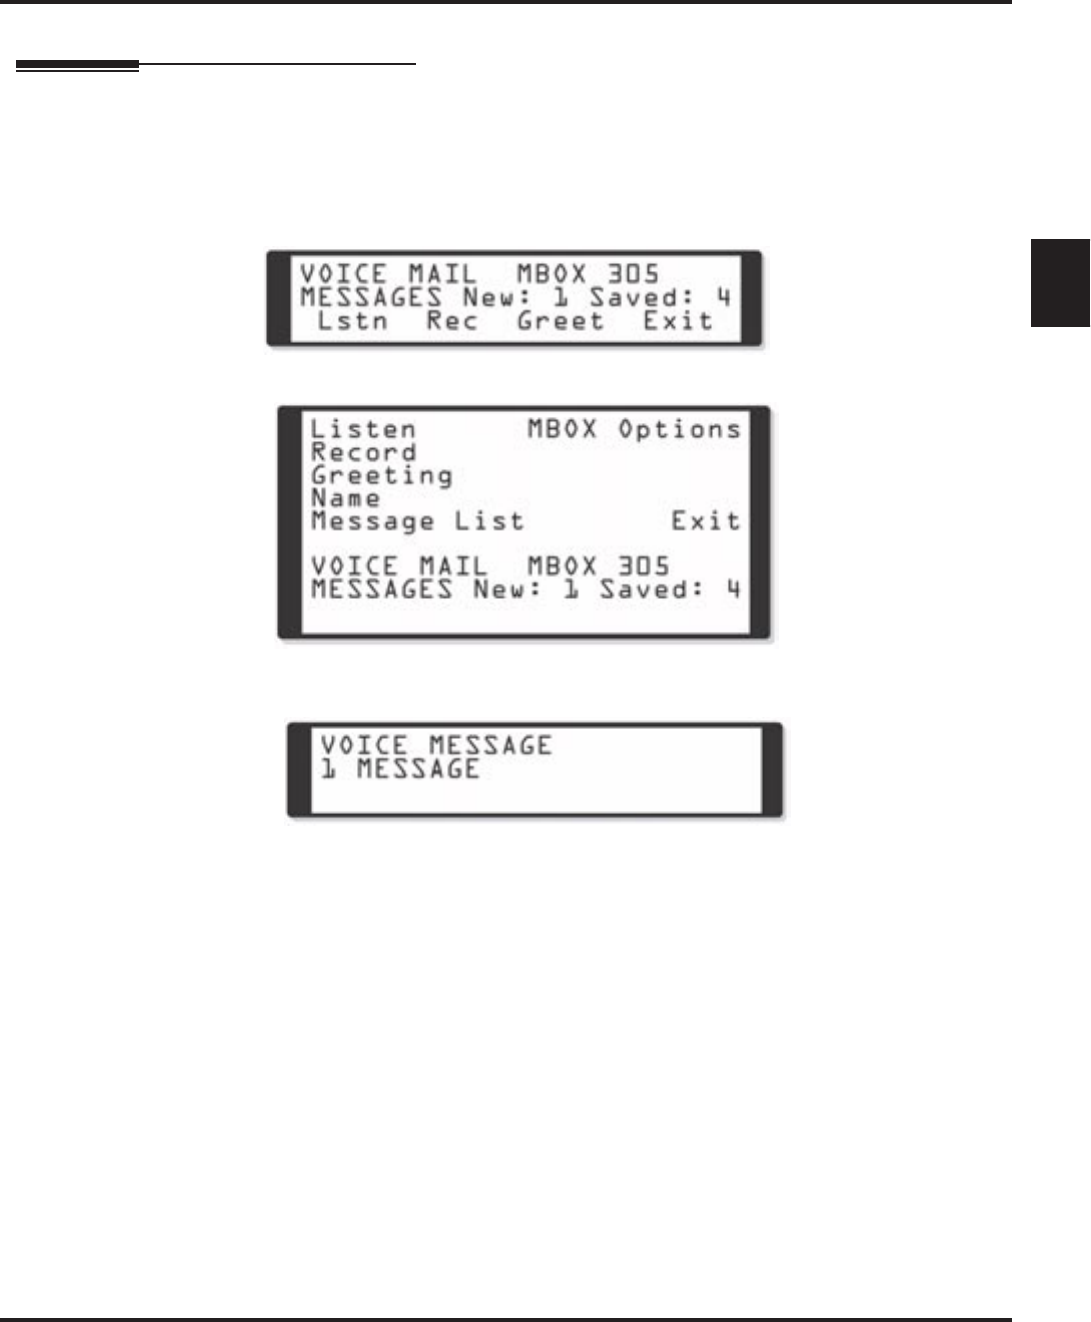
Message Count Display
Aspire S IntraMail Feature Handbook Chapter 1: Features ◆67
1
Message Count Display
Description
The telephone display provides interactive status updates for the subscriber’s mailbox. When initially logged
into the mailbox, the telephone display shows the number of new and saved messages. The message count
automatically updates as the subscriber receives new messages and processes older messages.
22- and 34-Button Display
Super Display
If an extension’s MSG key is optionally assigned as a Message Waiting key (see Programming below), the
telephone display can show the number of new Voice Mail messages without the user logging onto their
mailbox. If the user has 1 new Voice Mail message in their mailbox, for example, they see:
For Super Display telephones, this same message shows on lines 7 and 8.
Enhanced Message Key Operation
When a keyset has 15-02-26: Multi-Line Telephone Basic Setup: MSG Key Operation Mode set to 1, the
MSG
key provides one-button access to IntraMail. When the user presses
MSG
, they immediately call their mailbox.
When a keyset has 15-02-26: Multi-Line Telephone Basic Setup: MSG Key Operation Mode set to 0, the fol-
lowing occurs:
■If a user has new voice mail messages waiting, pressing MSG shows the number of waiting voice mail
messages. Pressing MSG a second time calls voice mail.
■
If a user has new Message Waiting indications left, pressing
MSG
shows the extension that left the Mes-
sage Waiting. Pressing
MSG
a second time places an Intercom call to the co-worker that left the Message
Waiting.
■If a user has both new Voice Mail messages and Messages Waiting:
- Pressing MSG shows the number of new voice mail messages.
- Pressing Vol Up and Vol Down scrolls between the voice mail messages count and the Message
Waiting count.

Message Count Display
68 ◆Chapter 1: Features Aspire S IntraMail Feature Handbook
- Pressing MSG a second time will either call Voice Mail or return the Message Waiting call, depend-
ing on which count is displayed.
Operation
Using the Message Count Display
Operation is automatic.

Message Delete
Aspire S IntraMail Feature Handbook Chapter 1: Features ◆69
1
Message Delete
Description
A Subscriber Mailbox user can delete any messages left in their mailbox. Message Delete lets the subscriber
do their own mailbox maintenance. They can delete messages they no longer need and save messages that
contain essential information. With Message Delete, the subscriber doesn’t have to rely on the System
Administrator to perform these routine mailbox maintenance functions.
Operation
Deleting a Message
[Super Display Soft Key] - [Keyset Soft Key]
Log onto Subscriber Mailbox.
L (5) Access the Message Listen mode (to listen to the message that you want to delete).
[Listen] - [Lstn]
E (3) Erase the message.
[Erase] - [Erase]
■You automatically return to the Message Listen mode.

Message Forward
70 ◆Chapter 1: Features Aspire S IntraMail Feature Handbook
Message Forward
Description
A Subscriber Mailbox user can forward a message in their mailbox to a co-worker. Forwarding is helpful
when a subscriber receives a message with which a co-worker can assist them. Rather than sending a new
message, the subscriber can just forward the message with which they need help. They can also optionally
record a comment before the forwarded message. Typically, the comment would describe the reason for the
message forwarding.
IntraMail erases the message in the subscriber’s mailbox after they forward it. The Message Forward desti-
nation receives the forwarded message as a new message.
Operation
Forwarding a Message
[Super Display Soft Key] - [Keyset Soft Key]
Log onto Subscriber Mailbox.
L (5) Access the Message Listen mode (to listen to the message that you want to forward).
[Listen] - [Lstn]
MF (63) Access the Message Forward Menu.
[Forward] - [N/A]
Enter the number of the mailbox to which you want to forward the message.
■
# Start recording.
[Continue] - [Cont]
Record a comment that will precede the forwarded message, OR
Dial # to forward without a comment.
While recording a comment for your forwarded message.
*Pause or restart recording.
[Resume] - [Resume]
[Pause] - [Resume]
E (3) Cancel the forwarding and exit your mailbox.
[Cancel] - [Cncl]
# End the recording.
[Done] - [Done]
* Back up and re-enter the mailbox number.
[Mailbox] - [MBOX]
#Go back to the Message Listen mode.
[Exit] - [Exit]
#Exit the Message Listen mode and go to the Mailbox Main Menu.
[Exit] - [Exit]
0Plays Help message.

Message Length
Aspire S IntraMail Feature Handbook Chapter 1: Features ◆71
1
Message Length
Description
You can set the maximum length of a message that can be left in a Subscriber Mailbox. When a caller tries to
leave a message that exceeds the limit, they hear, “You have reached the recording limit.” IntraMail sends the
portion of the message that fits within the allowed Message Length and hangs up. The Message Length
option helps you maximize the storage space reserved for messages. If you find that callers are leaving
unusually long messages, shorten the Message Length. IntraMail will cut off the message once the caller
reaches the Message Length limit. On the other hand, if you hear that IntraMail is cutting off caller’s mes-
sages prematurely, increase the Message Length to give callers more time.
Operation
N/A

Message Listen Mode
72 ◆Chapter 1: Features Aspire S IntraMail Feature Handbook
Message Listen Mode
Description
After logging onto their mailbox, the subscriber can select the category of messages to which they want to
listen. Then can listen to just new messages, just saved messages, or all messages. Message Listen Mode lets
the subscriber customize their mailbox to initially play just the list of messages to which they want to listen.
For example, if a subscriber has many saved messages and just a few new messages, then can log onto their
mailbox and dial 1N to select the new message list. When they press L, they will then cycle through just their
new message.
Initially, a Subscriber Mailbox uses the All Message List. If they select a different message list, IntraMail
reinstates the all Message List the next time they log onto their mailbox.
Operation
Message Listen Mode
[Super Display Soft Key] - [Keyset Soft Key]
Log onto Subscriber Mailbox.
[Message List] + [N/A]
1N (16) Listen to new messages.
[Message List + New Messages] - [N/A]
1S (17) Listen to saved messages.
[Message List + Saved Messages] - [N/A]
1A (12) Listen to all messages.
[Message List + All Messages] - [N/A]
0Plays Help message.

Message Notification
Aspire S IntraMail Feature Handbook Chapter 1: Features ◆73
1
Message Notification
Description
Once activated by the Subscriber Mailbox user, Message Notification dials a telephone number to let the
user know when there are new messages in their mailbox. With Message Notification, a subscriber who is
out of the office does not have keep calling their mailbox remotely to find out if they have new messages.
IntraMail will let them know automatically. Notification can call extensions, local numbers, long distance
numbers and digital pagers. When a Subscriber Mailbox user sets up Message Notification, they choose
from the following options:
■If Message Notification is enabled or disabled.
(Message Notification can only occur if it is enabled.)
■The time of day Message Notification should begin and end.
(Callouts will only occur between the begin and end times.)
■The type of device to which Message Notification will be calling.
(Message Notification can call a normal telephone number or a digital pager.)
■The telephone or pager service phone number.
Note: To protect your mailbox from unauthorized access, be sure to record a security code for your mailbox
before enabling Message Notification.
How Message Notification Works to Normal Telephone Numbers
1. The subscriber activates Message Notification for their mailbox (see Operation below).
2. When the subscriber receives a new message, IntraMail immediately dials the destination that should
receive the Message Notification.
- IntraMail waits up to 30 seconds for ringback, reorder, busy or voice activity from the called num-
ber. If nothing is detected, the callout is considered unanswered.
3. If the recipient answers, IntraMail plays the notification message (“Hello, I have a message for”) and
asks the recipient to dial 1 to log onto their mailbox. The recipient hears the notification message if:
■They say “Hello” after answering the callout, or
■The system receives answer supervision from the telco after the recipient answers the call.
(Note that the recipient can skip the announcement by dialing 1 to log onto their mailbox after answer-
ing the callout – without saying “Hello”.)
■The notification is to a system extension.
4. Once the recipient logs onto the mailbox, the notification is considered acknowledged and will not reoc-
cur until the subscriber receives new messages.
5. If the recipient doesn’t answer, the system will retry the callout number. After completing the pro-
grammed number of callout attempts, Message Notification will stop.
6. Once the notification process begins, a new message does not restart the process if it is already in
progress. Once the process ends (e.g., if the message is acknowledged or the maximum number of call-
out attempts is reached), the next new message will restart the process.
How Message Notification Works to Digital Pager Numbers
1. The subscriber activates Message Notification for their mailbox (see Operation below).
2. When subscriber receives a new message, IntraMail immediately dials the pager service.
- IntraMail waits up to 30 seconds for ringback, reorder, busy or voice activity from the called num-
ber. If nothing is detected, the callout is considered unanswered.
3. After the pager service answers, IntraMail sends a dial string which causes the pager display to show the
subscriber’s mailbox number as well as the number of new messages in the mailbox.
■The notification is considered acknowledged if the recipient logs onto the mailbox. Notification will
not reoccur until the subscriber receives new messages.
■If the pager service doesn’t answer, IntraMail will retry the callout number. Message Notification may
eventually cancel if the callout remains unacknowledged.

Message Notification
74 ◆Chapter 1: Features Aspire S IntraMail Feature Handbook
Operation
Setting Up Message Notification(Page 1 of 2)
[Super Display Soft Key] - [Keyset Soft Key]
Log onto Subscriber Mailbox.
OP (67) Access the Mailbox Options menu.
[MBOX Options] - [N/A]
N (6) Access the Message Notification Options Menu.
[Notification] - [Notif]
IntraMail plays a summary of your Message Notification settings.
• The your telephone display shows your current notification settings (see sample below).
For telephone numbers
NOTIFY ON 8AM- 5PM
NUMBER: 12039265400
OR
For pager numbers
NOTIFY ON 8AM- 5PM
PAGER: 12039265400
O (6) Turn Message Notification on or off.
[On] - [On]
[Off] - [Off]
C (2) Change your Message Notification setup.
[Change] - [Chnge]
When you see: NOTIFICATION BEGIN
Enter the hour you want Message Notification to begin.
• Enter 2 digits for the hour
A (2) Select AM
[AM] - [AM]
P (7) Select PM
[PM] - [PM]
*Skip this option without changing your entry.
[Next] - Next]
#
Back up to the previous level without changing your
entry.
[Exit] - [Exit]
When you see: NOTIFICATION END
Enter the hour you want Message Notification to end.
• Enter 2 digits for the hour.
•For 24-hour notification, make the End Time the same as the
Start Time.
A (2) Select AM
[AM] - [AM]
P (7) Select PM
[PM] - [PM]
*Skip this option without changing your entry.
[Next] - [Next]
#
Back up to the previous level without changing your
entry.
[Exit] - [Exit]
When you see: NOTIFY VIA
N (6) The notification destination is a telephone number.
[Number] - [Num]
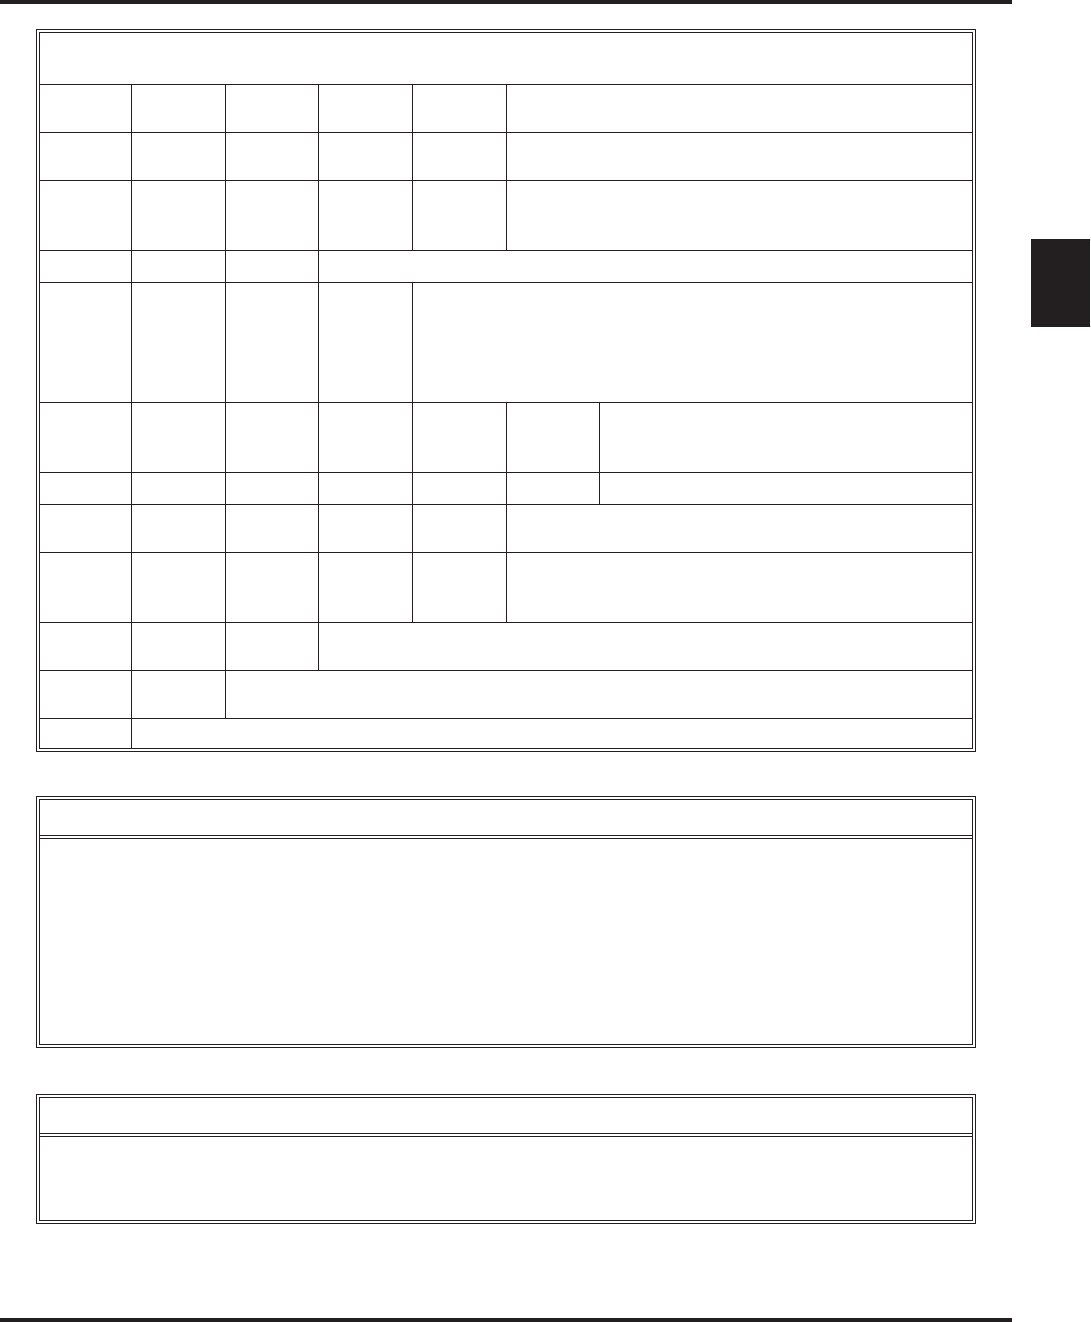
Message Notification
Aspire S IntraMail Feature Handbook Chapter 1: Features ◆75
1
D (3) The notification destination is a digital pager.
[Pager] - [Pager]
*Skip this option without changing your entry.
[Next] - [Next]
#
Back up to the previous level without changing your
entry.
[Exit] - [Exit]
When you see: NUMBER
Enter the Message Notification callout number (16 digits max).
• Enter the number exactly as you want the system to dial it
(including a leading 1 for toll calls, if required).
•If the number you enter is 4 digits or less, it will be an Intercom
call. If it is more than 4 digits, it will be an outside call.
#Accept the number entered and back up to
the previous level.
[OK] - [OK]
[Clear] Erase the number you just entered.
*Skip this option without changing your entry.
[Next] - [Next]
#
Back up to the previous level without changing your
entry.
[Exit] - [Exit]
#Go back to the Mailbox Options menu.
[Exit] - [Exit]
#Go back to the Main Menu.
[Exit] - [Exit]
0Plays Help message.
Answering a Message Notification Callout to a Telephone
To answer a Message Notification to a telephone:
1. Answer the callout at the programmed destination.
■If IntraMail doesn’t hear your voice (or you don’t speak), just go to the next step and dial 1 to proceed.
2. Dial 1 to accept the Message Notification.
OR
hang up to have the Message Notification call back later.
3. When you dial 1, you automatically log onto the subscriber mailbox that left you the Message Notification.
■If you don’t log onto your mailbox, IntraMail will re-send your notification.
Answering a Digital Pager Message Notification Callout
To answer a Digital Pager notification:
1. Operation is automatic.
■If you don’t call and log onto your mailbox, IntraMail will re-send your pager notification.
Setting Up Message Notification(Page 2 of 2)
[Super Display Soft Key] - [Keyset Soft Key]

Message Playback Direction
76 ◆Chapter 1: Features Aspire S IntraMail Feature Handbook
Message Playback Direction
Description
When a user dials
L
(5) after logging into their mailbox, IntraMail will play their messages in either LIFO
(last-in-first-out) or FIFO (first-in-first-out) order. Since Message Playback Direction lets a subscriber listen to
messages in the order they find most helpful, check with them to find out how they want this option set. If the
subscriber prefers to hear their new messages first, enable LIFO (last-in-first-out) listening order. The newest
(last-in) messages are at the top of the message list and the oldest messages are at the bottom of the list. If the
subscriber wants to be reminded of their oldest messages first, enable FIFO (first-in-first-out) listening order.
The oldest (first-in) messages are at the top of the message list and the newest messages are at the bottom.
Operation
N/A


Message Reply
78 ◆Chapter 1: Features Aspire S IntraMail Feature Handbook
Message Reply
Description
A Subscriber Mailbox user can reply to a message from a co-worker by dialing RE, without knowing the
caller’s extension or mailbox number. Message Reply saves the subscriber valuable time since they don’t
need to know the sender’s extension number or send a separate message to respond. The subscriber can just
listen to the co-worker’s message, dial a code, and record their answer. The message sender receives the
reply as a new message.
Operation
Message Reply
Log onto Subscriber Mailbox.
L (5) Listen to your messages.
[Listen] - [Lstn]
While listening to a message.
RE (73) Reply to the message.
[Reply] - [N/A]
■If the mailbox does not exist, you will be prompted to enter the mailbox number to
receive the reply. This can occur if you dial RE while listening to a message from an
outside caller.
#Start recording.
[Continue] - [Cont]
Options available while recording.
*Pause or restart recording.
[Resume] - [Resume]
[Pause] - [Pause]
E (3) Erase recording.
[Cancel] - [Cncl]
# End the recording.
[Done] - [Done]
*Back up and re-enter the mailbox number.
[Mailbox] - [MBOX]
[Exit] - [Exit] Exit without recording and go back to the Message Listen menu.
#Exit and go back to the mailbox Main Menu.
[Exit] - [Exit]
0Plays Help message

Message Storage Limit
Aspire S IntraMail Feature Handbook Chapter 1: Features ◆79
1
Message Storage Limit
Description
Message Storage Limit sets how many messages can be left in a Subscriber Mailbox. Message Storage Limit
is another invaluable tool for managing IntraMail’s voice message storage space. To conserve storage space
and make it available for new messages, decrease the Message Storage Limit. If storage space is not an issue,
increase the Message Storage Limit so subscribers can store additional messages. Be sure to let the subscrib-
ers know how many messages their mailboxes can hold. By default, IntraMail can store up to 99 messages in
each Subscriber Mailbox.
Operation
N/A

Message Waiting Lamp
80 ◆Chapter 1: Features Aspire S IntraMail Feature Handbook
Message Waiting Lamp
Description
An extension’s Message Waiting (MSG) lamp flashes on the telephone to indicate that the user has new mes-
sages waiting in their mailbox. Once IntraMail is properly installed and programmed, telephone Message
Waiting Lamp operation is automatic. The lamp will flash fast when there are new messages in the extension
user’s mailbox. The Message Waiting Lamp is a visual reminder of new messages. The subscriber does not
have to call their mailbox and listen to the voice prompts to find out when they have new messages.
Operation
N/A

Multiple Company Greetings
Aspire S IntraMail Feature Handbook Chapter 1: Features ◆81
1
Multiple Company Greetings
Description
The Automated Attendant can answer each individual trunk (outside line) with a unique greeting and unique
set of dialing options. Since there are a total of 8 Answer Tables, this allows up to 8 companies or depart-
ments to share a single IntraMail. Callers to each company hear that company’s greeting (Instruction Menu)
and can dial options that may be only available to that specific company. You set this up as follows:
■Assign a unique Answer Table (1-8) to each trunk that you want to have an individual greeting.
■For each Answer Table, assign the Call Routing Mailbox that will handle the call.
■For each of the assigned Call Routing Mailboxes, set up the dialing options (Dial Action Table) and
record an Instruction Menu.
Note: If multiple companies or departments share an IntraMail, messaging and calling between the workers
of each company or department are not restricted.
Operation
N/A

Next Call Routing Mailbox
82 ◆Chapter 1: Features Aspire S IntraMail Feature Handbook
Next Call Routing Mailbox
Description
The Next Call Routing Mailbox provides callers with additional dialing options while listening to a Subscriber
Mailbox recorded or default greeting. It also provides additional dialing options to callers routed to an
Announcement Mailbox. Next Call Routing Mailbox lets the caller choose how IntraMail should handle their
call. For example, if an Automated Attendant caller dials a subscriber’s extension and hears the greeting, Next
Call Routing Mailbox (if programmed) allows them to dial other options instead of hanging up.
Logging Onto a Subscriber Mailbox while Listening to the Greeting
A subscriber who wishes to log onto their mailbox while listening to their greeting must have the option set
in their Next Call Routing Mailbox. To allow this capability, for example:
■Program the Next Call Routing Mailbox # digit as LOGON to IXXX.
■While listening to their greeting, the subscriber can dial:
# (to route to their Next Call Routing Mailbox), then
# and their mailbox number to log onto their mailbox.
By default, this option is provided in Call Routing Mailbox 1. Additionally, the subscriber should enable a
Security Code for their mailbox to prevent unauthorized logons.
Operation
N/A
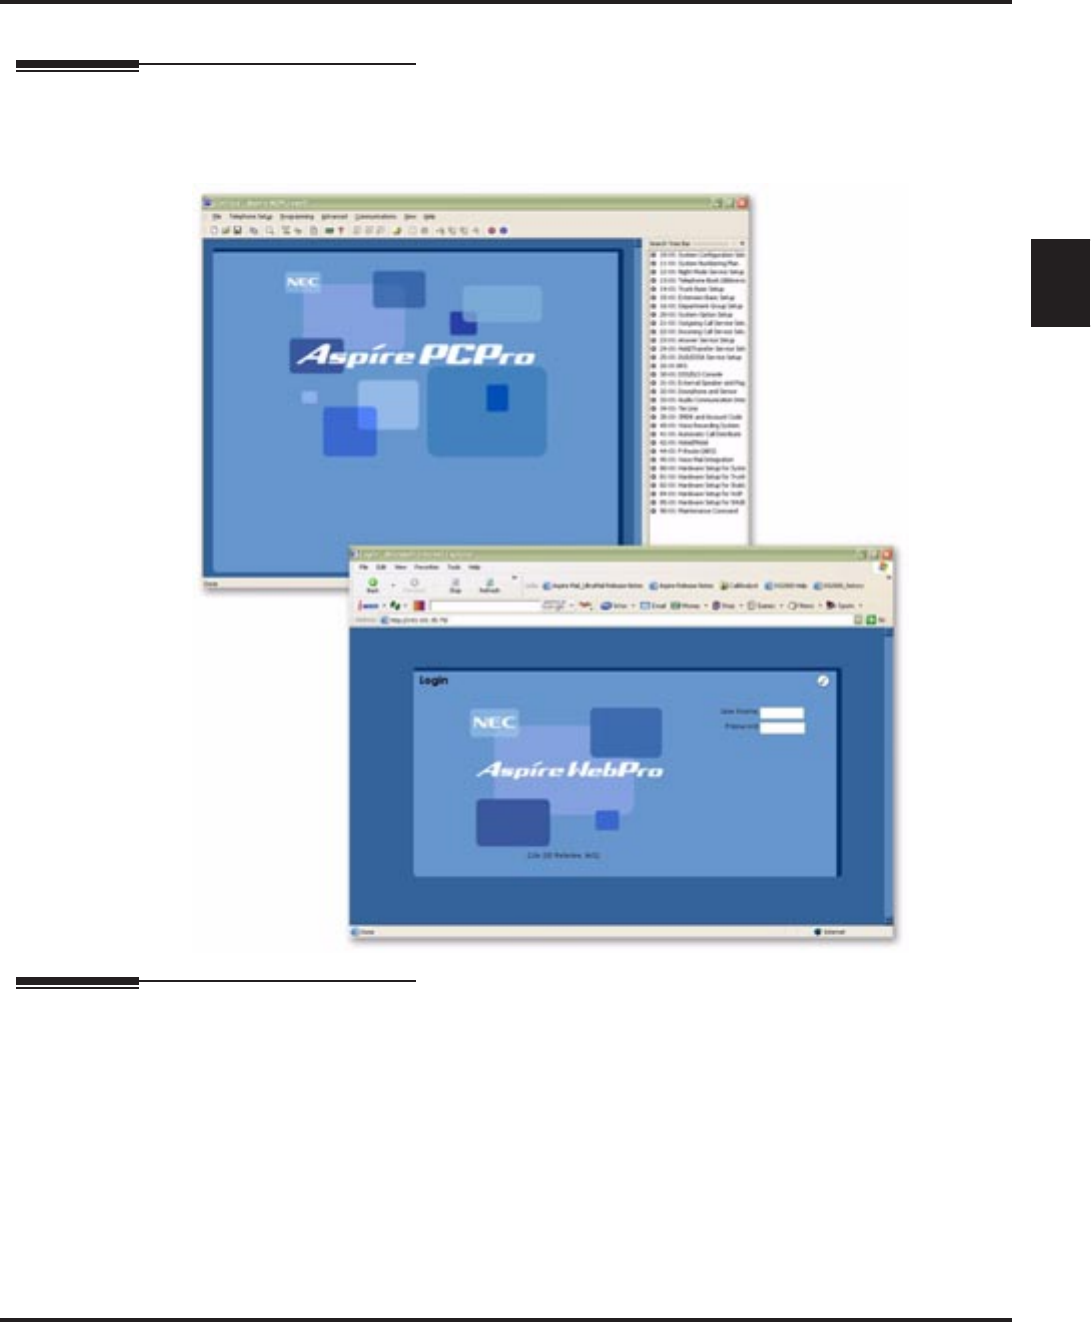
Programming Voice Mail
Aspire S IntraMail Feature Handbook Chapter 1: Features ◆83
1
Programming Voice Mail
Description
You can program (customize) IntraMail by using the PCPro and WebPro programming applications. You can
also do limited programming from the System Administrator’s mailbox. Check with your Sales Representa-
tive for availability of updated versions of these programs for Aspire S and IntraMail.
Operation
See Description above.

Quick Message
84 ◆Chapter 1: Features Aspire S IntraMail Feature Handbook
Quick Message
Description
Quick Message is a Dial Action Table action that allows Automated Attendant callers to dial a digit (normally
*) followed by a mailbox number to leave a message in a Subscriber Mailbox. Since Quick Message is
enabled by default, it is an efficient way for experienced Automated Attendant callers to leave messages.
There is no need to dial an extension first. To make this option more readily available to all Automated Atten-
dant callers, consider having the active Instruction Menu describe how to use the Quick Message option.
There are two Quick Message Dial Action Table actions:
■Quick Message with Greeting (REC1)
The caller hears the mailbox greeting followed by a beep and can leave message. If the greeting is not
recorded, the caller hears, “At the tone, you can leave your message for extension xxx (or name if
recorded). Start recording at the tone. When you are done, press the # key or hang up.”
■Quick Message without Greeting (REC2)
The caller bypasses the mailbox greeting (hearing “Recording” and a beep instead) and can leave a mes-
sage. This is typically used with a Next Call Routing Mailbox when the caller is asked to dial a digit
(e.g., 1) to leave a message. Otherwise, the mailbox greeting (if recorded) would be heard again.
Operation
Leaving a Quick Message
To leave a Quick Message after the Automated Attendant answers:
1. Dial *.
2. Dial the Subscriber Mailbox number.
3. Leave message and hang up.
OR
Leave message and dial #.
■Dialing # may provide you with additional dialing options. This depends on how the called mailbox’s Next
Call Routing Mailbox is set up.
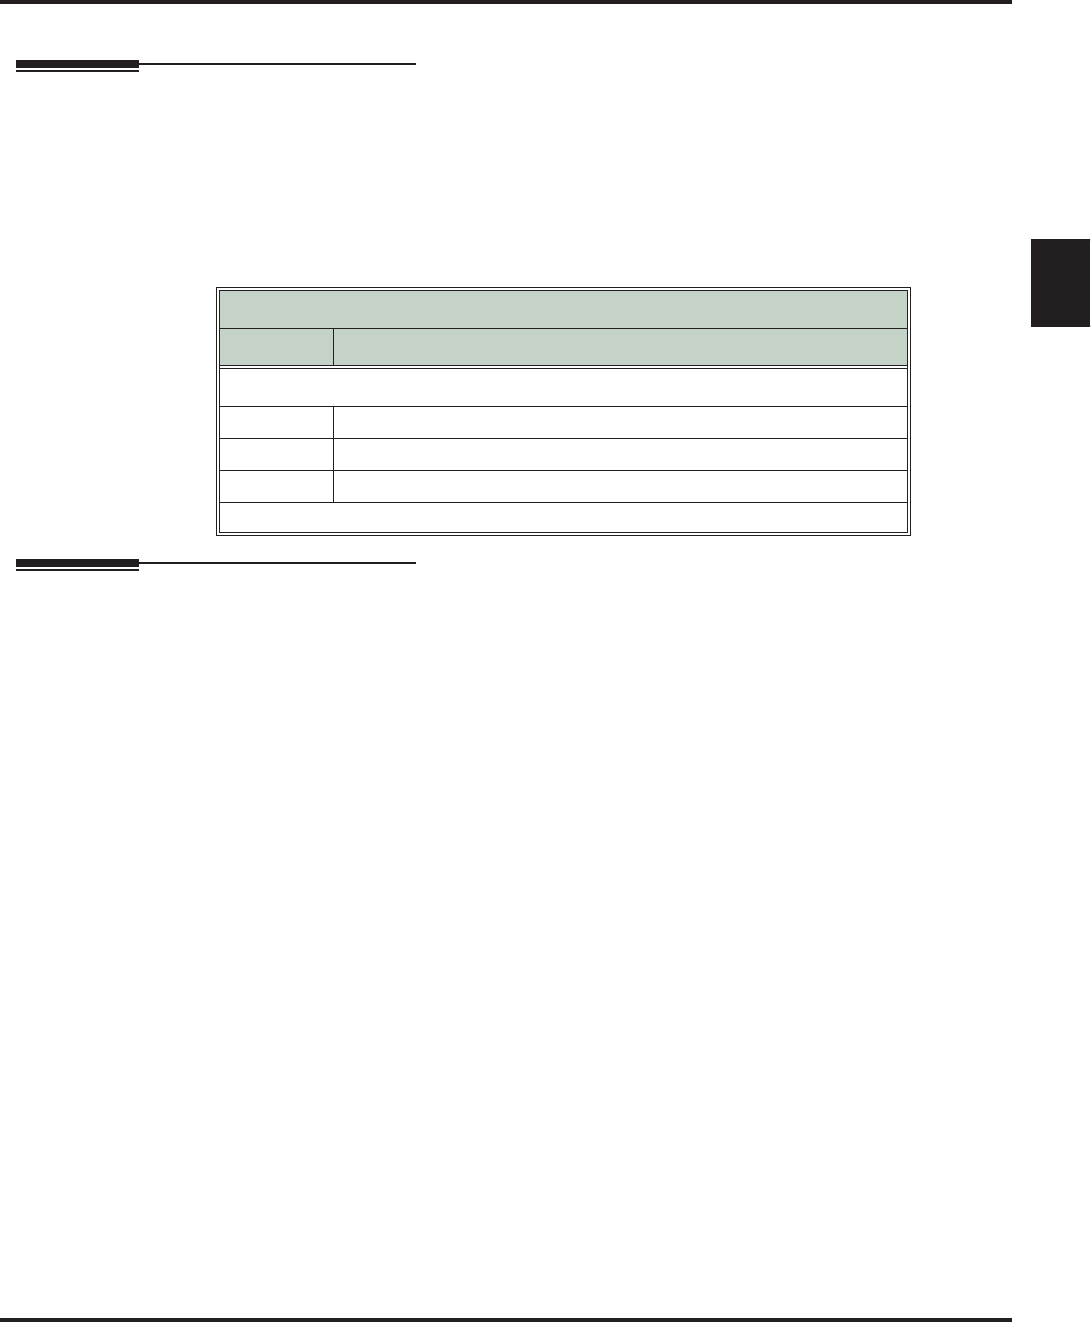
Record and Send a Message
Aspire S IntraMail Feature Handbook Chapter 1: Features ◆85
1
Record and Send a Message
Description
A Subscriber Mailbox user can record and send a message to any other Subscriber Mailbox. Record and
Send a Message is the heart of IntraMail’s voice messaging system. It allows co-workers to efficiently stay in
touch and exchange essential information without relying on message slips, memos, or email.
Recording Options
While recording a message, a Subscriber Mailbox user has many recording options from which to choose.
The following table shows these options.
Operation
See the chart on the following page.
Message Recording Options
Option Description
Options available while recording:
*Pause/resume recording.
E (3) Erase the recording.
#End recording.
Dial 0 while recording to hear the list of options.

Record and Send a Message
86 ◆Chapter 1: Features Aspire S IntraMail Feature Handbook
Record and Send a Message
[Super Display Soft Key] - [Keyset Soft Key]
Log onto Subscriber Mailbox.
RS (77) Record and send a message.
[Record] - [Rec]
Enter the number of the mailbox to receive the message.
#Start recording.
[Continue] - [Contd]
Options available while recording.
*Pause or restart recording.
[Resume] - [Resume]
[Pause] - [Pause]
E (3) Erase recording.
[Cancel] - [Cncl]
# End the recording.
[Done] - [Done]
*Back up and re-enter the mailbox number.
[Mailbox] - [MBOX]
[Exit] Exit without recording and go back to the mailbox Main Menu.
#Exit without recording and go back to the mailbox Main Menu.
[Exit] - [Exit]

Remote Programming
Aspire S IntraMail Feature Handbook Chapter 1: Features ◆87
1
Remote Programming
Description
You can remotely program (customize) IntraMail by using the PCPro and WebPro programming applica-
tions. You can also do limited remote programming from the System Administrator’s mailbox. Check with
your Sales Representative for availability of updated versions of these programs for Aspire S and IntraMail.
Operation
TBD

Routing Mailbox
88 ◆Chapter 1: Features Aspire S IntraMail Feature Handbook
Routing Mailbox
Description
Routing Mailboxes are one of three mailbox categories: Station, Master, and Routing. Routing Mailboxes
are a category of mailboxes normally used to route Automated Attendant calls. A Routing Mailbox can be
either an Announcement Mailbox or a Call Routing Mailbox.
■See Announcement Mailbox on page 11 and Call Routing Mailbox on page 28 for more..
Operation
See Announcement Mailbox on page 11 and Call Routing Mailbox on page 28.

Screened Transfer
Aspire S IntraMail Feature Handbook Chapter 1: Features ◆89
1
Screened Transfer
Description
Screened Transfer is an Automated Attendant option that allows callers to directly dial system extensions.
Screened Transfer (and its related feature Unscreened Transfer) allows the IntraMail Automated Attendant to
transfer outside calls to system extensions without the need for a live receptionist or operator. It is similar to
telephone system screened transfers in which the transferring party controls the transfer. After an Automated
Attendant caller dials an extension, IntraMail calls (screens) the destination extension to see if the transfer
can go through.
■If the destination is busy (both line appearances) or in DND, the Automated Attendant doesn’t extend the
call and immediately provides the caller with additional options.
■If the destination is available, the Automated Attendant rings it. If the destination answers, the call goes
through. If the destination doesn’t answer within a preset interval, the Automated Attendant doesn’t
extend the call and provides the caller with additional options.
Screened vs. Unscreened Transfer
Both Screened and Unscreened Transfer allow Automated Attendant callers to directly dial system exten-
sions. The following summarizes the differences between these two types of Automated Attendant transfer.
■With Unscreened Transfer, calls from the Automated Attendant ring like other transferred calls and dis-
play the incoming Caller ID data (if provided by telco and enabled in programming). Screened Transfers
ring like Intercom calls and do not display Caller ID until the call is answered.
■Both Screened and Unscreened Transfers route unanswered calls to the subscriber’s greeting (recorded
or default) so the caller can leave a message. However, only Screened Transfer allows the caller to dial 2
to reach the Next Call Routing Mailbox options (if programmed).
Screened Transfer and Inactive Mailboxes
Screened Transfer to an extension can only occur if the destination extension has an active mailbox. If the
extension’s mailbox is inactive, the Automated Attendant caller hears, “That is an invalid entry,” and then
returns to the Automated Attendant.
The table on the next page shows in detail how Screened Transfer operates.

Screened Transfer
90 ◆Chapter 1: Features Aspire S IntraMail Feature Handbook
Operation
N/A
Screened Transfer (TRF) Operation
■Call = Call answered by the Automated Attendant.
■Extension = Extension dialed by Automated Attendant caller.
If Auto Attendant Do Not Disturb is off (see page 19 for more on this feature):
Extension Idle Extension Busy Extension in DND
With Active
Greeting Recorded 1. Places a screened (Inter-
com) call to extension.
-If answered, transfers call.
2. If unanswered1:
-With no Next Call Routing
Mailbox, caller hears greet-
ing and can leave a message.
-With a Next Call Routing
Mailbox, caller can dial 1
to leave a message or 22 for
other options.
1. When busy:
-With no Next Call Routing
Mailbox, caller hears greet-
ing and can leave a mes-
sage.
-With a Next Call Routing
Mailbox, caller can dial 1
to leave a message or 22 for
other options.
1. When in DND:
-With no Next Call Routing
Mailbox, caller hears greet-
ing and can leave a mes-
sage.
-With a Next Call Routing
Mailbox, caller can dial 1
to leave a message or 22 for
other options.
With Active Greet-
ing Not Recorded 1. Places a screened (Inter-
com) call to extension.
-If answered, transfers call.
2. If unanswered1:
-With no Next Call Routing
Mailbox, IntraMail prompts
caller to leave a message.
-With a Next Call Routing
Mailbox, caller can dial 1
to leave a message or 22 for
other options.
1. When busy:
-With no Next Call Routing
Mailbox, IntraMail
prompts caller to leave a
message.
1. With a Next Call Routing
Mailbox, caller can dial 1
to leave a message or 22 for
other options.
1. When in DND:
-With no Next Call Routing
Mailbox, caller hears greet-
ing and can leave a mes-
sage.
-With a Next Call Routing
Mailbox, caller can dial 1
to leave a message or 22 for
other options.
If Auto Attendant Do Not Disturb is on (see page 19 for more on this feature):
Extension Idle Extension Busy Extension in DND
With Active Greet-
ing Recorded or
not recorded
1. Sends call immediately to mailbox:
-Plays greeting.
-Prompts caller to start recording.
1 After 47-08-02: Screened Transfer Timeout interval.
2 Dialing 2 routes the call to the Next Call Routing Mailbox for additional dialing options. See Next Call Routing Mailbox
on page 82 for more.

Security Code
Aspire S IntraMail Feature Handbook Chapter 1: Features ◆91
1
Security Code
Description
A mailbox can have a security code to protect it from unauthorized access. A Security Code must be 4 digits
long, using 0-9. If a subscriber wants to keep their mailbox private, they can enter a Security Code. No one
else can use the subscriber’s mailbox unless they know the code.
Operation
Changing or Deleting a Security Code (From your Subscriber Mailbox)
[Super Display Soft Key] - [Keyset Soft Key]
Log onto Subscriber Mailbox.
OP (67) Access the Mailbox Options Menu.
[MBOX Options] - [N/A]
S (7) Access the Security Code options.
[Sec.Code] - [Sec]
Enter new Security Code (4 digits).
C (2) Accept Security Code entry and go back to the Mailbox Options
Menu.
[OK] - [OK]
I (4) Do not accept Security Code entry and go back to the Security
Code options Menu.
[Clear] - [Clear]
[Exit] - [Exit] Exit to the Mailbox Options menu without changing
your Security Code.
*Optionally erase your Security Code and go back to the Mailbox Options
Menu.
[Erase] - [Erase]
#Exit to the Mailbox Options Menu without making any changes to your Secu-
rity Code.
[Exit] - [Exit]
0 Plays Help message

Security Code
92 ◆Chapter 1: Features Aspire S IntraMail Feature Handbook
Deleting a Security Code (From your System Administrator’s Mailbox)
[Super Display Soft Key] - [Keyset Soft Key]
Log onto System Administrator’s mailbox.
SA (72) Access System Administrator options.
[System Admin] - [N/A]
S (7) Select Subscriber Mailbox Maintenance options.
[Subscriber] - [Subs]
Enter the number of the Subscriber Mailbox you want to maintain.
S (7) Erase mailbox’s Security Code.
[Erase Security Code] - [N/A]
#Go back to System Administrator options.
[Exit] - [Exit]
0Plays Help message.
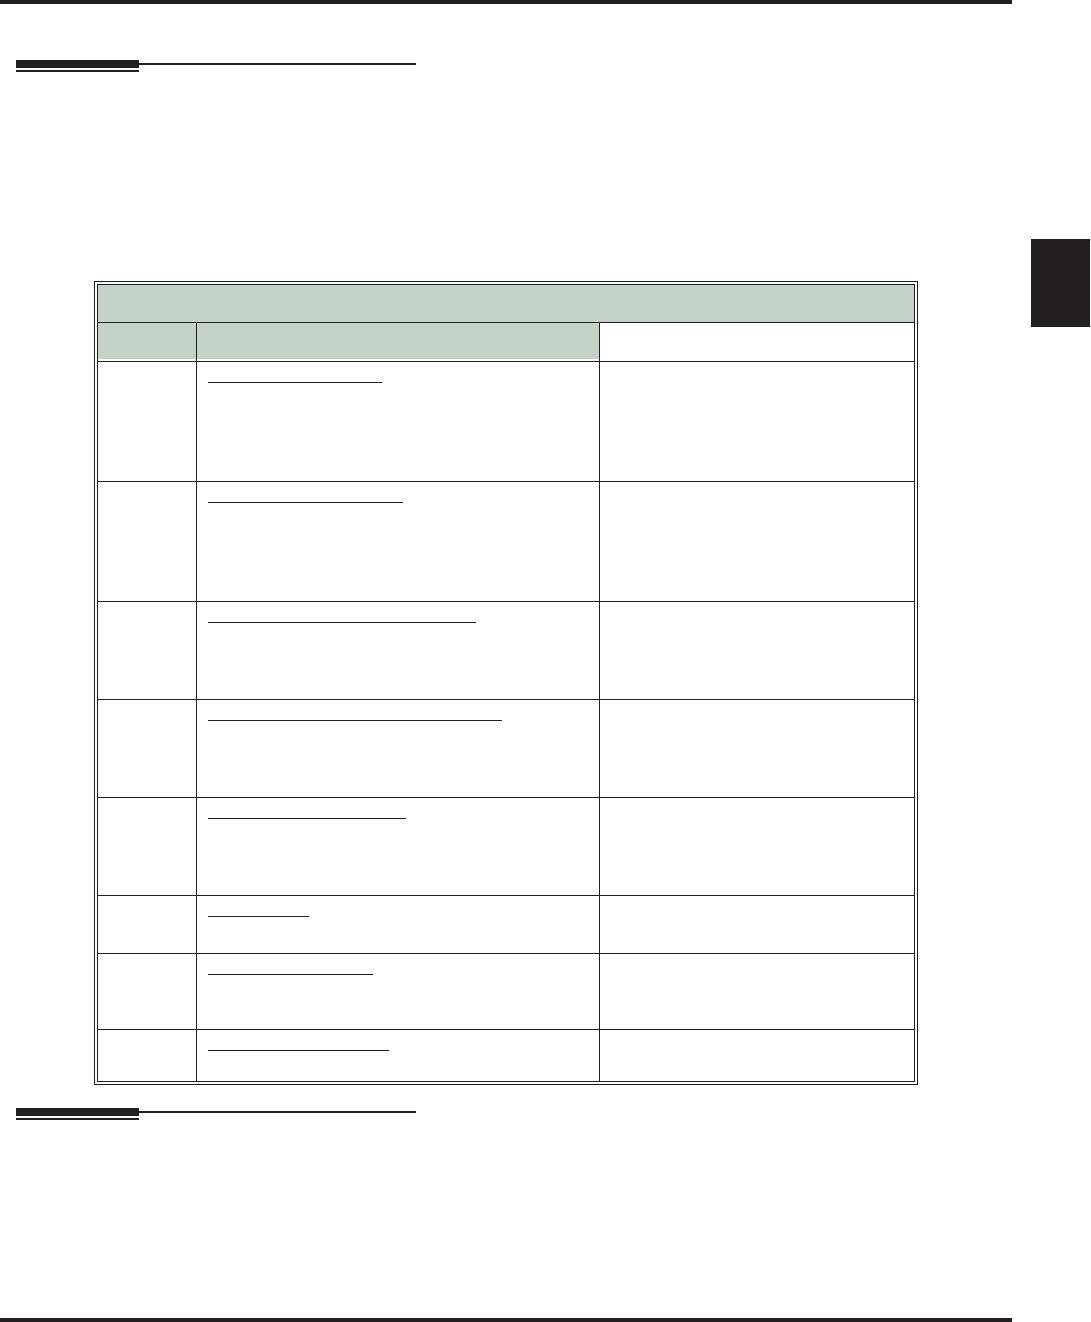
Single Digit Dialing
Aspire S IntraMail Feature Handbook Chapter 1: Features ◆93
1
Single Digit Dialing
Description
An Automated Attendant caller can press a single key to route to an extension, route to another destination, or
use an IntraMail feature. Single Digit Dialing simplifies the Automated Attendant since the caller just dials a
single digit to reach an extension or use an option. If you set up Single Digit Dialing, be sure to customize the
active Instruction Menu so it describes which digits the caller should dial to use the available options.
All of the features in the following Dial Action Table Key Action Summary table are accessible from a single
Dial Action Table digit.
Operation
Refer to the Dial Action Table Key Action Summary Table beginning on page 93.
Dial Action Table Key Action Summary
Action Description Feature Reference
TRF
Screened Transfer (1)
Allows an Automated Attendant caller to place
a Screened Transfer to an extension. IntraMail
calls (screens) the destination to see if the call
can go through.
Screened Transfer (page 89)
UTRF
Unscreened Transfer (2)
Allows an Automated Attendant caller to place
an Unscreened Transfer to an extension.Intra-
Mail transfers the call the destination and then
hangs up.
Unscreened Transfer (page 103)
REC1
Quick Message with Greeting (3)
Allows an Automated Attendant caller to leave
a Quick Message at an extension. The caller
will hear the extension’s personal greeting.
Quick Message (page 84)
REC2
Quick Message without Greeting (4)
Allows an Automated Attendant caller to leave
a Quick Message at an extension. The caller
will not hear the extension’s personal greeting
Quick Message (page 84)
LOGON
Log Onto Voice Mail (5)
Allows an Automated Attendant caller to log
onto a mailbox, either directly or one of their
choosing.
Log Onto Voice Mail (page 59)
Hang
Up Hang Up (6)
IntraMail says “Goodbye” and hangs up. Hang Up (page 53)
GOTO Go to a Mailbox, (7)
Allows an Automated Attendant caller to route
to another mailbox.
Go To A Mailbox (page 48)
UND Undefined Routing (0)
This action provides no routing. N/A

Station Mailbox
94 ◆Chapter 1: Features Aspire S IntraMail Feature Handbook
Station Mailbox
Description
Station Mailboxes are one of three mailbox categories: Station, Master, and Routing. Station Mailboxes are
the category of mailboxes assigned to stations (extensions). All Station Mailboxes are Subscriber Mailboxes.
■For more on the options available to Station Mailboxes, see Subscriber Mailbox on page 95.
Operation
See Subscriber Mailbox on page 95.

Subscriber Mailbox
Aspire S IntraMail Feature Handbook Chapter 1: Features ◆95
1
Subscriber Mailbox
Description
A Subscriber Mailbox is the type of mailbox assigned to a telephone system extension. The telephone
assigned to the Subscriber Mailbox is called the subscriber’s extension. When an extension user accesses
their voice mail, they are using their Subscriber Mailbox. It provides the IntraMail voice messaging services.
At system startup, IntraMail automatically assigns a Subscriber Mailbox to extensions 301-308. All other
extensions do not have Subscriber Mailboxes automatically assigned. See Programming below for more.
Operation
N/A
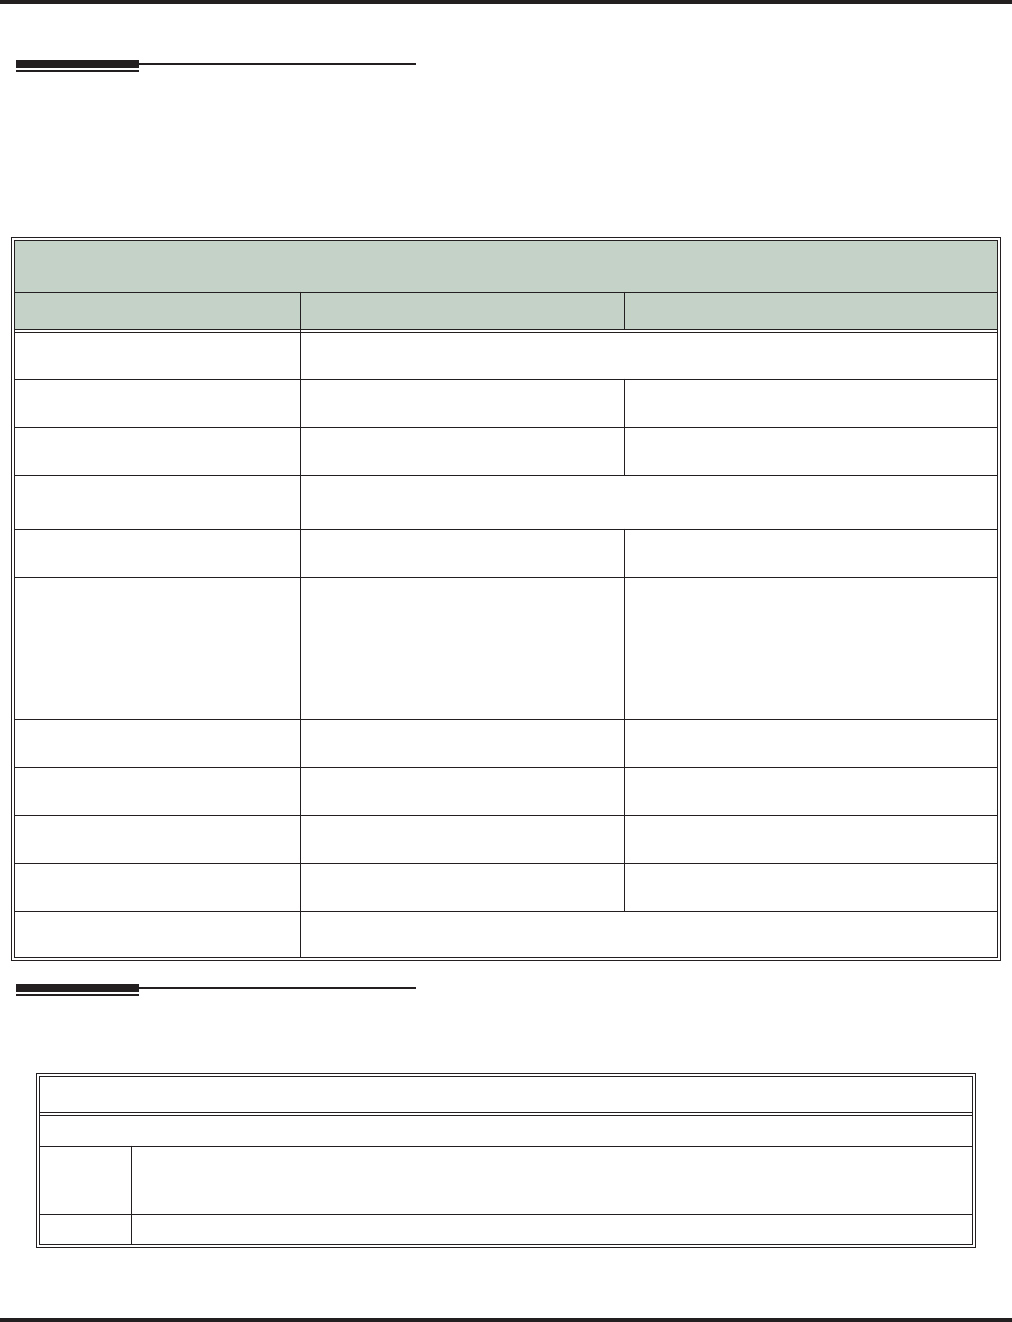
System Administrator
96 ◆Chapter 1: Features Aspire S IntraMail Feature Handbook
System Administrator
Description
The System Administrator is a Subscriber Mailbox that has unique system administration features such as
recording Menus and deleting messages in a co-worker’s mailbox. The System Administrator features are an
essential part of IntraMail setup since they allow the recording of the system-wide messages and provide Sub-
scriber Mailbox maintenance. After logging onto their Subscriber Mailbox, the System Administrator can use
all of the features in the
SA
menu. The System Administrator Options table below shows these options.
Operation
Refer to the individual features referenced in the System Administrator Options on page 96.
System Administrator Options
[Super Display Soft Key] - [Keyset Soft Key]
Option Description For more, see:
SA (72)
[System Admin] - [N/A] Access the System Administrator options.
I (4)
[Instruction] - [Instr] Record an Instruction Menu. Instruction Menu on page 54.
A (2)
[Announcement] - [Annc] Record an Announcement Message. Announcement Message on page 13.
S (7)
[Subscriber] - [Subs] Access the Subscriber Maintenance options (see the following features).
EA (32)
[Erase All Messages] - [Msgs] Erase all messages in a mailbox. Erasing All Messages on page 39.
EG (34)
[Erase Greeting] - [Greet] Erase a mailbox greeting.
■With Multiple Greetings, this
option simultaneously erases all
recorded greetings in a Subscriber
Mailbox. Additionally, the active
greeting is reset to 1.
Greeting on page 49.
EN (36)
[Erase Name] - [Name] Erase a mailbox name. Mailbox Name on page 60.
S (7)
[Erase Security Code] - [N/A] Delete a mailbox Security Code. Mailbox Security Code Delete on page 63.
N (6)
[Record New Name] - [N/A] Record Mailbox Name. Mailbox Name on page 60.
O (6)
[Schedule Override] - [N/A] Override the active Answer Schedule. Answer Schedule Override on page 14
V (8)
[Prompt Version] - [N/A] Hear the version number of the IntraMail stored voice prompts.
Accessing the System Administrator Options
Log onto System Administrator’s Mailbox.
SA (72) Access the System Administrator Menu.
[System Admin] - [N/A]
■Turn to System Administrator Options on page 96 for more.
0Plays Help message.

System Administrator Mailbox
Aspire S IntraMail Feature Handbook Chapter 1: Features ◆97
1
System Administrator Mailbox
Description
A System Administrator Mailbox is a Subscriber Mailbox in which you have enabled the System Adminis-
trator option. This provides the subscriber with system administration capabilities. IntraMail can have multi-
ple System Administrator Mailboxes. Turn to System Administrator on page 96 for more.
Operation
See Accessing the System Administrator Options on page 96.

System Re-initialization
98 ◆Chapter 1: Features Aspire S IntraMail Feature Handbook
System Re-initialization
Description
Initializing the telephone system automatically initializes all IntraMail programming. You may want to do
this if the site requirements significantly change and it is easier to start over from default than remove all
your custom programming. Re-initializing IntraMail returns all programmed options to their default values.
To initialize (erase) Subscriber Mailbox Security Codes and all recordings, use a System Administrator
Mailbox.
Operation
N/A
Re-initializing the telephone system returns all programmed options to
their factory set (default) values. Any site specific programming
you have done will be erased following re-initialization.

Time and Date
Aspire S IntraMail Feature Handbook Chapter 1: Features ◆99
1
Time and Date
Description
Since IntraMail is completely integrated with the telephone system software, the IntraMail time and date is
the same as the phone system time and date. Since time and date is used on telephone displays and with the
Auto Time Stamp and Time and Date Stamp features, be sure to set it accurately. To change the time and date,
use the system programmable options. See Programming below. The Time and Date is retained if the tele-
phone system power should fail or the system resets.
In addition, a Subscriber Mailbox user can hear the time and date when they call their mailbox.
Operation
Hearing the Current Time and Date
Log onto Subscriber Mailbox.
TI (84) Access the Time and Date option.
■IntraMail plays the time and date, and then returns you to the mailbox Main Menu.
0Plays Help message.

Time and Date Stamp
100 ◆Chapter 1: Features Aspire S IntraMail Feature Handbook
Time and Date Stamp
Description
While listening to a message, a Subscriber Mailbox user can dial TI to hear the Time and Date the message
was left. This is a handy option while reviewing messages. The subscriber can just dial a code to find out
when the message arrived.
Time and Date Stamp with Caller ID
With caller ID installed, a mailbox user can dial TI while listening to a message to hear the time the message
was sent, as well as the caller’s number.
Operation
Hearing the Time and Date a Message was Left
Log onto Subscriber Mailbox.
L (5) Access the Message Listen mode.
[Listen] - [Lstn]
TI (84) Hear the time and date the message was sent.
■Turn to Listening to Messages on page 56 for more on your listening options.
0Plays Help message

Transfer to a Mailbox
Aspire S IntraMail Feature Handbook Chapter 1: Features ◆101
1
Transfer to a Mailbox
Description
An extension user can transfer their active call to a co-worker’s mailbox. This lets the caller leave a personal
message for the co-worker. Transfer to a Mailbox is one of the big conveniences of IntraMail since the caller
can state their business and not have to call back later. It saves the caller time and cuts down on unnecessary
telephone system call processing. Transfer to a Mailbox is frequently used by attendants and receptionists as
well as other co-workers.
Operation
Transferring your call to a Co-Worker’s Mailbox
To transfer your active call to a co-worker’s mailbox:
1. Press HOLD.
2. Dial your co-worker’s mailbox number (e.g., 301 for extension 301).
3. Press MSG.
4. Press SPK to hang up.
■To optionally transfer a call to co-worker’s mailbox without first ringing their phone, press MSG before
dialing their mailbox number. (This is the only procedure you can use to transfer to a Guest Mailbox.)
■To transfer a call to a co-worker’s mailbox from a single line telephone, use the following procedure:
Hookflash + Dial *8 + Dial the co-worker’s mailbox + Hang up.

Undefined Routing
102 ◆Chapter 1: Features Aspire S IntraMail Feature Handbook
Undefined Routing
Description
An Automated Attendant Undefined Routing is a Dial Action Table key assignment for which there is no
routing defined. When an Automated Attendant caller dials a digit and there is no routing assigned, IntraMail
plays, “That is an invalid entry. ” IntraMail then repeats the dialing options (Instruction Menu) to the caller.
If a Dial Action Table key assignment has no function, you should normally leave it undefined. By default,
keys 1,2, 5, 6, 7, and 8 have Undefined Routing.
Operation
N/A

Unscreened Transfer
Aspire S IntraMail Feature Handbook Chapter 1: Features ◆103
1
Unscreened Transfer
Description
Unscreened Transfer is an Automated Attendant option that allows callers to directly dial system exten-
sions. Unscreened Transfer (and its related feature Screened Transfer) allows the IntraMail Automated
Attendant to transfer outside calls to system extensions without the need for a live receptionist or operator.
It is similar to telephone system unscreened transfers in which the transferring party immediately extends
the call. After an Automated Attendant caller dials an extension, IntraMail transfers the call to the destina-
tion and hangs up. Any recalls or additional routing are handled by the telephone system – just as with any
other unscreened transfer.
Screened vs. Unscreened Transfer
Both Screened and Unscreened Transfer allow Automated Attendant callers to directly dial system exten-
sions. The following summarizes the differences between these two types of Automated Attendant transfer.
■With Unscreened Transfer, calls from the Automated Attendant ring like other transferred calls and dis-
play the incoming Caller ID data (if provided by telco and enabled in programming). Screened Transfers
ring like Intercom calls and do not display Caller ID until the call is answered.
■Both
Screened and Unscreened Transfers route unanswered calls to the subscriber’s greeting (recorded or
default) so the caller can leave a message. However, only Screened Transfer allows the caller to dial 2 to
reach the Next Call Routing Mailbox options (if programmed).
Unscreened Transfer and Inactive Mailboxes
An Unscreened Transfer will go through to the destination extension even if the destination doesn’t have an
active mailbox. If the Unscreened Transfer is unanswered at the destination, the call returns to the Auto-
mated Attendant.
The table on the next page shows in detail how Unscreened Transfer operates.
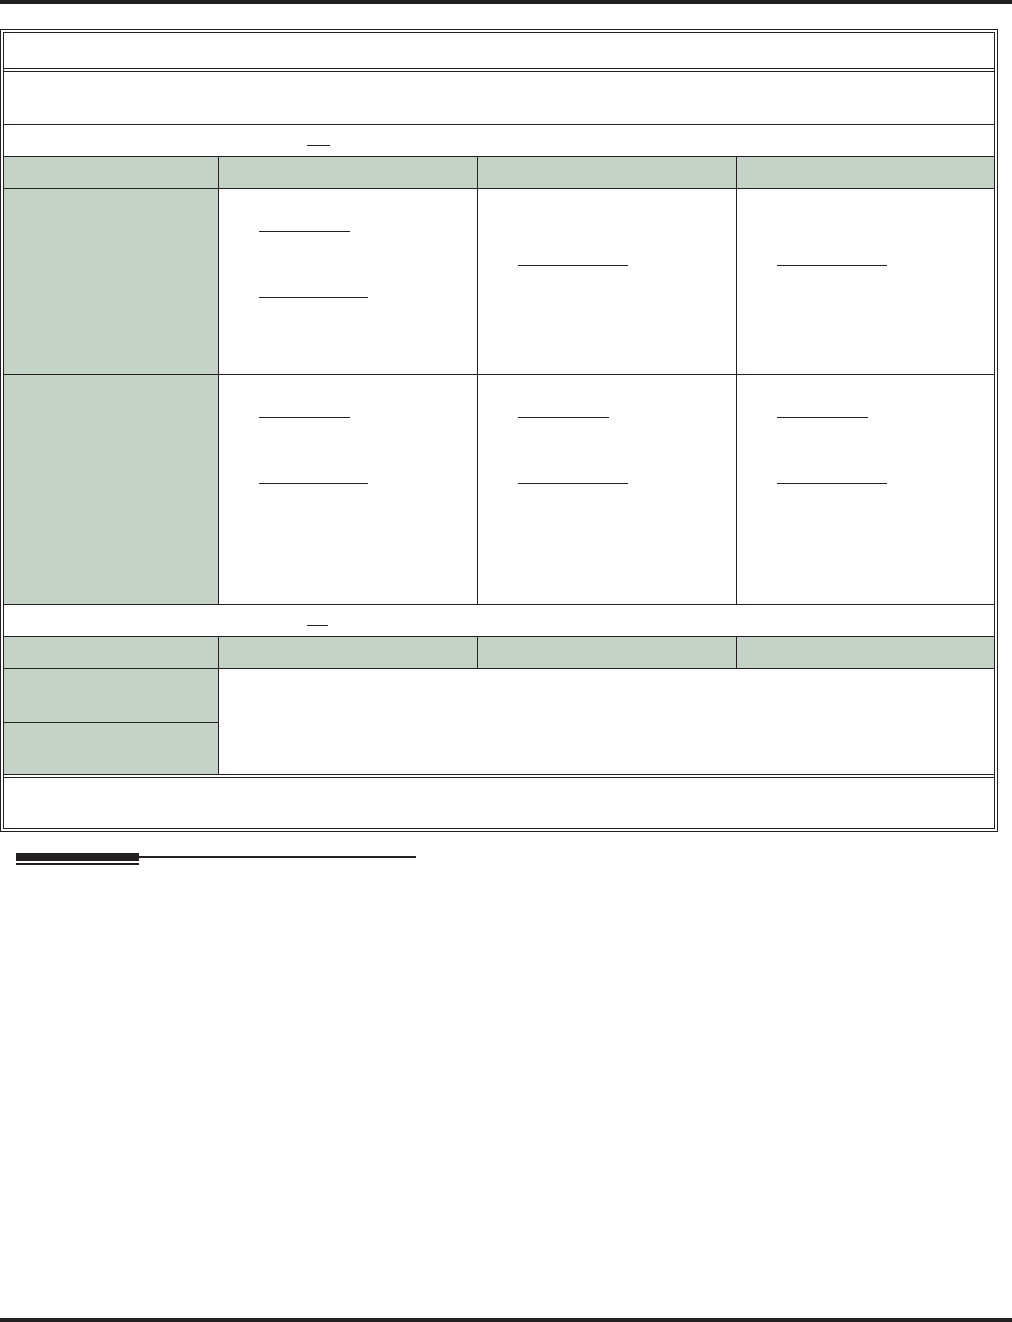
Unscreened Transfer
104 ◆Chapter 1: Features Aspire S IntraMail Feature Handbook
Operation
N/A
Unscreened Transfer (UTRF) Operation
■Call = Call answered by the Automated Attendant.
■Extension = Extension dialed by Automated Attendant caller.
If Auto Attendant Do Not Disturb is off (see page 19 for more on this feature):
Extension Idle Extension Busy Extension in DND
With Active Greeting
Recorded 1.
Transfers call to extension.
-If answered, connects call
(just like a phone system
transfer).
-If unanswered1 in a
default phone system,
plays greeting (so caller
can start recording).2
1.
Transfers call to extension.
2. Retrieves call.
3.
If unanswered1 in a
default phone system,
plays greeting (so caller
can start recording)
2
1.
Transfers call to extension.
2. Retrieves call.
3.
If unanswered1 in a
default phone system,
plays greeting (so caller
can start recording).
2
With Active Greeting
Not Recorded 1.
Transfers call to extension.
-If answered, connects call
(just like a phone system
transfer).
-
If unanswered1 in a
default phone system,
plays name (if recorded)
or extension number. Intr-
aMail then prompts caller
to leave a message.2
1.
Transfers call to extension.
-If answered, connects call
(just like a phone system
transfer).
-
If unanswered1 in a
default phone system,
plays name (if recorded)
or extension number. Intr-
aMail then prompts caller
to leave a message.2
1.
Transfers call to extension.
-If answered, connects call
(just like a phone system
transfer).
-
If unanswered1 in a
default phone system,
plays name (if recorded)
or extension number. Intr-
aMail then prompts caller
to leave a message.2
If Auto Attendant Do Not Disturb is on (see page 19 for more on this feature):
Extension Idle Extension Busy Extension in DND
With Active Greeting
Recorded 1. Sends call immediately to mailbox:
-Plays greeting.
-Prompts caller to start recording.
With Active Greeting
Not Recorded
1
After 24-02-04: Transfer Recall Time.
2 Custom phone system programming may redirect the unanswered call (for example, to a hunt group or another extension).

Voice Mail Overflow
Aspire S IntraMail Feature Handbook Chapter 1: Features ◆105
1
Voice Mail Overflow
Description
The telephone system can automatically reroute unanswered outside calls to the IntraMail Automated Atten-
dant. Voice Mail Overflow ensures that IntraMail will pick up calls that don’t go through. This allows callers
to leave a message rather than having to call back later. Voice Mail can be the overflow destination for the
following types of calls:
■Direct Inward Line (DIL) Overflow
A trunk that directly rings an extension can overflow to that extension’s mailbox if not answered.
■Incoming Ring Groups
A trunk ringing an extension’s line keys can overflow to the IntraMail Automated Attendant.
■Department Calling Groups
A call to a Department Group master (pilot) number can overflow to IntraMail if unanswered. The over-
flow destination is the Master Mailbox assigned to the Department Group. The Master Mailbox can be a:
- Call Routing Mailbox
This gives the Department Group caller additional dialing options if their call is unanswered.
- Announcement Mailbox
This plays a prerecorded announcement to the Department Group caller if their call is unanswered.
The Announcement Mailbox can then hang up or provide additional dialing options.
- Subscriber Mailbox
The Department Group caller can leave a message in the groups master mailbox. A Member of the
group can then retrieve the message later on.
The call into the Department Group can be one of the following:
-A Direct Inward Line to the Department Group master (pilot) number.
-A Screened Transfer from the IntraMail Automated Attendant to the Department Group master
(pilot) number.
-An Unscreened Transfer from the IntraMail Automated Attendant to the Department Group master
(pilot) number.
Operation
N/A

Volume Control
106 ◆Chapter 1: Features Aspire S IntraMail Feature Handbook
Volume Control
Description
Since IntraMail is completely integrated with the telephone system software, Volume Control is available at
a subscriber’s keyset any time while listening to a message, greeting, or prerecorded voice prompt. Volume
Controls let the user interactively adjust the loudness of the IntraMail messages and prompts to a comfort-
able level.
Operation
Volume Control
To adjust the volume while using any mailbox feature:
1. Press VOL ▲ or VOL ▼.

Soft Key Glossary
Aspire SIntraMail System Guide Chapter 2: Soft Key Glossary ◆111
2
Chapter 2:
Soft Key Glossary
Soft Key Glossary
Soft Key Glossary
■Following is an alphabetical index of the IntraMail soft keys. Also see the Operation section of each feature.
Soft Key Feature Phone Type Definition
All Messages Listening to Messages
Main Menu
Message Listen Mode Super Display Press to select the list of all messages.
AM Message Notification Super Display
Keyset When programming a Message Notification time, press to
indicate that the entered time is AM.
Announcement Announcement Mailbox
System Administrator
Super Display Press to access the Announcement Mailbox message options.
Annc Keyset
Callback Caller ID with Return Call
Listening to Messages
Make Call Super Display Press to call the person who left you the message.
Cancel Announcement Mailbox
Auto Att. Do Not Disturb
Call Routing Mailbox
Conversation Record
Greeting
Instruction Menu
Mailbox Name
Message Forward
Message Reply
Record and Send a
Message
Super Display
Press to erase the current message, name, or greeting.
Cncl Keyset
Change Message Notification Super Display Change the Message Notification setup.
Chnge Keyset
Clear Message Notification Super Display
Keyset Erase the Message Notification number you just entered.

Soft Key Glossary
112 ◆Chapter 2: Soft Key Glossary Aspire SIntraMail System Guide
Continue Message Forward
Message Reply
Record and Send a
Message
Super Display
Press to begin recording.
Cont Keyset
DND OFF Auto Att. Do Not Disturb
Greeting Super Display Press to turn Auto Attendant Do Not Disturb off.
DND ON Auto Att. Do Not Disturb
Greeting Super Display Press to turn Auto Attendant Do Not Disturb of.
Done
Announcement Mailbox
Auto Att. Do Not Disturb
Call Routing Mailbox
Conversation Record
Greeting
Instruction Menu
Mailbox Name
Message Forward
Message Reply
Record and Send a
Message
Super Display
Keyset Press to exit the recording mode while recording a message,
name, or greeting.
Erase
Announcement Mailbox
Auto Att. Do Not Disturb
Call Routing Mailbox
Greeting
Instruction Menu
Listening to Messages
Mailbox Name
Message Delete
Security Code
Super Display
Keyset Press to erase the currently accessed message, name, greeting,
or Security Code.
Erase All Messages Erasing All Messages
System Administrator
Super Display Press to erase all messages in the selected Subscriber
Mailbox.
Erase Greeting System Administrator Super Display Press to erase a subscriber’s greeting from the System
Administrator Mailbox.
Greet Keyset
Erase Name Mailbox Name
System Administrator Super Display Press this key to erase the selected Mailbox’s name.
Erase Security Code Mailbox Sec. Code Delete
Security Code
System Administrator Super Display Press to delete the selected mailbox’s Security Code.
Soft Key Feature Phone Type Definition

Soft Key Glossary
Aspire SIntraMail System Guide Chapter 2: Soft Key Glossary ◆113
2
Exit
Answer Schedule Override
Announcement Mailbox
Auto Att. Do Not Disturb
Auto Time Stamp
Call Routing Mailbox
Erasing All Messages
Exiting a Mailbox
Greeting
Instruction Menu
Listening to Messages
Mailbox Name
Mailbox Sec. Code Delete
Main Menu
Message Forward
Message Notification
Message Reply
Record and Send a
Message
Security Code
Super Display
Keyset Press to go back to the previous menu level or exit your
mailbox.
Forward Listening to Messages
Message Forward Super Display Press to access the Message Forward Menu.
Greeting Auto Att. Do Not Disturb
Greeting
Main Menu
Super Display Press to access the Mailbox Greeting options.
Greet Keyset
Greeting 1
Greeting 2
Greeting 3 Auto Att. Do Not Disturb
Greeting
Super Display
Press to select a Greeting.
Gr1
Gr2
Gr3 Keyset
Instruction Call Routing Mailbox
Instruction Menu
System Administrator
Super Display Press to access the Instruction Menu options.
Instr Keyset
Listen Announcement Mailbox
Auto Att. Do Not Disturb
Call Routing Mailbox
Caller ID with Return Call
Greeting
Instruction Menu
Listening to Messages
Mailbox Name
Main Menu
Make Call
Message Delete
Message Forward
Message Reply
Time and Date Stamp
Super Display
Press to listen to message, name, or greeting.
Lstn Keyset
Mailbox
Answer Schedule Override
Message Forward
Message Reply
Record and Send a
Message
Super Display
Select another mailbox.
MBOX Keyset
MBOX Options
Auto Time Stamp
Mailbox Options Menu
Main Menu
Message Notification
Security Code
Super Display Press to access the Mailbox Options Menu.
Soft Key Feature Phone Type Definition

Soft Key Glossary
114 ◆Chapter 2: Soft Key Glossary Aspire SIntraMail System Guide
Message List Main Menu
Message Listen Mode Super Display Press to access the Message Listen Mode Menu.
Msgs Erasing All Messages
System Administrator Keyset Press to erase all messages in the selected Subscriber
Mailbox.
Name Mailbox Name
Main Menu
System Administrator Super Display Press to access the Mailbox Name Menu. Also used by the
System Administrator when erasing a Mailbox Name.
Next Message Notification Super Display
Keyset Press to skip to the next option without changing your entry.
Next Message Listening to Messages Super Display
While listening to a message, press to listen to the next message.
Next Keyset
New Messages Listening to Messages
Main Menu
Message Listen Mode Super Display Press to select the list of new messages.
Notification Message Notification Super Display Press to access the Message Notification Options Menu.
Notif Keyset
Number Message Notification Super Display Press to program a telephone number as the notification
destination.
Num Keyset
Off
Answer Schedule Override
Auto Time Stamp
Message Notification
Super Display
Keyset Press to turn the selected feature off.
OK
Message Notification
Super Display
Keyset Accept the notification number entered and back up to the
previous level.
On
Answer Schedule Override
Auto Time Stamp
Message Notification
Super Display
Keyset Press to turn the selected feature on.
PM Message Notification Super Display
Keyset When programming a Message Notification time, press to
indicate that the entered time is PM.
Pager Message Notification Super Display Press to to program a pager number as the notification
destination.
Pager Keyset
Pause
Announcement Mailbox
Auto Att. Do Not Disturb
Call Routing Mailbox
Conversation Record
Greeting
Instruction Menu
Listening to Messages
Mailbox Name
Message Forward
Message Reply
Record and Send a
Message
Super Display
Keyset Press to pause while recording a a message, name, or
greeting.
Prompt Version System Administrator Super Display Press to hear the version number of the IntraMail stored voice
prompts.
Soft Key Feature Phone Type Definition

Soft Key Glossary
Aspire SIntraMail System Guide Chapter 2: Soft Key Glossary ◆115
2
Record Announcement Mailbox
Auto Att. Do Not Disturb
Call Routing Mailbox
Greeting
Instruction Menu
Mailbox Name
Main Menu
Record and Send a
Message
Super Display
Press to record a message, name, or greeting.
Rec Keyset
Record New Name Mailbox Name
System Administrator Super Display Used by System Administrator to record the selected
mailbox’s name.
Repeat Listening to Messages Super Display Go back to the beginning of the message.
Rpt Keyset
Reply Listening to Messages
Message Reply Super Display Reply to the currently accessed message.
Resume
Announcement Mailbox
Auto Att. Do Not Disturb
Call Routing Mailbox
Conversation Record
Greeting
Instruction Menu
Mailbox Name
Message Forward
Message Reply
Record and Send a
Message
Super Display
Keyset Press to resume while recording a a message, name, or
greeting.
Return Exiting a Mailbox Super Display Press to return to your mailbox.
Return Keyset
Saved Messages Listening to Messages
Message Listen Mode Super Display Press to select the list of saved messages.
Schedule Override Answer Schedule
Override
System Administrator Super Display Press to access the Answer Schedule Override option.
Sec.Code Security Code Super Display Press to access the Security Code options.
Sec Keyset
Subscriber Erasing All Messages
Mailbox Name
Mailbox Sec. Code Delete
Security Code
System Administrator
Super Display
Press to select the Subscriber Mailbox maintenance options.
Subs Keyset
System Admin
Announcement Mailbox
Answer Schedule Override
Call Routing Mailbox
Erasing All Messages
Instruction Menu
Mailbox Name
Main Menu
Mailbox Sec. Code Delete
Security Code
System Administrator
Super Display Press to access System Administrator options.
Soft Key Feature Phone Type Definition

Soft Key Glossary
116 ◆Chapter 2: Soft Key Glossary Aspire SIntraMail System Guide
Time Stamp Auto Time Stamp Super Display Press to select the Auto Time Stamp feature.
Time Keyset
Soft Key Feature Phone Type Definition


0893422
January 31, 2005
Printed in U.S.A.
NEC Unified Solutions, Inc.,
4 Forest Parkway, Shelton, CT 06484
TEL: 203-926-5400 FAX: 203-929-0535
www.necunifiedsolutions.com
