BMC Remedy Service Desk: Incident Management User Guide 174271 IM
Incident%20Mgmt-User-Guide-7.6%20version
IM-User-Guide%20Version%207.6.04
User Manual:
Open the PDF directly: View PDF ![]() .
.
Page Count: 208 [warning: Documents this large are best viewed by clicking the View PDF Link!]
- Contents
- About this Book
- Introducing BMC Remedy Incident Management
- Working with the Requester console
- Working with the Overview console
- Registering and assigning incident requests as support staff
- Functional areas of the console
- Managing service targets
- Registering incident requests
- Reviewing the status of an incident request
- Viewing incident request records
- Creating an Incident request record using a template
- Creating an incident request record without a template in Classic View
- Overview of incident ownership
- Adding or modifying a customer profile
- First call resolution
- Searching for matching records
- Accessing BMC Remedy Knowledge Management
- Creating a solution database entry from an incident
- Relating incident requests as duplicates
- Assigning incident requests
- Resolving and closing incident requests as support staff
- Resolving incident requests
- Accepting an incident request
- Receiving notification of assignments
- Working with assignments
- Working with tasks
- Searching for a solution
- Time worked on an incident request must be recorded
- Recording your time
- Recording time for an assistant
- Updating your time after the incident request is reassigned
- Creating work information entries
- Adding work information entries to an open incident request record
- Modifying work information entries
- Modifying work information entries from an open incident request
- Updating an incident request
- Creating a change request
- Closing incident requests
- Resolving incident requests
- Working with incident requests as a manager
- Creating and monitoring tasks
- Tasks overview
- Adding tasks using task templates
- Creating ad hoc tasks
- Accepting task assignments
- Opening and viewing individual task records
- Reassigning task sequence numbers
- Assigning and reassigning tasks
- Updating task record details
- Planning task times
- Tracking the time spent working on tasks
- Adding work information to a task
- Canceling tasks
- Closing tasks
- Resolving, closing, and canceling incident requests with open tasks
- Supplemental BMC Remedy Incident Management features
- Using the KPI flashboards
- Using the Service Desk ROI flashboard
- Viewing your profile
- Creating a problem from an incident
- Selecting application preferences
- Searching for records
- Working with records
- Using the decision tree
- Using scripts
- Recording CI unavailability
- Working with relationships
- Creating reminders
- Broadcasting messages
- Paging and sending email messages
- Assigning or reassigning an incident to a vendor
- Updating assignment availability
- Working with reports
- Managing configuration items
- Index

BMC Remedy Service Desk:
Incident Management User
Guide
Supporting
Version 7.6.04 of BMC Remedy Incident Management
January 2011
www.bmc.com

Contacting BMC Software
You can access the BMC Software website at http://www.bmc.com. From this website, you can obtain
information about the company, its products, corporate offices, special events, and career opportunities.
United States and Canada
Address BMC SOFTWARE INC
2101 CITYWEST BLVD
HOUSTON TX 77042-2827 USA
Telephone 1 713 918 8800
or
1 800 841 2031
Fax 1 713 918 8000
Outside United States and Canada
Telephone +01 713 918 8800 Fax +01 713 918 8000
© Copyright 1996, 1998-1999, 2002-2006, 2009, 2010- 2011 BMC Software, Inc.
BMC, BMC Software, and the BMC Software logo are the exclusive properties of BMC Software, Inc., are
registered with the U.S. Patent and Trademark Office, and may be registered or pending registration in
other countries. All other BMC trademarks, service marks, and logos may be registered or pending
registration in the U.S. or in other countries. All other trademarks or registered trademarks are the
property of their respective owners.
Current and Notes are trademarks or registered trademarks of International Business Machines
Corporation in the United States, other countries, or both.
IT Infrastructure Library® is a registered trademark of the Office of Government Commerce and is used
here by BMC Software, Inc., under license from and with the permission of OGC.
ITIL® is a registered trademark, and a registered community trademark of the Office of Government
Commerce, and is registered in the U.S. Patent and Trademark Office, and is used here by BMC Software,
Inc., under license from and with the permission of OGC.
Crystal Reports is a trademark or registered trademark of SAP AG in Germany and in several other countries.
The information included in this documentation is the proprietary and confidential information of BMC
Software, Inc., its affiliates, or licensors. Your use of this information is subject to the terms and conditions
of the applicable End User License agreement for the product and to the proprietary and restricted rights
notices included in the product documentation.
Restricted rights legend
U.S. Government Restricted Rights to Computer Software. UNPUBLISHED—RIGHTS RESERVED
UNDER THE COPYRIGHT LAWS OF THE UNITED STATES. Use, duplication, or disclosure of any data
and computer software by the U.S. Government is subject to restrictions, as applicable, set forth in FAR
Section 52.227-14, DFARS 252.227-7013, DFARS 252.227-7014, DFARS 252.227-7015, and DFARS
252.227-7025, as amended from time to time. Contractor/Manufacturer is BMC SOFTWARE INC, 2101
CITYWEST BLVD, HOUSTON TX 77042-2827, USA. Any contract notices should be sent to this address.

Customer support
Support website
You can obtain technical support from BMC 24 hours a day, 7 days a week at http://www.bmc.com/support. From this
website, you can
■ read overviews about support services and programs that BMC offers
■ find the most current information about BMC products
■ search a database for problems similar to yours and possible solutions
■ order or download product documentation
■ download products and maintenance
■ report a problem or ask a question
■ subscribe to receive proactive e-mail alerts
■ find worldwide BMC support center locations and contact information, including e-mail addresses, fax numbers, and
telephone numbers
Support by telephone or e-mail
In the United States and Canada, if you need technical support and do not have access to the web, call 800 537 1813 or
send an e-mail message to customer_support@bmc.com. (In the subject line, enter SupID:yourSupportContractID, such
as SupID:12345). Outside the United States and Canada, contact your local support center for assistance.
Before contacting BMC
Have the following information available so that Customer Support can begin working on your issue immediately:
■ product information
― product name
― product version (release number)
― license number and password (trial or permanent)
■ operating system and environment information
― machine type
― operating system type, version, and service pack or other maintenance level such as PUT or PTF
― system hardware configuration
― serial numbers
― related software (database, application, and communication) including type, version, and service pack or
maintenance level
■ sequence of events leading to the problem
■ commands and options that you used
■ messages received (and the time and date that you received them)
― product error messages
― messages from the operating system, such as file system full
― messages from related software
3

License key and password information
If you have questions about your license key or password, contact Customer Support through one of the following methods:
■ Send an e-mail message to customer_support@bmc.com. (In the Subject line, enter SupID:yourSupportContractID ,
such as SupID:12345.)
■ In the United States and Canada, call 1 800 537 1813. Outside the United States and Canada, contact your local support
center for assistance.
■ Submit a new issue at http://www.bmc.com/support_home.
4
BMC Remedy Service Desk: Incident Management User Guide

Contents
About this Book 11
Audience ..........................................................................................................................11
BMC Remedy IT Service Management Suite documents .........................................12
Conventions .....................................................................................................................14
Syntax statements ...........................................................................................................14
Chapter 1 Introducing BMC Remedy Incident Management 17
BMC Remedy ITSM usability enhancements .............................................................17
Where to find features and fields that have moved .......................................21
What's new in BMC Remedy Incident Management .....................................23
About the IT Home Page ...............................................................................................23
Configuring the IT Home Page ..........................................................................26
Consoles overview ...............................................................................................27
Navigating consoles, forms, and modules .................................................................29
Incident Request form views .........................................................................................32
Best Practice view ................................................................................................32
Using the Customer and Contact fields in Best Practice view ......................35
Classic view ..........................................................................................................35
User interface standards for field labels ...........................................................36
Calbro Services ................................................................................................................36
User roles .........................................................................................................................37
Support staff roles ................................................................................................38
Manager roles .......................................................................................................38
User role ................................................................................................................39
Mapping permission groups to SMPM roles ..................................................40
Process flow and the lifecycle of an incident request ................................................41
Incident management use cases ...................................................................................43
Incident resolution—first call resolution ..........................................................43
Incident resolution with assignment to specialist ...........................................45
Incident request resolution—emergency change request ..............................48
Chapter 2 Working with the Requester console 51
Requester role ..................................................................................................................53
Requester console users .................................................................................................53
Working with service requests .....................................................................................54
Defining a service request ..................................................................................55
Contents 5

Service request state changes .............................................................................56
Performing additional service request functions ............................................56
Troubleshooting service requests with errors .................................................57
Viewing service request details from an incident request form ..............................59
Chapter 3 Working with the Overview console 61
Functional areas ..............................................................................................................61
Console list table .............................................................................................................64
Selecting status values ....................................................................................................65
Configuring the Overview console to display tasks .................................................65
Chapter 4 Registering and assigning incident requests as support staff 67
Functional areas of the console .....................................................................................67
Managing service targets ...............................................................................................71
Registering incident requests ........................................................................................74
Reviewing the status of an incident request ....................................................75
Viewing incident request records ......................................................................76
Creating an Incident request record using a template ...................................76
Creating an incident request record without a template in Classic View .
78
Overview of incident ownership .......................................................................82
Adding or modifying a customer profile .........................................................82
First call resolution ..............................................................................................85
Searching for matching records .........................................................................85
Accessing BMC Remedy Knowledge Management .......................................89
Creating a solution database entry from an incident .....................................91
Relating incident requests as duplicates ..........................................................93
Assigning incident requests ..........................................................................................94
Reassigning incident requests ............................................................................95
Chapter 5 Resolving and closing incident requests as support staff 97
Resolving incident requests ..........................................................................................97
Accepting an incident request ............................................................................99
Receiving notification of assignments ...........................................................100
Working with assignments ...............................................................................101
Working with tasks ............................................................................................102
Searching for a solution ....................................................................................102
Time worked on an incident request must be recorded ..............................102
Recording your time ..........................................................................................103
Recording time for an assistant ........................................................................104
Updating your time after the incident request is reassigned ......................105
6
BMC Remedy Service Desk: Incident Management User Guide

Creating work information entries ..................................................................106
Adding work information entries to an open incident request record ......107
Modifying work information entries ..............................................................108
Modifying work information entries from an open incident request ........109
Updating an incident request ...........................................................................110
Creating a change request ................................................................................110
Closing incident requests .............................................................................................111
Completing an incident request .......................................................................112
Closing an incident request ..............................................................................114
Quickly closing an incident request ................................................................114
Moving a resolved incident request back to In Progress .............................115
Reopening a closed or resolved incident request ..........................................115
Chapter 6 Working with incident requests as a manager 117
Assigning incident requests as a group coordinator ...............................................117
Rejecting an incident .........................................................................................118
Tracking incident requests ..........................................................................................119
Overview of BMC SLM calculations ...............................................................120
Working with the Watch List ...........................................................................121
Handling incident escalations .....................................................................................122
Approving solutions ....................................................................................................123
Chapter 7 Creating and monitoring tasks 125
Tasks overview ..............................................................................................................125
Opening the Task form .....................................................................................126
Adding tasks using task templates ............................................................................126
Creating ad hoc tasks ...................................................................................................127
Accepting task assignments ........................................................................................129
Receiving task assignment notifications by BMC Remedy Alert ...............129
Accepting a task assignment ............................................................................130
Opening and viewing individual task records .........................................................131
Reassigning task sequence numbers .........................................................................131
Reassigning sequence numbers to task group children ...............................131
Assigning and reassigning tasks ................................................................................132
Updating task record details .......................................................................................133
Planning task times ......................................................................................................133
Tracking the time spent working on tasks ................................................................134
Using the Start and Stop buttons .....................................................................134
Manually entering the time ..............................................................................135
Enter work into the effort log ...........................................................................135
Adding work information to a task ..........................................................................136
Contents 7

Canceling tasks ..............................................................................................................137
Closing tasks ..................................................................................................................138
Resolving, closing, and canceling incident requests with open tasks ...................139
Canceling an incident with open tasks ...........................................................139
Chapter 8 Supplemental BMC Remedy Incident Management features 141
Using the KPI flashboards ...........................................................................................141
BMC Remedy Incident Management KPIs ....................................................142
KPI flashboard variables ...................................................................................143
Opening the KPI flashboards ...........................................................................145
Viewing and displaying data ...........................................................................145
Using the Service Desk ROI flashboard ....................................................................147
To open the ROI flashboards ............................................................................148
Configured parameters .....................................................................................149
Viewing and displaying data ...........................................................................151
ROI Active variables ..........................................................................................151
Viewing your profile ....................................................................................................153
Creating a problem from an incident .........................................................................153
Selecting application preferences ...............................................................................154
Searching for records ....................................................................................................156
Running Defined Searches ...............................................................................157
Creating a custom search ..................................................................................157
Editing and deleting a custom search .............................................................159
Searching all records .........................................................................................159
Using Global search ...........................................................................................160
Working with records ..................................................................................................161
Printing records ..................................................................................................161
Modifying records .............................................................................................162
Using the decision tree .................................................................................................162
Using scripts ..................................................................................................................162
Recording CI unavailability ........................................................................................163
Working with relationships .........................................................................................164
Defining relationships .......................................................................................165
Copying relationships .......................................................................................167
Indicating impacted areas .................................................................................168
Modifying relationship types ...........................................................................169
Performing quick actions on a relationship ...................................................169
Removing relationships ....................................................................................170
Creating reminders .......................................................................................................171
Broadcasting messages ................................................................................................173
Creating broadcast messages ...........................................................................173
8
BMC Remedy Service Desk: Incident Management User Guide

Viewing and modifying broadcast messages ................................................175
Limiting the number of messages ...................................................................176
Paging and sending email messages ..........................................................................177
Paging a person or on-call group ....................................................................177
Sending email .....................................................................................................179
Assigning or reassigning an incident to a vendor ...................................................180
Updating assignment availability ..............................................................................181
Working with reports ...................................................................................................182
Generating a report ............................................................................................183
Using qualifications to generate a report .......................................................184
Using advanced qualifications to generate a report .....................................186
BMC Remedy Incident Management predefined reports ............................187
Chapter 9 Managing configuration items 191
Creating a CI ..................................................................................................................192
Inventory management ................................................................................................197
Placing bulk CIs in inventory ...........................................................................197
Placing non-bulk CIs in inventory .................................................................198
Managing inventory tasks ................................................................................199
Contents 9
10
BMC Remedy Service Desk: Incident Management User Guide

About this Book
The BMC Remedy Service Desk: Incident Management User Guide describes how to
use the BMC Remedy Incident Management application of the BMC Remedy IT
Service Management Suite.
The BMC Remedy IT Service Management Suite includes:
■The BMC Remedy Service Desk solution, which includes the
BMC Remedy Incident Management application and the BMC Remedy Problem
Management application
■The BMC Remedy Asset Management application
■The BMC Remedy Change Management application, which also includes the BMC
Remedy Release Management module
The applications run with the BMC Remedy Action Request System (BMC Remedy
AR System) environment and share a common database. All these applications
receive data from the BMC Atrium Configuration Management Database (BMC
Atrium CMDB).
Audience
This guide is intended for the following IT professionals:
■IT support staff
■IT managers
The Requester console, which is also described in this guide, is intended for any IT
requester” (that is, anyone requesting support from IT).
About this Book 11

BMC Remedy IT Service Management Suite
documents
The following table lists the documentation available for BMC Remedy Service Desk:
Incident Management. It also lists relevant documents for related solutions and
products.
Unless otherwise noted, online documentation is available with the product and on
the Customer Support website at http://www.bmc.com/support .
Title Document provides Audience
BMC Remedy Service Desk: Incident Management
BMC Remedy IT Service
Management Release Notes
Information about known issues in each release of
BMC Remedy IT Service Management. Also provides
a list of new features included with the applications.
Everyone
BMC Remedy Service Desk: Incident
Management User Guide
Procedures for using the BMC Remedy Incident
Management application; includes new features and
overview.
Everyone
BMC Remedy IT Service
Management Administration Guide
Procedures for administrating and configuring the
BMC Remedy IT Service Management applications.
Administrators
BMC Remedy IT Service
Management Concepts Guide
Conceptual overview information about the
applications that make up the BMC Remedy ITSM
suite of applications.
Everyone
Help Help for using and configuring BMC Remedy
Incident Management , available by clicking Help in
the product interface.
Available from Help links after Help is installed.
Everyone
Other BMC Remedy IT Service Management products
BMC Remedy Service Desk: Problem
Management User Guide
Procedures for using the BMC Remedy Service Desk:
Problem Management application; includes new
features and overview.
Everyone
BMC Remedy Asset Management
User Guide
Procedures for using the BMC Remedy Asset
Management application; includes new features and
overview.
Everyone
BMC Remedy Change Management
User Guide
Procedures for using the BMC Remedy Change
Management application; includes new features and
overview.
Everyone
BMC Service Management Process
Model, BMC Best Practice Flows
A white paper describing the best practice work flow
for the BMC Remedy IT Service Management
processes that are covered by the BMC Service
Management Process Model.
Everyone
Solutions
BMC Remedy IT Service Management Suite documents
12
BMC Remedy Service Desk: Incident Management User Guide

Title Document provides Audience
BMC Service Impact Manager:
Integration for BMC Remedy Service
Desk User Guide
Detailed information about the Integration for the
BMC Remedy Service Desk (IBRSD) component. This
guide is intended for system administrators and users
with an understanding of the BMC Impact Manager
and BMC Remedy Service Desk environments.
Administrators
and BMC
Impact
Manager users
Service Management Solutions
Release Notes
Information about new features, open issues, and
resolved issues.
Everyone
BMC Atrium CMDB
BMC Atrium Core Release Notes Information about new features, open issues, and
resolved issues.
Everyone
BMC Atrium CMDB User Guide Information about using BMC Atrium CMDB,
including searching for and comparing CIs and
relationships, relating CIs, viewing history, running
impact simulations, and viewing federated data.
Users
BMC Atrium Core Troubleshooting
Guide
Information about resolving issues with BMC Atrium
Core components, including API, filter and console
error messages and their solutions.
Administrators,
programmers,
and BMC
Support
personnel
BMC Remedy Action Request System
BMC Remedy Approval Server Guide Information about installation and configuration of the
BMC Remedy Approval Server, how to use the BMC
Remedy Approval Server, and understanding the
approval workflow.
Everyone
BMC Service Level Management
BMC Service Level Management
Release Notes
Information about known issues in each release of
BMC Service Level Management. Also provides a list
of new features included with the application.
Everyone
BMC Service Level Management
User Guide
Procedures for using the BMC Service Level
Management application; includes new features and
overview.
Everyone
BMC Service Request Management
BMC Service Request Management
Release Notes
Information about new features and known issues. Everyone
BMC Service Request Management
User Guide for Administrators and
Users
Procedures for using the BMC Service Request
Management application.
Everyone
BMC Remedy Knowledge Management
BMC Remedy Knowledge
Management User Guide
Procedures for using the BMC Remedy Knowledge
Management application; includes new features and
overview.
Everyone
BMC Remedy IT Service Management Suite documents
About this Book 13

Title Document provides Audience
BMC Service Management Process Model
BMC Service Management Process
Model Role Mapping to BMC
Remedy ITSM Suite
List and description of BMC Service Management
Process Model roles.
Everyone
Conventions
This document uses the following special conventions:
■All syntax, operating system terms, and literal examples are
presented in this typeface.
■Variable text in path names, system messages, or syntax is displayed in italic text:
testsys/instance/fileName
■This document uses a symbol to show menu sequences. For example, Actions =>
Create Test instructs you to choose the Create Test command from the Actions
menu.
Syntax statements
This topic explains conventions for showing syntax statements.
A sample statement follows:
COMMAND KEYWORD1 [KEYWORD2 | KEYWORD3] KEYWORD4={YES | NO} fileName…
Convention Example
Items in italic type represent variables that you
must replace with a name or value. If a variable
is represented by two or more words, initial
capitals distinguish the second and subsequent
words.
alias
databaseDirectory
serverHostName
Brackets indicate a group of optional items. Do
not type the brackets when you enter the
option. A comma means that you can choose
one or more of the listed options. You must use
a comma to separate the options if you choose
more than one option.
[tableName, columnName, field]
[-full, -incremental, -level] (UNIX)
Conventions
14
BMC Remedy Service Desk: Incident Management User Guide

Convention Example
Braces indicate that at least one of the enclosed
items is required. Do not type the braces when
you enter the item.
{DBDName | tableName}
UNLOAD device={disk | tape, fileName |
deviceName}
{-a | -c} (UNIX)
A vertical bar means that you can choose only
one of the listed items. In the example, you
would choose either commit or cancel.
{commit | cancel}
{-commit | -cancel} (UNIX)
An ellipsis indicates that you can repeat the
previous item or items as many times as
necessary.
columnName…
Syntax statements
About this Book 15

Syntax statements
16 BMC Remedy Service Desk: Incident Management User Guide

Introducing BMC Remedy Incident
Management
According to IT Infrastructure Library (ITIL) standards, the primary goal of the
incident management process is to restore normal service operation as quickly as
possible with minimum disruption to the business, thus ensuring that the best
achievable levels of availability and service are maintained.
The BMC Remedy Incident Management application helps you to restore normal
service operation quickly by managing all aspects of an incident, from creation to
their resolution and closure.
The processes described in this guide are developed from the BMC Service
Management Process Model (SMPM), which is a companion product to BMC
Remedy Incident Management. The SMPM describes a set of predefined processes
for the delivery and support of information technology (IT) services. The processes
described by the SMPM are aligned with ITIL good practices.
BMC Remedy ITSM usability enhancements
The BMC Remedy ITSM 7.6.04 release contains the following usability
enhancements. These enhancements are available only when the applications are
accessed through a web browser.
1
Chapter 1 Introducing BMC Remedy Incident Management 17

Table 1: BMC Remedy ITSM usability enhancements
Description Affected applications and modules
To help you retrieve information faster, the type-
ahead search functionality is available on more
fields. When you start to type a query into a field
that has the type-ahead search functionality, one or
more possible matches are immediately presented
for selection in a drop-down list. As you type more
characters, the list changes to match what you type.
■BMC Remedy Change Management
■Release Management
■BMC Remedy Incident Management
■BMC Remedy Problem Management
■BMC Remedy Knowledge Management
■BMC Service Request Management
To improve application usability when using the
Best Practice and Classic view, a system–generated
record ID is assigned to all new record types
immediately when the application displays the form
in New mode.
■BMC Remedy Change Management
■Release Management
■BMC Remedy Incident Management
■BMC Problem Management
■BMC Service Request Management (work order)
To improve application performance, system
administrators can configure system messages from
filters and servers to appear in a message bar instead
of in pop-up windows. For information about this
configuration, see the BMC Remedy Action Request
System 7.6.04 Configuration Guide.
■BMC Remedy Asset Management
■BMC Remedy Change Management
■Release Management
■BMC Remedy Incident Management
■BMC Remedy Problem Management
■BMC Remedy Knowledge Management
■BMC Service Request Management
■BMC Service Level Management
BMC Remedy ITSM usability enhancements
18
BMC Remedy Service Desk: Incident Management User Guide

Description Affected applications and modules
Using the Application Preferences settings, you can
configure the system to display a confirmation
message when you submit a new record. For
information about these settings, see your
application's user guide.
■BMC Remedy Change Management
■Release Management
■BMC Remedy Incident Management
■BMC Remedy Problem Management
■BMC Service Request Management (work order)
To provide easier access to the BMC Service
Management Process Model (SMPM) from the
applications, the Process Overview link is available
from the Quick Actions navigation area of the main
forms. The Process Overview link is also available
above the main tables on the consoles.
■BMC Remedy Asset Management
■BMC Remedy Change Management
■BMC Remedy Incident Management
■BMC Remedy Problem Management
To improve overall system performance, most
consoles and forms now open inside a single view
area, instead of in individual windows.
■BMC Remedy Asset Management
■BMC Remedy Change Management
■BMC Remedy Incident Management
■BMC Remedy Problem Management
■BMC Service Request Management (work order)
■BMC Remedy Knowledge Management
To make navigation through the BMC Remedy ITSM
suite of applications easier, a more consistent
navigation model is used on the IT Home Page,
consoles, and forms. For example, the application
menu that appeared on the IT Home page in earlier
releases of the BMC Remedy ITSM suite of
applications is now used on all of the application
consoles and main forms.
■BMC Remedy Asset Management
■BMC Remedy Change Management
■BMC Remedy Incident Management
■BMC Remedy Problem Management
■BMC Service Request Management (work order)
■BMC Remedy Knowledge Management
BMC Remedy ITSM usability enhancements
Chapter 1 Introducing BMC Remedy Incident Management 19

Description Affected applications and modules
To make required fields more obvious, when you
save a record, a red box outlines required fields that
do not contain valid information.
■BMC Remedy Asset Management
■BMC Remedy Change Management
■BMC Remedy Incident Management
■BMC Remedy Problem Management
■BMC Service Request Management
To improve usability, the number of steps needed to
create a work info entry has been reduced. See the
applicable application user guide for information
about how to create work info entries.
■BMC Remedy Change Management
■BMC Remedy Incident Management
■BMC Remedy Problem Management
■BMC Service Request Management
To make searching for information across
applications easier and more intuitive, a global
search option is available. The search scans and
retrieves information from the installed BMC
Remedy ITSM applications and presents it in a
readable, consumable format. See the applicable
application user guide for information about how the
global search function works.
■BMC Remedy Asset Management
■BMC Remedy Change Management
■BMC Remedy Incident Management
■BMC Remedy Problem Management
■BMC Service Request Management(work order)
To make creating Relationships easier, a new link
called Create Relationship to is available. See the
applicable application user guide for information
about how the link works.
■BMC Remedy Change Management
■BMC Remedy Incident Management
■BMC Remedy Problem Management
BMC Remedy ITSM usability enhancements
20
BMC Remedy Service Desk: Incident Management User Guide

Description Affected applications and modules
To help you find field-level details more easily, you
can use the new Detail icon to display detailed
information about the field's content. For example, if
you click the Detail icon associated with the
Customer field, the People form appears with
information about the customer whose name appears
in the field. This new feature replaces the
hyperlinked field labels in earlier versions of the
applications.
■BMC Remedy Change Management
■Release Management
■BMC Remedy Incident Management
■BMC Remedy Problem Management
■BMC Service Request Management (work order)
To quickly access BMC Atrium Explorer from the
Service and CI fields, you can click the new Explore
CI icon.
■BMC Remedy Asset Management
■BMC Remedy Change Management
■BMC Remedy Incident Management
■BMC Remedy Problem Management
To improve search capabilities, a new search icon is
added to the fields that open a search dialog box or
form.
■BMC Remedy Change Management
■Release Management
■BMC Remedy Incident Management
■BMC Remedy Problem Management
■Task Management
■BMC Service Request Management (work order)
Where to find features and fields that have moved
This section lists features and fields that have moved from their previous locations
on the user interface and provides you with their new location.
On the console
The following console features and links have moved.
■KPIs—You now access the KPIs by clicking the KPIs link in the Functions menu
on the navigation pane.
BMC Remedy ITSM usability enhancements
Chapter 1 Introducing BMC Remedy Incident Management 21

■Defined Searches— You now access Defined Searches from the Filter By drop
down menu at the top of the console.
■Manage My Searches—You now access Manage My Searches by clicking the
magnifying glass icon beside the Filter By field.
■Process Overview—You now access Process Overview from a link above the
console table.
■Consoles—You now access other consoles from the Application menu.
On the form
The following application form features, fields, and links have moved.
■You now access these fields from the main body of the form:
—Assigned Group
—Assignee
—Vendor Group
—Vendor Ticket Number
—Status
—Status Reason
—Resolution
■You now access the following links from the Quick Action section of the
Navigation pane.
—Create Relationship to—for creating relationships between the current record
and other record types.
—Create Related Request—for creating other record types.
—Process Overview—for opening a process flow diagram.
—Work information—Changes have been made to the way that you create work
information entries in Best Practice view. For information about creating work
information entries in this view, see “Adding work information entries to an
open incident request record” on page 107.
—Relationships—Changes have been made to the way you create relationships
in the Best Practice view. For information about how to create relationships in
this view, see “Defining relationships” on page 165
BMC Remedy ITSM usability enhancements
22
BMC Remedy Service Desk: Incident Management User Guide

■Tool bar—The Incident form tool bar is removed. The following tool bar functions
have been retained and are available from other locations on the interface:
—Return to Home Page —To close the application and return to the Home page,
click the Home icon on the breadcrumb bar. This function replaces the Close
button, which has been removed from the interface.
—New mode—To invoke new mode, open the Application menu, Select Incident
Management, and click New Incident.
—Modify mode—If your installation is configured to open a new incident
request form after you click save when creating a new incident request record,
then to invoke Modify mode you must open the incident request record that
you want to modify from the console.
—Search mode—From the breadcrumb bar, return to the Incident console and
use Search Incident in the Navigation pane.
■You now access other consoles from the Application menu.
What's new in BMC Remedy Incident Management
This section describes the new features in this release that are specific to BMC
Remedy Incident Management.
Under some circumstances, you can now quickly close the incident request, without
first passing it through the Resolved status. For information about how to do this,
see Quickly closing an incident request on page 114
About the IT Home Page
When you start the BMC Remedy IT Service Management Suite, the IT Home Page
displays the Overview console by default. However, you can set up what you want
to see on the IT Home Page. If you are a system administrator, you can configure the
page for all users. Otherwise, you can configure your own user ID to see your views.
About the IT Home Page
Chapter 1 Introducing BMC Remedy Incident Management 23
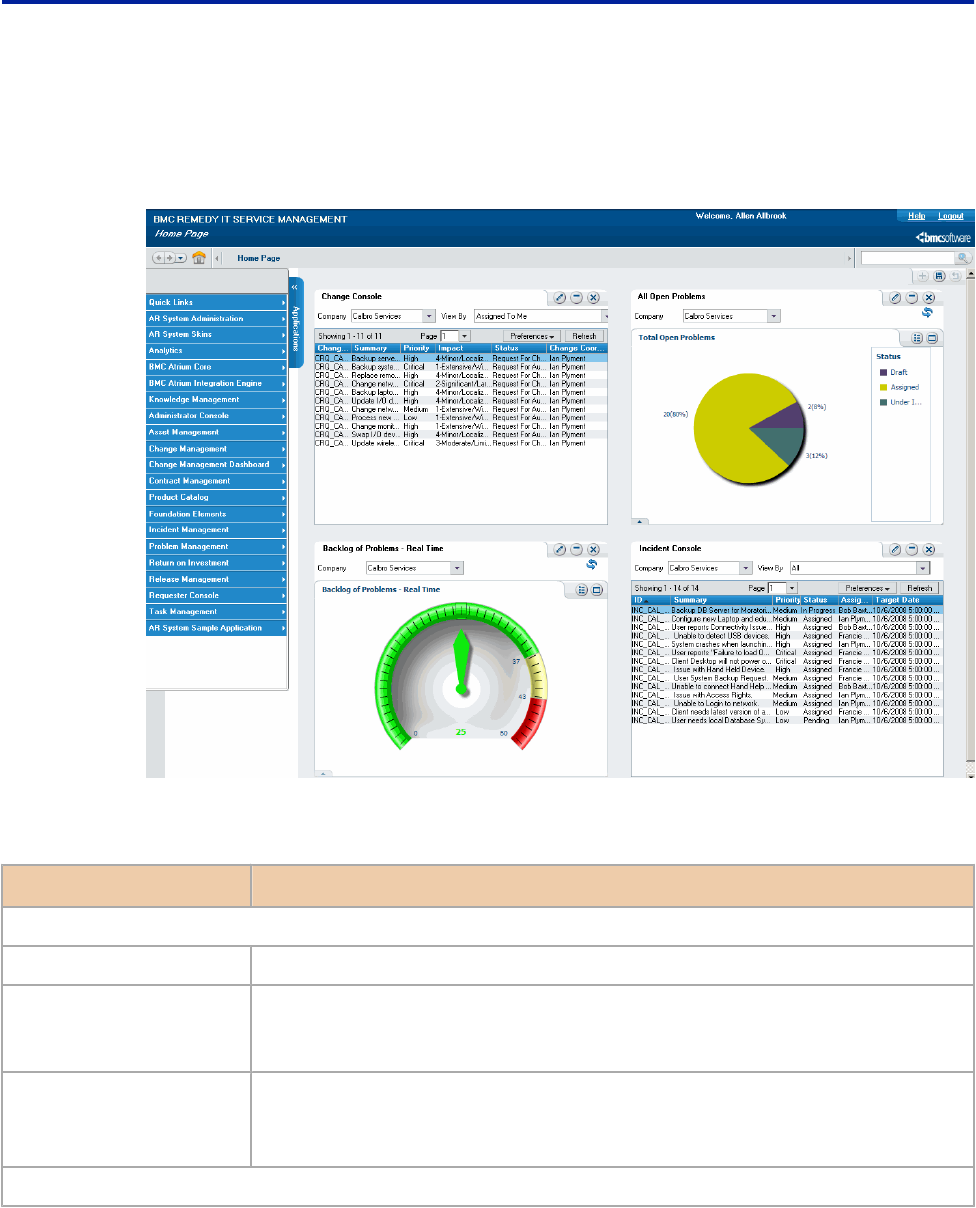
The following figure illustrates the functional areas of the IT Home Page.
Figure 1: IT Home Page and its functional areas
The following table describes each of the functional areas of the IT Home Page.
Functional area Purpose
Home Page header
Logout Click Logout to exit the application.
Breadcrumb bar The breadcrumb bar helps you keep track of the records you are viewing and
helps with navigation. For more information about breadcrumbs, refer to
“Navigating consoles, forms, and modules ” on page 29.
Global search Type in a word or a phrase in the search area, and the application will search
across multiple forms for records that match your input. For more information
about global search, refer to “Using Global search” on page 160.
Navigation pane
About the IT Home Page
24
BMC Remedy Service Desk: Incident Management User Guide

Functional area Purpose
Applications Depending on your permissions and other installed applications, the following
links are displayed. Use them to open applications.
■Quick Links
■AR System Administration
■Analytics
■BMC Atrium Core
■BMC Atrium Integration Engine
■Administrator Console
■Asset Management
■Change Management
■Change Management Dashboard
■Contract Management
■Product Catalog
■Foundation Elements
■Incident Management
■Problem Management
■Return On Investment
■Release Management
■Requestor Console
■Task Management
Note: When you run your mouse over the applications, you see a second menu.
You can select one of those options to go directly to a form. For example, roll
over Change Management and select Change/Release Calendar. The Calendar
screen appears.
Configuration Buttons Use these buttons to configure your panel display.
Overview console
About the IT Home Page
Chapter 1 Introducing BMC Remedy Incident Management 25

Functional area Purpose
Company and View By These fields combine to provide a way to indicate the company name and the
assigned-to categories filtering the records in the Console List table.
Refresh This button refreshes the data in the table.
Preferences This button allows you to set preferences for the console list table. You can
remove columns, set refresh intervals, reset and save your preferences.
Console List table This table lists the different types of requests.
Configuring the IT Home Page
You can configure the IT Home Page to display information of your choice. For
example, Bob Baxter is the Manager for payroll at Calbro Services. He likes to keep
track of all potential problems, changes, and incidents pertaining to his department.
He also tracks software license contracts so that he knows which ones are about to
expire. Bob configures his panels to display all the information he is looking for, as
follows:
■Asset Management => Contracts About to Expire in 90 Days
■Change Management => All Open Changes with Extensive Impact
■Incident Management => All Open Incidents with Extensive Impact
■Problem Management => All Open Problems by Status and Priority
To add or delete panels
You can specify how many panels to display on your IT Home Page up to a
maximum of four panels.
1 In the IT Home Page, click the Add panels to layout button.
Four panels appear.
2 To delete a panel, click the Close button on the panel.
To configure panels
You can select what to display on your IT Home Page.
Note
You can configure your panels only with options for which you have permissions.
About the IT Home Page
26
BMC Remedy Service Desk: Incident Management User Guide

1 In the panel, click the Show list and run your cursor over the list of options.
2 From the list of work areas for each option, select the one to display (for example,
Asset Management => Software Certificates).
The panel displays your selection.
3 Repeat Step 1 to for your other panels.
To change display on a panel, click the Edit button to display the Show list,
and make another selection.
4 Click the Save Current Layout button to save your IT Home Page.
A dialog box confirms that your customized layout has been saved.
5 Click OK.
When you next log in, you will see your saved IT Home Page.
To expand and collapse panels
1 In the panel, click the Collapse button. The panel will collapse. In the panel
click the Expand button. The panel will expand to its original size.
To restore a default IT Home Page view
1 In the IT Home Page, click the Restore Default Layout button. A dialog box
informs you that the default layout for this page will be brought back. Click OK
to proceed or Cancel to retain your current layout. If you click OK, the panels on
the IT Home Page disappear and the Overview Console is displayed.
To hide or show the navigation pane
1 In the IT Home Page, click the Applications button to hide or show the
navigation pane.
Consoles overview
The following consoles provide access to all or a part of BMC Remedy Incident
Management:
■Requester console
About the IT Home Page
Chapter 1 Introducing BMC Remedy Incident Management 27
■Overview console
■Incident Management console
Note
Figure 2 on page 28 shows how these consoles integrate with BMC Remedy
Incident Management and other BMC Remedy ITSM applications.
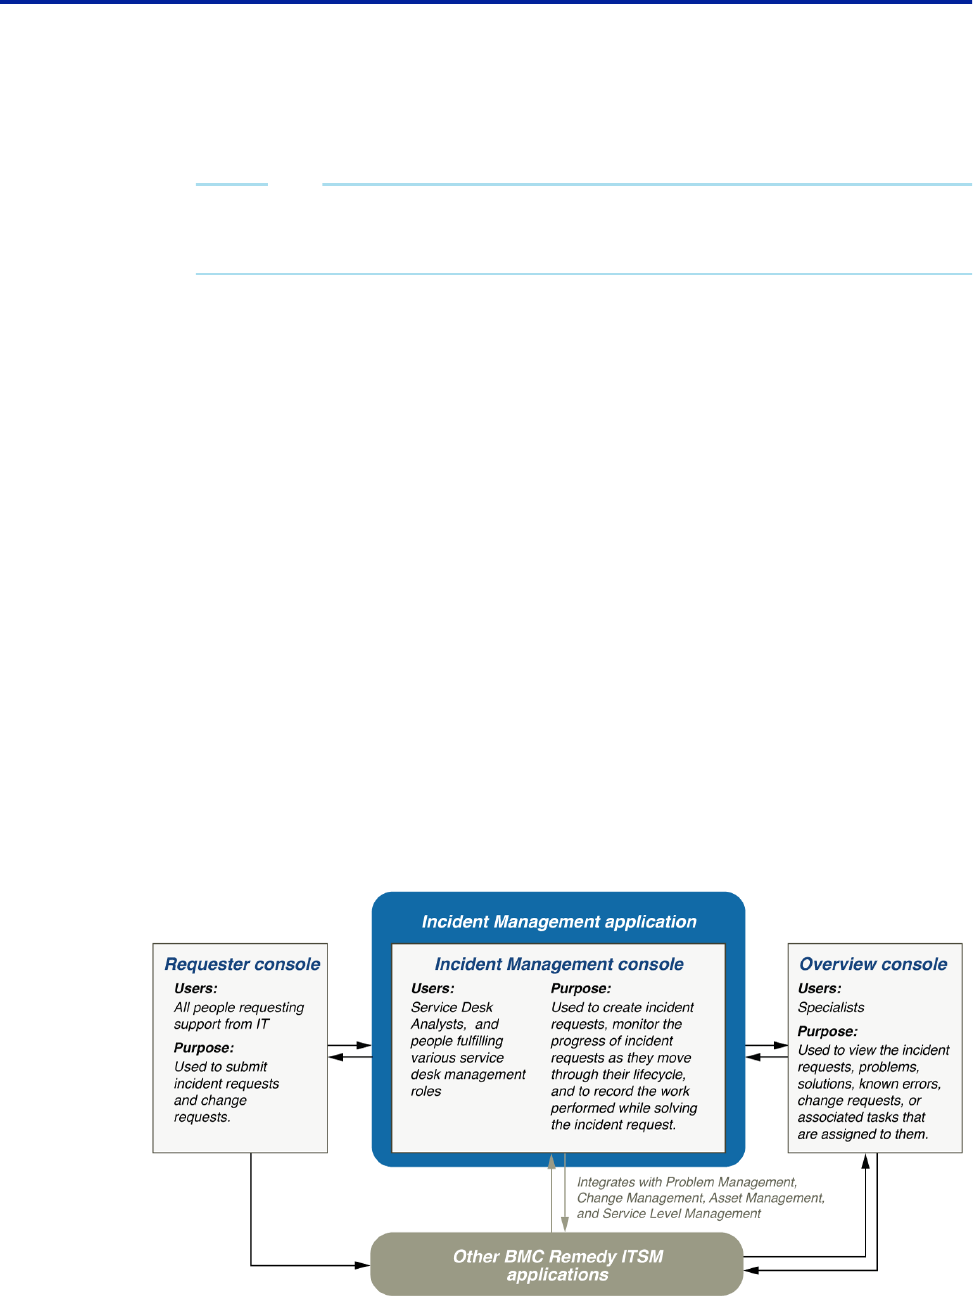
From the Requester console, IT users can submit incident requests directly to BMC
Remedy Incident Management.
Using the Overview console, service desk workers who fulfill many different roles
can view incident requests that are assigned to them through BMC Remedy Incident
Management, and additional work assignments that come to them through other
BMC Remedy ITSM applications with which BMC Remedy Incident Management
integrates:
■BMC Remedy Problem Management
■BMC Remedy Asset Management
■BMC Remedy Change Management
The Incident Management console is the main console for the application. It provides
service desk workers with a single point from which they can generate incident
requests, monitor the progress of incident requests as they move through their
lifecycle, and record work that was performed while solving the incident request.
Figure 2: Consoles used to access BMC Remedy Incident Management
About the IT Home Page
28
BMC Remedy Service Desk: Incident Management User Guide

Navigating consoles, forms, and modules
This section describes how to navigate around BMC Remedy ITSM consoles, forms,
and modules.
In most cases, when you open consoles, forms, and modules from the IT Home page,
they open inside the IT Home page view. Similarly, if you open a form from a
console, the form replaces the console in the view.
If you open a related record from a form, the related record opens in the view that
was occupied by the form. For example, if you are working with a problem
investigation (the "parent" record) and from the parent record you open a related
incident request, the incident request replaces the parent record in the view. If you
then open a change request from the incident request, the change request replaces
the incident request in the view, and so on. To help you keep track of the records
you are viewing and to help with navigation, there is a breadcrumb bar across the
top of the view field.
Note
Not all of the consoles, forms, and modules open in the view area. For example, CI
records open in a new window. When a console, module, or form opens in a
window, it is not added to the breadcrumb bar.
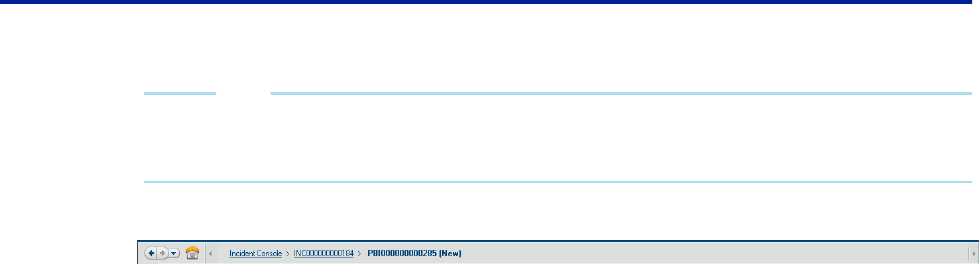
The breadcrumb bar contains links to the records that you opened from the parent
record. When you open a record, the breadcrumb trail expands along the
breadcrumb bar to the right, with the new link. If there are more than six links in the
breadcrumb trail, arrows appear at one or both ends of the bar that let you scroll
back and forward on the bar to see links not currently in the view.
The first link in the breadcrumb trail indicates the place from which you started. It
can be a console or a form. For example, if you open a change request record directly
from the IT Home page, the first link in the breadcrumb trail takes you to the change
request.
The last link corresponds to the record currently in the view. If you open a link to the
left of the record currently in view, the system truncates the breadcrumb trail to that
link. The history is retained, however, so you can use the back and forward arrows
in the navigation controls to move through the bar one record at a time. There is also
a history of your most recently viewed records, which you can use to move directly
to a record. Click the down arrow to open the history list.
Navigating consoles, forms, and modules
Chapter 1 Introducing BMC Remedy Incident Management 29
Note
The Forward button is only visible after you move back down the breadcrumb bar
by opening a link to a record that you previously viewed.
Figure 3: The breadcrumb navigation buttons and bar
If you are viewing a record from the middle of the breadcrumb trail and then branch
off to another parent-type record, the system removes the forward breadcrumb trail
from the point where you branched off and starts a new history from there, using the
new parent-type record as the starting point. For example: You open a problem
investigation, then open a related incident request, and from the incident request
you open a related change request. If you go back to the incident request record and
then open a second problem investigation, the breadcrumb bar no longer contains a
link to the change request. The breadcrumb trail now shows the original problem
investigation, the incident request, and the second problem investigation. It then
shows any related records that you subsequently open from the second problem
investigation.
When you close the parent record, the system removes the breadcrumb history.
What happens to data as I move back and forth on the
breadcrumb trail?
If you are entering information into a record and open another record from the
breadcrumb trail, the system prompts you to save the work, if you have not done so.
If you do not save the information, the system does not preserve it on the record and
you must re-enter it later.
If someone updates a record on your breadcrumb trail that is not currently in the
view, those changes are visible to you when you open the record again.
How does the breadcrumb trail behave with forms in
Search mode?
If you run a search from a form that is in Search mode, the last entry in the
breadcrumb trail is the name of the form.
When you open a record from the search results table, that record does not appear in
the breadcrumb trail. However, if you drill down through that record to open other
related records, those related records will appear in the breadcrumb trail.
To return to the originating record, use the history list.
Navigating consoles, forms, and modules
30
BMC Remedy Service Desk: Incident Management User Guide

Note
All of the records that you open from a form in Search mode are added to the history
list.
To return to the results table, click the name of the form in the breadcrumb trail.
Can I force a second window to open?
If you press the Shift key and then click a record entry in a console or in any search
results table, the record opens in a second window. Also, if you hold the Shift key
and click a link, button, and so on, the form or dialog box associated with the link or
button opens in another window.
Note
If there is a record in the history list that you want to open in a second window,
press the Shift key and then double-click the entry.
Which consoles, forms, and modules open in a new window?
Not all of the consoles, forms, and modules open in the IT Home page's view. The
consoles, forms, and modules in the following list open in a new window. If you
open one of these from the IT Home page, any unsaved changes to the IT Home
page are lost.
Tip
Before you open any of these consoles, forms, or modules, save the changes to the IT
Home page that you want to keep.
■BMC Remedy Asset Management, except for the Asset Management console.
■BMC Action Request System Administrator
■All BMC Atrium applications
■Application Administration
■BMC Service Level Management
■All Service Request Management entry points, except for Work Order
■Analytics
■Service Management Process Model
Navigating consoles, forms, and modules
Chapter 1 Introducing BMC Remedy Incident Management 31

Incident Request form views
BMC Remedy Incident Management release provides different ways to view the
Incident Request form:
■Best Practice view (the default view)
■Classic view
Your view is configured for you by your system administrator. For information
about configuring views, see the BMC Remedy IT Service Management Administration
Guide for information about configuring views.
Note
If a procedure differs depending on the view, both methods are described.
Instructions for the Best Practice view are provided first.
Best Practice view
In this view, the fields most commonly used for creating, resolving, and updating
incident requests are immediately visible. You can access additional, less frequently
used functionality from the tabbed sections of the form or from the links in the
Navigation pane.
The order in which the fields appear on the form reflect the order in which you
gather the information when you create the incident request record. This reduces the
amount of time needed to create the record and improves the overall efficiency of the
operation.
Also, by making the Work Detail tab visible beside the customer information when
you open the record, the most important information is immediately visible when
you require a quick but comprehensive overview of an existing incident request.
The following list outlines the Best Practice view features:
■Customer field—The Customer field is where you record the name of the
customer for whom you will be performing the work related to the incident
request. For more information about using the Customer field, see Using the
Customer and Contact fields in Best Practice view on page 35.
■Contact field—The Contact field is where you record the name of someone who
you can contact about the incident request, if the person named in the Customer
field is unavailable. For example, if the person named in the Customer field has an
administrative assistant, you would enter this person's name in the Contatct field.
Incident Request form views
32
BMC Remedy Service Desk: Incident Management User Guide

For more information about using the Contact field, see Using the Customer and
Contact fields in Best Practice view on page 35.
■Template field—The Template field encourages the use of templates. For
information about the benefits of using templates and how to create an incident
request using templates, see Creating an Incident request record using a template
on page 76.
■Service field—The Service field relates business service configuration items (CIs)
to the incident request at the time it is created. Service entitlement for business
service CIs are related either to the customer directly or to the customer’s
company, organization, or department. Only the CIs that you are entitled to see
appear in the selection list for this field.
■CI field—The CI field provides a place for you to indicate to which piece of
infrastructure the incident request pertains. This field is a required field when you
resolve the incident, however, you can indicate the CI at any time in the incident
request lifecycle.
■Product categorization—The product categorization fields are automatically filled
based on the business service CI that you select in the Service field. This
automation reduces registration time and makes sure that the correct information
is used to determine the assignment of the incident request. You can also quickly
select or change operational and product categorizations from the Quick Actions
area of the Navigation pane by using the Select Operational and Select Product links.
Incident Request form views
Chapter 1 Introducing BMC Remedy Incident Management 33
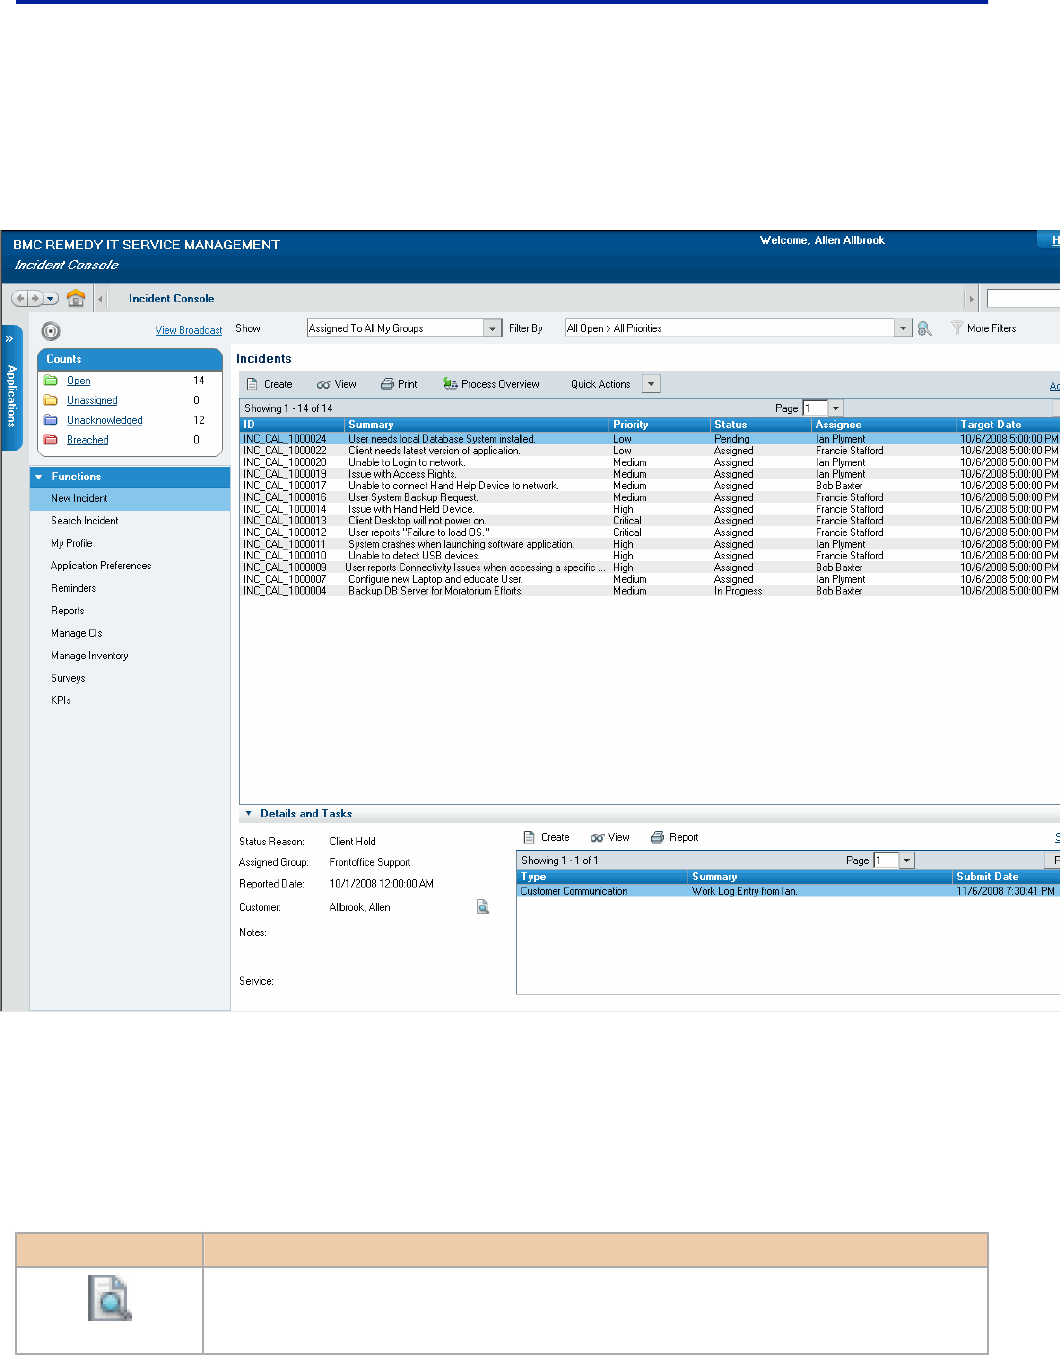
The Best Practice view is recommended for all BMC Remedy Incident Management
users, regardless of their role. For information about BMC Remedy Incident
Management roles, see User roles on page 37.
Figure 4: Incident console - Best Practice view
Icons used in the interface
This table describes the icons used on the consoles and in the Best Practice view of
the application interface.
Table 2: Icon descriptions
Icon Description
Detail—Displays detailed information about the field's content. For example, if you
click the Detail icon associated with the Customer field, the People form appears with
information about the customer whose name appears in the field.
Incident Request form views
34
BMC Remedy Service Desk: Incident Management User Guide
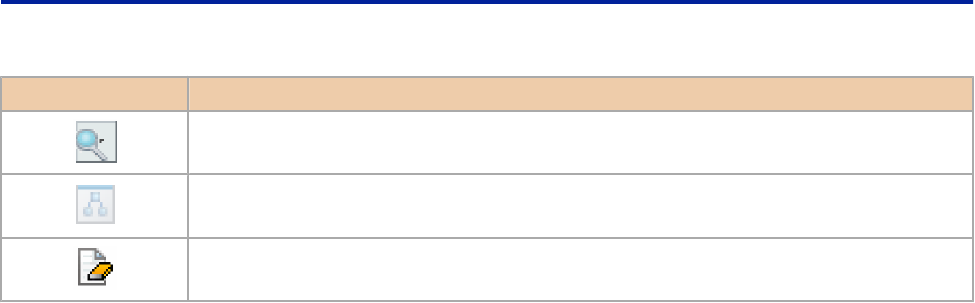
Icon Description
Search—Searches for field contents. This icon is associated with fields that have the
ability to open a search dialog box or form.
Explore CI—Opens the BMC Atrium Explorer for the CIs selected in the Service and
CI fields.
Clear field contents—Clears the contents of the field and allows you to make another
selection. It does not delete the record.
Using the Customer and Contact fields in Best Practice view
Depending on how the Customer and Contact fields are configured, you can search
for a customer based on Corporate ID, First Name, Last Name, Internet Email, or
Phone Number.
If the customer record uses the VIP or the Sensitive flag, this information appears in
red after the Customer field label.
Clicking the maginfying glass icon to the right of the Customer and the Contact
fields opens the People form. From there, you can create a customer profile record if
one does not exist. For more information about creating a customer profile, see
Adding or modifying a customer profile on page 82.
The eraser icon to the right of the Customer and the Contact fields only clears the
field’s contents. It does not delete the customer profile.
For more information about creating and modifying People records from the
Incident Request form, see Adding or modifying a customer profile on page 82.
Classic view
The Classic view is the Incident Request form as it appeared in previous releases of
BMC Remedy Incident Management. This view is provided for customers who are
upgrading from earlier versions of BMC Remedy Incident Management and who are
not yet ready to adopt the Best Practice view. The following fields have been added
to the Classification tab:
■Service field—The Service field relates business service configuration items (CIs)
to the incident request at the time it is created. Service entitlement for business
service CIs are related either to the customer directly or to the customer’s
company, organization, or department. Only the CIs that you are entitled to see
appear in the selection list for this field.
Incident Request form views
Chapter 1 Introducing BMC Remedy Incident Management 35

■CI field—The CI field provides a place for you to indicate to which piece of
infrastructure the incident request pertains. This field is a required field when you
resolve the incident, however, you can indicate the CI at any time in the incident
request lifecycle.
User interface standards for field labels
On BMC Remedy ITSM forms, field labels provide data entry hints.
Table 3 on page 36 lists the significance of field-label formats and special characters.
Table 3: Significance of field labels for data entry
Field-label format or special characters Significance for data entry
Bold label followed by an asterisk (*) Field is required to submit and update the form.
Note: If you leave the field blank when you attempt
to submit the form, the field is highlighted with a red
border.
Field label not bolded Field is optional.
Italicized label System-generated value for this field. Typically this
field is read-only for the user.
Label followed by a plus sign (+) Additional functionality is associated with this field.
Typically, you access this functionality by pressing
Enter. For example, you might press Enter in a field
to access a search dialog box or to perform a search
based on the value typed into the field.
If a field label followed by a plus sign is also bolded,
the field is required. Otherwise, the field is optional.
Calbro Services
In the BMC Remedy ITSM documentation set, a fictional company named Calbro
Services helps explain how BMC Remedy ITSM principles and procedures are used
in practice.
Although Calbro Services is a fictional company, it is based on research of actual
BMC Software customers. Learning how Calbro Services manages common IT
Service Management scenarios should prove useful as you use the BMC Remedy
ITSM applications in your own environment.
Calbro Services, a large, global company, is headquartered in New York City and
publicly traded on the New York Stock Exchange. The company has 27,000
Calbro Services
36
BMC Remedy Service Desk: Incident Management User Guide
employees in 240 offices located in 20 countries. Table 4 on page 37 describes key
business services in Calbro Services.
Table 4: Key business services
Service Description
Online banking 500 ATMs in major cities
WWW presence Corporate site and online brokerage services
Discount equity brokerage Online and storefront services
Sales force automation Automated sales activities such as leads, orders, reports,
and so on
Customer support Support centers in the United States, Europe, and Asia
Mass marketing World-wide marketing campaigns aimed at making
Calbro Services a household name
User roles
BMC Remedy Incident Management provides functionality both to people
requesting support from IT and to IT people providing support to others. How each
person uses BMC Remedy Incident Management defines their role. BMC Remedy
Incident Management roles are divided into the following categories:
■support staff, for a description of these roles, see Support staff roles on page 38.
■managers, for a description of these roles, see Manager roles on page 38.
■users, for a description of this role, see User role on page 39.
Note
The permissions model in BMC Remedy Incident Management has had several
updates since version 6.0. To define permissions and functional roles, review
the permissions and functional roles section in the BMC Remedy IT Service
Management Administration Guide.
The following figure illustrates the different BMC Remedy Incident Management
support staff and management roles. It also shows where each role fits into the
lifecycle of an incident request. For general information about the incident request
lifecycle, see Process flow and the lifecycle of an incident request on page 41.
The relationship between specific BMC Remedy Incident Management roles and the
individual stages in the lifecycle are explained in the following sections:
■Registering and assigning incident requests as support staff on page 67
User roles
Chapter 1 Introducing BMC Remedy Incident Management 37

■Resolving and closing incident requests as support staff on page 97
■Working with incident requests as a manager on page 117
Support staff roles
For the incident management process, the SMPM defines the following support staff
roles.
Service Desk Analysts are usually first-line support staff. A service desk analyst’s
responsibilities include:
■Providing the interface between the service owner organization and its customers.
■Obtaining accurate and complete information from the user when creating the
incident request, and doing so efficiently and accurately.
■Resolving as many of their registered incident requests as possible within the
limitations of their access rights and their time constraints.
■Ensuring that the incident requests that they have registered, but which they are
unable to resolve, are assigned to the most appropriate group for resolution.
■Validating incident request resolutions with their users.
Specialists are usually second-line and third-line support staff. They are
considered subject matter experts. Their main responsibility is to provide an
accurate analysis and a diagnosis of their assigned incident requests to restore
service to the affected users. A specialist’s responsibilities include:
■Resolving incident requests.
■Updating incident requests with relevant information and status changes.
■Escalating incident requests, for which resolutions can be implemented only
through the change management process, to the owner of the affected service.
Manager roles
For the incident management process, the SMPM defines the following management
roles.
Group coordinators are responsible for the quality and integrity of the incident
management processes and for the work of their support group members. They
User roles
38
BMC Remedy Service Desk: Incident Management User Guide

coordinate the assignment of incident requests to support staff. The group
coordinator’s other responsibilities include:
■Monitoring incidents.
■Monitoring open incidents requiring assignment.
■Managing the assignment of incidents to their appropriate support groups for
resolution.
■Receiving notifications of incident assignments and escalations.
■Facilitating the resolution of escalated incidents in accordance with the escalation
policy.
■Ensuring the resolution of incidents within the support group's service targets.
■Ensuring the overall completeness and accuracy of closed incidents.
■Reviewing reports.
■Ensuring that incidents requiring root cause analysis are copied into BMC
Remedy Problem Management.
■Managing support group membership.
■Managing scripts, templates, and decision trees.
On-Duty managers take over the responsibility from service owners when the
owner is not available to perform the incident escalation handling procedure. In
these situations, the on-duty manager decides whether an escalated incident must be
resolved by implementing an emergency change, by recovering the affected service
at its continuity site, or by continuing the resolution of the incident within the
incident management process.
Service owners create and assign incident requests. They also decide whether an
escalated incident needs to be resolved by implementing an emergency change, by
recovering the affected service at its continuity site, or by continuing the resolution
of the incident within the incident management process.
User role
A user is usually an employee who needs assistance from the IT support staff to
resolve an incident or implement a change. Anyone in your organization can be a user.
The incident user’s responsibilities include:
User roles
Chapter 1 Introducing BMC Remedy Incident Management 39

■Requesting support when necessary and providing the required information to
help resolve the incident requests. They submit requests by filling out the Request
form, or by contacting the service desk by email or telephone.
■Verifying the solution provided by the service owner organization and reopening
the incident request if the solution is not acceptable.
Mapping permission groups to SMPM roles
The following table maps the SMPM defined incident management roles to the
equivalent permissions that each role needs in BMC Remedy Incident Management.
For more information about how SMPM roles map to BMC Remedy ITSM Suite, see
the BMC Service Management Process Model Role Mapping to BMC Remedy ITSM Suite
white paper.
Note
This section does not list of all permission groups and functional roles defined in
BMC Remedy Incident Management, only those that are mapped to SMPM roles.
Table 5: Incident management role mapping
SMPM role name Calbro user BMC Remedy Incident Management permission groups
Service Desk Analyst FrancieStafford ■Incident Master
■Problem Viewer
■Infrastructure Change Viewer
■Asset Viewer
Specialist Ian Plyment ■Incident User
■Problem User
■Task User
■Infrastructure Change Viewer
■Asset Viewer
User roles
40
BMC Remedy Service Desk: Incident Management User Guide

SMPM role name Calbro user BMC Remedy Incident Management permission groups
Group Coordinator BobBaxter ■Incident User
■Problem User
■Infrastructure Change User
■Asset Viewer
On-Duty Manager MaryMann ■Incident User
■Problem Viewer
■Infrastructure Change Viewer
■Asset Viewer
Service Owner AllenAllbrook ■Incident User
■Problem Viewer
■Infrastructure Change Viewer
■Asset Viewer
User JoeUnser ■No BMC Remedy Incident Management
permissions are needed.
Process flow and the lifecycle of an incident
request
The Process Flow Status area displays the flow of the incident request through the
stages of the process in blue. The current stage of the incident is highlighted in green.
The status of the incident is indicated by both color and text.
Process flow and the lifecycle of an incident request
Chapter 1 Introducing BMC Remedy Incident Management 41
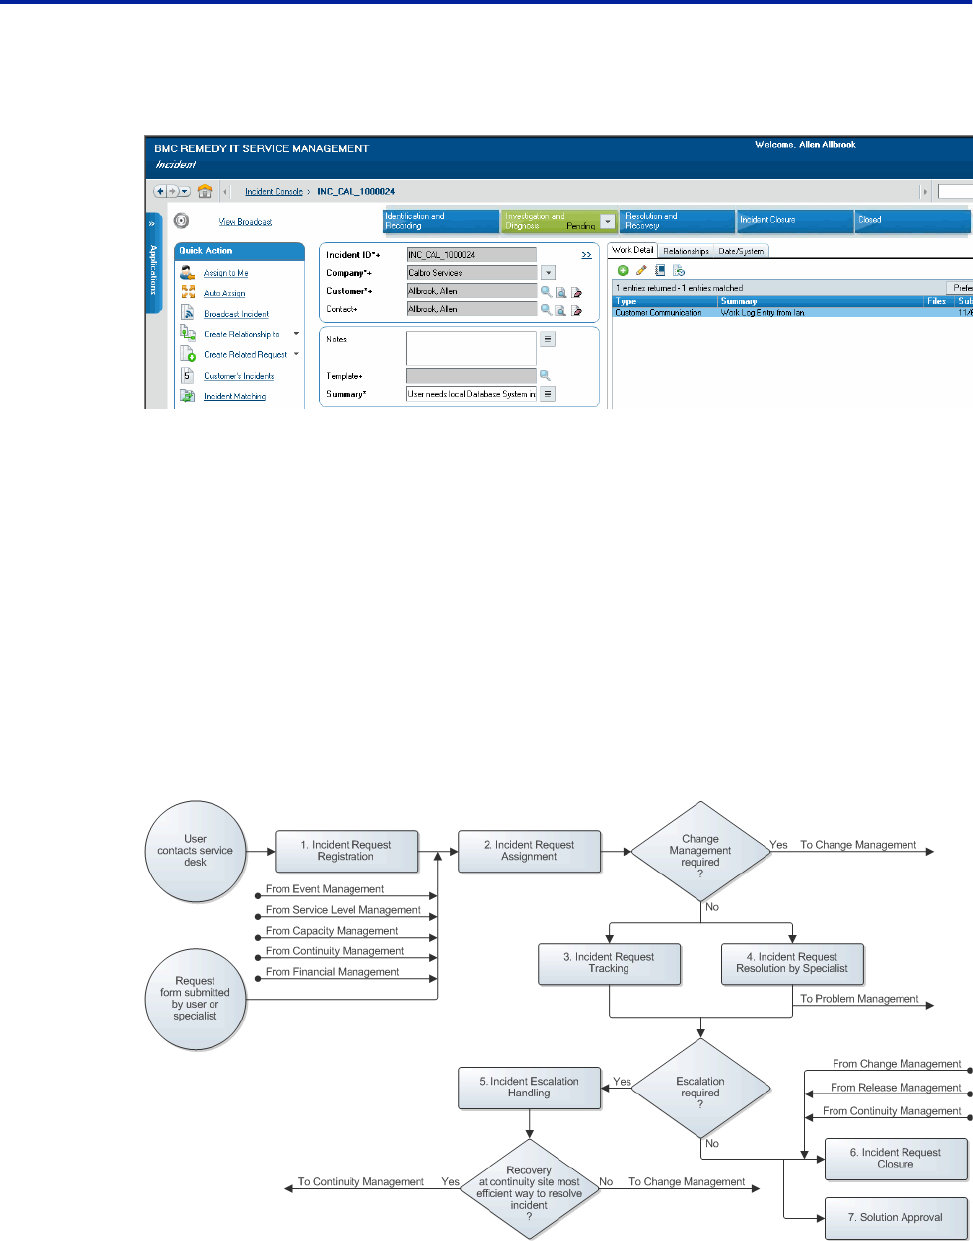
Figure 5: The Process Flow Status area (Best Practice view)
The Process Flow Status area also guides you through the stages of the incident
lifecycle. At each stage, the diagram provides applicable accelerators. When you
select an accelerator, you are prompted to enter the data required to complete the
task. You can also enter optional recommended data in the dialog box.
The following figure provides an overview of the incident request lifecycle, as
described by SMPM. Each of the major steps in the diagram corresponds to sections
in Registering and assigning incident requests as support staff on page 67,
Resolving and closing incident requests as support staff on page 97, and Working
with incident requests as a manager on page 117, where the steps and their
associated tasks are explained in more detail.
Figure 6: Incident Request lifecycle
Process flow and the lifecycle of an incident request
42
BMC Remedy Service Desk: Incident Management User Guide

Incident management use cases
This section describes common incident management use cases that you typically
encounter as IT support staff. The Calbro Services user personas help to illustrate the
use cases and ITIL good practices workflow, however, the use cases do not
necessarily make reference to specific Calbro Service sample data.
The following use cases are described:
Incident resolution—first call resolution on page 43
Incident resolution with assignment to specialist on page 45
Incident resolution—first call resolution
Francie Stafford is a service desk analyst who works on the Calbro Services service
desk. She receives a call from Joe Unser, a Calbro Services benefits agents who
cannot access one of his key applications, because he is locked out of his user
account. Francie creates an incident request, resolves the incident for Joe, and then
closes the incident request.
Table 6: Incident resolution—first call resolution
Role Tasks and actions Explanation
Customer Contacting the service desk
1 Joe Unser, the service desk
customer, phones Francie Stafford
on the service desk
Joe Unser needs to have one of his user
accounts unlocked, and calls the service
desk to open an incident request.
Incident management use cases
Chapter 1 Introducing BMC Remedy Incident Management 43

Role Tasks and actions Explanation
Service desk analyst Registering the incident request record
1 On the Incident Management
console, Francie clicks Create, to
open a new incident request record.
2 Francie enters the first few letters of
Joe’s email address on the incident
request form and then presses
Enter. The application matches the
email address and fills in part of the
incident request record based on
the contents of Joe’s People record.
3 Francie selects the appropriate
template to populate the new
incident request record with basic
information common to all requests
of this type.
4 In the template, Francie sees a set of
work instructions that describe how
to unlock Joe’s account.
Francie Stafford receives Joe’s call and,
using the BMC Remedy Incident
Management Best Practice view, creates a
new incident request record using the
applicable template.
For detailed information about how to do
this, see Creating an Incident request record
using a template on page 76.
Francie is able to unlock Joe’s account while
he is on the phone.
For detailed information about first call
resolution, see First call resolution on page
85.
Service desk analyst
and Service desk
customer
Closing the incident request
1 After unlocking Joe’s account,
Francie asks him to confirm the
account has been unlocked
successfully by logging into his
application.
2 Joe is able to log in, and confirms
this to Francie.
3 Francie then enters the resolution in
the Work Details tab (Work Info
when using the Classic view),
makes sure that all other required
fields on the incident request record
are completed, and then moves the
incident request record’s Status to
Closed.
While Joe is still on the phone, Francie asks
him to confirm that his account is unlocked
and that he can log in to his system. Joe
confirms this, so Francie updates the
resolution field on the incident request
record to indicate this. Francie closes the
incident request record.
For detailed information about closing
incident request records, see Closing
incident requests on page 111.
Incident management use cases
44
BMC Remedy Service Desk: Incident Management User Guide

Incident resolution with assignment to specialist
Francie Stafford receives another call from Joe Unser who, this time, cannot send
documents to his local printer. Francie creates an incident request, but cannot resolve
it herself. The incident request is automatically assigned to a specialist, Ian Plyment,
who accepts the assignment and restores Joe’s printer connection. Ian then closes the
incident request.
Table 7: Incident resolution with assignment to specialist
Role Tasks and actions Explanation
Service desk
customer
Contacting the service desk
1 Joe Unser, the service desk
customer, phones Francie Stafford
on the service desk
Joe Unser cannot send documents to his
local printer.
Service desk analyst Registering the incident request record
1 On the Incident Management
console, Francie clicks Create, to
open a new incident request record.
2 Francie enters the first few letters of
Joe’s email address on the incident
request form and then presses
Enter. The application matches the
email address and fills in part of the
incident request record based on
the contents of Joe’s People record.
3 Francie selects the appropriate
template to populate the new
incident request record with basic
information common to all requests
of this type.
4 After Francie completes the incident
request registration and saves it, the
incident request is assigned to an
assignment group as specified in
the template.
Francie Stafford receives Joe’s call and,
using the BMC Remedy Incident
Management Best Practice view, creates a
new incident request record from the
applicable template.
For detailed information about how to do
this, see Creating an Incident request record
using a template on page 76.
Incident management use cases
Chapter 1 Introducing BMC Remedy Incident Management 45
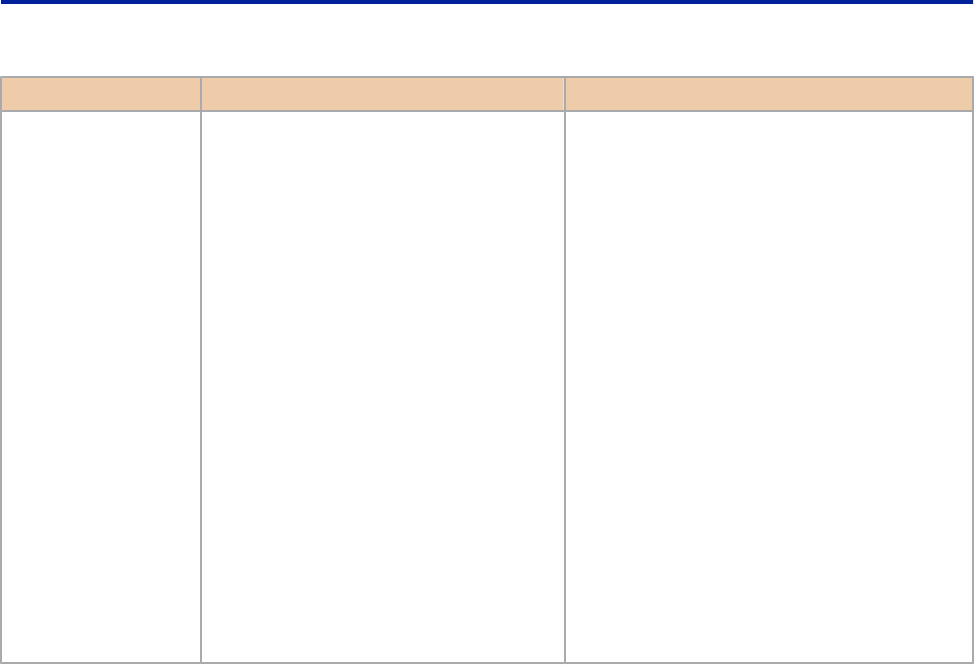
Role Tasks and actions Explanation
Specialist Accepting the assignment
1 On the Incident Management
console header, Ian selects his
company in the Company field and
his support group from the View By
field.
2 From the Defined searches area, he
runs All Open Unassigned - All
Priorities, which returns all of the
open, unassigned incident requests
for his support group.
3 Ian selects Joe’s incident request
and opens it.
4 In the Navigation pane, Ian selects
Assign to Me and then changes the
record’s status to In Progress.
Ian Plyment is a specialist who works for
the support group to which Joe’s incident
request is assigned. From the Incident
Management console, Ian runs a defined
search for all open, unassigned incident
request for his support group. Joe’s incident
request is one of the records found by the
search. Ian opens the record and accepts the
assignment.
For more information about how to run a
defined search, see Running Defined
Searches on page 157.
For more information about how to accept
an assignment see Accepting an incident
request on page 99.
Incident management use cases
46
BMC Remedy Service Desk: Incident Management User Guide

Role Tasks and actions Explanation
Specialist Using Incident Matching to resolve
the incident
1 From the Navigation pane on the
incident request record, Ian opens
the Incident Matching window.
2 On the Search Criteria Page 1 tab,
Ian types Printer in the Summary
Keyword Search field and selects
Connectivity from the Operational
Categorization Tier 1 menu.
3 He clicks Search.
Any matching incidents, problem
investigations, known errors, and
solutions appear in the tabs at the
bottom half of the dialog box.
1 Ian views details of the matching
records and finds information that
helps him resolve incident request.
2 From the Relationship Type list on
the Incident Matching window, Ian
selects Resolved By and then clicks
Relate With Solution. This copies
the solution from the matching
record to the Resolution field of the
incident request record.
Ian uses the Incident Matching feature to
determine the cause of Joe’s incident and
resolves it by restoring Joe’s printer
connection.
For more information about using the
Incident Matching feature, see To search for
matching records—Classic view on page
86. This section also discusses other
methods to search for possible solutions.
Completing the incident request
1 On the incident request record, Ian
makes sure that all other required
fields on the incident request record
are completed
2 Ian then moves the incident request
record’s status to Resolved and
provides a status reason of
Customer Follow-Up Required.
Ian is unable to contact Joe directly to
determine that his printing service is
successfully restored, so he completes the
incident request by moving the status to
Resolved with a status reason of Customer
Follow-Up Required. BMC Remedy Incident
Management sends Joe an email asking him
to contact the Service Desk to confirm that
the incident is resolved. If Joe does not
respond within a specific period of time,
which is configurable for each installation,
the auto close rule moves the incident
request’s status to Closed.
For more information about Closing an
incident request, including Completing an
Incident Request, see Closing incident
requests on page 111.
Incident management use cases
Chapter 1 Introducing BMC Remedy Incident Management 47

Incident request resolution—emergency change request
This user scenario describes how to resolve an incident request with an emergency
change request.
Joe Unser, a Calbro Services benefits agent, cannot access the local area network. He
contacts the Calbro Service desk, and Francie Stafford, a service desk analyst, creates
an incident request.
The incident request is assigned to Ian Plyment, a specialist in the support group
assigned to Joe’s company. Ian determines that Joe’s data port is broken, and an
emergency change is required to restore Joe’s service.
Ian contacts Allen Allbrook, the owner of the service, to let him know that an
emergency change is required. Allen assesses the risk and authorizes Ian to perform
the work.
Ian then replaces Joe’s data port and documents his actions in the incident request.
Ian verifies with Joe that he can now access the local area network.
Ian closes the incident request and notifies Mary Mann, the change coordinator, of
the emergency change so she can register the change. This ensures everyone can see
what was changed, should the emergency change cause other incidents to occur. It
also ensures that BMC Atrium CMDB is updated.
Note
BMC Remedy Incident Management and BMC Remedy Change Management must
be installed to follow this user scenario.
Detailed information about the individual actions mentioned in this user scenario
are described in the BMC Remedy Service Desk: Incident Management User Guide and
the BMC Remedy Change Management User Guide.
Table 8 on page 48 describes the typical steps involved in this user scenario.
Table 8: Resolving an incident request with an emergency change
Role Actions Explanation
Service desk customer The customer contacts the service desk. Joe cannot access the local area network.
Incident management use cases
48
BMC Remedy Service Desk: Incident Management User Guide

Role Actions Explanation
Service desk analyst On the Incident console, the service desk
analyst registers the incident request
record.
The analyst uses Incident Matching to
search for a solution.
When the specialist does not find a
solution, the specialist completes the
incident request registration and saves
the record.
The incident request is assigned to an
assignment group as specified in the
template.
Francie Stafford receives Joe’s call and,
using the BMC Remedy Incident
Management Best Practice view, creates
a new incident request record from the
applicable template.
Specialist The specialist accepts the assignment:
On the Incident console, the specialist
searches for incident requests that are
assigned to his support group, but not to
an individual.
The specialist opens the customer's
incident request and assigns it to himself.
In the work details, the specialist
specifies that the incident request is
being handled according to the
emergency change protocol.
Ian Plyment is a specialist working for
the support group that supports Joe’s
company. Ian searches for all open,
unassigned incident requests for his
support group. Joe’s incident request is
one of the records found by the search.
Ian opens the record and accepts the
assignment.
Ian investigates Joe’s incident request
and determines that his data port is
broken. The fix requires an emergency
change. Ian contacts Allen Allbrook, the
owner of the affected service, to tell him
this incident request requires an
emergency change. Ian also notes this in
the Work Detail tab of the incident
request.
Allen analyzes the risk and impact of the
emergency change request and then
authorizes Ian to implement the
emergency change.
Specialist The specialist implements the change
and records all work in the incident
request. The specialist contacts the
customer to verify that the affected
service has been restored. The specialist
closes the incident request.
After the change is implemented and
verified, Ian closes the incident request
and asks Mary Mann, the change
coordinator, to register a change for this
emergency change. This ensures
everyone can see what was changed, in
case the emergency change causes
incidents to occur. This also makes sure
Allen, the service owner, is informed
and BMC Atrium CMDB is updated.
Incident management use cases
Chapter 1 Introducing BMC Remedy Incident Management 49
Role Actions Explanation
Change coordinator The change coordinator creates an
emergency change request.
From the Incident form, the change
coordinator creates a change request.
This opens the Change Request form and
copies information from the incident
request record to the change request
record.
From Joe’s incident ticket, Mary creates
the emergency change request. By
creating the request from the incident
request, much of the information is
copied directly from the incident request
record to the change request record. This
saves time and ensures accuracy. While
creating the emergency change request,
Mary creates a relationship between
Joe’s incident request and the emergency
change request.
Incident management use cases
50
BMC Remedy Service Desk: Incident Management User Guide

Working with the Requester
console
The Requester console enables users to quickly submit changes and incidents to
BMC Remedy Change Management and BMC Remedy Incident Management.
2
Chapter 2 Working with the Requester console 51
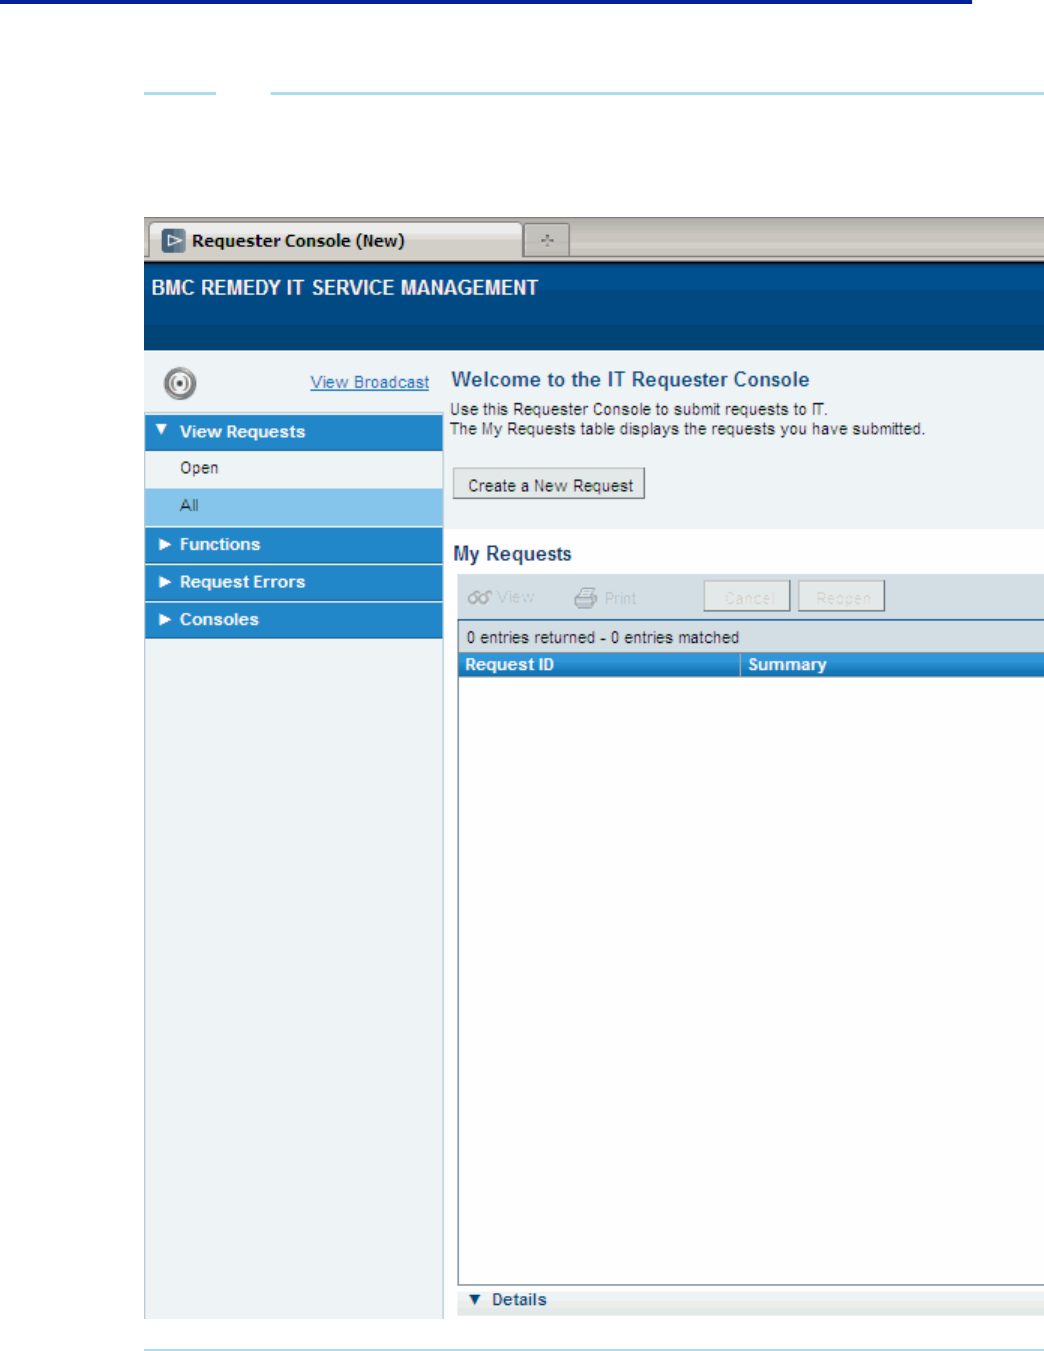
Note
If you have BMC Service Request Management installed, the Requester console is replaced by BMC Service Request Management. For information about BMC Service Request Management, see
BMC Service Request Management User Guide.
Figure 7: Requestor console
52
BMC Remedy Service Desk: Incident Management User Guide

Requester role
Users of the Requester console are usually employees who need assistance from the
IT support staff. The user is typically an employee in the organization who must
have a change implemented or an incident resolved. Any member of your
organization can be a user.
However, the user might not be an employee. Non-employees can also be users
because non-registered users can also submit service requests.
Traditionally, after a user made a telephone call to a central help desk, a support
staff member logged the request. BMC Remedy Incident Management and BMC
Remedy Change Management provide user self-provisioning. Using the Requester
console, users can submit, track, and (in some cases) resolve their own requests.
BMC Remedy Change Management and BMC Remedy Incident Management are
preconfigured to work with the Requester console. However, an organization can
can decide to make the Requester console unavailable.
The Requester console is the primary interface for users to define and view their
requests. From the Requester console, you can define a request that is submitted to
BMC Remedy Change Management or BMC Remedy Incident Management. You
can also view requests and respond to a survey after the request has been resolved.
Requester console users
The following permissions can be used for accessing the Requester console to submit
service requests:
■Request Master—This user is responsible for troubleshooting service requests.
The request master can view requests submitted by other users and view the
details of a record in the Service Request form. This user is more of an
administrator than a support user.
■Registered User—This user has a record in the People form, and the user’s
AR login information is in the Login/Access Details tab of the People form or in
the BMC Remedy AR System User form.
■Unknown User—All other users are considered to be unknown users even if they
have a record in the People form. If a user’s login information is not in the People
form, the user is considered an unknown user.
Requester role
Chapter 2 Working with the Requester console 53

Note
For unknown users who do not have an BMC Remedy AR System login to be
able to access the Requester console, the BMC Remedy AR System server Allow
Guest User option must be selected. The Allow Guest User option is unavailable
in multi-tenancy mode (for more information about multi-tenancy, see the BMC
Remedy IT Service Management Guide to Multi-Tenancy). Also, the AR Submitter
locked mode option must be selected for users with a read-only license to
respond to surveys. A default People record with a valid BMC Remedy
AR System login must be defined in the application for use by unknown users.
For more information, see the BMC Remedy IT Service Management
Administration Guide.
If a user meets any of the following conditions, the user type is unknown user:
■The user has an entry in the People form and in the BMC Remedy AR System
User form, but does not have a BMC Remedy AR System login ID in the People
form.
■The user has an entry in the People form, but does not have an entry in the BMC
Remedy AR System User form or an BMC Remedy AR System login ID in the
People form. This type of user is also a BMC Remedy AR System guest user.
■The user does not have an entry in the People form but has an entry in the BMC
Remedy AR System User form.
■The user does not have an entry in the People form or in the BMC Remedy
AR System User form. This type of user is also an BMC Remedy AR System guest
user.
Additional factors that control access to the Requester console by unknown users
follow:
■Unknown users are not allowed access if the multi-tenancy option is selected. Multi-
tenancy restricts access of data from different companies or business units.
■In addition to setting the Tenancy Mode to Single-Tenancy, the Allow Unknown
Users option must be set to Yes and login information added.
The console is the entry point for users to define, view, update, or cancel service
requests.
Working with service requests
This section describes working with service requests.
Working with service requests
54
BMC Remedy Service Desk: Incident Management User Guide

Defining a service request
BMC recommends the New Request wizard as a simplified method of submitting
service requests. You can also define service requests from the Change and Incident
Request forms.
To define a service request
1 From the Requester console, click Create a New Request.
Pay careful attention to the following items for the Requester section:
■If you are a registered user, the fields in the Requester section are filled from
your People record. You can edit only the Phone and Email fields.
■If you are an unknown user, the First Name and Last Name fields are filled
with your login information. The Company is filled with the company name.
Unknown users must enter information in the Phone and Email fields.
2 Complete the required fields, as shown in bold with an asterisk.
a Select a definition from the Summary list that best describes your issue.
If the list does not contain the specific request to log, type a summary of the
request in the Summary field.
Note
If BMC Remedy Incident Management is installed, entering a summary or ad
hoc request” generates an incident request. If only BMC Remedy Change
Management is installed, a change request is generated.
If you select a summary definition that is an incident request, then related
solution database entries appear in the Possible Solutions table. If, however,
BMC Remedy Problem Management is not installed, possible solutions do not
appear for manually entered summaries or selected summary definitions.
If there is a solution database entry that might be valid, click the entry, and
then click View. Review the solution entry. If the solution resolves your
request, click Use Solution.
If you choose a matching solution, the solution entry is related your request
and the request is resolved automatically.
b Select an Urgency level for your request.
c If you do not have a record in the People form, enter your company, first name
and last name.
Working with service requests
Chapter 2 Working with the Requester console 55

3 (Optional) Click Add Attachment to enter request work information. You can
include a note or an attachment.
4 Complete the optional fields:
■Date Required—Enter the date when you need the request to be completed.
■Phone—Enter or edit your phone number.
■Email—Enter or edit your email address.
5 Click Save.
The request appears in the Requests table.
Service request state changes
For changes and incidents, the Requests table provides the status of its underlying
service request. Users are notified by email when a service request undergoes a
status change, for example, when a service request is moved from In Progress to
Completed or a change request reaches the Completed state.
Performing additional service request functions
In addition to defining a service request, you can perform the functions listed in the
following table. All the listed functions are performed from the Requester console.
Table 9: Additional service request functions
Function Action
Filter your service requests Click the appropriate link from the View Requests section, located in the
Navigation pane, and then select Open or All.
Note: Open is the default view. To change the default view, select another
sort option, and then click Save As Default View.
View a service request From the Requests table, select the service request, and then click View.
Only the requests that the logged in user has submitted appear in the
Requests table. Change requests are prefixed with CRQ and Incident
requests are prefixed by INC.
Working with service requests
56
BMC Remedy Service Desk: Incident Management User Guide

Function Action
Add work information From the Requests table, select the service request, and then click View.
Click the Add Work Info link in the console’s Functions section of the
Navigation pane.
You can add:
■A summary of the work log in the Summary field.
■Additional information in the Notes field.
■An attachment. You can add only one attachment for each work
information entry. To add multiple attachments, add multiple work
information entries.
Search for a request by request
ID
In the Functions area of the Navigation pane, click Search by Request ID,
and then enter the complete Request ID or the numeric part of the ID.
Print a service request From the Requests table, select the service request, and then click Print.
Review the report, and then click the Print icon on the toolbar.
Note: If you are having problems printing from BMC Remedy User, choose
Tools > Options in BMC Remedy User. On the Advanced tab of the
Options dialog box, make sure the ODBC Use Underscores option is
selected.
Cancel a service request From the Requests table, select the service request, and then click Cancel.
The Status changes to Canceled.
You can only cancel a service request that is open.
Reopen a request From the Requests table, select the service request, and then click Reopen.
The Status changes to New, Staged, or In Progress.
You can only reopen service requests that are completed or rejected.
Complete a survey From the Functions are of the Navigation pane, click View Survey, select a
survey, and then click Respond. Type your responses to the questions, and
then click Save.
View broadcast messages View the broadcasts by clicking the Broadcast link in the Navigation pane.
Note: If there are new broadcasts, the label on the link changes to New
Broadcast, and the color of the link changes from gray to red.
To view more details, select a broadcast entry, and then click View.
Broadcasts are filtered by the logged-in user’s company. If the logged-in
user’s company cannot be determined, only Global broadcasts appear.
Only Public” messages are shown to the users.
Troubleshooting service requests with errors
If the service request cannot be completed because of an error from BMC Remedy
Change Management or BMC Remedy Incident Management, you can view which
service requests contain errors and review the event log to troubleshoot the service
Working with service requests
Chapter 2 Working with the Requester console 57

request. If the error is the result of integration or other configuration issues, you can
also see the BMC Remedy IT Service Management Administration Guide for
information to help you troubleshoot the problem.
Note
To see service requests with errors, you need Command Event Master permissions
in addition to Requester console Master permissions.
To view requests with errors
1 From the Navigation pane of the Requester console, choose Request Errors =>
View Requests with Errors.
2 Click the Change/Incident Data tab.
3 Click Reset Error to restart the service request.
Users can now continue to work on the service request.
4 Click View Events to review the event log and troubleshoot the service request.
5 View the event details:
■Protocol
■Access Mode
■Error Code
■Error Message
6 Take any of the following actions for events that are in error:
■Retry
■Ignore
It is best to retry each event in the order the events are generated. By default, the
event table is sorted with the recent event on top, in reverse chronological order.
Typically events should be retried when the problem indicated by the error
message has been fixed.
WARNING
Delete service requests with caution. They cannot be recovered. You must have
BMC Remedy AR System administrator permissions to delete service request
records.
Working with service requests
58
BMC Remedy Service Desk: Incident Management User Guide

Viewing service request details from an
incident request form
If someone submits a service request from which BMC Service Request Management
subsequently generates an incident request, you can view information about the
originating request from the incident request form. The information available
includes the date on which the service request was submitted, who submitted it, and
the related company. You can also view information about approvers, an activity
log, and process flow diagram showing the request's status.
1 Open an Incident Request form.
2 In the navigation pane, click Advanced Functions > View Service Request.
Viewing service request details from an incident request form
Chapter 2 Working with the Requester console 59

Viewing service request details from an incident request form
60 BMC Remedy Service Desk: Incident Management User Guide

Working with the Overview
console
The information in this section is for people who fulfill one or more of the following
support roles:
■service desk analysts
■specialists
■group coordinators
■on-duty managers
Use the Overview console if you must respond to, manage, or track individual or
group work assignments from a variety of sources. For example, if your company
runs the full BMC Remedy ITSM Suite, either you or the group you manage might
receive work assignments from BMC Remedy Incident Management, BMC Remedy
Problem Management, and BMC Remedy Change Management. From the Overview
console, you can quickly get information about all your work assignments and
perform the procedures that you use most often.
Functional areas
This section describes the functional areas of the Overview console.
Table 10: Overview console functional areas
Functional area Purpose
Overview console header
3
Chapter 3 Working with the Overview console 61

Functional area Purpose
Show This field provides a filte by which you can manage the contents of the
Console List table. The choices are:
■All—Shows all records
Submitted by Me—Shows all records submitted by you.
Assigned to Me—Shows all records assigned to you.
Assigned to My Selected Groups—Asks you to select one of the
groups to which you belong, and then displays the records assigned to
that group.
Assigned to all My Groups—Displays the records assigned to all of
the support groups to which you belong.
Refresh Refreshes the data in the tables.
Navigation pane
View Broadcast, or New
Broadcast
Opens the broadcast dialog box, from where you can view, create,
modify, and delete broadcasts.
When there are unread broadcast messages, this area displays a message:
New Broadcasts, followed by the number of new messages. When
there are new broadcast messages, the area also turns red.
Note: If you open the Overview console with no new broadcast messages,
but the View Broadcast link is red, open the Application Preferences
dialog box and make sure that a Console View preference has been
selected.
Functions Use the links in this area to do the following actions:
■Select Status Values—Use this link to open a diaglog box from which
you can fitler the console to show only records that match the
conditions that you specify. This filter works in conjunction with the
Show field.
■My Profile—Allows you to change the information associated with
your login profile. For example, if your title changes or if you move to
a new office location, use this link to open the People form and update
your title or location, and so on.
■Application Preferences—Set your program preferences and options.
IT Home Page Use this link to open the IT Home Page.
ROI Console Use this link to open the Retrun on Investment (ROI) console.
CMDB Use this link to open the BMC Atrium CMDB.
Console list panel
Functional areas
62
BMC Remedy Service Desk: Incident Management User Guide
Functional area Purpose
Create Creates a new record.
View Displays a form containing detailed information about the selected record
in the Console list table.
Print Prints the selected record.
Search for Ticket Opens a dialog box from which you can select the type of ticket you are
searching for. After you select the type of record from the menu, click the
Select button to open a search form specific to the type of ticket you are
searching for.
Note: To see activity records and CI unavailability records, you must
search for those tickets, because these records are not displayed in the
Console List table.
Preferences Using Preferences, you can control the appearance of the Console List
table. For example, you can add or remove a column.
Functional areas
Chapter 3 Working with the Overview console 63
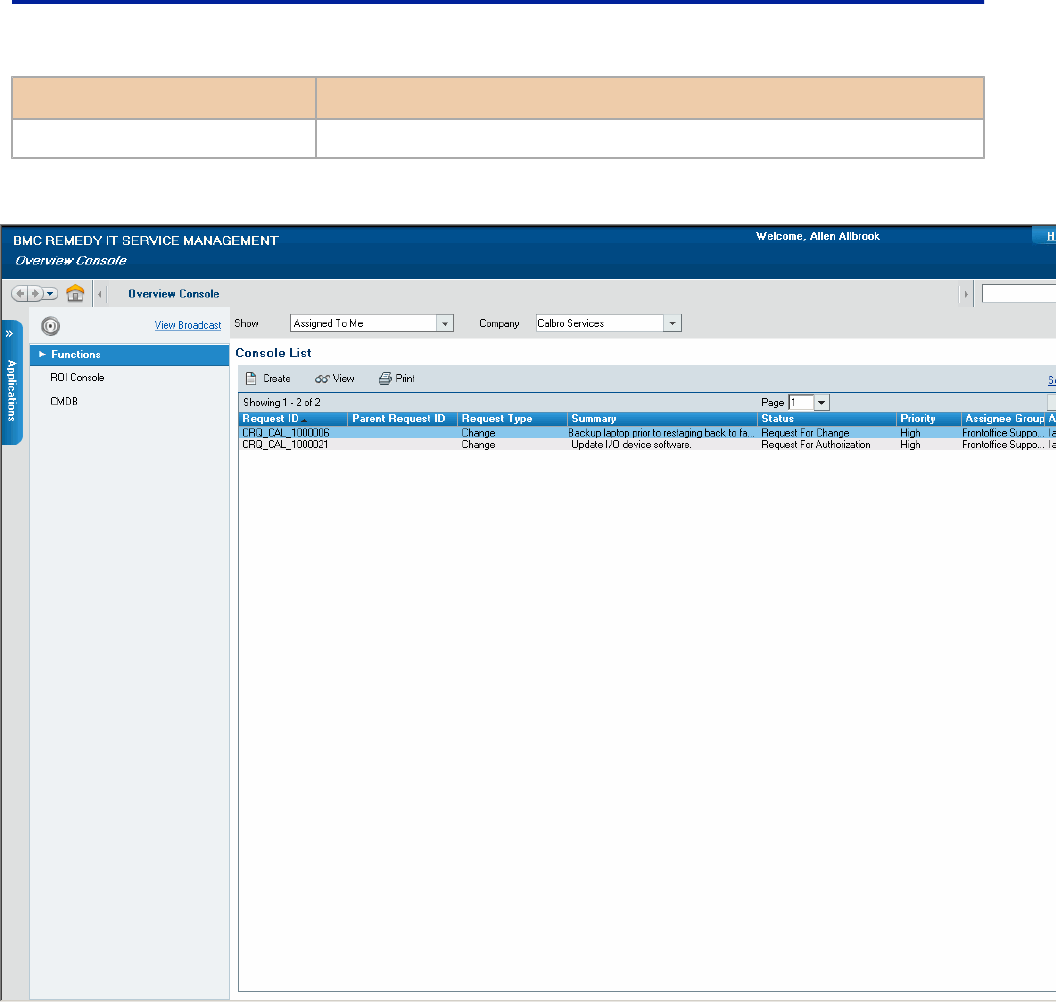
Functional area Purpose
Console list table Lists the different types of requests.
Figure 8: Overview console
Console list table
The Console list table lists different types of requests. The types of requests that you
can choose from depend on the applications that are installed.
A specific prefix identifies each type of request:
■CRQ—Identifies change requests. To view and define change requests, BMC
Remedy Change Management must be installed.
Console list table
64
BMC Remedy Service Desk: Incident Management User Guide

■RLM—Identifies release requests. To view and define release requests, BMC
Remedy Change Management must be installed.
■TAS—Identifies tasks.
■SDB—Identifies solution database entries. To view and define solution entries,
BMC Remedy Service Desk must be installed.
■INC—Identifies incidents. To view and define incidents, BMC Remedy Service
Desk must be installed.
■PBI—Identifies problems. To view and define problems, BMC Remedy Service
Desk must be installed.
■PKE—Identifies known errors. To view and define known errors, BMC Remedy
Service Desk must be installed.
■PR—Identifies purchase requisitions. To view and define purchase requisitions,
BMC Remedy Asset Management must be installed.
You can also change the table’s contents by using the Show filter at the top of the
console.
Selecting status values
You can use the Select Status Values dialog box to filter the requests that appear in
the Overview console based on their status.
To select status values
1 From the Navigation pane , choose Functions => Select Status Values.
2 In the Select Status Values dialog box, select the status values for each category
from the lists, then click OK to close the dialog box.
3 If the Assigned Work table does not refresh with the filtered records, click
Refresh to reload the table’s contents.
Configuring the Overview console to display
tasks
This section describes how to configure the Overview console to display the tasks
that are assigned to you.
Selecting status values
Chapter 3 Working with the Overview console 65

The default behavior of the Overview console is to not display your tasks. If you
want the Overview console to display them, then you must change the Show Task
configuration option to Yes. You do this from the Task Management tab of the
Application Preferences dialog box. You only need to perform this procedure once;
the Overview console remembers this setting between sessions.
To configure the Overview console to display tasks
1 From the Applications area of the IT Home Page, select Foundation Elements =>
Overview console.
2 From the Navigation pane of the Overview console, select Functions =>
Application Preferences
3 In the Application Preferences dialog box, click the Task Management tab.
4 From the Show Task menu, select Yes and then click Save.
Later, if you want to prevent the Overview console from displaying your tasks,
then repeat the preceding procedure selecting No from the Show Task menu.
Configuring the Overview console to display tasks
66
BMC Remedy Service Desk: Incident Management User Guide

Registering and assigning incident
requests as support staff
The information in this section is for people who fulfill the support role of service
desk analyst.
Group coordinators and on-duty managers should also be familiar with the information
in this section to better understand the support staff tasks and so they can fulfill the
role of support staff if necessary. Using the Incident Management console, support
staff can create, track, and resolve incident requests. The tasks described by this
section are organized according to the stages of the incident management lifecycle as
described by the BMC Service Management Process Model (SMPM).
The following diagram illustrates the SMPM stages covered in this section.
Figure 9: The SMPM stages covered in this section
Functional areas of the console
This section describes the areas of the Incident Management console and the features
and functions that you can access from them.
The following figure illustrates the functional areas of the Incident console. The
following table describes what you can do in each of the functional areas.
4
Chapter 4 Registering and assigning incident requests as support staff 67
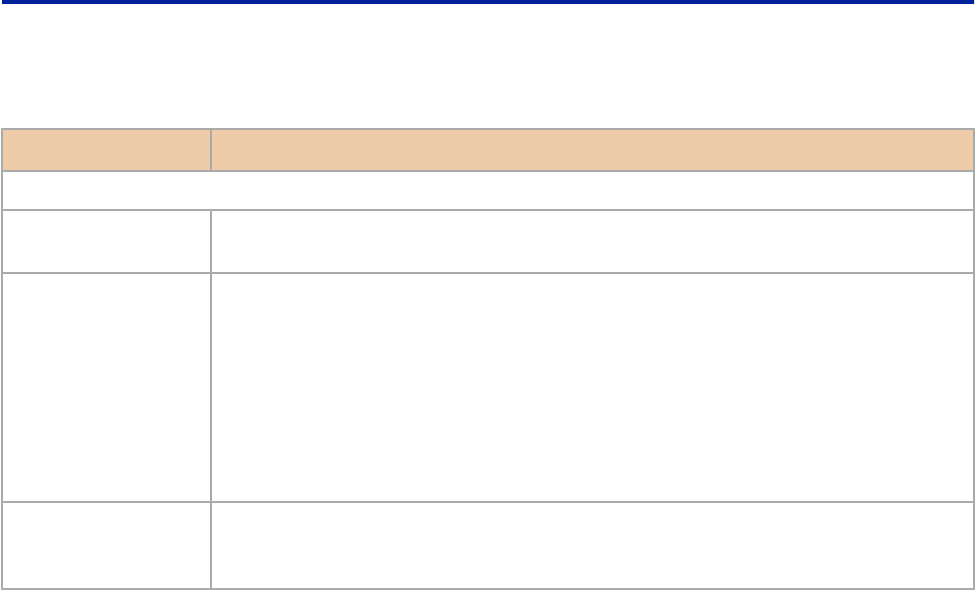
Table 11: Incident Management console functional areas
Functional area Purpose
Incident Management console header
Breadcrumb bar A navigation aid that contains links to related records that you opened from the
current incident request.
Breadcrumb
navigation controls
Back button—takes you back one link in the breadcrumb trail.
Forward button—takes you forward one link in the breadcrumb trail. The Forward
button is only visible if you have returned to a record on the breadcrumb trail that
you previously viewed
Drop down menu—contains links to all the records that you have viewed from the
current incident request, including records that might not be currently visible in
breadcrumb trail.
Home icon—takes you to the IT Home page.
Search If you have BMC Remedy Knowledge Management installed, this search feature lets
you search across multiple forms for records that match a key term. For more
information about using this search, see “Using Global search” on page 160.
Functional areas of the console
68
BMC Remedy Service Desk: Incident Management User Guide

Functional area Purpose
Show
Filter By
Magnifying glass icon
More filters
This area contains the following fields: Show, Filter By and Advanced. These fields
combine to provide a way that you can filter the incident request records in the
Incidents table.
The Show field has a menu from which you select the basic criteria by which you
want to filter the contents of the Incident table, the menu choices include:
1 Submitted by me—all incident requests submitted by you.
2 All—all incident request, regardless of who submitted them.
3 Assigned to me—all incident requests assigned to you.
4 Assigned to my group—all incident request assigned to a specific support group
of which you are a member. If you select this, you are prompted to select the
support group.
5 Assigned to all my groups—all incident requests assigned to all of the support
groups of which you are a member.
6 Watch List—all incident requests on the Watch List
Note: If you select Watch List, then Filter By is not available.
The Filter By field places conditions on the basic criteria that you choose in the Show
field. This helps you manage the number of records returned by the Show field. If
you select Assigned to me in the Show field and All Open > All Priorities from the
Filter By field, then the Incidents table contains all open incidents, regardless of their
priority, that are assigned to you.
The Magnifying glass icon opens the Managem My Searches dialog box from which
you can edit, save, and delete custom searches. Saved custom searches appear in the
My Searches node of the Defined Searches list. For more information about Manage
My Searches, see "Creating a custom search," later in this guide.
More filters provides a way for you to further filter the contents of the Incidents
table. If you still have a large number of records after using the Filter By field, click
Advanced to open a dialog box that contains fields in which you can indicate even
more precise information, such as product or operational categories. For example,
using the advanced field you can add the product category Hardware to the filter.
When added to the Show and Filter by fields, the Incidents table now contains all
open hardware incidents, regardless of their priority, that are assigned to you. An
active funnel icon appears beside More filters to show when a filter from this area is
active.
Refresh Updates the console with the latest information.
Navigation pane
Functional areas of the console
Chapter 4 Registering and assigning incident requests as support staff 69

Functional area Purpose
View Broadcast, or
New Broadcast
Opens the broadcast dialog box, from where you can view, create, modify, and
delete broadcasts.
When there are unread broadcast messages, this area displays a message: New
Broadcast, along with the number of new messages. When there are new
broadcast messages, the area also turns red.
See Broadcasting messages in this table.
Note: If you open the console with no new broadcast messages, but the View
Broadcast link is red, open the Application Preferences dialog box and make sure
that a Console View preference has been selected. For information about how to
view and select the Console View preference, see Setting application preferences in
this table.
Counts This area contains incident request metrics. The numbers relate to the selection in
the Show field. For example, if the Show field contains Submitted by me, then the
metrics that appear in this area show the open, unassigned, unacknowledged, and
breached incidents that were submitted by you.
Functions Use the links in this area to do the following actions:
■New Incident—Create a new incident request record.
■Search Incident—Search the database for current incident request records.
■My Profile—Set your profile.
■Application Preferences—Set your application preferences and application
options.
■Reminders—View and create reminders.
■Reports—Create and run custom reports.
■Manage CIs—Search for information about specific CI types and gives you
access to the CI records.
■Manage Inventory—Access the Manage Inventory form of BMC Remedy Asset
Management.
■Surveys—Review and respond to customer surveys.
■KPIs—Click the KPIs link to select and to view the incident management
flashboards. The flashboards that appear represent, in graphical format:
Process KPI—See Using the KPI flashboards for information about how to use
these flashboards.
Total Open Incidents—Click either All Open or By Status and Priority.
Functional areas of the console
70
BMC Remedy Service Desk: Incident Management User Guide

Functional area Purpose
Applications This area contains links to other BMC applications, consoles, and modules. The
contents of this area depend on what other applications and so on are installed.
Click the double greater-than sign to open or close this panel.
Incidents table
Quick Actions Select the action from the menu. You can perform the following quick actions:
■Assign to group member—Reassigns the incident request to another member of
your group.
■Assign to me—Reassigns the incident request to yourself.
■Incident Closure—Moves incident requests with a status of Resolved to the
Closed status.
Process Overview Opens the detailed Incident Management process in SMPM, if the full SMPM
application is installed and configured. Otherwise, it opens a high-level diagram of
the incident management process.
Print Prints the selected record in the Watch List and the Incidents table.
View Shows the incident request record that is selected in the Incidents table.
Create Creates a new incident request record.
Table A list of the incident request records according to the company selected in the
Company field and the group selected in the View By field.
Detail and Tasks
Details—When selected, contains detailed information about the record selected in the Incidents table. To
see Incident Details when the Tasks table is showing, click Show Details. The Create, View, and Report
icons relate to work information notes. For information about working with work information notes, see
Creating work information entries.
Tasks—When selected, lets you view tasks associated with the incident request record selected in the
Incidents table. To see Tasks when Details is showing, click Show Tasks.
Managing service targets
If the BMC Service Level Management (BMC SLM) application is installed, the
Incident Request form shows both overview and in-depth information about the
incident in relation to the applicable service targets.
You can view request-based service targets attached to incident requests. This
enables you to see whether the service target has been met, missed, or is in a
warning state.
Managing service targets
Chapter 4 Registering and assigning incident requests as support staff 71

To view service targets related to an incident request
1 From the Incident Management console, open the relevant incident request
record.
2 View the SLM Status icon from the Navigation pane. The following table
describes the SLM Status icon states.
Table 12: BMC SLM Status icons
Icon Description
■ Status: Not Attached.
■ No service target is attached to the incident.
■ Status: Attached.
■ Green: The service targets are in compliance.
■ Status: Warning.
■ Yellow: At least one service target is at risk.
■ Status: Breached.
■ Red: At least one service target did not meet its goal.
3 Click the icon to display the SLM:IntegrationDialog form to see in depth
information about the incident in relation to the applicable service targets.
The status gauge on the SLM:Integration Dialog form shows the current status of
the selected service target. The following table explains the colors and fields on
the status gauge.
Table 13: Status gauge on the SLM:Integration Dialog form
Color or field Description
Green The service target is in compliance.
Yellow The service target has a warning status.
Red The service target has missed its goal.
Managing service targets
72
BMC Remedy Service Desk: Incident Management User Guide

Color or field Description
Due Date and Time The goal time within which either a response or a resolution for the incident must
occur; otherwise the goal is missed.
Time Until Due The amount of time left until the goal is considered missed.
Time Past Due The amount of time that has passed since the goal was due.
The following table describes the information in the SLM:IntegrationDialog form.
Table 14: Information about the SLM:IntegrationDialog form
Field Description
Incident ID The ID of the incident.
Details Click to see details about the selected service targets.
Service Target table
SVT Title The name of the service target.
Goal The type of goal for the service target:
■ Response-time goal—The incident request must be responded to within the
time specified.
■ Resolution-time goal—The incident request must be resolved within the time
specified.
Hours/Min The response or resolution time stipulated in the goal.
Cost Per Min The cost per minute for missing the response or resolution time goal.
Due Date/Time The goal time within which either a response or a resolution for the incident
must occur; otherwise the goal is missed.
Managing service targets
Chapter 4 Registering and assigning incident requests as support staff 73
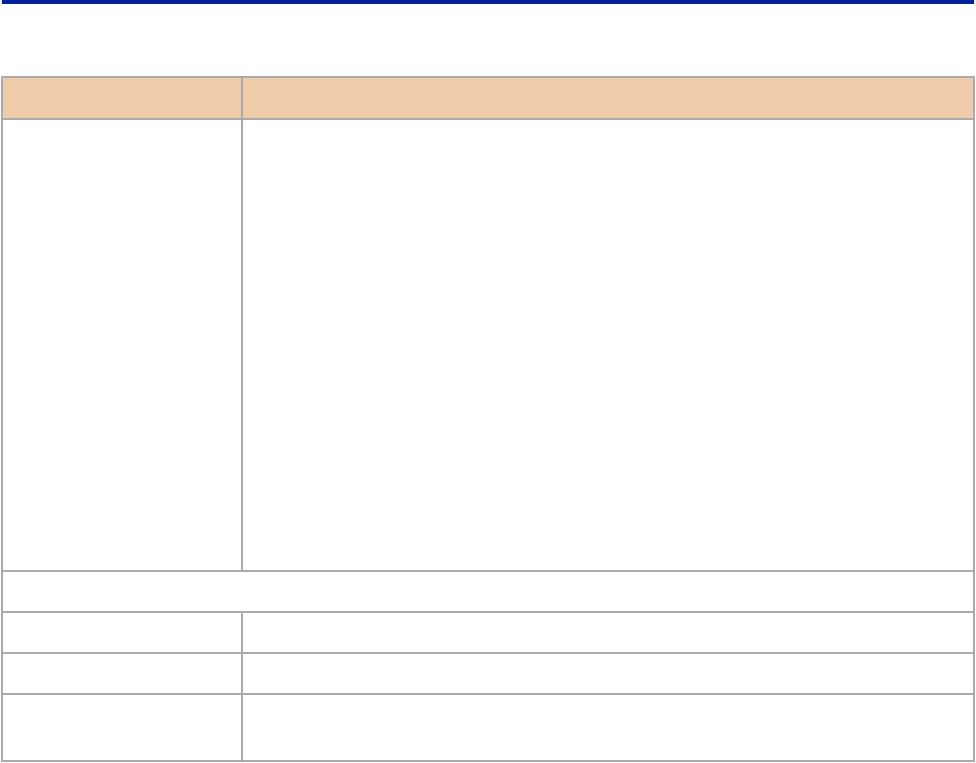
Field Description
Progress The status of the service target:
■ Attached—The service target has been attached to the incident.
■ Detached—The service target has not been attached to the incident.
■ In Process—Work on the request is taking place.
■ Pending—Work on the request is stopped (for example, waiting for a part, or
waiting for a response from the submitter).
■ Warning—The service target is at risk.
■ Missed or Met—The service target has either missed or met its goal.
■ Invalid—The service target is disabled.
Milestones for SVT
Title The title of the milestone.
Execution Time The time that the milestone actions are executed.
Status The current status of the milestone. The status is either active or inactive
(pending), or Action Performed.
For more information about service targets and milestones, see the BMC Service
Level Management User Guide.
Registering incident requests
When a user contacts the service desk with an incident request, you first determine
the nature of the request. If the request is about a previously registered request, you
query the request and update the user with the current status.
If the request concerns an incident that was resolved, but for which the resolution
was not effective, reopen the incident request record and assign the incident to a
specialist.
If this is a new incident request, you create an new incident request record by
capturing key information about the user and the incident. If possible, you resolve
the incident immediately and then complete the incident request, otherwise you
make sure the incident request is assigned to the appropriate group.
Registering incident requests
74
BMC Remedy Service Desk: Incident Management User Guide
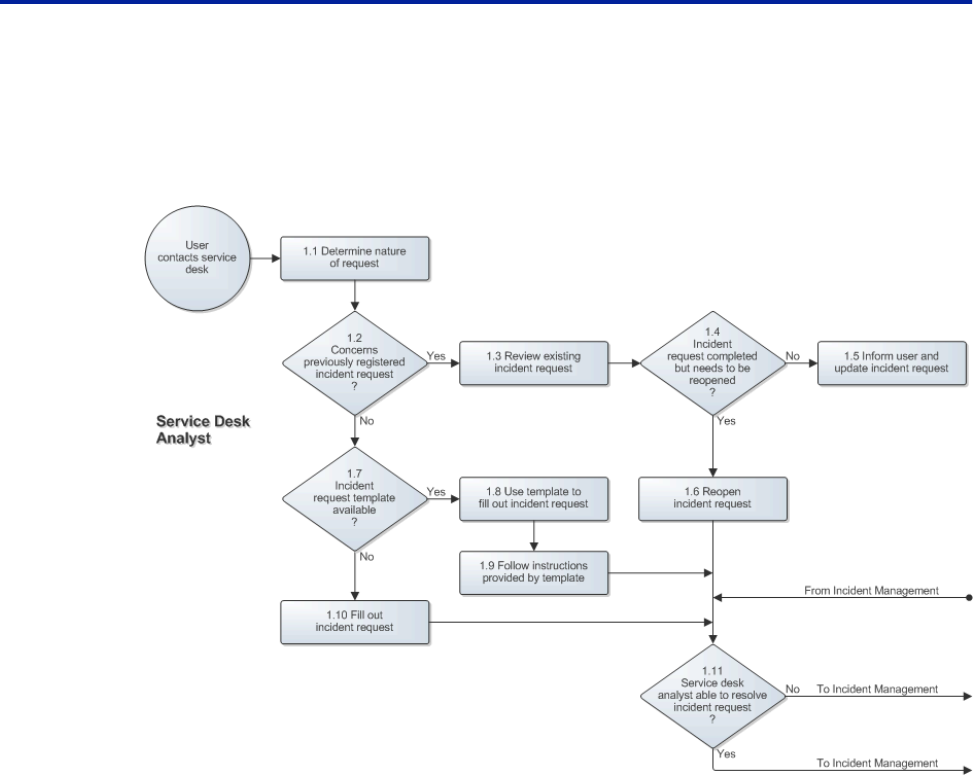
The following figure provides an overview of the registering incident requests
process, as described by the SMPM.
Figure 10: Registering incident requests
Reviewing the status of an incident request
If a customer calls to enquire about the status of a registered incident request, you
can quickly review all of the customer’s active records (that is, records that do not
have a status of Closed) from the incident request form, using the following procedure.
To review the status of an incident request
1 From the Incident Management console, click Create.
2 In the Customer or Contact field on the new Incident Request form, type the
customer’s or the contact’s information as described in Using the Customer and
Contact fields in Best Practice view, elsewhere in this guide.
3 When the application updates the new incident request record with the
customer’s information, In the Quick Actions area, click Customer’s Incidents.
4 In the Customer’s Incidents window, select the incident request you are
reviewing the status for and click View.
Registering incident requests
Chapter 4 Registering and assigning incident requests as support staff 75

5 When you finish reviewing the status in the Incident Request Information
window, choose one of the following actions:
■Close—returns you to the Customer’s Incidents window. Choose this to review
more incident records for the customer.
■Close All—returns you to the Search form. Choose this when you are finished.
Viewing incident request records
Use the following procedure when you want to view the an incident record in detail.
To view an incident request
1 In the Incidents table, double-click the incident request you want to view.
Fields on the form display the incident status and other information that has been
collected about the incident.
Creating an Incident request record using a template
The purpose of this stage is to accurately record and recognize disruptions to
services provided by IT to its customers. When creating a new incident request
record, you classify the incident and record user information, CI information, and a
description of the incident.
The key to this activity is the accuracy and completeness of the information
recorded. To help ensure accuracy and completeness, BMC recommends that you
use a template to help create the record. A template ensures consistency in the way
information about the incident request is captured. A template can also set a
relationship to a CI. Your administrator can define templates for commonly
occurring incidents, as described in the BMC Remedy IT Service Management
Administration Guide.
To use a template
1 On the Incident Management console, click Create.
2 Enter the Customer or Contact information as described in the following table.
Registering incident requests
76
BMC Remedy Service Desk: Incident Management User Guide

When using the Best Practice view When using the Classic view
In the Customer or Contact field on the new Incident
Request form, type the customer’s or the contact’s
information as described in Using the Customer and
Contact fields in Best Practice view on page 35.
On the Incident Request form, type the customer’s
last name in the Last Name field and press ENTER.
If there are multiple customers with the same last
name, you are prompted to select the appropriate
customer. The Company, First Name, and Phone
Number fields are completed from the customer
record. The company drives the selection on other
menus, such as Operational, Product, and Resolution .
3 Check the rest of the customer information for accuracy.
4 Type the incident request details in the Notes field.
5 Open the Incident Template Selection form as described in the following table.
When using the Best Practice view When using the Classic view
If you know the template name
■ Type a portion of the template name in the
Template field and then press Enter.
If you don’t know the template name
■ Click inside the Template field and then press
Enter.
From the Quick Links section of the Navigation pane,
click Select Template.
A list of templates available to your default support group appears in the Viewing
Templates for Support Group area of the Incident Template Selection form.
Note
If you belong to multiple support groups, you can select a template from another
of your support groups by selecting a different group from the Viewing
Templates for Support Group menu at the top of the form.
6 From the hierarchical list, select the appropriate template and then click Select.
7 Type a brief description in the Summary field.
8 Select the business service CI from the Service list.
You must select the business service CI from the menu. The business services that
appear in this menu have a relationship type of Used By” either for the customer
directly or the organization the customer belongs to.
Registering incident requests
Chapter 4 Registering and assigning incident requests as support staff 77

9 If the incident request was caused by a CI, you can record the CI in the CI field.
This creates a relationship between the incident request record and the CI record.
The CIs that appear in the menu are all the other CIs related to the customer that
are not business service CIs. If there are no CIs related to the customer, click the
button beside the CI field to open a CI search form, from which you can search for
all CIs.
10 Complete the rest of the incident request form as appropriate.
Note
Use the Contact field to record the name of someone who reports an incident on
behalf of someone else. Use this field, for example, if an administrative assistant is
reporting an incident on behalf of an executive. By using the Contact field, you
can type the name of the person who is experiencing the incident in the Customer
field. This is especially important if the person experiencing the incident is
registered as a VIP or as a sensitive customer. It also ensures that the BMC
Remedy Incident Management application displays the correct set of business CIs
in the Service field selection list, and so on.
Tip
If your template does not supply categorizations (Operational Categorization and
Product Categorization), you can open a dialog box where you record this
information by clicking Categorizations in the Links area when using the Best
Practice view or the Classification tab when using the Classic view.
11 Click Save.
Creating an incident request record without a template in
Classic View
If your system does not have templates defined, use the following procedure to
create an incident request in the Classic view.
To create an incident request record using the Classic view
1 In the Navigation pane, select Functions => New Incident.
2 In the Process Flow Status area, click the arrow in the Identification and
Recording box.
3 Select Next Stage => Investigation and Diagnosis.
You can move directly to the Resolution and Recovery stage or the Incident
Closure stage by selecting the appropriate stage.
Registering incident requests
78
BMC Remedy Service Desk: Incident Management User Guide

The Incident Request form appears. The tabs on this form prompt you to enter
required and optional information.
Note
This is a dynamic form. The fields on the Required and Optional tabs depend on
the information to move from the current stage or state to the selected stage or state.
4 On the Incident Request form, type the customer’s last name in the Last Name
field and press ENTER.
If there are multiple customers with the same last name, you are prompted to
select the appropriate customer. The Company, First Name, and Phone Number
fields are completed from the customer record. The company drives the selection
on other menus, such as Operational, Product, and Resolution .
5 Type a brief description in the Summary field.
6 You can type additional details in the Notes field.
7 Select the business service CI from the Service list.
You must select the business service CI from menu. The business services that
appear in this menu have a relationship type of Used By” either for the customer
directly or to the customer’s organization.
8 If the incident request was caused by a CI, you can record the CI in the CI field.
This creates a relationship between the incident request record and the CI record.
The CIs that appear in the menu are all the other CIs related to the customer that
are not business service CIs. If the CI you are looking for does not appear in this
list, click the button beside the CI field to open a CI search form, from which you
can search for all CIs.
9 Select values from the Impact and Urgency lists.
10 If appropriate, select a different service company.
When you select the customer, the service company is set to the customer’s
company.
11 Select the appropriate service type:
■User Service Restoration—Use this service type for typical service restoration
requests (for example, a request to restore printing services).
Registering incident requests
Chapter 4 Registering and assigning incident requests as support staff 79

■User Service Request—Use this service type if the incident request is a simple
question or a request for information (for example, a request for how to”
information).
■Infrastructure Restoration—Use this service type if the incident request is
more focused on the restoration of infrastructure service. Typically, these types
of incident requests are reported by system management tools (for example, if
an incident is detected on a piece of network infrastructure by system
monitoring software).
■Infrastructure Event—Use this service type when a system management tool
registers an event that does not require infrastructure restoration.
12 Click Save.
If you did not assign the incident, the incident is automatically assigned based on
predefined assignment routing. If there is no appropriate predefined assignment
routing, you are prompted to assign the incident.
13 If prompted, assign the incident; then click Save.
To create an incident request record using the Best Practice view
Use the following procedure if you are using Best Practice view to create an incident
request without a template. you can use
1 In the Navigation pane, select Functions => New Incident.
The Incident Request form appears.
2 In the Customer or Contact field on the new Incident Request form type the
customer's or the contact's information as described in Using the Customer and
Contact fields in Best Practice view on page 35.
3 You can type details about the incident in the Notes field.
4 Type a brief description in the Summary field.
5 Select the business service CI from the Service list.
You must select the business service CI from menu. The business services that
appear in this menu have a relationship type of Used By” either for the customer
directly or to the customer’s organization.
6 If the incident request was caused by a CI, you can record the CI in the CI field.
This creates a relationship between the incident request record and the CI record.
Registering incident requests
80
BMC Remedy Service Desk: Incident Management User Guide

The CIs that appear in the menu are all the other CIs related to the customer that
are not business service CIs. If the CI you are looking for does not appear in this
list, click the button beside the CI field to open a CI search form, from which you
can search for all CIs.
7 Select values from the Impact and Urgency lists.
8 Select the appropriate incident type:
■User Service Restoration—Use this service type for typical service restoration
requests (for example, a request to restore printing services).
■User Service Request—Use this service type if the incident request is a simple
question or a request for information (for example, a request for how to”
information).
■Infrastructure Restoration—Use this service type if the incident request is
more focused on the restoration of infrastructure service. Typically, these types
of incident requests are reported by system management tools (for example, if
an incident is detected on a piece of network infrastructure by system
monitoring software).
■Infrastructure Event—Use this service type when a system management tool
registers an event that does not require infrastructure restoration.
9 Select the reported source.
10 Select the assigned group and the assignee.
If you do not assign the incident, the incident is automatically assigned based on
predefined assignment routing. If there is no appropriate predefined assignment
routing, you are prompted to assign the incident when you click Save.
Note
The names that appear in the list of assignees depends on the assigned group you
select.
11 If you use an external vendor, select the vendor's name from the list and, if used,
the vendor's ticket number.
12 Click Save.
Registering incident requests
Chapter 4 Registering and assigning incident requests as support staff 81

Overview of incident ownership
Incident ownership is determined automatically by BMC Remedy Incident
Management when the incident request record is created. BMC Remedy Incident
Management assigns incident ownership based on the following criteria:
■the support group of the person who submits the incident request record.
■the support group the incident request record is assigned to.
For example, consider the following support groups:
■Support Group A has a support group role of Help Desk. Person A is in Support
Group A.
■Support Group B does not have a support group role of Help Desk; for example, it
might have a support group role of Tier 2. Person B is in Support Group B.
■Support Group C does not have a support group role of Help Desk; for example,
it might have a support group role of Tier 3.
Based on these support groups, the following example events show how the
incident owner is set when no incident owner assignment event is predefined:
■Person A submits an incident. Because Person A is a member of a support group
with the role of Help Desk, ownership of the incident is set to Support Group A,
regardless of who is assigned this incident.
■Person B submits an incident and assigns it to Support Group A. Ownership of
the incident is set to Support Group A because the group has the role of Help Desk.
■Person B submits another incident, and assigns the incident to Support Group C.
Support Group B becomes the owner, because Person B is the submitter.
Adding or modifying a customer profile
Before you can record an incident, the customer must be listed in the People
database. Customers are usually added to the People database by your
administrator, as described in the BMC Remedy IT Service Management Administration
Guide .
However, if you have Contact People User or Contact People Admin permissions,
and a customer is not listed in the database, you can add a customer’s profile from
the Incident Request form. (If you are unsure about your permissions, ask you
system administrator.) You can also modify the customer and the contact phone
number and site directly on the Incident Request form. A modification directly on
Registering incident requests
82
BMC Remedy Service Desk: Incident Management User Guide
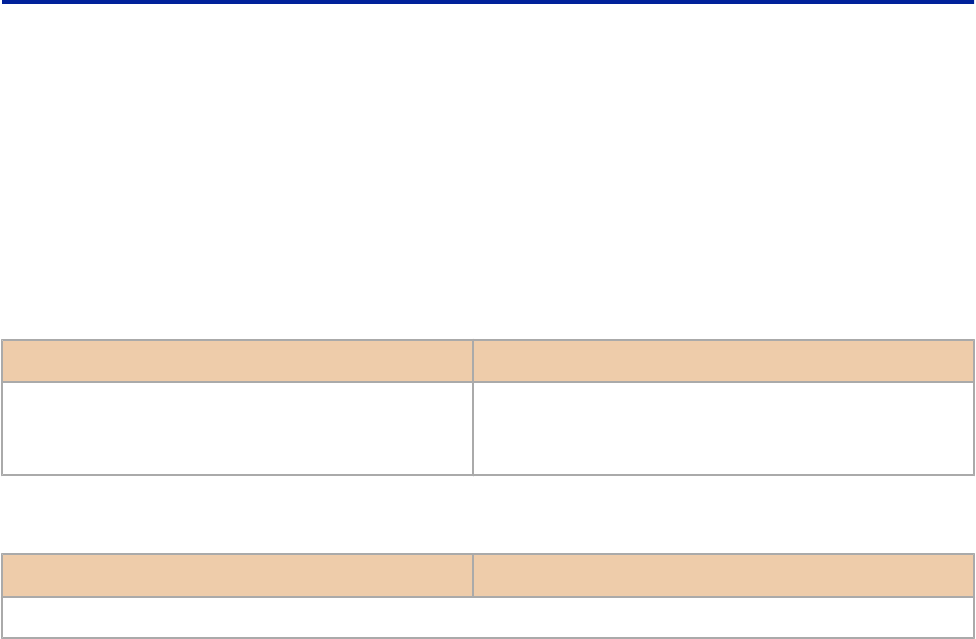
the Incident Request form, however, applies only to the current incident, it does not
update the People record permanently.
To update the People database permanently, you can open the People form from the
Incident Request record, as described in the following procedure.
To add a new, or modify a current, customer profile
1 Do one of the following actions.
To add a new customer profile To modify a customer profile
From the Incident Management console click
Create to create a new incident request record.
From the Incident Management console, open a
current incident request record belonging to the
customer whose profile you are modifying.
2 Do one of the following actions.
To add a new customer profile To modify a customer profile
When using the Best Practice view
Registering incident requests
Chapter 4 Registering and assigning incident requests as support staff 83

To add a new customer profile To modify a customer profile
■ Click the magnifying glass icon to the right of
the Customer or Contact field ot open the
People form.
To make modifications to the current record
1 To modify the Company or Customer fields, click
the eraser icon to the right of the Customer field to
clear it and then complete the fields with the new
information.
2 To modify the Contact field, click the eraser icon to
the right of the field to clear it and then add the
new information.
3 To update the Customer or Contact phone and site
information, click the double arrow link above the
Incident ID field.
This toggles to an area that opens these fields.
1 Click the pencil icon beside the field you are
modifying.
2 In the resulting dialog box, make the required
changes.
3 Click OK to save the changes and to close the
dialog box.
4 Click the double arrow link above the Customer
Phone field to return to your starting point.
To make permanent modifications
1 Click either the Customer or Contact link.
2 In the People form, make the required changes.
3 Click Save and then Click Yes to save the changes
and close the form.
When using the Classic view
■ Click Create on the Customer tab. ■ Click Modify on the Customer tab.
3 On the People form, complete or modify the required fields.
If adding a customer record, you do not need to add all the information for this
individual’s profile, only what is necessary to submit the record.
Registering incident requests
84
BMC Remedy Service Desk: Incident Management User Guide

Note
You cannot define a Support Person record here. See the BMC Remedy IT Service
Management Administration Guide for further details.
4 Click Save.
If adding a new customer, the status of the person you added has a default value
of Proposed. Your People/Contact administrator must verify those in proposed
status, update them to Enabled, and add any other information that is necessary.
First call resolution
Before you assign an incident request, determine if you can resolve the incident
yourself. To do this, use the BMC Remedy Incident Management’s Incident
Matching feature, or the BMC Remedy Knowledge Management application, if you
have access to it, to look for matching, or similar, incident requests, problem
investigations, known errors, and solution entries.
Note
BMC Remedy Knowledge Management is a separate application that must be
integrated with BMC Remedy Incident Management before you can use it. For
information about accessing BMC Remedy Knowledge Management, see To access
BMC Remedy Knowledge Management on page 89.
If you cannot resolve the incident request, assign the incident request to a specialist.
For information about how to do this, see Assigning incident requests, elsewhere in
this guide.
Note
You can also use the Advanced Search feature to look for similar incident records.
For information about how to do this, see Searching for similar incident requests
elsewhere in this guide.
Searching for matching records
By using the record matching features, you can search for existing records that
describe incidents that are similar to the one you are currently trying to resolve. This
helps you ensure that you do not spend time and effort trying to resolve issues that
were resolved previously.
Registering incident requests
Chapter 4 Registering and assigning incident requests as support staff 85

Best practice
Whenever possible, search for matching records while you are in conversation with
the customer. This ensures that you have access to customer-specific information
and context, which allows you to conduct a more effective search.
To search for matching records—Classic view
1 Open or create an incident request.
2 Use one of the following methods to search for a solution:
■Incident Matching feature. To use this method, continue with step 3.
■BMC Remedy Knowledge Management application. When installed, this
application is available from the Links area of the Navigation pane when the
Incident Request form is open. For detailed information about how to open this
application, see To access BMC Remedy Knowledge Management on page 89.
3 In the Navigation pane, choose Functions => Incident Matching
4 Select the appropriate check boxes to search for incidents, problem investigations,
known errors, or solution database entries.
5 Run the search by using either the incident request operational categorization or
the product categorization.
■Operational Categorization—In the Search By Operational Categorization area,
click Current Operation.
■Product Categorization—in the Search By Product Categorization area, click
Current Product.
Note
To further filter the search results, you can specify other fields in the search
criteria pages.
6 Click Search.
Matching incidents, problem investigations, known errors, and solutions appear
in the tabs at the bottom half of the dialog box.
7 To view details of a matching record, perform the following steps:
a On the bottom of the form, click a tab, such as the Known Errors tab.
This tab lists the matching records according to the tab you clicked.
Registering incident requests
86
BMC Remedy Service Desk: Incident Management User Guide

b Select the appropriate record.
c On the top half of the form, click the appropriate Search and Solution tab, such
as the Known Error Search and Solution tab.
d Within that tab click the solution tab, such as the View Known Error Solution
tab.
8 If the matching record resolves the current incident, from the Relationship Type
list, select Resolved by.
9 To relate the record and copy the solution to the resolution of the incident, click
Relate with Solution.
10 Alternatively, to relate the record without the solution, click Relate Without
Solution.
To search for matching records—Best Practice view
1 Open or create an incident request.
2 Use one of the following methods to search for a solution:
■Incident Matching feature. To use this method, continue with step 3.
■BMC Remedy Knowledge Management application. When installed, this
application is available from the Links area of the Navigation pane when the
Incident Request form is open. For detailed information about how to open this
application, see To access BMC Remedy Knowledge Management on page 89.
3 In the Navigation pane, choose Quick Actions => Incident Matching
4 In the Search field of the dialog box that opens, type a search string. For example,
if you are looking for an incident request about a printer that regularly goes off-
line, you might type printer off line.
The search scans multiple fields in each record looking for a match, and returns a
list of records that contain the phrase "printer off line" in one of the scanned fields.
Tip
Try to supply as much information as possible in each search to reduce the overall
number of records returned by the search. If, after using a more specific search
string, the search returns too many records, consider using the advanced search.
To do this, click Use Advanced Search, which opens the Incident Matching form
in search mode. This search behaves the same way as the search described in To
search for matching records-Classic view, above.
Registering incident requests
Chapter 4 Registering and assigning incident requests as support staff 87

5 To view details of a matching record, perform the following steps:
a In the search results list at the bottom of the search form, select a record.
b Click View.
6 If the matching record resolves the current incident, from the Relationship Type
list, select Resolved by.
7 To relate the record in the search results list and to copy its solution to the
resolution of the incident, click Relate with Solution.
8 Alternatively, to relate the record without the solution, click Relate Without
Solution.
Searching for similar incident requests
Another tool that you can use for finding similar incident request records is the
Advanced Search feature, which is available when an incident request record is open.
To search for similar incident requests
1 With the incident request record open, from the Navigation pane, chose
Advanced Functions => Advanced Search.
2 In the Advanced Search Selection dialog box, select the type of search you want to
perform, then click Select.
■Search incident request by Work Info—Searches for incident request using
fields from the Work Details tab (Work Info when using the Classic view) tab.
■Search incident request by Relationships—Searches for incident requests
using fields from the Relationship form.
■Search Incidents by Assignment Logs—Searches for Incidents using fields
from the Assignment Log form.
3 On the search form, provide as much information as possible, and then click
Search.
4 View the incident requests that match the search criteria in the table that appears.
Registering incident requests
88
BMC Remedy Service Desk: Incident Management User Guide

Tip
You can use the advanced search bar to define a more complex set of criteria than
you can specify by using only fields in a form. For example, you can search for all
incident requests with two different values in the same field. Thus, you can search
for all incident requests that have a status of Resolved or Closed. For more
information about using the advanced search bar, see the BMC Remedy User
Client online help system. To access the help system, from the BMC Remedy User
Client tool bar, select Help => Contents and Index.
Accessing BMC Remedy Knowledge Management
If you have access to BMC Remedy Knowledge Management, you can also use this
to help you resolve the incident request on your own. This procedure describes how
to acces BMC Remedy Knowledge Management.
To access BMC Remedy Knowledge Management
1 If you have access to BMC Remedy Knowledge Management, you can use that
application to look for a solution, as described in the following table.
When using the Best Practice view When using the Classic view
With the incident request record open, from the
Links area of the Navigation pane, click Search
Knowledge Base. For information about using BMC
Remedy Knowledge Management, see the BMC
Remedy Knowledge Management User Guide.
With the incident request record open, from the
Quick Links area of the Navigation pane, click
Search Knowledge Base. For information about
using BMC Remedy Knowledge Management, see
the BMC Remedy Knowledge Management User Guide.
Creating a knowledge base article from an incident
If you have access to BMC Remedy Knowledge Management, you can also create
knowledge base articles that described the resolution. These can be helpful to others
who are trying to resolve similar incident requests.
Registering incident requests
Chapter 4 Registering and assigning incident requests as support staff 89

Best practice
"Search early and search often!" This Knowledge Centered Support (KCS) maxim
means that before you create a knowledge base article, you should search the
knowledge base to determine if there are already articles on the issue. It also means
that you should conduct multiple searches using different criteria. This increases the
likelihood that you will find a match. For complete information about searching for
knowledge base articles, see the BMC Remedy Knowledge Management User Guide.
Creating a knowledge base article when you create the incident request ensures a
tighter integration between incident management and the knowledge base, which is
important for good knowledge management.
When you create the knowledge base article, it is important to capture the full
context of the incident. This includes capturing technical information, such as
hardware and software details, and non-technical information, such as what the
customer thinks could be causing the incident and what impact the incident is having
on them.
BMC recommends that you use the following information categories when capturing
technical information.
■Incident—The situation (or question) in the customer's words; what are they
trying to do or what is not working.
It is important to capture the issue in the customer's words, because this is likely
that the way that other customers view it the same of similar issues. If the
customer's description is reworded or recategorized by technical staff subsequent
to the incident request being recorded, it might not be found as a match when
searching knowledge base articles the next time a similar issue arises.
■Environment—What technology does the customer have? Was anything in the
environment changed recently?
■Resolution—The steps required to resolve the incident or answer the question.
■Metadata—High level categorization of the article's content aids searchability,
maintenance, reporting, and other processes related to the handling of the article.
Over time, the way that a person who reports an incident remembers and interprets
non-technical information can change. It is important, therefore, to capture non-
technical information in a knowledge base article early in the incident handling
process. For this reason, BMC also recommends that you create the knowledge base
article and register the incident request simultaneously. Even if the incident
resolution is not yet known, you can start the knowledge base article and then add
resolution information later. This ensures that known details are captured and are
available to others who might be working on the same or a similar incident request.
By always creating incident requests and knowledge base articles simultaneously,
you also ensure that knowledge articles become an integral byproduct of incident
registration.
Registering incident requests
90
BMC Remedy Service Desk: Incident Management User Guide
Note
For complete information about creating knowledge base articles, see the BMC
Remedy Knowledge Management User Guide.
To create a knowledge base article
1 Open the resolved incident request record.
2 Create the knowledge base article.
When using the Best Practice view When using the Classic view
From the Links area of the Navigation pane, click
Create Knowledge.
From the Quick Links area of the Navigation pane,
click Create Knowledge.
Creating a solution database entry from an incident
If you have access to BMC Remedy Problem Management, you can publish the
resolution from an incident into the solution database.
Registering incident requests
Chapter 4 Registering and assigning incident requests as support staff 91

Best practice
"Search early and search often!" This Knowledge Centered Support (KCS) maxim
means that before you create a knowledge base article, you should search the
knowledge base to determine if there are already articles on the issue. It also means
that you should conduct multiple searches using different criteria. This increases the
likelihood that you will find a match. For complete information about searching for
knowledge base articles, see the BMC Remedy Knowledge Management User Guide.
Creating a knowledge base article when you create the incident request ensures a
tighter integration between incident management and the knowledge base, which is
important for good knowledge management.
When you create the knowledge base article, it is important to capture the full
context of the incident. This includes capturing technical information, such as
hardware and software details, and non-technical information, such as what the
customer thinks could be causing the incident and what impact the incident is having
on them.
BMC recommends that you use the following information categories when capturing
technical information.
■Incident—The situation (or question) in the customer's words; what are they
trying to do or what is not working.
It is important to capture the issue in the customer's words, because this is likely
that the way that other customers view it the same of similar issues. If the
customer's description is reworded or recategorized by technical staff subsequent
to the incident request being recorded, it might not be found as a match when
searching knowledge base articles the next time a similar issue arises.
■Environment—What technology does the customer have? Was anything in the
environment changed recently?
■Resolution—The steps required to resolve the incident or answer the question.
■Metadata—High level categorization of the article's content aids searchability,
maintenance, reporting, and other processes related to the handling of the article.
Over time, the way that a person who reports an incident remembers and interprets
non-technical information can change. It is important, therefore, to capture non-
technical information in a knowledge base article early in the incident handling
process. For this reason, BMC also recommends that you create the knowledge base
article and register the incident request simultaneously. Even if the incident
resolution is not yet known, you can start the knowledge base article and then add
resolution information later. This ensures that known details are captured and are
available to others who might be working on the same or a similar incident request.
By always creating incident requests and knowledge base articles simultaneously,
you also ensure that knowledge articles become an integral byproduct of incident
registration.
Registering incident requests
92
BMC Remedy Service Desk: Incident Management User Guide

To create a solution entry from an incident
1 Open the incident record.
2 Click the Relationships tab.
3 From the Request Type list, select Solution Database.
4 Click Create.
5 Edit the form as required.
6 Click Save.
Relating incident requests as duplicates
You can relate an incident request to another as a duplicate. The original incident
request resolves all its duplicates. When someone resolves, closes, or cancels the
original incident request, its Operational and Product Categorizations, Resolution,
and CI fields are copied to the related duplicates, marking them with a status of
Resolved. Also, if the original incident request record has a value in the Service field
that is also a valid service for the customer who submitted the duplicate record, and
the duplicate record’s Service field is empty, the program copies the service from the
original incident request record to the duplicate.
To relate an incident request as a duplicate
1 For information about creating relationships, see Defining relationships on page
165.
Keep the following points in mind when creating the relatioship.
■If the current incident is a duplicate of the original incident, from the
Relationship Type list, select Duplicate of.
■If the current incident is the original incident, from the Relationship Type list,
select Original of.
Restoring a resolved incident request record to In Progress
status
If the recorded resolution did not resolve the incident, you can restore the incident
request record to the In Progress status. This also moves the incident back to the
Resolution and Recovery stage in the incident request lifecycle.
Registering incident requests
Chapter 4 Registering and assigning incident requests as support staff 93

For information about how to do this, see Moving a resolved incident request back to
In Progress on page 115.
Assigning incident requests
Service desk analysts and Group Coordinators each play a role in assigning incident
requests. The information in this section applies to service desk analysts.
For information about the group coordinator’s role, see Assigning incident requests
as a group coordinator on page 117.
When you register a new incident request, one of the following actions happen:
■The routing rules used by BMC Remedy Incident Management automatically
assign the incident request to the most appropriate group when the incident
request record is saved.
■If the incident request is created from a template that has an assignment group
predefined, the incident request is assigned to the predefined assignment group.
If you reopen a current incident request, you manually reassign the incident request
to the most appropriate group. For information about how to do this, see
Reassigning incident requests on page 95. The coordinator of the group to which
the incident request is assigned then reviews the request.
Assigning incident requests
94
BMC Remedy Service Desk: Incident Management User Guide
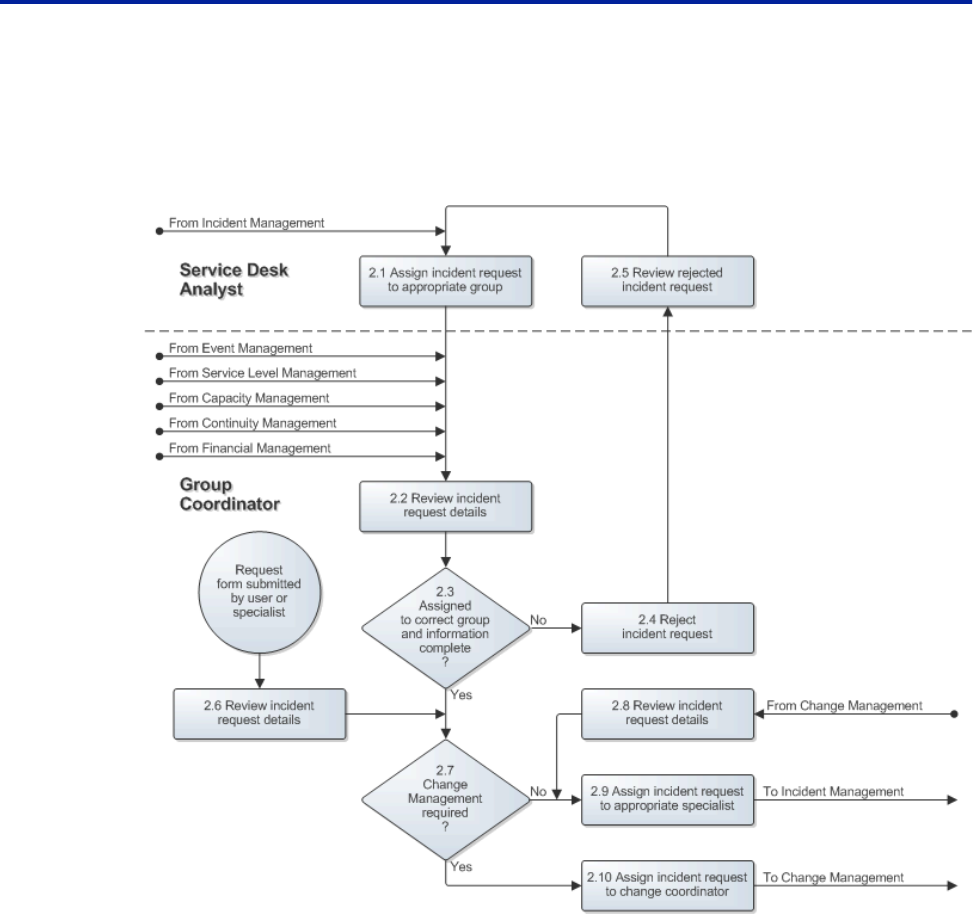
The following figure provides an overview of the incident request assignment
process as described by the SMPM.
Figure 11: Assigning incident requests
Reassigning incident requests
You can reassign an incident to either an individual or a support group.
Use the shortcut in the Quick Actions section (Quick Links in Classic view) of the
Incident Request form to reassign an incident to yourself (Assign to Me) or to
reassign an incident based on automatic routing (Auto Assign). This assigns the
incident based on predefined mapping. Automated assignment can be based on the
customer organization, location, operational categorization, or product categorization.
To reassign an incident
1 Open the incident request record.
Assigning incident requests
Chapter 4 Registering and assigning incident requests as support staff 95
2 Reassign the investigation.
When using the Best Practice view When using the Classic view
1 Click the Work Detail tab.
2 Select the Assigned Group from the list.
3 After selecting an Assigned Group, select the
Assignee from the list.
1 Click the Assignment tab.
2 Select the Assigned Group from the list.
3 After selecting an Assigned Group, select the
Assignee from the list.
3 Click Save.
Assigning incident requests
96
BMC Remedy Service Desk: Incident Management User Guide
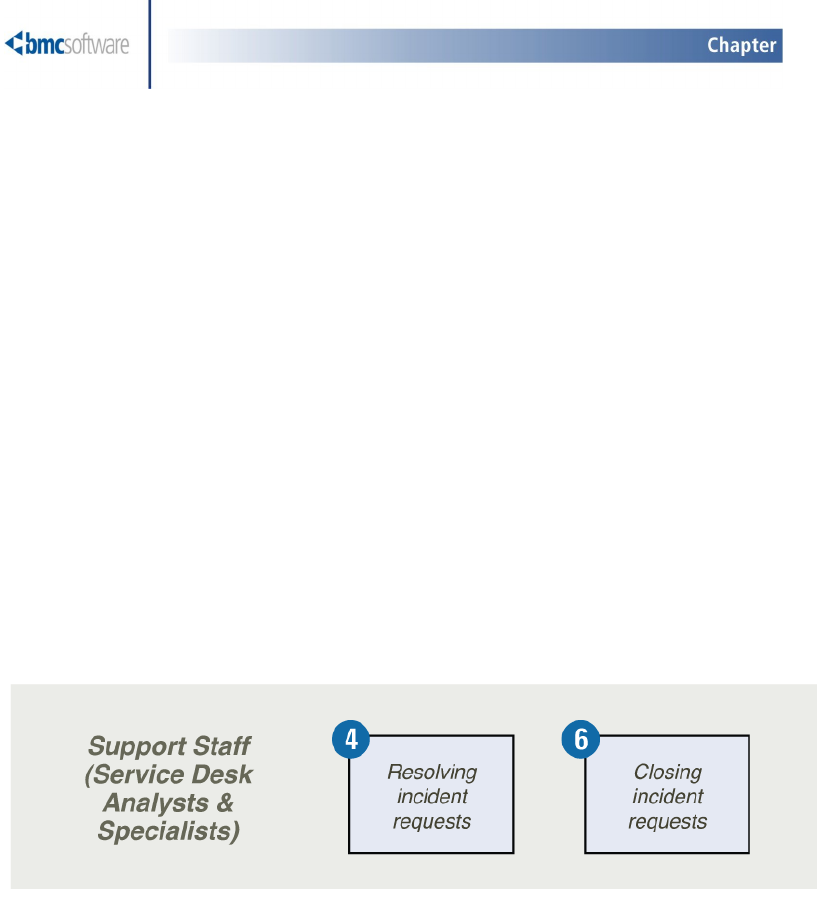
Resolving and closing incident
requests as support staff
The information in this section is for people who fulfill the role of specialist.
Group coordinators and on-duty managers should also be familiar with the information
in this section to better understand the support staff tasks and so they can fulfill the
role of support staff if necessary. The tasks described by this section are organized
according to the stages of the incident management lifecycle as described by the
BMC Service Management Process Model (SMPM). See Process flow and the
lifecycle of an incident request on page 41 for an illustration of the incident
management lifecycle.
Figure 12: The SMPM stages covered in this section
Resolving incident requests
You review an assigned incident request to determine whether the resolution
requires a change.
If the preferred method of incident request resolution is through the change
management process, you escalate the incident request by assigning it to the service
owner. For information about how to do this, see Creating a change request on page
110.
Perform an incident request resolution by using the change management process
when the resolution requires a change that will:
5
Chapter 5 Resolving and closing incident requests as support staff 97

■have a negative affect on the service during the service hours (defined by the SLA)
■change the functionality of a service
■require an update to the BMC Atrium Configuration Management Database (BMC
Atrium CMDB)
If the incident request does not require the change management process, you resolve
the incident.
After resolving the incident request, you update the incident request, to make sure
the user is notified of the resolution.
If the resolution information entered in the incident request might help users, service
desk analysts, or other specialists resolve future, similar cases, you can create a
solution database entry to document the solution.
If the incident request was resolved using a workaround, but the incident can recur,
you notify the problem coordinator, so that a problem investigation record can be
created.
Resolving incident requests
98
BMC Remedy Service Desk: Incident Management User Guide
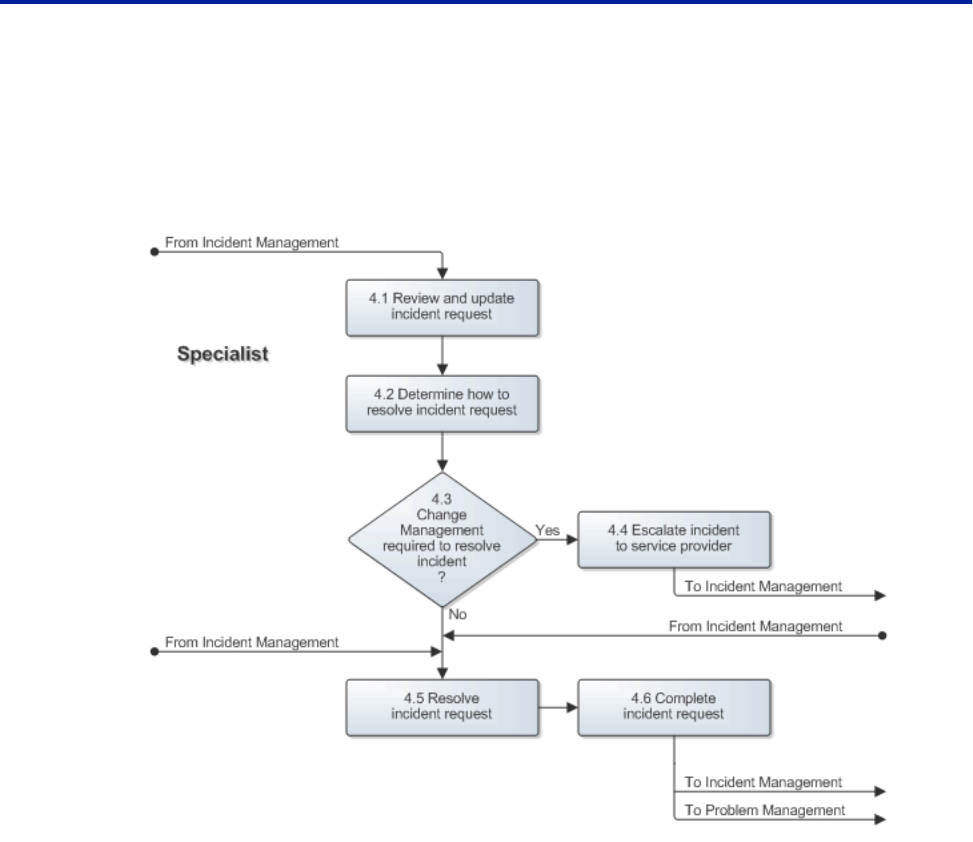
The following figure provides an overview of the incident request resolution process
as described by the SMPM.
Figure 13: Incident request resolution
Accepting an incident request
There are several on-going tasks that you must perform when you accept and begin
working on an incident request, as described by the procedures that follow. These on-
going tasks help to keep the incident request record up-to-date with the latest
information about the work being performed to resolve the incident. These on-going
tasks include:
■Receiving notification of assignments on page 100
■Working with assignments on page 101
■Working with tasks on page 102
■Time worked on an incident request must be recorded on page 102
■Creating work information entries on page 106
Resolving incident requests
Chapter 5 Resolving and closing incident requests as support staff 99

■Modifying work information entries on page 108
Receiving notification of assignments
When an incident is assigned to you, you can receive notification through:
■BMC Remedy Alert
■Email
You configure how you receive each notification from the People form, as described
in the BMC Remedy IT Service Management Administration Guide.
All incidents assigned to you or your support groups appear in the Incident
Management and Overview consoles.
The purpose of the notification policy is to inform key IT support staff and
customers about incidents that have caused a service disruption. Notifications from
BMC Remedy Incident Management are automated and driven by BMC Remedy
Incident Management events.
Automated notifications are sent to individuals or groups, such as when an incident
is created, assigned, or resolved.
Individual and system-wide preferences indicate whether to send notifications by
alert, email, or pager. The administrator can configure the notification method, as to
whether business hours and holidays are included or excluded, and whether to send
individual or group notifications. For details about configuration, see the BMC
Remedy IT Service Management Administration Guide.
The following scenarios are examples of notifications sent from BMC Remedy
Incident Management:
■Customers are notified by email when the incident is resolved. The message
includes the resolution.
■The incident owner is notified when an incident is resolved, if the assignee group
is different from the owner group.
■The Problem assignment group or assignee is notified when a solution entry is
created from an incident.
Assignees of incidents related to problem investigations, known errors, and change
requests can receive notification from BMC Remedy Problem Management or BMC
Remedy Change Management. For details, see the BMC Remedy Service Desk: Problem
Management User Guide and BMC Remedy Change Management User Guide.
Resolving incident requests
100
BMC Remedy Service Desk: Incident Management User Guide

If you are using BMC SLM, notifications can be sent out based on milestone actions
that are defined as part of service targets in the BMC SLM application. Service target
escalations occur when the incident’s responded date is in danger of breaching the
service terms (for information about setting the responded date, see To set the
responded date on page 101 which follows). For example, this happens when:
■The target response time has elapsed and the incident is still assigned. .
■The target resolution time has elapsed and the incident is still open (not resolved,
closed, or canceled).
You can view the Responded Date on the Date/System tab. For details about service
target calculations, see Overview of BMC SLM calculations on page 120.
You can configure BMC SLM to send notifications to incident assignees, assignee
group coordinators, incident owners, or owner group coordinators by using
templates included with the BMC Remedy Incident Management when it is
integrated with BMC SLM. For details about how to configure the service targets and
the notifications in BMC SLM, see the BMC Service Level Management User Guide .
To set the responded date
1 Open the incident request
If the reported source is Email, Fax, Voicemail, Web, Self Service, BMC Impact
Manager Event, or Other, the Response field appears.
2 Select Yes from the Response field list.
3 Save the change to the incident request record.
The Responded Date field on the Date/System tab is updated with the date on
which you changed the Response field from No to Yes.
Working with assignments
When you work on open incidents, you are working on incidents assigned to you or
to your support group. You can also assist with an incident assigned to another
support group when a task is assigned to you.
To accept an assignment
1 Open the incident request record.
2 Assign the incident request record to yourself.
Resolving incident requests
Chapter 5 Resolving and closing incident requests as support staff 101

When using the Best Practice view When using the Classic view
From the Quick Actions section of the Navigation
pane, click Assign to Me.
From the Quick Links section of the Navigation pane,
click Assign to Me.
3 Change the Status to In Progress.
4 Click Save.
Working with tasks
You can assign tasks to one or more people without changing the assignment of the
incident.
For information about working with tasks, see Creating and monitoring tasks on
page 125.
Searching for a solution
You can search for information that might help resolve the current incident request
in other incident requests, problem investigations, known errors, and solution
database entries.
To find information that might help resolve the current incident request, use the
methods for finding similar incident requests described in First call resolution on
page 85. If BMC Remedy Knowledge Management is installed, you can also use this
application to search for possible solutions. For information about accessing BMC
Remedy Knowledge Management, see First call resolution on page 85. For
information about how to use BMC Remedy Knowledge Management, see the BMC
Remedy Knowledge Management User Guide.
Time worked on an incident request must be recorded
You must keep track of the time that you spend working on an incident request.
If the incident request record is open on your desktop while you are working on it,
you can use a timer to keep track of the time. Or, you can enter the time manually.
If you receive assistance from someone else, you can also keep track of their time
through the Incident Assignment Log. The Incident Assignment Log contains a
record of who created the current incident request as well as individual records for
Resolving incident requests
102
BMC Remedy Service Desk: Incident Management User Guide

each group and person who was subsequently assigned to the request. Each record
contains the total effort duration for each assignee (that is, the amount of time each
group or person worked on the incident request), as well as other information.
Note
Because the Incident Assignment Log is historical, it does not contain a record for the
current assignee, only for previous assignees. The system updates the Incident
Assignment Log with a record for the most recent assignee each time the incident
request is reassigned. When the incident request is moved to the Closed state, the
system writes the final assignee record to the Incident Assignment Log.
You can also update the amount of time you spent working on an incident request
after it has been assigned to another assignee.
Recording your time
Use the following procedure to record time against an incident request that currently
is assigned to you.
To record your time
1 Open the incident request record.
2 Perform one of the following tasks.
When using the Best Practice view When using the Classic view
■ In the Work Detail area, click the clock graphic
beside the Assignee field to open the Effort Time
Spent window.
■ Click the Assignment tab.
3 Enter the time you spent on the incident request in the Effort Time Spent
(Minutes) field.
Tip
Use the automatic timer to keep track of your time anytime you work on the
incident request while the incident request record is open on your desktop. To
start the timer, click the Stopped button (the text on the button changes to Started
—the button’s text reports the timer’s current status). When you finish working
on the incident request, make sure you click the Started button (the text on the
button changes to Stopped).
4 Click Save.
Resolving incident requests
Chapter 5 Resolving and closing incident requests as support staff 103

Note
The Effort Time Spent Minutes field is a data entry field only. When you click
Save, the time value that you provided in Effort Time Spent Minutes is written to
a database field called Total Time Spent, which totals the time spent on the
incident request for the current assignee. After the BMC Remedy Incident
Management writes the time value to Total Time Spent, it resets Effort Time Spent
Minutes to zero. If you reassign the incident request or resolve it, the cumulative
time is written from Total Time Spent to the Assignment Log and Total Time
Spent is reset to zero.
Recording time for an assistant
Use the following procedure to record time against an incident request for someone
who assisted you but who was not formally assigned to the incident request.
To record an assistant’s time
1 Open the incident request record.
2 Perform one of the following actions.
When using the Best Practice view When using the Classic view
■ In the Work Detail area, click the clock graphic
beside the Assignee field to open the Effort Time
Spent window.
■ Click the Assignment tab.
3 Click Update Assignment Log to open the Incident Assignment Log dialog box.
4 Add the assistant to the Assignment Log by selecting values for the following
fields:
■Support Company—the name of the assistant’s support company
■Support Organization—the name of the assistant’s support organization
■Assigned Group—the name of the assistant’s assigned group
■Assignee—the name of the assistant’s name of the individual.
5 In the Effort Time Spent (Minutes) field, enter the time the assistant spent on the
incident request .
6 Click Add.
Resolving incident requests
104
BMC Remedy Service Desk: Incident Management User Guide

An entry containing this information appears in the table at the bottom of the
Incident Assignment Log dialog box.
Updating your time after the incident request is reassigned
Use the following procedure to update the time that you spend on an incident
request after it has been reassigned. For example, if the person or group to which the
incident request is reassigned asks for your help with some aspect of the incident
request resolution, you can update your record in the Incident Assignment Log with
the additional time.
Note
You can update the time only for your own Incident Assignment Log records. You
cannot update the records of other support groups or individuals.
To update your time after the incident request is reassigned
1 Open the incident request record.
2 Open the Incident Assignment Log dialog box.
When using the Best Practice view When using the Classic view
■ In the Work Detail area, click the clock graphic
beside the Assignee field to open the Effort Time
Spent window.
■ Click the Assignment tab.
3 Click Update Assignment Log.
4 In the table at the bottom of the Incident Assignment dialog box, select your
record.
5 In the Effort Time Spent (Minutes) field of the Update Assignee Effort Duration
area, type the number of minutes that you are adding or subtracting from your
recorded time.
6 Click the plus button (+) to add the time to the record’s total amount of time, or
click the minus button (-) to subtract the time.
7 Click Close.
Note
You cannot delete a completed assignment log.
Resolving incident requests
Chapter 5 Resolving and closing incident requests as support staff 105

Creating work information entries
When you begin working on an incident request, you must make sure that you keep
careful work information entries in the Work Details area of the incident request
record (or in the Work Info tab when using the Classic view), explaining what you
have done.
For example, you might want to add a note that a particular CI was deployed, and
include the date.
You can add work information entries to an incident request record directly from the
Incidents table (as described in this procedure), or you can add them to open
incident request records. For information about how to do this, see Adding work
information entries to an open incident request record on page 107.
Note
If you are using the Best Practice view, you can view multiple work info entries at
the same time by clicking the History icon. When you click this icon, the system
displays a pop-up window with the Notes field entries arranged with the most
recent entry at the top (a date and time stamp is also visible with each entry).
To add work information entries from the Incidents table
1 From the Incident Management console, select the incident request record.
2 At the bottom of the Incident Management console, if the Tasks table is visible,
open the Incident Detail area by clicking Show Incident Detail.
3 Click Create.
4 Enter the work information details in the Incident Work Info dialog box.
5 To add an attachment to the record, right-click in the attachment table and select
Add from the menu that appears.
6 Choose whether to lock the work log.
Note
If you select Yes, you cannot modify the work log after you save it.
7 Choose the type of view access:
■Internal—Choose this if you do not want the customer to see the work
information entry.
■Public—Choose this if you want the customer to see the work information entry.
Resolving incident requests
106
BMC Remedy Service Desk: Incident Management User Guide

8 Click Save.
Note
To see a report of selected work information entries, select one or more entries,
and click Report.
Adding work information entries to an open incident request
record
You can also add work information entries to an open incident request record, as
described in the following procedure.
To add work information entries to an open incident request record-Classic view
1 With the incident request record open, click the Work Info tab.
2 Complete the fields on the tab as described in the Classic view section of Creating
work information entries on page 106.
To add work information entries to an open incident request record-Best
Practice view
1 Open the incident request record.
2 On the Work Details tab, click the Create icon.
3 Type the information in the Notes field at the bottom of the tab.
Note
If you want to add an attachment to the work information note, perform step 4 to
step 6.
4 Click the button to the right of the Attachment field.
The Add Attachment dialog box opens.
5 Click Browse and then navigate to the file you want to attach.
6 Select the file, click Open, and then click OK.
The file name appears in the Attachment field.
Resolving incident requests
Chapter 5 Resolving and closing incident requests as support staff 107

Note
· To view the attachment, click the spectacles icon.
· To remove the attachment, click the eraser icon.
· By default, the Work Info Type is General Information (the Work Info Type let's
you categorize the type or source of the work info entry); the Locked status is Yes
(the work note cannot be edited after you save it); the View Access is Internal
(your customers cannot view the entry). If you want to change these settings, click
the arrow beside More Details to reveal these fields and then update them
appropriately. You can also make additional attachments—to a total of 3—in the
More Details area. Clicking the arrow again hides the fields.
7 Click Add.
The note text appears in the Work Details table.
Modifying work information entries
If the work information entry is not locked, you can modify any field on it. The
following procedure describes how to modify the notes, add attachments, lock the
entry so it cannot be modified later, and change the viewing access level.
To modify a work information entry from the Incidents table
1 From the Incident Management console, select the incident request record.
2 At the bottom of the Incident Management console, if the Tasks table is visible,
open the Incident Detail area by clicking Show Incident Detail.
3 From the list of work information entries, select the work information record that
you want to update.
4 Click View.
5 Make the required modification as described in the following table.
Table 15: Modifying work information entries
Modification Action
To update the note Click inside the Notes field and type the changes.
Resolving incident requests
108
BMC Remedy Service Desk: Incident Management User Guide

Modification Action
To add an attachment Right-click in the attachment table and select Add from the
menu that appears, and then follow the onscreen instructions.
Note: Attachments to work information entries created in
BMC Service Request Management are not transferred with
information sent to a back-end application, such as an
incident, a change request, or a work order. You can access
the attachments only from the service request.
To lock the entry From the Locked list, select Yes or No.
Note: If you select Yes, the work information entry cannot
be modified after you save it.
To change the view access level From the View Access list, select Internal or Public from the
View Access list.
■Internal—Select this if you do not want the customer to
see the work information entry.
■Public—Select this if you want the customer to see the
work information entry.
6 Click Save.
Modifying work information entries from an open incident
request
You can also modify a work information entry from an open incident request,
according to the following procedure.
To modify a work information entry from an open incident request—Classic view
1 With the incident request record open, click the Work Info tab.
2 Select the work information entry that you want to update.
3 Complete the fields on the tab as described in the Classic view section ofTo
modify a work information entry from the Incidents table on page 108.
To modify a work information entry from an open incident request—Best
Practice view
1 Open the incident request record.
Resolving incident requests
Chapter 5 Resolving and closing incident requests as support staff 109

2 On the Work Details tab, select the work information entry that you want to
update.
The Notes field updates to contain the work info text and the More Details area
expands to reveal the hidden fields.
3 Make the required changes.
Note
If you need to remove an attachment, click the Eraser icon beside the associated
Attachment field.
4 Click Save.
Updating an incident request
To update an incident request, open the incident request and then update the details
as required. Click save when you finish.
Creating a change request
If infrastructure change is required to permanently resolve the incident request,
assign the incident request to a Change Coordinator.
For information about how to reassign a ticket to a Change Coordinator this, see
Reassigning incident requests on page 95. If you have the correct change
management permissions, you can create a change request from the Incident Request
form. If you are not sure about your change management permissions, ask your
system administrator.
To create change from an incident
1 Open the incident request record.
2 Create the change request from the incident request.
When using Best Practice view When using Classic view
From the Quick Actions area, click the arrow beside
Create Related Request.
From the Navigation pane, select Create Other
Requests => Create Change
From the menu, select Infrastructure Change
Resolving incident requests
110
BMC Remedy Service Desk: Incident Management User Guide

A Change Request form appears. The Product and Operational Categorization are
copied from the incident to the infrastructure change. A relationship is created
between the change and the incident.
3 Complete the Change Request form.
For information about recording change requests, see the BMC Remedy Change
Management User Guide.
4 Click Save.
Closing incident requests
When you resolve the incident request, move the incident request status to Resolved.
If you are in communication with the customer when you resolve the incident
request, and can verify the resolution, move the request status to Closed
immediately. For information about how to do this, see Closing an incident request
on page 114.
If you cannot verify the resolution at the time you make it, complete the incident
request with the Resolved status, and set the Status Reason field to Customer Follow-
up Required. For information about how to do this, see Completing an incident
request on page 112.
Note
The customer must verify the resolution within a specified period of time, or BMC
Remedy Incident Management automatically moves the incident request status to
Closed. The length of this period is configurable. Check with your system
administrator to determine how much time your organization specifies. The default
setting is 15 days.
If the resolution information entered in the incident request can help users, service
desk analysts, or other specialists resolve future, similar cases, you can create a
solution database entry to document the solution. For information about how to do
this, see Creating a solution database entry from an incident on page 91.
If the incident request was resolved using a workaround, but the incident can recur,
notify the problem coordinator so that person can investigate the issue in a timely
manner and then decide whether to create a problem investigation.
Closing incident requests
Chapter 5 Resolving and closing incident requests as support staff 111
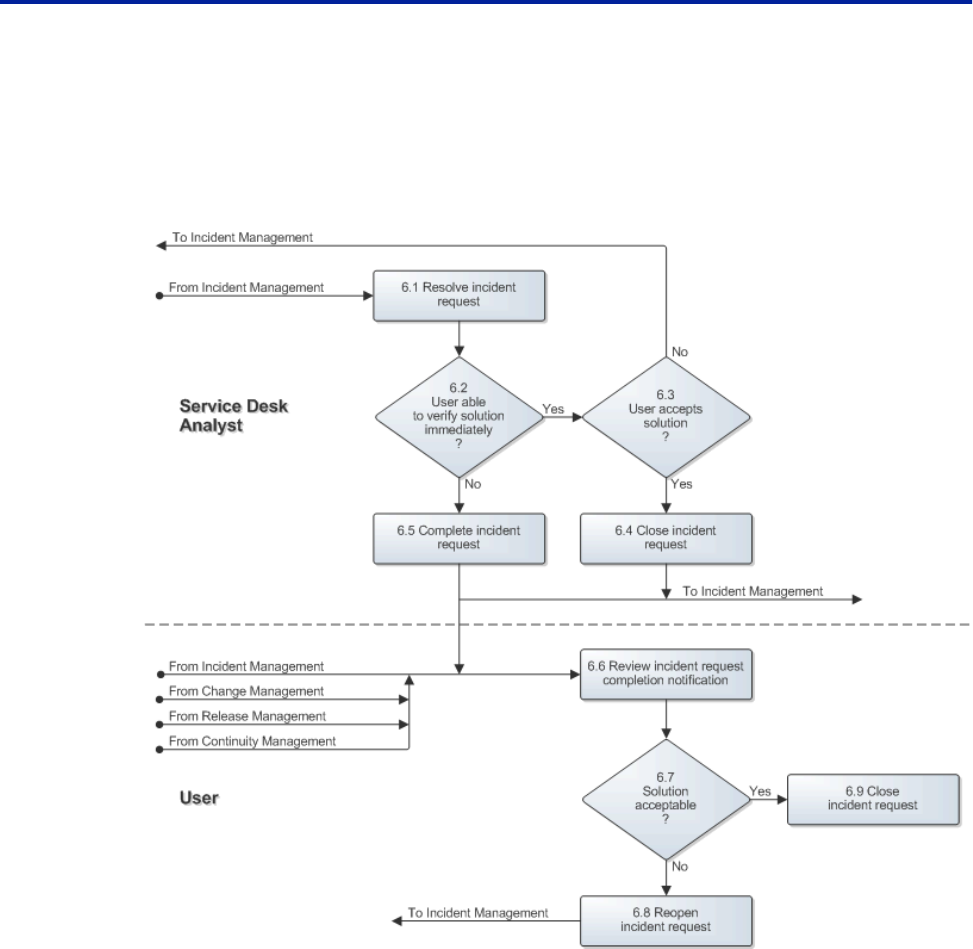
If the user does not accept the resolution, the user contacts the service desk and asks
for the incident request to be reopened. Depending on the incident request’s status
refer to one of the sections listed at the bottom of the page.
Figure 14: Incident request closure
Completing an incident request
Use this procedure when you have resolved the incident request, but are unable to
have the user verify the resolution.
To complete an incident request
1 Open the incident request record.
2 Change the Status field to Resolved.
3 Select the appropriate status reason.
Closing incident requests
112
BMC Remedy Service Desk: Incident Management User Guide

The status reason can indicate action required before the incident is closed, such
as Customer Follow-up Required.
Note
If the incident type is User Service Restoration or Infrastructure Restoration, you
must perform the following step. If the incident type is User Service Request or
Infrastructure Event, then the following step is recommended, but not required.
4 Provide a description of what you did to resolve the incident request. You can do
this using one, or both, of the following methods.
Resolution field—Type a description of what you did to resolve the incident
request.
Resolution Categorization fields—Select a predefined resolution from a set of
menu choices in the Incident Categorization dialog box. To open this dialog box,
choose Categorization from the Links menu in the navigation pane. When the
dialog box opens, select a resolution description from the Tier 1, Tier 2, and Tier 3
menus in the Resolution Categorization area.
5 Click Save.
The status of the incident is set to Resolved.
If CI unavailability was created from this incident and your support group is
responsible for the CI unavailability, you are prompted to update the CI
unavailability.
■To update the CI unavailability, for example, if the CI is now available, click
Update. For details about CI unavailability.
■To continue resolving the incident without updating the CI, click Close and
Continue Save.
■To return to the Incident Request form without saving, click Close and Cancel
Save.
Note
When you resolve an incident request that has related duplicate requests, BMC
Remedy Incident Management also updates those duplicate requests as resolved.
It can take up to several minutes to update duplicate requests, because BMC
Remedy Incident Management processes these updates in the background.
Closing incident requests
Chapter 5 Resolving and closing incident requests as support staff 113

Closing an incident request
This activity makes sure that the incident has successfully restored the service to the
user and that the user is satisfied with the outcome. When the user agrees that the
incident can be closed, review the incident request record for completion and, if
appropriate, create a solution database entry.
If you leave an incident as resolved, after a period of time BMC Remedy Incident
Management closes the incident. The time for your installation to close the incident
is configurable, so check with your administrator to find out the interval for your
organization. The default setting is 15 days.
To close an incident request
1 Open the incident request record.
2 Review the Incident Request form to make sure that it is complete and accurate.
3 In the status field, choose Closed.
4 Click Save.
The status is now set to Closed. If the incident was broadcast, the broadcast is
removed.
Quickly closing an incident request
Under some circumstances, you can quickly close the incident request, without first
passing it through the Resolved status.
For example, if you are on the phone with a customer and can confirm with the
customer that the incident request has been resolved, you can use this procedure to
close the incident request immediately.
Note
You cannot perform this procedure if the status of the incident request is already set
to Resolved.
To quickly close an incident request
1 With the incident request open, click the down arrow in the area of the process
flow bar that corresponds with the current status of the incident request, for
example, Resolution and Recovery.
Closing incident requests
114
BMC Remedy Service Desk: Incident Management User Guide

2 From the menu, select Next Stage => Close.
If any information is missing from the record that is required to close it, a dialog
box appears asking for the information.
3 If prompted to, provide any missing information.
4 Click Save.
The incident request moves to the Closed status.
Moving a resolved incident request back to In Progress
Use the following procedure to move an incident request record with a status of
Resolved back to the In Progress status. You do this if the reported resolution did not
resolve the incident request, and further work is needed.
To move a resolved incident request to In Progress
1 Open a resolved incident.
2 In the Status field, select In Progress.
3 Click Save.
The incident moves back to the Resolution and Recovery stage, and the status
changes from Resolved to In Progress.
Reopening a closed or resolved incident request
Use the following procedure when you want to reopen a resolved or a closed
incident request.
Note
To reopen a closed incident request, you must have support group lead or support
group manager permissions. People with these permissions can also modify a closed
incident request if they are the support group lead or support group manager of the
Incident Owner group. Someone with incident master permissions can modify any
closed incident request.
To reopen a closed incident
1 Open a closed incident.
Closing incident requests
Chapter 5 Resolving and closing incident requests as support staff 115

2 From the Navigation pane, select Functions => Re-open incident.
A new Incident Request form appears with a new incident number. The basic
details from the closed incident are copied to it and a relationship is created
between the new and closed incident request.
Note
The Re-open option is only enabled under Functions when the status of the
selected record is Closed.
3 On the new Incident Request form, click Save.
To reopen a resolved incident
Anyone with Incident Master permissions, or anyone with Incident User
permissions belonging to the Incident Assigned group or the Incident Owner group
can use the Reopen Incident function to reopen a resolved incident request.
1 Open the resolved incident.
2 On the process flow bar, click the arrow on the Incident Closure stage and select
Reopen from the menu.
Closing incident requests
116
BMC Remedy Service Desk: Incident Management User Guide
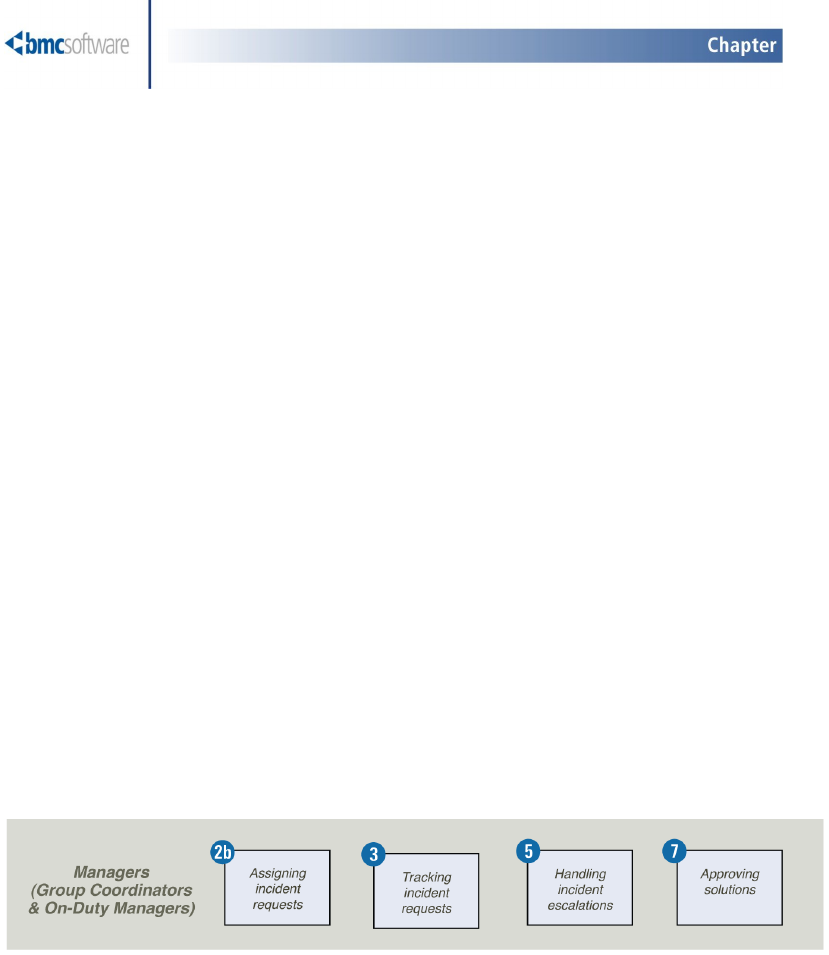
Working with incident requests as
a manager
The information in this section is for people who fulfill the management role of
group coordinator. On-duty managers should also be familiar with the information
in this section.
Other people in your organization, who occasionally fulfill the role of group
coordinators and on-duty managers, should also be familiar with the information in
this section. Using the Incident Management console, managers can assign and track
incident requests, make escalations when necessary, and approve solutions. The
tasks described by this section are organized according to the stages of the incident
management lifecycle as described by the BMC Service Management Process Model
(SMPM). For more information about the incident management lifecycle, see Figure
6 on page 42.
The following figure illustrates the SMPM stages covered in this section.
Figure 15: The SMPM management stages covered in this section
Assigning incident requests as a group
coordinator
This information in this section applies to group coordinators.
When an incident request is assigned to a group by the service desk analyst, you
must review it before assigning it to a specialist.
6
Chapter 6 Working with incident requests as a manager 117

If important information is missing from the incident request or if it is assigned to
the wrong group, you send it back to the service desk for correction by reassigning it
back to the service desk. For information about how to do this, see Reassigning
incident requests on page 95.
If the incident request is accepted, you check whether the request requires the
change management process. If it does, your escalate (or assign) the incident request
to the service owner. For information about how to do this, see Assigning incident
requests on page 94.
The resolution of an incident request is performed using the change management
process when the resolution requires a change that will:
■have a negative affect on the service during the service hours (defined by the SLA)
■change the functionality of a service
■require an update to the BMC Atrium Configuration Management Database (BMC
Atrium CMDB)
If the incident request does not require the change management process, you assign
the incident to a specialist within your group.
If a change is required, you assign the incident request to the change coordinator of
the affected service. For information about how to do this, see Assigning incident
requests on page 94.
For information about rejecting incident requests, see the following section:
Rejecting an incident
If the incident request does not contain enough information for the specialist to work
with, or if it is assigned to the wrong group, you can reject the incident request by
assigning it back to the service desk.
Note
Make sure you include a note in the Work Info section of the incident request record
explaining why the incident request was rejected. Include the name of the correct
group to which the incident request needs to be assigned, if known.
For information about how to do this, see Reassigning incident requests on page 95.
Assigning incident requests as a group coordinator
118
BMC Remedy Service Desk: Incident Management User Guide

Tracking incident requests
If BMC Service Level Management (BMC SLM) is installed, you receive a notification
when the incident request is in danger of breaching the service terms. For example,
this happens when:
■The target response time has elapsed and the incident is still assigned.
■The target resolution time has elapsed and the incident is still open (not resolved,
closed, or canceled).
Note
You can view the Responded Date on the Date/System tab of the Incident
Request form. For details about service target calculations, see Overview of
BMC SLM calculations on page 120.
You can configure BMC SLM to send notifications to incident assignees, assignee
group coordinators, incident owners, or owner group coordinators, by using
templates included with BMC Remedy Incident Management when you integrate it
with BMC SLM. For details about configuring service targets and notifications in
BMC SLM, see the BMC Service Level Management User Guide .
When you receive an escalation, you determine the cause of the notification and act
accordingly.
For example, if the notification occurred because an SLA was breached, you escalate
the incident request to the service owner of the affected service.
If, however, the escalation notification occurred because an SLA threshold is
approaching a breach, you determine whether the incident request needs to be
reassigned to another specialist with different skills, greater experience, or with
different access rights.
If you decide not to reassign the incident request, then you must notify the assigned
specialist that the incident request must be resolved quickly to avoid any service
level objective (SLO) violations.
Beginning with BMC Remedy Service Desk: Incident Management version 7.6.00,
you can place incident requests that require special monitoring on the Watch List
(see Working with the Watch List on page 121 for information about using this new
feature).
Tracking incident requests
Chapter 6 Working with incident requests as a manager 119
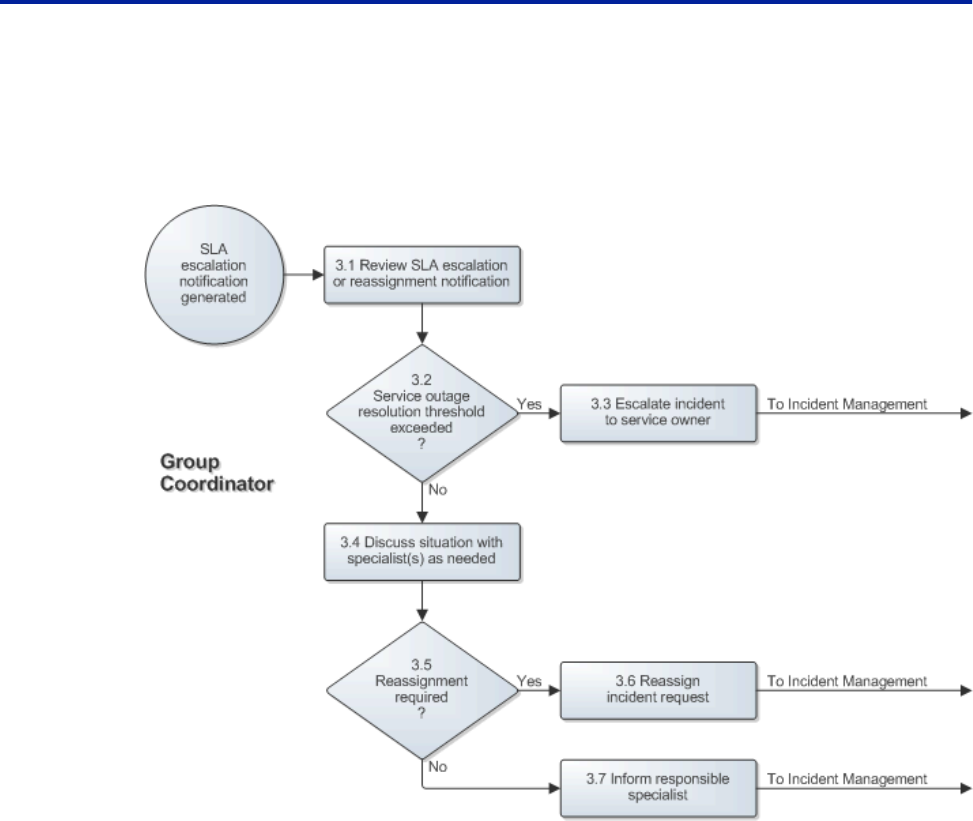
The following figure provides an overview of the tracking incident requests process,
as described by the SMPM.
Figure 16: Tracking incident requests
Overview of BMC SLM calculations
From the Incident Request form, you can view incident service targets defined in
BMC SLM. Service targets can be defined in BMC SLM for response time and
resolution time. Service targets for an incident can be determined by related CIs,
product and service categorization, and many additional criteria.
The service target response time applies when an incident request’s reported source
is: Email, Fax, Voicemail, Web, Self Service, BMC Impact Manager Event, or Other.
In these cases, the Responded Date is blank until someone indicates that the incident
has been responded to by updating the Response field on the Incident Request form
to Yes (for information about updating the Response field, see To set the responded
date on page 101. When support staff respond to an incident request from one of the
previously noted sources, the Responded Date is set to the date that the incident was
responded to.
Tracking incident requests
120
BMC Remedy Service Desk: Incident Management User Guide

The service target resolution time is configurable, a typical scenario would be from
when the incident is recorded until it is resolved. The following scenarios can affect
the calculated resolution time:
■When an incident is in a pending state, it might not be included in BMC SLM
calculations, depending on the status reason.
■When a resolved incident is reopened, the BMC SLM calculations account for time
spent in the resolved state.
Working with the Watch List
The Watch List provides a separate area where you can place records that you
particularly want to monitor.
Note
You can use the Watch List to track an incident request record throughout its
lifecycle, even if it is reassigned to a group that you do not belong to. After you add
an incident request record to the Watch List, it stays there until you remove it.
The following table describes how to add and remove records from the Watch List.
Table 16: Working with the Watch List
Action Note
Viewing the Watch List From the Defined Searches list in the Navigation pane , click Watchlist.
Returning to the
Incidents table
From the Defined Searches list in the Navigation pane , run one of the searches.
Adding records From the Incidents table, select the record to add.
Click Add to Watch List
Note: When you add a record to the Watch List, it is still enabled in the Incidents
table.
Removing records From the Watch List table, select the record to remove.
Click Remove From Watch List
Note: This does not delete the record from the database; it only removes it from
the Watch List.
Note
When you are viewing the Watch List , the Company and View By fields at the top
of the Incident Management console are disabled.
Tracking incident requests
Chapter 6 Working with incident requests as a manager 121

Handling incident escalations
If an incident request is escalated to the service owner, the service owner consults
with the specialists who were handling the request to understand the request’s
current status and what solutions have been tried already.
If the service owner determines that the best way to restore service is through the
continuity site, the service owner escalates the incident request to the on-duty
manager to implement the continuity site strategy (see Reassigning incident requests
on page 95 for information about how to do this).
If activating a continuity site is not practical, the service owner determines whether
service can be restored through the change management process. If possible, the
service owner creates a change request (see Creating a change request on page 110
for information about how to do this).
The resolution of an incident request is performed using the change management
process when the resolution requires a change that will:
■have a negative affect on the service during the service hours (defined by the SLA)
■change the functionality of a service
■require an update to the BMC Atrium CMDB
If the change management process is needed, the service owner also consults with
the specialists assigned to the incident request to understand the risks that might
cause the change implementation to fail, and what affect, if any, the change will have
on the users. Through this consultation, they develop a strategy to minimize the
affect of the change. When this is done, the service owner asks the specialist to
implement the change as an emergency change.
If change management is not required, the service owner makes sure that the most
appropriate specialists continue to resolve the incident within the incident
management process.
Note
The role of service owner is performed by the on-duty manager when the service
owner of the affected service is not available.
Handling incident escalations
122
BMC Remedy Service Desk: Incident Management User Guide
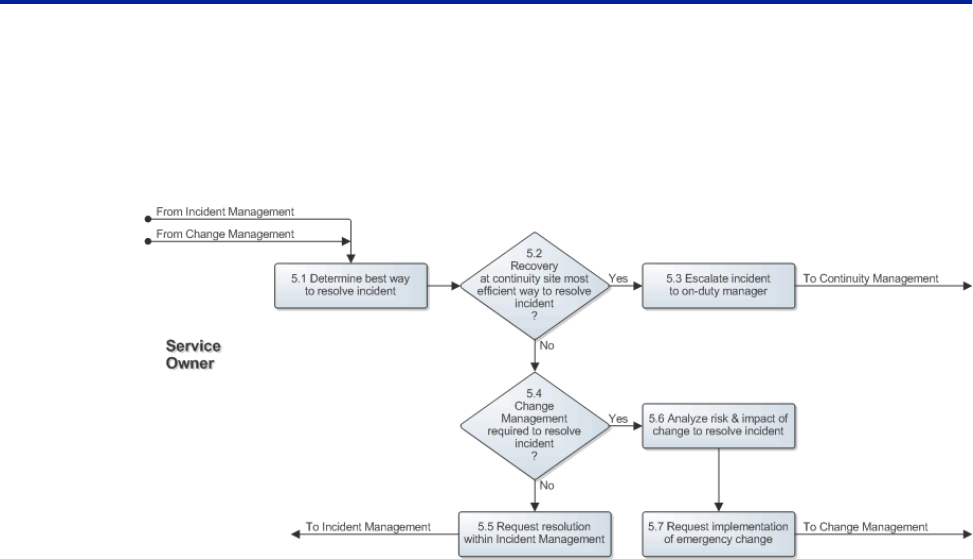
The following figure provides an overview of the escalation handling process as
described by the SMPM.
Figure 17: Escalation handling
Approving solutions
When the specialist proposes a solution, you must review the proposed solution to
make sure the information is complete and accurate. You might need to contact the
specialist for clarification or to better understand the proposed solution.
When you agree that the proposed solution is accurate and complete, and
appropriate for the incident request, you approve the solution by changing the
Status field on the Solution form from Inactive to Active.
If you do not agree that the proposed solution is appropriate for the incident request,
you perform the following steps on the Solution form:
■record the reason for disagreement in Work Info
■set the Expiry Date field to today’s date
■leave the Status field reading Inactive
To approve or reject a solution
1 Open the incident request record.
2 Click the Relationship tab.
Approving solutions
Chapter 6 Working with incident requests as a manager 123
3 From the Relationships table, select the solution database entry you are working
on, and then click View.
4 Perform the following steps, as required.
Approving a solution Rejecting a solution
Change the Status field from Inactive to Active. Leave the Status field at Inactive.
On the Date/System tab, change the Expiry Date to today’s
date.
Add a work information note to record the reason for
disagreement.
5 Click Save.
Approving solutions
124
BMC Remedy Service Desk: Incident Management User Guide

Creating and monitoring tasks
The information in this section is for people who fulfill one or more of the following
support roles:
■service desk analysts
■group coordinators
■specialists
Tasks overview
A task is a unit of work that needs to be completed as a step in resolving an incident
request. If the solution to an incident request involves more than one action,
procedure, or process, consider dividing the solution into separate tasks. Dividing
the solution into separate tasks can help you to better manage and to monitor the
incident request as it moves toward resolution.
You can assign the tasks to the same person, to several people, or to a support group.
The person or support group to whom the task is assigned is the task implementer.”
When the group coordinator sets the task status to In Progress, the task
implementers are notified of the tasks assigned to them by email, BMC Remedy
Alert, pager, or some additional means. After a task is assigned to the task
implementers, they can log their progress as they complete each task.
Note
Tasks can have an Assigned status only if the associated incident request also has the
status of Assigned.
You can use a task template to add a task to an incident request, or you can create an
ad hoc task. Task templates are predefined tasks that you can quickly add to an
incident request. For information about how to do this, see Adding tasks using task
templates on page 126. An ad hoc task is any task that is not included in the list of
7
Chapter 7 Creating and monitoring tasks 125

task templates and, therefore, you must create it manually. For information about
how to do this, see Creating ad hoc tasks on page 127.
When using task templates, you can also add tasks that are divided into sub-tasks. A
task that has sub-tasks is called a task group.” The sub-tasks of the task group are
called children” of the task group.
Although tasks and task groups are related to specific incident request records,
information about the tasks and task groups is stored on a separate Task form. You
can relate an unlimited number of tasks or task groups to an incident request.
After a task or task group is assigned to a task implementer, the task implementer
receives notifications to perform each of the assigned tasks.
Opening the Task form
How you open the Task form depends on whether you are using the Best Practice
view or the Classic view.
The following table describes how to open the Task form from both of the BMC
Remedy Incident Management views.
Table 17: Opening the Task form
When using the Best Practice view When using the Classic view
1 Open the incident request record.
2 From the Navigation pane, select Links > Tasks.
1 Open the incident request record
2 Click the Tasks tab.
Adding tasks using task templates
To save time, you can use a task template to add a task to an incident request record.
Task templates are created by your system administrator. A task template is a
predefined task; usually for the most commonly performed tasks that your service
desk handles. Because the Task form is predefined (that is, the fields are already
completed), you do not need to spend time manually completing the form.
The following are the types of tasks that you can add to an incident request record
when using templates: Task Template” and Task Group Template.” Task templates
associate a single task to the incident request record. Task Template tasks can be
either Manual” or Automatic.” Manual tasks must be performed by a person.
Automatic tasks are preformed by a computer or automated system, but you must
still assign automatic tasks to a person, so there is someone to monitor the task.
Adding tasks using task templates
126
BMC Remedy Service Desk: Incident Management User Guide

The Task Group template generates a task that has two or more sub-tasks. Task
Group tasks can be defined either as standard or sequencing. Standard task group
tasks can be performed in any order. In a sequencing task group, however, the tasks
must be performed in the sequence indicated on the Task form.
To add a task using task templates
1 Open the Tasks form, as described in Opening the Task form on page 126.
2 From the Request Type list, select either Task Template or Task Group Template,
and then click Relate.
Tip
To manage a large number of task templates, you can filter the list by selecting
from the Type and Category lists at the top of the dialog box.
3 From the list of tasks in the Select Template dialog box, select the template for the
task you are adding, and then click Relate.
When you click Relate, the Task form closes.
4 Repeat steps List item. on page 127 and List item. on page 127 for all tasks you
want to add to the incident.
The templates you selected are displayed in the Tasks and Task Groups list. If
there are no templates listed, click inside the list to refresh the table.
5 If necessary, redefine the numeric sequence of the children tasks created by any
group template, as described in Reassigning sequence numbers to task group
children on page 131.
The task management subsystem enforces the dependencies between tasks. These
relate to the sequence order specified in the Incident Request form.
6 Click Close.
7 When you finish adding templates, save the incident.
Creating ad hoc tasks
Add hoc tasks are tasks that are not predefined by a task template and, therefore,
must be created manually.
Creating ad hoc tasks
Chapter 7 Creating and monitoring tasks 127

To create an ad hoc task
1 Open the Tasks form, as described in Opening the Task form on page 126.
2 From the Request Type list, choose Ad hoc.
3 Click Relate.
The Create Task form appears. Certain fields in the form are already filled in with
the data for the incident.
4 In the upper region of the form, fill in the following required fields:
■Name—Enter a descriptive name of the task.
■Summary—Enter a brief description of the task.
The Type field is set to Manual by default when you create an ad hoc task.
5 On the General tab, fill in information about the company.
The Company field defaults to the contents of the Incident Location field in the
Incident Request form. Your task can be assigned to an different department or a
different company.
6 On the Requester tab, fill in information about the person creating the task
(Requester) and the intended target of the task (Requested For).
Some information is set by default from the Requested By information of the
incident.
7 On the Classification tab, fill in information about the product and operational
categorizations.
8 In the Assignment/Dates tab, assign the task by completing the following fields:
■Assignee Group—Optionally, select a task implementer group from the list.
■Assignee—Optionally, select a task implementer from the list.
The BMC Remedy Assignment Engine automatically assigns the task when the
task is created according to how the administrator has configured BMC
Remedy Incident Management, but you can override this if necessary. For more
information about assignment configuration, see the BMC Remedy IT Service
Management Administration Guide.
■Scheduled Start Date—Optionally, enter an estimated start date.
■Scheduled End Date—Optionally, enter an estimated end date.
Creating ad hoc tasks
128
BMC Remedy Service Desk: Incident Management User Guide

You can set the Start Date and End Date to be different from the dates of the
parent incident.
9 On the Relationships tab, search for and then relate configuration items that are
needed with this task.
You can perform quick actions that are with the task, for example, get related
relationships.
10 When you finish creating the task, click Save.
The task information form closes and returns you to the Incident Request form.
The task management subsystem enforces the dependencies between tasks. These
relate to any Sequence order you might have specified in the Incident Request form.
11 Click Save on the Incident Request form.
Accepting task assignments
You receive notification of assigned tasks by way of BMC Remedy Alert, email, and
so on. You can also use the Overview console or the Incident Management console to
view all tasks assigned to you. Tasks are identified by the TAS prefix. To access the
Incident Management console, the task implementer must have Incident Master,
Incident User, Incident Submitter, or (at minimum) Incident Viewer permissions.
Note
When you follow the recommended lifecycle of an incident, the status of a task must
be Scheduled before you accept the task.
Receiving task assignment notifications by BMC Remedy Alert
You can receive notification of a task that is assigned to you by way of BMC Remedy
Alert. To receive task assignment notifications using BMC Remedy Alert, use the
following procedure.
To receive notification of task assignment by BMC Remedy Alert
1 Log in to BMC Remedy Alert.
When you or your group receive a notification that you or your group have been
assigned to a task, the information appears in BMC Remedy Alert.
2 To evaluate a task, select the task listed in the BMC Remedy Alert window.
Accepting task assignments
Chapter 7 Creating and monitoring tasks 129

3 Choose Alerts => Details.
The task appears in a Task form in Modify mode.
You accept a task by changing its status to Work in Progress. When an incident is
set to In Progress and a task is not assigned to a person or group, the task status is
set to Pending. Later, when the task is assigned, it moves automatically to the
Assigned status. However, you can only change the status to Work in Progress
manually.
Note
When the incident is in Assigned status, all the tasks have a status of Staged.
Accepting a task assignment
After you receive notification of a task assingment, you must accept it. Use the
following procedure to accept a task assignment.
To accept an assigned task
1 Open the Tasks form, as described in Opening the Task form on page 126.
2 Select the task that you want to accept.
3 Click View.
Note
To view the related incident request record, click Open next to the Request ID
field on the Task form.
4 If the Status Field of the incident is set to In Progress, manually set the Status field
to Work in Progress.
This is an important step, because the task then moves into Work in Progress
status. In addition, different escalations occur based on the task’s status. If the
task is still in the Scheduled state while you are working on it, an inaccurate
escalation can occur.
5 Click Save.
Accepting task assignments
130
BMC Remedy Service Desk: Incident Management User Guide

Opening and viewing individual task records
You can open and view the contents of individual task records. This enables you to
see detailed information about the individual records and to update them.
To view task records
1 Open the Tasks form, as described in Opening the Task form on page 126.
2 Click inside the Tasks and Task Groups table.
A list of the tasks and task group appears in the table.
3 In the Tasks and Task Group table, select the task record you want to view, and
then click View.
Reassigning task sequence numbers
When you relate tasks or task groups to an incident, they are automatically
sequenced in the order in which you related them to the incident. This sequence is
strictly enforced inside the incident.
You can, however, reassign the sequence in which tasks and task groups are
performed. You can also assign the same sequence number to more than one task or
children tasks of a task group. If two tasks or children tasks of a task group have the
same sequence number, they are considered peers. You can work on peer tasks in
any order.
To reassign a sequence to task groups and tasks
1 Open the Tasks form, as described in Opening the Task form on page 126.
2 In the Tasks and Task Groups table, select the task that you want to resequence.
3 Click either the up arrow or the down arrow located to the right of the table. This
moves the selected task either higher or lower in the sequence.
4 Click Close.
Reassigning sequence numbers to task group children
You can change the order in which the children of a group template task are sequenced.
Opening and viewing individual task records
Chapter 7 Creating and monitoring tasks 131

To reassign sequence numbers to task group children
1 Open the Tasks form, as described in Opening the Task form on page 126.
2 In the Tasks and Tasks Groups table, select the task group.
The tasks assigned to the task group appear in the Children of Selected Task
Group table.
Note
You might need to click inside the Children of Selected Task Group table to
refresh its contents.
3 In the Children of Selected Task Group table, select the task you want to reassign.
4 Click either the up arrow or the down arrow located to the right of the table. This
moves the selected task either higher or lower in the sequence.
Assigning and reassigning tasks
After creating a task or adding a task template to an incident request record, you
assign it. You can assign tasks to individuals or to a support group.
If you cannot resolve one of your assigned tasks, you can reassign the task, or you
can ask your group coordinator to reassign the task. For example, you might ask the
group coordinator to reassign the task in situations where you want to reassign the
task to someone outside your group.
To assign a task using the Best Practice view
1 Open the task record as described in Opening and viewing individual task
records on page 131.
2 Select the Assignment tab.
3 From the Assignee or Assignee Group lists, select the person or support group to
work on the task as the task implementer.
4 Save and close the form.
5 The task implementer for that task is notified of the task assignment.
Assigning and reassigning tasks
132
BMC Remedy Service Desk: Incident Management User Guide

To reassign a task using the Classic view
1 Open the task record as described in Opening and viewing individual task
records on page 131.
2 Click the Assignment tab.
3 In the Assignee or Assignee Group fields, choose the group or person to you want
to reassign the task to.
4 Make sure the Notify Assignee field is set to Yes.
5 Click Save.
6 The new task implementer is notified of the request assignment. Until the new
implementer accepts the task assignment, you are still assigned to the task and
have responsibility for it.
Updating task record details
After a task record is created, you can change the details that appear on the record.
To update task record details, open the task record as described in Opening and
viewing individual task records on page 131 and then update the details as needed.
Save the changes and close the form.
Planning task times
You can plan the time for individual tasks. The Dates tab in the Task form includes
fields where you can enter scheduling information. You can create the time segments
that are required to complete individual tasks.
To plan the time for tasks
1 Open the task record as described in Opening and viewing individual task
records on page 131.
2 Click the Dates tab.
3 In the Dates/Time region of the form, provide dates for the Scheduled Start Date
and Scheduled End Date fields.
4 In the Time Segment Action field, select the following options:
Updating task record details
Chapter 7 Creating and monitoring tasks 133

■Analyze Time Segments
■Create Business Event Time Segment
■Modify Business Event Time Segment
■Create Categorizational Time Segment
■Modify Categorizational Time Segment
■Create/Modify CI Time Segment
5 Save and close the form.
Tracking the time spent working on tasks
You can track the time spent working on a task at any time after it is created. Use this
feature between the time the task status is in Implementation In Progress and
Closed. You can track the time spent working on a task in different ways:
Using the Start and Stop buttons
When you use this method, the time is automatically calculated based on when you
click the start and stop clock buttons.
To use the start and the stop buttons to track the time spent working on a task
1 Open the task record as described in Opening and viewing individual task
records on page 131.
2 Click the Assignment tab.
3 Click the Start Clock button.
The current date and current time are displayed in the read-only Start Time field.
4 Click Save.
5 When you finish working on the task and want to stop tracking the time, click
Stop Clock. You must repeat steps 1 and 2 first if you closed the task after saving
it in step 4.
Tracking the time spent working on tasks
134
BMC Remedy Service Desk: Incident Management User Guide

A message reports the number of minutes spent working on the task. The time
spent is also added to the value in the read-only Total Time Spent field.
6 Save and close the form.
You can use the start and stop clock buttons as many times as is required. Each
successive time, the new time is added to the value already in the Total Time
Spent field.
Manually entering the time
When you use this menthod to record your time, you can enter a time into the Time
Spent field directly.
To manually track the time spent working on a task
1 Open the task record as described in Opening and viewing individual task
records on page 131.
2 Click the Assignment tab.
3 Enter a number of hours or minutes manually in the editable Time Spent fields.
4 Click Save.
The time you entered is automatically added to the value already in the Total
Time Hours and Minutes fields.
Enter work into the effort log
To use this method of time tracking, you create an effort log entry as described in the
following procedure.
To use the Task Effort log to track the time spent working on a task
1 Open the task record as described in Opening and viewing individual task
records on page 131.
2 Click the Assignment tab.
3 Click Effort Log.
The Task Effort Log window appears.
Tracking the time spent working on tasks
Chapter 7 Creating and monitoring tasks 135

4 Enter information into the effort log.
For example, you can enter time spent in hours and minutes and additional details.
5 Click Add to Effort Log.
An entry is added to the effort log. You can view the entry or delete it as needed.
6 Close the task effort log to return to the task.
7 Click Save.
Adding work information to a task
Work information is a note about any work you performed while completing or
trying to complete the task. You can add work information to each task included in
the incident. The work information for each task appears in the Work Info of
Selected Task table on the Task form.
To add work information to a task
1 Open the task record as described in Opening and viewing individual task
records on page 131.
2 Click the Work Info tab.
3 If needed, modify the work information type.
4 From the Source list, select the source of this information.
Information sources can include, for example, email messages, system
assignment, or the web.
5 Enter the details of your work information record in the Date, Summary, and
Notes fields.
6 To add attachments to the record, right-click in the attachment table and select
Add from the menu that appears.
7 From the Locked list, select Yes or No to lock the log.
8 Select the view access:
■Internal—Only users within your organization can see the entry.
Adding work information to a task
136
BMC Remedy Service Desk: Incident Management User Guide

■External—Everyone with access to the system can see the entry.
9 When you finish updating, save your changes.
The Save operation adds your entry to the task’s work history. You filter out
specific work entries in the Show field, based on the type of activity that appears
in the table.
10 To see a report of the activities you performed against this task, click Report.
11 To display all current entries for work information history, click View.
12 Close the Task form when you finish with it.
13 When you return to the Incident Request form, refresh the work information
entry of the Assigned Task table to display all the entries.
Canceling tasks
You can cancel tasks by accessing them through the Incident Request form. This
action does not delete the task; it sets the status of the task to Closed and the closure
code to Canceled.
Note
If you cancel an incident with open tasks, all the tasks associated with the canceled
incident are also canceled. For information about canceling an incident with open
tasks, see Resolving, closing, and canceling incident requests with open tasks on
page 139.
To cancel tasks using the Best Practice viewí
1 Open the incident request record.
2 From the Links section of the Navigation pane, click Tasks.
3 In the Tasks and Task Groups table, select the task you want to cancel.
4 Click Cancel.
5 The status of the task is automatically set to Closed.
6 Save the incident request record.
Canceling tasks
Chapter 7 Creating and monitoring tasks 137

To cancel tasks using the Classic View
1 Open the incident request record.
2 Click the Tasks tab.
3 In the Tasks and Task Groups table, select the task you want to cancel.
4 Click Cancel.
5 The status of the task is automatically set to Closed.
6 Save the incident request record.
Closing tasks
When you have completed a task, you are ready to close it.
Note
Depending on how your system is configured, you might not be able to resolve the
incident until you close the task.
To close a task
1 Open the task record as described in Opening and viewing individual task
records on page 131.
2 Click the Assignment tab.
3 Update the time you spent on the task.
You can create an entry in the effort log as needed.
4 Click the Work Info tab.
5 Make an entry in the Work Info History field.
6 At the top of the Task form, set the Status field to Closed.
When a task is set to a status of Closed and certain conditions apply, you have the
option of updating related CIs that might be affected by this modification.
7 Select a status reason to describe how the task was closed. The closure codes are:
■Success
Closing tasks
138
BMC Remedy Service Desk: Incident Management User Guide

■Failed
■Canceled
8 Click Save.
Resolving, closing, and canceling incident
requests with open tasks
You resolve and close incident requests with open tasks the same way that you close
other types of incident requests. However, depending how your environment is
configured, if you resolve or close an incident request with open tasks, you might
receive either an error message or a warning message. Depending on your
configuration, it is also possible to receive no message.
The following paragraphs describe what to do if you receive an error message, what
happens when you receive a warning message, and when you receive no message.
For information about what happens if you cancel an incident request, see Canceling
an incident with open tasks on page 139 which follows.
Error message—If you receive an error message when closing an incident that has
open tasks, you must close all the open tasks before you can close the incident.
When the Incident Resolution with Open Tasks rule is configured to generate an
error message, the error condition stops all workflow processing and prevents the
incident from being closed.
This is the default configuration.
Warning message—If you receive a warning message when closing an incident that
has an open task, you can still close the incident successfully. The task remains open,
however.
No message—It is possible to close an incident that has an open task and receive no
message, depending on how your installation is configured. If you receive no
message when closing an incident with an open task, the task remains open.
Canceling an incident with open tasks
If you cancel an incident that has an open task associated with it, the open task is
also canceled.
Resolving, closing, and canceling incident requests with open tasks
Chapter 7 Creating and monitoring tasks 139

Resolving, closing, and canceling incident requests with open tasks
140 BMC Remedy Service Desk: Incident Management User Guide

Supplemental BMC Remedy
Incident Management features
This section contains descriptions of supplemental features that you might also use if
you work with the Overview console or the Incident Management console.
Using the KPI flashboards
The KPI flashboards graph incident management business processes against the
incident management key performance indicators (KPIs).
Incident management KPIs are described in BMC Remedy Incident Management
KPIs on page 142. If you have BMC Service Management Process Model (SMPM)
installed, you can also view the incident management KPI definitions there.
Tip
The SMPM defines a key performance indicator as, A vital and measurable result to
track the efficiency, effectiveness, and predictability of a process.”
The KPI flashboard component collects the data according to the selected customer
company. Each KPI flashboard contains graphs that present the following types of
information:
■Relevant historical data—Use this graph for trending purposes. The most recent
historical data displayed in the graph is collected from the previous month.
Historical data goes back to a maximum of one year.
Note
Historical data only appears in a graph when that historical data exists in the
database. Typically, new or recent installations, or upgrades, of BMC Remedy
Incident Management might not have historical data available.
8
Chapter 8 Supplemental BMC Remedy Incident Management features 141

■Current, or real time data—Use this graph to see what is happening with the
business process now. In most cases, the displayed real time data is collected from
the first day of the current month to today’s date.
You can also view the individual incident request records that are reported by the
real time flashboard graph. For example, you can view all of the incident request
records that are reported by the Incident Backlog KPI flashboard. For information
about how to do this, see Viewing and displaying data on page 145.
Note
KPI flashboards are available only for version 7.6.00 (and later) of the BMC Remedy
ITSM applications. If you are running a mixed environment, that is, if you are
running some BMC Remedy ITSM applications at version level 7.5.01 (or earlier),
you see flashboards with only the version 7.6.00 (or later) applications.
BMC Remedy Incident Management KPIs
The following table lists and describes the incident management key performance
indicators.
Table 18: BMC Remedy Incident Management KPIs
KPI name Description of graph content
Incidents Resolved This graph displays:
■The number of closed incident requests with the Service Type field set to User
Service Restoration and that were resolved without escalations
■The total number of closed incidents
Rejected Solutions This graph displays:
■The number of times that an incident request was reopened because its solution
was not accepted
■The total number of resolved incident requests
Incident Backlog This graph displays the number of incident requests that do not yet have their Status
field set to Resolved, Closed, or Canceled.
Using the KPI flashboards
142
BMC Remedy Service Desk: Incident Management User Guide

KPI name Description of graph content
Service Desk
Resolutions
This graph displays:
■The number of incident requests that were both registered and resolved at the
service desk without assistance from another group
■The total number of incident requests registered by service desk analysts
KPI flashboard variables
KPI flashboards use variables to fetch the data that is used to create the flashboard
graphs for the selected company. In most cases, you can control what data appears
in the graph.
Table 19 on page 143 lists the KPI graph types and the active variable names, and
describes the information they provide. This helps you to understand the effects of
hiding or displaying a specific variable.
Table 19: KPI flashboards variables
Graph type Variable name Data displayed by the variable
Incidents Resolved
Historical HPD:INC:KPI_Incident_ResolvedHistory_
V1
Displays the number of escalated incident
requests that were closed in the past year.
This data is shown in the blue portion of
the graph.
HPD:INC:KPI_Incident_ResolvedHistory Displays the number of non-escalated
incident requests that were closed in the
past year.
Real Time HPD:INC:KPI_Incident_Resolved_Real Displays all of the closed incidents for the
User Service Restoration service type that
were closed without breaching the target
date. This data is shown in the blue
portion of the graph.
HPD:INC:KPI_Incident_Resolved_Real_V
1
Displays all of the escalated closed
incidents for the User Service Restoration
service type. This data is shown in the
yellow portion of the graph.
Rejected Solutions
Using the KPI flashboards
Chapter 8 Supplemental BMC Remedy Incident Management features 143

Graph type Variable name Data displayed by the variable
Historical HPD:INC:KPI_Rejected_SolnHistory Displays the number of rejected solutions
for the past year. This data is shown in the
blue portion of the graph.
HPD:INC:KPI_Rejected_SolnHistory_V1 Displays the number of resolved incidents
for the past year. This data is shown in the
yellow portion of the graph.
Real Time HPD:INC:KPI_Rejected_Soln Displays the number of rejected solutions
for the current reporting period. This data
is shown in the blue portion of the graph.
HPD:INC:KPI_Rejected_Soln_V1 Displays the number of resolved incidents
for the current reporting period. This data
is shown in the yellow portion of the graph.
Incident Backlog
Historical HPD:INC:KPI_BacklogHistory Displays the number of incident requests
that do not yet have Resolved, Closed, or
Cancelled status for the past year.
Note: This graph uses only one variable.
Hiding this variable prevents the graph
from displaying any information.
Real Time You cannot select active variables for this graph. This real time graph does not use active
variables. It displays the number of
incident requests that do not have
Resolved, Closed, or Cancelled status for
the current reporting period.
Service Desk Resolutions
Historical HPD:INC:KPI_ServiceDeskHistory_v1 Displays the number of incident requests
that were created by the service desk
during the past year. This data is shown in
the yellow portion of the graph.
HPD:INC:KPI_ServiceDeskHistory Displays the number of incident requests
that were created and resolved by the
service desk during the past year. This
data is shown in the blue portion of the
graph.
Real Time HPD:INC:KPI_ServiceDesk_V1 Displays the number of incident requests
that were created by the service desk
during the reporting period. This data is
shown in the blue portion of the graph.
HPD:INC:KPI_ServiceDesk Displays the number of incident requests
that were created and resolved by the
service desk during the reporting period.
This data is shown in the yellow portion of
the graph.
Using the KPI flashboards
144
BMC Remedy Service Desk: Incident Management User Guide

Opening the KPI flashboards
Use this procedure to open the KPI flashboards.
To open the KPI flashboards
1 From the Functions area of the Navigation pane, click the KPIs link.
2 From the Company list at the top, select the customer company for which you
want to view KPI flashboards.
Note
Your access level determines the companies that you see in the Company list.
3 From the Navigation pane, choose ProcessKPIs => KPIflashboardLink
is the link to the specific KPI flashboard that you want to see.
Tip
Click the triangle beside the Process KPI text to open and close this area of the
Navigation pane.
Viewing and displaying data
Controls on the open flashboard help you view and display the data. The actions
that you can perform and the procedures that you use to perform them are described
in The following table.
Note
Not all of the KPI flashboards support all of these procedures.
Table 20: KPI flashboard actions and procedures
Action Procedure
View specific records used to create the real time KPI flashboard
data
Use this procedure, for example, to view all of the incident request
records that are reported by the Incident Backlog KPI flashboard.
That is, you can see all of the records that do not yet have their
Status field set to Resolved, Closed, or Canceled for the reporting
period. This function is not available on the historical data graph.
1 Click anywhere inside the real-
time graph.
2 In the search results list, select the
record you want to view.
Using the KPI flashboards
Chapter 8 Supplemental BMC Remedy Incident Management features 145

Action Procedure
Zoom a graph
Use the zoom feature to enlarge a section of the graph. You can also
use full screen mode to enlarge the entire graph as described later
in this table.
1 Click the arrow in the lower left
corner of the graph to expand the
bottom control panel.
2 Click the magnifying glass icon,
and then follow the onscreen
instructions.
Hide or display the graph legend
The default setting is to show the graph legend. The legend
provides information about how to interpret the graph. Not all
graphs have a legend.
1 Click the arrow in the lower left
corner of the graph to expand the
bottom control panel.
2 Deselect or select the Show Legend
check box to either hide or display
the legend.
Change the graph style
There are many different graph styles from which you can choose.
For example, you can select to display the KPI data in a line graph,
a bar graph, a stacked bar graph, an area chart, and so on.
However, be aware that some data is best represented in a
particular format and that changing the format might affect the way
in which the data is interpreted. Not all graphs support all graph styles.
1 Click the arrow in the lower left
corner of the graph to expand the
bottom control panel.
2 Click the double-arrow button, and
then select the graph style you want.
Change the graph titles
You can customize the title text that appears on the graphs to suit
your organization’s needs. For example, you can change the titles of
the X and Y axis.
1 In the upper right corner of the
graph, click the Open Options
Panel icon.
2 Change the label text appropriately
to your organization’s needs.
3 Click Apply when you finish
updating the text.
Hide or display active variables
See KPI flashboard variables on page 143 and ROI Active variables
on page 151 for descriptions of the active variables. Not all graphs
have active variables that you can turn on or off.
Note: This procedure can also be used on ROI flashboards.
1 In the upper right corner of the
graph, click the Open Options
Panel icon.
2 Select or clear the active variables
that you want to display or hide.
Using the KPI flashboards
146
BMC Remedy Service Desk: Incident Management User Guide
Action Procedure
View a graph in full screen mode
You can display the selected graph across the entire screen for
better visibility. Not all graphs display in full screen-mode.
1 In the upper right corner of the
graph, click the Full Screen icon.
2 When you finish viewing the
graph in full-screen mode, press
ESC to restore regular display
mode.
Using the Service Desk ROI flashboard
The Service Desk ROI flashboards provide a platform from which you can compare
the baseline incident request call-handling and the baseline CI outage costs that were
incurred prior to implementing BMC Remedy Incident Management with the actual
costs realized after the installation. This information is displayed in graphs on the
Cost of Incident Handling flashboard.
Note
In some cases, if the relative difference between the numbers reported in each graph
is large enough, the smaller graph might not appear on the flashboard. However, a
number representing the value of the smaller graph is always visible.
The information displayed in these graphs helps you to determine the return on
investment (ROI) that your organization achieves from the BMC Remedy Incident
Management implementation.
Additional ROI flashboards are available on the ROI console that provide similar
information for other BMC Remedy ITSM applications. For more information about
those flashboards, see the BMC Remedy Change Management User Guide.
Note
To view the ROI console you must have ROI Viewer or ROI Admin permissions.
The ROI data is collected by the ROI flashboard component according to:
■The customer company that you select in the ROI console
■The date range that you specify in the ROI console
■A set of parameters that are configured by someone with ROI Admin permissions.
Using the Service Desk ROI flashboard
Chapter 8 Supplemental BMC Remedy Incident Management features 147

For information about configuring the ROI flashboard parameters, see the BMC
Remedy IT Service Management Administration Guide . For descriptions of what the
configured parameters mean, see Configured parameters on page 149.
Note
ROI flashboards are available only for version 7.6.00 of the BMC Remedy ITSM
applications and later. If you are running a mixed environment, you see only the
version 7.6.00 (or later) application flashboards listed on the ROI console. For
example, if you are running version 7.6.00 of BMC Remedy Change Management
and version 7.5.01 of BMC Remedy Incident Management, you see only the BMC
Remedy Change Management flashboards on the ROI console.
To open the ROI flashboards
Use this procedure to opent the ROI flashboards.
1 In the Navigation pane of the Overview console, click the ROI Console link.
2 From the Navigation pane, choose ROI Console.
3 From the lists at the top of the ROI console, select the following parameters:
Company—The client company for which you want to make the comparison.
Start Date—The start date of the period for which the graph is created.
End Date—The end date of the period for which the graph is created.
Note
Your access level controls the companies that you see in the Company list. The
Effort Input, Effort Estimate, Baseline Effort, and Cost fields are configured
parameters and are completed automatically by the application. For information
about what the configured parameters mean, see Configured parameters on page
149 which follows.
Using the Service Desk ROI flashboard
148
BMC Remedy Service Desk: Incident Management User Guide

Note
Although you can enter a date range that includes a day of the month, the day of
the month is ignored and only the month and the year are considered. For the
purposes of the system calculations, Start Date is always assumed to be the first
day of the selected month and year, and the End Date is always assumed to be
the last day of the selected month and year. For example, if you enter May 21st,
2009 as the Start Date, and July 10th, 2009 as the End date, the system uses May
1st, 2009 as the start date and July 31st, 2009 as and end date.
4 In the ROI Navigation pane, choose Service Desk > FlashBoardName.
If other BMC Remedy ITSM applications are installed, you also see links to those
ROI flashboards in the Navigation pane.
Configured parameters
This section helps you understand the ROI parameters that are configured from the
Application Administration console by someone with ROI Admin permissions.
The following table lists and describes the configured parameters for the Cost of
Incident Handling.
Table 21: Cost of Incident Handling parameter descriptions
Parameter Description
Cost The estimated per-hour cost of incident handling used by your organization for
creating projections.
Using the Service Desk ROI flashboard
Chapter 8 Supplemental BMC Remedy Incident Management features 149

Parameter Description
Effort Input For Effort Input, the ROI Administrator can select from: Specify Effort Estimate,
Use Baseline Effort, or Calculate Cumulative Effort.
■Specify Effort Estimate
Your organization selects this Effort Input value if it wants to specify an estimate
that is different from the one specified in the Baseline Effort field. This parameter
represents he estimated number of hours to complete an incident request.
■Use Baseline Effort
Your organization selects this Effort Input value if it wants the flashboard to use
the same value as that specified in the Baseline Effort field to determine effort input.
■Calculate Cumulative Effort
Your organization selects this value if it wants the flashboard to calculate the
Effort Input value by totaling the effort of all people who recorded work against
any given incident request that was closed during the reporting period selected
by the user.
Note: Calculate Cumulative Effort is used only if your organization is tracking
effort in the BMC Remedy Incident Management application.
Effort Estimate (in hours) The actual value of the Specify Effort Estimate parameter, if that parameter is
configured.
Baseline Effort The estimated average number of hours required to handle an incident request,
expressed in hours, used by your organization for creating projections.
The following table lists and describes the configured parameters for the Cost of
Outages flashboards.
Table 22: Cost of Outages parameter descriptions
Parameter Description
Company The customer company to which the rest of the parameters described in this
section apply. If they apply to all companies, select Global.
Cost (per minute) The estimated cost of outages used by your organization for creating projections.
For example, if your organization estimates that CI outages costs 95 dollars per
minute, then enter 95. If your organization estimates that CI outages costs 50
euros per minute, then enter 50, and so on. The default setting for this parameter
is 10.
Monthly Outages (in
minutes)
The estimated amount of time lost to CI outages per month, expressed in
minutes, used by your organization for creating projections. The default setting
for this parameter is 10.
Using the Service Desk ROI flashboard
150
BMC Remedy Service Desk: Incident Management User Guide
Parameter Description
Outage Input For Outage Input, the ROI Administrator can select from: Calculate Cumulative
Outage and Specify Estimated Outage.
■Calculate Cumulative Outage
Your organization selects this Outage Input value if it wants the system to use
the total amount of time lost to CI outages (in minutes) for the specified date
range. This is determined from examining the closed incident request records
that also have related CI Unavailability records. For each CI Unavailability
record, the system calculates the duration of the unavailability and then adds
that amount of unavailability to the running unavailability total for the specified
date range. This is the default selection for Outages Input.
■Specify Estimated Outage
Your organization selects this Outage Input value if it wants the system to use
the number specified in the Estimated Outage (in minutes) field to calculate the
actual outage cost. When you select Specify Estimated Outage (in minutes), the
Estimated Outage (in minutes) field appears below the Outage Input field. For
more information about the Estimated Outage (in minutes) field, see the
explanation of that field, which follows. The default value is 100.
Estimated Outage (in
minutes)
The estimated amount of time, in minutes, lost to outages on a monthly basis,
used by your organization for creating projections.
Viewing and displaying data
The Cost of Incident Handling flashboard controls help you view and display the data.
The actions that you can perform and the procedures that you use to perform them
are the same as those described for the KPI flashboards. See the section on KPI
flashboards for more information about the actions and procedures that you can
perform.
ROI Active variables
The ROI flashboards use active variables to fetch the data that is used to create the
graphs. The following tables list and describe the Cost of Incident Handling and the
Cost of Outages active variable names and the meaning of the information they
provide.
Using the Service Desk ROI flashboard
Chapter 8 Supplemental BMC Remedy Incident Management features 151

Note
The active variable used to determine the actual cost of incident handling and the
actual cost of outages depends on which value is selected for the Effort Input
parameter (for incident handling) and Outage Input parameter (for outages) by the
ROI administrator. For information about the ROI Administrator-configured
parameters, see Configured parameters on page 149.
The following tables describe the ROI active variables.
Table 23: Cost of Incident Handling active variables (Effort Input = Specify Effort Estimate)
Active variable name Meaning
ROI:Costofcallhandling_Baseline Baseline costs
ROI:Costofcallhandling_Actual Actual costs
Table 24: Cost of Incident Handling active variables (Effort Input = Use Projected Effort)
Active variable name Meaning
ROI:Costofcallhandling_Baseline Baseline costs
ROI:Costofcallhandling_Usingprojectedeffort Actual costs
Table 25: Cost of Incident Handling active variables (Effort Input = Calculate Cumulative Effort)
Active variable name Meaning
ROI:Costofcallhandling_Baseline Baseline costs
ROI:Costofcallhandling_Usingcumulativeeffort Actual costs
Table 26: Cost of Outages - (Outage Input=Cumulative Resolution)
Active variable name Meaning
ROI:CIUnavailability_Baseline Displays the projected cost. The values for the cost
are selected from the configuration form.
ROI:CIUnavailability_INC Displays the Actual cost . The values are selected
from Incident form and the configurations to arrive
at the Actual Cost.
Table 27: Cost of Outages - (Outage Input=Specify Estimated Outages)
Active variable name Meaning
ROI:CIUnavailability_Baseline Displays the projected cost. The values for the cost
are selected from the configuration form.
Using the Service Desk ROI flashboard
152
BMC Remedy Service Desk: Incident Management User Guide

Active variable name Meaning
ROI:CIUnavailability_Estimated Displays the Actual cost. The values are selected
from configuration forms directly for calculation.
Viewing your profile
You can view and modify your personal profile. When you click My Profile, the
People (Search) form appears. In this form, you can:
■Update company information such as organization, business, and home address,
and so on.
■View permissions.
For detailed information about the People form, see the BMC Remedy IT Service
Management Administration Guide.
To modify your profile
1 From the Incident Management console Navigation pane, choose Functions =>
My Profile.
2 On the People form, update the information at the top of the form, or click the tab
corresponding to the area in which you want to change the profile information.
3 Make your changes by selecting from the various lists that are available.
4 When you finish making the changes, click Save.
Creating a problem from an incident
If you fulfill the Problem Coordinator role, you can create a problem investigation
from an incident request.
To create a problem investigation from an incident request
1 Open the incident request record.
2 Create the problem investigation.
Viewing your profile
Chapter 8 Supplemental BMC Remedy Incident Management features 153

When using Best Practice view When using Classic view
From the Quick Action area, click the arrow beside
Create Related Request.
From the Navigation pane, select Create Other
Requests => Create Problem
From the menu, select Problem Investigation
The Problem form appears. The details are copied from the incident request to the
Problem form and a relationship is created between the problem investigation
and the incident request.
3 Complete the Problem form, as described in the BMC Remedy Service Desk: Problem
Management User Guide.
4 Click Save.
Selecting application preferences
You can set preferences to:
■Automatically use decision trees, if available, whenever you record a new incident.
■Set defaults for the consoles.
■Determine the action that occurs after you save an Incident Request form.
■Determine which console appears by default when you open BMC Remedy
Incident Management.
To set your preferences
1 From the Navigation pane of the Incident Management console, choose
Functions => Application Preferences.
2 Update the Application Preferences form as appropriate.
The following table describes the BMC Remedy Incident Management settings
available on the form.
Table 28: Application preference settings
Setting Description
Preferences for This is a read-only field that identifies the user.
Selecting application preferences
154
BMC Remedy Service Desk: Incident Management User Guide

Setting Description
Default Home Page Select the console that you want to appear as your home page when you log into the
BMC Remedy Action Request System (BMC Remedy AR System) server. For example,
if you want the Incident Management console to appear, select Incident Management
Console.
Company Select the company that you want to appear by default in the Company field, which is
found under the More Filters feature on the application's console.
Console View The default console view, with the search criteria, controls which incident requests
appear in the Assigned Work area. You can temporarily change this setting from the
Navigation pane of the console. The following list shows you the available selections:
■All—Displays all incident requests.
■Submitted by me—Displays all incident requests that you submitted.
■Assigned to Me—Displays incident requests to you.
■Assigned to my Selected Groups—Prompts you to first select a support group to
which you belong, then displays incident requests assigned to that group.
■Assigned to All My Groups—Displays incident requests assigned to all your
support groups. You can choose to display all work, or work that are not yet
assigned to an individual.
Confirm on Submit Choose whether to display a confirmation message when you submit a new problem
investigation record.
Console Page On Form Open
■Data Set Name—When multiple data sets exist, such as production and training
data sets, select the appropriate data set.
Selecting application preferences
Chapter 8 Supplemental BMC Remedy Incident Management features 155

Setting Description
Form ■After New Save—This setting controls the action after you click Save on the
Incident Request form. The following list shows the available selections:
—New request after submit—Closes the newly created incident request, then
opens a blank incident request form in New mode, ready for you to create a new
incident request.
—Modify request after submit—Saves the new incident request, but leaves the
record open so that you can continue to work with it and add or change
information.
■Enable Auto-Decision Tree—If you select Yes from this list and a decision tree is
set up; you are prompted by the decision tree when you record a new incident. For
more information about decision trees, see Using the decision tree on page 162.
■Tab Views—You can choose whether to show the following tabs if you are using
the Classic view:
— Vendor
— Financials
— Date System
Overview console You can chose whether to show incident requests in the Overview console. You can
also chose to filter which incident requests appear on the console according to their
status and, if you have BMC Service Level Management installed, by service target status.
Role— You can also filter the entries by Role using one of the following selections (this
filter works in conjunction with the other Overview console preferences you selected
above):
■Assigned Group—Chose this selection if you want to show only incident requests
for which your support group is the assignee.
■Owner Group—Chose this selection if you want to show only incident requests for
which your support group is the owner.
3 Click Save.
Searching for records
You can search for incident request records from the Incident Management console.
Searching for records
156
BMC Remedy Service Desk: Incident Management User Guide

To do this, you can run a series of predefined searches, search all of the records using
the Search Incident form, or create and save your own custom searches using
advanced qualifications.
Running Defined Searches
Defined Searches are a series of predefined searches that you can use to look for
incident request records. For example, you can use a predefined search to locate all
open incident requests with a priority of Critical.
Run this type of search from the Filter by menu at the top of the viewing area.
Note
You can view the support groups you belong to by clicking the My Profile link in the
Navigation pane, then opening the Support Groups tab. For more information about
this link, see Viewing your profile on page 153.
To run a Defined Search
1 Ensure the Show field at the top of the viewing area points to the appropriate
entry for the type of search you want to run.
2 From the Filter By menu, select Defined Searches.
3 Open the search category that corresponds to the search you want to run and then
select a specific search.
For example, to see all open, unassigned incident requests, select All Open
Unassigned => All Priorities.
4 Click the search name to run the search. In the preceding example, you click All
Priorities.
Tip
If the contents of the Incident table does not update after you run the search, click
the Refresh button.
Creating a custom search
You can define and save a custom search. After you save the custom search, it
appears in the My Searches node of the Defined Searches list.
Searching for records
Chapter 8 Supplemental BMC Remedy Incident Management features 157

Note
The My Searches node only appears after a custom search is defined.
To create a custom search
1 At the top of the console, click the magnifying glass icon beside the Filter by field.
2 In the Search Name field, type a name for the search.
3 Click Build Search Qualification to open the Advanced Qualification Builder
dialog box, and then define the search qualification.
4 From the Keywords or Fields selection boxes, select the keywords or record fields
on which you want to search.
To insert operators (+, =, >, <, and so on), click the appropriate operator button.
Do not forget to place literal values between double quotation marks.
For example, if Allen Allbrook is performing an incident request review and he
needs to search for incident requests that meet the following criteria:
■Impact => 2-Significant/Large or 1-Extensive/Widespread
■Service = Payroll Service
■the Last Resolved Date >= 07/19/2008
Then his query would look like this:
(‘Impact’ = 2-Significant/Large” OR ‘Impact’ = ”1-Extensive/Widespread”)
AND ‘Service’ = Payroll Service” AND ‘Last Resolved Date’ >= 07/19/2008”
Note
Date formats can vary, depending on how your system is configured. The date
shown in this sample query is only an example.
5 Click Select to close the Advanced Qualification Builder, and then click Save.
6 Close the Manage My Searches dialog box.
The search appears in the Defined Searches list, under the My Searches node.
Note
The My Searches node appears only when a custom search is defined.
Searching for records
158
BMC Remedy Service Desk: Incident Management User Guide

Editing and deleting a custom search
After you create a custom search, you can change the search criteria or you can delte
it . Use the following procedure to edit or delete a custom search.
To edit or delete the custom search
1 Open the Manage My Searches dialog box as described in the preceding
procedure.
2 From the list of searches, select the search you are modifying or deleting.
3 Perform one of the actions described in the following table.
To modify the search To delete the search
1 Edit the search as required.
2 Click Save.
3 Click Close.
1 Click Delete.
2 Click Close.
Searching all records
The following procedure describes how to search all incidents. Use this type of
search when you are looking for an incident that is not associated with your ID or
your group’s ID, or any time you search all incidents.
To search all records
1 From the Incident Management console Navigation pane, choose Functions =>
Search Incident.
A form appears that you can use to perform the search.
The form is laid out in a similar way to the Incident Request form.
2 Use the tabs and fields to build your search condition.
To reduce the number of records found by the search, enter as much information
into the form as you can.
Searching for records
Chapter 8 Supplemental BMC Remedy Incident Management features 159

Note
If the Customer field is configured to search on an attribute other than First Name
or Last Name, you can still search using the customer’s name by opening the
Additional Search tab and using the First Name or Last Name fields.
3 When you finish entering your search criteria, click Search.
When the search finishes, the search results table lists all the records that match
the search criteria.
Note
The search criteria are persistent. This means that if you run a search and then
close the BMC Remedy Incident Management application, the next time that you
open the application and perform this procedure, the search criteria that you
entered in this step are still present in the search form. They remain until you
change or delete them.
4 Scroll through the table to find the specific record you want.
5 When you find the record, select it to display it in Modify mode.
Note
When you open a record from the search results table, it is added to the history
list, but not to the breadcrumb bar. However, any related records that you open
from the record do appear in the breadcrumb bar and get added to the history list.
Using Global search
If you have BMC Remedy Knowledge Management installed, you can use the Global
search feature. Global search searches across multiple forms for records that match a
word or phrase that you type in the search area.
To use Global search
1 In the text field to the right of the breadcrumb bar, type your search string and
then click Search.
Figure 18: Global search
2 Locate the record you want in the search results table and double-click it.
Searching for records
160
BMC Remedy Service Desk: Incident Management User Guide

The record opens in the viewing area and the system updates the breadcrumb
trail with an entry for the record you opened.
Note
As you drill down through the record, each record you open is also added to the
breadcrumb trail.
If you want to maintain the contents of the search results table to view later, do
not change the text in the Search field. If you do, when you click the Search icon
to return to the search results table, the search feature will execute a new search
based on the changed content of the Search field.
3 To return to the search results table, click the Search icon again.
Working with records
This section discusses some of the common functions related to record handling.
Printing records
You can print a copy of a record to keep for filing purposes or to share with someone
who does not have access to BMC Remedy Incident Management.
Use this procedure to print a record.
To print a record
1 Open the incident request record.
2 Click Print at the bottom of the form to open the Business Objects Report Preview
dialog box.
The Business Objects Report Preview dialog box appears, enabling you to view
the record before you print it.
3 Click the Print icon on the menu bar at the top of the dialog box.
4 When the print confirmation dialog box appears, click the Print icon to send the
record to your local printer.
5 Close the Business Objects dialog box.
Working with records
Chapter 8 Supplemental BMC Remedy Incident Management features 161

Modifying records
After you generate a record, you can modify or update the information it contains.
Use the following procedure to modify a record.
To modify a record
1 Open the incident request record.
2 Click the field, tab, or link in the Navigation pane that contains or takes you to the
information you want to update.
3 Make the appropriate changes.
4 Click Save.
Using the decision tree
A decision tree takes you step-by-step through a questionnaire. Based on your
answers, the decision tree completes part of the form for a new incident request
record. Each element in the decision tree displays a list of items. Your final selection
completes part of the incident.
Decision trees are built by a manager or administrator at your company.
You can set up your preferences to use available decision trees whenever you start a
new incident. For information about setting up your application preferences, see
Selecting application preferences on page 154.
For information about configuring decision trees, see the BMC Remedy IT Service
Management Administration Guide.
Using scripts
Scripts are detailed instructions that have been set up at your company to help you
record important information about an incident request. You have access only to
scripts that have been set up for your support group. Scripts might include a list of
questions to ask the user. These questions can assist you in resolving or assigning the
incident.
The following list describes the types of scripts:
Using the decision tree
162
BMC Remedy Service Desk: Incident Management User Guide

■Initiator scripts—Select an initiator script when you record an incident after you
indicate the user.
■Assignment scripts—Select an assignment script when you assign or reassign an
incident after you indicate the assignee. The assignment scripts correspond to the
group to which you are assigning the incident. For example, a networking group
might have specific questions for you to ask the user when you assign the incident.
To use an Initiator script
1 On the Incident Management console, click Create.
2 Record the user’s information in the Customer field.
3 From the Navigation pane, select Advanced Functions => Initiator Script.
To use an Assignment script
1 On the Incident Management console, open an incident request record or click
Create.
2 Ensure the user’s name is recorded in the Customer field.
3 From the Navigation pane, select Advanced Functions => Assignment Script.
Recording CI unavailability
CI unavailability is the actual down-time of a CI. You can record CI unavailability
due to an unexpected circumstance from the incident.
Note
You can record CI unavailability only if BMC Remedy Asset Management is installed.
To record CI unavailability
1 Open the incident request record.
2 Click the Relationships tab.
3 From the Request Type list, select Configuration Item, and then click Search.
4 Click inside the CIs table to refresh the contents and then select the CI record
against which you want to record the unavailability.
Recording CI unavailability
Chapter 8 Supplemental BMC Remedy Incident Management features 163

5 In the Relationship Type field of the CI Relationships Search dialog box, select the
relationship type.
6 Click Relate with Unavailability.
Note
Relate with Unavailability is available only when you are searching for CIs to
relate to an incident.
7 In the Unavailability Type list, select whether the unavailability is scheduled or
unscheduled, and whether it is full or partial unavailability.
8 Select the actual start date of the unavailability.
9 Complete additional fields of the form, as appropriate.
10 Click Save.
11 Close the CI Relationship Search dialog box.
Working with relationships
By defining and maintaining relationships among records, you can create a
sophisticated overview of the connections and interdependencies among the current
record and additional service issues being tracked by BMC Remedy Incident
Management.
An incident can be related to any of the following record types:
■Configuration item
■Another incident
■Solution database entry
■Known error
■Problem investigation
If you have BMC Remedy Asset Management and BMC Remedy Change
Management, an incident can also be related to the following record types:
■CI unavailability
■Release
Working with relationships
164
BMC Remedy Service Desk: Incident Management User Guide

■Infrastructure change
Defining relationships
Use the following procedure to define a relationship.
To define a relationship—Classic view
1 Open the incident request record.
2 Click the Relationships tab.
3 From the Request Type list, select the type of record you want to relate the current
record to.
4 Click Search.
5 In the dialog box that appears, complete the search criteria tabs with the relevant
information, and then click Search.
Note
The content of the dialog box depends on the type of record you chose in the
Request Type list. Try to supply as much information as possible in the search
dialog box to reduce the overall number of records returned by the search.
6 From the search results table that appears, select the request type with which you
want to create the relationship.
7 From the Relationship Type list at the bottom of the search dialog box, select the
type of relationship you want to create.
8 Create the relationship by clicking the appropriate relate button at the bottom of
the dialog box.
Note
The specific text on the relate button depends on the type of relationship you are
creating. For example, if you are creating a relationship with another incident
request record, the button reads Relate. If you are creating a relationship with a
known error, there are two relate buttons: Relate With Solution and Relate
Without Solution, and so on.
9 Click OK to dismiss the dialog box.
Working with relationships
Chapter 8 Supplemental BMC Remedy Incident Management features 165

To define a relationship-Best Practice view
1 Open the incident request record.
2 In the Quick Actions area, click the arrow beside Create Relationship to.
3 From the menu, select the type of record to you want to relate the current record
to.
Note
If BMC Remedy Remedy Knowledge Management is installed in your
environment, then continue with this procedure. Otherwise, go to Step step 5 on
page 165 of “To define a relationship—Classic view” on page 165 and complete
that procedure.
4 In the Search field of the dialog box that opens, type a search string. For example,
if you are creating a relationship to an incident request about a printer that
regularly goes off-line, you might type printer off line.
The search scans multiple fields in each record looking for a match, and returns a
list of records that contain the phrase "printer off line" in one of the scanned fields.
Note
The type of search dialog box that appears depends on the type of record you
chose from the menu. Try to supply as much information as possible in each type
of search to reduce the overall number of records returned by the search. If, after
using a more specific search string, the search returns too many records, consider
using the advanced search. To do this, click Use Advanced Search, which opens a
form in search mode that is relevant to the type of relationship you are making.
This search behaves the same way as the search described in To define a relationship-
Classic view, above.
5 From the search results table, select the specific record to which you want to
create the relationship.
6 From the Relationship Type list at the bottom of the search dialog box, select the
type of relationship you want to create.
7 Create the relationship by clicking the appropriate relationship type button at the
bottom of the dialog box.
Working with relationships
166
BMC Remedy Service Desk: Incident Management User Guide

Note
The specific text on the relate button depends on the type of relationship you are
creating. For example, if you are creating a relationship with another incident
request record, the button reads Relate. If you are creating a relationship with a
known error, there are two relate buttons: Relate With Solution and Relate
Without Solution, and so on.
8 Click Close to dismiss the dialog box.
Copying relationships
When you define a relationship between the current incident request record and
another record, the other record might already have one or more records related to
it. To more thoroughly document all the record relationships, you can chose to relate
the other record’s related records to the current incident request record.
For example: you are creating a relationship between Incident Request Record A and
CI B. Unknown to you, CI B already has a relationship with Incident Request Record
C. However, by using the procedure described in this section, you discover the
relationship between CI B and Incident Request Record C and subsequently decide
to make a relationship between Incident Request Record A and Incident Request
Record C.
To view the other record’s other relationships and relate them to the current incident
request record, use the procedure that follows.
Note
You cannot use this procedure to copy related CIs.
To copy relationships
1 Open the incident request record.
2 Click the Relationships tab.
3 From the Relationships table, select the record with the other relationships that
you want to copy.
4 From the Quick Actions list on the Relationships tab, select Get Related
Relationships, then click Execute.
The Copy Related Relationships dialog box appears. This dialog box contains a
table of all other records related to the record you selected in Step 3 on page 167.
Working with relationships
Chapter 8 Supplemental BMC Remedy Incident Management features 167

5 From the table of related records, select the other record that you want to relate to
the current record.
Note
To see the details of the other record, select it, then click View. A form appears
with detailed information about the selected record. Use this feature to help you
determine whether you want to relate the other record to the current record.
6 Click inside the Relationship Type field.
Note
The contents of the Relationship Type list depends on the type of record you are
trying to create the relationship with.
7 Select the type of relationship you want to create, and then click Select.
8 Click OK to dismiss the note that confirms the relationship creation.
9 Close the Copy Related Relationships form.
The newly created relationship appears in the Relationships table.
Indicating impacted areas
The Impacted Areas dialog box gives you a place to show the region, site, location,
and so on, that are affected by the content of the record. Use the following procedure
to indicate the impacted areas.
To indicate an impacted area
1 Open the incident request record.
2 In the Navigation pane, choose Advanced Functions => Impacted Areas.
3 From the Impacted Areas dialog box, select items from the various lists that help
describe the impacted area appropriate for the incident you are working on, for
example, Company, Region, and so on.
Note
Required fields are marked with an asterisk.
4 Click Add.
Working with relationships
168
BMC Remedy Service Desk: Incident Management User Guide

Note
You can add as many impacted areas as necessary. You can also delete areas that
you have previously chosen in this dialog box.
5 When you finish indicating the impacted areas, click Close.
Modifying relationship types
After you define a relationship, you can change the relationship type and update the
relationship description. Use the following procedure to modify the relationship.
To modify a relationship
1 Open the incident request record.
2 Click the Relationships tab.
3 From the Relationships table, select the relationship you want to modify.
4 From the Quick Actions list, select Modify Relationship Type, and then click
Execute.
5 Enter the new relationship details according to the onscreen instructions.
6 Click Save to save your changes.
Performing quick actions on a relationship
You can perform many other actions on a relationship. For a list of these actions, see
the tables in the following procedure.
To perform a quick action
1 Open the incident request record.
2 Click the Relationships tab.
3 From the Relationships table, select the relationship entry for which you want to
perform the action.
4 From the Quick Actions list, select the action you want to perform, such as Get
Impacted Areas.
Working with relationships
Chapter 8 Supplemental BMC Remedy Incident Management features 169

The following table lists available quick actions for any related item.
Table 29: Effects of general relationship actions
Relationship action Effect
Get Related Relationships Copies the relationships of the selected record to the current
incident’s relationships.
Modify Relationship Type Prompts you to modify the relationship type, as described in
Modifying relationship types on page 169.
More quick actions are available when you select a related configuration item, as
indicated in the following table.
Table 30: Effects of relationship actions for related CIs
Relationship action Effect
BMC Atrium Explorer Opens a graphical relationship viewer that shows a selected CI’s
relationship with other records.
Create New CI Unavailability If Asset Management is installed, you can create CI
unavailability for the selected CI.
Get CI Impact/Urgency Copies the impact and urgency of the selected CI.
Get CI Product Categorization Copies the product categorization from the selected CI to the
classification of the current incident.
Get CI Resolution Product Cat. Copies the product categorization from the selected CI to the
resolution of the current incident.
Get Impacted Areas If Asset Management is installed, prompts you to select
impacted areas, as defined in the selected CI, into the current
incident’s impacted areas.
5 Click Execute.
Removing relationships
Use the following procedure to remove a relationship.
To remove a relationship
1 Open the incident request record.
2 Click the Relationships tab.
Working with relationships
170
BMC Remedy Service Desk: Incident Management User Guide

3 In the Relationships table, select the relationship you want to remove.
4 Click Remove.
5 Click Yes when BMC Remedy Incident Management prompts you to confirm the
removal.
BMC Remedy Incident Management refreshes the Relationships list.
Creating reminders
Use reminders to create notes for yourself and others. You can send the reminders
by email or by BMC Remedy Alert, and can specify when they are sent. You can
create generic reminders, or you can create reminders that are associated with a
specific request.
For example, you can send yourself a note about a specific incident to remind
yourself to check on it.
You can create and view reminders from either the Incident Management console or
from within a specific incident request record. Where you create or view a reminder
determines which reminders you see, as described in the following list:
■Incident Management console—You can view all reminders that you created.
■Incident Request form—You can view all reminders associated with that
incident. This includes the reminders that were created by other users of BMC
Remedy Incident Management.
To create a reminder
1 From the Navigation pane either on the Incident Management console or with the
incident request record open, choose Functions => Reminders.
Note
If you create a reminder from the Incident Management console, the reminder is
general in nature. If you open a record and create a reminder, the reminder is
specific to the open record.
2 Click the Create Reminder tab.
Note
If you are creating the reminder from the main console, skip the next step.
Creating reminders
Chapter 8 Supplemental BMC Remedy Incident Management features 171

3 To remove the link between the reminder you are creating and the open record,
select, then delete the contents of the Link to Request-ID field. The Request-ID
and Form fields are filled in automatically by BMC Remedy Incident
Management. The Request-ID field links the reminder to the open record.
4 From the Notify list, select either Individual or Group, depending on whether
you are sending the reminder to a single person, or a support group.
5 In the Recipient field, type the name of the person or group to whom you want to
send the reminder.
If you type a person’s name and press ENTER, BMC Remedy Incident
Management automatically fills in the BMC Remedy AR System Login field. If
BMC Remedy Incident Management discovers multiple matches with the name
that you entered, another dialog box appears, from which you can specify which
of the matching names you want to receive the reminder.
6 In the Time field, enter the date and time that you want BMC Remedy Incident
Management to send the reminder.
You can type the information directly into the field, or you can click the button
next to the field and select the date and time from the calendar that appears. By
default, the Time field contains the current date and the current time, plus one
hour (that is, if it is 3:00 p.m., the Time field reads 4:00 p.m.).
7 In the Subject field, enter information about the reminder.
If you need more space to type the entry, click the Browse button next to the field.
A larger text entry box appears.
The information in this field appears in the subject line if the reminder is sent by
email.
8 In the Message field, type the reminder message text.
If you need more space to type the entry, click the ellipsis button next to the field.
A larger text entry box appears.
9 Click Save.
10 Click Close to close the Reminders dialog box.
The reminder is sent at the time you specified.
Creating reminders
172
BMC Remedy Service Desk: Incident Management User Guide

Broadcasting messages
This feature lets you send messages to your entire organization, selected groups
within the organization, and to external customers as well. You can use this feature
to send messages about work in progress, system status, planned work, and so on.
You can also use this feature to view messages that were broadcast to you from other
groups in your organization.
Creating broadcast messages
To create a broadcast, you must have the functional role of Broadcast Submitter. For
information about having this functional role added to your system ID, either see the
BMC Remedy IT Service Management Administration Guide or contact your system
administrator.
To create a broadcast message
1 Open the New/Modify Broadcasts form.
How you do this depends on where you are when creating the broadcast message.
Note
When you create a broadcast message from the Incident Request form, it is related
to the incident request record currently open. When you create a broadcast
message from the Incident Management console, it is not related to any specific
incident request record.
■Incident Management console—Click the View Broadcast link (or New
Broadcast link, if there are unviewed broadcast messages) and then click
Create.
■Incident Request form—Perform one of the following actions.
When using the Best Practice view When using the Classic view
From the Navigation pane, select Quick Actions =>
Broadcast Incident.
From the Navigation pane, select Functions =>
Broadcast Incident.
2 Enter information in the required fields.
Broadcasting messages
Chapter 8 Supplemental BMC Remedy Incident Management features 173

Table 31: Required fields
Field Explanation
Company Select the company to which this broadcast pertains. Only users with access to
this company can see the broadcast. If you select Global from the Company list,
the broadcast is sent to everyone.
Note: Of the various Location fields, only Company is mandatory. The other
Location fields: Region, Site Group, Site, Organization, and Department, are
informational fields that allow you to specify the physical location, and so on, to
which the broadcast applies. These fields otherwise do not restrict who can see
the broadcast. All people assigned to the specified company will see the
broadcast.
Subject A short description of what the broadcast is about.
Broadcast Message The text of your message.
Broadcast Type Select a broadcast type from the list.
Broadcast Start Date and
Broadcast End Date
To start the broadcast now, click inside the Broadcast Start Date field, and press
ENTER. To select a date from the calendar, click the Browse button next to the
field, then use the calendar that appears to select the date on which the broadcast
is to start and the date on which you want it to end. You can also specify times of
the day using the Time feature at the bottom of the calendar.
Broadcast Originated
From
This field is completed by the system. The contents depend on where you are
creating the broadcast. If you broadcast from an incident, this is set to Incident.
Broadcast Originated
From ID
This field is filled in by the system, but only when you create a broadcast from
within a record. If you create a broadcast from the main console, the field
appears dimmed.
View Access Select Internal if you want the broadcast enabled only for members of your
organization. If you also want the broadcast enabled from the Requester console,
select Public.
Notify If you want a broadcast notification automatically sent to an individual or group,
select Yes.If you select Yes, the Manual Email l button and the Notify Support
area appear.Use the Manual Email button to manually send an email about the
broadcast to a person or group. When the Email System form appears, enter the
recipient’s email address in the Internet email field, and then click Send Email
Now.Use the Notify Support area to indicate the group you want to notify of the
broadcast. You must complete all of the fields: Support Company, Support
Organization, and Support Group. The notification is sent at the time and on the
date specified in the Broadcast Start Date field.
Priority Select a priority level for the broadcast. The choices are Low, Medium, and High.
3 To add an attachment to the broadcast message, right-click inside the table and
choose Add from the menu that appears.
Broadcasting messages
174
BMC Remedy Service Desk: Incident Management User Guide

The Add Attachment dialog box appears. Use this to indicate the file you want to
attach. Click Open to attach the indicated file. You are limited to one attachment
for each broadcast.
4 To allow members of another group to modify the message, perform the
following steps:
a Click the Authoring Groups tab.
b Click Manage Authoring Groups.
The Authoring Group dialog box appears.
c Indicate the group that you want to have authoring rights by selecting from
the menus. Click Add when you finish.
Note
The support group that you belong to appears in the table by default.
You can indicate another group, or click Close to dismiss the dialog box.
5 Click Save to save the broadcast message and close the dialog box.
Tip
When viewing a broadcast message, you can also create new broadcast messages.
For information about how to do this, see Viewing and modifying broadcast
messages on page 175.
Viewing and modifying broadcast messages
While viewing broadcasts, you can modify the message (if you belong to an
authorized authoring group), create a new broadcast message, and under some
circumstances (when viewing the message from the current record) relate the
broadcast message to the current record.
When viewing a broadcast from either the Incident Management console or the
Incident Request form, you can create a new incident request from the broadcast. If
you do this, and the broadcast was created originally from either: a problem
investigation, a CI (configuration item), a CI unavailability, or another incident
request, BMC Remedy Incident Management asks whether you want to relate the
new incident request to the originating record.
To view or modify a broadcast message
1 Open the View Broadcasts form.
Broadcasting messages
Chapter 8 Supplemental BMC Remedy Incident Management features 175

How you do this depends on where you are when viewing the broadcast message.
■Incident Management console—Click the View Broadcast link (or New
Broadcast link, if there are unviewed broadcast messages) and then click View.
■Incident Request form—Perform one of the following actions.
When using the Best Practice view When using the Classic view
Click the View Broadcast link (or New Broadcast
link, if there are unviewed broadcast messages) and
then click View.
From the Navigation pane, select Quick Links =>
View Broadcast.
Tip
When viewing broadcast messages from the Incident Request form, you see all
the broadcasts, not just ones related to the current record. If the View Broadcast
table contains many messages, you can sort the contents of the table using the
table column headers. To do this, right-click inside the table and then select
Sort => Column Header Name => Ascending/Descending .
Tip
For example, in the Best Practice view, to sort the broadcasts alphabetically by
broadcast title from A to Z, right-click inside the Broadcast View table and then
select Sort => Broadcast_Type => Ascending.
2 Inside the View Broadcasts table, double-click the message you want to view.
3 To modify the broadcast message, click Modify.
Tip
When viewing broadcast messages, you can create a new broadcast message by
clicking Create and then following the steps described in Creating broadcast
messages on page 173.
4 Change the fields as necessary.
5 Click Save.
Limiting the number of messages
If a large number of messages appear in the Broadcast table of the current record,
you can reduce the number of messages that appear by opening the Broadcast
Search Criteria tab and defining a set of criteria that filters out messages that do not
match.
Broadcasting messages
176
BMC Remedy Service Desk: Incident Management User Guide

Note
This section applies only when using the Classic view.
To limit the number of messages
1 From the Navigation pane of an open incident request record, Select Quick
Actions (Quick Links in Classic view) => View Broadcast.
2 On the View Broadcast window, click the Broadcast Search Criteria tab.
3 Complete the fields on the search form according to your search parameters, and
then click Search.
The search results appear in the View Broadcasts table at the top of the search form.
Paging and sending email messages
BMC Remedy Incident Management gives you different methods of sending
messages to either individuals or organizations:
■Pages
■Email
This section describes how to send both types of messages.
Note
BMC Remedy Incident Management can send notification messages to individuals,
based on incident assignments and other events, as pages or emails. To send
information about configuring notification as pager messages or email messages, see
the BMC Remedy IT Service Management Administration Guide.
Paging a person or on-call group
You can page individuals or the on-call member of a group about the current record
using the Paging System feature.
To page a person or an on-call group member
1 Open the incident request record.
Paging and sending email messages
Chapter 8 Supplemental BMC Remedy Incident Management features 177

2 In the Navigation pane, choose Functions => Paging System.
3 Select either:
■Page By Person—To page an individual.
■Page By On-Call Group—To page the on-call member of a specified group.
4 Select the recipient.
To select the recipient
a Complete the fields in the Search Criteria area, and then click Search.
b Click the recipient’s name in the search results table, and then click Select.
Note
If you are sending a page to a person (instead of an on-call group) and need
help determining the correct person, you can see more information about the
individual by selecting their name from the list, and then clicking View. This
opens the People form, which contains detailed information about the recipient.
5 Complete the fields in the Paging Information area, as follows, and then click
Send Page Now.
■Pager Service Provider—Select the recipient’s pager service provider from the
list.
If you are sending a page to a person, you can find this information by selecting
the person’s name from the search results list, and then clicking View (as
described in step 4). When the People form appears, click the Notifications tab
and look for the following field: Pager Service Provider.
Note
To learn more about the service provider, click the button with the globe icon
beside the field to open a link that takes you to the service provider’s website.
This link is configured by your administrator, as described in the BMC Remedy
IT Service Management Administration Guide.
■Pager Type—BMC Remedy Incident Management fills in this field
automatically, using information already recorded about the receipt.
■Pager Number—BMC Remedy Incident Management automatically fills in this
field with the pager’s telephone number, when possible. If the pager number is
recorded, you must enter the pager number manually. See the Manual Pager
Number description in this list.
Paging and sending email messages
178
BMC Remedy Service Desk: Incident Management User Guide

■Pager Email—If the pager has an email address, type it here. If you are sending
the page to a person, this information is available on the Notifications tab, as
described previously.
■Manual Pager Number—If the pager’s telephone number is not available
automatically from the paging system, type the pager’s telephone number here.
■Alphanumeric Pager Message or Numeric Pager Message—Type your
message in this field. Be aware that only one of these fields is enabled,
depending on the type of pager the recipient carries.
Sending email
You can send messages about the current record using the Email System.
You can use this function to send email to any valid email address. This might
include an SMS recipient or a wireless PDA user, if you can send email to the device.
To send an email message
1 Open the incident request record.
2 In the Navigation pane, choose Functions => Email System.
3 Indicate the recipient by selecting one of the following options:
■Current Contact—If BMC Remedy Incident Management assigned a current
contact to the record when you open the Email System form, the contact’s name
with contact information appears in the table and is the default recipient.
■Current Assignee—To select the current assignee, click Select Current
Assignee. The current assignee’s name with contact information appears in the
table.
4 To select another recipient, perform the following steps:
a Complete the fields in the People Search Criteria area.
b Click Search.
c When the search finishes, select the recipient’s name in the search results table.
If you need help determining the correct name in the list, you can see more
information about an individual by selecting their name from the list, and then
clicking View. This opens the People form, which contains detailed
information about the recipient.
Paging and sending email messages
Chapter 8 Supplemental BMC Remedy Incident Management features 179

5 Complete the email information fields. See the list that follows for a description of
the fields.
■Internet Email—This displays the recipient’s email address. When you select
the email recipient, as described in steps List item. on page 179 and List item.
on page 179, the Internet email address updates from the people record.
■Email Subject Line—By default, the subject line contains the incident ID
number, to which you can append text or overtype.
■Email Message Body—You type the message text here. By using the series of
buttons to the right of the Email Message Body field, you can also
automatically insert text from the record into the message text; you can insert
the following values:
—Status
—Summary
—Details
—Resolution
Note
If one or more of these buttons are dimmed, it means the corresponding field in
the record contains no information.
■Email Attachment—You can attach a file to the email message (BMC Remedy
Incident Management limits you to one attachment). To do this, right-click
inside the Email Attachment table, and then click Add. The Add Attachment
dialog box appears. Browse to and select the file that you want to attach. Click
Open. Details of the attached file appear in the table.
6 Click Send Email Now.
Assigning or reassigning an incident to a
vendor
If you need third-party vendor support to resolve an incident, use the vendor-related
fields on the Incident form to track the assignment.
To assign or reassign an incident to a vendor (Best Practice view)
1 Open the incident request record.
Assigning or reassigning an incident to a vendor
180
BMC Remedy Service Desk: Incident Management User Guide

2 From the Vendor Group menu, select the vendor.
3 If the vendor's ticket number is available, type it in the Vendor Ticket Number
field.
4 To send the vendor an email notification, use the Email function from the
Functions area in the Navigation pane.
To assign or reassign an incident to a vendor (Classic view)
1 Open the incident request record.
2 Click the Vendor tab.
3 To assign the incident to a vendor support group, select the vendor company,
organization, and group.
If the person indicated in the Vendor Contact field is registered in the People form
with a valid email address, BMC Remedy Incident Management sends an email
notification to that person.
4 If you selected the vendor from the menus, you can press ENTER in either of the
vendor name fields to select the vendor contact. If the vendor is not listed, you
can type the vendor contact information.
If you type the vendor contact, BMC Remedy Incident Management uses the
content of the Vendor Email field to send an email notification to the vendor.
5 Enter any other information that you are tracking, such as the vendor ticket
number.
6 Click Save.
The Vendor Assignment Status field is set to Assigned. The Reported to Vendor
Date is set to the current date and time, if you did not specify otherwise.
Updating assignment availability
Your assignment availability status indicates whether you are available to accept
work assignments. If your status is Yes, you are available. If your status is No, you
are not available.
You can quickly update your status using the My Profile function.
Updating assignment availability
Chapter 8 Supplemental BMC Remedy Incident Management features 181

Note
If you have management level permissions, you can also update the status of the
people in the support group that you manage.
To update assignment availability
1 From the Navigation pane, choose Functions => My Profile.
2 From the Assignment Availability menu, choose the status you want.
3 Click Save.
Working with reports
BMC Remedy ITSM provides a variety of predefined reports to give you quick and
easy access to information about your system. Use the Report console to generate
these reports. If the predefined reports return more information than you need, you
can manage the scope of the report using qualifications.
This release of BMC Remedy ITSM integrates the Crystal reports from version 7.6.00
and Web reports from version 7.6.01. On the web interface, a number of reports are
available in the Web format. Additional Crystal reports are available only if users
have a valid Crystal license and have chosen to install them for the web at the time
of installation.
Note
If you modify the prepared reports supplied Customer Support can only provide
limited assistance if you should have a reporting problem. In addition, there is no
guarantee that BMC Customer Support can solve problems that result from these
modifications. The standard reports included with the BMC Remedy ITSM
application are designed to be used without modification.
WARNING
If your database does not support the Not Equal To argument in this format: "!=",
format the content of your reports can be affected. Reports that have additional
qualifications that filter out Group By fields (for example, ‘Department’ !=
"Engineering") also filter out the specified conditions and records that have Group
By fields set to Unspecified or Null. Check with your system administrator to
determine whether your database supports this form of the Not Equal To argument.
Working with reports
182
BMC Remedy Service Desk: Incident Management User Guide

Generating a report
Use this procedure to generate a standard report without qualifications by using the
BMC Remedy web console.
For information about generating reports with qualifications, see Using
qualifications to generate a report on page 184 or Using qualifications to generate a
report on page 184.
To generate a report by using the Remedy web console
1 In the navigation pane on the application console, choose Functions => Reports.
2 On the Reporting console, select one of the options under Show:
All Reports Displays all available reports
Created by me Displays reports that you created
3 Under Category, select applicationName => reportCategory => reportName.
A list of available reports is displayed. Reports are organized by category, some
of which contain subcategories. The reports that you see vary according to which
applications are installed.
4 Select the report that you want to run.
5 Click Run.
If you select a report that requires additional parameters, you are prompted to
enter the required parameters. For example, if the selected report requires a date
range, the date range field appears.
6 Enter the required parameters, and click OK.
7 If the report displayed is a web report, you can specify the following additional
options:
Toggle
Table of
Contents
Display the table of contents for the current report
Export
Report
Export the report to a file of the specified format
Working with reports
Chapter 8 Supplemental BMC Remedy Incident Management features 183

To export the report, select one of the following formats from
the Export Format list:
■Excel
■PostScript
■PDF
■Word
■PowerPoint
Select the appropriate page options, and click OK.
Print Report Print the report to HTML or PDF format
Using qualifications to generate a report
You can manage the scope of a report by adding qualifications to the criteria that the
report engine uses to generate the report content. You can tell the report to search
only certain specified fields for particular values, or you can build advanced
qualifications by using field names, keywords, and operators.
This procedure describes how to generate basic qualifications by using the Show
Additional Filter option. To generate a report by using advanced qualifications, see
Using advanced qualifications to generate a report on page 186.
To use qualifications to generate a report
1 From the navigation pane in the application console, choose Functions =>
Reports.
2 On the Reporting console, select one of the options under Show:
All Reports Displays all available reports
Created by me Displays reports that you created
3 Under Category, select applicationName => reportCategory => reportName.
Working with reports
184
BMC Remedy Service Desk: Incident Management User Guide
A list of available reports is displayed. Reports are organized by category, some
of which contain subcategories. The reports that you see vary according to which
applications are installed.
4 Select the Show Additional Filter option.
Along with a list of available fields, two sections are displayed—the simple query
builder and the advanced query builder. You use the simple query builder to
quickly construct a simple query. Alternatively, advanced users can use the
advanced query builder to build the query by using BMC Remedy AR System
query syntax.
For additional information about the BMC Remedy AR System Reporting console,
see the BMC Remedy Mid Tier Guide.
5 Select a field name from the Available Fields list, and click Add next to the
simple query builder.
Note
Click to remove a qualification.
6 Click the down arrow next to the field name listed in the qualification box, and
select the appropriate operator.
7 Enter or select a value for the field in the right column.
Example
If you want to enter the qualification Cost Center = 001, select the Cost Center
field, click the down arrow next to the field and select =, and then enter 001 in the
right column.
8 Repeat steps 5 through 7 for each field that you want to include in the report.
9 When you finish defining your additional qualifications, click Run.
10 If the report displayed is a web report, you can specify the following additional
options:
Toggle Table
of Contents
Display the table of contents
Export Report Export the report to a file of the specified format
To export the report, select one of the following formats from
the Export Format list:
Working with reports
Chapter 8 Supplemental BMC Remedy Incident Management features 185

■Excel
■PostScript
■PDF
■Word
■PowerPoint
Select the appropriate page options, and click OK.
Print Report Print the file to HTML or PDF format
Using advanced qualifications to generate a report
You can manage the scope of a report by adding qualifications to the criteria that the
report engine uses to generate the report content. You can tell the report to search
only specified fields for particular values, or you can build advanced qualifications
by using field names, keywords, and operators.
To generate a report by using advanced qualifications
1 From the Navigation pane in the application console, choose Functions =>
Reports.
2 On the Reporting Console, select one of the options under Show:
All Reports Displays all available reports
Created by me Displays reports that you created
3 Under Category, select applicationName => reportCategory => reportName.
A list of available reports is displayed. Reports are organized by category, some
of which contain subcategories. The reports that you see vary according to which
applications are installed.
4 Select the Show Additional Filter option.
Along with a list of available fields, two sections are displayed—the simple query
builder and the advanced query builder. You use the simple query builder to
quickly construct a simple query. Alternatively, advanced users can use the
Working with reports
186
BMC Remedy Service Desk: Incident Management User Guide

advanced query builder to build the query by using BMC Remedy AR System
query syntax.
For additional information about the BMC Remedy AR System Reporting console,
see the BMC Remedy Mid Tier Guide.
5 Select a field name from the Available Fields list, and click Add next to the
advanced query builder. Use the BMC Remedy AR System query syntax to build
your qualification.
6 Construct your qualification by using the various operators provided by the
qualification builder.
7 Repeat steps 5 and 6 for each field that you want to include in the report.
Note
Select the qualification and press Delete to remove a qualification.
8 When you finish defining your advanced qualification, click Run to view the
updated report.
BMC Remedy Incident Management predefined reports
This section lists the predefined Web reports and Crystal Reports available for BMC
Remedy Incident Management. It provides a brief description of each report and
shows you where to find it.
You first select the type of report that you want to run. The report type pulls
information from the appropriate BMC Remedy ITSM application form. After you
select a report type, you select the individual report that you want to run.
Table 32 on page 187 describes the predefined Web reports and Table 33 on page
188 describes the predefined Crystal Reports included, organized by the type of report.
Table 32: Web reports—names and descriptions
Report name Description
All Incidents => Incident Details (Dynamic - By Status and Assigned Groups)
Working with reports
Chapter 8 Supplemental BMC Remedy Incident Management features 187

Report name Description
All Incidents by Status and Assigned
Groups
Lists details of all incidents. Details include summary and
work information.
The report provides a summary of all incidents by status. You
can drill down to the assigned groups for the selected incident
status.
You can also select an assigned group to see incident details.
For additional details about the incident, you can select the
incident record in the report to view the Incident form and
take required action.
Open Incidents => Count By Assignee Group
Open Incident Count by Assignee Group
and Assignee
Provides a count of the incident by assigned group and the
each assignee for the group. Management can use this report to
review the current workload.
Open Incidents => Count By Product Categorization
Open Incident Count by Product
Categorization
Provides a breakdown of the number of incidents for each
product category (for example, under Hardware, the count for
Processing Unit)
Resolved Incidents => Resolved Incidents
Resolved Incident Volume by Product
Categorization
Displays details of all resolved incidents based on Tier 1
product categorization
Table 33: Crystal Reports—names and descriptions
Report name Description
Asset => Configuration Items with Open Incidents
Configuration Items with Open Incidents Lists CIs that have open incidents on them
Incident Information => Aging
Incidents By Activity Time Lists all open incidents and the amount of time since the
reported date
Incident Information => All Incidents
High Volume Incident by Company Chart Displays a pie chart of all incidents based on the company.
This report is intended for use with multi-tenancy.
High Volume Incident by Departments
Chart
Displays a pie chart of all incidents based on the department
High Volume Incident Requester Chart Displays a pie chart of all incidents based on the user
Incident Details by Date Range Lists details of all incidents based on a specified date range.
Details include Summary and work information.
Incident Volume By Product
Categorization Chart
Displays a bar graph illustrating all incidents based on Tier 1
product categorization
Working with reports
188
BMC Remedy Service Desk: Incident Management User Guide

Report name Description
Monthly Incident Volumes Provides a count of all incidents by month
Weekly Incident Volume Chart Provides a count of all incidents by week
Incident Information => Assignee Charts
Open Incident Volume by Assignee Displays a bar chart of the number of open incidents for each
assignee
Resolved and Closed Incident Volume by
Assignee
Displays a bar chart of the number of resolved and closed
incidents for each assignee
Incident Information => Assignment Log Data
Group Assignment to Incidents Displays a history of the groups assigned to each incident request
Incident Information => Open Incidents
Incident Volume By Priority and Status
Charts
Displays a bar graph illustrating all open incidents based on
Tier 1 product categorization
My Open Incidents Reports all open incidents that are assigned to the ID from
which the report is run
Open Incidents - Current / by Date Range Provides a list of all open, current incidents or a list of
incidents based on a particular date range
Incident Information => Resolved Incidents
My Resolved Incidents Displays all resolved incidents that are assigned to the ID
under which the report is run
Resolved Incident Counts by Product
Categorization
Provides a count of all resolved incidents based on product
categorization
Resolved Incident Volume by Company
Charts
Displays a pie chart illustrating all resolved cases based on
company. This report is for multi-tenancy clients.
Resolved Incident Volume By Department
Charts
Displays a pie chart illustrating all resolved cases based on a
department
Resolved Incident Volume By Priority and
Status Charts
Displays pie charts illustrating all resolved and closed cases—
one based on status, and the other based on priority of all
resolved cases
Resolved Incident Volume By Product
Categorization Chart
Displays a pie chart illustrating all resolved incidents based on
Tier 1 product categorization
Relationship Information => Change
Change Induced Incidents Lists incidents that were caused by changes
Note: This report is available only if BMC Remedy Change
Management is installed.
Incident Information => Related Configuration Items
Working with reports
Chapter 8 Supplemental BMC Remedy Incident Management features 189
Report name Description
Incidents with Related Configuration Items Returns a list of incident requests that have a related CI.
Included is the type of CI, a summary of the incident request,
and the reported date
Working with reports
190
BMC Remedy Service Desk: Incident Management User Guide

Managing configuration items
A configuration item (CI) is a physical, logical, or conceptual entity that is part of your
IT environment and has configurable attributes.
Some CI types are virtual, while others are physical. The Service CI type is an
example of a virtual CI. In this context, a service can be provided from one business
or organization within a business to another. Service CIs can include customer
support, employee provisioning, web farms, storage, and so on.
Other CI types are physical and include hardware and software.
You can use the information in CIs to diagnose user incident requests and to
determine if a change to a CI or the IT infrastructure must be made. For example, if a
user calls in with a printing problem, you can check the printer’s CI to see whether
the printer is down.
To record information against CIs, such as CI unavailability, or to relate an incident
request to a CI, the CI must be recorded in the BMC Atrium Configuration
Management Database (BMC Atrium CMDB). If you do not have BMC Remedy
Asset Management, then BMC Remedy Incident Management provides limited
ability to manage CIs and inventory.
Note
You can manage configuration items even if your environment does not run BMC
Remedy Asset Management. To manage configuration items, including creating and
modifying CIs and managing inventory for bulk and non bulk CI's, you do not need
a BMC Remedy Asset management license. However, if you are running BMC
Remedy Asset Management, then you have access to additional functionality, as
described in the BMC Remedy Asset Management User Guide. To make use of this
additional functionality, you will need either Asset Admin or User permissions and
an AR System fixed or floating license.
9
Chapter 9 Managing configuration items 191

Creating a CI
To create a CI, you must have Asset Admin permission. If you have Asset User
permission and you are modifying a CI, your administrator must open the
appropriate CI, and then relate your support group to the CI.
There are many different types of CIs that you can create. While the general
procedure for creating each CI type is similar, only the specific fields on the CI form
change depending on the CI type.
This section provides several examples of how to create CIs.
To create a Service CI
1 From the Navigation pane of the console, choose Functions => Manage CIs.
2 From the CI Type list , select Logical Entity => Business Serviceand then click
Create.
3 On the Business System form, type the CI name in the CI Name field.
When creating a CI name, BMC recommends that you follow a consistent naming
convention. According to IT Infrastructure Library (ITIL) guidelines, identifiers
should be short but meaningful. For example, Payroll” or Network.” The name
can be followed by a numeric code, such as NETWORK100.
4 Complete the optional fields that appear on the form in a way that is appropriate
for the service you are creating.
Table 34: Optional fields when creating a Service CI
Field name Description
CI ID A customer specified identifier. You can use this to augment
the CI Name.
Company The company that owns the service.
Impact, Urgency, and Priority Used to determine service levels when assigning support.
Supported Indicates whether the service currently is supported.
System Role A description of the role the service fulfills in the organization.
Additional Information A place to record any additional information about the service.
Users Affected The number of users who use this service.
Product Categorization Use this file to categorize the business service through multiple
tiers. This hierarchy is used to drive assignment routing.
Creating a CI
192
BMC Remedy Service Desk: Incident Management User Guide
Field name Description
Location The location of the support group that supports the service.
Lifecycle The date on which the service became active.
5 Click Save.
Note
Depending on how your application is configured, after you click Save to create a
Service CI, the Service CI form might be redisplayed in a Modify window.
Note
The People tab referred to in the following procedure does not appear on the
Business Service form until you create and save the CI. The Relationships tab,
Outage tab, and Impact tab also appear after you save the new CI. If the People
tab does not appear after you click Save, then search for and open the CI record as
described in To search for CIs from the console on page 199, and then continue
with List item. on page 193.
6 Open the People tab and click Add.
7 From the Type list in the CI Person Type, select People Organization and then
click OK.
8 From the Company list in the Organization Search window, select the company to
which you are relating the service and then click Search.
Note
If you are relating the service to the entire company, then skip List item. on page
101.
9 If you are relating the service either to an organization within the company or to a
department within the organization, select the organization and, if necessary, the
department from the Organization and Department lists.
■Organization—If you choose Organization, the service is related to the
specified organization within the specified company.
■Department—If you choose Department, the service is related to the specified
department within the specified organization.
10 From the Choose a Relationship Level list, select how much of the company will
be related to this service.
Creating a CI
Chapter 9 Managing configuration items 193

For example, if you are relating the service to the entire company, then select
Company. If you specified department in the preceding step, then select
Department, and so on.
11 Click Select.
12 From the Role list in the Asset Person Role window, select Used By and click OK.
13 Click OK to dismiss the confirmation note.
14 Click Save and then click Close.
To create a computer system CI
1 From the Navigation pane of the console, choose Functions => Manage CIs.
2 From the CI Type list of the CI Type dialog box, select System => Computer
System.
3 Click Create.
4 In the CI Name field of the Computer System form, type a name for the CI.
When creating a CI name, BMC recommends that you follow a consistent naming
convention. According to ITIL guidelines, identifiers should be short but
meaningful, and for hardware they should not based on supplier device names.
For example, the name can include an indicator of the CI’s function (such as
Workstation” or Monitor”) followed by a numeric code, such as MONITOR100.
5 In the CI ID field, type a unique alphanumeric value for the CI.
6 Select the company to which this CI belongs.
7 From the Primary Capability and Capability lists, select the roles this CI performs
in your company’s topology.
8 Select a status from the Status list.
The default value is Deployed. You can select one of the following options.
Table 35: Computer system CI status options
Status Description
Ordered The CI was ordered from the supplier.
Received The CI was received in shipping.
Creating a CI
194
BMC Remedy Service Desk: Incident Management User Guide

Status Description
Being Assembled The CI is being assembled.
Deployed The CI was installed.
In Repair The CI is down for maintenance.
Down The CI is down, but not yet in maintenance.
End of Life The CI is no longer being deployed.
Transferred The CI was transferred to another place.
Delete The CI is marked for deletion. You must be a member of the APP-Management or APP-
Administrator group to mark a CI for deletion.
In Inventory The CI is in inventory but not yet deployed. When you select this status, you are
prompted to select the inventory place.
On Loan The CI is on loan to another location.
Disposed The CI is no longer available and was disposed of.
Reserved The CI was reserved and taken out of inventory.
Return to Vendor The CI must be returned to the vendor as damaged or unwanted.
9 Specify whether the CI is supported by selecting Yes or No from the Supported
list.
10 Select what impact or urgency this CI will have if it goes down.
11 In the Users Affected field, specify the number of people who use this CI or are
affected if it goes down.
12 Complete the other fields in this area.
Table 36: Field names and descriptions
Field name Description
Tag Number The CI tag number. This is the number usually placed on the
product by a member of your IT department to track the CI.
Serial Number The CI serial number.
Part Number The CI part number.
System Role The role this CI plays in your company.
Status Reason The reason this CI has the status it does.
13 Click the General tab.
Creating a CI
Chapter 9 Managing configuration items 195

14 Categorize your CI using the lists and fields in the Product Categorization area.
15 Specify the place of the CI using the lists and fields in the Location area.
16 Enter the dates of the CI in the lifecycle area.
17 Click the Specifications tab.
18 Add more information about the CI.
19 Click Save.
To create a bulk inventory CI
Note
Bulk inventory items are not tracked by an separate record for each item. Instead,
bulk items are tracked by quantities of an item type. For example, cables used to
connect desktop computers to the network do not require individual records but
rather, one record for a bulk quantity of the specific cable type.
1 From the Navigation pane of the console, choose Functions => Manage CIs.
2 From the CI Type list of the Manage CI Information dialog box, select Bulk
Inventory => Bulk Inventory, and click Create.
3 In the Bulk Inventory form, complete the following required fields.
Field name Description
CI Name Enter the name of the bulk inventory item, for example,
Microsoft Windows XP.
Tier 1, Tier 2, and Tier 3 Categorize the item.
Received Quantity Enter the number of items received.
4 Click Save.
To create an inventory location CI
Note
You can use inventory location CIs to indicate where bulk inventory and other CIs
are located.
1 From the Navigation pane of the console, choose Functions => Manage CIs
Creating a CI
196
BMC Remedy Service Desk: Incident Management User Guide

2 From the Type list of the Manage CI Information dialog box, select System =>
Inventory Location, and click Create.
3 In the CI Name field of the Inventory Location form, enter the location name.
4 Complete the optional fields.
5 Click Save.
Inventory management
You can use the Manage Inventory function to track bulk inventory items and other
CIs that are available for deployment.
Before you can track inventory, you must:
■Create bulk inventory CIs, or other CIs to be tracked as inventory. For information
about how to do this, see To create a bulk inventory CI on page 196 or To create a
computer system CI on page 194.
■Create inventory location CIs. For information about how to do this, see To create
an inventory location CI on page 196.
■For bulk inventory, specify the received quantity and the inventory locations. For
information about how to do this, see To place bulk CIs in inventory on page 198.
■For non-bulk inventory CIs, set the inventory status to In Inventory, and select a
location. For information about how to do this, see To manually track the time
spent working on a task on page 135.
The following list of topics are covered in this section:
Placing bulk CIs in inventory
To place bulk CIs in inventory, you must specify the location or locations for them.
Tip
If you do not see a location, make sure that the CI has a CI type of inventory location,
and not physical location. For information about creating inventory locations, see To
create an inventory location CI on page 196.
Inventory management
Chapter 9 Managing configuration items 197

To place bulk CIs in inventory
1 Open a bulk CI, as described in To search for CIs from the console on page 199.
2 On the Inventory Location tab, click Add.
3 In the Search Inventory Locations dialog box, specify the search criteria and click
Search.
4 Select a location, and click Relate.
5 In the message about the relationship, click OK.
6 If the inventory is stored in multiple locations, for each location, repeat List item.
on page 198 and List item. on page 198.
7 Click Close.
On the Bulk Inventory form, the Inventory Location tab lists each of the related
locations.
8 Click in the Quantity Per Location field for a location, and type the quantity in
that location.
9 Continue to enter the quantity for each location, until all the quantity in stock for
the bulk CI is accounted for.
10 Click Save.
After items are in inventory, you can use the Manage Inventory function to:
■view
■relocate
■reserve and use CIs and bulk inventory items
Placing non-bulk CIs in inventory
You can place non-bulk CIs that you want to manage in inventory by changing the
status of the CI to In Inventory, and then designating a location for that CI.
To place non-bulk CIs in inventory
1 Open a CI, as described in To search for CIs from the console on page 199.
Inventory management
198
BMC Remedy Service Desk: Incident Management User Guide

2 From the Status list, select In Inventory.
3 Click OK in the confirmation message that appears.
4 In the Search Inventory Locations dialog box , from the Location list, select a
location, make sure other values are correct, and click Search.
5 Select a location and click Return.
Managing inventory tasks
This section describes how to perform inventory management tasks that you most
commonly use.
The following tasks are described:
To search for CIs from the console
1 From the Functions area of the console Navigation pane, click the Manage CIs
link.
2 From the CI Type list on the Manage CI Information window, select the type of CI
you are looking for and click Search.
3 On the form that appears, provide as much information about the CI you are
searching for as possible and click Search.
4 From the search results list at the top of the window, select the CI.
The details appear in the CI form below the search results.
To view inventory locations
1 From the Navigation pane of console, choose Functions => Manage Inventory.
2 Enter your search criteria in the Manage Inventory dialog box, and click Search.
Results matching your search criteria appear in the table.
3 Select a CI or bulk inventory item from the table, and click View Location.
4 View the CIs in the inventory listed in the Inventory Location form.
5 Click Close.
Inventory management
Chapter 9 Managing configuration items 199

To relocate CIs
1 From the Navigation pane of the console, choose Functions => Manage
Inventory.
2 Search for inventory in the current location using the Manage Inventory dialog
box.
3 Select the CI or bulk inventory item you want to relocate, and click Relocate CIs.
4 For the location where you want to relocate the CI, specify search criteria, and
click Search in the Search Inventory Locations dialog box.
5 Select the location where you want to relocate your CI.
6 In the Quantity field, enter the number of CIs you want to relocate.
7 Click Relocate.
To reserve and use inventory
1 From the Navigation pane of console, choose Functions => Manage Inventory.
2 From the CI Type menu in the Manage Inventory dialog box, select the CI or bulk
inventory item you want to reserve and use.
3 Click Search.
4 Click in the Transaction Qty column and enter the number of assets or bulk
inventory items you want to use.
5 Click Reserve/Use Inventory.
The number of CIs or bulk inventory items in the Qty in Stock column is reduced
by the number reserved and used.
Inventory management
200
BMC Remedy Service Desk: Incident Management User Guide

Index
A
accelerators for process flows, best practice 42
active variables
for KPIs, described 143
for ROIs, described 151
hiding and displaying 146
ad hoc requests 55
adding
predefined task groups to change requests 126
predefined tasks to change requests 126
Advanced Qualification dialog box, generating
reports 186
advanced qualifications, using to generate reports
186
advanced search feature, using 88
answers.. See solutions
application preferences, selecting 154
Assigned Work table, about 64
assigning sequence numbers
task 131
task group 131
assignments
accepting 130
incidents, reassigning 95
notification of from Remedy Alert 129
notification of, task implementer 129
receiving notification of 100
audience 11
automatic task, defined 126
B
best practices
CI naming conventions 192, 194
using CIs to diagnose user problems 191
BMC Remedy Alert notifications 129
BMC SLM
calculations 120
status gauge 72
breadcrumb bar 29
broadcasts
creating 173
limiting 176
viewing 175
C
Calbro Services 36
calculations 120
canceling change tasks 137
categorizations, recording 78
Change Management, requester role 53
change requests
adding predefined task groups 126
adding predefined tasks 126
relating predefined task groups 126
relating predefined tasks 126
scenario 48
change tasks
accepting assignments 129, 130
assigning to task implementers 132
canceling 137
closing 138
creating 127
notification of assignments 129
predefined 126
scheduling 133
tracking time 134
CI Field, behavior described 33, 36
CIs
naming conventions, best practice 192, 194
non-bulk 198
problem diagnosis 191
recording unavailability 163
relocating 199
status 194
Classic view, described 35
Command Event Master permission 58
Contact field, behavior described 32
conventions, documentation 14
copying relationships 167
ABCDEFGHIJKLMNOPQRSTUVWXYZ
Index 201
creating
broadcasts 173
custom searches 157
known errors from incidents 153
service requests 55
solution entries from incidents 92
crystal reports
license 182
custom searches
creating 157
editing 159
customer field, behavior described 32
customer name, used when searching 160
customer profile, adding and modifying 82
D
decision trees, using 162
defined searches
described 157
using 157
defining relationships 165
Dialog, Integration in SLM 72
duplicating incidents 93
E
editing custom searches 159
emergency change requests 48
F
fields
standards for labels 36
forms
Advanced Qualification 186
Simple Qualification 185
SLM, Integration Dialog 72
Task 128
Task Effort Log 135
G
generating
reports with advanced qualifications 186
reports with qualifications 184
reports without qualifications 183
standard reports 183
Global search 160
I
icons, recognizing 34
impacted areas, indicating 168
Incident Assignment Log, described 102
Incident Request form views, described 32
incident requests
creating problem investigations from 153
creating solution entries from 92
matching 102
ownership, about 82
reassigning 95
relating as duplicates 93
using decision trees 162
using templates 76
viewing related service targets 71
Index Term 21, 23, 65, 114
Integration Dialog in SLM 72
inventory
non-bulk CIs 198
reserving 199
viewing locations 199
K
Key Performance Indicator,. See KPI flashboards
knowledge base articles
creating 90
searching 89
known errors, creating 153
KPI flashboards
active variables 143
changing the appearance of 146
described 141
enlarging 146, 147
opening the Flashboard console 145
view and display controls 145
viewing underlying records 145
L
lifecycle of an incident 42
limiting number of broadcast messages 176
logs, Task Effort 135
M
manager role 38
manual task, defined 126
ABCDEFGHIJKLMNOPQRSTUVWXYZ
202
BMC Remedy Service Desk: Incident Management User Guide
modifying
profile 153
records 162
relationships 169
N
New Request Wizard, defined 55
non-bulk CIs, placing in inventory 198
notifications
assignments 100
in BMC SLM 101
O
operational categorization, recording 78
Overview console
Assigned Work table 64
Overview console, about 61
ownership for incidents 82
P
peer task, defined 131
permissions
Command Event Master 58
Requester console 53
predefined
task groups 126
tasks 126
predefined reports
Crystal Reports 187
Web reports 187
printing, records 161
process flow
about 42
accelerators 42
Process Flow Status area 42
product categorization
about 33
recording 78
profile, viewing and modifying 153
Q
qualifications, generating reports with 184
R
recent records, viewing 29
recording
CI unavailability 163
records
modifying 162
printing 161
relating and unrelating 164
searching for 159
refreshing data 62
registered users 53
relating
change tasks 127
predefined task groups to change requests 126
predefined tasks to change requests 126
relationships
copying 167
defining 165
impacted areas 168
modifying 169
quick actions 169
relating and unrelating records 164
removing 170
relocating CIs 199
removing relationships 170
reports
about 182
generating 183
generating with advanced qualifications 186
generating with qualifications 184
generating without qualifications 183
predefined 187
request masters
Command Event Master permission 58
defined 53
Requester console
functions 61
user permissions, Command Event Master 58
user permissions, Registered User 53
user permissions, Request Master 53
user permissions, Unknown User 53
requester role 39, 53
reserving inventory 199
resolving incident requests 102
responded date, setting 100
Response field, used in SLM calculations 120
retrying events in order, best practice 58
reviewing an incident’s status 75
ROI flashboards
access levels control companies 148
active variables 151
configured parameters described 149
described 147
selecting parameters in console 148
view and display controls 151
ABCDEFGHIJKLMNOPQRSTUVWXYZ
Index 203
roles
manager 38
requester 39, 53
support staff 38
S
scheduling change tasks 133
scripts, about 162
searching
CI search form, opening 78, 79, 81
customer name, explained 160
defined searches, using 157
for records 159
for similar incident requests 88
for solutions 102
inventory locations 199
knowledge base articles 89
sequence numbers
adding to task groups 131
reassigning 131
reassigning for tasks 131
sequencing task, defined 127
Service field, behavior described 33, 35
Service Level Management.. See BMC SLM
service request details, viewing from Incident
Request form 59
service requests
ad hoc requests 55
creating 55
Service Request Wizard 55
states 56
See also Requester console
service targets, viewing related incident requests 71
Simple Qualification dialog box, generating reports
185
SLM
Integration Dialog 72
SLM Integration Dialog 72
Solution database, creating entries 92
solutions
creating solution database entries 92
searching for 102
standard task, defined 127
status
gauge 72
reviewing an incident’s 75
viewing 72
status values, selecting 65
support staff role, about 38
syntax statement conventions 14
T
task children, defined 126
Task Effort log 135
Task form
relating ad hoc tasks to change requests 128
task groups
assigning sequence numbers 131
defined 126
predefined 126
task implementers
accepting assignments 129
change tasks, closing 138
defined 125
receiving assignment notifications 129
tasks
adding work information 136
assigning sequence numbers 131
predefined 126
working with 102
Template field, behavior described 33
templates
predefined task 126
predefined task group 126
using 76
tracking
task time automatically 134
task time in effort log 135
task time, about 134
U
unknown users
defined 53
multi-tenancy 54
usability improvements 17
use scenarios
emergency change request 48
user interfaces
standards for field labels 36
users
registered 53
request master 53
unknown 53
V
vendor, assign an incident request to 180
ABCDEFGHIJKLMNOPQRSTUVWXYZ
204
BMC Remedy Service Desk: Incident Management User Guide
viewing
broadcasts 175
incident requests related to service targets 71
profile 153
views.. See Incident Request form views
W
web reports 182
wizards
Process Flow Status 42
Service Request 55
work info
adding to an open incident 107
attachment, adding 107
attachment, removing 107
attachment, viewing 107
work information
adding attachment 108
adding entries 106
attachments from BMC Service Request
Management 109
changing view access 108
locking 108
modifying fields 108
tab, using to add information 136
ABCDEFGHIJKLMNOPQRSTUVWXYZ
Index 205
49532
*174271*
