Raspberry Pi Mechatronics Projects HOTSHOT 1849696225 %7BE56CA9D0%7D %5BYamanoor %26 Yamanoor 2015 01 26%5D {E56CA9D0} [Yamanoor & 26]
User Manual: 1849696225 %7BE56CA9D0%7D Raspberry Pi Mechatronics Projects Hotshot %5BYamanoor %26 Yamanoor 2015-01-26%5D
Open the PDF directly: View PDF ![]() .
.
Page Count: 606 [warning: Documents this large are best viewed by clicking the View PDF Link!]
- Raspberry Pi Mechatronics Projects HOTSHOT
- Credits
- About the Authors
- About the Reviewers
- www.PacktPub.com
- Support files, eBooks, discount offers, and more
- Why subscribe?
- Free access for Packt account holders
- Preface
- What this book covers
- What you need for this book
- Who this book is for
- Conventions
- Mission briefing
- Why is it awesome?
- Your Hotshot objectives
- Mission checklist
- Task 1
- Prepare for lift off
- Engage thrusters
- Objective complete – mini debriefing
- Classified intel
- Reader feedback
- Customer support
- Downloading the example code
- Downloading the color images of this book
- Errata
- Piracy
- Questions
- 1. Hello World
- A quick introduction to the Raspberry Pi
- Features of a Raspberry Pi
- Where can I buy a Raspberry Pi?
- Requirements to get started with the Raspberry Pi
- Operating systems on the Raspberry Pi
- Getting started with Raspbian
- Downloading Raspbian
- Flashing image on to the SD card
- Windows
- Linux
- A command-line interface-based approach
- Identifying the SD card mount point
- Unmount the SD card
- Flash the SD card
- GUI-based approach
- Setting up the Raspberry Pi
- Mission briefing
- Why is it awesome?
- Your Hotshot objectives
- Mission checklist
- Hunting and gathering
- Engage thrusters
- Objective complete – mini debriefing
- Setting up the GPIO
- Engage thrusters
- Installing GPIO libraries
- Objective complete – mini debriefing
- GPIO programming using Python
- Engage thrusters
- An alternative to quick2wire – RPi.GPIO
- Objective complete – mini debriefing
- Electrical output of our program
- Engage thrusters
- Objective complete – mini debriefing
- Introduction to the Pi Crust – a prototyping platform for the Raspberry Pi
- Mission accomplished
- Hotshot challenge
- 2. A Raspberry WebIDE Example
- Mission briefing
- Why is it awesome?
- Your Hotshot objectives
- Mission checklist
- Installation, features, and usage of the Occidentalis operating system from Adafruit
- Prepare for lift off
- Engage thrusters
- Objective complete – mini debriefing
- Setup of a remote login into the Raspberry Pi
- Prepare for lift off
- Engage thrusters
- Objective complete – mini debriefing
- Installation of the Raspberry Pi WebIDE
- Engage thrusters
- Objective complete – mini debriefing
- Python development on the WebIDE
- Prepare for lift off
- Quick introduction to the I2C interface
- Configuring the I2C interface on the Raspberry Pi
- Engage thrusters
- Objective complete – mini debriefing
- Test and debugging examples using the WebIDE
- Prepare for lift off
- Engage thrusters
- Objective complete – mini debriefing
- Mission accomplished
- Hotshot challenge
- 3. The Arduino Raspberry Pi Interface
- Mission briefing
- Why is it awesome?
- Where can you buy an Arduino?
- Your Hotshot objectives
- Mission checklist
- Installing the Arduino IDE
- Prepare for lift off
- Engage thrusters
- Objective complete – mini debriefing
- Programming the Arduino using the Raspberry Pi
- Prepare for lift off
- Engage thrusters
- Objective complete – mini debriefing
- Raspberry Pi AlaMode
- Prepare for lift off
- Engage thrusters
- Objective complete – mini debriefing
- The Weasley weather clock
- Prepare for lift off
- Engage thrusters
- Objective complete – mini debriefing
- Controlling the stepper using the Arduino
- Prepare for lift off
- Engage thrusters
- Counterclockwise rotation of the stepper motor
- Objective complete – mini debriefing
- Controlling the RGB LED Strip using the Arduino
- Prepare for lift off
- Engage thrusters
- Objective complete – mini debriefing
- I2C Communication using the Arduino (optional)
- Prepare for lift off
- Engage thrusters
- The 7-Segment display
- 8x8 LED matrix
- BlinkM
- Proximity sensor
- Objective complete – mini debriefing
- Serial port communication with the Raspberry Pi
- Engage thrusters
- Python program for the Weasley clock
- Arduino acknowledgement to control signal
- Control flow for the weather clock
- Temperature data
- Control of the RGB LED strip
- Control of stepper via serial port
- Programming the weather forecast position
- 8x8 matrix control
- BlinkM control
- Objective complete – mini debriefing
- Mission accomplished
- Hotshot challenge
- 4. Christmas Light Sequencer
- Mission briefing
- Why is it awesome?
- Your objectives
- Mission checklist
- Interface the devices to the Raspberry Pi
- Prepare for lift off
- Engage thrusters
- Connecting multiple appliances to the Raspberry Pi
- Objective complete – mini debriefing
- Setting up the digitally addressable RGB matrix
- Prepare for lift off
- Where can I buy them?
- Engage thrusters
- How does it work?
- Lighting up the RGB LED strip
- An Arduino-based control
- Objective complete – mini debriefing
- Interface of an audio device
- Prepare for lift off
- Engage thrusters
- Objective complete – mini debriefing
- Installing the web server
- Prepare for lift off
- Engage thrusters
- Objective complete – mission debriefing
- Interfacing the web server
- Prepare for lift off
- Engage thrusters
- Objective complete – mini debriefing
- Mission accomplished
- References
- 5. Internet of Things Example – An E-mail Alert Water Fountain
- Mission briefing
- Why is it awesome?
- Your objectives
- Mission checklist
- Prepare for lift off
- Engage thrusters
- Objective complete – mini debriefing
- Installation of the Flask framework
- Prepare for lift off
- Engage thrusters
- Objective complete – mini debriefing
- Controlling RGB LEDs from a web page
- Prepare for lift off
- Engage thrusters
- Objective complete – mini debriefing
- Setup of the e-mail alerts in the fountain
- Prepare for lift off
- Engage thrusters
- Objective complete – mini debriefing
- Mission accomplished
- Hotshot challenge
- 6. Raspberry Pi as a Personal Assistant
- Mission briefing
- Why is it awesome?
- Your objectives
- Mission checklist
- Setting up the e-mail feed parser
- Prepare for lift off
- Engage thrusters
- Setting up the parser for reminders and events
- Prepare for lift off
- Engage thrusters
- Designing an enclosure design for the personal assistant
- Prepare for lift off
- Engage thrusters
- Setting up the assembly for the dish monitor
- Prepare for lift off
- Engage thrusters
- Objective complete – mini debriefing
- Setting up sensors for the key alert system
- Prepare for lift off
- Engage thrusters
- Objective complete – mini debriefing
- Mission accomplished
- Hotshot challenges
- References
- 7. Raspberry Pi-based Line Following Robot
- Mission briefing
- Why is it awesome?
- Your Hotshot objectives
- Mission checklist
- Assembly of the Pi Plate for the line following robot
- Prepare for lift off
- Engage thrusters
- Objective complete – mini debriefing
- Sensor selection, interface, and data interpretation
- Engage thrusters
- Light Dependent Resistors
- Infrared emitter/detector
- Machine-vision-based line following robot
- Sensor selection
- Objective complete – mission debriefing
- Implementation of line following logic based on sensor data
- Prepare for lift off
- Engage thrusters
- Objective complete – mini debriefing
- Testing the motor driver circuit
- Prepare for lift off
- Engage thrusters
- Objective complete – mini debriefing
- Preparation of the line following course
- Prepare for lift off
- Engage thrusters
- Use electrical tape and build a track
- Designing the chassis for the line following robot
- Prepare for lift off
- Engage thrusters
- Objective complete – mini debriefing
- A step-by-step assembly of the robot
- Prepare for lift off
- Engage thrusters
- Objective complete – mini debriefing
- Mission accomplished
- Hotshot challenge
- References
- 8. Connect Four Desktop Game using Raspberry Pi
- Mission briefing
- Why is it awesome?
- Your objectives
- Mission checklist
- Hello world example with the pygame
- Prepare for lift off
- Engage thrusters
- Playing sounds using the pygame module
- Building menus using the pygame module
- Objective complete – mini debriefing
- Getting started with the Connect Four game (UI and sound effects)
- Prepare for lift off
- Engage Thrusters
- Adding a menu for the game
- Adding sounds to the game
- Objective complete – mission debriefing
- Interfacing game inputs using the PiFace module
- Prepare for lift off
- Engage thrusters
- Objective complete – mini debriefing
- A brief description of the Connect Four Game AI
- Prepare for lift off
- Engage thrusters
- Main game loop
- Objective complete – mini debriefing
- Marquee design and control (optional)
- Prepare for lift off
- Engage thrusters
- Objective complete – mini debriefing
- Setup of the switches using a cardboard box
- Prepare for lift off
- Engage thrusters
- Objective complete – mini debriefing
- Mission accomplished
- Hotshot challenge
- References
- 9. The Raspberry Pi-enabled Pet/Wildlife Monitor
- Mission briefing
- Why is it awesome?
- Your objectives
- Mission checklist
- Installing and testing the python-twisted framework
- Prepare for lift off
- Engage thrusters
- Objective complete – mini debriefing
- Setting up and testing Spark Core to interact with appliances
- Prepare for lift off
- Engage Thrusters
- Objective complete – mini debriefing
- Installing and testing the Google Coder project on the Raspberry Pi
- Prepare for lift off
- Engage thrusters
- Objective complete – objective complete
- A brief overview of a bird feeder that triggers a camera
- Prepare for lift off
- Engage thrusters
- Objective complete – mini debriefing
- Alternatives and project ideas to consider
- Mission accomplished
- Hotshot challenge
- 10. Raspberry Pi Personal Health Monitor
- Mission briefing
- Why is it awesome?
- Your Hotshot objectives
- Mission checklist
- Setting up a web server to record health parameters
- Prepare for lift off
- Engage thrusters
- Objective complete – mini debriefing
- A simple exercise tool using the Raspberry Pi
- Prepare for lift off
- Engage thrusters
- A mini project idea
- Objective complete – mini debriefing
- Setting up an e-mail feed parser to refill a prescription as well as remind the user about an upcoming doctor's appointment
- Engage thrusters
- Setting up a reminder for doctor's appointments
- Objective complete – mini debriefing
- A simple tool that reminds a person to take his/her pills
- Prepare for lift off
- Engage thrusters
- Other project ideas
- Objective complete – mini debriefing
- Mission accomplished
- Hotshot challenge
- 11. Home Automation using Raspberry Pi
- Mission briefing
- Why is it awesome?
- Your objectives
- Mission checklist
- A simple example that controls limited indoor and outdoor lighting in the evening
- Prepare for lift off
- Software prerequisites
- Engage thrusters
- Objective complete – mini debriefing
- Alternative solutions and some project ideas to consider
- A customary web server example
- Prepare for lift off
- Engage thrusters
- Objective complete – mini debriefing
- Turning on a lawn sprinkler only when there is no rain forecast!
- Prepare for lift off
- Engage thrusters
- Objective complete – mini debriefing
- Gaining remote access to your Raspberry Pi to control appliances
- Some project ideas to consider
- Mission accomplished
- 12. Using a Raspberry Pi for Science and Education
- Mission briefing
- Why is it awesome?
- Your Hotshot objectives
- Improving your vocabulary using the Raspberry Pi
- Prepare for lift off
- Engage thrusters
- Objective complete – mini debriefing
- Raspberry Pi and Khan Academy
- Some ideas to consider
- Building a science fair exhibit using the Raspberry Pi
- Prepare for lift off
- Engage thrusters
- Objective complete – mini debriefing
- Some simple educational experiments using the Raspberry Pi
- Hotshot challenge
- 13. Tips and Tricks
- Mission briefing
- Why is it awesome?
- Your objectives
- Mission checklist
- Setting up Raspberry Pi as a development platform
- #1 – Simple trick for Python development via remote login
- #2 Web development using Google Coder
- #3 Adafruit Occidentalis
- #4 Java Development using the Raspberry Pi
- #5 The Thingbox project
- Remotely logging in the Raspberry Pi from anywhere on the Internet
- Problems that might be encountered while using Raspberry Pi
- SD card corruption
- Power issues
- Devices powered by USB
- Cool add-on hardware sources developed for the Raspberry Pi platform
- The Raspberry Pi model B versus B+, model A versus A+
- Project ideas that can be implemented over a weekend
- Useful resources for the Raspberry Pi
- Raspberry Pi Foundation's forums:
- Raspberry Pi Stack Exchange:
- Element 14's Raspberry Pi community:
- Mission accomplished
- Index


RaspberryPiMechatronicsProjects
HOTSHOT

TableofContents
RaspberryPiMechatronicsProjectsHOTSHOT
Credits
AbouttheAuthors
AbouttheReviewers
www.PacktPub.com
Supportfiles,eBooks,discountoffers,andmore
Whysubscribe?
FreeaccessforPacktaccountholders
Preface
Whatthisbookcovers
Whatyouneedforthisbook
Whothisbookisfor
Conventions
Missionbriefing
Whyisitawesome?
YourHotshotobjectives
Missionchecklist
Task1
Prepareforliftoff
Engagethrusters
Objectivecomplete–minidebriefing
Classifiedintel
Readerfeedback
Customersupport
Downloadingtheexamplecode
Downloadingthecolorimagesofthisbook
Errata
Piracy
Questions

1.HelloWorld
AquickintroductiontotheRaspberryPi
FeaturesofaRaspberryPi
WherecanIbuyaRaspberryPi?
RequirementstogetstartedwiththeRaspberryPi
OperatingsystemsontheRaspberryPi
GettingstartedwithRaspbian
DownloadingRaspbian
FlashingimageontotheSDcard
Windows
Linux
Acommand-lineinterface-basedapproach
IdentifyingtheSDcardmountpoint
UnmounttheSDcard
FlashtheSDcard
GUI-basedapproach
SettinguptheRaspberryPi
Missionbriefing
Whyisitawesome?
YourHotshotobjectives
Missionchecklist
Huntingandgathering
Engagethrusters
Objectivecomplete–minidebriefing
SettinguptheGPIO
Engagethrusters
InstallingGPIOlibraries
Objectivecomplete–minidebriefing
GPIOprogrammingusingPython
Engagethrusters
Analternativetoquick2wire–RPi.GPIO

Objectivecomplete–minidebriefing
Electricaloutputofourprogram
Engagethrusters
Objectivecomplete–minidebriefing
IntroductiontothePiCrust–aprototypingplatformfortheRaspberryPi
Missionaccomplished
Hotshotchallenge
2.ARaspberryWebIDEExample
Missionbriefing
Whyisitawesome?
YourHotshotobjectives
Missionchecklist
Installation,features,andusageoftheOccidentalisoperatingsystemfromAdafruit
Prepareforliftoff
Engagethrusters
Objectivecomplete–minidebriefing
SetupofaremoteloginintotheRaspberryPi
Prepareforliftoff
Engagethrusters
Objectivecomplete–minidebriefing
InstallationoftheRaspberryPiWebIDE
Engagethrusters
Objectivecomplete–minidebriefing
PythondevelopmentontheWebIDE
Prepareforliftoff
QuickintroductiontotheI2Cinterface
ConfiguringtheI2CinterfaceontheRaspberryPi
Engagethrusters
Objectivecomplete–minidebriefing
TestanddebuggingexamplesusingtheWebIDE
Prepareforliftoff

Engagethrusters
Objectivecomplete–minidebriefing
Missionaccomplished
Hotshotchallenge
3.TheArduinoRaspberryPiInterface
Missionbriefing
Whyisitawesome?
WherecanyoubuyanArduino?
YourHotshotobjectives
Missionchecklist
InstallingtheArduinoIDE
Prepareforliftoff
Engagethrusters
Objectivecomplete–minidebriefing
ProgrammingtheArduinousingtheRaspberryPi
Prepareforliftoff
Engagethrusters
Objectivecomplete–minidebriefing
RaspberryPiAlaMode
Prepareforliftoff
Engagethrusters
Objectivecomplete–minidebriefing
TheWeasleyweatherclock
Prepareforliftoff
Engagethrusters
Objectivecomplete–minidebriefing
ControllingthestepperusingtheArduino
Prepareforliftoff
Engagethrusters
Counterclockwiserotationofthesteppermotor
Objectivecomplete–minidebriefing

ControllingtheRGBLEDStripusingtheArduino
Prepareforliftoff
Engagethrusters
Objectivecomplete–minidebriefing
I2CCommunicationusingtheArduino(optional)
Prepareforliftoff
Engagethrusters
The7-Segmentdisplay
8x8LEDmatrix
BlinkM
Proximitysensor
Objectivecomplete–minidebriefing
SerialportcommunicationwiththeRaspberryPi
Engagethrusters
PythonprogramfortheWeasleyclock
Arduinoacknowledgementtocontrolsignal
Controlflowfortheweatherclock
Temperaturedata
ControloftheRGBLEDstrip
Controlofstepperviaserialport
Programmingtheweatherforecastposition
8x8matrixcontrol
BlinkMcontrol
Objectivecomplete–minidebriefing
Missionaccomplished
Hotshotchallenge
4.ChristmasLightSequencer
Missionbriefing
Whyisitawesome?
Yourobjectives
Missionchecklist

InterfacethedevicestotheRaspberryPi
Prepareforliftoff
Engagethrusters
ConnectingmultipleappliancestotheRaspberryPi
Objectivecomplete–minidebriefing
SettingupthedigitallyaddressableRGBmatrix
Prepareforliftoff
WherecanIbuythem?
Engagethrusters
Howdoesitwork?
LightinguptheRGBLEDstrip
AnArduino-basedcontrol
Objectivecomplete–minidebriefing
Interfaceofanaudiodevice
Prepareforliftoff
Engagethrusters
Objectivecomplete–minidebriefing
Installingthewebserver
Prepareforliftoff
Engagethrusters
Objectivecomplete–missiondebriefing
Interfacingthewebserver
Prepareforliftoff
Engagethrusters
Objectivecomplete–minidebriefing
Missionaccomplished
References
5.InternetofThingsExample–AnE-mailAlertWaterFountain
Missionbriefing
Whyisitawesome?
Yourobjectives

Missionchecklist
Prepareforliftoff
Engagethrusters
Objectivecomplete–minidebriefing
InstallationoftheFlaskframework
Prepareforliftoff
Engagethrusters
Objectivecomplete–minidebriefing
ControllingRGBLEDsfromawebpage
Prepareforliftoff
Engagethrusters
Objectivecomplete–minidebriefing
Setupofthee-mailalertsinthefountain
Prepareforliftoff
Engagethrusters
Objectivecomplete–minidebriefing
Missionaccomplished
Hotshotchallenge
6.RaspberryPiasaPersonalAssistant
Missionbriefing
Whyisitawesome?
Yourobjectives
Missionchecklist
Settingupthee-mailfeedparser
Prepareforliftoff
Engagethrusters
Settinguptheparserforremindersandevents
Prepareforliftoff
Engagethrusters
Designinganenclosuredesignforthepersonalassistant
Prepareforliftoff

Engagethrusters
Settinguptheassemblyforthedishmonitor
Prepareforliftoff
Engagethrusters
Objectivecomplete–minidebriefing
Settingupsensorsforthekeyalertsystem
Prepareforliftoff
Engagethrusters
Objectivecomplete–minidebriefing
Missionaccomplished
Hotshotchallenges
References
7.RaspberryPi-basedLineFollowingRobot
Missionbriefing
Whyisitawesome?
YourHotshotobjectives
Missionchecklist
AssemblyofthePiPlateforthelinefollowingrobot
Prepareforliftoff
Engagethrusters
Objectivecomplete–minidebriefing
Sensorselection,interface,anddatainterpretation
Engagethrusters
LightDependentResistors
Infraredemitter/detector
Machine-vision-basedlinefollowingrobot
Sensorselection
Objectivecomplete–missiondebriefing
Implementationoflinefollowinglogicbasedonsensordata
Prepareforliftoff
Engagethrusters

Objectivecomplete–minidebriefing
Testingthemotordrivercircuit
Prepareforliftoff
Engagethrusters
Objectivecomplete–minidebriefing
Preparationofthelinefollowingcourse
Prepareforliftoff
Engagethrusters
Useelectricaltapeandbuildatrack
Designingthechassisforthelinefollowingrobot
Prepareforliftoff
Engagethrusters
Objectivecomplete–minidebriefing
Astep-by-stepassemblyoftherobot
Prepareforliftoff
Engagethrusters
Objectivecomplete–minidebriefing
Missionaccomplished
Hotshotchallenge
References
8.ConnectFourDesktopGameusingRaspberryPi
Missionbriefing
Whyisitawesome?
Yourobjectives
Missionchecklist
Helloworldexamplewiththepygame
Prepareforliftoff
Engagethrusters
Playingsoundsusingthepygamemodule
Buildingmenususingthepygamemodule
Objectivecomplete–minidebriefing

GettingstartedwiththeConnectFourgame(UIandsoundeffects)
Prepareforliftoff
EngageThrusters
Addingamenuforthegame
Addingsoundstothegame
Objectivecomplete–missiondebriefing
InterfacinggameinputsusingthePiFacemodule
Prepareforliftoff
Engagethrusters
Objectivecomplete–minidebriefing
AbriefdescriptionoftheConnectFourGameAI
Prepareforliftoff
Engagethrusters
Maingameloop
Objectivecomplete–minidebriefing
Marqueedesignandcontrol(optional)
Prepareforliftoff
Engagethrusters
Objectivecomplete–minidebriefing
Setupoftheswitchesusingacardboardbox
Prepareforliftoff
Engagethrusters
Objectivecomplete–minidebriefing
Missionaccomplished
Hotshotchallenge
References
9.TheRaspberryPi-enabledPet/WildlifeMonitor
Missionbriefing
Whyisitawesome?
Yourobjectives
Missionchecklist

Installingandtestingthepython-twistedframework
Prepareforliftoff
Engagethrusters
Objectivecomplete–minidebriefing
SettingupandtestingSparkCoretointeractwithappliances
Prepareforliftoff
EngageThrusters
Objectivecomplete–minidebriefing
InstallingandtestingtheGoogleCoderprojectontheRaspberryPi
Prepareforliftoff
Engagethrusters
Objectivecomplete–objectivecomplete
Abriefoverviewofabirdfeederthattriggersacamera
Prepareforliftoff
Engagethrusters
Objectivecomplete–minidebriefing
Alternativesandprojectideastoconsider
Missionaccomplished
Hotshotchallenge
10.RaspberryPiPersonalHealthMonitor
Missionbriefing
Whyisitawesome?
YourHotshotobjectives
Missionchecklist
Settingupawebservertorecordhealthparameters
Prepareforliftoff
Engagethrusters
Objectivecomplete–minidebriefing
AsimpleexercisetoolusingtheRaspberryPi
Prepareforliftoff
Engagethrusters

Aminiprojectidea
Objectivecomplete–minidebriefing
Settingupane-mailfeedparsertorefillaprescriptionaswellasremindtheuserabout
anupcomingdoctor’sappointment
Engagethrusters
Settingupareminderfordoctor’sappointments
Objectivecomplete–minidebriefing
Asimpletoolthatremindsapersontotakehis/herpills
Prepareforliftoff
Engagethrusters
Otherprojectideas
Objectivecomplete–minidebriefing
Missionaccomplished
Hotshotchallenge
11.HomeAutomationusingRaspberryPi
Missionbriefing
Whyisitawesome?
Yourobjectives
Missionchecklist
Asimpleexamplethatcontrolslimitedindoorandoutdoorlightingintheevening
Prepareforliftoff
Softwareprerequisites
Engagethrusters
Objectivecomplete–minidebriefing
Alternativesolutionsandsomeprojectideastoconsider
Acustomarywebserverexample
Prepareforliftoff
Engagethrusters
Objectivecomplete–minidebriefing
Turningonalawnsprinkleronlywhenthereisnorainforecast!
Prepareforliftoff
Engagethrusters

Objectivecomplete–minidebriefing
GainingremoteaccesstoyourRaspberryPitocontrolappliances
Someprojectideastoconsider
Missionaccomplished
12.UsingaRaspberryPiforScienceandEducation
Missionbriefing
Whyisitawesome?
YourHotshotobjectives
ImprovingyourvocabularyusingtheRaspberryPi
Prepareforliftoff
Engagethrusters
Objectivecomplete–minidebriefing
RaspberryPiandKhanAcademy
Someideastoconsider
BuildingasciencefairexhibitusingtheRaspberryPi
Prepareforliftoff
Engagethrusters
Objectivecomplete–minidebriefing
SomesimpleeducationalexperimentsusingtheRaspberryPi
Hotshotchallenge
13.TipsandTricks
Missionbriefing
Whyisitawesome?
Yourobjectives
Missionchecklist
SettingupRaspberryPiasadevelopmentplatform
#1–SimpletrickforPythondevelopmentviaremotelogin
#2WebdevelopmentusingGoogleCoder
#3AdafruitOccidentalis
#4JavaDevelopmentusingtheRaspberryPi
#5TheThingboxproject

RemotelyloggingintheRaspberryPifromanywhereontheInternet
ProblemsthatmightbeencounteredwhileusingRaspberryPi
SDcardcorruption
Powerissues
DevicespoweredbyUSB
Cooladd-onhardwaresourcesdevelopedfortheRaspberryPiplatform
TheRaspberryPimodelBversusB+,modelAversusA+
Projectideasthatcanbeimplementedoveraweekend
UsefulresourcesfortheRaspberryPi
RaspberryPiFoundation’sforums:
RaspberryPiStackExchange:
Element14’sRaspberryPicommunity:
Missionaccomplished
Index

RaspberryPiMechatronicsProjects
HOTSHOT

RaspberryPiMechatronicsProjects
HOTSHOT
Copyright©2015PacktPublishing
Allrightsreserved.Nopartofthisbookmaybereproduced,storedinaretrievalsystem,
ortransmittedinanyformorbyanymeans,withoutthepriorwrittenpermissionofthe
publisher,exceptinthecaseofbriefquotationsembeddedincriticalarticlesorreviews.
Everyefforthasbeenmadeinthepreparationofthisbooktoensuretheaccuracyofthe
informationpresented.However,theinformationcontainedinthisbookissoldwithout
warranty,eitherexpressorimplied.Neithertheauthors,norPacktPublishing,andits
dealersanddistributorswillbeheldliableforanydamagescausedorallegedtobecaused
directlyorindirectlybythisbook.
PacktPublishinghasendeavoredtoprovidetrademarkinformationaboutallofthe
companiesandproductsmentionedinthisbookbytheappropriateuseofcapitals.
However,PacktPublishingcannotguaranteetheaccuracyofthisinformation.
Firstpublished:February2015
Productionreference:1190215
PublishedbyPacktPublishingLtd.
LiveryPlace
35LiveryStreet
BirminghamB32PB,UK.
ISBN978-1-84969-622-7
www.packtpub.com
Credits
Authors
SaiYamanoor
SrihariYamanoor
Reviewers
GuyScheffer
SreedharVaddi
CheukYu
CommissioningEditor
UshaIyer
AcquisitionEditors
UshaIyer
RebeccaPedley
SamWood
ContentDevelopmentEditor
SusmitaSabot
TechnicalEditor
ParagTopre
CopyEditor
JanbalDharmaraj
ProjectCoordinator
MiltonD’souza
Proofreaders
SimranBhogal
MariaGould
AmeeshaGreen
PaulHindle
Indexer
HemanginiBari
Graphics
SheetalAute
DishaHaria
ProductionCoordinators
AparnaBhagat
ManuJoseph
CoverWork
AparnaBhagat

AbouttheAuthors
SaiYamanoorisamechatronicsengineerworkingforaprivatestart-upschoolintheSan
FranciscoBayAreawherehebuildsdevicesthathelpstudentsachievetheirfullpotential.
HecompletedhisdegreeinmechanicalengineeringatCarnegieMellonUniversity,
Pittsburgh,PA,andhisundergraduateworkinmechatronicsatSriKrishnaCollegeof
EngineeringandTechnology,Coimbatore,India.Hisinterests,deeplyrootedinDIYand
opensoftwareandhardwarecultures,includedevelopinggadgetsandappsthatimprove
qualityoflife,InternetofThings,crowdfunding,education,andnewtechnologies.Inhis
sparetime,heplayswithvariousdevicesandarchitecturessuchasRaspberryPi,Arduino,
Galileo,Androiddevices,andothers.Saishareshisadventureswithmechatronicsatthe
aptlynamed“MechatronicsCraze”blogathttp://mechatronicscraze.wordpress.com/.
Iwanttothankmyparentsforencouragingmeinallmyendeavorsandformakingme
whatIamtoday.Iamgratefultomybrotherwhohashelpedshapemycareerallthese
years.IlookforwardtoworkingwithSriharionsimilarprojectsinthefuture.Isincerely
thankMr.S.BalajiRaghavendrawhohasbeenagreatsourceofinspirationtomewhile
pursuingmyundergraduatedegree.IamalsothankfultoSusmitaSabotandtheentire
supportteamatPacktPublishingwhowerepatientandunderstoodthecircumstances
duringdifficulttimes.
SrihariYamanoorisanaturephotographerandmechanicalengineerwithexperience
workinginmedicaldevicedesignandCAD/CAM.Hecompletedhismaster’sinscience
aswellasadegreeinengineeringfromStanfordUniversity.Hisworkandinterestsin
medicaldevicesincludewomen’shealth,cancer,orthopedics,andcardiovasculardiseases,
aswellasnewerareassuchasdigitalhealthandelectronichealthrecords.Hehasseveral
thousandsofhoursofCADexperiencebehindhimandisalsocertifiedamongother
thingsasaSolidWorksexpert,simulationprofessional,andaSolidWorksinstructor.His
interestsrangefromengineeringandeducationtosocialentrepreneurship,animalwelfare,
andcrowdfunding.
Iwouldliketothankmyparents,NarasimhanandYasodaVenakatakrishnan,fortheir
steadfastsupportinmyeducationandeffortsthroughouttheyears,culminatinginprojects
suchasthisbook.Overthecourseoftheyears,manyfriendshavehelpedbothSaiandme
growinmanyways.Forthisreason,Iwouldliketosayabigwordofthanks,inno
particularorder,toRikaCatherineHirachi,AnnaLiuJao,ShirupaGupta,PatrickNguyen,
VishnuPrasadRamachandran,AndrewEib,ChristopherMa,andKarthikPalaniappan.I
amsureIammissingsomenames,andforthis,Iapologizeinadvance.Iwouldalsolike
tothankmygraciousmentors,Dr.KevinWaldron,Dr.JamesStubbs,RussellSampson,
MukundPatel,andasIfondlycallhim,Cyril“Master”,allofwhomhavegivenmeadvice
andshownmetheway.Iwouldliketoespeciallythankmyfirstcat,Squeaky,andthe
felinesBob,Saxon,andFishbone,thathavefollowedme,forinspiringmeandpushing
metostayontrackandkeepaneyeonthebigpicture.
AbouttheReviewers
SreedharVaddihas4yearsofexperienceinbigdata,4yearsincloudcomputing,and15
yearsinJava.Hisexperienceincludesworkinthefieldsofbigdatasecurity,
biomedical/healthcare,mobilesecurity,financialservices(wholesale,mortgage,
investment,andbrokerage),theWeb(marketplace,crowdsourcing,andadvertising),news
andentertainment,propertyandcasualtyinsurance,softwareproductdevelopment,and
scientificresearch.
Hehashands-onexperienceasanarchitectworkingonenterprisemobileapplications,
Hadoop,SaaS,PaaS,IaaS,thecloud,richenterpriseapplications,n-tierenterprise
systems,EnterpriseApplicationIntegration(EAI)inweb-enablinglegacysystems,IBM
MainframeandSAP,andSOAwebserviceswithJava2andJEE.
HehasalsoworkedinallphasesofSDLC,namelydesigning,developing,performance
testing,andimplementingWeb-2.0,Web-UI,server-side,middleware,andmobile
applications.HehasalsoworkedwithBig5ConsultingandFortune100companies.He
hasledteamsofsizesvaryingfrom2to80acrosstheglobeindifferenttimezones,
cultures,anddialects.
HeisanadministratorofJEEcontainers(Geronimo,WebSphere,Weblogic,JBoss,and
Tomcat)andCDH.Heisalsoatechnicalconsultantatastealthmodestart-upinanimal
careintheclinicaltrialsindustry.Heisadiligentworkerandquicklearnerwithexcellent
problemsolving,presentation,andmentoringskills.
CheukYuispursuingabachelor’sdegreeinelectricalengineeringattheUniversityof
California,LosAngeles(UCLA),withanemphasisoncircuitandsignalprocessing.He
workedonmultipleembeddedsystemsprojectsusingvariousmicrocontrollerssuchas
Arduino,Teensy,andRaspberryPi.AsastudentresearcherfortheELFINCubeSat
MissionatUCLA,healsohashands-onexperienceworkingonprintedcircuitboards,
includingdesigningandtestingavionicsandgroundsupportequipmentboards.Besides
workandstudy,heisalsoanamateurradiooperatorandastronomer.
www.PacktPub.com

Supportfiles,eBooks,discountoffers,and
more
Forsupportfilesanddownloadsrelatedtoyourbook,pleasevisitwww.PacktPub.com.
DidyouknowthatPacktofferseBookversionsofeverybookpublished,withPDFand
ePubfilesavailable?YoucanupgradetotheeBookversionatwww.PacktPub.comandas
aprintbookcustomer,youareentitledtoadiscountontheeBookcopy.Getintouchwith
usat<service@packtpub.com>formoredetails.
Atwww.PacktPub.com,youcanalsoreadacollectionoffreetechnicalarticles,signup
forarangeoffreenewslettersandreceiveexclusivediscountsandoffersonPacktbooks
andeBooks.
https://www2.packtpub.com/books/subscription/packtlib
DoyouneedinstantsolutionstoyourITquestions?PacktLibisPackt’sonlinedigital
booklibrary.Here,youcansearch,access,andreadPackt’sentirelibraryofbooks.

Whysubscribe?
FullysearchableacrosseverybookpublishedbyPackt
Copyandpaste,print,andbookmarkcontent
Ondemandandaccessibleviaawebbrowser

Preface
TheRaspberryPiisaquaintexampleoftechnologicalinnovationsthatcomebyonce
everytwoorthreedecadesandsetoffarevolutionthattoucheseveryaspectofhumanlife
fromscientificexplorationtoentertainmenttoeducation.Whatisexcitingthistime
aroundisthatthereareseveralsuchinnovationshappeningsimultaneously.Theymight
soundlike,andareinaway,buzzwords,buttheyareinfactreal,andarechangingour
livesinsomanyways,sofewofwhichweareconsciouslyawareof.Wearespeakingof
innovationsinentrepreneurship,suchascrowdsourcingortheemergenceofDIYwithan
almostcult-likefollowingtoinnovationsintechnologythatarecurrent,suchas3D
printingandInternetofEverything,andinnovationsthatareimpendingsuchas4D
printing,smartmanufacturing,andmuchmore.
TheRaspberryPihasalreadyfoundseveralusesasevidencedbyhundredsofwebsites,
projectexamples,andcrowdsourcingcampaigns.PeoplehaveusedthePitobuildrobots,
teachprogramming,restoreoldgamingconsoles,streamvideos,collectdata,anddomany
otherthings.ThePiitselfhasgonethroughdesigniterationsandcontinuestospur
competingsystems.PeoplehavetakenadvantageofthisandhavehookedupthePito
manydifferentecosystems,expandingitsubiquityandutility.
ThepurposeofthisbookistohelpthosewhoareexcitedabouttheRaspberryPiandhave
projectideasinmind,orwouldsimplyliketogettheirhandsdirtyandpractice
implementingprojectssothattheycanthenusethatknowledgeforotherendeavors.We
triedtotakeapracticalapproach,introducingthePiinthefirstcoupleofprojectthatyou
canskipifyouarefamiliarwiththeRaspberryPiandhaveuseditbefore.Wethendiscuss
projectsofincreasingcomplexity.Wehavealsoattemptedtodiversifytheprojectsto
demonstratevarioususesforthePithroughoutthebook.

Whatthisbookcovers
Project1,HelloWorld,willintroducetheRaspberryPiandremindyouofthingsthatyou
shouldknowasyouproceedthroughthebook.WewillsetuptheRaspberryPiandblink
anLED.
Project2,ARaspberryWebIDEExample,willtakeyouthroughPythondevelopment
usingabrowser.WewillusetheAdafruitWebIDEandleadyouthroughthedevelopment
processusingAdafruitproductsaspropsfortheexamples.
Project3,TheArduinoRaspberryPiInterface,isinspiredbytheHarryPotterseries,and
inanefforttoshowourloveforthisseries,wehavecreatedaclocksimilartothe
innovativeandendearingWeasleyclockusingtheRaspberryPiandanArduino.This
project,ofcourse,allowstheclocktoreportbackweatherconditions.
Project4,ChristmasLightSequencer,discussesholidaysasthebesttimeforDIYprojects,
andifyouareeverstarvedofideas,holidaysarethebesttimetocookupideas.Wepicked
aChristmas-themedprojecttodemonstratecontrollingappliancesconnectedtoalocal
networkusingRaspberryPi.
Project5,InternetofThingsExample–AnE-mailAlertWaterFountain,followsthe
themeofthepreviousproject.Wewillshowyouhowtocontroladecorativefountainsuch
thatanytimeyoureceiveanewe-mail,yourfountain’slightwillflashanalert(thiscan
alsobeswitchedtoreceiveTwitteralerts).
Project6,RaspberryPiasaPersonalAssistant,willshowyouhowyoucanusethePias
yourpersonalassistant,remindingyouofchores,settingalarms,anddoingeverythingat
yourcommand.
Project7,RaspberryPi-basedLineFollowingRobot,willtakeyouthroughthesimplestof
allrobots,thelinefollowingbot,withRaspberryPiatthehelm.Thisprojectwillshow
youthewayforthisandothercomplexroboticsprojectsyouwishtoimplement.
Project8,ConnectFourDesktopGameusingRaspberryPi,followstheinstant-classic
themefortheRaspberryPi,whichincludesgames.Allmannersofgamingapplications,
includingtherevivalofarchaicgamestonewonesandmods,arebeingcreatedusingthe
RaspberryPi.Wewillimplementthegameusingapushbuttoninterface.
Project9,TheRaspberryPi-enabledPet/WildlifeMonitor,willwalkyouthroughafun
exampleofabirdfeedermonitorthatallowsyoutotriggeraphotocaptureeachtimethe
birdapproachesthefeeder.Youcanthinkofextendingthistootherpets,orsay,theferal
catsinyourcolony.
Project10,RaspberryPiPersonalHealthMonitor,isaprojectwherewesetupasimple
webservertorecordourpersonalhealthparameters,buildasimpletooltoremind
ourselvestoremainphysicallyactive,andremindourselvestorefillaprescriptionviae-
mailalerts.
Project11,HomeAutomationusingRaspberryPi,isaprojectwherewewillshowyou
howtocontrolappliancesusingatwistednetworkwheretheapplianceisconnectedtoa

platformsuchasanArduino.TheRaspberryPiactsasaserverthatcontrolsallsuchnodes
inthenetwork.
Project12,UsingaRaspberryPiforScienceandEducation,isaprojectpackedwith
examples,includingavocabularylearningtool,awebhostforKhanAcademy,anda
windmillgeneratorscienceexhibit.Havefunlearningandteaching!
Project13,TipsandTricks,isaprojectpackedwithtipsandtricksthatwillhelpyouuse
theRaspberryPi!
Youcanalsogetthevideos,tipsandtricks,andmanymorethingsrelatedtotheprojectsat
http://diywithpi.com/.
Whatyouneedforthisbook
Togetstarted,youwillneedtheRaspberryPi,amonitor,akeyboard,apowersource,and
preferably,alaptoporpersonalcomputerrunningonanyOS—Windows,Linux,orApple.
Otherhardwareandsoftwarerecommendationsaremadeintheindividualprojects,and
youarewelcometoreplacethemwithwhatyouseefit.AworkingknowledgeofPythonis
preferred,butnotrequired.
Whothisbookisfor
Thisbookisprimarilyaimedathobbyistsanddo-it-yourselfenthusiastsaswellasthose
lookingtoimplementspecificprojectsusinglowcosthardwareandsoftwarecentered
aroundtheRaspberryPi.Basicexposuretoelectronics,programming,andInternetusage
isassumed.Wehavetriedtotakeapragmaticapproach,implementingtheprojectsand
showinghowyoucandothisonyourown.
Conventions
Inthisbook,youwillfindseveralheadingsappearingfrequently.Togiveclear
instructionsofhowtocompleteaprocedureortask,weuse:
Missionbriefing
Thissectionexplainswhatyouwillbuild,withascreenshotofthecompletedproject.
Whyisitawesome?
Thissectionexplainswhytheprojectiscool,unique,exciting,andinteresting.Itdescribes
whatadvantagetheprojectwillgiveyou.

YourHotshotobjectives
Thissectionexplainstheeightmajortasksrequiredtocompleteyourproject.
Task1
Task2
Task3
Task4
Task5
Task6
Task7
Task8
Missionchecklist
Thissectionexplainsanypre-requisitesfortheproject,suchasresourcesorlibrariesthat
needtobedownloaded,andsoon.
Task1
Thissectionexplainsthetaskthatyouwillperform.
Prepareforliftoff
Thissectionexplainsanypreliminaryworkthatyoumayneedtodobeforebeginning
workonthetask.
Engagethrusters
Thissectionliststhestepsrequiredinordertocompletethetask.
Objectivecomplete–minidebriefing
Thissectionexplainshowthestepsperformedintheprevioussectionallowsusto
completethetask.Thissectionismandatory.
Classifiedintel
Thissectionprovidessomeextrainformationrelevanttothetask.
Youwillalsofindanumberofstylesoftextthatdistinguishbetweendifferentkindsof
information.Herearesomeexamplesofthesestyles,andanexplanationoftheirmeaning.
Codewordsintext,databasetablenames,foldernames,filenames,fileextensions,
pathnames,dummyURLs,userinput,andTwitterhandlesareshownasfollows:“Wewill
gothroughtheimportantfeaturesofthepygamemodule,whichisnecessarytobuildour
arcadegame,includingplayingsoundsandcontrollingthemenu.”
Ablockofcodeissetasfollows:
GPIO.output(25,True)
while1:
GPIO.output(25,False)
sleep(1)
GPIO.output(25,True)
sleep(1)
Anycommand-lineinputoroutputiswrittenasfollows:
#cp/usr/src/asterisk-addons/configs/cdr_mysql.conf.sample
/etc/asterisk/cdr_mysql.conf
Newtermsandimportantwordsareshowninbold.Wordsthatyouseeonthescreen,in
menusordialogboxesforexample,appearinthetextlikethis:“clickingtheNextbutton
movesyoutothenextscreen”.
Note
Warningsorimportantnotesappearinaboxlikethis.
Tip
Tipsandtricksappearlikethis.

Readerfeedback
Feedbackfromourreadersisalwayswelcome.Letusknowwhatyouthinkaboutthis
book—whatyoulikedormayhavedisliked.Readerfeedbackisimportantforusto
developtitlesthatyoureallygetthemostoutof.
Tosendusgeneralfeedback,simplysendane-mailto<feedback@packtpub.com>,and
mentionthebooktitleviathesubjectofyourmessage.
Ifthereisatopicthatyouhaveexpertiseinandyouareinterestedineitherwritingor
contributingtoabook,seeourauthorguideonwww.packtpub.com/authors.
Customersupport
NowthatyouaretheproudownerofaPacktbook,wehaveanumberofthingstohelp
youtogetthemostfromyourpurchase.


Downloadingthecolorimagesofthisbook
WealsoprovideyouaPDFfilethathascolorimagesofthescreenshots/diagramsusedin
thisbook.Thecolorimageswillhelpyoubetterunderstandthechangesintheoutput.You
candownloadthisfilefrom
http://www.packtpub.com/sites/default/files/downloads/6227OT_ColoredImages.pdf.

Errata
Althoughwehavetakeneverycaretoensuretheaccuracyofourcontent,mistakesdo
happen.Ifyoufindamistakeinoneofourbooks—maybeamistakeinthetextorthe
code—wewouldbegratefulifyouwouldreportthistous.Bydoingso,youcansave
otherreadersfromfrustrationandhelpusimprovesubsequentversionsofthisbook.If
youfindanyerrata,pleasereportthembyvisitinghttp://www.packtpub.com/submit-
errata,selectingyourbook,clickingontheerratasubmissionformlink,andenteringthe
detailsofyourerrata.Onceyourerrataareverified,yoursubmissionwillbeacceptedand
theerratawillbeuploadedonourwebsite,oraddedtoanylistofexistingerrata,underthe
Erratasectionofthattitle.Anyexistingerratacanbeviewedbyselectingyourtitlefrom
http://www.packtpub.com/support.

Piracy
PiracyofcopyrightmaterialontheInternetisanongoingproblemacrossallmedia.At
Packt,wetaketheprotectionofourcopyrightandlicensesveryseriously.Ifyoucome
acrossanyillegalcopiesofourworks,inanyform,ontheInternet,pleaseprovideuswith
thelocationaddressorwebsitenameimmediatelysothatwecanpursuearemedy.
Pleasecontactusat<copyright@packtpub.com>withalinktothesuspectedpirated
material.
Weappreciateyourhelpinprotectingourauthors,andourabilitytobringyouvaluable
content.

Chapter1.HelloWorld
ItisaHotshotcustomtobeginlearninganythingnewwithaHelloWorldexample.Since
wewillbedoingreallycoolthingsinthisbook,wewillsay“HelloWorld”inaunique
fashion.Inthisproject,wewillusetheRaspberryPitocauseanLEDlighttoblink.This
projectisdirectedtowardsthosewhoarerelativelynewtotheRaspberryPienvironment
asawarm-upexercise.FeelfreetoskipaheadifyouhavealreadydonethiswithyourPi,
thoughwesuggestyoulookthroughandmakesureyouhaven’tmissedanything.
AquickintroductiontotheRaspberryPi
IfwesearchforthetermRaspberryPiovertheweboropentheRaspberryPi
Foundation’swebpage,wewillfindthattheRaspberryPiisacomputerthatisthesizeof
acreditcard.
PartsofaRaspberryPi

FeaturesofaRaspberryPi
TheRaspberryPiFoundation(http://www.raspberrypi.org/)initiallyreleasedthe
RaspberryPimodelB.ThiswasfollowedbytheRaspberryPimodelA.In2014,the
RaspberryPifoundationreleasedvariantsB+andA+.TheRaspberryPimodelsAandA+
(costing25USDand20USDrespectively)donotcomewithanEthernetport,aUSBport
and256MBRAM.ThemodelA+replacedmodelAwhilethemodelB+replacedmodel
B.ThemodelB(price:35USD)camewithanEthernetport,2USBports,and512MB
RAM;modelB+,whichsupersedesmodelB,comeswith40pinGPIOheaderasopposed
to26intheearliermodels,andhas4USBportsandamicroSDcardslotinsteadofthe
SDslot.PertheRaspberryPiFoundationwebsite,modelB+(aswellasmodelA+)
consumeslowerpower,hasbetteraudioandabetterformfactor,whichwecertainly
concurwith.ThemodelA+alsocomeswitha40pinGPIOheaderandamicroSDcard
slot.ThemodelsA+andB+haveninemoreGPIOpinsthantheirpredecessors.
Note
TheRaspberryPi2wasreleasedafterwefinishedwritingthebook.Pleaserefertothe
book’ssitetofindoutmoreaboutgettingstartedwithmodel2.
TheobjectiveofthisbookistobuildcoolprojectsusingtheRaspberryPi.Wewilldiscuss
thecomponentsofRaspberryPifromthisperspective.Ifyouareinterestedinfindingout
moreabouttheRaspberryPi,theRaspberryPiFoundation’swebpagehaspublishedthe
technicalspecificationsofallthecomponents.
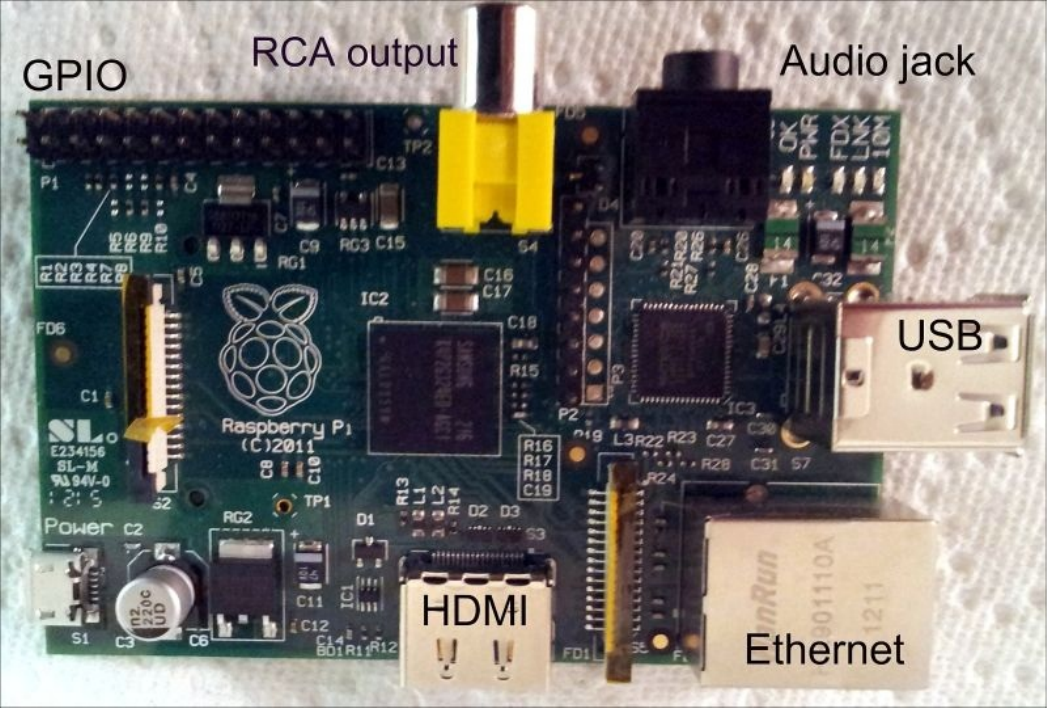
First,wewilldiscussthecomponentsavailableontheRaspberryPiandtheuseofthese
componentsinourprojects.ThecomponentsoftheRaspberryPiinclude:
2USBports(1USBportavailableinmodelA)
Ethernetport(availableonlyinmodelsBandB+)
RCAoutput
HDMIoutput
Audiooutput
Lowlevelperipherals,whichinclude:
GPIO(GeneralPurposeInputOutput)
UART/SerialPort(UniversalAsynchronousReceiverTransmitter)
I2C(twowireinterface)
SPI(SerialPeripheralInterface)
WherecanIbuyaRaspberryPi?
Element14andRSComponentsarethemostcommondistributorsoftheRaspberryPiin
theUnitedStates.TheRaspberryPimodelAwasroughlypricedat25USD,whileits
successormodelA+waspricedat20USD.ThemodelBwaspricedat35USDandthe
modelB+ispricedat40USD.Therearealsoaneverincreasingnumberoflocal
distributorssuchasAdafruitandFry’sElectronicsintheUSthatselltheRaspberryPi
foramargin.PleasechecktheRaspberryPiFoundationwebsiteandothersourcesfor
morevendors.

RequirementstogetstartedwiththeRaspberryPi
Inthissection,wewilldiscusstheitemsrequiredtogetstartedwiththeRaspberryPi.We
willneedallthesamethingsthatarerequiredtouseacomputer/laptop.Theyare:
Display
Keyboard
Mouse
Wi-FiAdapter/Ethernetcable
Note
ItispossibletousetheRaspberryPiviaremoteloginusingasecureshell.Thismight
seemdifficulttothosewhoarenewtotheLinuxenvironment.ThesetupoftheRaspberry
PiforremoteloginisexplainedinProject13,TipsandTricks.
TheRaspberryPieLinuxwiki(http://elinux.org/RPi_Hub)haslistedperipheralsthathave
beentestedandconfirmedtohaveworkedontheRaspberryPi.Youhavethefreedomto
chooseperipheralsaccordingtoyourchoice.
Display:TheRaspberryPiisprovidedwithanHDMIoutputandanRCAoutput.It
ispossibletoconnectamonitorthathasanHDMIinput.Itisalsopossibletoconnect
monitorsthathaveaDVIinputwithanHDMItotheDVIcable.
Powersupply:SincetheRaspberryPiconsumes700mAforitsoperation,itis
recommendedthatthereaderusespoweredUSBhubstousedevicessuchasWi-Fi
adaptersasopposedtopluggingindevicessuchastheWi-Fiadaptersdirectlytothe
USBportoftheRaspberryPitoavoidthedeviceresettingitself.
OperatingsystemsontheRaspberryPi
TheRaspberryPifoundationrecommendsthefollowingoperatingsystemsonthe
RaspberryPi.Theyare:
Raspbian
ArchLinuxARM
RISCOS
Youarewelcometochooseanyoperatingsystemofyourchoice.Forbeginners,we
stronglyrecommendtheRaspbianOSforprojects.TheRaspbianisequippedwithtoolsto
getstartedeasily.TheRaspberryPi’sfirmwareisimplementedsuchthattheoperating
systemisloadedfromanSDcard.

GettingstartedwithRaspbian
Inthissection,wewilldownloadanimagefromtheRaspberryPiFoundation’swebpage
toacomputer,flashanSDcardwiththeimage,andsetuptheoperatingsystemonthe
RaspberryPi.Wewillalsotrytowriteandexecuteourfirstexample.
DownloadingRaspbian
ThelatestRaspbianimageishostedontheRaspberryPiFoundation’swebpage
(http://www.raspberrypi.org/downloads/).Thelatestimageatthetimeofwritingthisbook
wasRaspbianwheezy.Weneedtodownloadtheimageandextractittothefolderofour
choice.
RaspbianwheezyontheRaspberryPiFoundation’swebsite
FlashingimageontotheSDcard
WewilldiscussflashingtheSDcardwiththeRaspbianimageonbothWindowsand
Linuxmachines.
Windows
Extractthefilestoalocationofyourchoice.TheWin32DiskImagertoolisrequiredto
preparetheSDcardwiththeRaspbianimage.
Tip
AstandardRaspbianimageisabout1.8GBbig.Itisstronglyrecommendedthatyouuse
anSDcardthatisatleastof4GBbig.
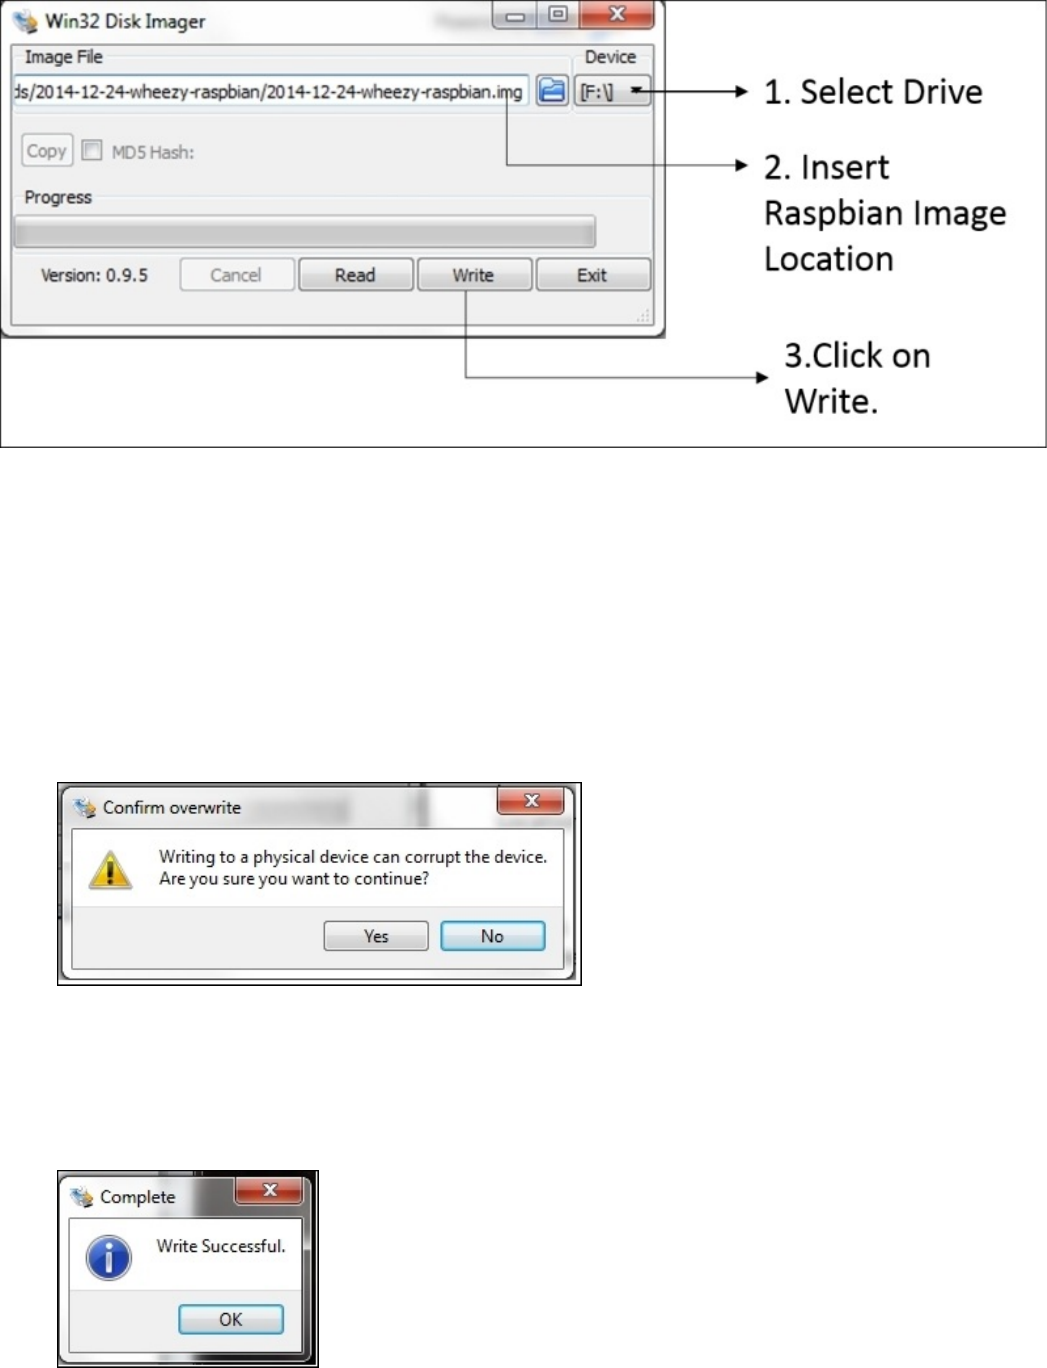
TheWin32DiskImagertool
WecanflashtheSDcardinthreesimplesteps(asshownintheprecedingscreenshot):
1. SelecttheSDcardthatneedstobeflashed.
2. SelecttheRaspbianimagelocation.
3. ClickonWrite.
4. ClickonYestoconfirm.
ConfirmoverwritingtheSDcard
5. Itcantakeawhilebeforethewritecycleiscompleted.
Linux

TherearetwoidenticalmethodstoflashanSDcardonaLinuxmachine.Thetwo
approachesinclude:
AGUI-basedapproach
Acommand-lineinterface-basedapproach
Acommand-lineinterface-basedapproach
TheSDcardcanbeflashedinthreesimplestepsusingacommand-lineinterface.These
stepsareasfollows:
1. IdentifytheSDcardmountpoint.
2. UnmounttheSDcard.
3. FlashtheSDcard.
IdentifyingtheSDcardmountpoint
AssoonasweinserttheSDcardintoaUSBcardreaderoranSDcardslotfoundona
laptop,weneedtoopenaterminalonourLinuxmachine.Weneedtoidentifyourdevice’s
mountpointonthemachineusingthefollowingcommand:
df–h
Thedevicesenumeratedonthemachinewillbelistedasshowninthefollowing
screenshot:
Storagedevicesidentifiedbytheoperatingsystem

UnmounttheSDcard
Inthepreviousexample,the/dev/sdb5pathisthestoragedeviceofinterest.Theremay
bemorethanonestoragedevicethatmightbeconnectedtoamachine.Weneedtomake
surethatwehaveidentifiedtherightdevice.Oncewehaveidentifiedthedevice,ithasto
beunmountedusingthefollowingcommand:
umount/dev/sdb
FlashtheSDcard
Now,wewillflashourSDcardusingthefollowingcommand:
ddbs=4Mif=~/2012-09-18-wheezy-raspbian.imgof=/dev/sdb
Theif=argumentpointstothelocationoftheimageandof=referstotheSDcardmount
point.Thewriteoperationtakesawhiletocompleteanditisreadyforuseonthe
RaspberryPiuponcompletion.
GUI-basedapproach
OnaDebianLinux-basedoperatingsystem,thereisapackagecalledusb-imagewriter.
TheImageWriterpackageperformsthesameoperationsrequiredtoflashanSDcard.
AUSBImageWriteronUbuntu
SettinguptheRaspberryPi
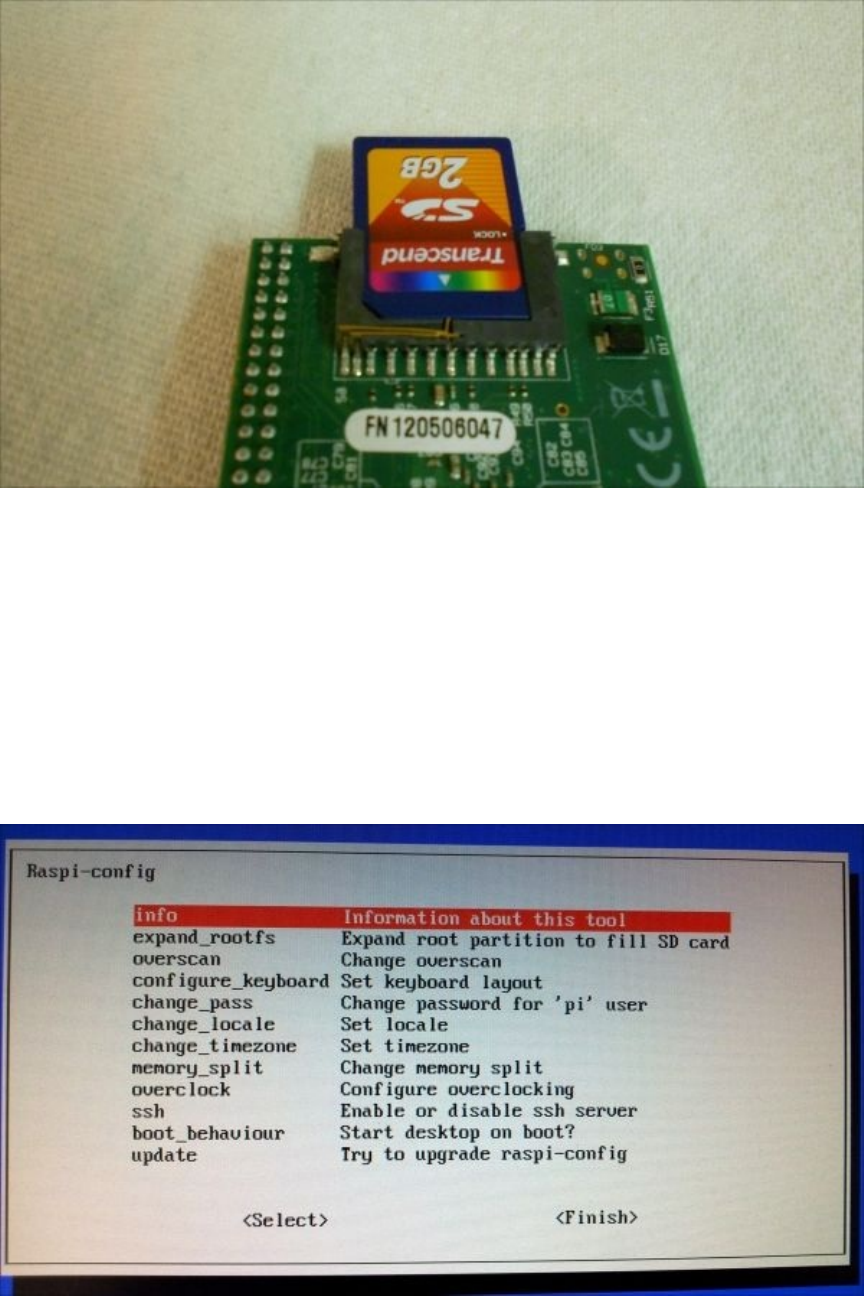
Nowthattheimageisflashed,let’sgetstartedwithsettinguptheRaspberryPiforthefirst
time.WewillhavetoinserttheSDcardslotfoundontheothersideoftheRaspberryPi.
AflashedSDcardintheslot
Whenthekeyboardandthemouseareconnected,wecangetstartedbypoweringupthe
RaspberryPi!
OncetheRaspberryPiispoweredup,theoperatingsystembootsuptoRaspi-config.The
raspi-configisthetoolusedtosetupdesktopoptions,keyboardsettings,storage
settings,andsoon.TheRaspi-configscreenisshowninthefollowingscreenshot:
TheRaspi-configscreen

Inthissection,wewilldiscusseachfeatureoftheraspi-configtool:
info:Asthenamesuggests,thissectiongivesthegeneralinformationaboutthetool.
expand_rootfs:WhiletheSDcardisflashedwiththeoperatingsystemimage,the
SDcardispartitionedjustaboutthesizeoftheimage.Thiscommandaidstoexpand
thepartitionsothattheremainingspacecanbeusedforfilestorage.
overscan:ThisisanoptionusedwhentheRaspberryPiisconnectedtothe
television.
configure_keyboard:Thisoptionisusedtoconfigurethechange_typeoptionofthe
keyboard.
change_pass:Thedefaultpasswordisraspberry,andifnecessary,thisoptionlets
youswitchtoastrongerpassword.
change_locale:Theoptionletsyouchangethelanguagepreferences.
change_timezone:Wecansetourcurrenttimezoneusingthisoption.
memory_split:ThisoptionletsussplitthememorybetweentheARMprocessor’s
CPUandthegraphicsprocessor.
overclock:Thedefaultclockspeedis700MHz.Thisoptionletsyousettheclock
speedto1GHz.ThismightvaryforRaspberryPi2.
ssh:Thisoptionenablesthesecureshellserver.Thisisrequiredtoremotelylogin
theRaspberryPiandcontroldevicesremotely.ItisenabledbydefaultonRaspbian.
boot_behaviour:Thisoptionenablesyoutobootdirectlyintothedesktop.
Tip
Itisimportantthatyouenablethisoptiononasthedefaultoptionbootsintoanormal
text-basedconsole.
update:IftheRaspberryPiisconnectedtotheInternetusinganEthernetcable,the
raspi-configtooldownloadsanypackagethatmightbeavailable.
OncewecompletethesetupprocessbyselectingFinish,theRaspberryPirebootsand
expandsthefilesystemifnecessary.
Missionbriefing
Inthisproject,wewillsetuptheGPIO(GeneralPurposeInputOutput)peripheralon
theRaspberryPiandwriteourfirstprogramtocauseanLEDtoblink.Attheend,wewill
repeatthesamestepswithaRaspberryPiadd-onboardcalledPiCrust.Thiswillallow
youtogetyourfeetwetandensureyouhavealltherighttoolsgoingforward,andshould
youneedto,troubleshootanyproblemsyoumightidentify.
Whyisitawesome?
Thinkofsaying“HelloWorld”asbothanodtoprogrammingtraditionandadryrunto
ensureyouarewellequipped!

YourHotshotobjectives
Theobjectivesforthismissionarequitesimple,andyettakeusallseveralmilestones
further!HerearetheobjectivesoftheHelloWorldmission:
Collectallthenecessarytools
SetuptheGPIOperipheral
IntroduceourselvestotheRaspberryPienvironment
Turnalightemittingdiode(LED)onandoffwitha1seconddelay

Missionchecklist
Goovertheprevioussections,andmakesureyouhaveallthetools.DownloadtheGPIO
libraries,andensureyoucanlogintotheRaspberryPiremotely,andyouareallset!
Note
TherearetwodifferentwaystouseaRaspberryPi.Theyare:
ConnectingamonitortotheHDMIportortheRCAjackandakeyboardtotheUSB
portoftheRaspberryPi.
RemotelyloggingintotheRaspberryPifromthereader’sworkstation.
Ifyouareabeginner,itisbesttousethefirstmethodwhilethesecondmethodcanbe
usedifyouarefamiliarwiththeLinuxoperatingsystemandremotelogincapabilities.
OncewecompletethesetupprocessbyselectingFinish,theRaspberryPirebootsand
expandsthefilesystemifnecessary.

Huntingandgathering
Asstatedbefore,youwillneedtomakesureyouhaveallthetools.So,goahead,huntand
gatheraway.Grabatleastoneofeachofthefollowingandmorethanoneofeach,ifyou,
likeus,arepronetoaccidents:
AlaptoptodownloadtheRaspberryPiimageandsetupeverything
RaspberryPi—ModelB/B+(preferred),akeyboard,andamousefortheRaspberry
Pi(optional)
SDcardwith4GBmemory(SDcardpreparationwasexplainedearlierinthis
project)
USBPowerAdapter(Rated1.0A)andMicroUSBpowercable
Ethernetcable
Wi-Fiadapter—(optional)refertotheeLinuxwikiforRaspberryPiforverified
peripherals
Breadboard
Jumperwires
DiscreteResistorValues
Aworkbench(oracleanworkingsurface—hopefullyyouhaveone)
Goodthoughtsandacan-doattitude
Lotsofcoffee,tea,orasafebeverageofyourchoice
Engagethrusters
Youwillneedallofthetoolslistedintheprevioussectiontogetthroughthisproject.Take
yourtimeandmakesureyouhaveeverythinghandy!
Objectivecomplete–minidebriefing
Doyouhaveallthetools?Readytogo?Thenontothenexttask!
SettinguptheGPIO
WeneedtoenabletheGPIOperipheralsinourRaspbianinstallationtogetstarted.In
ordertodownloadtherequiredtoolsandsetthingsinmotion,theRaspberryPineedstobe
connectedtotheInternet.
TheGPIOpinisapinthatisavailablefromtheRaspberryPi’sprocessorthatenables
interfacinginputandoutputdevicestotheRaspberryPi.Inthissection,wewilltalkabout
settinguptheGPIOforinterfacinganoutputdevice.Thereisa26-pininterface(40in
ModelB+)availableontheRaspberryPiandabout17ofthose26pinsareGPIOpins(26
oftheminModelB+)whiletheothersaremiscellaneouspinssuchaspower.Thepinsare
drivenbya3.3VrailandeachGPIOpinisratedforabout17mAandthetotalcurrent
drawnotexceeding50mA.
Engagethrusters
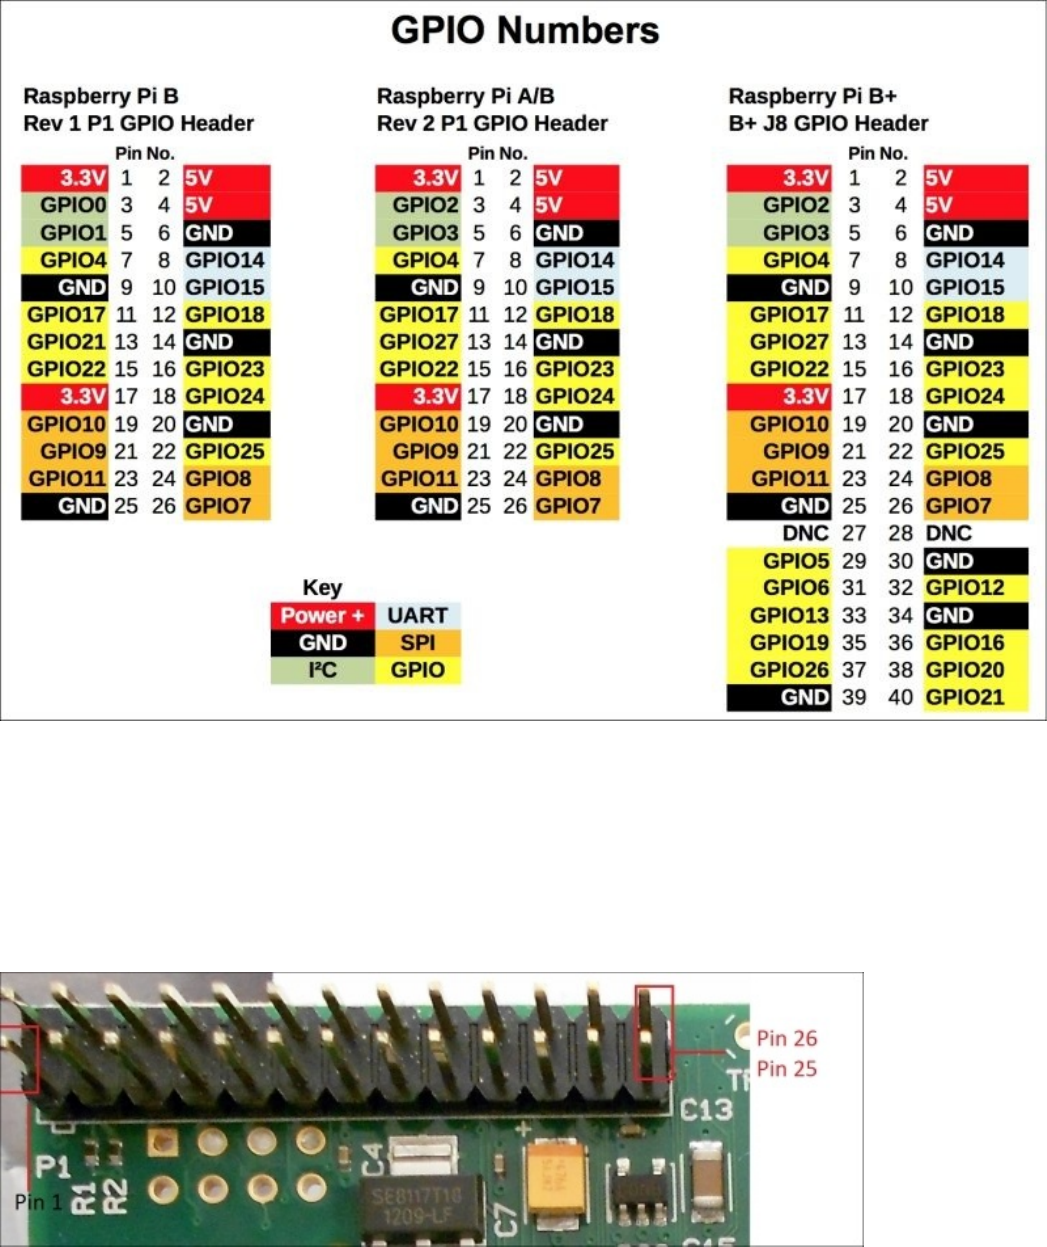
WealsoneedtoknowtheGPIOperipheralsavailabletoconductourexperiment.The
followingfigureshowstheGPIOmapsoftheRaspberryPiRev1andRev2:
GPIOmapforModelsA,B,andB+.(ImagepublishedwithpermissionfromRaspi.tv)
TheletterP1showninthefollowingimagecorrespondstoP1-1oftheGPIOmap.P1-1
correspondstothefirstpinontheleftinthefrontrow,whileP1-2correspondstothefirst
pinontheleftinthebackrow.
TheRaspberryPiGPIOperipheral
Inthisbook,wewillbemostlyusingPythonprogramminglanguage.Pythonisavery
simpleandeasylanguagetolearn.Wemaywanderofftootherprogramminglanguages
fromtimetotime,butwewillmostlysticktoPython.Withthisinmind,let’sgetstarted.
InstallingGPIOlibraries
TherearealotoflibrariesavailabletoaccesstheGPIOperipheral.Theeasiesttoinstall
anduseisthequick2wirepythonAPI.TheAPIisusedtocontroltheGPIOperipherals
andI2CdevicesconnectedtotheRaspberryPi.
Note
TherearedifferentlibrariessuchastheRPi.GPIO,Pi4J,andsoon.Weareusingthe
quick2wireAPIinthisexampleasabeginnermightfinditeasytouse.Youarewelcome
touseotherlibrariesofyourchoice.Thequick2wire-gpio-admintoolenablescontrolling
theGPIOpinswithoutrootaccess.
Onedisadvantageofusingthequick2wiremoduleisthatitprovidesaccessonlytoGPIO
pins0through7.
Theterminalcanbelocatedintheleftcornerofthedesktopandhasbeenhighlightedin
thefollowingscreenshot:
ACommand-lineterminalontheRaspbiandesktop
1. Thequick2wirelibraryinstallationisbasedonapostonthequick2wirewebsite
(http://quick2wire.com/articles/how-to-add-quick2wire-as-a-raspbian-software-
source/).Inordertoinstallthequick2wire-pythonlibrary,therepositoryneedstobe
addedto/etc/apt/sources.list.
Inthecommandline,therepositoryisaddedbyusingthenanotexteditor:
sudonano/etc/apt/sources.list
Thefollowinglinesneedtobeaddedtothefile:
#Quick2WireSoftware
debhttp://dist.quick2wire.com/raspbianwheezymain
deb-srchttp://dist.quick2wire.com/raspbianwheezymain
ThefilecanbesavedbytypingCTRL+X.Thefilecanalsobesavedbypressing
Ykeywhileexitingtheeditor.
Alternatively,thelinescanbeaddedusingagraphicaltexteditorsuchas,
leafpadandsavingit:
sudoleafpad/etc/apt/sources.list
2. Inordertoensurethatthepackagesaredownloadedfromthequick2wirerepository,
weneedtoauthenticatethepackagesusingakeyavailablefromquick2wire:
wgethttps://raw.githubusercontent.com/quick2wire/quick2wire-software-
users/master/software@quick2wire.com.gpg.key
sudoapt-keyadd
software@quick2wire.com.gpg.key
3. Thecacheisupdatedandthelatestsoftwarepackagescanbedownloadedasfollows:
sudoapt-getupdate
sudoapt-getupgrade
4. Thequick2wiretoolisinstalledasfollows:
sudoapt-getinstallquick2wire-gpio-admin
sudoapt-getinstallquick2wire-python3-api
Objectivecomplete–minidebriefing
Now,wasn’tthateasy?Let’sgetmorefamiliarwiththeGPIOinput/outputoperations.
GPIOprogrammingusingPython
Inthissection,wewillensurethatthelibraryiscorrectlyinstalledandaddtheusertothe
group.ThiswillenabletheusertousetheGPIOpinswithouthavingrootprivileges.This
willbefollowedbythesectionongettingstartedwithGPIOcontrolprogrammingin
Python.
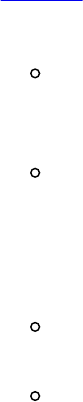
Engagethrusters
InordertogetstartedwithprogrammingintheRaspberryPi,wewilllaunchPython
IDLE3fromthedesktop.
LaunchingIDLE3fromthedesktop
1. Now,wehavetogetstartedwithprogrammingtheLEDblinkingexampleinIDLE3.
2. ThisLEDblinkingsamplecodeisasfollows:
fromtimeimportsleep
fromquick2wire.gpioimportpins,Out
withpins.pin(7,direction=Out)asout_pin:
whileTrue:
out_pin.value=1
sleep(1)
out_pin.value=0
sleep(1)
out_pin.unexport()
3. Wewillimportthesleepclassfromthetimemoduleinthefirstline.Thisisrequired
tointroducea1-seconddelaybetweenturningtheLEDonandoffeveryother
second:
fromtimeimportsleep
4. Wealsoneedthepinclassfromthequick2wireGPIOlibrary:

fromquick2wire.gpioimportPin
5. Weneedtosettheoutputpinthatwewillbeusingintheexample:
LED_output=Pin(8,Pin.Out)
6. Wecansetthepintothelogicalhigh(3.3V)asfollows:
LED_output=1
7. Wewillsetthepintothelogicallow(0V)asfollows:
LED_output=0
8. Wewillexecutethesamethingusinganinfinitewhileloop:
whileTrue:
LED_output=1
sleep(1)
LED_output=0
sleep(1)
9. ThiswillmaketheLEDblinkwitha1-seconddelay.Weshouldalsonotetheindent
ontheblinksequence.Theblinksequencehasadifferentindentcomparedtothe
whileloop.Hence,thecodethatisatadifferentindentisexecutedinfinitely.
10. Whentheprogramisinterrupted(bypressingCTRL+Conthekeyboard),weneed
tounexportthepinsatexit:
out_pin.unexport()
Analternativetoquick2wire–RPi.GPIO
1. AnotheralternativeistouseRPi.GPIO(https://pypi.python.org/pypi/RPi.GPIO).It
comesasastandardpackagealongwiththeRaspbianWheezyOS.Let’sperforma
quickreviewofthecode:
importRPi.GPIOasGPIO
fromtimeimportsleep
GPIO.setmode(GPIO.BCM)
GPIO.setup(8,GPIO.OUT)
GPIO.output(8,GPIO.LOW)
whileTrue:
GPIO.output(8,GPIO.HIGH)
sleep(1)
GPIO.output(8,GPIO.LOW)
sleep(1)
GPIO.cleanup()
2. Afterimportingtherequiredmodules,wegetstartedwithsettingupthepin
numberingmode.Therearetwotypesofpinnumberingmodes,namely:
TheBCMPinnumberingmode:Thepinnumbersarebaseduponthepin

numbersoftheBCMchip.
TheBoardnumberingmode:Thepinnumbersarebaseduponthepin
numbersoftheRaspberryPiGPIOheader.
Inthisexample,wewillsettheBCMnumberingmodeandsetpin8asthe
output:
GPIO.setmode(GPIO.BCM)
GPIO.setup(8,GPIO.OUT)
3. Wecansetthepintologicalhigh(3.3V)asfollows:
GPIO.output(8,GPIO.HIGH)
4. Wecansetthepintologicallow(3.3V)asfollows:
GPIO.output(8,GPIO.LOW)
5. Now,theLEDcanbemadetoblinkwitha1seconddelay:
whileTrue:
GPIO.output(8,GPIO.HIGH)
sleep(1)
GPIO.output(8,GPIO.LOW)
sleep(1)
6. WhentheprogramisinterruptedbytypingCTRL+C,wehavetocleanupand
releaseanyoccupiedGPIOresources:
GPIO.cleanup()
Objectivecomplete–minidebriefing
Inthissection,wefinishedwritingaprogramtomakeanLEDblink.Inthenextsection,
wewillputacircuittogetherthatmakesanLEDblink.
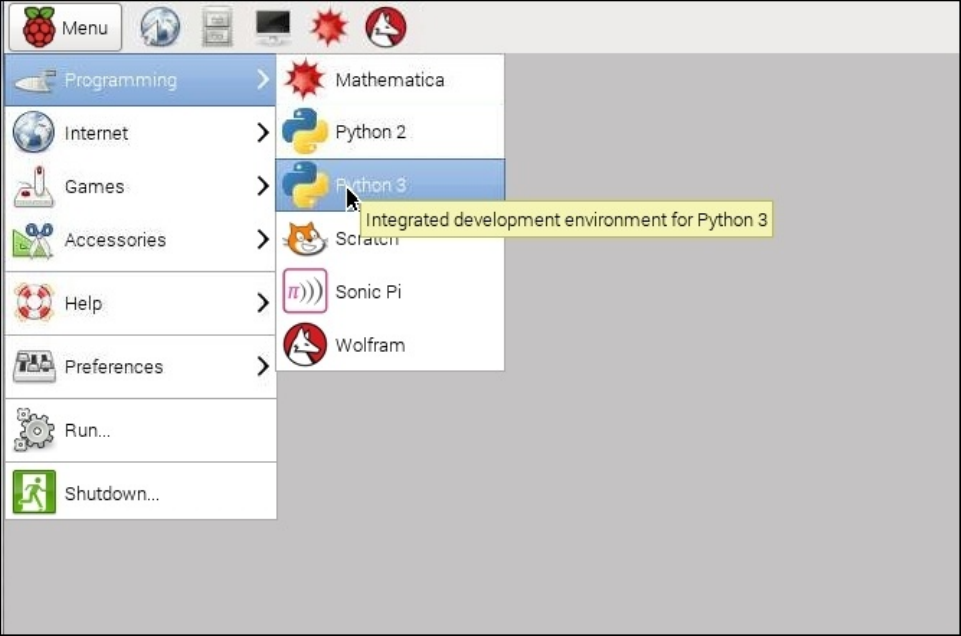
Electricaloutputofourprogram
Intheprevioussection,wewroteaprogramtomakeanLEDblink.Let’slookatthe
electricalconnectiontoobservetheoutputofourprogram.Wewillconnectaresistor
betweentheGPIOpinandtheanodeoftheLED.Wewillconnectthecathodetothe
groundpinoftheRaspberryPi.
Engagethrusters
WewillconnecttheLEDandtheresistortotheGPIOpinandthegroundpin,asshownin
thisimage:
LEDblinkingcircuit
Note
IfwearenotcarefulwiththehandlingoftheRaspberryPiGPIOpins,itmayeither
temporarilyresettheRaspberryPiorsometimesevenpermanentlydamagetheGPIOpin.
ThereareseveraltutorialsinbasicelectronicsavailableovertheWeb.Itisimportantthat
youfamiliarizeyourselfwiththebasicsofelectronics.
Onceweconnectthecircuitasshownintheprecedingimage,wewillbeabletoexecute
theprogramandconcludeourexperiment.
Wecanexecutetheprogrambyrunningthemodule,asshowninthefollowingscreenshot:
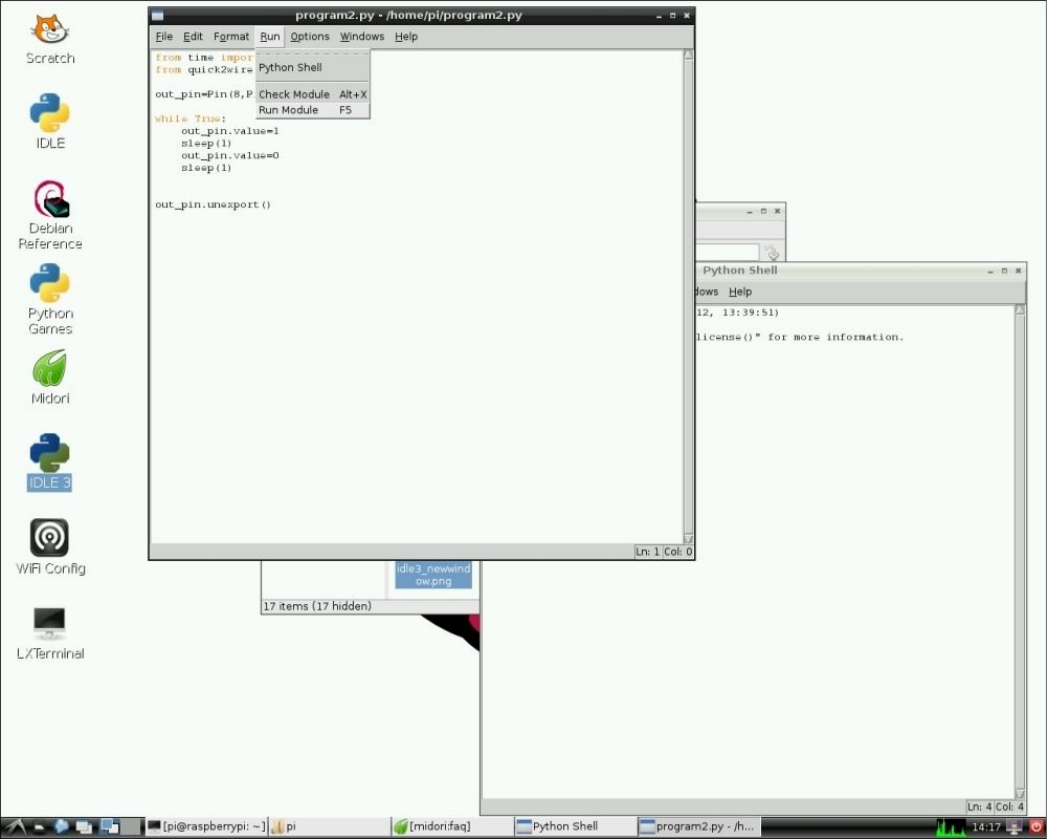
ExecutingthePythonexample
Objectivecomplete–minidebriefing
That’sit!WehavewetourfeetbysayingHelloWorldbyblinkinganLED!Onourwayto
biggerandbetterthings,let’sstopandexaminethePiCrustforamoment.
IntroductiontothePiCrust–aprototypingplatformfortheRaspberry
Pi
NowthatourHelloWorldexampleisdone,wewillleaveyouwithonemorething.
Throughoutthisbook,wewillreviewsomeadd-onhardwaretoaccesstheGPIO
peripheralsontheRaspberryPi.Inthisproject,wewilldiscussthePiCrustboardforthe
RaspberryPi.
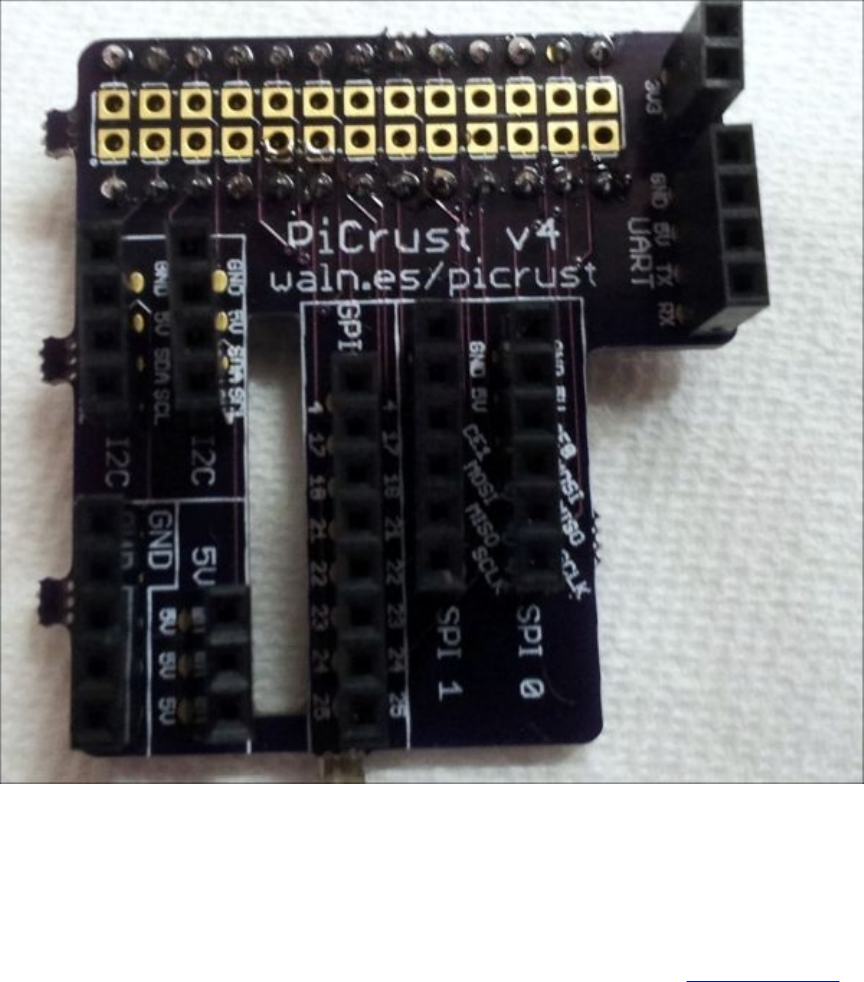
ThePiCrustboardwasdesignedbyJoeWalnes.Itisaboardthatisstackableonthe
RaspberryPiandeliminatestheneedforabreadboardtoprototypecircuits.
APiCrustboard
ThePiCrustisanopensourceadd-onhardwareandcostsapproximately$14tobuildone
ourselves.Thedesigncanbedownloadedfreeofcostfromhttp://picru.st.
So,itisuptoyoutodecidewhetheryouwanttosimplybuyone,buildone,orasweare
pronetoencourage,improveuponitandopensourceitforotherstobenefit!
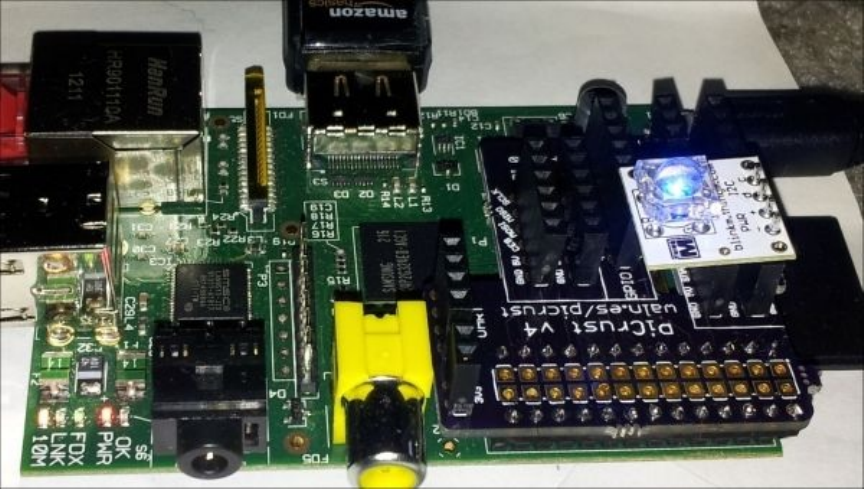
ThemainadvantagebehindPiCrustisthatitisaidsprototyping.Itallowseasyaccessto
theI2Cinterface,SPIinterface,UARTport,andtheGPIOpins.Thefollowingfigure
showsBlinkM—anI2C-drivenRGBLEDmountedontopofthePiCrust.
PiCruststackedontopoftheRaspberryPi
Missionaccomplished
Nowthatyouhavetraveledthisfarwithus,howdoyoufeel?Doyouneedabreak,or
morecoffee?Beforeyoudoeither,let’sreview.
Inthisproject,wegotstartedwiththeLEDblinkingexampleusingtheRaspberryPi.We
discussedthesetupofGPIOperipheralsandusingtheminanexperiment.Youare
welcometocontinueexperimentswiththeGPIOperipheralswithprojectssuchasLED
sequencing,threebitcounter,andsoon.
Intheforthcomingprojects,wewilllookintoI2Ccommunication,SPIcommunication,
andUARTcommunication(serialport).
Hotshotchallenge
Welldone;youhavetaughtyourPitosay“HelloWorld”!However,wearesureyoucan
domore,muchmore.HaveyouwatchedthemovieCloseEncountersoftheThirdKind?
Well,ifnot,youshould.However,thisisnotachallengeinitself.Inthemovie,thehuman
beingsattemptatcommunicationwithwhattheybelieveisaliensbybuildingapatternof
lightsthataresettomusic.CanyoumakeapatternofLEDsrepeatthatorsomething
similar?

Chapter2.ARaspberryWebIDE
Example
Inthisproject,wewilllearnhowtodevelopprojectsusingtheWebIDEfromAdafruit
Industries.WewillflashanSDcardwiththeRaspbianOS,installtheOccidentalistool
(https://learn.adafruit.com/adafruit-raspberry-pi-educational-linux-distro/occidentalis-v0-
dot-3),setuptheweb-baseddevelopmenttool,andtestthesetupusinganexample.
Note
OccidentaliswasinitiallyavailableasaRaspbianOSimagebyAdafruitIndustries.It
comprisedofthetoolsetthatenabledtogetstartedwithprojectdevelopmentusingthe
RaspberryPi.TheOSimagewasdeprecatedandreleasedafterwefinishedwritingthe
book.Wehavetakenourbestefforttoupdatethebook.Pleaserefertothisbook’swebsite
formoreinformation.
Missionbriefing
Inthisproject,wewilldiscussinstallingatool,Occidentalis,andaWebIDEthatenables
programminginthePythonlanguageontheRaspberryPi.Wewillalsodiscussone
examplefromtheAdafruitrepositoryandanotherexampleofdrivinganRGBLED.
Thefollowingtableliststhebillofmaterialsusedinthisproject.Thesearejustexamples,
andalternativeproductsthathaveasimilarspecificationmayalsobeused.
Item EstimatedCost
RaspberryPiModelB 35USD
AdafruitCobbler(https://www.adafruit.com/product/914) 7USD
Adafruit7-segmentLEDBackpack(https://www.adafruit.com/product/879) 10USD
Blinkm(https://www.sparkfun.com/products/8579) 13USD

Whyisitawesome?
TheAdafruitWebIDEincombinationwiththeOccidentalisoperatingsystemenables
developmentinthePythonlanguageonaRaspberryPiusingjustawebbrowser.Italso
enablesaccesstosampleprojectsdevelopedbyAdafruitviaBitbucket,asourcecontrol
tool.(IfyouarenotfamiliarwithsourcecontroltoolssuchasBitbucket,Git,andsoon,
theexamplesinthisprojectareagreatwaytogetstarted!)TheAdafruitWebIDEisatool
developedforhobbyistsandcomeswithexamplesfortechniquessuchaspulse-width
modulation(usedinlightingsystemcontrol)andI2Ccommunication,andalsoprovides
examplesforcontrollingproductsfromAdafruit.
Note
TheAdafruitWebIDEisnowabetareleaseanditmaynotworksuccessfullyacross
differentplatforms.TheAdafruitlearningsystemhasindicatedthatthisdevelopmenttool
wasdirectedtowardsadvancedhobbyists.Wehavetakenourbesteffortstoexplainitas
simplyaspossible.
Pulse-widthmodulationisatechniqueusedwidelyinmotorcontrol,lightingsystems,and
soon.Itisatechniquewheretheaveragevoltageappliedtoadeviceisvariedbychanging
thewidthofthepulse.Thereareseveraltutorialsonpulse-widthmodulation
(https://learn.sparkfun.com/tutorials/pulse-width-modulation)availableallovertheWeb.
I2Ccommunication(https://learn.sparkfun.com/tutorials/i2c)isaformofserial
communicationinterfaceusedtoconnectmultipleslavedevices(usuallysensors)witha
masterdevice(RaspberryPioramicrocontroller)throughacommoninterface.

YourHotshotobjectives
Inthisproject,wewilldiscussthefollowingfeatures:
BootstrappingyourRaspberryPibyinstallingOccidentalis
SetupofremoteloginintotheRaspberryPi
InstallationoftheRaspberryPiWebIDE
PythondevelopmentontheWebIDE
TestanddebuggingexamplesusingtheWebIDE
Note
ThisprojectshouldnotbeconsideredasanattempttopromoteAdafruitIndustriesor
theirproductsdevelopedfortheirplatform.Thisprojectmerelydemonstrates
simplificationofdevelopmentontheRaspberryPiusingatoolfromAdafruit
Industries.

Missionchecklist
Inordertogetstarted,thefirststepistoinstalltheOccidentalisdistro,whichisa
derivativeoftheRaspbianoperatingsystem.
Thethingsrequiredtogetstartedareasfollows:
A4GBSDcardflashedwiththeRaspbianOS
AnOccidentalisimage.
AnEthernetcable
Installation,features,andusageofthe
Occidentalisoperatingsystemfrom
Adafruit
ThefirststepisinstallingOccidentalisontheRaspberryPi.


Engagethrusters
1. YoucanfinddetailedinstructionsoninstallingtheOccidentalistoolat
https://github.com/adafruit/Adafruit-Pi-Finder.
2. Alternatively,astep-by-stepinstructionisalsoavailableonthisbook’swebsite.We
cannotincludethemheresincechangesweremadetoOccidentalisinstallation
processafterwefinishedwritingthisbook.
Objectivecomplete–minidebriefing
Oncetheinstallationiscomplete,wehavetoensurethattheRaspberryPiaswellasthe
developmentmachineareconnectedtothenetworkviatheEthernetportoraUSBWi-Fi
dongle.

SetupofaremoteloginintotheRaspberry
Pi
Inthissection,wewillremotelylogintotheRaspberryPiusingasecureshell.Sincethe
RaspberryPicomeswithsshdenabled,itispossibletologinremotelyusingthelocal
name,raspberrypi.local(Duringthebootstrappingprocess,theavahi-daemontoolis
installedandhence,itispossibletoremotelylogintotheRaspberryPiusingthelocal
name,raspberrypi.local).Alternatively,onaWindowsmachine,youcanuseatool
suchasAdvancedIPScanner(http://www.advanced-ip-scanner.com/)tofindtheIP
addressoftheRaspberryPi.Asnapshotofthistoolisshownlaterinthisproject.
Note
IfyouareusingaWindowsmachine,theBonjourPrintServicesdrivershavetobe
installedtoremotelyloginusingthelocalname,raspberrypi.local.TheBonjourPrint
Servicesdriversareavailablefromhttp://support.apple.com/kb/DL999.
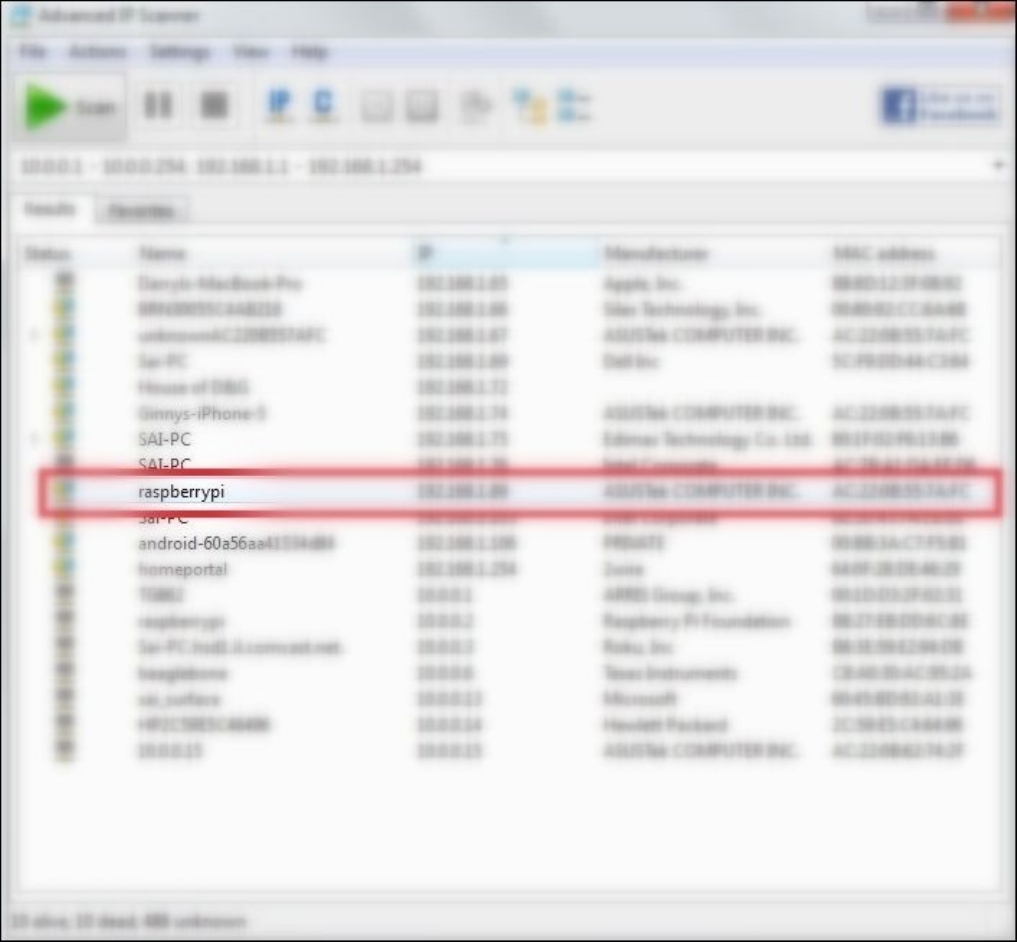
Prepareforliftoff
TheIPaddressoftheRaspberryPicanbeidentifiedusingtoolssuchasAdvancedIP
Scanner,asshowninthefollowingscreenshot:
AlistofdevicesandIPaddressesconnectedtoanetworksimilartotheRaspberryPi
Engagethrusters
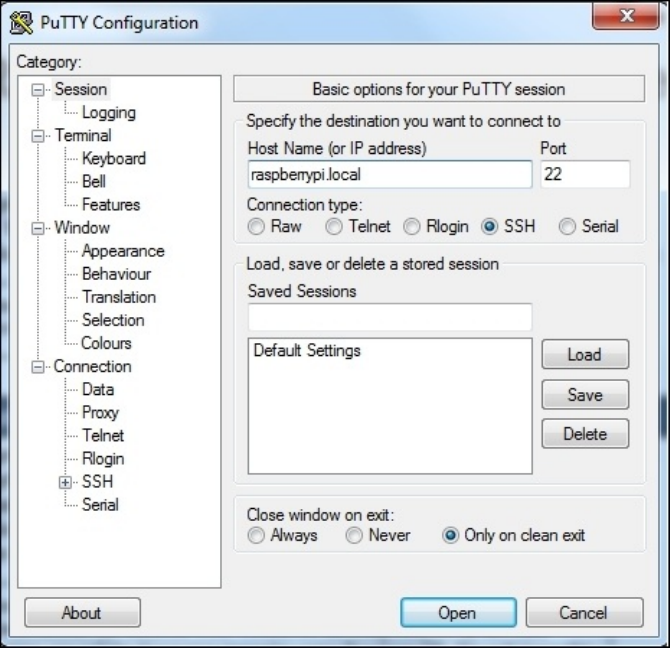
1. OnceweknowtheIPaddress,weuseanSSHclientsuchasPuTTYonWindowsora
command-lineterminalonaLinuxoraMacmachinetoremotelylogintothe
machine(inthiscase,weshowthisonaWindowsmachine).
2. OnaWindowsmachine,weeitherusetheIPaddressoftheRaspberryPioritslocal
name(raspberrypi.local)andlogintotheRaspberryPi,asshowninthefollowing
screenshot:
3. OnceweentertheIPaddress/localnameinthePuTTywindow,weloginas
follows:
loginas:pi
<username>@<ipaddress>'spassword:raspberry
Alternatively,wecanalsologinusingtheIPaddressoftheRaspberryPiinsteadof
thelocalname,raspberrypi.local.
Objectivecomplete–minidebriefing
Iftheusernameandpasswordareenteredcorrectly,weshouldbeabletoremotelylogin
totheRaspberryPitoinstallthewebserver.

InstallationoftheRaspberryPiWebIDE
WewillgetstartedbyusingaremoteloginclientsuchasPuTTYtoremotelylogintothe
RaspberryPiandinstalltheAdafruitWebIDE.Inordertogetstartedwithexamplesfrom
theAdafruitrepository,weneedaBitbucketaccount,andAdafruitprovidesdetailed
instructionsforthisathttp://learn.adafruit.com/webide/getting-started.
Engagethrusters
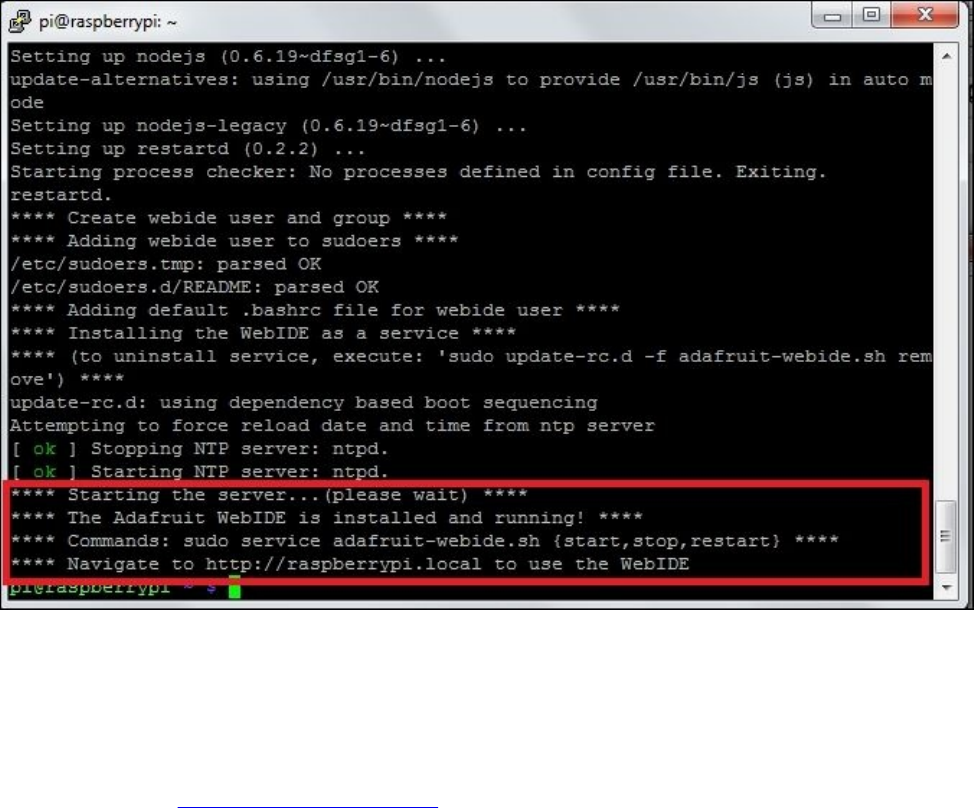
1. Oncewehaveloggedin,theAdafruitlearningsystem’swebsiterecommends
executingthefollowingtoinstallthewebserver:
curlhttps://raw.githubusercontent.com/adafruit/Adafruit-
WebIDE/master/scripts/install.sh|sudosh
2. Itshouldtakeaboutfiveminutestofinishtheinstallation.Iftheinstallationwas
successful,weshouldbeabletoseethemessagemarkedinthefollowingscreenshot:
SuccessfulcompletionoftheAdafruitWebIDEinstallation
3. Assumingtheinstallationwassuccessful,weshouldbeabletolaunchtheAdafruit
WebIDEusinghttp://raspberrypi.local.
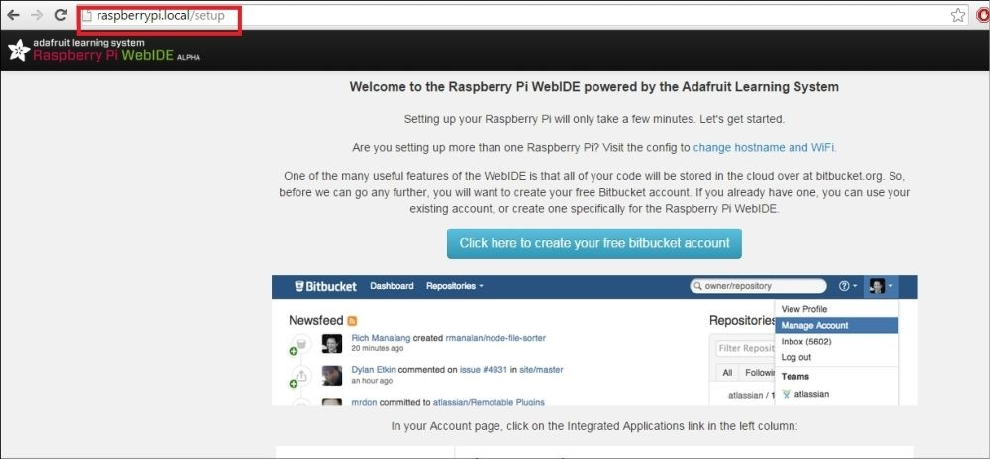
AdafruitWebIDElaunchedforthefirsttime
4. InordertomakeuseoftheexamplesfromAdafruitIndustries,weneedtocreatea
Bitbucketaccount(itispossibletocreateonewithaGoogleaccount)andintegrate
theWebIDEwiththeBitbucketaccount.Theinstructionsforthisareprovidedonthe
webpage,asshownintheprecedingscreenshot.
Objectivecomplete–minidebriefing
Iftheinstallationwassuccessful,aftercompletionoftheregistration,wearedonewith
thistask.Let’smoveonandlearntocodeusingtheWebIDE!
PythondevelopmentontheWebIDE
Inthissection,wewillusea7-segmentLEDbackpackandtheAdafruitCobbleralong
witha26-pinribboncable.WewilltestanexamplefromtheAdafruitrepository
(https://github.com/adafruit/Adafruit-Raspberry-Pi-Python-Code).Inthisproject,thenew
add-onhardwarethatwewilldiscussistheAdafruitCobbler.TheCobblerisasmall
boardthataidsprototypingcircuitsonabreadboard.TheAdafruitCobblercostsabout7
USDwhiletheribboncablecostsabout3USDandthe7-segmentbackpackcostsabout
10USD.
Note
TheearliermentionedproductsaremerelyexamplestodemonstratetheAdafruitWebIDE.
Therearealternativeprototypingplatformsandproductsavailableforahigherorlower
price.
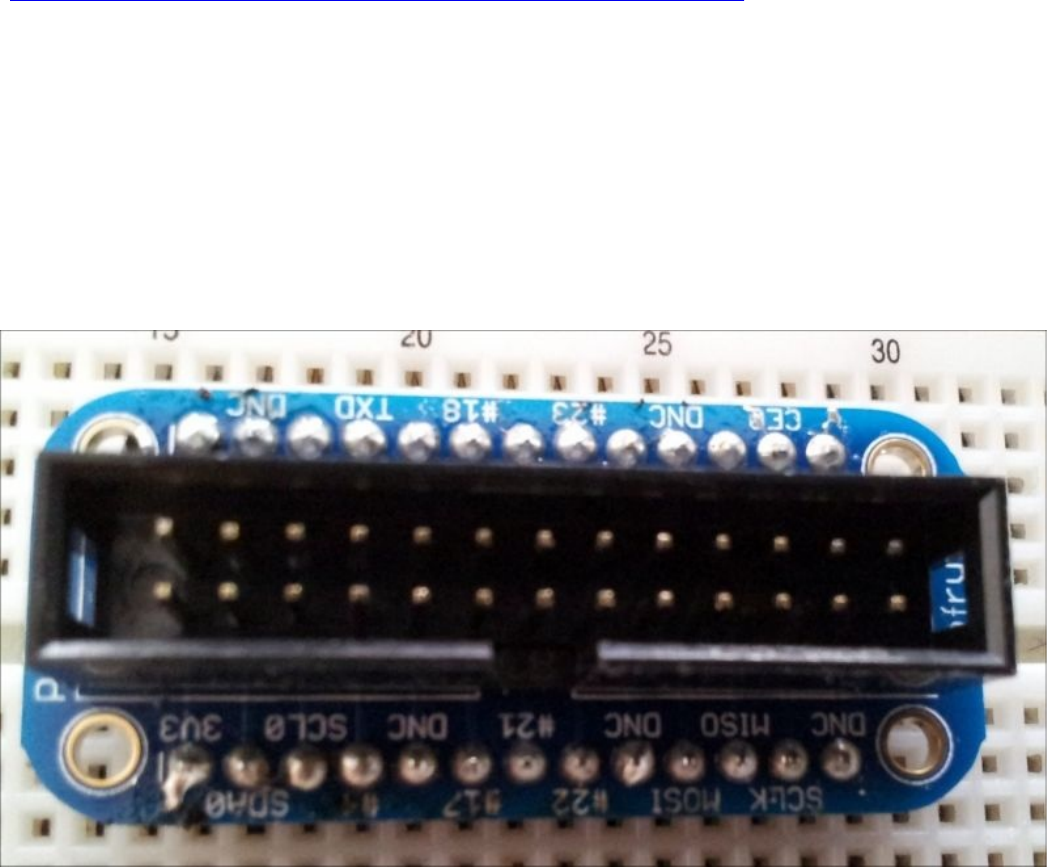
TheCobblermountedonabreadboard

Prepareforliftoff
Inordertogetstartedwiththeprototyping,the26-pinribboncableisusedtoconnectthe
GPIOinterfacetotheCobbler,asshowninthefollowingimage.Wehavetoensurethat
pin1oftheGPIOheadermatchespin1oftheAdafruitCobbler.(TheCobblercomeswith
ashroudedheader,andhenceitisfoolproof.However,pin1oftheRaspberryPineedsto
bematchedcorrectly.)
QuickintroductiontotheI2Cinterface
TheI2CinterfacewasinventedbyPhillipsSemiconductors.Itisaformofserial
communicationinterfaceusedtoconnectmultipleslavedevices(usuallysensors)witha
masterdevice(RaspberryPioramicrocontroller)throughacommoninterface.Each
devicehasauniqueaddressthatisusedbythemastertoreadorwritedata.Thereare
plentyofresourcesavailabletofamiliarizeourselveswiththeI2Cinterface.Wewillmove
ontothenextstageofconfiguringtheinterface.
ConfiguringtheI2CinterfaceontheRaspberryPi
IntheOccidentalisdistribution,theI2Cdriversareinstalledandenabledbydefault.
Hence,wecangetstartedbyconnectingtheAdafruit7-segmentbackpacktotheAdafruit
Cobbler,asshowninthefollowingimage.(ConnectionsbetweentheCobblerandthe7-
segmentbackpackareClockpin,SCL(C)-SCL(B)DataPin-SDA(C)-SDA(B),3V3(C)
to+(B)GND(C)to-(B),whereCistheCobblerandBisthebackpack):
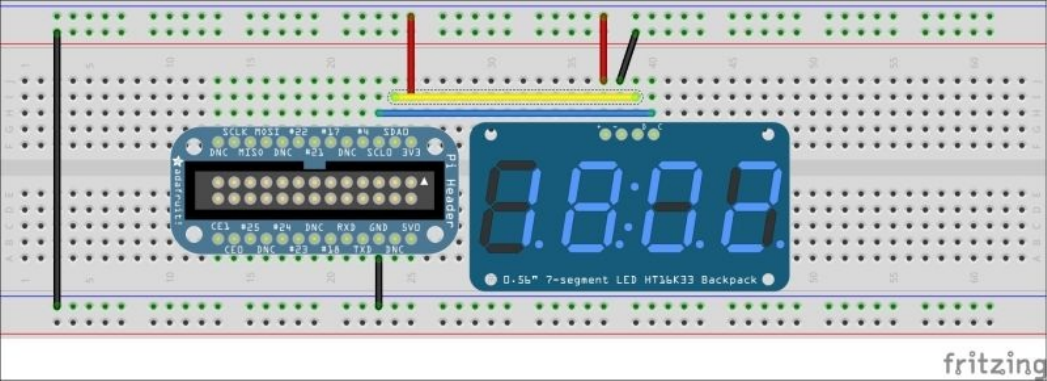
7-segmentbackpackconnectionsonabreadboard
NowthatwehaveconnectedtheRaspberryPi,theAdafruitCobbler,andthe7-segment
backpack,let’sgetstartedwiththedetectionofthebackpackontheRaspberryPi’sI2C
interfaceandprogramanexample.
Beforewegetstartedwiththeexample,weneedtodeterminetheI2Cbustowhichthe
deviceisconnectedbyusingthefollowingcommand:
sudoi2cdetect–y0
Thecommandoutputsatablethatcontainsthelistofdevicesforthatparticularbus.Since
therearenodevicesconnectedtobus0,wescanfordevicesonbus1.Inthisexperiment,
wearetestingtheAdafruit7-segmentbackpack.Inthefigurethatfollows,the7-segment
backpackisconnectedtobus1andthedeviceaddressis0x70.Refertothefollowing
screenshot:
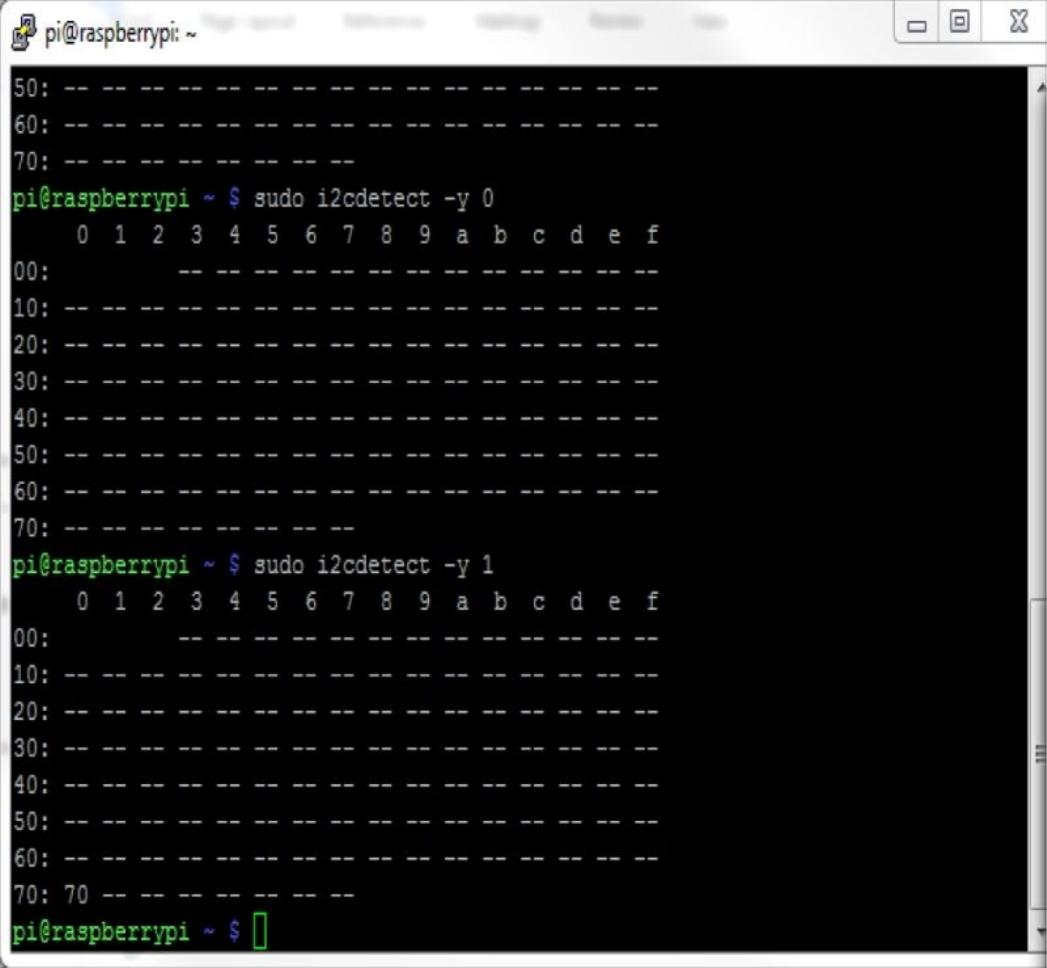
Thei2cdetectoutput
Weshouldchangethebusaddressinthecodetodrivethe7-segmentbackpack.Line11in
theAdafruit_I2C.pyfileneedstobechangedinthecodeaccordingtothebustowhich
thedeviceisconnected.Hence,line11shouldbe:
def__init__(self,address,bus=smbus.SMBus(1),debug=False):
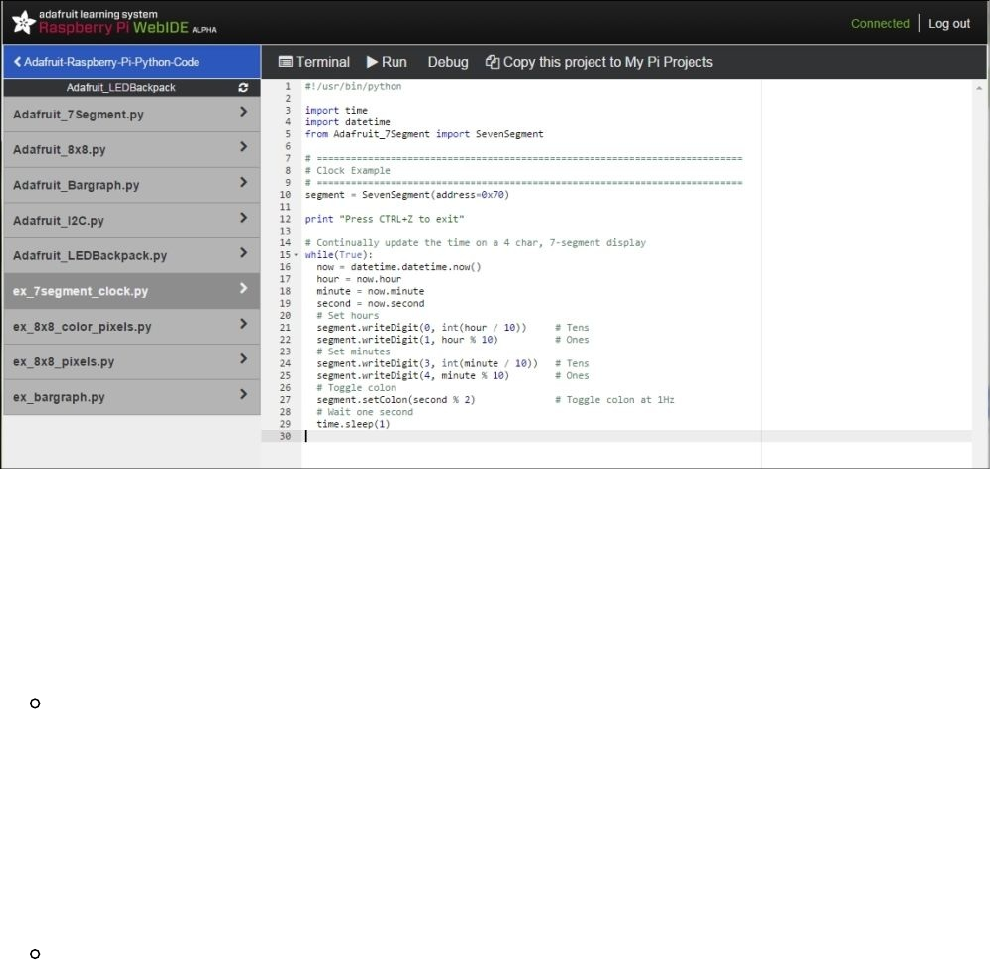
Engagethrusters
1. The7-segmentbackpackisadevicecontrolledviaanI2Cport.AnyI2Cdevicehas
fourpins,namelyclock,data,powersupply,andground.TheI2Cdeviceneedstobe
connectedtotheCobbler,asshownintheearlierscreenshot.
2. ThereareseveralexamplesavailablefromAdafruitintheWebIDE.Let’slocatethe
ex_7segment_clock.pyexample(intheIDE,itislocatedatAdafruit_Raspberry-
Pi-Python-Code|ex_7segment_clock.py).Thisisasimpleexampletodisplaythe
currenttimeonthe7-segmentbackpack:
Theex_7segment_clock.pyfilelocationintheWebIDE
3. Let’sdoaquickreviewoftheprogram.Wegetstartedbyimportingthedatetime
andAdafruit_7Segmentmodules:
ThesegmentvariableisinitializedasaninstanceofanI2Cdeviceattheaddress
0x70.Weenteraninfiniteloopandgetthecurrenttimeusingthedatetime
module:
now=datetime.datetime.now()
hour=now.hour
minute=now.minute
second=now.second
Sincethe7-segmentLEDbackpackconsistsoffourdigits,wewritethecurrent
timeateachpositionasfollowsalongwithacolon:
#Sethours
segment.writeDigit(0,int(hour/10))#Tens
segment.writeDigit(1,hour%10)#Ones
#Setminutes
segment.writeDigit(3,int(minute/10))#Tens
segment.writeDigit(4,minute%10)#Ones

#Togglecolon
segment.setColon(second%2)#Togglecolonat1Hz
#Waitonesecond
Thisexerciseisrepeatedwithaonesecondinterval.
4. TheprogramisexecutedbyclickingonRunfoundintheIDE.Ifourconnections
wereright,weshouldbeabletoseethecurrenttimeonthe7-segmentdisplay
(showninthefollowingfigure).
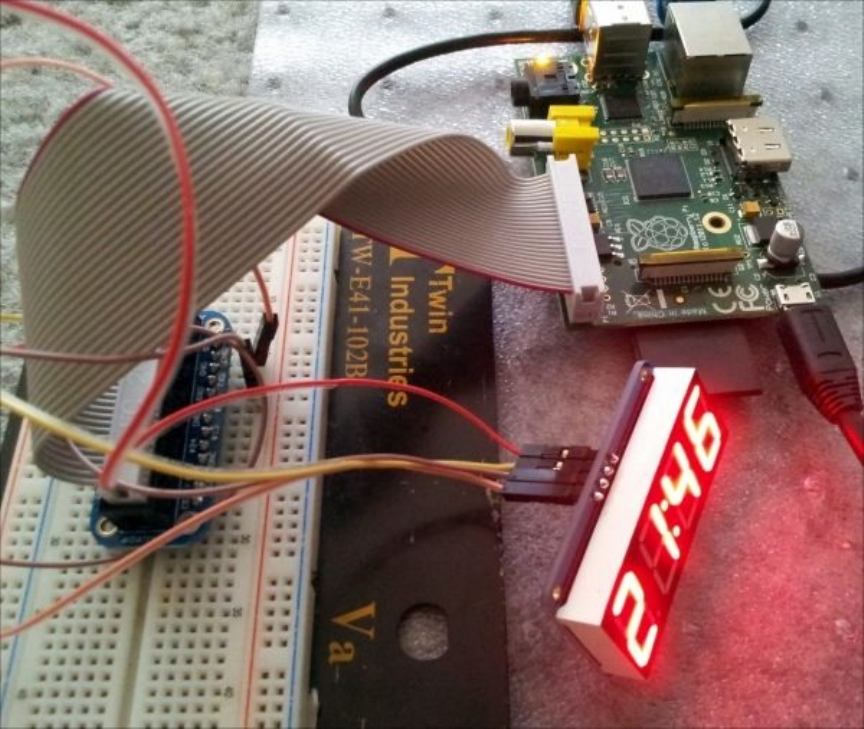
Objectivecomplete–minidebriefing
WewereabletotestanAdafruitproductusingtheirWebIDEinthissection.
A7-segmentbackpackconnectedtotheCobbler
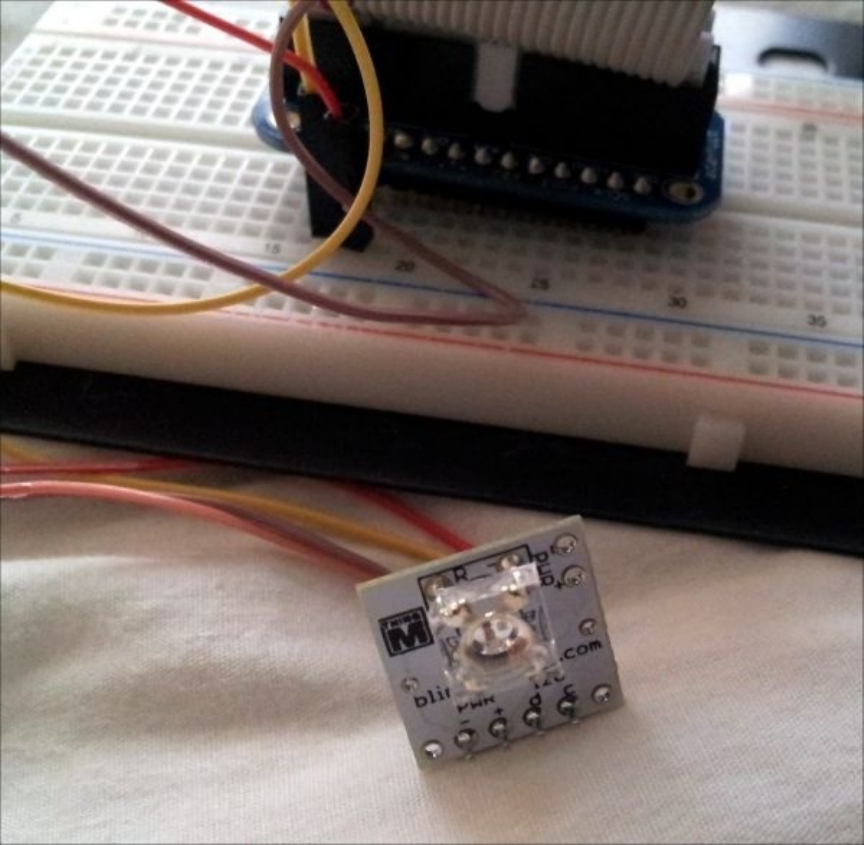
Testanddebuggingexamplesusingthe
WebIDE
Inthisexample,wewillconnecttheBlinkMtotheRaspberryPi.ABlinkMisanRGB
LEDthatcanbeconnectedtoyourRaspberryPiviatheI2Cinterface.Itispossibleto
executelightscriptsusingtheport.TheconnectionstotheBlinkMaresimilartothatof
the7-segmentbackpack.
BlinkMconnectedtotheCobbler
Note
ItisimportanttopayattentionwhileconnectingdevicestotheGPIOheaderofthe
RaspberryPi.IftherearedevicesthatdrawalotofcurrentfromtheGPIOpins,itmay
resetthePiorpermanentlydamageitintheeventofashortcircuit.Itisassumedthatyou
arefamiliarwithbasicelectronicsandcapableofhandlingsuchdevices.
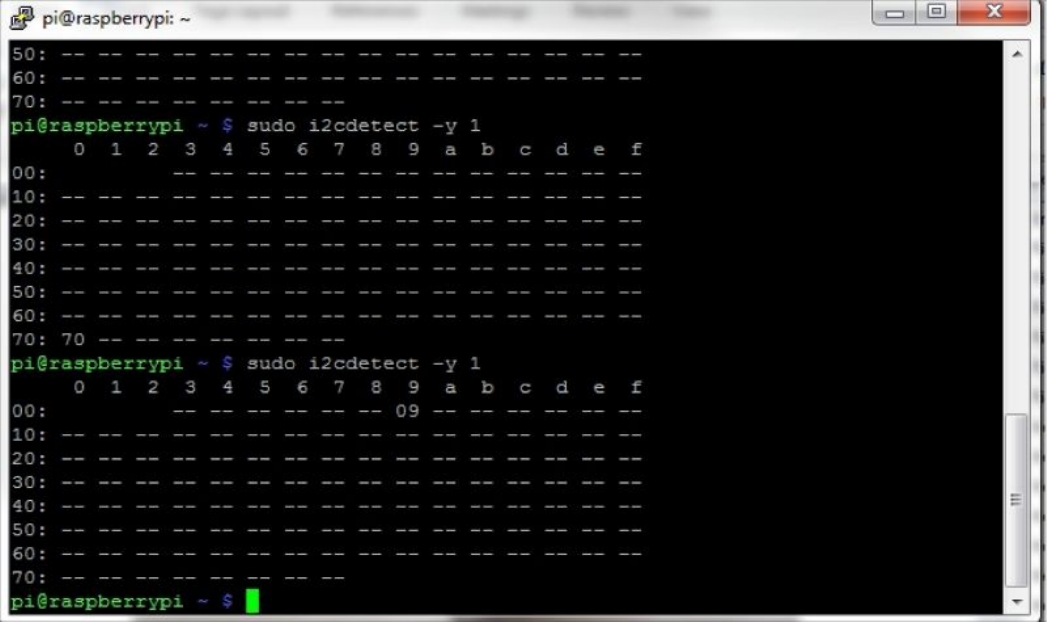
Prepareforliftoff
Similartothepreviousexperiment,weneedtodeterminethebustowhichthedeviceis
connectedusingthei2cdetectcommand.Asshowninthefollowingscreenshot,the
deviceisconnectedtobus1andthedeviceaddressis0x09:
Blinkmconnectedtobus1

Engagethrusters
1. TheBlinkMdatasheet
(thingm.com/fileadmin/thingm/downloads/BlinkM_datasheet.pdf)providesstep-by-
stepinformationtoexecutethelightscripts.
2. AlistofscriptsavailableontheBlinkMisshowninthefollowingscreenshot:
AlistofscriptsavailableontheBlinkM
3. Let’sseethecodetoexecutealightscript(forexample,scriptnumber6)onthe
BlinkMusingtheAdafruitWebIDEinterface.Inordertoexecuteascriptforever,the
datasheetmentionsthatthefollowingcharactersshouldbewrittenattheI2Cdevice
addressinthefollowingsequence:'p',<scriptno>,0,0.Let’sdiscusshowto
executethisusingaPythonscriptontheRaspberryPiinterfacedwiththeBlinkM
LED.ThePythonscriptofthisexampleiscalledPlay_blinkm.py:
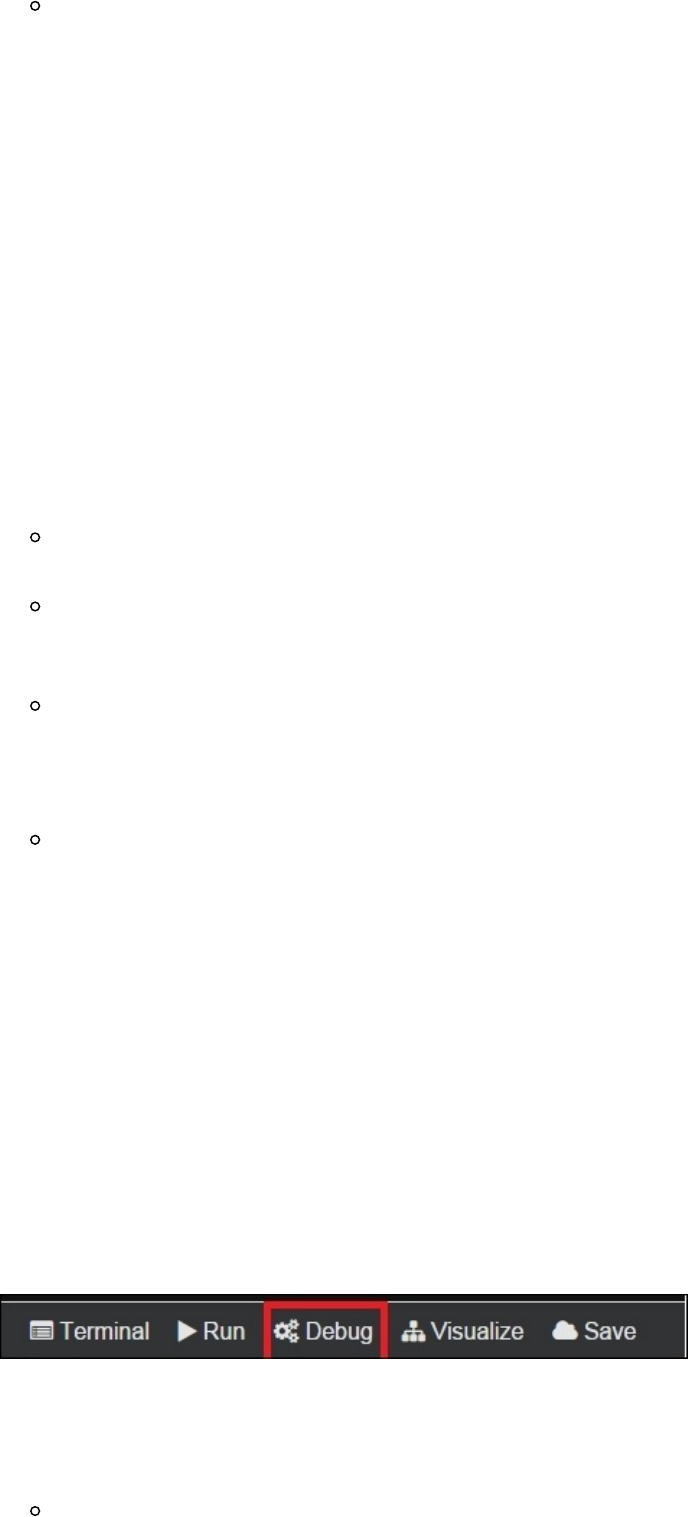
ThePlay_blinkm.pyfilecanbeexecutedbycreatinganewfileinthe
repositorythatwascreatedwhenyousignedupforaBitbucketaccount.When
thefileissaved,thechangesaresavedtoyourBitbucketaccount.Thecodefor
thisisgivenasfollows:
#!/usr/bin/python
#python-smbus
importsmbus
#createi2cobject
bus=smbus.SMBus(1)
#refertodatasheetforscriptsequence
#Playscriptbywriting0x70orponthebus
bus.write_byte(0x09,0x70)
#playscriptno:6
bus.write_byte(0x09,0x06)
#playthescriptinfinitely
bus.write_byte(0x09,0x00)
bus.write_byte(0x09,0x00)
Thefirstlineofthiscodeiscalledshebang.Itindicatesthatthescripthastobe
executedusingPython.
Weneedtoimportpython-smbustoexecutethelightscript:
importsmbus
WeneedtocreateanobjectforI2Ccommunication.Weneedtowritethe
controlscriptviabus1.Thisisdonebythefollowinglineofcode:
bus=smbus.SMBus(1)
Inordertoplayascript(scriptnumber6inthiscase)forever,wewrite'p',
<scriptno>,0,0ontheI2Cbusasfollows:
bus.write_byte(0x09,0x70)
bus.write_byte(0x09,0x06)
bus.write_byte(0x09,0x00)
bus.write_byte(0x09,0x00)
4. ThiswouldcausetheBlinkMtoexecutescriptnumber6aslongasthedeviceis
poweredanduntilanotherinstructionhasbeenissuedtothedevicethroughtheI2C
interface.
5. Now,itispossibletodebugourprogrambyexecutingitstepbystep.Thishelps
identifyanyproblemswiththeprogram.Let’sreviewsomeoptionstodebuga
program.Wecanlaunchtheprogramfortroubleshooting/debuggingbyclickingon
Debug.
TheAdafruitWebIDEtoolbar
Thisopensuptwoconsoles,DebugOutputandDebugVariables(shownin

thefollowingscreenshot).ThewindowDebugOutputprintsanyoutputofthe
program.Ifweincludedanyprintstatementsinourprogram,theoutputis
displayedinthiswindow.Thiswindowcanbeusedtoviewanyresults,ensure
thataparticularcallbackfunctionwasexecuted,ordeterminewhetherthe
programexecutiongotpastaparticularlineoftheprogram.
TheDebugVariableswindowdisplaysthestateofvariablesastheprogramis
beingexecuted.BoththewindowsarehelpfulindeterminingwhetheraPython
scriptwaswrittenasintended.
Debugterminals
WhenwestartdebuggingaPythonscript,thetoolbaratthetoppresentsuswith
twooptions,namelyStepOverandStepIn,asshowninthefollowing
screenshot:
TheAdafruitdebugtoolbar
Inthisexample,itispossibletotesttheexecutionofcommandsbystepping
througheachlineofthescript.Thisisreallyusefulwhendevices(forexample,
apressuresensor)arenotprovidingtheintendedoutputtoidentifytheroot
cause.
Objectivecomplete–minidebriefing
Inthissection,weinterfacedandcontrolledanRGBLEDusinganI2Cinterfaceand
discussedsomeoptionsavailablefordebuggingintheAdafruitWebIDE.
TheAdafruitWebIDEcanconsiderablyreducetheturnaroundtimeforanyproject
developmentactivity.
Missionaccomplished
Inthisproject,weworkedontwosimpleexperimentsusingtheI2Cinterfaceonthe
RaspberryPi.ThetwoexamplesdiscussedusingtheAdafruitWebIDEreflectthefactthat
thetoolcanhelpsavetimeforanyelectronicsprojectinvolvingaRaspberryPisinceit
comeswithsomeoftheprerequisitesinstalledalongwithawebinterfacethatjustmakes
remotedevelopmenteasier.
WehopethatyouhadfuntakingtheOccidentalisdistributionforatestdriveandfindit
usefulinyourprojects.
Hotshotchallenge
Inthisproject,weusedtwodifferenttypesofI2Cdevices,thatis,anLEDbackpackand
anRGBLED.ItispossibletoconnectmultipleI2Cdevicestothesameinterface.How
canthisbeachieved?HowcanweidentifytheaddressesoftheseI2Cinterface-enabled
devicesandcontrolthem?

Chapter3.TheArduinoRaspberryPi
Interface
Inthisproject,wewilllookintointerfacingtheRaspberryPitotheArduino
microcontrollerdevelopmentplatform.Arduino(www.arduino.cc)isapopular
microcontrollerplatformthatiswidelyusedtoprototypedifferentprojects.Wewill
discussinstallationoftheArduinodevelopmentenvironmentanddiscussanexampleof
itsusage.
RaspberryPiandArduinohavebecomepopularplatformsamonghobbyists,anditis
beingwidelyusedbypeoplefromdifferentbackgrounds,includingschoolanduniversity
students,artists,andengineers.ThisprojectexplainshowtheRaspberryPicanbeusedin
combinationwithArduino.
Note
TheRaspberryPicomeswithaGPIOpinsetthatisquitecapableofinterfacingand
controldevices.WewouldliketodiscusstheArduinoRaspberryPiinterfacebecauseyou
mayhaveprojectsthatwereoriginallybuiltusinganArduino,especiallyinscenarios
wherearemotefirmwareupdateneedstobeperformedontheArduinoplatformusingthe
RaspberryPi.Thisprojectpresentstheoptionsofenhancingthecapabilitiesofthe
ArduinomicrocontrollerusingaRaspberryPi.

Missionbriefing
Inthefirstpartoftheproject,wewilldiscussprogrammingtheArduinoforthefirsttime,
andinthesecondhalf,wewilllookintothecontrolofaWeasleyweatherclock.Wewill
alsolookintotheRaspberryPiAlaMode,stackableadd-onarduinohardware
(http://wyolum.com/projects/alamode/).
Whyisitawesome?
ArduinoisanopensourcemicrocontrollerdevelopmentplatformbasedontheAtmel
seriesofmicrocontrollers.Ithasbroughtengineers,artists,andstudentstothesametable.
Theprogramminginterface(programsarewritteninC/C++usually)issosimpleandthis
wasthesolereasonthatmadetheplatformsopopular.Hence,itiswidelyusedfor
prototypinginproductdevelopment.
Overtheyears,therehavebeenseveralhardwareadd-onsthataidedinhardware
developmentusingtheArduino.Someoftheseadd-onscanbestackedontopofthe
Arduinodevelopmentplatform,andtheyarecommonlyreferredtoasshields.Thereare
shieldsformedicaldevices,interfacingsensors,GPSunits,andactuatorssuchasstepper
motors,servomotors,andsoon.Theecosystemofthegadgetsthatarebuiltaroundthe
Arduinoissovastthatthemicrocontrollerplatformwaslaunchedintothestratosphere
alongwithaheliumballoon.
WherecanyoubuyanArduino?
SincetheArduinoisanopensourcemicrocontrollerboard,therearemanyresellersforthe
product.ThebasicversionoftheArduinoistheArduinoUnoandcostsabout$29.95.
Arduino-relatedproductsaresoldatwebsitessuchasSparkfun,Adafruit,andSeeed
Studio.

YourHotshotobjectives
Inthisproject,wewilldothefollowing:
InstalltheArduinoIDE
ProgramtheArduinousingtheRaspberryPi
RaspberryPiAlaMode(oranyotherArduinodevelopmentboard)
IntroductiontoWeasleyWeatherClockandBillofMaterials
ControlthestepperusingtheArduino
ControltheRGBLEDStripusingtheArduino
I2CCommunicationusingtheArduino(optional)
SerialportcommunicationwiththeRaspberryPi
Missionchecklist
WeneedaRaspberryPialongwithanSDcardflashedwiththeRaspbianOS,amicro
USBpowercable,displaysetup,andanArduinotogetstarted.Inthelatersectionofthis
project,wewillneedsomeadditionalhardwaresuchasRGBLEDStrips,motors,wires,
andsoon.
InstallingtheArduinoIDE
Inthissection,wewillinstalltheArduinoIDEontheRaspberryPi.
Prepareforliftoff
AnArduinomicrocontrollerdevelopmentplatform(anyvariantthatcouldbeprogrammed
usingtheArduinoIDEisfine)isabsolutelyessentialforthissectionoftheproject.
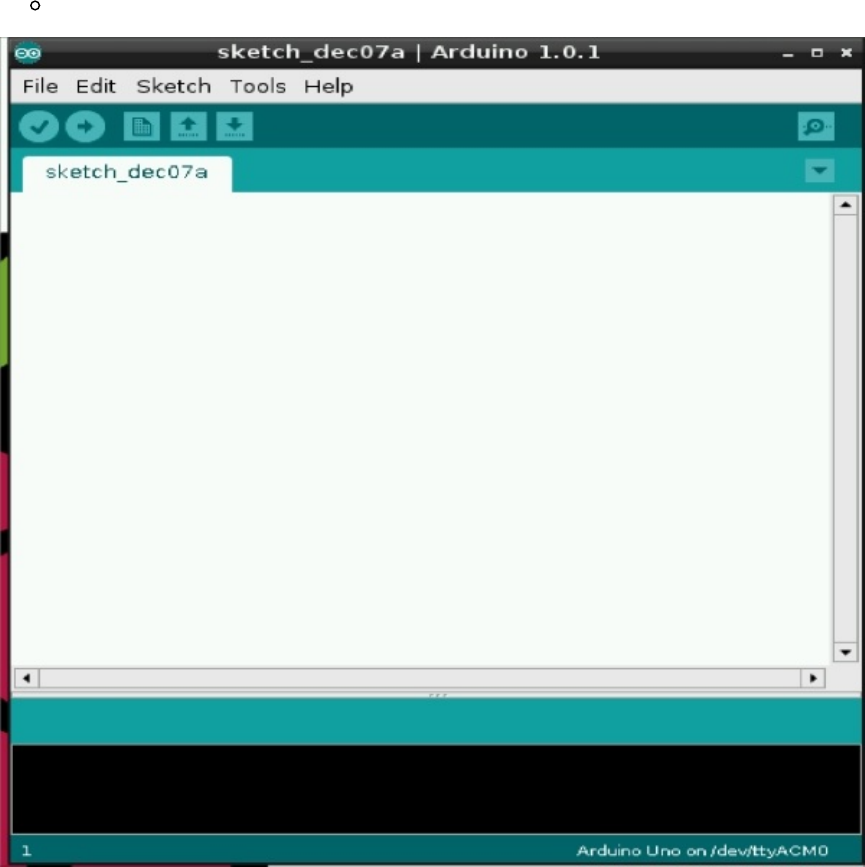
Engagethrusters
1. TheIDEcouldbeinstalledbyexecutingthefollowingcommandinthecommand
lineterminal:
sudoapt-getinstallarduino
2. MostArduinoproductscomewithaUSBportandareprogrammedviatheUSBport
(theArduinoenumeratesasaserialportdevice).Ittakesawhiletodownloadand
installtheArduinoIDE.Oncetheinstallationisfinished,wecantesttheinstallation
byexecutingthefollowingcommand:
arduino
TheArduinoIDEisshowninthefollowingscreenshot:
TheArduinoIDEinterface
Objectivecomplete–minidebriefing
NowthatwehaveinstalledtheArduinoIDE,let’smoveontothenextsectionandrunan
exampletestusingtheArduinodevelopmentplatform.
ProgrammingtheArduinousingthe
RaspberryPi
WewillintroduceourselvestotheArduinoIDEwithanLEDblinkingexample.
Prepareforliftoff
ThereareseveralexamplesfortheArduinoandittakeslessthanaminutetoexecutethe
firstprogram.Let’sgetstartedwiththetraditionalLEDblinkingexample.TheLED
blinkingexamplecanbefoundatFile|Examples|01.Basics|Blink.
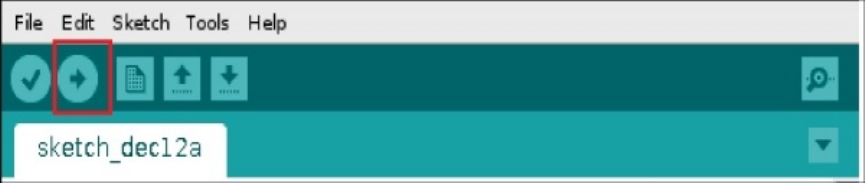
Engagethrusters
1. WegetstartedbyidentifyingtheArduino’sserialportenumeratedontheRaspberry
Pi.
2. TheserialportisidentifiedfromTools|SerialPort.Usuallythereisonlyoneserial
portasshowninthefollowingscreenshot.Ifthereismorethanoneserialportdevice
connected,itisrecommendedthatyouproceedwithcaution.
3. WecanprogramtheArduinobyclickingontheUploadbutton.
TheArduinoIDEinterface
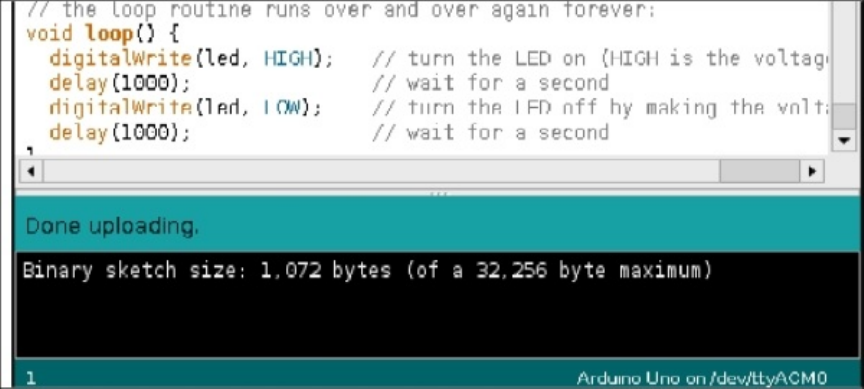
Objectivecomplete–minidebriefing
IftheArduinoisconnectedandtheserialportwascorrectlyidentified,theprogramshould
beuploadedsuccessfully.
SketchuploadedusingtheArduinoIDE
MostArduinoproductscomewithanonboardLEDtotesttheLEDblinkingexample.
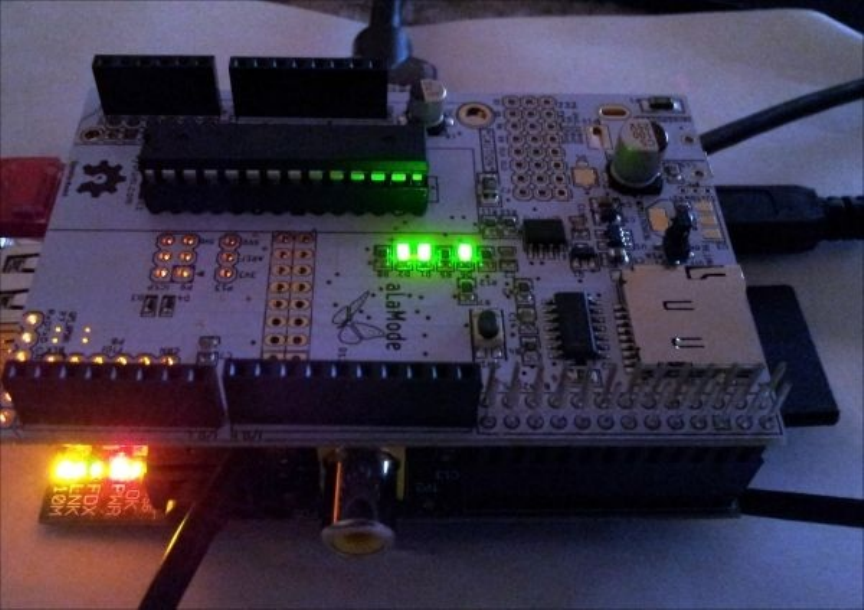
RaspberryPiAlaMode
Inthissection,wewillbrieflydiscusstheRaspberryPiAlaMode’sfeaturesanditssetup.
RaspberryPiAlaMode(asshowninthefollowingfigure)isastackableArduino
developmentplatformdevelopedspecificallyfortheRaspberryPi.Theboard,whichis
releasedasopensourcehardware,ispricedatabout$45andalsoincludesareal-time
clockandamicroSDcardslotfordatalogging.
RaspberryPiAlaModemodestackedontheRaspberryPi

Prepareforliftoff
TheattractivefeatureoftheboardisthatitcouldbeprogrammedviatheRaspberryPi’s
UARTpinsandhenceeliminatestheneedforaUSBport.Theboardcouldbeeither
poweredviatheRaspberryPiorthroughtheMicroBUSBportusingawallwart
transformer.Theproduct’swebpage,http://wyolum.com/projects/alamode/alamode-
getting-started/,offersasinglestepprocesstostartusingtheboard.
Note
TheRaspberryPiAlaModemodeisjustoneexampleofthestackableArduinohardware.
ThereareprobablyothersimilarstackableArduinohardwareavailableinthemarket.For
example,https://www.kickstarter.com/projects/raspitv/raspio-duino-affordable-arduino-
programming-on-ras.
Engagethrusters
1. Oncethearchiveisdownloadedfromtheirwebpage,weextractthecontents:
tar–xvzfalamode-setup.tar.gz
2. Oncethefilesareextracted,thesetupisasfollows:
sudo./setup
3. Aftertheinstallationiscomplete,theRaspberryPialamode’sserialportis
enumeratedas/dev/ttyS0.
Objectivecomplete–minidebriefing
Aftertheinstallationiscomplete,weshouldhavetheRaspberryPiAlaModemode
enumeratedandbereadytostartprogrammingthehardwareadd-onboard.
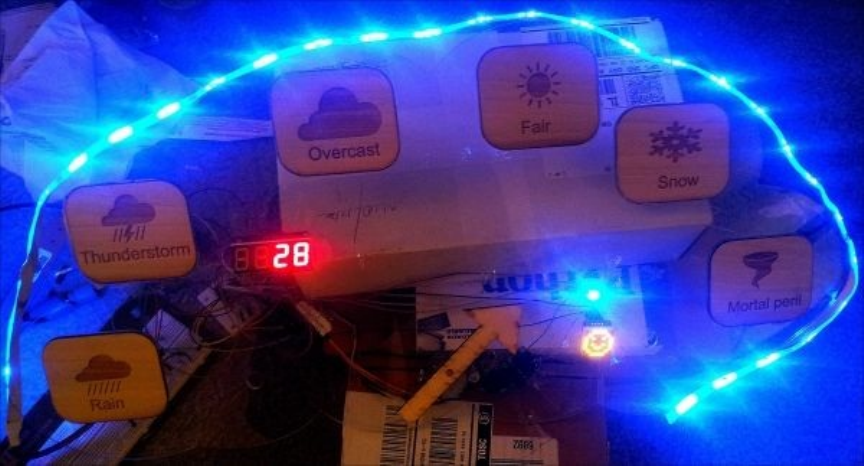
TheWeasleyweatherclock
WewillbuildaWeasleyweatherclockinthisprojectusinganArduinomicrocontroller
boardandtheRaspberryPi.TheWeasleyWeatherclockisinspiredbytheWeasleyclock
seenintheHarryPotterseriesofmovies.AWeasleyclockisusedtoidentifythecurrent
locationofafamilymemberoftheWeasleys(forexample,work,school,andsoon)and
alsothesafetyofthefamilymember.Mrs.MollyWeasley(thematriarchoftheWeasleys)
usedtheWeasleyclocktokeeptabsonherfamilyandthisclockhashaditsvariantsover
theyears.Thisprojecthappenstobeoneofthem!
TheWeasleyweatherclockisonethatdisplaysthecurrentoutdoortemperatureandthe
forecast.Italsowarnsusaboutimpendingdangersduetoconditionssuchastornadoes,
blizzards,andsoon.
AWeasleyweatherclockbuiltusingtheArduinoandtheRaspberryPi
Prepareforliftoff
Thefollowingitems(alongwiththeirapproximatecost)arerequiredtobuildourWeasley
clock:
Item Price
RaspberryPimodelB*1 US$35
ArduinoUno/RaspberryPiAlaModemode(http://wyolum.com/projects/alamode/)*1 US$30/45
AcrylicSheet24inchesx20inches*0.093inchthick*1 US$10
Woodsheet1ftx1/2ftx0.25inchthick*1 US$5
5VDCSteppermotorfromAdafruit*1(http://www.adafruit.com/product/858) US$5
RGBLEDStrip1m*1(analogones(http://www.adafruit.com/products/1004)) US$15
NPNtransistors*2(BC547orNP2222) US$1
PowerDarlingtonStepperDriver(ULN2003A) US$2
Cablesforconnection US$4
7-SegmentBackpack(http://www.adafruit.com/product/879) US$10
A8x8LEDMatrixbackpack(optional(http://www.adafruit.com/product/871)) US$10
BlinkM(optional) US$13
12V,1ADCwalltransformer(optional(https://www.sparkfun.com/products/8579)) US$8
Totalcost US$122approx.
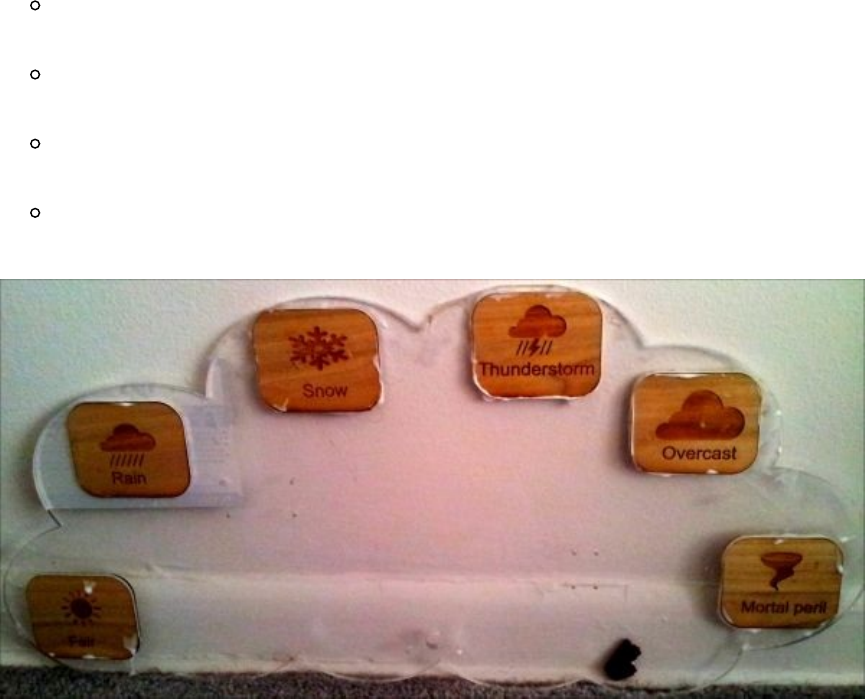
Engagethrusters
1. TheWeasleyclockcouldbeeasilyassembledwithpartsmachinedwithalasercutter.
Lasercuttingisaprocesswherepartsaremachined/engraved/cutusingahigh-
powerlaserbeaminacontrolledenvironment.
Thelasercutteriswidelyusedforprototypingpurposes.Thedesignfilesfor
lasercuttingareavailablealongwiththisbookcodebundle.
Inthisexample,thedialoftheweatherclockiscutfromtheacrylicandthe
designincludesmountingholesfortheclockaswellasthesteppermotor.
Theweatherkeywordsareengravedandmachinedusingwoodsheets.The
assemblyofthekeywordsandthedialareshowninthefollowingfigure:
PartialassemblyoftheWeasleyClock
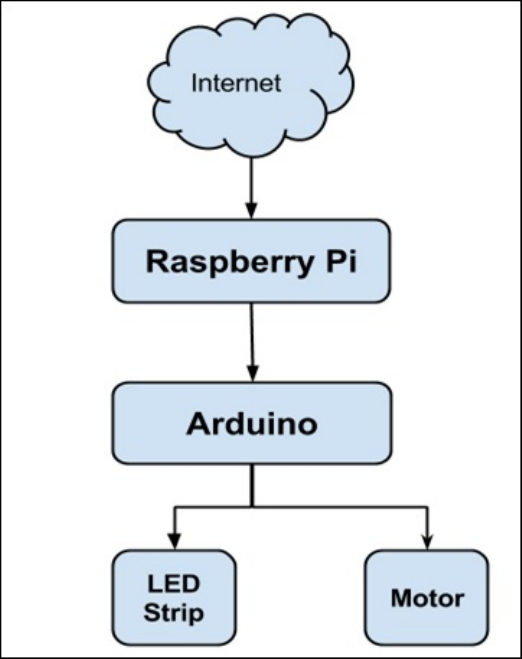
Objectivecomplete–minidebriefing
Theassemblyshownintheimageissufficienttotestthisexample.Youcanaddmore
featurestothedesign.Forexample,youcanaddslotsontheacrylicboardtoembeda7-
Segmentdisplay,8x8LEDmatrix,oraBlinkMRGBLEDtothedesign.
Inthisexample,theArduinoisthelow-levelcontroller,whichdrivestheRGBLEDstrip,
steppermotor,andsoon,whiletheweatherdataisobtainedfromtheInternetusingthe
RaspberryPi.WewilldiscusstheArduinocodeinthefirstpartofourtask.
FlowofdataandcontrolinthisWeasleyClockproject

ControllingthestepperusingtheArduino
Thepartnumberofthesteppermotorusedinthisexampleis28BJY-48
(http://www.adafruit.com/product/858).Asteppermotorisatypeofmotorthatisoperated
byenergizingitscoilsinseveralsteps.Thecoilenergizationinseveralstepsenablesthe
steppertorotateinpreciseangularsteps.Thisprecisemovementaidstheuseofastepper
motorinopenloopsystems.Sincetheworkingprincipleofasteppermotorisbeyondthe
scopeofthebook,let’sdiscussitscontroltechnique.
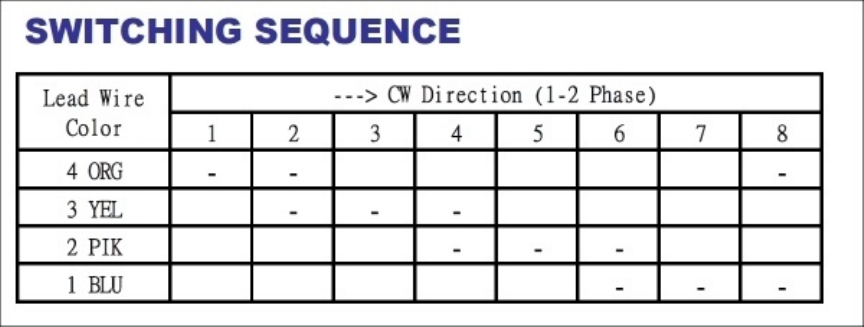
Prepareforliftoff
Thesteppermotorispoweredbyacommonleadconnectedtothepowersupplyandthe
otherendisconnectedtoatransistor.Sincetransistorscanbeusedasswitches,theleads
ofthecoilcanbegroundedalternatively.Thisalternativesequencecausesthestepper
motortorotateandthespeedofrotationiscontrolledbyintroducingadelayinbetween
thecoilenergization.Theminimumdelayrequiredbetweeneachenergizationstepto
makethestepperrotateproperlyandavoidmissstepsis2milliseconds.Thisisduetothe
designlimitationsofthesteppermotor.
Thefollowingtableshowsthecoilenergizationsequenceforthesteppermotorina
clockwisedirection(borrowedfromthedatasheet).Theenergizationsequenceshownhere
wouldmakethestepperrotateinahalfstepperactuation,thatis,thestepperwouldrotate
2.8125degreesforeveryactuationsequence.
Note
Itisassumedthatyouarefamiliarwithsteppermotorsandtheircontroltheory.
Asteppermotorenergizationsequencefrom28BJY-48’sdatasheet

Engagethrusters
1. Eachcolumnintheprecedingdiagramindicatestheleadthatneedstobeenergizedto
rotateasinglestep.
2. Forexample,inthecaseofclockwiserotation,Lead4isenergizedandallotherleads
areturnedoff.Thedatasheetexplainsthatthesteppermotorrotatesapproximately
5.625degreesperstep.
3. Hence,64actuationstepsarerequired(64*5.626=360degrees)tomakeone
completerotation.Thesteppermotorisinterfacedtoagearboxof1:64ratio,and
eachrotationtakesabout4096steps.
4. Let’sreviewthecoderequiredfortheenergizationsequence(codeborrowedfromthe
Arduinoforumshttp://forum.arduino.cc/index.php?topic=85335.0):
//Step1
digitalWrite(motorPin4,HIGH);
digitalWrite(motorPin3,LOW);
digitalWrite(motorPin2,LOW);
digitalWrite(motorPin1,LOW);
delay(motorSpeed);
//Step2
digitalWrite(motorPin4,HIGH);
digitalWrite(motorPin3,HIGH);
digitalWrite(motorPin2,LOW);
digitalWrite(motorPin1,LOW);
delay(motorSpeed);
//Step3
digitalWrite(motorPin4,LOW);
digitalWrite(motorPin3,HIGH);
digitalWrite(motorPin2,LOW);
digitalWrite(motorPin1,LOW);
delay(motorSpeed);
//Step4
digitalWrite(motorPin4,LOW);
digitalWrite(motorPin3,HIGH);
digitalWrite(motorPin2,HIGH);
digitalWrite(motorPin1,LOW);
delay(motorSpeed);
//Step5
digitalWrite(motorPin4,LOW);
digitalWrite(motorPin3,LOW);
digitalWrite(motorPin2,HIGH);
digitalWrite(motorPin1,LOW);
delay(motorSpeed);
//Step6
digitalWrite(motorPin4,LOW);
digitalWrite(motorPin3,LOW);
digitalWrite(motorPin2,HIGH);
digitalWrite(motorPin1,HIGH);
delay(motorSpeed);
//Step7
digitalWrite(motorPin4,LOW);
digitalWrite(motorPin3,LOW);
digitalWrite(motorPin2,LOW);

digitalWrite(motorPin1,HIGH);delay(motorSpeed);
//Step8
digitalWrite(motorPin4,HIGH);
digitalWrite(motorPin3,LOW);
digitalWrite(motorPin2,LOW);
digitalWrite(motorPin1,HIGH);
delay(motorSpeed);
}
5. Let’sdiscussthefirststepinthesteppermotorenergizationsequence:
//Step1
digitalWrite(motorPin4,HIGH);
digitalWrite(motorPin3,LOW);
digitalWrite(motorPin2,LOW);
digitalWrite(motorPin1,LOW);
delay(motorSpeed);
6. Intheprecedinglinesofcode,themotorPin4pinissettoHigh,whiletheotherpins
aresettoLow.Asshowninthefollowingfigure,thepinsmotorPin1through
motorPin4areconnectedtoapowerDarlingtoncircuit.Youcanfindareferenceto
thePowerDarlingtoncircuitathttps://coefs.uncc.edu/dlsharer/files/2012/04/F5.pdf.
AnArduinosteppermotorinterface
7. Whenmotorpin4(theD11pinoftheArduinoisconnectedtothebasepinofthe
powerDarlingtonpair)issettohigh,thetransistor(whichactsaswitch)connectsthe
orangeleadtothegroundandenergizesthecoilandtherebythesteppermovesbya
singlestep.
8. Similarly,thesteppermotor’scoilsareenergizedinthesequenceshowninthetable.
Forexample,instep2,thecoils4and3areenergizedbysettingmotorPin4and
motorPin3toHighandotherpinstoLow.
Counterclockwiserotationofthesteppermotor

1. Thecounterclockwiserotationisachievedbyreversingtheorderofenergization.In
thefirststep,Lead1isenergized,whichisfollowedbyLeads1and2.Thetablefor
counterclockwiserotationisshownasfollows:
LeadWireColor
CCWDirection
12345678
1BLU - -
2PIK ---
3YEL ---
4ORG ---
2. Hence,thecodeforthefirststepwillbeasfollows:
digitalWrite(motorPin1,HIGH);
digitalWrite(motorPin2,LOW);
digitalWrite(motorPin3,LOW);
digitalWrite(motorPin4,LOW);
delay(motorSpeed);

Objectivecomplete–minidebriefing
Note
Ifyouarenotfamiliarwithsteppermotorsandtheircontroltechniques,thereareabundant
resourcesandonesuchresourceis
http://www.societyofrobots.com/member_tutorials/node/314.
WediscussedthesteppermotorcontroltechniqueusingtheArduinomicrocontroller.Once
wehavediscussedtheprerequisites,wewilltakethiscodesampleandbuildthingsaround
it.

ControllingtheRGBLEDStripusingthe
Arduino
WedepictthemoodoftheweatherforecastbyusingRGBLEDlighting.Weindicatecold
weatherindicationswithbluecolorlighting,fairweatherconditionswithgreenlighting,
andwarm/dangerousweatherconditionsusingredlighting.Inthissection,wewilllook
intocontrollinganRGBLEDusingtheArduino.
TheRGBLEDstripsoldbyAdafruitindustries(http://www.adafruit.com/products/1004)
consumesabout60mApersegment.ItisbestrecommendedtodrivetheRGBLEDstrip
usingatransistorswitchingcircuit.Weneedtousethreetransistorsforthethreecolors
anditispossibletocontroleachcolorindividuallyanditisalsopossibletoobtaina
combinationofcolours.
Note
ItispossibletoproduceasecondarycolorusingtheRGBcombinations.Thiscanbe
achievedbyturningontheRGBsegmentsatthesametimeandvaryingthebrightnessof
theprimarycolors.Therearevastresourcesavailableforsuchtipsandtricksonthe
Internetandanexplanationofthisisbeyondthescopeofthisbook.
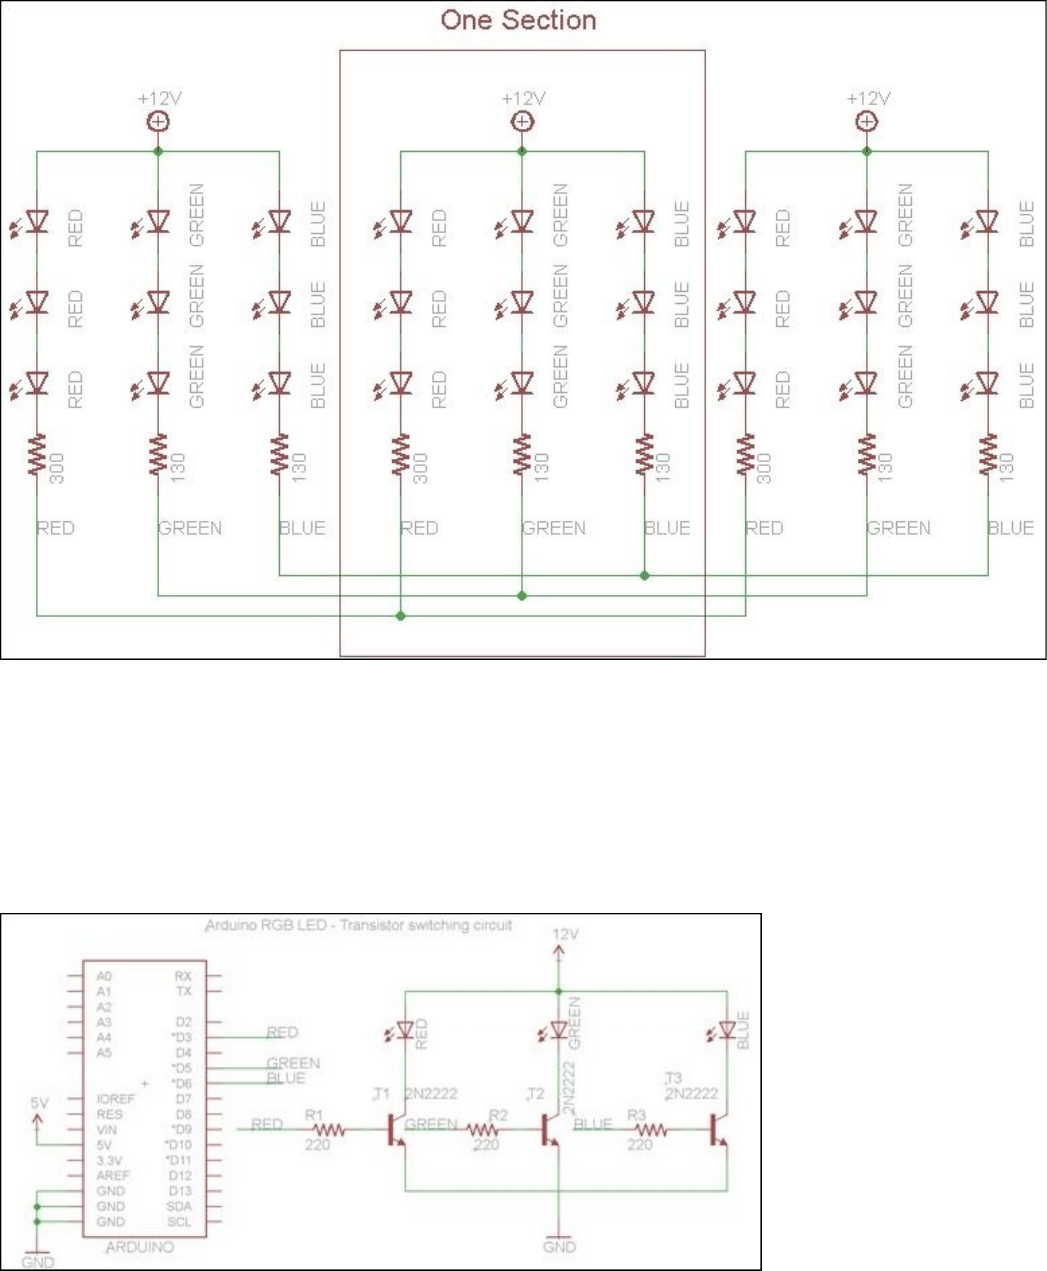
Prepareforliftoff
TheAdafruitlearningwebsiteprovidesexamplesforcontrollingtheRGBLEDusinga
pulsewidthmodulationtechnique.TheschematicfortheAnalogRGBstripisshownin
thefollowingdiagram:
RGBLEDstripschematic(borrowedfromAdafruit)
SincetheRGBstriprequires12V,wemustuseatransistorswitchingcircuittocontrolthe
LEDs.ThetransistorswitchingcircuitforcontrollingtheRed,Green,andBluechannels
oftheLEDstripisshowninthefollowingdiagram:
TheArduinoRGBswitchingcircuit
TheRGBchannelsareconnectedtotheNPNtransistorsthatactasswitches.Thebaseof
thetransistorisconnectedtothePWM(PulseWidthModulation)outputoftheArduino.
ThisenablesyoutoadjustthebrightnessoftheRGBchannels,andconsequently,produce
differentcolors.

Engagethrusters
1. AdafruithasprovidedanexampleforadjustingthebrightnessoftheLEDsand
producingdifferentcolorsfromthecombinationofprimarycolors.Let’sconsiderthe
followingpieceofcode:
//fadefrombluetoviolet
for(r=0;r<256;r++){
analogWrite(REDPIN,r);
delay(FADESPEED);
}
//fadefromviolettored
for(b=255;b>0;b--){
analogWrite(BLUEPIN,b);
delay(FADESPEED);
}
2. Inthiscode,thered,greenandbluesegmentsoftheRGBLEDstripareconnectedto
theD3,D5,andD6oftheArduino,respectively.
ThevaluewrittentothepinsusingtheanalogWritefunctionsetsthebrightness
valueofeachcolor.
TheanalogWritefunctionvariesthedutycycleofthePWMchanneland
acceptsvaluesbetween0and255.
Thevalue0indicatesa0percentdutycycleand255indicatesa100percent
dutycycle.ThedutycycledeterminesthecurrentthatflowsthroughtheLED,
andinturn,controlsthebrightnessandcolor.
Objectivecomplete–minidebriefing
WediscussedadjustingthebrightnessoftheRGBLEDstripusingthePulseWidth
ModulationTechniqueandanArduinomicrocontroller-baseddevelopmentplatform.
I2CCommunicationusingtheArduino
(optional)
Inthisproject,thereisa7-Segmentdisplay,8x8LEDmatrix,proximitysensor(to
determinethehomeposition),andaBlinkMRGBLEDthatcommunicatesviatheI2C
interface.Wewilldiscusstheapplicationofeachcomponentinthisproject.
Prepareforliftoff
ThemainrequirementforthissectionisthenecessaryI2Cdevicerequiredtointerface
withtheweatherclock.

Engagethrusters
Letusreviewaboutthe7-Segmentdisplay.
The7-Segmentdisplay
1. TheAdafruit7-Segmentdisplaybackpack(reference:thetutorialavailableat
https://learn.adafruit.com/adafruit-led-backpack/0-dot-56-seven-segment-backpack
providesinstructionsonsettingupthebackpackandtestingthebackpackwithacode
sample),whichisusedtodisplaythecurrentatmospherictemperatureobtainedvia
theRaspberryPi.
2. Adafruitprovideslibrariestowritetothe7-Segmentdisplay.Inordertowritetothe
7-Segmentdisplay,wedeclarea7-Segmentobject:
Adafruit_7segmentmatrix_7segment=Adafruit_7segment();
WeinitializetheI2CportaddressofthedeviceintheArduinosetup()function:
matrix_7segment.begin(0x70);
Now,wecancalltheobjectandwritedataonthedisplay(codeborrowedfrom
AdafruitLEDbackpacklibraries):
matrix_7segment.clear();
matrix_7segment.print(temp,DEC);
matrix_7segment.writeDisplay();
8x8LEDmatrix
1. TheAdafruit8x8matrixisusedtodisplaythemoodofthecurrentweathercondition
usingasmiley.(Thesetuptutorialcanbefoundathttps://learn.adafruit.com/adafruit-
led-backpack/0-8-8x8-matrix).
2. Ifthecurrentweatherconditionisfair,asmileisdisplayedandafrownisdisplayed
forimpendingdanger.
3. Thewriteprocessissimilartothe7-Segmentdisplay.The7-Segmentdisplayandthe
8x8displaymatrixusetheMAX7219chip.Hence,itisnecessarytouseadifferent
addressfortheLEDmatrix.TheAdafruittutorial(https://learn.adafruit.com/adafruit-
led-backpack/connecting-multiple-backpacks)clearlyexplainshowtochangeI2C
portaddressesontheLEDbackpack.Youarewelcometoswitchtheaddressifboth
the7-SegmentdisplayandtheLEDmatrixarebeingusedintheproject.
4. Itisalsopossibletowritestringstothe8x8matrixandscrolllikeamarquee.Similar
tothe7-Segmentdisplay,wewillinitializetheobjecttocommunicatewiththeLED
matrix:
Adafruit_8x8matrixmatrix=Adafruit_8x8matrix();
WeinitializetheI2CportaddressofthedeviceintheArduinosetup()function:
matrix_7segment.begin(0x73);
Adafruittutorialsalsoexplainthecreationofbitmapsforthesmileystobe

displayed:
staticuint8_t__attribute__((progmem))smile_bmp[]={0x3C,0x42,
0x95,0xA1,0xA1,0x95,0x42,0x3C};
staticuint8_t__attribute__((progmem))frown_bmp[]={0x3C,0x42,
0xA5,0x91,0x91,0xA5,0x42,0x3C};
staticuint8_t__attribute__((progmem))neutral_bmp[]={0x3C,0x42,
0x95,0x91,0x91,0x95,0x42,0x3C}
ThebitmapisusedtodeterminetheLEDsthatwouldhavetobeturnedonto
createthesmiley.Forexample,0x3C(binaryvalue:00111100)turnsonthe
LEDsexceptforthefirstandlasttwooneitherends:
matrix.clear();
matrix.setRotation(3);
matrix.drawBitmap(0,0,smile_bmp,8,8,LED_ON);
matrix.writeDisplay();
ThesetRotationfunctionisusedtorotatethedisplayimageby90degrees.
ThedrawBitmapfunctionisusedtodrawthebitmaponthedisplay.Inthe
drawBitmapfunction,thefirsttwoargumentsspecifythexandyofthestarting
positionfollowedbythebitmap,width,heightofthebitmap,anditscolor.
BlinkM
1. WediscussedtheBlinkMRGBLEDinProject2,ARaspberryWebIDEExample.
TheBlinkMisusedtoindicateimpendingdangerbyflashingaredcolorintheevent
ofimpendingdanger.WeusetheBlinkMlibrariestoplayaflashingredscriptinsuch
scenarios:
BlinkM_playScript(script_no,0,0);
2. TheBlinkM_playScriptfunctiontakesthescriptnumberoftheRGBLED.The
secondargumentisthenumberofrepeatsforthescript.Whenthethirdargumentis
zero,thescriptisplayedinaninfiniteloop.
Proximitysensor
1. Theproximitysensorisusedtodeterminethehomepositionofthearrowthatisused
topointtotheweatherposition.Theproximitysensorusedinthisprojectisthe
OSEPPProximitySensorModulefromParallax.Theproximitysensordetectsthe
presenceofobjectsandcommunicatesthisviatheI2Ccommunicationport.
2. SimilartotheotherI2Cdevices,wesetthesensoraddressasfollows:
constuint8_tsensorAddr=0x20;
WeturnonthesensorintheArduinosetup()method:
WriteByte(sensorAddr,0x3,0xFE);
Thesensor’sreadingisreadby:
ReadByte(sensorAddr,0x0,&val)
Objectivecomplete–minidebriefing
WediscussedtheinterfacingofdifferentI2Cdevicesthatcouldbeusedinthisproject.In
thenextsection,wewillworkoncontrollingthesedevicesusinganindividualcontrol
signal.
Serialportcommunicationwiththe
RaspberryPi
Asmentionedearlier,theweatherdataisobtainedbytheRaspberryPiandcommunicates
thedatawithcontrolcharactersviatheserialport.Wewilldiscussthecontrolsignalsused
inthisproject.

Engagethrusters
Let’sgetstartedbyreviewingthePythonscriptusedtooperatetheweatherdisplay.
PythonprogramfortheWeasleyclock
1. Inthissection,wewilldiscussthePythoncodefortheweatherclock.Theimportant
requirementforthisprojectisthePythonweatherAPI.Weneedtodownloadand
installittogetstarted.IfsubversionisnotinstalledontheRaspberryPi,itcanbe
installedusingthefollowingcommand:
sudoapt-getinstallsubversion
2. Oncetheinstallationiscomplete,thePythonweatherAPIrepositorycanbeclonedas
follows:
svncheckouthttp://python-weather-api.googlecode.com/svn/trunk/
python-weather-api-read-only
3. ThePythonweatherAPIhasaPython3requirementandisinstalledasfollows:
cdpython-weather-api-read-only
python3setup.pybuild
python3setup.pyinstall
4. Let’sreviewthePythonscriptusedtooperatetheweatherdisplay.Wewillimportthe
serialport,pywapi,andtime(fordelay)modulesfortheproject:
#!/usr/bin/envpython
importserial
importglob
importpprint
importpywapi
fromtimeimportsleep
Wewilldetermineandestablishconnectiontotheserialport.Thescan()
functionidentifiesalltheserialportsavailableontheRaspberryPi:
#Establishserialportcommunication
defscan():
returnglob.glob('/dev/ttyS*')+glob.glob('/dev/ttyUSB*')+
glob.glob('/dev/ttyACM*')
sport_data=scan()
fornameinscan():
serialport=serial.Serial(name,9600)
sleep(5)
serialport.write(bytes("A",'ascii'))
sleep(1)
response=serialport.read()
if(response==b'A'):
sport=name
serialport.close()
break
seport=serial.Serial(sport,9600,timeout=45)
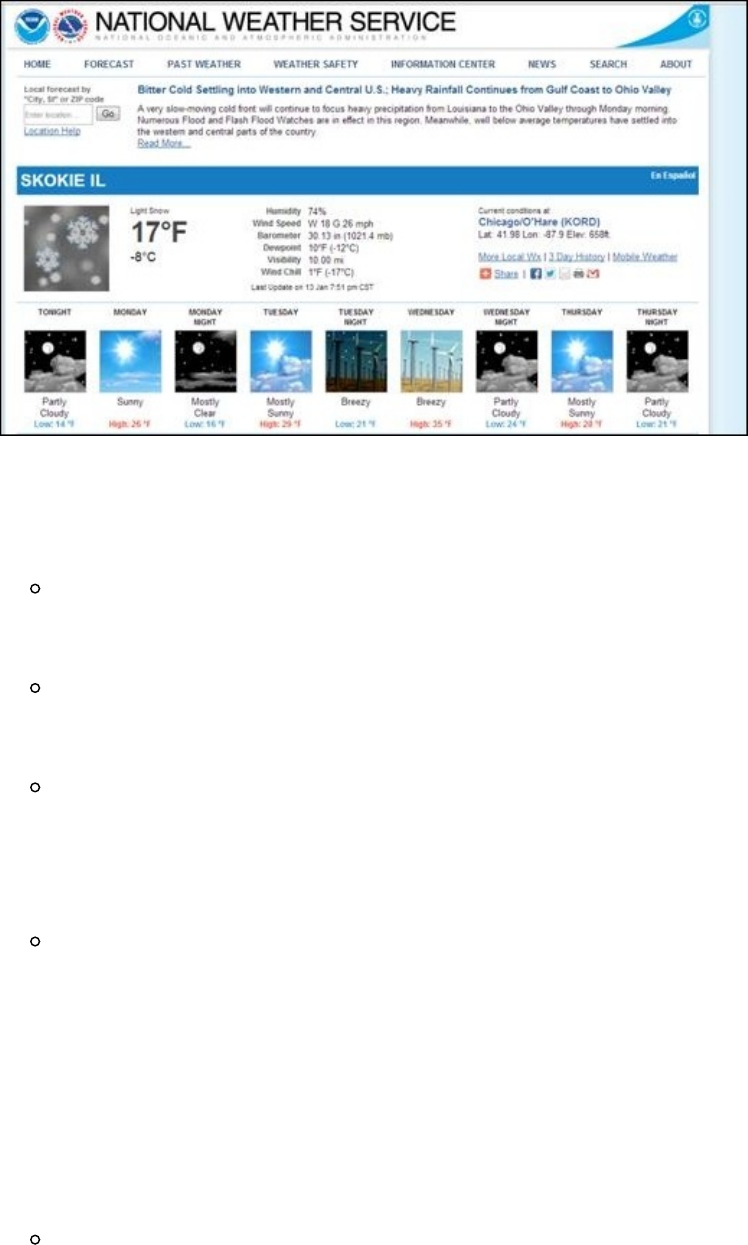
5. Oncetheserialportshavebeenidentified,wetestthembysendingabyteAandawait
aresponse.WhenaresponsewiththebyteAisreceived,weidentifyandsavethe
serialport.Afteridentification,wewillestablishaconnectionwiththeArduino.
6. Inthisproject,weareusingtheNOAAwebsitetoobtaintheweatherdata.Wehave
toidentifythecity’sweathercodetoobtainthecurrentlocation’sweatherstation
code.Thiscouldbesimplyobtainedbyenteringthezipcodeontheirwebsite.For
example,theweatherstationcodeforChicagoisKORD.
WeatherstationforChicago,IL
Theweatherdataisobtainedasfollows:
result=pywapi.get_weather_from_noaa('KORD')
Thetemperaturedataisretrievedasfollows:
temperature=int(float(result['temp_f']))
Theretrieveddataiswrittentotheserialport:
temperature_string="S"+str(temperature)
#print(temperature_string)
seport.write(bytes(temperature_string,'ascii'))
Basedonthetemperaturedata,theRGBstrip,BlinkMcontroldata,and8x8
matrixdataarewrittentotheArduino:
if(temperature>40):
seport.write(bytes("G",'ascii'))
sleep(5)
seport.write(bytes("P4",'ascii'))
sleep(5)
seport.write(bytes("M1",'ascii'))
sleep(5)
Wewillsettheweatherclocktopointataweatherforecastbasedonthedata
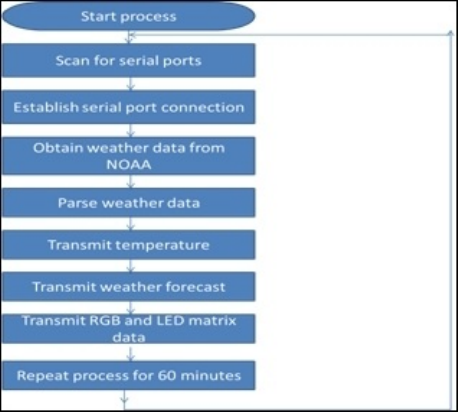
obtained:
if(result['weather']=='LightSnow')or(result['weather']=='Snow')
or(result['weather']=='Flurries'):
seport.write(bytes("H",'ascii'))
sleep(5)
seport.write(bytes("T-2",'ascii'))
sleep(5)
7. Let’sreviewthecodeforthecontrolfromtheRaspberryPiandthecorresponding
acknowledgmentsignals.
Arduinoacknowledgementtocontrolsignal
Letusreviewonthecontrolsignalandcontrolflowoftheweatherclock.
Controlflowfortheweatherclock
ThefollowingflowchartshowswhathappensintheArduinowhenacontrolcharacteris
receivedfromtheRaspberryPi.
Theweatherclockprogramflow
1. TheRaspberryPitriestoidentifytheArduinobysendingacharacterA.TheArduino
respondswithanacknowledgementcharacterA:
if(serial_read=='A'){
Serial.print("A");
}
2. Thisisafoolproofmechanismtoidentifyandestablishacommunicationwiththe
weatherclockcontrollerfromtheRaspberryPi.
Temperaturedata
1. TheRaspberryPitemperaturedataissenttotheArduinowiththeletter/characterS.

Thereceiveddataisconvertedtoasignedintegerandpassedasanargumenttothe7-
Segmentdisplaylibraries:
if(serial_read=='S'){
while(Serial.available()){
sb=Serial.read();
sevenseg_string[serInIndx]=sb;
serInIndx++;
temp=0;
}
temp=atoi(sevenseg_string);
memset(sevenseg_string,0,9);
}
2. WhenthecharacterSisreceived,wereadallthecharactersintothebuffer
sevenseg_string.Thestringisconvertedtoanintegerusingtheatoifunctionand
storedinthetempvariable.Thebufferisclearedattheendofthecycle.Thismethod
takessub-zerotemperaturesintoconsideration.
ControloftheRGBLEDstrip
1. TheindividualcolorsoftheRGBLEDarecontrolledindividuallyusingtheASCII
charactersR,G,and,Brespectively.Eachcolorindicatesauniqueweathercondition,
namely,blueindicatescoldweather,greenindicatesfairweatherconditions,andred
colorindicatesimpedingdangerinweatherconditions:
if(serial_read=='R'||serial_read=='G'||
serial_read=='B'){
color_bit=serial_read;
}
if(color_bit=='R'){
lightsequence_red();
}
elseif(color_bit=='G'){
lightsequence_green();
}
elseif(color_bit=='B'){
lightsequence_blue();
}
2. Whenthecharacterisreceived,thecorrespondinglightsequenceisturnedon.
Controlofstepperviaserialport
1. Earlier,wediscussedthecontrolofthesteppermotorusingapowerDarlington
driverandthecontrolroutineforonefullrotation.Inthissection,wewilldiscuss
howtocontrolthedirectionandthenumberofstepsbasedontheinputfromthe
serialport.Inthisexample,theclockwisedirectionisindicatedby+,and
counterclockwisedirectionisindicatedby-.
Forexample,inordertomove45stepsinaclockwisedirection,thecommand
wouldbe+45precededbytheletterP.Hence,itwouldbeP+45.Similarly,the

counterclockwisedirectioncommandwouldbeP-45:
if(serial_read=='P'){
while(Serial.available())
{
sb=Serial.read();
serInString[serInIndx]=sb;
serInIndx++;
}
}
2. WeawaittheserialcharacterPandstoretherestofthestringinabuffer.Oncethe
dataisstoredinthebuffer,wewilldeterminewhetherthefirstcharacteris+or-.
TheASCIInumberforthe+signis43and45forthe-sign.Wecomparethe
firstcharacterinthebufferandexecutethecommandaccordingly.Serial
communicationsusuallytransmitASCIInumbersandhencethenumbersare
convertedintotheirdecimalequivalents:
if(serInString[0]==43){
intvar_serial=0;
for(serOutIndx=1;serOutIndx<serInIndx;serOutIndx++)
{
var_serial=var_serial*10+(serInString[serOutIndx]-48);
}
motorSpeed=20;
for(inti=0;i<var_serial;i++){
clockwise();
}
Weconvertthereceivedserialdataintotheirdecimalequivalentatthisstep:
var_serial=var_serial*10+(serInString[serOutIndx]-48);
Onceconverted,wemovethestepperforthedesirednumberofstepsineither
directionusingtheclockwise()andcounterclockwise()functions.
3. Wewantthesteppermotortoreachthehomepositioneverytimebeforepointingtoa
particularweathercondition.Thissystemisanopenloopandsoitisnecessaryto
movethearrowtothehomepositionbeforepointingtothecurrentweather
condition.
Note
Thesteppermotormovesinacounterclockwisedirectiontopointatallweather
conditionsandaclockwisedirectiontomovetowardsthehomeposition.
4. Hence,whentheletterHistransmittedviatheserialport,thearrowismovedtowards
thehomeposition:
if(serial_read=='H'){
reset_stepper();
lightsequence();
}

Thereset_stepper()functiontakescareofsettingthearrowtothehome
position:
voidreset_stepper(void){
uint8_tval;
//Getthevaluefromthesensor
if(ReadByte(sensorAddr,0x0,&val)==0)
{
//ThesecondLSBindicatesifsomethingwasnotdetected,
i.e.,
//LO=objectdetected,HI=nothingdetected
while(val&0x2)
{
motorSpeed=20;
Serial.println("Nothingdetected");
if(ReadByte(sensorAddr,0x0,&val)==0){
clockwise();//Wekeepgoingclockwiseuntilthearrowis
detected
}
}
}
else
{
Serial.println("Failedtoreadfromsensor");
}
}
Inthereset_stepper()function,wewillexecutethesteppermotor’sclockwise
routineuntiltheobjectisdetected.Thesensorreferencemanualmentionsthat
anobjectisdetectedifthesecondLSBissettolow.Hence,thestepperrotates
intheclockwisedirectionuntilalowsignalisdetected.
Programmingtheweatherforecastposition
1. Intheprevioussection,wediscussedthesteppermotorcontrolviatheserialport.
Sinceweareusingasteppermotor,itispossibletopointateachweatherforecast
conditionbasedonapredeterminednumberofstepsfromthestep.So,wewill
determinethenumberofstepsrequiredtopointateachweatherforecastcondition
andprogramthesepositionsintotheflashmemoryoftheArduino.
WeshouldusethePROGMEMkeywordtostorethepositiondataintheflash
memoryoftheArduinosincetheyareaconstant:
constintmydata[6][2]PROGMEM={
1,10,
2,18,
3,28,
4,43,
5,54,
6,66};
Thenumbers1through6inthearraycorrespondtotheweatherforecast

indicatorsstartinginthecounterclockwisedirection.Thesecondposition
indicatesthenumberofpositionsfromthehomepositiontopointtothat
particularweathercondition.
ThecommandforindicatingweatherdataisprecededbytheletterT.Inorderto
pointtotheweatherforecast,Rain,thecommandwouldbeT-6.Whena
characterTisreceived,westorethedatareceivedinabuffer.Itisconfirmedthat
thesecondcharacterreceivedaftertheletterTisanumberbetween1and6.We
willretrievethecorrespondingpositiondatafromtheflashmemoryusingthe
pgm_read_word_near()function.Oncethedataisretrieved,thesteppermotor
controlroutineisexecutedforthedesirednumberofsteps.
Nowwewillretrievethedatafromtheflashmemoryasfollows:
if(serial_read=='T'){
while(Serial.available())
{
sb=Serial.read();
serInString[serInIndx]=sb;
serInIndx++;
}
}
intvar_serial=serInString[1]-48;
serInIndx=0;
if(var_serial>0&&var_serial<=6)
{
steps=pgm_read_word_near(&mydata[(var_serial-1)][1]);
Serial.println(steps);
}
if(serInString[0]==45){
motorSpeed=20;
for(inti=0;i<steps;i++){
counterclockwise();
}
8x8matrixcontrol
WewillcontroltheLEDmatrixusingtheletterM.AsmileisdisplayedifM1is
receivedandafrownifM2isreceived:
if(serial_read=='M'){
sb=Serial.read();
if(sb-'0'==1){
set_display(smile_bmp);
}
elseif(sb-'0'==2){
set_display(frown_bmp);
}
}
BlinkMcontrol
TheBlinkMscriptisplayedwhenevertheletterPisreceived.TheletterPisfollowed
bythescriptnumber.
if(serial_read=='P'){
while(Serial.available())
{
sb=Serial.read();
serInString[serInIndx]=sb;
serInIndx++;
}
BlinkM_playScript(BlinkM_addr,serInString[0]-48,0,0);
}
Objectivecomplete–minidebriefing
Inthissection,wediscussedtheoverallcontroloftheweatherclockanditsinterfaceto
theInternet.Wealsodiscussedtheinterfacingofthesensorsanddisplayingtheweather
data.
Missionaccomplished
Inthisproject,wediscussedinterfacinganArduinowiththeRaspberryPi.Thiswas
followedbyanexampleofconstructingaweatherclock.WedemonstratedtheArduinoas
alow-levelcontrollerthatinterfacesactuators,sensors,anddisplaydeviceswhilethe
RaspberryPiisinterfacedwiththeInternet.Ihopeyouenjoyedtheproject!
Hotshotchallenge
Inthisexample,thecitylocationwashard-codedintothePythonscript.Itispossibleto
displaytheweatherdatabasedonthezipcode/citylocation.Whatcouldtheinputdevice
be?Howcanthisbeachieved?
Chapter4.ChristmasLightSequencer
Asthenamesuggests,wewilldesignautomationandcontrolofChristmaslightsinour
homes.Wewilldecorateourhomeswithlightsforanyfestiveoccasionandworkona
projectthatenablesustobuildfantasticprojects.Wewillbuildalocalservertocontrol
thedevices.Wewillusetheweb.pyframeworktodesignthewebserver.We’dliketo
dedicatethischaptertothememoryofAaronSwartzwhowasthefounderoftheweb.py
framework.

Missionbriefing
Inthischapter,wewillinstallalocalwebserver-basedcontrolofGPIOpinsonthe
RaspberryPi.Wewillusethiswebserverframeworktocontrolitviaawebpage.
TheRaspberryPiontopofthetreeisjustanornamentfordecoration
Whyisitawesome?
Wecelebratefestiveoccasionsbydecoratingourhomes.Thedecorationsreflectourheart
anditcanbeenhancedbyusingRaspberryPi.
Note
ThisprojectinvolvesinterfacingAC-powereddevicestoRaspberryPi.Youshould
exerciseextremecautionwhileinterfacingthedevices,anditisstronglyrecommended
thatyousticktotherecommendeddevices.

Yourobjectives
Inthischapter,wewillworkonthefollowingaspects:
InterfaceoftheChristmastreelightsandotherdecorativeequipmenttothe
RaspberryPi
Setupthedigitally-addressableRGBmatrix
Interfaceofanaudiodevice
Settingupthewebserver
Interfacingdevicestothewebserver

Missionchecklist
Thischapterisbasedonabroadconcept.Youarefreetochoosedecorativeitemsofyour
owninterest.Wechosetoshowthefollowingitemsfordemonstration:
Item EstimatedCost
Christmastree*1 30USD
Outdoordecoration(optional) 30USD
SantaClausfigurine*1 20USD
Digitallyaddressablestrip*1 30USDapproximately
PowerSwitchTail2fromAdafruitIndustries(http://www.adafruit.com/product/268) 25USDapproximately
ArduinoUno(anyvariant) 20–30USDapproximately

InterfacethedevicestotheRaspberryPi
Note
ItisimportanttoexercisecautionwhileconnectingelectricalappliancestotheRaspberry
Pi.Ifyoudon’tknowwhatyouaredoing,pleaseskipthissection.Adultsupervisionis
requiredwhileconnectingappliances.
Inthistask,wewilllookintointerfacingdecorativeappliances(operatedwithanAC
powersupply)suchastheChristmastree.ItisimportanttointerfaceACappliancestothe
RaspberryPiinaccordancewithsafetypractices.ItispossibletoconnectACappliances
totheRaspberryPiusingsolidstaterelays.However,iftheprototypeboardsaren’t
connectedproperly,itisapotentialhazard.Hence,weusethePowerSwitchTailIIsold
byAdafruitIndustries.
Note
ThePowerSwitchTailIIhasbeenratedfor110V.
AccordingtothespecificationsprovidedontheAdafruitwebsite,PowerSwitchTail’s
relaycanswitchupto15Aresistiveloads.Itcanbecontrolledbyprovidinga3-12VDC
signal.WewilllookintocontrollingthelightsonaChristmastreeinthistask.
PowerSwitchTailII–imagesource:Adafruit.com
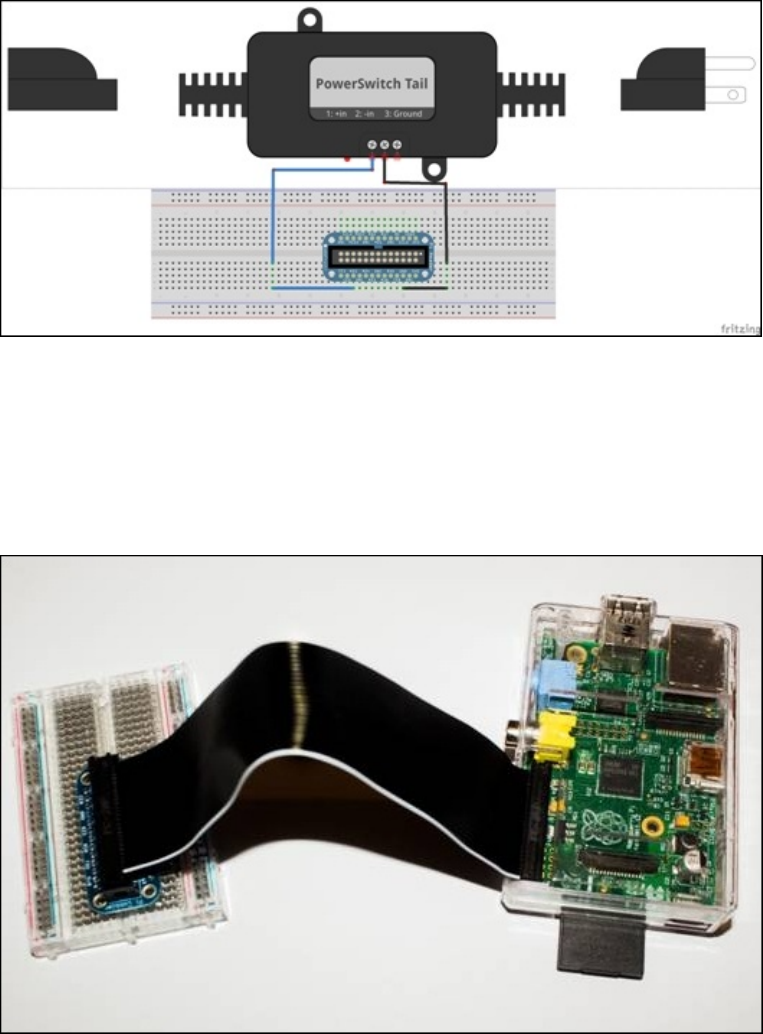
Prepareforliftoff
WehavetoconnectthePowerSwitchTailIItotheRaspberryPitotestit.Thefollow
FritzingschematicshowstheconnectionoftheswitchtotheRaspberryPiusingPi
Cobbler.Pin25isconnectedtoin+,whilethein-pinisconnectedtotheGroundpinof
theRaspberryPi.
TheRaspberryPiconnectiontothePowerSwitchTailIIusingPiCobbler
ThePiCobblerbreakoutboardisconnectedtotheRaspberryPiasshowninthefollowing
image:

Engagethrusters
1. Inordertotestthedevice,therearetwooptionstocontrolthedevicetheGPIOPins
oftheRaspberryPi.Thiscanbecontrolledeitherusingthequick2wireGPIOlibrary
orusingtheRaspiGPIOlibrary.
Note
Themaindifferencebetweenthequick2wiregpiolibraryandtheRaspiGPIOlibrary
isthattheformerdoesnotrequirethatthePythonscripttoberunwithrootuser
privileges(tothosewhoarenotfamiliarwithrootprivileges,thePythonscriptneeds
toberunusingsudo).InthecaseoftheRaspiGPIOlibrary,itispossibletosetthe
ownershipofthepinstoavoidexecutingthescriptasroot.Thisisleftassome
homeworkforyou.
2. Oncetheinstallationiscomplete,let’sturnon/offthelightsonthetreewithathree
secondinterval.Thecodeforitisgivenasfollows:
#Importtherpi.gpiomodule.
importRPi.GPIOasGPIO
#Importdelaymodule.
fromtimeimportsleep
#SettoBCMGPIO
GPIO.setmode(GPIO.BCM)
#BCMpin25istheoutput.
GPIO.setup(25,GPIO.OUT)
#InitialisePin25tolow(false)sothattheChristmastreelightsare
switchedoff.
GPIO.output(25,False)
while1:
GPIO.output(25,False)
sleep(3)
GPIO.output(25,True)
sleep(3)
Intheprecedingexample,wewillgetstartedbyimportingtheraspi.gpio
moduleandthetimemoduletointroduceadelaybetweenturningon/offthe
lights:
importRPi.GPIOasGPIO
#Importdelaymodule
fromtimeimportsleep
WeneedtosetthemodeinwhichtheGPIOpinsarebeingused.Therearetwo
modes,namelytheboard’sGPIOmodeandtheBCMGPIOmode(more
informationavailableonhttp://sourceforge.net/p/raspberry-gpio-python/wiki/).
TheformerreferstothepinnumbersontheRaspberryPiboardwhilethelatter
referstothepinnumberfoundontheBroadcomchipset.Inthisexample,we
willadopttheBCMchipset’spindescription.
Wewillsetthepin25tobeanoutputpinandsetittofalsesothatthe
Christmastreelightsareswitchedoffatthestartoftheprogram:
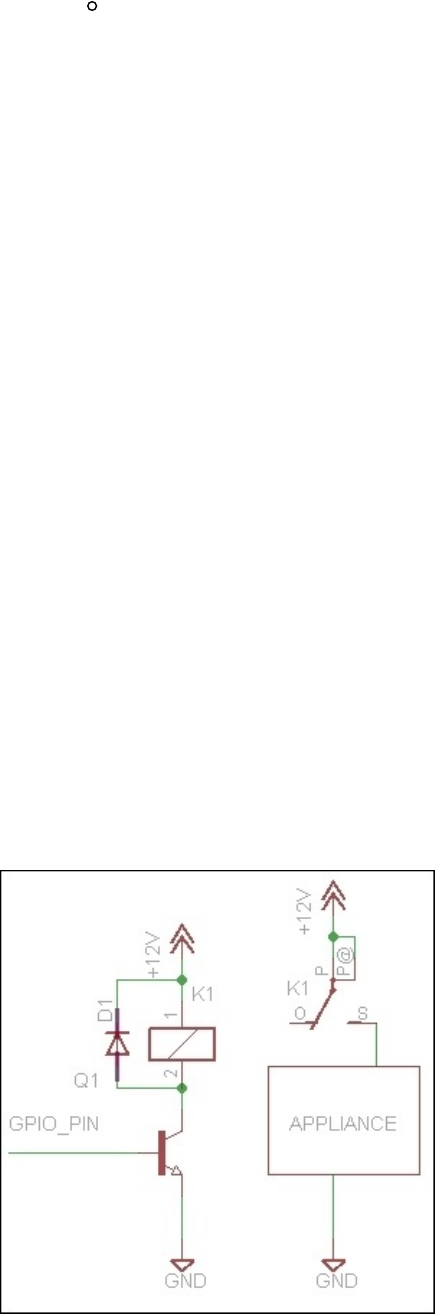
GPIO.setup(25,GPIO.OUT)
GPIO.output(25,False)
Intheprecedingroutine,weareswitchingoffthelightsandturningthemback
onwithathree-secondinterval:
while1:
GPIO.output(25,True)
sleep(3)
GPIO.output(25,False)
sleep(3)
3. Whenthepin25issettohigh,thedeviceisturnedon,anditisturnedoffwhenthe
pinissettolowwithathree-secondinterval.
ConnectingmultipleappliancestotheRaspberryPi
Let’sconsiderascenariowherewehavetocontrolmultipleappliancesusingthe
RaspberryPi.
Itispossibletoconnectamaximumof15devicestotheGPIOinterfaceoftheRaspberry
Pi.(Thereare17GPIOpinsontheRaspberryPiModelB,buttwoofthosepins,namely
GPIO14and15,aresettobeUARTinthedefaultstate.Thiscanbechangedafterstartup.
ItisalsopossibletoconnectaGPIOexpandertoconnectmoredevicestoRaspberryPi.)
Inthecaseofappliancesthatneedtobeconnectedtothe110VACmains,itis
recommendedthatyouusemultiplepowerswitchtailstoadheretosafetypractices.
Inthecaseofdecorativelightsthatoperateusingabattery(forexample,atwo-feet
Christmastree)orappliancesthatoperateatlowvoltagelevelsof12VDC,asimple
transistorcircuitandarelaycanbeusedtoconnectthedevices.Asamplecircuitisshown
inthefigurethatfollows:
Atransistorswitchingcircuit
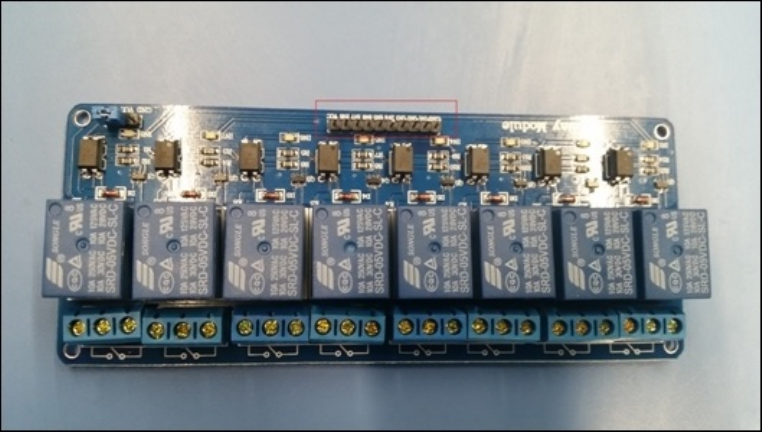
Intheprecedingcircuit,sincetheGPIOpinsoperateat3.3Vlevels,wewillconnectthe
GPIOpintothebaseoftheNPNtransistor.Thecollectorpinofthetransistorisconnected
tooneendoftherelay.
ThetransistoractsasaswitchandwhentheGPIOpinissettohigh,thecollectoris
connectedtotheemitter(whichinturnisconnectedtotheground)andhence,energizes
therelay.
Relaysusuallyhavethreeterminals,namely,thecommonterminal,NormallyOpen
Terminal,andNormallyClosedTerminal.Whentherelayisnotenergized,thecommon
terminalisconnectedtotheNormallyClosedTerminal.Uponenergization,theNormally
OpenTerminalisconnectedtothecommonterminal,thusturningontheappliance.
Thefreewheelingdiodeacrosstherelayisusedtoprotectthecircuitfromanyreverse
currentfromtheswitchingoftherelays.
Thetransistorswitchingcircuitaidsinoperatinganappliancethatoperatesat12VDC
usingtheRaspberryPi’sGPIOpins(theGPIOpinsoftheRaspberryPioperateat3.3V
levels).Therelayandthetransistorswitchingcircuitenablescontrollinghighcurrent
devicesusingtheRaspberryPi.
Itispossibletouseanarrayofrelays(asshowninthefollowingimage)andcontrolan
arrayofdecorativelightingarrangements.Itwouldbecooltocontrollighting
arrangementsaccordingtothemusicthatisbeingplayedontheRaspberryPi(aproject
ideafortheholidays!).
Therelayboard(again,showninthefollowingimage)operatesat5VDCandcomeswith
thecircuitrydescribedearlierinthissection.Wecanmakeuseoftheboardbypowering
uptheboardusinga5VpowersupplyandconnectingtheGPIOpinstothepins
highlightedinred.Asexplainedearlier,therelaycanbeenergizedbysettingtheGPIOpin
tohigh.
Arelayboard
Objectivecomplete–minidebriefing
Inthissection,wediscussedcontrollingdecorativelightsandotherholidayappliancesby
runningaPythonscriptontheRaspberryPi.Let’smoveontothenextsectiontosetup
thedigitallyaddressableRGBLEDstrip!
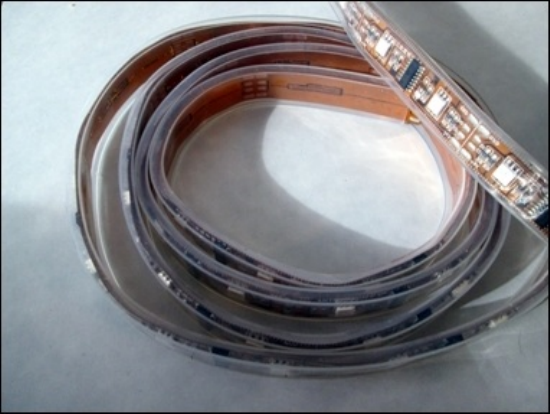
SettingupthedigitallyaddressableRGB
matrix
Inthissection,wewilltalkaboutsettingupoptionsavailableforLEDlighting.Wewill
discusstwotypesofLEDstrips,namelyanalogRGBLEDstripsanddigitally-addressable
RGBLEDstrips.
Aswediscussedthefirstoneindetailinthepreviouschapter,wewillskipitandmoveon
tothesecondkind.AsampleofthedigitallyaddressableRGBLEDstripisshowninthe
imagethatfollows:

Prepareforliftoff
Asthenameexplains,digitally-addressableRGBLEDstripsarethosewherethecolourof
eachRGBLEDcanbeindividuallycontrolled(inthecaseoftheanalogstrip,thecolours
cannotbeindividuallycontrolled).
WherecanIbuythem?
TherearedifferentmodelsofthedigitallyaddressableRGBLEDstripsbasedondifferent
chipssuchasLPD6803,LPD8806,andWS2811.Thestripsaresoldinareelofa
maximumlengthof5meters.SomesourcestobuytheLEDstripsincludeAdafruit
(http://www.adafruit.com/product/306)andBanggood(http://www.banggood.com/5M-
5050-RGB-Dream-Color-6803-IC-LED-Strip-Light-Waterproof-IP67-12V-DC-p-
931386.html)andtheycostabout50USDforareel.Somevendors(includingAdafruit)
selltheminstripsofonemeteraswell.
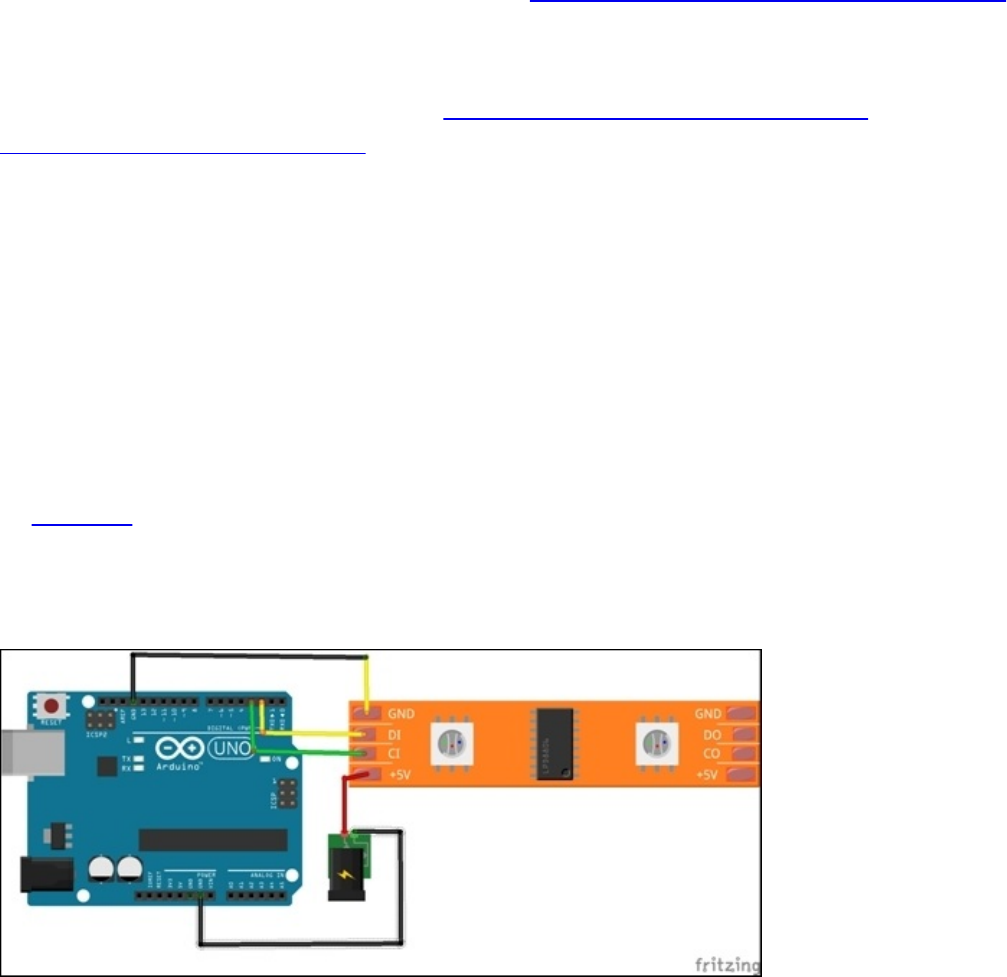
Engagethrusters
Let’sreviewhowtocontrolandusethesedigitally-addressableRGBLEDstrips.
Howdoesitwork?
MostdigitallyaddressableRGBstripscomewithterminalstopoweringtheLEDs,aclock
pin,andadatapin.TheLEDsareseriallyconnectedtoeachotherandarecontrolled
throughtheSPI(SerialPeripheralInterface).
TheRGBLEDsonthestriparecontrolledbyachipthatlatchesdatafromthe
microcontroller/RaspberryPiontotheLEDswithreferencetotheclockcyclesreceivedon
theclockpin.
InthecaseoftheLPD8806strip,eachchipcancontrolabout2LEDs.Itcancontroleach
channeloftheRGBLEDusingaseven-bitPWMchannel.Moreinformationonthe
functionoftheRGBLEDstripisavailableathttps://learn.adafruit.com/digital-led-strip.
ItispossibletobreaktheLEDstripintoindividualsegments.Eachsegmentcontains
about2LEDs,andAdafruitindustrieshasprovidedanexcellenttutorialtoseparatethe
individualsegmentsoftheLEDstrip(https://learn.adafruit.com/digital-led-
strip/advanced-separating-strips).
LightinguptheRGBLEDstrip
TherearetwowaysofconnectingtheRGBLEDstrip.Theycaneitherbeconnectedtoan
ArduinoandcontrolledbytheRaspberryPiorcontrolledbytheRaspberryPidirectly.
AnArduino-basedcontrol
Note
Itisassumedthatyouarefamiliarwithprogrammingmicrocontrollers,especiallythoseon
theArduinoplatform.
InProject3,TheArduinoRaspberryPiInterface,wediscussedconnectingananalog
RGBstripusinganArduino.Weusedcontrolcommandstochangethecolorofthestrip
throughtheserialportofArduino.Similarly,wecanconnecttheRGBstriptothe
Arduino.
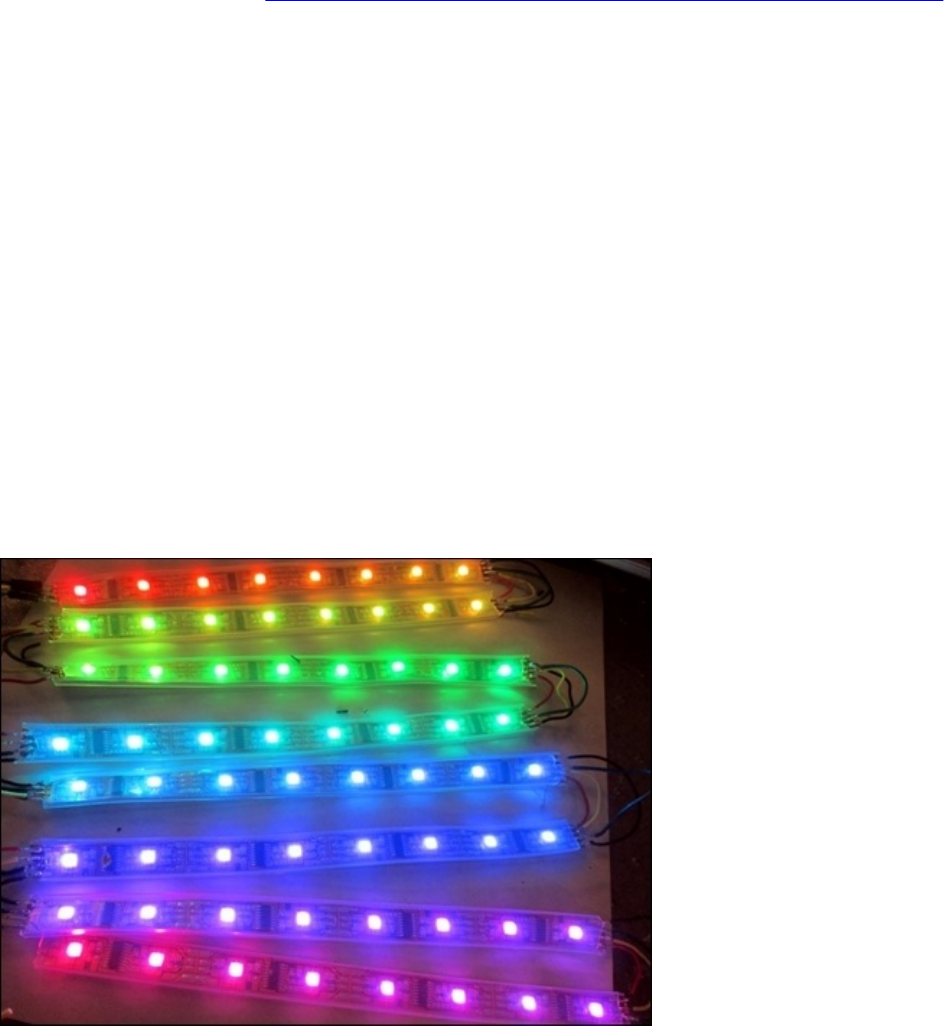
AnArduinoconnectiontothedigitallyaddressableinterface
Intheprecedingfigure,theLEDstripispoweredbyanexternalpowersupply.(Thetiny
greenadapterrepresentstheexternalpowersupply.Therecommendedpowersupplyfor
theRGBLEDstripis5V/2ApermeterofLEDs(whilewritingthischapter,wegotanold
computerpowersupplytopoweruptheLEDs).TheClockpins(theCIpin)andtheData
pins(DI)ofthefirstsegmentoftheRGBstripareconnectedtothepinsD2andD3
respectively.(WearedoingthissincewewilltesttheexamplefromAdafruitindustries.
Theexampleisavailableathttps://github.com/adafruit/LPD8806/tree/master/examples.)
SincetheRGBstripconsistsofmultiplesegmentsthatareseriallyconnected,theClock
Out(CO)andDataOut(DO)pinsofthefirstsegmentareconnectedtotheClockIn(CI)
andDataIn(DI)pinsofthesecondsegmentandsoon.
Let’sreviewtheexample,strandtest.pde,totesttheRGBLEDstrip.Theexample
makesuseofSoftwareSPI(BitBangingoftheclockanddatapinsforlightingeffects).It
isalsopossibletousetheSPIinterfaceoftheArduinoplatform.(Refertothisbook’s
websiteforanexample.)
Intheexample,weneedtosetthenumberofLEDsusedforthetest.Forexample,we
needtosetthenumberofLEDsonthestripto64foratwo-meterstrip.Hereishowtodo
this:
1. Thefollowinglineneedstobechanged:
intnLEDs=64;
2. Oncethecodeisuploaded,theRGBmatrixshouldlightup,asshowninthisimage:
8x8RGBmatrixlitup
3. Let’squicklyreviewtheArduinosketchfromAdafruit.Wewillgetstartedbysetting
upanLPD8806objectasfollows:
//nLEDSrefertonumberofLEDsinthestrip.Thiscannotexceed160
LEDs/5mduetocurrentdraw.
LPD8806strip=LPD8806(nLEDs,dataPin,clockPin);
4. Inthesetup()sectionoftheArduinosketch,wewillinitializetheRGBstripas
follows:
//StartuptheLEDstrip
strip.begin();
//Updatethestrip,tostarttheyareall'off'
strip.show();
5. Assoonasweenterthemainloop,scriptssuchascolorChaseandrainboware
executed.
6. WecanmakeuseofthisArduinosketchtoimplementserialportcommandsto
controlthelightingscriptsusingtheRaspberryPi.
Note
ThistaskmerelyprovidessomeideasofconnectingandlightinguptheRGBLED
strip.YoushouldfamiliarizeyourselfwiththeworkingprinciplesoftheRGBLED
strip.
ThereareseveralexamplesavailableforcontrollingtheLEDstripusingtheArduino
platform.Afewareavailableonthewebsiteofthisbook.
Note
TheRaspberryPihasanSPIport,andhence,itispossibletocontroltheRGBstrip
directlyfromtheRaspberryPi.Refertothisbook’swebsiteforsomeexamples.
Objectivecomplete–minidebriefing
Inthissection,wereviewedoptionsfordecorativelightingandcontrollingthemusingthe
RaspberryPiandArduino.
Interfaceofanaudiodevice
Inthistask,wewillworkoninstallingMP3andWAVfileaudioplayertoolsontheRaspbian
operatingsystem.
Prepareforliftoff
TheRaspberryPiisequippedwitha3.5mmaudiojackandthespeakerscanbeconnected
tothatoutput.Inordertogetstarted,weinstalltheALSAutilitiespackageanda
command-linemp3player:
sudoapt-getinstallalsa-utils
sudoapt-getinstallmpg321
Engagethrusters
Inordertousethealsa-utilsormpg321players,wehavetoactivatetheBCM2835’s
sounddriversandthiscanbedoneusingthemodprobecommand:
sudomodprobesnd_bcm2835
Afteractivatingthedrivers,itispossibletoplaytheWAVfilesusingtheaplaycommand
(aplayisacommand-lineplayeravailableaspartofthealsa-utilspackage):
aplaytestfile.wav
AnMP3filecanbeplayedusingthempg321command(acommand-lineMP3player):
mpg321testfile.mp3
Note
Intheprecedingexamples,thecommandswereexecutedinthedirectorywheretheWAV
fileortheMP3filewaslocated.IntheLinuxenvironment,itispossibletostopplayinga
filebypressingCTRL+C.
Objectivecomplete–minidebriefing
Wewereabletoinstallsoundutilitiesinthissection.Later,wewillusetheinstalled
utilitiestoplayaudiofromawebpage.
ItispossibletoplaythesoundfilesontheRaspberryPiusingthemoduleavailablein
Python.Someexamplesinclude:Snacksoundtoolkit,Pygame,andsoon.
Installingthewebserver
Inthissection,wewillinstallalocalwebserveronRaspberryPi.Therearedifferentweb
serverframeworksthatcanbeinstalledontheRaspberryPi.TheyincludeApachev2.0,
Boost,theRESTframework,andsoon.

Prepareforliftoff
Asmentionedearlier,wewillbuildawebserverbasedontheweb.pyframework.This
sectionisentirelyreferencedfromweb.pytutorials(http://webpy.github.io/).Inorderto
installweb.py,aPythonmoduleinstallersuchaspiporeasy_installisrequired.Wewill
installitusingthefollowingcommand:
sudoapt-getinstallpython-setuptools
Engagethrusters
Theweb.pyframeworkcanbeinstalledusingtheeasy_installtool:
sudoeasy_installweb.py
Oncetheinstallationiscomplete,itistimetotestitwithaHelloWorld!example.
WewillopenanewfileusingatexteditoravailablewithPythonIDLEandgetstarted
withaHelloWorld!examplefortheweb.pyframeworkusingthefollowingsteps:
1. Thefirststepistoimporttheweb.pyframework:
importweb
2. Thenextstepisdefiningtheclassthatwillhandlethelandingpage.Inthiscase,itis
index:
urls=('/','index')
3. WeneedtodefinewhatneedstobedonewhenonetriestoaccesstheURL.Wewill
liketoreturntheHelloworld!text:
classindex:
defGET(self):
return"Helloworld!"
4. Thenextstepistoensurethatawebpageissetupusingtheweb.pyframeworkwhen
thePythonscriptislaunched:
if__name__=='__main__':
app=web.application(urls,globals())
app.run()
5. Wheneverythingisputtogether,thefollowingcodeiswhatwe’llsee:
importweb
urls=('/','index')
classindex:
defGET(self):
return"Helloworld!"
if__name__=='__main__':
app=web.application(urls,globals())
app.run()
6. WeshouldbeabletostartthewebpagebyexecutingthePythonscript:
pythonhelloworld.py
WeshouldbeabletolaunchthewebsitefromtheIPaddressoftheRaspberryPi.For
example,iftheIPaddressis10.0.0.10,thewebpagecanbeaccessedat
http://10.0.0.10:8080anditdisplaysthetextHelloworld.Yay!

AHelloworld!exampleusingtheweb.pyframework
Objectivecomplete–missiondebriefing
WebuiltasimplewebpagetodisplaytheHelloworldtext.Inthenexttask,wewillbe
interfacingtheChristmastreeandotherdecorativeappliancestoourwebpagesothatwe
cancontrolitfromanywhereonthelocalnetwork.
Itispossibletochangethedefaultportnumberforthewebpageaccessbylaunchingthe
Pythonscriptasfollows:
pythonhelloworld.py1234
Now,thewebpagecanbeaccessedathttp://<IP_Address_of_the_Pi>:1234.
Interfacingthewebserver
Inthissection,wewilllearntointerfaceonedecorativeapplianceandaspeaker.Wewill
createaformandbuttonsonanHTMLpagetocontrolthedevices.
Prepareforliftoff
Inthistask,wewillreviewthecode(availablealongwiththischapter)requiredto
interfacedecorativeappliancesandlightingarrangingtoawebpageandcontrolledovera
localnetwork.Let’sgetstartedwithopeningthefileusingatexteditingtool(Python
IDLE’stexteditororanyothertexteditor).

Engagethrusters
1. Wewillimportthefollowingmodulestogetstartedwiththeprogram:
importweb
fromwebimportform
importRPi.GPIOasGPIO
importos
2. TheGPIOmoduleisinitialized,theboardnumberingisset,andensurethatall
appliancesareturnedoffbysettingtheGPIOpinstoloworfalseanddeclareany
globalvariables:
#Setboard
GPIO.setmode(GPIO.BCM)
#Initializethepinsthathavetobecontrolled
GPIO.setup(25,GPIO.OUT)
GPIO.output(25,False)
3. Thisisfollowedbydefiningthetemplatelocation:
urls=('/','index')
render=web.template.render('templates')
4. Thebuttonsusedinthewebpagearealsodefined:
appliances_form=form.Form(
form.Button("appbtn",value="tree",class_="btntree"),
form.Button("appbtn",value="Santa",class_="btnSanta"),
form.Button("appbtn",value="audio",class_="btnaudio")
)
Inthisexample,threebuttonsareused,avalueisassignedtoeachbuttonalong
withtheirclass.
Inthisexample,weareusingthreebuttonsandthenameisappbtn.Avalueis
assignedtoeachbuttonthatdeterminesthedesiredactionwhenabuttonis
clicked.Forexample,whenaChristmastreebuttonisclicked,thelightsneedto
beturnedon.Thisactioncanbeexecutedbasedonthevaluethatisreturned
duringthebuttonpress.
5. Thehomepageisdefinedintheindexclass.TheGETmethodisusedtorenderthe
webpageandPOSTforbuttonclickactions.
classindex:
defGET(self):
form=appliances_form()
returnrender.index(form,"RaspberryPiChristmaslights
controller")
defPOST(self):
userData=web.input()
ifuserData.appbtn=="tree":
globalstate
state=notstate
elifuserData.appbtn=="Santa":
#dosomethinghereforanotherappliance

elifuserData.appbtn=="audio":
os.system("mpg321/home/pi/test.mp3")
GPIO.output(25,state)
raiseweb.seeother('/')
InthePOSTmethod,weneedtomonitorthebuttonclicksandperformanaction
accordingly.Forexample,whenthebuttonwiththetreevalueisreturned,we
canchangetheBooleanvalue,state.Thisinturnswitchesthestateofthe
GPIOpin25.Earlier,weconnectedthepowertailswitchtopin25.
6. Theindexpagefilethatcontainstheformandbuttonsisasfollows:
$defwith(form,title)
<html>
<head>
<title>$title</title>
<linkrel="stylesheet"type="text/css"href="/static/styles.css">
</head>
<body>
<P><center><H1>ChristmasLightsController</H1></center>
<br/>
<br/>
<formclass="form"method="post">
$:form.render()
</form>
</body>
</html>
7. Thestylesofthebuttonsusedonthewebpagearedescribedasfollowsin
‘styles.css‘:
form.btntree{
margin-left:200px;
margin-right:auto;
background:transparenturl("images/topic_button.png")no-repeattop
left;
width:186px;
height:240px;
padding:0px;
position:absolute;
}
form.btnSanta{
margin-left:600px;
margin-right:auto;
background:transparenturl("images/Santa-png.png")no-repeattop
left;
width:240px;
height:240px;
padding:40px;
position:absolute;
}
body{background-image:url('bg-snowflakes-3.gif');}
8. Thewebpagelookslikewhatisshowninthefollowingfigure:

Yay!WehaveaChristmaslightscontrollerinterface.

Objectivecomplete–minidebriefing
WehavewrittenasimplewebpagethatinterfacesaChristmastreeandRGBtreeand
playsMP3files.Thisisagreatprojectforaholidayweekend.
ItispossibletoviewthiswebpagefromanywhereontheInternetandturnthese
applianceson/off(FansoftheTVshowBigBangTheorymightlikethisidea.Astep-by-
stepinstructiononsettingitupisavailableat
http://www.everydaylinuxuser.com/2013/06/connecting-to-raspberry-pi-from-
outside.html).

Missionaccomplished
Inthisproject,wehaveaccomplishedthefollowing:
InterfacingtheRGBmatrix
InterfacingACappliancestoRaspberryPi
Designofawebpage
Interfacingdevicestothewebpage
Weusedexamplestodemonstratethecapabilitiesofenhancingthefestivedecoration
usingtheRaspberryPi.Itisdefinitelypossibletoenhancethisprojectusingourcreativity.

Chapter5.InternetofThingsExample–
AnE-mailAlertWaterFountain
Inthisproject,wewillworkonbuildingawaterfountainenabledbyRaspberryPi.We
willalsodecoratethefountainwithlightingthatcanbecontrolledwiththehelpofaweb
interface.Thisfountainwillenableustoreceiveemailalertsaswell.Itisagreatexample
toenabletheInternetofThingsusingtheRaspberryPi.

Missionbriefing
WewilllearntobuildafountainandcontrolitusingaRaspberryPi.Wewillbuildaweb
pagebasedontheFlaskframeworkandtrytocontrolthelightingarrangementonthe
fountain.Wewilldemonstratehowadecorativepiece,suchasatabletopfountain,canbe
usedtoreceivee-mailortweetalerts.
FollowingisanimagethatshowsafountaincontrolledbytheRaspberryPi:
Whyisitawesome?
Tabletopfountainsaresoothingineffectandplayagreatroleinrelievingstress.Itisfun
tohaveaRaspberryPiplayagreatroleincontrollingourbehavior.Italsoenablesusto
remindourselvestocheckoure-mails/Twitterfeedsonaregularbasis.

Yourobjectives
Inthisproject,wewillbuildthetabletopfountaininthefollowingsteps:
Assemblingthefountain
InstallationoftheFlaskframeworkandinterfacingthefountain
ControllingRGBLEDsfromthewebpage
Settingupe-mailalertsforthefountain

Missionchecklist
Atabletopfountaincanbebuiltinseveralways,anditispossibletoincludealotof
decorativepiecestoenhancetheappeal.Theitemslistedinthefollowingtableincludea
basiclistofitemstodemonstrateafountaincontrolledbyaPi:
Item Cost
(approximate)
ADIYfountainkit,includingcontainer,pebbles,andsoon(fromhomeimprovementcompaniessuch
asHomeDepotoraDIYproductsuppliersuchasAmericanScienceandSurplus). 30USD
Asubmersiblepump(source:sameastheprecedingkit). 10USD
AdigitallyaddressableRGBLEDstrip(AdafruitorBanggood.LinktosourcesofLEDprovidedin
thepreviousproject).
16.00/meter
USD
Awoodendowelrod(source:anyhobbystore). 2.00USD
Anacrylicsheet(source:anyhomeimprovementstore). 12.00USD
Mountingaccessories(scotchtapeandsoon). 10.00USD
Inthistask,wewillgetstartedwithassemblingthewaterfountainforourproject.The
fountainassemblyisasimplethree-stepprocess.Thereareseveralresourcesavailable
onlinetobuildadesktopfountainusingrawmaterialsavailableathome(asomewhat
simpletutorialonbuildingatabletopfountainusingasubmersiblefromapetstore:
http://www.instructables.com/id/Table-Fountain/).Wewilllookintoanexampleusingan
off-the-shelfDIYfountainkitinthisstep.

Prepareforliftoff
IfthereaderisnotabletogainaccesstoaDIYfountainkit,thefollowingitemsare
required:
Abasin(preferablyopaquesothatitdiffuseslight)
Afountain/submersiblepumpfromapetshop
Pebblesandgravel
Decorativeaccessoriesavailablefromaquariums
Theseitemscouldbepurchasedfromahobbyshoporanaquariumsuppliesstore.

Engagethrusters
1. TheDIYtabletopfountainkitcomeswithabasinthathasaprovisiontorunthe
fountainpump’scableoutofthebasinthroughasealedoutlet.
Abasinwithasealedelectricaloutlet
2. Next,wewillplacethefountainpumpinsidethebasin.
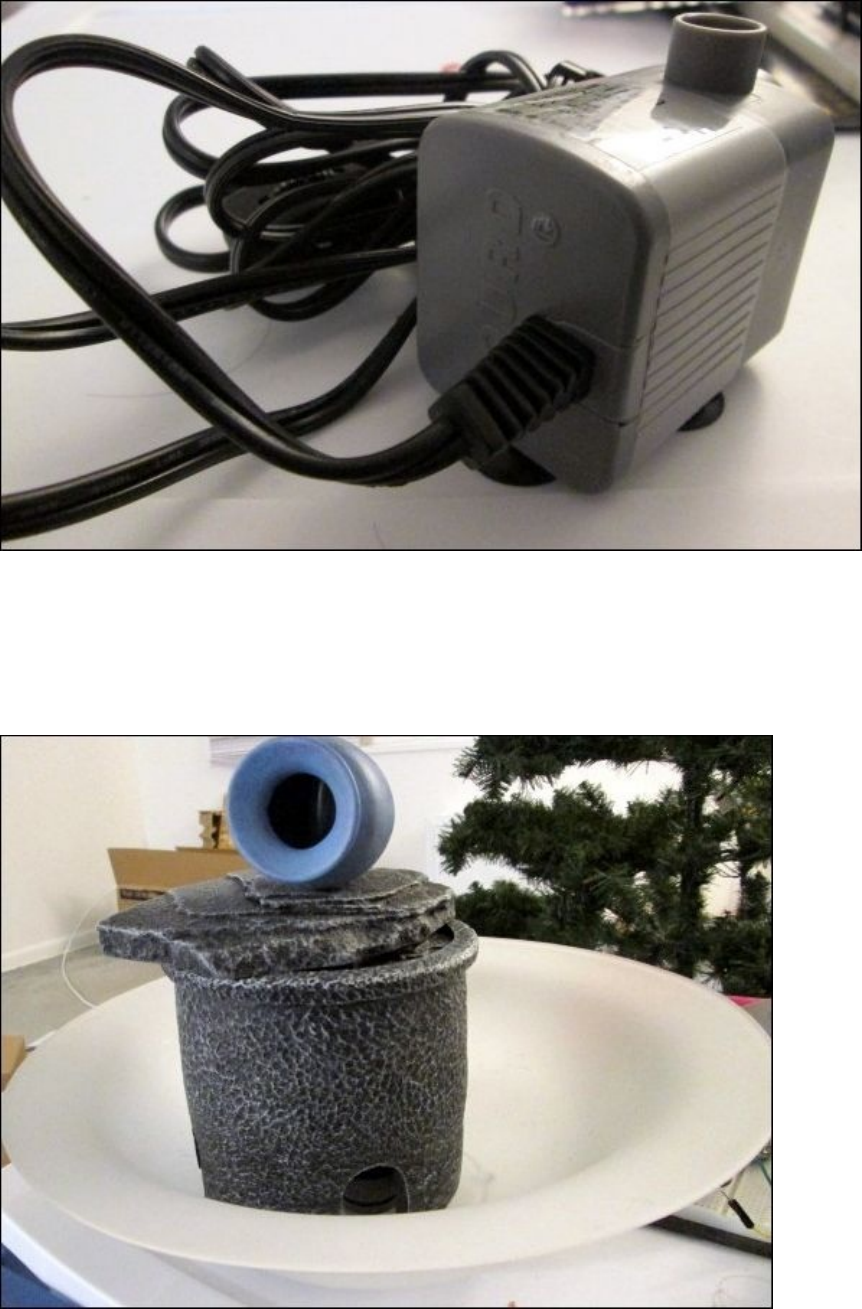
Fountainpumptobeplacedinsidethebasin
3. Wewillnowcoverthepumpwithacoverandplaceadecorativepot.
Fountainpumpcoveredwithadecorativepot
4. Wecanfillthesidesofthepumpwithgravel,pebbles,smallpiecesofrock,andother
decorativeaccessories.Wethenturnonthepumpandtestthewaterflowtomake
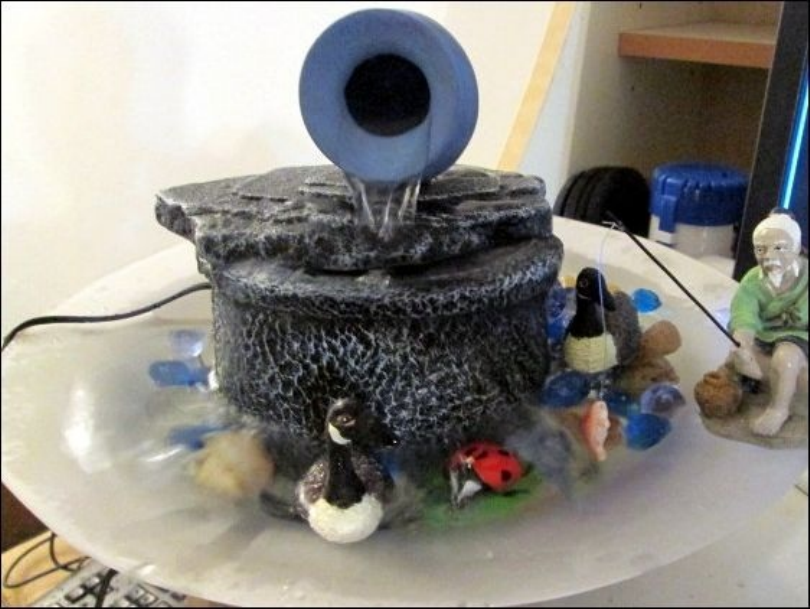
surethatwedon’tspillwaterandmakeamess.
Afountainwithdecorativeaccessories
5. We’llwrapthefountainwithadigitallyaddressableRGBLEDstripandwearedone
withassemblingthefountainwhenwepowerthefountainalongwiththeRGBLEDs.

AwaterfountainstrappedwithadigitallyaddressableRGBLED
Objectivecomplete–minidebriefing
Inthefirststep,wefinishedassemblingthefountainandtheRGBLEDstrip.Wewill
moveontoinstallawebframeworktoimplementlightingcontrolfortheframework,
whichwecanchangebasedonourneeds.
InstallationoftheFlaskframework
Inthistask,wewillinstalltheFlaskframeworkontheRaspberryPiandcompleteatest
webpageontheRaspberryPi.WewillusetheFlaskframeworktocontroltheRGBLED
strip.
Prepareforliftoff
Inthepreviousprojects,weinstalledpythonmoduleinstallerssuchaspipor
easy_install.Ifeitherofthesetoolsisn’tinstalled,theycanbeinstalledbyexecutingthe
followingcommand:
sudoapt-getinstallpython-pip
Alternatively,youcanusethefollowingcommand:
sudoapt-getinstallpython-setuptools.
Next,wewillworkoninstallingtheFlaskframeworkandthefirstexample.
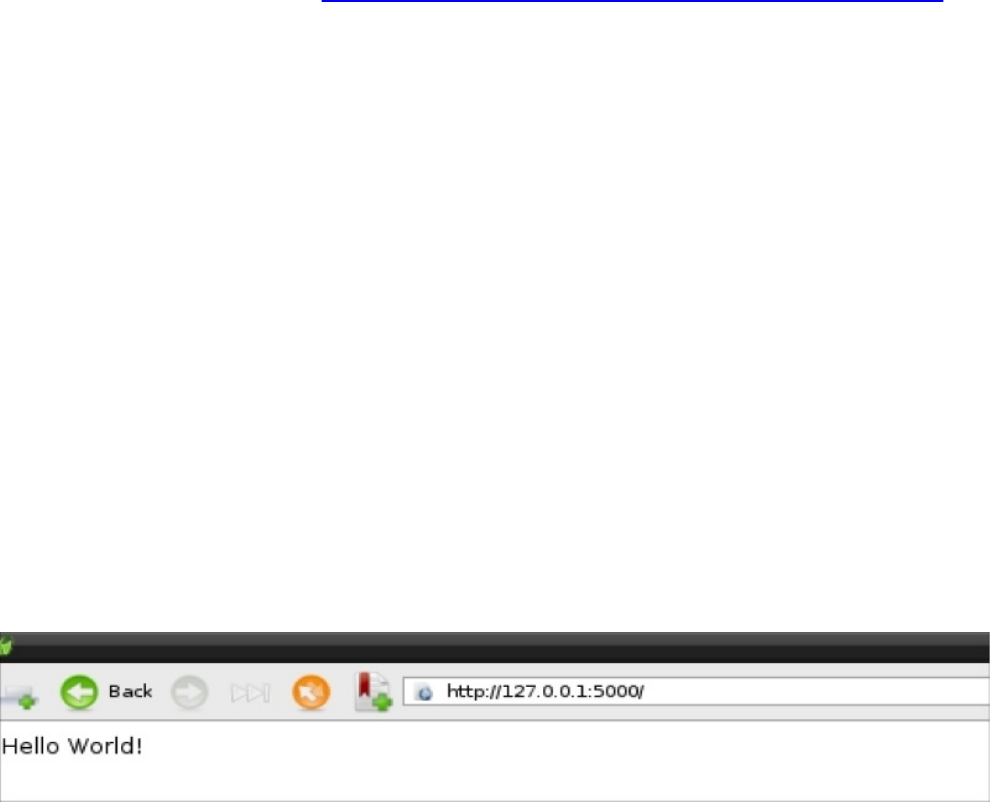
Engagethrusters
1. TheFlaskframeworkisinstalledusingthefollowingcommand:
sudoeasy_installflask
2. Oncetheinstallationiscomplete,wewilluseanexampleavailablefromtheFlask
frameworkdocumentation(http://flask.pocoo.org/docs/0.10/quickstart/#quickstart)
andcreateaPythonscript(usingPythonIDLE’seditor):
fromflaskimportFlask
app=Flask(__name__)
@app.route("/")
defhello():
return"HelloWorld!"
if__name__=="__main__":
app.run()
3. WhenweexecutethesavedfileandexecutethePythonscript,thewebserveris
launchedlocallyontheRaspberryPi:
pythonhelloworld.py
*Runningon
http://127.0.0.1:5000/
4. ThewebserverisonlyvisibletotheRaspberryPiandawebpage(webaddress:
http://127.0.0.1:5000)islaunchedontheRaspberryPi’sbrowser,whichwill
showthetextHelloWorld!.
AnHelloWorldexampleontheFlaskframework-basedwebserver
5. Inordertomakethewebservervisibletoalldevicesonthelocalnetwork,weneed
tochangethefollowinglineinthePythonscript:
app.run('0.0.0.0')
Objectivecomplete–minidebriefing
Inthistask,wearedoneinstallingtheFlaskframeworkforcontrollingtheframework.We
willmoveontothenexttasktosetupthings.

ControllingRGBLEDsfromawebpage
Inthistask,wewilllearnhowtocontroltheRGBLEDsfromawebpage.Wewillusethe
digitallycontrolledRGBLEDstripfromAdafruitIndustries.Wewillinterfaceacolor
pickerandsetthecoloroftheRGBstrip.Thecolorpickerwheelwasborrowedfrom
circadianlightingproject,ChrisFane,distributedunderMITlicense.
(https://github.com/rasathus/circadianLighting).Wewillmodifythiscodesampletosuit
ourneeds.We’llalsousetheLPD8806librarywrittenbyAdamHaile,distributedunder
GPLv3license.(https://github.com/adammhaile/RPi-LPD8806.git).
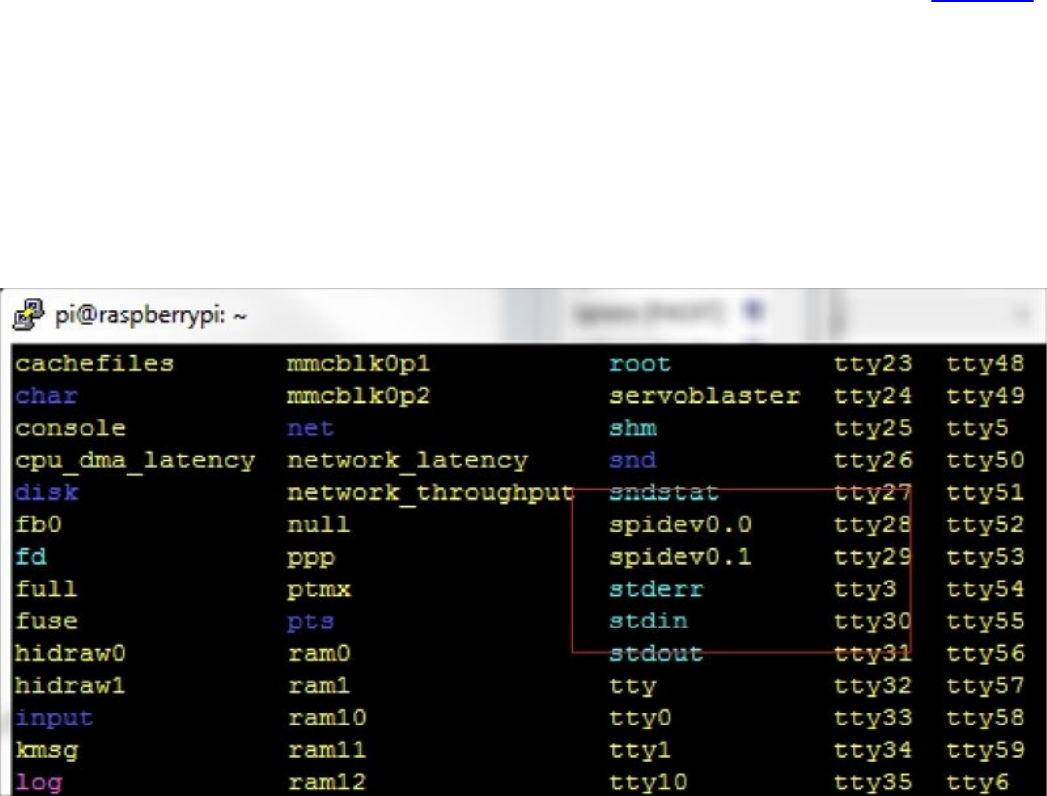
Prepareforliftoff
SinceweareusingthedigitallyaddressableRGBLEDstrip,weneedtoenabletheSPI
driversontheRaspberryPi.
Note
EnablingofSPIdriversisnotnecessaryiftheyouhaveinstalledOccidentalisinProject2,
ARaspberryWebIDEExample.
Thefollowingfileneedstobemodified:/etc/modprobe.d/raspi-blacklist.conf.
Theblacklistspi-bcm2708lineneedstobecommentedout(adda#atthestartofthe
line).Thenwegetthedriversworkingbyexecutingthefollowingcommand:
sudomodprobespi_bcm2708
TheSPIdevicescanbefoundlistedinthe/devdirectory:
SPIdeviceslistedinthedirectory
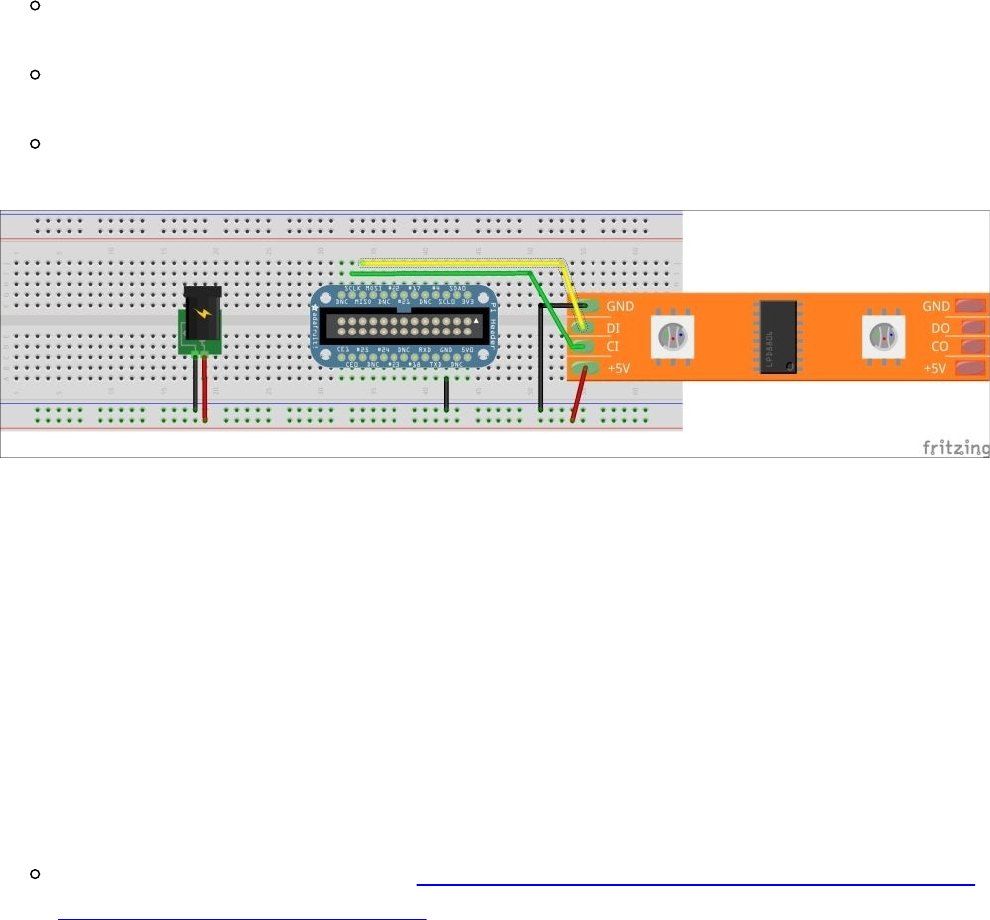
Engagethrusters
1. TheRaspberryPineedstobeconnectedtotheSPIinterfaceoftheRaspberryPi.The
RGBLEDstriphastobepoweredbya5VDCadapter.TheclockpinCIneedstobe
connectedtotheclockpinoftheRaspberryPi(pin14,SCKpinoftheRaspberryPi).
TheclockpinCIneedstobeconnectedtotheclockpinoftheRaspberryPi(pin
14oftheGPIOheader,SCKpinoftheRaspberryPi).
ThedatapinDI(DataIn)needstobeconnectedtotheMOSIpin(pin12ofthe
GPIOheader)oftheRaspberryPi.
TheGND(groundpin)oftheRGBLEDstripneedstobeconnectedtothe
GND(groundpin)oftheGPIOheaderoftheRaspberryPi.
ConnectingtheRGBLEDStriptotheRaspberryPiusingaPiCobbler
2. Inordertocontrolthelightingarrangement,let’smakeuseoftheCircadianlighting
project’sPythonscriptandAdamHaile’sLPD8806library.Wewillgetstartedby
importingtheFlaskframeworkandtheLPD8806library.Wewillinitializethe
LPD8806librarybysettingthenumberofdigitallyaddressableRGBLEDsusedin
thisproject:
num=64
led=LEDStrip(num)
Thecircadianlightingproject(http://rasathus.blogspot.com/2013/02/nasa-style-
circadian-lighting-wrap-up.html)usesacolorpicker(basedonRaphael.js)and
acolorissetonmouseclick.Theclicksonthecolorpickerwheelareconverted
intoRGBvaluesasfollows:
rgb_array=[0,0,0]
HEX='0123456789abcdef'
HEX2=dict((a+b,HEX.index(a)*16+HEX.index(b))forainHEXfor
binHEX)
defrgb(triplet):
triplet=triplet.lower()
rgb_array[0]=HEX2[triplet[0:2]]
rgb_array[1]=HEX2[triplet[2:4]]
rgb_array[2]=HEX2[triplet[4:6]]
return
(HEX2[triplet[0:2]],HEX2[triplet[2:4]],HEX2[triplet[4:6]])
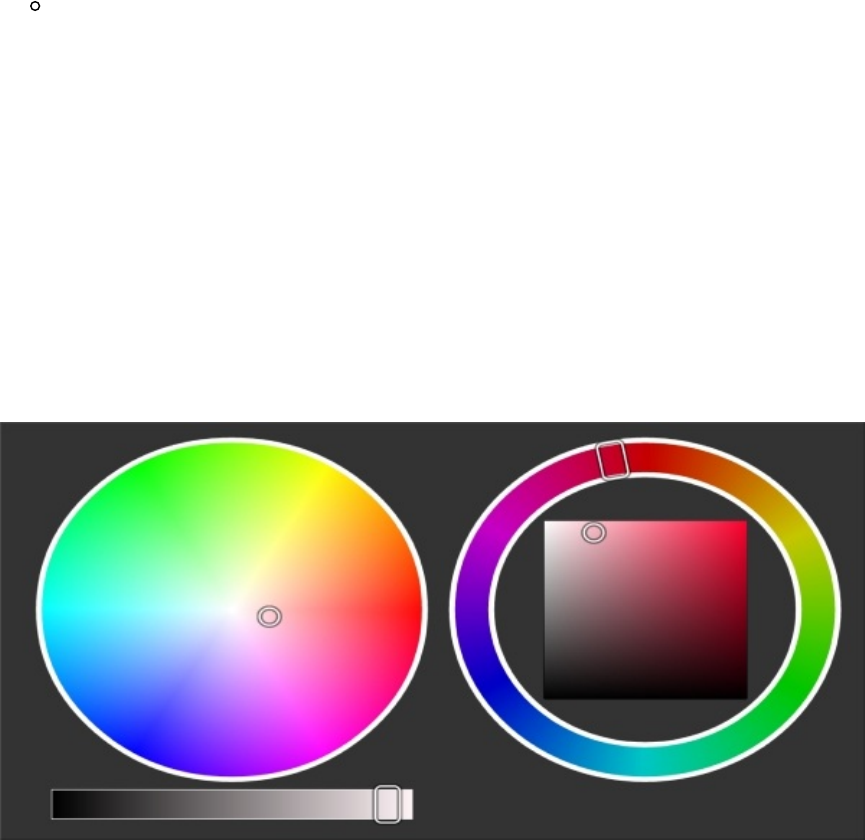
deftriplet(rgb):
returnformat((rgb[0]<<16)|(rgb[1]<<8)|rgb[2],'06x')
Wheneveraclickisdetected,thepostedhexvaluesfromthewebserverare
detectedasfollows:
@app.route('/set/<hex_val>',methods=['GET','POST'])
defsend_command(hex_val):
rgb_val=rgb(hex_val)
3. TheRGBvaluesarepassedtoLPD8806viatheRaspberryPi’sSPIinterface:
led.fill(Color(rgb_val[0],rgb_val[1],rgb_val[2],0.98))
led.update()
4. Now,whenweexecutethescriptavailablealonginthewebserversamplefolder,we
shouldbeabletolaunchawebserverthatwilldisplayacolourpickerasshowninthe
followingdiagram:
Aflaskframework-basedRGBinterface
Objectivecomplete–minidebriefing
Inthistask,wefinishedsettingupthewebserverthatcontrolsthefountain.Inthenext
task,wewillreviewsettingupe-mailalertsthroughcolourchangesonthefountain.
Itispossibletocontrolthelightsofthefountainbasedonasongbeingplayedonthe
RaspberryPi.Howcanthisbeachieved?Visitthisbook’swebsiteforsomeclues.
Setupofthee-mailalertsinthefountain
Inthistask,wewillreviewsettingupe-mailalertsfromGmailaccounts.Wecanblinkan
LED(asshowninthisstep)orflashtheRGBLEDstrip(thishastobeexecutedbythe
reader)whenane-mailofaspecificcategoryisreceived(forexample,worke-mail).
Prepareforliftoff
Wewillgetstartedbyinstallingthepython-feedparsertool.Googleprovidesaread-only
inboxfeedandwewillmakeuseofthefeedparsermoduletodeterminewhetherwe
receivedanynewe-mails.
sudoapt-getinstallpython-feedparser

Engagethrusters
1. Inordertologinandparsethroughthee-mailfeed,wegetstartedbyimportingthe
feedparsermodule:
importsys
importfeedparser
2. Wewilldefinethevariables,includingtheGmailusernameandpassword(changed
togenericnamesbelow)alongwiththefunctionthatretrievesallunreade-mails.
Refertothefollowingexample:
Note
Inthisexample,wearejustretrievingthecountofanynewunreade-mails.Itis
possibletoparseandidentifye-mailswithspecificlabels.Wewillleavethattothe
reader.Formoreinformation,referto
https://developers.google.com/gmail/gmail_inbox_feed.
newEmail=""
username="username@gmail.com"
password="password"
proto="https://"
server="mail.google.com"
path="/gmail/feed/atom"
defmail():
email=
int(feedparser.parse(proto+username+":"+password+"@"+server+path)
["feed"]["fullcount"])
returnemail
TheprecedingfunctionhasbeenborrowedfromtheWonderHowTowebsite
(http://null-byte.wonderhowto.com/how-to/make-gmail-notifier-python-
0132845/).
Let’ssavethisfunctioninaseparatefileandtrytocallitfromanotherfile.For
example,thefunctionhasbeensavedinafilecalledparser.py.
3. Now,wewillimporttheparsermodulebyopeninganotherfileasamoduleand
implementthee-mailnotifier.Inthisfile,wewillblinkanLEDwhenthereisanew
e-mail.WewillstartbyimportingtheparsermoduleandRPi.GPIO:
importparser
importtime
importRPi.GPIOasgpio
Wewillgetstartedbysettingtheoutputpinsforthee-mailnotifierexample:
gpio.setwarnings(False)
gpio.setmode(gpio.BCM)
gpio.setup(17,gpio.OUT)
Now,we’llcheckfornewe-mailsandblinkanLEDifthereisanunreade-mail:
whileTrue:
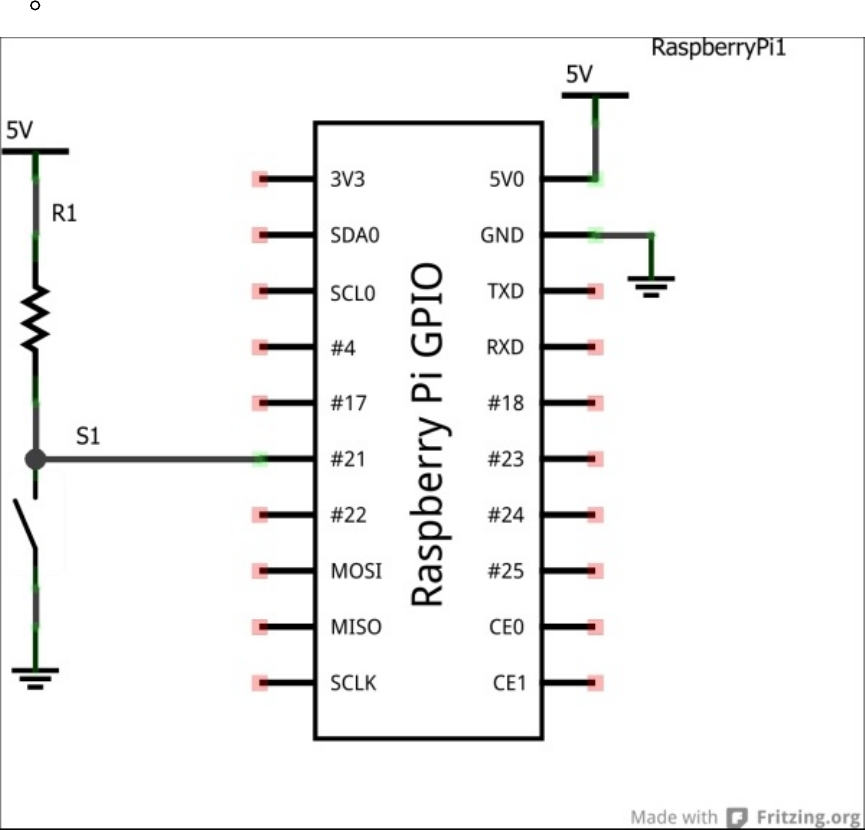
mail=parser.mail()#checkforemail
count=0
ifmail>0:#printfornewemails
print(mail)
print("newemails\n")
whilecount<10:
count+=1
gpio.output(17,gpio.HIGH)#blinkLEDiftherearenewemails
time.sleep(1)
gpio.output(17,gpio.LOW)
time.sleep(1)
gpio.output(17,gpio.LOW)#setLEDtolow
else:
time.sleep(10)#repeatcyclefor10seconds
TheLEDneedstobeconnectedasshowninthefollowingfigure:
ARaspberryPie-mailnotifier–SchematiccreatedwithFritzing,RaspberryPi
Library.Courtesy:Adafruit
Note
Inthistask,wejustmadeanLEDblinkwhenanewe-mailisreceived.Youshouldtryto
importtheLPD8806moduleandflashtheRGBLEDstrip.
Objectivecomplete–minidebriefing
Inthistask,wecompletedthesetupofthee-mailalertsaswellasauserinteraction
elementofblinkinganLED.Thisbringsustotheendoftheassemblyandsetupofthe
fountain.
Missionaccomplished
Inthisproject,weassembledafountain,awebserverframework,controlledtheRGB
LEDs,andsetupe-mailalerts.Theyshouldlookprettyaccordingtotheuser’screativity.
Hotshotchallenge
Inthisproject,wesetupe-mailalertswiththedisplay.IsitpossibletosetTwitteralerts?
Chapter6.RaspberryPiasaPersonal
Assistant
Inthisproject,wewillbuildatoolusingRaspberryPithatactsasapersonalassistant.
Thisprojectpresentsideastoovercomedifficultiesencounteredinourday-to-daylives
(forexample,keepingtrackofdailyappointments,payingbillsontime),overcome
procrastination,oreaseourroutinestressinducingactivitiesbyautomatingthem.
Missionbriefing
Inthisproject,webuildsomethingthathelpsinsimplifyingourday-to-dayactivities,ease
ourburdeninperformingmundanetasks,andremindusaboutimportant
appointments/tasksaswellastrackingthem.Wewillworkonimplementingasolutionfor
eachpossiblescenario(forexample,wewillimplementasolutiontochecke-mailsand
reviewasolutiontocreateanalertforanewe-mail).
Whyisitawesome?
Wedoourbesttobesuccessfulinourcareerandleadahealthylifestyle.Whilewriting
thisbook,wehadtocomeupwithaplantoovercomeourprocrastinationandtrackour
taskseffectively(especially,deliveringthedraftsofeachprojectontime!).

Yourobjectives
Inthisproject,wewillaccomplishthefollowing:
Settingupthee-mailfeedparser
Settinguptheparserforremindersandevents
Designinganenclosureforthepersonalassistant
Settinguptheassemblyforthedishmonitor
Settingupsensorsforthekeyalertsystem

Missionchecklist
Inthistask,wewillworkoninstallingalltoolsandPythonmodulesusedinthisproject:
1. Beforewestartinstallingthetoolsrequiredforthisproject,ifnecessary,youcan
updatetherepositoriesandpackagelistsasfollows:
sudoapt-getupdate
2. Wewillstartwithinstallingpython-feedparser.Weusedthepython-feedparser
toolinthepreviousprojectandcreatede-mailalertsforthewaterfountain.Ifyou
skippedthepreviousproject,thetoolcanbeinstalledasfollows:
sudoapt-getinstallpython-feedparser
3. WewilluseGoogleCalendartoorganizeeventsandappointmentsasanexample.We
needtoinstallthepython-gdatatooltomakeuseoftheGoogleAPIs:
sudoapt-getinstallpython-gdata
4. AnotherimportanttoolrequiredforthisprojectisOpenCV(http://opencv.org/).
OpenCVisanopensourcecomputervisionframeworkdevelopedbyIntel.OpenCV
iswidelyusedbyresearchersandhobbyistsinapplicationssuchasobject
recognition,machinevisionapplicationssuchascomponentinspectionona
manufacturingline,andmore.
Note
Itisimportanttoknowthatittakesatleastfourhourstofinishthecompilationof
OpenCV.
TheinstallationprocedureforOpenCVontheRaspberryPihasbeenborrowed
fromhttp://mitchtech.net/raspberry-pi-opencv/andtheOpenCVinstallation
guideforLinux
(http://docs.opencv.org/doc/tutorials/introduction/linux_install/linux_install.html).
Beforewegetstartedwiththeinstallationprocess,thedependenciesfor
OpenCVneedtobeinstalled.Thedependenciescanbeinstalledusingthe
followingshellscriptavailablealongwiththisproject:
shOpenCVInstall.sh
Oncethedependencieshavebeeninstalled,wecangetstartedwiththeOpenCV
installation.ThesourcefilestoinstallOpenCVcanbedownloadedfrom
http://sourceforge.net/projects/opencvlibrary/files/opencv-unix/2.4.10/opencv-
2.4.10.zip.
Weneedtoextractthedownloadedsource:
unzipopencv-2.4.10.zip
ThenextstepisthemakefilegenerationusingCMake.Thelibraryhastobe
compiledwithPythonsupportthatenablesapplicationdevelopmentusinga
Pythonscriptlibraryandsupport.
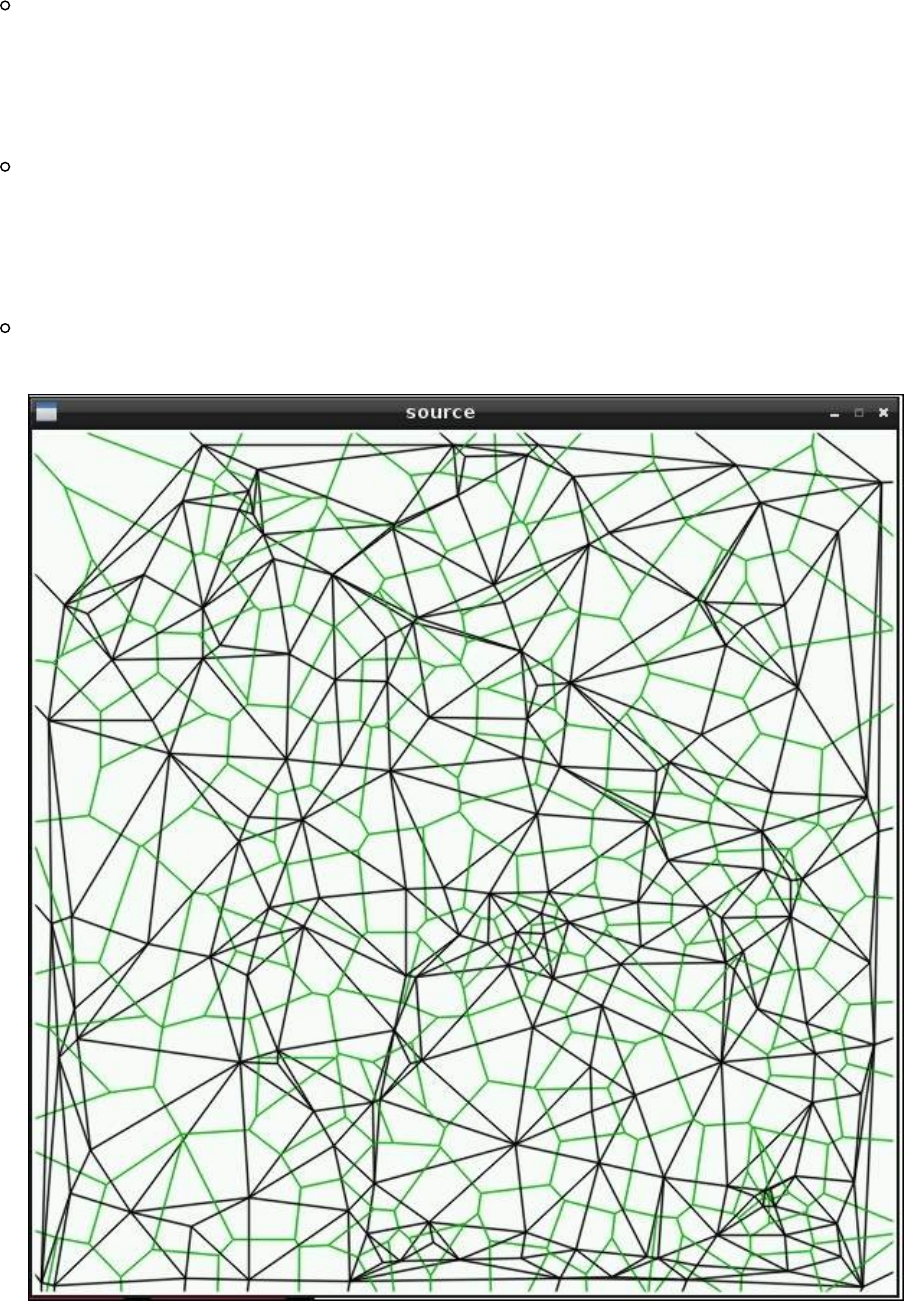
cdopencv-2.4.5
mkdirbuild
cdbuild
cmake-DCMAKE_BUILD_TYPE=RELEASE-D
CMAKE_INSTALL_PREFIX=/usr/local-DBUILD_NEW_PYTHON_SUPPORT=ON-D
BUILD_EXAMPLES=ON
Oncethemakefilehasbeengeneratedsuccessfully,OpenCVcanbebuiltand
installedasfollows:
make
sudomakeinstall
Oncethelibraryhasbeeninstalled,weneedtotestwhethertheinstallationwas
successfulbyexecutingoneofthePythonsamplesavailableinOpenCV:
cd~/opencv-2.4.5/samples/python
pythondelaunay.py
Iftheinstallationwassuccessful,weshouldabletolaunchtheDelaunay
triangulationsample.
Delaunaytriangulation–OpenCV
5. NowthatwehaveinstalledOpenCV,wewillproceedtobuildourprojectoverthe
forthcomingtasksoftheproject.
Settingupthee-mailfeedparser
Inthistask,wewilllearntosetupane-mailfeedparserandblinkanLED.Asan
example,wewillchecknewe-mailsinaGmailaccount.
Prepareforliftoff
Sincewealreadyinstalledthepython-feedparsermodule,wewillgetstartedwith
settingupthemailparser.Wewillbuildeachmoduleofourprojectasaseparateexample.

Engagethrusters
1. UsingPythonIDLE,let’sgetstartedwithwritingapythonscripttoachievethistask.
Wewillgetstartedbyimportingthefeedparsermodule:
importsys
importfeedparser
2. Wewilldefinethefunctionrequiredtochecke-mails:
newEmail=""
username="username@gmail.com"
password="password"
proto="https://"
server="mail.google.com"
path="/gmail/feed/atom"
defmail():
email=
int(feedparser.parse(proto+username+":"+password+"@"+server+path)
["feed"]["fullcount"])
returnemail
Note
TheprecedingfunctionhasbeenborrowedfromtheWonderHowTowebsite
(http://null-byte.wonderhowto.com/how-to/make-gmail-notifier-python-0132845/).
Let’ssavethisfunctioninaseparatefileandtrytocallitfromanotherfile.For
example,thefunctionhasbeensavedinafilecalledparser.py.
Wewillimportparser.pyinanotherfileasamoduleandimplementthee-mail
notifier.Inthisfile,wewillblinktheLEDwhenthereisanewe-mail.Wewill
startbyimportingtheparsermoduleandRPi.GPIO:
importparser
importtime
importRPi.GPIOasgpio
Wewillgetstartedbysettingtheoutputpinsforthee-mailnotifierexample:
gpio.setwarnings(False)
gpio.setmode(gpio.BCM)
gpio.setup(17,gpio.OUT)
Wewillcheckfornewe-mailsandblinkanLEDifnecessary:
whileTrue:
mail=parser.mail()#checkforemail
count=0
ifmail>0:#printfornewemails
print(mail)
print("newemails\n")
whilecount<10:
count+=1
gpio.output(17,gpio.HIGH)#blinkLEDiftherearenewemails
time.sleep(1)
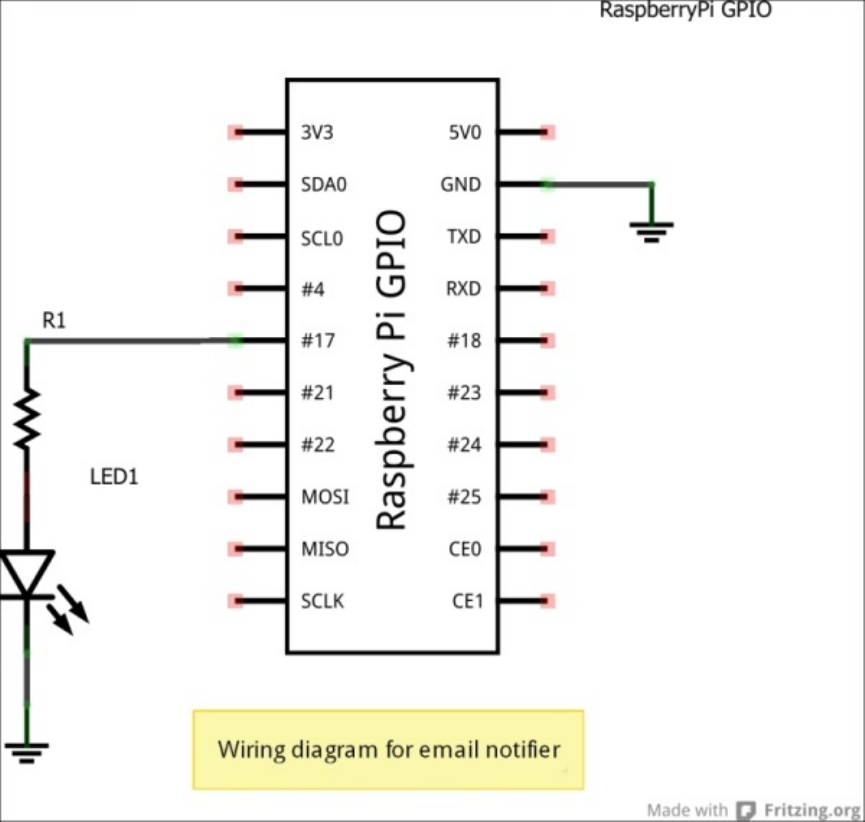
gpio.output(17,gpio.LOW)
time.sleep(1)
gpio.output(17,gpio.LOW)#setLEDtolow
else:
time.sleep(10)#repeatcyclefor10seconds
3. TheLEDneedstobeconnectedasshowninthefollowingdiagram:
RaspberryPiemailnotifier–SchematiccreatedwithFritzing,RaspberryPiLibrary
Settinguptheparserforremindersand
events
Inthistask,wewillimplementamodulethatwillblinkanLEDtoremindusabout
importanteventsandappointments.
Prepareforliftoff
TheGoogleDataPythonclientlibraryisrequiredforthistask.Youalsohavetosavesome
tasksinyourcalendartotesttheimplementation.

Engagethrusters
1. UsingthePythonIDLE’seditor,let’sgetstartedbycreatinganewfilecalled
calendars.py:
importgdata.calendar.service
importgdata.service
importgdata.calendar
importtime
2. WecangetstartedbydefiningaGoogleCalendarobject.Wewilldefinethe
usernameandpasswordforourGoogleaccount:
calendar_service=gdata.calendar.service.CalendarService()
calendar_service.email='username@gmail.com'
calendar_service.password='password'
calendar_service.ProgrammaticLogin()
3. Thecalendar_queryfunctionperformsaqueryforcalendareventsbydefininga
timeframeasfollows:
query=
gdata.calendar.service.CalendarEventQuery('default','private','full')
query.start_min='2014-01-01'
query.start_max='2013-05-31'
feed=calendar_service.CalendarQuery(query)
returnfeed
4. Let’screateanotherPythonscriptandtestthefunctionalityofthecalendarmodule
(calendar.py).Wewillbeginbyimportingthepreviousdefinitionasamodule:
importcalendar
feed=calendar.calendar_query()
Now,wewillprintthedetailsoftheretrievedevents:
fori,an_eventinenumerate(feed.entry):
print'\t%s.%s'%(i,an_event.title.text,)
fora_wheninan_event.when:
print'\t\tStarttime:%s'%(a_when.start_time,)
print'\t\tEndtime:%s'%(a_when.end_time,)
TheprecedingexamplewasborrowedfromthedocumentationoftheGoogle
CalendarAPI.Whenexecuted,theoutputwouldbesomethinglikethe
following:
0.Sai
Starttime:2013-05-12T11:30:00.000-05:00
Endtime:2013-05-12T12:30:00.000-05:00
1.EventatFiregrillhouse
Starttime:2013-04-24T18:30:00.000-05:00
Endtime:2013-04-24T19:30:00.000-05:00
2.ChicagoHardwareStartupMeetup-FIRSTMEETING
Starttime:2013-01-23T18:30:00.000-06:00
Endtime:2013-01-23T21:00:00.000-06:00

3.FreescaleSABRELiteBoard
Starttime:2013-01-30T12:00:00.000-06:00
Endtime:2013-01-30T13:00:00.000-06:00
5. SinceweareabletoretrieveandparsetheeventsontheGoogleCalendar,wewilltry
toblinkanLEDtoremindusabouttheeventsandappointments.
WewillgetstartedwithimportingtheRPi.GPIOmoduleinthesamefile:
importcalendar_special
importtime
importdatetime
importRPi.GPIOasgpio
Sinceweusedpin17forthee-mailalerts,let’susepin24forremindersand
events.
TheeventscanberetrievedfromGoogleCalendarasfollows:
feed=calendar_special.calendar_query()#retrieveeventsfrom
calendar
fori,an_eventinenumerate(feed.entry):
fora_wheninan_event.when:#Weretrievethestarttimeand
endtimeforeachappointment/event
try:
start_time=
datetime.datetime.strptime(a_when.start_time.split(".")[0],"%Y-%m-
%dT%H:%M:%S")
end_time=
datetime.datetime.strptime(a_when.end_time.split(".")[0],"%Y-%m-
%dT%H:%M:%S")
exceptValueError:
print(ValueError)
continue
current_time=datetime.datetime.now()
ifend_time>current_time:#Hastheeventended?
print'\t%s.%s'%(i,an_event.title.text,)
print'\t\tStarttime:%s'%(a_when.start_time,)
print'\t\tEndtime:%s'%(a_when.end_time,)
Wewillfilteroutallupcomingeventsandlistthemwithdetails.Wewillcheck
whetherwehavesetanalertfortheevent.Ifindeedtherewasanalert,wewill
blinkanLEDuntiltheeventhasended:
forreminderina_when.reminder:
ifreminder.method=="alert"\
andstart_time-datetime.timedelta(0,60*int(reminder.minutes))
<current_time:
print'\t%s.%s'%(i,an_event.title.text,)
print'\t\tStarttime:%s'%(a_when.start_time,)
print'\t\tEndtime:%s'%(a_when.end_time,)
count=0
gpio.output(24,gpio.HIGH)
time.sleep(1)
gpio.output(24,gpio.LOW)
time.sleep(1)

Designinganenclosuredesignforthe
personalassistant
Inthistask,wewilllookintotheenclosuredesignfortheproject.Inordertomakethings
simple,wewilluseadesignthatisopensource.Theenclosureisonethatcanbe
assembledinfewsimplesteps.ThisenclosurewasdesignedbyMichaelMilazzo
(http://makezine.com/2013/01/18/laser-cutting-a-glueless-acrylic-project-box/).
Prepareforliftoff
Thisenclosurecanbefabricatedinfewsimplestepsusingalasercutter.Thedesign
availablealongwiththisprojectinthePDFformatcanbemodifiedusingadesigntool
suchasInkscapeorAdobeIllustrator.
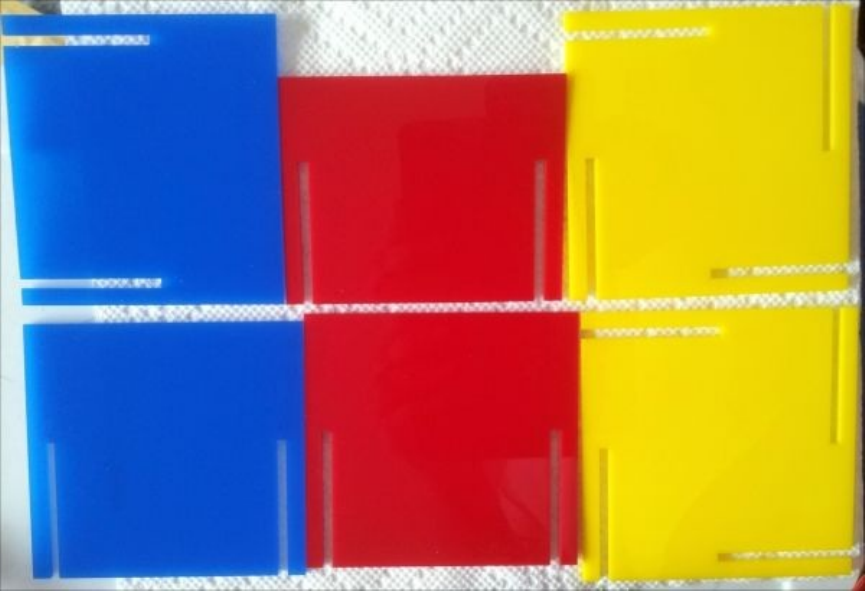
Engagethrusters
1. Theenclosuredesignismeanttobemanufacturedusingalasercutter.Sincelaser
cutterscanbeeasilyaccessedfromhackerspaces,openworkshops,andsoon,it
shouldbeeasytomakethisenclosure.
2. Alasercutteriseasytousewhenweadheretosafetypractices.Youmustundergo
trainingtooperatealasercutter.Thefilesusedforlasercuttingareavailablefromthe
precedinglink.
3. Oncethelasercuttingoperationiscomplete,thepartsoftheenclosurelooklikethe
oneshowninthefollowingimage:
AGluelessbox
4. Theassemblyoftheenclosureisquiteintuitive.Wewillmakeuseofthisenclosure
inthelaterpartofthisproject.
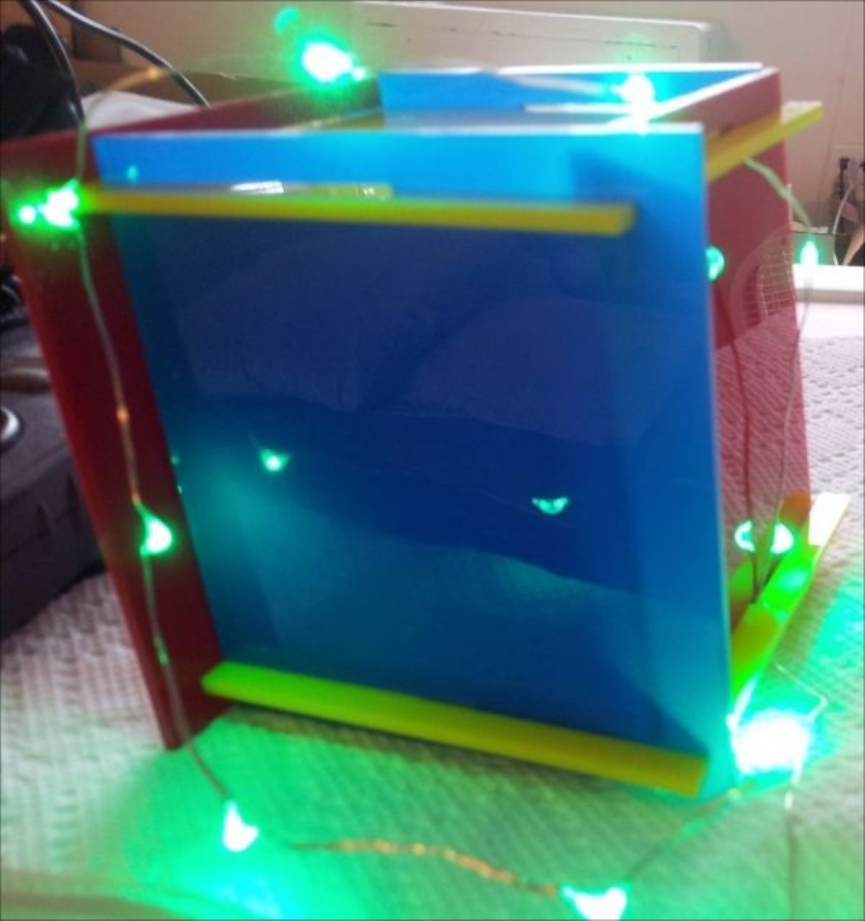
Anassembledenclosure

Settinguptheassemblyforthedish
monitor
Inthistask,wewillsetupamonitoroverthekitchensink.Wewillcheckwhetherthere
aredishesinthesinkandsendLEDalertstotheuser.SincewehaveinstalledOpenCV
already,wewillgetstartedwiththesetupofthemonitor.
ThistaskwasinspiredbyahackerbasedinLondonwhobuiltadishdetectortoalertusers
ofacommunalkitchen.
Note
ThecodesampleforthisfunctionhasbeenborrowedfromtheOpenCVDishDetector
projectbyTom:http://beagleboard.org/blog/2013-11-26-project-spotlight-dirty-dish-
detector/

Prepareforliftoff
Wewillgetstartedbymountingacameraontopofthesinkandconnectingittoan
overheadcamera,asshowninthefollowingimage:
Anoverheadcameraontopofthesink
Engagethrusters
1. WewillgetstartedbyimportingtheOpenCVmodule:
importtime
importsys
importcv2.cvascv
2. Wewillinitializethecameratocaptureframes:
capture=cv.CaptureFromCAM(0)
3. Afterinitialization,wewillgrabaframeforprocessing:
im=cv.QueryFrame(capture)
4. We’llconverttheimagetograyscaleforimageprocessingandfeaturedetection:
gray=cv.CreateImage(cv.GetSize(im),8,1)
edges=cv.CreateImage(cv.GetSize(im),cv.IPL_DEPTH_8U,1)
cv.CvtColor(im,gray,cv.CV_BGR2GRAY)
5. Wewillextractthefeaturesoftheimageusingthecannyedgedetectiontechnique.
Sincetheinformationispronetonoise,weusethesmoothingtechniquetoeliminate
thenoiseintheimage:
cv.Canny(gray,edges,200,100,3)
cv.Smooth(gray,gray,cv.CV_GAUSSIAN,3,3)
6. Wewillattempttodetectthedishesusingcommonshapesfoundinthedishes.The
techniqueiscalledHoughtransformsandwewilltrytodetectcircularobjectsin
theimage:
storage=cv.CreateMat(640,1,cv.CV_32FC3)
cv.HoughCircles(gray,storage,cv.CV_HOUGH_GRADIENT,1,30,100,55,0,0)
7. Wewilldrawacirclearoundeachobjectdetected.Thishelpsineliminatingany
incorrectobjectdetection:
foriinrange(storage.rows):
val=storage[i,0]
vessels=vessels+1#incrementdishesdetectedby1
radius=int(val[2])
center=(int(val[0]),int(val[1]))
cv.Circle(im,center,radius,(0,0,255),3,8,0)
8. Theobjectsdetectedcanbeviewedasfollows:
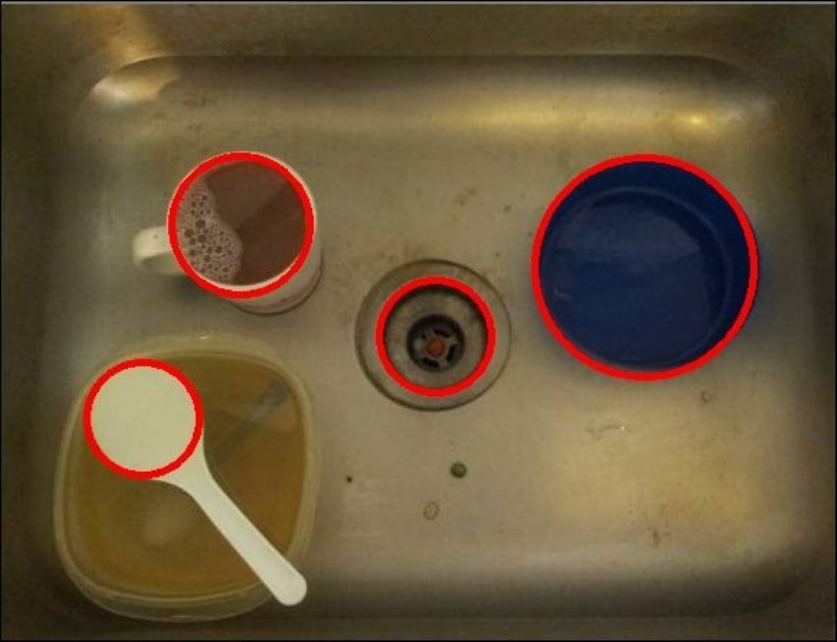
DishesdetectedinOpenCV
9. Ifavesselisdetected,wewilltriggeranLEDalerttoannoytheuser.
Objectivecomplete–minidebriefing
WehavesetupadishmonitortoalerttheuserwhendishesaredetectedusinganLED.
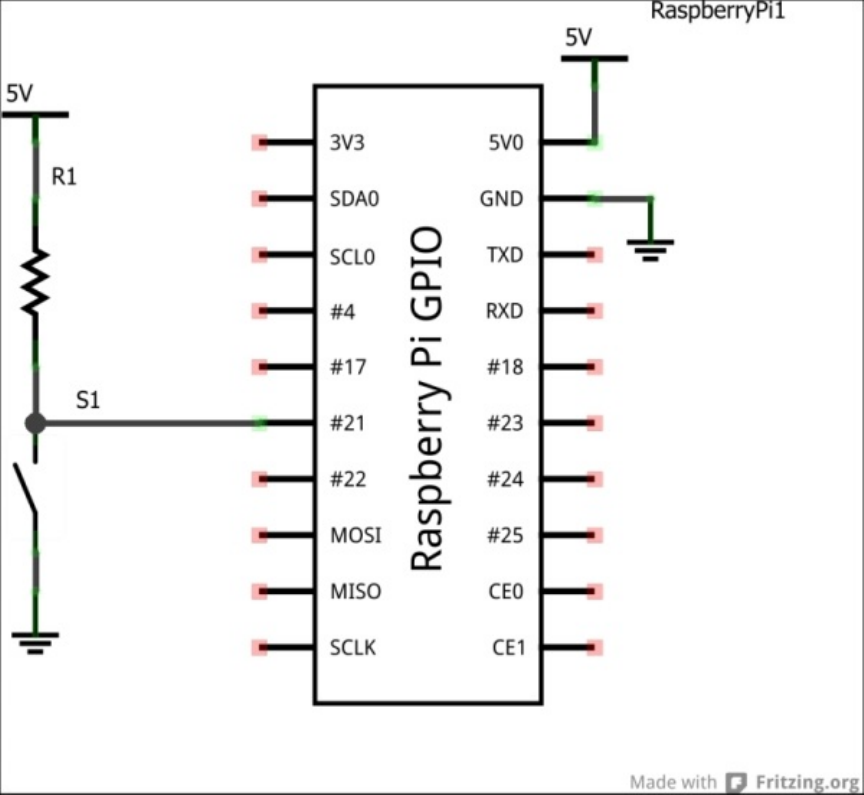
Settingupsensorsforthekeyalertsystem
Inthistask,wewilltrytobuildamodulethattriestoalerttheuserifthethingsthatwe
usedaily(suchasthekeystoourapartmentdoororthecarkey)arenotfoundintheright
place.Ithelpsussavealotoftimefranticallysearchingformisplaceditems.Wewillusea
reedswitchandamagnetforthismodule.
Theuniquenessaboutthistaskisthatwetrytoimproveourliveswithsimpleitemsthat
areeasytopurchaseandsimpletobuild.Amagnetandareedswitchareavailablefrom
allhobbystores.Youcanalsouseareedswitchindoorsecuritysystems.Thefollowingis
adiagramofareedswitchinterfacedtoaRaspberryPi:
ReedswitchsetupwiththeRaspberryPiGPIO

Prepareforliftoff
Wewillinterfacethereedswitchasshownintheprecedingdiagram.Let’stestitona
breadboardbeforesettingitupinanenclosure:
ReedswitchinterfacedtoRaspberryPi

Engagethrusters
1. Wewillbetrackingwhetherthekeyisintherightplacebyattachingabarmagnetto
thekeys.WewillsetupaGPIOpinaswegetstarted:
importRPi.GPIOasGPIO
GPIO.setmode(GPIO.BCM)
GPIO.setwarnings(False)
GPIO.setmode(GPIO.BCM)
GPIO.setup(18,GPIO.IN)
2. Wewillreadtheinputsandifthemagnetinthekeyisnotnearbythereedswitch,we
shouldbeabletotriggeranalert:
whileTrue:
if(GPIO.input(18)):
print("Keysareintherightplace")
else
print("Keysmissing!")
3. Nowthatwehavesetaninputforthereedswitch,weshouldbeabletosetupthe
reedswitchinsidetheenclosureasshowninthefollowingimage:
Areedswitchwiththemagnetattachedtothekey
Objectivecomplete–minidebriefing
Inthistask,youlearnedtouseasimplereedswitchtotheRaspberryPiandhelpimprove
ourlives.
Missionaccomplished
Inthisprojectweimplementeddifferentmodules,includinge-mailalerts,calendaralerts,
adishmonitor,andakeyalertsystem.Weleaveittotheusertointegrateallsubsystems
usingtheircreativity.You(likeus)havelearnedtouseRaspberryPitoimproveour
qualityoflife.
Hotshotchallenges
HowcanweuseRaspberryPitoenhancethelivesofseniorcitizens?
Thedishdetectorisnoiseprone.Howcanitbeimproved?

References
1. OpenCVinstallationontheRaspberryPiavailableathttp://mitchtech.net/raspberry-
pi-opencv/.
2. OpenCVguideforinstallationonUbuntuavailableat
http://docs.opencv.org/doc/tutorials/introduction/linux_install/linux_install.html.
3. PythonGmailnotifierfromtheWonderHowTowebsite,http://null-
byte.wonderhowto.com/how-to/make-gmail-notifier-python-0132845/.
4. GoogledataclientAPIdocumentationforGoogleCalendar.
5. GoogleCalendarusingpynotifybyJulienDanjou.
6. OpenCVdishdetector,availableat,
http://www.adafruit.com/blog/2014/03/11/beaglebone-black-used-to-detect-dirty-
dishes-beagleboneblack-txinstruments-beagleboardorg/,Tom,Londonhackerspace.
Chapter7.RaspberryPi-basedLine
FollowingRobot
Inthisproject,wewillbuildalinefollowingrobotthatiscontrolledbyyourRaspberryPi.
Note
ItisabsolutelynotnecessarytomakeuseoftheRaspberryPitobuildalinefollowing
robotunlessyouareusingacameratofollowtheline.Wearebuildingthisrobotto
demonstrateanexampleofbuildingamechatronicsystemusingtheRaspberryPi.
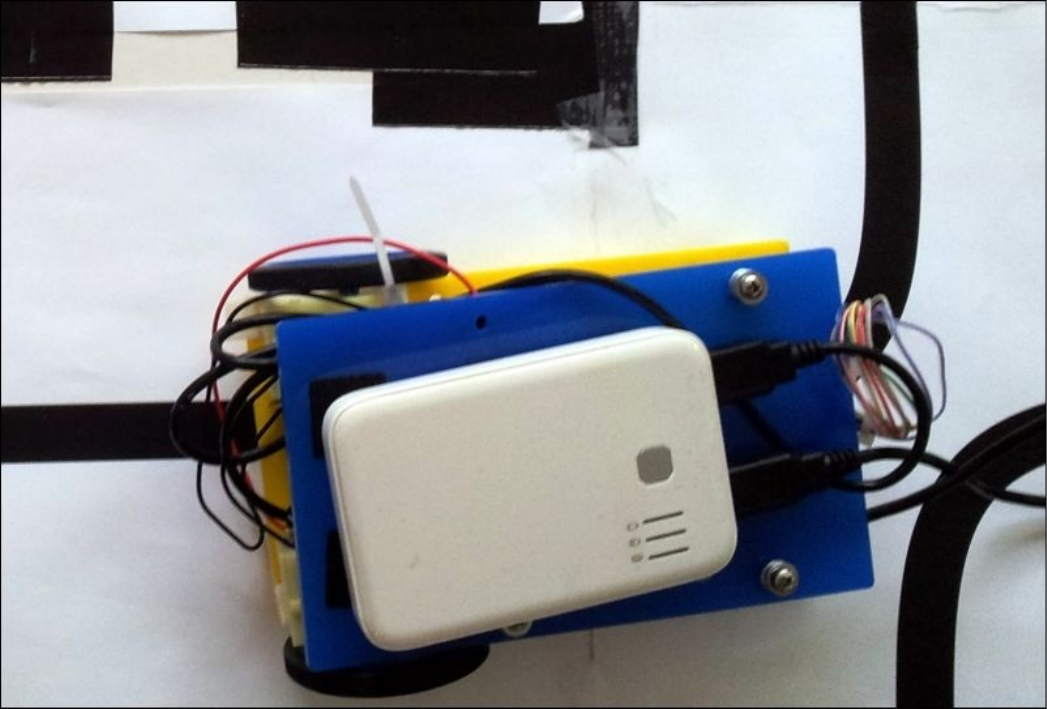
Missionbriefing
Inthisproject,wewillbuildalinefollowingrobotthatwillfollowablacklineagainsta
whitebackground.Therobotwillmakeuseofapairofinfraredsensorstotrackthe
orientationoftherobotanddrivetherobotaccordingly.
Alinefollowingrobot
Whyisitawesome?
ThePi,asyouhaveseeninthelastfewprojects,offersyouimmensefunctionalityand
manyadvantagesovermicrocontrollers.Youcanbringthispowerandsmallerfootprints
torobotics.So,wearegettingyoustartedoffwiththelinefollowingrobot.Onceyouget
thisundercontrol,thepossibilitiesareendless,makingthisanawesomesegueinto
roboticsandbeyond.

YourHotshotobjectives
Inthisproject,wewillbuildthelinefollowingrobotinthefollowingsteps:
AssemblyofthePiPlateforthelinefollowingrobot
Sensorselection,interfacingsensors,anddatainterpretation
Implementationoflinefollowinglogicbasedonsensordata
Testingthemotordrivercircuit
Preparationofthelinefollowingcourse
Designingthechassisforthelinefollowingrobot
Astep-by-stepassemblyoftherobot
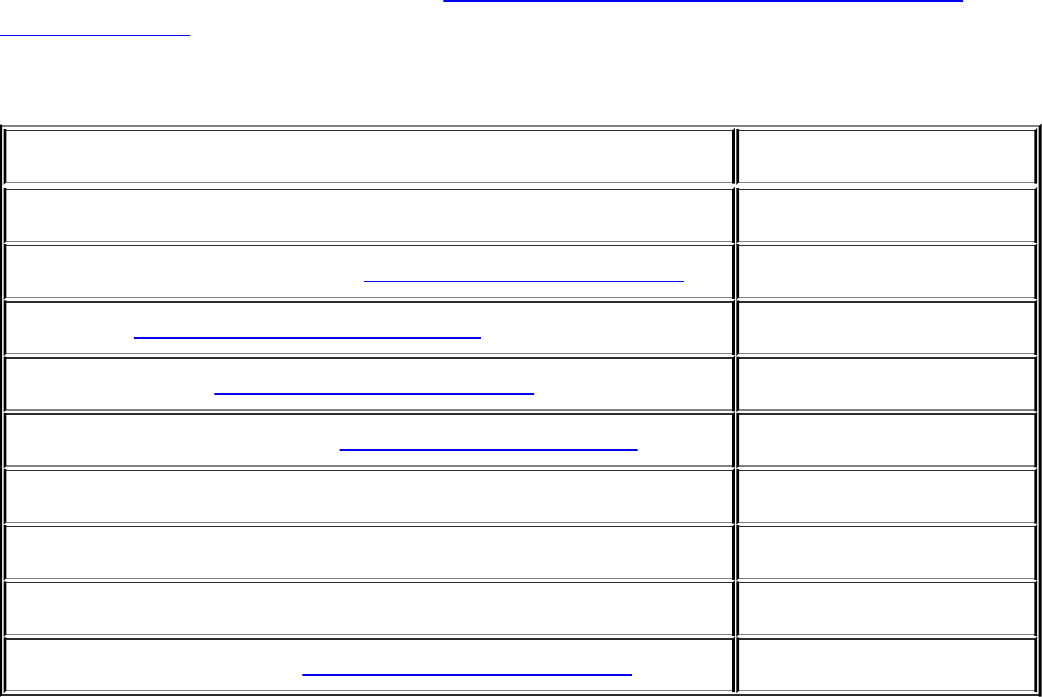
Missionchecklist
Thereareoff-the-shelfproductsavailabletobuildalinefollowingrobot,forexample,
Make:itBasicRoboticsStarterKit(http://www.makershed.com/products/makeit-
robotics-start-kit).Alternatively,inordertobuildalinefollowingrobot,thefollowing
itemsarerequiredandthereadermayaddorremovecomponentstotherobotbasedon
his/hercreativity:
Item Cost
Alinefollowingsensorarray 10USD(intermsofcomponents)
DCmotorswithagearbox*2–60rpm(http://www.pololu.com/product/1594) 11USD
ArduinoUno(http://store.arduino.cc/product/A000066) 30USD
Plasticwheels–1pair(http://www.pololu.com/product/1425) 8USD
HBridgechip–forexample,L293D(http://www.pololu.com/product/24) 3USD
Anacrylicsheet(preferably12inchx24inchtocutthechassisusingalasercutter) 5USD
AUSBbatterypack(preferably10,000mAh,1Amaxoutput) 15USD
Aposterboard 3USD
PiPlatefromAdafruitIndustries(https://www.adafruit.com/product/801) 15USD
AssemblyofthePiPlatefortheline
followingrobot
Note
ThePiPlateisnecessaryonlyifyouaregoingtobuildyourowncircuitry(insteadofan
off-the-shelfrobotkit)thatdrivestherobot.
WewillmakeuseofthePiPlatefromAdafruitIndustries.ThePiPlateisstackableandan
add-onhardwarefortheRaspberryPi.ThePiPlateislikeabreadboard/perforated
prototypingboardandenablesprototypingusingtheRaspberryPiplatform.Wewill
assembletheheadersontheboard.

Prepareforliftoff
ThePiPlateisavailablefromAdafruitIndustries(www.adafruit.com).Itcosts15.95
USD.Thisstackableadd-onhardwareisusefulbecausethesensorsandactuatorscanbe
connectedusingthescrew-interminals.Thiswillavoidanylooseconnectionstoyour
RaspberryPiwhiletherobotisinmotion.
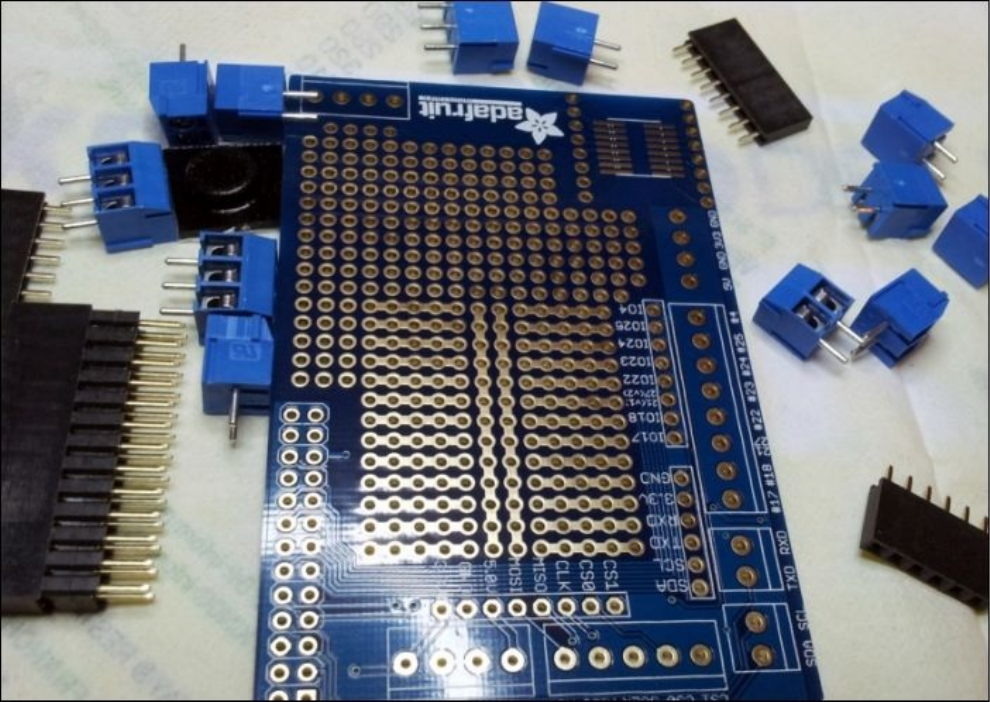
Engagethrusters
1. ThecontentsofthePiPlatepackageareasfollows:
ContentsofaPiPlatepackage
Note
AdultsupervisionisrequiredforsolderingandputtingthePiPlatetogether.
2. ThePiPlaterequiressolderingoftheterminals,andAdafruithassometutorialsin
settingupthePiPlate.Whentheterminalsandheadersareassembledtogether,we
havewhatisshowninthefollowingimage:
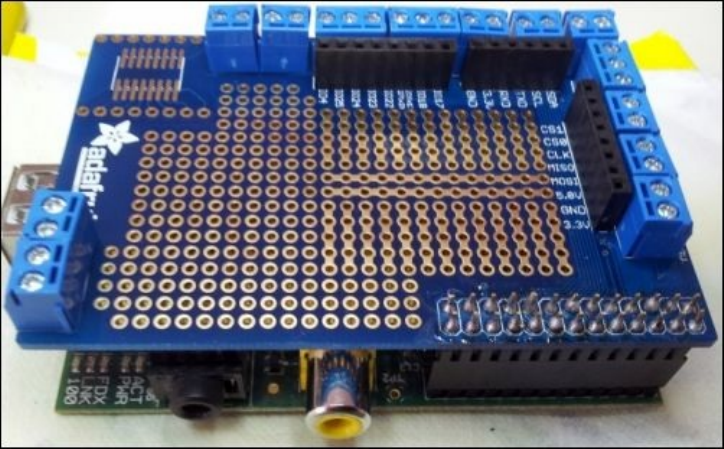
APiPlatestackedontheRaspberryPi
Objectivecomplete–minidebriefing
ItisunlikelythattherewillbeaproblemwiththePiPlateunlessthereisacoldsolder.
Sensorselection,interface,anddata
interpretation
Inthistask,wewilldiscussthedifferentsensorsavailabletobuildalinefollowingrobot
andpickasensorforthisproject.
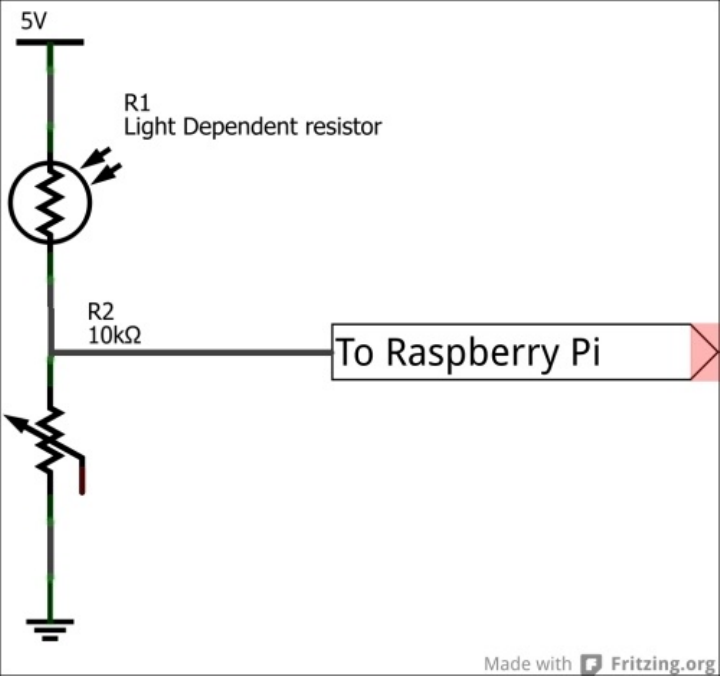
Engagethrusters
Wewilldiscussthreesensorsinthistask,includinglightdetectingresistors,IR
emitters/detectors,andacamera.Wewilldiscusstheiroperations,features,andtheir
distinctedgeoverothersensingtechniquesaswellastheirdisadvantages.
LightDependentResistors
Asthenamesuggests,LightDependentResistorsarethosethatchangetheirresistance
whenlightisincidentonthesurfaceoftheresistor.
LightDependentResistorsareusedincombinationwithabrightLED.Wecanmakeuse
ofthedifferenceinreflectivitybetweendifferentcolouredsurfacestofollowablackline
onadarksurface.
WhenLightDependentResistorisinsertedintoapotentialdividerconfiguration,as
showninthefollowingdiagram,thedropinvoltagecausesapotentialimbalanceleading
toachangeinvoltage.Sincethereflectanceofwhiteandblackcolorsurfacesvaries,the
changeinvoltagecanbeusedtodistinguishbetweenblackandwhitecolors.This
propertyofLightDependentResistorscanbeusedinourlinefollowingrobot:
ALightDependantResistorinapotentialdividerconfiguration
Thepotentiometerinthepotentialdividerconfigurationisusedtoadjustthesensitivityof
LightDependentResistorsdependinguponthesurroundinglightingconditions.
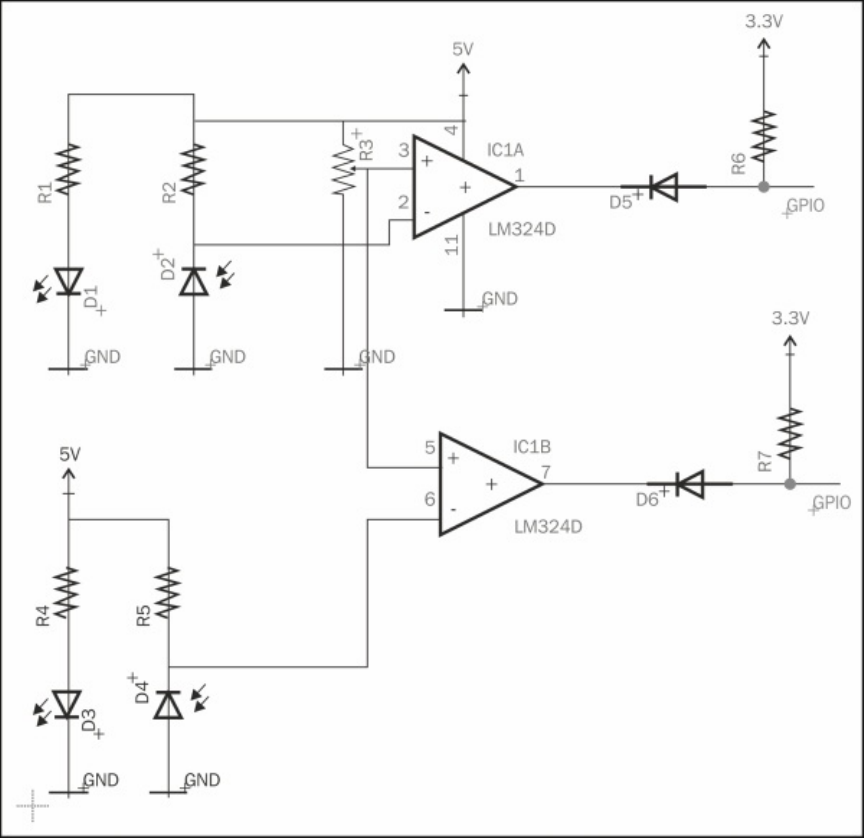
LightDependentResistorscanbeusedasasensortobuildalinefollowingrobot,except
inthosecaseswherethesensorresponsetimeisnottrivial.Hence,LDRscannotbeused
incaseswheretherobotisdesignedtomoveathigherspeeds.
LightDependentResistorshavetobecompletelyisolatedfromlightsourcesotherthanthe
brightwhiteLED.ThisistomakesurethattheLEDrespondstoreflectedlightfromthe
brightLED.
Infraredemitter/detector
Aninfrared(IR)emitter/detectorcombinationisthebestalternativetotheLight
DependentResistors.Inbothcases(theLDRandIRsensors),theemitter(ultrabright
whiteLED/IRLED)andthedetector(LightDependentResistorsorphotodiode)are
arrangednexttoeachother.
ThefollowingdiagramshowsthecircuitforanIRemitter/detector:
AnIRemitter/detectorforthelinefollowingrobot
Theprecedingfigureshowsaphotodiodethatisconnectedtotheinvertingterminalofan
op-amp.Thepotentiometer(thatisconnectedtothenon-invertingterminaloftheop-amp)

canbeusedtovarythesensitivityofthesensor.
Whenlightfallsonthephotodiode,itpullsdownthe10Kresistor,andhence,theoutput
oftheop-ampishigh.Thesignaldiode,1N4148,actsasasignallevelconverterbetween
5Vand3.3V(RaspberryPi’sGPIOpinsare3.3Vtolerant).Whenthe5Vsideishigh,the
3.3Vsideisalsohigh(thediodeisreversebiasedandhencethepullupresistorkeepsthe
3.3Vsidehigh).Whentheinfraredsensorisontopoftheblacksurface,theoutputofthe
op-ampislow(sincetheinvertingterminalishigh)andthepullupresistoronthe3.3V
sideispulleddown.Thus,theGPIOpinispulleddown.Theinfraredsensorshowninthe
precedingdiagramcanonlybeusedincontrolledlightingconditionsastheyareproneto
strayinfraredradiationfromdaylight.
Inconditionswheretherobothastooperateunderbroaddaylightconditions,theinfrared
transmitterandreceiverhastobepulsewidthmodulatedsothatthesensorcandistinguish
betweennoiseandtheactualsignal(moreinformationcanbefoundat
http://www.ermicro.com/blog/?p=1908).
Machine-vision-basedlinefollowingrobot
Thefinalalternativetoasensortobuildalinefollowingrobotisacamera.TheRaspberry
Pifoundationhasreleaseditsowncameramoduleanditisalsosimpletointerface.
Alinefollowingrobotcanbeimplementedbygrabbingaframefromthecameramodule
andconvertingitintoagrayscaleimage.Thegrayscaleimagecanbeusedtodetermine
thecurrentpositionoftherobotwithrespecttothelinethathastobefollowed.Since
whiteandgreysurfaceshavevaryinglevelsofgreycolour,theorientationoftherobotcan
becorrectedusingadifferentialsteeringmechanism.
Acamerawouldbeoverkillforbuildingalinefollowingrobottojustfollowablackline
onawhitesurfaceinanindoorenvironment(also,abitoverwhelmingforabeginner).
However,wecanuseitoutofanacademicinterest.
Sensorselection
Wehavediscussedthedifferentsensingoptionsavailableforbuildingalinefollowing
robot.Wewillchoosetheinfraredsensor.Wechosetheinfraredsensorforthefollowing
reasons:
Itcanbeusedonlyincontrolledlightingconditions(sinceweareusingan
unmodulatedinfraredlightsource)butservesasagoodstartforabeginner
Itisreadilyavailableandeasytointerface
Ithasadistinctedgeoverlightdetectingresistorssinceithasabetterresponsetime
Objectivecomplete–missiondebriefing
Inthistask,wediscussedthedifferentsensoroptionsavailableforalinefollowingrobot.
Implementationoflinefollowinglogic
basedonsensordata
Inthistask,wewillimplementasimplelinefollowingtechniqueusingtheinfraredsensor.
Wewillmakeuseofapairofinfraredsensorstotrackablacklineonawhitesurface.The
robotwillmoveforwardifboththesensorsareonawhitesurface.Therobotturnsleftif
theleftsensorisontheblacklineandviceversa.
Prepareforliftoff
ThesensorneedstobesolderedandconnectedtotheRaspberryPi(somethingliketheone
shownintheprecedingschematic).Alternatively,youmayuseasensorofyourchoice.
Engagethrusters
1. Asalways,wewillgetstartedbyimportingtherequiredmodules,especially
Rpi.GPIO:
importRPi.GPIOasGPIO
fromtimeimportsleep
2. Wewillsetthepinconfigurationthatwewilluseinthisprogram:
GPIO.setwarnings(False)
GPIO.setmode(GPIO.BCM)
GPIO.setup(18,GPIO.IN)
GPIO.setup(25,GPIO.IN)
3. Thecontrollogicexplainedearlierisimplementedasfollows:
state=1
prev_state=0
whileTrue:
#bothsensorsareonwhitesurface
if((GPIO.input(18)==GPIO.HIGH)and(GPIO.input(25)==GPIO.HIGH)):
state=0
#leftsensoraloneisontheblacksurface
elif((GPIO.input(18)==GPIO.LOW)and(GPIO.input(25)==GPIO.HIGH)):
state=1
#rightsensoraloneisontheblacksurface
elif((GPIO.input(18)==GPIO.HIGH)and(GPIO.input(25)==GPIO.LOW)):
state=2
#ifsensorstatehaschangedsincelasttime,updatemotorcontrol
ifstate!=prev_state:
ifstate==0:
#moverobotforward
elifstate==1:
#turnrobotleft
elifstate==2:
#turnrobotright
prev_state=state
sleep(0.15)
Thesensorstatesarecheckedonceevery15milliseconds.Ifthereisachangeof
sensorstates,themotorcontrolisupdated(asperthelogicexplainedinthistask).
4. Sinceweareusingonlytwosensors,therobotrunscrisscrossacrosstheline.Inorder
toachievesmoothtrackingoftheline,asensorarrayisusedfordrivingthemotors
usingacontrolalgorithmsuchasaPIDcontrolalgorithm.
Objectivecomplete–minidebriefing
Inthistask,weimplementedthelinefollowinglogicforourrobot.Inthenexttask,we
willdiscussmotorcontroltodrivetherobotThiswouldbeeventuallyintegratedintothe
linefollowinglogic.
Testingthemotordrivercircuit
Inthisproject,wewilluseapairofDCmotorstodrivetherobot.WewilluseadualH-
bridge(SN754410)drivertocontroltheDCmotors.WewilluseasoftwarePWMlibrary
writtenfortheRaspberryPi.WechoseDCmotorsforthefollowingreasons:
1. DCmotorsareeasytooperateandcontrolusinganH-bridgeinterfacedtothe
RaspberryPi.
2. ThereisasoftwarePWMlibrarythatmakesiteasiertocontroltheDCmotors.
Inthistask,wewillimplementtheDCmotorcontrolcircuitandalsowriteaprogramto
controltheDCmotors.

Prepareforliftoff
WewillusethesoftwarePWMfunctionavailablewithRPi.GPIO.ThesoftwarePWM
functionisavailableonversionsgreaterthan0.5.3.WeneedtodeterminetheRPi.GPIO
versioninstalledontheRaspberryPiusingacommand-lineterminal:
python
importRPi.GPIO
RPi.GPIO.VERSION
Ifthereturnedvalueisearlierthan0.53,thepackagecanbeupdatedasfollows:
sudoapt-getupdate
sudoapt-getupgrade
WewillbemakinguseofpulsewidthmodulationtodrivetheDCmotors.Itisimportant
thatyoufamiliarizeyourselfwithpulsewidthmodulationtechniquestocontrolaDC
motor.WealsoneedtosetuptheDCmotorsfortestingbyconnectingthewheelstothe
motor(somethingsimilartothefollowingfigure):
DCmotorswithsolderedwiresandwheelswithstrappedsiliconetires
Wealsoneedtoconstructthemotorcontrolcircuitryasshowninthefollowingschematic:
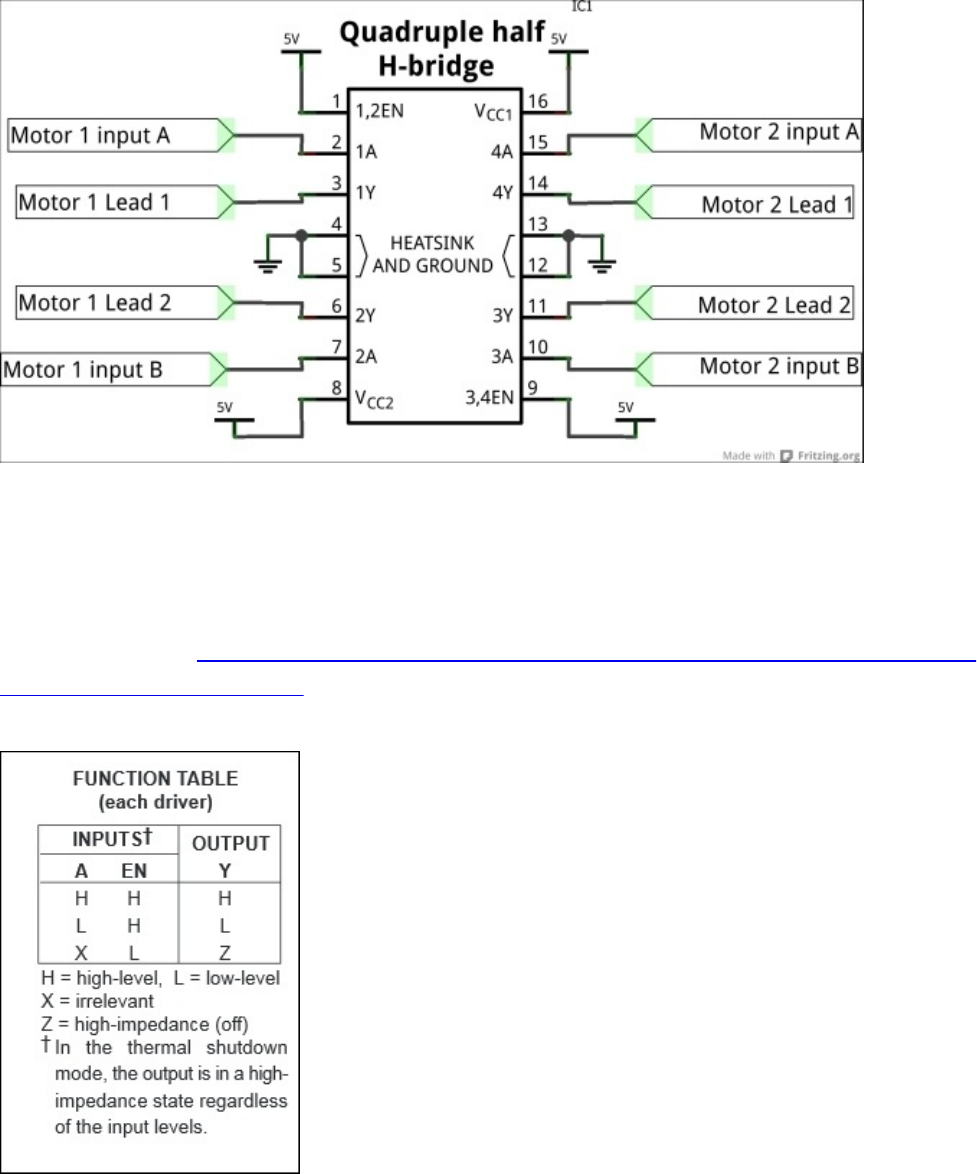
ASN754410motorcontrolcircuitry
AnH-bridgecircuitisusedforbidirectionalcontrolofaDCmotorusingamicrocontroller
orRaspberryPi(https://itp.nyu.edu/physcomp/labs/motors-and-transistors/dc-motor-
control-using-an-h-bridge/).TheH-Bridgetakesin2inputsforeachmotor.Thefollowing
tableshowsalogictablethatdictatesthecontrolofamotorusinganH-Bridge:
TheSN754410truthtable
Forexample,ifpin1Aissettohighwhile2Aissettolowandtheleadsofthemotorare
connectedto1Yand2Yrespectively,themotorrotatesinonedirection,whileitrotatesin
theoppositedirectionwhen1Aissettolowand2Aissettohigh.
Engagethrusters
1. WewillgetstartedwiththetestingoftheDCmotorswithasimplePythonprogram.
Wewillgetstartedbyimportingthemodules:
importRPi.GPIOasGPIO
importtime
2. Wewilldeclarethepinsthatwillbeusedasoutputpins.WewillconnecttheGPIO
pins,8,9,10,and,11tomotordriverpins,1A,2A,3A,and4A,respectively:
GPIO.setwarning(False)
GPIO.setmode(GPIO.BCM)
GPIO.setup(8,GPIO.OUT)#connectedto1A
GPIO.setup(9,GPIO.OUT)#connectedto2A
GPIO.setup(10,GPIO.OUT)#connectedto3A
GPIO.setup(11,GPIO.OUT)#connectedto4A
3. Wetestboththemotorsbyrotatingtheminbothdirectionsfor10secondsand
stoppingthem:
whileTrue:
#Rotatebothmotorsforwardfor10seconds
GPIO.output(8,GPIO.HIGH)
GPIO.output(9,GPIO.LOW)
GPIO.output(10,GPIO.HIGH)
GPIO.output(11,GPIO.LOW)
sleep(10)
#Stopmotorsandrotateinreversedirections
GPIO.output(8,GPIO.LOW)
GPIO.output(10,GPIO.LOW)
#Goreverse
GPIO.output(9,GPIO.HIGH)
GPIO.output(11,GPIO.HIGH)
sleep(10)
#Stopmotorsandrotatebothinoppositedirections
GPIO.output(9,GPIO.LOW)
GPIO.output(11,GPIO.LOW)
GPIO.output(8,GPIO.HIGH)
GPIO.output(9,GPIO.LOW)
GPIO.output(10,GPIO.LOW)
GPIO.output(11,GPIO.HIGH)
sleep(10)
#StopMotors
GPIO.output(8,GPIO.LOW)
GPIO.output(9,GPIO.LOW)
GPIO.output(10,GPIO.LOW)
GPIO.output(11,GPIO.LOW)
4. Intheprecedingexample,boththemotorswererunningat100percentdutycycle.
Wewilllookintocontrollingthemotorsusingpulsewidthmodulation.Wewillset

thepinsasoutputanddeclaretheoperatingchannelfrequenciesforthePWMpins
(1kHz):
GPIO.setup(8,GPIO.OUT)#connectedto1A
GPIO.setup(9,GPIO.OUT)#connectedto2A
GPIO.setup(10,GPIO.OUT)#connectedto3A
GPIO.setup(11,GPIO.OUT)#connectedto4A
GPIO.output(9,GPIO.HIGH)
GPIO.output(11,GPIO.HIGH)
motor1=GPIO.PWM(8,1000)
motor2=GPIO.PWM(10,1000)
5. Wewillstartthepulsewidthmodulationsignal(10percentdutycycle–runsat10
percentoftheratedvoltage)asfollows:
motor1.start(10)
motor2.start(10)
Wecanvarythespeedofthemotorasfollows:
whileTrue:
motor1.ChangeDutyCycle(25)
motor2.ChangeDutyCycle(25)
sleep(15)
motor1.ChangeDutyCycle(50)
motor2.ChangeDutyCycle(50)
sleep(15)
motor1.ChangeDutyCycle(75)
motor2.ChangeDutyCycle(75)
sleep(15)
motor1.ChangeDutyCycle(100)
motor2.ChangeDutyCycle(100)
sleep(15)
Objectivecomplete–minidebriefing
Inthistask,weimplementedamotordrivercircuitryandtestedit.
Preparationofthelinefollowingcourse
Inthistask,wewillpreparethelinefollowingtrackfortherobot.
Prepareforliftoff
Therearetwoapproachestobuildingalinefollowingtrack.Theyincludethefollowing:
1. PrintatrackavailablefromParallaxandsetitontopofaposterboard.
2. UseelectricaltapeandbuildatrackusingatutorialfromPololu.
Thefollowingitemsarerequiredtocompletethistask:
1. Aposterboard
2. Apermanentmarker
3. Apencil
4. Aruler
5. A4sheets
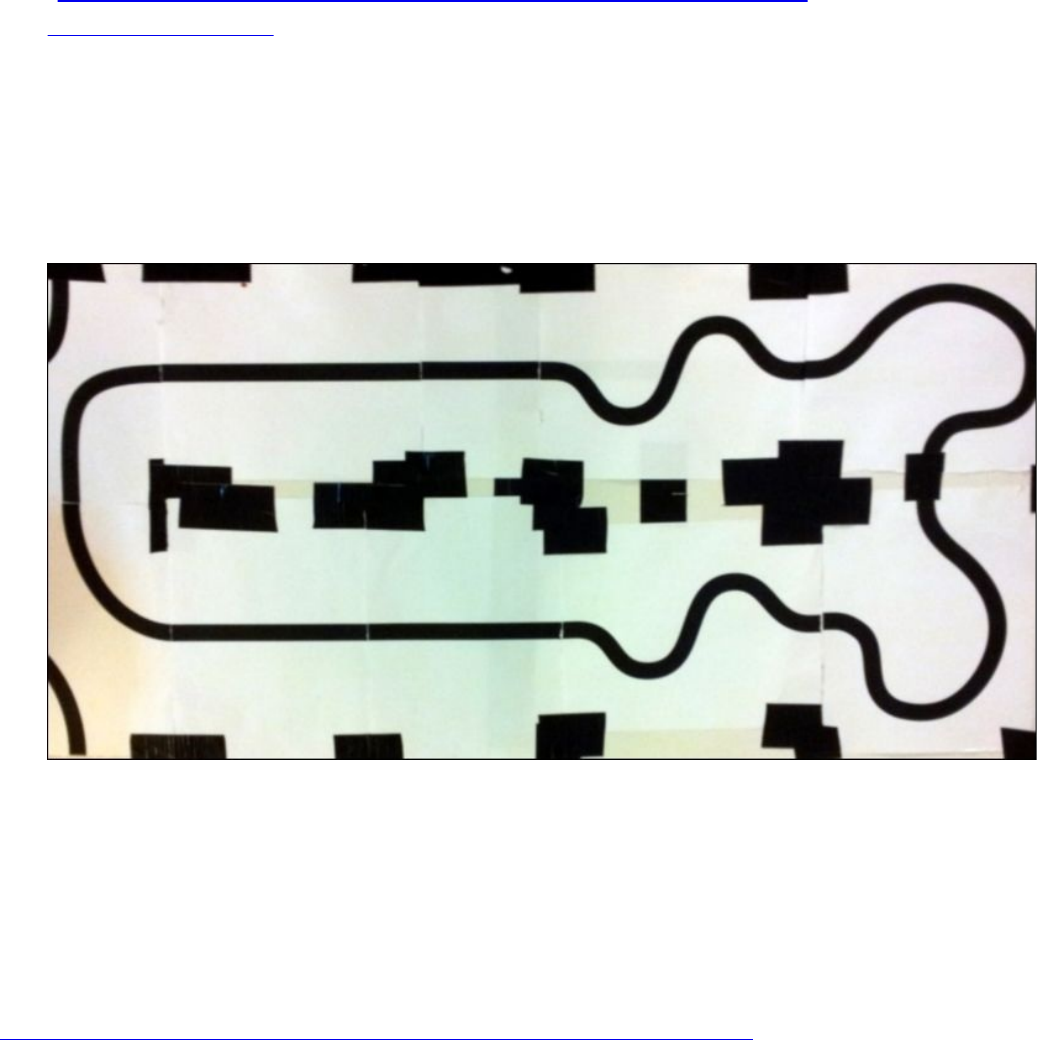
Engagethrusters
1. Wewilluseareadilyavailablelineforthefollowingtrack
(http://www.parallax.com/sites/default/files/downloads/28136-S2-
PrintableTracks.pdf)designedfortheScribblerlinefollowingrobotfromParallax.
ThelinefollowingtrackfromParallaxconsistsof10individualpiecesoftrackthat
canbearrangedandcustomizedaccordingtoourneeds.
2. Wewillgetstartedwithprintingtwosetsofthetrackavailablealongwiththis
project’sdownloadsandarrangethemaccordingtoourneedsanddeterminethe
complicityofthetrack.Anexampleofthetrackisshowninthefollowingimage,and
thiscanbeconsideredthefastestwayofbuildingalinefollowingtrack:
Alinefollowingtrack
Useelectricaltapeandbuildatrack
Pololuhaspublishedanexcellenttutorial
(https://www.pololu.com/docs/pdf/0J22/building_line_courses.pdf)onbuildingatrack
usingelectricaltape.Theonlydisadvantagebehindusingthismethodtobuildatrackis
thatthewrinklesontheelectricaltapecanaffectthesmoothoperationoftherobot.
Designingthechassisforthelinefollowing
robot
Inthistask,wewilldesignthechassisforthelinefollowingrobot.Thereareseveral
optionsavailableintermsofdesigntoolsforthedesignofthechassis.WechoseAutodesk
Inventor,buttherearealotoftoolssuchasAutodesk123Dandsoon.
Prepareforliftoff
Thechassisfortherobotisfabricatedusingthelasercuttingtechnique.Youarewelcome
tofabricateyourownchassis.Wehavechosentouselasercuttingbecauseitistheeasiest
tocomplete.Thetechniqueinvolvesdesigningthechassisfollowedbypreparingthe
designforfabricationandlasercutting.
Youmaydownloadthedesignfileavailablealongwiththisprojectanduseitforlaser
cutting.ThereisatrialversionofAutodeskInventoravailablefordownloadanditcan
beinstalledandusedfordesigningacustomchassis.
Asamaker/hacker,itisimportantthatyoulearnhowtousethesetoolsandhowtodesign
achassis.
Note
Theuseoftoolssuchasalasercutterrequiressomebasictrainingandsupervision.Itis
importantthatyouundergotherequisitesafetytrainingbeforeoperatingsuchequipment.
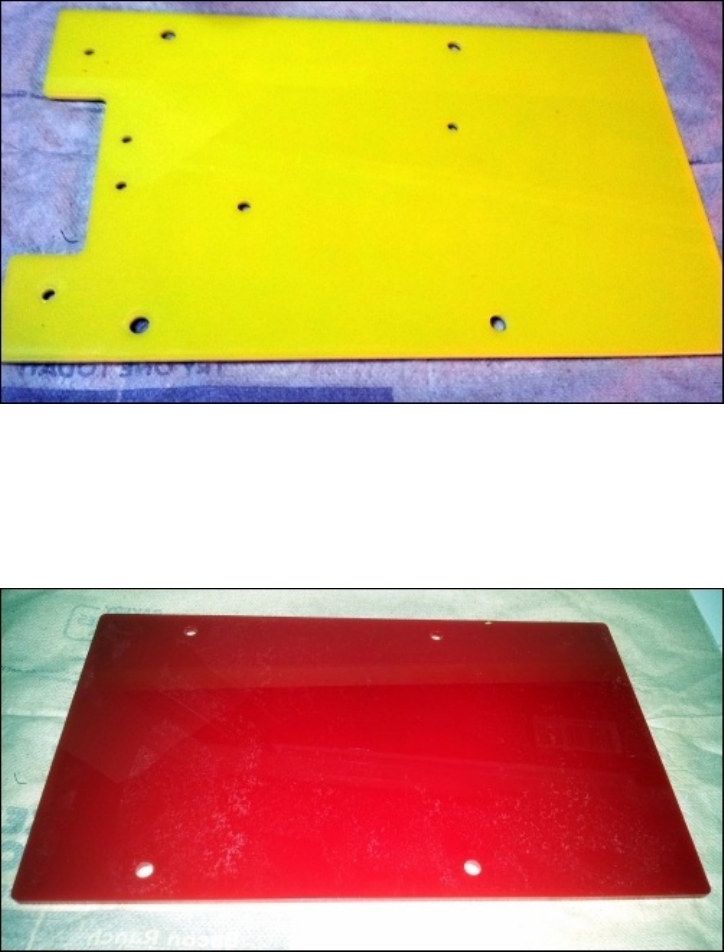
Engagethrusters
1. Wewillbeginbyconsideringthecomponentsthatgointotherobot.Thecomponents
includetheinfraredsensors,aballcaster,twoDCmotors,theRaspberryPi,thePi
Plate,andthebattery.
2. SincethePiPlatewillbestackedontopoftheRaspberryPi,wewillmountthe
batteryonaseparateplatemountedontopoftheRaspberryPi.Thecomponent
positionsaredesignedbasedonintuition.Thechassisisshowninthefollowing
image:
Lasercutchassisoflinefollowingrobot
3. Thetopplatethatholdsthebatterypackisshowninthefollowingimage:
Atopplateusedtomountthebatteryofthelinefollowingrobot
Objectivecomplete–minidebriefing
Wehavefinisheddesigningthepartsandfabricatingthemusingalasercutter.
Astep-by-stepassemblyoftherobot
Inthistask,wewillassembletherobotinsimplestepsthatareaccompaniedbya
photographicalrepresentation.
Prepareforliftoff
Weneedtohavethefollowingpartsreadytoassembletherobot:
1. Topandbottomchassisplatesforthelinefollowingrobot
2. Infraredsensors
3. Apairof#2screwsandnuts(washersoptional)
4. AballcasterassemblywithscrewsfromPololu
5. 2*M2.5screwsformountingtheRaspberryPi(washersoptional)
6. 4*#61-inchscrewswithspacers(washersoptional)
7. ARaspberryPi
8. Velcro
9. Battery
10. 2DCmotors
11. Double-sidedtape
12. APiPlate
13. Amotordriver
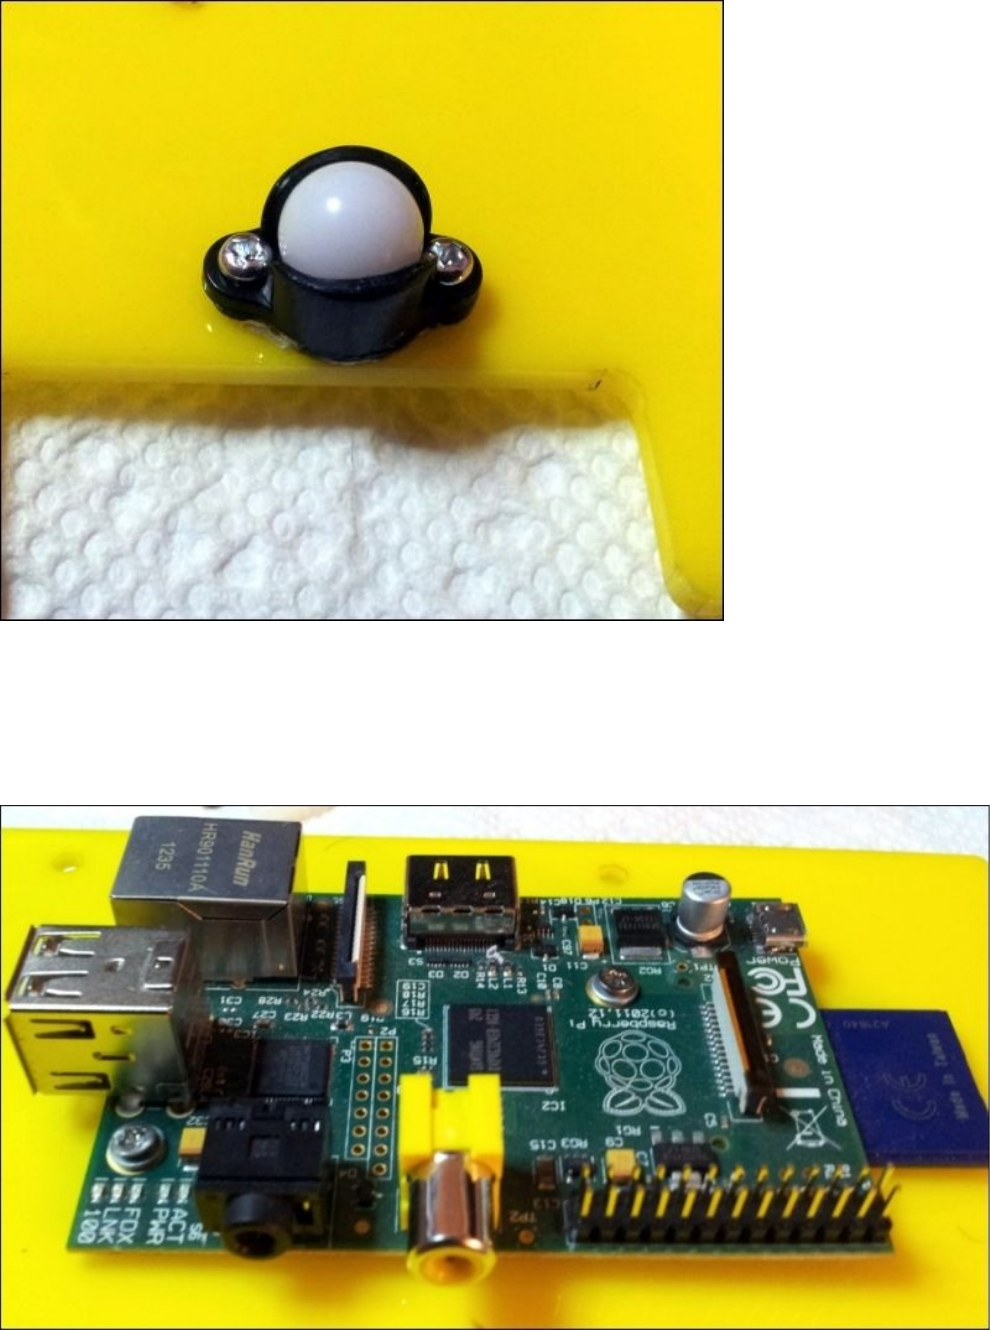
Engagethrusters
1. Wewillgetstartedbymountingthecastorwheel.
Mountingthecastorwheel
2. WewillmounttheRaspberryPiusingM2.5screws.
RaspberryPimountedusingM2.5screws
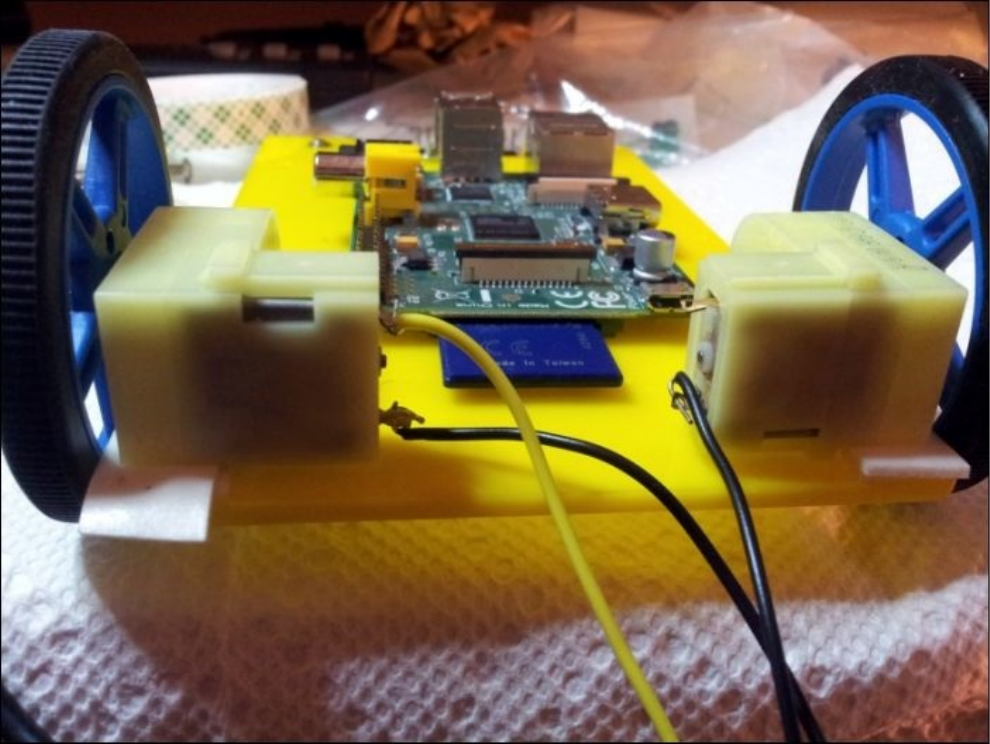
3. ThisisfollowedbytheDCmotorscoupledwithwheelsusingthedouble-sidedtape.
TheDCmotorswithaplasticgearboxfromPololudonotcomewithamounting
hole,andhence,wewillusedouble-sidedtapetomountthemotors.Similarly,the
infraredsensorswerealsomountedusingdouble-sidedtapeatthecenterwitha
spacingthatishalfthewidthofthetrack.
DCmotorsmountedusingdouble-sidedtape
4. WewillmountthePiPlateandthetopchassisplate.Wewillusevelcrotomountthe
USBbatterypacktocompletethelinefollowingrobotassembly.
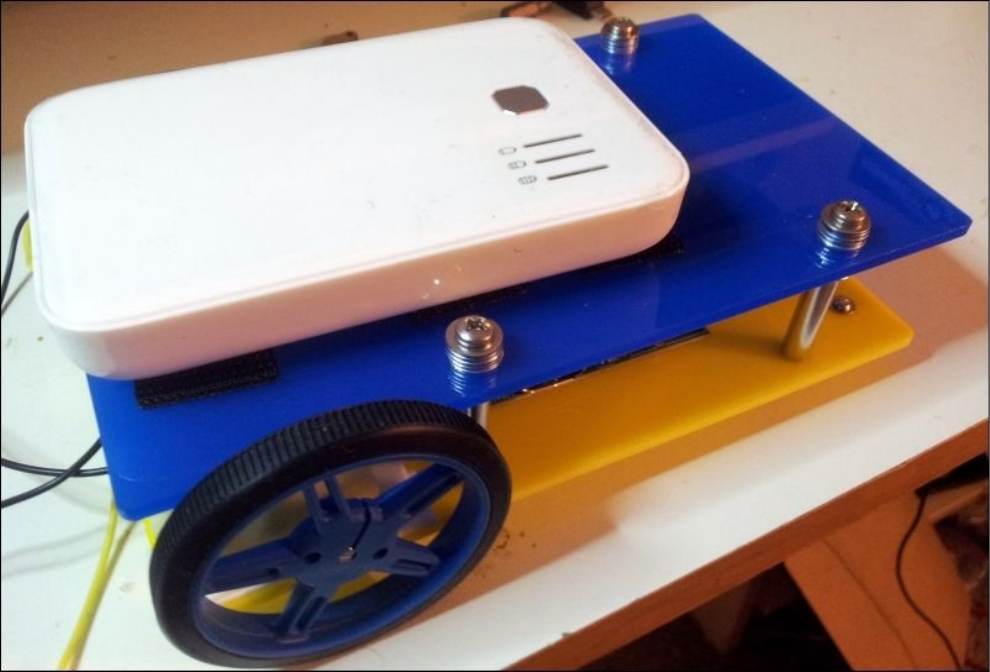
Anassembledrobot
5. Oncetheassemblyiscompleted,wehavetoconnectthemotorsandthesensorsto
getstartedwiththetesting.
Objectivecomplete–minidebriefing
Wehavecompletedtheassemblyofthelinefollowingrobotinthistask.Oncethemotor
controlcodeisimplementedintothelinefollowinglogic,weareallsettotestingtherobot
onthetrack.Thismayrequiresometweakingthemotorspeedtomaketherobottrackthe
lineeffectively.
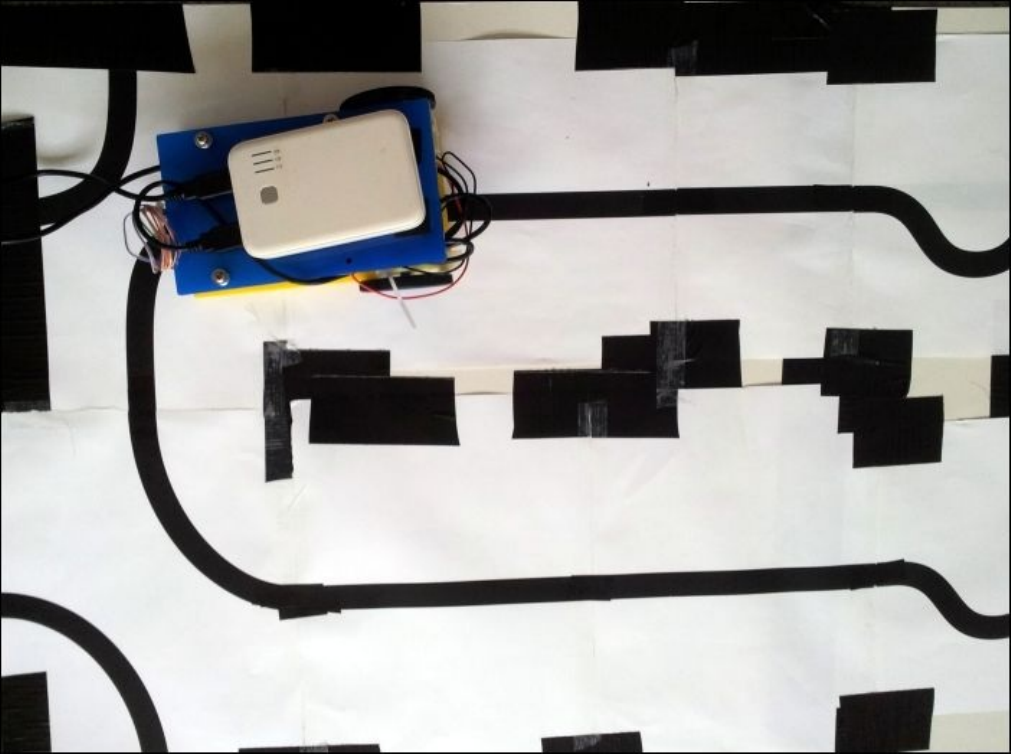
Missionaccomplished
Inthisproject,webuiltalinefollowingrobotstepbystep.Wegotstartedwiththesensors
followedbymotorcontrol,chassisdesign,arenadesign,andintegration.Now,wehavea
linefollowingrobot.
Alinefollowingrobotonthearena
Hotshotchallenge
Inthisproject,wedidnotmakeuseofanymotorcontrolalgorithm(likePID)tosteerthe
robot.Howdoweimplementone?

References
ThePololututorialonBuildingLineFollowingandLineMazeCoursescanbefoundat
http://www.pololu.com/docs/0J22
TheAdvancedLineFollowingwith3pi:PIDControltutorialcanbefoundat
http://www.pololu.com/docs/0J21/7.c
TheParallaxlinefollowingtrack:
http://www.parallax.com/Portals/0/Downloads/docs/prod/robo/scribbler2/Tracks.pdf

Chapter8.ConnectFourDesktopGame
usingRaspberryPi
Inthisproject,wewillbuildadesktopgameenabledbytheRaspberryPi.Wewillbuilda
prototypeusingacardboardbox,amonitor,andaninputcontrolonthecabinetand
implementoptionalspeakersandamarqueeforthegame.Thegamewillmakeuseofthe
python-pygamemodule(agameengineavailableunderGPLlicense:
http://pygame.org/wiki/about).

Missionbriefing
AConnectFourgameisatwo-playergamewheretheobjectiveistoconnectfourcoins
ofthesamecolorinavertical,horizontal,ordiagonalfashion(moreinformationis
availableathttp://en.wikipedia.org/wiki/Connect_Four).Wewillinstallthenecessary
softwarepackagesandaddallthenecessaryaccessoriestomakeadesktopprototype.The
ConnectFourgameinthisprojectisbasedonthebookMakingGameswithPython&
Pygame(http://inventwithpython.com/makinggames.pdf).Thisdesktopgameisagreat
startforpeoplewhoaretryingtogettingstartedwithelectronicsasahobby.
Whenwefinishthisproject,ourcabinetwillbesomethingliketheoneshowninthe
followingimage:
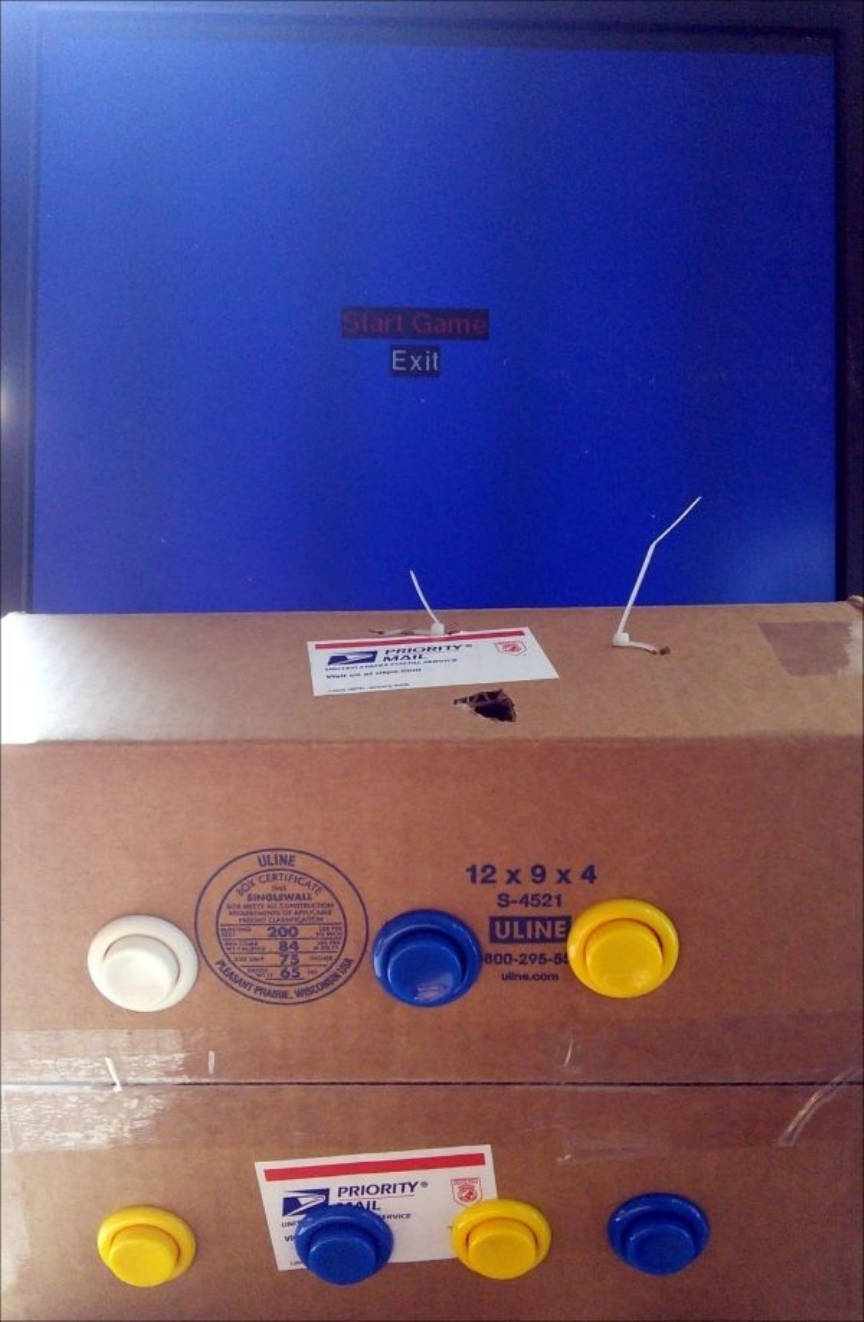

Whyisitawesome?
Ifyouarelikeusandhaveevervisitedthearcadeandwonderedhowmuchfunitwillbe
tobuildagameyourself,thisprojectisforyou.SingleboardcomputerssuchasRaspberry
PiandsitessuchasInstructables(http://www.instructables.com/)onlymakethings
easier,andofcourse,isn’titfuntoconsideradaptingthedesignandleaveyourownstamp
onit?WewillfocusonthePiandhowtouseitforthegameandleavetherestuptowhat
youfindontheInternetandyourownimagination.
Note
Inthisproject,wewillpresentthesubsystemsofwhatcouldpossiblygointobuildinga
minidesktop/tabletoparcadesuchasagameusingRaspberryPi.Wewillnotconcentrate
onpresentingabetteruserinterfaceforthegameoracabinet,butratherwhatittakesto
buildsomethingsimilartoanarcadegame,includinggamelaunch,hardwareinterface,
andsoon.

Yourobjectives
WewillbuildourConnectFourdesktopgamethroughthefollowingactivities:
Installationofthepre-requisites(Missionchecklist)
AhelloworldexamplewiththePython-pygame
Inputcontroldesignforthegame
GettingstartedwiththeConnectFourgame(UI+soundeffects)
AbriefdescriptionoftheConnectFourGameAI
Marqueedesignandcontrol
Settingupoftheswitchesusingacardboardbox

Missionchecklist
OneofthemainprerequisitesforthisprojectistheinstallationofPython-pygame.The
toolcanbeinstalledinasinglestepasfollows:
sudoapt-getinstallpython-pygame
Thisistheonlysoftwaretoolthatwewilluseinthisproject.Werequirethefollowing
itemsfortheconstructionofthearcadecabinet.Wealsoneedthefollowingitemsforthe
project:
Item EstimatedCost
Acardboardbox
MomentaryPressbuttons–Arcadestyle*8
(http://na.suzohapp.com/all_catalogs/pushbuttons/58-9111-L)2.70USDeach
16*32LEDdisplayfromAdafruitorPi-LitedisplayfortheRaspberryPi(optional) USD40USD/31
USD
Amonitorofthereader’schoicewithsignalcabletoconnecttoRaspberryPi 50USD
approximately
RaspberryPi 25USD/35USD
RGBLEDstrip(optional) 10USD
approximately
Helloworldexamplewiththepygame
Inthistask,wewilllearntheusageofpygameforgamedevelopment.Wewillgetstarted
withanexamplethatopensablankwindowandwriteacoupleoflinestomonitorevents
sothatwecanquittheprogramifthewindowisclosed.
Wewillgothroughtheimportantfeaturesofthepygamemodule,whichisnecessaryto
buildourarcadegame,includingplayingsoundsandcontrollingthemenu.

Prepareforliftoff
Asmentionedearlier,thisprojectisbasedonthebookMakingGameswithPython&
Pygame(http://inventwithpython.com/makinggames.pdf).Inthistask,wewillgothrough
selectfeaturesofthepygamemodule.Itisimportantthatyoufamiliarizeyourselfwiththe
differentfeaturesavailableunderthepygamemodule.
Engagethrusters
1. WewillgetstartedbyimportingthemodulesrequiredfortheHelloworldexample.
Wewillimportthepygameandthesysmodule:
importpygame,sys
2. Next,wewillalsoimportpygame.locals,sinceitcontainsseveralconstant
variables:
frompygame.localsimport*
3. Inordertomakeuseofthefunctionsofthepygamemodule,weneedtoinitializethe
module:
pygame.init()
4. Wewillsetthewindowwidthandheightparametersandcreateapygame.Surface
objectthatisstoredinavariablecalledDISPLAYSURF:
DISPLAYSURF=pygame.display.set_mode((400,300))
5. Wewillsetthewindowtitlename:
pygame.display.set_caption('HelloWorld!')
6. Now,wewillrunaloopthatwaitsforeventsinsidethewindowandupdatethe
displaythrougheverycycle.Inthisexample,wedonothaveanythingtobeupdated.
Wewillquittheprogramwhentheuserclosesthewindow:
whileTrue:#maingameloop
foreventinpygame.event.get():
ifevent.type==QUIT:
pygame.quit()
sys.exit()
pygame.display.update()
7. ThisshouldopenupablankwindowtitledHelloWorld.
Playingsoundsusingthepygamemodule
Sincethesoundeffectsformthecruxofanarcadegame,weneedtoknowhowtoplay
soundsusingthepygameplatform.
1. Wewilldeclareasoundobjecttoplaythebeeps.wavfile,availablealongwiththe
downloadsofthisfile.Thefileneedstobecopiedintothesamedirectoryasthe
pythonscriptthatrunsthegameasfollows:
soundObj=pygame.mixer.Sound('beeps.wav')
2. Thesoundcanbeplayedinaloopbycallingtheplay()methodasfollows:
whileTrue:#maingameloop
soundObj.play()

3. Wecanstopplayingthesoundfilebycallingthestop()method.
Buildingmenususingthepygamemodule
1. Wewillneedasimplemenuforourdesktopgame.Wewillmakeuseofthemenu
class(distributedunderGNUGPLv3license)writtenbyScottBarlow.Let’sreview
thesimple_example.pyexample.(http://www.pygame.org/project-MenuClass-
1260-.html.)
2. Inthismenuexample,amenuobjectiscreated;whenamenuoptionisselectedusing
akeyboard,theselectedoptionishighlightedandprintedonaterminalwhenthe
returnkeyispressed.Forexample,whenthedownkeyispressedtoselectLoad
Gameandthereturnkeypressed,theLoadGameoptionisprintedtotheterminal.
3. Let’sdiscusstheparametersthatneedtobepassedasargumentstocreateamenu
object.Accordingtothedocumentationavailablewiththemenuclass,amenuobject
hastobedefinedwiththefollowingparameters:
menu=cMenu(x,y,h_pad,v_pad,orientation,number,
background,buttonList)
Theparametersxandyrefertothelocationoftheoriginofthemenuobjecton
thegamescreen
Theparametersh_padandv_padrefertothespacingbetweenthebuttonsinthe
horizontalandverticaldirections
Theorientationparameterreferstothearrangementofthebuttonsonthe
screen,thatis,'horizontal'or'vertical'
Thenumberparameterreferstothenumberofbuttonsthatcanbe
accommodatedinasinglerow(whenarrangedhorizontally)orinasingle
column(whenarrangedvertically)
Thebackgroundparameterreferstothesurfaceonwhichthemenuhastobe
created
ThebuttonListparameterreferstothelistofbuttonsthatwewantonthe
screen
4. Wewillgetstartedbydeclaringamenuobjectandlistingalltheoptionswewantin
themenu,namely:
menu=cMenu(50,50,20,5,'vertical',100,screen,
[('StartGame',1,None),
('ScoreBoard',2,None),
('Exit',3,None)])
5. Themenuneedstobecenteredonthesurfaceofthescreen:
menu.set_center(True,True)
6. Thetextofthemenubuttonsalsoneedstobealigned:
menu.set_alignment('center','center')
7. Inordertodisplayandupdatethemenuandselectionparameters,asimplestate
machineisused:
state=0
prev_state=1
8. Thepygame.event.wait()methoddetectsanykeyboardormouseeventsand
updatesthecurrentstateaccordingly.
9. Themenuisupdatedbythemethod(duetoakeypressevent/returnkeypress):
pygame.event.post(pygame.event.Event(EVENT_CHANGE_STATE,key=0))
10. Whenthereturnkeyispressedtoselectanoption,theselectedoptionisprintedto
theterminalandthemenuisupdatedbyhighlightingtheselectedoption(inred)by
rect_list,state=menu.update(e,state):
whileTrue:
ifprev_state!=state:
pygame.event.post(pygame.event.Event(EVENT_CHANGE_STATE,key=0))
prev_state=state
e=pygame.event.wait()
ife.type==pygame.KEYDOWNore.type==EVENT_CHANGE_STATE:
ifstate==0:
rect_list,state=menu.update(e,state)
elifstate==1:
print'StartGame!'
state=0
elifstate==2:
print'LoadGame!'
state=0
elifstate==3:
print'Options!'
state=0
else: print'Exit!'
pygame.quit()
sys.exit()
#Quitiftheuserpressestheexitbutton
ife.type==pygame.QUIT:
pygame.quit()
sys.exit()
#Updatethescreen
pygame.display.update()
Objectivecomplete–minidebriefing
Wehavefinishedtestingthepygamemoduleandreviewedasimplemenudesignexample
alongwithtestingtheplayingofsoundsusingthepygamemodule.

GettingstartedwiththeConnectFour
game(UIandsoundeffects)
Inthistask,wewillworkonsomepreliminarytweaksfortheConnectFourgame.Wewill
taketheexamplefromNewGameSourceCode:Fourina
Row,http://inventwithpython.com/blog/2011/06/10/new-game-source-code-four-in-a-row/,
andmakeuseoftheexamplesdiscussedintheprevioustask,namely,playingsoundsand
menudesignandaddthemtotheConnectFourGamePythonscript.


EngageThrusters
1. Inthisproject,thegameneedstobelaunchedfullscreenassoonasRaspberryPi(that
hasbeensetuptolaunchthedesktopgame)ispoweredup.
2. Thepygame.display.set_modemethodisusedtosetthegametofullscreenwiththe
pygame.FULLSCREENargument.Theresolutionofthegamewillbe(Windowwidthx
Windowheight),inthiscase,640x480pixels:
DISPLAYSURF=pygame.display.set_mode((WINDOWWIDTH,
WINDOWHEIGHT),pygame.FULLSCREEN)
3. Inordertolaunchthegame(thePythonscript:Connect_four.py)afterRaspberryPi
ispoweredup,let’screateashellscriptusingatexteditorwiththefollowing
contentsandcallitstartup.sh:
#!/bin/sh
pythonConnect_four.py
4. Theshellscriptneedstobesavedtothe/home/pilocation.Alternatively,thescript
canbesavedatanyotherlocation.
5. Theshellscripthastobemadeanexecutablefileusingthechmodcommand:
sudochmod755startup.sh
6. Inordertoexecutestartup.shuponboot,the/etc/rc.localfileneedstobe
modified.Inthecommand-lineterminalofRaspberryPi,thefilecanbeopenedusing
atexteditorsuchasnano:
sudonano/etc/rc.local
7. Beforethelastlineofthefile,exit0,thefollowinglineshavetobeadded:
sleep10
cd/home/pi/
/home/pi/startup.sh&
exit0
8. Thescriptisexecutedafterallthekernelmodulesareinitialized.Thescriptis
executedfromthedirectorywherethefileshavebeensaved.
Addingamenuforthegame
Thenextstepistoaddamenuforthegame.Asdiscussedintheprevioustask,wewill
makeofthemenuclassavailableathttp://www.pygame.org/project-MenuClass-
1260-.html
1. ThefirststepistoimportthemenuclassintotheConnectFourgame’sPythonscript:
frommenuimport*
2. Let’screateamenuobjectwiththeStartGameoptionstolaunchthegameandExit
toquitthegame.Wewillintegratethemenufromthefirsttaskofthisproject.We

willgetstartedbyaddingthemenuthatneedstobedrawnonthesurface:
menu=cMenu(50,50,20,5,'vertical',100,DISPLAYSURF,
[('StartGame',1,None),
('Exit',2,None)])
3. Let’ssetthebackgroundofthemenutoabluecolor:
DISPLAYSURF.fill(BGCOLOR)
4. Usingthemenudesigndiscussedintheprevioustask,let’saddalinetolaunchthe
gamewhentheStartGameoptionisselected.Thegameislaunchedbycallingthe
runGame(isFirstGame)method:
ifstate==0:
rect_list,state=menu.update(e,state)
elifstate==1:
runGame(isFirstGame)
isFirstGame=False
state=0
elifstate==2:
print'Exit'
pygame.quit()
sys.exit()
pygame.display.update()
Addingsoundstothegame
Whilethegameisinprogress,thesoundscanbeplayedusingpygame.mixer.Refertothe
followingstepstofindouthowtodothis:
1. Let’sgetstartedbyimportingpygame.mixer:
importpygame.mixer
2. Thisisfollowedbyinitializingpygame.mixer:
pygame.mixer.init()
3. Thesoundsthatwillbeplayedwhenthegameislaunchedorwhilethegameisin
progresshavetobeloaded:
menu_sound=pygame.mixer.Sound('8-bit-circus-music.wav')
moves_sound=pygame.mixer.Sound('ding.wav')
4. WechosetousesoundsfromFreeSounds(https://www.freesound.org).Thesounds
areavailableunderCreativeCommonsLicense.
Tip
Dinghitscanbefoundat
https://www.freesound.org/people/adcbicycle/sounds/13952/and8BitCircusMusic
canbefoundathttps://www.freesound.org/people/bone666138/sounds/198896/.
5. Inthemainmenu,let’splaythe8-bit-circus-musicfileinaninfiniteloop(until
theuserlaunchesagameorexitsthemenu).
menu_sound.play(-1)
6. Theparameter-1indicatesthatthefilesneedtobefiledinaloop.
7. Inordertostopplayingthesound,thestop()methodhastobecalledbefore
launchingthegame:
menu_sound.stop()#stopplayingthesound
runGame(isFirstGame)
8. Thesoundfileisplayedinalooponceagainafterthegameisover.
9. Similarly,thedingsoundisplayedwheneverthegameAI(calledthecomputerinthe
game)ortheplayerhasplayedaturn:
moves_sound.play()#Playdingsound
Objectivecomplete–missiondebriefing
Wehavecompletedthebasictweaksrequiredforthegame.Inthenextstep,wewill
interfacethearcadestylebuttonstothegame.
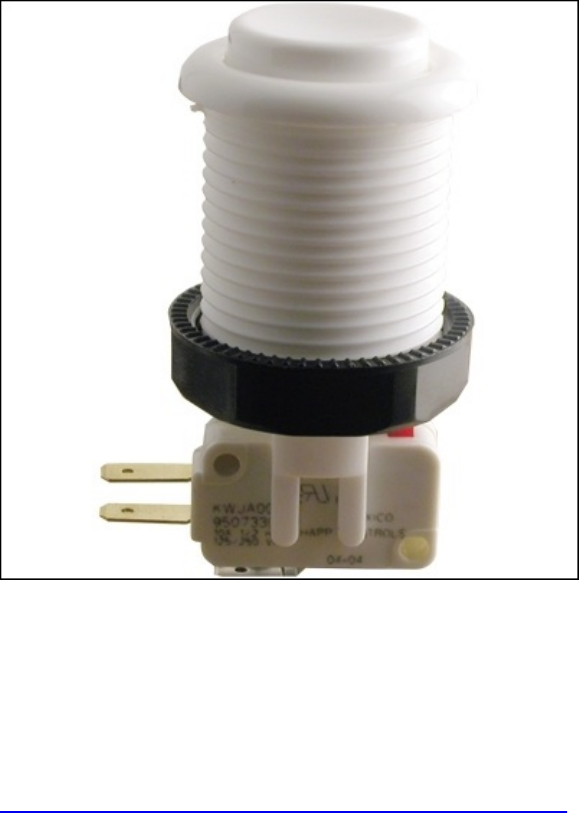
InterfacinggameinputsusingthePiFace
module
Inthistask,wewillreviewinterfacingthearcadestylebuttons(showninthefollowing
image)toRaspberryPitoplaythegame.Inthistask,wewilljustdiscussthesoftwarepart
ofthecode.
Momentaryarcadepushbuttonswitch
(http://na.suzohapp.com/all_catalogs/pushbuttons/58-9111-L)
WewillmakeuseofthePiFaceinterfaceboardavailableat
http://www.piface.org.uk/products/piface_digital/tointerfacethesebuttonstoRaspberry
Pi.Theboardisastackableadd-onhardwarethatcanbeusedtointerfaceeightinputsand
eightoutputs.ThePiFacecomeswithfourtactileswitchesandwecangetstartedwith
testingtheinputs.
ThemainreasonbehindusingthePiFaceisthatweneedtomonitortheswitchstatesto
determinethereisakeypress.ThePiFacecomeswithanI/Oexpansionoptionandcanbe
accessedthroughtheSPIinterface.Thesefeaturesenablesimplecontrolofthegame
inputs.

Prepareforliftoff
1. RaspberryPi’sSerialPeripheralInterface(SPI)driversneedtoenabledbyeditingthe
/etc/modprobe.d/raspi-blacklist.conffileusingatexteditorsuchasnano:
sudonano/etc/modprobe.d/raspi-blacklist.conf
Thedriverscanbeenabledbyinsertingan#beforethefollowingline:
#blacklistspi-bcm2708
TheSPIdriversneedtobeloadedusingthemodprobecommand:
sudomodprobespi-bcm2708
Thedrivers/toolsrequiredtointerfacewiththePiFacemodulecanbeinstalled
asfollows:
wgethttp://pi.cs.man.ac
.uk/download/old_install.txt
Note
TheinstallationpackagesforthePiFacemoduleareavailableasDebianpackages.
Refertotheinstallationguidefromhttp://www.piface.org.uk/guides/.Ifyouinstall
theDebianpackages,thePythonmoduleimportsandthemethodsusedtoreadthe
inputsmightalsovaryaccordingly.
2. Let’srenamethefileandexecuteit:
mvinstall.txtinstall.sh
chmod+xinstall.sh
./install.sh
3. Oncetherequiredtoolsareinstalled,RaspberryPihastoberestartedusingthe
followingcommand:
sudoreboot
4. OnceRaspberryPihasrestarted,theemulatorthatcomesalongwiththetoolcanbe
tested.TheemulatorenablesyoutotestallinputsandoutputsofthePiFaceinterface.
Theemulatorcanbelaunchedfromthecommand-lineterminalasfollows:
Piface/scripts/piface-emulator
5. Theemulatorinterfacewouldbesomethingliketheoneshowninthefollowing
screenshot:
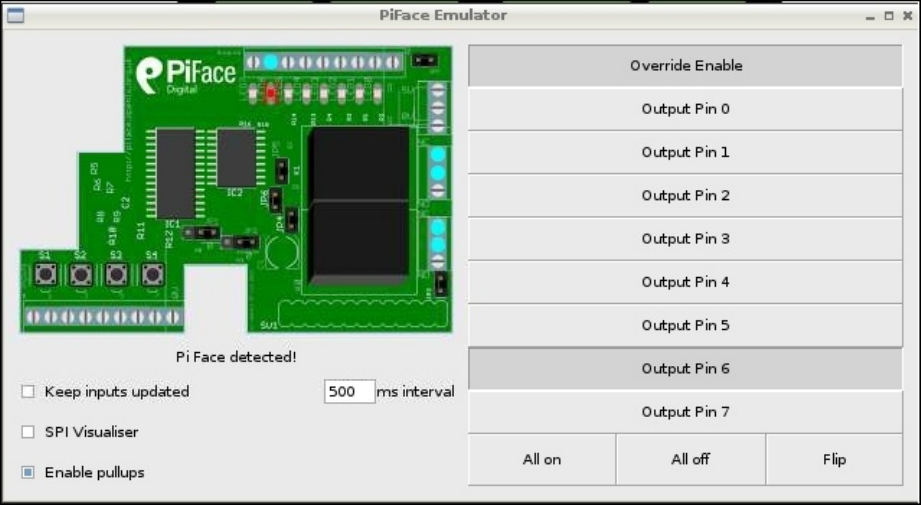

Engagethrusters
1. Let’stestthebuttonsavailableonthePiFacemoduleusingaPythonscript:
importpiface.pfioaspfio
2. Thepiface.pfiomoduleneedstobeimportedandinitialized:
pfio.init()
3. Theread_input()methodreturnsan8-bitnumberthatrepresentstheinputstatesof
alltheeightbuttons:
whileTrue:
print(pfio.read_input())
4. Eachbitofthe8-bitnumbercorrespondstoadigitalinputonthePiFacemodule.The
followingtableshowstheswitchpositionsthatarerepresentedbybitpositions:
S7 S6 S5 S4 S3 S2 S1 S0
Switchpositionsrepresentedbybitpositions
5. Whenaswitchispressed,aparticularbitissetandthisbitcanbeusedtointerpret
thecolumnpositionoftheConnectFourgame.
6. Forexample,whenS0ispressed,thebit0issetandhencethe8-bitwordvalueis1.
WhenS1ispressed,thebit1issetandthe8-bitwordvalueis2andsoon.
7. WeignorescenarioswhentwoswitchesarepressedatthesametimeastheConnect
Fourgameinvolvesplayingonlyonecolumnatatime.
8. TheConnectFourgamewasdesignedtobeplayedusingamouse.Let’sperform
sometweakstoplayitusingbuttons.Let’sgetstartedbycommentingoutthe
getHumanMove()function.
9. Whenthegameisplayedusingamouse,thecoinisactuallydraggedanddroppedby
theplayer.Thisneedstobesimulatedwhileusingthebuttons.Inordertodoso,let’s
createacopyoftheanimateComputerMoving(board,column)methodandrenameit
asanimatePlayerMoving(board,column).
10. Inthegame,thecomputerplaystheredcolourcoinswhilethehumanplayerplays
withtheblackcolourcoins.So,let’schangethe
animatePlayerMoving(board,column)methodtosimulatethehumanplayer’scoin
movements.
11. ThefollowingarethemodificationsrequiredintheanimatePlayerMovingmethod:
x=REDPILERECT.left
y=REDPILERECT.top
drawBoard(board,{'x':x,'y':y,'color':RED})
animateDroppingToken(board,column,RED)
12. Similarly,themaingameloopalsoneedstobemodifiedtosimulatethehuman
player’sgamemoves:
ifturn==HUMAN:
animatePlayerMoving(mainBoard,0)
makeMove(mainBoard,RED,0)
moves_sound.play()
ifisWinner(mainBoard,RED):
winnerImg=HUMANWINNERIMG
break
turn=COMPUTER#switchtootherplayer'sturn
13. Thenextstepistointerfacethebuttonstothegame.Thefollowingcodeneedstobe
addedunderthehumanplayer’sturn:
#waitforabuttonpress
whilecolumn==0:
column=pfio.read_input()
column_position=0
ifcolumn==1:
column_position=0
elifcolumn==2:
column_position=1
elifcolumn==4:
column_position=2
elifcolumn==8:
column_position=3
elifcolumn==16:
column_position=4
elifcolumn==32:
column_position=5
elifcolumn==64:
column_position=6
14. Weusetheread_input()functiontodetectanybuttonpress.Whenabuttonis
pressed,thereturnedvaluecanbeanywherebetween1and64.Thereturnvalueis
usedtoidentifythecolumnpositionandthecoinmovementissimulated.
15. Similarly,themainmenuofthegameneedstobemodifiedtobecontrolledusing
buttons.Thegameislaunchedwhenbutton1ispressedandtheplayerleavesthe
gamewhenabuttonispressed:
ife.type==EVENT_CHANGE_STATE:
ifstate==0:
rect_list,state=menu.update(e,state)
column=0
whilecolumn==0:
column=pfio.read_input()
pygame.display.update()
ifcolumn==1:
state=1
elifcolumn==2:
state=2
ifstate==1:
menu_sound.stop()
runGame(isFirstGame)
isFirstGame=False
state=0
prev_state=1
elifstate==2:
print'Exit'
pygame.quit()
sys.exit()
Objectivecomplete–minidebriefing
Inthistask,wecompletedthetransferofcontrolstomakeuseofthearcadestylebuttons.
WewillnowproceedtothenextstagewherewewilldiscussthegameAI,marquee
design,andsoon.
AbriefdescriptionoftheConnectFour
GameAI
Inthistask,wewilldiscussthegeneralmechanismofthegame.Wewilldiscussthe
functioncallsused,gameflow,andageneralideaofthegamemechanism.Itwouldbea
goodideatofollowthiscodereviewalongwiththegamecodeavailableinthisproject.

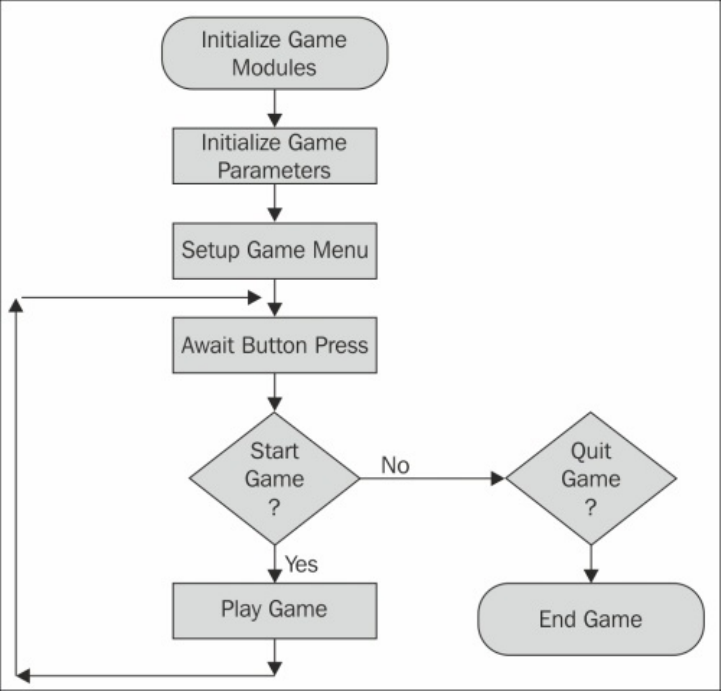
Engagethrusters
1. Let’sgetstartedwithreviewingthegeneralstructureofthegameusingtheflowchart
showninthefollowingdiagram:
2. Thefirststepistoimportthemodulesrequiredtolaunchandplaythegame.This
includesthepygame,pygame.mixer,piface,andserialmodules.
3. Afterimportingtherequisitemodules,gameparameterssuchasgamedifficulty,
boardsizeintermsofwidthandheight,backgroundcolor,windowsize,colorsofthe
computer,andplayercoinsareinitialized.
4. Thegamemenuisinitializedandrenderedonthegamescreentoawaitabuttonpress
bytheplayer.
Maingameloop
1. Whenthestartbuttonispressed,therunGamefunctioniscalledtostartthegame.If
thegameisbeinglaunchedforthefirsttime,theisFirstGamevariableissettotrue.
Thecomputeralwaysplaysfirstfortheveryfirsttimeafterthegameislaunchedand
thefirstturnisrandomizedforconsecutiveplays.
2. Whenanewgameisinitialized,thegetNewBoardmethodiscalledtocreateanempty
boardobjecttogetstartedwiththegame.Allgamemovesbythecomputerandthe
humanplayerarerecordedtothisobject.Thisisusedtodeterminewhetherthereisa
winneraswellasthecomputertodeterminepotentialmovestoplaythegame.
3. Onceweenterthemaingameloop,thegameloopisdividedintotwotasks,the
computerandthehuman’sturn.
4. Whenitistheplayer’sturn,wewaitfortheplayertoplaytheirturnusingthe
buttons.Whenabuttonpressisdetected,usingtheanimatePlayerMovingmethod,a
coindropissimulated.Thegame’sboardobjectisupdatedwiththelatestmove.
5. Thisisfollowedbythecomputer’sturn.ThegetComputerMovemethodcallsthe
getPotentialMovesfunctiontodeterminethebestpossiblemovesavailableforthe
computer’sturn.Then,thecomputer’scoindropissimulatedusingthe
animateComputerMoving()method.
6. ThegameAIrunsacheckaftereachturnhasbeenplayedtodeterminewhetherthe
playerorthecomputerisawinnerusingtheisWinnermethod.
7. Ifeitherofthemhaswonthegame,animagedeclaringthewinnerischosen.The
gamealsocheckswhetherthegamewasatie.Wheneitheroftheearliermentioned
threeeventsoccur,theprogrambreaksoutofthegameloopanddisplaysthewinner
(oratie)andwaitsforthestartbuttoneventtoreturntothemainmenu.
Consequently,thiswillenableyoutostartanewgame.
Objectivecomplete–minidebriefing
Nowthatthecodereviewiscomplete,let’smoveontothenexttasktoimplementa
simplemarqueeandwireuptheinputbuttons.

Marqueedesignandcontrol(optional)
Inthistask,wewillimplementthemarqueecontrolforourarcadegame.Wewilldisplay
informationsuchastheplayer’sturn(whetheritisthecomputerorthehumanplayer’s
turn),thewinnerofthegameattheend(orwhetheritwasatie),orgame-specific
messagesonthemarquee.WewillusethePiLiteLEDMatrixdisplay
(http://shop.ciseco.co.uk/pi-lite-lots-of-leds-for-the-raspberry-pi-1206-red/)thatcanbe
usedtoscrollmessagesacrossthedisplay.
PiLite–Courtesy:TheCisecoPLCwebsite

Prepareforliftoff
ThePiLitedisplaycanbepurchasedfromtheCisecoPLCwebsite
(http://shop.ciseco.co.uk/pi-lite-lots-of-leds-for-the-raspberry-pi-1206-red/).Thedisplay
costsabout33USD.
Oneoftherequirementsistheseriallibrary,whichisrequiredtocontrolthedisplay.It
canbeinstalledasfollows:
sudoapt-getinstallpython-serial
Oncewearedoneinstallingthemodule,weshouldbeabletoimportthemoduleandstart
programmingthemessagesinourgame.TheCisecoPi-LiteGitHubrepositorycomes
withexamplessuchastheBarScrollexample.Itisessentialthatyoudownloadsuch
examplesandtestifthepython-serialmoduleisfunctionallycorrect.
Engagethrusters
1. Wewillgetstartedbyimportingtheserialmoduleandinitializingtheserialport
parameters,includingthebaudrateandportname:
importserial
serialport=serial.Serial()
serialport.baudrate=9600
serialport.timeout=0
serialport.port="/dev/ttyAMA0"
2. Afterinitialization,theserialportisopenedtostartscrollingthemessagesacrossthe
display:
try:
serialport.open()
exceptserial.SerialException,e:
sys.stderr.write("couldnotopenport%r:%s\n"%(port,e))
3. Asanexample,wewilldisplaytheWelcometoConnectFourGamemessageinthe
maingamemenu:
column=pfio.read_input()
serialport.write("WelcometoConnectFourGame")
pygame.display.update()
Objectivecomplete–minidebriefing
Inthistask,wefinishedintegratingtheLEDdisplaytoRaspberryPithatrunsthegame.
Setupoftheswitchesusingacardboard
box
Inthistask,wewilldesignourarcadegamecabinetusingcardboard.Wewillusecable
tiestomountthecomponentsofourarcadegame.Wewillleaveittothereadertodesigna
bettercabinetusingtoolsoftheirchoice.
Prepareforliftoff
Weshouldputtogetheramonitor,RaspberryPi,speakers,andthepushbuttonsusedto
playthegame.Wealsoneedplentyofcardboardtoprototypethedesignofourcabinet.

Engagethrusters
1. Let’sgetstartedwithmountingtheswitches.Theswitcheswillbemountedontoa
cardboardbox.
2. Wegetstartedbymountingthearcadestylepushbuttonsonacardboardbox.The
arcadestylepushbuttonsusedinthisprojectrequireaholethatis1.13inchesin
diameter.Carefullycreatetheholesusingasharpobject.
Note
Donothurtyourselfwhilehandlingsharpobjects.Parentalsupervisionisrequiredif
childrenareworkingonthisproject.
3. Oncethemountingholesarecutoutofthecardboardbox,weneedtomountthe
switchesasshowninthefollowingimage.Theswitchesarelockedinplacebyalock
nutfromthebackside.
4. ThenextstepistointerfacethebuttonstothePiFacemodule.ThePiFacemanual
describesthatthedigitalinputshavepullupresistorsandhencetheswitchescanbe
connectedasshowninthefigurethatfollows:
5. Thecommonterminalofthebuttonneedstobeconnectedtothegroundterminalof
thePiFacemodule.Thenormallyopen(N.O.)terminalofthebuttonisconnectedto
thedigitalinputterminals(S0throughS7)ofthePiFacemodule.
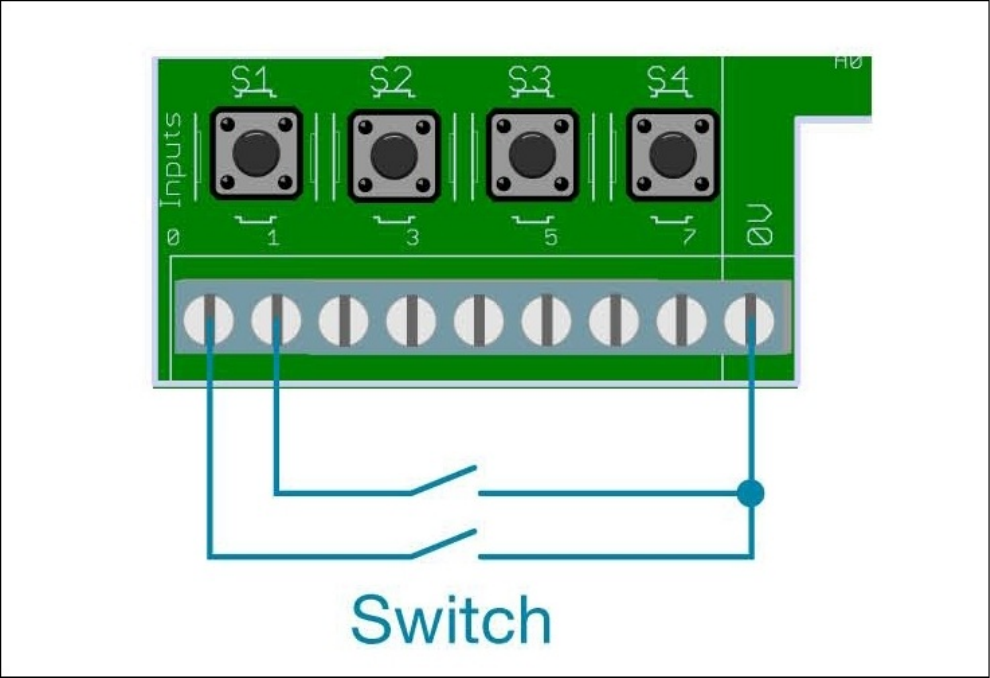
SuggestedinputconnectionsprovidedbythePiFacemanual
6. ThenextstepistoconnectamonitortoRaspberryPi.Thefollowingfigureshowsa
monitorwiththeConnectFourgamelaunchedandtheswitchesmountedontoa
cardboardboxandinterfacedwiththePiFacemodule:

Objectivecomplete–minidebriefing
Inthistask,wefinishedsettingupthedesktopConnectFourgameusingRaspberryPi.
Missionaccomplished
Inthisproject,weaccomplishedthefollowing:
1. WeusedaPythonscriptfortheConnectFourGameandtweakedittoour
requirements.
2. Weimplementedinputcontrolsusingarcadestyleswitches.
3. Wewroteaprogramtocontrolthemarquee.
4. Wealsosetupthingsonacardboardboxtoplaythegame.
Hotshotchallenge
Inthisproject,weperformedcontroloftheinputswitchesasablockingoperation.Can
youfigureouthowtomonitorswitchpresseventsbystartingmultiplethreads?Howcan
weimprovethespeedofthegame?

References
1. MakingGameswithPythonandPygameisavailableat
http://inventwithpython.com/makinggames.pdf.
2. PiFaceGuidescanbefoundathttp://www.piface.org.uk/guides/.
3. Pi-LiteUsers’Guidecanbefoundathttp://openmicros.org/index.php/articles/94-
ciseco-product-documentation/raspberry-pi/280-b040-pi-lite-beginners-guide.
Chapter9.TheRaspberryPi-enabled
Pet/WildlifeMonitor
Inthisproject,wewilldiscusshowtheRaspberryPicaninteractwithotherdevicesona
network.Thisdevicecaneitherbealaptop,anArduino,oranyotherdeviceconnectedto
anetwork.WewillmakeuseofthecapabilityoftheRaspberryPitoactasacontrol
deviceinthenetworkandimplementasimplesolutionthatcansafelyinteractwithour
preciouslittleanimalfriends.
Missionbriefing
Inthisproject,wewilllearntobuildaninteractivepetorwildlife(wecallitwildlifeinthe
contextofanimalsthatarenotdomesticated,forexample,wildcats)monitorthatcanbe
monitoredandcontrolledwithinanetwork(withsomeextraeffortyoushouldbeableto
controlanywhereontheWeb).Thisprojectpresentsthreedifferentpossibilitieswherewe
canmakeuseoftheRaspberryPiincombinationwithotherdevicestobuildaninteractive
deviceforpetsthatdispensetreatstointerfacewithdevicesthateitherinteractwith
pets/feralcats/birds.Thisinteractivedevicecaneitherbeacamerathatcapturesamoment
(forexample,awildbirdcomingandeatingoutofyourbirdfeeder)orarelayboard
activatedtofeedtreatstoouranimalfriendwhileweareawayfromhome.
Note
Thisprojecthasbeenpresentedasanexampletohelpapersonenhancethequalityoflife
fortheiranimalfriends.Thisprojectshouldnotbeconstruedasareplacementofhuman
interactionforouranimalfriends.Wetotallyunderstandthatpetseasethestressinour
livesandthisprojectpresentssomeexamplestomaketheirlivesbetter.
Whyisitawesome?
WearedemonstratingthecapabilitiesoftheRaspberryPiwhilebuildingapetmonitor.
Thiscanbeadoptedinanyapplicationwherethereneedstobeexchangeofinformation
betweendevices.ThisprojectdemonstratestheuseoftheRaspberryPiinthebetterment
ofourlivesfromanotherperspective.Ourpetsandotherferalfriends(forexample,birds
orferalcats)thatvisitusareourfamilymembersandwetryourbesttotakecareofthem.
OurgoalinthisprojectistomaketheRaspberryPidoourjobbetter.

Yourobjectives
Inthisproject,wewillexplorethefollowingtopics:
Installingandtestingthepython-twistedframework
SettingupandtestingSparkCoretointeractwithappliances
InstallingandtestingtheGoogleCoderprojectontheRaspberryPi
Abriefoverviewofabirdfeederthattriggersacamera

Missionchecklist
Forthisproject,wewillneed:
1. ARaspberryPiplusSDcard(atleast4GBinsize)
2. Anyoneofthefollowingboards:
AnArduinoEthernetboard(http://arduino.cc/en/Main/arduinoBoardEthernet)
ASparkCoreboard(https://www.spark.io/)
AnArduinoUnoplusESP8266board(http://www.banggood.com/ESP8266-
Remote-Serial-Port-WIFI-Transceiver-Wireless-Module-p-947259.html)
AfewresistorsandLEDstotestthingsout
AUSBwebcameraortheRapberryPi’scameramodule

Installingandtestingthepython-twisted
framework
Inthistask,wewillreviewthepython-twistedframework
(https://twistedmatrix.com/trac/).TheTwistedframeworkisanopensourceevent-driven
networkenginethatcanbeusedtosendcontrolmessagestootherdevices(forexample,a
petfeedercanbeoperatedusingRaspberryPitodispensesolidfoodtoouranimal
friends).ThemessagingprotocoliscalledAMP(AsynchronousMessagingProtocol)
whichisavailableathttp://amp-protocol.net/.
Prepareforliftoff
TheRaspberryPi(withanSDcardflashedwiththeOSimage)connectedtotheInternetis
neededforthistaskalongwithanArduinoEthernetBoard(oranyoneoftheboards
mentionedearlierinthechecklist.Networkconnectivityisessential).Wewillinstallthe
python-twistedframeworkandreviewaquickexampletoexchangemessagesbetween
ArduinoandtheRaspberryPi.

Engagethrusters
1. Thepython-twistedframeworkcanbeinstalledfromtheterminaloftheRaspberry
Piasfollows:
sudoapt-getinstallpython-twisted
2. Oncetheinstallationiscomplete,itistimetoreviewanexampleofthepython-
twistedframeworktotesttheframework
(http://twistedmatrix.com/documents/current/_downloads/simpleserv.py).
1. Inthistask,wewilllaunchaserverontheRaspberryPiandtrytocommunicate
totheserverwithinthelocalnetwork.
2. Let’smodifytheprecedingexampletobindthepython-twistedservertotheIP
addressofRaspberryPisothatwecanexchangemessageswithotherdeviceson
thenetwork.ThisdevicecaneitherbeanArduinooralaptop.
3. WewillmodifythelistenTCPmethodtobindtheservertotheIPaddressofthe
RaspberryPiandlistentoincomingmessagesattheportaddress,8000.
reactor.listenTCP(8000,factory,50,'192.168.1.89')
4. ThewebservercanbelaunchedbyexecutingaPythonscript.
5. Now,usingalaptopthatisconnectedtothesamenetwork,let’smodifythe
simpleclient.pyscripttosendandreceivemessagestotheserverjust
launchedontheRaspberryPi
(https://twistedmatrix.com/documents/14.0.1/_downloads/simpleclient.py).
6. InordertoconnecttotheserverlaunchedonRaspberryPi,theconnectTCP
methodneedstobemodifiedtoincludetheIPaddressthattheclienthasto
connect:
reactor.connectTCP('192.168.1.89',8000,f)
7. Inthisexample,theRaspberryPiistheserverandthelaptopistheclient.The
serverinthisexampleechoesallincomingmessages.Thus,whentheclient
connectsandsendsamessage,theoutputwillbesomethinglike:
Serversaid:Hello,World!
connectionlost
Connectionlost-goodbye!
3. Nowthatwehaveinstalledtheserver,let’sdiscussasimpleArduinosketchto
interactwiththeserverlaunchedontheRaspberryPi.Thesketchisavailablealong
withthisproject’sdownloads(TwistedFrameworkTest.ino).
1. WewillgetstartedbydeclaringanIPaddressobjectthatincludestheIPaddress
ofRaspberryPi:
//MACAddressoftheArduino
bytemac[]={0x90,0xA2,0xDA,0x0F,0x02,0xFC};
//IPAddressoftheRaspberryPi
IPAddressserver(192,168,1,89);
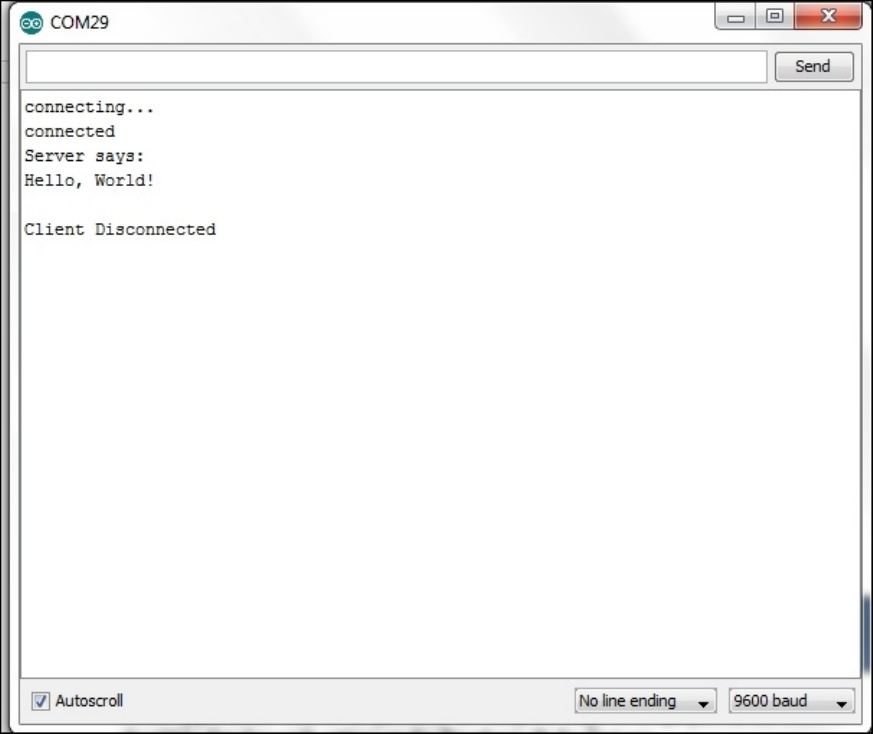
2. TheArduinoactsasaTCPclientandconnectstotheRaspberryPi:
if(client.connect(server,8000)){
Serial.println("connected");
client.println("Hello,World!");
client.println();
//Letswaitfortheclienttoreadand
//echothemessage
//Note:Asecond'sdelayisabitexcessive
delay(1000);
//Ifthereisaresponsefromtheserver
//echobackthemessage
Serial.println("Serversays:");
while(client.available()){
charc=client.read();
Serial.print(c);
}
client.stop();
Serial.println("ClientDisconnected");
}else{
Serial.println("connectionfailed");
}
3. TheArduinoclientconnectstotheRaspberryPiandtransmitstheHello,
World!message.TheRaspberryPiechoesbackthemessagetotheArduino
client.Ascreenshotoftheserver’sresponsetotheclientisshownasfollows:
InteractionoftheArduinoclientwiththeRaspberryPi
4. WedemonstratedtheabilitytotransmitandreceivemessagesbetweenArduinoand
theRaspberryPi.
Objectivecomplete–minidebriefing
Attheendofthisproject,wewilldiscussmakinguseofthepython-twistedframework
andanArduinoEthernetboardtohelpyoucontrolacameratriggerorremotelydispense
treatsusingapetfeeder.

SettingupandtestingSparkCoreto
interactwithappliances
Inthistask,wewillsetupSparkCore.ItisadevelopmentboardthatmakesbringingWi-
Fitohardwareveryeasy.WewillusetheCoreforthisprojectbecausewelovethe
simplicityofthesetupandoperation.YoucanreadmoreaboutSparkCoreattheofficial
website,https://www.spark.io/.
Youarewelcometouseasimilardeviceofyourchoosing.Agoodalternativewillbeto
useanArduinowithaWi-Fiadapter/shield(forexample,theESP8266Wi-Fimodulecan
befoundathttp://www.seeedstudio.com/wiki/WiFi_Serial_Transceiver_Module)orifyou
prefer,anEthernetshield(asdiscussedintheprevioustaskofthisproject).
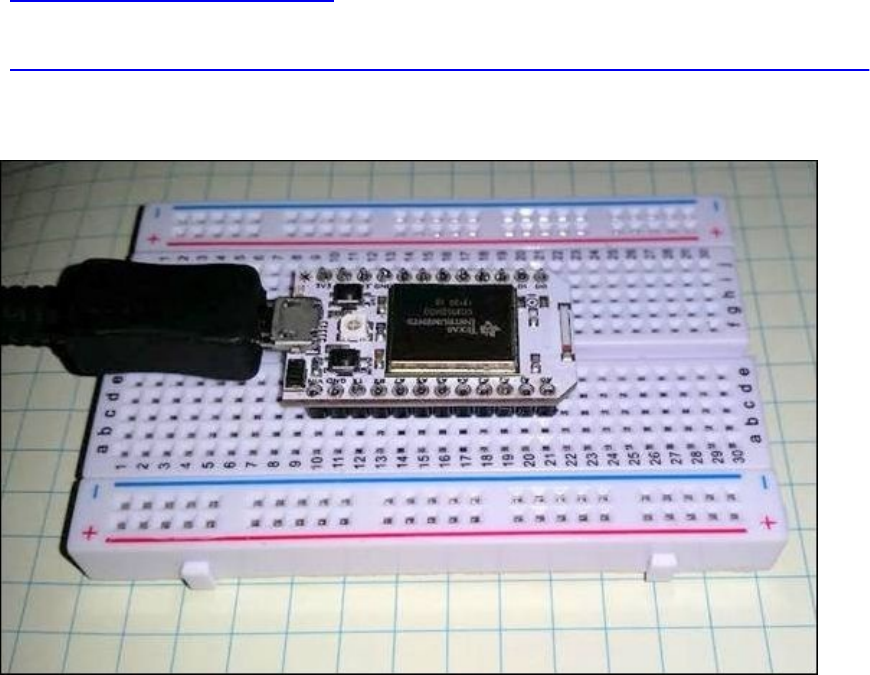
Prepareforliftoff
Inthistask,wewillsetuptheSparkCore.PoweruptheSparkCoreusingamicro-USB
cableconnectedtoapowersource(5Vsource).Itcanbepoweredusingabatterypack,a
laptop,ora5VUSBwallwart.Basedonyourprojectneeds,youcanuseabatterypackif
thesensornodeforthepetmonitorhastobeinstalledoutdoors.
TheeasiestwaytoconnecttheSparkCoretoyourWi-Finetworkisthroughaphone
application.ThisandothermechanismsaredetailedontheSparkCorewebsite
(http://docs.spark.io/connect/).WewillsetupourSparkCorebydownloadingthe
applicationontoanAndroidphoneandSamsungGalaxyS5throughtheGooglePlaystore
(https://play.google.com/store/apps/details?id=io.spark.core.android&hl=en).Theapp
searchesforSparkCoresinrangeandifyousupplytheWi-Fipassword,itsendsthecode
totheCore(s)andletsitconnecttoyourWi-Fi.
TheSparkCoreboard

EngageThrusters
WewillwarmupbyimplementingtheLEDexampleonSparkCoreorsomethingsimilar.
ThedocumentationincludescodetoconnectanLEDwitharesistortotheCore
(http://docs.spark.io/examples/).Wedecidedtodosomethingevensimpler.Thereis
alreadyanLEDconnectedtopinD7andwedecidedtoturnthisoneoninstead.
AlltheappsyouneedcanbedownloadedtoacustomwebpageavailableforeachSpark
Corethroughausernameandpassword.
OnceyouhavesetuptheCore,youwillcreateausernameandpassword.Fordifferent
Cores,youwillneeddifferentusernames.Usingthis,youcangototheSparkhomepage
(http://www.spark.io/)andclickontheBuildbutton.Thistakesyoutothehomepageof
thedevelopmentenvironment.
Usingthisdevelopmentenvironment,wecreatedasimpleLEDblinkingapplication:
voidsetup(){
pinMode(7,OUTPUT);
}
voidloop(){
//turntheLEDon(HIGHisthevoltagelevel)
digitalWrite(7,HIGH);
//waitforasecond
delay(1000);
//turntheLEDoffbymakingthevoltageLOW
digitalWrite(7,LOW);
//waitforasecond
delay(1000);
}
Note
TheprecedingcodeiswritteninCprogramminglanguage.Ifyouarejumpingdirectlyto
thisprojectfromotherprojects,wesuggestthatyoufamiliarizeyourselfwiththeArduino
orSparkCoreplatform.Somelearningresourcesareavailableat
https://learn.adafruit.com/search?q=Arduino
Asyoucansee,theappisquitesimple;theappsetsupthepin7asoutput.Theprogram
turnsontheLEDforasecondandturnsitoffforonesecond.
Now,let’sdiscussanexamplethatismoreorlesssimilartotheexamplediscussedinthe
previoustask:
TCPClientclient;
//IPAddressoftheRaspberryPi
byteserver[]={192,168,1,89};
voidsetup()
{
Serial.begin(9600);
while(!Serial.available())SPARK_WLAN_Loop();
delay(1000);
Serial.println("connecting…");
if(client.connect(server,8000)){
Serial.println("connected");
client.println("Hello,World!");
client.println();
//Letswaitfortheclienttoreadand
//echothemessage
//Note:Asecond'sdelayisabitexcessive
delay(1000);
//Ifthereisaresponsefromtheserver
//echobackthemessage
Serial.println("Serversays:");
while(client.available()){
charc=client.read();
Serial.print(c);
}
client.stop();
Serial.println("ClientDisconnected");
}else{
Serial.println("connectionfailed");
}
}
voidloop()
{
//Nothingtodohere
}
Theonlydifferencebetweenthepreviousexampleandthisexampleisthatthelatteruses
theTCPClientclasswhiletheformerusestheEthernetClientclass.
Objectivecomplete–minidebriefing
That’sit.YounowhaveSparkCore,allsetupandreadytogo,withyourusername,and
yourownpagetodownloadappsandcollectandtransmitdatathroughtheCore.
InstallingandtestingtheGoogleCoder
projectontheRaspberryPi
Thisisprobablythesimpleststageoftheprojectasyoushouldbefamiliarwithsettingup
theRaspberryPiforfirstuse.
TheGoogleCoderisatoolreleasedbyGooglethatenablespeopletolearnweb
developmentusingtheRaspberryPi.Itisatoolthatprovidesanintuitivelearningprocess.
AfterinstallingtheGoogleCodertool,wewilltestinterfacingtheGPIOpinsofthe
RaspberryPitothewebinterface.


Engagethrusters
1. Let’sgetstartedwithsettingupGoogleCoderfortheRaspberryPi.Oncetheimage
isdownloaded,wehavetoinstalltheimageontoanSDcard.Ifyouarenotfamiliar
withtheinstallationoftheRaspbianimageontoanSDcard,thefirstprojectofthis
bookisreallyhelpful(wethink!).
2. OncetheRaspberryPiispoweredupafterflashingtheSDcard,MacBookusersmay
launchthetoolfromabrowserbygoingtohttp://coder.local.
3. WindowsusershavetoinstallApple’sBonjourPrintServicesforWindows
(http://support.apple.com/kb/DL999).Onceinstalled,theGoogleCodertoolcanbe
launchedusingaChromebrowser.Now,theGoogleCoderplatformcanbeaccessed
athttp://coder.local.
4. Thesetupprocessisreallysimple.Ifeverythingwentasplanned,weshouldbeable
toseethelandingpageoftheGoogleCoderapplication.
TheGoogleCoderlandingpage
5. Let’stesttheBlinkyLightsexamplefromtheGoogleCoderprojectavailableat
http://googlecreativelab.github.io/coder-projects/projects/blinky_lights/.Theexample
providesdetailedinstruction,includingthecircuitryandcoderequiredtosetupa
switchtoreadbuttonstatesfromtheGPIOinterfaceoftheRaspberryPi(Wechoseto
skiptheexplanationastheexamplealreadyprovidesadetailedelaborationofthe
examplecode).
6. TheBlinkyLightsexampledemonstratestheuseofthenode.jsbasedGPIOhelper
(https://www.npmjs.com/package/pi-gpio)toread/writeGPIOpins.
Objectivecomplete–objectivecomplete
Wewillmakeuseofthethreetasksdiscussedinthisprojecttoputtogetheratriggerthat
comestoeatoutofabirdfeeder.
Abriefoverviewofabirdfeederthat
triggersacamera
Inthistask,wewillsetupabirdfeederwithamotionsensor.Wheneverabirdfliesinto
feedonthegrainsoutofthefeeder,themotionsensoristriggeredtosendamessagetothe
RaspberryPi.AcameramoduleoraUSBcameraisconnectedtotheRaspberryPi,which
capturessomebeautifulmomentsinourbackyard.
SrihariYamanoor(oneoftheauthorsofthisbook)hasanextensivebackyardwherethis
birdfeederhasbeeninstalled.Checkoutthisbook’swebsitetofindoutwhetherwehave
capturedanybeautifulmomentsthusfar!

Prepareforliftoff
Inordertobuildthisinteractivepetfeeder,weneedthefollowingitems:
Apetfeeder.(Availablefromhomeimprovementstores,forexample,HomeDepot,
Lowes,andsoon).
ThePIRsensor(http://www.adafruit.com/product/189).
SparkCoreoranyWi-Fienabledboard.
AUSBbatterypack(http://www.adafruit.com/products/1959).rd
(http://www.adafruit.com/products/64).
RaspberryPiwithaTwistedframeworkinstalled.
ARaspberryPicameramodulewithalensattachment.Forexample,
http://store.cutedigi.com/raspberry-pi-camera-module-5mp-wide-angle-160-degree/.
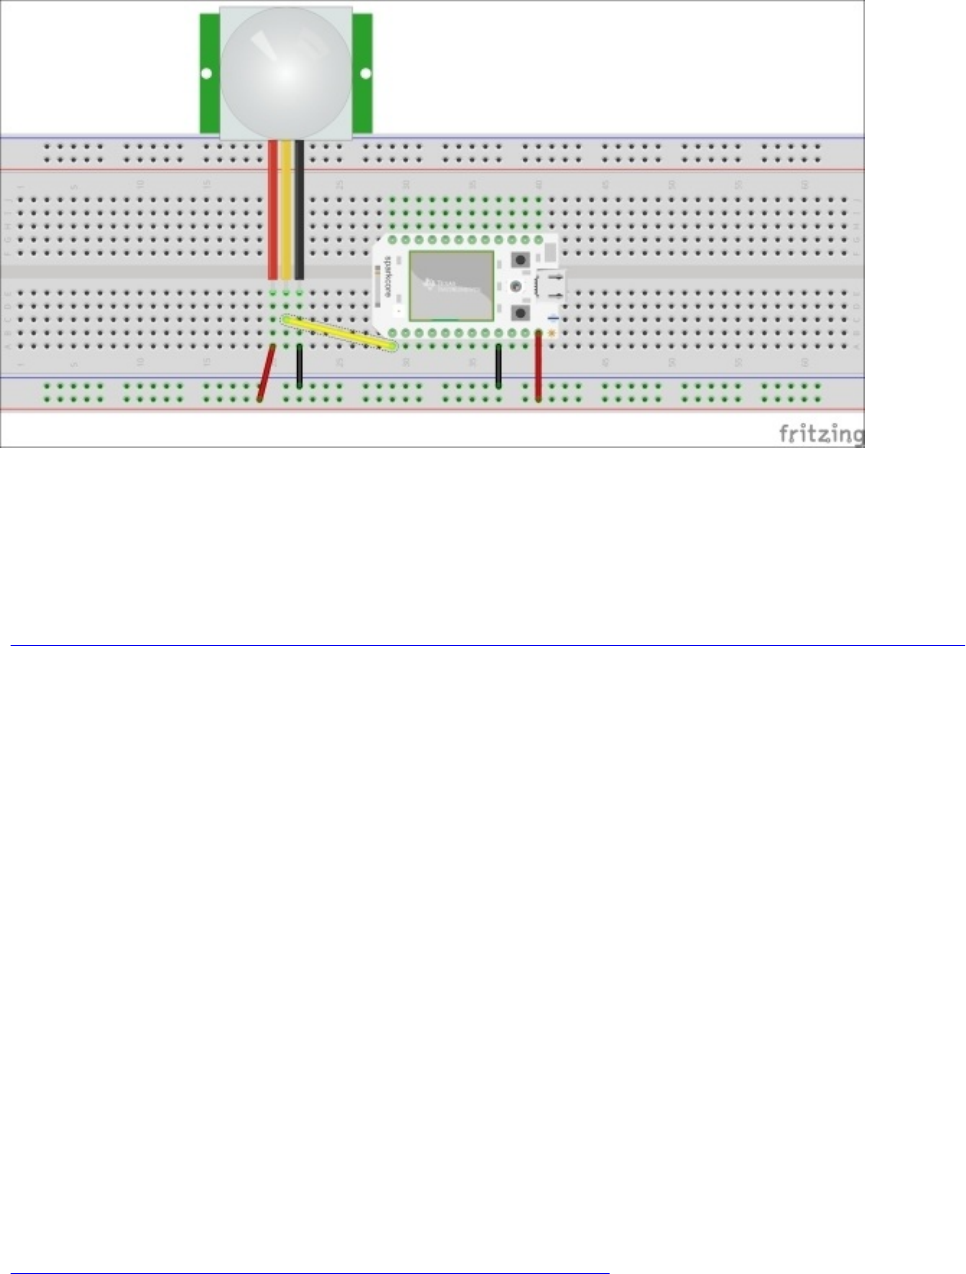
Engagethrusters
1. ThefirststepinvolvedinprogrammingSparkCoreistodetectthemotionsensor
eventsandpublishthoseresultstoRaspberryPi.
2. ThesensorneedstobeconnectedtoSparkCoremountedonthebreadboardasshown
inthefollowingfigure:
AmotionsensorconnectedtoSparkCore
3. WewillmodifytheexamplefromAdafruitthatprintsthemotionsensorevents
(https://learn.adafruit.com/pir-passive-infrared-proximity-motion-sensor/using-a-pir).
4. Wheneveramotioneventisdetected,weneedtosendanalerttothepython-
twistedserverlaunchedonRaspberryPi:
if(client.connect(server,8000)){
Serial.println("MotionDetected");
client.println("MotionDetected");
client.println();
//Letswaitfortheclienttoreadand
//echothemessage
//Note:Asecond'sdelayisabitexcessive
delay(1000);
client.stop();
Serial.println("ClientDisconnected");
}else{
Serial.println("connectionfailed");
}
5. Inordertotakepicturesofthebirdfeederwhenthereisanincomingmotion
detectionevent,thecamerahastobeinterfacedtotheRaspberryPiasdemonstrated
inthevideoprovidedbytheRaspberryPiFoundation
(https://www.youtube.com/watch?v=GImeVqHQzsE).
6. Inordertotriggeracameratotakeasnapshotusingthepython-twistedserver,we

needthepicameramodule(https://pypi.python.org/pypi/picamera).Itcanbeinstalled
asfollows:
sudoapt-getinstallpython-picamera
7. Let’smodifythepython-twistedexample,simpleserv.py,toimportthepicamera
anddatetimemodules(tonamethepicturescapturedbythecamerausinga
timestamp).
8. IftheincomingmessageisMotionDetected,wewilltakeapictureandnamethe
fileusingatimestamp.
9. Inthecallbackmethod,DataReceived,let’scaptureanimage:
withpicamera.PiCamera()ascamera:
camera.start_preview()
time.sleep(2)
camera.capture('img{timestamp:%Y-%m-%d-%H-%M}.jpg')

Abirdtrigger

Objectivecomplete–minidebriefing
Checkoutthisbook’swebsitetolookattheRaspberryPiandSparkSensorsetupthatis
usedtotakepictures.Thisisreallyhelpfultolearnmoreaboutthebirdsinyour
neighborhood.
Alternativesandprojectideastoconsider
1. Inthisproject,wediscussedtheexamplesusingtheSparkCoreandtheArduino
Ethernetboard.AnotherexampletoconsideristheEPS8266module,whichis
availableathttp://www.banggood.com/buy/Esp8266.html,andcostsabout3USD.
Refertothisbook’swebsiteforsettinguptheESP8266moduletoemulatethese
examples.
2. InProject4,ChristmasLightSequencer,weusedaPowerSwitchTailandarelay
boardexampletocontroldecorativeappliances.Similarly,wecanusethemtocontrol
automaticpetfeederstodispensetreats.
Missionaccomplished
Inthisproject,weinterfacedbuiltasmallecosystemofdevicesthatweremonitoredby
theRaspberryPi.Weusedthoseexamplestobuildabirdfeeder!
Hotshotchallenge
Inthisproject,wediscussedinterfacingasensortotakepicturesofbirdsthatcometofeed
fromthebirdfeeder.Isitpossibletouploadthevideofeedtosomewherethat’ssecure
overtheInternet?Howdowedothis?
Chapter10.RaspberryPiPersonalHealth
Monitor
Inthisproject,wewilldiscussimplementingasolutionwhereRaspberryPiactsasa
personalhealthmonitor.Wewouldliketodedicatethisprojecttoallthepeoplewhohave
beendiagnosedwithtype2diabetesoranyotherlifestylediseases.Thisprojectpresents
sometricksforthosediagnosedwithsuchlifestylediseases.
Note
Pleasedonotconsiderthisprojectasanalternativetoexistingtreatmentandpractices.
Thisproject’strickswillhelpyouleadabetterlife.Forexample,yourRaspberryPican
remindyoutotakeyourprescribedmedication(ifany).

Missionbriefing
Inthisproject,wewillbuildsomesolutionstoaddresscommonproblemsencounteredby
peoplewithlifestylediseases.SimilartoProject6,RaspberryPiasaPersonalAssistant,
thisprojectpresentsdifferenttipsandtrickstoleadabetterlifeineachtask.Wewill
discussexampleswhereapersoncanbuildasimplewebservertostorehis/herdailyvital
healthparameters(forexample,bloodpressure,bloodoxygensaturationlevels(SpO2),
andsoon).Also,theservercanhelpapersontoremainphysicallyactivethroughtheday,
provideaquickrecapofthee-mailparser,providetheeventremindertoolfromProject6,
RaspberryPiasaPersonalAssistanttoremindapersonaboutupcomingappointments,
refillhis/herprescriptions,andsoon.
Whyisitawesome?
Wedecidedtowritethisprojectbasedonthepersonalexperienceofoneoftheauthors’
familymember.Itisquitestressfulforapersonwhenhe/sheisdiagnosedwithachronic
conditionssuchastype2diabetes.Thepersonissubjectedtostressfulconditionsrelated
tochangeindailyfoodhabits,developingahabitofconsumingmedicationeveryday,and
beingmindfulofwhathe/sheeatseverydaywhilstensuringthattheircriticalhealth
parametersareintact.Itisobviouslydifficulttoacceptasuddenchange,andthisproject
presentssomeoptionstomitigatesuchdifficultiesandbringtheperson’shealthbackon
track.

YourHotshotobjectives
Inthisproject,wewillreviewthefollowingexamples:
Settingupawebservertorecordhealthparameters
AsimplephysicalexercisetoolusingRaspberryPi
Settingupane-mailfeedparsertorefillaprescriptionaswellasremindtheuser
aboutanupcomingdoctor’sappointment
Asimpletoolthatremindsapersontotakehis/herpills

Missionchecklist
Itwouldbegreattohavethefollowingcomponentsforthisproject:
ARaspberryPialongwithanSDcard(ofatleast4GBinsize)thathasbeenflashed
withanimageandrequisitepowercable.
AnArduinoEthernetboard(http://arduino.cc/en/Main/arduinoBoardEthernet).This
iscompletelyoptional.
Atactileswitch,resistors(10K),andapiezoelectricbuzzer(allthesecomponentsare
availablefromRadioShack).
ItwouldbegreattohavetwoRaspberryPiboardstobuildthephysicalexercisetool
usingRaspberryPi.
Settingupawebservertorecordhealth
parameters
Inthistask,wewillbuildasimplewebserverthatcanbeusedtomaintaincriticalhealth
parameters.Let’sconsiderascenariowhereapersonisdiagnosedwithhighblood
pressure.Thedoctorasksthepatienttorecordhis/hervitalhealthparameterssuchas
pulse,oxygenlevel,orbloodpressure.Forthissituation,wewillbuildasimplewebpage
thatrecordsthedataandstoresitinaCSVfile.

Prepareforliftoff
WewillbeusingtheFlaskframework(http://Flask.pocoo.org/)todeploythewebserver
onRaspberryPi.WemadeuseoftheFlaskframeworkinProject4,ChristmasLight
Sequencer.JustincaseyouskippedthroughProject4,ChristmasLightSequencer,a
Pythonpackagemanagersuchaspiporeasy_installisrequiredtoinstalltheFlask
framework:
sudoapt-getinstallpython-pip
AftertheinstallationofthePythonpackagemanageriscomplete,theFlaskframework
maybeinstalledasfollows:
sudopipinstallFlask

Engagethrusters
1. WewillmodifythisbasicFlaskframeworkexample
(http://runnable.com/UhLMQLffO1YSAADK/handle-a-post-request-in-Flask-for-
python)totakeinputfromabrowser:
Inthefrontendofthewebserver,let’screatetextboxesinthe
form_submit.htmlfilewherewecanenterthebloodpressure,oxygen
saturationlevels,andpulsedata.Thelandingpagewilllookliketheoneshown
inthefollowingfigure(whenopenedinabrowser):
Theformusedtorecordvitalhealthparameters
InthePythonscriptthatlaunchesthewebserver,wereadthesubmitted
parametersandwritethemtoaCSVfilealongwithatimestamp:
@app.route('/',methods=['POST'])
defrecord():
#recordallthedatafromtheform
bloodPressure=request.form['BloodPressure']
SpO2=request.form['SpO2']
pulse=request.form['pulse']
#beforewritingtoacsvfile,logtimestamps
date=datetime.today().strftime('%Y-%m-%d')
time=datetime.now().strftime('%H:%M:%S')
logfile=open('static\\comments.csv','a')
logfile.write(",".join([date,time,bloodPressure,SpO2,
pulse,'\n']))
logfile.close()
return
render_template('form_action.html',date=date,time=time,bloodPressur
e=bloodPressure,SpO2=SpO2,pulse=pulse
Oncewe’redonewritingtotheCSVfile,weredirectthesubmittedformtoa

pagethatdisplaystherecordedvaluesalongwiththetimestamp(asshowninthe
followingfigure):
Thepagedisplayedaftertheresultsarerecorded
2. ItispossibletoviewtherecordeddataonthewebpagebyreadingtheCSVfile.We
leavethisforyoutofigureout(lookatthisbook’swebsitefortheanswer).
Objectivecomplete–minidebriefing
WebuiltasimpleFlask-framework-basedwebservertorecordvitalhealthparameters
usingRaspberryPi.Itispossibletoe-mailthedataatregularintervalsusingthesmtp
moduleinPython.
AsimpleexercisetoolusingtheRaspberry
Pi
Inthistask,wewillreviewafunexamplethatenablesapersontobephysicallyactive
every60minutes.
Prepareforliftoff
ThisexampleisbasedontheTwistedframeworkdiscussedinthepreviousproject.It
wouldbegreattohavetwoRaspberryPiboards(setupwiththeSDcardimagesand
poweredup)oranArduinoEthernetboard.Alaptopthatisconnectedtothesamenetwork
astheRaspberryPiisjustassufficient.
IfyoumissedinstallingtheTwistedframeworkinthepreviousproject,theTwisted
frameworkcanbeinstalledasfollows:
sudoapt-getinstallpython-twisted
Note
IftheseconddeviceisaRaspberryPioralaptopthatrunsLinux,Mac,orWindows
operatingsystems,theTwistedframeworkneedstobeinstalledontheseconddeviceas
well.

Engagethrusters
1. Let’sperformaquickreviewofwhatwewillbuildinthisproject:
Let’sconsidertwodevicesthatcanbeconnectedtoanetwork.Oneofthe
devicesisaRaspberryPiwhiletheotherdevicecouldeitherbeanArduinoora
RaspberryPi.Wewillreviewthecoderequiredtobuildthistoolforbothcases.
Thesedeviceshavetobeinstalledattwoextremecornersinsideahouse.This
canbedifferentfloorsofthehouseorthefarthestcornersofthehouse.
AbuzzerandabuttonwillbeconnectedtoaRaspberryPi.
Thebuzzerwouldgooffevery60minutesononeofthedevices.Someonehas
towalkuptothedeviceandturnoffthebuzzerbypressingabutton.
Thisenablesapersontogetsomephysicalactivitybywalkingbackandforth
betweenthetwodevices(assumingtheRaspberryPidevicesareinstalledfaraway
fromthepersonintheinterestofgainingsomephysicalactivity).
Note
Thisexampleisjustamotivationaltoolandacasualreminderfortheconcerned
persontoremainphysicallyactive.
2. ThebuzzerandtheswitchareconnectedtotheRaspberryPiasshowninthe
followingdiagram:
AbuttonandbuzzerschematiccreatedusingFritzing
TheprecedingbreadboardrepresentationshowsanAdafruitPiCobblermounted
onabreadboard.RefertoProject4,ChristmasLightSequencer,forapictorial
representationofhowthePiCobblerneedstobeconnectedtotheRaspberryPi.

GPIO#25oftheRaspberryPiisconnectedtothebaseoftheNPNtransistor,
BC547.Thetransistor’scollectorpinisconnectedtothenegativeterminalofthe
buzzer.Theotherendofthebuzzerisconnectedto5V.Theemitterpinofthe
transistorisconnectedtotheground.Thetransistoractsasaswitchandturnson
thebuzzerwhenthebasepinissettohigh.
GPIO#18oftheRaspberryPiispulledupto3.3Vandatactileswitchis
connectedtotheGPIOswitch.Theotherendoftheswitchisconnectedtothe
ground.
3. Let’sperformaquickreviewofthetwistedservercodethatrunsontheRaspberryPi.
Similartothepreviousproject,thisexampleisalsoasimplemodificationofthe
Twistedframeworkexample,simpleserver
(http://twistedmatrix.com/documents/current/_downloads/simpleserv.py).
Let’screateaclassthattakescareofsettingoffthebuzzerwhenthereisan
incomingmessage:
#Declareinputsandoutputs.
GPIO.setmode(GPIO.BCM)
GPIO.setup(18,GPIO.IN)
GPIO.setup(25,GPIO.OUT)
GPIO.setwarnings(False)
classAsyncTask:
def__init__(self):
self.run_state=True
#avoidingthechannelargumentthrowsanerror
defterminate(self,channel):
self.run_state=False
defadd_callback(self):
GPIO.add_event_detect(18,GPIO.FALLING,callback=self.terminate)
defrun(self):
whileself.run_state==True:
GPIO.output(25,GPIO.HIGH)
time.sleep(1)
GPIO.output(25,GPIO.LOW)
time.sleep(1)
GPIO.remove_event_detect(18)
IntheAsyncTaskclass,thebuzzercanbesetoffbytriggeringaseparatethread
tocalltherunfunction.Thissetsoffthebuzzerwithaone-secondinterval.
Theadd_callbackmethodisusedtoturnoffthebuzzerwhenthebuttonis
pressed.Theadd_event_detectmethodwaitsforthestateofGPIO#18to
changefromhightolow.Thisturnsoffthebuzzerbysettingrun_stateto
False.Whileexitingtheinfiniteloop,weremovethecallbackfunctionsusing
theremove_event_detectmethod.
Whenaclient(Arduino,laptop,oranotherRaspberryPi)sendsamessagetothe
server,thethreadisinitializedandacallbackfunctionisregisteredasfollows:
async_task=AsyncTask()

async_task.add_callback()
thread=Thread(target=async_task.run,args=())
thread.start()
Tosummarize,anincomingmessagetriggersthebuzzerandapersonhasto
walktotheRaspberryPi’slocationtoturnoffthebuzzer.
4. IftheclientdevicethatsendsamessagetotheRaspberryPiisalaptopthatrunsa
Linux,Mac,orWindowsoperatingsystemortheRaspberryPi,itissufficienttorun
thesimpleclient.pyexampleaftermodifyingthecodetochangetheserveraddress
tothatoftheRaspberryPi
(https://twistedmatrix.com/documents/14.0.1/_downloads/simpleclient.py).
5. Intheprecedingexample,wedemonstrateasinglecycletosetoffthebuzzer.This
canberepeatedincyclesof60minutesusingabatchscript(inaWindows
environment)orashellscript(LinuxorMacenvironment).
6. IfthedeviceisanArduino,EthernetClienthastobeinitializedandconnectedto
theRaspberryPitosendatestmessage.Thiscanberepeatedina60-minutecycle:
Serial.println("connecting…");
if(client.connect(server,8000)){
Serial.println("connected");
client.println("Hello,World!");
client.println();
//Letswaitfortheclienttoreadand
//echothemessage
//Note:Asecond'sdelayisabitexcessive
delay(1000);
//Ifthereisaresponsefromtheserver
//echobackthemessage
Serial.println("Serversays:");
while(client.available()){
charc=client.read();
Serial.print(c);
}
client.stop();
Serial.println("ClientDisconnected");
}else{
Serial.println("connectionfailed");
}
Aminiprojectidea
ItwillbefuntoinstallanumberofRaspberryPiboardsinthesamenetworkand
implementanasynchronousmessagingprotocol.Thisprotocolcansetoffbuzzersasa
chainreactiontoencouragemorephysicalactivity.Pleasenotethatthismayannoyother
membersofthehousehold.
Objectivecomplete–minidebriefing
Wediscussedatoolthatcanannoyapersontoremainphysicallyactive.

Settingupane-mailfeedparsertorefilla
prescriptionaswellasremindtheuser
aboutanupcomingdoctor’sappointment
Inthistask,wewilldiscusssettingupanLEDtoalertapersonaboutanincominge-mail
torefillaprescriptionorwhenthereisanupcomingdoctor’sappointment.
JustincaseyouskippedthroughProject6,RaspberryPiasaPersonalAssistant,the
python-feedparsertoolandthepython-gdatatoolhavetobeinstalled:
sudoapt-getinstallpython-feedparser
sudoapt-getinstallpython-gdata
Note
Thistaskissimilartothee-mailnotifierwesetupinProject5,InternetofThings
Example–AnE-mailAlertWaterFountain.Wewilljustdiscussaminormodificationto
blinkanLEDwhenthereisane-mailintheinboxtorefillaprescription.

Engagethrusters
1. Wewillgetstartedbycheckingforanynewincominge-mails:
email=feedparser.parse(proto+username+":"+password+"@"+server+path)
2. Let’sassumetheprescriptionrefillremindere-mailsubjectiscalledWalgreens.We
williterativelycheckthrougheachentryandtriggeranLEDalert:
formailinemail.entries:
ifmail.title=="Walgreens":
async_task=AsyncTask()
async_task.add_callback()
thread=Thread(target=async_task.run,args=())
thread.start()
AnasynchronoustaskcanbetriggeredtoblinkanLEDuntilthealertis
acknowledgedbypressingabutton.Thecircuitryissimilartotheonediscussed
intheprevioustask.
3. Thisenablesapersontorespondtoane-mailandrefillhis/herprescriptionwhen
necessary.Thispreventsarefillremindergettingburiedamonge-mailsandenables
thepersontokeepatabonprescriptiondelays.
Settingupareminderfordoctor’sappointments
ThisisalsosimilartotheeventnotifierthatwediscussedinProject6,RaspberryPiasa
PersonalAssistant.Let’sassumethatalldoctor’sappointmentsaresavedinthecalendar
asDoctor'sappointment.Itispossibletoprominentlydisplayallupcomingdoctor’s
appointmentsasfollows:
fori,an_eventinenumerate(feed.entry):
ifan_event.title.text=="Doctor'sappointment":
print'\t%s.%s'%(i,an_event.title.text,)
Intheprecedingexample,wearejustprintingittoaconsole.Youcanperhapsmakeuse
ofadisplay,forexample,anOLEDdisplaythatiscontrolledviaaserialport,anddisplay
itataprominentlocation.
Objectivecomplete–minidebriefing
Inthistask,wecompletedthesetupofane-mailnotifiertorefillprescriptionsanda
reminderforanupcomingdoctor’sappointment.
Asimpletoolthatremindsapersonto
takehis/herpills
Inthistask,wewillbuildasimpletoolthatremindsapersontotakehis/herpillsontime.
Thecircuitryrequiredforthisexampleissimilartotheexamplesdiscussedintheprevious
tasks.Wearediscussingthisexamplebecauseitisdifficultforsomeonetodevelopahabit
oftakingtheirmedicationontime.Itiscriticalthatpeopleidentifiedwithchronic
conditionsdonotmisstheirprescriptionschedule.

Prepareforliftoff
WeextensivelydiscussedinterfacingthebuzzertoaRaspberryPiintheprevioustask.
It’llbenicetohaveanenclosureforthepillboxreminder.Anexampleofapillreminderis
availablefrominstructablesathttp://www.instructables.com/id/The-Pill-Reminder/.We
willonlydiscusshowtotriggerthebuzzerataselectedtimeoftheday.
Engagethrusters
Let’ssayapersonhastotakehis/herprescribedpillsat9:30inthemorning;abuzzercan
betriggeredusingthedatetimemoduleinPython:
whileTrue:
t=datetime.datetime.now()
ift.hour==9andt.minute==30:
async_task=AsyncTask()
async_task.add_callback()
thread=Thread(target=async_task.run,args=())
thread.start()
break
Otherprojectideas
Similartotheexamplesdiscussedearlier,itisalsopossibletosetreminderstosync
pedometerdata,gotothegym,orevenrecordthehealthparametersdiscussedearlierin
thisproject.
Objectivecomplete–minidebriefing
Inthistask,wecompletedthepillboxremindersetuptohelpustakeourmedicationon
time.
Missionaccomplished
Inthisproject,wediscussedseveralexamplesofRaspberryPiactingasapersonalhealth
monitorusingasimpleconcept.Thiscanbeadaptedfordifferentscenariosaccordingto
yourcreativity.
Hotshotchallenge
HowcanweuseRaspberryPitoenhancethelivesofseniorcitizens?
Chapter11.HomeAutomationusing
RaspberryPi
Inthisproject,wewillreviewsomeautomationexamplesusingRaspberryPi.These
examplescanbeconsideredasprojectsthatcanbeexecutedoveraweekend.
Missionbriefing
Inthisproject,wewilldiscussdifferentoptionsavailableforautomationathomeusing
RaspberryPi.Theexamplesuseasimilarconcept(moreorless)andyoucanpickthe
tasksofyourchoiceandturnyourhomeintoasmarthome.
Whyisitawesome?
AquickwebsearchyieldsalotofprojectsrelatedtohomeautomationusingRaspberryPi.
Wehavetriedtokeepthisprojectuniquebyensuringthatitissimpleenoughtobe
executedoveraweekend(thoughsomeexamplesmightappearrepetitiveifyouhavebeen
readingthroughtheprojectsintheircorrectorder),whileincorporatingfeedbackfrom
projectsavailableallovertheWeb.

Yourobjectives
Wewilldiscussthefollowingexamplesinthisproject:
Asimpleexamplethatcontrolslimitedindoorandoutdoorlightingintheevening
Acustomarywebserverexample
Turningonalawnsprinkleronlywhenthereisanorainforecast!

Missionchecklist
Thefollowinghardwareitemsarerequiredforthisproject:
1. RaspberryPialongwiththenecessaryaccessories(anSDcard—atleast4GBinsize,
1AUSBpowersupply,andamicro-USBpowercable).
2. PowerSwitchTailIIfromAdafruitthatisavailableat
http://www.adafruit.com/product/268.
3. Ethernetcables/Wi-Fiadapter(optional,neededtoconnecttheRaspberryPitoa
network).
4. Sensorsofyourchoice.Forexample,Soilmoisturesensor.
5. Generalhardwarefromthelocalstore(thisdependsuponthereader’sproject
requirements).
6. ArduinoEthernetBoard(optional)availableat
http://arduino.cc/en/Main/arduinoBoardEthernet.
Wewillinstallthesoftwareprerequisitesaswerevieweachexampleinthisproject.
Asimpleexamplethatcontrolslimited
indoorandoutdoorlightingintheevening
Let’sconsiderascenariowhereapersonlivesinaneighborhoodthatisnotsowelllit.In
winter,thetemperaturesareusuallyextremeincitiessuchasChicagoandthesunusually
setsaround5p.m.Thepoorlylitneighborhoodalongwiththecoldweathermakesit
difficultforapersontoentertheirhome.
Wewillbuildasimplesolutionthatturnsonalight(thatcanbeeitheranoutdooror
indoorhallwaylight)thatspeedsuptheprocessofenteringabuilding.

Prepareforliftoff
Inthisexample,wewillmakeuseofPowerSwitchTail2(soldbyAdafruitIndustries:
http://www.adafruit.com/product/268)toturnon/offthelights.
ThePowerswitchtailisratedtocontrolappliancesratedtooperateat110Vanditcan
switchresistiveloadsupto15A.ThePowerSwitchTail2canswitchon/offappliances
whenitisactivatedbya3-12VDCsignal.
OnemainadvantageofusingthePowerSwitchTail2isthatitisopto-isolated(opto-
isolationensuresthatRaspberryPiisprotectedfromanytransientvoltageswhileturning
on/offthelights)andprovidesasafealternativetointerfacingelectricalappliancesto
RaspberryPi.TheimagebelowshowsaPowerSwitchTail2availablefrom
http://www.adafruit.com.
PowertailswitchII–Photocourtesy:adafruit.com
Softwareprerequisites
WewillneedtherepositorytoolGit.Thiscanbeinstalledasfollows:
sudoapt-getgit-core
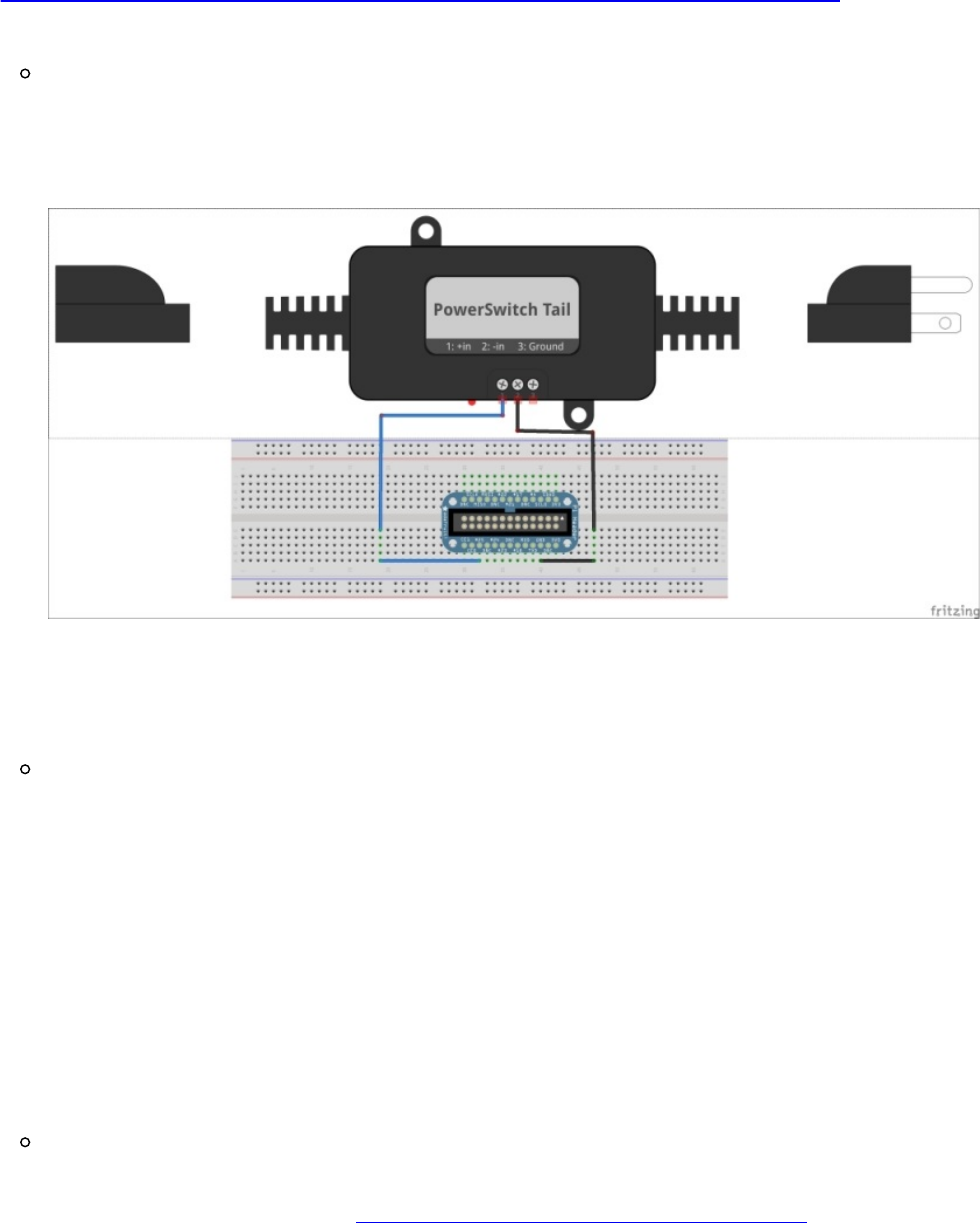
Engagethrusters
1. PowerSwitchTail2’sdatasheet
(http://www.adafruit.com/datasheets/PST%20II%20product%20insert.pdf)providesa
schematicdescriptionoftheinternalcircuitryofPowerSwitchTail2.
PowerSwitchTail2isconnectedtoRaspberryPiasshowninthefollowing
figure.Thein+terminaloftheswitchisconnectedtotheGPIO#17of
RaspberryPi,whilethein-terminalisconnectedtothegroundpinofRaspberry
Pi.
PowerSwitchTail2’sinterfacetoRaspberryPi
ThepowercordtothelightingequipmentneedstobeconnectedtoPowerSwitch
Tail2.
Note
Itisassumedthatyouarefamiliarwithsomeminorrewiringtoconnect
indoor/outdoorlightingappliances.Priortrainingisrequiredtohandlesuchelectrical
hardware.Ifyouarenotfamiliarwithhandlingrewiring,itisbesttoconnectanoff-
the-shelfelectricalappliance.
2. Let’sreviewthecodeforanexamplewherethelightsneedtobeturnedonbetween
5:30p.m.and10:45p.m.everyday.
WegetstartedbycreatingUnixtimestampsforthestartandendtimes(Unix
timestampsreferstothetimeelapsedsinceJanuary1,1970inseconds.More
informationisavailableathttp://en.wikipedia.org/wiki/Unix_time):
#Getcurrenttime
now=datetime.datetime.now()
#Createdatetimeobjects
startTime=datetime.datetime(now.year,now.month,now.day,17,30,0)

endTime=datetime.datetime(now.year,now.month,now.day,22,45,0)
#Createunixtimestamps
unixStart=(startTime-
datetime.datetime(1970,1,1)).total_seconds()
unixEnd=(endTime-datetime.datetime(1970,1,1)).total_seconds()
unixNow=(now-datetime.datetime(1970,1,1)).total_seconds()
TheUnixtimestampsareusedtocheckwhetheritistimetoturnon/offthe
appliances:
if(unixStart<=unixNow<=unixEnd):
GPIO.output(25,GPIO.HIGH)
while(unixStart<=unixNow<=unixEnd):
now=datetime.datetime.now()
unixNow=(now-
datetime.datetime(1970,1,1,0,0,0)).total_seconds()
print"Triggered",now.hour,":",now.minute,":",now.second
sleep(1)
GPIO.output(25,GPIO.LOW)

Objectivecomplete–minidebriefing
Yay!Wearedonewithasimpleautomationtaskofkeepingthelightsonatagiventime
periodeveryday.
Alternativesolutionsandsomeprojectideastoconsider
1. IfitisnotpossibletoinstallRaspberryPirightnexttothepowertailswitch,itis
possibletointerfacethePowerSwitchTail2toanArduinoEthernetboardand
controlledbyRaspberryPiusingtheTwistedframeworkexample(hint:refertothe
examplesfromthepreviousproject,Project10,RaspberryPiPersonalHealth
Monitor).ThisenablesyoutocontrolanetworkofdevicesusingRaspberryPi.
2. OnealternativetoconsiderifitisnotpossibletopurchaseaPowerSwitchTail2—
SparkFunhasanexcellenttutorialonbuildingacontrollableACpoweroutlet
(https://www.sparkfun.com/tutorials/119).
3. Inthisexample,weassumedthatthelightswillbeturnedonbetweentheselected
timeslots.Itisalsopossibletoturnonthelightsbydeterminingthesunsettime.
NOAAprovidesinformationoncalculatingsunsettimes,whichisavailableat
http://www.esrl.noaa.gov/gmd/grad/solcalc/calcdetails.html.
4. Anotheralternativetoturning/offlightingappliances—itwouldbeagreatideato
makecoffeeeverydayusingPowerSwitchTail2.Ifthecoffeemakerisfilledwith
waterandthecoffeepods/filterarereplaced,thecoffeemakerwillbeturnedonatthe
chosentime!Wewillhaveourcoffeereadyrightaftergettingoutofbed.
Note
PowerSwitchTail2isdesignedforresistiveloadsandespeciallyforlimiteduse.Do
nottrytouseitwithheavyinductiveloadssuchasamotor.Thistoolisstrictly
recommendedforthosewhoareknowledgeablewiththefundamentalsofelectrical
engineering.

Acustomarywebserverexample
AnyhomeautomationprojectusingRaspberryPiyieldsalotofexamplesthatinvolves
buildingawebserverthatcontrolsapplianceswithinalocalnetworkthattakescareof
securingtheplaceusingelectromechanicallocks.Wewillbuildasimplewebserverthat
canbeusedtoturnoffanLEDfromawebpage.Thisconceptcanbeexpandedtocontrol
multipleappliancesandreadsensordatafromtheGPIOinterfaceofRaspberryPi.
Note
ThistaskismeantforabsolutebeginnerswhoarenotfamiliarwithPythonweb
frameworktools.Wearediscussingthisexampleconsideringsomereadersmightjump
righttoProject11,HomeAutomationUsingRaspberryPi.

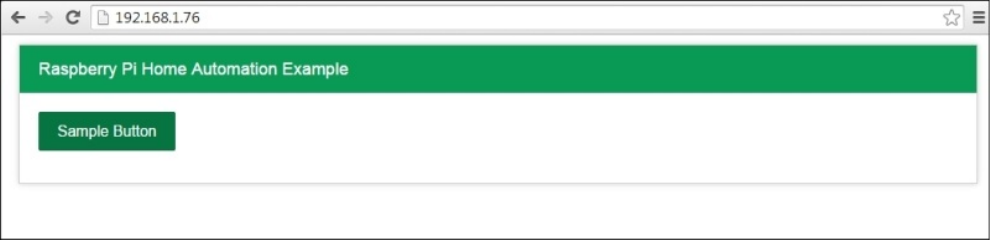
Engagethrusters
1. Thefirstpartissettingupthelandingpage.Whenauserenterstheaddressofthe
webserver,thewebpagewouldbesomethinglikewhatisshowninthefollowing
screenshot.TheHTMLpageconsistsofasinglebuttoncalledSampleButton.
Aflaskframework-basedwebserver
2. Whenabuttonisclicked,theincomingPOSTrequestisusedtoswitchthestatesof
theLEDfromONtoOFFandviceversa:
@app.route('/',methods=['POST'])
defrecord():
#recordallthedatafromtheform
globalstate
ifstate==False:
state=True
else:
state=False
GPIO.output(25,state)
returnrender_template('form_submit.html')
3. ThewebservercanbelaunchedfromtheIPaddressofRaspberryPi.Thewebpage
shouldbeaccessiblefromhttp://192.168.1.76:75:
#Runtheapp:)
if__name__=='__main__':
app.run(
host="0.0.0.0",
port=int("75")
)\
Thewebserverexampleisavailablealongwiththisproject.Checkthisbook’swebsitefor
moreexamples.

Objectivecomplete–minidebriefing
Usingthesimpleconceptexplainedearlier,itispossibletocontrolanyappliance(by
interfacingsomecontroldevicesuchasthepowerswitchtailtoRaspberryPi’sGPIO
pins).Itisalsopossibletoreadsensorstatesaswellastrackanyspecialinformation.For
example,itispossibletotrackthestatusofapackagethatisexpectedtobedelivered.
USPSprovidesstatusofshipmentsthatcanbedisplayedonthewebpage(formore
informationonAPIs,checkouthttps://www.usps.com/business/web-tools-
apis/welcome.htm).
Inalltheseexamples,wereviewedcontrolappliancesusingRaspberryPiwithinalocal
network.Inthelatertaskofthisproject,wewillreviewcontrollingthedevicefrom
anywhereovertheInternet.
Turningonalawnsprinkleronlywhen
thereisnorainforecast!
ThisexamplewasinspiredbyacommentonanarticlerelatedtoHomeAutomationusing
RaspberryPi.Thecommentermentioned:
TheonlyhomeautomationthatI’minterestedin(andstillhaven’tseen)issomething
that’llturnoffmylawnsprinklersifit’srainedacertainamountintheprecedingdaysor
ifit’srainingonthedaythatthesprinklersareprogrammedtogoon.
Wedecidedtowhipupaquickexamplethatwouldturnonthesprinklerwhenitisnot
goingtorainonaparticularday.

Prepareforliftoff
Inordertochecktheweatherforecast,weneedtomakethepython-weather-apilibrary
(thelibraryisdistributedwithMITlicense).WewillmakeuseoftheNOAAAPI.The
librarycanbedownloadedusingthewgetcommand:
wgethttps://launchpad.net/python-weather-api/trunk/0.3.8/+download/pywapi-
0.3.8.tar.gz
Thesourcefilesareavailableinacompressedfolder.Thecontentsofthecompressedfile
canbeextractedasfollows:
tar–xvzfpywapi-0.3.8.tar.gz
Onceextracted,thelibrarycanbeinstalledasfollows:
pythonsetup.pybuild
sudopythonsetup.pyinstall
WealsoneedaflowcontrolvalvesimilartothisonesoldonSparkFunavailableat
https://www.sparkfun.com/products/10456.

Engagethrusters
1. NOAA(http://www.weather.gov/)providesweatherdatageneratedfromtheweather
stationssituatedindifferentcities.Eachcity’sweatherstationhasauniquefour-letter
code.Forexample,Chicago,Illinois’codeisKORD.Wewillmakeuseofthisfour-
lettercodetoretrievetheweatherforecastforacity.
2. Theweatherdataisretrievedusingthepywapilibraryasfollows:
defmain():
pp=pprint.PrettyPrinter(indent=4)
whileTrue:
result=pywapi.get_weather_from_noaa('KORD')
pp.pprint(result['weather'])
sleep(10)
3. Wewillturnonthesprinkleronlyiftheweatherforecast(availableundertheweather
keyword)isanythingotherthanRain,LightRain,orThunderstorm:
if(result['weather']!='LightRain'or
result['weather']!='Rain'or
result['weather']!='Thunderstorm'):
GPIO.output(25,GPIO.HIGH)
4. Thesprinklercanbeturnedonusingatransistorswitchingcircuitandarelay.(Ifyou
arenotfamiliarwithtransistorswitchingcircuitandrelays,Project4,Christmas
LightSequencerprovidesinformationaboutatransistorswitchingcircuitinextensive
detail).
5. Ithasnotbeendemonstratedherebutthepywapimoduleneedstobeusedin
conjunctionwiththedatetimemoduletoturnonthesprinkleratselectedtimesof
day.
Objectivecomplete–minidebriefing
IfitisnotpossibletointerfacethesolenoidvalvedirectlytoRaspberryPi,asthesolenoid
valvecanonlybeinterfacedtoanArduinoandcontrolledusingthepython-twisted
framework.
InstatessuchasCaliforniawheretherearesometimesseveredroughts,itiscommon
practicetosavewaterfromdrainpipesusingbarrels.Thepywapimodulecanbeusedto
replacethebarrelsifthereisanupcomingrainforecast.

GainingremoteaccesstoyourRaspberryPito
controlappliances
ItispossibletoremotelylogintoRaspberryPiusingSSH(SecureShell).An
organizationcalledWeaved(http://www.weaved.com/)providesthecapabilitiestologin.
Thetutorialavailablefromhttps://www.juicypi.io/access-your-raspberry-pi-anywhere-in-
the-world-using-weaved/providesdetailedinstructionstoinstalltherequisitetools.
ThisenablesyoutocontrolthedevicesinterfacedtoRaspberryPi.

Someprojectideastoconsider
Inhouseswithlonghallways,itisnotalwayspossibletohearthedoorbellringfrom
thefarendofthehouse.Itispossibletoplaceaforcesensitiveresistor
(https://www.sparkfun.com/products/9375)totrackanyvisitorstothehouse.
Likewise,itispossibletotrackpackagesleftonthedoormat.
InProject6,RaspberryPiasaPersonalAssistant(thepersonalassistantproject),we
builtasmallenclosuretokeeptrackofkeysusingareedswitch.Asimilarconcept
canbeusedtotrackitemsusingareedswitch.
ThereisawirelessprotocolcalledZ-Wavethatwasspecificallydesignedforhome
automationpurposes.RaspberryPicanbeturnedintoacontrolcentretowirelessly
controlappliancesusingtheZ-Wavemodules.Raspberrycompatiblemodulesare
availableforsaleathttp://razberry.z-wave.me/(checkoutthisbook’ssiteforsome
examples).
InProject5,InternetofThingsExample–AnE-mailAlertWaterFountain,webuilt
awebserverthatcansetcolorsoftheRGBLEDstrip.Therearesomeinteresting
ideastodecorateourhomeswiththeseRGBLEDstrips
(http://www.usledsupply.com/shop/install/project-photos-and-ideas.html).
GEApplianceshascomeupwithaninterestingdevelopmenttoolthatcanbeusedto
controlproductsfromGE.ThistoolincombinationwithRaspberryPi(running
Twistedserver)canbeusedtocontrolGEproductsinsomeone’shome.Inthefuture,
allGEapplianceswillbecapableofbeingconnectedtoasmartdevicesnetwork.
Missionaccomplished
Inthisproject,welookedintodifferentsolutionsthatcanbeimplementedusingRaspberry
Pioveraweekend.Wereviewedsomebasicexamplesthatcanbepossiblytweakedto
turnahomeintoasmartone.
Chapter12.UsingaRaspberryPifor
ScienceandEducation
Inthisproject,wewillreviewsomeexamplesofhowtheRaspberryPicanbeusedto
educateourselves.WewillreviewexamplesofhowtousetheRaspberryPiforself-
improvementoreducatingchildreninthefieldofscience.
Missionbriefing
Inthisproject,wewillreviewsomeexamplestodemonstratehowtheRaspberryPicanbe
usedtoeducateourselvesforself-improvementordemonstrateasimplephysics
experiment.
Whyisitawesome?
ThePi,asyouhaveseeninthelastfewprojects,offersyouimmensefunctionality,and
wasbasicallydesignedtoencouragelearningcomputerscienceatanaffordablecost.As
wehaveseen,thepossibilitiesofbuildinggadgetsusingtheRaspberryPiareendless,
makingthisanawesomesegueintoself-improvementandscience.

YourHotshotobjectives
Inthisproject,wewilldiscussthefollowingexamples:
ImprovingyourvocabularyusingtheRaspberryPi
RaspberryPiandKhanAcademy
BuildingasciencefairexhibitusingtheRaspberryPi


Prepareforliftoff
WeneedtoinstalltheWordnikPythonclient(distributedundertheApacheLicense)
availableasaPythonpackage:
sudopipinstallwordnik
ThenextstepistoobtainanAPIkeytomakeuseoftheAPI.Thiscanbeobtainedby
registeringforanaccountwithWordnikandrequestinganAPIkey
(http://developer.wordnik.com/).
Oncetheinstallationiscomplete,itistimetoreviewtheexample.
Note
TheWordnikAPIismerelybeingdemonstratedasanexample.RefertotheAPItermsof
agreementtodeterminehowtheAPIcanbeusedinacommercialapplication.

Engagethrusters
1. Let’sreviewanexamplethatfetchesthewordofthedayusingtheWordnikAPI.The
firststepistoimporttheWordnikPythonclient:
fromwordnikimport*
2. ThenextstepistocreateaclientthatinitializestheAPItoaccessthewordlist:
url='http://api.wordnik.com/v4'
key='APIKey'
client=swagger.ApiClient(key,url)
3. ThenextstepistoinitializetheWordnikAPIandretrievethewordoftheday:
words=WordsApi.WordsApi(client)
example=words.getWordOfTheDay()
4. ThereturnedobjectisaWordOfTheDayobject(https://github.com/wordnik/wordnik-
python/blob/master/wordnik/models/WordOfTheDay.py).Let’sprinttheword,
definition,andthepublisheddate:
string='TheWordoftheDayis'+example.word+'.'
printstring
string='Definition:'+example.definitions[0].text
printstring
string='Date='+example.publishDate.strftime("%D")
printstring
5. TheoutputofthisPythonscriptissomethingliketheoneshownhere:
TheWordoftheDayisasportation.
Definition:Thefeloniousremovalofgoodsfromtheplacewherethey
weredeposited.
Date=01/19/15
6. Now,thiswordofthedaycanbedisplayedonascreenatsomeprominentlocation
usingaGUItoolsuchasTkinter(http://zetcode.com/gui/tkinter/)andupdatedevery
24hours.Refertothisbook’swebsiteforsomeideas.
Objectivecomplete–minidebriefing
Inthistask,wereviewedanexampleofhowtouseyourRaspberryPiforself-
improvement;similarly,thereareAPIsfromothersourcesthatprovideaquoteoftheday,
jokeoftheday,andsoon.

RaspberryPiandKhanAcademy
Inthistask,wewillreviewanexamplethatenablesworkingonmathexercisesfromKhan
Academy(https://www.khanacademy.org/).KhanAcademyisanon-profiteducational
organizationthatprovidesfreelearningresourcesforvarioussubjects,includingmathand
computerscience.Inthisexample,wewillhostasimplewebserveronaRaspberryPi
thathoststheexercisesfromKhanAcademylocally.Thisenablescustomizationofthe
learningtoolstotheuser’sneeds.Forexample,itcanbehostedonanetworkthatisnot
connectedtotheInternetandwecancustomizecontentfromKhanAcademytohelp
someoneimproveontheirmathskills.
ThefirststepistoclonetherepositoryonaRaspberry
gitclonehttps://github.com/Khan/khan-exercises
Oncetherepositoryiscloned,itistimetolaunchthewebserver!
Note
Theexercisesaredistributedunderanon-commerciallicensewhilethewebserver
frameworkisdistributedunderanMITlicense.Youmustbeawareofthelicense
agreementswhentryingtomakeuseofresourcesfromKhanAcademy.
Thelaunchoftheserverinvolvesasinglestep.Afterswitchingtothekhan-exercises
directory,thewebservercanbelaunchedasfollows:
python–mSimpleHTTPServer
ThewebservercanbeaccessedonalocalnetworkbyusingyourRaspberryPi’sIP
addressfromabrowserusinghttp://192.168.1.98:8000/khan-exercises/exercises/.
ThefollowingisascreenshotofthewebserverhostedonaRaspberryPi:
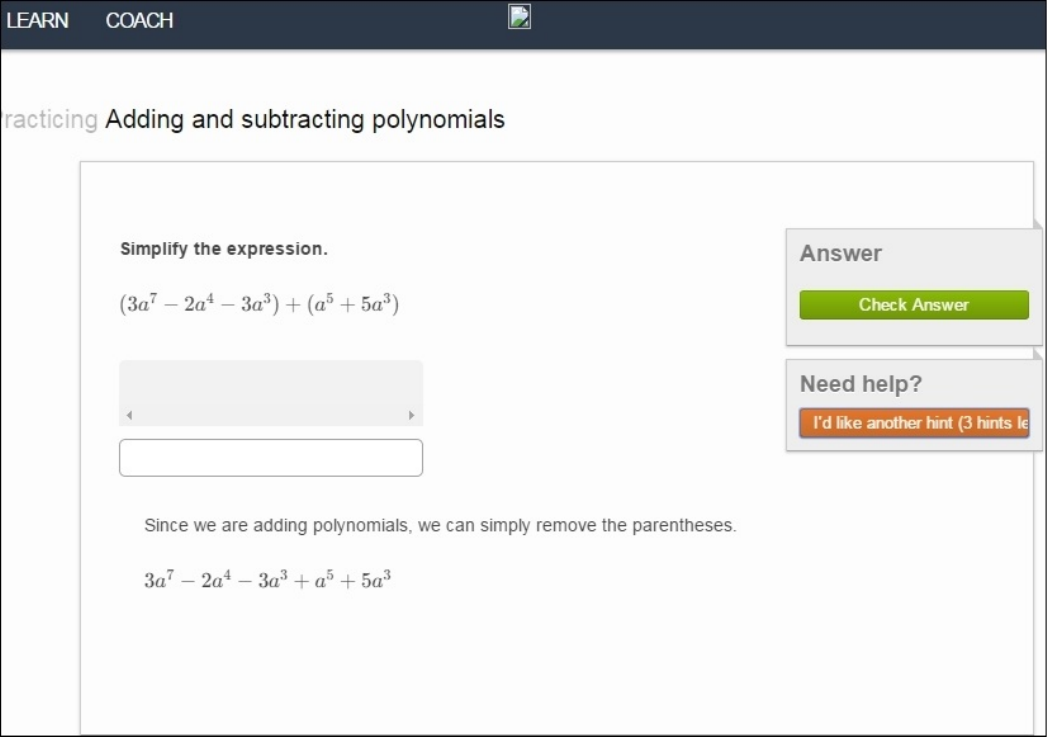
KhanAcademyexercisesonalocalserver
Someideastoconsider
WeusethiswebservertosolvepuzzlesusingtheRaspberryPi.Itcanbeusefultosharpen
yourmentalacuitywhilekillingtime.
Buildingasciencefairexhibitusingthe
RaspberryPi
Inthistask,wewillbuildasimplephysicsexperimentcontrolledbytheRaspberryPi.
Thiscanbeusedtoexplainhowthingssuchasasolarpanel,windmill,andsoonwork.In
thisexample,wewillbuildawindmillexperimentthatcanpossiblybeusedasa
demonstrativeexhibitatasciencefair.

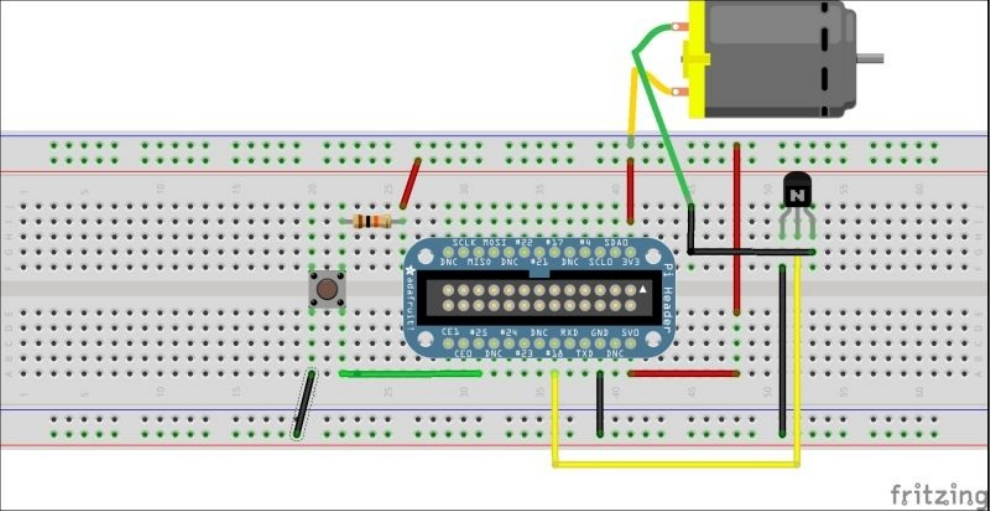
Engagethrusters
1. TheDCmotorofthewindenergykitneedstobeinterfacedtotheRaspberryPi
GPIOpinasshowninthefollowingFritzingschematic:
AFritzingschematicshowingtheinterfaceofaDCmotorandabuttonforcontrol
2. SincetheDCmotorisinterfacedtoyourRaspberryPi’sGPIO#18,itcanbeturned
on(wearemakinguseoftheRPi.GPIOlibraries;refertopreviousprojectsifyouare
notfamiliarwithRPi.GPIO):
importRPi.GPIOasGPIO
GPIO.setmode(GPIO.BCM)
GPIO.setup(18,GPIO.OUT)
GPIO.output(25,GPIO.HIGH)
3. Whenavisitorattheexhibitionwouldliketoknowhowawindmillworks,an
instructionalaudiorecording(thedownloadavailablewiththisprojectmerelyplaysa
testMP3file)canbeplayedatthepressofabuttonasfollows:
defmy_callback(channel):
os.system('mpg321recording.mp3&')
GPIO.add_event_detect(25,GPIO.FALLING,callback=my_callback)
4. ThefollowingimageshowsawindmillgeneratorkitinterfacedtoaRaspberryPi:
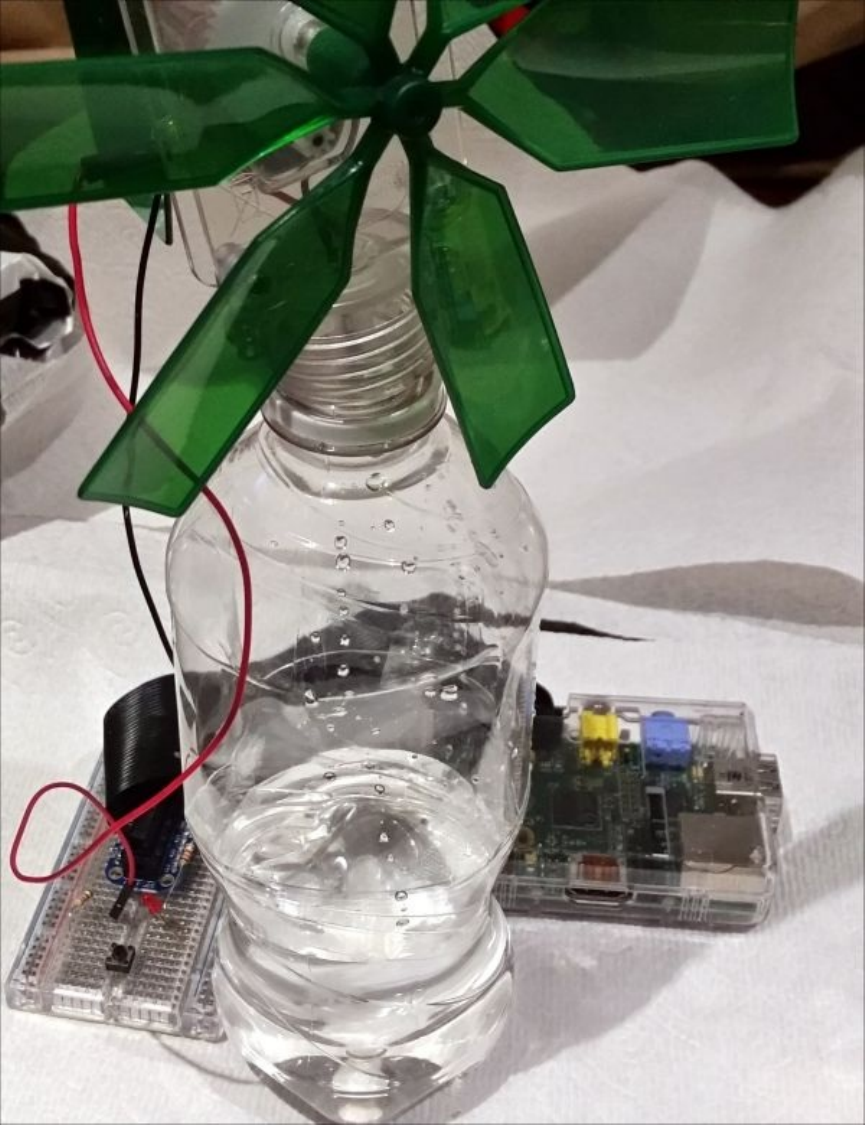
Awindmillgeneratorkit
Objectivecomplete–minidebriefing
YourRaspberryPicanalsobeusedtobuildsomethingthatteststheskillsofpeopleata
sciencefairortoprovideentertainment(raffledraw,puzzle,andsoon).

Somesimpleeducationalexperimentsusingthe
RaspberryPi
1. Asoftwaretoolthatalertswhentheinternationalspacestationfliesbyyourvicinity
canbefoundathttp://issabove.com/iss-above-and-the-raspberry-pi/.
2. AcollectionofscientificexperimentarticlesusingtheRaspberryPicanbefoundat
http://www.raspberrypi.org/the-raspberry-pi-in-scientific-research/.
3. ScratchisagraphicalprogrammingtooldevelopedbyMITtomotivatechildrento
getstartedwithlearningtoprogram.Scratchcanbefoundat
http://www.raspberrypi.org/tag/scratch/.

Chapter13.TipsandTricks
Inthisproject,wewilldiscusstipsandtrickstoovercomeanyproblemsonemight
encounterwithRaspberryPi.Wealsoprovideprojectideas,generalinformation,anda
dissectionoftheRaspberryPiitself.
Missionbriefing
Inthisbook,wediscusseddifferentprojects,spanningdifferentdifficultylevels.Before
wrappingupthisbook,wewouldliketoshareourexperienceaboutthechallengeswe
encounteredandsharesometipsandresourcestoovercomesituationsthatyoumight
encounterandpossiblesolutionsforthem.Wewillalsodiscusspossibleprojectideasthat
youcantrytoimplementoveraweekend.Wewillgointoeachaspectbriefly.
Whyisitawesome?
Thisprojectsharestipsandtricks,providesprojectideas,anddiscussessolutionsto
problemsgenerallyencounteredinDIYprojects.

Yourobjectives
Inthisproject,wewilldiscussthefollowing:
SettingupRaspberryPiasadevelopmentplatform
Projectideasthatcanbeimplementedoveraweekend
RemotelyloggingintoRaspberryPifromanywhereontheInternet
ProblemsthatmightbeencounteredwhileusingRaspberryPi
Cooladd-onhardwaresourcesdevelopedfortheRaspberryPiplatform
UsefulresourcesforRaspberryPi
Missionchecklist
Haveyourcuriosity,attentionandpassionattheready.
SettingupRaspberryPiasadevelopment
platform
RaspberryPiiscurrentlythemostbasic,idealhardwareenvironmenttogetstartedwith
learningtocodeinaparticularlanguageoradvancedsystemsdevelopment.
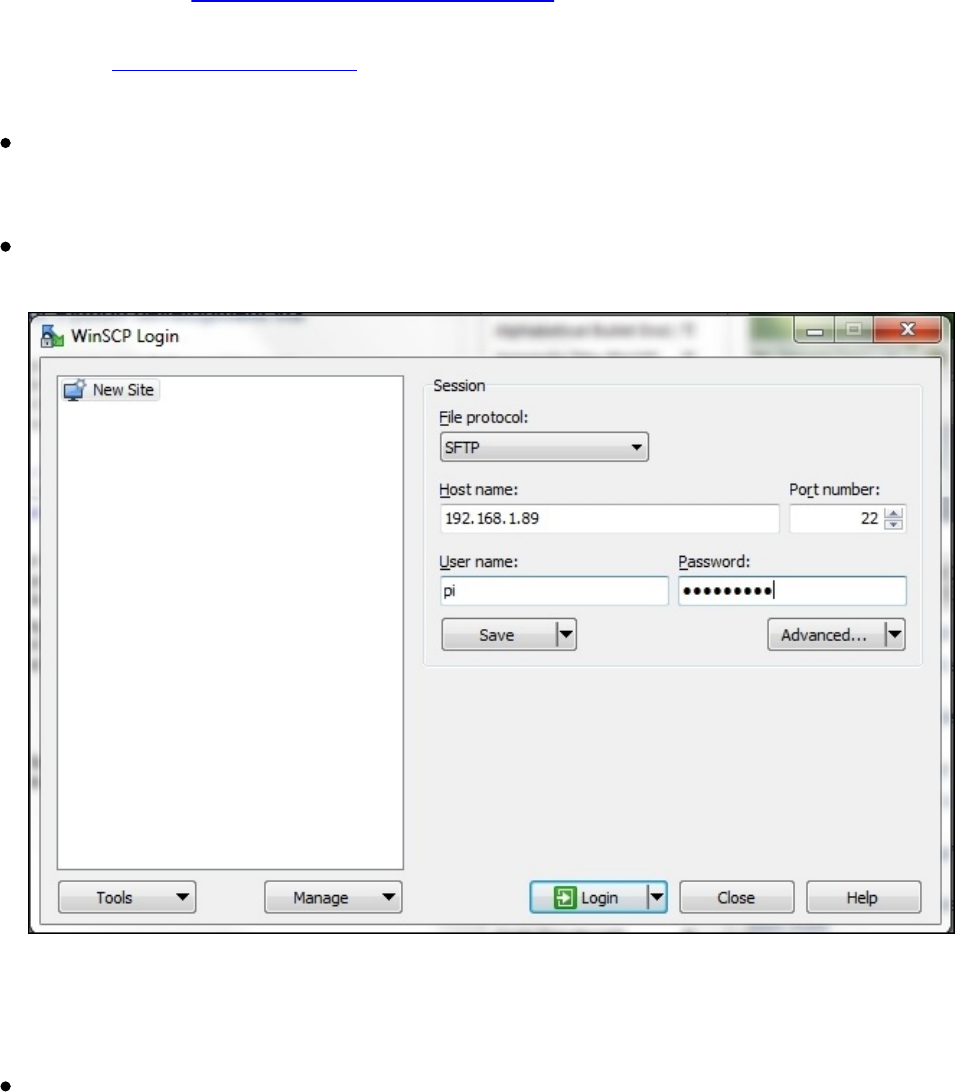
#1–SimpletrickforPythondevelopmentvia
remotelogin
Whilewritingthisbook,wefounditconvenienttowritePythonscriptsonour
laptop/desktop,copythemovertoRaspberryPi,andtestthemviaremotelogin.Thiswas
especiallyusefulwhenwehadRaspberryPicontrollinginterfacedtotoolsonaChristmas
tree.ItisdifficulttosetupamonitorandkeyboardforRaspberryPiandworkfromthere.
WeusedWinSCP(http://winscp.net/eng/index.php—sincewewereusingalaptoprunning
Windows)totransferfilesfromthelaptoptoRaspberryPi.Then,weusedthePuTTY
SSHclient(http://www.putty.org/)foraremotelogintoRaspberryPiandtestedthe
scripts:
InordertoremotelylogintoRaspberryPiortransferfilesusingWinSCP,OpenSSH
isrequired.TheRaspbianWheezyimagecomeswithSSHinstalledandenabledby
default.
Let’sloginafterdownloadingandinstallingWinSCP.Theusernamewouldbepiand
thepasswordraspberry(unlessyou’vechangedthedefaultpassword).
TheWinSCPloginwindow
Thenextstepisittolocatethefilestobetransferredonthelocalmachineaswellas
identifyingthefolderwherethefilesneedtobecopiedtoRaspberryPi.Thefileson
thelocalmachinearelocatedontheleft-handside,whilethefilesonRaspberryPi
arelocatedontheright-handsideofthewindow.
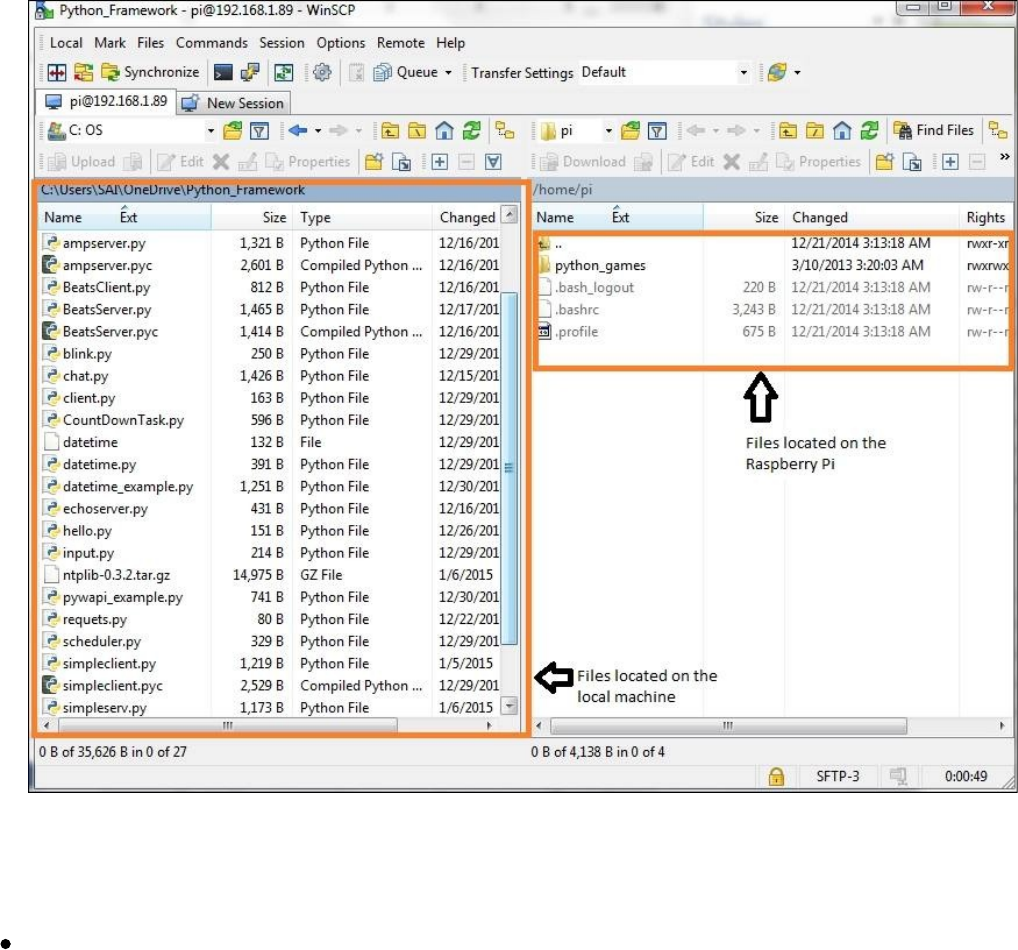
TransferringfilesusingWinSCP
Oncethefilesaretransferred,wecanmakeuseofPuTTYforremoteloginto
RaspberryPi.Asshowninthefollowingfigure,wecanconnecttotheRaspberryPi
usingtheIPaddressofRaspberryPiandloginusingthecredentialsprovidedearlier.
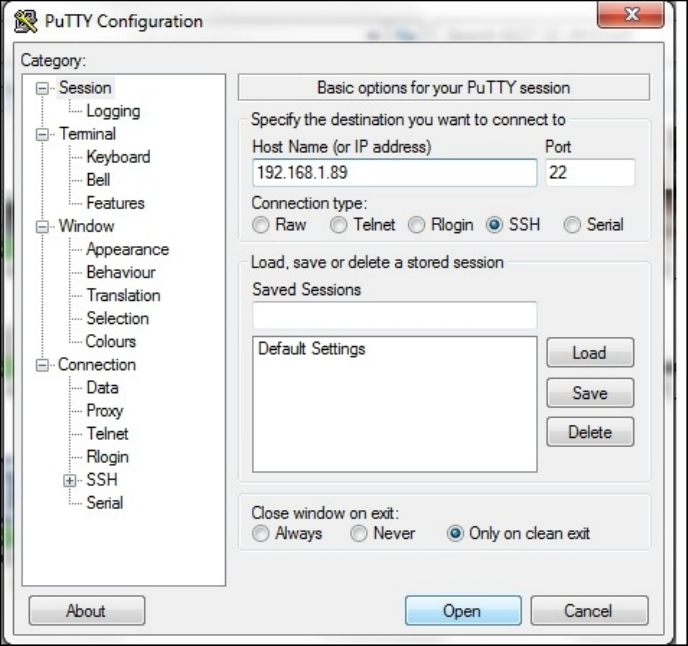
ConnectingtoRaspberryPiusingPuTTY
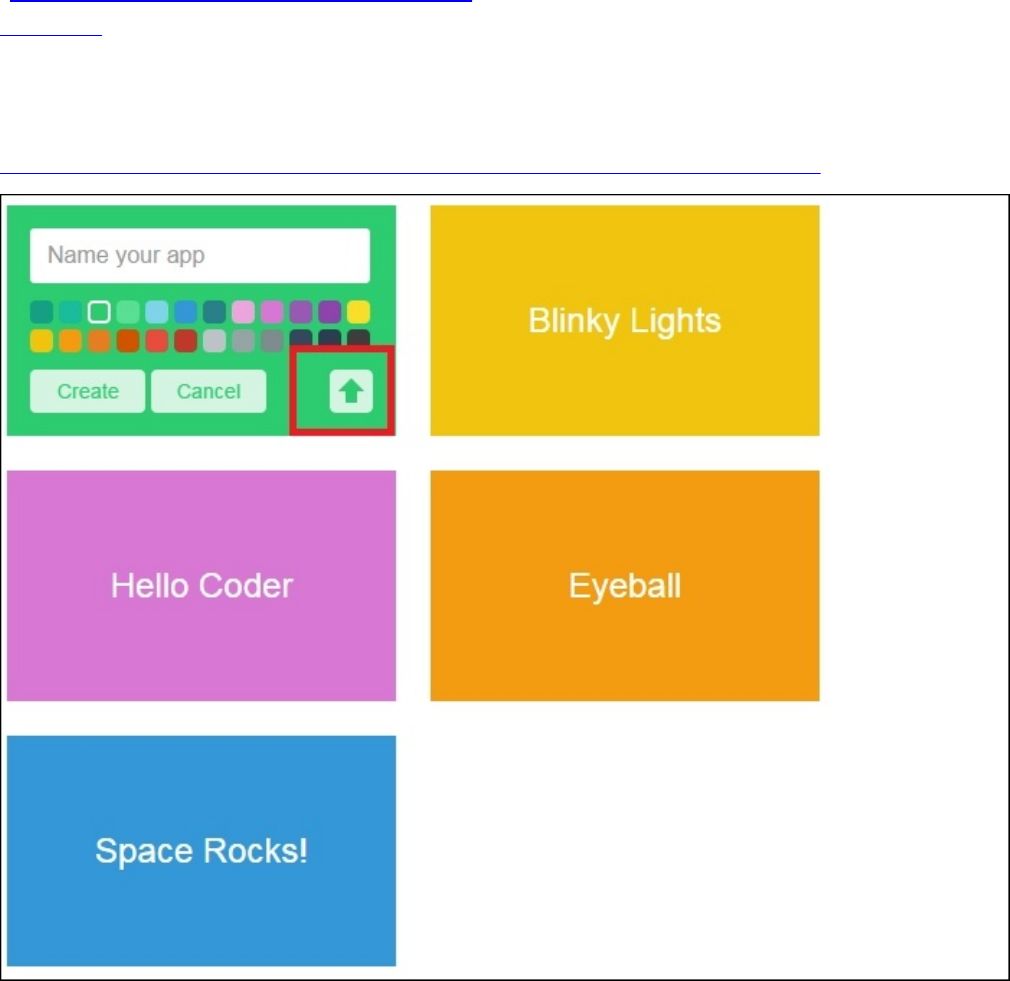
#2WebdevelopmentusingGoogleCoder
GooglereleasedanopensourcetoolbasedontheRaspberryPiplatformcalledCoder
(http://googlecreativelab.github.io/coder/).WemadeuseoftheGoogleCodertoolin
Project9,TheRaspberryPi-enabledPet/WildlifeMonitor.GoogleCoderisanopen
sourcetooltolearnwebdevelopment,butitsusehasexpandedandasanopensourcetool,
itisreadyforyourprojectsastheneedarises.Forexample,itispossibletobuildaweb
interfacetoread/writetotheGPIOinterfaceofRaspberryPi(forexample,
http://googlecreativelab.github.io/coder-projects/projects/blinky_lights/).
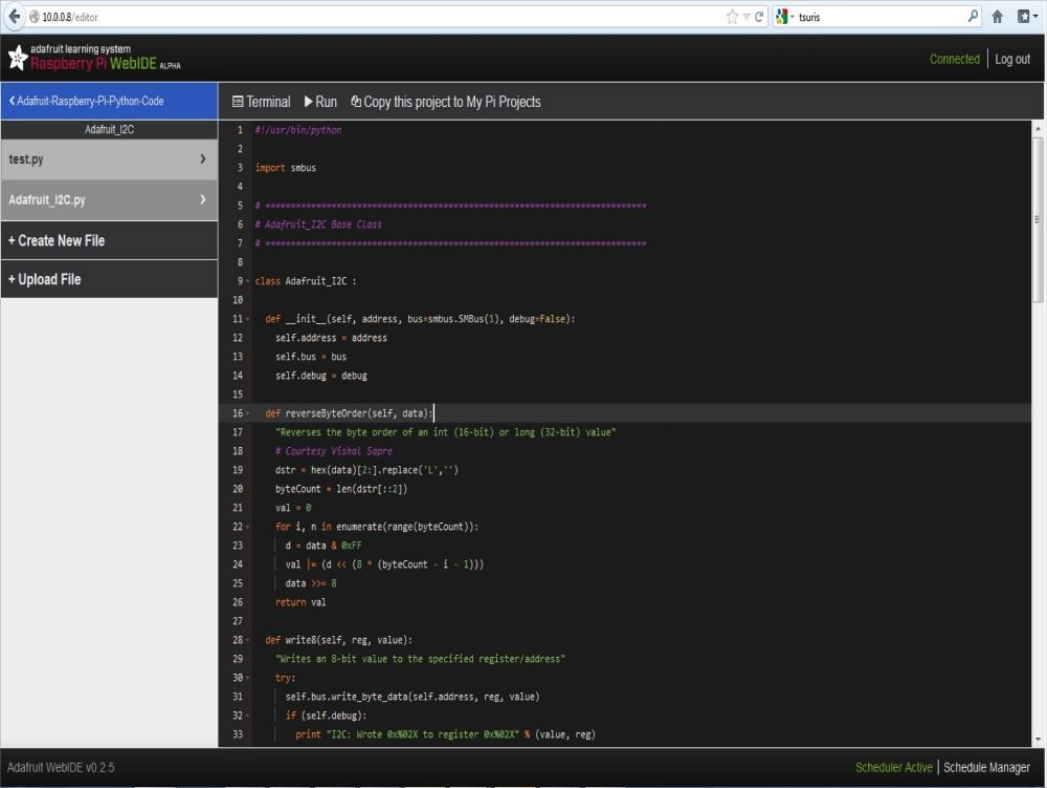
#3AdafruitOccidentalis
AdafruitIndustriesreleasedaversionofRaspbian,Occidentalisthatenabledeasier
hardwaredevelopmentasitfeatureddriversforallstandardcommunicationprotocols.
AdafruitIndustriesalsoreleasedaweb-baseddevelopmenttoolthatcomeswithseveral
Pythonexamples.
#4JavaDevelopmentusingtheRaspberryPi
OraclehasreleasedatutorialsetthatteachesJavadevelopmentusingRaspberryPi.This
includestutorialsoninterfacepressuresensorsandwritingJavacodetoreadbarometric
pressuredatafromthesensorviatheI2Cinterface.
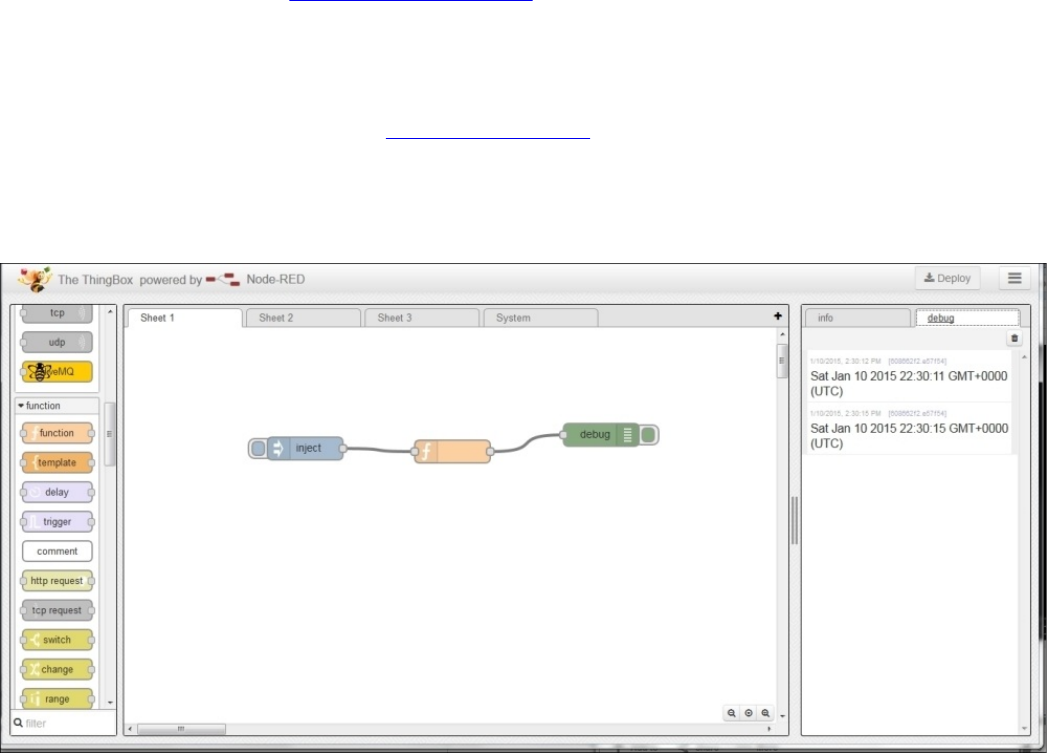
#5TheThingboxproject
TheThingBoxProject(http://thethingbox.io/)isatoolthatallowsyoutoenableprojects
thatarerelatedtotheInternetofThingsonRaspberryPi.Itisasetoftoolsthatallowsyou
tointerfacesensorsandappliancestotheInternet,availableasanOSimagethatcanbe
flashedontoanSDcardandrunonRaspberryPi.Oneofthetoolsavailablewiththe
ThingBoxProjectisNode-RED(http://nodered.org).TheNode-REDtool(shownin
followingscreenshot),infact,isagraphicalinterfacetoolthateliminatestheneedforyou
toprogramtocontrolthedevicesconnectedtoyourPi.Asthenamesuggests,any
applicationisbuiltusingnodesandthecontrolflowisshownbyconnectedwires.
AHelloworldprojectusingNode-RED

RemotelyloggingintheRaspberryPi
fromanywhereontheInternet
AcompanycalledWeaved(http://www.weaved.com/)hasreleasedatoolthatisstillunder
betatestingwhilewritingthisbook.ItenablesyoutoremotelylogintoRaspberryPithat
isconnectedtotheInternetfromanywhereontheWeb(apartfromalocalnetwork).There
isalsoatutorialtoinstallandusethetool(https://www.juicypi.io/access-your-raspberry-
pi-anywhere-in-the-world-using-weaved/).Thisenablesremotecontrol/datacollection.
Problemsthatmightbeencounteredwhile
usingRaspberryPi
ThefollowingaresomeproblemsweencounteredwhileweworkedonRaspberryPi.

SDcardcorruption
WeencounteredSDcardcorruptionswhileworkingwithRaspberryPi.Insomecases,we
hadtodiscardtheSDcardbutinothercases,wewereabletorecovertheSDcardusing
AdvancedPartitionScannerWizardandre-imagetheSDcard.
Sometimesthefailureoccursbecausethereisapowerfailurewhilethecardisstillbeing
writtento.Suchfailuresareunavoidableoverthelifeofyourprojects.Hereareafew
waystoavoidSDcardcorruption:
PowerdownyourPiproperlyafteruse
ChargeyourbatterypacksandmakesurePihasaconstantpowersupplyatalltimes
BesuretobuygoodqualitySDcardsandaswitheverythingelsedigital,havebackups.
Powerissues
WeencounteredissuesrelatedtothepowerdrawofRaspberryPi.Wehadlittlesuccess
withthingssuchasabatterypack(wewereabletogetitworkingusinga2700mAh
batterypack).Asyoumaybeaware,RaspberryPineedsa1A,5VUSBpowersupply.
DevicespoweredbyUSB
SomedevicessuchasawebcamcannotbeconnecteddirectlytotheRaspberryPianda
USBhubmaybenecessarytoconnectsuchdevices.
Cooladd-onhardwaresourcesdeveloped
fortheRaspberryPiplatform
Thereareseveralproductsandadd-onhardwaredevelopedspecificallyforRaspberryPi.
MostofthemaredesignedspecificallyforRaspberryPi.Someofthemareavailable
throughDIYproductsellerssuchasSparkfunandAdafruitIndustries.Mostproductsare
developedthroughcrowdfundingsitessuchasKickstarterandIndiegogo.Wemadeour
bestefforttointroduceanewpieceofhardwareineachproject.Asimplewebsearch
shouldpopupanewproductforaspecificapplication.

TheRaspberryPimodelBversusB+,modelA
versusA+
TheRaspberryPimodelA+andB+hasmoreGPIOpinsthanthemodelAandB.The
modelB+hastwomoreUSBportswhilemodelA+consumeslesspowerthanthemodel
A.Hence,itispossibleuseapoweroverEthernetmodule(PoE).Checkout
http://www.silvertel.com/component/content/article/22-latest-news/304-raspberry-pi-
poe.htmlformoreinformation.
IfyouownaRaspberryPiB+butthehardwareyouowniscompatiblewithRaspberryPi
modelB,youcanmakeuseofa40pinto26pinadapteravailablefromAdafruit
Industries(https://www.adafruit.com/products/1986).

Projectideasthatcanbeimplemented
overaweekend
Besideswhatyouhaveseensofarinthisbook,thereareseveralcoolprojectsthatcanbe
implementedinaweekorless.Theseincludethefollowing:
AsmartalarmclockbasedonRaspberryPi,withfeaturessuchascustomalarm
sounds,period,snoozeoptions,theabilitytoreportweatherconditions,alertyou
abouttoday’sto-dolist,andmuchmore.
Homeautomationandhomesurveillancesystems,acamerathatworksonmotion,
VOCalarms,moodlighting,lightingcontrols,andsoon.
Asensornetwork,wiredorwireless,tomonitorvariousparametersaroundyour
house—temperature,plants,pets,andothers.
Adigitalphotoframenetworkthatchangesimagesacrossmanyframes,depending
onthetimeofthedayandsoon.
SeasonalprojectssuchaslightsforDiwali,Hanukah,orChristmas.
UsefulresourcesfortheRaspberryPi
Inthissection,wewilldiscussusefulresourcesthatareavailableforRaspberryPi.While
thisbookcancovereveryaspectoftheprojectsdevelopedinthisbook,wewilldefinitely
runintotrouble.Let’slookatsomeusercommunitiesthatcantrytoaddressourproblem.

RaspberryPiFoundation’sforums:
TheRaspberryPiFoundation(http://www.raspberrypi.org/forums/)hasmaintaineda
forumsinceitsinception.Thisforumprovidesanswerstoavastspectrumofquestions
thatyoumayhave.Italsooffersanopportunitytodirectlyinteractwiththecreatorsof
RaspberryPi.


Element14’sRaspberryPicommunity:
TheElement14website(http://www.element14.com/community/community/raspberry-pi)
hostsaseriesofblogpostsfromRaspberryPiuserswhohavebuiltanecosystemof
gadgetssurroundingRaspberryPi.Thecommunitywebpagehostscontestsregularlyin
ordertoexhibitthetalentofRaspberryPienthusiastsandDIYhobbyists.Thecommunity
webpagealsohasauserforumtoexchangeinformation,askquestionsrelatedtoorder
status,andsoon.
Missionaccomplished
Inthisproject,wediscussedcertainprojectideas,tips,andtricksandproblemsyoumight
encounterwhileworkingonaprojectusingRaspberryPi.Theauthorssincerelyhopethat
youhaveenjoyedthisbook.

Index
A
AdafruitCobbler
about/PythondevelopmentontheWebIDE
AdafruitIndustries
URL/Prepareforliftoff,TheRaspberryPimodelBversusB+,modelAversus
A+
AdafruitOccidentalis
about/#3AdafruitOccidentalis
AdafruitWebIDE
Occidentalis/Whyisitawesome?
AdvancedIPScanner
URL/SetupofaremoteloginintotheRaspberryPi
AI,ConnectFourgame
about/AbriefdescriptionoftheConnectFourGameAI,Engagethrusters
maingameloop/Maingameloop
AMP(AsynchronousMessagingProtocol)
URL/Installingandtestingthepython-twistedframework
Arduino
about/Whyisitawesome?
distributors/WherecanyoubuyanArduino?
programming,withRaspberryPi/ProgrammingtheArduinousingthe
RaspberryPi,Engagethrusters
Arduinoacknowledgement,forcontrollingsignal
controlflow,forweatherclock/Controlflowfortheweatherclock
temperaturedata/Temperaturedata
RGBLEDstripcontrol/ControloftheRGBLEDstrip
steppermotorcontrol/Controlofstepperviaserialport
weatherforecastposition,programming/Programmingtheweatherforecast
position
8x8matrixcontrol/8x8matrixcontrol
BlinkMcontrol/BlinkMcontrol
ArduinoEthernetBoard
URL/Missionchecklist
ArduinoEthernetboard
URL/Missionchecklist
ArduinoIDE
installing/InstallingtheArduinoIDE,Objectivecomplete–minidebriefing
ArduinoRaspberryPiinterfaceproject
about/Missionbriefing
features/Whyisitawesome?
objectives/YourHotshotobjectives

checklist/Missionchecklist
ArduinoIDE,installing/InstallingtheArduinoIDE,Objectivecomplete–mini
debriefing
Arduino,programmingwithRaspberryPi/ProgrammingtheArduinousingthe
RaspberryPi,Engagethrusters
RaspberryPiAlaMode/RaspberryPiAlaMode,Engagethrusters
WeasleyWeatherClock/TheWeasleyweatherclock,Engagethrusters,
Objectivecomplete–minidebriefing
steppermotor,controllingwithArduino/Controllingthestepperusingthe
Arduino,Prepareforliftoff,Engagethrusters
RGBLEDstrip,controllingwithArduino/ControllingtheRGBLEDStrip
usingtheArduino,Prepareforliftoff,Engagethrusters
I2Ccommunication,Arduinoused/I2CCommunicationusingtheArduino
(optional)
serialportcommunication,withRaspberryPi/Serialportcommunicationwith
theRaspberryPi
ArduinoUnoplusESP8266board
URL/Missionchecklist
Atmelseries/Whyisitawesome?
audiodevice
interfacing/Interfaceofanaudiodevice
AutodeskInventor/Prepareforliftoff

B
8BitCircusMusic
URL/Addingsoundstothegame
BarScrollexample/Prepareforliftoff
BCMGPIOmode
URL/Engagethrusters
birdfeeder
settingup,withmotionsensor/Prepareforliftoff,Engagethrusters,Objective
complete–minidebriefing
requisites/Prepareforliftoff
BlinkM/IntroductiontothePiCrust–aprototypingplatformfortheRaspberryPi
about/TestanddebuggingexamplesusingtheWebIDE
URL,fordatasheet/Engagethrusters
BonjourPrintServicesdrivers
URL/SetupofaremoteloginintotheRaspberryPi
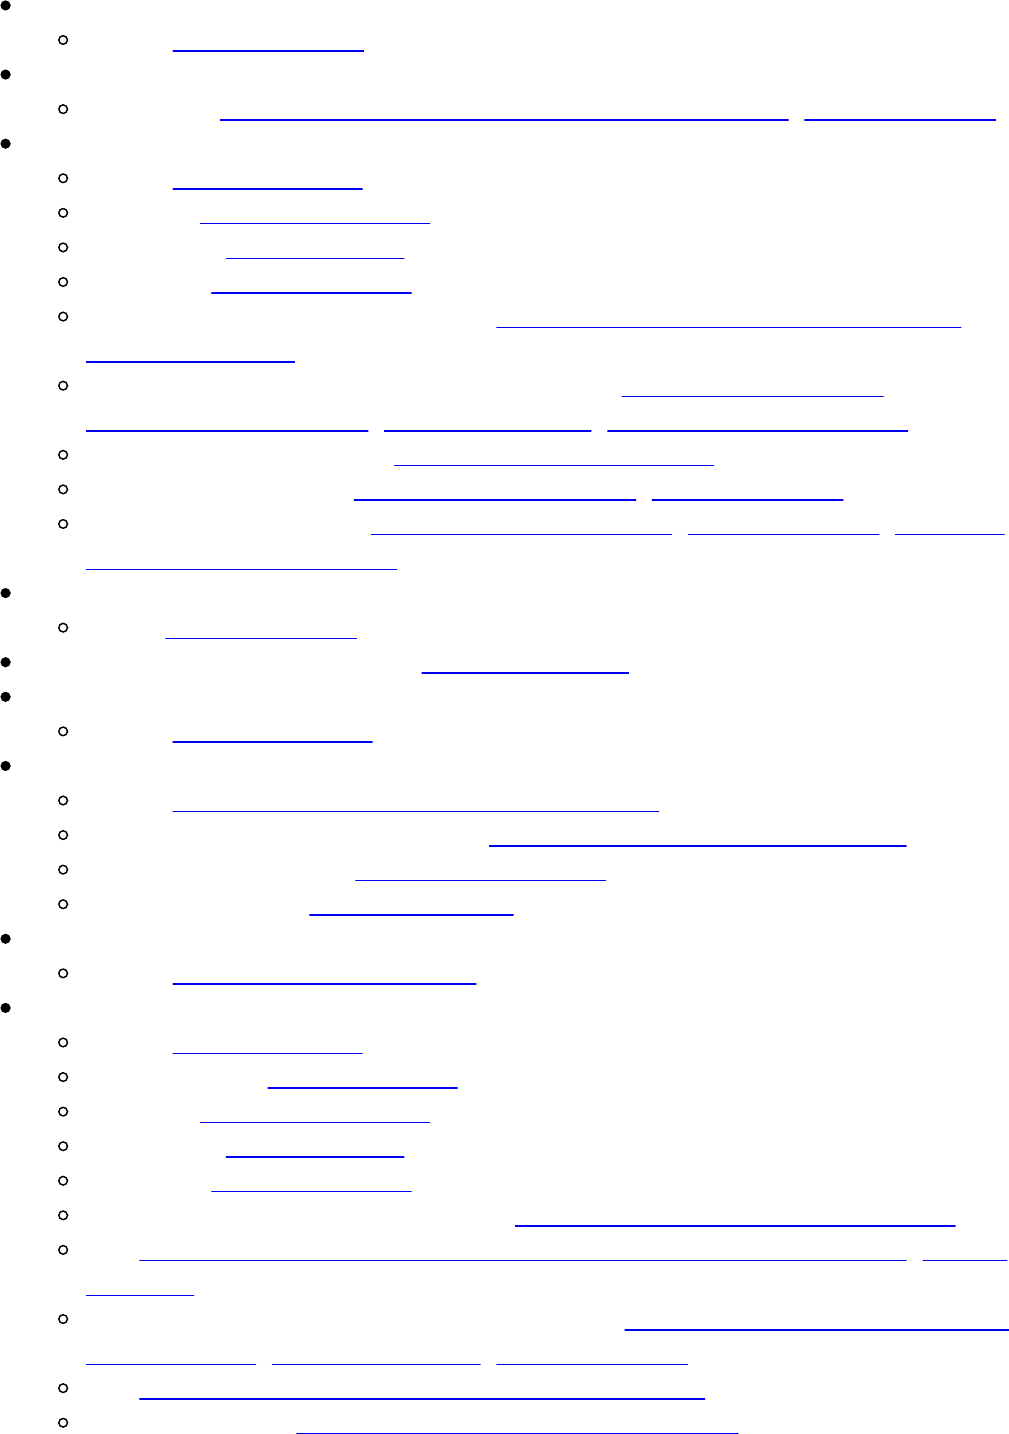
C
cannyedgedetectiontechnique
about/Engagethrusters
chassis
designing/Designingthechassisforthelinefollowingrobot,Engagethrusters
Christmaslightsequencerproject
about/Missionbriefing
features/Whyisitawesome?
objectives/Yourobjectives
checklist/Missionchecklist
decorativeappliances,interfacing/InterfacethedevicestotheRaspberryPi,
Prepareforliftoff
digitallyaddressableRGBmatrix,settingup/Settingupthedigitally
addressableRGBmatrix,Prepareforliftoff,AnArduino-basedcontrol
audiodevice,interfacing/Interfaceofanaudiodevice
webserver,installing/Installingthewebserver,Engagethrusters
webserver,interfacing/Interfacingthewebserver,Engagethrusters,Objective
complete–minidebriefing
circadianlightingproject
URL/Engagethrusters
CisecoPi-Litegithubrepository/Prepareforliftoff
CMake
about/Missionchecklist
command-lineinterface-basedapproach
about/Acommand-lineinterface-basedapproach
SDcardmountpoint,identifying/IdentifyingtheSDcardmountpoint
SDcard,unmounting/UnmounttheSDcard
SDcard,flashing/FlashtheSDcard
components,RaspberryPi
about/FeaturesofaRaspberryPi
ConnectFourdesktopgame
about/Missionbriefing
referencelink/Missionbriefing
features/Whyisitawesome?
objectives/Yourobjectives
checklist/Missionchecklist
Helloworldexample,withpygame/Helloworldexamplewiththepygame
UI/GettingstartedwiththeConnectFourgame(UIandsoundeffects),Engage
Thrusters
gameinputs,interfacingwithPiFacemodule/Interfacinggameinputsusingthe
PiFacemodule,Prepareforliftoff,Engagethrusters
AI/AbriefdescriptionoftheConnectFourGameAI
marqueecontrol/Marqueedesignandcontrol(optional)


D
datainterpretation,linefollowingrobot/Engagethrusters
DCmotor
controlling,withH-Bridge/Prepareforliftoff
devices
interfacing,toRaspberryPi/InterfacethedevicestotheRaspberryPi,Prepare
forliftoff,Engagethrusters
digitallyaddressableRGBmatrix
settingup/SettingupthedigitallyaddressableRGBmatrix,Prepareforliftoff
working/Howdoesitwork?
Dinghits
URL/Addingsoundstothegame
dishmonitor
assembling/Settinguptheassemblyforthedishmonitor,Engagethrusters,
Objectivecomplete–minidebriefing
DIYtabletopfountainkit
requistes/Prepareforliftoff
about/Engagethrusters

E
e-mailalerts
settingup,infountain/Setupofthee-mailalertsinthefountain,Engage
thrusters
e-mailfeedparser
settingup/Settingupthee-mailfeedparser,Engagethrusters,Settingupane-
mailfeedparsertorefillaprescriptionaswellasremindtheuseraboutan
upcomingdoctor’sappointment,Engagethrusters
settingup,forreminders/Settinguptheparserforremindersandevents,
Engagethrusters
settingup,forevents/Settinguptheparserforremindersandevents,Engage
thrusters
doctorappointmentsreminder,settingup/Settingupareminderfordoctor’s
appointments
electricaltape
used,forbuildingtrack/Useelectricaltapeandbuildatrack
Element14
URL/Element14’sRaspberryPicommunity:
about/Element14’sRaspberryPicommunity:
enclosuredesign,personalassistant
URL/Prepareforliftoff


G
gameinputs,ConnectFourdesktopgame
interfacing/InterfacinggameinputsusingthePiFacemodule,Prepareforlift
off,Engagethrusters
GoogleCoder
about/InstallingandtestingtheGoogleCoderprojectontheRaspberryPi
URL/Prepareforliftoff,#2WebdevelopmentusingGoogleCoder
settingup/Engagethrusters
used,forwebdevelopment/#2WebdevelopmentusingGoogleCoder
GPIO
settingup/Missionbriefing,SettinguptheGPIO,Engagethrusters
features/Whyisitawesome?
objectives/YourHotshotobjectives
checklist/Missionchecklist
requisites/Huntingandgathering
libraries,installing/InstallingGPIOlibraries
libraryinstallation,verifying/GPIOprogrammingusingPython

H
Helloworldexample,ConnectFourdesktopgame
about/Helloworldexamplewiththepygame
pygamemodule,features/Prepareforliftoff
pygamemodule,using/Engagethrusters
sounds,playingwithpygamemodule/Playingsoundsusingthepygame
module
menus,buildingwithpygamemodule/Buildingmenususingthepygame
module,Objectivecomplete–minidebriefing
homeautomationproject
about/Missionbriefing
features/Whyisitawesome?
objectives/Yourobjectives
checklist/Missionchecklist
light,turningon/Asimpleexamplethatcontrolslimitedindoorandoutdoor
lightingintheevening,Prepareforliftoff
customarywebserverexample/Acustomarywebserverexample,Engage
thrusters,Objectivecomplete–minidebriefing
lawnsprinkler,turningon/Turningonalawnsprinkleronlywhenthereisno
rainforecast!,Engagethrusters
remoteaccess,enablingforcontrollingappliances/Gainingremoteaccessto
yourRaspberryPitocontrolappliances
considerations/Someprojectideastoconsider
Houghtransforms
about/Engagethrusters

I
I2Ccommunication
about/Whyisitawesome?,I2CCommunicationusingtheArduino(optional)
URL,fortutorials/Whyisitawesome?
7-Segmentdisplay/The7-Segmentdisplay
8x8LEDmatrix/8x8LEDmatrix
BlinkM/BlinkM
proximitysensor/Proximitysensor
ImageWriterpackage/GUI-basedapproach
Infrared(IR)emitter/detector
about/Infraredemitter/detector
infraredsensor
used,forimplementinglinefollowinglogic/Implementationoflinefollowing
logicbasedonsensordata,Engagethrusters
Instructables
URL/Whyisitawesome?
interface
URL/Sensorselection,interface,anddatainterpretation
issues,RaspberryPi
SDcardcorruption/SDcardcorruption
powerissues/Powerissues
devicespoweredbyUSB/DevicespoweredbyUSB


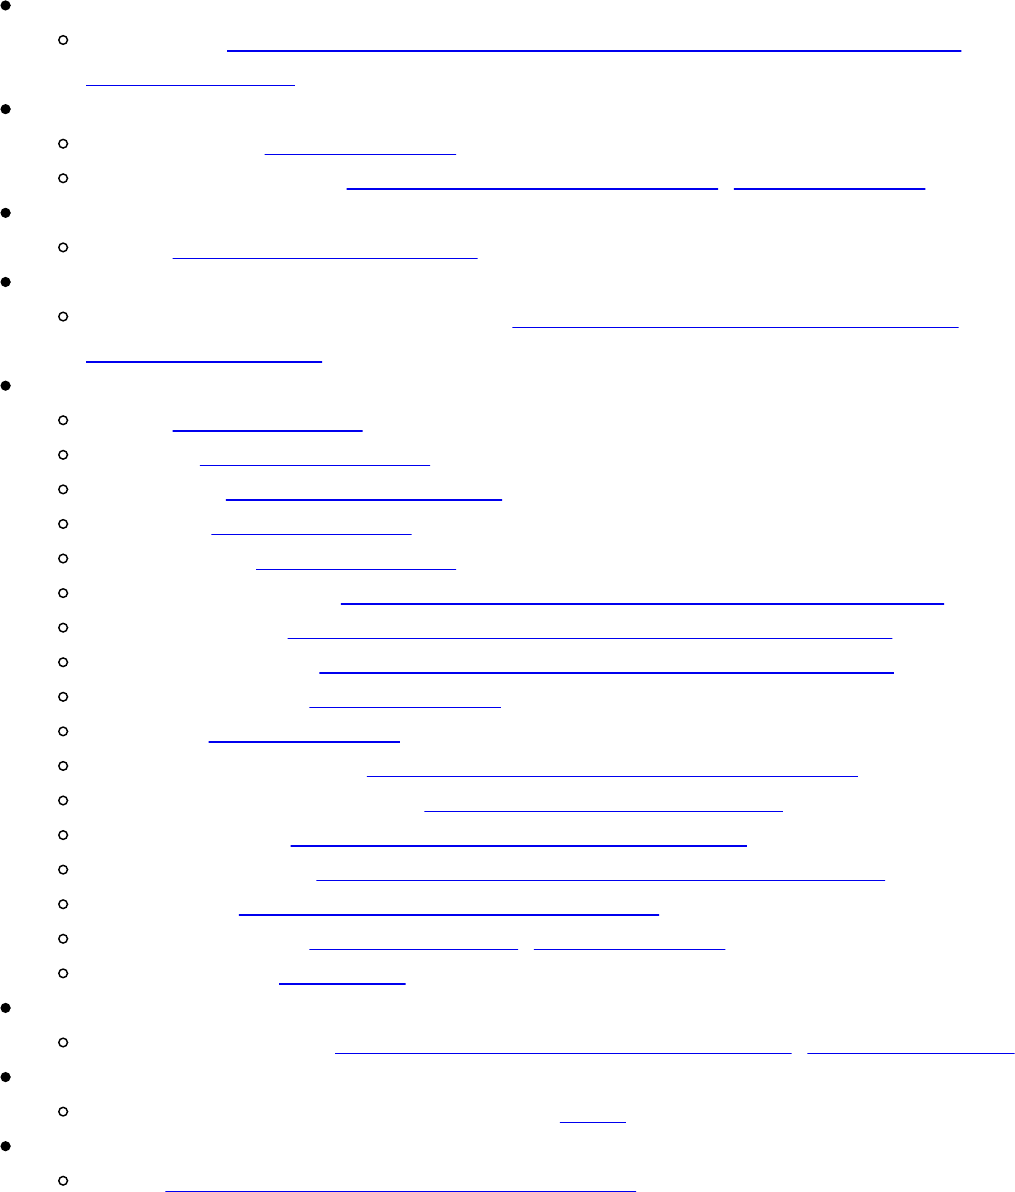
L
lawnsprinkler
turningon/Turningonalawnsprinkleronlywhenthereisnorainforecast!,
Prepareforliftoff
LEDblinkingexample
programming/Engagethrusters
electricalconnection/Electricaloutputofourprogram,Engagethrusters
LightDependentResistors
about/LightDependentResistors
linefollowinglogic
implementing,withinfraredsensor/Implementationoflinefollowinglogic
basedonsensordata
linefollowingrobot
about/Missionbriefing
features/Whyisitawesome?
objectives/YourHotshotobjectives
checklist/Missionchecklist
prerequisites/Missionchecklist
PiPlate,assembling/AssemblyofthePiPlateforthelinefollowingrobot
PiPlate,testing/AssemblyofthePiPlateforthelinefollowingrobot
datainterpretation/Sensorselection,interface,anddatainterpretation
sensors,selecting/Engagethrusters
interface/Engagethrusters
MachineVision-based/Machine-vision-basedlinefollowingrobot
motordrivercircuit,testing/Testingthemotordrivercircuit
track,preparing/Preparationofthelinefollowingcourse
chassis,designing/Designingthechassisforthelinefollowingrobot
assembling/Astep-by-stepassemblyoftherobot
assembling,steps/Prepareforliftoff,Engagethrusters
referencelinks/References
linefollowingtrack
preparing,forrobot/Preparationofthelinefollowingcourse,Prepareforliftoff
Linux
SDcardwithRaspbianimage,flashing/Linux
LPD8806library
URL/ControllingRGBLEDsfromawebpage

M
MachineVision-basedlinefollowingrobot/Machine-vision-basedlinefollowing
robot
Make*itBasicRoboticsStarterKit
URL/Missionchecklist
marqueecontrol,ConnectFourgame
implementing/Marqueedesignandcontrol(optional),Prepareforliftoff
menuclass
URL/Addingamenuforthegame
motordrivercircuit
testing/Testingthemotordrivercircuit,Prepareforliftoff,Engagethrusters
multipleappliances
connecting,toRaspberryPi/ConnectingmultipleappliancestotheRaspberry
Pi


O
Occidentalis
about/Missionbriefing
features/Whyisitawesome?
objectives/YourHotshotobjectives
installing/Installation,features,andusageoftheOccidentalisoperatingsystem
fromAdafruit
Occidentalisdistro
requisites/Missionchecklist
OpenCV
URL/Missionchecklist
URL,forinstallationonRaspberryPi/Missionchecklist
URL,forinstallationonLinux/Missionchecklist
OpenCVDishDetectorproject
URL/Settinguptheassemblyforthedishmonitor
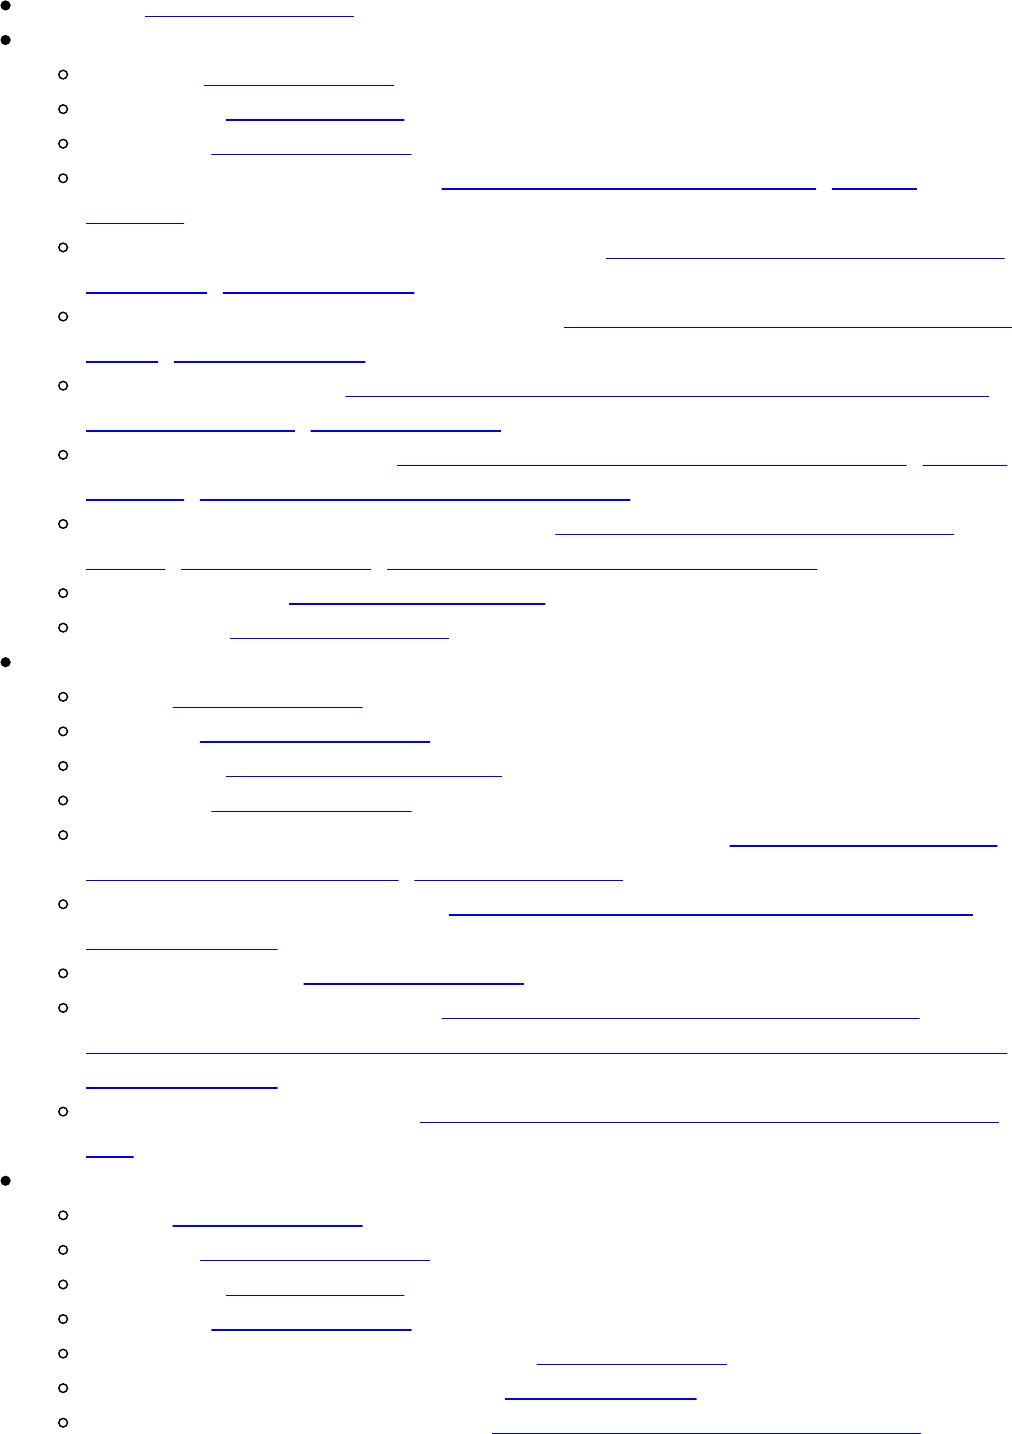
P
Parallax/Prepareforliftoff
personalassistant
building/Missionbriefing
objectives/Yourobjectives
checklist/Missionchecklist
e-mailfeedparser,settingup/Settingupthee-mailfeedparser,Engage
thrusters
e-mailfeedparser,settingupforreminders/Settinguptheparserforreminders
andevents,Engagethrusters
e-mailfeedparser,settingupforevents/Settinguptheparserforremindersand
events,Engagethrusters
enclosure,designing/Designinganenclosuredesignforthepersonalassistant,
Prepareforliftoff,Engagethrusters
dishmonitor,assembling/Settinguptheassemblyforthedishmonitor,Engage
thrusters,Objectivecomplete–minidebriefing
sensors,settingupforkeyalertsystem/Settingupsensorsforthekeyalert
system,Engagethrusters,Objectivecomplete–minidebriefing
implementation/Missionaccomplished
challenges/Hotshotchallenges
personalhealthmonitor
about/Missionbriefing
features/Whyisitawesome?
objectives/YourHotshotobjectives
checklist/Missionchecklist
webserver,settingupforrecordinghealthparameters/Settingupawebserver
torecordhealthparameters,Prepareforliftoff
simpleexercisetool,building/AsimpleexercisetoolusingtheRaspberryPi,
Engagethrusters
miniprojectidea/Aminiprojectidea
e-mailfeedparser,settingup/Settingupane-mailfeedparsertorefilla
prescriptionaswellasremindtheuseraboutanupcomingdoctor’sappointment,
Engagethrusters
pillremindertool,building/Asimpletoolthatremindsapersontotakehis/her
pills
pet/wildlifemonitor
about/Missionbriefing
features/Whyisitawesome?
objectives/Yourobjectives
checklist/Missionchecklist
python-twistedframework,installing/Engagethrusters
python-twistedframework,testing/Engagethrusters
python-twistedframework,using/Objectivecomplete–minidebriefing
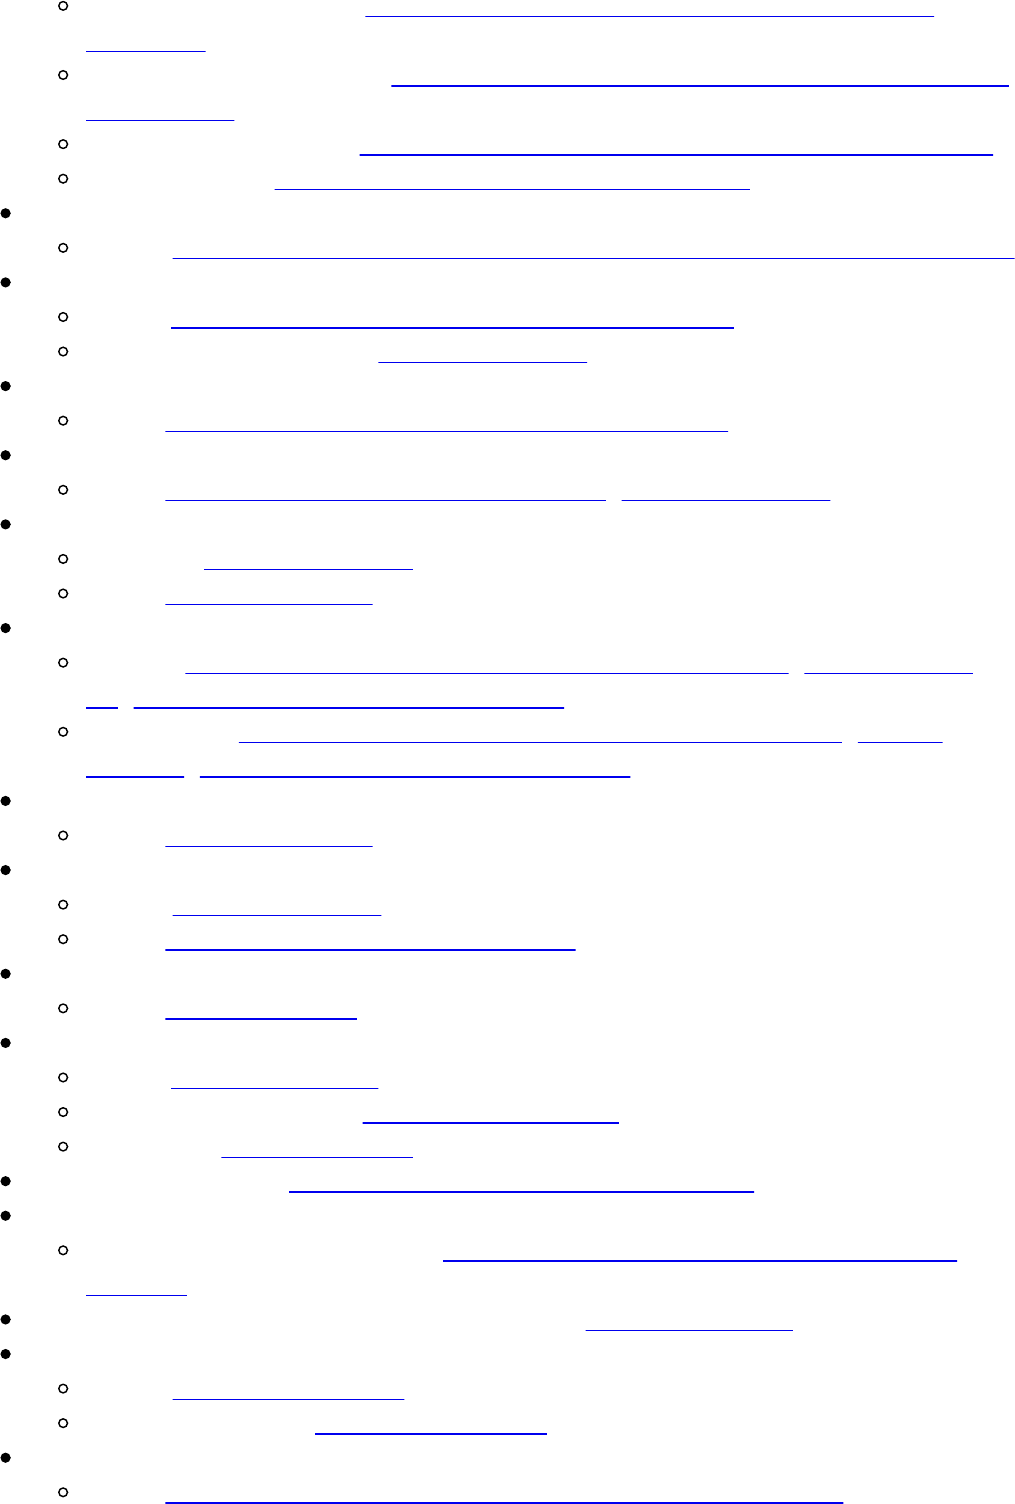
SparkCore,settingup/SettingupandtestingSparkCoretointeractwith
appliances
GoogleCoder,installing/InstallingandtestingtheGoogleCoderprojectonthe
RaspberryPi
birdfeeder,settingup/Abriefoverviewofabirdfeederthattriggersacamera
considerations/Alternativesandprojectideastoconsider
PiCrust
about/IntroductiontothePiCrust–aprototypingplatformfortheRaspberryPi
PiFace
using/InterfacinggameinputsusingthePiFacemodule
installationguide,URL/Prepareforliftoff
PiFaceinterfaceboard
URL/InterfacinggameinputsusingthePiFacemodule
PiLiteLEDMatrixdisplay
URL/Marqueedesignandcontrol(optional),Prepareforliftoff
pillreminder
building/Prepareforliftoff
URL/Prepareforliftoff
PiPlate
testing/AssemblyofthePiPlateforthelinefollowingrobot,Prepareforlift
off,Objectivecomplete–minidebriefing
assembling/AssemblyofthePiPlateforthelinefollowingrobot,Engage
thrusters,Objectivecomplete–minidebriefing
PIRsensor
URL/Prepareforliftoff
Pololu
about/Prepareforliftoff
URL/Useelectricaltapeandbuildatrack
powerDarlingtoncircuit
URL/Engagethrusters
PowerSwitchTail2
using/Prepareforliftoff
softwareprerequisites/Softwareprerequisites
settingup/Engagethrusters
PowerSwitchTailII/InterfacethedevicestotheRaspberryPi
projectsideas
implementing,overweekend/Projectideasthatcanbeimplementedovera
weekend
Proportional-Integral-Derivativecontrol(PID)/Hotshotchallenge
pulse-widthmodulation
about/Whyisitawesome?
URL,fortutorials/Whyisitawesome?
PuTTYSSHclient
URL/#1–SimpletrickforPythondevelopmentviaremotelogin

python-twistedframework
about/Installingandtestingthepython-twistedframework
installing/Engagethrusters
testing/Engagethrusters
using/Objectivecomplete–minidebriefing
python-twistedframework
URL/Installingandtestingthepython-twistedframework
Pythondevelopment
viaremotelogin/#1–SimpletrickforPythondevelopmentviaremotelogin
Pythondevelopment,onWebIDE
about/PythondevelopmentontheWebIDE,Prepareforliftoff
I2Cinterface/QuickintroductiontotheI2Cinterface
I2Cinterface,configuringonRaspberryPi/ConfiguringtheI2Cinterfaceon
theRaspberryPi
I2Cinterface,configuringoonRaspberryPi/ConfiguringtheI2Cinterfaceon
theRaspberryPi,Engagethrusters
PythonIDLE3
LEDblinkingexample,programming/Engagethrusters

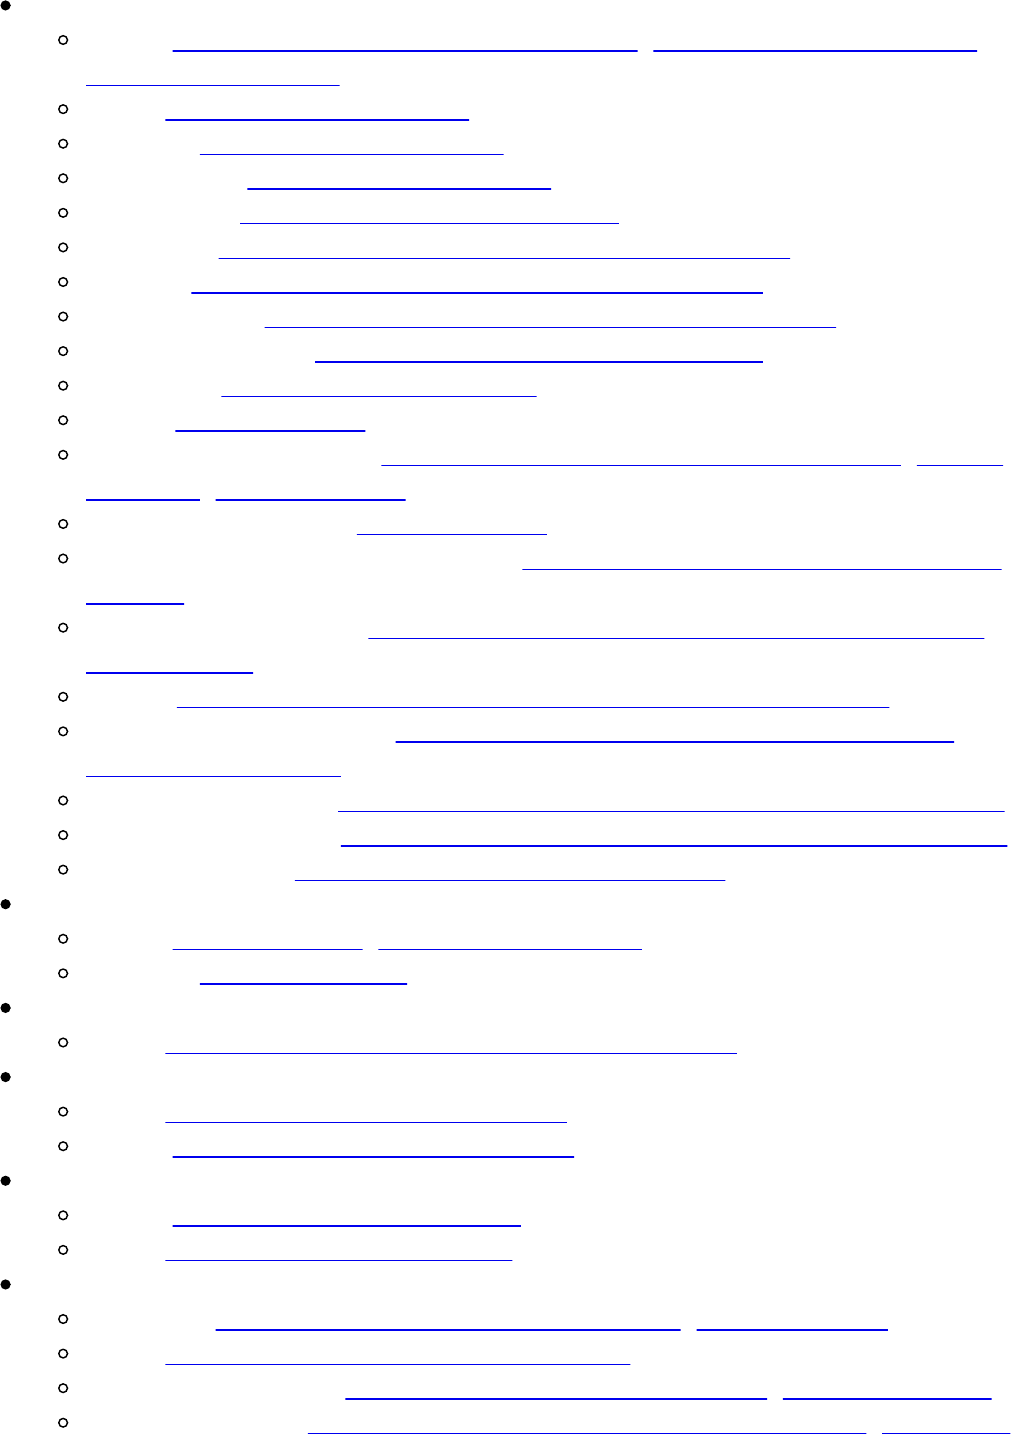
R
RaspberryPi
about/AquickintroductiontotheRaspberryPi,SettingupRaspberryPiasa
developmentplatform
URL/FeaturesofaRaspberryPi
features/FeaturesofaRaspberryPi
components/FeaturesofaRaspberryPi
distributors/WherecanIbuyaRaspberryPi?
requisites/RequirementstogetstartedwiththeRaspberryPi
display/RequirementstogetstartedwiththeRaspberryPi
powersupply/RequirementstogetstartedwiththeRaspberryPi
operatingsystems/OperatingsystemsontheRaspberryPi
settingup/SettinguptheRaspberryPi
GPIO/Missionbriefing
remotelogin,settingup/SetupofaremoteloginintotheRaspberryPi,Prepare
forliftoff,Engagethrusters
tipsandtricksproject/Missionbriefing
settingup,asdevelopmentplatform/SettingupRaspberryPiasadevelopment
platform
remotelogin,enabling/RemotelyloggingintheRaspberryPifromanywhere
ontheInternet
issues/ProblemsthatmightbeencounteredwhileusingRaspberryPi
add-onhardwaresources/Cooladd-onhardwaresourcesdevelopedforthe
RaspberryPiplatform
modelB,versusB+/TheRaspberryPimodelBversusB+,modelAversusA+
modelA,versusA+/TheRaspberryPimodelBversusB+,modelAversusA+
usefulresources/UsefulresourcesfortheRaspberryPi
RaspberryPiAlaMode
about/Missionbriefing,RaspberryPiAlaMode
features/Prepareforliftoff
RaspberryPieLinuxwiki
URL/RequirementstogetstartedwiththeRaspberryPi
RaspberryPiFoundationforums
URL/RaspberryPiFoundation’sforums:
about/RaspberryPiFoundation’sforums:
RaspberryPiStackExchange
about/RaspberryPiStackExchange:
URL/RaspberryPiStackExchange:
RaspberryPiWebIDE
installing/InstallationoftheRaspberryPiWebIDE,Engagethrusters
URL/InstallationoftheRaspberryPiWebIDE
Pythondevelopment/PythondevelopmentontheWebIDE,Prepareforliftoff
examples,testing/TestanddebuggingexamplesusingtheWebIDE,Preparefor

liftoff,Engagethrusters
examples,debugging/TestanddebuggingexamplesusingtheWebIDE,Prepare
forliftoff,Engagethrusters
Raspbian
about/GettingstartedwithRaspbian
downloading/DownloadingRaspbian
URL/DownloadingRaspbian
image,flashingonSDcard/FlashingimageontotheSDcard
Raspbianimage
flashing,onSDcard/FlashingimageontotheSDcard
Raspbianwheezy/DownloadingRaspbian
raspi-configtool
info/SettinguptheRaspberryPi
expand_rootfs/SettinguptheRaspberryPi
overscan/SettinguptheRaspberryPi
configure_keyboard/SettinguptheRaspberryPi
change_pass/SettinguptheRaspberryPi
change_locale/SettinguptheRaspberryPi
change_timezone/SettinguptheRaspberryPi
memory_split/SettinguptheRaspberryPi
overclock/SettinguptheRaspberryPi
ssh/SettinguptheRaspberryPi
boot_behaviour/SettinguptheRaspberryPi
update/SettinguptheRaspberryPi
remotelogin
settingup,inRaspberryPi/SetupofaremoteloginintotheRaspberryPi,
Engagethrusters
enabling/RemotelyloggingintheRaspberryPifromanywhereontheInternet
resources,RaspberryPi
about/UsefulresourcesfortheRaspberryPi
foundationforums/RaspberryPiFoundation’sforums:
StackExchange/RaspberryPiStackExchange:
Element14/Element14’sRaspberryPicommunity:
RGBLEDs
controlling,fromwebpage/ControllingRGBLEDsfromawebpage,Engage
thrusters
RGBLEDstrip
controlling,withArduino/ControllingtheRGBLEDStripusingtheArduino,
Prepareforliftoff,Objectivecomplete–minidebriefing
lightingup/LightinguptheRGBLEDstrip,AnArduino-basedcontrol
S
7-segmentbackpack/Engagethrusters
scienceandeducationproject
about/Missionbriefing
features/Whyisitawesome?
objectives/YourHotshotobjectives
vocabulary,improving/ImprovingyourvocabularyusingtheRaspberryPi,
Engagethrusters
KhanAcademyexample/RaspberryPiandKhanAcademy
sciencefairexhibit,building/Buildingasciencefairexhibitusingthe
RaspberryPi,Engagethrusters,Objectivecomplete–minidebriefing
educationalexperiments/Somesimpleeducationalexperimentsusingthe
RaspberryPi
sciencefairexhibit
building/BuildingasciencefairexhibitusingtheRaspberryPi,Engage
thrusters
Scribblerlinefollowingrobot
URL/Engagethrusters
SDcard,withRaspbianimage
flashing,onWindows/Windows
flashing,onLinux/Linux
SDcardwithRaspbianimage,flashingonLinux
command-lineinterface-basedapproach/Acommand-lineinterface-based
approach
GUI-basedapproach/GUI-basedapproach
sensors
selecting/Engagethrusters,Sensorselection
LightDependentResistors/LightDependentResistors
Infrared(IR)emitter/detector/Infraredemitter/detector
seriallibrary/Prepareforliftoff
serialportcommunication
about/SerialportcommunicationwiththeRaspberryPi
Pythonprogram,forWeasleyclock/PythonprogramfortheWeasleyclock
Arduinoacknowledgement,forcontrollingsignal/Controlflowfortheweather
clock
shebang/Engagethrusters
shields/Whyisitawesome?
simpleexercisetool
building/Prepareforliftoff,Engagethrusters
sourcefiles
URL,forOpenCVinstallation/Missionchecklist
SparkCore
URL/SettingupandtestingSparkCoretointeractwithappliances

settingup/Prepareforliftoff
LEDexample,implementing/EngageThrusters
SparkCoreboard
URL/Missionchecklist
SparkFun
URL/Alternativesolutionsandsomeprojectideastoconsider,Prepareforlift
off
SPI(SerialPeripheralInterface)/Howdoesitwork?
SSH(SecureShell)/GainingremoteaccesstoyourRaspberryPitocontrol
appliances
steppermotor
about/Prepareforliftoff
controlling,Arduinoused/Prepareforliftoff,Engagethrusters
counterclockwiserotation/Counterclockwiserotationofthesteppermotor
switches,ConnectFourdesktop
settingup,withcardboardbox/Setupoftheswitchesusingacardboardbox,
Prepareforliftoff,Engagethrusters

T
tabletopmusicalfountainproject
building/Missionbriefing
features/Whyisitawesome?
objectives/Yourobjectives
checklist/Missionchecklist
assembling/Missionchecklist
DIYfountainkit/Prepareforliftoff
Flaskframework,installing/InstallationoftheFlaskframework,Engage
thrusters
RGBLEDs,controllingfromwebpage/ControllingRGBLEDsfromaweb
page,Engagethrusters
e-mailalerts,settingup/Setupofthee-mailalertsinthefountain,Engage
thrusters,Objectivecomplete–minidebriefing
TheThingBoxProject
about/#5TheThingboxproject
URL/#5TheThingboxproject
tipsandtricksproject
about/Missionbriefing
features/Whyisitawesome?
objectives/Yourobjectives
checklist/Missionchecklist
Tkinter
URL/Engagethrusters
track
building,withelectricaltape/Useelectricaltapeandbuildatrack

W
WeasleyWeatherClock
about/TheWeasleyweatherclock
requisites/Prepareforliftoff
assembling/Engagethrusters
Weaved
URL/GainingremoteaccesstoyourRaspberryPitocontrolappliances,
RemotelyloggingintheRaspberryPifromanywhereontheInternet
web.pytutorials
URL/References
webdevelopment
GoogleCoderused/#2WebdevelopmentusingGoogleCoder
webserver
installing/Installingthewebserver,Engagethrusters
interfacing/Interfacingthewebserver,Engagethrusters,Objectivecomplete–
minidebriefing
settingup,forrecordinghealthparameters/Settingupawebservertorecord
healthparameters,Prepareforliftoff,Engagethrusters
Win32DiskImagertool/Windows
Windows
SDcardwithRaspbianimage,flashing/Windows
WinSCP
URL/#1–SimpletrickforPythondevelopmentviaremotelogin
WonderHowTo
URL/Engagethrusters
WordnikAPI
URL/ImprovingyourvocabularyusingtheRaspberryPi
installing/Prepareforliftoff
using/Engagethrusters
WordOfTheDayobject
URL/Engagethrusters
