23075 Io T6 Lab Manual
User Manual:
Open the PDF directly: View PDF ![]() .
.
Page Count: 64

2019 MASTERs Conference
23075 IoT6
Simplifying TCP/IP Applications
with MPLAB® Harmony
Hands-On
Lab Manual
Instructors:
Martin Ruppert
Raji Shanmugasundaram
Niklas Larsson
Microchip Technology Inc.

23075 IoT6 Simplifying TCP/IP Applications with MPLAB® Harmony
2
Table of Contents
Introduction 3
Hardware Requirements 4
Software Requirements 5
How to connect the USB and the CAT5 Network cable to the board 6
Lab 1 7
Overview 7
Lab Procedure 8
Lab 2 27
Overview 27
Lab Procedure 31
Lab 3 48
Overview 48
Lab Procedure 51
MPLAB® Harmony TCP/IP Stack 54
TCP Module API Function List 54
UDP Module API Function List 55
Harmony TCP/IP API Subset For all Lab’s 56
TCP Socket Management Functions 56
UDP Socket Management Functions 60
64

23075 IoT6 Simplifying TCP/IP Applications with MPLAB® Harmony
3
Introduction
This Lab Manual provides the step by step procedure to complete two labs in the MASTERs 23075 IoT6
Class.
If you don’t know how TCP/IP works but you have to add network connectivity to your product, this is the right class
for you. We will teach you the basics of TCP/IP, how the client-server model works, what ports and sockets are and
how applications use them to create TCP/IP connections. The class will also teach you the fundamentals of network
analysis with the well-known tool Wireshark. The hands-on part of the class utilizes Microchip's 32-bit MCUs with
MPLAB® Harmony. You can learn the architecture and the fundamentals of the Harmony TCP/IP stack to interface
your TCP/IP application with some common stack APIs. To make your life easier, the FreeRTOS™ task schedular is
used to simplify your application programming.
In Lab 1 we will open a TCP project, do some stack re-configuration and a connectivity check and in Lab 2 we will show an
Application integration for local access, using the example of a Vending machine. Finally in Lab 3 we will make an Application
integration for external access, using the example of a Weather Service.

23075 IoT6 Simplifying TCP/IP Applications with MPLAB® Harmony
4
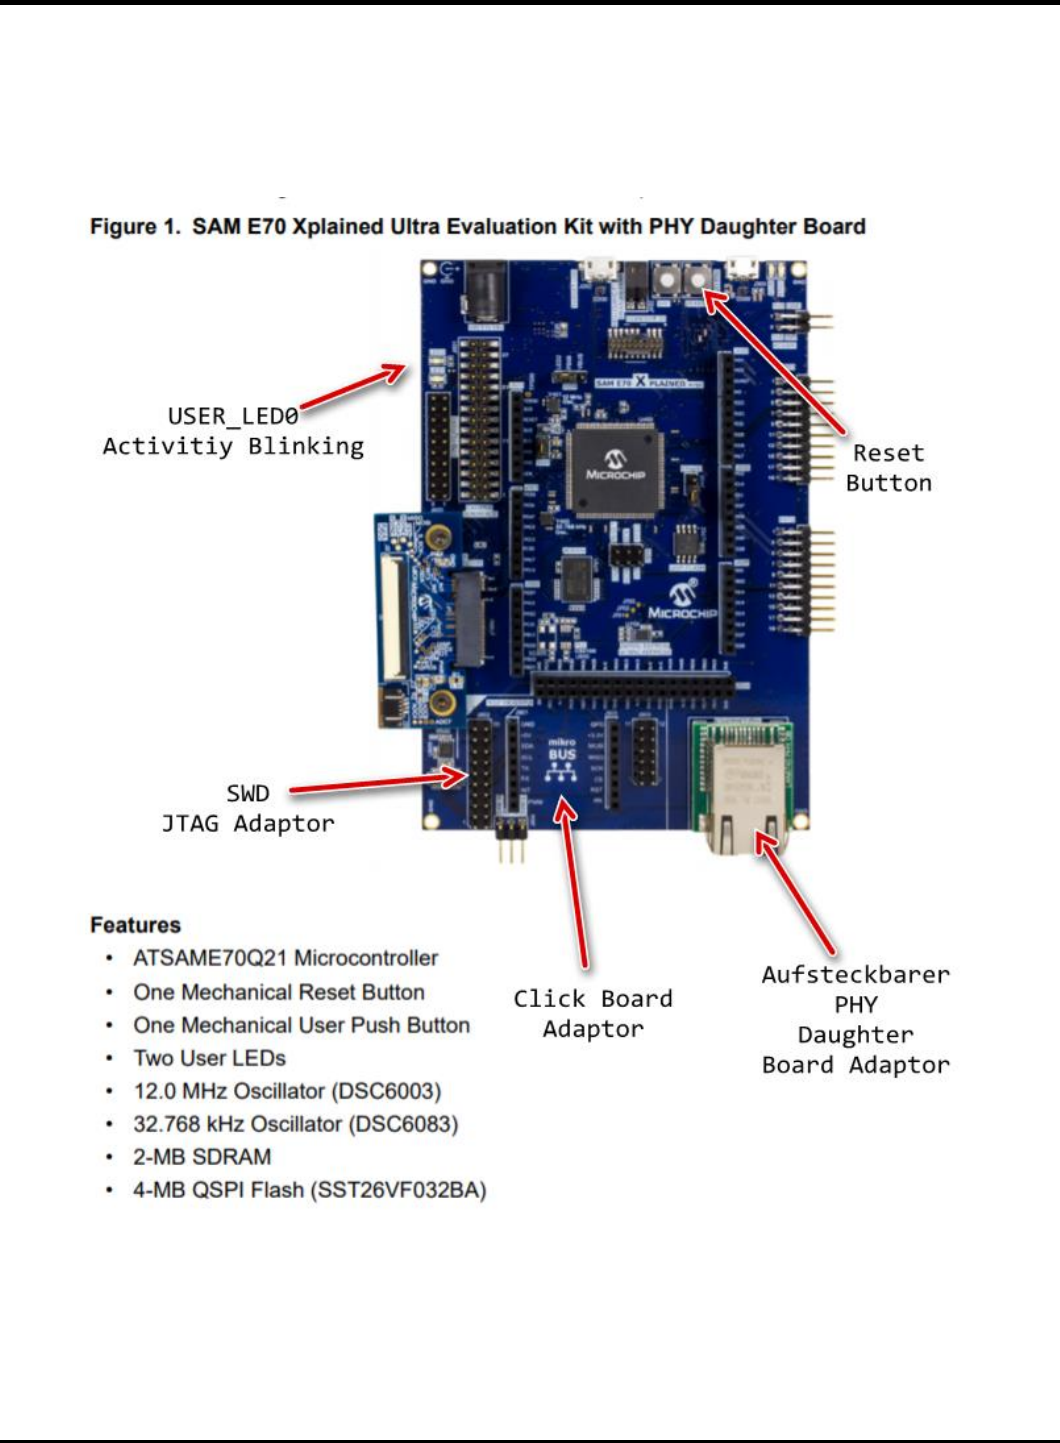
Hardware Requirements
The following hardware is required:
• SAM E70 Xpained Ultra (Microchip Part Number: DM320113)
o https://www.microchip.com/DevelopmentTools/ProductDetails/PartNO/DM320113
• OLED1 Xplained Pro extension kit (Microchip Part Number: ATOLED1-XPRO)
o https://www.microchip.com/Developmenttools/ProductDetails/ATOLED1-XPRO
• Cat 5 Ethernet Patch Cable
• USB Male A to USB Male B Micro Cable
23075 IoT6 Simplifying TCP/IP Applications with MPLAB® Harmony
5
Software Requirements
The following software is required:
• Microchip MPLAB X IDE v5.20
o http://www.microchip.com/mplab
• Microchip MPLAB XC32 Compiler v2.15
o http://www.microchip.com/mplab/compilers
• Microchip MPLAB Harmony 3
o http://www.microchip.com/mplab/mplab-harmony
• Microchip MPLAB Harmony Configuration (MHC) Tool Plugin v3.3.0.1
• Tera Term v4.95
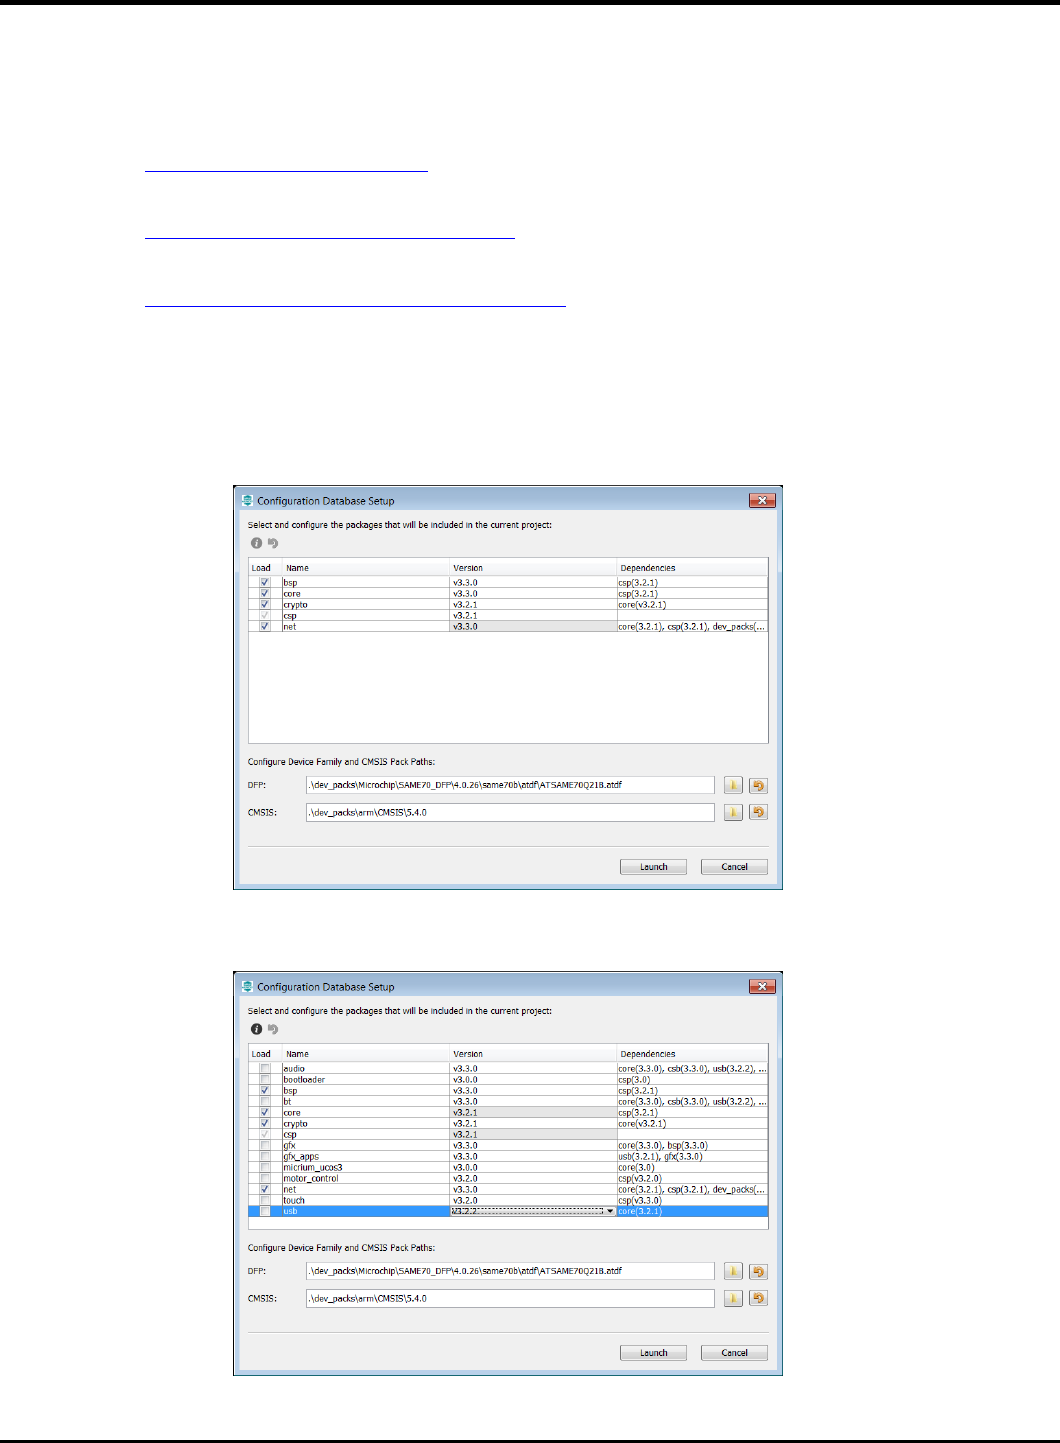
The Lab1, Lab2 and Lab3 class expects a Harmony 3 with the following subset of Versions (Tags)
To make it more easy in the class for the attendees, the folder C:/MASTERs/23075 already contains this H3 Checkout
In the (optional) case a standard Harmony 3 installation is used, in the MHC configuration the csp v3.2.1 and core v3.2.1 must be
selected. This can be done by clicking on the sub module and select in the drop down menu, the above mentioned version.
The following checkout could take several minutes. The checkout is only local, no external Github access will be used.
23075 IoT6 Simplifying TCP/IP Applications with MPLAB® Harmony
6
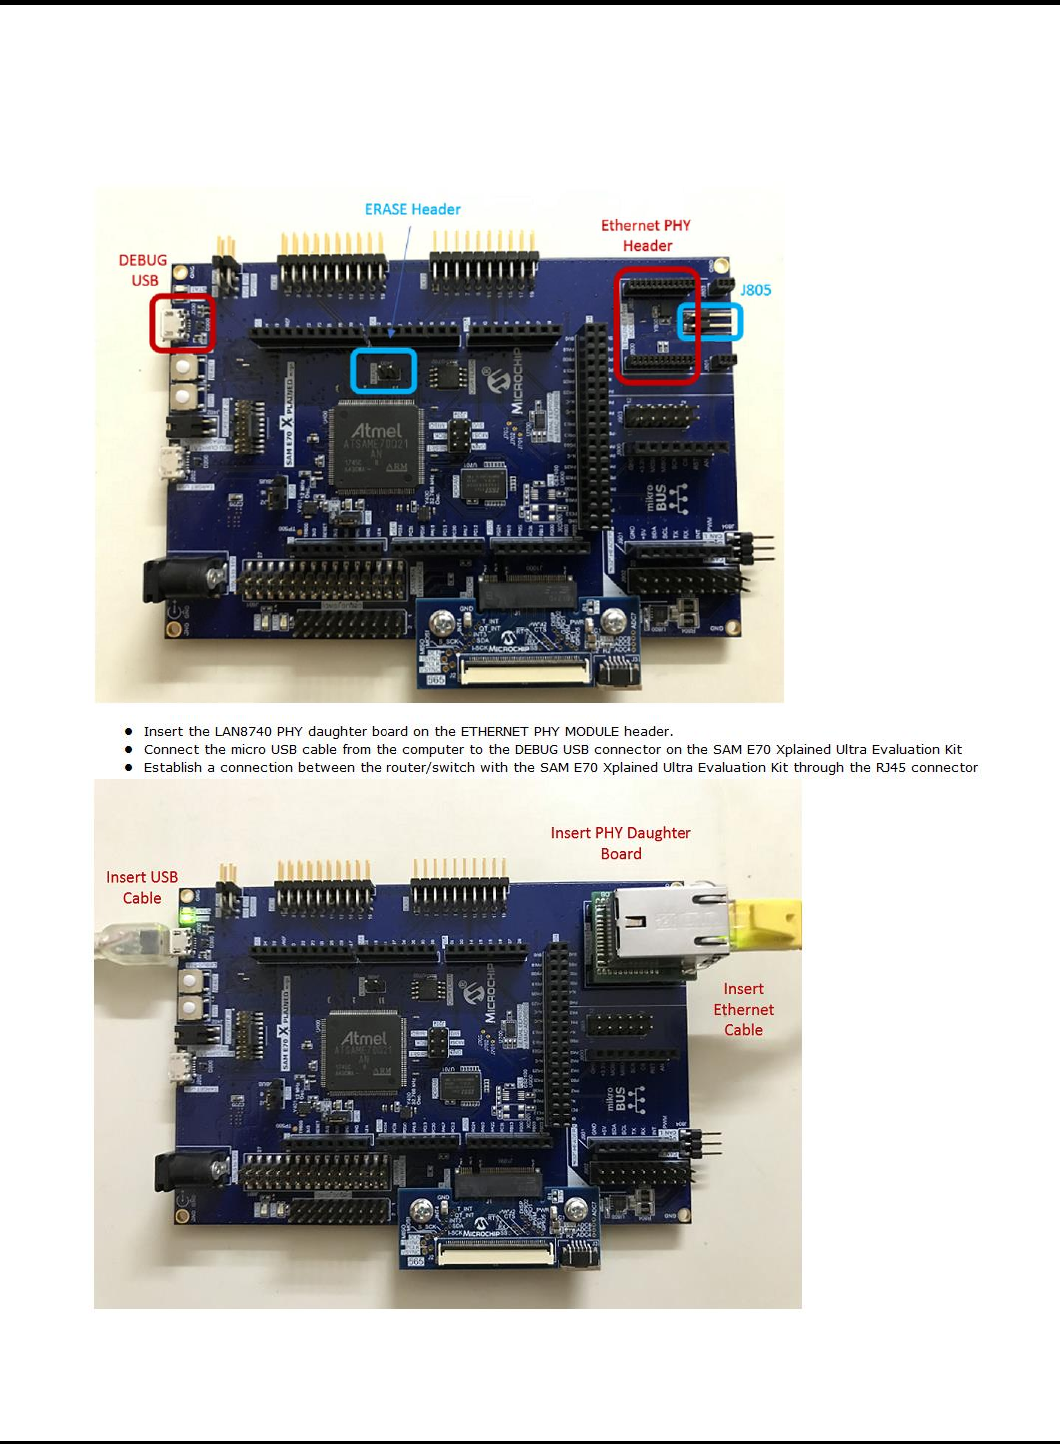
How to connect the USB and the CAT5 Network cable to the board
- Ensure the Erase jumper is open
- Open the J805 jumper

23075 IoT6 Simplifying TCP/IP Applications with MPLAB® Harmony
7
Lab 1
Overview
Lab 1 will show you how to open an existing TCP/IP MPLAB Harmony 3 Project and using the MPLAB Harmony Configuration (MHC)
Tool. The project will incorporate basic TCP/IP functionality to allow the SAM E70 Xplained Ultra to connect to an Ethernet Network,
along with a simple application to flash a “Heartbeat” LED every 500ms. Once the project is generated and programmed onto the
development kit, you will use a number of techniques to validate that the PIC is connected to a network and determine its IP
Address. The concepts that will be covered in this lab include:
• Open a SAM E70 MPLAB X Project
• Configuring the MPLAB Harmony path
• Configuring the TCP/IP Stack options, including:
o Network Configuration of the Host Name
o TCP/IP Services including Dynamic Host Configuration Protocol Client, ICMPv4 Server (for Ping testing) &
Announce Discovery Tool
o Bandwidth testing with “iperf”
• Configuring the Harmony Console and Command Service for monitoring and control of the TCP/IP stack via a Terminal
Client running on a USB CDC Interface (Emulated RS232 COM Port).
Toggling the IO Pin that drives USER_LED0 on the SAM E70 Xplained UltraSAM E70 Xplained Ultra
• Using the Windows Command Line Ping Tool and the Microchip TCP/IP Discovery tools to test connectivity of your SAM
E70 Xplained UltraSAM E70 Xplained Ultra on the network
• Use the Console and Command System to get help on available TCPIP Commands and execute a command to get
information about the network configuration.
23075 IoT6 Simplifying TCP/IP Applications with MPLAB® Harmony
8
Lab Procedure
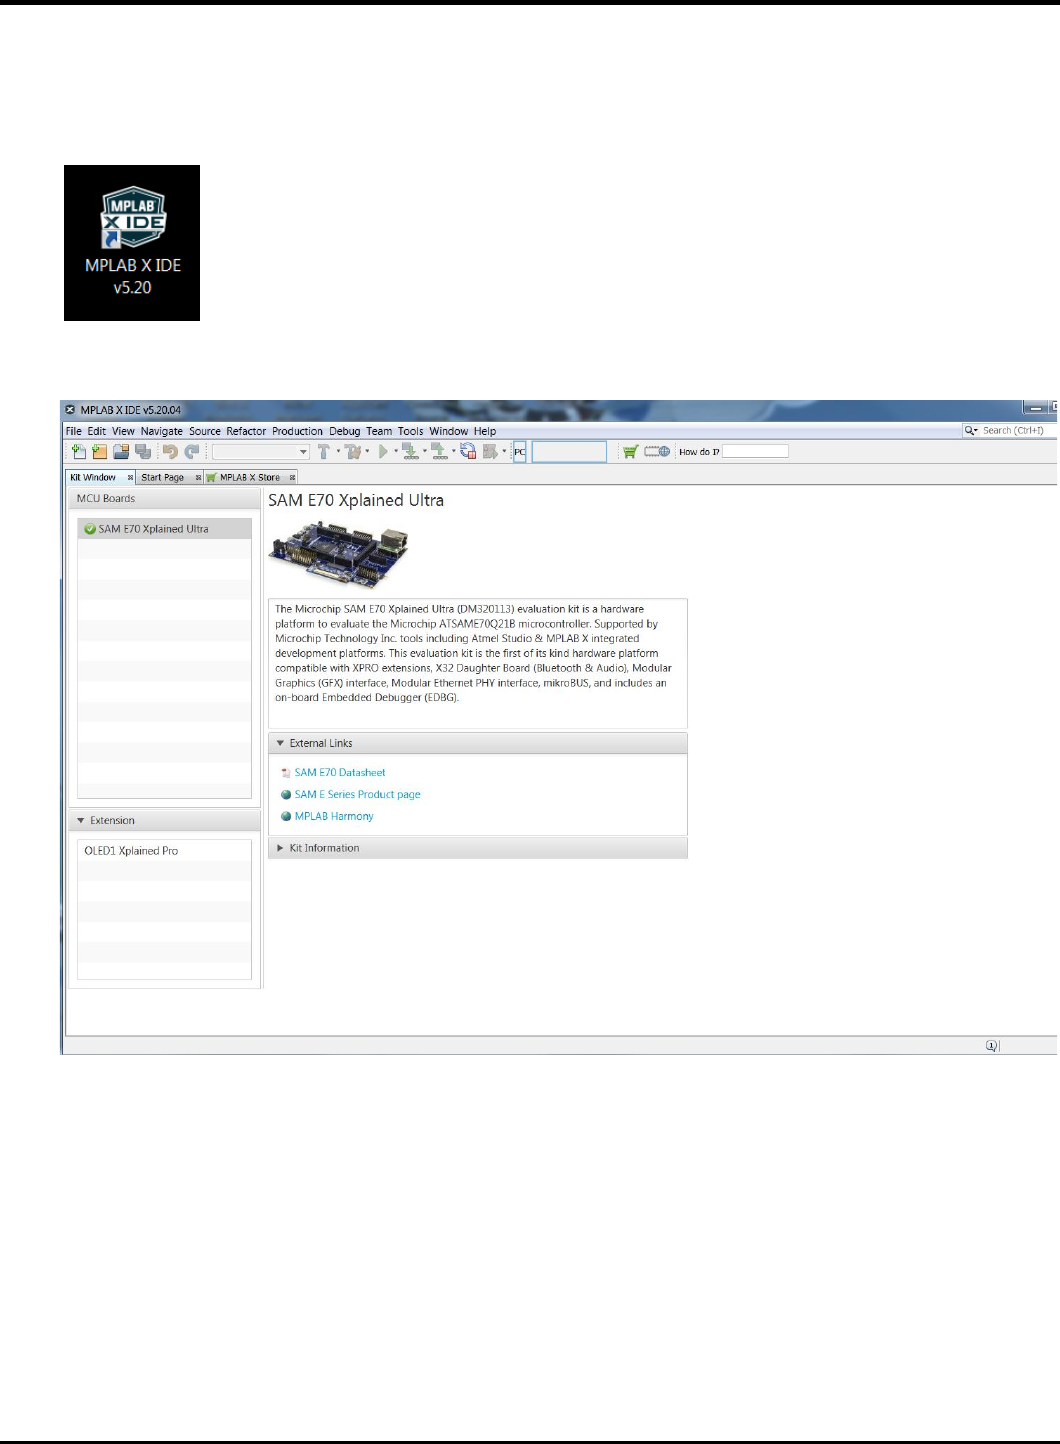
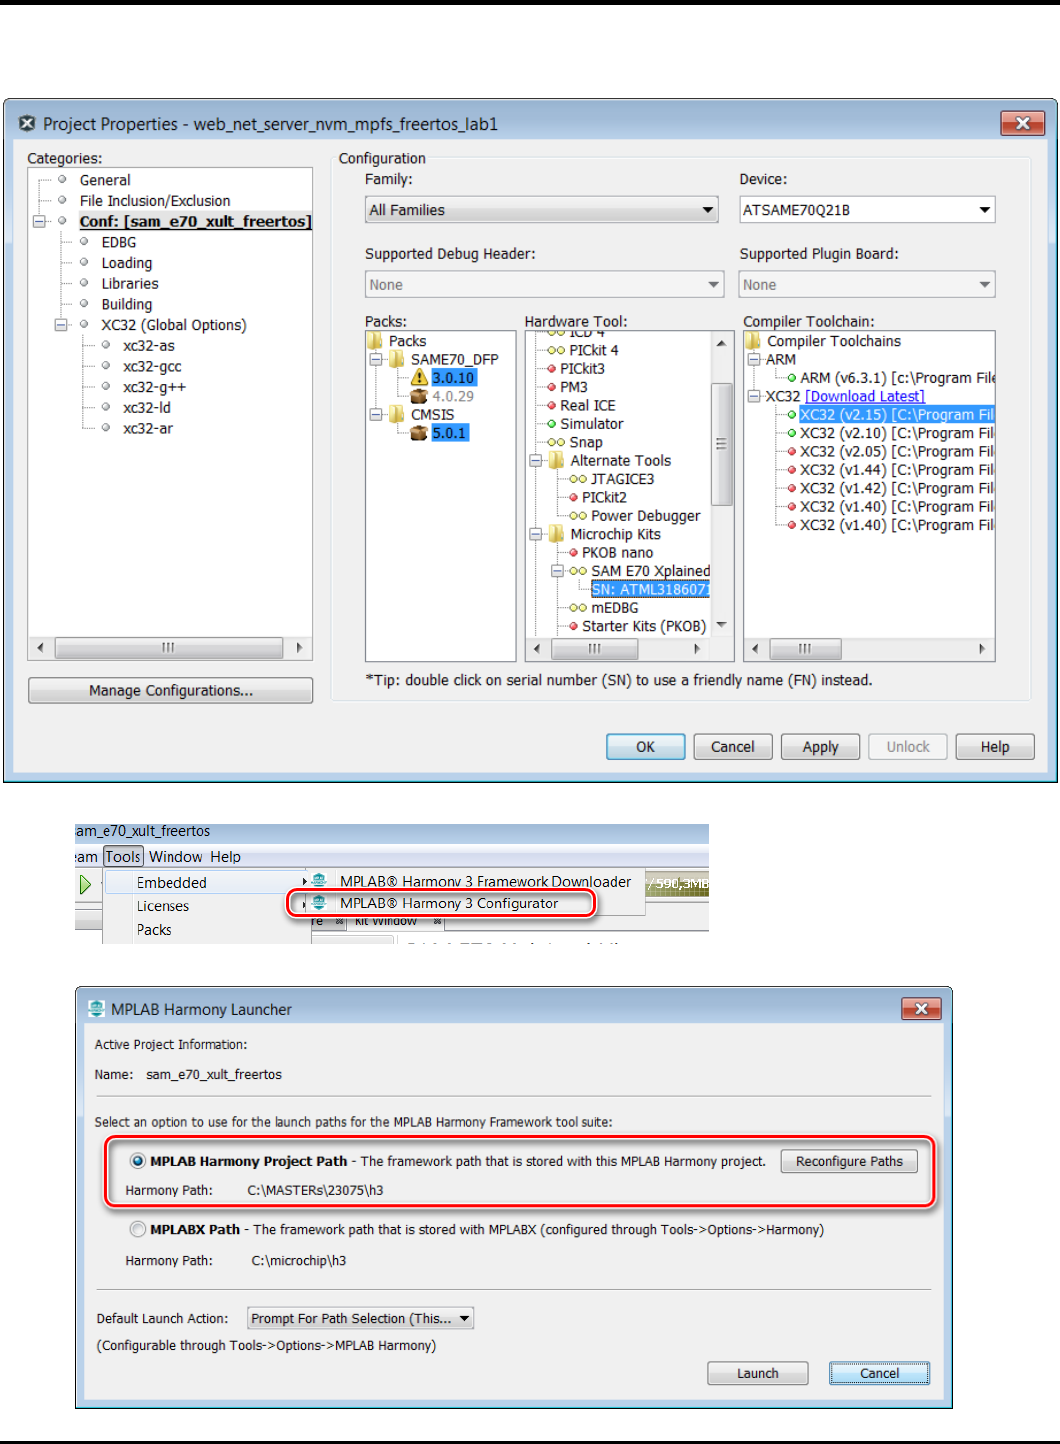
Starting MPLAB X IDE
1.1. Start MPLAB X IDE by double clicking on the MPLAB X IDE v5.20 icon found on the Windows desktop.
23075 IoT6 Simplifying TCP/IP Applications with MPLAB® Harmony
9
Project Load, modify with MHC, Generate, build and run
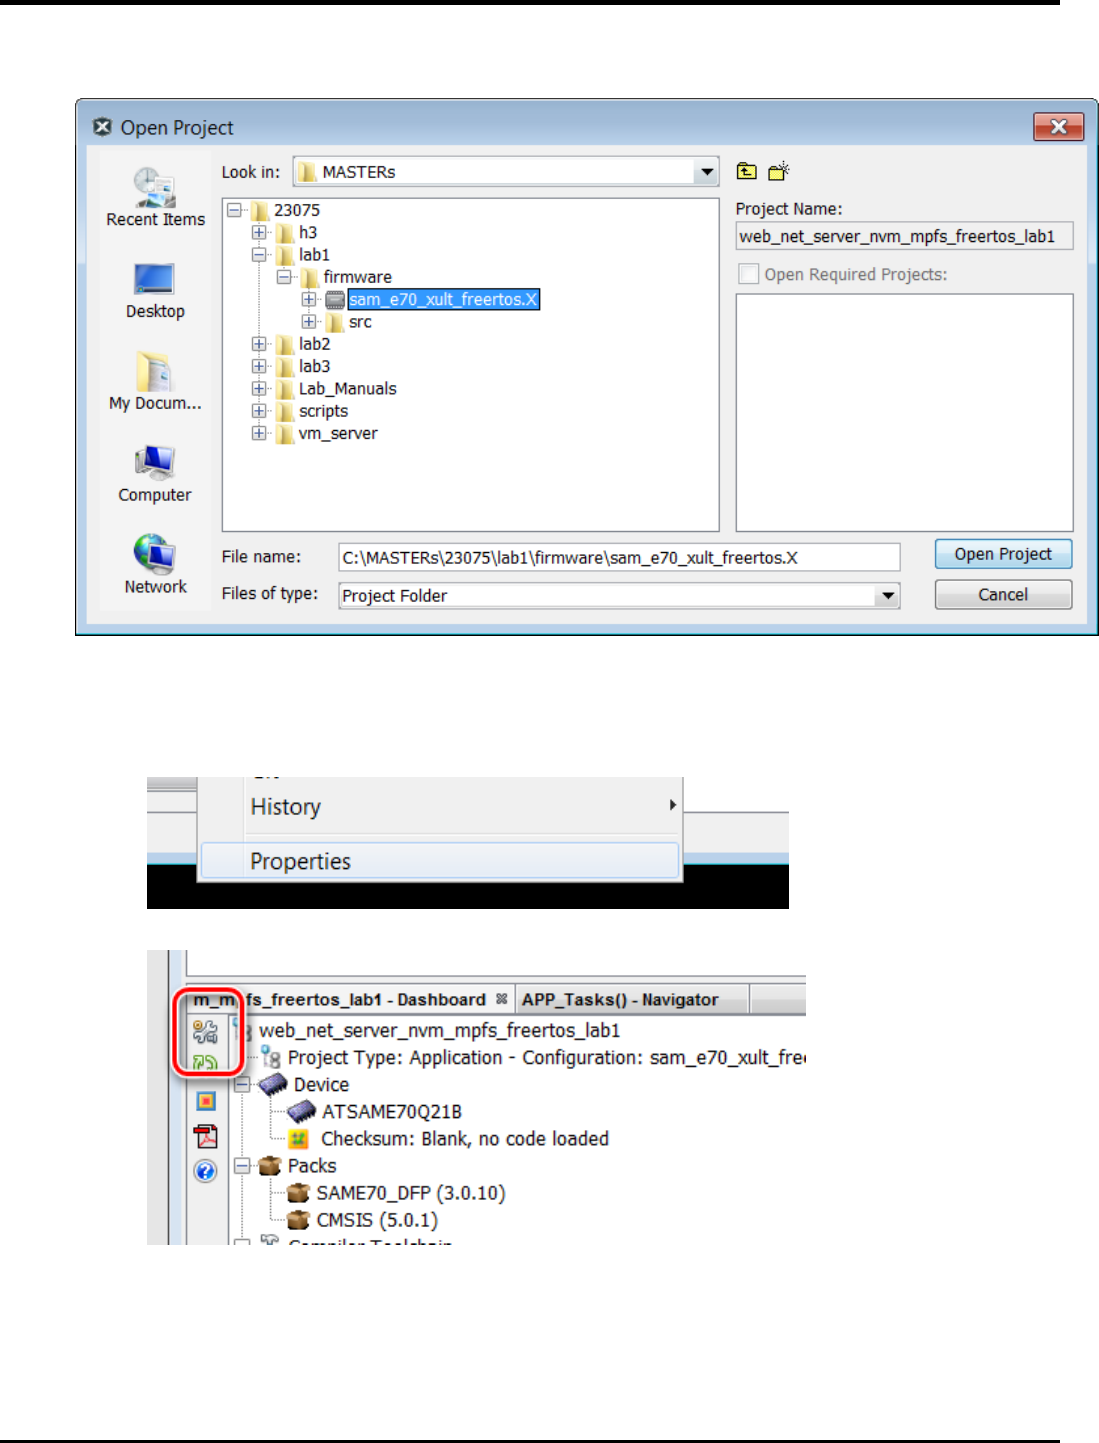
1. Open Project by choosing FileOpen Project… from the main menu and select lab1 project
2. Open Project Properties by choosing
a. FileProject Properties from the main menu
b. Or select with a right click the project node in the project windows and select at the bottom
c. Or select the toolbox in the Dashboard
23075 IoT6 Simplifying TCP/IP Applications with MPLAB® Harmony
10
3. Select the XC32 Compiler v2.15
4. Select the SAME70 Xplained by clicking on the SN: Number
5. Select from the Tools Menu the Harmony 3 Configurator
6. Ensure the H3 Path is set to “C:\MASTERs\23075\h3\”
23075 IoT6 Simplifying TCP/IP Applications with MPLAB® Harmony
11
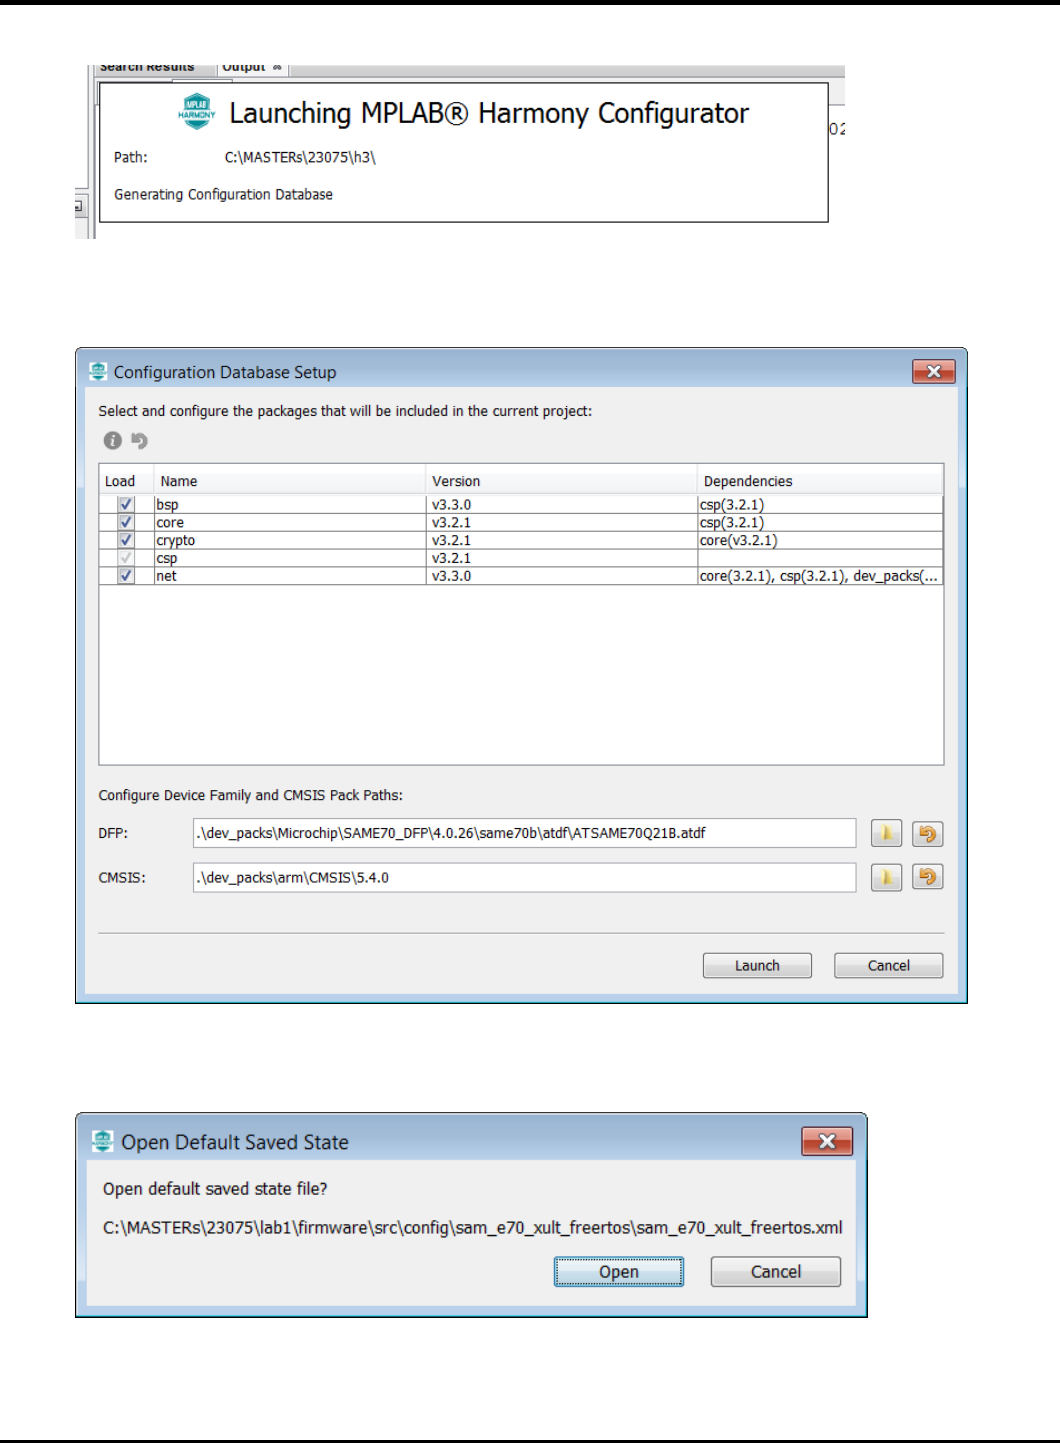
7. Select “Launch”
The first time the MHC is started, it can take up to 2 Minutes before the Configuration Database is prepared
8. In the next window the H3 parts and their used Version Numbers are displayed
Click on “Launch”
9. Open the saved state file
23075 IoT6 Simplifying TCP/IP Applications with MPLAB® Harmony
12
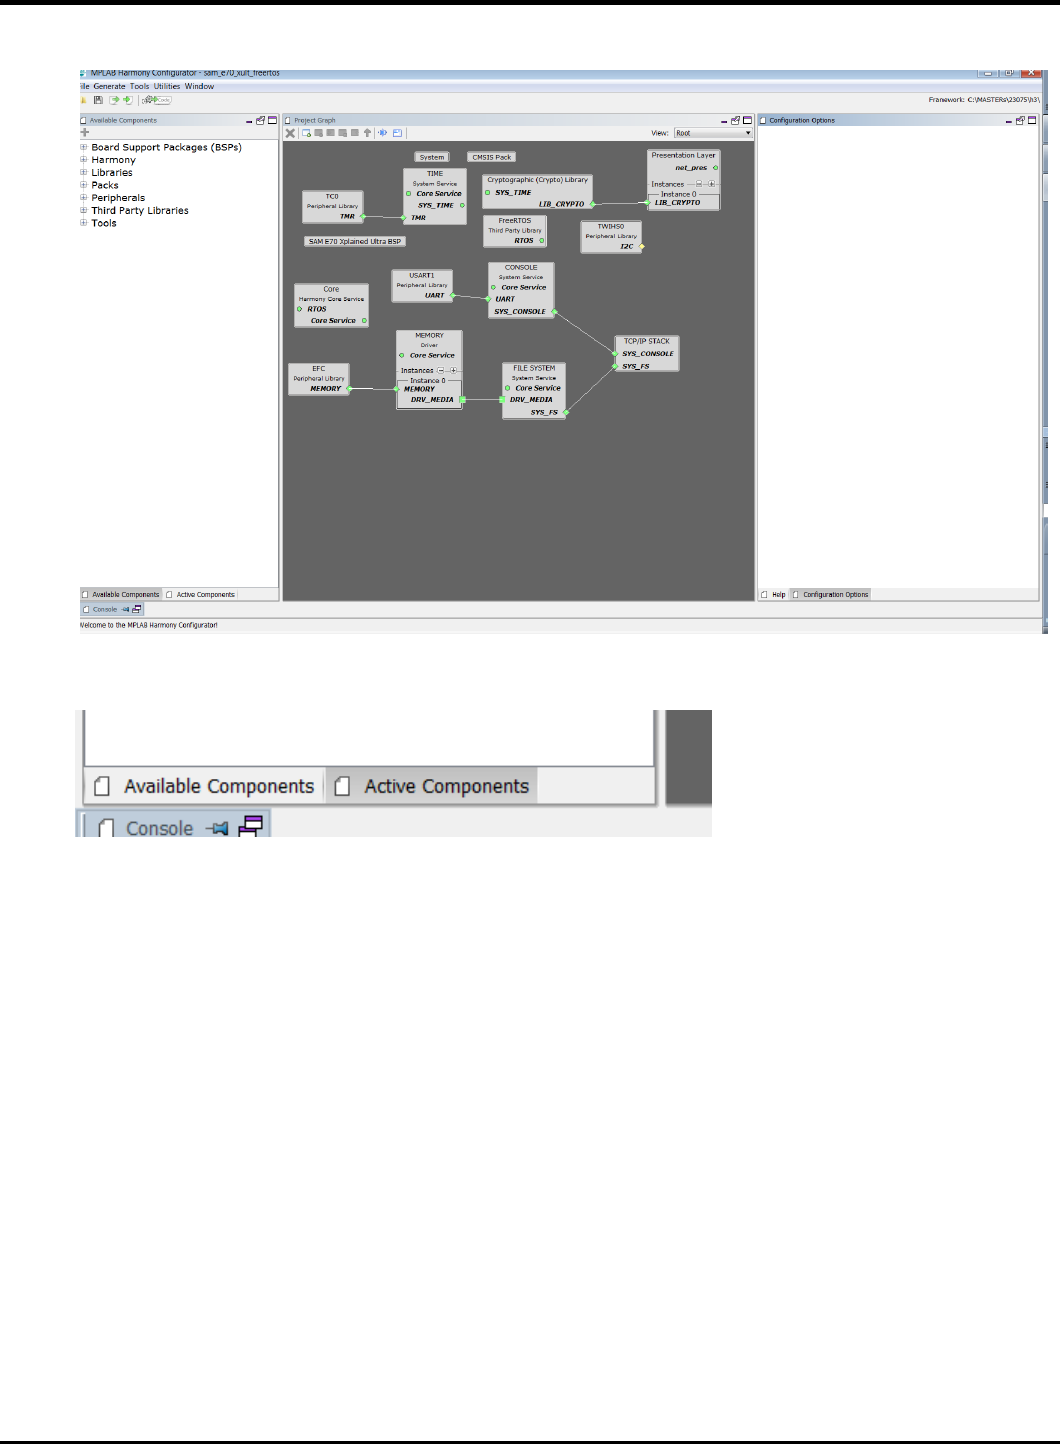
10. The MHC is up and running
11. Select Active Components (left below)
23075 IoT6 Simplifying TCP/IP Applications with MPLAB® Harmony
13
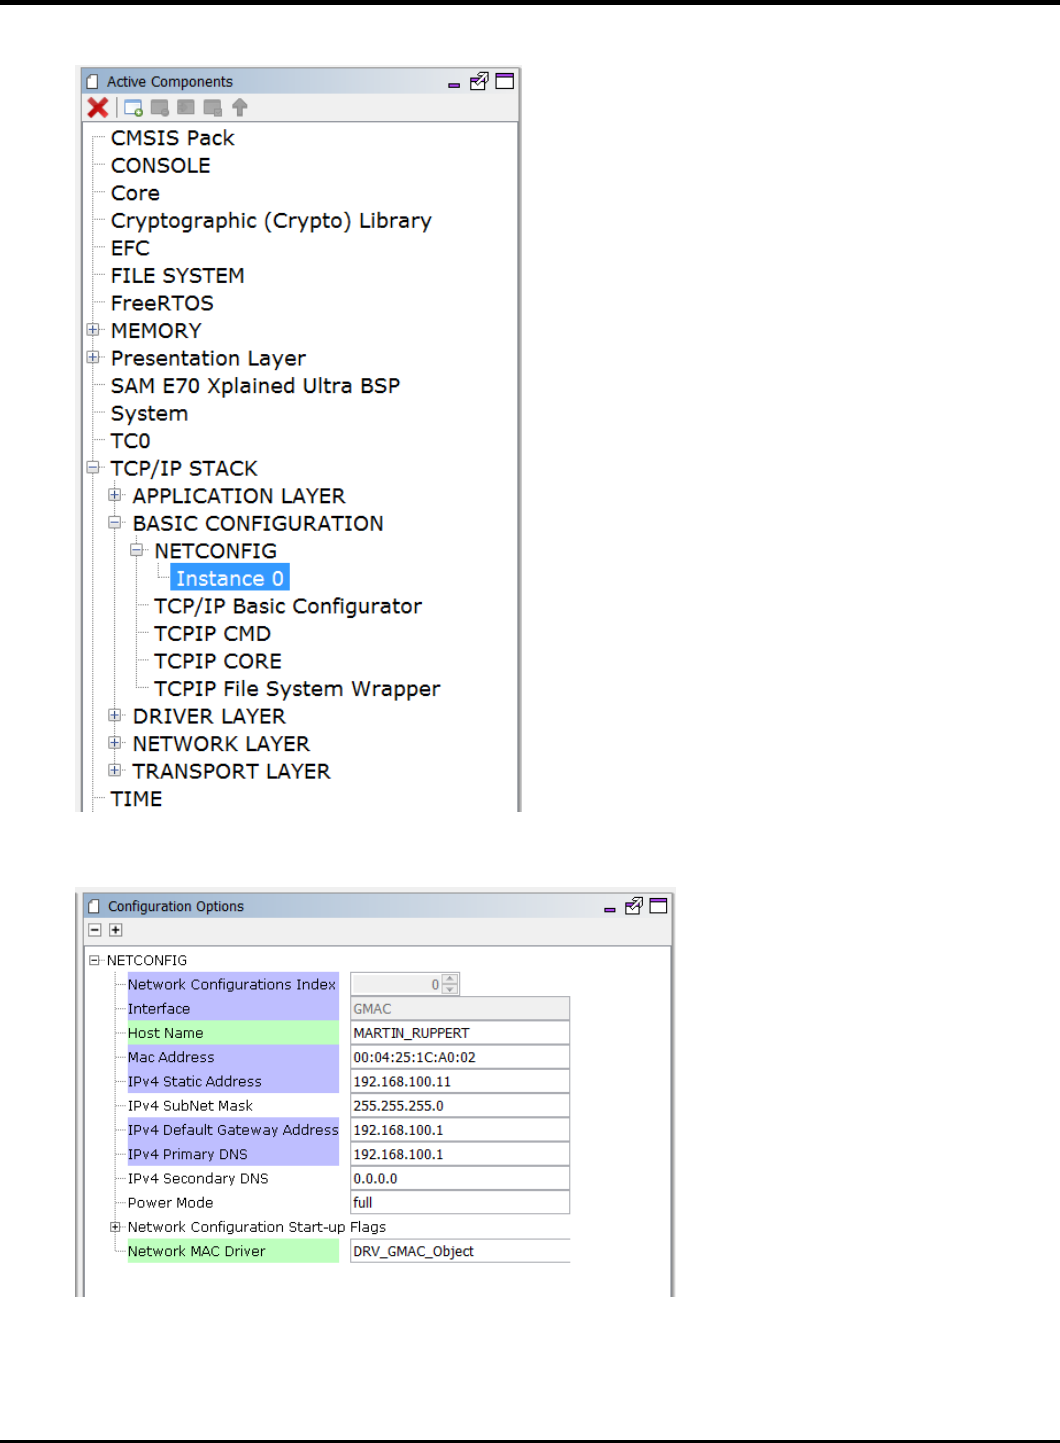
12. Select the Instance 0 in Active Components
13. And change in the Configuration Options (on the right side) the Host Name to something meaningful for you.
The Host name can be identified in the Network.
23075 IoT6 Simplifying TCP/IP Applications with MPLAB® Harmony
14
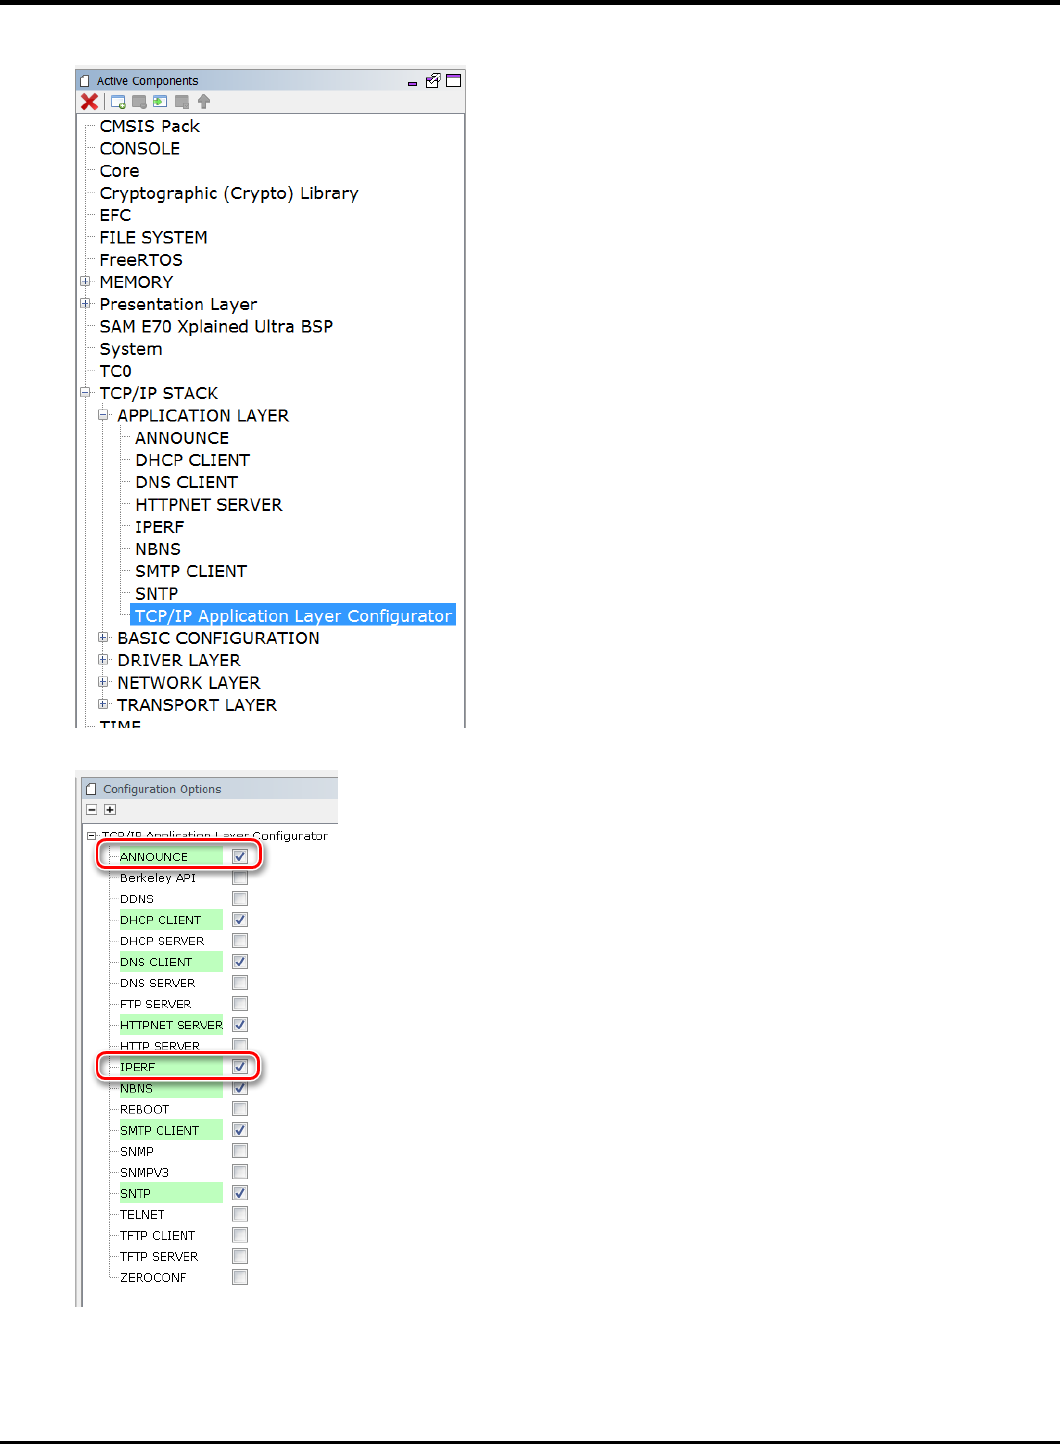
14. Select “TCP/IP Application Layer Configuration” in Active Components
15. Ensure that ANNOUNCE and IPERF are selected
23075 IoT6 Simplifying TCP/IP Applications with MPLAB® Harmony
15
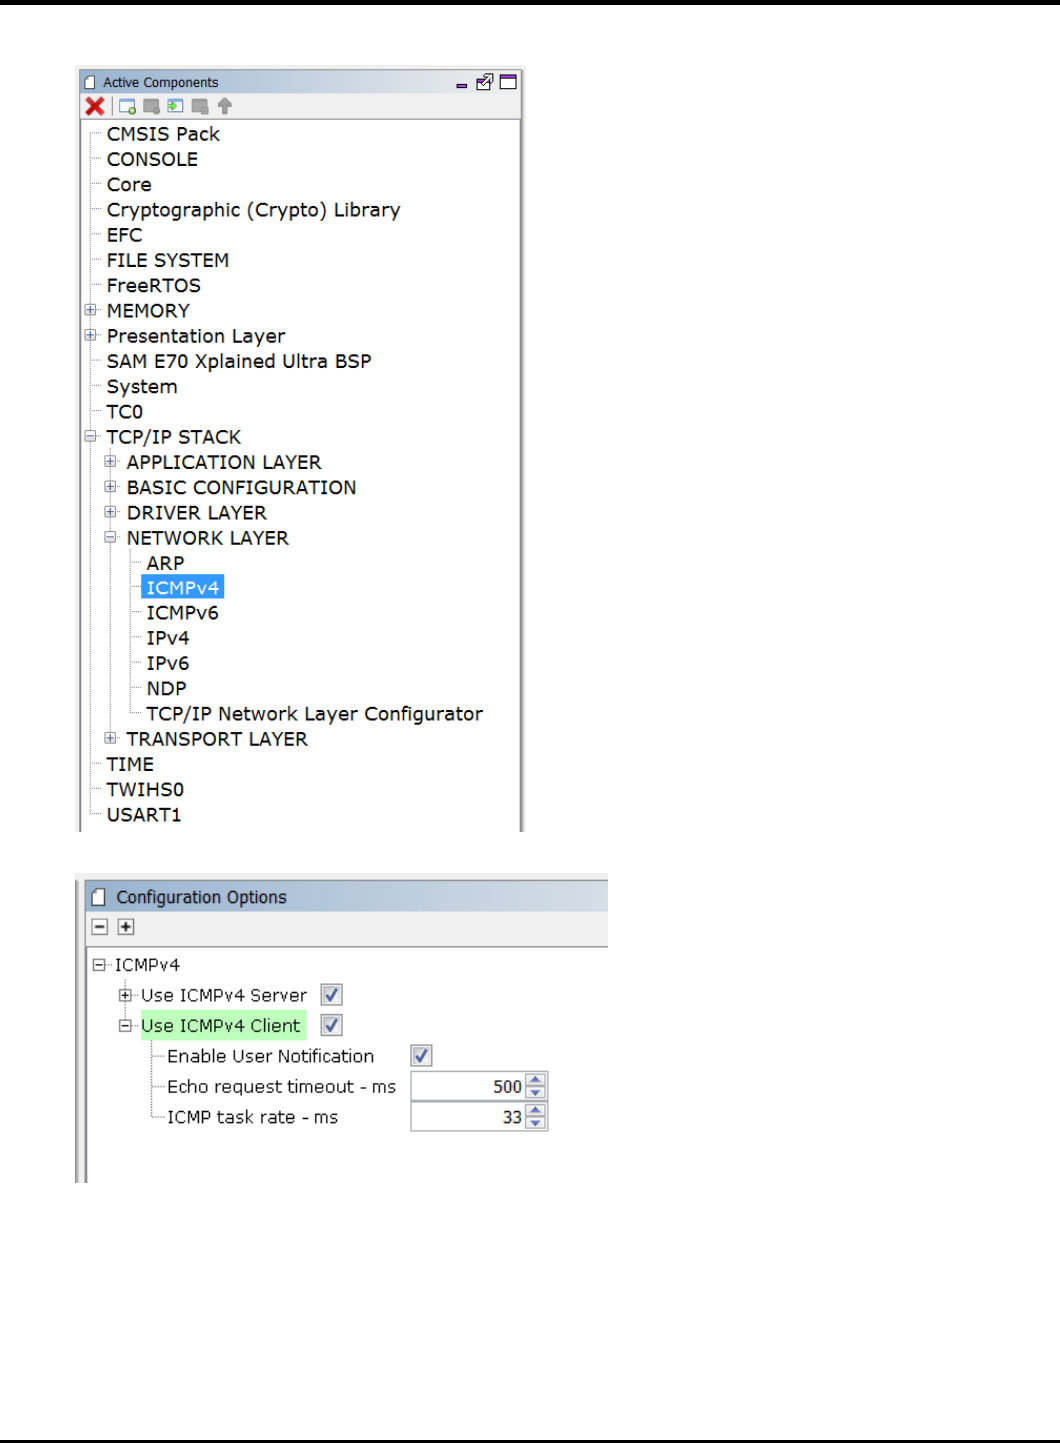
16. Select ICMPv4 in the Active Components
17. And ensure that the “Use ICMPv4 Client” is selected
23075 IoT6 Simplifying TCP/IP Applications with MPLAB® Harmony
16
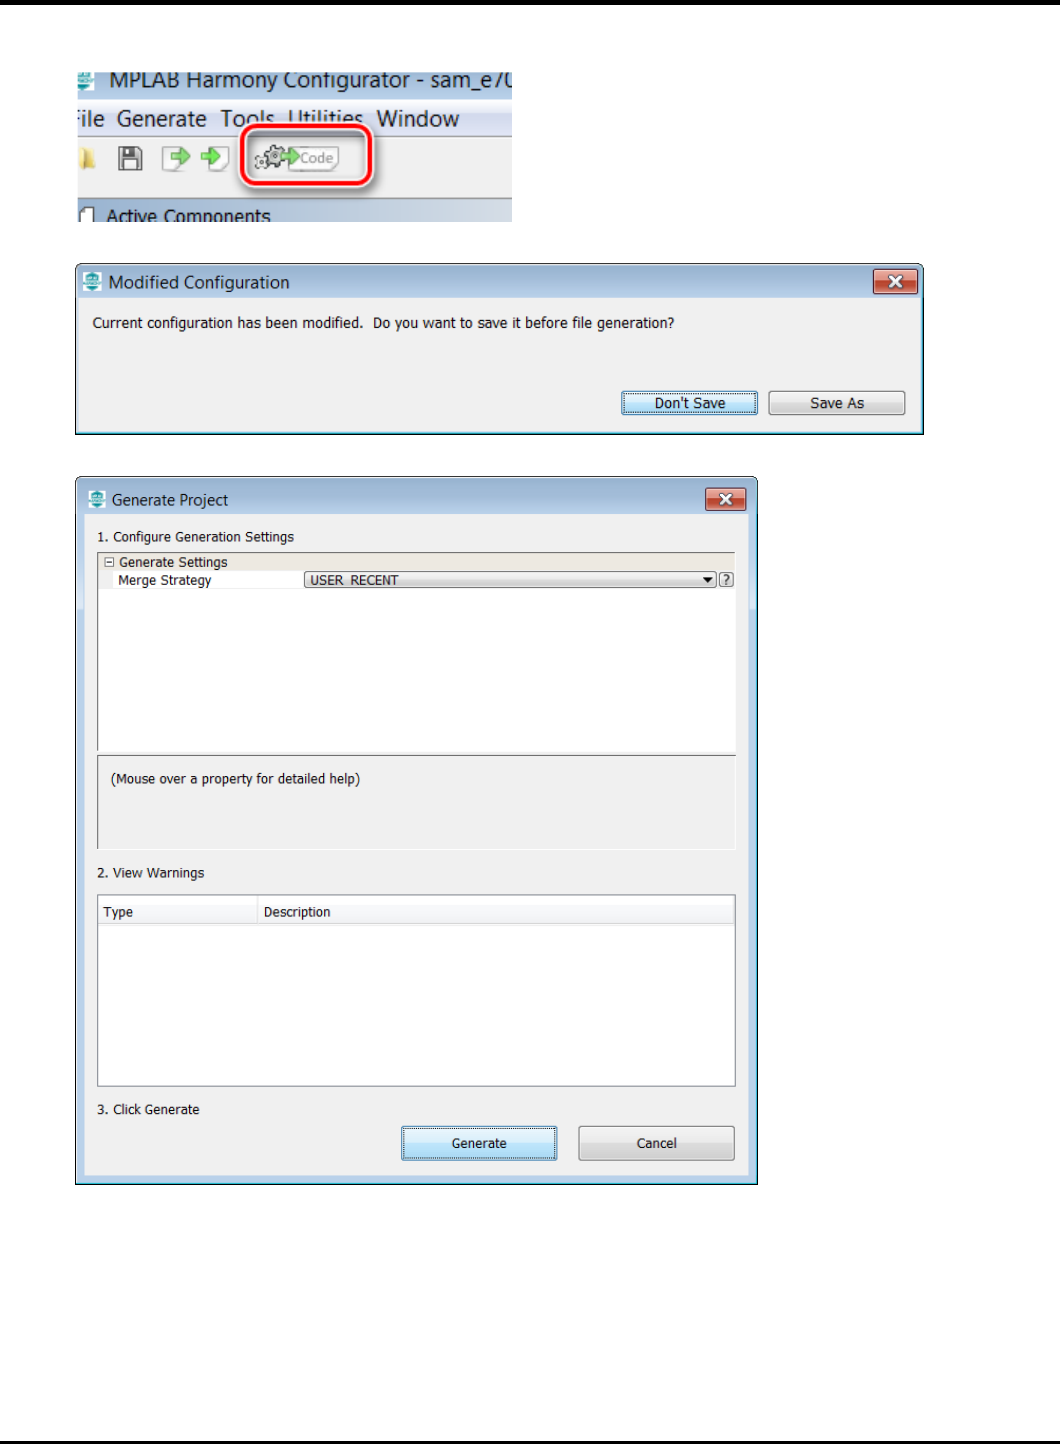
18. Select “Code” (Generate Code)
19. Select Don’t Save
20. Select Generate
23075 IoT6 Simplifying TCP/IP Applications with MPLAB® Harmony
17
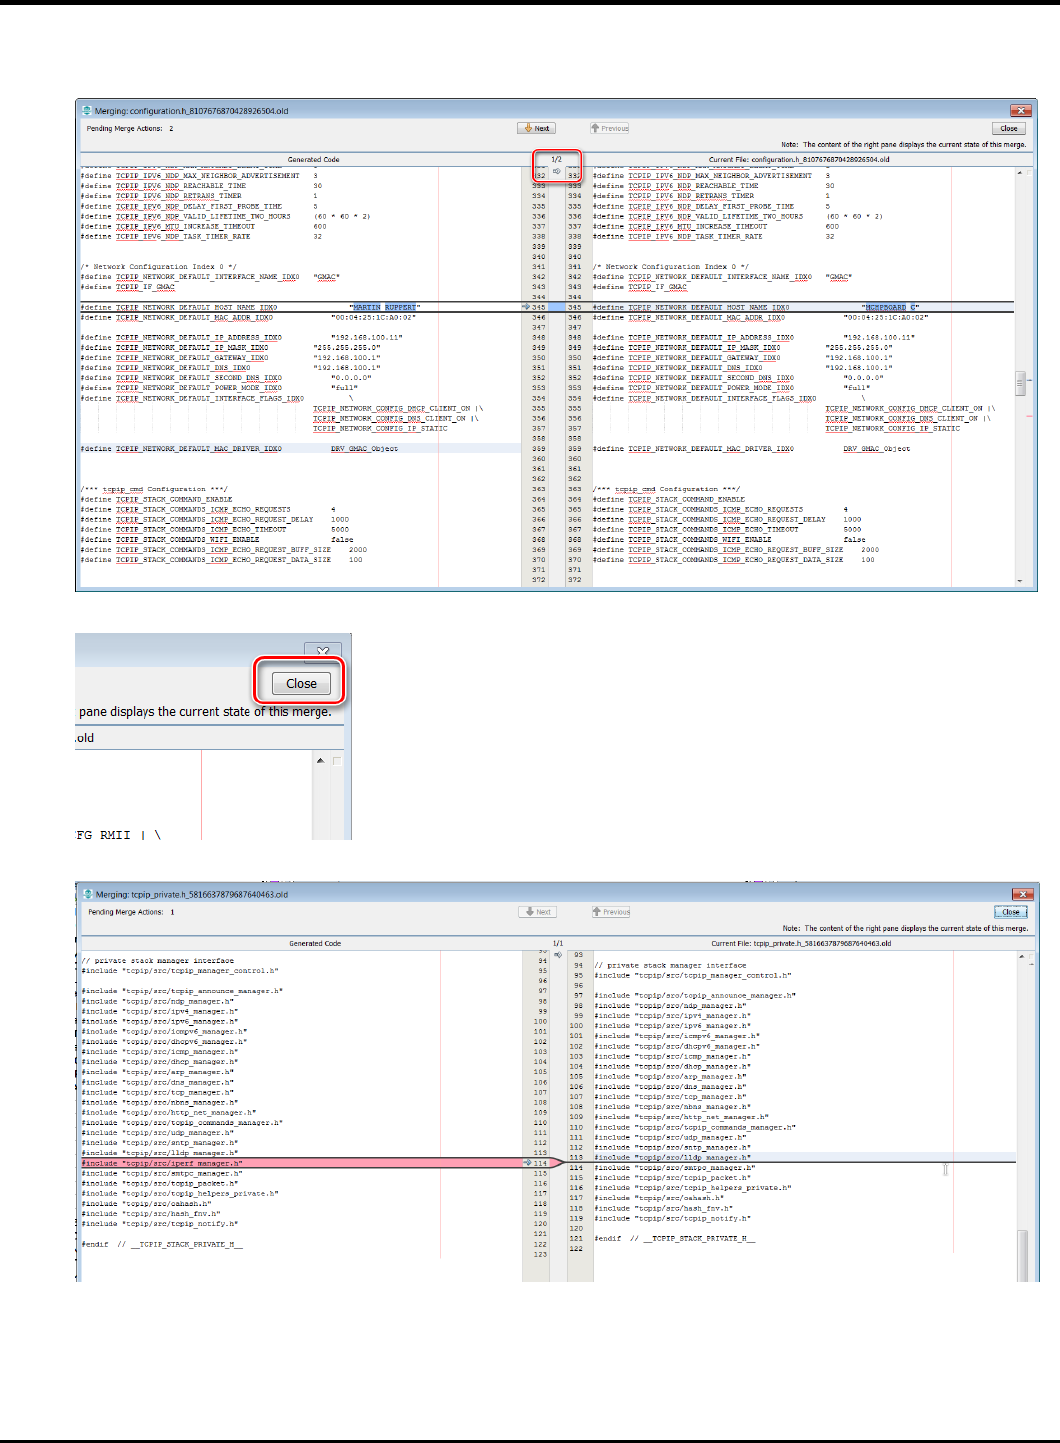
21. Some Files will be changed and the MHC is asking in a “diff” window, if the changes should be taken over.
Accept all changes in the file by clicking on the Arrow in the middle above.
22. Then click on close in the upper right corner
23. Same for the next 2 diff windows
23075 IoT6 Simplifying TCP/IP Applications with MPLAB® Harmony
18
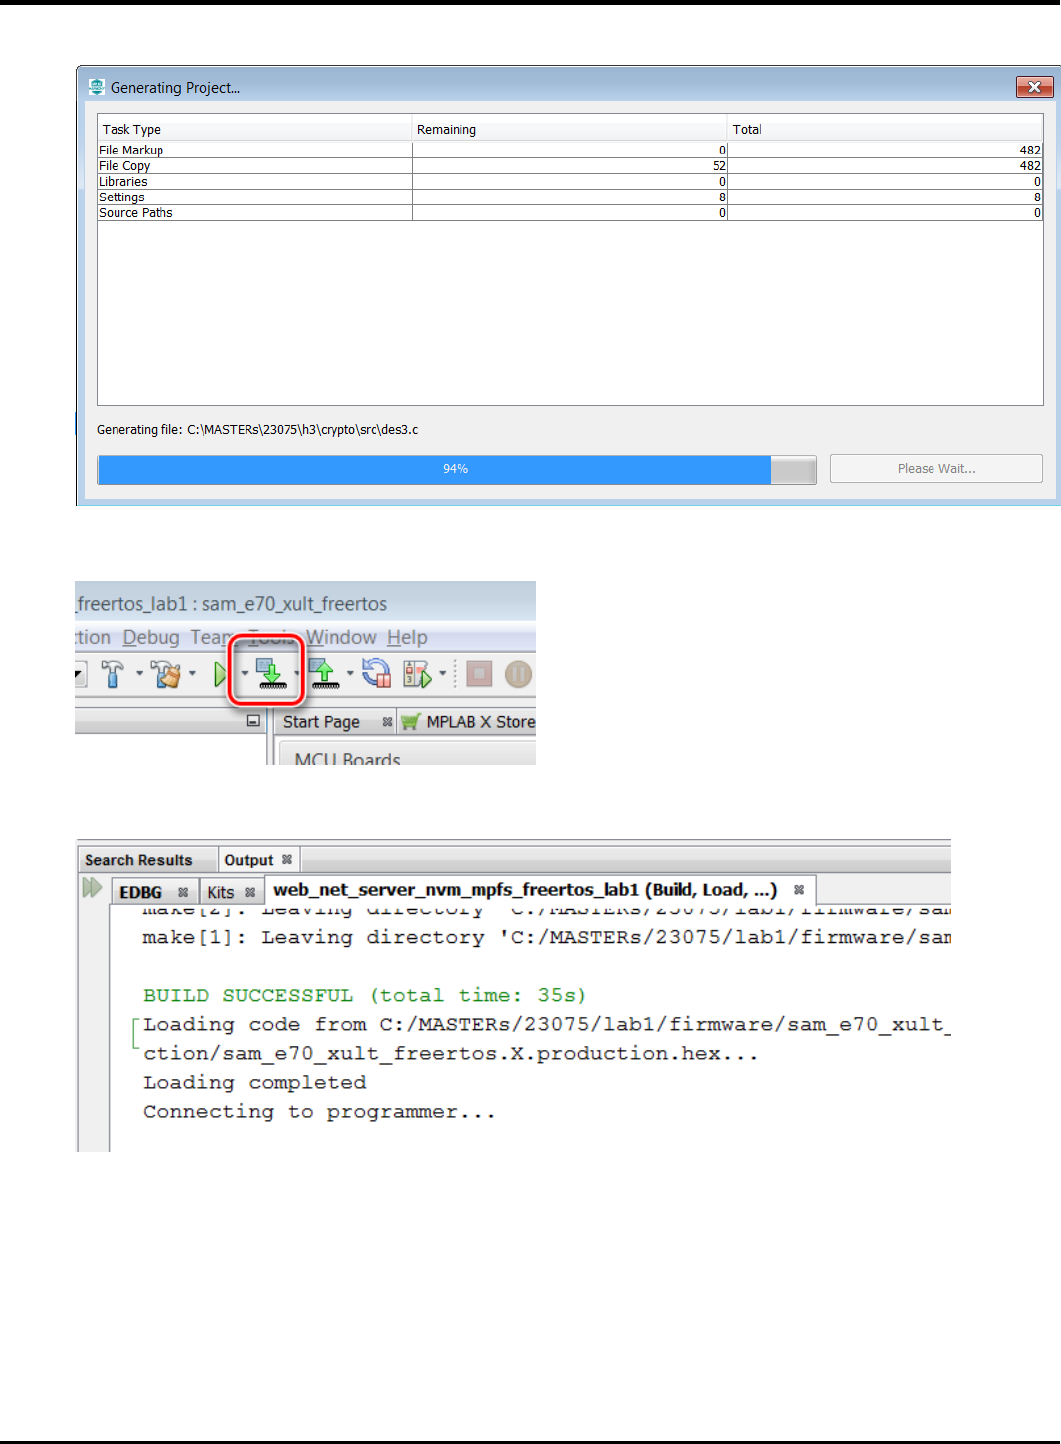
24. The whole process is displayed with a progress bar
25. Back again in the main window of MPLABX, click on the “Make and Program Device” button
26. After successful build, the SAME70 is programmed automatically
23075 IoT6 Simplifying TCP/IP Applications with MPLAB® Harmony
19
27. The programming take about 30 seconds with on Board Debugger Check whether the USER_LED0 Activity is Blinking
23075 IoT6 Simplifying TCP/IP Applications with MPLAB® Harmony
20
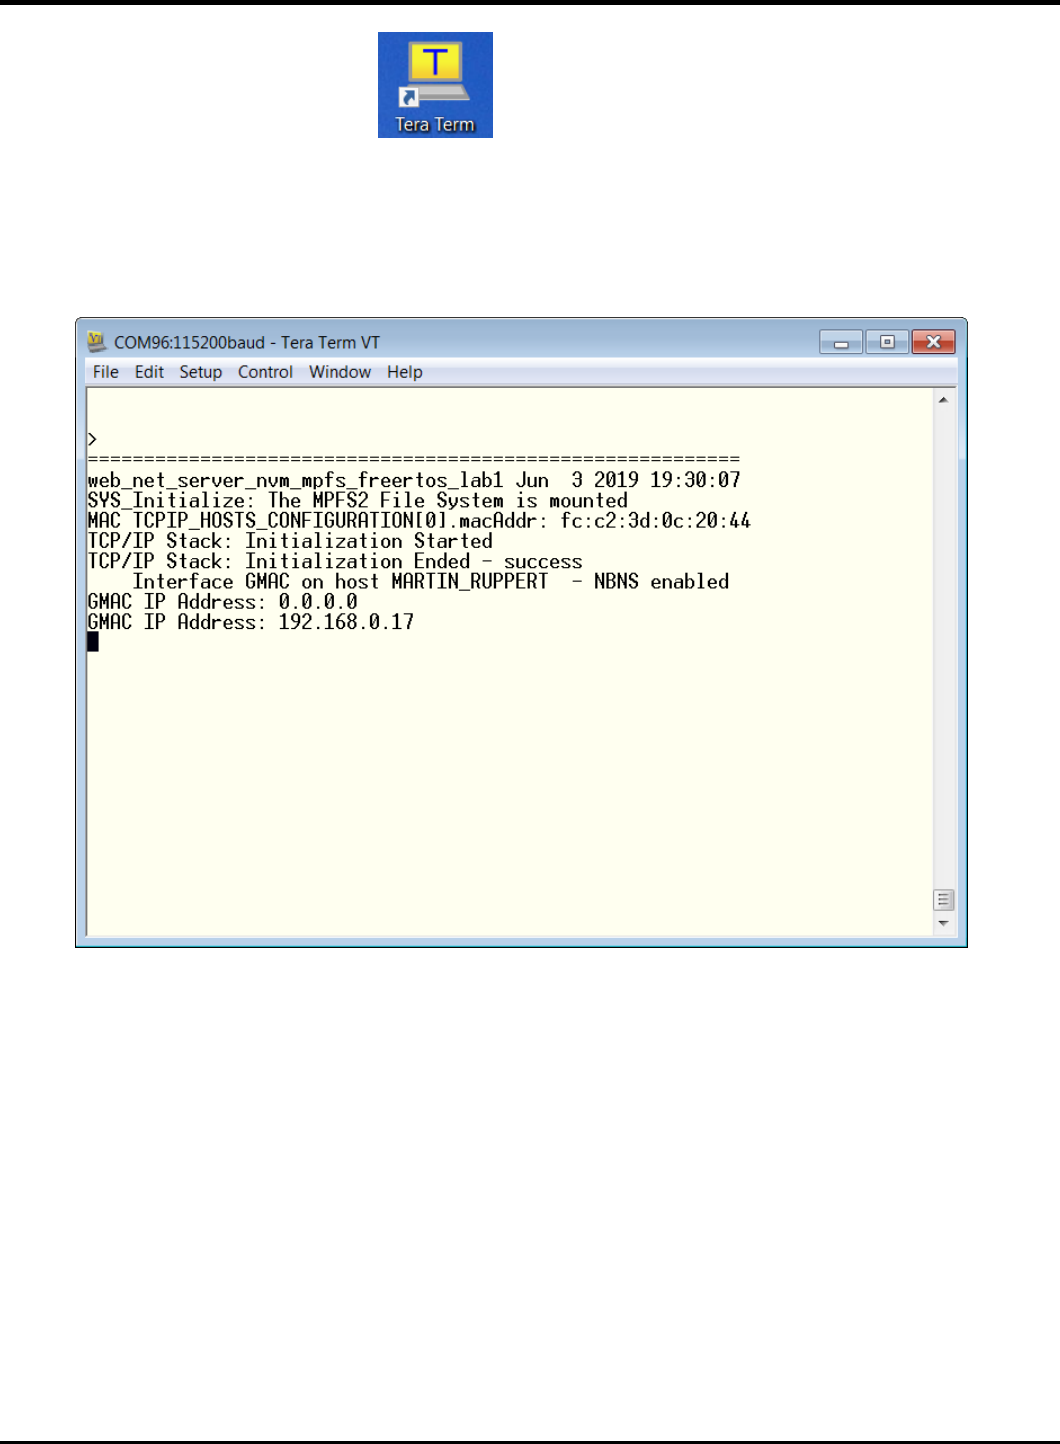
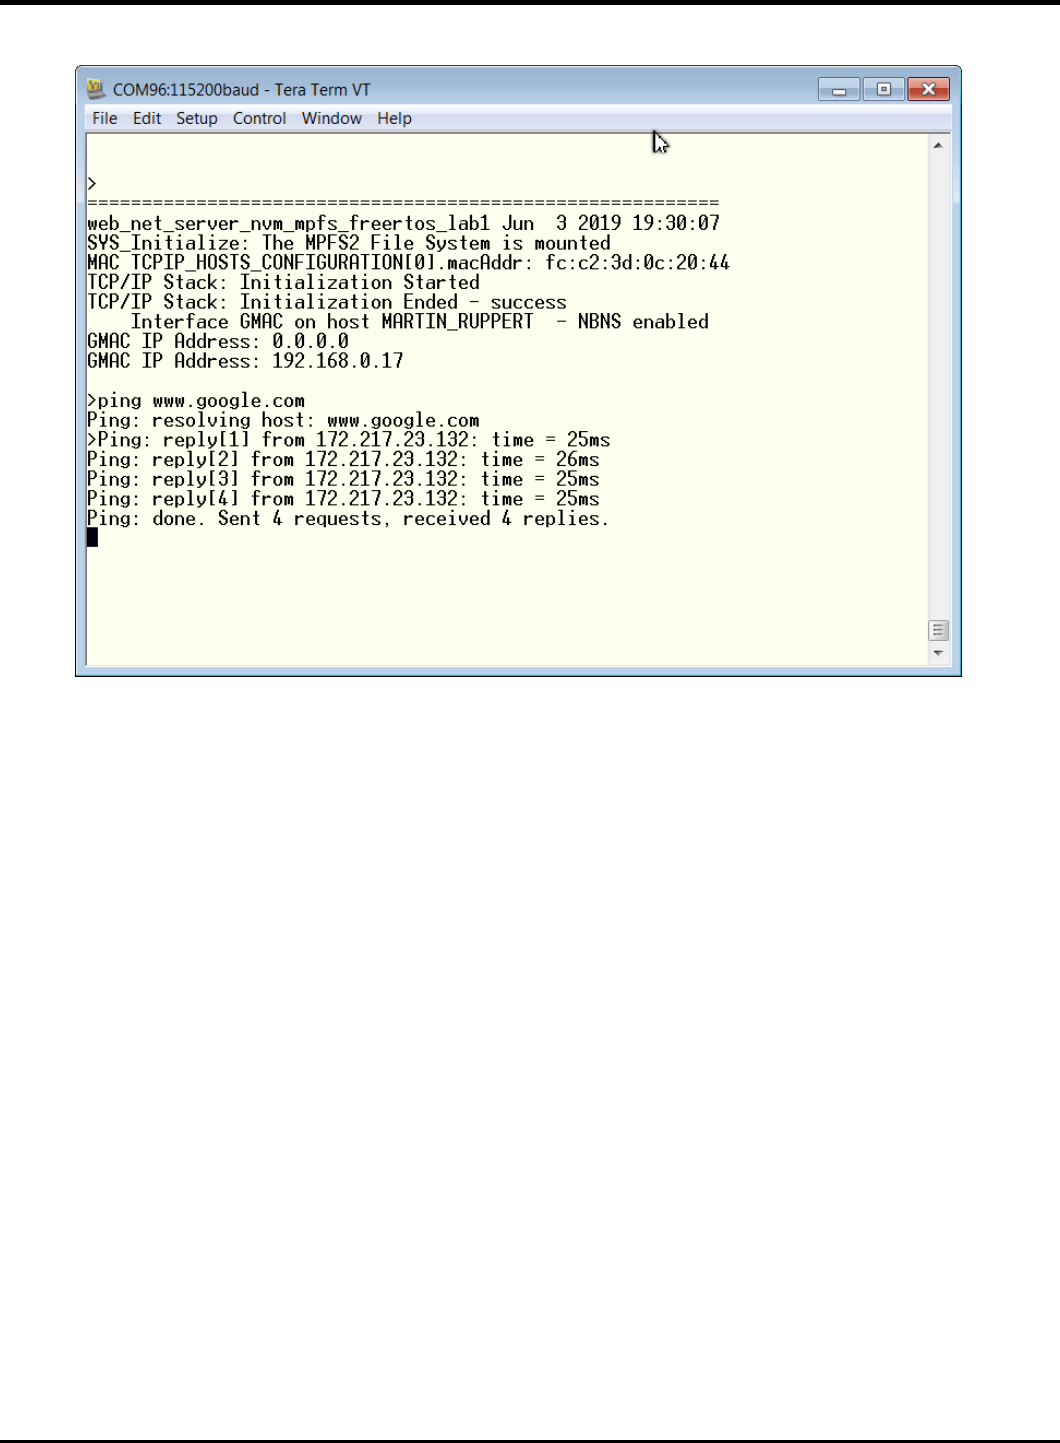
28. Open Terra Term Terminal Program and select under Setup->Serial Port the COM Port and the Baudrate
115200 (in this case a COM96, but could be a different COM Port number in your case).
The press the Reset Button of the Board and let the Firmware restart. You should see the start message with the Lab
name and the build timestamp at first, followed by the MAC Address from EEPROM.
29. After some small time, the IP Address should be change from 0.0.0.0 to a valid address
23075 IoT6 Simplifying TCP/IP Applications with MPLAB® Harmony
21
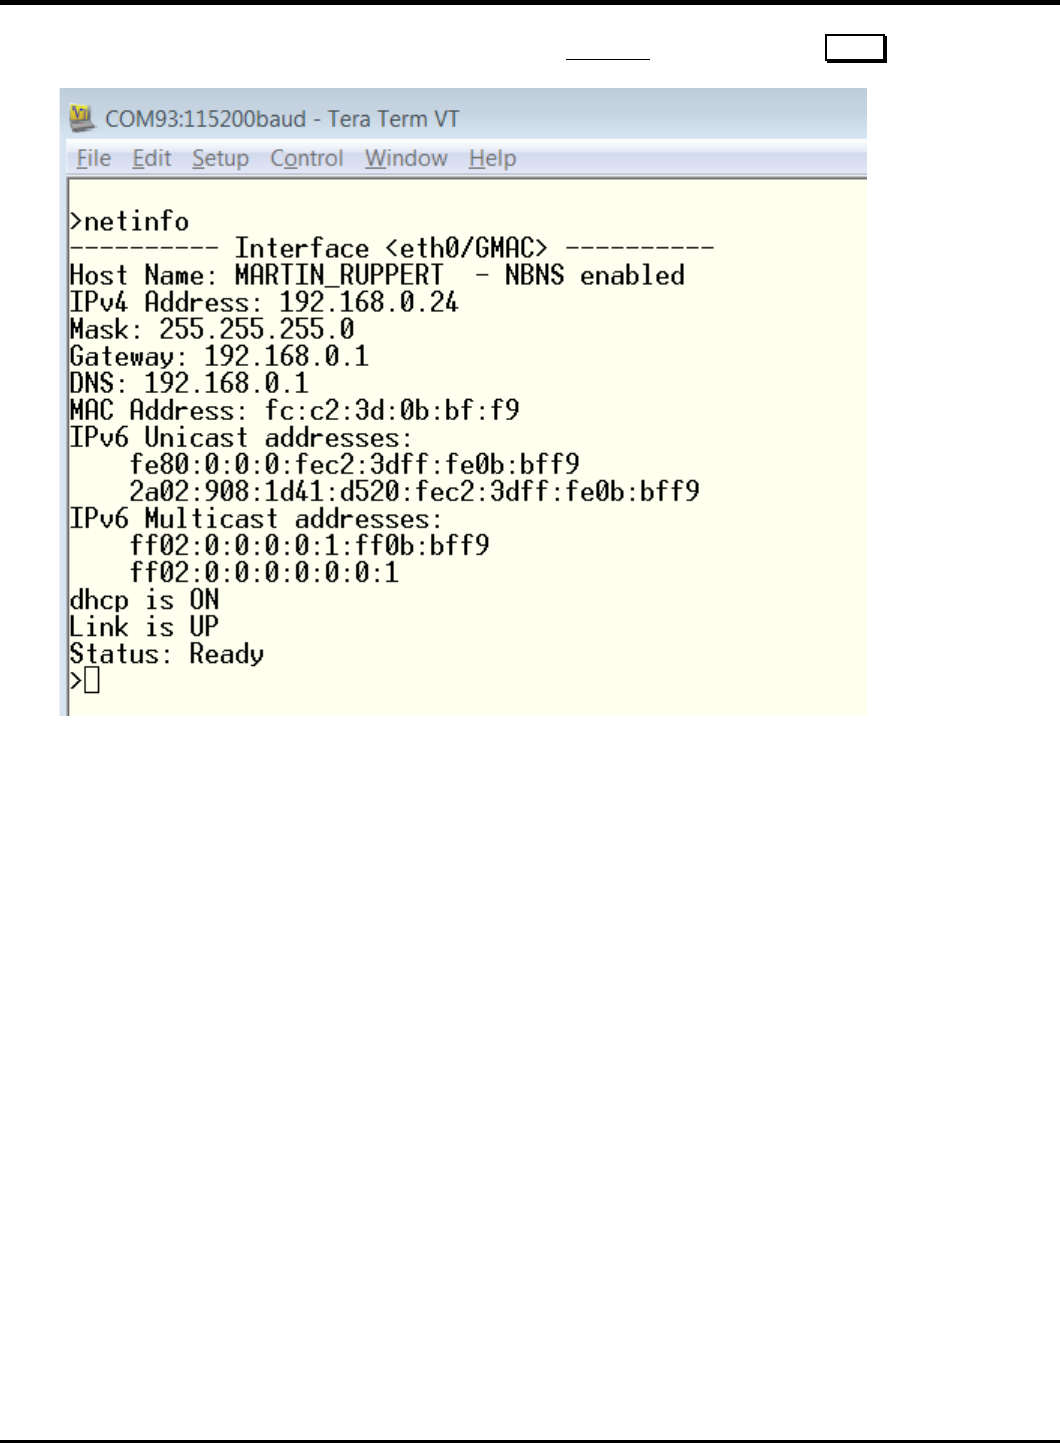
30. To check the basic information about the network enter the netinfo command and press Enter .
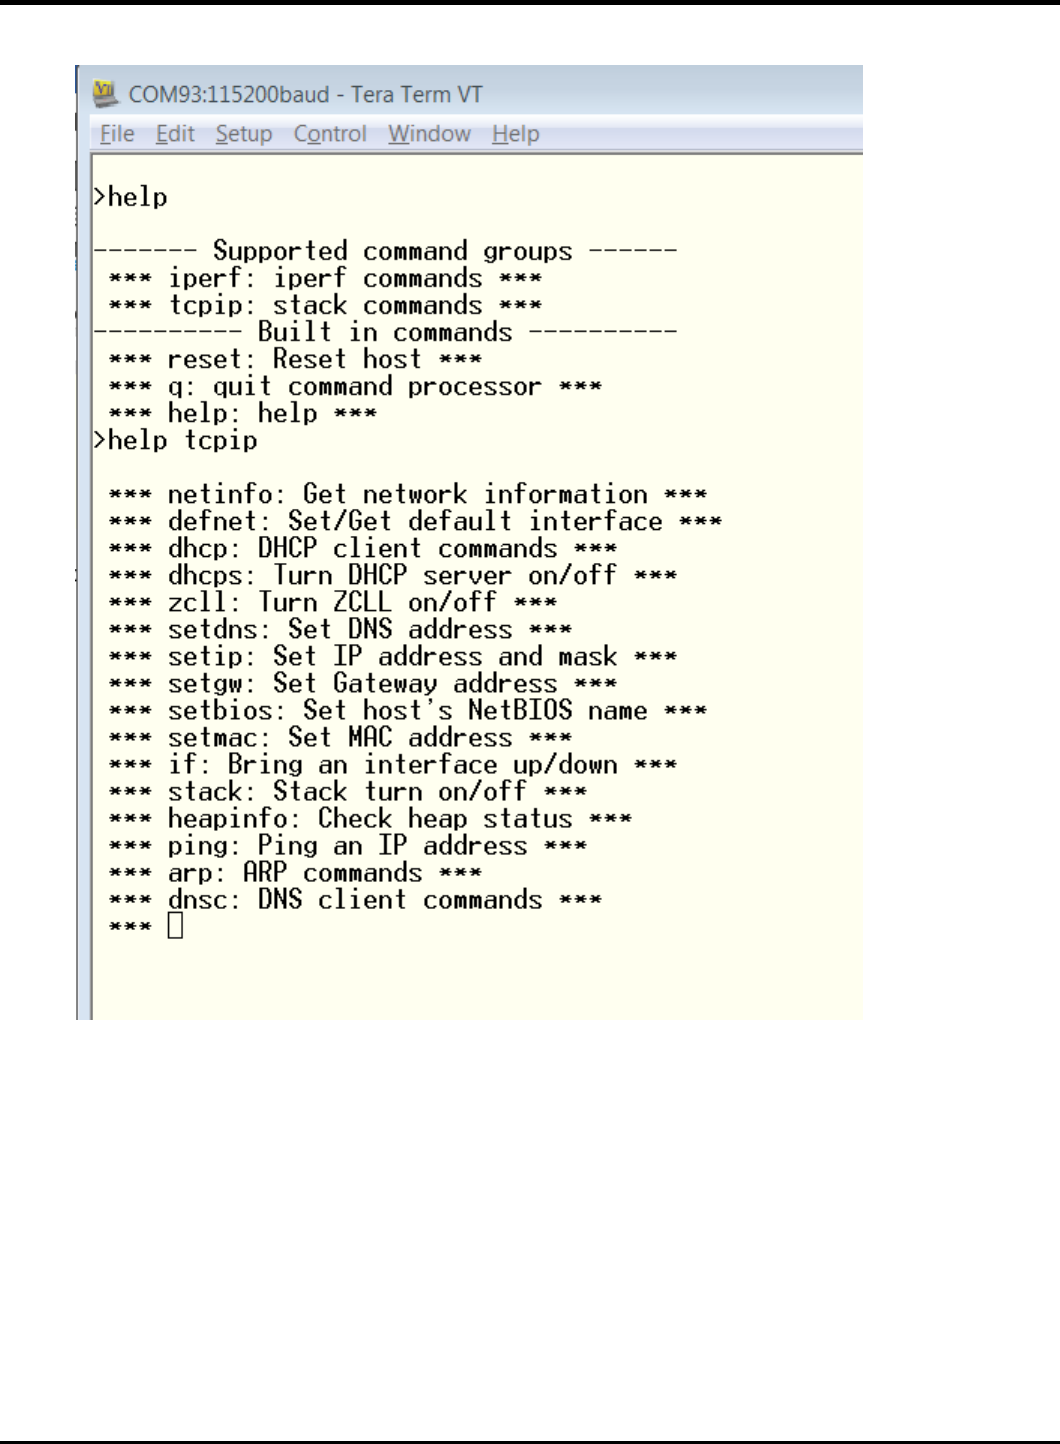
23075 IoT6 Simplifying TCP/IP Applications with MPLAB® Harmony
22
31. A help shows the available commands
23075 IoT6 Simplifying TCP/IP Applications with MPLAB® Harmony
23
32. As a first simple test you can ping an external Server or anything else you like (Maybe the board of your class neighbor?)
23075 IoT6 Simplifying TCP/IP Applications with MPLAB® Harmony
24
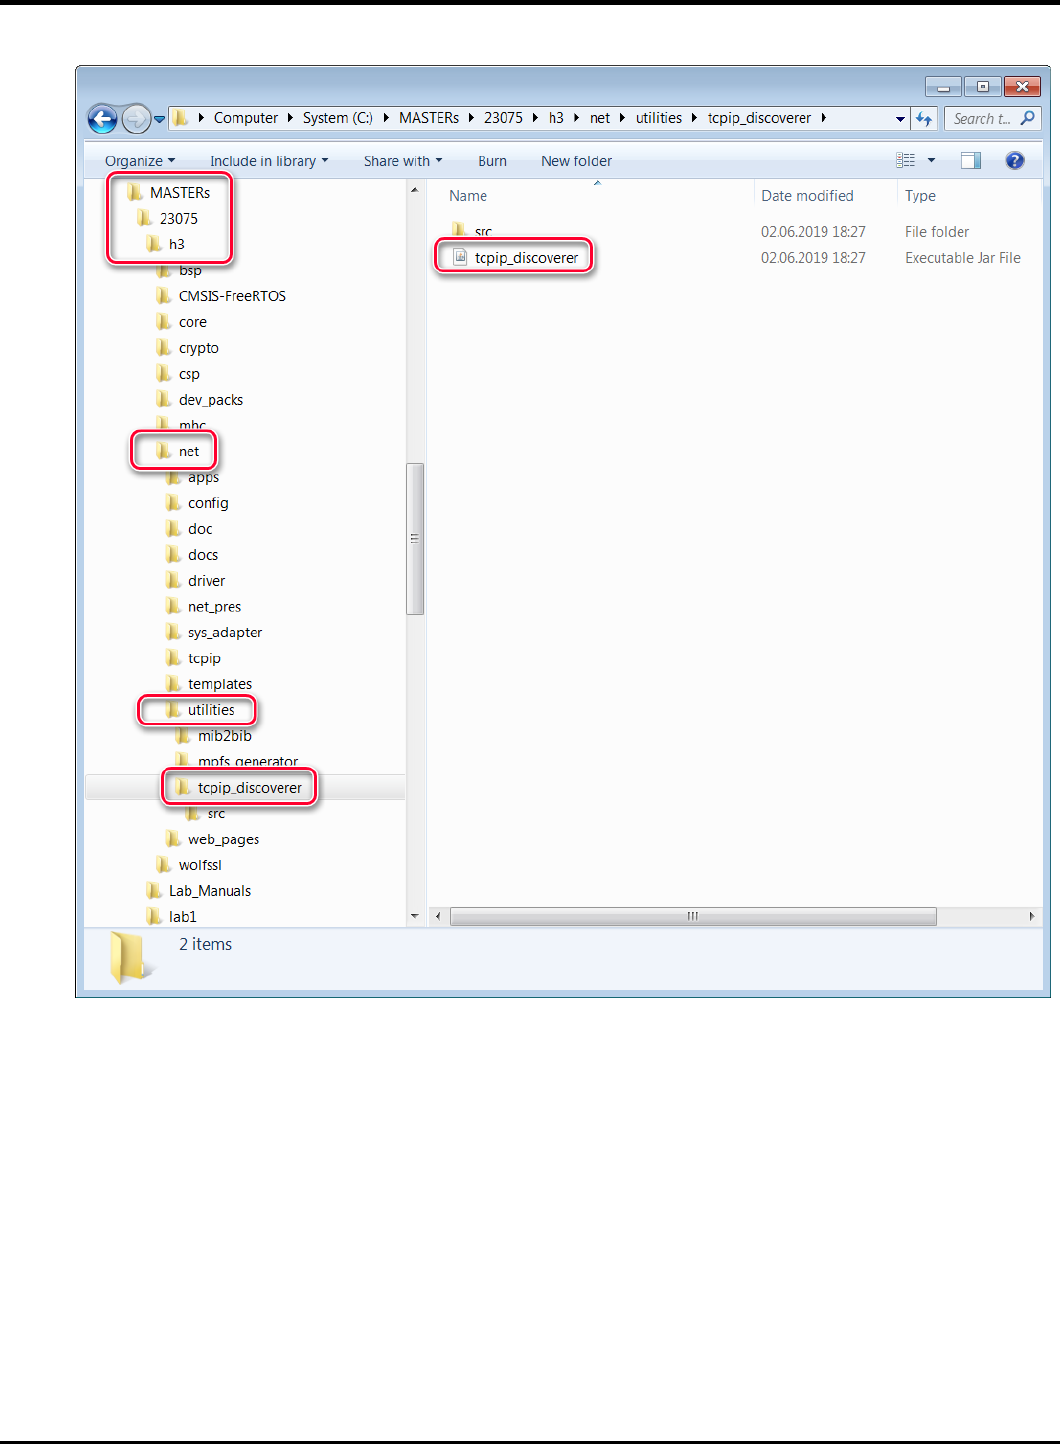
33. Select the tcpip_discoverer tool from
23075 IoT6 Simplifying TCP/IP Applications with MPLAB® Harmony
25
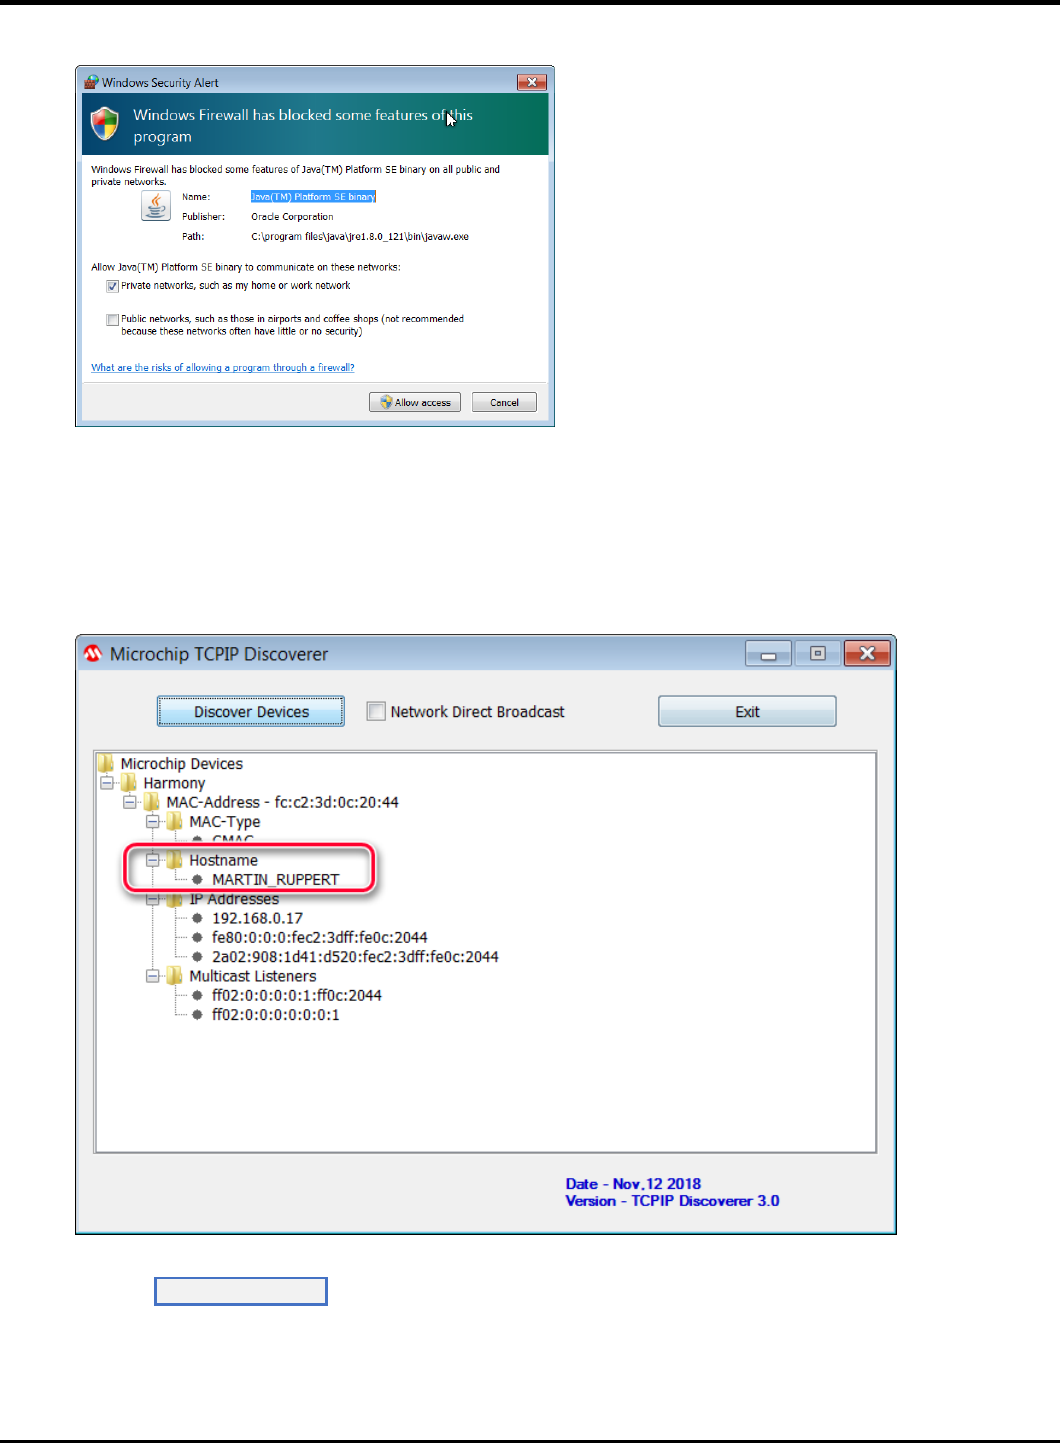
34. If Windows is asking for permissions allow the access
35. The TCP Discover should list all boards in the classroom. We have made this tool to help you to find your board in the
network. The source codes of this tool (Java) are part of the H3.
You can identify your board by the Host Name that has select in an earlier step. The Host Name is also known to the
DHCP server and is listed in their typical Web Interfaces as a connected device.
Press the Dis cover De vic es button: The tool will send a UDP broadcast on port 30303, with the packet “Discovery,
who is out there?” All H3 devices running the Announce service will respond to this broadcast, by sending a return
broadcast on port 30303. The broadcast packet contains data on the type of interface used, the Host Name, MAC and IP
Address. The Discover tool listens to all broadcasts on port 30303 and will show found devices under the Microchip

23075 IoT6 Simplifying TCP/IP Applications with MPLAB® Harmony
26
Devices tree. You can identify your device by looking for the host name that you entered in MHC Setup process. The
Microchip TCPIP Discoverer tool also shows the IP address for your board.
36. A double click on the MAC-Address line will put you in your default Internet Browser
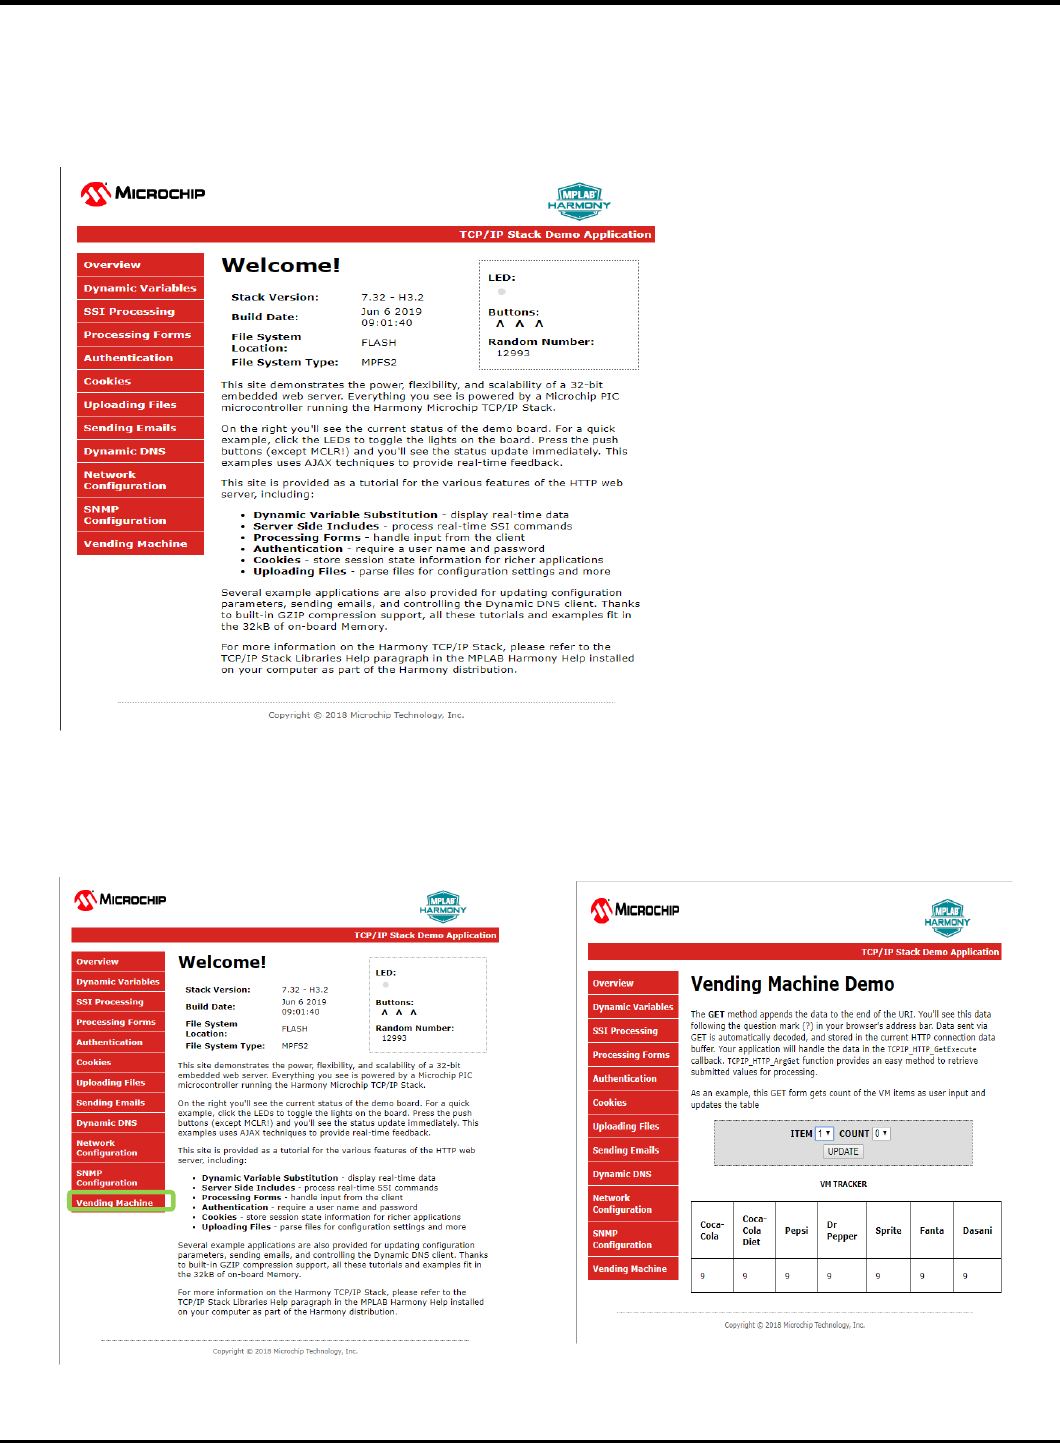
37. And the Webpage is displayed. Please take some time an play with the sub menus to find out the capabilities of or H3
Web Server
37. Congratulations, you have completed Lab 1!
23075 IoT6 Simplifying TCP/IP Applications with MPLAB® Harmony
27
Lab 2
Overview
You will be implementing an embedded network application to update and track status of an Vending Machine (VM).
The implementation is sectioned into two modules.
TASK 1:
The task is to interface the up/down and select buttons and an OLED of a
Vending Machine to the HTTP-Server. The HTTP-Server keeps track of the
items in the Vending Machine.
The HTTP- Client (PC-web page) talks to the HTTP- server and displays the
status of the Vending Machine. The HTTP-Client also sends out an update
request to the HTTP- server using Ethernet Interface.
TASK 2:
The task is to make all the VMs in the class network to talk to a server. When a
Bay of a VM is empty it sends out a message to a common server.
An example Message:
“Message: 1 from Martin: The Pepsi Bay is empty”
The Message number (1) and the Host name (Martin) together forms a unique
Message and makes it easy to differentiate your message from other VMs on the
network server and the number helps to find the recent ones.
E70 HTTP- SERVER
/Vending Machine -1
Ethernet Switch
PC – HTTP-Client (1)
E70 HTTP-SERVER
/Vending Machine-(n)
PC- HTTP-Client (n)
Ethernet Switch
E70 HTTP-SERVER /
Vending Machine (1)
SERVER
E70 HTTP- SERVER /
Vending Machine (n)
23075 IoT6 Simplifying TCP/IP Applications with MPLAB® Harmony
28
Data Protocol
TASK1
VM-1
VM-1
VM-1
TASK 2
VM-1
VM-2
VM-3
GET /VM.htm?ITEM=2&COUNT=5
TCP HTTP Port 80
Sends the request “GET /MY_Data.xml
HTTP/1.1” for every 500ms
PC HTTP-Client-1
TCP HTTP Port 80
HTTP/1.1 200 OK
Sends the
MY_Data.xml file to
update the web page with
PC -HTTP-Client-1
TCP HTTP Port 80
PC HTTP-Client-1
BAY Empty Message
BAY Empty Message
BAY Empty Message
CLASS SERVER
23075 IoT6 Simplifying TCP/IP Applications with MPLAB® Harmony
29
Application Implementation
The Vending Machine demo (Task 1 and 2) is implemented using “SAM E70 Xplained Ultra Evaluation Kit “and “OLED1 Xplained Pro Extension
Kit”. The OLED Xplained pro has three buttons, LEDs and an OLED.
- The VM application uses Button 1(Down) and 2(UP) to scroll through the VM items and Button 3 to select an item from
the Vending Machine.
- The LEDs above the button indicates a button press with a blink.
- The OLED is used to display the name and their corresponding number of the items in a Vending Machine.
- When select button(B3) is pressed the HTTP-Server will decrement the count of an item and updates the HTTP-
Client(Web page)through ethernet interface.
E70 WEB SERVER
/Vending Machine
23075 IoT6 Simplifying TCP/IP Applications with MPLAB® Harmony
30
The Vending machine demo runs the below user applications in conjunction with MPLAB Harmony TCP/IP Stack:
• OLED and Button Contoller (MMI_Tasks): Manages the operation of the OLED display , Buttons and LEDs.
• Application Contoller (app_Tasks()): manages all high level network communications with client and server.
SYS_FS_TASKS()
NET_PRES_Tasks ()
TCPIP_STACK_Tasks ()
APP_Tasks ()
SYS_CMD_TASKS()
SYS_FS_TASKS()
DRV_MIIM_TASKs ()
NET_PRES_Tasks ()
23075 IoT6 Simplifying TCP/IP Applications with MPLAB® Harmony
31
Objectives
In Lab 1, you configured a new MPLAB Harmony Project from scratch that included the TCP/IP Stack middleware and a LED
Flasher. The project you created in Lab 1 will be used as the starting point for Lab 2.. The source code for the OLED and Button
Controller are included into the project.
You will learn about several Harmony TCP/IP API functions by adding the necessary APIs into the application source code to
manage the TCP Sockets and data exchanged with socket. You will also learn how the dynamic variables in a web page are
handled by the server. Finally, you will get to use the Packet Sender software tool to perform isolated testing of the embedded
application prior to connecting your VM implementation to the server on the network.
Lab Procedure
Project Setup
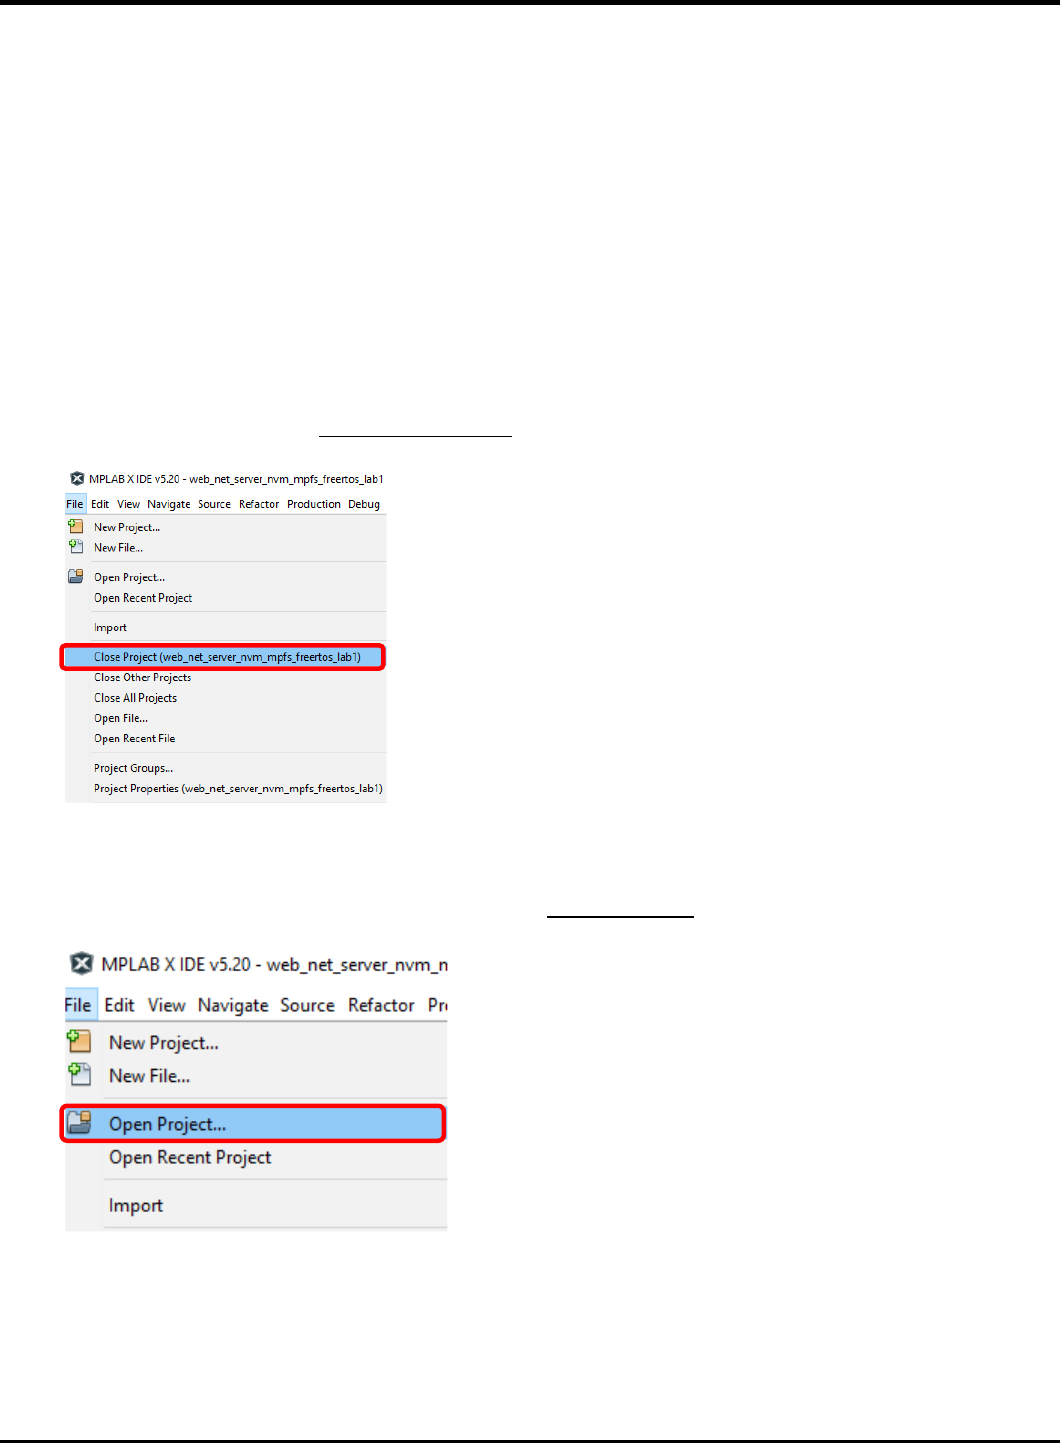
1.2. Close Lab 1 project by choosing FileClose Project(lab1) in the main menu.
1.3. The project for Lab 2 has already been setup in advance. The project is a working implementation of Lab 1 that has been
renamed to web_net_server_nvm_mpfs_lab2, and has a number of files added including mmi.c and modified app.c file
are added to the project. To open the Lab 2 project, choose FileOpen Project in the main menu.
1.4. In the Open Project window, enter C:\MASTERs\21070\ web_net_server_nvm_mpfs_lab2\firmware into the File name
text box or navigate to the file .
1.5. Click on sam_e70_xult_freetos.X icon in the file list.
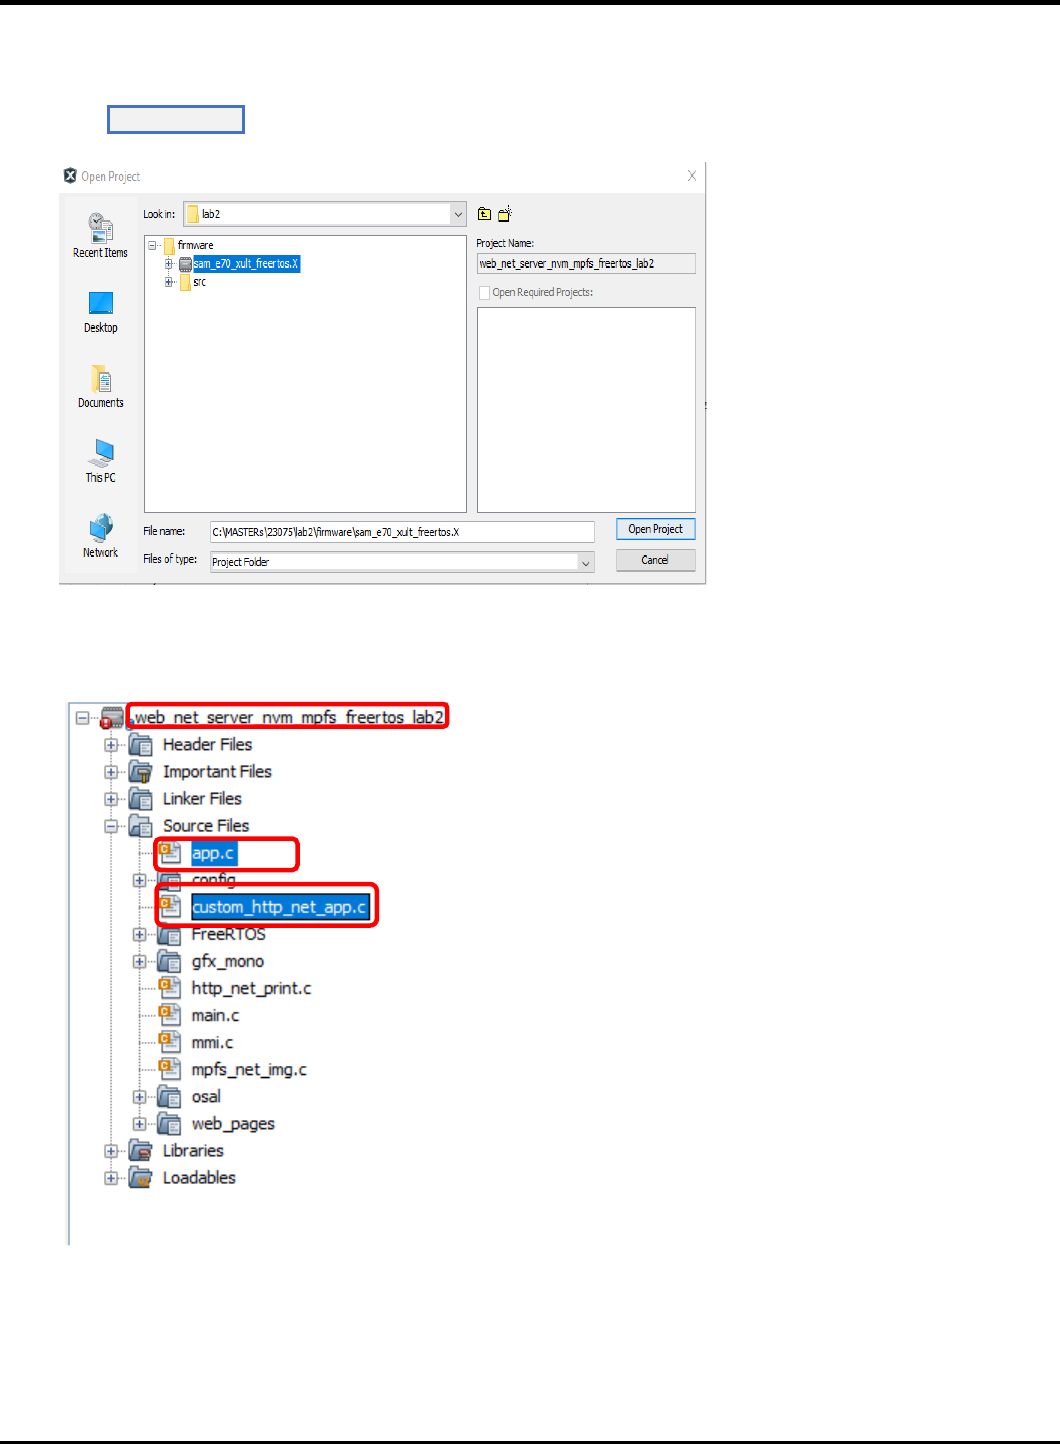
23075 IoT6 Simplifying TCP/IP Applications with MPLAB® Harmony
32
1.6. Press Op en Pro j ect.
1.7. The source and header structure for the project is shown below.
23075 IoT6 Simplifying TCP/IP Applications with MPLAB® Harmony
33
MHC Code Generation
1.8. The project configurations are already set, and we are going to look on the configurations and generate the code. (steps
1.8 -1.22)
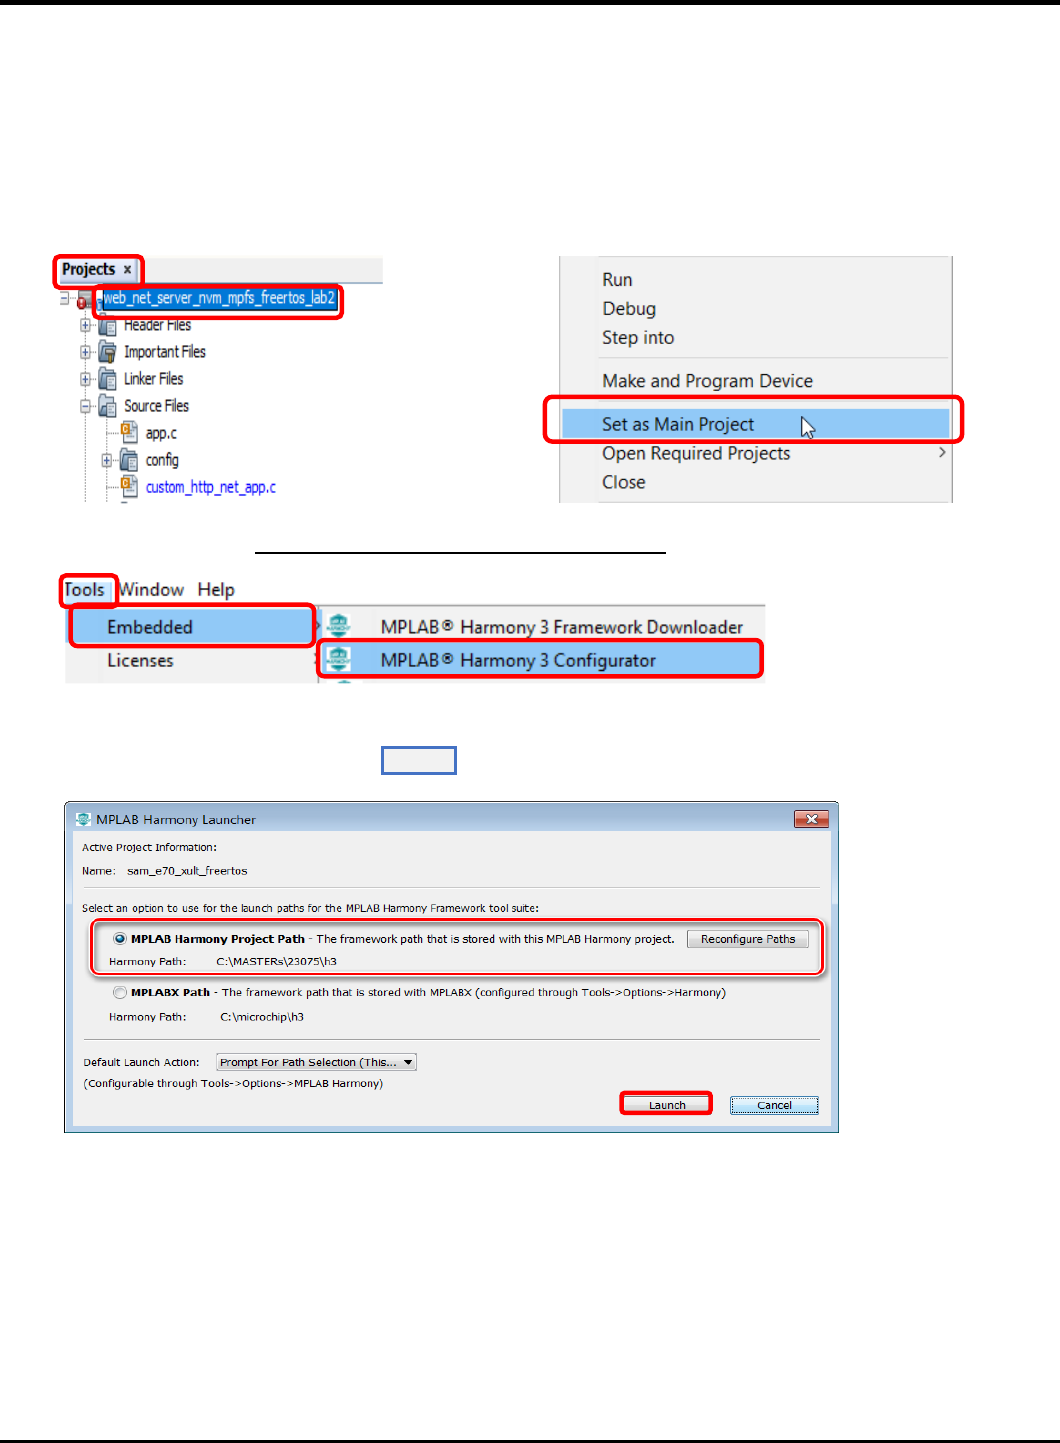
1.9. Before the MHC Configuration tool can be used, you need to set lab2 as the main project, by right clicking on the
web_net_server_nvm_mpfs_lab2 folder under the Projects window, and choosing Set as Main Project in the popup
menu.
1.10. To launch MHC, choose ToolsEmbeddedMPLAB Harmony 3 Configurator in the main menu.
1.11. In the MPLAB Harmony Launcher dialog box, make sure the path states
C:\MASTERs\23075\h3 and click on Laun ch .

23075 IoT6 Simplifying TCP/IP Applications with MPLAB® Harmony
34
1.12. In the nest window the H3 parts and their used Version Number are displayed. Click on Laun ch
1.13. Open the saved state file
1.14. Explore and look on the configurations tree by clicking on the modules under Active Components (step 1.14 and 1.15- can
be skipped and continue from 1.16).
1.15. Click and check the “Core” option under Active Components. On right hand side the Configuration options are displayed,
check the “Number of Applications “options under Configuration Options which is set to 2.Expand both Application 0 and
1 Configuration trees, and the Application Name is set to app (Application Interface) for Application 0, and mmi(Man
Managed Interface for buttons, leds and OLED)for Application 1.
1.16. Check on TCP/IP Stack under Active components and its configuration under Configuration options.
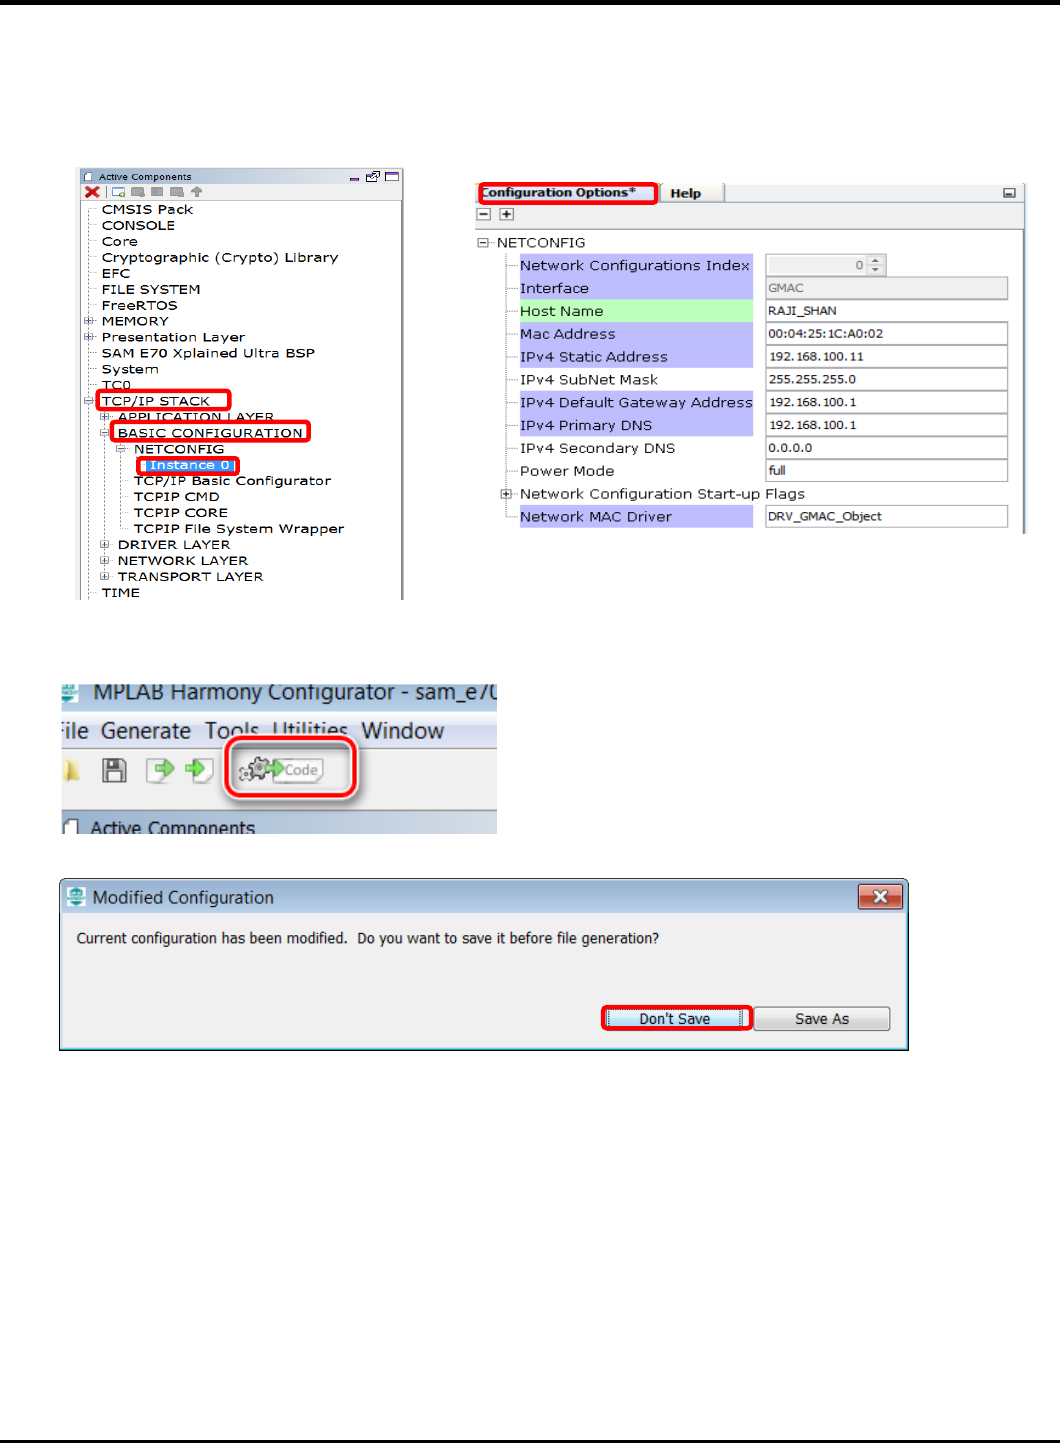
23075 IoT6 Simplifying TCP/IP Applications with MPLAB® Harmony
35
1.17. Select the Instance 0 in the TCP/IP stack under Active Components to enter the HOST Name (TCP/IP STACK->BASIC
CONFIGURATION->Instance 0). And change in the Configuration Options (displayed on the right side of MPlabx) the Host
Name to your firstname_lastname. The Host name can be identified in the Network.
1.18. Select “Code” (Generate Code) which is under the menu tabs.
1.19. Select Don’t Save

23075 IoT6 Simplifying TCP/IP Applications with MPLAB® Harmony
36
1.20. Select Generate
1.21. Some Files will be changed, and the MHC is asking in a “diff” window, if the changes should be taken over. Don’t accept
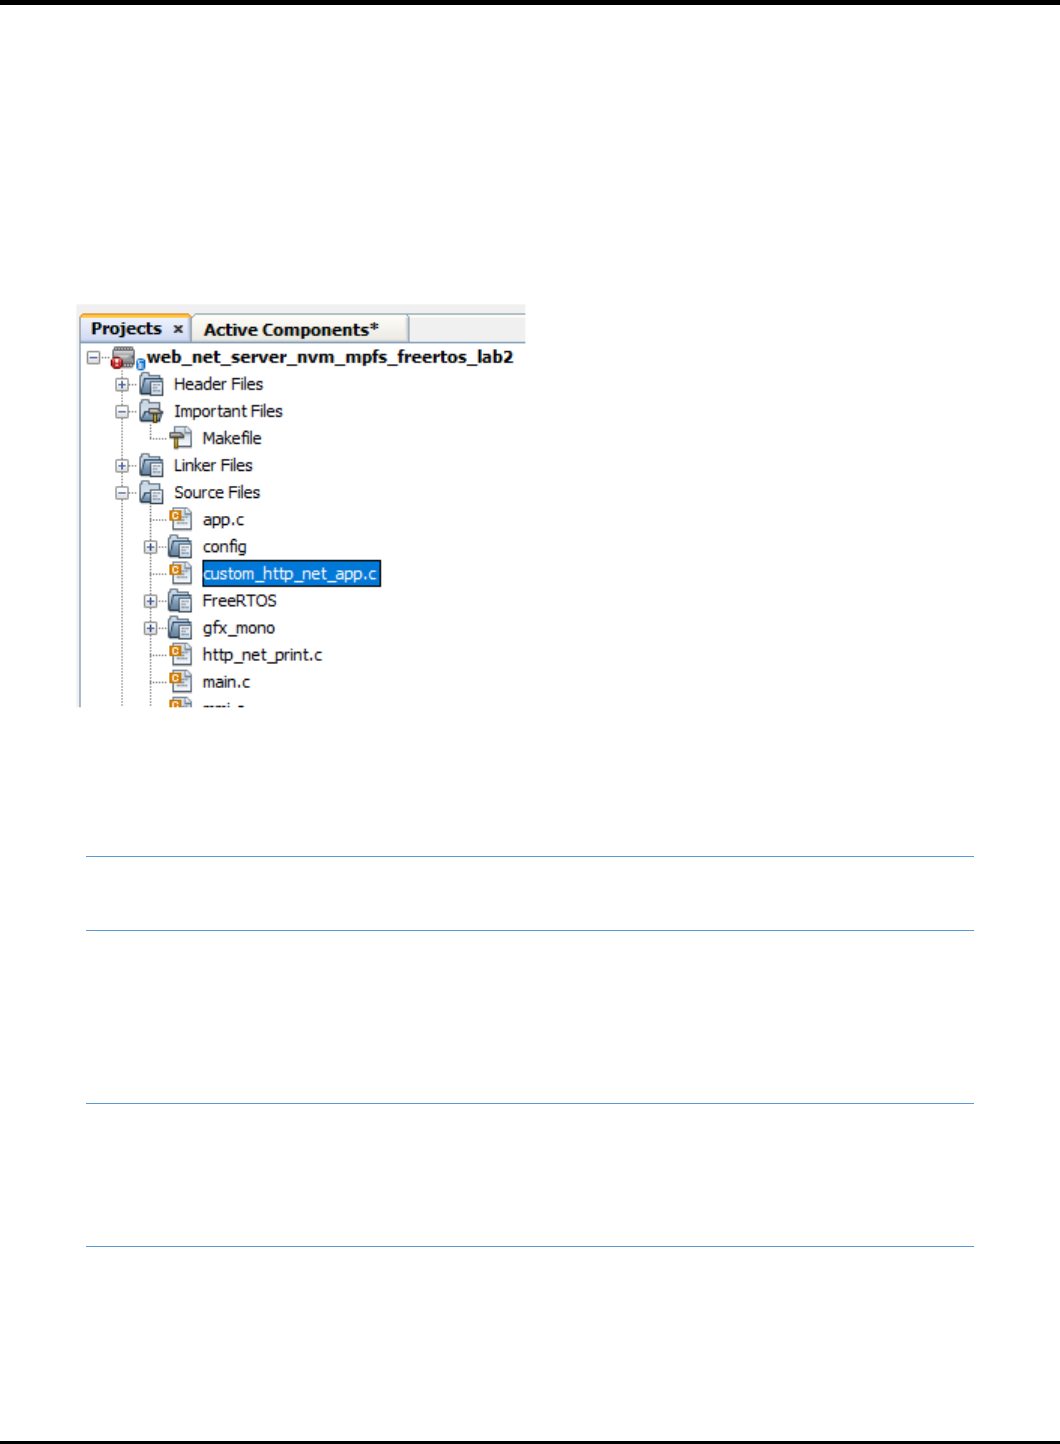
the changes for “custom_http_net_app.c” file just click on close(step 2 in pic).Accept all changes for the other files by
clicking on the Arrow in the middle and then close.
.
1
2
1
2

23075 IoT6 Simplifying TCP/IP Applications with MPLAB® Harmony
37
1.22. The whole process is displayed with a progress bar
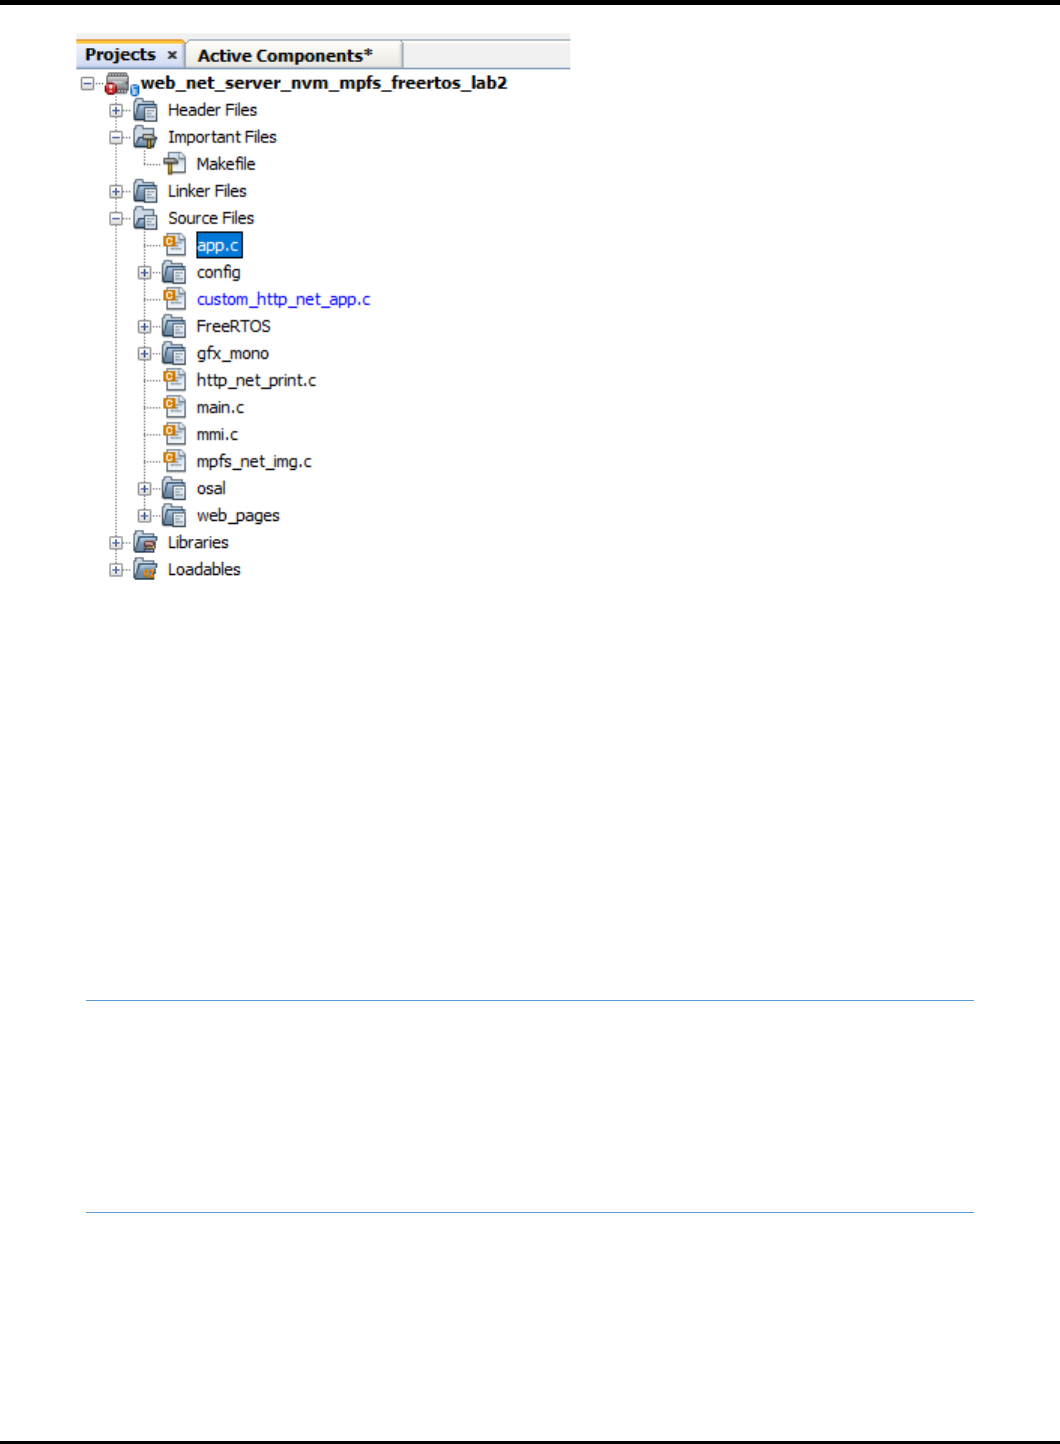
1.23. After the MHC has finished generating the project, go to the Projects Window and expand the Header Files and Source
Files to see the source/header files for the app and mmi application file and TCP/IP stack files.
➢ The WEB page source code for the VM application is found under the folder web-pages->VM.htm
➢ The hex file for the web page is in mpfs_net_img.c which is generated using the utility MPFS- generator which
comes along with Harmony net package.
23075 IoT6 Simplifying TCP/IP Applications with MPLAB® Harmony
38
Application Source and Header File Setup TASK1:
In the VM application when an VM ITEM update is initiated by the HTTP- client (WEB PAGE) it sends out a GET command that
needs to be processed by the HTTP-Server. The get command is sent along with the argument of the VM “Item” to be updated
and its “Count” which are processed by the HTTP-Server. In Harmony TCP/IP stack GET command is handled by the function
TCPIP_HTTP_NET_ConnectionGetExecute ().
Follow the procedure under to include the code that process the GET request from HTTP-CLient: -
1.24. Click and Open the file custom_http_net_app.c. Search for the function TCPIP_HTTP_NET_ConnectionGetExecute ()
(Approx. Line.No. 247) in which the below code snippets need to be inserted.
1.25. Find the TODO[1] and insert the below code starting from the line mentioned as “//<--Insert the solution for TODO[4]
starting on this line” . Code can be inserted either by typing or copy and paste which is provided for your convenience at
the end of the file (custom_http_net_app.c).
ptr = TCPIP_HTTP_NET_ArgGet(httpDataBuff, (const uint8_t *)"ITEM");
1.26. Find the TODO[2] and insert the code snippet starting from the line mentioned as “//<--Insert the solution for Item 2
starting on this line” . Code can be inserted either by typing or copy and paste which is provided for your convenience at
the end of the file (custom_http_net_app.c).
ptr = TCPIP_HTTP_NET_ArgGet(httpDataBuff, (const uint8_t *)"COUNT");
VM_Count[Update_Item]=*ptr;

23075 IoT6 Simplifying TCP/IP Applications with MPLAB® Harmony
39
TASK 2:
When a Bay of the VM is empty it sends out the message to the common server. The sate machine to open a socket to send
message and close socket is shown below
In this section, you will gain some experience with the use of Harmony TCP/IP API functions. The app.c source is missing lines
of code. All missing code specifically relates to management of the setting up the TCP Client such as opening or closing the
socket, checking if the socket is connected, checking if data is available, and writing data to the socket. Your task is to read the
description for each missing item, select the appropriate Harmony TCP/IP API, and fill in the missing line of code.
1.27. The first step to do is get the common server’s IP address. Get the address from the presenter and make a note.
1.28. Click and Open the file app.c. and find the function APP_Tasks (). (Approx. Line.No. 200) in which the below code snippets
are inserted.
Stack
Initialized
NO
YES
File Mounted
No link found
If new link
found
Stack not
Initialized
MAC address
READ
Mount
file
If WEB file is not
mounted
not mounted
READ
MAC address
TCP/IP stack Int
Link is established
Wait to
read
MAC
Connection
Established
If wait time out
Send out the TCP
message
Close connection
Set-up TCP
client
Wait for
link
Wait for
TCP
If a VM Bay
is empty
Error
check for
any new
link
Display the IP
address
23075 IoT6 Simplifying TCP/IP Applications with MPLAB® Harmony
40
1.29. Find the TODO[3] in which common SERVER IP address is entered. Replace the x with the common server IP address ().
For example: if the server IP address is 192.168.0.108 replace
* x1 with 192
* x2 with 168
* x3 with 0
* x4 with 108
1.30. Find TODO[4] and add the below snippet to Open a socket for TCP_Client . Code can be inserted either by typing or copy
and paste the code which is provided for your convenience at the end of the file (app.c).
appData.socket = TCPIP_TCP_ClientOpen(IP_ADDRESS_TYPE_IPV4,
appData.port,
(IP_MULTI_ADDRESS*) & addr);
1.31. Find TODO[5] and add the below snippet to check the TCP connection is established 0.
Insert the code in the line mentioned as “//<--Insert the solution for TODO[5] starting on this line”
Code can be inserted either by typing or copy and paste the code which is provided for your convenience at the end of
the file (app.c).

23075 IoT6 Simplifying TCP/IP Applications with MPLAB® Harmony
41
if (!TCPIP_TCP_IsConnected(appData.socket))
1.32. Find TODO[6] and add the below snippet to check the TCP connection is established .
Insert the code in the line mentioned as “//<--Insert the solution for TODO[6] starting on this line”
Code can be inserted either by typing or copy and paste the code which is provided for your convenience at the end of
the file (app.c).
if (TCPIP_TCP_PutIsReady(appData.socket) == 0)
1.33. Find TODO[7] and add the below snippet to send the message to the common server once a TCP connection at port 80 is
established .
Insert the code in the line mentioned as “//<--Insert the solution for TODO[7] starting on this line”
Code can be inserted either by typing or copy and paste the code which is provided for your convenience at the end of
the file (app.c).
sprintf(buffer, "MSG:%d from %s : %s is empty", (int) MessageCounter++, (char *)
TCPIP_HOSTS_CONFIGURATION[0].macAddr, (char *) VM_Items[bay_index - 1]);
SYS_CONSOLE_PRINT("Sending message: %s\r\n", buffer);
TCPIP_TCP_ArrayPut(appData.socket, (uint8_t*) buffer, strlen(buffer));
1.34. Find TODO[8] and add the below snippet to close the TCP Client socket.
Insert the code in the line mentioned as “//<--Insert the solution for TODO[8] starting on this line”
Code can be inserted either by typing or copy and paste the code which is provided for your convenience at the end of
the file (app.c).
TCPIP_TCP_Close(appData.socket);
23075 IoT6 Simplifying TCP/IP Applications with MPLAB® Harmony
42
Hardware Setup
This hardware setup is common to both TASK1 and TASK2. After adding the required code for the application, make the hardware
connections to programme the device and to see the output
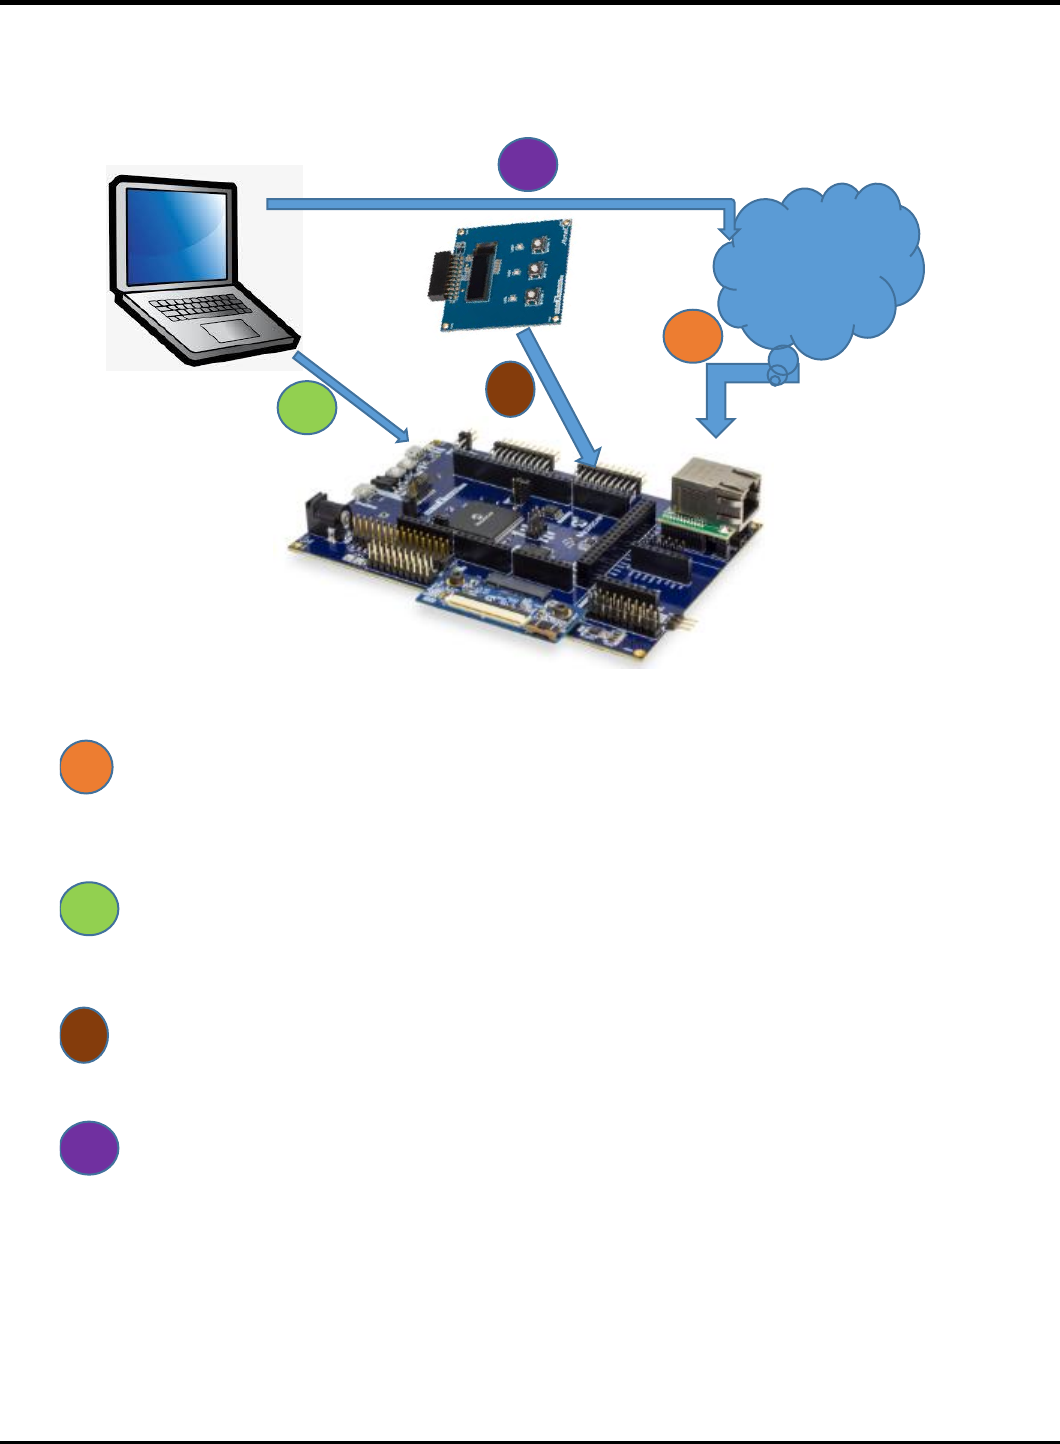
1.35. Network Connection
Cable: CAT5 Ethernet Cable supplied with Starter Kit
Connection: RJ45 Jack from the class network to PCB Top RJ45 Jack(make sure the jumper below the
Ethernet PHY module is taken off)
1.36. Programming and Console Connection
Cable USB Male A to USB Male B Micro cable
Connection: USB Debug Port on PCB Top to Laptop USB Port
1.37. OLED1 Xplained Pro Connection
OLED1 X PLAINED PRO
Connection: Connect the OLED x PLAINED PRO to the EXT 2 of the board (Extension close to Ethernet
PHY)
1.38. PC
PC needs to be connected to the Class network or
It can be connected to the wireless network
2
3
1
CLASS
ETHERNET
NETWORK
3
2
1
4
4

23075 IoT6 Simplifying TCP/IP Applications with MPLAB® Harmony
43
1.39. In the main window of MPLABX, click on the “Make and Program Device” button
1.40. After successful build, the SAME70 is programmed automatically. Build and Programming are monitored on the output
window at the bottom of the MPLAB X IDE screen.
1.41. Immediately after programming, you can see the text on the OLED screen in series like the screens below.
Use the Buttons 1 and 2 (Previous and Next item) on the OLED1 Xplained pro to scroll through the items of the Vending
Machine.
Welcome to
23075 IoT6
Vending
Machine
B1-UP, B2-Down
B3-Select
1.Coco-Cola
9
23075 IoT6 Simplifying TCP/IP Applications with MPLAB® Harmony
44
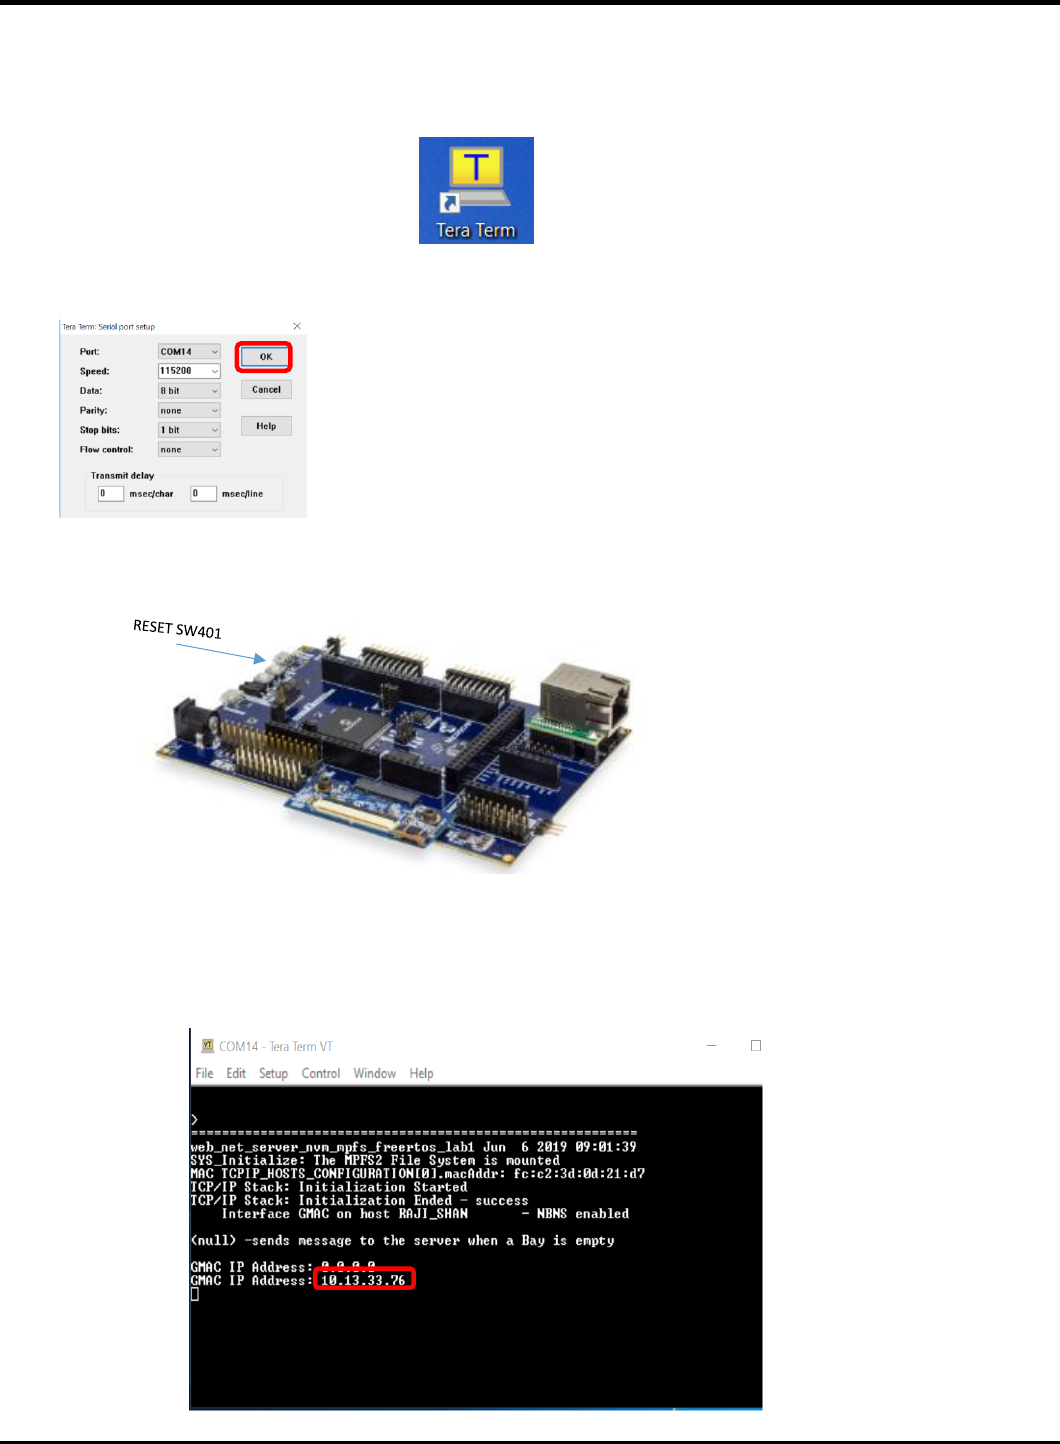
1.42. Now open a Tera Term to see the status of the HTTP server and its IP address.
If Tera Term is still open from Lab 1, click on the window title bar to make it active. If Tera Term needs to be re-opened
and configured, refer the below steps.
Open Terra Term Terminal Program and select under” Setup->Serial Port” (in this
case a COM14, but could be a different COM Port number in your case) set the speed to
115200.Match the below set-up and click “OK ”
1.43. Reset the Board and let the Firmware restart.
1.44. After some small time, the IP Address should change from 0.0.0.0 to a valid address. Take time to go through the
Initialization messages, MAC address, Host name and the IP address of the HTTP- server displayed on the tera term
terminal.
23075 IoT6 Simplifying TCP/IP Applications with MPLAB® Harmony
45
1.45. Open a web browser and enter the HTTP- Server IP address that you got on the tera term in the previous step. This opens
a web page (HTTP-Client)
1.46. Click on the Vending Machine tab to see the page for the Vending Machine Demo.
23075 IoT6 Simplifying TCP/IP Applications with MPLAB® Harmony
46
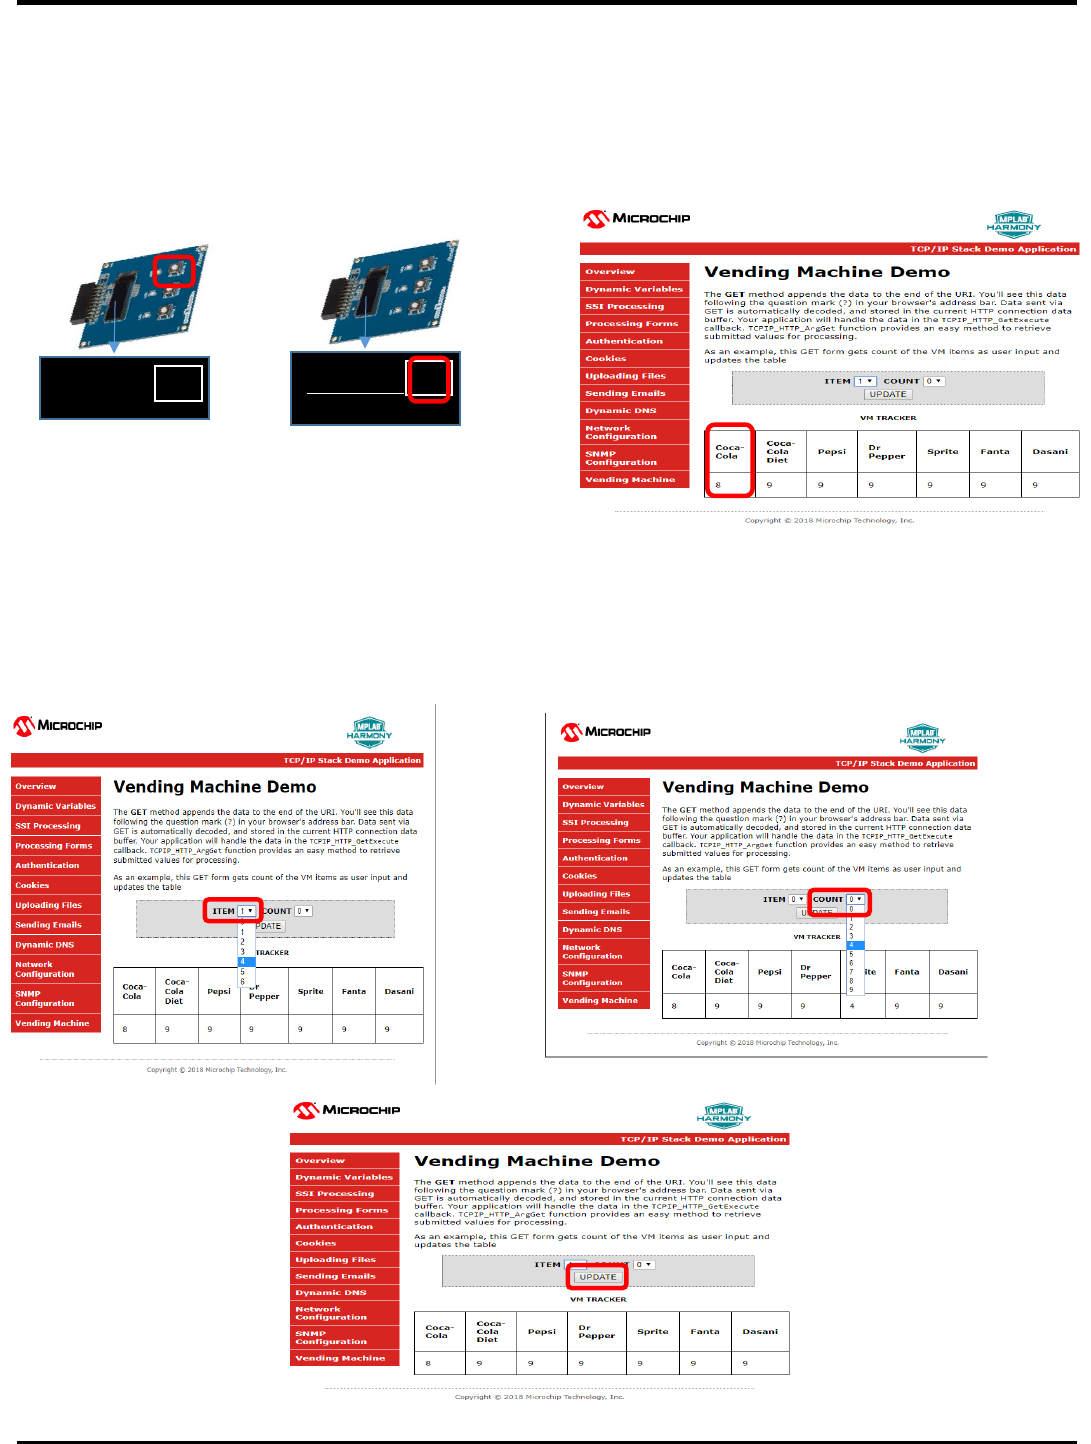
1.47. Use the Button 3 on the OLED to pick an item from the VM. The count of the corresponding item on the OLED scren
will be decremented by 1 and is reflected on the Web page as well as on the OLED screen.
1.48. Check on the VM update. Pick an item and the count to be changed on the WEB page from the ITEM and COUNT drop
down menu. Select update. When an update is selected the WEB page will send a GET command along with the ITEM
number and COUNT to the HTTP-server. The HTTP-server decodes the GET command and displays it on the VM diaply
(OLED).
1.Coco-Cola
8

23075 IoT6 Simplifying TCP/IP Applications with MPLAB® Harmony
47
Example:
On the web page ITEM 4 and its count will be changed to 4 and, also on the OLED.
You have successfully completed TASK 1 and let’s move on to TASK 2.
1.49. To test Task 2, one or more Bay of the VM machine must be Zero. Press the select Button 3 and make one or more item to
zero count. After few second you can see the messages ” Sending VM status “ , “Starting Connection” and “TCP Socket
Connected” and the “BAY Empty message” and TCP client closed on the tera term.
1.50. Look at the presenter’s screen to identify your message.
MSG:338 from fc:c2:3d:0d:21:d7 : 2.Diet-Coke is empty
Message No. MAC address
4. Dr Pepper
4

23075 IoT6 Simplifying TCP/IP Applications with MPLAB® Harmony
48
Lab 3
Overview
In many IoT applications, JSON is commonly used as a format in order to transport high-level data in an effective way. It is generally
an alternative to XML. Consider the following example of describing a person named Raji-Niklas Ruppert in JSON-format:
{
“firstName” : “Raji-Niklas”,
“lastName” : “Ruppert”,
“age” : 30,
“address” : {
“streetAddress” : “2355 W Chandler Blvd”,
“city” : “Chandler”,
“state” : “AZ”,
“postalCode” : “85224”,
}
}
Using this format makes it very easy to communicate between applications requiring information about Raji-Niklas Ruppert.
The advantage of using JSON in embedded applications is that because it is easy to read for humans, it is simple to parse and make
use of. Due to this, it is commonly used to transmit data between a server and a web application. In this lab we are going to
implement an embedded application fetching weather data from a web server. When the application accesses a specific URL
specifying a command with a geographic location, the web server will respond by sending the current weather in JSON-format to
the web application. The application will be running on our SAME70-boards.
In this lab we will only do very simple parsing (which is one of the strengths using JSON), using standard string operations. There
are however more sophisticated parsers which can be used for more robust and complex applications, while still only consuming a
very limited footprint.
The weather service used in this lab is https://openweathermap.org/. With OpenWeatherMap, there are several services such as
hourly forecast, UV Index, Air pollution and more, all outputting in JSON. With the free account there are limited option to only use
the “Current Weather Data” service. With this service you can request the current weather from different geographic locations.
Depending on by which method (City ID, ZIP Code, Coordinates etc.) the URL call will be slightly different. A full description of the
API can be found here: https://openweathermap.org/current. For this lab we will fetch current weather by city. The following URL
for this is:

23075 IoT6 Simplifying TCP/IP Applications with MPLAB® Harmony
49
http://api.openweathermap.org/data/2.5/weather?q={CITY}&APPID={API Key}
The API Key is unique to each user. This is also how OpenWeatherMap tracks how many requests you attempt. The API Key is a 15-
byte long hexadecimal string. It can look like this:
ed3da58111974261002c2af4f8e8e81f
In most JSON API:s there is also a well defined format specified, which tells you where the different objects and strings are located
in the JSON-message. From OpenWeatherMap:
{"coord":{"lon":-122.09,"lat":37.39},
"sys":{"type":3,"id":168940,"message":0.0297,"country":"US","sunrise":1427723751,"sunset":14
27768967},
"weather":[{"id":800,"main":"Clear","description":"Sky is Clear","icon":"01n"}],
"base":"stations",
"main":{"temp":285.68,"humidity":74,"pressure":1016.8,"temp_min":284.82,"temp_max":286.48},
"wind":{"speed":0.96,"deg":285.001},
"clouds":{"all":0},
"dt":1427700245,
"id":0,
"name":"Mountain View",
"cod":200}

23075 IoT6 Simplifying TCP/IP Applications with MPLAB® Harmony
50
Application Flow
Lab Outline
• In the the source code file app,c are TODO’s. At this places you have to change the source codes. At the bottom of the app.c
you find the solutions. Either you think about what you have to change, or you just copy the solution at the right place.
• The main purpose of this class is to point you to the crucial points in an Harmony 3 application and not to let you write a
complete TCP application
• The pre-made template is built from the Harmony example project, tcpip_tcp_client.
• First, we will need to declare the APPID_KEY.
• We will then set the host & port of the remote connection static as we will only connect to OpenWeatherMap.
• After this, we will redirect the user input from the command console to a char* buffer to be used in the application.
• Now we have all information required to build the URL from the introduction.
• When we have connected and requested the data, we need to parse the resulting JSON- string (the whole JSON containing
the current weather will be in one string).
• Typically, good practice when you debug JSON-strings is to print the resulting string for you to view with your own eyes that
it looks correct.
• At last, redirect the application to go back to accepting user input.

23075 IoT6 Simplifying TCP/IP Applications with MPLAB® Harmony
51
Lab Procedure
1. Start by closing any open projects in MPLAB X IDE.
2. Open a new project and choose lab3 -> Firmware -> sam_e70_xult_freertos.X.
3. Open the file app.c located under source files.
4. Go to (CTRL+F) “TODO A”. Enter the correct APPID_KEY. Either you create your own account on OpenWeatherMap or you
take the one written I the class.
5. Now scroll down to “TODO B”, the function APP_Initialize.
6. Set the application to connect to the host api.openweathermap.org and the port to 80. This is set to 80 because this call will
be over HTTP.
7. Re-direct the user input from APP_URL_BUFFER to the cityBuffer array. This can be done in several ways, but one is to use
the built-in C function snprintf(char* dest, size_t size, const char *format, …). The first argument is the destination buffer
(cityBuffer), the second one is the max size to be copied (128, because that is specified in the declaration) and the
formatted input in this scenario is APP_URL_BUFFER. This can be found in “TODO C”.
8. Scroll down to “TODO D”, the state APP_TCPIP_WAIT_FOR_CONNECTION. In this state we will wait for a connection to be
established. Once established we will send a GET command with the full URL in the format specified in the introduction:
http://api.openweathermap.org/data/2.5/weather?q={CITY}&APPID={API Key}.
9. Once the request is sent to the server, the application will go into the APP_TCIPIP_WAIT_FOR_RESPONSE state.
Once the connection is closed, set the next state to be APP_STATE_JSON_PARSE_RETRIEVED_DATA.

23075 IoT6 Simplifying TCP/IP Applications with MPLAB® Harmony
52
10. Now go down in the state APP_STATE_JSON_PARSE_RETRIEVED_DATA. One of the first things we want to do after we
have sorted out the JSON-part of the retrieved data is to print the raw JSON-string. This helps us debug & analyse.
11. In a real application, we would need to first know the format of the JSON message in order to be able to parse it correctly.
To make this lab more efficiently, we will do this backwards. If you look at this example piece of API response from
OpenWeatherMap found in the introduction section to this lab. Looking at the format from the API, we need to calculate
in what position the value of humidity start. The function strstr will cut the resulting Json string at the first occurrence of
“humidity”. A hint is to look at the other blocks where you parse the temperature, pressure and main weather.
12. Once the parsing is done, we wish to print the values of the main weather, pressure, temperature and humidity.
13. Now to complete the loop, we want to go back to the APP_TCPIP_WAITING_FOR_COMMAND state once the JSON-
parsing and printing is done.
23075 IoT6 Simplifying TCP/IP Applications with MPLAB® Harmony
53
14. When the build process was correct, then program the E70
15. Open the Terminal program, press the Reset Button
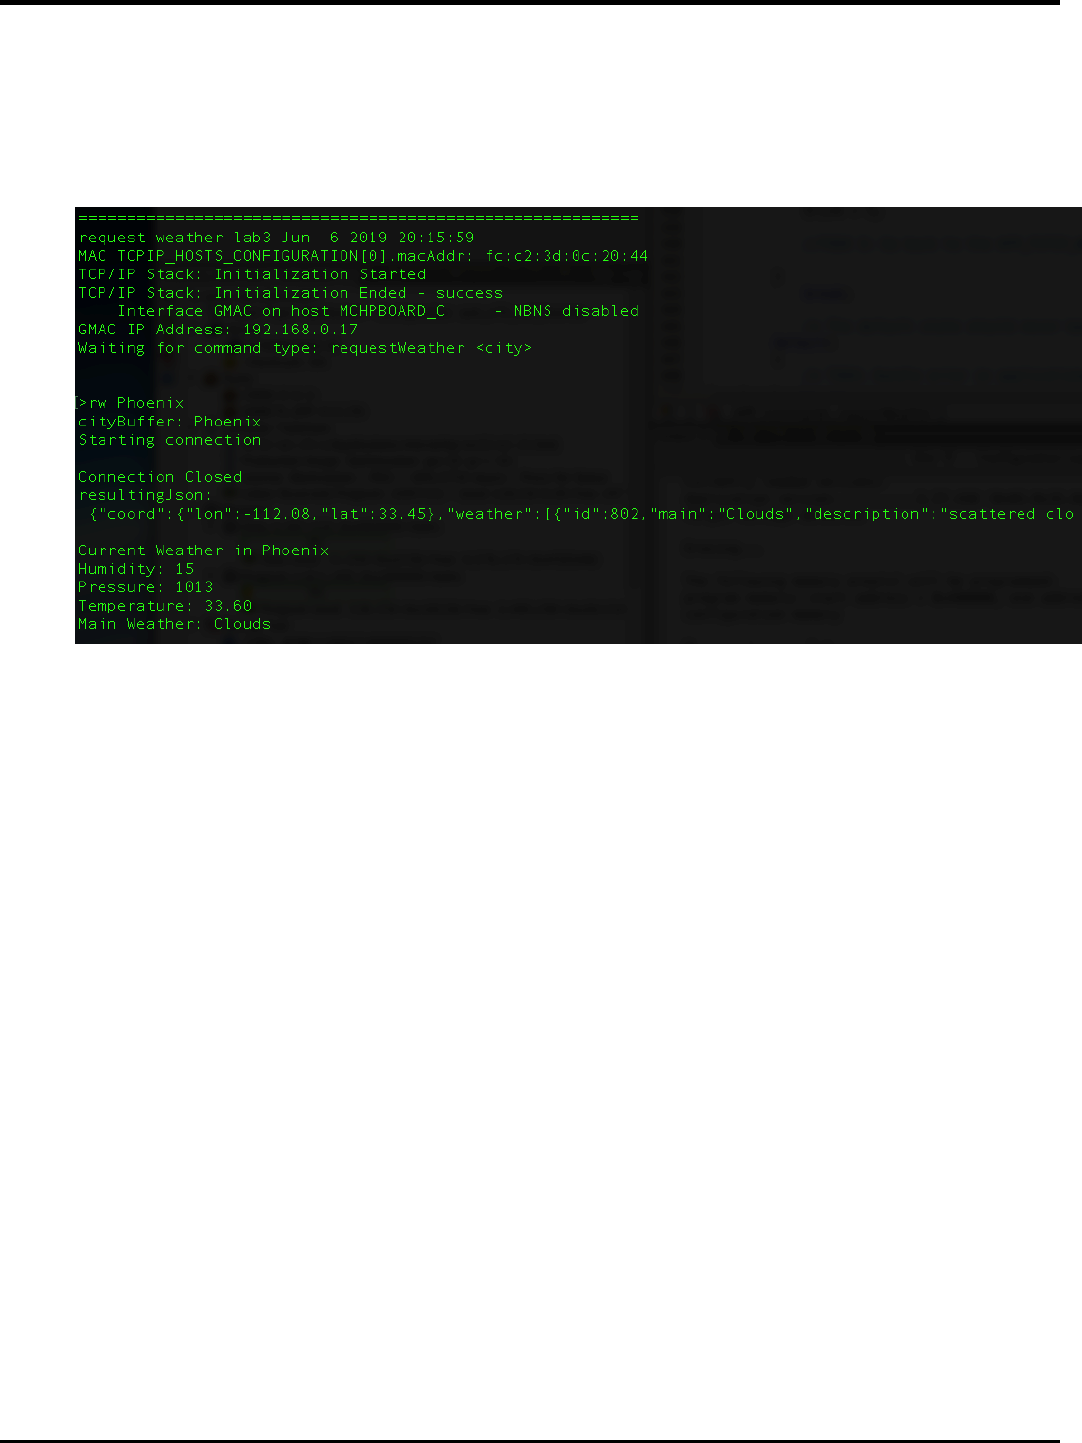
16. When “>” is prompter you can put in “requestWeather <city>”
Or the short form: ”rw <city>”
For ex. “rw Phoenix”
17. At this point you reached the end of the class and can walk outside to check if the current weather report was correct

23075 IoT6 Simplifying TCP/IP Applications with MPLAB® Harmony
54
MPLAB® Harmony TCP/IP Stack
TCP Module API Function List
Socket Management Functions
TCPIP_TCP_ServerOpen
Opens a TCP socket as a server.
TCPIP_TCP_ClientOpen
Opens a TCP socket as a client.
TCPIP_TCP_Close
Disconnects an open socket and destroys the socket handle, releasing the associated resources.
TCPIP_TCP_Connect
Connects a client socket.
TCPIP_TCP_Bind
Binds a socket to a local address.
TCPIP_TCP_RemoteBind
Binds a socket to a remote address.
TCPIP_TCP_IsConnected
Determines if a socket has an established connection.
TCPIP_TCP_WasReset
Self-clearing semaphore indicating socket reset.
TCPIP_TCP_Disconnect
Disconnects an open socket.
TCPIP_TCP_Abort
Aborts a connection.
TCPIP_TCP_OptionsGet
Allows getting the options for a socket like: current RX/TX buffer size, etc.
TCPIP_TCP_OptionsSet
Allows setting options to a socket like adjust RX/TX buffer size, etc.
TCPIP_TCP_SocketInfoGet
Obtains information about a currently open socket.
TCPIP_TCP_SocketNetGet
Gets the current network interface of an TCP socket.
TCPIP_TCP_SocketNetSet
Sets the interface for an TCP socket
TCPIP_TCP_SignalHandlerDeregister
Deregisters a previously registered TCP socket signal handler.
TCPIP_TCP_SignalHandlerRegister
Registers a TCP socket signal handler.
TCPIP_TCP_Task
Standard TCP/IP stack module task function.
Transmit Data Functions
TCPIP_TCP_Put
Writes a single byte to a TCP socket.
TCPIP_TCP_PutIsReady
Determines how much free space is available in the TCP TX buffer.
TCPIP_TCP_StringPut
Writes a null-terminated string to a TCP socket.
TCPIP_TCP_ArrayPut
Writes an array from a buffer to a TCP socket.
TCPIP_TCP_Flush
Immediately transmits all pending TX data.
TCPIP_TCP_FifoTxFullGet
Determines how many bytes are pending in the TCP TX FIFO.
TCPIP_TCP_FifoTxFreeGet
Determines how many bytes are free and could be written in the TCP TX FIFO.
Receive Data Transfer Functions
TCPIP_TCP_ArrayFind
Searches for a string in the TCP RX buffer.
TCPIP_TCP_Find
Searches for a byte in the TCP RX buffer.
TCPIP_TCP_Get
Retrieves a single byte to a TCP socket.
TCPIP_TCP_Peek
Peaks at one byte in the TCP RX buffer/FIFO without removing it from the buffer.
TCPIP_TCP_Discard
Discards any pending data in the RCP RX FIFO.
TCPIP_TCP_FifoRxFreeGet
Determines how many bytes are free in the RX buffer/FIFO.
TCPIP_TCP_FifoSizeAdjust
Adjusts the relative sizes of the RX and TX buffers.
TCPIP_TCP_FifoRxFullGet
Determines how many bytes are pending in the RX buffer/FIFO.
TCPIP_TCP_GetIsReady
Determines how many bytes can be read from the TCP RX buffer.
TCPIP_TCP_ArrayGet
Reads an array of data bytes from a TCP socket's RX buffer/FIFO.
TCPIP_TCP_ArrayPeek
Reads a specified number of data bytes from the TCP RX buffer/FIFO without removing them from
the buffer.

23075 IoT6 Simplifying TCP/IP Applications with MPLAB® Harmony
55
UDP Module API Function List
Socket Management Functions
TCPIP_UDP_ServerOpen
Opens a UDP socket as a server.
TCPIP_UDP_ClientOpen
Opens a UDP socket as a client.
TCPIP_UDP_IsOpened
Determines if a socket was opened.
TCPIP_UDP_IsConnected
Determines if a socket has an established connection.
TCPIP_UDP_Bind
Bind a socket to a local address and port. This function is meant for client sockets. It assigns
a specific source address and port for a socket.
TCPIP_UDP_RemoteBind
Bind a socket to a remote address This function is meant for server sockets.
TCPIP_UDP_Close
Closes a UDP socket and frees the handle.
TCPIP_UDP_OptionsGet
Allows getting the options for a socket such as current RX/TX buffer size, etc.
TCPIP_UDP_OptionsSet
Allows setting options to a socket like adjust RX/TX buffer size, etc
TCPIP_UDP_SocketInfoGet
Returns information about a selected UDP socket.
TCPIP_UDP_SocketNetGet
Gets the network interface of an UDP socket
TCPIP_UDP_SocketNetSet
Sets the network interface for an UDP socket
TCPIP_UDP_TxOffsetSet
Moves the pointer within the TX buffer.
TCPIP_UDP_SourceIPAddressSet
Sets the source IP address of a socket
TCPIP_UDP_BcastIPV4AddressSet
Sets the broadcast IP address of a socket Allows an UDP socket to send broadcasts.
TCPIP_UDP_DestinationIPAddressSet
Sets the destination IP address of a socket
TCPIP_UDP_DestinationPortSet
Sets the destination port of a socket
TCPIP_UDP_Disconnect
Disconnects a UDP socket and re-initializes it.
TCPIP_UDP_SignalHandlerDeregister
Deregisters a previously registered UDP socket signal handler.
TCPIP_UDP_SignalHandlerRegister
Registers a UDP socket signal handler.
TCPIP_UDP_Task Standard
TCP/IP stack module task function.
Transmit Data Functions
TCPIP_UDP_PutIsReady
Determines how many bytes can be written to the UDP socket.
TCPIP_UDP_TxPutIsReady
Determines how many bytes can be written to the UDP socket.
TCPIP_UDP_ArrayPut
Writes an array of bytes to the UDP socket.
TCPIP_UDP_StringPut
Writes a null-terminated string to the UDP socket.
TCPIP_UDP_Put
Writes a byte to the UDP socket.
TCPIP_UDP_TxCountGet
Returns the amount of bytes written into the UDP socket.
TCPIP_UDP_Flush
Transmits all pending data in a UDP socket.
Receive Data Transfer Functions
TCPIP_UDP_GetIsReady
Determines how many bytes can be read from the UDP socket.
TCPIP_UDP_ArrayGet
Reads an array of bytes from the UDP socket.
TCPIP_UDP_Get
Reads a byte from the UDP socket.
TCPIP_UDP_RxOffsetSet
Moves the read pointer within the socket RX buffer.
TCPIP_UDP_Discard
Discards any remaining RX data from a UDP socket.
22075 IoT6 Simplifying TCP/IP Applications with MPLAB® Harmony
56
Harmony TCP/IP API Subset For all Lab’s
TCP Socket Management Functions
TCPIP_TCP_ArrayGet Function
This function reads an array of data bytes from a TCP socket's RX buffer/FIFO. The data is removed from the FIFO in the process.
Function Prototype
uint16_t TCPIP_TCP_ArrayGet(
TCP_SOCKET hTCP,
uint8_t* buffer,
uint16_t len
);
Preconditions
TCP is initialized.
Parameters
Parameter
Description
hTCP
The socket from which data is to be read.
buffer
Pointer to the array to store data that was read.
len
Number of bytes to be read.
Returns
Type
Description
uint16_t
The number of bytes read from the socket. If less than len, the RX FIFO
buffer became empty or the socket is not connected.
TCPIP_TCP_ClientOpen Function
Provides a unified method for opening TCP client sockets. Sockets are created at the TCP module initialization, and can be
claimed with this function and freed using TCPIP_TCP_Abort or TCPIP_TCP_Close. If the remoteAddress != 0 (and the address
pointed by remoteAddress != 0) then the socket will immediately initiate a connection to the remote host.
Function Prototoype
TCP_SOCKET TCPIP_TCP_ClientOpen(
IP_ADDRESS_TYPE addType,
TCP_PORT remotePort,
IP_MULTI_ADDRESS* remoteAddress
);
Preconditions
TCP is initialized.

23075 IoT6 Simplifying TCP/IP Applications with MPLAB® Harmony
57
Parameters
Parameter
Description
addType
The type of address being used. Valid values are: IP_ADDRESS_TYPE_IPV4 or
IP_ADDRESS_TYPE_IPV6
remotePort
TCP port to connect to. The local port for client sockets will be automatically
picked by the TCP module.
remoteAddress
The remote address to be used
Returns
Type
Description
TCP_SOCKET
Handle - Save this handle and use it when calling all other TCP APIs. If no
sockets of the specified type were available to be opened, the handle will
contain a value equal to INVALID_SOCKET.
TCPIP_TCP_Close Function
Graceful Option Set: If the graceful option is set for the socket (default), a TCPIP_TCP_Disconnect will be tried. If the linger option
is set (default) the TCPIP_TCP_Disconnect will try to send any queued TX data before issuing FIN. If the FIN send operation fails or
the socket is not connected the abort is generated.
Graceful Option Not Set: If the graceful option is not set, or the previous step could not send the FIN, a TCPIP_TCP_Abort is
called, sending a RST to the remote node. Communication is closed, the socket is no longer valid and the associated resources are
freed.
Function Prototype
void TCPIP_TCP_Close(
TCP_SOCKET hTCP
);
Preconditions
TCP socket should have been opened with TCPIP_TCP_ServerOpen/TCPIP_TCP_ClientOpen.
hTCP - valid socket
Parameters
Parameter
Description
hTCP
Handle to the socket to disconnect and close.
Returns
Type
Description
Void
None
TCPIP_TCP_GetIsReady Function
Call this function to determine how many bytes can be read from the TCP RX buffer. If this function returns zero, the application
must return to the main stack loop before continuing in order to wait for more data to arrive.
22075 IoT6 Simplifying TCP/IP Applications with MPLAB® Harmony
58
Function Prototype
uint16_t TCPIP_TCP_GetIsReady(
TCP_SOCKET hTCP
);
Preconditions
TCP is initialized.
Parameters
Parameter
Description
hTCP
The socket to check.
Returns
Type
Description
uint16_t
The number of bytes available to be read from the TCP RX buffer.
TCPIP_TCP_IsConnected Function
This function determines if a socket has an established connection to a remote node. Call this function after calling
TCPIP_TCP_ServerOpen()/TCPIP_TCP_ClientOpen() to determine when the connection is set up and ready for use.
Function Prototype
bool TCPIP_TCP_IsConnected(
TCP_SOCKET hTCP
);
Preconditions
TCP is initialized.
Parameters
Parameter
Description
hTCP
The TCP socket to check.
Returns
Type
Description
bool
True: the socket is connected
False: the socket is disconnected
TCPIP_TCP_PutIsReady Function
Call this function to determine how many bytes can be written to the TCP TX buffer. If this function returns zero, the application
must return to the main stack loop before continuing in order to transmit more data.
Function Prototype
uint16_t TCPIP_TCP_PutIsReady(
TCP_SOCKET hTCP
);
23075 IoT6 Simplifying TCP/IP Applications with MPLAB® Harmony
59
Preconditions
TCP is initialized.
Parameters
Parameter
Description
hTCP
The socket from which data is to be written.
Returns
Type
Description
uint16_t
The number of bytes available to be written in the TCP TX buffer.
TCPIP_TCP_StringPut Function
This function writes a null-terminated string to a TCP socket. The null-terminator is not copied to the socket.
Function Prototype
const uint8_t* TCPIP_TCP_StringPut(
TCP_SOCKET hTCP,
const uint8_t* Data
);
Preconditions
TCP is initialized.
Parameters
Parameter
Description
hTCP
The socket from which data is to be written.
const uint8_t*
Data
Returns
Type
Description
const uint8_t*
Pointer to the byte following the last byte written to the socket. If this
pointer does not dereference to a NULL byte, the buffer became full or
the socket is not connected.
TCPIP_TCP_WasReset Function
This function is a self-clearing semaphore indicating whether or not a socket has been disconnected since the previous call. This
function works for all possible disconnections: a call to TCPIP_TCP_Disconnect, a FIN from the remote node, or an
acknowledgment timeout caused by the loss of a network link. It also returns true after the first call to TCPIP_TCP_Initialize.
Applications should use this function to reset their state machines.
Function Prototype
bool TCPIP_TCP_WasReset(
TCP_SOCKET hTCP
);
Preconditions
TCP is initialized.
22075 IoT6 Simplifying TCP/IP Applications with MPLAB® Harmony
60
Parameters
Parameter
Description
hTCP
The TCP socket to check.
Returns
Type
Description
bool
true: the socket was disconnected since the previous call
false: the socket remained connected since the previous call
UDP Socket Management Functions
TCPIP_UDP_ArrayGet Function
This function reads an array of bytes from the UDP socket, while adjusting the current read pointer and decrementing the
remaining bytes available. TCPIP_UDP_GetIsReady should be used before calling this function to get the number of the available
bytes in the socket.
Function Prototype
uint16_t TCPIP_UDP_ArrayGet(
UDP_SOCKET hUDP,
uint8_t * cData,
uint16_t wDataLen
);
Preconditions
UDP socket should have been opened with TCPIP_UDP_ServerOpen/TCPIP_UDP_ClientOpen.
hUDP - valid socket
Parameters
Parameter
Description
hUDP
UDP Socket Handle
cData
The buffer to receive the bytes being read. If NULL, the bytes are simply
discarded
wDataLen
Number of bytes to be read from the socket.
Returns
Type
Description
uint16_t
The number of bytes successfully read from the UDP buffer. If this value is
less than wDataLen, then the buffer was emptied and no more data is
available.
TCPIP_UDP_Close Function
Closes a UDP socket and frees the handle. Call this function to release a socket and return it to the pool for use by future
communications.
23075 IoT6 Simplifying TCP/IP Applications with MPLAB® Harmony
61
Function Prototoype
void TCPIP_UDP_Close(
UDP_SOCKET hUDP
);
Preconditions
UDP socket should have been opened with TCPIP_UDP_ServerOpen/TCPIP_UDP_ClientOpen.
hUDP - valid socket
Parameters
Parameter
Description
hUDP
UDP Socket Handle
Returns
Type
Description
void
None
TCPIP_UDP_GetIsReady Function
This function will return the number of bytes that are available in the specified UDP socket RX buffer. The UDP socket
queues incoming RX packets in an internal queue. If currently there is no RX packet processed (as a result of retrieving all
available bytes with TCPIP_UDP_ArrayGet, for example), this call will advance the RX packet to be processed to the next
queued packet. If a RX packet is currently processed, the call will return the number of bytes left to be read from this
packet.
Function Prototype
uint16_t TCPIP_UDP_GetIsReady(
UDP_SOCKET hUDP
);
Preconditions
UDP socket should have been opened with TCPIP_UDP_ServerOpen/TCPIP_UDP_ClientOpen.
hUDP parameter is a valid socket
Parameters
Parameter
Description
hUDP
UDP Socket Handle
Returns
Type
Description
uint16_t
The number of bytes that can be read from the socket.
22075 IoT6 Simplifying TCP/IP Applications with MPLAB® Harmony
62
TCPIP_UDP_ServerOpen Function
Provides a unified method for opening UDP server sockets.
Function Prototype
UDP_SOCKET TCPIP_UDP_ServerOpen(
IP_ADDRESS_TYPE addType,
UDP_PORT localPort,
IP_MULTI_ADDRESS* localAddress
);
Preconditions
UDP is initialized.
Parameters
Parameter
Description
IP_ADDRESS_TYPE addType
The type of address being used.
IP_ADDRESS_TYPE_IPV4 or IP_ADDRESS_TYPE_IPV6.
UDP_PORT localPort
UDP port on which to listen for connections
IP_MULTI_ADDRESS* localAddress
Local IP address to use. Can be 0 (NULL) if any incoming interface will do.
Returns
Type
Description
UDP_SOCKET
Handle - Save this handle and use it when calling all other UDP APIs. If no
sockets of the specified type were available to be opened, the handle will
contain a value equal to INVALID_SOCKET.
TCPIP_UDP_SocketInfoGet Function
This function will fill a user passed UDP_SOCKET_INFO structure with status of the selected socket
Function Prototype
bool TCPIP_UDP_SocketInfoGet(
UDP_SOCKET hUDP,
UDP_SOCKET_INFO* pInfo
);
Preconditions
UDP socket should have been opened with TCPIP_UDP_ServerOpen()/TCPIP_UDP_ClientOpen()().
hUDP - valid socket
pInfo - valid address of a UDP_SOCKET_INFO structure
Parameters
Parameter
Description
hUDP
UDP Socket Handle
pInfo
Pointer to UDP_SOCKET_INFO to receive socket information

23075 IoT6 Simplifying TCP/IP Applications with MPLAB® Harmony
63
Returns
Type
Description
bool
true if call succeeded
false if no such socket or invalid pinfo.
UDP_SOCKET_INFO Structure
Holds information about a UDP Socket
Structure
typedef struct {
IP_ADDRESS_TYPE addressType;
IP_MULTI_ADDRESS remoteIPaddress;
IP_MULTI_ADDRESS localIPaddress;
IP_MULTI_ADDRESS sourceIPaddress;
IP_MULTI_ADDRESS destIPaddress;
UDP_PORT remotePort;
UDP_PORT localPort;
TCPIP_NET_HANDLE hNet;
} UDP_SOCKET_INFO;
Members
Type
Member Name
Description
IP_ADDRESS_TYPE
addressType
address type of the socket
IP_MULTI_ADDRESS
remoteIPaddress
current socket destination address
IP_MULTI_ADDRESS
localIPaddress
current socket source address
IP_MULTI_ADDRESS
sourceIPaddress
source address of the last packet
IP_MULTI_ADDRESS
destIPaddress
destination address of the last packet
UDP_PORT
remotePort
Port number associated with remote node
UDP_PORT
localPort
local port number
TCPIP_NET_HANDLE
hNet
associated interface