26898 Manual Version 2
User Manual:
Open the PDF directly: View PDF ![]() .
.
Page Count: 2
II. Preset schedules
There are 3 pre-programmed times that
run individually or simultaneously.
Choose from the following:
“evening” (5pm-12am)
“morning” (5am-8am)
“all night” (6pm-6am).
When a preset or custom program
is chosen, the blue LED indicator light
will turn on.
If a preset schedule does not fit your
needs, a custom on/off time can be used
to modify the preset. Example: Using “evening” (5pm-12am)
and adding a “my off time” of 10pm will create a 5pm-10pm
timer schedule.
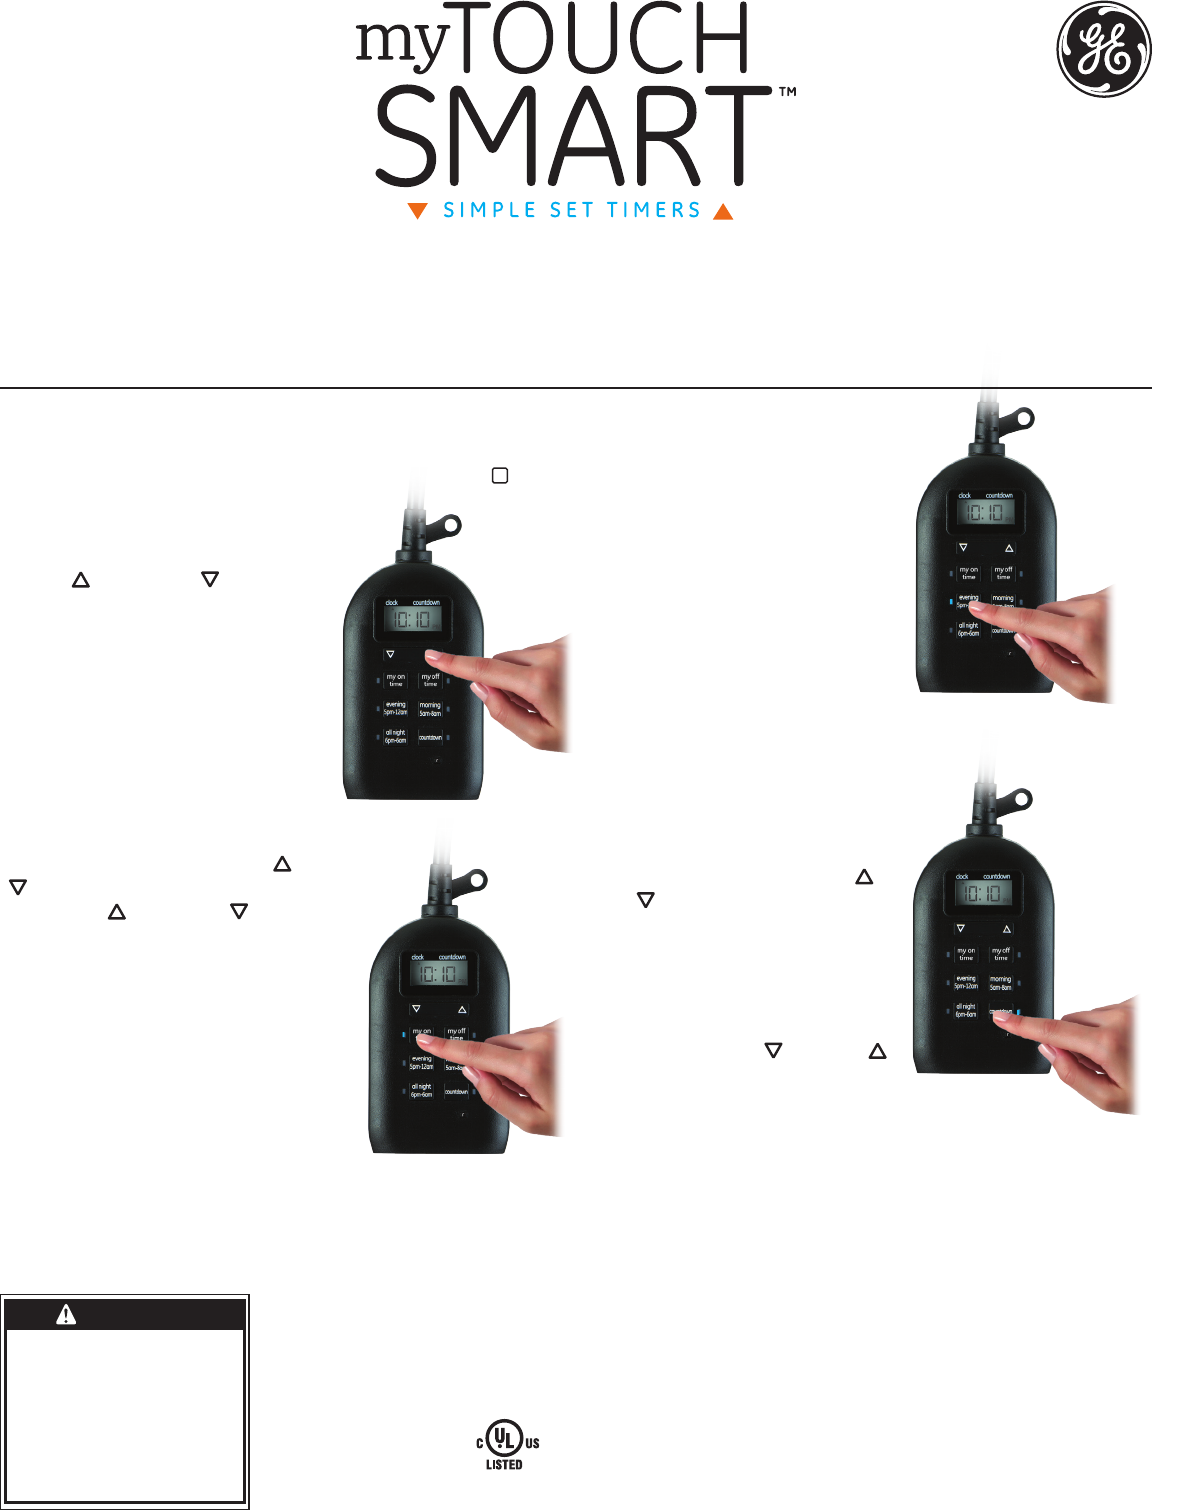
III. Countdown
Press “countdown,” then use up ( ) and
down ( ) arrows to set from 1 minute
to 24 hours. The last countdown time
set will become the new default until
the countdown button is pushed again.
Note: When daylight savings time
occurs use the down ( ) and up ( )
arrows to adjust the time by 1 hour.
1. Setup
If no numbers are visible on-screen, plug timer into an outlet and
let timer charge for 1 hour. Once charged, press the reset ( r )
button in the lower right corner using a toothpick or pencil.
2. Set the time
Use up ( ) and down ( ) arrows to set
current time, take note of AM or PM time.
3. Programming
Options
Set your custom on & off time
and/or pick any of the presets
that suit your schedule!
I. Choose your custom on/off times
Press “my on time,” then use up ( ) and down
( ) arrows to set on time. Press “my off time,”
then use up ( ) and down ( ) arrows to set off
time. (If you set the “my on time” earlier than
the current time, it will not turn on until the
next day at the time scheduled. Use the
Countdown to turn on the timer if needed
immediately.) When using “my on” and
“my off” times make sure the blue light is
lit next to the button. The blue lights will
only illuminate when plugged into a
wall outlet.
Mounting /Installation
1. Mount the timer on a wall near a GFCI receptacle using a screw or nail. Timer must be mounted in a vertical position with
the outlets facing downwards at least 4ft. above ground level. Screw or nail head must extend at least 3/16” out from
the wall (nails or screws not included).
2. Hang the timer, from the hole at the top of the unit.
WARNING
RISK OF ELECTRIC SHOCK
• PLUG DIRECTLY INTO
A GFCI PROTECTED
ELECTRICAL OUTLET
• UNPLUG TIMER BEFORE
CLEANING
• FULLY INSERT PLUG
• KEEP AWAY FROM
CHILDREN
• NOT FOR WATER
IMMERSION
• SUITABLE FOR
INDOOR AND OUTDOOR
LOCATIONS, STORE
INDOORS WHILE NOT
IN USE.
RISK OF FIRE
• DO NOT USE TO
CONTROL APPLIANCES
THAT CONTAIN HEATING
ELEMENTS (COOKING
APPLIANCES, HEATERS,
IRONS, ETC.)
• DO NOT EXCEED
ELECTRICAL RATINGS
• RATINGS ARE FOR BOTH
OUTLETS COMBINED
• DO NOT USE IF DEVICE
OR CORD IS DAMAGED.
• DO NOT USE WITH AN
EXTENSION CORD
MADE IN CHINA
GE is trademark of General Electric Company and is under license by
Jasco Products Company LLC, 10 E. Memorial Rd., Oklahoma City, OK 73114.
This Jasco product comes with a 1-year limited warranty.
Visit www.jascoproducts.com for warranty details product registration.
Questions? Contact us at 1-800-654-8483 between 7:30AM–5:00PM CST.
Outdoor/Indoor
Plug-In Digital
Timer
26898 VERSION 02 6/19/15
Total ratings for both outlets:
125V 50/60 Hz
15A 1875 General Purpose/Resistive
10A 1250W Tungsten
1/2 HP
Works with dimmable
LED and CFL bulbs.
This device complies with part 15 of the FCC and Industry Canada license-exempt RSS standard(s).
Operation is subject to the following two conditions: (1 this device may not cause harmful
interference, and (2) this device must accept any interference received, including interference that
may cause undesired operation.
FCC NOTE: The manufacturer is not responsible for any radio or TV interference caused by
unauthorized modifications to this equipment. Such modifications could void the user’s authority
to operate the equipment.
NOTE: This equipment has been tested and found to comply with the limits for a Class B digital
device, pursuant to Part 15 of the FCC Rules. These limits are designed to provide reasonable
protection against harmful interference in a residential installation. This equipment generates,
uses and can radiate radio frequency energy and, if not installed and used in accordance with
the instructions may cause harmful interference to radio communications. However, there is no
guarantee that interference will not occur in a particular installation. If this equipment does cause
harmful interference to radio or television reception, which can be determined by turning the
equipment off and on, the user is encourage to try to correct the interference by one or more of
the following measures:
• Reorient or relocate the receiving antenna.
• Increase the separation between the equipment and receiver.
• Connect the equipment into an outlet on a circuit different
from that to which the receiver is connected.
• Consult the dealer or an experienced radio/TV technician for help.
CAN ICES-3(B)/NMB-3(B)
HECHO EN CHINA
GE es una marca registrada de la companía General Electric Company y es utilizada bajo licencia
a la companía Jasco Prodcucts Company LLC, 10 E. Memorial Rd., Oklahoma City, OK 73114.
Este producto de Jasco Products tiene una garantía limitada de 1 Año.
Visite www.jascoproducts.com para detalles.
¿Tiene preguntas? Comuníquese al 1-800-654-8483 entre las 7:30 a.m. y las 5:00 p.m. CST
( hora central estándar).
II. Horarios programados
Existen tres programas preestablecidos que pueden activarse de
manera individual o simultánea. Elija entre los siguientes:
“noche” (5 p. m. - 12 a. m.)
“mañana” (5 a. m. - 8 a. m.)
“toda la noche” (6 p. m. - 6 a. m.)
Cuando un preset o la costumbre
se elige programa, el luz indicadora
LED azul se encenderá . Si un horario
preestablecido no satisface sus
necesidades, puede usar un tiempo
de encendido/apagado personalizado
para modificar el preestablecido.
Ejemplo: Si usa “noche” (5 p.m. -12 a.
m.) y a “mi hora de apagado” le
asigna el valor de 10 p. m., se creará
un horario de 5 p. m. - 10 p. m. en el temporizador.
III. Cuenta regresiva
Presione el botón de “cuenta
regresiva”, luego use arriba ( ) y
abajo ( ) flechas para programar
desde 1 minuto a 24 horas. La cuenta
regresiva quedará en la memoria
hasta que se cambie.
Nota: Cuando se cambie el horario de
verano, use las flechas ( / ) para
ajustar la hora en 1 hora.
1. Programación
Si no aparecen números en la pantalla, enchufe el temporizador
en un tomacorriente y deje que se cargue durante una hora. Una
vez cargado, presione el botón restablecer ( r) que se encuentra
en la esquina inferior derecha con un lápiz o palillo de dientes.
2. Cómo programar la hora
Use las flechas arriba ( ) y abajo
( ) para programar la hora actual.
3. Opciones de
Programación
Programe su hora de encendido y
apagado y escoja el programa
preestablecido que se adapte a
su horario.
I. Escoja la hora de
vencendido/apagado que desee.
Presione “my on time” (mi hora de encendido),
luego con las flechas ( / ) programe la hora.
Presione el botón “my off time” (mi hora de
apagado), luego con las flechas programe la
hora. (Si establece la Mi Hora antes de la
hora actual, no se enciende hasta el día
siguiente a la hora programada). Utilice la
cuenta regresiva para encender el
temporizador Si necesita de inmediato
Cuando utiliza los botones “my on time”
(mi hora de encendido) o “my off time” (mi
hora de apagado) asegúrese de que la luz
azul al lado del botón esté encendida. La
luz azul solo se encenderá si el temporizador está enchufado.
Montaje/instalación
1. Con un tornillo o clavo, instale el temporizador en una pared cerca de un tomacorriente GFCI. Temporizador debe ser montado en una
posición vertical con las tomas de corriente hacia abajo al menos 1.3 metros sobre el nivel del suelo. La cabeza del tornillo o del clavo se
debe extender al menos 3/16” fuera de la pared (tornillo o clavo no incluido).
2. Cuelgue el temporizador enganchando el orificio de la parte superior de la unidad en el tornillo o clavo.
PRECAUCIÓN
RIESGO DE DESCARGA
ELÉCTRICA
• CONECTE DIRECTAMENTE
A UNA TOMA ELÉCTRICA
PROTEGIDA CON GFCI
• DESCONECTE EL
TEMPORIZADOR ANTES DE
HACER LIMPIEZA
• INSERTE COMPLETAMENTE
EL ENCHUFE
• MANTENGA ALEJADOS A
LOS NIÑOS
• NO PARA INMERSIÓN EN AGUA
• APTO PARA INTERIORES Y
EXTERIORES, ALMACENAR EN
INTERIORES MIENTRAS NO ESTÉ
EN USO
RIESGO DE INCENDIO
• NO USE PARA CONTROLAR
ELECTRODOMÉSTICOS
QUE TIENEN ELEMENTOS
TÉRMICOS (ESTUFAS,
CALENTADORES,
PLANCHAS, ETC.)
• NO SOBREPASE LAS
ESPECIFICACIONES
ELÉCTRICAS LIMITE
• PUNTUACIONES PARA
SALIDAS DE AMBOS
COMBINADOS
• NO UTILIZAR SI EL DISPOSITIVO
O EL CABLE ESTÁN DAÑADOS
• NO USE CON (CABLE DE)
EXTENSIÓN
Temporizador
digital enchufable
para exterior
y interior
Valor nominal total para
ambos tomacorrientes:
125 V 50/60 Hz
15 A 1875 W Fines generales/carga resistiva
10 A 1250 W Tungsteno
1/2 HP
Funciona con bombillas
atenuables LED e CFL.
Este dispositivo cumple con la Parte 15 de las Normas de la FCC. La operación está sujeta
a las siguientes dos condiciones: (1) este dispositivono puede causar interferencias perjudiciales
y (2) este dispositivo debe aceptar cualquier interferencia recibida, incluidas las interferencias
que puedan provocar una operación indeseable.
FCC NOTA: Los cambios o modificaciones a esta unidad que no hayan sidoexpresamente
aprobados por la parte responsable del cumplimiento de las reglas, pueden anular la autoridad
del usuario para poder operar el equipo.
NOTA: Este equipo ha sido probado y cumple con los límites para un dispositivo digital de Clase B,
de conformidad con la Parte 15 de las Normas de la FCC. Estos límites están diseñados para
proporcionar una protección razonable contra interferencias en una instalación residencial. Este
equipo genera, utiliza y puede irradiar energía de radiofrecuencia y, si no se instala y utiliza de
acuerdo con las instrucciones, puede causar interferencia dañina a la comunicación por radio. Sin
embargo, no hay ninguna garantía que no ocurra interferencia en una instalación en particular.
Si este equipo causa interferencias perjudiciales a la recepción de radio o televisión, esto se puede
comprobar apagando y encendiendo el equipo repetidamente, se le sugiere al usuario tratar de
remediar la interferencia tomando una o más de las siguientes medidas.
• Reorientar o reubicar la antena de recepción
• Aumentar la separación entre el equipo y el receptor
• Conectar el equipo a un tomacorriente en un circuito distinto de aquel al
que está conectado el receptor
• Consultar al distribuidor o a un técnico de radio / TV para obtener ayuda.
