IPStor User Guide Virtual Tape Library 316855201A
User Manual: Virtual Tape Library
Open the PDF directly: View PDF ![]() .
.
Page Count: 164 [warning: Documents this large are best viewed by clicking the View PDF Link!]
- Copyright 2008
- Support Information
- Introduction
- Basic Features
- Launch the Console
- Search for tapes
- Understanding the objects in the tree
- Create virtual tape libraries
- Create virtual tapes
- How virtual tapes are allocated from multiple LUNs
- Add SAN Clients (backup servers)
- Assign virtual tape libraries to clients
- Mirror the VTL database
- Set Console options
- Manage Administrators
- VTL compression
- View the Event Log
- Refer to the Attention Required tab
- Set Server properties
- Apply software patch updates
- Configure VTL to send SNMP traps
- Appliance health checking
- Data Deduplication
- Replicate Data
- Types of replication
- Auto Replication
- Remote Copy
- Requirements
- Configuring replication for virtual tapes
- Configuring replication for Virtual Index Tapes (VITs)
- Check replication status
- Promote a replica resource
- Change your replication configuration options
- Suspend/resume replication schedule
- Manually start the replication process
- Remove a replication configuration
- Fibre Channel Target Mode
- iSCSI Clients
- Email Alerts
- Command Line
- Using the command line utility
- Commands
- Common arguments
- Login/logout to the VTL Server
- Virtual devices / Clients
- Get virtual device list
- Get Client virtual device list
- Add client
- Delete client
- Get client properties
- Assign virtual device
- Unassign virtual device
- Create virtual device
- Delete virtual device
- Get supported virtual libraries
- Get supported virtual drives
- Create virtual tape library
- Add virtual tape drive
- Create standalone tape drive
- Create virtual tape
- Move virtual tape
- Tape copy
- Set tape duplication
- Set tape properties
- Reclaim disk space
- System configuration
- Replication
- Physical devices
- Reports
- Event Log
- Technical support
- Appendix
- Troubleshooting
- General Console operations
- Physical resources
- Logical resources
- Take an X-ray of your system for technical support
- Index

Sun StorageTek
Virtual Tape Library
VTL Prime
VTL Prime Solaris User’s Guide
316855201
September 2008
Rev A

Submit comments about this document at: glsfs@sun.com
Sun Microsystems, Inc.
www.sun.com
Virtual Tape Library
VTL Prime Solaris User’s Guide
Part No. 316855201
September 2008, Revision A

Sun Microsystems, Inc. has intellectual property rights relating to technology that is described in this document. In particular, and without
limitation, these intellectual property rights may include one or more of the U.S. patents listed at http://www.sun.com/patents and one or
more additional patents or pending patent applications in the U.S. and in other countries.
This document and the product to which it pertains are distributed under licenses restricting their use, copying, distribution, and
decompilation. No part of the product or of this document may be reproduced in any form by any means without prior written authorization of
Sun and its licensors, if any.
Third-party software, including font technology, is copyrighted and licensed from Sun suppliers.
Parts of the product may be derived from Berkeley BSD systems, licensed from the University of California. UNIX is a registered trademark in
the U.S. and in other countries, exclusively licensed through X/Open Company, Ltd.
Sun, Sun Microsystems, the Sun logo, Java, AnswerBook2, docs.sun.com, and Solaris are trademarks or registered trademarks of Sun
Microsystems, Inc. in the U.S. and in other countries.
AMD Opteron is a trademark or registered trademark of Advanced Microdevices, Inc.
All SPARC trademarks are used under license and are trademarks or registered trademarks of SPARC International, Inc. in the U.S. and in other
countries. Products bearing SPARC trademarks are based upon an architecture developed by Sun Microsystems, Inc.
The OPEN LOOK and Sun™ Graphical User Interface was developed by Sun Microsystems, Inc. for its users and licensees. Sun acknowledges
the pioneering efforts of Xerox in researching and developing the concept of visual or graphical user interfaces for the computer industry. Sun
holds a non-exclusive license from Xerox to the Xerox Graphical User Interface, which license also covers Sun’s licensees who implement OPEN
LOOK GUIs and otherwise comply with Sun’s written license agreements.
U.S. Government Rights—Commercial use. Government users are subject to the Sun Microsystems, Inc. standard license agreement and
applicable provisions of the FAR and its supplements.
DOCUMENTATION IS PROVIDED "AS IS" AND ALL EXPRESS OR IMPLIED CONDITIONS, REPRESENTATIONS AND WARRANTIES,
INCLUDING ANY IMPLIED WARRANTY OF MERCHANTABILITY, FITNESS FOR A PARTICULAR PURPOSE OR NON-INFRINGEMENT,
ARE DISCLAIMED, EXCEPT TO THE EXTENT THAT SUCH DISCLAIMERS ARE HELD TO BE LEGALLY INVALID.
Copyright 2008 Sun Microsystems, Inc., 4150 Network Circle, Santa Clara, Californie 95054, Etats-Unis. Tous droits réservés.
Sun Microsystems, Inc. a les droits de propriété intellectuels relatants à la technologie qui est décrit dans ce document. En particulier, et sans la
limitation, ces droits de propriété intellectuels peuvent inclure un ou plus des brevets américains énumérés à http://www.sun.com/patents et
un ou les brevets plus supplémentaires ou les applications de brevet en attente dans les Etats-Unis et dans les autres pays.
Ce produit ou document est protégé par un copyright et distribué avec des licences qui en restreignent l’utilisation, la copie, la distribution, et la
décompilation. Aucune partie de ce produit ou document ne peut être reproduite sous aucune forme, par quelque moyen que ce soit, sans
l’autorisation préalable et écrite de Sun et de ses bailleurs de licence, s’il y en a.
Le logiciel détenu par des tiers, et qui comprend la technologie relative aux polices de caractères, est protégé par un copyright et licencié par des
fournisseurs de Sun.
Des parties de ce produit pourront être dérivées des systèmes Berkeley BSD licenciés par l’Université de Californie. UNIX est une marque
déposée aux Etats-Unis et dans d’autres pays et licenciée exclusivement par X/Open Company, Ltd.
Sun, Sun Microsystems, le logo Sun, Java, AnswerBook2, docs.sun.com, et Solaris sont des marques de fabrique ou des marques déposées de
Sun Microsystems, Inc. aux Etats-Unis et dans d’autres pays.
AMD Opteron est une marque de fabrique ou une marque deposee de Advanced Microdevices, Inc.
Toutes les marques SPARC sont utilisées sous licence et sont des marques de fabrique ou des marques déposées de SPARC International, Inc.
aux Etats-Unis et dans d’autres pays. Les produits portant les marques SPARC sont basés sur une architecture développée par Sun
Microsystems, Inc.
L’interface d’utilisation graphique OPEN LOOK et Sun™ a été développée par Sun Microsystems, Inc. pour ses utilisateurs et licenciés. Sun
reconnaît les efforts de pionniers de Xerox pour la recherche et le développement du concept des interfaces d’utilisation visuelle ou graphique
pour l’industrie de l’informatique. Sun détient une license non exclusive de Xerox sur l’interface d’utilisation graphique Xerox, cette licence
couvrant également les licenciées de Sun qui mettent en place l’interface d ’utilisation graphique OPEN LOOK et qui en outre se conforment aux
licences écrites de Sun.
LA DOCUMENTATION EST FOURNIE "EN L’ÉTAT" ET TOUTES AUTRES CONDITIONS, DECLARATIONS ET GARANTIES EXPRESSES
OU TACITES SONT FORMELLEMENT EXCLUES, DANS LA MESURE AUTORISEE PAR LA LOI APPLICABLE, Y COMPRIS NOTAMMENT
TOUTE GARANTIE IMPLICITE RELATIVE A LA QUALITE MARCHANDE, A L’APTITUDE A UNE UTILISATION PARTICULIERE OU A
L’ABSENCE DE CONTREFAÇON.
Sun Microsystems, Inc., 4150 Network Circle, Santa Clara, California 95054, U.S.A. All rights reserved.Copyright 2008
VTL Prime Solaris User’s Guide • September 2008 • 316855201 • A
Revision History
Name Part # Revision Date Comments
VTL Prime Solaris User’s Guide 316855201 A September
2008
EC000729
This document describes
procedures for using VTL Prime
with either the Graphical User
Interface (GUI) or Command Line
Interface (CLI).

VTL Prime Solaris User’s Guide • September 2008 • 316855201 • A

316855201 • A v
SupportInformation
SunMicrosystems,Inc.(Sun)offersseveralmethodsforyoutoobtainadditional
information.
Sun’sExternalWebSite
Sun’sexternalWebsiteprovidesmarketing,product,event,corporate,and
serviceinformation.TheexternalWebsiteisaccessibletoanyonewithaWeb
browserandanInternetconnection.
TheURLfortheSunexternalWebsiteis:
http://www.sun.com
TheURLforSunStorageTekbrand‐specificinformationis:
http://www.sun.com/storagetek
ProductPublications
TheSunDocumentationWebsiteprovidesonlineaccesstoSunproduct
publications:
http://www.docs.sun.com
ToorderhardcopyversionsofSunpublications,contactaSunsalesormarketing
representative.
PartnersSite
TheSunPartnerssiteisawebsiteforpartnerswithaSunPartnerAgreement.This
siteprovidesinformationaboutproducts,services,customersupport,upcoming
events,trainingprograms,andsalestoolstosupportpartners.Accesstothissite,

vi VTL Prime Solaris User’s Guide • September 2008 A • 316855201
beyondthePartnersLoginpage,isrestricted.OnthePartnersLoginpage,Sun
employeesandcurrentpartnerswhodonothaveaccesscanrequestaloginIDand
passwordandprospectivepartnerscanapplytobecomeSunStorageTekresellers.
TheURLforpartnerswithaSunPartnerAgreementis:
http://www.sun.com/partners/
Third‐PartyWebSites
Sunisnotresponsiblefortheavailabilityofthird‐partywebsitesmentionedinthis
document.Sundoesnotendorseandisnotresponsibleorliableforanycontent,
advertising,products,orothermaterialsthatareavailableonorthroughsuchsites
orresources.Sunwillnotberesponsibleorliableforanyactualorallegeddamage
orlosscausedbyorinconnectionwiththeuseoforrelianceonanysuchcontent,
goods,orservicesthatareavailableonorthroughsuchsitesorresources.
CustomerSupport
Customersupportisavailable24hoursaday,sevendaysaweek,tocustomerswith
SunorStorageTekmaintenancecontractsandtoSunemployees.TheURLfor
SunStorageTeksupportis:
http://www.sun.com/storagetek/support
Customer‐initiatedMaintenance
Customer‐initiatedmaintenancebeginswithatelephonecallfromyoutoSun
MicrosystemsStorageTekSupport.Youreceiveimmediateattentionfromqualified
Sunpersonnel,whorecordprobleminformationandrespondwiththeappropriate
levelofsupport.
TocontactSunMicrosystemsStorageTekSupportaboutaproblem:
1. Use the telephone and call:
✎ 800.872.4786(1.800.USA.4SUN)(insidetheUnitedStates)
✎ 800.722.4786(Canada)
Forinternationallocations,goto
http://www.sun.com/service/contacting/solution.html
fortheappropriatetelephonenumber.
2. Describe the problem to the call taker. The call taker will ask several questions
and will either route your call to or dispatch a support representative.

316855201 • A Support Information vii
Ifyouhavethefollowinginformationwhenyouplaceaservicecall,theprocess
willbemucheasier:
■Accountname
■Sitelocationnumber
■Contactname
■Telephonenumber
■Equipmentmodelnumber
■Deviceaddress
■Deviceserialnumber(ifknown)
■Urgencyofproblem
■FaultSymptomCode(FSC)
■Problemdescription
Sun’sWorldwideOffices
YoumaycontactanyofSunísworldwideofficestodiscusscompletestorage,service,
andsupportsolutionsforyourorganization.Youcanfindaddressandtelephone
numberinformationonSunísexternalWebsiteat:
http://www.sun.com/worldwide/
Commentingonthisbook
Sunwelcomesyourcommentsandsuggestionsforimprovingthisbook.Contactus
atglsfs@sun.com. Pleaseincludethetitle,partnumber,issuedate,andrevision.

VTL Prime Solaris User’s Guide • September 2008 • 316855201 • A viii
Contents
Introduction
Sun StorageTek Virtual Tape Library Prime (VTL Prime) overview . . . . . . . . . . . . . . . . .1
Single Instance Repository . . . . . . . . . . . . . . . . . . . . . . . . . . . . . . . . . . . . . . . . . . . . . . . .1
VTL Prime Configuration . . . . . . . . . . . . . . . . . . . . . . . . . . . . . . . . . . . . . . . . . . . . . . . . . .2
VTL Prime components . . . . . . . . . . . . . . . . . . . . . . . . . . . . . . . . . . . . . . . . . . . . . . . . . .2
Basic Features
Launch the Console . . . . . . . . . . . . . . . . . . . . . . . . . . . . . . . . . . . . . . . . . . . . . . . . . . . . .4
Search for tapes . . . . . . . . . . . . . . . . . . . . . . . . . . . . . . . . . . . . . . . . . . . . . . . . . . . . . . . .4
Understanding the objects in the tree . . . . . . . . . . . . . . . . . . . . . . . . . . . . . . . . . . . . . . . .4
VirtualTape Library System object . . . . . . . . . . . . . . . . . . . . . . . . . . . . . . . . . . . . . . .4
Virtual Tape Libraries . . . . . . . . . . . . . . . . . . . . . . . . . . . . . . . . . . . . . . . . . . . . . . .4
Virtual Tape Drives . . . . . . . . . . . . . . . . . . . . . . . . . . . . . . . . . . . . . . . . . . . . . . . . .4
Virtual Vault. . . . . . . . . . . . . . . . . . . . . . . . . . . . . . . . . . . . . . . . . . . . . . . . . . . . . . .5
Replica Resources . . . . . . . . . . . . . . . . . . . . . . . . . . . . . . . . . . . . . . . . . . . . . . . . .5
Deduplication Policies . . . . . . . . . . . . . . . . . . . . . . . . . . . . . . . . . . . . . . . . . . . . . . .5
Database. . . . . . . . . . . . . . . . . . . . . . . . . . . . . . . . . . . . . . . . . . . . . . . . . . . . . . . . .5
Disk Resources . . . . . . . . . . . . . . . . . . . . . . . . . . . . . . . . . . . . . . . . . . . . . . . . . . . .5
SAN Clients object . . . . . . . . . . . . . . . . . . . . . . . . . . . . . . . . . . . . . . . . . . . . . . . . . . .5
Reports object . . . . . . . . . . . . . . . . . . . . . . . . . . . . . . . . . . . . . . . . . . . . . . . . . . . . . .5
Create a report . . . . . . . . . . . . . . . . . . . . . . . . . . . . . . . . . . . . . . . . . . . . . . . . . . . .6
View a report . . . . . . . . . . . . . . . . . . . . . . . . . . . . . . . . . . . . . . . . . . . . . . . . . . . . . .6
Export data from a report . . . . . . . . . . . . . . . . . . . . . . . . . . . . . . . . . . . . . . . . . . . .6
Physical Resources object . . . . . . . . . . . . . . . . . . . . . . . . . . . . . . . . . . . . . . . . . . . . .6
Rescan physical devices . . . . . . . . . . . . . . . . . . . . . . . . . . . . . . . . . . . . . . . . . . . . . .7
Create virtual tape libraries . . . . . . . . . . . . . . . . . . . . . . . . . . . . . . . . . . . . . . . . . . . . . . . .8
Create virtual tapes . . . . . . . . . . . . . . . . . . . . . . . . . . . . . . . . . . . . . . . . . . . . . . . . . . . . .12
How virtual tapes are allocated from multiple LUNs . . . . . . . . . . . . . . . . . . . . . . . . . . . .16
Round Robin Logic with Tape Capacity on Demand disabled . . . . . . . . . . . . . . . . .16
Round Robin Logic with Tape Capacity on Demand enabled . . . . . . . . . . . . . . . . .16
Considerations . . . . . . . . . . . . . . . . . . . . . . . . . . . . . . . . . . . . . . . . . . . . . . . . . . . . .17
Add SAN Clients (backup servers) . . . . . . . . . . . . . . . . . . . . . . . . . . . . . . . . . . . . . . . . .18
Assign virtual tape libraries to clients . . . . . . . . . . . . . . . . . . . . . . . . . . . . . . . . . . . . . . .19
Mirror the VTL database . . . . . . . . . . . . . . . . . . . . . . . . . . . . . . . . . . . . . . . . . . . . . . . . .21
Check mirroring status . . . . . . . . . . . . . . . . . . . . . . . . . . . . . . . . . . . . . . . . . . . . .21
Replace a failed disk . . . . . . . . . . . . . . . . . . . . . . . . . . . . . . . . . . . . . . . . . . . . . . .22
Fix a minor disk failure . . . . . . . . . . . . . . . . . . . . . . . . . . . . . . . . . . . . . . . . . . . . .22
Replace a disk that is part of an active mirror configuration . . . . . . . . . . . . . . . . .22
Swap the primary disk with the mirrored copy. . . . . . . . . . . . . . . . . . . . . . . . . . . .22
Remove a mirror configuration . . . . . . . . . . . . . . . . . . . . . . . . . . . . . . . . . . . . . . .22
Set Console options . . . . . . . . . . . . . . . . . . . . . . . . . . . . . . . . . . . . . . . . . . . . . . . . . . . .23
Manage Administrators . . . . . . . . . . . . . . . . . . . . . . . . . . . . . . . . . . . . . . . . . . . . . . . . . .25
VTL compression . . . . . . . . . . . . . . . . . . . . . . . . . . . . . . . . . . . . . . . . . . . . . . . . . . . . . .26

VTL Prime Solaris User’s Guide • September 2008 • 316855201 • A ix
Enable/disable compression . . . . . . . . . . . . . . . . . . . . . . . . . . . . . . . . . . . . . . . . .26
View the Event Log . . . . . . . . . . . . . . . . . . . . . . . . . . . . . . . . . . . . . . . . . . . . . . . . . . . . .27
Sort the Event Log. . . . . . . . . . . . . . . . . . . . . . . . . . . . . . . . . . . . . . . . . . . . . . . . .27
Filter the Event Log . . . . . . . . . . . . . . . . . . . . . . . . . . . . . . . . . . . . . . . . . . . . . . . .27
Print/export the Event Log. . . . . . . . . . . . . . . . . . . . . . . . . . . . . . . . . . . . . . . . . . .27
Refer to the Attention Required tab . . . . . . . . . . . . . . . . . . . . . . . . . . . . . . . . . . . . . . . .28
Set Server properties . . . . . . . . . . . . . . . . . . . . . . . . . . . . . . . . . . . . . . . . . . . . . . . . . . .29
Apply software patch updates . . . . . . . . . . . . . . . . . . . . . . . . . . . . . . . . . . . . . . . . . . . . .29
Configure VTL to send SNMP traps . . . . . . . . . . . . . . . . . . . . . . . . . . . . . . . . . . . . . . . .30
Appliance health checking . . . . . . . . . . . . . . . . . . . . . . . . . . . . . . . . . . . . . . . . . . . . . . .30
Data Deduplication
Enable deduplication . . . . . . . . . . . . . . . . . . . . . . . . . . . . . . . . . . . . . . . . . . . . . . . . . . . .32
Replicating the deduplication repository . . . . . . . . . . . . . . . . . . . . . . . . . . . . . . . . . . . . .33
Requirements . . . . . . . . . . . . . . . . . . . . . . . . . . . . . . . . . . . . . . . . . . . . . . . . . . . . .34
Connect appliances . . . . . . . . . . . . . . . . . . . . . . . . . . . . . . . . . . . . . . . . . . . . . . . . .35
Add the replication target server . . . . . . . . . . . . . . . . . . . . . . . . . . . . . . . . . . . . . . .35
Data deduplication policies . . . . . . . . . . . . . . . . . . . . . . . . . . . . . . . . . . . . . . . . . . . . . . .37
Add deduplication policies . . . . . . . . . . . . . . . . . . . . . . . . . . . . . . . . . . . . . . . . . . . .37
Modify deduplication policies . . . . . . . . . . . . . . . . . . . . . . . . . . . . . . . . . . . . . . . . . .40
Perform deduplication . . . . . . . . . . . . . . . . . . . . . . . . . . . . . . . . . . . . . . . . . . . . . . . . . . .40
Monitor deduplication and view statistics . . . . . . . . . . . . . . . . . . . . . . . . . . . . . . . . . . . .41
Deduplication Policies object . . . . . . . . . . . . . . . . . . . . . . . . . . . . . . . . . . . . . . . . . .41
Individual deduplication policies . . . . . . . . . . . . . . . . . . . . . . . . . . . . . . . . . . . . . . .42
Repository statistics . . . . . . . . . . . . . . . . . . . . . . . . . . . . . . . . . . . . . . . . . . . . . . . . .46
Reclaim data repository disk space . . . . . . . . . . . . . . . . . . . . . . . . . . . . . . . . . . . . . . . .48
Replicate Data
Remote Replication. . . . . . . . . . . . . . . . . . . . . . . . . . . . . . . . . . . . . . . . . . . . . . . .49
Local Replication. . . . . . . . . . . . . . . . . . . . . . . . . . . . . . . . . . . . . . . . . . . . . . . . . .49
Types of replication . . . . . . . . . . . . . . . . . . . . . . . . . . . . . . . . . . . . . . . . . . . . . . . . . . . . .50
Auto Replication . . . . . . . . . . . . . . . . . . . . . . . . . . . . . . . . . . . . . . . . . . . . . . . . . . . . . . .51
Remote Copy . . . . . . . . . . . . . . . . . . . . . . . . . . . . . . . . . . . . . . . . . . . . . . . . . . . . . . . . .51
Requirements . . . . . . . . . . . . . . . . . . . . . . . . . . . . . . . . . . . . . . . . . . . . . . . . . . . . . . . . .52
Configuring replication for virtual tapes . . . . . . . . . . . . . . . . . . . . . . . . . . . . . . . . . . . . . .53
Configuring replication for Virtual Index Tapes (VITs) . . . . . . . . . . . . . . . . . . . . . . . . . .58
Check replication status . . . . . . . . . . . . . . . . . . . . . . . . . . . . . . . . . . . . . . . . . . . . . . . . .58
Promote a replica resource . . . . . . . . . . . . . . . . . . . . . . . . . . . . . . . . . . . . . . . . . . . . . . .59
Change your replication configuration options . . . . . . . . . . . . . . . . . . . . . . . . . . . . . . . .60
Suspend/resume replication schedule . . . . . . . . . . . . . . . . . . . . . . . . . . . . . . . . . . . . . .60
Manually start the replication process . . . . . . . . . . . . . . . . . . . . . . . . . . . . . . . . . . . . . . .60
Remove a replication configuration . . . . . . . . . . . . . . . . . . . . . . . . . . . . . . . . . . . . . . . . .60
Fibre Channel Target Mode
Overview . . . . . . . . . . . . . . . . . . . . . . . . . . . . . . . . . . . . . . . . . . . . . . . . . . . . . . . . . . . . .62

VTL Prime Solaris User’s Guide • September 2008 • 316855201 • A x
Installation and configuration overview . . . . . . . . . . . . . . . . . . . . . . . . . . . . . . . . . . . . . .63
Configure Fibre Channel hardware on server . . . . . . . . . . . . . . . . . . . . . . . . . . . . . . . . .64
Ports . . . . . . . . . . . . . . . . . . . . . . . . . . . . . . . . . . . . . . . . . . . . . . . . . . . . . . . . . . . .64
Zoning . . . . . . . . . . . . . . . . . . . . . . . . . . . . . . . . . . . . . . . . . . . . . . . . . . . . . . . . . . .64
Switches . . . . . . . . . . . . . . . . . . . . . . . . . . . . . . . . . . . . . . . . . . . . . . . . . . . . . . . . .65
Persistent binding . . . . . . . . . . . . . . . . . . . . . . . . . . . . . . . . . . . . . . . . . . . . . . . . . .66
VSA . . . . . . . . . . . . . . . . . . . . . . . . . . . . . . . . . . . . . . . . . . . . . . . . . . . . . . . . . . . . .66
QLogic HBAs . . . . . . . . . . . . . . . . . . . . . . . . . . . . . . . . . . . . . . . . . . . . . . . . . . . . . .67
QLogic Multi-ID HBAs . . . . . . . . . . . . . . . . . . . . . . . . . . . . . . . . . . . . . . . . . . . . . . .68
QLA2X00FS.CONF file . . . . . . . . . . . . . . . . . . . . . . . . . . . . . . . . . . . . . . . . . . . . . .69
Configure Fibre Channel hardware on clients . . . . . . . . . . . . . . . . . . . . . . . . . . . . . . . . .71
NetWare clients . . . . . . . . . . . . . . . . . . . . . . . . . . . . . . . . . . . . . . . . . . . . . . . . . . . .71
HBA settings for Fibre Channel clients . . . . . . . . . . . . . . . . . . . . . . . . . . . . . . . . . .72
Windows 2000/2003 . . . . . . . . . . . . . . . . . . . . . . . . . . . . . . . . . . . . . . . . . . . . . . . .72
HP-UX 10, 11, and 11i . . . . . . . . . . . . . . . . . . . . . . . . . . . . . . . . . . . . . . . . . . . . . . .73
AIX 4.3 and higher . . . . . . . . . . . . . . . . . . . . . . . . . . . . . . . . . . . . . . . . . . . . . . . . . .73
Linux – all versions . . . . . . . . . . . . . . . . . . . . . . . . . . . . . . . . . . . . . . . . . . . . . . . . .73
Solaris 7, 8, 9, and 10 . . . . . . . . . . . . . . . . . . . . . . . . . . . . . . . . . . . . . . . . . . . . . . .74
NetWare – all versions . . . . . . . . . . . . . . . . . . . . . . . . . . . . . . . . . . . . . . . . . . . . . . .74
Verify your hardware configuration . . . . . . . . . . . . . . . . . . . . . . . . . . . . . . . . . . . . . . . . .75
Set QLogic ports to target mode . . . . . . . . . . . . . . . . . . . . . . . . . . . . . . . . . . . . . . . . . . .78
Single port QLogic HBAs . . . . . . . . . . . . . . . . . . . . . . . . . . . . . . . . . . . . . . . . . . . . .78
Multi port QLogic HBAs . . . . . . . . . . . . . . . . . . . . . . . . . . . . . . . . . . . . . . . . . . . . . .79
Associate World Wide Port Names with clients . . . . . . . . . . . . . . . . . . . . . . . . . . . . . . .80
iSCSI Clients
Overview . . . . . . . . . . . . . . . . . . . . . . . . . . . . . . . . . . . . . . . . . . . . . . . . . . . . . . . . . . . . .82
Supported platforms . . . . . . . . . . . . . . . . . . . . . . . . . . . . . . . . . . . . . . . . . . . . . . . .82
Windows configuration . . . . . . . . . . . . . . . . . . . . . . . . . . . . . . . . . . . . . . . . . . . . . . . . . .83
Requirements . . . . . . . . . . . . . . . . . . . . . . . . . . . . . . . . . . . . . . . . . . . . . . . . . . . . .83
Enable iSCSI . . . . . . . . . . . . . . . . . . . . . . . . . . . . . . . . . . . . . . . . . . . . . . . . . . . . . .83
Register client initiators with your VTL server . . . . . . . . . . . . . . . . . . . . . . . . . . . . .84
Add your iSCSI client . . . . . . . . . . . . . . . . . . . . . . . . . . . . . . . . . . . . . . . . . . . . . . . .85
Create targets for the iSCSI client to log onto . . . . . . . . . . . . . . . . . . . . . . . . . . . . .86
Log the client onto the target . . . . . . . . . . . . . . . . . . . . . . . . . . . . . . . . . . . . . . . . . .87
Disable iSCSI . . . . . . . . . . . . . . . . . . . . . . . . . . . . . . . . . . . . . . . . . . . . . . . . . . . . . .87
Linux client configuration . . . . . . . . . . . . . . . . . . . . . . . . . . . . . . . . . . . . . . . . . . . . . . . .88
Prepare the iSCSI initiator . . . . . . . . . . . . . . . . . . . . . . . . . . . . . . . . . . . . . . . . . . . .88
Add your iSCSI client . . . . . . . . . . . . . . . . . . . . . . . . . . . . . . . . . . . . . . . . . . . . . . . .88
Create targets for the iSCSI client to log onto . . . . . . . . . . . . . . . . . . . . . . . . . . . . .89
Log the client onto the target . . . . . . . . . . . . . . . . . . . . . . . . . . . . . . . . . . . . . . . . . .90
Email Alerts
Configure Email Alerts . . . . . . . . . . . . . . . . . . . . . . . . . . . . . . . . . . . . . . . . . . . . . . . . . .91
Modify Email Alerts properties . . . . . . . . . . . . . . . . . . . . . . . . . . . . . . . . . . . . . . . . . . . .95
Script/program trigger information . . . . . . . . . . . . . . . . . . . . . . . . . . . . . . . . . . . . . . . . .96

VTL Prime Solaris User’s Guide • September 2008 • 316855201 • A xi
Customize email for a specific trigger . . . . . . . . . . . . . . . . . . . . . . . . . . . . . . . . . . .96
New script/program . . . . . . . . . . . . . . . . . . . . . . . . . . . . . . . . . . . . . . . . . . . . . . . . .96
Command Line
Using the command line utility . . . . . . . . . . . . . . . . . . . . . . . . . . . . . . . . . . . . . . . . . . . .98
Commands . . . . . . . . . . . . . . . . . . . . . . . . . . . . . . . . . . . . . . . . . . . . . . . . . . . . . . . . . . .98
Common arguments . . . . . . . . . . . . . . . . . . . . . . . . . . . . . . . . . . . . . . . . . . . . . . . . . . . .99
Login/logout to the VTL Server . . . . . . . . . . . . . . . . . . . . . . . . . . . . . . . . . . . . . . . . . . .100
Virtual devices / Clients . . . . . . . . . . . . . . . . . . . . . . . . . . . . . . . . . . . . . . . . . . . . . . . . .101
System configuration . . . . . . . . . . . . . . . . . . . . . . . . . . . . . . . . . . . . . . . . . . . . . . . . . .114
Replication . . . . . . . . . . . . . . . . . . . . . . . . . . . . . . . . . . . . . . . . . . . . . . . . . . . . . . . . . .116
Physical devices . . . . . . . . . . . . . . . . . . . . . . . . . . . . . . . . . . . . . . . . . . . . . . . . . . . . . .122
Reports . . . . . . . . . . . . . . . . . . . . . . . . . . . . . . . . . . . . . . . . . . . . . . . . . . . . . . . . . . . . .124
Event Log . . . . . . . . . . . . . . . . . . . . . . . . . . . . . . . . . . . . . . . . . . . . . . . . . . . . . . . . . . .130
Technical support . . . . . . . . . . . . . . . . . . . . . . . . . . . . . . . . . . . . . . . . . . . . . . . . . . . . .131
Appendix
System security . . . . . . . . . . . . . . . . . . . . . . . . . . . . . . . . . . . . . . . . . . . . . . . . . . . . . . .132
Install an operating system on your VTL Server . . . . . . . . . . . . . . . . . . . . . . . . . . . . . .134
Install Solaris . . . . . . . . . . . . . . . . . . . . . . . . . . . . . . . . . . . . . . . . . . . . . . . . . . . . .134
Install a certified operating system on your VTL appliance . . . . . . . . . . . . . . . . . . . . . .134
Console installation . . . . . . . . . . . . . . . . . . . . . . . . . . . . . . . . . . . . . . . . . . . . . . . . . . . .137
Pre-installation . . . . . . . . . . . . . . . . . . . . . . . . . . . . . . . . . . . . . . . . . . . . . . . . . . . .137
Installation . . . . . . . . . . . . . . . . . . . . . . . . . . . . . . . . . . . . . . . . . . . . . . . . . . . . . . .137
Troubleshooting
General Console operations . . . . . . . . . . . . . . . . . . . . . . . . . . . . . . . . . . . . . . . . . . . . .138
Physical resources . . . . . . . . . . . . . . . . . . . . . . . . . . . . . . . . . . . . . . . . . . . . . . . . . . . .140
Logical resources . . . . . . . . . . . . . . . . . . . . . . . . . . . . . . . . . . . . . . . . . . . . . . . . . . . . .141
Client cannot see tape library/drive as provisioned by VTL . . . . . . . . . . . . . . . . . .143
Take an X-ray of your system for technical support . . . . . . . . . . . . . . . . . . . . . . . . . . .145
Index
VTL Prime Solaris User’s Guide • September 2008 • 316855201 • A 1
Introduction
Sun StorageTek Virtual Tape Library Prime (VTL Prime) overview
Sun StorageTek VTL Prime increases the speed and reliability of backups that use
standard third-party backup applications by leveraging disk to emulate industry-
standard tape libraries. VTL leverages your existing Fibre Channel or IP SAN to
transfer data to and restore data from a disk-based virtual tape at ultra-high speeds.
Since VTL Prime uses disk to back up data, it eliminates the media and mechanical
errors that can occur with physical tapes and drives. And, because VTL Prime can
emulate more tape drives than your physical tape library really has, more backup
streams can run simultaneously, enabling organizations to easily complete their
backups within the allotted backup window.
Single Instance Repository
Single Instance Repository (SIR) works seamlessly with VTL Prime to eliminate
redundant data without impacting your established backup window, thereby
minimizing storage requirements. Deduplication occurs as a separate, off-line
process.
After a virtual tape is unloaded
from a tape drive and moved to
a slot, the deduplication
process scans the tape,
analyzes the data, and
determines whether data is
unique or has already been
copied to the SIR repository.
The process then passes only
single instances of unique data
to the SIR repository; data is
compressed automatically. The
original virtual tape is replaced
with a virtual index tape (VIT)
pointing to SIR storage, freeing
considerable space on the tape
for more data.
Deduplication occurs as a separate, off-line process. Backup and restore jobs have
higher priority than deduplication. Deduplication jobs are temporarily suspended
when the tape being deduplicated is needed for backup or restore; when the backup
application finishes using that particular tape, the deduplication job automatically
resumes from where it left off.
VTL Prime Solaris User’s Guide • September 2008 • 316855201 • A 2
If replication is configured, SIR replicates its repository and metadata. Data
duplicated across remote sites is deduplicated at the central site, enabling only
globally unique data to be replicated to the disaster recovery site.
VTL Prime Configuration
Once VTL Prime is configured, the backup software treats the virtual tape library as
though it were just another standalone tape library attached to the backup server.
This configuration is ideal for organizations that already have a backup process in
place with which they are comfortable but which is not meeting all of their backup
objectives. Adding a VTL Prime appliance as another tape library allows you to
easily increase your parallel backup streams and take advantage of VTL Prime’s
rapid data recovery without having to alter your current configuration. With the
backup application managing the entire backup process, a virtual tape is just
another tape.
VTL Prime components
There are three components to VTL Prime:
• VTL Prime Server - Manages the VTL Prime system.
• VTL Prime Console - The graphical administration tool where you configure
VTL Prime add/configure clients, set properties, and configure deduplication
policies.
• VTL Prime Clients - The backup servers that use VTL Prime. VTL Prime
supports Fibre Channel, SCSI, and iSCSI backup servers on most major
platforms.
VTL Prime Solaris User’s Guide • September 2008 • 316855201 • A 3
Basic Features
The VTL Console displays the configuration for your VTL appliance. The information
is organized in a familiar Explorer-like tree view.
The tree allows you to navigate the various VTL appliances and their configuration
objects. You can expand or collapse the display to show only the information that
you wish to view. To expand an item that is collapsed, click on the symbol next to
the item. To collapse an item, click on the symbol next to the item. Double-
clicking on the item will also toggle the expanded/collapsed view of the item.
You need to connect to a server before you can expand it.
When you highlight any object in the tree, the right-hand pane contains detailed
information about the object. You can select one of the tabs for more information.
The Console log located at the bottom of the window displays information about the
local version of the Console. The log features a drop-down box that allows you to
see activity from this Console session.

VTL Prime Solaris User’s Guide • September 2008 • 316855201 • A 4
Launch the Console
On the VTL server or a Solaris workstation with vtlconsole installed, change the
directory location to the directory where the vtlconsole program resides and start the
vtlconsole GUI:
cd /usr/local/vtlconsole
./vtlconsole&
Search for tapes
The Console has a search feature that helps you find any virtual tape. To search:
1. Select Edit menu --> Find.
2. Enter the full barcode.
Once you click Search, you will be taken directly to that tape in the tree.
Understanding the objects in the tree
VirtualTape Library System object
The VirtualTape Library System object contains all of the information about your VTL
system:
Virtual Tape
Libraries This object lists the virtual tape libraries that are currently available. Each virtual
tape library consists of one or more virtual tape drives and one or more virtual tapes.
Each virtual tape library and drive can be assigned to one or more backup servers
(SAN clients). Each library’s virtual tapes are sorted in barcode order.
For each library, you can:
• Create/delete virtual tapes
• Create/delete virtual tape drives
• Enable replication for tapes in the library
• Set tape properties for the library (enable/modify tape capacity on demand,
change maximum tape capacity)
For each virtual tape, you can:
• Move the virtual tape to a slot, drive, or to the virtual vault
• Enable replication for that tape or make a single remote copy
• Change tape properties (change barcode, enable/modify tape capacity on
demand, enable write protection, and configure Auto Archive/Replication)
Virtual Tape
Drives This object lists the standalone virtual tape drives that are currently available. Each
virtual tape drive can be assigned to one or more backup servers (SAN clients). For
each virtual tape drive, you can create/delete virtual tapes.
VTL Prime Solaris User’s Guide • September 2008 • 316855201 • A 5
Virtual Vault This object lists the virtual tapes that are currently in the virtual vault. The virtual
vault is a tape storage area for tapes that are not inside a virtual tape library. Virtual
tapes will only appear in the virtual vault after they have been moved from a virtual
tape library. Virtual tapes in the vault can be replicated, exported to a physical tape,
or moved to a virtual library or standalone drive. There is no limit to the number of
tapes that can be in the virtual vault. Tapes in the vault are sorted in barcode order.
Replica
Resources This object lists the Replica Resources that are on this VTL server. Replica
Resources store data from virtual tapes that has been replicated from a remote
server. Clients do not have access to Replica Resources.
Deduplication
Policies This object lists the deduplication policies that have been set for virtual tapes. You
can create or modify policies from this object, set clusters, perform deduplication,
and view deduplication statistics and status.
Database This object contains configuration information for the VTL. The database can be
mirrored for high availability. Refer to ‘Mirror the VTL database’ for more detailed
information.
Disk Resources This object lists the virtual disks that have been allocated for
VirtualTape
icons The following table describes the icons that are used to describe virtual tape drives
and virtual tapes in the console:
SAN Clients object
SAN clients are the backup servers that use the VTL. VTL supports Fibre Channel
and iSCSI backup servers. For client configuration information, refer to the
appropriate sections in this guide.
Reports object
VTL provides reports that offer a wide variety of information:
• Throughput
• Physical resources - allocation and configuration
• Disk space usage
• Fibre Channel adapters configuration
• Replication status
• Virtual tape/library information
• Job status
Icon Description
The C icon indicates that this virtual tape drive has compression
enabled.

VTL Prime Solaris User’s Guide • September 2008 • 316855201 • A 6
Create a report 1. To create a report, right-click on the Reports object and select New.
2. Select a report.
Depending upon which report you select, additional windows appear to allow
you to filter the information for the report.
3. If applicable, set the date or date range for the report and indicate which SAN
Clients or resources to use in the report.
Selecting Past 30 Days, or Past 7 Days will create reports that generate data
relative to the time of execution.
Include All Resources and Clients – Includes all current and previous
configurations for this server (including clients that you may have changed or
deleted).
Include Current Active Resources and Clients Only – Includes only those
resources and clients that are currently configured for this server.
The Replication Status Report has a different dialog that lets you specify a range
by selecting starting and ending dates.
4. Enter a name for the report.
5. Confirm all information and click Finish to create the report.
View a report When you create a report, it is displayed in the right-hand pane and is added
beneath the Reports object in the configuration tree.
Expand the Reports object to see the existing reports (including reports created
using the Command Line Interface) available for this server.
When you select an existing report, it is displayed in the right-hand pane.
Export data
from a report You can save the data from the server and device throughput and usage reports.
The data can be saved in a comma delimited (.csv) or tab delimited (.txt) text file. To
export information, right-click on a report that is generated and select Export.
Physical Resources object
Physical resources are all of your SCSI adapters/FC HBAs and storage devices.
Storage devices include hard disks, tape drives, and tape libraries. Hard disks are
used for creating virtual tape libraries/drives and virtual tapes.
From Physical Resources, you can prepare new hardware and rescan devices.
VTL Prime Solaris User’s Guide • September 2008 • 316855201 • A 7
Physical
resource icons The following table describes the icons that are used to describe physical resources
in the console:
Rescan physical devices
1. To rescan devices, right-click on Physical Resources and select Rescan.
You only rescan at the adapter level but Solaris only supports a system rescan,
which rescans all adapters.
2. Determine what you want to rescan.
If you are discovering new devices, set the range of adapters, SCSI IDs, and
LUNs that you want to scan.
Use Report LUNs - The system sends a SCSI request to LUN 0 and asks for a
list of LUNs. Note that this SCSI command is not supported by all devices.
Stop scan when a LUN without a device is encountered - This option will scan
LUNs sequentially and then stop after the last LUN is found. Use this option only
if all of your LUNs are sequential.
Icon Description
The T icon indicates that this is a target port.
The I icon indicates that this is an initiator port.
The red arrow indicates that this Fibre Channel HBA is down and cannot
access its storage.
The V icon indicates that this disk has been virtualized.
The F icon indicates that this is shared storage and is being used by
another server. The Owner field lists the other server.
VTL Prime Solaris User’s Guide • September 2008 • 316855201 • A 8
Create virtual tape libraries
You can create a virtual tape library in the following two ways:
• Use the configuration wizard - If you have already configured your system,
you can launch the wizard by right-clicking on the VirtualTape Library
System object in the console and selecting Configuration Wizard.
• Right-click on the Virtual Tape Libraries object and select New.
Note: If you have recently added additional storage to your VTL system, before you
can use it to create a virtual tape library, you must reserve it for virtual use. To do
this: Right-click on Physical Resources and select Prepare Devices. Set hard drives
to Reserved for Virtual Device.
1. Select the tape library that you are emulating.
VTL Prime Solaris User’s Guide • September 2008 • 316855201 • A 9
2. Enter information about the tape drives in your library.
Virtual Drive Name Prefix - The prefix is combined with a number to form the
name of the virtual drive.
Total Virtual Drives - Determines the number of virtual tape drives available.
This translates into the number of concurrent backup jobs that can run. Backup
software licensing considerations may affect the number of tape drives you wish
to present to each client server. This number can exceed the standard number of
drives for the library as long as the backup software supports it.
3. Determine if you want to use Auto Replication for this virtual library.

VTL Prime Solaris User’s Guide • September 2008 • 316855201 • A 10
Auto Replication replicates data to another VTL server whenever a virtual tape is
moved to an IE slot from a virtual library (such as from a backup application or
other utility). If selected, determine whether you want the virtual tape copied
(retained) or moved (removed) after the data is replicated. If you select Move,
indicate how long to wait before deleting it. Also, select the remote server from
the list of existing target servers. You can also click Add to add another VTL
server.
4. Enter barcode information for the virtual library.
Barcode Starts/Ends - Indicate a range of barcodes that will be used when
creating virtual tapes. By default, barcodes increment in an alphanumeric
sequence; for example, XXX0009 to XXX000A. In order to set the barcode to
increment in a numeric sequence (XXX0009 to XXX0010), you have to set the
last three digits of the Barcode Ends field to 999; for example, XXX0999
Note that for IBM libraries, the default barcode range is set to six characters.
Slot - Maximum number of tape slots in your tape library.
Import/Export Slots - Number of slots used to take tapes in and out of the bin.
VTL Prime Solaris User’s Guide • September 2008 • 316855201 • A 11
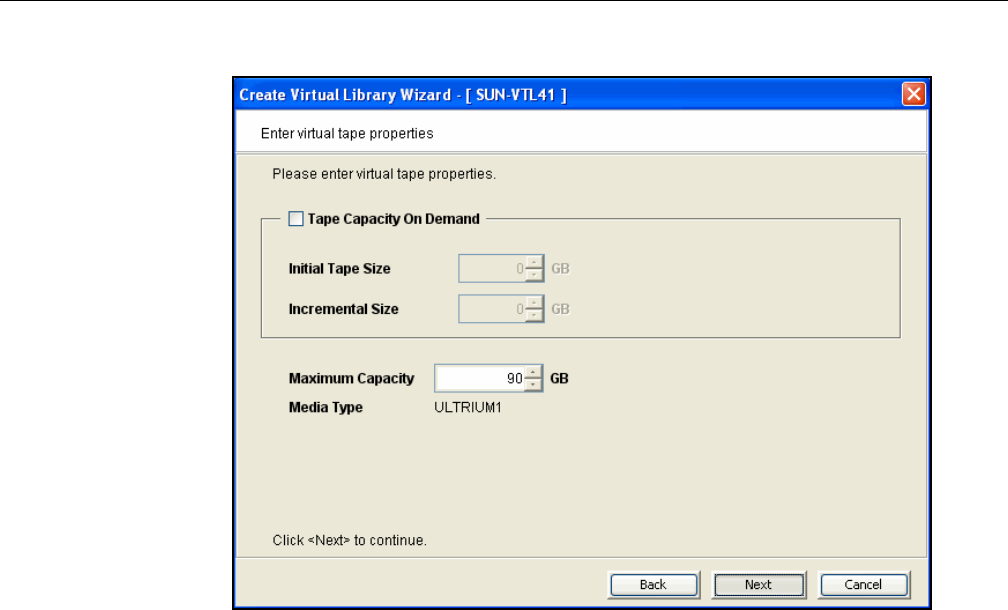
5. Enter the guidelines for expanding virtual tape capacity.
Tape Capacity On Demand - Allows you to create small resources for your
tapes and then automatically allocate additional space when needed. This can
save considerable amounts of disk space without affecting system performance.
If you do not select this option, VTL will allocate each virtual tape at the full size
of the tape you are emulating.
Initial Tape Size/Incremental Size - Enter the initial size of each resource and the
amount by which it will be incremented.
Maximum Capacity - Indicate the maximum size for each tape.
6. Verify all information and then click Finish to create the virtual tape library.
You will be prompted to create virtual tapes. Answer Yes to continue. Refer to
the following section for more information about creating virtual tapes.
VTL Prime Solaris User’s Guide • September 2008 • 316855201 • A 12
Create virtual tapes
You can create virtual tapes in the following two ways:
• Use the configuration wizard - If you have already configured your system,
you can launch the wizard by right-clicking on the VirtualTape Library
System object in the console and selecting Configuration Wizard.
• Right-click on a virtual tape library or on the Tapes object and select New
Tape(s).
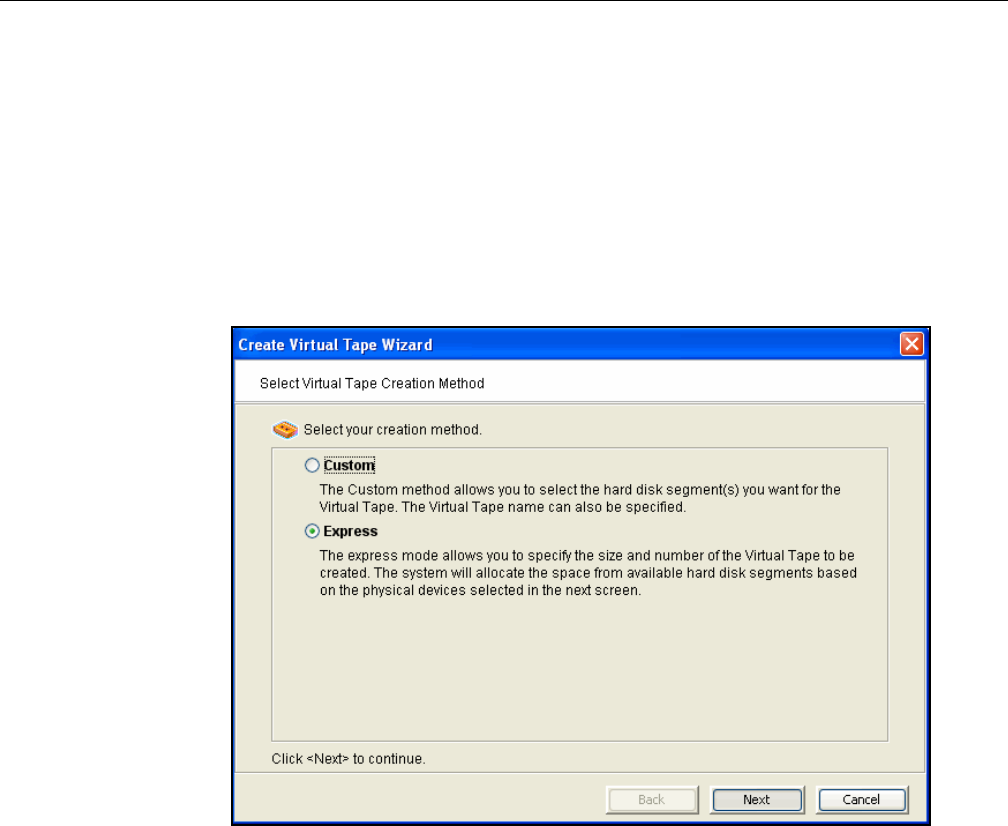
1. Select how you want to create the virtual tape(s).
Custom lets you select which physical device(s) to use and lets you designate
how much space to allocate from each.
Express automatically creates the resource(s) for you using an available
device(s). If you select Express, you can create multiple virtual tapes at the
same time.
VTL Prime Solaris User’s Guide • September 2008 • 316855201 • A 13
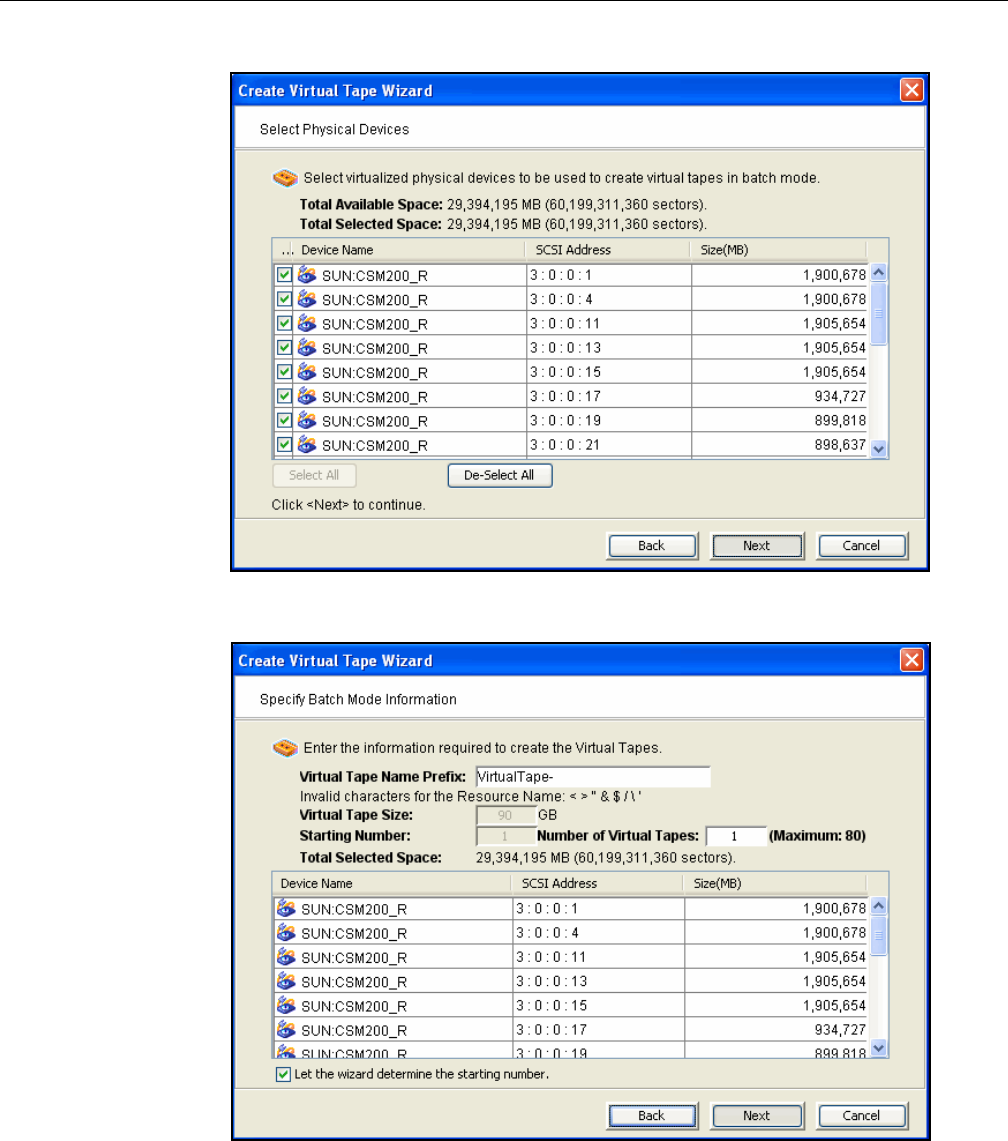
2. Specify which physical device should be used to create the virtual tapes.
3. Specify Batch Mode information.
VTL Prime Solaris User’s Guide • September 2008 • 316855201 • A 14
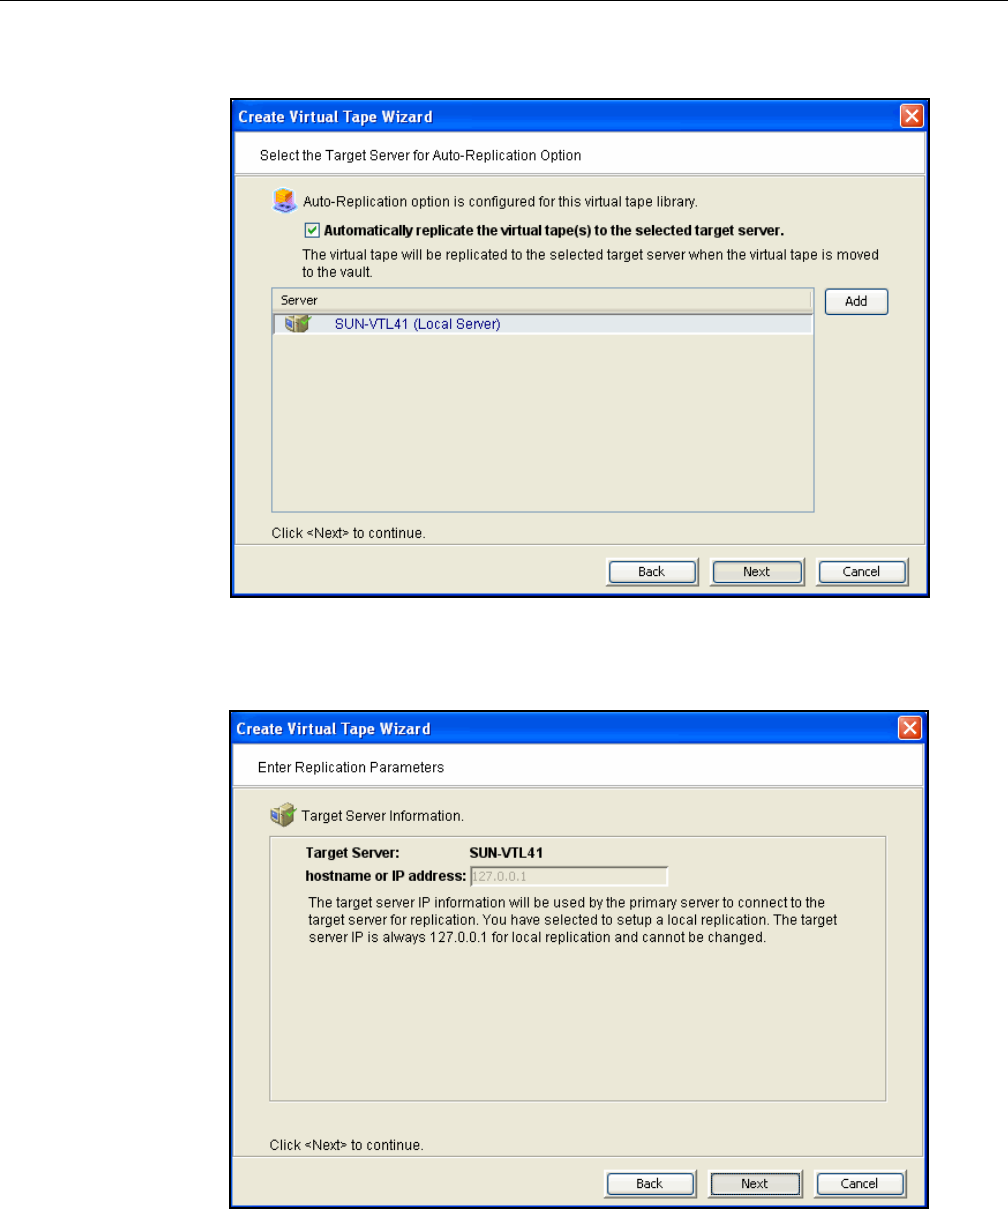
4. If Auto Replication is enabled for the virtual library and you want it enabled for
this/these tapes, select the target server.
You will be asked to confirm the hostname/IP address and indicate how long the
system should attempt to replicate data before timing out and how often it should
attempt to retry before skipping a scheduled replication.
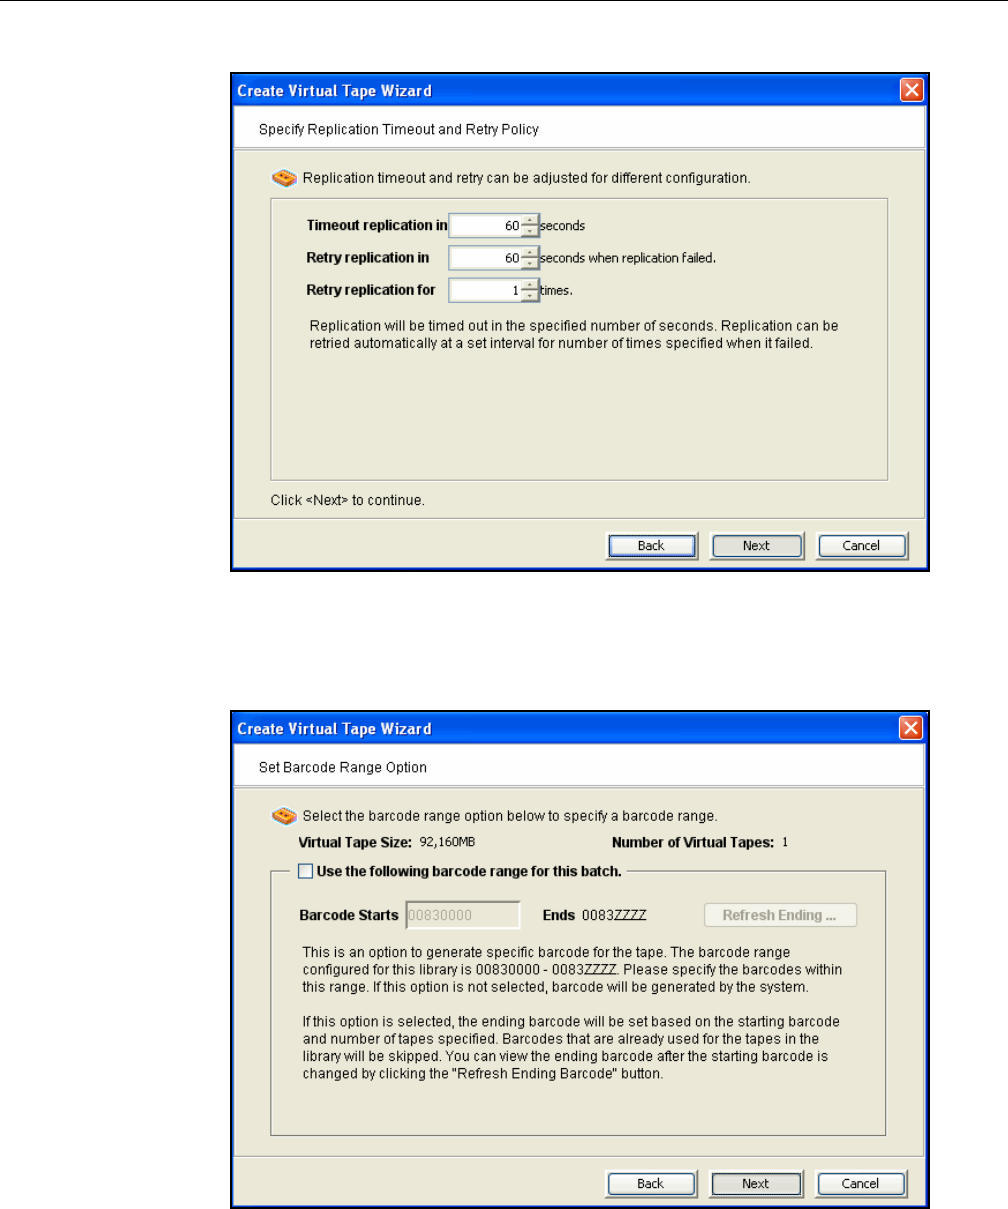
VTL Prime Solaris User’s Guide • September 2008 • 316855201 • A 15
5. Depending upon which method you selected, specify the size of the tape(s),
name, and number of tapes to create.
6. If desired, set a barcode range for the virtual tapes you are creating.
7. Verify all information and then click Finish to create the virtual tape(s).

VTL Prime Solaris User’s Guide • September 2008 • 316855201 • A 16
How virtual tapes are allocated from multiple LUNs
Round Robin Logic is the algorithm VTL uses when allocating new tapes from
multiple LUNs. This logic ensures that tapes are evenly distributed across all LUNs
rather than having multiple tapes allocated on a single LUN, which will decrease the
performance of the storage unit.
VTL chooses the LUN from which the tape will be allocated according to the amount
of space the LUN has available. The LUN with the most available space will be
selected for the tape. You can view the amount of available space on each LUN by
highlighting Storage Devices under Physical Resources in the left pane of the VTL
Console. When a virtual tape is deleted, the allocated space will be freed on its
specified LUN.
Note that it is possible for a virtual tape to be created from multiple LUNs. This will
happen if a virtual tape has a larger capacity than the available space of the initial
LUN from which the tape is allocated.
Round Robin Logic with Tape Capacity on Demand disabled
When Tape Capacity on Demand is disabled, the entire capacity of the virtual tape
will be allocated on the LUN at once. There is no way for VTL to free any unused
allocated space on the LUN unless the virtual tape is deleted.
As an example, let us say that the user has three LUNs: LUN1, LUN2, and LUN3.
LUN1 has a total of 100 GB available. LUN2 has a total of 200 GB available. LUN3
has a total of 300 GB available. When the user attempts to create a tape that is 200
GB, it will be allocated from LUN3 because this LUN has the most available space.
When this tape is created, the available space on LUN3 will become 100 GB. When
the user attempts to create a second tape that is 100 GB, it will be allocated from
LUN2 because this LUN currently has the most available space.
Round Robin Logic with Tape Capacity on Demand enabled
When Tape Capacity on Demand is enabled, the user has the option to specify the
following values: Initial Tape Size, Incremental Size, and Maximum Capacity.
Only the Initial Tape Size of the virtual tape will be allocated on the LUN. The
Incremental Size tells VTL how much additional space needs to be allocated as the
tape expands.
The Tape Capacity on Demand logic attempts to expand the tape on the same LUN,
provided there is enough space available. If there is not enough space available,
VTL will expand the virtual tape across another LUN using the round robin logic and
the LUN selected will be the one with the most available space.
VTL will allocate the minimum amount of space that the virtual tape needs,
depending upon how much data is written and the incremental size specified.

VTL Prime Solaris User’s Guide • September 2008 • 316855201 • A 17
If the user decides to erase all of the data on the tape, VTL will free up the allocated
space, except for the initial size. The initial size will remain allocated. If the user
decides to erase a portion of the tape, the allocated space will be freed up until the
rewind point on the tape.
Considerations
Initially, tape creation will use round robin logic because each LUN has exactly one
segment. Once the LUNs start to have holes and different segments are deleted, the
round robin logic will begin to diminish. This is because VTL will need to take into
account the segments that become available. Therefore, VTL will consider larger
segments on a LUN to be the preferred choice in allocating space. At times, even if
a LUN has more space available, it will not be the preferred choice by VTL to
allocate a tape. Instead, VTL will choose a LUN with a larger segment size.
VTL Prime Solaris User’s Guide • September 2008 • 316855201 • A 18
Add SAN Clients (backup servers)
You can add SAN Clients in the following two ways:
• Use the configuration wizard - If you have already configured your system,
you can launch the wizard by right-clicking on the VirtualTape Library
System object in the console and selecting Configuration Wizard.
• Right-click on the SAN Clients object and select Add.
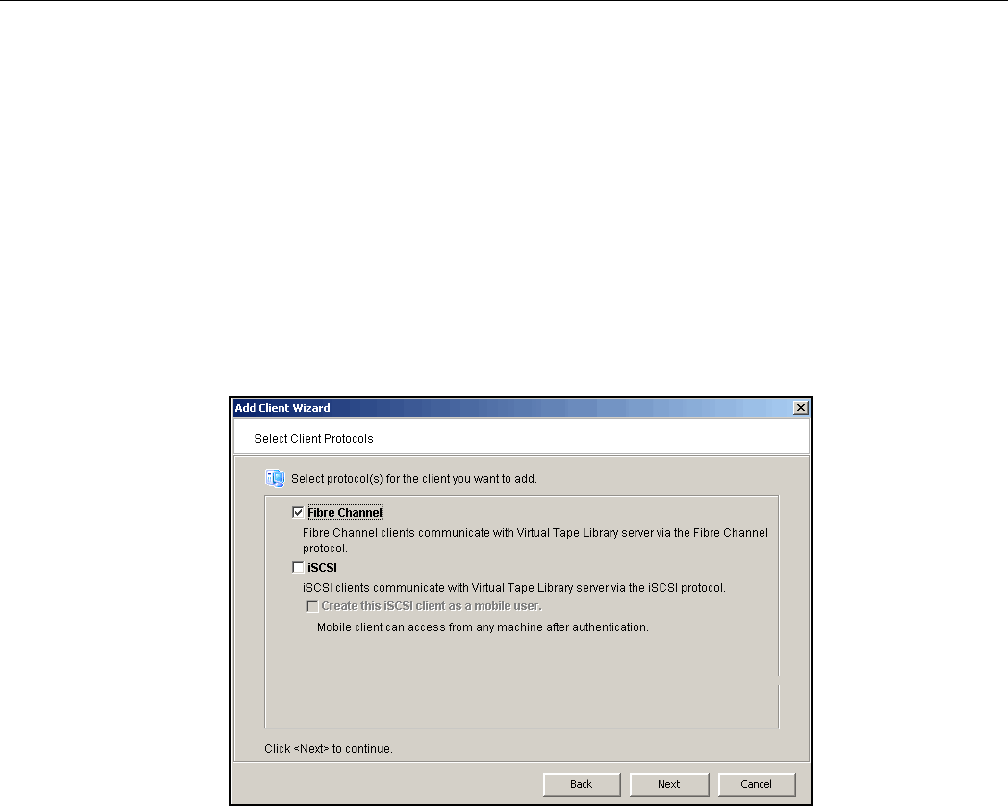
1. Enter the client name.
2. Select the protocol being used by the client.
(Note-Only FC shown when I tried this)
3. Identify your backup server.
For Fibre Channel clients, click Next and select the initiator WWPN for the
client. Note that if the client WWPN is in a zone, it will automatically let you
select initiators only from that zone. In addition, if there is only one initiator
WWPN in the client, VTL will automatically select it for you and the dialog will not
be displayed.
Click Next and set Fibre Channel options.
Enable Volume Set Addressing may be required for particular Fibre Channel
clients, such as HP-UX clients that require VSA to access storage devices.
Select IBM i-Series Server Support if you have a licensed iSeries client.
Select Enable Celerra Support if you have a licensed EMC Celerra client.
For iSCSI clients, specify if the client is a mobile client. A mobile client is simply
a username and password that can be used to authenticate to the VTL server
from any iSCSI client machine. If this a mobile client, you will have to enter a
username and password on the next dialog.
VTL Prime Solaris User’s Guide • September 2008 • 316855201 • A 19
If this is a stationary (not mobile) client, click Next and select the initiator that the
client uses. If the initiator does not appear, you can manually add it.
Click Next and add/select users who can authenticate for this client. When you
add users, you will have to enter a name and password for each.
If you select Allow Unauthenticated Access, the VTL Server will recognize the
client as long as it has an authorized initiator name. With authenticated access,
an additional check is added that requires the user to type in a username and
password. More than one username/password pair can be assigned to the
client, but they will only be useful when coming from the machine with an
authorized initiator name.
4. Click Finish when you are done.
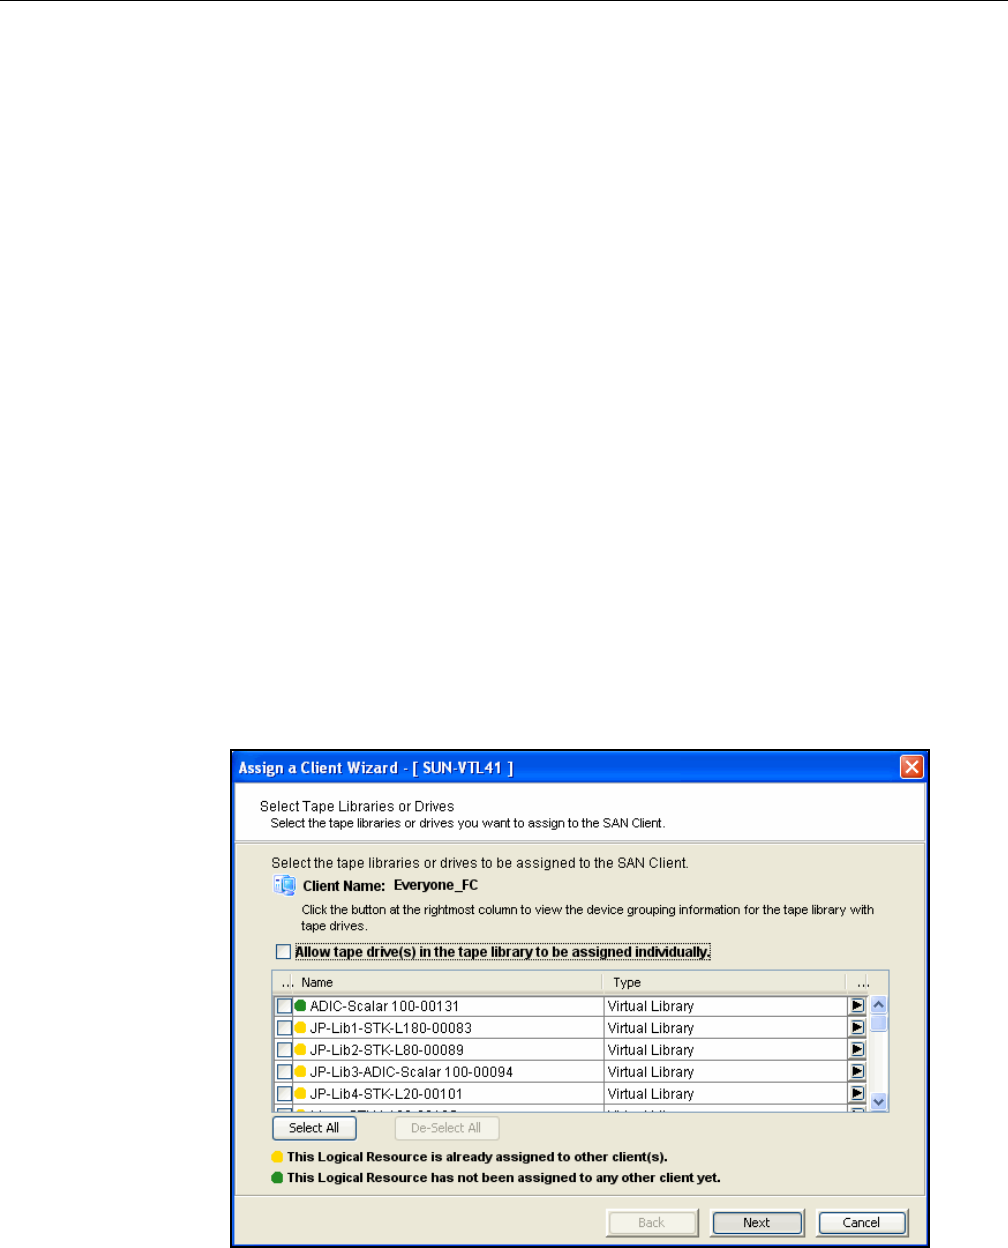
Assign virtual tape libraries to clients
You can assign virtual tape libraries to clients in the following three ways:
• Use the configuration wizard - If you have already configured your system,
you can launch the wizard by right-clicking on the VirtualTape Library
System object in the console and selecting Configuration Wizard.
• Right-click on a SAN Client or on the Everyone client and select Assign. The
Everyone client is a generic client that you can assign to all (or some) of
your virtual libraries/drives.
• Right-click on a virtual tape library and select Assign.
1. Assign virtual tape libraries/drives to your backup clients.

VTL Prime Solaris User’s Guide • September 2008 • 316855201 • A 20
You can assign the entire library to a backup client or you can assign individual
tape drives.
Note: Do not select any “SIR Tape Drive” virtual drive that may appear in the list
of available libraries and drives.
2. Click Finish when you are done.
(FC version only) After configuring VTL, you should perform a device scan on
your backup server.
VTL Prime Solaris User’s Guide • September 2008 • 316855201 • A 21
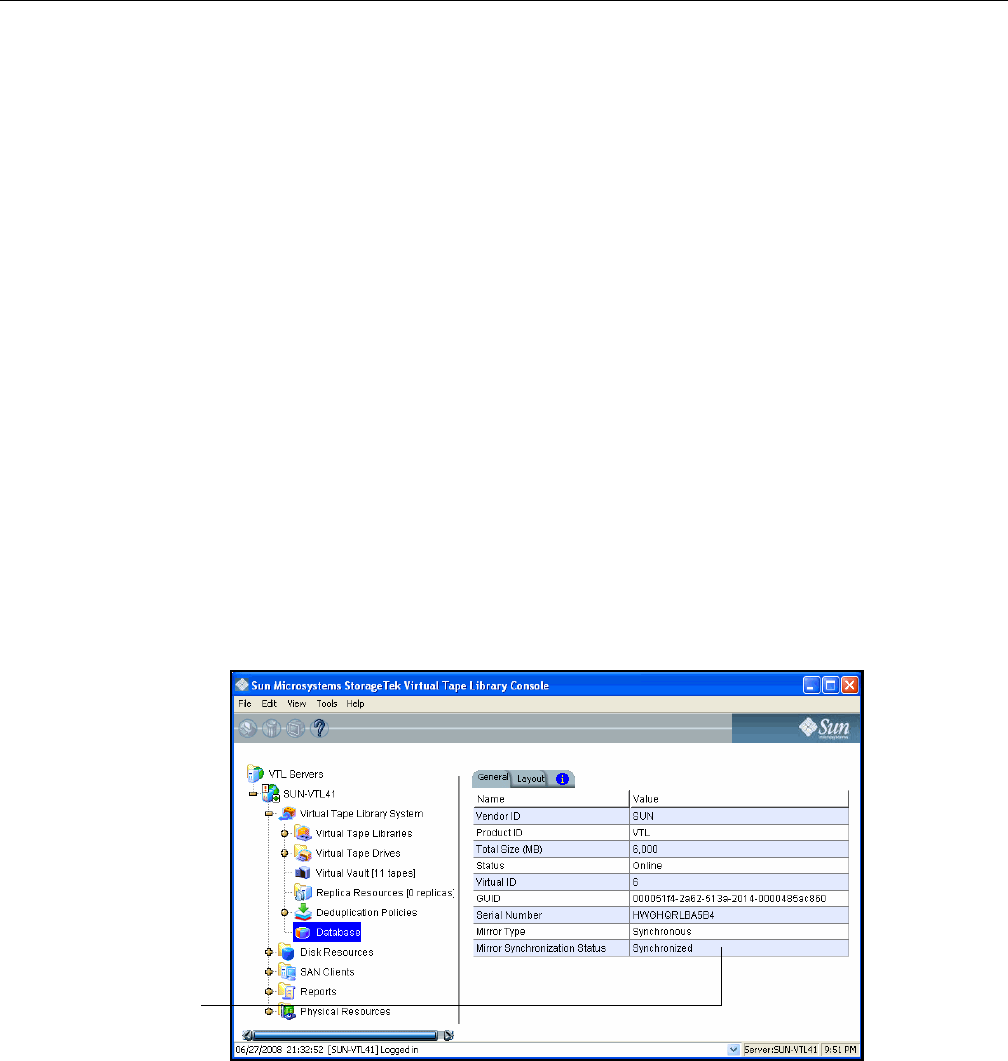
Mirror the VTL database
Mirroring the VTL database protects your configuration if the disk storing the
database is lost.
With mirroring, each time data is written to the VTL database, the same data is
simultaneously written to the mirrored copy. This disk maintains an exact copy of the
database. In the event that the database is unusable, VTL seamlessly swaps to the
mirrored copy.
The mirror can be defined with disks that are not necessarily identical to each other
in terms of vendor, type, or even interface (SCSI, FC, iSCSI).
To set mirroring:
1. Right-click on the Database object (under the Virtual Tape Library System
object) and select Mirror --> Add.
2. Select the physical device to use for the mirror.
3. Confirm that all information is correct and then click Finish to create the mirroring
configuration.
Check mirroring
status You can see the current status of your mirroring configuration by checking the
General tab of the database.
•Synchronized - Both disks are synchronized. This is the normal state.
•Not synchronized - A failure in one of the disks has occurred or
synchronization has not yet started. If there is a failure in the primary
database VTL swaps to the mirrored copy.
• If the synchronization is occurring, you will see a progress bar along with the
percentage that is completed.
Current status of
mirroring configuration.

VTL Prime Solaris User’s Guide • September 2008 • 316855201 • A 22
Replace a
failed disk If one of the mirrored disks has failed and needs to be replaced:
1. Right-click on the database and select Mirror --> Remove to remove the
mirroring configuration.
2. Physically replace the failed disk.
The failed disk is always the mirrored copy because if the primary database disk
fails, VTL swaps the primary with the mirrored copy.
3. Right-click on the database and select Mirror --> Add to create a new mirroring
configuration.
Fix a minor disk
failure If one of the mirrored disks has a minor failure, such as a power loss:
1. Fix the problem (turn the power back on, plug the drive in, etc.).
2. Right-click on the database and select Mirror --> Synchronize.
This re-synchronizes the disks and re-starts the mirroring.
Replace a disk
that is part of an
active mirror
configuration
If you need to replace a disk that is part of an active mirror configuration:
1. If you need to replace the primary database’s disk, right-click on the database
and select Mirror --> Swap to reverse the roles of the disks and make it a
mirrored copy.
2. Select Mirror --> Remove to cancel mirroring.
3. Replace the disk.
4. Right-click on the database and select Mirror --> Add to create a new mirroring
configuration.
Swap the
primary disk
with the
mirrored copy
Right-click on the database and select Mirror --> Swap to reverse the roles of the
primary database disk and the mirrored copy. You will need to do this if you are
going to perform maintenance on the primary database disk or if you need to
remove the primary database disk.
Remove a
mirror
configuration
Right-click on the database and select Mirror --> Remove to delete the mirrored
copy and cancel mirroring. You will not be able to access the mirrored copy
afterwards.
VTL Prime Solaris User’s Guide • September 2008 • 316855201 • A 23
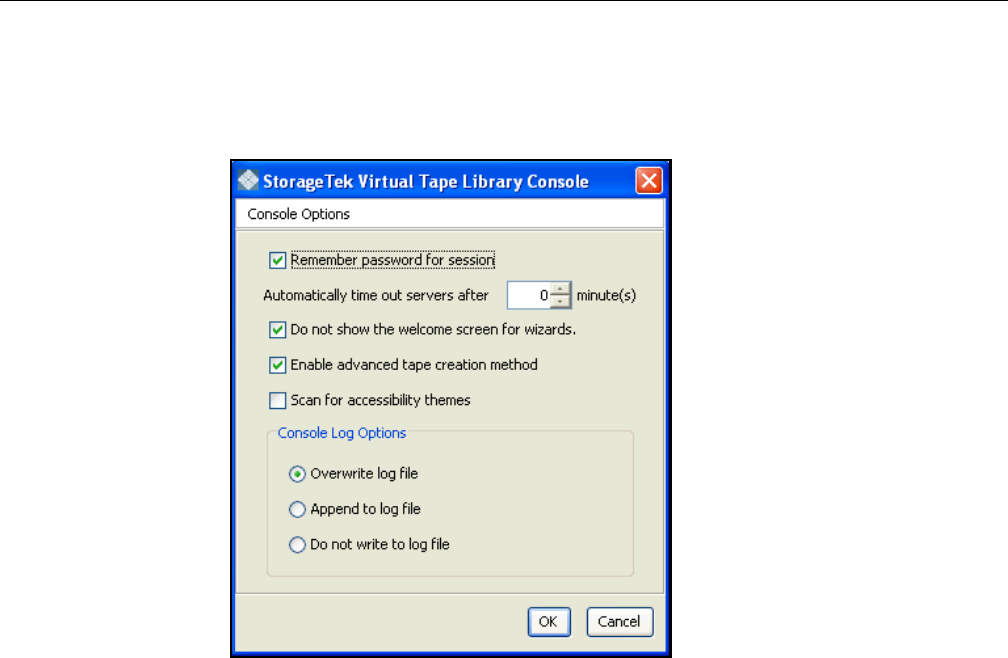
Set Console options
To set options for the Console:
1. Select Tools --> Console Options.
2. Make any necessary changes.
Remember password for session - If the Console is already connected to a
server, when you attempt to open a second, third, or subsequent server, the
Console will use the credentials that were used for the last successful
connection. If this option is unchecked, you will be prompted to enter a password
for every server you try to open.
Automatically time out servers after nn minute(s) - The Console will collapse a
server that has been idle for the number of minutes you specify. If you need to
access the server again, you will have to reconnect to it. The default is 10
minutes. Enter 00 minutes to disable the timeout.
Do not show the welcome screen for wizards - Each wizard starts with a
welcome screen that describes the function of the wizard. Determine whether or
not you want the welcome screen to be displayed.
Enable Advanced Tape Creation Method - With Advance Tape Creation enabled,
you are offered advanced options when creating tapes, such as capacity-on-
demand settings for virtual libraries, tape capacity of tapes, and device, name,
and barcode selection for each tape that is created.
Scan for Accessibility Themes - Select if your computer uses Windows
Accessibility Options.
Console Log Options - The Console log (vtlconsole.log) is kept on the local
machine and stores information about the local version of the Console. The

VTL Prime Solaris User’s Guide • September 2008 • 316855201 • A 24
Console log is displayed at the very bottom of the Console screen. The options
affect how information for each Console session will be maintained:
Overwrite log file - Overwrite the information from the last Console session when
you start a new session.
Append to log file - Keep all session information.
Do not write to log file - Do not maintain a Console log.
VTL Prime Solaris User’s Guide • September 2008 • 316855201 • A 25
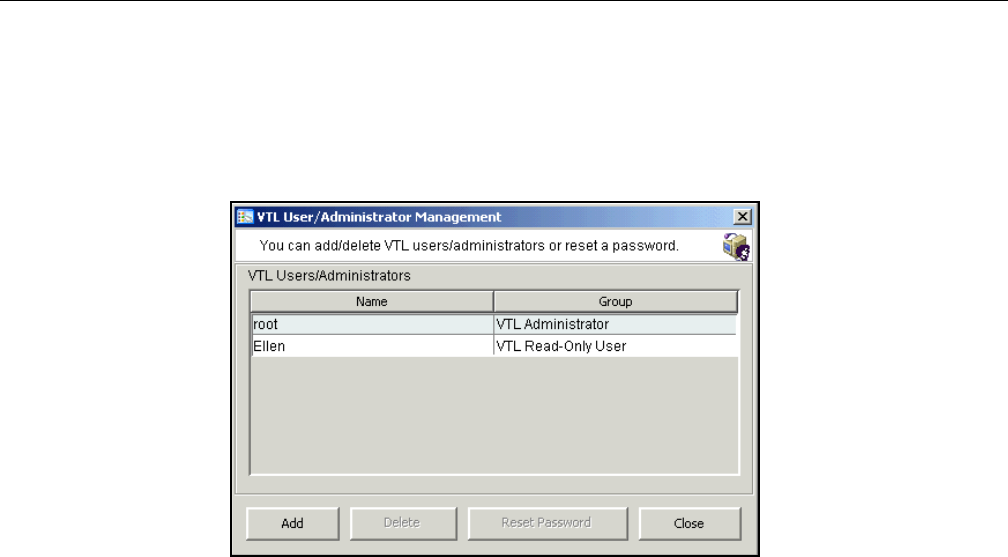
Manage Administrators
Only the root user can add or delete a VTL administrator or change an
administrator’s password.
1. Right-click on the server and select Administrators.
There are two types of administrators:
- VTL Administrators are authorized for full Console access.
- VTL Read-Only Users are only permitted to view information in the Console.
They are not authorized to make changes and they are not authorized for client
authentication.
2. Select the appropriate option.
When you add an administrator, the name must adhere to the naming
convention of the operating system running on your VTL Server. Refer to your
operating system’s documentation for naming restrictions.
You cannot delete the root user or change the root user’s password from this
screen. Use the Change Password option instead.

VTL Prime Solaris User’s Guide • September 2008 • 316855201 • A 26
VTL compression
VTL’s compression saves disk space by compressing files so that more data can be
stored by a virtual tape drive. The increase in capacity is directly related to the
compressibility of the data being backed up. If you can compress the data being
backed up by a factor of up to 2:1, you can store up to twice as much information on
the virtual tape.
Software compression uses an LZO algorithm that runs on the VTL server.
In order to use compression, you must also enable tape drive compression in your
backup application.
Note: If you are already using software compression that is supplied by your backup
application, you should not use VTL’s compression. Using both types of
compression will cause VTL to try to compress already-compressed data and this
can slow down your backups.
Enable/disable
compression To enable or disable compression:
1. In the VTL Console, right-click on VirtualTape Library System and select
Properties.
2. Select the Enable VirtualTape Library compression mode checkbox
Compression will apply to all tapes in your system.

VTL Prime Solaris User’s Guide • September 2008 • 316855201 • A 27
View the Event Log
The Event Log details significant occurrences during the operation of the VTL
Server. The Event Log can be viewed in the VTL Console when you highlight a
server in the tree and select the Event Log tab in the right pane.
The columns displayed are:
Sort the Event
Log When you initially view the Event Log, all information is displayed in chronological
order (most recent at the top). If you want to reverse the order (oldest at top) or
change the way the information is displayed, you can click on a column heading to
re-sort the information. For example, if you click on the ID heading, you can sort the
events numerically. This can help you identify how often a particular event occurs.
Filter the Event
Log By default, all informational system messages, warnings, and errors are displayed.
To filter the information that is displayed:
1. Right-click on a server and select Event Log --> Filter.
2. Select which message types you want to include.
3. Search for records that contain/do not contain specific text.
4. Specify the maximum number of lines to display.
5. Select a time or date range for messages.
Print/export the
Event Log You can print the Event Log to a printer or save it as a text file. These options are
available (once you have displayed the Event Log) when you right-click on the
server and select the Event Log options.
Type I: This is an informational message. No action is required.
W: This is a warning message that states that something occurred
that may require maintenance or corrective action. However, the
VTL system is still operational.
E: This is an error that indicates a failure has occurred such that a
device is not available, an operation has failed, or a licensing
violation. Corrective action should be taken to resolve the cause of
the error.
C: These are critical errors that stop the system from operating
properly.
Date The date on which the event occurred.
Time The time at which the event occurred.
ID This is the message number.
Event
Message This is a text description of the event describing what has occurred.

VTL Prime Solaris User’s Guide • September 2008 • 316855201 • A 28
Refer to the Attention Required tab
The Attention Required tab displays information that may require your attention,
such as:
• Hardware appliance errors
• Replication errors
It also notifies you when an import/export job has completed.
The Attention Required tab only appears for a VTL server when an error/notification
occurs; it will not appear at other times. When the tab does appear, you will see an
exclamation icon on the server. object in the navigation tree.
Clear issues
from the list After you have resolved an issue, you can click the check box next to it and click the
Clear button. You can clear individual issues or you can click the box next to one of
the categories to deleted all issues in that section.

VTL Prime Solaris User’s Guide • September 2008 • 316855201 • A 29
Set Server properties
To set properties for a specific server:
1. Right-click on the server and select Properties.
2. On the Activity Database Maintenance tab, indicate how often the VTL activity
data should be purged.
The Activity Log is a database that tracks all system activity, including all data
read, data written, number of read commands, write commands, number of
errors etc. This information is used to generate information for the VTL reports.
3. On the SNMP Maintenance tab, VTL to send traps to your SNMP manager.
Refer to ‘Configure VTL to send SNMP traps’ for more information.
4. On the Storage Monitoring tab, enter the maximum amount of storage that can
be used by VTL before you should be alerted.
When the utilization percentage is reached, a warning message will be sent to
the Event Log.
Apply software patch updates
You can apply patches to your VTL server through the Console.
Add patch To apply a patch:
1. Download the patch onto the computer where the Console is installed.
2. Highlight an VTL server in the tree.
3. Select Tools menu --> Add Patch.
4. Confirm that you want to continue.
5. Locate the patch file and click Open.
The patch will be copied to the server and installed.
Rollback patch To remove (uninstall) a patch and restore the original files:
1. Highlight an VTL server in the tree.
2. Select Tools menu --> Rollback Patch.
3. Confirm that you want to continue.
4. Select the patch and click OK.

VTL Prime Solaris User’s Guide • September 2008 • 316855201 • A 30
Configure VTL to send SNMP traps
VTL provides Simple Network Management Protocol (SNMP) support to integrate
VTL management into an existing enterprise management solution, such as HP
OpenView, CA Unicenter, IBM Tivoli NetView, or BMC Patrol.
By default, event log messages will not be sent, but you may want to configure VTL
to send certain types of messages. To do this:
1. In the Console, right-click on your VTL server appliance and select Properties.
2. Select the SNMP Maintenance tab.
3. Indicate the information that should be included in traps sent to your SNMP
manager.
SysLocation - Enter the location that should be included in traps.
SysContact - Enter any contact information that should be included in traps. This
could be a name or an email address.
4. Specify the type of message that should be sent.
Five levels of messages are available:
• None – No messages will be sent.
• Critical - Only critical errors that stop the system from operating properly
will be sent.
• Error – Errors (failure such as a resource is not available or an operation
has failed) and critical errors will be sent.
• Warning – Warnings (something occurred that may require maintenance or
corrective action), errors, and critical errors will be sent.
• Informational – Informational messages, errors, warnings, and critical error
messages will be sent.
5. Click Add to enter the name of your SNMP server and a valid SNMP community
name.
6. To verify that SNMP traps are set up properly, set the level to Informational and
then do anything that causes an entry to be added to the event log (such as
logging into the VTL console or creating a new virtual tape library or virtual tape
drive).
You should see an SNMP trap for the event.
Appliance health checking
(SuperMicro motherboards only) VTL provides a mechanism to periodically check
the health of the VTL appliance for possible failures. Any errors that are detected will
be reported to the Console Event log and can be used to send out SNMP traps.
Error checking is performed every three minutes. To eliminate reporting repeated
error conditions, an error condition will not be reported more than once in every two
hours.

VTL Prime Solaris User’s Guide • September 2008 • 316855201 • A 31
Data Deduplication
The data deduplication solution integrates seamlessly with VTL to eliminate
redundant data without impacting your established backup window. Deduplication
offers as much as a 30:1 reduction of backup data, minimizing replication time and
storage requirements.
The deduplication process scans virtual tape cartridges, analyzes the data, and
determines whether data is unique or has already been copied to the deduplication
repository. The process then passes only single instances of unique data to the
deduplication repository. The original virtual tape is replaced with a virtual index tape
(VIT) pointing to deduplication storage, freeing considerable space for more data.
Deduplication occurs as a separate, off-line process. Backup and restore jobs have
higher priority than deduplication. Deduplication jobs are temporarily suspended
when the tape being deduplicated is needed for backup or restore; when the backup
application finishes using that particular tape, the deduplication job automatically
resumes from where it left off.
Deduplication is controlled by policies managed in VTL. You can set policies for all
tapes in a library, groups or ranges of tapes, or just an individual tape. Deduplication
is performed in the background without user intervention. During normal use, the
deduplication option is transparent to the backup operation. Data duplicated across
remote sites is deduplicated at the central site, enabling only globally unique data to
be replicated to the disaster recovery site.
When replication is configured as part of a deduplication policy, the deduplication
repository and metadata are replicated.
VTL Prime Solaris User’s Guide • September 2008 • 316855201 • A 32
Enable deduplication
Deduplication must be enabled on the VTL server, as well as on any VTL server that
will serve as a replica target for a replicated deduplication repository. To do this:
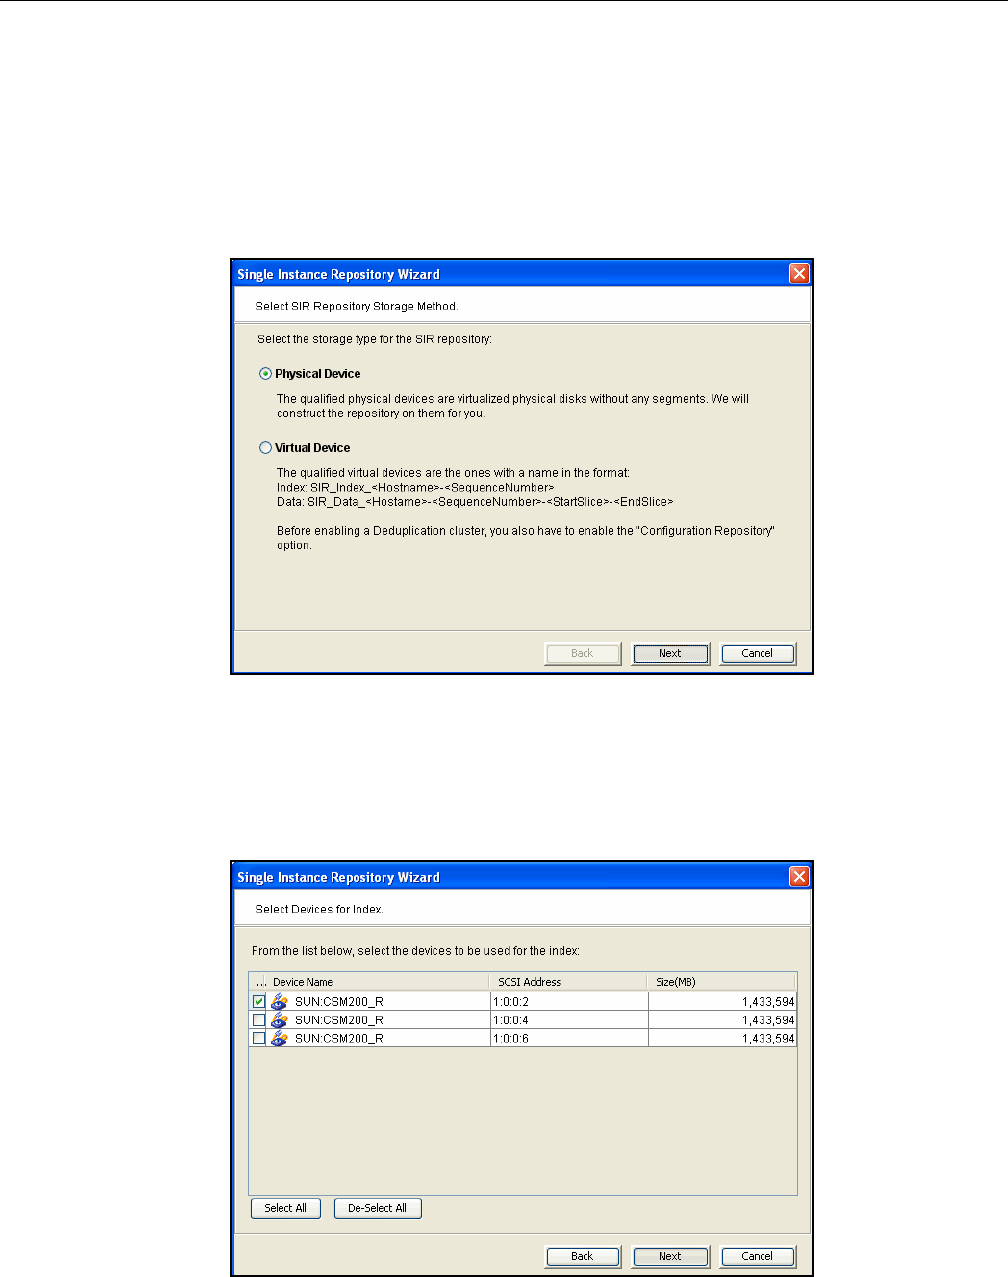
1. Right-click on the server and select Options --> Enable Deduplication.
2. To automate the process of preparing SIR storage, select Physical Device.
3. In the Select Devices for Index dialog, select the virtualized disk that will serve
as the index resource, scratch resource, and configuration repository resource.
The LUN must be of sufficient size to contain these resources.
The minimum size disk required for these resources is calculated in GB as
Number of CPUs on deduplication appliance x 20 + 10.
VTL Prime Solaris User’s Guide • September 2008 • 316855201 • A 33
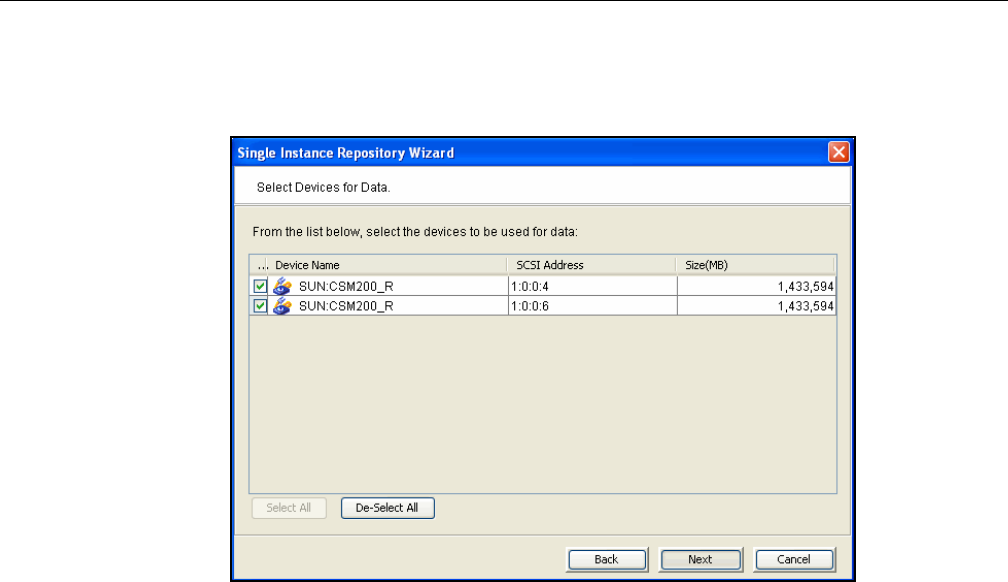
4. In the Select Devices for Data dialog, select the device(s) that will be used for
data storage.
Select 1, 2, 4, 8, 16, or any number of disks based on 2 to the Nth power.
5. In the confirmation dialog, select Finish to complete the wizard.
Replicating the deduplication repository
When you create a deduplication policy, you have the option of configuring
replication for the tapes in the policy. If you do this for all deduplication policies, you
effectively replicate the entire deduplication repository.
Replication from the source server to the target server occurs via Fibre Channel or
iSCSI. The target server is usually located at a remote location. If a disaster occurs
and the replica is needed, the administrator can move the replicated tape from the
virtual vault to its virtual tape library so that it can be accessed by backup software.
Replication of deduplicated data occurs in several stages:
• When replication occurs, the virtual index tape (VIT) from the source server
is copied to the target server and becomes a foreign virtual index tape
(FVIT) which you can see when you select the Replica Resources object.
• The FVIT is scanned to determine whether or not the data blocks it uses
exist locally. Missing data blocks are replicated from the source server to the
target server. After all missing data blocks are replicated, the target server
has all the data blocks used by the FVIT.
• The target server automatically creates a local virtual index tape (LVIT) and
puts it in the target server’s virtual vault; the LVIT is now a replica of the
source VIT and contains pointers to the replicated blocks of data.
Replication is complete when you see the LVIT in the target server’s virtual
vault. The name of the LVIT corresponds to the name of the FVIT. The
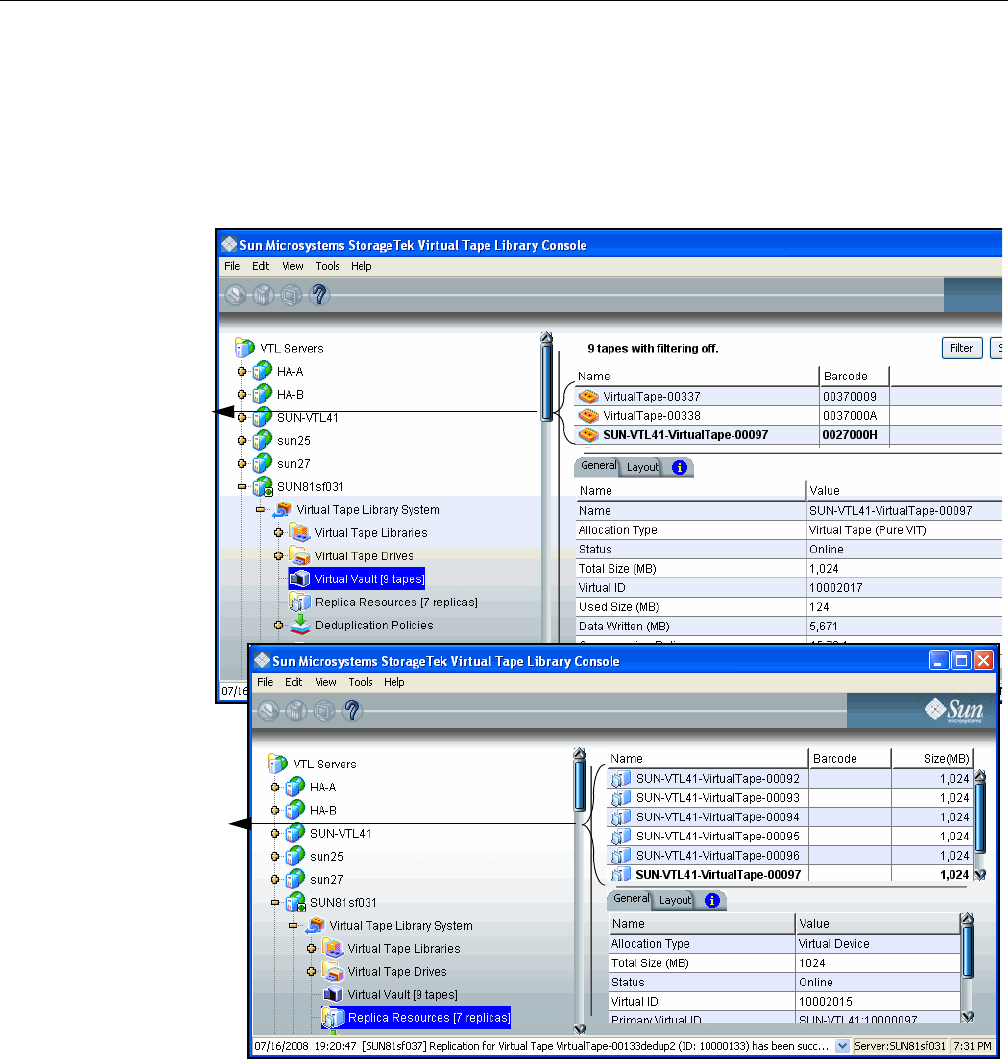
VTL Prime Solaris User’s Guide • September 2008 • 316855201 • A 34
image below shows the VTL target server, with FVITs listed for the Replica
Resources object and the LVITs for replicated data listed for the Virtual Vault
object.
Note: This final step may not occur immediately after the initial replication of
data and can take some time to complete, depending on the availability of
SIR tape drives on the target server and the amount of data on the FVIT.
Requirements
• (Remote Replication) You must have two VTL servers.
• (Remote Replication) You must have write access to both servers.
• You must have enough space on the target server for the replica resource.
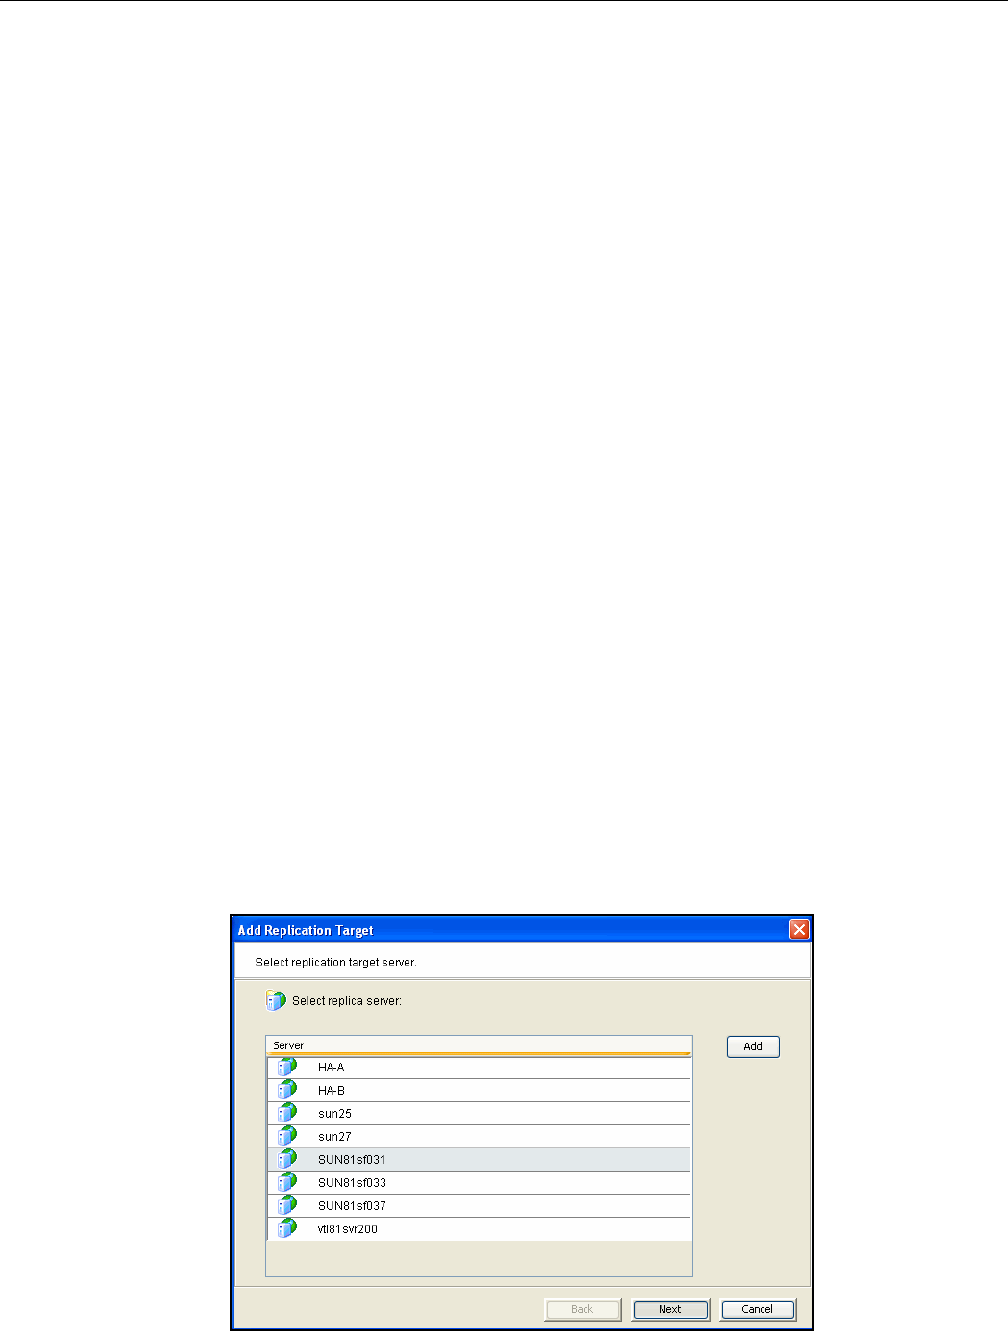
• You must enable replication between the two VTL servers by adding the
target server to the primary server using the console on the primary server.
Foreign virtual index
tapes (VIT replicas)
in Replica Resources
Local virtual index
tapes in the Virtual
Vault after replication
VTL Prime Solaris User’s Guide • September 2008 • 316855201 • A 35
• You must enable deduplication on the target server using the console on the
target server.
• The target server must be a 64-bit server.
Connect appliances
In order to configure replication to another VTL server using a Fibre Channel (FC)
switch, the servers must be zoned so a target port on the replica source server is
zoned to an initiator port on the replica target server (refer to “Fibre Channel Target
Mode” for complete information on zoning and configuring a replica target server).
While most customers choose to use a Fibre Channel switch to connect their VTL
and deduplication appliances, it is also possible to direct-connect the appliances. If
you are using an iSCSI connection, the iSCSI option must be enabled on both
servers. If you are direct-connecting the appliances, the source VTL server must
have at least two target ports and you must connect the appliances as follows:
• Target port on the replica source server with the initiator port on the replica
target server
• Initiator port on the replica source server with the target port on the
replication target server
• Target port(s) on the replica source server with the initiator port(s) on the
backup server
Add the replication target server
Before you can configure replication for a tape, you must enable replication between
the two VTL servers. To do this:
1. Right-click the server and select Options --> Deduplication --> Replication -->
Add Target.
2. If the server you wish to use as a target is listed, select the server. (You must be
logged into that server).

VTL Prime Solaris User’s Guide • September 2008 • 316855201 • A 36
3. If the server is not listed, select Add.
4. Enter login information for the VTL server that will serve as the target.
5. Select OK. The server appears in the list. Select the server.
6. In the next screen, iSCSI is selected by default. Select the correct replication
protocol.
7. In the next screen, confirm the information and click Finish. The target server is
configured to be the replication target.
The SIR Replication tab appears in the right-hand pane for both servers when
replication has been configured. Content identifies the replicator (the data source)
and the replica (the VTL server to which data is replicated).
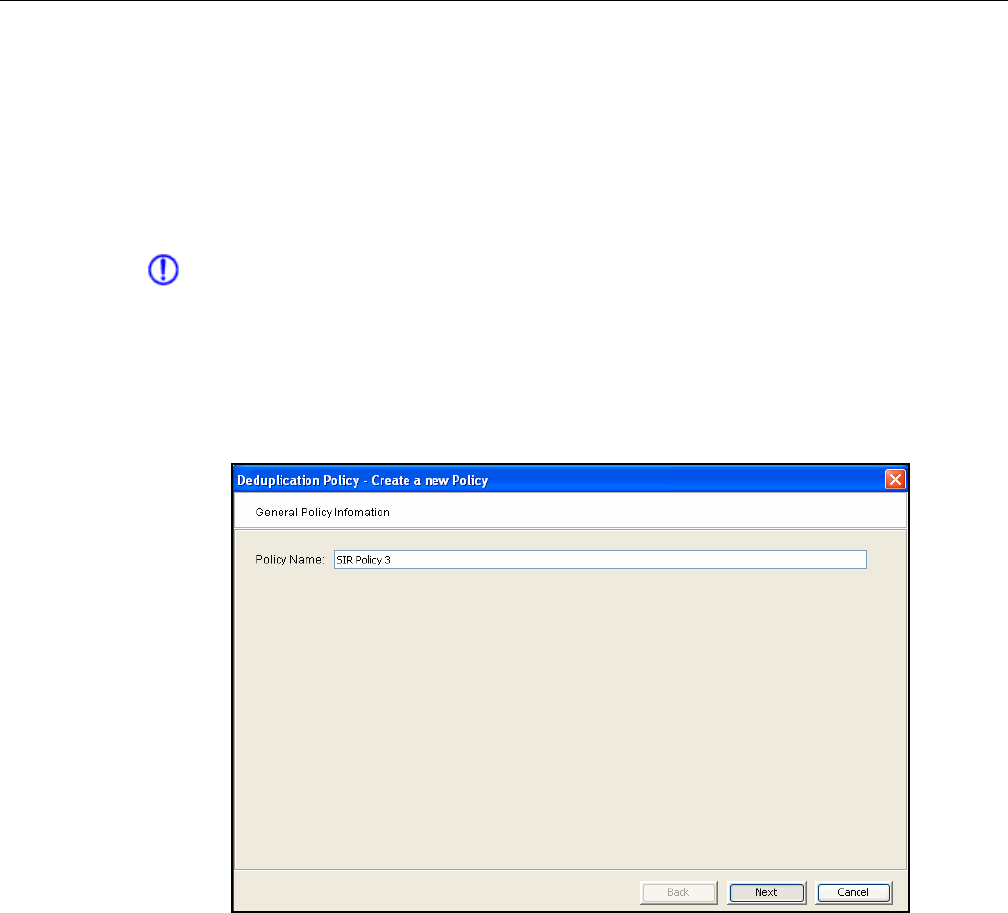
VTL Prime Solaris User’s Guide • September 2008 • 316855201 • A 37
Data deduplication policies
Add deduplication policies
Deduplication policies specify which virtual tapes need to have deduplication and
when deduplication should occur. You must have at least one virtual tape library and
one virtual tape in order to create a policy.
Note: Once you set your deduplication policies, you should not change the IP
address or hostname of your appliance(s). If you need to change the IP address or
host name, do it BEFORE setting your policies.
1. On your VTL server, right-click on the Deduplication Policies object and select
New.
2. For a new policy, enter a name for the policy.
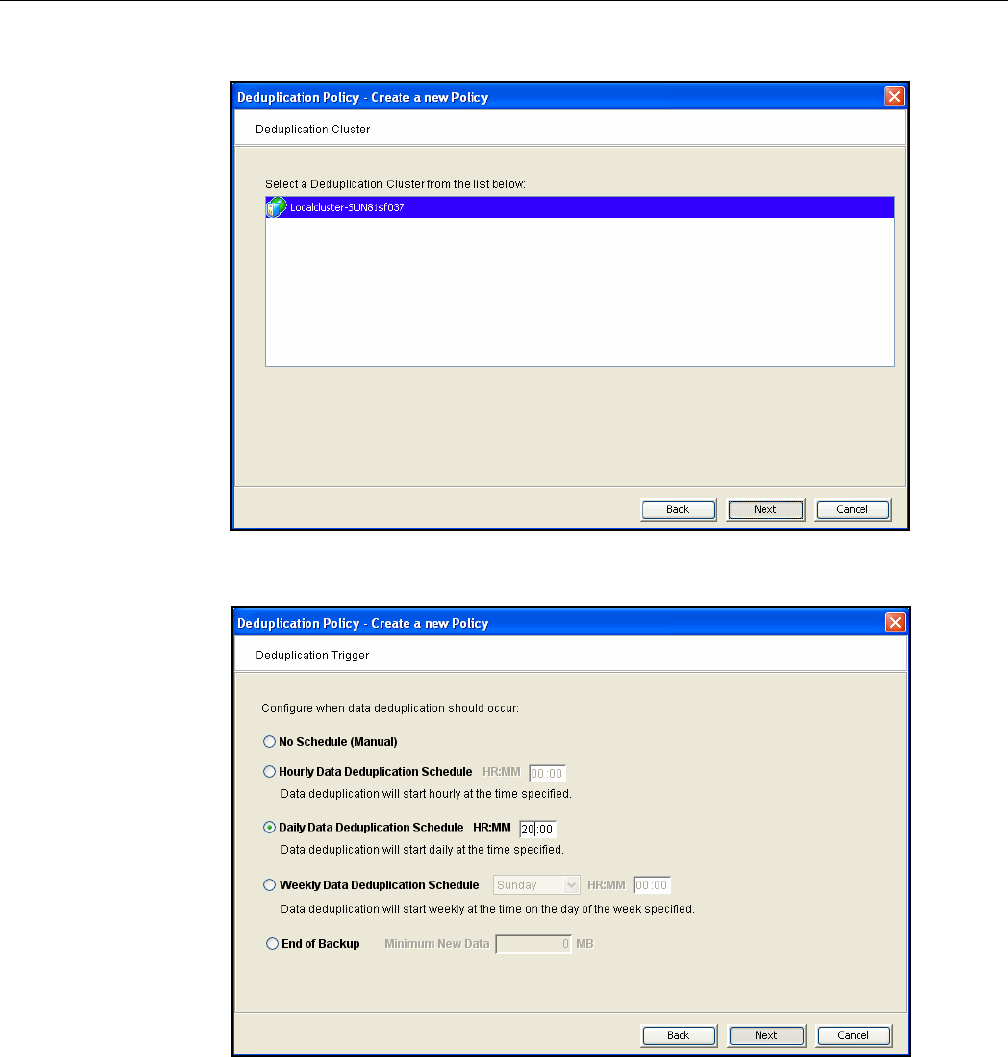
VTL Prime Solaris User’s Guide • September 2008 • 316855201 • A 38
3. Select a deduplication cluster to associate with the policy.
4. Indicate how often deduplication should occur.
If you are setting deduplication for a specific time, be sure to set the
deduplication policy to a time after the backup job will be completed for the
virtual tape associated with the policy.
Note: If the job is not completed by the time the next deduplication job should
begin, the policy will wait the selected time after the current deduplication job is
complete. For example, if you choose to deduplicate every two minutes and the
deduplication policy is running for more than two minutes, the policy will continue
until completion and then wait two minutes before starting again.
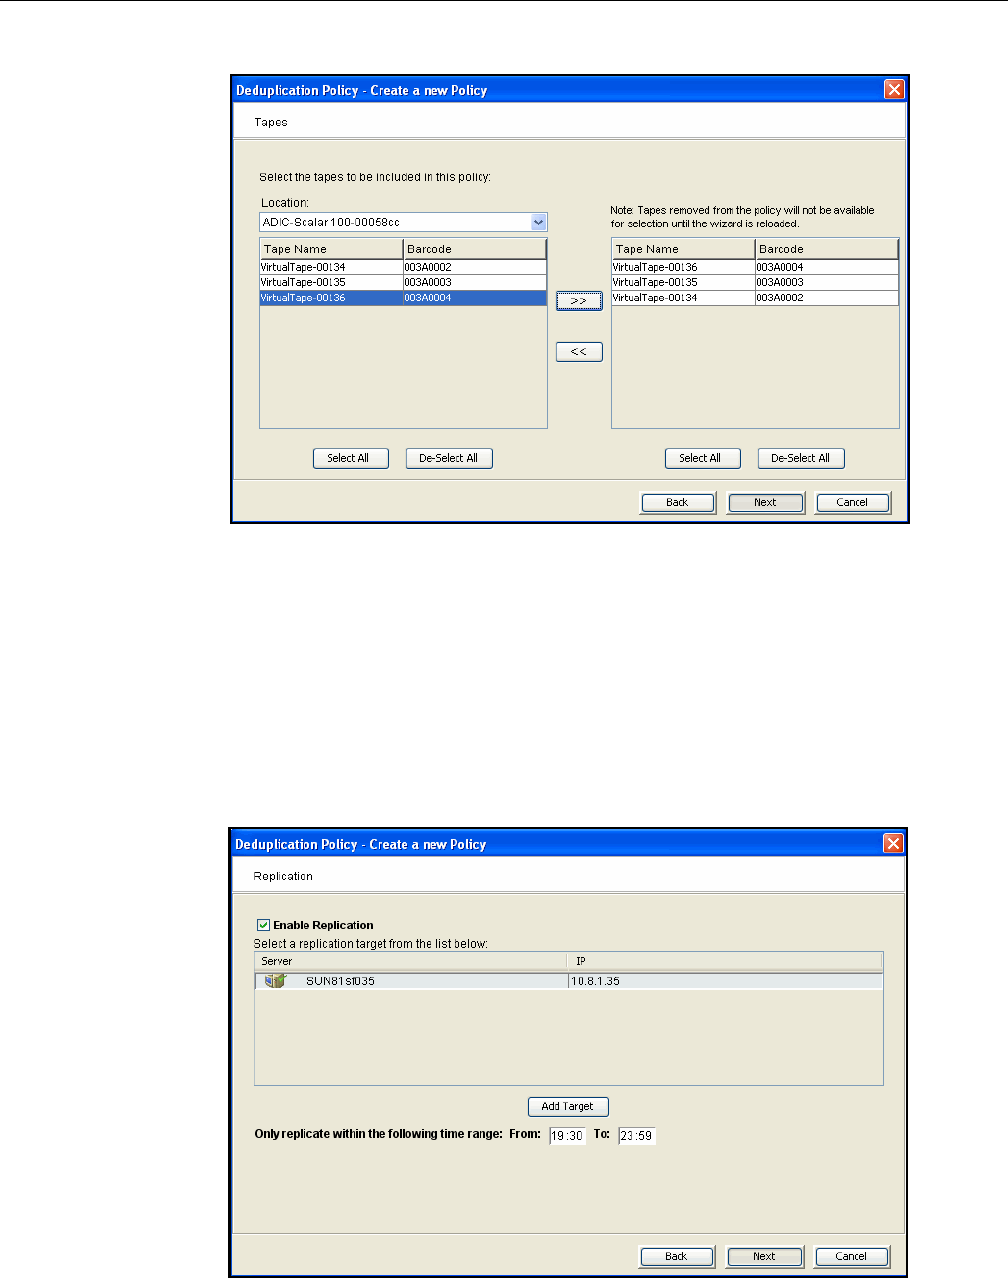
VTL Prime Solaris User’s Guide • September 2008 • 316855201 • A 39
5. Select the virtual tape(s) that you want to include in this policy.
A virtual tape can be part of only one deduplication policy at a time.
Use the Location drop-down box to select a virtual tape library. Then, highlight
one or more tapes and use the >> button to move the tape(s) to the right column.
6. Indicate whether you want to enable Replication for the tapes in this policy. If this
is the first deduplication policy being created for this library, no replication targets
will be listed. Add the target server. If a replication target has already been
created for this VTL, be sure to add the same replication target (refer to ‘Add the
replication target server’). Deduplication must already be enabled on the target
server.

VTL Prime Solaris User’s Guide • September 2008 • 316855201 • A 40
For information on replicating the deduplication repository, refer to ‘Replicating
the deduplication repository’.
7. Click Finish to finalize the policy.
The policy is enabled and will execute at the next scheduled time.
To view statistics about running policies, refer to ‘Monitor deduplication and view
statistics’.
Modify deduplication policies
After a policy is created, you can do the following:
• To modify the properties of a policy, right-click on the policy and select Edit.
• To execute a policy right now, regardless of the time, right-click on the policy
and select Run.
• If a policy is running and you want it to stop, right-click on the policy and
select Stop.
• To completely remove a policy, right-click on the policy and select Delete.
Perform deduplication
If your deduplication job has not started yet, you can use the console to force it to
run now by right-clicking on a policy and selecting Run.
Before deduplication, the virtual tape’s backup data is stored on the disks of the VTL
Server. When the deduplication policy runs, an intelligent “Tape Scanner“ process
on the deduplication server analyzes the backup data to perform deduplication.
Upon completion, the entire virtual tape will be free of any backup data, and instead,
an “index” to the real data is stored. All truly unique data blocks found during the
deduplication process are stored on the deduplication server disk space.
Therefore, you can describe the deduplication process as a “data block mover” that
moves all blocks from VTL storage space to the deduplication storage space, except
that redundant blocks are discarded. A virtual tape that has been deduplicated is
called a “Virtual Index Tape” because it contains only the pointers to the data,
instead of the actual data.
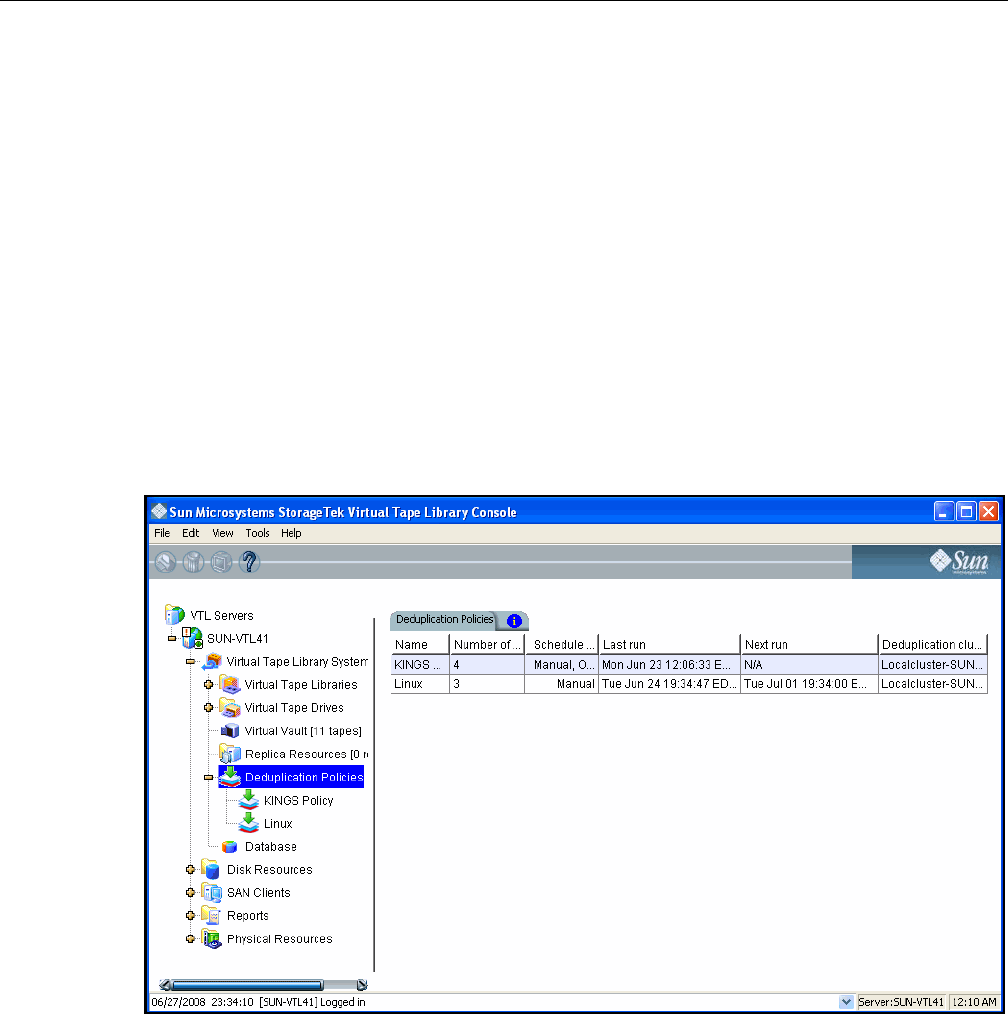
VTL Prime Solaris User’s Guide • September 2008 • 316855201 • A 41
Monitor deduplication and view statistics
From the console, you can view the following:
• Status of running policies
• Scanner history
• Repository statistics for the cluster
Deduplication Policies object
When you highlight the Deduplication Policies object, the right-hand pane lists all of
the policies that are configured for deduplication on this server.
For each policy, you can see the number of tapes included, schedule information
(such as status, history, and next run time), and the deduplication cluster to which
this policy belongs.
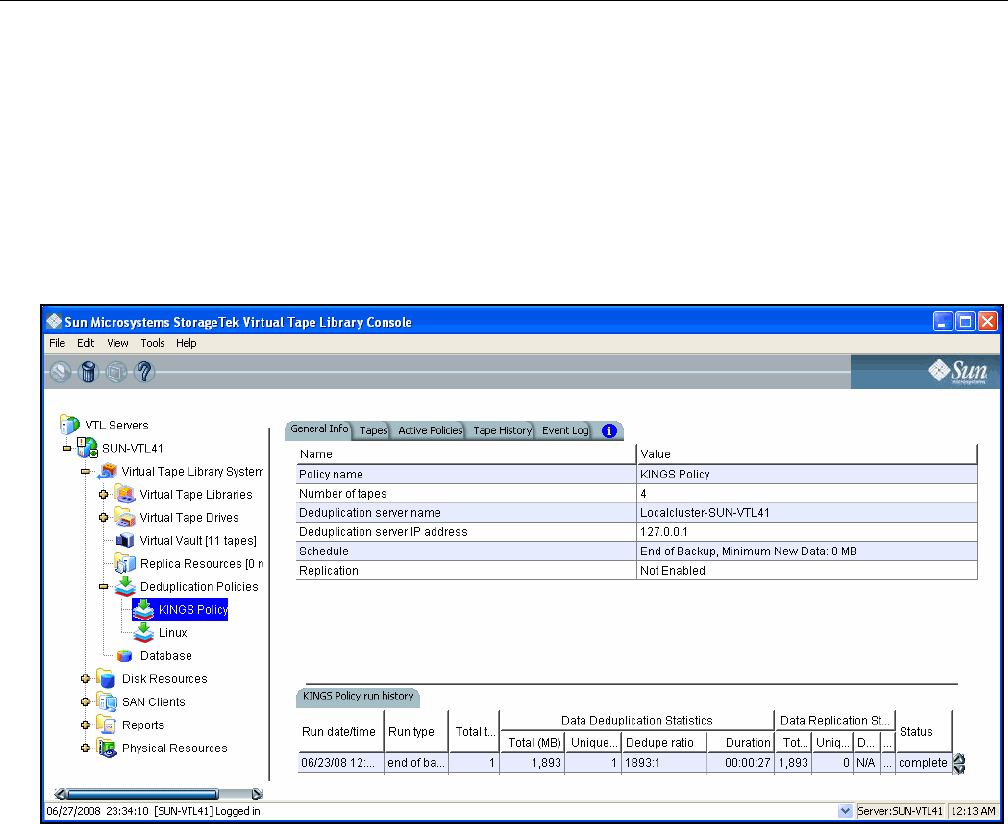
VTL Prime Solaris User’s Guide • September 2008 • 316855201 • A 42
Individual deduplication policies
When you highlight a policy in the tree, you can view information about that policy.
General Info
tab The General Info tab shows how many tapes are included in this policy,
deduplication cluster and server information, schedule and replication information,
and policy history, including when and why the policy was run, number of tapes
scanned, total amount of data scanned, total amount of unique data written to the
repository, and the deduplication ratio.
Tapes tab The Tapes tab lists information about each virtual tape in the policy.
Tape name - The name of the virtual tape.
Barcode - The barcode assigned to the tape.
Size - Maximum uncompressed storage capacity of the tape. This is determined
when the tape was created.
Written - The amount of data (before compression) that is written to tape by backup
applications. This amount can be greater then the tape size if the data is
compressed.
New - The amount of data (before compression) that has not yet been deduplicated,
including newly appended data to a tape.
In deduplication - The amount of data (before compression) written that has now
been moved to deduplication storage. This is basically the difference between the
data written and the data not yet deduplicated.
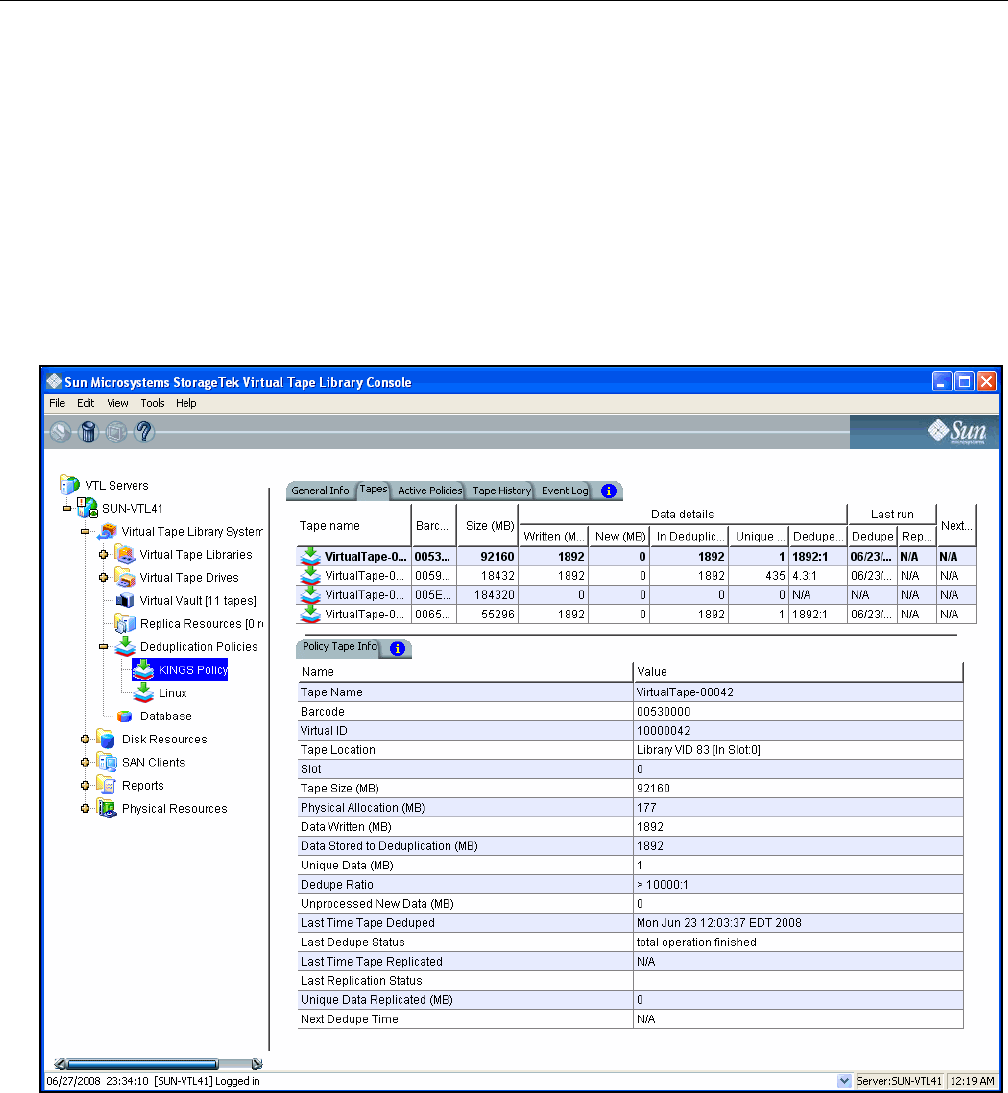
VTL Prime Solaris User’s Guide • September 2008 • 316855201 • A 43
Unique data - The actual physical storage in deduplication used to store tape data.
This includes the effect of deduplication compression.
Dedupe ratio - The ratio between the data moved to deduplication and the unique
data.
Last run Dedupe - The last time the tape was deduplicated.
Last run Replicated - The last time the tape was replicated.
Next run - The next time the tape will be deduplicated.
When you highlight a tape in the top section, the Policy Tape Info tab in the bottom
section displays additional details about the tape:
Virtual ID - The tape’s virtual ID.
Tape location and slot - The tape’s current location.
Physical allocation - The physical size of the tape.
Last Dedupe Status - The status of the last time this policy ran.
Last Replication Status - The status of the last time data for tapes in this policy was
replicated
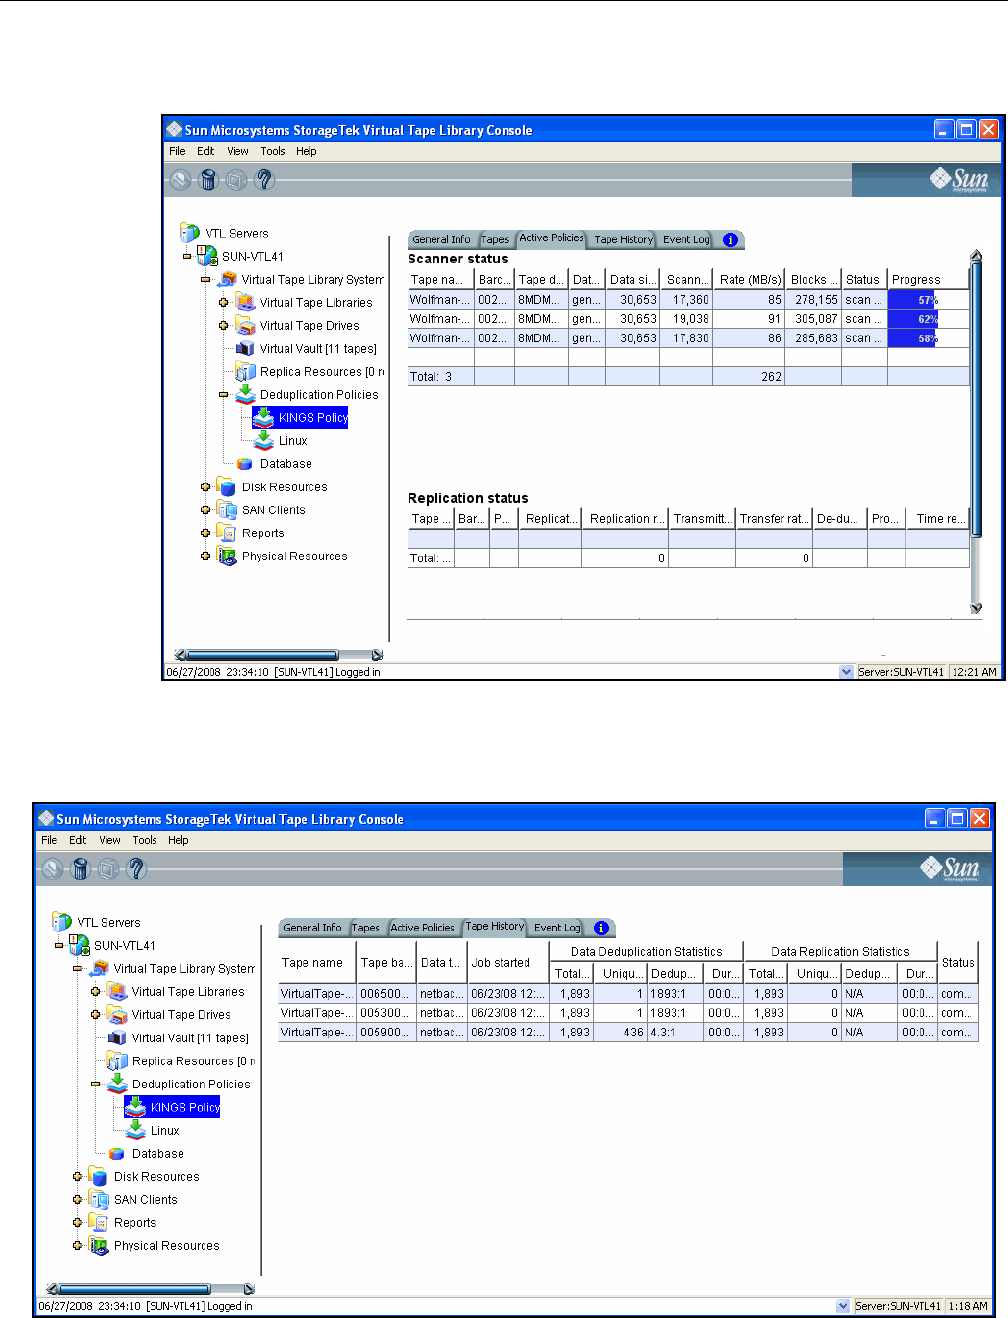
VTL Prime Solaris User’s Guide • September 2008 • 316855201 • A 44
Active Policies
tab The Active Policies tab lists information about currently running policies and
replication jobs. The data is automatically refreshed.
Tape History
tab The Tape History tab lists all of the deduplication and replication jobs that have run
and provides statistics for each.
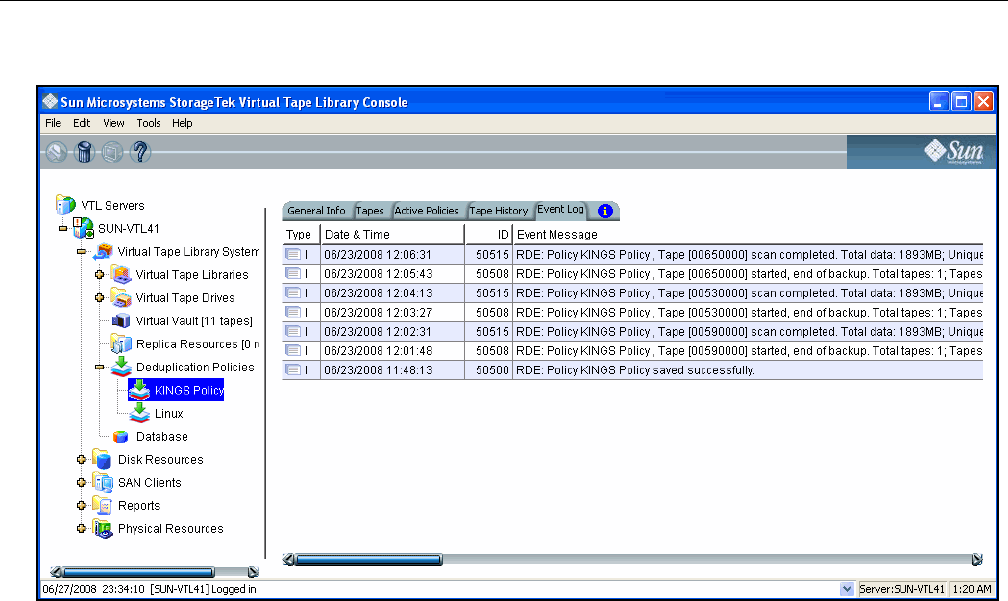
VTL Prime Solaris User’s Guide • September 2008 • 316855201 • A 45
Event Log tab The Event Log tab displays informational events and errors pertaining to this policy.
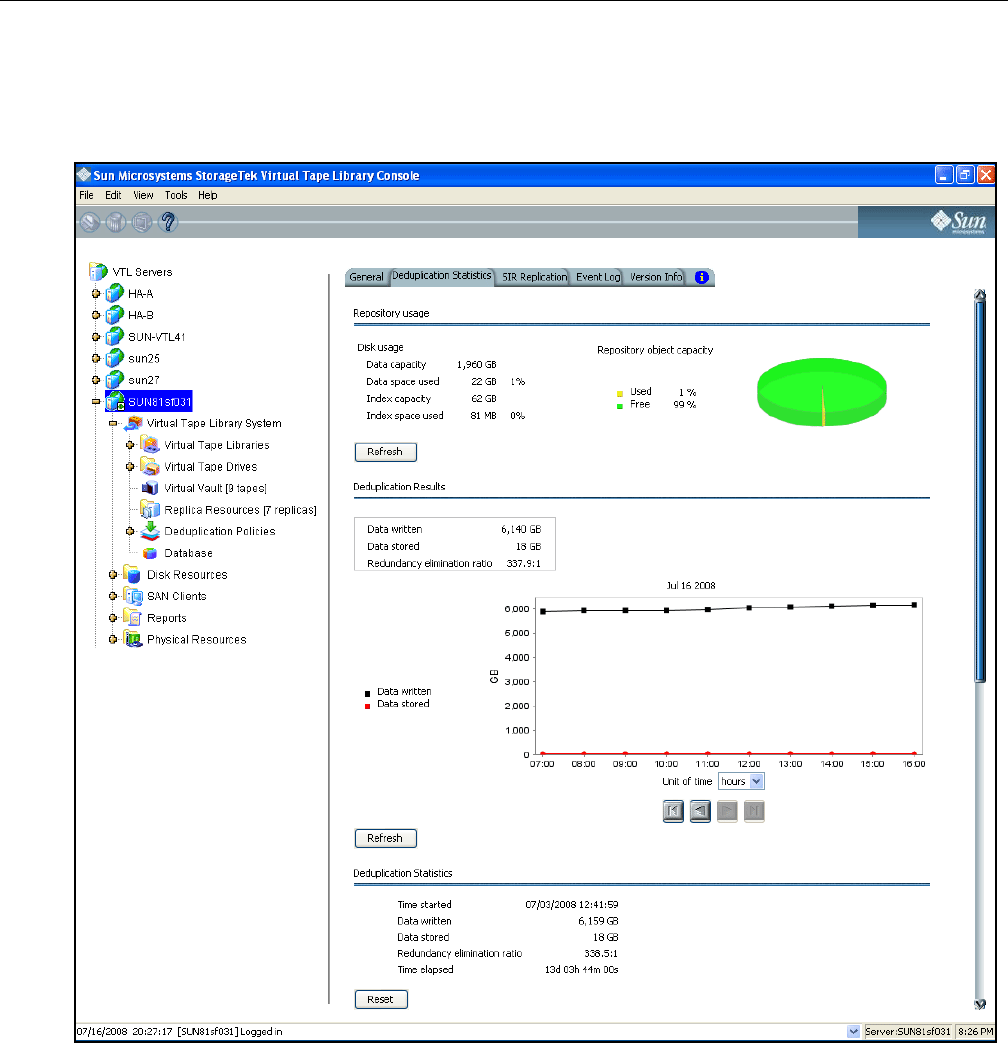
VTL Prime Solaris User’s Guide • September 2008 • 316855201 • A 46
Repository statistics
To view repository statistics for the entire cluster, highlight the VTL server and select
the Deduplication Statistics tab in the right panel.
The values displayed for Data written represent data scanned in VTL; Data stored
values represent the amount of unique data stored in the repository.
The Redundancy elimination ratio (frequently referred to in the industry as the
Deduplication Ratio) represents this formula: [(data scanned)÷(data stored)].
The Deduplication Statistics display provides three ways to look at these values:
• Repository usage
• Deduplication results

VTL Prime Solaris User’s Guide • September 2008 • 316855201 • A 47
• Deduplication statistics
Repository
usage This section of the display shows the current state of the physical disk used as the
deduplication repository, which includes deduplication data and deduplication index
storage. Values are based on all tape scans performed during the life span of the
selected server.
Disk Usage values show how much disk space has been allocated to each
deduplication storage component and how much space has been used.
The Repository object capacity graphic represents memory usage. Select Refresh
to update the display to include activity that has occurred since the last refresh.
Deduplication
results This section of the display combines data written and data stored statistics for all
accumulated data to show deduplication activity over time. Viewing data in
this way allows you to calculate the redundancy elimination ratio for any
period of time.
Reviewing deduplication operations for successive weeks of full backup reveals the
true redundancy ratios of week-to-week data evolution and can be used to
accurately forecast repository requirements. You can identify how quickly you are
using your repository disk space and when you are likely to need to add more.
Select a Unit of time from the drop-down list to adjust the granularity of the graph.
Use the arrow buttons to scan through accumulated data. Click Refresh to include
data for deduplication activity that has occurred since the last refresh.
Deduplication
statistics This section of the display shows current statistics: a view of the redundancy
elimination ratio based on tape scans performed since a user last reset the display.
For example, statistics might reflect 7 days, 1 hour, 2 minutes, and 2 seconds of
deduplication processing, during which 125 GB of data was scanned by
deduplication. 45 GB of data was unique and therefore stored in the repository,
resulting in a redundancy elimination ratio of 2.8:1.
Statistics are automatically updated every 30 seconds. You can click the Reset
button to reset values to zero and reset the time to the current time. Subsequent
updates will reflect activity since the reset. If you view the display after a few
minutes, the redundancy elimination ratio will reflect tapes currently being scanned.
Note: It is not uncommon to see a ratio of 1000:1 for a particular tape; this simply
indicates that extremely little data has changed.

VTL Prime Solaris User’s Guide • September 2008 • 316855201 • A 48
Reclaim data repository disk space
During the deduplication process, only single instances of unique data are passed to
the deduplication repository. The original virtual tape is replaced with a VIT pointing
to deduplication storage.
Over time, VITs can be erased, formatted or overwritten by your backup application
(such as when a tape has expired). It is also possible that you may have manually
deleted a VIT from the VTL console.
When a VIT is eliminated, the pointers to deduplication storage are deleted but the
actual deduplicated data is not.
The Space Reclamation option allows you to delete the deduplicated data and free
up the associated disk space from the data repository. To do this right-click on the
VTL server object and then select Options/Deduplication/Run Space Reclamation.
Note: Putting a VIT in a scratch pool of a backup application does not mean that the
storage used by that VIT can be reclaimed. Storage can be reclaimed only when a
VIT is deleted from the console or erased/formatted/overwritten by the backup
application.
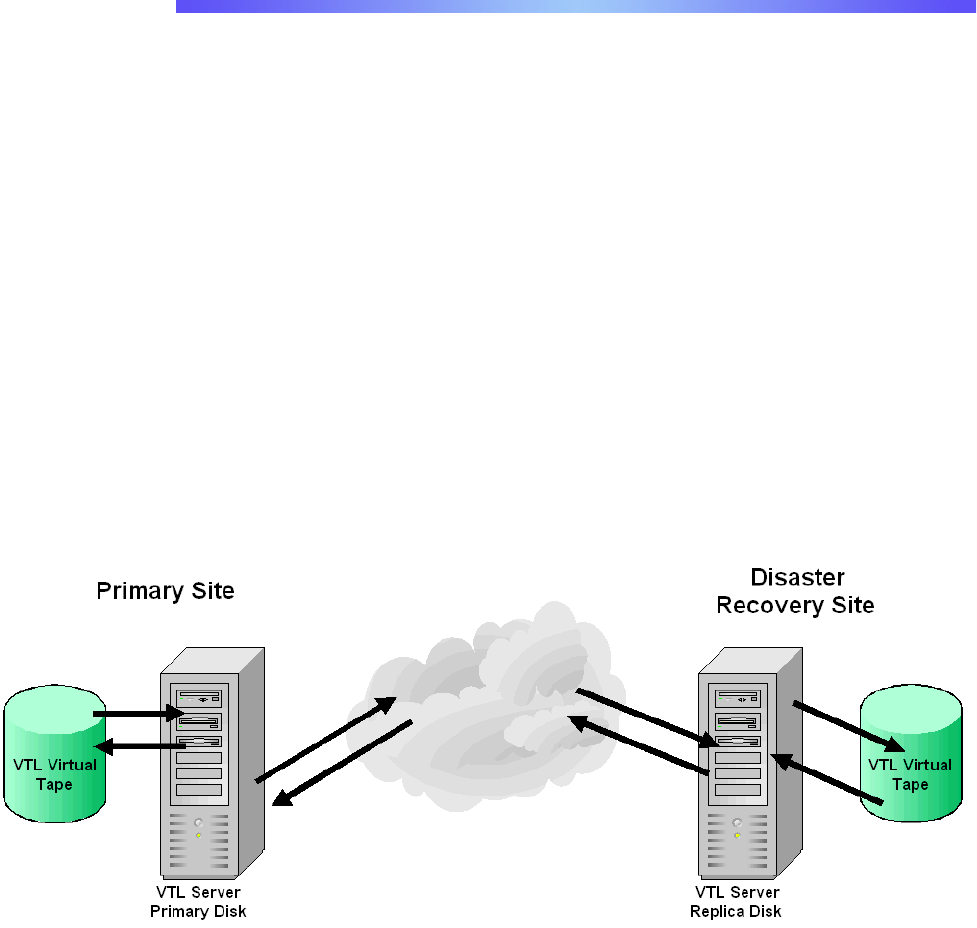
VTL Prime Solaris User’s Guide • September 2008 • 316855201 • A 49
Replicate Data
Replication protects the information on a virtual tape by maintaining a copy of the
virtual tape on the same VTL server or on another VTL server.
At prescribed intervals, when the tape is not in use, changed data from the primary
virtual tape on the source server is transmitted to the replica resource on the target
server so that they are synchronized. The target server is usually located at a
remote location. Under normal operation, backup clients do not have access to the
replica resource on the target server.
If a disaster occurs and the replica is needed, the administrator can promote the
replica to become the primary virtual tape so that clients can access it.
VTL offers two types of replication, Remote Replication and Local Replication. Both
types can be enhanced with the Compression and/or Encryption options.
Remote
Replication Remote Replication allows fast, data synchronization of storage volumes from one
VTL server to another over the IP network.
With Remote Replication, the replica disk is located on a separate VTL server,
called the target server.
Local
Replication Local Replication allows fast, data synchronization of storage volumes within one
VTL server. Because there is only one VTL server, the primary and target servers
are the same server.
Local Replication can be used to maintain a local copy of virtual tape data or it can
be used to maintain a remote copy within metropolitan area Fibre Channel SANs.
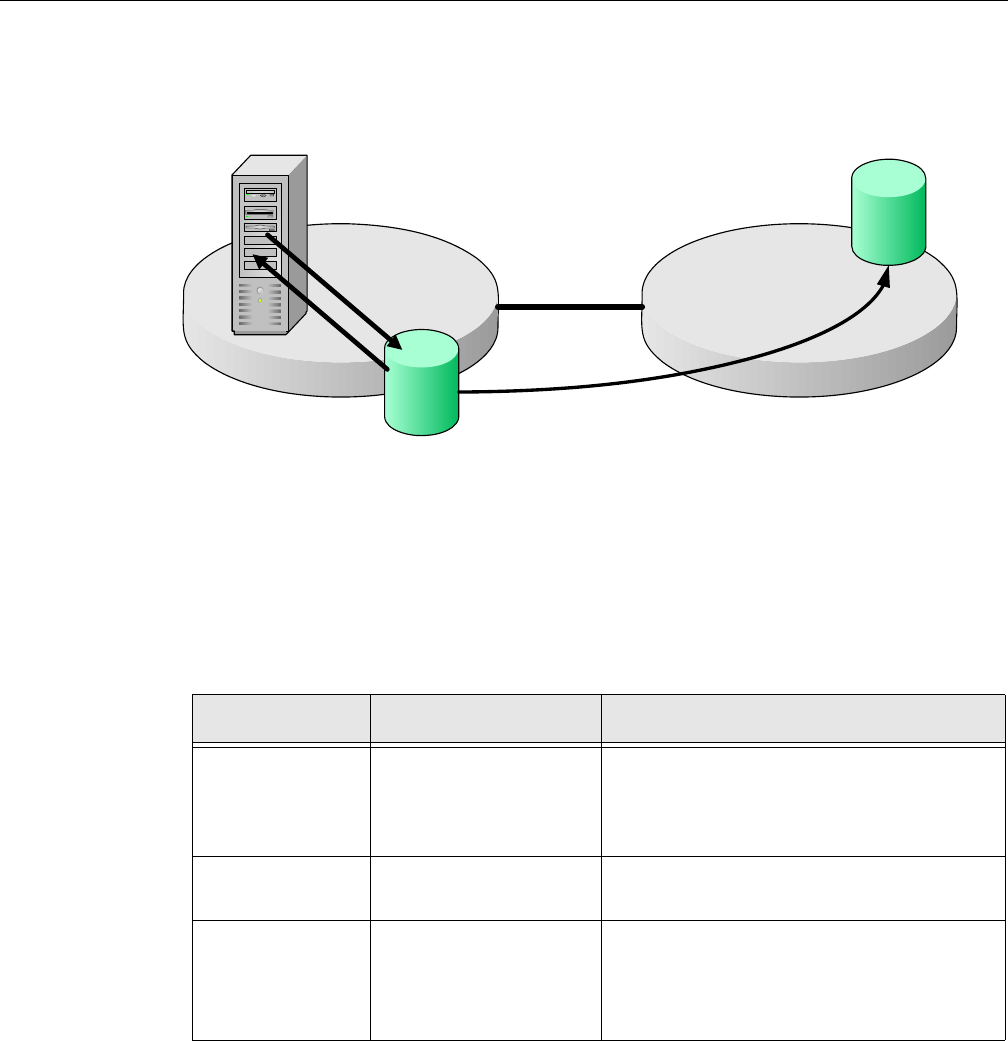
VTL Prime Solaris User’s Guide • September 2008 • 316855201 • A 50
With Local Replication, the replica disk can be connected to the VTL server via a
gateway using edge routers or protocol converters.
Types of replication
Note: For information on replicating the deduplication repository, refer to
‘Replicating the deduplication repository’.
There are three methods for replicating tape data in VTL; two provide automatic
replication and one is a manual process that can be used if you are not using the
automatic methods:
VTL Server
Primary Disk
VTL Virtual
Tape
VTL Virtual
Tape
Primary Site Disaster
Recovery Site
Gateway
Feature Automatic/Manual Description
Auto Replication Automatic Replicates the contents of a single tape
whenever a virtual tape is exported from a
virtual library (such as from a backup
application or other utility).
Remote Copy Manual Replicates the contents of a single tape on
demand.
Replication Automatic Replicates changed data from a primary
virtual tape to the same VTL server or
another VTL server at prescribed intervals,
based on user-defined policies.

VTL Prime Solaris User’s Guide • September 2008 • 316855201 • A 51
Auto Replication
Auto Replication replicates the contents of a single tape whenever a virtual tape is
exported from a virtual library (such as from a backup application or other utility).
Auto Replication is enabled when you create a virtual tape library. If it is enabled for
a library, when you create tapes for the library, you can enable/disable Auto
Replication for the individual tape.
Note: Do not enable auto-replication for libraries or tapes for which you will defining
a deduplication policy. This feature is not supported for Virtual Index Tapes (VITs).
If you want to enable Auto Replication for an existing library:
1. Right-click on a virtual tape library and select Properties.
2. Select Auto Replication.
3. Select whether you want the virtual tape copied (retained) or moved (removed)
after the data is replicated.
If you select to move it, indicate how long to wait before deleting it
4. Select the target server.
Remote Copy
You can copy the contents of a single tape whenever you need to. Because the
Remote Copy feature replicates the full tape rather than appending to an existing
virtual tape, you can copy a tape only if there is no virtual tape on the target server
with the same barcode. Therefore, if you have copied this tape before, you must
delete the copy from the target server before continuing.
Note: You cannot copy a tape that is configured for replication or Auto Replication.
1. Right-click on a tape and select Remote Copy.
2. Select if you want to copy to a local or remote server.
If you select to copy to a remote server, you will have to select the server. If the
server you want does not appear in the list, click the Add button.
3. Confirm/enter the target server’s IP address.

VTL Prime Solaris User’s Guide • September 2008 • 316855201 • A 52
4. Select a location for the copied tape.
You can select a tape library or the virtual vault.
If you select a tape library, the media must be compatible.
5. Confirm that all information is correct and then click Finish to create the copy.
Requirements
The following are the requirements for setting up a replication configuration:
• (Remote Replication) You must have two VTL servers.
• (Remote Replication) You must have write access to both servers.
• You must have enough space on the target server for the replica resource.
• You must enable replication between the two VTL servers by adding the
target server to the primary server using the console on the primary server.
• The target server must be a 64-bit server.
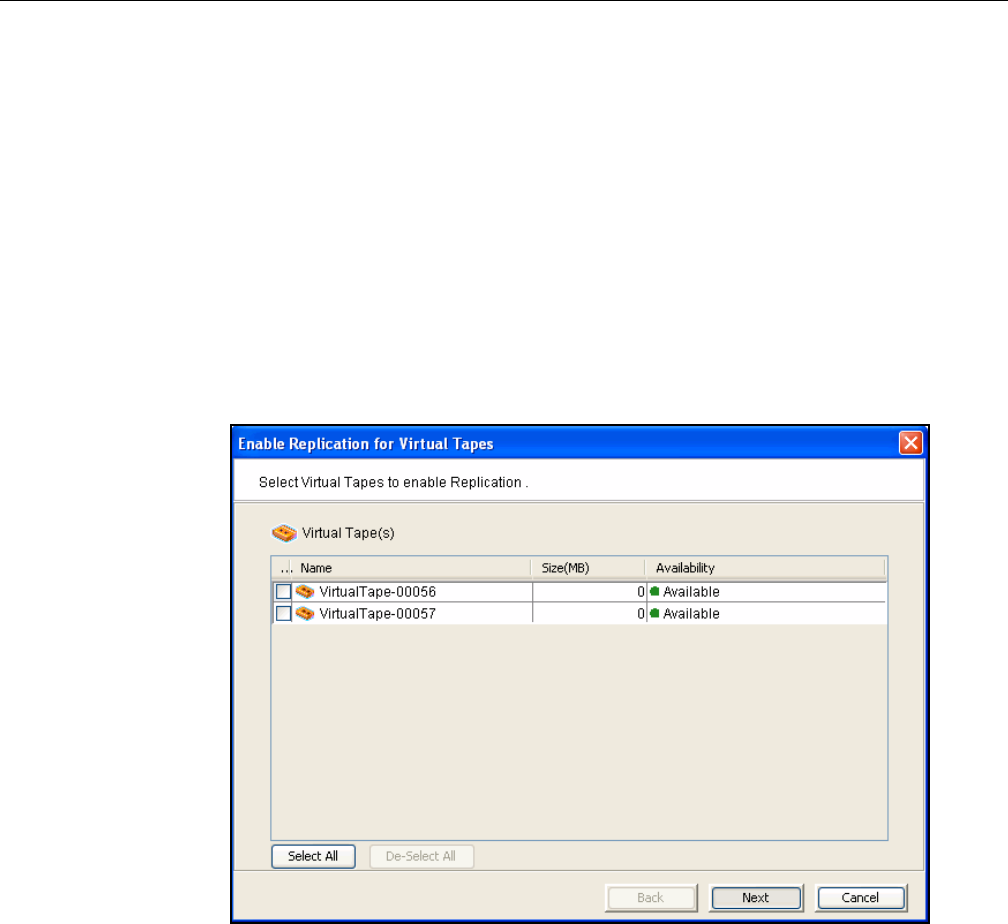
VTL Prime Solaris User’s Guide • September 2008 • 316855201 • A 53
Configuring replication for virtual tapes
You must enable replication for each virtual tape that you want to replicate.
1. Right-click on a virtual tape and select Replication --> Add.
To enable replication for multiple virtual tapes in the same virtual tape library,
right-click on the virtual tape library and select Replication --> Add.
You can also right-click on the virtual vault and enable replication for the virtual
tapes in the virtual vault.
Each virtual tape in the library can only have one replica resource.
2. If you selected a virtual tape library, select one or more available virtual tapes to
replicate.
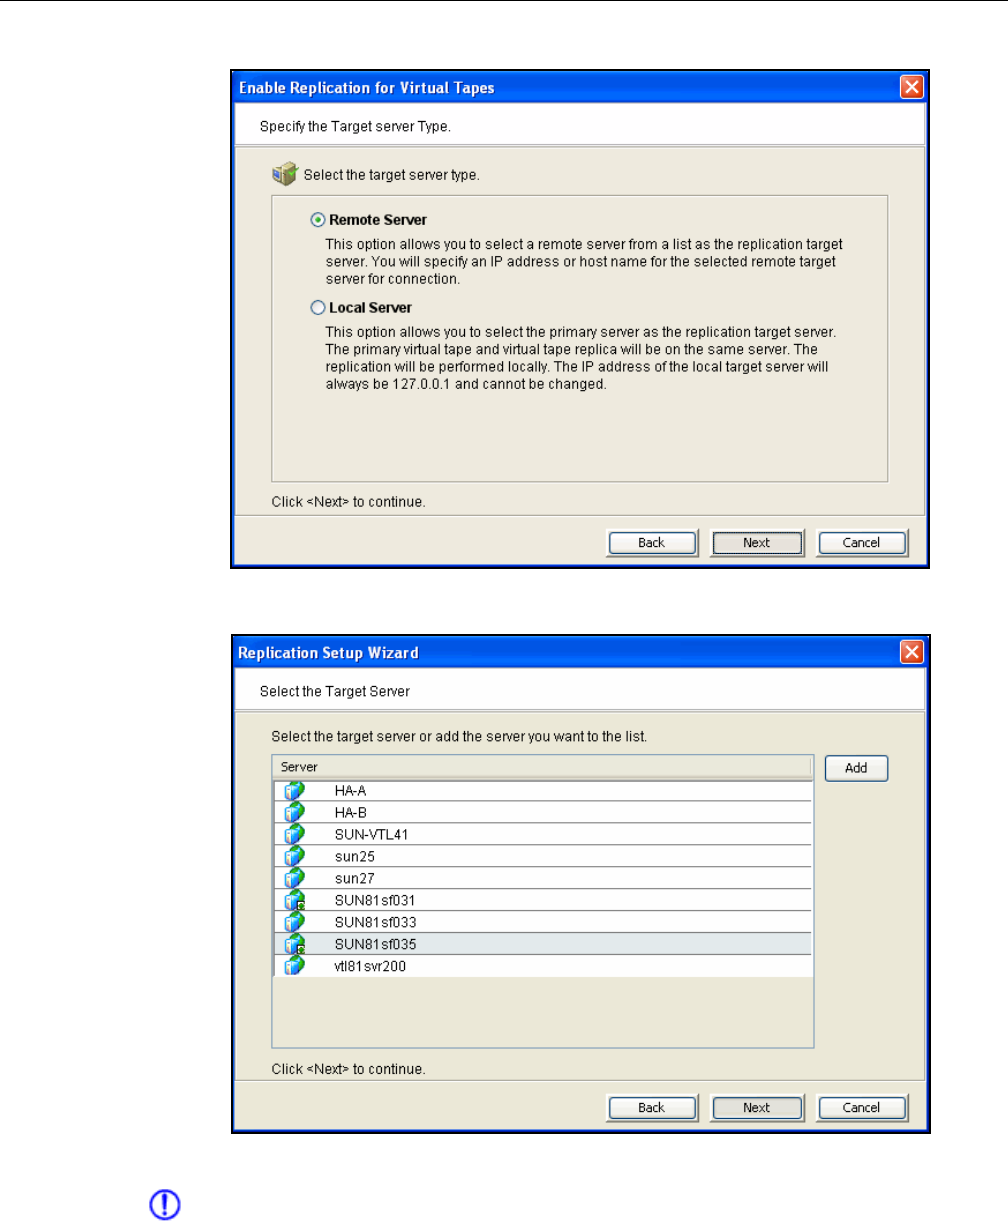
VTL Prime Solaris User’s Guide • September 2008 • 316855201 • A 54
3. Indicate whether you want to use remote replication or local replication.
4. Select the server that will contain the replica.
If the server you want does not appear on the list, click the Add button.
Note: For Solaris systems, the target server must be a 64-bit server.
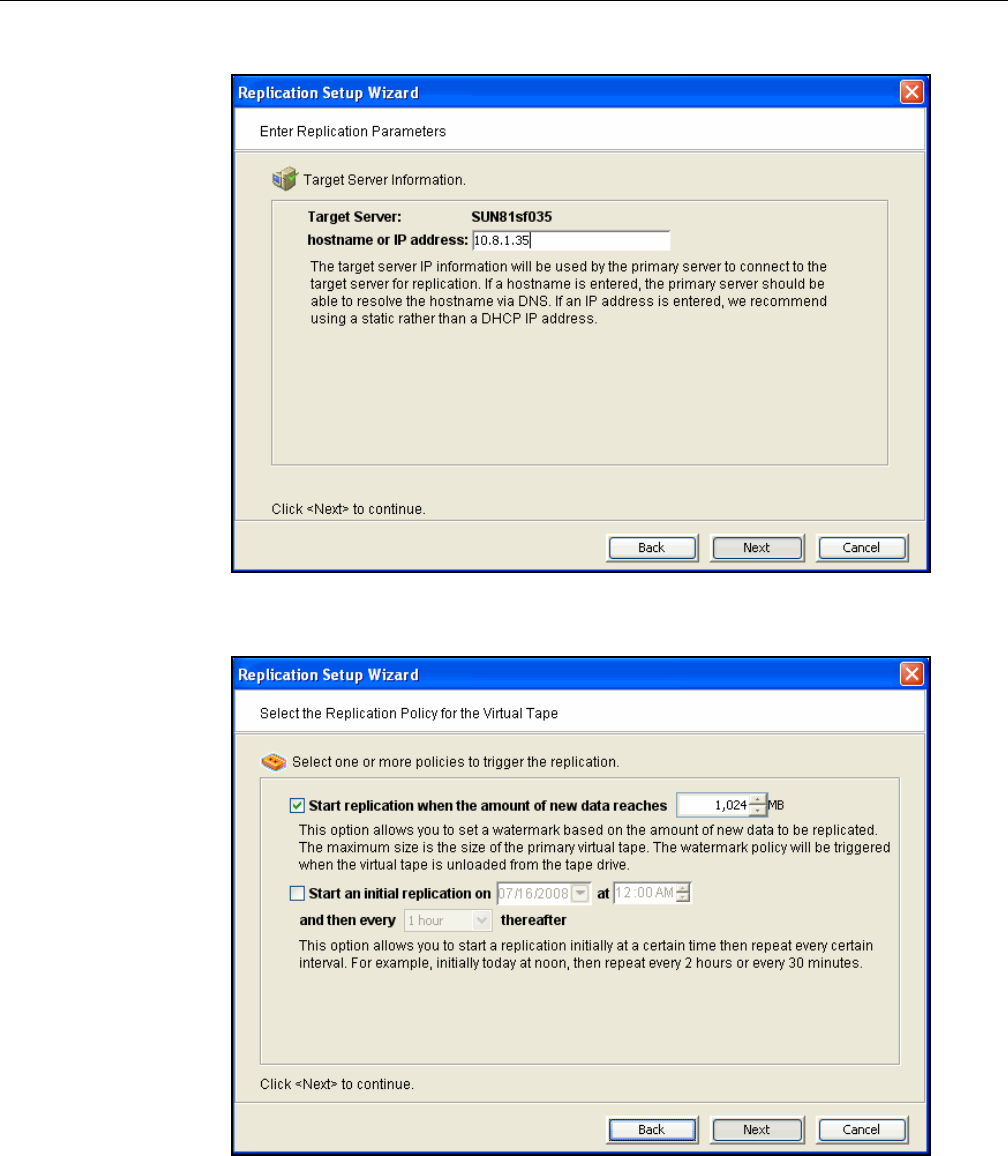
VTL Prime Solaris User’s Guide • September 2008 • 316855201 • A 55
5. Confirm/enter the target server’s IP address.
6. Configure how often, and under what circumstances, replication should occur.
You must select at least one policy, but you can have multiple.
Start replication when the amount of new data reaches - If you enter a
watermark value, when the value is reached, replication of the changed data will
begin as soon as the virtual tape is back in the library.
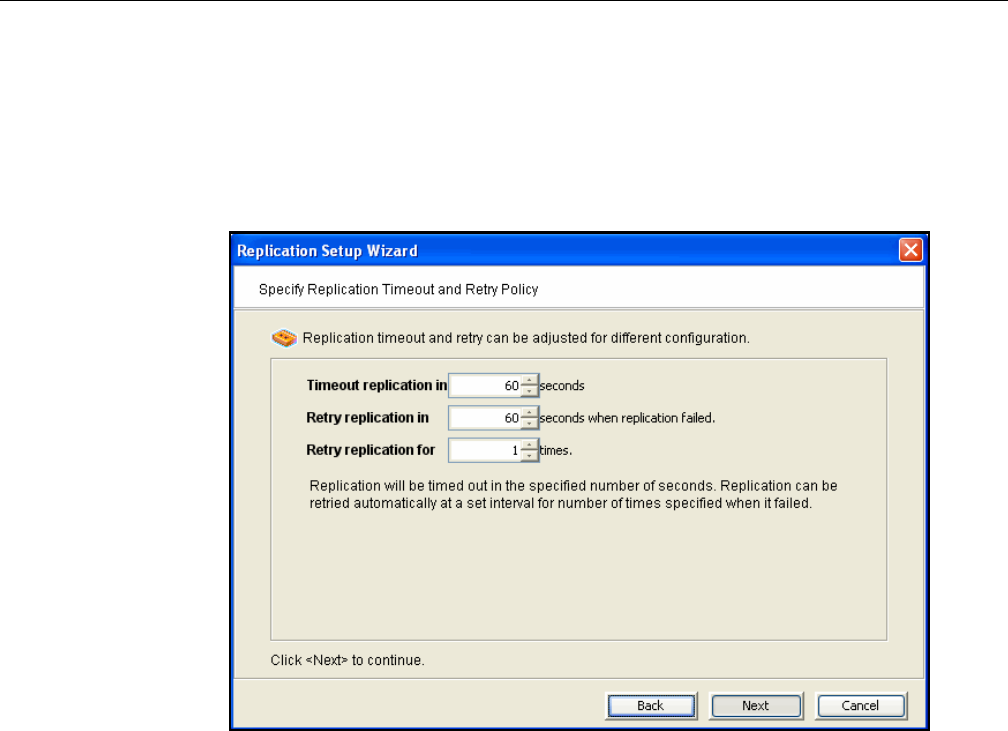
VTL Prime Solaris User’s Guide • September 2008 • 316855201 • A 56
Start an initial replication on mm/dd/yyyy at hh:mm and then every n hours/
minutes thereafter - Indicate when replication should begin and how often it
should be repeated.
If a replication is already occurring when the next time interval is reached, the
new replication request will be ignored.
7. Indicate what to do if a replication attempt fails.
Replication can only occur when the virtual tape is in the vault and is not in use.
Indicate how long the system should attempt to replicate data before timing out
and how often it should attempt to retry before skipping a scheduled replication.
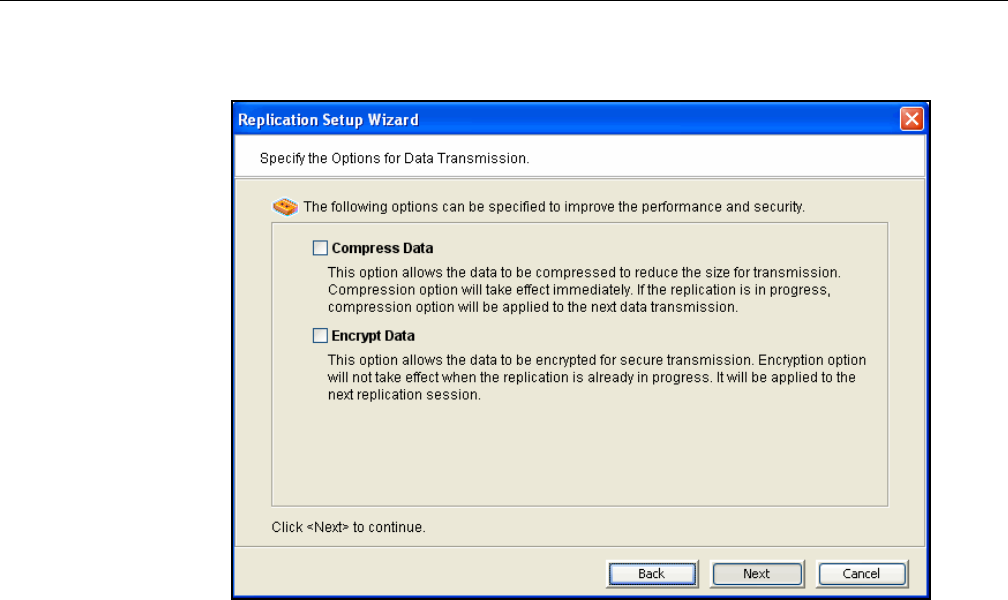
VTL Prime Solaris User’s Guide • September 2008 • 316855201 • A 57
8. (Remote Replication only) Indicate if you want to use Compression or
Encryption.
The Compression option provides enhanced throughput during replication by
compressing the data stream.
The Encryption option secures data transmission over the network during
replication. Initial key distribution is accomplished using the authenticated Diffie-
Hellman exchange protocol. Subsequent session keys are derived from the
master shared secret, making it very secure.
The Compression option is not supported for replication of virtual tapes or for
tapes that are or will be included in a deduplication policy; Encryption is not
supported for replicating tapes that are or will be included in a deduplication
policy.
9. If you selected a virtual tape library, review your configuration settings and select
Finish.
10. If you selected a single tape, select Express in the next screen shown after the
screen in step 8.
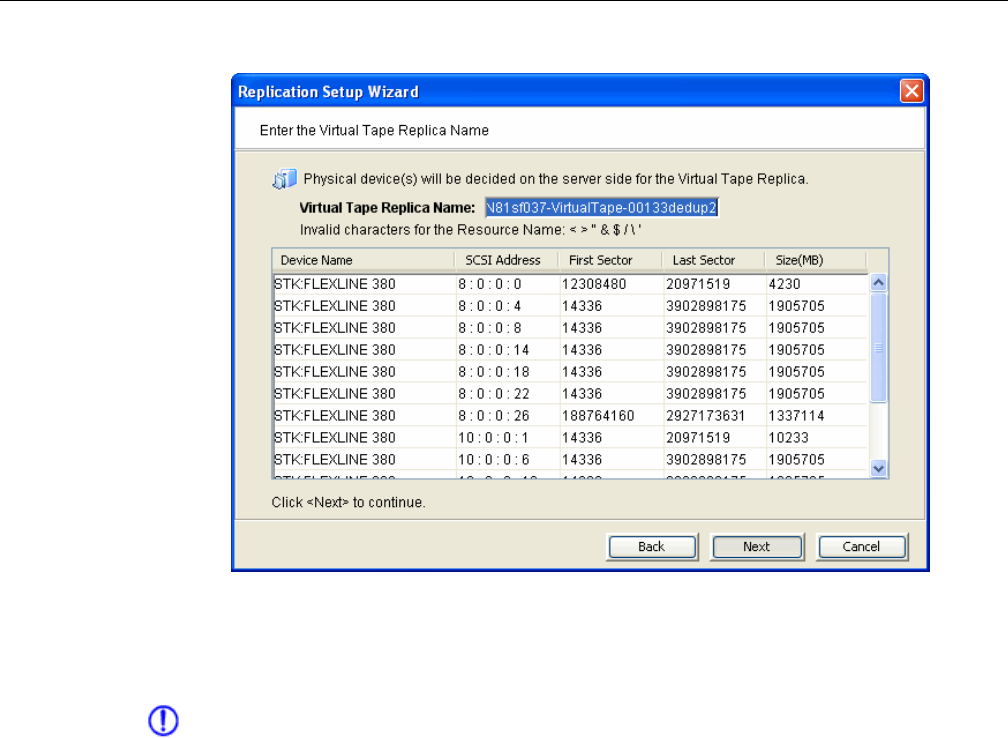
VTL Prime Solaris User’s Guide • September 2008 • 316855201 • A 58
11. Enter a name for the virtual tape replica:
The name is not case sensitive.
12. Confirm that all information is correct and then click Finish to create the
replication configuration.
Note: Once you create your replication configuration, you should not change the
hostname of the source (primary) server. If you do, you will need to recreate your
replication configuration.
Configuring replication for Virtual Index Tapes (VITs)
Replication for VITs is defined as part of the process of creating deduplication
policies (refer to ‘Data deduplication policies’)
Check replication status
There are several ways to check replication status:
•Replication tab of the primary virtual tape - displays the policies set for
replication as well as the replication status.
•General tab of the Replica Resource on the target server - displays status of
replication in progress.
• Event Log - displays status and operational information, as well as any
errors.
• Replication Status Report - can be run from the Reports object. It provides a
centralized view for displaying real-time replication status for all tapes
enabled for replication. It can be generated for an individual tapes, multiple
tapes, source server or target server, for any range of dates. This report is
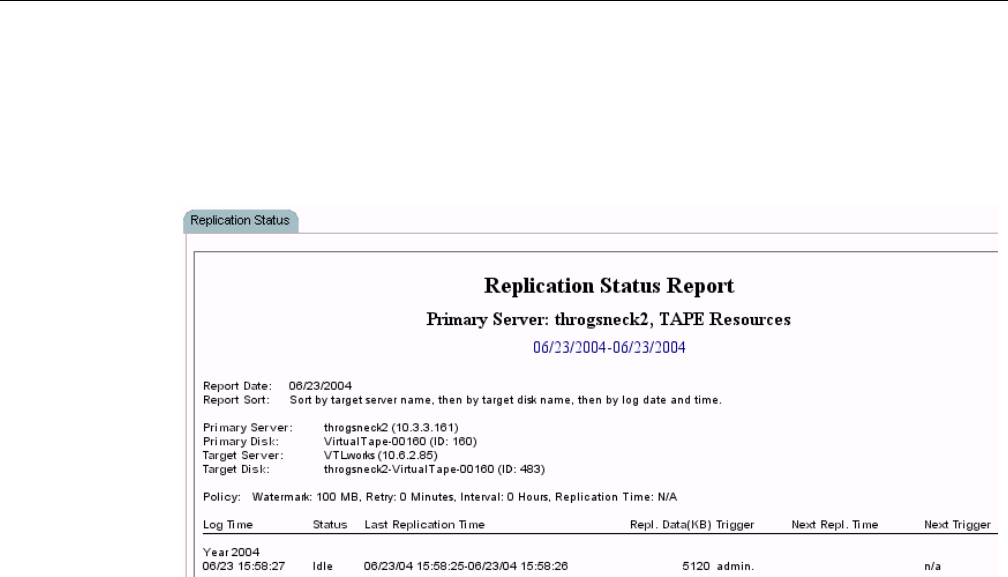
VTL Prime Solaris User’s Guide • September 2008 • 316855201 • A 59
useful for administrators managing multiple servers that either replicate data
or are the recipients of replicated data. The report can display information
about existing replication configurations only or it can include information
about replication configurations that have been deleted or promoted (you
must select to view all replication activities in the database). The following is
a sample Replication Status Report:
Promote a replica resource
Note: Promoting a replica resource is valid only for virtual tapes, not for Virtual Index
Tapes (VITs).
If a replica resource is needed, the administrator can promote the replica to become
a usable virtual tape. After promotion, the virtual tape is put into the virtual vault so
that you can move it to any virtual library on that server (formerly the target server).
If you need to get the virtual tape back to the formerly primary server, you must
replicate it back to that server.
Promoting a replica resource breaks the replication configuration. Once a replica
resource is promoted, it cannot revert back to a replica resource.
You must have a valid replica resource in order to promote it. For example, if a
problem occurred (such as a transmission problem or the replica resource failing)
during the first and only replication, the replicated data would be compromised and
therefore could not be promoted to a primary virtual tape.
You cannot promote a replica resource while a replication is in progress.
1. In the Console, locate the target server, right-click on the appropriate Replica
Resource and select Replication --> Promote.
2. Confirm the promotion and click OK.
3. From the client, rescan devices or restart the client to see the promoted virtual
tape.

VTL Prime Solaris User’s Guide • September 2008 • 316855201 • A 60
Change your replication configuration options
You can change the following for your replication configuration:
• Static IP address of your target server
• Policies that trigger replication (watermark, interval, time)
• Timeout and retry policies
• Data transmission options (encryption, compression)
To change the configuration:
1. Right-click on the primary virtual tape and select Replication --> Properties.
2. Make the appropriate changes and click OK.
Suspend/resume replication schedule
You can suspend future replications from automatically being triggered by your
replication policies (watermark, interval, time). This will not stop a replication that is
currently in progress. You can still manually start the replication process while the
schedule is suspended. To suspend/resume replication, right-click on the primary
virtual tape and select Replication --> Suspend (or Resume).
You can see the current settings by checking the Replication Schedule field on
Replication tab of the primary virtual tape.
Stop a replication in progress
To stop a replication that is currently in progress, right-click on the primary virtual
tape and select Replication --> Stop.
Note that you do not need to stop an active replication job so that a backup can
occur. When a virtual tape is mounted in a virtual tape drive, the active replication
job will automatically be cancelled so that the backup application can write to the
tape. Replication will continue when the next replication trigger occurs.
Manually start the replication process
To force a replication that is not scheduled, select Replication --> Synchronize.
Remove a replication configuration
This procedure allows you to remove the replication configuration on the source
server and either delete or promote the replica resource on the target server at the
same time.
1. Right-click on the virtual tape library and select Replication-->Remove.
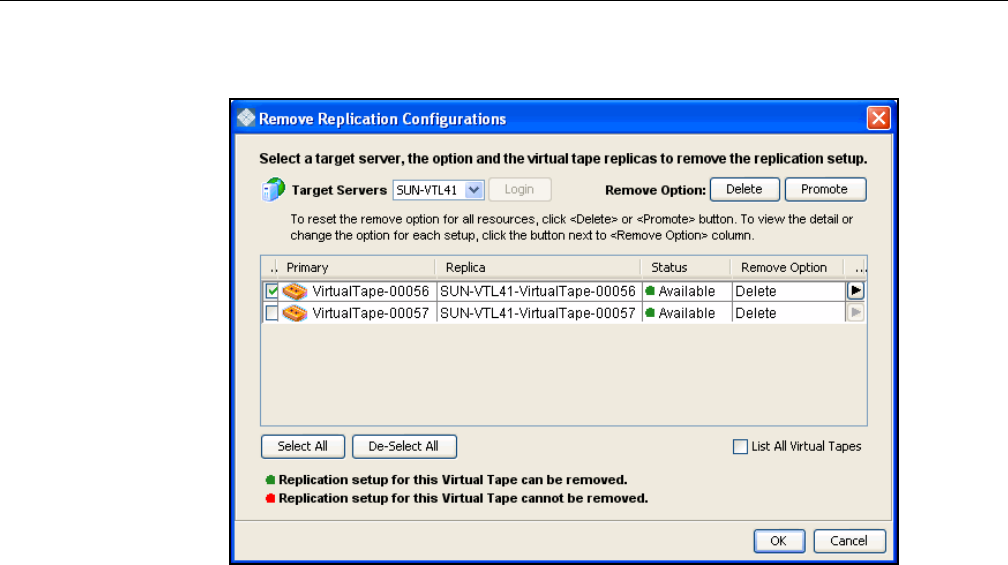
VTL Prime Solaris User’s Guide • September 2008 • 316855201 • A 61
2. Select the replication target server, the option to remove or promote, and select
the virtual tape replicas.
3. Select OK.
4. In the confirmation message box, type Yes to confirm that you want to remove
replication configuration from the selected tapes.
A success message is displayed when the process is complete.
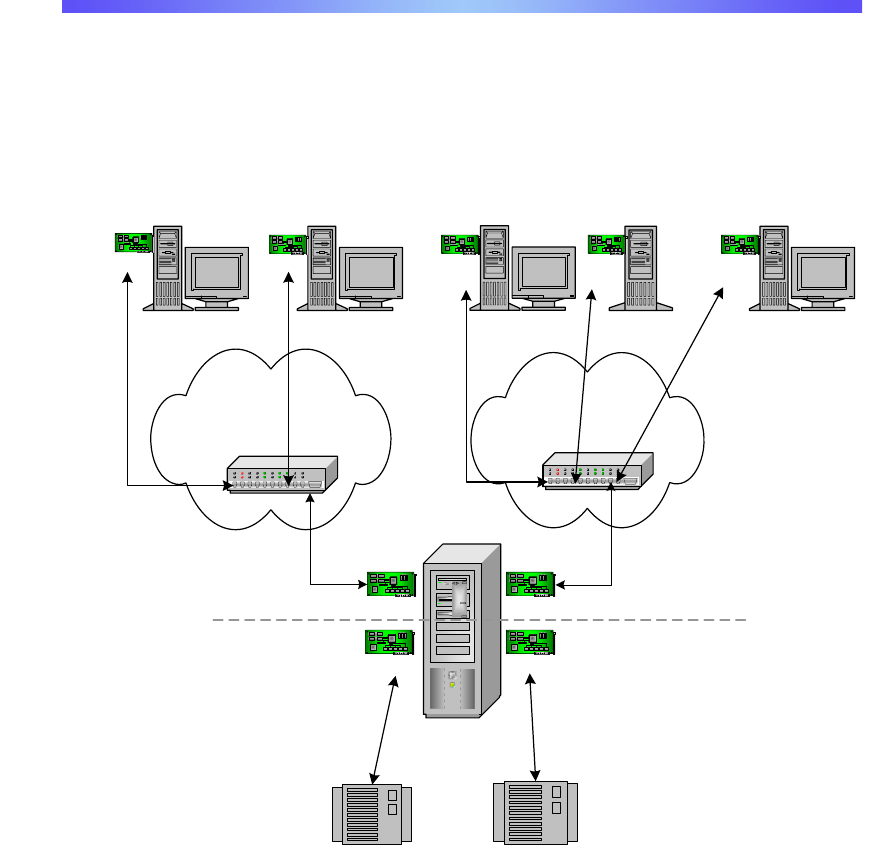
VTL Prime Solaris User’s Guide • September 2008 • 316855201 • A 62
Fibre Channel Target Mode
Overview
The VTL server is protocol-independent and supports multiple outbound target
protocols, including Fibre Channel Target Mode.
This chapter provides configuration information for Fibre Channel Target Mode as
well as the associated Fibre Channel SAN equipment.
As you can see from the illustration above, an application server can be either an
iSCSI client or a Fibre Channel client, but not both. Using separate cards and
switches, you can have all types of VTL Clients (FC and iSCSI) on your network.
Initiators
FC Card
FC Card
NIC (IP)
SCSI Card
SCSI Disk array FC Disk array
Windows 2003
application server
NetWare server
Targets
Targets
Initiators
Windows 2000
application server
Windows 2003
application server
NIC NIC FC
Card FC
Card FC
Card
IP SAN
Fibre
Channel
SAN
FC Switch
GB Switch
VTL Server
Windows 2003
application server

VTL Prime Solaris User’s Guide • September 2008 • 316855201 • A 63
Installation and configuration overview
The installation and configuration of Fibre Channel Target Mode involves several
steps. Where necessary, detailed information appears in subsequent sections.
1. Configure Fibre Channel hardware on server.
2. Configure Fibre Channel hardware on clients.
3. Verify your hardware configuration.
4. Enable Fibre Channel Target Mode.
This is done in the configuration wizard. If it was not, do the following:
• In the Console, highlight the VTL Server that has the FC HBAs.
• Right-click on the Server and select Options --> Enable FC Target Mode. An
Everyone_FC client will be created under SAN Clients. This is a generic
client that you can assign to all (or some) of your tape libraries/drives. It
allows any WWPN not already associated with a Fibre Channel client to
have read/write non-exclusive access to any tape libraries/drives assigned
to Everyone_FC.
5. Set QLogic ports to target mode.
6. Add Fibre Channel clients.
You can add clients in the following two ways:
• Use the configuration wizard - If you have already configured your system,
you can launch the wizard by right-clicking on the VirtualTape Library
System object in the console and selecting Configuration Wizard.
• Right-click on the SAN Clients object and select Add.
7. (Optionally) Associate World Wide Port Names with clients.
8. Assign virtual tape libraries to clients.
For security purposes, you can assign specific tape libraries/drives to specific
clients. For the rest, you can use the Everyone client. Refer to ‘Assign virtual
tape libraries to clients’ for more information.
9. Trigger a device rescan or reboot client machine to access new devices.
In order to see the new devices, after you have finished configuring your Fibre
Channel Clients, you will need to trigger a device rescan or reboot the Client
machine, depending upon the requirements of the operating system.

VTL Prime Solaris User’s Guide • September 2008 • 316855201 • A 64
Configure Fibre Channel hardware on server
VTL supports the use of QLogic HBAs for the VTL server.
Ports
Your VTL appliance will be equipped with several Fibre Channel ports. Some of
these ports will interface with storage arrays. Others will interface with physical tape
libraries, while the remaining ports will interface with backup (media) servers.
The ports that connect to storage arrays are commonly known as Initiator Ports.
The ports that will interface with the backup servers' FC initiator ports will run in a
different mode known as Target Mode.
Zoning
Note: If a port is connected to a switch, we highly recommend the port be in at least
one zone.
There are two types of zoning that can be configured on each switch, hard zoning
(based on port #) and soft zoning (based on WWPNs).
Hard zoning is zoning using the port number of the switches. With hard zoning, if a
zone has two ports (0 and 1) and port 0 goes down for some reason, you will need to
remove the current zoning configuration, move the plug to another valid port, re-
zone, and then enable the new zoning configuration.
Soft zoning uses the WWPN in the configuration. The WWPN remains the same in
the zoning configuration regardless of the port location. If a port fails, you can simply
move the cable from the failed port to another valid port without having to
reconfigure the zoning.
VTL requires isolated zoning where one initiator is zoned to one target in order to
minimize I/O interruptions by non-related FC activities, such as port login/out and
resets.
For example, for the case of upstream (to client) zoning, if there are two client
initiators and two VTL targets on the same FC fabric and if it is desirable for all four
path combinations to be established, you should use four specific zones, one for
each path (Client_Init1/VTL_Tgt1, Client_Init1/VTL_Tgt2, Client_Init2/VTL_Tgt1,
and Client_Init2/VTL_Tgt2). You cannot create a single zone that includes all four
ports. The four-zone method is cleaner because it does not allow the two client
initiators nor the two VTL target ports to see each other. This eliminates all of the
potential issues such as initiators trying to log in to each other under certain
conditions.
The same should be done for downstream (to storage) zoning. If there are two VTL
initiators and two storage targets on the same fabric, there should be four zones
(VTL_Init1/Storage_Tgt1, VTL_Init1/Storage_Tgt2, VTL_Init2/Storage_Tgt1, and
VTL_Init2/Storage_Tgt2).

VTL Prime Solaris User’s Guide • September 2008 • 316855201 • A 65
If hard zoning is used, it is necessary to create zones for each standby target,
doubling the number of upstream zones. This extra set of zones is not necessary in
the case of soft zoning because zones are defined by WWPN combinations.
Additionally, make sure that storage devices to be used by VTL are not zoned to
clients (backup servers). Ports on storage devices to be used by VTL should be
zoned to VTL’s initiator ports while the clients are zoned to VTL’s target ports. Make
sure that from the storage unit’s management GUI (such as SANtricity and
NaviSphere), the LUNs are re-assigned to VTL as the “host”. VTL will virtualize
these LUNS. VTL can then define virtual tapes out of these LUNS and further
provision them to the clients.
Switches
For the best performance, if you are using 2 or 4 Gig switches, all of your cards
should be 2 or 4 Gig cards. Examples of 2 Gig cards include the QLogic 2300 and
Emulex LP952L. Examples of 4 Gig cards include the QLogic 24xx.
Storage array Connect an FC cable from a port on the storage array to an FC port on the FC
switch.
Backup servers Typically, backup servers are already connected to the FC switch before the
deployment. In this case, only FC switch zoning requires modification. Connect an
FC cable from each backup server to an FC port on the FC switch.
Configure a FC
switch using
soft zoning
The following are generic FC zoning steps applicable to any FC switch hardware.
Refer to hardware or vendor documentation for specific zoning instructions for your
FC switch.
1. Access the FC switch via its web interface and log in if necessary.
2. Access the Name Server Table.
3. Access the zoning configuration and log in if necessary.
4. Using previously recorded FC HBA information, look for the WWPNs for the
adapters from the VTL appliance, storage array, and backup servers.
5. Create aliases for each WWPN.
Note that some switches (i.e. McData) do not use aliasing.
6. Create zones for your configuration, for example:
• Zone 1: VTL WWPN (initiator)->storage array WWPN (target)
• Zone 2: VTL WWPN (initiator)->Tape Library WWPN (target)
• Zone 3: VTL WWPN (target)->backup server WWPN (initiator)
7. Save the configuration.

VTL Prime Solaris User’s Guide • September 2008 • 316855201 • A 66
Configure a FC
switch using
hard zoning
Follow the steps above but use the port number in place of the WWPN.
Persistent binding
Persistent binding is automatically enabled for all QLogic HBAs connected to
storage device targets upon the discovery of the device (via a Console physical
device rescan with the Discover New Devices option enabled). However, persistent
binding will not be SET until the HBA is reloaded. You can reload HBAs by rebooting
the VTL server.
Without persistent binding, there is a risk that the wrong storage controller port will
be accessed when the VTL appliance is rebooted (or VTL HBA driver is reloaded).
VSA
Some storage devices (such as EMC Symmetric storage controller and older HP
storage) use VSA (Volume Set Addressing) mode. This addressing method is used
primarily for addressing virtual buses, targets, and LUNs. If your storage device
uses VSA, you must enable it through the console.
Incorrect use of VSA can lead to problems seeing the disks at the HBA level. If the
HBA cannot see the disks, VTL is not able to access and manage them. This is true
both ways: (1) the storage requires VSA, but it is not enabled and (2) the storage
does not use VSA, but it is enabled.
To determine if the storage device that is being provisioned by VTL has VSA mode,
use the storage's own management utility.
To enable VSA, right-click on Physical Resources or a specific adapter and select
Target Port Binding. Click the VSA checkbox for the appropriate storage device
targets.
Some clients, such as HP-UX clients, use VSA mode. In order for these clients to
access VTL, you must enable VSA on the VTL's target ports (this is done when you
enable Target Mode on an HBA port from the Console). Otherwise, for example, HP-
UX (10, 11, 11i) Fibre Channel Clients using HP Tachyon Fibre Channel HBAs
cannot detect more than eight LUNs (eight VTL virtual tape drives and robotic arm).

VTL Prime Solaris User’s Guide • September 2008 • 316855201 • A 67
QLogic HBAs
Target mode
settings The table below lists the recommended settings (changes are indicated in bold) for
QLogic HBA target mode. These values are set in the qla2x00fs.conf file and will
override those set through the BIOS settings of the HBA.
For initiators, consult the best practice guideline from the storage vendor. If an
initiator is to be used by multiple brands, the best practice is to select a setting that
best satisfies all brands. If this is not possible, consult technical support for advice,
or separate the conflicting storage units to their own initiator connections.
Name Default Recommendation
frame_size 2 (2048byte) 2 (2048byte)
loop_reset_delay 0 0
adapter_hard_loop_id 0 0
connection_option 1 (point to point) 1 (point to point)
hard_loop_id 0 0-124
Make sure that both primary target adapter and
secondary standby adapter are set to the SAME value
fibre_channel_tape_support 0 (disable) 1 (enable)
data_rate 2 (auto) Based on the switch capability – 0 (1 Gig), 1 (2 Gig), 2
(auto), or 2 (4Gig)
execution_throttle 255 255
LUNs_per_target 256 256
enable_lip_reset 1 (enable) 1 (enable)
enable_lip_full_login 1 (enable) 1 (enable)
enable_target_reset 1 (enable) 1 (enable)
login_retry_count 8 8
port_down_retry_count 8 8
link_down_timeout 45 45
extended_error_logging_flag 0 (no logging) 0 (no logging)
interrupt_delay_timer 0 0
iocb_allocation 512 512
enable_64bit_addressing 0 (disable) 0 (disable)
fibrechannelconfirm 0 (disable) 0 (disable)
class2service 0 (disable) 0 (disable)
acko 0 (disable) 0 (disable)
VTL Prime Solaris User’s Guide • September 2008 • 316855201 • A 68
QLogic Multi-ID HBAs
With a Multi-ID HBA, each port can be both a target and an initiator (dual mode).
When using a Multi-ID HBA, there are two WWPNs, the base port and the alias.
Important notes:
• You should not use the Multi-ID driver if you intend to directly connect a
target port to a client host.
• With dual mode, clients will need to be zoned to the alias port (called Target
WWPN). If they are zoned to the base port, clients will not see any devices.
• You will only see the alias port when that port is in target mode.
• You will only see the alias once all of the VTL services are started.
• If you are using the QLogic Multi-ID driver with loop-only mode, you will not
be able to use a McData Director class switch. The standard point-to-point
driver is required for this configuration.
responsetimer 0 (disable) 0 (disable)
fastpost 0 (disable) 0 (disable)
driverloadrisccode 1 (enable) 1 (enable)
q12xmaxqdepth 32 32 (configurable through the VTL Console)
max_srbs 4096 4096
q12xlogintimeout 20 seconds 20 seconds
q12xretrycount 20 20
q12xsuspendcount 10 10
q12xdevflag 0 0
q12xplogiabsentdevice 0 (no PLOGI) 0 (no PLOGI)
busbusytimeout 60 seconds 60 seconds
displayconfig 1 1
retry_gnnft 10 10
recoverytime 10 seconds 10 seconds
failbacktime 5 seconds 5 seconds
bind 0 (by Port Name) 0 (by Port Name)
qfull_retry_count 16 16
qfull_retry_delay 2 2
q12xloopupwait 10 10
Name Default Recommendation

VTL Prime Solaris User’s Guide • September 2008 • 316855201 • A 69
QLA2X00FS.CONF file
The qla2x00fs.conf file is used to adjust settings for FC adapters installed on the
VTL appliance. Refer to ‘QLogic HBAs’ for recommended target settings.
1. Determine the HBA settings to change.
2. Back up the qla2x00fs.conf file:
cp /kernel/drv/qla2x00fs.conf /kernel/drv/qla2x00fs.conf.bak
3. Modify qla2x00fs.conf using the vi editor.
4. Save the qla2x00fs.conf file.
5. Update driver properties and reboot VTL:
update_drv -f qla2x00fs
reboot
You must reboot the VTL server for the changes in the qla2x00fs.conf file to take
effect and to recognize the new settings.
Link speed In the qla2x00fs.conf file, the link speed is set to auto-negotiate by default for every
FC port. You must manually update this and match the link speed with the switch
speed.
# Fibre Channel Data Rate Option
# 0 = 1 gigabit/second
# 1 = 2 gigabit/second
# 2 = Auto-negotiate
# 3 = 4 gigabit/second
hba0-fc-data-rate=2;
It may be necessary to manually set the port switch speed on the FC switch as well.
If you are attaching storage array directly to the VTL appliance, adjust the link speed
for all FC ports. Check with your vendor to obtain any recommended FC HBA
settings.
Device
identification Typically, Solaris will assign its own device numbers, such as c1 and c2 (controller 1
and 2), etc. These controller numbers were assigned when Solaris first discovered a
new adapter. However, the VTL appliance does not identify the same devices in the
same way.
VTL will identify QLogic adapters as hba0, hba1, hba2, and so on in the
qla2x00fs.conf file.
Settings for each individual FC port (for example, hba0 or hba1) can be modified in
qla2x00fs.conf.
To identify which adapter belongs to which HBA in qla2x00fs.conf:
1. Run the following command:
For example:

VTL Prime Solaris User’s Guide • September 2008 • 316855201 • A 70
ispdev | grep qla2x00fs
This command will output all QLogic adapters with the assigned adapter #,
qla2x00fs instance #, device path, WWPN, mode, and other properties, if
available.
adapter2 qla2x00fs0 /devices/pci@1d,0/pci1022,7450@1/pci1014,1a7@1/
pci1077,102@4 210000e08b833490 initiator | |
adapter3 qla2x00fs1 /devices/pci@1d,0/pci1022,7450@1/pci1014,1a7@1/
pci1077,102@4,1 210100e08ba33490 initiator | |
adapter4 qla2x00fs2 /devices/pci@1d,0/pci1022,7450@1/pci1014,1a7@1/
pci1077,102@6 210200e08bc33490 initiator | |
adapter5 qla2x00fs3 /devices/pci@1d,0/pci1022,7450@1/pci1014,1a7@1/
pci1077,102@6,1 210300e08be33490 initiator | |
For example, in the above example, adapter2 is mapped to qla2x00fs instance0,
which is also referred to as hba0 in the qla2x00fs.conf file.
adapter2->qla2x00fs0(hba0)
adapter3->qla2x00fs1(hba1)
adapter4->qla2x00fs2(hba2)
adapter5->qla2x00fs3(hba3)
2. Run the following command to determine which physical port belongs to each
adapter number in qla2x00fs.conf:
tail -f /var/adm/messages and unplug the FC port.
You will see a loop down message like the one below.
"Oct 1 14:54:38 SUN81sf029 qla2x00fs: [ID 376780 kern.notice]
QLA2x00fs(4): LOOP DOWN"
The 4 is the instance number in the above example.
Data rate 1. Scroll down to the appropriate section.
2. Search for data_rate.
It should look like this:
# Fibre Channel Data Rate Option
# 0 = 1 gigabit/second
# 1 = 2 gigabit/second
# 2 = Auto-negotiate
# 3 = 4 gigabit/second
hba0-fc-data-rate=2;
3. For the adapter to be configured (i.e., hba4), change the value:
hba4-fc-data-rate=1;
The hba0-fc-data-rate should be left untouched. It is the default setting for the
rest of ports.
4. Repeat for each adapter to be configured.

VTL Prime Solaris User’s Guide • September 2008 • 316855201 • A 71
Configure Fibre Channel hardware on clients
Fabric topology (For all clients except Solaris SPARC clients) When setting up clients on a Fibre
Channel network using a Fabric topology, we recommend that you set the topology
that each HBA will use to log into your switch to Point-to-Point Only.
If you are using a QLogic 2200 HBA, the topology is set through the QLogic BIOS:
Configure Settings --> Extended Firmware settings --> Connection Option: Point-to-
Point Only
Note: We recommend hard coding the link speed of the HBA to be in line with the
switch speed.
NetWare clients
HBA settings are configured through nwconfig. Do the following after installing the
card:
1. Type nwconfig.
2. Go to Driver Options and select Config disk and Storage device drivers.
3. Select Select an Additional Driver and type the path for the updated driver (i.e
sys:\qlogic).
4. Set the following parameters:
• Scan All Luns = yes
• FailBack Enabled = yes
• Read configuration = yes
• Requires configuration = no
• Report all paths = yes
• Use Portnames = no
• Qualified Inquiry = no
• Report Lun Zero = yes
• GNFT SNS Query = no
• Console Alerts = no

VTL Prime Solaris User’s Guide • September 2008 • 316855201 • A 72
HBA settings for Fibre Channel clients
This section provides recommended settings for clients that are connected to VTL.
For QLogic HBAs, you can modify the BIOS settings using the SANsurfer tool. We
do not support FC port drivers.
For all HBAs that support persistent binding, persistent binding should be
configured. Check with the HBA vendor for persistent binding procedures.
We recommend that you reload the driver (reboot) in order for changes to be made
effective for most operating systems, such as Windows, Linux, and Solaris. It is not
necessary to reboot AIX clients since there are no BIOS settings that need to be
configured. For HP-UX, you will not be required to reboot unless you are using an
Emulex HBA since you will need to recompile the kernel.
Below are charts for different types of HBAs for different types of clients. These
settings apply for cluster and non-cluster environments unless specified.
Windows 2000/2003
LUNS per
target The LUNS per target should be set to 64. You can set this value to 256 because we
use Report LUN upstream. However, this is dependent on your requirements and is
based on the number of LUNs.
HBA Card Type Setting
QLogic Login Retry Count = 180
Port Down Retry Count = 251805
Link Down Count = 30
Enable Target Reset = True
FrameSize = 2048
Execution Throttle = 255
LUNS per target = 64
Tape mode = Enable
Queue depth = 32
Emulex Node Timeout = 30
Link Timeout = 30
Reset FF = 1 (true)
VTL Prime Solaris User’s Guide • September 2008 • 316855201 • A 73
HP-UX 10, 11, and 11i
For Tachyon HBAs, you must use port swapping scripts for special switches, such
as the Brocade 3900 / 12000 with firmware 4.1.2b. Cisco switches can detect the
port change automatically so there is no need to use port swapping scripts with
Cisco switches.
AIX 4.3 and higher
There are no BIOS or OS level changes that can be made for AIX.
Linux – all versions
There are no OS level modifications to be made for a Linux client.
HBA Card Type Settings
Emulex Node timeout = 30
Link timeout = 30
scsi timeout = 30
Port swapping not required
Tachyon scsi timeout = 30
HBA Card Type Settings
IBM Retry Timeout = 30
Emulex Retry Timeout = 30
Cambex Retry Timeout = 30
HBA Card Type Settings
QLogic Login Retry Count = 180
Port Down Retry Count = 180
Link Down Count = 30
Enable Target Reset = True
FrameSize = 2048
Execution Throttle = 255
LUNS per target = 256
Tape mode = Enable
Queue depth = 32
Emulex Node Timeout = 30
Link Timeout = 30
Disk timeout value = 60

VTL Prime Solaris User’s Guide • September 2008 • 316855201 • A 74
Solaris 7, 8, 9, and 10
The changes indicated above should be changed in the *.conf files for their
respective HBAs.
NetWare – all versions
The settings indicated above should be modified at the ql23xx driver line in the
startup.ncf file.
The Port Down Retry Count and Link Down Retry is configurable in the BIOS
whereas the /XRetry, /XTimeout, and /PortDown values are configured by the driver.
The Port Down Retry Count and the /Portdown values combined will approximately
be the total disk timeout.
HBA Card Type Settings
QLogic Login Retry Count = 8
Port Down Retry Count = 8
Link Down Count = 30
Enable Target Reset = True
FrameSize = 2048
Throttle = 255
LUNS per target = 256
Tape mode = Enable
Queue depth = 32
Emulex Node Timeout = 30
Link Timeout = 30
Disk timeout value = 60
HBA Card Type Settings
QLogic Port Down Retry Count = 30
Link Down Retry = 30
/XRetry = 60
/XTimeout = 120
/PortDown = 120
Set Multi-Path Support = ON
Link Down Retry= 30
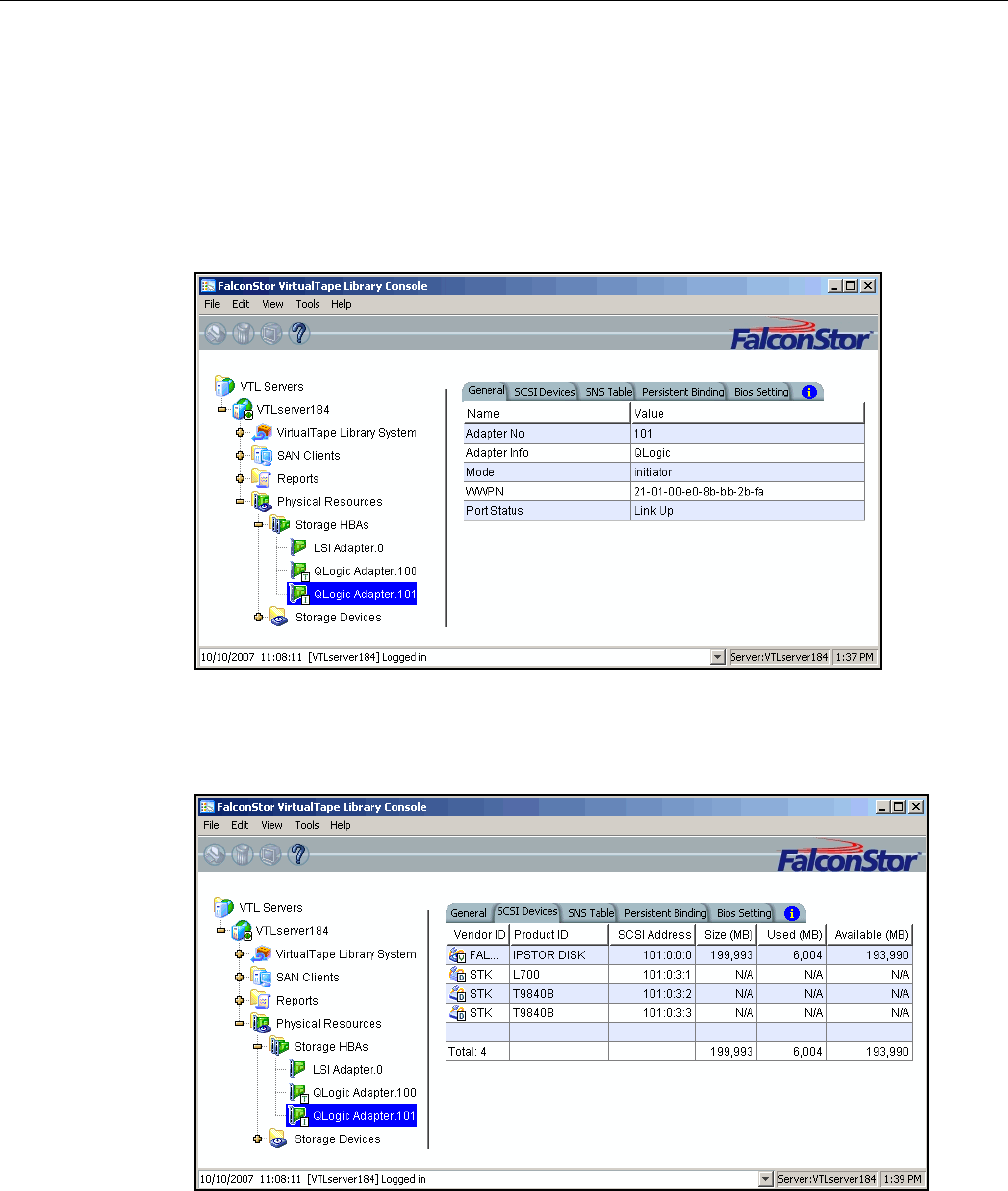
VTL Prime Solaris User’s Guide • September 2008 • 316855201 • A 75
Verify your hardware configuration
After all of your Fibre Channel hardware has been configured, you should verify that
everything is set correctly. You can do this in the VTL console by highlighting a port
under Physical Resources.
General tab The General tab displays information about the port, including mode (target or
initiator), status, and WWPN.
SCSI Devices
tab The SCSI Devices tab lists the SCSI storage devices attached to this adapter. If you
expect to see a device that is not listed, right-click on the adapter and select
Rescan.
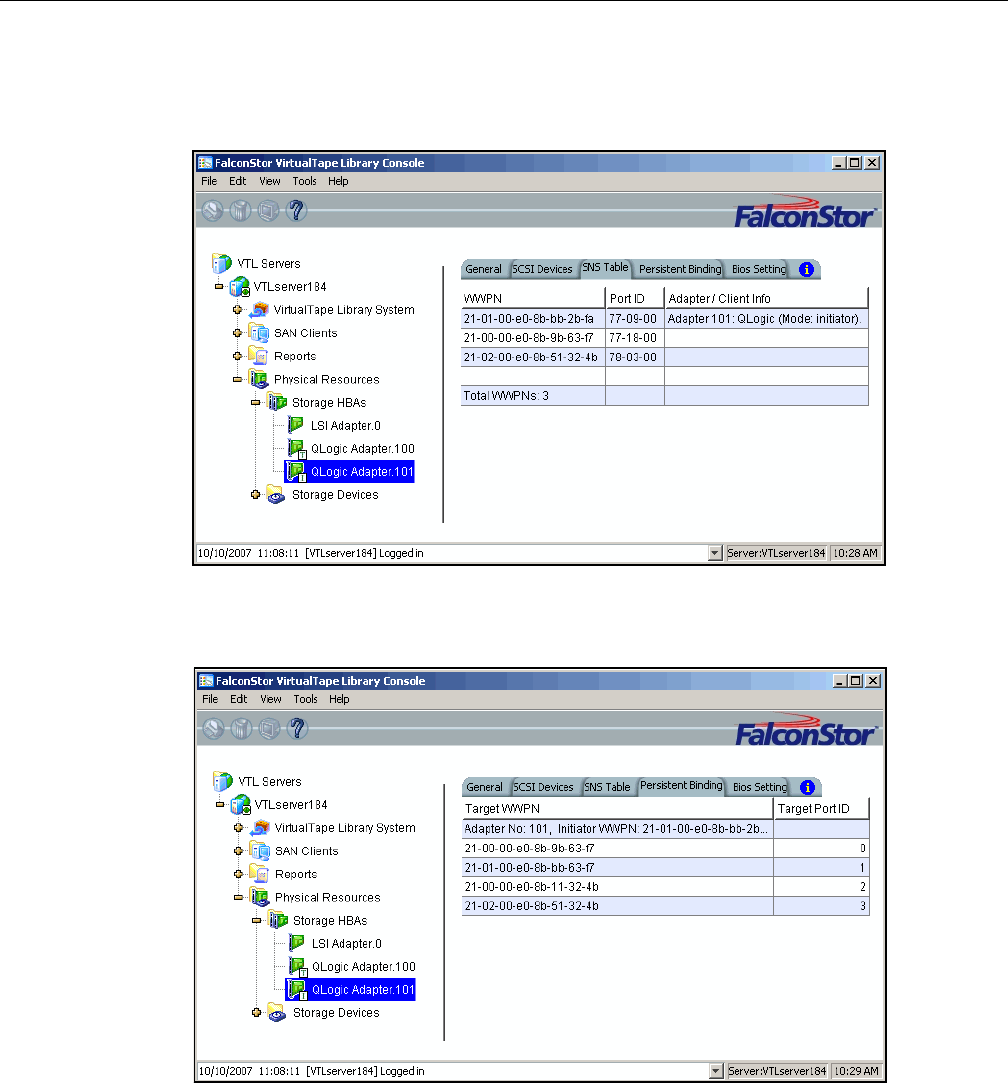
VTL Prime Solaris User’s Guide • September 2008 • 316855201 • A 76
SNS Table tab The SNS Table tab lists the ports to which this adapter is zoned. VTL queries the
switch for its Simple Name Server (SNS) database and displays this information. If
you expect to see a WWPN that is not listed, right-click on the adapter and select
Refresh SNS.
Persistent
Binding tab (Initiator ports only) The Persistent Binding tab lists all of the target ports to which
this adapter is bound.
Bios Setting tab The Bios Setting tab lists all of the HBA settings for this adapter so that you can
confirm what is set.
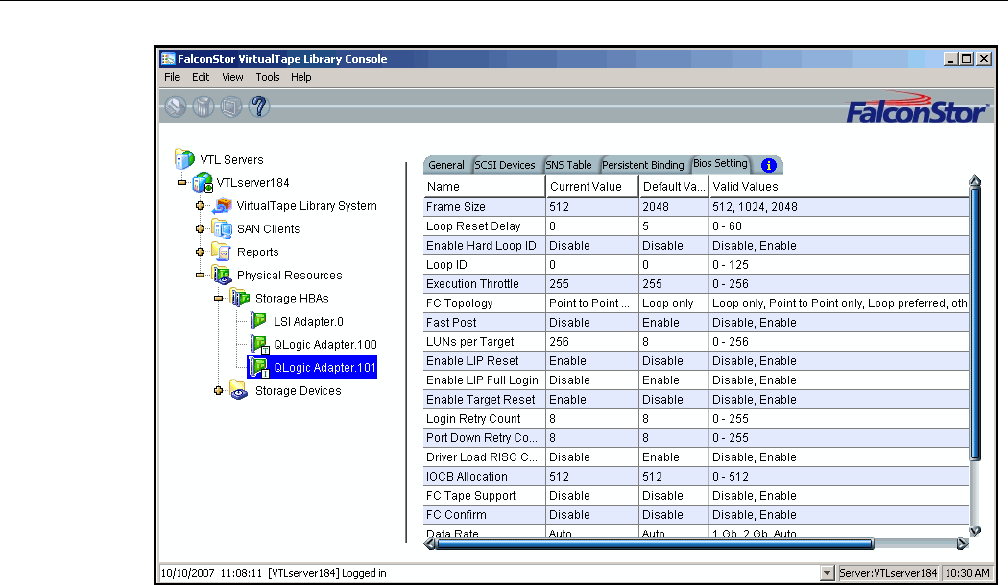
VTL Prime Solaris User’s Guide • September 2008 • 316855201 • A 77
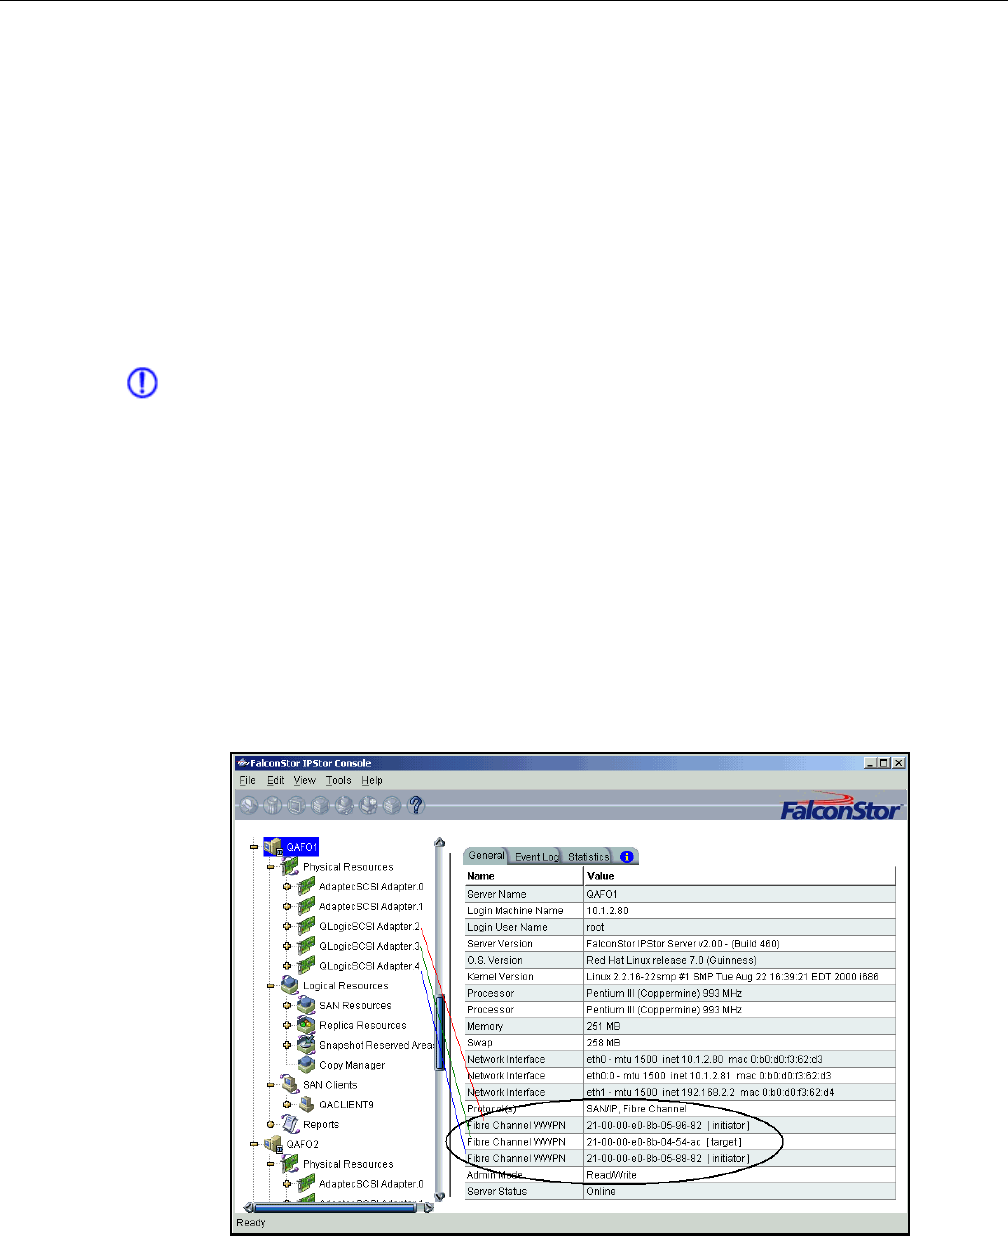
VTL Prime Solaris User’s Guide • September 2008 • 316855201 • A 78
Set QLogic ports to target mode
Single port QLogic HBAs
By default, all QLogic point-to-point ports are set to initiator mode, which means they
will initiate requests rather than receive them. Determine which ports you want to
use in target mode and set them to become target ports so that they can receive
requests from your Fibre Channel Clients.
You need to switch one of those initiators into target mode so your clients will be
able to see the VTL Server. You will then need to select the equivalent adapter on
the secondary server and switch it to target mode.
Note: If a port is in initiator mode and has devices attached to it, that port cannot be
set for target mode.
To set a port:
1. In the Console, expand Physical Resources.
2. Right-click on a HBA and select Options --> Enable Target Mode.
You will get a Loop Up message on your VTL Server if the port has successfully
been placed in target mode.
3. When done, make a note of all of your WWPNs.
It may be convenient for you to highlight your server and take a screenshot of
the Console.
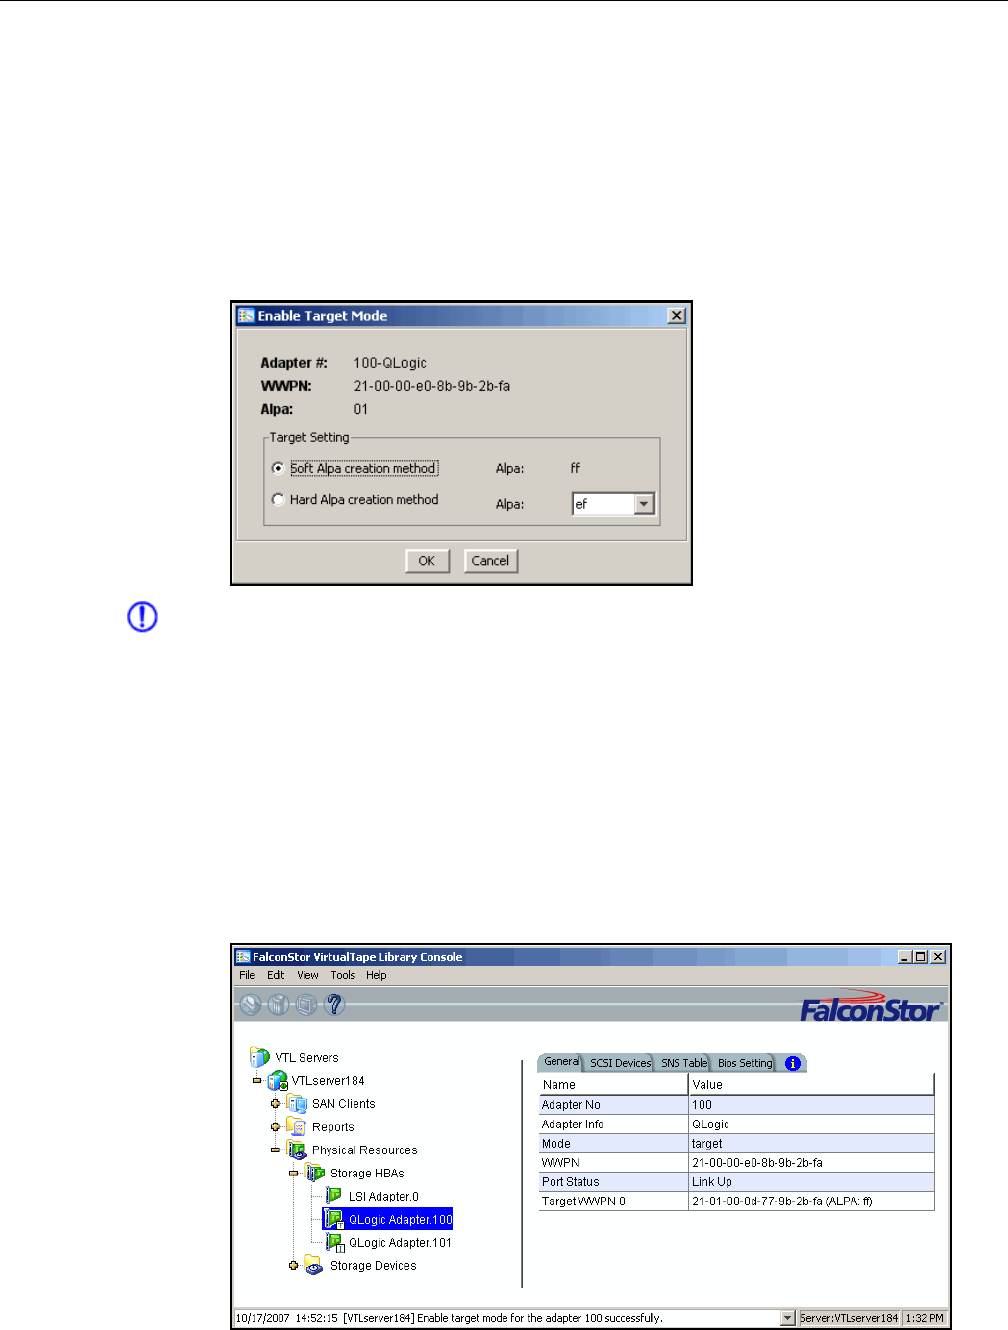
VTL Prime Solaris User’s Guide • September 2008 • 316855201 • A 79
Multi port QLogic HBAs
With a multi-ID HBA, each port can be both a target and an initiator. To use target
mode, you must enable target mode on a port.
To set target mode:
1. In the Console, expand Physical Resources.
2. Right-click on a multi-ID HBA and select Options --> Enable Target Mode.
Note: If you want to spoof a multi-ID WWPN, enter the spoofed target WWPN to
replace the default Target WWPN.
All targets must use either the soft or hard Alpa (Arbitrated Loop Physical
Address) creation method. You cannot mix and match.
Soft Alpa creation method - HBA firmware generates Alpa addresses.
Hard Alpa creation method - You have to specify Alpa addresses.
3. Click OK to enable.
Afterwards, you will see two WWPNs listed for the port. The first is the base
WWPN and the second is the Target WWPN (also known as the alias port).
Clients need to be zoned to this port in order to see devices.
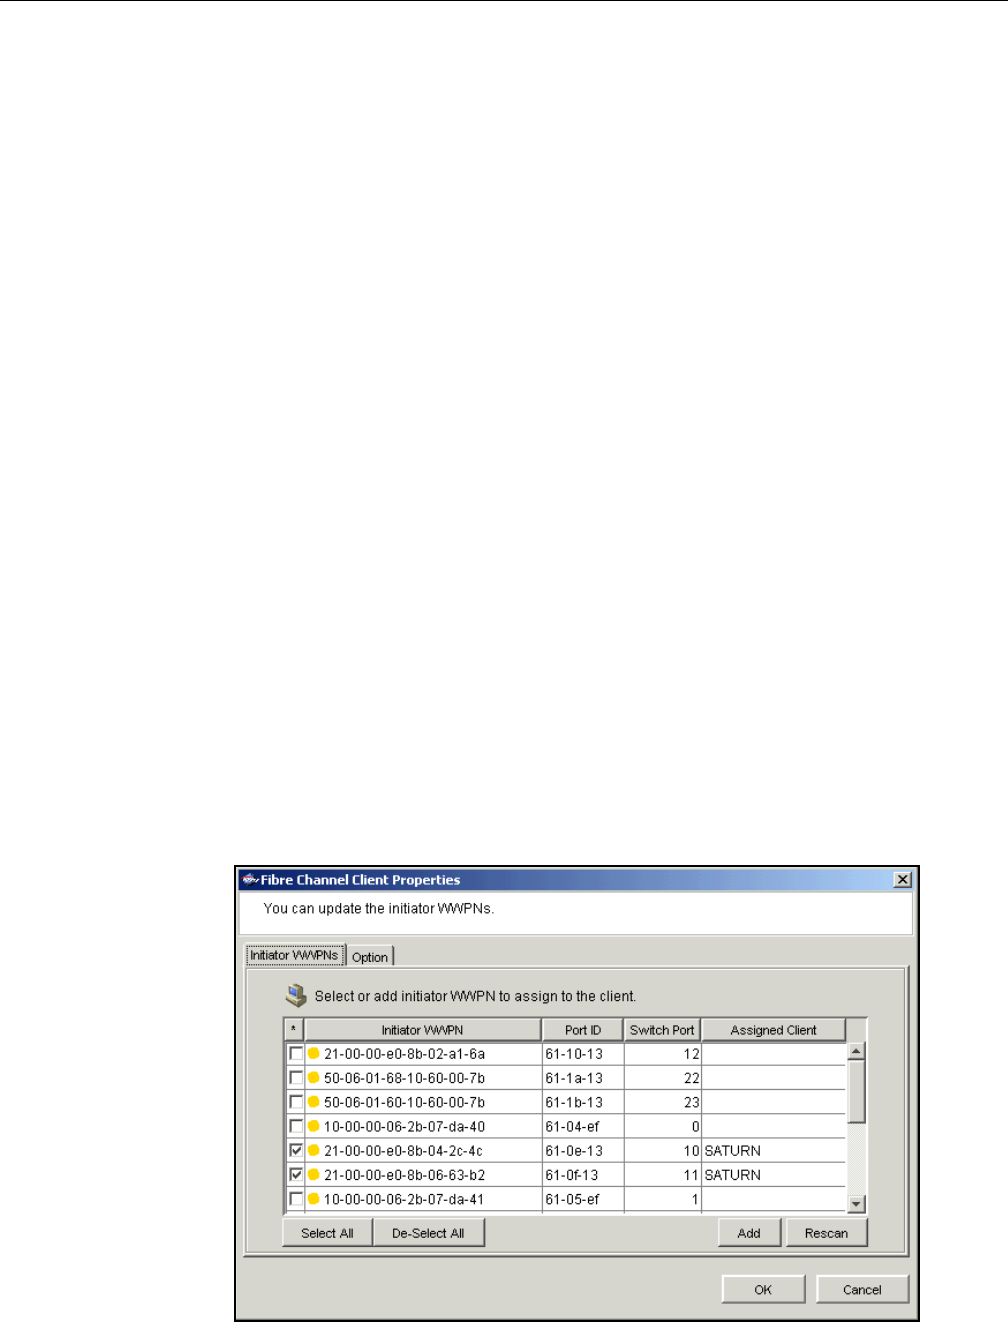
VTL Prime Solaris User’s Guide • September 2008 • 316855201 • A 80
Associate World Wide Port Names with clients
Similar to an IP address, the WWPN uniquely identifies a port in a Fibre Channel
environment. Unlike an IP address, the WWPN is vendor assigned and is hardcoded
and embedded.
Depending upon whether or not you are using a switched Fibre Channel
environment, determining the WWPN for each port may be difficult.
• If you are using a switched Fibre Channel environment, VTL will query the
switch for its Simple Name Server (SNS) database and will display a list of
all available WWPNs. You will still have to identify which WWPN is
associated with each machine.
• If you are not using a switched Fibre Channel environment, you can
manually determine the WWPN for each of your ports. There are different
ways to determine it, depending upon the hardware vendor. You may be
able to get the WWPN from the BIOS during bootup or you may have to
read it from the physical card. Check with your hardware vendor for their
preferred method.
To simplify this process, when you enabled Fibre Channel, an Everyone client was
created under SAN Clients. This is a generic client that you can assign to all (or
some) of your tape libraries/drives. It allows any WWPN not already associated with
a Fibre Channel client to have read/write non-exclusive access to any tape libraries/
drives assigned to Everyone.
For security purposes, you may want to assign specific WWPNs to specific clients.
For the rest, you can use the Everyone client.
Do the following for each client for which you want to assign specific virtual devices:
1. Highlight the Fibre Channel Client in the Console.
2. Right-click on the Client and select Properties.

VTL Prime Solaris User’s Guide • September 2008 • 316855201 • A 81
3. Select the Initiator WWPN(s) belonging to your client.
Here are some methods to determine the WWPN of your clients:
- Most Fibre Channel switches allow administration of the switch through an
Ethernet port. These administration applications have utilities to reveal or allow
you to change the following: Configuration of each port on the switch, zoning
configurations, the WWPNs of connected Fibre Channel cards, and the current
status of each connection. You can use this utility to view the WWPN of each
Client connected to the switch.
- When starting up your Client, there is usually a point at which you can access
the BIOS of your Fibre Channel card. The WWPN can be found there.
- The first time a new Client connects to the VTL Server, the following message
appears on the server screen:
FSQLtgt: New Client WWPN Found: 21 00 00 e0 8b 43 23 52
4. If necessary, click Add to add WWPNs for the client.
You will see the following dialog if there are no WWPNs in the server’s list. This
could occur because the client machines were not turned on or because all
WWPNs were previously associated with clients.

VTL Prime Solaris User’s Guide • September 2008 • 316855201 • A 82
iSCSI Clients
Overview
The VTL server is protocol-independent and supports multiple outbound target
protocols, including iSCSI Target Mode.
iSCSI builds on top of the regular SCSI standard by using the IP network as the
connection link between various entities involved in a configuration. iSCSI inherits
many of the basic concepts of SCSI. For example, just like SCSI, the entity that
makes requests is called an initiator, while the entity that responds to requests is
called a target. Only an initiator can make requests to a target; not the other way
around. Each entity involved, initiator or target, is uniquely identified.
By default, when a client machine is added as an iSCSI client of a VTL server, it
becomes an iSCSI initiator.
The initiator name is important because it is the main identity of an iSCSI initiator.
Supported platforms
iSCSI target mode is supported for the following platforms:
•Windows
•Linux

VTL Prime Solaris User’s Guide • September 2008 • 316855201 • A 83
Windows configuration
Requirements
• A VTL server with an Ethernet adapter installed.
• A Windows client machine.
• You must install an iSCSI software initiator on each of your client machines.
iSCSI initiator software/hardware is available from many sources and needs
to be installed and configured on all clients that will access shared storage.
For Windows hosts, you can download from Microsoft’s website: http://
www.microsoft.com/windowsserversystem/storage/iscsi.mspx
Enable iSCSI
In order to add a client using the iSCSI protocol, you must enable iSCSI for your VTL
server.
In the VTL Console, right-click on your VTL server, select Options --> Enable iSCSI.
As soon as iSCSI is enabled, a new SAN client called Everyone_iSCSI is
automatically created on your VTL server. This is a special SAN client that does not
correspond to any specific client machine. Using this client, you can create iSCSI
targets that are accessible by any iSCSI client that connects to the VTL server.
While such a publicly available target is convenient, it should be avoided, or at least
configured with the proper read/write access, so that there will be no data corruption
if two or more clients use the Everyone_iSCSI client simultaneously.
Before an iSCSI client can be served by a VTL server, the two entities need to
mutually recognize each other. The following sections take you through this process.

VTL Prime Solaris User’s Guide • September 2008 • 316855201 • A 84
Register client initiators with your VTL server
This enables the VTL server to see the available initiators. The following steps are
for the Microsoft iSCSI Initiator. If you are using a different iSCSI initiator, refer to the
documentation provided by the vendor.
You can also manually add your initiators through the Add Client wizard in the VTL
Console.
1. Run Microsoft iSCSI Initiator on the Windows client machine.
You can find the program in the Control Panel or on your desktop (if you are the
user that installed it).
2. Click Add on the Target Portals tab and enter the VTL server’s IP address or
name (if resolvable).
Use the default socket.
3. Click Advanced and go to the General tab.
In the CHAP logon information section, you can see the iSCSI initiator name of
the client machine automatically filled in as the user name. Note that it is
possible to change the initiator name of the machine by going to the Initiator
Settings tab. However, it should be avoided because the default name is the one
most appropriate according to the iSCSI standard as well as common practices.
Altering it can possibly introduce unnecessary complications.
If the client machine is a mobile client, select CHAP logon information and
replace the initiator name with a user name that belongs to one of the VTL
server’s mobile clients.
It can still obtain iSCSI targets by authenticating as a mobile client. In this case,
in Target secret, enter the corresponding password. Then, click OK to finish
adding the target portal.
Note: If the client machine is not a mobile client, do not select CHAP logon
information.
4. Click OK to add the client.
When you click OK, any iSCSI target assigned to the client will appear on the
Available Targets tab. However, since no actual iSCSI target has been assigned
to the VTL server’s iSCSI clients yet, the Available Targets tab will currently be
blank.

VTL Prime Solaris User’s Guide • September 2008 • 316855201 • A 85
Add your iSCSI client
1. Right-click on SAN Clients and select Add.
2. Select iSCSI and determine if the client is a mobile client.
Stationary iSCSI clients corresponds to specific iSCSI client initiators, and
consequently, the client machine that owns the specific initiator names. Only a
client machine with a correct initiator name can connect to the VTL server to
access the resources assigned to this stationary client.
A mobile client is simply a username and password that a user can use to
authenticate to the VTL server from any iSCSI client machine. Note that when
you right-click on a mobile client in the VTL Console, the Properties option is
grayed out because the properties, such as the list of assigned iSCSI initiator
names, do not apply to mobile clients. If you want to change the username or
password for a mobile client, you must delete the current one and then recreate
it with the desired username and password.
3. Determine how the client should be named.
You can create the name from the initiator name or enter a custom name.
4. Select the initiator that this client uses.
If the initiator does not appear, you can manually add it.
5. Add/select users who can authenticate for this client.
Click Add to add users. You will have to enter a name and password for each.
For unauthenticated access, select Allow Unauthenticated Access. With
unauthenticated access, the VTL server will recognize the client as long as it has
an authorized initiator name. With authenticated access, an additional check is
added that requires the user to type in a username and password. More than
one username/password pair can be assigned to the client, but they will only be
useful when coming from the machine with an authorized initiator name.
6. Confirm all information and click Finish.

VTL Prime Solaris User’s Guide • September 2008 • 316855201 • A 86
Create targets for the iSCSI client to log onto
1. In the VTL Console, create at least one virtual iSCSI device (i.e. a virtual tape
library) that can be used for iSCSI clients but do not assign it/them to the iSCSI
clients until a target is created.
2. Right-click on an iSCSI client and select Create Target.
3. Enter a new target name for the client or accept the default.
4. Select the IP address of the VTL server.
5. Use the default starting LUN.
LUN IDs must start with zero.
Once the iSCSI target is created for a client, LUNs can be assigned under the
target using available virtual iSCSI devices.
6. Confirm all information and click Finish.
7. Select Yes to assign a resource to the new target.
8. Select the virtual iSCSI device(s) to be assigned to the client.
You can only assign a device to a client once even if the client has multiple
targets. You cannot assign the same device to the same client more than once.
9. If needed, change the LUN for the resource.
10. Confirm all information and click Finish.

VTL Prime Solaris User’s Guide • September 2008 • 316855201 • A 87
Log the client onto the target
The following steps are for the Microsoft iSCSI Initiator. If you are using a different
iSCSI initiator, refer to the documentation provider by the vendor.
1. To see the iSCSI targets from the client machine, run Microsoft iSCSI Initiator
again.
2. Since the VTL server is already added as a target portal, go to the Available
Targets tab and click Refresh to get the latest status.
Assigned iSCSI targets should now appear.
3. Click Log On and select Automatically restore this connection when the system
reboots if it is desirable to have a persistent target.
4. Click Advanced and select CHAP logon information.
If the iSCSI target is assigned to a mobile client from the VTL server, enter the
authentication credential for that mobile client.
If the target is assigned to this particular client machine, and authenticated
access is used, enter an assigned username and password for this client. This
should be the same username/password that you entered when you added the
client in the VTL Console.
Once logged on, the status of an iSCSI target should change to Connected.
The Active Sessions tab lists all of the iSCSI targets that are already in
Connected status. It also allows the client machine to log off from each iSCSI
target.
Disable iSCSI
To disable iSCSI for a VTL server, right-click on the server node in the VTL Console,
and select Options --> Disable iSCSI.
Note that before disabling iSCSI, all iSCSI initiators and targets for this VTL server
must be removed.

VTL Prime Solaris User’s Guide • September 2008 • 316855201 • A 88
Linux client configuration
Prepare the iSCSI initiator
You must install and configure an iSCSI software initiator on each of your Linux
client machines.
1. Download the latest production iSCSI initiator from the following website: http://
sourceforge.net/projects/linux-iscsi/
2. Extract the files from the .gz file that you downloaded by typing:
tar xfvz filename
For example: tar xfvz linux-iscsi-3.4.3.gz
3. Compile the iSCSI initiator.
To do this, go to the newly created directory (such as linux-iscsi-3.4.3) and type
the following commands:
make clean
make
make install
4. Edit the /etc/iscsi.conf file.
If you are not using CHAP, add the following line to the end of the file:
DiscoveryAddress=IP address of VTL server
For example: DiscoveryAddress=192.10.10.1
If you are using CHAP, add the following lines to the end of the file:
DiscoveryAddress=IP address of VTL server
OutgoingUsername=CHAP username
OutgoingPassword=CHAP password
You must make a note of the CHAP username and password because you will
have to enter it in the VTL Console.
5. Start the initiator by typing:
/etc/init.d/iscsi start
Add your iSCSI client
1. In the VTL Console, right-click on SAN Clients and select Add.
2. Enter a name for the client.
3. Click Find to locate the client machine.
The IP address of the machine with the specified host name will be automatically
filled in if the name is resolvable.

VTL Prime Solaris User’s Guide • September 2008 • 316855201 • A 89
4. Select iSCSI and determine if the client is a mobile client.
Stationary iSCSI clients corresponds to specific iSCSI client initiators, and
consequently, the client machine that owns the specific initiator names. Only a
client machine with a correct initiator name can connect to the VTL server to
access the resources assigned to this stationary client.
A mobile client is simply a username and password that a user can use to
authenticate to the VTL server from any iSCSI client machine. Note that when
you right-click on a mobile client in the VTL Console, the Properties option is
grayed out because the properties, such as the list of assigned iSCSI initiator
names, do not apply to mobile clients.
5. Select the initiator that this client uses.
If the initiator does not appear, you can manually add it.
6. Enter/select users who can authenticate for this client.
Click Add to add users. You will have to enter a name and password for each.
For unauthenticated access, select Allow Unauthenticated Access. With
unauthenticated access, the VTL server will recognize the client as long as it has
an authorized initiator name. With authenticated access, an additional check is
added that requires the user to type in a username and password. More than
one username/password pair can be assigned to the client, but they will only be
useful when coming from the machine with an authorized initiator name.
7. Confirm all information and click Finish.
Create targets for the iSCSI client to log onto
1. In the VTL Console, create at least one virtual iSCSI device (i.e. a virtual tape
library) that can be used for iSCSI clients but do not assign them to the iSCSI
clients until a target is created.
2. Right-click on an iSCSI client and select Create Target.
3. Enter a new target name for the client or accept the default.
4. Select the IP address of the VTL server.
5. Select the iSCSI device(s) to be assigned to the client.
6. Use the default starting LUN.
LUN IDs must start with zero.
Once the iSCSI target is created for a client, LUNs can be assigned under the
target using available iSCSI devices.
7. Confirm all information and click Finish.

VTL Prime Solaris User’s Guide • September 2008 • 316855201 • A 90
Log the client onto the target
On the client machine, type the following command to log the client onto the target:
/etc/init.d/iscsi reload
Afterwards, you can display a list of all the disks that this client can access (including
the target) by typing:
cat /proc/scsi/scsi
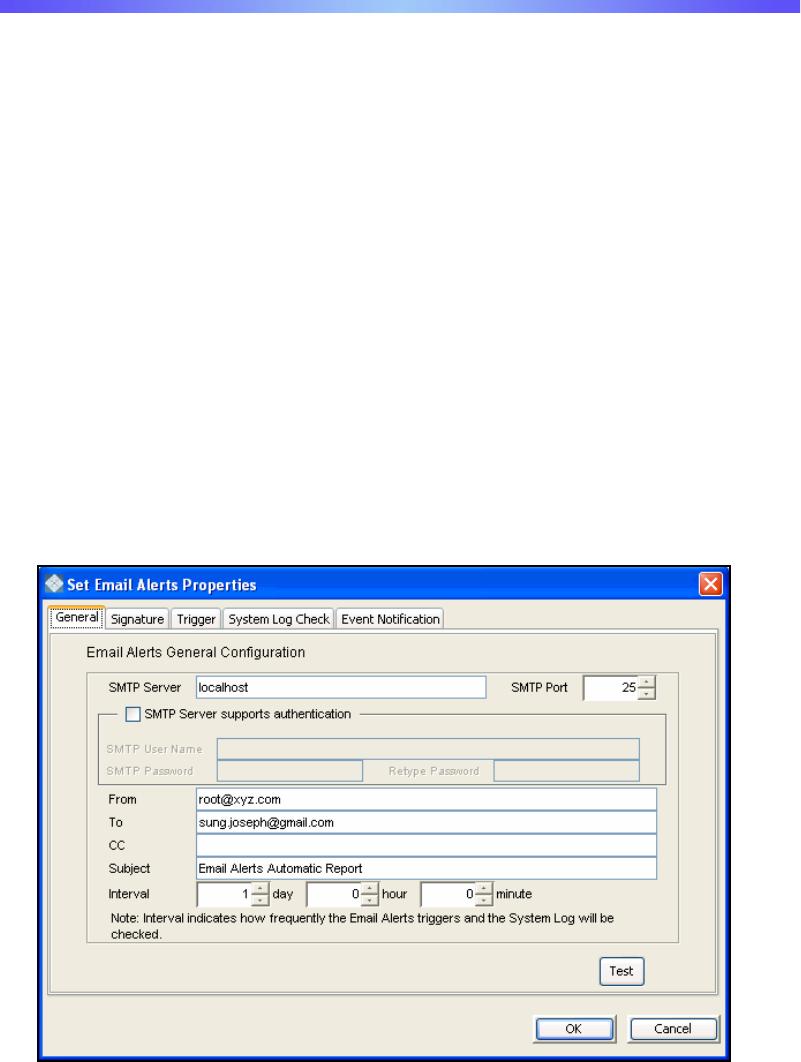
VTL Prime Solaris User’s Guide • September 2008 • 316855201 • A 91
Email Alerts
VTL includes a unique customer support utility that proactively identifies and
diagnoses potential system or component failures and automatically notifies system
administrators via email.
Using pre-configured scripts (called triggers), Email Alerts monitors a set of pre-
defined, critical system components (memory, disk, etc.). With its open architecture,
administrators can easily register new elements to be monitored by these scripts.
When an error is triggered, Email Alerts generates an email and sends it to a system
administrator.
With Email Alerts, system administrators are able to take corrective measures within
the shortest amount of time, ensuring optimum service uptime and IT efficiency.
Configure Email Alerts
1. In the Console, right-click on your VTL server and select Options --> Enable
Email Alerts.
2. Enter general information for your Email Alerts configuration.
SMTP Server - Specify the mail server that Email Alerts should use to send out
notification emails.
SMTP Port - Specify the mail server port that Email Alerts should use.
SMTP Server supports authentication - Indicate if the SMTP server supports
authentication.
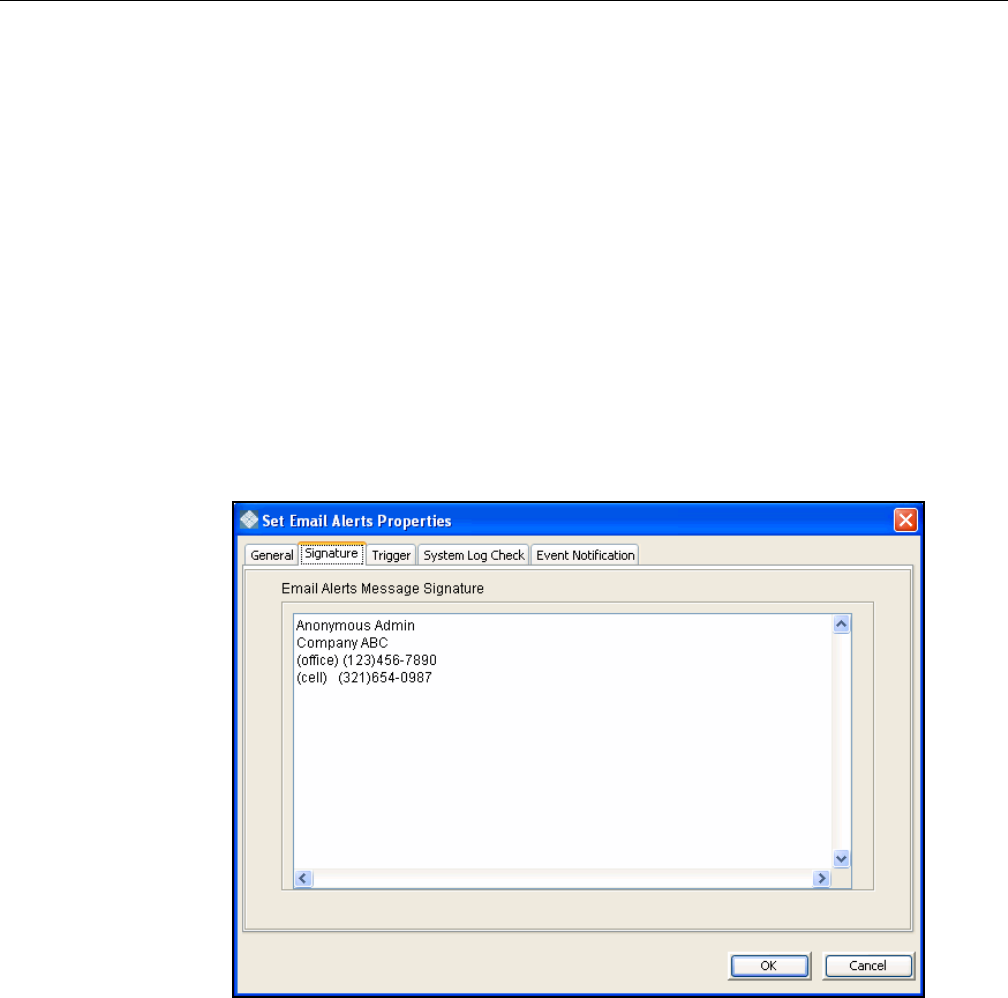
VTL Prime Solaris User’s Guide • September 2008 • 316855201 • A 92
SMTP Username/Password - Specify the user account that will be used by Email
Alerts to log into the mail server.
From - Specify the email account that will be used in the “From” field of emails
sent by Email Alerts.
To - Specify the email address of the account that will receive emails from Email
Alerts. This will be used in the “To” field of emails sent by Email Alerts.
CC - Specify any other email accounts that should receive emails from Email
Alerts.
Subject - Specify the text that should appear on the subject line.
Interval - Specify how frequently the Email Alerts triggers and the System Log
should be checked.
Test - Click the Test button to send a test Email Alerts email.
3. In the Signature tab, enter the contact information that should appear in each
Email Alerts email.
VTL Prime Solaris User’s Guide • September 2008 • 316855201 • A 93
4. In the Trigger tab, selectt the triggers that will cause Email Alerts to send an
email.
Triggers are the scripts/programs that perform various types of error checking.
By default, scripts/programs are provided that check for low system memory, low
disk space, and relevant new entries in the system log.
The following are the default scripts that are provided:
chkcore.sh 10 (Core file check) - This script checks to see if a new core file has
been created by the operating system in the bin directory of VTL. If a core file is
found, Email Alerts compresses it, deletes the original, and sends an email
report but does not send the compressed core file (which can still be large). If
there are more than 10 (variable) compressed core files, they will all be deleted.
memchk.sh 5 (Memory check) - This script takes in a percentage as the
parameter and checks whether the available system memory is below this
percentage. If yes, Email Alerts sends an email report.
syslogchk.sh (System log check) - This script looks at the system log for
specific entries that it needs to report on. This is determined by information
specified on the System Log Check dialog. If matches are found, Email Alerts
sends an email report.
diskusagechk.sh / 95 (Disk usage check) - This script checks the disk space
usage of the root file system. If the current percentage is over the specified
percentage (default is 95), Email Alerts sends an email report. You can add
multiple diskusagechk.sh triggers for different mount points (for example, /home
could be used in another trigger).
vtlstatus.sh (VTL status check) - This script calls “vtl status” and checks if any
module of VTL has stopped. If so, Email Alerts sends an email report.
VTL Prime Solaris User’s Guide • September 2008 • 316855201 • A 94
If you need to modify an existing script or create a new script/program, refer to
‘Script/program trigger information’ for more information.
5. In the System Log Check tab, indicate the terms that should be tracked in the
system log by Email Alerts.
The system log records important events or errors that occur in the system,
including those generated by VTL.
This dialog allows you to rule out entries in the system log that have nothing to
do with VTL, and to list the types of log entries generated by VTL that Email
Alerts needs to examine. Entries that do not match the entries here will be
ignored, regardless of whether or not they are relevant to VTL.
The trigger for monitoring the system log is syslogchk.sh. To inform the trigger of
which specific log entries need to be captured, you can specify the general types
of entries that need to be inspected by Email Alerts.
Each line is a regular expression. The regular expression rules follow the pattern
for AWK (a standard Unix utility).
VTL Prime Solaris User’s Guide • September 2008 • 316855201 • A 95
6. In the Event Notification Configuration tab, indicate the severity level of
messages that should be sent as email alerts by Email Alerts.
If you select None, no messages will be sent via email.
Maximum event wait time is the maximum period of time within which an e-mail
will be sent once a message is received.
7. Confirm all information and click Finish to enable Email Alerts.
Modify Email Alerts properties
Once Email Alerts is enabled, you can modify the information by right-clicking on
your VTL server and selecting Email Alerts.
Click on the appropriate tab to update the desired information.

VTL Prime Solaris User’s Guide • September 2008 • 316855201 • A 96
Script/program trigger information
Email Alerts uses script/program triggers to perform various types of error checking.
By default, several scripts/programs are provided that check for low system memory,
changes to the VTL XML configuration file, and relevant new entries in the system
log.
Customize email for a specific trigger
You can specify an email address to override the default To address or a text subject
to override the default Subject. To do this:
1. Right-click on your VTL server and select Email Alerts.
2. Select the Trigger tab.
3. For an existing trigger, highlight the trigger and click Edit.
For a new trigger, click Add.
4. Check the Redirect Notification Without Attachment checkbox.
5. Enter the alternate email address or subject.
If you specify an email address, it overrides the return code. Therefore, no
attachment will be sent, regardless of the return code.
New script/program
The trigger can be a shell script or a program (Java, C, etc.). If you create a new
script/program, you must add it in the Console so that Email Alerts knows of its
existence.
To do this:
1. Right-click on your VTL server and select Email Alerts.
2. Select the Trigger tab.
3. Click Add.
4. Click Browser to locate the shell script/program.
5. If required, enter an argument for the trigger.
You can also enter a comment for the trigger and specify alternate email
information.

VTL Prime Solaris User’s Guide • September 2008 • 316855201 • A 97
Return codes Return codes determine what happens as a result of the script’s/program’s
execution. The following return codes are valid:
• 0: No action is required and no email is sent.
• Non-zero: Email Alerts sends an email.
Output from
trigger In order for a trigger to send useful information in the email body, it must redirect its
output to the environment variable $IPSTORCLHMLOG.
Sample script The following is the content of the VTL status check trigger, vtlstatus.sh:
#!/bin/sh
RET=0
if [ -f /etc/.is.sh ]
then
. /etc/.is.sh
else
echo Installation is not complete. Environment profile is missing in
/etc.
echo
exit 0 # don't want to report error here so have to exit with error
code 0
fi
$ISHOME/bin/vtl status | grep STOPPED >> $VTLCLHMLOG
if [ $? -eq 0 ] ; then
RET=1
fi
exit $RET
If any VTL module has stopped, this trigger generates a return code of 1 and sends
an email.

VTL Prime Solaris User’s Guide • September 2008 • 316855201 • A 98
Command Line
VirtualTape Library (VTL) provides a simple utility that allows you to perform some of
the more common VTL functions at a command line instead of through the VTL
Console. You can use this command line utility to automate many tasks, as well as
integrate VTL with your existing management tools.
Using the command line utility
Type iscon at the command line to display a list of commands. Each command must
be combined with the appropriate long or short arguments (ex. Long: --server-name
Short: -s servername) that are described in this chapter.
If you type the command name (for example, c:\iscon importtape), a list of
arguments will be displayed for that command.
Commands
On the following pages is a list of commands you can use to perform VTL functions
from the command line. You should be aware of the following as you enter
commands:
• Type each command on a single line, separating arguments with a space.
• You can use either the short or long arguments.
• Variables are listed in <> after each argument.
• Arguments listed in brackets [ ] are optional.
• The order of the arguments is irrelevant.
• Arguments separated by | are choices. Only one can be selected.
• For a value entered as a literal, it is necessary to enclose the value in
quotes (double or single) if it contains special characters such as *, <, >, ?, |,
%, $, or space. Otherwise, the system will interpret the characters with a
special meaning before it is passed to the command.
• Literals cannot contain leading or trailing spaces. Leading or trailing spaces
enclosed in quotes will be removed before the command is processed.
VTL Prime Solaris User’s Guide • September 2008 • 316855201 • A 99
Common arguments
The following arguments are used by many commands. For each, a long and short
variation is included. You can use either one. The short arguments ARE case
sensitive. For arguments that are specific to each command, refer to the section for
that command.
Note: You only need to use the --server-username (-u) and --server-password (-p)
arguments when you log into a server. You do not need them for subsequent
commands on the same server during your current session.
Short Argument Long Argument Value/Description
-s --server-name VTL Server Name (hostname or IP address)
-u --server-username VTL Server Username
-p --server-password VTL Server User Password
-c --client-name VTL Client Name
-v --vdevid VTL Virtual Device ID

VTL Prime Solaris User’s Guide • September 2008 • 316855201 • A 100
Login/logout to the VTL Server
Log in to the VTL Server
iscon login [-s <server-name> -u <username> -p <password>|-e] [-X <rpc-timeout>]
iscon login [--server-name=<server-name> --server-username=<username>
--server-password=<password>|--environment] [--rpc-timeout=<rpc-timeout>]
Description:
This command allows you to log into the specified VTL Server with a given username and password. Once
successfully logged into the server, -u (--server-username) and –p (--server-password) are not necessary for the
other CLI commands with optional –u and –p arguments.
In order to use the -e (--environment) parameter, you must set the following three environment variables:
• ISSERVERNAME
• ISUSERNAME
• ISPASSWORD
After setting these variables, the environment parameter can be used in the login command in place of -s <server-
name> -u <user-name> -p <password>. Therefore, you could type the following to log in: iscon login -e
To set these environment variables in the bash shell, you must set three variables as follows:
• export ISSERVERNAME=10.1.1.1
• export ISUSERNAME=root
• export ISPASSWORD=password
-X (--rpc-timeout) is an option to specify a number between 1 and 30000 in seconds for the RPC timeout. The
system will retry the command for the amount of time specified if the server does not respond. The default RPC
timeout is 30 seconds.
Log out from the VTL Server
iscon logout -s <server-name> [-X <rpc-timeout>]
iscon logout --server-name=<server-name> [--rpc-timeout=<rpc-timeout>]
Description:
This command allows you to log out from the specified VTL Server. If the server was not logged in or you have
already logged out from the server when this command is issued, error 0x0902000f will be returned. After logging
out from the server, the -u and –p arguments will not be optional for the server commands.

VTL Prime Solaris User’s Guide • September 2008 • 316855201 • A 101
Virtual devices / Clients
Get virtual device list
iscon getvdevlist -s <server-name> [-u <username> -p <password>]
[-l [-v <vdevid> | -n <vdevname>] [-A] [-C] [-M <output-delimiter>] ]
[-X <rpc-timeout>]
iscon getvdevlist --server-name=<server-name>
[--server-username=<username> --server-password=<password>]
[--longlist [--vdevid=<vdevid> | --vdevname=<vdevname>]
[--long-physical-layout] [--long-client-list]
[--output-delimiter=<output-delimiter>] ] [--rpc-timeout=<rpc-timeout>]
Description:
This command retrieves and displays information about all virtual devices or a specific virtual device from the
specified server. The default output format is a list with a heading.
The –l (--longlist) optional argument displays detailed information for each virtual device. Additional options can be
specified along with the –l (--longlist) option to display the physical device layout and/or the assigned client
information.
-v (--vdevid) or -n (--vdevname) are options to display only the specified virtual device information when
-l (--longlist) is specified.
-A(--long-physical-layout) displays the physical layout when -l (--longlist) is specified.
-C (--long-client-list) displays the assigned client list when -l (--longlist) option is specified.
-M (--output-delimiter) can be specified when -l is specified to replace the linefeed with the specified delimiter. The
maximum length of the delimiter is 8.
-X (--rpc-timeout) is an option to specify a number between 1 and 30000 in seconds for the RPC timeout. The
system will retry the command for the amount of time specified if the server does not respond. The default RPC
timeout is 30 seconds.
Get Client virtual device list
iscon getclientvdevlist -s <server-name> [-u <username> -p <password>]
-c <client-name> [-t <client-type>] [-l [-M <output-delimiter>] ]
[-X <rpc-timeout>]
iscon getclientvdevlist --server-name=<server-name>
[--server-username=<username> --server-password=<password>]
--client-name=<client-name> [--client-type=<client-type>]
[--longlist [--output-delimiter=<output-delimiter>] ] [--rpc-timeout=<rpc-timeout>]
Description:
This command retrieves and displays information about all virtual devices assigned to the client from the specified
server. The default output format is a list with heading. Use -c (--client-name) to specify a client name or * for all
clients. -t (client-type) is the type of the client protocol to be retrieved in one of the following values: SCSI, FC, or
ISCSI. The client type will only take effect when the client name is *. Be aware that in some platforms you are
required to enclose the "*" in double quote to take it as a literal.
-l(--longlist) is an option to display the long format.

VTL Prime Solaris User’s Guide • September 2008 • 316855201 • A 102
-M (--output-delimiter) can be specified when -l is specified to replace the linefeed with the specified delimiter. The
maximum length of the delimiter is 8.
-X (--rpc-timeout) is an option to specify a number between 1 and 30000 in seconds for the RPC timeout. The
system will retry the command for the amount of time specified if the server does not respond. The default RPC
timeout is 30 seconds.
Add client
iscon addclient -s <server-name> [-u <username> -p <password>]
-c <client-name>
[-I <initiator-wwpns>] [-a <on|off>] [-A <on|off>]] | [-C <on|off>] [-X <rpc-timeout>]
iscon addclient --server-name=<server-name>
[--server-username=<username> --server-password=<password>]
--client-name=<client-name> [--initiator-wwpns=<initiator-wwpns>]
[--enable-VSA=<on|off>] [--enable-iSeries=<on|off>]] | [--enable-Celerra=<on|off>]
[--rpc-timeout=<rpc-timeout>]
Description:
This command allows you to add a client to the specified server. -c (--client-name) is a unique client name for the
client to be created. The maximum length of the client name is 64. The following characters are invalid for a client
name: <>"&$/\'
-I (--initiator-wwpns) is the option to set the initiator WWPNs. An initiator WWPN is a 16-byte Hex value. Separate
initiator WWPNs with commas if more than one initiator WWPN is specified. For example:
13af35d2f4ea6fbc,13af35d2f4ea6fad
-a (--enable-VSA) is an option for Volume Set Addressing with the following values: on or off (default).
-A (--enable-iSeries) is an option to support IBM iSeries Server with the following values: on or off (default).
-C (--enable-Celerra) is an option to support Celerra with the following values: on or off (default).
Enabling Celerra will automatically disable VSA and iSeries, and vice versa.
-X (--rpc-timeout) is an option to specify a number between 1 and 30000 in seconds for the RPC timeout. The
system will retry the command for the amount of time specified if the server does not respond. The default RPC
timeout is 30 seconds.
Delete client
iscon deleteclient -s <server-name> [-u <username> -p <password>]
-c <client-name> [-X <rpc-timeout>]
iscon deleteclient --server-name=<server-name>
[--server-username=<username> --server-password=<password>]
--client-name=<client-name> [--rpc-timeout=<rpc-timeout>]
Description:
This command allows you to delete a client from the specified server. -c (--client-name) is the name of the client to
be deleted.

VTL Prime Solaris User’s Guide • September 2008 • 316855201 • A 103
-X (--rpc-timeout) is an option to specify a number between 1 and 30000 in seconds for the RPC timeout. The
system will retry the command for the amount of time specified if the server does not respond. The default RPC
timeout is 30 seconds.
Get client properties
iscon getclientprop -s <server-name> [-u <username> -p <password>]
-c <client-name> [-X <rpc-timeout>]
iscon getclientprop --server-name=<server-name>
[--server-username=<username> --server-password=<password>]
--client-name=<client-name> [--rpc-timeout=<rpc-timeout>]
Description:
This command gets client properties. -c (--client-name) is required to specify the client name.
-X (--rpc-timeout) is an option to specify a number between 1 and 30000 in seconds for the RPC timeout. The
system will retry the command for the amount of time specified if the server does not respond. The default RPC
timeout is 30 seconds.
Assign virtual device
iscon assignvdev -s <server-name> [-u <username> -p <password>]
-v <vdevid> -c <client-name> -a <access-mode> [-y]
[-I <initiatorWWPN|*>] [-T <targetWWPN|*>] [-l <lun>] [-X <rpc-timeout>]
iscon assignvdev --server-name=<server-name>
[--server-username=<username> --server-password=<password>] --vdevid=<vdevid>
--client-name=<client-name> --access-mode=<access-mode> [--vlib-only]
[--initiatorWWPN=<initiatorWWPN|*>] [--targetWWPN=<targetWWPN|*>] [--lun=<lun>]
[--rpc-timeout=<rpc-timeout>]
Description:
This command allows you to assign a virtual device on a specified server to a client.
-v (--vdevid) is required to specify the virtual device ID of the virtual tape library or virtual tape drive to be assigned.
-c (--client-name) is required to specify the client to which the virtual tape library or drive will be assigned.
The values for <access-mode> are: Readonly, ReadWrite, ReadWriteNonExclusive. The values for the short
format are: R / W / N.
-y (--vlib-only) is an option that allows you to assign the virtual tape library to the client without assigning all of the
virtual tape drives in the library. The default is to assign all of the virtual tape drives in the library.
-I (--initiatorWWPN) and -T (--targetWWPN) are options for Fibre Channel clients. The initiator WWPN or target
WWPN is a 16-byte hex value or "*" for all. For example, 13af35d2f4ea6fbc. The default is "*" if it is -I or the -T
option is not specified.
-l (--lun) is another option for Fibre Channel clients. The range is between 0 and 15. The next available LUN will be
assigned if is it is not specified.
-M (--output-delimiter) can be specified when -l is specified to replace the linefeed with the specified delimiter. The
maximum length of the delimiter is 8.

VTL Prime Solaris User’s Guide • September 2008 • 316855201 • A 104
-X (--rpc-timeout) is an option to specify a number between 1 and 30000 in seconds for the RPC timeout. The
system will retry the command for the amount of time specified if the server does not respond. The default RPC
timeout is 30 seconds.
Unassign virtual device
iscon unassignvdev -s <server-name> [-u <username> -p <password>]
-v <vdevid> -c <client-name> [-y] [-f] [-X <rpc-timeout>]
iscon unassignvdev --server-name=<server-name> [--server-username=<username>]
[--server-password=<password>] --vdevid=<vdevid> --client-name=<client-name>
[--vlib-only] [--force] [--rpc-timeout=<rpc-timeout>]
Description:
This command allows you to unassign a virtual device on the specified server from a client.
-v (--vdevid) is required to specify the virtual device ID of the virtual tape library or drive to be unassigned.
-c (--client-name) is required to specify the client name from which to unassign the library or drive.
-y (--vlib-only) is an option that allows you to unassign the virtual tape library to the client without unassigning all of
the virtual tape drives in the library. The default is to unassign all of the virtual tape drives in the library.
The -f (--force) option is required to unassign the virtual device when the client is connected and the virtual device
is attached. An error will be returned if the force option is not specified.
-X (--rpc-timeout) is an option to specify a number between 1 and 30000 in seconds for the RPC timeout. The
system will retry the command for the amount of time specified if the server does not respond. The default RPC
timeout is 30 seconds.
Create virtual device
iscon createvdev -s <server-name> [-u <username> -p <password>]
-I <ACSL> [-n <vdevname>] [-X <rpc-timeout>]
iscon createvdev --server-name=<server-name>
[--server-username=<username> --server-password=<password>]
--scsiaddress=<ACSL> [--vdevname=<vdevname>] [--rpc-timeout=<rpc-timeout>]
Description:
This command allows you to create a direct virtual device, such as virtual tape library or virtual tape drive.
-I (--scsiaddress) is required to specify the SCSI address of the virtual tape library or virtual tape drive in the
following format: ACSL=#:#:#:# (adapter:channel:id:lun)
-n (--vdevname) is an option to specify the direct virtual device name. A default name will be generated if the name
is not specified.The maximum length is 64. Leading and trailing spaces will be removed. Enclose the name in
double quotes.The following characters are invalid for the direct virtual device name: <>"&$/\'
-X (--rpc-timeout) is an option to specify a number between 1 and 30000 in seconds for the RPC timeout. The
system will retry the command for the amount of time specified if the server does not respond. The default RPC
timeout is 300 seconds.

VTL Prime Solaris User’s Guide • September 2008 • 316855201 • A 105
Delete virtual device
iscon deletevdev -s <server-name> [-u <username> -p <password>]
-v <vdevid> [-d] [-f] [-X <rpc-timeout>]]
iscon deletevdev --server-name=<server-name>
[--server-username=<username> --server-password=<password>] --vdevid=<vdevid>
[--delete-virtual-tapes] [--force] [--rpc-timeout=<rpc-timeout>]
Description:
This command allows you to delete a virtual tape library, virtual tape drive, standalone virtual tape drive, or virtual
tape.
In order to delete a virtual tape drive from a virtual tape library, the virtual tape drive must have the highest element
number in the library.
-v (--vdevid) is required to specify the virtual device ID.
A virtual device cannot be deleted if any of the following conditions apply:
• The specified virtual device is a virtual tape library or a virtual tape drive and there are clients currently
connected to the library or drive.
• The specified virtual device is a virtual tape configured for replication, unless the -f (--force) option is used.
• The specified virtual device is the only existing virtual tape drive in the parent virtual tape library.
-d (--delete-virtual-tapes) is an option to delete all of the existing virtual tapes from a virtual tape library, a
standalone virtual tape drive, or a loaded virtual tape drive selected for deletion. By default, the virtual tapes are
moved to the vault, or, if a loaded virtual tape drive is selected, back to the library.
-f (--force) is an option to force the deletion of a virtual tape configured for replication. The corresponding virtual
tape replica will not be deleted or promoted.
-X (--rpc-timeout) is an option to specify a number between 1 and 30000 seconds for the RPC timeout. The system
will retry the command for the amount of time specified if the server does not respond. The default RPC timeout is
30 seconds.
Get supported virtual libraries
iscon getsupportedvlibs -s <server-name> [-u <username> -p <password>]
[-l [-t <vlib-type>] [-c][-M <output-delimiter>] ] [-X <rpc-timeout>]
iscon getsupportedvlibs --server-name=<server-name>
[--server-username=<username> --server-password=<password>]
[--longlist [--vlib-type=<vlib-type>] [--compatible-drive-list]
[--output-delimiter=<output-delimiter>] ] [--rpc-timeout=<rpc-timeout>]
Description:
This command retrieves information about all supported virtual tape libraries.
-l (--longlist) can be specified to get the supported library information in a long format. The default is to display the
information in a list format.
-t (--vlib-type) is an option with the -l (--longlist) option to get the detail library information for a specific library. The
format for the <vlib-type> is: <vendorID>:<productID>. For example, ADIC:Scalar 100

VTL Prime Solaris User’s Guide • September 2008 • 316855201 • A 106
-c (--compatible-drive-list) is an option to display the compatible drives in a tabular format instead of the default
long format.
-M (--output-delimiter) can also be specified with the -l (--longlist) option to replace the linefeed with the specified
delimiter. The maximum length of the delimiter is 8.
-X (--rpc-timeout) is an option to specify a number between 1 and 30000 in seconds for the RPC timeout. The
system will retry the command for the amount of time specified if the server does not respond. The default RPC
timeout is 30 seconds.
Get supported virtual drives
iscon getsupportedvdrives -s <server-name> [-u <username> -p <password>]
[-l [-M <output-delimiter>] ] [-X <rpc-timeout>]
iscon getsupportedvdrives --server-name=<server-name>
[--server-username=<username> --server-password=<password>]
[--longlist [--output-delimiter=<output-delimiter>] ] [--rpc-timeout=<rpc-timeout>]
Description:
This command retrieves information about all supported virtual tape drives.
-l (--longlist) can be specified to get the supported drive information in a long format. The default is to display the
information in a list format.
-M (--output-delimiter) can be specified when -l is specified to replace the linefeed with the specified delimiter. The
maximum length of the delimiter is 8.
-X (--rpc-timeout) is an option to specify a number between 1 and 30000 in seconds for the RPC timeout. The
system will retry the command for the amount of time specified if the server does not respond. The default RPC
timeout is 30 seconds.
Create virtual tape library
iscon createvirtuallibrary -s <server-name> [-u <username> -p <password>]
-t <vlib-type> [-n <vlib-name>] -d <vdrive-type> [-r <vdrive-name-prefix>]
[-R <num-of-drives>] [-A <auto-archive-mode> [-Y <days>] [-J] | -N <auto-repl-mode>
-S <target-name> [-M <#[D|H|M]>] ] [-B <barcode-range>] [-T <num-of-slots>]
[-E <import-export-slots>] [-D -I <initial-size> -C <increment-size>]
[-m <max-capacity>] [-L <on|off>] [-k <key-name> -W <key-password>] [-X <rpc-timeout>]
iscon createvirtuallibrary --server-name=<server-name>
[--server-username=<username> --server-password=<password>]
--vlib-type=<vlib-type> [--vlib-name=<vlib-name>] --vdrive-type=<vdrive-type>
[--vdrive-name-prefix=<vdrive-name-prefix>] [--num-of-drives=<num-of-drives>]
[--auto-archive-mode=<auto-archive-mode> [--delay-delete-days=<days>]
[--auto-eject-to-ie] | --auto-replication=<auto-repl-mode> --target-name=<target-name>
[--delay-delete-time=<#[D|H|M]>] ] [--barcode=<barcode-range>]
[--num-of-slots=<num-of-slots>] [--import-export-slots=<import-export-slots>]
[--capacity-on-demand --initial-size=<initial-size> --increment-size=<increment-size>]
[--max-capacity=<max-capacity>] [--auto-loader=<on|off>]
[--key-name=<key-name> --key-pasword=<key-password>] [--rpc-timeout=<rpc-timeout>]
Description:
This command creates a virtual tape library.

VTL Prime Solaris User’s Guide • September 2008 • 316855201 • A 107
-t (--vlib-type) is required in the following format: <vdendorID>:<productID>
-n (--vlib-name) is optional. A default name will be provided in the format of <vendorID>-<productID>-<vid> if it is
not specified.
-d (--vdrive-type) is required to specify the type of tape drive to be created in the library. The format of <vdrive-
type> is as follows: <vdendorID>:<productID>
-r (--vdrive-name-prefix) is an option to specify the prefix of the virtual drive. The default prefix is in the format of
<drive-vdendorID>-<drive-productID>-<vid>.
-R (--num-of-drives) can also be specified up to the maximum number of drives supported by the library. The
default is 1 if it is not specified.
-A (--auto-archive-mode) is an option with one of the following values: copy or move.
-Y (--delay-delete-days) is an option for move mode to specify the number of days to wait before deletion. The
maximum is 365 days.
-J (--auto-eject-to-ie) is an option to be specified with -A (--auto-archive-mode) to eject the tape to the import/export
(IE) slot after the export job.
-N (--auto-replication) is an option with one of the following values: replication or remotemove.
-S (--target-name) is the remote server name for auto-replication. It is required for auto-replication.
-M (--delay-delete-time) is an option for remotemove mode to specify a time to wait before deletion. It can be
specified in days(D), hours(H) or minutes(M). For example, 2D, 10H, 150M. The default value is one day.
-B (--barcode) can be specified in the following format: <barcodeB>-<barcodeE>
Barcode is an alpha-numeric value with a length of 4 to 12. <barcodeB> and <barcodeE> have to be the same
length.
<barcodeE> has to be greater then <barcodeB>. A default <barcode-range> will be generated if it is not specified.
-T (--num-of-slots) and -E (--import-export-slots) are optional. The <num-of-slots> can exceed the maximum
number of slots supported by the specified library type, but it is limited to 65536. The <--import-export-slots>
cannot exceed the maximun number of IE slots supported by the specified library type. The default is to use the
maximum number of slots supported by the specified library type.
-D (--capacity-on-demand) is an option to expand the virtual tape when needed. The default is to create the virtual
tape with the maximum capacity if it is not specified.
-I (--initial-size) and -C (--increment-size) are options to be specified with <capacity-on-demand> option. The
default value for both options is 5 GB. The <--increment-size> cannot be less than 5 GB.
-m (--max-capacity) is an option to specify the maximum capacity of the virtual tape. The maximum capacity
configured for the specified type of virtual library will be used if it is not specified.
The unit of <max-capacity>, <initial-size> and <increment-size> are all in GB.
-L (--auto-loader) is an option to set the auto-loader for those libraries that support the feature. The default value is
off.

VTL Prime Solaris User’s Guide • September 2008 • 316855201 • A 108
-k (--key-name) and -W (--key-password) are options for tape encryption support to be set in conjunction with Auto-
Archive Mode.
A virtual device ID will be assigned to the virtual library when it is created successfully.
-X (--rpc-timeout) is an option to specify a number between 1 and 30000 in seconds for the RPC timeout. The
system will retry the command for the amount of time specified if the server does not respond. The default RPC
timeout is 30 seconds.
Add virtual tape drive
iscon addvirtualdrive -s <server-name> [-u <username> -p <password>]
-L <tape-library-vid> [-r <vdrive-name-prefix>] [-R <num-of-drives>] [-X <rpc-timeout>]
iscon addvirtualdrive --server-name=<server-name>
[--server-username=<username> --server-password=<password>]
--tape-library-vid=<tape-library-vid> [--vdrive-name-prefix=<vdrive-name-prefix>]
[--num-of-drives=<num-of-drives>] [--rpc-timeout=<rpc-timeout>]
Description:
This command adds a virtual tape drive to a specify virtual tape library.
-L (--tape-library-vid) is required to specify the virtual tape library to add the virtual tape drive(s).
-r (--vdrive-name-prefix) is an option to specify the prefix of the virtual tape drive. The default prefix is in the format
of <drive-vdendorID>-<drive-productID>-<vid>.
-R (--num-of-drives) is optional, the default is 1 if it is not specified.
-X (--rpc-timeout) is an option to specify a number between 1 and 30000 in seconds for the RPC timeout. The
system will retry the command for the amount of time specified if the server does not respond. The default RPC
timeout is 300 seconds.
Create standalone tape drive
iscon createstandalonedrive -s <server-name> [-u <username> -p <password>]
-d <vdrive-type> [-r <vdrive-name-prefix>] [-R <num-of-drives>]
[-D -I <initial-size> -C <increment-size>] [-m <max-capacity>] [-X <rpc-timeout>]
iscon createstandalonedrive --server-name=<server-name>
[--server-username=<username> --server-password=<password>]
--vdrive-type=<vdrive-type> [--vdrive-name-prefix=<vdrive-name-prefix>]
[--num-of-drives=<num-of-drives>] [--capacity-on-demand --initial-size=<initial-size>
--increment-size=<increment-size>] [--max-capacity=<max-capacity>]
[--rpc-timeout=<rpc-timeout>]
Description:
This command creates a standalone virtual tape drive.
-d (--vdrive-type) is required to specify the type of tape drive to be created in the following format:
<vdendorID>:<productID>
-r (--vdrive-name-prefix) is an option to specify the prefix of the virtual drive. The default prefix is in the format of
<drive-vdendorID>-<drive-productID>-<vid>.

VTL Prime Solaris User’s Guide • September 2008 • 316855201 • A 109
-R (--num-of-drives) can be specified to create multiple drives of the same type. The default is 1 if it is not specified.
The maximum number of drives is 10.
-D (--capacity-on-demand) is an option to expand the virtual tape when needed. The default is to create the virtual
tape with the maximum capacity if it is not specified.
-I (--initial-size) and -C (--increment-size) are options to be specified with <capacity-on-demand> option. The
default value for both options is 5 GB. The <--increment-size> cannot be less than 5 GB.
-m (--max-capacity) is an option to specify the maximum capacity of the virtual tape. The maximum capacity
configured for the specified type of virtual tape drive will be used if it is not specified.
The unit of <max-capacity>, <initial-size> and <increment-size> are all in GB.
-X (--rpc-timeout) is an option to specify a number between 1 and 30000 in seconds for the RPC timeout. The
system will retry the command for the amount of time specified if the server does not respond. The default RPC
timeout is 30 seconds.
Create virtual tape
iscon createvirtualtape -s <server-name> [-u <username> -p <password>] -v <parent-vid>
[ [-g <#(GB)> [-I <ACSL>] ] [-n <vdevname>] [-B <barcode | barcode-range>] -t <count>]
[-A -l <plib-vid> -b <physical-tape-barcode> [-J] | -N [-S <target-name>]
[-U <target-username> -P <target-password>] [-X <rpc-timeout>]
iscon createvirtualtape --server-name=<server-name>
[--server-username=<username> --server-password=<password>]
--parent-vid=<parent-vid> [ [--size-gb=<#(GB)>] [--scsiaddress=<ACSL>] ]
[--vdevname=<vdevname>] [--barcode=<barcode | barcode-range>] [--count=<count>]
[--enable-auto-archive --plib-vid=<plib-vid>
--physical-tape-barcode=<physical-tape-barcode>
[--auto-eject-to-ie] | --enable-auto-remotecopy
--target-name=<target-name> [--target-username=<target-username>
--target-password=<target-password>] [--rpc-timeout=<rpc-timeout>]
Description:
This command creates a virtual tape.
-v (--parent-vid) is the virtual device id of the virtual tape library or standalone tape drive.
-g (--size-gb) is an option to specify the size in GB. The size of the virtual tape will be the size configured in the
properties of the virtual tape library or virtual tape drive if it is not specified. This option cannot be specified if the
capacity on demand option is not enabled at parent level.
-I (--scsiaddress) is an option to specify specific physical devices to be used to create a virtual device. It can be a
list of ACSLs separated by a comma or a file enclosed in <> containing an ACSL on each line.
ACSL=#:#:#:# (adapter:channel:id:lun)
-n (--vdevname) is an option to specify the virtual tape name or prefix when creating more than one tape. The
maximum length of the virtual device name is 64. Leading and trailing spaces will be removed. Enclose the name in
double quotes to ensure the proper name. The following characters are invalid for the name: <>"&$/\'
-B (--barcode) is an option to either set the virtual tape with the provided barcode or create virtual tapes in batch
mode configured with barcodes form the specified barcode range. The argument must be within the barcode range
configured for the library and must not contain used barcodes. When provided as a barcode range, the option
creates a virtual tape for each barcode in the range.

VTL Prime Solaris User’s Guide • September 2008 • 316855201 • A 110
-t (--count) is an option to create multiple virtual tapes having the barcode automatically chosen from within the
barcode range configured at library level. The library must have the required number of free slots available. If
combined, "count" and "barcode" options must agree in number.
If the parent library has the auto-archive/remotecopy property enabled, use the following options to provide
additional information for virtual tape creation:
-A (--enable-auto-archive) is an option when the parent library is enabled with auto-archive option.
-J (--auto-eject-to-ie) is optional when <auto-archive-mode> is specified.
-N (--enable-auto-replication) is an option when the parent library is enabled with the auto-replication option.
-S (--target-name) can be specified when auto-replication option is specified. The default remote server from the
parent library will be used if it is not specified.
The count and barcode options cannot be specified when the -A (--enable-auto-archive) option is specified
because the number of tapes will be obtained from the list of barcodes specified with -b (--physical-tape-barcode)
option.
-X (--rpc-timeout) is an option to specify a number between 1 and 30000 in seconds for the RPC timeout. The
system will retry the command for the amount of time specified if the server does not respond. The default RPC
timeout is 30 seconds.
Move virtual tape
iscon movevirtualtape -s <server-name> [-u <username> -p <password>] -v <vdevid>
[-L <tape-library-vid> | -D <tape-drive-vid> | -l <slot-no>] [-X <rpc-timeout>]
iscon movevirtualtape --server-name=<server-name>
[--server-username=<username> --server-password=<password>] --vdevid=<vdevid>
[--tape-library-vid=<tape-library-vid> | --tape-drive-vid=<tape-drive-vid> |
--slot-no=<slot-no>] [--rpc-timeout=<rpc-timeout>]
Description:
This command moves a virtual tape to a different location.
-v (--vdevid) is required to specify the ID of the virtual tape to be moved.
-L (--tape-library-vid) is the virtual library to move to. It is not required if the virtual tape is moved within the library.
-D (--tape-drive-vid) is the virtual drive in a library or the standalone drive to move to.
-l (--slot-no) is the slot in a library to move to.
If none of the above locations are specified, the vault will be assumed to be the new location.
If the tape is in a slot in a library, it can be moved to a different slot or a drive in the library, or it can be moved to the
vault.
• Vlib Slot -> Tape drive (in the library only)
• Vlib Slot -> Slots in same library
• Vlib Slot -> Vault

VTL Prime Solaris User’s Guide • September 2008 • 316855201 • A 111
If it is in a drive in the library, it can be moved to an available slot in the library or to the vault.
• Vlib Drive -> Slots in same library
• Vlib Drive -> Vault
If the tape is in a standalone drive, it can only be moved to the vault.
• Standalone Tape Drive -> Vault
If the tape is in the vault, it can be moved to an available slot in a library, or an available standalone drive.
• Vault -> Vlib (First available slot)
• Vault -> Standalone Tape Drive
-X (--rpc-timeout) is an option to specify a number between 1 and 30000 in seconds for the RPC timeout. The
system will retry the command for the amount of time specified if the server does not respond. The default RPC
timeout is 30 seconds.
Tape copy
iscon tapecopy -s <server-name> [-u <username> -p <password>]
-v <source-vdevid> -S <target-name> [-U <target-username> -P <target-password>]
[-L <tape-library-vid> | -D <tape-drive-vid>] [-n <vdevname>] [-f]
[-X <rpc-timeout>]
iscon tapecopy --server-name=<server-name>
[--server-username=<username> --server-password=<password>]
--source-vdevid=<source-vdevid> --target-name=<target-name>
[--target-username=<target-username> --target-password=<target-password>]
[--tape-library-vid=<tape-library-vid> | --tape-drive-vid=<tape-drive-vid>]
[--vdevname=<vdevname>] [--force] [--rpc-timeout=<rpc-timeout>]
Description:
This command copies a tape.
-v (--source-vdevid) is required to specify the ID of the virtual tape to be copied from.
-S (--target-name) is required to specify the target server name where the remote tape copy will be created and
copied to.
-U (--target-username) and -P (--target-password) are optional for connection and login to the target server if the
target server was not logged in with login command.
-L <tape-library-vid> and -D <tape-drive-vid> are options to move the tape copy to the virtual tape library or virtual
tape drive when the copy is completed.
-n (--vdevname) is an option to specify the virtual tape name of the tape copy. The maximum length of the virtual
device name is 64. Leading and trailing spaces will be removed. Enclose the name in double quotes. The following
characters are invalid for the name: <>"&$/\'
A default name with the primary server and source virtual tape name will be generated if it is not specified.
-f (--force) option is required when the tape is scheduled to be deleted. The deletion schedule for the virtual tape
will be removed and the replication will be configured.

VTL Prime Solaris User’s Guide • September 2008 • 316855201 • A 112
-X (--rpc-timeout) is an option to specify a number between 1 and 30000 in seconds for the RPC timeout. The
system will retry the command for the amount of time specified if the server does not respond. The default RPC
timeout is 30 seconds.
Set tape duplication
iscon setvirtuallibrarytapeduplication -s <server-name> [-u <username> -p <password>]
-v <vdevid> -Z <on|off> -Q <num-of-copies> [-X <rpc-timeout>]
iscon setvirtuallibrarytapeduplication --server-name=<server-name>
[--server-username=<username> --server-password=<password>]
--vdevid=<vdevid> --tape-duplication=<on|off> --num-of-copies=<num-of-copies>
[--rpc-timeout=<rpc-timeout>]
Description:
This command sets the Tape Duplication property for a virtual tape library.
-v (--vdevid) is required in order to identify the virtual library.
-Z (--tape-duplication) is required in order to enable or disable the Tape Duplication property: on (enable) or off
(disable).
-Q (--num-of-copies) is an option to specify the number of copies to be made using the same barcode if tape
duplication option is enabled. The maximum value is 5. The default value is 1.
The virtual library must have the Auto Archive or Tape Caching property enabled in order to enable tape
duplication.
-X (--rpc-timeout) is an option to specify a number between 1 and 30000 seconds for the RPC timeout. The system
will retry the command for the amount of time specified if the server does not respond. The default RPC timeout is
30 seconds.
Set tape properties
iscon settapeproperty -s <server-name> [-u <username> -p <password>]
-v <vdevid> [-B <barcode>] [-f] [-F] [-w <on|off>] [-A <auto-archive-mode> [-Y <days>]
[-J <on|off>] | -N <auto-repl-mode> -S <target-name>
[-U <target-username> -P <target-password>]
[-M <#[D|H|M]>] ] [-k <key-name> -W <key-password> | -d]
[-Z <on|off> -Q <num-of-copies>] [-X <rpc-timeout>]
iscon settapeproperty --server-name=<server-name>
[--server-username=<username> --server-password=<password>] --vdevid=<vdevid>
[--barcode=<barcode>] [--force] [--full-capacity] [--tape-write-protect=<on|off>]
[--auto-archive-mode=<auto-archive-mode> [--delay-delete-days=<days>]
[--auto-eject-to-ie] | --auto-replication=<auto-repl-mode> --target-name=<target-name>
[--server-username=<username> --server-password=<password>]
[--delay-delete-time=<#[D|H|M]>] ] [--key-name=<key-name> --key-pasword=<key-password> |
--disable-key] [--tape-duplication=<on|off> --num-of-copies=<num-of-copies>]
[--rpc-timeout=<rpc-timeout>]
Description:
This command sets tape properties.
-v (--vdevid) is required to specify the ID of the virtual tape to set the properties.

VTL Prime Solaris User’s Guide • September 2008 • 316855201 • A 113
-B (--barcode) is the option to specify the new barcode for the tape. -f (--force) option is required if the new barcode
is not in the barcode range specified for the parent library. Barcode is an alpha-numerical value with a length of 4 to
12.
-F (--full-capacity) is an option to expand the tape to the maximum capacity and turn off the <capacity-on-demand>
option if it is enabled for the virtual tape.
-w (--tape-write-protect) is an option to turn on and off the tape write protection with the following values: on or off.
-A (--auto-archive-mode) is an option with one of the following values: copy or move or inherited or none.
• "none" is the value to turn off the auto-archive mode if the virtual tape is enabled with auto-archive option.
• "inherited" can only be specified when the parent library is enabled with auto-archive option.
-Y (--delay-delete-days) is an option for move mode to specify the number of days to wait before the deletion. The
maximum is 365 days.
-J (--auto-eject-to-ie) is an option for auto-archive mode in order to enable or disable the ejection of the physical
tape to the IE slot after a successful archive job: on (enable) or off (disable).
-N (--auto-replication) is an option with one of the follwing values: localcopy, localmove, replication, remotemove, or
none.
-S (--target-name) is the remote server name for auto-replication. It is required for auto-replication.
-U (--target-username) and -P (--target-password) are options to specify a different user ID and password to log in
to the remote server.
-M (--delay-delete-time) is an option for auto-replication move mode to specify up to 30 days of retention period
before deletion. The default value is 1 day. The value can be specified in days(D), hours(H) or minutes(M). For
example: 2D, 10H, 150M.
-A (--auto-archive-mode) and -N (--auto-replication) cannot be specified if replication is enabled for the tape.
-k (--key-name), -W (--key-password) and -d (--disable-key) are options for tape encryption support to be set in
conjunction with Auto-Archive Mode. Specify the key name and key password of the encryption key if you wish to
encrypt the data when exporting the virtual tape to the physical tape. Specify -d (--disable-key) if you wish to
disable tape encryption for this tape.
-Z (--tape-duplication) is an option to set the Tape Duplication property with one of the following values: on
(enable), off (disable), or inherit.
-Q (--num-of-copies) is an option to specify the number of copies to be made using the same barcode if the tape
duplication option is enabled. The maximum value is 5. The default value is 1.
Tape Duplication can be enabled only if the virtual library hosting the virtual tape has the Tape Caching property
enabled or the virtual tape has the Auto Archive property enabled.
At least one of the properties has to be specified.
-X (--rpc-timeout) is an option to specify a number between 1 and 30000 in seconds for the RPC timeout. The
system will retry the command for the amount of time specified if the server does not respond. The default RPC
timeout is 30 seconds.

VTL Prime Solaris User’s Guide • September 2008 • 316855201 • A 114
Reclaim disk space
iscon reclaimtapes -s <server-name> [-u <username> -p <password>]
-T <tape-vid-list> [-X <rpc-timeout>]
iscon reclaimtapes --server-name=<server-name>
[--server-username=<username> --server-password=<password>]
--tape-vid-list=<tape-vid-list> [--rpc-timeout=<rpc-timeout>]
Description:
This command reclaims the disk space occupied by the specified migrated virtual tapes.
-T (--tape-vid-list) is required to specify the ID of the virtual tapes to be reclaimed, separated with commas.
-X (--rpc-timeout) is an option to specify a number between 1 and 30000 in seconds for the RPC timeout. The
system will retry the command for the amount of time specified if the server does not respond. The default RPC
timeout is 300 seconds.
System configuration
Add a license keycode
iscon addlicense -s <server-name> [-u <username> -p <password>] -k <license-keycode>
[-X <rpc-timeout>]
iscon addlicense --server-name=<server-name>
[--server-username=<username> --server-password=<password>] --license=<license-keycode>
[--rpc-timeout=<rpc-timeout>]
Description:
This command adds a license keycode.
-X (--rpc-timeout) is an option to specify a number between 1 and 30000 in seconds for the RPC timeout. The
system will retry the command for the amount of time specified if the server does not respond. The default RPC
timeout is 30 seconds.
Remove a license keycode
iscon removelicense -s <server-name> [-u <username> -p <password>] -k <license-keycode>
[-X <rpc-timeout>]
iscon removelicense --server-name=<server-name>
[--server-username=<username> --server-password=<password>] --license=<license-keycode>
[--rpc-timeout=<rpc-timeout>]
Description:
This command removes a license keycode.
-X (--rpc-timeout) is an option to specify a number between 1 and 30000 in seconds for the RPC timeout. The
system will retry the command for the amount of time specified if the server does not respond. The default RPC
timeout is 30 seconds.

VTL Prime Solaris User’s Guide • September 2008 • 316855201 • A 115
Get VTL info
iscon getvtlinfo -s <server-name> [-u <username> -p <password>]
[-T <vtl-info_type> [-L <tape-library-vid>]] [-F <vtl-info-filter>] [-l [-M]]
[-X <rpc-timeout>]
iscon getvtlinfo --server-name=<server-name>
[--server-username=<username> --server-password=<password>]
[--vtl-info-type=<vtl-info-type> [--tape-library-vid=<tape-library-vid>] ]
[--vtl-info-filter=<vtl-info-filter>]
[--longlist [--ouput-delimiter=<output-delimiter>] ] [--rpc-timeout=<rpc-timeout>]
Description:
This command retrieves VTL information.
-T (--vtl-info-type) is the VTL information type with one of the following values: VLIBS or VDRIVES or VAULT or
PLIBS or PDRIVES.
• VLIBS = display virtual tape libraries only.
• VDRIVES = display standalone virtual tape drives only
• VAULT = display virtual tape vault only.
• PLIBS = display physical tape libraries only.
• PDRIVES = display standalone physical tape drives only.
The default is to display all the information.
-L (--tape-library-vid) is an option to specify the virtual tape library when VLIBS is specified, or to specify the
physical tape library when PLIBS is specified.
-F (--vtl-info-filter) is an additional filter that can be combined using the following values separated with commas:
library or drive or tape.
• library = include physical and/or virtual library information.
• drive = include physical and/or virtual drive information.
• tape = include physical and/or virtual tape information.
For example: -F "library,drive,tape" or --vtl-info-filter="library,drive,tape"
The default is to display all of the information that applies. There will be an error if <vtl-info-type> is specified and
the <vtl-info-filter> specified does not apply. For example, "library" does not apply to "VDRIVES".
-l (--longlist) is an option to display the information in a detail format.
-M (--output-delimiter) can be specified when -l is specified to replace the linefeed with the specified delimiter. The
maximum length of the delimiter is 8.
-X (--rpc-timeout) is an option to specify a number between 1 and 30000 in seconds for the RPC timeout. The
system will retry the command for the amount of time specified if the server does not respond. The default RPC
timeout is 30 seconds.

VTL Prime Solaris User’s Guide • September 2008 • 316855201 • A 116
Replication
Create a replica
iscon createreplication -s <server-name> [-u <username> -p <password>]
-v <source-vdevid> -S <target-name> [-U <target-username> -P <target-password>]
[-w <watermark(MB)> | [-d <YYYYMMDDHHMM> -i <#[H|M]>]] [-r <on>]
[[-t <timeout>] [-I <retry-in]>] [-C <retry-for>]] [-c <on|off>] [-e <on|off>]
[-n <replica-vdev-name>] [-X <rpc-timeout>]
iscon createreplication --server-name=<server-name>
[--server-username=<username> --server-password=<password>]
--source-vdevid=<source-vdevid> --target-name=<target-name>
[--target-username=<target-username> --target-password=<target-password>]
[--watermark=<watermark(MB)> | [--date=<YYYYMMDDHHMM> --interval=<#[H|M]>]] |
[--repl-first <on>] [[--replication-timeout=<timeout>]
[--replication-retry-interval=<retry-in>] [--replication-retry-count=<retry-for]]
[--compression=<on|off>] [--encryption=<on|off>] [--force] [--rpc-timeout=<rpc-timeout>]
Description:
This command allows you to set up a replication configuration.
-v (--source-vdevid) is required to specify the ID of the virtual tape to be configured for replication.
-S (--target-name) is required to specify the target server name.
-U (--target-username) and -P (--target-password) are optional for connection and login to the target server if the
target server are not logged in with a login command.
The replication configuration requires a trigger policy to be set. If no trigger policy is specified, the command will
automatically apply the appropriate default policy based on the tape caching property of the specified virtual tape.
Any combination of the following two options can be used to set up a replication trigger policy for a virtual tape with
the tape caching property disabled. The default policy is 1024 MB watermark.
-w (--watermark) is a data size based trigger in MB. The watermark is checked when the tape is unloaded from the
tape drive and the replication is triggered if the amount of new data on the tape has reached the specified
watermark.
-d (--date) combined with -i (--interval) is a time based trigger. The replication is triggered at the time specified by
date and then repeated every interval. -d (--date) format is YYYYMMDDHHMM and -i (--interval) format is a
number followed by H for hours or M for minutes (e.g. -i 2H or --interval=120M). The default value for interval is 1H
(one hour).
-r (--repl-first) is an option to replicate the virtual tape before it is migrated. Use "on" in order to enable this policy or
"off" to have tape migration executed first. The default policy is to replicate the virtual tape after it is migrated.
Replication is retried based on the timeout policy:
• -t (--replication-timeout) in seconds (default 60).
• -I (--replication-retry-interval) in seconds (default 60).
• -C (--replication-retry-count) retry count (default 1).
-c (--compression) is an option to enable or disable compression with one of the values: on or off.

VTL Prime Solaris User’s Guide • September 2008 • 316855201 • A 117
-e (--encryption) is an option for remote replication only to set encryption with one of the values: on or off.
-f (--force) option is required when the tape is scheduled to be deleted. The deletion schedule for the virtual tape
will be removed and the replication will be configured.
-X (--rpc-timeout) is an option to specify a number between 1 and 30000 in seconds for the RPC timeout. The
system will retry the command for the amount of time specified if the server does not respond. The default RPC
timeout is 30 seconds.
Promote a replica
iscon promotereplica -s <server-name> -v <vdevid> | -S <target-name> -V <replicaid>
[-u <username> -p <password>] [-U <target-username> -P <target-password>] [-f]
[-X <rpc-timeout>]
iscon promotereplica --server-name=<server-name> --vdevid=<vdevid> |
--target-name=<target-name> --replicaid=<replicaid> [--server-username=<username>
--server-password=<password>] [--target-username=<target-username>
--target-password=<target-password>] [--force] [--rpc-timeout=<rpc-timeout>]
Description:
This command allows you to promote a replica to a regular virtual device if the primary disk is available and the
replica disk is in a valid state.
Specify either the primary server and the source virtual tape ID or the target server and the tape replica ID. The
user name and password must be provided for both servers, if the servers were not registered using the login
command.
-v (--vdevid) is the ID of the source virtual tape and -V (--replicaid) is the ID of the tape replica.
If the source virtual tape is still valid and available, and the tape replica is in an invalid state, the tape replica can be
promoted with the force option. But, it is recommended to synchronize the tape replica with the source virtual tape
first unless the source virtual tape is physically defective or unavailable.
-f (--force) is an option to enforce the promotion if the source virtual tape is no longer available or the tape replica is
in invalid state, if you are sure the data on the tape replica is useful.
-X (--rpc-timeout) is an option to specify a number between 1 and 30000 in seconds for the RPC timeout. The
system will retry the command for the amount of time specified if the server does not respond. The default RPC
timeout is 30 seconds.
Remove replication
iscon removereplication -s <server-name> -v <vdevid> | -S <target-name> -V <replicaid>
[-u <username> -p <password>] [-U <target-username> -P <target-password>] [-f]
[-X <rpc-timeout>]
iscon removereplication --server-name=<server-name> --vdevid=<vdevid> |
--target-name=<target-name> --replicaid=<replicaid> [--server-username=<username>
--server-password=<password>] [--target-username=<target-username>
--target-password=<target-password>] [--force] [--rpc-timeout=<rpc-timeout>]
This command allows you to remove the replication configuration from the primary disk on the primary server and
delete the replica disk on the target server.

VTL Prime Solaris User’s Guide • September 2008 • 316855201 • A 118
Specify either the primary server and the source virtual tape ID or the target server and the tape replica ID. The
user name and password must be provided for both servers, if the servers were not registered using the login
command.
-v (--vdevid) is the ID of the source virtual tape and -V (--replicaid) is the ID of the tape replica.
If the target server no longer exists or cannot be connected to, only the replication configuration on the primary
server will be removed.
If the primary server no longer exists or cannot be connected to, only the tape replica will be deleted.
-f (--force) option has to be specified when either the primary server or target server no longer exists or cannot be
connected.
-X (--rpc-timeout) is an option to specify a number between 1 and 30000 in seconds for the RPC timeout. The
system will retry the command for the amount of time specified if the server does not respond. The default RPC
timeout is 30 seconds.
Suspend replication
iscon suspendreplication -s <server-name> [-u <username> -p <password>]
-v <vdevid> [-X <rpc-timeout>]
iscon suspendreplication --server-name=<server-name>
[--server-username=<username> --server-password=<password>] --vdevid=<vdevid>
[--rpc-timeout=<rpc-timeout>]
Description:
This command allows you to suspend scheduled replications for a virtual device that will be triggered by your
replication policy. It will not stop a replication that is currently in progress.
-v (--source-vdevid) is the ID of the source virtual tape on the primary server to be suspended.
-X (--rpc-timeout) is an option to specify a number between 1 and 30000 in seconds for the RPC timeout. The
system will retry the command for the amount of time specified if the server does not respond. The default RPC
timeout is 30 seconds.
Resume replication
iscon resumereplication -s <server-name> [-u <username> -p <password>]
-v <vdevid> [-X <rpc-timeout>]
iscon resumereplication --server-name=<server-name>
[--server-username=<username> --server-password=<password>] --vdevid=<vdevid>
[--rpc-timeout=<rpc-timeout>]
Description:
This command allows you to resume replication for a virtual device that was suspended by the suspendreplication
command. The replication will then be triggered by the replication policy once it is resumed.
-v (--source-vdevid) is the ID of the source virtual tape on the primary server to be resumed.

VTL Prime Solaris User’s Guide • September 2008 • 316855201 • A 119
-X (--rpc-timeout) is an option to specify a number between 1 and 30000 in seconds for the RPC timeout. The
system will retry the command for the amount of time specified if the server does not respond. The default RPC
timeout is 30 seconds.
Set replication properties
iscon setreplicationproperties -s <server-name> [-u <username> -p <password>]
-v <source-vdevid> [-w <watermark(MB)> | [-d <YYYYMMDDHHMM> -i <#[H|M]>]] |
[-r <on|off>] [[-t <timeout>] [-I <retry-in]>] [-C <retry-for>]] [-c <on|off>]
[-e <on|off>] [-X <rpc-timeout>]
iscon setreplicationproperties --server-name=<server-name>
[--server-username=<username> --server-password=<password>]
--source-vdevid=<source-vdevid>
[--watermark=<watermark(MB)> | [--date=<YYYYMMDDHHMM> --interval=<#[H|M]>]] |
[--repl-first <on|off>] [[--replication-timeout=<timeout>] [--replication-retry-
interval=<retry-in>] [--replication-retry-count=<retry-for]][--compression=<on|off>]
[--encryption=<on|off>] [--rpc-timeout=<rpc-timeout>]
Description:
This command allows you to change the replication policy for the specified virtual tape.
-v (--source-vdevid) is required to specify the ID of the source virtual tape.
Any combination of the following two options can be used to set up a replication trigger policy for a virtual with the
tape caching property disabled.
-w (--watermark) is a data size based trigger in MB. The watermark is checked when the tape is unloaded from the
tape drive and the replication is triggered if the amount of new data on the tape has reached the specified
watermark.
-d (--date) combined with -i (--interval) is a time based trigger. The replication is triggered at the time specified by
date and then repeated every interval. -d (--date) format is YYYYMMDDHHMM and -i (--interval) format is a
number followed by H for hours or M for minutes (e.g. -i 2H or --interval=120M).
To delete a watermark trigger specify 0 for the watermark. To delete a time based trigger specify NA for date. At
least one trigger must remain active.
The date argument is not required if you are only changing the interval.
For virtual tapes having the tape caching property enabled, replication is triggered based on the tape caching
policy:
-r (--repl-first) is required to replicate the virtual tape before it is migrated. Use "on" in order to enable this policy or
"off" to have tape migration executed first.
The replication retry policy can be changed using the following options:
• -t (--replication-timeout) in seconds (default 60).
• -I (--replication-retry-interval) in seconds (default 60).
• -C (--replication-retry-count) retry count (default 1).
-c (--compression) is an option to enable or disable compression with one of the values: on or off.

VTL Prime Solaris User’s Guide • September 2008 • 316855201 • A 120
-e (--encryption) is an option for remote replication only to set the encryption with one of the values: on or off.
-X (--rpc-timeout) is an option to specify a number between 1 and 30000 in seconds for the RPC timeout. The
system will retry the command for the amount of time specified if the server does not respond. The default RPC
timeout is 30 seconds.
Get replication properties
iscon getreplicationproperties -s <server-name> [-u <username> -p <password>]
-v <source-vdevid> [-X <rpc-timeout>]
iscon getreplicationproperties --server-name=<server-name>
[--server-username=<username> --server-password=<password>]
--source-vdevid=<source-vdevid> [--rpc-timeout=<rpc-timeout>]
Description:
This command allows you to get the replication properties for a virtual device configured for replication.
-v (--source-vdevid) is required to specify the ID of the source virtual tape.
-X (--rpc-timeout) is an option to specify a number between 1 and 30000 in seconds for the RPC timeout. The
system will retry the command for the amount of time specified if the server does not respond. The default RPC
timeout is 30 seconds.
Get replication status
iscon getreplicationstatus -S <target-name> [-U <username> -P <password>]
-V <replicaid> [-X <rpc-timeout>]
iscon getreplicationstatus --target-name=<target-name>
[--target-username=<username> --target-password=<password>]
--replicaid=<replicaid> [--rpc-timeout=<rpc-timeout>]
Description:
This command shows the replication status.
-S (--target-name) is the target server and -V (--replicaid) is ID of the tape replica, both of which are required.
-X (--rpc-timeout) is an option to specify a number between 1 and 30000 in seconds for the RPC timeout. The
system will retry the command for the amount of time specified if the server does not respond. The default RPC
timeout is 30 seconds.
Start replication
iscon startreplication -s <server-name> [-u <username> -p <password>]
-v <vdevid> [-X <rpc-timeout>]
iscon startreplication --server-name=<server-name>
[--server-username=<username> --server-password=<password>]
--vdevid=<vdevid> [--rpc-timeout=<rpc-timeout>]
Description:

VTL Prime Solaris User’s Guide • September 2008 • 316855201 • A 121
This command allows you to start replication on demand for a virtual device.
-v (--source-vdevid) is the ID of the source virtual tape on the primary server to start.
-X (--rpc-timeout) is an option to specify a number between 1 and 30000 in seconds for the RPC timeout. The
system will retry the command for the amount of time specified if the server does not respond. The default RPC
timeout is 30 seconds.
Stop replication
iscon stopreplication -s <server-name> [-u <username> -p <password>]
-v <vdevid> [-X <rpc-timeout>]
iscon stopreplication --server-name=<server-name>
[--server-username=<username> --server-password=<password>]
-vdevid=<vdevid> [--rpc-timeout=<rpc-timeout>]
This command allows you to stop the replication that is in progress for a virtual device.
-v (--source-vdevid) is the ID of the source virtual tape on the primary server to stop.
-X (--rpc-timeout) is an option to specify a number between 1 and 30000 in seconds for the RPC timeout. The
system will retry the command for the amount of time specified if the server does not respond. The default RPC
timeout is 30 seconds.

VTL Prime Solaris User’s Guide • September 2008 • 316855201 • A 122
Physical devices
Rescan physical devices
iscon rescandevices -s <server-name> [-u <username> -p <password>]
[-a <adapter-range>] [-i <scsi-range>] [-l <lun-range>] [-L] [-X <rpc-timeout>]
iscon rescandevices --server-name=<server-name>
[--server-username=<username> --server-password=<password>]
[--adapter-range=<adapter-range>] [--scsi-range=<scsi-range>] [--lun-range=<lun-range>]
[--sequential] [--rpc-timeout=<rpc-timeout>]
Description:
This command allows you to rescan the physical resource(s) on the specified server to get the proper physical
resource configuration.
-a (--adapter-range) is the adapter or adapter range to be rescanned. The default is to rescan all adapters, if it is
not specified. For example: -a 5 or -a 5-10
-i (--scsi-range) is the starting SCSI ID and ending SCSI ID to be rescanned. The default is to rescan all the SCSI
IDs if the range is not specified. For example: -i 0-5
-l (--lun-range) is the starting LUN and ending LUN to be rescanned. The default is not to rescan any LUN if it is not
specified. For example: -l 0-10
-L (--sequential) is an option to rescan sequentially.
-X (--rpc-timeout) is an option to specify a number between 1 and 30000 in seconds for the RPC timeout. The
system will retry the command for the amount of time specified if the server does not respond. The default RPC
timeout is 300 seconds.
Import disk
iscon importdisk -s <server-name> [-u <username> -p <password>]
-i <guid> | -I <ACSL> [-X <rpc-timeout>]
iscon importdisk --server-name=<server-name>
[--server-username=<username> --server-password=<password>]
--scsiaddress=<ACSL> | --guid=<guid> [--rpc-timeout=<rpc-timeout>]
Description:
This command allows you to import a foreign disk to the specified server. A foreign disk is a virtualized physical
device containing VTL logical resources previously set up on a different VTL server. If the previous server is no
longer available, the disk can be set up on a new VTL server and the resources on the disk can be imported to the
new server to make them available to clients.
The <guid> is the unique identifier of the physical device. <ACSL> is the SCSI address of the physical device in the
following format: #:#:#:# (adapter:channel:scsi id:lun)
Either -i (--guid) or -I (--scsiaddress) has to be specified.
-X (--rpc-timeout) is an option to specify a number between 1 and 30000 in seconds for the RPC timeout. The
system will retry the command for the amount of time specified if the server does not respond. The default RPC
timeout is 300 seconds.

VTL Prime Solaris User’s Guide • September 2008 • 316855201 • A 123
Prepare physical device for VTL server
iscon preparedisk -s <server-name> [-u <username> -p <password>]
[-U <target-username> -P <target-password>] -i <guid> | -I <ACSL>
-C <category> [-N <new-guid>] [-X <rpc-timeout>]
iscon preparedisk --server-name=<server-name>
[--server-username=<username> --server-password=<password>]
[--target-username=<username> --target-password=<password>]
--scsiaddress=<ACSL> | --guid=<guid> --category=<category> [--new-guid=<new-guid>]
[--rpc-timeout=<rpc-timeout>]
Description:
This command allows you to prepare a physical device to be used by an VTL server or reserve a physical device
for other usage.
The <guid> is the unique identifier of the physical device. <ACSL> is the SCSI address of the physical device in the
following format: #:#:#:# (adapter:channel:scsi id:lun)
Either -i (--guid) or -I (--scsiaddress) has to be specified.
-C (--category) is the required to specify the new category for the physical device in one of the following values:
unassigned or virtual or direct or service-enabled.
-N (--new-guid) is an option to specify the new guid for the physical device if the new category is "virtual".
-X (--rpc-timeout) is an option to specify a number between 1 and 30000 in seconds for the RPC timeout. The
system will retry the command for the amount of time specified if the server does not respond. The default RPC
timeout is 300 seconds.

VTL Prime Solaris User’s Guide • September 2008 • 316855201 • A 124
Reports
Refer to ‘Create a report’ and ‘View a report’ for information on generating CLI reports.
Server throughput report
iscon createserverthroughputreport -s <server-name> [-u <username> -p <password]
[-z <report period>] | [-D <date-range>] [-o <filename>] [-f] [-X <rpc-timeout>]
iscon createserverthroughputreport --server-name=<server-name>
[--server-username=<username> --server-password=<password>]
[--report-period=<report-period>] | [--date-range=<date-range>]
[--output-file=<filename>] [--force] [--rpc-timeout=<rpc-timeout>]
Description:
This command creates a report that displays throughput data and configuration information for a specific server.
-z (--report-period) is the period of time that the report should cover. The accepted values are:
•t - today
• y - yesterday
• 7 - last seven days
• 30 - last thirty days
-D (--date-range) is the starting date and ending date in the following format (maximum 30 days):
YYYYMMDD-YYYYMMDD or YYYYMMDD
Either -z (--report-period) or -D (--date-range) can be specified, but not both. The date option is applied to the
server local time. The default value is: "-z t" (today).
-o (--output-file) is the file name used to save the report data. If an output filename is not specified, the default
filename is: ServerThroughput-server-MM-DD-YYYY-hh-mm-ss[.#]
[.#] is the additional suffix when there is a duplicate.
Specify the -f (--force) option if you want to overwrite the existing file if the output file already exists.
-X (--rpc-timeout) is an option to specify a number between 1 and 30000 in seconds for the RPC timeout. The
default RPC timeout is 300 seconds.
SCSI channel throughput report
iscon createscsichannelthroughputreport -s <server-name> [-u <username> -p <password>]
[-z <report period>] | [-D <date-range>] -t <adapter-no> [-o <filename>] [-f]
[-X <rpc-timeout>]
iscon createscsichannelthroughputreport --server-name=<server-name>
[--server-username=<username> --server-password=<password>]
[--report-period=<report-period>] | [--date-range=<date-range>]
--adapter-no=<adapter-no> [--output-file=<filename>] [--force] [--rpc-timeout=<rpc-
timeout>]
Description:

VTL Prime Solaris User’s Guide • September 2008 • 316855201 • A 125
This command creates a report that displays the throughput values for a specific SCSI/Fibre channel.
-t (--adapter-no) is required in order to identify the requested SCSI/Fibre Channel adapter.
-z (--report-period) is the period of time that the report should cover. The accepted values are:
•t - today
• y - yesterday
• 7 - last seven days
• 30 - last thirty days
-D (--date-range) is the starting date and ending date in the following format (maximum 30 days):
YYYYMMDD-YYYYMMDD or YYYYMMDD
Either -z (--report-period) or -D (--date-range) can be specified, but not both. The date option is applied to the
server local time. The default value is: "-z t" (today).
-o (--output-file) is the file name used to save the report data. If the output filename is not specified, the default
filename is: SCSIChannelThroughput-server-MM-DD-YYYY-hh-mm-ss[.#]
[.#] is the additional suffix when there is a duplicate.
Specify the -f (--force) option if you want to overwrite the existing file if the output file already exists.
-X (--rpc-timeout) is an option to specify a number between 1 and 30000 in seconds for the RPC timeout. The
default RPC timeout is 300 seconds.
Device throughput report
iscon createdevicethroughputreport -s <server-name> [-u <username> -p <password>]
-I <ACSL> [-z <report period>] | [-D <date-range>] [-o <filename>] [-f]
[-X <rpc-timeout>]
iscon createdevicethroughputreport --server-name=<server-name>
[--server-username=<username> --server-password=<password>] --scsiaddress=<ACSL>
[--report-period=<report-period>] | [--date-range=<date-range>]
[--output-file=<filename>] [--force] [--rpc-timeout=<rpc-timeout>]
Description:
This command creates a report that displays throughput values for a specific device.
-I <ACSL> (--scsiaddress) is the LUN address of the device.
-z (--report-period) is the period of time that the report should cover. The accepted values are:
•t - today
• y - yesterday
• 7 - last seven days
• 30 - last thirty days
-D (--date-range) is the starting date and ending date in the following format (maximum 30 days):
YYYYMMDD-YYYYMMDD or YYYYMMDD

VTL Prime Solaris User’s Guide • September 2008 • 316855201 • A 126
Either -z (--report-period) or -D (--date-range) can be specified, but not both. The date option is applied to the
server local time. The default value is: "-z t" (today).
-o (--output-file) is the file name used to save the report data. If the output filename is not specified, the default
filename is: SCSIDeviceThroughput-server-MM-DD-YYYY-hh-mm-ss[.#]
[.#] is the additional suffix when there is a duplicate.
Specify the -f (--force) option if you want to overwrite the existing file if the output file already exists.
-X (--rpc-timeout) is an option to specify a number between 1 and 30000 in seconds for the RPC timeout. The
default RPC timeout is 300 seconds.
Disk usage report
iscon creatediskusagereport -s <server-name> [-u <username> -p <password>][-o <filename>]
[-f] [-X <rpc-timeout>]
iscon creatediskusagereport --server-name=<server-name>
[--server-username=<username> --server-password=<password>] [--output-file=<filename>]
[--force] [--rpc-timeout=<rpc-timeout>]
Description:
This command creates a report that displays the amount of disk space used by disk libraries on a specific server.
-o (--output-file) is the file name used to save the report data. If the output filename is not specified, the default
filename is: DiskSpaceUsage-server-MM-DD-YYYY-hh-mm-ss[.#]
[.#] is the additional suffix when there is a duplicate.
Specify the -f (--force) option if you want to overwrite the existing file if the output file already exists.
-X (--rpc-timeout) is an option to specify a number between 1 and 30000 in seconds for the RPC timeout. The
default RPC timeout is 300 seconds.

VTL Prime Solaris User’s Guide • September 2008 • 316855201 • A 127
Fibre Channel adapter configuration report
iscon createfcaconfreport -s <server-name> [-u <username> -p <password>] [-o <filename>]
[-f] [-X <rpc-timeout>]
iscon createfcaconfreport --server-name=<server-name>
[--server-username=<username> --server-password=<password>] [--output-file=<filename>]
[--force] [--rpc-timeout=<rpc-timeout>]
Description:
This command creates a report that displays the Fibre Channel adapter configuration for a specific server.
-o (--output-file) is the file name used to save the report data. If the output filename is not specified, the default
filename is: FCAdaptersConfig-server-MM-DD-YYYY-hh-mm-ss[.#]
[.#] is the additional suffix when there is a duplicate.
Specify the -f (--force) option if you want to overwrite the existing file if the output file already exists.
-X (--rpc-timeout) is an option to specify a number between 1 and 30000 in seconds for the RPC timeout. The
default RPC timeout is 300 seconds.
Replication status report
iscon createreplicationstatusreport -s <server-name> [-u <username> -p <password>]
[-D <date-range>] [-r <repl-resource-type> | -R <resourceList>] [-o <outputFilename>]
[-f] [-X <rpc-timeout>]
iscon createreplicationstatusreport --server-name=<server-name>
[--server-username=<username> --server-password=<password>] [--date-range=<date-range>]
[--repl-resource-type=<repl-resource-type> | --resource-list=<resourceList>]
[[--output-file=<outputFilename>] [--force] [--rpc-timeout=<rpc-timeout>]
Description:
This command creates a report that displays the status of a specified resource on a specific server.
-D (--date-range) is an option to specify the date range to be queried. The date format is YYYYMMDD or
YYYYMMDD-YYYYMMDD. If date range is not specified, the default is today's date.
-r (--repl-resource-type) is an option to specify a generic resourse type to be queried. It can be one of the following:
• TAPE
• TAPEReplica
The default value is TAPE.
-R <--resource-list> in an option to report the status of the specified resources only. The argument can be a list of
virtual identificators separated with commas or the name of a file enclosed in <> containing the resource ID on
each line. All the resources must be of the type specified by "-r".
• Example 1: -R 10000005,10000006
• Example 2: -R "<res_id_file.txt>"

VTL Prime Solaris User’s Guide • September 2008 • 316855201 • A 128
-o (--output-file) is the file name used to save the report data. If the output filename is not specified, the default
filename is: ReplicationStatus-server-MM-DD-YYYY-hh-mm-ss[.#]
[.#] is the additional suffix when there is a duplicate.
Specify the -f (--force) option if you want to overwrite the existing file if the output file already exists.
-X (--rpc-timeout) is an option to specify a number between 1 and 30000 in seconds for the RPC timeout. The
default RPC timeout is 300 seconds.
Virtual library information report
iscon createvirlibinforeport -s <server-name> [-u <username> -p <password>]
[-o <filename>] [-f] [-X <rpc-timeout>]
iscon createvirlibinforeport --server-name=<server-name>
[--server-username=<username> --server-password=<password>] [--output-file=<filename>]
[--force] [--rpc-timeout=<rpc-timeout>]
Description:
This command creates a report that displays all of the virtual libraries for a specific server.
-o (--output-file) is the file name used to save the report data. If the output filename is not specified, the default
filename is: VirtualLibraryInfo-server-MM-DD-YYYY-hh-mm-ss[.#]
[.#] is the additional suffix when there is a duplicate.
Specify the -f (--force) option if you want to overwrite the existing file if the output file already exists.
-X (--rpc-timeout) is an option to specify a number between 1 and 30000 in seconds for the RPC timeout. The
default RPC timeout is 300 seconds.
Virtual tape information report
iscon createvirtapeinforeport -s <server-name> [-u <username> -p <password>]
[-o <filename>] [-f] [-X <rpc-timeout>]
iscon createvirtapeinforeport --server-name=<server-name>
[--server-username=<username> --server-password=<password>] [--output-file=<filename>]
[--force] [--rpc-timeout=<rpc-timeout>]
Description:
This command creates a report that displays all of the virtual tapes for a specific server.
-o (--output-file) is the file name used to save the report data. If the output filename is not specified, the default
filename is: VirtualTapeInfo-server-MM-DD-YYYY-hh-mm-ss[.#]
[.#] is the additional suffix when there is a duplicate.
Specify the -f (--force) option if you want to overwrite the existing file if the output file already exists.
-X (--rpc-timeout) is an option to specify a number between 1 and 30000 in seconds for the RPC timeout. The
default RPC timeout is 300 seconds.

VTL Prime Solaris User’s Guide • September 2008 • 316855201 • A 129
Create job report
iscon createjobreport -s <server-name> [-u <username> -p <password>]
[-z <report period>] | [-D <date-range>] [-o <filename>] [-f] [-X <rpc-timeout>]
iscon createjobreport --server-name=<server-name>
[--server-username=<username> --server-password=<password>]
[--report-period=<report-period>] | [--date-range=<date-range>]
[--output-file=<filename>] [--force] [--rpc-timeout=<rpc-timeout>]
Description:
This command creates a report that displays all of the jobs executed during a selected period of time for a specific
server.
-z (--report-period) is the period of time that the report should cover. The accepted values are:
•t - today
• y - yesterday
• 7 - last seven days
• 30 - last thirty days
-D (--date-range) is the starting date and ending date in the following format (maximum 30 days):
YYYYMMDD-YYYYMMDD or YYYYMMDD
Either -z (--report-period) or -D (--date-range) can be specified, but not both. The date option is applied to the
server local time. The default value is: "-z t" (today).
-o (--output-file) is the file name used to save the report data. If the output filename is not specified, the default
filename is: JobReport-MM-DD-YYYY-hh-mm-ss[.#]
[.#] is the additional suffix when there is a duplicate.
Specify the -f (--force) option if you want to overwrite the existing file if the output file already exists.
-X (--rpc-timeout) is an option to specify a number between 1 and 30000 in seconds for the RPC timeout. The
default RPC timeout is 300 seconds.

VTL Prime Solaris User’s Guide • September 2008 • 316855201 • A 130
Event Log
Get Event Log
iscon geteventlog -s <server-name> [-u <username> -p <password>]
[-D <date-range>] [-F <fileFormat>] [-o <filename>] [-H] [-f] [-X <rpc-timeout>]
iscon geteventlog --server-name=<server-name>
[--server-username=<username> --server-password=<password>] [--date-range=<date-range>]
[--file-format=<fileFormat>] [--include-heading] [--output-file=<filename>] [--force]
[--rpc-timeout=<rpc-timeout>]
Description:
This command gets the event log.
-D (--date-range) is the starting date/time and ending date/time in the following format:
YYYYMMDDhhmmss-YYYYMMDDhhmmss or YYYYMMDDhhmmss
-F (--fileFormat) is one of the following formats: csv (default) or txt.
-H (--include-heading) is the option to include the event log data heading.
-o (--output-file) is the full path of the file name to save the event log data. If an output filename is not specified, the
default filename is: eventlogYYYY-MM-DD-hh-mm-<servername>[.#]
[.#] is the additional suffix when there is a duplicate.
Specify the -f (--force) option if you want to overwrite the existing file if the output file already exists.
-X (--rpc-timeout) is an option to specify a number between 1 and 30000 in seconds for the RPC timeout. The
system will retry the command for the amount of time specified if the server does not respond. The default RPC
timeout is 30 seconds.

VTL Prime Solaris User’s Guide • September 2008 • 316855201 • A 131
Technical support
Get X-Ray
iscon getxray -s <server-name> [-u <username> -p <password>]
[-l <#|all|YYMMDDhhmm-YYMMDDhhmm>] [-r] [-o <filename>] [-f] [-X <rpc-timeout>]
iscon getxray --server-name=<server-name>
[--server-username=<username> --server-password=<password>]
[--get-log=<#|all|YYMMDDhhmm-YYMMDDhhmm>] [--rescan-for-xray] [--output-file=<filename>]
[--force] [--rpc-timeout=<rpc-timeout>]
Description:
This command allows you to get X-ray information from the VTL Server for diagnostic purposes. Each X-ray
contains technical information about your server, such as server messages and a snapshot of your server's current
configuration and environment. You should not create an X-ray unless you are requested to do so by your
Technical Support representative.
-l (--get-log) is a filter to get the specified log messages.
• # = number of lines
• all = all the log messages
• YYMMDDhhmm-YYMMDDhhmm = log messages in date/time range
The default is to get all the log messages.
-r (--rescan-for-xray) is an option to rescan the physical devices before the xray is taken. The default is not to
rescan the devices.
-o (--output-file) is the full path of the file name to save the xray to. The default output filename format is:
xray-YYYY-MM-DD-hh-mm-<servername>.tar.gz
Specify the -f (--force) option if you want to overwrite the existing file if the output file already exists. Otherwise, an
error will be returned.
-X (--rpc-timeout) is an option to specify a number between 1 and 30000 in seconds for the RPC timeout. The
system will retry the command for the amount of time specified if the server does not respond. The default RPC
timeout is 300 seconds.
Get attention required information
iscon getattentionrequired -s <server-name> [-u <username> -p <password>]
[-X <rpc-timeout>]
iscon getattentionrequired --server-name=<server-name>
[--server-username=<username> --server-password=<password>]
[--rpc-timeout=<rpc-timeout>]
Description:
This commands displays the attention required messages.
-X (--rpc-timeout) is an option to specify a number between 1 and 30000 in seconds for the RPC timeout. The
system will retry the command for the amount of time specified if the server does not respond. The default RPC
timeout is 300 seconds.

VTL Prime Solaris User’s Guide • September 2008 • 316855201 • A 132
Appendix
This appendix contains information about system security, VTL Server operating
system installation, and VTL Console installation.
System security
VTL uses the following ports. Network firewalls should allow access through these
ports for successful communications. In order to maintain a high level of security,
you should disable all unnecessary ports. The only ports required by VTL are:
Port Purpose
TCP port 11576 Used for VTL Console to VTL appliance management communication
UDP port 11577 Used for IP replication
UDP port 161 Used for SNMP traps
TCP port 161 Used for SNMP traps
TCP port 3260 Used for iSCSI
UDP port 25 Used for sendmail (Email Alerts)
TCP port 25 Used for sendmail (Email Alerts)
UDP port 22 Used for SSH
TCP port 22 Used for SSH
UDP port 23 Used for TELNET
TCP port 23 Used for TELNET
UDP port 20 Used for FTP
TCP port 20 Used for FTP
UDP port 21 Used for FTP
TCP port 21 Used for FTP
UDP port 111 PortMapper (ACSLS)*
TCP port 111 PortMapper (ACSLS)*
UDP port 6666 Areca FalconStor Raid Controller #1 (Appliances with built in storage)
TCP port 6666 Areca FalconStor Raid Controller #1 (Appliances with built in storage)
VTL Prime Solaris User’s Guide • September 2008 • 316855201 • A 133
*Note: PortMapper requires dynamic ports to be open. This requires the ACSLS to
be in the same VLAN with ACSLS server.
Although you may temporarily open some ports during initial setup of the VTL
server, such as the telnet port (23) and FTP ports (20 and 21), you should shut them
down after you have done your work.
UDP port 6667 Areca FalconStor Raid Controller #2 (Appliances with built in storage)
TCP port 6667 Areca FalconStor Raid Controller #2 (Appliances with built in storage)
UDP port 6668 Areca FalconStor Raid Controller #3 (Appliances with built in storage)
TCP port 6668 Areca FalconStor Raid Controller #3 (Appliances with built in storage)
TCP 11576 SANClient
TCP 11582 SANClient
TCP 11762 SANClient
Port Purpose

VTL Prime Solaris User’s Guide • September 2008 • 316855201 • A 134
Install an operating system on your VTL Server
Install Solaris
Install a certified operating system on your VTL appliance
You must install a certified operating system on your VTL appliance before you
install VTL. If you purchased VTL as a turnkey appliance, this will have been done
for you. Otherwise, refer to ’Install an operating system on your VTL Server’ in the
“Appendix” for detailed information.
You must install the Solaris operating system on your VTL appliance before you
install VTL. If you purchased VTL as a turnkey appliance, this will have been done
for you. Otherwise, refer to the instructions below to install the operating system.
Note: Starting with the Solaris 10, 1/06 release, the Solaris installation programs for
x86-based systems use the GRUB boot loader. For instructions about how to install
the Solaris operating system with GRUB, refer to your Solaris installation guide.
Installation
media Ensure that you have the correct media for your installation:
• If you are installing from a DVD, use the Solaris 10 Operating System for
x86 Platforms DVD.
• If you are installing from CD media, use the following:
• Solaris 10 Software CDs.
• Solaris 10 Languages for x86 Platforms CD – The installation program
prompts you for this CD, if necessary, to support languages for specific
geographic regions.
Note: If you want to upgrade a system that has non-global zones installed, you
cannot use the Solaris 10 Software CDs. You must use the Solaris 10 Operating
System DVD or a network installation image.
Before you
begin Before you begin:
• Check your system BIOS to make sure you can boot from CD or DVD
media. If your system must boot from a diskette, complete the steps
described in the “Solaris 10 3/05 for x86: Copying the Boot Software to a
Diskette” documentation.
• Acquire any install time updates (ITUs) or drivers that you need to install the
operating system on your hardware. To determine if you need an ITU or
additional drivers, refer to your hardware documentation.
• Verify that your system meets the minimum requirements required by
Solaris. Refer to your Solaris documentation for more information.
Note: If you are installing the Solaris operating system on a system that is not
produced by Sun Microsystems, check the Solaris Hardware Compatibility List

VTL Prime Solaris User’s Guide • September 2008 • 316855201 • A 135
on Sun’s website (http://www.sun.com/bigadmin/hcl) before you begin the
installation.
• Gather the information you need to install the operating system on a
nonnetworked system:
• Host name of the system that you are installing
• Language and locales that you intend to use on the system
• Gather the information you need to install the operating system on a
networked system:
• Host name of the system that you are installing
• Language and locales that you intend to use on the system
• Host IP address
• Subnet mask
• Type of name service (for example, DNS, NIS, or NIS+)
• Domain name
• Host name of the name server
• Host IP address of the name server
• Root password
Installation 1. Insert the appropriate media in your system.
2. Boot the system by shutting it down and then turning it off and then on.
3. If you need to manually set the BIOS to boot from CD or DVD, type the
appropriate key sequence to interrupt your system boot process.
Modify the boot priority in the BIOS and exit the BIOS to return to the installation
program.
A memory test and hardware detection are executed. The screen refreshes. The
Solaris Booting System screen is displayed.
4. Determine if you need to modify device settings.
You might need to modify device settings if you want to perform the following
tasks:
• Install device drivers
• Install ITUs
• Disable Advanced Configuration and Power Interface (ACPI)
• Set up a serial console
• Reset the default boot device
If you do not need to modify device settings, continue.
If you need to modify device settings with the Solaris Device Configuration
Assistant, press the ESC key. The Solaris Device Configuration Assistant (DCA)
screen is displayed. Follow the instructions on the DCA screens to modify device
settings.
Note: You must press the ESC key within five seconds to interrupt the installation
and modify device settings.

VTL Prime Solaris User’s Guide • September 2008 • 316855201 • A 136
5. Select an installation type.
The Solaris installation program checks the default boot disk for the
requirements to install or upgrade the system. If the Solaris installation cannot
detect the system configuration, the program prompts you for any missing
information. When the check is completed, the installation selection screen is
displayed with several options.
To install with the Solaris installation GUI, select option 1, Solaris Interactive.
To perform an unattended custom JumpStart installation, select option 2,
Custom JumpStart.
To install with the text installer in a desktop session, select option 3, Solaris
Interactive Text (Desktop session). You can also type b - text at the prompt.
Select this installation type to override the default GUI installer and run the text
installer.
To install with the text installer in a console session, select option 4, Solaris
Interactive Text (Console session). You can also type b - nowin at the prompt.
Select this installation type to override the default GUI installer and run the text
installer.
If you wait 30 seconds without typing anything, an interactive installation will be
started.
6. After installation, you need to configure the NIC and sshd daemon manually, if
needed.
For detailed Solaris installation and configuration information, refer to your
Solaris Installation and User Guide.

VTL Prime Solaris User’s Guide • September 2008 • 316855201 • A 137
Console installation
The Console is the graphical administration tool where you configure VTL, add/
configure clients, set properties, and manage the import/export of tapes.
Pre-installation
The computer that runs the Console needs connectivity to the network segment
where VTL is running. This is because it communicates directly with the server and
clients (backup servers). The Console may be installed on any number of machines,
including the clients themselves, provided that they have a Graphical User Interface.
Installation
The installation includes a console.zip file that contains the VTL console.
Load VTL console software on a laptop or workstation:
1. Transfer the Console1813.zip file from the VTL Prime server’s /Software
directory
2. Unzip the file.
3. Go to the Solaris directory and run:
# pkgadd -d vtlconsole - 5.01-1813.i386.pkg
Start the VTL console:
1. Go to /usr/local/vtlconsole and type:
# ./vtlconsole &

VTL Prime Solaris User’s Guide • September 2008 • 316855201 • A 138
Troubleshooting
General Console operations
The VTL Console is unable to connect to a VTL server
There are several operations that occur when the Console connects to the server. A
dialog indicates the current step. If there is a failure, the word Failed appears at the
end of the step. Determining the current phase of connection can help you pinpoint
the problem. It is also possible that the server is busy. Wait for a while and retry. At
what step did the connection fail?
•Connecting to the VTL server - If the IP address of the server has recently
changed, delete the server from the Console and re-add it. If you entered a
server name, try entering its IP address instead. If this does not help or if the
IP address has not changed, ping the target machine.
If ping does not reply, ping other machines in the same subnet. If there is still
no response, there is a network problem. Run a network command or utility to
show the status of the network.
•Verifying user name and password - Check the user name and the
password. You may use the root password or any other administrator or
read-only user that you have created with VTL previously. Make sure the
user name and password exist on the server by opening a local session.
The password is case-sensitive. Make sure the Caps Lock key is not
pressed on the keyboard.
From the machine where VTL Console is installed open a SSH session to the
VTL server. Log on to the server with the same user name and password. If
the connection between the two machines is fine, the Console should be able
to connect to the server unless some important server module is not running,
such as the communication module. To see the status of all modules, at the
machine where VTL server is running, go to the system console and type:
vtl status.
If a module has stopped, restart it with the command:
vtl restart <module name>
Afterwards, go back to the Console and retry connecting to the server.
•Retrieving the server configuration - If there is something wrong with the
configuration, an error message may appear. Contact technical support.
•Checking the VTL license - Contact technical support.
•Expanding the VTL server node - This may be due to high memory usage.
Check the memory consumption on the machine. If it is very high, stop all
unnecessary processes. If the problem persists or if the memory
consumption is normal, contact technical support.

VTL Prime Solaris User’s Guide • September 2008 • 316855201 • A 139
Requested operations cannot be performed from the Console
Check server
activity Sometimes the VTL server is very busy with operations that cause high CPU
utilization (such as expanding tapes or data compression).
You can check the Event Log or syslog (/var/adm/messages) for messages that
show you the current activity of the system.
If you see messages such as Server Busy or RPC Timeout, you should wait awhile
and retry your action after the current operation finishes.
If the problem persists or the server is not really busy, contact technical support.
Console operations are very slow
Check Console
machine
memory usage
On the machine where you are using the VTL Console, use the appropriate system
utility (such as Task Manager) to show the memory usage of all running processes.
If the memory usage is unusual, stop all unnecessary processes from running or
provide more memory.
Check server
activity Sometimes the VTL server is very busy performing heavy processing. You can
check the Event Log or syslog (/var/adm/messages) for excessive pending SCSI
commands on a single SCSI queue that may delay update requests coming from the
Console. Also, try starting a second instance of the Console. If the second Console
cannot establish connections, that means the server is busy with previous RPC
operations.
If this is the case, you should wait awhile and retry your action after the current
processing finishes.
If the problem persists or the server is not really busy, contact technical support.

VTL Prime Solaris User’s Guide • September 2008 • 316855201 • A 140
Physical resources
The VTL Console does not show physical storage devices as expected
There are several steps to try when physical storage devices have been connected/
assigned to the VTL server yet they are not showing in the VTL Console.
Rescan devices Perform a rescan from the VTL Console (right-click on the Physical Resources
object and select Rescan). Make sure that the Discover New Devices option is
specified. By default, Solaris rescans all adapters.
Check system
log messages Check the Event Log or syslog (/var/adm/messages) for error messages that may
correspond to the rescan operation and report failures on SCSI devices. It may be
that even though the devices were discovered, they were not accessible due to
errors.
Check device
type For external SCSI devices, make sure you check the following:
• Make sure the system is powered on. Perform a power cycle to make sure.
• Physically make sure all the cable connectors are securely plugged in.
• Verify SCSI termination. This can be quite involved. If you are not sure, you
may have to contact the manufacturer of the devices and have their
representatives assist with the troubleshooting.
Once the above conditions are verified, determine the SCSI HBA and the proper
driver for it. This can normally be accomplished by going to the website of the HBA
manufacturer. From the server console, make sure the correct driver for the HBA is
loaded properly. If not sure, unload and load the driver again. While doing that, look
into the syslog to see if any error messages have been logged corresponding to the
action of loading the driver. Under some circumstances, the system may need to be
power cycled (not just rebooted) to properly load the drive.
Some Fibre Channel devices use VSA (Volume Set Addressing) mode. This
addressing method is used primarily for addressing virtual buses, targets, and
LUNs. If this is the case, make sure to enable VSA on the VTL initiator driver and
use persistent binding. Otherwise, VTL cannot manage the storage.
Client does not see any devices
When using a Mutli-ID HBA with dual mode, clients will need to be zoned to the alias
port. If they are zoned to the base port, clients will not see any devices for you to
assign. To correct this problem, check the zoning.

VTL Prime Solaris User’s Guide • September 2008 • 316855201 • A 141
Logical resources
Virtual tapes are displayed as "offline" on the Console
If a physical resource that was used to create the virtual tape is missing, the tape’s
status will be offline (missing segment).
From the VTL Console determine which physical resources comprise this virtual
drive. To do this, highlight the tape in the tree and check the Layout tab or look under
the Storage Devices object for the icon. For each physical device, check that:
• It is turned on
• It still exists (has not been removed)
• It is in a normal state and does not show any failure
• There is no failure at the connection level. Check FC connectivity to VTL to
make sure that each physical resource is accessible.
Tape expansion does not work
Check device
size Highlight the tape in the Console and check that the Total Size field shows the
correct size of the expanded tape device.
Correct size -
check client os If the Console shows the correct size of the expanded virtual tape, the expansion
has succeeded but the client machine is having trouble seeing the new size.
Make sure the client machine has been refreshed to see the updated status of its
drives. You need to run the utility corresponding to your operating system to rescan
the device and discover its new size.
Once the operating system has recognized the new space on the virtual disk, the file
system or the application on the device has to be expanded also. If the file system or
the application supports expansion, use the corresponding utility to expand it.
•Windows NT clients - You must restart your Windows NT client after
expanding a virtual device in order for the expanded area to become
available.
•Windows 2000 clients - Go to Windows Disk Management. If it does not
show any unallocated space at the end of the virtual device, you must run a
"Rescan Disks" command from the Disk Management GUI in order to
discover changes to disk size.
•Windows 2000 Dynamic Disks - Expansion of dynamic disks using the
Expand SAN Resource Wizard is not supported for clients. Due to the
nature of dynamic disks, it is not safe to alter the size of the virtual device.
However, dynamic disks do provide an alternative method to extend the
dynamic volume:
1. Create a new SAN Resource and assign it to the VTL client. This
additional disk which will be used to extend the dynamic volume.
2. Use Disk Manager to write the disk signature and upgrade the disk to
"Dynamic”.

VTL Prime Solaris User’s Guide • September 2008 • 316855201 • A 142
3. Use Disk Manager to extend the dynamic volume. The new SAN
Resource should be available in the list box of the Dynamic Disk
expansion dialog.
•Solaris clients - Label the disk with the new geometry using the utility
$IPSTORCLIENT/bin/labeldisk.
•AIX clients - Expanding a virtual disk will not change the size of the existing
AIX volume group. To expand the volume group, a new disk has to be
assigned and the extendvg command has to be used to enlarge the size of
the volume group.
•Linux clients - On the client machine's system console, type rmmod FC
HBA driver and insmod FC HBA driver. This unloads and reloads the
driver for the FC HBA and causes Linux to rescan all devices on that HBA,
allowing it to recognize any new device size. If this method is not feasible,
such as when the boot disk is running on the FC HBA, contact technical
support.
Incorrect size -
check Event
Log
If the Console does not show the correct size of the expanded virtual tape, the
expansion was probably not successful. Check the Event Log to look for any error
messages regarding the expansion. Errors may appear if:
• There is not enough physical disk space for the expansion. Add more
physical storage or change the size of expansion.
• The physical partition is invalid. Check the storage device.
• An IO error occurred.
• An RPC timeout occurred when the expand command was issued. Try the
following operation to see if the server is busy:
• On the VTL server, run the command top or ps –x
• Find and stop any unnecessary processes. If you find that the server is
too busy, wait to see if the problem persists.
If it is possible to correct the problem, try to do so and then expand the virtual tape
again. If it still does not work or if the Event Log does not show any errors relating to
the expansion, contact technical support.

VTL Prime Solaris User’s Guide • September 2008 • 316855201 • A 143
Client cannot see tape library/drive as provisioned by VTL
Check device
discovery by os Check if the client’s operating system sees the device or if it is the backup software
that does not see the tape library or drive. Depending on the OS, the new device is
indicated in the different ways:
•Windows - Tape libraries appear under Medium Changers and tape drives
under Tape drives. Usually the tape drive is indicated as \tape<index>.
•Linux - The tape library is usually indicated by /dev/sg<index> (the sg
module should be loaded) and the tape drive by /dev/st/<index>, /dev/nst/
<index>, and /dev/sg/<index> (The st module should be loaded).
•Solaris - The tape library is usually indicated by /dev/sg<index> (the sg
module should be loaded) and the tape drive by /dev/rmt/<index> (the st
module should be loaded).
•HP-UX - The tape library is usually indicated by /dev/rac/cXtXdX (the schgr
driver must be loaded) and the tape drive by /dev/rmt/<index> (the stape
driver should be loaded).
•AIX - The tape device is usually indicated by /dev/rmt<index> (for LTO1/
LTO2) or /dev/mt<index> (for DLT/SDLT).
Operating
system does
not see device
If the operating system does not see the device, you need to troubleshoot virtual
device discovery. To do this, in the Console, select the virtual device. Check the
device status. If the device status is offline, that is the problem as clients cannot see
an offline device. Refer to the ‘Virtual tapes are displayed as "offline" on the
Console’ section for more information.
If the device status is online, check the client configuration.
•Check client assignment - From the Console, right-click on the specific
client. If you do not see virtual devices on the Resources tab, assign them to
that client. To share a device between several clients the mode should be
Read/Write non-exclusive, otherwise device attachment fails.
•Check WWPN - From the Console, right-click the client and select
Properties. Record initiator and target WWPNs. Highlight the Physical
Resources object and locate the HBA that matches the recorded target HBA
WWPN. Highlight the SNS table tab for that HBA and look for the WWPN
that matches the recorded initiator WWPN. If the WWPN is not correct,
unassign the client and assign it again using the appropriate mapping type.
If multiple HBAs exist, either from the client host or from the VTL target, look
up all entries from all target SNS tables.
•Check VSA addressing - Some hosts use VSA (Volume Set Addressing)
mode. This addressing method is used primarily for addressing virtual
buses, targets, and LUNs. If this is the case, make sure to enable VSA on
the VTL target driver. Otherwise some clients cannot detect more than eight
LUNs on VTL virtual devices.
Operating
system sees
device
If the operating system sees the device but the backup software does not see the
device at all, you need to check the drivers for the backup software. Make sure the
driver used corresponds to the nature of the library and also the tape drive. Some

VTL Prime Solaris User’s Guide • September 2008 • 316855201 • A 144
backup products recommend using specific versions of drivers. Refer to the backup
software manual for such settings or any necessary upgrade. Also, make sure that
multiple backup software is not installed on the same backup server as they may
conflict with each other.
If the operating system sees the device but the backup software does not see the
device in the expected place, you need to check serialization. VTL libraries
support serialization. Serialization is the conversion of the content of an object into a
sequential stream. It identifies the owner of each component, such as robot, slots,
and tape drives. If the device appears in the backup software, but it is not attached
to the expected component, it may be related to the serialization. Refer to your
backup software manual for any patch or upgrade related to serialization on the
backup software.
Client sees the tape library/drive but cannot access it
Check device
access by OS Check if the client’s operating system can access the device or if it is the backup
software that cannot access the tape library or drive.
Depending on the OS you can use a raw device utility. Most of these tools work with
tape drives; they are not capable of moving tapes into the drives. Even if some can
move tapes, you need to know the exact address of the tape and the drive.
We recommend that you use the Console to put a tape in a drive before running
these tools. Also, stop the backup software before you use these utilities:
•Windows - For IBM Ultrium devices you can use ntutil, a command line tool
that can check the tape device.
•Unix systems - You can use the mt or tar commands to access the tape
device, for example: mt -f /dev/rmt/0 status
OS cannot
access device If the operating system cannot access the device, you need to troubleshoot virtual
device access.
• Go to the storage to verify that it is not in error or in an abnormal state. The
assigned devices have to be in read/write mode.
• Check the Event Log or syslog (/var/adm/messages) for message indicating
IO errors. Such messages usually begin with log_scsi_error.
• Check client driver - Go to the client machine and check the adapter driver
version. It should be certified for use with VTL.
OS can access
device If the operating system can access the device, you need to troubleshoot the backup
software. Verify that you have the correct drivers.
Client can no longer access the tape library/drive
Client machines may lose device access if you switch between a Multi-ID HBA and a
single-ID HBA. If this occurs, you should reboot the client machine.
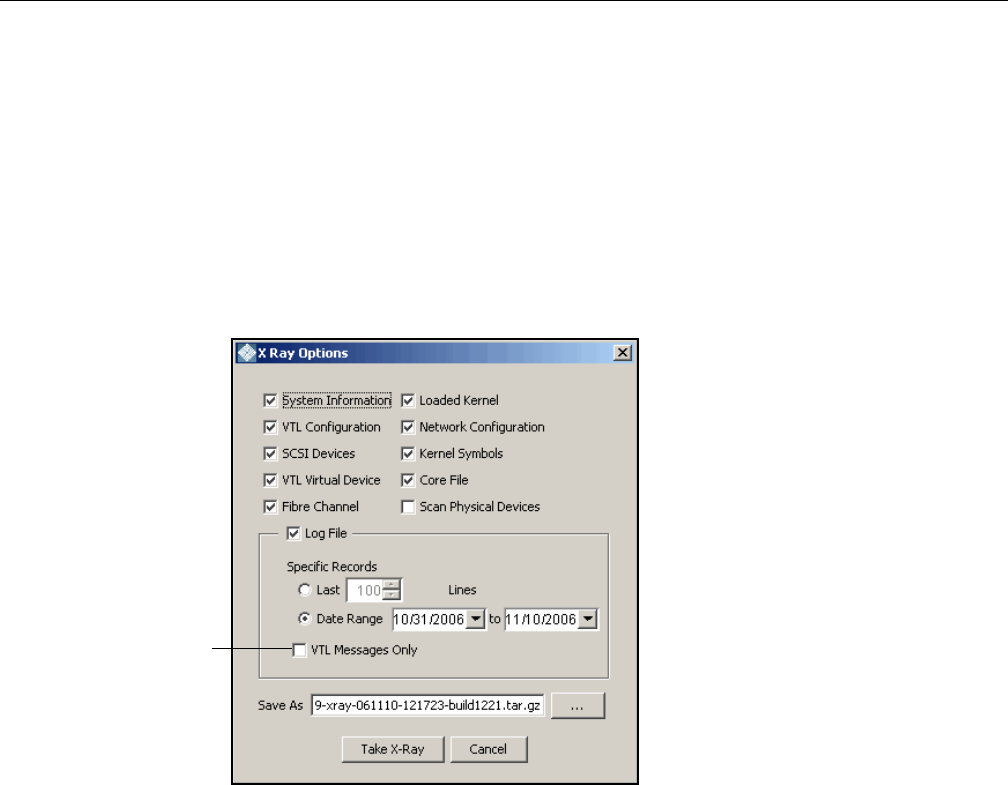
VTL Prime Solaris User’s Guide • September 2008 • 316855201 • A 145
Take an X-ray of your system for technical support
Taking an X-ray of your system is useful for your technical support team to help
solve system problems. Each X-ray contains technical information about your
server, such as server messages and a snapshot of your server's current
configuration and environment. You should not create an X-ray unless you are
requested to do so by your technical support representative.
To create an X-ray file:
1. In the Console, right-click on your VTL server and select X-Ray.
2. Based on the discussion with your Technical Support representative, select the
options you want to include and set the file name.
3. Click the Take X-Ray button.
Filter out and include only
VTL messages from the
System Event Log.

VTL Prime Solaris User’s Guide • September 2008 • 316855201 • A 146
Index
A
Activity Log 29
Administrator
Management 25
Types 25
Attention required tab 28
Auto expansion 11
Auto replication 10
B
Backup server
Device scan 20
C
Client 2, 5, 143
Add 18
HBA settings 72
iSCSI 82
NetWare
QLogic driver 71
COD
Virtual tapes 11
Command line
Commands 98
Common arguments 99
Event Log 130
Login/logout 100
Physical devices 122
Remote copy 116
Usage 98
Virtual devices-client 101
X-ray 131
Components 2
Compression
Disable 26
Enable 26
Virtual tape drive 26
Console 2, 138
Administrator Management 25
Installation 137
Launch 4
Log 23
Overview 3
Pre-installation 137
Rescan devices 7
Server
Properties 29
D
Database 5
Deduplication 31
Enable 32
Monitor 41
Perform 40
Policies 37
Reclaim disk space 48
Statistics 41
Deduplication policies
Add 37
Enable replication 39
Modify 40
Device scan 20
Devices
Rescan 7
Disaster recovery
Replication 49
E
Email Alerts 91
Configuration 91
Message severity 95
Modifying properties 95
System log check 94
Triggers 93, 96
Customize email 96
New script 96
Output 97
Return codes 97
Sample script 97
Event Log 27, 130
Export 27
Filter information 27
Print 27
Sort information 27
F
Fibre Channel Target Mode
Client HBA settings 72
AIX 73
HP-UX 73
Linux 73
NetWare 74

VTL Prime Solaris User’s Guide • September 2008 • 316855201 • A 147
Solaris 74
Windows 72
Data rate 70
Fabric topology 71
fshba.conf
Device identification 69
Hardware configuration 71
Server 64
Initiator mode 78
Installation and configuration 63
Link speed 69
Multi-ID
Ports 79
NetWare clients
QLogic driver 71
Persistent binding 66
Clients 72
Ports 64
qla2x00fs.conf 69
QLogic configuration 67
QLogic ports 78
Server HBA settings 67
Switches 65
Configure for hard zoning 66
Configure for soft zoning 65
Target mode 78
Target port binding 66
Zoning 64
H
HBA
Multi-ID 68
I
Icons 6
Import disk
Command line 122
Installation
Console 137
Solaris 134
VTL Server operating system 134
Introduction 1
iSCSI Target Mode 82
Initiators 82
Linux
Add iSCSI client 88
Configuration 88
Create targets for iSCSI client 89
Log client onto target 90
Prepare iSCSI initiator 88
Mobile client 89
Stationary client 89
Targets 82
Windows
Configuration 83
Disable 87
Enable 83
Mobile client 18, 85
Requirements 83
Stationary client 85
L
Local Replication 49
Logical resources 141
Logs 23
Console 23
M
Messages
SNMP 30
Mirroring
Fix minor disk failure 22
Remove configuration 22
Replace disk in active configuration 22
Replace failed disk 22
Status 21
Swap 22
Multi-ID
HBA 68
N
NetWare Client
QLogic driver 71
O
Offline tapes 141
Operating system 134
P
Passwords
Add/delete administrator password 25
Change administrator password 25
Patch
Apply 29
Rollback 29
Persistent binding 66
Clients 72
Physical resources 6, 140

VTL Prime Solaris User’s Guide • September 2008 • 316855201 • A 148
Icons 6
Ports 132
Prepare physical device
Command line 123
Q
QLogic
Configuration 67
Ports 78
Target mode settings 67
R
Remote Replication 49
Replica resources 5
Replication 49
Auto replication 51
Change configuration options 60
Connect appliances 35
Deduplication repository
Add target server 35, 39
Force 60
Local 49
Policies 55
Primary tape 49
Promote replica resource 59
Remote 49
Remote copy 51
Remove configuration 60
Replica resource 49
FVIT 33
Requirements 34, 40, 49, 52
Resume schedule 60
Start manually 60
Status 58
Stop in progress 60
Suspend schedule 60
Virtual Index Tapes 58
Virtual tapes 53
Virtual vault
LVIT 33
Reports 5
Create 6
Export data 6
View 6
Rescan
Command line 122
Devices 7
Round Robin Logic 16
S
SAN Client 5
Add 18
iSCSI 82
Search
Tapes 4
Security
Ports 132
System 132
Server
Properties 29
SNMP 30
Traps 29
Software updates
Add patch 29
Rollback patch 29
Solaris
Installation 134
Standalone tape drive
Command line 108
Statistics
Repository 46
Storage monitoring 29
T
Tape capacity-on-demand 11
Tape expansion 141
Tapes
Command line 109, 110
Move 110
Search 4
Write protect 4
Target mode settings
QLogic 67
Target port binding 66
Traps 30
Troubleshooting 138, 140, 141, 143, 145
V
Virtual tape drives 4
Command line 106, 108
Virtual tape libraries 4
Command line 105, 106
Create 8
Virtual tapes
Create 12
How they are allocated 16
Virtual vault 5
Volume set addressing 66


SUN™ THE NETWORK IS THE COMPUTER ©2006 Sun Microsystems, Inc. All rights reserved. Sun, Sun Microsystems, and the Sun logo are trademarks or registered trademarks of Sun Microsystems, Inc. in the
United States and other countries.
Sun Microsystems, Inc. 4150 Network Circle, Santa Clara, CA 95054 USA Phone 1-650-960-1300 or 1-800-555-9SUN Web sun.com
ARGENTINA: 5411-4317-5636 • AUSTRALIA: 1-800-550-786 • AUSTRIA: 43-1-601-26-0 • BALKANS: 301-6188-111 • BELGIUM: 32 2-704 89 83 • BRAZIL: 55-11-51872100 • BRUNEI: 65-216-8333 • CANADA: 1-800-422-8020 (GENERAL); 416-964-2001 (LEARNING MANAGEMENT SYSTEM SALES,TORONTO) • CHILE: 562-372-4500 • COLOMBIA: 571-629-2323
CZECH REPUBLIC: 420 2 33009311 • DENMARK: 45 4556 5040 • EGYPT: 00 202 570 9442 • FINLAND: 358-9-525-561 • FRANCE: 33-1-41-33-17-17 • GERMANY: 49-89-460-08-2788 • GREECE: 30-01-6188101 • HONG KONG: 852-2877-7077 • HUNGARY: 361-202-4415 • INDIA: 91-80-229-8989 • INDONESIA: 65-216-8333 • IRELAND: 353-1-668-4377
ISRAEL: 972-9-9710500 • ITALY: 39-02-9259511 • JAPAN: 81-3-5779-1820 • KOREA: 82-2-3453-6602 • MALAYSIA: 603-2116-1887 • MIDDLE EAST: 00 9714 3366333 • MEXICO: 525-261-0344 • NETHERLANDS: 31-33-4515200 • NEW ZEALAND: 0800-786-338 • NORTH WEST AFRICA: 00 9714 3366333 • NORWAY: FROM NORWAY: 47-22023950, TONORWAY:
47-23369650 • PAKISTAN: 00-9714-3366333 • PEOPLE'SREPUBLIC OF CHINA: 8610-6803-5588 • PHILIPPINES: 632-885-7867 • POLAND: 48-22-8747848 • PORTUGAL: 351-21-413-4000 • RUSSIA: 7-095-935-8411 • SAUDI ARABIA: 00 9714 3366333 • SINGAPORE: 65-216-8300 • SOUTH AFRICA: 27-11-256-6300 • SPAIN: 34-902-210-412 • SRI LANKA:
65-2168333 • SWEDEN: 46-8-631 22 00 • SWITZERLAND: 41-1-908-90-50 (GERMAN) 41-22-999-0444 (FRENCH) • TAIWAN: 886-2-25185735 • THAILAND: 662-344-6855 • TURKEY: 90 212 335 22 00 • UNITED KINGDOM: 44-1276-416-520 • UNITED STATES: 1-800-422-8020 • VENEZUELA: 582-905-3800 • VIETNAM: 65-216-8333 • WORLDWIDE
HEADQUARTERS:1-650-960-1300
