OESMINI OPM_RevB The MINI OES 6.08 390oes1010mi Operatorsmanual
User Manual: The MINI OES-6.08
Open the PDF directly: View PDF ![]() .
.
Page Count: 54
Part No. OESMINI-OPM Rev B 02/11
Operator’s Manual
Use and Care Instructions
The MINI
Model Number: OES 6.08 mini, OES 3.10 mini, OES 6.10 mini,
OES 10.10 mini, OES 6.10 2in1 mini
Cleveland Range, LLC
1333 East 179
th
Street
Cleveland, Ohio 44110
Phone: (216) 481- 4900
Fax: (216) 481 - 3782
www.clevelandrange.com

ALL SERVICE MUST BE PERFORMED BY A QUALIFIED
CLEVELAND RANGE AUTHORIZED TECHNICIAN.
This Operation Manual is a part of your new MINI. You must keep and maintain it for
the entire life span of your MINI and pass it on to the next owner of the MINI.
This manual may be subject to new technical developments, modifications, and unforeseen errors.
KEEP THIS MANUAL FOR REFERENCE
The MINI Convotherm by Cleveland Combi/Oven-Steamers are intended for other than household use.
For caster equipped MINIs: If the Restraining Device must be disconnected,
it must be reconnected after the MINI has been returned to its originally
installed position BEFORE restarting the MINI.
FOR YOUR SAFETY
Do not store or use gasoline or
other flammable vapors or liquids
in the vicinity of this or any other
appliance.
Improper installation, adjustment, alteration, service or
maintenance can cause property damage, injury or death.
Read the installation, operating and maintenance instructions
thoroughly before installing or servicing this equipment.
Disconnect power at the main external power switch before servicing or repairing a MINI.
Failure to disconnect power can result in death, injury, and property damage.
Do not connect the MINI Oven-Steamer drain connection to any drain material
that cannot sustain 140
o
Fahrenheit.
Using drain material that cannot withstand 140
o
Fahrenheit can result in injury,
equipment damage, and property damage.

Your MINI in Action
You can cook a variety of foods in your MINI Convotherm by Cleveland
Combi/Oven-Steamer using hot air, steam, and MINI hot air and steam.
Your MINI is extremely versatile and can cook sous-vide as well as steam, blanch,
poach, stew, boil, roast, braise, bake, grill, “fry,” rethermalize and defrost.
Just place food in containers or on wire racks, select the cooking mode, and time, or
core temperature and start cooking with your MINI.
NOTICE: MINIs are intended for commercial use only.
NOTICE: The ambient temperature for operating your new MINI must be between
40°F and 95°F.
OPERATOR’S
MANUAL
The MINI
Table of Contents
Page
CHAPTER 1 INTRODUCTION _______________________________________________ 1
A. OPERATIONAL SAFETY __________________________________________________ 1
B. CLEANING AND MAINTENANCE ____________________________________________ 2
C. NEVER! ________________________________________________________________ 2
D. SERVICE AND SERVICE RECORDS _________________________________________ 2
E. OPERATOR TRAINING ____________________________________________________ 2
CHAPTER 2 GENERAL OPERATION __________________________________________ 3
A. MAIN EXTERNAL POWER SWITCH __________________________________________ 3
B. DOOR HANDLE and DOOR SWITCH _________________________________________ 3
C. START-UP AND SHUTDOWN INSTRUCTIONS _________________________________ 4
D. INSPECTING THE MINI BEFORE SWITCHING ON _______________________________ 4
E. INSPECTING THE COOKING COMPARTMENT _________________________________ 5
F. PRE-HEATING THE MINI ____________________________________________________ 5
G. CORE TEMPERATURE SENSOR 6
H. ERROR MESSAGES FUNCTION _____________________________________________ 6
CHAPTER 3 PRODUCT VIEWS AND OPERATION________________________________ 7
A. EXTERIOR VIEWS ________________________________________________________ 7
B. QUICK START GUIDE _____________________________________________________ 8
C. CONTROL PANEL DETAIL VIEW _____________________________________________ 9
CHAPTER 4 COOKING WITH THE MINI ______________________________________ 10
A. STEAM MODE ____________________________________________________________ 11
B. COMBI MODE ____________________________________________________________ 12
C. HOT AIR MODE ___________________________________________________________ 13
D. RETHERM MODE _________________________________________________________ 14
E. MEASURING THE CORE TEMPERATURE _____________________________________ 16
F. DELTA-T COOKING ________________________________________________________ 18
G. COOK & HOLD ____________________________________________________________ 19
H. LT COOKING _____________________________________________________________ 20
CHAPTER 5 ADVANCED FUNCTIONS _________________________________________ 21
A. CRISP & TASTY ___________________________________________________________ 21
B. TRAY TIMER _____________________________________________________________ 22
C. PRE-HEAT ___ ____________________________________________________________ 23
D. VAPOR REDUCTION _______________________________________________________ 23
E. KEY LOCK _______________________________________________________________ 23
F. ADD MOISTURE MANUALLY ________________________________________________ 24
G. OVERNIGHT COOKING ____________________________________________________ 25
H. COOL DOWN ____________________________________________________________ 25
CHAPTER 6 USING MULTI-STEP RECIPIES _____________________________________ 26
A. CREATING A MULTI-STEP RECIPE __________________________________________ 26
B. RECORDING A RECIPE IN REAL-TIME ________________________________________ 26
CHAPTER 7 USING THE COOKBOOK _________________________________________ 28
A. ENTERING A NEW RECIPE IN THE COOKBOOK ________________________________ 28
B. EXECUTING A RECIPE FROM THE COOKBOOK ________________________________ 28
C. INTEGRATING PRE-HEATING INTO A RECIPE _________________________________ 29
D. COPYING A RECIPE _______________________________________________________ 29
E. DELETING A RECIPE ______________________________________________________ 29
F. CHANGING A STEP OF A RECIPE ___________________________________________ 29
G. INSERTING A STEP INTO A RECIPE _________________________________________ 30
H. ADDING A STEP TO A RECIPE ______________________________________________ 30
I. DELETING A STEP FROM A RECIPE _________________________________________ 30
J. SAVE RECIPES TO MEMORY _______________________________________________ 31
K. LOAD RECIPES FROM MEMORY ____________________________________________ 31
L. ADDING AN “ACTION” PROMPT TO A RECIPE _________________________________ 32
CHAPTER 8 USING PRESS & GO ____________________________________________ 33
A. ASSIGN A RECIPE OR SEMI-AUTOMATIC CLEANING TO A PRESS & GO KEY ______ 33
B. TO OVERWRITE A PRESS & GO KEY ________________________________________ 33
C. EXECUTING A COOKING RECIPE WITH PRESS & GO __________________________ 33
CHAPTER 9 AT THE END OF THE DAY OR SHIFT _______________________________ 34
A. CLEANING THE OVEN CHAMBER ____________________________________________ 34
B. SEMI-AUTOMATIC CLEANING OF THE OVEN CHAMBER _________________________ 37
C. FULLY-AUTOMATIC CLEANING OF THE OVEN CHAMBER_________________________ 38
CHAPTER 10 MINI SETUP __________________________________________________ 40
TO USE THE SETUP MENU ____________________________________________________ 40
A. SIGNAL TONE ____________________________________________________________ 40
B. VOLUME ________________________________________________________________ 40
C. TIME ____________________________________________________________________ 40
D. DATE ___________________________________________________________________ 41
E. ORDER OF COOKBOOK RECIPES ___________________________________________ 41
F. DEFAULT AND MEMORY SETTINGS _________________________________________ 41
G. TEMPERATURE DISPLAY __________________________________________________ 42
H. NETWORK ADDRESS ______________________________________________________ 42
I. LANGUAGE ______________________________________________________________ 42
CHAPTER 11 TROUBLESHOOTING ____________________________________________ 43
A. ERROR DIAGNOSIS SYSTEM _______________________________________________ 43
B. ERROR MESSAGES AND REMEDIES (TABLE) __________________________________ 44
C. OPERATING IRREGULARITIES NOT HAVING ERROR MESSAGES (TABLE) _________ 44
CHAPTER 12 EMERGENCY OPERATION _______________________________________ 46
A. INSTRUCTIONS FOR EMERGENCY OPERATION _______________________________ 46
B. EMERGENCY OPERATION METHODS ________________________________________ 47
1
CHAPTER 1 INTRODUCTION
For safe use of MINIs, each operator must read, understand, and follow the instructions, and heed and
obey the warnings of the Installation Manual and Operators Manual, and the labels on the MINI,
accessories, and supporting products.
The owner(s) and operator(s) of this equipment must keep these instructions in an easily accessible
location for reference and training.
The owner(s) and operators(s) of this equipment must be aware that steam can cause serious injuries
and equipment damage. Pay particular attention to the Operational Safety section of this chapter and the
various NOTICES, CAUTIONS, WARNINGS, and DANGERS displayed in this manual and on the
equipment.
A. OPERATIONAL SAFETY
The safe and effective operation of one or more MINIs depends upon proper installation, use,
maintenance, and repair. Operational Safety must encompass all of these factors. This section outlines
the minimum safety policies that must be considered when using one or more MINIs. Any Operational
Safety Program must be tailored to the specific site and use of the equipment. To help avoid injuries,
accidents and damage to the MINI Oven-Steamer, the owner / operator must instruct and train employees
on a regular basis.
Burn hazards are present in any professional food service operation. When using the MINI, observe the
following precautions to help reduce the risk of burns and other injuries.
NOTE: Cooking is interrupted whenever the MINI door is opened.
1. AIR SUPPLY Use the MINI Oven-Steamer in a draft-free and well vented environment. Proper air
supply for ventilation is REQUIRED for and CRITICAL to safe, efficient operation of a MINI.
2. STEAM –Remember at all times that steam can cause severe burns.
3. HEAT – The MINI, cooking containers, shelves, and inner door and anything else inside the cooking
compartment are HOT, as are many of the component parts. Wear DRY heatproof gloves or mitts.
4. HEAT – During operation the temperature of the glass panel in the door and the outer door casing
can rise above 140°F.
5. Never breathe steam, condensate, or hot air.
6. SCALDS – Do not place containers with liquid contents or contents that become liquid on oven racks
higher than you can see into the containers.
7. SCALDS – Cover containers (individual or on trolleys) containing hot or hot liquid items to help
prevent spills during transport.
8. EXHAUST VENTS – The top of the MINI, and the steam exhaust vents are very hot during operation
and remain hot for some time.
a. Never breathe gas or steam from the exhaust vents.
b. Use extreme caution when working on or near the exhaust vents, surrounding area and component parts.
9. HAND SHOWER: GREASE SPATTER – Hot grease will spatter and cause burns if sprayed with
water. Locate fryers and similar appliances outside the range of the optional MINI hand shower.
10. HAND SHOWER: ELECTRIC SHOCK – Use the optional hand shower only on the inside of the oven.
Use of the hand shower, hoses, power cleaners, or pressure washers on the outside of the MINI can
cause electric shock and / or damage electrical and electronic components.
11. Optional HAND SHOWER – Do NOT spray water in a hot cooking compartment.
12. Wear BOOTS appropriate to the work area to help protect feet, and to help prevent slips and falls.
13. Use non-slip, draining, anti-fatigue FLOOR MATS (not included) rated for use in wet, greasy, and dry
work areas to help prevent slipping and / or falling injuries.
• Obtain the best mats for your needs from your local supplier.
2
B. CLEANING AND MAINTENANCE
1. CLEANING AND DAILY MAINTENANCE – Wait for the MINI to cool before cleaning and performing
daily maintenance.
2. CLEANING AND DAILY MAINTENANCE – Do NOT use hoses, power cleaners or pressure washers,
or harsh or abrasive cleaning agents inside OR outside the cooking compartment.
3. CLEANING AGENTS – Use only genuine Convotherm by Cleveland and Cleveland Range cleaning
and descaling products.
4. CLEANING AGENTS – Follow the instructions and heed and obey the warnings on the labels.
5. CLEANING AGENTS – Products other than genuine Convotherm by Cleveland and Cleveland Range
cleaning and descaling products can damage the MINI, cause injury, or present heath hazards.
6. DRAIN – Inspect and clean the drain cover and drain before each use. Injury, equipment damage,
and/or reduced cooking performance can result from a blocked drain cover and drain at the bottom of
the cooking compartment.
7. GENERAL INSPECTION – Before each use of the MINI, Inspect the door glass, door gasket
assembly, shelves, racks, drain and accessories for proper installation and cleanliness.
C. NEVER!
1. MINI must NEVER be started or operated at a temperature lower than 40°F, including after transport,
or storage outside, or in an unheated area.
2. The MINI must never be operated outside.
3. MINIs must never be used to cook foodstuffs in sealed containers other than those designed for this
purpose. (MINIs are excellent for “purpose built” containers such as sous-vide packages.)
4. MINIs must never be used to heat flammable items such as oils, fats, cloths, or similar items.
5. MINIs must never be used to heat non-food items (except suitable appliance accessories).
6. Never operate a MINI without the fan guard latched in place.
7. Never reach behind the fan guard during operation.
8. Never manually stop the fan.
9. Never operate a MINI without the drain cover in place.
10. Never use anything but hands to operate the keys, switches, and controls on the MINI.
11. Never push food, debris, or scale into the drain.
D. SERVICE AND SERVICE RECORDS
1. Allow only qualified Cleveland Range authorized service representatives to service the MINI.
2. Use only Cleveland Range factory authorized repair parts.
3. Maintain written records of maintenance, service, and repairs. Each record should include at least:
• The date and time of maintenance, service, or repair
• A description of the maintenance, service, or repair. Include part numbers if applicable.
• Copies of purchase orders and invoices for parts and labor.
• The name and signature of the person performing the maintenance, service, or repair.
E. OPERATOR TRAINING
Any Operational Safety Program must be tailored to the specific site and use of the equipment.
Operator training should include:
1. Operation of the MINI and accessories.
2. Start-up procedures.
3. Normal and emergency shut-down procedures.
4. Interior and exterior cleaning procedures
5. How to recognize and report problems so that corrective action can be taken by trained personnel.
3
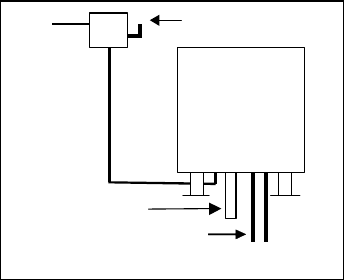
MIN I
DRAIN LINE
COLD W ATER SUPPLY LINE S
MAIN EXTERN AL
POWER SW ITCH
CHAPTER 2 GENERAL OPERATION
A. MAIN EXTERNAL POWER SWITCH
NOTE: To help protect electrical and electronic
components: Turn OFF the Control Power Service
Disconnect Switch BEFORE turning on the Main External
Power Switch.
The Main External Power Switch is usually left ON. If the
switch is off, turn it ON as follows:
1. Turn ON the water supply valve(s).
2. Turn ON the Main External Power Switch.
3. Turn ON the MINI with the ON/OFF key (see Chapter
3).
NOTE: Depending on the time the Main External Power Switch has been off, the date and time may need
to be reset (see Chapter 10).
B. DOOR HANDLE and DOOR SWITCH
See Chapter 3, “Product Views.” The door handle combines the door latch with a safety vent position and
a wear-free door switch. The MINI cannot start unless the door is closed and latched. Cooking functions
stop if the door handle is moved to the open position. The MINI Oven-Steamer can only work with a
functioning door switch. If a malfunction occurs, immediately contact your qualified Cleveland Range
authorized service representative.
The door handle operates as follows:
Handle Positions
• Vertical: closed. (The wear-free door switch is engaged and the MINI can operate.)
• Turn to the right or left to unlatch the door.
• The handle springs back to Vertical when let go.
To open the closed MINI door:
1. Stand to the hinge side and back from the door.
2. Turn the handle, open the door slightly and wait for steam, condensate and heat to dissipate.
(The MINI cannot operate with the handle in the airing position.)
3. Open the door.

4
C. START-UP AND SHUTDOWN INSTRUCTIONS
In the event of a power failure:
1. Turn OFF the Main External Power Switch.
2. Turn OFF Control Power Service Disconnect Switch.
3. If the power failure is prolonged: turn OFF the water supply.
4. When power is restored: restart a MINI with the Startup Procedure.
Start-up Instructions
1. Turn on the MINI by pressing the ON/OFF key.
2. Press the key for operating mode desired; steam or hot air:
a. Select time and temperature.
b. Start the MINI by pressing the Start/Stop Key.
3. To cook in other modes or use features: see the Operator’s Manual.
Shutdown Instructions
1. Press the ON/OFF key to turn off the MINI.
D. INSPECTING THE MINI BEFORE SWITCHING ON
Inspect the MINI before switching ON.
1. Check for assembly, operation, and cleanliness as follows:
a. Check regularly to ensure that the screws and hinges of the door are firmly in place and operating
properly.
b. Inspect the glass door panels. If the glass door panels are nicked, scratched, or cracked: remove the
MINI from service and replace the glass immediately. Damaged glass panels may shatter during
operation.
c. Make sure the glass door panels are clean and latched into place.
d. Do not place or store anything on top of the MINI. The exhaust vent area and the top of the MINI
are hot.
e. Do not place or store anything underneath the MINI.
f. KEEP THE APPLIANCE AREA FREE OF AND CLEAR FROM COMBUSTIBLES.
g. Do not store or leave combustibles near the MINI.
h. Do not block or obstruct the area beneath the gas MINI with objects of any kind.
i. Make sure the air vents of the MINI are not blocked.
j. Check for water line leaks.
k. Check for clogged or slow cooking compartment drain, drainpipe, and floor drain.
l. Check for control malfunctions.
m. Check the door gasket for proper assembly, damage, wear, and seal leaks.
Do NOT attempt to operate a MINI during a power failure!
Death, injury, and equipment damage can result.

5
E. INSPECTING THE COOKING COMPARTMENT
Inspect the cooking compartment before starting a cooking operation with a MINI for proper assembly and
cleanliness as follows:
1. Inspect the Drain
The drain in the bottom of the cooking compartment has a removable cover. The cover prevents large
food particles, debris and scale from entering and blocking the drain line. Any blockage of the drain
line or drain cover can reduce reduced cooking performance, equipment damage, and injury.
A blocked or slow drain may cause:
• Hot water to collect in the compartment and spill out when the compartment door opens.
• Steam leaks around the door gasket.
• Reduced cooking performance.
2. Inspect for proper latching and assembly of the cooking compartment.
The following features should be checked before every operation of the MINI for proper assembly.
a. Check that the fan guard is in position and secure.
b. Check that the hanging shelf racks are secured into their operating positions at both the top and
bottom.
c. Make sure that the inner door glass is properly latched into position. When properly latched, the
inner door is tight with the outer door and does not move by itself or rattle.
d. Open and close the door. All movements should be smooth.
NOTES:
• DO NOT USE the MINI if water stands in the drain opening. Immediately clean the drain. See
Chapter 9, “At the End of the Day or Shift” for instructions.
• Remove any food, debris, or scale blocking the drain or screen.
• Never push food, debris, or scale into the drain.
• Be sure the drain cover is properly installed into the bottom of the cooking compartment. The
drain cover prevents large pieces of food from entering and blocking the drain.
F. PRE-HEATING THE MINI
1. The pre-heating function heats the oven to the desired temperature before loading food and helps
ensure consistency and quality. Use pre-heating at the start of a shift, after long pauses in cooking,
and between multiple cooking or rethermalizing batches.
NOTICE: Before pre-heating: inspect and clean the Oven Compartment. After pre-heating the Oven
Compartment is too hot to inspect and clean safely.
a. To pre-heat a MINI: Close the door and start the MINI in the desired mode (Steam, Hot Air, or
MINI).
• Pre-heat temperatures should be 10-20% higher than cooking temperatures.
• Typical-pre-heat times are 10 to 15 minutes.
• See Chapter 3, for basic operating instructions.
DRAIN SCREEN COVER
CAUTION
Inspect and clean the drain cover and drain before each use.
Injury, equipment damage, and/or reduced cooking performance can result from a
blocked drain cover and drain at the bottom of the cooking compartment.

6
• Repeat the preheat process as needed to maintain constant oven temperature and high food
quality.
b. To use pre-heating in a recipe: Pre-heating is also a programmable function. See “Pre-Heating”
in Chapter 5, “Advanced Functions” for, details.
c. To Pre-Heat or reheat between batches for Rethermalization: See “Retherm Mode” in
Chapter 4 for times and temperatures for specific applications.
G. CORE TEMPERATURE SENSOR
• See “Measuring the Core Temperature” in Chapter 4 for details regarding use and care.
• The Core Temperature Sensor is REQUIRED for PC-HACCP, Delta-T cooking, and Cook & Hold.
1. The Core Temperature Sensor may be HOT! Wear dry, heatproof gloves or mitts to handle it.
2. The Core Temperature Sensor is a precision measuring device. Handle with care.
3. Hang the Core Temperature Sensor correctly in its rack when not in use.
4. Do not allow the Core Temperature Sensor to hang out of the oven.
5. Do not prick yourself or others with the Core Temperature Sensor tip(s).
6. Remove the Core Temperature Sensor from the food before removing dishes from the oven.
H. ERROR MESSAGES FUNCTION
NOTES:
• MINIs have a fully automatic error diagnosis system.
• Most errors are indicated in the Multifunction Display by an error code and description.
• See Chapter 11 “Troubleshooting” for a list of error codes and remedies.
Do not place containers with liquid contents or contents that become liquid on oven
racks higher than you can see into the containers.
Hot liquid can spill or splash causing death, injury, or equipment damage.

7
CHAPTER 3 PRODUCT VIEWS AND OPERATION
A. EXTERIOR VIEWS
1.
Control Panel
2. Oven Light
3. Door with Double Glass Panel
4.
Door Handle
5. Door Drip Tray
6. Appliance Drip Tray
7. Legs (Required)
8. Rating Plate
Notes:
1. Magnetic Door Switch
• If the oven door is opened during operation, the magnetic door switch automatically interrupts the
recipe. The timer stops.
• After the door is closed, the MINI automatically continues the recipe.
• If the oven door is opened when the buzzer sounds at the end of a recipe, it automatically
switches the buzzer off.
2. Operate controls with hands only!
1
2
3
5
CAUTION
HOT!
6
7
8
4
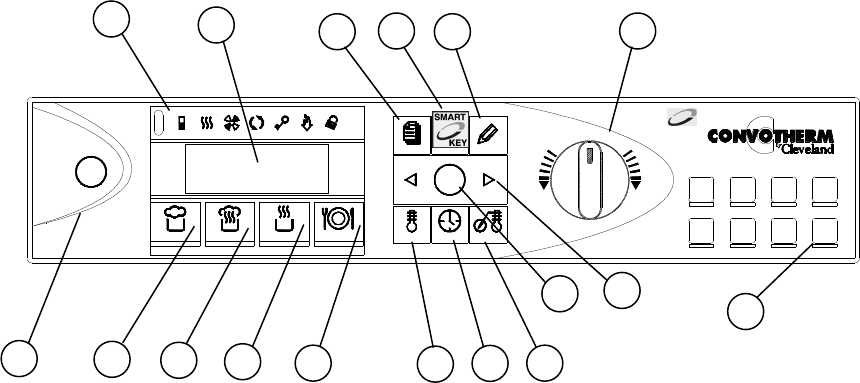
8
START
STOP
STEAM COMBI RETHERMHOT AIR TEMP PROBETIME
COOKBOOK EDIT
ON
OFF
1 2 3 4
5 6 7 8
Figure 4-1
Control Panel
B. QUICK START GUIDE
CONTROL PANEL BASIC OPERATION
Operate Controls with HANDS Only!
ALWAYS PRE-HEAT!
1. Switch on with key (1).
2. Select cooking mode with keys (2-5).
3. Press key (10) to start.
OR
1. Press key (7) and rotate Selector Dial
(15) to set oven temperature.
2. Press key (8) and rotate Selector Dial
(15) to set cooking time.
OR
Press key (9) and rotate Selector Dial (15)
to set core temperature.
ALL
1. Press key (10) to start the MINI.
2. To change the settings while cooking:
press keys (7) OR (8) OR (9) and adjust
the settings with the Selector Dial (15).
3. When the buzzer sounds press key (11)
or open the door.
NOTE: See “CONTROL PANEL” in Chapter
4, Section B for detailed descriptions of
control panel functions.
1 3
2
15
6
11
4
13 14 12
5 9
10
7 8
17
16
9
C. CONTROL PANEL DETAIL VIEW
Item numbers correspond to numbers on the control panels in Figure 4-1
Operate controls with hands only!
1. ON/OFF
When the MINI is turned ON:
• Self-diagnosis is performed.
• Oven light turns on.
• Steam generator fills and heats (OEB and
OGB models).
2. Steam
• Oven temperature is continuously
variable between 86°F and 248°F.
3. Combi Hot Air and Steam
• Oven temperature is continuously
variable between 212°F and 482°F.
4. Hot Air
• Oven temperature is continuously
variable between 86°F and 482°F.
5. Retherm
• Oven temperature is continuously
variable between 248°F and 320°F.
6. Display
Display in normal mode:
• Date.
• Time.
• Oven Temperature.
• Cooking Time
• Core (Probe) Temperature.
Display in programming mode:
• Clear text.
• Memory.
• Symbols.
7. Oven Temperature
• Set the nominal oven temperature.
• View the actual or nominal oven
temperature.
• See elapsed cooking time when using
Core Temperature mode.
8. Cooking Time
• Set the cooking time from 1 minute to 9
hours, 59 minutes using the Selector Dial.
• Set Continuous Mode
1. At 9:59 or 0:01, release the Selector
Dial.
2. Turn the Selector Dial again to the left
or right.
• See the actual or nominal cooking time.
• See elapsed cooking time when using
Core Temperature mode.
9. Core Temperature
• Set the nominal core temperature.
• See the actual or nominal core
temperature.
• See the actual core temperature during
cooking time mode.
• See elapsed cooking time when using
Core Temperature mode.
10. Start/Stop
• Start cooking modes and recipes.
• Stop the cooking activity.
• Escape or Exit Smart Key functions
11. Scroll Left and Scroll Right
• Page / Scroll one step forward or back
in programming mode.
12. Cookbook
• Call up, exit cookbook.
• View a list of stored recipes in the
display.
13. Smart Key
• Set Extra Functions.
• Set-Up the MINI.
• Enter Sub-Menus.
14. Edit
• Create, change, copy, and delete
recipes.
15. Selector Dial
• Set: Oven temperature, cooking time,
core temperature, recipe name, recipe
number.
• Select Smart Key functions, editing
functions and recipes in the cookbook.
16. Press & Go Keys
• Start saved recipes with one key.
• LED below key lights up when
corresponding recipe is started.
17. Function Indicators (left to right)
• Light up when function or activity is
engaged:
Reduced Power
Burner or Electric Heating ON
Reduced Fan Speed
Cooking Mode Engaged
Button Lock
Crisp & Tasty Engaged
Program Protection
10
CAUTION
Some foods drip juices. Use a solid catch pan under perforated pans when cooking food that
drips juices. Dripping juices can cause burns and clog the drain.
Hot Air, Steam, and Condensate will cause burns and scalds.
To help prevent burns and scalds when opening the MINI door: always stand to the hinge side and
back from the MINI door, and then open the MINI door to the “airing” position, and wait for the
steam and heat to dissipate before carefully opening the door.
CAUTION
Do NOT use hanging shelf racks that are bent or otherwise
damaged in any way.
Pans and accessories placed in damaged racks can tip and
spill, causing burns, injuries and/or equipment damage
CHAPTER 4 COOKING WITH THE MINI
Maximum Combined Weight of Food and Containers or Accessories
Model Number Maximum Weight Per Shelf
6.08 mini 11 lbs
3.10 mini 11 lbs
6.10 mini 11 lbs
10.10 mini 11 lbs
6.10 2in1 mini 11 lbs
Table 5-1
DO NOT BREATHE STEAM, HOT AIR OR CONDENSATE
DEATH OR INJURY WILL RESULT.

11
A.
Steam Mode.
• PRE-HEAT countertop models for 10-15 minutes and floor models for 30 minutes at 10-20%
HIGHER than the cooking temperature before cooking.
• SET COOKING TEMPERATURE 10-20% LOWER THAN TRADITIONAL COOKING METHODS.
• Maximum Combined Weight of Food and Containers or Accessories is 11 pounds per shelf.
Using Steam Mode
Turn the MINI on with the
ON/OFF
key.
1. Press the steam key.
a. The default temperature or last temperature selected appears in the display
b. The default time value or the last selected cooking time appears in the display
c. To start immediately, press the Start/Stop key.
OR:
1. Press the Temperature key.
a. The oven temperature appears in the display.
b. Set the required oven temperature (86°F-248°F) with the Selector Dial.
2. Select Time or Core Temperature mode:
• Time: Press the Time key. Set the desired cooking time or select Continuous mode (at 9:59 or
0:01, release the Selector Dial and then turn again to the left or the right until
- : - -
appears).
• Core Temperature: Press the Core Temperature key and set the desired core temperature.
3. Press the Start/Stop key.
• Steam mode starts.
• The display shows the nominal oven temperature, and the cooking time remaining, or the actual
core temperature.
4. To change the set values while operating, press the Temperature, Time, or Core Temperature key
and set the temperature, time or core temperature with the Selector Dial. The new value appears in
the display
5. To view the actual oven temperature, nominal cooking time and nominal core temperature: press the
respective key either once or twice as required.
6. When the set time has elapsed or the core temperature has been reached, the Signal Tone sounds
and the recipe ends.
7. Press the Start/Stop key or open the door to stop the Signal Tone.
The following advanced functions are available through the Smart Key when “Steam” mode is ON:
Tray Timer Vapor Reduction
Pre-Heating
See Chapter 5, “Advanced Functions” for details.

12
B.
Combi Mode
• PRE-HEAT countertop models for 10-15 minutes and floor models for 30 minutes at 10-20%
HIGHER than the cooking temperature before cooking before cooking.
• Pre-heat floor models with the pre-heat bridge or the trolley in place.
• SET COOKING TEMPERATURE 10-20% LOWER THAN TRADITIONAL COOKING METHODS.
• Maximum Combined Weight of Food and Containers or Accessories is 11 pounds per shelf.
Using Combi Mode
Turn the MINI on with the ON/OFF key.
1. Press the Combi key.
a. The default temperature or last temperature selected appears in the display
b. The default time value or the last selected cooking time appears in the display
c. To start immediately, press the Start/Stop key.
OR:
1. Press the Temperature key. The oven temperature appears in the display.
• Select the required oven temperature from 212° F to 482° F with the Selector Dial.
2. Select Time or Core Temperature mode:
• Time: Press the Time key. Set the desired cooking time or select continuous mode (at 9:59 or
0:01, release the Selector Dial and then turn again to the left or the right until
- : - -
appears).
• Core Temperature: Press the Core Temperature key and set the desired core temperature.
2. Press the Start/Stop key.
• Combi mode starts.
• The display shows the nominal oven temperature, and the cooking time remaining or the actual
core temperature.
3. To change the set values while operating, press the Temperature, Time, or Core Temperature key
and set the temperature, time or core temperature with the Selector Dial. The new value appears in
the display.
4. To view the actual oven temperature, nominal cooking time and nominal core temperature: press the
respective key either once or twice as required.
5. When the set time has elapsed or the core temperature has been reached, the Signal Tone sounds
and the recipe ends.
6. Press the Start/Stop key or open the door to stop the Signal Tone.
Note: In TIME mode, to display the core temperature reached during operation: press and hold down
both the Time key and the Core Temperature key. The current core temperature appears in the display.
The following advanced functions are available through the Smart Key when “Combi” mode is ON:
Crisp & Tasty (demoisturizing) Tray Timer
Pre-Heating Vapor Reduction
Delta-T Cooking
See Chapter 5, “Advanced Functions” for details.

13
C. Hot Air Mode
• PRE-HEAT countertop models for 10-15 minutes and floor models for 30 minutes at 10-20%
HIGHER than the cooking temperature before cooking.
• Pre-heat floor models with the pre-heat bridge or the trolley in place.
• SET COOKING TEMPERATURE 10-20% LOWER THAN TRADITIONAL COOKING METHODS.
• Maximum Combined Weight of Food and Containers or Accessories is 11 pounds per shelf.
Using Hot Air Mode
The “Hot Air” mode is for roasted foods and baked goods requiring no moisture.
Turn the MINI on with the ON/OFF key.
1. Press the Hot Air key.
a. The default temperature or last temperature selected appears in the display
b. The default time value or the last selected cooking time appears in the display
c. To start immediately, press the Start/Stop key
OR:
1. Press the Temperature key.
• The oven temperature appears in the display.
• Set the required oven temperature from 86°F to 482°F with the Selector Dial.
2. Select Time or Core Temperature mode:
• Time: Press the Time key. Set the desired cooking time or select continuous mode (at 9:59 or
0:01, release the Selector Dial and then turn again to the left or the right until
- : - -
appears).
• Core Temperature: Press the Core Temperature key and set the desired core temperature.
3. Press the Start/Stop key.
• Hot Air mode starts.
• The display shows the nominal oven temperature and the cooking time remaining or actual core
temperature.
4. To change the set values while operating, press the Temperature, Time, or Core Temperature key
and set the temperature, time or core temperature with the Selector Dial. The new value appears in
the display.
5. To read the actual oven temperature, nominal cooking time, and nominal core temperature: press
the relevant key either once or twice needed.
6. When the set time has elapsed or the core temperature has been reached, the Signal Tone sounds
and the recipe ends.
7. Press the Start/Stop key or open the door to stop the Signal Tone.
Note: In TIME mode, to display the core temperature reached during operation: press and hold down
both the Time key and the Core Temperature key. The current core temperature appears in the display.
The following advanced functions are available through the Smart Key when “Hot Air” mode is ON:
Crisp & Tasty (demoisturizing) Tray Timer
Pre-Heating Add Moisture Manually
Delta-T Cooking Vapor Reduction
See Chapter 5, “Advanced Functions” for details.

14
D.
Retherm Mode
This mode allows you to rethermalize prepared dishes on plates or platters in a short time.
NOTE: This Manual uses the term “rethermalize” for both the reheating cooking containers and for
“regenerate,” meaning reheating plates or platters.
• PRE-HEAT countertop models for 10-15 minutes and floor models for 30 minutes at 10-20%
HIGHER than the rethermalizing temperature before rethermalizing.
• Pre-heat floor models with the pre-heat bridge or the trolley in place.
• Maximum Combined Weight of Food and Containers or Accessories is 11 pounds per shelf.
• See TABLE 5-2 (below) for pre-heat temperatures and rethermalization times and temperatures.
• After rethermalizing for the third time in a fully-loaded oven, always pre-heat again to the original
pre-heat temperature.
• After pre-heating, wait for the fan to stop before opening the doors, and then load prepared plates
or platters quickly. This helps keep warm air inside the MINI.
• To help achieve good quality, do not interrupt the rethermalization process.
• NEVER Add cold food to the MINI for rethermalization while hot food is being held!
NOTICE: Rethermalization times and temperatures are dependent on the number of plates and types of
food to be rethermalized.
Pre-heat Times and Temperatures and Rethermalization Times and Temperatures
Guide values for pre-heat temperatures and rethermalization times and temperatures
when the MINI is fully loaded.
Rethermalization times and temperatures are dependent on the number of plates to be
rethermalized.
Model
Number
mini
Plate
capacity
up to 12”
dia.
Pre-heating
temperature
Convection
Mode
Pre-heat
time
Rethermalization
temperature
Rethermalization
time
6.08 4 356°F 10 mins 248 – 266°F 4 - 8 mins
3.10 4 356°F 10 mins 248 – 266°F 4 - 8 mins
6.10 4 356°F 10 mins 248 – 266°F 4 - 8 mins
10.10 4 356°F 10 mins 248 – 266°F 4 - 8 mins
6.10 2in1 4 356°F 10 mins 248 – 266°F 4 - 8 mins
After three (3) rethermalizations, pre-heat again.
Table 5-2

15
Using Rethermalization Mode
Turn the MINI on with the ON/OFF key.
1. Press the Retherm key.
a. The display shows the last nominal values selected or the default values for rethermalizing.
b. To start immediately, press the Start/Stop key.
OR:
1. Press the Temperature key.
• The oven temperature appears on the display.
• Set the required oven temperature from 248°F to 320°F with the Selector Dial.
2. Select Time or Core Temperature mode:
• Time: Press the Time key. Set the desired cooking time or select continuous mode (at 9:59 or
0:01, release the Selector Dial and then turn again to the left or the right until
- : - -
appears).
• Core Temperature: Press the core temperature key and set the desired core temperature.
2. Press the Start/Stop key.
• Retherm mode starts.
• The display shows the nominal oven temperature and the rethermalizing time remaining OR the
actual core temperature.
3. To change the set values while operating, press the Temperature, Time, or Core Temperature key
and set the temperature, time or core temperature with the Selector Dial. The new value appears in
the display
4. To read the actual oven temperature, nominal cooking time, and nominal core temperature: press
the relevant key either once or twice needed.
5. When the set time has elapsed or the core temperature has been reached, the Signal Tone sounds
and the recipe ends.
6. Press the Start/Stop key or open the door to stop the Signal Tone.
The following advanced functions are available through the Smart Key when “Retherm” mode is ON:
Tray Timer
Pre-Heating
Vapor Reduction
See Chapter 5, “Advanced Functions” for details.
16
CAUTION
Core Temperature Sensor is SHARP.
Use caution to avoid stabbing yourself or others.
NOTICE
The Core Temperature Sensor is a precision instrument.
• Use the Core Temperature Sensor only to measure core temperature.
• Handle it with care.
• Keep the Core Temperature Sensor in its holder when not in use.
• Do not allow the Core Temperature Sensor or cable to hang out of the oven.
• Remove the Core Temperature Sensor from food before taking items out of the oven.
• Do not use the Core Temperature Sensor to handle food items.
• Do not bend the Core Temperature Sensor.
• Do not pull on the cable.
• Cool the Core Temperature Sensor with the Hand Shower before inserting the Core Temperature
Sensor into food items to help prevent false readings.
CAUTION
Core Temperature Sensor may be HOT
Handle with caution to help avoid burns.
E. Measuring the Core Temperature
Measuring the Core Temperature
Measuring the core temperature is recommended when cooking large or multiple cuts of meat.
1. Turn the MINI on with the ON/OFF key.
2. Insert the sensor (probe) through the center of the food item.
3. Select the cooking mode required.
4. Press the Temperature key. The oven temperature appears in the display.
5. Set the required oven temperature with the Selector Dial.
6. Press the Core Temperature key and set the required core temperature with the Selector Dial.
7. Press the Start/Stop key.
• The selected mode starts.
• The display shows the nominal oven temperature and the actual core temperature.
6. To change the set values while operating, press the Temperature, Time, or Core Temperature key
and set the temperature, time or core temperature with the Selector Dial. The new value appears in
the display.

17
Measuring the Core Temperature (CONTINUED)
7. Read the actual oven temperature and the nominal core temperature by pressing the relevant key
either once or twice as needed.
8. When the set core temperature has been reached, the Signal Tone sounds and the recipe ends.
9. Press the Start/Stop key or open the door to stop the Signal Tone.
Notes:
• To display the time elapsed in Core Temperature mode: Press and hold down both the Core
Temperature and the Time keys. The time elapsed appears in the display.
• To display the core temperature reached in Time mode, press and hold down both the Time key and
the Core Temperature key. The current core temperature appears in the display.
• The Core Temperature Sensor is a multi-point sensor. Optimum cooking results are possible without
finding the exact center of the meat.

18
F.
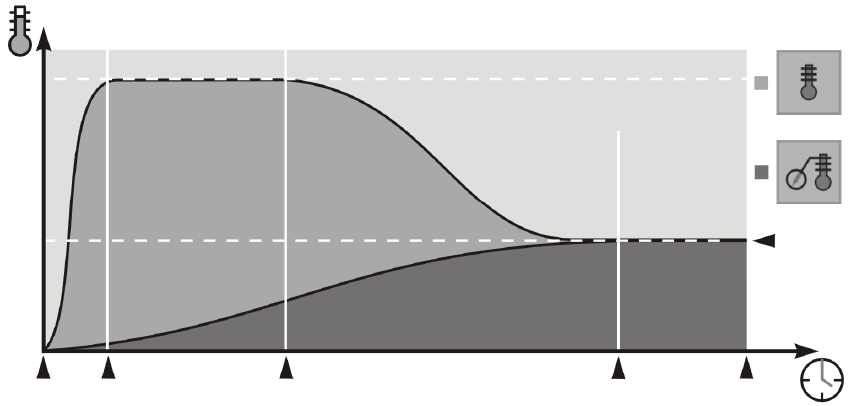
Delta-T Cooking
Delta – T cooking requires use of the Core Temperature Sensor
• The higher the Delta-T temperature, the greater the loss in weight and the darker the browning.
• When using Delta-T cooking: use of the Core Temperature Sensor is required, because the oven
temperature increases with the core temperature.
• The oven temperature is the Delta-T temperature PLUS the Core Temperature. See illustration.
To use Delta-T Cooking:
1. Turn the Combi ON with the ON/OFF key.
2. Select mode: Steam or Hot Air.
3. Press the Smart Key.
• Various options appear in the display.
• Select Delta-T cooking with the Selector Dial.
• Confirm by pressing the Smart Key.
4. Confirm “Yes” if needed.
5. Press the Smart Key
6. Press the Core Temperature key.
7. Set the desired final core temperature with the Selector Dial.
8. Press the Temperature key.
9. Set the desired Delta-T spread temperature.
10. Press the Start/Stop key to start Delta-T cooking.
11. The display shows the Delta-T spread temperature and the actual core temperature.
• To view or adjust the nominal core temperature, press the Core Temperature key.
• To view or adjust the actual oven temperature, press the temperature key once or twice as
needed.
12. When the set core temperature is reached: the Signal Tone sounds and the Delta -T process ends.
13. Press the Start/Stop key or open the door to stop the Signal Tone.
∆
∆∆
∆T = Difference between oven temperature and core temperature
Start Required core
temperature reached.

19
G. Cook & Hold
NEVER Add cold food to the MINI for rethermalization while
hot food is being held!
IMPORTANT:
• Cook and hold requires use of the Core Temperature Sensor
• For more information on the Cook Phase and entering recipe names See Chapter 7
“Using Multi-Step Recipes.”
• The Cook & Hold function includes a “cook” phase and a “hold” phase.
• The Hold phase is the LAST step in a recipe AFTER the food is cooked.
• The Hold phase is the second step if only one cooking step is required.
• The switch from cook phase to hold phase is automatic. (See Table 5-4 and illustration
“The Principle of Cook & Hold).
• Always pre-heat the MINI.
To Use Cook & Hold:
1. Turn the MINI on with the ON/OFF key.
2. Press the Edit key. Various options appear in the display.
3. Select New Recipe with the Selector Dial.
4. Confirm by pressing the Edit key.
5. Enter the steps of the recipe, pressing the Edit key after each step. See Chapter 7 for details.
6. After the last recipe step is entered, press the Smart Key when the mode keys flash.
7. Various options appear in the display.
8. Select Cook & Hold with the Selector Dial.
9. Confirm by pressing the Smart Key.
10. Confirm “Yes” with the Smart Key.
11. Do NOT press a mode key (Steam, Combi, Hot Air, Retherm).
12. Press the temperature key.
13. Set the required hold temperature with the Selector Dial. (Oven temperature 86-210°F)
14. Confirm by pressing the Edit key.
15. Press the Edit key again to name the recipe. See Chapter 7 for details.
16. Start the recipe from the cookbook. See Chapter 7 for details.
NOTES:
• When using the “Hot Air” or “Combi” mode in the cook phase, a temperature range of 248° F to
300° F is recommended.
• The time at which the oven switches to the hold phase depends on the type of food, volume being
cooked, and portion or piece size.
• Select the required nominal core temperature for the hold temperature to avoid overcooking.
RECOMMENDATIONS:
Prepare food during quiet times, load the MINI and start the Cook & Hold process well before the
finished dishes are required.
20
The principle of Cook & Hold
This example shows Cook & Hold used with the Core Temperature Sensor.
NEVER Add cold food to the MINI for rethermalization while
hot food is being held!
H. LT Cooking: Cooking at Low Temperatures
NOTES:
• Use oven temperatures from 86°F to 212°F
• LT Cooking requires use of the Core Temperature Sensor
• Dark types of meat are particularly suited to low-temperature cooking.
Some of the benefits of Low Temperature cooking:
• Meat retains almost all its raw weight, and becomes very tender and juicy.
• To prevent the surface of foods from drying out, the fan runs for 2 seconds every minute when
below 212°F.
• This method of cooking prevents crustiness.
RECOMMENDATIONS:
• SET the oven temperature only a few degrees higher than the final core temperature.
• The higher the oven temperature, the greater the meat shrinkage.
Start
Required final core
temperature =
Holding temperature
Max. Time for
keeping hot
Ready to serve
Cook phase Hold phase
Holding
Switchover from
Cook to Hold
Oven
chamber
Preheated

21
CHAPTER 5 ADVANCED FUNCTIONS
With Extra Functions, your Convotherm by Cleveland enables you to maximize productivity in the
food preparation processes and cooking processes.
Introduction to Advanced Functions
• Advanced Functions can be activated with the Smart Key.
• Extra functions and their symbols appear only if they are compatible with the selected cooking mode.
• Smart Key functions can be selected and activated / deactivated at any time during operation by
pressing the Smart Key.
• Combine Smart Key functions as desired.
• Smart Key functions (except add moisture manually and tray timer) are programmable.
• Smart Key functions can be integrated into recipes.
• When a recipe comes to an end, the MINI automatically resets the selected extra function
(except in key lock) to the standard setting.
• Press the Start/Stop key to exit the Smart Key menu at any time.
A. Crisp & Tasty Function (Demoisturizing)
• Use Crisp & Tasty to reduce moisture content.
• Excess moisture is drawn out the food and then out of the oven.
• Crisp & Tasty can be used in the Hot Air and Combi modes.
To use Crisp & Tasty:
1. Press the Smart Key.
2. Various options appear in the display.
3. Select Crisp & Tasty with the Selector Dial.
4. Confirm by pressing the Smart Key.
5. Select “Yes” with the Selector Dial.
6. Confirm “Yes” with the Smart Key.
7. Select the Crisp & Tasty level with the Selector Dial.
low demoisturizing – 25% for omelets.
medium demoisturizing – 50% for quick roasts, escallops, flaky pastry.
high demoisturizing – continuous for moist fruit flans, casseroles, roasts, fryer ready
products.
8. Confirm “Yes” with the Smart Key.
9. The Crisp & Tasty icon appears in the display.
10. The display shows the nominal values for the selected mode, or recipe.
11. Press the Start/Stop key.
12. The MINI starts with the Crisp & Tasty function ON.
NOTES:
• Crisp & Tasty can be combined with other Advanced Functions.
• Crisp & Tasty is programmable, and can be integrated into recipes.
• Crisp & Tasty can be turned on or off while the MINI is running.
• When the program comes to an end, the MINI automatically resets Crisp & Tasty to OFF.

22
B. Tray Timer
• The MINI oven must be ON and operating in a cooking mode before the Tray Timer can be set.
• The Tray Timer function provides up to twenty (20) timers for mixed oven loads to keep track of
the optimum finish for each different dish.
• The Tray Timer is NOT a programmable function.
• The Tray Timer icon does NOT appear while the Tray Timer is in use.
• There is no connection between individual Tray Timers and the position or placement of food in the MINI.
• Tray Timers do not stop counting down while the MINI door is open.
• While this allows great flexibility in use, careful planning is strongly recommended to make best
use of the Tray Timer function.
To use the Tray Timer:
1. Select Mode: Steam, Combi, Hot Air, or Retherm.
2. Set the timer to Continuous (
- - : - -
) before using the Tray Timer.
3. Set the temperature.
4. START the selected cooking mode with the Start/Stop key.
5. The oven on icon must appear before the Tray Timer can be set.
6. Press the Smart Key.
7. Various options appear in the display.
8. Select Tray Timer with the Selector Dial.
9. Confirm by pressing the Smart Key.
10. The display shows the nominal (set) time on the left, and time remaining on the right.
Timer No. Set Time Time Remaining
Timer 1: 00:00 00:00
Timer 2: 00:00 00:00
Timer 3: 00:00 00:00
11. Select the desired Tray Timer (Timer 7, for example) with the Selector Dial.
12. Use the scroll right (arrow) key to navigate to the nominal time.
13. Set the Tray Timer with the Selector Dial.
14. Use the scroll left (arrow) key to navigate back to the Tray Timer column.
15. Select the next desired Tray Timer with the Selector Dial.
16. Repeat steps 12, 13, and 14 as desired, to set up to twenty (20) individual Tray Timers.
17. The Tray Timers START COUNTING DOWN as soon as a time greater than 0:00 is entered.
18. Exit the Tray Timer function with the Smart Key, or Start/Stop key.
19. When the set time on a Tray Timer has elapsed, the Signal Tone sounds.
20. Press the Start/Stop key or open the door.
21. Take appropriate action (check food, load, unload, stir, etc.)
22. Use steps 6-18 to reset an individual Tray Timer to 0:00. The countdown and Signal Tone for
that Tray Timer stops and makes that Tray Timer available for use.
23. Individual Tray Timers may be added or adjusted as needed without affecting the other Tray Timers by
using steps 6-18 without changing the time to 0:00.
NOTE: The Tray Timers CONTINUE TO COUNT DOWN after a Signal Tone sounds, and the
Start/Stop key is pressed and / or the oven door is opened.

23
C. Pre-Heat
• The Pre-Heat function heats the oven to the desired temperature before loading food, and helps
ensure consistency and quality.
1. Press the Smart Key.
2. Various options appear in the display.
3. Use the Selector Dial to select Pre-Heat .
4. Confirm by pressing the Smart Key.
5. Select “Yes” with the Selector Dial.
6. Confirm “Yes” with the Smart Key.
7. Press the Temperature key and set the pre-heat temperature.
8. Press the Time key and set the pre-heat time.
9. The display shows the Pre-Heat icon
.
10. Pre-heating starts.
D. Vapor Reduction
• The MINI oven must be ON and operating in a cooking mode before Vapor Reduction can be used.
• Vapor Reduction turns on the condenser to reduce the vapor discharge from the MINI.
• Vapor Reduction can be programmed.
1. Press the Smart Key. Various options appear in the display.
2. Use the selector dial to select ‘Vapor reduction’ .
3. Confirm by pressing the Smart Key.
4. Confirm ‘Yes’ with the Smart Key.
5. The required values for the cooking program appear in the display. Enter the values.
6. Press the Smart Key. Vapor Reduction starts.
Recommendations:
• Use Vapor Reduction when there is a lot of exhaust steam for the Steam and Combi modes.
E. Key Lock
• Lock and unlock almost all the keys on the MINI a Personal Identification Number (PIN).
• The following control panel features cannot be locked:
6019002_00
D
and the Press&Go keys.
• The factory setting is “PIN 001”. To change the PIN, please contact your qualified Cleveland
Range authorized service technician.
To Lock:
1. Press the Smart Key.
2. Various options appear in the display.
3. Use the Selector Dial to select the Key Lock function .
4. Confirm by pressing the Smart Key.
5. Select “Yes” with the Selector Dial.
6. Confirm “Yes” with the Smart Key.
7. The display shows "PIN 000”.
8. Use the Selector Dial to select the PIN code.
9. Confirm by pressing the Smart Key.

24
10. Press the keys to be locked one after the other.
11. Lock selection can be changed to unlocked by pressing the desired key again BEFORE pressing
the Start/Stop key.
12. The display shows “lock” or “unlock."
13. Press the Start/Stop key.
14. Key Lock is activated and the icon appears in the display.
15. The symbol appears whenever at least one key (button) has been locked.
To Unlock:
1. Press the Smart Key.
2. Various options appear in the display.
3. Use the Selector Dial to select the Key Lock function.
4. Confirm by pressing the Smart Key.
5. Select “Yes” with the Selector Dial.
6. Confirm “Yes” with the Smart Key. The display shows “PIN 000".
7. Use the Selector Dial to select the PIN code. The factory setting is “001."
8. Confirm by pressing the Smart Key.
9. The display shows “all keys unlocked.” All keys are now unlocked.
To Unlock when the Smart Key is also locked:
1. Turn OFF the MINI with the On/Off key.
2. The display shows the time and date
3. Press the Smart Key.
4. The display shows “PIN 000".
5. Proceed with normal unlocking.
RECOMMENDATIONS:
• The Key Lock function allows you to prevent unauthorized or accidental alterations to your
settings on your MINI. This gives you confidence that you can achieve optimum results for your
dishes and satisfaction for your guests.
• Choose a PIN with a low number to reduce the time spent entering it.
F. Add Moisture Manually
• Add Moisture Manually adds moisture to the oven by generating a jet of steam.
• Add moisture manually is NOT programmable, and can NOT be incorporated into a recipe.
• The Cooking Mode Engaged (Oven On) icon must appear and the oven must be operating
in Combi or Hot Air modes to use Add Moisture Manually.
To Add Moisture Manually
1. Press the Smart Key.
2. Various options appear in the display.
3. Use the Selector Dial to select Add Moisture Manually .
4. Confirm by pressing the Smart Key.
5. Confirm “Yes” with the Smart Key.
6. The MINI produces a jet of steam.

25
I. Overnight Cooking
1. Press the Smart Key.
2. Use the Selector Dial to select Overnight Cooking
3. Press the Smart Key.
4. Confirm “Yes” if needed.
5. Press the Smart Key.
6. Three icons appear Medium , Well Done , and Boil .
7. Use the Selector Dial to select one of the icons.
8. Press the Smart Key to start the cooking program.
J. Cool Down
• Cool Down uses the fan to lower the temperature in the oven quickly.
• Cool Down works in any cooking mode.
• The lowest temperature Cool Down can reach is 131°F.
To use Cool Down:
9. Open the oven door.
10. Make sure nothing is in front of the open oven door.
11. Press the Smart Key.
12. Use the Selector Dial to select Cool Down .
13. Press the Smart Key.
14. Confirm “Yes” if needed.
15. Press the Smart Key.
16. The Temperature display appears with the Cool Down icon in the middle.
17. To set the desired Cool Down temperature:
18. Press the Temperature Key.
19. Set the temperature with the Selector Dial
20. Press the Start/Stop key to start Cool Down.
21. If the oven door is closed, an “open the door” prompt will appear.
22. The fan runs until the new temperature is reached.
23. The fan stops and a signal tone sounds.
24. Press Start/Stop to silence the signal tone.
25. Press any cooking mode key to exit Cool Down.
26
CHAPTER 6 USING MULTI-STEP RECIPES
• Use Recipes to simplify the preparation of dishes.
• Save and store Recipes in the Cookbook
• Use Recipes to adjust popular or complex dishes until the results are perfect.
A. Creating a Multi-Step Recipe
• A Recipe combines up to twenty (20) individual steps and can include cooking modes, nominal
settings, and programmable functions.
• The step and number of steps appears in the top of the multifunction display.
• EXAMPLE: If a Recipe consists of three steps, then the MINI’s display shows 01/03 for the first
of three steps. The time and temperature of the current step is shown beneath as usual. When
one step has finished, the MINI moves automatically to the next step and the display changes to
show the next step is in progress, “02/03” for the second step and so on.
To enter the first step:
1. Press one of the cooking mode keys for 3 seconds.
2. 01/01 appears in the top of the display, with the time and temperature values underneath.
3. Press the Temperature key. The oven temperature appears in the display.
4. Set the required oven temperature with the Selector Dial.
5. Press the Time key or Core Temperature key.
6. Set the required cooking time or core temperature.
7. To enter more steps, repeat Steps 1- 6 as needed.
8. Press the Start/Stop key. The recipe starts.
9. When all the steps are complete: the Signal Tone sounds and the recipe ends.
10. Press the Start/Stop key or open the door.
11. To exit the Recipe, press any cooking mode key OR restart the recipe with the Start/Stop key.
NOTES:
• Advanced Functions, Delta-T, and Cook & Hold can be integrated into Recipes.
• Check a recipe before starting by pressing the Smart Key and navigating with the arrow keys.
• Extra steps can NOT be added to a recipe when checking steps.
• The oven temperature, cooking time and/or core temperature may be changed for each step.
B. Recording a Recipe in Real-Time
• Start the Recording function to save all the settings entered for a new dish.
• All mode, temperature and time changes for up to twenty (20) steps, or until deactivated are
recorded.
NOTES:
• Only steps that run to completion in real-time are recorded.
• Steps must be at least one (1) minute long.
• The Start/Stop key may be pressed while the oven is operating without loosing or overwriting
saved steps.
• The most recent Recipe created or used can be transferred into the cookbook.
• A full memory location can be overwritten with a new recipe by selecting the full memory location
with the Selector Dial and pressing the Edit key.

27
To START Recording:
Use the Edit key, NOT the Smart Key to navigate this function.
1. Press the Edit key. Various options appears in the display.
a. Use the Selector Dial to select “recording”.
b. Confirm by pressing the Edit key.
c. Confirm “Yes” with the Edit key.
d. The Recording icon appears in the display.
e. Recording continues to record up to twenty (20) steps or until deactivated.
f. For more information, see the instructions in Chapter 5 “Cooking with the MINI.”
2. To STOP Recording, press the Edit key. Various options appear in the display.
a. Use the Selector Dial to select “recording.”
b. Confirm by pressing the Edit key.
3. Transferring a recorded recipe into the cookbook
a. Press the Edit key. Various options appear in the display.
b. Use the Selector Dial to select “transfer to cookbook” .
c. Confirm by pressing the Edit key.
d. To enter the name of a recipe, select the a letter with the Selector Dial and use the Scroll Right
(arrow) key to move to the next letter or space.
e. Use the Scroll Left (arrow) key to move back to a letter to change it using the Selector Dial.
f. When the recipe name is complete, press the Edit key to enter it into the cookbook.
g. Use the Selector Dial to select a memory location.
h. To enter the memory location, press the Edit key.
i. The recipe is stored in the Cookbook.

28
CHAPTER 7 USING THE COOKBOOK
• Combine up to 20 steps to make a recipe, save the recipe under its own name in the Cookbook, and
call it up and start it as needed.
• Use recipes in the Cookbook for regularly prepared dishes or ones prepared by semi-skilled staff.
• To find recipes in the Cookbook quickly, sort cooking recipes alphabetically by name.
• Change, copy, or delete saved recipes, and write individual steps, at any time.
• Close a recipe without saving changes and return to the Cookbook by pressing the Cookbook key.
• Use the Edit function to make practical or creative adjustments to recipes quickly and easily.
• The oven or core temperature and the cooking time of a recipe can be changed at any time while
the MINI is operating.
• To view the steps in a recipe, press the Cookbook key, select the desired recipe with the Selector
Dial, and press the Smart Key. Scroll through the steps with the selector dial.
A. Entering a New Recipe in the Cookbook
1. Press the Edit key. Various options appear in the display.
2. Use the Selector Dial to select “new recipe”
3. Confirm by pressing the Edit key.
4. The cooking mode keys flash and the display shows 01/01.
5. Select the required cooking mode and set the time and temperature. See Chapter 5 for details.
6. Confirm by pressing the Edit key.
7. The cooking mode keys flash and the display shows 02/02.
8. To add more steps, repeat steps 2-6 as needed.
9. To finish entering new steps press the Edit key when the cooking mode keys flash.
10. To enter the name of a cooking recipe, select the letter with the Selector Dial and use the scroll right
(arrow) key to move to the next letter, or space.
11. Use the scroll left (arrow) key to move back to an entered letter to change it using the Selector Dial.
12. Press the Edit key to confirm the recipe name.
13. Use the Selector Dial to select a memory location.
14. Press the Edit key to confirm the memory location.
15. The recipe is now saved in the Cookbook.
NOTES:
• Delta-T cooking, Cook & Hold and advanced functions can be incorporated into recipes. For
more information, see Chapters 5 and 6.
• A full memory location can be overwritten with a new recipe by selecting the full memory location
with the Selector Dial and pressing the Edit key.
• Individual steps can be checked by stopping all processes, pressing the Cookbook key, and
pressing the Smart Key. The steps appear in the display.
B. Executing a Recipe from the Cookbook
1. Press the Cookbook key. The saved recipes appear in the display.
2. Use the Selector Dial to select the required recipe.
3. Press the Start/Stop key. The MINI executes the recipe.
• The steps follow automatically one after the other.
• Recipe name, current step, and number of steps appear in the top of the display.
• The time and temperature appear at the bottom of the display.
4. When the cooking time has elapsed or the core temperature is reached, the Signal Tone sounds and
the recipe ends.
5. Press the Start/Stop key or open the door.

29
C. Integrating Pre-Heating into a Recipe
1. Press the Edit key. Various options appear in the display.
2. Use the Selector Dial to select “new recipe” .
3. Confirm by pressing the Edit key.
4. The cooking mode keys flash and the display shows 01/01.
5. Press the Smart Key
6. Use the Selector Dial to select Pre-Heat .
7. Press the Smart Key to confirm Pre-Heat.
8. Press the Smart Key again to answer “Yes.”
9. Enter the desired values for preheating the MINI.
10. Confirm by pressing the Edit key.
11. The cooking mode keys flash and the display shows 02/02.
12. Write the recipe as described in Chapter 8, Item A “Entering a New Recipe in the Cookbook.”
• For more information, see Chapter 8, Item A.
D. Copying a Recipe
1. Press the Cookbook key. The saved recipes appear in the display.
2. Select the desired recipe.
3. Press the Edit key.
4. Various options appear in the display.
5. Select “copy recipe” .
6. Confirm with the Edit key.
7. Use the Selector Dial to select a memory location.
8. Press the Edit key to confirm the memory location.
9. The recipe is now saved in the Cookbook
10. For more information, see Chapter 8, Item A “Entering a New Recipe in the Cookbook.”
E. Deleting a Recipe
1. Press the Cookbook key. The saved recipes appear in the display.
2. Select the desired recipe.
3. Press the Edit key. Various options appear in the display.
4. Select “delete recipe” ..
5. Confirm with the Edit key.
6. The recipe is deleted and the memory location is free.
F. Changing a Step of a Recipe
1. Press the Cookbook key. The saved recipes appear in the display.
2. Use the Selector Dial to select the desired recipe.
3. Press the Edit key. Various options appear in the display.
4. Use the Selector Dial to select “change cooking recipe” .
5. Press the Edit key.
6. Use the Scroll Left and Scroll Right (arrow) keys to select the step to be changed.
7. Change the cooking mode and values entered.
8. Press the Edit key to confirm the change, recipe name, and location.
9. For more information, see Chapter 8, Item A “Entering a New Recipe in the Cookbook.”

30
G. Inserting a Step into a Recipe
• If a recipe already has 20 steps, no more steps can be added.
• The new step is inserted BEFORE the selected step.
1. Press the Cookbook key. The saved recipes appear in the display.
2. Select the desired recipe with the Selector Dial.
3. Confirm with the Edit key.
4. Select “change cooking recipe.”
5. Confirm with the Edit key.
6. Select the step BEFORE which a new step is to be inserted with the Scroll (arrow) keys.
7. Press the Smart Key. Various options appear in the display.
8. Select “insert step” .
9. Confirm by pressing the Smart Key.
10. The cooking mode keys flash.
11. Write a step as described in Item A, “Entering a New Recipe in the Cookbook.”
12. A new step is inserted before the selected step.
13. All subsequent steps are re-numbered accordingly.
H. Adding a Step to a Recipe
• The new step is added at the END of the recipe.
• If a recipe already has 20 steps, no more steps may be added.
1. Press the Cookbook key. The saved recipes appear in the display.
2. Select the desired recipe.
3. Confirm with the Edit key. Various options appear.
4. Select “change recipe” icon .
5. Confirm with the Edit key.
6. Press the Smart Key. Various options appear in the display.
7. Select “add step” .
8. Confirm by pressing the Smart Key.
9. Confirm by pressing the Smart Key again.
10. The MINI adds the new Step at the END of the recipe.
11. The cooking mode keys flash.
12. Write a step as described in Chapter 8, Item A, “Entering a New Recipe in the Cookbook.”
13. A new step is inserted at the end of the recipe.
• For more information, see Chapter 8, Item A “Entering a New Recipe in the Cookbook
I. Deleting a Step from a Recipe
• When a recipe has been deleted which contains only one step, or one of 20 steps has been
deleted, all cooking mode keys flash and a new step can be entered.
1. Press the Cookbook key. The saved recipes appear in the display.
2. Select the required recipe.
3. Confirm with the Edit key.
4. Select “change recipe” icon .
5. Confirm with the Edit key.
6. Use the Scroll (arrow) keys to select the step to be deleted.

31
7. Press the Smart Key. Various options appear in the display.
8. Select “delete step” .
9. Confirm by pressing the Smart Key.
10. Confirm “yes” by pressing the Smart Key.
11. The selected step is deleted.
12. All subsequent steps are re-numbered accordingly.
13. Press cookbook to exit the function.
• For more information, see Chapter 8, Item A “Entering a New Recipe in the Cookbook
J. Save Recipes to Memory
•
Saves all current recipes to memory and overwrites recipes already in memory.
1. Press the Smart Key.
2. Use the Selector Dial to select Setup.
3. Press the Smart Key.
4. Confirm “Yes” if needed.
5. Press the Smart Key.
6. Press the Smart Key.
7. Use the Selector Dial to select Save to Memory .
8. Press the Smart Key
9. Confirm “Yes” if needed.
10. Press the Smart Key.
11. “Please Wait” and program numbers appear in the display.
12. After saving is complete, the MINI returns to the last cooking mode used.
K. Load Recipes from Memory
• All recipes are replaced with the recipes that have been saved to memory.
• NOTE: If recipes have not been saved to memory, leaving memory empty, all recipes will be
erased.
1. Press the Smart Key.
2. Use the Selector Dial to select Setup.
3. Press the Smart Key.
4. Confirm “Yes” if needed.
5. Press the Smart Key.
6. Use the Selector Dial to select Load from Memory .
7. Press the Smart Key.
8. Confirm “Yes” if needed.
9. Press the Smart Key.
10. “Please Wait” and program numbers appear in the display.
11. After the programs are loaded from the memory, the MINI returns to the last cooking mode used.

32
L. Adding an “ACTION” Prompt to a Recipe
• The Action prompt reminds the Operator to take the needed manual action such as stirring,
turning, or basting, between steps in a cooking program.
• Add the Action prompt to the program step that follows the needed manual steps.
12. Press the Edit key. Various options appear in the display.
13. Select “new recipe.”
14. Press the Edit key
15. Write the step BEFORE the “Action” prompt is needed.
16. Within the step AFTER the Action prompt is needed.
17. Enter the Action prompt as follows:
18. Press the Smart Key.
19. Select “Action” with the selector dial.
20. Press the Smart Key.
21. Confirm “Yes” if needed.
22. Press the Smart Key.
23. Finish writing the recipe and save it as normal.
24. When the “Action…” prompt appears and the signal tone sounds, open the oven door and take
the required action.
25. Close the door. The recipe will continue running as normal.
33
CHAPTER 8 USING PRESS & GO
• Recipes saved in the Cookbook and cleaning procedures can be assigned to Press & Go keys.
• Start a Recipe or cleaning process with just one touch of a Press & Go key.
A. To Assign a Recipe or Semi-Automatic Cleaning Process to a Press & Go Key
1. Press the cookbook key. The saved recipes appear in the display.
2. Use the Selector Dial to select the desired recipe or cleaning process.
3. Hold down the desired Press & Go key for three seconds.
4. The audible signal sounds indicating the recipe or cleaning process is assigned to the selected
Press & Go key.
5. Press the cookbook key to exit the function.
B. To Overwrite a Press & Go Key
1. Select the desired Recipe or cleaning process
2. Select, press, and hold down the Press & Go key for three seconds.
3. The audible signal sounds indicating the Recipe or cleaning process is assigned to the selected
Press & Go key.
C. To Execute a recipe with Press & Go
1. Press the appropriate Press & Go key
2. The MINI executes the desired recipe.
3. The display shows the recipe name, current step and number of steps.
4. The time and temperature are shown in the display.
5. When the cooking time has elapsed and/or the core temperature is reached, the Signal Tone sounds
and the recipe ends.
6. Press the Start/Stop key or open the door.
RECOMMENDATIONS:
• The Press & Go keys are particularly suitable for dishes prepared on a regular basis, such as
pretzels, rolls and croissants. These can be produced by semi-skilled staff to high quality.
• Locking the control panel when using Press & Go prevents changes to cooking modes and helps
ensure consistency and quality.
• Assign a Press & Go key to pre-heat the MINI.

34
CAUTION
Clean the oven chamber at least once per day or more frequently as needed
Failure to clean the Combi properly and regularly can cause equipment damage.
Damage caused by improper cleaning will invalidate the Warranty!
CAUTION
INTERIOR CLEANING INSTRUCTION
To clean the cooking compartment, see the Operator’s Manual for complete
instructions. CONVOClean solution followed by CONVOCare solution, followed by a
thorough rinsing is the only authorized method of cleaning and the only cleaning
solutions to be used to clean this equipment.
Improper cleaning can cause equipment damage and will invalidate the Warranty.
CHAPTER 9 AT THE END OF THE DAY OR SHIFT
A. Cleaning the Oven Chamber
1. Cleaning – General
a. Regular cleaning of the MINI after use, inside and out, helps guarantee many years of
satisfaction from your MINI.
b. Clean and maintain the MINI ONLY when the MINI is cold.
c. Use the hand shower only inside the oven chamber.
d. Clean the outside of the MINI only by hand.
e. Never use the hand shower, hose, pressure washer or similar device on the outside of the MINI.
f. NEVER spray anything on or into the air intakes or outlets of the MINI.
g. Do NOT use hoses, pressure washers, high-pressure cleaners, or water jets to clean inside the
MINI oven chamber.
h. Do NOT spray water into a hot oven chamber.
i. Use only genuine Convotherm by Cleveland and Cleveland Range cleaning products. Follow the
instructions and heed and obey the warnings on the labels. Other products can cause injury,
present heath hazards, and damage the MINI.
j. Never use irritant, acidic, highly alkaline cleaners, high-alcohol, chlorine, chlorinated, or abrasive
cleaning agents, scrapers, or abrasive materials to clean the MINI.
k. Poor water quality can cause discoloration inside the oven chamber. Remove these
discolorations with CONVOCare. Spray CONVOCare on the affected surfaces in a COLD oven
chamber, wait 10 minutes, wipe off with a soft cloth or sponge, rinse thoroughly with clean water
and begin cleaning as usual.
l. Damage caused as a result of improper cleaning voids the warranty.
2. Semi-Automatic Cleaning - General
a. If the oven chamber is very heavily soiled, additional manual cleaning may be necessary.
b. Depending on the level of soiling of the oven chamber, the hanging pan racks may be left in the
oven during the automatic cleaning process.
c. Do NOT interrupt the semi-automatic cleaning process.
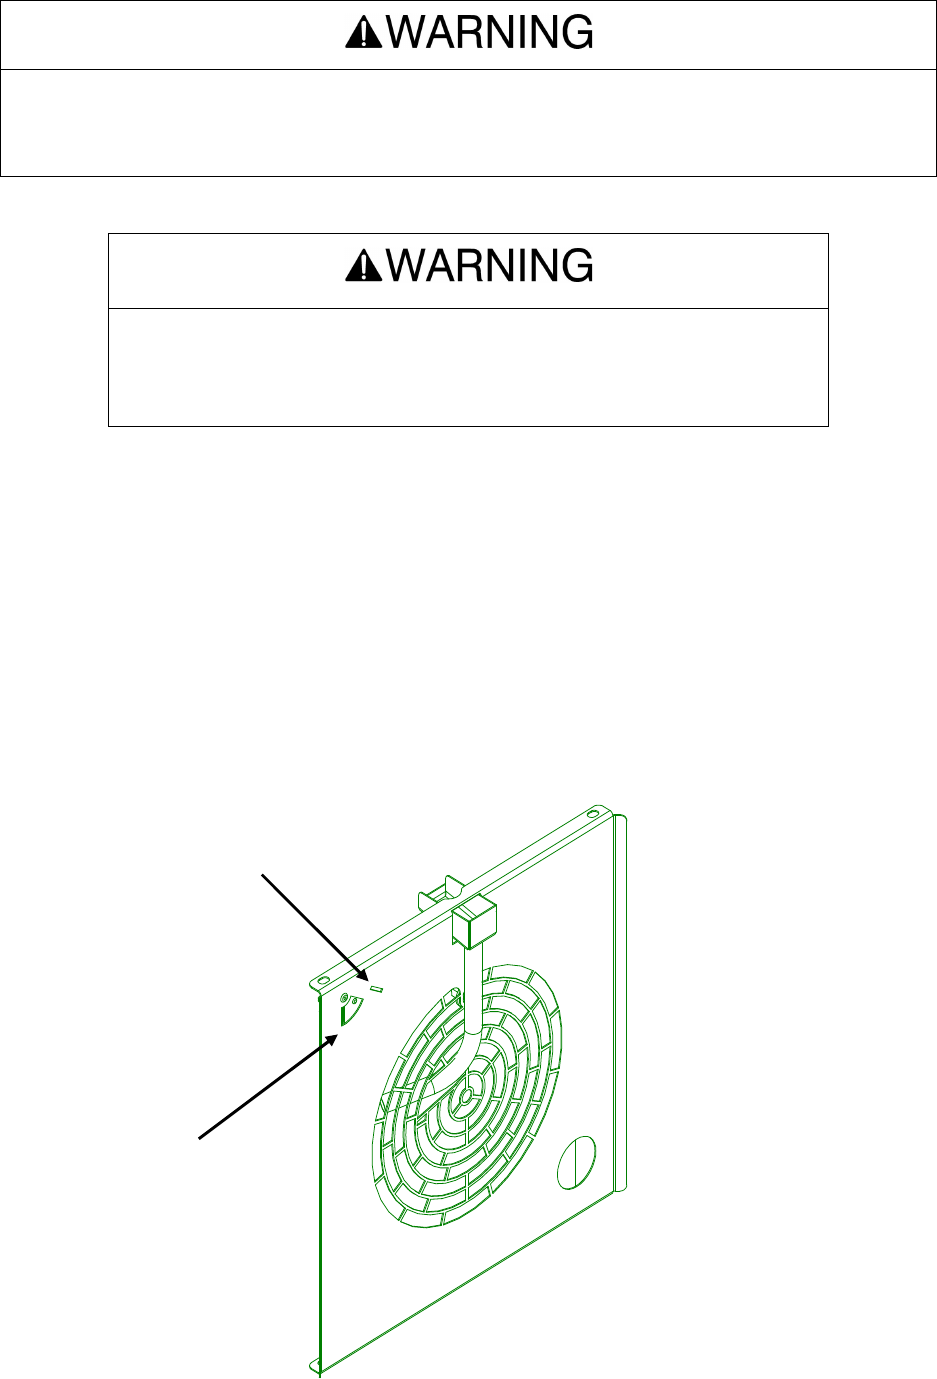
35
Figure 9-1
Fan Guard
3. Manual Cleaning of the Oven Chamber
a. Use CONVOClean and CONVOCare to clean the oven chamber.
1) Spray with CONVOClean and wait five minutes.
2) Rinse thoroughly with the hand shower (or similar sprayer).
3) Spray with CONVOCare and wait five minutes
4) Rinse thoroughly with the hand shower (or similar sprayer)..
b. Clean the MINI daily to prevent discoloration and corrosion of the stainless steel.
1) Avoid scratching the oven chamber or fan guard.
2) Scratches can collect soil and / or allow corrosion to begin.
3) Do NOT use harsh or abrasive cleaning agents, scouring pads, or scrapers.
c. Clean the fan guard and the fan area behind the fan guard at the same time.
When working with cleaning agents and spray bottles: Wear suitable clothing,
protective gloves and protective goggles to help protect from splashes and spills.
Failure to do so can result in chemical burns on skin and in eyes.
Read, understand, and heed and obey all instructions and safety
information found on cleaning agent labels, Material Safety Data Sheets,
and related documents and sources. Failure to do so can result in death,
injury, and equipment damage.
Turn Clockwise
to Lock
Fan Guard Lock
Press In to Unlock

36
CAUTION
Do NOT use hanging pan racks that are bent or otherwise damaged in
any way. Pans and accessories placed in damaged racks can tip and
spill, causing burns, injuries and/or equipment damage
1) Remove the fan guard. See Figure 9-1.
a. Push the fan guard lock in. Do NOT use the core temperature sensor (probe).
b. Lift up on the bottom of the fan guard while pushing in on the fan guard lock.
c. Pull the bottom of the fan guard towards you and remove it.
2) Clean the fan guard in a sink or dishwasher, and clean the oven chamber
3) Replace the fan guard. See Figure 9-1.
a. Insert the fan guard top edge first into the oven chamber.
b. Place the bottom edge on the support pins.
c. Turn the fan guard lock back to its locked position. (It will click.)
4) Make sure that the hanging pan racks do not become bent; otherwise grills, racks,
containers and accessories will no longer be safely supported. If the hanging pan racks
become bent then remove the MINI from service and contact your qualified Cleveland
Range authorized service representative at once.
d. Clean the interior of the of the double glass doors daily.
1) Release the quick-action locks on the door glass.
2) Clean the glass with a non-abrasive cleaner and a soft cloth.
3) Do not use harsh or abrasive cleaning agents, scouring pads, or scrapers because they will
damage the glass.
e. Regular cleaning of the hygienic plug-in gasket (door gasket) increases service life.
1) Wait for the gasket to cool.
2) Clean the gasket with mild, scent free dish detergent and a soft cloth.
3) Do not use harsh or abrasive agents, scouring pads or scrapers because they will damage
the gasket.
4) Air dry the gasket.
f. Remove and clean the drain cover.
1) Clean food residue and drippings from the cover and drain in the oven chamber.
2) Spray with CONVOClean and wait five minutes
3) Rinse thoroughly with the hand shower (or similar sprayer).
4) Spray with CONVOCare and wait five minutes
5) Rinse thoroughly with the hand shower (or similar sprayer).
g. Clean the drain and make sure that it is not blocked.
h. Clean the door drip tray, appliance drip trays and accessory drip trays.
NOTES:
• If a white deposit forms inside the oven chamber, the water treatment system is not correctly
set, or the addition of a water treatment system is required. To remove this deposit, use
vinegar and a soft cloth.
37
• Ask your qualified Cleveland Range authorized service representative about adding or
setting a water treatment system.
B. Semi-Automatic Cleaning of the Oven Chamber
NOTE: Do NOT press the Start/Stop key while using the Semi-automatic Cleaning process. This
stops the cleaning process.
Note: Semi-automatic cleaning uses cooking modes to assist the cleaning process. The display
shows the nominal values for the cooking modes.
Semi-automatic cleaning of oven chamber
• The MINI has a semi-automatic oven chamber cleaning mode: “Cleaning.”
• See this instruction sheet (P/N 260AYM), “One-Hand Sprayer with Telescoping Wand,” for safety
information, detailed instructions for using the Sprayer (P/N 111598) and other information.
• Semi-automatic cleaning uses cooking modes to assist the cleaning process. The display shows the
nominal values for the cooking modes.
• Always wear appropriate protective clothing and equipment when using this Sprayer, including
protective gloves and goggles.
1. Before starting the Semi-Automatic Cleaning process, make sure the oven chamber is below 158°F
by stopping all processes and pressing the Temperature key twice to view the actual temperature.
2. If the oven chamber is above 158°F then open the MINI door and wait 15 minutes.
3. Check the oven temperature again.
a) If the oven temperature is at or below 158°F then go to Step 4.
b) If the oven temperature is still above 158°F then wait 15 more minutes and check the oven
chamber temperature. Repeat this step as needed until the oven chamber temperature is at or
below 158°F and then go to Step 4.
4. Press the Smart Key. Various options appear in the display.
5. Use the Selector Dial to select “Cleaning” .
6. Confirm by pressing the Smart Key.
7. Confirm “Yes” with the Smart Key.
8. The display shows the Time and Temperature for “Cleaning.”
9. Press the Smart Key The cleaning process will start.
10. The first step is 158°F for 10 minutes in Hot Air mode.
11. After the first step, the signal tone sounds.
12. Open the oven door and spray the oven chamber, and accessories. with original Convotherm by
Cleveland CONVOClean, using the Hand Sprayer, P/N 111598.
13. Close the door and allow the CONVOClean to take effect.
14. Do NOT press the Start / Stop key again.
15. The cleaning cooking mode will continue automatically.
16. The next step is 86°F for 10 minutes in Steam mode, followed by 212°F for 10 minutes in Steam
mode.
The Semi-Automatic Cleaning process is designed to be started when the
oven chamber temperature is at or below 158°F. Death, injury, and equipment
damage can result from starting the Semi-Automatic Cleaning process when
the oven chamber is above 158°F.

38
17. After both steps have run, the second signal tone sounds.
18. Clean thoroughly behind the fan guard. Clean the fan guard in a sink or dishwasher.
Remove the fan guard. See Figure 9-1.
a. Push the fan guard lock in. Do NOT use the core temperature sensor (probe).
b. Lift up on the bottom of the fan guard while pushing in on the fan guard lock.
c. Pull the bottom of the fan guard towards you and remove it.
19. Remove the oven racks operating positions and place them in the bottom of the oven chamber.
20. Run MINI mode with Crisp ‘n’ Tasty at level 3 (High) at 212°F for 10 minutes.
21. Turn OFF the MINI.
22. IMPORTANT: Rinse the oven chamber, accessories, and behind the fan guard thoroughly
with the hand shower (or similar sprayer).
23. Repeat “Cleaning” using CONVOCare in place of CONVOClean including Step 22, rinsing the
oven chamber, accessories, and behind the fan guard thoroughly with the hand shower (or
similar sprayer).
24. After cleaning, replace the oven racks and fan guard.
Replace the fan guard. See Figure 9-1.
a. Insert the fan guard top edge first into the oven chamber.
b. Place the bottom edge on the support pins.
c. Turn the fan guard lock back to its locked position. (It will click.)
25. In the case of severe staining or soiling, repeat the cleaning process.
26. After use or after cleaning, leave the MINI door open.
C. Fully-Automatic Cleaning of the Oven Chamber
NOTE: Do NOT press the Start/Stop key while using the Fully-automatic Cleaning process. This
stops the cleaning process.
Check that the following requirements have been met:
No food has been left in the oven.
For 6.102in1 and 10.10, make sure the two drawers are filled correctly and contain enough cleaner.
For the 3.10 or 6.10, make sure the cleaning fluid containers are connected correctly to the unit and
that the containers contain enough cleaning fluid.
You are already conversant with the operating steps..
1. Turn the armature nozzle on the top of the over through one complete turn to ensure that it moves
freely.
2. Remove the larger items of burnt food residues from the oven.
3. Close the appliance door
4. Select the functions menu:
5. Use the tilt selector switch to choose the "fully automatic cleaning" icon.
6. Press the "Functions menu" button to confirm and verify that the Confirm menu appears in the display..
7. Use the tilt selector switch to choose "YES".
8. Press the "Functions menu" button to confirm that A selection menu appears in the display.
9. Use the tilt selector switch to choose the soiling level.
a. Q = quick clean
b. 1 = light soiling
c. 2 = normal soiling

39
d. 3 = heavy soiling
e. 4 = heavy soiling with Shine+
10. Press the "Functions menu" button to confirm that Fully automatic cleaning starts.
11. Open the appliance door when prompted by the system, ensure that the oven is empty and close the appliance
door so the the combi steamer starts the fully automatic cleaning program. Caution: Never interrupt this cycle.
Do not open the appliance door.
12. For very heavy soiling, we recommend following this cycle with semi-automatic cleaning when you
can target any remaining dirt.
13. The following table shows what faults might occur and the appropriate actions:
Fault Action
"Not enough water" appears in display Check the water supply.
"No cleaner pressure" appears in display Check which fluid container or drawer is almost
empty and re-fill it. In an emergency use water.
Power failure or interruption of the fully automatic
cleaning cycle.
If cleaning solutions have been used, the combi
steamer will automatically rinse the oven before it
can be operated.

40
B. CHAPTER 10 MINI SETUP
NOTES:
The various setup options are described in detail below.
You can exit the menu at any time by pressing the Start/Stop key.
To use the Setup Menu:
1. Press the Smart Key.
2. Various options appear in the display.
3. Use the Selector Dial to select “Setup”
.
4. Confirm by pressing the Smart Key.
5. Confirm “yes” with the Smart Key.
6. Various options appear in the display.
A. Signal Tone
To select the Signal Tone from the Setup Menu:
1. Select “Signal Tone” with the Selector Dial.
2. Confirm by pressing the Smart Key.
3. The display shows the selection of available Signal Tones.
4. To choose a Signal Tone, use the Selector Dial.
5. Pause on a Signal Tone to hear it sound.
6. Confirm the selection by pressing the Smart Key.
B. Volume
To select a Volume Level from the Setup Menu:
• When setting the volume, consider the noise level in your kitchen.
1. Select “Volume”
with the Selector Dial.
2. Confirm by pressing the Smart Key.
3. The display shows the volume options and a Signal Tone sounds.
4. Use the Selector Dial to select the desired volume.
5. Confirm the setting by pressing the Smart Key.
C. Time
To set the Time from the “Setup” menu:
• If the power is off for more than three days, the time must be re-entered
1. Select “Time”
with the Selector Dial.
2. Confirm by pressing the Smart Key.
3. The display shows the time format options available.
4. Select the desired format with the Selector Dial.
5. To enter the current time, use the Scroll (arrow) keys to switch between hours and minutes.
6. Set the correct time with the Selector Dial.
7. Confirm the setting by pressing the Smart Key.

41
D. Date
To set the Date from the Setup Menu:
• If the power is off for more than three days, the date must be re-entered
1. Select “Date” with the Selector Dial.
2. Confirm by pressing the Smart Key.
3. The display shows the date formats available.
4. Select the desired format with the Selector Dial.
5. To enter the current date, use the Scroll (arrow) keys to switch between day, month and year
6. Set the correct date with the Selector Dial.
7. Confirm by pressing the Smart Key.
E. Order of Cookbook Recipes
To organize recipes alphabetically or numerically in the Cookbook with the Setup Menu:
1. Select “cookbook alphabetic”
with the Selector Dial.
2. Confirm by pressing the Smart Key.
3. Use the Selector Dial to select “Yes” to sort alphabetically, OR select “No” to sort numerically.
4. Press the Smart Key to confirm the selection.
5. “Please wait” appears in the display. The sorting may take some time.
6. When the sorting is complete, the MINI returns to cooking mode.
F. Default and Memory Settings
NOTES:
• Select whether the default or the memory setting (i.e. the last setting used) for cooking time and
temperature appears in the display when a cooking mode (cooking mode) is selected.
• Using the default settings helps prevent mistakes by semi-skilled staff.
• Every time a cooking mode is selected, the settings are stored.
• Memory settings are suitable for cooking several batches one after the other. Time and
temperature are set and the cooking mode can be started immediately
• The factory default settings are adjustable (See Table 12-1).
To select Default or Memory Settings from the Setup Menu:
1. Select “practical settings” with the Selector Dial.
2. Confirm by pressing the Smart Key.
3. To use default settings: select “no” with the Selector Dial and press the Smart Key.
• The MINI uses default settings.
4. OR To change the default settings: Select “yes” with the Selector Dial and press the Smart Key.
5. The display shows a list of the default settings set.
6. Select the default setting to change with the Selector Dial.
7. Use the Scroll RIGHT (arrow) key to space through to the desired number
8. Set the required default setting with the Selector Dial.
9. Use the Scroll LEFT (arrow) key to space back to accept the setting.
10. To change more settings, repeat the procedure above.
11. Press the Smart Key to confirm the new settings.

42
Factory Default Settings
Cooking Mode
Oven Temperature
Core Temperature
Cooking Time
212°F 158°F 25 min
302°F 158°F 70 min
338°F 158°F 30 min
275°F 158°F 5 min
Table 10-1
G. Temperature Display
To select temperature display in °C or °F for temperature in the Setup Menu:
1. Select “temperature in °C,”
2. Confirm by pressing the Smart Key.
3. Select “yes” for °C and “no” for °F
4. Confirm the selection with the Smart Key.
5. The temperature display is set as specified.
H. Network Address
NOTES:
• The Network Address is factory set to “1.”
• Select a different network address for each appliance.
• The network address is required for the use of PC Control, PC-HACCP and the Convotherm by
Cleveland Service System.
To set the Network Address from the Setup Menu:
1. Use the Selector Dial to select “Network Address” .
2. Confirm by pressing the Smart Key.
3. The display shows the network address currently set.
4. Use the Selector Dial to select the desired network address (1 - 99)
5. Confirm by pressing the Smart Key.
I. Language
To select a language from the Setup Menu.
1. Choose, select “Language” with the Selector Dial
2. Confirm by pressing the Smart Key.
3. The languages available appear in the display.
4. Use the Selector Dial to select the desired language
5. Confirm by pressing the Smart Key.
RECOMMENDATION:
• Select the language of your country or that spoken by your staff.
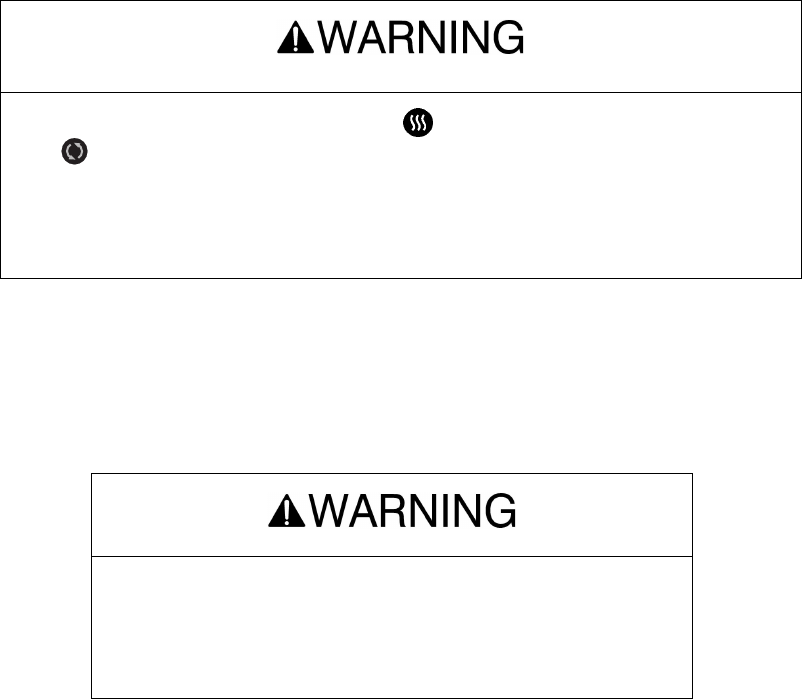
43
CHAPTER 11 TROUBLESHOOTING
A. Error Diagnosis System
• Convotherm by Cleveland MINI Oven-Steamers are equipped with an error diagnosis system.
1. If an error occurs, the system displays an error code and a description of the error.
2. To continue operating, emergency operation is available (see below).
3. The following tables help troubleshoot if errors or malfunctions occur while a MINI Oven-Steamer
is operating. The tables show possible causes and their remedies.
4. If the instruction in the “Remedy” column is “Call for Service,” call your service agency or the
Service Department at Cleveland Range at 216-481-4900.
If the Burner or Electric Heating ON icon and the Cooking Mode Engaged
icon are lit, but the electric heater does not start and the fan does not start
then remove the MINI from service.
Use of the MINI with these two icons lit can cause injury or equipment damage.
Call your qualified Cleveland Range authorized service representative at once.
If an error cannot be rectified with the aid of these tables,
contact your qualified Cleveland Range authorized service
representative at once; otherwise, injury or equipment
damage may result.

44
B. Error Messages and Remedies
Error Message on display Possible cause Remedy
E01 Not enough water Water valve closed Open water valve
Solenoid valve dirt filter contaminated Remove and clean filter
Solenoid valve fault Call for Service
E02 Connection area temperature
too high
Connection area ventilation fault
Air supply blocked
Allow MINI to cool, or continue
cooking at a lower oven
temperature, and call Service
E04 Connection area fan
malfunction
Auxiliary fan fault Call for Service
E11/E32 Excess temperature in oven
or oven sensor failure
Excess oven temperature Call for Service
Oven sensor fault Call for Service
E15/E36 Excess temperature of
condenser or condenser
sensor failure
Water tap closed Open water tap
Excess temperature in condenser via hot
water connection
Connect appliance to cold water,
restart
Solenoid valve dirt filter contaminated Remove and clean filter
Solenoid valve fault Call for Service
Condenser sensor fault Call for Service
E33 Core Temperature Sensor
faulty
Core Temperature Sensor faulty Set cooking mode with time, and
call Service
E29 Ground connection of sensor Temperature sensor fault Call for Service
E80/E95/E96 ID error / software error /
connection fault
Control fault Call for Service
E82 Working parameter error Problems during switch between C and F Check settings in Cookbook or
check °C/F in settings
C. Operating Irregularities not having Error Messages
Error Possible cause Remedy
Uneven browning Fan guard not correctly locked Lock fan guard correctly
Nominal oven temperature too high Select lower temperature and increase
cooking time
Not pre-heated Always pre-heat MINIs
Bypass pipe greasy Clean bypass
Incorrect accessories, containers Use suitable accessories and containers
Control elements not illuminated and do
not react when switched on
No power connection, external failsafe
triggered
Call for Service
Appliance does not react to information
entered
Software has hung itself up Hold down the ON/OFF switch for 5
seconds or disconnect appliance for 5
seconds
Appliance cannot be switched on or off ON/OFF has been locked for 3 seconds Try again after 3 seconds
Oven is not lit inside Oven light faulty Call for Service
Water sprays from air outlet when door is
closed
Steam measuring line blocked Clean steam measurement line; see
“Daily servicing and maintenance”
Appliance drain blocked Clean drain

45
Operating Irregularities not having Error Messages (Continued)
Error Possible cause Remedy
Water inside the oven Drain blocked Descale
Steam or water running out of base of
appliance (condenser).
Drain connection blocked or covered Remove object
Drain blocked Rinse condenser and drain thoroughly,
clean/check own drain system
White or black marks inside oven Incorrect cleaning agent Use genuine CONVOClean and
CONVOCare cleaning agents
Water hardness too high See Water Quality Recommendations in
Warranty

46
CHAPTER 12 EMERGENCY OPERATION
• To continue to use your Convotherm by Cleveland MINI Oven-Steamer in the case of an error
which cannot be solved immediately, an “Emergency Operation” function is available.
• This allows you to use at least some of the appliance functions despite a malfunction.
• Call the Service Department at Cleveland Range at 216-481-4900 immediately.
NOTES:
• Cooking times can be longer.
• Monitor the cooking process and the status of the product carefully.
• Locked modes will not respond to keys being pressed.
If the MINI experiences an error:
• The Signal Tone sounds.
• An error number appears in the display, e.g. “E01.”
A. Instructions for Emergency Operation
1. Press the Start/Stop key to confirm the error.
2. The modes which can be selected are indicated by flashing.
3. Proceed as normal.
4. Select a mode by pressing the corresponding key
5. Set operating information as described under the individual modes.
6. Depending on the error, a limited range of functions (e.g. Temperature) will be available.
7. To start the MINI in Emergency Operation, press the Start/Stop key.
8. When the cooking time has elapsed, press the Start/Stop key.
9. When the error has been rectified, the appliance automatically switches back to normal operation:
a. The error number will no longer be displayed.
b. The back-lighting / function display of the mode keys will not flash.
c. Keys will react to being pressed as normal.

47
B. Emergency Operation Methods
X: Operation possible
–: Operation not possible
Error Message on display OES Steam Combi Hot
Air
Retherm Cook
&
Hold
Delta-
T
E01 Not enough water X -- -- up to
356°F
-- X X
E02 Connection area temp.
too high
X X up to 284°F up to
284°F
up to
284°F
up to
284°F
up to
284°F
E04 Connection area fan
malfunction
X X up to 284°F up to
284°F
up to
284°F
up to
284°F
up to
284°F
E11 Excess oven
temperature
-- -- -- -- -- -- --
E15 Excess temperature of
condenser
X -- -- up to
356°F
-- X X
E33 Core temp. sensor
faulty
X X X X X X X
E36 Condenser sensor
failure
X
X
(2)
up to 356°F
(2)
up to
356°F
(2)
up to
356°F
(2)
X
(2)
X (2)
E 29 Error in ground
connection
-- -- -- -- -- -- --
E80 ID error -- -- -- -- -- -- --
E81 Program memory error X X X X X X X
E82 Working parameter
error
X X X X X X X
E83 Algo. error X X X X X X X
E89 I2C error X X X X X X X
NOTES:
1) Cooking time will be much longer, dishes in upper levels will be ready first
2) Injection of water into condenser constantly activated (higher water consumption)
3) Errors E23 and E26 simultaneously, steam generator is not pre-heated
