5161 1001 003_Artline_Release_Note_#3_Jan91 003 Artline Release Note #3 Jan91
5161-1001-003_Artline_Release_Note_#3_Jan91 5161-1001-003_Artline_Release_Note_%233_Jan91
User Manual: 5161-1001-003_Artline_Release_Note_#3_Jan91
Open the PDF directly: View PDF ![]() .
.
Page Count: 56
Artline~
Release Note 03
11
Digital Research",
Copyright © 1991 Digital Research Inc. All rights reserved.
No
part
of
this
publication
may
be reproduced, transcribed, stored
in
a retrieval
system,
or
translated
into
any
language or computer language,
in
any
form
or
by
any
means, electronic, mechanical, magnetic, optical, chemi-
cal,
manual
or
otherwise without
the
prior written permission of Digital
Research Inc., 70
Garden
Court, Box DRI, Monterey, California 93942.
Artline © CCP Development GmbH, 1988, 1989, 1990
NOTICE
TO
USER
DIGITAL RESEARCH MAKES NO REPRESENTATIONS OR
WAR-
RANTIES WITH RESPECT TO THE CONTENTS HEREOF AND SPE-
CIFICALLY DISCLAIMS ANY IMPLIED WARRANTIES OF
MERCHANTABILITY OR FITNESS FOR ANY PARTICULAR PUR-
POSE. Further, Digital Research Inc. reserves
the
right
to revise
this
publication
and
to
make
changes from time to time
to
the
content hereof
without obligation
of
Digital Research Inc. to notify
any
person
of
such
revision
or
changes.
This
manual
should not be construed
as
any
representation or
warranty
with respect to
the
software
named
herein. Occasionally changes
or
variations exist
in
the
software
that
are
not
reflected
in
the
manual.
Generally,
if
such changes or variations are known to exist
and
to affect
the
product significantly, a release note or README file accompanies
the
manual
and
the
distribution disks.
In
that
event, be
sure
to
read
the
release note
or
README file before using
the
product.
TRADEMARKS
Digital Research, Artline,
and
GEM
are
registered
trademarks
and
Presentation Team, GEM Artline, GEM Draw Plus,
and
the
Digital
Research logo
are
trademarks
of
Digital Research Inc.
We
Make
Computers Work
is
a service
mark
of Digital Research Inc.
Adobe
and
PostScript
are
registered
trademarks
of
Adobe Systems Inc.
Bitstream
is
a registered
trademark
and
Fontware is a
trademark
of
Bitstream
Inc.
HiJaak
is
a
trademark
of
Inset
Systems, Inc. Ventura
Publisher
is
a registered
trademark
of Ventura Software, a Xerox
Company. ITC Galliard
is
a registered
trademark
of
International
Typeface Corporation. Hewlett-Packard
and
LaserJet
are
registered
trademarks
of
Hewlett-Packard Corporation.
If
any
other
trademarks
are
mentioned herein,
they
are
the
property
of
their
respective owners.
Artline Release Note 03
January
1991
Contents
Preface
1 Symbol
File
Conversion
Using
SYF2GEM
.......................
0
o.
1-
1
Quitting
SYF2GEM
. . . . . . . . . . . . 0 • 0 • • 0 0 • 0 0 0 0 0
1-5
Converted
Symbol
Files
.............
0 0 • 0 0 0 0 0
1-5
2
BLDAF4
Font
File
Conversion
Generating
Fonts
with
BLDAF4
...
0
•••
0 0 • 0 0
•••
0 0 0 2-2
Creating
the
Source
Files
. . . . . . . . . . 0 0 • 0 0 0 0 0 0 2-2
Finding Font Information
..........
0 0 0 • • 0 • 0 0 2-4
Running
BLDAF4
....................
. . . 0 2-5
3 HiJaak
File
Conversion
Utility
File
Format Types
.......
0 • 0 • • • • 0 • • • 0 • 0 • • 0 0
3-2
Destination
File
Types
............
0
••
0 0 • 0 0 0 0 0
3-3
Starting HiJaak 0
•••
0
••••••
0
••
0
•••
0 0 • 0 0 0 0 0 3-4
From
the
Command
Line . . . 0 • • 0 • • • • • 0 • • 0 0 0 0 3-4
From Artline . . . . . . . . . . . . . . . . . . . 0 0 • • • • 0 0 3-5
HiJaak
Interface
..................
0 • 0
••
0 0 3-6
Using a Mouse
..
. . . . . . . . . . . . 0 • • 0 0 • • 0 • 0 0 3-6
Using
the
Keyboard
....
. . . . . . . . 0 • 0 0 • • 0 0 0 0 3-6
HiJaak
Keyboard
and
Mouse Functions
...
0 0
00
0 0 0 0 3-8
USing
HiJaak Help . . . . . . . . . . . . . . . . . . 0 • • • 0 0 0 3-9
iii
How
to
Convert
Files
.......................
3-
10
Select
Files
to
be
Converted
Dialog . . . . . . . . . . . . . 3-
11
Source Options Dialog
....................
3-
13
Fonts in
Converted
Files
. . . . . . . . . . . . . . . . . . . . 3-
13
Destination
Files
Dialog
....................
3-
14
Destination Options Dialog . . . . . . . . . . . . . . . . . . 3-15
Advanced
Destination Options
...............
3-
16
Exiting HiJaak
.........................
3-
17
E
PS
Conversion
..........................
3-
18
EPS
Destination Options
....................
3-21
HiJaak Menus . . . . . . . . . . . . . . . . . . . . . . . . . . . 3-23
File
Menu
. . . . . . . . . . . . . . . . . . . . . . . . . . . . 3-23
Convert
. . . . . . . . . . . . . . . . . . . . . . . . . 3-25
Help
...............................
3-25
A Ventura
Publisher
Compatibility
Unsupported Systems . . . . . . . . . . . . . . . . .
A-1
Hewlett
Packard
LaserJet
Series
II
............
A-2
B Application
and
Documentation Updates
Generallnformation
.......................
B-2
Clip
Art
...........................
B-2
Color
Files
. . . . . . . . . . . . . . . . . . . . . . . .
B-3
Fonts for GEM Applications . . . . . . . . . . . . . . . .
B-3
Everex
Memory
Boards
..................
B-4
Documentation
Updates
..................
B-6
iv
Preface
THE
Artline® Release Note
03
describes
the
following:
o SYF2GEM. This program converts
GEM®
ArtlineTM
(Version 1.0) symbol files to
the
Artline, Version 2.0,
GEM format.
o BLDAF4.
The
release note describes how you create
Artline font files from files created
with
non-Digital Re-
search® versions
of
Bitstream®
Fontware
TM.
o HiJaak™ for Digital Research. This
utility
converts
files created
with
other
popular graphics applications
to
the
Artline, Version 2.0, GEM format.
In
addition,
you can convert files between several vector
and
raster
file formats, including CGM, WMF, EPS, TIFF,
and
PCX.
You
can also convert Artline files for
raster
fax
card
transmission.
o Additional information about
the
Artline program, as
well as additions
and
corrections to
the
manuals.
NOTE: Throughout
this
release note,
the
symbol
.J
represents
the
Return
(or
Enter)
key
or
means
"Press
the
Return
(or
Enter)
key."
v

Symbol
File
Conversion
SYMBOL files, a feature
of
GEM Artline (Version 1.0)
made
it
possible for you to collect pictures
and
use
them
repeatedly
in
other
files.
In
Artline, Version 2.0,
the
need
for symbol files
has
been
replaced by
the
ability to merge files, compatibility
with
many
additional file formats,
and
an
extensive clip
art
gallery.
The
SYF2GEM symbol file conversion program
is
pro-
vided so
that
GEM Artline
users
can
convert
their
symbol
files (with extension SYF) to GEM files
that
can
be
opened
or
merged
in
Artline, Version 2.0.
Using
SYF2GEM
SYF2GEM is a graphics-based application
that
uses
the
same
system software
that
Artline uses. Because you
run
the
program
with
the
Artline
ToApp
command, you
must
already be
in
Artline before you
can
start
SYF2GEM.
To
start
SYF2GEM,
[I] Display
the
Artline File
menu
and
choose
the
To
App
command. (The
To
App
command
is
described
in
de-
tail
in
Chapter
3
of
the
Artline User Reference Guide.)
[]]
In
the
Run
Application dialog, click on
the
Run
but-
ton
to display
the
Item
Selector.
1-1
Using
SYF2GEM
1-2
I1J
In
the
Item
Selector,
set
the
directory
path
to
the
di-
rectory
in
which SYF2GEM
is
located (the default is
\ARTLINE\CONVERT)
and
then
double-click on
SYF2GEM.APP.
[]]
In
the
Run
Application dialog,
make
your selection
in
the
Parameters
box according to
the
guidelines on
the
next
two pages.
SYF2GEM's Application Type is GEM
and
is
automat-
ically set. Choices among
the
Options (Auto-Save
Current
Picture
and
Return
to Artline)
are
a
matter
of
personal preference.
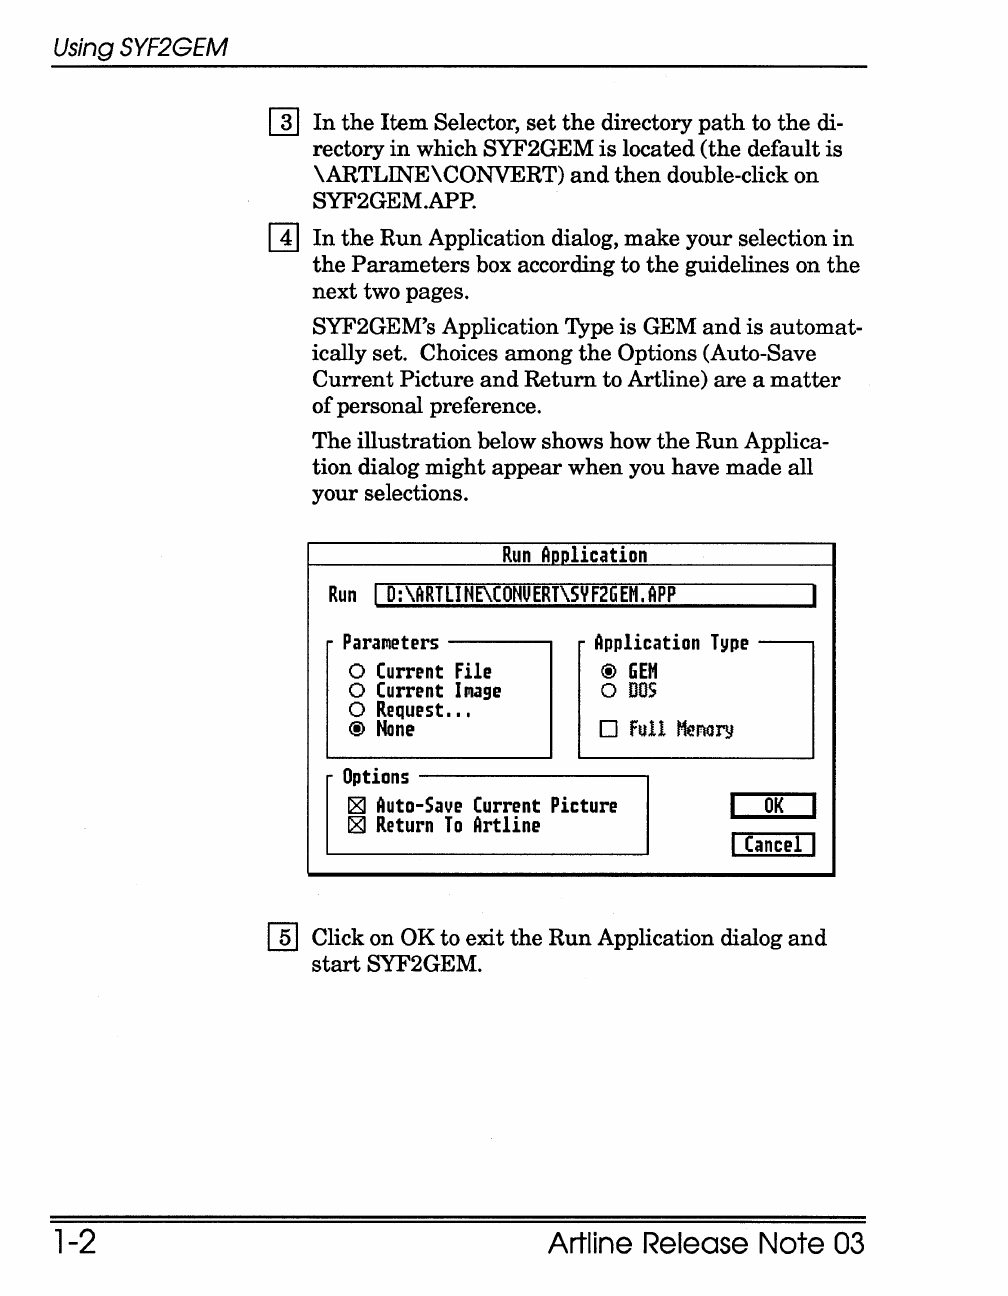
The illustration below shows how
the
Run
Applica-
tion dialog
might
appear
when
you have
made
all
your selections.
Run
Application
Run
I
D:\ARTLINE\CONUERT\SYF26EM.APP
I
Pararlleters
Application
T!lpe
-
o
Current
File
@
GEM
o
Current
I~age
o
DOS
o
Request
...
@
None
o
full
MenoT9
Options
~
Auto-Save
Current
Picture I
OK
I
~
Return
To
Artline I
Cancel
I
[]]
Click on OK to exit
the
Run
Application dialog
and
start
SYF2GEM.
Artline Release Note
03
Using
SYF2GEM
Parameters
SYF2GEM
can
accept two of
the
Run
Application dialog's
parameters: Request
and
None.
Request
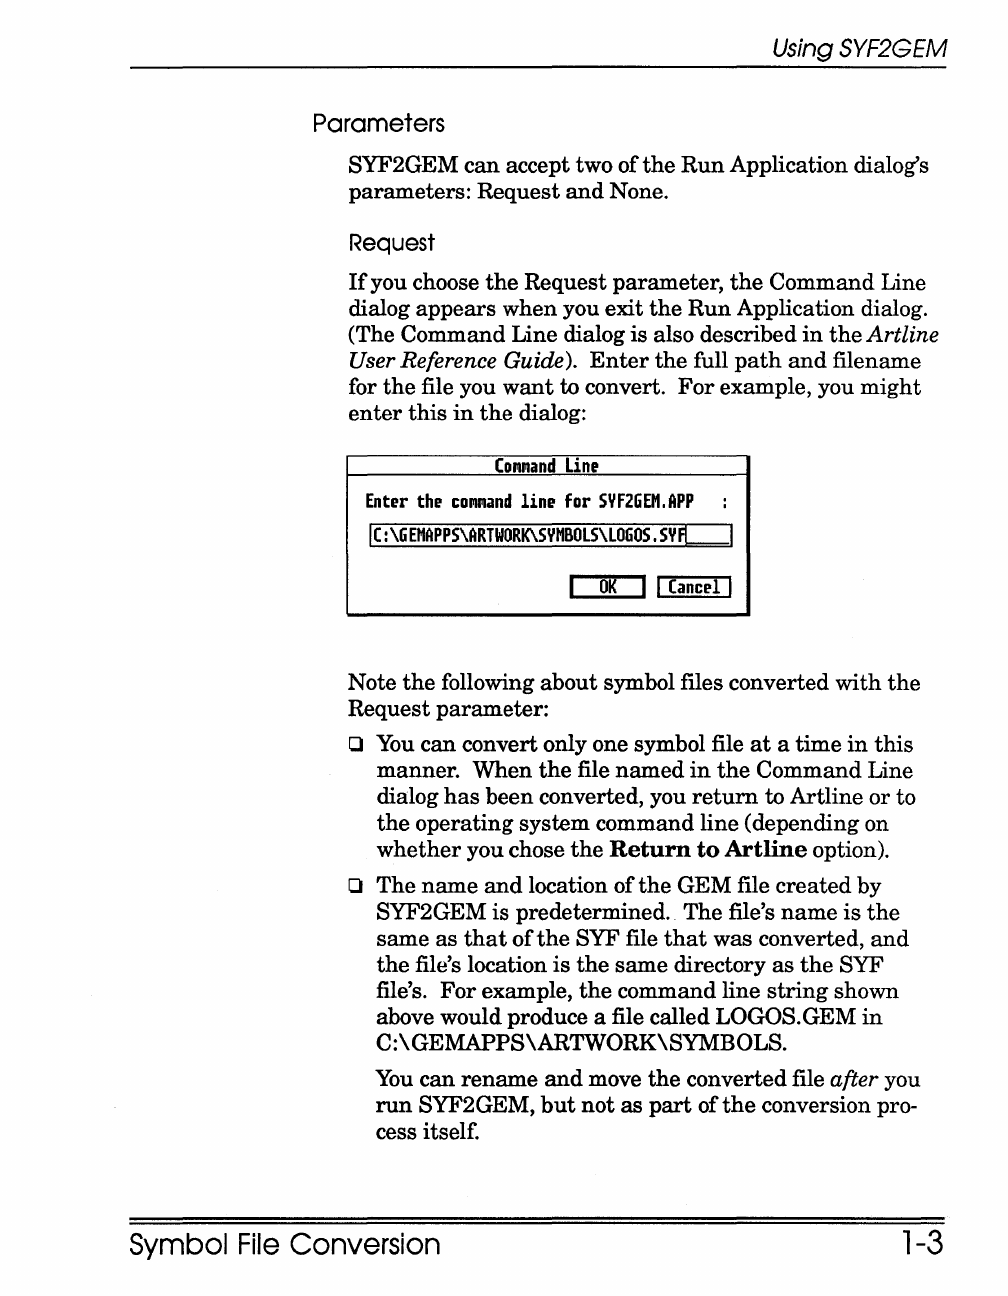
If
you choose
the
Request parameter,
the
Command Line
dialog
appears
when you exit
the
Run
Application dialog.
(The Command Line dialog
is
also described
in
the
Artline
User Reference Guide).
Enter
the
full
path
and
filename
for
the
file you
want
to convert.
For
example, you
might
enter
this
in
the
dialog:
(olllllland
Line
Enter
the
tUlIlliland line
fur
SYF2GEM,APP
IC:\6EMAPPS\ARTWORK\SYMBOLS\L060S,
SYA
__
I
OK
I I
Caned
I
Note
the
following about symbol files converted
with
the
Request
parameter:
o
You
can
convert only one symbol file
at
a
time
in
this
manner. When
the
file
named
in
the
Command Line
dialog
has
been converted, you
return
to Artline
or
to
the
operating system command line (depending on
whether
you chose
the
Return
to
Artline
option).
o The
name
and
location
of
the
GEM file
created
by
SYF2GEM is predetermined. The file's
name
is
the
same
as
that
of
the
SYF file
that
was converted,
and
the
file's location
is
the
same
directory
as
the
SYF
file's.
For
example,
the
command line
string
shown
above would produce a file called LOGOS. GEM
in
C:\GEMAPPS\ARTWORK\SYMBOLS.
You
can
rename
and
move
the
converted file after you
run
SYF2GEM,
but
not
as
part
of
the
conversion pro-
cess itself.
Symbol
File
Conversion
1-3

Using
SYF2GEM
1-4
None
The None
parameter
differs from
the
Request
parameter
in
two
important
respects:
D
You
can
convert more
than
one symbol file.
D
You
can
specify
the
converted file's
name
and
location.
To
convert symbol files
with
the
None parameter,
[!]
When
you exit
the
Run
Application dialog,
the
first
Item
Selector ofSYF2GEM (labeled "Symbol-File to
convert") appears.
[]]
Change
the
path
in
the
Item
Selector to your symbol
file directory,
and
double-click on
the
name
of
the
first file you
want
to convert.
[]]
The
second SYF2GEM
Item
Selector (labeled "GEM-
File to create") appears.
[1] Note
that
the
Item
Selector automatically supplies a
GEM filename
that
matches
the
SYF file's name.
This GEM file will be
created
in
the
directory
in
which SYF2GEM is located.
You
have two options
at
this
point:
-
You
can
accept
the
default
name
and
path.
To
do
so, exit
the
Item
Selector
by
clicking on OK or
pressing .J.
-
You
can
save
the
converted file to
the
directory
of
your choice
and
with
the
filename
of
your choice.
To
do so, change
the
path
in
the
Item
Selector, sup-
ply a
new
name,
and
then
exit
the
Item
Selector by
clicking on OK
or
pressing.J.
I}]
The "Symbol-File to convert"
Item
Selector
appears
again.
You
have two options:
-
You
can
choose
another
symbol file to convert,
in
which case
the
cycle
repeats
itself.
-
You
can
quit
SYF2GEM
by
clicking on
the
Item
Selector's Cancel
button
or
by pressing
Esc.
Artline Release
Note
03
Quiffing
SYF2GEM
Quitting
SYF2GEM
You
can
quit
SYF2GEM
any
time
the
Item
Selector
is
dis-
played by clicking on
the
Item
Selector's Cancel
button
or
by pressing Esc.
Converted Symbol
Files
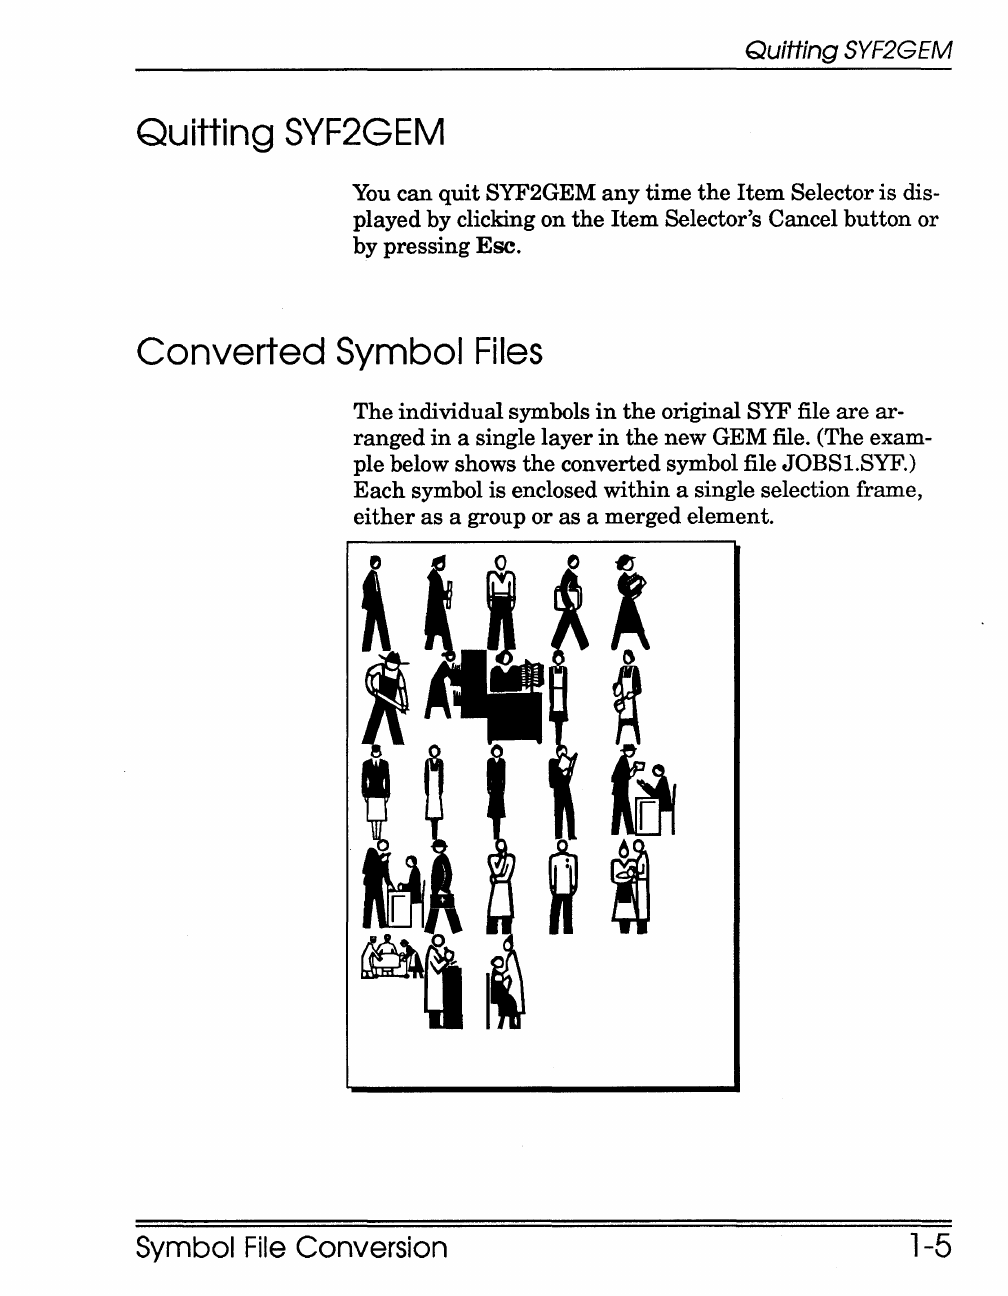
The
individual symbols
in
the
original SYF file
are
ar-
ranged
in
a single
layer
in
the
new GEM file. (The exam-
ple below shows
the
converted symbol file JOBSl.SYF.)
Each
symbol
is
enclosed
within
a single selection frame,
either
as
a group
or
as
a merged element.
Symbol
File
Conversion
1-5
Converted
Symbol
Files
1-6
To
use a converted symbol file,
[I]
Open
the
file
into
which you
want
to
insert
symbols.
(]]
Merge
the
converted symbol file
into
the
current
file
(Merge
File
command).
[]]
Activate
the
symbol layer, select a symbol you
want,
and
Cut
or
Copy
it
to
the
paste
buffer.
[!]
Activate
the
layer
in
which you
want
the
symbol,
and
Paste
the
symbol onto
the
drawing surface.
[]]
For
additional symbols,
repeat
steps 3
and
4.
~
When you have
inserted
all
the
symbols you
want,
use
the
Layer
Manager
to remove
the
layer
that
con-
tains
the
unwanted
symbol.
Artline Release
Note
03
BLDAF4
Font
File
Conversion
T
HIS
chapter
describes how you create Artline font files
with
non-Digital Research versions
of
Bitstream.
Fontware-for
example,
the
version
of
Fontware
that
accompanies
Xerox®
Ventura
Publisher® .
In
general, BLDAF4 uses
three
things:
o a source font file (extension PFA)
o a
kerning
information file (extension AFM)
o font
information-font
ID
and
weight
NOTE:
The AFM file
is
not
required,
but
you will
not
be able to
crea
te
kerned
text
without
it.
Digital Research versions
of
Fontware
automatically gen-
erate
a PFAfile,
an
AFM (for
Adobe®
Font
Metric) file,
and
a
PFI
file
that
contains
the
necessary font informa-
tion. The
Artline Utilities Guide describes how you create
Artline fonts from Digital Research versions
of
Fontware.
To
create Artline fonts from non-Digital Research ver-
sions
of
Fontware, you
must
create
the
PFA
and
AFM
files
and
then
pass
the
font information
as
parameters
to
BLDAF4.
2-1
Generating
Fonts with
BLDAF4
Generating
Fonts
with
BLDAF4
2-2
The
BLDAF4 process consists
of
three
major steps:
[]]
creating
the
source files
[]]
finding font information
[ill
running
BLDAF4
Creating
the
Source
Files
Fontware
creates
the
following source files
that
BLDAF4
uses for each font you
are
generating:
o A PFA file
that
contains
the
character
set
description.
The PFA file
is
required.
o
An
AFM file
that
contains
the
information required for
kerning
text
characters.
To
create
the
AFM
and
PFA files,
IT] Change directories to \FONTWARE.
[]]
Start
Fontware
by typing BITS 1 (note
the
space)
and
pressing
.J.
[ill Select
the
typefaces you
want
and
tell
Fontware
to
make
PostScript
printer
fonts.
Fontware
terminates
very quickly,
but
a new file
called FWARE.JOB
has
been
created.
In
addition,
this
process creates a
\PSFONTS
directory (if one
does
not
already exist)
in
the
root directory of drive C
(C:\PSFONTS).
[]]
With \FONTWARE as
the
current
directory, type
the
following command:
CVTPSO FWARE.JOB .J
This command creates PSO files
in
C:
\PSFONTS
for
each
of
your font files. These files
are
needed for cre-
ating
the
AFM
and
PFA files.
Artline Release Note
03
Generating
Fonts with
BLDAF4
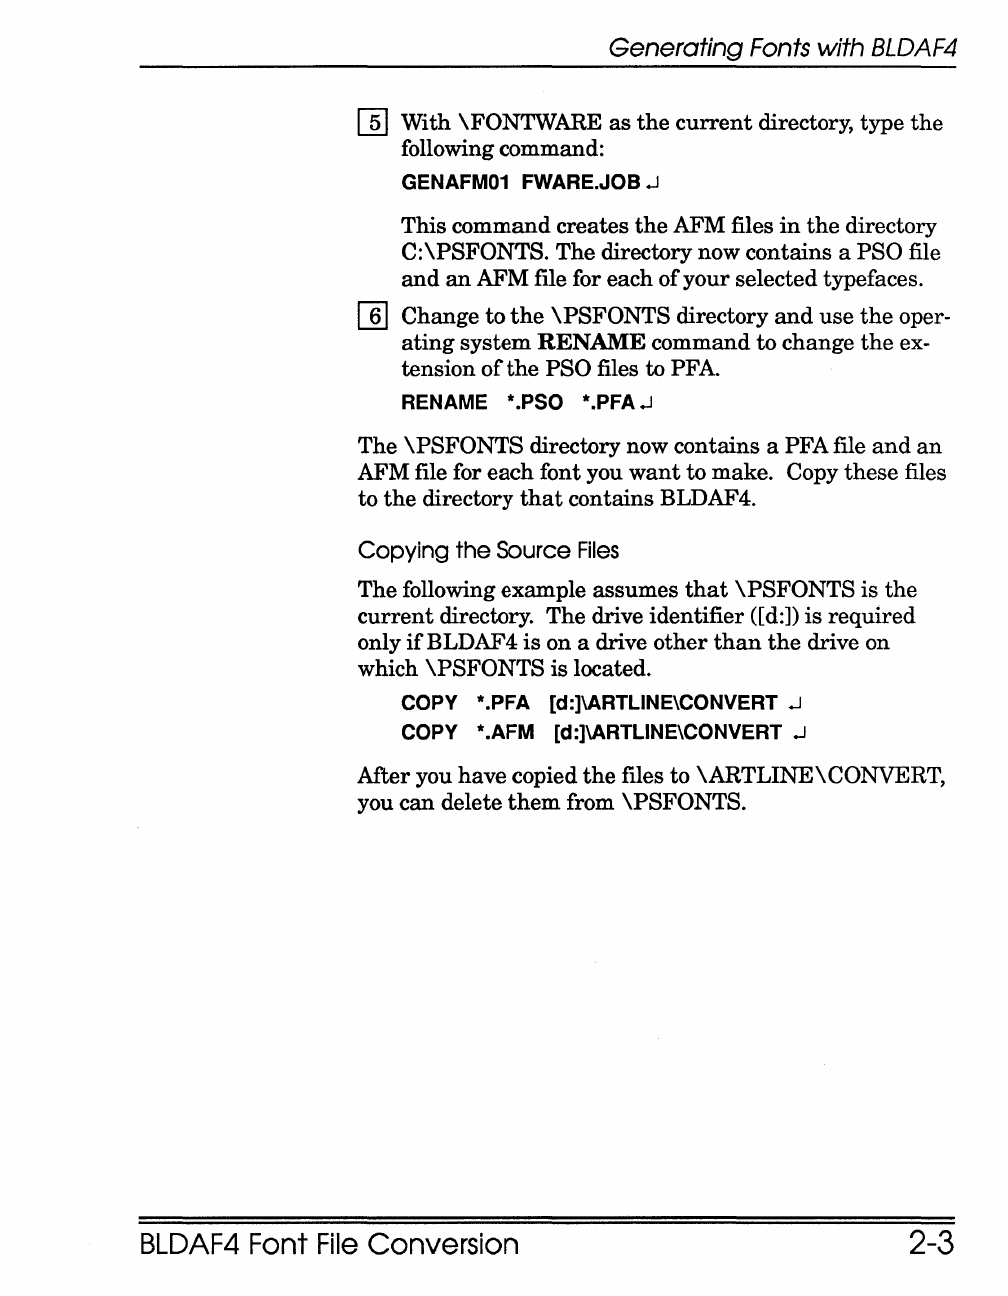
[]]
With \FONTWARE as
the
current
directory, type
the
following command:
GENAFM01 FWARE.JOB.J
This command creates
the
AFM files
in
the
directory
C:
\PSFONTS.
The
directory now contains a PSO file
and
an
AFM file for each
of
your selected typefaces.
[]]
Change
to
the
\PSFONTS
directory
and
use
the
oper-
ating
system
RENAME
command
to
change
the
ex-
tension
of
the
PSO files to PFA.
RENAME * .PSO * .PFA
.J
The
\PSFONTS
directory now contains a PFAfile
and
an
AFM file for each font you
want
to make. Copy
these
files
to
the
directory
that
contains BLDAF4.
Copying
the
Source
Files
The following example assumes
that
\PSFONTS
is
the
current
directory.
The
drive identifier ([d:])
is
required
only
if
BLDAF4
is
on a drive
other
than
the
drive on
which
\PSFONTS
is
located.
COpy
* .PFA [d:]\ARTLlNE\CONVERT.J
COpy
*.AFM [d:]\ARTLlNE\CONVERT.J
After you have copied
the
files to \ARTLlNE\CONVERT,
you can delete
them
from
\PSFONTS.
BLDAF4
Font
File
Conversion 2-3
Generating
Fonts with
BLDAF4
2-4
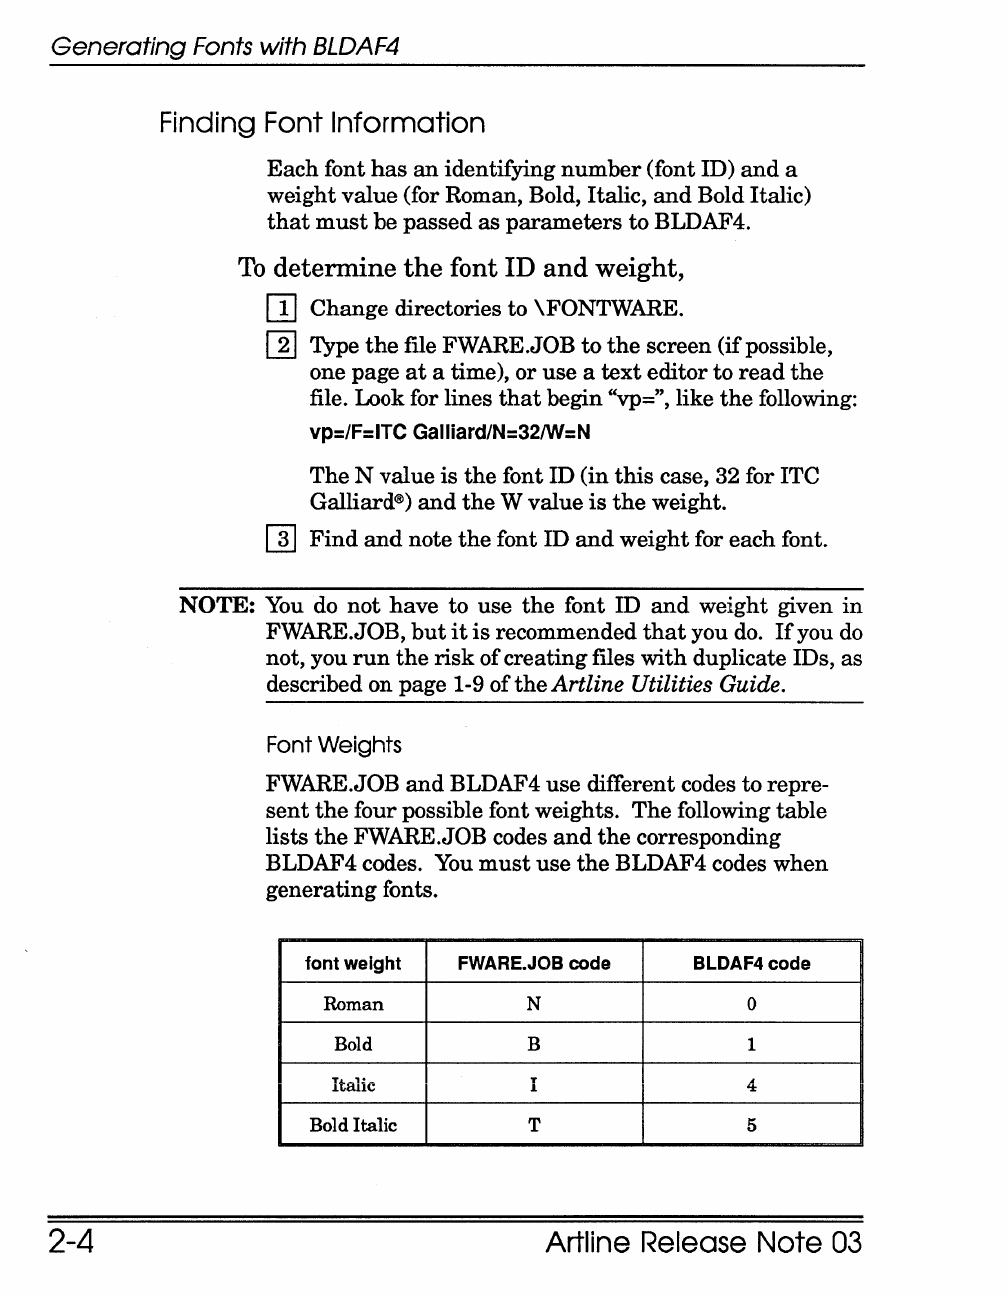
Finding Font Information
Each
font
has
an
identifying
number
(font ID)
and
a
weight
value
(for Roman, Bold, Italic,
and
Bold Italic)
that
must
be
passed
as
parameters
to
BLDAF4.
To
determine
the
font ID
and
weight,
IT]
Change
directories
to
\FONTWARE.
[]]
Type
the
file FWARE.JOB
to
the
screen
(if
possible,
one
page
at
a time),
or
use
a
text
editor
to
read
the
file. Look for lines
that
begin "vp=", like
the
following:
vp=/F=ITC Galliard/N=321W=N
The
N
value
is
the
font ID
(in
this
case, 32 for ITC
Galliard®)
and
the
W
value
is
the
weight.
[]]
Find
and
note
the
font ID
and
weight
for
each
font.
NOTE:
You do
not
have
to
use
the
font ID
and
weight given
in
FWARE.JOB,
but
it
is
recommended
that
you do.
If
you do
not, you
run
the
risk
of
creating
files
with
duplicate IDs,
as
described on page 1-9
of
the
Artline Utilities Guide.
Font Weights
FWARE.JOB
and
BLDAF4
use
different codes
to
repre-
sent
the
four possible font weights.
The
following
table
lists
the
FWARE.JOB codes
and
the
corresponding
BLDAF4 codes. You
must
use
the
BLDAF4 codes
when
generating
fonts.
font weight FWARE.JOB code BLDAF4code
Roman N 0
Bold B 1
Italic I 4
Bold Italic T 5
Artline Release Note
03
Generating
Fonts with
BLDAF4
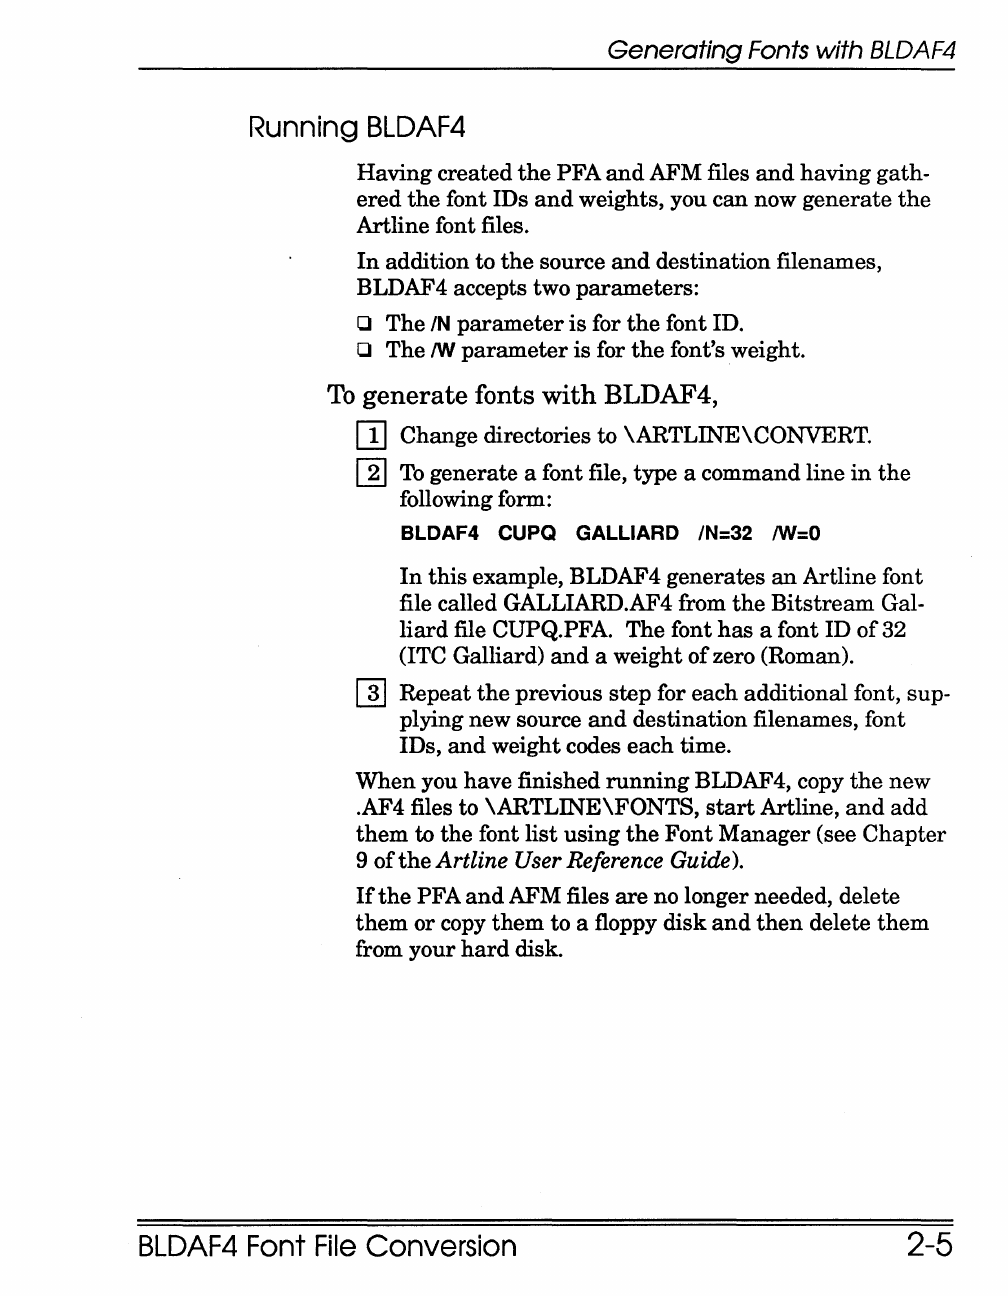
Running
BLDAF4
Having created
the
PFA
and
AFM files
and
having gath-
ered
the
font IDs
and
weights, you can now generate
the
Artline font files.
In
addition to
the
source
and
destination filenames,
BLDAF4 accepts two parameters:
o The IN
parameter
is
for
the
font ID.
o The!W
parameter
is for
the
font's weight.
To
generate
fonts
with
BLDAF4,
[}]
Change directories to \ARTLINE\CONVERT.
[]]
To
generate a font file, type a command line
in
the
following form:
BLDAF4 CUPQ GALLIARD IN=32 !W=O
In
this
example, BLDAF4 generates
an
Artline font
file called GALLIARD.AF4 from
the
Bitstream
Gal-
liard
file CUPQ.PFA. The font
has
a font ID
of
32
(ITC Galliard)
and
a weight
of
zero (Roman).
[]]
Repeat
the
previous step for each additional font, sup-
plying new source
and
destination filenames, font
IDs,
and
weight codes each time.
When you have finished
running
BLDAF4, copy
the
new
.AF4 files to
\ARTLINE\FONTS,
start
Artline,
and
add
them
to the font list
using
the
Font
Manager
(see
Chapter
9
of
the
Artline User Reference Guide).
If
the
PFA
and
AFM files
are
no longer needed, delete
them
or copy
them
to a floppy disk
and
then
delete
them
from your
hard
disk.
BLDAF4
Font
File
Conversion 2-5

HiJaak
File
Conversion Utility
HIJAAK for Digital Research
is
a utility
that
converts files
created
by
other
applications to a file format
that
you
can
open
or
merge
in
Artline.
You
can also
use
HiJaak
to convert Artline files
to formats
that
can be
used
with
other
applications,
or
for
raster
fax
card
transmission.
This
chapter
contains information
about
the
following:
o basic background on
HiJaak
and
file conversion;
o how to
start
and
use
HiJaak;
o
the
HiJaak
menus
and
commands.
If
you selected
the
default destination directory
during
the
Artline
Setup
program,
HiJaak
was
installed
in
the
\ARTLINE\CONVERT directory. Otherwise,
HiJaak
was
installed
in
the
destination directory you specified
during
Setup.
3-1
File
Format
Types
File
Format
Types
vector
raster
3-2
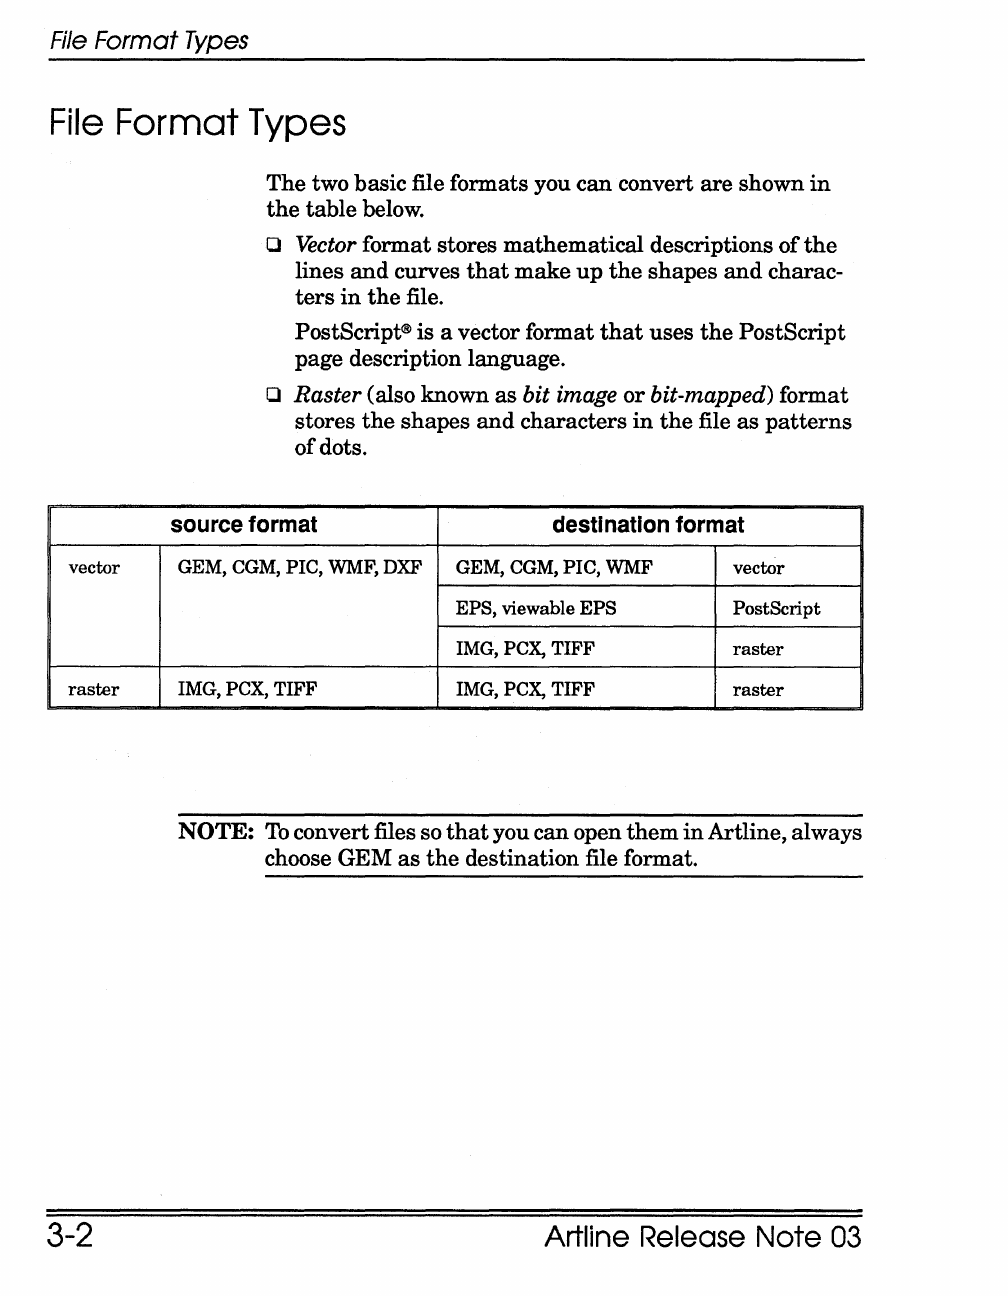
The two basic file formats you
can
convert
are
shown
in
the
table below.
o
'Vector
format stores mathematical descriptions
of
the
lines
and
curves
that
make
up
the
shapes
and
charac-
ters
in
the
file.
PostScript®
is
a vector format
that
uses
the
PostScript
page description language.
o
Raster
(also known
as
bit image
or
bit-mapped) format
stores
the
shapes
and
characters
in
the
file
as
patterns
of
dots.
source format destination format
GEM, CGM, PIC, WMF, DXF GEM, CGM, PIC, WMF vector
EPS, viewable
EPS
PostScript
IMG,
PCx,
TIFF
raster
IMG, PCX,
TIFF
IMG,
PCx,
TIFF
raster
NOTE:
To
convert files so
that
you can open
them
in
Artline, always
choose GEM
as
the
destination file format.
Artline Release
Note
03
Destination
File
Types
Destination
File
Types
destination type
GEM
WMF
CGM
TIFF
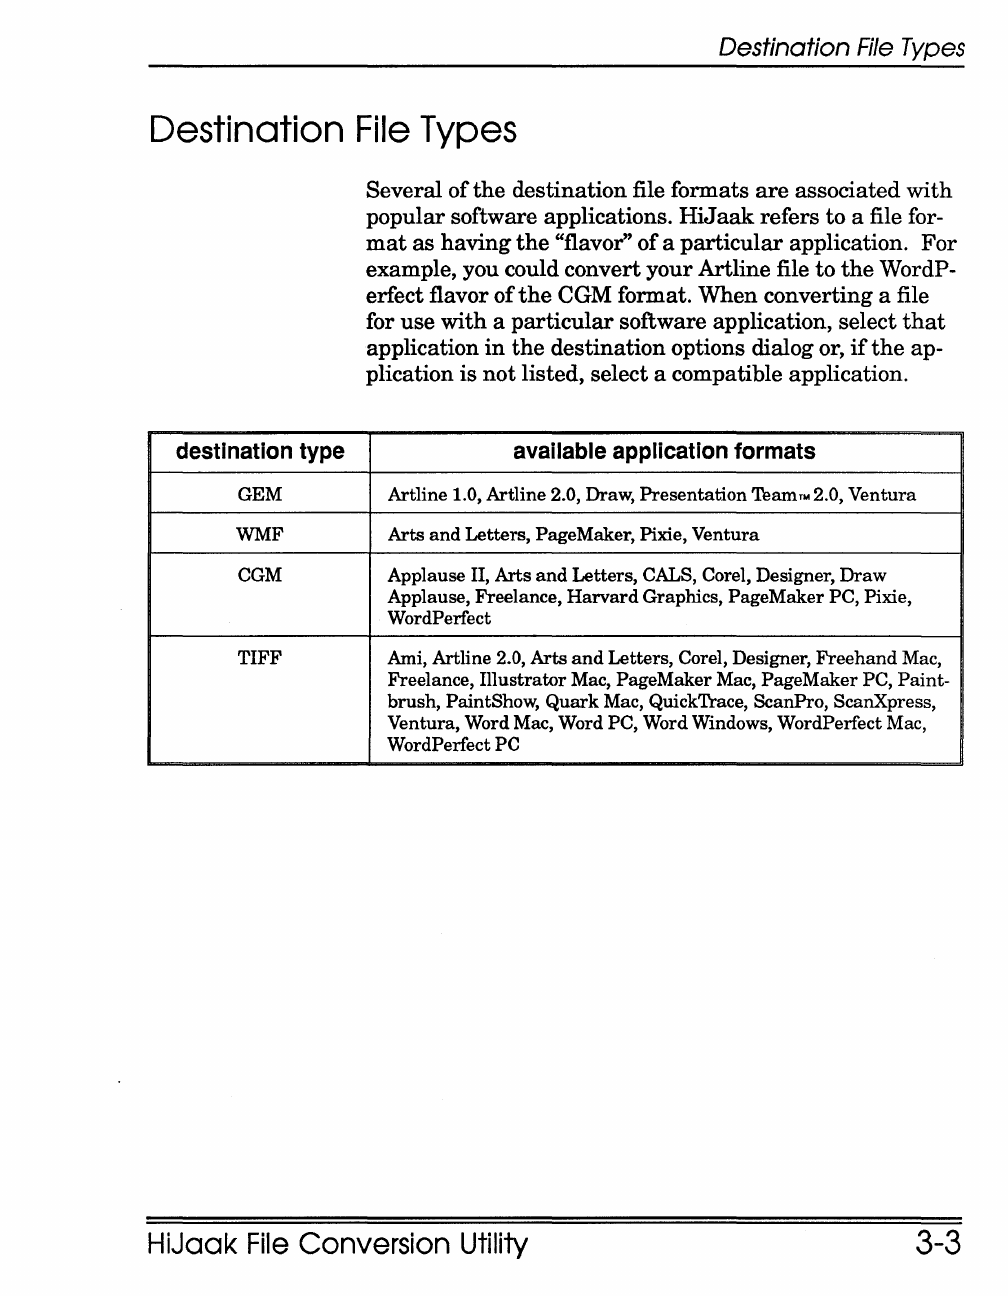
Several
of
the
destination file formats
are
associated
with
popular software applications.
HiJ
aak
refers to a file for-
mat
as
having
the
"flavor"
of
a
particular
application.
For
example, you could convert your Artline file to
the
WordP-
erfect flavor
of
the
CGM format. When converting a file
for
use
with
a
particular
software application, select
that
application
in
the
destination options dialog or,
if
the
ap-
plication is not listed, select a compatible application.
available application formats
Artline 1.0, Artline 2.0, Draw, Presentation
TeamTM
2.0, Ventura
Arts
and
Letters, PageMaker, Pixie, Ventura
Applause II, Arts
and
Letters, CALS, Corel, Designer,
Draw
Applause, Freelance,
Harvard
Graphics, PageMaker PC, Pixie,
WordPerfect
Ami, Artline 2.0, Arts
and
Letters, Corel, Designer,
Freehand
Mac,
Freelance, Illustrator Mac, PageMaker Mac, PageMaker PC, Paint-
brush, PaintShow,
Quark
Mac, QuickTrace, ScanPro, ScanXpress,
Ventura, Word Mac, Word PC, Word Windows, WordPerfect Mac,
WordPerfect PC
HiJaak
File
Conversion Utility 3-3
Starting HiJaak
Starting HiJaak
3-4
You
can
start
HiJ
aak
from
the
operating system com-
mand
line
or
from
within
Artline.
From
the
Command
Line
To
start
HiJaak
from
the
command line,
[]J Switch to
the
disk drive
and
directory
in
which you
have
installed HiJaak..
For
example,
if
HiJaak
is
on
drive D
and
you chose
the
default destination direc-
tory
during
Setup,
these
two commands
take
you to
the
directory
in
which
it
is
installed:
D:.J
CD \ARTLlNE\CONVERT
.J
[]]
Type
the
following command to
start
HiJaak:
HJD
.J
Artline Release Note
03
Starting HiJaak
From Artline
To
start
HiJ
aak
from Artline,
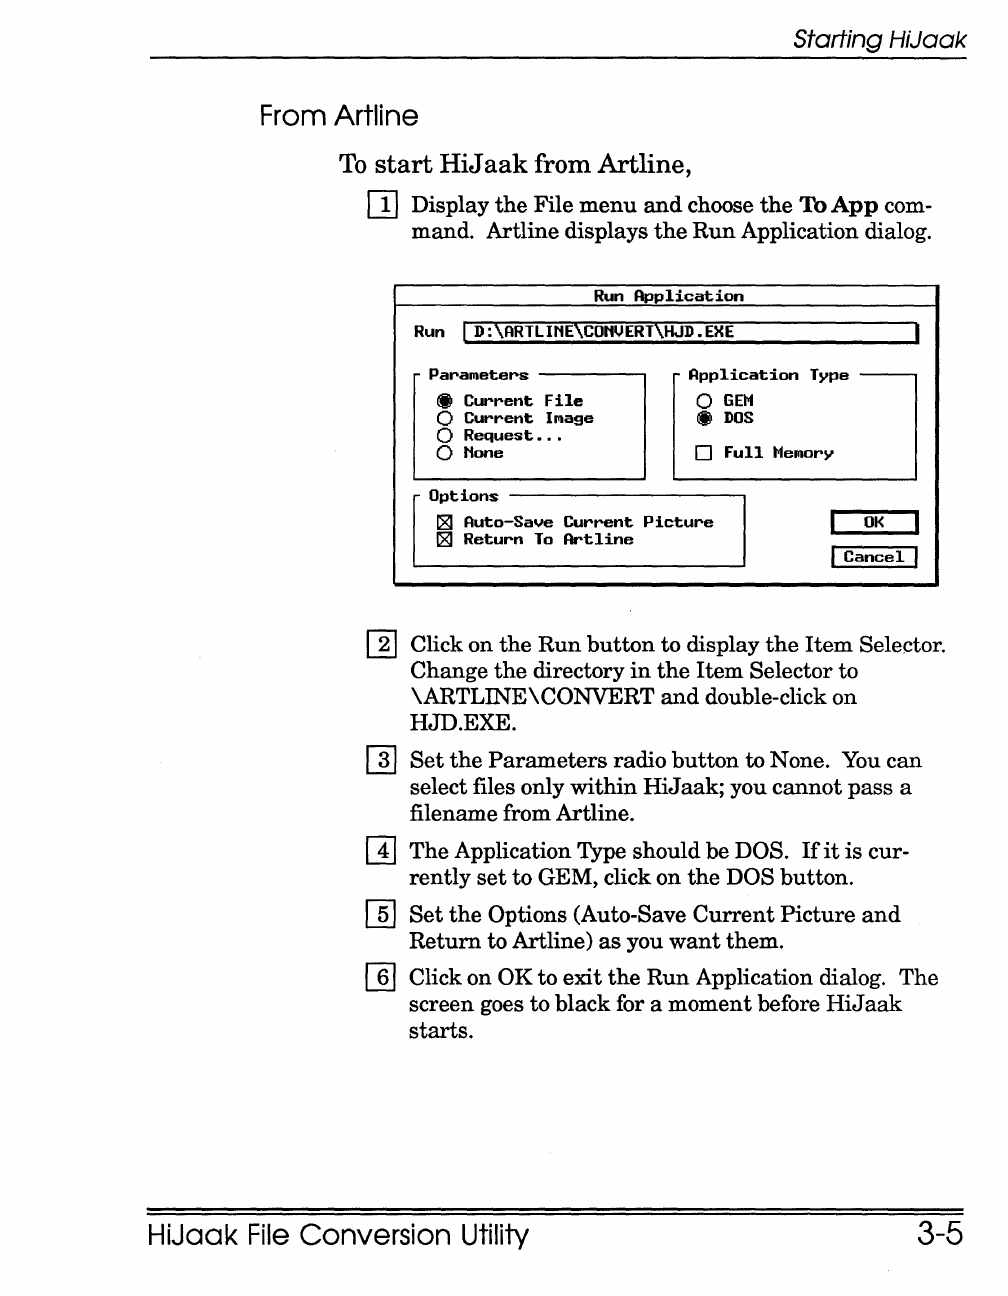
[]
Display
the
File
menu
and
choose
the
To
App
com-
mand. Artline displays
the
Run
Application dialog.
Run
Application
Run I D:
\ARTL
INE\CONVERT\HJD
•
EXE
I
r
Parameters
r
Application
Type -
•
Current
File
o
GEM
o
Current
Image • D08
o
Request
•..
o None 0
Full
Memory
Options
~
Auto-Save
Current
Picture
I
OK
I
~
Return
To
Artline
I
Cancel
I
[]]
Click on
the
Run
button
to display
the
Item
Selector.
Change
the
directory
in
the
Item
Selector to
\ARTLINE\CONVERT
and
double-click
on
HJD.EXE.
I]]
Set
the
Parameters
radio
button
to None. You
can
select files only
within
HiJaak;
you
cannot
pass
a
filename from Artline.
[1]
The Application Type should be DOS.
If
it
is
cur-
rently
set
to GEM, click
on
the
DOS button.
[§]
Set
the
Options (Auto-Save
Current
Picture
and
Return
to Artline)
as
you
want
them.
(]]
Click on OK to
exit
the
Run
Application dialog.
The
screen goes to black for a
moment
before
HiJaak
starts.
HiJaak
File
Conversion Utility 3-5
HiJaak
Interface
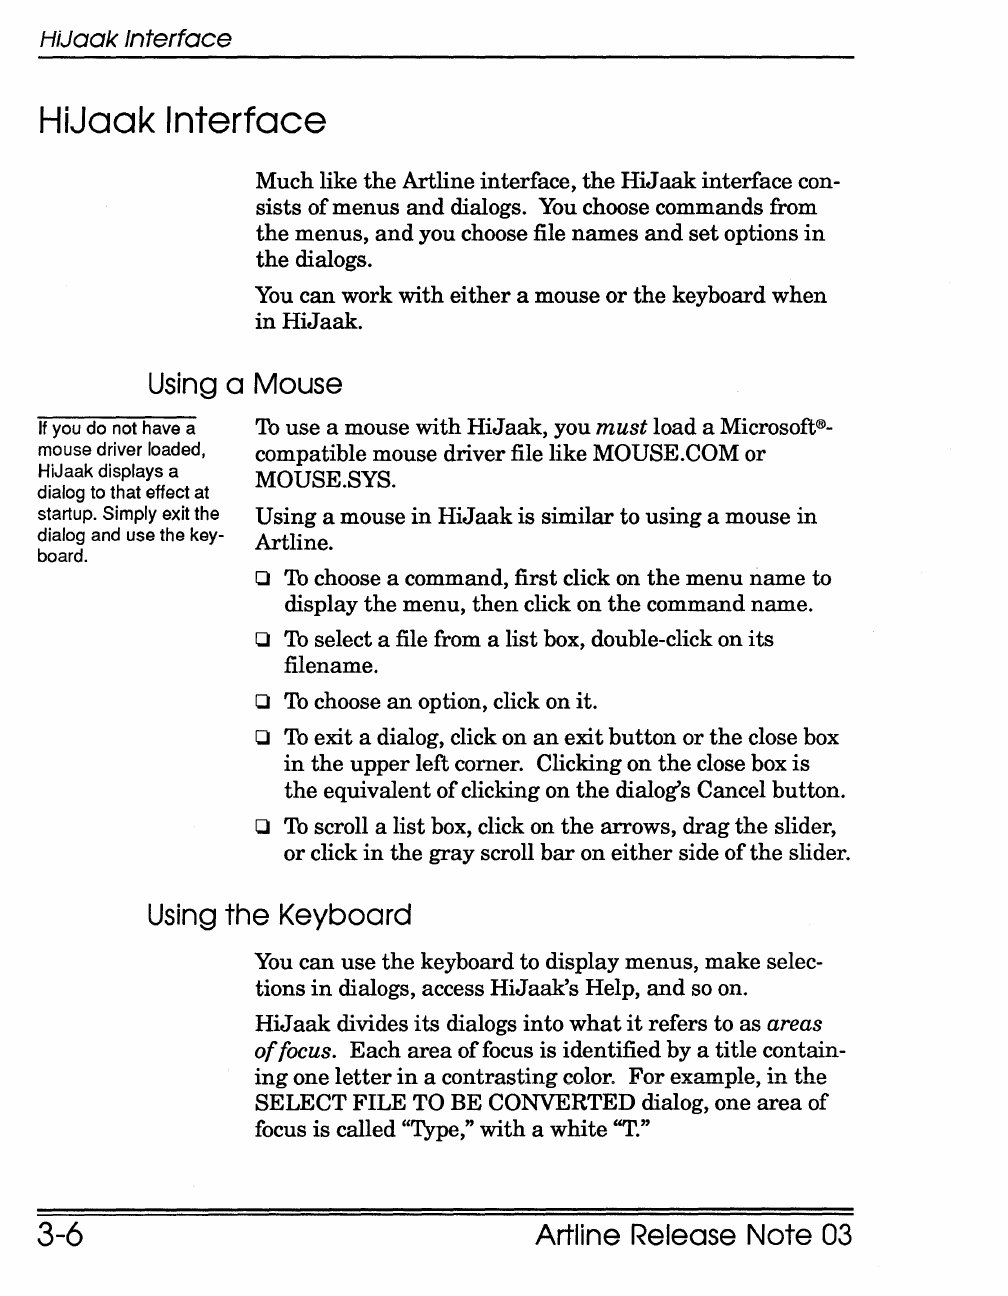
HiJaak Interface
Much like
the
Artline interface,
the
HiJaak
interface con-
sists
of
menus
and
dialogs.
You
choose commands from
the
menus,
and
you choose file
names
and
set
options
in
the
dialogs.
You
can
work with
either
a mouse
or
the
keyboard
when
in
HiJaak.
Using
a Mouse
If
you do not have a
mouse driver loaded,
HiJaak displays a
dialog to that effect at
startup. Simply exit the
dialog and use the key-
board.
To
use
a mouse
with
HiJaak,
you
must
load a Microsoft®-
compatible mouse driver file like MOUSE.COM
or
MOUSE.SYS.
Using
a mouse
in
HiJaak
is
similar to using a mouse
in
Artline.
o
To
choose a command, first click on
the
menu
name
to
display
the
menu,
then
click on
the
command name.
o
To
select a file from a
list
box, double-click
on
its
filename.
o
To
choose
an
option, click on it.
o
To
exit a dialog, click on
an
exit
button
or
the
close box
in
the
upper
left corner. Clicking on
the
close box
is
the
equivalent
of
clicking on
the
dialog's Cancel button.
o
To
scroll a list box, click on
the
arrows,
drag
the
slider,
or
click
in
the
gray
scroll
bar
on
either
side
of
the
slider.
Using
the
Keyboard
3-6
You
can
use
the
keyboard to display menus,
make
selec-
tions
in
dialogs, access
HiJaak's
Help,
and
so on.
HiJaak
divides
its
dialogs
into
what
it
refers to as areas
offocus.
Each
area
of
focus is identified by a title contain-
ing
one
letter
in
a contrasting color.
For
example,
in
the
SELECT
FILE
TO BE CONVERTED dialog, one
area
of
focus
is
called "Type,"
with
a white
"T."
Artline Release
Note
03
HiJaak Interface
These
are
the
keyboard techniques you
use
in
HiJ
aak:
o
To
move to a specific
area
of
focus, press
the
Alt
key
as
you type
the
area's highlighted letter.
For
example, to
switch to
the
Type
area,
type Alt-T.
o
To
move from one
area
of
focus to
the
next,
press
the
Tab
key.
To
move to
the
previous
area
of
focus, press
Shift-Tab.
o
To
select
items
from a
list
box, follow
these
steps:
-1
Move
the
highlight to
the
list
box from which you
want
to select.
-2
Move
the
highlight
bar
in
the
list
box by pressing
the
up-arrow
or
down-arrow key or, for
larger
jumps,
the
PgUp
or
PgDn
key.
-3
Select a highlighted type from
the
Type box by
pressing.J. Select a highlighted filename by
pressing
Alt-S.
o
To
change directories, do
either
of
the
following:
-Type a full
pathname
into
the
text
field
in
the
cen-
ter
of
the
dialog,
and
press
.J.
-Move
the
highlight
bar
in
the
file
list
box to a direc-
tory
name
(indicated
by
square
brackets-[PIX],
for
example)
and
press.J.
To
go
up
one level
in
the
direc-
tory
path,
highlight
the
[..J
entry
and
press .J.
o
To
get
help on topics, follow
these
steps:
-1
Click on
Help
in
the
menu
bar, press
Alt-
H,
or
click on
the
Help
button
at
the
bottom
of
a dialog.
-2
Press
Alt-R to move to
the
Related Topics
area
and
then
use
the
arrow keys to highlight a Help
topic.
Press
Alt-S
to select
the
topic.
Do not press
.J
to select a topic.
If
you do, you will
exit
the
Help system
without
selecting anything.
o
To
exit a dialog
and
continue
the
conversion process,
press .J
or
type Alt-O.
To
exit a dialog
and
return
to
the
previous dialog, press
Esc.
HiJaak
File
Conversion Utility 3-7
HiJaak
Interface
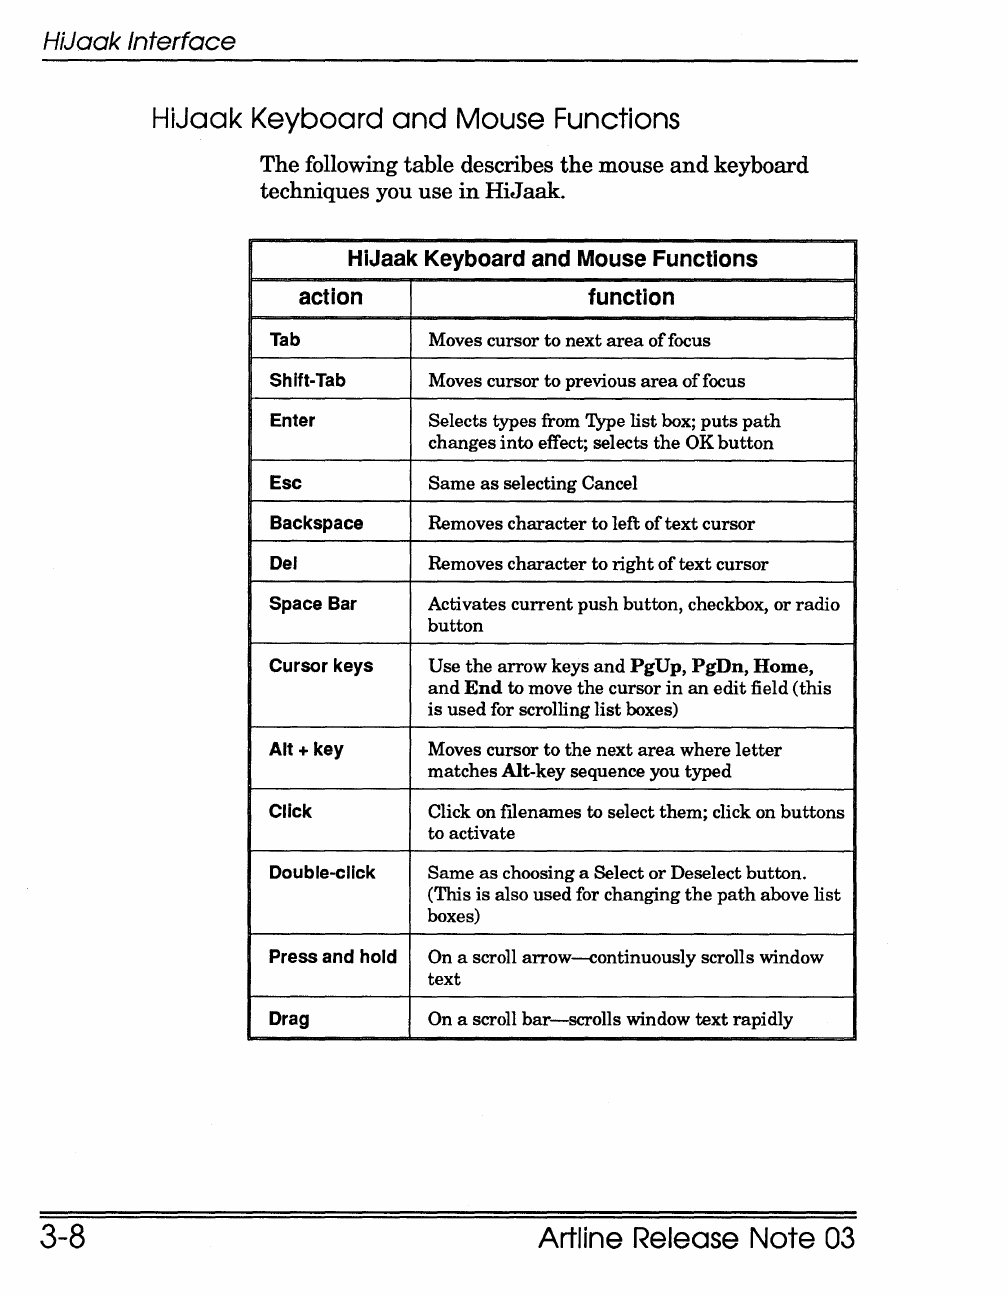
HiJaak Keyboard
and
Mouse Functions
3-8
The following table describes
the
mouse
and
keyboard
techniques you use
in
HiJaak.
HiJaak Keyboard and Mouse Functions
action function
Tab
Moves cursor
to
next
area
of
focus
Shift-Tab Moves cursor
to
previous
area
of
focus
Enter Selects types from Type
list
box;
puts
path
changes into effect; selects
the
OK
button
Esc
Same
as
selecting Cancel
Backspace Removes
character
to
left
of
text
cursor
Del Removes
character
to
right
of
text
cursor
Space Bar Activates
current
push
button, checkbox, or
radio
button
Cursor keys Use
the
arrow
keys
and
PgUp,
PgDn,
Home,
and
End
to move
the
cursor
in
an
edit
field
(this
is
used
for scrolling
list
boxes)
Alt
+ key Moves cursor
to
the
next
area
where
letter
matches
Alt-key sequence you
typed
Click Click on filenames to select
them;
click on
buttons
to activate
Double-click
Same
as
choosing a Select
or
Deselect
button.
(This
is
also
used
for changing
the
path
above
list
boxes)
Press and hold On a scroll
arrow-continuously
scrolls window
text
Drag On a scroll
bar-scrolls
window
text
rapidly
Artline Release
Note
03
Using HiJook Help
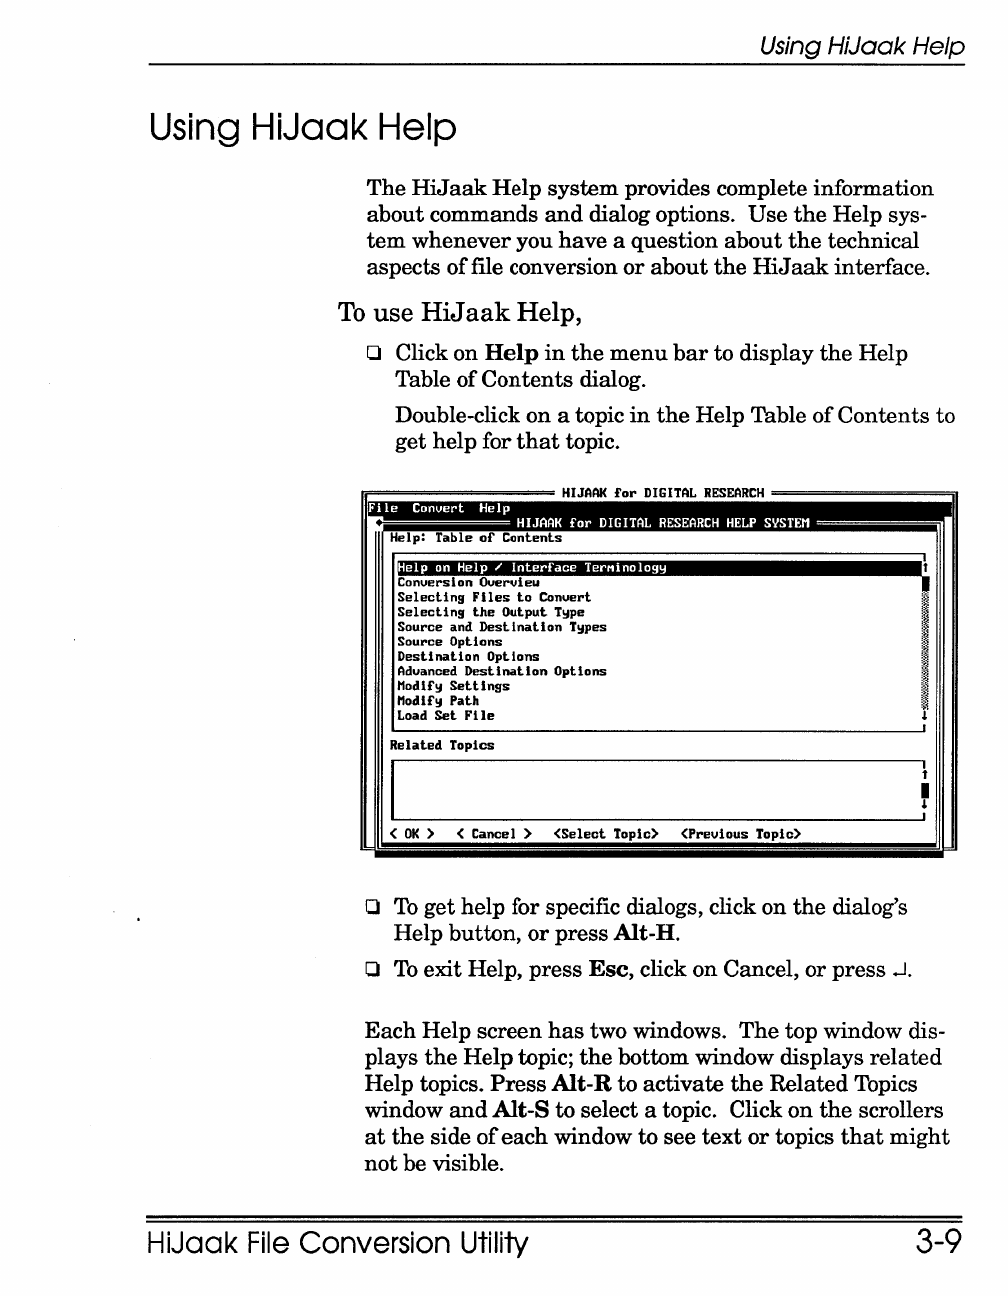
Using HiJaak Help
The
HiJaak
Help system provides complete information
about commands
and
dialog options. Use
the
Help sys-
tem
whenever you have a question
about
the
technical
aspects offile conversion
or
about
the
HiJaak
interface.
To
use
HiJaak
Help,
o Click on
Help
in
the
menu
bar
to display
the
Help
Table of Con
tents
dialog.
Double-click on a topic
in
the
Help Table
of
Contents to
get help for
that
topic.
r.=========
HIJAAK
for
DIGITAL
RESEARCH
========;a
ile
Convert Help
HIJAAK
for
DIGITAL
RESEARCH
HELP
SYSTEM
Help: Table
of
Contents
W·M
.•
,M:e
....
m
mii'3.
i
9p;·',i
.••
.i.p
Conversion Overvieu
Selecting
Files
to
Convert
Selecting
the
Output Type
Source and
Destination
Types
Source Options
Destination
Options
Advanced
Destination
Options
/1odlfy
Settings
/1odify Path
Load
Set
File
Related
Topics
<
OK
> < Cancel >
<Select
Topic> <Previous Topic>
o
To
get help for specific dialogs, click on
the
dialog's
Help button,
or
press Alt-H.
o
To
exit Help, press
Esc,
click on Cancel,
or
press .J.
1
I
l'
Each
Help screen
has
two windows.
The
top window dis-
plays
the
Help
topic;
the
bottom window displays
related
Help topics.
Press
Alt-R to activate
the
Related Topics
window
and
Alt-S
to select a topic. Click
on
the
scrollers
at
the
side
of
each window to see
text
or
topics
that
might
not
be visible.
HiJaak
File
Conversion Utility 3-9
How
to
Convert
Files
How
to
Convert
Files
3-10
HiJ
aak
file conversion
is
a simple process. Depending on
how
many
options you specify
or
whether
you accept de-
fault
settings,
the
file conversion process
can
be four basic
steps.
Take
these
steps
to convert a file:
[]
Select
the
file you
want
to convert from
the
SELECT
FILES
TO BE CONVERTED dialog.
[]]
(Optional)
Set
the
source options, such
as
fonts,
by
clicking
on
the
Set
Options check box.
[]]
In
the
DESTINATION
FILES
dialog, specify
the
des-
tination file type.
You
can also specify
the
names
and
destination directories of
the
converted files.
[]]
In
the
OUTPUT OPTIONS dialog,
set
destination op-
tions, such as file type format ("flavor"), height,
width,
and
aspect ratio.
HiJaak
converts
the
source file you selected to
the
desti-
nation
file type
and
name
you specified.
On
-screen mes-
sages indicate when
the
file conversion
is
complete.
An
option
is
available for you to save
the
process log
as
a file.
Artline Release Note
03
How
to
Convert
Files
Select
Files
to
be
Converted
Dialog
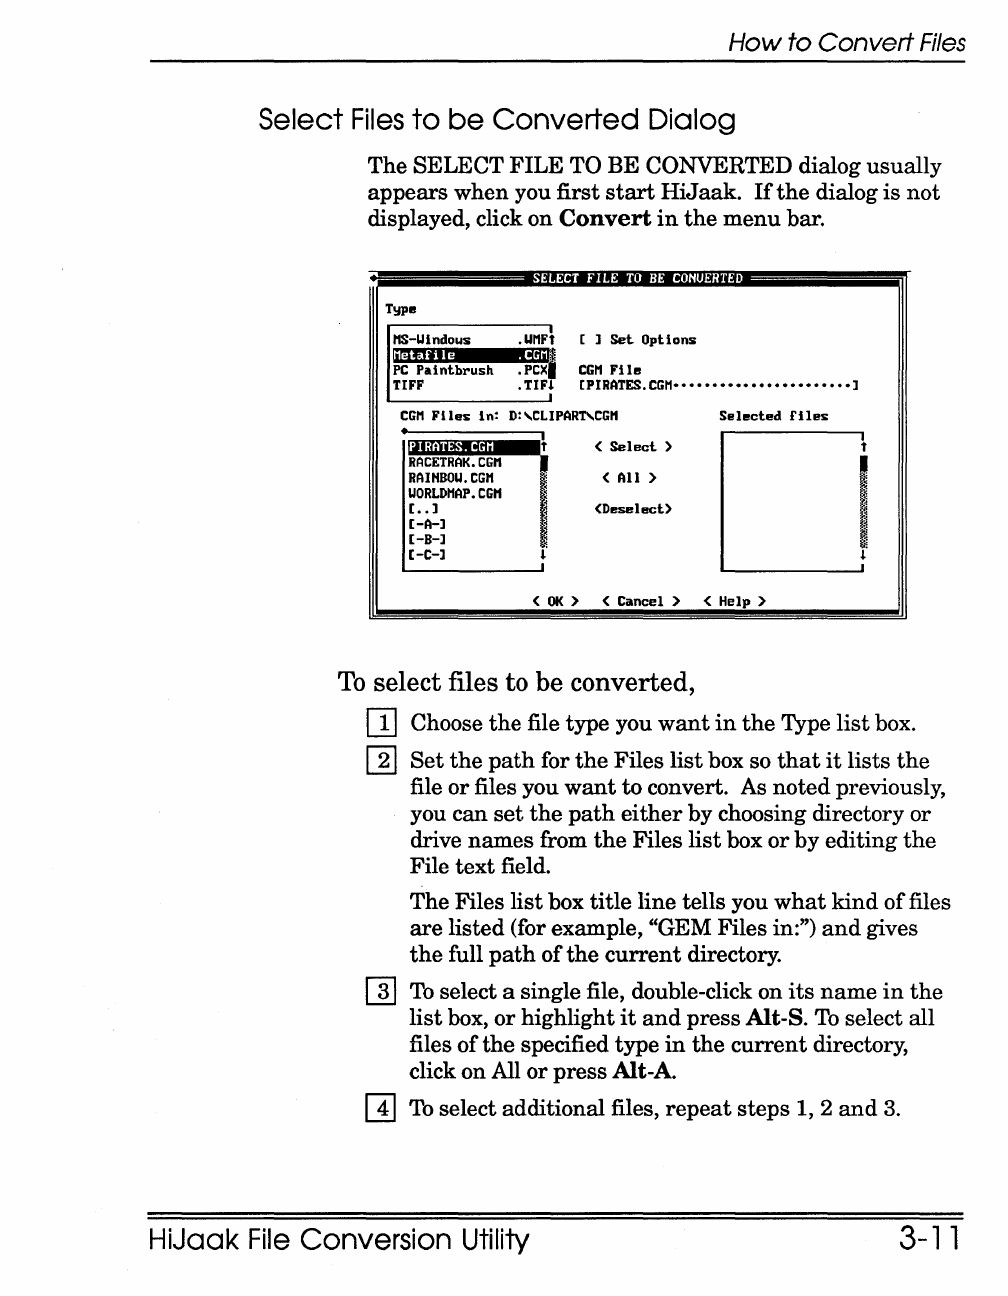
The SELECT
FILE
TO BE CONVERTED dialog usually
appears
when you first
start
HiJ
aak.
If
the
dialog
is
not
displayed, click on
Convert
in
the
menu
bar.
SELECT
FILE
TO
BE
CONUERTED
T!lpe
11!11S*-~U~intlidO.Lls._~.U~MFlt
[]
Set
Options
11
mmUi
-
IIdil'"
PC
Paintbrush
.PCX
CGM
File
TIFF
.TIF~
[PIRATES.CGn·······················]
RACETRAK.CGM
RAIHBOU.CGM
UORLDMAP.CGM
[..
]
[-A-]
[-B-]
[-C-]
Selected
flIes
(
Select
)
(
All
)
(Deselect)
<
OK
> < Cancel >
(Help
>
To
select files to be converted,
[!] Choose
the
file type you
want
in
the
Type
list
box.
[]]
Set
the
path
for
the
Files
list
box so
that
it
lists
the
file
or
files you
want
to
convert. As
noted
previously,
you can
set
the
path
either
by choosing directory or
drive
names
from
the
Files
list
box
or
by
editing
the
File
text
field.
The Files
list
box
title
line tells you
what
kind
of
files
are
listed (for example, "GEM Files in:")
and
gives
the
full
path
of
the
current
directory.
[]]
To
select a single file, double-click on
its
name
in
the
list
box,
or
highlight
it
and
press Alt-S.
To
select all
files
of
the
specified type
in
the
current
directory,
click on
Allor
press
Alt-A.
[!]
To
select additional files,
repeat
steps 1, 2
and
3.
HiJaak
File
Conversion Utility 3-11
How
to
Convert
Files
3-12
To
de-select files,
[!]
Click on
the
file
in
the
"Selected files"
list
box.
[]]
Click on Deselect
or
press
Alt-
D.
To
set
options,
Click on
the
Set
Options
button
to place
an
X
in
the
check
box. The SOURCE OPTIONS dialog
appears
after
you
exit
the
SELECT
FILE
dialog.
If
there
is no X
in
the
check box,
the
options dialog does not appear.
The
SOURCE OPTIONS dialog varies according to
the
source file type.
If
you elect to
set
source options,
refer
to
the
HiJaak
Help for descriptions
of
the
options.
NOTE:
In
most
cases, you can skip
the
source options. See "Fonts
in
Converted Files" on
the
next
page.
To
exit
the
SELECT FILE dialog,
Click on OK or
press.J
to continue
the
conversion.
To
can-
cel
the
current
settings
and
exit
the
dialog, click on Can-
cel, click
on
the
"close" diamond
at
the
top left corner
of
the
dialog,
or
press Esc.
Multiple
File
Type
and
Path Conversions
By
repeating
each
of
the
steps listed on
the
previous page,
you
can
choose files
of
a variety
of
formats
and
from a va-
riety
of
directories.
For
example, you could choose IMG files from one direc-
tory, PCX files from another,
and
GEM files from yet an-
other.
You
can
also select files all
of
one type,
but
from
different directories. Managing multiple conversions
of
this
kind
can
get confusing, however,
and
you
might
find
it
easier
to
run
separate
conversions for files
of
a given
type
or
from different directories.
Artline Release Note
03

How
to
Convert
Files
Source Options Dialog
In
the
SOURCE OPTIONS dialog you
can
set
various
characteristics for
the
file conversion. The appearance
of
this
dialog varies according to
whether
you selected a ras-
ter
or
vector file type. The
HiJaak
Help
system
describes
the
options available
in
this
dialog.
•
CGH
SOURCE
OPTIONS
Source Fonts InterMediate Fonts
for
DUTCH
UTCH
I
PRE-ROMAH
PRE-SlUSS
ROMAH
SIMPLEX
SUISS
SUISSZ
DEFAULT
CAD
RUMBULL
i
SHERMAH
<Scan
Source>
<Add
User Font}
<Del
Src
Font> <Edit User Font>
<Del
User Font}
<
OK
> <Cancel>
<Help>
t
I
!~
,
Make your selections
in
the
dialog
and
click
on
OK
or
press .J to accept
the
settings
and
display
the
DESTINA-
TION FILE(S) dialog.
If
you click
on
Cancel
or
press
Esc,
you
return
to
the
SELECT FILES dialog.
Fonts in
Converted
Files
When converting files
that
contain editable
text
to
an
Artline-compatible format, you
can
skip source options.
Instead,
when
you open
the
converted file
in
Artline,
an
alert
gives you
the
option
of
substituting
fonts
or
convert-
ing
the
text
to curves. Choose
the
substitution
option.
If, when you open
the
file
in
Artline, you decide
that
the
substituted
font
is
not
what
you
want,
you
can
change it.
Select a
text
string, double-click
on
it
to re-open it,
and
use
the
Create
Text
Element
dialog to assign
another
Artline font
to
the
text. Do
this
for each
text
string
you
want
to change.
HiJaak
File
Conversion Utility 3-13
How
to
Convert
Files
3-14
Destination
Files
Dialog
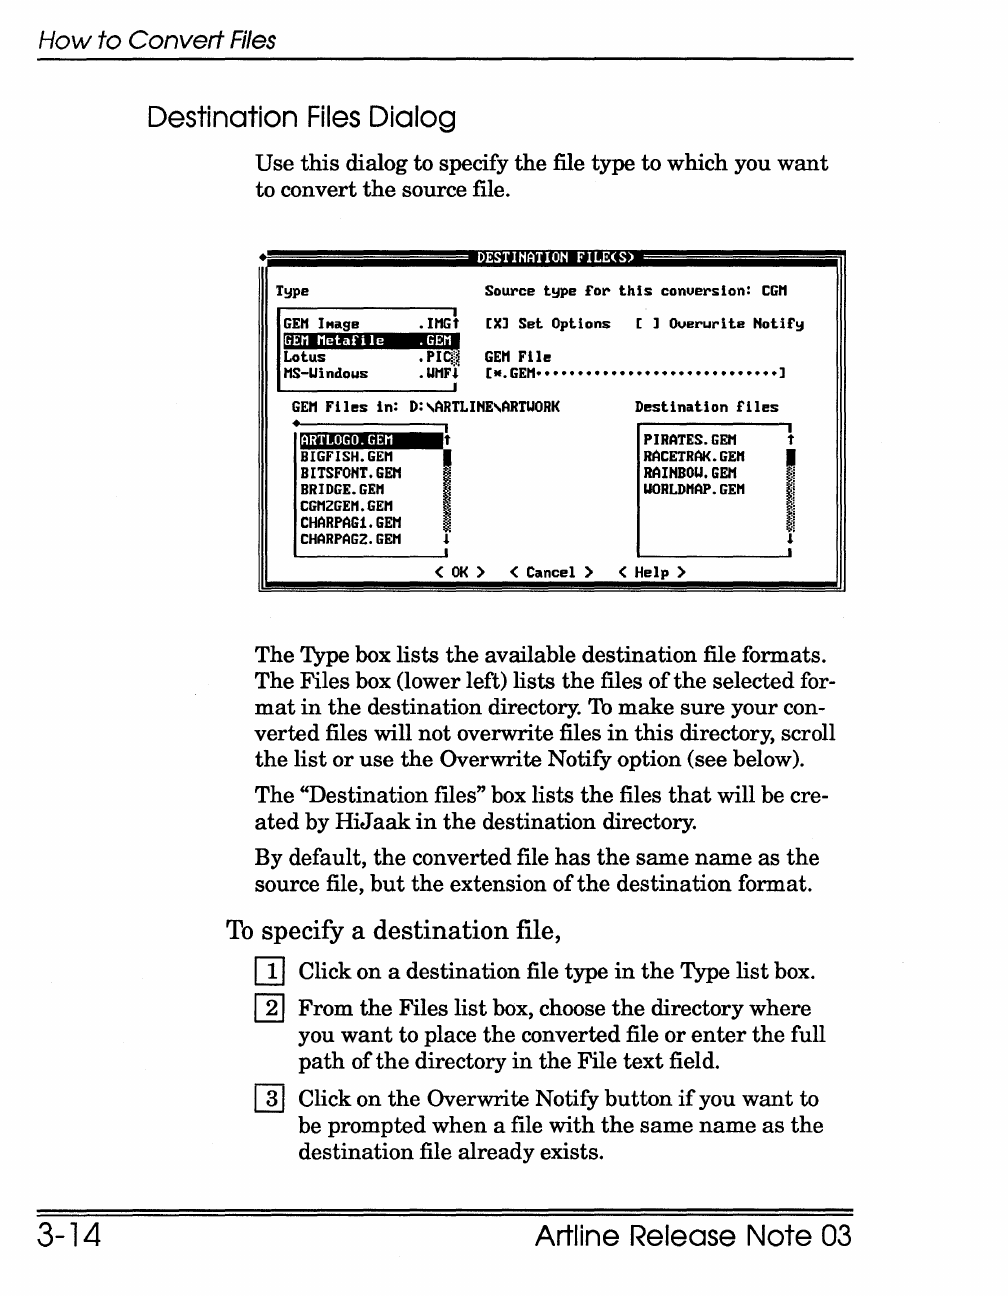
Use
this
dialog to specify
the
file type
to
which you
want
to convert
the
source file.
DESTINATION
FILE(S)
T~pe
Source
t~pe
for
this
conversion:
CGM
GEM
IMage
.IMGt
[X]
Set
Options
[]
Ouerurite
Hotif~
GEM
Metafile
.GEM
Lotus
MS-Uindous
GEM
FlIes
in:
•
ri1in!'IB'I~!i
BIGFISH.GEM
B
ITSFOHT
•
GEI1
BRIDGE.
GEM
CGM2GEM.GEM
CHARPAG1.GEM
CHAAPAGZ.GEM
•
Plo,~~
GEM
File
.UMFl
[M.GEM·····························]
D:\ARTLIHE\ARIUORK
Destination
files
I
t
PIRATES.GEI1
t
I
RACETRAK.GEM
,
RAIHBOU.GEI1
UOALDMAP.GEM
t
:~
l l
<
OK
> < Cancel > < Help >
The
Type box lists
the
available destination file formats.
The
Files box (lower left) lists
the
files
of
the
selected for-
mat
in
the
destination directory.
To
make
sure
your con-
verted
files will not overwrite files
in
this
directory, scroll
the
list
or
use
the
Overwrite Notify option (see below).
The
"Destination files" box lists
the
files
that
will be cre-
ated
by
HiJ
aak
in
the
destination directory.
By default,
the
converted file
has
the
same
name
as
the
source file,
but
the
extension
of
the
destination format.
To
specify a
destination
file,
[]]
Click on a destination file type
in
the
Type
list
box.
[]]
From
the
Files
list
box, choose
the
directory where
you
want
to place
the
converted file
or
enter
the
full
path
of
the
directory
in
the
File
text
field.
[]]
Click on
the
Overwrite Notify
button
if
you
want
to
be prompted when a file
with
the
same
name
as
the
destination file already exists.
Artline Release Note
03
How
to
Convert
Files
To
rename
a file
or
set
a new
path,
[]
Select
the
file from
the
"Destination files"
list
box.
[]]
Type
the
new
name
and/or
path
in
the
File
text
field.
To
set
options,
o Click on
the
Set
Options
button
to place
an
X
in
the
check box. The destination options dialog
appears
after
you exit
the
DESTINATION
FILES
dialog.
If
there
is
no X
in
the
check box,
the
options dialog does
not
appear.
To
exit
the
dialog,
Click on OK to accept
the
file
names
and
settings,
or
click
on Cancel to
return
to
the
previous dialog.
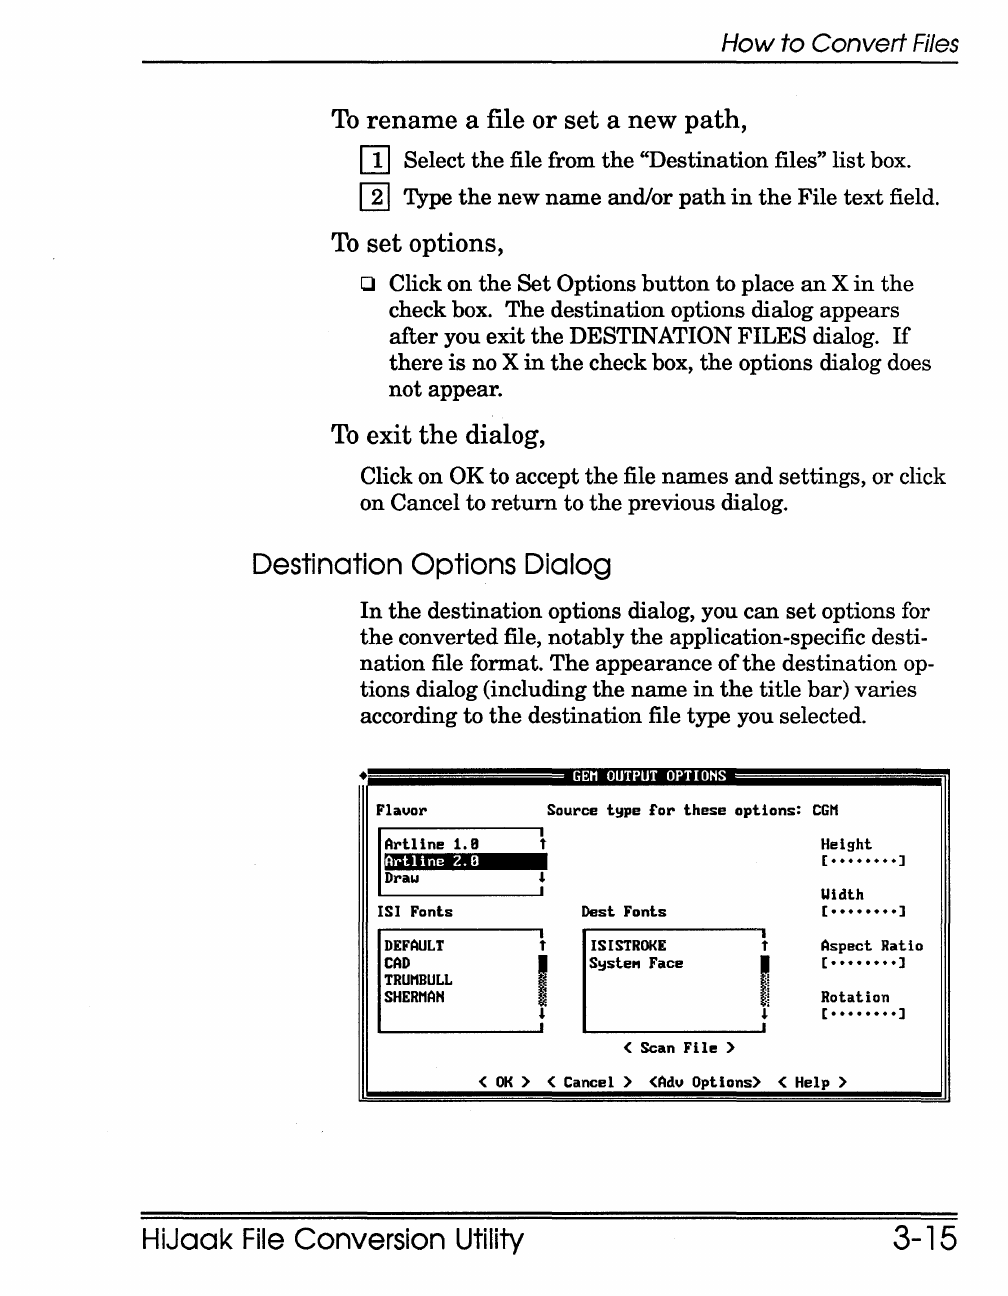
Destination Options Dialog
In
the
destination options dialog, you
can
set
options for
the
converted file, notably
the
application-specific desti-
nation
file format. The appearance
of
the
destination op-
tions dialog (including
the
name
in
the
title bar) varies
according to
the
destination file type you selected.
•
Flavor
Artline
1.8
I'lr-tline
2.0
Draw
lSI Fonts
DEFAULT
CAD
TRUMBULL
SHERMAN
GEM
OUTPUT
OPTIONS
Source
type
for
these
options:
CGM
t
~
Dest Fonts
t lSI
STROKE
I Systel'l Face
~
< Scan
File>
t
1
01
0'
0'
i'
Height
[ ........ ]
Uidth
[ ........ ]
Aspect
Ratio
[ ........ ]
Rotation
[ ........ ]
<
OK
>
(Cancel
>
<Adv
Options> < Help >
HiJaak
File
Conversion Utility 3-15
How
to
Convert
Files
3-16
Select
the
destination file format. The
HiJaak
Help sys-
tem
describes
the
other
options available
in
this
dialog.
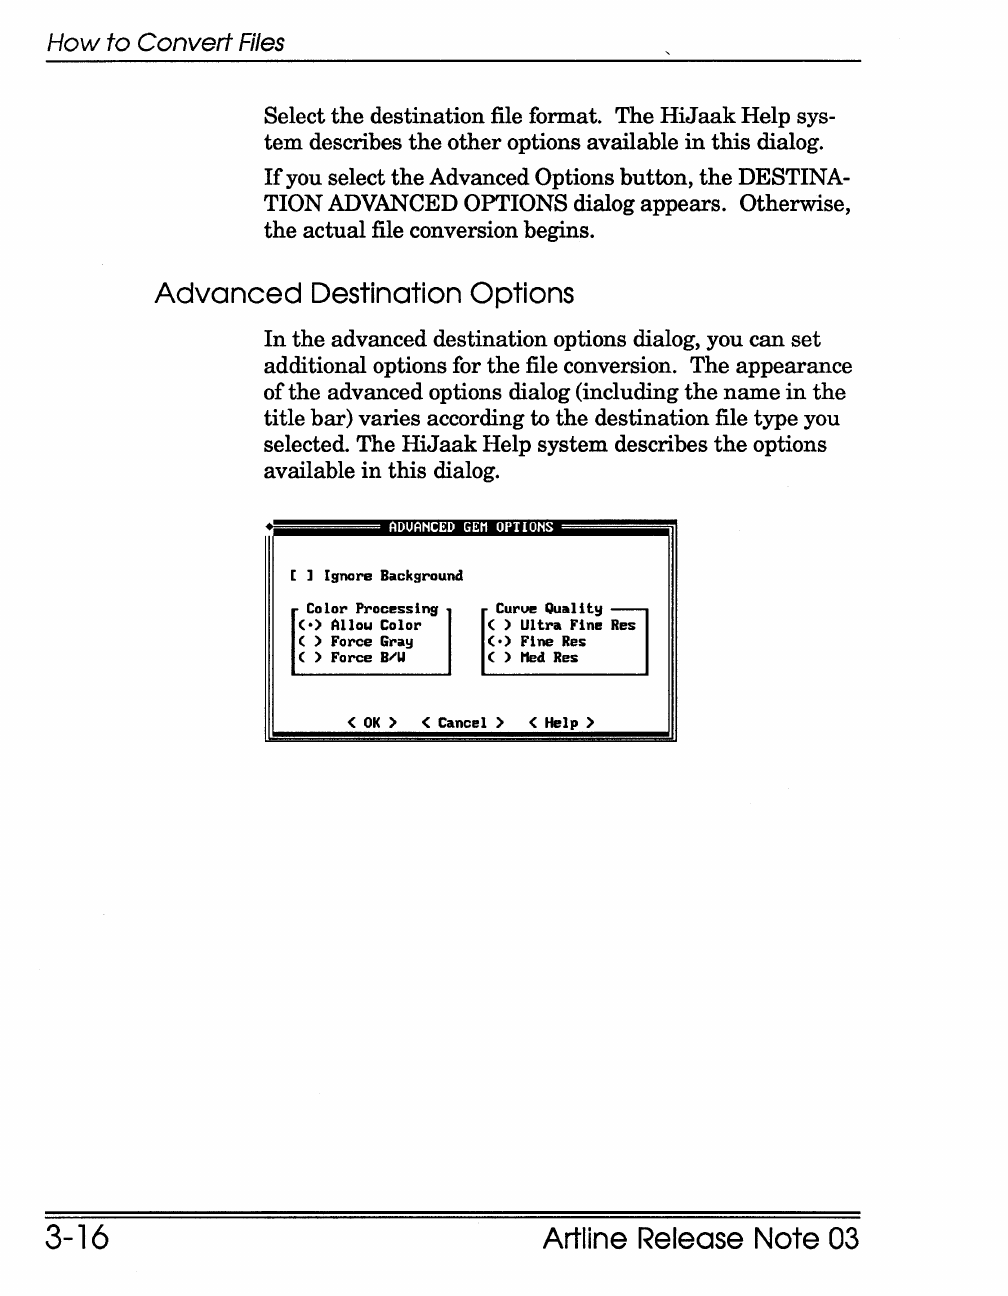
If
you select
the
Advanced Options button,
the
DESTINA-
TION ADVANCED OPTIONS dialog appears. Otherwise,
the
actual
file conversion begins.
Advanced
Destination Options
In
the
advanced destination options dialog, you
can
set
additional options for
the
file conversion. The appearance
of
the
advanced options dialog (including
the
name
in
the
title
bar)
varies according to
the
destination file type you
selected. The
HiJaak
Help system describes
the
options
available
in
this
dialog.
ADUANCED
GEM
OPTIONS
[ ] Ignore Background
Color
Processing
(0)
Allo.., Color
( ) Force Gray
( ) Force
B;U
Curve Quali
ty
( )
Ultra
Fine
Res
(0)
Fine
Res
( )
Ned
Res
<
OK
> < Cancel > < Help >
Artline Release Note
03
How
to
Convert
Files
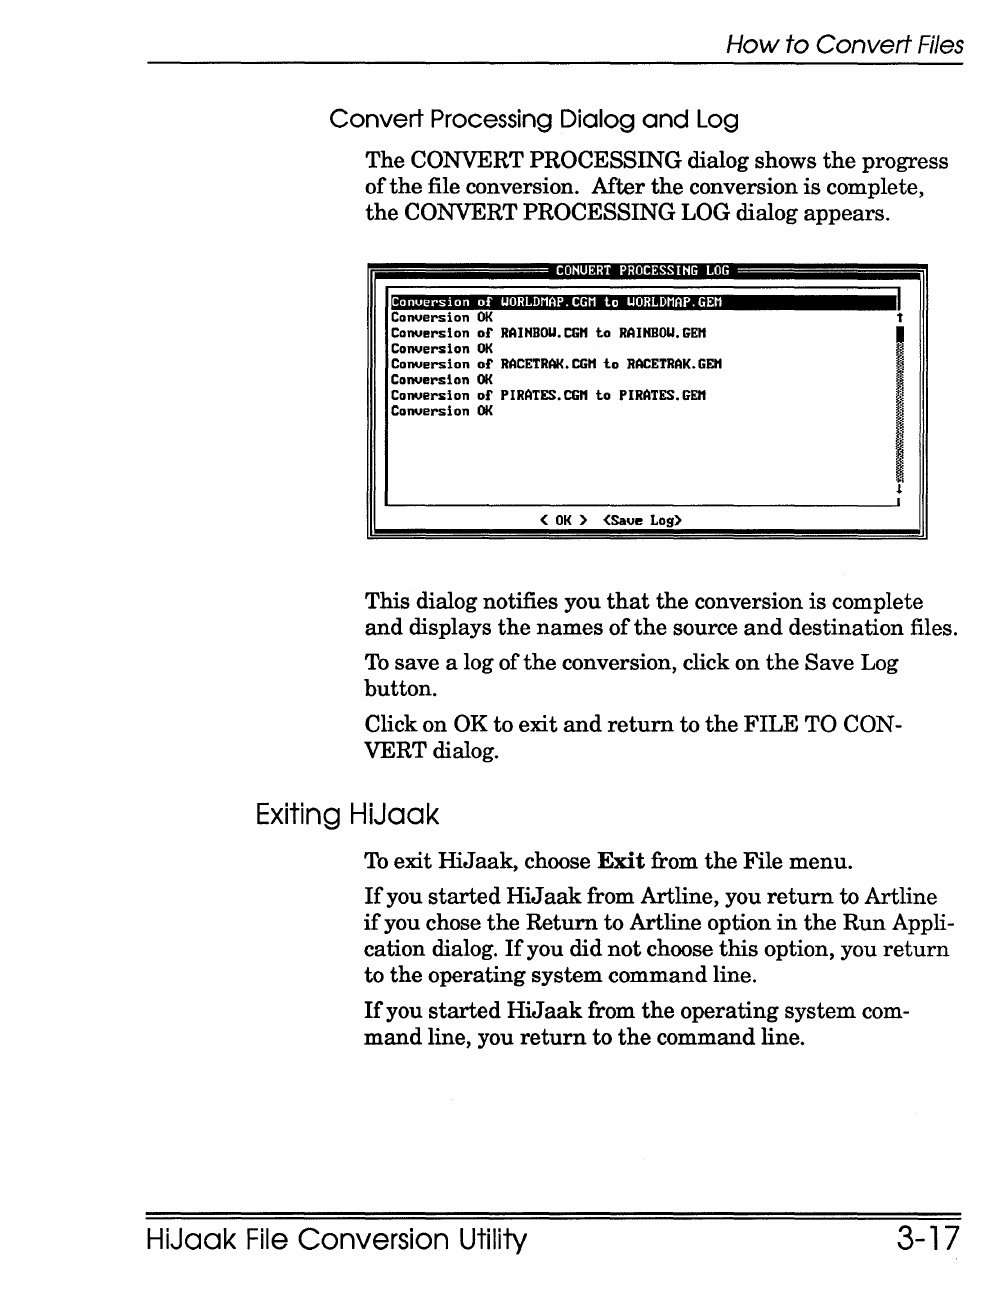
Convert Processing Dialog
and
Log
The CONVERT PROCESSING dialog shows
the
progress
of
the
file conversion.
Mter
the
conversion
is
complete,
the
CONVERT PROCESSING LOG dialog appears.
CONUERT
PROCESSING
LOG
Conversion
of
WORLDMAP.CGM
to
UORLDMAP.GEM
Conversion
OK
Conversion
or
RAIHBOU.CGH
to
RAIHBOU.GEH
Conversion
OK
Conversion
or
RACETRAK.
CGH
to
HACETRAK.
GEM
Conversion
OK
Conversion
or
PIRATES.CGH
to
PIRATES.GEH
Conversion
OK
<
OK)
<Save Log)
This dialog notifies you
that
the
conversion
is
complete
and
displays
the
names
of
the
source
and
destination files.
To
save a log
of
the
conversion, click on
the
Save
Log
button.
Click on OK to exit
and
return
to
the
FILE
TO CON-
VERT dialog.
Exiting HiJaak
To
exit
HiJaak,
choose
Exit
from
the
File menu.
If
you
started
HiJ
aak
from Artline, you
return
to Artline
if
you chose
the
Return
to Artline option
in
the
Run
Appli-
cation dialog.
If
you
did
not
choose
this
option, you
return
to
the
operating system command line.
If
you
started
HiJaak
from
the
operating system com-
mand
line, you
return
to
the
command line.
HiJaak
File
Conversion Utility 3-17
EPS
Conversion
EPS
Conversion
3-18
Using
HiJaak,
you can convert your Artline GEM files (or
files
in
other
source formats) to
EPS
(encapsulated PostS-
cript) formats
that
can
be opened
in
Adobe Illustrator,
loaded
into
frames
in
Ventura Publisher,
or
copied to a
PostScript printer.
One
reason
for such a conversion
is
to
create
Illustrator-
compatible clip art from your Artline files.
NOTE:
Because
the
EPSF
PostScript option
in
Artline produces
files
that
can
be loaded
into
frames
in
Ventura,
the
principal
reason
for
using
HiJaak
to
convert GEM files to Ventura-
compatible
EPS
files would
be
to convert a large
number
of
files
at
one time.
The
steps
required for converting to
EPS
are
the
same
as
for
other
conversions,
with
the
destination options deter-
mining
the
Illustrator, Ventura,
or
printer
compatibility
of
the
converted files.
Artline Release Note
03
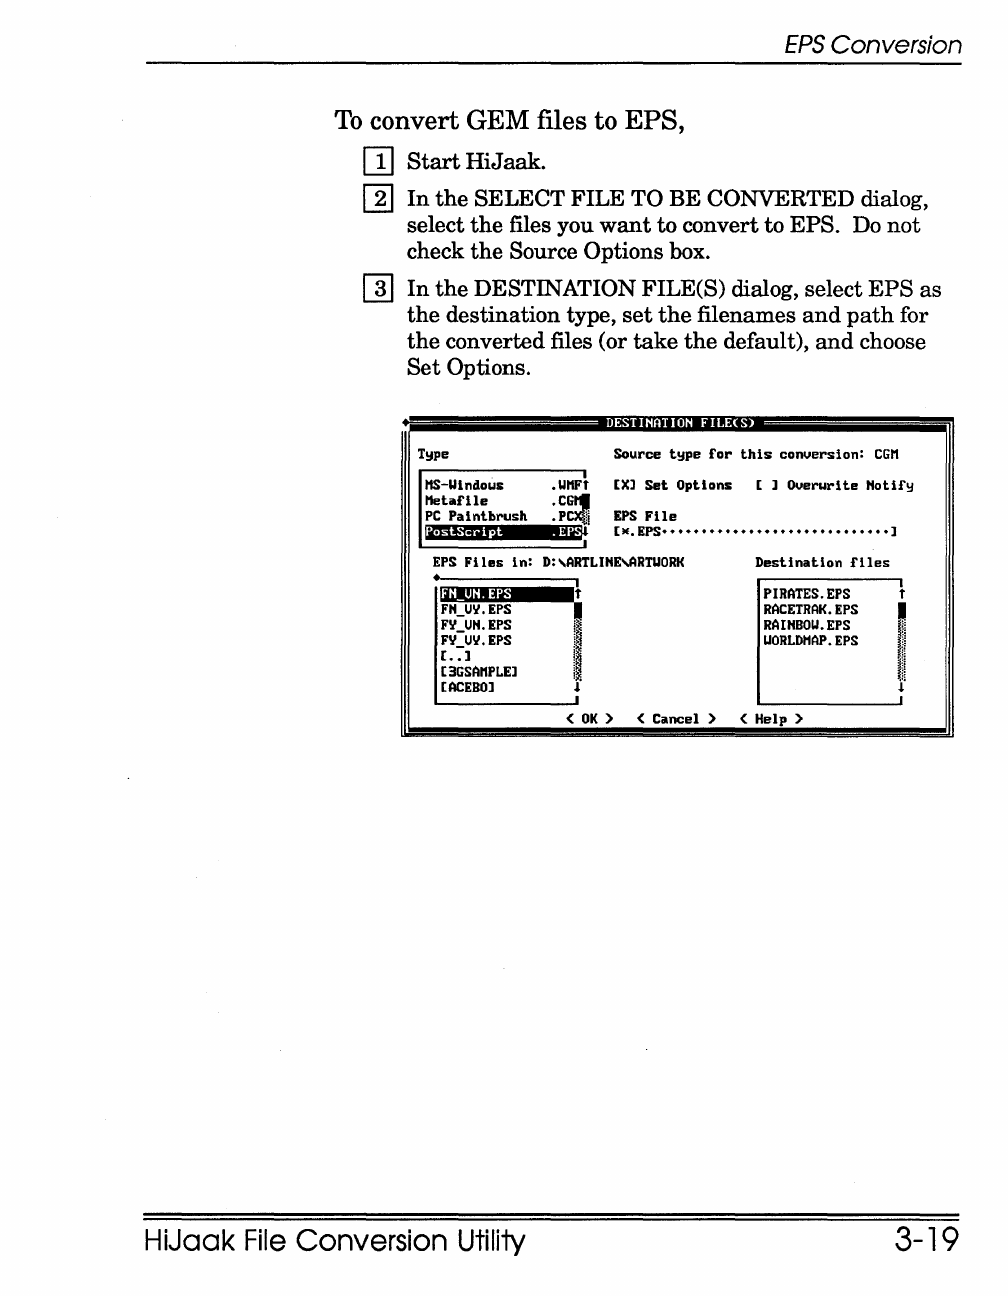
To
convert GEM files to EPS,
[!]
Start
HiJaak.
EPS
Conversion
[]]
In
the
SELECT FILE TO BE CONVERTED dialog,
select
the
files you
want
to
convert to EPS.
Do
not
check
the
Source Options box.
[]]
In
the
DESTINATION FILE(S) dialog, select
EPS
as
the
destination type,
set
the
filenames
and
path
for
the
converted files (or
take
the
default),
and
choose
Set
Options.
Type
HS-iUndous
Metafile
PC
Paintbrush
DESTINATION
FILE(S)
Source
type
for
this
conversion:
CGH
.UHFt
[Xl
Set
Options
.CGtt
.PC~i
EPS
File
[ 1
Ouerurite
Hotif~
PostScript
.EPS [
•.
iPS·····························]
EPS
Files
in:
D:'ARTLIHE~RTUORK
Destination
files
•
FH_UV.EPS
FY
UH.EPS
FY-UY.EPS
[.
:-]
[3GSAHPLEl
[ACEBO]
HiJaak
File
Conversion Utility
t
PIRATES.EPS
RACETRAK.EPS
RAIHBOU.
EPS
UORLDHAP.EPS
<
OK
> < Cancel > < Help >
3-19
EPS
Conversion
3-20
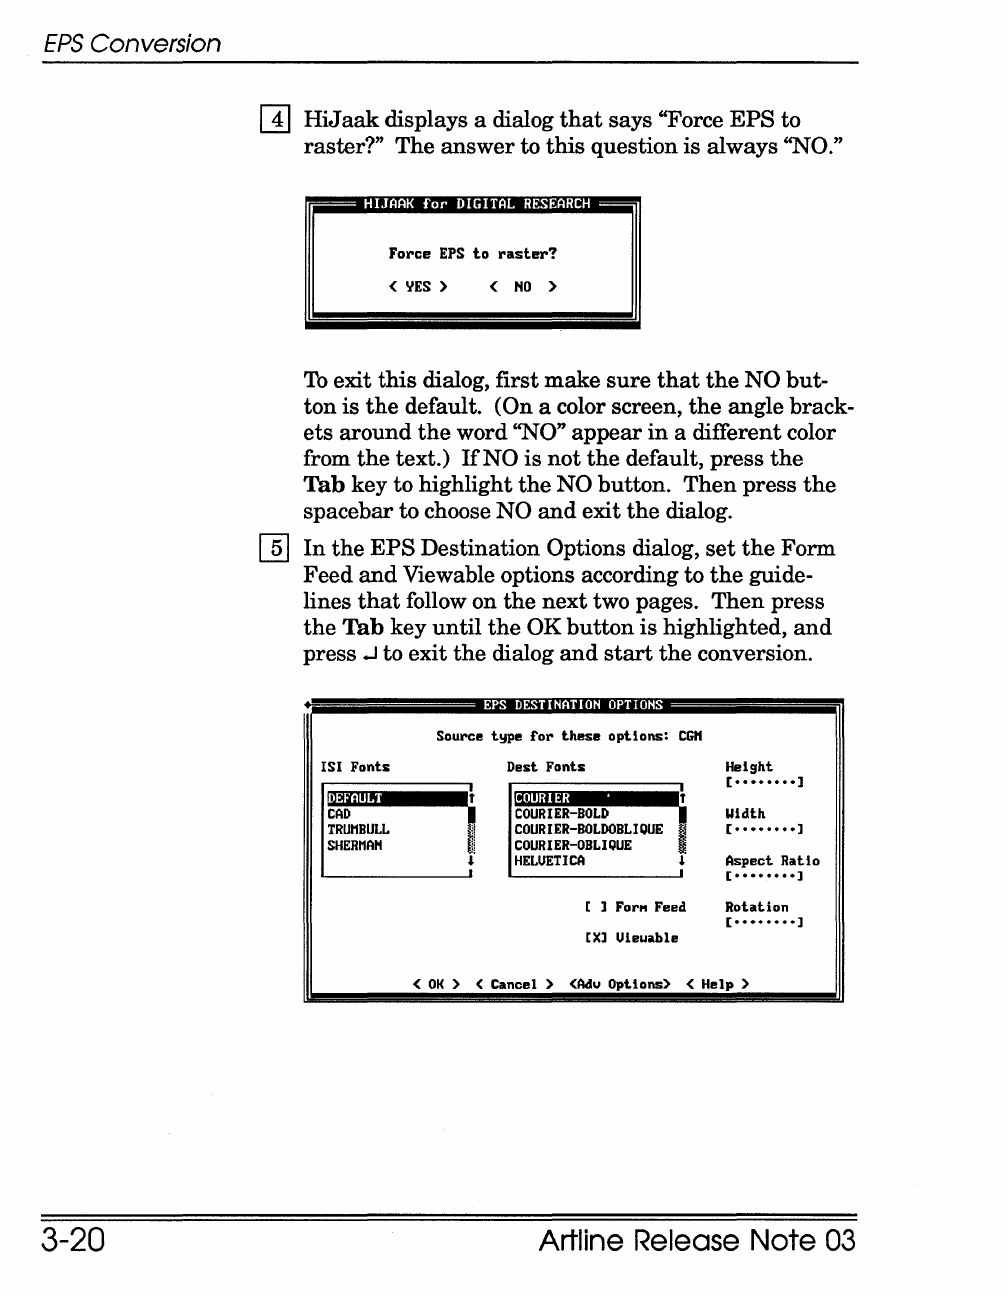
[1]
HiJ
aak
displays a dialog
that
says "Force
EPS
to
raster?" The
answer
to
this
question is always ''NO.''
HIJAAK
for
DIGITAL
RESEARCH
Force
EPS
to
raster?
<
YES
) <
NO
)
To
exit
this
dialog, first
make
sure
that
the
NO
but-
ton is
the
default. (On a color screen,
the
angle brack-
ets
around
the
word "NO"
appear
in
a different color
from
the
text.)
If
NO
is
not
the
default, press
the
Tab
key to highlight
the
NO button.
Then
press
the
spacebar to choose NO
and
exit
the
dialog.
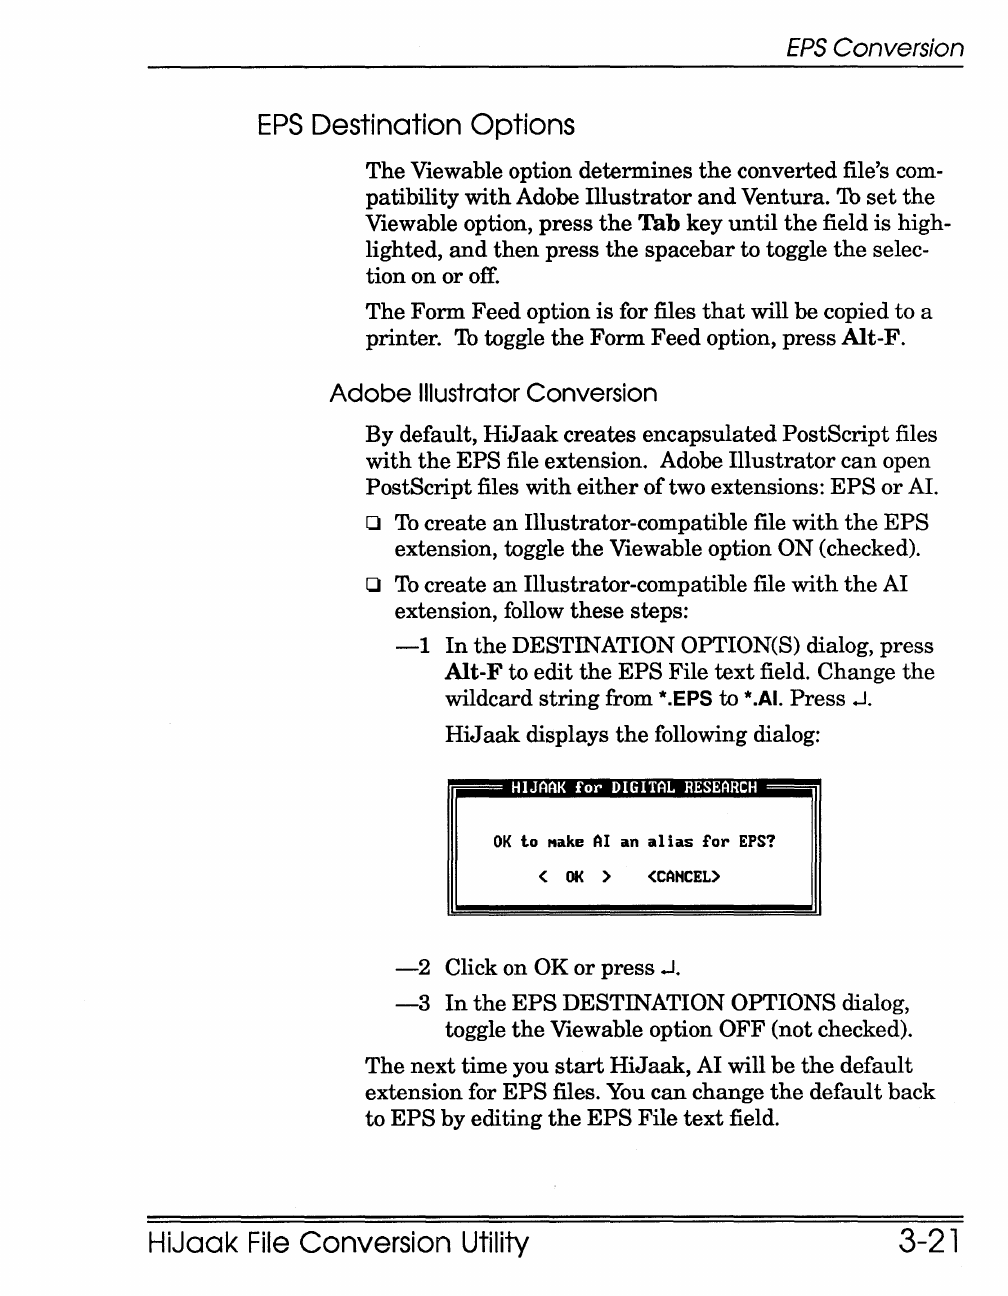
[]]
In
the
EPS
Destination Options dialog,
set
the
Form
Feed
and
Viewable options according to
the
guide-
lines
that
follow on
the
next
two pages.
Then
press
the
Tab
key
until
the
OK
button
is
highlighted,
and
press
-I
to exit
the
dialog
and
start
the
conversion.
lSI
Fonts
fllMt;""
CAD
TRUMBULL
SHERMAN
EPS
DESTINATION
OPTIONS
Source
t~pe
for
these
options:
CGM
Dest
Fonts
COURIER
•
COURIER-BOLD
I
COURIER-BOLDOBLIQUE
~
•..
COURIER-OBLIQUE
~
HELUETlCA
1
[ ]
For"
Feed
[Xl Uieuable
Height
[
........
]
IoIidth
[
........
]
Aspect
Ratio
[
........
]
Rotation
[
........
]
<
OK
>
(Cancel
>
<Adu
Options> < Help >
Artline Release
Note
03
EPS
Conversion
EPS
Destination Options
The Viewable option determines
the
converted file's com-
patibility
with
Adobe
Illustrator
and
Ventura.
'lb
set
the
Viewable option,
press
the
Tab key
until
the
field
is
high-
lighted,
and
then
press
the
spacebar to toggle
the
selec-
tion on or
off.
The
Form Feed option
is
for files
that
will be copied to a
printer. 1b toggle
the
Form
Feed
option, press
Alt-
F.
Adobe
Illustrator Conversion
By default,
HiJaak
creates encapsulated PostScript files
with
the
EPS
file extension. Adobe
Illustrator
can
open
PostScript files
with
either
of
two extensions:
EPS
or
AI.
o
To
create
an
Illustrator-compatible file
with
the
EPS
extension, toggle
the
Viewable option
ON
(checked).
o
To
create
an
Illustrator-compatible file
with
the
AI
extension, follow these steps:
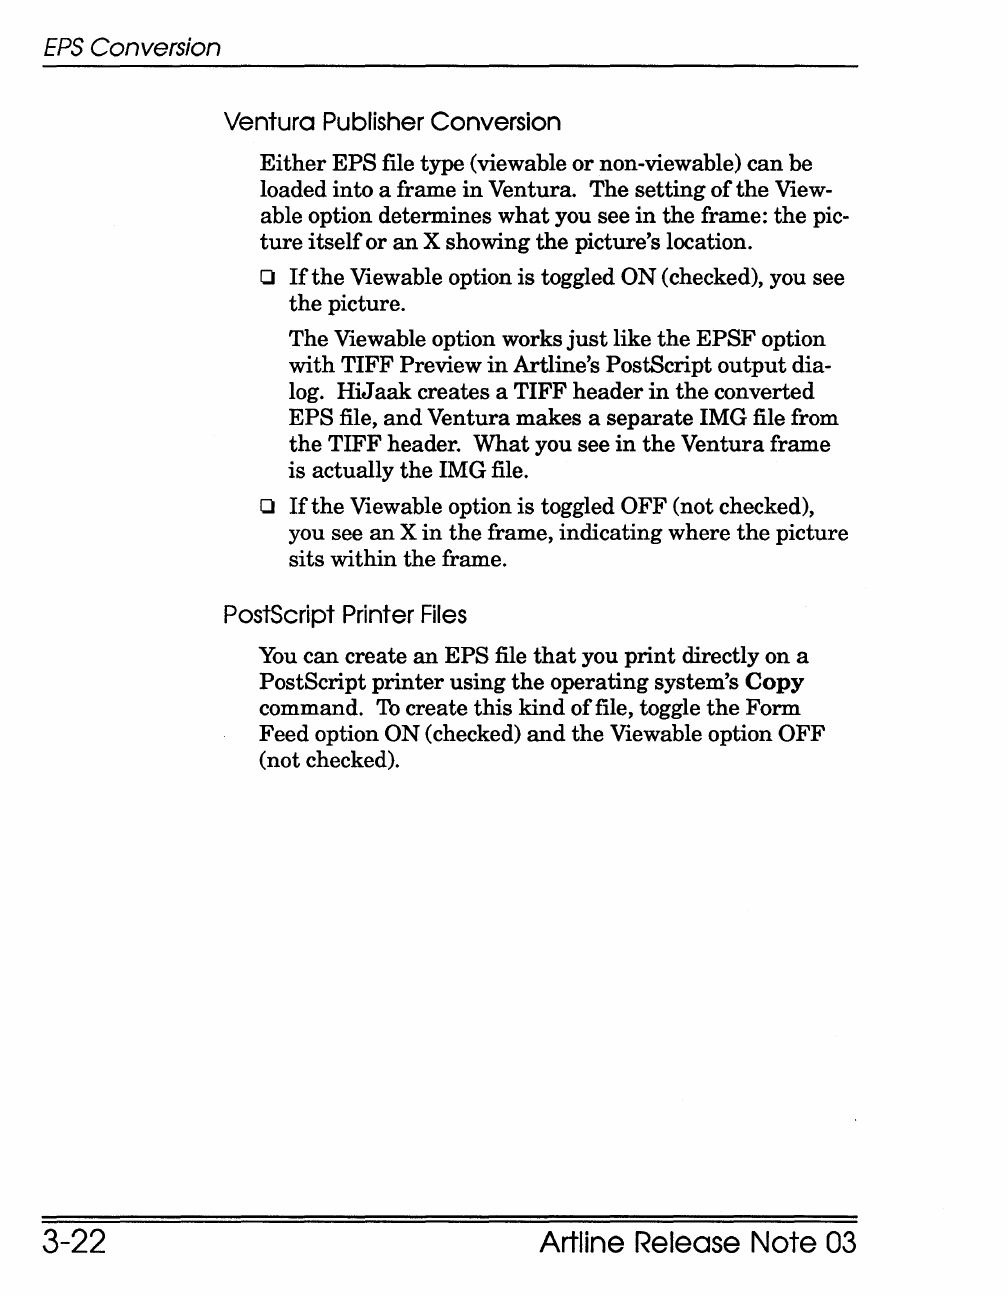
-1
In
the
DESTINATION OPTION(S) dialog, press
Alt-F to
edit
the
EPS
File
text
field. Change
the
wildcard
string
from *.EPS to *.AI.
Press
.J.
HiJ
aak
displays
the
following dialog:
HIJAAK
for
DIGITAL
RESEARCH
OK
to
"ake
AI
an
alias
for
EPS?
(
OK)
(CAHCEL)
-2
Click on OK
or
press .J.
-3
In
the
EPS
DESTINATION OPTIONS dialog,
toggle
the
Viewable option
OFF
(not checked).
The
next
time
you
start
HiJ
aak, AI will
be
the
default
extension for
EPS
files.
You
can
change
the
default back
to
EPS
by editing
the
EPS
File
text
field.
HiJaak
File
Conversion Utility
3-21
EPS
Conversion
3-22
Ventura Publisher Conversion
Either
EPS
file type (viewable
or
non-viewable)
can
be
loaded
into
a frame
in
Ventura. The
setting
of
the
View-
able option determines
what
you see
in
the
frame:
the
pic-
ture
itself
or
an
X showing
the
picture's location.
D
If
the
Viewable option
is
toggled
ON
(checked), you see
the
picture.
The
Viewable option works
just
like
the
EPSF
option
with
TIFF
Preview
in
Artline's PostScript
output
dia-
log.
HiJ
aak
creates a
TIFF
header
in
the
converted
EPS
file,
and
Ventura makes a
separate
IMG file from
the
TIFF
header.
What
you see
in
the
Ventura
frame
is
actually
the
IMG file.
D
If
the
Viewable option
is
toggled
OFF
(not checked),
you see
an
X
in
the
frame, indicating where
the
picture
sits
within
the
frame.
PostScript Printer
Files
You
can
create
an
EPS
file
that
you
print
directly
on
a
PostScript
printer
using
the
operating
system's
Copy
command.
To
create
this
kind
of
file, toggle
the
Form
Feed
option
ON
(checked)
and
the
Viewable option
OFF
(not checked).
Artline Release
Note
03
HiJaak Menus
HiJaak Menus
File
Menu
Use
the
HiJaak
File
menu
commands
to
set
default
paths,
to load
or
save
the
setup
file, to exit,
and
to get in-
formation
about
HiJaak.
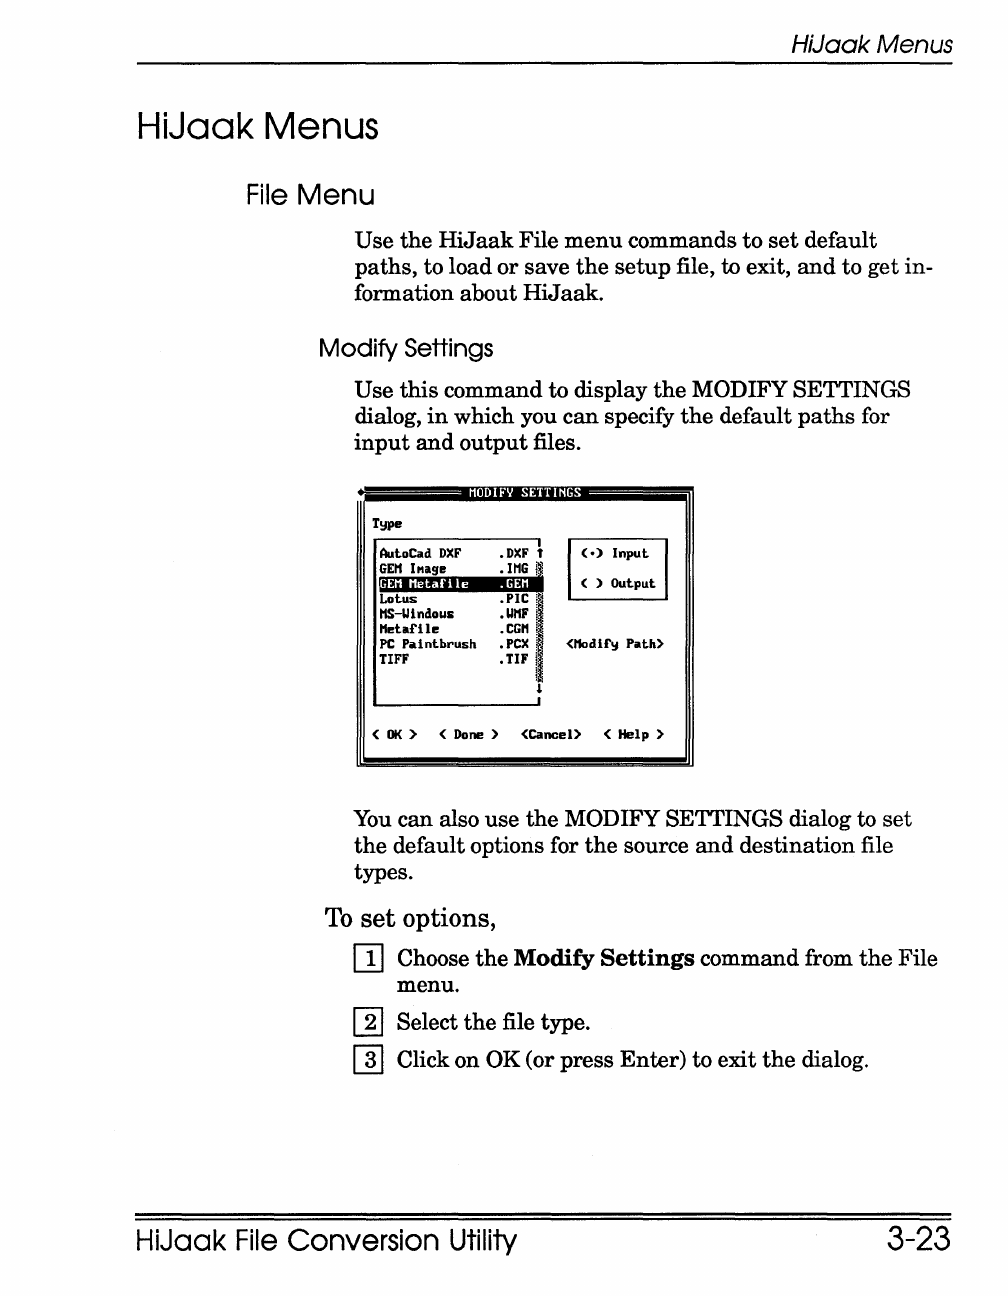
Modify Settings
Use
this
command to display
the
MODIFY SETTINGS
dialog,
in
which you
can
specify
the
default
paths
for
input
and
output
files.
t10IHFlJ
SETTINGS
T!lpe
AutoCad
DXF
.DXF
t
(.)
Input
GE"
IMage
.I"G
~
GEM
MetaFile
.GEM
Lotus
t1S-Lllndous
Hetaflle
( ) Output
PC
Pillntbrush
TIFF
.PIC
!~
.LI"F
II
.tCH
1~
.pex
~
(HodlF!I
Path)
• TIF
II
1
<
OK
> <
Done
> <Cancel> < Help >
You
can also
use
the
MODIFY SETTINGS dialog to
set
the
default options for
the
source
and
destination
file
types.
To
set
options,
[]
Choose
the
Modify
Settings
command from
the
File
menu.
[]J
Select
the
file type.
[]]
Click on OK (or press
Enter)
to exit
the
dialog.
HiJaak
File
Conversion Utility 3-23
HiJaak Menus
3-24
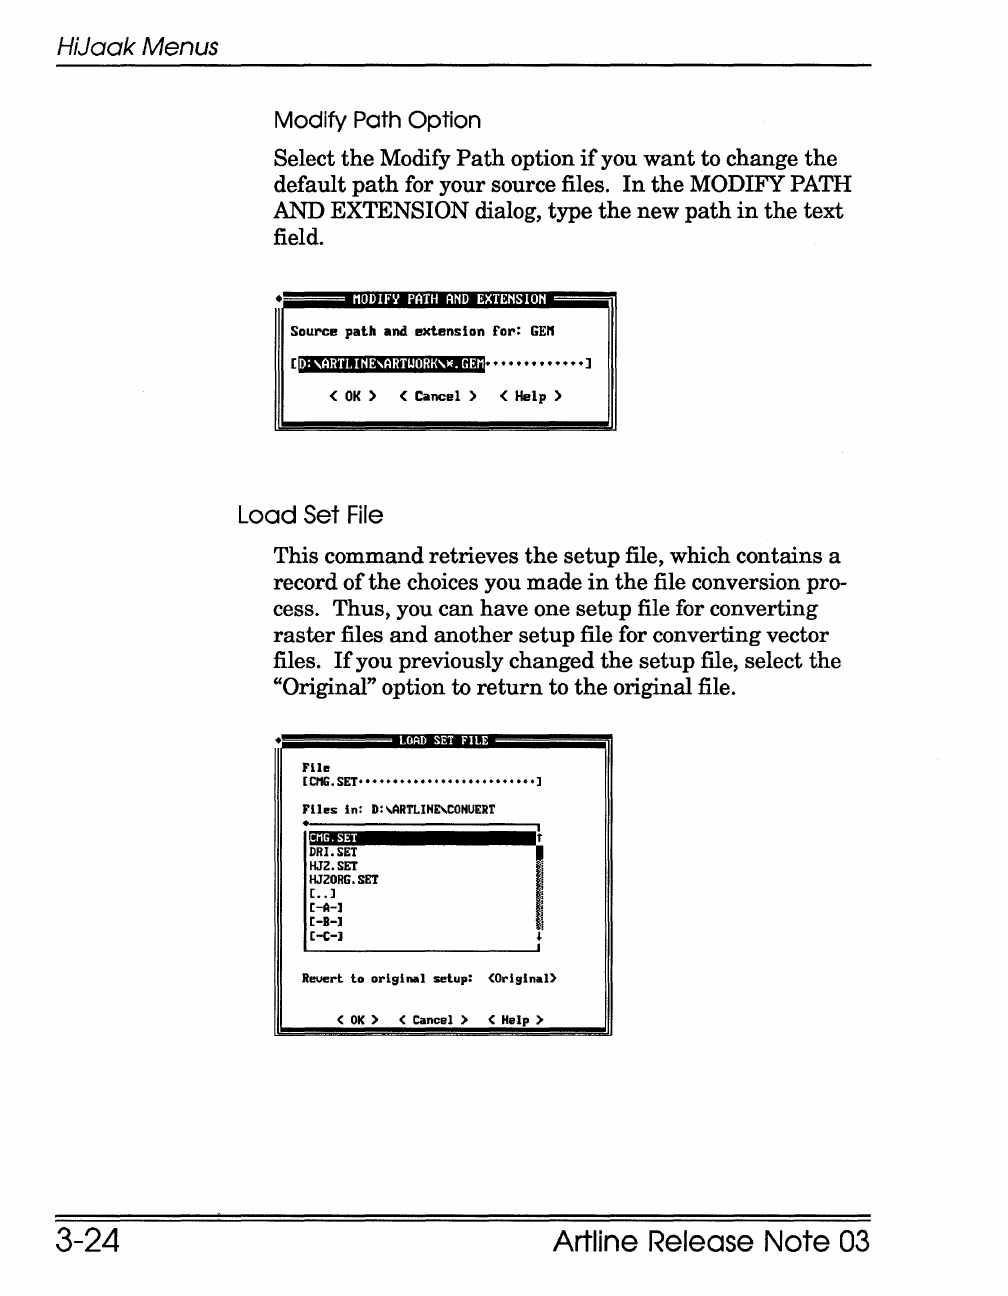
Modify Path Option
Select
the
Modify
Path
option
if
you
want
to change
the
default
path
for your source files.
In
the
MODIFY PATH
AND EXTENSION dialog, type
the
new
path
in
the
text
field.
•
MODIFV
PATH
AND
EXTENSION
Source
path
and
extension
for:
GEn
.............
]
<
OK)
<
Cancel)
< Help )
Load
Set
File
This command retrieves
the
setup
file, which contains a
record
of
the
choices you
made
in
the
file conversion pro-
cess. Thus, you can have one
setup
file for converting
raster
files
and
another
setup
file for converting vector
files.
If
you previously changed
the
setup
file, select
the
"Original" option to
return
to
the
original file.
•
LOAD
SET
FI
LE
Flle
[CI1G.
SET··························]
Flies
in:
D:
\ARnIHE\COHUERT
•
DRI.SET
HJ2.SET
HJ20RG.SET
[..
]
[-~-]
[-B-]
[-t-]
Revert
to
origi
nil
I
setup:
(Original)
<
OK)
< Cancel > <
Help>
Artline Release
Note
03
HiJaak Menus
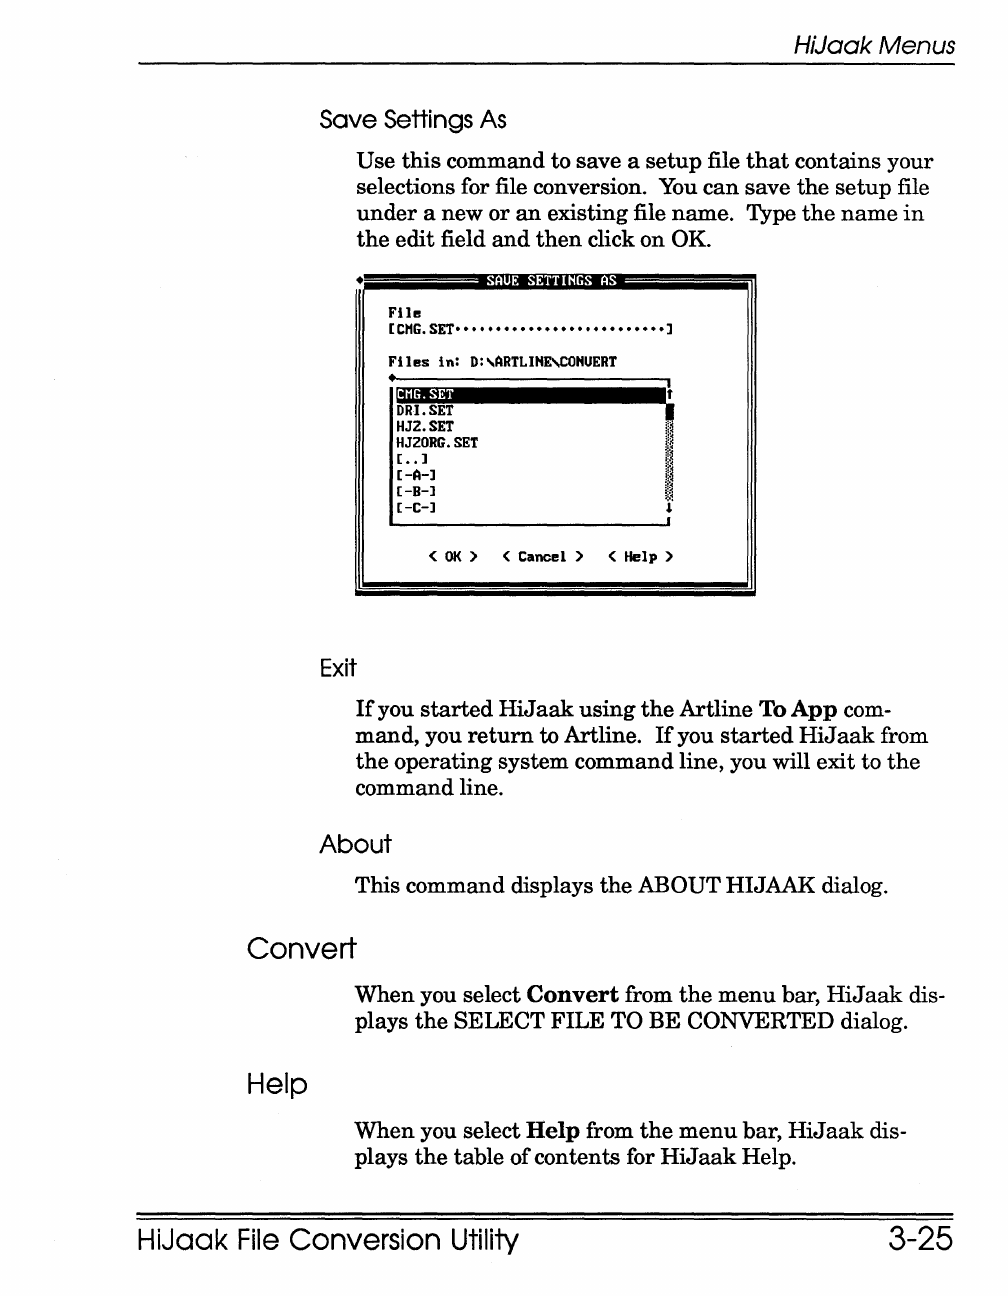
Save Settings
As
Use
this
command to save a
setup
file
that
contains your
selections for file conversion.
You
can
save
the
setup
file
under
a new
or
an
existing file name. Type
the
name
in
the
edit
field
and
then
click on OK.
•
Exit
SAUE
SETTINGS
AS
File
[tHG.SET··························]
Files
in:
D:\ARTLIHE\COHUERT
•
eNG.
SET
DRI.SET
HJ2.SET
HJ20RG.SET
[..
]
[-A-]
[-B-]
[-C-]
I
i
I
I'
<
OK
> <
Cancel
> <
Help
>
If
you
started
HiJ
aak
using
the
Artline
To
App
com-
mand,
you
return
to Artline.
If
you
started
HiJ
aak
from
the
operating system command line, you will exit to
the
command line.
About
This command displays
the
ABOUT HIJAAK dialog.
Convert
Help
When
you select
Convert
from
the
menu
bar,
HiJaak
dis-
plays
the
SELECT
FILE
TO
BE
CONVERTED dialog.
When
you select
Help
from
the
menu
bar,
HiJ
aak
dis-
plays
the
table
of
contents for
HiJaak
Help.
HiJaak
File
Conversion Utility 3-25

Ventura
Publisher
Com
pati
b ility
APPENDIX
C
of
the
Artline Installation guide describes
the
two
~
Artline file formats you can
use
in
Xerox Ventura
Publisher
chapter
files.
o
EPSF
(Encapsulated PostScript)
You
can
print
files containing
EPSF
graphics only on a
PostScript printer. Page 3-14
of
the
Artline User Refer-
ence Guide describes
the
EPSF
option.
o GEM
You
can
print
files containing GEM graphics on PostS-
cript
or
non-PostScript printers. However, you
must
first
run
the
VPSETUP program described
in
Appendix
C of
the
Artline Installation guide to replace
the
Ven-
tura
system software
with
the
Artline, Version 2.0,
system software.
Unsupported Systems
Xerox
Ventura
Publisher
can
run
under
many
system con-
figurations, some
of
which
are
not
currently
supported
by
Artline, Version 2.0.
If
the
screen you
are
using
with
Ven-
tura
is
not listed
in
the
VPSETUP
menu,
your configura-
tion
is
not
supported.
A-l
Hew/eff
Packard
LaserJet Series
/I
A-2
If
your system configuration is not supported, you have
two options:
(J
You
can use EPSF files,
if
you have a PostScript
printer.
(J
You
can
use
HiJ
aak
to convert your Artline, Version
2.0, files to
the
GEM Artline (Version 1.0) format. This
creates Ventura Publisher 2.0 compatible GEM files.
When you convert your files to GEM Artline format,
however,
the
files wiUlose features unique to Artline,
Version 2.0, (such
as
fountains
and
masking) due to
differences
in
the
system software releases.
Hewlett
Packard
LaserJet
Series
II
If
you have a Hewlett Packard® LaserJet® Series
II
printer, choose
the
soft font
printer
driver option when
you
run
VPSETUP regardless of whether you chose
the
bit
map
printer
driver when you
ran
the
Artline Setup
program. Selecting
the
soft font
printer
driver
in
VPSETUP ensures
that
Ventura Publisher will
print
any
fonts you might be using
in
your Artline, Version 2.0, files.
Artline Release
Note
03
Application
and
Documentation
Updates
T
HIS
appendix contains information
that
became available
after
the
Artline documentation
went
to
press. The appendix consists
of
two sections.
o "General Information" contains
new
information
or
in-
formation
that
was
inadvertantly
omitted
from
the
manuals.
o "Documentation Updates" contains corrections
or
changes
to
the
information
in
the
manuals.
For
additional
important
information, see
the
README
file
on
the
first disk
of
your Artline
master
disk set.
B-1

General
Information
General
Information
Clip Art
B-2
The Artline clip
art
is
provided
in
two formats, GEM
and
encapsulated PostScript® (EPS), for which
the
file exten-
sions
are
. GEM
and
.EPS, respectively. However,
the
de-
fault extensions
in
the
Item
Selector
are
.GEM
and
.AI
(for
the
Adobe®
Illustrator
EPS
format).
To open
or
merge clip
art
files
with
the
.EPS extension,
add
*.EPS to
the
Directory line
in
the
Item
Selector. Fol-
low
these
steps:
[]]
Move
the
cursor to
the
Directory line
in
the
Item
Se-
lector.
[]]
If
you
want
the
Item
Selector to
list
all files
with
the
.GEM, .AI,
or
.EPS extension, type ,*.EPS.
The
Direc-
tory line should
then
end
"*.GEM,*.AI,*.EPS."
If
you
want
the
Item
Selector to
list
only files
with
the
.EPS extension, press
the
Backspace key to delete
the
string
"*.GEM,*.AI." Do
not
delete
the
path
infor-
mation
and
the
final backslash.
Then
type *.EPS.
[]]
Press.J
or click
in
the
list
window to
update
the
list
of
filenames.
[]]
Open one
of
the
clip
art
directories
and
then
open one
of
the
.EPS files.
[]]
Display
the
Options
menu
and
choose
the
Save
Pref-
erences
command.
From
then
on,
the
Item
Selector will include *.EPS
on
the
Directory line
when
you choose
the
Open
or
Merge
File
command.
Artline Release Note
03
Genera//nformation
Color
Files
The
\ARTLINE\COLORS directory includes a special file
called RGB.COL, which
merits
some explanation.
RGB.COL is
intended
to be displayed
with
the
Fountain
tool
in
its
palette display mode. The purpose ofRGB.COL
is
to show
that
solid colors
and
fountains
can
be
displayed
in
the
same
palette.
Each
"solid" color
is
actually a foun-
tain
of
a given color to itself.
The solid colors
are
accessible
both
from
the
Fill Color
tool (as
true
solid colors)
and
from
the
Fountain
tool.
Note, however,
that
the
fill colors
are
named
differently
from
the
fountain colors.
For
example,
the
solid color
counterpart
of
"Fill # 15"
is
called ''Red60 Green40
Blue20," where
the
numbers
indicate
the
percentages of
the
component colors.
You
might
want
to
use
the
Color
Manager
to
rename
the
fountain color to a
name
similar
to
the
solid
color-for
example, "R60 G40 B20."
Fonts
for
GEM
Applications
If
you
plan
to
run
a GEM application from Artline using
the
To
App
command, copy all screen
and
printer
font
files associated
with
that
application from
the
\GEMAPPS\FONTS
directory to
the
directory called
\ARTLINE\FONTS.
Application
and
Documentation Updates 8-3
General
Information
8-4
Everex
Memory
Boards
Two
problems associated with Everex memory boards
have
been
identified:
a failure to create
an
ARTLINE.INI file
a general expanded memory problems
ARTLlNE.INI
The first time you
start
Artline
after
you
run
Setup,
an
initialization file called ARTLINE.INI
is
created,
as
indi-
cated by a box
that
appears on
the
screen saying "Initializ-
ing
fonts."
From
then
on,
the
file is automatically
updated
and
saved each time you
quit
Artline.
If
you have
an
Everex memory board, Artline
might
not
create ARTLINE.INI
at
initial
startup.
If
you see
the
"Ini-
tializing fonts" box each time you
start
Artline, you will
know
that
is
the
case. (Inability to create ARTLINE.INI
means, among
other
things,
that
you cannot save your
preferences. )
To
make
Artline create
and
save ARTLINE.INI, you
must
first create a "dummy" ARTLINE.INI before you
next
start
Artline. Follow these steps:
[}]
From
the
command line, create a small file
in
the
\ARTLINE directory
and
call
it
ARTLINE.INI. (The
contents
of
the
file
are
immaterial;
they
will be over-
written.)
You
can create
the
file
in
either
of
the
fol-
lowing ways:
-Use
the
COpy
command to copy
an
existing file to
ARTLINE.INI.
.....
Use
the
COpy
CON
command
or
a
text
editor to
create a file containing
as
little
as
a single charac-
ter.
The
COpy
and
COpy
CON
commands
are
de-
scribed
in
your operating system manual.
[]]
Start
Artline.
Artline Release
Note
03
General
Information
[]]
As
it
loads, Artline encounters
the
dummy
version
of
ARTLINE.INI
and
displays
an
alert
saying ''Wrong
version
of
ARTLINE.INI." Click
on
the
alert's OK
button
or
press
..1.
When
you
exit
the
alert, Artline initializes
the
fonts one
more time
and
then
creates a
true
ARTLINE.lNI file.
From
then
on, Artline will
update
and
save ARTLINE.INI
each time you quit.
Expanded Memory Problems
Difficulties
in
properly
using
expanded
memory
can
cause
a
number
of
Artline's tools
and
other
features to work in-
correctly.
Th
solve
this
problem,
add
a
/0
switch (the let-
ter
0,
not
a zero) to
the
Everex DEVICE line
in
your
CONFIG.SYS file.
The
following
is
an
example
of
a line
from a typical CONFIG.SYS:
DEVICE=C:\DRIVERS\EMM.SYS
/0
Application
and
Documentation Updates 8-5
Documentation
Updates
Documentation Updates
8-6
Artline Installation Startup
Hewlett-Packard
Laser
Jet
Printers
The
Setup
menus
contain two
entries
for
the
LaserJet
Se-
ries
II
printer, one
using
bitmapped fonts
and
the
other
using
softfonts.
Because Artline
itself
uses
neither
bitmaps
nor
softfonts
(text
is
sent
to
the
LaserJet
as
a vector),
these
options
are
made available
in
the
event
that
you will be
using
the
Output
program to
print
files created
with
other
compati-
ble programs (like Digital Research
Presentation
Team™)
that
use
bitmapped fonts
or
softfonts.
Choose
the
printer
configuration
that
matches
the
config-
uration
of
your compatible applications.
Note
the
following about
the
two options:
o Bitmapped fonts have two
advantages-the
files
tend
to be
smaller
than
the
softfont files,
and
you
can
com-
bine
portrait
and
landscape fonts on
the
same
page.
The
main
disadvantage to hitmapped fonts
is
that
they
usually
print
more slowly
than
softfonts.
o Softfonts
print
faster
than
bitmaps,
but
they
have
a
larger
file size,
and
you
cannot
combine
portrait
and
landscape on
the
same
page.
Artline
User
Reference
Guide
Direct
Entry Fields
Direct
entry
fields
in
Artline's dialogs (described on page
1-15 of
the
Artline User Reference Guide) accept only al-
phanumeric
characters
A-Z,
a-z,
and
0-9.
Artline Release
Note
03
Artline Clip
Art
Gallery
3G Graphics, Inc.
Documentation Updates
The booklet does
not
list
the
toll-free
number
for
3G
Graphics, Inc.,
and
lists
an
outdated
FAX number. The
correct numbers
are
as
follows:
toll-free: 1-800-456-0234
FAX:
(206) 364-3736
Artline Utilities Guide
Font
Filters
The
Fontographer® font filter (FGF2AF4) accepts only
Fontographer-format files
created
for PC-compatible sys-
tems.
It
does not accept .PFA files
created
on
the
Macin-
tosh®
and
then
converted to
the
PC file format.
Application
and
Documentation Updates
B-7


5161-1001- 003
