[MSP] Developer's Guide To Microsoft Enterprise Library [C# Edition]
User Manual:
Open the PDF directly: View PDF ![]() .
.
Page Count: 256 [warning: Documents this large are best viewed by clicking the View PDF Link!]
- Contents
- Welcome to the Library
- Much ADO about Data Access
- Error Management Made Exceptionally Easy
- Introduction
- When Should I Use the Exception Handling Block?
- How Do I Use the Exception Handling Block?
- What Exception Policies Do I Need?
- Diving in with a Simple Example
- Wrapping an Exception
- Replacing an Exception
- Logging an Exception
- Shielding Exceptions at WCF Service Boundaries
- Handling Specific Exception Types
- Executing Code around Exception Handling
- Assisting Administrators
- Extending Your Exception Handling
- Summary
- As Easy As Falling Off a Log
- A Cache Advance for your Applications
- Banishing Validation Complication
- Relieving Cryptography Complexity
- An Authentic Approach to Token Identity
- Appendix A: Dependency Injection with Unity
- Appendix B: Dependency Injection in Enterprise Library
- Appendix C: Policy Injection in Enterprise Library
- Appendix D: Enterprise Library Configuration Scenarios
- Appendix E: Encrypting Configuration Files
- Index

’
Microsoft® Enterprise
Library
Solutions for Enterprise Development
Alex Homer
with
Nicolas Botto
Bob Brumfield
Grigori Melnik
Erik Renaud
Fernando Simonazzi
Chris Tavares

Copyright and Terms of Use
ISBN: 9780735645233
This document is provided “as-is.” Information and views expressed in
this document, including URL and other Internet Web site references,
may change without notice. You bear the risk of using it.
Some examples depicted herein are provided for illustration only and
are fictitious. No real association or connection is intended or should
be inferred.
This document does not provide you with any legal rights to any
intellectual property in any Microsoft product. You may copy and
use this document for your internal, reference purposes.
© 2010 Microsoft. All rights reserved.
Microsoft, Windows, Windows Server, Windows Vista, Visual C#,
SQL Server, Active Directory, IntelliSense, Silverlight, MSDN, Internet
Explorer, and Visual Studio are trademarks of the Microsoft group of
companies. All other trademarks are property of their respective owners.

1 Welcome to the Library 1
Meet the Librarian 1
What You Get with Enterprise Library 1
Things You Can Do with Enterprise Library 3
Why You Should Use Enterprise Library 4
Some Fundamentals of Enterprise Library 6
Choosing Which Blocks To Install 6
Installing Enterprise Library 7
Assemblies And References 7
GAC or Bin, Signed or Unsigned? 8
Importing Namespaces 9
Configuring Enterprise Library 10
The Configuration Tools 10
Using The Configuration Tools 11
Encrypting Configuration Sections 14
Instantiating and Using Enterprise Library Objects 14
Enterprise Library Objects, Facades, and Factories 15

Creating Instances of Enterprise Library Types 15
The Simple Approach
— Using The Enterprise Library Service Locator 16
The Sophisticated Approach
— Accessing The Container Directly 16
Pros and Cons of Object Instantiation 18
More Reasons to be Sophisticated 19
Getting Objects From Previous Versions
Of Enterprise Library 21
The Example Applications 22
Summary 23
2 Much ADO about Data Access 25
Introduction 25
What Does the Data Access Application Block Do? 26
Data Operations Supported by the Data Access Block 26
How Do I Use the Data Access Block? 28
Configuring the Block and Referencing the Required Assemblies 28
Creating Database Instances 29
The Example Application 30
Reading Multiple Data Rows 31
Reading Rows Using a Query with No Parameters 31
Reading Rows Using an Array of Parameter Values 32
Reading Rows Using Queries with Named Parameters 33
Retrieving Data as Objects 35
About Accessors 35
Creating and Executing an Accessor 37
Creating and Using Mappers 38
Retrieving Xml Data 39
Retrieving Single Scalar Values 40
Retrieving Data Asynchronously 41
Preparing for Asynchronous Data Access 42
Retrieving Row Set Data Asynchronously 43
Retrieving Data as Objects Asynchronously 45
Updating Data 45
Executing an Update Query 46
Working with DataSets 47
Updating the Database from a DataSet 48
Managing Connections 52
Working with Connection-Based Transactions 53
Working with Distributed Transactions 55
Extending the Block to Use Other Databases 58
Summary 58

3 Error Management Made Exceptionally Easy 61
Introduction 61
When Should I Use the Exception Handling Block? 62
How Do I Use the Exception Handling Block? 62
What Exception Policies Do I Need? 63
Allowing Exceptions to Propagate 63
About Exception Handling Policies 63
Choosing an Exception Handling Strategy 65
Process or Handle Exception? 66
Using the Process Method 67
Diving in with a Simple Example 68
Applying Exception Shielding 69
Wrapping an Exception 70
Configuring the Wrap Handler Policy 70
Initializing the Exception Handling Block 71
Editing the Application Code to Use the New Policy 71
Replacing an Exception 74
Logging an Exception 75
Shielding Exceptions at WCF Service Boundaries 78
Creating a Fault Contract 78
Configuring the Exception Handling Policy 78
Editing the Service Code to Use the New Policy 79
The Fault Contract Exception Handler 80
Handling Specific Exception Types 81
Executing Code around Exception Handling 82
Assisting Administrators 84
Extending Your Exception Handling 87
Summary 87
4 As Easy as Falling Off a Log 89
Introduction 89
What Does the Logging Block Do? 90
Logging Categories 92
Logging Overhead and Additional Context Information 93
How Do I Use the Logging Block? 93
Configuring the Logging Block 93
Initializing the Logging Block 94
Diving In with an Example 95
Creating and Writing Log Entries with a Logwriter 95
About Logging Categories 98
Filtering by Category 100
Writing Log Entries to Multiple Categories 100
Controlling Output Formatting 101

Non-Formatted Trace Listeners 102
Filtering by Severity in a Trace Listener 103
Filtering All Log Entries by Priority 103
Creating and Using Logentry Objects 104
Capturing Unprocessed Events and Logging Errors 105
About Special Sources 105
An Example of Using Special Sources 106
Logging to a Database 108
Using the Database Trace Listener 109
Testing Logging Filter Status 110
Obtaining Information about Trace Sources
and Trace Listeners 111
Checking if Filters Will Block a Log Entry 112
Adding Additional Context Information 114
Tracing and Correlating Activities 115
An Example of Tracing Activities 116
Creating Custom Trace Listeners, Filters, and Formatters 119
Summary 119
5 A Cache Advance for Your Applications 121
Introduction 121
What Does the Caching Block Do? 123
Flushed or Expired? 123
Which Expiration Policy? 124
How Do I Configure the Caching Block? 124
Persistent Caching 125
Encrypting Cached Items 126
Initializing the Caching Block 126
How Do I Use the Caching Block? 127
About the Example Application 127
Adding Items to and Retrieving Items from the Cache 127
What’s In My Cache? 130
Using the Isolated Storage Backing Store 131
Encrypting the Cached Data 133
Using the Database Backing Store 134
Removing Items From and Flushing the Cache 135
Using a File Dependency and Extended Time Expiration 136
Adding the Items to the Cache 137
Refreshing the Cache 139
Loading the Cache 141
Proactive Cache Loading 141
Reactive Cache Loading 142
Extending Your Cache Advance 143
Summary 144

6 Banishing Validation Complication 145
Introduction 145
Techniques for Validation 146
Where Should I Validate? 146
What Should I Validate? 146
How Should I Validate? 147
What Does the Validation Block Do? 147
The Range of Validators 149
Validating with Attributes 151
DataAnnotations Attributes 151
Self-Validation 152
Validation Rule Sets 154
Assigning Validation Rules to Rule Sets 154
Configuring Validation Block Rule Sets 154
Specifying Rule Sets When Validating 155
How Do I Use The Validation Block? 156
Preparing Your Application 156
Choosing a Validation Approach 157
Options for Creating Validators Programmatically 158
Performing Validation and Displaying Validation Errors 159
Understanding Message Template Tokens 160
Diving in With Some Simple Examples 161
Validating Objects and Collections of Objects 162
Creating a Type Validator using the ValidatorFactory 162
Delving Deeper into ValidationResults 163
Using the Object Validator 164
Differences Between the Object Validator
and the Factory-Created Type Validators 165
Validating Collections of Objects 165
Using Validation Attributes 166
Using the Validation Block Attributes 166
Using Data Annotation Attributes 169
Defining Attributes in Metadata Classes 171
Specifying the Location of Validation Rules 172
Creating and Using Individual Validators 173
Validating Strings for Contained Characters 173
Validating Integers within a Domain 173
Validating with a Composite Validator 174
Validating Single Members of an Object 175
WCF Service Validation Integration 176
Defining Validation in the Service Contract 176
Editing the Service Configuration 177
Using the Product Service and Detecting Validation Errors 178
User Interface Validation Integration 180
ASP.NET User Interface Validation 180

Windows Forms User Interface Validation 181
WPF User Interface Validation 181
Creating Custom Validators 182
Summary 182
7 Relieving Cryptography Complexity 183
Introduction 183
What Does the Cryptography Block Do? 183
A Secret Shared 184
Making a Hash of It 184
How Does the Cryptography Block Manage
Encryption Keys? 184
How Does the Cryptography Block Integrate
With Other Blocks? 185
How Do I Use the Cryptography Block? 185
Configuring Cryptographic Providers 186
Adding the Required References 187
Diving in with an Example 187
Encrypting and Decrypting Data Using
A Symmetric Provider 188
Encrypting and Decrypting a Text String 188
Encrypting and Decrypting an Object Instance 189
Obtaining and Comparing Hash Values 191
Creating and Comparing Hash Values for Text Strings 191
Creating and Comparing Hash Values for Object Instances 193
Creating Custom Cryptography Providers 195
Summary 196
8 An Authentic Approach to Token Identity 197
Introduction 197
What Does the Security Block Do? 198
What are Authorization Rule Providers? 198
About Authorization Manager (AzMan) 198
Why Do I Need a Security Cache? 199
How Do I Configure the Security Block? 200
Configuring Authorization Rules 202
How Do I Use the Security Block? 202
Diving in With an Example 203
Caching a User Identity and Obtaining
A Temporary Token 204
Displaying User Identity Details 205
Displaying Generic Principal Details 205
Authenticating a User Using a Token 206

Terminating a User Session and Expiring the Token 207
Checking If a User is Authorized to Perform a Task 208
Using Security Block Configured Rules 208
Using AzMan Provider Rules 210
Creating Custom Authorization Providers 212
Summary 212
213
What is Dependency Injection? 213
The Unity Dependency Injection and Interception Mechanism 214
Summary of Unity Features 215
Defining Dependencies with Unity 216
Constructor Injection 217
Automatic Constructor Injection 217
Design-Time Configuration 218
Run-Time Configuration 219
Configuration with Attributes 219
Property (Setter) Injection 220
Design-Time Configuration 220
Run-Time Configuration 221
Configuration with Attributes 221
Method Call Injection 222
Design-Time Configuration 222
Run-Time Configuration 223
Configuration with Attributes 223
More Dependency Injection Opportunities 224
Resolving Populated Instances of Your Classes 224
225
Loading Configuration Information into a Unity Container 225
Viewing Registrations in the Container 226
Populating Entire Object Graphs at Application Startup 227
Maintaining a Container Reference in Request-Based
Applications 228
Using an Alternative Service Locator or Container 229
231
233
About Enterprise Library Configuration 233
External Configuration 234
Programmatic Support 234
Using the Fluent Interfaces 234

Scenarios for Advanced Configuration 235
: Using The Default Application
Configuration File 235
: Using A Non-Default Configuration Store 235
: Sharing The Same Configuration
Between Multiple Applications 236
: Managing And Enforcing Configuration
For Multiple Applications 236
: Sharing Configuration Sections
Across Multiple Applications 237
: Applying a Common Configuration
Structure for Applications 238
Deployment Environments 239
241

1
Meet the Librarian
Before we begin our exploration of Microsoft® Enterprise Library and the wondrous
range of capabilities and opportunities it encompasses, you need to meet the Librarian.
Sometimes we call him Tom, sometimes we call him Chris, and sometimes we call him
Grigori. But, despite this somewhat unnerving name variability, he—in collaboration with
an advisory board of experts from the industry and other internal Microsoft product
groups, and a considerable number of other community contributors—is the guardian and
protector of the Microsoft Enterprise Library.
Since its inception as a disparate collection of individual application blocks, the Li-
brarian has guided, prodded, inspired, and encouraged his team to transform it into a
comprehensive, powerful, easy-to-use, and proven library of code that can help to mini-
mize design and maintenance pain, maximize development productivity, and reduce costs.
And now in version 5.0, it contains even more built-in goodness that should make your
job easier. It’s even possible that, with the time and effort you will save, Enterprise Library
can reduce your golf handicap, help you master the ski slopes, let you spend more time
with your kids, or just make you a better person. However, note that the author, the
publisher, and their employees cannot be held responsible if you just end up watching
more TV or discovering you actually have a life.
What You Get with Enterprise Library
Enterprise Library is made up of a series of application blocks, each aimed at managing
specific crosscutting concerns. In case this concept is unfamiliar, crosscutting concerns
are those annoying tasks that you need to accomplish in several places in your application.
When trying to manage crosscutting concerns there is often the risk that you will imple-
ment slightly different solutions for each task at each location in your application, or that
you will just forget them altogether. Writing entries to a system log file or Windows®
Event Log, caching data, and validating user input are typical crosscutting concerns. While
there are several approaches to managing them, the Enterprise Library application blocks
make it a whole lot easier by providing generic and configurable functionality that you
can centralize and manage.
Welcome to the Library 1
2 ch a p ter one
What are application blocks? The definition we use is “pluggable and reusable
software components designed to assist developers with common enterprise development
challenges.” Application blocks help address the kinds of problems developers commonly
face from one line-of-business project to the next. Their design encapsulates the
Microsoft recommended practices for Microsoft .NET Framework-based applications,
and developers can add them to .NET-based applications and configure them quickly
and easily.
As well as the application blocks, Enterprise Library contains configuration tools, plus
a set of core functions that manage tasks applicable to all of the blocks. Some of
these functions—routines for handling configuration and serialization, for example—are
exposed and available for you to use in your own applications.
And, on the grounds that you need to learn how to use any new tool that is more
complicated than a hammer or screwdriver, Enterprise Library includes a range of sample
applications, descriptions of key scenarios for each block, hands-on labs, and comprehen-
sive reference documentation. You even get all of the source code and the unit tests that
the team created when building each block (the team follows a test-driven design
approach by writing tests before writing code). So you can understand how it works, see
how the team followed good practices to create it, and then modify it if you want it to
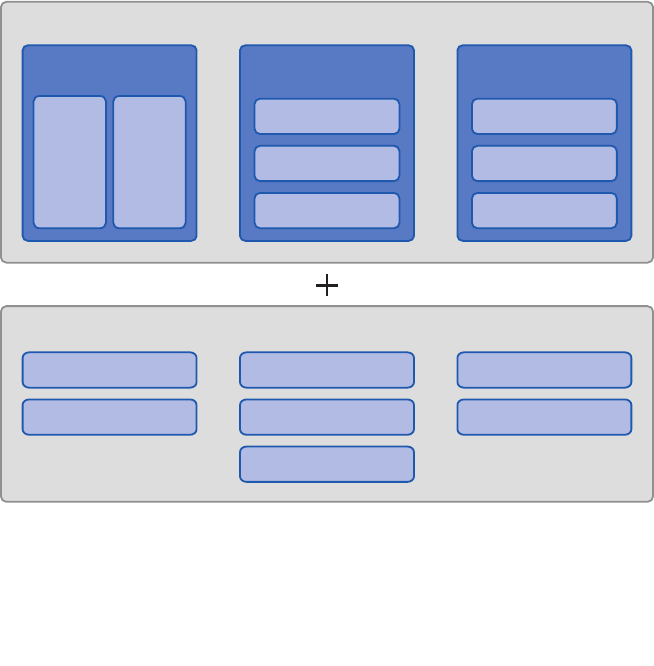
do something different. Figure 1 shows the big picture for Enterprise Library.
Enterprise Library—the big picture
Enterprise Library Big Picture
In the Box
Run time Design time Guidance
Functional
Blocks
Wiring
Blocks
Configuration Console
Configuration Schema
Visual Studio
Integration
Conceptual
Documentation
API Reference
Documentation
Source Code (with tests)
Developer’s Guide
Migration Guide
Hands on Labs
CodePlex Support Forum
EntLibContrib
Community Extensions
Videos & Demos
FAQs
Ancillary
3
Things You Can Do with Enterprise Library
If you look at the installed documentation, you’ll see that Enterprise Library today actu-
ally contains nine application blocks. However, there are actually only seven blocks that
“do stuff”—these are referred to as functional blocks. The other two are concerned with
“wiring up stuff” (the wiring blocks). What this really means is that there are seven blocks
that target specific crosscutting concerns such as caching, logging, data access, and valida-
tion. The other two, the Unity Dependency Injection mechanism and the Policy Injection
Application Block, are designed to help you implement more loosely coupled, testable,
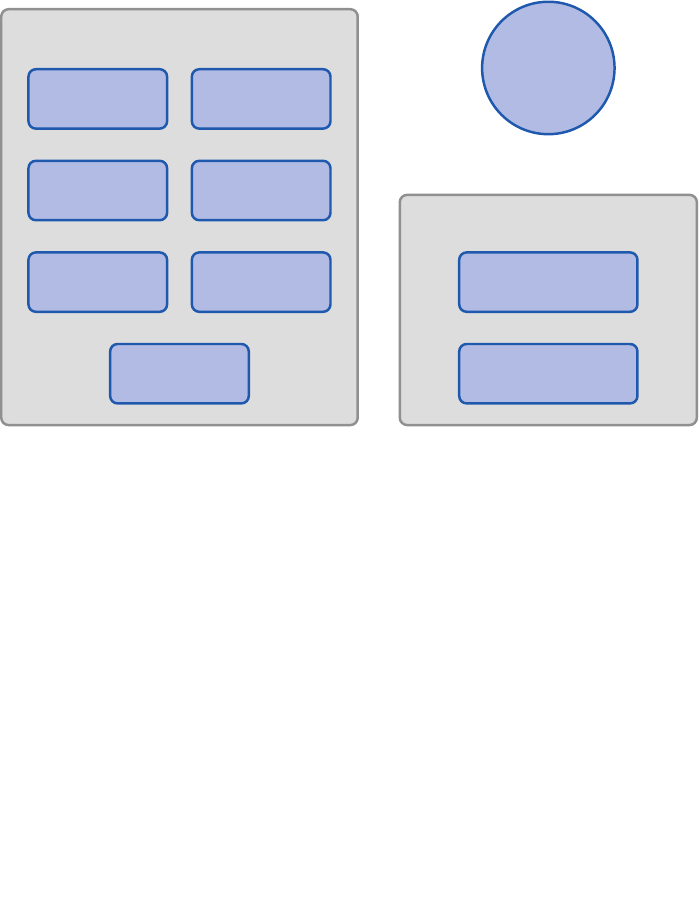
and maintainable systems. There’s also some shared core pieces used in all the blocks. This
is shown in Figure 2.
The parts of Enterprise Library
In this book we’ll be concentrating on the seven functional blocks. If you want to know
more about how you can use Unity and the Policy Injection Application Block, check out
the appendices for this guide. They describe the capabilities of Unity as a dependency
injection mechanism and the use of policy injection in more detail.
The following list describes the crosscutting scenarios you’ll learn about in this book:
• Caching. The Caching Application Block lets you incorporate a local cache in
your applications that uses an in-memory cache and, optionally, a database or
isolated storage backing store. The block provides all the functionality needed
to retrieve, add, and remove cached data, and supports configurable expiration
and scavenging policies. You can also extend it by creating your own pluggable
Data Access
Caching
Functional Application Blocks
Cryptography
Logging
Exception
Handling
Security
Validation Policy Injection/
Interception
Unity
Core
Wiring Application Blocks

4 ch a p ter one
providers or by using third-party providers—for example, to support distrib-
uted caching and other features. Caching can provide considerable improve-
ments in performance and efficiency in many application scenarios.
• Credential Management. The Security Application Block lets you easily
implement common authorization-related functionality, such as caching the
user’s authorization and authentication data and integrating with the Microsoft
.NET Framework security features.
• Data Access. The Data Access Application Block simplifies many common data
access tasks such as reading data for display, passing data through application
layers, and submitting changed data back to the database system. It includes
support for both stored procedures and in-line SQL, can expose the data as a
sequence of objects for client-side querying, and provides access to the most
frequently used features of ADO.NET in simple-to-use classes.
• Encryption. The Cryptography Application Block makes it easy to incorporate
cryptographic functionality such as encrypting and decrypting data, creating a
hash from data, and comparing hash values to verify that data has not been
altered. Using this block can help you avoid common pitfalls when developing
custom mechanisms that might introduce security vulnerabilities.
• Exception Handling. The Exception Handling Application Block lets you
quickly and easily design and implement a consistent strategy for managing
exceptions that occur in various architectural layers of your application. It can
log exception information, hide sensitive information by replacing the original
exception with another exception, and maintain contextual information for an
exception by wrapping the original exception inside another exception.
• Logging. The Logging Application Block simplifies the implementation of
common logging functions such as writing information to the Windows Event
Log, an e-mail message, a database, Windows Message Queuing, a text file, a
Windows Management Instrumentation (WMI) event, or a custom location.
• Validation. The Validation Application Block provides a range of features for
implementing structured and easy-to-maintain validation mechanisms using
attributes and rule sets, and integrating with most types of application inter-
face technologies.
Why You Should Use Enterprise Library
As you can see from the previous section, Enterprise Library provides a comprehensive
set of features that can help you to manage your crosscutting concerns though a reusable
set of components and core functionality. Of course, like many developers, you may suf-
fer from the well-known NIH (not invented here) syndrome. But, seriously, isn’t it about
time that every developer on your team stopped writing his or her own logging frame-
work? It’s a commonly accepted fact that the use of standard and proven code libraries
and components can save development time, minimize costs, reduce the use of precious
test resources, and decrease the overall maintenance effort. In the words of the Librarian,
“These days you cannot afford not to reuse.”

5welcome to the libr a ry
You can download the Nucleus Research 2009 Report on Microsoft patterns &
practices, which reviews the key components, benefits, and includes direct feedback
from software architects and developers who have adopted patterns & practices
deliverables in their projects and products from http://msdn.microsoft.com/en-us/
practices/ee406167.aspx.
And it’s not as though Enterprise Library is some new kid on the block that might
morph into something completely different next month. Enterprise Library as a concept
has been around for many years, and has passed through five full releases of the library as
well as intermediate incremental releases.
Enterprise Library continues to evolve along with the capabilities of the .NET Frame-
work. As the .NET Framework has changed over time, some features that were part of
Enterprise Library were subsumed into the core, while Enterprise Library changed to take
advantage of the new features available in both the .NET Framework and the underlying
system. Examples include new programming language capabilities and improved perfor-
mance and capabilities in the .NET configuration and I/O mechanisms. Yet, even in version
5.0, the vast majority of the code is entirely backwards compatible with applications
written to use Enterprise Library 2.0.
You can also use Enterprise Library as learning material—not only to implement de-
sign patterns in your application, but also to learn how the development team applies
patterns when writing code. Enterprise Library embodies many design patterns, and dem-
onstrates good architectural and coding techniques. The source code for the entire library
is provided, so you can explore the implementations and reuse the techniques in your own
applications.
And, finally, it is free! Or rather, it is distributed under the Microsoft Public License
(MSPL) that grants you a royalty-free license to build derivative works, and distribute
them free—or even sell them. You must retain the attribution headers in the source files,
but you can modify the code and include your own custom extensions. Do you really need
any other reasons to try Enterprise Library?
You’ll notice that, even though we didn’t print “Don’t Panic!” in large friendly letters
on the cover, this book does take a little time to settle down into a more typical style
of documentation, and start providing practical examples. However, you can be sure
that—from here on in—you’ll find a whole range of guidance and examples that will
help you master Enterprise Library quickly and easily. There are other resources to help
if you’re getting started with Enterprise Library (such as hands-on-labs), and there’s
help for existing users as well (such as the breaking changes and migration information
for previous versions) available at http://www.codeplex.com/entlib/. You can also visit
the source code section of the site to see what the Enterprise Library team is working
on as you read this guide.

6 ch a p ter one
Some Fundamentals of Enterprise Library
Before we dive into our tour of the application blocks and features of Enterprise Library,
you need to grasp some fundamentals. In this chapter, the Librarian will help you explore
topics such as how to install and deploy the library, and how to perform initial configura-
tion. After that, you’ll be free to skip to any of the other chapters and learn more about
the ways that each block helps you to simplify your code and manage your crosscutting
concerns. For more information about the topics covered in this chapter, see the product
documentation installed with Enterprise Library, or the online documentation available at
http://go.microsoft.com/fwlink/?LinkId=188874.
Enterprise Library is a “pick and mix” candy store, where you choose just the features you
want to use and simply disregard the rest. Of course, before you can choose your favorite
candies from the tempting displays in the candy store, you need to find a paper bag to
hold them. You can think of this as a prerequisite for picking and mixing, and a basic
feature that you will use every time—irrespective of whether you choose gummy bears,
chocolate-covered hazelnuts, or mint imperials.
Likewise, with Enterprise Library, there are prerequisites and basic features. The main
prerequisite before you start development is to install the binaries and support files onto
your machine. The basic features that you need every time you use Enterprise Library are
the core assemblies that implement access to configuration, object creation, and ancillary
features used by all of the blocks.
However, when you install Enterprise Library, you can choose which of the applica-
tion blocks you want to install; though it is generally a good idea to install them all unless
you are sure you will not use specific blocks. Some blocks have dependencies on other
blocks, and installing all of them while developing your applications will simplify configu-
ration and ensure that you do not have to re-run the installer to add other blocks later on.
When you come to deploy your application, you only need to deploy the blocks you are
using and their dependent blocks.
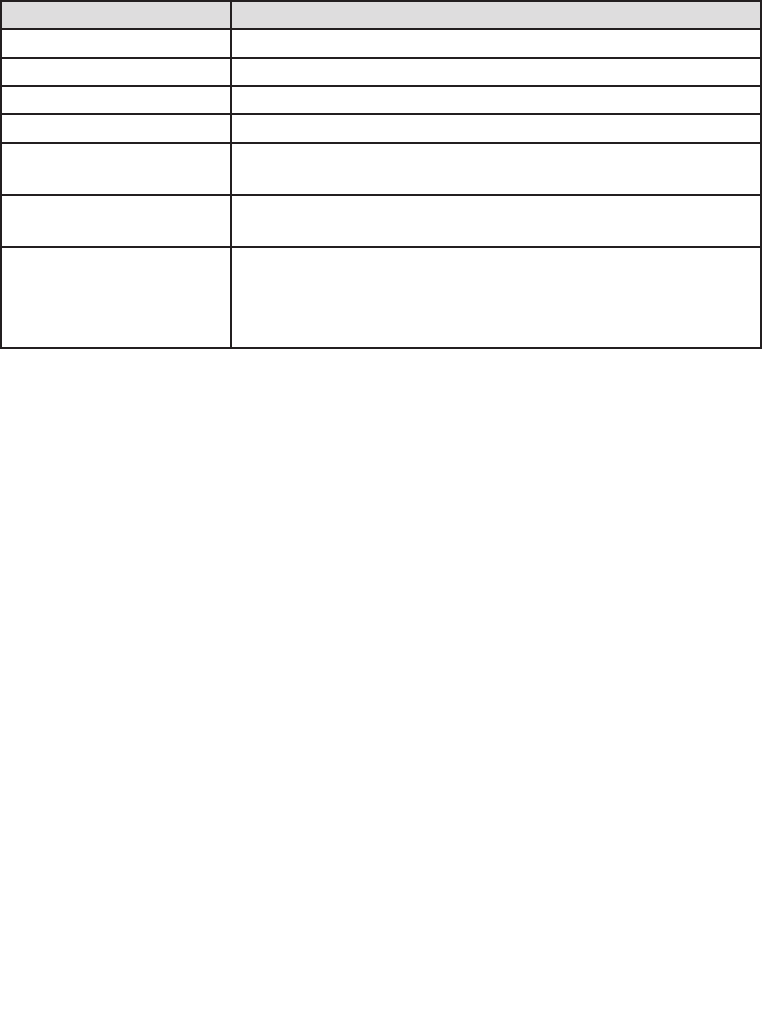
For example, the Exception Handling block depends on the Logging block for logging
exception information. Table 1 shows the full list of these dependencies.
Application block optional dependencies
Application Block Optional dependencies
Caching Block May use the Data Access block to cache data in a database.
May use the Cryptography block to encrypt cached data.
Exception Handling Block May use the Logging block to log exception information.
May use the Data Access block to log exception information to
a database.
Logging Block May use the Data Access block to log to a database.
Security Block May use the Caching block to cache credentials.
May use the Data Access block to cache credentials in a database.
May use the Cryptography block to encrypt cached credentials.

7welcome to the libr a ry
The configuration tools will automatically add the required block to your application
configuration file with the default configuration when required. For example, when you
add a Logging handler to an Exception Handling block policy, the configuration tool will
add the Logging block to the configuration with the default settings.
The seven application blocks we cover in this guide are the functional blocks that are
specifically designed to help you manage a range of crosscutting concerns. All of these
blocks depend on the core features of Enterprise Library, which in turn depend on the
Unity dependency injection and interception mechanism (the Unity Application Block) to
perform object creation and additional basic functions.
To begin using Enterprise Library you must first install it. You can download the current
version from http://msdn.microsoft.com/entlib/. Simply run the Microsoft Installer (MSI)
package to begin the installation, and select the blocks and features you want to install.
This installs the precompiled binaries ready for you to use, along with the accompanying
tools and resources such as the configuration editor and scripts to install the samples and
instrumentation.
If you want to examine the source code, and perhaps even modify it to suit your own
requirements, be sure to select the option to install the source code when you run the
installer. The source code is included within the main installer as a separate package,
which allows you to make as many working copies of the source as you want and go back
to the original version easily if required. If you choose to install the source, then it’s also
a good idea to select the option to have the installer compile the library for you so that
you are ready to start using it straight away. However, if you are happy to use the precom-
piled assemblies, you do not need to install or compile the source code.
After the installation is complete, you will see a Start menu entry containing links to
the Enterprise Library tools, source code installer, and documentation. The tools include
batch files that install instrumentation, database files, and other features. There are also
batch files that you can use to compile the entire library source code, and to copy all the
assemblies to the bin folder within the source code folders, if you want to rebuild the li-
brary from the source code.
It’s not uncommon, when people first look at Enterprise Library, to see a look of mild
alarm spread across their faces. Yes, there are quite a few assemblies, but remember:
• You only need to use those directly connected with your own scenario.
• Several are required for only very special situations.
• The runtime assemblies you will use in your applications are mostly less than
100 KB in size; and the largest of all is only around 500 KB.
• In most applications, the total size of all the assemblies you will use will be
between 1 and 2 MB.

8 ch a p ter one
The assemblies you should add to any application that uses Enterprise Library are the
common (core) assembly, the Unity dependency injection mechanism (if you are using the
default Unity container), and the container service location assembly:
• Microsoft.Practices.EnterpriseLibrary.Common.dll
• Microsoft.Practices.Unity.dll
• Microsoft.Practices.Unity.Interception.dll
• Microsoft.Practices.ServiceLocation.dll
You will also need the assembly Microsoft.Practices.Unity.Configuration.dll
if you wish to reference specific Unity configuration classes in your code. However,
in the majority of cases, you will not require this assembly.
In addition to the required assemblies, you must reference the assemblies that implement
the Enterprise Library features you will use in your application. There are several assem-
blies for each application block. Generally, these comprise a main assembly that has the
same name as the block (such as Microsoft.Practices.EnterpriseLibrary.Logging.dll),
plus additional assemblies that implement specific handlers or capabilities for the block.
You only need these additional assemblies if you want to use the features they add. For
example, in the case of the Logging block, there is a separate assembly for logging to a
database (Microsoft.Practices.EnterpriseLibrary.Logging.Database.dll). If you do not
log to a database, you do not need to reference this additional assembly.
GAC or Bin, Signed or Unsigned?
All of the assemblies are provided as precompiled signed versions that you can install into
the global assembly cache (GAC) if you wish. However, if you need to run different ver-
sions of Enterprise Library assemblies side by side, this may be problematic and you may
prefer to locate them in folders close to your application.
You can then reference the compiled assemblies in your projects, which automati-
cally copies them to the bin folder. In a Web application, you can simply copy them di-
rectly to your application’s bin folder. This approach gives you simple portability and easy
installation.
Alternatively, you can install the source code for Enterprise Library and use the scripts
provided to compile unsigned versions of the assemblies. This is useful if you decide to
modify the source code to suit your own specific requirements. You can strong name and
sign the assemblies using your own credentials afterwards if required.
For more information about side-by-side operation and other deployment issues,
see the documentation installed with Enterprise Library and available online at http://
go.microsoft.com/fwlink/?LinkId=188874.
9welcome to the libr a ry
Importing Namespaces
After you reference the appropriate assemblies in your projects, you will probably want
to add using statements to your project files to simplify your code and avoid specifying
objects using the full namespace names. Start by importing the two core namespaces that
you will require in every project that uses Enterprise Library:
• Microsoft.Practices.EnterpriseLibrary.Common
• Microsoft.Practices.EnterpriseLibrary.Common.Configuration
Depending on how you decide to work with Enterprise Library in terms of instantiating
the objects it contains, you may need to import two more namespaces. We’ ll come to
this when we look at object instantiation in Enterprise Library a little later in this
chapter.
You will also need to import the namespaces for the specific application blocks you are
using. Most of the Enterprise Library assemblies contain several namespaces to organize
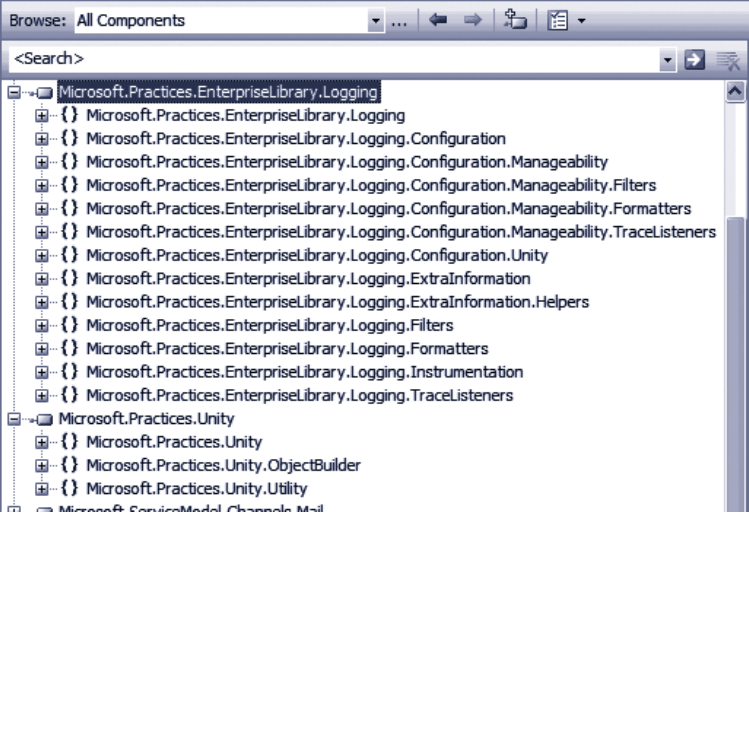
the contents. For example, as you can see in Figure 2, the main assembly for the Logging
block (one of the more complex blocks) contains a dozen subsidiary namespaces. If you
use classes from these namespaces, such as specific filters, listeners, or formatters, you
may need to import several of these namespaces.
Namespaces in the Logging block

10 ch a pter one
Configuring Enterprise Library
Before the original individual application blocks were combined into Enterprise Library,
one of the biggest challenges for users was configuration. You had to edit the sections of
the application configuration file manually, which proved to be error-prone and just plain
annoying. In Enterprise Library, you have a choice of tools for performing configuration
and a wealth of opportunities for defining and managing your configuration informa-
tion.
This flexibility comes about because Enterprise Library uses configuration sources to
expose configuration information to the application blocks and the core features of the
library. The configuration sources can read configuration from standard .NET configura-
tion files (such as App.config and Web.config), from other files, from a database (using the
example SQL Configuration Source available from http://entlib.codeplex.com), and can
also take into account Group Policy rules for a machine or a domain.
In addition, you can use the fluent interface or the .NET configuration API to create
and populate configuration sources programmatically, merge parts of your configuration
with a central shared configuration, generate merged configuration files, and generate
different configurations for individual run-time environments. For more information
about these more advanced configuration scenarios, see Appendix D, “Enterprise Library
Configuration Scenarios.”
Enterprise Library includes a stand-alone configuration console, and a configuration edi-
tor that integrates with Microsoft Visual Studio®. The stand-alone console is provided
as versions specifically aimed at the 32-bit (x86) platform and versions compiled for any
platform. For each of these platforms, there is a separate version of the console for the
3.5 and 4.0 versions of the .NET Framework. You can even copy it (and the assemblies it
uses) to a machine that does not have Enterprise Library installed if you just want to
perform post-deployment configuration and system administration. Figure 3 shows the
configuration console with some of the application blocks covered in this book installed
into the configuration.
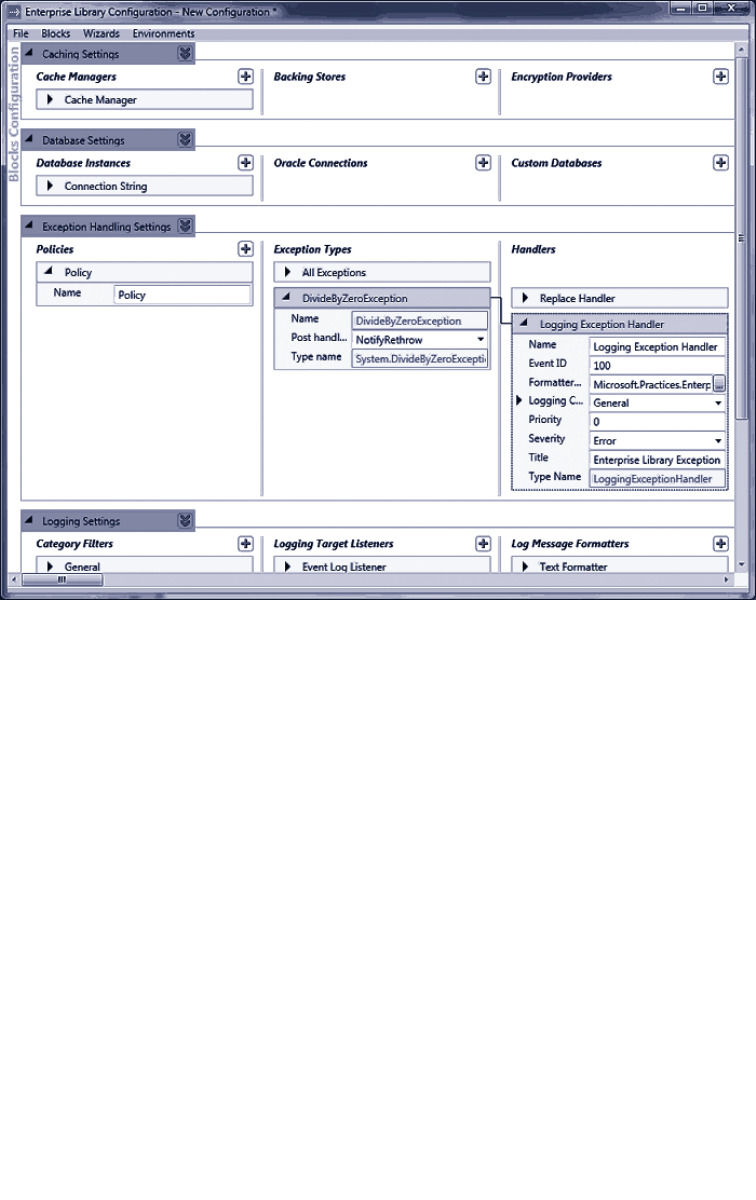
11welcome to the libr a ry
The Enterprise Library configuration console
The Visual Studio configuration editor displays an interface very similar to that shown in
Figure 3, but allows you to edit your configuration files with a simple right-click in Solu-
tion Explorer.
The most common scenario for basic configuration of an application is to store the con-
figuration information in a local configuration file (such as Web.config or App.config). You
can create a new Enterprise Library configuration in the configuration console and then
save it to disk, or you can open an existing configuration file and edit it to add Enterprise
Library to your application.
Even if you use the more advanced approaches described in Appendix D, “Enterprise
Library Configuration Scenarios,” the techniques for defining your Enterprise Library
configuration are basically the same. The general procedure for configuring an application
is as follows:

12 ch a pter one
1. Open the stand-alone configuration tool from your Start menu, or right-
click on a configuration file in Visual Studio Solution Explorer and click Edit
Enterprise Library V5 Configuration.
2. Click the Blocks menu and select the block you want to add to the configura-
tion. This adds the block with the default settings.
• If you want to use the configuration console to edit values in
the <appSettings> section of your configuration file, select Add
Application Settings.
• If you want to enable instrumentation for Enterprise Library,
select Add Instrumentation Settings.
• If you want to use an alternative source for your configuration, such
as a custom XML file, select Add Configuration Settings.
3. To view the configuration settings for each section, block, or provider, click
the right-facing arrow next to the name of that section, block, or provider.
Click it again, or press the Spacebar key, to collapse this section.
4. To view the properties pane for each main configuration section, click the
downward-facing double arrow. Click it again to close the properties pane.
5. To add a provider to a block, depending on the block or the type of provider,
you either right-click the section in the left column and select the appropriate
Add item on the shortcut menu, or click the plus-sign icon in the appropriate
column of the configuration tool. For example, to add a new exception type to
a policy in the Exception Handling block, right-click the Policy item and click
Add Exception Type.
When you rename items, the heading of that item changes to match the name. For
example, if you renamed the default Policy item in the Exception Handling block,
the item will show the new name instead of “Policy.”
1. Edit the properties of the section, block, or provider using the controls in that
section for that block. You will see information about the settings required,
and what they do, in the subsequent chapters of this guide. For full details of
all of the settings that you can specify, see the documentation installed with
Enterprise Library for that block.
2. To delete a section or provider, right-click the section or provider and click
Delete on the shortcut menu. To change the order of providers when more
than one is configured for a block, right-click the section or provider and click
the Move Up or Move Down command on the shortcut menu.

13w elcome to the libr a ry
3. To set the default provider for a block, such as the default Database for the
Data Access block, click the down-pointing double arrow icon next to the
block name and select the default provider name from the drop-down list.
In this section you can also specify the type of provider used to encrypt this
section, and whether the block should demand full permissions.
For more details about encrypting configuration, see the next section of this chapter.
For information about running the block in partial trust environments, which requires
you to turn off the Require Permission setting, see the documentation installed with
Enterprise Library.
4. To use a wizard to simplify configuration for a common task, such as configur-
ing logging to a database, open the Wizards menu and select the one you
require. The wizard will display a series of dialogs that guide you through
setting the required configuration.
5. If you want to configure different settings for an application based on different
deployment scenarios or environments, open the Environments menu and click
New Environment. This adds a drop-down list, Overrides on Environment, to
each section. If you select Override Properties in this list, you can specify the
settings for each new environment that you add to the configuration. This
feature is useful if you have multiple environments that share the same basic
configuration but require different property settings. It allows you to create a
base configuration file (.config) and an environment delta file that contains
the differences (.dconfig). See Appendix D, “Enterprise Library Configuration
Scenarios” for information on configuring and using multiple environments.
6. As you edit the configuration, the lower section of the tool displays any
warnings or errors in your configuration. You must resolve all errors before you
can save the configuration.
7. When you have finished configuring your application, use the commands on the
File menu to save it as a file in your application folder with the appropriate
name; for example, use Web.config for a Web application and App.config for
a Windows Forms application.
You can, of course, edit the configuration files using a text or XML editor, but this is
likely to be a more tedious process compared to using the configuration console. How-
ever, it may be a useful approach for minor changes to the configuration when the
application is running on a server where the configuration console is not installed.
Enterprise Library also contains an XML configuration schema that you can use to enable
IntelliSense® and simplify hand editing of the configuration files.
To enable the Enterprise Library XML schema in Visual Studio, open the configuration
file, open the XML menu, and click Schemas. In the XML Schemas dialog, locate
the Enterprise Library schema and change the value in the Use column to Use this
schema. Then click OK.

14 ch a pter one
Probably the most common approach for storing configuration information for your
applications that use Enterprise Library is to use an App.config or Web.config file stored
in the root folder of your application. That’s fine, but you may be concerned that anyone
who happens to stroll past the server (either physically, or virtually over the Internet) will
be able to open the file and see sensitive details. These might include connection strings
for the Data Access block, validation rules for the Validation block, or connection infor-
mation used by the Logging block to communicate with Windows Message Queuing.
While in theory, you will protect your configuration files by physically securing the
server and not leaving it running under a logged-on administrator account, you can (and
probably should) add an extra layer of protection by encrypting sections of your configu-
ration files. The configuration tools can do this for you automatically; all you need to do
is set the ProtectionProvider property of the specific block or configuration section that
you want to encrypt. For more information, see Appendix E, “Encrypting Configuration
Files.”
Instantiating and Using Enterprise Library Objects
After you have referenced the assemblies you need, imported the required namespaces,
and configured your application, you can start to think about creating instances of the
Enterprise Library objects you want to use in your applications. As you will see in each of
the following chapters, the Enterprise Library application blocks are optimized for use as
loosely coupled components in almost any type of application. In addition, the change in
this release to using a dependency injection container to generate instances of Enterprise
Library objects means that you can realize the benefits of contemporary design patterns
and solution architectures more easily.
By default, Enterprise Library uses the Unity dependency injection mechanism, which is
provided as part of Enterprise Library. However, it’s possible to configure Enterprise
Library to use any dependency injection container—or other underlying mechanism—
that exposes the required configuration information though an implementation of the
IServiceLocator interface. See Appendix B, “Dependency Injection in Enterprise
Library,” and http://commonservicelocator.codeplex.com for more information.
In Appendix A, “Dependency Injection with Unity,” we take a more in-depth look at what
a dependency injection container actually is, and how it can assist you in applying design
patterns that follow the dependency inversion principle (DIP); in particular, how the
Dependency Injection (DI) pattern can help you to create more decoupled applications
that are easier to build, test, and maintain. However, you don’t need to understand this or
learn about DI to be able to use Enterprise Library. You can create instances of Enterprise
Library objects easily and quickly with a single line of code.
15welcome to the libr a ry
, ,
Each of the application blocks in Enterprise Library contains one or more core objects
that you typically use to access the functionality of that block. An example is the
Exception Handling Application Block, which provides a facade named Exception
Manager that exposes the methods you use to pass exceptions to the block for handling.
The following table lists the commonly used objects for each block.
Application Block Non-static Instance or Factory
Caching ICacheManager
Cryptography CryptographyManager
Data Access Database
Exception Handling ExceptionManager
Logging LogWriter
TraceManager
Security ISecurityCacheProvider
IAuthorizationProvider
Validation ValidatorFactory
ConfigurationValidatorFactory
AttributeValidatorFactory
ValidationAttributeValidatorFactory
There are also task-specific objects in some blocks that you can create directly in your
code in the traditional way using the new operator. For example, you can create
individual validators from the Validation Application Block, or log entries from the
Logging Application Block. We show how to do this in the examples for each applica-
tion block chapter.
To use the features of an application block, all you need to do is create an instance of the
appropriate object, facade, or factory listed in the table above and then call its methods.
The behavior of the block is controlled by the configuration you specified, and often you
can carry out tasks such as exception handling, logging, caching, and encrypting values
with just a single line of code. Even tasks such as accessing data or validating instances of
your custom types require only a few lines of simple code. So, let’s look at how you create
instances of the Enterprise Library objects you want to use.
In this release of Enterprise Library, there are two recommended approaches to creating
instances of the Enterprise Library objects. The decision as to which you use is based
solely on the way you decide to architect your application. You can use the simple ap-
proach of obtaining instances using the Enterprise Library service locator, which provides
access to the Unity container that holds the Enterprise Library configuration information.
Alternatively, if you are already a DI convert, you can take charge of the entire process by
creating and populating a container and using it to create and manage both Enterprise
Library objects and your own custom types. We’ll look at both approaches next.

16 ch a pter one
The Simple Approach — Using the Enterprise Library Service Locator
When you initially create an instance of an Enterprise Library type in your application
code, the underlying mechanism reads your configuration information into a container
and exposes it to your code through a service locator that is initialized as part of the En-
terprise Library configuration mechanism. This service locator provides methods that you
can call at any point in your application code to obtain configured instances of any Enter-
prise Library type.
For example, if you are using the Logging Application Block, you can obtain a refer-
ence to a LogWriter using a single line of code, and then call its Write method to write
your log entry to the configured targets, as shown here.
var writer = EnterpriseLibraryContainer.Current.GetInstance<LogWriter>();
writer.Write("I'm a log entry created by the Logging block!");
Notice that this code uses type inference through the var keyword. The variable will
assume the type returned by the assignment; this technique can make your code more
maintainable.
If you configured more than one instance of a type for a block, such as more than one
Database for the Data Access Application Block, you can specify the name when you call
the GetInstance method. For example, you may configure an Enterprise Library Database
instance named Customers that specifies a Microsoft SQL Server® database, and a sepa-
rate Database instance named Products that specifies another type of database. In this
case, you specify the name of the object you want to resolve when you call the Get
Instance method, as shown here.
var customerDb
= EnterpriseLibraryContainer.Current.GetInstance<Database>("Customers");
You don’t have to initialize the block, read configuration information, or do anything
other than call the methods of the service locator. For many application scenarios, this
simple approach is ideal for obtaining instances of the Enterprise Library types you want
to use.
The Sophisticated Approach — Accessing the Container Directly
If you want to take advantage of design patterns such as Dependency Injection and Inver-
sion of Control in your application, you will probably already be considering the use of a
dependency injection mechanism to decouple your components and layers, and to resolve
types. If this is the case, the more sophisticated approach to incorporating Enterprise
Library into your applications will fit well with your solution architecture.
Instead of allowing Enterprise Library to create, populate, and expose a default con-
tainer that holds just Enterprise Library configuration information, you can create the
container and populate it yourself—and hold onto a reference to the container for use in
your application code. This not only allows you to obtain instances of Enterprise Library
objects, it also lets you use the container to implement dependency injection for your
own custom types. Effectively, the container itself becomes your service locator.

17welcome to the libr a ry
For example, you can create registrations and mappings in the container that specify
features such as the dependencies between the components of your application, map-
pings between types, the values of parameters and properties, interception for methods,
and deferred object creation.
You may be thinking that all of these wondrous capabilities will require a great deal
of code and effort to achieve; however, they don’t. To initialize and populate the default
Unity container with the Enterprise Library configuration information and make it avail-
able to your application, only a single line of code is required. It is shown here:
var theContainer = new UnityContainer()
.AddNewExtension<EnterpriseLibraryCoreExtension>();
Now that you have a reference to the container, you can obtain an instance of any Enter-
prise Library type by calling the container methods directly. For example, if you are using
the Logging Application Block, you can obtain a reference to a LogWriter using a single
line of code, and then call its Write method to write your log entry to the configured
targets.
var writer = theContainer.Resolve<LogWriter>();
writer.Write("I'm a log entry created by the Logging block!");
And if you configured more than one instance of a type for a block, such as more than
one database for the Data Access Application Block, you can specify the name when you
call the Resolve method, as shown here:
var customerDb = theContainer.Resolve<Database>("Customers");
You may have noticed the similarity in syntax between the Resolve method and the
GetInstance method we used earlier. Effectively, when you are using the default Unity
container, the GetInstance method of the service locator simply calls the Resolve
method of the Unity container. It therefore makes sense that the syntax and parameters
are similar. Both the container and the service locator expose other methods that allow
you to get collections of objects, and there are both generic and non-generic overloads
that allow you to use the methods in languages that do not support generics.
One point to note if you choose this more sophisticated approach to using Enterprise
Library in your applications is that you should import two additional namespaces into
your code. These namespaces include the container and core extension definitions:
• Microsoft.Practices.EnterpriseLibrary.Common.Configuration.Unity
• Microsoft.Practices.Unity
18 ch a pter one
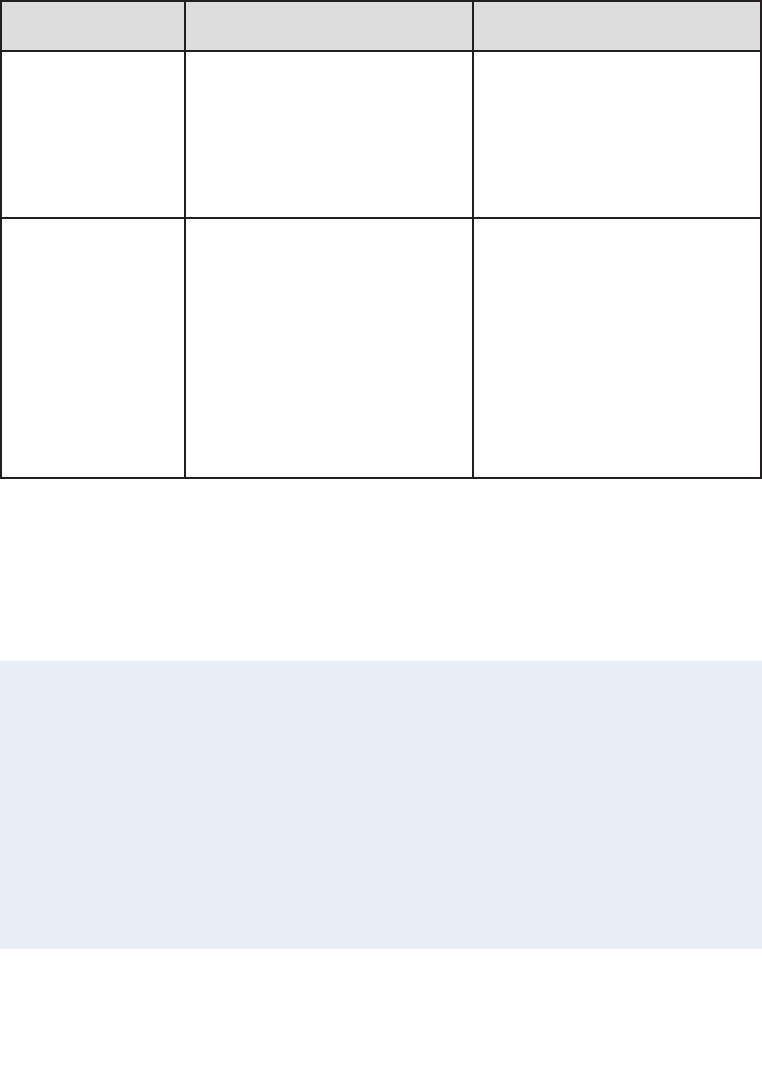
Pros and Cons of Object Instantiation
If you haven’t already decided which approach to follow for creating Enterprise Library
objects, the following table will help you to understand the advantages and disadvan-
tages of each one.
Object instantiation
technique
Advantages Considerations
Using the
Enterprise Library
service locator
Requires no initialization code. The
service locator is made available
automatically.
You can resolve types anywhere in
your application code. You don’t need
to hold onto a reference to the
container.
You can only resolve Enterprise
Library types (as interfaces, abstract
types, or concrete types that are
registered automatically).
You cannot manipulate, or add
registrations or mappings to the
container.
Using the container
as the service
locator
You can directly access all the
functionality of the Unity container.
You can iterate over the contents and
read or manipulate the registrations
and mappings (though you should not
attempt to change the Enterprise
Library configuration information).
You can add and remove your own
registrations and mappings, allowing
you to take full advantage of DI
techniques.
Requires initialization, though this
is simply one line of code executed
at application startup, or simple
configuration settings, when you
use the default Unity container.
Request-based applications such
as ASP.NET and Web services
require additional code to store the
container reference and resolve
the dependencies of the request
class (such as the Page).
One of the prime advantages of the more sophisticated approach of accessing the con-
tainer directly is that you can use it to resolve dependencies of your own custom types.
For example, assume you have a class named TaxCalculator that needs to perform logging
and implement a consistent policy for handling exceptions that you apply across your
entire application. Your class will contain a constructor that accepts an instance of an
ExceptionManager and a LogWriter as dependencies.
public class TaxCalculator
{
private ExceptionManager _exceptionManager;
private LogWriter _logWriter;
public TaxCalculator(ExceptionManager em, LogWriter lw)
{
this._exceptionManager = em;
this._logWriter = lw;
}
...
}

19welcom e to the libr a ry
If you use the Enterprise Library service locator approach, you could simply obtain these
instances within the class constructor or methods when required, rather than passing
them in as parameters. However, a more commonly used approach is to generate and reuse
the instances in your main application code, and pass them to the TaxCalculator when
you create an instance.
var exManager
= EnterpriseLibraryContainer.Current.GetInstance<ExceptionManager>();
var writer
= EnterpriseLibraryContainer.Current.GetInstance<LogWriter>();
TaxCalculator calc = new TaxCalculator(exManager, writer);
Alternatively, if you have created and held a reference to the container, you just need to
resolve the TaxCalculator type through the container. Unity will instantiate the type,
examine the constructor parameters, and automatically inject instances of the Exception-
Manager and a LogWriter into them. It returns your new TaxCalculator instance with
all of the dependencies populated.
TaxCalculator calc = theContainer.Resolve<TaxCalculator>();
More Reasons to be Sophisticated
It is clear from the preceding examples that managing the container yourself offers con-
siderable advantages in all but the simplest applications or scenarios. And the example
you’ve seen for using dependency injection only scratches the surface of what you can do
using the more sophisticated approach. For example, if you have a reference to the con-
tainer, you can:
• Manage the lifetime of your custom types. They can be resolved by the con-
tainer as singletons, with a lifetime based on the lifetime of the object that
created them, or as a new instance per execution thread.
• Implement patterns such as plug-in and service locator by mapping interfaces
and abstract types to concrete implementations of your custom types.
• Defer creation of the resolved custom type until it is actually required.
• Specify dependencies and values for parameters and properties of the resolved
instances of your custom types.
• Apply interception to your custom types to modify their behavior, implement
management of crosscutting concerns, or add additional functionality.
• Set up hierarchies of dependencies that are automatically populated to achieve
maximum decoupling between components, assist in debugging, simplify
testing, and reduce maintenance cost and effort.
When you use the default Unity container, you have a powerful general-purpose depen-
dency injection mechanism in your arsenal. You can define and modify registrations and
mappings in the container programmatically at run time, or you can define them using
configuration files. Appendix A, “Dependency Injection with Unity,” contains more infor-
mation about using Unity.

20 ch a pter one
To give you a sense of how easy it is to use, the following code registers a mapping
between an interface named IMyService and a concrete type named CustomerService,
specifying that it should be a singleton.
theContainer.RegisterType<IMyService, CustomerService>(
new ContainerControlledLifetimeManager());
Then you can resolve the single instance of the concrete type using the following code.
IMyService myServiceInstance = theContainer.Resolve<IMyService>();
This returns an instance of the CustomerService type, though you can change the actual
type returned at run time by changing the mapping in the container. Alternatively, you can
create multiple registrations or mappings for an interface or base class with different
names and specify the name when you resolve the type.
Unity can also read its configuration from your application’s App.config or Web.
config file (or any other configuration file). This means that you can use the sophisticated
approach to creating Enterprise Library objects and your own custom types, while being
able to change the behavior of your application just by editing the configuration file.
If you want to load type registrations and mappings into a Unity container from a
configuration file, you must add the assembly Microsoft.Practices.Unity.Configuration.
dll to your project, and optionally import the namespace Microsoft.Practices.Unity.
Configuration into your code. This assembly and namespace contains the extension to
the Unity container for loading configuration information.
For example, the following extract from a configuration file initializes the container and
adds the same custom mapping to it as the RegisterType example shown above.
<unity>
<alias alias="CoreExtension"
type="Microsoft.Practices.EnterpriseLibrary.Common.Conguration
.Unity.EnterpriseLibraryCoreExtension,
Microsoft.Practices.EnterpriseLibrary.Common" />
<namespace name="Your.Custom.Types.Namespace" />
<assembly name="Your.Custom.Types.Assembly.Name" />
<container>
<extension type="CoreExtension" />
<register type="IMyService" mapTo="CustomerService">
<lifetime type="singleton" />
</register>
</container>
</unity>

21welcome to the libr a ry
Then, all you need to do is load this configuration into a new Unity container. This requires
just one line of code, as shown here.
var theContainer = new UnityContainer().LoadConguration();
Other techniques we demonstrate in Appendix A, “Dependency Injection with Unity,”
include using attributes to register type mappings and dependencies, defining named
registrations, and specifying dependencies and values for parameters and properties.
The one point to be aware of when you use the more sophisticated technique for creating
objects is that your application is responsible for managing the container, holding a refer-
ence to it, and making that reference available to code that must access the container. In
forms-based applications that automatically maintain global state (for example, applica-
tions built using technologies such as Windows Forms, Windows Presentation Foundation
(WPF), and Silverlight®), you can use an application-wide variable for this.
However, in request-based applications built using technologies such as ASP.NET,
ASMX, and Windows Communication Foundation (WCF), you generally require addi-
tional code to maintain the container and make it available for each request. We discuss
some of the ways that you can achieve this in Appendix B, “Dependency Injection in En-
terprise Library,” and you will find full details in the documentation installed with Enter-
prise Library and available online at http://go.microsoft.com/fwlink/?LinkId=188874.
If you have used versions of Enterprise Library prior to version 5.0, you may be more
familiar with the previous approach to creating objects within your application code.
Earlier versions generally supported or recommended the use of a series of static facades.
While these facades are still supported in version 5.0 for backward compatibility with
existing applications, they are no longer the recommended approach and may be depre-
cated in future releases.
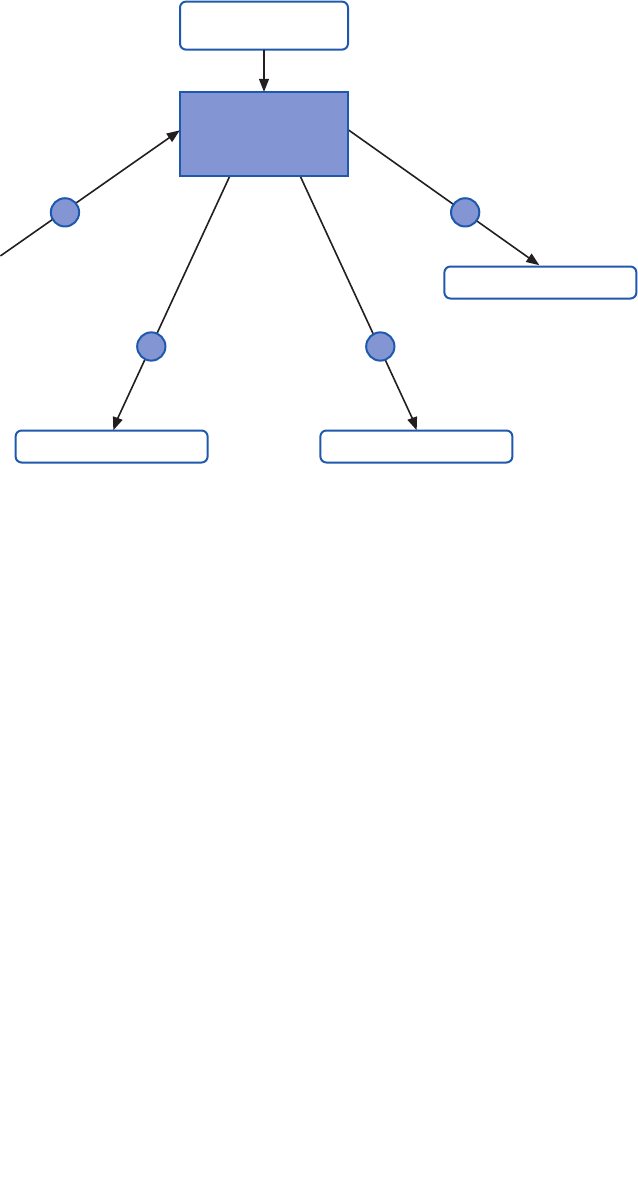
Figure 5 summarizes all the approaches you can use to get access to the features of
Enterprise Library. 1 and 2 are the recommended approaches for Enterprise Library 5.0; 3
and 4 are still supported to make it easier to upgrade your existing applications that use
a previous version of Enterprise Library.
22 ch a pter one
Four ways, one library
The Example Applications
To help you understand how you can use Enterprise Library and each of the seven applica-
tion blocks covered in this guide, we provide a series of simple example applications that
you can run and examine. Each is a console-based application and, in most cases, all of
the relevant code that uses Enterprise Library is found within a series of routines in the
Program.cs file. This makes it easy to see how the different blocks work, and what you
can achieve with each one.
The examples use the simplest approach (the service locator and GetInstance meth-
od described earlier in the chapter) for creating the Enterprise Library objects they require,
and have the configuration information for the blocks they use stored in the App.config
file. Each of the options in the examples exercises specific features of the relevant block
and displays the results. You can open the solutions for these examples in Visual Studio,
or just run the executable file in the bin\debug folder and view the source files in a text
editor if you prefer.
To obtain the example applications, go to
http://go.microsoft.com/fwlink/?LinkId=189009.
var myLogger =
EnterpriseLibraryContainer.Current.GetInstance<LogWriter>( );
myLogger.Write(…);
Configuration
Instance Factory
Service Locator Static Facade
Logger.Write(…);
var factory = new LogWriterFactory( );
var myLogger = factory.Create( );
myLogger.Write(…);
var myLogger = Container.Resolve<LogWriter>( );
myLogger.Write(…);
1
3
4
Container
2

23w elcome to the libr ary
Summary
This brief introduction to Enterprise Library will help you to get started if you are not
familiar with its capabilities and the basics of using it in applications. This chapter de-
scribed what Enterprise Library is, where you can get it, and how it can make it much
easier to manage your crosscutting concerns. This book concentrates on the application
blocks in Enterprise Library that “do stuff” (as opposed to those that “wire up stuff”). The
blocks we concentrate on in this book include the Caching, Cryptography, Data Access,
Exception Handling, Logging, Security, and Validation Application Blocks.
The aim of this chapter was also to help you get started with Enterprise Library by
explaining how you deploy and reference the assemblies it contains, how you configure
your applications to use Enterprise Library, how you instantiate Enterprise Library objects,
and the example applications we provide. Some of the more advanced features and con-
figuration options were omitted so that you may concentrate on the fundamental require-
ments. However, each appendix in this guide provides more detailed information, while
Enterprise Library contains substantial reference documentation, samples, and other re-
sources that will guide you as you explore these more advanced features.

25
Introduction
When did you last write an enterprise-level application where you didn’t need to handle
data? And when you were handling data there was a good chance it came from some kind
of relational database. Working with databases is the single most common task most
enterprise applications need to accomplish, so it’s no surprise that the Data Access Ap-
plication Block is the most widely used of all of the Enterprise Library blocks—and no
coincidence that we decided to cover it in the first of the application block chapters in
this book.
A great many of the millions of Enterprise Library users around the world first cut
their teeth on the Data Access block. Why? Because it makes it easy to implement the
most commonly used data access operations without needing to write the same repetitive
code over and over again, and without having to worry about which database the applica-
tion will target. As long as there is a Data Access block provider available for your target
database, you can use the same code to access the data. You don’t need to worry about
the syntax for parameters, the idiosyncrasies of the individual data access methods, or the
different data types that are returned.
This means that it’s also easy to switch your application to use a different database,
without having to rewrite code, recompile, and redeploy. Administrators and operators
can change the target database to a different server; and even to a different database
(such as moving from Oracle to Microsoft® SQL Server® or the reverse), without affect-
ing the application code. In the current release, the Data Access Application Block con-
tains providers for SQL Server, SQL Server Compact Edition, and Oracle databases. There
are also third-party providers available for the IBM DB2, MySql, Oracle (ODP.NET), Post-
greSQL, and SQLite databases. For more information on these, see http://codeplex.com/
entlibcontrib.
2Much ADO about Data Access

26 ch a pter t wo
What Does the Data Access Application Block Do?
The Data Access Application Block abstracts the actual database you are using, and
exposes a series of methods that make it easy to access that database to perform common
tasks. It is designed to simplify the task of calling stored procedures, but also provides full
support for the use of parameterized SQL statements. As an example of how easy the
block is to use, when you want to fill a DataSet you simply create an instance of the
appropriate Database class, use it to get an appropriate command instance (such as
DbCommand), and pass this to the ExecuteDataSet method of the Database class. You
don’t need to create a DataAdapter or call the Fill method. The ExecuteDataSet method
manages the connection, and carries out all the tasks required to populate your DataSet.
In a similar way, the Database class allows you to obtain a DataReader, execute
commands directly, and update the database from a DataSet. The block also supports
transactions to help you manage multiple operations that can be rolled back if an error
occurs.
In addition to the more common approaches familiar to users of ADO.NET, the Data
Access block also provides techniques for asynchronous data access for databases that
support this feature, and provides the ability to return data as a sequence of objects
suitable for client-side querying using techniques such as Language Integrated Query
(LINQ). However, the block is not intended to be an Object/Relational Mapping (O/RM)
solution. It uses mappings to relate parameters and relational data with the properties of
objects, but does not implement an O/RM modeling solution.
The major advantage of using the Data Access block, besides the simplicity achieved
through the encapsulation of the boilerplate code that you would otherwise need to
write, is that it provides a way to create provider-independent applications that can
easily be moved to use a different source database type. In most cases, unless your code
takes advantage of methods specific to a particular database, the only change required is
to update the contents of your configuration file with the appropriate connection string.
You don’t have to change the way you specify queries (such as SQL statements or stored
procedure names), create and populate parameters, or handle return values. This also
means reduced requirements for testing, and the configuration changes can even be
accomplished through Group Policy.
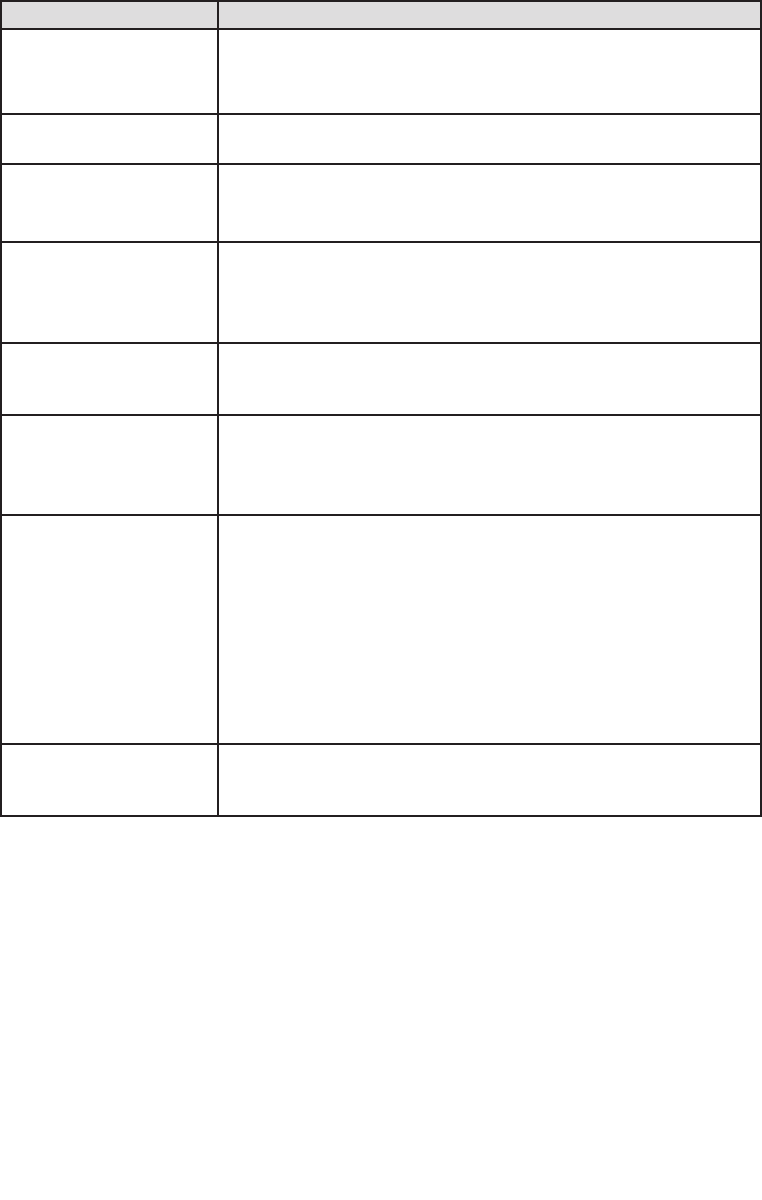
The following table lists by task the most commonly used methods that the Data Access
Application Block exposes to retrieve and update data. Some of the method names will
be familiar to those used to using ADO.NET directly.
27much a do about data access
Task Methods
Filling a DataSet and
updating the database from
a DataSet.
ExecuteDataSet. Creates, populates, and returns a DataSet.
LoadDataSet. Populates an existing DataSet.
UpdateDataSet. Updates the database using an existing DataSet.
Reading multiple data rows. ExecuteReader. Creates and returns a provider-independent
DbDataReader instance.
Executing a Command. ExecuteNonQuery. Executes the command and returns the number of
rows affected. Other return values (if any) appear as output parameters.
ExecuteScalar. Executes the command and returns a single value.
Retrieving data as a
sequence of objects.
ExecuteSprocAccessor. Returns data selected by a stored procedure
as a sequence of objects for client-side querying.
ExecuteSqlStringAccessor. Returns data selected by a SQL statement
as a sequence of objects for client-side querying.
Retrieving XML data (SQL
Server only).
ExecuteXmlReader. Returns data as a series of XML elements
exposed through an XmlReader. Note that this method is specific
to the SqlDatabase class (not the underlying Database class).
Creating a Command. GetStoredProcCommand. Returns a command object suitable for
executing a stored procedure.
GetSqlStringCommand. Returns a command object suitable for
executing a SQL statement (which may contain parameters).
Working with Command
parameters.
AddInParameter. Creates a new input parameter and adds it to
the parameter collection of a Command.
AddOutParameter. Creates a new output parameter and adds it
to the parameter collection of a command.
AddParameter. Creates a new parameter of the specific type and
direction and adds it to the parameter collection of a command.
GetParameterValue. Returns the value of the specified parameter
as an Object type.
SetParameterValue. Sets the value of the specified parameter.
Working with transactions. CreateConnection. Creates and returns a connection for the current
database that allows you to initiate and manage a transaction over the
connection.
You can see from this table that the Data Access block supports almost all of the common
scenarios that you will encounter when working with relational databases. Each data ac-
cess method also has multiple overloads, designed to simplify usage and integrate—when
necessary—with existing data transactions. In general, you should choose the overload
you use based on the following guidelines:
• Overloads that accept an ADO.NET DbCommand object provide the most
flexibility and control for each method.
• Overloads that accept a stored procedure name and a collection of values to be
used as parameter values for the stored procedure are convenient when your
application calls stored procedures that require parameters.
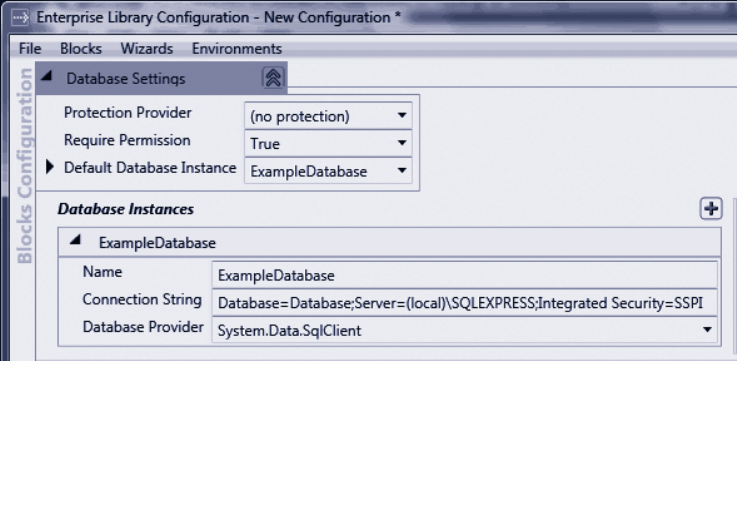
28 ch a pter t wo
• Overloads that accept a CommandType value and a string that represents
the command are convenient when your application executes inline SQL
statements, or stored procedures that require no parameters.
• Overloads that accept a transaction allow you to execute the method within
an existing transaction.
• If you use the SqlDatabase type, you can execute several of the common
methods asynchronously by using the Begin and End versions of the methods.
• You can use the Database class to create Accessor instances that execute data
access operations both synchronously and asynchronously, and return the
results as a series of objects suitable for client-side querying using technologies
such as LINQ.
How Do I Use the Data Access Block?
Before you start to use the Data Access block, you must add it to your application. You
configure the block to specify the databases you want to work with, and add the relevant
assemblies to your project. Then you can create instances of these databases in your code
and use them to read and write data.
The first step in using the Data Access block is to configure the databases you want to
access. The block makes use of the standard <connectionStrings> section of the App.
config, Web.config, or other configuration file to store the individual database connec-
tion strings, with the addition of a small Enterprise Library-specific section that defines
which of the configured databases is the default. You can configure all of these settings
using the Enterprise Library configuration console, as shown in Figure 1.
Creating a new configuration for the Data Access Application Block

29much a do about data access
After you configure the databases you need, you must instantiate them in your application
code. Add references to the assemblies you will require, and add using statements to your
code for the namespaces containing the objects you will use. In addition to the Enterprise
Library assemblies you require in every Enterprise Library project (listed in Chapter 1,
“Introduction”), you must reference or add to your bin folder the assembly Microsoft.
Practices.EnterpriseLibrary.Data.dll. This assembly includes the classes for working with
SQL Server databases.
If you are working with a SQL Server Compact Edition database, you must also refer-
ence or add the assembly Microsoft.Practices.EnterpriseLibrary.Data.SqlCe.dll. If you
are working with an Oracle database, you can use the Oracle provider included with
Enterprise Library and the ADO.NET Oracle provider, which requires you to reference
or add the assembly System.Data.OracleClient.dll. However, keep in mind that the
OracleClient provider is deprecated in version 4.0 of the .NET Framework, although it
is still supported by Enterprise Library. For future development, consider choosing a
different Oracle driver, such as that available from the Enterprise Library Contrib site at
http://codeplex.com/entlibcontrib.
To make it easier to use the objects in the Data Access block, you can add references
to the relevant namespaces, such as Microsoft.Practices.EnterpriseLibrary.Data and
Microsoft.Practices.EnterpriseLibrary.Data.Sql to your project.
You can use a variety of techniques to obtain a Database instance for the database you
want to access. The section “Instantiating Enterprise Library Objects” in Chapter 1, “In-
troduction” describes the different approaches you can use. The examples you can down-
load for this chapter use the simplest approach: calling the GetInstance method of the
service locator available from the Current property of the EnterpriseLibraryContainer,
as shown here, and storing these instances in application-wide variables so that they can
be accessed from anywhere in the code.
// Resolve the default Database object from the container.
// The actual concrete type is determined by the conguration settings.
Database defaultDB = EnterpriseLibraryContainer.Current.GetInstance<Database>();
// Resolve a Database object from the container using the connection string name.
Database namedDB
= EnterpriseLibraryContainer.Current.GetInstance<Database>("ExampleDatabase");
The code above shows how you can get an instance of the default database and a named
instance (using the name in the connection strings section). Using the default database is
a useful approach because you can change which of the databases defined in your
configuration is the default simply by editing the configuration file, without requiring
recompilation or redeployment of the application.
Notice that the code above references the database instances as instances of the
Database base class. This is required for compatibility if you want to be able to change
the database type at some later stage. However, it means that you can only use the

30 ch a pter t wo
features available across all of the possible database types (the methods and properties
defined in the Database class).
Some features are only available in the concrete types for a specific database. For
example, the ExecuteXmlReader method is only available in the SqlDatabase class. If you
want to use such features, you must cast the database type you instantiate to the
appropriate concrete type. The following code creates an instance of the SqlDatabase
class.
// Resolve a SqlDatabase object from the container using the default database.
SqlDatabase sqlServerDB
= EnterpriseLibraryContainer.Current.GetInstance<Database>() as SqlDatabase;
In addition to using configuration to define the databases you will use, the Data Access
block allows you to create instances of concrete types that inherit from the Database
class directly in your code, as shown here. All you need to do is provide a connection
string that specifies the appropriate ADO.NET data provider type (such as SqlClient).
// Assume the method GetConnectionString exists in your application and
// returns a valid connection string.
string myConnectionString = GetConnectionString();
SqlDatabase sqlDatabase = new SqlDatabase(myConnectionString);
Now that you have your new Database object ready to go, we’ll show you how you can
use it to perform a variety of tasks. You can download an example application (a simple
console-based application) that demonstrates all of the scenarios you will see in the
remainder of this chapter. You can run this directly from the bin\debug folder, or open the
solution named DataAccess in Microsoft Visual Studio® to see all of the code as you run
the examples.
The two connection strings for the database we provide with this example are:
Data Source=.\SQLEXPRESS;AttachDbFilename=|DataDirectory|\WWPlatform
mdf;Integrated Security=True;User Instance=TrueAsynchronous Processing=true;
Data Source=.\SQLEXPRESS;AttachDbFilename=|DataDirectory|\WWPlatform
mdf;Integrated Security=True;User Instance=True
If you have configured a different database using the scripts provided with the example,
you may find that you get an error when you run this example. It is likely that you have
an invalid connection string in your App.config file for your database. In addition, use
the Services MMC snap-in in your Administrative Tools folder to check that the SQL
Server (SQLEXPRESS) database service (the service is named MSSQL$SQLEXPRESS)
is running.

31much ado about data access
In addition, the final example for this block uses the Distributed Transaction
Coordinator (DTC) service. This service may not be set to auto-start on your machine.
If you receive an error that the DTC service is not available, open the Services MMC
snap-in from your Administrative Tools menu and start the service manually; then
run the example again.
One of the most common operations when working with a database is reading multiple
rows of data. In a .NET application, you usually access these rows as a DataReader
instance, or store them in a DataTable (usually within a DataSet you create). In this
section we’ll look at the use of the ExecuteReader method that returns a DataReader.
You will see how to use a DataSet with the Data Access block methods later in this
chapter.
Reading Rows Using a Query with No Parameters
Simple queries consisting of an inline SQL statement or a stored procedure, which take
no parameters, can be executed using the ExecuteReader method overload that accepts
a CommandType value and a SQL statement or stored procedure name as a string.
The following code shows the simplest approach for a stored procedure, where you
can also omit the CommandType parameter. The default is CommandType.Stored
Procedure (unlike ADO.NET, where the default is CommandType.Text).
// Call the ExecuteReader method by specifying just the stored procedure name.
using (IDataReader reader = namedDB.ExecuteReader("MyStoredProcName"))
{
// Use the values in the rows as required.
}
To use an inline SQL statement, you must specify the appropriate CommandType value,
as shown here.
// Call the ExecuteReader method by specifying the command type
// as a SQL statement, and passing in the SQL statement.
using (IDataReader reader = namedDB.ExecuteReader(CommandType.Text,
"SELECT TOP 1 * FROM OrderList"))
{
// Use the values in the rows as required - here we are just displaying them.
DisplayRowValues(reader);
}
The example named Return rows using a SQL statement with no parameters uses this code
to retrieve a DataReader containing the first order in the sample database, and then dis-
plays the values in this single row. It uses a simple auxiliary routine that iterates through
all the rows and columns, writing the values to the console screen.

32 ch a pter t wo
void DisplayRowValues(IDataReader reader)
{
while (reader.Read())
{
for (int i = 0; i < reader.FieldCount; i++)
{
Console.WriteLine("{0} = {1}", reader.GetName(i), reader[i].ToString());
}
Console.WriteLine();
}
}
The result is a list of the columns and their values in the DataReader, as shown here.
Id = 1
Status = DRAFT
CreatedOn = 01/02/2009 11:12:06
Name = Adjustable Race
LastName = Abbas
FirstName = Syed
ShipStreet = 123 Elm Street
ShipCity = Denver
ShipZipCode = 12345
ShippingOption = Two-day shipping
State = Colorado
Reading Rows Using an Array of Parameter Values
While you may use simple no-parameter stored procedures and SQL statements in some
scenarios, it’s far more common to use queries that accept input parameters that select
rows or specify how the query will execute within the database server. If you use only
input parameters, you can wrap the values up as an Object array and pass them to the
stored procedure or SQL statement. Note that this means you must add them to the array
in the same order as they are expected by the query, because you are not using names for
these parameters—you are only supplying the actual values. The following code shows
how you can execute a stored procedure that takes a single string parameter.
// Call the ExecuteReader method with the stored procedure
// name and an Object array containing the parameter values.
using (IDataReader reader = defaultDB.ExecuteReader("ListOrdersByState",
new object[] { "Colorado" }))
{
// Use the values in the rows as required - here we are just displaying them.
DisplayRowValues(reader);
}

33much a do a bout data access
The example named Return rows using a stored procedure with parameters uses this code to
query the sample database, and generates the following output.
Id = 1
Status = DRAFT
CreatedOn = 01/02/2009 11:12:06
Name = Adjustable Race
LastName = Abbas
FirstName = Syed
ShipStreet = 123 Elm Street
ShipCity = Denver
ShipZipCode = 12345
ShippingOption = Two-day shipping
State = Colorado
Id = 2
Status = DRAFT
CreatedOn = 03/02/2009 01:12:06
Name = All-Purpose Bike Stand
LastName = Abel
FirstName = Catherine
ShipStreet = 321 Cedar Court
ShipCity = Denver
ShipZipCode = 12345
ShippingOption = One-day shipping
State = Colorado
Reading Rows Using Queries with Named Parameters
The technique in the previous example of supplying just an array of parameter values is
easy and efficient, but has some limitations. It does not allow you to specify the direction
(such as input or output), or the data type—which may be an issue if the data type of a
parameter does not exactly match (or cannot be implicitly converted into) the correct
type discovered for a stored procedure. If you create an array of parameters for your
query, you can specify more details about the types of the parameters and the way they
should be used.
In addition, some database systems allocate parameters used in SQL statements or
stored procedures simply by position. However, many database systems, such as SQL
Server, allow you to use named parameters. The database matches the names of the pa-
rameters sent with the command to the names of the parameters defined in the SQL
statement or stored procedure. This means that you are not confined to adding parameters
to your command in a specific order. However, be aware that if you use named parameters
and then change the database type to one that does not support named parameters, any
parameters that are supplied out of order will probably cause errors. (This may be difficult
to detect if all of the parameters are of the same data type!)

34 ch a pter t wo
To work with named parameters or parameters of defined types, you must access the
Command object that will be used to execute the query, and manipulate its collection
or parameters. The Data Access block makes it easy to create and access the Command
object by using two methods of the Database class: GetSqlStringCommand and
GetStoredProcCommand. These methods return an instance of the appropriate
command class for the configured database as a provider-independent DbCommand type
reference.
After you create the appropriate type of command, you can use the many variations
of the Database methods to manipulate the collection of parameters. You can add
parameters with a specific direction using the AddInParameter or AddOutParameter
method, or by using the AddParameter method and providing a value for the Parameter
Direction parameter. You can change the value of existing parameters already added to
the command using the GetParameterValue and SetParameterValue methods.
The following code shows how easy it is to create a command, add an input param-
eter, and execute both a SQL statement and a stored procedure. Notice how the code
specifies the command to which the Database class should add the parameter (there
could be more than one connection defined for the database), the name, the data type,
and the value of the new parameter.
// Read data with a SQL statement that accepts one parameter prexed with @.
string sqlStatement = "SELECT TOP 1 * FROM OrderList WHERE State LIKE @state";
// Create a suitable command type and add the required parameter.
using (DbCommand sqlCmd = defaultDB.GetSqlStringCommand(sqlStatement))
{
defaultDB.AddInParameter(sqlCmd, "state", DbType.String, "New York");
// Call the ExecuteReader method with the command.
using (IDataReader sqlReader = namedDB.ExecuteReader(sqlCmd))
{
DisplayRowValues(sqlReader);
}
}
// Now read the same data with a stored procedure that accepts one parameter.
string storedProcName = "ListOrdersByState";
// Create a suitable command type and add the required parameter.
using (DbCommand sprocCmd = defaultDB.GetStoredProcCommand(storedProcName))
{
defaultDB.AddInParameter(sprocCmd, "state", DbType.String, "New York");
// Call the ExecuteReader method with the command.
using (IDataReader sprocReader = namedDB.ExecuteReader(sprocCmd))
{

35much ado a bout data access
DisplayRowValues(sprocReader);
}
}
The example named Return rows using a SQL statement or stored procedure with named
parameters uses the code you see above to execute a SQL statement and a stored proce-
dure against the sample database. The code provides the same parameter value to each,
and both queries return the same single row, as shown here.
Id = 4
Status = DRAFT
CreatedOn = 07/02/2009 05:12:06
Name = BB Ball Bearing
LastName = Abel
FirstName = Catherine
ShipStreet = 888 Main Street
ShipCity = New York
ShipZipCode = 54321
ShippingOption = Three-day shipping
State = New York
Modern programming techniques typically concentrate on data as objects. This approach
is useful if you use Data Transfer Objects (DTOs) (see http://msdn.microsoft.com/en-us/
library/ms978717.aspx) to pass data around you application layers, implement a data
access layer using O/RM techniques, or want to take advantage of new client-side data
querying techniques such as LINQ.
The Data Access block is not, in itself, an O/RM solution; but it contains features that
allow you to extract data using a SQL statement or a stored procedure as the query, and
have the data returned to you as a sequence of objects that implements the IEnumerable
interface. This allows you to execute queries, or obtain lists or arrays of objects that
represent the original data in the database.
About Accessors
The block provides two core classes for performing this kind of query: the SprocAccessor
and the SqlStringAccessor. You can create and execute these accessors in one operation
using the ExecuteSprocAccessor and ExecuteSqlAccessor methods of the Database
class, or create a new accessor directly and then call its Execute method.
Accessors use two other objects to manage the parameters you want to pass into the
accessor (and on to the database as it executes the query), and to map the values in
the rows returned from the database to the properties of the objects it will return to the
client code. Figure 2 shows the overall process.
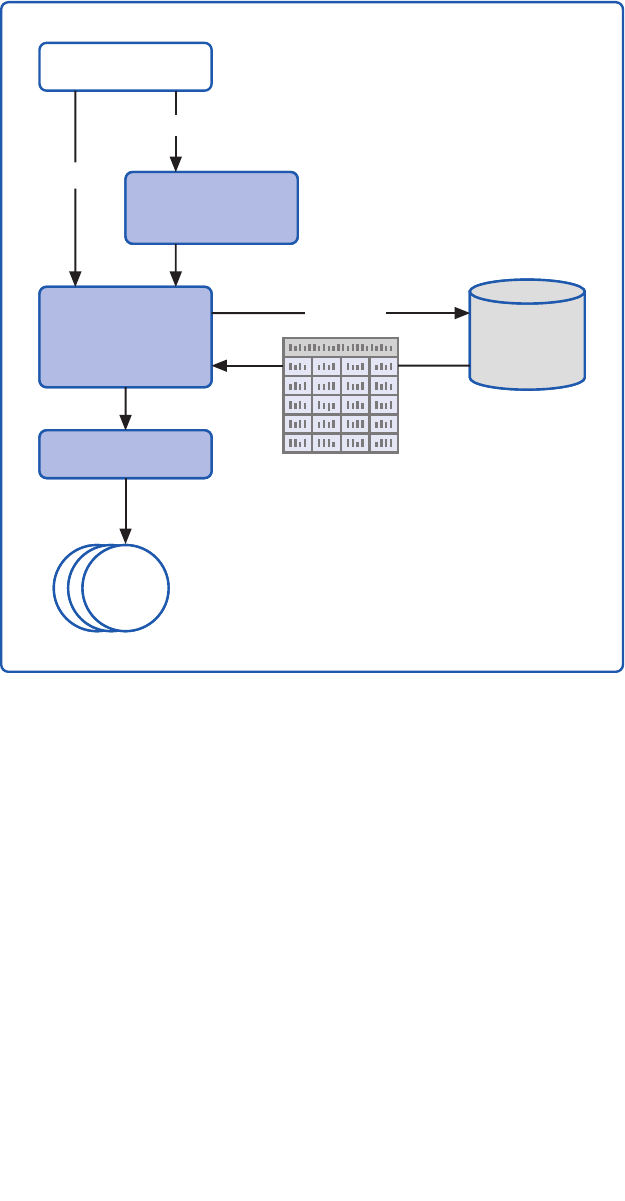
36 ch a pter t wo
Overview of data accessors and the related types
The accessor will attempt to resolve the parameters automatically using a default mapper
if you do not specify a parameter mapper. However, this feature is only available for stored
procedures executed against SQL Server and Oracle databases. It is not available when
using SQL statements, or for other databases and providers, where you must specify a
custom parameter mapper that can resolve the parameters.
If you do not specify an output mapper, the block uses a default map builder class
that maps the column names of the returned data to properties of the objects it creates.
Alternatively, you can create a custom mapping to specify the relationship between
columns in the row set and the properties of the objects.
Inferring the details required to create the correct mappings means that the default
parameter and output mappers can have an effect on performance. You may prefer to
create your own custom mappers and retain a reference to them for reuse when possible
to maximize performance of your data access processes when using accessors.
Client Code
Database
Output Mapper
Objects
Query
Parameters
Accessor
Parameter
Mapper
Execute

37much ado about data access
For a full description of the techniques for using accessors, see the Enterprise Library
documentation on MSDN® at http://go.microsoft.com/fwlink/?LinkId=188874, or
installed with Enterprise Library. This chapter covers only the simplest approach: using the
ExecuteSprocAccessor method of the Database class.
Creating and Executing an Accessor
The following code shows how you can use an accessor to execute a stored procedure
and then manipulate the sequence of objects that is returned. You must specify the object
type that you want the data returned as—in this example it is a simple class named
Product that has the three properties: ID, Name, and Description.
The stored procedure takes a single parameter that is a search string, and returns
details of all products in the database that contain this string. Therefore, the code first
creates an array of parameter values to pass to the accessor, and then calls the
ExecuteSprocAccessor method. It specifies the Product class as the type of object to
return, and passes to the method the name of the stored procedure to execute and the
array of parameter values.
// Create an object array and populate it with the required parameter values.
object[] paramArray = new object[] { "%bike%" };
// Create and execute a sproc accessor that uses the default
// parameter and output mappings.
var productData = defaultDB.ExecuteSprocAccessor<Product>("GetProductList",
paramArray);
// Perform a client-side query on the returned data. Be aware that
// the orderby and ltering is happening on the client, not in the database.
var results = from productItem in productData
where productItem.Description != null
orderby productItem.Name
select new { productItem.Name, productItem.Description };
// Display the results
foreach (var item in results)
{
Console.WriteLine("Product Name: {0}", item.Name);
Console.WriteLine("Description: {0}", item.Description);
Console.WriteLine();
}
The accessor returns the data as a sequence that, in this example, the code handles using
a LINQ query to remove all items where the description is empty, sort the list by name,
and then create a new sequence of objects that have just the Name and Description
properties. For more information on using LINQ to query sequences, see http://msdn.
microsoft.com/en-us/library/bb397676.

38 ch a pter t wo
Keep in mind that returning sets of data that you manipulate on the client can have an
impact on performance. In general, you should attempt to return data in the format
required by the client, and minimize client-side data operations.
The example Return data as a sequence of objects using a stored procedure uses the code you
see above to query the sample database and process the resulting rows. The output it
generates is shown here.
Product Name: All-Purpose Bike Stand
Description: Perfect all-purpose bike stand for working on your bike at home.
Quick-adjusting clamps and steel construction.
Product Name: Bike Wash - Dissolver
Description: Washes off the toughest road grime; dissolves grease, environmentally
safe. 1-liter bottle.
Product Name: Hitch Rack - 4-Bike
Description: Carries 4 bikes securely; steel construction, ts 2" receiver hitch.
For an example of creating an accessor and then calling the Execute method, see the
section “Retrieving Data as Objects Asynchronously” later in this chapter.
Creating and Using Mappers
In some cases, you may need to create a custom parameter mapper to pass your param-
eters to the query that the accessor will execute. This typically occurs when you need to
execute a SQL statement to work with a database system that does not support param-
eter resolution, or when a default mapping cannot be inferred due to a mismatch in the
number or types of the parameters. The parameter mapper class must implement the
IParameterMapper interface and contain a method named AssignParameters that takes
a reference to the current Command instance and the array of parameters. The method
simply needs to add the required parameters to the Command object’s Parameters
collection.
More often, you will need to create a custom output mapper. To help you do this, the
block provides a class called MapBuilder that you can use to create the set of mappings
you require between the columns of the data set returned by the query and the properties
of the objects you need.
By default, the accessor will expect to generate a simple sequence of a single type of
object (in our earlier example, this was a sequence of the Product class). However, you
can use an accessor to return a more complex graph of objects if you wish. For example,
you might execute a query that returns a series of Order objects and the related Order
Lines objects for all of the selected orders. Simple output mapping cannot cope with this
scenario, and neither can the MapBuilder class. In this case, you would create a result set
mapper by implementing the IResultSetMapper interface. Your custom row set mapper
must contain a method named MapSet that receives a reference to an object that imple-
ments the IDataReader interface. The method should read all of the data available
through the data reader, processes it to create the sequence of objects you require, and
return this sequence.

39much a do about data access
Some years ago, XML was the coolest new technology that was going to rule the world
and change the way we think about data. In some ways, it did, though the emphasis on
XML has receded as the relational database model continues to be the basis for most
enterprise systems. However, the ability to retrieve data from a relational database as
XML is useful in many scenarios, and is supported by the Data Access block.
SQL Server supports a mechanism called SQLXML that allows you to extract data as
a series of XML elements, or in a range of XML document formats, by executing specially
formatted SQL queries. You can use templates to precisely control the output, and have
the server format the data in almost any way you require. For a description of the capa-
bilities of SQLXML, see http://msdn.microsoft.com/en-us/library/aa286527(v=MSDN.10).
aspx.
The Data Access block provides the ExecuteXmlReader method for querying data
as XML. It takes a SQL statement that contains the FOR XML statement and executes
it against the database, returning the result as an XmlReader. You can iterate through the
resulting XML elements or work with them in any of the ways supported by the XML
classes in the .NET Framework. However, as SQLXML is limited to SQL Server (the imple-
mentations of this type of query differ in other database systems), it is only available when
you specifically use the SqlDatabase class (rather than the Database class).
The following code shows how you can obtain a SqlDatabase instance, specify a
suitable SQLXML query, and execute it using the ExecuteXmlReader method.
// Resolve a SqlDatabase object from the container using the default database.
SqlDatabase sqlServerDB
= EnterpriseLibraryContainer.Current.GetInstance<Database>() as SqlDatabase;
// Specify a SQL query that returns XML data.
string xmlQuery = "SELECT * FROM OrderList WHERE State = @state FOR XML AUTO";
// Create a suitable command type and add the required parameter
// NB: ExecuteXmlReader is only available for SQL Server databases
using (DbCommand xmlCmd = sqlServerDB.GetSqlStringCommand(xmlQuery))
{
xmlCmd.Parameters.Add(new SqlParameter("state", "Colorado"));
using (XmlReader reader = sqlServerDB.ExecuteXmlReader(xmlCmd))
{
// Iterate through the elements in the XmlReader
while (!reader.EOF)
{
if (reader.IsStartElement())
{
Console.WriteLine(reader.ReadOuterXml());
}
}
}
}

40 ch a pter t wo
The code above also shows a simple approach to extracting the XML data from the
XmlReader returned from the ExecuteXmlReader method. One point to note is that,
by default, the result is an XML fragment, and not a valid XML document. It is,
effectively, a sequence of XML elements that represent each row in the results set. There-
fore, at minimum, you must wrap the output with a single root element so that it
is well-formed. For more information about using an XmlReader, see “Reading XML
with the XmlReader” in the online MSDN documentation at http://msdn.microsoft.com/
en-us/library/9d83k261.aspx.
The example Return data as an XML fragment using a SQL Server XML query uses the
code you see above to query a SQL Server database. It returns two XML elements in the
default format for a FOR XML AUTO query, with the values of each column in the data
set represented as attributes, as shown here.
<OrderList Id="1" Status="DRAFT" CreatedOn="2009-02-01T11:12:06" Name="Adjustable
Race" LastName="Abbas" FirstName="Syed" ShipStreet="123 Elm Street"
ShipCity="Denver" ShipZipCode="12345" ShippingOption="Two-day shipping"
State="Colorado" />
<OrderList Id="2" Status="DRAFT" CreatedOn="2009-02-03T01:12:06" Name="All-Purpose
Bike Stand" LastName="Abel" FirstName="Catherine" ShipStreet="321 Cedar Court"
ShipCity="Denver" ShipZipCode="12345" ShippingOption="One-day shipping"
State="Colorado" />
You might use this approach when you want to populate an XML document, transform
the data for display, or persist it in some other form. You might use an XSLT style sheet
to transform the data to the required format. For more information on XSLT, see “XSLT
Transformations” at http://msdn.microsoft.com/en-us/library/14689742.aspx.
A common requirement when working with a database is to extract a single scalar value
based on a query that selects either a single row or a single value. This is typically the case
when using lookup tables or checking for the presence of a specific entity in the database.
The Data Access block provides the ExecuteScalar method to handle this requirement.
It executes the query you specify, and then returns the value of the first column of the
first row of the result set as an Object type. This means that it provides much better
performance than the ExecuteReader method, because there is no need to create a
DataReader and stream the results to the client as a row set. To maximize this efficiency,
you should aim to use a query that returns a single value or a single row.
The ExecuteScalar method has a set of overloads similar to the ExecuteReader
method we used earlier in this chapter. You can specify a CommandType (the default is
StoredProcedure) and either a SQL statement or a stored procedure name. You can also
pass in an array of Object instances that represent the parameters for the query. Alterna-
tively, you can pass to the method a Command object that contains any parameters you
require.
The following code demonstrates passing a Command object to the method to
execute both an inline SQL statement and a stored procedure. It obtains a suitable
Command instance from the current Database instance using the GetSqlStringCommand

41much a do about data access
and GetStoredProcCommand methods. You can add parameters to the command before
calling the ExecuteScalar method if required. However, to demonstrate the way the
method works, the code here simply extracts the complete row set. The result is a single
Object that you must cast to the appropriate type before displaying or consuming it in
your code.
// Create a suitable command type for a SQL statement.
// NB: For efciency, aim to return only a single value or a single row.
using (DbCommand sqlCmd
= defaultDB.GetSqlStringCommand("SELECT [Name] FROM States"))
{
// Call the ExecuteScalar method of the command.
Console.WriteLine("Result using a SQL statement: {0}",
defaultDB.ExecuteScalar(sqlCmd).ToString());
}
// Create a suitable command type for a stored procedure.
// NB: For efciency, aim to return only a single value or a single row.
using (DbCommand sprocCmd = defaultDB.GetStoredProcCommand("GetStatesList"))
{
// Call the ExecuteScalar method of the command.
Console.WriteLine("Result using a stored procedure: {0}",
defaultDB.ExecuteScalar(sprocCmd).ToString());
}
You can see the code listed above running in the example Return a single scalar value from
a SQL statement or stored procedure. The somewhat unexciting result it produces is shown
here.
Result using a SQL statement: Alabama
Result using a stored procedure: Alabama
Having looked at all of the main ways you can extract data using the Data Access block,
we’ll move on to look at some more exciting scenarios (although many would perhaps fail
to consider anything connected with data access exciting...). Databases are generally not
renowned for being the fastest of components in an application—in fact many people
will tell you that they are major bottleneck in any enterprise application. It’s not that they
are inefficient, it’s usually just that they contain many millions of rows, and the queries
you need to execute are relatively complex. Of course, it may just be that the query is
badly written and causes poor performance, but that’s a different story.
One way that applications can minimize the performance hit from data access is to
perform it asynchronously. This means that the application code can continue to execute,
and the user interface can remain interactive during the process. Asynchronous data
access may not suit every situation, but it can be extremely useful.

42 ch a pter t wo
For example, you might be able to perform multiple queries concurrently and combine
the results to create the required data set. Or query multiple databases, and only use the
data from the one that returned the results first (which is also a kind of failover feature).
However, keep in mind that asynchronous data access has an effect on connection and
data streaming performance over the wire. Don’t expect a query that returns ten rows to
show any improvement using an asynchronous approach—it is more likely to take longer
to return the results!
The Data Access block provides asynchronous Begin and End versions of many of the
standard data access methods, including ExecuteReader, ExecuteScalar, Execute
XmlReader, and ExecuteNonQuery. It also provides asynchronous Begin and End
versions of the Execute method for accessors that return data as a sequence of objects.
You will see both of these techniques here.
Preparing for Asynchronous Data Access
Before you can execute a query asynchronously, you must specify the appropriate setting
in the connection string for the database you want to use. By default, asynchronous data
access is disabled for connections, which prevents them from suffering the performance
hit associated with asynchronous data retrieval. To use asynchronous methods over a
connection, the connection string must include Asynchronous Processing=true (or just
async=true), as shown in this extract from a <connectionStrings> section of a configura-
tion file.
<connectionStrings>
<add name="AsyncExampleDatabase"
connectionString="Asynchronous Processing=true; Data Source=.\SQLEXPRESS;
Initial Catalog=MyDatabase; Integrated Security=True;"
providerName="System.Data.SqlClient" />
...
</connectionStrings>
In addition, asynchronous processing in the Data Access block is only available for SQL
Server databases. The Database class includes a property named SupportsAsync that you
can query to see if the current Database instance does, in fact, support asynchronous
operations. The example for this chapter contains a simple check for this.
One other point to note is that asynchronous data access usually involves the use of
a callback that runs on a different thread from the calling code. A common approach to
writing callback code in modern applications is to use Lambda expressions rather than a
separate callback handler routine. This callback usually cannot directly access the user
interface in a Windows® Forms or Windows Presentation Foundation (WPF) application.
You will, in most cases, need to use a delegate to call a method in the original UI class to
update the data returned by the callback.
Other points to note about asynchronous data access are the following:
• You can use the standard .NET methods and classes from the System.
Threading namespace, such as wait handles and manual reset events, to
manage asynchronous execution of the Data Access block methods. You can
also cancel a pending or executing command by calling the Cancel method

43much a do about data access
of the command you used to initiate the operation. For more information,
see “Asynchronous Command Execution in ADO.NET 2.0” on MSDN at
http://msdn.microsoft.com/en-us/library/ms379553(VS.80).aspx.
• The BeginExecuteReader method does not accept a CommandBehavior
parameter. By default, the method will automatically set the Command
Behavior property on the underlying reader to CloseConnection unless
you specify a transaction when you call the method. If you do specify a
transaction, it does not set the CommandBehavior property.
• Always ensure you call the appropriate EndExecute method when you use
asynchronous data access, even if you do not actually require access to the
results, or call the Cancel method on the connection. Failing to do so can
cause memory leaks and consume additional system resources.
• Using asynchronous data access with the Multiple Active Results Set (MARS)
feature of ADO.NET may produce unexpected behavior, and should generally
be avoided.
• Asynchronous data access is only available if the database is SQL Server 7.0
or later. Also, for SQL Server 7.0 and SQL Server 2000, the database connection
must use TCP. It cannot use shared memory. To ensure that TCP is used for
SQL Server 7.0 and SQL Server 2000, use localhost, tcp:server_name, or
tcp:ip_address for the server name in the connection string.
Asynchronous code is notoriously difficult to write, test, and debug for all edge cases,
and you should only consider using it where it really can provide a performance benefit.
For guidance on performance testing and setting performance goals see “patterns &
practices Performance Testing Guidance for Web Applications” at http://perftesting-
guide.codeplex.com/.
Retrieving Row Set Data Asynchronously
The following code shows how you can perform asynchronous data access to retrieve a
row set from a SQL Server database. The code creates a Command instance and adds two
parameters, and then calls the BeginExecuteReader method of the Database class to
start the process. The code passes to this method a reference to the command to execute
(with its parameters already added), a Lambda expression to execute when the data
retrieval process completes, and a null value for the AsyncState parameter.
// Create command to execute stored procedure and add parameters.
DbCommand cmd = asyncDB.GetStoredProcCommand("ListOrdersSlowly");
asyncDB.AddInParameter(cmd, "state", DbType.String, "Colorado");
asyncDB.AddInParameter(cmd, "status", DbType.String, "DRAFT");
// Execute the query asynchronously specifying the command and the
// expression to execute when the data access process completes.
asyncDB.BeginExecuteReader(cmd,
asyncResult =>
{

44 ch a pter t wo
// Lambda expression executed when the data access completes.
try
{
using (IDataReader reader = asyncDB.EndExecuteReader(asyncResult))
{
DisplayRowValues(reader);
}
}
catch (Exception ex)
{
Console.WriteLine("Error after data access completed: {0}", ex.Message);
}
}, null);
The Lambda expression then calls the EndExecuteReader method to obtain the results
of the query execution. At this point you can consume the row set in your application or,
as the code above does, just display the values. Notice that the callback expression should
handle any errors that may occur during the asynchronous operation.
You can also, of course, use the separate callback approach instead of an inline Lambda
expression if you wish.
The AsyncState parameter can be used to pass any required state information into the
callback. For example, when you use a separate callback, you would pass a reference to
the current Database instance as the AsyncState parameter so that the callback code can
call the EndExecuteReader (or other appropriate End method) to obtain the results.
When you use a Lambda expression, the current Database instance is available within the
expression and, therefore, you do not need to populate the AsyncState parameter.
The example Execute a command that retrieves data asynchronously uses the code
shown above to fetch two rows from the database and display the contents. As well as
the code above, it uses a simple routine that displays a “Waiting...” message every second
as the code executes. The result is shown here.
Database supports asynchronous operations
Waiting... Waiting... Waiting... Waiting... Waiting...
Id = 1
Status = DRAFT
CreatedOn = 01/02/2009 11:12:06
Name = Adjustable Race
LastName = Abbas
FirstName = Syed
ShipStreet = 123 Elm Street
ShipCity = Denver
ShipZipCode = 12345
ShippingOption = Two-day shipping
State = Colorado

45much ado about data access
Id = 2
Status = DRAFT
CreatedOn = 03/02/2009 01:12:06
Name = All-Purpose Bike Stand
LastName = Abel
FirstName = Catherine
ShipStreet = 321 Cedar Court
ShipCity = Denver
ShipZipCode = 12345
ShippingOption = One-day shipping
State = Colorado
Of course, as we don’t have a multi-million-row database handy to query, the example
uses a stored procedure that contains a WAIT statement to simulate a long-running data
access operation. It also uses ManualResetEvent objects to manage the threads so
that you can see the results more clearly. Open the sample in Visual Studio, or view the
Program.cs file, to see the way this is done.
Retrieving Data as Objects Asynchronously
You can also execute data accessors asynchronously when you want to return your data
as a sequence of objects rather than as rows and columns. The example Execute a com-
mand that retrieves data as objects asynchronously demonstrates this technique. You can
create your accessor and associated mappers in the same way as shown in the previous
section of this chapter, and then call the BeginExecute method of the accessor. This
works in much the same way as when using the BeginExecuteReader method described
in the previous example.
You pass to the BeginExecute method the lambda expression or callback to execute
when the asynchronous data access process completes, along with the AsyncState and
an array of Object instances that represent the parameters to apply to the stored proce-
dure or SQL statement you are executing. The lambda expression or callback method can
obtain a reference to the accessor that was executed from the AsyncState (casting it to
an instance of the DataAccessor base type so that the code will work with any accessor
implementation), and then call the EndExecute method of the accessor to obtain a
reference to the sequence of objects the accessor retrieved from the database.
So far, we’ve looked at retrieving data from a database using the classes and methods of
the Data Access block. Of course, while this is typically the major focus of many applica-
tions, you will often need to update data in your database. The Data Access block provides
features that support data updates. You can execute update queries (such as INSERT,
DELETE, and UPDATE statements) directly against a database using the Execute
NonQuery method. In addition, you can use the ExecuteDataSet, LoadDataSet, and
UpdateDataSet methods to populate a DataSet and push changes to the rows back into
the database. We’ll look at both of these approaches here.

46 ch a pter t wo
Executing an Update Query
The Data Access block makes it easy to execute update queries against a database. By
update queries, we mean inline SQL statements, or SQL statements within stored proce-
dures, that use the UPDATE, DELETE, or INSERT keywords. You can execute these kinds
of queries using the ExecuteNonQuery method of the Database class.
Like the ExecuteReader method we used earlier in this chapter, the Execute
NonQuery method has a broad set of overloads. You can specify a CommandType (the
default is StoredProcedure) and either a SQL statement or a stored procedure name. You
can also pass in an array of Object instances that represent the parameters for the query.
Alternatively, you can pass to the method a Command object that contains any parameters
you require. There are also Begin and End versions that allow you to execute update
queries asynchronously.
The following code from the example application for this chapter shows how you can
use the ExecuteNonQuery method to update a row in a table in the database. It updates
the Description column of a single row in the Products table, checks that the update
succeeded, and then updates it again to return it to the original value (so that you can run
the example again). The first step is to create the command and add the required param-
eters, as you’ve seen in earlier examples, and then call the ExecuteNonQuery method
with the command as the single parameter. Next, the code changes the value of the
command parameter named description to the original value in the database, and then
executes the compensating update.
string oldDescription
= "Carries 4 bikes securely; steel construction, ts 2\" receiver hitch.";
string newDescription = "Bikes tend to fall off after a few miles.";
// Create command to execute the stored procedure and add the parameters.
DbCommand cmd = defaultDB.GetStoredProcCommand("UpdateProductsTable");
defaultDB.AddInParameter(cmd, "productID", DbType.Int32, 84);
defaultDB.AddInParameter(cmd, "description", DbType.String, newDescription);
// Execute the query and check if one row was updated.
if (defaultDB.ExecuteNonQuery(cmd) == 1)
{
// Update succeeded.
}
else
{
Console.WriteLine("ERROR: Could not update just one row.");
}
// Change the value of the second parameter
defaultDB.SetParameterValue(cmd, "description", oldDescription);
// Execute query and check if one row was updated

47much ado about data access
if (defaultDB.ExecuteNonQuery(cmd) == 1)
{
// Update succeeded.
}
else
{
Console.WriteLine("ERROR: Could not update just one row.");
}
Notice the pattern used to execute the query and check that it succeeded. The
ExecuteNonQuery method returns an integer value that is the number of rows updated
(or, to use the more accurate term, affected) by the query. In this example, we are specify-
ing a single row as the target for the update by selecting on the unique ID column.
Therefore, we expect only one row to be updated—any other value means there was a
problem.
If you are expecting to update multiple rows, you would check for a non-zero
returned value. Typically, if you need to ensure integrity in the database, you could
perform the update within a connection-based transaction, and roll it back if the result
was not what you expected. We look at how you can use transactions with the Data
Access block methods in the section “Working with Connection-Based Transactions”
later in this chapter.
The example Update data using a Command object, which uses the code you see above,
produces the following output.
Contents of row before update:
Id = 84
Name = Hitch Rack - 4-Bike
Description = Carries 4 bikes securely; steel construction, ts 2" receiver hitch.
Contents of row after rst update:
Id = 84
Name = Hitch Rack - 4-Bike
Description = Bikes tend to fall off after a few miles.
Contents of row after second update:
Id = 84
Name = Hitch Rack - 4-Bike
Description = Carries 4 bikes securely; steel construction, ts 2" receiver hitch.
Working with DataSets
If you need to retrieve data and store it in a way that allows you to push changes back
into the database, you will usually use a DataSet. The Data Access block supports simple
operations on a normal (non-typed) DataSet, including the capability to fill a DataSet and
then update the original database table from the DataSet.

48 ch a pter t wo
To fill a DataSet, you use the ExecuteDataSet method, which returns a new instance
of the DataSet class populated with a table containing the data for each row set returned
by the query (which may be a multiple-statement batch query). The tables in this DataSet
will have default names such as Table, Table1, and Table2.
If you want to load data into an existing DataSet, you use the LoadDataSet method.
This allows you to specify the name(s) of the target table(s) in the DataSet, and lets you
add additional tables to an existing DataSet or refresh the contents of specific tables in
the DataSet.
Both of these methods, ExecuteDataSet and LoadDataSet, have a similar broad set
of overloads to the ExecuteReader and other methods you’ve seen earlier in this chapter.
You can specify a CommandType (the default is StoredProcedure) and either a SQL
statement or a stored procedure name. You can also pass in an array of Object instances
that represent the parameters for the query. Alternatively, you can pass to the method a
Command object that contains any parameters you require.
For example, the following code lines show how you can use the ExecuteDataSet
method with a SQL statement; with a stored procedure and a parameter array; and with
a command pre-populated with parameters. The code assumes you have created the Data
Access block Database instance named db.
DataSet productDataSet;
// Using a SQL statement.
string sql = "SELECT CustomerName, CustomerPhone FROM Customers";
productDataSet = db.ExecuteDataSet(CommandType.Text, sql);
// Using a stored procedure and a parameter array.
productDataSet = db.ExecuteDataSet("GetProductsByCategory",
new Object[] { "%bike%" });
// Using a stored procedure and a named parameter.
DbCommand cmd = db.GetStoredProcCommand("GetProductsByCategory");
db.AddInParameter(cmd, "CategoryID", DbType.Int32, 7);
productDataSet = db.ExecuteDataSet(cmd);
Updating the Database from a DataSet
To update data in a database from a DataSet, you use the UpdateDataSet method, which
returns a total count of the number of rows affected by the update, delete, and insert
operations. The overloads of this method allow you to specify the source DataSet
containing the updated rows, the name of the table in the database to update, and
references to the three Command instances that the method will execute to perform
UPDATE, DELETE, and INSERT operations on the specified database table.
In addition, you can specify a value for the UpdateBehavior, which determines how
the method will apply the updates to the target table rows. You can specify one of the
following values for this parameter:

49much ado about data access
• Standard. If the underlying ADO.NET update process encounters an error, the
update stops and no subsequent updates are applied to the target table.
• Continue. If the underlying ADO.NET update process encounters an error, the
update will continue and attempt to apply any subsequent updates.
• Transactional. If the underlying ADO.NET update process encounters an error,
all the updates made to all rows will be rolled back.
Finally, you can—if you wish—provide a value for the UpdateBatchSize parameter of the
UpdateDataSet method. This forces the method to attempt to perform updates in
batches instead of sending each one to the database individually. This is more efficient,
but the return value for the method will show only the number of updates made in the
final batch, and not the total number for all batches. Typically, you are likely to use a batch
size value between 10 and 100. You should experiment to find the most appropriate batch
size; it depends on the type of database you are using, the query you are executing, and
the number of parameters for the query.
The examples for this chapter include one named Fill a DataSet and update the source
data, which demonstrates the ExecuteDataSet and UpdateDataSet methods. It uses the
simple overloads of the ExecuteDataSet and LoadDataSet methods to fill two DataSet
instances, using a separate routine named DisplayTableNames (not shown here) to display
the table names and a count of the number of rows in these tables. This shows one of the
differences between these two methods. Note that the LoadDataSet method requires a
reference to an existing DataSet instance, and an array containing the names of the tables
to populate.
string selectSQL = “SELECT Id, Name, Description FROM Products WHERE Id > 90";
// Fill a DataSet from the Products table using the simple approach.
DataSet simpleDS = defaultDB.ExecuteDataSet(CommandType.Text, selectSQL);
DisplayTableNames(simpleDS, "ExecuteDataSet");
// Fill a DataSet from the Products table using the LoadDataSet method.
// This allows you to specify the name(s) for the table(s) in the DataSet.
DataSet loadedDS = new DataSet("ProductsDataSet");
defaultDB.LoadDataSet(CommandType.Text, selectSQL, loadedDS,
new string[] { "Products" });
DisplayTableNames(loadedDS, "LoadDataSet");
This produces the following result.
Tables in the DataSet obtained using the ExecuteDataSet method:
- Table named 'Table' contains 6 rows.
Tables in the DataSet obtained using the LoadDataSet method:
- Table named 'Products' contains 6 rows.
The example then accesses the rows in the DataSet to delete a row, add a new row,
and change the Description column in another row. After this, it displays the updated
contents of the DataSet table.

50 ch a pter t wo
// get a reference to the Products table in the DataSet.
DataTable dt = loadedDS.Tables["Products"];
// Delete a row in the DataSet table.
dt.Rows[0].Delete();
// Add a new row to the DataSet table.
object[] rowData = new object[] { -1, "A New Row", "Added to the table at "
+ DateTime.Now.ToShortTimeString() };
dt.Rows.Add(rowData);
// Update the description of a row in the DataSet table.
rowData = dt.Rows[1].ItemArray;
rowData[2] = "A new description at " + DateTime.Now.ToShortTimeString();
dt.Rows[1].ItemArray = rowData;
// Display the contents of the DatSet.
DisplayRowValues(dt);
This produces the following output. To make it easier to see the changes, we’ve omitted
the unchanged rows from the listing. Of course, the deleted row does not show in the
listing, and the new row has the default ID of -1 that we specified in the code above.
Rows in the table named 'Products':
Id = 91
Name = HL Mountain Frame - Black, 44
Description = A new description at 14:25
...
Id = -1
Name = A New Row
Description = Added to the table at 14:25
The next stage is to create the commands that the UpdateDataSet method will use to
update the target table in the database. The code declares three suitable SQL statements,
and then builds the commands and adds the requisite parameters to them. Note that each
parameter may be applied to multiple rows in the target table, so the actual value must be
dynamically set based on the contents of the DataSet row whose updates are currently
being applied to the target table.
This means that you must specify, in addition to the parameter name and data type,
the name and the version (Current or Original) of the row in the DataSet to take the
value from. For an INSERT command, you need the current version of the row that

51much ado about data access
contains the new values. For a DELETE command, you need the original value of the ID
to locate the row in the table that will be deleted. For an UPDATE command, you need
the original value of the ID to locate the row in the table that will be updated, and the
current version of the values with which to update the remaining columns in the target
table row.
string addSQL = "INSERT INTO Products (Name, Description) "
+ "VALUES (@name, @description)";
string updateSQL = "UPDATE Products SET Name = @name, "
+ "Description = @description WHERE Id = @id";
string deleteSQL = "DELETE FROM Products WHERE Id = @id";
// Create the commands to update the original table in the database
DbCommand insertCommand = defaultDB.GetSqlStringCommand(addSQL);
defaultDB.AddInParameter(insertCommand, "name", DbType.String, "Name",
DataRowVersion.Current);
defaultDB.AddInParameter(insertCommand, "description", DbType.String,
"Description", DataRowVersion.Current);
DbCommand updateCommand = defaultDB.GetSqlStringCommand(updateSQL);
defaultDB.AddInParameter(updateCommand, "name", DbType.String, "Name",
DataRowVersion.Current);
defaultDB.AddInParameter(updateCommand, "description", DbType.String,
"Description", DataRowVersion.Current);
defaultDB.AddInParameter(updateCommand, "id", DbType.String, "Id",
DataRowVersion.Original);
DbCommand deleteCommand = defaultDB.GetSqlStringCommand(deleteSQL);
defaultDB.AddInParameter(deleteCommand, "id", DbType.Int32, "Id",
DataRowVersion.Original);
Finally, you can apply the changes by calling the UpdateDataSet method, as shown
here.
// Apply the updates in the DataSet to the original table in the database.
int rowsAffected = defaultDB.UpdateDataSet(loadedDS, "Products",
insertCommand, updateCommand, deleteCommand,
UpdateBehavior.Standard);
Console.WriteLine("Updated a total of {0} rows in the database.", rowsAffected);
The code captures and displays the number of rows affected by the updates. As expected,
this is three, as shown in the final section of the output from the example.
Updated a total of 3 rows in the database.

52 ch a pter t wo
For many years, developers have fretted about the ideal way to manage connections in
data access code. Connections are scarce, expensive in terms of resource usage, and can
cause a big performance hit if not managed correctly. You must obviously open a connec-
tion before you can access data, and you should make sure it is closed after you have
finished with it. However, if the operating system does actually create a new connection,
and then closes and destroys it every time, execution in your applications would flow like
molasses.
Instead, ADO.NET holds a pool of open connections that it hands out to applications
that require them. Data access code must still go through the motions of calling the
methods to create, open, and close connections, but ADO.NET automatically retrieves
connections from the connection pool when possible, and decides when and whether to
actually close the underlying connection and dispose it. The main issues arise when you
have to decide when and how your code should call the Close method. The Data Access
block helps to resolve these issues by automatically managing connections as far as is
reasonably possible.
When you use the Data Access block to retrieve a DataSet, the ExecuteDataSet
method automatically opens and closes the connection to the database. If an error occurs,
it will ensure that the connection is closed. If you want to keep a connection open,
perhaps to perform multiple operations over that connection, you can access the Active
Connection property of your DbCommand object and open it before calling the
ExecuteDataSet method. The ExecuteDataSet method will leave the connection open
when it completes, so you must ensure that your code closes it afterwards.
In contrast, when you retrieve a DataReader or an XmlReader, the ExecuteReader
method (or, in the case of the XmlReader, the ExecuteXmlReader method) must leave
the connection open so that you can read the data. The ExecuteReader method sets the
CommandBehavior property of the reader to CloseConnection so that the connection
is closed when you dispose the reader. Commonly, you will use a using construct to ensure
that the reader is disposed, as shown here:
using (IDataReader reader = db.ExecuteReader(cmd))
{
// use the reader here
}
This code, and code later in this section, assumes you have created the Data Access
block Database instance named db and a DbCommand instance named cmd.
Typically, when you use the ExecuteXmlReader method, you will explicitly close the
connection after you dispose the reader. This is because the underlying XmlReader class
does not expose a CommandBehavior property. However, you should still use the same
approach as with a DataReader (a using statement) to ensure that the XmlReader is
correctly closed and disposed.

53much a do abou t data access
using (XmlReader reader = db.ExecuteXmlReader(cmd))
{
// use the reader here
}
Finally, if you want to be able to access the connection your code is using, perhaps to
create connection-based transactions in your code, you can use the Data Access block
methods to explicitly create a connection for your data access methods to use. This means
that you must manage the connection yourself, usually through a using statement as
shown below, which automatically closes and disposes the connection:
using (DbConnection conn = db.CreateConnection())
{
conn.Open();
try
{
// perform data access here
}
catch
{
// handle any errors here
}
}
-
A common requirement in many applications is to perform multiple updates to data in
such a way that they all succeed, or can all be undone (rolled back) to leave the databases
in a valid state that is consistent with the original content. The traditional example is
when your bank carries out a monetary transaction that requires them to subtract a
payment from one account and add the same amount to another account (or perhaps
slightly less, with the commission going into their own account).
Transactions should follow the four ACID principles. These are Atomicity (all of
the tasks of a transaction are performed or none of them are), Consistency (the
database remains in a consistent state before and after the transaction), Isolation (other
operations cannot access or see the data in an intermediate state during a transaction),
and Durability (the results of a successful transaction are persisted and will survive
system failure).
You can execute transactions when all of the updates occur in a single database by
using the features of your database system (by including the relevant commands such as
BEGIN TRANSACTION and ROLLBACK TRANSACTION in your stored procedures).
ADO.NET also provides features that allow you to perform connection-based
transactions over a single connection. This allows you to perform multiple actions on
different tables in the same database, and manage the commit or rollback in your data
access code.

54 ch a pter t wo
All of the methods of the Data Access block that retrieve or update data have over-
loads that accept a reference to an existing transaction as a DbTransaction type. As an
example of their use, the following code explicitly creates a transaction over a connection.
It assumes you have created the Data Access block Database instance named db and two
DbCommand instances named cmdA and cmdB.
using (DbConnection conn = db.CreateConnection())
{
conn.Open();
DbTransaction trans = conn.BeginTransaction();
try
{
// execute commands, passing in the current transaction to each one
db.ExecuteNonQuery(cmdA, trans);
db.ExecuteNonQuery(cmdB, trans);
trans.Commit(); // commit the transaction
}
catch
{
trans.Rollback(); // rollback the transaction
}
}
The examples for this chapter include one named Use a connection-based transaction,
which demonstrates the approach shown above. It starts by displaying the values of two
rows in the Products table, and then uses the ExecuteNonQuery method twice to
update the Description column of two rows in the database within the context of a
connection-based transaction. As it does so, it displays the new description for these
rows. Finally, it rolls back the transaction, which restores the original values, and then
displays these values to prove that it worked.
Contents of rows before update:
Id = 53
Name = Half-Finger Gloves, L
Description = Full padding, improved nger ex, durable palm, adjustable closure.
Id = 84
Name = Hitch Rack - 4-Bike
Description = Carries 4 bikes securely; steel construction, ts 2" receiver hitch.
-------------------------------------------------------------------------------
Updated row with ID = 53 to 'Third and little ngers tend to get cold.'.
Updated row with ID = 84 to 'Bikes tend to fall off after a few miles.'.
-------------------------------------------------------------------------------

55much ado about data access
Contents of row after rolling back transaction:
Id = 53
Name = Half-Finger Gloves, L
Description = Full padding, improved nger ex, durable palm, adjustable closure.
Id = 84
Name = Hitch Rack - 4-Bike
Description = Carries 4 bikes securely; steel construction, ts 2" receiver hitch.
If you need to access different databases as part of the same transaction (including data-
bases on separate servers), of if you need to include other data sources such as Microsoft
Message Queuing (MSMQ) in your transaction, you must use a distributed transaction
coordinator (DTC) mechanism such as Windows Component Services. In this case, you
just perform the usual data access actions, and configure your components to use the
DTC. Commonly, this is done through attributes added to the classes that perform the
data access.
However, ADO.NET supports the concept of automatic or lightweight transactions
through the TransactionScope class. You can specify that a series of actions require trans-
actional support, but ADO.NET will not generate an expensive distributed transaction
until you actually open more than one connection within the transaction scope. This
means that you can perform multiple transacted updates to different tables in the same
database over a single connection. As soon as you open a new connection, ADO.NET
automatically creates a distributed transaction (using Windows Component Services), and
enrolls the original connections and all new connections created within the transaction
scope into that distributed transaction. You then call methods on the transaction scope
to either commit all updates, or to roll back (undo) all of them.
Therefore, once you create the transaction scope or explicitly create a transaction,
you use the Data Access block methods in exactly the same way as you would outside of
a transaction. You do not need to pass the transaction scope to the methods as you would
when using ADO.NET methods directly. For example, the methods of the Data Access
Application Block automatically detect if they are being executed within the scope of a
transaction. If they are, they enlist in the transaction scope and reuse the existing connec-
tion (because opening a new one would force Component Services to start a distributed
transaction), and do not close the connection when they complete. The transaction scope
will close and dispose the connection when it is disposed.
Typically, you will use the TransactionScope class in the following way:
using (TransactionScope scope
= new TransactionScope(TransactionScopeOption.RequiresNew))
{
// perform data access here
}
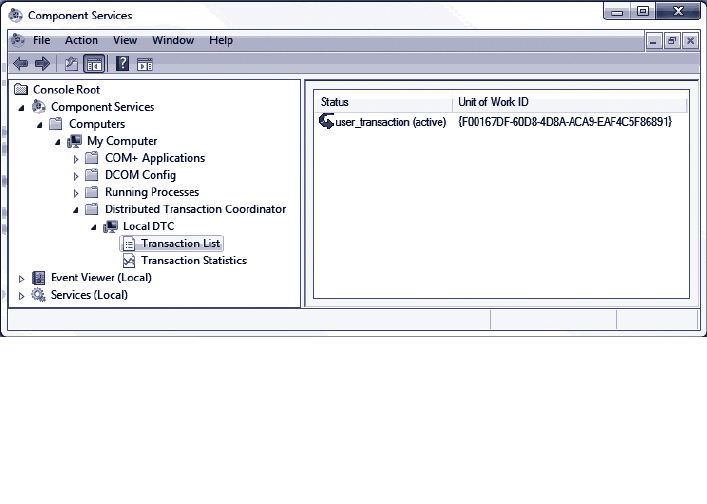
56 ch a pter t wo
For more details about using a DTC and transaction scope, see “Distributed Transactions
(ADO.NET)” at http://msdn.microsoft.com/en-us/library/ms254973.aspx and “System.
Transactions Integration with SQL Server (ADO.NET)” at http://msdn.microsoft.com/
en-us/library/ms172070.aspx.
The examples for this chapter contain one named Use a TransactionScope for a distrib-
uted transaction, which demonstrates the use of a TransactionScope with the Data Access
block. It performs the same updates to the Products table in the database as you saw in
the previous example of using a connection-based transaction. However, there are subtle
differences in the way this example works.
In addition, as it uses the Windows Distributed Transaction Coordinator (DTC) ser-
vice, you must ensure that this service is running before you execute the example; depend-
ing on your operating system it may not be set to start automatically. To start the service,
open the Services MMC snap-in from your Administrative Tools menu, right-click on the
Distributed Transaction Coordinator service, and click Start. To see the effects of the
TransactionScope and the way that it promotes a transaction, open the Component
Services MMC snap-in from your Administrative Tools menu and expand the Component
Services node until you can see the Transaction List in the central pane of the snap-in.
When you execute the example, it creates a new TransactionScope and executes the
ExecuteNonQuery method twice to update two rows in the database table. At this point,
the code stops until you press a key. This gives you the opportunity to confirm that there
is no distributed transaction—as you can see if you look in the transaction list in the
Component Services MMC snap-in.
After you press a key, the application creates a new connection to the database (when
we used a connection-based transaction in the previous example, we just updated the
parameter values and executed the same commands over the same connection). This new
connection, which is within the scope of the existing TransactionScope instance, causes
the DTC to start a new distributed transaction and enroll the existing lightweight transac-
tion into it; as shown in Figure 3.
Viewing DTC transactions

57much ado about data access
The code then waits until you press a key again, at which point it exits from the using
clause that created the TransactionScope, and the transaction is no longer in scope. As
the code did not call the Complete method of the TransactionScope to preserve the
changes in the database, they are rolled back automatically. To prove that this is the case,
the code displays the values of the rows in the database again. This is the complete output
from the example.
Contents of rows before update:
Id = 53
Name = Half-Finger Gloves, L
Description = Full padding, improved nger ex, durable palm, adjustable closure.
Id = 84
Name = Hitch Rack - 4-Bike
Description = Carries 4 bikes securely; steel construction, ts 2" receiver hitch.
-------------------------------------------------------------------------------
Updated row with ID = 53 to 'Third and little ngers tend to get cold.'.
No distributed transaction. Press any key to continue...
Updated row with ID = 84 to 'Bikes tend to fall off after a few miles.'.
New distributed transaction created. Press any key to continue...
-------------------------------------------------------------------------------
Contents of row after disposing TransactionScope:
Id = 53
Name = Half-Finger Gloves, L
Description = Full padding, improved nger ex, durable palm, adjustable closure.
Id = 84
Name = Hitch Rack - 4-Bike
Description = Carries 4 bikes securely; steel construction, ts 2" receiver hitch.
This default behavior of the TransactionScope ensures that an error or problem that
stops the code from completing the transaction will automatically roll back changes. If
your code does not seem to be updating the database, make sure you remembered to call
the Complete method!

58 ch a pter t wo
Extending the Block to Use Other Databases
The Data Access block contains providers for SQL Server, Oracle, and SQL Server
Compact Edition. However, you can extend the block to use other databases if you wish.
Writing a new provider is not a trivial task, and you may find that there is already a third
party provider available for your database. For example, at the time of writing, the
Enterprise Library Community Contribution site listed providers for MySql and SQLite
databases. For more information, visit the EntLib Contrib Project site at http://codeplex.
com/entlibcontrib/.
If you decide to create a new provider, you can create a new class derived from the
Enterprise Library Database class and override its methods to implement the appropriate
functionality. One limiting factor is that there must be an ADO.NET provider available for
your database. The Database class in Enterprise Library relies on this to perform data
access operations.
You must also be aware of the differences between database functionality, and man-
age these differences in your code. For example, you must handle return values, parameter
prefixes (such as “@”), data type conversions, and other relevant factors. However, you
can add additional methods to your provider to take advantage of features of your target
database that are not available for other database types. For example, the SQL Server
provider in the Data Access block exposes a method that uses the SQLXML functionality
in SQL Server to extract data in XML format.
For more information on creating additional database providers for the Data
Access block, see the Enterprise Library online guidance at http://go.microsoft.com/
fwlink/?LinkId=188874 or the installed documentation.
Summary
This chapter discussed the Data Access Application Block; one of the most commonly
used blocks in Enterprise Library. The Data Access block provides two key advantages for
developers and administrators. Firstly, it abstracts the database so that developers and
administrators can switch the application from one type of database to another with only
changes to the configuration files required. Secondly, it helps developers by making it
easier to write the most commonly used sections of data access code with less effort, and
it hides some of the complexity of working directly with ADO.NET.
In terms of abstracting the database, the block allows developers to write code in
such a way that (for most functions) they do not need to worry which database (such as
SQL Server, SQL Server CE, or Oracle) their applications will use. They write the same
code for all of them, and configure the application to specify the actual database at run
time. This means that administrators and operations staff can change the targeted data-
base without requiring changes to the code, recompilation, retesting, and redeployment.

59much a do about data access
In terms of simplifying data access code, the block provides a small number of
methods that encompass most data access requirements, such as retrieving a DataSet, a
DataReader, a scalar (single) value, one or more values as output parameters, or a series
of XML elements. It also provides methods for updating a database from a DataSet, and
integrates with the ADO.NET TransactionScope class to allow a range of options for
working with transactions. However, the block does not limit your options to use more
advanced ADO.NET techniques, as it allows you to access the underlying objects such as
the connection and the DataAdapter.
The chapter also described general issues such as managing connections and integra-
tion with transactions, and explored the actual capabilities of the block in more depth.
Finally, we looked briefly at how you can use the block with other databases, including
those supported by third-party providers.

61
3
Introduction
Let’s face it, exception handling isn’t the most exciting part of writing application code.
In fact, you could probably say that managing exceptions is one of those necessary tasks
that absorb effort without seeming to add anything useful to your exciting new applica-
tion. So why would you worry about spending time and effort actually designing a
strategy for managing exceptions? Surely there are much more important things you could
be doing.
In fact, a robust and well-planned exception handling plan is a vital feature of your
application design and implementation. It should not be an afterthought. If you don’t have
a plan, you can find yourself trying to track down all kinds of strange effects and
unexpected behavior in your code. And, worse than that, you may even be sacrificing
security and leaving your application and systems open to attack. For example, a failure
may expose error messages containing sensitive information such as: “Hi, the application
just failed, but here’s the name of the server and the database connection string it was
using at the time.” Not a great plan.
The general expectations for exception handling are to present a clear and appropri-
ate message to users, and to provide assistance for operators, administrators, and support
staff who must resolve problems that arise. For example, the following actions are
usually part of a comprehensive exception handling strategy:
• Notifying the user with a friendly message
• Storing details of the exception in a production log or other repository
• Alerting the customer service team to the error
• Assisting support staff in cross-referencing the exception and tracing the cause
So, having decided that you probably should implement some kind of structured excep-
tion handling strategy in your code, how do you go about it? A good starting point, as
usual, is to see if there are any recommendations in the form of well-known patterns that
you can implement. In this case, there are. The primary pattern that helps you to build
secure applications is called Exception Shielding. Exception Shielding is the process of
ensuring that your application does not leak sensitive information, no matter what run-
time or system event may occur to interrupt normal operation. And on a more granular
level, it can prevent your assets from being revealed across layer, tier, process, or service
boundaries.
Error Management Made
Exceptionally Easy

62 ch a pter thr ee
Two more exception handling patterns that you should consider implementing are the
Exception Logging pattern and the Exception Translation pattern. The Exception Logging
pattern can help you diagnose and troubleshoot errors, audit user actions, and track mali-
cious activity and security issues. The Exception Translation pattern describes wrapping
exceptions within other exceptions specific to a layer to ensure that they actually reflect
user or code actions within the layer at that time, and not some miscellaneous details that
may not be useful.
In this chapter, you will see how the Enterprise Library Exception Handling block can
help you to implement these patterns, and become familiar with the other techniques that
make up a comprehensive exception management strategy. You’ll see how to replace,
wrap, and log exceptions; and how to modify exception messages to make them more
useful. And, as a bonus, you’ll see how you can easily implement exception shielding for
Windows® Communication Foundation (WCF) Web services.
When Should I Use the Exception Handling Block?
The Exception Handling block allows you to configure how you want to manage excep-
tions, and centralize your exception handling code. It provides a selection of plug-in ex-
ception handlers and formatters that you can use, and you can even create your own
custom implementations. You can use the block when you want to implement exception
shielding, modify exceptions in a range of ways, or chain exceptions (for example, by
logging an exception and then passing it to another layer of your application). The con-
figurable approach means that administrators can change the behavior of the exception
management mechanism simply by editing the application configuration without requiring
any changes to the code, recompilation, or redeployment.
The Exception Handling block was never intended for use everywhere that you catch
exceptions. The block is primarily designed to simplify exception handling and exception
management at your application or layer boundaries.
How Do I Use the Exception Handling Block?
Like all of the Enterprise Library application blocks, you start by configuring your applica-
tion to use the block, as demonstrated in Chapter 1, “Introduction.” Then you add one or
more exception policies and, for each policy, specify the type of exception it applies to.
Finally, you add one or more exception handlers to each policy. The simplest approach is
a policy that specifies the base type, Exception, and uses one of the handlers provided
with the block. However, you’ll see the various handlers, and other options, demonstrated
in the examples in this chapter.

63er ror management m a de e xceptionally easy
What Exception Policies Do I Need?
The key to handling exceptions is to apply the appropriate policies to each type of excep-
tion. You can pretend you are playing the well-known TV quiz game that just might make
you a millionaire:
Question: How should I handle exceptions?
A: Wrap them B: Replace them
C: Log and re-throw them D: Allow them to propagate
You can, of course, phone a friend or ask the audience if you think it will help. However,
unlike most quiz games, all of the answers are actually correct (which is why we don’t
offer prizes). If you answered A, B, or C, you can move on to the section “About Exception
Handling Policies.” However, if you answered D: Allow them to propagate, read the
following section.
If you cannot do anything useful when an exception occurs, such as logging exception
information, modifying the exception details, or retrying the failed process, there is no
point in catching the exception in the first place. Instead, you just allow it to propagate
up through the call stack, and catch it elsewhere in your code—either to resolve the issue
or to display error messages. Of course, at this point, you can apply an exception policy;
and so you come back to how you should choose and implement an appropriate exception
handling strategy.
Each policy you configure for the Exception Handling block can specify one or more ex-
ception types, such as DivideByZeroException, SqlException, InvalidCastException,
the base class Exception, or any custom exception type you create that inherits from
System.Exception. The block compares exceptions that it handles with each of these
types, and chooses the one that is most specific in the class hierarchy.
For each policy, you configure:
• One or more exception handlers that the block will execute when a matching
exception occurs. You can choose from four out-of-the-box handlers: the
Replace handler, the Wrap handler, the Logging handler, and the Fault
Contract exception handler. Alternatively, you can create custom exception
handlers and choose these (see “Extending your Exception Handling” near
the end of this chapter for more information).
• A post-handling action value that specifies what happens after the Exception
Handling block executes the handlers you specify. Effectively, this setting tells
the calling code whether to continue executing. You can choose from:
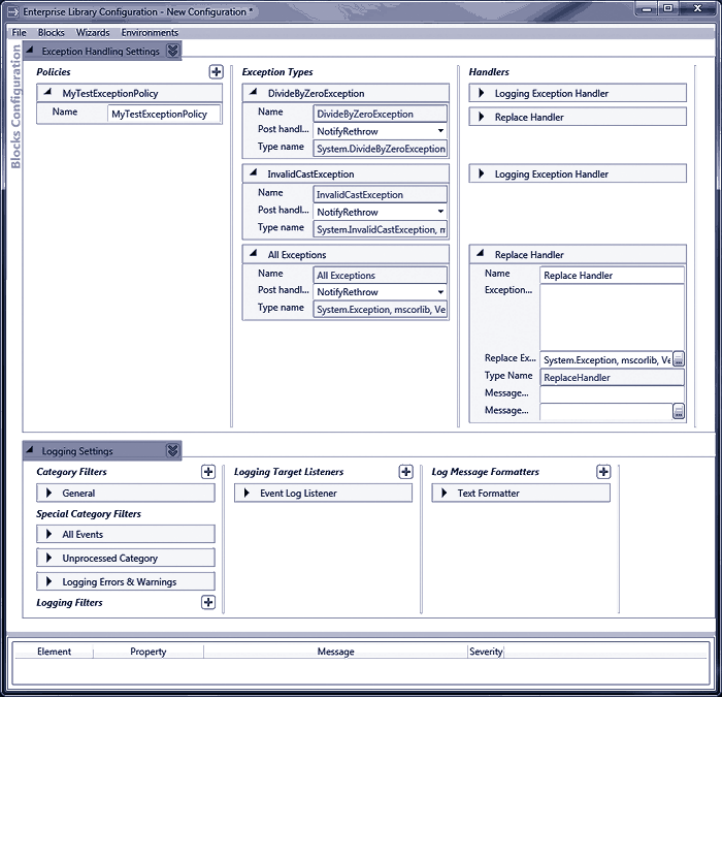
64 ch a pter thr ee
• NotifyRethrow (the default). Return true to the calling code to
indicate that it should throw an exception, which may be the one that
was actually caught or the one generated by the policy.
• ThrowNewException. The Exception Handling block will throw the
exception that results from executing all of the handlers.
• None. Returns false to the calling code to indicate that it should
continue executing.
Figure 1 shows an example policy named MyTestExceptionPolicy in the Enterprise
Library configuration console. This policy handles the three exception types—Divide
ByZeroException, Exception (shown as All Exceptions in the configuration tool), and
InvalidCastException—and contains a mix of handlers for each exception type. The tool
automatically adds the logging section to the configuration with the default settings
when you add a Logging exception handler to your exception handling configuration.
Configuration of the MyTestExceptionPolicy exception handling policy

65error m anagement made exceptionally e asy
Notice how you can specify the properties for each type of exception handler. For ex-
ample, in the previous screenshot you can see that the Replace Handler has properties
for the exception message and the type of exception you want to use to replace the
original exception. Also, notice that you can localize your policy by specifying the name
and type of the resource containing the localized message string.
So let’s get back to our quiz question, “How should I handle exceptions?” You should be
able to see from the options available for exception handling policies how you can imple-
ment the common strategies for handling exceptions:
• Replace the exception with a different one and throw the new exception.
This is an implementation of the Exception Shielding pattern. In your exception
handling code, you can clean up resources or perform any other relevant
processing. You use a Replace handler in your exception handling policy to
replace the exception with a different exception containing sanitized or new
information that does not reveal sensitive details about the source of the error,
the application, or the operating system. Add a Logging handler to the excep-
tion policy if you want to log the exception. Place it before the Replace handler
to log the original exception, or after it to log the replacement exception (if
you log sensitive information, make sure your log files are properly secured).
Set the post-handling action to ThrowNewException so that the block will
throw the new exception.
• Wrap the exception to preserve the content and then throw the new
exception. This is an implementation of the Exception Translation pattern. In
your exception handling code, you can clean up resources or perform any other
relevant processing. You use a Wrap handler in your exception-handling policy
to wrap the exception within another exception that is more relevant to the
caller and then throw the new exception so that code higher in the code stack
can handle it. This approach is useful when you want to keep the original
exception and its information intact, and/or provide additional information
to the code that will handle the exception. Add a Logging handler to the
exception policy if you want to log the exception. Place it before the Wrap
handler to log the original exception, or after it to log the enclosing exception.
Set the post-handling action to ThrowNewException so that the block will
throw the new exception.
• Log and, optionally, re-throw the original exception. In your exception
handling code, you can clean up resources or perform any other relevant
processing. You use a Logging handler in your exception handling policy to
write details of the exception to the configured logging store such as Windows
Event Log or a file (an implementation of the Exception Logging pattern). If
the exception does not require any further action by code elsewhere in the
application (for example, if a retry action succeeds), set the post-handling
action to None. Otherwise, set the post-handling action to NotifyRethrow.
Your event handler code can then decide whether to throw the exception.
Alternatively, you can set it to ThrowNewException if you always want the
Exception Handling block to throw the exception for you.

66 ch a pter thr ee
Remember that the whole idea of using the Exception Handling block is to implement
a strategy made up of configurable policies that you can change without having to edit,
recompile, and redeploy the application. For example, the block allows you (or an admin-
istrator) to:
• Add, remove, and change the types of handlers (such as the Wrap, Replace,
and Logging handlers) that you use for each exception policy, and change the
order in which they execute.
• Add, remove, and change the exception types that each policy will handle,
and the types of exceptions used to wrap or replace the original exceptions.
• Modify the target and style of logging, including modifying the log messages,
for each type of exception you decide to log. This is useful, for example, when
testing and debugging applications.
• Decide what to do after the block handles the exception. Provided that the
exception handling code you write checks the return value from the call to the
Exception Handling block, the post-handling action will allow you or an
administrator to specify whether the exception should be thrown. Again, this
is extremely useful when testing and debugging applications.
?
The Exception Handling block provides two ways for you to manage exceptions. You can
use the Process method to execute any method in your application, and have the block
automatically perform management and throwing of the exception. Alternatively, if you
want to apply more granular control over the process, you can use the HandleException
method. The following will help you to understand which approach to choose.
• The Process method is the most common approach, and is useful in the
majority of cases. You specify either a delegate (the address of a method) or
a lambda expression that you want to execute. The Exception Handling block
executes the method or expression, and automatically manages any exception
that occurs. You will generally specify a PostHandlingAction of ThrowNew
Exception so that the block automatically throws the exception that results
from executing the exception handling policy. However, if you want the code
to continue to execute (instead of throwing the exception), you can set the
PostHandlingAction of your exception handling policy to None.
• The HandleException method is useful if you want to be able to detect the
result of executing the exception handling policy. For example, if you set the
PostHandlingAction of a policy to NotifyRethrow, you can use the return
value of the HandleException method to determine whether or not to throw
the exception. You can also use the HandleException method to pass an
exception to the block and have it return the exception that results from
executing the policy—which might be the original exception, a replacement
exception, or the original exception wrapped inside a new exception.
You will see both the Process and the HandleException techniques described in the
following examples, although most of them use the Process method.

67error managemen t m a de exceptionally easy
Using the Process Method
The Process method has several overloads that make it easy to execute functions that
return a value, and methods that do not. Typically, you will use the Process method in one
of the following ways:
• To execute a routine or method that does not accept parameters and does not
return a value:
exManager.Process(method_name, "Exception Policy Name");
• To execute a routine that does accept parameters but does not return a value:
exManager.Process(() => method_name(param1, param2),
"Exception Policy Name");
• To execute a routine that accepts parameters and returns a value:
var result = exManager.Process(() => method_name(param1, param2),
"Exception Policy Name");
• To execute a routine that accepts parameters and returns a value, and to also
supply a default value to be returned should an exception occur and the policy
that executes does not throw the exception. If you do not specify a default
value and the PostHandlingAction is set to None, the Process method will
return null for reference types, zero for numeric types, or the default empty
value for other types should an exception occur.
var result = exManager.Process(() => method-name(param1, param2),
default_result_value,
"Exception Policy Name");
• To execute code defined within the lambda expression itself:
exManager.Process(() =>
{
// Code lines here to execute application feature
// that may raise an exception that the Exception
// Handling block will handle using the policy named
// in the nal parameter of the Process method.
// If required, the lambda expression dened here
// can return a value that the Process method will
// return to the calling code.
},
"Exception Policy Name");
The Process method is optimized for use with lambda expressions, which are supported
in C# 3.0 on version 3.5 of the .NET Framework and in Microsoft® Visual Studio®
2008 onwards. If you are not familiar with lambda functions or their syntax, see http://
msdn.microsoft.com/en-us/library/bb397687.aspx. For a full explanation of using the
HandleException method, see the “Key Scenarios” topic in the online documentation for
Enterprise Library 4.1 at http://msdn.microsoft.com/en-us/library/dd203198.aspx.

68 ch a pter thr ee
Diving in with a Simple Example
The code you can download for this guide contains a sample application named
ExceptionHandling that demonstrates the techniques described in this chapter. The
sample provides a number of different examples that you can run. They illustrate each
stage of the process of applying exception handling described in this chapter. However,
this chapter describes an iterative process of updating a single application scenario. To
make it easier to see the results of each stage, we have provided separate examples for
each of them.
If you run the examples under the Visual Studio debugger, you will find that the code
halts when an exception occurs—before it is sent to the Exception Handling block. You
can press F5 at this point to continue execution. Alternatively, you can run the examples
by pressing Ctrl-F5 (non-debugging mode) to prevent this from happening.
To see how you can apply exception handling strategies and configure exception handling
policies, we’ll start with a simple example that causes an exception when it executes. First,
we need a class that contains a method that we can call from our main routine, such as
the following in the SalaryCalculator class of the example application.
public Decimal GetWeeklySalary(string employeeId, int weeks)
{
String connString = string.Empty;
String employeeName = String.Empty;
Decimal salary = 0;
try
{
connString = CongurationManager.ConnectionStrings
["EmployeeDatabase"].ConnectionString;
// Access database to get salary for employee here...
// In this example, just assume it's some large number.
employeeName = "John Smith";
salary = 1000000;
return salary / weeks;
}
catch (Exception ex)
{
// provide error information for debugging
string template = "Error calculating salary for {0}."
+ " Salary: {1}. Weeks: {2}\n"
+ "Data connection: {3}\n{4}";
Exception informationException = new Exception(
string.Format(template, employeeName, salary, weeks,
connString, ex.Message));
throw informationException;
}
}

69er ror managem ent m ade e xceptiona lly easy
You can see that a call to the GetWeeklySalary method will cause an exception of type
DivideByZeroException when called with a value of zero for the number of weeks
parameter. The exception message contains the values of the variables used in the
calculation, and other information useful to administrators when debugging the
application. Unfortunately, the current code has several issues. It trashes the original
exception and loses the stack trace, preventing meaningful debugging. Even worse, the
global exception handler for the application presents any user of the application with all
of the sensitive information when an error occurs.
If you run the example for this chapter, and select option Typical Default Behavior
without Exception Shielding, you will see this result generated by the code in the catch
statement:
Exception type System.Exception was thrown.
Message: 'Error calculating salary for John Smith.
Salary: 1000000. Weeks: 0
Connection: Database=Employees;Server=CorpHQ;
User ID=admin;Password=2g$tXD76qr Attempted to divide by zero.'
Source: 'ExceptionHandlingExample'
No inner exception
It’s clear that the application as it stands has a severe security hole that allows it to reveal
sensitive information. Of course, we could prevent this by not adding the sensitive
information to the exception message. However, the information will be useful to
administrators and developers if they need to debug the application. For example, if the
data connection had failed or the database contained invalid data, they would have seen
this through missing values for the employee name or salary; and they could see if the
configuration file contains the correct database connection string. Alternatively, in the
case shown here, they can immediately tell that the database returned the required values
for the operation, but the user interface allowed the user to enter the value zero for the
number of weeks.
To provide this extra information, yet apply exception shielding, you may consider
implementing configuration settings and custom code to allow administrators to specify
when they need the additional information. However, this is exactly where the Exception
Handling block comes in. You can set up an exception handling policy that administrators
can modify as required, without needing to write custom code or set up custom
configuration settings.
The first step is to create an exception handling policy that specifies the events you
want to handle, and contains a handler that will either wrap (hide) or replace (remove) the
exception containing all of the debugging information with one that contains a simple
error message suitable for display to users or propagation through the layers of the ap-
plication. You’ll see these options implemented in the following sections. You will also see
how you can log the original exception before replacing it, how you can handle specific
types of exceptions, and how you can apply exception shielding to WCF services.
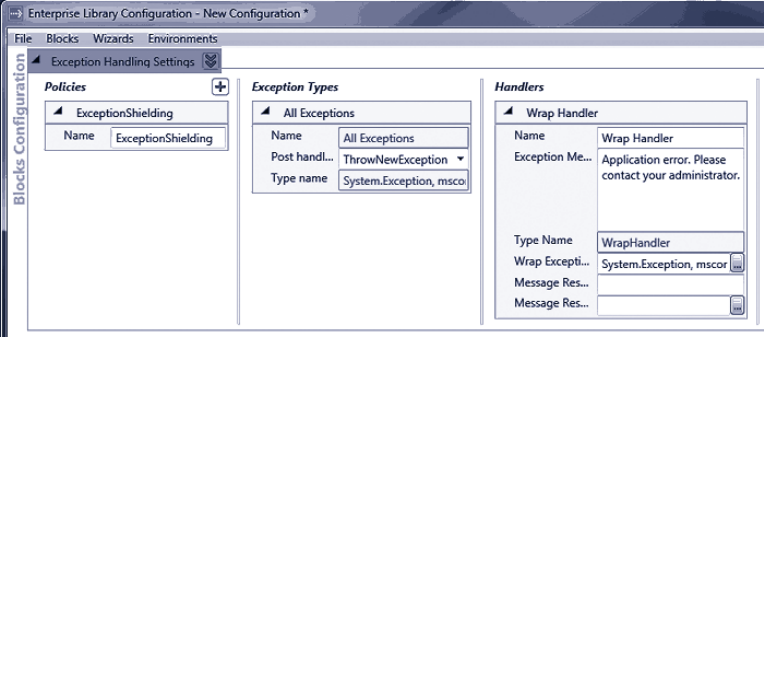
70 ch a pter thr ee
Wrapping an Exception
If you want to retain the original exception and the information it contains, you can wrap
the exception in another exception and specify a sanitized user-friendly error message for
the containing exception. This is the error message that the global error handler will
display. However, code elsewhere in the application (such as code in a calling layer that
needs to access and log the exception details) can access the contained exception and
retrieve the information it requires before passing the exception on to another layer or to
the global exception handler. This intermediate code could alternatively remove the
contained exception—or use an Exception Handling block policy to replace it at that
point in the application.
So, the first stage is to configure the exception handling policy you require. You need to
add a policy that specifies the type of exception returned from your code (in this case,
we’ll specify the base class Exception), and set the PostHandlingAction property for this
exception type to ThrowNewException so that the Exception Handling block will
automatically throw the new exception that wraps the original exception. Then, add a
Wrap handler to the policy, and specify the exception message and the type of exception
you want to use to wrap the original exception (we chose Exception here again). Figure 2
shows the completed configuration.
Configuration of the Wrap handler

71error m anagement made exceptionally e asy
Now you must edit your code to use the Exception Handling block. You’ll need to add
references to the appropriate Enterprise Library assemblies and namespaces. The examples
in this chapter demonstrate logging exception information and handling exceptions in a
WCF application, as well as the basic processes of wrapping and replacing exceptions, so
we’ll add references to all of the assemblies and namespaces required for these tasks.
The assemblies you must add to your project (in addition to the assemblies required
for all Enterprise Library projects) are:
• Microsoft.Practices.EnterpriseLibrary.ExceptionHandling.dll
• Microsoft.Practices.EnterpriseLibrary.ExceptionHandling.WCF.dll
• Microsoft.Practices.EnterpriseLibrary.ExceptionHandling.Logging.dll
• Microsoft.Practices.EnterpriseLibrary.Logging.dll
If you are only wrapping and replacing exceptions in your application but not logging
them, you don’t need to add the assemblies and references for logging. If you are not
using the block to shield WCF services, you don’t need to add the assemblies and
references for WCF.
To make it easier to use the objects in the Exception Handling block, you can add refer-
ences to the relevant namespaces to your project.
Now you can resolve an instance of the ExceptionManager class you’ll use to per-
form exception management. You can use the dependency injection approach described
in Chapter 1, “Introduction” and Appendices A and B, or the GetInstance method. This
example uses the simple GetInstance approach.
// Global variable to store the ExceptionManager instance.
ExceptionManager exManager;
// Resolve the default ExceptionManager object from the container.
exManager = EnterpriseLibraryContainer.Current.GetInstance<ExceptionManager>();
Now you can update your exception handling code to use the new policy. You have two
choices. If the configured exception policy does everything you need to do, you can
actually remove the try...catch block completely from the method that may cause an
error, and—instead—use the Process method of the ExceptionManager to execute the
code within the method, as shown here.
public Decimal GetWeeklySalary(string employeeId, int weeks)
{
string employeeName = String.Empty;
Decimal salary = 0;
Decimal weeklySalary = 0;
exManager.Process(() => {
string connString = CongurationManager.ConnectionStrings

72 ch a pter thr ee
["EmployeeDatabase"].ConnectionString;
// Access database to get salary for employee.
// In this example, just assume it's some large number.
employeeName = "John Smith";
salary = 1000000;
weeklySalary = salary / weeks;
},
"ExceptionShielding");
return weeklySalary;
}
The body of your logic is placed inside a lambda function and passed to the Process
method. If an exception occurs during the execution of the expression, it is caught and
handled according to the configured policy. The name of the policy to execute is specified
in the second parameter of the Process method.
Alternatively, you can use the Process method in your main code to call the method
of your class. This is a useful approach if you want to perform exception shielding at
the boundary of other classes or objects. If you do not need to return a value from the
function or routine you execute, you can create any instance you need and work with it
inside the lambda expression, as shown here.
exManager.Process(() =>
{
SalaryCalculator calc = new SalaryCalculator();
Console.WriteLine("Result is: {0}", calc.GetWeeklySalary("jsmith", 0));
},
"ExceptionShielding");
If you want to be able to return a value from the method or routine, you can use the
overload of the Process method that returns the lambda expression value, like this.
SalaryCalculator calc = new SalaryCalculator();
var result = exManager.Process(() =>
calc.GetWeeklySalary("jsmith", 0), "ExceptionShielding");
Console.WriteLine("Result is: {0}", result);
Notice that this approach creates the instance of the SalaryCalculator class outside of
the Process method, and therefore it will not pass any exception that occurs in the con-
structor of that class to the exception handling policy. But when any other error occurs,
the global application exception handler sees the wrapped exception instead of the
original informational exception. If you run the example Behavior After Applying Exception
Shielding with a Wrap Handler, the catch section now displays the following. You can see
that the original exception is hidden in the Inner Exception, and the exception that wraps
it contains the generic error message.

73error m anagement made exceptionally e asy
Exception type System.Exception was thrown.
Message: 'Application Error. Please contact your administrator.'
Source: 'Microsoft.Practices.EnterpriseLibrary.ExceptionHandling'
Inner Exception: System.Exception: Error calculating salary for John Smith.
Salary: 1000000. Weeks: 0
Connection: Database=Employees;Server=CorpHQ;User ID=admin;Password=2g$tXD76qr
Attempted to divide by zero.
at ExceptionHandlingExample.SalaryCalculator.GetWeeklySalary(String employeeI
d, Int32 weeks) in ...\ExceptionHandling\ExceptionHandling\SalaryCalculator.cs:
line 34
at ExceptionHandlingExample.Program.<WithWrapExceptionShielding>b__0() in ...
ExceptionHandling\ExceptionHandling\Program.cs:line 109
at Microsoft.Practices.EnterpriseLibrary.ExceptionHandling.ExceptionManagerIm
pl.Process(Action action, String policyName)
This means that developers and administrators can examine the wrapped (inner)
exception to get more information. However, bear in mind that the sensitive information
is still available in the exception, which could lead to an information leak if the exception
propagates beyond your secure perimeter. While this approach may be suitable for highly
technical, specific errors, for complete security and exception shielding, you should use
the technique shown in the next section to replace the exception with one that does not
contain any sensitive information.
For simplicity, this example shows the principles of exception shielding at the level of
the UI view. The business functionality it uses may be in the same layer, in a separate
business layer, or even on a separate physical tier. Remember that you should design
and implement an exception handling strategy for individual layers or tiers in order to
shield exceptions on the layer or service boundaries.
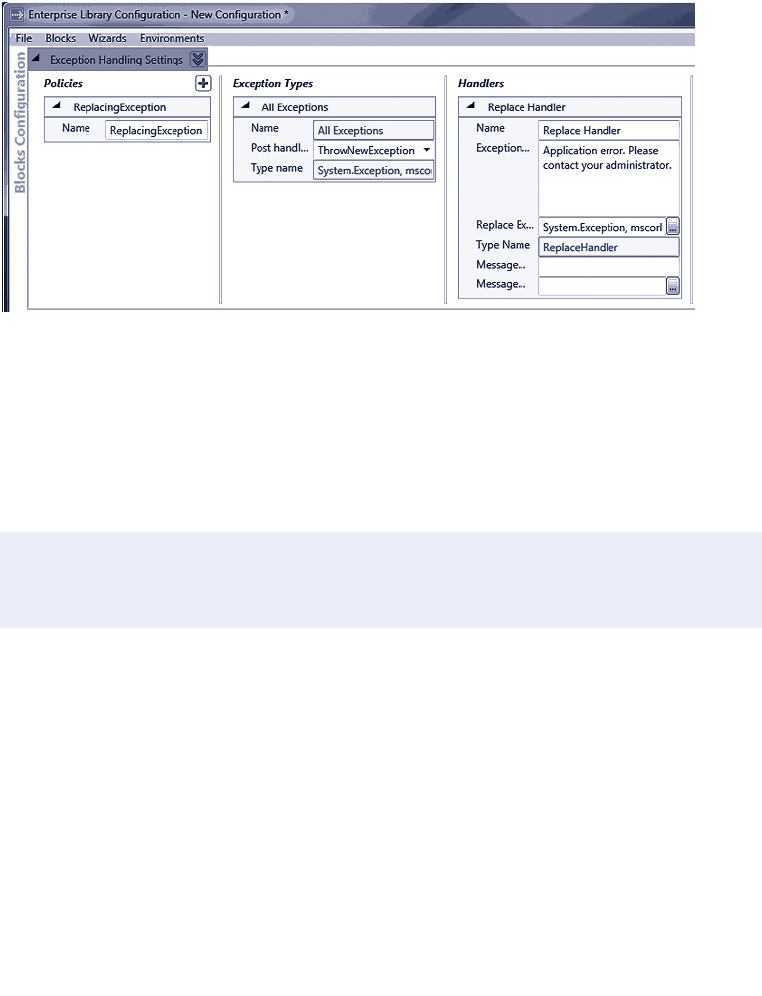
74 ch a pter thr ee
Replacing an Exception
Having seen how easy it is to use exception handling policies, we’ll now look at how you
can implement exception shielding by replacing an exception with a different exception.
This approach is also useful if you need to perform cleanup operations in your code, and
then use the exception to expose only what is relevant. To configure this scenario, simply
create a policy in the same way as the previous example, but with a Replace handler
instead of a Wrap handler, as shown in Figure 3.
Configuring a Replace handler
When you call the method that generates an exception, you see the same generic excep-
tion message as in the previous example. However, there is no inner exception this time.
If you run the example Behavior After Applying Exception Shielding with a Replace Handler,
the Exception Handling block replaces the original exception with the new one specified
in the exception handling policy. This is the result:
Exception type System.Exception was thrown.
Message: 'Application Error. Please contact your administrator.'
Source: 'Microsoft.Practices.EnterpriseLibrary.ExceptionHandling'
No Inner Exception

75er ror management m a de e xceptionally easy
Logging an Exception
The previous section shows how you can perform exception shielding by replacing an
exception with a new sanitized version. However, you now lose all the valuable debugging
and testing information that was available in the original exception. Of course, the
Librarian (remember him?) realized that you would need to retain this information and
make it available in some way when implementing the Exception Shielding pattern. You
preserve this information by chaining exception handlers within your exception handling
policy. In other words, you add a Logging handler to the policy.
That doesn’t mean that the Logging handler is only useful as part of a chain of
handlers. If you only want to log details of an exception (and then throw it or ignore it,
depending on the requirements of the application), you can define a policy that contains
just a Logging handler. However, in most cases, you will use a Logging handler with
other handlers that wrap or replace exceptions.
Figure 4 shows what happens when you add a Logging handler to your exception
handling policy. The configuration tool automatically adds the Logging Application block
to the configuration with a set of default properties that will write log entries to the
Windows Application Event Log. You do, however, need to set a few properties of the
Logging exception handler in the Exception Handling Settings section:
• Specify the ID for the log event your code will generate as the Event ID
property.
• Specify the TextExceptionFormatter as the type of formatter the Exception
Handling block will use. Click the ellipsis (...) button in the Formatter Type
property and select TextExceptionFormatter in the type selector dialog that
appears.
• Set the category for the log event. The Logging block contains a default
category named General, and this is the default for the Logging exception
handler. However, if you configure other categories for the Logging block, you
can select one of these from the drop-down list that is available when you click
on the Logging Category property of the Logging handler.
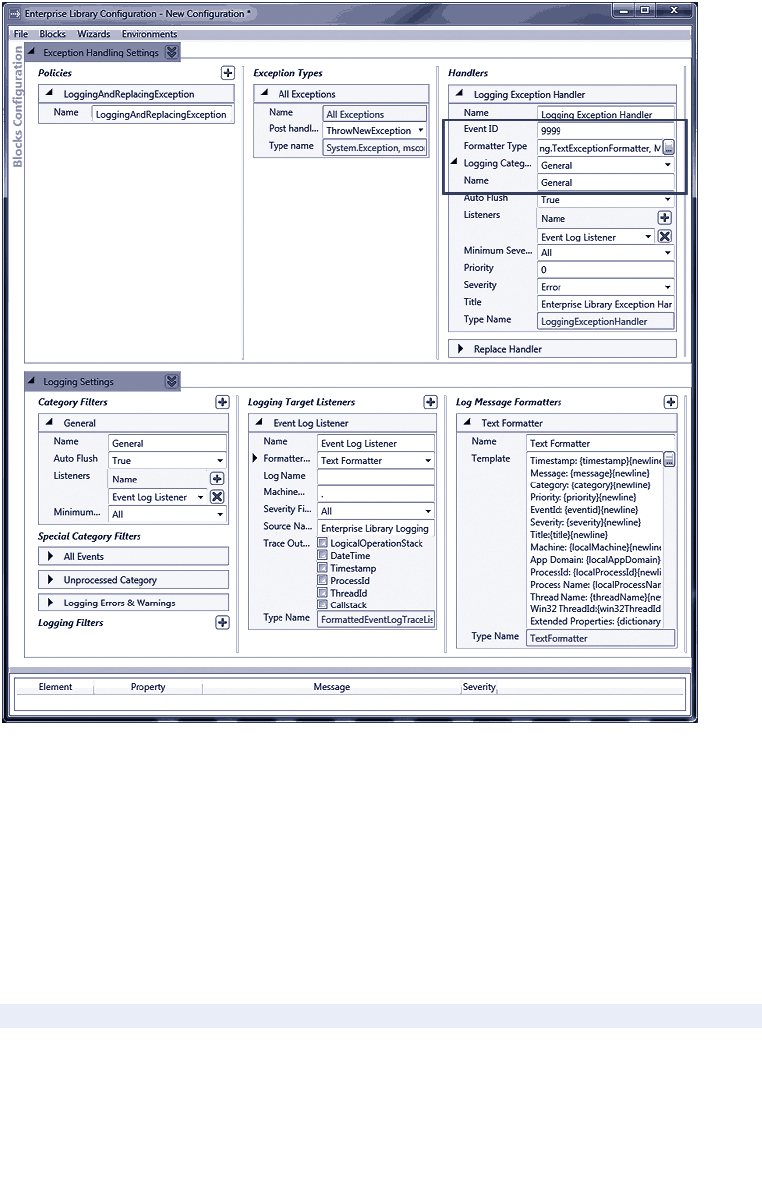
76 ch a pter thr ee
Adding a logging handler
The configuration tool adds new exception handlers to the end of the handler chain by
default. However, you will obviously want to log the details of the original exception
rather than the new exception that replaces it. You can right-click on the Logging handler
and use the shortcut menu to move it up to the first position in the chain of handlers if
required.
In addition, if you did not already do so, you must add a reference to the Logging
Application block assembly to your project and (optionally) add a using statement to your
class, as shown here.
using Microsoft.Practices.EnterpriseLibrary.Logging;

77error m anagement made exceptionally easy
Now, when the application causes an exception, the global exception handler continues
to display the same sanitized error message. However, the Logging handler captures
details of the original exception before the Exception Handling block policy replaces it,
and writes the details to whichever logging sink you specify in the configuration for the
Logging block. The default in this example is Windows Application Event Log. If you run
the example Logging an Exception to Preserve the Information it Contains, you will see an
exception like the one in Figure 5.
Details of the logged exception
This example shows the Exception Handling block using the default settings for the
Logging block. However, as you can see in Chapter 4, “As Easy As Falling Off a Log,” the
Logging block is extremely configurable. So you can arrange for the Logging handler in
your exception handling policy to write the information to any Windows Event Log,
an e-mail message, a database, a message queue, a text file, a Windows Management
Instrumentation (WMI) event, or a custom location using classes you create that take
advantage of the application block extension points.
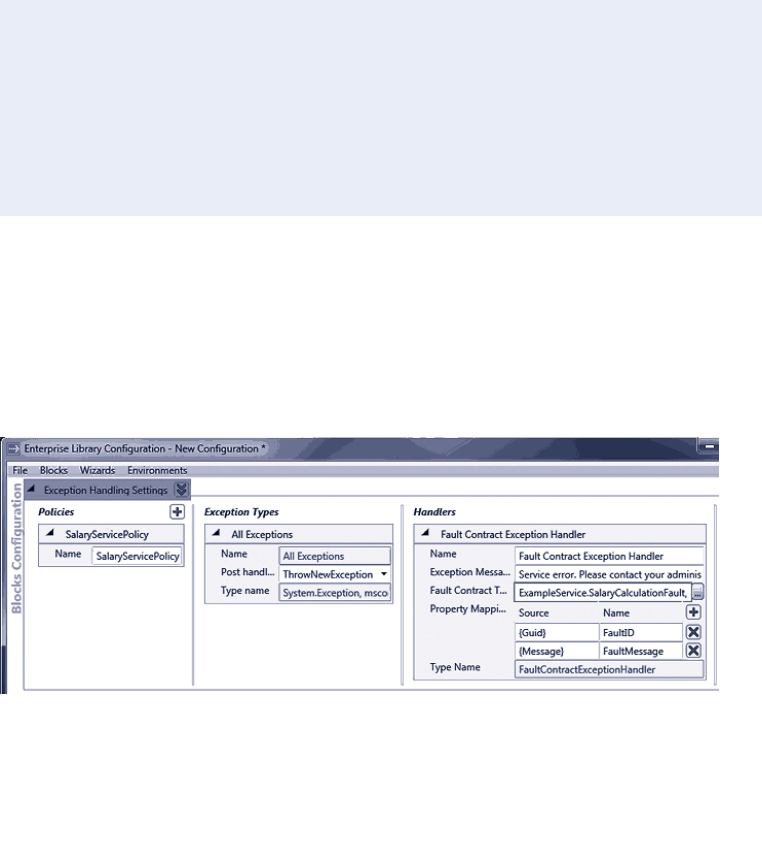
78 ch a pter thr ee
Shielding Exceptions at WCF Service Boundaries
You can use the Exception Handling block to implement exception handling policies for
WCF services. A common scenario is to implement the Exception Shielding pattern at a
WCF service boundary. The Exception Handling block contains a handler specifically
designed for this (the Fault Contract exception handler), which maps the values in the
exception to a new instance of a fault contract that you specify.
A fault contract for a WCF service will generally contain just the most useful properties
for an exception, and exclude sensitive information such as the stack trace and anything
else that may provide attackers with useful information about the internal workings of
the service. The following code shows a simple example of a fault contract suitable for
use with the Fault Contract exception handler:
[DataContract]
public class SalaryCalculationFault
{
[DataMember]
public Guid FaultID { get; set; }
[DataMember]
public string FaultMessage { get; set; }
}
Figure 6 shows a sample configuration for the Fault Contract exception handler. This
specifies the type SalaryCalculationFault as the target fault contract type, and the ex-
ception message that the policy will generate to send to the client. Note that, when using
the Fault Contract exception handler, you should always set the PostHandlingAction
property to ThrowNewException so that the Exception Handling block throws an excep-
tion that forces WCF to return the fault contract to the client.
The Fault Contract exception handler configuration

79error m a nagement made e xceptionally easy
Notice that we specified Property Mappings for the handler that map the Message
property of the exception generated within the service to the FaultMessage property
of the SalaryCalculationFault class, and map the unique Handling Instance ID of the
exception (specified by setting the Source to “{Guid}”) to the FaultID property, as shown
in Figure 6.
After you specify your fault contract and configure the Fault Contract exception handler,
you must edit your service code to use the new exception policy. If you did not already
do so, you must also add a reference to the assembly that contains the Fault Contract
exception handler to your project and (optionally) add a using statement to your service
class, as shown here:
using Microsoft.Practices.EnterpriseLibrary.ExceptionHandling.WCF;
You can now call the Process method of the ExceptionManager class from code in your
service in exactly the same way as shown in the previous examples of wrapping and re-
placing exceptions in a Windows Forms application. Alternatively, you can add attributes
to the methods in your service class to specify the policy they should use when an
exception occurs, as shown in this code:
[ServiceContract]
public interface ISalaryService
{
[OperationContract]
[FaultContract(typeof(SalaryCalculationFault))]
decimal GetWeeklySalary(string employeeId, int weeks);
}
[ExceptionShielding("SalaryServicePolicy")]
public class SalaryService : ISalaryService
{
public decimal GetWeeklySalary(string employeeId, int weeks)
{
SalaryCalculator calc = new SalaryCalculator();
return calc.GetWeeklySalary(employeeId, weeks);
}
}
You add the ExceptionShielding attribute to a service implementation class or to a
service contract interface, and use it to specify the name of the exception policy to use.
If you do not specify the name of a policy in the constructor parameter, or if the specified
policy is not defined in the configuration, the Exception Handling block will automati-
cally look for a policy named WCF Exception Shielding.

80 ch a pter thr ee
The Exception Handling block executes the Fault Contract exception handler that you
specify in your policy when an exception occurs. Effectively, the Fault Contract handler
is a specialized version of the Replace handler. It takes the original exception, generates
an instance of the fault contract, populates it with values from the exception, and then
throws a FaultException<YourFaultContractType> exception. The handler performs the
following actions:
• It generates a new instance of the fault contract class you specify for the
FaultContractType property of the Fault Contract exception handler.
• It extracts the values from the properties of the exception that you pass to the
method.
• It sets the values of the new fault contract instance to the values extracted
from the original exception. It uses mappings between the exception property
names and the names of the properties exposed by the fault contract to assign
the exception values to the appropriate properties. If you do not specify a
mapping, it matches the source and target properties that have the same name.
The result is that, instead of a general service failure message, the client receives a fault
message containing the appropriate information about the exception.
The example Applying Exception Shielding at WCF Application Boundaries uses the
service described above and the Exception Handling block WCF Fault Contract handler
to demonstrate exception shielding. You can run this example in one of three ways:
• Inside Visual Studio by starting it with F5 (debugging mode) and then pressing
F5 again when the debugger halts at the exception in the SalaryCalculator
class.
• Inside Visual Studio by right-clicking SalaryService.svc in Solution Explorer
and selecting View in Browser to start the service, then pressing Ctrl-F5
(non-debugging mode) to run the application.
• By starting the SalaryService in Visual Studio (as described in the previous
bullet) and then running the executable file ExceptionHandlingExample.exe
in the bin\debug folder directly.
The result is shown below. You can see that the exception raised by the SalaryCalculator
class causes the service to return an instance of the SalaryCalculationFault type that
contains the fault ID and fault message. However, the Exception Handling block captures
this exception and replaces the sensitive information in the message with text that
suggests the user contact their administrator. Research shows that users really appreciate
this type of informative error message.
Getting salary for 'jsmith' from WCF Salary Service...
Exception type System.ServiceModel.FaultException`1[ExceptionHandlingExample.Sal
aryService.SalaryCalculationFault] was thrown.
Message: 'Service error. Please contact your administrator.'
Source: 'mscorlib'
No Inner Exception
Fault contract detail:

81error m a nagement m a de e xceptionally easy
Fault ID: bafb7ec2-ed05-4036-b4d5-56d6af9046a5
Message: Error calculating salary for John Smith. Salary: 1000000. Weeks: 0
Connection: Database=Employees;Server=CorpHQ;User ID=admin;Password=2g$tXD76qr
Attempted to divide by zero.
You can also see, below the details of the exception, the contents of the original fault
contract, which are obtained by casting the exception to the type FaultException<Salary
CalculationFault> and querying the properties. You can see that this contains the original
exception message generated within the service. Look at the code in the example file, and
run it, to see more details.
Handling Specific Exception Types
So far, all of the examples have used an exception policy that handles a single exception
type (in the examples, this is Exception so that the policy will apply to any type of excep-
tion passed to it). However, you can specify multiple exception types within a policy, and
specify different handlers—including chains of handlers—for each exception type. Figure
7 shows a section of the configuration console with three exception types defined for the
policy named NotifyingRethrow (which is used in the next example). Each exception
type has different exception handlers specified.
Three exception types defined

82 ch a pter thr ee
The advantage of this capability should be obvious. You can create policies that will
handle different types of exceptions in different ways and, for each exception type, can
have different messages and post-handling actions as well as different handler combina-
tions. And, best of all, administrators can modify the policies post deployment to change
the behavior of the exception handling as required. They can add new exception types,
modify the types specified, change the properties for each exception type and the associ-
ated handlers, and generally fine-tune the strategy to suit day-to-day operational require-
ments.
Of course, this will only work if your application code throws the appropriate
exception types. If you generate informational exceptions that are all of the base type
Exception, as we did in earlier examples in this chapter, only the handlers for that excep-
tion type will execute.
Executing Code around Exception Handling
So far, all of the examples have used the Process method to execute the code that may
cause an exception. They simply used the Process method to execute the target class
method, as shown here.
SalaryCalculator calc = new SalaryCalculator();
var result = exManager.Process(() =>
calc.GetWeeklySalary("jsmith", 0), "ExceptionShielding");
Console.WriteLine("Result is: {0}", result);
However, as you saw earlier in this chapter, the Process method does not allow you to
detect the return value from the exception handling policy executed by the Exception
Handling block (it returns the value of the method or function it executes). In some cases,
though perhaps rarely, you may want to detect the return value from the exception han-
dling policy and perform some processing based on this value, and perhaps even capture
the exception returned by the Exception Handling block to manipulate it or decide
whether or not to throw it in your code.
In this case, you can use the HandleException method to pass an exception to the
block as an out parameter to be populated by the policy, and retrieve the Boolean result
that indicates if the policy determined that the exception should be thrown or ignored.
The example Executing Custom Code Before and After Handling an Exception, demon-
strates this approach. The SalaryCalculator class contains two methods in addition to the
GetWeeklySalary method we’ve used so far in this chapter. These two methods, named
RaiseDivideByZeroException and RaiseArgumentOutOfRangeException, will cause an
exception of the type indicated by the method name when called.
The sample first attempts to execute the RaiseDivideByZeroException method, like
this.
SalaryCalculator calc = new SalaryCalculator();
Console.WriteLine("Result is: {0}", calc.RaiseDivideByZeroException("jsmith", 0));

83er ror management m a de e xceptionally easy
This exception is caught in the main routine using the exception handling code shown
below. This creates a new Exception instance and passes it to the Exception Handling
block as the out parameter, specifying that the block should use the NotifyingRethrow
policy. This policy specifies that the block should log DivideByZero exceptions, and
replace the message with a sanitized one. However, it also has the PostHandlingAction
set to None, which means that the HandleException method will return false. The
sample code simply displays a message and continues.
...
catch (Exception ex)
{
Exception newException;
bool rethrow = exManager.HandleException(ex, "NotifyingRethrow",
out newException);
if (rethrow)
{
// Exception policy setting is "ThrowNewException".
// Code here to perform any clean up tasks required.
// Then throw the exception returned by the exception handling policy.
throw newException;
}
else
{
// Exception policy setting is "None" so exception is not thrown.
// Code here to perform any other processing required.
// In this example, just ignore the exception and do nothing.
Console.WriteLine("Detected and ignored Divide By Zero Error "
+ "- no value returned.");
}
}
Therefore, when you execute this sample, the following message is displayed.
Getting salary for 'jsmith' ... this will raise a DivideByZero exception.
Detected and ignored Divide By Zero Error - no value returned.
The sample then continues by executing the RaiseArgumentOutOfRangeException
method of the SalaryCalculator class, like this.
SalaryCalculator calc = new SalaryCalculator();
Console.WriteLine("Result is: {0}",
calc.RaiseArgumentOutOfRangeException("jsmith", 0));
This section of the sample also contains a catch section, which is—other than the
message displayed to the screen—identical to that shown earlier. However, the Notifying
Rethrow policy specifies that exceptions of type Exception (or any exceptions that are
not of type DivideByZeroException) should simply be wrapped in a new exception that

84 ch a pter thr ee
has a sanitized error message. The PostHandlingAction for the Exception type is set to
ThrowNewException, which means that the HandleException method will return true.
Therefore the code in the catch block will throw the exception returned from the block,
resulting in the output shown here.
Getting salary for 'jsmith' ... this will raise an ArgumentOutOfRange exception.
Exception type System.Exception was thrown.
Message: 'An application error has occurred.'
Source: 'ExceptionHandlingExample'
Inner Exception: System.ArgumentOutOfRangeException: startIndex cannot be larger
than length of string.
Parameter name: startIndex
at System.String.InternalSubStringWithChecks(Int32 startIndex, Int32 length,
Boolean fAlwaysCopy)
at System.String.Substring(Int32 startIndex, Int32 length)
at ExceptionHandlingExample.SalaryCalculator.RaiseArgumentOutOfRangeException
(String employeeId, Int32 weeks) in ...\ExceptionHandling\ExceptionHandling\Sala
ryCalculator.cs:line 57
at ExceptionHandlingExample.Program.ExecutingCodeAroundException(Int32 positi
onInTitleArray) in ...\ExceptionHandling\ExceptionHandling\Program.cs:line 222
Assisting Administrators
Some would say that the Exception Handling block already does plenty to make an
administrator’s life easy. However, it also contains features that allow you to exert extra
control over the way that exception information is made available, and the way that it can
be used by administrators and operations staff. If you have ever worked in a technical
support role, you’ll recognize the scenario. A user calls to tell you that an error has
occurred in the application. If you are lucky, the user will be able to tell you exactly what
they were doing at the time, and the exact text of the error message. More likely, he or
she will tell you that they weren’t really doing anything, and that the message said
something about contacting the administrator.
To resolve this regularly occurring problem, you can make use of the Handling
InstanceID value generated by the block to associate logged exception details with
specific exceptions, and with related exceptions. The Exception Handling block creates a
unique GUID value for the HandlingInstanceID of every execution of a policy. The value
is available to all of the handlers in the policy while that policy is executing. The Logging
handler automatically writes the HandlingInstanceID value into every log message it
creates. The Wrap and Replace handlers can access the HandlingInstanceID value and
include it in a message using the special token {handlingInstanceID}.
Figure 8 shows how you can configure a Logging handler and a Replace handler in a
policy, and include the {handlingInstanceID} token in the Exception Message property
of the Replace handler.
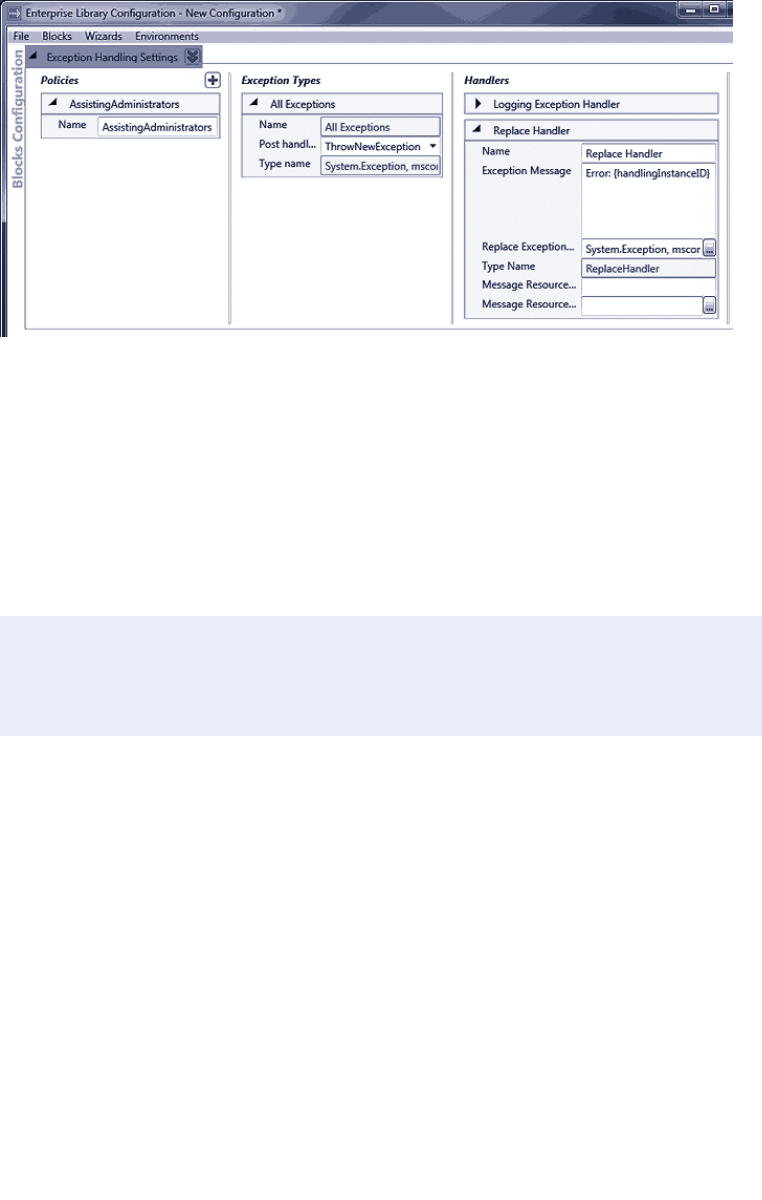
85error m a nagement made exceptionally easy
Configuring a unique exception handling instance identifier
Now your application can display the unique exception identifier to the user, and they can
pass it to the administrator who can use it to identify the matching logged exception in-
formation. This logged information will include the information from the original excep-
tion, before the Replace handler replaced it with the sanitized exception. If you select the
option Providing Assistance to Administrators for Locating Exception Details in the example
application, you can see this in operation. The example displays the following details of
the exception returned from the exception handling policy:
Exception type System.Exception was thrown.
Message: 'Application error. Please advise your administrator and provide them
with this error code: 22f759d3-8f58-43dc-9adc-93b953a4f733'
Source: 'Microsoft.Practices.EnterpriseLibrary.ExceptionHandling'
No Inner Exception
In a production application, you will probably show this message in a dialog of some type.
One issue, however, is that users may not copy the GUID correctly from a standard error
dialog (such as a message box). If you decide to use the HandlingInstanceID value to
assist administrators, consider using a form containing a read-only text box or an error
page in a Web application to display the GUID value in a way that allows users to copy it
to the clipboard and paste into a document or e-mail message. Figure 9 shows a simple
Windows Form displayed as a modal dialog. It contains a read-only TextBox control that
displays the Message property of the exception, which contains the HandlingInstanceID
GUID value.
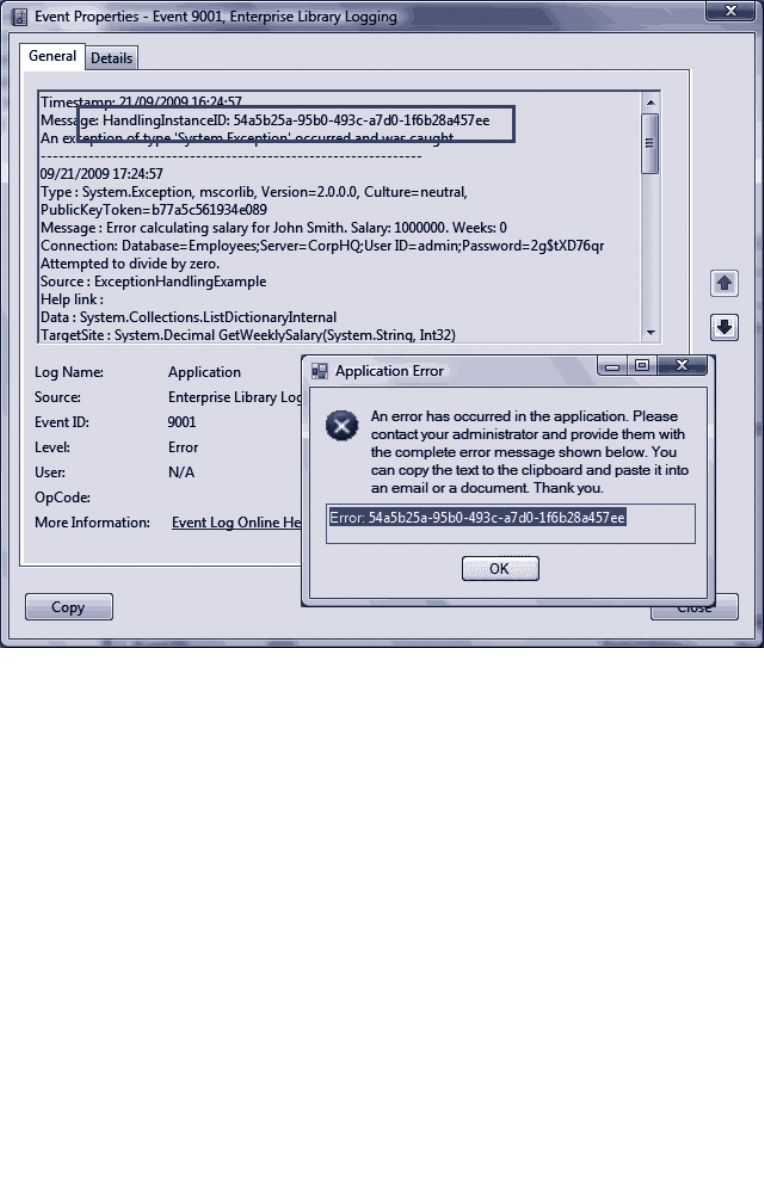
86 ch a pter thr ee
Displaying and correlating the handling instance identifier

87error m a nagement made exceptionally easy
Extending Your Exception Handling
Like all of the Enterprise Library application blocks, the Exception Handling block is
extensible. You can create new exception handlers and exception formatters if you need
to perform specific tasks that the block does not implement by default. For example, you
could create an exception handler that displays the exception details in a dialog, creates
an XML message, or generates a Web page. All that is required is that you implement the
IExceptionHandler interface defined within the block. This interface contains one
method named HandleException that the Exception Handling block will execute when
you add your handler to a policy chain.
The Exception Handling block uses formatters to create the message sent to the
Logging block when you use a Logging handler. The two formatters provided are
the TextExceptionFormatter and the XmlExceptionFormatter. The TextException
Formatter generates a simple text format for the error message, as you have seen in the
previous sections of this chapter. The XmlExceptionFormatter generates, as you would
expect, an XML-formatted document as the error message. You can create custom
formatters if you want to control the exact format of this information. You simply create
a new class that derives from the ExceptionFormatter base class in the Exception
Handling block, and override the several methods it contains for formatting the exception
information as required.
Summary
In this chapter you have seen why, when, and how you can use the Enterprise Library
Exception Handling block to create and implement exception handling strategies. Poor
error handling can make your application difficult to manage and maintain, hard to debug
and test, and may allow it to expose sensitive information that would be useful to attack-
ers and malicious users.
A good practice for exception management is to implement strategies that provide a
controlled and decoupled approach to exception handling through configurable policies.
The Exception Handling block makes it easy to implement such strategies for your ap-
plications, irrespective of their type and complexity. You can use the Exception Handling
block in Web and Windows Forms applications, Web services, console-based applications
and utilities, and even in administration scripts and applications hosted in environments
such as SharePoint®, Microsoft Office applications, other enterprise systems.
This chapter demonstrated how you can implement common exception handling
patterns, such as Exception Shielding, using techniques such as wrapping, replacing, and
logging exceptions. It also demonstrated how you can handle different types of
exceptions, assist administrators by using unique exception identifiers, and extend the
Exception Handling block to perform tasks that are specific to your own requirements.

89
Introduction
Just in case you didn’t quite grasp it from the title, this chapter is about one of the most
useful and popular of the Enterprise Library blocks, the Logging application block, which
makes it really easy to perform logging in a myriad of different ways depending on the
requirements of your application.
Logging generally fulfills two main requirements: monitoring general application
performance, and providing information. In terms of performance, logging allows you to
monitor what’s happening inside your application and, in some cases, what’s happening in
the world outside as well. For example, logging can indicate what errors or failures have
occurred, when something that should have happened did not, and when things are taking
a lot longer than they should. It can also simply provide status information on processes
that are working correctly—including those that talk to the outside world. Let’s face it,
there’s nothing more rewarding for an administrator than seeing an event log full of those
nice blue information icons.
Secondly, and possibly even more importantly, logging can provide vital information
about your application. Often referred to as auditing, this type of logging allows you to
track the behavior of users and processes in terms of the tasks they carry out, the infor-
mation they read and change, and the resources they access. It can provide an audit trail
that allows you to follow up and get information about malicious activity (whether it
succeeds or not), will allow you to trace events that may indicate future attack vectors or
reveal security weaknesses, and even help you to recover when disaster strikes (though
this doesn’t mean you shouldn’t be taking the usual precautions such as backing up sys-
tems and data). One other area where audit logging is useful is in managing repudiation.
For example, your audit logs may be useful in legal or procedural situations where users
or external attackers deny their actions.
The Logging block is a highly flexible and configurable solution that allows you to
create and store log messages in a wide variety of locations, categorize and filter mes-
sages, and collect contextual information useful for debugging and tracing as well as for
auditing and general logging requirements. It abstracts the logging functionality from the
log destination so that the application code is consistent, irrespective of the location and
type of the target logging store. Changes to almost all of the parameters that control
4As Easy As Falling Off a Log

90 ch a pter four
logging are possible simply by changing the configuration after deployment and at run
time. This means that administrators and operators can vary the logging behavior as they
manage the application, including when using Group Policy.
What Does the Logging Block Do?
The Logging application block allows you to decouple your logging functionality from
your application code. The block can route log entries to a Windows® Event Log, a data-
base, or a text (or XML) file. It can also generate an e-mail message containing the logging
information, a message you can route through Windows Message Queuing (using a dis-
tributor service provided with the block), or a Windows Management Instrumentation
(WMI) event. And, if none of these built-in capabilities meets your requirements, you can
create a provider that sends the log entry to any other custom location or executes some
other action.
In your application, you simply generate a log entry using a suitable logging object,
such as the LogWriter class, and then call a method to write the information it contains
to the logging system. The Logging block routes the log message through any filters you
define in your configuration, and on to the listeners that you configure. Each listener
defines the target of the log entry, such as Windows Event Log or an e-mail message, and
uses a formatter to generate suitably formatted content for that logging target.
You can see from this that there are many objects involved in this multi-step process,
and it is important to understand how they interact and how the log message flows
through the pipeline of processes. Figure 1 shows the overall process in more detail, and
provides an explanation of each stage.
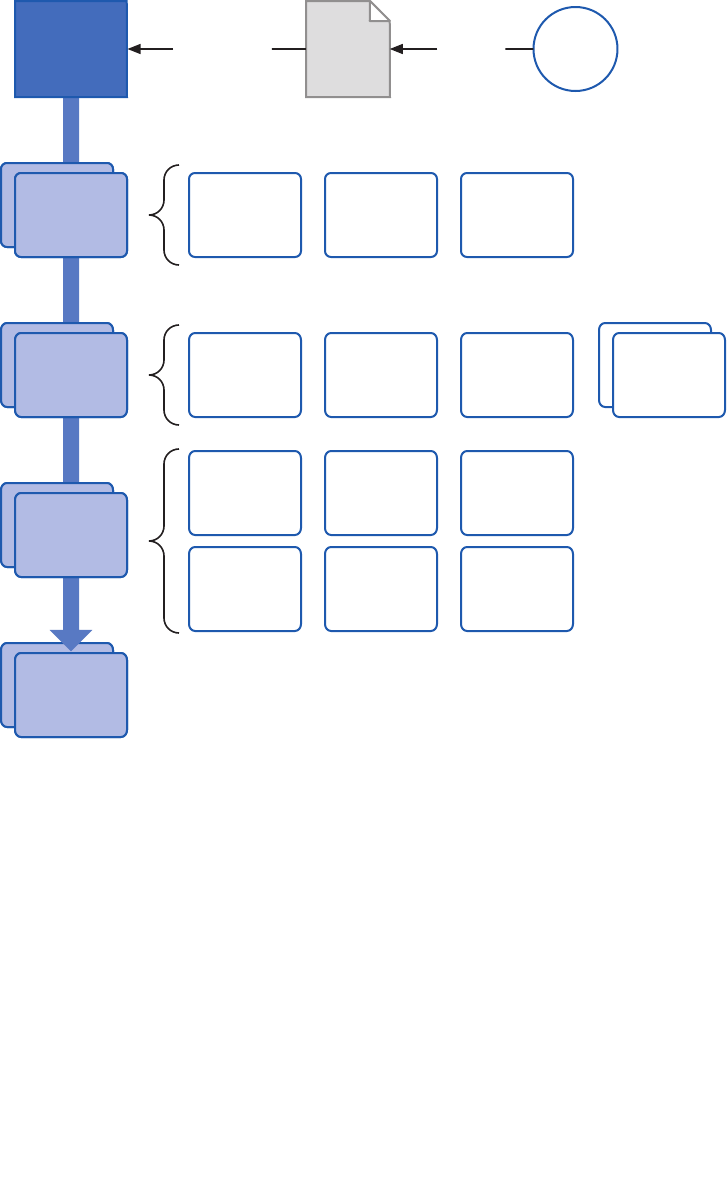
91as easy a s fa lling off a log
An overview of the logging process and the objects in the Logging block
ClientLog Entry createsis passed to
Log
Writer
Log
Filter
Trace
Source
Trace
Listener
Log
Formatter
Priority
Filter
Log
Enabled
Filter
Category
Filter
All Events
Log Source
Not Processed
Log Source
Errors
Log Source
Category
Source
Formatted
Event Log
Trace Listener
Flat File
Trace
Listener
WMI
Trace
Listener
MSMQ
Trace
Listener
E-mail
Trace
Listener
Formatted
Database Trace
Listener
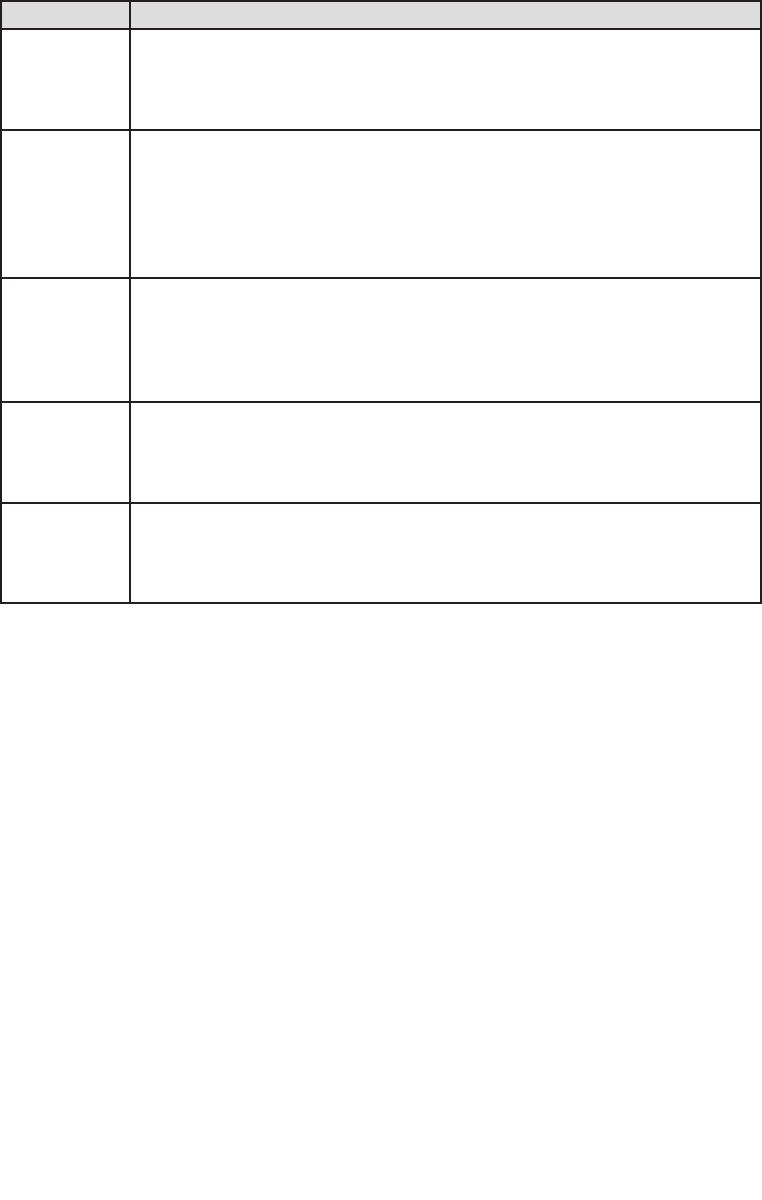
92 ch a pter four
Stage Description
Creating the
Log Entry
The user creates a LogWriter instance, uses it to create a new LogEntry, and passes it
to the Logging block for processing. Alternatively, the user can create a new LogEntry
explicitly, populate it with the required information, and use a LogWriter to pass it to
the Logging block for processing.
Filtering the
Log Entry
The Logging block filters the LogEntry (based on your configuration settings) for
message priority, or categories you added to the LogEntry when you created it. It also
checks to see if logging is enabled. These filters can prevent any further processing of
the log entries. This is useful, for example, when you want to allow administrators to
enable and disable additional debug information logging without requiring them to
restart the application.
Selecting Trace
Sources
Trace sources act as the link between the log entries and the log targets. There is a
trace source for each category you define in the logging block configuration; plus,
there are three built-in trace sources that capture all log entries, unprocessed entries
that do not match any category, and entries that cannot be processed due to an error
while logging (such as an error while writing to the target log).
Selecting Trace
Listeners
Each trace source has one or more trace listeners defined. These listeners are
responsible for taking the log entry, passing it through a separate log formatter that
translates the content into a suitable format, and passing it to the target log. Several
trace listeners are provided with the block, and you can create your own if required.
Formatting the
Log Entry
Each trace listener can use a log formatter to format the information contained in the
log entry. The block contains log message formatters, and you can create your own
formatter if required. The text formatter uses a template containing placeholders that
makes it easy to generate the required format for log entries.
Categories allow you to specify the target(s) for log entries processed by the block. You
can define categories that relate to one or more targets. For example, you might create a
category named General containing trace listeners that write to text files and XML files,
and a category named Auditing for administrative information that is configured to use
trace listeners that write to one or more databases. Then you can assign a log entry to one
or more categories, effectively mapping it to multiple targets. The three log sources shown
in the schematic in Figure 1 (all events log source, not processed log source, and errors log
source) are themselves categories for which you can define trace listeners.
Logging is an added-value service for applications, and so any failures in the logging
process must be handled gracefully without raising an exception to the main business
processes. The Logging block achieves this by sending all logging failures to a special
category (the errors log source) which is named Logging Errors & Warnings. By
default, these error messages are written to Windows Event Log, though you can
configure this category to write to other targets using different trace listeners if you
wish.

93as ea sy as falling off a log
No matter how you implement logging, it will always have some performance impact. The
Logging block provides a flexible and highly configurable logging solution that is care-
fully designed to minimize performance impact. However, you should be aware of this
impact, and consider how your own logging strategy will affect it. For example, a complex
configuration that writes log entries to multiple logs and uses multiple filters is likely to
have more impact than simple configurations. You must balance your requirements for
logging against performance and scalability needs.
To maximize performance, the LogWriter class by default exposes properties only
for the commonly required information. This includes the event ID, message, priority, and
categories you specify in the configuration. The LogWriter also automatically collects
some context information such as the time, the application domain, the machine name,
and the process ID—where possible—using cached values in order to minimize perfor-
mance impact.
However, collecting additional context information can be expensive in processing
terms and, if you are not going to use the information, wastes precious resources and may
affect performance. Therefore, the Logging block only collects other less commonly used
information from the environment, which you might require only occasionally, if you
specify that you want this information when you create the LogEntry instance. Four
classes within the Logging block can collect specific sets of context information that you
can add to your log entry. This includes COM+ diagnostic information, the current stack
trace, the security-related information from the managed runtime, and security-related
information from the operating system. There is also a dictionary property for the log
entry where you can add any additional custom information you require, and which must
appear in your logs.
How Do I Use the Logging Block?
It’s time to see some examples of the Logging block use, including how to create log
entries and write them to various targets such as the Windows Event Log, disk files, and
a database. Later you’ll see how you can use some of the advanced features of the block,
such as checking filter status and adding context information to a log entry. However,
before you can start using the Logging block, you must configure it.
You can configure the Logging block using the configuration tool described in Chapter 1,
“Introduction.” The logging settings section of the configuration tool contains three
columns where you configure filters (trace sources), logging target listeners (trace listen-
ers), and log message formatters. The first column contains three types of filter: categories
(category sources), special categories, and logging filters. All of these items were described
in the schematic shown in Figure 1 and the accompanying table.
Figure 2 shows the configuration tool loaded with the configuration for the examples
used in this chapter. You can see that we have configured several types of filters, listeners,
and formatters. As the configuration contains the Database trace listener, the configura-
tion tool has automatically added the Database Settings section as well.
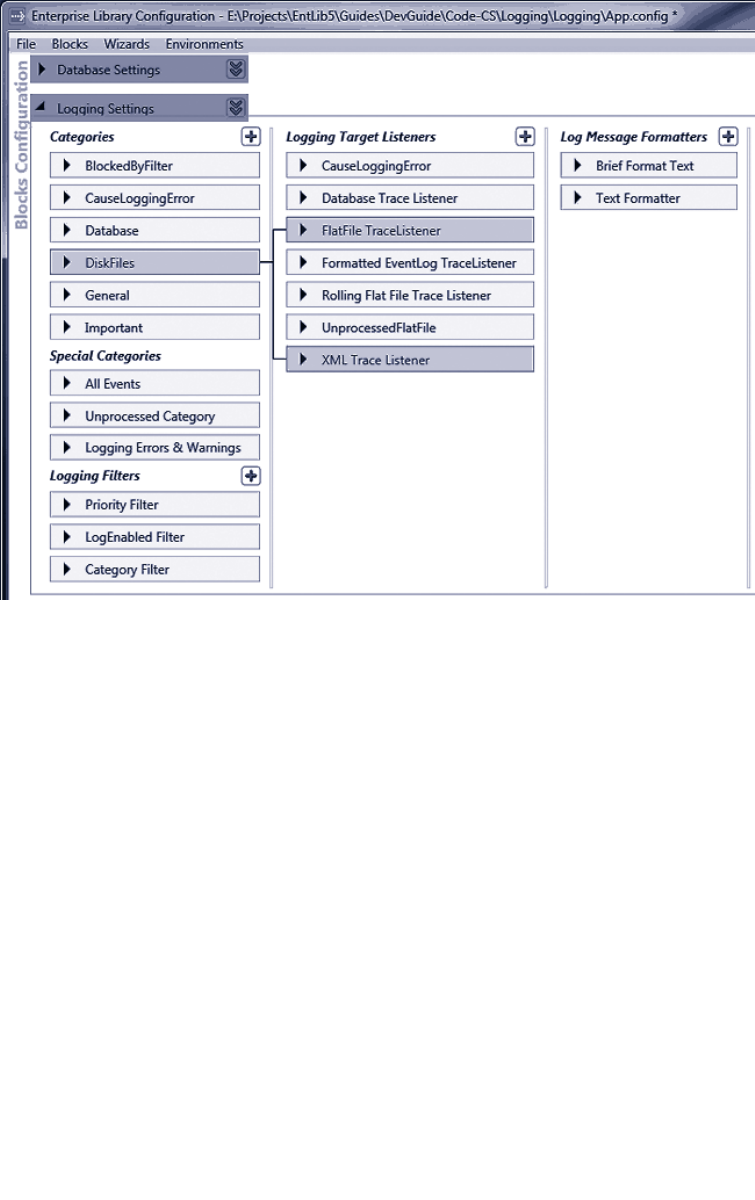
94 ch a pter four
The configuration settings for the sample application
The easiest way to learn about how the Logging block configuration works is to run the
configuration tool yourself and open the App.config file from the example application.
You can expand each of the sections to see the property settings, and to relate each item
to the others.
Now you must edit your code to use the Logging block. You’ll need to add references
to the appropriate Enterprise Library assemblies and namespaces. The assemblies you
must add to your project (in addition to the assemblies required for all Enterprise Library
projects) are:
• Microsoft.Practices.EnterpriseLibrary.Logging.dll
• Microsoft.Practices.EnterpriseLibrary.Logging.Database.dll
• Microsoft.Practices.EnterpriseLibrary.Data.dll
However, if you do not intend to send log entries to a database, you will not require the
last two assemblies on this list.
Now you are ready to write some code.

95as easy a s fa lling off a log
To demonstrate the features of the Logging block, we provide a sample application that
you can download and run on your own computer. You can run the executable directly
from the bin\Debug folder, or you can open the solution named Logging in Microsoft®
Visual Studio® to see the code and run it under Visual Studio. The application includes a
preconfigured database for storing log entries, as well as scripts you can use to create the
Logging database within a different database server if you prefer.
You do not need to run the scripts if you have Microsoft SQL Server® Express
installed locally. If you want to specify a different database for logging, edit the
script named CreateLoggingDb.cmd to specify the location of the database and
execute it. After you do that, you must change the connection string named
ExampleDatabase to point to your new database.
In addition, depending on the version of the operating system you are using,
you may need to execute the application under the context of an account with
administrative privileges. If you are running the sample from within Visual Studio,
start Visual Studio by right-clicking the entry in your Start menu and selecting
Run as administrator.
One other point to note about the sample application is that it creates a folder named
Temp in the root of your C: drive if one does not already exist, and writes the text log files
there so that you can easily find and view them.
The first of the examples, Simple logging with the Write method of a LogWriter, demon-
strates how you can use a LogWriter directly to create log entries. The first stage is to
obtain a LogWriter, and the example uses the simplest approach—the GetInstance
method of the current Enterprise Library container. See the following code.
// Resolve the default LogWriter object from the container.
LogWriter defaultWriter
= EnterpriseLibraryContainer.Current.GetInstance<LogWriter>();
Now you can call the Write method and pass in any parameter values you require. There
are many overloads of the Write method. They allow you to specify the message text, the
category, the priority (a numeric value), the event ID, the severity (a value from the Tra-
ceEventType enumeration), and a title for the event. There is also an overload that allows
you to add custom values to the log entry by populating a Dictionary with name and
value pairs (you will see this used in a later example). Our example code uses several of
these overloads. We’ve removed some of the Console.WriteLine statements from the
code listed here to make it easier to see what it actually does.
// Check if logging is enabled before creating log entries.
if (defaultWriter.IsLoggingEnabled())
{
defaultWriter.Write("Log entry created using the simplest overload.");
defaultWriter.Write("Log entry with a single category.", "General");

96 ch a pter four
defaultWriter.Write("Log entry with a category, priority, and event ID.",
"General", 6, 9001);
defaultWriter.Write("Log entry with a category, priority, event ID, "
+ "and severity.", "General", 5, 9002,
TraceEventType.Warning);
defaultWriter.Write("Log entry with a category, priority, event ID, "
+ "severity, and title.", "General", 8, 9003,
TraceEventType.Warning, "Logging Block Examples");
}
else
{
Console.WriteLine("Logging is disabled in the conguration.");
}
Notice how the code first checks to see if logging is enabled. There is no point using
valuable processor cycles and memory generating log entries if they aren’t going any-
where. The Filters section of the Logging block configuration can contain a special filter
named the Log Enabled Filter (we have configured one in our example application). This
filter has the single property, Enabled, that allows administrators to enable and disable all
logging for the block. When it is set to False, the IsLoggingEnabled property of the
LogWriter will return false as well.
The example produces the following result. All of the events are sent to the General
category, which is configured to write events to the Windows Application Event Log (this
is the default configuration for the block).
Created a Log Entry using the simplest overload.
Created a Log Entry with a single category.
Created a Log Entry with a category, priority, and event ID.
Created a Log Entry with a category, priority, event ID, and severity.
Created a Log Entry with a category, priority, event ID, severity, and title.
Open Windows Event Viewer 'Application' Log to see the results.
You can open Windows Event Viewer to see the results. Figure 3 shows the event
generated by the last of the Write statements in this example.
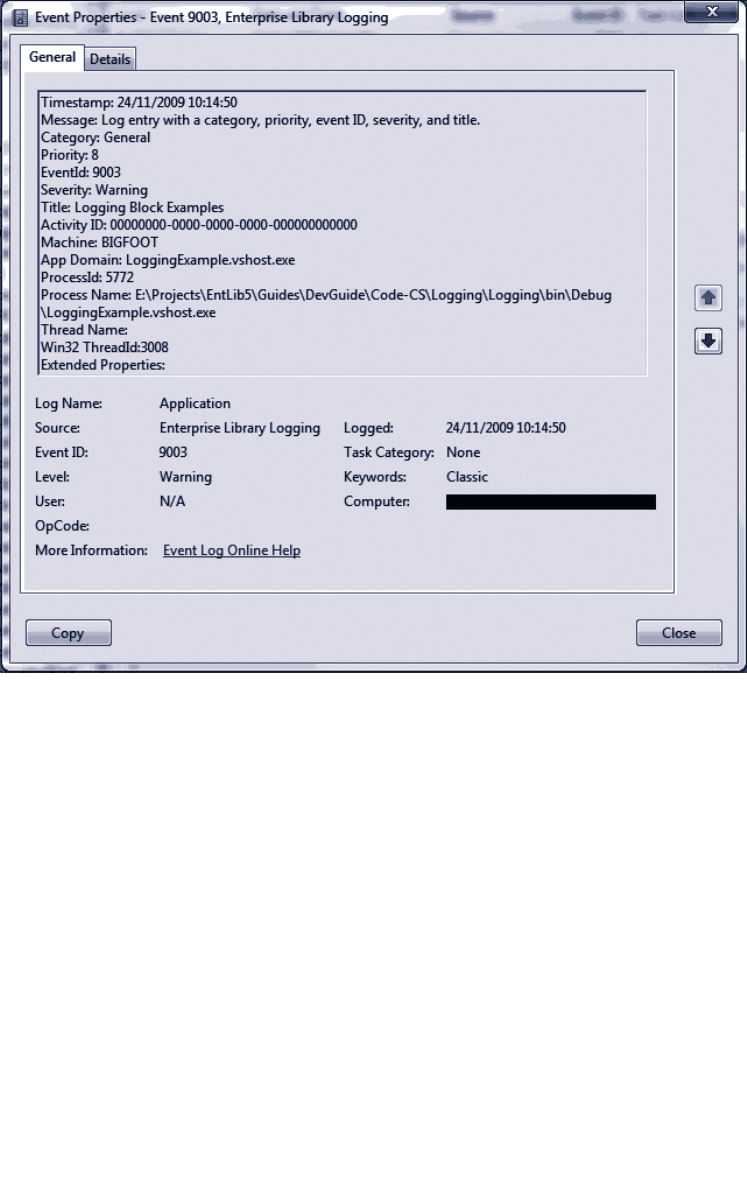
97as easy a s fa lling off a log
The logged event
If you do not specify a value for one of the parameters of the Write method, the
Logging block uses the default value for that parameter. The defaults are Category =
General, Priority = -1, Event ID = 1, Severity = Information, and an empty string for
Title.

98 ch a pter four
About Logging Categories
Categories are the way that Enterprise Library routes events sent to the block to the
appropriate target, such as a database, the event log, an e-mail message, and more. The
previous example makes use of the default configuration for the Logging block. When
you add the Logging block to your application configuration using the Enterprise Library
configuration tools, it contains the single category named General that is configured to
write events to the Windows Application Event Log.
You can change the behavior of logging for any category. For example, you can change
the behavior of the previous example by reconfiguring the event log trace listener
specified for the General category, or by reconfiguring the text formatter that this trace
listener uses. You can change the event log to which the event log trace listener sends
events; edit the template used by the text formatter; or add other trace listeners.
However, it’s likely that your application will need to perform different types of
logging for different tasks. The typical way to achieve this is to define additional
categories, and then specify the type of trace listener you need for each category. For
example, you may want to send audit information to a text file or an XML file, to a
database, or both; instead of to Windows Event Log. Or you may want to send indications
of catastrophic failures to administrators as e-mail messages. If you are using an enterprise-
level monitoring system, you may instead prefer to write events to the WMI subsystem,
or send them to another system through Windows Message Queuing.
You can easily add categories to your application configuration. The approach is to
add the trace listeners for the logging targets you require, such as the flat file trace
listener or database trace listener to the Logging Target Listeners section, and then
add the categories you require to the Category Filters section. Finally, you link them
together in any combination by adding each of the required trace listener(s) to the
category filter in the Category Filters section. Figure 4 shows this type of configuration,
were the General category will output log messages to an event log listener and a database
trace listener.
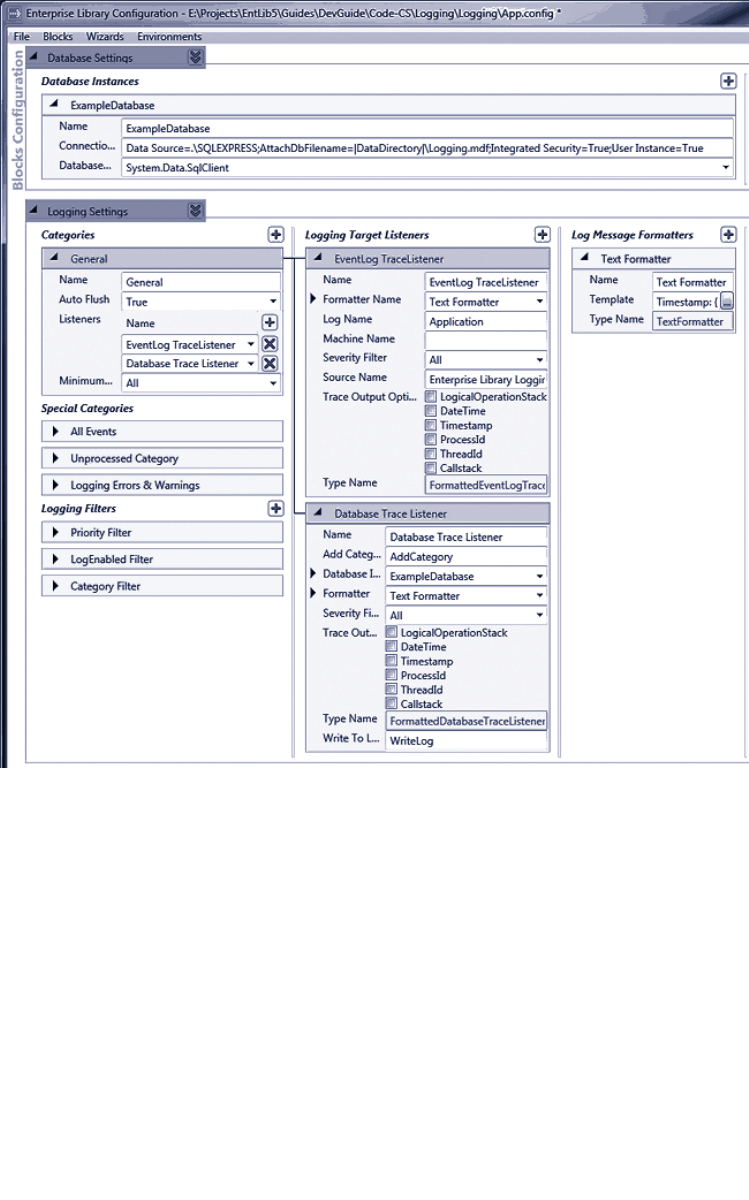
99as easy as falling off a log
Configuring trace listeners for different categories
You can specify two properties for each category (source) you add, and for the default
General category. You can set the Auto Flush property to specify that the block should
flush log entries to their configured target trace listeners each time as soon as they are
written to the block, or only when you call the FlushContextItems method of the Log-
Writer. If you set the Auto Flush property to False, ensure that your code calls this
method when an exception or failure occurs to avoid losing any cached logging informa-
tion.
The other property you can set for each category is the Minimum Severity (which
sets the Source Levels property of each listener). This specifies the minimum severity
(such as Warning or Critical) for the log entries that the category filter will pass to its

100 chapter four
configured trace listeners. Any log entries with a lower severity will be blocked. The de-
fault severity is All, and so no log entries will be blocked unless you change this value. You
can also configure a Severity Filter (which sets the Filter property) for each individual
trace listener, and these values can be different for trace listeners in the same category.
You will see how to use the Filter property of a trace listener in the next example in this
chapter.
Filtering by Category
The Logging Filters section of the Logging block configuration can contain a filter that
you can use to filter log entries sent to the block based on their membership in specified
categories. You can add multiple categories to your configuration to manage filtering,
though overuse of this capability can make it difficult to manage logging.
To help you define filters, the configuration tool contains a filter editor dialog that
allows you to specify the filter mode (Allow all except..., or Deny all except...) and then
build a list of categories to which this filter will apply. The example application contains
only a single filter that is configured to allow logging to all categories except for the
category named (rather appropriately) BlockedByFilter. You will see the BlockedByFilter
category used in the section “Capturing Unprocessed Events and Logging Errors” later in
this chapter.
Writing Log Entries to Multiple Categories
In addition to being able to define multiple categories, you can send a log entry to more
than one category in a single operation. This approach often means you can define fewer
categories, and it simplifies the configuration because each category can focus on a spe-
cific task. You don’t need to have multiple categories with similar sets of trace listeners.
The second example, Logging to multiple categories with the Write method of a Log-
Writer, shows how to write to multiple categories. The example has two categories, named
DiskFiles and Important, defined in the configuration. The DiskFiles category contains
references to a flat file trace listener and an XML trace listener. The Important category
contains references to an event log trace listener and a rolling flat file trace listener.
The example uses the following code to create an array of the two category names,
DiskFiles and Important, and then it writes three log messages to these two categories
using the Write method of the LogWriter in the same way as in the previous example.
Again, we’ve removed some of the Console.WriteLine statements to make it easier to
see what the code actually does.
// Check if logging is enabled before creating log entries.
if (defaultWriter.IsLoggingEnabled())
{
// Create a string array (or List<>) containing the categories.
string[] logCategories = new string[] {"DiskFiles", "Important"};
// Write the log entries using these categories.
defaultWriter.Write("Log entry with multiple categories.", logCategories);
defaultWriter.Write("Log entry with multiple categories, a priority, "

101as easy a s fa lling off a log
+ "and an event ID.", logCategories, 7, 9004);
defaultWriter.Write("Log entry with multiple categories, a priority, "
+ "event ID, severity, and title.", logCategories, 10,
9005, TraceEventType.Critical, "Logging Block Examples");
}
else
{
Console.WriteLine("Logging is disabled in the conguration.");
}
Controlling Output Formatting
If you run the example above and then open Windows Event Log, you will see the three
events generated by this example. Also, in the C:\Temp folder, you will see three files.
RollingFlatFile.log is generated by the rolling flat file trace listener, and contains the same
information as the event log event generated by the event log trace listener. If you explore
the configuration, you will see that they both use the same text formatter to format the
output.
The FlatFile.log file, which is generated by the flat file trace listener, contains only a
simplified set of values for each event. For example, this is the output generated for the
last of the three log entries.
----------------------------------------
Timestamp: 24/11/2009 10:49:26
Message: Log entry with multiple categories, a priority, event ID, severity, and
title.
Category: DiskFiles, Important
Priority: 10
EventId: 9005
ActivityId: 00000000-0000-0000-0000-000000000000
Severity: Critical
Title:Logging Block Examples
----------------------------------------
The reason is that the flat file trace listener is configured to use a different text format-
ter—in this case one named Brief Format Text (listed in the Formatters section of the
configuration tool). All trace listeners use a formatter to translate the contents of the log
entry properties into the appropriate format for the target of that trace listener. Trace
listeners that create text output, such as a text file or an e-mail message, use a text
formatter defined within the configuration of the block.
If you examine the configured text formatter, you will see that it has a Template
property. You can use the Template Editor dialog available for editing this property to
change the format of the output by adding tokens (using the drop-down list of available
tokens) and text, or by removing tokens and text. Figure 5 shows the default template for
a text formatter, and how you can edit this template. A full list of tokens and their
meaning is available in the online documentation for Enterprise Library, although most are
fairly self-explanatory.
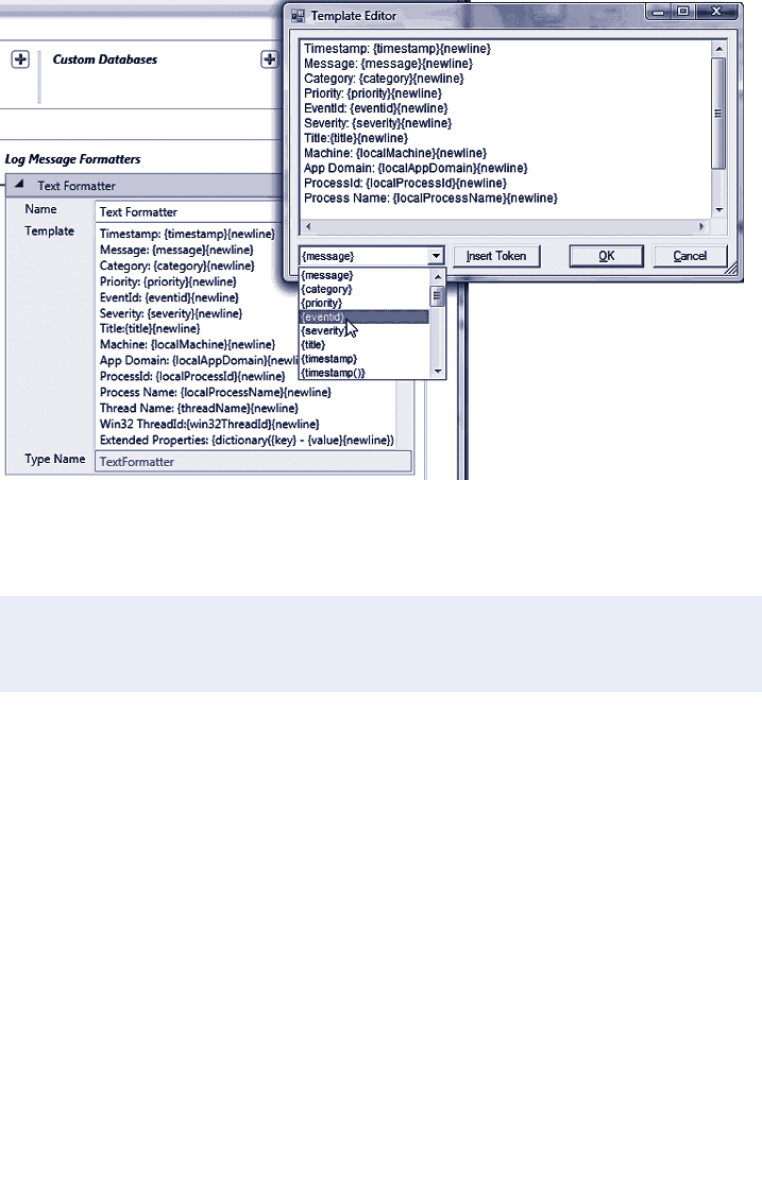
102 ch a pter four
Editing the template for a text formatter
The template we used in the Brief Format text formatter is shown here.
Timestamp: {timestamp(local)}{newline}Message: {message}{newline}Category: {category
{newline}Priority: {priority}{newline}EventId:
{eventid}{newline}ActivityId: {property(ActivityId)}{newline}Severity:
{severity}{newline}Title:{title}{newline}
Non-Formatted Trace Listeners
While we are discussing output formatting, there is one other factor to consider. Some
trace listeners do not use a text formatter to format the output they generate. This is
generally because the output is in a binary or specific format. The WMI trace listener is a
typical example that does not use a text formatter.
For such trace listeners, you can set the TraceOutputOptions property to one of
a range of values to specify the values you want to include in the output. The Trace
OutputOptions property accepts a value from the System.Diagnostics.TraceOptions
enumeration. Valid values include CallStack, DateTime, ProcessId, LogicalOperation
Stack, Timestamp, and ThreadId. The documentation installed with Enterprise Library,
and the documentation for the System.Diagnostics namespace on MSDN®, provide more
information.

103as easy as fa lling off a log
Filtering by Severity in a Trace Listener
The previous example generates a third disk file that we haven’t looked at yet. We didn’t
forget this, but saved if for this section because it demonstrates another feature of the
trace listeners that you will often find extremely useful. To see this, you need to view the
file XmlLogFile.xml that was generated in the C:\Temp folder by the XML trace listener
we used in the previous example. You should open it in Microsoft Internet Explorer®
(or another Web browser or text editor) to see the structure.
You will see that the file contains only one event from the previous example, not the
three that the code in the example generated. This is because the XML trace listener has
the Filter property in its configuration set to Error. Therefore, it will log only events
with a severity of Error or higher. If you look back at the example code, you will see that
only the last of the three calls to the Write method specified a value for the severity
(TraceEventType.Critical in this case), and so the default value Information was used for
the other two events.
If you get an error indicating that the XML document created by the XML trace listener
is invalid, it’s probably because you have more than one log entry in the file. This means
that it is not a valid XML document—it contains separate event log entries added to
the file each time you ran this example. To view it as XML, you must open the file in
a text editor and add an opening and closing element (such as <root> and </root>)
around the content. Or, just delete it and run the example once more.
All of the trace listeners provided with Enterprise Library expose the Filter property, and
you can use this to limit the log entries written to the logging target to only those that
are important to you. If your code generates many information events that you use for
monitoring and debugging only under specific circumstances, you can filter these to
reduce the growth and size of the log when they are not required.
Alternatively, (as in the example) you can use the Filter property to differentiate the
granularity of logging for different listeners in the same category. It may be that a flat file
trace listener will log all entries to an audit log file for some particular event, but an Email
trace listener in the same category will send e-mail messages to administrators only when
an Error or Critical event occurs.
Filtering All Log Entries by Priority
As well as being able to filter log entries in individual trace listeners based on their sever-
ity, you can set the Logging block to filter all log entries sent to it based on their priority.
Alongside the log-enabled filter and category filter in the Filters section of the configura-
tion (which we discussed earlier in this chapter), you can add a filter named Priority
Filter.
This filter has two properties that you can set: Minimum Priority and Maximum
Priority. The default setting for the priority of a log entry is -1, which is the same as the
default setting of the Minimum Priority property of the filter, and there is no maximum
priority set. Therefore, this filter will not block any log entries. However, if you change
the defaults for these properties, only log entries with a priority between the configured
values (including the specified maximum and minimum values) will be logged. The excep-
tion is log entries that have the default priority of -1. These are never filtered.

104 ch a pter four
So far we have used the Write method of the LogWriter class to generate log entries. An
alternative approach that may be useful if you want to create log entries individually,
perhaps to return them from methods or to pass them between processes, is to generate
instances of the LogEntry class and then write them to the configured targets after-
wards.
The example, Creating and writing log entries with a LogEntry object, demonstrates this
approach. It creates two LogEntry instances. The code first calls the most complex
constructor of the LogEntry class that accepts all of the possible values. This includes
a Dictionary of objects with a string key (in this example, the single item Extra
Information) that will be included in the output of the trace listener and formatter. Then
it writes this log entry using an overload of the Write method of the LogWriter that
accepts a LogEntry instance.
Next, the code creates a new empty LogEntry using the default constructor and
populates this by setting individual properties, before writing it using the same Write
method of the LogWriter.
// Check if logging is enabled before creating log entries.
if (defaultWriter.IsLoggingEnabled())
{
// Create a Dictionary of extended properties
Dictionary<string, object> exProperties = new Dictionary<string, object>();
exProperties.Add("Extra Information", "Some Special Value");
// Create a LogEntry using the constructor parameters.
LogEntry entry1 = new LogEntry("LogEntry with category, priority, event ID, "
+ "severity, and title.", "General", 8, 9006,
TraceEventType.Error, "Logging Block Examples",
exProperties);
defaultWriter.Write(entry1);
// Create a LogEntry and populate the individual properties.
LogEntry entry2 = new LogEntry();
entry2.Categories = new string[] {"General"};
entry2.EventId = 9007;
entry2.Message = "LogEntry with individual properties specied.";
entry2.Priority = 9;
entry2.Severity = TraceEventType.Warning;
entry2.Title = "Logging Block Examples";
entry2.ExtendedProperties = exProperties;
defaultWriter.Write(entry2);
}
else
{
Console.WriteLine("Logging is disabled in the conguration.");
}
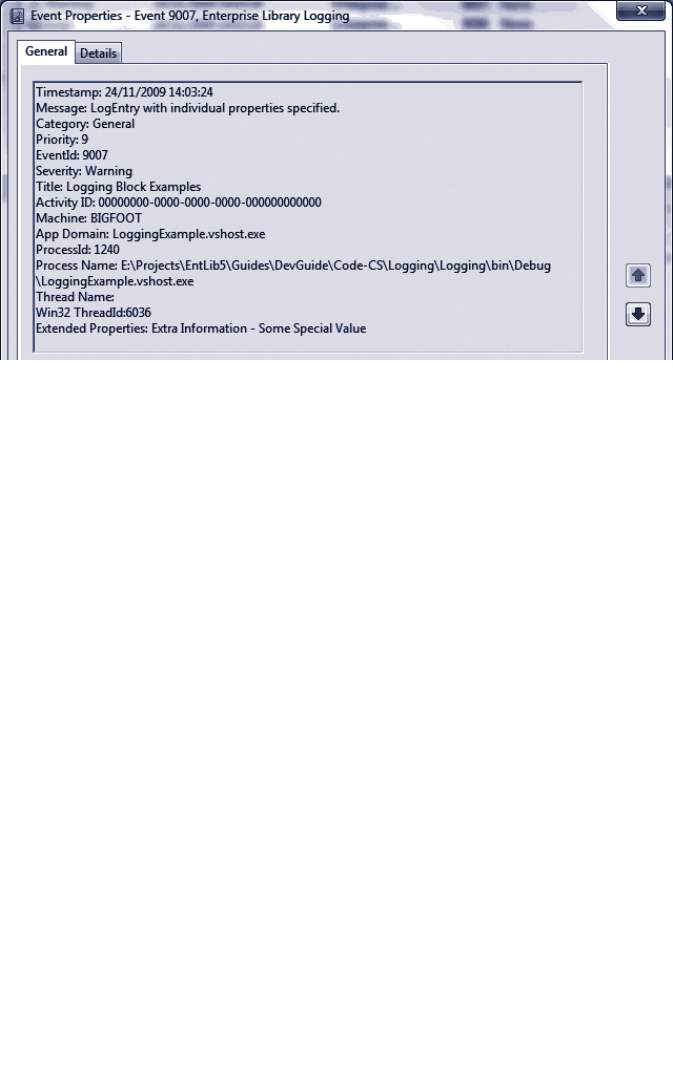
105a s e asy as falling off a log
This example writes the log entries to the Windows Application Event Log by using the
General category. If you view the events this example generates, you will see the values
set in the code above including (at the end of the list) the extended property we specified
using a Dictionary. You can see this in Figure 6.
A log entry written to the General category
The capability to route log entries through different categories to a configured set of
trace listener targets provides a very powerful mechanism for performing a wide range of
logging activities. However, it prompts some questions. In particular, what happens if the
categories specified in a log entry don’t match any in the configuration? And what
happens if there is an error when the trace listener attempts to write the log entry to the
target?
About Special Sources
In fact, the Logging block includes three special sources that handle these situations. Each
is effectively a category, and you can add references to configured trace listeners to each
one so that events arriving in that category will be written to the target(s) you specify.
The All Events special source receives all events, irrespective of all other settings
within the configuration of the block. You can use this to provide an audit trail of all
events, if required. By default, it has no trace listeners configured.
The Unprocessed Category special source receives any log entry that has a category
that does not match any configured categories. By default, this category has no trace
listeners configured.
The Logging Errors & Warnings special source receives any log entry that causes an
error in the logging process. By default, this category contains a reference to a trace
listener that writes details of the error to the Windows Application Event Log, though
you can reconfigure this if you wish.

106 chapter four
An Example of Using Special Sources
The example, Using Special Sources to capture unprocessed events or errors, demonstrates
how the Logging block reacts under these two circumstances. The code first writes a log
entry to a category named InvalidCategory, which does not exist in the configuration.
Next, it writes another log entry to a category named CauseLoggingError that is config-
ured to use a Database trace listener. However, this trace listener specifies a connection
string that is invalid; it points to a database that does not exist.
// Check if logging is enabled before creating log entries.
if (defaultWriter.IsLoggingEnabled())
{
// Create log entry to be processed by the "Unprocessed" special source.
defaultWriter.Write("Entry with category not dened in conguration.",
"InvalidCategory");
// Create log entry to be processed by the "Errors & Warnings" special source.
defaultWriter.Write("Entry that causes a logging error.", "CauseLoggingError");
}
else
{
Console.WriteLine("Logging is disabled in the conguration.");
}
You might expect that neither of these log entries would actually make it to their target.
However, the example generates the following messages that indicate where to look for
the log entries that are generated.
Created a Log Entry with a category name not dened in the conguration.
The Log Entry will appear in the Unprocessed.log le in the C:\Temp folder.
Created a Log Entry that causes a logging error.
The Log Entry will appear in the Windows Application Event Log.
This occurs because we configured the Unprocessed Category in the Special Sources
section with a reference to a flat file trace listener that writes log entries to a file named
Unprocessed.log. If you open this file, you will see the log entry that was sent to the
InvalidCategory category.
The example uses the default configuration for the Logging Errors & Warnings
special source. This means that the log entry that caused a logging error will be sent to
the formatted event log trace listener referenced in this category. If you open the applica-
tion event log, you will see this log entry. The listing below shows some of the content.
Timestamp: 24/11/2009 15:14:30
Message: Tracing to LogSource 'CauseLoggingError' failed. Processing for other
sources will continue. See summary information below for more information. Should
this problem persist, stop the service and check the conguration le(s) for
possible error(s) in the conguration of the categories and sinks.

107as eas y as fa lling off a log
Summary for Enterprise Library Distributor Service:
======================================
-->
Message:
Timestamp: 24/11/2009 15:14:30
Message: Entry that causes a logging error.
Category: CauseLoggingError
...
...
Exception Information Details:
======================================
Exception Type: System.Data.SqlClient.SqlException
Errors: System.Data.SqlClient.SqlErrorCollection
Class: 11
LineNumber: 65536
Number: 4060
Procedure:
Server: (local)\SQLEXPRESS
State: 1
Source: .Net SqlClient Data Provider
ErrorCode: -2146232060
Message: Cannot open database "DoesNotExist" requested by the login. The login
failed.
Login failed for user 'xxxxxxx\xxx'.
...
...
StackTrace Information Details:
======================================
...
...
In addition to the log entry itself, you can see that the event contains a wealth of informa-
tion to help you to debug the error. It contains a message indicating that a logging error
occurred, followed by the log entry itself. However, after that is a section containing
details of the exception raised by the logging mechanism (you can see the error message
generated by the SqlClient data access code), and after this is the full stack trace.
One point to be aware of is that logging database and security exceptions should always
be done in such a way as to protect sensitive information that may be contained in the
logs. You must ensure that you appropriately restrict access to the logs, and only expose
non-sensitive information to other users. You may want to consider applying exception
shielding, as described in Chapter 3, “Error Management Made Exceptionally Easy.”
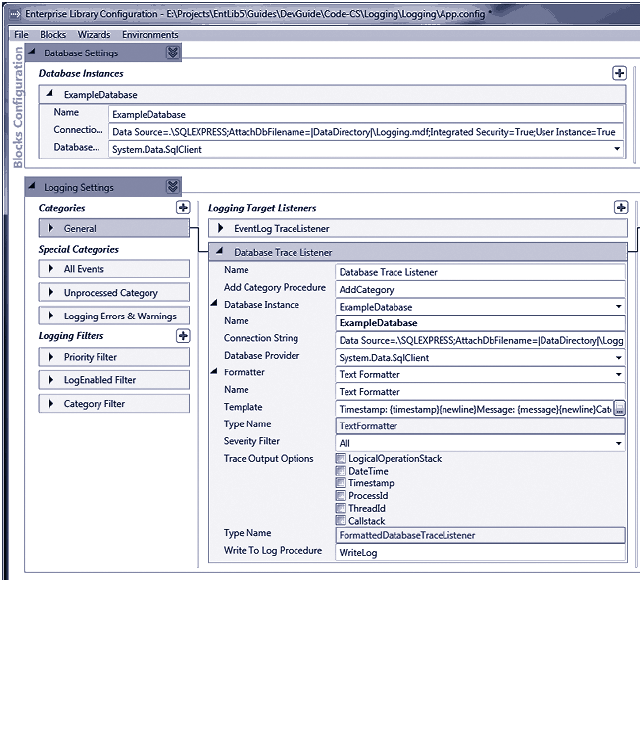
108 chapter four
One of the most common requirements for logging, after Windows Event Log and text
files, is to store log entries in a database. The Logging block contains the database trace
listener that makes this easy. You configure the database using a script provided with
Enterprise Library, located in the \Blocks\Logging\Src\DatabaseTraceListener\Scripts
folder of the source code. We also include these scripts with the example for this chap-
ter.
The scripts assume that you will use the locally installed SQL Server Express database,
but you can edit the CreateLoggingDb.cmd file to change the target to a different data-
base server. The SQL script that the command file executes creates a database named
Logging, and adds the required tables and stored procedures to it.
However, if you only want to run the example application we provide for this chapter,
you do not need to create a database. The project contains a preconfigured database file
named Logging.mdf (located in the bin\Debug folder) that is auto-attached to your local
SQL Server Express instance. You can connect to this database using Visual Studio Server
Explorer to see the contents. The configuration of the database trace listener contains
the Database Instance property, which is a reference to this database as configured in the
settings section for the Data Access application block (see Figure 7).
Configuration of the Database trace listener

109as easy a s fa lling off a log
The database trace listener uses a text formatter to format the output, and so you can
edit the template used to generate the log message to suit your requirements. You can
also add extended properties to the log entry if you wish. In addition, as with all trace
listeners, you can filter log entries based on their severity if you like.
The Log table in the database contains columns for only the commonly required
values, such as the message, event ID, priority, severity, title, timestamp, machine and
process details, and more. It also contains a column named FormattedMessage that
contains the message generated by the text formatter.
Using the Database Trace Listener
The example, Sending log entries to a database, demonstrates the use of the database trace
listener. The code is relatively simple, following the same style as the earlier example of
creating a Dictionary of extended properties, and then using the Write method of the
LogWriter to write two log entries. The first log entry is created by the LogWriter from
the parameter values provided to the Write method. The second is generated in code as
a new LogEntry instance by specifying the values for the constructor parameters. Also
notice how easy it is to add additional information to a log entry using a simple Dictionary
as the ExtendedProperties of the log entry.
// Check if logging is enabled before creating log entries.
if (defaultWriter.IsLoggingEnabled())
{
// Create a Dictionary of extended properties
Dictionary<string, object> exProperties = new Dictionary<string, object>();
exProperties.Add("Extra Information", "Some Special Value");
// Create a LogEntry using the constructor parameters.
defaultWriter.Write("Log entry with category, priority, event ID, severity, "
+ "title, and extended properties.", "Database",
5, 9008, TraceEventType.Warning,
"Logging Block Examples", exProperties);
// Create a LogEntry using the constructor parameters.
LogEntry entry = new LogEntry("LogEntry with category, priority, event ID, "
+ "severity, title, and extended properties.",
"Database", 8, 9009, TraceEventType.Error,
"Logging Block Examples", exProperties);
defaultWriter.Write(entry);
}
else
{
Console.WriteLine("Logging is disabled in the conguration.");
}

110 ch a pter four
To see the two log messages created by this example, you can open the Logging.mdf
database from the bin\Debug folder using Visual Studio Server Explorer. You will find that
the FormattedMessage column of the second message contains the following. You can
see the extended property information we added using a Dictionary at the end of the
message.
Timestamp: 03/12/2009 17:14:02
Message: LogEntry with category, priority, event ID, severity, title, and extended
properties.
Category: Database
Priority: 8
EventId: 9009
Severity: Error
Title: Logging Block Examples
Activity ID: 00000000-0000-0000-0000-000000000000
Machine: BIGFOOT
App Domain: LoggingExample.vshost.exe
ProcessId: 5860
Process Name: E:\Logging\Logging\bin\Debug\LoggingExample.vshost.exe
Thread Name:
Win32 ThreadId:3208
Extended Properties: Extra Information - Some Special Value
Note that you cannot simply delete logged information due to the references between
the Log and CategoryLog tables. However, the database contains a stored procedure
named ClearLogs that you can execute to remove all log entries.
The connection string for the database we provide with this example is:
Data Source=.\SQLEXPRESS;AttachDbFilename=|DataDirectory|\Logging.
mdf;Integrated Security=True;User Instance=True
If you have configured a different database using the scripts provided with Enter-
prise Library, you may find that you get an error when you run this example. It is likely
to be that you have an invalid connection string in your App.config file for your data-
base. In addition, use the Services applet in your Administrative Tools folder to check
that the SQL Server (SQLEXPRESS) database service (the service is named
MSSQL$SQLEXPRESS) is running.
As you’ve seen in earlier examples, the Logging block allows you to check if logging is
enabled before you create and write a log entry. You can avoid the additional load that
this places on your application if logging is not enabled. However, even when logging is
enabled, there is no guarantee that a specific log entry will be written to the target log
store. For example, it may be blocked by a priority filter if the message priority is below
a specified level, or it may belong only to one or more categories where the relevant
category filter(s) have logging disabled (a common scenario in the case of logging code
specifically designed only for debugging use).

111as e a sy as falling off a log
The example, Checking filter status and adding context information to the log entry,
demonstrates how you can check if a specific log entry will be written to its target before
you actually call the Write method. After checking that logging is not globally disabled,
the example creates two LogEntry instances with different categories and priorities.
It passes each in turn to another method named ShowDetailsAndAddExtraInfo. The
following is the code that creates the LogEntry instances.
// Check if logging is enabled before creating log entries.
if (defaultWriter.IsLoggingEnabled())
{
// Create a new LogEntry with two categories and priority 3.
string[] logCategories = new string[] {"General", "DiskFiles"};
LogEntry entry1 = new LogEntry("LogEntry with categories 'General' and "
+ "'DiskFiles' and Priority 3.", logCategories,
3, 9009, TraceEventType.Error,
"Logging Block Examples", null);
ShowDetailsAndAddExtraInfo(entry1);
// Create a new LogEntry with one category and priority 1.
logCategories = new string[] { "BlockedByFilter" };
LogEntry entry2 = new LogEntry("LogEntry with category 'BlockedByFilter' and "
+ "Priority 1.", logCategories, 1, 9010,
TraceEventType.Information,
"Logging Block Examples", null);
ShowDetailsAndAddExtraInfo(entry2);
}
else
{
Console.WriteLine("Logging is disabled in the conguration.");
}
The ShowDetailsAndAddExtraInfo method takes a LogEntry instance and does two
different things. Firstly, it shows how you can obtain information about the way that the
Logging block will handle the log entry. This may be useful in advanced scenarios where
you need to be able to programmatically determine if a specific log entry was detected
by a specific trace source, or will be written to a specific target. Secondly, it demonstrates
how you can check if specific filters, or all filters, will block a log entry from being written
to its target.
Obtaining Information about Trace Sources and Trace Listeners
The first section of the ShowDetailsAndAddExtraInfo method iterates through the
collection of trace sources (LogSource instances) exposed by the GetMatchingTrace
Sources method of the LogWriter class. Each LogSource instance exposes a Listeners
collection that contains information about the listeners (which specify the targets to
which the log entry will be sent).

112 ch a pter four
void ShowDetailsAndAddExtraInfo(LogEntry entry)
{
// Display information about the Trace Sources and Listeners for this LogEntry.
IEnumerable<LogSource> sources = defaultWriter.GetMatchingTraceSources(entry);
foreach (LogSource source in sources)
{
Console.WriteLine("Log Source name: '{0}'", source.Name);
foreach (TraceListener listener in source.Listeners)
{
Console.WriteLine(" - Listener name: '{0}'", listener.Name);
}
}
...
Checking if Filters Will Block a Log Entry
Next, the ShowDetailsAndAddExtraInfo method checks if any filters will block the cur-
rent log entry. There are two ways you can do this. You can query each filter type in turn,
or just a specific filter type, by using the GetFilter method of the LogWriter class to get
a reference to that type of filter. Then you can check if this filter is enabled, and also use
the ShouldLog method (to which you pass the list of categories for the log entry) to see
if logging will succeed.
The following code shows this approach. It also shows the simpler approach that you
can use if you are not interested in the result for a specific filter type. The LogWriter class
also exposes the ShouldLog method, which indicates if any filters will block this entry.
...
// Check if any lters will block this LogEntry.
// This approach allows you to check for specic types of lter.
// If there are no lters of the specied type congured, the GetFilter
// method returns null, so check this before calling the ShouldLog method.
CategoryFilter catFilter = defaultWriter.GetFilter<CategoryFilter>();
if (null == catFilter || catFilter.ShouldLog(entry.Categories))
{
Console.WriteLine("Category Filter(s) will not block this LogEntry.");
}
else
{
Console.WriteLine("A Category Filter will block this LogEntry.");
}
PriorityFilter priFilter = defaultWriter.GetFilter<PriorityFilter>();
if (null == priFilter || priFilter.ShouldLog(entry.Priority))
{
Console.WriteLine("Priority Filter(s) will not block this LogEntry.");
}

113as easy a s falling off a log
else
{
Console.WriteLine("A Priority Filter will block this LogEntry.");
}
// Alternatively, a simple approach can be used to check for any type of lter
if (defaultWriter.ShouldLog(entry))
{
Console.WriteLine("This LogEntry will not be blocked by cong settings.");
....
// Add context information to log entries after checking that the log entry
// will not be blocked due to conguration settings. See the following
// section 'Adding Additional Context Information' for details.
....
}
else
{
Console.WriteLine("This LogEntry will be blocked by conguration settings.");
}
}
After you determine that logging will succeed, you can add extra context information and
write the log entry. You’ll see the code to achieve this shortly. In the meantime, this is the
output generated by the example. You can see that it contains details of the log (trace)
sources and listeners for each of the two log entries created by the earlier code, and the
result of checking if any category filters will block each log entry.
Created a LogEntry with categories 'General' and 'DiskFiles'.
Log Source name: 'General'
- Listener name: 'Formatted EventLog TraceListener'
Log Source name: 'DiskFiles'
- Listener name: 'FlatFile TraceListener'
- Listener name: 'XML Trace Listener'
Category Filter(s) will not block this LogEntry.
Priority Filter(s) will not block this LogEntry.
This LogEntry will not be blocked due to conguration settings.
...
Created a LogEntry with category 'BlockedByFilter', and Priority 1.
Log Source name: 'BlockedByFilter'
- Listener name: 'Formatted EventLog TraceListener'
A Category Filter will block this LogEntry.
A Priority Filter will block this LogEntry.
This LogEntry will be blocked due to conguration settings.

114 ch a pter four
While it’s useful to have every conceivable item of information included in your log mes-
sages, it’s not always the best approach. Collecting information from the environment
absorbs processing cycles and increases the load that logging places on your application.
The Logging block is highly optimized to minimize the load that logging incurs. As an
example, some of the less useful information is not included in the log messages by
default—particularly information that does require additional resources to collect.
However, you can collect this information if you wish. You may decide to do so in
special debugging instrumentation that you only turn on when investigating problems, or
for specific areas of your code where you need the additional information, such as
security context details for a particularly sensitive process.
After checking that a log entry will not be blocked by filters, the ShowDetails
AndAddExtraInfo method (shown in the previous section) adds a range of additional
context and custom information to the log entry. It uses the four standard Logging block
helper classes that can generate additional context information and add it to a Dictionary.
These helper classes are:
• The DebugInformationProvider, which adds the current stack trace to the
Dictionary.
• The ManagedSecurityContextInformationProvider, which adds the current
identity name, authorization type, and authorization status to the Dictionary.
• The UnmanagedSecurityContextInformationProvider, which adds the current
user name and process account name to the Dictionary.
• The ComPlusInformationProvider, which adds the current activity ID, applica-
tion ID, transaction ID (if any), direct caller account name, and original caller
account name to the Dictionary.
The following code shows how you can use these helper classes to create additional
information for a log entry. It also demonstrates how you can add custom information to
the log entry—in this case by reading the contents of the application configuration file
into the Dictionary. After populating the Dictionary, you simply set it as the value of the
ExtendedProperties property of the log entry before writing that log entry.
...
// Create additional context information to add to the LogEntry.
Dictionary<string, object> dict = new Dictionary<string, object>();
// Use the information helper classes to get information about
// the environment and add it to the dictionary.
DebugInformationProvider debugHelper = new DebugInformationProvider();
debugHelper.PopulateDictionary(dict);
ManagedSecurityContextInformationProvider infoHelper
= new ManagedSecurityContextInformationProvider();
infoHelper.PopulateDictionary(dict);
UnmanagedSecurityContextInformationProvider secHelper
= new UnmanagedSecurityContextInformationProvider();
secHelper.PopulateDictionary(dict);

115a s easy as fa lling off a log
ComPlusInformationProvider comHelper = new ComPlusInformationProvider();
comHelper.PopulateDictionary(dict);
// Get any other information you require and add it to the dictionary.
string congInfo = File.ReadAllText(@"..\..\App.cong");
dict.Add("Cong information", congInfo);
// Set dictionary in the LogEntry and write it using the default LogWriter.
entry.ExtendedProperties = dict;
defaultWriter.Write(entry);
....
The example produces the following output on screen.
Added the current stack trace to the Log Entry.
Added current identity name, authentication type, and status to the Log Entry.
Added the current user name and process account name to the Log Entry.
Added COM+ IDs and caller account information to the Log Entry.
Added information about the conguration of the application to the Log Entry.
LogEntry written to congured trace listeners.
To see the additional information added to the log entry, open Windows Event Viewer
and locate the new log entry. We haven’t shown the contents of this log entry here as it
runs to more than 350 lines and contains just about all of the information about an event
occurring in your application that you could possibly require!
The final topic for this chapter demonstrates another feature of the Logging block that
makes it easier to correlate multiple log entries when you are trying to trace or debug
some recalcitrant code in your application. One of the problems with logging is that rely-
ing simply on the event ID to correlate multiple events that are related to a specific pro-
cess or section of code is difficult and error prone. Event IDs are often not unique, and
there can be many events with the same event ID generated from different instances of
the components in your application that are intermixed in the logs.
The Logging block makes it easy to add an additional unique identifier to specific log
entries that you can later use to filter the log and locate only entries related to a specific
process or task. The Logging block tracing feature makes use of the .NET Correlation
Manager class, which maintains an Activity ID that is a GUID. By default, this is not set,
but the Logging block allows you to use a TraceManager to generate Tracer instances.
Each of these sets the Activity ID to a randomly generated GUID value that is maintained
only during the context of the tracer. The Activity ID returns to its previous value when
the tracer is disposed or goes out of scope.
You specify an operation name when you create the tracer. This is effectively the
name of a category defined in the configuration of the block. All log entries created
within the context of the tracer will be assigned to that category in addition to any cat-
egories you specify when you create the log entry.

116 ch a pter four
You can specify a GUID value when you create and start a tracer, and all subsequent
log entries within the scope of that tracer and all nested tracers that do not specify a
different GUID will have the specified activity ID. If you start a new nested tracer instance
within the scope of a previous one, it will have the same activity ID as the parent tracer
unless you specify a different one when you create and start the nested tracer; in that
case, this new activity ID will be used in subsequent log entries within the scope of this
tracer.
Although the Logging block automatically adds the activity ID to each log entry, this
does not appear in the resulting message when you use the text formatter with the
default template. To include the activity ID in the logged message that uses a text
formatter, you must edit the template property in the configuration tools to include
the token {property(ActivityId)}. Note that property names are case-sensitive in
the template definition.
An Example of Tracing Activities
The example, Tracing activities and publishing activity information to categories, should help
to make this clear. At the start of the application, the code resolves a TraceManager in-
stance from the Enterprise Library container in the same way as we resolved the Log-
Writer we’ve been using so far.
// Resolve a TraceManager object from the container.
TraceManager traceMgr
= EnterpriseLibraryContainer.Current.GetInstance<TraceManager>();
Next, the code creates and starts a new Tracer instance using the StartTrace method of
the TraceManager, specifying the category named General. As it does not specify
an Activity ID value, the TraceManager creates one automatically. This is the preferred
approach, because each separate process running an instance of this code will generate a
different GUID value. This means you can isolate individual events for each process.
The code then creates and writes a log entry within the context of this tracer,
specifying that it belongs to the DiskFiles category in addition to the General category
defined by the tracer. Next, it creates a nested Tracer instance that specifies the catego-
ry named Database, and writes another log entry that itself specifies the category named
Important. This log entry will therefore belong to the General, Database, and Important
categories. Then, after the Database tracer goes out of scope, the code creates a new
Tracer that again specifies the Database category, but this time it also specifies the
Activity ID to use in the context of this new tracer. Finally, it writes another log entry
within the context of the new Database tracer scope.
// Start tracing for category 'General'. All log entries within trace context
// will be included in this category and use any specied Activity ID (GUID).
// If you do not specify an Activity ID, the TraceManager will create a new one.
using (traceMgr.StartTrace("General"))
{
// Write a log entry with another category, will be assigned to both.

117a s easy as fa lling off a log
defaultWriter.Write("LogEntry with category 'DiskFiles' created within "
+ "context of 'General' category tracer.", "DiskFiles");
// Start tracing for category 'Database' within context of 'General' tracer.
// Do not specify a GUID to use so that the existing one is used.
using (traceMgr.StartTrace("Database"))
{
// Write a log entry with another category, will be assigned to all three.
defaultWriter.Write("LogEntry with category 'Important' created within "
+ "context of rst nested 'Database' category tracer.", "Important");
}
// Back in context of 'General' tracer here.
// Start tracing for category 'Database' within context of 'General' tracer
// as above, but this time specify a GUID to use.
using (traceMgr.StartTrace("Database",
new Guid("{12345678-1234-1234-1234-123456789ABC}")))
{
// Write a log entry with another category, will be assigned to all three.
defaultWriter.Write("LogEntry with category 'Important' created within "
+ "context of nested 'Database' category tracer.", "Important");
}
// Back in context of 'General' tracer here.
}
Not shown above are the lines of code that, at each stage, write the current Activity ID
to the screen. The output generated by the example is shown here. You can see that,
initially, there is no Activity ID. The first tracer instance then sets the Activity ID to a
random value (you will get a different value if you run the example yourself), which is also
applied to the nested tracer.
However, the second tracer for the Database category changes the Activity ID to the
value we specified in the StartTrace method. When this tracer goes out of scope, the
Activity ID is reset to that for the parent tracer. When all tracers go out of scope,
the Activity ID is reset to the original (empty) value.
- Current Activity ID is: 00000000-0000-0000-0000-000000000000
Written LogEntry with category 'DiskFiles' created within context of 'General'
category tracer.
- Current Activity ID is: a246ada3-e4d5-404a-bc28-4146a190731d
Written LogEntry with category 'Important' created within context of rst
'Database' category tracer nested within 'DiskFiles' category TraceManager.
- Current Activity ID is: a246ada3-e4d5-404a-bc28-4146a190731d

118 ch a pter four
Leaving the context of the rst Database tracer
- Current Activity ID is: a246ada3-e4d5-404a-bc28-4146a190731d
Written LogEntry with category 'Important' created within context of second
'Database' category tracer nested within 'DiskFiles' category TraceManager.
- Current Activity ID is: 12345678-1234-1234-1234-123456789abc
Leaving the context of the second Database tracer
- Current Activity ID is: a246ada3-e4d5-404a-bc28-4146a190731d
Leaving the context of the General tracer
- Current Activity ID is: 00000000-0000-0000-0000-000000000000
Open the log les in the folder C:\Temp to see the results.
If you open the RollingFlatFile.log file you will see the two log entries generated within
the context of the nested tracers. These belong to the categories Important, Database,
and General. You will also see the Activity ID for each one, and can confirm that it is
different for these two entries. For example, this is the first part of the log message
for the second nested tracer, which specifies the Activity ID GUID in the StartTrace
method.
Timestamp: 01/12/2009 12:12:00
Message: LogEntry with category 'Important' created within context of second
nested 'Database' category tracer.
Category: Important, Database, General
Priority: -1
EventId: 1
Severity: Information
Title:
Activity ID: 12345678-1234-1234-1234-123456789abc
Be aware that other software and services may use the Activity ID of the Correlation
Manager to provide information and monitoring facilities. An example is Windows
Communication Foundation (WCF), which uses the Activity ID to implement tracing.
You must also ensure that you correctly dispose Tracer instances. If you do not take
advantage of the using construct to automatically dispose instances, you must ensure
that you dispose nested instances in the reverse order you created them—by disposing
the child instance before you dispose the parent instance. You must also ensure that you
dispose Tracer instances on the same thread that created them.

119a s e asy as falling off a log
Creating Custom Trace Listeners, Filters, and Formatters
You can extend the capabilities of the Logging block if you need to add specific function-
ality to it. In general, you will only need to implement custom log filters, trace listeners,
or log formatters. The design of the block makes it easy to add these and make them
available through configuration.
To create a new log filter, you can either implement the ILogFilter interface, which
specifies the single method Filter that must accept an instance of a LogEntry and return
true or false, or you can inherit the base class LogFilter and implement the Filter
method.
To create a custom trace listener, you can inherit from the abstract base class
CustomTraceListener and implement the methods required to send your log entry to the
appropriate location or execute the relevant actions to log the message. You can expose
a property for the relevant log formatter if you want to allow users to select a specific
formatter for the message.
To create a custom log formatter, you can either implement the ILogFormatter inter-
face, which specifies the single method, Format, that must accept an instance of a Log
Entry and return the formatted message, or you can inherit the base class, LogFormatter,
and implement the Format method.
For more information about extending the Logging block, see the online documenta-
tion at http://go.microsoft.com/fwlink/?LinkId=188874 or consult the installed help
files.
Summary
This chapter described the Enterprise Library Logging Application Block. This block is
extremely useful for logging activities, events, messages, and other information that your
application must persist or expose—both to monitor performance and to generate audit-
ing information. The Logging block is, like all of the other Enterprise Library blocks,
highly customizable and driven through configuration so that you (or administrators and
operations staff) can modify the behavior to suit your requirements exactly.
You can use the Logging block to categorize, filter, and write logging information to
a wide variety of targets, including Windows event logs, e-mail messages, disk files, Win-
dows Message Queuing, and a database. You can even collect additional context informa-
tion and add it to the log entries automatically, and add activity IDs to help you correlate
related messages and activities. And, if none of the built-in features meets your require-
ments, you can create and integrate custom listeners, filters, and formatters.
This chapter explained why you should consider decoupling your logging features
from your application code, what the Logging block can do to help you implement flex-
ible and configurable logging, and how you actually perform the common tasks related to
logging. For more information about using the Logging block, see the online documenta-
tion at http://go.microsoft.com/fwlink/?LinkId=188874 or consult the installed help
files.

121
Introduction
How do you make your applications perform faster? You could simply throw hardware at
the problem, but with the increasing move towards green data centers, soaking up more
electricity and generating more heat that you have to get rid of is not exactly a great way
to showcase your environmental awareness. Of course, you should always endeavor to
write efficient code and take full advantage of the capabilities of the platform and oper-
ating system, but what does that entail?
One of the ways that you may be able to make your application more efficient is to
ensure you employ an appropriate level of caching for data that you reuse, and which is
expensive to create. However, caching every scrap of data that you use may be counter-
productive. For example, I once installed a photo screensaver that used caching to store
the transformed versions of the original images and reduce processing requirements as it
repeatedly cycled through the collection of photos. It probably works fine if you only
have a few dozen images, but with my vast collection of high-resolution photos it very
quickly soaked up three gigabytes of memory, bringing my machine (with only one gig of
memory installed) to its knees.
So, before you blindly implement caching across your whole application, think about
what, how, where, and when you should implement caching. Table 1 contains some
pointers.
5A Cache Advance for your
Applications
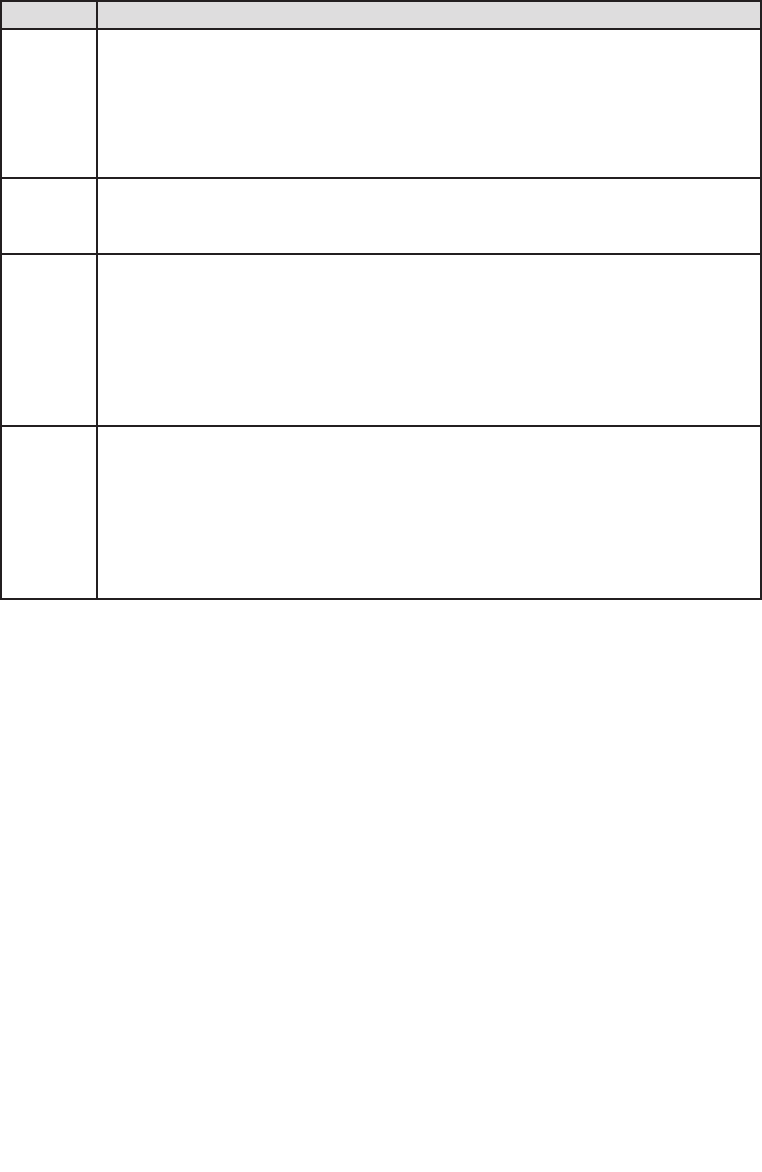
122 chapter five
Defining a caching strategy
What? Data that applies to all users of the application and does not change frequently, or data
that you can use to optimize reference data lookups, avoid network round-trips, and avoid
unnecessary and duplicate processing. Examples are data such as product lists, constant
values, and values read from configuration or a database. Where possible, cache data in a
ready-to-use format. Do not cache volatile data, and do not cache sensitive data unless you
encrypt it.
When? You can cache data when the application starts if you know it will be required and it is
unlikely to change. However, you should cache data that may or may not be used, or data
that is relatively volatile, only when your application first accesses it.
Where? Ideally, you should cache data as near as possible to the code that will use it, especially in a
layered application that is distributed across physical tiers. For example, cache data you use
for controls in your user interface in the presentation layer, cache business data in the
business layer, and cache parameters for stored procedures in your data layer. If your
application runs on multiple servers and the data may change as the application runs, you
will usually need to use a distributed cache accessible from all servers. If you are caching
data for a user interface, you can usually cache the data on the client.
How ? Caching is a crosscutting concern—you are likely to implement caching in several places,
and in many of your applications. Therefore, a reusable and configurable caching mecha-
nism that you can install in the appropriate locations is the obvious choice. The Caching
Application Block is an ideal solution for non-distributed caching. It supports both an
in-memory cache and, optionally, a backing store that can be either a database or isolated
storage. The block provides all the functionality needed to retrieve, add, and remove
cached data, and supports configurable expiration and scavenging policies.
This chapter concentrates (obviously) on the patterns & practices Caching Application
Block, which is designed for use as a non-distributed cache on a client machine. It is ideal
for caching data in Windows® Forms, Windows Presentation Foundation (WPF), and
console-based applications. You can use it in server-based roles such as ASP.NET applica-
tions, services, business layer code, or data layer code; but only where you have a single
instance of the code running.
Out of the box, the Caching Application Block does not provide the features required
for distributed caching across multiple servers. Other solutions you may consider for
caching are the ASP.NET cache mechanism, which can be used on a single server
(in-process) and on multiple servers (using a state server or a SQL Server® database),
or a third party solution that uses the Caching Application Block extension points.
Also keep in mind that version 4.0 of the .NET Framework includes the System.
Runtime.Caching namespace, which provides features to support in-memory caching.
The current version of the Caching block is likely to be deprecated after this release, and
Enterprise Library will instead make use of the caching features of the .NET Framework.

123a cache advance for your a pplications
What Does the Caching Block Do?
The Caching Application Block provides high-performance and scalable caching capabili-
ties, and is both thread safe and exception safe. It caches data in memory, and optionally
maintains a synchronized backing store that, by default, can be isolated storage or a data-
base. It also provides a wide range of expiration features, including the use of multiple
expiration settings for cached items (including both time-based and notification-based
policies).
Even better, if the cache locations are not suitable for your requirements, or the
caching mechanism doesn’t do quite what you want in terms of storing or retrieving cache
items, you can modify or extend it. For example, you can create your own custom expira-
tion policies and backing store providers, and plug them in using the built-in extension
points. This means that you can implement caching operations throughout your applica-
tions that you access from code using a single simple API.
On top of all that, the caches you implement are configurable at design time and run
time, so that administrators can change the caching behavior as required both before and
after deployment. Administrators can change the backing store that the caching mecha-
nism uses, configure encryption of the cached contents, and change the scavenging
behavior—all through configuration settings.
?
One of the main factors that can affect application performance is memory availability.
While caching data can improve performance, caching too much data can (as you saw
earlier) reduce performance if the cache uses too much of the available memory. To coun-
ter this, the Caching block performs scavenging on a fixed cycle in order remove items
when memory is in short supply. Items may be removed from the cache in two ways:
• When they expire. If you specify an expiration setting, the item is removed
from the cache during the next scavenging cycle if they have expired. You
can specify a combination of settings based on the absolute time, sliding
time, extended time format (for example, every evening at midnight), file
dependency, or never. You can also specify a priority, so that lower priority
items are scavenged first. The scavenging interval and the maximum number
of items to scavenge on each pass are configurable.
• When they are flushed. You can explicitly expire (mark for removal) individual
items in the cache, or explicitly expire all items, using methods exposed by the
Caching block. This allows you to control which items are available from the
cache. The scavenging mechanism removes items that it detects have expired
and are no longer valid. However, until the scavenging cycle occurs, the items
remain in the cache but are marked as expired, and you cannot retrieve them.

124 chapter five
The difference is that flushing might remove valid cache items to make space for more
frequently used items, whereas expiration removes invalid and expired items. Remember
that items may have been removed from the cache by the scavenging mechanism even if
they haven’t expired, and you should always check that the cached item exists when you
try to retrieve and use it. You may choose to recreate the item and re-cache it at this
point.
?
If you have data that is relatively volatile, is updated regularly, or is valid for only a
specific time or interval, you can use a time-based expiration policy to ensure that items
do not remain in the cache beyond their useful valid lifetime. You can specify how long
an item should remain in the cache if not accessed (effectively the timer starts at zero
again each time it is accessed), or specify the absolute time that it should be removed
irrespective of whether it has been accessed in the meantime.
If the data you cache depends on changes to another resource, such as a disk file, you
can improve caching efficiency by using a notification-based expiration policy. The
Caching block contains an expiration provider that detects changes to disk files. You can
create your own custom expiration policy providers that detect, for example, WMI events,
database events, or business logic operations and invalidate the cached item when they
occur.
How Do I Configure the Caching Block?
Like all of the Enterprise Library application blocks, you start by configuring your applica-
tion to use the block. Chapter 1, “Introduction,” demonstrates the basic principles for
using the configuration tool. To configure the Caching block, you add the Caching
Settings section to the tool, which adds a default cache manager. The cache manager
exposes the caching API and is responsible for manipulating the cached items. You can
add more than one cache manager to the configuration if you want to implement multiple
caches, or change the default cache manager for a custom one that you create. For
example, you may decide to replace it with a custom or third party cache manager
that supports distributed caching for a Web farm or application farm containing multiple
servers.
Figure 1 shows the configuration for the examples in this chapter of the guide. You
can see the four cache managers we use, with the section for the EncryptedCache
Manager expanded to show its property settings.
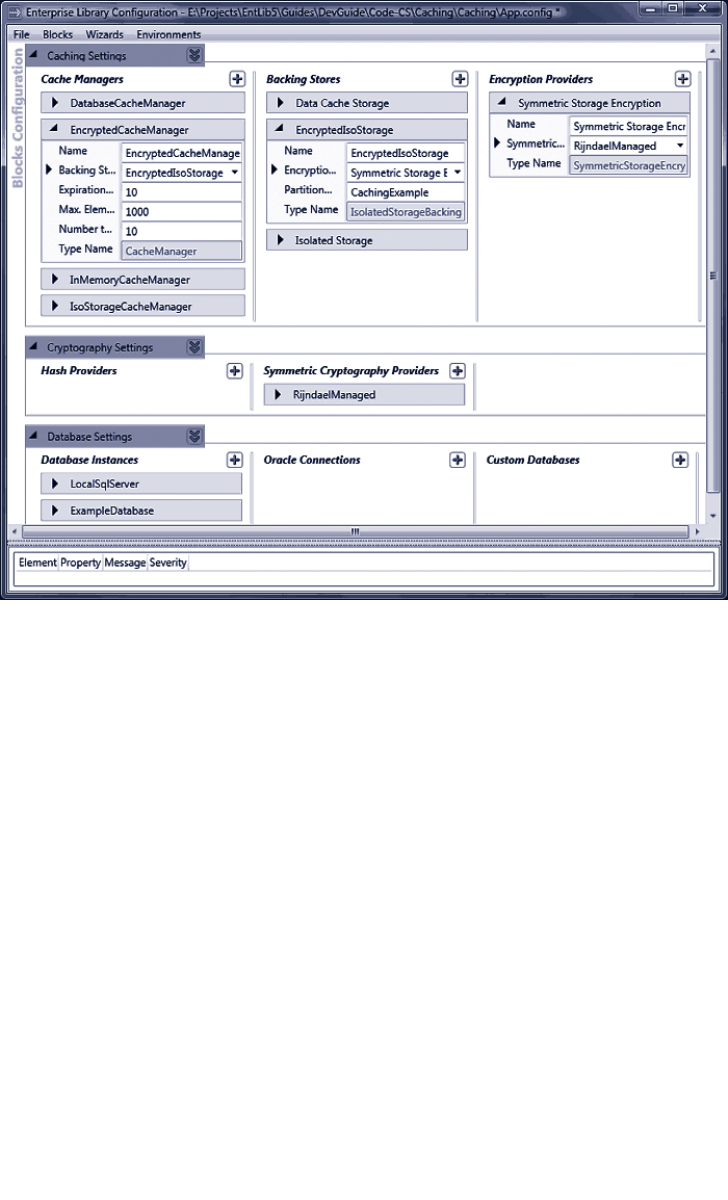
125a cache a dvance for your a pplicat ions
Configuring caching in Enterprise Library
For each cache manager, you can specify the expiration poll frequency (the interval in
seconds at which the block will check for expired items and remove them), the maximum
number of items in the cache before scavenging will occur irrespective of the polling
frequency, and the number of items to remove when scavenging the cache.
You can also specify, in the configuration properties of the Caching Application Block
root node, which of the cache managers you configure should be the default. The Caching
block will use the one you specify if you instantiate a cache manager without providing
the name of that cache manager.
The cache manager caches items in memory only. If you want to persist cached items
across application and system restarts, you can add a persistent backing store to your
configuration. You can specify only a single backing store for each cache manager
(obviously, or it would get extremely confused), and the Caching block contains providers
for caching in both a database and isolated storage. You can specify a partition name for
each persistent backing store, which allows you to target multiple cache storage providers
at isolated storage or at the same database.

126 chapter five
If you add a data cache store to your configuration, the configuration tool automati-
cally adds the Data Access Application Block to the configuration. You configure a data-
base connection in the Data Access block configuration section, and then select this
connection in the properties of the data cache store provider. For details of how you
configure the Data Access Application Block, see Chapter 2 “Much ADO about Data
Access.”
You can add a provider that implements symmetric storage encryption to each persistent
backing store you configure if you want to encrypt the stored items. This is a really good
plan if you must store sensitive information. When you add a symmetric storage
encryption provider to your configuration, the configuration tool automatically adds the
Cryptography Application Block to the configuration.
You configure a symmetric cryptography provider in the Cryptography block con-
figuration section. You can use the Windows Data Protection API (DPAPI) symmetric
provider, or select from other providers such as AES, Triple DES, and Rijndael. For details
of how you configure the Cryptography Application Block, see Chapter 7, “Relieving
Cryptography Complexity.” Then in the properties of the symmetric storage encryption
provider in the Caching block section, select the provider you just configured.
Note that the Caching Application Block does not encrypt data in the in-memory
cache, even if you configure encryption for the associated backing store. If it is possible
that a malicious user could access the application process’s memory, do not store
sensitive information, such as credit card numbers or passwords, in the cache.
And now, at last, you are ready to write code that uses the Caching block. You’ll see the
ways that you can use it demonstrated in the examples in this chapter.
When you create a project that uses the Caching block, you must edit the project and
code to add references to the appropriate Enterprise Library assemblies and namespaces.
The examples in this chapter demonstrate caching to a database and encrypting cached
data, as well as writing to the isolated storage backing store.
The assemblies you must add to your project (in addition to the assemblies listed in
Chapter 1, “Introduction,” that are required for all Enterprise Library projects) are:
• Microsoft.Practices.EnterpriseLibrary.Caching.dll
• Microsoft.Practices.EnterpriseLibrary.Caching.Cryptography.dll
• Microsoft.Practices.EnterpriseLibrary.Caching.Database.dll
• Microsoft.Practices.EnterpriseLibrary.Data.dll
• Microsoft.Practices.EnterpriseLibrary.Security.Cryptography.dll
If you do not wish to cache items in a database, you don’t need to add the Database and
Data assemblies. If you do not wish to encrypt cached items, you don’t need to add the
two Cryptography assemblies.
To make it easier to use the objects in the Caching block, you can add references to the
relevant namespaces to your project. Then you are ready to write some code.

127a cache a dvance for your a pplications
How Do I Use the Caching Block?
You manipulate your caches using the interface of the Cache Manager. It is a relatively
simple interface. There are two overloads of the Add method for adding items to the
cache; plus methods to retrieve a cached item, remove a single item, flush all items, and
check if the cache contains a specified item. The single property, Count, returns the
number of items currently in the cache.
The code you can download for this guide contains a sample application named Caching
that demonstrates the techniques described in this chapter. The sample provides a number
of different examples that you can run.
Before you attempt to run the example, you must create a new encryption key for the
Caching block to use to encrypt the data in one of the examples that uses a symmetric
encryption provider. This is because the key is tied to either the user or the machine,
and so the key included in the sample files will not work on your machine. In the
configuration console, navigate to the Symmetric Cryptography Providers section of
the Cryptography Application Block Settings and select the RijndaelManaged
provider. Click the “...” button next to the Key property to start the Cryptographic
Key Wizard. Use this wizard to generate a new key, save the key file, and automatically
update the contents of App.config.
The first of the examples, Cache data in memory using the null backing store, demonstrates
some of the options you have when adding items to the cache.
To add an item to the cache, you can use the simple approach of specifying just the key
for the item and the value to cache as parameters to the Add method. The item is cached
with a never expired lifetime, and normal priority. If you want more control over the way
an item is cached, you can use the other overload of the Add method, which additionally
accepts a value for the priority, a reference to a callback that will execute when
the cached item expires, and an array of expirations that specify when the item should
expire.
Possible values for the priority, as defined in the CacheItemPriority enumeration, are
None, Low, Normal, High, and NotRemovable. In addition to the NeverExpired value
for the expirations, you can use AbsoluteTime, SlidingTime, FileDependency, and
ExtendedFormatTime expirations. If you create an array containing more than one
expiration instance, the block will expire the item when any one of these indicates that it
has expired.
The example starts by obtaining a reference to an instance of a CacheManager—
in this case one that has no backing store defined in its configuration (or, to be more
precise, it has the NullBackingStore class defined) and so uses only the in-memory cache.
It stores this reference as the interface type ICacheManager.
Next, it calls a separate routine that adds items to the cache and then displays the
contents of the cache. This routine is reused in many of the examples in this chapter.

128 chapter five
// Resolve the default CacheManager object from the container.
// The actual concrete type is determined by the conguration settings.
// In this example, the default is the InMemoryCacheManager instance.
ICacheManager defaultCache
= EnterpriseLibraryContainer.Current.GetInstance<ICacheManager>();
// Store some items in the cache and show the contents using a separate routine.
CacheItemsAndShowCacheContents(defaultCache);
The CacheItemsAndShowCacheContents routine uses the cache manager passed to it;
in this first example, this is the in-memory only cache manager. However, the code to add
items to the cache and manipulate the cache is (as you would expect) identical for all
configurations of cache managers. Notice that the code defines a set of string values that
it uses as the cache keys. This makes it easier for the code later on to examine the contents
of the cache. This is the declaration of the cache keys array and the first part of the code
in the CacheItemsAndShowCacheContents routine.
// Declare an array of string values to use as the keys of the cached items.
string[] DemoCacheKeys
= {"ItemOne", "ItemTwo", "ItemThree", "ItemFour", "ItemFive"};
void CacheItemsAndShowCacheContents(ICacheManager theCache)
{
// Add some items to the cache using the key names in the DemoCacheKeys array.
theCache.Add(DemoCacheKeys[0], "Some Text");
theCache.Add(DemoCacheKeys[1],
new StringBuilder("Some text in a StringBuilder"));
theCache.Add(DemoCacheKeys[2], 42, CacheItemPriority.High, null,
new NeverExpired());
theCache.Add(DemoCacheKeys[3], new DataSet(), CacheItemPriority.Normal,
null, new AbsoluteTime(new DateTime(2099, 12, 31)));
// Note that the next item will expire after three seconds
theCache.Add(DemoCacheKeys[4],
new Product(10, "Exciting Thing", "Useful for everything"),
CacheItemPriority.Low, null,
new SlidingTime(new TimeSpan(0, 0, 3)));
// Display the contents of the cache.
ShowCacheContents(theCache);
...
In the code shown above, you can see that the CacheItemsAndShowCacheContents
routine uses the simplest overload to cache the first two items; a String value and an
instance of the StringBuilder class. For the third item, the code specifies the item to
cache as the Integer value 42 and indicates that it should have high priority (it will remain

129a cache a dva nce for you r a pplications
in the cache after lower priority items when the cache has to be minimized due to memory
or other constraints). There is no callback required, and the item will never expire.
The fourth item cached by the code is a new instance of the DataSet class,
with normal priority and no callback. However, the expiry of the cached item is set to an
absolute date and time (which should be well after the time that you run the example).
The final item added to the cache is a new instance of a custom class defined within
the application. The Product class is a simple class with just three properties: ID, Name,
and Description. The class has a constructor that accepts these three values and sets the
properties in the usual way. It is cached with low priority, and a sliding time expiration set
to three seconds.
The final line of code above calls another routine named ShowCacheContents that
displays the contents of the cache. Not shown here is code that forces execution of the
main application to halt for five seconds, redisplay the contents of the cache, and repeat
this process again. This is the output you see when you run this example.
The cache contains the following 5 item(s):
Item key 'ItemOne' (System.String) = Some Text
Item key 'ItemTwo' (System.Text.StringBuilder) = Some text in a StringBuilder
Item key 'ItemThree' (System.Int32) = 42
Item key 'ItemFour' (System.Data.DataSet) = System.Data.DataSet
Item key 'ItemFive' (CachingExample.Product) = CachingExample.Product
Waiting for last item to expire...
Waiting... Waiting... Waiting... Waiting... Waiting...
The cache contains the following 5 item(s):
Item key 'ItemOne' (System.String) = Some Text
Item key 'ItemTwo' (System.Text.StringBuilder) = Some text in a StringBuilder
Item key 'ItemThree' (System.Int32) = 42
Item key 'ItemFour' (System.Data.DataSet) = System.Data.DataSet
Item with key 'ItemFive' has been invalidated.
Waiting for the cache to be scavenged...
Waiting... Waiting... Waiting... Waiting... Waiting...
The cache contains the following 4 item(s):
Item key 'ItemOne' (System.String) = Some Text
Item key 'ItemTwo' (System.Text.StringBuilder) = Some text in a StringBuilder
Item key 'ItemThree' (System.Int32) = 42
Item key 'ItemFour' (System.Data.DataSet) = System.Data.DataSet
You can see in this output that the cache initially contains the five items we added to it.
However, after a few seconds, the last one expires. When the code examines the contents
of the cache again, the last item (with key ItemFive) has expired but is still in the cache.
However, the code detects this and shows it as invalidated. After a further five seconds,
the code checks the contents of the cache again, and you can see that the invalidated item
has been removed.

130 chapter five
Depending on the performance of your machine, you may need to change the value
configured for the expiration poll frequency of the cache manager in order to see the
invalidated item in the cache and the contents after the scavenging cycle completes.
What’s In My Cache?
The example you’ve just seen displays the contents of the cache, indicating which items
are still available in the cache, and which (if any) are in the cache but not available because
they are waiting to be scavenged. So how can you tell what is actually in the cache and
available for use? In the time-honored way, you might like to answer “Yes” or “No” to the
following questions:
• Can I use the Contains method to check if an item with the key I specify is
available in the cache?
• Can I query the Count property and retrieve each item using its index?
• Can I iterate over the collection of cached items, reading each one in turn?
If you answered “Yes” to any of these, the bad news is that you are wrong. All of these are
false. Why? Because the cache is managed by more than one process. The cache manager
you are using is responsible for adding items to the cache and retrieving them through the
public methods available to your code. However, a background process also manages the
cache, checking for any items that have expired and removing (scavenging) those that are
no longer valid. Cached items may be removed when memory is scarce, or in response to
dependencies on other items, as well as when the expiry date and time you specified
when you added an item to the cache has passed.
So, even if the Contains method returns true for a specified cache key, that item
might have been invalidated and is only in the cache until the next scavenging operation.
You can see this in the output for the previous example, where the two waits force the
code to halt until the item has been flagged as expired, and then halt again until it is
scavenged. The actual delay before scavenging takes place is determined by the expiration
poll frequency configuration setting of the cache manager. In the previous example, this
is 10 seconds.
The correct approach to extracting cached items is to simply call the GetData
method and check that it did not return null. However, you can use the Contains method
to see if an item was previously cached and will (in most cases) still be available in the
cache. This is efficient, but you must still (and always) check that the returned item is not
null after you attempt to retrieve it from the cache.
The code used in the examples to read the cached items depends on the fact that we
use an array of cache keys throughout the examples, and we can therefore check if any of
these items are in the cache. The code we use is shown here.

131a cache a dva nce for your a pplic ations
void ShowCacheContents(ICacheManager theCache)
{
if (theCache.Count > 0)
{
Console.WriteLine("Cache contains the following {0} item(s):",
theCache.Count);
// Cannot iterate the cache, so use the ve known keys
foreach (string key in DemoCacheKeys)
{
if (theCache.Contains(key))
{
// Try and get the item from the cache
object theData = theCache.GetData(key);
// If item has expired but not yet been scavenged, it will still show
// in the count of the number of cached items, but the GetData method
// will return null.
if (null != theData)
Console.WriteLine("Item key '{0}' ({1}) = {2}", key,
theData.GetType().ToString(), theData.ToString());
else
Console.WriteLine("Item with key '{0}' has been invalidated.", key);
}
}
}
else
{
Console.WriteLine("The cache is empty.");
}
}
The previous example showed how you can use the Caching Block as a powerful
in-memory caching mechanism. However, often you will want to store the items in the
cache in some type of persistent backing store. The Caching block contains a provider
that uses Windows Isolated Storage on the local machine. This stores data in a separate
area for each user, which means that different users will be able to see and retrieve only
their own cached data.
One point to note is that objects to be cached in any of the physical backing stores
must be serializable. The only case where this does not apply is when you use the
in-memory only (null backing store) approach. The Product class used in these
examples contains only standard value types as its properties, and carries the Serializable
attribute. For more information about serialization, see “Object Serialization in the .NET
Framework” at http://msdn.microsoft.com/en-us/library/ms973893.aspx.
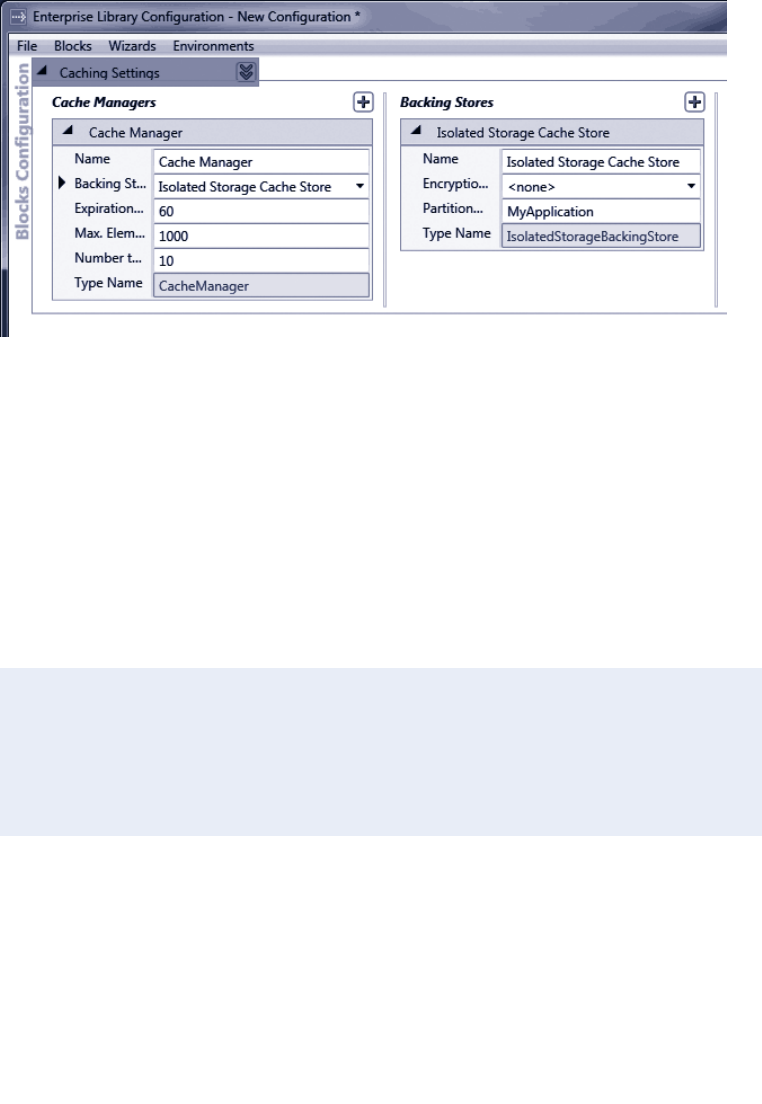
132 chapter five
To use isolated storage as your backing store, you simply add the isolated storage
backing store provider to your cache manager using the configuration tools, as shown in
Figure 2.
Adding the isolated storage backing store
Notice that you can specify a partition name for your cache. This allows you to separate
the cached data for different applications (or different cache managers) for the same user
by effectively segregating each one in a different partition within that user’s isolated
storage area.
Other than the configuration of the cache manager to use the isolated storage back-
ing store, the code you use to cache and retrieve data is identical. The example, Cache data
locally in the isolated storage backing store, uses a cache manager named IsoStorageCache
Manager that is configured with an isolated storage backing store. It retrieves a reference
to this cache manager by specifying the name when calling the GetInstance method of
the current Enterprise Library container.
// Resolve a named CacheManager object from the container.
// In this example, this one uses the Isolated Storage Backing Store.
ICacheManager isoStorageCache
= EnterpriseLibraryContainer.Current.GetInstance<ICacheManager>(
"IsoStorageCacheManager");
...
CacheItemsAndShowCacheContents(isoStorageCache);
The code then executes the same CacheItemsAndShowCacheContents routine you saw
in the first example, and passes to it the reference to the isoStorageCache cache
manager. The result you see when you run this example is the same as you saw in the first
example in this chapter.

133a cache a dvance for your a pplications
If you find that you get an error when you re-run this example, it may be because the
backing store provider cannot correctly access your local isolated storage store. In most
cases, you can resolve this by deleting the previously cached contents. Open the folder
Users\<your-user-name>\AppData\Local\IsolatedStorage, and expand each of the
subfolders until you find the Files\CachingExample subfolder. Then delete this entire
folder tree. You should avoid deleting all of the folders in your IsolatedStorage folder
as these may contain data used by other applications.
By default, the Caching block does not encrypt the data that it stores in memory or in a
persistent backing store. However, you can configure the block to use an encryption
provider that will encrypt the data that the cache manager stores in the backing store—
but be aware that data in the in-memory cache is never encrypted.
To use encryption, you simple add an encryption provider to the configuration of the
backing store. When you first add an encryption provider, the configuration tool
automatically adds the Cryptography block to your configuration. Therefore, you must
ensure that the relevant assembly, Microsoft.Practices.EnterpriseLibrary.Security.
Cryptography.dll, is referenced in your project.
After you add the encryption provider to the configuration of the backing store,
configure the Cryptography section by adding a new symmetric provider, and use the Key
wizard to generate a new encryption key file or import an existing key. Then, back in the
configuration for the Caching block, select the new symmetric provider you added for the
symmetric encryption property of the backing store. For more information about config-
uring the Cryptography block, see Chapter 7, “Relieving Cryptography Complexity.”
The examples provided for this chapter include one named Encrypt cached data in a
backing store, which demonstrates how you can encrypt the persisted data. It instantiates
the cache manager defined in the configuration of the application with the name
EncryptedCacheManager:
// Resolve a CacheManager instance that encrypts the cached data.
ICacheManager encryptedCache
= EnterpriseLibraryContainer.Current.GetInstance<ICacheManager>(
"EncryptedCacheManager");
...
CacheItemsAndShowCacheContents(encryptedCache);
The code then executes the same CacheItemsAndShowCacheContents routine you saw
in the first example, and passes to it the reference to the encryptedCache cache
manager. And, again, the result you see when you run this example is the same as you saw
in the first example in this chapter.
If you find that you get an error when you run this example, it is likely to be that you
have not created a suitable encryption key that the Cryptography block can use, or
the absolute path to the key file in the App.config file is not correct. To resolve this,
open the configuration console, navigate to the Symmetric Providers section of the
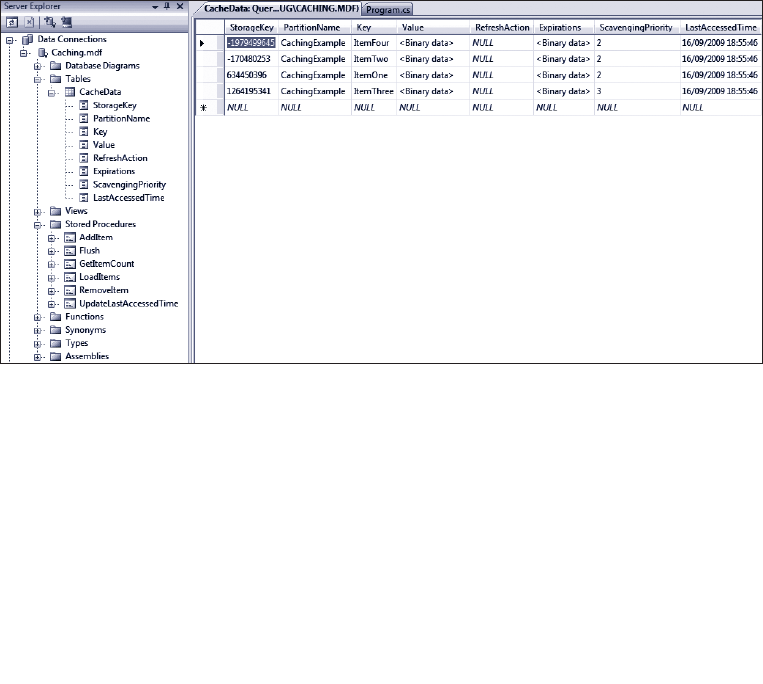
134 chapter five
Cryptography Application Block Settings, and select the RijndaelManaged provider.
Click the “...” button in the Key property to start the Cryptographic Key Wizard.
Use this wizard to generate a new key, save the key file, and automatically update
the contents of App.config.
You can easily and quickly configure the Caching block to use a database as your persis-
tent backing store for cached data if you wish. Enterprise Library contains a script and a
command file that you can run to create the database (located in the \Blocks\Caching\
Src\Database\Scripts folder of the Enterprise Library source code). We also include these
scripts with the example for this chapter.
The scripts assume that you will use the locally installed SQL Server Express database,
but you can edit the CreateCachingDb.cmd file to change the target to a different data-
base server. The SQL script that the command file executes creates a database named
Caching, and adds the required tables and stored procedures to it.
However, if you only want to run the example application we provide for this chapter,
you do not need to create a database. The project contains a preconfigured database file
(located in the bin\Debug folder) that is auto-attached to your local SQL Server Express
instance. You can connect to this database using the Microsoft® Visual Studio® Server
Explorer to see the contents, as shown in Figure 3.
Viewing the contents of the cache in the database table
To configure caching to a database, you simply add the database cache storage provider
to the cache manager using the configuration console, and specify the connection string
and ADO.NET data provider type (the default is System.Data.SqlClient, though you can
change this if you are using a different database system).

135a cache a dva nce for your applications
You can also specify a partition name for your cache, in the same way as you can for
the isolated storage backing store provider. This allows you to separate the cached data
for different applications (or different cache managers) for the same user by effectively
segregating each one in a different partition within the database table.
Other than the configuration of the cache manager to use the database backing store,
the code you use to cache and retrieve data is identical. The example, Cache data in a
database backing store, uses a cache manager named DatabaseCacheManager that is
configured with a data cache storage backing store. As with the earlier example, the
code retrieves a reference to this cache manager by specifying the name when calling
the GetInstance method of the current Enterprise Library container.
// Resolve a CacheManager instance that uses a Database Backing Store.
ICacheManager databaseCache
= EnterpriseLibraryContainer.Current.GetInstance<ICacheManager>(
"DatabaseCacheManager");
...
CacheItemsAndShowCacheContents(databaseCache);
The code then executes the same CacheItemsAndShowCacheContents routine you saw
in the first example, and passes to it the reference to the databaseCache cache manager.
As you will be expecting by now, the result you see when you run this example is the same
as you saw in the first example in this chapter.
The connection string for the database we provide with this example is:
Data Source=.\SQLEXPRESS; AttachDbFilename=|DataDirectory|\Caching.mdf;
Integrated Security=True; User Instance=True
If you have configured a different database using the scripts provided with the
example, you may find that you get an error when you run this example. It is likely to
be that you have an invalid connection string in your App.config file for your database.
In addition, use the Services applet in your Administrative Tools folder to check that
the SQL Server (SQLEXPRESS) database service (the service is named
MSSQL$SQLEXPRESS) is running.
Having seen how you can add items to your cache, and use a variety of backing store
options and encryption, it’s time now to see how you can manipulate the cache to remove
items, or clear it completely by flushing it. Items are removed from the cache automati-
cally based on their expiration or dependencies, but you can also remove individual items
or remove all items.
The example, Remove and flush cached items, actually demonstrates more than just
removing and flushing items—it shows how you can use a dependency to remove related
items from your cache, how to create extended time expirations, and how to use an array
of expirations. There is quite a lot of code in this example, so we’ll step through it and
explain each part in turn.
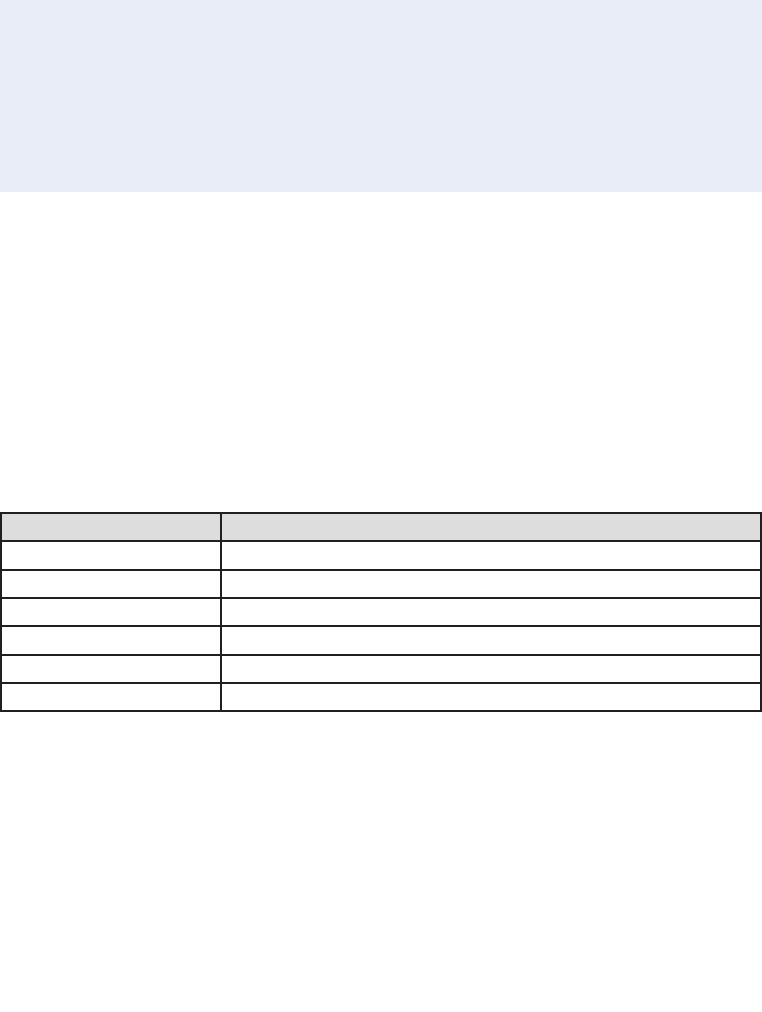
136 chapter five
Using a File Dependency and Extended Time Expiration
The example starts by creating a NeverExpired expiration instance, followed by writing
a text file to the current execution folder. It then creates a FileDependency on that file.
This is a typical scenario where you read data from a file, such as a text file or an XML
document, which you will access frequently in your code. However, if the original file is
changed or deleted, you want the equivalent cached item to be removed from the
cache.
// Create an expiration that never expires
NeverExpired never = new NeverExpired();
// Create a text le to use in a FileDependency
File.AppendAllText("ATextFile.txt", "Some contents for the le");
// Create an expiration dependency on the new text le
FileDependency leDep = new FileDependency("ATextFile.txt");
Next, the code creates an instance of the ExtendedFormatTime class. This class allows
you to specify expiration times for the cached item based on a repeating schedule.
It provides additional opportunities compared to the more common SlidingTime and
AbsoluteTime expiration types you have seen so far.
The constructor of the ExtendedFormatTime class accepts a string value that it
parses into individual values for the minute, hour, day, month, and weekday (where zero
is Sunday) that together specify the frequency with which the cached item will expire.
Each value is delimited by a space. An asterisk indicates that there is no value for that part
of the format string, and effectively means that expiration will occur for every occurrence
of that item. It all sounds very complicated, so some examples will no doubt be useful (see
Table 2).
Expiration
Extended Format String Meaning
* * * * * Expires every minute.
5 * * * * Expires at the 5th minute of every hour.
* 21 * * * Expires every minute of the 21st hour of every day.
31 15 * * * Expires at 3:31 PM every day.
7 4 * * 6 Expires every Saturday 4:07 AM.
15 21 4 7 * Expires at 9:15 PM on every 4th of July.
The example generates an ExtendedFormatTime that expires at 30 minutes past every
hour. Then it creates an array of type ICacheItemExpiration that contains the File
Dependency created earlier and the new ExtendedFormatTime instance.

137a cache adva nce for your applications
// Create an extended expiration for 30 minutes past every hour
ExtendedFormatTime extTime = new ExtendedFormatTime("30 * * * *");
// Create array of expirations containing the le dependency and extended format
ICacheItemExpiration[] expirations
= new ICacheItemExpiration[] { leDep, extTime };
Adding the Items to the Cache
Now (at last) the code can add some items to the cache. It adds four items: the first uses
the NeverExpired expiration, the second uses the array that contains the file dependency
and extended format time expiration, and the other two just use the simple approach to
caching items that you saw in the first example of this chapter. The code then displays the
contents of the cache and waits for you to press a key.
// Add items to the cache using the key string names in the DemoCacheKeys array.
defaultCache.Add(DemoCacheKeys[0], "A cached item that never expires",
CacheItemPriority.NotRemovable, null, never);
defaultCache.Add(DemoCacheKeys[1], "A cached item that depends on both "
+ "a disk le and an hourly extended time expiration.",
CacheItemPriority.Normal, null, expirations);
defaultCache.Add(DemoCacheKeys[2], "Another cached item");
defaultCache.Add(DemoCacheKeys[3], "And yet another cached item.");
ShowCacheContents(defaultCache);
Console.Write("Press any key to delete the text le...");
Console.ReadKey(true);
The following is the output you see at this point in the execution.
Created a 'never expired' dependency.
Created a text le named ATextFile.txt to use as a dependency.
Created an expiration for 30 minutes past every hour.
Cache contains the following 4 item(s):
Item key 'ItemOne' (System.String) = A cached item that never expires
Item key 'ItemTwo' (System.String) = A cached item that depends on both a disk
le and an hourly extended time expiration.
Item key 'ItemThree' (System.String) = Another cached item
Item key 'ItemFour' (System.String) = And yet another cached item.
When you press a key, the code continues by deleting the text file, and then re-displaying
the contents of the cache. Then, as in earlier examples, it waits for the items to be
scavenged from the cache. The output you see is shown here.

138 chapter five
Cache contains the following 4 item(s):
Item key 'ItemOne' (System.String) = A cached item that never expires
Item with key 'ItemTwo' has been invalidated.
Item key 'ItemThree' (System.String) = Another cached item
Item key 'ItemFour' (System.String) = And yet another cached item.
Waiting for the dependent item to be scavenged from the cache...
Waiting... Waiting... Waiting... Waiting...
Cache contains the following 3 item(s):
Item key 'ItemOne' (System.String) = A cached item that never expires
Item key 'ItemThree' (System.String) = Another cached item
Item key 'ItemFour' (System.String) = And yet another cached item.
You can see that deleting the text file caused the item with key ItemTwo that depended
on it to be invalidated and removed during the next scavenging cycle.
At this point, the code is again waiting for you to press a key. When you do, it contin-
ues by calling the Remove method of the cache manager to remove the item having the
key ItemOne, and displays the cache contents again. Then, after you press a key for the
third time, it calls the Flush method of the cache manager to remove all the items from
the cache, and again calls the method that displays the contents of the cache. This is the
code for this part of the example.
Console.Write(“Press any key to remove {0} from the cache...", DemoCacheKeys[0]);
Console.ReadKey(true);
defaultCache.Remove(DemoCacheKeys[0]);
ShowCacheContents(defaultCache);
Console.Write("Press any key to ush the cache...");
Console.ReadKey(true);
defaultCache.Flush();
ShowCacheContents(defaultCache);
The result you see as this code executes is shown here.
Press any key to remove ItemOne from the cache...
Cache contains the following 2 item(s):
Item key 'ItemThree' (System.String) = Another cached item
Item key 'ItemFour' (System.String) = And yet another cached item.
Press any key to ush the cache...
The cache is empty.

139a cache advance for your a pplications
So far, when we used the Add method to add items to the cache, we passed a null value
for the refreshAction parameter. You can use this parameter to detect when an item
is removed from the cache, and discover the value of that item and the reason it was
removed.
You must create a class that implements the ICacheItemRefreshAction interface,
and contains a method named Refresh that accepts as parameters the key of the item
being removed, the value as an Object type, and a value from the CacheItemRemove
dReason enumeration. The values from this enumeration are Expired, Removed
(typically by your code or a dependency), Scavenged (typically in response to shortage
of available memory), and Unknown (a reserved value you should avoid using).
Therefore, inside your Refresh method, you can query the parameter values passed
to it to obtain the key and the final cached value of the item, and see why it was removed
from the cache. At this point, you can make a decision on what to do about it. In some
cases, it may make sense to insert the item into the cache again (such as when a file on
which the item depends has changed, or if the data is vital to your application). Of course,
you should generally only do this if it expired or was removed. If items are being scavenged
because your machine is short of memory, you should think carefully about what you
want to put back into the cache!
The example, Detect and refresh expired or removed cache items, illustrates how you can
capture items being removed from the cache, and re-cache them when appropriate. The
example uses the following implementation of the ICacheItemRefreshAction interface
to handle the case when the cache contains instances of the Product type. For a general
situation where you cache different types, you would probably want to check the type
before attempting to cast it to the required target type. Also notice that the class carries
the Serializable attribute. All classes that implement the ICacheItemRefreshAction
interface must be marked as serializable.
[Serializable]
public class MyCacheRefreshAction : ICacheItemRefreshAction
{
public void Refresh(string key, object expiredValue,
CacheItemRemovedReason removalReason)
{
// Item has been removed from cache. Perform desired actions here, based on
// the removal reason (for example, refresh the cache with the item).
Product expiredItem = (Product)expiredValue;
Console.WriteLine("Cached item {0} was expired in the cache with "
+ "the reason '{1}'", key, removalReason);
Console.WriteLine("Item values were: ID = {0}, Name = '{1}', "
+ "Description = {2}", expiredItem.ID,
expiredItem.Name, expiredItem.Description);
// Refresh the cache if it expired, but not if it was explicitly removed
if (removalReason == CacheItemRemovedReason.Expired)

140 chapter five
{
CacheManager defaultCache = EnterpriseLibraryContainer.Current.GetInstance
<CacheManager>("InMemoryCacheManager");
defaultCache.Add(key, new Product(10, "Exciting Thing",
"Useful for everything"), CacheItemPriority.Low,
new MyCacheRefreshAction(),
new SlidingTime(new TimeSpan(0, 0, 10)));
Console.WriteLine("Refreshed the item by adding it to the cache again.");
}
}
}
To use the implementation of the ICacheItemRefreshAction interface, you simply
specify it as the refreshAction parameter of the Add method when you add an item to
the cache. The example uses the following code to cache an instance of the Product class
that will expire after three seconds.
defaultCache.Add(DemoCacheKeys[0], new Product(10, “Exciting Thing",
"Useful for everything"),
CacheItemPriority.Low, new MyCacheRefreshAction(),
new SlidingTime(new TimeSpan(0, 0, 3)));
The code then does the same as the earlier examples: it displays the contents of the cache,
waits five seconds for the item to expire, displays the contents again, waits five more
seconds until the item is scavenged, and then displays the contents for the third time.
However, this time the Caching block executes the Refresh method of our ICacheItem
RefreshAction callback as soon as the item is removed from the cache. This callback
displays a message indicating that the cached item was removed because it had expired,
and that it has been added back into the cache. You can see it in the final listing of the
cache contents shown here.
The cache contains the following 1 item(s):
Item key 'ItemOne' (CachingExample.Product) = CachingExample.Product
Waiting... Waiting... Waiting... Waiting... Waiting...
The cache contains the following 1 item(s):
Item with key 'ItemOne' has been invalidated.
Cached item ItemOne was expired in the cache with the reason 'Expired'
Item values were: ID = 10, Name = 'Exciting Thing', Description = Useful for
everything
Refreshed the item by adding it to the cache again.
Waiting... Waiting... Waiting...
The cache contains the following 1 item(s):
Item key 'ItemOne' (CachingExample.Product) = CachingExample.Product

141a cache adva nce for your applications
If you have configured a persistent backing store for a cache manager, the Caching block
will automatically load the in-memory cache from the backing store when you instantiate
that cache manager. Usually, this will occur when the application starts up. This is an ex-
ample of proactive cache loading. Proactive cache loading is useful if you know that the
data will be required, and it is unlikely to change much. Another approach is to create a
class with a method that reads data you require from some data source, such as a database
or an XML file, and loads this into the cache by calling the Add method for each item.
If you execute this on a background or worker thread, you can load the cache without
affecting the interactivity of the application or blocking the user interface.
Alternatively, you may prefer to use reactive cache loading. This approach is useful
for data that may or may not be used, or data that is relatively volatile. In this case (if you
are using a persistent backing store), you may choose to instantiate the cache manager
only when you need to load the data. Alternatively, you can flush the cache (probably
when your application ends) and then load specific items into it as required and when
required. For example, you might find that you need to retrieve the details of a specific
product from your corporate data store for display in your application. At this point, you
could choose to cache it if it may be used again within a reasonable period and is unlikely
to change during that period.
Proactive Cache Loading
The example, Load the cache proactively on application startup, provides a simple demon-
stration of proactive cache loading. In the startup code of your application you add code
to load the cache with the items your application will require. The example creates a list
of Product items, and then iterates through the list calling the Add method of the cache
manager for each one. You would, of course, fetch the items to cache from the location
(such as a database) appropriate for your own application. It may be that the items
are available as a list, or—for example—by iterating through the rows in a DataSet or a
DataReader.
// Create a list of products - may come from a database or other repository
List<Product> products = new List<Product>();
products.Add(new Product(42, "Exciting Thing",
"Something that will change your view of life."));
products.Add(new Product(79, "Useful Thing",
"Something that is useful for everything."));
products.Add(new Product(412, "Fun Thing",
"Something that will keep the grandchildren quiet."));
// Iterate the list loading each one into the cache
for (int i = 0; i < products.Count; i++)
{
theCache.Add(DemoCacheKeys[i], products[i]);
}

142 chapter five
Reactive Cache Loading
Reactive cache loading simply means that you check if an item is in the cache when you
actually need it, and—if not—fetch it and then cache it for future use. You may decide at
this point to fetch several items if the one you want is not in the cache. For example, you
may decide to load the complete product list the first time that a price lookup determines
that the products are not in the cache.
The example, Load the cache reactively on demand, demonstrates the general pattern
for reactive cache loading. After displaying the contents of the cache (to show that it is,
in fact, empty) the code attempts to retrieve a cached instance of the Product class.
Notice that this is a two-step process in that you must check that the returned value is
not null. As we explained in the section “What’s In My Cache?” earlier in this chapter, the
Contains method may return true if the item has recently expired or been removed.
If the item is in the cache, the code displays the values of its properties. If it is not in
the cache, the code executes a routine to load the cache with all of the products. This
routine is the same as you saw in the previous example of loading the cache proactively.
Console.WriteLine(“Getting an item from the cache...");
Product theItem = (Product)defaultCache.GetData(DemoCacheKeys[1]);
// You could test for the item in the cache using CacheManager.Contains(key)
// method, but you still must check if the retrieved item is null even
// if the Contains method indicates that the item is in the cache:
if (null != theItem)
{
Console.WriteLine("Cached item values are: ID = {0}, Name = '{1}', "
+ "Description = {2}", theItem.ID, theItem.Name,
theItem.Description);
}
else
{
Console.WriteLine("The item could not be obtained from the cache.");
// Item not found, so reactively load the cache
LoadCacheWithProductList(defaultCache);
Console.WriteLine("Loaded the cache with the list of products.");
ShowCacheContents(defaultCache);
}
After displaying the contents of the cache after loading the list of products, the example
code then continues by attempting once again to retrieve the value and display its proper-
ties. You can see the entire output from this example here.

143a cache advance for your a pplications
The cache is empty.
Getting an item from the cache...
The item could not be obtained from the cache.
Loaded the cache with the list of products.
The cache contains the following 3 item(s):
Item key 'ItemOne' (CachingExample.Product) = CachingExample.Product
Item key 'ItemTwo' (CachingExample.Product) = CachingExample.Product
Item key 'ItemThree' (CachingExample.Product) = CachingExample.Product
Getting an item from the cache...
Cached item values are: ID = 79, Name = 'Useful Thing', Description = Something
that is useful for everything.
In general, the pattern for a function that performs reactive cache loading is:
1. Check if the item is in the cache and the value returned is not null.
2. If it is found in the cache, return it to the calling code.
3. If it is not found in the cache, create or obtain the object or value and cache it.
4. Return this new value or object to the calling code.
Extending Your Cache Advance
The Caching block, like all the other blocks in Enterprise Library, contains extension
points that allow you to create custom providers and integrate them with the block.
You can also replace the default cache manager if you want to use a different caching
mechanism, or modify the source code to otherwise change the behavior of the block.
The cache manager is responsible for loading items from a persistent backing store
into memory when you instantiate the application block. It also exposes the methods that
manipulate the cache. If you want to change the way that the Caching block loads
or manages cached items, for example to implement a distributed or specialist
caching mechanism, or perform asynchronous or delayed cache loading, you can use the
ICacheManager interface and implement the methods and properties it defines.
Alternatively, if you just want to use a different backing store or add a new expiration
policy, you can create custom backing store providers and expiration policies and use
these instead of the built-in providers and policies. To create a custom backing store
provider, you can implement the IBackingStore interface or inherit from the Base
BackingStore abstract class. To create a custom expiration policy, you can implement
the ICacheItemExpiration interface and, optionally, the ICacheItemRefreshAction
interface for a class that refreshes an expired cache item.
For more information about extending the Caching block, see the online documenta-
tion and the help files installed with Enterprise Library.

144 chapter five
Summary
This chapter looked at the ways that you can implement caching across your application
and your enterprise in a consistent and configurable way by using the Caching Application
Block. The block provides a non-distributed cache that can cache items in memory, and
optionally in a persistent backing store such as isolated storage or a database. You can also
easily add new backing stores if required, and even replace the cache manager if you want
to create a mechanism that does support other features, such as distributed caching.
The Caching block is flexible in order to meet most requirements for most types of
applications. You can define multiple caches and partition each one, which is useful if you
want to use a single database for multiple caches. And you can easily add encryption to
the caching mechanism for items stored in a persistent backing store.
The block also provides a wide range of expiration mechanisms, including several
time-based expirations as well as file-based expiration. Unlike some caching mechanisms,
you can specify multiple expirations for each cached item, and even create your own
custom expiration policies.
On top of all of this flexibility, the block makes it easy for administrators and opera-
tors to change the behavior through configuration using the configuration tools provided
with Enterprise Library. They can change the settings for the cache, such as the polling
frequency, change the backing stores that the block uses, and change the algorithms that
it uses to encrypt cached data.
This chapter discussed all of these features, and contained detailed examples of how
you can use the block in your own applications. For more information about the Caching
block, see the online documentation and the help files installed with Enterprise Library.

145
Introduction
If you happen to live in the U.S. and I told you that the original release date of version 2.0
of Enterprise Library was 13/01/2006, you’d wonder if I’d invented some new kind of
calendar. Perhaps they added a new month to the calendar without you noticing (which
I’d like to call Plutember in honor of the now-downgraded ninth planet). Of course, in
many other countries around the world, 13/01/2006 is a perfectly valid date in January.
This validation issue is well known and the solution probably seems obvious, but I once
worked with an application that used dates formatted in the U.S. mm/dd/yyyy pattern
for the filenames of reports it generated, and defaulted to opening the report for the
previous day when you started the program. Needless to say, on my machines set up to
use U.K. date formats, it never did manage to find the previous day’s report.
Even better, when I tried to submit a technical support question on their Web site, it
asked me for the date I purchased the software. The JavaScript validation code in the Web
page running on my machine checked the format of my answer (27/04/2008) and
accepted it. But the server refused to believe that there are twenty seven months in a year,
and blocked my submission. I had to lie and say I purchased it on May 1 instead.
The problem is that validation can be an onerous task, especially when you need to
do it in so many places in your applications, and for a lot of different kinds of values. It’s
extremely easy to end up with repeated code scattered throughout your classes, and yet
still leave holes where unexpected input can creep into your application and possibly
cause havoc.
Robust validation can help to protect your application against malicious users and
dangerous input (including SQL injection attacks), ensure that it processes only valid data
and enforces business rules, and improve responsiveness by detecting invalid data before
performing expensive processing tasks.
So, how do you implement comprehensive and centralized validation in your applica-
tions? One easy solution is to take advantage of the Enterprise Library Validation block.
The Validation block is a highly flexible solution that allows you to specify validation rules
in configuration, with attributes, or in code, and have that validation applied to objects,
method parameters, fields, and properties. It even includes features that integrate with
Windows® Forms, Windows Presentation Foundation (WPF), ASP.NET, and Windows
Communication Foundation (WCF) applications to present validation errors within the
user interface or have them handled automatically by the service.
6Banishing Validation
Complication

146 chapter six
Techniques for Validation
Before we explore the Validation block, it’s worth briefly reviewing some validation good
practices. In general, there are three factors you should consider: where you are going
to perform validation, what data should you validate, and how you will perform this
validation.
?
Validation should, of course, protect your entire application. However, it is often the case
that you need to apply validation in more than one location. If your application consists
of layers, distributed services, or discrete components, you probably need to validate at
each boundary. This is especially the case where individual parts of the application could
be called from more than one place (for example, a business layer that is used by several
user interfaces and other services).
It is also a really good idea to validate at trust boundaries, even if the components on
each side of the boundary are not physically separated. For example, your business layer
may run under a different trust level or account context than your data layer (even if they
reside on the same machine). Validation at this boundary can prevent code that is running
in low trust and which may have been compromised, from submitting invalid data to code
that runs in higher trust mode.
Finally, a common scenario: validation in the user interface. Validating data on the
client can improve application responsiveness, especially if the UI is remote from the
server. Users do not have to wait for the server to respond when they enter or submit
invalid data, and the server does not need to attempt to process data that it will later
reject. However, remember that even if you do validate data on the client or in the UI you
must always revalidate on the server or in the receiving service. This protects against
malicious users who may circumvent client-side validation and submit invalid data.
?
To put it simply, everything. Or, at least any input values you will use in your application
that may cause an error, involve a security risk, or could result in incorrect processing.
Remember that Web page and service requests may contain data that the user did not
enter directly, but could be used in your application. This can include cookies, header
information, credentials, and context information that the server may use in various ways.
Treat all input data as suspicious until you have validated it.

147banishing validation complication
?
For maximum security, your validation process should be designed to accept only data
that you can directly determine to be valid. This approach is known as positive validation
and generally uses an allow list that specifies data that satisfies defined criteria, and rejects
all other data. Examples are rules that check if a number is between two predefined limits,
or if the submitted value is within a list of valid values. Use this approach whenever
possible.
The alternative and less-secure approach is to use a block list containing values that
are not valid. This is called negative validation, and generally involves accepting only data
that does not meet specific criteria. For example, as long as a string does not contain any
of the specified invalid characters, it would be accepted. You should use this approach
cautiously and as a secondary line of defense, because it is very difficult to create a
complete list of criteria for all known invalid input—which may allow malicious data to
enter your system.
Finally, consider sanitizing data. While this is not strictly a validation task, you can as
an extra precaution attempt to eliminate or translate characters in an effort to make the
input safe. However, do not rely on this technique alone because, as with negative
validation, it can be difficult to create a complete list of criteria for all known invalid input
unless there is a limited range of invalid values.
What Does the Validation Block Do?
The Validation block consists of a broad range of validators, plus a mechanism that
executes these validators and collects and correlates the results to provide an overall
validation result (true/valid or false/invalid). The Validation block can use individual
attributes applied to classes and class members that the application uses (both the valida-
tion attributes provided with the Validation block and data annotation attributes from
the System.ComponentModel.DataAnnotations namespace), in addition to rule sets
defined in the configuration of the block, which specify the validation rules to apply.
The typical scenario when using the Validation block is to define rule sets through
configuration or attributes applied to your classes. Each rule set specifies the set of
individual validators and combinations of these validators that implement the validation
rules you wish to apply to that class. Then you use a ValidatorFactory (or one of the
equivalent implementations of this factory) to create a type validator for the class,
optionally specifying the rule set it should use. If you don’t specify a rule set, it uses the
default rules. Then you can call the Validate method of the type validator. This method
returns an instance of the ValidationResults class that contains details of all the
validation errors detected. Figure 1 illustrates this process.
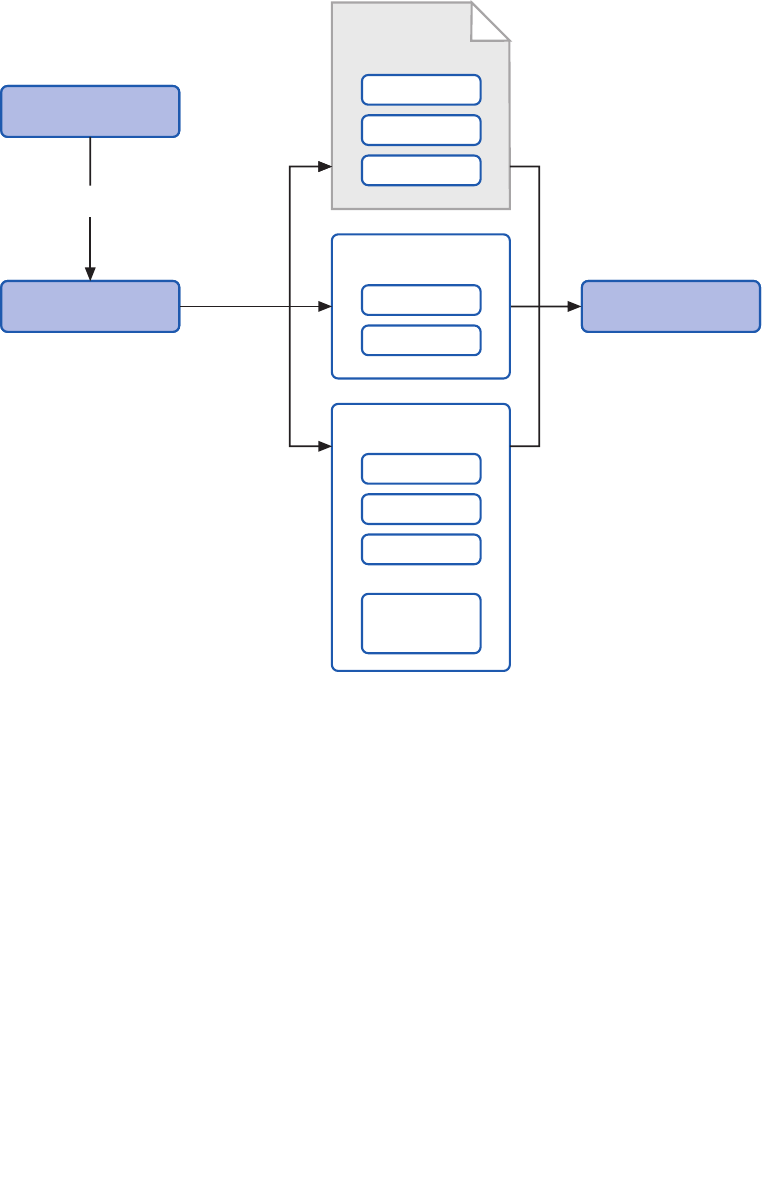
148 chapter six
An overview of the validation process
When you use a rule set to validate an instance of a specific type or object, the block can
apply the rules to:
• The type itself
• The values of public readable properties
• The values of public fields
• The return values of public methods that take no parameters
Notice that you can validate the values of method parameters and the return type of
methods that take parameters when that method is invoked, only by using the validation
call handler (which is part of the Validation block) in conjunction with the Unity
dependency injection and interception mechanism. The validation call handler will
validate the parameter values based on the rules for each parameter type and any
Data Annotations
Validator Factory
Create Validator
Type Validator Validate
Configuration
Rule
Rule
Rule
Validation Results
Attribute
Attribute
Attribute
Self
Validation
Attribute
Attribute
VAB Attributes
. . .
. . .
. . .

149banishing va lidation complic ation
validation attributes applied to the parameters. We don’t cover the use of the validation
call handler in this guide, as it requires you to be familiar with Unity interception
techniques. For more information about interception and the validation call handler,
see the Unity interception documentation installed with Enterprise Library or available
online at http://go.microsoft.com/fwlink/?LinkId=188875.
Alternatively, you can create individual validators programmatically to validate specific
values, such as strings or numeric values. However, this is not the main focus of the
block—though we do include samples in this chapter that show how you can use indi-
vidual validators.
In addition, the Validation block contains features that integrate with Windows®
Forms, Windows Presentation Foundation (WPF), ASP.NET, and Windows Communication
Foundation (WCF) applications. These features use a range of different techniques to
connect to the UI, such as a proxy validator class based on the standard ASP.NET
Validator control that you can add to a Web page, a ValidationProvider class that you
can specify in the properties of Windows Forms controls, a ValidatorRule class that you
can specify in the definition of WPF controls, and a behavior extension that you can
specify in the <system.ServiceModel> section of your WCF configuration. You’ll see
more details of these features later in this chapter.
Validators implement functionality for validating Microsoft® .NET Framework data types.
The validators included with the Validation block fall into three broad categories: value
validators, composite validators, and type (object) validators. The value validators allow
you to perform specific validation tests such as verifying:
• The length of a string, or the occurrence of a specified set of characters within
it.
• Whether a value lies within a specified range, including tests for dates and
times relative to a specified date/time.
• Whether a value is one of a specified set of values, or can be converted to a
specific data type or enumeration value.
• Whether a value is null, or is the same as the value of a specific property of
an object.
• Whether the value matches a specified regular expression.
The composite validators are used to combine other validators when you need to apply
more complex validation rules. The Validation block includes an AND validator and an
OR validator, each of which acts as a container for other validators. By nesting these
composite validators in any combination and populating them with other validators, you
can create very comprehensive and very specific validation rules.

150 ch a pter six
Table 1 describes the complete set of validators provided with the Validation block.
The validators provided with the Validation block
Validator
type
Validator name Description
Value
Validators
Contains
Characters
Validator
Checks that an arbitrary string, such as a string entered by a user in a
Web form, contains any or all of the specified characters.
Date Time Range
Validator
Checks that a DateTime object falls within a specified range.
Domain Validator Checks that a value is one of the specified values in a specified set.
Enum Conversion
Validator
Checks that a string can be converted to a value in a specified
enumeration type.
Not Null Validator Checks that the value is not null.
Property
Comparison
Validator
Compares the value to be checked with the value of a specified
property.
Range Validator Checks that a value falls within a specified range.
Regular Expres-
sion Validator
Checks that the value matches the pattern specified by a regular
expression.
Relative Date
Time Validator
Checks that the DateTime value falls within a specified range using
relative times and dates.
String Length Vali-
dator
Checks that the length of the string is within the specified range.
Type Conversion
Validator
Checks that a string can be converted to a specific type.
Type
Validators
Object Validator Causes validation to occur on an object reference. All validators
defined for the object’s type will be invoked.
Object Collection
Validator
Checks that the object is a collection of the specified type and then
invokes validation on each element of the collection.
Composite
Validators
And Composite
Validator
Requires all validators that make up the composite validator to be
true.
Or Composite
Validator
Requires at least one of the validators that make up the composite
validator be true.
Single
Member
Validators
Field Value
Validator
Validates a field of a type.
Method Return
Value Validator
Validates the return value of a method of a type.
Property Value
Validator
Validates the value of a property of a type.

151banishing va lidation com plication
For more details on each validator, see the documentation installed with Enterprise
Library or available online at http://go.microsoft.com/fwlink/?LinkId=188874. You will see
examples that use many of these validators throughout this chapter.
If you have full access to the source code of your application, you can use attributes
within your classes to define your validation rules. You can apply validation attributes in
the following ways:
• To a field. The Validation block will check that the field value satisfies all
validation rules defined in validators applied to the field.
• To a property. The Validation block will check that the value of the get prop-
erty satisfies all validation rules defined in validators applied to the property.
• To a method that takes no parameters. The Validation block will check that
the return value of the method satisfies all validation rules defined in validators
applied to the method.
• To an entire class, using only the NotNullValidator, ObjectCollection
Validator, AndCompositeValidator, and OrCompositeValidator). The
Validation block can check if the object is null, that it is a member of the
specified collection, and that any validation rules defined within it are satisfied.
• To a parameter in a WCF Service Contract. The Validation block will check
that the parameter value satisfies all validation rules defined in validators
applied to the parameter.
• To parameters of methods that are intercepted, by using the validation call
handler in conjunction with the Policy Injection application block. For more
information on using interception, see Appendix C, “Policy Injection in
Enterprise Library.”
Each of the validators described in the previous section has a related attribute that you
apply in your code, specifying the values for validation (such as the range or comparison
value) as parameters to the attribute. For example, you can validate a property that must
have a value between 0 and 10 inclusive by applying the following attribute to the
property definition, as seen in the following code.
[RangeValidator(0, RangeBoundaryType.Inclusive, 10, RangeBoundaryType.Inclusive)]
DataAnnotations Attributes
In addition to using the built-in validation attributes, the Validation block will perform
validation defined in the vast majority of the validation attributes in the System.
ComponentModel.DataAnnotations namespace. These attributes are typically used by
frameworks and object/relational mapping (O/RM) solutions that auto-generate classes
that represent data items. They are also generated by the ASP.NET validation controls
that perform both client-side and server-side validation. While the set of validation
attributes provided by the Validation block does not map exactly to those in the
DataAnnotations namespace, the most common types of validation are supported.
A typical use of data annotations is shown here.

152 ch a pter six
[System.ComponentModel.DataAnnotations.Required(
ErrorMessage = "You must specify a value for the product ID.")]
[System.ComponentModel.DataAnnotations.StringLength(6,
ErrorMessage = "Product ID must be 6 characters.")]
[System.ComponentModel.DataAnnotations.RegularExpression("[A-Z]{2}[0-9]{4}",
ErrorMessage = "Product ID must be 2 capital letters and 4 numbers.")]
public string ID { get; set; }
In reality, the Validation block validation attributes are data annotation attributes, and
can be used (with some limitations) whenever you can use data annotations attributes—
for example, with ASP.NET Dynamic Data applications. The main difference is that the
Validation block attribute validation occurs only on the server, and not on the client.
Also keep in mind that, while DataAnnotations supports most of the Validation block
attributes, not all of the validation attributes provided with the Validation block are
supported by the built-in .NET validation mechanism. For more information, see the
documentation installed with Enterprise Library, and the topic “System.Component
Model.DataAnnotations Namespace” at http://msdn.microsoft.com/en-us/library/system.
componentmodel.dataannotations.aspx.
-
Self-validation might sound as though you should be congratulating yourself on your
attractiveness and wisdom, and your status as fine and upstanding citizen. However, in
Enterprise Library terms, self-validation is concerned with the use of classes that contain
their own validation logic.
For example, a class that stores spare parts for aircraft might contain a function that
checks if the part ID matches a specific format containing letters and numbers. You add
the HasSelfValidation attribute to the class, add the SelfValidation attribute to any
validation functions it contains, and optionally add attributes for the built-in Validation
block validators to any relevant properties. Then you can validate an instance of the class
using the Validation block. The block will execute the self-validation method.
Self-validation cannot be used with the UI validation integration features for Windows
Forms, WPF, or ASP.NET.
Self-validation is typically used where the validation rule you want to apply involves values
from different parts of your class or values that are not publicly exposed by the class, or
when the validation scenario requires complex rules that even a combination of composed
validators cannot achieve. For example, you may want to check if the sum of the number
of products on order and the number already in stock is less than a certain value before
allowing a user to order more. The following extract from one of the examples you’ll see
later in this chapter shows how self-validation can be used in this case.

153banishing va lidation complic ation
[HasSelfValidation]
public class AnnotatedProduct : IProduct
...
... code to implement constructor and properties goes here
...
[SelfValidation]
public void Validate(ValidationResults results)
{
string msg = string.Empty;
if (InStock + OnOrder > 100)
{
msg = "Total inventory (in stock and on order) cannot exceed 100 items.";
results.AddResult(new ValidationResult(msg, this, "ProductSelfValidation",
"", null));
}
}
The Validation block calls the self-validation method when you validate this class instance,
passing to it a reference to the collection of ValidationResults that it is populating with
any validation errors found. The code above simply adds one or more new Validation
Result instances to the collection if the self-validation method detects an invalid condi-
tion. The parameters of the ValidationResult constructor are:
• The validation error message to display to the user or write to a log. The
ValidationResult class exposes this as the Message property.
• A reference to the class instance where the validation error was discovered
(usually the current instance). The ValidationResult class exposes this as the
Target property.
• A string value that describes the location of the error (usually the name
of the class member, or some other value that helps locate the error). The
ValidationResult class exposes this as the Key property.
• An optional string tag value that can be used to categorize or filter the results.
The ValidationResult class exposes this as the Tag property.
• A reference to the validator that performed the validation. This is not used
in self-validation, though it will be populated by other validators that validate
individual members of the type. The ValidationResult class exposes this as
the Validator property.

154 ch a pter six
A validation rule set is a combination of all the rules with the same name, which may be
located in a configuration file or other configuration source, in attributes defined within
the target type, and implemented through self-validation. In other words, a rule set
includes any type of validation rule that has a specified name.
Rule set names are case-sensitive. The two rule sets named MyRuleset and
MyRuleSet are different!
How do you apply a name to a validation rule? And what happens if you don’t specify
a name? In fact, the way it works is relatively simple, even though it may appear compli-
cated when you look at configuration and attributes, and take into account how these are
actually processed.
To start with, every validation rule is a member of some rule set. If you do not
specify a name, that rule is a member of the default rule set; effectively, this is the rule set
whose name is an empty string. When you do specify a name for a rule, it becomes part
of the rule set with that name.
Assigning Validation Rules to Rule Sets
You specify rule set names in a variety of ways, depending on the location and type of the
rule:
• In configuration. You define a type that you want to apply rules to, and then
define one or more rule sets for that type. To each rule set you add the required
combination of validators, each one representing a validation rule within that
rule set. You can specify one rule set for each type as the default rule set for
that type. The rules within this rule set are then treated as members of the
default (unnamed) rule set, as well as that named rule set.
• In Validation block validator attributes applied to classes and their mem-
bers. Every validation attribute will accept a rule set name as a parameter. For
example, you specify that a NotNullValidator is a member of a rule set named
MyRuleset, like this.
[NotNullValidator(MessageTemplate = "Cannot be null",
Ruleset = "MyRulesetName")]
• In SelfValidation attributes within a class. You add the Ruleset parameter to
the attribute to indicate which rule set this self-validation rule belongs to. You
can define multiple self-validation methods in a class, and add them to different
rule sets if required.
[SelfValidation(Ruleset = "MyRulesetName")]
Configuring Validation Block Rule Sets
The Enterprise Library configuration console makes it easy to define rule sets for specific
types that you will validate. Each rule set specifies a type to which you will apply the rule
set, and allows you to specify a set of validation rules. You can then apply these rules as
a complete set to an instance of an object of the defined type.
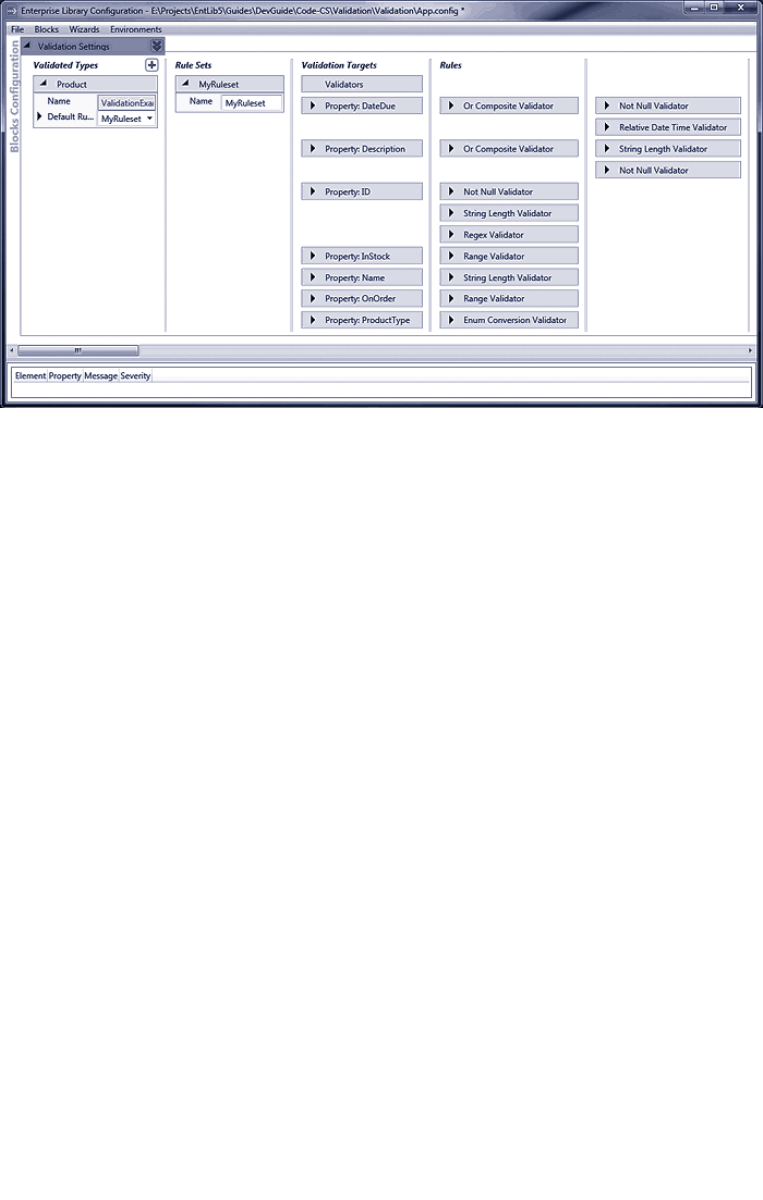
155banishing validation complication
The configuration for the examples
Figure 2 shows the configuration console with the configuration used in the example
application for this chapter. It defines a rule set named MyRuleset for the validated type
(the Product class). MyRuleset is configured as the default rule set, and contains a series
of validators for all of the properties of the Product type. These validators include
two Or Composite Validators (which contain other validators) for the DateDue and
Description properties, three validators that will be combined with the And operation
for the ID property, and individual validators for the remaining properties.
When you highlight a rule, member, or validator in the configuration console, it
shows connection lines between the configured items to help you see the relationships
between them.
Specifying Rule Sets When Validating
You can specify a rule set name when you create a type validator that will validate an
instance of a type. If you use the ValidatorFactory facade to create a type validator for
a type, you can specify a rule set name as a parameter of the CreateValidator method. If
you create an Object Validator or an Object Collection Validator programmatically by
calling the constructor, you can specify a rule set name as a parameter of the constructor.
Finally, if you resolve a validator for a type through the Enterprise Library Container, you
can specify a rule set name as the string key value. We look in more detail at the options
for creating validators later in this chapter.
• If you specify a rule set name when you create a validator for an object, the
Validation block will apply only those validation rules that are part of the
specified rule set. It will, by default, apply all rules with the specified name that
it can find in configuration, attributes, and self-validation.

156 ch a pter six
• If you do not specify a rule set name when you create a validator for an
object, the Validation block will, by default, apply all rules that have no name
(effectively, rules with an empty string as the name) that it can find in configu-
ration, attributes, and self-validation. If you have specified one rule set in
configuration as the default rule set for the type you are validating (by setting
the DefaultRule property for that type to the rule set name), rules within this
rule set are also treated as being members of the default (unnamed) rule set.
The one time that this default mechanism changes is if you create a validator for a
type using a facade other than ValidatorFactory. As you’ll see later in this chapter you
can use the ConfigurationValidatorFactory, AttributeValidatorFactory, or Validation
AttributeValidatorFactory to generate type validators. In this case, the validator will only
apply rules that have the specified name and exist in the specified location.
For example, when you use a ConfigurationValidatorFactory and specify the name
MyRuleset as the rule set name when you call the CreateValidator method, the validator
you obtain will only process rules it finds in configuration that are defined within a rule
set named MyRuleset for the target object type. If you use an AttributeValidator
Factory, the validator will only apply Validation block rules located in attributes and
self-validation methods of the target class that have the name MyRuleset.
Configuring multiple rule sets for the same type is useful when the type you need
to validate is a primitive type such as a String. A single application may have dozens
of different rule sets that all target String.
How Do I Use The Validation Block?
In the remainder of this chapter, we’ll show you in more detail how you can use the
features of the Validation block you have seen in previous sections. In this section, we
cover three topics that you should be familiar with when you start to use the block in your
applications: preparing your application to use the block, choosing a suitable approach for
validation, the options available for creating validators, accessing and displaying validation
errors, and understanding how you can use template tokens in validation messages.
To use the Validation block, you must reference the required assemblies. In addition to
the assemblies required in every application that uses Enterprise Library (listed in Chapter
1, “Introduction”), you require the main Validation block assembly, Microsoft.Practices.
EnterpriseLibrary.Validation.dll. If you intend to use the integration features for ASP.
NET, Windows Forms, WPF, or WCF, you must also reference the relevant assembly that
contains these features.
Then you can edit your code to specify the namespaces used by the Validation block
and, optionally, the integration features if you need to integrate with WCF or a UI
technology.
If you are using WCF integration, you should add a reference to the System.Service
Model namespace.

157b a nishing validation complication
Before you start to use the Validation block, you should consider how you want to per-
form validation. As you’ve seen, there are several approaches you can follow. Table 2
summarizes these, and will help you to choose one, or a combination, most suited to your
requirements.
Validation approaches
Validation approach Advantages Considerations
Rule sets in
configuration
Supports the full capabilities of the
Validation block validators.
Validation rules can be changed
without requiring recompilation and
redeployment.
Validation rules are more visible and
easier to manage.
Rules are visible in configuration files
unless the content is encrypted.
May be open to unauthorized alteration
if not properly protected.
Type definitions and validation rule
definitions are stored in different files
and accessed using different tools, which
can be confusing.
Validation block
attributes
Supports the full capabilities of the
Validation block validators.
Validation attributes may be defined
in separate metadata classes.
Rules can be extracted from the
metadata for a type by using reflection.
Requires modification of the source code
of the types to validate.
Some complex rule combinations may not
be possible—only a single And or Or
combination is available for multiple rules.
Hides validation rules from administrators
and operators.
Data annotation
attributes
Allows you to apply validation rules
defined by .NET data annotation
attributes, which may be defined in
separate metadata classes.
Typically used with technologies such
as LINQ, for which supporting tools
might be used to generate code.
Technologies such as ASP.NET Dynamic
Data that use these attributes can
perform partial client-side validation.
Rules can be extracted from the
metadata for a type by using reflection.
Requires modification of the source code.
Does not support all of the powerful
validation capabilities of the Validation
block.
Self-validation Allows you to create custom validation
rules that may combine values of
different members of the class.
Requires modification of the source code.
Hides validation rules from administrators
and operators.
Rules cannot be extracted from the
metadata for a type by using reflection.
Validators created
programmatically
A simple way to validate individual
values as well as entire objects.
Useful if you only need to perform small
and specific validation tasks, especially
on value types held in variables.
Requires additional code and is generally
more difficult to manage for complex
validation scenarios.
Hides validation rules from administrators
and operators.
More difficult to administer and manage.

158 ch a pter six
If you decide to use attributes to define your validation rules within classes but are finding
it difficult to choose between using the Validation block attributes and the Microsoft
.NET data annotation attributes, you should consider using the Validation block attributes
approach as this provides more powerful capabilities and supports a far wider range of
validation operations. However, you should consider the data annotations approach in the
following scenarios:
• When you are working with existing applications that already use data annota-
tions.
• When you require validation to take place on the client.
• When you are building a Web application where you will use the ASP.NET Data
Annotation Model Binder, or you are using ASP.NET Dynamic Data to create
data-driven user interfaces.
• When you are using a framework such as the Microsoft Entity Framework, or
another object/relational mapping (O/RM) technology that auto-generates
classes that include data annotations.
There are several ways that you can create the validators you require, whether you are
creating a type validator that will validate an instance of your class using a rule set or at-
tributes, or you are creating individual value validators:
• Use the ValidatorFactory facade to create validators. This approach makes
it easy to create type validators that you can use, in conjunction with rule sets,
to validate multiple members of an object instance. This is generally the
recommended approach. You also use this approach to create validators that
use only validation attributes or data annotations within the classes you want
to validate, or only rule sets defined in configuration. You can resolve an
instance of the ValidatorFactory using a single line of code, as you will see
later in this chapter.
• Create individual validators programmatically by calling their constructor.
The constructor parameters allow you to specify most of the properties you
require for the validator. You can then set additional properties, such as the
Tag or the resource name and type if you want to use a resource file to provide
the message template. You can also build combinations of validators using this
approach to implement complex validation rules.
• Resolve individual validators through the Enterprise Library Container. This
approach allows you to obtain a validator instance using dependency injection;
for example, by simply specifying the type of validator you require in the
constructor of a class that you resolve through the container. If you specify a
name when you resolve the instance, this is interpreted as the name of the
rule set for that validator to use when validating objects. See Appendix A,
“Dependency Injection with Unity” and Appendix B, “Using Dependency
Injection in Enterprise Library” for more information about using a container
to resolve and populate the dependencies of objects.

159banishing va lidation complicat ion
Previous versions of Enterprise Library used static facades named Validation and
ValidationFactory (as opposed to ValidatorFactory described above) to create
validators and perform validation. While these facades are still available for backwards
compatibility, you should use the approaches described above for creating validators
as you write new code.
To initiate validation, you call the Validate method of your validator. There are two
overloads of this method: one that creates and returns a populated ValidationResults
instance, and one that accepts an existing ValidationResults instance as a parameter. The
second overload allows you to perform several validation operations, and collect all of the
errors in one ValidationResults instance.
You can check if validation succeeded, or if any validation errors were detected, by
examining the IsValid property of a ValidationResults instance, and displaying details of
any validation errors that occurred. The following code shows a simple example of how
you can display the most relevant details of each validation error. See the section on
self-validation earlier in this chapter for a description of the properties of each individual
ValidationResult within the ValidationResults.
// Check if the ValidationResults detected any validation errors.
if (results.IsValid)
{
Console.WriteLine("There were no validation errors.");
}
else
{
Console.WriteLine("The following {0} validation errors were detected:",
results.Count);
// Iterate through the collection of validation results.
foreach (ValidationResult item in results)
{
// Show the target member name and current value.
Console.WriteLine("Target:'{0}' Key:'{1}' Tag:'{2}' Message:'{3}'",
item.Target, item.Key, item.Tag, item.Message);
}
}
Alternatively, you can extract more information about the validation result for each
individual validator where an error occurred. The example application we provide demon-
strates how you can do this, and you’ll see more details later in this chapter.

160 ch a pter six
One specific and very useful feature of the individual validators you define in your
configuration or attributes is the capability to include tokens in the message to auto-
matically insert values of the validator’s properties. This applies no matter how you create
your validator—in rule sets defined in configuration, as validation attributes, or when you
create validators programmatically.
The Message property of a validator is actually a template, not just a simple text
string that is displayable. When the block adds an individual ValidationResult to the
ValidationResults instance for each validation error it detects, it parses the value of the
Message property looking for tokens that it will replace with the value of specific proper-
ties of the validator that detected the error.
The value injected into the placeholder tokens, and the number of tokens used,
depends on the type of validator—although there are three tokens that are common to
all validators. The token {0} will be replaced by the value of the object being validated
(ensure that you escape this value before you display or use it in order to guard against
injection attacks). The token {1} will contain the name of the member that was being
validated, if available, and is equivalent to the Key property of the validator. The token {2)
will contain the value of the Tag property of the validator.
The remaining tokens depend the on the individual validator type. For example, in the
case of the Contains Characters validator, the tokens {3} and {4} will contain the charac-
ters to check for and the ContainsCharacters value (All or Any). In the case of a range
validator, such as the String Length validator, the tokens {3} to {6} will contain the values
and bound types (Inclusive, Exclusive, or Ignore) for the lower and upper bounds you
specify for the validator. For example, you may define a String Length validator like this:
[StringLengthValidator(5, RangeBoundaryType.Inclusive, 20,
RangeBoundaryType.Inclusive,
MessageTemplate = "{1} must be between {3} and {5} characters.")]
If this validator is attached to a property named Description, and the value of this prop-
erty is invalid, the ValidationResults instance will contain the error message Description
must be between 5 and 20 characters.
Other validators use tokens that are appropriate for the type of validation they
perform. The documentation installed with Enterprise Library lists the tokens for each of
the Validation block validators. You will also see the range of tokens used in the examples
that follow.
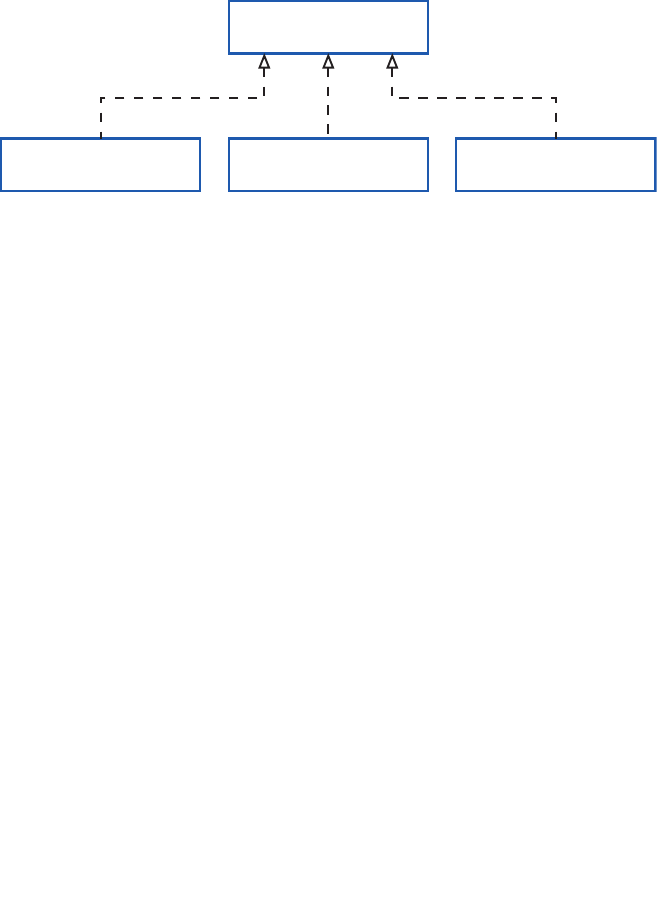
161banishing validation complication
Diving in With Some Simple Examples
The remainder of this chapter shows how you can use the Validation block in a variety of
situations within your applications. We provide a simple console-based example applica-
tion implemented as the Microsoft Visual Studio® solution named Validation. You
can open it in Visual Studio to view the code, or run the application directly from the
bin\Debug folder.
The application uses three versions of a class that stores product information. All of
these implement an interface named IProduct, as illustrated in Figure 3. Each has a string
property that is designed to be set to a value from an enumeration called ProductType
that defines the valid set of product type names.
The product classes used in the examples
The Product class is used primarily with the example that demonstrates using a configured
rule set, and contains no validation attributes. The AttributedProduct class contains
Validation block attributes, while the AnnotatedProduct class contains .NET Data
Annotation attributes. The latter two classes also contain self-validation routines—the
extent depending on the capabilities of the type of validation attributes they contain.
You’ll see more on this topic when we look at the use of validation attributes later in this
chapter.
The following sections of this chapter will help you understand in detail the different
ways that you can use the Validation block:
• Validating Objects and Collections of Objects. This is the core topic for using
the Validation block, and is likely to be the most common scenario in your
applications. It shows how you can create type validators to validate instances
of your custom classes, how you can dive deeper into the ValidationResults
instance that is returned, how you can use the Object Validator, and how you
can validate collections of objects.
• Using Validation Attributes. This section describes how you can use attributes
applied to your classes to enable validation of members of these classes. These
attributes use the Validation block validators and the .NET Data Annotation
attributes.
IProduct
AttributedProduct Product AnnotatedProduct

162 ch a pter six
• Creating and Using Individual Validators. This section shows how you can
create and use the validators provided with the block to validate individual
values and members of objects.
• WCF Service Validation Integration. This section describes how you can use
the block to validate parameters within a WCF service.
Finally, we’ll round off the chapter by looking briefly at how you can integrate the Valida-
tion block with user interface technologies such as Windows Forms, WPF, and ASP.
NET.
The most common scenario when using the Validation block is to validate an instance of
a class in your application. The Validation block uses the combination of rules defined in
a rule set and validators added as attributes to test the values of members of the class,
and the result of executing any self-validation methods within the class.
The Validation block makes it easy to validate entire objects (all or a subset of its
members) using a specific type validator or by using the Object validator. You can also
validate all of the objects in a collection using the Object Collection validator. We will
look at the Object validator and the Object Collection validator later. For the moment,
we’ll concentrate on creating and using a specific type validator.
Creating a Type Validator using the ValidatorFactory
You can resolve a ValidatorFactory instance through the Enterprise Library container and
use it to create a validator for a specific target type. This validator will validate objects
using a rule set, and/or any attributes and self-validation methods the target object con-
tains. To obtain an instance of the ValidatorFactory class, you can use the following
code.
ValidatorFactory valFactory
= EnterpriseLibraryContainer.Current.GetInstance<ValidatorFactory>();
You can then create a validator for any type you want to validate. For example, this code
creates a validator for the Product class and then validates an instance of that class named
myProduct.
Validator<Product> pValidator = valFactory.CreateValidator<Product>();
ValidationResults valResults = pValidator.Validate(myProduct);
By default, the validator will use the default rule set defined for the target type (you can
define multiple rule sets for a type, and specify one of these as the default for this type).
If you want the validator to use a specific rule set, you specify this as the single parameter
to the CreateValidator method, as shown here.
Validator<Product> productValidator
= valFactory.CreateValidator<Product>("RuleSetName");
ValidationResults valResults = productValidator.Validate(myProduct);

163banishing validation complication
The example named Using a Validation Rule Set to Validate an Object creates an instance
of the Product class that contains invalid values for all of the properties, and then uses
the code shown above to create a type validator for this type and validate it. It then dis-
plays details of the validation errors contained in the returned ValidationResults instance.
However, rather than using the simple technique of iterating over the ValidationResults
instance displaying the top-level errors, it uses code to dive deeper into the results to
show more information about each validation error, as you will see in the next section.
Delving Deeper into ValidationResults
You can check if validation succeeded, or if any validation error were detected, by
examining the IsValid property of a ValidationResults instance and displaying details of
any validation errors that occurred. However, when you simply iterate over a Validation
Results instance (as we demonstrated in the section “Performing Validation and
Displaying Validation Errors” earlier in this chapter), we displayed just the top-level errors.
In many cases, this is all you will require. If the validation error occurs due to a validation
failure in a composite (And or Or) validator, the error this approach will display is the
message and details of the composite validator.
However, sometimes you may wish to delve deeper into the contents of a Validation
Results instance to learn more about the errors that occurred. This is especially the case
when you use nested validators inside a composite validator. The code we use in the
example provides richer information about the errors. When you run the example, it
displays the following results (we’ve removed some repeated content for clarity).
The following 6 validation errors were detected:
+ Target object: Product, Member: DateDue
- Detected by: OrCompositeValidator
- Tag value: Date Due
- Validated value was: '23/11/2010 13:45:41'
- Message: 'Date Due must be between today and six months time.'
+ Nested validators:
- Detected by: NotNullValidator
- Validated value was: '23/11/2010 13:45:41'
- Message: 'Value can be NULL or a date.'
- Detected by: RelativeDateTimeValidator
- Validated value was: '23/11/2010 13:45:41'
- Message: 'Value can be NULL or a date.'
+ Target object: Product, Member: Description
- Detected by: OrCompositeValidator
- Validated value was: '-'
- Message: 'Description can be NULL or a string value.'
+ Nested validators:
- Detected by: StringLengthValidator
- Validated value was: '-'
- Message: 'Description must be between 5 and 100 characters.'
- Detected by: NotNullValidator

164 ch a pter six
- Validated value was: '-'
- Message: 'Value can be NULL.'
...
...
+ Target object: Product, Member: ProductType
- Detected by: EnumConversionValidator
- Tag value: Product Type
- Validated value was: 'FurryThings'
- Message: 'Product Type must be a value from the 'ProductType' enumeration.'
You can see that this shows the target object type and the name of the member of the
target object that was being validated. It also shows the type of the validator that per-
formed the operation, the Tag property values, and the validation error message. Notice
also that the output includes the validation results from the validators nested within the
two OrCompositeValidator validators. To achieve this, you must iterate recursively
through the ValidationResults instance because it contains nested entries for the
composite validators.
The code we used also contains a somewhat contrived feature: to be able to show the
value being validated, some examples that use this routine include the validated value at
the start of the message using the {0} token in the form: [{0}] validation error message.
The example code parses the Message property to extract the value and the message
when it detects that this message string contains such a value. It also encodes this value
for display in case it contains malicious content.
While this may not represent a requirement in real-world application scenarios, it is
useful here as it allows the example to display the invalid values that caused the validation
errors and help you understand how each of the validators works. We haven’t listed the
code here, but you can examine it in the example application to see how it works, and
adapt it to meet your own requirements. You’ll find it in the ShowValidationResults,
ShowValidatorDetails, and GetTypeNameOnly routines located in the region named
Auxiliary routines at the end of the main program file.
Using the Object Validator
An alternative approach to validating objects is to programmatically create an Object
Validator by calling its constructor. You specify the type that it will validate and, option-
ally, a rule set to use when performing validation. If you do not specify a rule set name,
the validator will use the default rule set. When you call the Validate method of the
Object validator, it creates a type-specific validator for the target type you specify, and
you can use this to validate the object, as shown here.
Validator pValidator = new ObjectValidator(typeof(Product), “RuleSetName");
ValidationResults valResults = pValidator.Validate(myProduct);
Alternatively, you can call the default constructor of the Object validator. In this case, it
will create a type-specific validator for the type of the target instance you pass to the
Validate method. If you do not specify a rule set name in the constructor, the validation
will use the default rule set defined for the type it is validating.

165banishing va lidation com plication
Validator pValidator = new ObjectValidator(“RuleSetName");
ValidationResults valResults = pValidator.Validate(myProduct);
The validation will take into account any applicable rule sets, and any attributes and self-
validation methods found within the target object.
Differences Between the Object Validator and the Factory-Created
Type Validators
While the two approaches you’ve just seen to creating or obtaining a validator for an
object achieve the same result, there are some differences in their behavior:
• If you do not specify a target type when you create an Object Validator
programmatically, you can use it to validate any type. When you call the
Validate method, you specify the target instance, and the Object validator
creates a type-specific validator for the type of the target instance. In contrast,
the validator you obtain from a factory can only be used to validate instances
of the type you specify when you obtain the validator. However, it can also be
used to validate subclasses of the specified type, but it will use the rules
defined for the specified target type.
• The Object Validator will always use rules in configuration for the type of
the target object, and attributes and self-validation methods within the target
instance. In contrast, you can use a specific factory class type to obtain
validators that only validate the target instance using one type of rule source
(in other words, just configuration rule sets, or just one type of attributes).
• The Object Validator will acquire a type-specific validator of the appropriate
type each time you call the Validate method, even if you use the same instance
of the Object validator every time. In contrast, a validator obtained from
one of the factory classes does not need to do this, and will offer improved
performance.
As you can see from the flexibility and performance advantages listed above, you should
generally consider using the ValidatorFactory approach for creating validators to validate
objects rather than creating individual Object Validator instances.
Validating Collections of Objects
Before we leave the topic of validation of objects, it is worth looking at how you can
validate collections of objects. The Object Collection validator can be used to check that
every object in a collection is of the specified type, and to perform validation on every
member of the collection. You can apply the Object Collection validator to a property
of a class that is a collection of objects using a Validation block attribute if you wish,
as shown in this example that ensures that the ProductList property is a collection of
Product instances, and that every instance in the collection contains valid values.
[ObjectCollectionValidator(typeof(Product))]
public Product[] ProductList { get; }

166 ch a pter six
You can also create an Object Collection validator programmatically, and use it to validate
a collection held in a variable. The example named Validating a Collection of Objects dem-
onstrates this approach. It creates a List named productList that contains two instances
of the Product class, one of which contains all valid values, and one that contains invalid
values for some of its properties. Next, the code creates an Object Collection validator
for the Product type and then calls the Validate method.
// Create an Object Collection Validator for the collection type.
Validator collValidator
= new ObjectCollectionValidator(typeof(Product));
// Validate all of the objects in the collection.
ValidationResults results = collValidator.Validate(productList);
Finally, the code displays the validation errors using the same routine as in earlier examples.
As the invalid Product instance contains the same values as the previous example, the
result is the same. You can run the example and view the code to verify that this is the
case.
Having seen how you can use rule sets defined in configuration, and how you can display
the results of a validation process, we can move on to explore the other ways you can
define validation rules in your applications. The example application contains two classes
that contain validation attributes and a self-validation method. The AttributedProduct
class contains Validation block attributes, while the AnnotatedProduct class contains
data annotation attributes.
Using the Validation Block Attributes
The example, Using Validation Attributes and Self-Validation, demonstrates use of the Vali-
dation block attributes. The AttributedProduct class has a range of different Validation
block attributes applied to the properties of the class, applying the same rules as the
MyRuleset rule set defined in configuration and used in the previous examples.
For example, the ID property carries attributes that add a Not Null validator, a String
Length validator, and a Regular Expression validator. These validation rules are, by default,
combined with an And operation, so all of the conditions must be satisfied if validation
will succeed for the value of this property.
[NotNullValidator(MessageTemplate = “You must specify a product ID.")]
[StringLengthValidator(6, RangeBoundaryType.Inclusive,
6, RangeBoundaryType.Inclusive,
MessageTemplate = "Product ID must be {3} characters.")]
[RegexValidator("[A-Z]{2}[0-9]{4}",
MessageTemplate = "Product ID must be 2 letters and 4 numbers.")]
public string ID { get; set; }

167banishing va lidation com plication
Other validation attributes used within the AttributedProduct class include an Enum
Conversion validator that ensures that the value of the ProductType property is a member
of the ProductType enumeration, shown here. Note that the token {3} for the String
Length validator used in the previous section of code is the lower bound value, while
the token {3} for the Enum Conversion validator is the name of the enumeration it is
comparing the validated value against.
[EnumConversionValidator(typeof(ProductType),
MessageTemplate = "Product type must be a value from the '{3}' enumeration.")]
public string ProductType { get; set; }
Combining Validation Attribute Operations
One other use of validation attributes worth a mention here is the application of a com-
posite validator. By default, multiple validators defined for a member are combined using
the And operation. If you want to combine multiple validation attributes using an
Or operation, you must apply the ValidatorComposition attribute first and specify
CompositionType.Or. The results of all validation operations defined in subsequent vali-
dation attributes are combined using the operation you specify for composition type.
The example class uses a ValidatorComposition attribute on the nullable DateDue
property to combine a Not Null validator and a Relative DateTime validator. The
top-level error message that the user will see for this property (when you do not
recursively iterate through the contents of the ValidationResults) is the message from
the ValidatorComposition attribute.
[ValidatorComposition(CompositionType.Or,
MessageTemplate = "Date due must be between today and six months time.")]
[NotNullValidator(Negated = true,
MessageTemplate = "Value can be NULL or a date.")]
[RelativeDateTimeValidator(0, DateTimeUnit.Day, 6, DateTimeUnit.Month,
MessageTemplate = "Value can be NULL or a date.")]
public DateTime? DateDue { get; set; }
If you want to allow null values for a member of a class, you can apply the IgnoreNulls
attribute.
Applying Self-Validation
Some validation rules are too complex to apply using the validators provided with the
Validation block or the .NET Data Annotation validation attributes. It may be that the
values you need to perform validation come from different places, such as properties,
fields, and internal variables, or involve complex calculations.
In this case, you can define self-validation rules as methods within your class (the
method names are irrelevant), as described earlier in this chapter in the section “Self-
Validation.” We’ve implemented a self-validation routine in the AttributedProduct class
in the example application. The method simply checks that the combination of the values
of the InStock, OnOrder, and DateDue properties meets predefined rules. You can
examine the code within the AttributedProduct class to see the implementation.

168 ch a pter six
Results of the Validation Operation
The example creates an invalid instance of the AttributedProduct class shown above,
validates it, and then displays the results of the validation process. It creates the following
output, though we have removed some of the repeated output here for clarity. You can
run the example yourself to see the full results.
Created and populated a valid instance of the AttributedProduct class.
There were no validation errors.
Created and populated an invalid instance of the AttributedProduct class.
The following 7 validation errors were detected:
+ Target object: AttributedProduct, Member: ID
- Detected by: RegexValidator
- Validated value was: '12075'
- Message: 'Product ID must be 2 capital letters and 4 numbers.'
...
...
+ Target object: AttributedProduct, Member: ProductType
- Detected by: EnumConversionValidator
- Validated value was: 'FurryThings'
- Message: 'Product type must be a value from the 'ProductType' enumeration.'
...
...
+ Target object: AttributedProduct, Member: DateDue
- Detected by: OrCompositeValidator
- Validated value was: '19/08/2010 15:55:16'
- Message: 'Date due must be between today and six months time.'
+ Nested validators:
- Detected by: RelativeDateTimeValidator
- Validated value was: '18/11/2010 13:36:02'
- Message: 'Value can be NULL or a date.'
- Detected by: NotNullValidator
- Validated value was: '18/11/2010 13:36:02'
+ Target object: AttributedProduct, Member: ProductSelfValidation
- Detected by: [none]
- Tag value:
- Message: 'Total inventory (in stock and on order) cannot exceed 100 items.'
Notice that the output includes the name of the type and the name of the member
(property) that was validated, as well as displaying type of validator that detected the
error, the current value of the member, and the message. For the DateDue property, the
output shows the two validators nested within the Or Composite validator. Finally, it
shows the result from the self-validation method. The values you see for the self-validation
are those the code in the self-validation method specifically added to the Validation
Results instance.

169b a nishing validation complicat ion
Validating Subclass Types
While discussing validation through attributes, we should briefly touch on the factors
involved when you validate a class that inherits from the type you specified when creating
the validator you use to validate it. For example, if you have a class named SaleProduct
that derives from Product, you can use a validator defined for the Product class to vali-
date instances of the SaleProduct class. The Validate method will also apply any relevant
rules defined in attributes in both the SaleProduct class and the Product base class.
If the derived class inherits a member from the base class and does not override it, the
validators for that member defined in the base class apply to the derived class. If the de-
rived class inherits a member but overrides it, the validators defined in the base class for
that member do not apply to the derived class.
Validating Properties that are Objects
In many cases, you may have a property of your class defined as the type of another class.
For example, your OrderLine class is likely to have a property that is a reference to an
instance of the Product class. It’s common for this property to be defined as a base type
or interface type, allowing you to set it to an instance of any class that inherits or imple-
ments the type specified for the property.
You can validate such a property using an ObjectValidator attribute within the class.
However, by default, the validator will validate the property using rules defined for the
type of the property—in this example the type IProduct. If you want the validation to
take place based on the actual type of the object that is currently set as the value of the
property, you can add the ValidateActualType parameter to the ObjectValidator attri-
bute, as shown here.
public class OrderLine
{
[ObjectValidator(ValidateActualType=true)]
public IProduct OrderProduct { get; set; }
...
}
Using Data Annotation Attributes
The System.ComponentModel.DataAnnotations namespace in the .NET Framework
contains a series of attributes that you can add to your classes and class members to
signify metadata for these classes and members. They include a range of validation attri-
butes that you can use to apply validation rules to your classes in much the same way as
you can with the Validation block attributes. For example, the following shows how you
can use the Range attribute to specify that the value of the property named OnOrder
must be between 0 and 50.
[Range(0, 50, ErrorMessage = “Quantity on order must be between 0 and 50.")]
public int OnOrder { get; set; }

170 ch a pter six
Compared to the validation attributes provided with the Validation block, there are some
limitations when using the validation attributes from the DataAnnotations namespace:
• The range of supported validation operations is less comprehensive, though
there are some new validation types available in.NET Framework 4.0 that
extend the range. However, some validation operations such as property value
comparison, enumeration membership checking, and relative date and time
comparison are not available when using data annotation validation attributes.
• There is no capability to use Or composition, as there is with the Or Composite
validator in the Validation block. The only composition available with data
annotation validation attributes is the And operation.
• You cannot specify rule sets names, and so all rules implemented with data
annotation validation attributes belong to the default rule set.
• There is no simple built-in support for self-validation, as there is in the
Validation block.
You can, of course, include both data annotation and Validation block attributes in the
same class if you wish, and implement self-validation using the Validation block mecha-
nism in a class that contains data annotation validation attributes. The validation methods
in the Validation block will process both types of attributes.
For more information about data annotations, see http://msdn.microsoft.com/en-us/
library/system.componentmodel.dataannotations.aspx (.NET Framework 3.5) and http://
msdn.microsoft.com/en-us/library/system.componentmodel.dataannotations(VS.100).
aspx (.NET Framework 4.0).
An Example of Using Data Annotations
The examples we provide for this chapter include one named Using Data Annotation At-
tributes and Self-Validation. This uses only the range of data annotation attributes in ver-
sion 3.5 of the .NET Framework, so you can run it on machines that do not have Visual
Studio 2010 or version 4.0 of the .NET Framework installed.
The class named AnnotatedProduct contains data annotation attributes to imple-
ment the same rules as those applied by Validation block attributes in the Attributed
Product class (which you saw in the previous example). However, due to the limitations
with data annotations, the self-validation method within the class has to do more work
to achieve the same validation rules.
For example, it has to check the minimum value of some properties as the data an-
notation attributes in version 3.5 of the .NET Framework only support validation of the
maximum value (in version 4.0, they do support minimum value validation). It also has to
check the value of the DateDue property to ensure it is not more than six months in the
future, and that the value of the ProductType property is a member of the ProductType
enumeration.
To perform the enumeration check, the self-validation method creates an instance of
the Validation block Enum Conversion validator programmatically, and then calls its
DoValidate method (which allows you to pass in all of the values required to perform the
validation). The code passes to this method the value of the ProductType property,

171b a nishing va lidation complic ation
a reference to the current object, the name of the enumeration, and a reference to the
ValidationResults instance being use to hold all of the validation errors.
var enumConverterValidator = new EnumConversionValidator(typeof(ProductType),
"Product type must be a value from the '{3}' enumeration.");
enumConverterValidator.DoValidate(ProductType, this, "ProductType", results);
The code that creates the object to validate, validates it, and then displays the results is
the same as you saw in the previous example, with the exception that it creates an invalid
instance of the AnnotatedProduct class, rather than the AttributedProduct class. The
result when you run this example is also similar to that of the previous example, but with
a few exceptions. We’ve listed some of the output here.
Created and populated an invalid instance of the AnnotatedProduct class.
The following 7 validation errors were detected:
+ Target object: AnnotatedProduct, Member: ID
- Detected by: [none]
- Tag value:
- Message: 'Product ID must be 6 characters.'
...
+ Target object: AnnotatedProduct, Member: ProductSelfValidation
- Detected by: [none]
- Tag value:
- Message: 'Total inventory (in stock and on order) cannot exceed 100 items.'
+ Target object: AnnotatedProduct, Member: ID
- Detected by: ValidationAttributeValidator
- Message: 'Product ID must be 2 capital letters and 4 numbers.'
+ Target object: AnnotatedProduct, Member: InStock
- Detected by: ValidationAttributeValidator
- Message: 'Quantity in stock cannot be less than 0.'
You can see that validation failures detected for data annotations contain less information
than those detected for the Validation block attributes, and validation errors are shown
as being detected by the ValidationAttributeValidator class—the base class for data
annotation validation attributes. However, where we performed additional validation
using the self-validation method, there is extra information available.
Defining Attributes in Metadata Classes
In some cases, you may want to locate your validation attributes (both Validation block
attributes and .NET Data Annotation validation attributes) in a file separate from the one
that defines the class that you will validate. This is a common scenario when you are using
tools that generate the class files, and would therefore overwrite your validation
attributes. To avoid this you can locate your validation attributes in a separate file that
forms a partial class along with the main class file. This approach makes use of the Meta
dataType attribute from the System.ComponentModel.DataAnnotations namespace.

172 ch a pter six
You apply the MetadataType attribute to your main class file, specifying the type of
the class that stores the validation attributes you want to apply to your main class
members. You must define this as a partial class, as shown here. The only change to the
content of this class compared to the attributed versions you saw in the previous sections
of this chapter is that it contains no validation attributes.
[MetadataType(typeof(ProductMetadata))]
public partial class Product
{
... Existing members dened here, but without attributes or annotations ...
}
You then define the metadata type as a normal class, except that you declare simple
properties for each of the members to which you want to apply validation attributes. The
actual type of these properties is not important, and is ignored by the compiler. The
accepted approach is to declare them all as type Object. As an example, if your Product
class contains the ID and Description properties, you can define the metadata class for
it, as shown here.
public class ProductMetadata
{
[Required(ErrorMessage = "ID is required.")]
[RegularExpression("[A-Z]{2}[0-9]{4}",
ErrorMessage = "Product ID must be 2 capital letters and 4 numbers.")]
public object ID;
[StringLength(100, ErrorMessage = "Description must be less than 100 chars.")]
public object Description;
}
Specifying the Location of Validation Rules
When you use a validator obtained from the ValidatorFactory, as we’ve done so far in the
example, validation will take into account any applicable rule sets defined in configuration
and in attributes and self-validation methods found within the target object. However,
you can resolve different factory types if you want to perform validation using only rule
sets defined in configuration, or using only attributes and self-validation. The specialized
types of factory you can use are:
• ConfigurationValidatorFactory. This factory creates validators that only apply
rules defined in a configuration file, or in a configuration source you provide.
By default it looks for configuration in the default configuration file (App.
config or Web.config). However, you can create an instance of a class that
implements the IConfigurationSource interface, populate it with configuration
data from another file or configuration storage media, and use this when you
create this validator factory.

173b a nishing validation complication
• AttributeValidatorFactory. This factory creates validators that only apply rules
defined in Validation block attributes located in the target class, and rules
defined through self-validation methods.
• ValidationAttributeValidatorFactory. This factory creates validators that only
apply rules defined in .NET Data Annotations validation attributes.
For example, to obtain a validator for the Product class that validates using only attributes
and self-validation methods within the target instance, and validate an instance of this
class, you resolve an instance of the AttributeValidatorFactory from the container, as
shown here.
AttributeValidatorFactory attrFactory =
EnterpriseLibraryContainer.Current.GetInstance<AttributeValidatorFactory>();
Validator<Product> pValidator = attrFactory.CreateValidator<Product>();
ValidationResults valResults = pValidator.Validate(myProduct);
You can create an instance of any of the validators included in the Validation block
directly in your code, and then call its Validate method to validate an object or value. For
example, you can create a new Date Time Range validator and set the properties, such
as the upper and lower bounds, the message, and the Tag property. Then you call the
Validate method of the validator, specifying the object or value you want to validate. The
example, Creating and Using Validators Directly, demonstrates the creation and use of
some of the individual and composite validators provided with the Validation block.
Validating Strings for Contained Characters
The example code first creates a ContainsCharactersValidator that specifies that the
validated value must contain the characters c, a, and t, and that it must contain all
of these characters (you can, if you wish, specify that it must only contain Any of the
characters). The code also sets the Tag property to a user-defined string that helps to
identify the validator in the list of errors. The overload of the Validate method used here
returns a new ValidationResults instance containing a ValidationResult instance for
each validation error that occurred.
// Create a Contains Characters Validator and use it to validate a string.
Validator charsValidator = new ContainsCharactersValidator("cat",
ContainsCharacters.All,
" Value must contain {4} of the characters '{3}'.");
charsValidator.Tag = "Validating the String value 'disconnected'";
ValidationResults valResults = charsValidator.Validate("disconnected");
Validating Integers within a Domain
Next, the example code creates a new DomainValidator for integer values, specifying an
error message and an array of acceptable values. Then it can be used to validate an integer,
with a reference to the existing ValidationResults instance passed to the Validate
method this time.

174 ch a pter six
// Create a Domain Validator and use it to validate an Integer value.
Validator integerValidator = new DomainValidator<int>(
"Value must be in the list 1, 3, 7, 11, 13.",
new int[] {1, 3, 7, 11, 13});
integerValidator.Tag = "Validating the Integer value '42'";
integerValidator.Validate(42, valResults);
Validating with a Composite Validator
To show how you can create composite validators, the next section of the example cre-
ates an array containing two validators: a NotNullValidator and a StringLengthValidator.
The first parameter of the NotNullValidator sets the Negated property. In this example,
we set it to true so that the validator will allow null values. The StringLengthValidator
specifies that the string it validates must be exactly five characters long. Notice that range
validators such as the StringLengthValidator have properties that specify not only the
upper and lower bound values, but also whether these values are included in the valid
result set (RangeBoundaryType.Inclusive) or excluded (RangeBoundaryType.Exclusive).
If you do not want to specify a value for the upper or lower bound of a range validator,
you must set the corresponding property to RangeBoundaryType.Ignore.
Validator[] valArray = new Validator[]
{
new NotNullValidator(true, "Value can be NULL."),
new StringLengthValidator(5, RangeBoundaryType.Inclusive,
5, RangeBoundaryType.Inclusive,
"Must be between {3} ({4}) and {5} ({6}) chars.")
};
Having created an array of validators, we can now use this to create a composite validator.
There are two composite validators, the AndCompositeValidator and the Or
CompositeValidator. You can combine these as well to create any nested hierarchy of
validators you require, with each combination returning a valid result if all (with the
AndCompositeValidator) or any (with the OrCompositeValidator) of the validators it
contains are valid. The example creates an OrCompositeValidator, which will return true
(valid) if the validated string is either null or contains exactly five characters. Then it
validates a null value and an invalid string, passing into the Validate method the existing
ValidationResults instance.
Validator orValidator = new OrCompositeValidator(
"Value can be NULL or a string of 5 characters.",
valArray);
// Validate two values with the Or Composite Validator.
orValidator.Validate(null, valResults);
orValidator.Validate("MoreThan5Chars", valResults);

175banishing va lidation com plication
Validating Single Members of an Object
The Validation block contains three validators you can use to validate individual members
of a class directly, instead of validating the entire type using attributes or rule sets.
Although you may not use this approach very often, you might find it to be useful in some
scenarios. The Field Value validator can be used to validate the value of a field of a type.
The Method Return Value validator can be used to validate the return value of a method
of a type. Finally, the Property Value validator can be used to validate the value of a
property of a type.
The example shows how you can use a Property Value validator. The code creates an
instance of the Product class that has an invalid value for the ID property, and then
creates an instance of the PropertyValueValidator class, specifying the type to validate
and the name of the target property. This second parameter of the constructor is the
validator to use to validate the property value—in this example a Regular Expression
validator. Then the code can initiate validation by calling the Validate method, passing in
the existing ValidationResults instance, as shown here.
IProduct productWithID = new Product();
PopulateInvalidProduct(productWithID);
Validator propValidator = new PropertyValueValidator<Product>("ID",
new RegexValidator("[A-Z]{2}[0-9]{4}",
"Product ID must be 2 capital letters and 4 numbers.")
);
propValidator.Validate(productWithID, valResults);
If required, you can create a composite validator containing a combination of validators,
and specify this composite validator in the second parameter. A similar technique can be
used with the Field Value validator and Method Return Value validator.
After performing all of the validation operations, the example displays the results by
iterating through the ValidationResults instance that contains the results for all of the
preceding validation operations. It uses the same ShowValidationResults routine we
described earlier in this chapter. This is the result:
The following 4 validation errors were detected:
+ Target object: disconnected, Member:
- Detected by: ContainsCharactersValidator
- Tag value: Validating the String value 'disconnected'
- Message: 'Value must contain All of the characters 'cat'.'
+ Target object: 42, Member:
- Detected by: DomainValidator`1[System.Int32]
- Tag value: Validating the Integer value '42'
- Message: 'Value must be in the list 1, 3, 7, 11, 13.'
+ Target object: MoreThan5Chars, Member:
- Detected by: OrCompositeValidator
- Message: 'Value can be NULL or a string of 5 characters.'
+ Nested validators:
- Detected by: NotNullValidator

176 ch a pter six
- Message: 'Value can be NULL.'
- Detected by: StringLengthValidator
- Message: 'Value must be between 5 (Inclusive) and 5 (Inclusive) chars.'
+ Target object: Product, Member: ID
- Detected by: RegexValidator
- Message: 'Product ID must be 2 capital letters and 4 numbers.'
You can see how the message template tokens create the content of the messages that
are displayed, and the results of the nested validators we defined for the Or Composite
validator. If you want to experiment with individual validators, you can modify and extend
this example routine to use other validators and combinations of validators.
This section of the chapter demonstrates how you can integrate your validation require-
ments for WCF services with the Validation block. The Validation block allows you to add
validation attributes to the parameters of methods defined in your WCF service contract,
and have the values of these automatically validated each time the method is invoked by
a client.
To use WCF integration, you edit your service contract, edit the WCF configuration
to add the Validation block and behaviors, and then handle errors that arise due to
validation failures. In addition to the other assemblies required by Enterprise Library and
the Validation block, you must add the assembly named Microsoft.Practices.Enterprise
Library.Validation.Integration.WCF to your application and reference them all in your
service project.
The example, Validating Parameters in a WCF Service, demonstrates validation in a
simple WCF service. It uses a service named ProductService (defined in the Example
Service project of the solution). This service contains a method named AddNewProduct
that accepts a set of values for a product, and adds this product to its internal list of
products.
Defining Validation in the Service Contract
The service contract, shown below, carries the ValidationBehavior attribute, and each
service method defines a fault contract of type ValidationFault.
[ServiceContract]
[ValidationBehavior]
public interface IProductService
{
[OperationContract]
[FaultContract(typeof(ValidationFault))]
bool AddNewProduct(
[NotNullValidator(MessageTemplate = "Must specify a product ID.")]
[StringLengthValidator(6, RangeBoundaryType.Inclusive,
6, RangeBoundaryType.Inclusive,
MessageTemplate = "Product ID must be {3} characters.")]
[RegexValidator("[A-Z]{2}[0-9]{4}",
MessageTemplate = "Product ID must be 2 letters and 4 numbers.")]

177banishing validation complicat ion
string id,
...
[IgnoreNulls(MessageTemplate = "Description can be NULL or a string value.")]
[StringLengthValidator(5, RangeBoundaryType.Inclusive,
100, RangeBoundaryType.Inclusive,
MessageTemplate = "Description must be between {3} and {5} characters.")]
string description,
[EnumConversionValidator(typeof(ProductType),
MessageTemplate = "Must be a value from the '{3}' enumeration.")]
string prodType,
...
[ValidatorComposition(CompositionType.Or,
MessageTemplate = "Date must be between today and six months time.")]
[NotNullValidator(Negated = true,
MessageTemplate = "Value can be NULL or a date.")]
[RelativeDateTimeValidator(0, DateTimeUnit.Day, 6, DateTimeUnit.Month,
MessageTemplate = "Value can be NULL or a date.")]
DateTime? dateDue);
}
You can see that the service contract defines a method named AddNewProduct that
takes as parameters the value for each property of the Product class we’ve used through-
out the examples. Although the previous listing omits some attributes to limit duplication
and make it easier to see the structure of the contract, the rules applied in the example
service we provide are the same as you saw in earlier examples of validating a Product
instance. The method implementation within the WCF service is simple—it just uses the
values provided to create a new Product and adds it to a generic List.
Editing the Service Configuration
After you define the service and its validation rules, you must edit the service configura-
tion to force validation to occur. The first step is to specify the Validation block as a
behavior extension. You will need to provide the appropriate version information for
the assembly, which you can obtain from the configuration file generated by the
configuration tool for the client application, or from the source code of the example,
depending on whether you are using the assemblies provided with Enterprise Library or
assemblies you have compiled yourself.
<extensions>
<behaviorExtensions>
<add name="validation"
type="Microsoft.Practices...WCF.ValidationElement,
Microsoft.Practices...WCF" />
</behaviorExtensions>
... other existing behavior extensions here ...
</extensions>

178 ch a pter six
Next, you edit the <behaviors> section of the configuration to define the validation
behavior you want to apply. As well as turning on validation here, you can specify a rule
set name (as shown) if you want to perform validation using only a subset of the rules
defined in the service. Validation will then only include rules defined in validation
attributes that contain the appropriate Ruleset parameter (the configuration for the
example application does not specify a rule set name here).
<behaviors>
<endpointBehaviors>
<behavior name="ValidationBehavior">
<validation enabled="true" ruleset="MyRuleset" />
</behavior>
</endpointBehaviors>
... other existing behaviors here ...
</behaviors>
Note that you cannot use a configuration rule set with a WCF service—all validation
rules must be in attributes.
Finally, you edit the <services> section of the configuration to link the ValidationBehavior
defined above to the service your WCF application exposes. You do this by adding the
behaviorConfiguration attribute to the service element for your service, as shown here.
<services>
<service behaviorConguration="ExampleService.ProductServiceBehavior"
name="ExampleService.ProductService">
<endpoint address="" behaviorConguration="ValidationBehavior"
binding="wsHttpBinding" contract="ExampleService.IProductService">
<identity>
<dns value="localhost" />
</identity>
</endpoint>
<endpoint address="mex" binding="mexHttpBinding" contract="IMetadataExchange" />
</service>
...
</services>
Using the Product Service and Detecting Validation Errors
At last you can use the WCF service you have created. The example uses a service refer-
ence added to the main project, and initializes the service using the service reference in
the usual way. It then creates a new instance of a Product class, populates it with valid
values, and calls the AddNewProduct method of the WCF service. Then it repeats the
process, but this time by populating the product instance with invalid values. You can
examine the code in the example to see this if you wish.

179banishing validation complication
However, one important issue is the way that service exceptions are handled. The
example code specifically catches exceptions of type FaultException<ValidationFault>.
This is the exception generated by the service, and ValidationFault is the type of the fault
contract we specified in the service contract.
Validation errors detected in the WCF service are returned in the Details property
of the exception as a collection. You can simply iterate this collection to see the validation
errors. However, if you want to combine them into a ValidationResults instance for
display, especially if this is part of a multi-step process that may cause other validation
errors, you must convert the collection of validation errors returned in the exception.
The example application does this using a method named ConvertToValidationRe-
sults, as shown here. Notice that the validation errors returned in the ValidationFault do
not contain information about the validator that generated the error, and so we must use
a null value for this when creating each ValidationResult instance.
// Convert the validation details in the exception to individual
// ValidationResult instances and add them to the collection.
ValidationResults adaptedResults = new ValidationResults();
foreach (ValidationDetail result in results)
{
adaptedResults.AddResult(new ValidationResult(result.Message, target,
result.Key, result.Tag, null));
}
return adaptedResults;
When you execute this example, you will see a message indicating the service being
started—this may take a while the first time, and may even time out so that you need to
try again. Then the output shows the result of validating the valid Product instance (which
succeeds) and the result of validating the invalid instance (which produces the now
familiar list of validation errors shown here).
The following 6 validation errors were detected:
+ Target object: Product, Member:
- Detected by: [none]
- Tag value: id
- Message: 'Product ID must be two capital letters and four numbers.'
...
+ Target object: Product, Member:
- Detected by: [none]
- Tag value: description
- Message: 'Description can be NULL or a string value.'
+ Target object: Product, Member:
- Detected by: [none]
- Tag value: prodType
- Message: 'Product type must be a value from the 'ProductType' enumeration.'
...
+ Target object: Product, Member:

180 chapter six
- Detected by: [none]
- Tag value: dateDue
- Message: 'Date due must be between today and six months time.'
Again, we’ve omitted some of the duplication so that you can more easily see the result.
Notice that there is no value available for the name of the member being validated or the
validator that was used. This is a form of exception shielding that prevents external clients
from gaining information about the internal workings of the service. However, the Tag
value returns the name of the parameter that failed validation (the parameter names are
exposed by the service), allowing you to see which of the values you sent to the service
actually failed validation.
The Validation block contains integration components that make it easy to use the
Validation block mechanism and rules to validate user input within the user interface of
ASP.NET, Windows Forms, and WPF applications. While these technologies do include
facilities to perform validation, this validation is generally based on individual controls and
values.
When you integrate the Validation block with your applications, you can validate
entire objects, and collections of objects, using sets of rules you define. You can also apply
complex validation using the wide range of validators included with the Validation block.
This allows you to centrally define a single set of validation rules, and apply them in more
than one layer and when using different UI technologies.
The UI integration technologies provided with the Validation block do not instantiate
the classes that contain the validation rules. This means that you cannot use self-
validation with these technologies.
ASP.NET User Interface Validation
The Validation block includes the PropertyProxyValidator class that derives from the
ASP.NET BaseValidator control, and can therefore take part in the standard ASP.NET
validation cycle. It acts as a wrapper that links an ASP.NET control on your Web page to
a rule set defined in your application through configuration, attributes, and self-validation.
To use the PropertyProxyValidator, you add the assembly named Microsoft.
Practices.EnterpriseLibrary.Validation.Integration.AspNet to your application, and
reference it in your project. You must also include a Register directive in your Web pages
to specify this assembly and the prefix for the element that will insert the PropertyProxy
Validator into your page.
<% @Register TagPrex="EntLibValidators"
Assembly="Microsoft.Practices.EnterpriseLibrary.Validation.Integration.AspNet"
Namespace="Microsoft.Practices.EnterpriseLibrary.Validation.Integration.AspNet"
%>
Then you can define the validation controls in your page. The following shows an example
that validates a text box that accepts a value for the FirstName property of a Customer
class, and validates it using the rule set named RuleSetA.

181b a nishing validation complication
<EntLibValidators:PropertyProxyValidator id="rstNameValidator"
runat="server" ControlToValidate="rstNameTextBox"
PropertyName="FirstName" RulesetName="RuleSetA"
SourceTypeName="ValidationQuickStart.BusinessEntities.Customer" />
One point to be aware of is that, unlike the ASP.NET validation controls, the Validation
block PropertyProxyValidator control does not perform client-side validation. However,
it does integrate with the server-based code and will display validation error messages in
the page in the same way as the ASP.NET validation controls.
For more information about ASP.NET integration, see the documentation installed
with Enterprise Library and available online at http://go.microsoft.com/fwlink/
?LinkId=188874.
Windows Forms User Interface Validation
The Validation block includes the ValidationProvider component that extends Windows
Forms controls to provide validation using a rule set defined in your application through
configuration, attributes, and self-validation. You can handle the Validating event to
perform validation, or invoke validation by calling the PerformValidation method of the
control. You can also specify an ErrorProvider that will receive formatted validation error
messages.
To use the ValidationProvider, you add the assembly named Microsoft.Practices.
EnterpriseLibrary.Validation.Integration.WinForms to your application, and reference it in
your project.
For more information about Windows Forms integration, see the documentation
installed with Enterprise Library and available online at http://go.microsoft.com/
fwlink/?LinkId=188874.
WPF User Interface Validation
The Validation block includes the ValidatorRule component that you can use in the bind-
ing of a WPF control to provide validation using a rule set defined in your application
through configuration, attributes, and self-validation. To use the ValidatorRule, you add
the assembly named Microsoft.Practices.EnterpriseLibrary.Validation.Integration.WPF to
your application, and reference it in your project.
As an example, you can add a validation rule directly to a control, as shown here.
<TextBox x:Name="TextBox1">
<TextBox.Text>
<Binding Path="ValidatedStringProperty" UpdateSourceTrigger="PropertyChanged">
<Binding.ValidationRules>
<vab:ValidatorRule SourceType="{x:Type test:ValidatedObject}"
SourcePropertyName="ValidatedStringProperty"/>
</Binding.ValidationRules>
</Binding>
</TextBox.Text>
</TextBox>

182 ch a pter six
You can also specify a rule set using the RulesetName property, and use the Validation
SpecificationSource property to refine the way that the block creates the validator for
the property.
For more information about WPF integration, see the documentation installed
with Enterprise Library and available online at http://go.microsoft.com/fwlink/
?LinkId=188874.
Creating Custom Validators
While the wide range of validators included with the Validation block should satisfy most
requirements, you can easily create your own custom validators and integrate them with
the block. This may be useful if you have some specific and repetitive validation task that
you need to carry out, and which is more easily accomplished using custom code.
The easiest way to create a custom validator is to create a class that inherits from one
of the abstract base classes provided with the Validation block. Depending on the type
of validation you need to perform, you may choose to inherit from base types such as the
ValueValidator or MemberAccessValidator classes, the Validator<T> base class (for
a strongly typed validator) or from the Validator class (for a loosely typed validator).
You can also create your own custom validation attributes that will apply custom
validators you create. The base class, ValidatorAttribute, provides a good starting point
for this.
For more information on extending Enterprise Library and creating custom providers,
see the documentation installed with Enterprise Library and available online at http://
go.microsoft.com/fwlink/?LinkId=188874.
Summary
In this chapter we have explored the Enterprise Library Validation block and shown you
how easy it is to decouple your validation code from your main application code. The
Validation block allows you to define validation rules and rule sets; and apply them to
objects, method parameters, properties, and fields of objects you use in your application.
You can define these rules using configuration, attributes, or even using custom code and
self-validation within your classes.
Validation is a vital crosscutting concern, and should occur at the perimeter of your
application, at trust boundaries, and (in most cases) between layers and distributed
components. Robust validation can help to protect your applications and services from
malicious users and dangerous input (including SQL injection attacks); ensure that it
processes only valid data and enforces business rules; and improve responsiveness.
The ability to centralize your validation mechanism and the ability to define rules
through configuration also make it easy to deploy and manage applications. Administra-
tors can update the rules when required without requiring recompilation, additional
testing, and redeployment of the application. Alternatively, you can define rules,
validation mechanisms, and parameters within your code if this is a more appropriate
solution for your own requirements.

183
Introduction
How secret are your secrets? We all know how important it is to encrypt information that
is sensitive, whether it is stored in a database or a disk file, passed over the network
(especially the Internet), or even sitting around in memory. Handing over a list of your
customers’ credit card numbers to some geek sitting in his bedroom hacking your online
store is not a great way to build customer confidence. Neither is allowing some disenfran-
chised administrator to leave your company with a plain-text copy of all your trading
partners’ network passwords.
The trouble is that writing all that extra code from scratch to perform reliable and
secure encryption is complicated and soaks up valuable development time. Even the
names of the encryption algorithms are impenetrable, such as AES, 3DES, and RC5. And
when it comes to hashing algorithms, there’s even more of an assortment. How do you
implement routines to use the HMAC, MD5, RIPEMD, and SHA algorithms?
The Microsoft® .NET Framework provides a range of managed code hashing and
encryption mechanisms, but you still need to write a good deal of code to use them.
Thankfully, the Cryptography Application Block makes it all very much easier. Like all of
the other application blocks in Enterprise Library, the Cryptography block is completely
configurable and manageable, and offers a wide range of hashing and encryption options
using many of the common (and some not so common) algorithms.
What Does the Cryptography Block Do?
The Cryptography block provides mechanisms to perform two basic activities: symmetric
encryption/decryption of data, and creating hash values from data. It contains a range of
providers that make use of the platform functions for a range of encryption and hashing
algorithms. These providers have a simple API that makes it easy to perform common
actions, without requiring you to be familiar with the individual algorithms or the process
of interacting with the platform functionality.
7Relieving Cryptography
Complexity

184 ch a pter sev en
One important point you must be aware of is that there are two basic types of encryp-
tion: symmetric (or shared key) encryption, and asymmetric (or public key) encryption.
The Cryptography block supports only symmetric encryption. The patterns & practices
guide “Data Confidentiality” at http://msdn.microsoft.com/en-us/library/aa480570.aspx
provides an overview of both types of encryption and lists the factors you should
consider when using encryption.
Is a secret still secret when you tell it to somebody else? When using symmetric en-
cryption, you don’t have a choice. Unlike asymmetric encryption, which uses different
public and private keys, symmetric encryption uses a single key to both encrypt and
decrypt the data. Therefore, you must share the encryption key with the other party so
that they (or it, in the case of code) can decrypt the data.
In general, this means that the key should be long and complex (the name of your dog
is not a great example of an encryption key). Depending on the algorithm you choose, this
key will usually be a minimum of 128 bits—the configuration tools in Enterprise Library
can generate random keys for you, as you’ll see in the section “Configuring Cryptographic
Providers” later in this chapter. Alternatively, you can configure the encryption providers
to use your existing keys.
Hashing is useful when you need to store a value or data in a way that hides the original
content with no option of reconstructing the original content. An obvious example is
when storing passwords in a database. Of course, the whole point of creating a hash is to
prevent the initial value from being readable; thus, the process is usually described as a
one-way hashing function. Therefore, as you can’t get the original value back again, you
can only use hashing where it is possible to compare hashed values. This is why many
systems allow users only to reset (but not retrieve) their passwords; because the system
itself has no way to retrieve the original password text.
In the case of stored passwords, the process is easy. You just hash the password the
user provides when they log in and compare it with the hash stored in your database or
repository. Just be aware that you cannot provide a forgotten password function that
allows users to retrieve a password. Sending them the hashed value would not be of any
help at all.
Other examples for using hashing are to compare two long string values or large
objects. Hashing effectively generates a unique key for such a value or object that is
considerably smaller, or shorter, than the value itself.
?
The keys required for both encryption and decryption are stored in separate files, one for
each key, on your machine. The full physical path and name of each key file is stored in
the configuration of your application. If you move your application or key files, you must
update this path.
One vitally important issue you must be aware of when using encryption (both
symmetric providers and some hashing algorithms) is that, if a malicious user or attacker

185relie v ing cryptogr a phy complexit y
obtains access to your keys, they can use them to decrypt your data. Therefore, to protect
the keys, the key files are encrypted automatically using the Windows® Data Protection
application programming interface (DPAPI), which relies on either a machine key or a user
key that is auto-generated by the operating system. If you lose a key file, or if a malicious
user or attacker damages it, you will be unable to decrypt the data you encrypted with
that key.
Therefore, ensure that you protect your key files from malicious access, and keep
backup copies. In particular, protect your keys with access control lists (ACL) that grant
only the necessary permissions to the identities that require access to the key file, and
avoid allowing remote debugging if the computer runs in a high-risk environment (such as
a Web server that allows anonymous access).
For more information on DPAPI, and a description of how it works, see “Windows
Data Protection” at http://msdn.microsoft.com/en-us/library/ms995355.aspx.
?
The Cryptography block integrates with the Caching block, where it can be used to en-
crypt cached data. When you add a symmetric storage encryption provider to the Caching
block, it automatically adds the Cryptography block to your application configuration.
The Security block uses the Caching block to store credentials. When you add a
caching store provider to a security cache for the Security block, you can configure that
caching store provider to use one of your configured cache managers. If that cache
manager uses a persistent backing store, you should ensure that you use a symmetric
storage encryption provider for that cache manager.
How Do I Use the Cryptography Block?
Like all of the Enterprise Library application blocks, you start by configuring your applica-
tion to use the block, as demonstrated in Chapter 1, “Introduction.” Then you add one or
more hash algorithm providers and one or more symmetric encryption providers, depend-
ing on the requirements of your application. For each of the providers that you add, you
select a specific cryptographic provider (algorithm type) and set the relevant properties
for each provider. If none of the built-in hash and symmetric encryption providers meets
your requirements, you can create custom providers and add these to your application
configuration.
After you add the hash algorithm providers and symmetric encryption providers you
want to use to your configuration, you can specify which of each of these is the default—
the one that the block will use if you don’t specify a provider by name in your application
code. You just use the drop-down lists for the DefaultHashProvider and Default
SymmetricCryptoProvider properties of the Cryptography Application Block node to
select the default providers.
Of course, as part of the configuration task, you still need to decide which algorithms
to use. For a Hash Algorithm Provider, you can specify if the provider will use a SALT
value (a random string pre-pended to the plain-text before hashing to improve the
security of the algorithm). In addition, for some of the hash algorithms, you can specify or

186 ch a pter sev en
generate a key for the algorithm. Other providers, such as SHA and MD5, do not require
a key. As a general recommendation, you should aim to use at minimum the SHA256 algo-
rithm for hashing, and preferably a more robust version such as SHA384 or SHA512.
You can use two different types of Symmetric Encryption Provider in the Cryptog-
raphy block (in addition to custom providers that you create). You can choose the DPAPI
provider, or one of the well-known symmetric algorithms such as AES or 3DES. As
a general recommendation, you should aim to use the AES (Rijndael) algorithm for
encryption.
Comprehensive information about the many different encryption and hashing algorithms
is contained in the Handbook of Applied Cryptography (Menezes, Alfred J., Paul C. van
Oorschot and Scott A. Vanstone, CRC Press, October 1996, ISBN: 0-8493-8523-7).
See http://www.cacr.math.uwaterloo.ca/hac/ for more information. You will also find
a list of publications that focus on cryptography at “Additional Documentation on
Cryptography” (http://msdn.microsoft.com/en-us/library/aa375543(VS.85).aspx).
In addition to the obvious properties for each cryptographic provider you add to your
configuration, such as the name, some providers require you to specify an encryption key.
If you already have a DPAPI-encrypted key file for the selected algorithm type, you can
use this. Alternatively, you can copy an existing plain text value of the appropriate size
and use that as the key value. The third approach is to allow the Enterprise Library
configuration to generate a new key for you.
When you add a provider that requires a key to your configuration, the configuration
tool starts the Cryptographic Key Wizard. This makes it easy to select or create the key
you need and save it to a file and to set the appropriate values in the configuration. The
only page you may find confusing is the final one where you must specify either Machine
mode or User mode access to the key.
You should select Machine mode if your application runs on its own dedicated
server that is not shared with other applications, or when you have multiple applications
that run on the same server and you want those applications to be able to share sensitive
information.
Select User mode if you run your application in a shared hosting environment and
you want to make sure that your application’s sensitive data is not accessible to other
applications on the server. In this situation, each application should run under a separate
identity, and the resources for the application—such as files and databases—should be
restricted to that identity.
If you add a DPAPI symmetric cryptography provider to your list of symmetric
providers, you can specify the Protection Scope as either CurrentUser or LocalMachine.
Current user means that DPAPI uses a loaded user profile to generate the key, and only
that user account can decrypt the encrypted data. Local machine means that any code
running on the machine has access to the protected key, and can decrypt any secret
encrypted in the same mode.

187relie v ing cryptogr a phy complexit y
To use the Cryptography block features in your application, you must reference the re-
quired assemblies and then instantiate the objects you want to use in your code. In addi-
tion to the Enterprise Library assemblies you require in every Enterprise Library project
(listed in Chapter 1, “Introduction”), you should reference or add to your bin folder the
following assemblies:
• Microsoft.Practices.EnterpriseLibrary.Security.Cryptography.dll
• Microsoft.Practices.EnterpriseLibrary.Security.Caching.dll
To make it easier to use the objects in the Cryptography block, you can add references to
the relevant namespaces to your project. Then you are ready to write some code. The
following sections demonstrate the tasks you can accomplish, and provide more details
about how the block helps you to implement a common and reusable strategy for
cryptography.
However, before you start to use the objects in the block, you must resolve an
instance of the CryptographyManager class. This class exposes the API that you interact
with to use the cryptography providers (symmetric and hash providers) in your code. The
simplest approach is to use the GetInstance method of the Enterprise Library container,
as shown here.
// Resolve the default CryptographyManager object from the container.
CryptographyManager defaultCrypto
= EnterpriseLibraryContainer.Current.GetInstance<CryptographyManager>();
Diving in with an Example
You can download an example application (a simple console-based application) that
demonstrates all of the scenarios you will see in the remainder of this chapter. You can
run this directly from the bin\debug folder, or open the solution named Cryptography in
Microsoft® Visual Studio® to see all of the code as you run the examples.
Before you attempt to run the example, you must create new encryption keys for the
block to use to encrypt the data when using a symmetric encryption provider. This is
because the key is tied to either the user or the machine, and so the key included in
the sample files will not work on your machine. In the configuration console, select the
AesManaged symmetric provider, and click the “...” button in the Key property to
start the Key wizard. Use this wizard to generate a new key, save the key file, and
automatically update the content of App.config. Then repeat this procedure for the
RijndaelManager symmetric provider. Rijndael is an implementation of the AES
algorithm. However, we will demonstrate both as we show you how to encrypt and
decrypt both value types and objects.

188 ch a pter sev en
To encrypt and decrypt information, you use a symmetric encryption provider. As you saw
earlier, the Cryptography block includes several symmetric encryption providers. The
examples we provide use two of these: the AES managed symmetric algorithm provider
and the Rijndael managed symmetric algorithm provider. The examples demonstrate how
to use these providers to encrypt both a text string and an object (in our example this is
a simple class named Product), and how to decrypt the encrypted item.
The Cryptography Manager exposes two methods for working with symmetric
encryption providers:
• The EncryptSymmetric method takes as parameters the name of a symmetric
provider configured in the Cryptography block for the application, and the item
to encrypt. There are two overloads of this method. One accepts a string and
returns a base-64 encoded string containing the encrypted text. The second
overload accepts the data to encrypt as a byte array, and returns a byte array
containing the encrypted data.
• The DecryptSymmetric method takes as parameters the name of a symmetric
provider configured in the Cryptography block for the application, and the item
to decrypt. There are two overloads of this method. One accepts a base-64
encoded string containing the encrypted text and returns the decrypted text.
The second overload accepts a byte array containing the encrypted data and
returns a byte array containing the decrypted item.
Encrypting and Decrypting a Text String
The first example, Encrypt and Decrypt a Text String using a Symmetric Algorithm, uses the
AES managed symmetric algorithm provider to encrypt and decrypt a text string.
The code shown below creates a text string and then calls the EncryptSymmetric
method of the Cryptography Manager, passing to it the name of the AES managed sym-
metric algorithm provider defined in the configuration of the application, and the text
string to encrypt. To decrypt the resulting string, the code then calls the Decrypt
Symmetric method of the Cryptography Manager, passing to it (as before) the name of
the AES managed symmetric algorithm provider defined in the configuration of the
application, and the encrypted base-64 encoded string. We’ve removed some of the lines
of code that simply write values to the console screen to make it easier to see the code
that actually does the work.
// Dene the text string instance to encrypt.
string sampleText = "This is some text to encrypt.";
// Use the AES Symmetric Algorithm Provider.
// The overload of the EncryptSymmetric method that takes a
// string returns the result as a Base-64 encoded string.
string encrypted = defaultCrypto.EncryptSymmetric("AesManaged", sampleText);
// Now decrypt the result string.

189reliev ing cryptogr a phy com plexity
string decrypted = defaultCrypto.DecryptSymmetric("AesManaged", encrypted);
// Destroy any in-memory variables that hold sensitive information.
encrypted = null;
decrypted = null;
Notice that the last lines of the code destroy the in-memory values that hold the sensitive
information used in the code. This is good practice as it prevents any leakage of this in-
formation should an error occur elsewhere in the application, and prevents any attacker
from being able to dump the memory contents and view the information. If you store data
in a string, set it to null, allowing the garbage collector to remove it from memory during
its next run cycle. If you use an array, call the static Array.Clear method (passing in the
array you used) to remove the contents after use.
You may also consider storing values in memory using the SecureString class, which is
part of the Microsoft .NET Framework. However, in the current release of Enterprise
Library, the methods of the Security block do not accept or return SecureString
instances, and so you must translate them into strings when interacting with the block
methods. For more information about using the SecureString class, see “SecureString
Class” at http://msdn.microsoft.com/en-us/library/system.security.securestring.aspx.
When you run this example, you’ll see the output shown below. You can see the value of
the original string, the base-64 encoded encrypted data, and the result after decrypting
this value.
Text to encrypt is 'This is some text to encrypt.'
Encrypted and Base-64 Encoded result is '+o3zulnEOeggpIqUeiHRD2ID4E85TSPxCjS/D6k
II4CUCjedFvlNOXjrqjna7ZWWbJp5yfyh/VrHw7oQPzUtUaxlXNdyiqSvDGcU814NNq4='
Decrypted string is 'This is some text to encrypt.'
Encrypting and Decrypting an Object Instance
The second example, Encrypt and Decrypt Data using a Symmetric Algorithm, uses the Ri-
jndael managed symmetric algorithm provider to encrypt and decrypt an instance of the
Product class defined within the example project.
The code shown below first creates a new instance of the Product class. We need to
pass this to the EncryptSymmetric method of the Cryptography Manager, along with the
name of the Rijndael managed symmetric algorithm provider defined in the configuration
of the application, as an array of bytes. The easiest way to perform the conversion to a
byte array is to take advantage of the SerializationUtility class in the Caching block. This
class exposes two methods: ToBytes and ToObject. We use the ToBytes method to
convert the Product instance into a byte array before passing it the EncryptSymmetric
method.

190 ch a pter sev en
Then the code decrypts the resulting byte array using the DecryptSymmetric
method of the Cryptography Manager, passing to it (as before) the name of the Rijndael
managed symmetric algorithm provider defined in the configuration of the application,
and the encrypted byte array. The ToObject method of the SerializationUtility class
then converts this back into an instance of the Product class. Again, we’ve removed some
of the lines of code that simply write values to the console screen to make it easier to see
the code that actually does the work.
// Create the object instance to encrypt.
Product sampleObject = new Product(42, "Fun Thing",
"Something to keep the grandchildren quiet.");
// Use the Rijndael Symmetric Algorithm Provider.
// Must serialize the object to a byte array rst. One easy way is to use
// the methods of the SerializationUtility class from the Caching block.
byte[] serializedObject = SerializationUtility.ToBytes(sampleObject);
// The overload of the EncryptSymmetric method that takes a
// byte array returns the result as a byte array.
byte[] encrypted = defaultCrypto.EncryptSymmetric("RijndaelManaged",
serializedObject);
// Now decrypt the result byte array and de-serialize the
// result to get the original object.
byte[] decrypted = defaultCrypto.DecryptSymmetric("RijndaelManaged", encrypted);
Product decryptedObject = (Product) SerializationUtility.ToObject(decrypted);
// Destroy any in-memory variables that hold sensitive information.
Array.Clear(encrypted, 0, encrypted.Length);
Array.Clear(decrypted, 0, decrypted.Length);
Array.Clear(serializedObject, 0, serializedObject.Length);
decryptedObject = null;
If you run this example, you’ll see the output shown below. You can see the value of the
properties of the Product class we created, the encrypted data (we base-64 encoded it
for display), and the result after decrypting this data.
Object to encrypt is 'CryptographyExample.Product'
- Product.ID = 42
- Product.Name = Fun Thing
- Product.Description = Something to keep the grandchildren quiet.
Encrypted result is 'System.Byte[]'
Contents (when Base-64 encoded for display) are:
OEnp9yOP6LInmsfFDaGfVR7RJbwU4/TQskYtIPsqXKcx4UhxMctzBPWXuUX8Q+RgKqYdGAZVVbSCR2Vx
yTmSDdYQNdiSohA5Fo6bWOqhOR5V0uxdcfNUgKhUhuIAhl5RZ8W5WD8M2CdMiqG1gPgQjJC2afwf1mJn

191r elieving cry ptogr a phy complexit y
F/4ZB/oD9QcCyQf5d5F1Ww==
Decrypted object is 'CryptographyExample.Product'
- Product.ID = 42
- Product.Name = Fun Thing
- Product.Description = Something to keep the grandchildren quiet.
To create and compare hash values, you use a hash provider. As you saw earlier, the Cryp-
tography block includes several hash providers. The examples we provide use two of
these: the SHA512 hash algorithm provider and the MD5Cng hash algorithm provider. The
examples demonstrate how to use these providers to create a hash for both a text string
and an object (in our example this is a simple class named Product), and how to compare
the generated hashes with the original and other text strings and object instances.
The Cryptography Manager exposes two methods for working with hash providers:
• The CreateHash method takes as parameters the name of a hash provider
configured in the Cryptography block for the application, and the item for
which it will create the hash value. There are two overloads of this method.
One accepts a string and returns the hash as a string. The second overload
accepts the data to encrypt as a byte array, and returns a byte array containing
the hash value.
• The CompareHash method takes as parameters the name of a hash provider
configured in the Cryptography block for the application, the un-hashed item
to compare the hash with, and the hash value to compare to the un-hashed
item. There are two overloads of this method. One accepts the un-hashed item
and the hash as strings. The second overload accepts the un-hashed item and
the hash as byte arrays.
Creating and Comparing Hash Values for Text Strings
The example Create and Compare Hash Values for Text Strings uses the SHA512 hash
algorithm provider to create a hash of three text strings. It then compares these hashes
with the original and other values to demonstrate how even a minor difference between
the original strings creates different hash values.
The code shown below creates three text strings that will be hashed. Notice that
the second and third vary only in the letter case of two words. Then the code uses the
CreateHash method of the Cryptography Manager to create the hashes of these three
strings. In each case, the code passes to the CreateHash method the name of the SHA512
hash algorithm provider defined in the configuration of the application, and the text
string.
Next, the code performs three comparisons of the hash values using the
CompareHash method of the Cryptography Manager. It compares the hash of the first
string with first string itself, to prove that they are equivalent. Then it compares the hash
of the first string with the second string, to provide that they are not equivalent. Finally,

192 ch a pter sev en
it compares the hash of the second string with the third string, which varies only in letter
case, to prove that these are also not equivalent.
As in earlier examples, we’ve removed some of the lines of code that simply write
values to the console screen to make it easier to see the code that actually does the
work.
// Dene the text strings instance to encrypt.
string sample1Text = "This is some text to hash.";
string sample2Text = "This is some more text to hash.";
string sample3Text = "This is Some More text to hash.";
// Create the hash values using the SHA512 Hash Algorithm Provider.
// The overload of the CreateHash method that takes a
// string returns the result as a string.
string hashed1Text = defaultCrypto.CreateHash("SHA512CryptoServiceProvider",
sample1Text);
string hashed2Text = defaultCrypto.CreateHash("SHA512CryptoServiceProvider",
sample2Text);
string hashed3Text = defaultCrypto.CreateHash("SHA512CryptoServiceProvider",
sample3Text);
// Compare the strings with some of the hashed values.
Console.WriteLine("Comparing the string '{0}' with the hash of this string:",
sample1Text);
Console.WriteLine("- result is {0}",
defaultCrypto.CompareHash("SHA512CryptoServiceProvider",
sample1Text, hashed1Text));
Console.WriteLine("Comparing the string '{0}' with hash of the string '{1}'",
sample1Text, sample2Text);
Console.WriteLine("- result is {0}",
defaultCrypto.CompareHash("SHA512CryptoServiceProvider",
sample2Text, hashed1Text));
Console.WriteLine("Comparing the string '{0}' with hash of the string '{1}'",
sample2Text, sample3Text);
Console.WriteLine("- result is {0}",
defaultCrypto.CompareHash("SHA512CryptoServiceProvider",
sample3Text, hashed2Text));
If you run this example, you’ll see the output shown below. You can see the hash values
of the three text strings, and the result of the three hash comparisons.

193relie v ing cryptogr a phy complexit y
Text strings to hash and the resulting hash values are:
This is some text to hash.
v38snPJbuCtwfMUSNRjsgDqu4PB7ok7LQ2id4RJMZUGlhn+LTgX3FNEVuUbauokCpiCzzfZI2d9sNjlo
56NmuZ/8FY2sknxrD262TLSSYSQ=
This is some more text to hash.
braokQ/wraq9WVnKSqBROBUNG2lBwiICwX0lTGPSaooaJXL7/WcJvUCtBry8+0iRg+Rij5Xiz56jD4Zm
xcKrp7kGVDeWuA7jHeYiFZmGbOU=
This is Some More text to hash.
aw3anokiiBXPJfxZ5kf2SrlTEN3lokVlT+46t0V1B7der1wsNTD4dPxKQly8SDAjoCgCWwzSCh4k+OUf
O6/y6JIpFtWpQDqHO3JH+Rj25K0=
Comparing the string 'This is some text to hash.' with the hash of this string:
- result is True
Comparing the string 'This is some text to hash.' with hash of the string 'This
is some more text to hash.'
- result is False
Comparing the string 'This is some more text to hash.' with hash of the string
'This is Some More text to hash.'
- result is False
Creating and Comparing Hash Values for Object Instances
The example Create and Compare Hash Values for Data Items uses the MD5Cng hash algo-
rithm provider to create a hash of two instances of the Product class defined within the
example project, demonstrating how different property values produce a different hash
value. It then compares the second object instance with the hash of the first to show that
they are different.
The code shown below starts by creating an instance of the Product class, and then
serializes it using the ToBytes method of the SerializationUtility class. Then it calls the
CreateHash method of the Cryptography Manager, passing to it the name of the
MD5Cng hash algorithm provider defined in the configuration of the application, and the
byte array generated from the Product class instance.
Next, the code repeats the process with another new instance of the Product class,
with different values for its properties, and displays the hash of this to show that it is
different from the other instance of the Product class created previously. Finally, the code
compares the hash of the first instance of the Product class with the second instance of
the same class to prove that they are not equivalent.

194 ch a pter sev en
As in earlier examples, we’ve removed some of the lines of code that simply write
values to the console screen to make it easier to see the code that actually does the work.
// Create the object instance to encrypt.
Product sample1Object = new Product(42, "Exciting Thing",
"Something to keep you on your toes.");
// Create the hash values using the SHA512 Hash Algorithm Provider.
// Must serialize the object to a byte array rst. One easy way is to use
// the methods of the SerializationUtility class from the Caching block.
byte[] serializedObject = SerializationUtility.ToBytes(sample1Object);
// The overload of the CreateHash method that takes a
// byte array returns the result as a byte array.
byte[] hashed1Object = defaultCrypto.CreateHash("MD5Cng", serializedObject);
// Do the same to generate a hash for another similar object with
// different property values.
Product sample2Object = new Product(79, "Fun Thing",
"Something to keep the grandchildren quiet.");
serializedObject = SerializationUtility.ToBytes(sample2Object);
byte[] hashed2Object = defaultCrypto.CreateHash("MD5Cng", serializedObject);
Console.WriteLine("Generated hash (when Base-64 encoded for display) is:");
Console.WriteLine(Convert.ToBase64String(hashed2Object));
Console.WriteLine();
// Compare the hashed values.
Console.WriteLine("Comparing second object with hash of the rst object:");
Console.WriteLine("- result is {0}",
defaultCrypto.CompareHash("MD5Cng",
serializedObject, hashed1Object));
If you run this example, you’ll see the output shown below. You can see the hash values
of the two instances of the Product class, and the result of the hash comparison.
First object to hash is 'CryptographyExample.Product'
- Product.ID = 42
- Product.Name = Exciting Thing
- Product.Description = Something to keep you on your toes.
Generated hash (when Base-64 encoded for display) is:
Gd2V77Zau/pgOcg1A2A5zk6RTd5zFFnHKXfhVx8LEi4=

195r elieving cryptogr aph y complexit y
Second object to hash is 'CryptographyExample.Product'
- Product.ID = 79
- Product.Name = Fun Thing
- Product.Description = Something to keep the grandchildren quiet.
Generated hash (when Base-64 encoded for display) is:
1Eyal+AHf3e2QyEB+sqsGDOdux1Iom4z0zGLYlHlC78=
Comparing second object with hash of the rst object:
- result is False
Creating Custom Cryptography Providers
While the Cryptography block contains providers for a range of hashing and encryption
algorithms, you may find that you have specific requirements that none of these algo-
rithms can satisfy. For example, you may wish to perform some company-specific encryp-
tion technique, or implement a non-standard hashing algorithm. You may even want to
apply multiple levels of encryption based on business requirements or data handling stan-
dards relevant to your industry.
Be aware that you may introduce vulnerabilities into your application by using non-
standard or custom encryption algorithms. The strength of any algorithm you use must
be verified as being suitable for your requirements, and rechecked regularly to ensure
that new decryption techniques or known vulnerabilities do not compromise your
application.
You can implement a custom hashing provider or a custom encryption provider, and inte-
grate them with Enterprise Library. The Cryptography block contains two interfaces,
IHashProvider and ISymmetricCryptoProvider, that define hashing and encryption
provider requirements. For a custom hashing provider, you must implement the Create-
Hash and CompareHash methods based on the hashing algorithm you choose. For a
custom encryption provider, you must implement the Encrypt and Decrypt methods
based on the encryption algorithm you choose.
One other way that you may want to modify the block is to change the way that it
creates and stores keys. By default, it stores keys that you provide or generate for the
providers in DPAPI-encrypted disk files. You can modify the KeyManager class in the
block to change this behavior, and modify the Wizard that helps you to specify the key in
the configuration tools.
For more information about extending and modifying the Cryptography block, see
the online documentation and the help files installed with Enterprise Library.

196 ch a pter sev en
Summary
This chapter looked at the Cryptography Application Block. It began by discussing cryp-
tographic techniques and strategies for which the block is suitable, and helped you decide
how you might use the block in your applications. The two most common scenarios are
symmetric encryption/decryption of data, and creating hash values from data. Symmetric
encryption is useful whenever you need to protect data that you are storing or sending
across a network. Hashing is useful for tasks such as storing passwords so that you can
confirm user identity without allowing the passwords to be visible to anyone who may
access the database or intercept the passwords as they pass over a network.
Many types of cryptographic algorithms that you may use with the Cryptography
block require access to a key for both encryption and decryption. It is vitally important
that you protect this key both to prevent unauthorized access to the data and to allow
you to encrypt it when required. The Cryptography block protects key files using DPAPI
encryption.
The bulk of the chapter then explored the main techniques for using the block. This
includes encrypting and decrypting data, creating a hash value, and comparing hash values
(for example, when verifying a submitted user password). As you have seen, the block
makes these commonly repeated tasks much simpler, while allowing the configuration to
be easily managed post-deployment and at run time by administrators and operations
staff.

197
Introduction
I guess most people have seen a sitcom on TV where some unfortunate member of the
cast is faced with a large red button carrying a sign that says “Do not press this button.”
You know that, after the requisite amount of facial contortions and farcical fretting, they
are going to press the button and some comedic event will occur. So it’s reasonably certain
that any user authorization strategy you adopt that contains an element that simply asks
the user not to press that button unless he is a manager or administrator is not likely to
provide a secure environment for your enterprise application.
User authorization—controlling what your users can and cannot do with your appli-
cation—is a vital ingredient of a robust security strategy. In general, an application UI
should prevent users from attempting actions for which they are not eligible; usually
by disabling or even hiding controls that, depending on their permissions within the
application, they are not permitted to use. And, of course, the application should check
that users are authorized to carry out all operations that they initiate, whether it is through
a UI or as a call from another layer or segment of the application.
The Security Application Block provides features that can help you to implement
authorization for your applications, and can simplify the task by allowing you to maintain
consistent security practices across the entire application and your enterprise as a whole.
It makes it easier for you to implement authorization using standard practices, and
you can extend the block to add specific functionality that you require for your own
scenarios.
8An Authentic Approach
to Token Identity

198 ch a pter eight
What Does the Security Block Do?
The Security Application Block implements two related features. It provides the capabil-
ity to configure and manage sets of authorization rules using a variety of rule providers,
and can help you to cache credentials for your application to use where it must make
repeated authorization checks. These two features combine to provide an environment
for implementing authorization in a flexible way, while allowing the details of the
authorization policies (the sets of rules) to be administered without requiring changes to
the application—eliminating the requirement to recompile, test, and redeploy the applica-
tion as the policies change. It also means that administrators can manage the policies using
Group Policy if required.
In your application code, you can quickly and easily create tokens for users, cache
these tokens, expire them, and check if users are authorized to perform specific tasks or
operations. These features make use of one or more authorization rule providers and
security caches that you define for your application, and even use across multiple applica-
tions. The following sections of this chapter explain what an authorization rule provider
and a security cache are, and how they help you to implement a security strategy for your
applications.
?
An authorization rule provider is a component or service that allows you to define rules.
Using a rule you specify a task or operation that users may perform, and you then allocate
users and groups to this task or operation. The Security block uses these rules to
determine whether a specific user or role is authorized to execute a specified task or
operation.
The Security block includes a rule provider that stores the information as a series of
expressions, one for each task or operation, in the application configuration file. You can
encrypt this section of the configuration file to prevent anyone who can access it from
being able to see the expressions. Alternatively, you can use the Windows® Authorization
Manager (AzMan) provider, part of the current Microsoft® Windows operating systems,
which allows you to store the authorization rules in a variety of locations, and include
Windows users and groups in the rules. Enterprise Library includes an assembly named
Microsoft.Practices.EnterpriseLibrary.Security.AzMan.dll that allows it to interact with
AzMan.
About Authorization Manager (AzMan)
While it’s useful to be able to define your security roles and authorization rules in the
application configuration file, what would be really cool is to be able to make use of the
groups, roles, and user accounts already defined on your system or network, and store
the rules in some portable format such as an XML file or (perhaps less portable) a data-
base. The details of Windows users and groups are stored in Active Directory®, and—
while you can write code to access the information—using Active Directory is not

199an authent ic a pproach to token iden tity
a trivial exercise. Windows Authorization Manager (AzMan) gives you a way to access this
information, and administer security rules in other locations, without requiring complex
code. It even provides a GUI that you can use to create authorization rules and administer
these rules.
The Windows AzMan provider is part of the operating system in Windows XP
Professional and Windows Server® 2003 and later. The GUI is part of the operating
system in Windows Vista® and Windows Server 2003 and later. In Windows Vista,
Windows Server® 2008, and Windows 7, AzMan provides additional capabilities. For
more information about AzMan, see the following resources:
• “Authorization Manager” (Overview) at http://technet.microsoft.com/en-us/
library/cc732290.aspx.
• “Authorization Manager” (Details) at http://technet.microsoft.com/en-us/
library/cc732077(WS.10).aspx.
• “How to install and administer the Authorization Manager in Windows Server
2003” at http://support.microsoft.com/kb/324470.
AzMan allows you to define an application, the roles for that application, and the opera-
tions (such as submit order or approve expenses) that the application exposes. For
each operation, you can define users and groups that can execute that operation. You
can include local and domain user accounts and account groups stored in Active
Directory. You can store your authorization rules in Active Directory, in an XML file, or
in a database.
?
Unless all of the features of your application are meant to be completely available to
anonymous users, you will need to authenticate users and definitively identify each one.
You can then determine what that user is and is not permitted to do inside your
application. Common approaches to authentication include logon dialogs where users
enter their user name and password (and, perhaps, additional information that helps to
confirm their identity), and other mechanisms such as smart card readers, fingerprint
readers, and more.
You may force users to authenticate when they first access the application, or at some
later stage when they try to execute some activity that has limited permissions. This
really depends on whether you want to hide or disable elements of the UI, or you are
happy to accept requests and then authenticate at that point in your application. For
example, a Web service application will usually authenticate users when a request is
received, while a Windows Forms application will usually authenticate users when they
start the application.
What you don’t want to do is continually annoy users by forcing them to reauthenti-
cate every time they try to execute some operation or carry out some task. For example,
if you are browsing a shopping Web site and adding to your cart all of those science
fiction DVDs you want to be able to watch over and over again, you wouldn’t expect to
have to enter your account logon details for every item. Once your application knows
who a user is, it should reuse the results of the initial authentication if possible.

200 ch a pter eight
To be able to do this, you must cache the user’s credentials for a predetermined
period when you first authenticate them, and generate a token that represents the user.
You may decide to cache the credentials for the duration a Windows Forms application
is running, or for the duration of the user’s session in ASP.NET. You may even decide to
persist them in a cache that survives application and machine restarts (such as the
user-specific isolated storage mechanism) if you want to allow the logged-on user of the
machine to be able to access the application without reauthenticating. An example is the
Windows operating system, which forces you to log on when you first start it up, but can
then reuse persistently cached credentials to connect to other resources such as mapped
drives.
The Security Application Block allows you to configure one or more Security Caches
that use an in-memory cache, and optionally a persistent backing store, to cache user
credentials for specific periods and obtain a token that you can use to check the user’s
identity at some future stage in your application.
An alternative approach to caching identities you may consider is to use the Microsoft
.NET Framework version 4.0 System.Runtime.Caching capabilities. However, you would
then need to implement suitable methods that accept and return identities, and ensure
that you correctly secure the stored content.
How Do I Configure the Security Block?
Like all of the Enterprise Library application blocks, you start by configuring your applica-
tion to use the block, as demonstrated in Chapter 1, “Introduction.” The Security Settings
section of the configuration for the Security block contains three areas, shown in Figure
1. The first is where you specify the authorization providers you want to use. Below that
is the area where you configure one or more security caches for your security tokens. Your
code can store tokens in this cache, and retrieve them when required. You can even persist
the credentials across application restarts by defining backing stores for credentials. The
third area is where you configure the authorization rules that define the users, groups, and
operations related to your application.
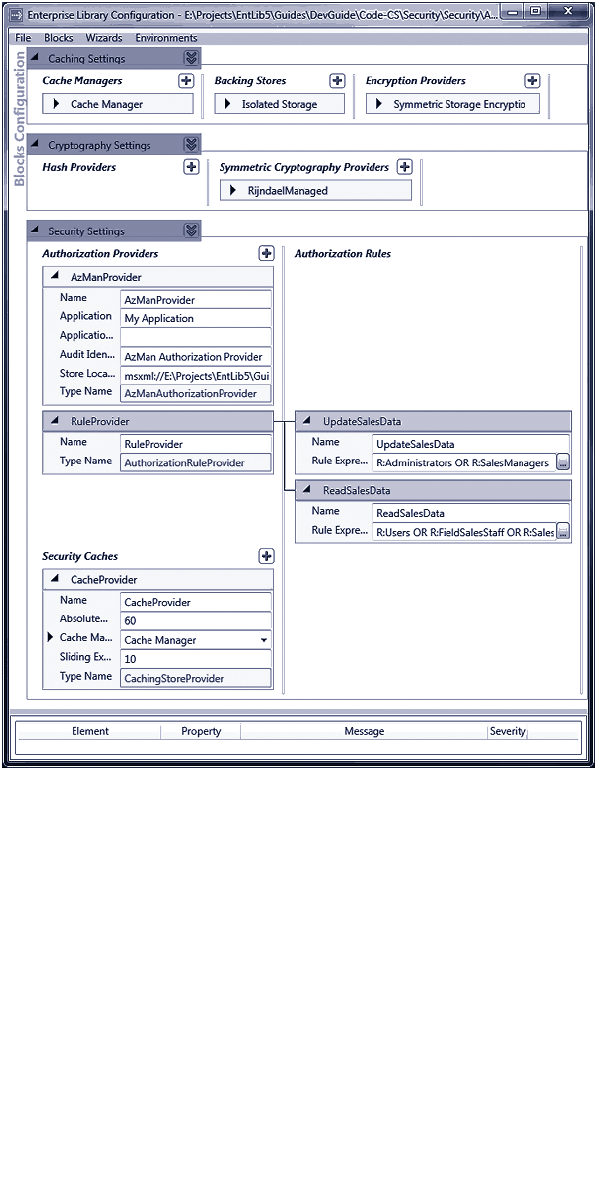
201an au thentic approach to token ident ity
The security settings section
Figure 1 shows the configuration for the example application we provide for this chapter.
You can see the areas where we defined the authorization providers and the security
cache. Because we specified the Caching Application Block as the security cache, the
configuration tool added the Caching block to the configuration automatically. We
added an isolated storage backing store to the Caching block to persist credentials, and
specified a symmetric storage provider for this store to protect the persisted credentials.
This automatically added the Cryptography block to the configuration, and we specified
a DPAPI symmetric crypto provider to perform the encryption.

202 chapter eight
For more information about configuring the Caching block, see Chapter 5, “A
Cache Advance for your Applications.” For more information about configuring
the Cryptography block, see Chapter 7 “Relieving Cryptography Complexity.”
The way that you configure your authorization rules depends on the type of authorization
provider you are using. If you use the AzMan provider, you must configure the authoriza-
tion rules using the AzMan GUI, or through the command line or scripting. If you choose
to use the standard authorization rule provider instead, you must configure the authoriza-
tion rules for this provider.
Each rule equates to a task or operation that your users may perform, and for which
you want to be able to authorize these users to check if they should be allowed to execute
"...that task. Click the "..." button in the Rule Expression property of an Authentication
Rule to open the Rule Expression Editor dialog, which..."makes it easier to generate the
expressions for each of the rules you define. It helps you to insert the appropriate tokens
that indicate individual identities, roles, and anonymous users; plus the operators that
allow you to specify compound rules. For example, the following expression identifies
users who are members of the Managers role or have the names Alice or Bob, but excludes
any managers who are also members of the ITAdmin role:
(R:Managers OR I:Alice OR I:Bob) AND NOT R:ITAdmin
If you specify this expression for a rule named Update Database, you can use the
Authorize method of the Security block to ensure that only users for whom the
expression evaluates to true can execute this task. You’ll see how in the following sections
of this chapter.
How Do I Use the Security Block?
After you configure the block, as described in the previous sections of this chapter, you
can write code in your application that uses the features of the block. However, first, you
must add references to the appropriate Enterprise Library assemblies to your project. In
addition to the Enterprise Library assemblies you require in every Enterprise Library proj-
ect (listed in Chapter 1, “Introduction”), you should reference or add to your bin folder
the following assemblies:
• Microsoft.Practices.EnterpriseLibrary.Security.dll
• Microsoft.Practices.EnterpriseLibrary.Security.Cryptography.dll
• Microsoft.Practices.EnterpriseLibrary.Security.Cache.CachingStore.dll
• Microsoft.Practices.EnterpriseLibrary.Security.Caching.dll
• Microsoft.Practices.EnterpriseLibrary.Security.Caching.Cryptography.dll
• Microsoft.Practices.EnterpriseLibrary.Security.AzMan.dll
You need the caching assemblies only if you are using a cache to store credentials. You
need the AzMan assembly only if you are using the AzMan rule store.

203an authentic a pproach to token identit y
Now, after adding references to the relevant namespaces to your project, you are
ready to write some code. The following sections demonstrate the tasks you can
accomplish, and provide more details of the way the block helps you to implement a
common and reusable strategy for security.
Diving in With an Example
You can download an example application (a simple console-based application) that dem-
onstrates all of the scenarios you will see in the remainder of this chapter. You can run this
directly from the bin\debug folder, or open the solution named Security in Microsoft
Visual Studio® to see all of the code as you run the examples.
Before you attempt to run the example, you must create a new encryption key for the
block to use to encrypt the data when using a symmetric encryption provider. This is
because the key is tied to either the user or the machine, and so the key included in the
sample files will not work on your machine. In the configuration console, select the
RijndaelManager symmetric provider and click the “...” button in the Key property
to start the Key Wizard. Use this wizard to generate a new key, save the key file, and
automatically update the contents of App.config.
You must also edit the path in the Store Location property of the AzMan authen-
tication provider so that it reflects the location of the file named Example.xml. This file
is included in the examples, and is located in the same folder as the main program files,
which is [path-to-samples]\Security\Security.
Before you start to use the objects in the block, you must resolve an instance of the
security cache and authorization providers you want to use in your application. The
example we provide uses the simplest approach—the GetInstance method of the Enter-
prise Library container, as shown here.
// Resolve the cache and auth provider objects from the container.
ISecurityCacheProvider secCache
= EnterpriseLibraryContainer.Current.GetInstance<ISecurityCacheProvider>(
"CacheProvider");
IAuthorizationProvider ruleAuth
= EnterpriseLibraryContainer.Current.GetInstance<IAuthorizationProvider>(
"RuleProvider");
IAuthorizationProvider azmanAuth
= EnterpriseLibraryContainer.Current.GetInstance<IAuthorizationProvider>(
"AzManProvider");

204 chapter eight
The first example, Authenticate a user and cache the identity, shows how you can use the
Security block to cache both an authenticated identity and a user principal, and return
temporary tokens that serve as an alternative to user credentials for the duration of the
user session. The following code, taken from the example, first checks that the user is
authenticated within the operating system and, if so, displays details of the user’s identity
using a separate routine named ShowUserIdentityDetails. We’ll look at that routine in a
short while.
The code then caches this Windows identity in the security cache to obtain the to-
ken, and displays details of this token. Then it generates a new generic principal for this
identity, defining it as a member of a role named FieldSalesStaff, and displays the details
of this new principal using another routine named ShowGenericPrincipalDetails. Again,
we’ll look at this routine in a short while. Next, the code caches the generic principal,
collects the token from the security cache, and displays details of this token.
// Get current Windows Identity and check if authenticated.
WindowsIdentity identity = WindowsIdentity.GetCurrent();
if (identity.IsAuthenticated)
{
Console.WriteLine("Current user identity obtained from Windows:");
ShowUserIdentityDetails(identity);
// Cache the Windows Identity and save the token in a variable.
identityToken = secCache.SaveIdentity(identity);
Console.WriteLine("Current user identity has been cached.");
Console.WriteLine("The IIdentity security token is '{0}'.",
identityToken.Value);
// Generate a Generic Principal for this identity and save in cache.
IPrincipal principal = new GenericPrincipal(identity,
new string[] {"FieldSalesStaff"});
Console.WriteLine("Created a new Generic Principal for this user:");
ShowGenericPrincipalDetails(principal);
principalToken = secCache.SavePrincipal(principal);
Console.WriteLine("Current user principal has been cached.");
Console.WriteLine("The IPrincipal security token is '{0}'.",
principalToken.Value);
}
else
{
Console.WriteLine("Current user is not authenticated.");
}

205an authentic a pproach to token identity
The tokens are stored in program-wide variables and are therefore available to code in the
other examples for this chapter.
You can also use the SaveProfile method of the security cache to store a user’s profile
(such as the user’s ASP.NET profile), and obtain a token that you can use to access it again
when required.
Displaying User Identity Details
The previous code uses a separate routine named ShowUserIdentityDetails that does
just that. It displays the values of the two properties common to all types that implement
the IIdentity interface, and then checks if the identity is actually an instance of the
WindowsIdentity class. If it is, the code displays the values of the additional properties
that are specific to this type.
void ShowUserIdentityDetails(object identity)
{
IIdentity iid = identity as IIdentity;
Console.WriteLine("- Current user {0} is authenticated.", iid.Name);
Console.WriteLine("- Authentication type: {0}.", iid.AuthenticationType);
if (identity is WindowsIdentity)
{
WindowsIdentity winIdentity = identity as WindowsIdentity;
Console.WriteLine("- Impersonation level: {0}.",
winIdentity.ImpersonationLevel);
Console.WriteLine("- Is the Guest account: {0}.", winIdentity.IsGuest);
Console.WriteLine("- Is the System account: {0}.", winIdentity.IsSystem);
Console.WriteLine("- SID value: '{0}'.", winIdentity.User.Value);
Console.WriteLine("- Member of {0} account groups.",
winIdentity.Groups.Count);
}
}
Displaying Generic Principal Details
The code you saw earlier uses a separate routine named ShowGenericPrincipalDetails
that displays details of a generic principal. It shows the identity name, and then calls the
IsInRole method to check if this principal is defined for two roles named SalesManagers
and FieldSalesStaff.
void ShowGenericPrincipalDetails(IPrincipal principal)
{
Console.WriteLine("- Current user is {0}.", principal.Identity.Name);
Console.WriteLine("- IsInRole 'SalesManagers': {0}.",
principal.IsInRole("SalesManagers"));
Console.WriteLine("- IsInRole 'FieldSalesStaff': {0}.",
principal.IsInRole("FieldSalesStaff"));
}

206 chapter eight
When you run the example, you will see output like that below. Of course, the identity
details will differ for your logged-on account. Notice, however, that the output shows
that the principal is a member of only one of the two roles we tested for. You can also see
the value of the tokens generated by the security cache when we cached the identity and
principal.
Current user identity obtained from Windows:
- Current user SOME-DOMAIN\username is authenticated.
- Authentication type: Kerberos.
- Impersonation level: None.
- Is the Guest account: False.
- Is the System account: False.
- SID value: 'S-1-5-21-xxxxxxx-117609710-xxxxxxxxx-1108'.
- Member of 12 account groups.
Current user identity has been cached.
The IIdentity security token is '02acc9a5-6dac-4b40-a82d-a16f3d9ddc37'.
Created a new Generic Principal for this user:
- Current user is SOME-DOMAIN\username.
- IsInRole 'SalesManagers': False.
- IsInRole 'FieldSalesStaff': True.
Current user principal has been cached.
The IPrincipal security token is 'ffcbc717-63ad-4a8b-82e2-26af54741ac1'.
After you cache an identity and obtain a token, you can use this token to authenticate a
user throughout your application. At any point in your code, you can use the token to
obtain an identity or principal that you have stored in the cache.
The example Retrieve a user’s identity from the cache shows how you can retrieve a
cached identity using a token. The code displays the value of the token, and then calls the
GetIdentity method to retrieve the matching identity from the cache. This method
returns null if the identity is not found in the cache.
// Check if the user has run the option that caches the identity and principal.
if (null != identityToken)
{
// Check if the user has been authenticated and the identity has been cached.
Console.WriteLine("The IIdentity security token is '{0}'.",
identityToken.Value);
Object identity = secCache.GetIdentity(identityToken);
if (null != identity)
{
// Identity was found in cache.
Console.WriteLine("User identity has been retrieved from the cache:");
ShowUserIdentityDetails(identity);

207an authentic approach to token identity
}
else
{
// Identity removed from cache due to time expiration, or explicitly in code.
Console.WriteLine("Identity not found in cache for the specied token.");
}
}
else
{
Console.WriteLine("You must obtain a token by caching the current "
+ "identity before you can retrieve it.");
}
You can also use the GetProfile method of the security cache to retrieve a user’s profile
(such as the user’s ASP.NET profile) by supplying a suitable token obtained from the
security cache using the SaveProfile method.
The example produces output like the following, though the actual values will, of
course, differ for your account identity.
The IIdentity security token is '02acc9a5-6dac-4b40-a82d-a16f3d9ddc37'.
User identity has been retrieved from the cache:
- Current user SOME-DOMAIN\username is authenticated.
- Authentication type: Kerberos.
- Impersonation level: None.
- Is the Guest account: False.
- Is the System account: False.
- SID value: 'S-1-5-21-xxxxxxx-117609710-xxxxxxxxx-1108'.
- Member of 12 account groups.
After you retrieve an identity, principal, or profile, you can compare the values with those
of the current user or use it to authenticate a user for other processes or systems.
When a user logs out of the application, or when you wish to invalidate the cached
identity, you can use the methods of the security cache. As you would expect, the
ExpireIdentity method expires a token corresponding to a cached identity, the Expire
Principal method expires a token corresponding to a cached principal, and the Expire
Profile method expires a token corresponding to a cached user profile. The example
Expire an authenticated user demonstrates how you can expire a cached identity and a
cached principal using these methods, as shown below.
// Check if the user has run the option that caches the identity and principal.
if (null != identityToken)
{
Console.WriteLine("The IIdentity security token is '{0}'.",

208 chapter eight
identityToken.Value);
// Expire the identity token in the cache.
secCache.ExpireIdentity(identityToken);
Console.WriteLine("The identity for this token has been expired "
+ "and removed from the cache.");
Console.WriteLine("The IPrincipal security token is '{0}'.",
principalToken.Value);
// Expire the principal token in the cache.
secCache.ExpirePrincipal(principalToken);
Console.WriteLine("The principal for this token has been expired "
+ "and removed from the cache.");
}
else
{
Console.WriteLine("You do not have a token that you can use to "
+ "expire an identity.");
}
When you run this example, you will see the values of the tokens before they are expired,
and messages indicating that they were removed from the cache.
The IIdentity security token is 'e303fd67-331a-45b0-94d4-087e462cacda'.
The identity for this token has been expired and removed from the cache.
The IPrincipal security token is 'd6563752-78ed-489a-86fa-efd76c97a976'.
The principal for this token has been expired and removed from the cache.
One of the main reasons for using the Security block to manage identities is that it makes
it easy to check if a user is authorized to perform a specified task or operation. The Secu-
rity block contains two authorization providers, though you can create your own and
integrate them with the Security block if you wish.
To check if a user is authorized, you call the Authorize method of an authorization
provider, passing to it the user principal and the name of the task or operation. The
Authorize method returns either true or false. The two providers included in the block
are the authorization rule provider and the AzMan authorization provider (for details of
these providers, see “What Are Authorization Rule Providers?” near the beginning of this
chapter). The examples we present for this chapter include one that uses the authoriza-
tion rule provider and one that uses the AzMan authorization provider.
Using Security Block Configured Rules
If you only need to store authorization rules within the configuration of your application
and have them fully managed by the Security block, you can use the authorization rule

209an authentic approach to token identit y
provider. As you saw earlier in this chapter, you configure a series of authorization rules
for your application. Each rule defines an expression that specifies which users can access
a specific task or carry out a specific operation.
The example Authorize a user for a process using a stored rule demonstrates this
approach to authorization. In the application configuration we defined two rules:
• The rule named UpdateSalesData uses the expression “R:Administrators OR
R:SalesManagers.” This allows a user who is a member of the Administrators
role or the SalesManagers role to execute this task.
• The rule named ReadSalesData uses the expression “R:Users OR
R:FieldSalesStaff OR R:SalesManagers.” This allows a user who is a member
of the Users, FieldSalesStaff, or SalesManagers role to execute this task.
The example code starts by displaying the value of the current principal token stored in
the application-level variable (you must execute the first example to authenticate yourself
and obtain a token before you can run this example). Then it retrieves the principal from
the security cache using this token, and calls a separate routine named AuthorizeUser
WithRules that performs the authorization.
The AuthorizeUserWithRules routine takes as parameters the generic principal as a
type that implements the IPrincipal interface, and a reference to the authorization pro-
vider to use. In this example, this is the Security block authorization rule provider resolved
from the Enterprise Library container and stored in the variable named ruleAuth when
the example application starts. We showed how you can obtain instances of the two
types of authorization provider in the section “Diving in With an Example,” earlier in this
chapter.
// Check if the user has run the option that caches the identity and principal.
if (null != principalToken)
{
// First try authorizing tasks using the cached Generic Principal.
Console.WriteLine("The IPrincipal security token is '{0}'.",
principalToken.Value);
// Retrieve the user principal from the security cache using the token.
IPrincipal principal = secCache.GetPrincipal(principalToken);
if (null != principal)
{
// Check if this user is authorized for tasks using the Rule Provider.
AuthorizeUserWithRules(principal, ruleAuth);
}
else
{
// Identity removed from cache due to time expiration, or explicitly in code.
Console.WriteLine("Principal not found in cache for the specied token.");
}
}
else

210 ch a pter eight
{
Console.WriteLine("You must obtain a token by caching the current identity "
+ "before you can use it to check authorization rules.");
}
The following code shows the AuthorizeUserWithRules routine we used in the previous
example. It simply calls the Authorize method of the authorization provider—once for
the UpdateSalesData task and once for the ReadSalesData task—and displays the
results.
void AuthorizeUserWithRules(IPrincipal principal,
IAuthorizationProvider authProvider)
{
// Determine whether user is authorized for rule dened as "UpdateSalesData".
bool canUpdateSalesData = authProvider.Authorize(principal, "UpdateSalesData");
Console.WriteLine("User can execute 'UpdateSalesData' task: {0}",
canUpdateSalesData);
// Determine whether user is authorized for rule dened as "ReadSalesData".
bool canReadSalesData = authProvider.Authorize(principal, "ReadSalesData");
Console.WriteLine("User can execute 'ReadSalesData' task: {0}",
canReadSalesData);
}
When you run this example, you will see output similar to that below. The code in the
first example of this chapter, which authorizes the user and caches the identity and
principal, defines the principal it generates as a member of only the FieldSalesStaff role,
and so the user is authorized only for the ReadSalesData task.
The IPrincipal security token is '77a9c8af-9691-4ae4-abb5-0e964dc4610e'.
User can execute 'UpdateSalesData' task: False
User can execute 'ReadSalesData' task: True
Using AzMan Provider Rules
The second example of authorization, Authorize a user for a process using AzMan rules, uses
the Windows Authorization Manager (AzMan) provider. In the example, we defined rules
for the same two tasks you saw in the previous example: UpdateSalesData and Read-
SalesData. However, AzMan depends on being able to access Windows account details
using the security identifier (SID), and so rules in the file named Example.xml we provide
with the examples may not be able to authenticate you on your machine. It will only work
if you are using a local machine account or your current domain logon account can access
the Active Directory® store to obtain information. You should open the Example.xml file
in AzMan (a snap-in for the Microsoft Management Console (MMC)) and edit the rules
it contains to specify your own local or domain accounts to experiment with AzMan
authorization.

211an authent ic a pproach to token iden tity
The example code is similar to what you saw when we used the Security block author-
ization rule provider in the previous example. It obtains the current user principal from
the security cache using the token stored in the application-level variable, and calls the
same AuthorizeUserWithRules method as the previous example to check if this principal
is authorized for the UpdateSalesData and ReadSalesData tasks. This example then
generates a WindowsPrincipal for the current user and checks if this is authorized for
the UpdateSalesData and ReadSalesData tasks.
The main differences in the code for this example are that it passes a reference to the
AzMan authorization provider created when the program starts to the AuthorizeUser
WithRules routine, as shown here.
// First try authorizing tasks using the cached Generic Principal.
IPrincipal genPrincipal = secCache.GetPrincipal(principalToken);
if (null != genPrincipal)
{
// Check if this user is authorized for tasks by AzMan.
AuthorizeUserWithRules(genPrincipal, azmanAuth);
}
...
// Now try checking for authorization for tasks using cached WindowsIdentity
IIdentity identity = secCache.GetIdentity(identityToken);
if (null != identity)
{
// Generate a WindowsPrincipal from the IIdentity.
IPrincipal winPrincipal = new WindowsPrincipal(identity as WindowsIdentity);
// Check if this user is authorized for tasks by AzMan.
AuthorizeUserWithRules(winPrincipal, azmanAuth);
// Note: this will only work if you are using a local machine account or your
// current domain account can access directory store to obtain information.
}
When you run this example, after configuring the AzMan rules to suit your own machine
and account, you should be able to see a result similar to that shown here.
The IPrincipal security token is '77a9c8af-9691-4ae4-abb5-0e964dc4610e'.
User can execute 'UpdateSalesData' task: False
User can execute 'ReadSalesData' task: True
The IIdentity security token is '3b6eb4a7-b958-4cc2-b2b9-112cd58c566d'.
User can execute 'UpdateSalesData' task: False
User can execute 'ReadSalesData' task: True

212 ch a pter eight
Creating Custom Authorization Providers
Although the Security Application Block contains only two authorization providers and
two caching providers, you can extend it easily to add new providers if none of those
included are exactly right for your own scenarios. The block contains a base class named
AuthorizationProvider that you can inherit from and extend to perform custom autho-
rization. You simply need to implement the Authorize method, and then integrate your
new provider with Enterprise Library.
You can also implement custom cache managers and cache backing stores and inte-
grate these with the Caching Application Block to provide a custom caching mechanism
for credentials, and implement a custom cryptography provider for the Cryptography
Application Block that you can then use to encrypt cached credentials. For more informa-
tion about creating custom providers, cache managers, and backing stores, see the online
documentation and the help files installed with Enterprise Library and available online at
http://go.microsoft.com/fwlink/?LinkId=188874.
Summary
This chapter described how you can use the Security Application Block to simplify com-
mon tasks such as caching authenticated user credentials and checking if users are autho-
rized to perform specific tasks. While the code required to implement these tasks without
using the Security block is not overly onerous, the block does save you the effort of
writing and testing the same code in multiple locations. It also allows you to use a variety
of different cache and authorization providers, depending on your requirements, and
change the provider through configuration. Administrators and operators will find this
feature useful when they come to deploy your applications in different environments.
The chapter described the scenarios for using the Security block, and explained the
concepts of authorizing users and caching credentials. It then presented detailed examples
of how you can use the features of the block in a sample application. You will find more
details on specific tasks, such as configuration and deployment, in online documentation
and the help files installed with Enterprise Library.

213
Modern business applications consist of custom business objects and components that
perform specific or generic tasks within the application, in addition to components that
individually address crosscutting concerns such as logging, authentication, authorization,
caching, and exception handling. The key to successfully building these types of applica-
tions is to achieve a decoupled or very loosely coupled design. Loosely coupled
applications are more flexible and easier to maintain. They are also easier to test during
development.
What is Dependency Injection?
Dependency injection (DI) is a prime technique for building loosely coupled applications.
It provides opportunities to simplify code, abstract and handle dependencies between
objects, and automatically generate dependent object instances. Dependency injection
describes the process of designing applications so that, rather than specifying concrete
dependencies within the application at design time and creating the required objects in
the code, the application decides at run time what objects it needs, and generates and
injects these into the application.
The use of dependency injection provides several benefits, including:
• Reducing coupling between classes. Dependencies are clearly defined in each
class. The configuration information, and mappings between interfaces or base
classes and the actual concrete types, are stored in the container used by the
dependency injection mechanism, and can be updated as required—without
requiring any changes to the run-time code.
• Making your code more discoverable. You can easily tell from the types of the
constructors, properties, or methods of your classes what objects they use and
what dependencies they have. If you create instances using code inside the
classes, it is more difficult to trace dependencies. Resolving dependencies at
the surface of a class by specifying the types or interfaces it requires and taking
advantage of dependency injection is the recommended approach.
• Making testing easier. If you resolve or obtain objects using code within your
classes, you must provide a suitably configured container for use when unit
testing these classes. If you take advantage of dependency injection, you can
create simple mock test objects for your classes to use.
Dependency Injection
with Unity
Appendix A
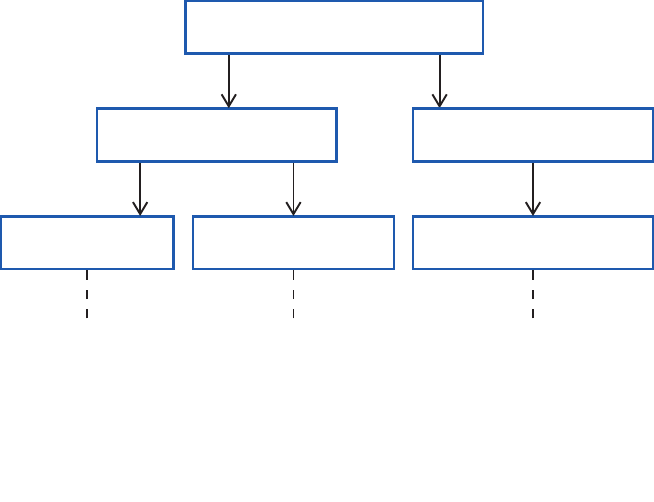
214 a ppendi x a
The Unity Dependency Injection and Interception Mechanism
Unity is a lightweight, flexible, configurable, and extensible dependency injection con-
tainer that supports constructor, property setter, and method call injection (as well as
instance and type interception). It is provided as an integral part of Enterprise Library and
is also available as a stand-alone DI mechanism. Unity provides a comprehensive set of
capabilities, and makes it easier to implement common dependency inversion patterns and
techniques that are useful in application architecture, design, and development.
Unity provides a container that you use to store type mappings and registrations. You
can create multiple containers, and nest these containers in a hierarchical fashion, if
required. It also supports extensions that allow you to implement extra functionality
for objects resolved through the container. Unity can generate instances of any object
that has a public constructor (in other words, objects that you can create using the new
operator).
As Unity creates each object, it inspects it for dependencies and automatically
populates these. So, for example, if you specify a parameter for the constructor or a
dependent property of a custom class to be of type MyBusinessComponent, Unity will
create an instance of MyBusinessComponent and populate the constructor or property.
However, if MyBusinessComponent defines a dependency on another class named
MyDataComponent, Unity will create an instance of that class and populate that
dependency, and so on. If there is no mapping in the container for the type specified in
the parameter or property, Unity simply creates a new instance of the specified type by
calling the constructor of that type that has the greatest number of parameters, and
returns it.
Imagine that MyDataComponent requires a LogWriter to create log messages. If it
contains a dependent parameter or property of type LogWriter, Unity will populate that
as part of the instantiation process as well. This process (sometimes referred to as
auto-wiring) can apply right across the defined dependencies in your application, as shown
in Figure 1.
A possible object graph for a business component
AuthProvider
MyBusinessComponent
MyDataComponent
LogWriter
AuthComponent
DataProvider

215dependency injection w ith unity
Unity is more than just a simple dependency injection container. It provides advanced
capabilities that allow you to satisfy a wide range of requirements that can help you build
more decoupled applications. Unity allows you to:
• Register mappings between interfaces or base classes and concrete object
types. When you resolve the interface or base type, Unity will return an
instance of the concrete type. This may be a new or an existing instance,
depending on the lifetime you specify for the registration.
• Register instances of existing objects in the container. When you resolve the
type, Unity will return an instance of that type. This is useful when working
with objects that must be instantiated as single instances (singletons), or must
have a non-standard lifetime, such as services used by your application. Unity
will return the existing instance.
• Specify the lifetime of objects that will be resolved through the container.
Unity can resolve objects based on the singleton pattern; or with a weak
reference when the object is managed by another process. It can also be
configured to return instances on a per-thread basis, where a new instance is
created for each thread while an existing instance is returned for calls on the
same thread.
• Define multiple named registrations for a type. You can create more than one
registration or mapping for a type as long as these registrations and mappings
have a unique name. Registrations and mappings that do not have a name are
known as default registrations and default mappings, where the name is
effectively an empty string.
• Construct an entire object graph for an application that will be resolved at
run time. Unity can automatically resolve the types specified in constructor
and method parameters and properties at run time. The parameters of con-
structors or methods of objects that are resolved through the container, or the
values for properties of objects resolved through the container, can be popu-
lated with an object resolved through another registration within the container,
or an instance of the specified type if no matching registration exists.
• Specify values for constructor and method parameters and properties. These
can be the parameters of constructors or methods of objects that are resolved
through the container, or the values for properties of objects resolved through
the container. The value can be specified directly, or it can be an object re-
solved through another registration within the container.
• Define matching rules and behaviors as part of an interception policy. These
can be used to apply business rules or change the behavior of existing compo-
nents. Calls to methods or properties of these objects will then pass through
a policy pipeline containing one or more interception behaviors. This is a similar
approach to that used in aspect-oriented programming (AOP).
• Add custom extensions to the container. These can extend or change the
behavior of the container when resolving objects. Some Unity features, such
as interception, are powered by a container extension that is included with the
standard Unity installation.
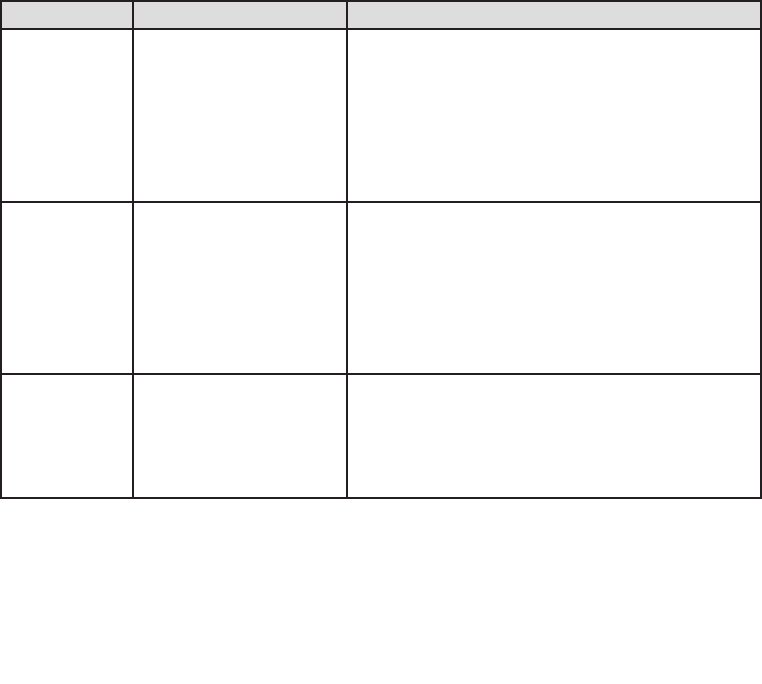
216 appendi x a
Defining Dependencies with Unity
Unity provides three ways for you to define the dependencies for each of your custom
types:
• You can define all of your dependency injection and interception requirements
using a configuration file. At run time, you use a single line of code to read the
configuration and load it into a Unity container.
• You can use the methods of the container that register types, type mappings,
parameter and property values, and interception requirements in your code.
You can also use these methods to modify any existing registrations in the
container at run time.
• You can apply attributes to define dependencies for constructor and method
parameters and properties of types that you will resolve through the container.
This is a simple approach, but does not provide the same level of control as
using a configuration file or the run-time container API.
You can also use a mixture of all of these techniques; for example, you can register a
mapping in the container between an interface and a concrete implementation, then use
an attribute to define a dependency for a property or parameter on an implementation
of this interface.
Table 1 will help you to choose the best approach for your own requirements.
Defining dependencies
Technique Description Considerations
Configuration-
based
Define dependencies using
registrations and mappings
loaded into the container
from a file or other configu-
ration source.
Makes it easy to change the registrations and depen-
dency mappings; often by just editing the configuration
file. However, users of the classes do not see the
dependencies in the source code. This approach is
flexible and allows comprehensive configuration of
injection of resolved type instances, fixed values,
and arrays.
Dynamic
registration
Define dependencies using
registrations and mappings
within the container by
generating them dynami-
cally at run time using code.
Changes to the registrations and dependency mappings
require you edit the code, though this is usually only in
one location in a startup file. However, users of the
classes do not see the dependencies in the source code.
This approach is flexible and allows comprehensive
configuration of injection of resolved type instances,
fixed values, and arrays.
Attribute-
based
Use attributes applied to
parameters and properties
within the classes to define
the dependencies.
Makes the dependencies obvious and easy to see in the
source code of classes, but requires you to edit the
source code when you need to change the dependen-
cies. This approach is also less flexible and less
comprehensive than the other approaches.

217dependency injection w ith unity
In addition, you can change the behavior of the dependency resolution mechanism in
several ways:
• You can specify parameter overrides or dependency overrides that set the
values of specific parameters.
• You can define optional dependencies, so that Unity will set the value of a
parameter or property to null if it cannot resolve the type of the dependency.
• You can use deferred resolution, so that the resolution does not take place until
the target type is actually required or used in your code.
• You can specify a lifetime manager that will control the lifetime of the resolved
type.
The following sections of this appendix describe some of the more common techniques
for defining dependencies in your classes though constructor, property, and method call
injection. We do not discuss interception in this appendix. For full details of all the
capabilities and uses of Unity, see the Unity section of the documentation installed
with Enterprise Library and available online at http://go.microsoft.com/fwlink/
?LinkId=188875.
By default, Unity will attempt to resolve and populate the types of every parameter of a
class constructor when you resolve that type through the container. You do not need to
configure or add attributes to a class for this to occur. Unity will choose the most complex
constructor (usually the one with the largest number of parameters), resolve the type of
each parameter through the container, and then create a new instance of the target type
using the resolved values.
The following are some simple examples that demonstrate how you can define
constructor injection for a type.
Automatic Constructor Injection
If you have a class that contains a non-default constructor, Unity will automatically
populate any dependencies defined in the parameters of the constructor. For example,
the following type has a dependency on a type named Database.
public class MyNewObject
{
public MyNewObject(Database defaultDB)
{
// code to use the resolved Database instance here
}
}
If you need to change the behavior of the automatic constructor injection process,
perhaps to specify the lifetime of the resolved type or to set the value or lifetime of the
types resolved for the parameters, you can configure the container at design time using a
configuration file or at run time using the container API.

218 appendi x a
Design-Time Configuration
Configuring constructor injection in a configuration file is useful when you need to exert
control over the process. For example, consider the following class that contains a single
constructor that takes two parameters.
public class MyNewObject
{
public MyNewObject(Database defaultDB, string departmentName)
{
...
}
}
The second parameter is a string, and Unity cannot generate an instance of a string type
unless you have registered it in the container using a named instance registration. There-
fore, you must override the default behavior of the automatic injection process. You can
do this in a configuration file, and at the same time manage three aspects of the injection
process: the resolved object lifetime, the value of parameters, and the choice of construc-
tor when the type contains more than one constructor.
For example, you can use the following register directive in a configuration file to
specify that the resolved instance of MyNewObject should be a singleton (with its
lifetime managed by the container), that Unity should resolve the type Database of the
parameter named defaultDB and inject the result, and that Unity should inject the string
value “Customer Service” into the parameter named departmentName.
<register type="MyNewObject">
<lifetime type="singleton" />
<constructor>
<param name="defaultDB" />
<param name="departmentName" value="Customer Service" />
</constructor>
</register>
When you specify constructor injection like this, you are also specifying which construc-
tor Unity should use. Even if the MyNewObject class contains a more complex
constructor, Unity will use the one that matches the list of parameters you specify in the
register element.
To register your types using named registrations, you simply add the name attribute
to the register element, as shown here.
<register type="MyNewObject" name="Special Customer Object">
...
</register>
To register mappings between an interface or base class and a type that implements the
interface or inherits the base type, you add the mapTo attribute to the register element.
You can, of course, define default (unnamed) and named mappings in the same way as you
do type registrations. The following example shows registration of a named mapping.

219dependency in jection with unity
<register type="IMyType" mapTo="MyImplementingType"
name="Special Customer Object">
...
</register>
Run-Time Configuration
You can configure injection for the default or a specific constructor at run time by calling
the RegisterType method of the Unity container. This approach also gives you a great deal
of control over the process. The following code registers the MyNewObject type with a
singleton (container-controlled) lifetime.
myContainer.RegisterType<MyNewObject>(new ContainerControlledLifetimeManager());
If you want to create a named registration, you add the name as the first parameter of the
RegisterType method, as shown here.
myContainer.RegisterType<MyNewObject>(“Special Customer Object",
new ContainerControlledLifetimeManager());
If you want to create a mapping, you specify the mapped type as the second generic type
parameter, as shown here.
myContainer.RegisterType<IMyType, MyImplementingType>(
"Special Customer Object",
new ContainerControlledLifetimeManager());
If you need to specify the value of the constructor parameters, such as a String type
(which Unity cannot create unless you register a String instance with the container), or
specify which constructor Unity should choose, you include an instance of the Injection
Constructor type in your call to the RegisterType method. For example, the following
creates a registration named Special Customer Object for the MyNewObject type as a
singleton, specifies that Unity should resolve the type Database of the parameter named
defaultDB and inject the result, and that Unity should inject the string value “Customer
Service” into the parameter named departmentName.
myContainer.RegisterType<MyNewObject>(
"Special Customer Object",
new ContainerControlledLifetimeManager(),
new InjectionConstructor(typeof(Database), "Customer Service")
);
Configuration with Attributes
When you specify just the type in a constructor parameter, as shown earlier, the con-
tainer will return the default concrete implementation of that type as defined in the
registrations within the container. To specify a named registration when using constructor
injection, you can add the Dependency attribute to the parameter definition, as shown
below.

220 a ppendi x a
public class MyNewObject
{
public MyNewObject([Dependency("CustomerDB")] Database customers)
{
// code to use the resolved Database instance here
}
}
If your class has multiple constructors, and you want to specify the one Unity will use,
you apply the InjectionConstructor attribute to that constructor, as shown in the code
excerpt that follows. If you do not specify the constructor to use, Unity chooses the most
complex (usually the one with the most parameters). This technique is useful if the most
complex constructor has parameters that Unity cannot resolve.
public class MyNewObject
{
public MyNewObject(Database defaultDB, string departmentName)
{
...
}
[InjectionConstructor]
public MyNewObject(Database defaultDB)
{
...
}
}
()
Property (setter) injection can populate one or more properties of your custom classes at
run time. Unlike constructor injection, property injection does not occur by default. You
must specify the dependency using a configuration file, programmatically at run time, or
by applying an attribute to the property that holds the dependent type.
Design-Time Configuration
To define property injection using a configuration file, you simply specify the names of
the properties that Unity should populate within the register element. If you want Unity
to resolve the type specified by the property, you need do no more than that. If you want
to specify a value, you can include this within the property element. If you want Unity
to use a named registration within the container to resolve the type, you include the
dependencyName attribute in the property element. Finally, if you want to resolve a type
that is compatible with the property name, such as resolving an interface type for which
you have named mappings already registered in the container, you specify the type to
resolve using a dependencyType attribute.

221dependency injection with unity
The following excerpt from a configuration file specifies dependency injection for
three public properties of a type named MyOtherObject. Unity will resolve whatever
type the BusinessComponent property of the MyOtherObject type is defined as
through the container and inject the result into that property. It will also inject the string
value “CorpData42” into the property named DataSource, and resolve the type ILogger
using a mapping named StdLogger and inject the result into the Logger property.
<register type="MyOtherObject">
<property name="BusinessComponent" />
<property name="DataSource" value="CorpData42" />
<property name="Logger" dependencyName="StdLogger" dependencyType="ILogger" />
</register>
Run-Time Configuration
You can configure injection for any public property of the target class at run time by
calling the RegisterType method of the Unity container. This gives you a great deal of
control over the process. The following code performs the same dependency injection
process as the configuration file example you have just seen. Notice the use of the
ResolvedParameter type to specify the named mapping that Unity should use to resolve
the ILogger interface.
myContainer.RegisterType<MyOtherObject>(
new InjectionProperty("BusinessComponent"),
new InjectionProperty("DataSource", "CorpData42"),
new InjectionProperty("Logger",
new ResolvedParameter(typeof(ILogger), "StdLogger")
)
);
You can use the ResolvedParameter type in constructor and method call injection as well
as in property injection, and there are other types of injection parameter classes available
for even more specialized tasks when configuring injection.
Configuration with Attributes
To specify injection for a property, you can alternatively apply the Dependency attribute
to it to indicate that the type defined and exposed by the property is a dependency of
the class. The following code demonstrates property injection for a class named
MyNewObject that exposes as a property a reference to an instance of the type
Database.
public class MyNewObject
{
[Dependency]
public Database CustomerDB { get; set; }
}

222 a ppendi x a
When you apply the Dependency attribute without specifying a name, the container will
return the type specified as the default (an unnamed registration) or a new instance of
that type. To specify a named registration when using property injection with attributes,
you include the name as a parameter of the Dependency attribute, as shown below.
public class MyNewObject
{
[Dependency("LocalDB")]
public Database NamedDB { get; set; }
}
Method call injection is a less common approach than constructor and property setter
injection, but is useful in two specific situations. Firstly, constructor injection only works
when you are instantiating new instances of objects (when the constructor is executed),
whereas method call injection will work with existing instances of objects. For example,
Unity will execute the method when it resolves an instance that is registered as a single-
ton, or when you call the BuildUp method of the container.
Secondly, while property setter injection also works with existing instances, it
requires public properties to be exposed. Using method call injection means that you do
not need to expose public properties to be able to inject values into existing instances of
resolved types.
The usual approach is to expose a public initialization method that takes as parameters
the objects you want to resolve and obtain references to. Unity will populate the
parameters and then call the method. As the method executes, you store the resolved
types in local variables of your class.
Method call injection does not occur by default, and must be configured using
a configuration file, programmatically at run time, or by applying an attribute to the
method.
Design-Time Configuration
The techniques for specifying dependency injection for method parameters is very similar
to what you saw earlier for constructor parameters. The following excerpt from a
configuration file defines the dependencies for the two parameters of a method named
Initialize for a type named MyNewObject. Unity will resolve the type of the parameter
named customerDB through the container and inject the result into that parameter of
the target type. It will also inject the string value “Customer Services” into the parameter
named departmentName.
<register type="MyNewObject">
<method name="Initialize">
<param name="customerDB" />
<param name="departmentName" value="Customer Services" />
</method>
</register>

223dependency inject ion wi th unity
You can also use the dependencyName and dependencyType attributes to specify how
Unity should resolve the type for a parameter in exactly the same way as you saw for
property injection. If you have more than one overload of a method in your class, Unity
uses the set of parameters you define in your configuration to determine the actual
method to populate and execute.
Run-Time Configuration
As with constructor and property injection, you can configure injection for any public
method of the target class at run time by calling the RegisterType method of the Unity
container. The following code achieves the same result as the configuration extract you
have just seen.
myContainer.RegisterType<MyNewObject>(
new InjectionMethod("Initialize", typeof(Database), "CustomerServices")
);
In addition, you can specify the lifetime of the type, and use named dependencies, in
exactly the same way as you saw for constructor injection.
Configuration with Attributes
You can apply the InjectionMethod attribute to a method to indicate that any types
defined in parameters of the method are dependencies of the class. The following code
demonstrates the most common scenario, saving the dependent object instance in a class-
level variable, for a class named MyNewObject that exposes a method named Initialize
that takes as parameters instances of the type Database and an instance of a concrete
type that implements the ILogger interface.
public class MyNewObject
{
private Database theDB;
private ILogger theLogger;
[InjectionMethod]
public void Initialize(Database customerDB, ILogger loggingComponent)
{
// assign the dependent objects to class-level variables
theDB = customerDB;
theLogger = loggingComponent;
}
}
You can also add the Dependency attribute to a parameter to specify the name of the
registration Unity should use to resolve the parameter type, just as you saw earlier for
constructor injection with attributes. And, as with constructor injection, all of the
parameters of the method must be resolvable through the container. If any are value types
that Unity cannot create, you must ensure that you have a suitable registration in the
container for that type, or use a dependency override to set the value.

224 a ppendi x a
In addition to the techniques we have shown here for defining dependencies, Unity allows
you to specify both the type to resolve, and its dependencies, as generic types. You
can also specify dependencies that are arrays of any type, including generic types. You can
even have Unity resolve all the members of an array automatically, or specify individual
members of the array yourself.
Resolving Populated Instances of Your Classes
After you have defined your object graph dependencies, you must resolve the type at the
root of this hierarchy through the container to initiate the dependency injection process.
In Unity, you use the Resolve method to kick off the process by specifying the type of
the object whose dependencies you want Unity to populate. The following code resolves
a populated instance of the MyNewObject type from the container.
MyNewObject theInstance = container.Resolve<MyNewObject>();
This returns the type registered as the default (no name was specified when it was
registered). If you want to resolve a type that was registered with a name, you specify this
name as a parameter of the Resolve method. You might also consider using implicit typing
instead of specifying the type, to make your code less dependent on the results of the
resolve process.
var theInstance = container.Resolve<MyNewObject>("Registration Name");
Alternatively, you may choose to define the returned type as the interface type when you
are resolving a mapped type. For example, if you registered a type mapping between the
interface IMyType and the concrete type MyNewObject, you should consider using the
following code when you resolve it.
IMyType theInstance = container.Resolve<IMyType>();
Writing code that specifies an interface instead of a particular concrete type means that
you can change the configuration to specify a different concrete type without needing
to change your code. Unity will always return a concrete type (unless it cannot resolve an
interface or abstract type that you specify; in which case an exception is thrown).
You can also resolve a collection of types that are registered using named mappings
(not default unnamed mappings) by calling the ResolveAll method. This may be useful if
you want to check what types are registered in your run-time code, or display a list of
available types. However, Unity also exposes methods that allow you to iterate over the
container and obtain information about all of the registrations.
We don’t have room to provide a full guide to using Unity here. However, this
discussion should have given you a taste of what you can achieve using dependency
injection. For more detailed information about using Unity, see the documentation
installed with Enterprise Library and available online at http://go.microsoft.com/
fwlink/?LinkId=188874.

225
This appendix discusses some of the more advanced topics that will help you to obtain
the maximum benefit from Enterprise Library in terms of creating objects and managing
the dependency injection container. It includes the following:
• Loading configuration information into a Unity container
• Viewing the registrations in the container
• Populating entire object graphs at application startup
• Maintaining a reference to the container in request-based applications
• Using an alternative service locator or dependency injection container
These topics provide information about how you can use the more sophisticated
dependency injection approach for creating instances of Enterprise Library objects, as
described in Chapter 1, “Introduction.” If you have decided not to use this approach,
and you are using the Enterprise Library service locator and its GetInstance method to
instantiate Enterprise Library types, they are not applicable to your scenario.
Loading Configuration Information into a Unity Container
Unlike many applications, and unlike the application blocks within Enterprise Library,
Unity does not automatically load configuration information when it starts. This is inten-
tional; it means that you can load configuration information into one or more new or
existing containers, including containers that you create as a hierarchy of parent and child
containers.
This also means that you can exert considerable control over how requests for types
are handled. For example, you can use multiple containers to specify dependencies for
different parts of your application, while allowing requests that cannot be satisfied in a
child container to pass up through the hierarchy of parent containers until a suitable
registration is found.
It also means that you can load configuration information from different sources. A
typical example is loading configuration from a file other than App.config or Web.config,
or by adding registrations programmatically by—for example—reading them from a
database and applying them to the container.
The Unity container class exposes the LoadConfiguration method that you can use
to populate a container. You can call this method with no parameters to read a <unity>
Dependency Injection in
Enterprise Library
Appendix B

226 a ppendi x b
section from the current application configuration file (App.config or Web.config), as
demonstrated in Chapter 1 of this guide. Alternatively, you can provide the method with
a UnityConfigurationSection instance that contains the configuration information. The
following code opens a configuration file using the methods of the Microsoft® .NET
Framework configuration system, casts it to a UnityConfigurationSection type, and
loads the registrations in the <container> section that has the name MyContainerName
into a new Unity container.
// Read a specied cong le using the .NET conguration system.
ExeCongurationFileMap map = new ExeCongurationFileMap();
map.ExeCongFilename = @"c:\congles\myunitycong.cong";
System.Conguration.Conguration cong
= CongurationManager.OpenMappedExeConguration(map,
CongurationUserLevel.None);
// Get the unity conguration section.
UnityCongurationSection section
= (UnityCongurationSection)cong.GetSection("unity");
// Create and populate a new UnityContainer with the conguration information.
IUnityContainer theContainer = new UnityContainer();
theContainer.LoadConguration(section, "MyContainerName");
You can define multiple containers within the <unity> section of a configuration file
providing each has a unique name, and load each one into a separate container at run time.
If you do not assign a name to a container in the configuration file, it becomes the default
container, and you can load it by omitting the name parameter in the LoadConfiguration
method.
To load a container programmatically in this way, you must add the System.Configura-
tion.dll assembly and the Microsoft.Practices.Unity.Configuration.dll assembly to your
project. You should also import the following namespaces:
• Microsoft.Practices.EnterpriseLibrary.Common.Configuration.Unity
• Microsoft.Practices.Unity
Viewing Registrations in the Container
Sometimes you may find that your application throws an error indicating that it cannot
resolve a specific type. The error messages that Unity returns are detailed, and should help
you to find the problem quickly. However, you may find it useful to be able to browse the
contents of the container to see the registrations and mappings it contains.
The Unity container exposes the Registrations property, which returns a collection
of ContainerRegistration instances; one for each registration or type mapping in the
container. The following example code shows how you can extract details for each
registration: the registered type, the type it maps to (if any), the name of the registration
(if it is not a default registration), and the lifetime manager type.

227dependency injection in en ter prise libr ary
foreach (ContainerRegistration item in theContainer.Registrations)
{
regType = item.RegisteredType.Name;
mapTo = item.MappedToType.Name;
regName = item.Name ?? "[default]";
lifetime = item.LifetimeManagerType.Name;
if (mapTo != regType)
{
mapTo = " -> " + mapTo;
}
else
{
mapTo = string.Empty;
}
lifetime = lifetime.Substring(0, lifetime.Length - "LifetimeManager".Length);
// Display details of the registration as appropriate.
}
Populating Entire Object Graphs at Application Startup
After you populate the container with your configuration information, both the Enterprise
Library information and the registrations and mappings for your own custom types, you can
resolve these custom types with all of their dependencies populated through dependency
injection. You can define dependencies in three ways:
• As one or more parameters of a constructor in the target class. Unity will create
instances of the appropriate types and populate the constructor parameters when
the target object is instantiated. This is the approach you will typically use. For
example, you can have Unity automatically create and pass into your constructor
an instance of a LogWriter or an ExceptionManager, store the reference in a class
variable or field, and use it within that class.
• As one or more properties of the target class. Unity will create an instance of the
type defined by the property or in configuration and set that instance as the value
of the property when the class is resolved through the container.
• As one or more parameters of a method in the target class. Unity will create
instances of the appropriate types and populate the method parameters when the
target object is instantiated, and then call that method. You can store the refer-
ences passed in the parameters in a class variable or field for use within that class.
This approach is typically used when you have an Initialize or similar method that
should execute when the class is instantiated.
By taking advantage of this capability to populate an entire object graph, you may decide
to have the container create and inject instances of the appropriate types for all of the
dependencies defined in your entire application when it starts up (or, at least, a significant
proportion of it).

228 a ppendi x b
While this may seem to be a strange concept, it means that you do not need to hold
onto a reference to the container after you perform this initial population of dependencies.
That doesn’t mean you cannot hold onto the container reference as well, but resolving all
of the required types at startup can improve run-time performance at the cost of slightly
increased startup time. Of course, this also requires additional memory and resources
to hold all of the resolved instances, and you must balance this against the expected
improvement in run-time performance.
You can populate all of your dependencies by resolving the main form or startup class
through the container. The container will automatically create the appropriate instances
of the objects required by each class and inject them into the parameters and properties.
However, it does rely on the container being able to create and return instances of types
that are not registered in the container. The Unity container can do this. If you use an
alternative container, you may need to preregister all of the types in your application,
including the main form or startup class.
Typically, this approach to populating an entire application object graph is best suited
to applications built using form-based or window-based technologies such as Windows®
Presentation Foundation (WPF), Windows Forms, console applications, and Microsoft
Silverlight® (using the version of Unity specifically designed for use in Silverlight applica-
tions).
For information about how you can resolve the main form, window, or startup class
of your application, together with example code, see the documentation installed with
Enterprise Library or available online at http://go.microsoft.com/fwlink/?LinkId=188874.
Maintaining a Container Reference in Request-Based
Applications
When using the default Unity DI mechanism with Enterprise Library, all you need to do
is initialize the container once on your application, and then use it to resolve (or obtain)
instances of Enterprise Library objects or your own classes and objects. Initializing the
container requires just the following single line of code.
// Create and populate the default container with application conguration.
var container = new UnityContainer()
.AddNewExtension<EnterpriseLibraryCoreExtension>();
However, to use the container to resolve types throughout your application, you must
hold a reference to it. You can store the container in a global variable in a Windows Forms
or WPF application, in the Application dictionary of an ASP.NET application, or in a
custom extension to the InstanceContext of a Windows Communication Foundation
(WCF) service.
Table 1 will help you to understand when and where you should hold a reference to
the container in forms-based and rich client applications built using technologies such as
Windows Forms, WPF, and Silverlight.
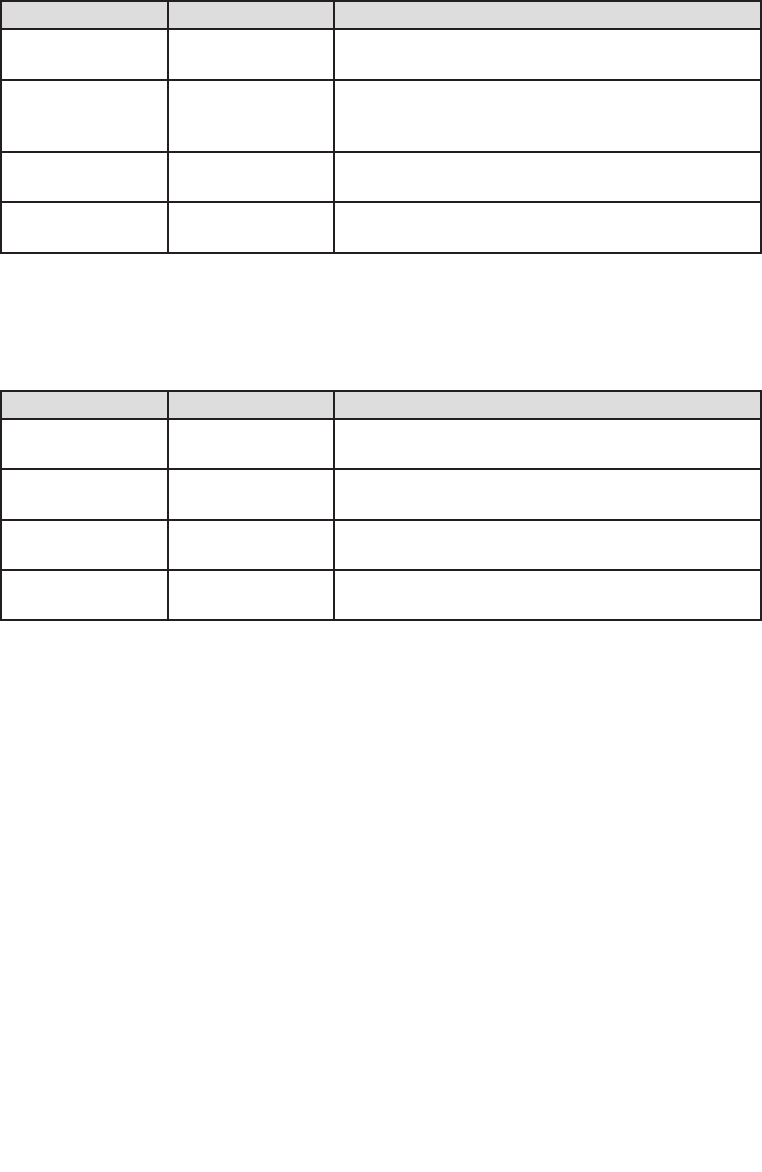
229dependency injection in enter prise libr ary
Holding a reference to the container in forms-based and rich client applications
Task When Where
Create and configure
container.
At application
startup.
Main routine, startup events, application definition file,
or as appropriate for the technology.
Obtain objects from
the container.
At application
startup, and later if
required.
Where appropriate in the code.
Store a reference to
the container.
At application
startup.
Global application state.
Dispose the
container.
When the applica-
tion shuts down.
Where appropriate in the code or automatically when the
application ends.
Table 2 will help you to understand when and where you should hold a reference to the
container in request-based applications built using technologies such as ASP.NET Web
applications and Web services.
Holding a reference to the container in request-based applications
Task When Where
Create and configure
container.
At application
startup.
HTTP Module (ASP.NET and ASMX), InstanceContext
extension (WCF).
Obtain objects from
the container.
During each HTTP
request.
In the request start event or load event. Objects are
disposed when the request ends.
Store a reference to
the container.
At application
startup.
Global application state or service context.
Dispose the
container.
When the applica-
tion shuts down.
Where appropriate in the code.
For more detailed information about how you can maintain a reference to the container
in different types of applications, in particular, request-based applications, and the code
you can use to achieve this, see the documentation installed with Enterprise Library or
available online at http://go.microsoft.com/fwlink/?LinkId=188874.
Using an Alternative Service Locator or Container
Enterprise Library, by default, uses the Unity dependency injection mechanism to create
instances of Enterprise Library objects. If you are already using, or plan to use, a different
dependency injection container in your application you may be able to use it to create
Enterprise Library objects instead of using Unity.
For this to work, you can obtain or write your own configurator that can load the
container with the Enterprise Library configuration information you specify, or create a
type that implements the IServiceLocator interface and can expose the configuration
information.

230 appendi x b
The default behavior of Enterprise Library is to create a new Unity container, create
a new configurator for the container, and then read the configuration information from
the application’s default configuration file (App.config or Web.config). The following
code extract shows the process that occurs.
var container = new UnityContainer();
var congurator = new UnityContainerCongurator(container);
// Read the conguration les and set up the container.
EnterpriseLibraryContainer.CongureContainer(congurator,
CongurationSourceFactory.Create());
// The container is now ready to resolve Enterprise Library objects
The task of the configurator is to translate the configuration file information into a series
of registrations within the container. Enterprise Library contains only the Unity
ContainerConfigurator, though you can write your own to suit your chosen container,
or obtain one from a third party.
An alternative approach is to create a custom implementation of the IServiceLocator
interface that may not use a configurator, but can read the application configuration and
return the appropriate fully populated Enterprise Library objects on demand.
See http://commonservicelocator.codeplex.com for more information about the
IServiceLocator interface.
To keep up with discussions regarding alternate configuration options for Enterprise
Library, see the forums on CodePlex at http://www.codeplex.com/entlib/Thread/
List.aspx.

231
Policy injection describes a method for inserting code between the client and an object
that the client uses, in order to change the behavior of the target object without requiring
any changes to that object, or to the client. The general design pattern for this technique
is called interception, and has become popular through the Aspect-Oriented Program-
ming (AOP) paradigm.
Interception has been a feature of Enterprise Library since version 3.0. In previous
releases of Enterprise Library, the manner in which you would enable interception was
through the Policy Injection Application Block, which exposed static facades you could
use to create wrapped instances of target objects and the appropriate proxy through
which the client can access that target object.
The block also contained a series of call handlers that are inserted into the intercep-
tion pipeline, between the client and the target object. The same set of call handlers as
used in previous versions of Enterprise Library is included in version 5.0, though they are
no longer located in the Policy Injection block (which is provided mainly for backwards
compatibility with existing applications).
In version 5.0 of Enterprise Library, the recommended approach for implementing
policy injection is through the Unity interception mechanism. This supports several dif-
ferent techniques for implementing interception, including the creation of derived classes
rather than remoting proxies, and it has much less impact on application performance.
The call handlers you use with the Unity interception mechanism can instantiate
application blocks, allowing you to apply the capabilities of the blocks for managing
crosscutting concerns for the target object. The capabilities provided by interception and
policy injection through Unity and Enterprise Library allow you to:
• Add validation capabilities by using the validation handler. This call handler uses
the Validation block to validate the values passed in parameters to the target
object. This is a useful approach to circumvent the limitations within the
Validation block, which cannot validate parameters of method calls except
in specific scenarios such as in Windows® Communication Foundation (WCF)
applications.
• Add logging capabilities to objects by using the logging handler. This call
handler uses the Logging block to generate log entries and write them to
configured target sources.
Policy Injection in
Enterprise Library
Appendix C

232 appendi x c
• Add exception handling capabilities by using the exception handling handler.
This call handler uses the Exception Handling block to implement a consistent
strategy for handling, replacing, wrapping, and logging exceptions.
• Add authorization capabilities to objects by using the authorization handler.
This call handler uses the Security block to check if the caller has the required
permission to execute each call.
• Add performance measurement capabilities by using the performance counter
handler. This call handler updates Windows® performance counters with each
call, allowing you to measure performance and monitor target object activity.
• Add custom behavior to objects by creating your own interception call
handlers.
For more information about using Unity to implement interception, see the documentation
installed with Enterprise Library or available online at http://go.microsoft.com/fwlink/
?LinkId=188874.
For information on how to use the Policy Injection block facade, see the documentation
for version 4.1 of Enterprise Library on MSDN® at http://msdn.microsoft.com/en-us/
library/dd139982.aspx.
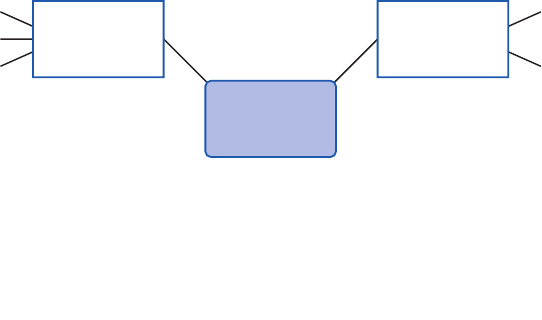
233
The comprehensive configuration capabilities of Enterprise Library—the result of the
extensible configuration system and the configuration tools it includes—make Enterprise
Library highly flexible and easy to use. The combination of these features allows you to:
• Read configuration information from a wide range of sources.
• Enforce common configuration settings across multiple applications.
• Share configuration settings between applications.
• Specify a core set of configuration settings that applications can inherit.
• Merge configuration settings that are stored in a shared location.
• Create different configurations for different deployment environments.
This appendix provides an overview of the scenarios for using these features and demon-
strates how you can apply them in your own applications and environments. More infor-
mation on the scenarios presented here is provided in the documentation installed
with Enterprise Library and available online at http://go.microsoft.com/fwlink/
?LinkId=188874.
About Enterprise Library Configuration
Enterprise Library configuration information is stored in instances of classes that imple-
ment the IConfigurationSource interface, and are typically known as configuration
sources. Figure 1 shows a high-level view of the two types of information for a configura-
tion source and the different ways that an application’s configuration can be defined and
applied.
Configuration sources in Enterprise Library
Enterprise Library
Configuration Scenarios
Appendix D
File
Database
. . .
Fluent Interface
System.Configuration API
External
Configuration
Programmatic
Support
Configuration
Source

234 appendi x d
External configuration encompasses the different ways that configuration information
can reside in a persistent store and be applied to a configuration source at run time.
Possible sources of persistent configuration information are files, a database, and other
custom stores. Enterprise Library can load configuration information from any of
these stores automatically. To store configuration in a database you can use the SQL
configuration source that is available as a sample from the Enterprise Library community
site at http://entlib.codeplex.com. You can also specify one or more configuration
sources to satisfy more complex configuration scenarios, and create different configura-
tions for different run-time environments. See the section “Scenarios for Advanced
Configuration” later in this appendix for more information.
Programmatic support encompasses the different ways that configuration information
can be generated dynamically and applied to a configuration source at run time. Typically,
in Enterprise Library this programmatic configuration takes place through the fluent
interface specially designed to simplify dynamic configuration, or by using the methods
exposed by the Microsoft® .NET Framework System.Configuration API.
Using the Fluent Interfaces
All of the application blocks except for the Validation Application Block and Policy Injec-
tion Application Block expose a fluent interface. This allows you to configure the block
at run time using intuitive code assisted by Microsoft IntelliSense® in Visual Studio®
to specify the providers and properties for the block. The following is an example of
configuring an exception policy for the Exception Handling Application Block and loading
this configuration into the Enterprise Library container.
var builder = new CongurationSourceBuilder();
builder.CongureExceptionHandling()
.GivenPolicyWithName("MyPolicy")
.ForExceptionType<NullReferenceException>()
.LogToCategory("General")
.WithSeverity(System.Diagnostics.TraceEventType.Warning)
.UsingEventId(9000)
.WrapWith<InvalidOperationException>()
.UsingMessage("MyMessage")
.ThenNotifyRethrow();
var congSource = new DictionaryCongurationSource();
builder.UpdateCongurationWithReplace(congSource);
EnterpriseLibraryContainer.Current
= EnterpriseLibraryContainer.CreateDefaultContainer(congSource);

235enter prise libr a ry configur ation scenarios
Scenarios for Advanced Configuration
The Enterprise Library stand-alone configuration console and the Visual Studio integrated
configuration editor allow you to satisfy a range of advanced configuration scenarios
based on external configuration sources such as disk files. When you use the configura-
tion tools without specifying a configuration source, they default to using the System
Configuration Source to create a single configuration file that contains the entire
configuration for the application. Your application will expect this to be named
App.config or Web.config (depending on the technology you are using), and will read it
automatically.
You can select Add Configuration Settings on the Blocks menu to display the
section that contains the default system configuration source. If you click the chevron
arrow to the right of the Configuration Sources title to open the section properties pane
you can see that this is also, by default, specified as the Selected Source—the configura-
tion source to which the configuration generated by the tool will be written. When an
application that uses Enterprise Library reads the configuration, it uses the settings
specified for the selected source.
The following sections describe the common scenarios for more advanced configura-
tion that you can accomplish using the configuration tools. Some of these scenarios
require you to add additional configuration sources to the application configuration.
:
This is the default and simplest scenario. You configure your application using the con-
figuration tool without adding a Configuration Sources section or any configuration
sources. You must specify either your application’s App.config or Web.config file when
you save the configuration, or use the configuration tool to edit an existing App.config or
Web.config file.
: -
In this scenario, you want to store your configuration in a file or other type of store,
instead of in the application’s App.config or Web.config file. To achieve this you:
1. Use the configuration tools to add a suitable configuration source to the
Configuration Sources section. If you want to use a standard format
configuration file, add a file-based configuration source. To store the
configuration information in a different type of store, you must install a
suitable configuration source. You can use the sample SQL configuration
source that is available from the Enterprise Library community site at
http://entlib.codeplex.com to store your configuration in a database.
2. Set the relevant properties of the new configuration source. For example, if you
are using the built-in file-based configuration source, set the File Path property
to the path and name for the configuration file.

236 appendi x d
3. Set the Selected Source property in the properties pane for the Configuration
Sources section to your new configuration source. This updates the application’s
default App.config or Web.config file to instruct Enterprise Library to use this
as its configuration source.
:
In this scenario, you want to share configuration settings between multiple applications
or application layers that run in different locations, such as on different computers. To
achieve this, you simply implement the same configuration as described in the previous
scenario, locating the configuration file or store in a central location. Then specify this file
or configuration store in the settings for the configuration source (such as the built-in
file-based configuration source) for each application.
:
In this scenario, you not only want to share configuration settings between multiple
applications or application layers that run on different computers (as in the previous
scenario), but also be able to manage and enforce these configuration settings for this
application or its layers on all machines within the same Active Directory® domain.
To achieve this you:
1. Use the configuration tools to add a manageable configuration source to the
Configuration Sources section.
2. Specify a unique name for the Application Name property that defines the
application within the Active Directory repository and domain.
3. Set the File Path property to the path and name for the configuration file.
4. Set the Selected Source property in the properties pane for the Configuration
Sources section to the new manageable configuration source. This updates the
application’s default App.config or Web.config file to instruct Enterprise Library
to use this as its configuration file.
5. After you finish configuring the application blocks and settings for your
application, right-click the title bar of the manageable configuration source and
select Generate ADM Template. This creates a Group Policy template that you
can install into Active Directory. The template contains the settings for the
application blocks, and configuring them in Active Directory forces each
application instance to use the centrally specified settings.
The manageable configuration source does not provide Group Policy support for the
Validation Application Block, the Policy Injection Application Block, or Unity.

237en ter prise libr a ry configur ation scenarios
:
In this scenario, you have multiple applications or application layers that must use the
same shared configuration for some application blocks (or for some sections of the
configuration such as instrumentation settings or connection strings). Effectively, you
want to be able to redirect Enterprise Library to some shared configuration sections,
rather than sharing the complete application configuration. For example, you may want
to specify the settings for the Logging Application Block and share these settings
between several applications, while allowing each application to use its own local settings
for the Exception Handling Application Block. You achieve this by redirecting specific
configuration sections to matching sections of a configuration store in a shared location.
The steps to implement this scenario are as follows:
1. Use the configuration tools to add a suitable configuration source for your
application to the Configuration Sources section. This configuration source
should point to the shared configuration store. If you want to use a standard
format configuration file as the shared configuration store, add a file-based
configuration source. To store the shared configuration information in a
different type of store, you must install a suitable configuration source. You
can use the sample SQL configuration source that is available from the
Enterprise Library community site at http://entlib.codeplex.com to store
your configuration in a database.
2. Set the relevant properties of the shared configuration source. For example,
if you are using the built-in file-based configuration source, set the File Path
property to the path and name for the application’s configuration file.
3. Set the Selected Source property in the properties pane for the Configuration
Sources section to System Configuration Source.
4. Click the plus-sign icon in the Redirected Sections column and click Add
Redirected Section. A redirected section defines one specific section of the
local application’s configuration that you want to redirect to the shared
configuration source so that it loads the configuration information defined
there. Any local configuration settings for this section are ignored.
5. In the new redirected section, select the configuration section you
want to load from the shared configuration store using the drop-down list in
the Name property. The name of the section changes to reflect your choice.
6. Set the Configuration Source property of the redirected section by selecting
the shared configuration source you defined in your configuration. This con-
figuration source will provide the settings for the configuration sections that
are redirected.

238 appendi x d
7. Repeat steps 4, 5, and 6 if you want to redirect other configuration sections
to the shared configuration store. Configuration information for all sections
for which you do not define a redirected section will come from the local
configuration source.
8. To edit the contents of the shared configuration store, you must open that
configuration in the configuration tools or in a text editor; you cannot edit
the configuration of shared sections when you have the local application’s
configuration open in the configuration tool. If you open the shared
configuration in the configuration tool, ensure that the Selected Source
property of that configuration is set to use the system configuration source.
You cannot share the contents of the Application Settings section. This section in
the configuration tool stores information in the standard <appSettings> section of
the configuration file, which cannot be redirected.
:
In this scenario you have a number of applications or application layers that use the same
configuration structure, and you want to inherit that structure but be able to modify or
add individual configuration settings by defining them in your local configuration file. You
can specify a configuration that inherits settings from a parent configuration source in a
shared location, and optionally override local settings. For example, you can configure
additional providers for an application block whose base configuration is defined in the
parent configuration. The steps to implement this scenario are as follows:
1. Use the configuration tools to add a suitable configuration source for your
application to the Configuration Sources section. This configuration source
should point to the shared configuration store. If you want to use a standard
format configuration file as the shared configuration store, add a file-based
configuration source. To store the shared configuration information in a
different type of store, you must install a suitable configuration source. You can
use the sample SQL configuration source that is available from the Enterprise
Library community site at http://entlib.codeplex.com to store your configura-
tion in a database.
2. Set the relevant properties of the shared configuration source. For example,
if you are using the built-in file-based configuration source, set the File Path
property to the path and name for the application’s configuration file.
3. Set the Parent Source property in the properties pane for the Configuration
Sources section to your shared configuration source. Leave the Selected
Source property in the properties pane set to System Configuration Source.
4. Configure your application in the usual way. You will not be able to see the
settings inherited from the shared configuration source you specified as the
parent source. However, these settings will be inherited by your local

239enter prise libr ary configu r ation scena rios
configuration unless you override them by configuring them in the local
configuration. Where a setting is specified in both the parent source and
the local configuration, the local configuration setting will apply.
5. To edit the contents of the shared parent configuration store, you must open
that configuration in the configuration tools or in a text editor; you cannot
edit the configuration of parent sections when you have the local application’s
configuration open in the configuration tool. If you open the parent configura-
tion in the configuration tool, ensure that the Selected Source property of
that configuration is set to use the system configuration source.
The way that the configuration settings are merged, and the ordering of items in
the resulting configuration, follows a predefined set of rules. These are described in
detail in the documentation installed with Enterprise Library and available online
at http://go.microsoft.com/fwlink/?LinkId=188874.
:
In this scenario, you want to be able to define different configuration settings for the
same application that will be appropriate when it is deployed to different environments,
such as a test and a production environment. In most cases the differences are minor, and
usually involve settings such as database connection strings or the use of a different
provider for a block. Enterprise Library implements this capability using a feature called
environmental overrides. The principle is that you specify override values for settings that
are different in two or more environments, and the differences are saved as separate
delta configuration files. The administrator then applies these differences to the main
configuration file when the application is deployed in each environment. To achieve
this:
1. Follow the instructions in the step-by-step procedure in the section “Using
the Configuration Tools” in Chapter 1, “Introduction,” which describes how
you configure multiple environments in the configuration tools and how
you define the overridden settings.
2. Open the properties pane for each of the environments you added to your
configuration by clicking the chevron arrow to the right of the environment
title, and set the Environment Delta File property to the path and name
for the delta file for that environment.
3. Save the configuration. The configuration tool generates a normal (.config)
file and a delta (.dconfig) file for each environment. The delta file(s) can be
managed by administrators, and stored in a separate secure location, if
required. This may be appropriate when, for example, the production
environment settings should not be visible to developers or testers.
4. To create a run-time merged configuration file (typically, this is done by
an administrator):

240 a ppendi x d
• Open the local configuration (.config) file.
• Select Open Delta File from the Environments menu and load the
appropriate override configuration (.dconfig) file.
• Set the Environment Configuration File property in the properties
pane for the environment to the path and name for the merged
configuration file for that environment.
• Right-click on the title of the environment and click Export Merged
Environment Configuration File.
6. Deploy the merged configuration file in the target environment.
Enterprise Library also contains a command-line utility named MergeConfiguration.exe
that you can use to merge configuration and delta files if you do not have the configura-
tion console deployed on your administrator system. It can also be used if you wish to
automate the configuration merge as part of your deployment process. Information about
MergeConfiguration.exe is included in the documentation installed with Enterprise
Library.
You cannot use environmental overrides with redirected sections or inherited
configuration settings. You can only use them when the entire configuration
of your application is defined within a local configuration source.
For more information on all of the scenarios presented here, see the documentation
installed with Enterprise Library and available online at http://go.microsoft.com/
fwlink/?LinkId=188874.

241
Appendix E
Enterprise Library supports encryption of configuration information. Unless your server
is fully protected from both physical incursion and remote incursion over the network,
you should consider encrypting any configuration files that contain sensitive information,
such as database connection strings, passwords and user names, or validation rules.
You can select any of the encryption providers that are included in your system’s
Machine.config file. Typically, these are the DataProtectionConfigurationProvider,
which uses the Microsoft® Windows® Data Protection API (DPAPI), and the Rsa
ProtectedConfigurationProvider, which uses RSA. The settings for these providers, such
as where keys are stored, are also in the Machine.config file. You cannot edit this file with
a configuration tool; instead, you must modify it using a text editor or an operating system
configuration tool.
As an example of the effect of this option, the following is a simple unencrypted
configuration for the Data Access block.
<dataConguration defaultDatabase="Connection String" />
<connectionStrings>
<add name="Connection String"
connectionString="Database=TheImportantOne; Server=WEHAVELIFTOFF;
User ID=secret; Password=DontTellNE1"
providerName="System.Data.SqlClient" />
</connectionStrings>
When you specify the DataProtectionConfigurationProvider option, the resulting
configuration section looks like the following.
<dataConguration
congProtectionProvider="DataProtectionCongurationProvider">
<EncryptedData>
<CipherData>
<CipherValue>AQAAANCMnd8BFdERjHoAwE/Cl+sBAAAAc8HVTgvQB0quQI81ya0uH
yTmSDdYQNdiSohA5Fo6bWOqhOR5V0uxdcfNUgKhUhuIAhl5RZ8W5WD8M2CdMiqG
...
JyEadytIBvTCbmvXefuN5MWT/T
Encrypting Configuration
Files

242 a ppendi x e
</CipherValue>
</CipherData>
</EncryptedData>
</dataConguration>
<connectionStrings
congProtectionProvider="DataProtectionCongurationProvider">
<EncryptedData>
<CipherData>
<CipherValue>AQAAANCMnd8BFdERjHoAwE/Cl+sBAAAAc8HVTgvQB0quQI81ya0uH
...
zBJp7SQXVsAs=</CipherValue>
</CipherData>
</EncryptedData>
</connectionStrings>
If you only intend to deploy the encrypted configuration file to the server where you
encrypted the file, you can use the DataProtectionConfigurationProvider. However, if
you want to deploy the encrypted configuration file on a different server, or on multiple
servers in a Web farm, you should use the RsaProtectedConfigurationProvider. You will
need to export the RSA private key that is required to decrypt the data. You can then
deploy the configuration file and the exported key to the target servers, and re-import
the keys. For more information, see “Importing and Exporting Protected Configuration
RSA Key Containers” at http://msdn.microsoft.com/en-us/library/yxw286t2(VS.80).
aspx.
Of course, the next obvious question is “How do I decrypt the configuration?”
Thankfully, you don’t need to. You can open an encrypted file in the configuration tools
as long as it was created on that machine or you have imported the RSA key file. In
addition, Enterprise Library blocks will be able to decrypt and read the configuration
automatically, providing that the same conditions apply.

243
Index
A
accessors see Data Access Application Block
ACID principles, 53
AddInParameter method, 27
AddOutParameter method, 27
AddParameter method, 27
advanced configuration scenarios, 235-240
AndCompositeValidator validator, 174
AnnotatedProduct class, 170-171
appendixes, 213-242
advanced configuration scenarios, 235-240
common configuration structure for
applications, 238-239
configuration for multiple applications,
236
default application configuration file, 235
in different environments, 239-240
non-default configuration store, 235-236
sharing across multiple applications,
237-238
sharing between multiple applications,
236
configuration scenarios, 233-240
fluent interface, 234
programmatic support, 234
dependency injection in Enterprise Library,
225-230
alternative service locator or container,
229-230
container reference in request-based
applications, 228-229
loading configuration information into a
Unity container, 225-226
populating object graphs at application
startup, 227-228
registrations in the container, 226-227
dependency injection with Unity, 213-224
encrypting configuration files, 241-242
policy injection in Enterprise Library, 231-232
application blocks, 2
optional dependencies, 6-7
Applying Exception Shielding at WCF Application
Boundaries example, 80
Aspect-Oriented Programming (AOP) paradigm,
231
ASP.NET user interface validation, 180-181
assemblies
Data Access Application Block, 28-29
and references overview, 7-8
attribute-based technique, 216
AttributeValidatorFactory, 173
Authenticate a user and cache the identity example,
204-205
authorization
authorization rule providers, 198
authorization rules, 202
Authorization Manager (AzMan), 198-199, 210-211
AuthorizationProvider class, 212
Authorize a user for a process using a stored rule
example, 209-210
Authorize a user for a process using AzMan rules
example, 210-211

244
B
BeginExecuteReader method, 43-44
Behavior After Applying Exception Shielding with
a Replace Handler example, 74
Behavior After Applying Exception Shielding with
a Wrap Handler example, 72-73
bin folder overview, 8
C
Cache data in a database backing store example, 135
Cache data in memory using the null backing store
example, 127-130
Cache data locally in the isolated storage backing
store example, 132-133
CacheItemsAndShowCacheContents routine, 128
Caching Application Block, 121-144
configuring, 124-126
extending, 143
flushing vs. expiring, 123-124
how to use, 127-143
adding and retrieving from the cache,
127-130
adding to cache, 137-138
Cache data in memory using the null backing
store example, 127-130
caching example, 127
contents of the cache, 130-131
database backing store, 134-135
Detect and refresh expired or removed cache
items example, 139-140
encrypting cached data, 133-134
file dependency and extended time
expiration, 136-137
isolated storage backing store, 131-133
loading the cache, 141-143
Load the cache proactively on application
startup example, 141-143
Load the cache reactively on demand
example, 142
proactive cache loading, 141
reactive cache loading, 142
refreshing the cache, 139-140
Remove and flush cached items example,
135-136
overview, 3-4
what it does, 123-124
Checking filter status and adding context information
to the log entry example, 111
composite validators, 150
configuration
advanced configuration scenarios, 235-240
configuration based technique, 216
configuration console, 10-11
configuration sources described, 233
encrypting configuration files, 241-242
Enterprise Library, 10-14
scenarios, 233-240
securing, 14
ConfigurationValidatorFactory, 172
constructor injection with Unity, 217-232
containers
alternative service locator or container,
229-230
directly accessing, 16-17
ContainsCharactersValidator, 173
contributors and reviewers, xix-xx
Create and Compare Hash Values for Data Items
example, 193-195
Create and Compare Hash Values for Text Strings
example, 191-193
CreateConnection method, 27
Creating and Using Validators Directly example, 173
Creating and writing log entries with a LogEntry
object example, 104-105
Credential Management
overview, 4
see also Security Application Block
Cryptographic Key Wizard, 186
Cryptography Application Block, 183-196
custom cryptography providers, 195
encryption keys, 184-185
examples, 187-195
Create and Compare Hash Values for Data
Items example, 193-195
Create and Compare Hash Values for Text
Strings example, 191-193
DecryptSymmetric method, 188
Encrypt and Decrypt a Text String using a
Symmetric Algorithm example, 188-189
Encrypt and Decrypt Data using a Symmet-
ric Algorithm example, 189-191
encrypting and decrypting a text string,
188-189

245inde x
encrypting and decrypting data symmetric
provider, 188
EncryptSymmetric method, 188
hash values, 191-195
object instances, 189-191
hashing, 184
how to use, 185-187
adding the required references, 187
configuring cryptographic providers, 186
integration with other blocks, 185
overview, 4
shared key encryption, 184
symmetric encryption, 184
what it does, 183-185
D
Data Access Application Block, 25-59
accessor creation, 37-38
accessors overview, 35-36
assemblies, 28-29
configuring, 28-29
connection-based transactions, 53-55
connections, 52
data operations supported by, 26-28
distributed transactions, 55-57
DTC transactions, 56
how to use, 28-57
methods supported by, 26-28
multiple rows, 31-35
array of parameter values, 32-33
named parameters, 33-35
query with no parameters, 31-32
other databases, 58-59
overview, 4
retrieving data as objects, 35-38
retrieving data asynchronously, 41-45
access, 42-43
row set data, 45
sample applications, 30-31
single scalar values, 40-41
updating data, 45-51
DataSets, 47-51
update queries, 46-51
updating the database from a DataSet,
48-51
what it does, 26-28
XML data, 39-40
data annotation attributes approach, 157
DataAnnotations attribute, 151-152
Database class, 58
Database instances, 29-30
DataReader method, 31-32
DataSets, 47-51
DbTransaction type, 54
dependency injection
described, xvi-15, 213
in Enterprise Library, 225-230
with Unity, 213-224
Detect and refresh expired or removed cache items
example, 139-140
DI (dependency injection) see dependency injection
Distributed Transaction Coordinator (DTC) service,
30-31
transactions, 55-56
distributed transactions, 55-57
dynamic registration technique, 216
E
Encrypt and Decrypt a Text String using a Symmetric
Algorithm example, 188-189
Encrypt and Decrypt Data using a Symmetric
Algorithm example, 189
Encrypt cached data in a backing store example,
133-134
EncryptedCacheManager manager, 124-125
encryption
configuration, 14
configuration files, 241-242
EncryptSymmetric method, 188
Enterprise Library, 1-23
assemblies and references overview, 7-8
the big picture, 2
bin folder overview, 8
configuring, 10-14
described, xii-xiv, 1-9
example applications, 22
fundamentals, 6-9
getting objects from previous versions, 21-22
global assembly cache (GAC) overview, 8
installation, 7-9
instance creation, 15-21
instantiating objects, 14
scenario overview, 3-4
service locators, 16-17
uses, 3-5

246
Enterprise Library service locator approach, 16-21
error management see Exception Handling
Application Block
example applications, 22
Exception Handling Application Block, 61-87
assisting administrators, 84-86
choosing exception policies, 63-67
about policies, 63-65
allowing exceptions to propagate, 63
choosing an exception handling strategy,
65-66
MyTestExceptionPolicy exception
handling policy, 64-65
Process method, 67
Process method vs. HandleException
method, 66
executing code, 82-84
extending exception handling, 87
how to use, 62
logging exceptions, 75-77
overview, 4
replacing exceptions, 74
shielding exceptions at WCF service
boundaries
creating a fault contract, 78
editing service code, 79
exception handling policy, 78-79
Fault Contract exception handler, 80
shielding exceptions at WC service
boundaries, 78-81
simple example, 68-69
exception shielding, 69
specific exception types, 81-82
when to use, 62
wrapping exceptions, 70-73
configuring the wrap handler policy, 70
editing the application code to use the
new policy, 71-73
initializing the exception handling
block, 71
Exception Logging pattern, 62
Exception Shielding pattern, 61
Exception Translation pattern, 62
Execute a command that retrieves data as objects
asynchronously example, 45
Execute a command that retrieves data
asynchronously example, 44-45
ExecuteDataSet method, 27, 48
ExecuteNonQuery method, 27, 46-47
ExecuteReader method, 27, 31
ExecuteScalar method, 27
ExecuteSprocAccessor method, 27
ExecuteSqlStringAccessor method, 27
ExecuteXmlReader method, 27
Executing Custom Code Before and After Handling
an Exception example, 82-84
expirations
example, 207-208
table of, 136-137
Expire an authenticated user example, 207-208
ExtendedFormatTime class, 136-137
F
facades, 15
factories, 15
Fault Contract exception handler, 78
Fill a DataSet and update the source data example,
49
fluent interface, 234
fundamentals, 6-9
G
GetInstance method, 16-17, 203
GetParameterValue method, 27
GetSqlStringCommand method, 27, 34
GetStoredProcCommand method, 27, 34
global assembly cache (GAC) overview, 8
guide, xiv-xviii
H
HandleException method vs. Process method, 66
HandlingInstanceID value, 84-86
hash values, 191-195
how to use this guide, xvii-xviii
I
IHashProvider interface, 195
injection
constructor injection with Unity, 217-232
dependency injection in Enterprise Library,
225-230
dependency injection with Unity, 213-224
method call injection, 222-223

247inde x
policy injection in Enterprise Library, 231-232
property (setter) injection, 220-221
in-memory only example, 128-130
installation, 7-9
instantiation
instance creation, 15-21
of objects, 14
pros and cons of, 18-19
interception, 231
introduction, 1-23
ISymmetricCryptoProvider interface, 195
L
LoadDataSet method, 27
Load the cache proactively on application startup
example, 141
Load the cache reactively on application startup
example, 142
Load the cache reactively on demand example, 163
LogEntry object, 104-105
Logging Application Block, 89-119
creating custom trace listeners, filters,
and formatters, 119
how to use, 93-102
configuring, 93-94
controlling output formatting, 101-102
filtering by categories, 100
intializing, 94
log entries to multiple categories, 100-101
logging categories, 98-100
LogWriter example, 95-97
settings, 94
Simple logging with the Write method of
a LogWriter example, 95
trace listeners for different categories, 99
logging categories, 92
logging overhead and additional context
information, 93
non-formatted trace listeners, 102-118
adding additional context information,
114-115
capturing unprocessed events and logging
errors, 105-107
Checking filter status and adding context
information to the log entry example,
111
checking if filters will block a log entry,
112-113
creating and using LogEntry objects,
104-105
Creating and writing log entries with a
LogEntry object example, 104
filtering all log entries by priority, 103
filtering by severity in a trace listener, 103
Sending log entries to a database example,
109
special sources, 105-107
trace sources and trace listeners, 111-112
Tracing activities and publishing activity
information to categories example,
116-118
tracing and correlating activities, 115-118
Using special sources to capture unprocessed
events or errors example, 106-107
overview, 4
process diagram, 92
what it does, 90-93
Logging Filters section, 100
Logging handler, 75-77
logging to multiple categories with the write method
of a log-writer example, 100-101
LogWriter example, 95
M
MetadataType attribute, 171-172
Microsoft Public License, 5
MyTestExceptionPolicy exception handling policy,
64-65
N
namespaces, 9
non-formatted trace listeners, 102-118
O
Object Collection validator, 155, 162, 165-166
objects
application blocks, 15
getting from previous versions, 21-22
validators, 150
Object Validator, 155, 162, 164-165
OrCompositeValidator, 174

248
P
policy injection, 231-232
preface, xv-xviii
prerequisites, xvii-xviii
Process method, 67, 71-73
vs. HandleException method, 66
PropertyProxyValidator class, 180-181
property (setter) injection, 220-221
Property Value validators, 175-176
ProtectionProvider property, 14
Providing Assistance to Administrators for Locating
Exception Details example, 85-86
R
registration
in the container, 226-227
dynamic registration technique, 216
Remove and flush cached items example, 135
Replace handler, 74
Resolve method, 17
Retrieve a userÆs identity from the cache example,
206-207
Return a single scalar value from a SQL statement or
stored procedure example, 41
Return data as an XML fragment using a SQL Server
XML query example, 40
Return data as a sequence of objects using a stored
procedure example, 38
Return rows using a SQL statement or stored
procedure with named parameters example, 35
Return rows using a SQL statement with no
parameters example, 31-32
Return rows using a stored procedure with
parameters example, 33
reviewers, xix-xx
row set data, 45
rule sets in configuration approach, 157
S
scenarios
advanced configuration, 235-240
configuration, 233-240
overview, 3-4
Security Application Block, 197-212
Authorization Manager (AzMan), 198-199
authorization rule providers, 198
authorization rules, 202
custom authorization providers, 212
examples, 202-211
Authenticate a user and cache the identity
example, 204-205
authorization rules, 208-210
Authorize a user for a process using a stored
rule example, 209-210
Authorize a user for a process using AzMan
rules example, 210-211
checking authorizations, 208-211
Expire an authenticated user example,
207-208
Retrieve a user’s identity from the cache
example, 206-207
ShowGenericPrincipalDetails routine,
205-206
ShowUserIdentityDetails routine, 205
how to configure, 200-202
how to use, 202-203
overview, 4
security cache, 199-200
security settings section, 201
what it does, 198
self-validation approach, 157
SelfValidation attribute, 152-153
Sending log entries to a database example, 109-110
service locators, 16-17
SetParameterValue method, 27
shared key encryption, 184
ShowCacheContents routine, 129-130
ShowDetailsAndAddExtraInfo method, 112-114
ShowGenericPrincipalDetails routine, 204-206
ShowUserIdentityDetails routine, 204-205
Simple logging with the Write method of a LogWriter
example, 95-97
single member validators, 150
single scalar values, 40-41
SprocAccessor class, 35
SqlDatabase instance, 39
SqlStringAccessor class, 35
SQLXML, 39
symmetric encryption, 184

249index
T
team, xix-xx
trace listeners, 102-118
Tracing activities and publishing activity information
to categories example, 116-117
TransactionScope class, 55-57
Typical Default Behavior without Exception Shielding
option, 69
U
Unity
attribute-based technique, 216
configuration based technique, 216
constructor injection, 217-222
automatic constructor injection, 217
configuration with attributes, 219-220
design-time configuration, 218-219
run-time configuration, 219
defining dependencies, 216-224
dynamic registration technique, 216
features, 215
mechanism, 214
method call injection, 222-223
configuration with attributes, 223
design-time configuration, 222-223
run-time configuration, 223
property (setter) injection, 220-221
configuration with attributes, 221-222
design-time configuration, 220-221
run-time configuration, 220-221
resolving populated instances of your classes,
224
UpdateDataSet method, 27
Update data using a Command object example, 47
Use a connection-based transaction example, 54
Using Data Annotation Attributes and Self-Validation
example, 170-171
Using special sources to capture unprocessed events or
errors example, 106-107
using statements, 9
Using Validation Attributes and Self-Validation
example, 166
V
Validating a Collection of Objects example, 166
Validating Parameters in a WCF Service example, 176
Validation Application Block, 145-182
creating custom validators, 182
functions, 147-156
assigning validation rules to rule sets, 154
DataAnnotations attribute, 151-152
range of validators, 149-151
SelfValidation attribute, 152-153
specifying rule sets when validating,
155-156
validating with attributes, 151-152
validation rule set, 154
how to use, 156-160
choosing a validation approach, 157-158
options for creating validators program-
matically, 158-159
performing validation and displaying
validation errors, 159
preparing the application, 156
understanding message template tokens,
160
how to validate, 147
overview, 4
simple examples, 161-182
ASP.NET user interface validation,
180-181
collections of objects, 165-166
combining validation attribute operations,
167
composite validators, 174
data annotation attributes, 169-171
data annotation attributes and self-
validation, 170-171
defining attributes in metadata classes,
171-172
defining validation in the service contract,
176-177
differences between object and factory-
created type validators, 165
editing the service configuration, 177-178
individual validators, 162, 173-176
objects and collections of objects,
161-166
Object Validator, 164-165

250
product service and detecting validation
errors, 178-180
properties that are objects, 169
results of validation operations, 168
self-validation, 167
single members of an object, 175-176
specifying the location of validation rules,
172-173
strings for contained characters, 173-174
subclass types, 169
type validators using the ValidatorFactory,
162-163
user interface validation integration,
180-182
Using Validation Attributes and Self-
Validation example, 166-167
validation attributes, 161, 166-169
Validation Block attributes, 166-169
ValidationResults instance, 163-164
WCF service validation integration, 162,
176-180
Windows Forms user interface validation,
181
WPF user interface validation, 181-182
validators described, 150
what and where to validate, 146
ValidationAttributeValidatorFactory, 173
Validation Block attributes, 166-169
validation block attributes approach, 157
ValidationProvider component, 181
ValidationResults instance, 163-164
ValidatorFactory, 162-163
ValidatorRule component, 181-182
validators see Validation Application Block
validators created programmatically approach, 157
value validators, 150
W
Windows Isolated Storage, 131-133
WPF user interface validation, 181-182
Wrap handler, 70
X
XML data, 39-40
