The Correct Bibliographic Citation For This Manual Is As Follows [SAS] SAS Certification Prep Guide Base Programmi
User Manual:
Open the PDF directly: View PDF ![]() .
.
Page Count: 819 [warning: Documents this large are best viewed by clicking the View PDF Link!]

The correct bibliographic citation for this manual is as follows: SAS Institute Inc. 2011. SAS®
Certification Prep Guide: Base Programming for SAS®9, Third Edition. Cary, NC: SAS
Institute Inc.
SAS® Certification Prep Guide: Base Programming for SAS®9, Third Edition.
Copyright © 2011, SAS Institute Inc., Cary, NC, USA
ISBN 978-1-60764-924-3
All rights reserved. Produced in the United States of America.
For a hard-copy book: No part of this publication may be reproduced, stored in a retrieval
system, or transmitted, in any form or by any means, electronic, mechanical, photocopying, or
otherwise, without the prior written permission of the publisher, SAS Institute Inc.
For a Web download or e-book: Your use of this publication shall be governed by the terms
established by the vendor at the time you acquire this publication.
U.S. Government Restricted Rights Notice: Use, duplication, or disclosure of this software and
related documentation by the U.S. government is subject to the Agreement with SAS Institute
and the restrictions set forth in FAR 52.227-19, Commercial Computer Software-Restricted
Rights (June 1987).
SAS Institute Inc., SAS Campus Drive, Cary, North Carolina 27513.
1st printing, July 2011
SAS® Publishing provides a complete selection of books and electronic products to help
customers use SAS software to its fullest potential. For more information about our e-books,
e-learning products, CDs, and hard-copy books, visit the SAS Publishing Web site at
support.sas.com/publishing or call 1-800-727-3228.
SAS® and all other SAS Institute Inc. product or service names are registered trademarks or
trademarks of SAS Institute Inc. in the USA and other countries. ® indicates USA registration.
Other brand and product names are registered trademarks or trademarks of their respective
companies.
SAS® Certification Prep Guide Base Programming for
SAS®9, Third Edition
- 1 -
Table of Contents
About This Book.....................................................................................................................................................................2
Chapter 1 Base Programming .................................................................................................................................................4
Chapter 2 Referencing Files and Setting Options .................................................................................................................43
Chapter 3 Editing and Debugging SAS Programs ................................................................................................................79
Chapter 4 Creating List Reports..........................................................................................................................................115
Chapter 5 Creating SAS Data Sets from External Files......................................................................................................159
Chapter 6 Understanding DATA Step Processing ...............................................................................................................215
Chapter 7 Creating and Applying User-Defined Formats...................................................................................................254
Chapter 8 Producing Descriptive Statistics.........................................................................................................................268
Chapter 9 Producing HTML Output ...................................................................................................................................304
Chapter 10 Creating and Managing Variables.....................................................................................................................331
Chapter 11 Reading SAS Data Sets ....................................................................................................................................364
Chapter 12 Combining SAS Data Sets ...............................................................................................................................391
Chapter 13 Transforming Data with SAS Functions...........................................................................................................437
Chapter 14 Generating Data with DO Loops......................................................................................................................506
Chapter 15 Processing Variables with Arrays .....................................................................................................................527
Chapter 16 Reading Raw Data in Fixed Fields...................................................................................................................563
Chapter 17 Reading Free-Format Data ...............................................................................................................................586
Chapter 18 Reading Date and Time Values.........................................................................................................................626
Chapter 19 Creating a Single Observation from Multiple Records ....................................................................................648
Chapter 20 Creating Multiple Observations from a Single Record ....................................................................................671
Chapter 21 Reading Hierarchical Files ...............................................................................................................................706
Appendix 1 Quiz Answer Keys...........................................................................................................................................733

- 2 -
About This Book
Audience
The SAS Certification Prep Guide: Base Programming for SAS®9 is for new or experienced SAS
programmers who want to prepare for the SAS Base Programming for SAS®9 exam.
Requirements and Details
Purpose
The SAS Certification Prep Guide: Base Programming for SAS®9 helps prepare you to take the SAS Base
Programming for SAS®9 exam. The book covers the objectives tested on the exam, including basic
concepts, producing reports, creating and modifying SAS data sets, and reading various types of raw data.
Before attempting the exam you should also have experience programming in the SAS®9 environment.
The book includes quizzes that enable you to test your understanding of material in each chapter.
Additionally, solutions to all quizzes are included at the back of the book.
Note: Exam objectives are subject to change. Please view the current exam objectives at
support.sas.com/certify.
Programming Environments
This book assumes you are running Base SAS or SAS Enterprise Guide software in the windowing
environment. You will learn how to write and manage your SAS programs in either the SAS windowing
environment workspace or in the SAS Enterprise Guide workspace.
If you are not sure which programming workspace you are using, select Help→About from the SAS
software main menu. If you are using SAS Enterprise Guide, the About window displays the name
“Enterprise Guide.” If you are using the SAS windowing environment, the About window displays the
name “SAS for Windows.”
Because the two programming workspaces differ, you will occasionally see notes in this book that provide
information specific to either SAS Enterprise Guide or to the SAS windowing environment.
How to Create Practice Data
If you are using the SAS 9.3 windowing environment, you can practice what you learn in this book by
using sample data that you create from within the SAS®9 environment. To set up this practice data, select
Help→Learning SAS Programming from the main SAS menu. When the SAS Online Training Sample
Data window appears, click OK to create a permanent SAS library named sasuser, which contains the
sample data.
You can access additional sample data by visiting the SAS Certification page on the SAS Training and
Bookstore Web site at support.sas.com/basepractice. There you will find links to practice data as well as
any updates to the guide.

- 3 -
Setting Result Formats in the SAS Windowing Environment
In the SAS windowing environment, you can use the Preferences window to specify whether you want
your output in HTML or LISTING format, or both. Your preferences are saved until you modify them, and
they apply to all output that you create. SAS Certification Prep Guide: Base Programming for SAS®9
generally shows output in HTML format, but some sample programs in this book specify features that
appear only in LISTING output. To create both HTML and LISTING output, do the following:
Start SAS and select Tools→Options→Preferences. Then click the Results tab and select the Create
listing and Create HTML check boxes. If you want to store your HTML output in a folder other than the
one shown, de-select the Use WORK folder check box and browse to the desired folder. HTML files are
named sashtml.htm. Click OK to close the Preferences window.
Note: In SAS 9.3, HTML output in the SAS windowing environment is the default for Windows and
UNIX, but not for other operating systems and not in batch mode. When you run SAS in batch mode or on
other operating systems, the LISTING destination is open and is the default. Your actual defaults might be
different because of your registry or configuration file settings.
SAS Certification Practice Exam: Base Programming for SAS®9
The SAS Certification Practice Exam: Base Programming for SAS®9 was designed to help you prepare for
the SAS Base Programming for SAS®9 exam. This practice exam was constructed to give you a view of
the type of questions on the official certification exam. You can get more information about this exam at
support.sas.com/basepractice.
SAS Base Programming for SAS®9
For information about how to register for the official SAS Base Programming for SAS®9 exam, see the
SAS Global Certification Web site at http://support.sas.com/certify.
Additional Resources
Other resources might be helpful when you are learning SAS programming. You can refer to them as
needed to enhance your understanding of the material covered in this book. You can access SAS Help,
documentation, and other resources from your SAS software or on the Web.
From SAS Software
Help For SAS®9, select Help→SAS Help and Documentation
SAS Enterprise Guide, select Help→SAS Enterprise Guide Help
Documentation For SAS®9, select Help→SAS Help and Documentation
SAS Enterprise Guide: Access online documentation on the Web. See On the Web below.
On the Web
Bookstore http://support.sas.com/publishing/
Training http://support.sas.com/training/
Certification http://support.sas.com/certify/
SAS Learning Edition http://support.sas.com/learn/le/
SAS Global Academic Program http://support.sas.com/learn/ap/
SAS OnDemand http://support.sas.com/ondemand/
Knowledge Base http://support.sas.com/resources/
Support http://support.sas.com/techsup/
Learning Center http://support.sas.com/learn/
Community http://support.sas.com/community/

- 4 -
Syntax Conventions
The following example shows the general form of SAS code is shown in the book:
DATA output-SAS-data-set
(DROP=variables(s) | KEEP=variables(s));
SET SAS-data-set <options>;
BY variable(s)
RUN;
In the general form above:
• DATA, DROP=, KEEP=, SET, BY, and RUN are in uppercase bold because they must be spelled as shown.
• output-SAS-data-set, variable(s), SAS-data-set, and options are in italics because each represents a value that you
supply.
• <options> is enclosed in angle brackets because it is optional syntax.
• DROP= and KEEP= are separated by a vertical bar ( | ) to indicate that they are mutually exclusive.
The general forms of SAS statements and commands that are shown in this book include only the syntax
that you need to know to prepare for the certification exam. For complete syntax, see the appropriate SAS
reference guide.
Chapter 1 Base Programming
Overview
SAS Programs
SAS Libraries
Referencing SAS Files
SAS Data Sets
Using the Programming Workspace
- 5 -
Chapter Summary
Chapter Quiz
Overview
Introduction
To program effectively using SAS, you need to understand basic concepts about SAS programs and the
SAS files that they process. In particular, you need to be familiar with SAS data sets.
In this chapter, you'll examine a simple SAS program and see how it works. You'll learn details about SAS
data sets (which are files that contain data that is logically arranged in a form that SAS can understand).
You'll see how SAS data sets are stored temporarily or permanently in SAS libraries. Finally, you'll learn
how to use SAS windows to manage your SAS session and to process SAS programs.
SAS Library with SAS Data Sets and Data Files
Objectives
In this chapter, you learn about
• the structure and components of SAS programs
• the steps involved in processing SAS programs
• SAS libraries and the types of SAS files that they contain
• temporary and permanent SAS libraries
• the structure and components of SAS data sets
• the SAS windowing environment.
SAS Programs
You can use SAS programs to access, manage, analyze, or present your data. Let's begin by looking at a
simple SAS program.
- 6 -
A Simple SAS Program
This program uses an existing SAS data set to create a new SAS data set containing a subset of the original
data set. It then prints a listing of the new data set using PROC PRINT. A SAS data set is a data file that is
formatted in a way that SAS can understand.
data sasuser.admit2;
set sasuser.admit;
where age>39;
run;
proc print data=sasuser.admit2;
run;
Let's see how this program works.
Components of SAS Programs
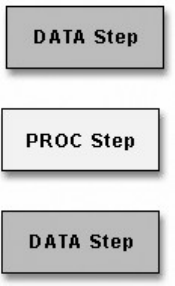
The sample SAS program contains two steps: a DATA step and a PROC step.
data sasuser.admit2;
set sasuser.admit;
where age>39;
run;
proc print data=sasuser.admit2;
run;
These two types of steps, alone or combined, form most SAS programs.
A SAS program can consist of a DATA step or a PROC step or any combination of DATA and PROC
steps.
Components of a SAS Program
- 7 -
DATA steps typically create or modify SAS data sets. They can also be used to produce custom-designed
reports. For example, you can use DATA steps to
• put your data into a SAS data set
• compute values
• check for and correct errors in your data
• produce new SAS data sets by subsetting, supersetting, merging, and updating existing data sets.
In the previous example, the DATA step produced a new SAS data set containing a subset of the original
data set. The new data set contains only those observations with an age value greater than 39.
PROC (procedure) steps invoke or call pre-written routines that enable you to analyze and process the data
in a SAS data set. PROC steps typically present the data in the form of a report. They sometimes create
new SAS data sets that contain the results of the procedure. PROC steps can list, sort, and summarize data.
For example, you can use PROC steps to
• create a report that lists the data
• produce descriptive statistics
• create a summary report
• produce plots and charts.
Characteristics of SAS Programs
Next let's look at the individual statements in our sample program. SAS programs consist of SAS
statements. A SAS statement has two important characteristics:
• It usually begins with a SAS keyword.
• It always ends with a semicolon.
As you've seen, a DATA step begins with a DATA statement, which begins with the keyword DATA. A
PROC step begins with a PROC statement, which begins with the keyword PROC. Our sample program
contains the following statements:
SAS Program Statements
- 8 -
Statements Sample Program Code
a DATA statement
data sasuser.admit2;
a SET statement
set sasuser.admit;
Additional programming statements
where age>39;
a RUN statement
run;
a PROC PRINT statement
proc print data=sasuser.admit2;
another RUN statement
run;
Layout for SAS Programs
SAS statements are free-format. This means that
• they can begin and end anywhere on a line
• one statement can continue over several lines
- 9 -
• several statements can be on the same line.
Blanks or special characters separate words in a SAS statement.
You can specify SAS statements in uppercase or lowercase. In most situations, text that is enclosed in
quotation marks is case sensitive.
You've examined the general structure of our sample program. But what happens when you run the
program?
Processing SAS Programs
When you submit a SAS program, SAS begins reading the statements and checking them for errors.
DATA and PROC statements signal the beginning of a new step. The RUN statement (for most procedures
and the DATA step) and the QUIT statement (for some procedures) mark step boundaries. The beginning
of a new step (DATA or PROC) also implies the end of the previous step. At a step boundary, SAS
executes any statements that have not previously executed and ends the step. In our sample program, each
step ends with a RUN statement.
data sasuser.admit2;
set sasuser.admit;
where age>39;
run;
proc print data=sasuser.admit2;
run;
Note: Though the RUN statement is not always required between steps in a SAS program, using it can
make the SAS program easier to read and debug, and it makes the SAS log easier to read.
Log Messages
Each time a step is executed, SAS generates a log of the processing activities and the results of the
processing. The SAS log collects messages about the processing of SAS programs and about any errors
that occur.
When SAS processes our sample program, you see the log messages shown below. Notice that you get
separate sets of messages for each step in the program.
Log Messages
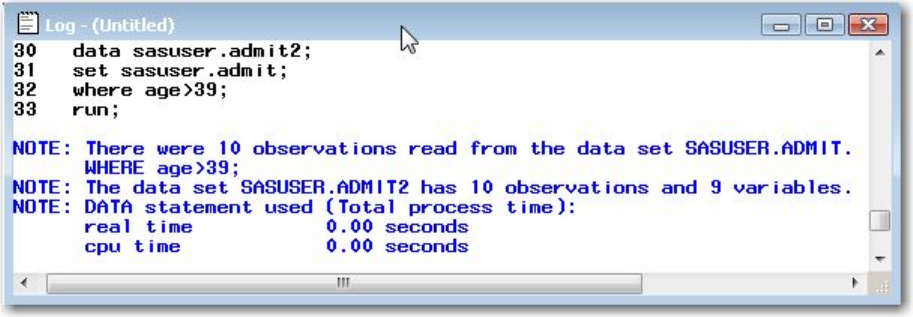
- 10 -
Results of Processing
• DATA step Output
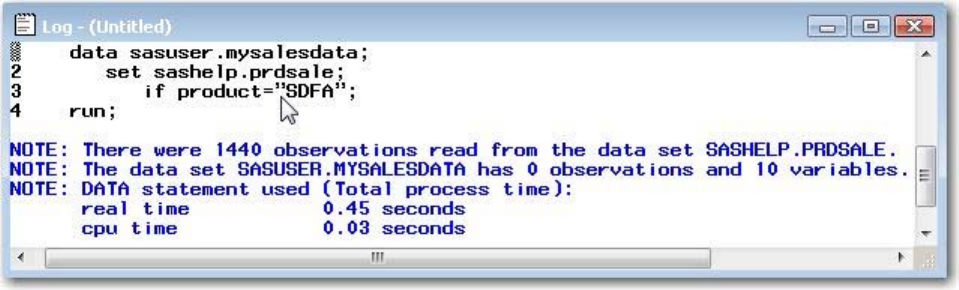
Suppose you submit the sample program below:
data sasuser.admit2;
set sasuser.admit;
where age>39;
run;
When the program is processed, it creates a new SAS data set (sasuser.admit2) containing only those observations with
age values greater than 39. The DATA step creates a new data set and produces messages in the SAS log, but it does not
create a report or other output.
• Procedure Output
If you add a PROC PRINT statement to this same example, the program produces the same new data set as before, but it
also creates the following report, which is displayed in HTML:
data sasuser.admit2;
set sasuser.admit;
where age>39;
run;
proc print data=sasuser.admit2;
run;
PRINT Procedure Output
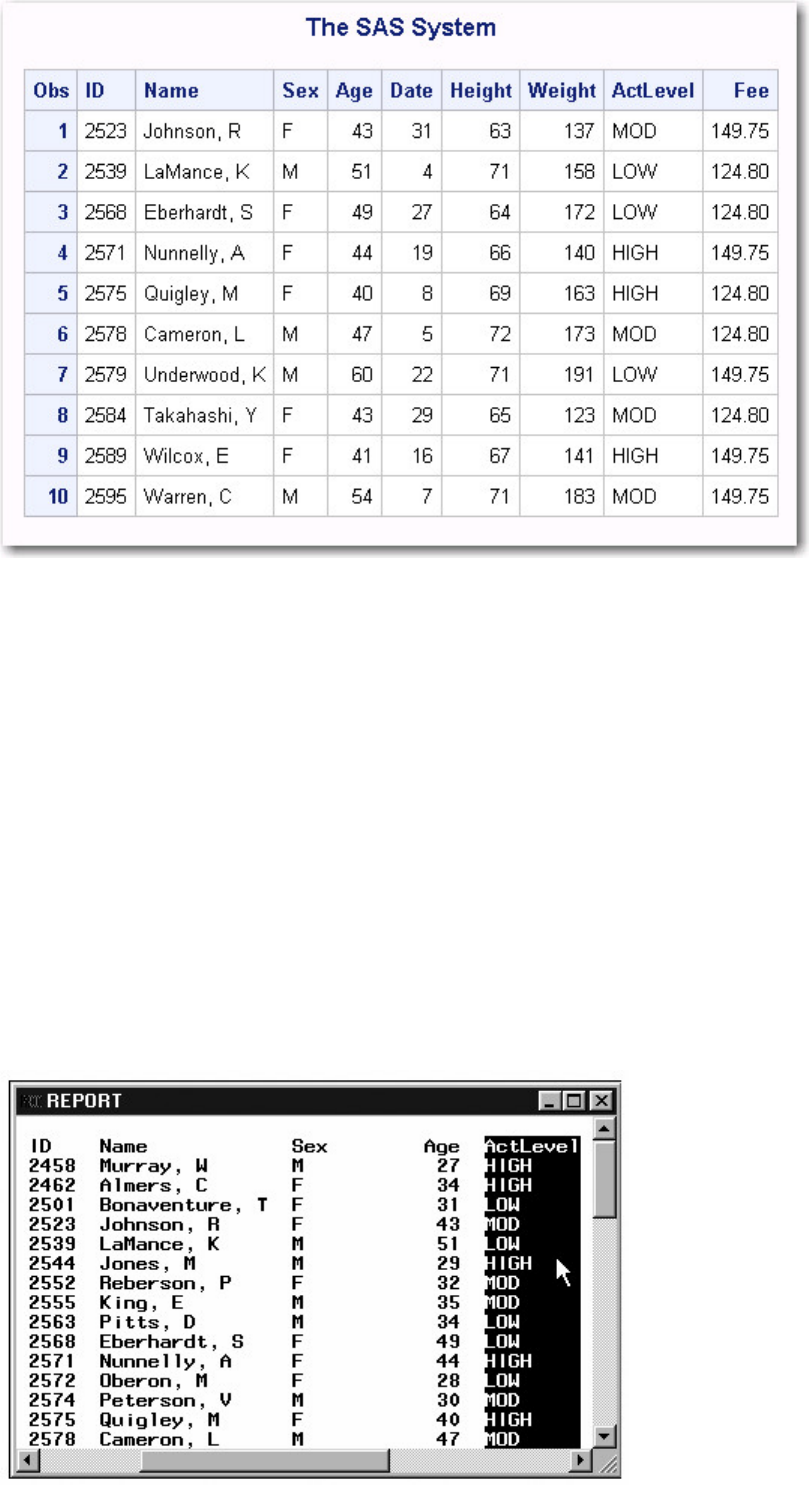
- 11 -
Note: Throughout this book, procedure output is shown in HTML in the style shown above unless
otherwise noted.
You've seen the results of submitting our sample program. For other SAS programs, the results of
processing might vary:
• Other Types of Procedural Output
o Some SAS programs open an interactive window (a window that you can use to directly modify data),
such as the REPORT window.
proc report data=sasuser.admit;
columns id name sex age actlevel;
run;
Interactive Report Window
- 12 -
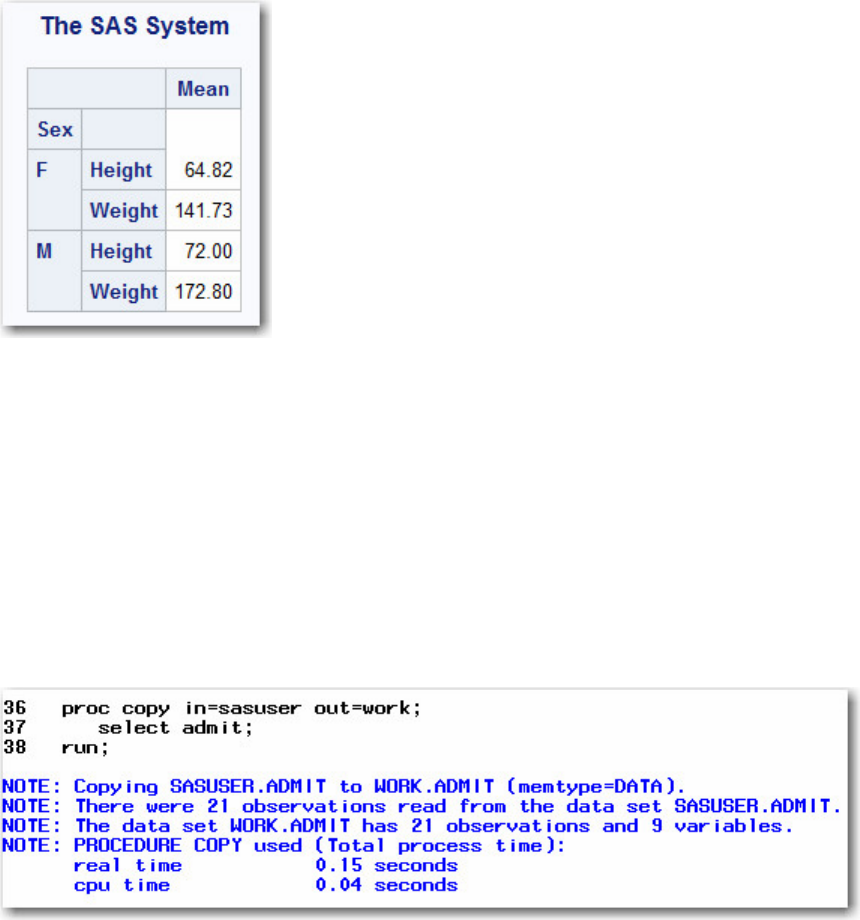
o SAS programs often invoke procedures that create output in the form of a report, as is the case with the
TABULATE procedure:
proc tabulate data=sasuser.admit;
class sex;
var height weight;
table sex*(height weight),mean;
run;
TABULATE Procedure Output
o Other SAS programs perform tasks such as sorting and managing data, which have no visible results
except for messages in the log. (All SAS programs produce log messages, but some SAS programs produce only log
messages.)
proc copy in=sasuser out=work;
select admit;
run;
Log Output
SAS Libraries
So far you've learned about SAS programs. Now let's look at SAS libraries to see how SAS data sets and
other SAS files are organized and stored.
How SAS Files Are Stored
- 13 -
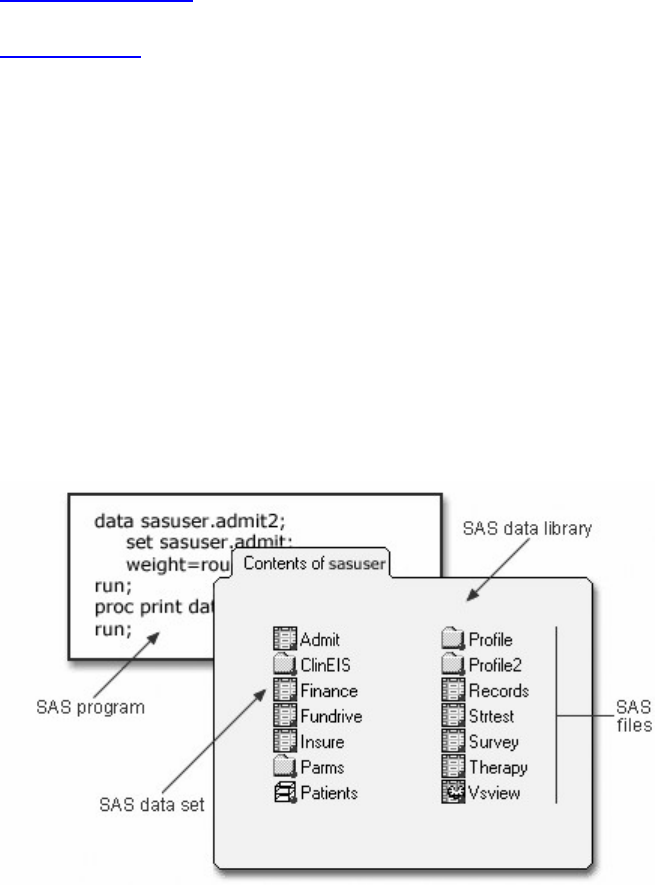
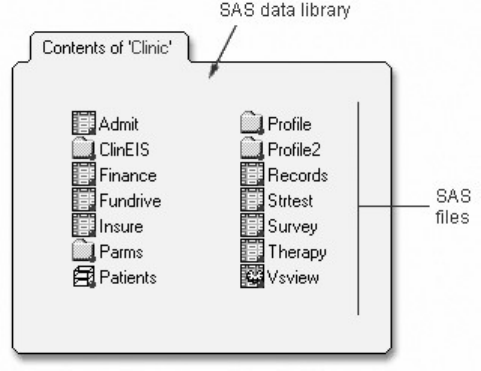
Every SAS file is stored in a SAS library, which is a collection of SAS files. A SAS data library is the
highest level of organization for information within SAS.
For example, in the Windows and UNIX environments, a library is typically a group of SAS files in the
same folder or directory.
SAS Data Library
The table below summarizes the implementation of SAS libraries in various operating environments.
Environments and SAS Libraries
In this environment...
A SAS library is...
Windows, UNIX, OpenVMS,
OS/2 (directory based-systems)
a group of SAS files that are stored in the same directory. Other files can
be stored in the directory, but only the files that have SAS file extensions
are recognized as part of the SAS library.
For more information, see the SAS documentation for your operating
environment.
z/OS (OS/390)
a specially formatted host data set in which only SAS files are stored.
Storing Files Temporarily or Permanently
Depending on the library name that you use when you create a file, you can store SAS files temporarily or
permanently.
Temporary SAS Data Library
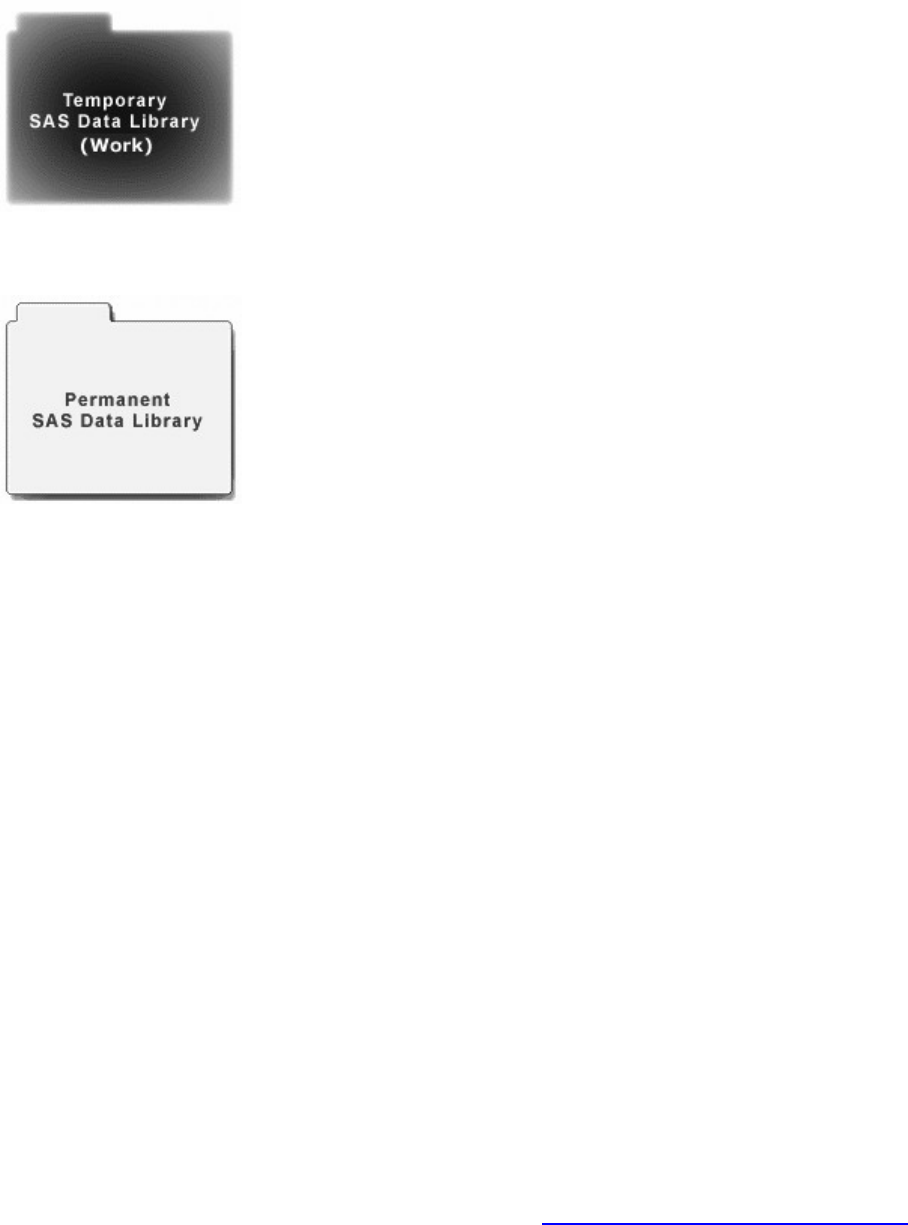
- 14 -
Permanent SAS Data Library
Temporary and Permanent SAS Libraries
Temporary SAS libraries last
only for the current SAS session.
Storing files temporarily:
If you don't specify a library name when you create a file (or if you specify the
library name Work), the file is stored in the temporary SAS data library. When you
end the session, the temporary library and all of its files are deleted.
Permanent SAS Libraries are
available to you during
subsequent SAS sessions.
Storing files permanently:
To store files permanently in a SAS data library, you specify a library name other
than the default library name Work.
For example, by specifying the library name sasuser when you create a file, you
specify that the file is to be stored in a permanent SAS data library until you delete
it.
You can learn how to set up permanent SAS libraries in Referencing Files and Setting Options.
Referencing SAS Files
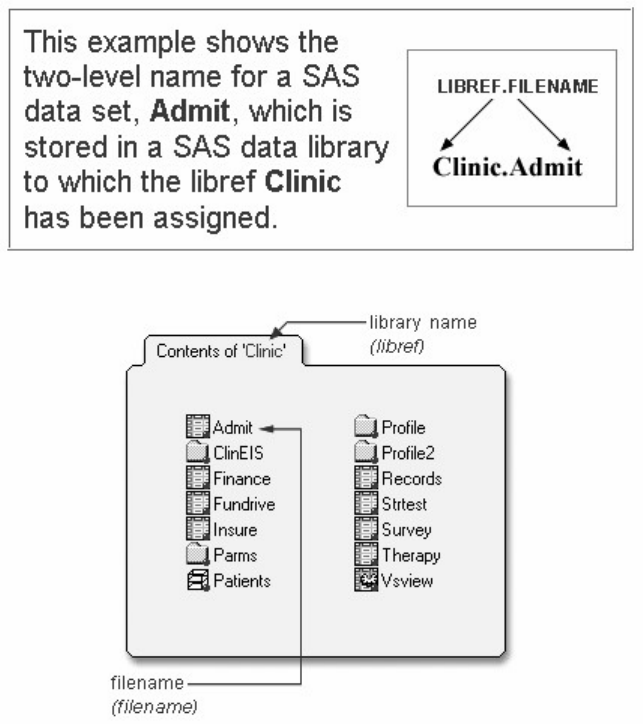
Two-Level Names
To reference a permanent SAS data set in your SAS programs, you use a two-level name consisting of the
library name and the filename, or data set name:
libref.filename

- 15 -
In the two-level name, libref is the name of the SAS data library that contains the file, and filename is the name of the file,
or data set. A period separates the libref and filename.
Two-Level SAS Name
For example, suppose we want to create a new permanent sas library named Clinic. In our sample program,
Clinic.Admit is the two-level name for the SAS data set Admit, which is stored in the library named Clinic.
Notice that the LIBNAME statement is used to define the libref, Clinic, and to give SAS the physical
location of the data files.
libname clinic 'c:\Users\Name\sasuser';
data clinic.admit2;
set clinic.admit;
weight =round(weight);
run;
Two-Level Name Clinic.Admit
Referencing Temporary SAS Files
To reference temporary SAS files, you can specify the default libref Work, a period, and the filename. For
example, the two-level name Work.Test references the SAS data set named Test that is stored in the
temporary SAS library Work.
Two-Level Temporary SAS Library Work.Test
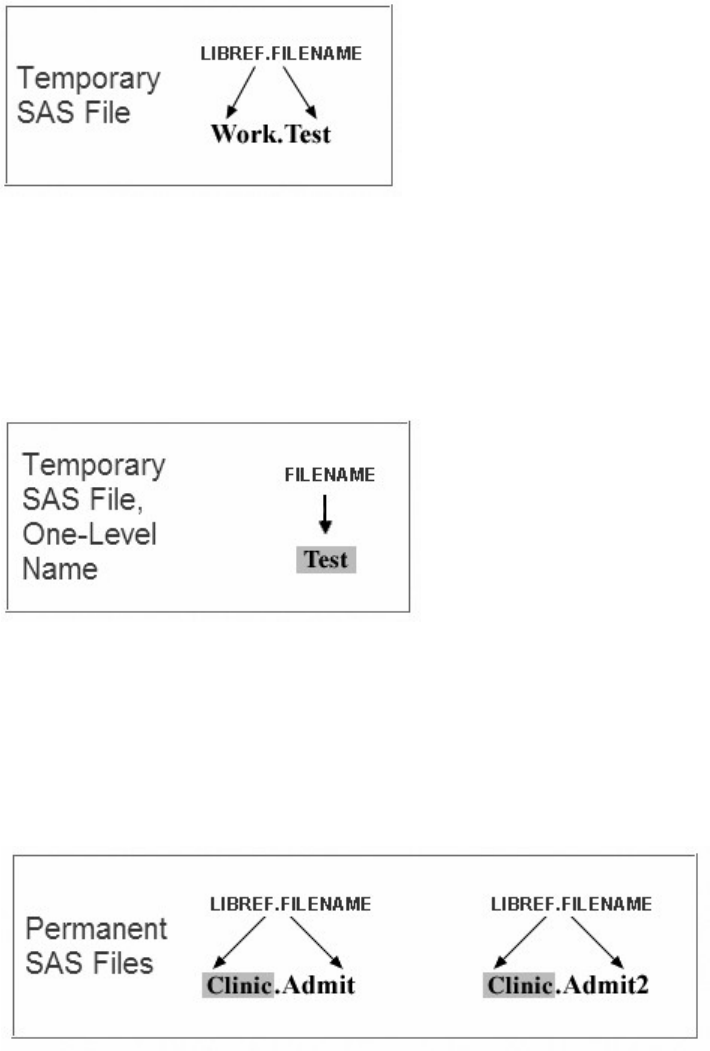
- 16 -
Alternatively, you can use a one-level name (the filename only) to reference a file in a temporary SAS
library. When you specify a one-level name, the default libref Work is assumed. For example, the
one-level name Test also references the SAS data set named Test that is stored in the temporary SAS
library Work.
One-Level Temporary SAS Library Test
Referencing Permanent SAS Files
You can see that Clinic.Admit and Clinic.Admit2 are permanent SAS data sets because the library name is
Clinic, not Work.
Referencing Permanent SAS Files
So, referencing a SAS file in any library except Work indicates that the SAS file is stored permanently. For
example, when our sample program creates Clinic.Admit2, it stores the new Admit2 data set permanently
in the SAS library Clinic.
Rules for SAS Names
These rules apply only to the filename portion of a SAS data set name. A libref can have a length of only
eight characters.
SAS data set names and variable names
• can be 1 to 32 characters long
• must begin with a letter (A-Z, either uppercase or lowercase) or an underscore (_)
- 17 -
• can continue with any combination of numbers, letters, or underscores.
These are examples of valid data set names and variable names:
• Payroll
• LABDATA1995_1997
• _EstimatedTaxPayments3
SAS Data Sets
So far, you've seen the components and characteristics of SAS programs, including how they reference
SAS data sets. Data sets are one type of SAS file. There are other types of SAS files (such as catalogs), but
this chapter focuses on SAS data sets. For most procedures, data must be in the form of a SAS data set to
be processed. Now let's take a closer look at SAS data sets.
Overview of Data Sets
As you saw in our sample program, for many of the data processing tasks that you perform with SAS, you
• access data in the form of a SAS data set
• analyze, manage, or present the data.
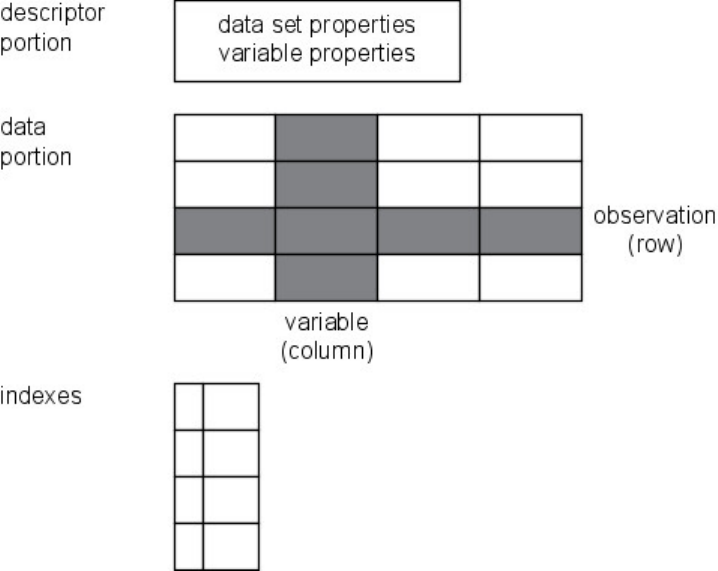
Conceptually, a SAS data set is a file that consists of two parts: a descriptor portion and a data portion.
Sometimes a SAS data set also points to one or more indexes, which enable SAS to locate rows in the data
set more efficiently. (The data sets that you work with in this chapter do not contain indexes.)
Parts of a SAS Data Set
Descriptor Portion
- 18 -
The descriptor portion of a SAS data set contains information about the data set, including
• the name of the data set
• the date and time that the data set was created
• the number of observations
• the number of variables.
Let's look at another SAS data set. The table below lists part of the descriptor portion of the data set
sasuser.insure, which contains insurance information for patients who are admitted to a wellness clinic.
(It's a good idea to give your data set a name that is descriptive of the contents.)
Descriptor Portion of Attributes in a SAS Data Set sasuser.insure
Data Set Name:
sasuser.INSURE
Member Type:
DATA
Engine:
V9
Created:
10:05 Tuesday, February 16, 2011
Observations:
21
Variables:
7
Indexes:
0
Observation Length:
64
Data Portion
The data portion of a SAS data set is a collection of data values that are arranged in a rectangular table. In
the example below, the name Murray is a data value, Policy 32668 is a data value, and so on.
Parts of a SAS Data Set: Data: Data Portion
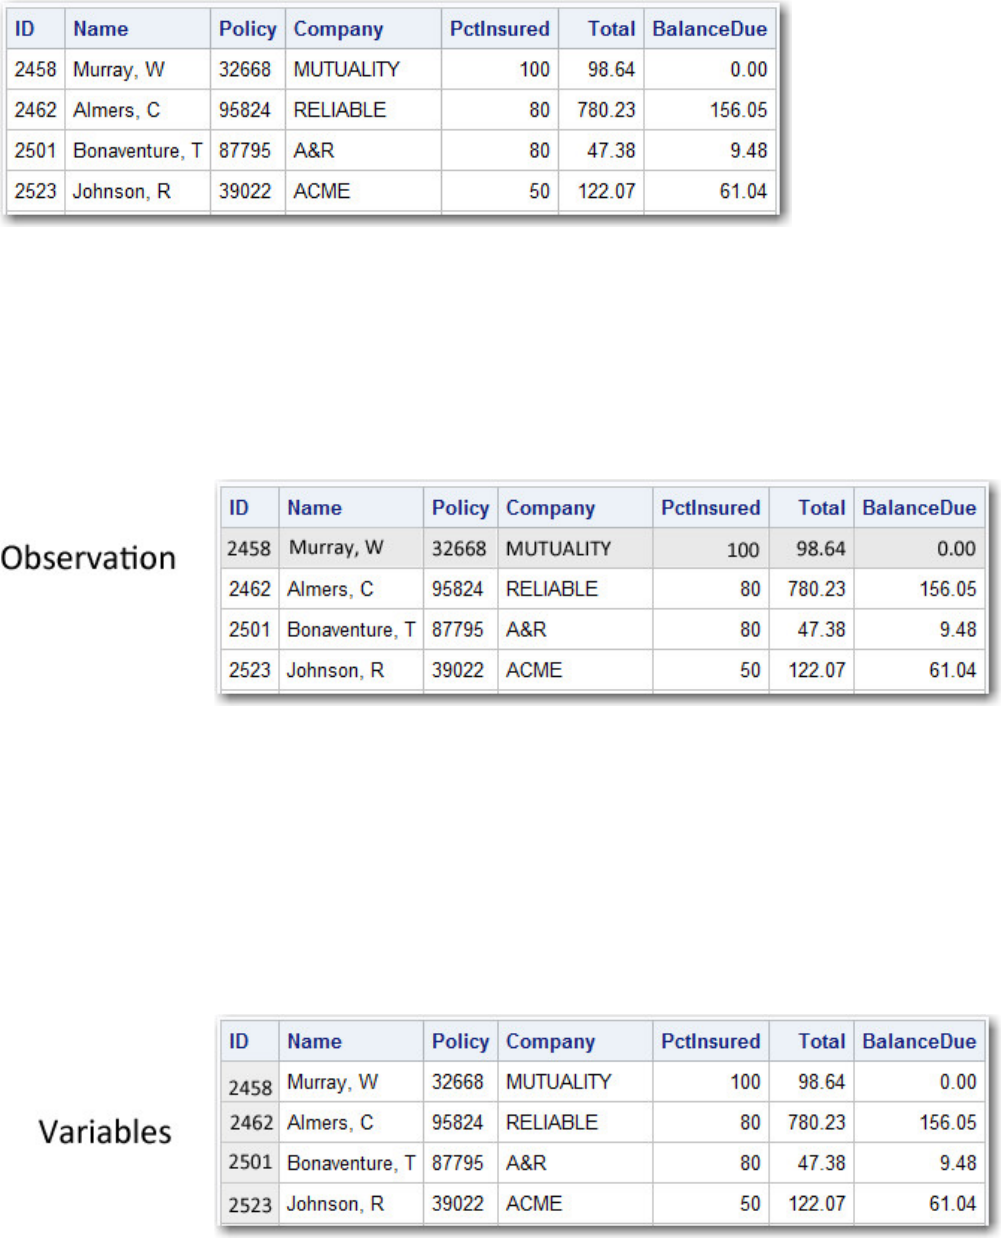
- 19 -
Observations (Rows)
Rows (called observations) in the data set are collections of data values that usually relate to a single object.
The values 2458, Murray, 32668, Mutuality, 100, 98.64 and 0.00 comprise a single observation in the
data set shown below.
Parts of a SAS Data Set: Observations
This data set has seven observations, each containing information about an individual. A SAS data set can
store any number of observations.
Variables (Columns)
Columns (called variables) in the data set are collections of values that describe a particular characteristic.
The values 2458, 2462, 2501, and 2523 comprise the variable ID in the data set shown below.
Parts of a SAS Data Set: Variable
This data set contains seven variables: ID, Name, Policy, Company, PctInsured, Total, and BalanceDue. A
SAS data set can store thousands of variables.
Missing Values
Every variable and observation in a SAS data set must have a value. If a data value is unknown for a
particular observation, a missing value is recorded in the SAS data set.
- 20 -
Missing Data Values
Variable Attributes
In addition to general information about the data set, the descriptor portion contains information about the
properties of each variable in the data set. The properties information includes the variable's name, type,
length, format, informat, and label.
When you write SAS programs, it's important to understand the attributes of the variables that you use. For
example, you might need to combine SAS data sets that contain same-named variables. In this case, the
variables must be the same type (character or numeric).
The following is a partial listing of the attribute information in the descriptor portion of the SAS data set
insure.policy. First, let's look at the name, type, and length variable attributes.
Variable Attributes in the Descriptor Portion of a SAS Data Set insure.policy
Variable
Type
Length
Format
Informat
Label
Policy
Char
8
Policy Number
Total
Num
8
DOLLAR8.2
COMMA10.
Total Balance
Name
Char
20
Patient Name
Name
Each variable has a name that conforms to SAS naming conventions. Variable names follow exactly the
same rules as SAS data set names. Like data set names, variable names
• can be 1 to 32 characters long
• must begin with a letter (A-Z, either uppercase or lowercase) or an underscore (_)
• can continue with any combination of numbers, letters, or underscores.

- 21 -
Variable Name Attributes
Variable
Type
Length
Format
Informat
Label
Policy
Char
8
Policy Number
Total
Num
8
DOLLAR8.2
COMMA10.
Total Balance
Name
Char
20
Patient Name
Your site may choose to restrict variable names to those valid in SAS 6, to uppercase variable names
automatically, or to remove all restrictions on variable names.
Type
A variable's type is either character or numeric.
• Character variables, such as Name (shown below), can contain any values.
• Numeric variables, such as Total (shown below), can contain only numeric values (the numerals 0 through 9, +,
-, ., and E for scientific notation).
Type Attribute
Variable
Type
Length
Format
Informat
Label
Policy
Char
8
Policy Number
Total
Num
8
DOLLAR8.2
COMMA10.
Total Balance
Name
Char
20
Patient Name
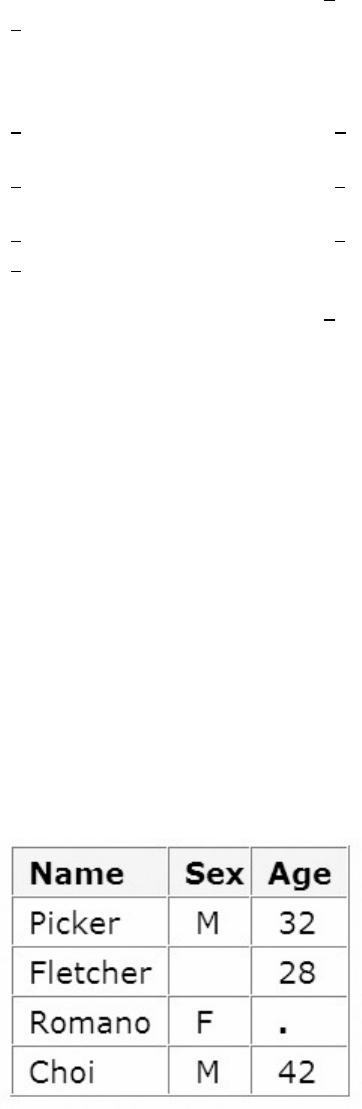
A variable's type determines how missing values for a variable are displayed. In the following data set,
Name and Sex are character variables, and Age and Weight are numeric variables.
• For character variables such as Name, a blank represents a missing value.
• For numeric variables such as Age, a period represents a missing value.
- 22 -
Missing Values Represented Based on Variable Type
Length
A variable's length (the number of bytes used to store it) is related to its type.
• Character variables can be up to 32,767 bytes long. In the example below, Name has a length of 20 characters and
uses 20 bytes of storage.
• All numeric variables have a default length of 8 bytes. Numeric values (no matter how many digits they contain)
are stored as floating-point numbers in 8 bytes of storage.
Length Attribute
Variable
Type
Length
Format
Informat
Label
Policy
Char
8
Policy Number
Total
Num
8
DOLLAR8.2
COMMA10.
Total Balance
Name
Char
20
Patient Name
You've seen that each SAS variable has a name, type, and length. In addition, you can optionally define
format, informat, and label attributes for variables. Let's look briefly at these optional attributes—you'll
learn more about them in later chapters as you need to use them.
Format
Formats are variable attributes that affect the way data values are written. SAS software offers a variety of
character, numeric, and date and time formats. You can also create and store your own formats. To write
values out using a particular form, you select the appropriate format.
Formats
- 23 -
For example, to display the value 1234 as $1,234.00 in a report, you can use the DOLLAR8.2 format, as
shown for Total below.
Format Attribute
Variable
Type
Length
Format
Informat
Label
Policy
Char
8
Policy Number
Total
Num
8
DOLLAR8.2
COMMA10.
Total Balance
Name
Char
20
Patient Name
Usually you have to specify the maximum width (w) of the value to be written. Depending on the
particular format, you may also need to specify the number of decimal places (d) to be written. For
example, to display the value 5678 as 5,678.00 in a report, you can use the COMMA8.2 format, which
specifies a width of 8 including 2 decimal places.
You can permanently assign a format to a variable in a SAS data set, or you can temporarily specify a
format in a PROC step to determine the way the data values appear in output.
Informat
Whereas formats write values out using some particular form, informats read data values in certain forms
into standard SAS values. Informats determine how data values are read into a SAS data set. You must use
informats to read numeric values that contain letters or other special characters.
Informats

- 24 -
For example, the numeric value $12,345.00 contains two special characters, a dollar sign ($) and a comma
(,). You can use an informat to read the value while removing the dollar sign and comma, and then store
the resulting value as a standard numeric value. For Total below, the COMMA10. informat is specified.
Informat Attribute
Variable
Type
Length
Format
Informat
Label
Policy
Char
8
Policy Number
Total
Num
8
DOLLAR8.2
COMMA10.
Total Balance
Name
Char
20
Patient Name
Label
A variable can have a label, which consists of descriptive text up to 256 characters long. By default, many
reports identify variables by their names. You may want to display more descriptive information about the
variable by assigning a label to the variable.
For example, you can label Policy as Policy Number, Total as Total Balance, and Name as Patient Name
to display these labels in reports.
Label Attribute
Variable
Type
Length
Format
Informat
Label
Policy
Char
8
Policy Number
Total
Num
8
DOLLAR8.2
COMMA10.
Total Balance
Name
Char
20
Patient Name
You may even want to use labels to shorten long variable names in your reports!
Using the Programming Workspace
- 25 -
Using the Main SAS Windows
When you start SAS, by default several primary windows are available to you. These include the Explorer,
Log, Output, Results, and code editing window(s). The window you use to edit your SAS programs may
vary, depending on your operating system and needs.
You use these SAS windows to explore and manage your files, to enter and submit SAS programs, to view
messages, and to view and manage your output.
We'll tour each of these windows shortly.
Using the Main SAS Windows
Your operating environment, and any options that you use when you start SAS, determine
• which of the main SAS windows are displayed by default
• their general appearance
• their position.
Features of SAS Windows
SAS windows have many features that help you get your work done. For example, you can
• maximize, minimize, and restore windows
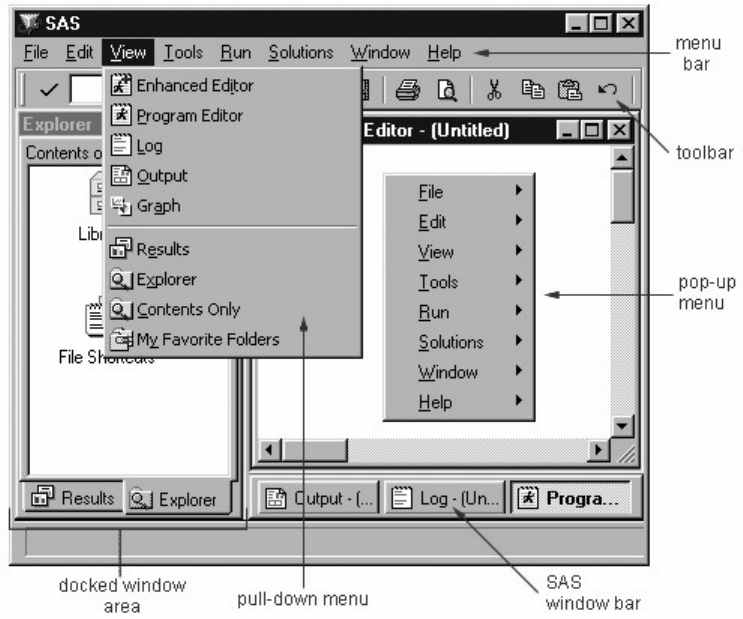
- 26 -
• use pull-down menus, pop-up menus, and toolbars
• get more help.
This chapter and later chapters show SAS®9 windows in the Windows operating environment.
Features of SAS Windows
Minimizing and Restoring Windows
In the Windows environment, you can click the Minimize button to send a window that you aren't using to
the SAS window bar. To restore the window to its former position, click the corresponding button on the
SAS window bar.
In other operating environments, minimizing the window shrinks it to an icon.
Docking and Undocking Windows
In the Windows and OS/2 environments, the Explorer and Results windows are docked by default, so they
can be resized but not minimized. If you prefer, you can select Window→Docked to undock the active
window, or you can turn docking off completely in the Preferences dialog box.
Issuing Commands
In SAS, you can issue commands by
• making selections from a menu bar
• by typing commands in a command box (or Toolbox) or on a command line.
- 27 -
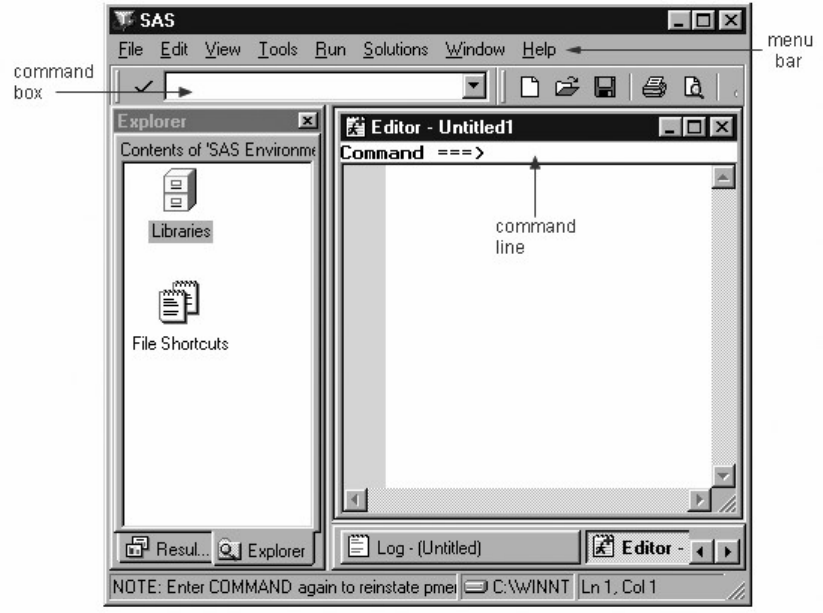
Using the SAS Command Box and Menu Bar to Issue Commands
In most operating environments, SAS displays a menu bar by default. In the Windows environment, the
menu bar selections correspond to the active window. To display a menu bar if it is not displayed, you can
type pmenus in the command box (or ToolBox) or on the command line.
In all operating environments, SAS displays a command box (or ToolBox) or command line by default.
You can display a command line in a particular window by activating that window and then using the
Tools menu as indicated below:
• In the Windows environment, select Tools→Options→Preferences, and then select the View tab and select the
Command line checkbox.
• In the UNIX and z/OS environments, select Tools→Options→Turn Command Line On.
• In the z/OS environment, you can display both a command line and a menu bar simultaneously in a window by
selecting Tools→Options→Command....
In the Windows and UNIX operating environments, you can also display a command line in a window by
activating the window, typing command in the command box (or ToolBox), and pressing Enter.
See the online help for a complete list of command-line commands.
Using Pop-Up Menus
Pop-up menus are context sensitive; they list actions that pertain only to a particular window. Generally,
you display pop-up menus by clicking the right mouse button. If you like, you can specify a function key
to open pop-up menus. Simply select Tools→Options→Keys and type wpopup as a function key setting.
To open a pop-up menu in the z/OS operating environment, type ? in the selection field beside the item.
- 28 -
Getting Help
Help is available for all windows in SAS. From the Help menu, you can access comprehensive online help
and documentation for SAS, or you can access task-oriented help for the active window. The Help menu is
discussed in more detail later in this chapter.
Customizing Your SAS Environment
You can customize many features of the SAS workspace such as toolbars, pop-up menus, icons, and so on.
Select the Tools menu to explore some of the customization options that are available.
You'll learn how to use features of SAS windows throughout this chapter. Now let's look at each of the
main SAS windows individually.
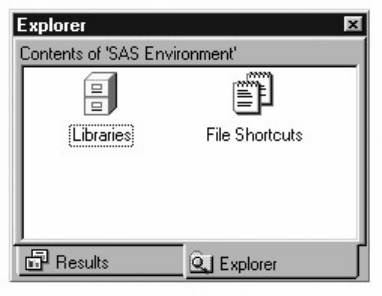
The Explorer Window
In the Explorer window, you can view and manage your SAS files, which are stored in SAS data libraries.
The library name is a logical name for the physical location of the files (such as a directory). You can think
of the library name as a temporary nickname or shortcut.
You use the Explorer window to
• create new libraries and SAS files
• open any SAS file
• perform most file management tasks such as moving, copying, and deleting files
• create shortcuts to files that were not created with SAS.
Notice that the Explorer window displays a tree view of its contents.
Tree View of the SAS Explorer Window

- 29 -
You can display the Explorer window by selecting View→Explorer. In the Windows and z/OS operating
environments, if the Explorer window is docked, you can click the Explorer tab to display the window.
Navigating the Explorer Window
You can find your way around the Explorer window by double-clicking folders to open them and see their
contents. You can also use pop-up menus to perform actions on a file (such as viewing its properties, or
copying it). Pop-up menus contain different options for different file types.
To open a pop-up menu in the z/OS operating environment, type ? in the selection field beside the item in
the Explorer window. To simulate a double-click, type S in the selection field beside the item.
Code Editing Windows
You can use the following editors to write and edit SAS programs:
• the Enhanced Editor window
• the Program Editor window
• the host editor of your choice.
This training focuses on the two SAS code editing windows: the Enhanced Editor and the Program Editor
windows. The Enhanced Editor is available only in the Windows operating environment.
The features of both editors are described below. In the remaining chapter and in future chapters, the
general term code editing window will be used to refer to your preferred SAS code editing window.
- 30 -
Enhanced Editor Window
In the Windows operating environment, an Enhanced Editor window opens by default. You can use the
Enhanced Editor window to enter, edit, and submit SAS programs. The initial window title is Editor -
Untitledn until you open a file or save the contents of the editor to a file. Then the window title changes to
reflect that filename. When the contents of the editor are modified, an asterisk is added to the title.
Enhanced Editor Window
You can redisplay or open additional Enhanced Editor windows by selecting View→Enhanced Editor.
Enhanced Editor Features
In the Enhanced Editor, you can perform standard editing tasks such as
• opening SAS programs in various ways, including drag and drop
• entering, editing, and submitting SAS programs
• using the command line or menus
• saving SAS programs
• clearing contents.
In addition, the Enhanced Editor provides useful editing features, including
• color coding and syntax checking of the SAS programming language
• expandable and collapsible sections
• recordable macros
• support for keyboard shortcuts (Alt or Shift plus keystroke)
• multi-level undo and redo.
For more information about the Enhanced Editor, open or activate the Enhanced Editor window, and then
select Help→Using This Window.
Clearing the Editor
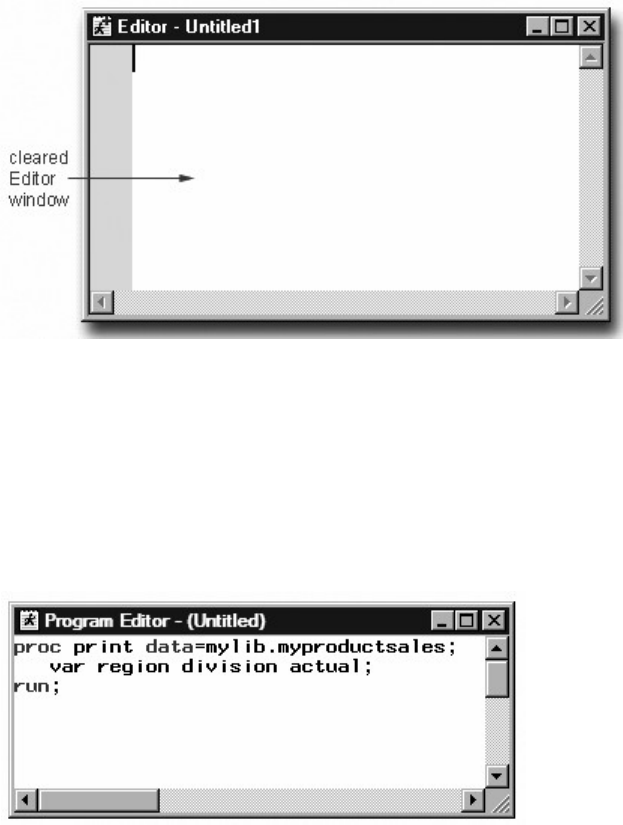
- 31 -
In the Enhanced Editor, the code does not disappear when you submit it.
To clear any of these windows, you can activate the window and select Edit→Clear All.
Cleared Editor Window
The Program Editor Window
As in the Enhanced Editor window, in the Program Editor window you enter, edit, and submit SAS
programs. You can also open existing SAS programs. You can display the Program Editor window by
selecting View→Program Editor.
Program Editor Window
Features
As in the Enhanced Editor window, in the Program Editor window you can perform standard editing tasks
such as
• opening SAS programs in various ways, including drag and drop
• entering, editing, and submitting SAS programs
• using the command line or menus
• saving SAS programs
• clearing contents
• recalling submitted statements.
- 32 -
However, the Program Editor does not provide some features of the enhanced Editor, such as syntax
checking (this feature is available in SAS 9.2), expandable and collapsible sections, and recordable
macros.
For more information about these features, open or activate the Program Editor window, and then select
Help→Using This Window.
Clearing the Editor
At any time you can clear program code from the Program Editor window by activating the window and
selecting Edit→Clear All.
When you submit SAS programs in the Program Editor window, the code in the window is automatically
cleared.
The Log Window
The Log window displays messages about your SAS session and about any SAS programs that you submit.
You can display the Log window by selecting View→Log.
Log Window
The Output Window
In the Output window, you browse LISTING output from SAS programs that you submit. (You can use a
browser to view HTML output.)
By default, the Output window is positioned behind the code editing and Log windows. When you create
output, the Output window automatically moves to the front of your display.
You can display the Output window at any time by selecting View→Output.
Output Window
- 33 -
Not all SAS programs create output in the Output window. Some open interactive windows. Others
produce only messages in the Log window.
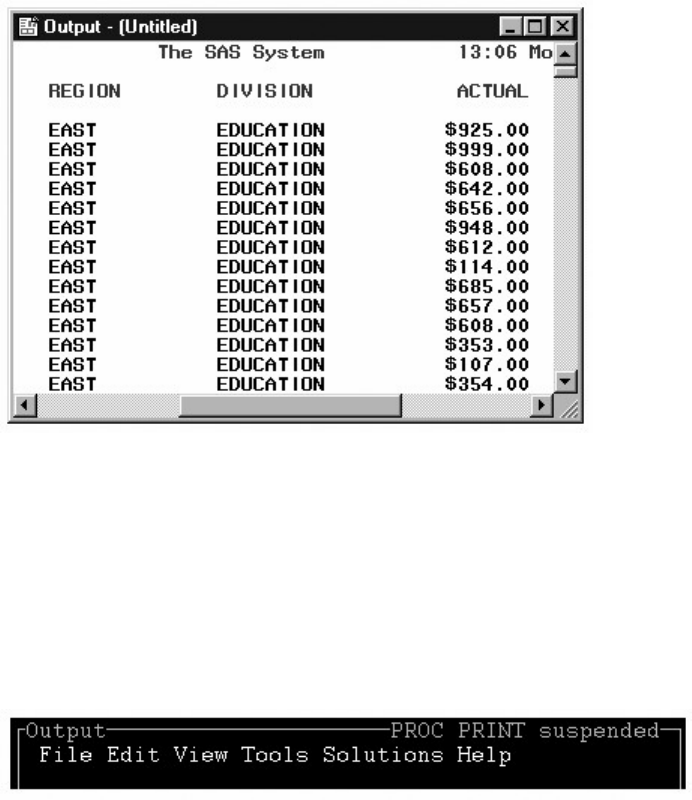
Note: In mainframe operating environments, when you create multiple pages of output, a message in the
Output window border indicates that the procedure is suspended. In the example below, PROC PRINT
output is suspended.
Mainframe Window Showing Suspended Procedure
To remove the message and view the remaining output, simply scroll to the bottom of the output.
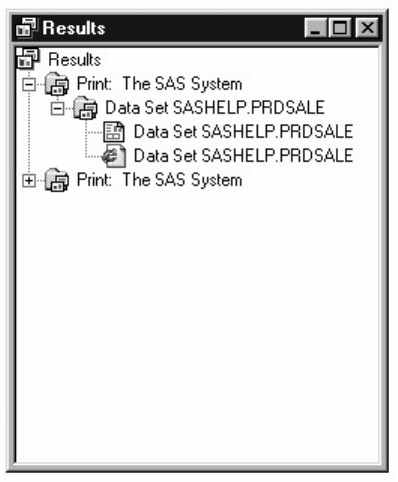
The Results Window
The Results window helps you navigate and manage output from SAS programs that you submit. You can
view, save, and print individual items of output. The Results window uses a tree structure to list various
types of output that might be available after you run SAS.
On most operating systems, the Results window is positioned behind the Explorer window and is empty
until you submit a SAS program that creates output. Then the Results window moves to the front of your
display. The Results window displays separate icons for LISTING output and HTML output. In the
example below, the first Print folder contains both types of output.
Results Window
- 34 -
Viewing Output in the Results Window
You can display the Results window at any time by selecting View→Results. HTML is the default output
type in the SAS windowing environment for UNIX and Windows. In these environments, when you
submit a SAS program, the HTML output is automatically displayed in the Results Viewer and the file is
listed in the Results window. In all other environments, LISTING is the default output.
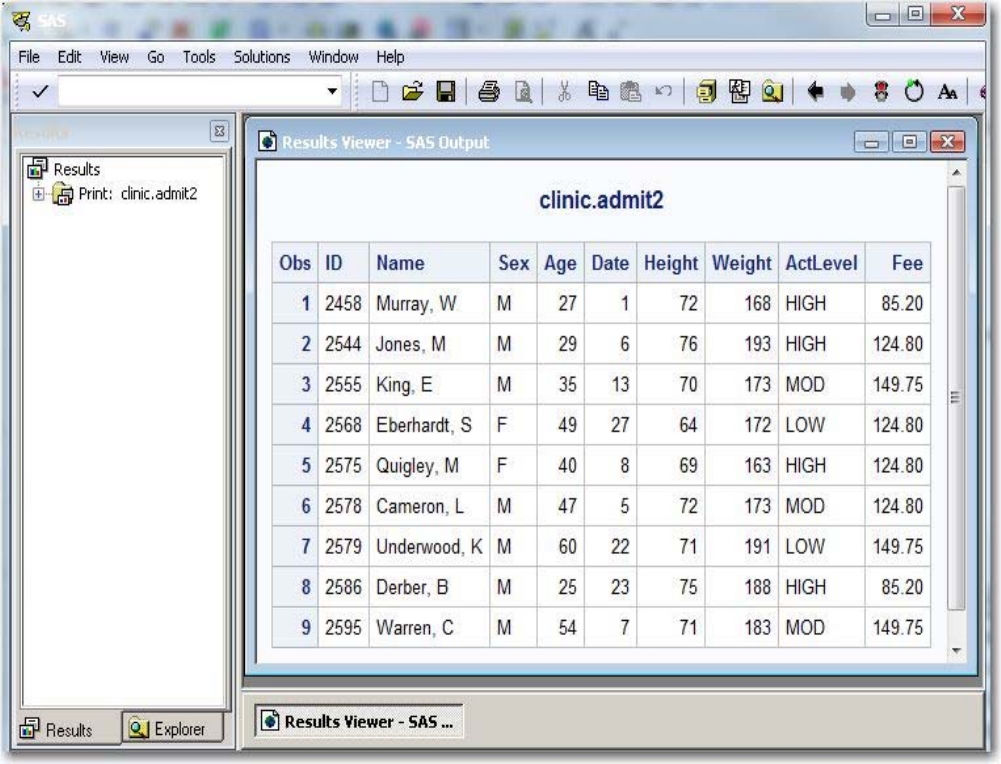
The left pane of the following display shows the Results window, and the right pane shows the Results
Viewer where the default HTML output is displayed. The Results window lists the files that were created
when the SAS program executed.
Results Window and Results Viewer
- 35 -
Creating SAS Libraries
Earlier in this chapter, you saw that SAS files are stored in libraries. By default, SAS defines several
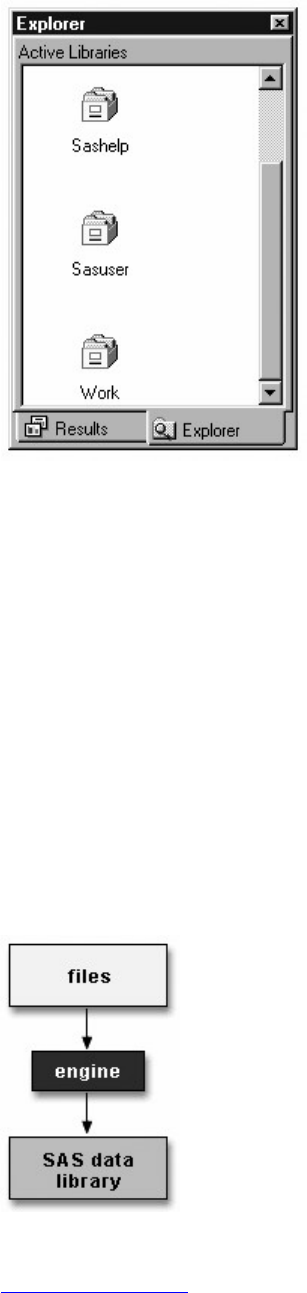
libraries for you (including Sashelp, Sasuser, and Work). You can also define additional libraries.
Sashelp
a permanent library that contains sample data and other files that control how SAS works at your site. This is a read-only
library.
Sasuser
a permanent library that contains SAS files in the Profile catalog that store your personal settings. This is also a
convenient place to store your own files.
Work
a temporary library for files that do not need to be saved from session to session.
Active SAS Libraries
- 36 -
You can also define additional libraries. When you define a library, you indicate the location of your SAS
files to SAS. Once you define a library, you can manage SAS files within it.
When you delete a SAS library, the pointer to the library is deleted, and SAS no longer has access to the
library. However, the contents of the library still exist in your operating environment.
Defining Libraries
To define a library, you assign a library name to it and specify a path, such as a directory path. (In some
operating environments you must create the directory or other storage location before defining the library.)
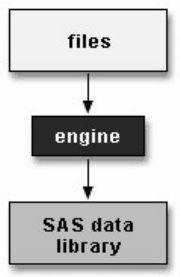
You can also specify an engine, which is a set of internal instructions that SAS uses for writing to and
reading from files in a library.
Defining LIbraries
In this chapter, you learn about SAS libraries. You can define SAS libraries using programming statements.
Specifying Engines shows you how to write LIBNAME statements to define SAS libraries.
Depending on your operating environment and the SAS/ACCESS products that you license, you can create
libraries with various engines. Each engine enables you to read a different file format, including file
formats from other software vendors.
Creating and Using File Shortcuts
- 37 -
You've seen that the Explorer window gives you access to your SAS files. You can also create a file
shortcut to an external file.
An external file is a file that is created and maintained in your host operating environment. External files
contain data or text, such as
• SAS programming statements
• records of raw data
• procedure output.
SAS can use external files, but they are not managed by SAS.
A file shortcut (or fileref) is an optional name that is used to identify an external file to SAS. File shortcuts
are stored in the File Shortcuts folder in the Explorer window. You can use a file shortcut to open, browse,
and submit a file.
When you delete a file shortcut, the pointer to the file is deleted, and SAS no longer has access to the file.
However, the file still exists in your operating environment.
Creating and Using File Shortcuts
If you have used SAS before, a file shortcut is the same as a file reference or fileref.
Using SAS Solutions and Tools
Along with windows for working with your SAS files and SAS programs, SAS provides a set of
ready-to-use solutions, applications, and tools. You can access many of these tools by using the Solutions
and Tools menus.
Using SAS Solutions and Tools
- 38 -
For example, you can use the table editor in the Tools menu to enter, browse, or edit data in a SAS data
set.
Getting Help
You've learned to use SAS windows to perform common SAS tasks. As you begin working in SAS, be
sure to take advantage of the different types of online help that are available from the Help menu.
SAS Help
• Using This Window is task-oriented help for the active window.
• SAS Help and Documentation is a complete guide to syntax, examples, procedures, concepts, and what's new.
• Getting Started tutorials are listed under Help for products where they are available.
• Selecting Learning SAS programming enables you to create data that is used in online training courses, and
displays SAS OnlineTutor if you have a site license.
• If you have Internet access, SAS on the Web provides links to information including Technical Support and
Frequently Asked Questions.
To access SAS online help, documentation, and other resources from your SAS software, select
Help→SAS Documentation from the SAS toolbar. You can also access SAS documentation in the SAS
Knowledge Base at support.sas.com.
Chapter Summary
- 39 -
Text Summary
Components of SAS Programs
SAS programs consist of two types of steps: DATA steps and PROC (procedure) steps. These two steps,
alone or combined, form most SAS programs. A SAS program can consist of a DATA step, a PROC step,
or any combination of DATA and PROC steps. DATA steps typically create or modify SAS data sets, but
they can also be used to produce custom-designed reports. PROC steps are pre-written routines that enable
you to analyze and process the data in a SAS data set and to present the data in the form of a report. They
sometimes create new SAS data sets that typically contain the results of the procedure.
Characteristics of SAS Programs
SAS programs consist of SAS statements. A SAS statement usually begins with a SAS keyword and
always ends with a semicolon. A DATA step begins with the keyword DATA. A PROC step begins with
the keyword PROC. SAS statements are free-format, so they can begin and end anywhere on a line. One
statement can continue over several lines, and several statements can be on a line. Blanks or special
characters separate “words” in a SAS statement.
Processing SAS Programs
When you submit a SAS program, SAS reads SAS statements and checks them for errors. When it
encounters a subsequent DATA, PROC, or RUN statement, SAS executes the previous step in the
program.
Each time a step is executed, SAS generates a log of the processing activities and the results of the
processing. The SAS log collects messages about the processing of SAS programs and about any errors
that occur.
The results of processing can vary. Some SAS programs open an interactive window or invoke procedures
that create output in the form of a report. Other SAS programs perform tasks such as sorting and managing
data, which have no visible results other than messages in the log.
SAS Libraries
Every SAS file is stored in a SAS library, which is a collection of SAS files such as SAS data sets and
catalogs. In the Windows and UNIX environments, a SAS library is typically a group of SAS files in the
same folder or directory.
Depending on the libref you use, you can store SAS files in a temporary SAS library or in permanent SAS
libraries.
• Temporary SAS files that are created during the session are held in a special work space that is assigned the
default libref Work. If you don't specify a libref when you create a file (or if you specify Work), the file is stored in the
temporary SAS library. When you end the session, the temporary library is deleted.
• To store files permanently in a SAS library, you assign it a libref other than the default Work. For example, by
assigning the libref sasuser to a SAS library, you specify that files within the library are to be stored until you delete them.
Referencing SAS Files

- 40 -
To reference a SAS file, you use a two-level name, libref.filename. In the two-level name, libref is the
name for the SAS library that contains the file, and filename is the name of the file itself. A period
separates the libref and filename.
To reference temporary SAS files, you specify the default libref Work, a period, and the filename.
Alternatively, you can simply use a one-level name (the filename only) to reference a file in a temporary
SAS library. Referencing a SAS file in any library except Work indicates that the SAS file is stored
permanently.
SAS data set names can be 1 to 32 characters long, must begin with a letter (A-Z, either uppercase or
lowercase) or an underscore (_), and can continue with any combination of numerals, letters, or
underscores.
SAS Data Sets
For many of the data processing tasks that you perform with SAS, you access data in the form of a SAS
data set and use SAS programs to analyze, manage, or present the data. Conceptually, a SAS data set is a
file that consists of two parts: a descriptor portion and a data portion. Some SAS data sets also contain one
or more indexes, which enable SAS to locate records in the data set more efficiently.
The descriptor portion of a SAS data set contains property information about the data set.
The data portion of a SAS data set is a collection of data values that are arranged in a rectangular table.
Observations in the data set correspond to rows or data lines. Variables in the data set correspond to
columns. If a data value is unknown for a particular observation, a missing value is recorded in the SAS
data set.
Variable Attributes
In addition to general information about the data set, the descriptor portion contains property information
for each variable in the data set. The property information includes the variable's name, type, and length. A
variable's type determines how missing values for a variable are displayed by SAS. For character variables,
a blank represents a missing value. For numeric variables, a period represents a missing value. You can
also specify format, informat, and label properties for variables.
Using the Main SAS Windows
You use the following windows to explore and manage your files, to enter and submit SAS programs, to
view messages, and to view and manage your output.
Windows and How They Are Used
Use this window ...
To ...
Explorer view your SAS files
create new libraries and SAS files
perform most file management tasks such as moving, copying, and deleting files
- 41 -
create shortcuts to files that were not created with SAS
Enhanced Editor (code editing
window)
enter, edit, and submit SAS program
Note: The Enhanced Editor window is available only in the Windows operating
environment.
Program Editor (code editing
window)
enter, edit, and submit SAS programs
Log view messages about your SAS session and about any SAS programs that you
submit
Output browse output from SAS programs
Results navigate and manage output from SAS programs
view, save, and print individual items of output
Points to Remember
• Before referencing SAS files, you must assign a name (libref, or library reference) to the library in which the files
are stored (or specify that SAS is to assign the name automatically).
• You can store SAS files either temporarily or permanently.
• Variable names follow the same rules as SAS data set names. However, your site may choose to restrict variable
names to those valid in Version 6 SAS, to uppercase variable names automatically, or to remove all restrictions on variable
names.
Chapter Quiz
Select the best answer for each question. After completing the quiz, you can check your answers using the
answer key in the appendix.
1. How many observations and variables does the data set below contain?
1. 3 observations, 4 variables
2. 3 observations, 3 variables
3. 4 observations, 3 variables
4. can't tell because some values are missing
2. How many program steps are executed when the program below is processed?
data user.tables;
infile jobs;
input date yyddmm8. name $ job $;
- 42 -
run;
proc sort data=user.tables;
by name;
run;
proc print data=user.tables;
run;
1. three
2. four
3. five
4. six
3. What type of variable is the variable AcctNum in the data set below?
1. numeric
2. character
3. can be either character or numeric
4. can't tell from the data shown
4. What type of variable is the variable Wear in the data set below?
1. numeric
2. character
3. can be either character or numeric
4. can't tell from the data shown
5. Which of the following variable names is valid?
1. 4BirthDate
2. $Cost
3. _Items_
4. Tax-Rate
6. Which of the following files is a permanent SAS file?
1. Sashelp.PrdSale
- 43 -
2. Sasuser.MySales
3. Profits.Quarter1
4. all of the above
7. In a DATA step, how can you reference a temporary SAS data set named Forecast?
1. Forecast
2. Work.Forecast
3. Sales.Forecast (after assigning the libref Sales)
4. only a and b above
8. What is the default length for the numeric variable Balance?
1. 5
2. 6
3. 7
4. 8
9. How many statements does the following SAS program contain?
proc print data=new.prodsale
label double;
var state day price1 price2; where state='NC';
label state='Name of State'; run;
1. three
2. four
3. five
4. six
10. What is a SAS library?
1. collection of SAS files, such as SAS data sets and catalogs
2. in some operating environments, a physical collection of SAS files
3. a group of SAS files in the same folder or directory
4. all of the above
Chapter 2 Referencing Files and Setting Options
Overview
- 44 -
Viewing SAS Libraries
Specifying Results Formats
Setting System Options
Additional Features
Chapter Summary
Chapter Quiz
Overview
Introduction
When you begin a SAS session, it's often convenient to set up your environment first. For example, you
may want to
• define libraries that contain the SAS data sets that you intend to use
• specify whether your procedure output is created as HTML (Hyper Text Markup Language) output, LISTING
output, or another type of output.
• set features of your LISTING output, if you are creating any, such as whether the date and time appear
• specify how two-digit year values should be interpreted.
This chapter shows you how to define libraries, reference SAS files, and specify options for your SAS
session. You also learn how to specify the form(s) of output to produce.
SAS System Options Window
- 45 -
Objectives
In this chapter, you learn to
• define new libraries by using programming statements
• reference SAS files to be used during your SAS session
• set results options to determine the type or types of output produced (HTML, LISTING output, or other) in
desktop operating environments
• set system options to determine how date values are read and to control the appearance of any LISTING output
that is created during your SAS session.
Defining Libraries
Often the first step in setting up your SAS session is to define the libraries. You can also use programming
statements to assign library names.
Remember that to reference a permanent SAS file, you
1. assign a name (libref) to the SAS library in which the file is stored
2. use the libref as the first part of the file's two-level name (libref.filename) to reference the file within the library.
Defining Libraries
- 46 -
Assigning Librefs
To define libraries, you can use a LIBNAME statement. You can store the LIBNAME statement with any
SAS program so that the SAS data library is assigned each time the program is submitted.
General form, basic LIBNAME statement:
LIBNAME libref 'SAS-data-library';
where
libref is 1 to 8 characters long, begins with a letter or underscore, and contains only letters, numbers, or
underscores.
SAS-data-library is the name of a SAS data library in which SAS data files are stored. The specification of the
physical name of the library differs by operating environment.
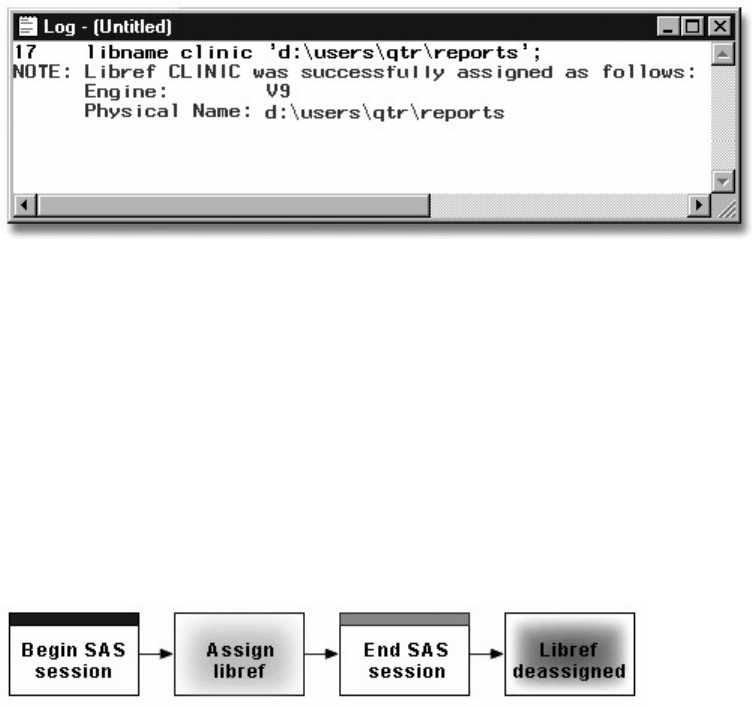
The LIBNAME statement below assigns the libref Clinic to the SAS data library D:\Users\Qtr\Reports in
the Windows environment.
libname clinic 'd:\users\qtr\reports';
Many of the examples in this book use the libref sasuser. The following LIBNAME statement assigns the
libref sasuser to the c:\Users\name\sasuser folder in a Windows operating environment:
libname sasuser 'c:\Users\name\sasuser';
The table below gives some examples of physical names for SAS data libraries in various operating
environments.
Physical Names for SAS Data Libraries
Environment
Sample Physical Name
Windows
c:\fitness\data
UNIX
/users/april/fitness/sasdata
z/OS (OS/390)
april.fitness.sasdata
- 47 -
The code examples in this chapter are shown in the Windows operating environment. If you are running
SAS within another operating environment, then the platform-specific names and locations will look
different. Otherwise, SAS programming code will be the same across operating environments.
You can use multiple LIBNAME statements to assign as many librefs as needed.
Verifying Librefs
After assigning a libref, it is a good idea to check the Log window to verify that the libref has been
assigned successfully.
Log Output for Clinic libref
How Long Librefs Remain in Effect
The LIBNAME statement is global, which means that the librefs remain in effect until you modify them,
cancel them, or end your SAS session.
Therefore, the LIBNAME statement assigns the libref for the current SAS session only. Each time you
begin a SAS session, you must assign a libref to each permanent SAS data library that contains files that
you want to access in that session. (Remember that Work is the default libref for a temporary SAS data
library.)
How Long Librefs Remain in Effect
When you end your SAS session or delete a libref, SAS no longer has access to the files in the library.
However, the contents of the library still exist on your operating system.
Remember that you can also assign a library from the SAS Explorer using the New Library window.
Libraries that are created with the New Library window can be automatically assigned at startup by
selecting Enable at Startup.
Specifying Two-Level Names
After you assign a libref, you specify it as the first element in the two-level name for a SAS file.
Specifying Two-Level Names
- 48 -
For example, in order for the PRINT procedure to read Clinic.Admit, you specify the two-level name of
the file as follows:
proc print data=clinic.admit;
run;
Referencing Files in Other Formats
You can use the LIBNAME statement to reference not only SAS files but also files that were created with
other software products, such as database management systems.
SAS can read or write these files by using the appropriate engine for that file type. For some file types, you
need to tell SAS which engine to use. For others, SAS automatically chooses the appropriate engine.
A SAS engine is a set of internal instructions that SAS uses for writing to and reading from files in a SAS
library.
Referencing Files in Other Formats
- 49 -
Specifying Engines
To indicate which engine to use, you specify the engine name in the LIBNAME statement, as shown
below.
General form, LIBNAME statement for files in other formats:
LIBNAME libref engine 'SAS-data-library';
where
libref is 1 to 8 characters long, begins with a letter or underscore, and contains only letters, numbers, or
underscores.
engine is the name of a library engine that is supported in your operating environment.
SAS-data-library is the name of a SAS library in which SAS data files are stored. The specification of the
physical name of the library differs by operating environment.
Interface Library Engines
Interface library engines support read-only access to BMDP, OSIRIS, and SPSS files. With these engines,
the physical filename that is associated with a libref is an actual filename, not a SAS library. This is an
exception to the rules for librefs.
Engines and Their Descriptions
Engine
Description
BMDP
allows read-only access to BMDP files
OSIRIS
allows read-only access to OSIRIS files
- 50 -
SPSS allows read-only access to SPSS files
For example, the LIBNAME statement below specifies the libref Rptdata and the engine SPSS for the file
G:\Myspss.dat in the Windows operating environment.
libname rptdata spss 'g:\myspss.spss';
For more information about interface library engines, see the SAS documentation for your operating
environment.
SAS/ACCESS Engines
If your site licenses SAS/ACCESS software, you can use the LIBNAME statement to access data that is
stored in a DBMS file. The types of data you can access depend on your operating environment and on
which SAS/ACCESS products you have licensed.
Relational Databases and Their Associated Files
Relational Databases
Nonrelational Files
PC Files
ORACLE
ADABAS
Excel (.xls)
SYBASE
IMS/DL-I
Lotus (.wkn)
Informix
CA-IDMS
dBase
DB2 for z/OS
DB2 for UNIX and PC
SYSTEM 2000
DIF
Oracle Rdb
Teradata
Access
ODBC
MySQL
SPSS
CA-OpenIngres
Netezza
Stata
Ole DB
Paradox
- 51 -
Viewing SAS Libraries
Viewing the Contents of a SAS Library
You've seen that you can assign librefs in order to access different types of data. Using the Programming
Workspace explained that after you have assigned a libref, you can view
• details about the library that the libref references
• the library's contents
• contents and properties of files in the library.
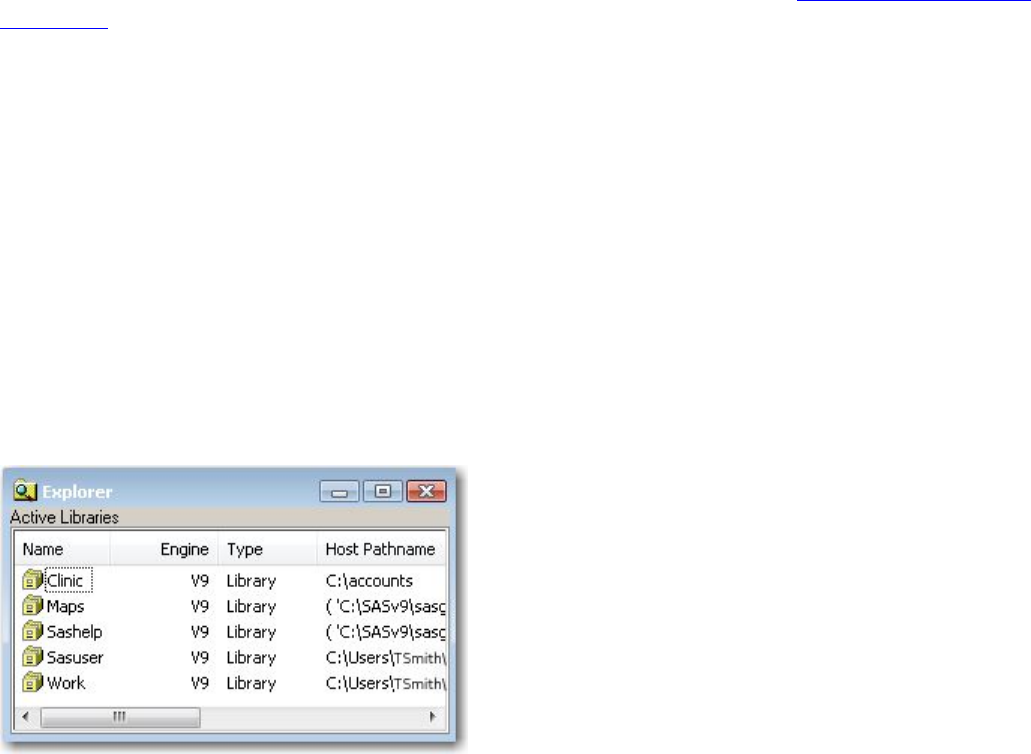
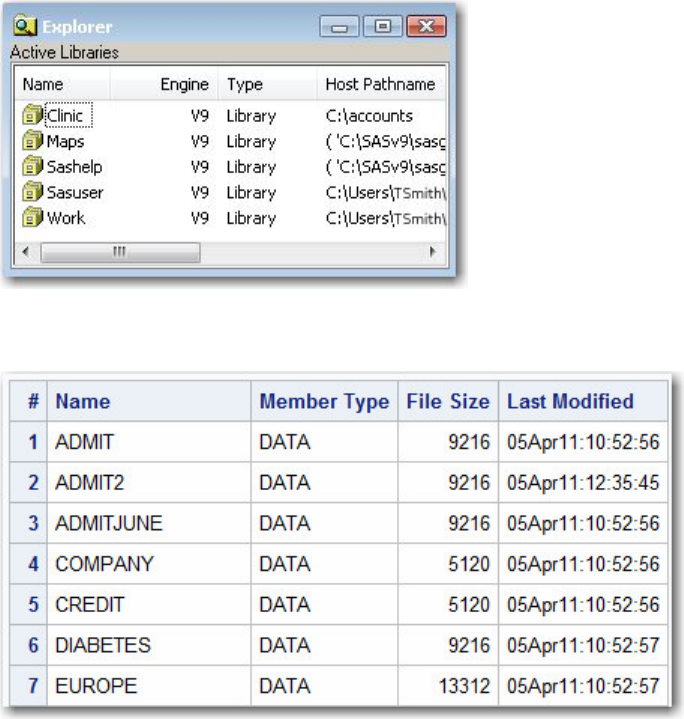
The libraries that are currently defined for your SAS session are listed under Libraries in the Explorer
window. To view details about a library, double-click Libraries (or select Libraries→Open from the
pop-up menu). Then select View→Details.
Information for each library (name, engine, type, host pathname, and date modified) is listed under Active
Libraries.
Viewing Active Libraries
To view the contents of a library, double-click the library name (or select the library name, and then select
Open from the pop-up menu). A list of the files contained in the library is displayed. If you have the
details feature turned on, then information about each file (name, size, type, description, and date modified)
is also listed.
Viewing the Contents of a SAS Library
- 52 -
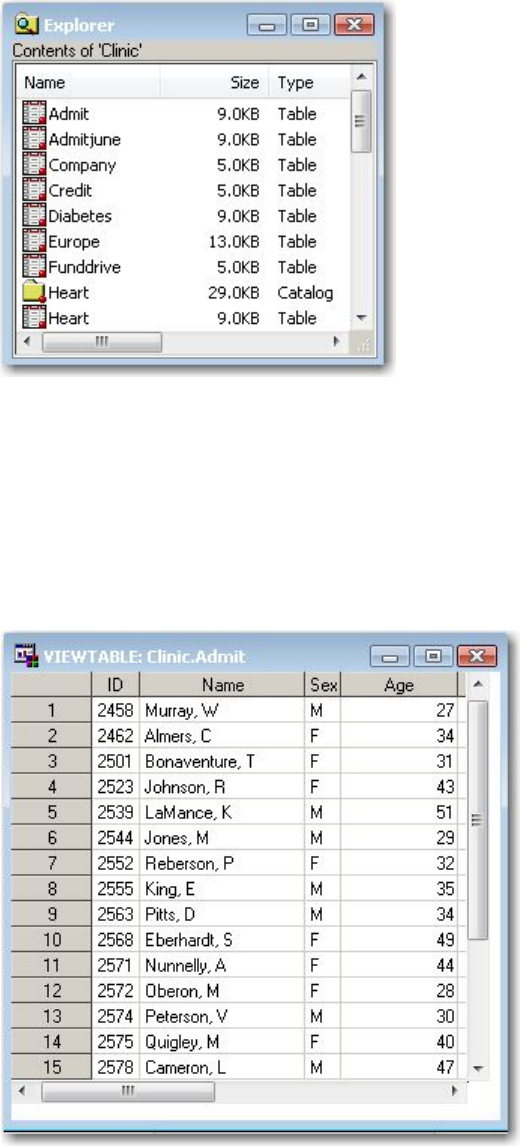
Viewing a File's Contents
To display a file's contents in a windowing environment, you can double-click the filename (or select the
filename, and then select Open from the pop-up menu). If you select a SAS data set (type Table or View),
its contents are displayed in the VIEWTABLE window.
Viewing a File's Contents
To display a file's properties, you can select the filename, and then select Properties from the pop-up
menu.
Note: If you are working in the z/OS operating environment, you can type ? in the selection field next to
a filename in the Explorer window to display a pop-up menu with a list of options for working with that
file.
If you have installed SAS/FSP software, you can type B or L in the selection field next to a data set name
to browse the data set observation by observation or to list the contents of the data set, respectively. For
more information, see the documentation for SAS/FSP.

- 53 -
If SAS/FSP is not installed, you can view the contents of a SAS data set by using the PRINT procedure
(PROC PRINT). You can learn how to use PROC PRINT in Creating List Reports.
Using PROC CONTENTS to View the Contents of a SAS Library
You've learned how to use SAS windows to view the contents of a SAS library or of a SAS file.
Alternatively, you can use the CONTENTS procedure to create SAS output that describes either of the
following:
• the contents of a library
• the descriptor information for an individual SAS data set.
General form, basic PROC CONTENTS step:
PROC CONTENTS DATA=SAS-file-specification NODS;
RUN;
where
SAS-file-specification specifies an entire library or a specific SAS data set within a library. SAS-file-specification
can take one of the following forms:
<libref.>SAS-data-set names one SAS data set to process.
<libref.>_ALL
_
requests a listing of all files in the library. (Use a period (.) to append _ALL_ to the
libref.)
NODS suppresses the printing of detailed information about each file when you specify _ALL_. (You can specify
NODS only when you specify _ALL_.)
Examples
To view the contents of the entire clinic library, you can submit the following PROC CONTENTS step:
proc contents data=clinic._all_ nods;
run;
The output from this step lists only the names, types, sizes, and modification dates for the SAS files in the
Clinic library.
Using PROC CONTENTS to View the Contents of a Library
- 54 -
Output from PROC CONTENTS on SAS Library Clinic
To view the descriptor information for only the clinic.Admit data set, you can submit the following PROC
CONTENTS step:
proc contents data=clinic.admit;
run;
The output from this step lists information for clinic.admit, including an alphabetic list of the variables in
the data set.
PROC CONTENTS Output Showing the Descriptor Information for a Single Data Set in a Library
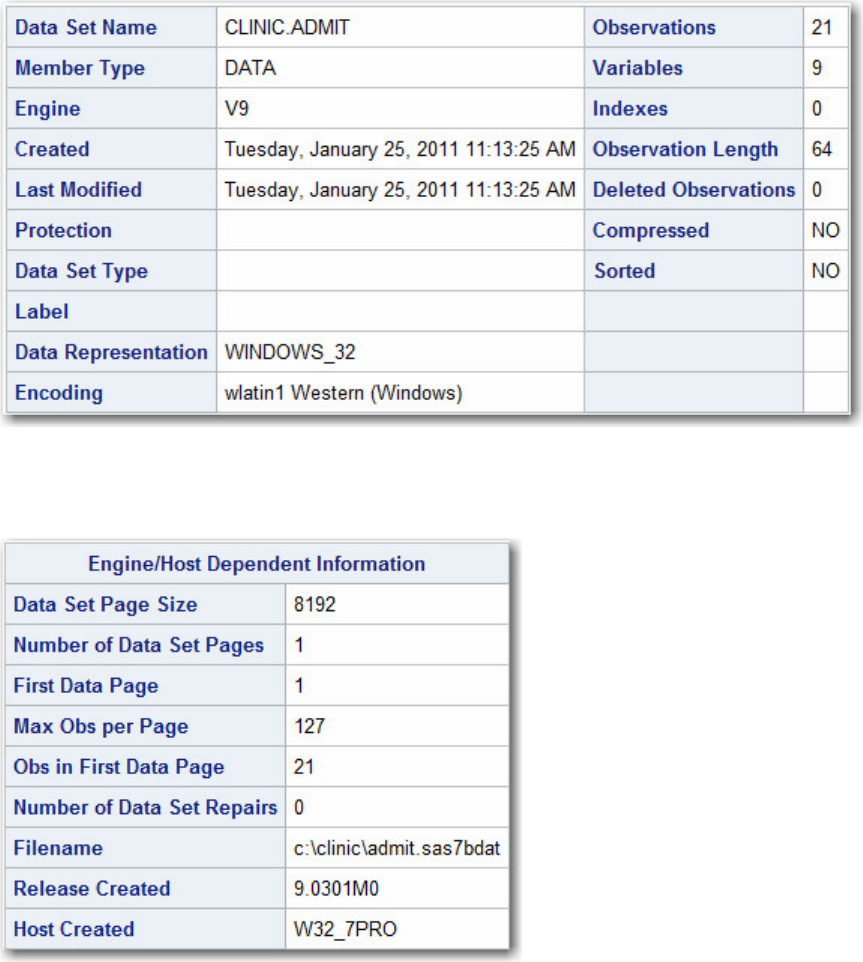
- 55 -
PROC CONTENTS Output Showing the Engine/Host Dependent information for a Single Data Set in a
Library
PROC CONTENTS Output Showing an Alphabetic List of the Variables in the Data Set
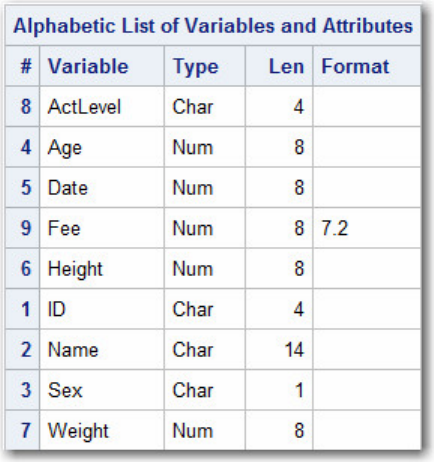
- 56 -
Using PROC DATASETS
In addition to PROC CONTENTS, you can use PROC DATASETS to view the contents of a SAS library
or a SAS data set. PROC DATASETS also enables you to perform a number of management tasks such as
copying, deleting, or modifying SAS files.
PROC CONTENTS and PROC DATASETS overlap in terms of functionality. Generally, these two
function the same:
• the CONTENTS procedure
• the CONTENTS statement in the DATASETS procedure.
PROC CONTENTS<options>;
RUN;
PROC DATASETS<options>;
CONTENTS<options>;
QUIT;
The major difference between the CONTENTS procedure and the CONTENTS statement in PROC
DATASETS is the default for libref in the DATA= option. For PROC CONTENTS, the default is either
Work or User. For the CONTENTS statement, the default is the libref of the procedure input library.
Notice also that PROC DATASETS supports RUN-group processing. It uses a QUIT statement to end the
procedure. The QUIT statement and the RUN statement are not required.
However, the options for the PROC CONTENTS statement and the CONTENTS statement in the
DATASETS procedure are the same. For example, the following PROC steps produce essentially the same
output (with minor formatting differences):
proc datasets;
contents data=clinic._all_ nods;
- 57 -
proc contents data=clinic._all_ nods;
run;
In addition to the CONTENTS statement, PROC DATASETS also uses several other statements. These
statements enable you to perform tasks that PROC CONTENTS does not perform. For more information
about PROC DATASETS, see the SAS documentation.
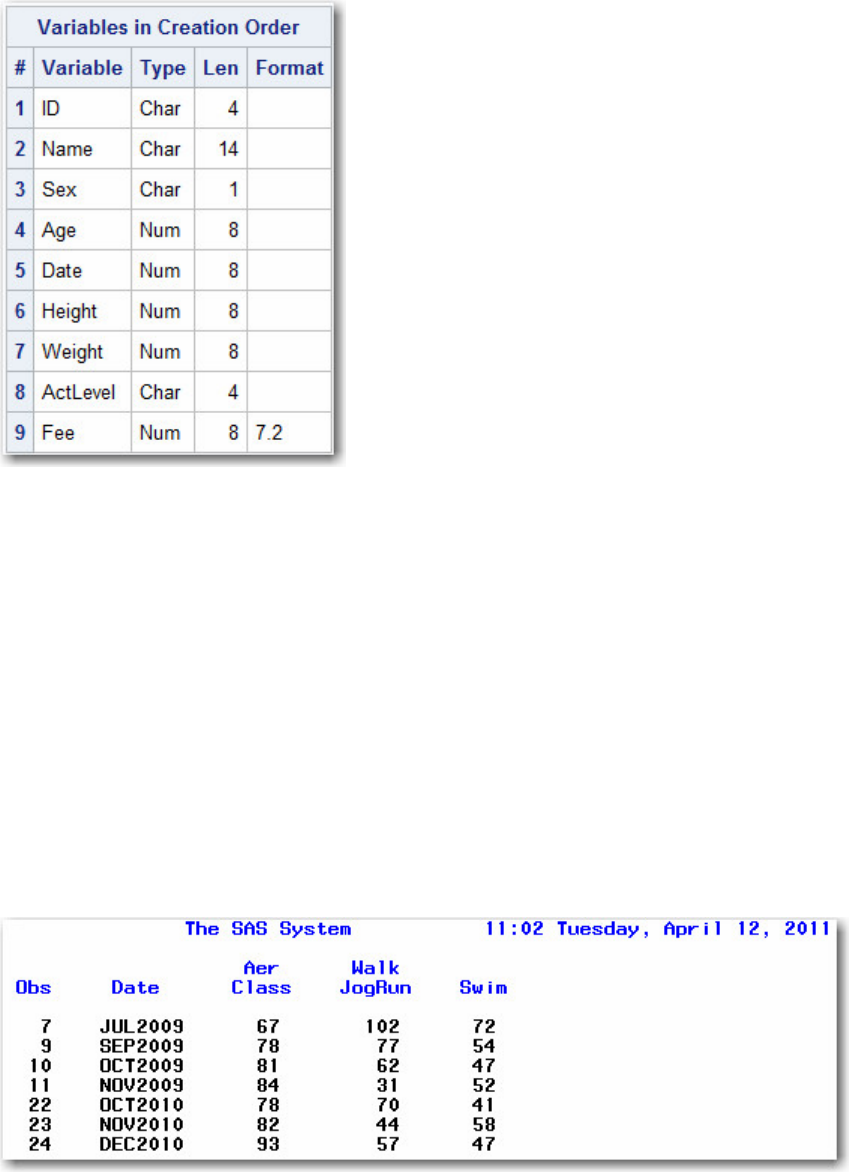
Viewing Descriptor Information for a SAS Data Set Using VARNUM
As with PROC CONTENTS, you can also use PROC DATASETS to display the descriptor information
for a specific SAS data set.
By default, PROC CONTENTS and PROC DATASETS list variables alphabetically. To list variable
names in the order of their logical position (or creation order) in the data set, you can specify the
VARNUM option in PROC CONTENTS or in the CONTENTS statement in PROC DATASETS.
For example, either of these programs creates output that includes the list of variables shown below:
proc datasets;
contents data=clinic.admit varnum;
proc contents data=clinic.admit varnum;
run;
Note: If you are using the sample data in the sasuser library, you may want to specify sasuser as the
libref (instead of clinic):
contents data=sasuser.admit varnum;
proc contents data=sasuser.admit varnum;
run;
Viewing Descriptor Information for a SAS Data Set Using VARNUM
- 58 -
Specifying Results Formats
Next, let's consider the appearance and format of your SAS output.
HTML and Listing Formats
In SAS 9.3 and later versions, when running SAS in windowing mode in the Windows and UNIX
operating environments, HTML output is created by default. In other platforms, you can create HTML
output using programming statements. When running SAS in batch mode, the default format is LISTING.
Let's look at these two result formats. The following PROC PRINT output is a listing of part of the SAS
data set Clinic.Therapy:
LISTING Output
This is HTML output from the same program:
HTML Output
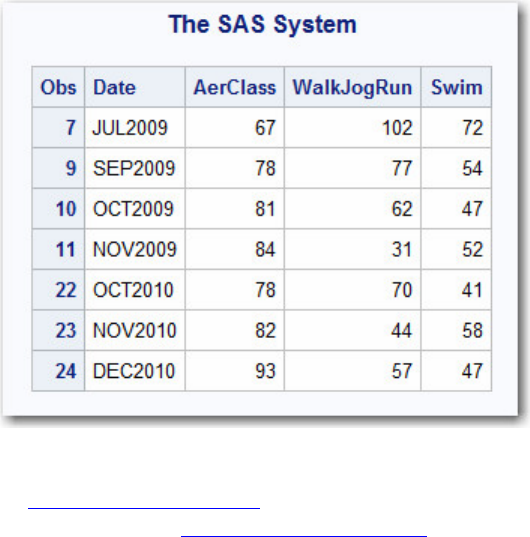
- 59 -
If you aren't running SAS in a desktop operating environment, you might want to skip this topic and go on
to Setting System Options. For details on creating HTML output using programming statements on any
SAS platform, see Producing HTML Output.
The Results Tab of the Preferences Window
You use the Preferences window to set the result format(s) that you prefer. Your preferences are saved
until you modify them, and they apply to all output that you create.
To open this window in desktop operating environments, select Tools→Options→Preferences. Then
click the Results tab. You can remember this sequence using the mnemonic TOPR (pronounced “topper”).
You can choose Listing, HTML, or both. You can also specify options for displaying and storing your
results.
Results tab options may differ somewhat, depending on your operating environment. The example below
is from the Windows operating environment.
The following display shows the SAS Results tab with the new default settings specified.
SAS Results Tab with the New Default Settings
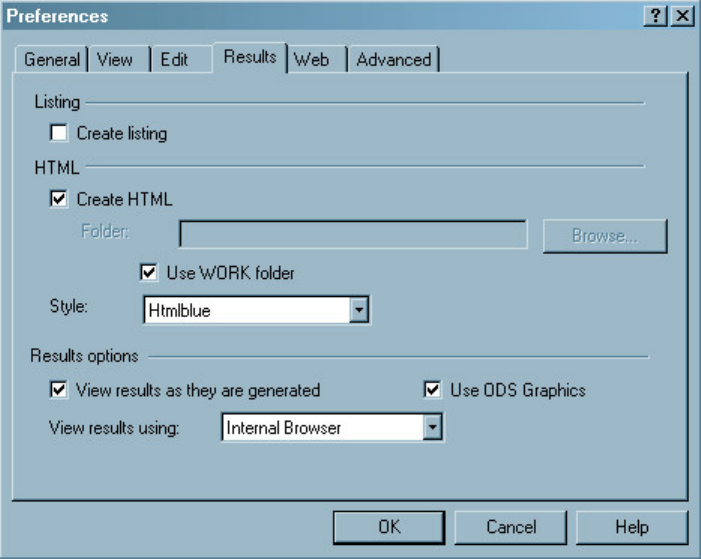
- 60 -
The default settings in the Results tab are as follows:
• The Create listing check box is not selected, so LISTING output is not created.
• The Create HTML check box is selected, so HTML output is created.
• The Use WORK folder check box is selected, so both HTML and graph image files are saved in the WORK
folder (and not your current directory).
• The default style, HTMLBlue, is selected from the Style drop-down list.
• The Use ODS Graphics check box is selected, so ODS Graphics is enabled.
• Internal browser is selected from the View results using: drop-down list, so results are viewed in an internal
SAS browser.
If you create HTML files, they are stored in the folder that you specify and are by default incrementally
named sashtml.htm, sashtml1.htm, sashtml2.htm, and so on, throughout your SAS session.
Now look at the two choices for viewing HTML results: Internal browser and Preferred web browser.
(These options appear in the Results tab only in the Windows operating environment.)
Internal Browser vs. Preferred Web Browser
To view HTML output, you can choose between these two options in the Results tab of the Preferences
window in the Windows operating environment:
• the Internal browser, called the Results Viewer window. SAS provides this browser as part of your SAS
installation.
• the Preferred web browser. If you select this option, SAS uses the browser that is specified in the Web tab of the
Preferences window. By default, this is the default browser for your PC.
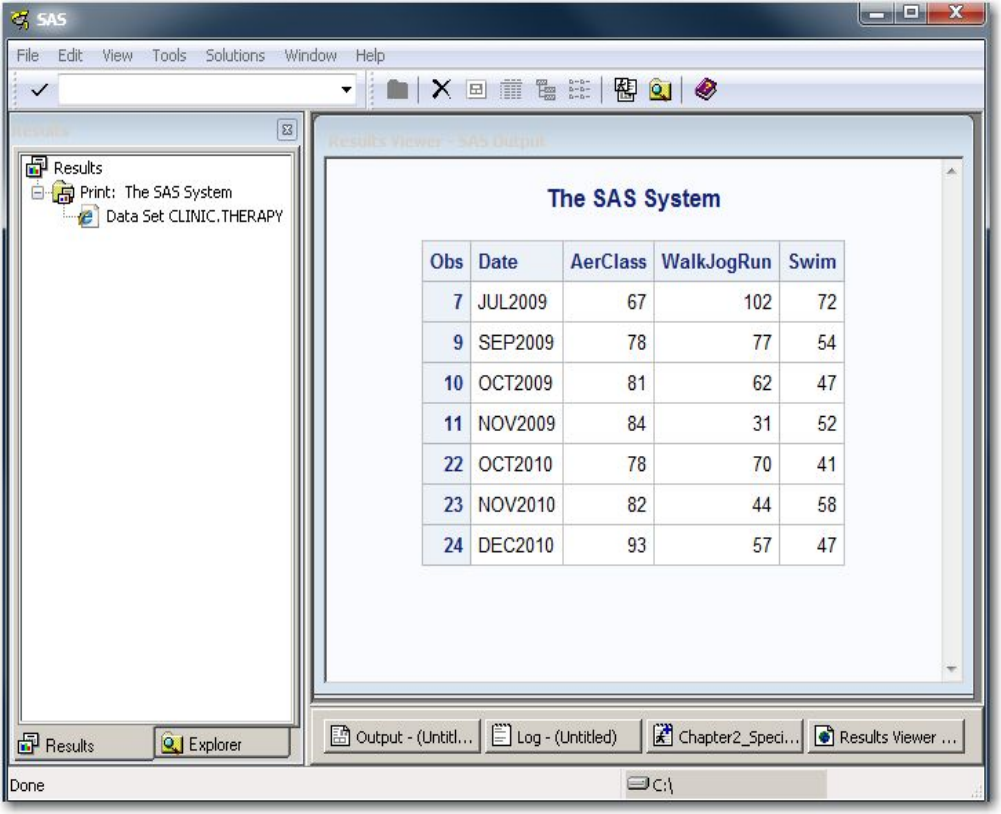
- 61 -
Internal Browser
The Results Viewer is displayed as a SAS window, as shown below.
Internal Browser Showing HTML Output
Preferred Web Browser
If you select the preferred web browser, your HTML output is displayed in a separate browser that is
independent of SAS. For example, the HTML output below is displayed in Internet Explorer.
Preferred Web Browser Showing HTML Output
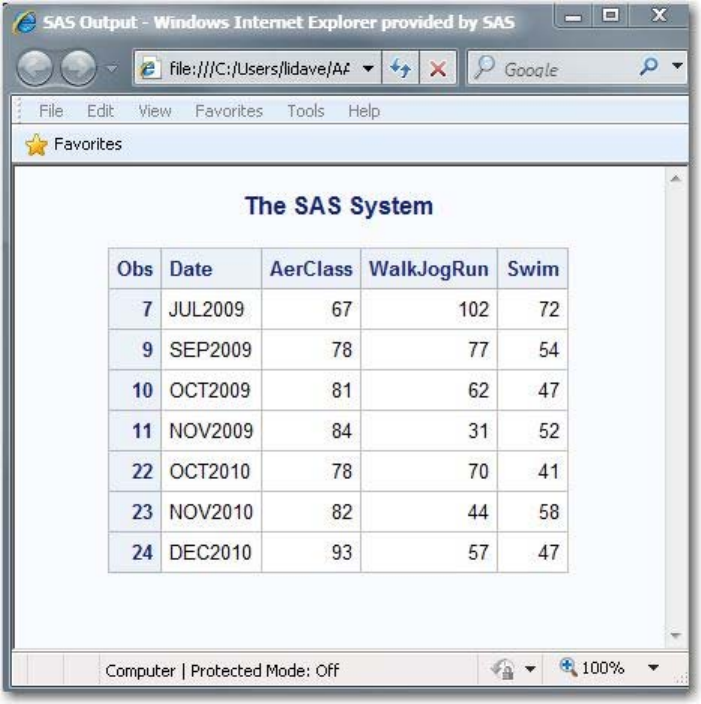
- 62 -
Setting System Options
Overview
If you create your procedure output as LISTING output, you can also control the appearance of your
output by setting system options such as
• line size (the maximum width of the log and output)
• page size (the number of lines per printed page of output)
• the display of page numbers
• the display of date and time.
The above options do not affect the appearance of HTML output.
All SAS system options have default settings that are used unless you specify otherwise. For example,
page numbers are automatically displayed in LISTING output (unless your site modifies this default).
LISTING Output Showing Default Settings
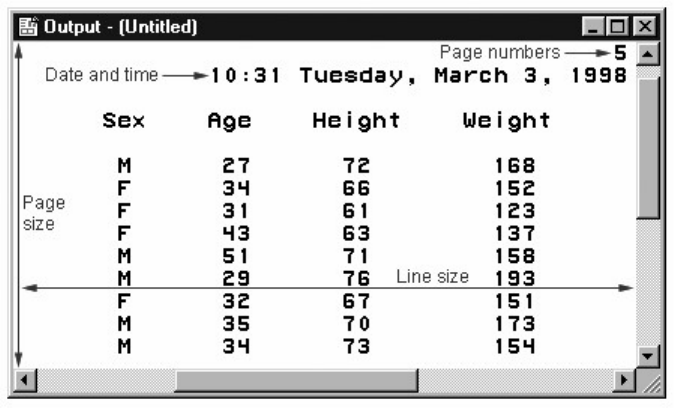
- 63 -
Changing System Options
To modify system options in your LISTING output, you submit an OPTIONS statement. You can place an
OPTIONS statement anywhere in a SAS program to change the settings from that point onward. However,
it is good programming practice to place OPTIONS statements outside of DATA or PROC steps so that
your programs are easier to read and debug.
Because the OPTIONS statement is global, the settings remain in effect until you modify them, or until
you end your SAS session.
General form, OPTIONS statement:
OPTIONS options;
where options specifies one or more system options to be changed. The available system options depend
on your host operating system.
Example: DATE | NODATE and NUMBER | NONUMBER Options
By default, page numbers and dates appear with LISTING output. The following OPTIONS statement
suppresses the printing of both page numbers and the date and time in LISTING output.
options nonumber nodate;
In the following example, the NONUMBER and NODATE system options suppress the display of page
numbers and the date in the PROC PRINT output. Page numbers are not displayed in the PROC FREQ
output, either, but the date does appear at the top of the PROC FREQ output since the DATE option was
specified.
ods listing;
options nonumber nodate;
proc print data=sasuser.admit;
var id sex age height weight;
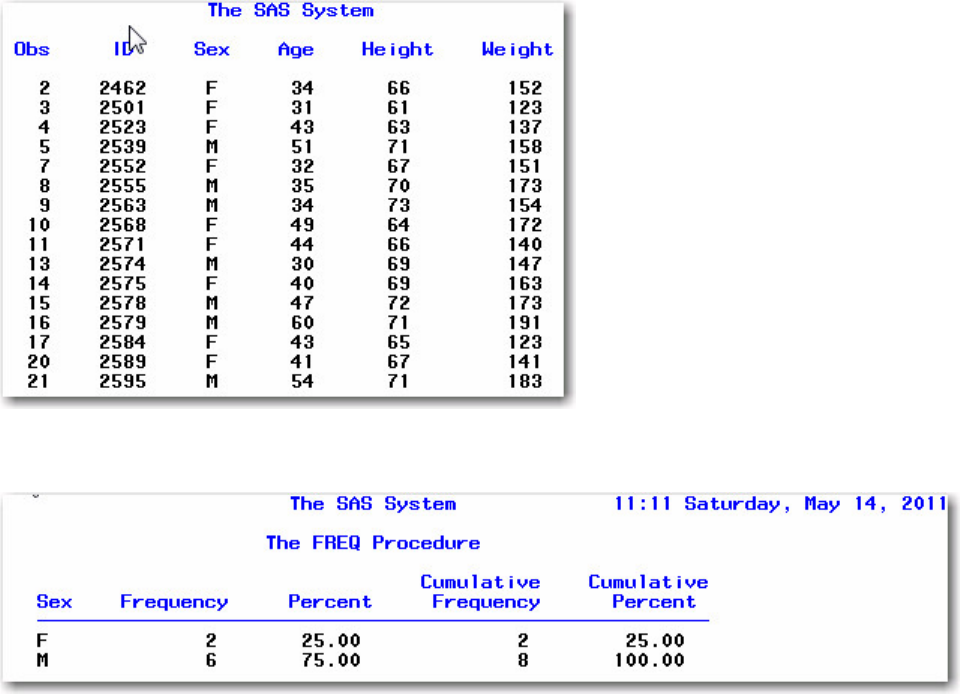
- 64 -
where age>=30;
run;
options date;
proc freq data=sasuser.diabetes;
where fastgluc>=300;
tables sex;
run;
proc print data=sasuser.diabetes;
run;
ods listing close;
PROC PRINT LISTING Output for sasuser.diabetes
PROC FREQ LISTING Output for sasuser.diabetes
PROC PRINT LISTING Output for sasuser.diabetes
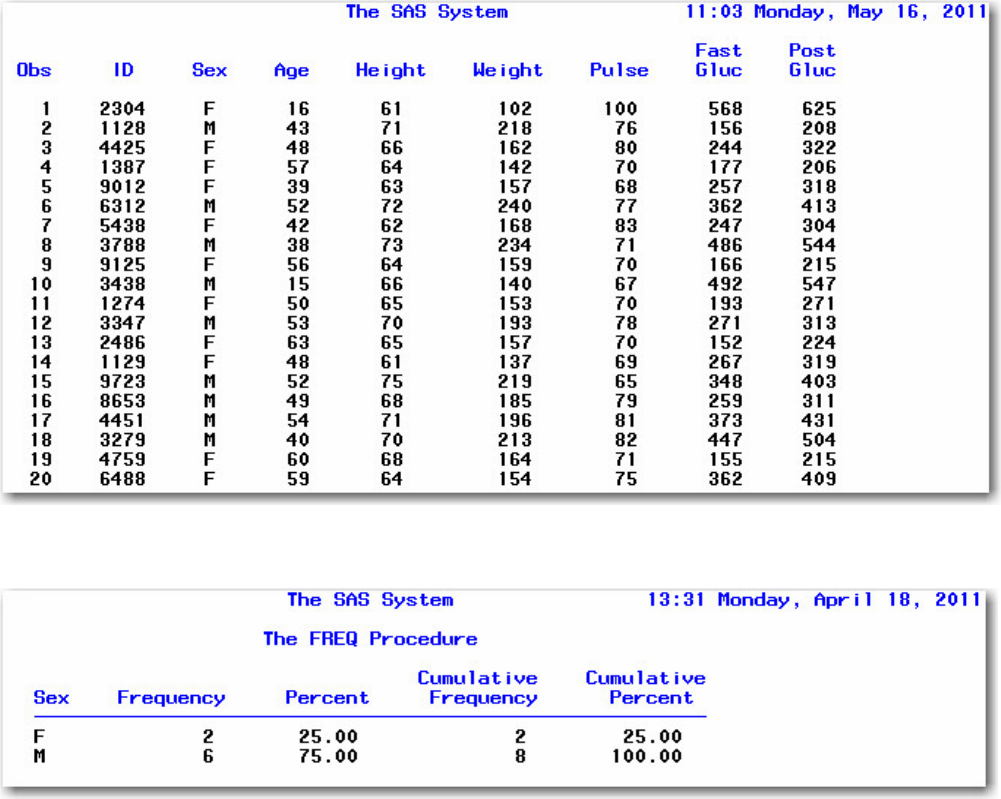
- 65 -
PROC FREQ LISTING Output with Date and Still No Page Number
Example: PAGENO= Option
If you print page numbers, you can specify the beginning page number for your LISTING report by using
the PAGENO= option. If you don't specify PAGENO=, output is numbered sequentially throughout your
SAS session, starting with page 1.
In the following example, the output pages are numbered sequentially throughout the SAS session,
beginning with number 3.
ods listing;
options nodate number pageno=3;
proc print data=hrd.funddrive;
run;
ods listing close;
Since SAS 9.3 does not creating LISTING output by default, the ODS LISTING statement was added to
generate LISTING output.
LISTING Output with the PAGENO= Option Set
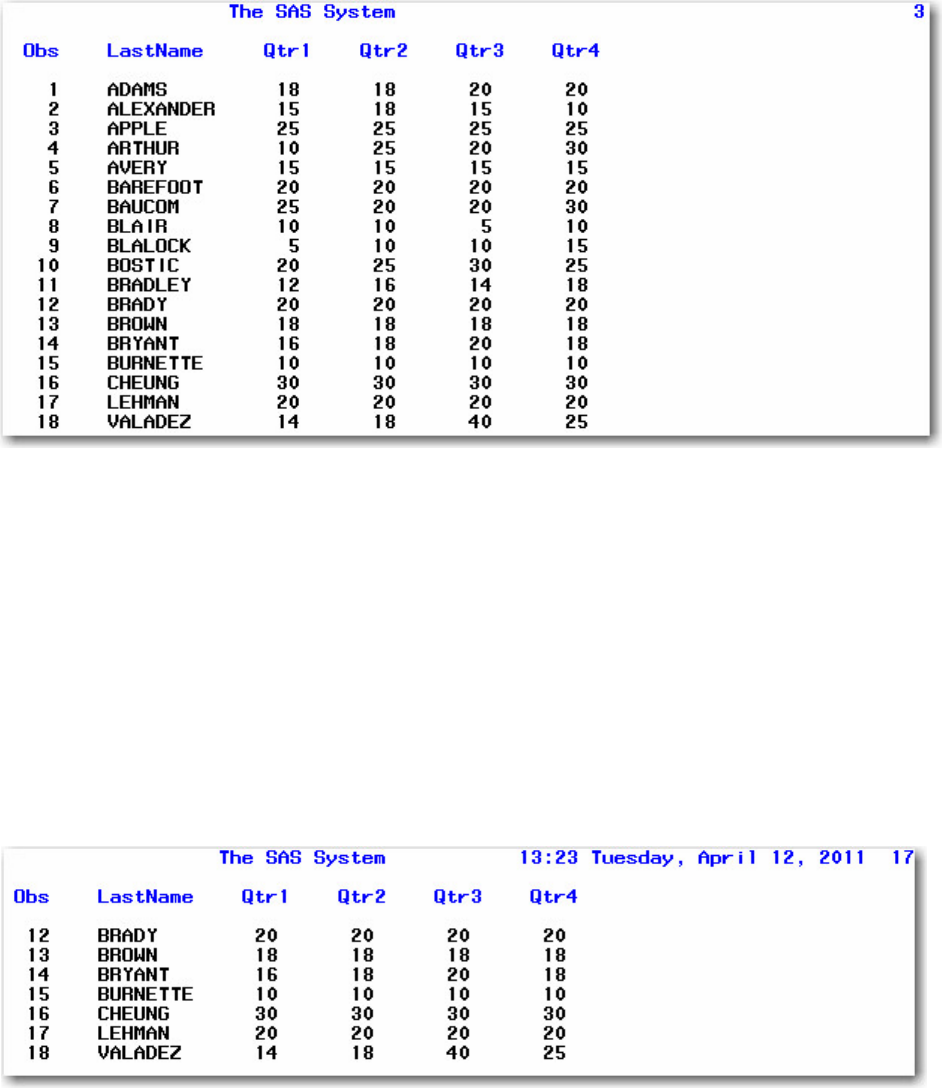
- 66 -
Example: PAGESIZE= Option
The PAGESIZE= option (alias PS=) specifies how many lines each page of output contains. In the
following example, each page of the output that the PRINT procedure produces contains 15 lines
(including those used by the title, date, and so on).
options number date pagesize=15;
proc print data=sasuser.admit;
run;
LISTING Output with PAGESIZE= 15
Example: LINESIZE= Option
The LINESIZE= option (alias LS=) specifies the width of the print line for your procedure output and log.
Observations that do not fit within the line size continue on a different line.
In the following example, the observations are longer than 64 characters, so the observations continue on a
subsequent page.
ODS listing;
options number linesize=64;
proc print data=flights.europe;
run;
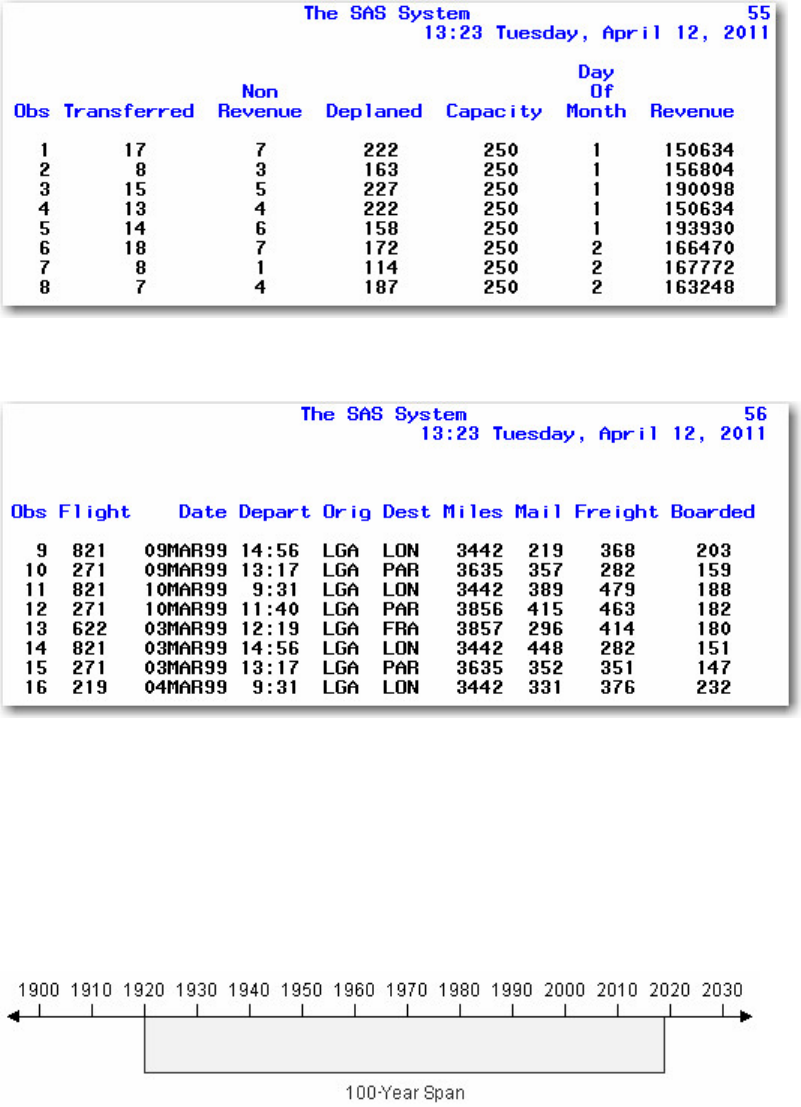
- 67 -
ODS listing close;
LISTING Output with the LINESIZE= Option Set, Page 1
LISTING Output with the LINESIZE= Option Set, Page 2
Handling Two-Digit Years: Year 2000 Compliance
If you use two-digit year values in your data lines, external files, or programming statements, you should
consider another important system option, the YEARCUTOFF= option. This option specifies which
100-year span is used to interpret two-digit year values.
The Default 100 Year Span in SAS
All versions of SAS represent dates correctly from 1582 A.D. to 20,000 A.D. (Leap years, century, and
fourth-century adjustments are made automatically. Leap seconds are ignored, and SAS does not adjust for
Daylight Savings Time.) However, you should be aware of the YEARCUTOFF= value to ensure that you
are properly interpreting two-digit years in data lines.
As with other system options, you specify the YEARCUTOFF= option in the OPTIONS statement:

- 68 -
options yearcutoff=1925;
How the YEARCUTOFF= Option Works
When a two-digit year value is read, SAS interprets it based on a 100-year span which starts with the
YEARCUTOFF= value. The default value of YEARCUTOFF= is 1920.
Default YEARCUTOFF= Date (1920)
Date Expressions and How They Are Interpreted
Date Expression Interpreted As
12/07/41 12/07/1941
18Dec15 18Dec2015
04/15/30 04/15/1930
15Apr95 15Apr1995
However, you can override the default and change the value of YEARCUTOFF= to the first year of
another 100-year span. For example, if you specify YEARCUTOFF=1950, then the 100-year span will be
from 1950 to 2049.
options yearcutoff=1950;
Using YEARCUTOFF=1950, dates are interpreted as shown below:
Interpreting Dates When YEARCUTOFF=1950
Date Expressions and How They Are Interpreted
Date Expression Interpreted As
12/07/41 12/07/2041
18Dec15 18Dec2015
04/15/30 04/15/2030
15Apr95 15Apr1995
How Four-Digit Years Are Handled
Remember, the value of the YEARCUTOFF= system option affects only two-digit year values. A date
value that contains a four-digit year value will be interpreted correctly even if it does not fall within the
100-year span set by the YEARCUTOFF= system option.

- 69 -
You can learn more about reading date values in Reading Date and Time Values.
Using System Options to Specify Observations
You've seen how to use SAS system options to change the appearance of output and interpret two-digit
year values. You can also use the FIRSTOBS= and OBS= system options to specify the observations to
process from SAS data sets.
You can specify either or both of these options as needed. That is, you can use
• FIRSTOBS= to start processing at a specific observation
• OBS= to stop processing after a specific observation
• FIRSTOBS= and OBS= together to process a specific group of observations.
General form, FIRSTOBS= and OBS= options in an OPTIONS statement:
FIRSTOBS=n
OBS=n
where n is a positive integer. For FIRSTOBS=, n specifies the number of the first observation to process.
For OBS=, n specifies the number of the last observation to process. By default, FIRSTOBS=1. The
default value for OBS= is MAX, which is the largest signed, eight-byte integer that is representable in your
operating environment. The number can vary depending on your operating system.
Each of these options applies to every input data set that is used in a program or a SAS process.
Examples: FIRSTOBS= and OBS= Options
The data set clinic.heart contains 20 observations. If you specify FIRSTOBS=10, SAS reads the 10th
observation of the data set first and reads through the last observation (for a total of 11 observations).
options firstobs=10;
proc print data=sasuser.heart;
run;
The PROC PRINT step produces the following output:
PROC PRINT Output with FIRSTOBS=10
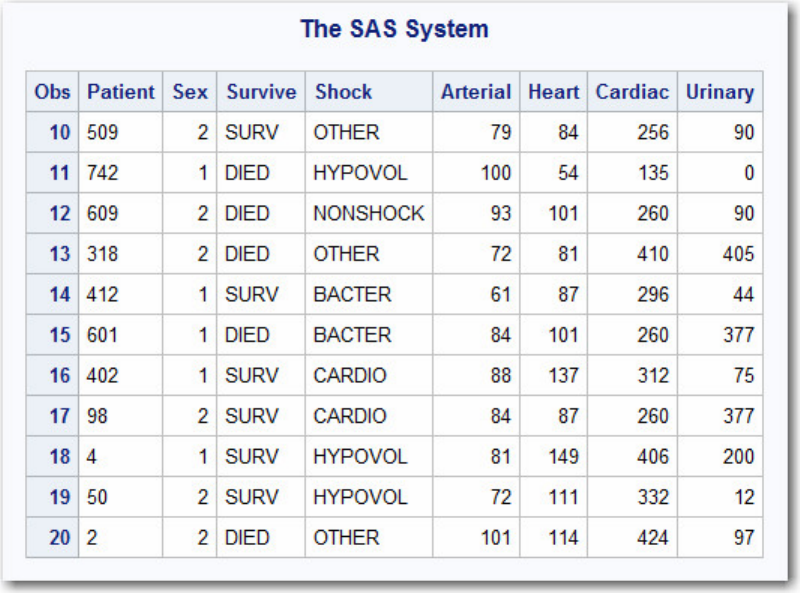
- 70 -
If you specify OBS=10 instead, SAS reads through the 10th observation, in this case for a total of 10
observations. (Notice that FIRSTOBS= has been reset to the default value.)
options firstobs=1 obs=10;
proc print data=sasuser.heart;
run;
Now the PROC PRINT step produces this output:
PROC PRINT Output with FIRSTOBS=1 and Obs=10
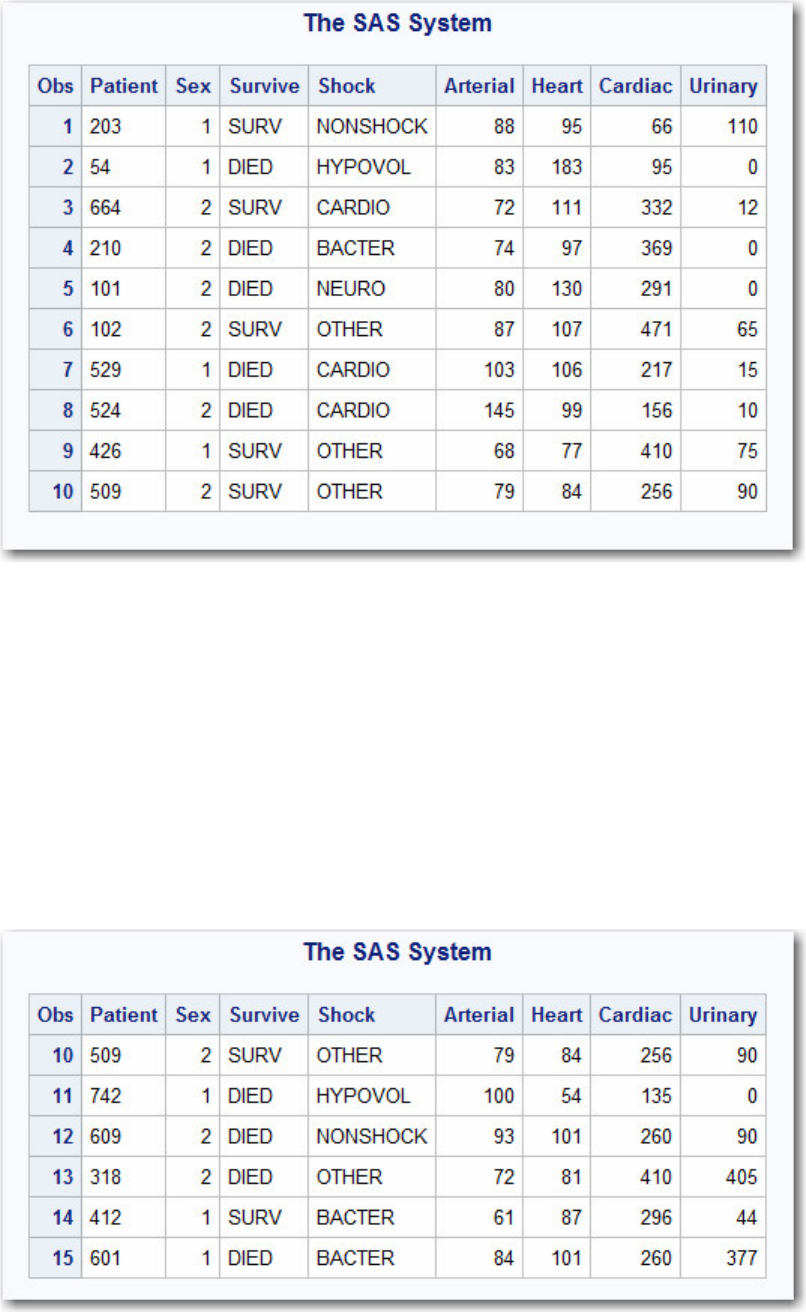
- 71 -
Combining FIRSTOBS= and OBS= processes observations in the middle of the data set. For example, the
following program processes only observations 10 through 15, for a total of 6 observations:
options firstobs=10 obs=15;
proc print data=sasuser.heart;
run;
Here is the output:
PROC PRINT Output with FIRSTOBS=10 and Obs=15
To reset the number of the last observation to process, you can specify OBS=MAX in the OPTIONS
statement.
options obs=max;
- 72 -
This instructs any subsequent SAS programs in the SAS session to process through the last observation in
the data set being read.
Using FIRSTOBS= and OBS= for Specific Data Sets
As you saw above, using the FIRSTOBS= or OBS= system options determines the first or last observation,
respectively, that is read for all steps for the duration of your current SAS session or until you change the
setting. However, you may want to
• override these options for a given data set
• apply these options to a specific data set only.
To affect any single file, you can use FIRSTOBS= or OBS= as data set options instead of as system
options. You specify the data set option in parentheses immediately following the input data set name.
A FIRSTOBS= or OBS= specification from a data set option overrides the corresponding FIRSTOBS= or
OBS= system option.
Example: FIRSTOBS= and OBS= as Data Set Options
As shown in the last example below, this program processes only observations 10 through 15, for a total of
6 observations:
options firstobs=10 obs=15;
proc print data=sasuser.heart;
run;
You can create the same output by specifying FIRSTOBS= and OBS= as data set options, as follows. The
data set options override the system options for this instance only.
options firstobs=10 obs=15;
proc print data=sasuser.heart(firstobs=10 obs=15);
run;
To specify FIRSTOBS= or OBS= for this program only, you could omit the OPTIONS statement
altogether and simply use the data set options.
The SAS System Options Window
You can also set system options by using the SAS System Options window. The changed options are reset
to the defaults at the end of your SAS session.
To view the SAS System Options window, select Tools→Options→System.
The SAS System Options Window
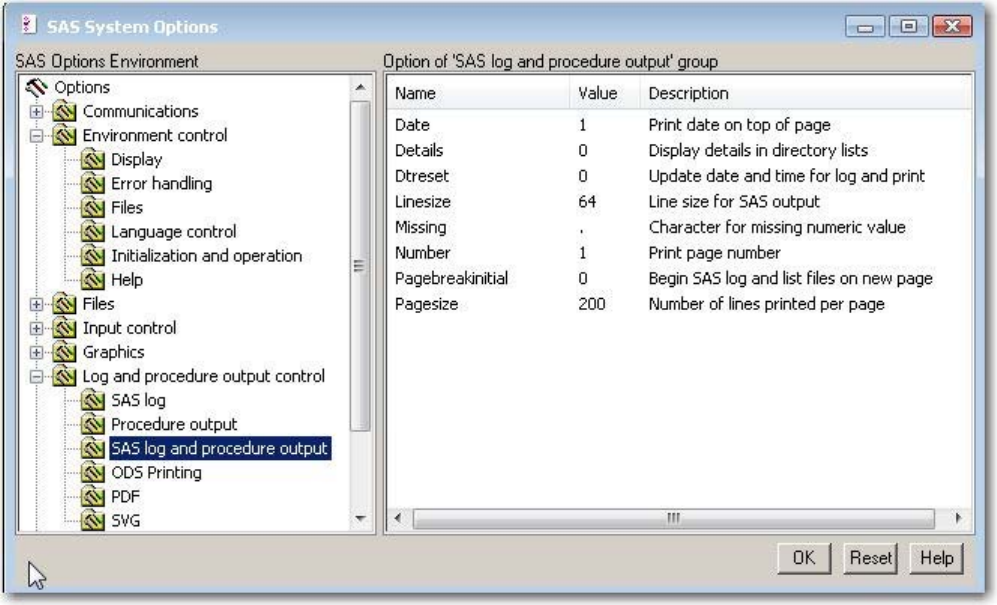
- 73 -
Changing Options
To change an option:
1. Expand the groups and subgroups under SAS Options Environment until you find the option that you want to
change. (Options in subgroups are listed in the right pane of the window.)
2. Click the name of the option that you want to change, and display its pop-up menu. Then select one of the
choices:
o Modify Value opens a window in which you type or select a new value for the option.
o Set to Default immediately resets the option to its default value.
For example, the SAS System Options window above shows options for the SAS log and procedure
output subgroup under the group Log and procedure output control.
Finding Options Quickly
To locate an option in the SAS System Options window:
1. Place your cursor over the name of any option group or subgroup, and display its pop-up menu.
2. Click Find Option. The Find Option dialog box appears.
3. Type the name of the option that you want to locate, and click OK.
The SAS System Options window expands to the appropriate option subgroup. All subgroup options also
appear, and the option that you located is highlighted.
Additional Features

- 74 -
When you set up your SAS session, you can set SAS system options that affect LISTING output,
information written to the SAS log, and much more. Here are some additional system options that you are
likely to use with SAS:
Selected System Options and Their Descriptions
FORMCHAR=
'formatting-characters'
specifies the formatting characters for your output device. Formatting
characters are used to construct the outlines of tables as well as dividers for
various procedures, such as the FREQ and TABULATE procedures. If you
do not specify formatting characters as an option in the procedure, then the
default specifications given in the FORMCHAR= system option are used.
FORMDLIM=
'delimit-character'
specifies a character that is used to delimit page breaks in SAS System
output. Normally, the delimit character is null. When the delimit character is
null, a new physical page starts whenever a page break occurs.
LABEL|NOLABEL
permits SAS procedures to temporarily replace variable names with
descriptive labels. The LABEL system option must be in effect before the
LABEL option of any procedure can be used. If NOLABEL is specified,
then the LABEL option of a procedure is ignored. The default setting is
LABEL.
REPLACE|NOREPLACE
specifies whether permanently stored SAS data sets are replaced. If you
specify NOREPLACE, a permanently stored SAS data set cannot be
replaced with one that has the same name. This prevents you from
inadvertently replacing existing SAS data sets. The default setting is
REPLACE.
SOURCE|NOSOURCE
controls whether SAS source statements are written to the SAS log.
NOSOURCE specifies not to write SAS source statements to the SAS log.
The default setting is SOURCE.
You can also use programming statements to control the result format of each item of procedure output
individually. For more information, see Producing HTML Output .
Chapter Summary
Text Summary
Referencing SAS Files in SAS Libraries
To reference a SAS file, you assign a libref (library reference) to the SAS library in which the file is stored.
Then you use the libref as the first part of the two-level name (libref.filename) for the file. To assign a
libref, you can submit a LIBNAME statement. You can store the LIBNAME statement with any SAS
- 75 -
program to assign the libref automatically when you submit the program. The LIBNAME statement
assigns the libref for the current SAS session only. You must assign a libref each time you begin a SAS
session in order to access SAS files that are stored in a permanent SAS library other than clinic. (Work is
the default libref for a temporary SAS library.)
You can also use the LIBNAME statement to reference data in files that were created with other software
products, such as database management systems. SAS can write to or read from the files by using the
appropriate engine for that file type. For some file types, you need to tell SAS which engine to use. For
others, SAS automatically chooses the appropriate engine.
Viewing Librefs
The librefs that are in effect for your SAS session are listed under Libraries in the Explorer window. To
view details about a library, double-click Libraries (or select Libraries→Open from the pop-up menu).
Then select View→Details. The library's name, engine, host pathname, and date are listed under Active
Libraries.
Viewing the Contents of a Library
To view the contents of a library, double-click the library name in the Explorer window (or select the
library name and then select Open from the pop-up menu). Files contained in the library are listed under
Contents.
Viewing the Contents of a File
If you are working in a windowing environment, you can display the contents of a file by double-clicking
the filename (or selecting the filename and then selecting Open from the pop-up menu) under Contents in
the Explorer window. If you select a SAS data set, its contents are displayed in the VIEWTABLE window.
If you are working in the z/OS operating environment, you can type ? in the selection field next to a
filename in the Explorer window to display a pop-up menu with a list of options for working with that file.
Listing the Contents of a Library
To list the contents of a library, use the CONTENTS procedure. Append a period and the _ALL_ option to
the libref to get a listing of all files in the library. Add the NODS option to suppress detailed information
about the files. As an alternative to PROC CONTENTS, you can use PROC DATASETS.
Specifying Result Formats
In desktop operating environments, you can choose to create your SAS procedure output as an HTML
document, a listing (traditional SAS output), or both. You choose the results format(s) that you prefer in
the Preferences window. Your preferences are saved until you modify them, and they apply to all output
that is created during your SAS session. To open this window, select Tools→Options→Preferences.
Then click the Results tab. Choose Create listing, Create HTML, or both.
If you choose Create HTML, then each HTML file is displayed in the browser that you specify (in the
Windows operating environment, the internal browser is the Results Viewer window). HTML files are
stored in the location that you specify and are by default incrementally named sashtml.htm, sashtml1.htm,
sashtml2.htm, and so on throughout your SAS session. To specify where HTML files are stored, type a
path in the Folder box (or click Browse to locate a pathname). If you prefer to store your HTML files
temporarily and to delete them at the end of your SAS session, click Use WORK folder instead of
- 76 -
specifying a folder. To specify the presentation style for HTML output, you can select an item in the Style
box.
Setting System Options
For your LISTING output, you can also control the appearance of your output by setting system options
such as line size, page size, the display of page numbers, and the display of the date and time. (These
options do not affect the appearance of HTML output.)
All SAS system options have default settings that are used unless you specify otherwise. For example,
page numbers are automatically displayed (unless your site modifies this default). To modify system
options, you submit an OPTIONS statement. You can place an OPTIONS statement anywhere in a SAS
program to change the current settings. Because the OPTIONS statement is global, the settings remain in
effect until you modify them or until you end your SAS session.
If you use two-digit year values in your SAS data lines, you must be aware of the YEARCUTOFF= option
to ensure that you are properly interpreting two-digit years in your SAS program. This option specifies
which 100-year span is used to interpret two-digit year values.
To specify the observations to process from SAS data sets, you can use the FIRSTOBS= and OBS=
options.
You can also use the SAS System Options window to set system options.
Additional Features
You can set a number of additional SAS system options that are commonly used.
Syntax
LIBNAME libref 'SAS-data-library';
LIBNAME libref engine'SAS-data-library';
OPTIONS options;
PROC CONTENTS DATA= libref._ALL_ NODS;
PROC DATASETS;
CONTENTS DATA= libref._ALL_ NODS;
QUIT;
Points to Remember
• LIBNAME and OPTIONS statements remain in effect for the current SAS session only.
• When you work with date values, check the default value of the YEARCUTOFF= system option and change it if
necessary.
Chapter Quiz
- 77 -
Select the best answer for each question. After completing the quiz, check your answers using the answer
key in the appendix.
1. If you submit the following program, how does the output look?
options pagesize=55 nonumber;
proc tabulate data=clinic.admit;
class actlevel;
var age height weight;
table actlevel,(age height weight)*mean;
run;
options linesize=80;
proc means data=clinic.heart min max maxdec=1;
var arterial heart cardiac urinary;
class survive sex;
run;
1. The PROC MEANS output has a print line width of 80 characters, but the PROC TABULATE output has
no print line width.
2. The PROC TABULATE output has no page numbers, but the PROC MEANS output has page numbers.
3. Each page of output from both PROC steps is 55 lines long and has no page numbers, and the PROC
MEANS output has a print line width of 80 characters.
4. The date does not appear on output from either PROC step.
2. How can you create SAS output in HTML format on any SAS platform?
1. by specifying system options
2. by using programming statements
3. by using SAS windows to specify the result format
4. you can't create HTML output on all SAS platforms
3. In order for the date values 05May1955 and 04Mar2046 to be read correctly, what value must the
YEARCUTOFF= option have?
1. a value between 1947 and 1954, inclusive
2. 1955 or higher
3. 1946 or higher
4. any value
4. When you specify an engine for a library, you are always specifying
1. the file format for files that are stored in the library.
2. the version of SAS that you are using.
3. access to other software vendors' files.
4. instructions for creating temporary SAS files.
5. Which statement prints a summary of all the files stored in the library named Area51?
1.
proc contents data=area51._all_ nods;
2.
proc contents data=area51 _all_ nods;
3.
proc contents data=area51 _all_ noobs;

- 78 -
4.
proc contents data=area51 _all_.nods;
6. The following PROC PRINT output was created immediately after PROC TABULATE output. Which system
options were specified when the report was created?
1. OBS=, DATE, and NONUMBER
2. NUMBER, PAGENO=1, and DATE
3. NUMBER and DATE only
4. none of the above
7. Which of the following programs correctly references a SAS data set named SalesAnalysis that is stored in a
permanent SAS library?
1.
data saleslibrary.salesanalysis;
set mydata.quarter1sales;
if sales>100000;
run;
2.
data mysales.totals;
set sales_99.salesanalysis;
if totalsales>50000;
run;
3.
proc print data=salesanalysis.quarter1;
var sales salesrep month;
run;
4.
proc freq data=1999data.salesanalysis;

- 79 -
tables quarter*sales;
run;
8. Which time span is used to interpret two-digit year values if the YEARCUTOFF= option is set to 1950?
1. 1950-2049
2. 1950-2050
3. 1949-2050
4. 1950-2000
9. Assuming you are using SAS code and not special SAS windows, which one of the following statements is false?
1. LIBNAME statements can be stored with a SAS program to reference the SAS library automatically
when you submit the program.
2. When you delete a libref, SAS no longer has access to the files in the library. However, the contents of
the library still exist on your operating system.
3. Librefs can last from one SAS session to another.
4. You can access files that were created with other vendors' software by submitting a LIBNAME
statement.
10. What does the following statement do?
libname osiris spss 'c:\myfiles\sasdata\data.spss';
1. defines a library called Spss using the OSIRIS engine
2. defines a library called Osiris using the SPSS engine
3. defines two libraries called Osiris and Spss using the default engine
4. defines the default library using the OSIRIS and SPSS engines
Chapter 3 Editing and Debugging SAS Programs
Overview
Opening a Stored SAS Program
Editing SAS Programs
Clearing SAS Programming Windows
Interpreting Error Messages
Correcting Errors
Resolving Common Problems
Additional Features
Chapter Summary
Chapter Quiz
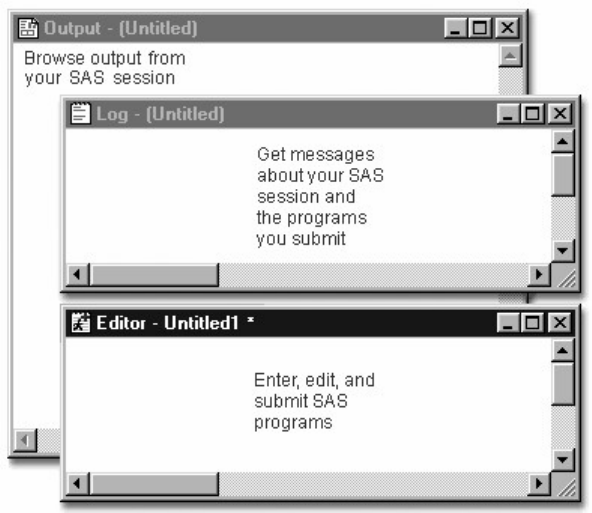
- 80 -
Overview
Introduction
Now that you're familiar with the basics, you can learn how to use the SAS programming windows to edit
and debug programs effectively.
SAS Programming Windows
Objectives
In this chapter you learn to
• open a stored SAS program
• edit SAS programs
• clear SAS programming windows
• interpret error messages in the SAS log
• correct errors
• resolve common problems.
Opening a Stored SAS Program
Overview
You can open a stored program in the code editing window, where you can edit the program and submit it
again.
You can open a program using

- 81 -
• file shortcuts
• My Favorite Folders
• the Open window
• the INCLUDE command.
In operating environments that provide drag-and-drop functionality, you can also open a SAS file by
dragging and dropping it into the code editing window.
Code Editor Window
Using File Shortcuts
File shortcuts are available in the SAS Explorer window. To open a program using file shortcuts:
1. At the top level of the SAS Explorer window, double-click File Shortcuts.
2. Double-click the file shortcut that you want to open, or select Open from the pop-up menu for the file.
File Short Cuts
The file opens in a new code editing window, with the filename shown as the window title.
You can select Submit from the pop-up menu to execute the file directly from File Shortcuts.
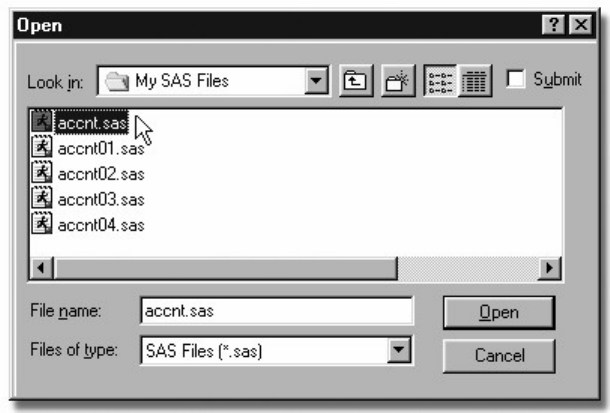
- 82 -
Remember that you open File Shortcuts with a single-click in the z/OS (z/OS) or CMS operating
environments. To open a file, you type
• ? beside the item to display pop-up menus
• S beside the item to simulate a double-click.
Using My Favorite Folders
To view and manage any files in your operating environment, you can use the My Favorite Folders
window.
To open a file that is stored in My Favorite Folders:
1. Select View→My Favorite Folders.
2. Double-click the file, or select Open from the pop-up menu for the file.
The file opens in a new code editing window, with the filename shown as the window title.
You can select Submit from the pop-up menu to execute the file directly from My Favorite Folders.
Using the Open Window
To use the Open window:
1. With the code editing window active, select →Open (or File→Open Program).
2. In the Open window, click the file that you want to open (or type the path for the file).
3. Click Open or OK.
The Open WIndow
The file opens in a new code editing window, with the filename shown as the window title.
In the Windows environment, you can submit your file directly from the Open window by clicking the
Submit check box before clicking Open.
- 83 -
The appearance of the Open window varies by operating environment. In mainframe operating
environments, files are not listed, so you must type the path for the file.
If you're not sure of the name of the file in which your program is stored, you can do either of the
following:
• use My Favorite Folders to locate the file in your operating environment
• issue the X command to temporarily suspend your SAS session.
The X command enables you to use operating system facilities without ending your SAS session. When you issue the X
command, you temporarily exit SAS and enter the host system.
To resume your SAS session after issuing the X command, issue the appropriate host system command, as
shown below.
Resuming a SAS Session
Operating Environment
Host command to resume SAS session
z/OS
RETURN or END
UNIX
exit
Windows
EXIT
Issuing an INCLUDE Command
You can also open a program by issuing an INCLUDE command.
General form, basic INCLUDE command:
INCLUDE 'file-specification'
where file-specification is the physical name by which the host system recognizes the file.
Example
Suppose you want to include the program D:\Programs\Sas\Myprog1.sas in the Windows operating
environment. To do so, you can issue the following INCLUDE command:
include 'd:\programs\sas\myprog1.sas'
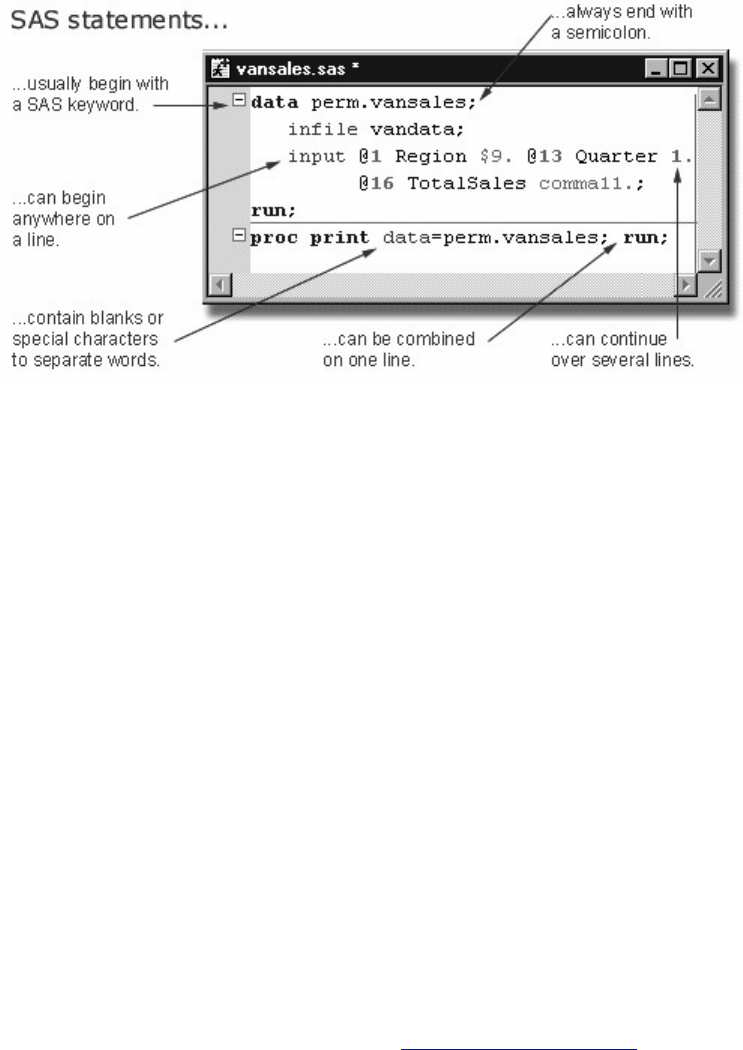
- 84 -
Because this is a command (not a SAS statement), no semicolon is used at the end.
Editing SAS Programs
Now that you know how to open a SAS program, let's review the characteristics of SAS statements and
look at enhancing the readability of your SAS programs.
SAS Program Structure
Remember that SAS programs consist of SAS statements. Consider the SAS program that is shown in a
code editing window below.
An Example SAS Program
Although you can write SAS statements in almost any format, a consistent layout enhances readability and
helps you understand the program's purpose. It's a good idea to
• begin DATA and PROC steps in column one
• indent statements within a step
• begin RUN statements in column one
• include a RUN statement after every DATA step or PROC step.
data sashelp.prdsale;
infile jobs;
input date name $ job $;
run;
proc print data=sashelp.prdsale;
run;
Now let's look at the Enhanced Editor window features that you can use to edit your SAS programs.
Note: If you are running SAS in an operating environment other than Windows, you can skip the
Enhanced Editor window section and see Program Editor Features instead.
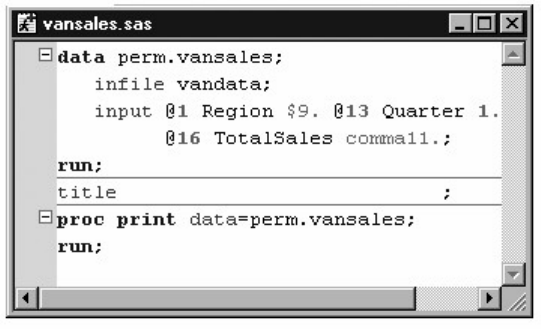
- 85 -
Using the Enhanced Editor
When you edit SAS programs in the Enhanced Editor, you can take advantage of a number of useful
features. The following section shows you how to
• use color-coding to identify code elements
• automatically indent the next line when you press the Enter key
• collapse and expand sections of SAS procedures, DATA steps, and macros
• bookmark lines of code for easy access to different sections of your program
• open multiple views of a file.
Enhanced Editor Window
You can also
• save color-coding settings in a color scheme
• create macros that record and play back program editing commands
• create shortcuts for typing in text using abbreviations
• customize keyboard shortcuts for most Enhanced Editor commands
• create and format your own keywords
• automatically reload modified disk files
• access Help for SAS procedures by placing the insertion point within the procedure name and pressing F1.
Entering and Viewing Text
The Enhanced Editor uses visual aides such as color coding and code sections to help you write and debug
your SAS programs.
You can use the margin on the left side of the Editor window to
• select one or more lines of text
- 86 -
• expand and collapse code sections
• display bookmarks.
Finding and Replacing Text
To find text in the Editor window, select Edit→Find or press Ctrl+F. You can set commonly used find
options, including specifying that the text string is a regular expression. You can also specify whether to
search in the code only, in the comments only, or in both the code and comments.
The Find Window
Using Abbreviations
You can define a character string so that when you type it and then press the Tab key or the Enter key, the
string expands to a longer character string.
For example, you could define the abbreviation myv7sasfiles, which would expand to
'c:\winnt\profiles\myid\personal\mysasfiles\v7';. Abbreviations are actually macros that insert one or
more lines of text.
To create an abbreviation,
1. Select Tools→Add Abbreviation.
2. For Abbreviation, type the name of the abbreviation.
3. For Text to insert for abbreviation, type the text that the abbreviation will expand into.
4. Click OK.
To use an abbreviation, type the abbreviation. When an abbreviation is recognized, a tooltip displays the
expanded text. Press the Tab key or Enter key to accept the abbreviation.
You can modify or delete abbreviations that you create.
Opening Multiple Views of a File
When you use the Enhanced Editor, you can see different parts of the same file simultaneously by opening
multiple views of the same file. While you are working with multiple views, you are working with only
one file, not multiple copies of the same file.
To open multiple views of the same file,
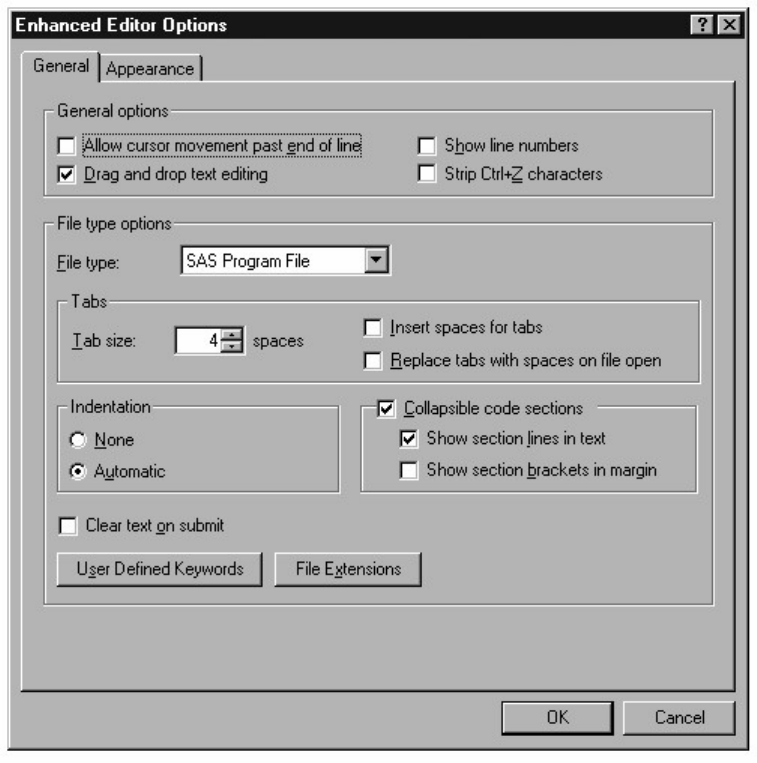
- 87 -
1. make the file the active window.
2. select Window→New Window.
The filename in the title bar is appended with a colon and a view number. Changes that you make to a file
in one view, such as changing text or bookmarking a line, occur in all views simultaneously. Actions such
as scroll bar movement, text selection, and expanding or contracting a section of code occur only in the
active window.
Setting Enhanced Editor Options
You can customize the Enhanced Editor by setting Enhanced Editor options. To open the Enhanced Editor
Options window, activate an Editor window and select Tools→Options→Enhanced Editor.
Click the tabs that are located along the top of the window to navigate to the settings that you want to
change, and then select the options that you want.
For example, Show line numbers specifies whether to display line numbers in the margin. When line
numbers are displayed, the current line number is red. Insert spaces for tabs specifies whether to insert
the space character or the tab character when you press the Tab key. If it is selected, the space character is
used. If it is not selected, the tab character is used.
When you are finished, click OK.
Enhanced Editor Options Window

- 88 -
For more information about setting options in the Enhanced Editor, select Help→Using This Window
from an Enhanced Editor window.
Program Editor Features
You use the Program Editor window to submit SAS programs. You can also enter and edit SAS programs
in this window, or you can open existing SAS programs that you created in another text editor.
To edit SAS programs in the Program Editor window, you can display line numbers. Then you can use text
editor line commands and block text editor line commands within the line numbers to insert, delete, move,
and copy lines within the Program Editor window.
In all operating environments, you can use line numbers, text editor line commands, and block text editor
line commands. Depending on your operating environment, you can also use features such as dragging and
dropping text, inserting lines with the Enter key, or marking and deleting text. For information about these
features, see the SAS documentation for your operating environment.
Line Numbers
In some operating environments, line numbers appear in the Program Editor window by default. In other
systems, the use of line numbers is optional. Activating line numbers can make it easier for you to edit
your program regardless of your operating environment.
Line Numbers
To turn on line numbers, use the NUMS command. Type nums on the command line or in the command
box and press Enter. To turn line numbers off, enter the NUMS command again. Line numbers activated
using the NUMS command will remain in effect for the duration of your SAS session.
To permanently display line numbers, select Tools→Options→Program Editor. Select the Editing tab.
Select the Display line numbers option. Click OK.
Text Editor Line Commands
Text editor line commands enable you to delete, insert, move, copy, and repeat text. You enter these
commands in the line number area in the Program Editor window.
The table below summarizes the basic text editing line commands.

- 89 -
Text Editor Line Commands
Command Action
Cn copies n lines (where n = a number up to 9999)
Dn deletes n lines
In insert n blank lines
Mn moves n lines
Rn repeats current line n times
A after (used with C, I, and M)
B before (used with C, I, and M)
You can use text editor line commands to perform actions like these:
Results from Using Text Editor Line Commands
Command
Action
00001
i3002
00003
inserts 3 lines after line 00002
0ib01
00002
00003
inserts 1 line before line 00001
0ib41
00002
00003
inserts 4 lines before line 00001
000c2
00002
0a 003
copies 2 lines (00001 and 00002) after line 00003
00001
0d302
00003
deletes 3 lines (00002, 00003, and 00004)
00b01
00002
00m 03
moves 1 line (00003) before line 00001
Example 1
In the example below, a PROC PRINT statement and a RUN statement need to be inserted after line
00004.
Incomplete Program
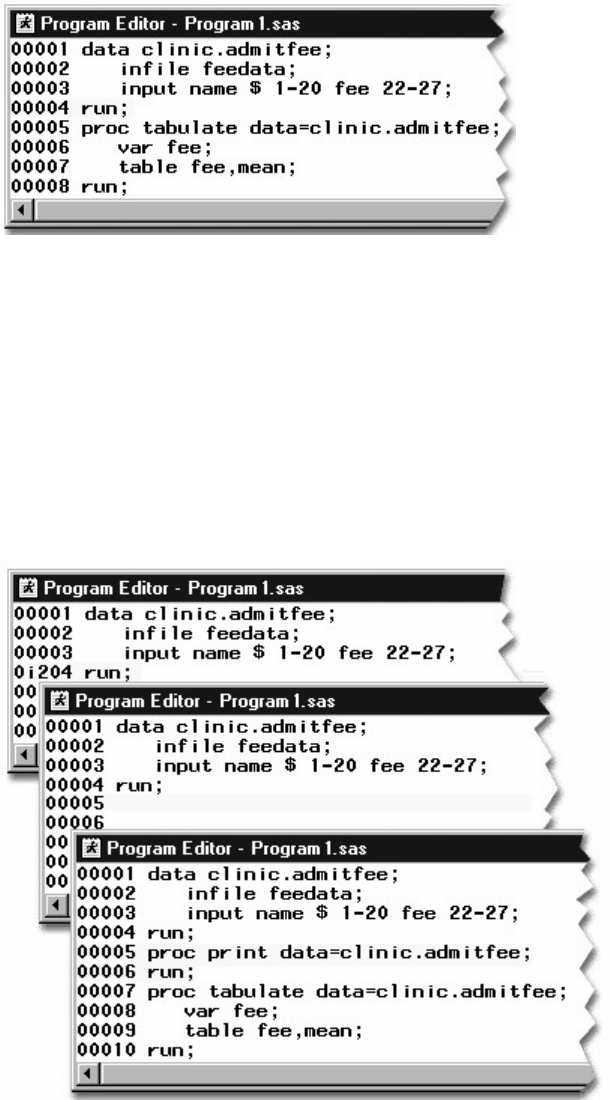
- 90 -
To insert the PROC PRINT and RUN statements in the program,
1. Type i2 anywhere in the line number area for line 00004 in the Program Editor window. Two blank lines are
inserted, and the cursor is positioned on the first new line.
2. Type the PROC PRINT statement on line 00005.
3. Type a RUN statement on line 00006.
Complete Program
Block Text Editor Line Commands
Block text editor line commands enable you to delete, repeat, copy, and move multiple lines in the
Program Editor window.
The block text editor line commands include the following:
Block Text Editor Line Commands
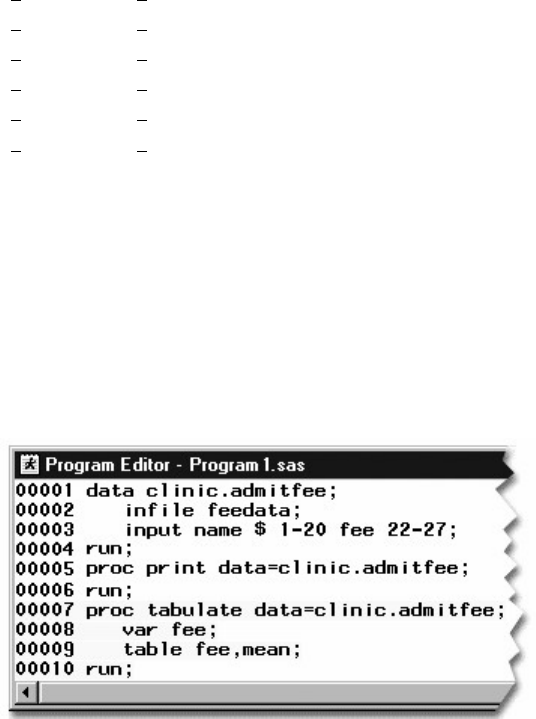
- 91 -
Command Action
DD deletes a block of lines
CC copies a block of lines
MM moves a block of lines
RR repeats multiple lines
A after (used with CC and MM commands)
B
b
efore (used with CC and MM commands)
To use a block command, specify the command on the first line affected and on the final line affected, and
then press Enter.
Example 1
In the program below, the PROC TABULATE step needs to be deleted.
Original Program
You can use the DD block command to remove the step. To use the DD command:
1. Type DD anywhere in the line number area for line 00007 to mark the first line affected.
2. Type DD anywhere in the line number area for line 00010 to mark the final line affected.
3. Press Enter to delete lines 00007-00010.
Edited Program
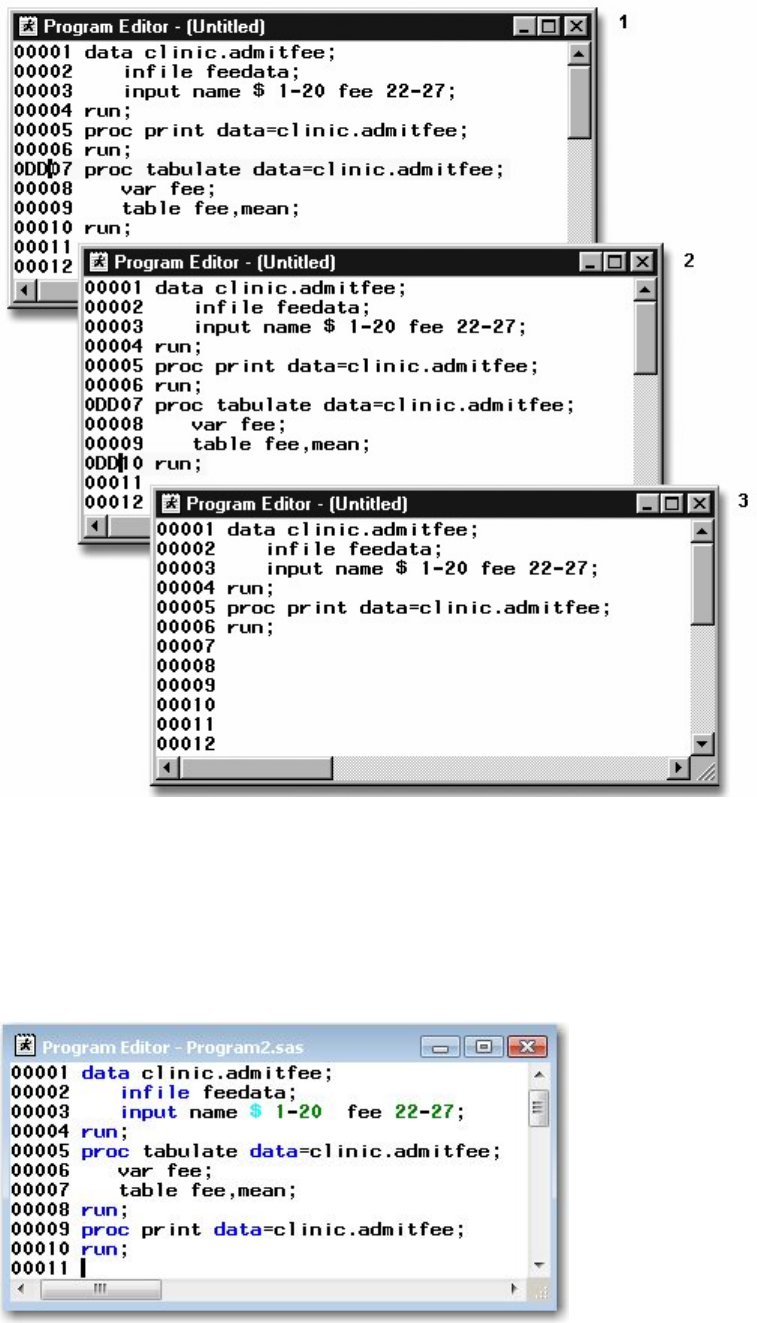
- 92 -
Example 2
In the example below, the PROC TABULATE step needs to be moved to the line after the PROC PRINT
step.
Original Program
You can use the MM block command with the A or B command to move a block of code to a specific
location. The MM is used to mark the block to be moved and the A or B is used to mark where you want
the block to go. You use the A if you want to move the block after the line, and you use b if you want to
move the block before the line.
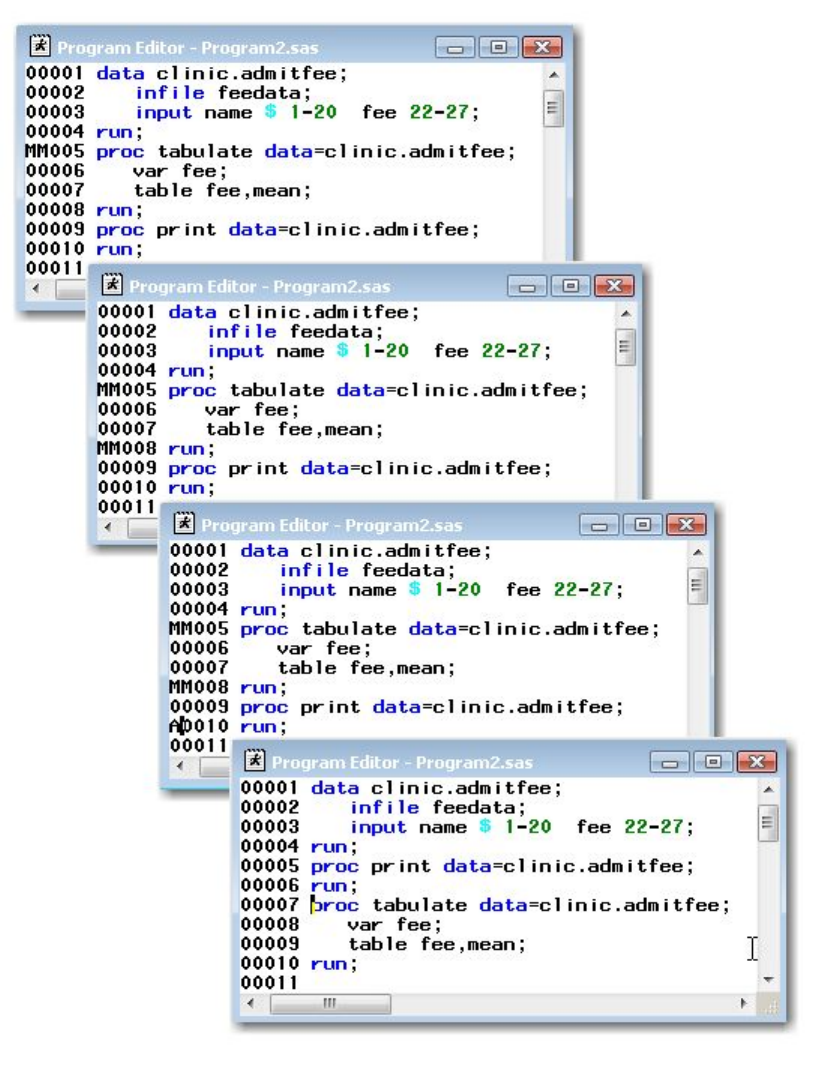
- 93 -
To use the MM command:
1. Type MM anywhere in the line number area for line 00005 to mark the first line affected.
2. Type MM anywhere in the line number area for line 00008 to mark the last line affected.
3. Type A anywhere in the line number area for line 00010 to move the block after line 00010.
4. Press Enter to move lines 00005-00008 to line 00010.
Edited Program
Recalling SAS Programs
- 94 -
SAS statements disappear from the Program Editor window when you submit them. However, you can
recall a program to the Program Editor by selecting Run→Recall Last Submit.
The area in which submitted SAS code is stored is known as the recall buffer. Program statements
accumulate in the recall buffer each time you submit a program. The recall buffer is last-in/first-out (the
most recently submitted statements are recalled first).
For example, if you submit two programs, you will need to select Run→Recall Last Submit two times to
recall the first program to the Program Editor window. You can recall statements any time during your
SAS session.
Recalled Programs
Saving SAS Programs
To save your SAS program to an external file, first activate the code editing window and select File→Save
As. Then specify the name of your program in the Save As window. It's good practice to assign the
extension .SAS to your SAS programs to distinguish them from other types of SAS files (such as .LOG for
log files and .DAT for raw data files).
Note: To save a SAS program as an external file in the z/OS operating environment, select File→Save
As→Write to File, and then specify the name of your program in the Save As dialog box. You can specify
SAS as the last level of the filename.
Save as WIndow
You can also save a SAS program by issuing a FILE command.
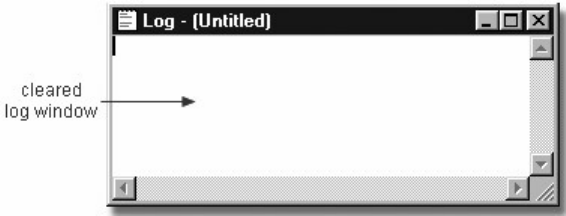
- 95 -
General form, basic FILE command:
FILE 'file-specification'
where file-specification is the name of the file to be saved.
Example
Suppose you want to save a program as D:\Programs\Sas\Newprog.Sas in the Windows operating
environment. To do so, you can issue the following FILE command:
file 'd:\programs\sas\newprog.sas'
Clearing SAS Programming Windows
When you run SAS programs, text accumulates in the Output window and in the Log window.
You might find it helpful to clear the contents of your SAS programming windows. To clear the Output
window, Editor window, Program Editor window, or Log window, activate each window individually and
select Edit→Clear All.
Cleared Log Window
You can also clear the contents of a window by activating the window and then issuing the CLEAR
command.
Text that has been cleared from windows cannot be recalled. However, in the Editor and Program Editor
windows, you can select Edit→Undo to redisplay the text.
Interpreting Error Messages
Error Types
So far, the programs that are shown in this chapter have been error-free, but programming errors do occur.
SAS can detect several types of errors. The most common are
• syntax errors that occur when program statements do not conform to the rules of the SAS language
• data errors that occur when some data values are not appropriate for the SAS statements that are specified in a
program.
- 96 -
This chapter focuses on identifying and correcting syntax errors.
Syntax Errors
When you submit a program, SAS scans each statement for syntax errors, and then executes the step (if no
syntax errors are found). SAS then goes to the next step and repeats the process. Syntax errors, such as
misspelled keywords, generally prevent SAS from executing the step in which the error occurred.
You already know that notes are written to the Log window at the conclusion of execution of the program.
When a program that contains an error is submitted, messages regarding the problem also appear in the
Log window. When a syntax error is detected, the Log window
• displays the word ERROR
• identifies the possible location of the error
• gives an explanation of the error.
Example
The program below contains a syntax error. The DATA step copies the SAS data set Clinic.Admit into a
new data set named Clinic.Admitfee. The PROC step should print the values for the variables ID, Name,
Actlevel, and Fee in the new data set. However, print is misspelled in the PROC PRINT statement.
data clinic.admitfee;
set clinic.admit;
run;
proc prin data=clinic.admitfee;
var id name actlevel fee;
run;
When the program is submitted, messages in the Log window indicate that the procedure PRIN was not
found and that SAS stopped processing the PRINT step due to errors. No output is produced by the PRINT
procedure, because the second step fails to execute.
Log Window Displaying Error Message
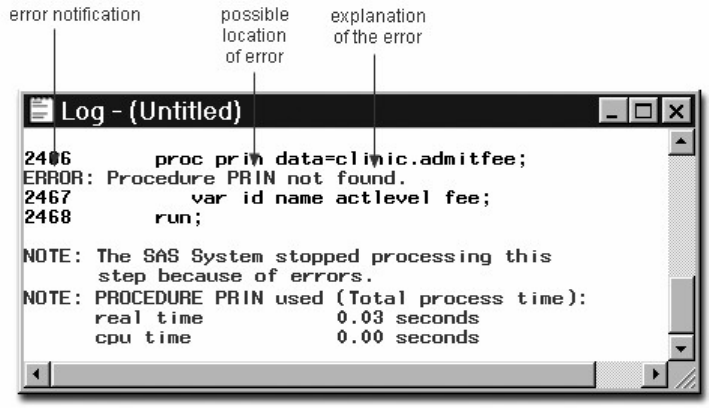
- 97 -
Problems with your statements or data might not be evident when you look at results in the Output window.
Therefore, it is important to review the messages in the Log window each time you submit a SAS program.
Correcting Errors
Overview
To modify programs that contain errors, you can edit them in the code editing window. You can correct
simple errors, such as the spelling error in the following program, by typing over the incorrect text,
deleting text, or inserting text.
data clinic.admitfee;
set clinic.admit;
run;
proc prin data=clinic.admitfee;
var id name actlevel fee;
run;
If you use the Program Editor window, you usually need to recall the submitted statements from the recall
buffer to the Program Editor window, where you can correct the problems. Remember that you can recall
submitted statements by issuing the RECALL command or by selecting Run→Recall Last Submit.
In the program below, the missing t has been inserted into the PRINT keyword that is specified in the
PROC PRINT statement.
Corrected Program
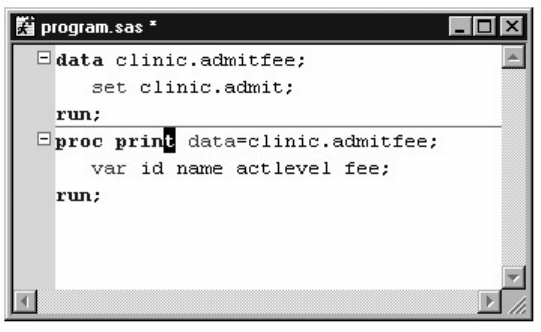
- 98 -
Some problems are relatively easy to diagnose and correct. But sometimes you might not know right away
how to correct errors. The online Help provides information about individual procedures as well as help
that is specific to your operating environment. From the Help menu, you can also select SAS on the Web
for links to Technical Support and Frequently Asked Questions, if you have Internet access.
Resubmitting a Revised Program
After correcting your program, you can submit it again. However, before doing so, it is a good idea to clear
the messages from the Log window so that you don't confuse the old error messages with the new
messages. Then you can resubmit the program and view any resulting output.
Correct PROC PRINT Output
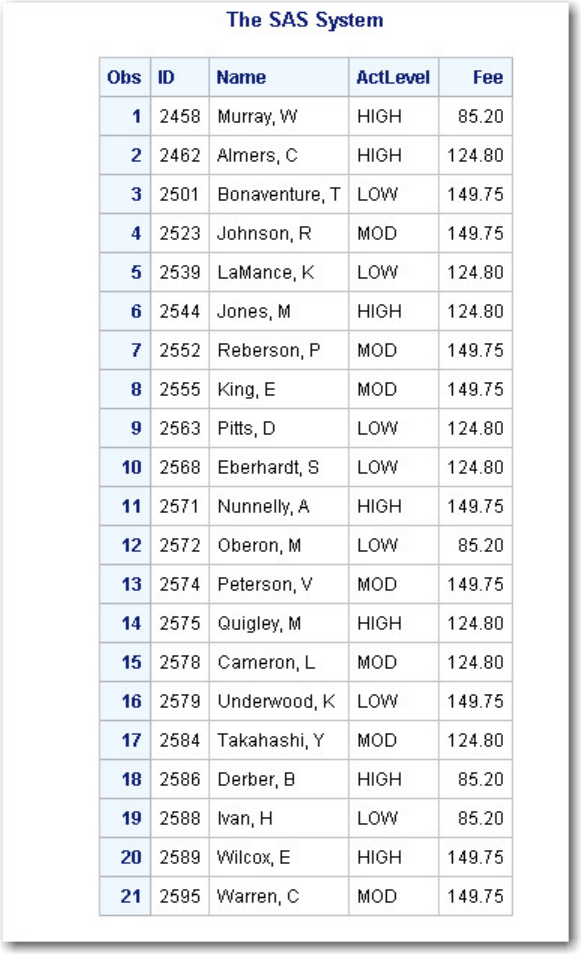
- 99 -
Remember to check the Log window again to verify that your program ran correctly.
Log Message with No Errors
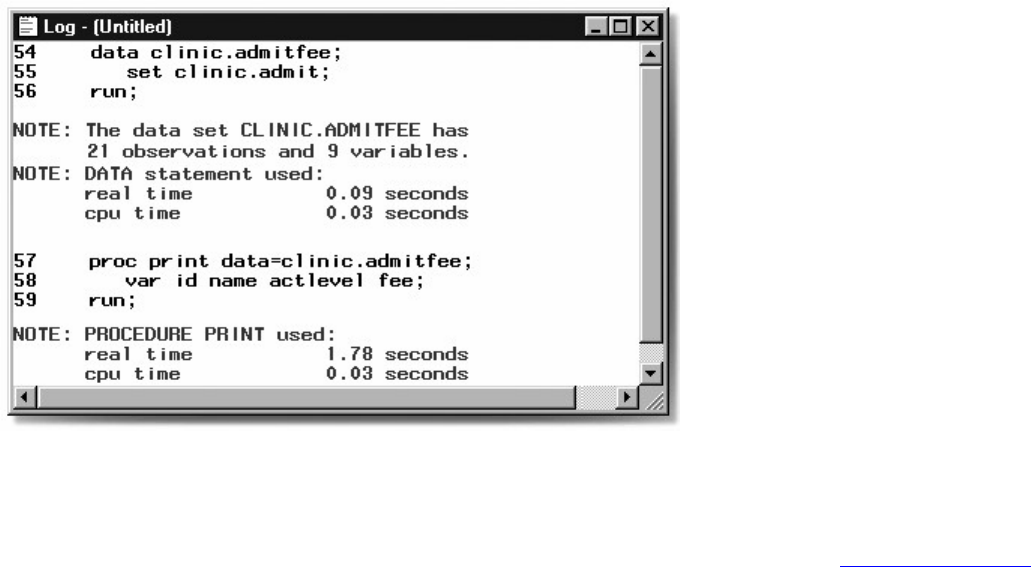
- 100 -
Because submitted steps remain in the recall buffer, resubmitting error-free steps wastes system resources.
You can place SAS comment symbols before and after your error-free code until you debug the rest of
your program. SAS ignores text between comment symbols during processing. When your entire program
is error-free, remove the comment symbols and your entire SAS program is intact. See Additional Features
for instructions about creating a SAS comment statement.
To resubmit a section of code in the Windows operating environment, highlight the selected code in the
code editing window. Then select Run→Submit.
Note: This and other chapters show you the Enhanced Editor window only. If you are not using the
Enhanced Editor as a code editing window, be sure to adapt the directions for the Program Editor window.
For example, you might need to recall programs.
Resolving Common Problems
Overview
In addition to correcting spelling mistakes, you might need to resolve several other types of common
syntax errors. These errors include
• omitting semicolons
• leaving quotation marks unbalanced
• specifying invalid options.
Another common problem is omitting a RUN statement at the end of a program. Although this is not
technically an error, it can produce unexpected results. For the sake of convenience, we'll consider it
together with syntax errors.
The table below lists these problems and their symptoms.
Identifying Problems in a SAS Program
- 101 -
Problem Symptom
missing RUN statement
“PROC (or DATA) step running” at top of active window
missing semicolon
log message indicating an error in a statement that seems to be valid
unbalanced quotation
marks
log message indicating that a quoted string has become too long or that a
statement is ambiguous
invalid option
log message indicating that an option is invalid or not recognized
Missing RUN Statement
Each step in a SAS program is compiled and executed independently from every other step. As a step is
compiled, SAS recognizes the end of the current step when it encounters
• a DATA or PROC statement, which indicates the beginning of a new step
• a RUN or QUIT statement, which indicates the end of the current step.
When the program below is submitted, the DATA step executes, but the PROC step does not. The PROC
step does not execute because there is no following DATA or PROC step to indicate the beginning of a
new step, nor is there a following RUN statement to indicate the end of the step.
data clinic.admitfee;
set clinic.admit;
run;
proc print data=clinic.admitfee;
var id name actlevel fee;
Because there is nothing to indicate the end of the PROC step, the PRINT procedure waits before
executing, and a “PROC PRINT running” message appears at the top of the active window.
Program Window with Message
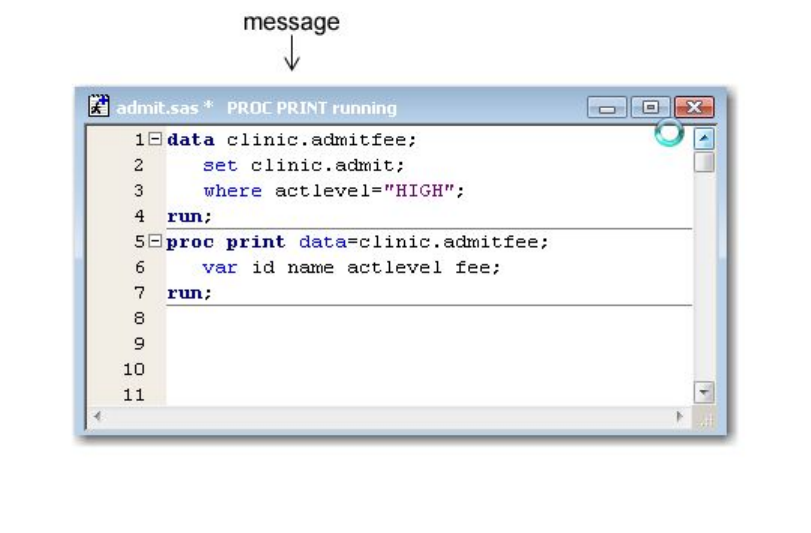
- 102 -
Resolving the Problem
To correct the error, submit a RUN statement to complete the PROC step.
run;
If you are using the Program Editor window, you do not need to recall the program to the Program Editor
window.
Missing Semicolon
One of the most common errors is the omission of a semicolon at the end of a statement. The program
below is missing a semicolon at the end of the PROC PRINT statement.
data clinic.admitfee;
set clinic.admit;
run;
proc print data=clinic.admitfee
var id name actlevel fee;
run;
When you omit a semicolon, SAS reads the statement that lacks the semicolon, plus the following
statement, as one long statement. The SAS log then lists errors that relate to the combined statement, not
the actual mistake (the missing semicolon).
Log Window with Error Message
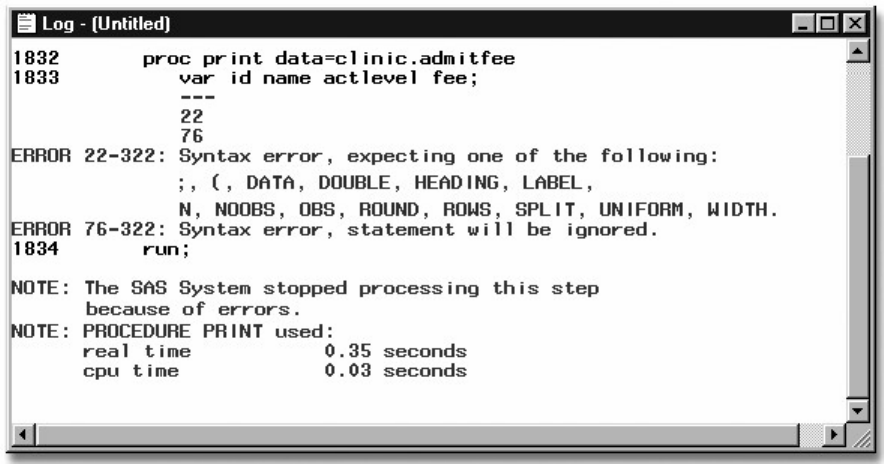
- 103 -
Resolving the Problem
To correct the error, do the following:
1. Find the statement that lacks a semicolon. You can usually locate the statement that lacks the semicolon by
looking at the underscored keywords in the error message and working backwards.
2. Add a semicolon in the appropriate location.
3. Resubmit the corrected program.
4. Check the Log window again to make sure there are no other errors.
Unbalanced Quotation Marks
Some syntax errors, such as the missing quotation mark after HIGH in the program below, cause SAS to
misinterpret the statements in your program.
data clinic.admitfee;
set clinic.admit;
where actlevel='HIGH;
run;
proc print data=clinic.admitfee;
var id name actlevel fee;
run;
When the program is submitted, SAS is unable to resolve the DATA step, and a “DATA STEP running”
message appears at the top of the active window.
Program Editor with Message
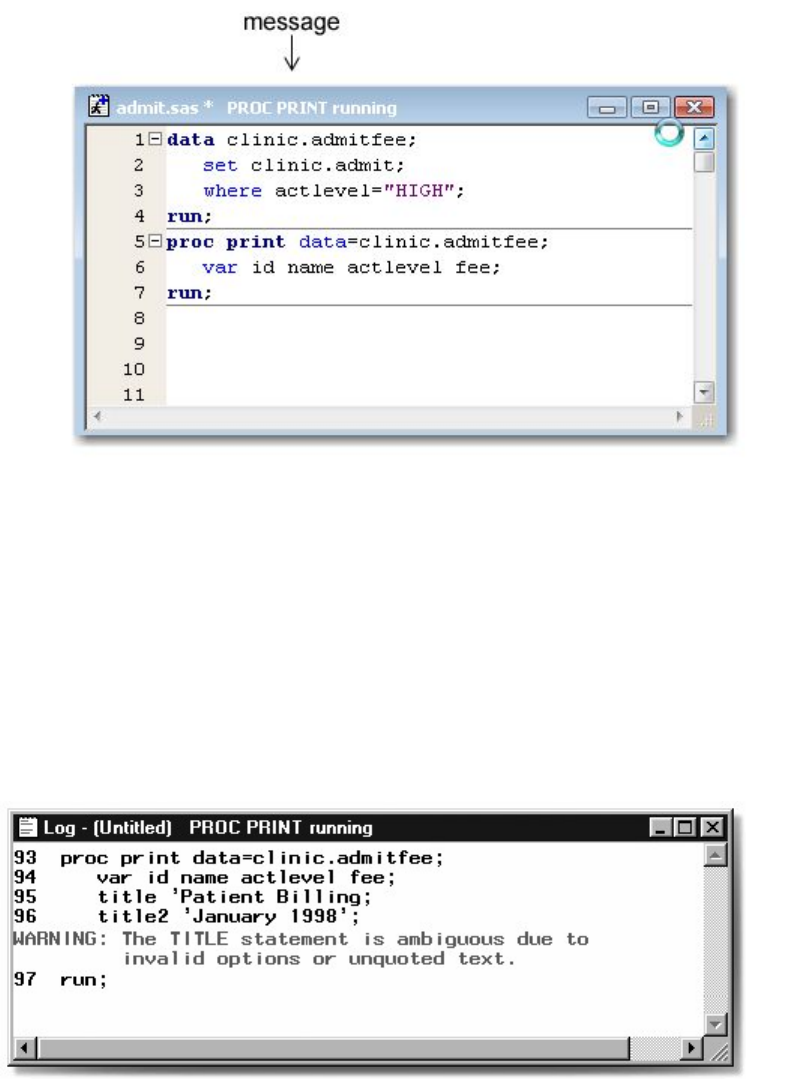
- 104 -
Sometimes a warning appears in the SAS log which indicates that
• a quoted string has become too long
• a statement that contains quotation marks (such as a TITLE or FOOTNOTE statement) is ambiguous due to
invalid options or unquoted text.
Log with Warning Message
When you have unbalanced quotation marks, SAS is often unable to detect the end of the statement in
which it occurs. Simply adding a quotation mark and resubmitting your program usually does not solve the
problem. SAS still considers the quotation marks to be unbalanced.
Therefore, you need to resolve the unbalanced quotation mark by canceling the submitted statements (in
the Windows and UNIX operating environments) or by submitting a line of SAS code (in the z/OS
operating environment) before you recall, correct, and resubmit the program.
If you do not resolve this problem when it occurs, it is likely that any subsequent programs that you submit
in the current SAS session will generate errors.
Resolving the Error in the Windows Operating Environment
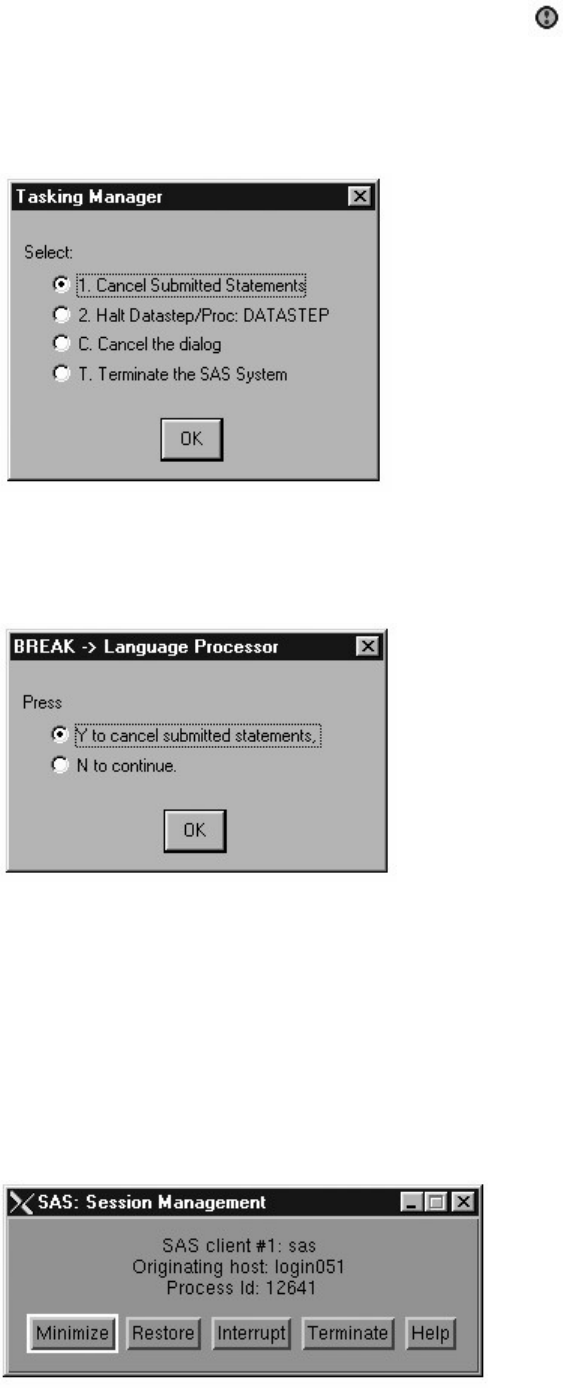
- 105 -
To resolve the error in the Windows operating environment:
1. Press the Ctrl and Break keys or click the Break Icon on the toolbar.
2. Select 1. Cancel Submitted Statements, and then click OK.
Tasking Manager Window
3. Select Y to cancel submitted statements, and then click OK.
Break Window
4. Correct the error and resubmit the program.
Resolving the Error in the UNIX Operating Environment
To resolve the error in the UNIX operating environment:
1. Open the Session Management window and click Interrupt.
Session Management Window
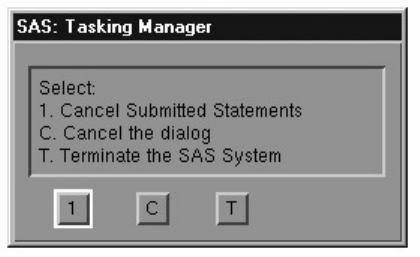
- 106 -
2. Select 1. Cancel Submitted Statements, and then click Y.
Tasking Management Window
3. Correct the error and resubmit the program.
Resolving the Error in the z/OS Operating Environment
To resolve the error in the z/OS operating environment:
1. Submit an asterisk followed by a quotation mark, a semicolon, and a RUN statement.
*'; run;
2. Delete the line that contains the asterisk followed by the quotation mark, the semicolon, and the RUN statement.
3. Insert the missing quotation mark in the appropriate place.
4. Submit the corrected program.
Note: You can also use the above method in the Windows and UNIX operating environments.
Invalid Option
An invalid option error occurs when you specify an option that is not valid in a particular statement. In the
program below, the KEYLABEL option is not valid when used with the PROC PRINT statement.
data sasuser.admitfee;
set clinic.admit;
where weight>180 and (actlevel="MOD" or actlevel="LOW");
run;
proc print data=clinic.admitfee keylabel;
label actlevel='Activity Level';
run;
When a SAS statement that contains an invalid option is submitted, a message appears in the Log window
indicating that the option is not valid or not recognized.
Log Window with Syntax Error Message
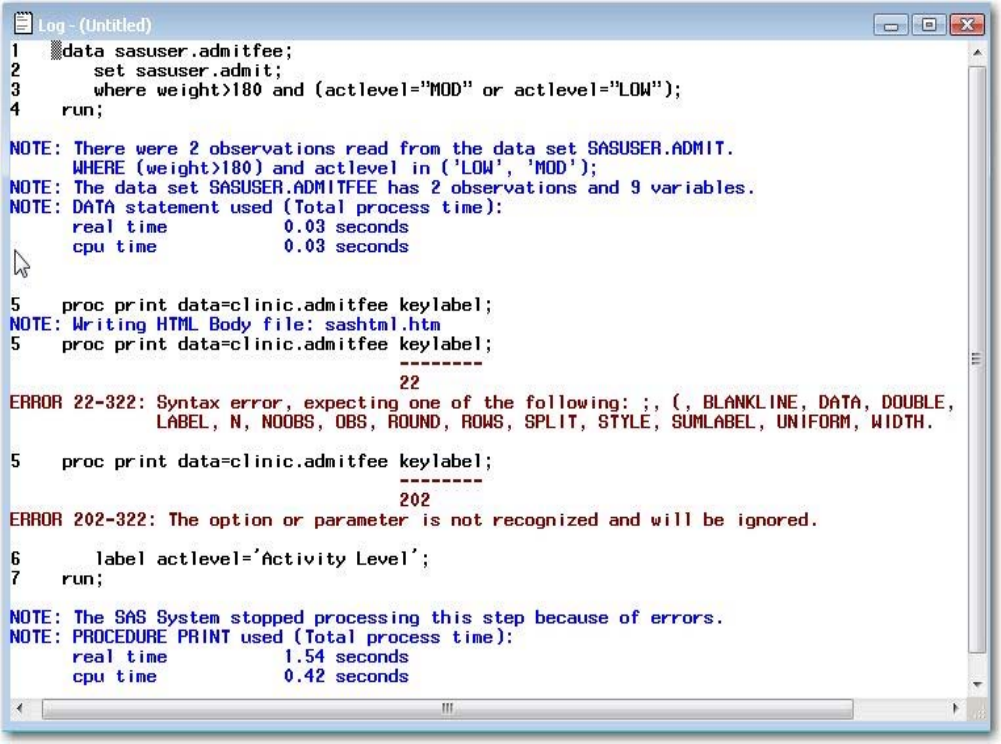
- 107 -
Resolving the Problem
To correct the error:
1. Remove or replace the invalid option, and check your statement syntax as needed.
2. Resubmit the corrected program.
3. Check the Log window again to make sure there are no other errors.
Additional Features
Comments in SAS Programs
You can insert comments into a SAS program to document the purpose of the program, to explain
segments of the program, or to describe the steps in a complex program or calculation. A comment
statement begins and ends with a comment symbol. There are two forms of comment statements:
*text;
or
- 108 -
/*text*/
SAS ignores text between comment symbols during processing.
The following program shows some of the ways comments can be used to describe a SAS program.
/* Read national sales data for vans */
/* from an external raw data file */
data perm.vansales;
infile vandata;
input @1 Region $9.
@13 Quarter 1. /* Values are 1, 2, 3, or 4 */
@16 TotalSales comma11.;
/* Print the entire data set */
proc print data=perm.vansales;
run;
CAUTION:
Avoid placing the /* comment symbols in columns 1 and 2. On some host operating systems, SAS might
interpret a /* in columns 1 and 2 as a request to end the SAS job or session. For more information, see the
SAS documentation for your operating environment.
System Options
SAS includes several system options that enable you to control error handling and Log window messages.
The table shown below contains brief descriptions of some of these options. You can use either the
OPTIONS statement or the SAS System Options window to specify these options.
Options for Controlling Error Handling and Log Window Messages
Option
Descriptions
ERRORS=n
Specifies the maximum number of observations for which complete data error
messages are printed.
FMTERR |
NOFMTERR
Controls whether SAS generates an error message when a format of a variable cannot
b
e found. NOFMTERR results in a warning instead of an error. FMTERR is the
default.
SOURCE |
NOSOURCE
Controls whether SAS writes source statements to the SAS log. SOURCE is the
default.
- 109 -
Error Checking In the Enhanced Editor
If you are using the Enhanced Editor, you can use its color-coding for program elements, quoted strings,
and comments to help you find coding errors.
You can also search for
• ending brackets or parentheses by pressing Ctrl+].
• matching DO-END pairs by pressing Alt+[. (You can learn about DO-END pairs in .)
See the following table for suggestions about finding syntax errors using the Enhanced Editor.
Finding Syntax Errors Using the Enhanced Editor
To find...
Do this...
Undefined or
misspelled keywords
In the Appearance tab of the Enhanced Editor Options dialog box, set the file
elements Defined keyword, User defined keyword, and the Undefined keyword
to unique color combinations.
When SAS recognizes a keyword, the keyword changes to the defined colors.
You'll be able to easily spot undefined keywords by looking for the color that you
selected for undefined keywords.
Unmatched quoted
strings
Look for one or more lines of the program that are the same color.
Text following a quotation mark remains the same color until the string is closed
with a matching quotation mark.
Unmatched
comments
Look for one or more lines of the program that are the same color.
Text that follows an open comment symbol ( /* ) remains the same color until the
comment is closed with a closing comment symbol ( */).
Matching DO-END
pairs
Place the cursor within a DO-END block and press Alt+[.
The cursor moves first to the DO keyword. If one of the keywords is not found, the
cursor remains as positioned.
When both of the keywords exist, pressing Alt+[ moves the cursor between the
DO-END keywords.
Matching
- 110 -
parentheses or
brackets Place the cursor on either side of the parenthesis or bracket. Press Ctrl+].
The cursor moves to the matching parentheses or bracket. If one is not found, the
cursor remains as positioned.
Missing
semi-colons ( ; )
Look for keywords that appear in normal text.
Debugging with the DATA Step Debugger
Unlike most syntax errors, logic errors do not stop a program from running. Instead, they cause the
program to produce unexpected results.
You can debug logic errors in DATA steps by using the DATA step debugger. This tool enables you to
issue commands to execute DATA step statements one by one, and then to pause to display the resulting
variables' values in a window. By observing the results that are displayed, you can determine where the
logic error lies.
The debugger can be used only in interactive mode. Because the debugger is interactive, you can repeat the
process of issuing commands and observing results as many times as needed in a single debugging session.
To invoke the debugger, add the DEBUG option to the DATA statement, and submit the program.
data perm.publish / debug;
infile pubdata;
input BookID $ Publisher & $22. Year;
run;
proc print data=perm.publish;
run;
Debugger Log Window
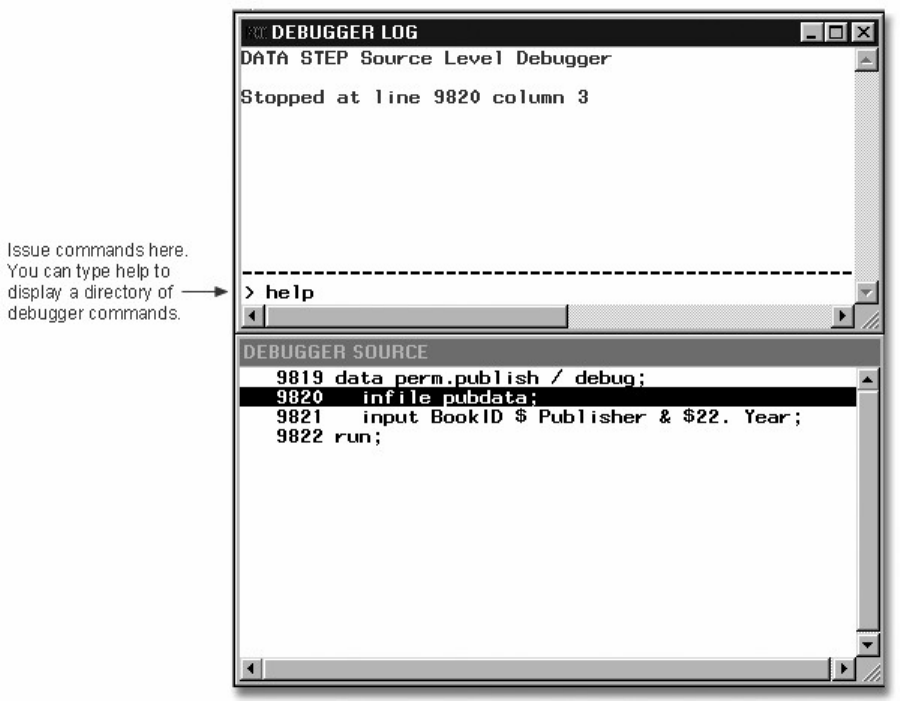
- 111 -
For detailed information about how to use the debugger, see the SAS documentation.
Chapter Summary
Text Summary
Opening a Stored SAS Program
A SAS program that is stored in an external file can be opened in the code editing window using
• file shortcuts
• My Favorite Folders
• the Open window
• the INCLUDE command.
Editing SAS Programs
SAS programs consist of SAS statements. Although you can write SAS statements in almost any format, a
consistent layout enhances readability and enables you to understand the program's purpose.
In the Windows operating environment, the Enhanced Editor enables you to enter and view text and
• select one or more lines of text
- 112 -
• use color-coding to identify code elements
• automatically indent the next line when you press the Enter key
• collapse and expand sections of SAS procedures, DATA steps, and macros
• bookmark lines of code for easy access to different sections of your program.
Using the Editor window, you can also find and replace text, use abbreviations, open multiple views of a
file, and set Enhanced Editor options.
The Program Editor window enables you to edit your programs just as you would with a word processing
program. You can also use text editor commands and block text editor commands to edit SAS programs.
Activating line numbers can make it easier for you to edit your program regardless of your operating
environment.
Remember that SAS statements disappear from the Program Editor window when they are submitted.
However, you can recall a program to the Program Editor window.
To save your SAS program to an external file, first activate the Program Editor window and select
File→Save As. Then specify the name of your program in the Save As window.
Clearing SAS Programming Windows
Text and output accumulate in the Editor, Program Editor, Log, and Output windows throughout your SAS
session. You can clear a window by selecting Edit→Clear All.
Interpreting Error Messages
When a SAS program that contains errors is submitted, error messages appear in the Log window. SAS
can detect three types of errors: syntax, execution-time, and data. This chapter focuses on identifying and
resolving common syntax errors.
Correcting Errors
To modify programs that contain errors, you can correct the errors in the code editing window. In the
Program Editor window, you need to recall the submitted statements before editing them.
Before resubmitting a revised program, it is a good idea to clear the messages from the Log window so that
you don't confuse old messages with the new. You can delete any error-free steps from a revised program
before resubmitting it.
Resolving Common Problems
You might need to resolve several types of common problems: missing RUN statements, missing
semicolons, unbalanced quotation marks, and invalid options.
Points to Remember
• It's a good idea to begin DATA steps, PROC steps, and RUN statements on the left and to indent statements
within a step.
• End each step with a RUN statement.
- 113 -
• Review the messages in the Log window each time you submit a SAS program.
• You can delete any error-free steps from a revised program before resubmitting it, or you can submit only the
revised steps in a program.
Chapter Quiz
Select the best answer for each question. After completing the quiz, check your answers using the answer
key in the appendix.
1. As you write and edit SAS programs, it's a good idea to
1. begin DATA and PROC steps in column one.
2. indent statements within a step.
3. begin RUN statements in column one.
4. do all of the above.
2. Suppose you have submitted a SAS program that contains spelling errors. Which set of steps should you perform,
in the order shown, to revise and resubmit the program?
1.
Correct the errors.
Clear the Log window.
Resubmit the program.
Check the Log window.
Correct the errors.
Resubmit the program.
Check the Output window.
Check the Log window.
Correct the errors.
Clear the Log window.
Resubmit the program.
Check the Output window.
Correct the errors.
Clear the Output window.
Resubmit the program.
Check the Output window.
3. What happens if you submit the following program?
proc sort data=clinic.stress out=maxrates;
by maxhr;
run;
proc print data=maxrates label double noobs;
label rechr='Recovery Heart Rate;
var resthr maxhr rechr date;
where toler='I' and resthr>90;
sum fee;
run;
1. Log messages indicate that the program ran successfully.
- 114 -
2. A “PROC SORT running” message appears at the top of the active window, and a log message might
indicate an error in a statement that seems to be valid.
3. A log message indicates that an option is not valid or not recognized.
4. A “PROC PRINT running” message appears at the top of the active window, and a log message might
indicate that a quoted string has become too long or that the statement is ambiguous.
4. What generally happens when a syntax error is detected?
1. SAS continues processing the step.
2. SAS continues to process the step, and the Log window displays messages about the error.
3. SAS stops processing the step in which the error occurred, and the Log window displays messages about
the error.
4. SAS stops processing the step in which the error occurred, and the Output window displays messages
about the error.
5. A syntax error occurs when
1. some data values are not appropriate for the SAS statements that are specified in a program.
2. the form of the elements in a SAS statement is correct, but the elements are not valid for that usage.
3. program statements do not conform to the rules of the SAS language.
4. none of the above
6. How can you tell whether you have specified an invalid option in a SAS program?
1. A log message indicates an error in a statement that seems to be valid.
2. A log message indicates that an option is not valid or not recognized.
3. The message “PROC running” or “DATA step running” appears at the top of the active window.
4. You can't tell until you view the output from the program.
7. Which of the following programs contains a syntax error?
1.
proc sort data=sasuser.mysales;
by region;
run;
2.
dat sasuser.mysales;
set mydata.sales99;
where sales<5000;
run;
3.
proc print data=sasuser.mysales label;
label region='Sales Region';
run;
4. none of the above
8. What should you do after submitting the following program in the Windows or UNIX operating environment?
proc print data=mysales;
where state='NC;
run;
1. Submit a RUN statement to complete the PROC step.
2. Recall the program. Then add a quotation mark and resubmit the corrected program.

- 115 -
3. Cancel the submitted statements. Then recall the program, add a quotation mark, and resubmit the
corrected program.
4. Recall the program. Then replace the invalid option and resubmit the corrected program.
9. Which of the following commands opens a file in the code editing window?
1.
file 'd:\programs\sas\newprog.sas'
2.
include 'd:\programs\sas\newprog.sas'
3.
open 'd:\programs\sas\newprog.sas'
4. all of the above
10. Suppose you submit a short, simple DATA step. If the active window displays the message “DATA step running”
for a long time, what probably happened?
1. You misspelled a keyword.
2. You forgot to end the DATA step with a RUN statement.
3. You specified an invalid data set option.
4. Some data values weren't appropriate for the SAS statements that you specified.
Chapter 4 Creating List Reports
Overview
Creating a Basic Report
Selecting Variables
Identifying Observations
Sorting Data
Generating Column Totals
Double Spacing LISTING Output
Specifying Titles and Footnotes
Assigning Descriptive Labels
Formatting Data Values
Using Permanently Assigned Labels and Formats
Additional Features
Chapter Summary
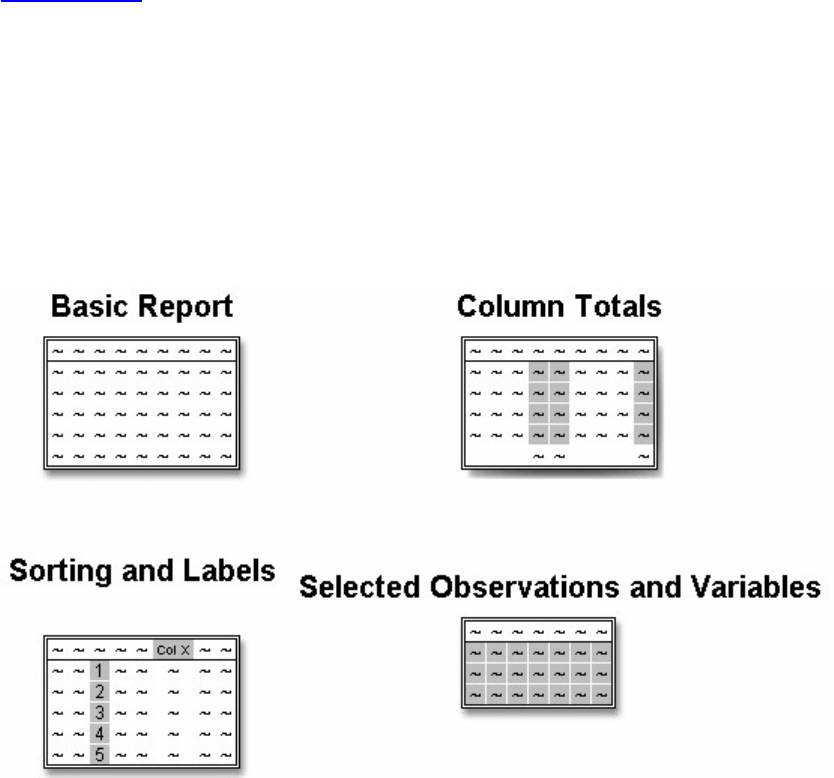
- 116 -
Chapter Quiz
Overview
Introduction
To list the information in a data set, you can create a report with a PROC PRINT step. Then you can
enhance the report with additional statements and options to create reports like those shown below.
PROC PRINT
Objectives
In this chapter, you learn to
• specify SAS data sets to print
• select variables and observations to print
• sort data by the values of one or more variables
• specify column totals for numeric variables
• double space LISTING output
• add titles and footnotes to procedure output
• assign descriptive labels to variables
• apply formats to the values of variables.
Creating a Basic Report
- 117 -
To produce a simple list report, you first reference the library in which your SAS data set is stored. If you
want, you can also set system options to control the appearance of your reports. Then you submit a basic
PROC PRINT step.
General form, basic PROC PRINT step:
PROC PRINT DATA=SAS-data-set;
RUN;
where SAS-data-set is the name of the SAS data set to be printed.
In the program below, the PROC PRINT statement invokes the PRINT procedure and specifies the data set
Therapy in the SAS data library to which the libref Patients has been assigned.
libname patients 'c:\records\patients';
proc print data=patients.therapy;
run;
Notice the layout of the resulting report below. By default,
• all observations and variables in the data set are printed
• a column for observation numbers appears on the far left
• variables and observations appear in the order in which they occur in the data set.
Patients.Therapy Data Set
- 118 -
Be sure to specify the equal sign in the DATA= option in SAS procedures. If you omit the equal sign, your
program produces an error similar to the following in the SAS log:
Error Message
Selecting Variables
- 119 -
Overview
By default, a PROC PRINT step lists all the variables in a data set. You can select variables and control the
order in which they appear by using a VAR statement in your PROC PRINT step.
General form, VAR statement:
VAR variable(s);
where variable(s) is one or more variable names, separated by blanks.
For example, the following VAR statement specifies that only the variables Age, Height, Weight, and Fee
be printed, in that order:
proc print data=clinic.admit;
var age height weight fee;
run;
The procedure output from the PROC PRINT step with the VAR statement lists only the values for the
variables Age, Height, Weight, and Fee.
Procedure Output
- 120 -
In addition to selecting variables, you can control the default Obs column that PROC PRINT displays to
list observation numbers. If you prefer, you can choose not to display observation numbers.
Printing Observations
Removing the OBS Column
- 121 -
To remove the Obs column, specify the NOOBS option in the PROC PRINT statement.
proc print data=work.example noobs;
var age height weight fee;
run;
Identifying Observations
You've learned how to remove the Obs column altogether. As another alternative, you can use one or more
variables to replace the Obs column in the output.
Using the ID Statement
To specify which variables should replace the Obs column, use the ID statement. This technique is
particularly useful when observations are too long to print on one line.
General form, ID statement:
ID variable(s);
where variable(s) specifies one or more variables to print instead of the observation number at the
beginning of each row of the report.
Example
To replace the Obs column and identify observations based on an employee's ID number and last name,
you can submit the following program.
proc print data=sales.reps;
id idnum lastname;
run;
This is HTML output from the program:
HTML Output

- 122 -
In LISTING output, the IDnum and LastName columns are repeated for each observation that is printed on
more than one line.
LISTING Output
If a variable in the ID statement also appears in the VAR statement, the output contains two columns for
that variable. In the example below, the variable IDnum appears twice.
proc print data=sales.reps;
id idnum lastname;
- 123 -
var idnum sex jobcode salary;
run;
IDNUM Output
Selecting Observations
By default, a PROC PRINT step lists all the observations in a data set. You can control which observations
are printed by adding a WHERE statement to your PROC PRINT step. There should be only one WHERE
statement in a step. If multiple WHERE statements are issued, only the last statement is processed.
General form, WHERE statement:
WHERE where-expression;
where where-expression specifies a condition for selecting observations. The where-expression can be any
valid SAS expression.
For example, the following WHERE statement selects only observations for which the value of Age is
greater than 30:
proc print data=clinic.admit;
var age height weight fee;
where age>30;
run;
Here is the procedure output from the PROC PRINT step with the WHERE statement:
PROC PRINT Output with WHERE Statement
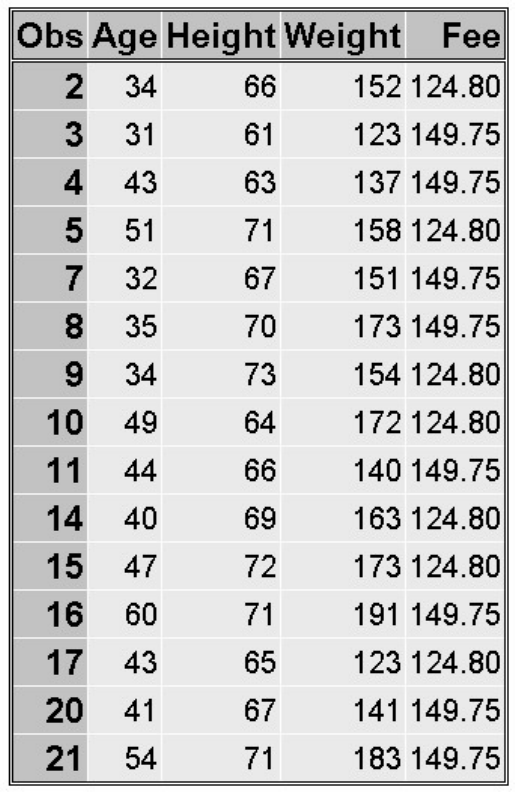
- 124 -
Specifying WHERE Expressions
In the WHERE statement you can specify any variable in the SAS data set, not just the variables that are
specified in the VAR statement. The WHERE statement works for both character and numeric variables.
To specify a condition based on the value of a character variable, you must
• enclose the value in quotation marks
• write the value with lowercase, uppercase, or mixed case letters exactly as it appears in the data set.
You use the following comparison operators to express a condition in the WHERE statement:
Comparison Operators in a WHERE Statement
Symbol
Meaning
Example
= or eq
equal to
where name='Jones, C.';

- 125 -
^= or ne not equal to where temp ne 212;
> or gt
greater than
where income>20000;
< or lt
less than
where partno lt "BG05";
>= or ge
greater than or equal to
where id>='1543';
<= or le
less than or equal to
where pulse le 85;
You can learn more about valid SAS expressions in Creating SAS Data Sets from External Files.
Using the CONTAINS Operator
The CONTAINS operator selects observations that include the specified substring. The symbol for the
CONTAINS operator is ?. You can use either the CONTAINS keyword or the symbol in your code, as
shown below.
where firstname CONTAINS 'Jon';
where firstname ? 'Jon';
Specifying Compound WHERE Expressions
You can also use WHERE statements to select observations that meet multiple conditions. To link a
sequence of expressions into compound expressions, you use logical operators, including the following:
Compound WHERE Expression Operators
Operator
Meaning
AND
&
and, both. If both expressions are true, then the compound expression is true.
OR
|
or, either. If either expression is true, then the compound expression is true.
Examples of WHERE Statements
• You can use compound expressions like these in your WHERE statements:
- 126 -
where age<=55 and pulse>75;
where area='A' or region='S';
where ID>'1050' and state='NC';
• When you test for multiple values of the same variable, you specify the variable name in each expression:
where actlevel='LOW' or actlevel='MOD';
where fee=124.80 or fee=178.20;
• You can use the IN operator as a convenient alternative:
where actlevel in ('LOW','MOD');
where fee in (124.80,178.20);
• To control the way compound expressions are evaluated, you can use parentheses (expressions in parentheses are
evaluated first):
where (age<=55 and pulse>75) or area='A';
where age<=55 and (pulse>75 or area='A');
Sorting Data
Overview
By default, PROC PRINT lists observations in the order in which they appear in your data set. To sort your
report based on values of a variable, you must use PROC SORT to sort your data before using the PRINT
procedure to create reports from the data.
The SORT procedure
• rearranges the observations in a SAS data set
• creates a new SAS data set that contains the rearranged observations
• replaces the original SAS data set by default
• can sort on multiple variables
• can sort in ascending or descending order
• does not generate printed output
• treats missing values as the smallest possible values.
General form, simple PROC SORT step:
- 127 -
PROC SORT DATA=SAS-data-set<OUT=SAS-data-set>;
BY <DESCENDING> BY-variable(s);
RUN;
where
the DATA= option specifies the data set to be read
the OUT= option creates an output data set that contains the data in sorted order
BY-variable(s) in the required BY statement specifies one or more variables whose values are used to sort the data
the DESCENDING option in the BY statement sorts observations in descending order. If you have more that one
variable in the BY statement, DESCENDING applies only to the variable that immediately follows it.
CAUTION:
If you don't use the OUT= option, PROC SORT overwrites the data set specified in the DATA= option.
Example
In the following program, the PROC SORT step sorts the permanent SAS data set Clinic.Admit by the
values of the variable Age within the values of the variable Weight and creates the temporary SAS data set
Wgtadmit. Then the PROC PRINT step prints a subset of the Wgtadmit data set.
proc sort data=clinic.admit out=work.wgtadmit;
by weight age;
run;
proc print data=work.wgtadmit;
var weight age height fee;
where age>30;
run;
The report displays observations in ascending order of age within weight.
Observations Displayed in Ascending Order of Age Within Weight
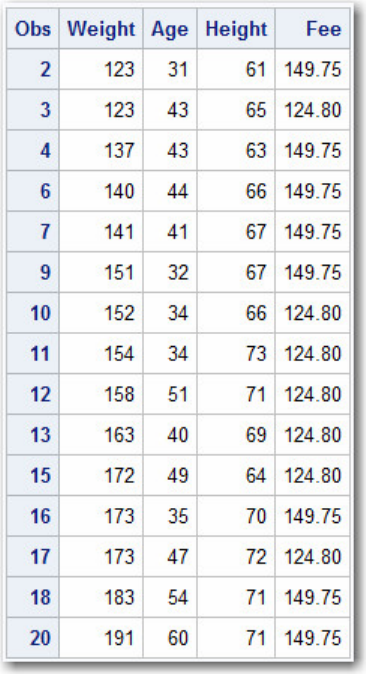
- 128 -
Adding the DESCENDING option to the BY statement sorts observations in ascending order of age within
descending order of weight. Notice that DESCENDING applies only to the variable Weight.
proc sort data=clinic.admit out=work.wgtadmit;
by descending weight age;
run;
proc print data=work.wgtadmit;
var weight age height fee;
where age>30;
run;
Observations Displayed in Descending Order
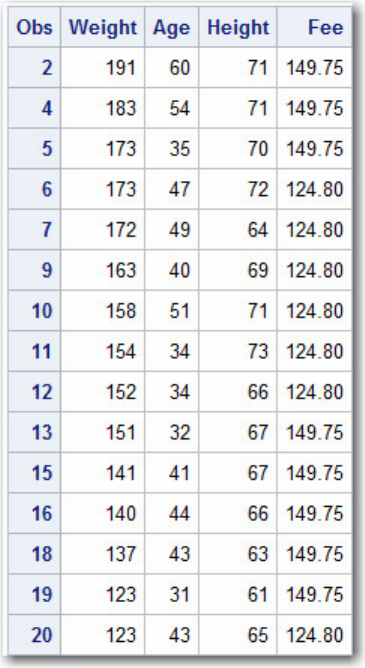
- 129 -
Generating Column Totals
Overview
To produce column totals for numeric variables, you can list the variables to be summed in a SUM
statement in your PROC PRINT step.
General form, SUM statement:
SUM variable(s);
where variable(s) is one or more numeric variable names, separated by blanks.
The SUM statement in the following PROC PRINT step requests column totals for the variable
BalanceDue:
proc print data=clinic.insure;
var name policy balancedue;
where pctinsured < 100;
sum balancedue;
run;
Column totals appear at the end of the report in the same format as the values of the variables.
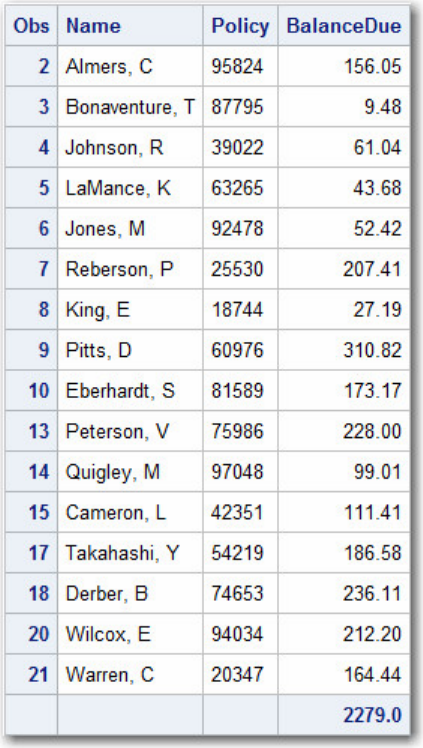
- 130 -
Column Totals
Requesting Subtotals
You might also want to subtotal numeric variables. To produce subtotals, add both a SUM statement and a
BY statement to your PROC PRINT step.
General form, BY statement in the PRINT procedure:
BY <DESCENDING> BY-variable-1
<...<DESCENDING><BY-variable-n>>
<NOTSORTED>;
where
BY-variable specifies a variable that the procedure uses to form BY groups. You can specify more than one
variable, separated by blanks.
the DESCENDING option specifies that the data set is sorted in descending order by the variable that
immediately follows.
the NOTSORTED option specifies that observations are not necessarily sorted in alphabetic or numeric order. If
observations that have the same values for the BY variables are not contiguous, the procedure treats each contiguous set as
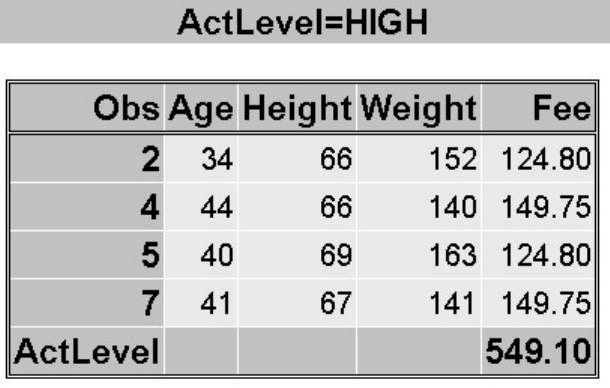
- 131 -
a separate BY group.
CAUTION:
If you do not use the NOTSORTED option in the BY statement, the observations in the data set must
either be sorted by all the variables that you specify, or they must be indexed appropriately.
Example
The SUM statement in the following PROC PRINT step requests column totals for the variable Fee, and
the BY statement produces a subtotal for each value of ActLevel.
proc sort data=clinic.admit out=work.activity;
by actlevel;
run;
proc print data=work.activity;
var age height weight fee;
where age>30;
sum fee;
by actlevel;
run;
In the output, the BY variable name and value appear before each BY group. The BY variable name and
the subtotal appear at the end of each BY group.
BY Group Output: High
BY Group Output: Low
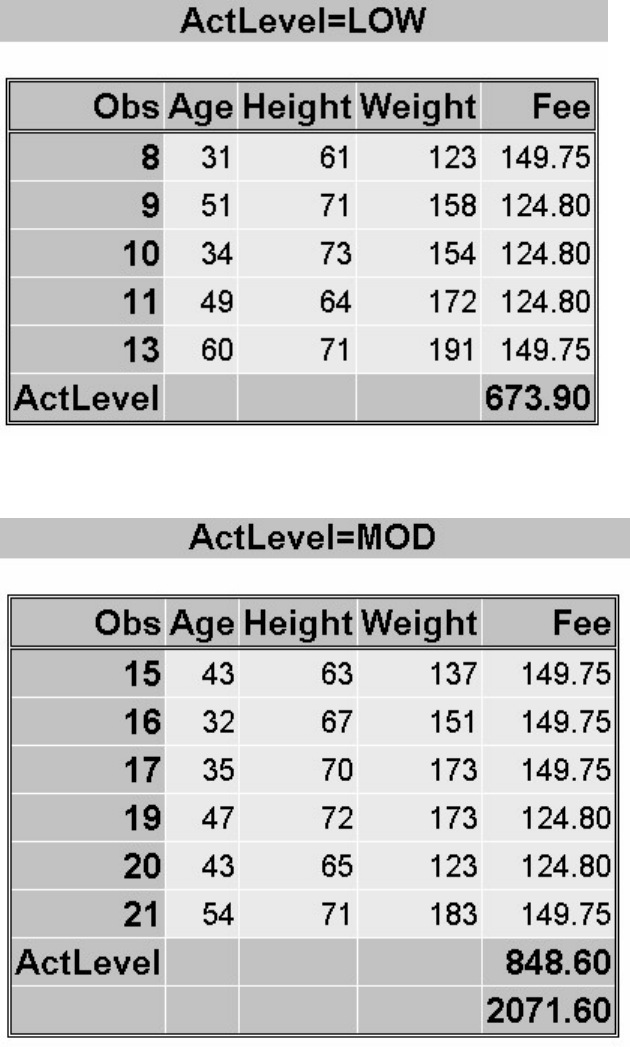
- 132 -
BY Group Output: Mod
Creating a Customized Layout with BY Groups and ID Variables
In the previous example, you may have noticed the redundant information for the BY variable. For
example, in the partial PROC PRINT output below, the BY variable ActLevel is identified both before the
BY group and for the subtotal.
Creating a Customized Layout with BY Groups and ID Variables

- 133 -
To show the BY variable heading only once, you can use an ID statement and a BY statement together
with the SUM statement. When an ID statement specifies the same variable as the BY statement,
• the Obs column is suppressed
• the ID/BY variable is printed in the left-most column
• each ID/BY value is printed only at the start of each BY group and on the line that contains that group's subtotal.
Example
The ID, BY, and SUM statements work together to produce the output shown below. The ID variable is
listed only once for each BY group and once for each sum. The BY lines are suppressed. Instead, the value
of the ID variable, ActLevel, identifies each BY group.
proc sort data=clinic.admit out=work.activity;
by actlevel;
run;
proc print data=work.activity;
var age height weight fee;
where age>30;
sum fee;
by actlevel;
id actlevel;
run;
Creating Custom Output Example Output
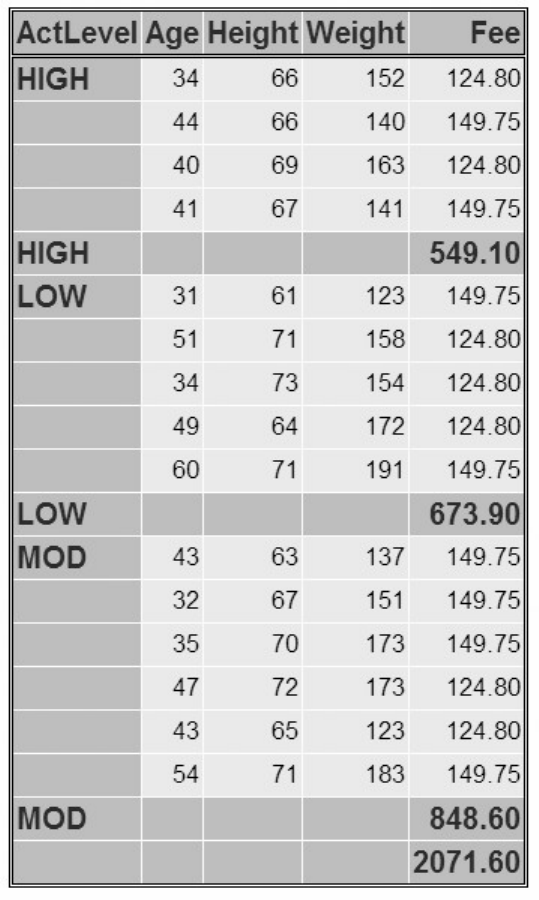
- 134 -
Requesting Subtotals on Separate Pages
As another enhancement to your PROC PRINT report, you can request that each BY group be printed on a
separate page by using the PAGEBY statement.
General form, PAGEBY statement:
PAGEBY BY-variable:
where BY-variable identifies a variable that appears in the BY statement in the PROC PRINT step. PROC
PRINT begins printing a new page if the value of the BY variable changes, or if the value of any BY
variable that precedes it in the BY statement changes.
CAUTION:
The variable specified in the PAGEBY statement must also be specified in the BY statement in the PROC
PRINT step.
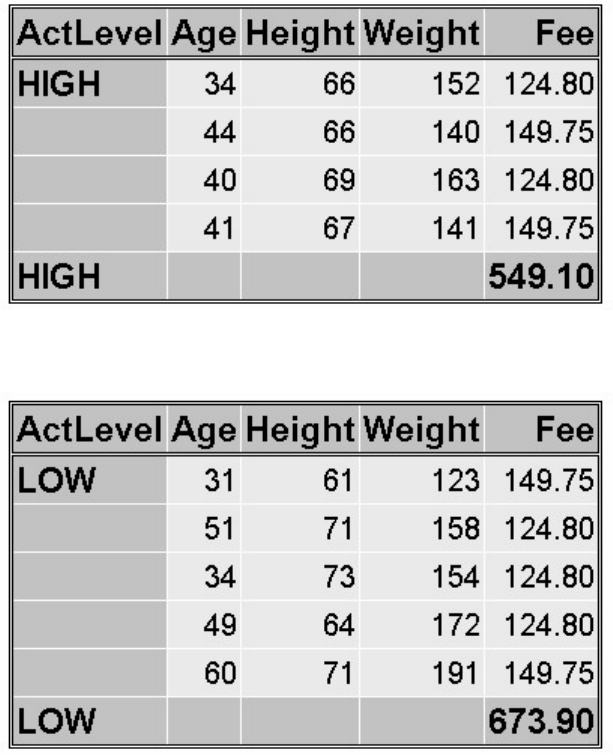
- 135 -
Example
The PAGEBY statement in the program below prints BY groups for the variable ActLevel separately. The
BY groups appear separated by horizontal lines in the HTML output.
proc sort data=clinic.admit out=work.activity;
by actlevel;
run;
proc print data=work.activity;
var age height weight fee;
where age>30;
sum fee;
by actlevel;
id actlevel;
pageby actlevel;
run;
PAGEBY Example: High
PAGEBY Example: Low
PAGEBY Example: Mod
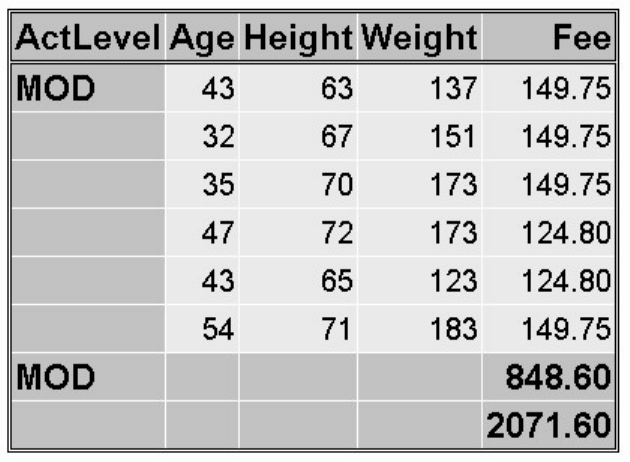
- 136 -
Double Spacing LISTING Output
If you are generating SAS LISTING output, one way to control the layout is to double space it. To do so,
specify the DOUBLE option in the PROC PRINT statement. For example,
proc print data=clinic.stress double;
var resthr maxhr rechr;
where tolerance='I';
run;
Double spacing does not apply to HTML output.
To generate SAS LISTING output, you must select Tools→Options→Preferences. Select the Results tab.
Select the Create listing option.
Double-Spaced LISTING Output
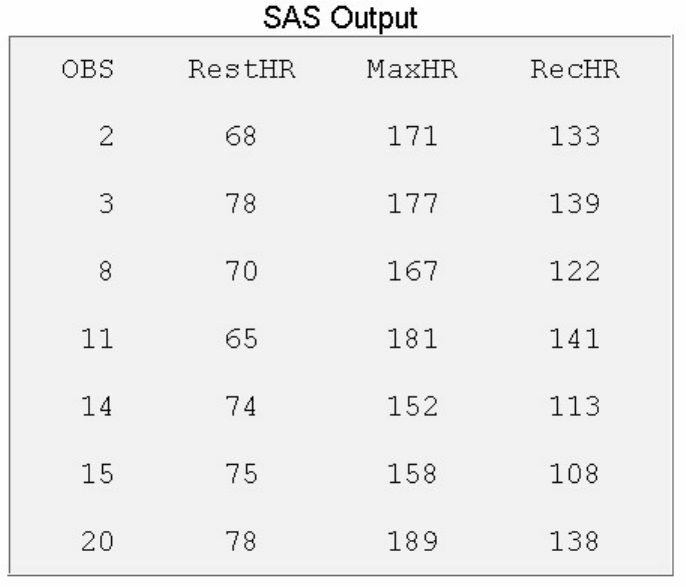
- 137 -
Specifying Titles and Footnotes
Overview
Now you've learned how to structure your PRINT procedure output. However, you might also want to
make your reports easy to interpret by
• adding titles and footnotes
• replacing variable names with descriptive labels
• formatting variable values.
Although this chapter focuses on PROC PRINT, you can apply these enhancements to most SAS
procedure output.
TITLE and FOOTNOTE Statements
To make your report more meaningful and self-explanatory, you can associate up to 10 titles with
procedure output by using TITLE statements before the PROC step. Likewise, you can specify up to 10
footnotes by using FOOTNOTE statements before the PROC step.
Because TITLE and FOOTNOTE statements are global statements, place them anywhere within or before
the PRINT procedure. Titles and footnotes are assigned as soon as TITLE or FOOTNOTE statements are
read; they apply to all subsequent output.
General form, TITLE and FOOTNOTE statements:
- 138 -
TITLE<n> 'text';
FOOTNOTE<n> 'text';
where n is a number from 1 to 10 that specifies the title or footnote line, and 'text' is the actual title or
footnote to be displayed. The maximum title or footnote length depends on your operating environment
and on the value of the LINESIZE= option.
The keyword title is equivalent to title1. Likewise, footnote is equivalent to footnote1. If you don't specify
a title, the default title is The SAS System. No footnote is printed unless you specify one.
Note: Be sure to match quotation marks that enclose the title or footnote text.
Using the TITLES and FOOTNOTES Windows
You can also specify titles in the TITLES window and footnotes in the FOOTNOTES window. Titles and
footnotes that you specify in these windows are not stored with your program, and they remain in effect
only during your SAS session.
To open the TITLES window, issue the TITLES command. To open the FOOTNOTES window, issue the
FOOTNOTES command.
To specify a title or footnote, type in the text you want next to the number of the line where the text should
appear. To cancel a title or footnote, erase the existing text. Notice that you do not enclose text in quotation
marks in these windows.
Titles Window
Example: Titles
The two TITLE statements below, specified for lines 1 and 3, define titles for the PROC PRINT output.
title1 'Heart Rates for Patients with';
title3 'Increased Stress Tolerance Levels';
proc print data=clinic.stress;
var resthr maxhr rechr;
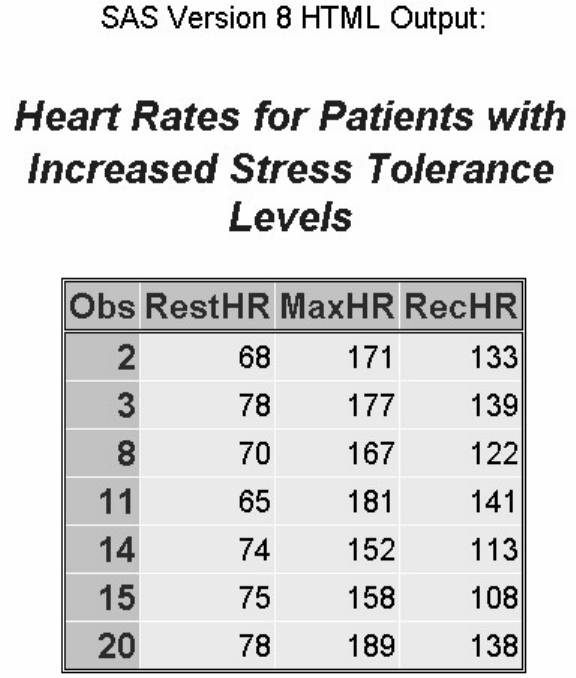
- 139 -
where tolerance='I';
run;
Title lines for HTML output appear differently depending on the version of SAS that you use. In SAS
Version 8, title lines simply appear consecutively, without extra spacing to indicate skipped title numbers.
In SAS®9 HTML output, title line 2 is blank.
HTML Output with Titles: SAS®8
HTML Output with Titles: SAS®9
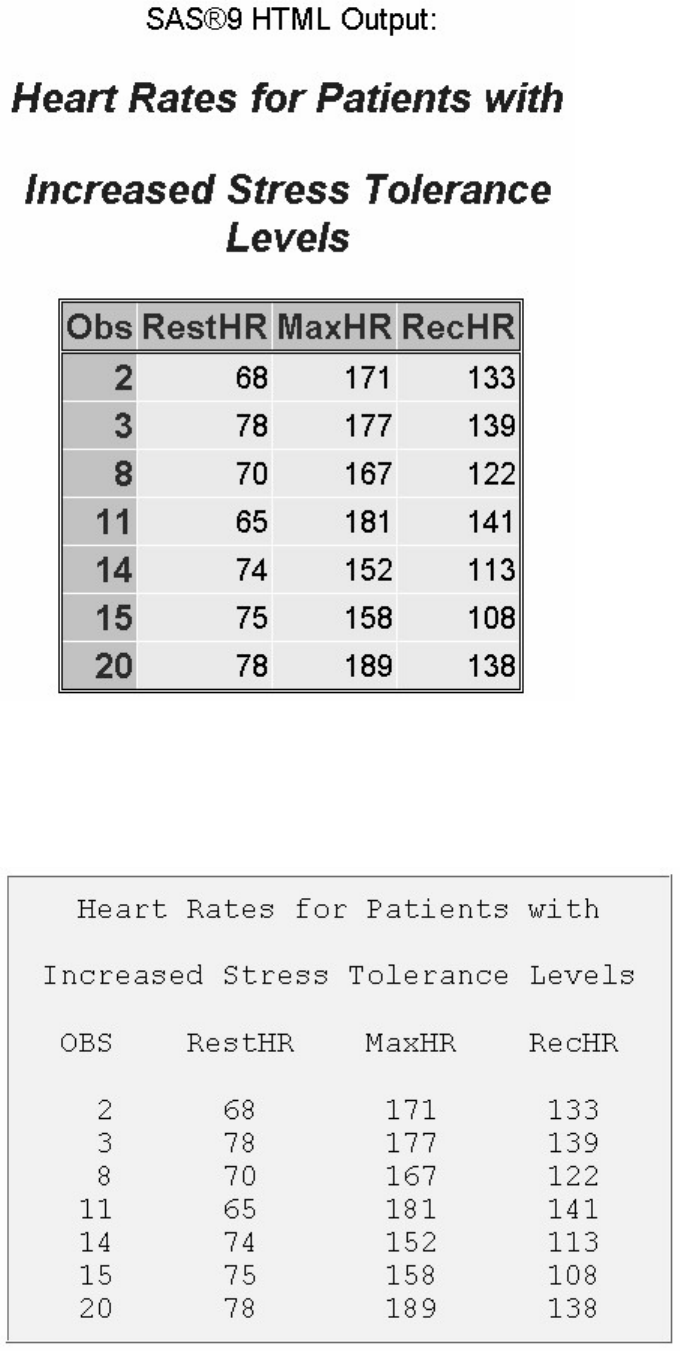
- 140 -
In SAS LISTING output for all versions of SAS, title line 2 is blank, as shown below. Titles are centered
by default.
LISTING Output with Titles: All Versions
Example: Footnotes

- 141 -
The two FOOTNOTE statements below, specified for lines 1 and 3, define footnotes for the PROC PRINT
output. Since there is no footnote2, a blank line is inserted between footnotes 1 and 2 in the output.
footnote1 'Data from Treadmill Tests';
footnote3 '1st Quarter Admissions';
proc print data=clinic.stress;
var resthr maxhr rechr;
where tolerance='I';
run;
Footnotes appear at the bottom of each page of procedure output. Notice that footnote lines are pushed up
from the bottom. The FOOTNOTE statement that has the largest number appears on the bottom line.
HTML Output with Footnotes
In SAS LISTING output, footnote line 2 is blank, as shown below. Footnotes are centered by default.
LISTING Output with Footnotes
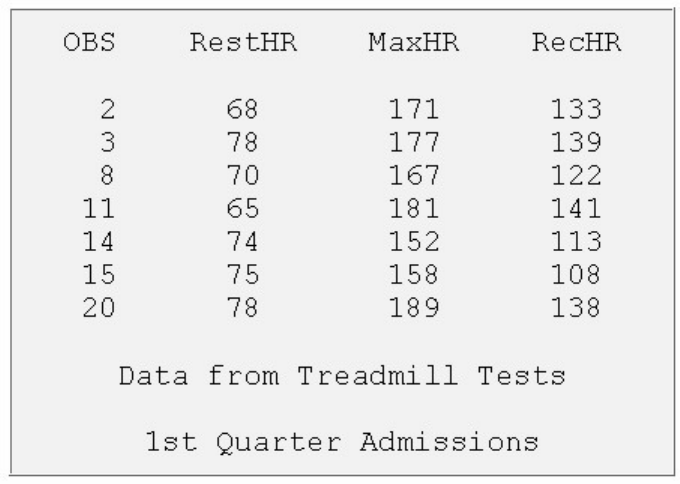
- 142 -
Modifying and Canceling Titles and Footnotes
TITLE and FOOTNOTE statements are global statements. That is, after you define a title or footnote, it
remains in effect until you modify it, cancel it, or end your SAS session.
For example, the footnotes that are assigned in the PROC PRINT step below also appear in the output
from the PROC TABULATE step.
footnote1 'Data from Treadmill Tests';
footnote3 '1st Quarter Admissions';
proc print data=clinic.stress;
var resthr maxhr rechr;
where tolerance='I';
run;
proc tabulate data=clinic.stress;
where tolerance='I';
var resthr maxhr;
table mean*(resthr maxhr);
run;
Redefining a title or footnote line cancels any higher-numbered title or footnote lines, respectively. In the
example below, defining a title for line 2 in the second report automatically cancels title line 3.
title3 'Participation in Exercise Therapy';
proc print data=clinic.therapy;
var swim walkjogrun aerclass;
run;
title2 'Report for March';
proc print data=clinic.therapy;
run;
- 143 -
To cancel all previous titles or footnotes, specify a null TITLE or FOOTNOTE statement (a TITLE or
FOOTNOTE statement with no number or text) or a TITLE1 or FOOTNOTE1 statement with no text. This
will also cancel the default title The SAS System.
For example, in the program below, the null TITLE1 statement cancels all titles that are in effect before
either PROC step executes. The null FOOTNOTE statement cancels all footnotes that are in effect after the
PROC PRINT step executes. The PROC TABULATE output appears without a title or a footnote.
title1;
footnote1 'Data from Treadmill Tests';
footnote3 '1st Quarter Admissions';
proc print data=clinic.stress;
var resthr maxhr rechr;
where tolerance='I';
run;
footnote;
proc tabulate data=clinic.stress;
var timemin timesec;
table max*(timemin timesec);
run;
Assigning Descriptive Labels
Temporarily Assigning Labels to Variables
You can also enhance your PROC PRINT report by labeling columns with more descriptive text. To label
columns, you use
• the LABEL statement to assign a descriptive label to a variable
• the LABEL option in the PROC PRINT statement to specify that the labels be displayed.
General form, LABEL statement:
LABEL variable1='label1'
variable2='label2'
... ;
Labels can be up to 256 characters long. Enclose the label in quotation marks.
The LABEL statement applies only to the PROC step in which it appears.
Example
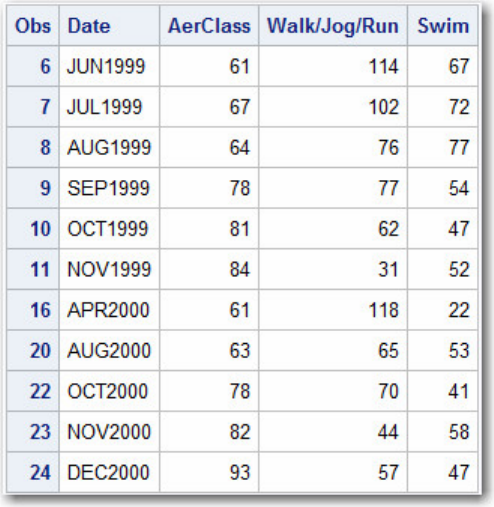
- 144 -
In the PROC PRINT step below, the variable name WalkJogRun is displayed with the label Walk/Jog/Run.
Note the LABEL option in the PROC PRINT statement. Without the LABEL option in the PROC PRINT
statement, PROC PRINT would use the name of the column heading walkjogrun even though you
specified a value for the variable.
proc print data=clinic.therapy label;
label walkjogrun=Walk/Jog/Run;
run;
Output Created Without the LABEL Option
Using Single or Multiple LABEL Statements
You can assign labels in separate LABEL statements . . .
proc print data=clinic.admit label;
var age height;
label age='Age of Patient';
label height='Height in Inches';
run;
. . . or you can assign any number of labels in a single LABEL statement.
proc print data=clinic.admit label;
var actlevel height weight;
label actlevel='Activity Level'
height='Height in Inches'
weight='Weight in Pounds';
- 145 -
run;
Formatting Data Values
Temporarily Assigning Formats to Variables
In your SAS reports, formats control how the data values are displayed. To make data values more
understandable when they are displayed in your procedure output, you can use the FORMAT statement,
which associates formats with variables.
Formats affect only how the data values appear in output, not the actual data values as they are stored in
the SAS data set.
General form, FORMAT statement:
FORMAT variable(s) format-name;
where
variable(s) is the name of one or more variables whose values are to be written according to a particular pattern
format-name specifies a SAS format or a user-defined format that is used to write out the values.
The FORMAT statement applies only to the PROC step in which it appears.
You can use a separate FORMAT statement for each variable, or you can format several variables (using
either the same format or different formats) in a single FORMAT statement.
Formats That Are Used to Format Data
This FORMAT
statement ...
Associates ...
To displa
y
values as ...
format date mmddyy8.;
the format MMDDYY8. with the variable Date
06/05/03
format net comma5.0
gross comma8.2;
the format COMMA5.0 with the variable Net and the
format COMMA8.2 with the variable Gross
1,234
5,678.90
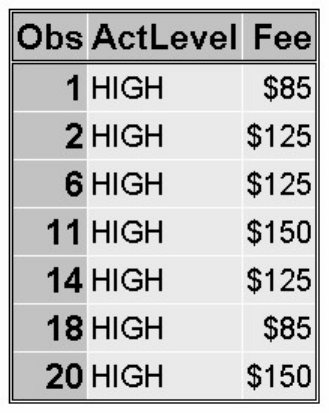
- 146 -
format net gross dollar9.2;
the format DOLLAR9.2 with both variables, Net and
Gross
$1,234.00
$5,678.90
For example, the FORMAT statement below writes values of the variable Fee using dollar signs, commas,
and no decimal places.
proc print data=clinic.admit;
var actlevel fee;
where actlevel='HIGH';
format fee dollar4.;
run;
FORMAT Statement Example
Specifying SAS Formats
The table below describes some SAS formats that are commonly used in reports.
Commonly Used SAS Formats
Format
Specifies values ...
Example
COMMAw.d
that contain commas and decimal places
comma8.2
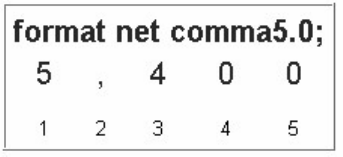
- 147 -
DOLLAR
w.d
that contain dollar signs, commas, and decimal places
dollar6.2
MMDDYYw.
as date values of the form 09/12/97 (MMDDYY8.) or 09/12/1997
(MMDDYY10.)
mmddyy10.
w.
rounded to the nearest integer in w spaces
7.
w.d
rounded to d decimal places in w spaces
8.2
$w.
as character values in w spaces
$12.
DATEw.
as date values of the form 16OCT99 (DATE7.) or 16OCT1999 (DATE9.)
date9.
Field Widths
All SAS formats specify the total field width (w) that is used for displaying the values in the output. For
example, suppose the longest value for the variable Net is a four-digit number, such as 5400. To specify
the COMMAw.d format for Net, you specify a field width of 5 or more. You must count the comma,
because it occupies a position in the output.
Note: When you use a SAS format, be sure to specify a field width (w) that is wide enough for the
largest possible value. Otherwise, values might not be displayed properly.
Specifying a Field Width (w) with the FORMAT Statement
Decimal Places
For numeric variables you can also specify the number of decimal places (d), if any, to be displayed in the
output. Numbers are rounded to the specified number of decimal places. In the example above, no decimal
places are displayed.
Writing the whole number 2030 as 2,030.00 requires eight print positions, including two decimal places
and the decimal point.
Whole Number Decimal Places
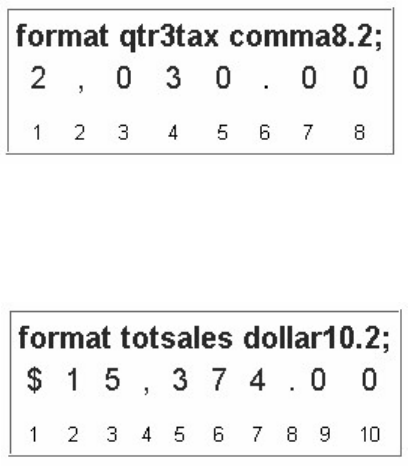
- 148 -
Formatting 15374 with a dollar sign, commas, and two decimal places requires ten print positions.
Specifying 10 Decimal Places
Examples
This table shows you how data values are displayed when different format, field width, and decimal place
specifications are used.
Displaying Data Values with Formats
Stored Value
Format
Displayed Value
38245.3975
COMMA12.2
38,245.40
38245.3975
12.2
38245.40
38245.3975
DOLLAR12.2
$38,245.40
38245.3975
DOLLAR9.2
$38245.40
38245.3975
DOLLAR8.2
38245.40
0
MMDDYY8.
01/01/60
0
MMDDYY10.
01/01/1960
- 149 -
0 DATE7. 01JAN60
0
DATE9.
01JAN1960
If a format is too small, the following message is written to the SAS log: “NOTE: At least one W.D format
was too small for the number to be printed. The decimal may be shifted by the 'BEST' format.”
Using Permanently Assigned Labels and Formats
You have seen how to temporarily assign labels and formats to variables. When you use a LABEL or
FORMAT statement within a PROC step, the label or format applies only to the output from that step.
However, in your PROC steps, you can also take advantage of permanently assigned labels or formats.
Permanent labels and formats can be assigned in the DATA step. These labels and formats are saved with
the data set, and they can later be used by procedures that reference the data set.
For example, the DATA step below creates Flights.March and defines a format and label for the variable
Date. Because the LABEL and FORMAT statements are inside the DATA step, they are written to the
Flights.March data set and are available to the subsequent PRINT procedure.
data sasuser.paris;
set sasuser.laguardia;
where dest="PAR" and (boarded=155 or boarded=146);
label date=’Departure Date’;
format date date9.;
run;
proc print data=sasuser.paris;
var date dest boarded;
run;
Using Permanent Labels and Formats
Notice that the PROC PRINT statement still requires the LABEL option in order to display the permanent
labels. Other SAS procedures display permanently assigned labels and formats without additional
statements or options.
You can learn about permanently assigning labels and formats in Creating and Managing Variables.

- 150 -
Additional Features
When you create list reports, you can use several other features to enhance your procedure output. For
example, you can
• control where text strings split in labels by using the SPLIT= option.
proc print data=reps split='*';
var salesrep type unitsold net commission;
label salesrep='Sales*Representative';
run;
• create your own formats, which are particularly useful for formatting character values.
proc format;
value $repfmt
'TFB'='Bynum'
'MDC'='Crowley'
'WKK'='King';
run;
proc print data=vcrsales;
var salesrep type unitsold;
format salesrep $repfmt.;
run;
You can learn more about user-defined formats in Creating and Applying User-Defined Formats .
Chapter Summary
Text Summary
Creating a Basic Report
To list the information in a SAS data set, you can use PROC PRINT. You use the PROC PRINT statement
to invoke the PRINT procedure and to specify the data set that you are listing. Include the DATA= option
to specify the data set that you are using. By default, PROC PRINT displays all observations and variables
in the data set, includes a column for observation numbers on the far left, and displays observations and
variables in the order in which they occur in the data set. If you use a LABEL statement with PROC
PRINT, you must specify the LABEL option in the PROC PRINT statement.
To refine a basic report, you can
• select which variables and observations are processed
• sort the data
• generate column totals for numeric variables.
Selecting Variables
- 151 -
You can select variables and control the order in which they appear by using a VAR statement in your
PROC PRINT step. To remove the Obs column, you can specify the NOOBS option in the PROC PRINT
statement. As an alternative, you can replace the Obs column with one or more variables by using the ID
statement.
Selecting Observations
The WHERE statement enables you to select observations that meet a particular condition in the SAS data
set. You use comparison operators to express a condition in the WHERE statement. You can also use the
CONTAINS operator to express a condition in the WHERE statement. To specify a condition based on the
value of a character variable, you must enclose the value in quotation marks, and you must write the value
with lower and uppercase letters exactly as it appears in the data set. You can also use the WHERE
statement to select a subset of observations based on multiple conditions. To link a sequence of
expressions into compound expressions, you use logical operators. When you test for multiple values of
the same variable, you specify the variable name in each expression. You can use the IN operator as a
convenient alternative. To control how compound expressions are evaluated, you can use parentheses.
Sorting Data
To display your data in sorted order, you use PROC SORT to sort your data before using PROC PRINT to
create reports. By default, PROC SORT sorts the data set specified in the DATA= option permanently. If
you do not want your data to be sorted permanently, you must create an output data set that contains the
data in sorted order. The OUT= option in the PROC SORT statement specifies an output data set. If you
need sorted data to produce output for only one SAS session, you should specify a temporary SAS data set
as the output data set. The BY statement, which is required with PROC SORT, specifies the variable(s)
whose values are used to sort the data.
Generating Column Totals
To total the values of numeric variables, use the SUM statement in the PROC PRINT step. You do not
need to specify the variables in a VAR statement if you specify them in the SUM statement. Column totals
appear at the end of the report in the same format as the values of the variables. To produce subtotals, add
both the SUM statement and the BY statement to your PROC PRINT step. To show BY variable headings
only once, use an ID and BY statement together with the SUM statement. As another enhancement to your
report, you can request that each BY group be printed on a separate page by using the PAGEBY statement.
Double Spacing Output
To double space your SAS LISTING output, you can specify the DOUBLE option in the PROC PRINT
statement.
Specifying Titles
To make your report more meaningful and self-explanatory, you can associate up to 10 titles with
procedure output by using TITLE statements anywhere within or preceding the PROC step. After you
define a title, it remains in effect until you modify it, cancel it, or end your SAS session. Redefining a title
line cancels any higher-numbered title lines. To cancel all previous titles, specify a null TITLE statement
(a TITLE statement with no number or text).
Specifying Footnotes
- 152 -
To add footnotes to your output, you can use the FOOTNOTE statement. Like TITLE statements,
FOOTNOTE statements are global. Footnotes appear at the bottom of each page of procedure output, and
footnote lines are pushed up from the bottom. The FOOTNOTE statement that has the largest number
appears on the bottom line. After you define a footnote, it remains in effect until you modify it, cancel it,
or end your SAS session. Redefining a footnote line cancels any higher-numbered footnote lines. To
cancel all previous footnotes, specify a null FOOTNOTE statement (a FOOTNOTE statement with no
number or text).
Assigning Descriptive Labels
To label the columns in your report with more descriptive text, you use the LABEL statement, which
assigns a descriptive label to a variable. To display the labels that were assigned in a LABEL statement,
you must specify the LABEL option in the PROC PRINT statement.
Formatting Data Values
To make data values more understandable when they are displayed in your procedure output, you can use
the FORMAT statement, which associates formats with variables. The FORMAT statement remains in
effect only for the PROC step in which it appears. Formats affect only how the data values appear in
output, not the actual data values as they are stored in the SAS data set. All SAS formats can specify the
total field width (w) that is used for displaying the values in the output. For numeric variables you can also
specify the number of decimal places (d), if any, to be displayed in the output.
Using Permanently Assigned Labels and Formats
You can take advantage of permanently assigned labels or formats without adding LABEL or FORMAT
statements to your PROC step.
Syntax
LIBNAME libref 'SAS-data-library';
OPTIONS options;
PROC SORT DATA=SAS-data-set OUT=SAS-data-set;
BY variable(s);
RUN;
TITLE<n > 'text';
FOOTNOTE<n>'text';
PROC PRINT DATA=SAS-data-set
BY<DESCENDING>BY-variable-1<...<DESCENDING><BY-variable-n>>
<NOTSORTED>;
PAGEBYBY-variable;
NOOBS LABEL DOUBLE;
ID variable(s);
VAR variable(s);
WHERE where-expression;
SUM variable(s);
- 153 -
LABEL variable1='label1' variable2='label2' ...;
FORMAT variable(s) format-name;
RUN;
Sample Program
libname clinic 'c:\stress\labdata';
options nodate number pageno=15;
proc sort data=clinic.stress out=work.maxrates;
by maxhr;
where tolerance='I' and resthr>60;
run;
title 'August Admission Fees';
footnote 'For High Activity Patients';
proc print data=work.maxrates label double noobs;
id name;
var resthr maxhr rechr;
label rechr='Recovery HR';
run;
proc print data=clinic.admit label;
var actlevel fee;
where actlevel='HIGH';
label fee='Admission Fee';
sum fee;
format fee dollar4.;
run;
Points to Remember
• VAR, WHERE, SUM, FORMAT and LABEL statements remain in effect only for the PROC step in which they
appear.
• If you don't use the OUT= option, PROC SORT permanently sorts the data set specified in the DATA= option.
• TITLE and FOOTNOTE statements remain in effect until you modify them, cancel them, or end your SAS
session.
• Be sure to match the quotation marks that enclose the text in TITLE, FOOTNOTE, and LABEL statements.
• To display labels in PRINT procedure output, remember to add the LABEL option to the PROC PRINT
statement.
• To permanently assign labels or formats to data set variables, place the LABEL or FORMAT statement inside the
DATA step.
Chapter Quiz

- 154 -
Select the best answer for each question. After completing the quiz, you can check your answers using the
answer key in the appendix.
1. Which PROC PRINT step below creates the following output?
1.
proc print data=flights.laguardia noobs;
var on changed flight;
where on>=160;
run;
2.
proc print data=flights.laguardia;
var date on changed flight;
where changed>3;
run;
3.
proc print data=flights.laguardia label;
id date;
var boarded transferred flight;
label boarded='On' transferred='Changed';
where flight='219';
run;
4.
proc print flights.laguardia noobs;
id date;
var date on changed flight;
where flight='219';
run;
2. Which of the following PROC PRINT steps is correct if labels are not stored with the data set?
1.
proc print data=allsales.totals label;
- 155 -
label region8='Region 8 Yearly Totals';
run;
2.
proc print data=allsales.totals;
label region8='Region 8 Yearly Totals';
run;
3.
proc print data allsales.totals label noobs;
run;
4.
proc print allsales.totals label;
run;
3. Which of the following statements selects from a data set only those observations for which the value of the
variable Style is RANCH, SPLIT, or TWOSTORY?
1.
where style='RANCH' or 'SPLIT' or 'TWOSTORY';
2.
where style in 'RANCH' or 'SPLIT' or 'TWOSTORY';
3.
where style in (RANCH, SPLIT, TWOSTORY);
4.
where style in ('RANCH','SPLIT','TWOSTORY');
4. If you want to sort your data and create a temporary data set named Calc to store the sorted data, which of the
following steps should you submit?
1.
proc sort data=work.calc out=finance.dividend;
run;
2.
proc sort dividend out=calc;
by account;
run;
3.
proc sort data=finance.dividend out=work.calc;
by account;
run;
4.
proc sort from finance.dividend to calc;
by account;
run;
- 156 -
5. Which options are used to create the following PROC PRINT output?
1. the DATE system option and the LABEL option in PROC PRINT
2. the DATE and NONUMBER system options and the DOUBLE and NOOBS options in PROC PRINT
3. the DATE and NONUMBER system options and the DOUBLE option in PROC PRINT
4. the DATE and NONUMBER system options and the NOOBS option in PROC PRINT
6. Which of the following statements can you use in a PROC PRINT step to create this output?
1.
var month instructors;
sum instructors aerclass walkjogrun swim;
2.
var month;
sum instructors aerclass walkjogrun swim;
3.
var month instructors aerclass;
sum instructors aerclass walkjogrun swim;
4. all of the above

- 157 -
7. What happens if you submit the following program?
proc sort data=clinic.diabetes;
run;
proc print data=clinic.diabetes;
var age height weight pulse;
where sex='F';
run;
1. The PROC PRINT step runs successfully, printing observations in their sorted order.
2. The PROC SORT step permanently sorts the input data set.
3. The PROC SORT step generates errors and stops processing, but the PROC PRINT step runs
successfully, printing observations in their original (unsorted) order.
4. The PROC SORT step runs successfully, but the PROC PRINT step generates errors and stops
processing.
8. If you submit the following program, which output does it create?
proc sort data=finance.loans out=work.loans;
by months amount;
run;
proc print data=work.loans noobs;
var months;
sum amount payment;
where months<360;
run;
1.
2.
- 158 -
3.
4.
9. Choose the statement below that selects rows in which
1. the amount is less than or equal to $5000
2. the account is 101-1092 or the rate equals 0.095.
1.
where amount <= 5000 and
account='101-1092' or rate = 0.095;
2.
where (amount le 5000 and account='101-1092')
or rate = 0.095;
3.
where amount <= 5000 and
(account='101-1092' or rate eq 0.095);
4.
where amount <= 5000 or account='101-1092'
and rate = 0.095;
10. What does PROC PRINT display by default?
1. PROC PRINT does not create a default report; you must specify the rows and columns to be displayed.
2. PROC PRINT displays all observations and variables in the data set. If you want an additional column
for observation numbers, you can request it.
3. PROC PRINT displays columns in the following order: a column for observation numbers, all character
variables, and all numeric variables.
4. PROC PRINT displays all observations and variables in the data set, a column for observation numbers
on the far left, and variables in the order in which they occur in the data set.

- 159 -
Chapter 5 Creating SAS Data Sets from External Files
Overview
Raw Data Files
Steps to Create a SAS Data Set from a Raw Data File
Referencing a SAS Library
Referencing a Raw Data File
Writing a DATA Step Program
Submitting the DATA Step Program
Creating and Modifying Variables
Subsetting Data
Reading Instream Data
Creating a Raw Data File
Additional Features
Reading Microsoft Excel Data
LIBNAME Statement Options
Creating Excel Worksheets
The IMPORT Wizard
Chapter Summary
Chapter Quiz
Overview
Introduction
In order to create reports with SAS procedures, your data must be in the form of a SAS data set. If your
data is not stored in the form of a SAS data set, you need to create a SAS data set by entering data, by
reading raw data, or by accessing files that were created by other software.
This chapter shows you how to design and write DATA step programs to create SAS data sets from raw
data that is stored in an external file and from data stored in Microsoft Excel worksheets. It also shows you
how to read data from a SAS data set and write observations out to these destinations.
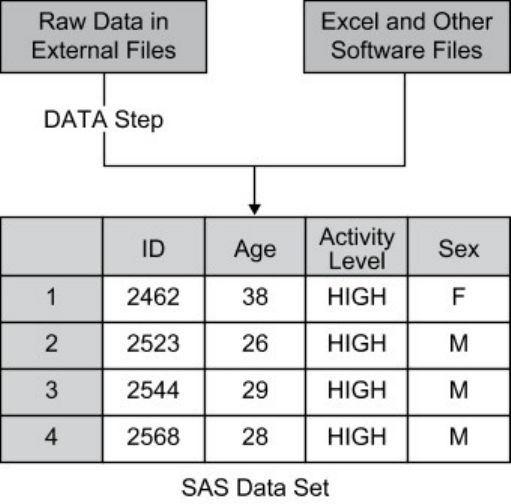
- 160 -
Regardless of the input data source — raw files or Excel worksheets — you use the DATA step to read in
the data and create the SAS data set.
Using the DATA Step to Create SAS Data Sets
Objectives
In this chapter, you learn to
• reference a SAS library
• reference a raw data file
• name a SAS data set to be created
• specify a raw data file to be read
• read standard character and numeric values in fixed fields
• create new variables and assign values
• select observations based on conditions
• read instream data
• submit and verify a DATA step program
• read a SAS data set and write the observations out to a raw data file.
• use the DATA step to create a SAS data set from an Excel worksheet
• use the SAS/ACCESS LIBNAME statement to read from an Excel worksheet
• create an Excel worksheet from a SAS data set
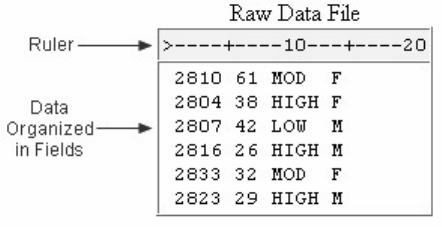
- 161 -
• use the IMPORT procedure to read external files
Raw Data Files
A raw data file is an external text file whose records contain data values that are organized in fields. Raw
data files are non-proprietary and can be read by a variety of software programs. The sample raw data files
in this chapter are shown with a ruler to help you identify where individual fields begin and end. The ruler
is not part of the raw data file.
Raw Data File
The table below describes the record layout for a raw data file that contains readings from exercise stress
tests that have been performed on patients at a health clinic. Exercise physiologists in the clinic use the test
results to prescribe various exercise therapies. The file contains fixed fields. That is, values for each
variable are in the same location in all records.
Record Layout for Raw Data
Field
Name
Starting
Column
Ending
Column
Description of Field
ID
1
4
patient ID number
Name
6
25
patient name
RestHR
27
29
resting heart rate
MaxHR
31
33
maximum heart rate during test
RecHR
35
37
recovery heart rate after test
TimeMin
39
40
time, complete minutes
- 162 -
TimeSec 42 43 time, seconds
Tolerance
45
45
comparison of stress test tolerance
b
etween this test and the last test (I=increased, D=decreased,
S=same, N=no previous test)
Steps to Create a SAS Data Set from a Raw Data File
Let's look at the steps for creating a SAS data set from a raw data file. In the first part of this chapter, you
will follow these steps to create a SAS data set from a raw data file that contains fixed fields.
Before reading raw data from a file, you might need to reference the SAS library in which you will store
the data set. Then you can write a DATA step program to read the raw data file and create a SAS data set.
To read the raw data file, the DATA step must provide the following instructions to SAS:
• the location or name of the external text file
• a name for the new SAS data set
• a reference that identifies the external file
• a description of the data values to be read.
After using the DATA step to read the raw data, you can use a PROC PRINT step to produce a report that
displays the data values that are in the new data set.
The table below outlines the basic statements that are used in a program that reads raw data in fixed fields.
Throughout this chapter, you'll see similar tables that show sample SAS statements.
Basic Statements for Reading Raw Data
To do this...
Use this SAS statement...
Reference SAS data library
LIBNAME statement
Reference external file
FILENAME statement
Name SAS data set
DATA statement
Identify external file
INFILE statement
- 163 -
Describe data INPUT statement
Execute DATA step
RUN statement
Print the data set
PROC PRINT statement
Execute final program step
RUN statement
You can also use additional SAS statements to perform tasks that customize your data for your needs. For
example, you may want to create new variables from the values of existing variables.
Referencing a SAS Library
Using a LIBNAME Statement
As you begin to write the program, remember that you might need to use a LIBNAME statement to
reference the permanent SAS library in which the data set will be stored.
To do this...
Use this SAS statement...
Example
Reference a SAS library
LIBNAME statement
libname taxes 'c:\users\name\sasuser';
For example, the LIBNAME statement below assigns the libref Taxes to the SAS library in the folder
C:\Acct\Qtr1\Report in the Windows environment.
libname taxes 'c:\acct\qtr1\report';
You do not need to use a LIBNAME statement in all situations. For example, if you are storing the data set
in a temporary SAS data set or if SAS has automatically assigned the libref for the permanent library that
you are using.
Many of the examples in this chapter use the libref Sasuser, which SAS automatically assigns.
Referencing a Raw Data File
Using a FILENAME Statement
When reading raw data, you can use the FILENAME statement to point to the location of the external file
that contains the data. Just as you assign a libref by using a LIBNAME statement, you assign a fileref by
using a FILENAME statement.
Referencing a Raw Data File
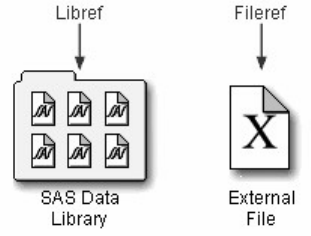
- 164 -
To do this...
Use this SAS statement...
Example
Reference a SAS library
LIBNAME statement
libname libref 'SAS-data-library';
Reference an external file
FILENAME statement
filename tests 'c:\users\tmill.dat';
Filerefs perform the same function as librefs: they temporarily point to a storage location for data.
However, librefs reference SAS data libraries, whereas filerefs reference external files.
Filerefs and Librefs
General form, FILENAME statement:
FILENAME fileref 'filename';
where
fileref is a name that you associate with an external file. The name must be 1 to 8 characters long, begin with a
letter or underscore, and contain only letters, numerals, or underscores.
'filename' is the fully qualified name or location of the file.
Defining a Fully Qualified Filename
The following FILENAME statement temporarily associates the fileref Tests with the external file that
contains the data from the exercise stress tests. The complete filename is specified as C:\Users\Tmill.dat
in the Windows environment.
filename tests 'c:\users\tmill.dat';
File Location
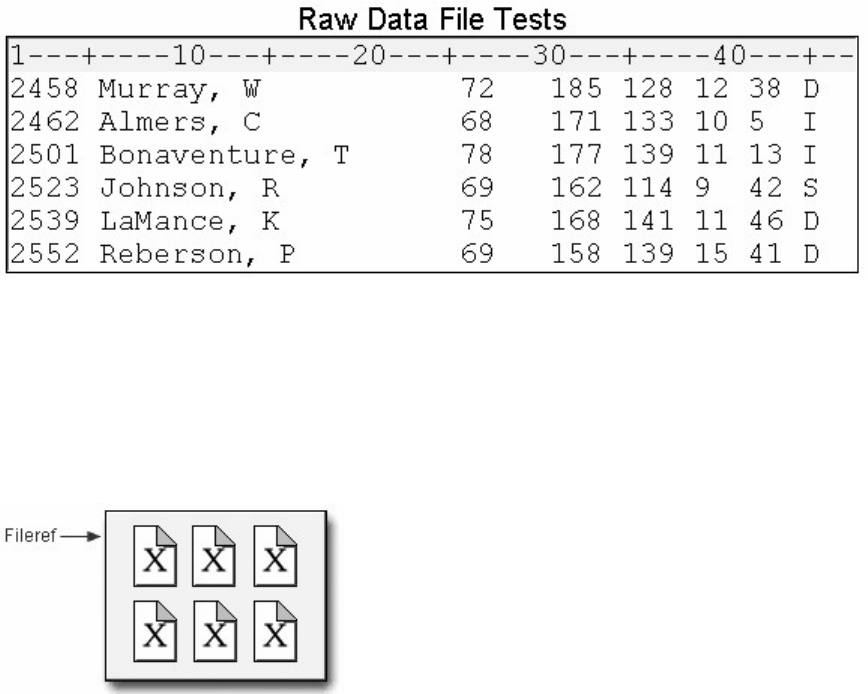
- 165 -
Defining an Aggregate Storage Location
You can also use a FILENAME statement to associate a fileref with an aggregate storage location, such as
a directory that contains multiple external files.
Aggregate Storage Location
This FILENAME statement temporarily associates the fileref Finance with the aggregate storage directory
C:\Users\Personal\Finances:
filename finance 'c:\users\personal\finances';
Viewing Active Filerefs
Like librefs, the filerefs currently defined for your SAS session are listed in the SAS Explorer window.
To view details about a referenced file, double-click File Shortcuts (or select File Shortcuts and then
Open from the pop-up menu). Then select View→Details. Information for each file (name, size, type, and
host path name) is listed.
Both the LIBNAME and FILENAME statements are global. In other words, they remain in effect until you
change them, cancel them, or end your SAS session.
Referencing a Fully Qualified Filename
When you associate a fileref with an individual external file, you specify the fileref in subsequent SAS
statements and commands.
Referencing a Fully Qualified Filename
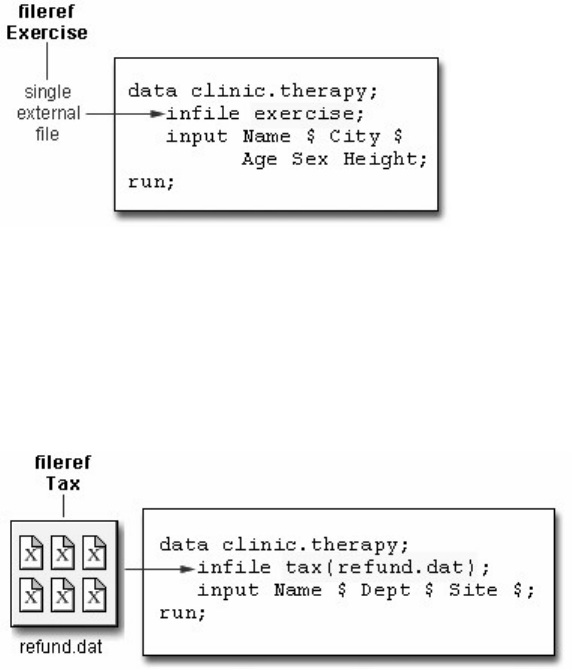
- 166 -
Referencing a File in an Aggregate Storage Location
To reference an external file with a fileref that points to an aggregate storage location, you specify the
fileref followed by the individual filename in parentheses:
Referencing a File in an Aggregate Storage Location
In the Windows environment, you can omit the filename extension but you will need to add quotation
marks when referencing an external file, as in
infile tax('refund');
For details on referencing external files stored in aggregate storage locations, see the SAS documentation
for your operating environment.
Writing a DATA Step Program
Naming the Data Set
The DATA statement indicates the beginning of the DATA step and names the SAS data set to be created.
Naming the Data Set
To do this...
Use this SAS statement...
Example
Reference a SAS library
LIBNAME statement
libname libref 'SAS-data-library';

- 167 -
Reference an external file FILENAME statement filename tests 'c:\users\tmill.dat';
Name a SAS data set
DATA statement
data clinic.stress;
General form, basic DATA statement:
DATA SAS-data-set-1 <...SAS-data-set-n>;
where SAS-data-set names (in the format libref.filename) the data set or data sets to be created.
Remember that the SAS data set name is a two-level name. For example, the two-level name Clinic.Admit
specifies that the data set Admit is stored in the permanent SAS library to which the libref Clinic has been
assigned.
Two-Level Names
Specifying the Raw Data File
When reading raw data, use the INFILE statement to indicate which file the data is in.
Specifying the Raw Data File
To do this...
Use this SAS statement...
Example
Reference a SAS library
LIBNAME statement
libname libref 'SAS-data-library';
Reference an external file
FILENAME statement
filename tests 'c:\users\tmill.dat';
Name a SAS data set
DATA statement
data clinic.stress;
Identify an external file
INFILE statement
infile tests;
General form, INFILE statement:
- 168 -
INFILE file-specification <options>;
where
file-specification can take the form fileref to name a previously defined file reference or 'filename' to point to the
actual name and location of the file
options describe the input file's characteristics and specify how it is to be read with the INFILE statement.
To read the raw data file to which the fileref Tests has been assigned, you write the following INFILE
statement:
infile tests;
Instead of using a FILENAME statement, you can choose to identify the raw data file by specifying the
entire filename and location in the INFILE statement. For example, the following statement points directly
to the C:\Irs\Personal\Refund.dat file:
infile 'c:\irs\personal\refund.dat';
Column Input
Column input specifies actual column locations for values. However, column input is appropriate only in
certain situations. When you use column input, your data must be
• standard character or numeric values
• in fixed fields.
Standard and Nonstandard Numeric Data
Standard numeric data values can contain only
• numerals
• decimal points
• numbers in scientific or E-notation (2.3E4, for example)
• plus or minus signs.
Nonstandard numeric data includes
• values that contain special characters, such as percent signs (%), dollar signs ($), and commas (,)
• date and time values
• data in fraction, integer binary, real binary, and hexadecimal forms.
- 169 -
The external file that is referenced by the fileref Staff contains the personnel information for a technical
writing department of a small computer manufacturer. The fields contain values for each employee's last
name, first name, job code, and annual salary.
Notice that the values for Salary contain commas. So, the values for Salary are considered to be
nonstandard numeric values. You cannot use column input to read these values.
Raw Data File
Fixed-Field Data
Raw data can be organized in several different ways.
The following external delimited file contains data that is not arranged in columns, meaning data that is not
arranged in columns. Notice that the values for a particular field do not begin and end in the same columns.
You cannot use column input to read this file.
Fixed Field Data
The following external file contains data that is arranged in columns or fixed fields. You can specify a
beginning and ending column for each field. Let's look at how column input can be used to read this data.
External File with Columns
- 170 -
If you are not familiar with the content and structure of your raw data files, you can use PROC FSLIST to
view them.
Describing the Data
The INPUT statement describes the fields of raw data to be read and placed into the SAS data set.
Describing the Data
To do this...
Use this SAS statement...
Example
Reference a SAS library
LIBNAME statement
libname libref 'SAS-data-library';
Reference an external file
FILENAME statement
filename tests 'c:\users\tmill.dat';
Name a SAS data set
DATA statement
data clinic.stress;
Identify an external file
INFILE statement
infile tests;
Describe data
INPUT statement
input ID $ 1-4 Name $ 6-25 ...;
Execute the DATA step
RUN statement
run;
General form, INPUT statement using column input:
INPUT variable <$> startcol-endcol . . .;
where
variable is the SAS name that you assign to the field
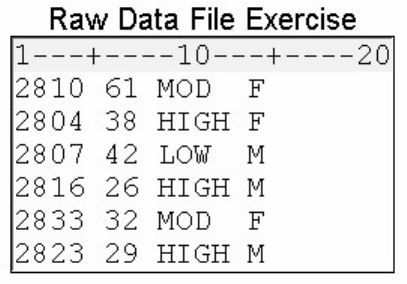
- 171 -
the dollar sign ($) identifies the variable type as character (if the variable is numeric, then nothing appears here)
startcol represents the starting column for this variable
endcol represents the ending column for this variable.
Look at the small data file shown below. For each field of raw data that you want to read into your SAS
data set, you must specify the following information in the INPUT statement:
• a valid SAS variable name
• a type (character or numeric)
• a range (starting column and ending column).
Raw Data File
The INPUT statement below assigns the character variable ID to the data in columns 1-4, the numeric
variable Age to the data in columns 6-7, the character variable ActLevel to the data in columns 9-12, and
the character variable Sex to the data in column 14.
filename exer 'c:\users\exer.dat';
data exercise;
infile exer;
input ID $ 1-4 Age 6-7 ActLevel $ 9-12 Sex $ 14;
run;
Assigning Column Ranges to Variables
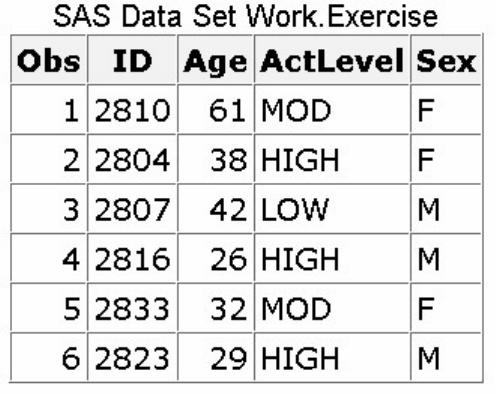
- 172 -
When you use column input, you can
• read any or all fields from the raw data file
• read the fields in any order
• specify only the starting column for values that occupy only one column.
input ActLevel $ 9-12 Sex $ 14 Age 6-7;
Remember that when you name a new variable, you must specify the name in the exact case that you want
it stored, for example NewBalance. Thereafter, you can specify the name in uppercase, lowercase, or
mixed case.
Specifying Variable Names
Each variable has a name that conforms to SAS naming conventions. Variable names
• must be 1 to 32 characters in length
• must begin with a letter (A-Z) or an underscore (_)
• can continue with any combination of numerals, letters, or underscores.
Let's look at an INPUT statement that uses column input to read the three data fields in the raw data file
below.
Raw Data File
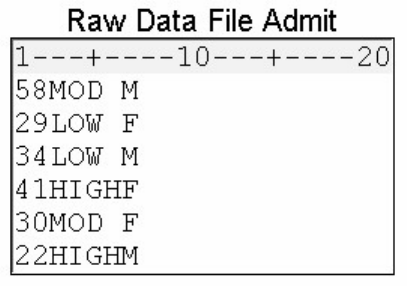
- 173 -
The values for the variable Age are located in columns 1-2. Because Age is a numeric variable, you do not
specify a dollar sign ($) after the variable name.
input Age 1-2
The values for the variable ActLevel are located in columns 3-6. You specify a $ to indicate that ActLevel
is a character variable.
input Age 1-2 ActLevel $ 3-6
The values for the character variable Sex are located in column 7. Notice that you specify only a single
column.
input Age 1-2 ActLevel $ 3-6 Sex $ 7;
Submitting the DATA Step Program
Verifying the Data
To verify your data, it is a good idea to use the OBS= option in the INFILE statement. Adding OBS=n to
the INFILE statement enables you to process only records 1 through n, so you can verify that the correct
fields are read before reading the entire data file.
The program below reads the first ten records in the raw data file referenced by the fileref Tests. The data
is stored in a permanent SAS data set, named Sasuser.Stress. Don't forget a RUN statement, which tells
SAS to execute the previous SAS statements.
data sasuser.stress;
infile tests obs=10;
input ID $ 1-4 Name $ 6-25
RestHR 27-29 MaxHR 31-33
RecHR 35-37 TimeMin 39-40
TimeSec 42-43 Tolerance $ 45;
run;
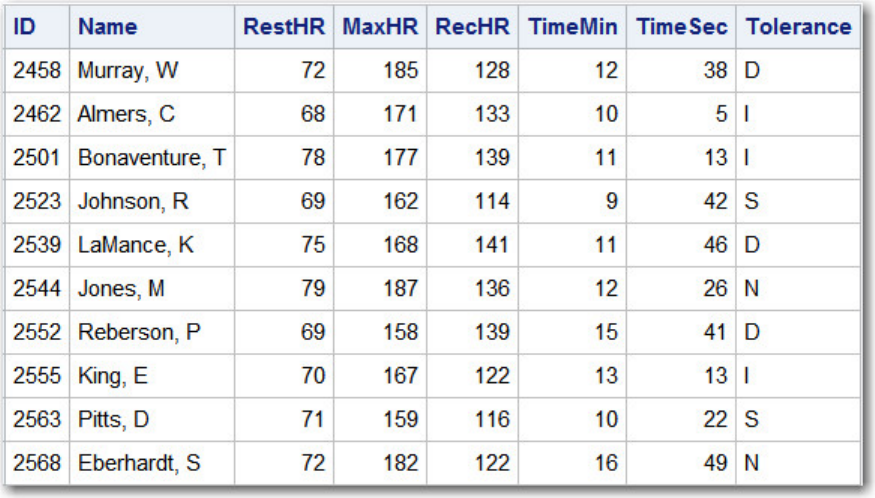
- 174 -
SAS Data Set sasuser.stress
Checking DATA Step Processing
If you submit the DATA step below it will run successfully.
data sasuser.stress;
infile tests obs=10;
input ID $ 1-4 Name $ 6-25
RestHR 27-29 MaxHR 31-33
RecHR 35-37 TimeMin 39-40
TimeSec 42-43 Tolerance $ 45;
run;
Messages in the log verified that the raw data file was read correctly. The notes in the log indicate that
• 10 records were read from the raw data file
• the SAS data set Sasuser.Stress was created with 10 observations and 8 variables.
SAS Log
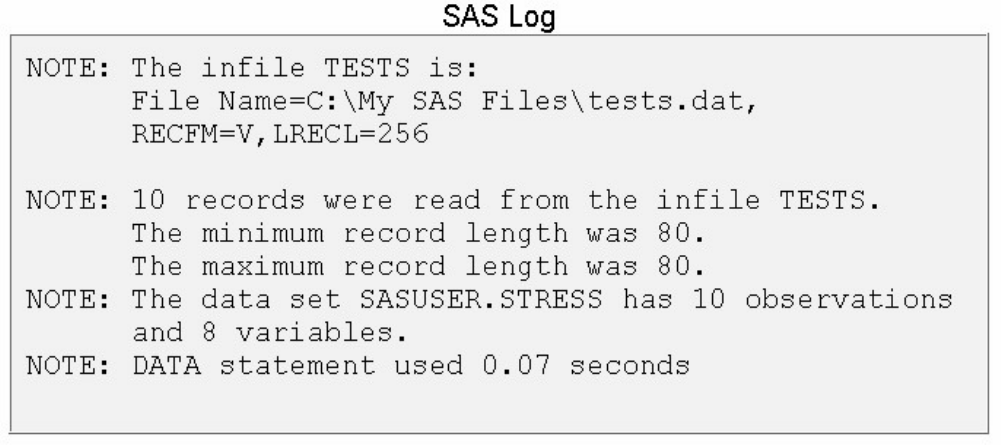
- 175 -
Printing the Data Set
The messages in the log seem to indicate that the DATA step program correctly accessed the raw data file.
But it is a good idea to look at the ten observations in the new data set before reading the entire raw data
file. You can submit a PROC PRINT step to view the data.
Printing the Data Set
To do this...
Use this SAS statement...
Example
Reference a SAS library
LIBNAME statement
libname libref 'SAS-data-library';
Reference an external file
FILENAME statement
filename tests 'c:\users\tmill.dat';
Name a SAS data set
DATA statement
data clinic.stress;
Identify an external file
INFILE statement
infile tests obs=10;
Describe data
INPUT statement
input ID $ 1-4 Name $ 6-25 ...;
Execute the DATA step
RUN statement
run;
Print the data set
PROC PRINT statement
proc print data=clinic.stress;
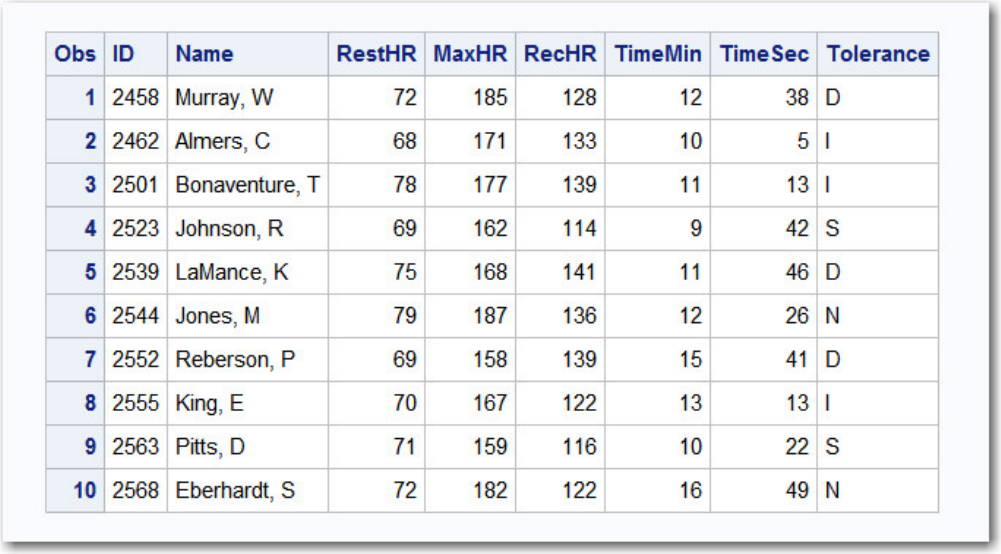
- 176 -
Execute the final program step RUN statement run;
The following PROC PRINT step prints the Sasuser.Stress data set.
proc print data=sasuser.stress;
run;
The PROC PRINT output indicates that the variables in the Sasuser.Stress data set were read correctly for
the first ten records.
PROC Print Output
Reading the Entire Raw Data File
Now that you've checked the log and verified your data, you can modify the DATA step to read the entire
raw data file. To do so, remove the OBS= option from the INFILE statement and re-submit the program.
data sasuser.stress;
infile tests;
input ID $ 1-4 Name $ 6-25
RestHR 27-29 MaxHR 31-33
RecHR 35-37 TimeMin 39-40
TimeSec 42-43 Tolerance $ 45;
run;
Invalid Data
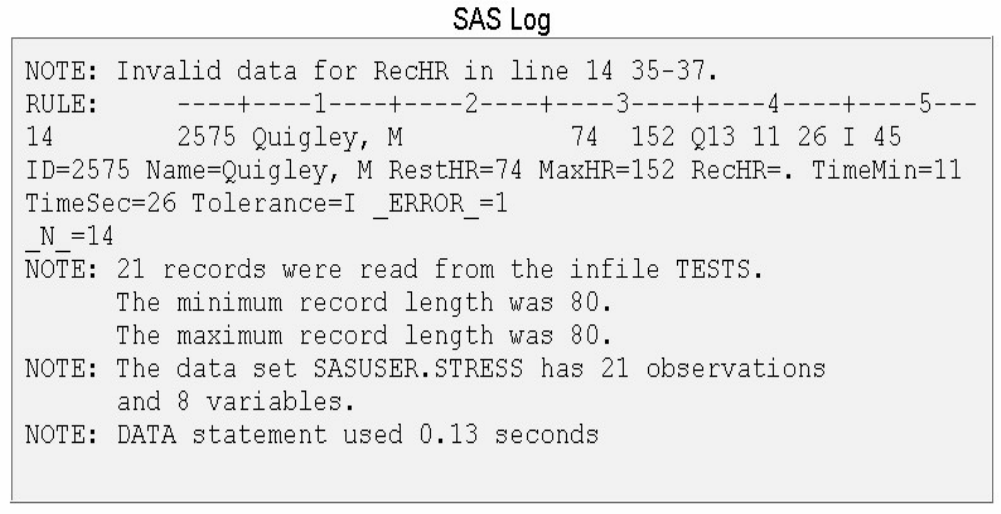
- 177 -
When you submit the revised DATA step and check the log, you see a note indicating that invalid data
appears for the variable RecHR in line 14 of the raw data file, columns 35-37.
This note is followed by a column ruler and the actual data line that contains the invalid value for RecHR.
SAS Log
The value Q13 is a data-entry error. It was entered incorrectly for the variable RecHR.
RecHR is a numeric variable, but Q13 is not a valid number. So RecHR is assigned a missing value, as
indicated in the log. Because RecHR is numeric, the missing value is represented with a period.
Notice, though, that the DATA step does not fail as a result of the invalid data but continues to execute.
Unlike syntax errors, invalid data errors do not cause SAS to stop processing a program.
Assuming that you have a way to edit the file and can justify a correction, you can correct the invalid value
and rerun the DATA step. If you did this, the log would then show that the data set Sasuser.Stress was
created with 21 observations, 8 variables, and no messages about invalid data.
SAS Log

- 178 -
After correcting the raw data file, you can print the data again to verify that it is correct.
proc print data=sasuser.stress;
run;
PROC Print Output
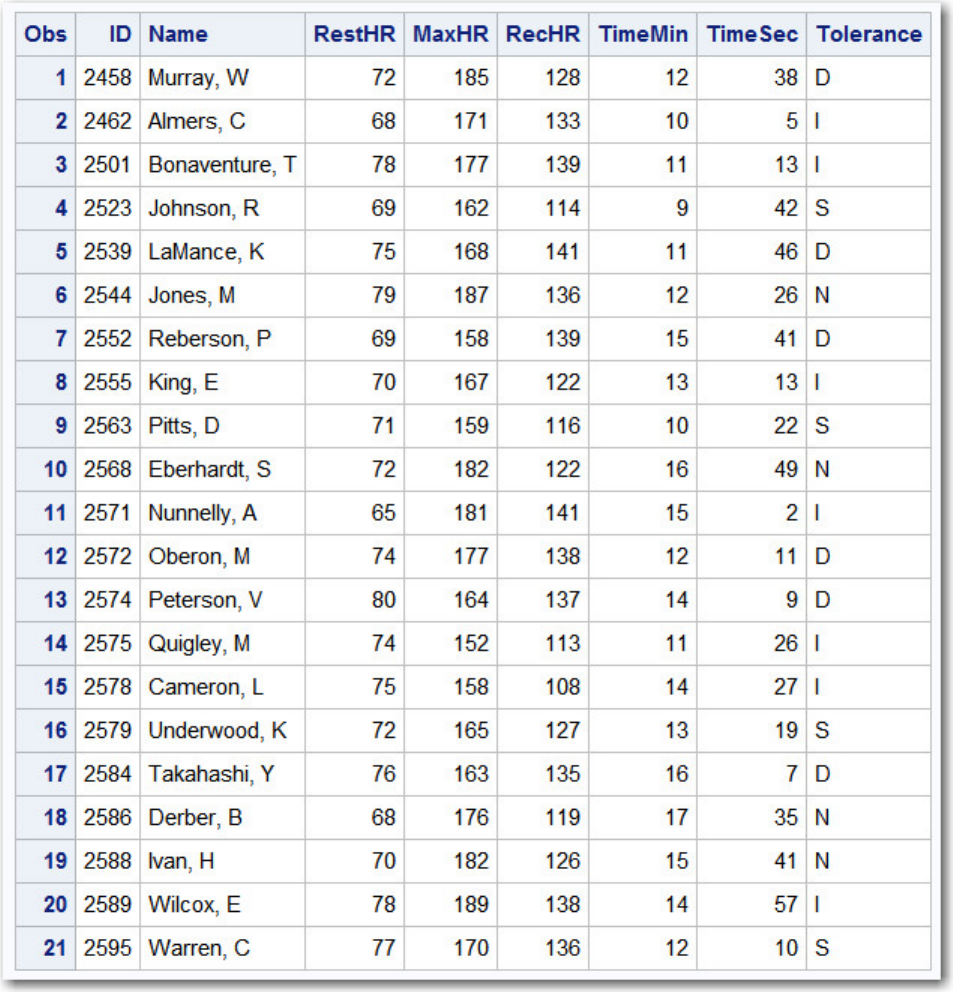
- 179 -
Whenever you use the DATA step to read raw data, remember the steps that you followed in this chapter,
which help ensure that you don't waste resources when accessing data:
• write the DATA step using the OBS= option in the INFILE statement
• submit the DATA step
• check the log for messages
• view the resulting data set
• remove the OBS= option and resubmit the DATA step
• check the log again
• view the resulting data set again.

- 180 -
Creating and Modifying Variables
Overview
So far in this chapter, you've read existing data. But sometimes existing data doesn't provide the
information you need. To modify existing values or to create new variables, you can use an assignment
statement in any DATA step.
General form, assignment statement:
variable=expression;
where
variable names a new or existing variable
expression is any valid SAS expression
The assignment statement is one of the few SAS statements that doesn't begin with a keyword.
For example, here is an assignment statement that assigns the character value Toby Witherspoon to the
variable Name:
Name='Toby Witherspoon';
SAS Expressions
You use SAS expressions in assignment statements and many other SAS programming statements to
• transform variables
• create new variables
• conditionally process variables
• calculate new values
• assign new values.
An expression is a sequence of operands and operators that form a set of instructions. The instructions are
performed to produce a new value:
• Operands are variable names or constants. They can be numeric, character, or both.
• Operators are special-character operators, grouping parentheses, or functions. You can learn about functions in
Transforming Data with SAS Functions.
Using Operators in SAS Expressions
To perform a calculation, you use arithmetic operators. The table below lists arithmetic operators.
- 181 -
Using Operators in SAS Expressions
Operator
Action
Example
Priority
-
negative prefix
negative=-x;
I
**
exponentiation
raise=x**y;
I
*
multiplication
mult=x*y;
II
/
division
divide=x/y;
II
+
addition
sum=x+y;
III
-
subtraction
diff=x-y;
III
When you use more than one arithmetic operator in an expression,
• operations of priority I are performed before operations of priority II, and so on
• consecutive operations that have the same priority are performed
o from right to left within priority I
o from left to right within priority II and III
• you can use parentheses to control the order of operations.
Note: When a value that is used with an arithmetic operator is missing, the result of the expression is
missing. The assignment statement assigns a missing value to a variable if the result of the expression is
missing.
You use the following comparison operators to express a condition.
Comparison Operators
Operator
Meaning
Example
= or eq
equal to
name='Jones, C.'
- 182 -
^= or ne not equal to temp ne 212
> or gt
greater than
income>20000
< or lt
less than
partno lt "BG05"
>= or ge
greater than or equal to
id>='1543'
<= or le
less than or equal to
pulse le 85
To link a sequence of expressions into compound expressions, you use logical operators, including the
following:
Logical Operators
Operator
Meaning
AND or &
and, both. If both expressions are true, then the compound expression is true.
OR or |
or, either. If either expression is true, then the compound expression is true.
More Examples of Assignment Statements
The assignment statement in the DATA step below creates a new variable, TotalTime, by multiplying the
values of TimeMin by 60 and then adding the values of TimeSec.
data sasuser.stress;
infile tests;
input ID $ 1-4 Name $ 6-25 RestHR 27-29 MaxHR 31-33
RecHR 35-37 TimeMin 39-40 TimeSec 42-43
Tolerance $ 45;
TotalTime=(timemin*60)+timesec;
run;
Assignment Statement Output
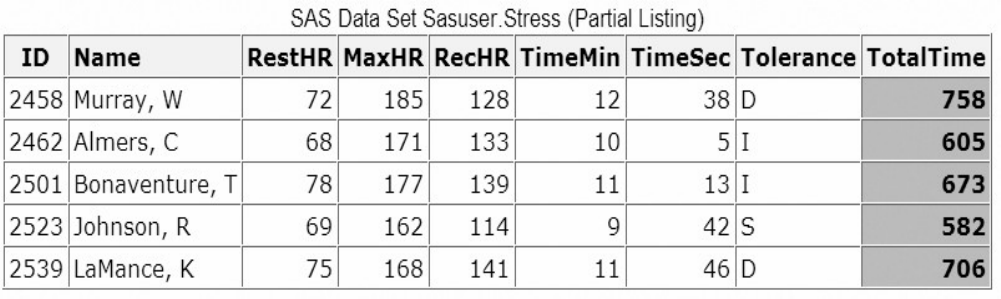
- 183 -
The expression can also contain the variable name that is on the left side of the equal sign, as the following
assignment statement shows. This statement re-defines the values of the variable RestHR as 10 percent
higher.
data sasuser.stress;
infile tests;
input ID $ 1-4 Name $ 6-25 RestHR 27-29 MaxHR 31-33
RecHR 35-37 TimeMin 39-40 TimeSec 42-43
Tolerance $ 45;
resthr=resthr+(resthr*.10);
run;
When a variable name appears on both sides of the equal sign, the original value on the right side is used to
evaluate the expression. The result is assigned to the variable on the left side of the equal sign.
data sasuser.stress;
infile tests;
input ID $ 1-4 Name $ 6-25 RestHR 27-29 MaxHR 31-33
RecHR 35-37 TimeMin 39-40 TimeSec 42-43
Tolerance $ 45;
resthr=resthr+(resthr*.10);
run; ^ ^
result original value
Date Constants
You can assign date values to variables in assignment statements by using date constants. To represent a
constant in SAS date form, specify the date as 'ddmmmyy' or 'ddmmmyyyy', immediately followed by a D.
General form, date constant:
'ddmmmyy'd
- 184 -
or
“ddmmmyy”d
where
dd is a one- or two-digit value for the day
mmm is a three-letter abbreviation for the month (JAN, FEB, and so on)
yy or yyyy is a two- or four-digit value for the year, respectively.
Be sure to enclose the date in quotation marks.
Example
In the following program, the second assignment statement assigns a date value to the variable TestDate.
data sasuser.stress;
infile tests;
input ID $ 1-4 Name $ 6-25 RestHR 27-29 MaxHR 31-33
RecHR 35-37 TimeMin 39-40 TimeSec 42-43
Tolerance $ 45;
TotalTime=(timemin*60)+timesec;
TestDate='01jan2000'd;
run;
You can also use SAS time constants and SAS datetime constants in assignment statements.
Time='9:25't;
DateTime='18jan2005:9:27:05'dt;
Subsetting Data
As you read your data, you can subset it by processing only those observations that meet a specified
condition. To do this, you can use a subsetting IF statement in any DATA step.
Using a Subsetting IF Statement
The subsetting IF statement causes the DATA step to continue processing only those observations that
meet the condition of the expression specified in the IF statement. The resulting SAS data set or data sets
contain a subset of the original external file or SAS data set.
General form, subsetting IF statement:
IF expression;
- 185 -
where expression is any valid SAS expression.
If the expression is true, the DATA step continues to process that observation.
If the expression is false, no further statements are processed for that observation, and control returns to the top of
the DATA step.
Example
The subsetting IF statement below selects only observations whose values for Tolerance are D. It is
positioned in the DATA step so that other statements do not need to process unwanted observations.
data sasuser.stress;
infile tests;
input ID $ 1-4 Name $ 6-25 RestHR 27-29 MaxHR 31-33
RecHR 35-37 TimeMin 39-40 TimeSec 42-43
Tolerance $ 45;
if tolerance='D';
TotalTime=(timemin*60)+timesec;
run;
Because Tolerance is a character variable, the value D must be enclosed in quotation marks, and it must be
the same case as in the data set.
See the SAS documentation for a comparison of the WHERE and subsetting IF statements when they are
used in the DATA step.
Reading Instream Data
Overview
Throughout this chapter, our program has contained an INFILE statement that identifies an external file to
read.
data sasuser.stress;
infile tests;
input ID $ 1-4 Name $ 6-25 RestHR 27-29 MaxHR 31-33
RecHR 35-37 TimeMin 39-40 TimeSec 42-43
Tolerance $ 45;
if tolerance='D';
TotalTime=(timemin*60)+timesec;
run;
However, you can also read instream data lines that you enter directly in your SAS program, rather than
data that is stored in an external file. Reading instream data is extremely helpful if you want to create data
and test your programming statements on a few observations that you can specify according to your needs.
- 186 -
To read instream data, you use
• a DATALINES statement as the last statement in the DATA step and immediately preceding the data lines
• a null statement (a single semicolon) to indicate the end of the input data.
data sasuser.stress;
input ID $ 1-4 Name $ 6-25 RestHR 27-29 MaxHR 31-33
RecHR 35-37 TimeMin 39-40 TimeSec 42-43
Tolerance $ 45;
datalines;
.
.
.
data lines go here
.
.
.
;
General form, DATALINES statement:
DATALINES;
You can use only one DATALINES statement in a DATA step. Use separate DATA steps to enter multiple sets of
data.
You can also use LINES; or CARDS; as the last statement in a DATA step and immediately preceding the data
lines. Both LINES and CARDS are aliases for the DATALINES statement.
If your data contains semicolons, use the DATALINES4 statement plus a null statement that consists of four
semicolons (;;;;).
Example
To read the data for the treadmill stress tests as instream data, you can submit the following program:
data sasuser.stress;
input ID $ 1-4 Name $ 6-25 RestHR 27-29 MaxHR 31-33
RecHR 35-37 TimeMin 39-40 TimeSec 42-43
Tolerance $ 45;
if tolerance='D';
TotalTime=(timemin*60)+timesec;
datalines;
2458 Murray, W 72 185 128 12 38 D
2462 Almers, C 68 171 133 10 5 I
- 187 -
2501 Bonaventure, T 78 177 139 11 13 I
2523 Johnson, R 69 162 114 9 42 S
2539 LaMance, K 75 168 141 11 46 D
2544 Jones, M 79 187 136 12 26 N
2552 Reberson, P 69 158 139 15 41 D
2555 King, E 70 167 122 13 13 I
2563 Pitts, D 71 159 116 10 22 S
2568 Eberhardt, S 72 182 122 16 49 N
2571 Nunnelly, A 65 181 141 15 2 I
2572 Oberon, M 74 177 138 12 11 D
2574 Peterson, V 80 164 137 14 9 D
2575 Quigley, M 74 152 113 11 26 I
2578 Cameron, L 75 158 108 14 27 I
2579 Underwood, K 72 165 127 13 19 S
2584 Takahashi, Y 76 163 135 16 7 D
2586 Derber, B 68 176 119 17 35 N
2588 Ivan, H 70 182 126 15 41 N
2589 Wilcox, E 78 189 138 14 57 I
2595 Warren, C 77 170 136 12 10 S
;
Notice that you do not need a RUN statement following the null statement (the semicolon after the data
lines). The DATALINES statement functions as a step boundary, so the DATA step is executed as soon as
SAS encounters it.
Creating a Raw Data File
Overview
Look at the SAS program and SAS data set that you created earlier in this chapter.
data sasuser.stress;
infile tests;
input ID $ 1-4 Name $ 6-25 RestHR 27-29 MaxHR 31-33
RecHR 35-37 TimeMin 39-40 TimeSec 42-43
Tolerance $ 45;
if tolerance='D';
TotalTime=(timemin*60)+timesec;
run;
SAS Data Set sasuser.stress Output
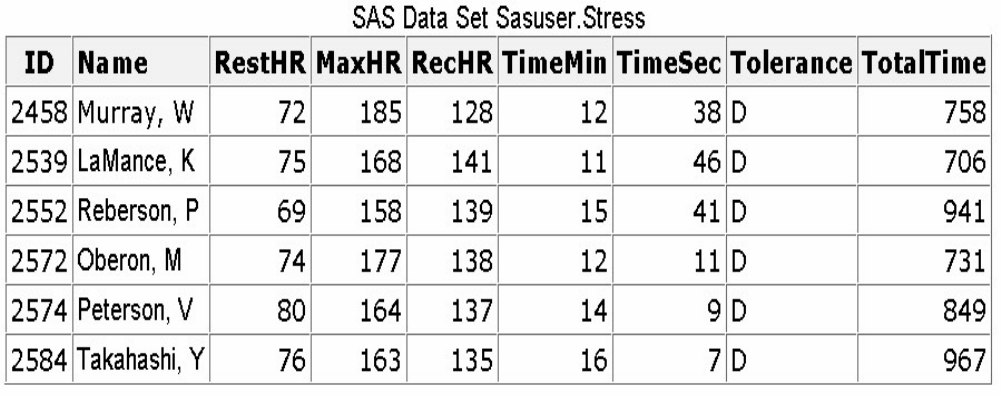
- 188 -
As you can see, the data set has been modified with SAS statements. If you wanted to write the new
observations to a raw data file, you could reverse the process that you've been following and write out the
observations from a SAS data set as records or lines to a new raw data file.
Using the _NULL_ Keyword
Because the goal of your SAS program is to create a raw data file and not a SAS data set, it is inefficient to
print a data set name in the DATA statement. Instead, use the keyword _NULL_, which enables you to use
the DATA step without actually creating a SAS data set. A SET statement specifies the SAS data set that
you want to read from.
data _null_;
set sasuser.stress;
The next step is to specify the output file.
Specifying the Raw Data File
You use the FILE and PUT statements to write the observations from a SAS data set to a raw data file, just
as you used the INFILE and INPUT statements to create a SAS data set. These two sets of statements work
almost identically.
When writing observations to a raw data file, use the FILE statement to specify the output file.
General form, FILE statement:
FILE file-specification <options> <operating-environment-options>;
where
file-specification can take the form fileref to name a previously defined file reference or 'filename' to point to the
actual name and location of the file
- 189 -
options names options that are used in creating the output file
operating-environment-options names options that are specific to an operating environment (for more
information, see the SAS documentation for your operating environment).
For example, if you want to read the Sasuser.Stress data set and write it to a raw data file that is referenced
by the fileref Newdat, you would begin your program with the following SAS statements.
data _null_;
set sasuser.stress;
file newdat;
Instead of identifying the raw data file with a SAS fileref, you can choose to specify the entire filename
and location in the FILE statement. For example, the following FILE statement points directly to the
C:\Clinic\Patients\Stress.dat file. Note that the path specifying the filename and location must be
enclosed in quotation marks.
data _null_;
set sasuser.stress;
file 'c:\clinic\patients\stress.dat';
Describing the Data
Whereas the FILE statement specifies the output raw data file, the PUT statement describes the lines to
write to the raw data file.
General form, PUT statement using column output:
PUT variable startcol-endcol...;
where
variable is the name of the variable whose value is written
startcol indicates where in the line to begin writing the value
endcol indicates where in the line to end the value.
In general, the PUT statement mirrors the capabilities of the INPUT statement. In this case you are
working with column output. Therefore, you need to specify the variable name, starting column, and
ending column for each field that you want to create. Because you are creating raw data, you don't need to
follow character variable names with a dollar sign ($).
data _null_;
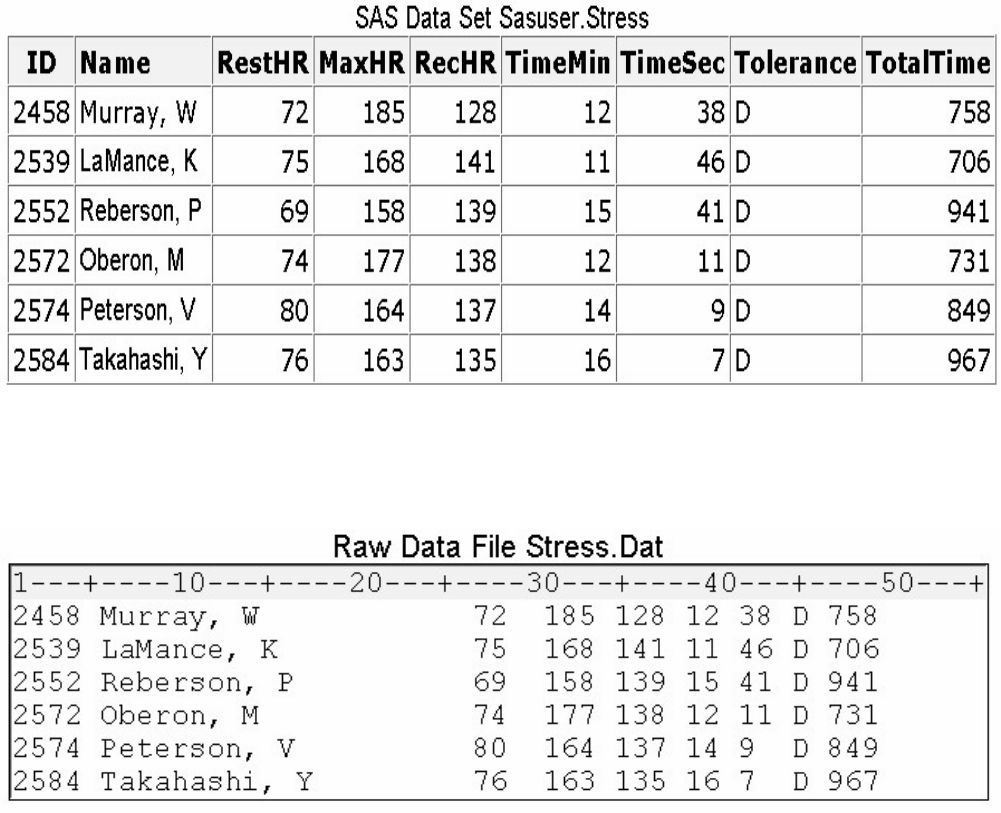
- 190 -
set sasuser.stress;
file 'c:\clinic\patients\stress.dat';
put id $ 1-4 name 6-25 resthr 27-29 maxhr 31-33
rechr 35-37 timemin 39-40 timesec 42-43
tolerance 45 totaltime 47-49;
run;
SAS Data Set sasuser.stress Output with PUT Statement
The resulting raw data file would look like this.
Creating a Raw Data File
In later chapters you'll learn how to use INPUT and PUT statements to read and write raw data in other
forms and record types.
Note: If you do not execute a FILE statement before a PUT statement in the current iteration of the
DATA step, SAS writes the lines to the SAS log. If you specify the PRINT fileref in the FILE statement,
before the PUT statement, SAS writes the lines to the procedure output file.
Additional Features
In this section, you learned to read raw data by using an INPUT statement that uses column input. You
also learned how to write to a raw data file by using the FILE statement with column input. However,
column input is appropriate only in certain situations. When you use column input, your data must be

- 191 -
• standard character and numeric values. If the raw data file contains nonstandard values, then you need to use
formatted input, another style of input. To learn about formatted input, see Reading SAS Data Sets.
• in fixed fields. That is, values for a particular variable must be in the same location in all records. If your raw data
file contains values that are not in fixed fields, you need to use list input. To learn about list input, see Reading
Free-Format Data.
Other forms of the INPUT statement enable you to read
• nonstandard data values such as hexadecimal, packed decimal, dates, and monetary values that contain dollar
signs and commas
• free-format data (data that is not in fixed fields)
• implied decimal points
• variable-length data values
• variable-length records
• different record types.
Reading Microsoft Excel Data
Overview
In addition to reading raw data files, SAS can also read Microsoft Excel data. Whether the input data
source is a SAS data set, a raw data file, or a file from another application, you use the DATA step to
create a SAS data set. The difference between reading these various types of input is in how you reference
the data. To read in Excel data you use one of the following methods:
• SAS/ACCESS LIBNAME statement
• Import Wizard
Remember, the Base SAS LIBNAME statement associates a SAS name (libref) with a SAS DATA library
by pointing to its physical location. But, the SAS/ACCESS LIBNAME statement associates a SAS name
with an Excel workbook file by pointing to its location.
In doing so, the Excel workbook becomes a new library in SAS, and the worksheets in the workbook
become the individual SAS data sets in that library.
The figure below illustrates the difference between how the two LIBNAME statements treat the data.
Comparing Libname Statements
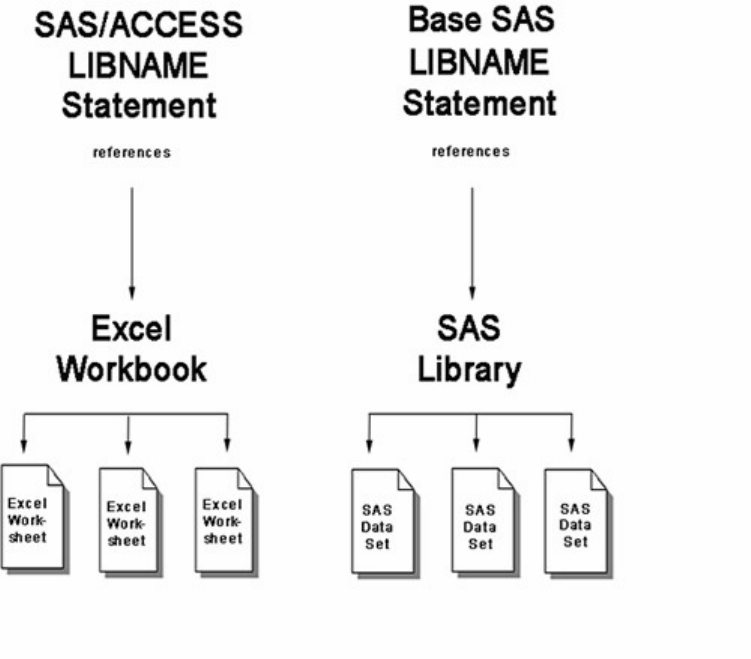
- 192 -
The next figure shows how the DATA step is used with three types of input data.
Using the DATA step with Different Types of Output

- 193 -
Notice how the INFILE and INPUT statements are used in the DATA step for reading raw data, but the
SET statement is used in the DATA step for reading in the Excel worksheets.
Running SAS with Microsoft Excel
• You must have licensed SAS/ACCESS Interface to PC Files to use a SAS/ACCESS LIBNAME statement that
references an Excel workbook.
• If you are running SAS version 9.1 or earlier and want to read in Microsoft Excel data, you must use Microsoft
Excel 2003 or earlier.
• To read Microsoft Excel 2007 data you must be running SAS version 9.2 or later.
• The examples in this section are based on SAS version 9.2 running with Microsoft Excel 2007.
Steps for Reading Excel Data
Let's look at the steps for reading in an Excel workbook file.
To read the Excel workbook file, the DATA step must provide the following instructions to SAS:
- 194 -
• a libref to reference the Excel workbook to be read
• the name and location (using another libref) of the new SAS data set
• the name of the Excel worksheet that is to be read
The table below outlines the basic statements that are used in a program that reads Excel data and creates a
SAS data set from an Excel worksheet. The PROC CONTENTS and PROC PRINT statements are not
requirements for reading in Excel data and creating a SAS data set. However, these statements are useful
for confirming that your Excel data has successfully been read into SAS.
Basic Steps for Reading Excel Data into a SAS Data Set
To do this...
Use this SAS
statement...
Example
Reference an Excel workbook file
SAS/ACCESS
LIBNAME statement
libname results
'c:\users\exercise.xlsx';
Output the contents of the SAS Library
PROC CONTENTS
proc contents
data=results._all_;
Execute the PROC CONTENTS statement
RUN statement
run;
Name and create a new SAS data set
DATA statement
data work.stress;
Read in an Excel worksheet (as the input
data for the new SAS data set)
SET statement
set results.'ActLevel$'n;
Execute the DATA step
RUN statement
run;
View the contents of a particular data set
PROC PRINT
proc print data=stress;
Execute the PROC PRINT statement
RUN statement
run;
The SAS/ACCESS LIBNAME Statement
The general form of the SAS/ACCESS LIBNAME statement is as follows:
- 195 -
General form, SAS/ACCESS LIBNAME statement:
LIBNAME libref 'location-of-Excel-workbook ' <options>;
where
libref is a name that you associate with an Excel workbook.
'location-of-Excel-workbook' is the physical location of the Excel workbook.
Example:
libname results 'c:\users\exercise.xlsx';
Referencing an Excel Workbook
Overview
This example uses data similar to the scenario used for the raw data in the previous section. The data
shows the readings from exercise stress tests that have been performed on patients at a health clinic.
The stress test data is located in an Excel workbook named exercise.xlsx (shown below), which is stored in
the location c:\users.
Excel Workbook
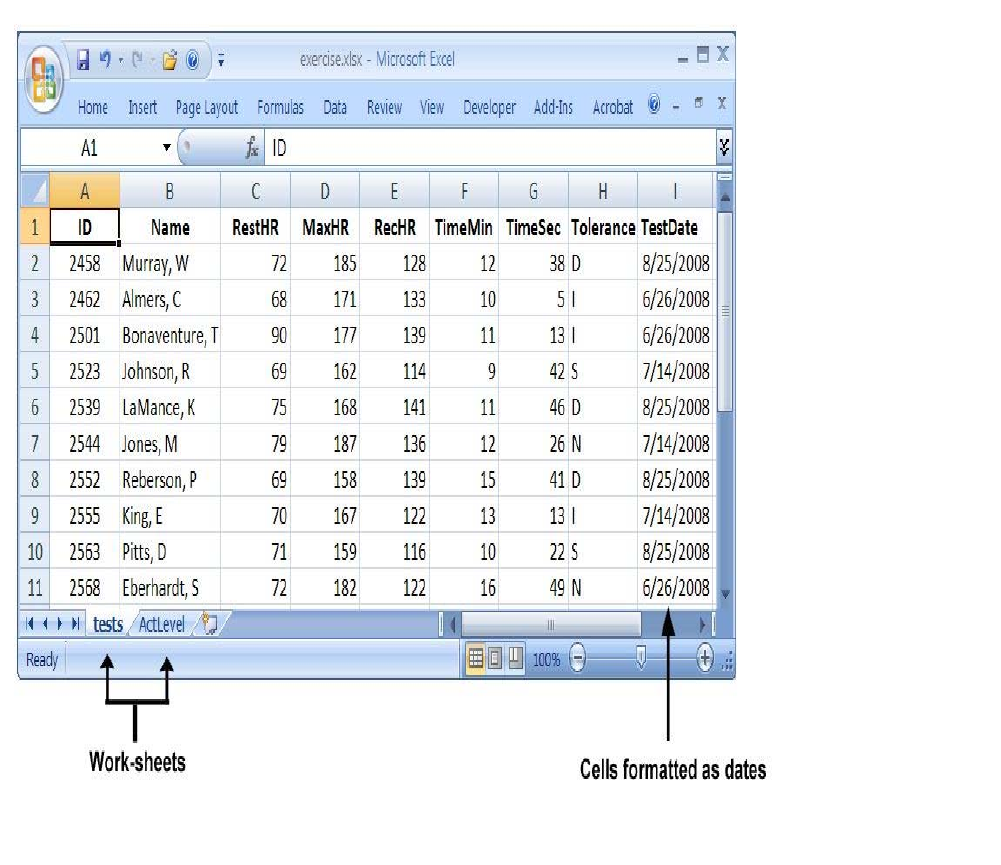
- 196 -
Notice in the sample worksheet above that the date column is defined in Excel as dates. That is, if you
right-click on the cells and select Format Cells (in Excel), the cells have a category of Date. SAS reads
this data just as it is stored in Excel. If the date had been stored as text in Excel, then SAS would have read
it as a character string.
To read in this workbook, you must first create a libref to point to the workbook's location:
libname results 'c:\users\exercise.xlsx';
The LIBNAME statement creates the libref results, which points to the Excel workbook exercise.xlsx. The
workbook contains two worksheets, tests and ActLevel, which are now available in the new SAS library
(results) as data sets.
After submitting the LIBNAME statement, you can look in the SAS Explorer window to see how SAS
handles your Excel workbook. The Explorer window enables you to manage your files in the SAS
windowing environment.
SAS Explorer Window
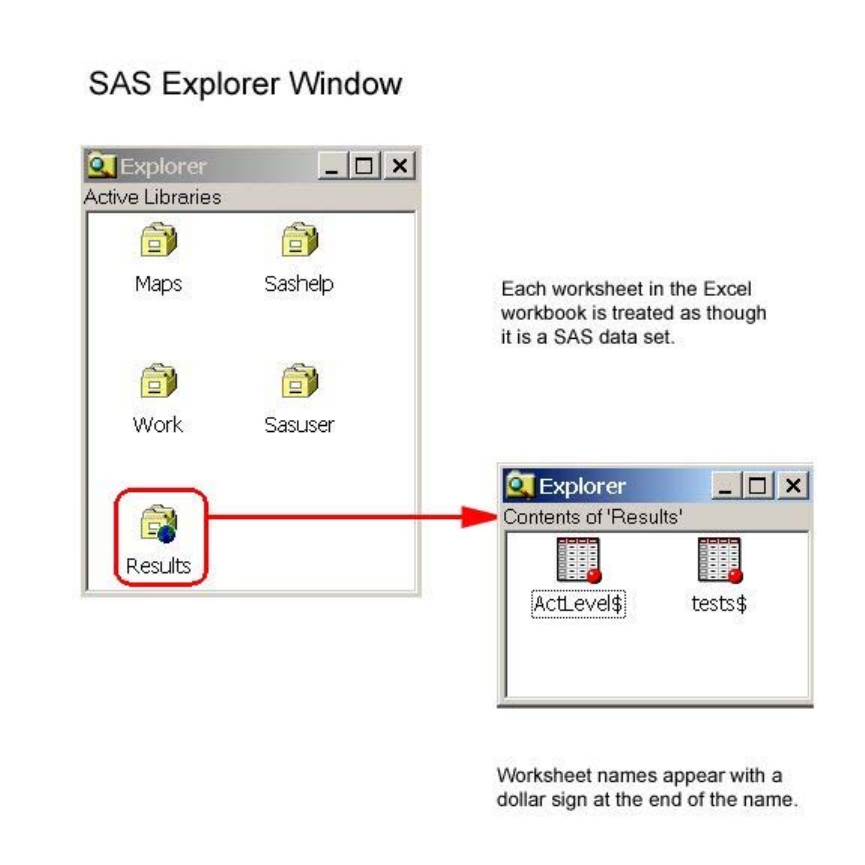
- 197 -
Name Literals
In the figure above, notice how the LIBNAME statement created a permanent library, results, which is the
SAS name (libref) we gave to the workbook file and its location. The new library contains two SAS data
sets, which accesses the data from the Excel worksheets. From this window you can browse the list of SAS
libraries or display the descriptor portion of a SAS data set.
Notice that the Excel worksheet names have the special character ($) at the end. All Excel worksheets are
designated this way. But remember, special characters such as these are not allowed in SAS data set names
by default. So, in order for SAS to allow this character to be included in the data set name, you must assign
a name literal to the data set name. A SAS name literal is a name token that is expressed as a string within
quotation marks, followed by the uppercase or lowercase letter n. The name literal tells SAS to allow the
special character ($) in the data set name.
Name Literal
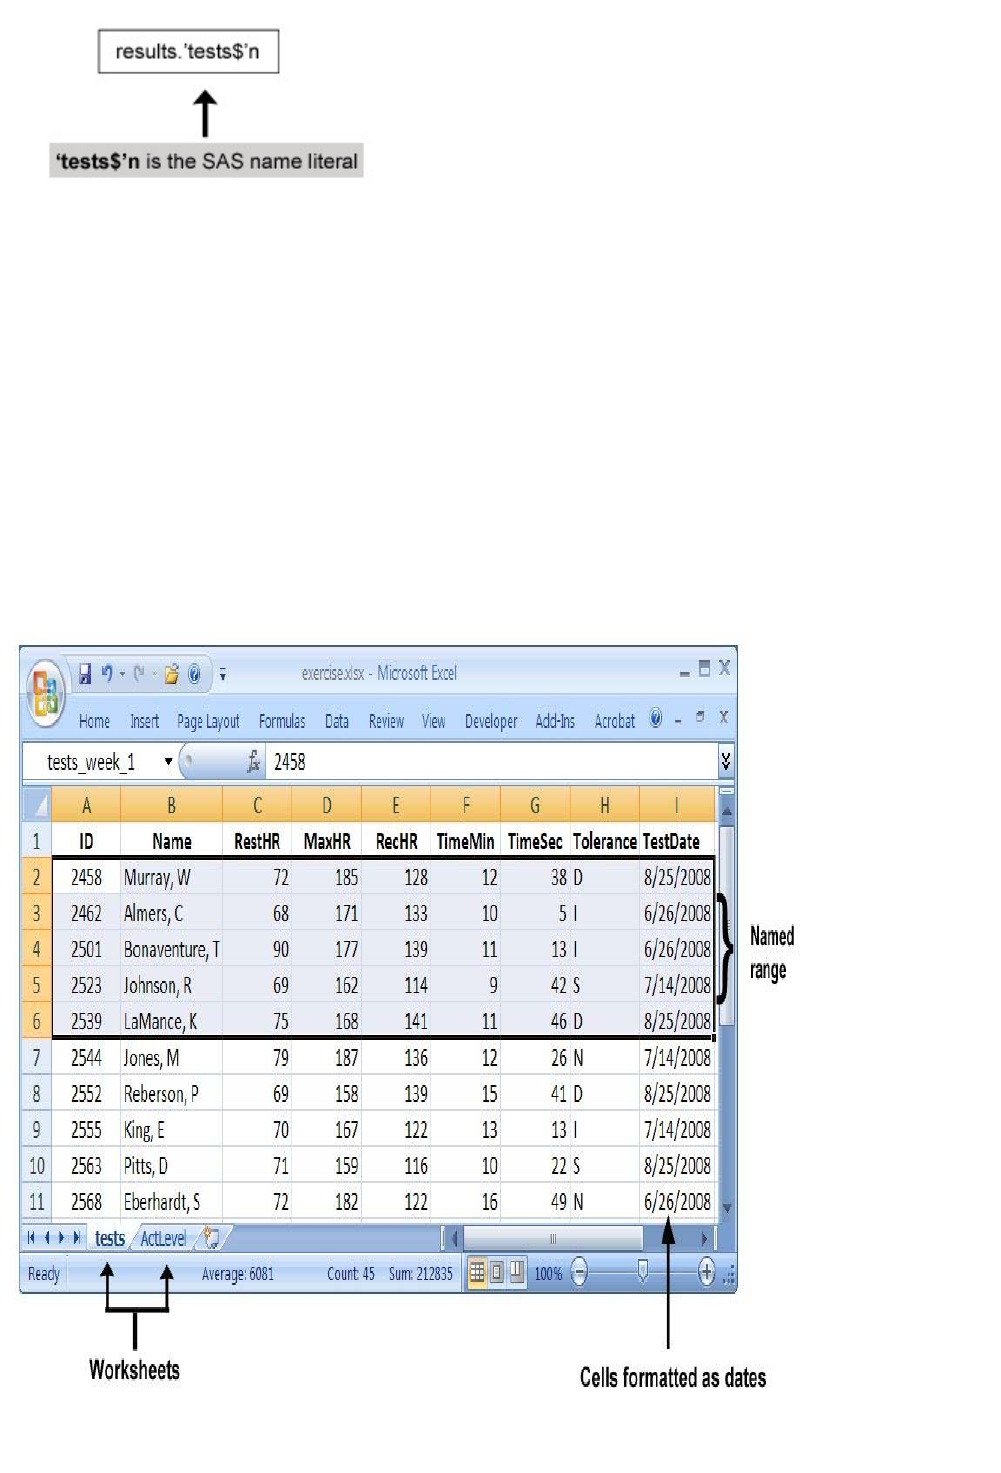
- 198 -
Named Ranges
A named range is a range of cells within a worksheet that you define in Excel and assign a name to. In the
example below, the worksheet contains a named range, tests_week_1, which SAS recognizes as a data set.
The named range, tests_week_1, and its parent worksheet, tests, will appear in the SAS Explorer window
as separate data sets, except that the data set created from the named range will have no dollar sign ($)
appended to its name.
For more information on named ranges, see your Microsoft Excel documentation.
Named Range
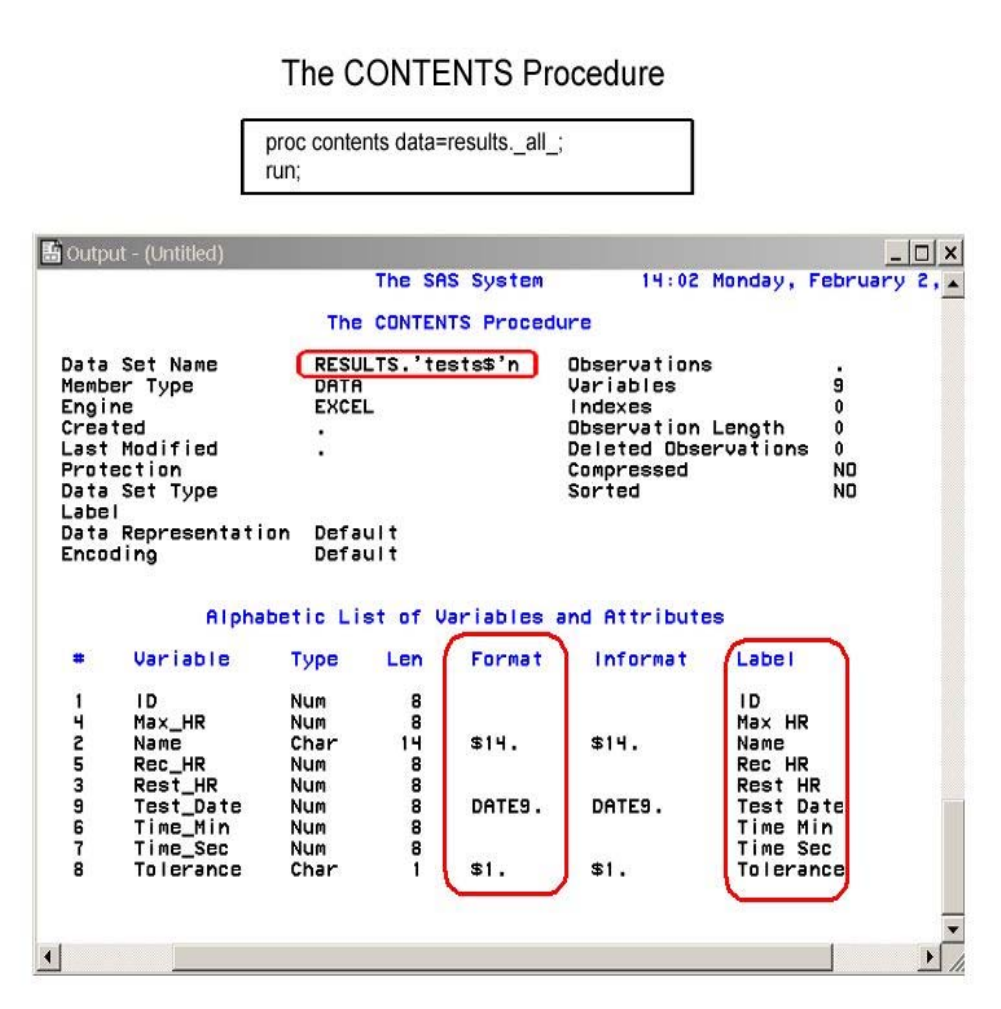
- 199 -
Using PROC CONTENTS
In addition to using the SAS explorer window to view library data, you can also use the CONTENTS
procedure with the _ALL_ keyword to produce information about a data library and its contents. In the
example below, PROC CONTENTS outputs summary information for the SAS data set tests, including
data set name, variables, data types, and other summary information. This statement is useful for making
sure that SAS successfully read in your Excel data before moving on to the DATA step.
proc contents data=results._all_;
run;
CONTENTS Procedure Output
About the sample output above:
- 200 -
• The variables in the data set are pulled from the Excel column headings. SAS uses underscores to replace the
spaces.
• The Excel dates in the Format column are converted to SAS dates with the default DATE9. format.
• This is partial output. The ACTLEVEL data set would also be included in the PROC CONTENTS report.
Creating the DATA Step
You use the DATA statement to indicate the beginning of the DATA step and name the SAS data set to be
created. Remember that the SAS data set name is a two-level name. For example, the two-level name
results.Admit specifies that the data set Admit is stored in the permanent SAS library to which the libref
results has been assigned.
When reading Excel data, use the SET statement to indicate which worksheet in the Excel file that you
want to read. To read in the Excel file you write the DATA and SET statements as follows:
data work.stress;
set results.'ActLevel$'n;
run;
In this example, the DATA statement tells SAS to name the new data set, stress, and store it in the
temporary library WORK. The SET statement in the DATA step specifies the libref (reference to the Excel
file) and the worksheet name as the input data.
You can use several statements in the DATA step to subset your data as needed. Here, the WHERE
statement is used with a variable to include only those participants whose activity level is HIGH.
data work.stress;
set results.'ActLevel$'n;
where ActLevel='HIGH';
run;
The figure below shows the partial output for this DATA step in table format.
DATA Step Output
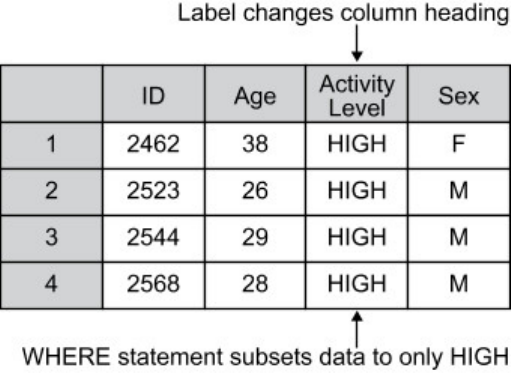
- 201 -
Using PROC PRINT
After using the DATA step to read in the Excel data and create the SAS data set, you can use PROC
PRINT to produce a report that displays the data set values.
You can also use the PRINT procedure to refer to a specific worksheet. Remember to use the name literal
when referring to a specific Excel worksheet. In the example below, the first PRINT statement displays the
data values for the new data set that was created in the DATA step. The second PRINT statement displays
the contents of the Excel worksheet that was referenced by the LIBNAME statement.
proc print data=work.stress;
run;
proc print data=results.'ActLevel$'n;
run;
Disassociating a Libref
If SAS has a libref assigned to an Excel workbook, the workbook cannot be opened in Excel. To
disassociate a libref, use a LIBNAME statement, specifying the libref and the CLEAR option.
libname results ’c:\users\exercise.xlsx’;
proc print data=results.'tests$'n;
run;
libname results clear;
SAS disconnects from the data source and closes any resources that are associated with that libref’s
connection.
LIBNAME Statement Options
There are several options that you can use with the LIBNAME statement to control how SAS interacts
with the Excel data. The general form of the SAS/ACCESS LIBNAME statement (with options) is as
follows:
- 202 -
libname libref 'location-of-Excel-workbook' <options>;
Example:
libname doctors 'c:\clinicNotes\addresses.xlsx' mixed=yes;
DBMAX_TEXT=n
indicates the length of the longest character string where n is any integer between 256 and 32,767 inclusive. Any character
string with a length greater than this value is truncated. The default is 1024.
GETNAMES=YES|NO
determines whether SAS will use the first row of data in an Excel worksheet or range as column names.
YES specifies to use the first row of data in an Excel worksheet or range as column names.
NO specifies not to use the first row of data in an Excel worksheet or range as column names. SAS generates and uses the
variable names F1, F2, F3, and so on.
The default is YES.
MIXED=YES|NO
Specifies whether to import data with both character and numeric values and convert all data to character.
YES specifies that all data values will be converted to character.
NO specifies that numeric data will be missing when a character type is assigned. Character data will be missing when a
numeric data type is assigned.
The default is NO.
SCANTEXT=YES|NO
specifies whether to read the entire data column and use the length of the longest string found as the SAS column width.
YES scans the entire data column and uses the longest string value to determine the SAS column width.
NO does not scan the column and defaults to a width of 255.
The default is YES.
SCANTIME=YES|NO
specifies whether to scan all row values in a date/time column and automatically determine the TIME. format if only time
values exist.
YES specifies that a column with only time values be assigned the TIME8. format.
NO specifies that a column with only time values be assigned the DATE9. format.
The default is NO.
USEDATE=YES|NO
specifies whether to use the DATE9. format for date/time values in Excel workbooks.
YES specifies that date/time values be assigned the DATE9. format.
NO specifies that date/time values be assigned the DATETIME. format.
The default is YES.
Creating Excel Worksheets
In addition to being able to read Excel data, SAS can also create Excel worksheets from SAS data sets.
- 203 -
To do this, you use the SAS/ACCESS LIBNAME statement. For example, to create a new worksheet
named high_stress from the temporary SAS data set work.high_stress and save this worksheet in the new
Excel file newExcel.xlsx, you would submit the following LIBNAME statement and DATA step:
libname clinic 'c:\Users\mylaptop\admitxl.xlsx' mixed=yes;
data clinic.admit;
set work.admit;
run;
The IMPORT Wizard
Importing Data
As an alternative to using programming statements, you can use the Import Wizard to guide you through
the process of creating a SAS data set from both raw data and from Excel worksheets. The Import Wizard
enables you to create a SAS data set from different types of external files, such as
• dBase files (*.dbf)
• Excel 2007 (or earlier version) workbooks (*.xls, *.xlsx, *.xlsb, or *.xlsm)
• Microsoft Access tables (*.mdb, *.accdb)
• Delimited files (*.*)
• Comma-separated values (*.csv).
The data sources that are available to you depend on which SAS/ACCESS products you have licensed. If
you do not have any SAS/ACCESS products licensed, the only type of data source files available to you
are CSV files, TXT files, and delimited files.
To access the Import Wizard, select File→Import Data from the menu bar. The Import Wizard opens
with the Select import type screen.
Import Wizard
- 204 -
Follow the instructions on each screen of the Import Wizard to read in your data. If you need additional
information, select the Help button at the bottom of each screen in the wizard.
Just as you can create a SAS data set from raw data by using the Import Wizard, you can use the Export
Wizard to read data from a SAS data set and to write the data to an external data source. To access the
Export Wizard, select File→Export Data from the menu bar.
Chapter Summary
Text Summary
Raw Data Files
A raw data file is an external file whose records contain data values that are organized in fields. The raw
data files in this chapter contain fixed fields.
Steps to Create a SAS Data Set
You need to follow several steps to create a SAS data set using raw data. You need to
• reference the raw data file to be read
• name the SAS data set
• identify the location of the raw data
• describe the data values to be read.
Referencing a SAS Library
- 205 -
To begin your program, you might need to use a LIBNAME statement to reference the SAS library in
which your data set will be stored.
Writing a DATA Step Program
The DATA statement indicates the beginning of the DATA step and names the SAS data set(s) to be
created.
Next, you specify the raw data file by using the INFILE statement. The OBS= option in the INFILE
statement enables you to process a specified number of observations.
This chapter teaches column input, the most simple input style. Column input specifies actual column
locations for data values. The INPUT statement describes the raw data to be read and placed into the SAS
data set.
Submitting the Program
When you submit the program, you can use the OBS= option with the INFILE statement to verify that the
correct data is being read before reading the entire data file.
After you submit the program, view the log to check the DATA step processing. You can then print the
data set by using the PROC PRINT procedure.
Once you've checked the log and verified your data, you can modify the DATA step to read the entire raw
data file by removing the OBS= option from the INFILE statement.
If you are working with a raw data file that contains invalid data, the DATA step continues to execute.
Unlike syntax errors, invalid data errors do not cause SAS to stop processing a program. If you have a way
to edit the invalid data, it's best to correct the problem and rerun the DATA step.
Creating and Modifying Variables
To modify existing values or to create new variables, you can use an assignment statement in any DATA
step. Within assignment statements, you can specify any SAS expression.
You can use date constants to assign dates in assignment statements. You can also use SAS time constants
and SAS datetime constants in assignment statements.
Subsetting Data
To process only observations that meet a specified condition, use a subsetting IF statement in the DATA
step.
Reading Instream Data
To read instream data lines instead of an external file, use a DATALINES statement, a CARDS statement,
or a LINES statement and enter data directly in your SAS program. Omit the RUN at the end of the DATA
step.
Creating a Raw Data File
- 206 -
When the goal of your SAS program is to create a raw data file and not a SAS data set, it is inefficient to
list a data set name in the DATA statement. Instead use the keyword _NULL_, which allows the power of
the DATA step without actually creating a SAS data set. A SET statement specifies the SAS data set that
you want to read from.
You can use the FILE and PUT statements to write out the observations from a SAS data set to a raw data
file just as you used the INFILE and INPUT statements to create a SAS data set. These two sets of
statements work almost identically.
Microsoft Excel Files
You can read Excel worksheets by using the SAS/ACCESS LIBNAME statement.
Steps to Create a SAS Data Set from Excel Data
You need to follow several steps to create a SAS data set using Excel. You need to
• provide a name for the new SAS data set
• provide the location or name of the libref and Excel worksheet
Referencing an Excel Workbook
To begin your program, you need to use a LIBNAME statement to reference the Excel workbook.
Writing a DATA Step Program
The DATA statement indicates the beginning of the DATA step and names the SAS data set(s) to be
created.
Next, you specify the Excel worksheet to be read by using the SET statement. You must use a SAS name
literal since SAS uses the special character ($) to name Excel worksheets.
Submitting the Program
When you submit the program, you can use the CONTENTS procedure to explore the new library and
contents.
After you submit the program, view the log to check the DATA step processing. You can then print the
data sets created from the Excel worksheets by using the PROC PRINT procedure.
Once you've checked the log and verified your data, you can modify the DATA step along with the
WHERE statement to subset parts of the data as needed.
Syntax
Reading Data from a Raw File or Reading Instream Data
LIBNAME libref 'SAS-data-library';
FILENAME fileref 'filename';
- 207 -
DATA SAS-data-set;
INFILE file-specification<OBS=n>;
INPUT variable <$> startcol-endcol...;
IF expression;
variable=expression;
DATALINES;
instream data goes here if used
;
RUN; /* not used with the DATALINES statement */
PROC PRINT DATA= SAS-data set;
RUN;
Creating a Raw Data File
LIBNAME libref 'SAS-data-library';
DATA _NULL_;
SET SAS-data-set;
FILE file-specification;
PUT variable startcol-endcol...;
RUN;
Reading Data from an Excel Workbook
LIBNAME libref '<location-of-Excel-workbook>';
PROC CONTENTS DATA= libref._ALL_;
DATA SAS-data-set;
SET libref.'worksheet_name$'n;
WHERE where-expression;
RUN;
PROC PRINT DATA= SAS-data set;
RUN;
Sample Programs
Reading Data from an External File
- 208 -
libname clinic 'c:\bethesda\patients\admit';
filename admit 'c:\clinic\patients\admit.dat';
data clinic.admittan;
infile admit obs=5;
input ID $ 1-4 Name $ 6-25 RestHR 27-29 MaxHR 31-33
RecHR 35-37 TimeMin 39-40 TimeSec 42-43
Tolerance $ 45;
if tolerance='D';
TotalTime=(timemin*60)+timesec;
run;
proc print data=clinic.admittan;
run;
Reading Instream Data
libname clinic 'c:\bethesda\patients\admit';
data clinic.group1;
input ID $ 1-4 Name $ 6-25 RestHR 27-29 MaxHR 31-33
RecHR 35-37 TimeMin 39-40 TimeSec 42-43
Tolerance $ 45;
if tolerance='D';
TotalTime=(timemin*60)+timesec;
datalines;
2458 Murray, W 72 185 128 12 38 D
2462 Almers, C 68 171 133 10 5 I
2501 Bonaventure, T 78 177 139 11 13 I
2523 Johnson, R 69 162 114 9 42 S
2539 LaMance, K 75 168 141 11 46 D
2544 Jones, M 79 187 136 12 26 N
2595 Warren, C 77 170 136 12 10 S
;
proc print data=clinic.group1;
run;
Reading Excel Data
libname sasuser 'c:\users\admit.xlsx' mixed=yes;
proc contents data=sasuser._all_;
run;
proc print data=sasuser.'worksheet1$'n;
run;
Creating an Excel Worksheet
- 209 -
libname clinic 'c:\Users\mylaptop\admitxl.xlsx' mixed=yes;
data clinic.admit;
set work.admit;
run;
Points to Remember
• LIBNAME and FILENAME statements are global. Librefs and filerefs remain in effect until you change them,
cancel them, or end your SAS session.
• For each field of raw data that you read into your SAS data set, you must specify the following in the INPUT
statement: a valid SAS variable name, a type (character or numeric), a starting column, and if necessary, an ending
column.
• When you use column input, you can read any or all fields from the raw data file, read the fields in any order, and
specify only the starting column for variables whose values occupy only one column.
• Column input is appropriate only in some situations. When you use column input, your data must be standard
character and numeric values, and these values must be in fixed fields. That is, values for a particular variable must be in
the same location in all records.
Chapter Quiz
Select the best answer for each question. After completing the quiz, you can check your answers using the
answer key in the appendix.
1. Which SAS statement associates the fileref Crime with the raw data file C:\States\Data\crime.dat?
1.
filename crime 'c:\states\data\crime.dat';
2.
filename crime c:\states\data\crime.dat;
3.
fileref crime 'c:\states\data\crime.dat';
4.
filename 'c:\states\data\crime' crime.dat;
2. Filerefs remain in effect until . . .
1. you change them.
2. you cancel them.
3. you end your SAS session.
4. all of the above
3. Which statement identifies the name of a raw data file to be read with the fileref Products and specifies that the
DATA step read-only records 1-15?
1.
infile products obs 15;

- 210 -
2.
infile products obs=15;
3.
input products obs=15;
4.
input products 1-15;
4. Which of the following programs correctly writes the observations from the data set below to a raw data file?
Data Set work.patients
1.
data _null_;
set work.patients;
infile 'c:\clinic\patients\referals.dat';
input id $ 1-4 sex 6 $ age 8-9 height 11-12
weight 14-16 pulse 18-20;
run;
2.
data referals.dat;
set work.patients;
input id $ 1-4 sex $ 6 age 8-9 height 11-12
weight 14-16 pulse 18-20;
run;
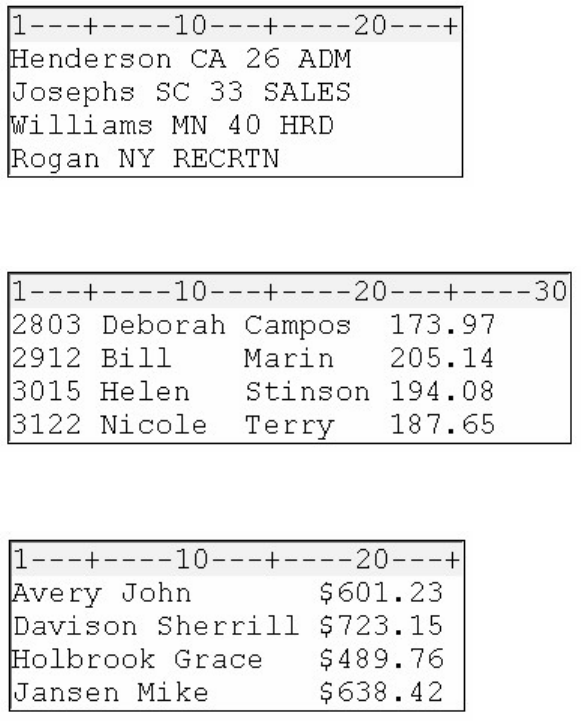
- 211 -
3.
data _null_;
set work.patients;
file c:\clinic\patients\referals.dat;
put id $ 1-4 sex 6 $ age 8-9 height 11-12
weight 14-16 pulse 18-20;
run;
4.
data _null_;
set work.patients;
file 'c:\clinic\patients\referals.dat';
put id $ 1-4 sex 6 $ age 8-9 height 11-12
weight 14-16 pulse 18-20;
run;
5. Which raw data file can be read using column input?
1. Raw Data File A
2. Raw Data File B
3. Raw Data File C
4. all of the above.
6. Which program creates the output shown below?
Raw Data and SAS Output Data Set
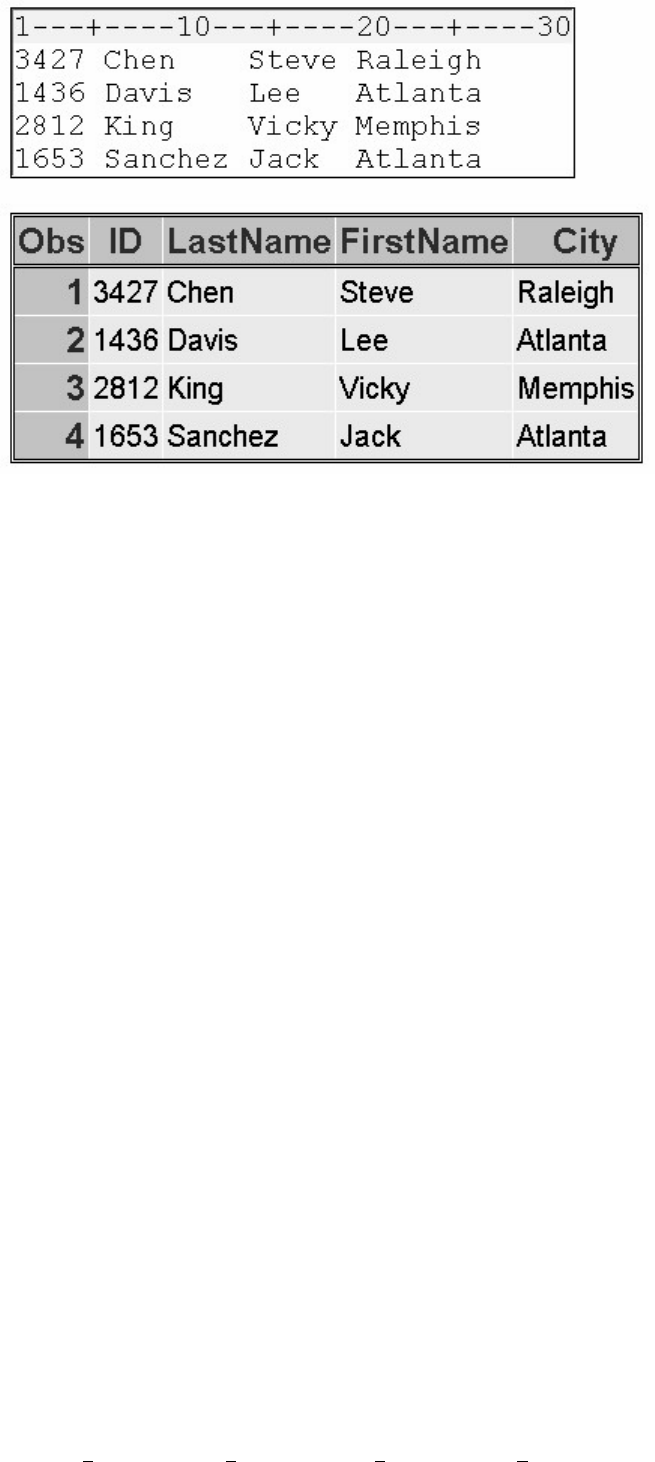
- 212 -
1.
data work.salesrep;
infile empdata;
input ID $ 1-4 LastName $ 6-12
FirstName $ 14-18 City $ 20-29;
run;
proc print data=work.salesrep;
run;
2.
data work.salesrep;
infile empdata;
input ID $ 1-4 Name $ 6-12
FirstName $ 14-18 City $ 20-29;
run;
proc print data=work.salesrep;
run;
3.
data work.salesrep;
infile empdata;
input ID $ 1-4 name1 $ 6-12
name2 $ 14-18 City $ 20-29;
run;
proc print data=work.salesrep;
run;
4. all of the above.
7. Which statement correctly reads the fields in the following order: StockNumber, Price, Item, Finish, Style?
Field Name Start Column End Column Data Type
StockNumber 1 3 character
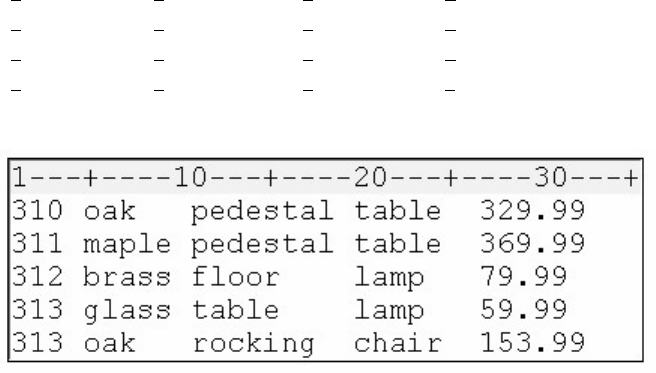
- 213 -
Finish 5 9 character
Style 11 18 character
Item 20 24 character
Price 27 32 numeric
8. Raw Data
9.
1.
input StockNumber $ 1-3 Finish $ 5-9 Style $ 11-18
Item $ 20-24 Price 27-32;
2.
input StockNumber $ 1-3 Price 27-32
Item $ 20-24 Finish $ 5-9 Style $ 11-18;
3.
input $ StockNumber 1-3 Price 27-32 $
Item 20-24 $ Finish 5-9 $ Style 11-18;
4.
input StockNumber $ 1-3 Price $ 27-32
Item $ 20-24 Finish $ 5-9 Style $ 11-18;
8. Which statement correctly re-defines the values of the variable Income as 100 percent higher?
1.
income=income*1.00;
2.
income=income+(income*2.00);
3.
income=income*2;
4.
income=*2;
9. Which program correctly reads instream data?
1.
data finance.newloan;
input datalines;
if country='JAPAN';
MonthAvg=amount/12;
1998 US CARS 194324.12
1998 US TRUCKS 142290.30
- 214 -
1998 CANADA CARS 10483.44
1998 CANADA TRUCKS 93543.64
1998 MEXICO CARS 22500.57
1998 MEXICO TRUCKS 10098.88
1998 JAPAN CARS 15066.43
1998 JAPAN TRUCKS 40700.34
;
2.
data finance.newloan;
input Year 1-4 Country $ 6-11
Vehicle $ 13-18 Amount 20-28;
if country='JAPAN';
MonthAvg=amount/12;
datalines;
run;
3.
data finance.newloan;
input Year 1-4 Country 6-11
Vehicle 13-18 Amount 20-28;
if country='JAPAN';
MonthAvg=amount/12;
datalines;
1998 US CARS 194324.12
1998 US TRUCKS 142290.30
1998 CANADA CARS 10483.44
1998 CANADA TRUCKS 93543.64
1998 MEXICO CARS 22500.57
1998 MEXICO TRUCKS 10098.88
1998 JAPAN CARS 15066.43
1998 JAPAN TRUCKS 40700.34
;
4.
data finance.newloan;
input Year 1-4 Country $ 6-11
Vehicle $ 13-18 Amount 20-28;
if country='JAPAN';
MonthAvg=amount/12;
datalines;
1998 US CARS 194324.12
1998 US TRUCKS 142290.30
1998 CANADA CARS 10483.44
1998 CANADA TRUCKS 93543.64
1998 MEXICO CARS 22500.57
1998 MEXICO TRUCKS 10098.88
1998 JAPAN CARS 15066.43
1998 JAPAN TRUCKS 40700.34

- 215 -
;
10. Which SAS statement subsets the raw data shown below so that only the observations in which Sex (in the
second field) has a value of F are processed?
Raw Data
1.
if sex=f;
2.
if sex=F;
3.
if sex='F';
4. a or b
Chapter 6 Understanding DATA Step Processing
Overview
Writing Basic DATA Steps
How SAS Processes Programs
Compilation Phase
Execution Phase
Debugging a DATA Step
Testing Your Programs

- 216 -
Chapter Summary
Chapter Quiz
Overview
Introduction
Creating SAS Data Sets from External Files explained how to read data, perform basic modifications, and
create a new SAS data set.
This chapter teaches you what happens behind the scenes when the DATA step reads raw data. You'll
examine the program data vector, which is a logical framework that SAS uses when creating SAS data
sets.
Understanding how the program operates can help you to anticipate how variables will be created and
processed, to plan your modifications, and to interpret and debug program errors. It also gives you useful
strategies for preventing and correcting common DATA step errors.
Objectives
In this chapter, you learn to
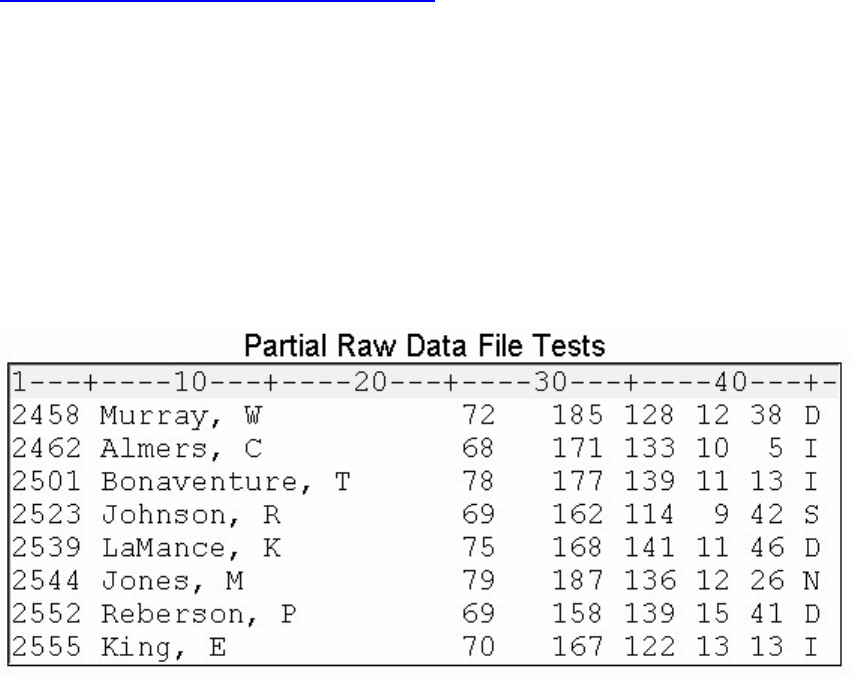
- 217 -
• identify the two phases that occur when a DATA step is processed
• interpret automatic variables
• identify the processing phase in which an error occurs
• debug SAS DATA steps
• validate and clean invalid data
• test programs by limiting the number of observations that are created
• flag errors in the SAS log.
Writing Basic DATA Steps
Creating SAS Data Sets from External Files explained how to write a DATA step to create a permanent
SAS data set from raw data that is stored in an external file.
data clinic.stress;
infile tests;
input ID 1-4 Name $ 6-25 RestHR 27-29
MaxHR 31-33 RecHR 35-37
TimeMin 39-40 TimeSec 42-43
Tolerance $ 45;
run;
You learned how to submit the DATA step and how to check the log to see whether the step ran
successfully.
- 218 -
You also learned how to display the contents of the data set with the PRINT procedure.
proc print data=clinic.stress;
run;
Output from the PRINT Procedure
How SAS Processes Programs
When you submit a DATA step, SAS processes the DATA step and then creates a new SAS data set. Let's
see exactly how that happens.
A SAS DATA step is processed in two phases:
- 219 -
• During the compilation phase, each statement is scanned for syntax errors. Most syntax errors prevent further
processing of the DATA step. When the compilation phase is complete, the descriptor portion of the new data set is
created.
• If the DATA step compiles successfully, then the execution phase begins. During the execution phase, the DATA
step reads and processes the input data. The DATA step executes once for each record in the input file, unless otherwise
directed.
The diagram below shows the general flow of DATA step processing for reading raw data. We'll examine
both the compilation phase and the execution phase in this chapter.
Let's start with the compilation phase.
Compilation Phase
Input Buffer
At the beginning of the compilation phase, the input buffer (an area of memory) is created to hold a record
from the external file. The input buffer is created only when raw data is read, not when a SAS data set is
read.
Program Data Vector
After the input buffer is created, the program data vector is created. The program data vector is the area of
memory where SAS holds one observation at a time.
The program data vector contains two automatic variables that can be used for processing but which are
not written to the data set as part of an observation.
• _N_ counts the number of times that the DATA step begins to execute.
- 220 -
• _ERROR_ signals the occurrence of an error that is caused by the data during execution. The default value is 0,
which means there is no error. When one or more errors occur, the value is set to 1.
Syntax Checking
During the compilation phase, SAS also scans each statement in the DATA step, looking for syntax errors.
Syntax errors include
• missing or misspelled keywords
• invalid variable names
• missing or invalid punctuation
• invalid options.
Data Set Variables
As the INPUT statement is compiled, a slot is added to the program data vector for each variable in the
new data set. Generally, variable attributes such as length and type are determined the first time a variable
is encountered.
data perm.update;
infile invent;
input Item $ 1-13 IDnum $ 15-19
InStock 21-22 BackOrd 24-25;
Total=instock+backord;
run;
Any variables that are created with an assignment statement in the DATA step are also added to the
program data vector. For example, the assignment statement below creates the variable Total. As the
statement is compiled, the variable is added to the program data vector. The attributes of the variable are
determined by the expression in the statement. Because the expression contains an arithmetic operator and
produces a numeric value, Total is defined as a numeric variable and is assigned the default length of 8.
data perm.update;
infile invent;
input Item $ 1-13 IDnum $ 15-19
InStock 21-22 BackOrd 24-25;
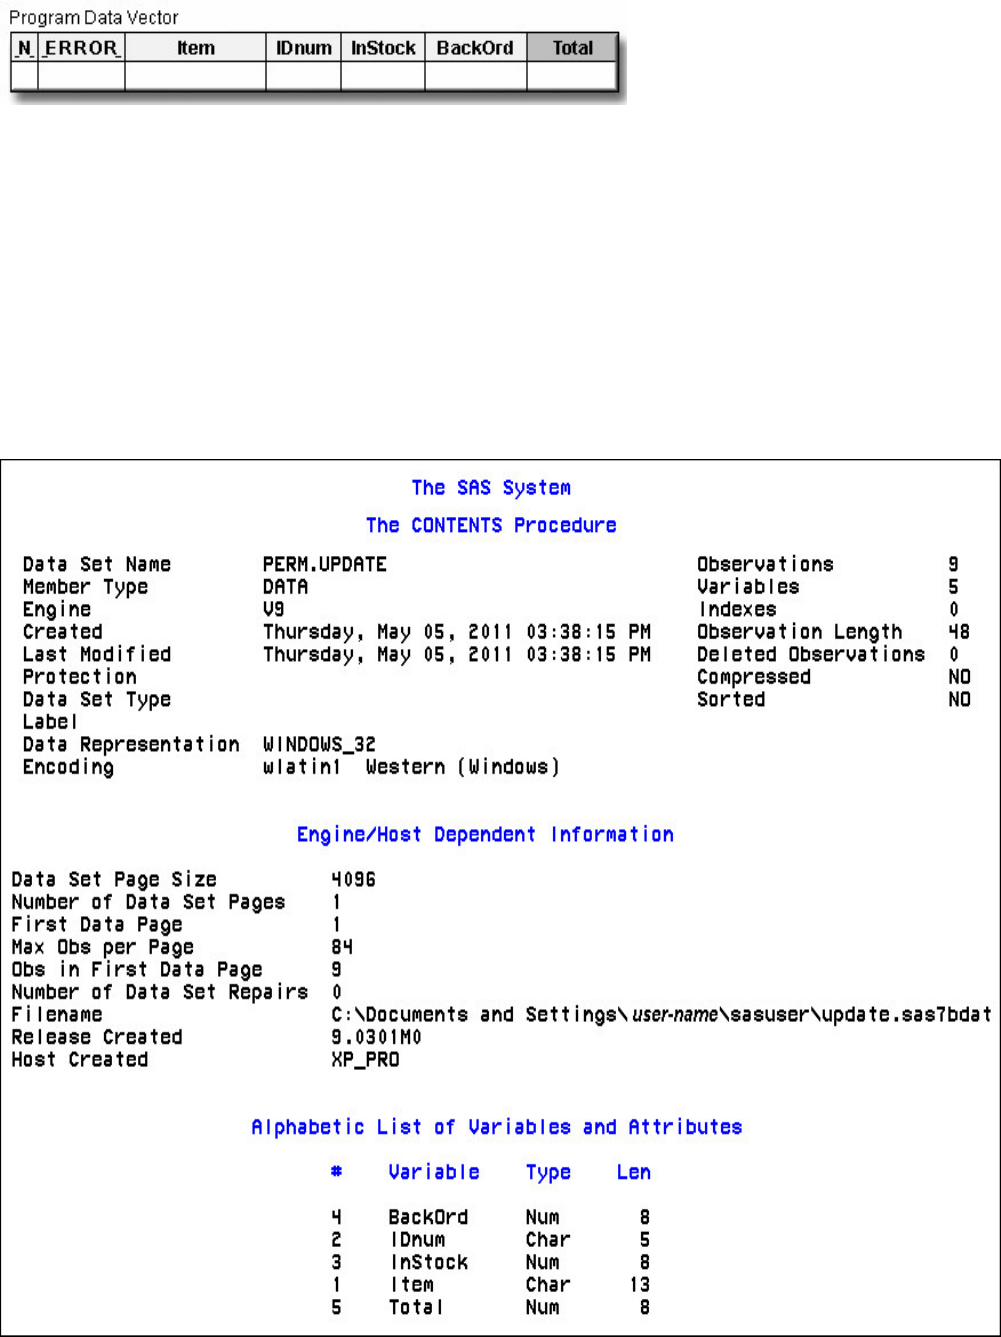
- 221 -
Total=instock+backord;
run;
Descriptor Portion of the SAS Data Set
At the bottom of the DATA step (in this example, when the RUN statement is encountered), the
compilation phase is complete, and the descriptor portion of the new SAS data set is created. The
descriptor portion of the data set includes
• the name of the data set
• the number of variables
• the names and attributes of the variables.
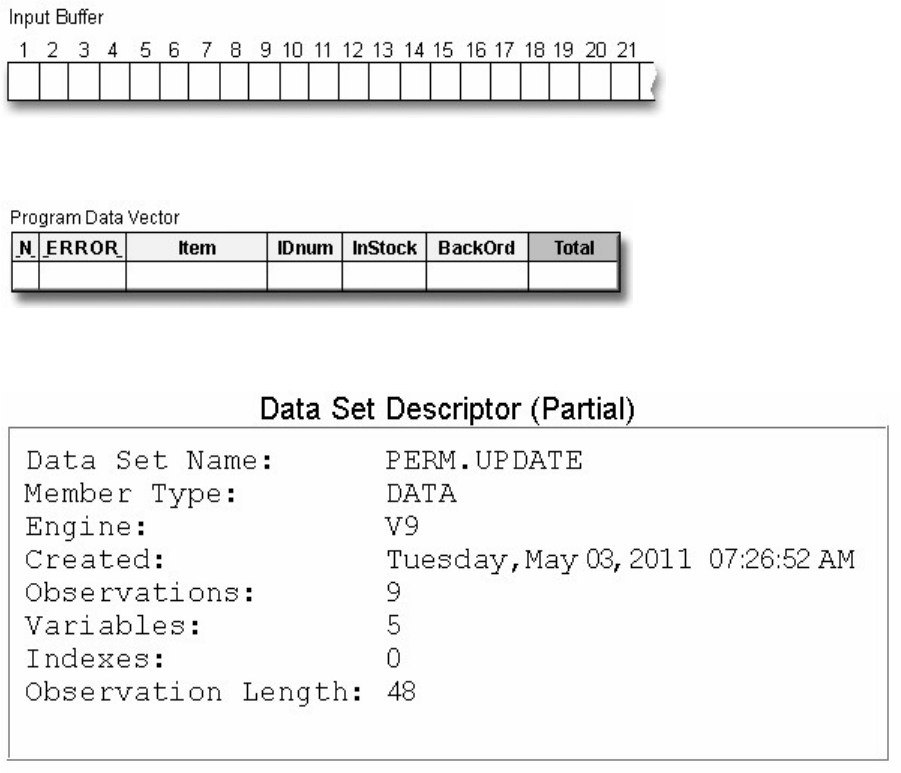
- 222 -
At this point, the data set contains the five variables that are defined in the input data set and in the
assignment statement. Remember, _N_ and _ERROR_ are not written to the data set. There are no
observations because the DATA step has not yet executed. During execution, each raw data record is
processed and is then written to the data set as an observation.
For additional information about assigning attributes to variables, see the SAS documentation.
Summary of the Compilation Phase
Let's review the compilation phase.
data perm.update;
infile invent;
input Item $ 1-13 IDnum $ 15-19
InStock 21-22 BackOrd 24-25;
Total=instock+backord;
run;
During the compilation phase, the input buffer is created to hold a record from the external file.
The program data vector is created to hold the current observation.
The descriptor portion of the SAS data set is created.
Execution Phase
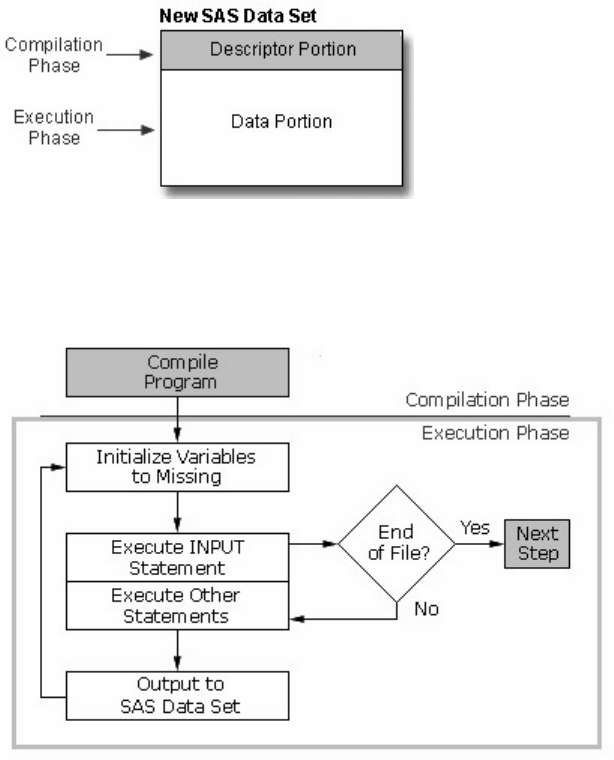
- 223 -
Overview
After the DATA step is compiled, it is ready for execution. During the execution phase, the data portion of
the data set is created. The data portion contains the data values.
During execution, each record in the input raw data file is read into the input buffer, copied to the program
data vector, and then written to the new data set as an observation. The DATA step executes once for each
record in the input file, unless otherwise directed by additional statements.
Example
The following DATA step reads values from the file Invent and executes nine times because there are nine
records in the file.
data perm.update;
infile invent;
input Item $ 1-13 IDnum $ 15-19
InStock 21-22 BackOrd 24-25;
Total=instock+backord;
run;
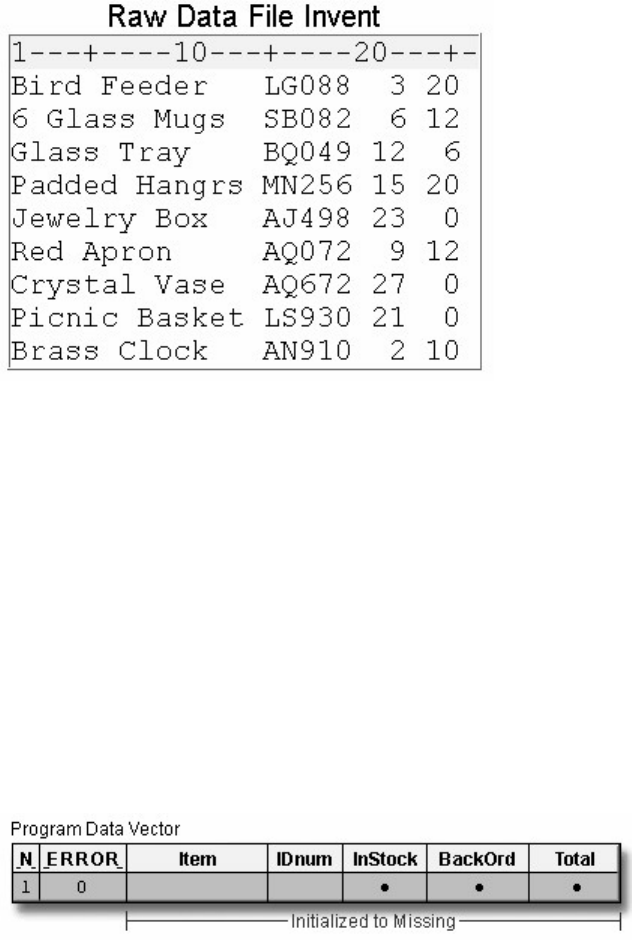
- 224 -
Initializing Variables
At the beginning of the execution phase, the value of _N_ is 1. Because there are no data errors, the value
of _ERROR_ is 0.
data perm.update;
infile invent;
input Item $ 1-13 IDnum $ 15-19
InStock 21-22 BackOrd 24-25;
Total=instock+backord;
run;
The remaining variables are initialized to missing. Missing numeric values are represented by periods, and
missing character values are represented by blanks.
INFILE Statement
Next, the INFILE statement identifies the location of the raw data.
data perm.update;
infile invent;
input Item $ 1-13 IDnum $ 15-19
InStock 21-22 BackOrd 24-25;
Total=instock+backord;
run;
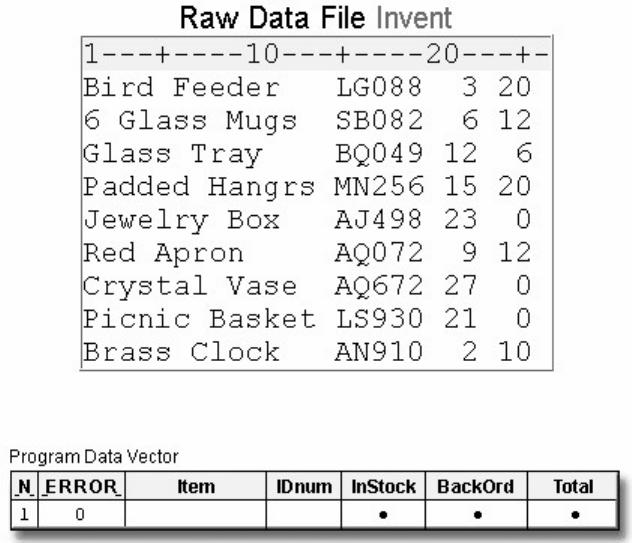
- 225 -
INPUT Statement
Next, the INPUT statement reads a record into the input buffer. Then, the raw data in columns 1-13 is read
and is assigned to Item in the program data vector.
data perm.update;
infile invent;
input Item $ 1-13 IDnum $ 15-19
InStock 21-22 BackOrd 24-25;
Total=instock+backord;
run;
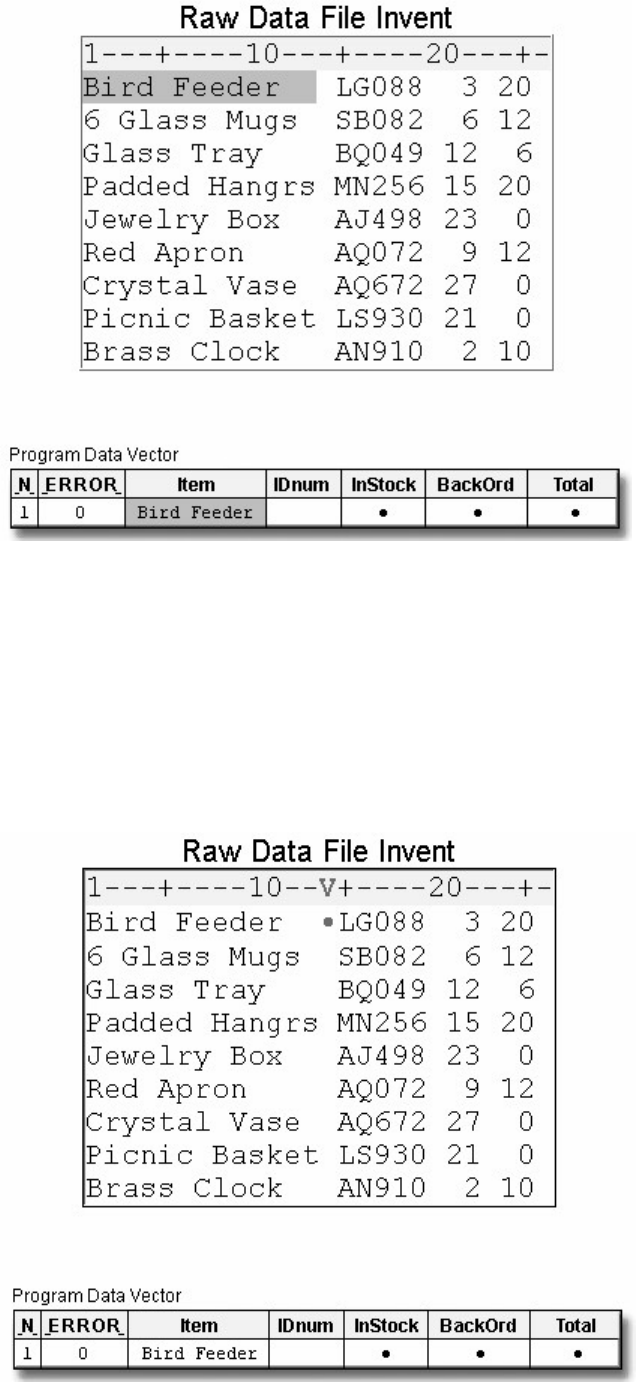
- 226 -
data perm.update;
infile invent;
input Item $ 1-13 IDnum $ 15-19
InStock 21-22 BackOrd 24-25;
Total=instock+backord;
run;
Next, the data in columns 15-19 is read and is assigned to IDnum in the program data vector.
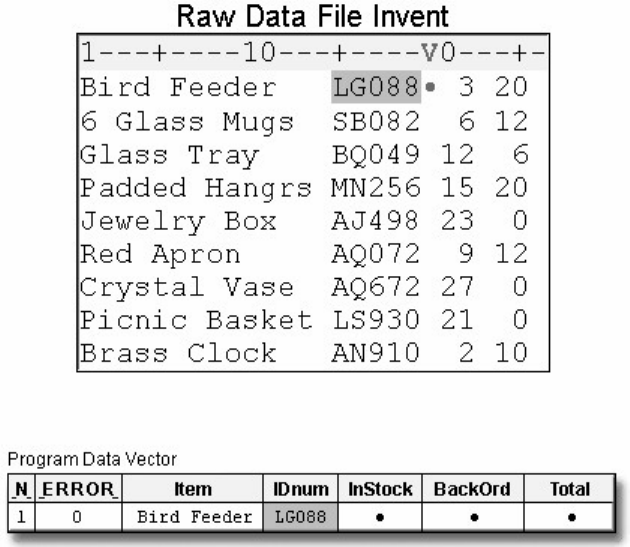
- 227 -
data perm.update;
infile invent;
input Item $ 1-13 IDnum $ 15-19
InStock 21-22 BackOrd 24-25;
Total=instock+backord;
run;
Likewise, the INPUT statement reads the values for InStock from columns 21-22, and it reads the values
for BackOrd from columns 24-25.
data perm.update;
infile invent;
input Item $ 1-13 IDnum $ 15-19
InStock 21-22 BackOrd 24-25;
Total=instock+backord;
run;
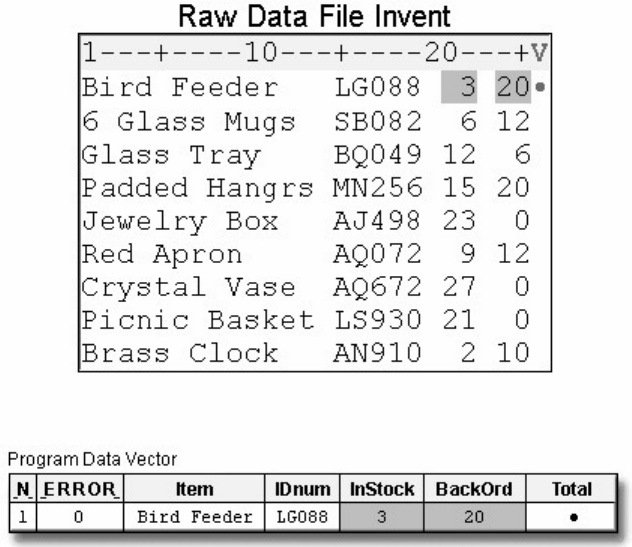
- 228 -
Next, the assignment statement executes. The values for InStock and BackOrd are added to produce the
values for Total.
data perm.update;
infile invent;
input Item $ 1-13 IDnum $ 15-19
InStock 21-22 BackOrd 24-25;
Total=instock+backord;
run;
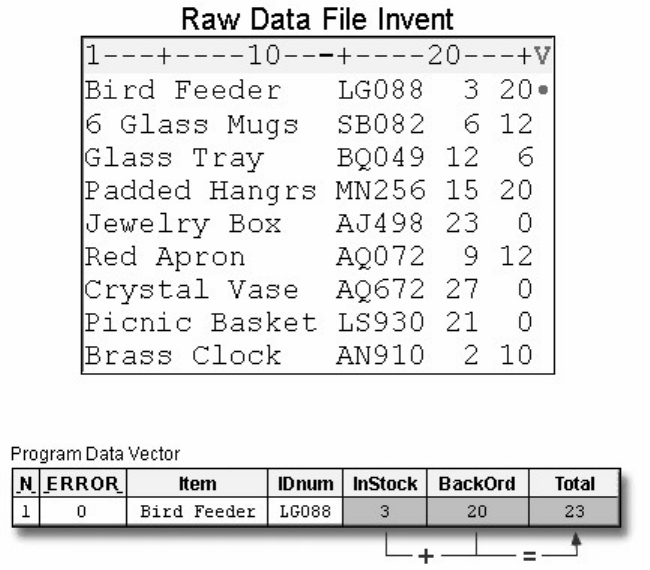
- 229 -
End of the DATA Step
At the end of the DATA step, several actions occur. First, the values in the program data vector are written
to the output data set as the first observation.
data perm.update;
infile invent;
input Item $ 1-13 IDnum $ 15-19
InStock 21-22 BackOrd 24-25;
Total=instock+backord;
run;

- 230 -
Next, control returns to the top of the DATA step and the value of _N_ increments from 1 to 2. Finally, the
variable values in the program data vector are re-set to missing. Notice that the automatic variable
_ERROR_ is reset to zero if necessary.
data perm.update;
infile invent;
input Item $ 1-13 IDnum $ 15-19
InStock 21-22 BackOrd 24-25;
Total=instock+backord;
run;
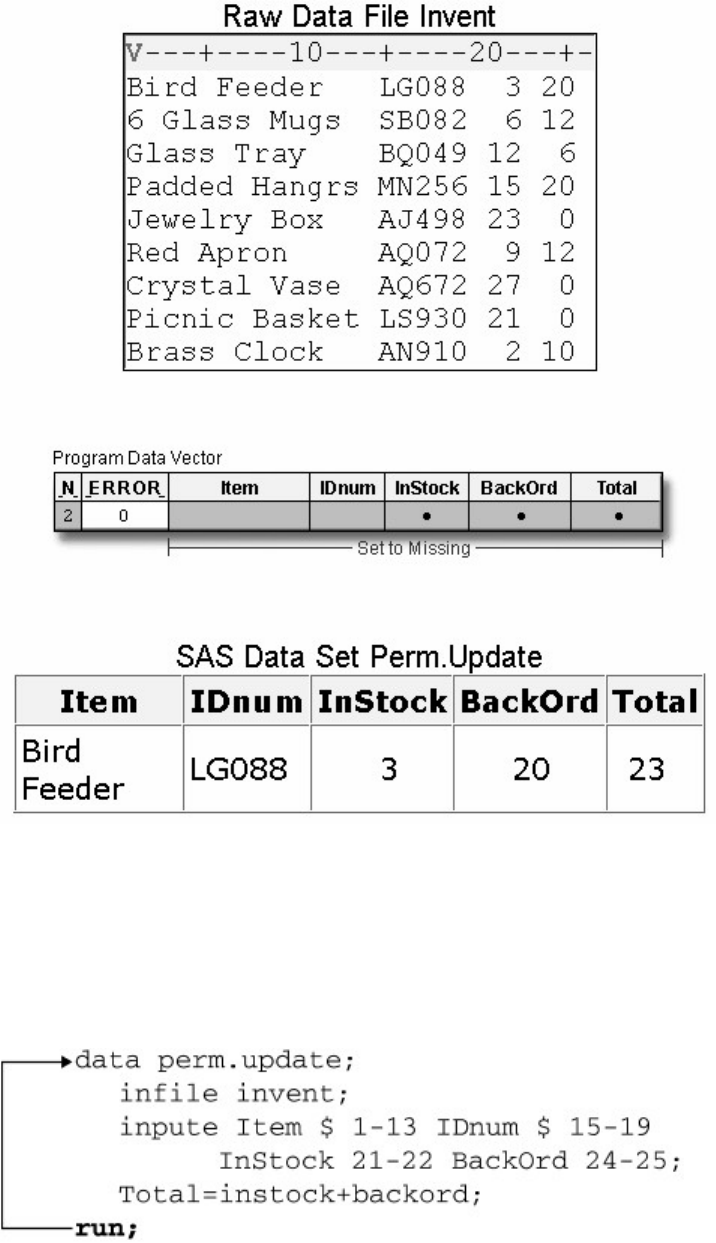
- 231 -
Iterations of the DATA Step
You can see that the DATA step works like a loop, repetitively executing statements to read data values
and create observations one by one. Each loop (or cycle of execution) is called an iteration. At the
beginning of the second iteration, the value of _N_ is 2, and _ERROR_ is still 0. Notice that the input
pointer points to the second record.

- 232 -
As the INPUT statement executes for the second time, the values from the second record are read into the
input buffer and then into the program data vector.
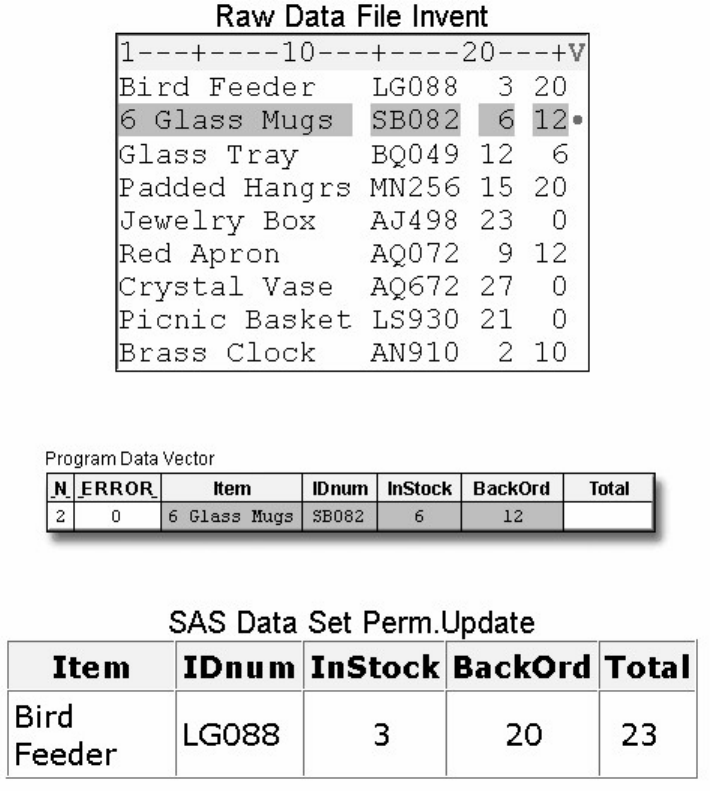
- 233 -
Next, the value for Total is calculated based on the current values for InStock and BackOrd. The RUN
statement indicates the end of the DATA step loop.
data perm.update;
infile invent;
input Item $ 1-13 IDnum $ 15-19
InStock 21-22 BackOrd 24-25;
Total=instock+backord;
run;
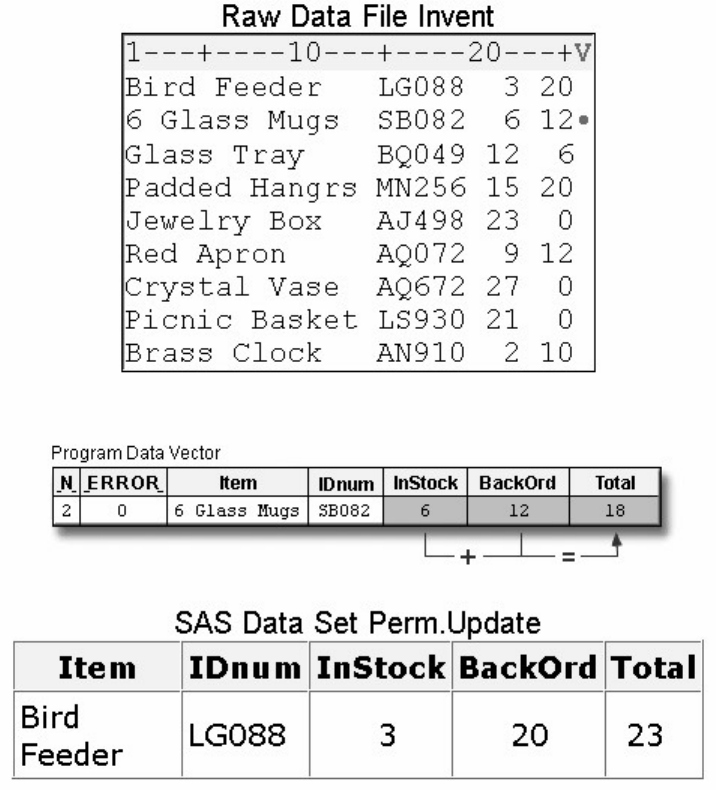
- 234 -
At the bottom of the DATA step, the values in the program data vector are written to the data set as the
second observation.
data perm.update;
infile invent;
input Item $ 1-13 IDnum $ 15-19
InStock 21-22 BackOrd 24-25;
Total=instock+backord;
run;
Next, the value of _N_ increments from 2 to 3, control returns to the top of the DATA step, and the values
for Item, IDnum, InStock, BackOrd, and Total are re-set to missing.
data perm.update;
infile invent;
input Item $ 1-13 IDnum $ 15-19
InStock 21-22 BackOrd 24-25;
Total=instock+backord;
run;

- 235 -
End-of-File Marker
The execution phase continues in this manner until the end-of-file marker is reached in the raw data file.
When there are no more records in the raw data file to be read, the data portion of the new data set is
complete and the DATA step stops.
This is the output data set that SAS creates:
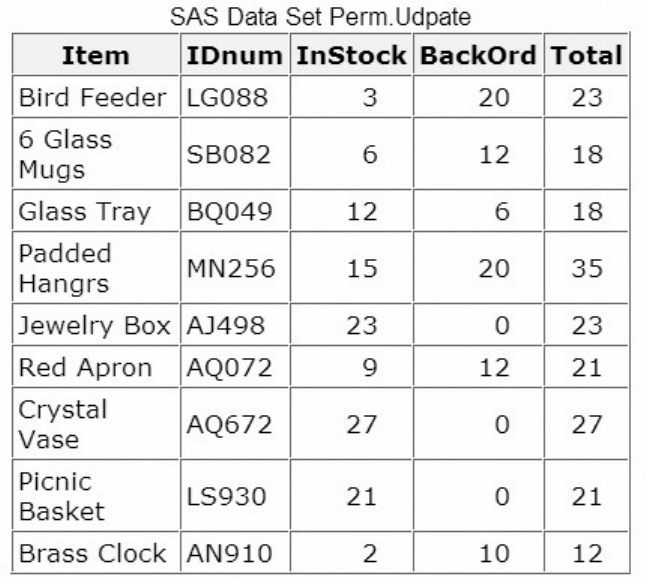
- 236 -
When reading variables from raw data, SAS sets the value of each variable in the DATA step to missing at
the beginning of each cycle of execution, with these exceptions:
• variables that are named in a RETAIN statement
• variables that are created in a sum statement
• data elements in a _TEMPORARY_ array
• any variables that are created with options in the FILE or INFILE statements
• automatic variables.
In contrast, when reading variables from a SAS data set, SAS sets the values to missing only before the
first cycle of execution of the DATA step. Therefore, the variables retain their values until new values
become available (for example, through an assignment statement or through the next execution of a SET or
MERGE statement). Variables that are created with options in the SET or MERGE statements also retain
their values from one cycle of execution to the next. (You learn about reading SAS data sets, working with
arrays, and using the SET and MERGE statements in later chapters.)
Summary of the Execution Phase
You've seen how the DATA step iteratively reads records in the raw data file. Now take a minute to review
execution-phase processing.
During the execution phase
• variables in the program data vector are initialized to missing before each execution of the DATA step
• each statement is executed sequentially
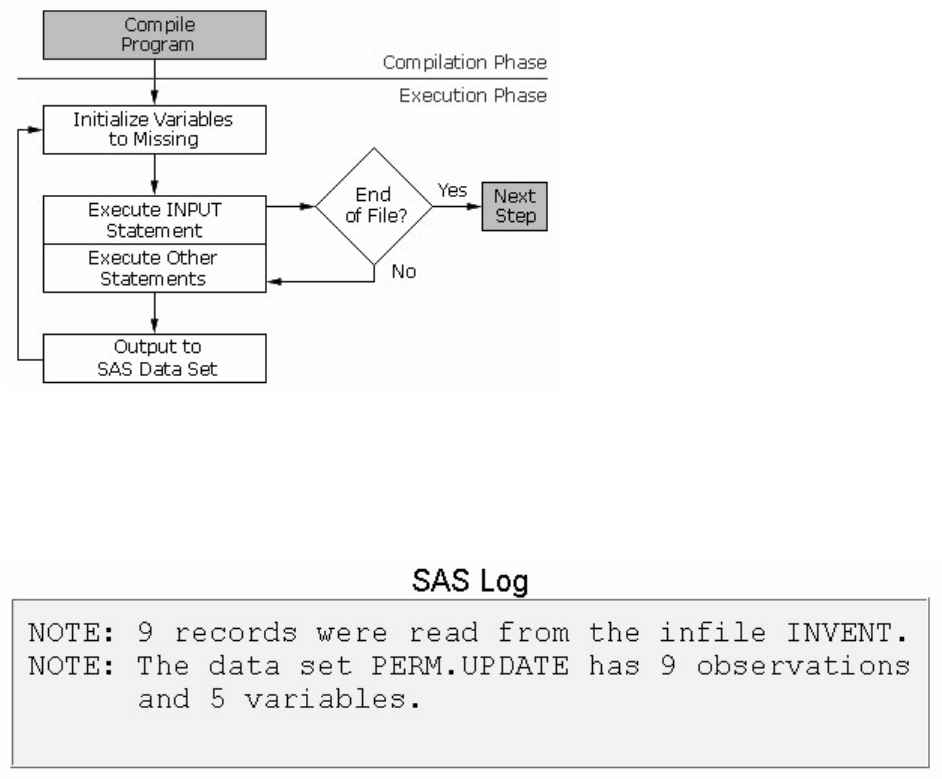
- 237 -
• the INPUT statement reads into the input buffer the next record from the external file identified by the INFILE
statement, and then reads the data into the program data vector
• other statements can then further modify the current observation
• the values in the program data vector are written to the SAS data set at the end of the DATA step
• program flow returns to the top of the DATA step
• the DATA step is executed until the end-of-file marker is reached in the external file.
End of the Execution Phase
At the end of the execution phase, the SAS log confirms that the raw data file was read, and it displays the
number of observations and variables in the data set.
You already know how to display the data set with the PRINT procedure.
proc print data=perm.update;
run;
Output from the PRINT Procedure
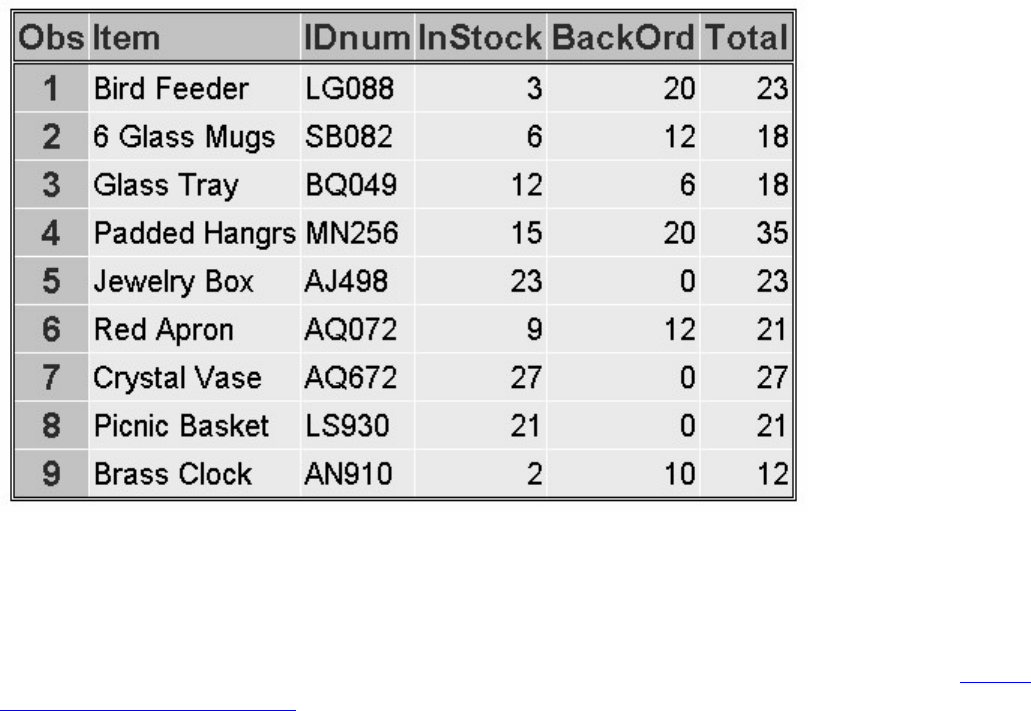
- 238 -
Debugging a DATA Step
Diagnosing Errors in the Compilation Phase
Now that you know how a DATA step is processed, you can use that knowledge to correct errors. Editing
and Debugging SAS Programs provided examples of errors that are detected during the compilation phase,
including
• misspelled keywords and data set names
• unbalanced quotation marks
• invalid options.
During the compilation phase, SAS can interpret some syntax errors (such as the keyword DATA
misspelled as DAAT). If it cannot interpret the error, SAS
• prints the word ERROR followed by an error message in the log
• compiles but does not execute the step where the error occurred, and prints the following message to warn you:
NOTE: The SAS System stopped processing this step because of errors.
Some errors are explained fully by the message that SAS prints; other error messages are not as easy to
interpret. For example, because SAS statements are free-format, when you fail to end a SAS statement
with a semicolon, SAS cannot detect the error.
Diagnosing Errors in the Execution Phase
As you have seen, errors can occur in the compilation phase, resulting in a DATA step that is compiled but
not executed. Errors can also occur during the execution phase. When SAS detects an error in the
execution phase, the following can occur, depending on the type of error:

- 239 -
• A note, warning, or error message is displayed in the log.
• The values that are stored in the program data vector are displayed in the log.
• The processing of the step either continues or stops.
Example
Suppose you misspelled the fileref in the INFILE statement below. This is not a syntax error, because SAS
does not validate the file that you reference until the execution phase. During the compilation phase, the
fileref Invnt is assumed to reference some external raw data file.
data perm.update;
infile invnt;
input Item $ 1-13 IDnum $ 15-19
InStock 21-22 BackOrd 24-25;
Total=instock+backord;
run;
This error is not detected until the execution phase begins. Because there is no external file that is
referenced by the fileref Invnt, the DATA step stops processing.
Because Invent is misspelled, the statement in the DATA step that identifies the raw data is incorrect. Note,
however, that the correct number of variables was defined in the descriptor portion of the data set.
Incorrectly identifying a variable's type is another common execution-time error. As you know, the values
for IDnum are character values. Suppose you forget to place the dollar sign ($) after the variable's name in
your INPUT statement. This is not a compile-time error, because SAS cannot verify IDnum's type until the
data values for IDnum are read.
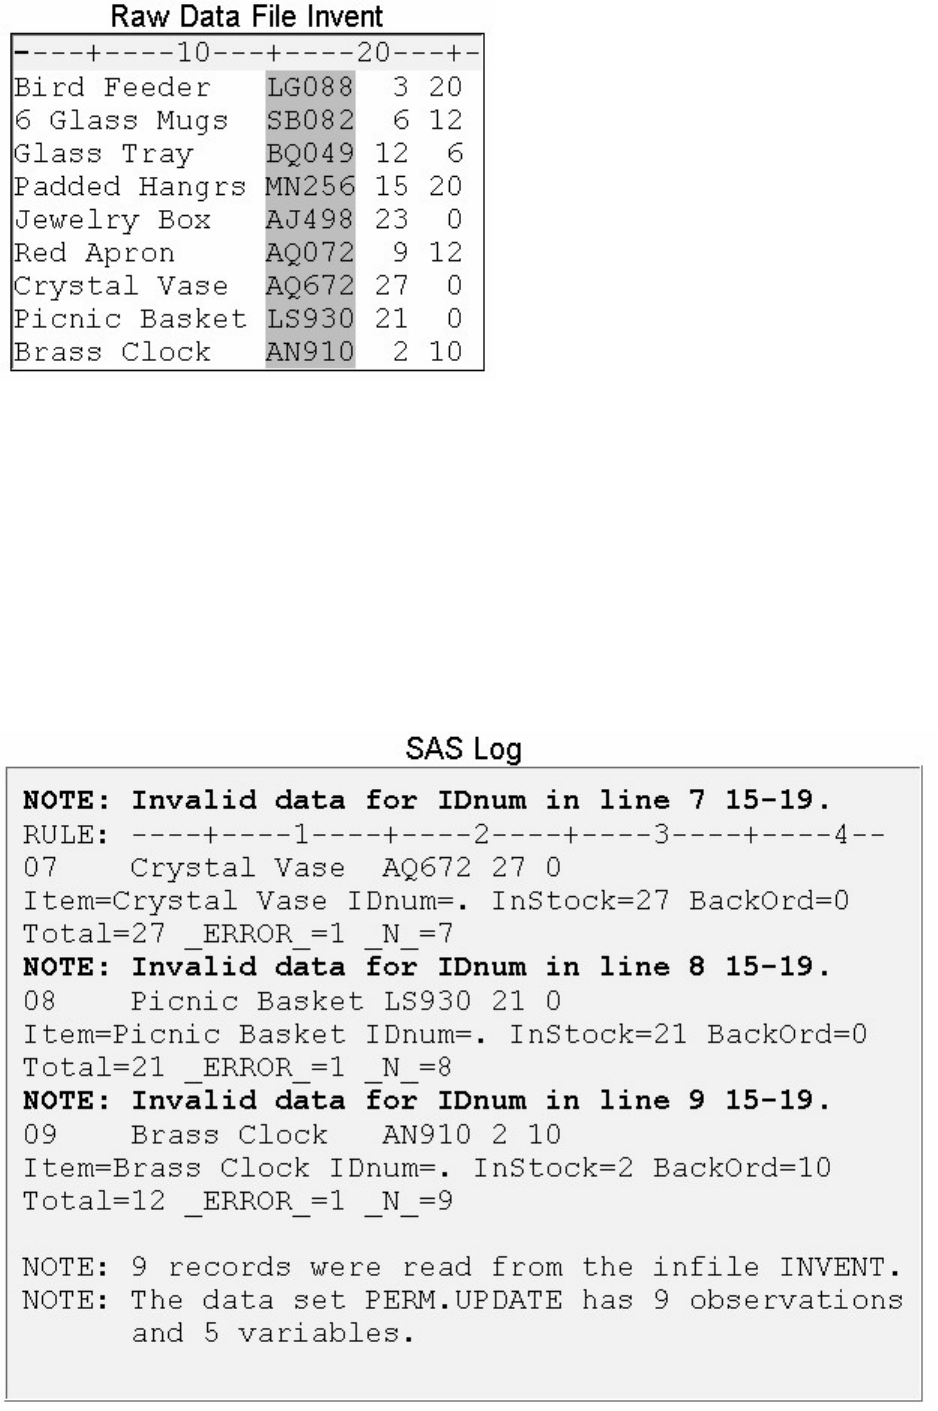
- 240 -
data perm.update;
infile invent;
input Item $ 1-13 IDnum 15-19
InStock 21-22 BackOrd 24-25;
Total=instock+backord;
run;
In this case, the DATA step completes the execution phase, and the observations are written to the data set.
However, several notes appear in the log.

- 241 -
Each note identifies the location of the invalid data for each observation. In this example, the invalid data
is located in columns 15-19 for all observations.
The second line in each note (excluding the RULE line) displays the raw data record. Notice that the
second field displays the values for IDnum, which are obviously character values.
The third and fourth lines display the values that are stored in the program data vector. Here, the values for
IDnum are missing, although the other values have been correctly assigned to their respective variables.
Notice that _ERROR_ has a value of 1, indicating that a data error has occurred.
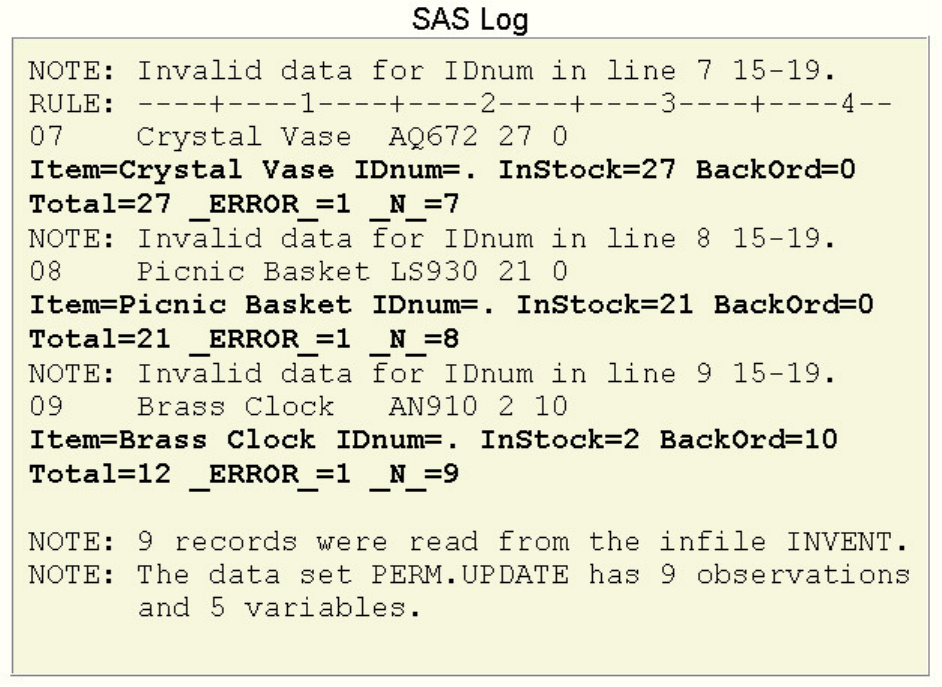
- 242 -
The PRINT procedure displays the data set, showing that the values for IDnum are missing. In this
example, the periods indicate that IDnum is a numeric variable, although it should have been defined as a
character variable.
proc print data=perm.update;
run;
Output from the PRINT Procedure Showing Missing Values for IDnum
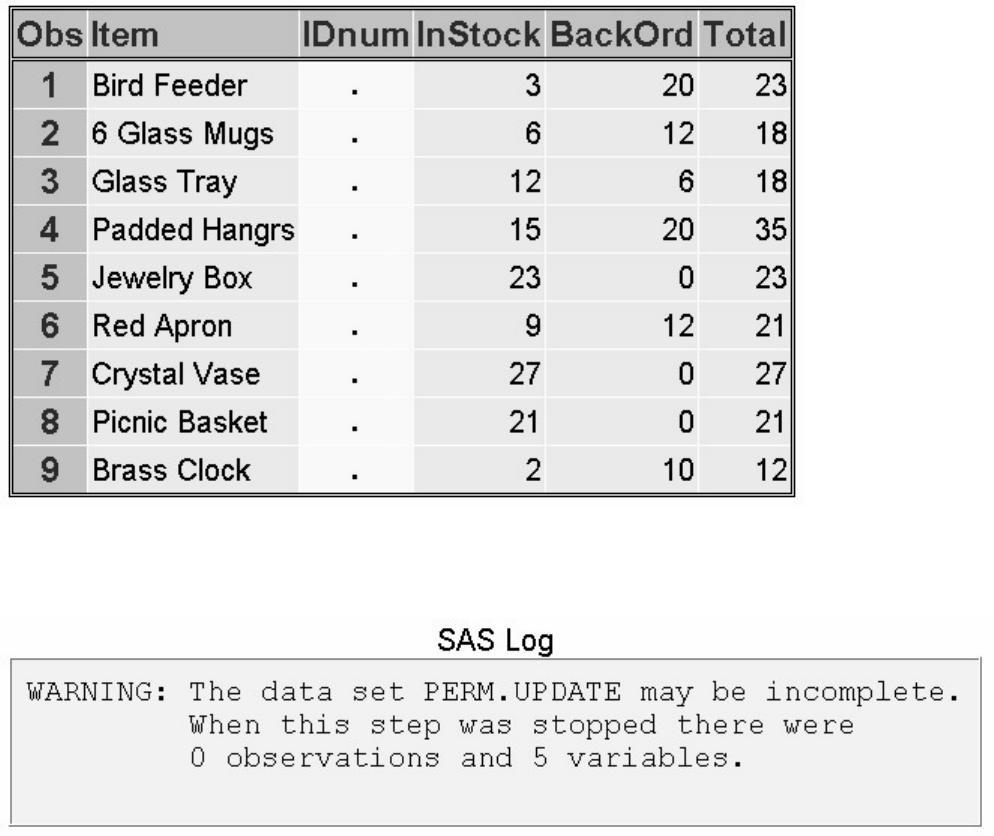
- 243 -
When you read raw data with the DATA step, it's important to check the SAS log to verify that your data
was read correctly. Here is a typical message:
When no observations are written to the data set, you should check to see whether your DATA step was
completely executed. Most likely, a syntax error or another error was detected at the beginning of the
execution phase.
Validating and Cleaning Data
Data errors occur when data values are not appropriate for the SAS statements that are specified in a
program. SAS detects data errors during program execution. When a data error is detected, SAS continues
to execute the program.
In general, SAS procedures analyze data, produce output, or manage SAS files. In addition, SAS
procedures can be used to detect invalid data. The following procedures can be used to detect invalid data:
• PROC PRINT
• PROC FREQ
• PROC MEANS
The PRINT procedure displays the data set, showing that the values for IDnum are missing. Periods
indicate that IDnum is a numeric variable, although it should have been defined as a character variable.

- 244 -
proc print data=perm.update;
run;
Output from the PRINT Procedure Showing Missing Values for IDnum
The FREQ procedure detects invalid character and numeric values by looking at distinct values. You can
use PROC FREQ to identify any variables that were not given an expected value.
General form, FREQ procedure:
PROC FREQ DATA=SAS-data-set <NLEVELS>;
TABLES variable(s);
RUN;
where
The TABLES statement specifies the frequency tables to produce.
The NLEVELS option displays a table that provides the number of distinct values for each variable named in the
TABLES statement.
In the following example, the data set contains invalid characters for the variables Gender and Age. PROC
FREQ displays the distinct values of variables and is therefore useful for finding invalid values in data.
You can use PROC FREQ with the TABLES statement to produce a frequency table for specific variables.
proc freq data=work.Patients;

- 245 -
tables Gender Age;
run;
In the output you can see both the valid (M and F) and invalid (G) values for Gender, and the valid and
invalid (242) values for age. In both the gender and age FREQ tables, one observation needs data cleaned
as shown below:
The MEANS procedure can also be used to validate data because it produces summary reports displaying
descriptive statistics. For example, PROC MEANS can show whether the values for a particular variable
are within their expected range.
General form, MEANS procedure:
PROC MEANS DATA=SAS-data-set <statistics>;
VAR variable(s);
RUN;
The VAR statement specifies the analysis variables and their order in the results.
The statistics to display can be specified in the PROC MEANS statement.
Using the same data set as in the previous example, we can submit PROC MEANS to determine if the Age
of all test subjects is within a reasonable range. Notice the VAR statement is specified with that particular
variable to get the statistical information, or range, of the data values.
proc means data=work.Patients;
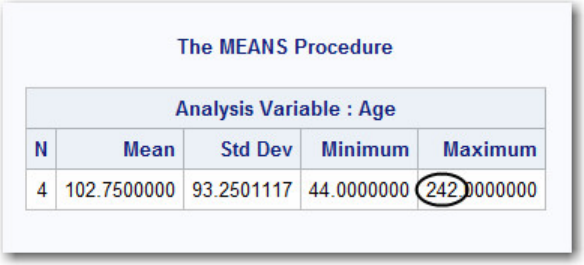
- 246 -
var Age;
run;
The output for the MEANS procedure displays a range of 44 to 242, which clearly indicates that there is
invalid data somewhere in the Age column.
Cleaning the Data
You can use an assignment statement or a conditional clause to programmatically clean invalid data once it
is identified. For example, if your input data contains a field called Gender, and that field has an invalid
value (a value other than M or F), then you can clean your data by changing the invalid value to a valid
value for Gender. To avoid overwriting your original data set, you can use the DATA statement to create a
new data set. The new data set will contain all of the data from your original data set, along with the
correct values for invalid data.
The following example assumes that in your input data, Gender has an invalid value of G. This error might
be the result of a data entry error. After examining your data, you determine that G should actually be F.
You can fix the invalid data for Gender by using an assignment statement along with an IF-THEN
statement:
data work.clean_data;
set work.patients;
gender=upcase(Gender);
if Gender='G' then Gender='F';
run;
proc print data=work.clean_data;
run;
When you examine your input data further, you find that two observations contain invalid values for Age.
These values exceed a maximum value of 110. You can uniquely identify each of the observations by the
variable Empid. By checking the date of birth in each of the observations, you determine the correct value
for Age. To change the data, you can use an IF-THEN-ELSE statement:
data work.clean_data;
set work.patients;
if empid=3294 then age=65;
else if empid=7391 then age=75;
run;

- 247 -
proc print data=work.clean_data;
run;
Another way of ensuring that your output data set contains valid data is to programmatically identify
invalid data and delete the associated observations from your output data set:
data work.clean_data;
set work.patients;
if Age>110 then delete;
run;
proc print data=work.clean_data;
run;
Testing Your Programs
Limiting Observations
Remember that you can use the OBS= option in the INFILE statement to limit the number of observations
that are read or created during the execution of the DATA step.
data perm.update;
infile invent obs=10;
input Item $ 1-13 IDnum $ 15-19
InStock 21-22 BackOrd 24-25;
Total=instock+backord;
run;
When processed, this DATA step creates the perm.update data set with variables but with only ten
observations.
PUT Statement
When the source of program errors is not apparent, you can use the PUT statement to examine variable
values and to print your own message in the log. For diagnostic purposes, you can use IF-THEN/ELSE
statements to conditionally check for values. You can learn about IF-THEN/ELSE statements in detail in
Creating and Managing Variables.
data work.test;
infile loan;
input Code $ 1 Amount 3-10 Rate 12-16
Account $ 18-25 Months 27-28;
if code='1' then type='variable';
else if code='2' then type='fixed';
else type='unknown';
if type=unknown then put 'MY NOTE: invalid value: '
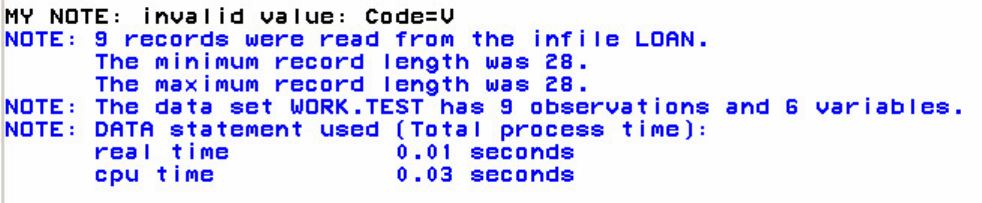
- 248 -
code=;
run;
In this example, if CODE does not have the expected values of 1 or 2, the PUT statement writes a message
to the log:
SAS Log
General form, simple PUT statement:
PUT specification(s);
where specification specifies what is written, how it is written, and where it is written. This can include
a character string
one or more data set variables
the automatic variables _N_ and _ERROR_
the automatic variable _ALL_
and much more. The following pages show examples of PUT specifications.
Character Strings
You can use a PUT statement to specify a character string to identify your message in the log. The
character string must be enclosed in quotation marks.
put 'MY NOTE: The condition was met.';
SAS Log
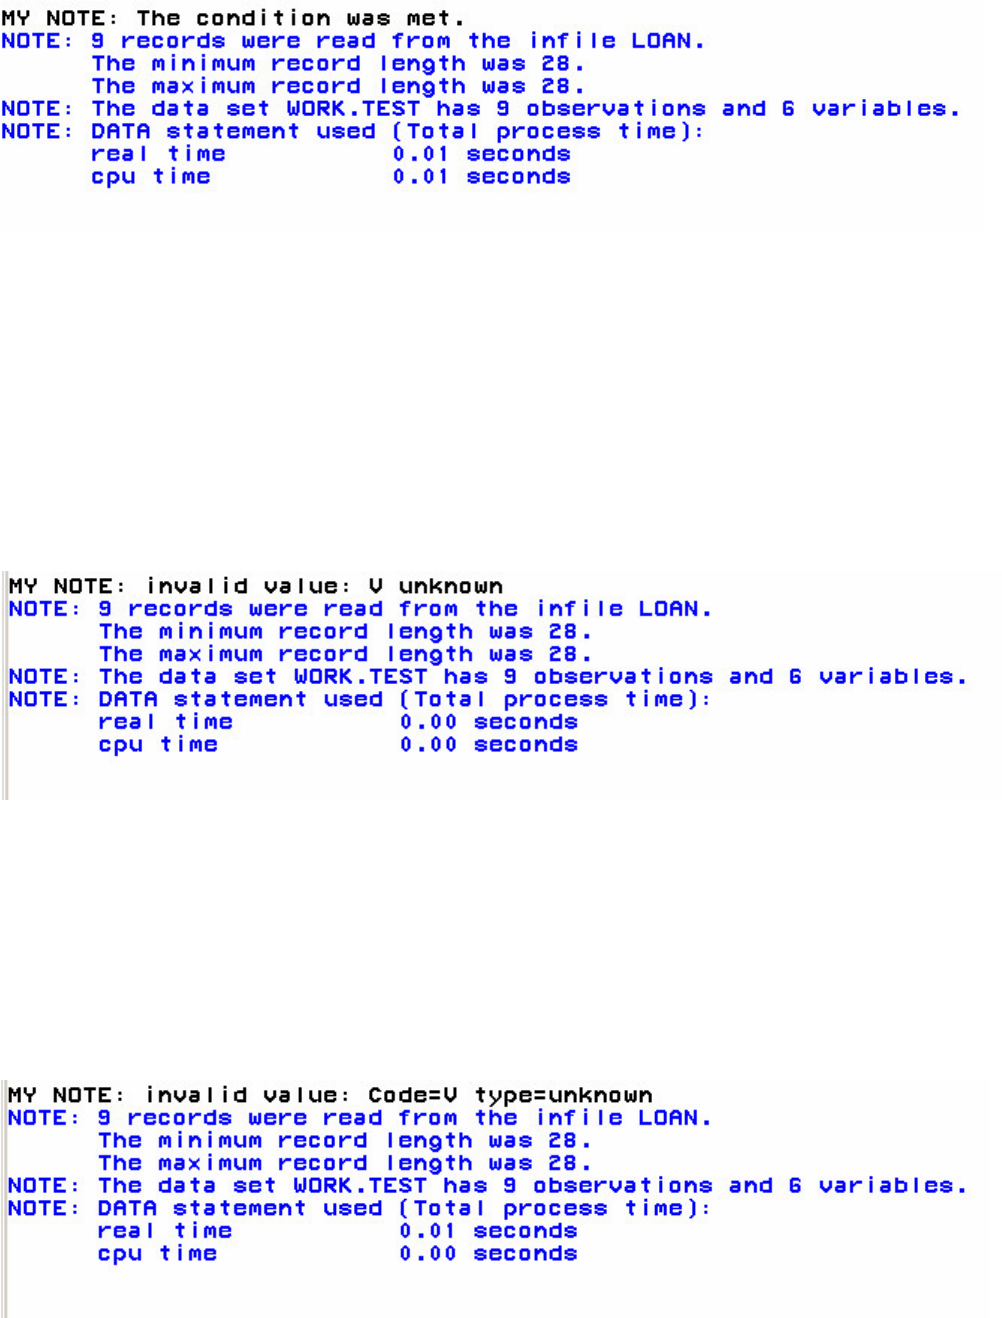
- 249 -
Data Set Variables
You can use a PUT statement to specify one or more data set variables to be examined for that iteration of
the DATA step:
put 'MY NOTE: invalid value: '
code type;
SAS Log
Note that when you specify a variable in the PUT statement, only its value is written to the log. To write
both the variable name and its value in the log, add an equal sign (=) to the variable name.
put 'MY NOTE: invalid value: '
code= type=;
SAS Log
Automatic Variables
You can use a PUT statement to display the values of the automatic variables _N_ and _ERROR_. In some
cases, knowing the value of _N_ can help you locate an observation in the data set:
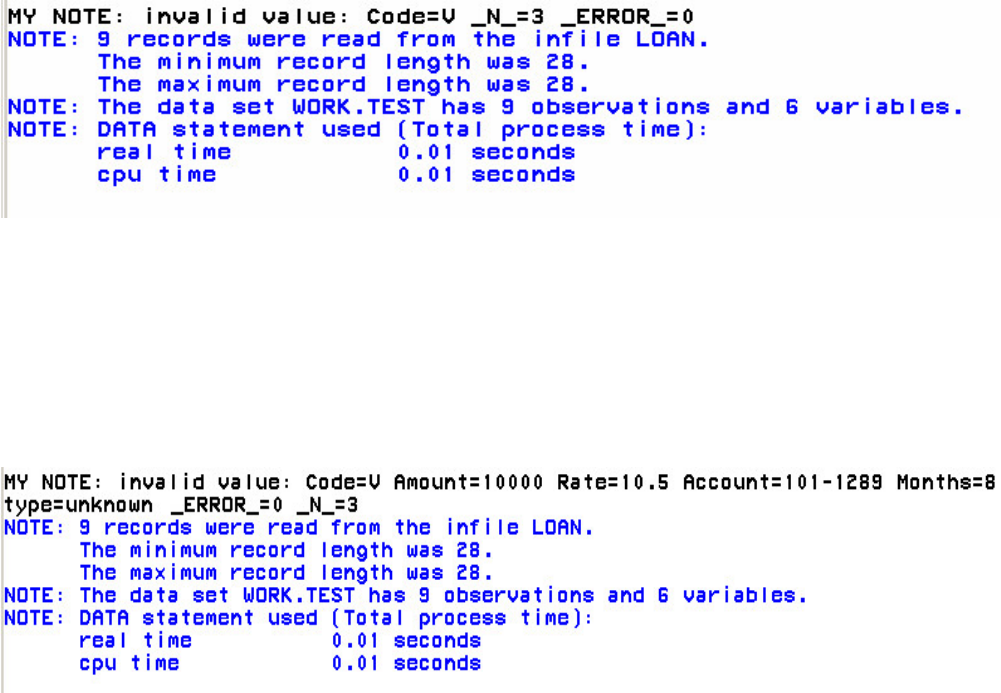
- 250 -
put 'MY NOTE: invalid value: '
code= _n_= _error_=;
SAS Log
You can also use a PUT statement to write all variable names and variable values, including automatic
variables, to the log. Use the _ALL_ specification:
put 'MY NOTE: invalid value: ' _all_ ;
SAS Log
Conditional Processing
You can use a PUT statement with conditional processing (that is, with IF-THEN/ELSE statements) to flag
program errors or data that is out of range. In the example below, the PUT statement is used to flag any
missing or zero values for the variable Rate.
data finance.newcalc;
infile newloans;
input LoanID $ 1-4 Rate 5-8 Amount 9-19;
if rate>0 then
Interest=amount*(rate/12);
else put 'DATA ERROR ' rate= _n_=;
run;
The PUT statement can accomplish a wide variety of tasks. This chapter shows a few ways to use the PUT
statement to help you debug a program or examine variable values. For a complete description of the PUT
statement, see the SAS documentation.
Chapter Summary

- 251 -
Text Summary
How SAS Processes Programs
A SAS DATA step is processed in two distinct phases. During the compilation phase, each statement is
scanned for syntax errors. During the execution phase, the DATA step writes observations to the new data
set.
Compilation Phase
At the beginning of the compilation phase, the input buffer and the program data vector are created. The
program data vector is the area of memory where one observation at a time is processed. Two automatic
variables are also created: _N_ counts the number of DATA step executions, and _ERROR_ signals the
occurrence of a data error. DATA step statements are checked for syntax errors, such as invalid options or
misspellings.
Execution Phase
During the execution phase, one record at a time from the input file is read into the input buffer, copied to
the program data vector, and then written to the new data set as an observation. The DATA step executes
once for each record in the input file, unless otherwise directed.
Diagnosing Errors in the Compilation Phase
Missing semicolons, misspelled keywords, and invalid options will cause syntax errors in the compilation
phase. Detected errors are underlined and are identified with a number and message in the log. If SAS can
interpret a syntax error, the DATA step compiles and executes; if SAS cannot interpret the error, the
DATA step compiles but doesn't execute.
Diagnosing Errors in the Execution Phase
Illegal mathematical operations or processing a character variable as numeric will cause data errors in the
execution phase. Depending on the type of error, the log might show a warning and might include invalid
data from the input buffer or the program data vector, and the DATA step either stops or continues.
Testing Your Programs
To detect common errors and save development time, use the OBS= option in the INFILE statement to
limit the number of observations that are read or created during the DATA step. You can also use the PUT
statement to examine variable values and to generate your own message in the log. For information about
Informats, see Using Informats.
Syntax
DATA <_NULL_|SAS-data-set>;
INFILE file-specification OBS=n;
INPUT variable-1 informat-1
<. . .variable-n informat-n;>
PUT specification(s);
RUN;
- 252 -
Sample Programs
data perm.update;
infile invent;
input Item $ 1-13 IDnum $ 15-19
InStock 21-22 BackOrd 24-25;
Total=instock+backord;
run;
data work.test;
infile loan;
input Code $ 1 Amount 3-10;
if code='1' then type='variable';
else if code='2' then type='fixed';
else put 'MY NOTE: invalid value: '
code=;
run;
Points to Remember
• Making, diagnosing, and resolving errors is part of the process of writing programs. However, checking for
common errors will save you time and trouble. Make sure that
o each SAS statement ends with a semicolon
o filenames are spelled correctly
o keywords are spelled correctly.
• In SAS output, missing numeric values are represented by periods, and missing character values are left blank.
• The order in which variables are defined in the DATA step determines the order in which the variables are stored
in the data set.
• Standard character values can include numbers, but numeric values cannot include characters.
Chapter Quiz
Select the best answer for each question. After completing the quiz, you can check your answers using the
answer key in the appendix.
1. Which of the following is not created during the compilation phase?
1. the data set descriptor
2. the first observation
3. the program data vector
4. the _N_ and _ERROR_ automatic variables
2. During the compilation phase, SAS scans each statement in the DATA step, looking for syntax errors. Which of
the following is not considered a syntax error?
1. incorrect values and formats
2. invalid options or variable names
3. missing or invalid punctuation
4. missing or misspelled keywords
3. Unless otherwise directed, the DATA step executes...
1. once for each compilation phase.
- 253 -
2. once for each DATA step statement.
3. once for each record in the input file.
4. once for each variable in the input file.
4. At the beginning of the execution phase, the value of _N_ is 1, the value of _ERROR_ is 0, and the values of the
remaining variables are set to:
1. 0
2. 1
3. undefined
4. missing
5. Suppose you run a program that causes three DATA step errors. What is the value of the automatic variable
_ERROR_ when the observation that contains the third error is processed?
1. 0
2. 1
3. 2
4. 3
6. Which of the following actions occurs at the beginning of an iteration of the DATA step?
1. The automatic variables _N_ and _ERROR_ are incremented by one.
2. The DATA step stops execution.
3. The descriptor portion of the data set is written.
4. The values of variables created in programming statements are re-set to missing in the program data
vector.
7. Look carefully at the DATA step shown below. Based on the INPUT statement, in what order will the variables be
stored in the new data set?
data perm.update;
infile invent;
input IDnum $ Item $ 1-13 Instock 21-22
BackOrd 24-25;
Total=instock+backord;
run;
1.
IDnum Item InStock BackOrd Total
2.
Item IDnum InStock BackOrd Total
3.
Total IDnum Item InStock BackOrd
4.
Total Item IDnum InStock BackOrd
8. If SAS cannot interpret syntax errors, then...
1. data set variables will contain missing values.
2. the DATA step does not compile.
3. the DATA step still compiles, but it does not execute.
4. the DATA step still compiles and executes.
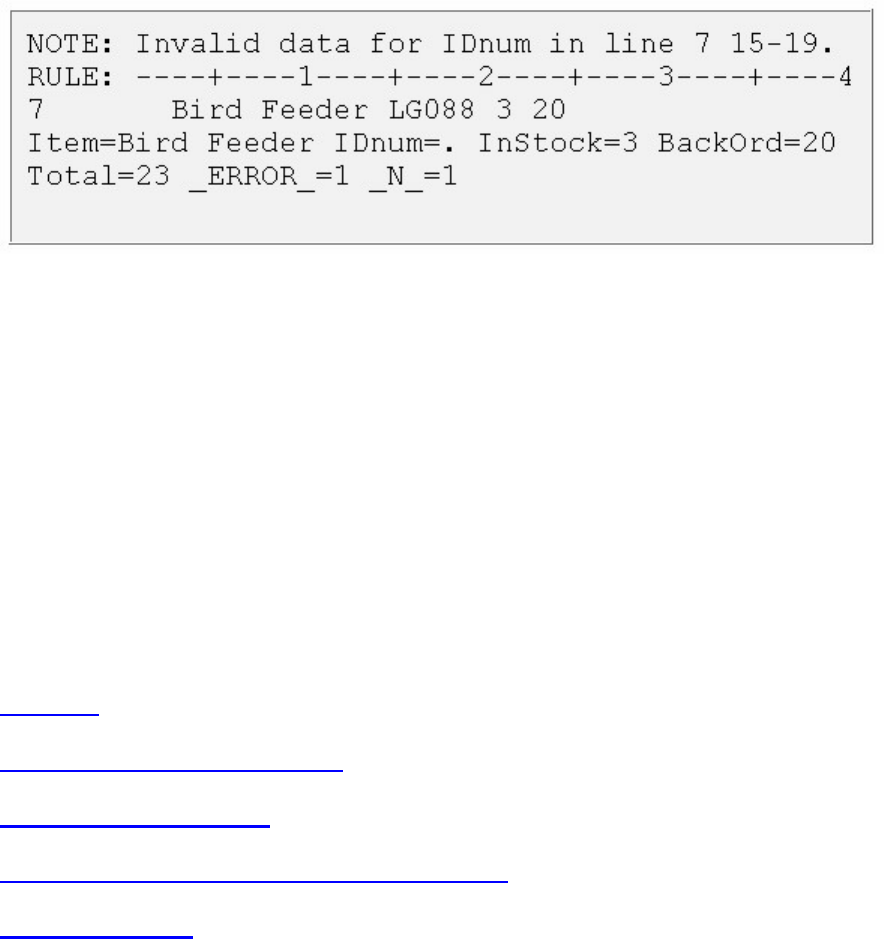
- 254 -
9. What is wrong with this program?
data perm.update;
infile invent
input Item $ 1-13 IDnum $ 15-19 Instock 21-22
BackOrd 24-25;
total=instock+backord;
run;
1. missing semicolon on second line
2. missing semicolon on third line
3. incorrect order of variables
4. incorrect variable type
10. Look carefully at this section of a SAS session log. Based on the note, what was the most likely problem with the
DATA step?
1. A keyword was misspelled in the DATA step.
2. A semicolon was missing from the INFILE statement.
3. A variable was misspelled in the INPUT statement.
4. A dollar sign was missing in the INPUT statement.
Chapter 7 Creating and Applying User-Defined
Formats
Overview
Introduction to PROC FORMAT
Defining a Unique Format
Associating User-Defined Formats with Variables
Chapter Summary
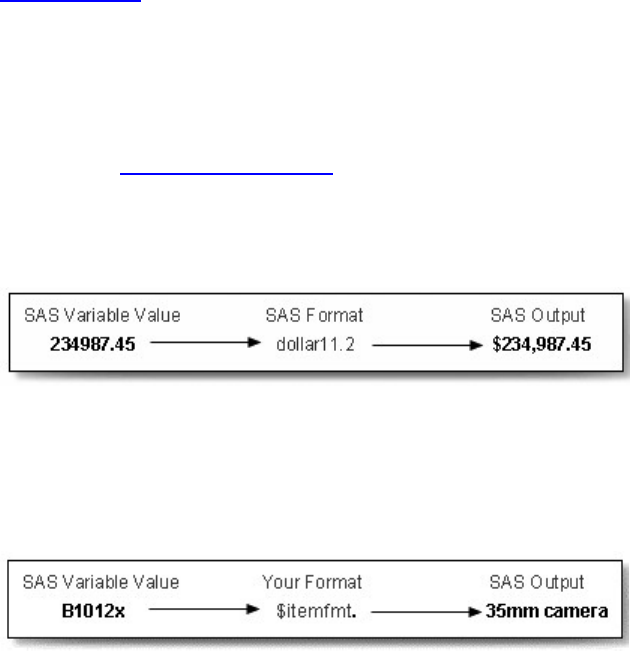
- 255 -
Chapter Quiz
Overview
Introduction
If you read Creating List Reports, you learned to associate formats with variables either temporarily or
permanently.
Variable and Format
But sometimes you might want to create custom formats for displaying variable values. For example, you
can format a product number so that it is displayed as descriptive text, as shown below.
Variable and Custom Format
Using the FORMAT procedure, you can define your own formats for variables. You can store your
formats temporarily or permanently, and you can display a list of all your formats and descriptions of their
values.
Objectives
In this chapter, you learn to
• create your own formats for displaying variable values
• permanently store the formats that you create
• associate your formats with variables.
Introduction to PROC FORMAT
Overview
Sometimes variable values are stored according to a code. For example, when the PRINT procedure
displays the data set Perm.Employee, notice that the values for JobTitle are coded, and they are not easily
interpreted.
Perm.Employee Data Set
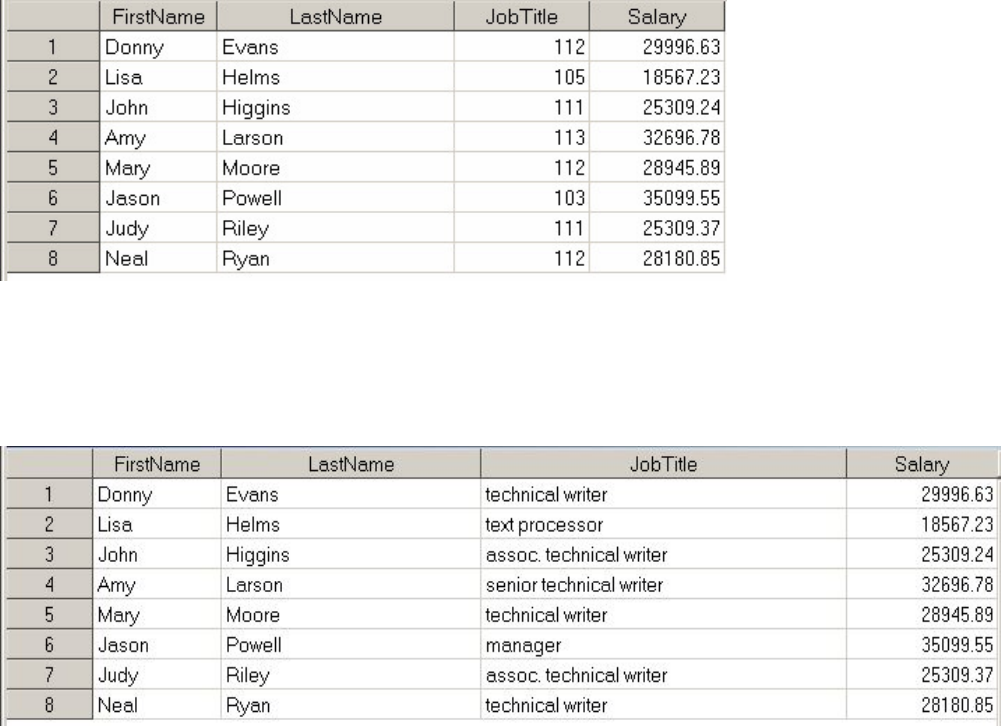
- 256 -
You can display more descriptive values for these variables. Here is how a report that contains formatted
values for the variable JobTitle might look. The predefined SAS formats cannot help here.
Perm.Employee Data Set with Formatted Values for JobTitle
However, you can use the FORMAT procedure to define your own formats for displaying values of
variables.
Invoking PROC FORMAT
To begin a PROC FORMAT step, you use a PROC FORMAT statement.
General form, PROC FORMAT statement:
PROC FORMAT <options>;
where options include
LIBRARY=libref specifies the libref for a SAS data library to contain a permanent catalog of user-defined formats
FMTLIB displays a list of all of the formats in your catalog, along with descriptions of their values.
Any time you use PROC FORMAT to create a format, the format is stored in a format catalog. If the SAS
data library does not already contain a format catalog, SAS automatically creates one. If you do not specify
the LIBRARY= option, the formats are stored in a default format catalog named Work.Formats.
- 257 -
As the libref Work implies, any format that is stored in Work.Formats is a temporary format that exists
only for the current SAS session. At the end of the current session, the catalog is erased.
Permanently Storing Your Formats
You can store your formats in a permanent format catalog named Formats when you specify the
LIBRARY= option in the PROC FORMAT statement.
PROC FORMAT LIBRARY=libref;
But first, you need a LIBNAME statement that associates the libref with the permanent SAS data library in
which the format catalog is to be stored.
libname library 'c:\sas\formats\lib';
When you associate a permanent format with a variable in a subsequent DATA or PROC step, you would
then use the Library libref to reference the location of the format catalog.
We'll discuss the use of permanent user-defined formats later, after you learn how to create them.
Now, any format that you create in this PROC FORMAT step is stored in a permanent format catalog
called Library.Formats.
libname library 'c:\sas\formats\lib';
proc format library=library;
... ;
run;
In the program above, the catalog Library.Formats is located in the SAS data library C:\Sas\Formats\Lib,
which is referenced by the libref Library.
Notice that LIB= is an acceptable abbreviation for the LIBRARY= option.
proc format lib=library;
Also notice that you can specify a catalog name in the LIBRARY= option, and you can store formats in
any catalog. The catalog name must conform to SAS naming conventions.
proc format lib=library.catalog;
Now that you know how to store your own formats, let's see how to create them.
Defining a Unique Format
- 258 -
Overview
You can use the VALUE statement to define a format for displaying one or more values.
General form, VALUE statement:
VALUE format-name
range1='label1'
range2='label2'
...;
where format-name
must begin with a dollar sign ($) if the format applies to character data
must be a valid SAS name
cannot be the name of an existing SAS format
cannot end in a number
does not end in a period when specified in a VALUE statement.
Note: In SAS 8.2, the format name must be a SAS name up to eight characters in length, not ending in a
number.
Note: Beginning with SAS®9, a numeric format name can be up to 32 characters in length. A character
format name can be up to 31 characters in length.
Notice that the statement begins with the keyword VALUE and ends with a semicolon after all the labels
have been defined. The following VALUE statement creates the JOBFMT format to specify descriptive
labels that will later be assigned to the variable JobTitle:
proc format lib=library;
value jobfmt
103='manager'
105='text processor'
111='assoc. technical writer'
112='technical writer'
113='senior technical writer';
run;
The VALUE range specifies
• a single value, such as 24 or 'S'.
• a range of numeric values, such as 0-1500.
• a range of character values enclosed in quotation marks, such as 'A'-'M'.
- 259 -
• a list of unique values separated by commas, such as 90,180,270 or 'B', 'D', 'F'. These values can be character
values or numeric values, but not a combination of character and numeric values (because formats themselves are either
character or numeric).
When the specified values are character values, they must be enclosed in quotation marks and must match
the case of the variable's values. The format's name must also start with a dollar sign ($). For example, the
VALUE statement below defines the $GRADE format, which displays the character values as text labels.
proc format lib=library;
value $grade
'A'='Good'
'B'-'D'='Fair'
'F'='Poor'
'I','U'='See Instructor';
run;
When the specified values are numeric values, they are not enclosed in quotation marks, and the format's
name should not begin with a dollar sign ($). The VALUE statement that defines the format JOBFMT
assigns labels to numeric values.
Specifying Value Ranges
You can specify a non-inclusive range of numeric values by using the less than symbol (<) to avoid any
overlapping. In this example, the range of values from 0 to less than 13 is labeled as child. The next range
begins at 13, so the label teenager would be assigned to the values 13 to 19.
proc format lib=library;
value agefmt
0-<13='child'
13-<20='teenager'
20-<65='adult'
65-100='senior citizen';
run;
You can also use the keywords LOW and HIGH to specify the lower and upper limits of a variable's value
range. The keyword LOW does not include missing numeric values. The keyword OTHER can be used to
label missing values as well as any values that are not specifically addressed in a range.
proc format lib=library;
value agefmt
low-<13='child'
13-<20='teenager'
20-<65='adult'
65-high='senior citizen'
other='unknown';
run;
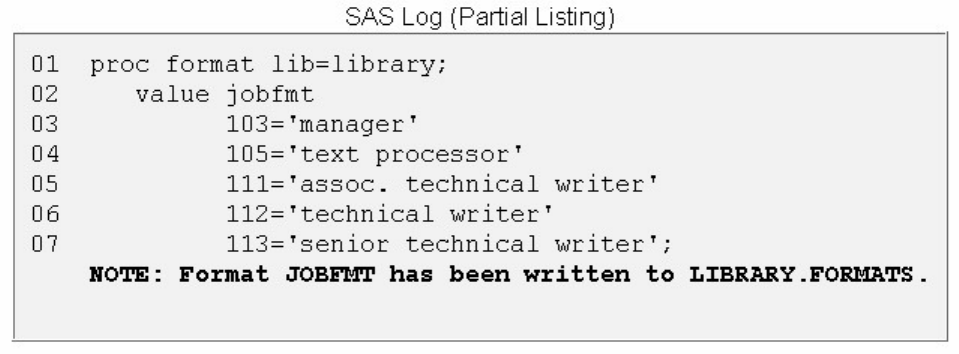
- 260 -
If applied to a character format, the keyword LOW includes missing character values.
When specifying a label for displaying each range, remember to
• enclose the label in quotation marks
• limit the label to 256 characters
• use two single quotation marks if you want an apostrophe to appear in the label, as in this example:
000='employee''s jobtitle unknown';
To define several formats, you can use multiple VALUE statements in a single PROC FORMAT step. In
this example, each VALUE statement defines a different format.
proc format lib=library;
value jobfmt
103='manager'
105='text processor'
111='assoc. technical writer'
112='technical writer'
113='senior technical writer';
value $respnse
'Y'='Yes'
'N'='No'
'U'='Undecided'
'NOP'='No opinion';
run;
The SAS log prints notes informing you that the formats have been created.
SAS Log
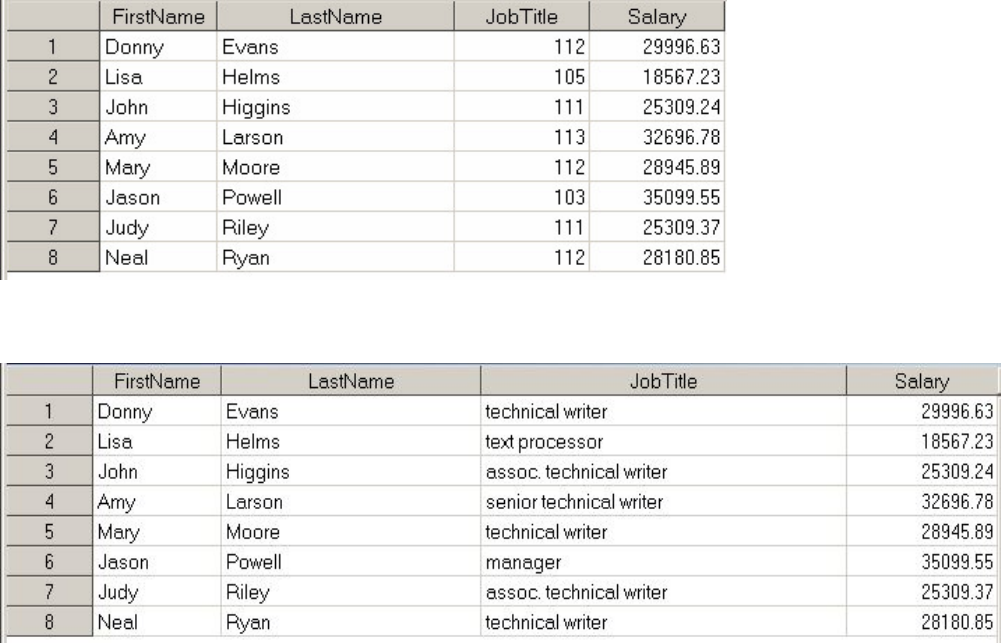
- 261 -
Because you have defined the JOBFMT format for displaying the values of JobTitle, the format can be
used with PROC PRINT for more legible output.
Data Set with Unformatted Values for JobTitle
Data Set with Formatted Values for JobTitle
The next section will show how to apply your formats to variables.
Associating User-Defined Formats with Variables
Referencing Your Formats
Remember that permanent, user-defined formats are stored in a format catalog. For example, the program
below stores the format JOBFMT in a catalog named Library.Formats, which is located in the directory
C:\Sas\Formats\Lib in the Windows environment.
libname library 'c:\sas\formats\lib';
proc format lib=library;
value jobfmt
103='manager'
105='text processor'
111='assoc. technical writer'
112='technical writer'
113='senior technical writer';
run;
To use the JOBFMT format in a subsequent SAS session, you must assign the libref Library again.
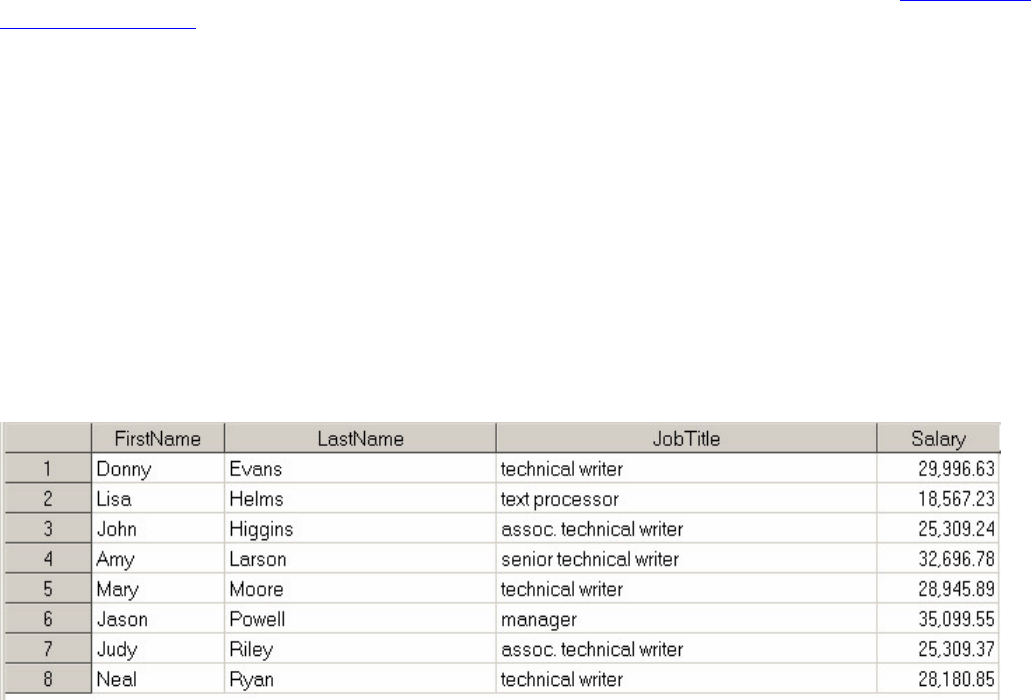
- 262 -
libname library 'c:\sas\formats\lib';
SAS searches for the format JOBFMT in two libraries, in this order:
• the temporary library referenced by the libref Work
• a permanent library referenced by the libref Library.
SAS uses the first instance of a specified format that it finds.
You can delete formats using PROC CATALOG or the SAS Explorer window.
Assigning Your Formats to Variables
Just as with SAS formats, you associate a user-defined format with a variable in a FORMAT statement.
data perm.employee;
infile empdata;
input @9 FirstName $5. @1 LastName $7. +7 JobTitle 3.
@19 Salary comma9.;
format salary comma9.2 jobtitle jobfmt.;
run;
Don't worry about @ pointer controls in programs in this chapter, as in @9 FirstName—they don't affect
the behavior of formats. To learn more about using @ pointer controls in SAS programs, see Reading Raw
Data in Fixed Fields.
Remember, you can place the FORMAT statement in either a DATA step or a PROC step. By placing the
FORMAT statement in a DATA step, you can permanently associate a format with a variable. Note that
you do not have to specify a width value when using a user-defined format.
When you submit the PRINT procedure, the output for Perm.Employee now shows commas in the values
for Salary, and it shows descriptive labels in place of the values for JobTitle.
proc print data=perm.employee;
run;
Data Set with Formatted Values for Salary and JobTitle
- 263 -
When associating a format with a variable, remember to
• use the same format name in the FORMAT statement that you specified in the VALUE statement
• place a period at the end of the format name when it is used in the FORMAT statement.
Note: The following example shows you how to create a format and then use the format in a DATA step. If you have
already created the JOBFMT format, you do not need to use PROC FORMAT to recreate it here.
libname library 'c:\sas\formats\lib';
proc format lib=library;
value jobfmt
103='manager'
105='text processor'
111='assoc. technical writer'
112='technical writer'
113='senior technical writer';
run;
libname perm 'c:\data\perm';
filename empdata 'c:\data\temp\newhires.txt';
data perm.employee;
infile empdata;
input @9 FirstName $5. @1 LastName $7. +7 JobTitle 3.
@19 Salary comma9.;
format salary comma9.2 jobtitle jobfmt.;
run;
Notice that a period is not required at the end of the SAS format COMMA9.2 in the FORMAT statement.
The period in this format occurs between the width specification and the decimal place specification. All
formats contain periods, but only user-defined formats invariably require periods at the end of the name.
If you do not format all of a variable's values, then those that are not listed in the VALUE statement are
printed as they appear in the SAS data set, as shown in the following example:
proc format lib=library;
value jobfmt
103='manager'
105='text processor';
run;
proc print data=perm.employee;
run;
Perm.Employee Data Set
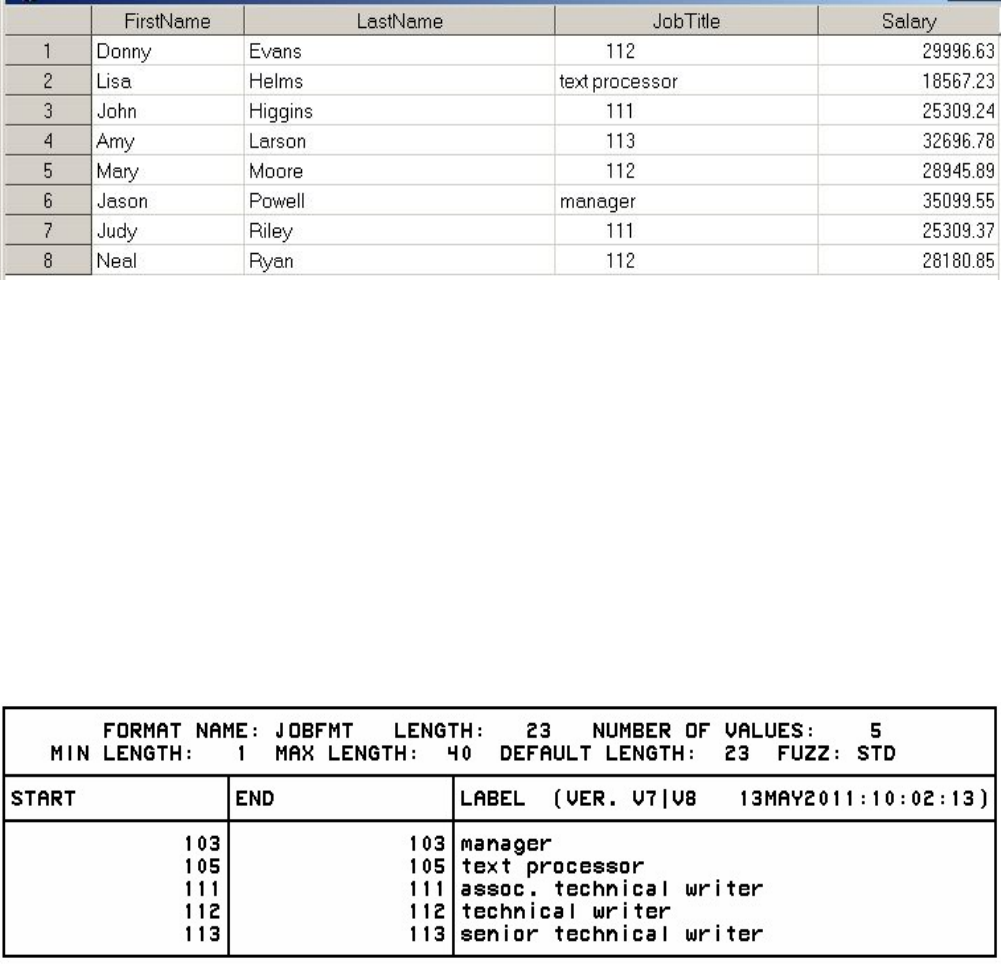
- 264 -
When you build a large catalog of permanent formats, it can be easy to forget the exact spelling of a
specific format name or its range of values. Adding the keyword FMTLIB to the PROC FORMAT
statement displays a list of all the formats in your catalog, along with descriptions of their values.
libname library 'c:\sas\formats\lib';
proc format library=library fmtlib;
run;
When you submit this PROC step, a description of each format in your permanent catalog is displayed as
output.
SAS Output: Format Description
In addition to the name, range, and label, the format description includes the
• length of the longest label
• number of values defined by this format
• version of SAS that was used to create the format
• date and time of creation.
Chapter Summary
Text Summary
Invoking PROC FORMAT
- 265 -
The FORMAT procedure enables you to substitute descriptive text for the values of variables. The
LIBRARY= option stores the new formats in a specified format catalog; otherwise, they are stored in a
default catalog named Work.Formats. The keyword FMTLIB displays the formats and values that are
currently stored in the catalog. The VALUE statement defines a new format for the values of a variable.
Defining a Unique Format
Formats can be specified for a single value, a range of values, or a list of unique values. Unique values
must be separated by commas. When character values are specified, the values must be enclosed in
quotation marks, and the format name must begin with a dollar sign ($). You can specify non-inclusive
numeric ranges by using the less than sign (<). The keywords HIGH, LOW, and OTHER can be used to
label values that are not specifically addressed in a range.
Associating User-Defined Formats with Variables
To access the permanent, user-defined formats in a format catalog, you'll need to use a LIBNAME
statement to reference the catalog library. To associate user-defined formats with variables in the
FORMAT statement, use the same format names in both the FORMAT and VALUE statements, but place
a period at the end of the format name when it is used in the FORMAT statement.
Syntax
LIBNAME libref 'SAS-data-library';
PROC FORMAT LIBRARY=libref FMTLIB;
VALUE format-name
range1='label1'
range2 'label2'
...;
RUN;
DATA SAS-data-set;
INFILE data-file;
INPUT pointer variable-name informat.;
FORMAT variable(s) format-name.;
RUN;
Sample Programs
libname library 'c:\sas\formats\lib';
proc format library=library fmtlib;
value jobfmt
103='manager'
105='text processor';
run;
data perm.empinfo;
infile empdata;
- 266 -
input @9 FirstName $5. @1 LastName $7.
+7 JobTitle 3. @19 Salary comma9.;
format salary comma9.2 jobtitle jobfmt.;
run;
Points to Remember
• Formats—even permanently associated ones—do not affect the values of variables in a SAS data set. Only the
appearance of the values is altered.
• A user-defined format name must begin with a dollar sign ($) when it is assigned to character variables. A format
name cannot end with a number.
• Use two single quotation marks when you want an apostrophe to appear in a label.
• Place a period at the end of the format name when you use the format name in the FORMAT statement.
Chapter Quiz
Select the best answer for each question. After completing the quiz, check your answers using the answer
key in the appendix
1. If you don't specify the LIBRARY= option, your formats are stored in Work.Formats, and they exist ...
1. only for the current procedure.
2. only for the current DATA step.
3. only for the current SAS session.
4. permanently.
2. Which of the following statements will store your formats in a permanent catalog?
1.
libname library 'c:\sas\formats\lib';
proc format lib=library
...;
2.
libname library 'c:\sas\formats\lib';
format lib=library
...;
3.
library='c:\sas\formats\lib';
proc format library
...;
4.
library='c:\sas\formats\lib';
proc library
...;
3. When creating a format with the VALUE statement, the new format's name
1. cannot end with a number
2. cannot end with a period
- 267 -
3. cannot be the name of a SAS format, and...
1. cannot be the name of a data set variable.
2. must be at least two characters long.
3. must be at least eight characters long.
4. must begin with a dollar sign ($) if used with a character variable.
4. Which of the following FORMAT procedures is written correctly?
1.
proc format lib=library
value colorfmt;
1='Red'
2='Green'
3='Blue'
run;
2.
proc format lib=library;
value colorfmt
1='Red'
2='Green'
3='Blue';
run;
3.
proc format lib=library;
value colorfmt;
1='Red'
2='Green'
3='Blue'
run;
4.
proc format lib=library;
value colorfmt
1='Red';
2='Green';
3='Blue';
run;
5. Which of these is false? Ranges in the VALUE statement can specify...
1. a single value, such as 24 or 'S'.
2. a range of numeric values, such as 0-1500.
3. a range of character values, such as 'A'-'M'.
4. a list of numeric and character values separated by commas, such as 90,'B',180,'D',270.
6. How many characters can be used in a label?
1. 40
2. 96
3. 200
4. 256

- 268 -
7. Which keyword can be used to label missing numeric values as well as any values that are not specified in a
range?
1. LOW
2. MISS
3. MISSING
4. OTHER
8. You can place the FORMAT statement in either a DATA step or a PROC step. What happens when you place it in
a DATA step?
1. You temporarily associate the formats with variables.
2. You permanently associate the formats with variables.
3. You replace the original data with the format labels.
4. You make the formats available to other data sets.
9. The format JOBFMT was created in a FORMAT procedure. Which FORMAT statement will apply it to the
variable JobTitle in the program output?
1.
format jobtitle jobfmt;
2.
format jobtitle jobfmt.;
3.
format jobtitle=jobfmt;
4.
format jobtitle='jobfmt';
10. Which keyword, when added to the PROC FORMAT statement, will display all the formats in your catalog?
1. CATALOG
2. LISTFMT
3. FMTCAT
4. FMTLIB
Chapter 8 Producing Descriptive Statistics
Overview
Objectives
Computing Statistics Using PROC MEANS
Selecting Statistics
Limiting Decimal Places
Specifying Variables in PROC MEANS
Group Processing Using the CLASS Statement
Group Processing Using the BY Statement
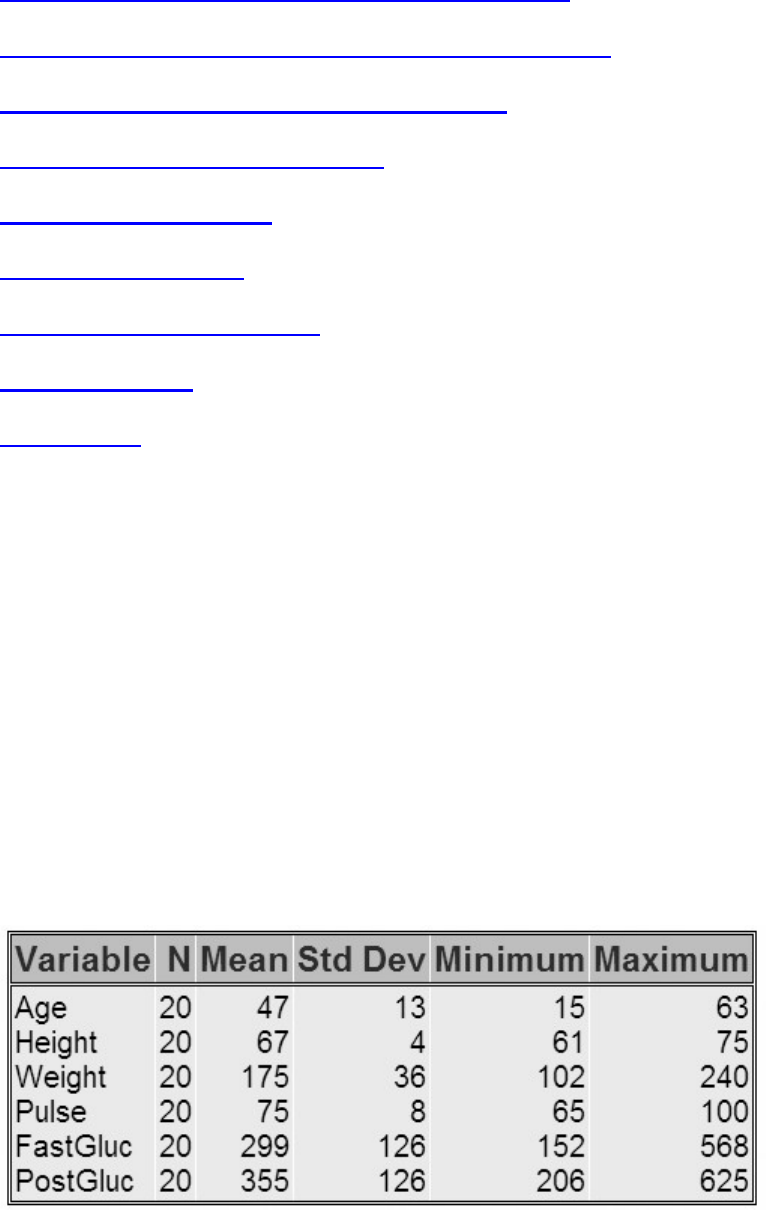
- 269 -
Creating a Summarized Data Set Using PROC MEANS
Creating a Summarized Data Set Using PROC SUMMARY
Producing Frequency Tables Using PROC FREQ
Specifying Variables in PROC FREQ
Creating Two-Way Tables
Creating N-Way Tables
Creating Tables in List Format
Chapter Summary
Chapter Quiz
Overview
Introduction
As you have seen, one of the many features of PROC REPORT is the ability to summarize large amounts
of data by producing descriptive statistics. However, there are SAS procedures that are designed
specifically to produce various types of descriptive statistics and to display them in meaningful reports.
The type of descriptive statistics that you need and the SAS procedure that you should use depend on
whether you need to summarize continuous data values or discrete data values.
If the data values that you want to describe are continuous numeric values (for example, people's ages),
then you can use the MEANS procedure or the SUMMARY procedure to calculate statistics such as the
mean, sum, minimum, and maximum.
MEANS Procedure Output
If the data values that you want to describe are discrete (for example, the color of people's eyes), then you
can use the FREQ procedure to show the distribution of these values, such as percentages and counts.
FREQ Procedure Output

- 270 -
This chapter will show you how to use the MEANS, SUMMARY, and FREQ procedures to describe your
data.
Objectives
In this chapter, you learn to
• determine the n-count, mean, standard deviation, minimum, and maximum of numeric variables using the
MEANS procedure
• control the number of decimal places used in PROC MEANS output
• specify the variables for which to produce statistics
• use the PROC SUMMARY procedure to produce the same results as the PROC MEANS procedure
• describe the difference between the SUMMARY and MEANS procedures
• create one-way frequency tables for categorical data using the FREQ procedure
• create two-way and -way crossed frequency tables
• control the layout and complexity of crossed frequency tables.
Computing Statistics Using PROC MEANS
Descriptive statistics such as the mean, minimum, and maximum provide useful information about
numeric data. The MEANS procedure provides these and other data summarization tools, as well as
helpful options for controlling your output.
Procedure Syntax
The MEANS procedure can include many statements and options for specifying needed statistics. For
simplicity, let's consider the procedure in its basic form.
General form, basic MEANS procedure:
PROC MEANS <DATA=SAS-data-set>
<statistic-keyword(s)> <option(s)>;
RUN;
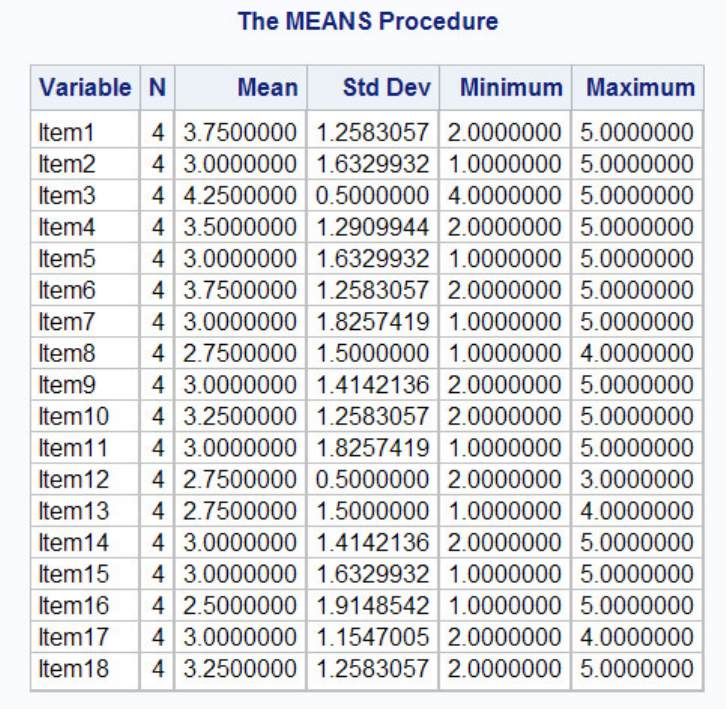
- 271 -
where
SAS-data-set is the name of the data set to be used
statistic-keyword(s) specify the statistics to compute
option(s) control the content, analysis, and appearance of output.
In its simplest form, PROC MEANS prints the n-count (number of nonmissing values), the mean, the
standard deviation, and the minimum and maximum values of every numeric variable in a data set.
proc means data=perm.survey;
run;
Default PROC MEANS Output
Selecting Statistics
The default statistics that the MEANS procedure produces (n-count, mean, standard deviation, minimum,
and maximum) are not always the ones that you need. You might prefer to limit output to the mean of the
values. Or you might need to compute a different statistic, such as the median or range of the values.

- 272 -
To specify statistics, include statistic keywords as options in the PROC MEANS statement. When you
specify a statistic in the PROC MEANS statement, default statistics are not produced. For example, to see
the median and range of Perm.Survey numeric values, add the MEDIAN and RANGE keywords as
options.
proc means data=perm.survey median range;
run;
MEANS Procedure Output Displaying Median and Range
The following keywords can be used with PROC MEANS to compute statistics:
Descriptive Statistics
Keyword
Description
CLM
Two-sided confidence limit for the mean
- 273 -
CSS
Corrected sum of squares
CV
Coefficient of variation
KURTOSIS
Kurtosis
LCLM
One-sided confidence limit below the mean
MAX
Maximum value
MEAN
Average
MODE
Value that occurs most frequently (new in SAS 9.2)
MIN
Minimum value
N
Number of observations with nonmissing values
NMISS
Number of observations with missing values
RANGE
Range
SKEWNESS
Skewness
STDDEV / STD
Standard deviation
STDERR
Standard error of the mean
SUM
Sum
SUMWGT
Sum of the Weight variable values
UCLM
One-sided confidence limit above the mean
- 274 -
USS
Uncorrected sum of squares
VAR
Variance
Quantile Statistics
Keyword
Description
MEDIAN / P50
Median or 50th percentile
P1
1st percentile
P5
5th percentile
P10
10th percentile
Q1 / P25
Lower quartile or 25th percentile
Q3 / P75
Upper quartile or 75th percentile
P90
90th percentile
P95
95th percentile
P99
99th percentile
QRANGE
Difference between upper and lower quartiles: Q3-Q1
Hypothesis Testing
Keyword
Description
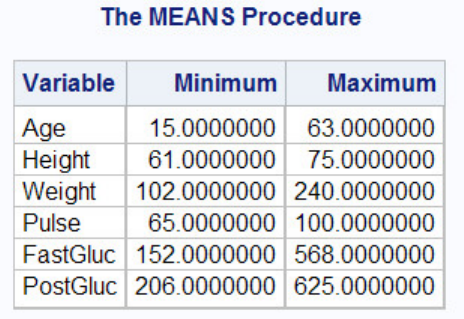
- 275 -
PROBT
Probability of a greater absolute value for the t value
T
Student's t for testing the hypothesis that the population mean is 0
Limiting Decimal Places
By default, PROC MEANS output automatically uses the BESTw. format to display numeric values in the
report.
The BESTw. format is the default format that SAS uses for writing numeric values. When there is no
format specification, SAS chooses the format that provides the most information about the value according
to the available field width. At times, this can result in unnecessary decimal places, making your output
hard to read.
proc means data=clinic.diabetes min max;
run;
Variables Fromatted with BESTw. Format
To limit decimal places, use the MAXDEC= option in the PROC MEANS statement, and set it equal to the
length that you prefer.
General form, PROC MEANS statement with MAXDEC= option:
PROC MEANS <DATA=SAS-data-set>
<statistic-keyword(s)> MAXDEC=n;
where n specifies the maximum number of decimal places.
proc means data=clinic.diabetes min max maxdec=0;
run;
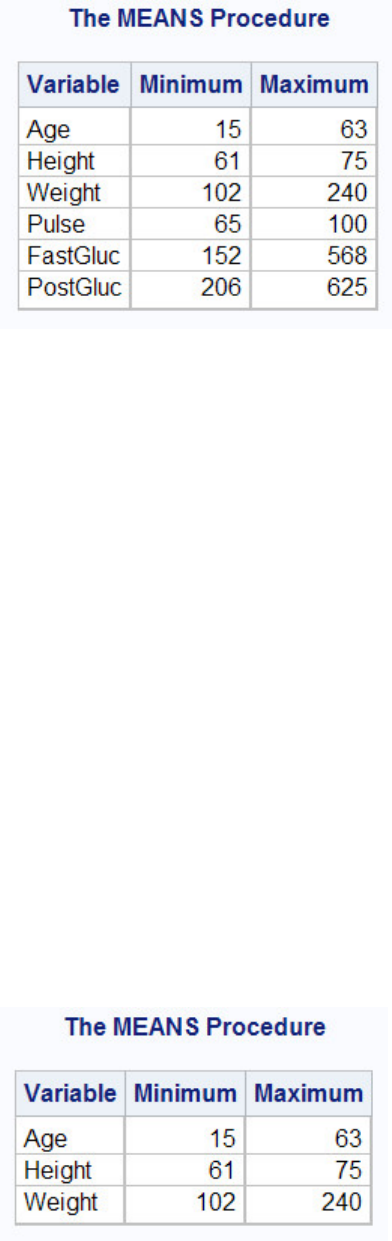
- 276 -
Variables Fromatted Using the MAXDEC= Option
Specifying Variables in PROC MEANS
By default, the MEANS procedure generates statistics for every numeric variable in a data set. But you'll
typically want to focus on just a few variables, particularly if the data set is large. It also makes sense to
exclude certain types of variables. The values of ID, for example, are unlikely to yield useful statistics.
To specify the variables that PROC MEANS analyzes, add a VAR statement and list the variable names.
General form, VAR statement:
VAR variable(s);
where variable(s) lists numeric variables for which to calculate statistics.
proc means data=clinic.diabetes min max maxdec=0;
var age height weight;
run;
Output with Selected Variables Age, Height, and Weight
In addition to listing variables separately, you can use a numbered range of variables.
proc means data=perm.survey mean stderr maxdec=2;
var item1-item5;
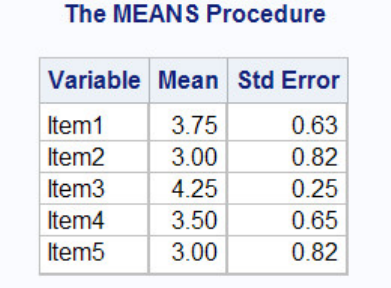
- 277 -
run;
Output with a Range of Variables Selected
Group Processing Using the CLASS Statement
You will often want statistics for groups of observations, instead of over the entire data set. For example,
census numbers are more useful when grouped by region than when viewed as a national total. To produce
separate analyses of grouped observations, add a CLASS statement to the MEANS procedure.
General form, CLASS statement:
CLASS variable(s);
where variable(s) specifies category variables for group processing.
CLASS variables are used to categorize data. CLASS variables can be either character or numeric, but they
should contain a limited number of discrete values that represent meaningful groupings. If a CLASS
statement is used, then the N Obs statistic is calculated. The N Obs statistic is based on the CLASS
variables, as shown in the output below.
The output of the program shown below is categorized by values of the variables Survive and Sex. The
order of the variables in the CLASS statement determines their order in the output table.
proc means data=clinic.heart maxdec=1;
var arterial heart cardiac urinary;
class survive sex;
run;
Output Categorized by Values of the Variables Survive and Sex
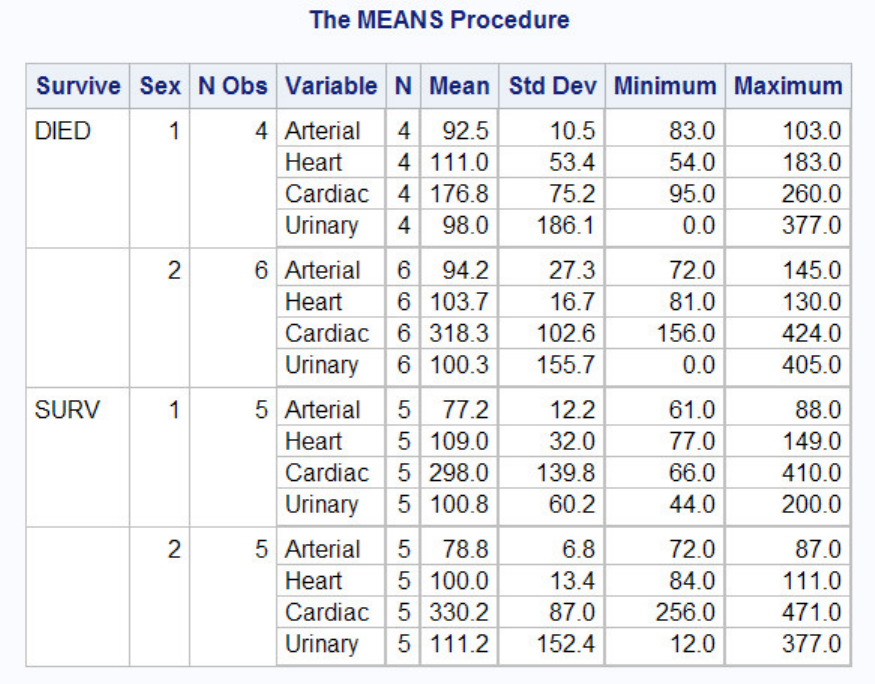
- 278 -
Group Processing Using the BY Statement
Like the CLASS statement, the BY statement specifies variables to use for categorizing observations.
General form, BY statement:
BY variable(s);
where variable(s) specifies category variables for group processing.
But BY and CLASS differ in two key ways:
1. Unlike CLASS processing, BY processing requires that your data already be sorted or indexed in the order of the
BY variables. Unless data set observations are already sorted, you will need to run the SORT procedure before using
PROC MEANS with any BY group.
CAUTION:
Be careful when sorting data sets to enable group processing. If you don't specify an output data set by using the OUT=
option, PROC SORT will overwrite your initial data set with the newly sorted observations.
2. BY group results have a layout that is different from the layout of CLASS group results. Note that the BY
statement in the program below creates four small tables; a CLASS statement would produce a single large table.
proc sort data=clinic.heart out=work.heartsort;
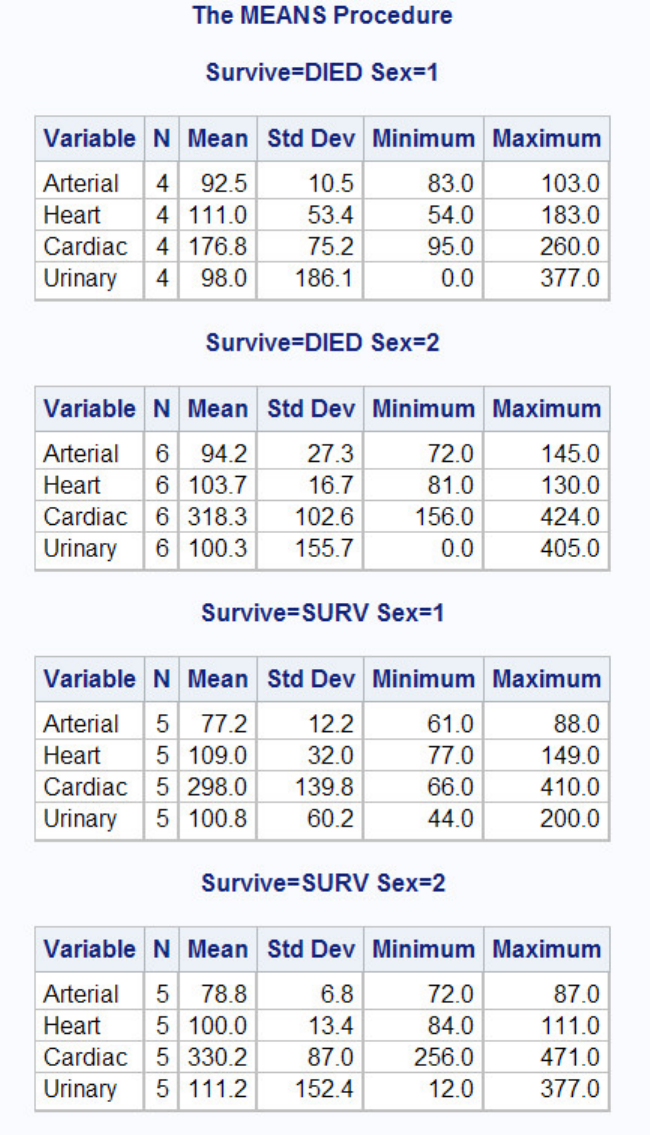
- 279 -
by survive sex;
run;
proc means data=work.heartsort maxdec=1;
var arterial heart cardiac urinary;
by survive sex;
run;
BY Groups Created by PROC MEANS
Because it doesn't require a sorting step, the CLASS statement is easier to use than the BY statement. However, BY group
- 280 -
processing can be more efficient when your categories might contain many levels.
Creating a Summarized Data Set Using PROC MEANS
Overview
You might want to create an output SAS data set. You can do this by using the OUTPUT statement in
PROC MEANS.
General form, OUTPUT statement:
OUTPUT OUT=SAS-data-set statistic=variable(s);
where
OUT= specifies the name of the output data set
statistic= specifies the summary statistic written out
variable(s) specifies the names of the variables to create. These variables represent the statistics for the analysis
variables that are listed in the VAR statement.
When you use the OUTPUT statement, the summary statistics N, MEAN, STD, MIN, and MAX are
produced for all of the numeric variables or for all of the variables that are listed in a VAR statement by
default. To specify which statistics to produce, use the OUT= option in the OUTPUT statement.
Specifying Statistics Using PROC MEANS
You can specify which statistics to produce in the output data set by using the OUT= option in the
OUTPUT statement.. To do so, you must specify the statistic and then list all of the variables. The
variables must be listed in the same order as in the VAR statement. You can specify more than one statistic
in the OUTPUT statement.
The following program creates a typical PROC MEANS report and also creates a summarized output data
set.
proc means data=clinic.diabetes;
var age height weight;
class sex;
output out=work.sum_gender
mean=AvgAge AvgHeight AvgWeight
min=MinAge MinHeight MinWeight;
run;
Report Created by PROC MEANS
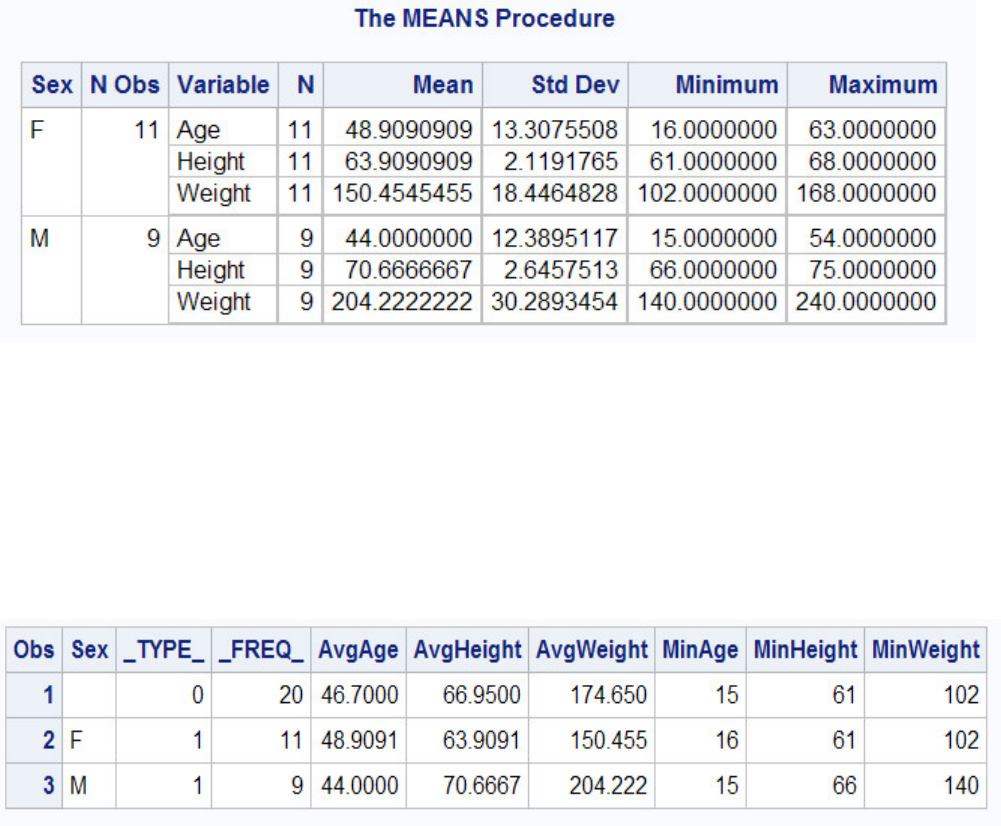
- 281 -
To see the contents of the output data set, submit the following PROC PRINT step.
proc print data=work.sum_gender;
run;
Data Set Created by PROC PRINT
You can use the NOPRINT option in the PROC MEANS statement to suppress the default report. For
example, the following program creates only the output data set:
proc means data=clinic.diabetes noprint;
var age height weight;
class sex;
output out=work.sum_gender
mean=AvgAge AvgHeight AvgWeight;
run;
In addition to the variables that you specify, the procedure adds the _TYPE_ and _FREQ_ variables to the
output data set. When no statistic keywords are specified, PROC MEANS also adds the variable _STAT_.
For more information about these variables, see the SAS documentation for the MEANS procedure.
Creating a Summarized Data Set Using PROC SUMMARY
You can also create a summarized output data set with PROC SUMMARY. When you use PROC
SUMMARY, you use the same code to produce the output data set that you would use with PROC
MEANS. The difference between the two procedures is that PROC MEANS produces a report by default
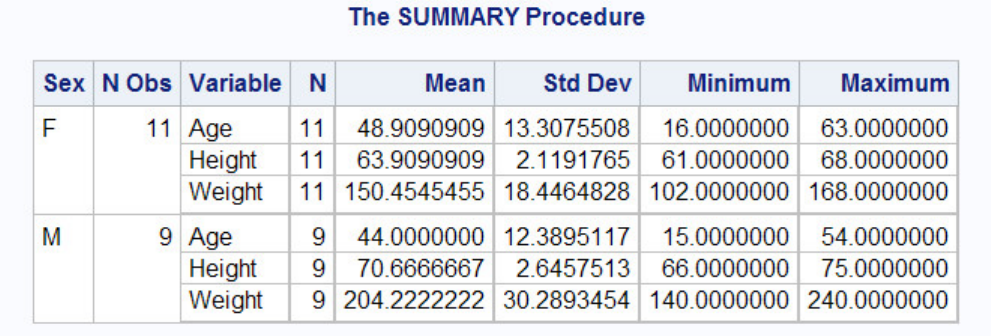
- 282 -
(remember that you can use the NOPRINT option to suppress the default report). By contrast, to produce a
report in PROC SUMMARY, you must include a PRINT option in the PROC SUMMARY statement.
Example
The following example creates an output data set but does not create a report:
proc summary data=clinic.diabetes;
var age height weight;
class sex;
output out=work.sum_gender
mean=AvgAge AvgHeight AvgWeight;
run;
If you placed a PRINT option in the PROC SUMMARY statement above, this program would produce the
same report as if you replaced the word SUMMARY with MEANS.
proc summary data=clinic.diabetes print;
var age height weight;
class sex;
output out=work.sum_gender
mean=AvgAge AvgHeight AvgWeight;
run;
Output Created by the SUMMARY Procedure with the PRINT Option Specified
Producing Frequency Tables Using PROC FREQ
The FREQ procedure is a descriptive procedure as well as a statistical procedure. It produces one-way and
n-way frequency tables, and it concisely describes your data by reporting the distribution of variable values.
You can use the FREQ procedure to create crosstabulation tables that summarize data for two or more
categorical variables by showing the number of observations for each combination of variable values.
Procedure Syntax
- 283 -
The FREQ procedure can include many statements and options for controlling frequency output. For
simplicity, let's consider the procedure in its basic form.
General form, basic FREQ procedure:
PROC FREQ <DATA=SAS-data-set >;
RUN;
where SAS-data-set is the name of the data set to be used.
By default, PROC FREQ creates a one-way table with the frequency, percent, cumulative frequency, and
cumulative percent of every value of all variables in a data set. This can produce excessive or inappropriate
output. It is recommended that you always use a TABLES statement with PROC FREQ.
Default PROC FREQ Output
For example, the following FREQ procedure creates a frequency table for each variable in the data set
Finance.Loans. All the unique values are shown for the variables Account and Amount.
proc freq data=finance.loans;
run;
Frequency Table for Account and Amount
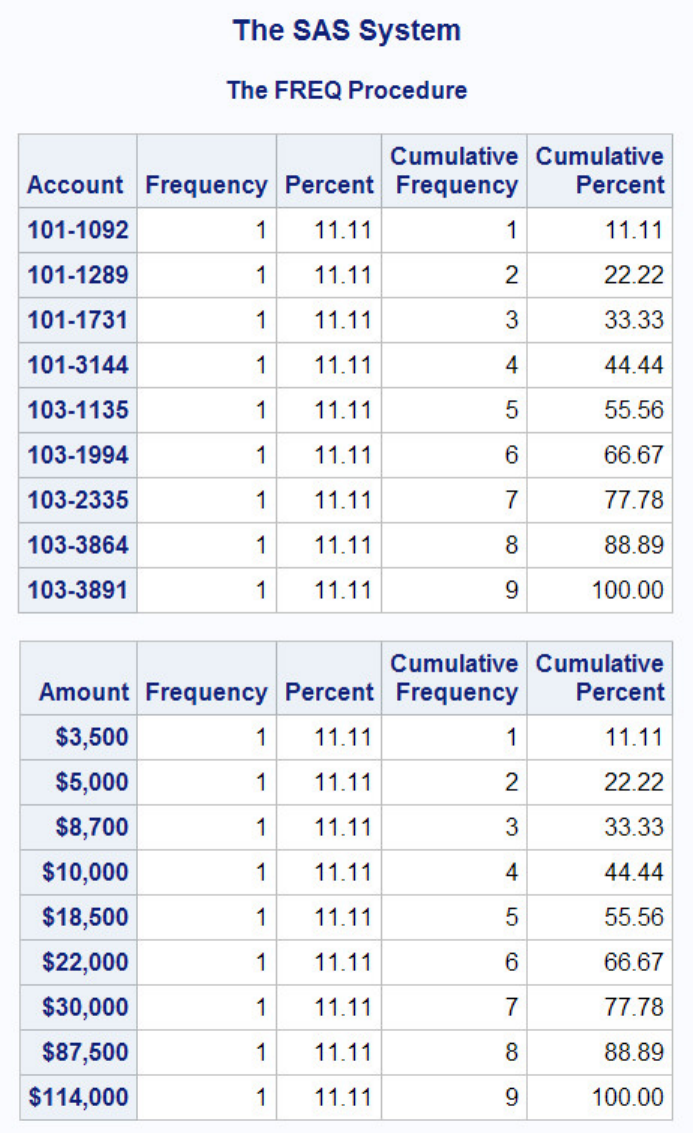
- 284 -
Specifying Variables in PROC FREQ
Overview
By default, the FREQ procedure creates frequency tables for every variable in your data set. But this isn't
always what you want. A variable that has continuous numeric values—such as DateTime—can result in a
lengthy and meaningless table. Likewise, a variable that has a unique value for each observation—such as
FullName—is unsuitable for PROC FREQ processing. Frequency distributions work best with variables
whose values can be described as categorical, and whose values are best summarized by counts rather than
by averages.
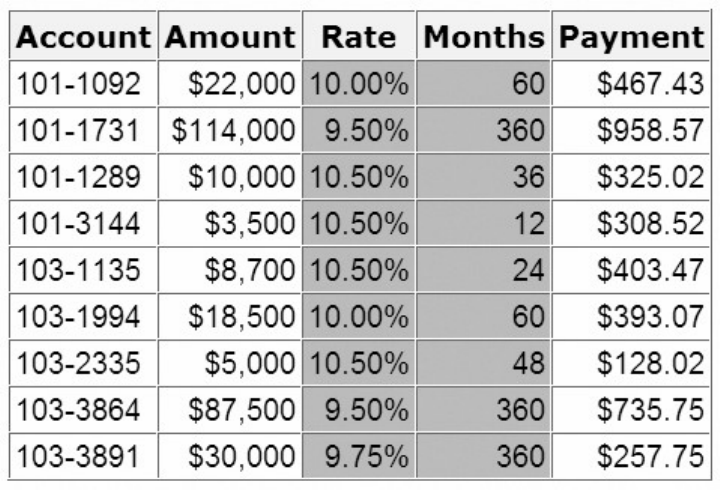
- 285 -
To specify the variables to be processed by the FREQ procedure, include a TABLES statement.
General form, TABLES statement:
TABLES variable(s);
where variable(s) lists the variables to include.
Example
The order in which the variables appear in the TABLES statement determines the order in which they are
listed in the PROC FREQ report.
Consider the SAS data set Finance.Loans. The variables Rate and Months are best described as categorical
variables, so they are the best choices for frequency tables.
PROC PRINT Report of the Data Set Finance.Loans
proc freq data=finance.loans;
tables rate months;
run;
Frequency Tables for Rate and Months
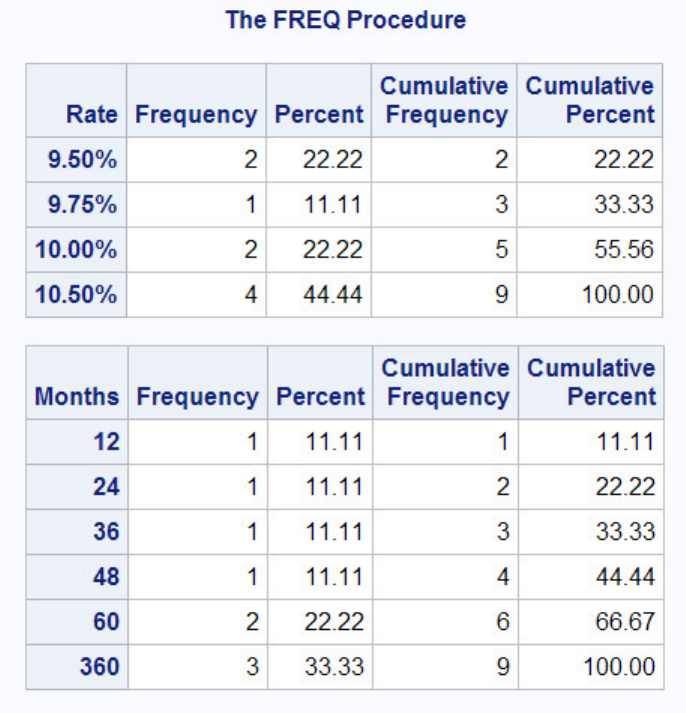
- 286 -
In addition to listing variables separately, you can use a numbered range of variables.
proc freq data=perm.survey;
tables item1-item3;
run;
Frequency Tables for Item1–Item3

- 287 -
Adding the NOCUM option to your TABLES statement suppresses the display of cumulative frequencies
and cumulative percentages in one-way frequency tables and in list output. The syntax for the NOCUM
option is shown below.
TABLES variable(s) / NOCUM;
Creating Two-Way Tables
So far, you have used the FREQ procedure to create one-way frequency tables. However, it is often helpful
to crosstabulate frequencies of two or more variables. For example, census data is typically crosstabulated
with a variable that represents geographical regions.
The simplest crosstabulation is a two-way table. To create a two-way table, join two variables with an
asterisk (*) in the TABLES statement of a PROC FREQ step.
General form, TABLES statement for crosstabulation:
TABLES variable-1 *variable-2 <* ... variable-n>;
where (for two-way tables)
- 288 -
variable-1 specifies table rows
variable-2 specifies table columns.
When crosstabulations are specified, PROC FREQ produces tables with cells that contain
• cell frequency
• cell percentage of total frequency
• cell percentage of row frequency
• cell percentage of column frequency.
For example, the following program creates the two-way table shown below.
proc format;
value wtfmt low-139='< 140'
140-180='140-180'
181-high='> 180';
value htfmt low-64='< 5''5"'
65-70='5''5-10"'
71-high='> 5''10"';
run;
proc freq data=clinic.diabetes;
tables weight*height;
format weight wtfmt. height htfmt.;
run;
Two-Way Table Created by PROC FREQ
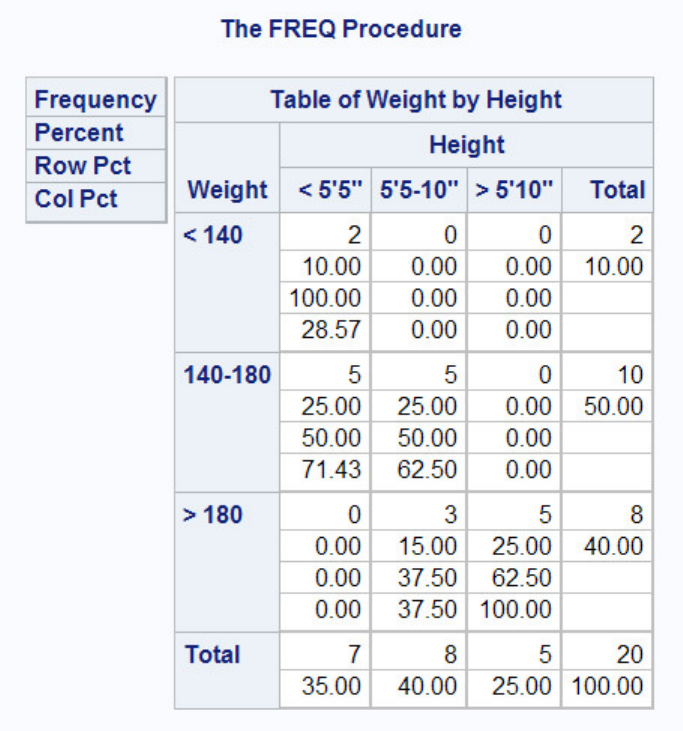
- 289 -
Note that the first variable, Weight, forms the table rows, and the second variable, Height, forms the
columns; reversing the order of the variables in the TABLES statement would reverse their positions in the
table. Note also that the statistics are listed in the legend box.
Creating N-Way Tables
Overview
For a frequency analysis of more than two variables, use PROC FREQ to create n-way crosstabulations. A
series of two-way tables is produced, with a table for each level of the other variables.
For example, suppose you want to add the variable Sex to your crosstabulation of Weight and Height in
the data set Clinic.Diabetes. Add Sex to the TABLES statement, joined to the other variables with an
asterisk (*).
tables sex*weight*height;
Determining the Table Layout
The order of the variables is important. In n-way tables, the last two variables of the TABLES statement
become the two-way rows and columns. Variables that precede the last two variables in the TABLES
statement stratify the crosstabulation tables.
- 290 -
levels
↓
tables sex*weight*height;
↑ ↑
rows + columns = two-way tables
Notice the structure of the output that is produced by the program shown below.
proc format;
value wtfmt low-139='< 140'
140-180='140-180'
181-high='> 180';
value htfmt low-64='< 5''5"'
65-70='5''5-10"'
71-high='> 5''10"';
run;
proc freq data=clinic.diabetes;
tables sex*weight*height;
format weight wtfmt. height htfmt.;
run;
Creating N-Way Tables
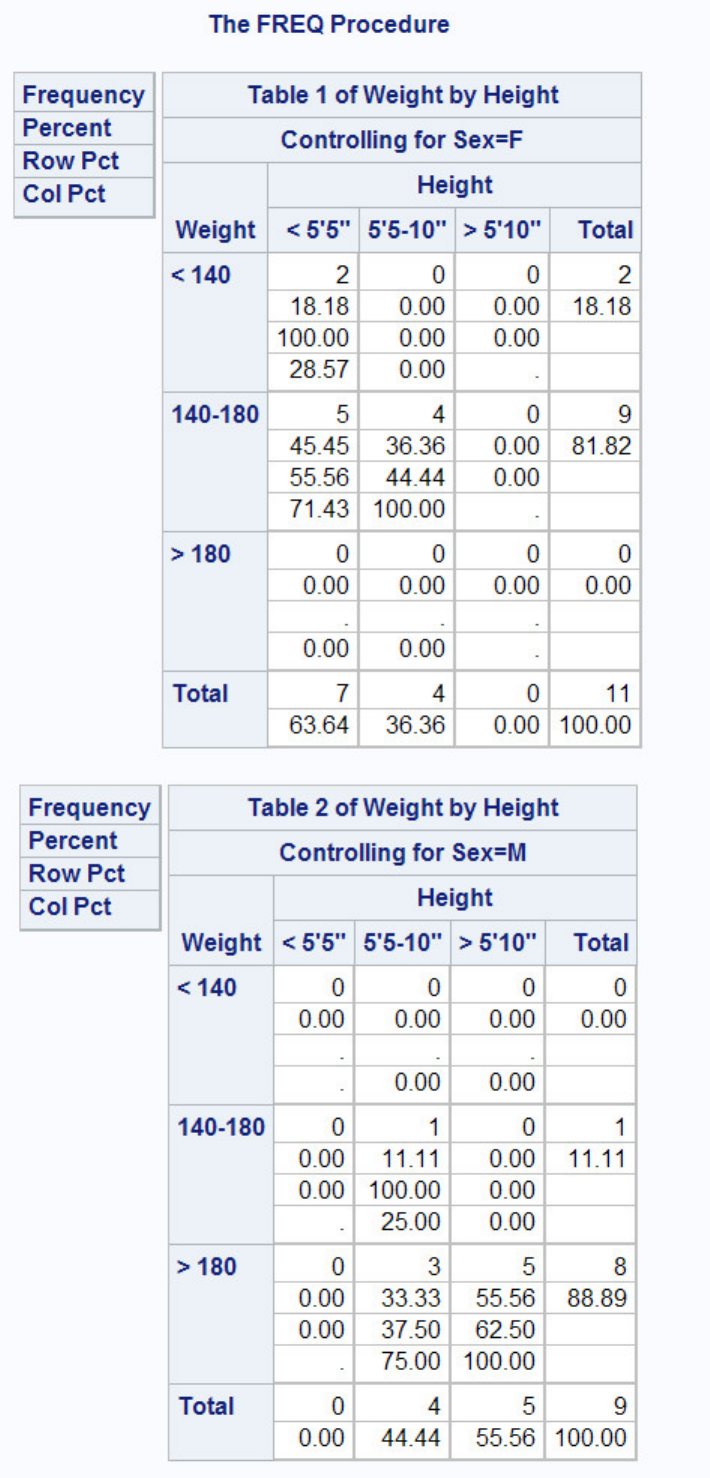
- 291 -
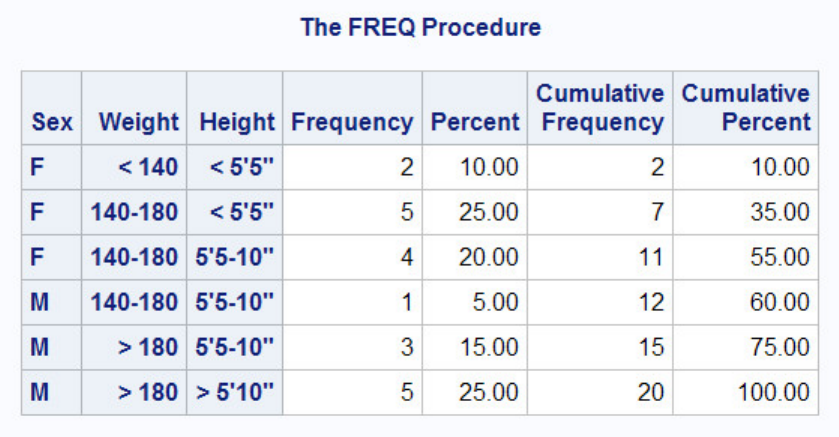
- 292 -
Creating Tables in List Format
Overview
When three or more variables are specified, the multiple levels of n-way tables can produce considerable
output. Such bulky, often complex crosstabulations are often easier to read as a continuous list. Although
this eliminates row and column frequencies and percents, the results are compact and clear.
The LIST option is not available when you also specify statistical options.
To generate list output for crosstabulations, add a slash (/) and the LIST option to the TABLES statement
in your PROC FREQ step.
TABLES variable-1 *variable-2 <* ... variable-n> / LIST;
Example
Adding the LIST option to our Clinic.Diabetes program puts its frequencies in a simple, short table.
proc format;
value wtfmt low-139='< 140'
140-180='140-180'
181-high='> 180';
value htfmt low-64='< 5''5"'
65-70='5''5-10"'
71-high='> 5''10"';
run;
proc freq data=clinic.diabetes;
tables sex*weight*height / list;
format weight wtfmt. height htfmt.;
run;
Table Created by Using the LIST Option
- 293 -
Changing the Table Format
Beginning in SAS®9, adding the CROSSLIST option to your TABLES statement displays crosstabulation
tables in ODS column format. This option creates a table that has a table definition that you can customize
by using the TEMPLATE procedure.
Notice the structure of the output that is produced by the program shown below.
proc format;
value wtfmt low-139='< 140'
140-180='140-180'
181-high='> 180';
value htfmt low-64='< 5''5"'
65-70='5''5-10"'
71-high='> 5''10"';
run;
proc freq data=clinic.diabetes;
tables sex*weight*height / crosslist;
format weight wtfmt. height htfmt.;
run;
Table Created by Using CROSSLIST Option: Sex=F

- 294 -
Table Created by Using CROSSLIST Option: Sex=M
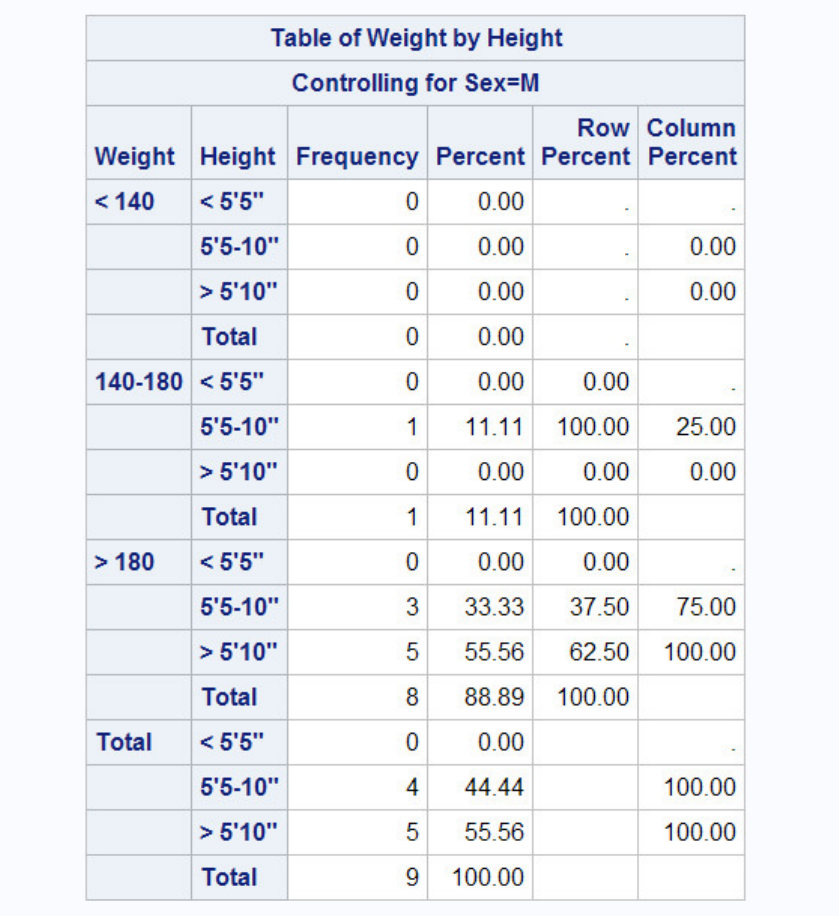
- 295 -
Suppressing Table Information
Another way to control the format of crosstabulations is to limit the output of the FREQ procedure to a few
specific statistics. Remember that when crosstabulations are run, PROC FREQ produces tables with cells
that contain:
• cell frequency
• cell percentage of total frequency
• cell percentage of row frequency
• cell percentage of column frequency.
You can use options to suppress any of these statistics. To control the depth of crosstabulation results, add
any combination of the following options to the TABLES statement:
• NOFREQ suppresses cell frequencies
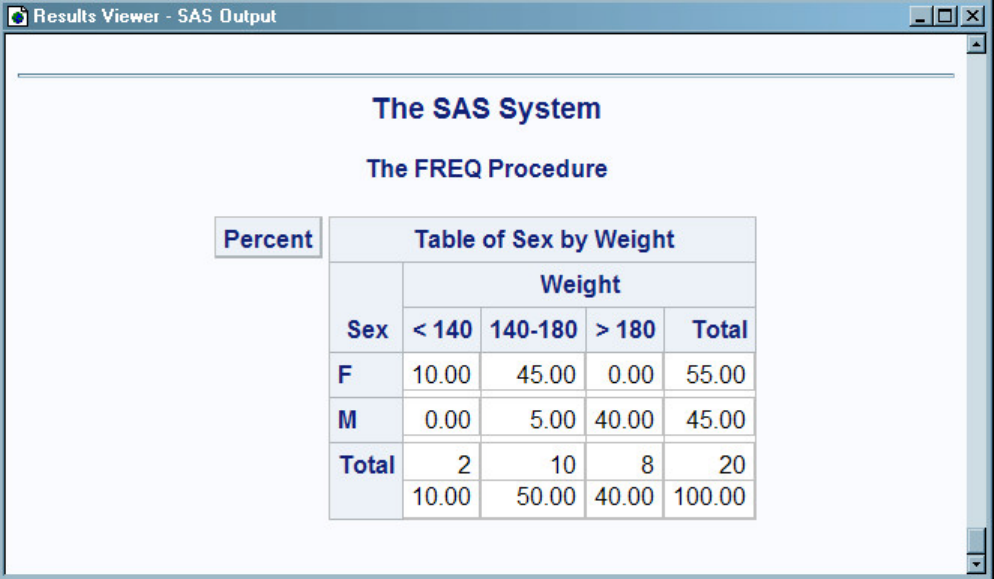
- 296 -
• NOPERCENT suppresses cell percentages
• NOROW suppresses row percentages
• NOCOL suppresses column percentages.
Example
Suppose you want to use only the percentages of Sex and Weight combinations in the data set
Clinic.Diabetes. To block frequency counts and row and column percentages, add the NOFREQ, NOROW,
and NOCOL options to your program's TABLES statement.
proc format;
value wtfmt low-139='< 140'
140-180='140-180'
181-high='> 180';
run;
proc freq data=clinic.diabetes;
tables sex*weight / nofreq norow nocol;
format weight wtfmt.;
run;
Suppressing Table Information
Notice that Percent is the only statistic that remains in the table's legend box.
Chapter Summary
- 297 -
Text Summary
Purpose of PROC MEANS
The MEANS procedure provides an easy way to compute descriptive statistics. Descriptive statistics such
as the mean, minimum, and maximum provide useful information about numeric data.
Specifying Statistics
By default, PROC MEANS computes the n-count (the number of non-missing values), the mean, the
standard deviation, and the minimum and maximum values for variables. To specify statistics, list their
keywords in the PROC MEANS statement.
Limiting Decimal Places
Because PROC MEANS uses the BEST. format by default, procedure output can contain unnecessary
decimal places. To limit decimal places, use the MAXDEC= option and set it equal to the length that you
prefer.
Specifying Variables in PROC MEANS
By default, PROC MEANS computes statistics for all numeric variables. To specify the variables to
include in PROC MEANS output, list them in a VAR statement.
Group Processing Using the CLASS Statement
Include a CLASS statement, specifying variable names, to group PROC MEANS output by variable values
of classes.
Group Processing Using the BY Statement
Include a BY statement, specifying variable names, to group PROC MEANS output by variable values.
Your data must be sorted according to those variables. Statistics are not computed for the BY variables.
Creating a Summarized Data Set Using PROC MEANS
You can create an output data set that contains summarized variables by using the OUTPUT statement in
PROC MEANS. When you use the OUTPUT statement without specifying the statistic-keyword= option,
the summary statistics N, MEAN, STD, MIN, and MAX are produced for all of the numeric variables or
for all of the variables that are listed in a VAR statement.
Creating a Summarized Data Set Using PROC SUMMARY
You can also create a summarized output data set by using PROC SUMMARY. The PROC SUMMARY
code for producing an output data set is exactly the same as the code for producing an output data set with
PROC MEANS. The difference between the two procedures is that PROC MEANS produces a report by
default, whereas PROC SUMMARY produces an output data set by default.
The FREQ Procedure
The FREQ Procedure is a descriptive procedure as well as a statistical procedure that produces one-way
and n-way frequency tables. It describes your data by reporting the distribution of variable values.
- 298 -
Specifying Variables
By default, the FREQ procedure creates frequency tables for every variable in your data set. To specify the
variables to analyze, include them in a TABLES statement.
Creating Two-Way Tables
When a TABLES statement contains two variables joined by an asterisk (*), PROC FREQ produces
crosstabulations. The resulting table displays values for
• cell frequency
• cell percentage of total frequency
• cell percentage of row frequency
• cell percentage of column frequency.
Creating N-Way Tables
Crosstabulations can include more than two variables. When three or more variables are joined in a
TABLES statement, the result is a series of two-way tables that are grouped by the values of the first
variables listed.
Creating Tables in List Format
To reduce the bulk of n-way table output, add a slash (/) and the LIST option to the end of the TABLES
statement. PROC FREQ then prints compact, multi-column lists instead of a series of tables. Beginning in
SAS®9, you can use the CROSSLIST option to format your tables in ODS column format.
Suppressing Table Information
You can suppress the display of specific statistics by adding one or more options to the TABLES
statement:
• NOFREQ suppresses cell frequencies
• NOPERCENT suppresses cell percentages
• NOROW suppresses row percentages
• NOCOL suppresses column percentages.
Syntax
PROC MEANS <DATA=SAS-data-set>
<statistic-keyword(s)> <option(s)>;
<VARvariable(s)>;
<CLASSvariable(s)>;
<BYvariable(s)>;
<OUTPUTout=SAS-data-set statistic=variable(s)>;
RUN;
- 299 -
PROC SUMMARY <DATA=SAS-data-set>
<statistic-keyword(s)> <option(s)>;
<VARvariable(s)>;
<CLASSvariable(s)>;
<BYvariable(s)>;
<OUTPUTout=SAS-data-set>;
RUN;
PROC FREQ <DATA=SAS-data-set>;
TABLES variable-1 *variable-2 <* ... variable-n>
/ <NOFREQ|NOPERCENT|NOROW|NOCOL|CROSSLIST>;
RUN;
Sample Programs
proc means data=clinic.heart min max maxdec=1;
var arterial heart cardiac urinary;
class survive sex;
run;
proc summary data=clinic.diabetes;
var age height weight;
class sex;
output out=work.sum_gender
mean=AvgAge AvgHeight AvgWeight;
run;
proc freq data=clinic.heart;
tables sex*survive*shock / nopercent list;
run;
Points to Remember
• In PROC MEANS, use a VAR statement to limit output to relevant variables. Exclude statistics for variables such
as dates.
• By default, PROC MEANS prints the full width of each numeric variable. Use the MAXDEC= option to limit
decimal places and improve legibility.
• Data must be sorted for BY group processing. You might need to run PROC SORT before using PROC MEANS
with a BY statement.
• PROC MEANS and PROC SUMMARY produce the same results; however, the default output is different. PROC
MEANS produces a report, whereas PROC SUMMARY produces an output data set.
• If you do not include a TABLES statement, PROC FREQ produces statistics for every variable in the data set.
Variables that have continuous numeric values can create a large amount of output. Use a TABLES statement to exclude
such variables, or group their values by applying a FORMAT statement.
- 300 -
Chapter Quiz
Select the best answer for each question. After completing the quiz, check your answers using the answer
key in the appendix.
1. The default statistics produced by the MEANS procedure are n-count, mean, minimum, maximum, and...
1. median
2. range
3. standard deviation
4. standard error of the mean.
2. Which statement will limit a PROC MEANS analysis to the variables Boarded, Transfer, and Deplane?
1.
by boarded transfer deplane;
2.
class boarded transfer deplane;
3.
output boarded transfer deplane;
4.
var boarded transfer deplane;
3. The data set Survey.Health includes the following variables. Which is a poor candidate for PROC MEANS
analysis?
1.
IDnum
2.
Age
3.
Height
4.
Weight
4. Which of the following statements is true regarding BY group processing?
1. BY variables must be either indexed or sorted.
2. Summary statistics are computed for BY variables.
3. BY group processing is preferred when you are categorizing data that contains few variables.
4. BY group processing overwrites your data set with the newly grouped observations.
5. Which group processing statement produced the PROC MEANS output shown below?
PROC MEANS Output
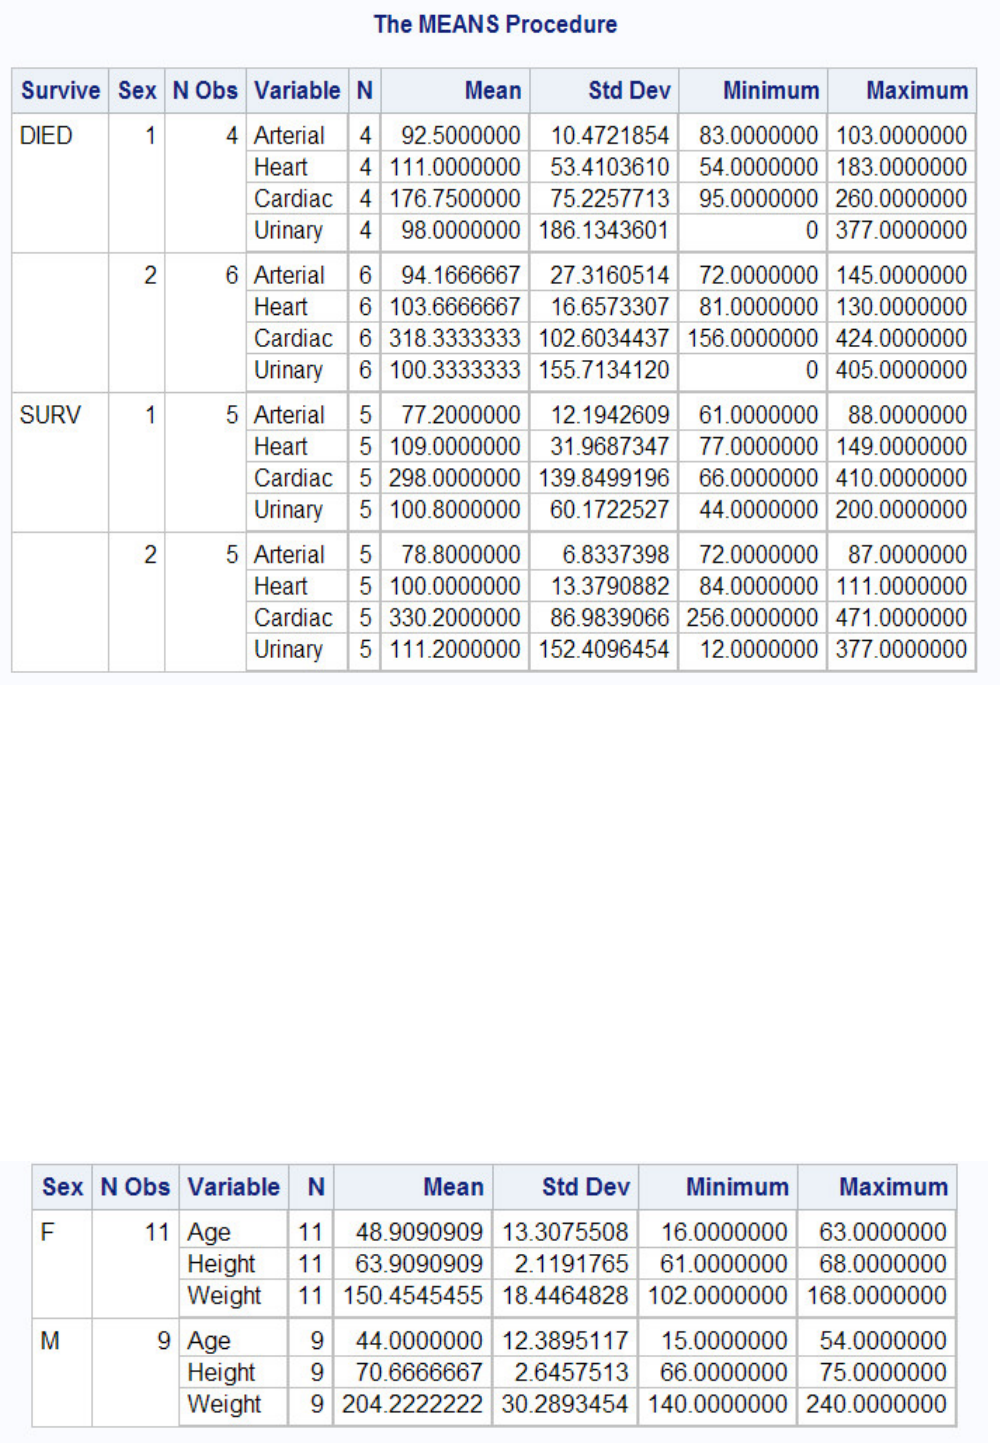
- 301 -
1.
class sex survive;
2.
class survive sex;
3.
by sex survive;
4.
by survive sex;
6. Which program can be used to create the following output?
Output
- 302 -
1.
proc means data=clinic.diabetes;
var age height weight;
class sex;
output out=work.sum_gender
mean=AvgAge AvgHeight AvgWeight;
run;
2.
proc summary data=clinic.diabetes print;
var age height weight; class sex;
output out=work.sum_gender
mean=AvgAge AvgHeight AvgWeight;
run;
3.
proc means data=clinic.diabetes noprint;
var age height weight;
class sex;
output out=work.sum_gender
mean=AvgAge AvgHeight AvgWeight;
run;
4. Both a and b.
7. By default, PROC FREQ creates a table of frequencies and percentages for which data set variables?
1. character variables
2. numeric variables
3. both character and numeric variables
4. none: variables must always be specified
8. Frequency distributions work best with variables that contain
1. continuous values.
2. numeric values.
3. categorical values.
4. unique values.
9. Which PROC FREQ step produced this two-way table?
Two-Way Table
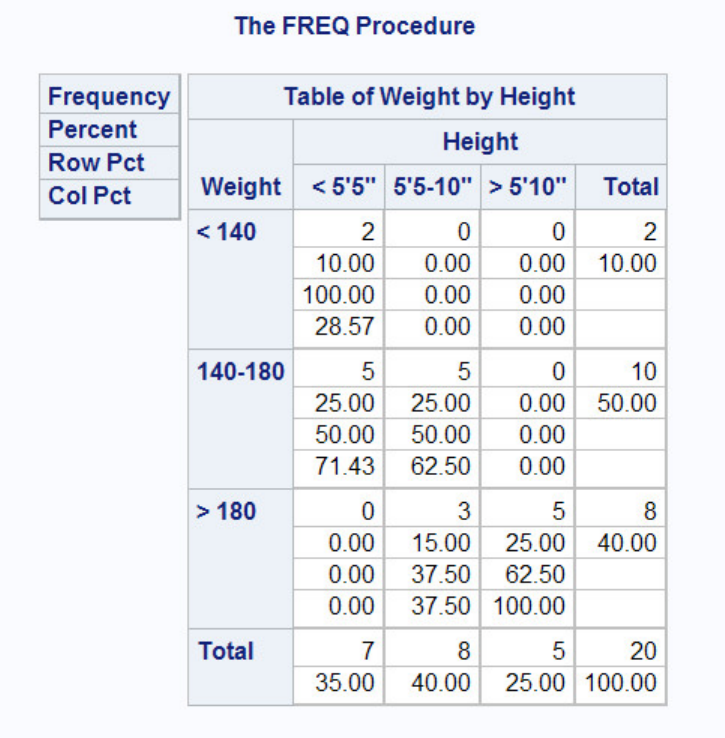
- 303 -
1.
proc freq data=clinic.diabetes;
tables height weight;
format height htfmt. weight wtfmt.;
run;
2.
proc freq data=clinic.diabetes;
tables weight height;
format weight wtfmt. height htfmt.;
run;
3.
proc freq data=clinic.diabetes;
tables height*weight;
format height htfmt. weight wtfmt.;
run;
4.
proc freq data=clinic.diabetes;
tables weight*height;
format weight wtfmt. height htfmt.;
run;
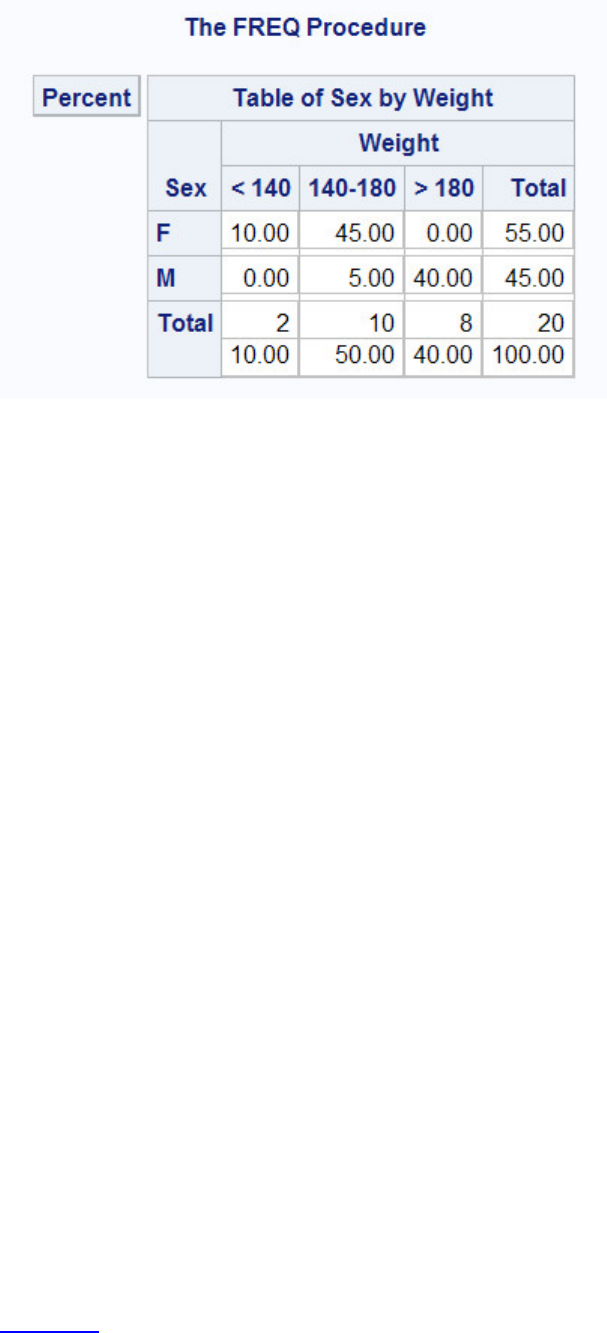
- 304 -
10. Which PROC FREQ step produced this table?
PROC FREQ Table
1.
proc freq data=clinic.diabetes;
tables sex weight / list;
format weight wtfmt.;
run;
2.
proc freq data=clinic.diabetes;
tables sex*weight / nocol;
format weight wtfmt.;
run;
3.
proc freq data=clinic.diabetes;
tables sex weight / norow nocol;
format weight wtfmt.;
run;
4.
proc freq data=clinic.diabetes;
tables sex*weight / nofreq norow nocol;
format weight wtfmt.;
run;
Chapter 9 Producing HTML Output
Overview

- 305 -
The Output Delivery System
Opening and Closing ODS Destinations
Creating HTML Output with Options
Creating HTML Output with a Table of Contents
Using Options to Specify Links and Paths
Changing the Appearance of HTML Output
Additional Features
Chapter Summary
Chapter Quiz
Overview
Introduction
In previous chapters, you've seen both traditional SAS LISTING output and HTML output. HTML output
is created by default in the SAS Windowing environment in the Windows and UNIX operating systems. If
you are not using SAS in the SAS in the SAS Windowing environment in the Windows and UNIX
operating systems, then you can set options to create HTML output. The HTML created by default is basic
HTML 4.0 with default formatting.
You can use ODS to create many other types of output. You can create RTF, PDF, Excel, and many others
using ODS statements. This chapter will discuss HTML output.
Using ODS, you can customize and manage HTML output by submitting programming statements. After
you create HTML files, you can view them in the Results Viewer or Internet Explorer, Netscape Navigator,
or any Web browser that fully supports HTML 4.0.
This chapter shows you how to create and view HTML output using ODS. You also learn how to apply
styles to ODS output.
Note: By default, all code that you submit to SAS with Enterprise Guide has ODS statements included to
create HTML output.
LISITING Output versus HTML Output
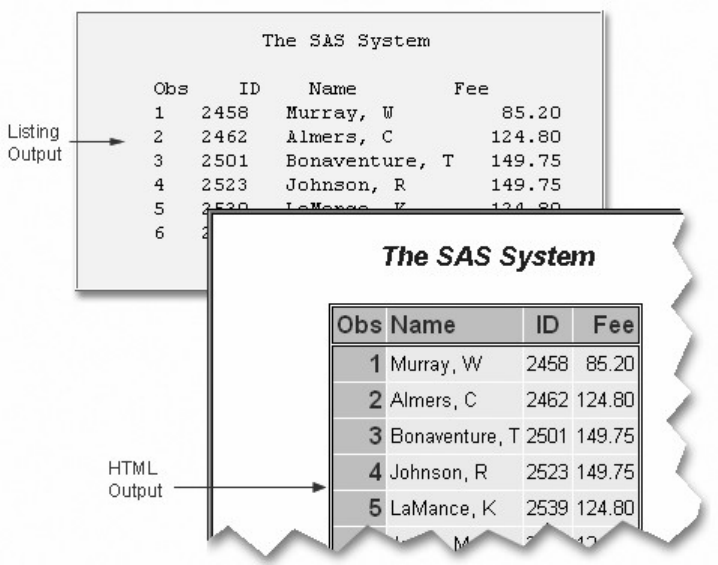
- 306 -
Objectives
In this chapter, you learn to
• open and close ODS destinations
• create a simple HTML file with the output of one or more procedures
• create HTML output with a linked table of contents in a frame
• use options to specify links and file paths
• view HTML output
• apply styles to HTML output.
The Output Delivery System
Before you learn to write ODS programming statements, it is helpful to understand a little about ODS.
Advantages of ODS
ODS gives you formatting options and makes procedure output much more flexible. With ODS, you can
easily create output in a variety of formats, including
• HTML output
HTML Output
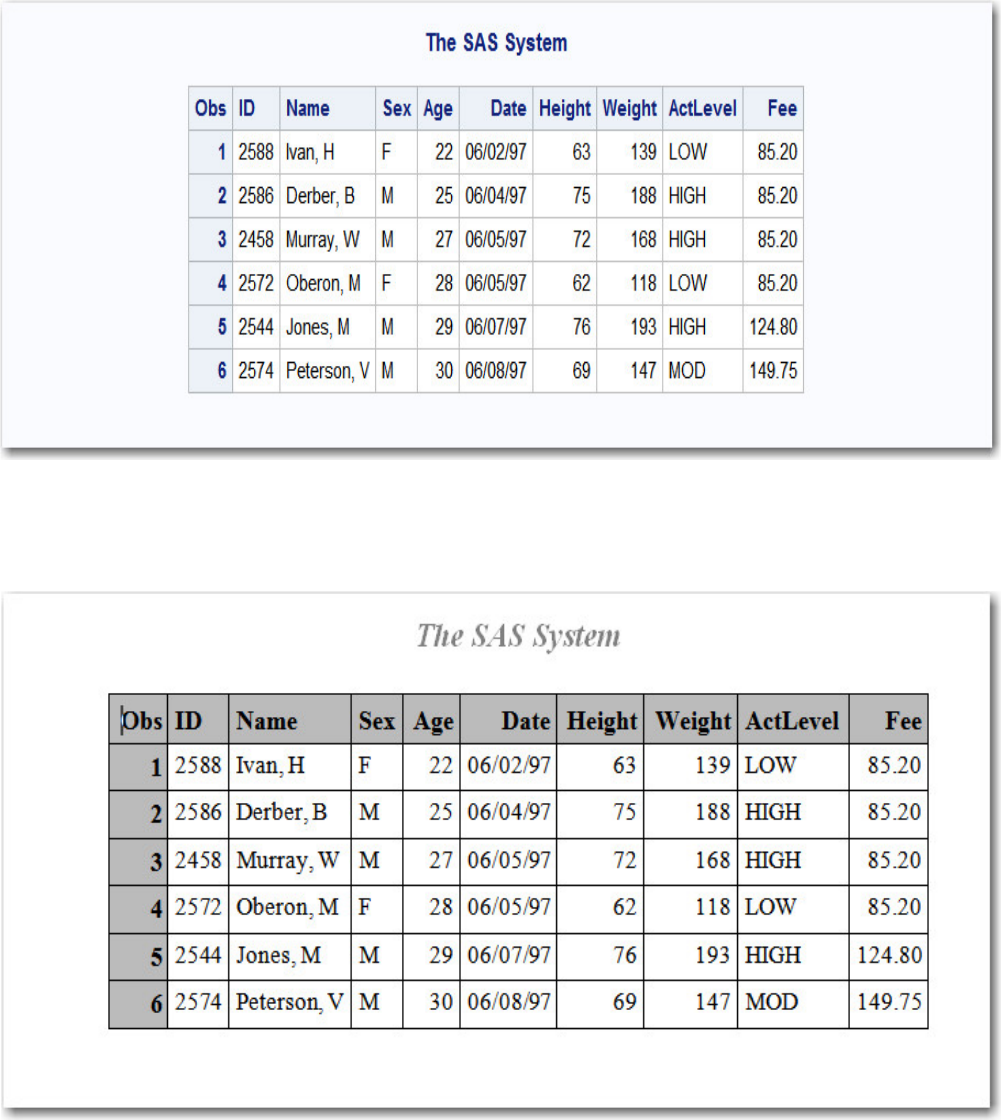
- 307 -
• RTF output
RTF Output
• PDF output
PDF Output
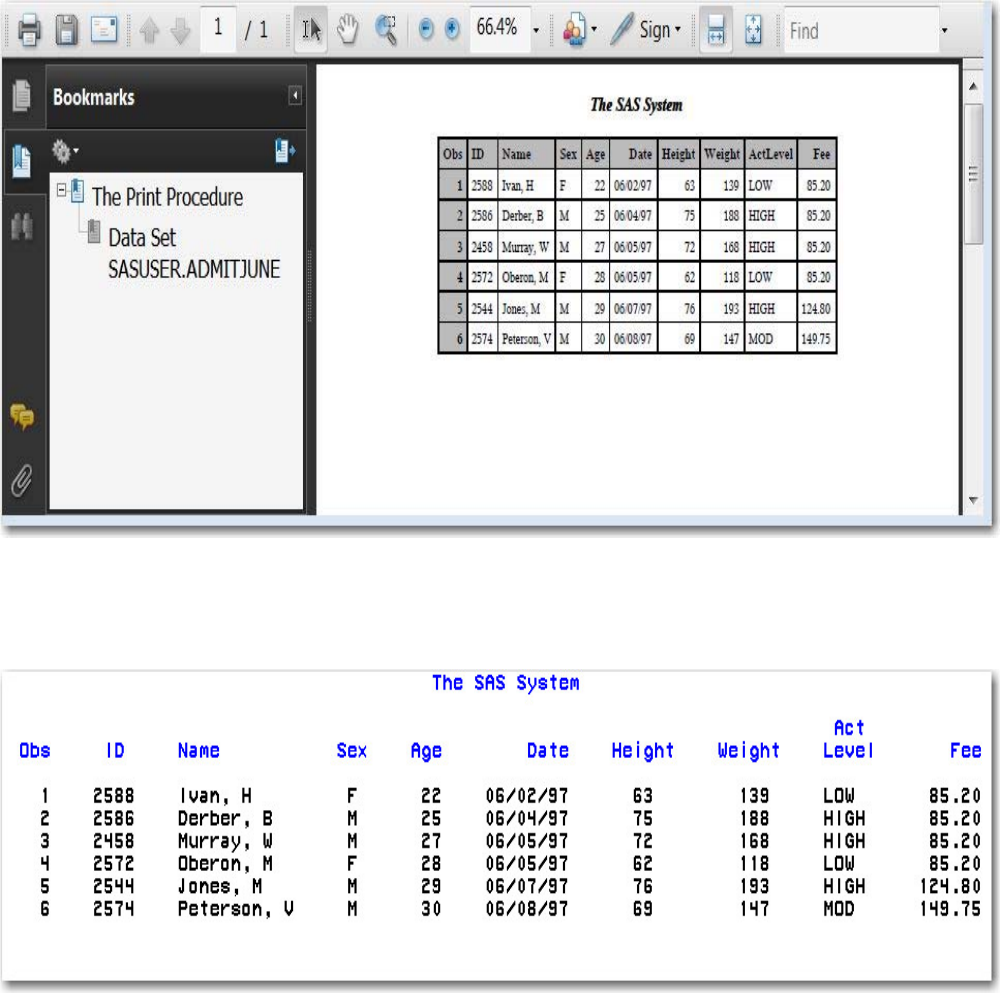
- 308 -
• traditional SAS LISTING output
LISTING Output
Also, ODS holds your output in its component parts (data and table definition) so that numerical data
retains its full precision.
Let's see how ODS creates output.
How ODS Works
When you submit your ODS statements and the SAS program that creates your output, ODS does the
following:
1. ODS creates your output in the form of output objects.
Each output object contains the results of a procedure or DATA step (the data component) and can also contain
information about how to render the results (the table definition).
ODS Processing: What Goes In
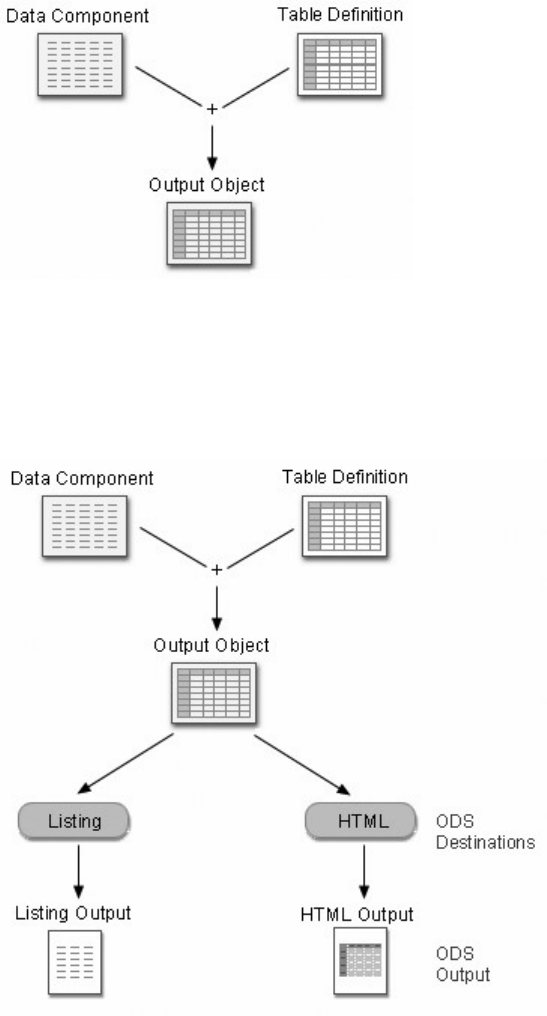
- 309 -
2. ODS sends the output object to the ODS destination(s) that you specify and creates formatted output as specified
by the destination. For example, when the LISTING and HTML destinations are open, ODS creates LISTING and HTML
output.
ODS Processing: What Comes Out
3. ODS creates a link to each output object in the Results window and identifies each output object by the
appropriate icon.
Results Window
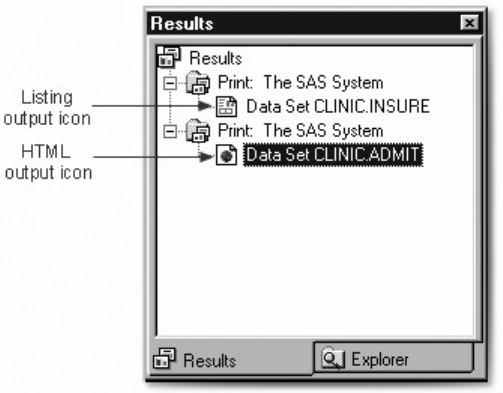
- 310 -
Let's look at how you open various ODS destinations.
Opening and Closing ODS Destinations
ODS Destinations
You use ODS statements to specify destinations for your output. Each destination creates a specific type of
formatted output. The table below lists some of the ODS destinations that are currently supported.
This
destination . . .
Produces . . .
HTML
output that is formatted in Hypertext Markup Language (HTML). This is the default
destination. You do not have to specify the ODS HTML statement to produce basic
HTML output.
LISTING
plain text output that is formatted like traditional SAS procedure (LISTING) output
Markup Languages
Family
output that is formatted using markup languages such as Extensible Markup
Language (XML)
Document
a hierarchy of output objects that enables you to render multiple ODS output
without rerunning procedures
Output
SAS data sets
Printer Family
output that is formatted for a high-resolution printer such as PostScript (PS),
Portable Document Format (PDF), or Printer Control Language (PCL) files
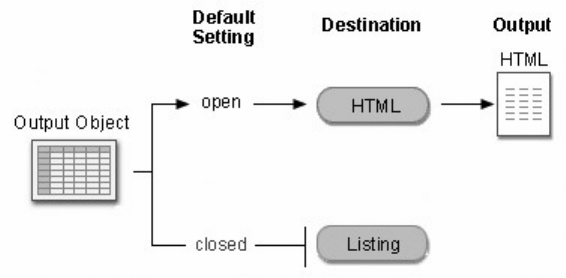
- 311 -
RTF Rich Text Format output for use with Word
In this chapter, we'll primarily work with the LISTING destination and the HTML destination. For
information about all ODS destinations, please see the SAS documentation for the Output Delivery
System.
Using Statements to Open and Close ODS Destinations
For each type of formatted output that you want to create, you use an ODS statement to open the
destination. At the end of your program, you use another ODS statement to close the destination so that
you can access your output.
General form, ODS statement to open and close destinations:
ODS open-destination;
ODS close-destination CLOSE;
where
open-destination is a keyword and any required options for the type of output that you want to create, such as
HTML FILE='html-file-pathname'
LISTING
close-destination is a keyword for the type of output.
You can issue ODS statements in any order, depending on whether you need to open or close the
destination. Most ODS destinations are closed by default. You open them at the beginning of your program
and close them at the end. The exception is the HTML destination, which is open by default.
Default ODS Destination
Example
The following program creates HTML output because the HTML destination is open by default. No other
ODS destinations are open, so no other output objects are produced.
- 312 -
proc print data=sasuser.mydata;
run;
The following program produces HTML and LISTING output:
ods listing;
proc print data=sasuser.mydata;
run;
ods listing close;
This example is meant to demonstrate how you open and close ODS destinations. You learn the specifics
of creating HTML output later in this chapter.
Closing the HTML Destination
As you have learned, the HTML destination is open by default. Because open destinations use system
resources, it is a good idea to close the HTML destination at the beginning of your program if you don't
want to produce HTML output. For example:
ods html close;
The HTML destination remains closed until you end your current SAS session or until you re-open the
destination. It's a good programming practice to reset ODS to HTML output (the default setting) at the end
of your programs. For example:
ods html;
Example
The following program produces only LISTING output:
ods html close;
ods listing;
proc print data=sasuser.mydata;
run;
ods listing close;
ods html;
Closing Multiple ODS Destinations at Once
You can produce output in multiple formats at once by opening each ODS destination at the beginning of
the program.
- 313 -
When you have more than one open ODS destination, you can use the keyword _ALL_ in the ODS
CLOSE statement to close all open destinations at once.
Example
The program below opens the RTF and PDF destinations before the PROC step and closes all ODS
destinations at the end of the program:
ods rtf file='RTF-file-pathname';
ods pdf file='PDF-file-pathname';
proc print data=sasuser.admit;
run;
ods _all_ close;
ods html;
Notice that the last ODS statement reopens the HTML destination so that ODS returns to producing
HTML output for subsequent DATA or PROC steps in the current session.
Now that you have learned how to open and close ODS destinations, let's look at creating HTML output
with options.
Creating HTML Output with Options
ODS HTML Statement
To create simple HTML output, you do not have to specify the ODS HTML statement. However, to create
HTML output with options specified, you open the HTML destination using the ODS HTML statement.
General form, ODS HTML statement:
ODS HTML BODY=file-specification;
ODS HTML CLOSE;
where file-specification identifies the file that contains the HTML output. The specification can be
a quoted string which contains the HTML filename (use only the filename to write the file to your current
working directory location, such as C:\Documents and Settings\username\My Documents\My SAS Files)
Example: ODS HTML BODY=“myreport.html”;
a quoted string which contains the complete directory path and HTML filename (include the complete pathname
if you want to save the HTML file to a specific location other than your working directory) Example: ODS HTML
BODY=“c:\reportdir\myreport.html”;
a fileref (unquoted file shortcut) that has been assigned to an HTML file using the FILENAME statement
- 314 -
Example: FILENAME MYHTML “c:\reportdir\myreport.html”; ODS HTML BODY=MYHTML;
a SAS catalog entry in the form entry-name.html. Note that the catalog name is specified in the PATH= option
and the entry-name.html value for the BODY= option is unquoted. Example: ODS HTML
PATH=work.mycatBODY=myentry BODY=.HTML;
FILE= can also be used to specify the file that contains the HTML output. FILE= is an alias for BODY=.
You can also use the PATH= option to explicitly specify a directory path for your file. This option will be
discussed in an upcoming topic.
Example
The program below creates PROC PRINT output in an HTML file. The BODY= option specifies the file
F:\admit.html in the Windows operating environment as the file that contains the PROC PRINT results.
ods html body='f:\admit.html';
proc print data=clinic.admit label;
var sex age height weight actlevel;
label actlevel='Activity Level';
run;
ods html close;
ods html;
The HTML file admit.html contains the results of all procedure steps between the ODS HTML statement
and ODS HTML CLOSE statement.
HTML Output
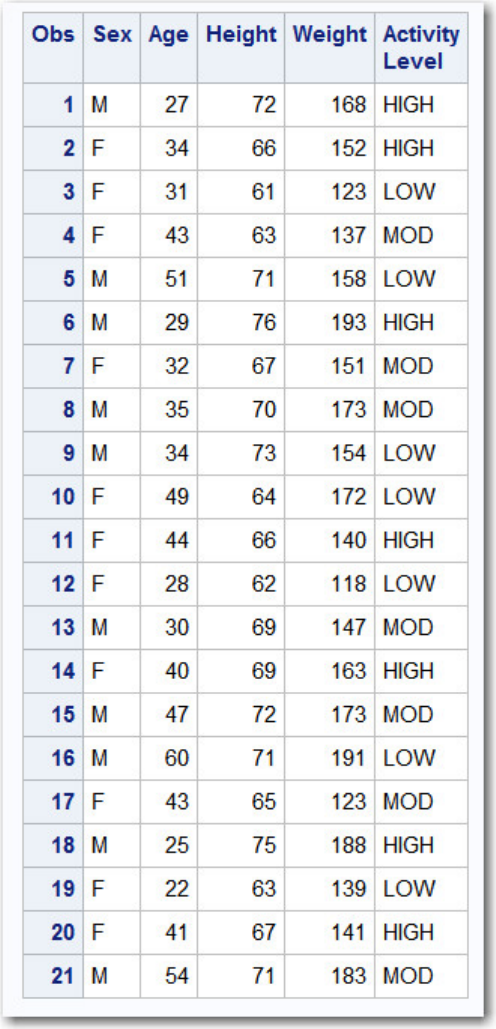
- 315 -
Viewing Your HTML Output
If you're working in the Windows environment, when you submit the program, the body file will
automatically appear in the Results Viewer (using the internal browser) or your preferred Web browser, as
specified in the Results tab of the Preferences window.
In other operating environments, you can double-click the corresponding link in the Results window to
view the HTML output in your Web browser. If you don't have a Web browser in your operating
environment, you can transfer the HTML files to an operating environment where you can view them.
Creating HTML Output in Enterprise Guide
When you specify a path and filename for your HTML results, SAS Enterprise Guide will allow you to
download and display the HTML file. In addition, you can use Windows Explorer to locate the file that
you created and then double-click it to open it in your browser.
- 316 -
When you submit a program, two HTML results appear in the Project window. One is the HTML output
that is created by SAS Enterprise Guide ODS statements. The other uses the ODS statements from the
code that you submitted and creates a temporary file labeled with the path and filename that you
designated. It is similar in style to the actual HTML file that is created in the location that you specify.
You can double-click the shortcut to open the HTML results in SAS Enterprise Guide, or you can
right-click the shortcut and select Open with default-browser to open it in a browser. To see the actual
file rather than the temporary file, you can use Windows Explorer to locate the HTML file that you created
and then double-click it to open it in your browser.
Creating HTML Output from Multiple Procedures
You can also use the ODS HTML statement to direct the results from multiple procedures to the same
HTML file.
The program below generates HTML output for the PRINT and TABULATE procedures. The results for
both procedures are saved to the file C:\Records\data.html in the Windows environment. A link for each
output object (one for each procedure) appears in the Results window.
ods html body='c:\records\data.html';
proc print data=clinic.admit label;
var id sex age height weight actlevel;
label actlevel='Activity Level';
run;
proc tabulate data=clinic.stress2;
var resthr maxhr rechr;
table min mean, resthr maxhr rechr;
run;
ods html close;
The following is a representation of the HTML file containing the results from the program above. The
results from the TABULATE procedure are appended. The results also show up in the Results window,
where you can select the PRINT procedure output or the TABULATE procedure output.
HTML Output
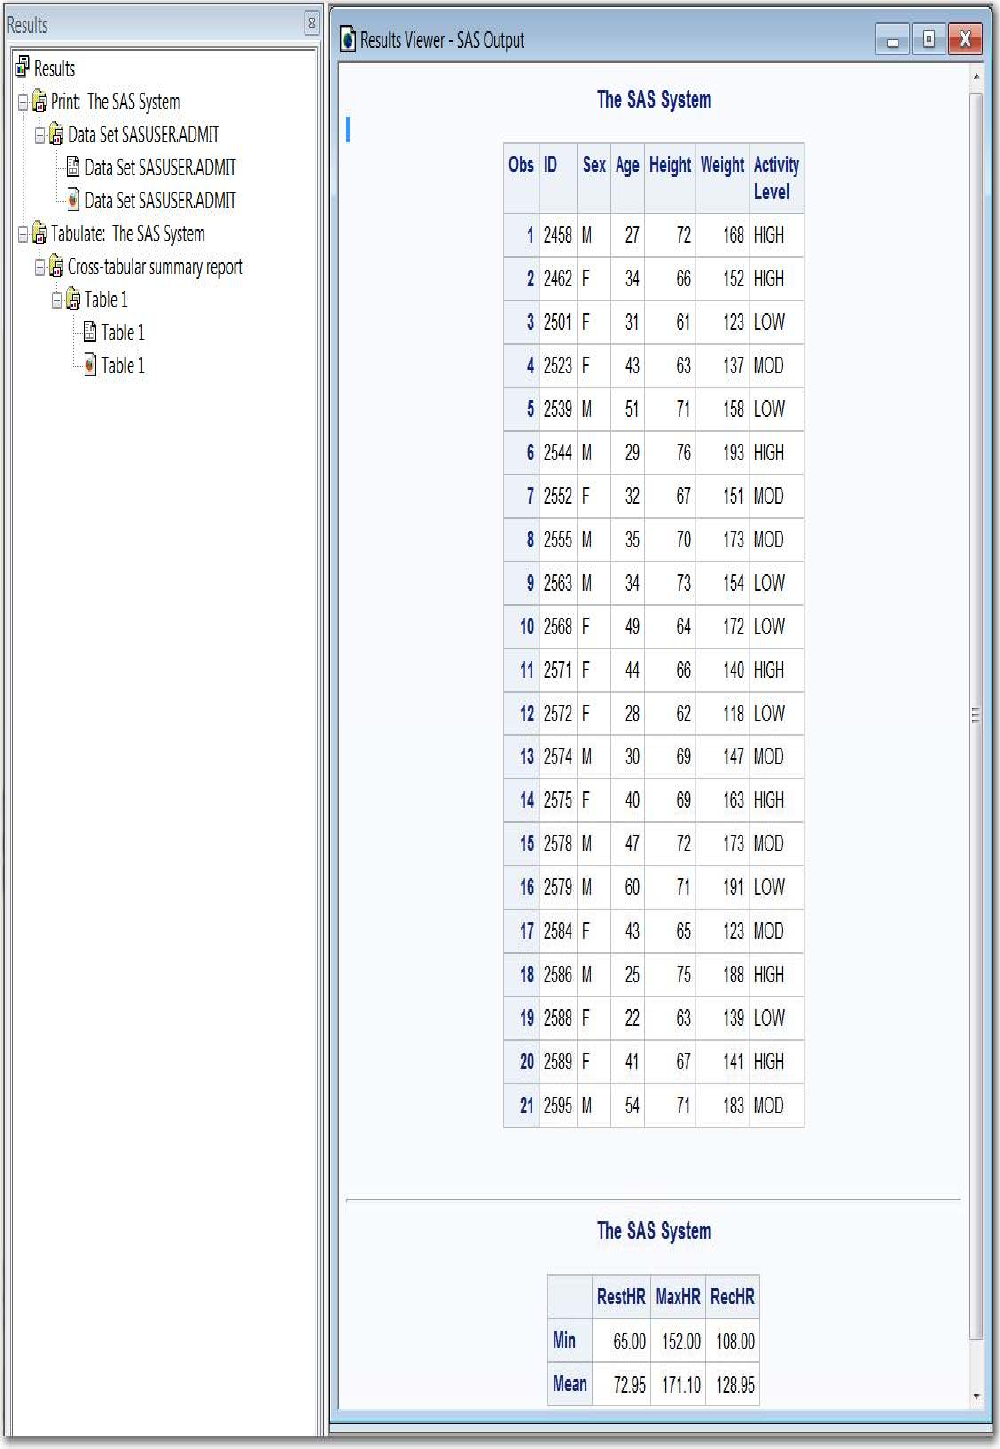
- 317 -
- 318 -
Creating HTML Output with a Table of Contents
Overview
So far in this chapter, you've used the BODY= specification to create an HTML file containing your
procedure output. Suppose you want to create an HTML file that has a table of contents with links to the
output of each specific procedure. You can do this by specifying additional files in the ODS HTML
statement.
General form, ODS HTML statement to create a linked table of contents:
ODS HTML
BODY=body-file-specification
CONTENTS=contents-file-specification
FRAME=frame-file-specification;
ODS HTML CLOSE;
where
body-file-specification is the name of an HTML file that contains the procedure output.
contents-file-specification is the name of an HTML file that contains a table of contents with links to the
procedure output.
frame-file-specification is the name of an HTML file that integrates the table of contents and the body file. If you
specify FRAME=, you must also specify CONTENTS=.
Note: To direct the HTML output to a specific storage location, specify the complete pathname of the
HTML file in the file-specification.
Example
In the program below,
• the BODY= specification creates data.html in the c:\records directory. The body file contains the results of
the two procedures.
• the CONTENTS= specification creates toc.html in the c:\records directory. The table of contents file has
links to each procedure output in the body file.
• the FRAME= specification creates frame.html in the c:\records directory. The frame file integrates the table
of contents and the body file.
- 319 -
ods html body='c:\records\data.html'
contents='c:\records\toc.html'
frame='c:\records\frame.html';
proc print data=clinic.admit label;
var id sex age height weight actlevel;
label actlevel='Activity Level';
run;
proc print data=clinic.stress2;
var id resthr maxhr rechr;
run;
ods html close;
ods html;
Viewing Frame Files
The Results window does not display links to frame files. In the Windows environment, only the body file
will automatically appear in the internal browser or your preferred Web browser.
To view the frame file that integrates the body file and the table of contents, select File→Open from
within the internal browser or your preferred Web browser. Then open the frame file that you specified
using FRAME=. In the example above, this file is frame.html, which is stored in the Records directory in
the Windows environment.
The frame file, frame.html, is shown below.
Frame File, Frame.html
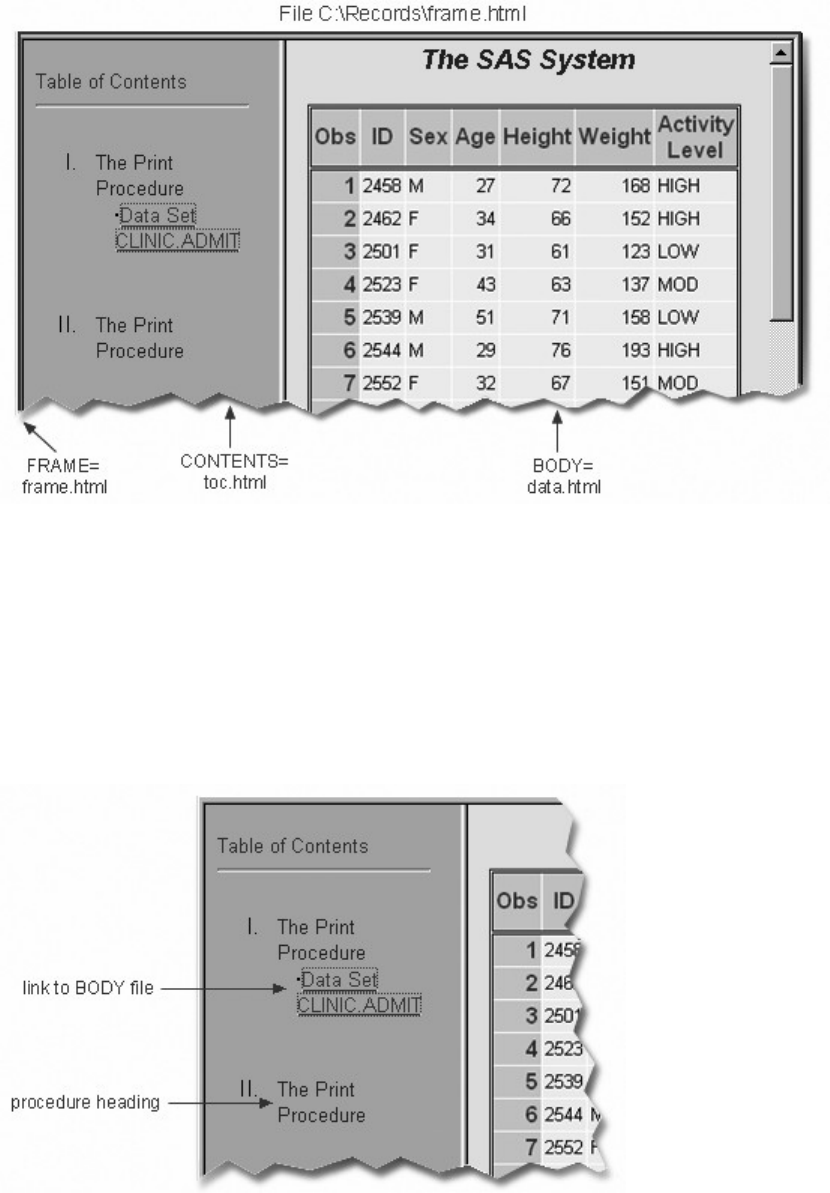
- 320 -
Using the Table of Contents
The table of contents created by the CONTENTS= option contains a numbered heading for each procedure
that creates output. Below each heading is a link to the output for that procedure.
On some browsers, you can select a heading to contract or expand the table of contents.
Table of Contents
Using Options to Specify Links and Paths
Overview
When ODS generates HTML files for the body, contents, and frame, it also generates links between the
files using the HTML filenames that you specify in the ODS HTML statement. If you specify complete
pathnames, ODS uses those pathnames in the links that it generates.
- 321 -
The ODS statement below creates a frame file that has links to c:\records\toc.html and
c:\records\data.html, and a contents file that has links to c:\records\data.html.
ods html body='c:\records\data.html'
contents='c:\records\toc.html'
frame='c:\records\frame.html';
A portion of the source code for the HTML file frame.html is shown below. Notice that the links have the
complete pathnames specified in the file specifications for the contents and body files.
Source Code for the HTML File Frame.html
These links work when you are viewing the HTML files locally. If you want to place these files on a Web
server so that other people could access them, then the link needs to include either the complete URL for
an absolute link or the HTML filename for a relative link.
The URL= Suboption
By specifying the URL= suboption in the BODY= or CONTENTS= file specification, you can provide a
URL that ODS uses in all the links that it creates to the file. You can use the URL= suboption in any ODS
file specification except FRAME= (because no ODS file references the frame file).
General form, URL= suboption in a file specification:
(URL='Uniform-Resource-Locator')
where Uniform-Resource-Locator is the name of an HTML file or the full URL of an HTML file. ODS
uses this URL instead of the file specification in all the links and references that it creates that point to the
file.
The URL= suboption is useful for building HTML files that might be moved from one location to another.
If the links from the contents and page files are constructed with a simple URL (one name), they work as
long as the contents, page, and body files are all in the same location.
Example: Relative URLs
In this ODS HTML statement, the URL= suboption specifies only the HTML filename. This is the most
common style of linking between files because maintenance is easier. The files can be moved as long as
they all remain in the same directory or storage location.
- 322 -
ods html body='c:\records\data.html' (url='data.html')
contents='c:\records\toc.html' (url='toc.html')
frame='c:\records\frame.html';
The source code for frame.html has only the HTML filename as specified on the URL= suboptions for the
body and contents files.
Source Code Frame.html
Example: Absolute URLs
Alternatively, in this ODS HTML statement, the URL= suboptions specify complete URLs using
Hypertext Transfer Protocol (HTTP). These files can be stored in the same or different locations.
ods html body='c:\records\data.html'
(url='http://mysite.com/myreports/data.html')
contents='c:\records\toc.html'
(url='http://mysite.com/mycontents/toc.html')
frame='c:\records\frame.html';
As you would expect, the source code for Frame.html has the entire HTTP addresses that you specified in
the URL= suboptions for the body and contents files.
Source Code Frame.html
When you use the URL= suboption to specify a complete URL, you might need to move your files to that
location before you can view them.
The PATH= Option
- 323 -
So far, you've learned to specify the complete pathname for HTML files in the BODY=, CONTENTS=,
and FRAME= specifications when you want to save HTML files to specific locations. You can use the
following options to streamline your ODS HTML statement:
PATH= option
specifies the location where you want to store your HTML output
URL=NONE suboption
prevents ODS from using the pathname in any links that it creates in your files
General form, PATH= option with the URL= suboption:
PATH=file-location-specification <(URL= NONE |'Uniform-Resource-Locator')>
where
file-location-specification identifies the location where you want HTML files to be saved. It can be one of the
following:
the complete pathname to an aggregate storage location, such as a directory or partitioned data set
a fileref (file shortcut) that has been assigned to a storage location
a SAS catalog (libname.catalog).
Uniform-Resource-Locator provides a URL for links in the HTML files that ODS generates. If you specify the
keyword NONE, no information from the PATH= option appears in the links or references.
If you do not use the URL= suboption, information from the PATH= option is added to links and references in the files
that are created.
Note: In the z/OS operating environment, if you store your HTML files as members in a partitioned data
set, the PATH= value must be a PDSE, not a PDS. You can allocate a PDSE within SAS as shown in this
example:
filename pdsehtml '.example.htm'
dsntype=library dsorg=po
disp=(new, catlg, delete);
Also, you should specify valid member names for the HTML files (without extensions).
Example: PATH= Option with URL=NONE
In the program below, the PATH= option directs the files data.html, toc.html, and frame.html to the
C:\Records directory in the Windows operating environment. The links from the frame file to the body
and contents files contain only the HTML filenames data.html and toc.html.
ods html path='c:\records' (url=none)
body='data.html'
- 324 -
contents='toc.html'
frame='frame.html';
proc print data=clinic.admit;
run;
proc print data=clinic.stress2;
run;
ods html close;
ods html;
This program generates the same files and links as the previous example in which you learned to use the
URL= suboption with the BODY= and CONTENTS= file specifications. However, it is a bit simpler to
specify the path only once in the PATH= option and to specify URL=NONE.
If you plan to move your HTML files, you should specify URL=NONE with the PATH= option to prevent
information from the PATH= option from creating URLs that are invalid or incorrect.
Example: PATH= Option without the URL= Suboption
In the program below, the PATH= option directs the files data.html, toc.html, and frame.html to the
C:\Records directory in the Windows operating environment. The links from the frame file to the body
and contents files contain the complete pathname, c:\records\data.html and c:\records\toc.html:
ods html path='c:\records'
body='data.html'
contents='toc.html'
frame='frame.html';
proc print data=clinic.admit;
run;
proc print data=clinic.stress2;
run;
ods html close;
ods html;
Example: PATH= Option with a Specified URL
In the program below, the PATH= option directs the files data.html, toc.html, and frame.html to the
C:\Records directory in the Windows operating environment. The links from the frame file to the body
and contents files contain the specified URL, http://mysite.com/myreports/data.html and
http://mysite.com/myreports/toc.html:
ods html path='c:\records'(url='http://mysite.com/myreports/')
body='data.html'
contents='toc.html'
frame='frame.html';
proc print data=clinic.admit;
- 325 -
run;
proc print data=clinic.stress2;
run;
ods html close;
ods html;
Changing the Appearance of HTML Output
Style Definitions
You can change the appearance of your HTML output by specifying a style in the STYLE= option in the
ODS HTML statement. Some of the style definitions that are currently shipped with SAS are
• Banker
• BarrettsBlue
• Default
• HTMLblue
• Minimal.
• Statistical
General form, STYLE= option:
STYLE=style-name
where style-name is the name of a valid SAS or user-defined style definition.
Note: Don't enclose style-name in quotation marks.
Example
In the program below, the STYLE= option applies the Banker style to the output for the PROC PRINT
step:
ods html body='c:\records\data.html'
style=banker;
proc print data=clinic.admit label;
var sex age height weight actlevel;
run;
ods html close;
ods html;
The following example shows PROC PRINT output with the Banker style applied.

- 326 -
PROC PRINT Output with the Banker Style Applied
To view a full list of the available style definitions, click the Results tab on the Explorer window. Then
right-click the Results icon and select Templates from the pop-up menu. In the Templates window, open
Sashelp.tmplmst. Then open the Styles folder. A list of the available style definitions appears in the right
panel of the Templates window.
Your site might have its own, customized, style definitions.
Additional Features
Customizing HTML Output
You've seen that you can use the STYLE= option to apply predefined styles to your HTML output.
However, you might want to further customize your results.
ODS provides ways for you to customize HTML output using definitions for tables, columns, headers, and
so on. These definitions describe how to render the HTML output or part of the HTML output. You can
create style definitions using the TEMPLATE procedure. See the online documentation for more
information.
Chapter Summary
Text Summary
The Output Delivery System
The Output Delivery System (ODS) makes new report formatting options available in SAS. ODS separates
your output into component parts so that the output can be sent to any ODS destination that you specify.
- 327 -
Opening and Closing ODS Destinations
Each ODS destination creates a different type of formatted output. By default, the HTML destination is
open and SAS creates simple HTML output. Because an open destination uses system resources, it is a
good idea to close the HTML destination if you don't need to create HTML output. Using ODS statements,
you can create multiple output objects at the same time. When you have several ODS destinations open,
you can close them all using the ODS _ALL_ CLOSE statement.
Creating HTML Output with Option
The HTML destination is open by default. However, you can use the ODS HTML statement to specify
options. Use the BODY= or FILE= specification to create a custom named HTML body file containing
procedure results. You can also use the ODS HTML statement to direct the HTML output from multiple
procedures to the same HTML file.
Creating HTML Output with a Table of Contents
In order to manage multiple pieces of procedure output, you can use the CONTENTS= and FRAME =
options with the ODS HTML statement to create a table of contents that links to your HTML output. The
table of contents contains a heading for each procedure that creates output.
Specifying a Path for Output
You can also use the PATH= option to specify the directory where you want to store your HTML output.
When you use the PATH= option, you don't need to specify the complete pathname for the body, contents,
or frame files. By specifying the URL= suboption in the file specification, you can provide a URL that
ODS uses in all the links that it creates to the file.
Changing the Appearance of HTML Output
You can change the appearance of your output using the STYLE= option in the ODS HTML statement.
Several predefined styles are shipped with SAS.
Additional Features
ODS provides ways for you to customize HTML output using style definitions. Definitions are created
using PROC TEMPLATE and describe how to render the HTML output or part of the HTML output.
Syntax
LIBNAME libref 'SAS-data-library';
ODS LISTING CLOSE;
ODS HTML PATH=file-specification
<(URL='Uniform-Resource-Locator' | NONE)>
BODY=file-specification
CONTENTS=<file-specification>
FRAME=<file-specification>
STYLE=<style-name>;
PROC PRINT DATA=SAS-data-set;
- 328 -
RUN;
ODS HTML CLOSE;
ODS LISTING;
Sample Program
libname clinic 'c:\data98\patients';
ods html path='c:\records'(url=none)
body='data.html'
contents='toc.html'
frame='frame.html'
style=brick;
proc print data=clinic.admit label;
var id sex age height weight actlevel;
label actlevel='Activity Level';
run;
proc print data=clinic.stress2;
var id resthr maxhr rechr;
run;
ods html close;
ods html;
Points to Remember
• An open destination uses system resources. Therefore, it is a good idea to close the HTML destination before you
create other types of output and reopen the HTML destination after you close all destinations destination.
• You do not need the ODS HTML CLOSE statement to create simple HTML output. However, if you want to
create HTML with options, then use the ODS HTML CLOSE statement to close the HTML destination. The ODS HTML
CLOSE statement is added after the RUN statement for the procedure.
• If you use the CONTENTS= and FRAME= options, open the frame file from within your Web browser to view
the procedure output and the table of contents.
Chapter Quiz
Select the best answer for each question. After completing the quiz, you can check your answers using the
answer key in the appendix.
1. Using ODS statements, how many types of output can you generate at once?
1. 1 (only LISTING output)
2. 2
3. 3
4. as many as you want
2. If ODS is set to its default settings, what types of output are created by the code below?
ods html file='c:\myhtml.htm';
- 329 -
ods pdf file='c:\mypdf.pdf';
1. HTML and PDF
2. PDF only
3. HTML, PDF, and LISTING
4. No output is created because ODS is closed by default.
3. What is the purpose of closing the HTML destination in the code shown below?
ods HTML close;
ods pdf ... ;
1. It conserves system resources.
2. It simplifies your program.
3. It makes your program compatible with other hardware platforms.
4. It makes your program compatible with previous versions of SAS.
4. When the code shown below is run, what will the file D:\Output\body.html contain?
ods html body='d:\output\body.html';
proc print data=work.alpha;
run;
proc print data=work.beta;
run;
ods html close;
1. The PROC PRINT output for Work.Alpha.
2. The PROC PRINT output for Work.Beta.
3. The PROC PRINT output for both Work.Alpha and Work.Beta.
4. Nothing. No output will be written to D:\Output\body.html.
5. When the code shown below is run, what file will be loaded by the links in D:\Output\contents.html?
ods html body='d:\output\body.html'
contents='d:\output\contents.html'
frame='d:\output\frame.html';
1. D:\Output\body.html
2. D:\Output\contents.html
3. D:\Output\frame.html
4. There are no links from the file D:\Output\contents.html.
6. The table of contents created by the CONTENTS= option contains a numbered heading for
1. each procedure.
2. each procedure that creates output.
3. each procedure and DATA step.
4. each HTML file created by your program.
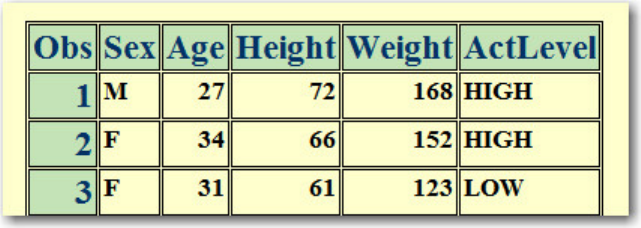
- 330 -
7. When the code shown below is run, what will the file D:\Output\frame.html display?
ods html body='d:\output\body.html'
contents='d:\output\contents.html'
frame='d:\output\frame.html';
1. The file D:\Output\contents.html.
2. The file D:\Output\frame.html.
3. The files D:\Output\contents.html and D:\Output\body.html.
4. It displays no other files.
8. What is the purpose of the URL= suboptions shown below?
ods html body='d:\output\body.html' (url='body.html')
contents='d:\output\contents.html'
(url='contents.html')
frame='d:\output\frame.html';
1. To create absolute link addresses for loading the files from a server.
2. To create relative link addresses for loading the files from a server.
3. To allow HTML files to be loaded from a local drive.
4. To send HTML output to two locations.
9. Which ODS HTML option was used in creating the following table?
1.
format=banker
2.
format='bbanker'
3.
style=banker
4.
style='banker'
10. What is the purpose of the PATH= option?

- 331 -
ods html path='d:\output' (url=none)
body='body.html'
contents='contents.html'
frame='frame.html';
1. It creates absolute link addresses for loading HTML files from a server.
2. It creates relative link addresses for loading HTML files from a server.
3. It allows HTML files to be loaded from a local drive.
4. It specifies the location of HTML file output.
Chapter 10 Creating and Managing Variables
Overview
Creating and Modifying Variables
Assigning Values Conditionally
Specifying Lengths for Variables
Subsetting Data
Assigning Permanent Labels and Formats
Assigning Values Conditionally Using SELECT Groups
Grouping Statements Using DO Groups
Chapter Summary
Chapter Quiz
Overview
Introduction
You've learned how to create a SAS data set from raw data that is stored in an external file. You've also
learned how to subset observations and how to assign values to variables.
This chapter shows you additional techniques for creating and managing variables. In this chapter, you
learn how to retain and accumulate values, assign variable values conditionally, select variables, and
assign permanent labels and formats to variables.
Variables Displayed in a Data Set
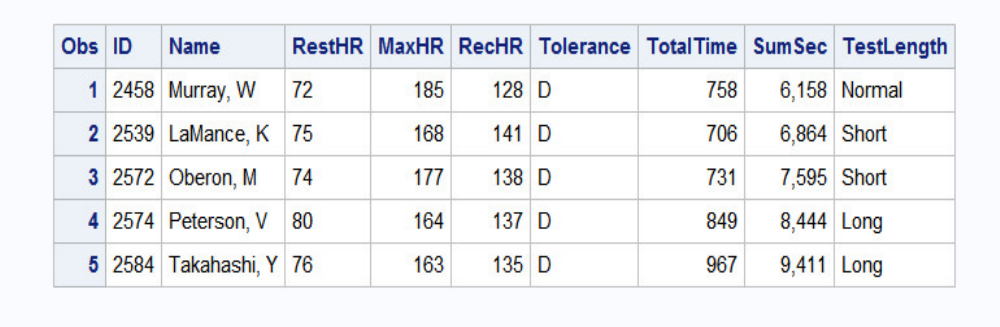
- 332 -
Objectives
In this chapter, you learn how to
• create variables that accumulate variable values
• initialize retained variables
• assign values to variables conditionally
• specify an alternative action when a condition is false
• specify lengths for variables
• delete unwanted observations
• select variables
• assign permanent labels and formats.
Creating and Modifying Variables
Accumulating Totals
It is often useful to create a variable that accumulates the values of another variable.
Suppose you want to create the data set Clinic.Stress and to add a new variable, SumSec, to accumulate the
total number of elapsed seconds in treadmill stress tests.
Clinic.Stress Data Set

- 333 -
To add the result of an expression to an accumulator variable, you can use a sum statement in your DATA
step.
General form, sum statement:
variable+expression;
where
variable specifies the name of the accumulator variable. This variable must be numeric. The variable is
automatically set to 0 before the first observation is read. The variable's value is retained from one DATA step execution
to the next.
expression is any valid SAS expression.
Note: If the expression produces a missing value, the sum statement ignores it. (Remember, however,
that assignment statements assign a missing value if the expression produces a missing value.)
The sum statement is one of the few SAS statements that doesn't begin with a keyword.
The sum statement adds the result of the expression that is on the right side of the plus sign (+) to the
numeric variable that is on the left side of the plus sign. At the top of the DATA step, the value of the
numeric variable is not set to missing as it usually is when reading raw data. Instead, the variable retains
the new value in the program data vector for use in processing the next observation.
Example
To find the total number of elapsed seconds in treadmill stress tests, you need a variable (in this example,
SumSec) whose value begins at 0 and increases by the amount of the total seconds in each observation. To
calculate the total number of elapsed seconds in treadmill stress tests, you use the sum statement shown
below:
data clinic.stress;
infile tests;
input ID $ 1-4 Name $ 6-25 RestHR 27-29 MaxHR 31-33
RecHR 35-37 TimeMin 39-40 TimeSec 42-43

- 334 -
Tolerance $ 45;
TotalTime=(timemin*60)+timesec;
SumSec+totaltime;
run;
The value of the variable on the left side of the plus sign (here, SumSec) begins at 0 and increases by the
value of TotalTime with each observation.
SumSec
=
TotalTime
+
Previous total
0
758#160;
=
758
+
0
1363#160;
=
605
+
758
2036
=
673
+
1363
2618
=
582
+
2036
3324
=
706
+
2618
Initializing Sum Variables
In a previous example, the sum variable SumSec was initialized to 0 by default before the first observation
was read. But what if you want to initialize SumSec to a different number, such as the total seconds from
previous treadmill stress tests?
You can use the RETAIN statement to assign an initial value other than the default value of 0 to a variable
whose value is assigned by a sum statement.
The RETAIN statement
• assigns an initial value to a retained variable
• prevents variables from being initialized each time the DATA step executes.
General form, simple RETAIN statement for initializing sum variables:
RETAIN variable <initial;-value>;
where

- 335 -
• variable is a variable whose values you want to retain
• initial-value specifies an initial value (numeric or character) for the preceding variable.
Note: The RETAIN statement
• is a compile-time only statement that creates variables if they do not already exist.
• initializes the retained variable to missing before the first execution of the DATA step if you do not supply an
initial value.
• has no effect on variables that are read with SET, MERGE, or UPDATE statements. (The SET and MERGE
statements are discussed in later chapters.)
Example
Suppose you want to add 5400 seconds (the accumulated total seconds from a previous treadmill stress test)
to the variable SumSec in the Clinic.Stress data set when you create the data set. To initialize SumSec with
the value 5400, you use the RETAIN statement shown below.
data clinic.stress;
infile tests;
input ID $ 1-4 Name $ 6-25 RestHR 27-29 MaxHR 31-33
RecHR 35-37 TimeMin 39-40 TimeSec 42-43
Tolerance $ 45;
TotalTime=(timemin*60)+timesec;
retain SumSec 5400;
sumsec+totaltime;
run;
Now the value of SumSec begins at 5400 and increases by the value of TotalTime with each observation.
SumSec
=
TotalTime
+
Previous total
5400
6158
=
758
+
5400
6763
=
605
+
6158
7436
=
673
+
6763
8018
=
582
+
7436

- 336 -
8724
=
706
+
8018
Assigning Values Conditionally
Overview
In the previous section, you created the variable SumSec by using a sum statement to add total seconds
from treadmill stress. This time, let's create a variable that categorizes the length of time that a subject
spends on the treadmill during a stress test. This new variable, TestLength, will be based on the value of
the existing variable TotalTime. The value of TestLength will be assigned conditionally:
If TotalTime is . . .
then TestLength is . . .
greater than 800
Long
750 - 800
Normal
less than 750
Short
To perform an action conditionally, use an IF-THEN statement. The IF-THEN statement executes a SAS
statement when the condition in the IF clause is true.
General form, IF-THEN statement:
IF expression THEN statement;
where
expression is any valid SAS expression.
statement is any executable SAS statement
Example
To assign the value Long to the variable TestLength when the value of TotalTime is greater than 800, add
the following IF-THEN statement to your DATA step:
data clinic.stress;
infile tests;
input ID $ 1-4 Name $ 6-25 RestHR 27-29 MaxHR 31-33
- 337 -
RecHR 35-37 TimeMin 39-40 TimeSec 42-43
Tolerance $ 45;
TotalTime=(timemin*60)+timesec;
retain SumSec 5400;
sumsec+totaltime;
if totaltime>800 then TestLength='Long';
run;
SAS executes the assignment statement only when the condition (TotalTime>800) is true. If the condition
is false, the value of TestLength will be missing.
Comparison and Logical Operators
When writing IF-THEN statements, you can use any of the following comparison operators:
Operator
Comparison Operation
= or eq
equal to
^= or ne
not equal to
> or gt
greater than
< or lt
less than
>= or ge
greater than or equal to
<= or le
less than or equal to
in
equal to one of a list
Examples:
if test<85 and time<=20
then Status='RETEST';
if region in ('NE','NW','SW')
then Rate=fee-25;
if target gt 300 or sales ge 50000
then Bonus=salary*.05;
- 338 -
You can also use these logical operators:
Operator
Logical Operation
&
and
|
or
^
not
Use the AND operator to execute the THEN statement if both expressions that are linked by AND are true.
if status='OK' and type=3
then Count+1;
if (age^=agecheck | time^=3)
& error=1 then Test=1;
Use the OR operator to execute the THEN statement if either expression that is linked by OR is true.
if (age^=agecheck | time^=3)
& error=1 then Test=1;
if status='S' or cond='E'
then Control='Stop';
Use the NOT operator with other operators to reverse the logic of a comparison.
if not(loghours<7500)
then Schedule='Quarterly';
if region not in ('NE','SE')
then Bonus=200;
Character values must be specified in the same case in which they appear in the data set and must be
enclosed in quotation marks.
if status='OK' and type=3
then Count+1;
if status='S' or cond='E'
then Control='Stop';
- 339 -
if not(loghours<7500)
then Schedule='Quarterly';
if region not in ('NE','SE')
then Bonus=200;
Logical comparisons that are enclosed in parentheses are evaluated as true or false before they are
compared to other expressions. In the example below, the OR comparison in parentheses is evaluated
before the first expression and the AND operator are evaluated.
Example of a Logical Comparison
In SAS, any numeric value other than 0 or missing is true, and a value of 0 or missing is false. Therefore, a
numeric variable or expression can stand alone in a condition. If its value is a number other than 0 or
missing, the condition is true. If its value is 0 or missing, the condition is false.
• 0 = False
• . = False
• 1 = True
As a result, you need to be careful when using the OR operator with a series of comparisons. Remember
that only one comparison in a series of OR comparisons must be true to make a condition true, and any
nonzero, nonmissing constant is always evaluated as true. Therefore, the following subsetting IF statement
is always true:
if x=1 or 2;
SAS first evaluates x=1, and the result can be either true or false. However, since the 2 is evaluated as
nonzero and nonmissing (true), the entire expression is true. In this statement, however, the condition is
not necessarily true because either comparison can evaluate as true or false:
if x=1 or x=2;
Providing an Alternative Action
Now suppose you want to assign a value to TestLength based on the other possible values of TotalTime.
One way to do this is to add IF-THEN statements for the other two conditions, as shown below.
if totaltime>800 then TestLength='Long';
if 750<=totaltime<=800 then TestLength='Normal';
- 340 -
if totaltime<750 then TestLength='Short';
However, when the DATA step executes, each IF statement is evaluated in order, even if the first condition
is true. This wastes system resources and slows the processing of your program.
Instead of using a series of IF-THEN statements, you can use the ELSE statement to specify an alternative
action to be performed when the condition in an IF-THEN statement is false. As shown below, you can
write multiple ELSE statements to specify a series of mutually exclusive conditions.
if totaltime>800 then TestLength='Long';
else if 750<=totaltime<=800 then TestLength='Normal';
else if totaltime<750 then TestLength='Short';
The ELSE statement must immediately follow the IF-THEN statement in your program. An ELSE
statement executes only if the previous IF-THEN/ELSE statement is false.
General form, ELSE statement:
ELSE statement;
where statement is any executable SAS statement, including another IF-THEN statement.
So, to assign a value to TestLength when the condition in your IF-THEN statement is false, you can add
the ELSE statement to your DATA step, as shown below:
data clinic.stress;
infile tests;
input ID $ 1-4 Name $ 6-25 RestHR 27-29 MaxHR 31-33
RecHR 35-37 TimeMin 39-40 TimeSec 42-43
Tolerance $ 45;
TotalTime=(timemin*60)+timesec;
retain SumSec 5400;
sumsec+totaltime;
if totaltime>800 then TestLeng h='Long';
else if 750<=totaltime<=800 then TestLength='Normal';
else if totaltime<750 then TestLength='Short';
run;
Using ELSE statements with IF-THEN statements can save resources:
• Using IF-THEN statements without the ELSE statement causes SAS to evaluate all IF-THEN statements.
• Using IF-THEN statements with the ELSE statement causes SAS to execute IF-THEN statements until it
encounters the first true statement. Subsequent IF-THEN statements are not evaluated.
- 341 -
For greater efficiency, construct your IF-THEN/ELSE statements with conditions of decreasing
probability.
Remember that you can use PUT statements to test your conditional logic.
data clinic.stress;
infile tests;
input ID $ 1-4 Name $ 6-25 RestHR 27-29 MaxHR 31-33
RecHR 35-37 TimeMin 39-40 TimeSec 42-43
Tolerance $ 45;
TotalTime=(timemin*60)+timesec;
retain SumSec 5400;
sumsec+totaltime;
if totaltime>800 then TestLength='Long';
else if 750<=totaltime<=800 then TestLength='Normal';
else put 'NOTE: Check this Length: ' totaltime=;
run;
Specifying Lengths for Variables
Overview
Previously, you added IF-THEN and ELSE statements to a DATA step in order to create the variable
TestLength. Values for TestLength were assigned conditionally, based on the value for TotalTime.
data clinic.stress;
infile tests;
input ID $ 1-4 Name $ 6-25 RestHR 27-29 MaxHR 31-33
RecHR 35-37 TimeMin 39-40 TimeSec 42-43
Tolerance $ 45;
TotalTime=(timemin*60)+timesec;
retain SumSec 5400;
sumsec+totaltime;
if totaltime>800 then TestLength='Long';
else if 750<=totaltime<=800 then TestLength='Normal';
else if totaltime<750 then TestLength='Short';
run;
But look what happens when you submit this program.
During compilation, when creating a new character variable in an assignment statement, SAS allocates as
many bytes of storage space as there are characters in the first value that it encounters for that variable. In
this case, the first value for TestLength occurs in the IF-THEN statement, which specifies a four-character
value (Long). So TestLength is assigned a length of 4, and any longer values (Normal and Short) are
truncated.
- 342 -
Truncated Variable Values
The example above assigns a character constant as the value of the new variable. You can also see other
examples of the default type and length that SAS assigns when the type and length of a variable are not
explicitly set.
You can use a LENGTH statement to specify a length (the number of bytes) for TestLength before the first
value is referenced elsewhere in the DATA step.
General form, LENGTH statement:
LENGTH variable(s) <$> length;
where
variable(s) names the variable(s) to be assigned a length
$ is specified if the variable is a character variable
length is an integer that specifies the length of the variable.
Examples:
length Type $ 8;
length Address1 Address2 Address3
$200;
length FirstName $12 LastName
$16;
- 343 -
Within your program, you include a LENGTH statement to assign a length to accommodate the longest
value of the variable TestLength. The longest value is Normal, which has six characters. Because
TestLength is a character variable, you must follow the variable name with a dollar sign ($).
data clinic.stress;
infile tests;
input ID $ 1-4 Name $ 6-25 RestHR 27-29 MaxHR 31-33
RecHR 35-37 TimeMin 39-40 TimeSec 42-43
Tolerance $ 45;
TotalTime=(timemin*60)+timesec;
retain SumSec 5400;
sumsec+totaltime;
length TestLength $ 6;
if totaltime>800 then testlength='Long';
else if 750<=totaltime<=800 then testlength='Normal';
else if totaltime<750 then TestLength='Short';
run;
Make sure the LENGTH statement appears before any other reference to the variable in the DATA step. If
the variable has been created by another statement, then a later use of the LENGTH statement will not
change its length.
Now that you have added the LENGTH statement to your program, the values of TestLength are no longer
truncated.
Variable Values That Are Not Truncated
Subsetting Data
- 344 -
Deleting Unwanted Observations
So far in this chapter, you've learned to use IF-THEN statements to execute assignment statements
conditionally. But you can specify any executable SAS statement in an IF-THEN statement. For example,
you can use an IF-THEN statement with a DELETE statement to determine which observations to omit as
you read data.
• The IF-THEN statement executes a SAS statement when the condition in the IF clause is true.
• The DELETE statement stops the processing of the current observation.
General form, DELETE statement:
DELETE;
To conditionally execute a DELETE statement, you submit a statement in the following general form:
IF expression THEN DELETE;
If the expression is
true, the DELETE statement executes, and control returns to the top of the DATA step (the observation is
deleted).
false, the DELETE statement does not execute, and processing continues with the next statement in the DATA
step.
Example
The IF-THEN and DELETE statements below omit any observations whose values for RestHR are lower
than 70.
data clinic.stress;
infile tests;
input ID $ 1-4 Name $ 6-25 RestHR 27-29 MaxHR 31-33
RecHR 35-37 TimeMin 39-40 TimeSec 42-43
Tolerance $ 45;
if resthr<70 then delete;
TotalTime=(timemin*60)+timesec;
retain SumSec 5400;
sumsec+totaltime;
length TestLength $ 6;
if totaltime>800 then testlength='Long';
else if 750<=totaltime<=800 then testlength='Normal';
else if totaltime<750 then TestLength='Short';
run;
- 345 -
Selecting Variables
Sometimes you might need to read and process variables that you don't want to keep in your data set. In
this case, you can use the DROP= and KEEP= data set options to specify the variables that you want to
drop or keep.
Use the KEEP= option instead of the DROP= option if more variables are dropped than kept. You specify
data set options in parentheses after a SAS data set name.
General form, DROP= and KEEP= data set options:
(DROP=variable(s))
(KEEP=variable(s))
where
the DROP=KEEP= or option, in parentheses, follows the name of the data set that contains the variables to be
dropped or kept
variable(s) identifies the variables to drop or keep.
Example
Suppose you are interested in keeping only the new variable TotalTime and not the original variables
TimeMin and TimeSec. You can drop TimeMin and TimeSec when you create the Stress data set.
data clinic.stress(drop=timemin timesec);
infile tests;
input ID $ 1-4 Name $ 6-25 RestHR 27-29 MaxHR 31-33
RecHR 35-37 TimeMin 39-40 TimeSec 42-43
Tolerance $ 45;
if tolerance='D';
TotalTime=(timemin*60)+timesec;
retain SumSec 5400;
sumsec+totaltime;
length TestLength $ 6;
if totaltime>800 then testlength='Long';
else if 750<=totaltime<=800 then testlength='Normal';
else if totaltime<750 then TestLength='Short';
run;
Stress Data Set with Dropped Variables
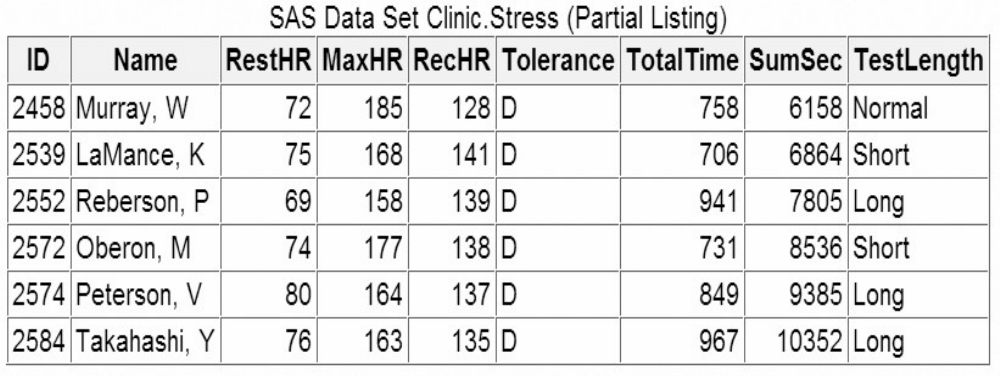
- 346 -
Another way to exclude variables from your data set is to use the DROP statement or the KEEP statement.
Like the DROP= and KEEP= data set options, these statements drop or keep variables. However, the
DROP and KEEP statements differ from the DROP= and KEEP data set options in the following ways:
• You cannot use the DROP and KEEP statements in SAS procedure steps.
• The DROP and KEEP statements apply to all output data sets that are named in the DATA statement. To exclude
variables from some data sets but not from others, use the DROP= and KEEP data set options in the DATA statement.
The KEEP statement is similar to the DROP statement, except that the KEEP statement specifies a list of
variables to write to output data sets. Use the KEEP statement instead of the DROP statement if the
number of variables to keep is smaller than the number to drop.
General form, DROP and KEEP statements:
DROP variable(s);
KEEP variable(s);
where variable(s) identifies the variables to drop or keep.
Example
The two programs below produce the same results. The first example uses the DROP= data set option. The
second example uses the DROP statement.
data clinic.stress(drop=timemin timesec);
infile tests;
input ID $ 1-4 Name $ 6-25 RestHR 27-29 MaxHR 31-33
RecHR 35-37 TimeMin 39-40 TimeSec 42-43
Tolerance $ 45;
if tolerance='D';
TotalTime=(timemin*60)+timesec;
retain SumSec 5400;

- 347 -
sumsec+totaltime;
length TestLength $ 6;
if totaltime>800 then testlength='Long';
else if 750<=totaltime<=800 then testlength='Normal';
else if totaltime<750 then TestLength='Short';
run;
data clinic.stress;
infile tests;
input ID $ 1-4 Name $ 6-25 RestHR 27-29 MaxHR 31-33
RecHR 35-37 TimeMin 39-40 TimeSec 42-43
Tolerance $ 45;
if tolerance='D';
drop timemin timesec;
TotalTime=(timemin*60)+timesec;
retain SumSec 5400;
sumsec+totaltime;
length TestLength $ 6;
if totaltime>800 then testlength='Long';
else if 750<=totaltime<=800 then testlength='Normal';
else if totaltime<750 then TestLength='Short';
run;
Assigning Permanent Labels and Formats
Overview
At this point, you've seen raw data read and manipulated to obtain the observations, variables, and variable
values that you want. Our final task in this chapter is to permanently assign labels and formats to variables.
If you read Creating List Reports, you learned to temporarily assign labels and formats within a PROC step.
These temporary labels and formats are applicable only for the duration of the step. To permanently assign
labels and formats, you use LABEL and FORMAT statements in DATA steps.
Remember that labels and formats do not affect how data is stored in the data set, but only how it appears
in output.
To do this...
Use this type of statement...
Reference a SAS data libraryReference an external file
libname clinic 'c:\users\may\data';
filename tests 'c:\users\tmill.dat';
- 348 -
Name a SAS data setIdentify an external fileDescribe raw data
data clinic.stress;
infile tests obs=10;
input ID $ 1-4 Name $ 6-25 ...;
Subset data
if resthr<70 then delete;
if tolerance='D';
Drop unwanted variables
drop timemin timesec;
Create or modify a variable
TotalTime=(timemin*60)+timesec;
Initialize and retain variable
retain SumSec 5400;
Accumulate values
sumsec+totaltime;
Specify a variable's length
length TestLength $ 6;
- 349 -
Execute statements conditionally
if totaltime>800 then TestLength='Long';
else if 750<=totaltime<=800
then TestLength='Normal';
else if totaltime<750
then TestLength='Short';
Label a variable
LABEL statement
Format a variable
FORMAT statement
Execute the DATA step
run;
List the data
proc print data=clinic.stress label;
Execute the final program step
run;
Example
To specify the label Cumulative Total Seconds (+5,400) and the format COMMA6. for the variable
SumSec, you can submit the following program:
data clinic.stress;
infile tests;
input ID $ 1-4 Name $ 6-25 RestHR 27-29 MaxHR 31-33
RecHR 35-37 TimeMin 39-40 TimeSec 42-43
Tolerance $ 45;
if resthr<70 then delete;
if tolerance='D';
drop timemin timesec;
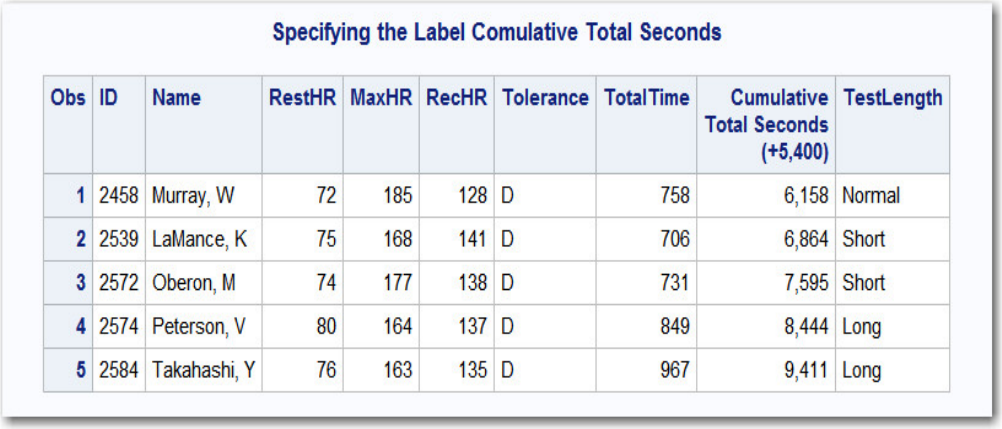
- 350 -
TotalTime=(timemin*60)+timesec;
retain SumSec 5400;
sumsec+totaltime;
length TestLength $ 6;
if totaltime>800 then testlength='Long';
else if 750<=totaltime<=800 then testlength='Normal';
else if totaltime<750 then TestLength='Short';
label sumsec='Cumulative Total Seconds (+5,400)';
format sumsec comma6.;
run;
You're done! When we print the new data set, SumSec is labeled and formatted as specified. (Don't forget
the LABEL option in the PROC PRINT statement.)
proc print data=clinic.stress label;
run;
Completed Clinic.Stress Data Set
Remember that most SAS procedures automatically use permanent labels and formats in output, without
requiring additional statements or options.
If you assign temporary labels or formats within a PROC step, they override any permanent labels or
formats that were assigned during the DATA step.
Assigning Values Conditionally Using SELECT Groups
Overview
Earlier in this chapter, you learned to assign values conditionally using IF-THEN/ELSE statements. You
can also use SELECT groups in DATA steps to perform conditional processing. A SELECT group
contains these statements:
- 351 -
This statement...
Performs this action...
SELECT
begins a SELECT group.
WHEN
identifies SAS statements that are executed when a particular condition is
true.
OTHERWISE
(optional)
specifies a statement to be executed if no WHEN condition is met.
END
ends a SELECT group.
You can decide whether to use IF-THEN/ELSE statements or SELECT groups based on personal
preference.
General form, SELECT group:
SELECT <(select-expression)>;
WHEN-1 (when-expression-1<..., when-expression-n>) statement;
WHEN-n (when-expression-1 <..., when-expression-n>) statement;
<OTHERWISEstatement;>
END;
where
SELECT begins a SELECT group.
the optional select-expression specifies any SAS expression that evaluates to a single value.
WHEN identifies SAS statements that are executed when a particular condition is true.
when-expression specifies any SAS expression, including a compound expression. You must specify at least one
when-expression.
statement is any executable SAS statement. You must specify the statement argument.
the optional OTHERWISE statement specifies a statement to be executed if no WHEN condition is met.
END ends a SELECT group.
Example: Basic SELECT Group
- 352 -
The following code is a simple example of a SELECT group. Notice that the variable a is specified in the
SELECT statement, and various values to compare to a are specified in the WHEN statements. When the
value of the variable a is
• 1, x is multiplied by 10
• 3, 4, or 5, x is multiplied by 100
• 2 or any other value, nothing happens.
select (a);
when (1) x=x*10;
when (3,4,5) x=x*100;
otherwise;
end
Example: SELECT Group in a DATA Step
Now let's look at a SELECT group in context. In the DATA step below, the SELECT group assign values
to the variable Group based on values of the variable JobCode. Most of the assignments are one-to-one
correspondences, but ticket agents (the JobCode values TA1, TA2, and TA3) are grouped together, as are
values in the Other category.
data emps(keep=salary group);
set sasuser.payrollmaster;
length Group $ 20;
select(jobcode);
when ("FA1") group="Flight Attendant I";
when ("FA2") group="Flight Attendant II";
when ("FA3") group="Flight Attendant III";
when ("ME1") group="Mechanic I";
when ("ME2") group="Mechanic II";
when ("ME3") group="Mechanic III";
when ("NA1") group="Navigator I";
when ("NA2") group="Navigator II";
when ("NA3") group="Navigator III";
when ("NA1") group="Navigator I";
when ("NA2") group="Navigator II";
when ("NA3") group="Navigator III";
when ("PT1") group="Pilot I";
when ("PT2") group="Pilot II";
when ("PT3") group="Pilot III";
when ("TA1","TA2","TA3") group="Ticket Agents";
otherwise group="Other";
end;
run;
- 353 -
Notice that in this case the SELECT statement contains a select-expression. You are checking values of a
single variable by using select(jobcode), which is more concise than eliminating the select-expression and
repeating the variable in each when-expression, as in when(jobcode=“FA1”).
Notice that the LENGTH statement in the DATA step above specifies a length of 20 for Group. Remember
that without the LENGTH statement, values for Group might be truncated, as the first value for Group
(Flight Attendant I) is not the longest possible value.
When you are comparing values in the when-expression, be sure to express the values exactly as they are
coded in the data. For example, the when-expression below would be evaluated as false because the values
for JobCode in Sasuser.Payrollmaster are stored in uppercase letters.
when ("fa1") group="Flight Attendant I";
In this case, given the SELECT group above, Group would be assigned the value Other.
As you saw in the general form for SELECT groups, you can optionally specify a select-expression in the
SELECT statement. The way SAS evaluates a when-expression depends on whether you specify a
select-expression.
Specifying SELECT Statements with Expressions
If you do specify a select-expression in the SELECT statement, SAS compares the value of the
select-expression with the value of each when-expression. That is, SAS evaluates the select-expression and
when-expression, compares the two for equality, and returns a value of true or false.
• If the comparison is true, SAS executes the statement in the WHEN statement.
• If the comparison is false, SAS proceeds either to the next when-expression in the current WHEN statement, or to
the next WHEN statement if no more expressions are present. If no WHEN statements remain, execution proceeds to the
OTHERWISE statement, if one is present.
Note: If the result of all SELECT-WHEN comparisons is false and no OTHERWISE statement is present,
SAS issues an error message and stops executing the DATA step.
In the following SELECT group, SAS determines the value of toy and compares it to values in each
WHEN statement in turn. If a WHEN statement is true compared to the toy value, SAS assigns the related
price and continues processing the rest of the DATA step. If none of the comparisons is true, SAS executes
the OTHERWISE statement and writes a debugging message to the SAS log.
select (toy);
when ("Bear") price=35.00;
when ("Violin") price=139.00;
when ("Top","Whistle","Duck") price=7.99;
otherwise put "Check unknown toy: " toy=;
end;
Specifying SELECT Statements without Expressions
- 354 -
If you don't specify a select-expression, SAS evaluates each when-expression to produce a result of true or
false.
• If the result is true, SAS executes the statement in the WHEN statement.
• If the result is false, SAS proceeds either to the next when-expression in the current WHEN statement, or to the
next WHEN statement if no more expressions are present, or to the OTHERWISE statement if one is present. (That is,
SAS performs the action that is indicated in the first true WHEN statement.)
If more than one WHEN statement has a true when-expression, only the first WHEN statement is used.
Once a when-expression is true, no other when-expressions are evaluated.
Note: If the result of all when-expressions is false and no OTHERWISE statement is present, SAS issues
an error message.
In the example below, the SELECT statement does not specify a select-expression. The WHEN statements
are evaluated in order, and only one is used. For example, if the value of toy is Bear and the value of
month is FEB, only the second WHEN statement is used, even though the condition in the third WHEN
statement is also met. In this case, the variable price is assigned the value 25.00:
select;
when (toy="Bear" and month in ('OCT', 'NOV', 'DEC')) price=45.00;
when (toy="Bear" and month in ('JAN', 'FEB')) price=25.00;
when (toy="Bear") price=35.00;
otherwise;
end;
Grouping Statements Using DO Groups
Overview
So far in this chapter, you've seen examples of conditional processing (IF-THEN/ELSE statements and
SELECT groups) that execute only a single SAS statement when a condition is true. However, you can
also execute a group of statements as a unit by using DO groups.
To construct a DO group, you use the DO and END statements along with other SAS statements.
General form, simple DO group:
DO;
SAS statements
END;
where
- 355 -
the DO statement begins DO group processing
SAS statements between the DO and END statements are called a DO group and execute as a unit
the END statement terminates DO group processing.
You can nest DO statements within DO groups.
You can use DO groups in IF-THEN/ELSE statements and SELECT groups to execute many statements as
part of the conditional action.
Examples
In this simple DO group, the statements between DO and END are performed only when TotalTime is
greater than 800. If TotalTime is less than or equal to 800, statements in the DO group do not execute, and
the program continues with the assignment statement that follows the appropriate ELSE statement.
data clinic.stress;
infile tests;
input ID $ 1-4 Name $ 6-25 RestHR 27-29 MaxHR 31-33
RecHR 35-37 TimeMin 39-40 TimeSec 42-43
Tolerance $ 45;
TotalTime=(timemin*60)+timesec;
retain SumSec 5400;
sumsec+totaltime;
length TestLength $ 6 Message $ 20;
if totaltime>800 then
do;
testlength='Long';
message='Run blood panel';
end;
else if 750<=totaltime<=800 then testlength='Normal';
else if totaltime<750 then TestLength='Short';
run;
In the SELECT group below, the statements between DO and END are performed only when the value of
Payclass is hourly. Notice that an IF-THEN statement appears in the DO group; the PUT statement
executes only when Hours is greater than 40. The second END statement in the program closes the
SELECT group.
data payroll;
set salaries;
select(payclass);
when ('monthly') amt=salary;
when ('hourly')
do;
amt=hrlywage*min(hrs,40);
if hrs>40 then put 'CHECK TIMECARD';

- 356 -
end;
otherwise put 'PROBLEM OBSERVATION';
end;
run;
Indenting and Nesting DO Groups
You can nest DO groups to any level, just like you nest IF-THEN/ELSE statements. (The memory
capabilities of your system may limit the number of nested DO statements that you can use. For details, see
the SAS documentation about how many levels of nested DO statements your system's memory can
support.)
The following is an example of nested DO groups:
do;
statements;
do;
statements ;
do;
statements;
end;
end;
end;
It is good practice to indent the statements in DO groups, as shown in the preceding statements, so that
their position indicates the levels of nesting.
There are three other forms of the DO statement:
• The iterative DO statement executes statements between DO and END statements repetitively based on the value
of an index variable. The iterative DO statement can contain a WHILE or UNTIL clause.
• The DO UNTIL statement executes statements in a DO loop repetitively until a condition is true, checking the
condition after each iteration of the DO loop.
• The DO WHILE statement executes statements in a DO loop repetitively while a condition is true, checking the
condition before each iteration of the DO loop.
You can learn about these forms of the DO statement in Generating Data with DO Loops.
Chapter Summary
Text Summary
Accumulating Totals
Use a sum statement to add the result of an expression to an accumulator variable.
Initializing and Retaining Variables
- 357 -
You can use the RETAIN statement to assign an initial value to a variable whose value is assigned by a
sum statement.
Assigning Values Conditionally
To perform an action conditionally, use an IF-THEN statement. The IF-THEN statement executes a SAS
statement when the condition in the IF expression is true. You can include comparison and logical
operators; logical comparisons that are enclosed in parentheses are evaluated as true or false before other
expressions are evaluated. Use the ELSE statement to specify an alternative action when the condition in
an IF-THEN statement is false.
Specifying Lengths for Variables
When creating a new character variable, SAS allocates as many bytes of storage space as there are
characters in the first value that it encounters for that variable at compile time. This can result in truncated
values. You can use the LENGTH statement to specify a length before the variable's first value is
referenced in the DATA step.
Subsetting Data
To omit observations as you read data, include the DELETE statement in an IF-THEN statement. If you
need to read and process variables that you don't want to keep in the data set, use the DROP= and KEEP=
data set options or the DROP and KEEP statements.
Assigning Permanent Labels and Formats
You can use LABEL and FORMAT statements in DATA steps to permanently assign labels and formats.
These do not affect how data is stored in the data set, only how it appears in output.
Assigning Values Conditionally Using SELECT Groups
As an alternative to IF-THEN/ELSE statements, you can use SELECT groups in DATA steps to perform
conditional processing.
Grouping Statements Using DO Groups
You can execute a group of statements as a unit with DO groups in DATA steps. You can use DO groups
in IF-THEN/ELSE statements and SELECT groups to perform many statements as part of the conditional
action.
Syntax
LIBNAME libref 'SAS-data-library';
FILENAME fileref 'filename';
DATA SAS-data-set(DROP=variable(s)|KEEP=variable(s));
INFILE file-specification <OBS=n>;
INPUT variable <$> startcol-endcol...;
DROP variable(s);
KEEP variable(s);
RETAIN variable initial-value;
- 358 -
variable+expression;
LENGTH variable(s) <$> length;
IF expressionTHEN statement;
ELSE statement;
IF expressionTHEN DELETE;
LABEL variable1='label1' variable2='label2' ...;
FORMAT variable(s) format-name;
SELECT <(select-expression)>;
WHEN-1 (when-expression-1 <..., when-expression-n>) statement;
WHEN-n (when-expression-1 <..., when-expression-n>) statement;
<OTHERWISEstatement;>
END;
RUN;
PROC PRINT DATA=SAS-data set LABEL;
RUN;
Sample Program
data clinic.stress;
infile tests;
input ID $ 1-4 Name $ 6-25 RestHR 27-29 MaxHR 31-33
RecHR 35-37 TimeMin 39-40 TimeSec 42-43
Tolerance $ 45;
if tolerance='D'and resthr ge 70 then delete;
drop timemin timesec;
TotalTime=(timemin*60)+timesec;
retain SumSec 5400;
sumsec+totaltime;
length TestLength $ 6;
if totaltime>800 then testlength='Long';
else if 750<=totaltime<=800 then testlength='Normal';
else if totaltime<750 then TestLength='Short';
label sumsec='Cumulative Total Seconds (+5,400)';
format sumsec comma6.;
run;
Points to Remember
• Like the assignment statement, the sum statement does not contain a keyword.
• If the expression in a sum statement produces a missing value, the sum statement ignores it. (Remember, however,
that assignment statements assign a missing value if the expression produces a missing value.)
• Using ELSE statements with IF-THEN statements can save resources. For greater efficiency, construct your
IF-THEN/ELSE statements with conditions of decreasing probability.
• Make sure the LENGTH statement appears before any other reference to the variable in the DATA step. If the
variable has been created by another statement, a later use of the LENGTH statement will not change its length.
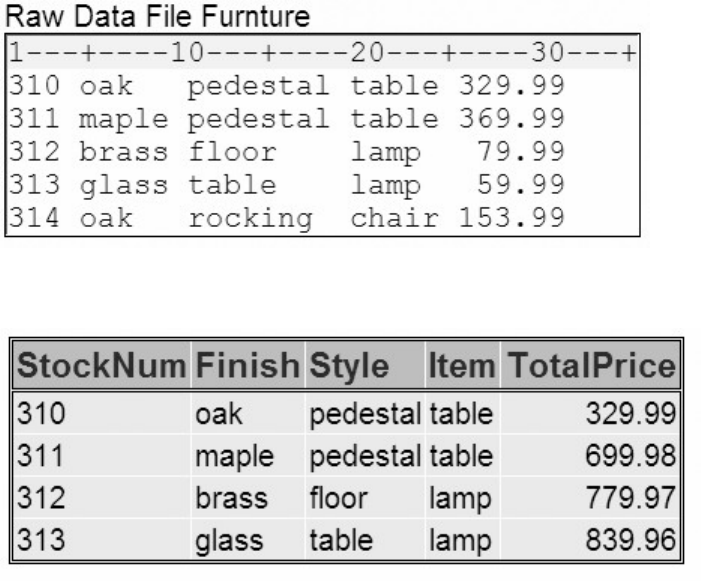
- 359 -
• Labels and formats do not affect how data is stored in the data set, only how it appears in output. You assign
labels and formats temporarily in PROC steps and permanently in DATA steps.
Chapter Quiz
Select the best answer for each question. After completing the quiz, you can check your answers using the
answer key in the appendix.
1. Which program creates the output shown below?
Output 1
Output 2
1.
data test2;
infile furnture;
input StockNum $ 1-3 Finish $ 5-9 Style $ 11-18
Item $ 20-24 Price 26-31;
if finish='oak' then delete;
retain TotPrice 100;
totalprice+price;
drop price;
run;
proc print data=test2 noobs;
run;
2.
data test2;
infile furnture;
input StockNum $ 1-3 Finish $ 5-9 Style $ 11-18
Item $ 20-24 Price 26-31;
- 360 -
if finish='oak' and price<200 then delete;
TotalPrice+price;
run;
proc print data=test2 noobs;
run;
3.
data test2(drop=price);
infile furnture;
input StockNum $ 1-3 Finish $ 5-9 Style $ 11-18
Item $ 20-24 Price 26-31;
if finish='oak' and price<200 then delete;
TotalPrice+price;
run;
proc print data=test2 noobs;
run;
4.
data test2;
infile furnture;
input StockNum $ 1-3 Finish $ 5-9 Style $ 11-18
Item $ 20-24 Price 26-31;
if finish=oak and price<200 then delete price;
TotalPrice+price;
run;
proc print data=test2 noobs;
run;
2. How is the variable Amount labeled and formatted in the PROC PRINT output?
data credit;
infile creddata;
input Account $ 1-5 Name $ 7-25 Type $ 27
Transact $ 29-35 Amount 37-50;
label amount='Amount of Loan';
format amount dollar12.2;
run;
proc print data=credit label;
label amount='Total Amount Loaned';
format amount comma10.;
run;
1. label Amount of Loan, format DOLLAR12.2
2. label Total Amount Loaned, format COMMA10.
3. label Amount, default format
4. The PROC PRINT step does not execute because two labels and two formats are assigned to the same
variable.
- 361 -
3. Consider the IF-THEN statement shown below. When the statement is executed, which expression is evaluated
first?
if finlexam>=95
and (research='A' or
(project='A' and present='A'))
then Grade='A+';
1.
finlexam>=95
2.
research='A'
3.
project='A' and present='A'
4.
research='A' or
(project='A' and present='A')
4. Consider the small raw data file and program shown below. What is the value of Count after the fourth record is
read?
data work.newnums;
infile numbers;
input Tens 2-3;
Count+tens;
run;
1. missing
2. 0
3. 30
4. 70
5. Now consider the revised program below. What is the value of Count after the third observation is read?
data work.newnums;
- 362 -
infile numbers;
input Tens 2-3;
retain Count 100;
count+tens;
run;
1. missing
2. 0
3. 100
4. 130
6. For the observation shown below, what is the result of the IF-THEN statements?
Status Type Count Action Control
Ok 3 12 E Go
7.
if status='OK' and type=3
then Count+1;
if status='S' or action='E'
then Control='Stop';
1.
Count = 12 Control = Go
2.
Count = 13 Control =Stop
3.
Count = 12 Control =Stop
4.
Count = 13 Control = Go
7. Which of the following can determine the length of a new variable?
1. the length of the variable's first reference in the DATA step
2. the assignment statement
3. the LENGTH statement
4. all of the above
8. Which set of statements is equivalent to the code shown below?
- 363 -
if code='1' then Type='Fixed';
if code='2' then Type='Variable';
if code^='1' and code^='2' then Type='Unknown';
1.
if code='1' then Type='Fixed';
else if code='2' then Type='Variable';
else Type='Unknown';
2.
if code='1' then Type='Fixed';
if code='2' then Type='Variable';
else Type='Unknown';
3.
if code='1' then type='Fixed';
else code='2' and type='Variable';
else type='Unknown';
4.
if code='1' and type='Fixed';
then code='2' and type='Variable';
else type='Unknown';
9. What is the length of the variable Type, as created in the DATA step below?
data finance.newloan;
set finance.records;
TotLoan+payment;
if code='1' then Type='Fixed';
else Type='Variable';
length type $ 10;
run;
1. 5
2. 8
3. 10
4. it depends on the first value of Type
10. Which program contains an error?
1.
data clinic.stress(drop=timemin timesec);
infile tests;
input ID $ 1-4 Name $ 6-25 RestHR 27-29 MaxHR 31-33
RecHR 35-37 TimeMin 39-40 TimeSec 42-43
Tolerance $ 45;
TotalTime=(timemin*60)+timesec;

- 364 -
SumSec+totaltime;
run;
2.
proc print data=clinic.stress;
label totaltime='Total Duration of Test';
format timemin 5.2;
drop sumsec;
run;
3.
proc print data=clinic.stress(keep=totaltime timemin);
label totaltime='Total Duration of Test';
format timemin 5.2;
run;
4.
data clinic.stress;
infile tests;
input ID $ 1-4 Name $ 6-25 RestHR 27-29 MaxHR 31-33
RecHR 35-37 TimeMin 39-40 TimeSec 42-43
Tolerance $ 45;
TotalTime=(timemin*60)+timesec;
keep id totaltime tolerance;
run;
Chapter 11 Reading SAS Data Sets
Overview
Reading a Single Data Set
Manipulating Data
Using BY-Group Processing
Detecting the End of a Data Set
Additional Features
Chapter Summary
Chapter Quiz
Overview
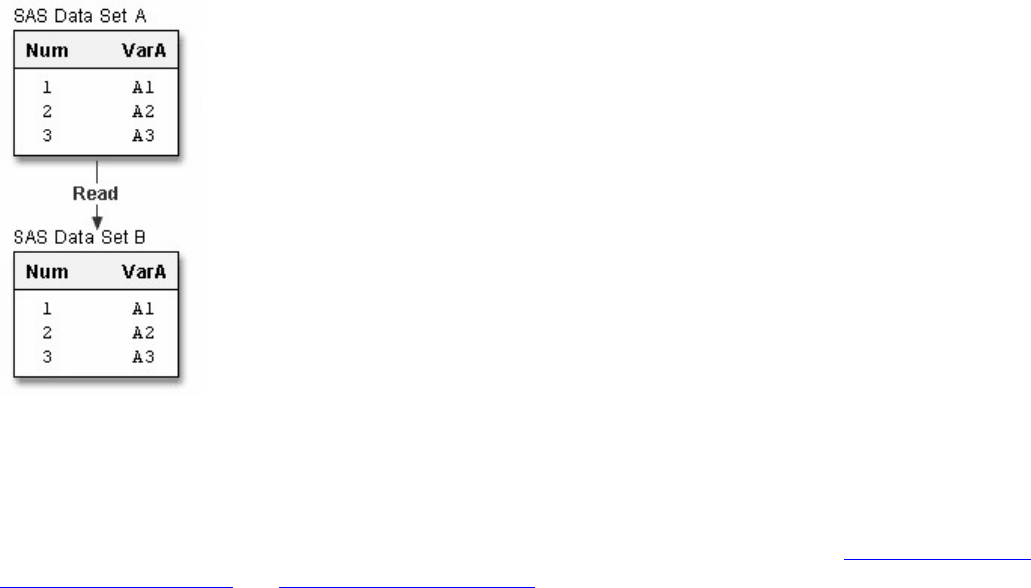
- 365 -
Introduction
You've learned about creating a SAS data set from raw data. However, you might often want to create a
new data set from an existing SAS data set. To create the new data set, you can read a data set using the
DATA step. As you read the data set, you can use all the programming features of the DATA step to
manipulate your data.
Data Set Diagram
This chapter shows you how to use the DATA step to read an existing SAS data set. When you create your
new data set, you can choose variables, select observations based on one or more conditions, and assign
values conditionally. You can also assign variable attributes such as formats and labels.
You can also merge, concatenate, or interleave two or more data sets. For details, see Creating SAS Data
Sets from External Files and Combining SAS Data Sets.
Objectives
In this chapter, you learn to
• create a new data set from an existing data set
• use BY groups to process observations
• read observations by observation number
• stop processing when necessary
• explicitly write observations to an output data set
• detect the last observation in a data set
• identify differences in DATA step processing for raw data and SAS data sets.
Reading a Single Data Set
- 366 -
The data set sasuser.admit contains health information about patients in a clinic, their activity level,
height and weight. Suppose you want to create a small data set containing all the men in the group who are
older than fifty.
To create the data set, you must first reference the library in which admit is stored and then the library in
which you want to store the males data set. Then you write a DATA step to read your data and create a
new data set.
General form, basic DATA step for reading a single data set:
DATA SAS-data-set;
SET SAS-data-set;
<more SAS statements>
RUN;
where
SAS-data-set in the DATA statement is the name (libref.filename) of the SAS data set to be created
SAS-data-set in the SET statement is the name (libref.filename) of the SAS data set to be read.
After you write a DATA step to name the SAS data set to be created, you specify the data set that will be
read in the SET statement. The DATA step below reads all observations and variables from the existing
data set admit into the new data set males. The DATA statement creates the permanent SAS data set
males, which is stored in the SAS library Men50 . The SET statement reads the permanent SAS data set
admit and subsets the data using a WHERE statement. The new data set, males, contains all males in
sasuser.admit who are older than 50.
libname sasuser "C:\Users\name\sasuser\";
libname Men50 "C:\Users\name\sasuser\Men50";
data Men50.males;
set sasuser.admit;
where sex='M' and age>50;
run;
When you submit this DATA step, the following messages appear in the log, confirming that the new data
set was created:
SAS Log Output
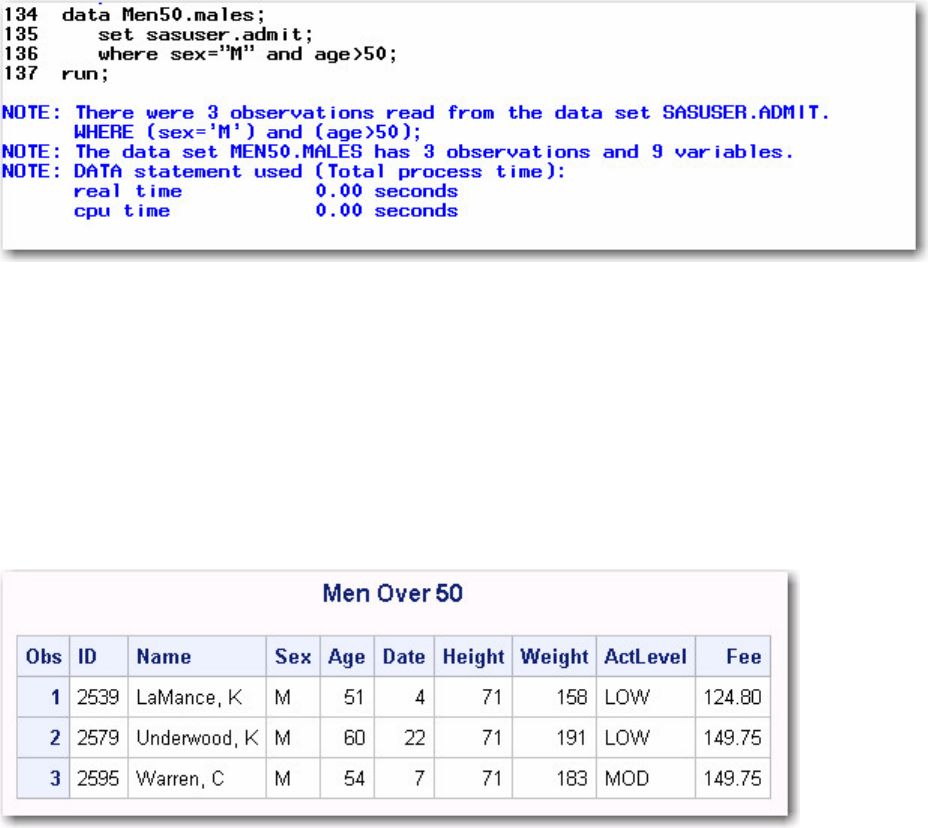
- 367 -
You can add a PROC PRINT statement to this same example to see the output of Men50.males.
proc print data=Men50.males;
title "Men Over 50";
run;
PROC PRINT Output For Data Set males
Manipulating Data
Overview
In the previous example, you read in the data set admit and used the WHERE statement in the DATA step
to subset the data. For any data set you read in, you can use any of the programming features of the DATA
step to manipulate your data.
For example, you can use any of the statements and data set options that you learned in previous chapters.
Manipulating Data Using the DATA Step
To do this...
Use this type of statement...
Subset data
- 368 -
if resthr<70 then delete;
if tolerance='D';
Drop unwanted variables
drop timemin timesec;
Create or modify a variable
TotalTime=(timemin*60)+timesec;
Initialize and retain a variable Accumulate values
retain SumSec 5400;
sumsec+totaltime;
Specify a variable's length
length TestLength $ 6;
Execute statements conditionally
if totaltime>800 then TestLength='Long';
else if 750<=totaltime<=800
then TestLength='Normal';
else if totaltime<750
then TestLength='Short';
Label a variableFormat a variable
label sumsec='Cumulative Total Seconds';
format sumsec comma6.;
- 369 -
Example
The following DATA step reads the data set lab23.drug1h, selects observations and variables, and creates
new variables.
data lab23.drug1h(drop=placebo uric);
set research.cltrials(drop=triglyc);
if sex='M' then delete;
if placebo='YES';
retain TestDate='22MAY1999'd;
retain Days 30;
days+1;
length Retest $ 5;
if cholesterol>190 then retest='YES';
else if 150<=cholesterol<=190 then retest='CHECK';
else if cholesterol<150 then retest='NO';
label retest='Perform Cholesterol Test 2?';
format enddate mmddyy10.;
run;
Where to Specify the DROP= and KEEP= Data Set Options
You've learned that you can specify the DROP= and KEEP= data set options anywhere you name a SAS
data set. You can specify DROP= and KEEP= in either the DATA statement or the SET statement,
depending on whether you want to drop variables onto output or input:
• If you never reference certain variables and you don't want them to appear in the new data set, use a DROP=
option in the SET statement.
In the DATA step shown below, the DROP= or KEEP= option in the SET statement prevents the variables Triglycerides
and UricAcid from being read. These variables won't appear in the Lab23.Drug1H data set.
data lab23.drug1h(drop=placebo);
set research.cltrials(drop=triglycerides uricacid);
if placebo='YES';
run;
• If you do need to reference a variable in the original data set (in a subsetting IF statement, for example), you can
specify the variable in the DROP= or KEEP= option in the DATA statement. Otherwise, the statement that references the
variable uses a missing value for that variable.
This DATA step uses the variable Placebo to select observations. To drop Placebo from the new data set, the DROP=
option must appear in the DATA statement.
data lab23.drug1h(drop=placebo);
set research.cltrials(drop=triglycerides uricacid);
if placebo='YES';

- 370 -
run;
When used in the DATA statement, the DROP= option simply drops the variables from the new data set. However, they
are still read from the original data set and are available within the DATA step.
Using BY-Group Processing
Finding the First and Last Observations in a Group
Creating List Reports explained how to use a BY statement in PROC SORT to sort observations and in
PROC PRINT to group observations for subtotals. You can also use the BY statement in the DATA step to
group observations for processing.
data temp;
set salary;
by dept;
run;
When you use the BY statement with the SET statement,
• the data sets that are listed in the SET statement must be sorted by the values of the BY variable(s), or they must
have an appropriate index.
• the DATA step creates two temporary variables for each BY variable. One is named FIRST.variable, where
variable is the name of the BY variable, and the other is named LAST.variable. Their values are either 1 or 0.
FIRST.variable and LAST.variable. identify the first and last observation in each BY group.
Finding the First and Last Observations in a Group
This variable . . .
Equals . . .
FIRST.variable
1 for the first observation in a BY group
0 for any other observation in a BY group
LAST.variable
1 for the last observation in a BY group
0 for any other observation in a BY group
Example
To work with FIRST.variable and LAST.variable, let's look at a different set of data. The Company.USA
data set contains payroll information for individual employees. Suppose you want to compute the annual
payroll by department. Assume 2,000 work hours per year for hourly employees.
- 371 -
Before computing the annual payroll, you need to group observations by values of the variable Dept.
Partial Listing of Data Set
The following program computes the annual payroll by department. Notice that the variable name Dept has
been appended to FIRST. and LAST.
proc sort data=company.usa out=work.temp;
by dept;
run;
data company.budget(keep=dept payroll);
set work.temp;
by dept;
if wagecat='S' then Yearly=wagerate*12;
else if wagecat='H' then Yearly=wagerate*2000;
if first.dept then Payroll=0;
payroll+yearly;
if last.dept;
run;
If you could look behind the scenes at the program data vector (PDV) as the Company.Budget data set is
created, you would see the following. Notice the values for FIRST.Dept and LAST.Dept.
Program Data Vector
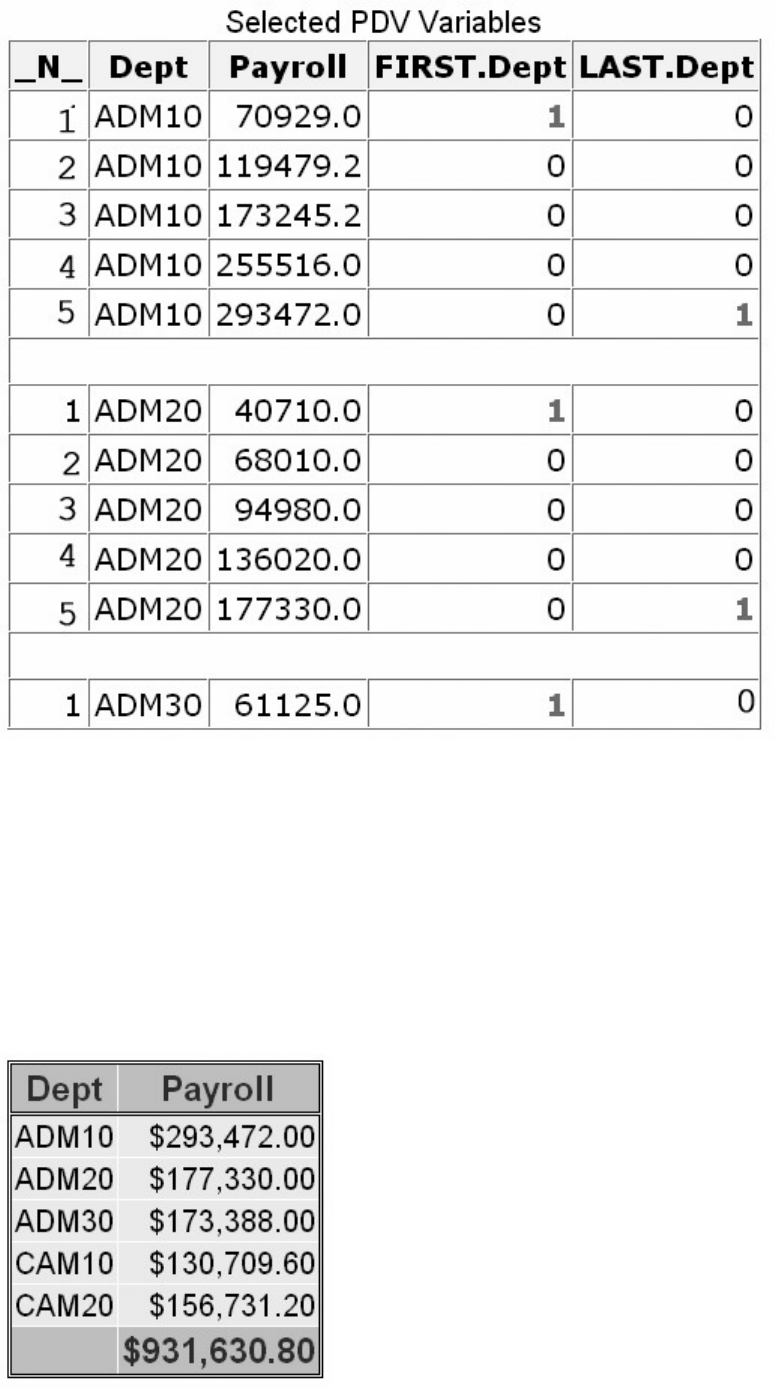
- 372 -
When you print the new data set, you can now list and sum the annual payroll by department.
proc print data=company.budget noobs;
sum payroll;
format payroll dollar12.2;
run;
Payroll Sum
Finding the First and Last Observations in Subgroups
- 373 -
When you specify multiple BY variables,
• FIRST.variable for each variable is set to 1 at the first occurrence of a new value for the primary variable
• a change in the value of a primary BY variable forces LAST.variable to equal 1 for the secondary BY variables.
Example
Suppose you now want to compute the annual payroll by job type for each manager. In your program, you
specify two BY variables, Manager and JobType.
proc sort data=company.usa out=work.temp2;
by manager jobtype;
data company.budget2(keep=manager jobtype payroll);
set work.temp2;
by manager jobtype;
if wagecat='S' then Yearly=wagerate*12;
else if wagecat='H' then Yearly=wagerate*2000;
if first.jobtype then Payroll=0;
payroll+yearly;
if last.jobtype;
run;
If you could look at the PDV now, you would see the following. Notice that the values for FIRST.JobType
and LAST.JobType change according to values of FIRST.Manager and LAST.Manager.
PDV
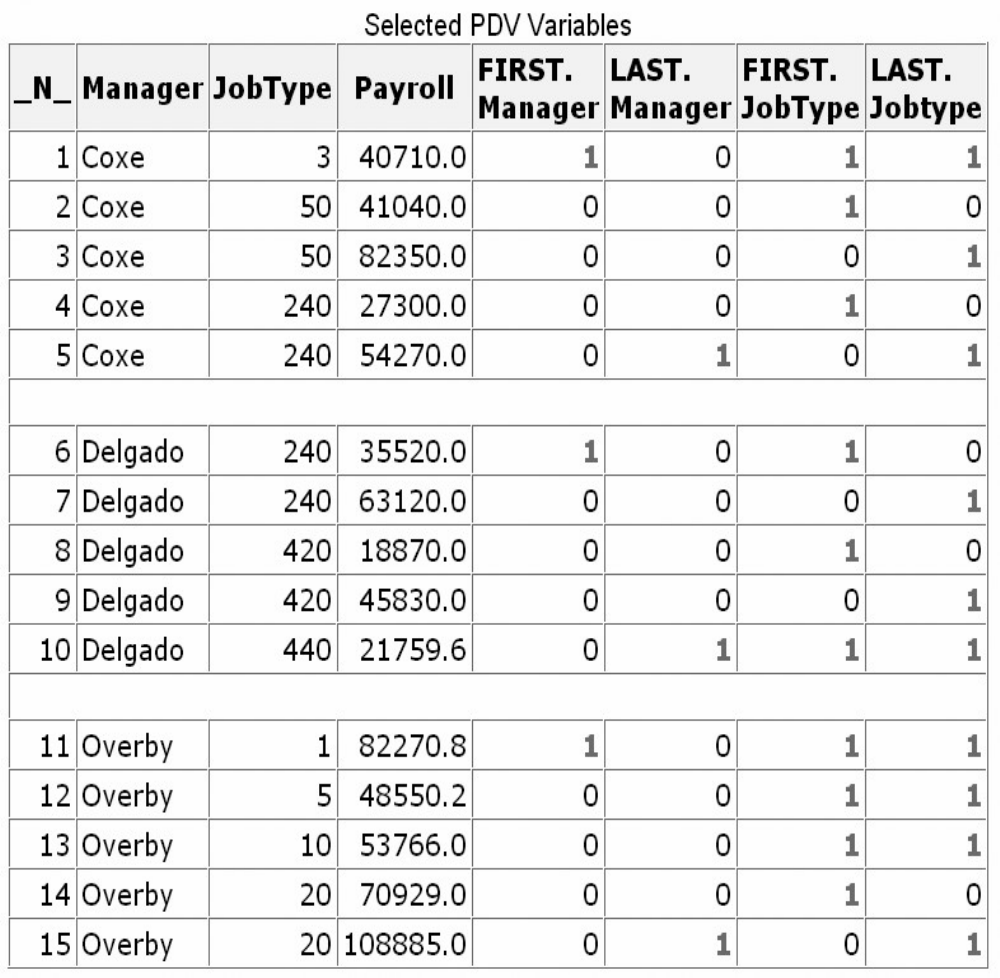
- 374 -
Now you can sum the annual payroll by job type for each manager. Here, the payroll for only two
managers (Coxe and Delgado) is listed.
proc print data=company.budget2 noobs;;
by manager;
var jobtype;
sum payroll;
where manager in ('Coxe','Delgado');
format payroll dollar12.2;
run;
Payroll Sum by Job Type and Manager
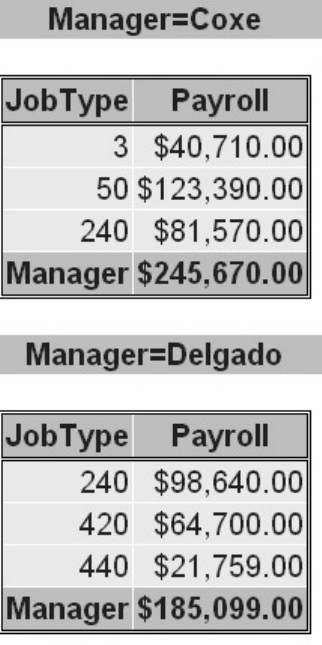
- 375 -
Reading Observations Using Direct Access
So far we have read the observations in an input data set sequentially. That is, we have accessed
observations in the order in which they appear in the physical file. However, you can also access
observations directly, by going straight to an observation in a SAS data set without having to process each
observation that precedes it.
To access observations directly by their observation number, you use the POINT= option in the SET
statement.
General form, POINT= option:
POINT=variable;
where variable
specifies a temporary numeric variable that contains the observation number of the observation to read
must be given a value before the SET statement is executed.
Example
Let's suppose you want to read only the fifth observation from a data set. In the following DATA step, the
value 5 is assigned to the variable ObsNum. The POINT= option reads the value of ObsNum to determine
which observation to read from the data set Company.USA.

- 376 -
data work.getobs5;
obsnum=5;
set company.usa(keep=manager payroll) point=obsnum;
run;
But let's see what would happen if you submitted this program.
As you learned in a previous chapter, the DATA step continues to read observations until it reaches the
end-of-file marker in the input data. However, because the POINT= option reads only specified
observations, SAS cannot read an end-of-file indicator as it would if the file were being read sequentially.
So submitting the following program would cause continuous looping.
data work.getobs5;
obsnum=5;
set company.usa(keep=manager payroll) point=obsnum;
run;
Preventing Continuous Looping with POINT=
Because there is no end-of-file condition when you use direct access to read data, you must use a STOP
statement to prevent continuous looping. The STOP statement causes SAS to stop processing the current
DATA step immediately and to resume processing statements after the end of the current DATA step.
General form, STOP statement:
STOP;
So, if you add a STOP statement, your program no longer loops continuously.
data work.getobs5;
obsnum=5;
set company.usa(keep=manager payroll) point=obsnum;
stop;
run;
But it doesn't write any observations to output, either! Remember from Understanding DATA Step
Processing that the DATA step writes observations to output at the end of the DATA step. However, in
this program, the STOP statement immediately stops processing before the end of the DATA step.
Let's see how you can write the observation to output before processing stops.
Writing Observations Explicitly
To override the default way in which the DATA step writes observations to output, you can use an
OUTPUT statement in the DATA step. Placing an explicit OUTPUT statement in a DATA step overrides
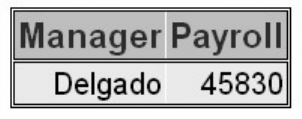
- 377 -
the automatic output, so that observations are added to a data set only when the explicit OUTPUT
statement is executed.
General form, OUTPUT statement:
OUTPUT <SAS-data-set(s)>;
where SAS-data-set(s) names the data set(s) to which the observation is written. All data set names that are
specified in the OUTPUT statement must also appear in the DATA statement.
Using an OUTPUT statement without a following data set name causes the current observation to be
written to all data sets that are named in the DATA statement.
With an OUTPUT statement, your program now writes a single observation to output—observation 5.
data work.getobs5;
obsnum=5;
set company.usa(keep=manager payroll) point=obsnum;
output;
stop;
run;
proc print data=work.getobs5 noobs;
run;
Single Observation
Suppose your DATA statement contains two data set names, and you include an OUTPUT statement that
references only one of the data sets. The DATA step will create both data sets, but only the data set that is
named in the OUTPUT statement will contain output. For example, the program below creates two
temporary data sets, Empty and Full. The result of this DATA step is that the data set Empty is created but
contains no observations, and the data set Full contains all of the observations from Company.Usa.
data empty full;
set company.usa;
output full;
run;
More Complex Ways of Using Direct Access
To convey concepts clearly, the examples in this section have been as simple as possible. However, most
uses of the POINT= option are more complex. For example, POINT= is commonly used to efficiently
select a random sample from a data set.

- 378 -
You can see more complex examples of using POINT= in Generating Data with DO Loops.
Detecting the End of a Data Set
Overview
Instead of reading specific observations, you might want to determine when the last observation in an input
data set has been read, so that you can perform specific processing. For example, you might want to output
only one observation that contains grand totals for numeric variables.
To create a temporary numeric variable whose value is used to detect the last observation, you can use the
END= option in the SET statement.
General form, END= option:
END=variable
where variable creates and names a temporary variable that contains an end-of-file marker. The variable,
which is initialized to 0, is set to 1 when the SET statement reads the last observation of the data set.
This variable is not added to the data set.
Note: Do not specify END= with POINT=. POINT= reads only a specific observation, so the last
observation in the data set is not encountered.
Example
Suppose you want to sum the number of seconds for treadmill stress tests. If you submit the following
program, you produce a new data set that contains cumulative totals for each of the values of TotalTime.
data work.addtoend(drop=timemin timesec);
set sasuser.stress2(keep=timemin timesec);
TotalMin+timemin;
TotalSec+timesec;
TotalTime=totalmin*60+totalsec;
run;
proc print data=work.addtoend noobs;
run;
Data Set with Cumulative Totals for Each of the Values of TotalTime
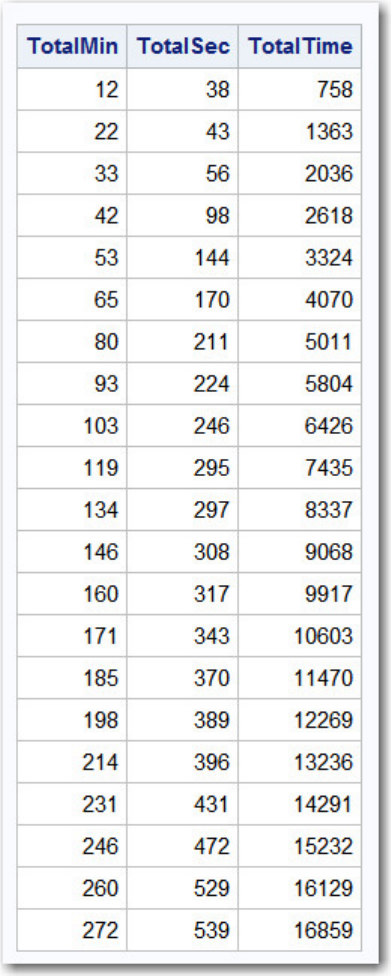
- 379 -
But what if you want only the final total (the last observation) in the new data set? The following program
uses the END= variable last to select only the last observation of the data set. You specify END= in the
SET statement and last wherever you need it in processing (here, in the subsetting IF statement).
data work.addtoend(drop=timemin timesec);
set sasuser.stress2(keep=timemin timesec) end=last;
TotalMin+timemin;
TotalSec+timesec;
TotalTime=totalmin*60+totalsec;
if last;
run;
proc print data=work.addtoend noobs;
run;
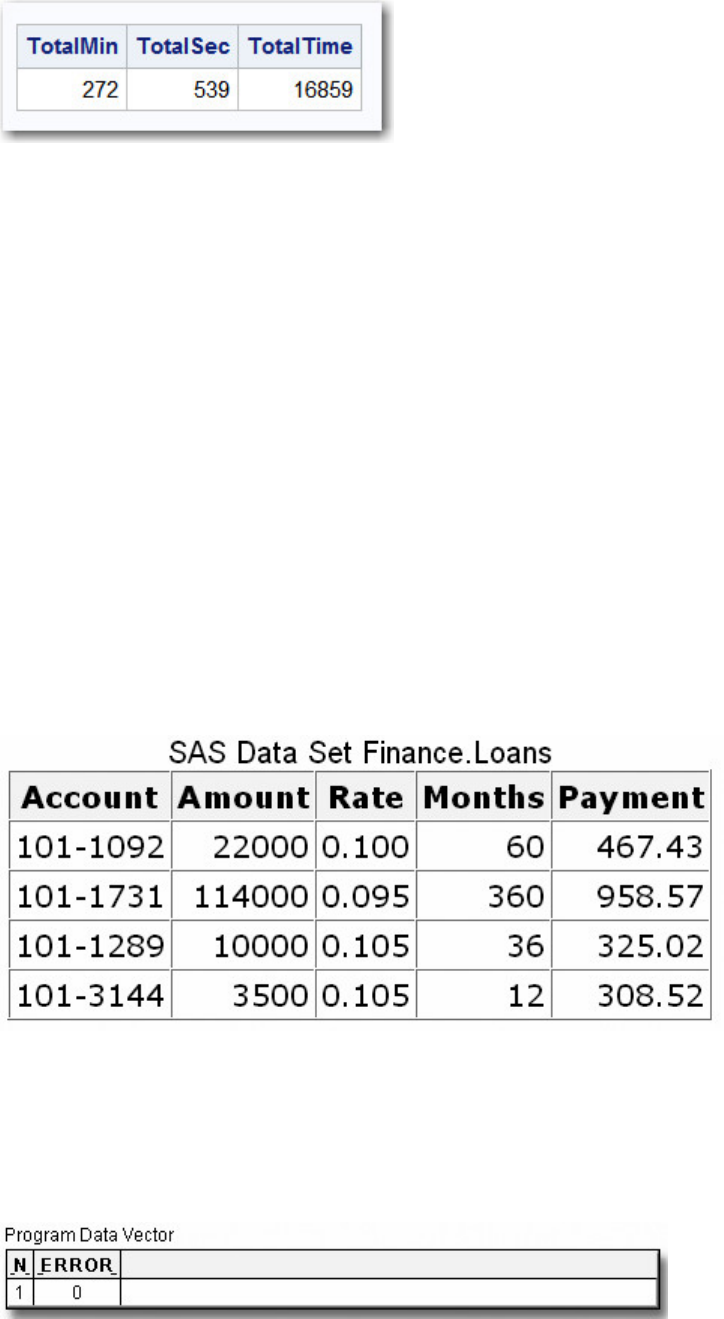
- 380 -
Now the new data set has one observation:
Data Set with One Observation
Understanding How Data Sets Are Read
In a previous chapter, you learned about the compilation and execution phases of the DATA step as they
pertain to reading raw data. DATA step processing for reading existing SAS data sets is very similar. The
main difference is that while reading an existing data set with the SET statement, SAS retains the values of
existing variables from one observation to the next.
Let's briefly look at the compilation and execution phases of DATA steps that use a SET statement. In this
example, the DATA step reads the data set Finance.Loans, creates the variable Interest, and creates the
new data set Finance.DueJan.
data finance.duejan;
set finance.loans;
Interest=amount*(rate/12);
run;
New Data Set Finance.DueJan
Compilation Phase
1. The program data vector is created and contains the automatic variables _N_ and _ERROR_.
program data vector with Automatic Variables
2. SAS also scans each statement in the DATA step, looking for syntax errors.
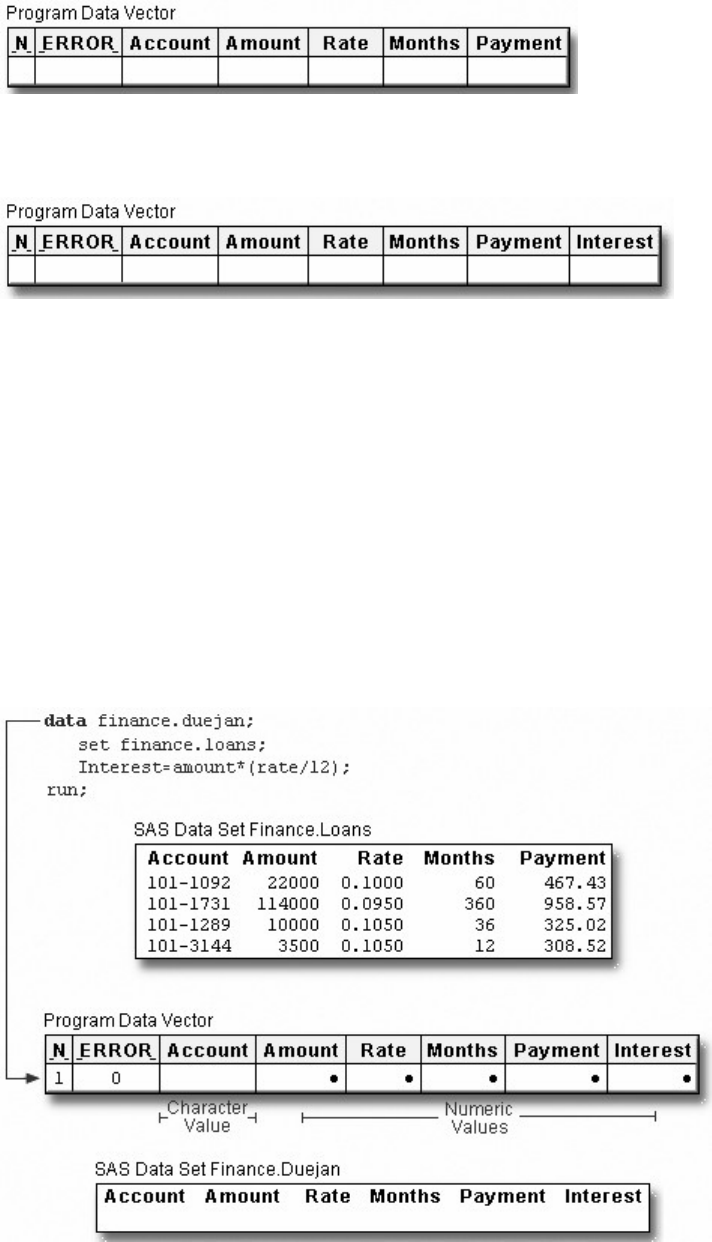
- 381 -
3. When the SET statement is compiled, a slot is added to the program data vector for each variable in the input data
set. The input data set supplies the variable names, as well as attributes such as type and length.
4. Any variables that are created in the DATA step are also added to the program data vector. The attributes of each
of these variables are determined by the expression in the statement.
5. At the bottom of the DATA step, the compilation phase is complete, and the descriptor portion of the new SAS
data set is created. There are no observations because the DATA step has not yet executed.
When the compilation phase is complete, the execution phase begins.
Execution Phase
1. The DATA step executes once for each observation in the input data set. For example, this DATA step will
execute four times because there are four observations in the input data set Finance.Loans.
2. At the beginning of the execution phase, the value of _N_ is 1. Because there are no data errors, the value of
_ERROR_ is 0. The remaining variables are initialized to missing. Missing numeric values are represented by a period,
and missing character values are represented by a blank.
3. The SET statement reads the first observation from the input data set into the program data vector.
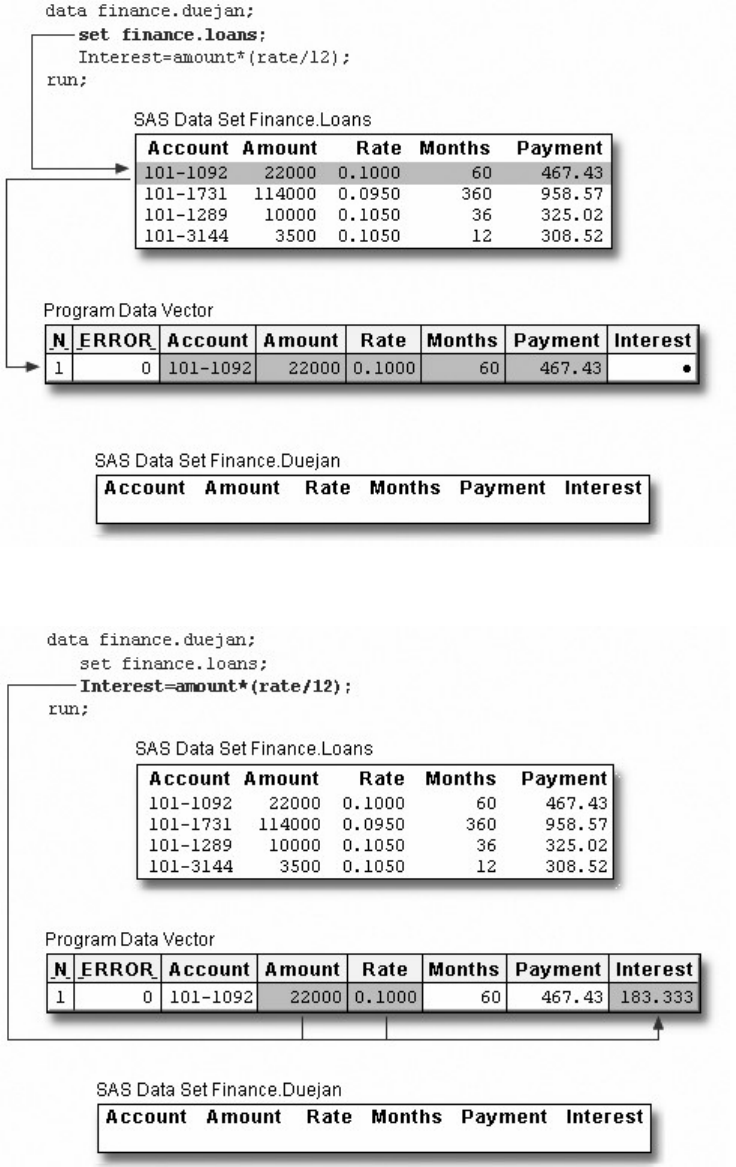
- 382 -
4. Then, the assignment statement executes to compute the value for Interest.
5. At the end of the first iteration of the DATA step, the values in the program data vector are written to the new data
set as the first observation.
- 383 -
6. The value of _N_ increments from 1 to 2, and control returns to the top of the DATA step. Remember, the
automatic variable _N_ keeps track of how many times the DATA step has begun to execute.
7. SAS retains the values of variables that were read from a SAS data set with the SET statement, or that were
created by a sum statement. All other variable values, such as the values of the variable Interest, are set to missing.
- 384 -
When SAS reads raw data, the situation is different. In that case, SAS sets the value of each variable in the DATA step to
missing at the beginning of each iteration, with these exceptions:
o variables named in a RETAIN statement
o variables created in a sum statement
o data elements in a _TEMPORARY_ array
o any variables created by using options in the FILE or INFILE statements
o automatic variables.
8. At the beginning of the second iteration, the value of _ERROR_ is reset to 0.
9. As the SET statement executes, the values from the second observation are read into the program data vector.
- 385 -
10. The assignment statement executes again to compute the value for Interest for the second observation.
11. At the bottom of the DATA step, the values in the program data vector are written to the data set as the second
observation.
- 386 -
12. The value of _N_ increments from 2 to 3, and control returns to the top of the DATA step. SAS retains the values
of variables that were read from a SAS data set with the SET statement, or that were created by a sum statement. All other
variable values, such as the values of the variable Interest, are set to missing.
This process continues until all of the observations are read.
Additional Features
The DATA step provides many other programming features for manipulating data sets. For example, you
can
- 387 -
• use IF-THEN/ELSE logic with DO groups and DO loops to control processing based on one or more conditions
• specify additional data set options
• process variables in arrays
• use SAS functions.
You can also combine SAS data sets in several ways, including match merging, interleaving, one-to-one
merging, and updating.
Chapter Summary
Text Summary
Setting Up
Before you can create a new data set, you must assign a libref to the SAS library that will store the data set.
Reading a Single Data Set
After you have referenced the library in which your data set is stored, you can write a DATA step to name
the SAS data set to be created. You then specify the data set to be read in the SET statement.
Selecting Variables
You can select the variables that you want to drop or keep by using the DROP= or KEEP= data set options
in parentheses after a SAS data set name. For convenience, use DROP= if more variables are kept than
dropped.
BY-Group Processing
Use the BY statement in the DATA step to group observations for processing. When you use the BY
statement with the SET statement, the DATA step automatically creates two temporary variables, FIRST.
and LAST. When you specify multiple BY variables, a change in the value of a primary BY variable
forces LAST.variable to equal 1 for the secondary BY variables.
Reading Observations Using Direct Access
In addition to reading input data sequentially, you can access observations directly by using the POINT=
option to go directly to a specified observation. There is no end-of-file condition when you use direct
access, so include an explicit OUTPUT statement and then the STOP statement to prevent continuous
looping.
Detecting the End of a Data Set
To determine when the last observation in an input data set has been read, use the END= option in the SET
statement. The specified variable is initialized to 0, then set to 1 when the SET statement reads the last
observation of the data set.
Syntax
- 388 -
LIBNAME libref 'SAS-data-library';
DATA SAS-data-set;
SET SAS-data-set (KEEP= variable-1 <...variable-n>) | (DROP= variable-1
<...variable-n>)
POINT=variable | END=variable;
OUTPUT <SAS-data-set>;
STOP;
RUN;
Sample Program
proc sort data=company.usa out=work.temp2;
by manager jobtype;
run;
data company.budget2(keep=manager jobtype payroll);
set work.temp2;
by manager jobtype;
if wagecat='S' then Yearly=wagerate*12;
else if wagecat='H' then Yearly=wagerate*2000;
if first.jobtype then Payroll=0;
payroll+yearly;
if last.jobtype;
run;
data work.getobs5;
obsnum=5;
set company.usa(keep=manager payroll) point=obsnum;
output;
stop;
run;
data work.addtoend(drop=timemin timesec);
set sasuser.stress2(keep=timemin timesec) end=last;
TotalMin+timemin;
TotalSec+timesec;
TotalTime=totalmin*60+totalsec;
if last;
run;
Points to Remember
• When you perform BY-group processing, the data sets listed in the SET statement must either be sorted by the
values of the BY variable(s), or they must have an appropriate index.
- 389 -
• When using direct access to read data, you must prevent continuous looping. Add a STOP statement to the DATA
step.
• Do not specify the END= option with the POINT= option in a SET statement.
Chapter Quiz
Select the best answer for each question. After completing the quiz, you can check your answers using the
answer key in the appendix.
1. If you submit the following program, which variables appear in the new data set?
data work.cardiac(drop=age group);
set clinic.fitness(keep=age weight group);
if group=2 and age>40;
run;
1. none
2. Weight
3. Age, Group
4. Age, Weight, Group
2. Which of the following programs correctly reads the data set Orders and creates the data set FastOrdr?
1.
data catalog.fastordr(drop=ordrtime);
set july.orders(keep=product units price);
if ordrtime<4;
Total=units*price;
run;
2.
data catalog.orders(drop=ordrtime);
set july.fastordr(keep=product units price);
if ordrtime<4;
Total=units*price;
run;
3.
data catalog.fastordr(drop=ordrtime);
set july.orders(keep=product units price
ordrtime);
if ordrtime<4;
Total=units*price;
run;
4. none of the above
3. Which of the following statements is false about BY-group processing?
When you use the BY statement with the SET statement:
- 390 -
1. The data sets listed in the SET statement must be indexed or sorted by the values of the BY variable(s).
2. The DATA step automatically creates two variables, FIRST. and LAST., for each variable in the BY
statement.
3. FIRST. and LAST. identify the first and last observation in each BY group, respectively.
4. FIRST. and LAST. are stored in the data set.
4. There are 500 observations in the data set Usa. What is the result of submitting the following program?
data work.getobs5;
obsnum=5;
set company.usa(keep=manager payroll) point=obsnum;
stop;
run;
1. an error
2. an empty data set
3. continuous loop
4. a data set that contains one observation
5. There is no end-of-file condition when you use direct access to read data, so how can your program prevent a
continuous loop?
1. Do not use a POINT= variable.
2. Check for an invalid value of the POINT= variable.
3. Do not use an END= variable.
4. Include an OUTPUT statement.
6. Assuming that the data set Company.USA has five or more observations, what is the result of submitting the
following program?
data work.getobs5;
obsnum=5;
set company.usa(keep=manager payroll) point=obsnum;
output;
stop;
run;
1. an error
2. an empty data set
3. a continuous loop
4. a data set that contains one observation
7. Which of the following statements is true regarding direct access of data sets?
1. You cannot specify END= with POINT=.
2. You cannot specify OUTPUT with POINT=.
3. You cannot specify STOP with END=.
4. You cannot specify FIRST. with LAST.
8. What is the result of submitting the following program?
data work.addtoend;
set clinic.stress2 end=last;

- 391 -
if last;
run;
1. an error
2. an empty data set
3. a continuous loop
4. a data set that contains one observation
9. At the start of DATA step processing, during the compilation phase, variables are created in the program data
vector (PDV), and observations are set to:
1. blank
2. missing
3. 0
4. there are no observations.
10. The DATA step executes:
1. continuously if you use the POINT= option and the STOP statement.
2. once for each variable in the output data set.
3. once for each observation in the input data set.
4. until it encounters an OUTPUT statement.
Chapter 12 Combining SAS Data Sets
Overview
One-to-One Merging
Concatenating
Appending
Interleaving
Match-Merging
Match-Merge Processing
Renaming Variables
Excluding Unmatched Observations
Selecting Variables
Additional Features
Chapter Summary
Chapter Quiz
Overview

- 392 -
Introduction
In SAS programming, a common task is to combine observations from two or more data sets into a new
data set. Using the DATA step, you can combine data sets in several ways, including the following:
Method of Merging (Combining) Illustration
One-to-one merging
Creates observations that contain all of the variables
from each contributing data set.
Combines observations based on their relative
position in each data set.
Statement: SET
Concatenating
Appends the observations from one data set to
another.
Statement: SET
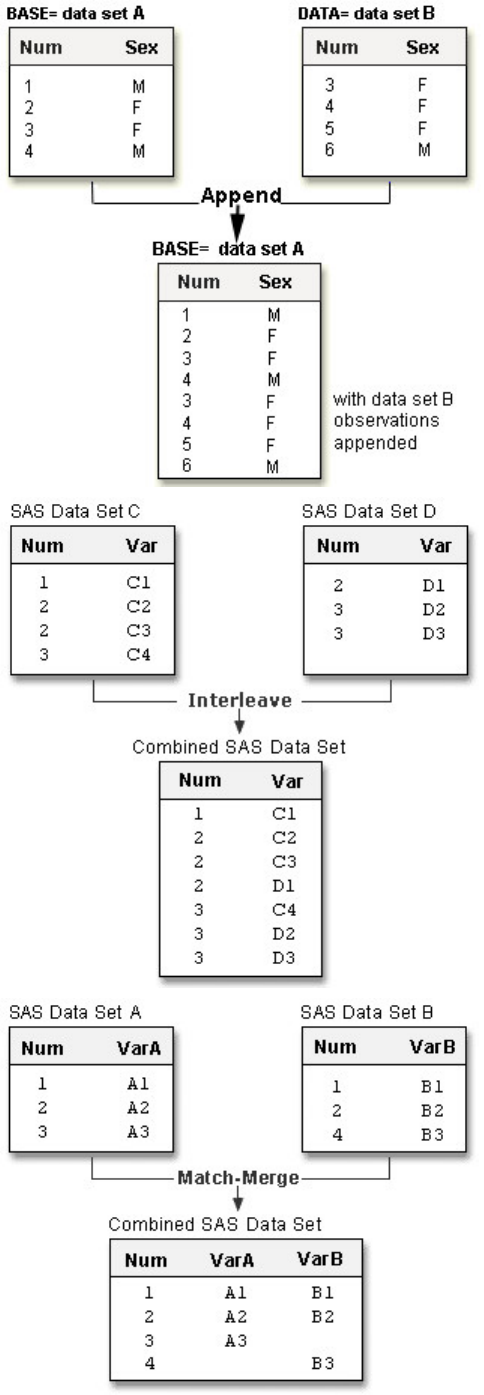
- 393 -
Appending
Appending adds the observations in the second data
set directly to the end of the original data set.
Procedure: APPEND
Interleaving
Intersperses observations from two or more data
sets, based on one or more common variables.
Statements: SET, BY
Match-merging
Matches observations from two or more data sets
into a single observation in a new data set according
to the values of a common variable.
Statements: MERGE, BY

- 394 -
You can also use PROC SQL to join data sets according to common values. PROC SQL enables you to
perform many other types of data set joins. See the SQL Processing with SAS e-learning course for
additional training.
This chapter shows you how to combine SAS data sets using one-to-one combing or merging,
concatenating, appending, interleaving, and match-merging. When you use the DATA step to combine
data sets, you have a high degree of control in creating and manipulating data sets.
Objectives
In this chapter, you learn to
• perform one-to-one merging (combining) of data sets
• concatenate data sets
• append data sets
• interleave data sets
• match-merge data sets
• rename any like-named variables to avoid overwriting values
• select only matched observations, if desired
• predict the results of match-merging.
One-to-One Merging
Overview
In Reading SAS Data Sets, you learned how to use the SET statement to read an existing SAS data set.
You can also use multiple SET statements in a DATA step to combine data sets. This is called one-to-one
merging (or combining). In one-to-one merging you can read different data sets, or you can read the same
data set more than once, as if you were reading from separate data sets.
General form, basic DATA step for one-to-one reading:
DATA output-SAS-data-set;
SET SAS-data-set-1;
SET SAS-data-set-2;
RUN;
where
output-SAS-data-set names the data set to be created
SAS-data-set-1 and SAS-data-set-2 specify the data sets to be read.
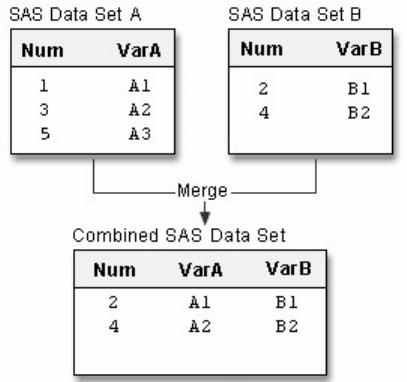
- 395 -
How One-to-One Merging Selects Data
When you perform one-to-one merging,
• the new data set contains all the variables from all the input data sets. If the data sets contain variables that have
the same names, the values that are read from the last data set overwrite the values that were read from earlier data sets.
• the number of observations in the new data set is the number of observations in the smallest original data set.
Observations are combined based on their relative position in each data set. That is, the first observation in one data set is
joined with the first observation in the other, and so on. The DATA step stops after it has read the last observation from the
smallest data set.
data one2one;
set a;
setb;
run;
One-to-One Merging
How One-to-One Reading Works
Let's look at a simple case of one-to-one merging.
data one2one;
set a;
set b;
run;
How One-to-One Reading Works
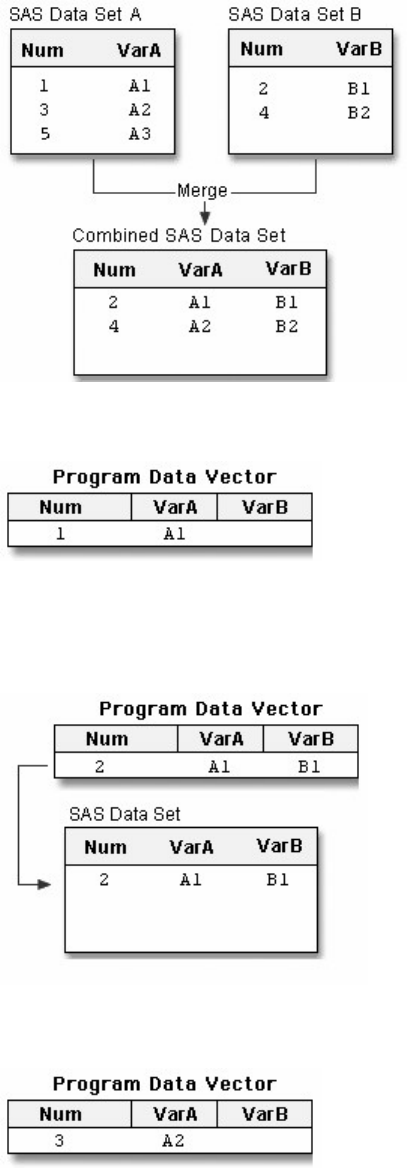
- 396 -
1. The first SET statement reads the first observation from data set A into the program data vector.
2. The second SET statement reads the first observation from data set B into the program data vector and SAS
writes the contents of the program data vector to the new data set. The value for Num from data set B overwrites the value
for Num from data set A.
3. The first SET statement reads the second observation from data set A into the program data vector.
4. The second SET statement reads the second observation from data set B, and SAS writes the contents of the
program data vector to the new data set. The value for Num from data set B overwrites the value for Num from data set A.
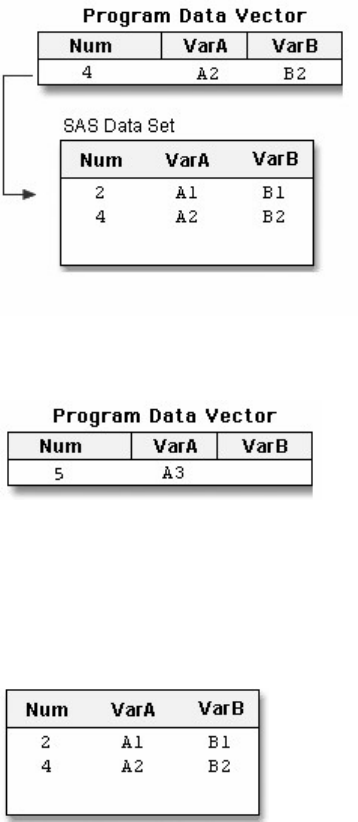
- 397 -
5. The first SET statement reads the third observation from data set A into the program data vector.
6. The second SET statement reads the end of file in data set B, which stops the DATA step processing with no
further output written to the data set. The last observation in data set A is read into the program data vector, but it is not
written to the output data set.
Final Combined SAS Data Set
Here is an example of how you might use one-to-one merging.
Example: One-to-One Merging
Suppose you have basic patient data (ID, sex, and age) in the data set Clinic.Patients and want to combine
it with other patient data (height and weight) for patients under age 60. The height and weight data is
stored in the data set Clinic.Measure. Both data sets are sorted by the variable ID.
Notice that Clinic.Patients contains 7 observations in which the patient age is less than 60, and
Clinic.Measure contains 6 observations.
Example: One-to-One Merging
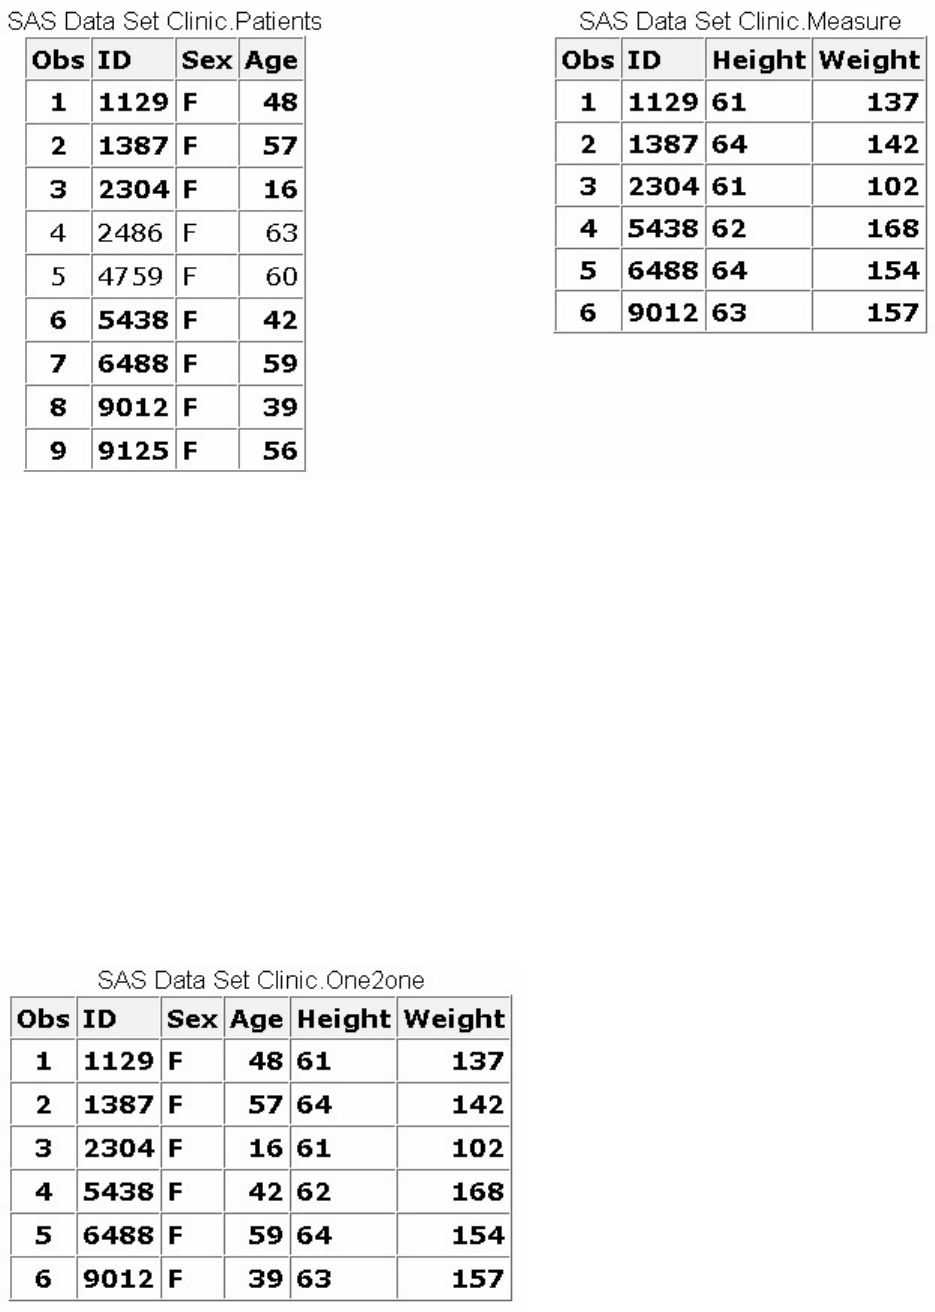
- 398 -
To subset observations from the first data set and combine them with observations from the second data set,
you can submit the following program:
data clinic.one2one;
set clinic.patients;
if age<60;
set clinic.measure;
run;
The resulting data set, Clinic.One2one, contains 6 observations (the number of observations read from the
smallest data set, which is Clinic.Measure). The last observation in Clinic.Patients is not written to the data
set because the second SET statement reaches an end-of-file, which stops the DATA step processing.
The Resulting Data Set for One-to-One Reading Example
Concatenating
Overview
- 399 -
Another way to combine SAS data sets with the SET statement is concatenating, which appends the
observations from one data set to another data set. To concatenate SAS data sets, you specify a list of data
set names in the SET statement.
General form, basic DATA step for concatenating:
DATA output-SAS-data-set;
SET SAS-data-set-1 SAS-data-set-2;
RUN;
where
output-SAS-data-set names the data set to be created
SAS-data-set-1 and SAS-data-set-2 specify the data sets to be read.
How Concatenating Selects Data
When a program concatenates data sets, all of the observations are read from the first data set listed in the
SET statement. Then all of the observations are read from the second data set listed, and so on, until all of
the listed data sets have been read. The new data set contains all of the variables and observations from all
of the input data sets.
data concat;
set a c;
run;
How Concatenating Selects
- 400 -
Notice that A and C contain a common variable named Num:
• Both instances of Num (or any common variable) must have the same type attribute, or SAS stops processing the
DATA step and issues an error message stating that the variables are incompatible.
• However, if the length attribute is different, SAS takes the length from the first data set that contains the variable.
In this case, the length of Num in A determines the length of Num in Concat.
• The same is true for the label, format, and informat attributes: If any of these attributes are different, SAS takes
the attribute from the first data set that contains the variable with that attribute.
Example
The following DATA step creates Clinic.Concat by concatenating Clinic.Therapy1999 and
Clinic.Therapy2000.
data clinic.concat;
set clinic.therapy1999 clinic.therapy2000;
run;
Below is the listing of Clinic.Concat. The first 12 observations were read from Clinic.Therapy1999, and
the last 12 observations were read from Clinic.Therapy2000.
Example: Concatenating
- 401 -
Appending
Overview
Another way to combine SAS data sets is to append one data set to another using the APPEND procedure.
Although appending and concatenating are similar, there are some important differences between the two
methods. Whereas the DATA step creates an entirely new data set when concatenating, PROC APPEND
simply adds the observations of one data set to the end of a “master” (or BASE) data set. SAS does not
create a new data set nor does it read the base data set when executing the APPEND procedure.
To append SAS data sets, you specify a BASE= data set, which is the data set to which observations are
added and then specify a DATA= data set, which is the data set containing the observations that are added
to the base data set. The data set specified with DATA= is the only one of the two data sets that SAS
actually reads.
- 402 -
General form of the APPEND procedure:
PROC APPEND BASE=SAS-data-set
DATA=SAS-data-set;
RUN;
where
BASE= names the data set to which observations are added
DATA= names the data set containing observations that are added to the base data set
For example, the following PROC APPEND statement appends the observations in data set B to the end of
data set A:
proc append base=A
data=B;
run;
How PROC APPEND Appends Data
Requirements for the APPEND Procedure
The requirements for appending one data set to another are as follows:
• Only two data sets can be used at a time in one step.
• The observations in the base data set are not read.
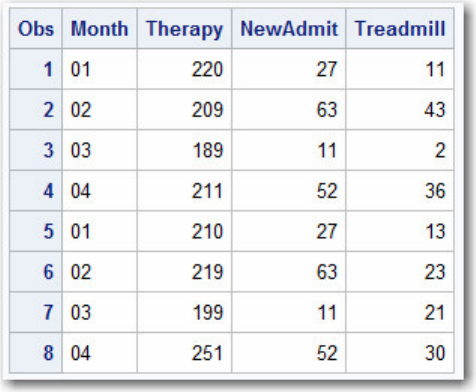
- 403 -
• The variable information in the descriptor portion of the base data set cannot change.
Notice that the final data set is the original data set with appended observations and that no new data set
was created.
Example
The following PROC APPEND statement appends the data set totals2011 to the base data set totals2005.
The two data sets are like-structured data sets: that is, both data sets have the same variable information.
proc append base=totals2005 data=totals2011;
run;
Below is the listing of totals2005. The first 4 observations already existed in totals2005, and the last 4
observations were read from totals2011 and added to totals2005.
Example: PROC APPEND
Using the FORCE Option with Unlike-Structured Data Sets
In order to use PROC APPEND with data sets that have unmatching variable definitions, you can use the
FORCE option in the PROC APPEND statement.
General form of the APPEND procedure with the FORCE option:
PROC APPEND BASE=SAS-data-set
DATA=SAS-data-set FORCE;
RUN;
The FORCE option is needed when the DATA= data set contains variables that meet any one of the
following criteria:
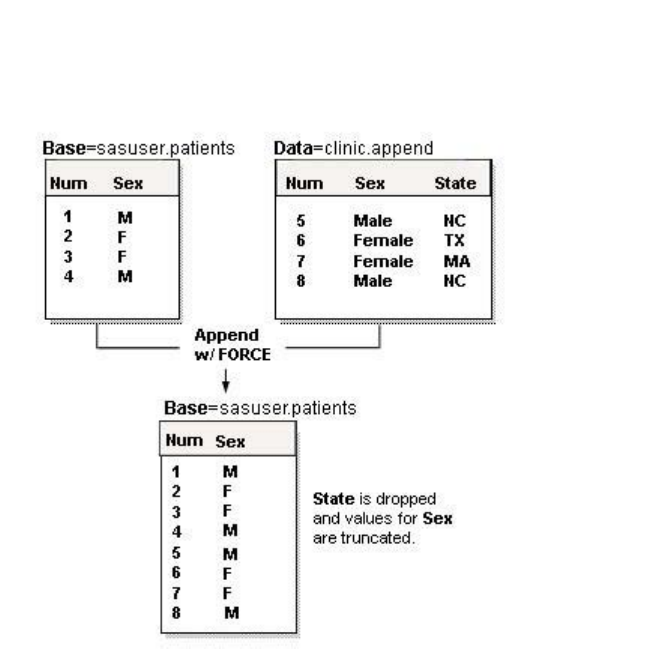
- 404 -
They are not in the BASE= data set.
They are variables of a different type (for example, character or numeric).
They are longer than the variables in the BASE= data set.
If the length of a variable is longer in the DATA= data set than in the BASE= data set, SAS truncates
values from the DATA= data set to fit them into the length that is specified in the BASE= data set.
If the type of a variable in the DATA= data set is different than in the BASE= data set, SAS replaces all
values for the variable in the DATA= data set with missing values and keeps the variable type of the
variable specified in the BASE= data set.
If the BASE= data set contains a variable that is not in the DATA= data set, the observations are appended,
but the observations from the DATA= data set have a missing value for the variable that was not present in
the DATA= data set. If the DATA= data set contains a variable that is not in the BASE= data set, the
variable is dropped from the output.
Example
For example:
proc append base=sasuser.patients
data=clinic.append force;
run;
Example: PROC APPEND with FORCE Option
- 405 -
Interleaving
Overview
If you use a BY statement when you concatenate data sets, the result is interleaving. Interleaving
intersperses observations from two or more data sets, based on one or more common variables.
To interleave SAS data sets, specify a list of data set names in the SET statement, and specify one or more
BY variables in the BY statement.
General form, basic DATA step for interleaving:
DATA output-SAS-data-set;
SET SAS-data-set-1 SAS-data-set-2;
BY variable(s);
RUN;
where
p
ut-SAS-data-set names the data set to be created
S
-data-set-1 and SAS-data-set-2 specify the data sets to be read.
i
able(s) specifies one or more variables that are used to interleave observations.
You can specify any number of data sets in the SET statement. Each input data set must be sorted or
indexed in ascending order based on the BY variable(s).
How Interleaving Selects Data
When SAS interleaves data sets, observations in each BY group in each data set in the SET statement are
read sequentially, in the order in which the data sets and BY variables are listed, until all observations have
been processed. The new data set includes all the variables from all the input data sets, and it contains the
total number of observations from all input data sets.
data interlv;
set c d;
by num;
run;
How Interleaving Selects Data
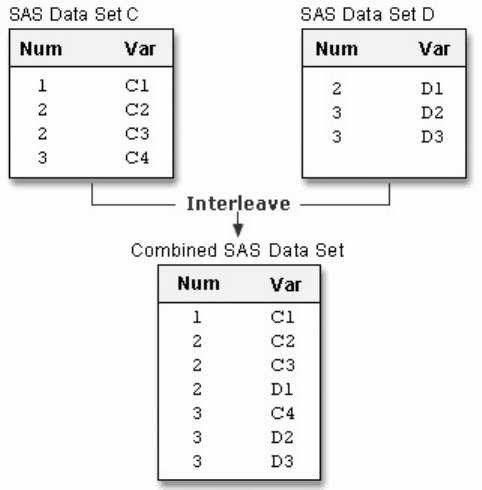
- 406 -
Example
The following DATA step creates Clinic.Interlv by interleaving Clinic.Therapy1999 and
Clinic.Therapy2000.
data clinic.interlv;
set clinic.therapy1999 clinic.therapy2000;
by month;
run;
Below is the listing of Clinic.Interlv. Notice that, unlike the previous example, observations are interleaved
by month instead of being concatenated.
Example: How Interleaving Selects Data
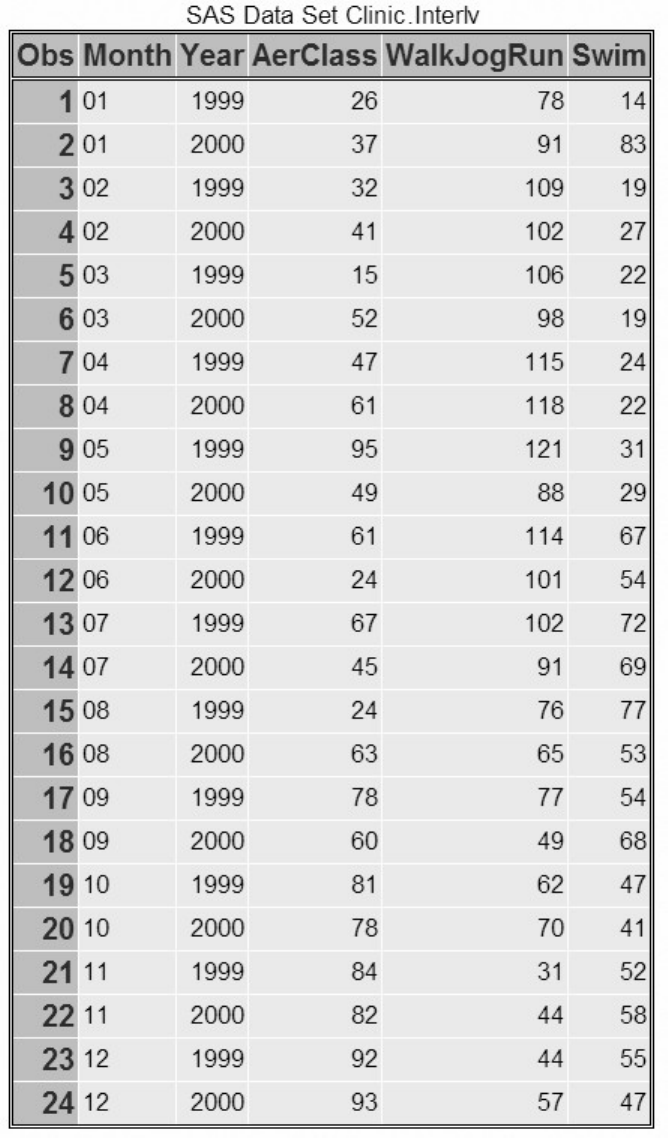
- 407 -
Match-Merging
Overview
So far in this chapter, we've combined data sets based on the order of the observations in the input data sets.
But sometimes you need to combine observations from two or more data sets into a single observation in a
new data set according to the values of a common variable. This is called match-merging.
When you match-merge, you use a MERGE statement rather than a SET statement to combine data sets.
- 408 -
General form, basic DATA step for match-merging:
DATA output-SAS-data-set;
MERGE SAS-data-set-1 SAS-data-set-2;
BY <DESCENDING> variable(s);
RUN;
where
p
ut-SAS-data-set names the data set to be created.
S
-data-set-1 and SAS-data-set-2 specify the data sets to be read.
i
able(s) in the BY statement specifies one or more variables whose values are used to match observations.
S
CENDING indicates that the input data sets are sorted in descending order (largest to smallest numerically, or reverse
alphabetical for character variables) by the variable that is specified. If you have more that one variable in the BY
statement, DESCENDING applies only to the variable that immediately follows it.
Each input data set in the MERGE statement must be sorted in order of the values of the BY variable(s), or
it must have an appropriate index. Each BY variable must have the same type in all data sets to be merged.
You cannot use the DESCENDING option with indexed data sets because indexes are always stored in
ascending order.
How Match-Merging Selects Data
Generally speaking, during match-merging, SAS sequentially checks each observation of each data set to
see whether the BY values match, and then writes the combined observation to the new data set.
data merged;
merge a b;
by num;
run;
How Match-Merging Selects Data
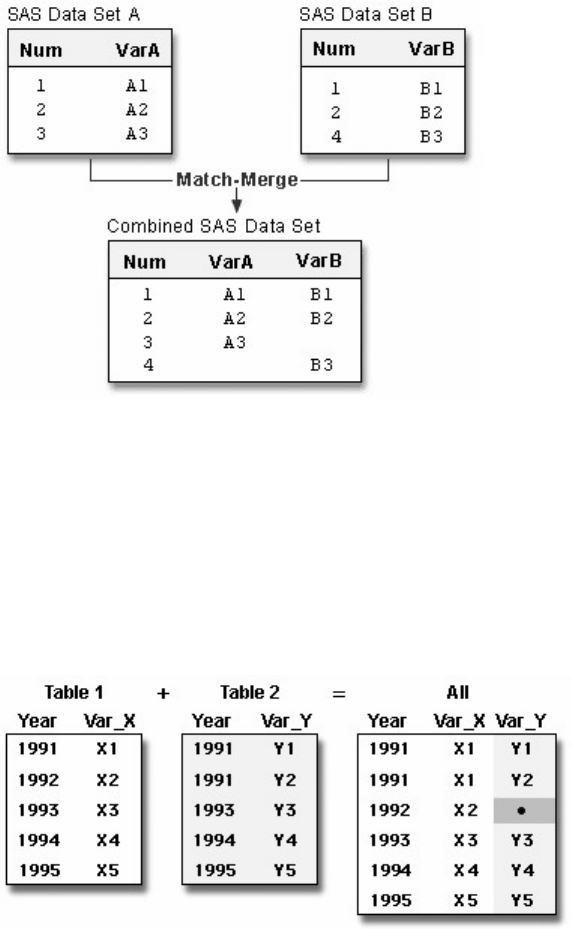
- 409 -
Basic DATA step match-merging produces an output data set that contains values from all observations in
all input data sets. You can add statements and options to select only matching observations.
If an input data set doesn't have any observations for a particular value of the by-variable, then the
observation in the output data set contains missing values for the variables that are unique to that input data
set.
Match-Merging with Missing Data
In match-merging, often one data set contains unique values for the BY-variable and other data sets
contain multiple values for the BY-variable.
Example
Suppose you have sorted the data sets Clinic.Demog and Clinic.Visit as follows:
proc sort data=clinic.demog;
by id;
run;
proc print data=clinic.demog;
run;
Example: Sorting clinic.demog
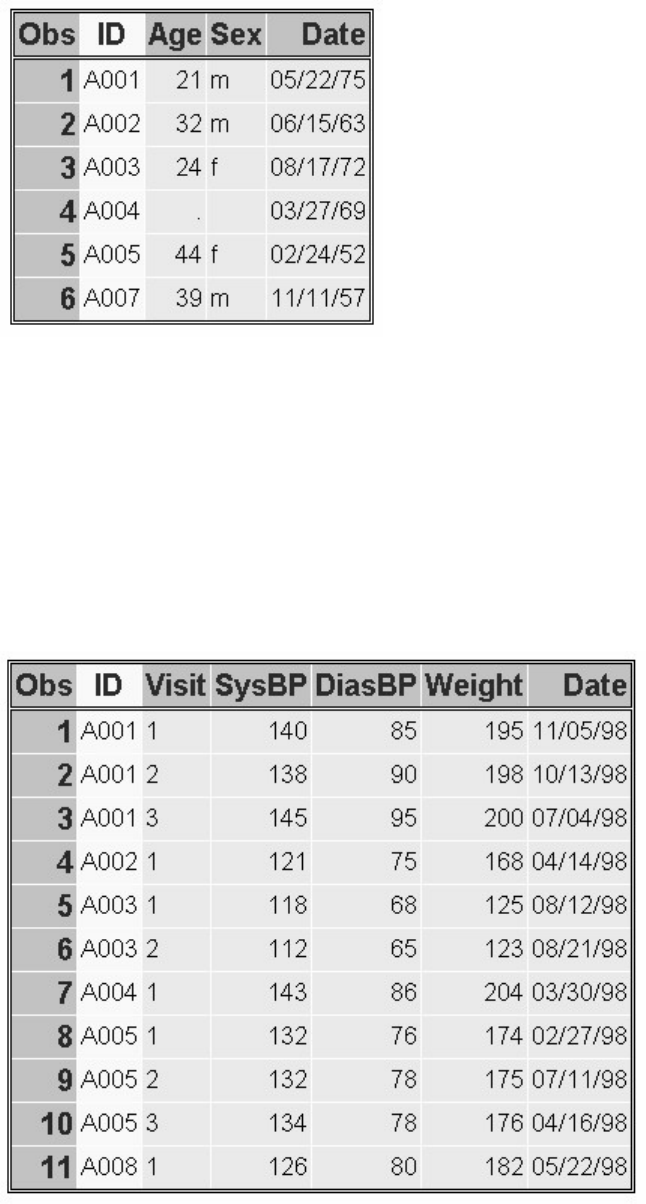
- 410 -
proc sort data=clinic.visit;
by id;
run;
proc print data=clinic.visit;
run;
Example: Sorting clinic.visit
You can then submit this DATA step to create Clinic.Merged by merging Clinic.Demog and Clinic.Visit
according to values of the variable ID.
data clinic.merged;
merge clinic.demog clinic.visit;
by id;
run;
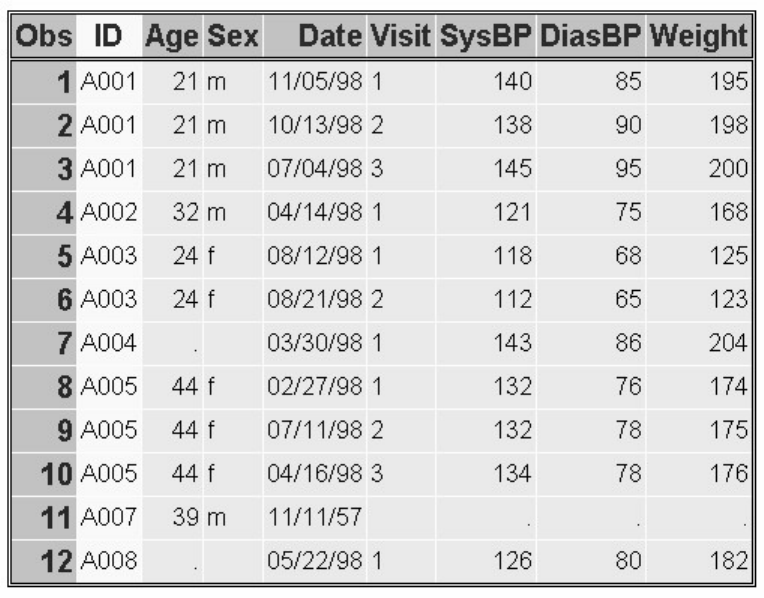
- 411 -
proc print data=clinic.merged;
run;
Notice that all observations, including unmatched observations and observations that have missing data,
are written to the output data set.
Match-merging Output
Example: Merge in Descending Order
The example above illustrates merging two data sets that are sorted in ascending order of the BY variable
ID. To sort the data sets in descending order and then merge them, you can submit the following program.
proc sort data=clinic.demog;
by descending id;
run;
proc sort data=clinic.visit;
by descending id;
run;
data clinic.merged;
merge clinic.demog clinic.visit;
by descending id;
run;
proc print data=clinic.merged;
run;
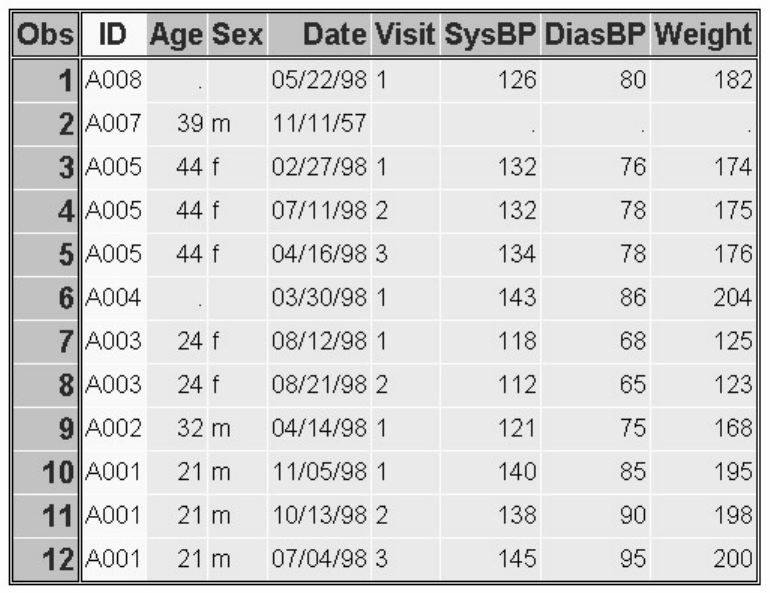
- 412 -
Notice that you specify the DESCENDING option in the BY statements in both the PROC SORT steps
and the DATA step. If you omit the DESCENDING option in the DATA step, you generate error
messages about improperly sorted BY variables.
Now the data sets are merged in descending order of the BY variable ID.
Example: Merge in Descending Order
Match-Merge Processing
Overview
The match-merging examples in this chapter are straightforward. However, match-merging can be more
complex, depending on your data and on the output data set that you want to create. To predict the results
of match-merges correctly, you need to understand how the DATA step performs match-merges.
When you submit a DATA step, it is processed in two phases:
the compilation phase, in which SAS checks the syntax of the SAS statements and compiles them (translates them into
machine code). During this phase, SAS also sets up descriptor information for the output data set and creates the program
data vector (PDV), an area of memory where SAS holds one observation at a time.
Match-Merge Processing: Compilation Phase
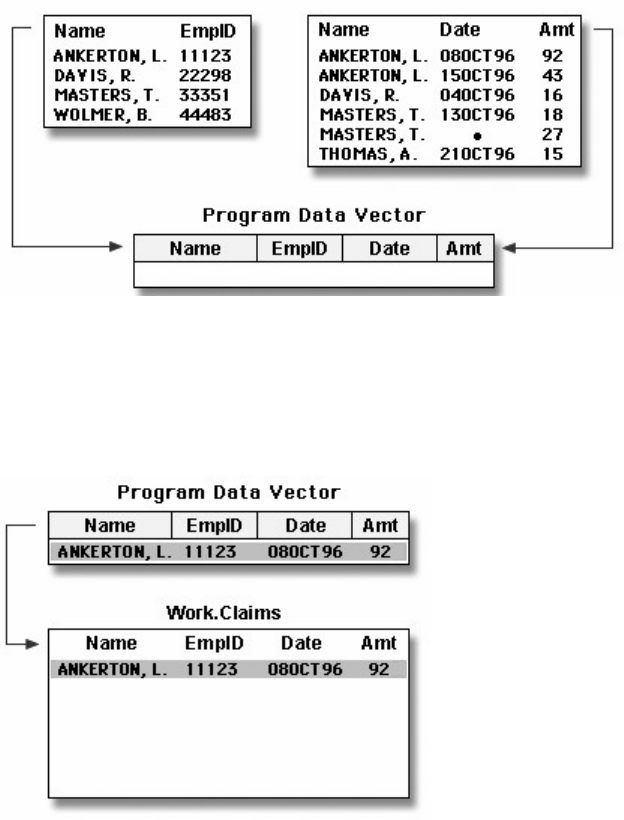
- 413 -
the execution phase, in which the DATA step reads data and executes any subsequent programming statements. When the
DATA step executes, data values are read into the appropriate variables in the program data vector. From here, the
variables are written to the output data set as a single observation.
Match-Merge Processing: Execution Phase
The following pages cover DATA step processing in greater detail. In those pages, you learn
how the DATA step sets up the new output data set
what happens when variables in different data sets have the same name
how the DATA step matches observations in input data sets
what happens when observations don't match
how missing values are handled.
The Compilation Phase: Setting Up the New Data Set
To prepare to merge data sets, SAS
reads the descriptor portions of the data sets that are listed in the MERGE statement
reads the rest of the DATA step program
creates the program data vector (PDV) for the merged data set
assigns a tracking pointer to each data set that is listed in the MERGE statement.
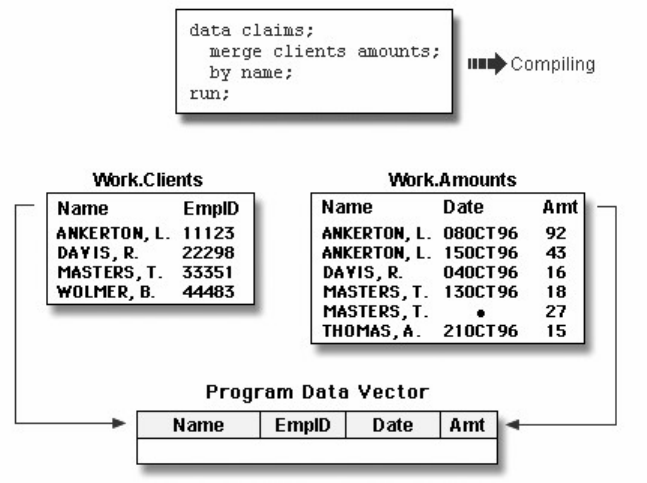
- 414 -
If variables that have the same name appear in more than one data set, the variable from the first data set
that contains the variable (in the order listed in the MERGE statement) determines the length of the
variable.
The Compilation Phase: Setting Up the New Data Set
The illustration above shows match-merging during the compilation phase. After reading the descriptor
portions of the data sets Clients and Amounts, SAS
creates a program data vector for the new Claims data set. The program data vector contains all variables from the two data
sets. Note that although Name appears in both input data sets, it appears in the program data vector only once.
assigns tracking pointers to Clients and Amounts.
The Execution Phase: Match-Merging Observations
After compiling the DATA step, SAS sequentially match-merges observations by moving the pointers
down each observation of each data set and checking to see whether the BY values match.
If Yes, the observations are read into the PDV in the order in which the data sets appear in the MERGE statement. Values of
any same-named variable are overwritten by values of the same-named variable in subsequent data sets. SAS writes the
combined observation to the new data set and retains the values in the PDV until the BY value changes in all the data sets.
The Execution Phase: Match-Merging Observations
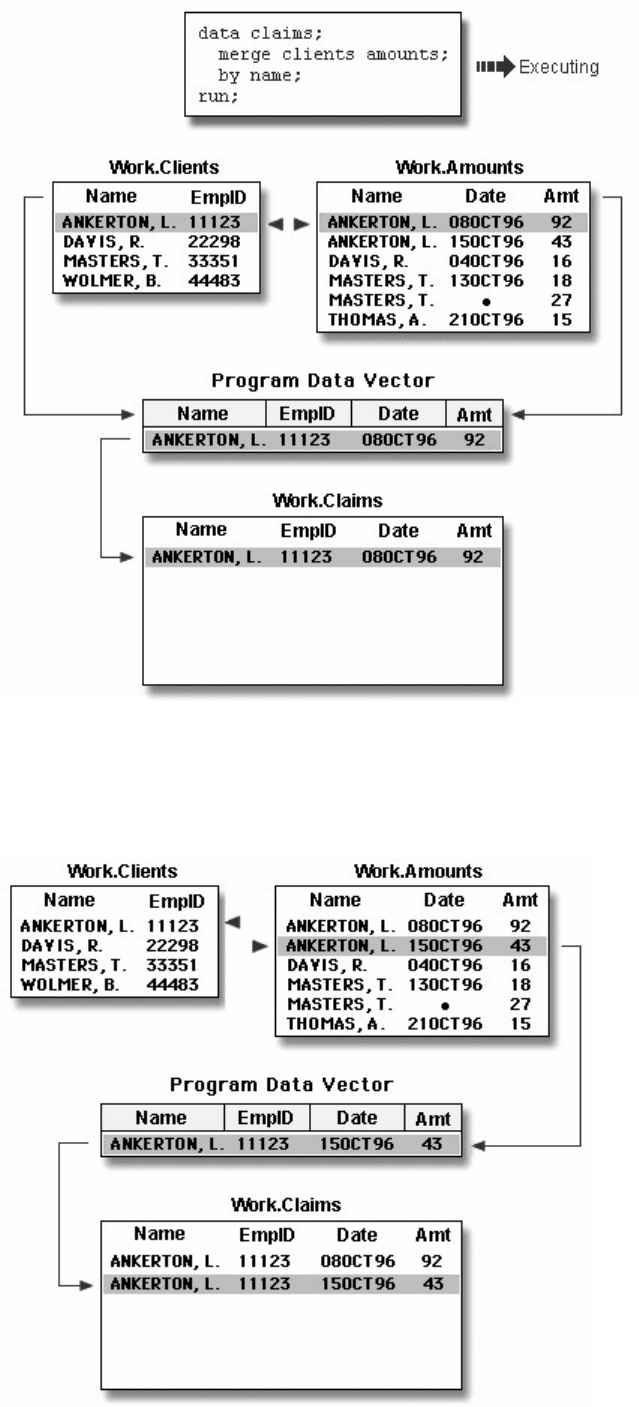
- 415 -
If No, SAS determines which BY value comes first and reads the observation that contains this value into the PDV. Then the
contents of the PDV are written
The Execution Phase: PDV
When the BY value changes in all the input data sets, the PDV is initialized to missing.
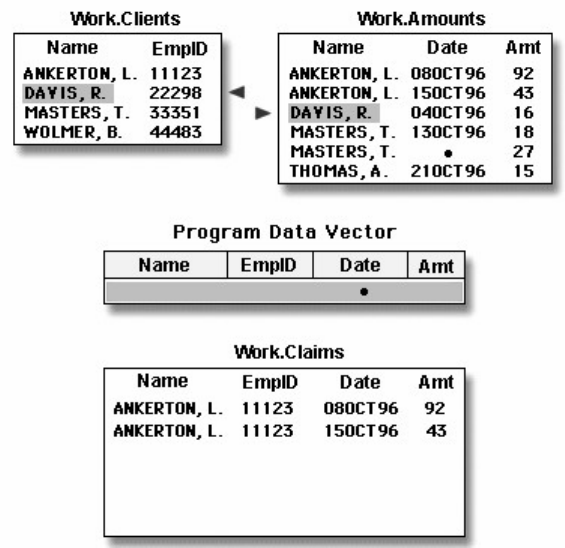
- 416 -
Initializing the PDV to Missing
The DATA step merge continues to process every observation in each data set until it has processed all
observations in all data sets.
Handling Unmatched Observations and Missing Values
By default, all observations that are read into the PDV, including observations that have missing data and
no matching BY values, are written to the output data set. (If you specify a subsetting IF statement to
select observations, then only those that meet the IF condition are written.)
If an observation contains missing values for a variable, then the observation in the output data set contains the missing values
as well. Observations that have missing values for the BY variable appear at the top of the output data set because missing
values sort first in ascending order.
Handling Unmatched Observations and Missing Values
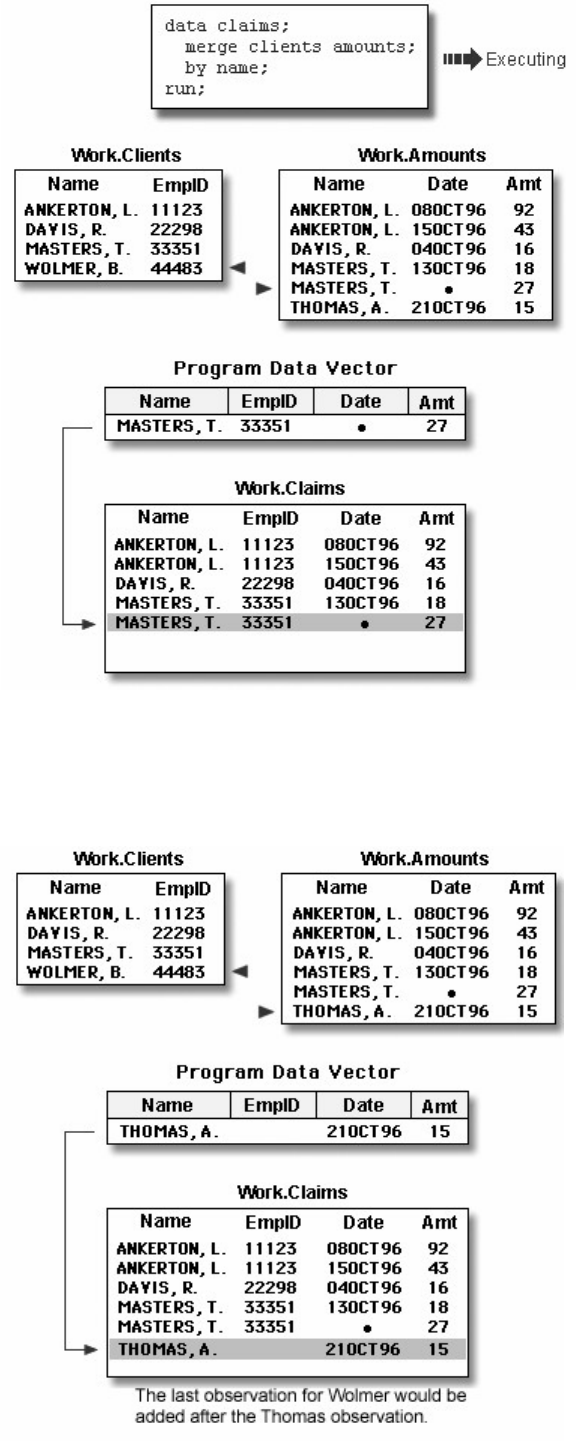
- 417 -
If an input data set doesn't have a matching BY value, then the observation in the output data set contains missing values for
the variables that are unique to that input data set.
Handling Unmatched Observations and Missing Values: Unique Missing Values
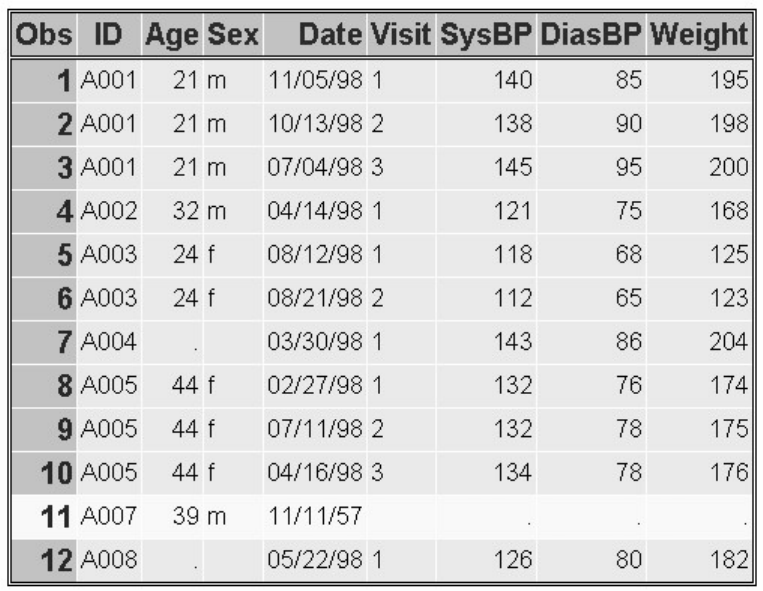
- 418 -
Renaming Variables
Sometimes you might have same-named variables in more than one input data set. In this case, DATA step
match-merging overwrites values of the like-named variable in the first data set in which it appears with
values of the like-named variable in subsequent data sets.
For example, Clinic.Demog contains the variable Date (date of birth), and Clinic.Visit also contains Date
(date of the clinic visit in 1998). The DATA step below overwrites the date of birth with the date of the
clinic visit.
data clinic.merged;
merge clinic.demog clinic.visit;
by id;
run;
proc print data=clinic.merged;
run;
The following output shows the effects of overwriting the values of a variable in the Clinic.Merged data
set. In most observations, the date is now the date of the clinic visit. In observation 11, the date is still the
birth date because Clinic.Visit did not contain a matching ID value and did not contribute to the
observation.
Renaming Variables
You now have a data set with values for Date that mean two different things: date of birth and date of
clinic visit. Let's see how to prevent this problem.
- 419 -
To prevent overwriting, you can rename variables by using the RENAME= data set option in the MERGE
statement.
General form, RENAME= data set option:
(RENAME=(old-variable-name=new-variable-name))
where
the RENAME= option, in parentheses, follows the name of each data set that contains one or more variables to be renamed
old-variable-name specifies the variable to be renamed
new-variable-name specifies the new name for the variable.
You can rename any number of variables in each occurrence of the RENAME= option.
You can also use RENAME= to rename variables in the SET statement or in the output data set that is
specified in the DATA statement.
In the following example, the RENAME= option renames the variable Date in Clinic.Demog to BirthDate,
and it renames the variable Date in Clinic.Visit to VisitDate.
data clinic.merged;
merge clinic.demog (rename=(date=BirthDate))
clinic.visit (rename=(date=VisitDate));
by id;
run;
proc print data=clinic.merged;
run;
The following output shows the effect of the RENAME= option.
Output for RENAME= Option
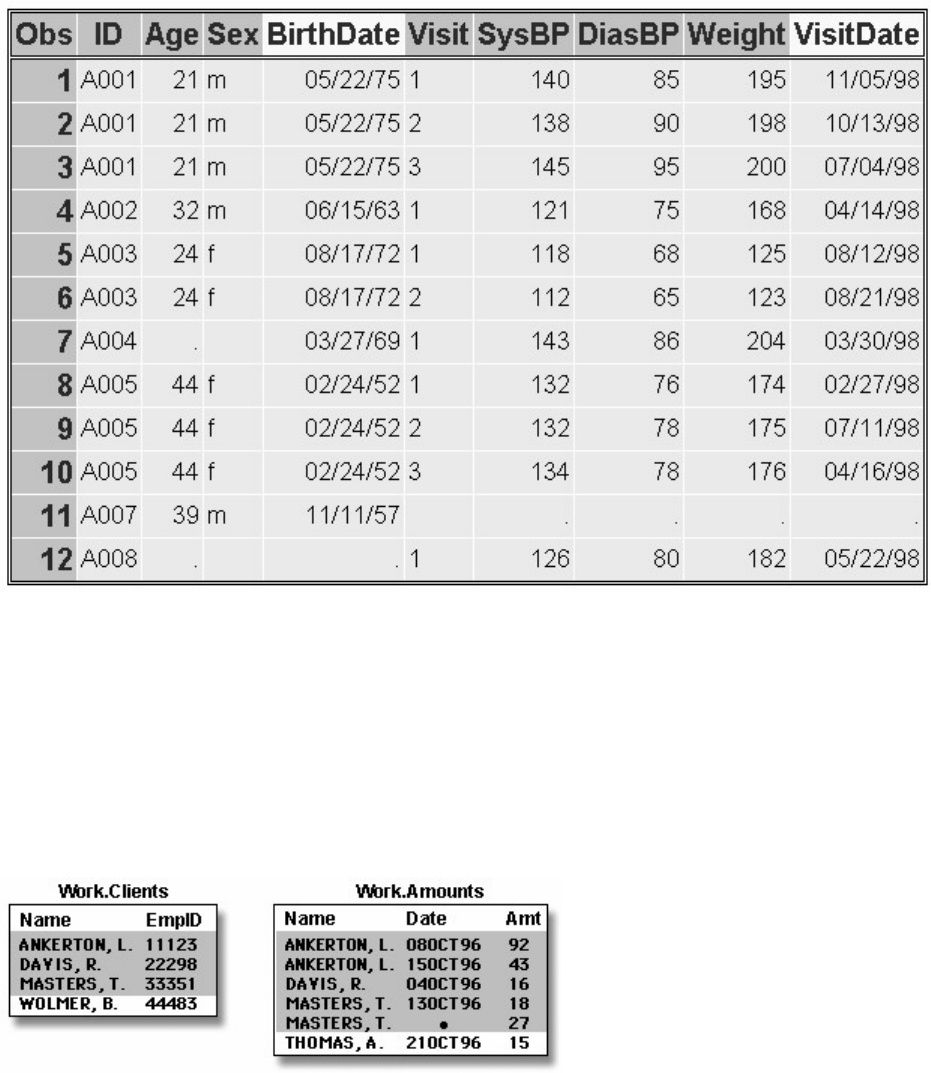
- 420 -
Excluding Unmatched Observations
Overview
By default, DATA step match-merging combines all observations in all input data sets. However, you may
want to select only observations that match for two or more specific input data sets.
Excluding Unmatched Observations
To exclude unmatched observations from your output data set, you can use the IN= data set option and the
subsetting IF statement in your DATA step. In this case, you use
the IN= data set option to create and name a variable that indicates whether the data set contributed data to the current
observation
the subsetting IF statement to check the IN= values and write to the merged data set only matching observations.
Creating Temporary IN= Variables
Suppose you want to match-merge the data sets Clinic.Demog and Clinic.Visit and select only
observations that appear in both data sets.
- 421 -
First, you use IN= to create two temporary variables, indemog and invisit. The IN= variable is a temporary
variable that is available to program statements during the DATA step, but it is not included in the SAS
data set that is being created.
General form, IN= data set option:
(IN= variable)
where
IN= option, in parentheses, follows the data set name
i
able names the variable to be created.
Within the DATA step, the value of the variable is 1 if the data set contributed data to the current
observation. Otherwise, its value is 0.
The DATA step that contains the IN= options appears below. The first IN= creates the temporary variable
indemog, which is set to 1 when an observation from Clinic.Demog contributes to the current observation.
Otherwise, it is set to 0. Likewise, the value of invisit depends on whether Clinic.Visit contributes to an
observation or not.
data clinic.merged;
merge clinic.demog(in=indemog)
clinic.visit(in=invisit
rename=(date=BirthDate));
by id;
run;
When you specify multiple data set options for a given data set, enclose them in a single set of parentheses.
Selecting Matching Observations
Next, to select only observations that appear in both Clinic.Demog and Clinic.Visit, you specify a
subsetting IF statement in the DATA step.
In the DATA step below, the subsetting IF statement checks the values of indemog and invisit and
continues processing only those observations that meet the condition of the expression. Here the condition
is that both Clinic.Demog and Clinic.Visit contribute to the observation. If the condition is met, the new
observation is written to Clinic.Merged. Otherwise, the observation is deleted.
data clinic.merged;
merge clinic.demog(in=indemog
rename=(date=BirthDate))
clinic.visit(in=invisit
rename=(date=VisitDate));
by id;
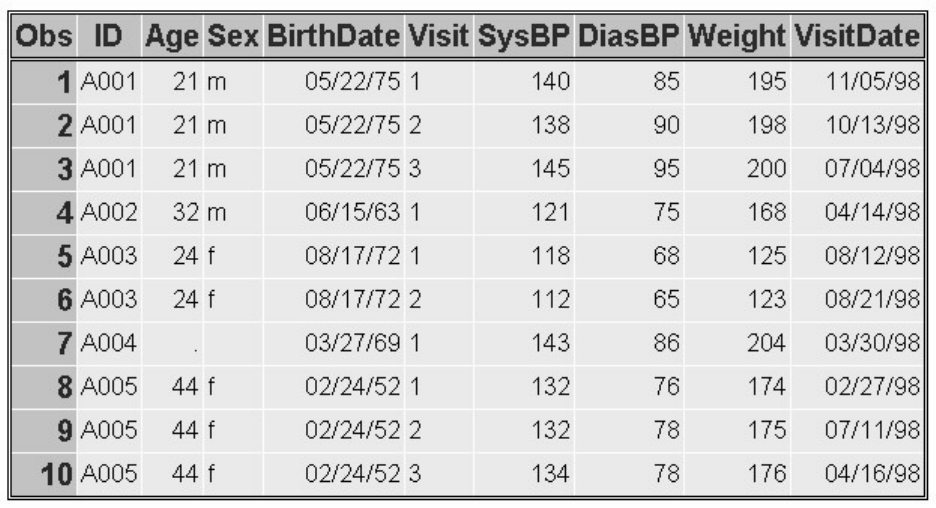
- 422 -
if indemog=1 and invisit=1;
run;
proc print data=clinic.merged;
run;
In previous examples, Clinic.Merged contained 12 observations. In the output below, notice that only 10
observations met the condition in the IF expression.
Selecting Matching Observations
SAS evaluates the expression within an IF statement to produce a result that is either nonzero, zero, or
missing. A nonzero and nonmissing result causes the expression to be true; a zero or missing result causes
the expression to be false.
Thus, you can specify the subsetting IF statement from the previous example in either of the following
ways. The first IF statement checks specifically for a value of 1. The second IF statement checks for a
value that is neither missing nor 0 (which for IN= variables is always 1).
if indemog=1 and invisit=1;
if indemog and invisit;
Selecting Variables
Overview
As with reading raw data or reading SAS data sets, you can specify the variables you want to drop or keep
by using the DROP= and KEEP= data set options.
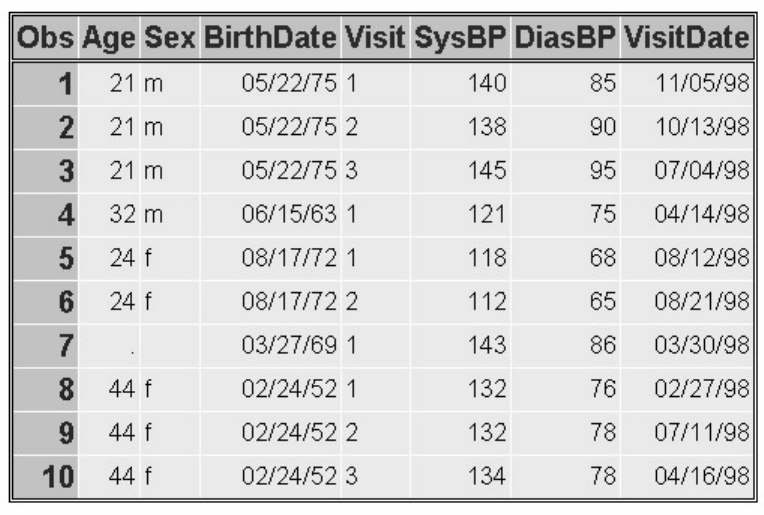
- 423 -
For example, the DATA step below reads all variables from Clinic.Demog and all variables except Weight
from Clinic.Visit. It then excludes the variable ID from Clinic.Merged after the merge processing is
complete.
data clinic.merged (drop=id);
merge clinic.demog(in=indemog
rename=(date=BirthDate))
clinic.visit(drop=weight in=invisit
rename=(date=VisitDate));
by id;
if indemog and invisit;
run;
proc print data=clinic.merged;
run;
Selecting Variables
Where to Specify DROP= and KEEP=
As you've seen in previous chapters, you can specify the DROP= and KEEP= options wherever you
specify a SAS data set. When match-merging, you can specify these options in either the DATA statement
or the MERGE statement, depending on whether you want to reference the variables in that DATA step:
If you don't reference certain variables and you don't want them to appear in the new data set, specify them in the DROP=
option in the MERGE statement.
merge clinic.demog(in=indemog
rename=(date=BirthDate))
clinic.visit(drop=weight in=invisit
- 424 -
rename=(date=VisitDate));
If you do need to reference a variable in the original data set (in a subsetting IF statement, for example), then you must specify
the variable in the DROP= option in the DATA statement. Otherwise, you may get unexpected results and your variable
will be uninitialized.
data clinic.merged (drop=id);
When used in the DATA statement, the DROP= option simply drops the variables from the new data set.
However, the variables are still read from the original data set and are available for processing within the
DATA step.
Additional Features
The DATA step provides a large number of other programming features for manipulating data when you
combine data sets. For example, you can
use IF-THEN/ELSE logic to control processing based on one or more conditions
specify additional data set options
perform calculations
create new variables
process variables in arrays
use SAS functions
use special variables such as FIRST. and LAST. to control processing.
You can also combine SAS data sets in other ways:
You can perform one-to-one merging, which creates a data set that contains all of the variables and observations from each
contributing data set. Observations are combined based on their relative position in each data set.
One-to-one merging is the same as one-to-one reading, with two exceptions:
You use the MERGE statement instead of multiple SET statements.
The DATA step reads all observations from all data sets.
data work.onemerge;
merge clinic.demog clinic.visit;
run;
You can perform a conditional merge, using DO loops or other conditional statements:
data work.combine;
set sales.pounds;

- 425 -
do while(not(begin le date le last));
set sales.rate;
end;
Dollars=(sales*1000)*rate;
run;
You can learn about DO loops in Generating Data with DO Loops.
You can read the same data set in more than one SET statement:
data work.combine(drop=totpay);
if _n_=1 then do until(last);
set sales.budget(keep=payroll) end=last;
totpay+payroll;
end;
set sales.budget;
Percent=payroll/totpay;
run;
Chapter Summary
Text Summary
One-to-One Merging
You can combine data sets with one-to-one merging (combining) by including multiple SET statements in
a DATA step. When you perform one-to-one merging, the new data set contains all the variables from all
the input data sets. If the data sets contain same-named variables, the values that are read in from the last
data set replace those that were read in from earlier ones. The number of observations in the new data set is
the number of observations in the smallest original data set.
data one2one;
set a;
set b;
run;
Concatenating
To append the observations from one data set to another data set, you concatenate them by specifying the
data set names in the SET statement. When SAS concatenates, data sets in the SET statement are read
sequentially, in the order in which they are listed. The new data set contains all the variables and the total
number of observations from all input data sets.
data concat;
set a b;
run;
- 426 -
Appending
Another way to combine SAS data sets is to append one data set to another using the APPEND procedure.
Although appending and concatenating are similar, there are some important differences between the two
methods. The DATA step creates a new data set when concatenating. PROC APPEND adds the
observations of one data set to the end of a “master” (or BASE) data set. SAS does not create a new data
set nor does it read the base data set when executing the APPEND procedure.
Interleaving
If you use a BY statement when you concatenate data sets, the result is interleaving. Interleaving
intersperses observations from two or more data sets, based on one or more common variables. Each input
data set must be sorted or indexed based on the BY variable(s). Observations in each BY group in each
data set in the SET statement are read sequentially, in the order in which the data sets and BY variables are
listed, until all observations have been processed. The new data set contains all the variables and the total
number of observations from all input data sets.
data interlv;
set a b;
by num;
run;
Match-Merging
Sometimes you need to combine observations from two or more data sets into a single observation in a
new data set according to the values of a BY variable. This is match-merging, which uses a MERGE
statement rather than a SET statement to combine data sets. Each input data set must be sorted or indexed
in ascending order based on the BY variable(s). During match-merging, SAS sequentially checks each
observation of each data set to see whether the BY values match, and then writes the combined observation
to the new data set.
data merged;
merge a b;
by num;
run;
Match-Merge Processing
To predict the results of match-merging correctly, you need to understand how the DATA step processes
data in match-merges.
Compiling
To prepare to merge data sets, SAS
reads the descriptor portions of the data sets that are listed in the MERGE statement
- 427 -
reads and compiles the rest of the DATA step program
creates the program data vector (PDV), an area of memory where SAS holds one observation at a time
assigns a tracking pointer to each data set that is listed in the MERGE statement.
If variables with the same name appear in more than one data set, the variable from the first data set that
contains the variable (in the order listed in the MERGE statement) determines the length of the variable.
Executing
After compiling the DATA step, SAS sequentially match-merges observations by moving the pointers
down each observation of each data set and checking to see whether the BY values match.
If Yes, the observations are read into the PDV in the order in which the data sets appear in the MERGE statement. Values of
any same-named variable are overwritten by values of the same-named variable in subsequent data sets. SAS writes the
combined observation to the new data set and retains the values in the PDV until the BY value changes in all the data sets.
If No, SAS determines which BY value comes first and reads the observation that contains this value into the PDV. Then the
observation is written to the new data set.
When the BY value changes in all the input data sets, the PDV is initialized to missing. The DATA step
merge continues to process every observation in each data set until it has processed all observations in all
data sets.
Handling Unmatched Observations and Missing Values
All observations that are written to the PDV, including observations that have missing data and no
matching BY values, are written to the output data set.
If an observation contains missing values for a variable, then the observation in the output data set contains the missing values
as well. Observations that have missing values for the BY variable appear at the top of the output data set.
If an input data set doesn't have a matching BY value, then the observation in the output data set contains missing values for
the variables that are unique to that input data set.
Renaming Variables
Sometimes you might have same-named variables in more than one input data set. In this case,
match-merging overwrites values of the same-named variable in the first data set with values of the
same-named variable in subsequent data sets. To prevent overwriting, use the RENAME= data set option
in the MERGE statement to rename variables.
Excluding Unmatched Observations
By default, match-merging combines all observations in all input data sets. However, you might want to
select only observations that match for two or more input data sets. To exclude unmatched observations,
use the IN= data set option and the subsetting IF statement in your DATA step. The IN= data set option
creates a variable to indicate whether the data set contributed data to the current observation. The
subsetting IF statement then checks the IN= values and writes to the merged data set only matching
observations.
Selecting Variables
- 428 -
You can specify the variables you want to drop or keep by using the DROP= and KEEP= data set options.
When match-merging, you can specify these options in either the DATA statement or the MERGE
statement, depending on whether or not you want to reference values of the variables in that DATA step.
When used in the DATA statement, the DROP= option simply drops the variables from the new data set.
However, they are still read from the original data set and are available within the DATA step.
Syntax
One-to-One Merging
LIBNAME libref 'SAS-data-library';
DATA output-SAS-data-set;
SET SAS-data-set-1;
SET SAS-data-set-2;
RUN;
Concatenating
DATA output-SAS-data-set;
SET SAS-data-set-1 SAS-data-set-2;
RUN;
Interleaving
PROC SORT DATA=SAS-data-set OUT=SAS-data-set;
BY variable(s);
RUN;
DATA output-SAS-data-set;
SET SAS-data-set-1 SAS-data-set-2;
BY variable(s);
RUN;
Match-Merging
PROC SORT DATA=SAS-data-set OUT=SAS-data-set;
BY variable(s);
RUN;
DATA output-SAS-data-set (DROP=variable(s) | KEEP=variable(s));
MERGE SAS-data-set-1 SAS-data-set-2
- 429 -
(RENAME=(old-variable-name=new-variable-name)
IN= variable DROP=variable(s) | KEEP=variable(s));
BY variable(s);
IF expression;
RUN;
Sample Programs
One-to-One Reading
data clinic.one2one;
set clinic.patients;
if age<60;
set clinic.measure;
run;
Concatenating
data clinic.concat;
set clinic.therapy1999 clinic.therapy2000;
run;
Interleaving
data clinic.intrleav;
set clinic.therapy1999 clinic.therapy2000;
by month;
run;
Match-Merging
data clinic.merged(drop=id);
merge clinic.demog(in=indemog
rename=(date=BirthDate))
clinic.visit(drop=weight in=invisit
rename=(date=VisitDate));
by id;
if indemog and invisit;
run;
Points to Remember
- 430 -
You can rename any number of variables in each occurrence of the RENAME= option.
In match-merging, the IN= data set option can apply to any data set in the MERGE statement. The RENAME=, DROP=, and
KEEP= options can apply to any data set in the DATA or MERGE statements.
Use the KEEP= option instead of the DROP= option if more variables are dropped than kept.
When you specify multiple data set options for a particular data set, enclose them in a single set of parentheses.
Chapter Quiz
Select the best answer for each question. After completing the quiz, check your answers using the answer
key in the appendix.
Which program will combine Brothers.One and Brothers.Two to produce Brothers.Three?
data brothers.three;
set brothers.one;
set brothers.two;
run;
data brothers.three;
set brothers.one brothers.two;
run;
data brothers.three;
set brothers.one brothers.two;
by varx;
run;
data brothers.three;
merge brothers.one brothers.two;
by varx;
run;
Which program will combine Actors.Props1 and Actors.Props2 to produce Actors.Props3?
- 431 -
data actors.props3;
set actors.props1;
set actors.props2;
run;
data actors.props3;
set actors.props1 actors.props2;
run;
data actors.props3;
set actors.props1 actors.props2;
by actor;
run;
data actors.props3;
merge actors.props1 actors.props2;
by actor;
run;
If you submit the following program, which new data set is created?
- 432 -
data work.jobsatis;
set work.dataone work.datatwo;
run;
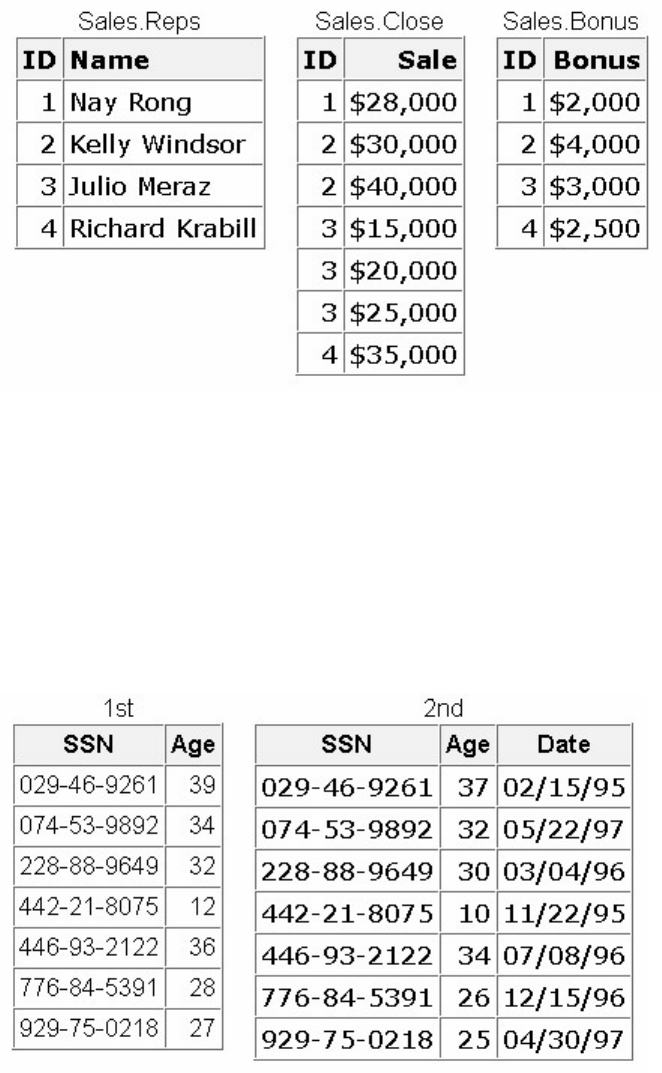
- 433 -
none of the above
If you concatenate the data sets below in the order shown, what is the value of Sale in observation 2 of the new data set?
missing
$30,000
$40,000
you cannot concatenate these data sets
What happens if you merge the following data sets by the variable SSN?
The values of Age in the 1st data set overwrite the values of Age in the 2nd data set.
The values of Age in the 2nd data set overwrite the values of Age in the 1st data set.
The DATA step fails because the two data sets contain same-named variables that have different values.
The values of Age in the 2nd data set are set to missing.
Suppose you merge data sets Health.Set1 and Health.Set2 below:
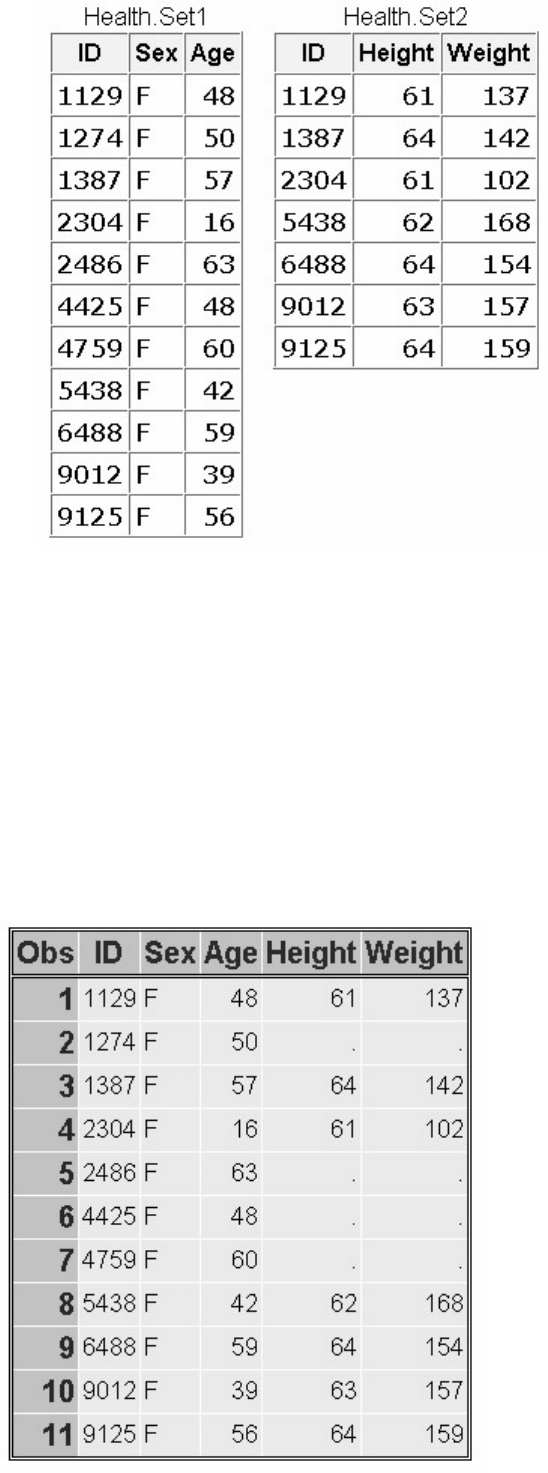
- 434 -
Which output does the following program create?
data work.merged;
merge health.set1(in=in1) health.set2(in=in2);
by id;
if in1 and in2;
run;
proc print data=work.merged;
run;
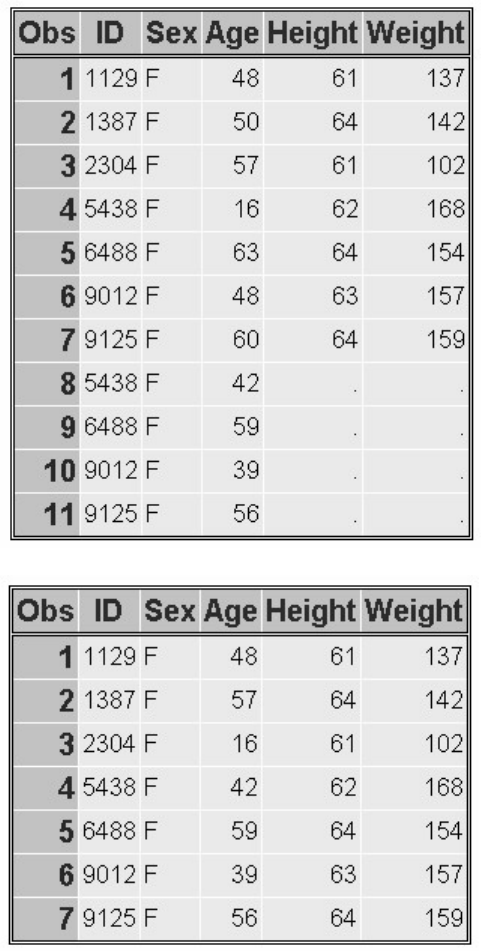
- 435 -
none of the above
The data sets Ensemble.Spring and Ensemble.Sum both contain a variable named Blue. How do you prevent the values of the
variable Blue from being overwritten when you merge the two data sets?
data ensemble.merged;
merge ensemble.spring(in=blue)
ensemble.summer;
by fabric;
run;
data ensemble.merged;
merge ensemble.spring(out=blue)
ensemble.summer;
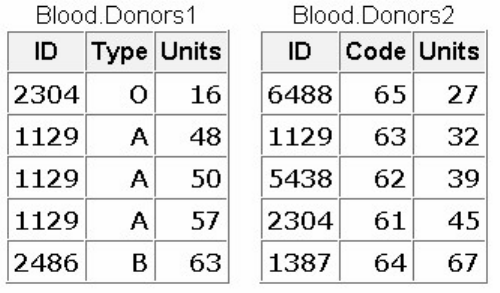
- 436 -
by fabric;
run;
data ensemble.merged;
merge ensemble.spring(blue=navy)
ensemble.summer;
by fabric;
run;
data ensemble.merged;
merge ensemble.spring(rename=(blue=navy))
ensemble.summer;
by fabric;
run;
What happens if you submit the following program to merge Blood.Donors1 and Blood.Donors2, shown below?
data work.merged;
merge blood.donors1 blood.donors2;
by id;
run
The Merged data set contains some missing values because not all observations have matching observations in the other data
set.
The Merged data set contains eight observations.
The DATA step produces errors.
Values for Units in Blood.Donors2 overwrite values of Units in Blood.Donors1.
If you merge Company.Staff1 and Company.Staff2 below by ID, how many observations does the new data set contain?
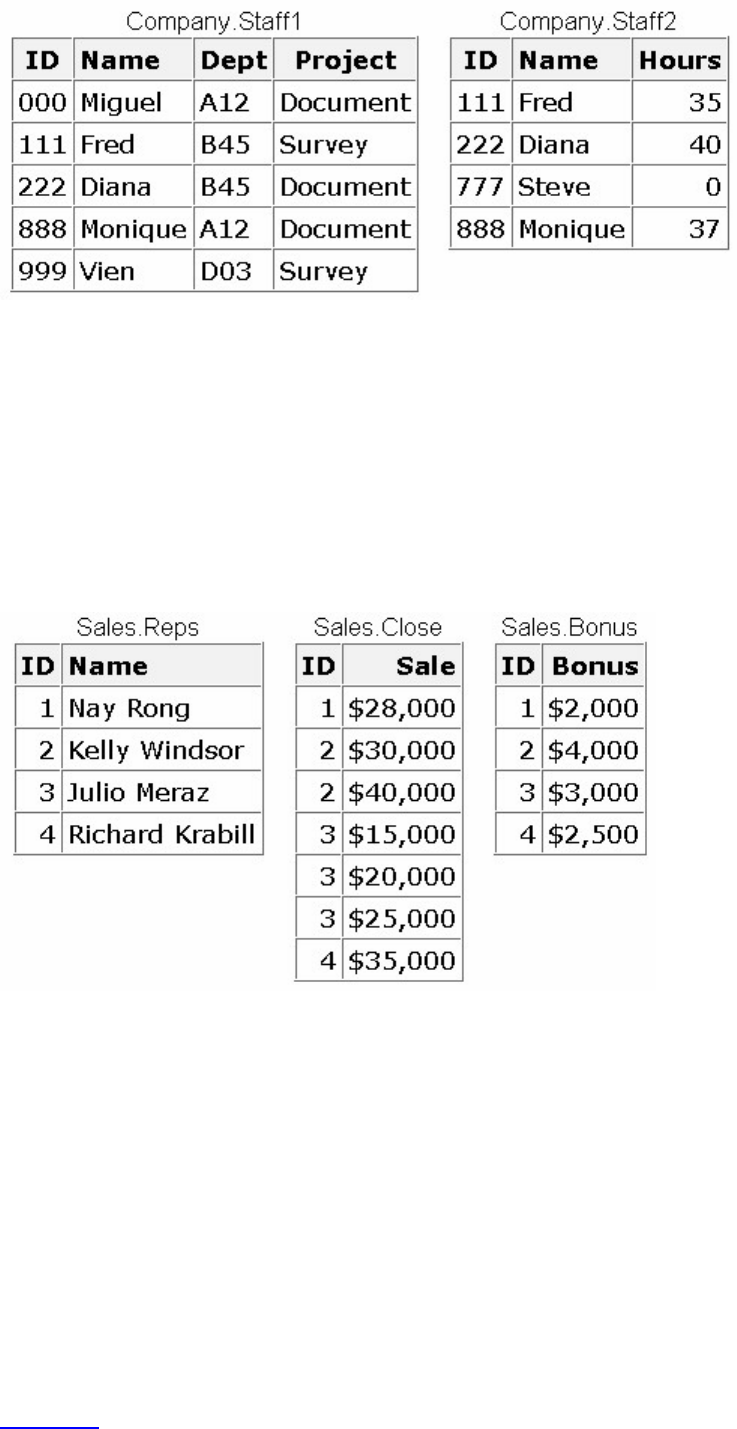
- 437 -
4
5
6
9
If you merge data sets Sales.Reps, Sales.Close, and Sales.Bonus by ID, what is the value of Bonus in the third observation in
the new data set?
$4,000
$3,000
missing
can't tell from the information given
Chapter 13 Transforming Data with SAS Functions
Overview

- 438 -
Understanding SAS Functions
General Form of SAS Functions
Converting Data with Functions
Manipulating SAS Date Values with Functions
Modifying Character Values with Functions
Modifying Numeric Values with Functions
Nesting SAS Functions
Chapter Summary
Chapter Quiz
Overview
Introduction
When planning modifications to SAS data sets, be sure to examine the many SAS functions that are
available. SAS functions are pre-written routines that provide programming shortcuts for many
calculations and manipulations of data.
This chapter teaches you how to use a variety of functions, such as those shown in the table below. You
learn to convert data from one data type to another, to work with SAS date and time values, and to
manipulate the values of character variables.
Selected SAS Functions and Their Descriptions
Function
Description
Form
Sample Value
YEAR
Extracts the year value from a SAS date value.
YEAR(date)
2002
QTR
Extracts the quarter value from a SAS date value.
QTR(date)
1
MONTH
Extracts the month value from a SAS date value.
MONTH(date)
12
DAY
Extracts the day value from a SAS date value.
DAY(date)
5
Objectives
- 439 -
In this chapter, you learn to
convert character data to numeric data
convert numeric data to character data
create SAS date values
extract the month, year, and interval from a SAS date value
perform calculations with date and datetime values and time intervals
extract, edit, and search the values of character variables
replace or remove all occurrences of a particular word within a character string.
Understanding SAS Functions
Overview
SAS functions are built-in routines that enable you to complete many types of data manipulations quickly
and easily. Generally speaking, functions provide programming shortcuts. There are many types of SAS
functions: arithmetic functions, financial functions, character functions, probability functions, and many
more.
SAS Function Catagories
Categories of SAS Functions
Array
Probability
Bitwise Logical Operations
Quantile
Character
Random Number
Character String Matching
Sample Statistics
Date and Time
SAS File I/O
Dynamic Link Library
Special
External Files
State and ZIP Code
- 440 -
Financial
Trigonometric
Hyperbolic
Truncation
Macro
Variable Control
Mathematical
Variable Information
MultiByte Character Set
Uses of SAS Functions
Using SAS functions, you can
calculate sample statistics
create SAS date values
convert U.S. ZIP codes to state postal codes
round values
generate random numbers
extract a portion of a character value
convert data from one data type to another.
This chapter concentrates on functions that
convert data
manipulate SAS date values
modify values of character variables.

- 441 -
However, be sure to explore the many other SAS functions, which are described in the SAS
documentation.
Example of a SAS Function
SAS functions can be used in DATA step programming statements. A SAS function can be specified
anywhere that you would use a SAS expression, as long as the function is part of a SAS statement.
Let's look at a simple example of a SAS function. The assignment statement below uses the MEAN
function to calculate the average of three exam scores that are stored in the variables Exam1, Exam2, and
Exam3.
AvgScore=mean(exam1,exam2,exam3);
When you reference a SAS function, the function returns a value that is based on the function arguments.
The MEAN function above contains three arguments: the variables Exam1, Exam2, and Exam3. The
function calculates the mean of the three variables that are listed as arguments.
Some functions require a specific number of arguments, whereas other functions can contain any number
of arguments. Some functions require no arguments.
General Form of SAS Functions
Arguments, Variable Lists, Arrays
To use a SAS function, specify the function name followed by the function arguments, which are enclosed
in parentheses.
General form, SAS function:
function-name(argument-1<,argument-n>);
where arguments can be
variables, mean(x,y,z)
constants, mean(456,502,612,498)
expressions, mean(37*2,192/5,mean(22,34,56))
Note: Even if the function does not require arguments, the function name must still be followed by
parentheses (for example, function-name()).
When a function contains more than one argument, the arguments are usually separated by commas.
function-name(argument-1,argument-2,argument-n)
However, for some functions, variable lists and arrays can also be used as arguments, as long as the list or
the array is preceded by the word OF. (You can learn about arrays in Processing Variables with Arrays.)
- 442 -
Example
Here is an example of a function that contains multiple arguments. Notice that the arguments are separated
by commas.
mean(x1,x2,x3)
The arguments for this function can also be written as a variable list.
mean(of x1-x3)
Or, the variables can be referenced by an array.
mean(of newarray{*})
When specifying function arguments with a variable list or an array, be sure to precede the list or the array
with the word OF. If you omit the word OF, the function arguments might not be interpreted as you expect.
For example, the function below returns X1 minus X3, not the average of the variables X1, X2, and X3.
mean(x1-x3)
Target Variables
Now that you are familiar with the purpose and general form of SAS functions, let's think about target
variables. A target variable is the variable to which the result of a function is assigned. For example, in the
statement below, the variable AvgScore is the target variable.
AvgScore=mean(exam1,exam2,exam3);
Unless the length of the target variable has been previously defined, a default length is assigned. The
default length depends on the function; the default for character functions can be as long as 200.
Default lengths could cause character variables to use more space than necessary in your data set. So,
when using SAS functions, consider the appropriate length for any character target variables. If necessary,
add a LENGTH statement to specify a length for the character target variable before the statement that
creates the values of that variable.
Converting Data with Functions
Introduction to Converting Data
Suppose you are asked to complete a number of modifications to the data set Hrd.Temp. The first
modification is to create a new variable that contains the salary of temporary employees. Examining the
data set, you realize that one of the variables needed to calculate salaries is the character variable PayRate.
To complete the calculation, you need to convert PayRate from character to numeric.

- 443 -
data hrd.newtemp;
set hrd.temp;
Salary=payrate*hours;
run;
In such cases, you should use the INPUT function before attempting the calculation. The INPUT function
converts character data values to numeric values. The PUT function converts numeric data values to
character values. Both functions are discussed in this section.
Potential Problems of Omitting INPUT or PUT
What happens if you skip the INPUT function or the PUT function when converting data?
SAS will detect the mismatched variables and will try an automatic character-to-numeric or
numeric-to-character conversion. However, this process doesn't always work. Suppose each value of
PayRate begins with a dollar sign ($). When SAS tries to automatically convert the values of PayRate to
numeric values, the dollar sign blocks the process. The values cannot be converted to numeric values.
Similar problems can occur with automatic numeric-to-character conversion.
Therefore, it is always best to include INPUT and PUT functions in your programs to avoid data type
mismatches and circumvent automatic conversion.
Automatic Character-to-Numeric Conversion
Let's begin with the automatic conversion of character values to numeric values.
By default, if you reference a character variable in a numeric context such as an arithmetic operation, SAS
tries to convert the variable values to numeric. For example, in the DATA step below, the character
variable PayRate appears in a numeric context. It is multiplied by the numeric variable Hours to create a
new variable named Salary.
data hrd.newtemp;
set hrd.temp;
Salary=payrate*hours;
run;
When this step executes, SAS automatically attempts to convert the character values of PayRate to
numeric values so that the calculation can occur. This conversion is completed by creating a temporary
numeric value for each character value of PayRate. This temporary value is used in the calculation. The
character values of PayRate are not replaced by numeric values.
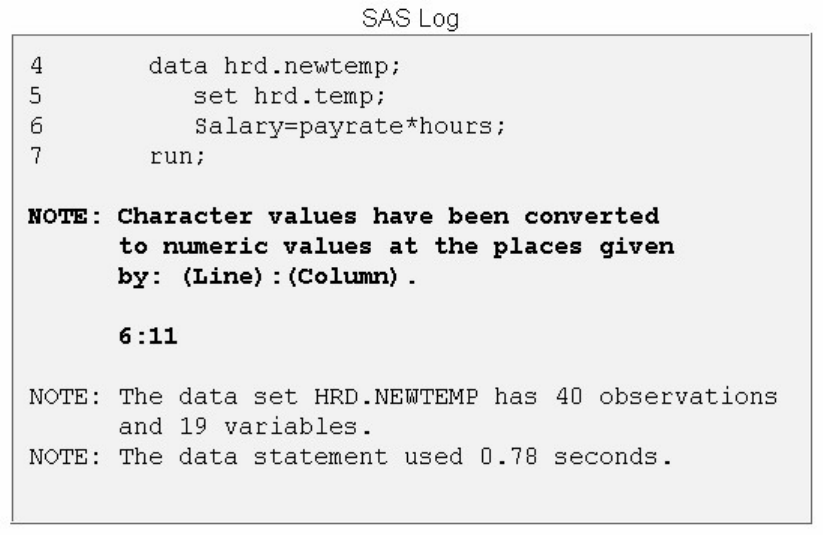
- 444 -
Whenever data is automatically converted, a message is written to the SAS log stating that the conversion
has occurred.
When Automatic Conversion Occurs
Automatic character-to-numeric conversion occurs when a character value is
assigned to a previously defined numeric variable, such as the numeric variable Rate
Rate=payrate;
used in an arithmetic operation
Salary=payrate*hours;
compared to a numeric value, using a comparison operator
if payrate>=rate;
specified in a function that requires numeric arguments.
NewRate=sum(payrate,raise);
The automatic conversion
uses the w. informat, where w is the width of the character value that is being converted
- 445 -
produces a numeric missing value from any character value that does not conform to standard numeric notation (digits with an
optional decimal point, leading sign or scientific notation).
Automatic Conversion of Character Variables
Character Value
automatic conversion
Numeric Value
12.47
→
12.47
-8.96
→
-8.96
1.243E1
→
12.43
1,742.64
→
.
Restriction for WHERE Expressions
The WHERE statement does not perform automatic conversions in comparisons. The simple program
below demonstrates what happens when a WHERE expression encounters the wrong data type. The
variable Number contains a numeric value, and the variable Character contains a character value, but the
two WHERE statements specify the wrong data type.
data work.convtest;
Number=4;
Character='4';
run;
proc print data=work.convtest;
where character=4;
run;
proc print data=work.convtest;
where number='4';
run;
This mismatch of character and numeric variables and values prevents the program from processing the
WHERE statements. Automatic conversion is not performed. Instead, the program stops, and error
messages are written to the SAS log.
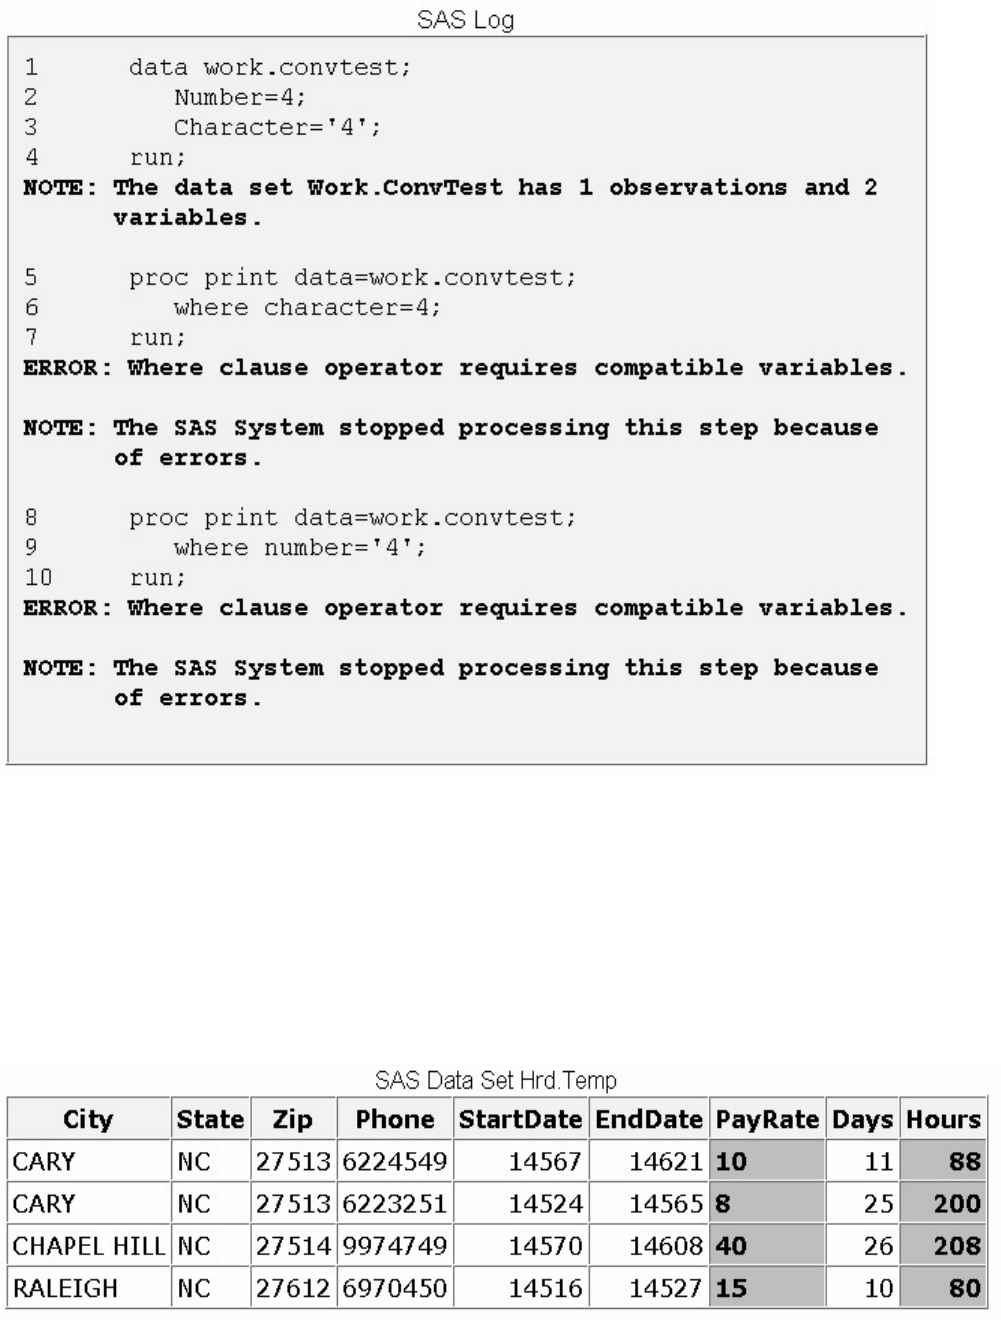
- 446 -
Explicit Character-to-Numeric Conversion
Using the INPUT Function
In order to avoid the problems we have seen, use the INPUT function to convert character data values to
numeric values. To learn how to use this function, let's examine one of the data set modifications needed
for Hrd.Temp. As mentioned earlier, you need to calculate employee salaries by multiplying the character
variable PayRate by the numeric variable Hours.
To calculate salaries, you write the following DATA step. It creates a new data set, Hrd.Newtemp, to
contain the original data plus the new variable Salary.
- 447 -
data hrd.newtemp;
set hrd.temp;
Salary=payrate*hours;
run;
However, you know that submitting this DATA step would cause an automatic character-to-numeric
conversion, because the character variable PayRate is used in a numeric context. You can explicitly
convert the character values of PayRate to numeric values by using the INPUT function.
General form, INPUT function:
INPUT(source,format)
where
r
ce indicates the character variable, constant, or expression to be converted to a numeric value
u
meric informat must also be specified, as in this example:
input(payrate,2.)
When choosing the informat, be sure to select a numeric informat that can read the form of the values.
Character Values and Associated Informats
Character Value
Informat
2115233
7.
2,115,233
COMMA9.
Example
Here's an example of the INPUT function:
Test=input(saletest,comma9.);
The function uses the numeric informat COMMA9. to read the values of the character variable SaleTest.
Then the resulting numeric values are stored in the variable Test.
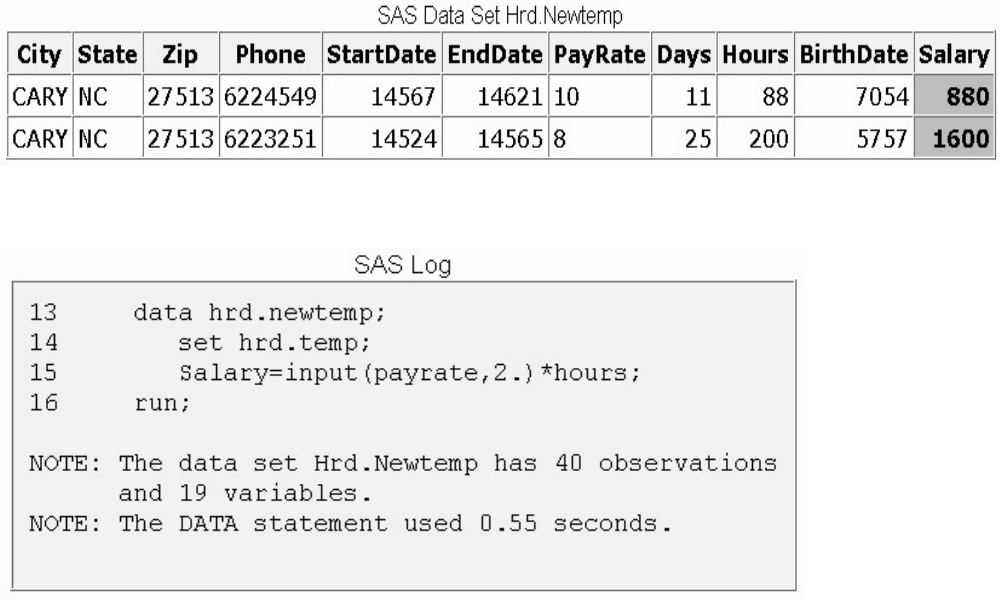
- 448 -
Now let's use the INPUT function to convert the character values of PayRate to numeric values.
You begin the function by specifying PayRate as the source.
Because PayRate has a length of 2, you choose the numeric informat 2. to read the values of the variable.
input(payrate,2.)
Finally, you add the function to the assignment statement in your DATA step.
data hrd.newtemp;
set hrd.temp;
Salary=input(payrate,2.)*hours;
run;
After the DATA step is executed, the new data set (which contains the variable Salary) is created.
Notice that no conversion messages appear in the SAS log when you use the INPUT function.
The form of the INPUT function is very similar to the form of the PUT function (which performs
numeric-to-character conversions).
INPUT(source,informat)
PUT(source,format))
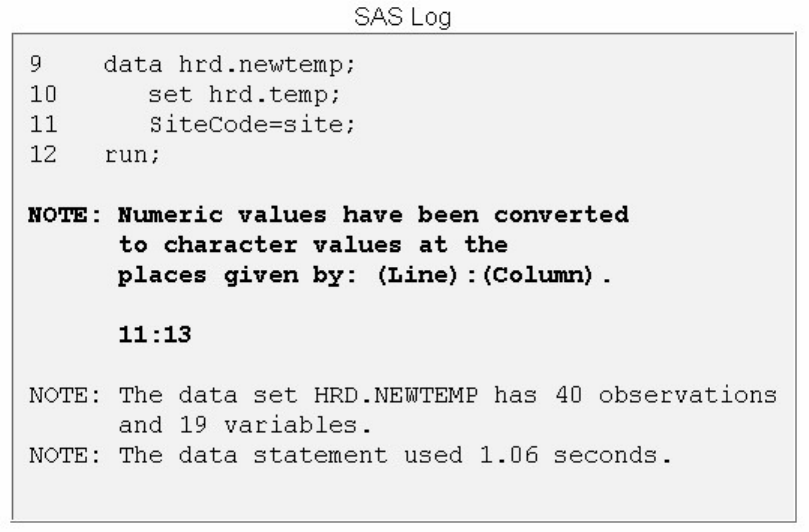
- 449 -
However, note that the INPUT function requires an informat, whereas the PUT function requires a format.
To remember which function requires a format versus an informat, note that the INPUT function requires
the informat.
Automatic Numeric-to-Character Conversion
The automatic conversion of numeric data to character data is very similar to character-to-numeric
conversion. Numeric data values are converted to character values whenever they are used in a character
context.
For example, the numeric values of the variable Site are converted to character values if you
assign the numeric value to a previously defined character variable, such as the character variable SiteCode: SiteCode=site;
use the numeric value with an operator that requires a character value, such as the concatenation operator: SiteCode=site||dept;
specify the numeric value in a function that requires character arguments, such as the SUBSTR function:
Region=substr(site,1,4);
Specifically, SAS writes the numeric value with the BEST12. format, and the resulting character value is
right-aligned. This conversion occurs before the value is assigned or used with any operator or function.
Automatic numeric-to-character conversion can cause unexpected results. For example, suppose the
original numeric value has fewer than 12 digits. The resulting character value will have leading blanks,
which might cause problems when you perform an operation or function.
Automatic numeric-to-character conversion also causes a message to be written to the SAS log indicating
that the conversion has occurred.
As we saw with the INPUT statement, it is best not to rely on automatic conversion. When you know that
numeric data must be converted to character data, perform an explicit conversion by including a PUT
function in your SAS program. We look at the PUT function in the next section.
Explicit Numeric-to-Character Conversion
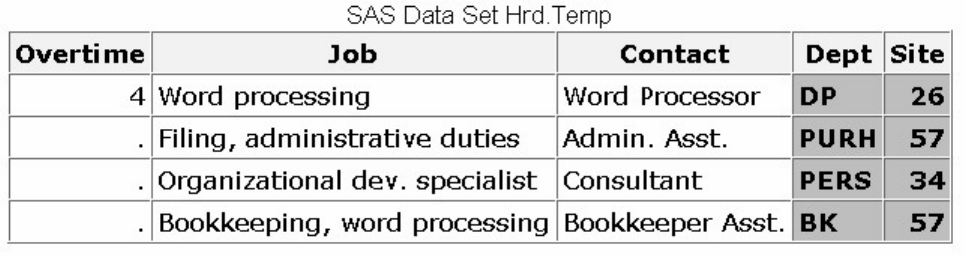
- 450 -
You can use the PUT function to explicitly convert numeric data values to character data values.
Let's use this function to complete one of the modifications needed for the data set Hrd.Temp. Suppose
you are asked to create a new character variable named Assignment that concatenates the values of the
numeric variable Site and the character variable Dept. The new variable values must contain the value of
Site followed by a slash (/) and then the value of Dept, for example, 26/DP. The following figure shows
selected variables from the Hrd.Temp data set.
You write an assignment statement that contains the concatenation operator (||) to indicate that Site should
be concatenated with Dept,using a slash as a separator. Note that the slash is enclosed in quotation marks.
All character constants must be enclosed in quotation marks.
data hrd.newtemp;
set hrd.temp;
Assignment=site||'/'||dept;
run;
You know that submitting this DATA step will cause SAS to automatically convert the numeric values of
Site to character values, because Site is used in a character context. The variable Site appears with the
concatenation operator, which requires character values. To explicitly convert the numeric values of Site to
character values, you must add the PUT function to your assignment statement.
General form, PUT function:
PUT(source,format)
where
r
ce indicates the numeric variable, constant, or expression to be converted to a character value
o
rmat matching the data type of the source must also be specified, as in this example:
put(site,2.)
e
PUT function always returns a character string.
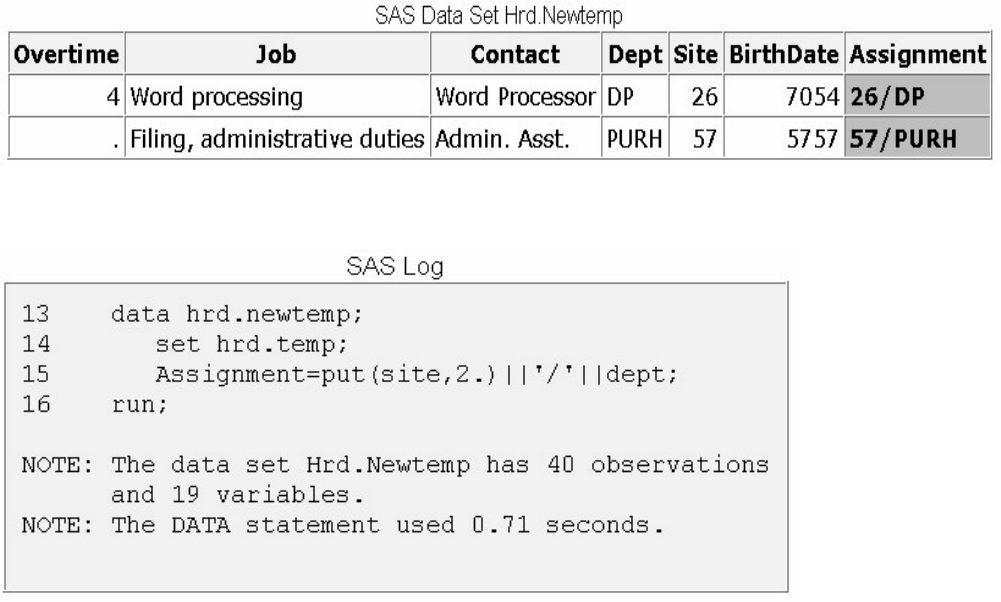
- 451 -
e
PUT function returns the source written with a format.
e
format must agree with the source in type.
m
eric formats right-align the result; character formats left-align the result.
y
ou use the PUT function to create a variable that has not been previously identified, it creates a character variable whose
length is equal to the format width.
Because you are listing a numeric variable as the source, you must specify a numeric format.
Now that you know the general form of the PUT function, you can rewrite the assignment statement in
your DATA step to explicitly convert the numeric values of Site to character values.
To perform this conversion, write the PUT function, specifying Site as the source. Because Site has a
length of 2, choose 2. as the numeric format. After you add this PUT function to the assignment statement,
the DATA step creates the new data set that contains Assignment.
data hrd.newtemp;
set hrd.temp;
Assignment=put(site,2.)||'/'||dept;
run;
Notice that no conversion messages appear in the SAS log when you use the PUT function.
Matching the Data Type
Remember that the format specified in the PUT function must match the data type of the source.
PUT(source,format)
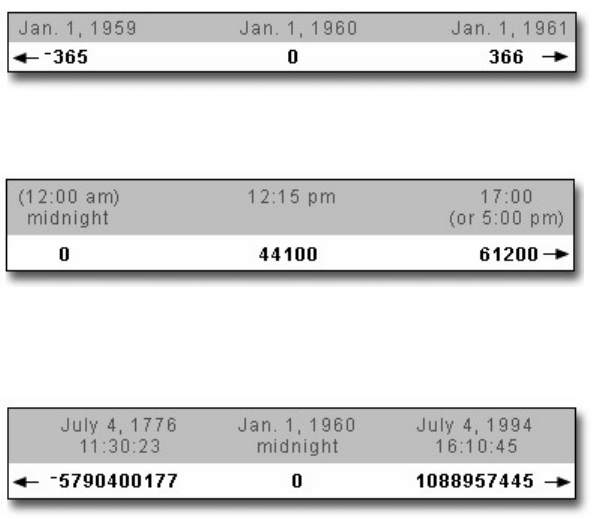
- 452 -
So, to do an explicit numeric-to-character data conversion, you specify a numeric source and a numeric
format. The form of the PUT function is very similar to the form of the INPUT function.
PUT(source,format)
INPUT(source,informat)
Note that the PUT function requires a format, whereas the INPUT function requires an informat. To
remember which function requires a format versus an informat, note that the INPUT function requires the
informat.
Manipulating SAS Date Values with Functions
SAS Date and Time Values
SAS includes a variety of functions that enable you to work with SAS date values. SAS stores a date value
as the number of days from January 1, 1960, to a given date. For example:
A SAS time value is stored as the number of seconds since midnight. For example:
Consequently, a SAS datetime value is stored as the number of seconds between midnight on January 1,
1960, and a given date and time. For example:
SAS stores date values as numbers so that you can easily sort the values or perform arithmetic
computations. You can use SAS date values as you use any other numeric values.
data test;
set hrd.temp;
TotDay=enddate-startdate;
run;
When you execute the program, TotDay has a value of 54 based on the StartDate and EndDate values in
the Hrd.Temp data set.
- 453 -
You can display SAS date values in a variety of forms by associating a SAS format with the values. The
format affects only the display of the dates, not the date values in the data set. For example, the FORMAT
statement below associates the DATE9. format with the variables StartDate and EndDate. A portion of the
output created by this PROC PRINT step appears below.
proc print data=hrd.temp;
format startdate enddate date9.;
run;
SAS date values are valid for dates that are based on the Gregorian calendar from A.D. 1582 through A.D.
20,000.
Use caution when working with historical dates. The Gregorian calendar was used throughout most of
Europe from 1582, but Great Britain and the American colonies did not adopt the calendar until 1752.
SAS Date Functions
SAS stores dates, times, and datetimes as numeric values. You can use several functions to create these
values.
Typical Use of SAS Date Functions
Function
Typical Use
Result
MDY
date=mdy(mon,day,yr);
SAS date
- 454 -
TODAYDATE
now=today();
now=date();
today's date as a SAS date
TIME
curtime=time();
current time as a SAS time
You use other functions to extract months, quarters, days, and years from SAS date values.
Selected Functions to Use with SAS Date Values
Function
Typical Use
Result
DAY
day=day(date);
day of month (1-31)
QTR
quarter=qtr(date);
quarter (1-4)
WEEKDAY
wkday=weekday(date);
day of week (1-7)
MONTH
month=month(date);
month (1-12)
YEAR
yr=year(date);
year (4 digits)
INTCK
x=intck('day',d1,d2);
x=intck('week',d1,d2);
x=intck('month',d1,d2);
x=intck('qtr',d1,d2);
x=intck('year',d1,d2);
days from D1 to D2
weeks from D1 to D2
months from D1 to D2
quarters from D1 to D2
years from D1 to D2
INTNX
x=intnx('interval',start-from,increment);
date, time, or datetime value
DATDIF
YRDIF
x=datdif(date1,date2,'ACT/ACT');
x=yrdif(date1,date2,'ACT/ACT');
days between date1 and date2
years between date1 and date2
- 455 -
In the following pages, you will see several SAS date functions, showing how they are used to both create
and extract date values.
YEAR, QTR, MONTH, and DAY Functions
Overview of YEAR, QTR, MONTH, and DAY Functions
Every SAS date value can be queried for the values of its year, quarter, month, and day. You extract these
values by using the functions YEAR, QTR, MONTH, and DAY. They each work the same way, so we'll
discuss them as a group.
General form, YEAR, QTR, MONTH, and DAY functions:
YEAR(date)
QTR(date)
MONTH(date)
DAY(date)
where date is a SAS date value that is specified either as a variable or as a SAS date constant. For more
information about SAS date constants, see the SAS documentation.
The YEAR function returns a four-digit numeric value that represents the year (for example, 2002). The
QTR function returns a value of 1, 2, 3, or 4 from a SAS date value to indicate the quarter of the year in
which a date value falls. The MONTH function returns a numeric value that ranges from 1 to 12,
representing the month of the year. The value 1 represents January, 2 represents February, and so on. The
DAY function returns a numeric value from 1 to 31, representing the day of the month. As you can see,
these functions are very similar in purpose and form.
Selected Date Functions and Their Uses
Function
Description
Form
Sample Value
YEAR
Extracts the year value from a SAS date value.
YEAR(date)
2002
QTR
Extracts the quarter value from a SAS date value
QTR(date)
1
MONTH
Extracts the month value from a SAS date value.
MONTH(date)
12
DAY
Extracts the day value from a SAS date value
DAY(date)
5
- 456 -
Example: Finding the Year and Month
Let's use the YEAR and MONTH functions to complete a simple task.
Suppose you need to create a subset of the data set Hrd.Temp that contains information about all
temporary employees who were hired in November 1999. Hrd.Temp contains the beginning and ending
dates for staff employment, but there are no month or year variables in the data set.
To determine the year in which employees were hired, you can apply the YEAR function to the variable
that contains the employee start date, StartDate. You write the YEAR function as
year(startdate)
Likewise, to determine the month in which employees were hired, you apply the MONTH function to
StartDate.
month(startdate)
To create the new data set, you include these functions in a subsetting IF statement within a DATA step.
The subsetting IF statement specifies that the new data set includes only observations in which the YEAR
function extracts a value of 1999 and the MONTH function extracts a value of 11 (for November).
data hrd.nov99;
set hrd.temp;
if year(startdate)=1999 and month(startdate)=11;
run;
Finally, you add a PROC PRINT step to the program so that you can view the new data set. Notice that the
PROC PRINT step includes a FORMAT statement to display the variables StartDate and EndDate with the
DATE9. format.
data hrd.nov99;
set hrd.temp;
if year(startdate)=1999 and month(startdate)=11;
proc print data=hrd.tempnov;
format startdate enddate date9.;
run;
- 457 -
Here is a portion of the PROC PRINT output that is created by your program. Notice that the new data set
contains information about only those employees who were hired in November 1999.
Example: Finding the Year
Now let's use the YEAR function to complete a task.
Suppose you need to create a subset of the data set Hrd.Temp that contains information about all
temporary employees who were hired during a specific year, such as 1998. Hrd.Temp contains the dates on
which employees began work with the company and their ending dates, but there is no year variable.
To determine the year in which employees were hired, you can apply the YEAR function to the variable
that contains the employee start date, StartDate. You write the YEAR function as
year(startdate)
Then, to create the new data set, you include this function in a subsetting IF statement within a DATA step.
This subsetting IF statement specifies that only observations in which the YEAR function extracts a value
of 1998 are placed in the new data set.
data hrd.temp98;
set hrd.temp;
if year(startdate)=1998;
run;
Finally, you add a PROC PRINT step to the program so that you can view the new data set. Notice that the
PROC PRINT step includes a FORMAT statement to display the variables StartDate and EndDate with the
DATE9. format.
data hrd.temp98;
set hrd.temp;

- 458 -
if year(startdate)=1998;
run;
proc print data=hrd.temp98;
format startdate enddate date9.;
run;
Here is a portion of the PROC PRINT output that is created by your program. Notice that the new data set
contains information for only those employees who were hired in 1998.
WEEKDAY Function
The WEEKDAY function enables you to extract the day of the week from a SAS date value.
General form, WEEKDAY function:
WEEKDAY(date)
where date is a SAS date value that is specified either as a variable or as a SAS date constant. For more
information about SAS date constants, see the SAS documentation.
The WEEKDAY function returns a numeric value from 1 to 7. The values represent the days of the week.
Values for the WEEKDAY Function
Value
equals
Day of the Week
1
=
Sunday
2
=
Monday
3
=
Tuesday
4
=
Wednesday
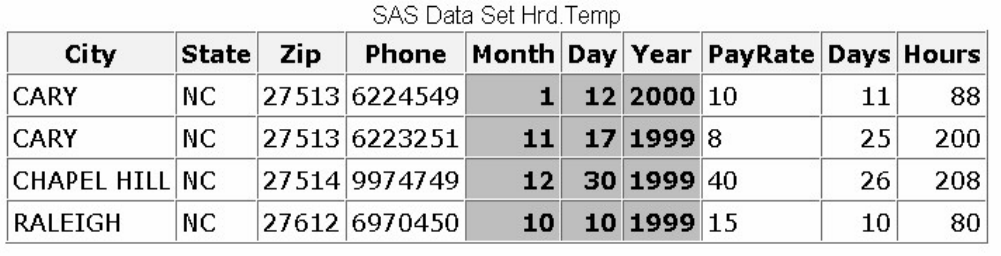
- 459 -
5
=
Thursday
6
=
Friday
7
=
Saturday
For example, suppose the data set Radio.Sch contains a broadcast schedule. The variable AirDate contains
SAS date values. To create a data set that contains only weekend broadcasts, you use the WEEKDAY
function in a subsetting IF statement. You include only observations in which the value of AirDate
corresponds to a Saturday or Sunday.
data radio.schwkend;
set radio.sch;
if weekday(airdate)in(1,7);
run;
Note: In the example above, the statement if weekday(airdate) in (1,7); is the same as if
weekday(airdate)=7 or weekday(airdate)=1;
MDY Function
Overview of MDY Function
The MDY function creates a SAS date value from numeric values that represent the month, day, and year.
For example, suppose the data set Hrd.Temp contains the employee start date in three numeric variables,
Month, Day, and Year.
Having the start date in three variables makes it difficult to perform calculations that are based on the
length of employment. You can convert these numeric values to useful SAS date values by applying the
MDY function.
General form, MDY function:
MDY(month,day,year)
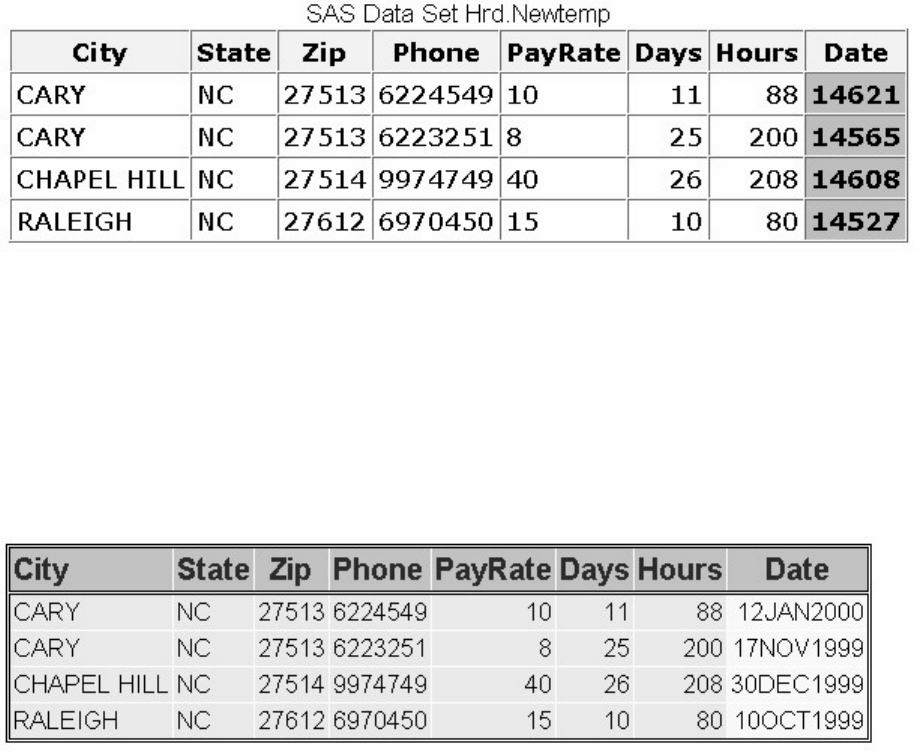
- 460 -
where
n
th can be a variable that represents the month, or a number from 1-12
y
can be a variable that represents the day, or a number from 1-31
r
can be a variable that represents the year, or a number that has 2 or 4 digits.
In the data set Hrd.Temp, the values for month, day, and year are stored in the numeric variables Month,
Day, and Year. You write the following MDY function to create the SAS date values:
mdy(month,day,year)
Then place this function in an assignment statement to create a new variable to contain the SAS date
values.
data hrd.newtemp(drop=month day year);
set hrd.temp;
Date=mdy(month,day,year);
run;
Here is the new data set that contains the variable Date.
Remember, to display SAS date values in a more readable form, you can associate a SAS format with the
values. For example, the FORMAT statement below associates the DATE9. format with the variable Date.
A portion of the output that is created by this PROC PRINT step appears below.
proc print data=hrd.newtemp;
format date date9.;
run;
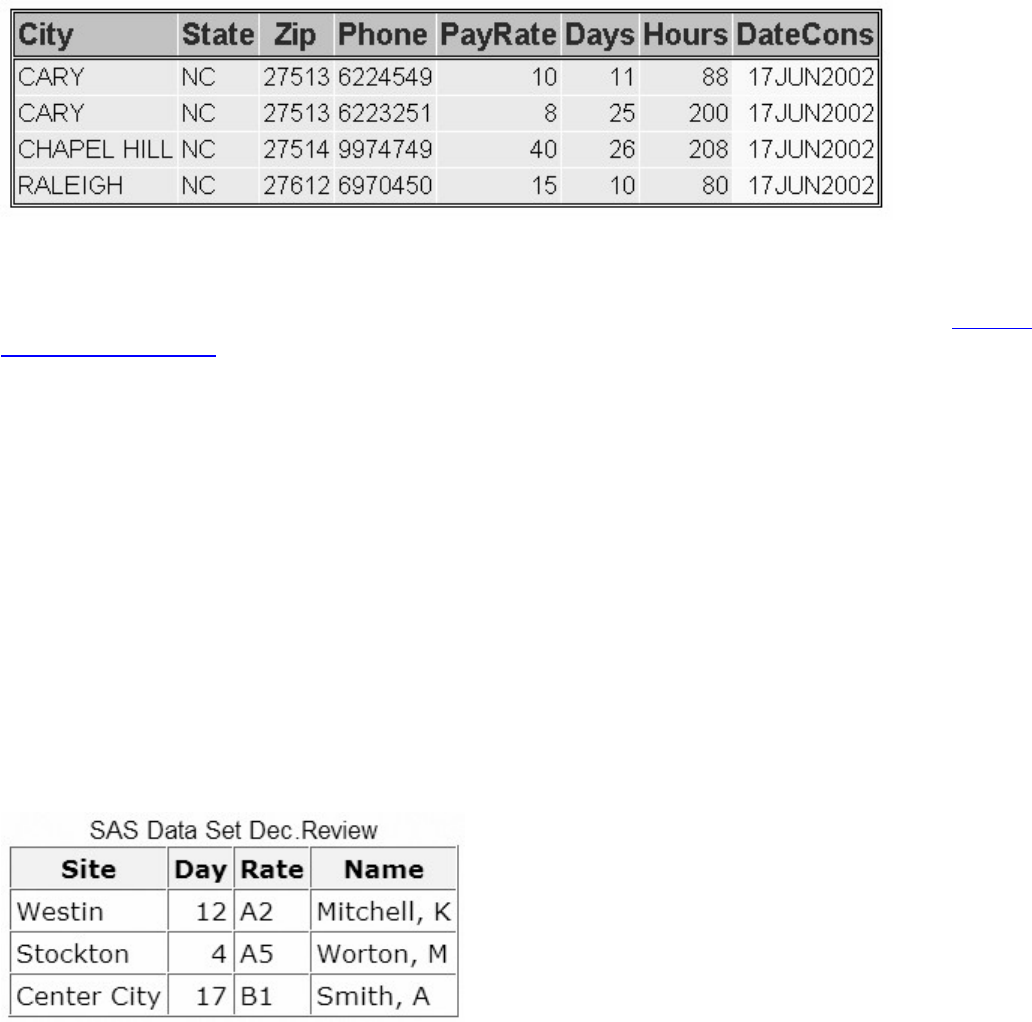
- 461 -
The MDY function can also add the same SAS date to every observation. This may be useful if you want
to compare a fixed beginning date with differing end dates. Just use numbers instead of data set variables
when providing values to the MDY function.
data hrd.newtemp;
set hrd.temp;
DateCons=mdy(6,17,2002);
proc print data=hrd.newtemp;
format datecons date9.;
run;
Note: Be careful when entering and formatting year values. The MDY function accepts two-digit values
for the year, but SAS interprets two-digit values according to the 100-year span that is set by the
YEARCUTOFF= system option. The default value of YEARCUTOFF= is 1920. For details, see Reading
Date and Time Values.
The use of four-digit year values in the MDY function is recommended:
MDY(5,10,20) = May 10, 1920
MDY(5,10,2020) = May 10, 2020
To display the years clearly, format SAS dates with the DATE9. format. This forces the year to appear
with four digits, as shown above in the Date and DateCons variables of your Hrd.Newtemp output.
Example: Finding the Date
Let's look at another example of the MDY function. The data set Dec.Review contains a variable named
Day. This variable contains the day of the month for each employee's performance appraisal. The
appraisals were all completed in December of 2010.
The following DATA step uses the MDY function to create a new variable named ReviewDate. This
variable contains the SAS date value for the date of each performance appraisal.
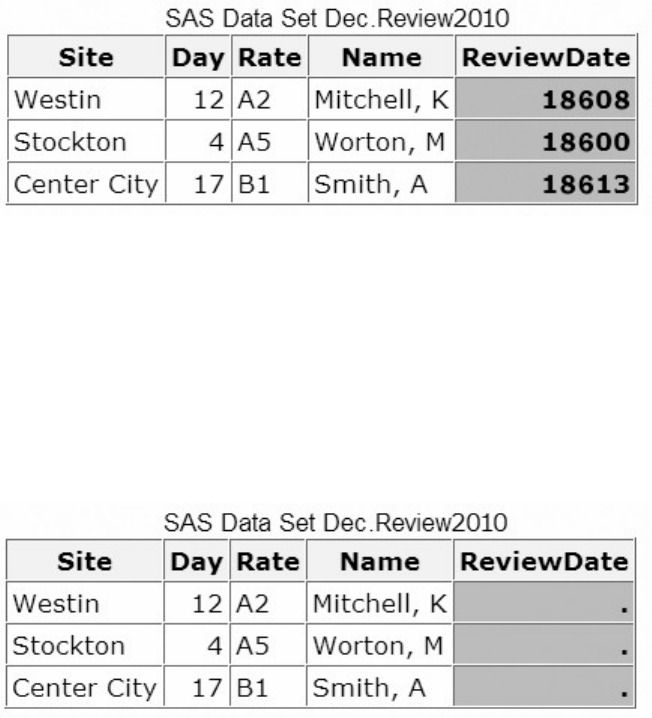
- 462 -
data dec.review2010;
set dec.review;
ReviewDate=mdy(12,day,2010);
run;
Note: If you specify an invalid date in the MDY function, SAS assigns a missing value to the target
variable.
data dec.review2010;
set dec.review;
ReviewDate=mdy(15,day,2010);
run;
DATE and TODAY Functions
The DATE and TODAY functions return the current date from the system clock as a SAS date value. The
DATE and TODAY functions have the same form and can be used interchangeably.
General form, DATE and TODAY functions:
DATE()
TODAY()
These functions require no arguments, but they must still be followed by parentheses.
Let's add a new variable, which contains the current date, to the data set Hrd.Temp. To create this variable,
write an assignment statement such as the following:
EditDate=date();
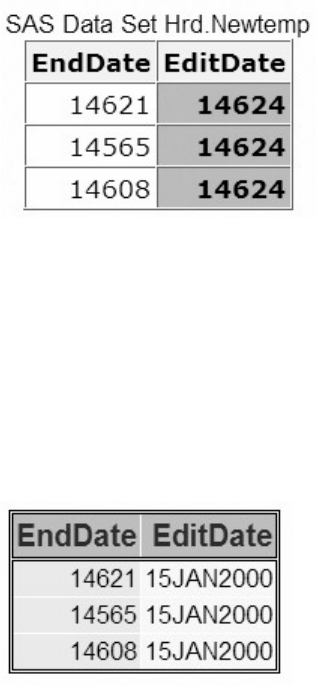
- 463 -
After this statement is added to a DATA step and the step is submitted, the data set that contains EditDate
is created.
data hrd.newtemp;
set hrd.temp;
EditDate=date();
run;
Note: For this example, the SAS date values shown below were created by submitting this program on
January 15, 2000.
Remember, to display these SAS date values in a different form, you can associate a SAS format with the
values. For example, the FORMAT statement below associates the DATE9. format with the variable
EditDate. A portion of the output that is created by this PROC PRINT step appears below.
proc print data=hrd.newtemp;
format editdate date9.;
run;
INTCK Function
Overview of INTCK Function
The INTCK function returns the number of time intervals that occur in a given time span. You can use it to
count the passage of days, weeks, months, and so on.
General form, INTCK function:
INTCK('interval',from,to)
- 464 -
where
e
rval
'
specifies a character constant or variable. The value can be one of the following:
AY
E
EKDAY
E
EK
N
DAY
M
IMONTH
O
NTH
R
M
IYEAR
A
R
m
specifies a SAS date, time, or datetime value that identifies the beginning of the time span.
p
ecifies a SAS date, time, or datetime value that identifies the end of the time span.
The type of interval (date, time, or datetime) must match the type of value in from.
The INTCK function counts intervals from fixed interval beginnings, not in multiples of an interval unit
from the from value. Partial intervals are not counted. For example, WEEK intervals are counted by
Sundays rather than seven-day multiples from the from argument. MONTH intervals are counted by day 1
of each month, and YEAR intervals are counted from 01JAN, not in 365-day multiples.
Consider the results in the following table. The values that are assigned to the variables Weeks, Months,
and Years are based on consecutive days.
Examples of SAS Statements and Their Values
SAS Statement
Value
Weeks=intck('week','31dec2000'd,'01jan2001'd);
0
Months=intck('month','31dec2000'd,'01jan2001'd);
1
Years=intck('year','31dec2000'd,'01jan2001'd);
1
- 465 -
Because December 31, 2000, is a Sunday, no WEEK interval is crossed between that day and January 1,
2001. However, both MONTH and YEAR intervals are crossed.
Examples
The following statement creates the variable Years and assigns it a value of 2. The INTCK function
determines that 2 years have elapsed between June 15, 1999, and June 15, 2001.
Years=intck('year','15jun1999'd,'15jun2001'd);
As shown here, the from and to dates are often specified as date constants.
Likewise, the following statement assigns the value 24 to the variable Months.
Months=intck('month','15jun1999'd,'15jun2001'd);
However, the following statement assigns 0 to the variable Years, even though 364 days have elapsed. In
this case the YEAR boundary (01JAN) is not crossed.
Years=intck('year','01jan2002'd,'31dec2002'd);
Example: The INTCK Function
A common use of the INTCK function is to identify periodic events such as due dates and anniversaries.
The following program identifies mechanics whose 20th year of employment occurs in the current month.
It uses the INTCK function to compare the value of the variable Hired to the date on which the program is
run.
data work.anniv20;
set flights.mechanics(keep=id lastname firstname hired);
Years=intck('year',hired,today());
if years=20 and month(hired)=month(today());
run;
proc print data=work.anniv20;
title '20-Year Anniversaries This Month';
run;
The following output is created when the program is run in December of 1999.
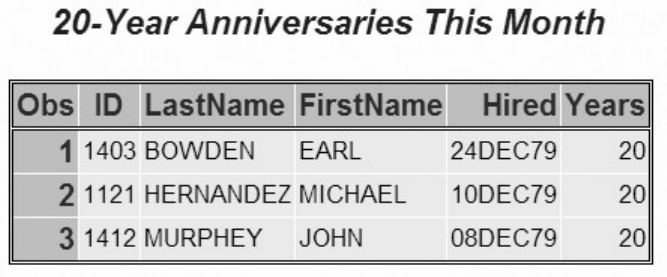
- 466 -
INTNX Function
The INTNX function is similar to the INTCK function. The INTNX function applies multiples of a given
interval to a date, time, or datetime value and returns the resulting value. You can use the INTNX function
to identify past or future days, weeks, months, and so on.
General form, INTNX function:
INTNX('interval',start-from,increment<,'alignment'>)
where
e
rval
'
specifies a character constant or variable.
r
t-from specifies a starting SAS date, time, or datetime value
r
ement specifies a negative or positive integer that represents time intervals toward the past or future
g
nment
'
(optional) forces the alignment of the returned date to the beginning, middle, or end of the interval.
The type of interval (date, time, or datetime) must match the type of value in start-from and increment.
When you specify date intervals, the value of the character constant or variable that is used in interval can
be one of the following:
DAY
WEEKDAY
WEEK
TENDAY
SEMIMONTH
MONTH
QTR
SEMIYEAR
YEAR
DATETIME
- 467 -
TIME
For example, the following statement creates the variable TargetYear and assigns it a SAS date value of
13515, which corresponds to January 1, 1997.
TargetYear=intnx('year','05feb94'd,3);
Likewise, the following statement assigns the value for the date July 1, 2001, to the variable TargetMonth.
TargetMonth=intnx('semiyear','01jan2001'd,1);
As you know, SAS date values are based on the number of days since January 1, 1960. Yet the INTNX
function can use intervals of weeks, months, years, and so on. What day should be returned when these
larger intervals are used?
That's the purpose of the optional alignment value: it lets you specify whether the returned value should
be at the beginning, middle, or end of the interval. When specifying date alignment in the INTNX function,
use the following values or their corresponding aliases:
BEGINNING Alias: B
MIDDLE Alias:M
END Alias:E
SAME Alias: SAMEDAY or S
The best way to understand the alignment option is to see its effect on identical statements. The following
table shows the results of three INTNX statements that differ only in the value of alignment.
Alignment Values for the INTNX Function
SAS Statement
Date Value
MonthX=intnx('month','01jan1995'd,5,'b');
12935 (June 1, 1995)
MonthX=intnx('month','01jan1995'd,5,'m');
12949 (June 15, 1995)
MonthX=intnx('month','01jan1995'd,5,'e');
12964 (June 30, 1995)
These INTNX statements count five months from January, but the returned value depends on whether
alignment specifies the beginning, middle, or end day of the resulting month. If alignment is not specified,
the beginning day is returned by default.
- 468 -
DATDIF and YRDIF Functions
The DATDIF and YRDIF functions calculate the difference in days and years between two SAS dates,
respectively. Both functions accept start dates and end dates that are specified as SAS date values. Also,
both functions use a basis argument that describes how SAS calculates the date difference.
General form, DATDIF and YRDIF functions:
DATDIF(start_date,end_date,basis))
YRDIF(start_date,end_date,basis))
where
r
t_date specifies the starting date as a SAS date value
d
_date specifies the ending date as a SAS date value
is specifies a character constant or variable that describes how SAS calculates the date difference.
There are two character strings that are valid for basis in the DATDIF function and four character strings
that are valid for basis in the YRDIF function. These character strings and their meanings are listed in the
table below.
Character Strings in the DATDIF Function
Character
String
Meaning
Valid in
DATDIF
Valid in
YRDIF
'30/360'
specifies a 30 day month and a 360 day year
yes
yes
'ACT/ACT'
uses the actual number of days or years between dates
yes
yes
'ACT/360'
uses the actual number of days between dates in calculating
the number of years (calculated by the number of days divided
by 360)
no
yes
'ACT/365'
uses the actual number of days between dates in calculating
the number of years (calculated by the number of days divided
by 365)
no
yes
The best way to understand the different options for the basis argument is to see the different effects that
they have on the value that the function returns. The table below lists four YRDIF functions that use the

- 469 -
same start_date and end_date. Each function uses one of the possible values for basis, and each one returns
a different value.
Examples of the YRDIF Function
YRDIF Statement
Returned Value
yrdif('16oct1998'd,'16feb2003'd,'30/360')
4.333333333
yrdif('16oct1998'd,'16feb2003'd,'ACT/ACT')
4.3369863014
yrdif('16oct1998'd,'16feb2003'd,'ACT/360')
4.4
yrdif('16oct1998'd,'16feb2003'd,'ACT/365')
4.3397260274
Modifying Character Values with Functions
Introduction to Modifying Character Values
This section teaches you how to use SAS functions to manipulate the values of character variables. After
completing this section, you will be able to
replace the contents of a character value
trim trailing blanks from a character value
search a character value and extract a portion of the value
convert a character value to uppercase or lowercase.
To begin, let's look at some of the modifications that need to be made to the character variables in
Hrd.Temp. These modifications include
separating the values of one variable into multiple variables
replacing a portion of a character variable's values
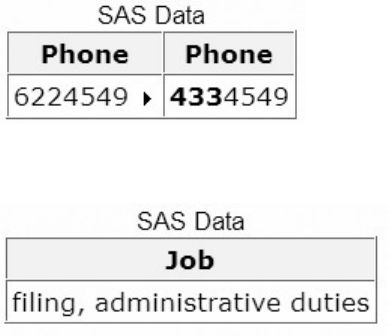
- 470 -
searching for a specific string within a variable's values.
Character Functions
The character functions listed below can help you complete these tasks. You will learn about these
functions as you continue this chapter.
Selected Character Functions
Function
Purpose
SCAN
returns a specified word from a character value.
SUBSTR
extracts a substring or replaces character values.
TRIM
trims trailing blanks from character values.
CATX
concatenates character strings, removes leading and trailing blanks, and inserts
separators.
INDEX
searches a character expression for a string of characters, and returns the position of the
string's first character for the first occurrence of the string.
FIND
searches for a specific substring of characters within a character string.
UPPERCASE
converts all letters in a value to uppercase.
LOWCASE
converts all letters in a value to lowercase.
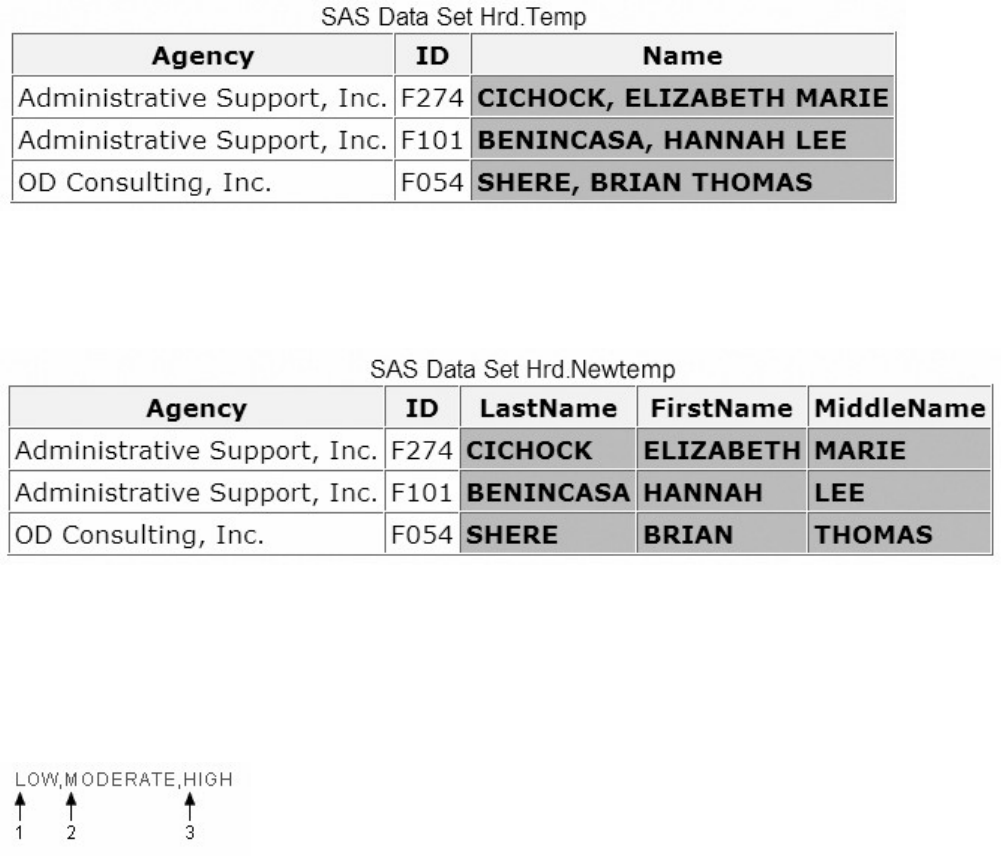
- 471 -
PROPCASE converts all letters in a value to proper case.
TRANWRD
replaces or removes all occurrences of a pattern of characters within a character string.
SCAN Function
The SCAN function enables you to separate a character value into words and to return a specified word.
Let's look at the following example to see how the SCAN function works.
The data set Hrd.Temp stores the names of temporary employees in the variable Name. The Name variable
contains the employees' first, middle, and last names.
However, suppose you want to separate the value of Name into three variables: one variable to store the
first name, one to store the middle name, and one to store the last name. You can use the SCAN function to
create these new variables.
Specifying Delimiters
The SCAN function uses delimiters, which are characters that are specified as word separators, to separate
a character string into words. For example, if you are working with the character string below and you
specify the comma as a delimiter, the SCAN function separates the string into three words.
Then the function returns whichever word you specify. In this example, if you specify the third word, the
SCAN function returns the word HIGH.
Here's another example. Once again, let's use the comma as a delimiter, and specify that the third word be
returned.

- 472 -
209 RADCLIFFE ROAD, CENTER CITY, NY, 92716
In this example, if you specify the third word, the word returned by the SCAN function is NY ( NY
contains a leading blank).
Specifying Multiple Delimiters
When using the SCAN function, you can specify as many delimiters as needed to correctly separate the
character expression. When you specify multiple delimiters, SAS uses any of the delimiters, singly or in
any combination, as word separators. For example, if you specify both the slash and the hyphen as
delimiters, the SCAN function separates the following text string into three words:
The SCAN function treats two or more contiguous delimiters, such as the parenthesis and slash below, as
one delimiter. Also, leading delimiters have no effect.
Default Delimiters
If you do not specify delimiters when using the SCAN function, default delimiters are used. The default
delimiters are
blank . < ( + | & ! $ * ) ; ^ - / , %
SCAN Function Syntax
Now that you are familiar with how the SCAN function works, let's examine the syntax of the function.
General form, SCAN function:
SCAN(argument,n<,delimiters>)
where
u
ment specifies the character variable or expression to scan.
p
ecifies which word to return.
i
miters are special characters that must be enclosed in single quotation marks (' '). If you do not specify delimiters, default
delimiters are used.
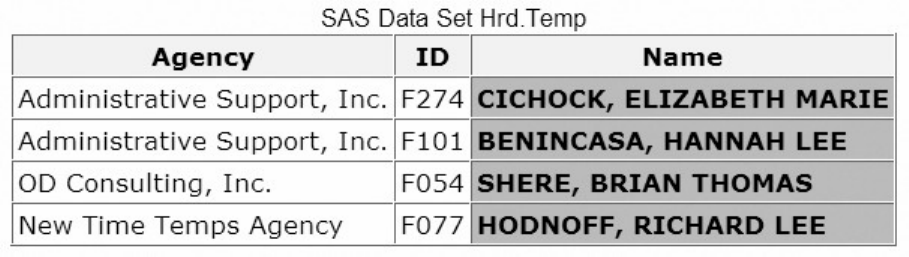
- 473 -
Use the SCAN function to create your new name variables for Hrd.Temp. To begin, examine the values of
the existing Name variable to determine which characters separate the names in the values. Notice that
blanks and commas appear between the names and that the employee's last name appears first, then the
first name, and then the middle name.
To create the LastName variable to store the employee's last name, you write an assignment statement that
contains the following SCAN function:
LastName=scan(name,1,' ,');
Note that a blank and a comma are specified as delimiters. You can also write the function without listing
delimiters, because the blank and comma are default delimiters.
LastName=scan(name,1);
The complete DATA step that is needed to create LastName, FirstName, and MiddleName appears below.
Notice that the original Name variable is dropped from the new data set.
data hrd.newtemp(drop=name);
set hrd.temp;
LastName=scan(name,1);
FirstName=scan(name,2);
MiddleName=scan(name,3);
run;
Specifying Variable Length
Note that the SCAN function assigns a length of 200 to each target variable. (Remember, a target variable
is the variable that receives the result of the function.) So, if you submit the DATA step above, the
LastName, FirstName, and MiddleName variables are each assigned a length of 200. This length is longer
than necessary for these variables.
To save storage space, add a LENGTH statement to your DATA step, and specify an appropriate length
for all three variables. Because SAS sets the length of a new character variable the first time it is
encountered in the DATA step, be sure to place the LENGTH statement before the assignment statements
that contain the SCAN function.
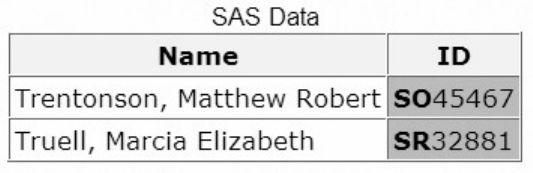
- 474 -
data hrd.newtemp(drop=name);
set hrd.temp;
length LastName FirstName MiddleName $ 10;
lastname=scan(name,1);
firstname=scan(name,2);
middlename=scan(name,3);
run;
SCAN versus SUBSTR
The SUBSTR function is similar to the SCAN function. Let's briefly compare the two. Both the SCAN and
SUBSTR functions can extract a substring from a character value:
SCAN extracts words within a value that is marked by delimiters.
SUBSTR extracts a portion of a value by starting at a specified location.
The SUBSTR function is best used when you know the exact position of the string that you want to extract
from the character value. The string does not need to be marked by delimiters. For example, the first two
characters of the variable ID identify the class level of college students. The position of these characters
does not vary within the values of ID.
The SUBSTR function is the best choice to extract class level information from ID. By contrast, the SCAN
function is best used when
you know the order of the words in the character value
the starting position of the words varies
the words are marked by some delimiter.
SUBSTR Function
The SUBSTR function can be used to
extract a portion of a character value
replace the contents of a character value.
Let's begin with the task of extracting a portion of a value. In the data set Hrd.Newtemp, the names of
temporary employees are stored in three name variables: LastName, FirstName, and MiddleName.
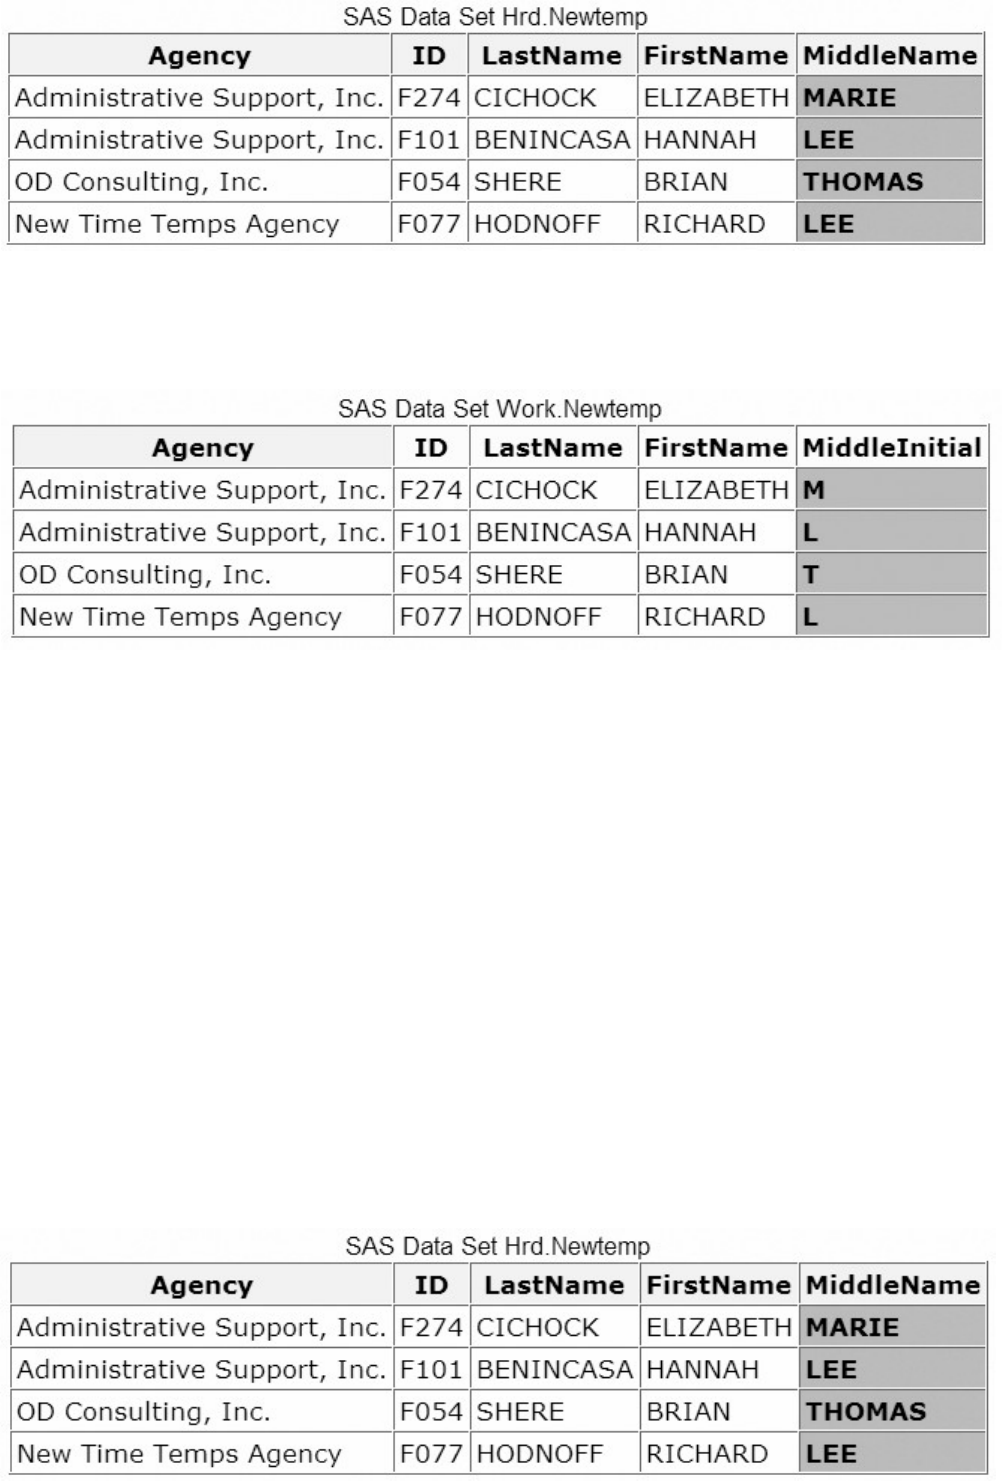
- 475 -
However, suppose you want to modify the data set to store only the middle initial instead of the full middle
name. To do so, you must extract the first letter of the middle name values and assign these values to the
new variable MiddleInitial.
The SUBSTR function enables you to extract any number of characters from a character string, starting at
a specified position in the string.
General form, SUBSTR function:
SUBSTR(argument,position <,n>)
where
u
ment specifies the character variable or expression to scan.
ition is the character position to start from.
p
ecifies the number of characters to extract. If n is omitted, all remaining characters are included in the substring.
Using the SUBSTR function, you can extract the first letter of the MiddleName value to create the new
variable MiddleInitial.
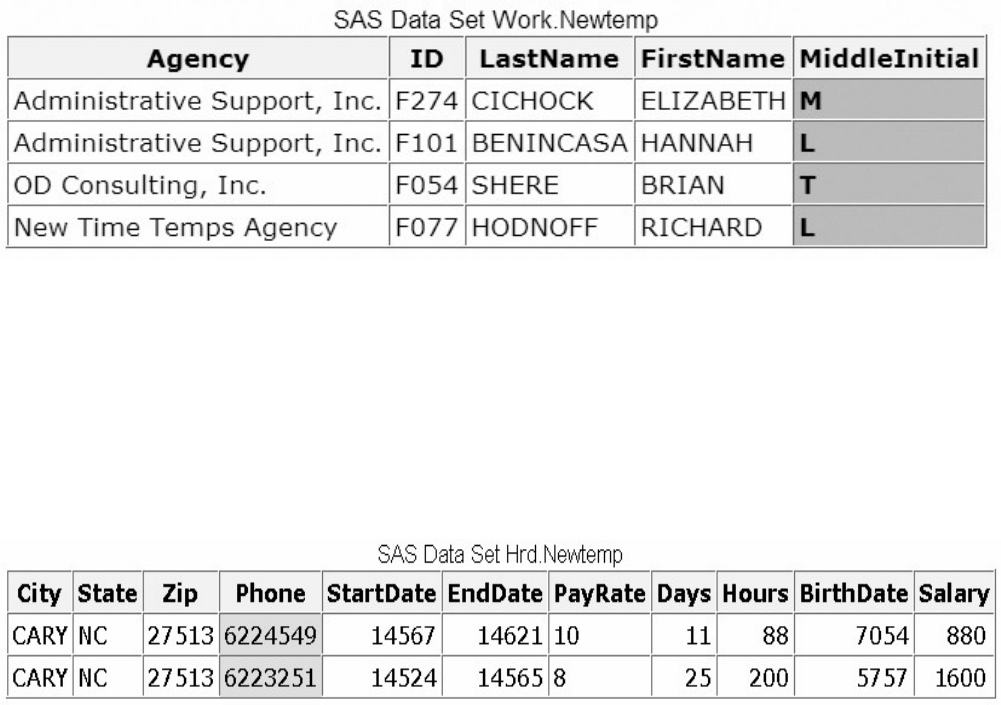
- 476 -
You write the SUBSTR function as:
substr(middlename,1,1)
This function extracts a character string from the value of MiddleName. The string to be extracted begins
in position 1 and contains one character. Then, you place this function in an assignment statement in your
DATA step.
data work.newtemp(drop=middlename);
set hrd.newtemp;
length MiddleInitial $ 1;
MiddleInitial=substr(middlename,1,1);
run;
The new MiddleInitial variable is given the same length as MiddleName. The MiddleName variable is then
dropped from the new data set.
You can use the SUBSTR function to extract a substring from any character value if you know the position
of the value.
Replacing Text Using SUBSTR
There is a second use for the SUBSTR function. This function can also be used to replace the contents of a
character variable. For example, suppose the local phone exchange 622 was replaced by the exchange 433.
You need to update the character variable Phone in Hrd.Temp to reflect this change.
You can use the SUBSTR function to complete this modification. The syntax of the SUBSTR function,
when used to replace a variable's values, is identical to the syntax for extracting a substring.
SUBSTR(
argument
,
position
,
n
)
- 477 -
However, in this case,
the first argument specifies the character variable whose values are to be modified.
the second argument specifies the position at which the replacement is to begin.
the third argument specifies the number of characters to replace. If n is omitted, all remaining characters are replaced.
Positioning the SUBSTR Function
SAS uses the SUBSTR function to extract a substring or to modify a variable's values, depending on the
position of the function in the assignment statement.
When the function is on the right side of an assignment statement, the function returns the requested string.
MiddleInitial=substr(middlename,1,1);
But if you place the SUBSTR function on the left side of an assignment statement, the function is used to
modify variable values.
substr(region,1,3)='NNW';
When the SUBSTR function modifies variable values, the right side of the assignment statement must
specify the value to place into the variable. For example, to replace the fourth and fifth characters of a
variable named Test with the value 92, you write the following assignment statement:
substr(test,4,2)='92';
Test Test
S7381K2 → S7392K2
S7381K7 → S7392K7
Now let's use the SUBSTR function to replace the 622 exchange in the variable Phone. You begin by
writing this assignment statement:
data hrd.temp2;
set hrd.temp;
substr(phone,1,3)='433';
run;
} ijnu8
This statement specifies that the new exchange 433 should be placed in the variable Phone, starting at
character position 1 and replacing three characters.
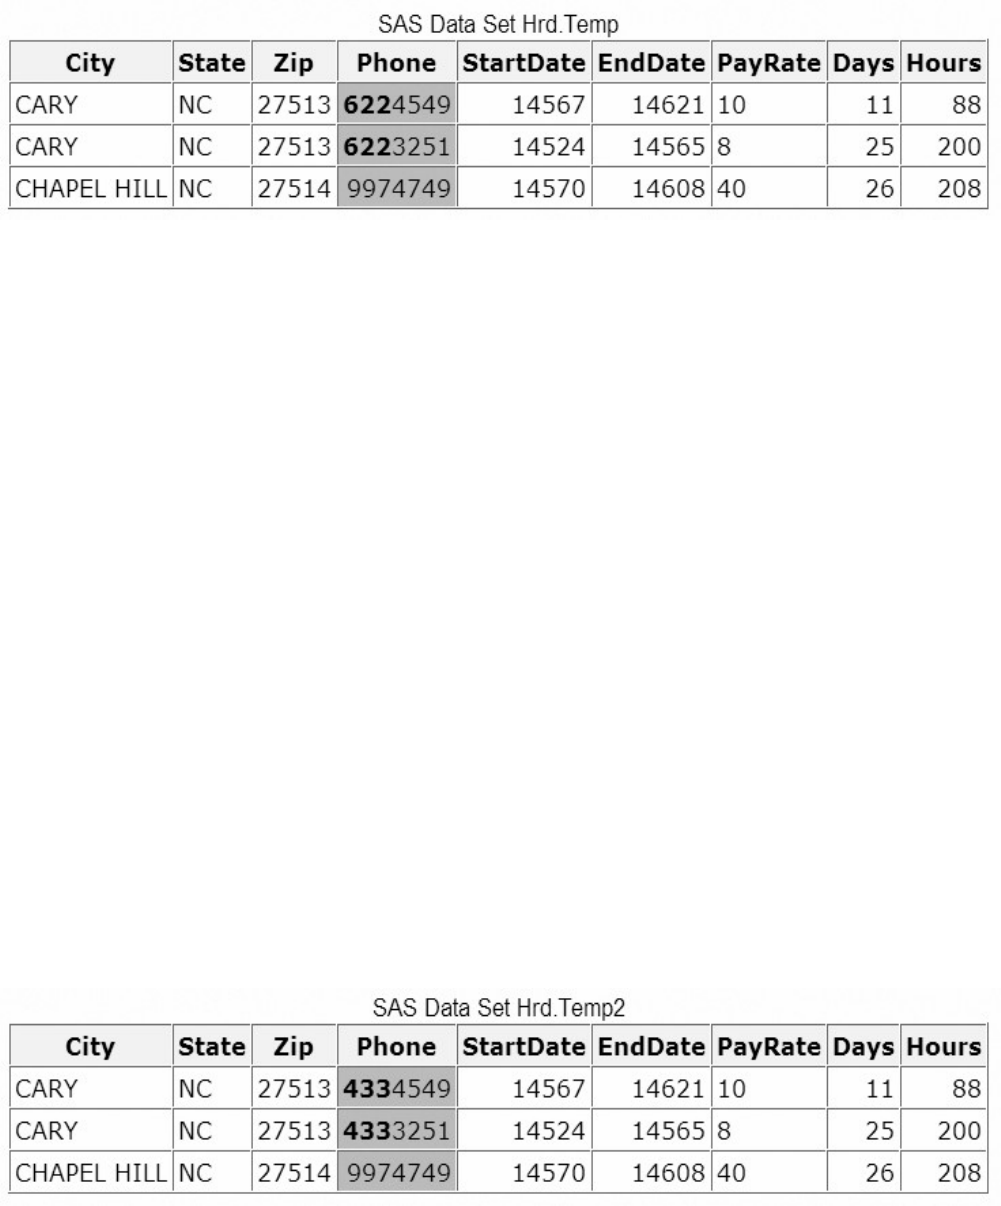
- 478 -
But executing this DATA step places the value 433 into all values of Phone. You need to replace only the
values of Phone that contain the 622 exchange. So, you add an assignment statement to the DATA step to
extract the exchange from Phone. Notice that the SUBSTR function is used on the right side of the
assignment statement.
data hrd.temp2(drop=exchange);
set hrd.temp;
Exchange=substr(phone,1,3);
substr(phone,1,3)='433';
run;
Now the DATA step needs an IF-THEN statement to verify the value of the variable Exchange. If the
exchange is 622, the assignment statement executes to replace the value of Phone.
data hrd.temp2(drop=exchange);
set hrd.temp;
Exchange=substr(phone,1,3);
if exchange='622' then substr(phone,1,3)='433';
run;
After the DATA step is executed, the appropriate values of Phone contain the new exchange.
Once again, remember the rules for using the SUBSTR function. If the SUBSTR function is on the right
side of an assignment statement, the function extracts a substring.
MiddleInitial=substr(middlename,1,1);
If the SUBSTR function is on the left side of an assignment statement, the function replaces the contents of
a character variable.
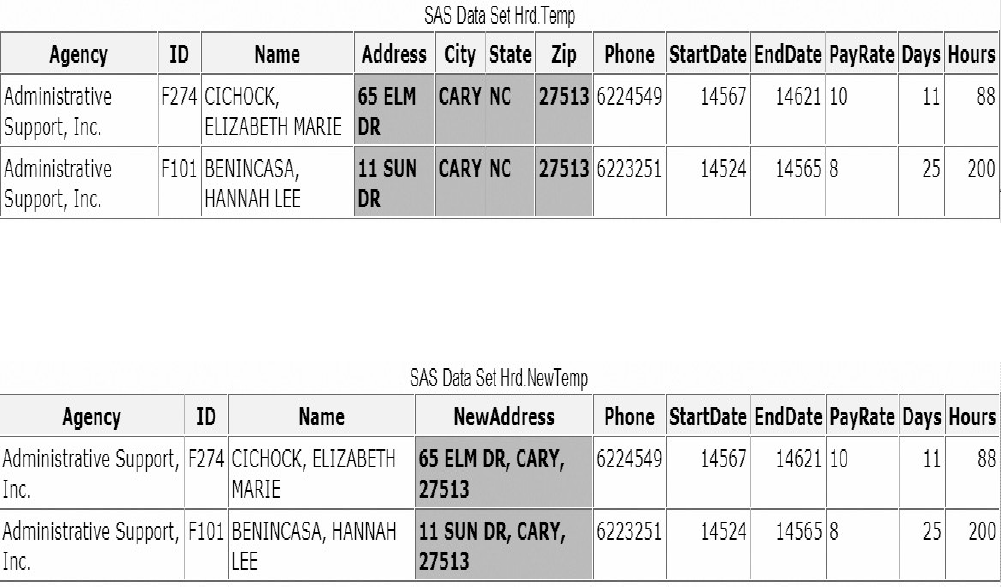
- 479 -
substr(region,1,3)='NNW';
TRIM Function
The TRIM function enables you to remove trailing blanks from character values. To learn about the TRIM
function, let's modify the data set Hrd.Temp.
The data set Hrd.Temp contains four address variables: Address, City, State, and Zip.
You need to create one address variable that contains the values of the three variables Address, City, and
Zip. (Because all temporary employees are hired locally, the value of State does not need to be included in
the new variable.)
Writing a DATA step to create this new variable is easy. You include an assignment statement that
contains the concatenation operator (||), as shown below.
data hrd.newtemp(drop=address city state zip);
set hrd.temp;
NewAddress=address||', '||city||', '||zip;
run;
The concatenation operator (||) enables you to concatenate character values. In this assignment statement,
the character values of Address, City, and Zip are concatenated with two character constants that consist of
a comma and a blank. The commas and blanks are needed to separate the street, city, and ZIP code values.
The length of NewAddress is the sum of the length of each variable and constant that is used to create the
new variable. Notice that this DATA step drops the original address variables from the new data set.
When the DATA step executes, you notice that the values of NewAddress do not appear as expected. The
values of the new variable contain embedded blanks.
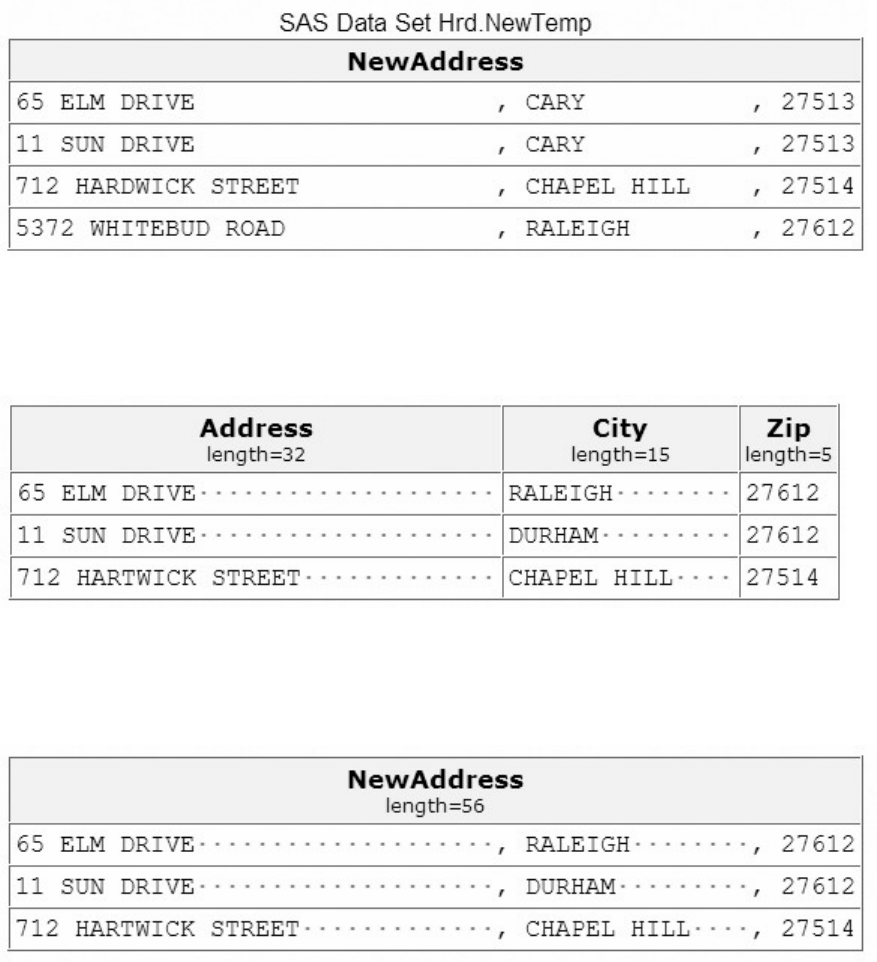
- 480 -
These blanks appear in the values of NewAddress because the values of the original address variables
contained trailing blanks. Whenever the value of a character variable does not match the length of the
variable, SAS pads the value with trailing blanks.
So, when the original address values are concatenated to create NewAddress, the trailing blanks in the
original values are included in the values of the new variable. The variable Zip is the only one that does
not contain trailing blanks.
The TRIM function enables you to remove trailing blanks from character values.
General form, TRIM function:
TRIM(argument)
where argument can be any character expression, such as
h
aracter variable: trim(address)
ther character function: trim(left(id)).
To remove the blanks from the variable NewAddress, include the TRIM function in your assignment
statement. Trim the values of Address and City.
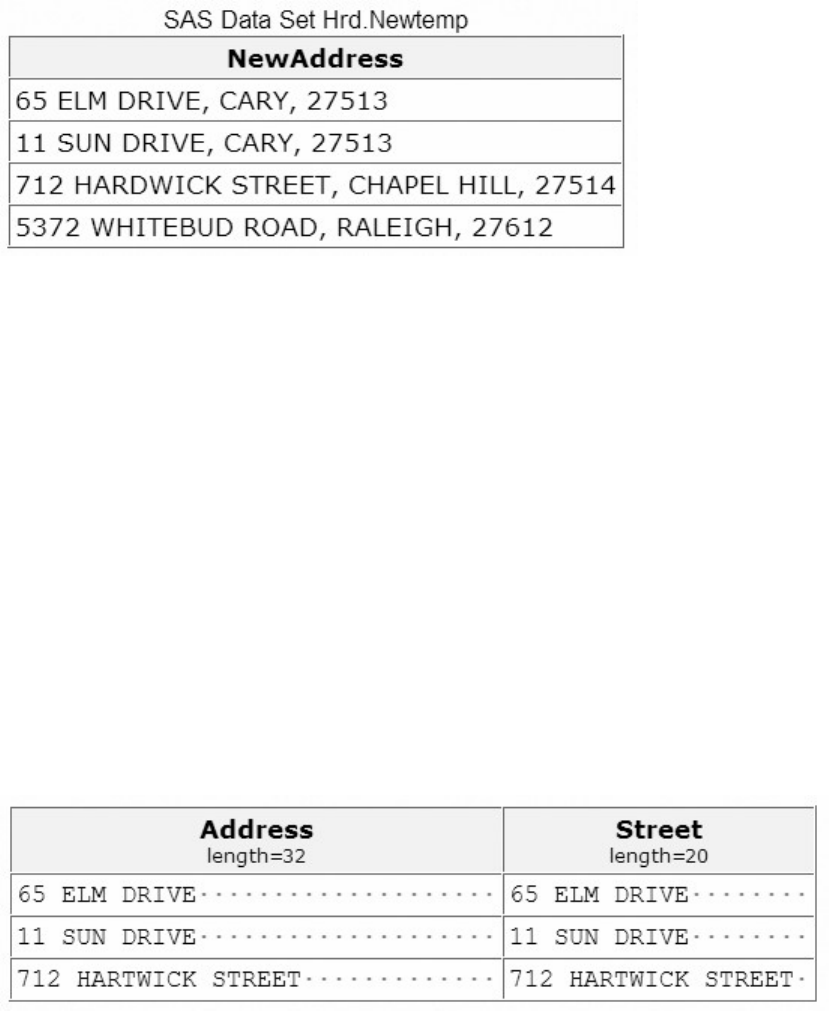
- 481 -
data hrd.newtemp(drop=address city state zip);
set hrd.temp;
NewAddress=trim(address)||', '||trim(city)||', '||zip;
run;
The revised DATA step creates the values that you expect for NewAddress.
Points to Remember
Keep in mind that the TRIM function does not affect how a variable is stored. Suppose you trim the values
of a variable and then assign these values to a new variable. The trimmed values are padded with trailing
blanks again if the values are shorter than the length of the new variable.
Here's an example. In the DATA step below, the trimmed value of Address is assigned to the new variable
Street. When the trimmed value is assigned to Street, trailing blanks are added to the value to match the
length of 20.
data temp;
set hrd.temp;
length Street $ 20;
Street=trim(address);
run;
CATX Function
Beginning in SAS®9, the CATX function enables you to concatenate character strings, remove leading
and trailing blanks, and insert separators. The CATX function returns a value to a variable, or returns a
value to a temporary buffer. The results of the CATX function are usually equivalent to those that are
produced by a combination of the concatenation operator and the TRIM and LEFT functions.
- 482 -
In most cases, if the CATX function returns a value to a variable that has not previously been assigned a
length, then that variable is given a length of 200 bytes. To save storage space, you can add a LENGTH
statement to your DATA step, and specify an appropriate length for your variable. Because SAS sets the
length of a new character variable the first time it is encountered in the DATA step, be sure to place the
LENGTH statement before the assignment statements that contain the CATX function.
If the concatenation operator (||) returns a value to a variable that has not previously been assigned a length,
then that variable is given a length that is the sum of the lengths of the values which are being
concatenated.
Remember that you learned to use the TRIM function along with the concatenation operator to create one
address variable that contains the values of the three variables Address, City, and Zip, and to remove extra
blanks from the new values. You used the DATA step shown below.
data hrd.newtemp(drop=address city state zip);
set hrd.temp;
NewAddress=trim(address)||', '||trim(city)||', '||zip;
run;
You can accomplish the same concatenation using only the CATX function.
General form, CATX function:
CATX(separator,string-1 <,...string-n>)
where
a
rato
r
specifies the character string that is used as a separator between concatenated strings
n
g specifies a SAS character string.
You want to create the new variable NewAddress by concatenating the values of the Address, City, and
Zip variables from the data set Hrd.Temp. You want to strip excess blanks from the old variables' values
and separate the variable values with a comma and a space. The DATA step below uses the CATX
function to create NewAddress.
data hrd.newtemp(drop=address city state zip);
set hrd.temp;
NewAddress=catx(', ',address,city,zip);
run;
The revised DATA step creates the values that you expect for NewAddress.
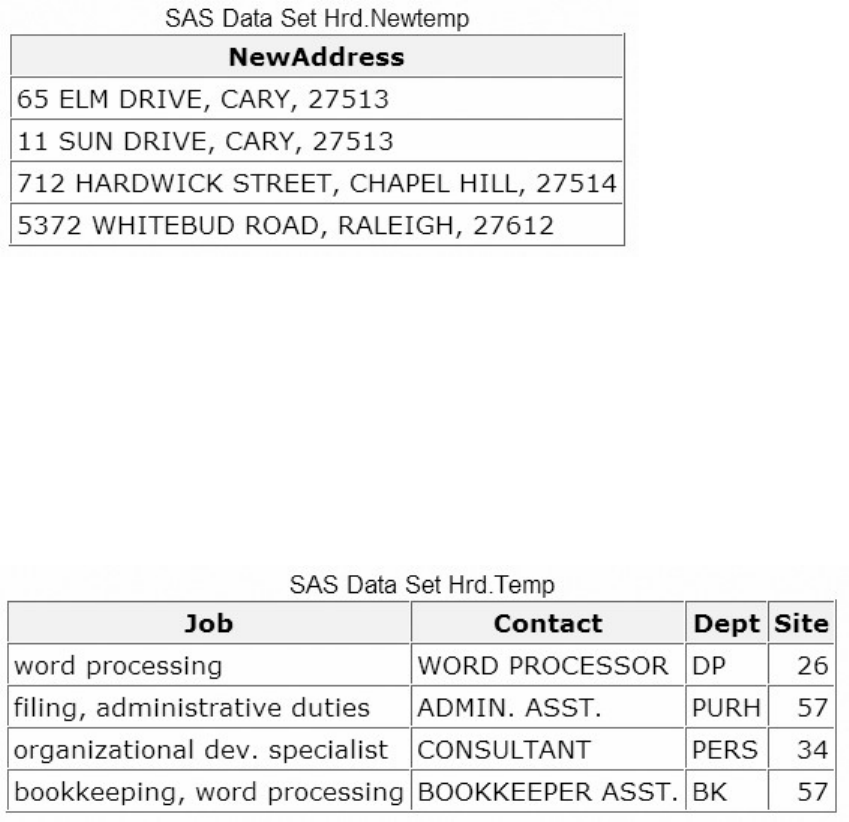
- 483 -
INDEX Function
The INDEX function enables you to search a character value for a specified string. The INDEX function
searches values from left to right, looking for the first occurrence of the string. It returns the position of the
string's first character; if the string is not found, it returns a value of 0.
Suppose you need to search the values of the variable Job, which lists job skills. You want to create a data
set that contains the names of all temporary employees who have word processing experience. The
following figure shows a partial list of observations in the Hrd.Temp data set.
The INDEX function can complete this search.
General form, INDEX function:
INDEX(source,excerpt)
where
r
ce specifies the character variable or expression to search
e
rpt specifies a character string that is enclosed in quotation marks ('')
To search for the occurrences of word processing in the values of the variable Job, you write the INDEX
function as shown below. Note that the character string is enclosed in quotation marks.
index(job,'word processing')
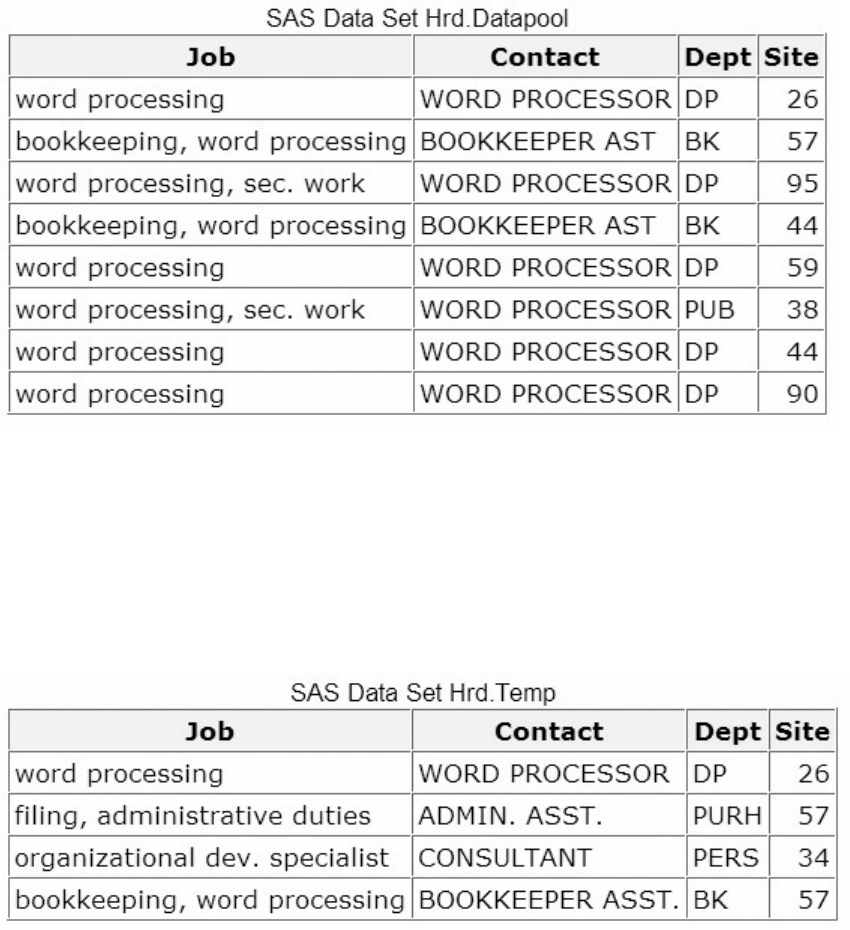
- 484 -
Then, to create the new data set, include the INDEX function in a subsetting IF statement. Only those
observations in which the function locates the string and returns a value greater than 0 are written to the
data set.
data hrd.datapool;
set hrd.temp;
if index(job,'word processing') > 0;
run;
Here's your data set that shows the temporary employees who have word processing experience. The
program processed all of the observations in the Hrd.Temp data set.
Note that the INDEX function is case sensitive, so the character string that you search for must be
specified exactly as it is recorded in the data set. For example, the INDEX function shown below would
not locate any employees who have word processing experience.
index(job,'WORD PROCESSING')
Finding a String Regardless of Case
To ensure that all occurrences of a character string are found, you can use the UPCASE or LOWCASE
function with the INDEX function. The UPCASE and LOWCASE functions enable you to convert
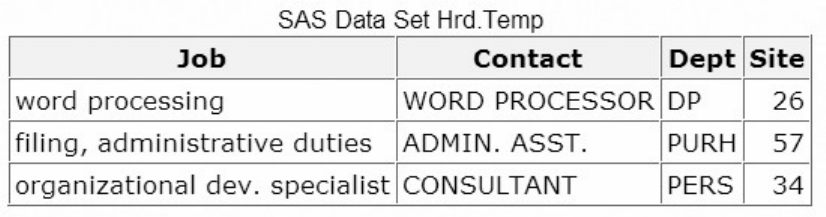
- 485 -
variable values to uppercase or lowercase letters. You can then specify the character string in the INDEX
function accordingly.
index(upcase(job),'WORD PROCESSING')
index(lowcase(job),'word processing')
The UPCASE and LOWCASE functions are presented later in this section.
FIND Function
Overview
Beginning in SAS®9,the FIND function enables you to search for a specific substring of characters within
a character string that you specify. The FIND function searches a string for the first occurrence of the
substring, and returns the position of that substring. If the substring is not found in the string, FIND returns
a value of 0.
The FIND function is similar to the INDEX function. Remember that you used the INDEX function to
search the values of the variable Job in Hrd.Temp in order to create a data set that contains the names of all
temporary employees who have word processing experience.
You can also use the FIND function to complete this search.
General form, FIND function:
FIND(string,substring<,modifiers><,startpos> )
where
n
g specifies a character constant, variable, or expression that will be searched for substrings
s
tring is a character constant, variable, or expression that specifies the substring of characters to search for in string
d
ifiers is a character constant, variable, or expression that specifies one or more modifiers
r
tpos is an integer that specifies the position at which the search should start and the direction of the search. The default
value for startpos is 1.
If string or substring is a character literal, you must enclose it in quotation marks.
- 486 -
The modifiers argument enables you to specify one or more modifiers for the function, as listed below.
The modifier i causes the FIND function to ignore character case during the search. If this modifier is not specified, FIND
searches for character substrings with the same case as the characters in substring.
The modifier t trims trailing blanks from string and substring.
If the modifier is a constant, enclose it in quotation marks. Specify multiple constants in a single set of
quotation marks. Modifier values are not case sensitive.
If startpos is not specified, FIND starts the search at the beginning of the string and searches the string
from left to right. If startpos is specified, the absolute value of startpos determines the position at which to
start the search. The sign of startpos determines the direction of the search. If startpos is positive, FIND
searches from startpos to the right; and if startpos is negative, FIND searches from startpos to the left.
Example
The values of the variable Job are all lowercase. Therefore, to search for the occurrence of word
processing in the values of the variable Job, you write the FIND function as shown below. Note that the
character substring is enclosed in quotation marks.
find(job,'word processing')
Then, to create the new data set, include the FIND function in a subsetting IF statement. Only those
observations in which the function locates the string and returns a value greater than 0 are written to the
data set.
data hrd.datapool;
set hrd.temp;
if find(job,'word processing') > 0;
run;
UPCASE Function
The UPCASE function converts all letters in a character expression to uppercase.
General form, UPCASE function:
UPCASE(argument)
where argument can be any SAS character expression, such as a character variable or constant.
Let's use the UPCASE function to convert the values of a character variable in Hrd.Temp. The values of
the variable Job appear in lowercase letters.

- 487 -
To convert the values of Job to uppercase, you write the UPCASE function as follows:
upcase(job)
Then place the function in an assignment statement in a DATA step. You can change the values of the
variable Job in place.
data hrd.newtemp;
set hrd.temp;
Job=upcase(job);
run;
Here's the new data set that contains the converted values of Job.
LOWCASE Function
The LOWCASE function converts all letters in a character expression to lowercase.
General form, LOWCASE function:
LOWCASE(argument)
where argument can be any SAS character expression, such as a character variable or constant.
Here's an example of the LOWCASE function. In this example, the function converts the values of a
variable named Title to lowercase letters.
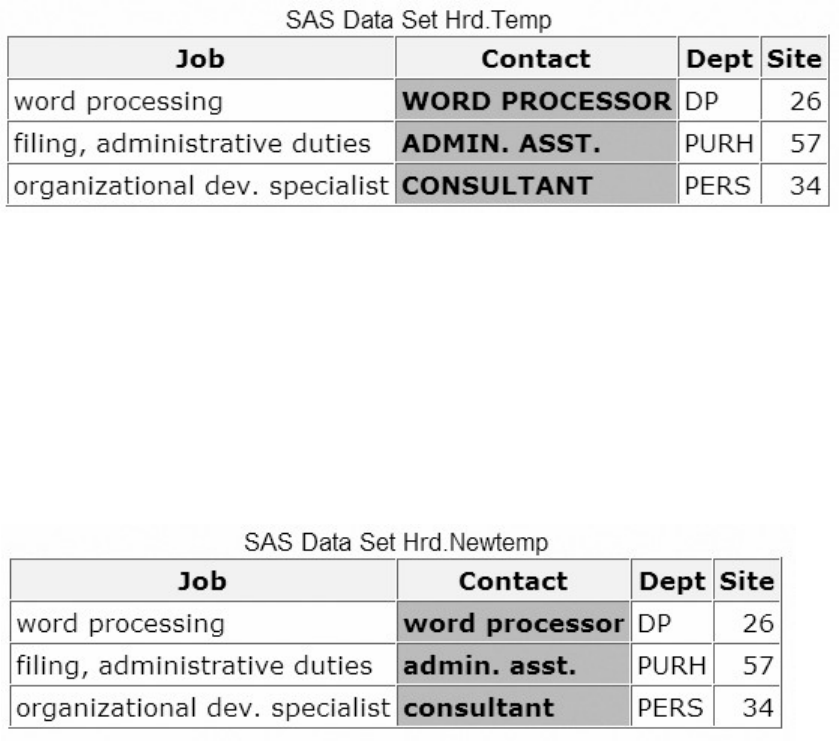
- 488 -
lowcase(title)
Another example of the LOWCASE function is shown below. The assignment statement in this DATA
step uses the LOWCASE function to convert the values of the variable Contact to lowercase.
data hrd.newtemp;
set hrd.temp;
Contact=lowcase(contact);
run;
After this DATA step executes, the new data set is created. Notice the converted values of the variable
Contact.
PROPCASE Function
Beginning in SAS®9, the PROPCASE function converts all words in an argument to proper case (so that
the first letter in each word is capitalized).
General form, PROPCASE function:
PROPCASE(argument<,delimiter(s)>)
where
u
ment can be any SAS expression, such as a character variable or constant
i
miter(s) specifies one or more delimiters that are enclosed in quotation marks. The default delimiters are blank, forward
slash, hyphen, open parenthesis, period, and tab.
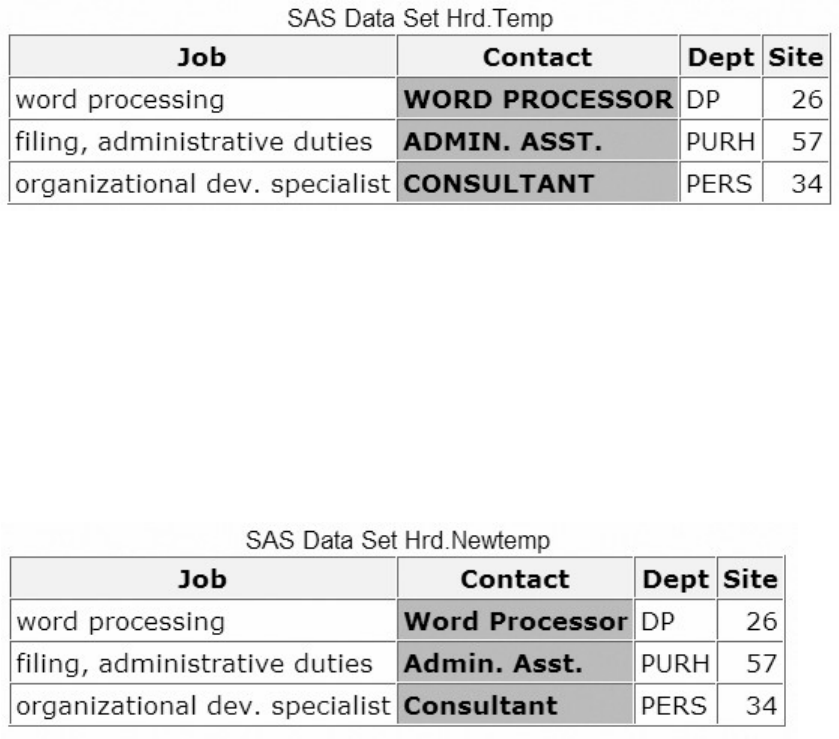
- 489 -
Note: If you specify delimiter(s), then the default delimiters are no longer in effect.
The PROPCASE function copies a character argument and converts all uppercase letters to lowercase
letters. It then converts to uppercase the first character of a word that is preceded by a delimiter.
PROPCASE uses the default delimiters unless you use the delimiter(s) argument.
Here's an example of the PROPCASE function. In this example, the function converts the values of a
variable named Title to proper case and uses the default delimiters.
propcase(title)
Another example of the PROPCASE function is shown below. The assignment statement in this DATA
step uses the PROPCASE function to convert the values for the variable Contact to proper case.
data hrd.newtemp;
set hrd.temp;
Contact=propcase(contact);
run;
After this DATA step executes, the new data set is created. Notice the converted values of the variable
Contact.
TRANWRD Function
The TRANWRD function replaces or removes all occurrences of a pattern of characters within a character
string. The translated characters can be located anywhere in the string.
In a DATA step, if the TRANWRD function returns a value to a variable that has not previously been
assigned a length, then that variable is given a length of 200 bytes. To save storage space, you can add a
LENGTH statement to your DATA step, and specify an appropriate length for your variable. Because SAS
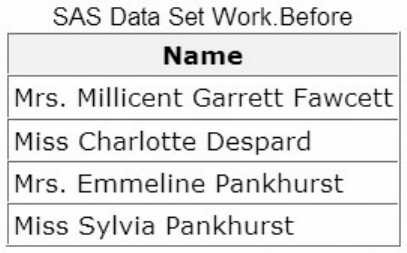
- 490 -
sets the length of a new character variable the first time it is encountered in the DATA step, be sure to
place the LENGTH statement before the assignment statements that contain the TRANWRD function.
General form, TRANWRD function:
TRANWRD(source,target,replacement)
where
r
ce specifies the source string that you want to translate
g
et specifies the string that SAS searches for in source
l
acement specifies the string that replaces target.
Note: target and replacement can be specified as variables or as character strings. If you specify
character strings, be sure to enclose the strings in quotation marks (' ' or " ").
You can use TRANWRD function to update variables in place. In this example, the function updates the
values of Name by changing every occurrence of the string Monroe to Manson.
name=tranwrd(name,'Monroe','Manson')
Another example of the TRANWRD function is shown below. In this case, two assignment statements use
the TRANWRD function to change all occurrences of Miss or Mrs. to Ms.
data work.after;
set work.before;
name=tranwrd(name,'Miss','Ms.');
name=tranwrd(name,'Mrs.','Ms.');
run;
After this DATA step executes, the new data set is created. Notice the changed strings within the variable
Name.
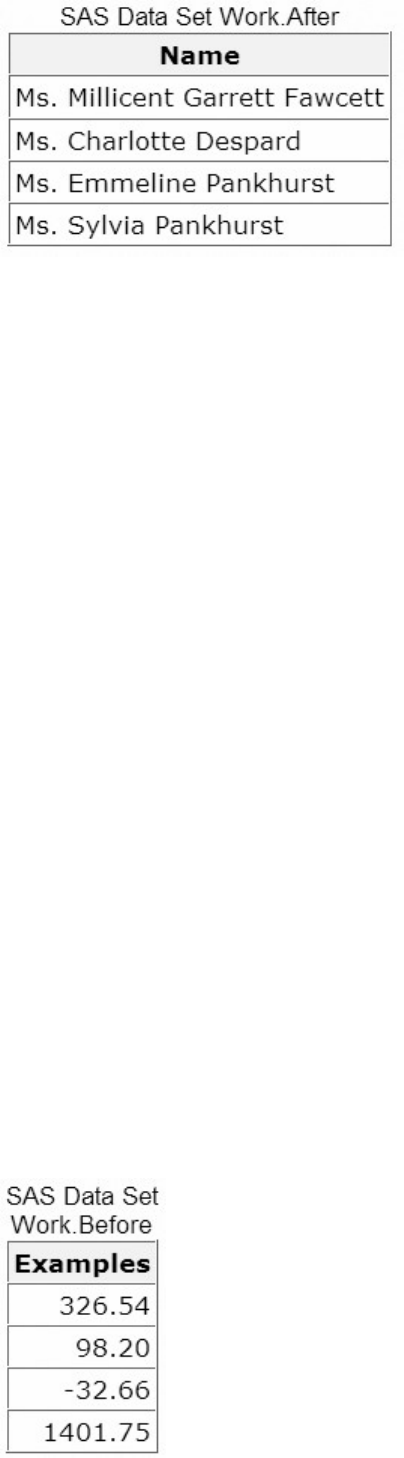
- 491 -
Modifying Numeric Values with Functions
Introduction to Modifying Numeric Values
You've seen how SAS functions can be used to
convert between character and numeric variable values
manipulate SAS date values
modify values of character variables.
SAS provides additional functions to create or modify numeric values. These include arithmetic, financial,
and probability functions. There are far too many of these functions to explore them all in detail, but let's
look at two examples.
INT Function
To return the integer portion of a numeric value, use the INT function. Any decimal portion of the INT
function argument is discarded.
General form, INT function:
INT(argument)
where argument is a numeric variable, constant, or expression.
The two data sets shown below give before-and-after views of values that are truncated by the INT
function.

- 492 -
data work.after;
set work.before;
Examples=int(examples);
run;
ROUND Function
To round values to the nearest specified unit, use the ROUND function.
General form, ROUND function:
ROUND(argument,round-off-unit)
where
u
ment is a numeric variable, constant, or expression.
n
d-off-unit is numeric and nonnegative.
If a round-off unit is not provided, a default value of 1 is used, and the argument is rounded to the nearest
integer. The two data sets shown below give before-and-after views of values that are modified by the
ROUND function.
data work.after;
set work.before;
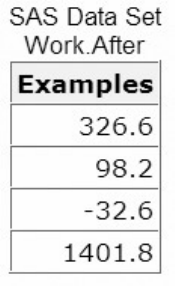
- 493 -
Examples=round(examples,.2);
run;
To learn more about SAS functions that modify numeric values, see the SAS documentation.
Nesting SAS Functions
Throughout this chapter, you've seen examples of individual functions. For example, in this assignment
statement the SCAN function selects the middle name (third word) from the variable Name:
MiddleName=scan(name,3);
Then this assignment statement uses the SUBSTR function to select the first letter from the variable
MiddleName:
MiddleInitial=substr(MiddleName,1,1);
To write more efficient programs, however, you can nest functions as appropriate. For example, you can
nest the SCAN function within the SUBSTR function in an assignment statement to compute the value for
MiddleInitial:
MiddleInitial=substr(scan(name,3),1,1);
This example of nested numeric functions determines the number of years between June 15, 1999, and
today:
Years=intck('year','15jun1999'd,today());
You can nest any functions as long as the function that is used as the argument meets the requirements for
the argument.
Chapter Summary
- 494 -
Text Summary
Using SAS Functions
SAS functions can be used to convert data and to manipulate the values of character variables. Functions
are written by specifying the function name, then its arguments in parentheses. Arguments can include
variables, constants, expressions, or other functions. Although arguments are typically separated by
commas, they can also be specified as variable lists or arrays.
Automatic Character-to-Numeric Conversion
When character variables are used in a numeric context, SAS tries to convert the character values to
numeric values. Numeric context includes arithmetic operations, comparisons with numeric values, and
assignment to previously defined numeric variables. The original character values are not changed. The
conversion creates temporary numeric values and places a note in the SAS log.
Explicit Character-to-Numeric Conversion
The INPUT function provides direct, controlled conversion of character values to numeric values. When a
character variable is read with a numeric informat, the INPUT function generates numeric values without
placing a note in the SAS log.
Automatic Numeric-to-Character Conversion
When numeric variables are used in a character context, SAS tries to convert the numeric values to
character values. Character context includes concatenation operations, use in functions that require
character arguments, and assignment to previously defined character variables. The original numeric
values are not changed; the conversion creates temporary character values and places a note in the SAS
log.
Explicit Numeric-to-Character Conversion
The PUT function provides direct, controlled conversion of numeric values to character values. The format
specified in a PUT function must match the source, so use an appropriate numeric format to create the new
character values. No note will appear in the SAS log.
SAS Date and Time Values
SAS date values are stored as the number of days from January 1, 1960; time values are stored as the
number of seconds since midnight. These values can be displayed in a variety of forms by associating them
with SAS formats.
YEAR, QTR, MONTH, and DAY Functions
To extract the year, quarter, month, or day value from a SAS date value, specify the YEAR, QTR,
MONTH, or DAY function followed by the SAS date value in parentheses. The YEAR function returns a
four-digit number; QTR returns a value of 1, 2, 3, or 4; MONTH returns a number from 1 to 12; and DAY
returns 1 to 31.
WEEKDAY Function
- 495 -
To extract the day of the week from a SAS date value, specify the function WEEKDAY followed by the
SAS date value in parentheses. The function returns a numeric value from 1 to 7, representing the day of
the week.
MDY Function
To create a SAS date value from a month, day, and year, specify the MDY function followed by the
component values. The result can be displayed in several ways by applying a SAS date format. SAS
interprets two-digit values according to the 100-year span that is set by the YEARCUTOFF= system
option. The default value of YEARCUTOFF= is 1920.
DATE and TODAY Functions
To convert the current date to a SAS date value, specify the DATE or TODAY function without arguments.
The DATE and TODAY functions can be used interchangeably.
INTCK Function
To count the number of time intervals that occur in a time span, use the INTCK function and specify the
interval constant or variable, the beginning date value, and the ending date value. The INTCK function
counts intervals from fixed interval beginnings, not in multiples of an interval unit. Partial intervals are not
counted.
INTNX Function
To apply multiples of an interval to a date value, use the INTNX function and specify the interval constant
or variable, the start-from date value, and the increment. Include the alignment option to specify whether
the date returned should be at the beginning, middle, or end of the interval, or on the same day.
DATDIF and YRDIF Functions
To calculate the difference between dates as a number of days or as a number of years, use the DATDIF or
YRDIF function. These functions accept SAS date values and return a difference between the date values
calculated according to the basis that you specify in the function.
SCAN Function
The SCAN function enables you to separate a character value into words and to return a word based on its
position. It defines words according to delimiters, which are characters that are used as word separators.
The name of the function is followed, in parentheses, by the name of the character variable, the desired
word number, and the specified delimiters enclosed in quotation marks.
SUBSTR Function
The SUBSTR function can be used to extract or replace any portion of a character string. To extract values,
place the function on the right side of an assignment statement and specify, in parentheses, the name of the
character variable, the starting character position, and the number of characters to extract. To replace
values, place the function on the left side of an assignment statement and specify, in parentheses, the name
of the variable being modified, the starting character position, and the number of characters to replace.
SCAN versus SUBSTR
- 496 -
Both the SCAN and SUBSTR functions can extract a substring from a character value. SCAN relies on
delimiters, whereas SUBSTR reads values from specified locations. Use SCAN when you know the
delimiter and the order of words. Use SUBSTR when the positions of the characters don't vary.
TRIM Function
Because SAS pads character values with trailing blanks, unwanted spaces can sometimes appear after
strings are concatenated. To remove trailing blanks from character values, specify the TRIM function with
the name of a character variable. Remember that trimmed values will be padded with blanks again if they
are shorter than the length of the new variable.
CATX Function
Beginning in SAS®9, you can concatenate character strings, remove leading and trailing blanks, and insert
separators in one statement by using the CATX function. The results of the CATX function are usually
equivalent to those that are produced by a combination of the concatenation operator and the TRIM and
LEFT functions.
INDEX Function
To test character values for the presence of a string, use the INDEX function and specify, in parentheses,
the name of the variable and the string enclosed in quotation marks. The INDEX function can be used with
a subsetting IF statement when you create a data set. Only those observations in which the function finds
the string and returns a value greater than 0 are written to the new data set.
FIND Function
Beginning in SAS®9, you can also use the FIND function to search for a specific substring of characters
within a character string that you specify. The FIND function is similar to the INDEX function, but the
FIND function enables you to ignore character case in your search and to trim trailing blanks. The FIND
function can also begin the search at any position that you specify in the string.
UPCASE Function
Lowercase letters in character values can be converted to uppercase by using the UPCASE function.
Include the function in an assignment statement, and specify the variable name in parentheses.
LOWCASE Function
Uppercase letters in character values can be converted to lowercase by using the LOWCASE function.
Include the function in an assignment statement, and specify the variable name in parentheses.
PROPCASE Function
Beginning in SAS®9, character values can be converted to proper case by using the PROPCASE function.
Include the function in an assignment statement, and specify the variable name in parentheses. Remember
that you can specify delimiters or use the default delimiters.
TRANWRD Function
- 497 -
You can replace or remove patterns of characters in the values of character variables by using the
TRANWRD function. Use the function in an assignment statement, and specify the source, target, and
replacement strings or variables in parentheses.
INT Function
To return the integer portion of a numeric value, use the INT function. Any decimal portion of the INT
function argument is discarded.
ROUND Function
To round values to the nearest specified unit, use the ROUND function. If a round-off unit is not provided,
the argument is rounded to the nearest integer.
Nesting SAS Functions
To write more efficient programs, you can nest functions as appropriate. You can nest any functions as
long as the function that is used as the argument meets the requirements for the argument.
Syntax
INPUT(source,informat)
PUT(source,format)
YEAR(date)
QTR(date)
MONTH(date)
DAY(date)
WEEKDAY(date)
MDY(month,day,year)
DATE()
TODAY()
INTCK('interval',from,to)
INTNX('interval',start-from,increment<,'alignment'>)
DATDIF(start_date,end_date,basis)
YRDIF(start_date,end_date,basis)
SCAN(argument,n,<delimiters>)
SUBSTR(argument,position,<n>)
- 498 -
TRIM(argument)
CATX(separator,string-1<,...string-n>)
INDEX(source,excerpt)
FIND(string,substring<,modifiers><,startpos>)
UPCASE(argument)
LOWCASE(argument)
PROPCASE((argument<,delimiter(s)>)
TRANWRD(source,target,replacement)
INT(argument)
ROUND(argument,round-off-unit)
Sample Programs
data hrd.newtemp;
set hrd.temp;
Salary=input(payrate,2.)*hours;
run;
data hrd.newtemp;
set hrd.temp;
Assignment=put(site,2.)||'/'||dept;
run;
data hrd.tempnov;
set hrd.temp;
if month(startdate)=11;
run;
data hrd.temp2010;
set hrd.temp;
if year(startdate)=2010;
run;
data radio.schwkend;
set radio.sch;
if weekday(airdate)in(1,7);
run;
- 499 -
data hrd.newtemp(drop=month day year);
set hrd.temp;
Date=mdy(month,day,year);
run;
data hrd.newtemp;
set hrd.temp;
EditDate=today();
run;
data work.anniv20;
set flights.mechanics(keep=id lastname firstname hired);
Years=intck('year',hired,today());
if years=20 and month(hired)=month(today());
proc print data=work.anniv20;
title '20-Year Anniversaries this Month';
run;
data work.after;
set work.before;
TargetYear=intnx('year','05feb94'd,3);
run;
data hrd.newtemp(drop=name);
set hrd.newtemp;
length LastName FirstName MiddleName $ 10;
lastname=scan(name,1,' ,');
firstname=scan(name,2,' ,');
middlename=scan(name,3,' ,');
run;
data hrd.temp2(drop=exchange);
set hrd.temp;
exchange=substr(phone,1,3);
if exchange='622' then substr(phone,1,3)='433';
run;
data hrd.newtemp(drop=address city state zip);
set hrd.temp;
NewAddress=trim(address)||', '||trim(city)||', '||zip;
run;
data hrd.datapool;
- 500 -
set hrd.temp;
if index(job,'word processing') > 0;
run;
data hrd.newtemp;
set hrd.temp;
Job=upcase(job);
run;
data hrd.newtemp;
set hrd.temp;
Contact=lowcase(contact);
run;
data hrd.newtemp;
set hrd.temp;
location=propcase(city);
run;
data work.after;
set work.before;
name=tranwrd(name,'Miss','Ms.');
name=tranwrd(name,'Mrs.','Ms.');
run;
data hrd.newtemp(drop=address city state zip);
set hrd.temp;
NewAddress=catx(', ',address,city,zip);
run;
data work.after;
set work.before;
Examples=int(examples);
run;
data work.after;
set work.before;
Examples=round(examples,.2);
run;
data hrd.datapool;
set hrd.temp;
if find(job,'word processing','t')>0;
- 501 -
run;
Points to Remember
Even if a function doesn't require arguments, the function name must still be followed by parentheses.
When specifying a variable list or an array as a function argument, be sure to precede the list or the array with the word OF.
To remember which function requires a format versus an informat, note that the INPUT function requires the informat.
If you specify an invalid date in the MDY function, a missing value is assigned to the target variable.
The SCAN function treats contiguous delimiters as one delimiter; leading delimiters have no effect.
When using the SCAN function, you can save storage space by adding a LENGTH statement to your DATA step to set an
appropriate length for your new variable(s). Place the LENGTH statement before the assignment statements that contain
the SCAN function.
When the SUBSTR function is on the left side of an assignment statement, it replaces variable values. When SUBSTR is on
the right side of an assignment statement, it extracts variable values. The syntax of the function is the same; only the
placement of the function changes.
The INDEX function is case sensitive. To ensure that all forms of a character string are found, use the UPCASE or
LOWCASE function with the INDEX function. You can also use the FIND function with the i modifier.
Chapter Quiz
Select the best answer for each question. After completing the quiz, you can check your answers using the
answer key in the appendix.
Which function calculates the average of the variables Var1, Var2, Var3, and Var4?
mean(var1,var4)
mean(var1-var4)
mean(of var1,var4)
mean(of var1-var4)
Within the data set Hrd.Temp, PayRate is a character variable and Hours is a numeric variable. What happens when the
following program is run?
data work.temp;
set hrd.temp;
- 502 -
Salary=payrate*hours;
run;
SAS converts the values of PayRate to numeric values. No message is written to the log.
SAS converts the values of PayRate to numeric values. A message is written to the log.
SAS converts the values of Hours to character values. No message is written to the log.
SAS converts the values of Hours to character values. A message is written to the log.
A typical value for the character variable Target is 123,456. Which statement correctly converts the values of Target to
numeric values when creating the variable TargetNo?
TargetNo=input(target,comma6.);
TargetNo=input(target,comma7.);
TargetNo=put(target,comma6.);
TargetNo=put(target,comma7.)
A typical value for the numeric variable SiteNum is 12.3. Which statement correctly converts the values of SiteNum to
character values when creating the variable Location?
Location=dept||'/'||input(sitenum,3.1);
Location=dept||'/'||input(sitenum,4.1);
Location=dept||'/'||put(sitenum,3.1);
Location=dept||'/'||put(sitenum,4.1);
Suppose the YEARCUTOFF= system option is set to 1920. Which MDY function creates the date value for January 3, 2020?
MDY(1,3,20)
- 503 -
MDY(3,1,20)
MDY(1,3,2020)
MDY(3,1,2020)
The variable Address2 contains values such as Piscataway, NJ. How do you assign the two-letter state abbreviations to a
new variable named State?
State=scan(address2,2);
State=scan(address2,13,2);
State=substr(address2,2);
State=substr(address2,13,2);
The variable IDCode contains values such as 123FA and 321MB. The fourth character identifies sex. How do you assign these
character codes to a new variable named Sex?
Sex=scan(idcode,4);
Sex=scan(idcode,4,1);
Sex=substr(idcode,4);
Sex=substr(idcode,4,1);
Due to growth within the 919 area code, the telephone exchange 555 is being reassigned to the 920 area code. The data set
Clients.Piedmont includes the variable Phone, which contains telephone numbers in the form 919-555-1234. Which of the
following programs will correctly change the values of Phone?
- 504 -
data work.piedmont(drop=areacode exchange);
set clients.piedmont;
Areacode=substr(phone,1,3);
Exchange=substr(phone,5,3);
if areacode='919' and exchange='555'
then scan(phone,1,3)='920';
run;
data work.piedmont(drop=areacode exchange);
set clients.piedmont;
Areacode=substr(phone,1,3);
Exchange=substr(phone,5,3);
if areacode='919' and exchange='555'
then phone=scan('920',1,3);
run;
data work.piedmont(drop=areacode exchange);
set clients.piedmont;
Areacode=substr(phone,1,3);
Exchange=substr(phone,5,3);
if areacode='919' and exchange='555'
then substr(phone,1,3)='920';
run;
data work.piedmont(drop=areacode exchange);
set clients.piedmont;
Areacode=substr(phone,1,3);
Exchange=substr(phone,5,3);
if areacode='919' and exchange='555'
then phone=substr('920',1,3);
run;
Suppose you need to create the variable FullName by concatenating the values of FirstName, which contains first names, and
LastName, which contains last names. What's the best way to remove extra blanks between first names and last names?
data work.maillist;
set retail.maillist;
length FullName $ 40;
fullname=trim firstname||' '||lastname;
run;
- 505 -
data work.maillist;
set retail.maillist;
length FullName $ 40;
fullname=trim(firstname)||' '||lastname;
run;
data work.maillist;
set retail.maillist;
length FullName $ 40;
fullname=trim(firstname)||' '||trim(lastname);
run;
data work.maillist;
set retail.maillist;
length FullName $ 40;
fullname=trim(firstname||' '||lastname);
run;
Within the data set Furnitur.Bookcase, the variable Finish contains values such as ash/cherry/teak/matte-black.
Which of the following creates a subset of the data in which the values of Finish contain the string walnut? Make the
search for the string case-insensitive.
data work.bookcase;
set furnitur.bookcase;
if index(finish,walnut) = 0;
run;
data work.bookcase;
set furnitur.bookcase;
if index(finish,'walnut') > 0;
run;
data work.bookcase;
set furnitur.bookcase;
if index(lowcase(finish),walnut) = 0;
run;
data work.bookcase;

- 506 -
set furnitur.bookcase;
if index(lowcase(finish),'walnut') > 0;
run;
Chapter 14 Generating Data with DO Loops
Overview
Constructing DO Loops
Nesting DO Loops
Iteratively Processing Observations from a Data Set
Conditionally Executing DO Loops
Using Conditional Clauses with the Iterative DO Statement
Creating Samples
Chapter Summary
Chapter Quiz
Overview
Introduction
You can execute SAS statements repeatedly by placing them in a DO loop. DO loops can execute any
number of times in a single iteration of the DATA step. Using DO loops lets you write concise DATA
steps that are easier to change and debug.
For example, the DO loop in this program eliminates the need for 12 separate programming statements to
calculate annual earnings:
data finance.earnings;
set finance.master;
Earned=0;
do month=1 to 12;
earned+(amount+earned)*(rate/12);
end;
run;
You can also use DO loops to
- 507 -
generate data
conditionally execute statements
read data.
This chapter shows you how to construct DO loops and how to include them in your programs.
Objectives
In this chapter, you learn to
construct a DO loop to perform repetitive calculations
control the execution of a DO loop
generate multiple observations in one iteration of the DATA step
construct nested DO loops.
Constructing DO Loops
Overview
DO loops process a group of statements repeatedly rather than once. This can greatly reduce the number of
statements required for a repetitive calculation. For example, these twelve sum statements compute a
company's annual earnings from investments. Notice that all 12 statements are identical.
data finance.earnings;
set finance.master;
Earned=0;
earned+(amount+earned)*(rate/12);
earned+(amount+earned)*(rate/12);
earned+(amount+earned)*(rate/12);
earned+(amount+earned)*(rate/12);
earned+(amount+earned)*(rate/12);
earned+(amount+earned)*(rate/12);
earned+(amount+earned)*(rate/12);
earned+(amount+earned)*(rate/12);
earned+(amount+earned)*(rate/12);
earned+(amount+earned)*(rate/12);
earned+(amount+earned)*(rate/12);
earned+(amount+earned)*(rate/12);
run;
Each sum statement accumulates the calculated interest earned for an investment for one month. The
variable Earned is created in the DATA step to store the earned interest. The investment is compounded
monthly, meaning that the value of the earned interest is cumulative.
- 508 -
A DO loop enables you to achieve the same results with fewer statements. In this case, the sum statement
executes twelve times within the DO loop during each iteration of the DATA step.
data finance.earnings;
set finance.master;
Earned=0;
do month=1 to 12;
earned+(amount+earned)*(rate/12);
end;
run;
To construct a DO loop, you use the DO and END statements along with other SAS statements.
General form, simple iterative DO loop:
DO index-variable=start TO stop BY increment;
SAS statements
END;
where the start, stop, and increment values
set upon entry into the DO loop
n
ot be changed during the processing of the DO loop
be numbers, variables, or SAS expressions.
The END statement terminates the loop.
The value of the index variable can be changed within the loop.
When creating a DO loop with the iterative DO statement, you must specify an index variable. The index
variable stores the value of the current iteration of the DO loop. You may use any valid SAS name.
DO
index-variable
=
start
TO
stop
BY
increment
;
SAS statements
END;
Next, specify the conditions that execute the DO loop. A simple specification contains a start value, a stop
value, and an increment value for the DO loop.
Do
index-variable
=
start
TO
stop
BY
increment
;
SAS statements
- 509 -
END;
The start value specifies the initial value of the index variable.
DO
index-variable
=
start
TO
stop
BY
increment
;
SAS statements
END;
The TO clause specifies the stop value. The stop value is the last index value that executes the DO loop.
DO
index-variable
=
start
TO
stop
BY
increment
;
SAS statements
END;
The optional BY clause specifies an increment value for the index variable. Typically, you want the DO
loop to increment by 1 for each iteration. If you do not specify a BY clause, the default increment value is
1.
DO
index-variable
=
start
TO
stop
BY
increment
;
SAS statements
END;
For example, the specification below increments the index variable by 1, resulting in quiz values of 1, 2, 3,
4, and 5:
do quiz=1 to 5;
By contrast, the following specification increments the index variable by 2, resulting in rows values of 2, 4,
6, 8, 10, and 12:
do rows=2 to 12 by 2;
DO Loop Execution
Using the form of the DO loop that was just presented, let's see how the DO loop executes in the DATA
step. This example sums the interest that was earned each month for a one-year investment.
data finance.earnings;
Amount=1000;
Rate=.075/12;
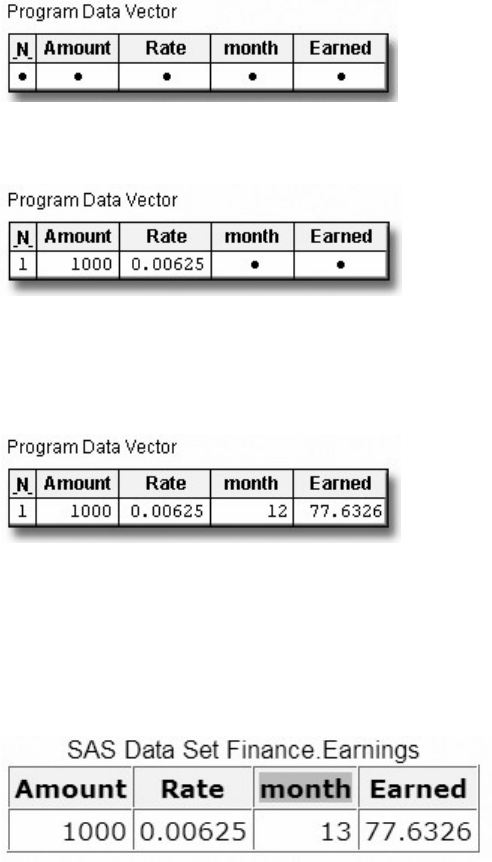
- 510 -
do month=1 to 12;
Earned+(amount+earned)*rate;
end;
run;
This DATA step does not read data from an external source. When submitted, it compiles and then
executes only once to generate data. During compilation, the program data vector is created for the
Finance.Earnings data set.
When the DATA step executes, the values of Amount and Rate are assigned.
Next, the DO loop executes. During each execution of the DO loop, the value of Earned is calculated and
is added to its previous value; then the value of month is incremented. On the twelfth execution of the DO
loop, the value of month is incremented to 12 and the value of Earned is 77.6326.
After the twelfth execution of the DO loop, the value of month is incremented to 13. Because 13 exceeds
the stop value of the iterative DO statement, the DO loop stops executing, and processing continues to the
next DATA step statement. The end of the DATA step is reached, the values are written to the
Finance.Earnings data set, and in this example, the DATA step ends. Only one observation is written to the
data set.
Notice that the index variable month is also stored in the data set. In most cases, the index variable is
needed only for processing the DO loop and can be dropped from the data set.
Counting Iterations of DO Loops
In some cases, it is useful to create an index variable to count and store the number of iterations in the DO
loop. Then you can drop the index variable from the data set.
data work.earn (drop=counter);
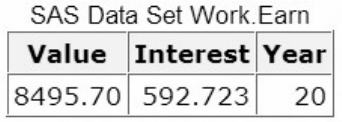
- 511 -
Value=2000;
do counter=1 to 20;
Interest=value*.075;
value+interest;
Year+1;
end;
run;
The sum statement Year+1 accumulates the number of iterations of the DO loop and stores the total in the
new variable Year. The final value of Year is then stored in the data set, whereas the index variable
counter is dropped. The data set has one observation.
Explicit OUTPUT Statements
To create an observation for each iteration of the DO loop, place an OUTPUT statement inside the loop.
By default, every DATA step contains an implicit OUTPUT statement at the end of the step. But placing
an explicit OUTPUT statement in a DATA step overrides automatic output, causing SAS to add an
observation to the data set only when the explicit OUTPUT statement is executed.
The previous example created one observation because it used automatic output at the end of the DATA
step. In the following example, the OUTPUT statement overrides automatic output, so the DATA step
writes 20 observations.
data work.earn;
Value=2000;
do Year=1 to 20;
Interest=value*.075;
value+interest;
output;
end;
run;
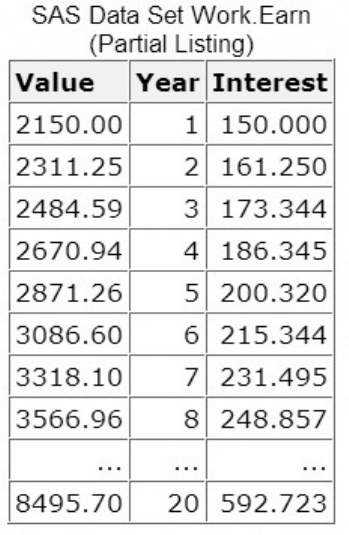
- 512 -
Decrementing DO Loops
You can decrement a DO loop's index variable by specifying a negative value for the BY clause. For
example, the specification in this iterative DO statement decreases the index variable by 1, resulting in
values of 5, 4, 3, 2, and 1.
DO index-variable=5 to 1 by -1;
SAS statements
END;
When you use a negative BY clause value, the start value must always be greater than the stop value in
order to decrease the index variable during each iteration.
DO index-variable=5 to 1 by -1;
SAS statements
END;
Specifying a Series of Items
You can also specify how many times a DO loop executes by listing items in a series.
General form, DO loop with a variable list:
DO index-variable=value1, value2, value3... ;
SAS statements
- 513 -
END;
where values can be character or numeric.
When the DO loop executes, it executes once for each item in the series. The index variable equals the
value of the current item. You must use commas to separate items in the series.
To list items in a series, you must specify either
all numeric values
DO index-variable=2,5,9,13,27;
SAS statements
END;
all character values, with each value enclosed in quotation marks
DO index-variable='MON','TUE','WED','THR','FRI';
SAS statements
END;
all variable names—the index variable takes on the values of the specified variables.
DO index-variable=win,place,show;
SAS statements
END;
Variable names must represent either all numeric or all character values. Do not enclose variable names in
quotation marks.
Nesting DO Loops
Iterative DO statements can be executed within a DO loop. Putting a DO loop within a DO loop is called
nesting.
do i=1 to 20;
SAS statements
do j=1 to 10;
SAS statements
end;
SAS statements
end;
- 514 -
The DATA step below computes the value of a one-year investment that earns 7.5% annual interest,
compounded monthly.
data work.earn;
Capital=2000;
do month=1 to 12;
Interest=capital*(.075/12);
capital+interest;
end;
run;
Let's assume the same amount of capital is to be added to the investment each year for 20 years. The new
program must perform the calculation for each month during each of the 20 years. To do this, you can
include the monthly calculations within another DO loop that executes 20 times.
data work.earn;
do year=1 to 20;
Capital+2000;
do month=1 to 12;
Interest=capital*(.075/12);
capital+interest;
end;
end;
run;
During each iteration of the outside DO loop, an additional 2,000 is added to the capital, and the nested
DO loop executes twelve times.
data work.earn;
do year=1 to 20;
Capital+2000;
do month=1 to 12;
Interest=capital*(.075/12);
capital+interest;
end;
end;
run;
Remember, in order for nested DO loops to execute correctly, you must
assign a unique index-variable name in each iterative DO statement.
data work.earn;
do year=1 to 20;
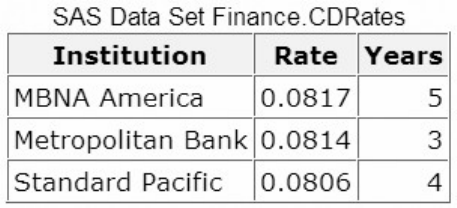
- 515 -
Capital+2000;
do month=1 to 12;
Interest=capital*(.075/12);
capital+interest;
end;
end;
run;
end each DO loop with an END statement.
data work.earn;
do year=1 to 20;
Capital+2000;
do month=1 to 12;
Interest=capital*(.075/12);
capital+interest;
end;
end;
run;
It is easier to manage nested DO loops if you indent the statements in each DO loop as shown above.
Iteratively Processing Observations from a Data Set
So far, you have seen examples of DATA steps that use DO loops to generate one or more observations
from one iteration of the DATA step. Now, let's look at a DATA step that reads a data set to compute the
value of a new variable.
The SAS data set Finance.CDRates, shown below, contains interest rates for certificates of deposit (CDs)
that are available from several institutions.
Suppose you want to compare how much each CD will earn at maturity with an investment of $5,000. The
DATA step below creates a new data set, Work.Compare, that contains the added variable, Investment.
data work.compare(drop=i);
set finance.cdrates;
Investment=5000;
do i=1 to years;
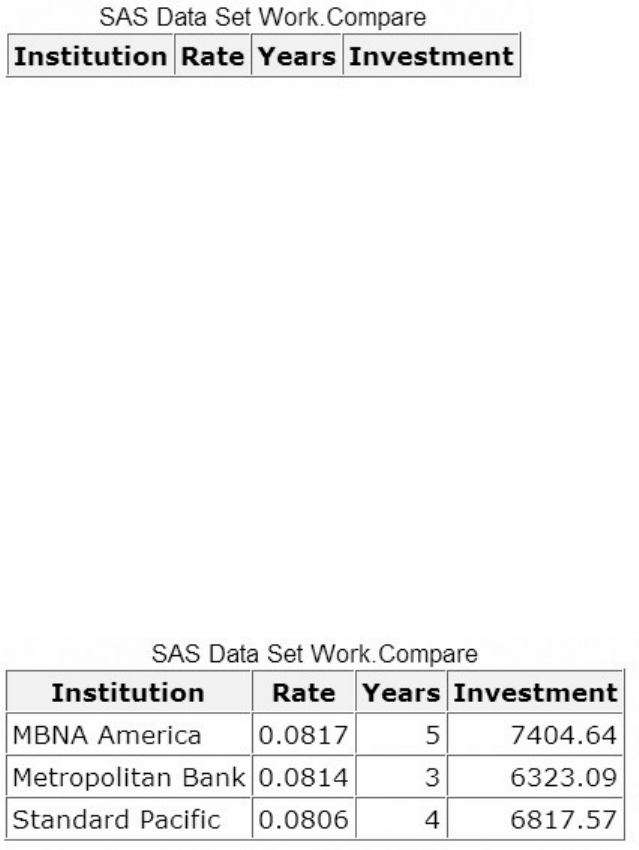
- 516 -
investment+rate*investment;
end;
run;
The index variable is used only to execute the DO loop, so it is dropped from the new data set. Notice that
the data set variable Years is used as the stop value in the iterative DO statement. As a result, the DO loop
executes the number of times specified by the current value of Years.
During each iteration of the DATA step,
an observation is read from Finance.CDRates
the value 5000 is assigned to the variable Investment
the DO loop executes, based on the current value of Years
the value of Investment is incremented (each time that the DO loop executes), using the current value of Rate.
At the bottom of the DATA step, the first observation is written to the Work.Compare data set. Control
returns to the top of the DATA step, and the next observation is read from Finance.CDRates. These steps
are repeated for each observation in Finance.CDRates. The resulting data set contains the computed values
of Investment for all observations that have been read from Finance.CDRates.
Conditionally Executing DO Loops
Overview
The iterative DO statement specifies a fixed number of iterations for the DO loop. However, there are
times when you want to execute a DO loop until a condition is reached or while a condition exists, but you
don't know how many iterations are needed.
Suppose you want to calculate the number of years required for an investment to reach $50,000. In the
DATA step below, using an iterative DO statement is inappropriate because you are trying to determine
the number of iterations required for Capital to reach $50,000.
data work.invest;
do year=1 to ? ;
Capital+2000;
- 517 -
capital+capital*.10;
end;
run;
The DO WHILE and DO UNTIL statements enable you to execute DO loops based on whether a condition
is true or false.
Using the DO UNTIL Statement
The DO UNTIL statement executes a DO loop until the expression becomes true.
General form, DO UNTIL statement:
DO UNTIL(expression);
SAS statements
END;
where expression is a valid SAS expression enclosed in parentheses.
The expression is not evaluated until the bottom of the loop, so a DO UNTIL loop always executes at least
once. When the expression is evaluated as true, the DO loop stops.
Assume you want to know how many years it will take to earn $50,000 if you deposit $2,000 each year
into an account that earns 10% interest. The DATA step below uses a DO UNTIL statement to perform the
calculation until $50,000 is reached. Each iteration of the DO loop represents one year.
data work.invest;
do until(Capital>=50000);
capital+2000;
capital+capital*.10;
Year+1;
end;
run;
During each iteration of the DO loop,
2000 is added to the value of Capital to reflect the annual deposit of $2,000
10% interest is added to Capital
the value of Year is incremented by 1.
Because there is no index variable in the DO UNTIL statement, the variable Year is created in a sum
statement to count the number of iterations of the DO loop. This program produces a data set that contains
- 518 -
the single observation shown below. To accumulate more than $50,000 in capital requires 13 years (and 13
iterations of the DO loop).
Using the DO WHILE Statement
Like the DO UNTIL statement, the DO WHILE statement executes DO loops conditionally. You can use
the DO WHILE statement to execute a DO loop while the expression is true.
General form, DO WHILE statement:
DO WHILE(expression);
SAS statements
END;
where expression is a valid SAS expression enclosed in parentheses.
An important difference between the DO UNTIL and DO WHILE statements is that the DO WHILE
expression is evaluated at the top of the DO loop. If the expression is false the first time it is evaluated, the
DO loop never executes. For example, in the following program, because the value of Capital is initially
zero, which is less than 50,000, the DO loop does not execute.
data work.invest;
do while(Capital>=50000);
capital+2000;
capital+capital*.10;
Year+1;
end;
run;
Using Conditional Clauses with the Iterative DO Statement
You have seen how the DO WHILE and DO UNTIL statements enable you to execute statements
conditionally and how the iterative DO statement enables you to execute statements a set number of times,
unconditionally.
DO WHILE (
expression
);
DO UNTIL(
expression
);
DO
index-variable
=
start
TO
stop
BY
increment
;
- 519 -
Now let's look at a form of the iterative DO statement that combines features of both conditional and
unconditional execution of DO loops.
In this DATA step, the DO UNTIL statement determines how many years it takes (13) for an investment to
reach $50,000.
data work.invest;
do until(Capital>=50000);
Year+1;
capital+2000;
capital+capital*.10;
end;
run;
Suppose you also want to limit the number of years you invest your capital to 10 years. You can add the
UNTIL or WHILE expression to an iterative DO statement to further control the number of iterations. This
iterative DO statement enables you to execute the DO loop until Capital is greater than or equal to 50000
or until the DO loop executes ten times, whichever occurs first.
data work.invest;
do year=1 to 10 until(Capital>=50000);
capital+2000;
capital+capital*.10;
end;
if year=11 then year=10;
run;
In this case, the DO loop stops executing after ten iterations, and the value of Capital never reaches 50000.
If you increase the amount added to Capital each year to 4000, the DO loop stops executing after the
eighth iteration when the value of Capital exceeds 50000.
data work.invest;
do year=1 to 10 until(Capital>=50000);
capital+4000;
capital+capital*.10;
- 520 -
end;
if year=11 then year=10;
run;
The UNTIL and WHILE specifications in an iterative DO statement function similarly to the DO UNTIL
and DO WHILE statements. Both statements require a valid SAS expression enclosed in parentheses.
DO
index-variable
=
start
TO
stop
BY
increment
UNTIL(
expression
);
DO
index-variable
=
start
TO
stop
BY
increment
WHILE(
expression
);
The UNTIL expression is evaluated at the bottom of the DO loop, so the DO loop always executes at least
once. The WHILE expression is evaluated before the execution of the DO loop. So, if the condition is
initially false, the DO loop never executes.
Creating Samples
Because it performs iterative processing, a DO loop provides an easy way to draw sample observations
from a data set. For example, suppose you would like to sample every tenth observation of the 5,000
observations in Factory.Widgets. Start with a simple DATA step:
data work.subset;
set factory.widgets;
run;
You can create the sample data set by enclosing the SET statement in a DO loop. Use the start, stop, and
increment values to select every tenth observation of the 5,000. Add the POINT= option to the SET
statement, setting the POINT= option equal to the index variable that is used in the DO loop. (You learned
about the POINT= option in Reading SAS Data Sets. )
data work.subset;
do sample=10 to 5000 by 10;
set factory.widgets point=sample;
end;
run;
Remember that, in order to prevent continuous DATA step looping, you need to add a STOP statement
when using the POINT= option. You also need to add an OUTPUT statement. Place the statement inside
the DO loop to output each observation selected. (If the OUTPUT statement were placed after the DO loop,
only the last observation would be written.)
- 521 -
data work.subset;
do sample=10 to 5000 by 10;
set factory.widgets point=sample;
output;
end;
stop;
run;
When the program runs, the DATA step reads the observations in Factory.Widgets identified by the
POINT= option. The values of the POINT= option are provided by the DO loop, which starts at 10 and
goes to 5,000 in increments of 10. The data set Work.Subset contains 500 observations.
Chapter Summary
Text Summary
Purpose of DO Loops
DO loops process groups of SAS statements repeatedly, reducing the number of statements required in
repetitive calculations.
Syntax of Iterative DO Loops
To construct an iterative DO loop, specify an index variable and the conditions that will execute the loop.
These conditions include a start value for the index variable, a stop value, and an increment value. Start,
stop, and increment values can be any number, numeric variable, or SAS expression that results in a
number.
DO Loop Execution
During each iteration of a DO loop, statements within the loop execute. Once the loop's index value
exceeds the stop value, the DO loop stops, and processing continues with the following DATA step
statement.
Generating Observations with DO Loops
Include an OUTPUT statement within the DO loop to write an observation for each iteration. This
overrides the automatic generation of output at the end of the DATA step.
Decrementing DO Loops
You can decrement a DO loop by specifying a negative value for the BY clause. The start value must be
greater than the stop value.
Specifying a Series of Items
You can specify how many times a DO loop executes by listing items in a series; the DO loop will execute
once for each item, with the index variable equal to the value of each item. A series can consist of all
numeric values, all character values (enclosed in quotation marks), or all variable names (without
quotation marks).
- 522 -
Nesting DO Loops
DO loops can run within DO loops, as long as you assign a unique index variable to each loop and
terminate each DO loop with its own END statement.
Iteratively Processing Observations from a Data Set
You can use a DO loop to read a data set and compute the value of a new variable. DO loop start and stop
values, for example, can be read from a data set.
Conditionally Executing DO Loops
The DO UNTIL statement executes a DO loop until a condition becomes true. Because the expression is
not evaluated until the bottom of the loop, a DO UNTIL loop will execute at least once. The DO WHILE
statement is used to execute a DO loop while a condition is true. Because the DO WHILE statement is
evaluated at the top of the DO loop, if the expression is initially false, the DO loop never executes.
Using Conditional Clauses with the Iterative DO Statement
DO WHILE and DO UNTIL statements can be used within iterative DO loops to combine conditional and
unconditional execution.
Creating Samples
DO loops provide an efficient way to create samples from data sets. Enclose the SET statement in a DO
loop, using the start, stop, and increment values to select the observations. Add the POINT= option to the
SET statement, setting it equal to the index variable of the DO loop. Then add a STOP statement to
prevent DATA step looping, and add an OUTPUT statement to write observations.
Syntax
DO index-variable=start TO stop BY increment;
SAS statements
END;
DO UNTIL(expression);
DO WHILE(expression);
DO index-variable=start TO stop BY increment UNTIL(expression);
DO index-variable=start TO stop BY increment WHILE(expression);
Sample Programs
Simple DO Loop
data work.earn;
Value=2000;
- 523 -
do year=1 to 20;
Interest=value*.075;
value+interest;
end;
run;
Nested DO Loops
data work.earn;
do year=1 to 20;
Capital+2000;
do month=1 to 12;
Interest=capital*(.075/12);
capital+interest;
end;
end;
run;
Conditional Clause
data work.invest;
do year=1 to 10 until(Capital>=50000);
capital+2000;
capital+capital*.10;
end;
if year=11 then year=10;
run;
Creating Samples
data work.subset;
do sample=10 to 5000 by 10;
set factory.widgets point=sample;
output;
end;
stop;
run;
Points to Remember
If you do not specify a BY clause, the increment value for DO loops is 1.
In most cases, the index variable is needed only for processing the DO loop and can be dropped from the data set.
- 524 -
The index variable is always incremented by one value beyond the stop value unless you terminate the DO loop in some other
manner.
It's easier to manage nested DO loops if you indent the statements in each loop.
Chapter Quiz
Select the best answer for each question. After completing the quiz, check your answers using the answer
key in the appendix.
Which statement is false regarding the use of DO loops?
They can contain conditional clauses.
They can generate multiple observations.
They can be used to combine DATA and PROC steps.
They can be used to read data.
During each execution of the following DO loop, the value of Earned is calculated and is added to its previous value. How
many times does this DO loop execute?
data finance.earnings;
Amount=1000;
Rate=.075/12;
do month=1 to 12;
Earned+(amount+earned)*rate;
end;
run;
0
1
12
13
On January 1 of each year, $5000 is invested in an account. Complete the DATA step below to determine the value of the
account after 15 years if a constant interest rate of ten percent is expected.
data work.invest;
...
Capital+5000;
capital+(capital*.10);
end;
run;
- 525 -
do count=1 to 15;
do count=1 to 15 by 10%;
do count=1 to capital;
do count=capital to (capital*.10);
In the data set Work.Invest, what would be the stored value for Year?
data work.invest;
do year=1990 to 2004;
Capital+5000;
capital+(capital*.10);
end;
run;
missing
1990
2004
2005
Which of the following statements is false regarding the program shown below?
data work.invest;
do year=1990 to 2004;
Capital+5000;
capital+(capital*.10);
output;
end;
run;
The OUTPUT statement writes current values to the data set immediately.
The last value for Year in the new data set is 2005.
The OUTPUT statement overrides the automatic output at the end of the DATA step.
- 526 -
The DO loop performs 15 iterations.
How many observations will the data set Work.Earn contain?
data work.earn;
Value=2000;
do year=1 to 20;
Interest=value*.075;
value+interest;
output;
end;
run;
0
1
19
20
Which of the following would you use to compare the result of investing $4,000 a year for five years in three different banks
that compound interest monthly? Assume a fixed rate for the five-year period.
DO WHILE statement
nested DO loops
DO UNTIL statement
a DO group
Which statement is false regarding DO UNTIL statements?
The condition is evaluated at the top of the loop, before the enclosed statements are executed.
The enclosed statements are always executed at least once.
SAS statements in the DO loop are executed until the specified condition is true.
The DO loop must have a closing END statement.
Select the DO WHILE statement that would generate the same result as the program below.
data work.invest;
capital=100000;
do until(Capital gt 500000);
Year+1;
capital+(capital*.10);
end;
run;

- 527 -
do while(Capital ge 500000);
do while(Capital=500000);
do while(Capital le 500000);
do while(Capital>500000);
In the following program, complete the statement so that the program stops generating observations when Distance reaches
250 miles or when 10 gallons of fuel have been used.
data work.go250;
set perm.cars;
do gallons=1 to 10 ... ;
Distance=gallons*mpg;
output;
end;
run;
while(Distance<250)
when(Distance>250)
over(Distance le 250)
until(Distance=250)
Chapter 15 Processing Variables with Arrays
Overview

- 528 -
Creating One-Dimensional Arrays
Expanding Your Use of Arrays
Additional Features
Chapter Summary
Chapter Quiz
Overview
Introduction
In DATA step programming, you often need to perform the same action on more than one variable.
Although you can process variables individually, it is easier to handle them as a group. You can do this by
using array processing.
For example, using an array and DO loop, the program below eliminates the need for 365 separate
programming statements to convert the daily temperature from Fahrenheit to Celsius for the year.
data work.report(drop=i);
set master.temps;
array daytemp{365} day1-day365;
do i=1 to 365;
daytemp{i}=5*(daytemp{i}-32)/9;
end;
run;
You can use arrays to simplify the code needed to
perform repetitive calculations
create many variables that have the same attributes
read data
rotate SAS data sets by changing variables to observations or observations to variables
compare variables
perform a table lookup.
This chapter teaches you how to define an array and how to reference elements of the array in the DATA
step.
Objectives
In this chapter, you learn to
group variables into one- and two-dimensional arrays
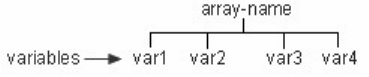
- 529 -
perform an action on array elements
create new variables with an ARRAY statement
assign initial values to array elements
create temporary array elements with an ARRAY statement.
Creating One-Dimensional Arrays
Understanding SAS Arrays
A SAS array is a temporary grouping of SAS variables under a single name. An array exists only for the
duration of the DATA step.
One reason for using an array is to reduce the number of statements that are required for processing
variables. For example, in the DATA step below, the values of seven data set variables are converted from
Fahrenheit to Celsius temperatures.
data work.report;
set master.temps;
mon=5*(mon-32)/9;
tue=5*(tue-32)/9;
wed=5*(wed-32)/9;
thr=5*(thr-32)/9;
fri=5*(fri-32)/9;
sat=5*(sat-32)/9;
sun=5*(sun-32)/9;
run;
As you can see, the assignment statements perform the same calculation on each variable in this series of
statements. Only the name of the variable changes in each statement.
By grouping the variables into a one-dimensional array, you can process the variables in a DO loop. You
use fewer statements, and the DATA step program is more easily modified or corrected.
data work.report(drop=day);
set master.temps;
array wkday{7} mon tue wed thr fri sat sun;
do day=1 to 7;
wkday{day}=5*(wkday{day}-32)/9;
end;
run;
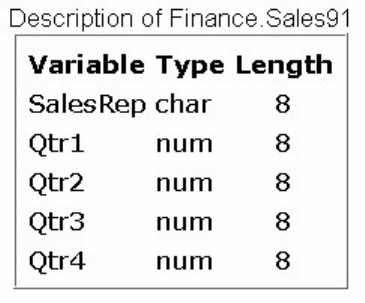
- 530 -
You will learn other uses for arrays as you continue through this chapter.
Defining an Array
To group data set variables into an array, use an ARRAY statement.
General form, ARRAY statement:
ARRAY array-name{dimension} <elements>;
where
a
y-name specifies the name of the array.
m
ension describes the number and arrangement of array elements.
m
ents lists the variables to include in the array. Array elements must be either all numeric or all character. If no elements
are listed, new variables will be created with default names.
Note: Do not give an array the same name as a variable in the same DATA step. Also, avoid using the
name of a SAS function; the array will be correct, but you won't be able to use the function in the same
DATA step, and a warning message will appear in the SAS log.
Note: You cannot use array names in LABEL, FORMAT, DROP, KEEP, or LENGTH statements.
Arrays exist only for the duration of the DATA step.
For example, in the data set Finance.Sales91, you might want to process the variables Qtr1, Qtr2, Qtr3, and
Qtr4 in the same way.
Specifying the Array Name
To group the variables in the array, first give the array a name. In this example, make the array name sales.
array sales{4} qtr1 qtr2 qtr3 qtr4;
Specifying the Dimension
- 531 -
Following the array name, you must specify the dimension of the array. The dimension describes the
number and arrangement of elements in the array. There are several ways to specify the dimension.
In a one-dimensional array, you can simply specify the number of array elements. The array elements are the variables that
you want to reference and process elsewhere in the DATA step.
array sales{4} qtr1 qtr2 qtr3 qtr4;
The dimension of an array doesn't have to be the number of array elements. You can specify a range of values for the
dimension when you define the array. For example, you can define the array sales as follows:
array sales{96:99} totals96 totals97 totals98 totals99;
You can also indicate the dimension of a one-dimensional array by using an asterisk (*). This way, SAS determines the
dimension of the array by counting the number of elements.
array sales{*} qtr1 qtr2 qtr3 qtr4;
Enclose the dimension in either parentheses, braces, or brackets.
( )
array sales{4} qtr1 qtr2 qtr3 qtr4;
[ ]
Specifying Array Elements
When specifying the elements of an array, you can list each variable name that you want to include in the
array. When listing elements, separate each element with a space. As with all SAS statements, you end the
ARRAY statement with a semicolon (;).
array sales{4} qtr1 qtr2 qtr3 qtr4;
You can also specify array elements as a variable list. Here is an example of an ARRAY statement that
groups the variables Qtr1 through Qtr4 into a one-dimensional array, using a variable list.
array sales{4} qtr1-qtr4;
Let's look more closely at array elements that are specified as variable lists.
Variable Lists as Array Elements
- 532 -
You can specify variable lists in the forms shown below. Each type of variable list is explained in more
detail following the table.
Variables and Their Forms
Variables
Form
a numbered range of variables
Var1-Varn
all numeric variables
_NUMERIC_
all character variables
_CHARACTER_
all character or all numeric variables
_ALL_
A Numbered Range of Variables
Qtr1 Qtr2 Qtr3 Qtr4 → Qtr1-Qtr4
The variables must have the same name except for the last character or characters.
The last character of each variable must be numeric.
The variables must be numbered consecutively.
array sales{4} qtr1-qtr4;
In the preceding example, you would use sales(4) to reference Qtr4. However, the index of an array doesn't
have to range from one to the number of array elements. You can specify a range of values for the index
when you define the array. For example, you can define the array sales as follows:
array sales{96:99} totals96-totals99;
All Numeric Variables
Amount Rate Term → _NUMERIC_
- 533 -
_NUMERIC_ specifies all numeric variables that have already been defined in the current DATA step.
array sales{*} _numeric_;
All Character Variables
FrstName LastName Address → _CHARACTER_
_CHARACTER_ specifies all character variables that have already been defined in the current DATA
step.
array sales{*} _character_;
All Variables
FrstName LastName Address → _ALL_
Amount Rate Term → _ALL_
_ALL_ specifies all variables that have already been defined in the current DATA step. The variables must
all be of the same type: all character or all numeric.
array sales{*} _all_;
Referencing Elements of an Array
Now let's look at some ways you can use arrays to process variables in the DATA step.
data work.report(drop=day);
set master.temps;
array wkday{7} mon tue wed thr fri sat sun;
do day=1 to 7;
if wkday{day}>95 then output;
end;
run;
data work.weights(drop=day);
set master.class;
array wt{6} w1-w6;
do day=1 to 6;
- 534 -
wt{day}=wt{day}*2.2;
end;
run;
data work.new(drop=day);
set master.synyms;
array term{9} also1-also9;
do day=1 to 9;
if term{day} ne ' ' then output;
end;
run;
The ability to reference the elements of an array by an index value is what gives arrays their power.
Typically, arrays are used with DO loops to process multiple variables and to perform repetitive
calculations.
array quarter{4} jan apr jul oct;
do qtr=1 to 4;
YearGoal=quarter{qtr}*1.2;
end;
When you define an array in a DATA step, a subscript value is assigned to each array element. The
subscript values are assigned in the order of the array elements.
1 2 3 4
array quarter{4} jan apr jul oct;
do qtr=1 to 4;
YearGoal=quarter{qtr}*1.2;
end;
You use an array reference to perform an action on an array element during execution. To reference an
array element in the DATA step, specify the name of the array, followed by a subscript value enclosed in
parentheses.
General form, ARRAY reference:
array-name(subscript)
where subscript
n
closed in parentheses, braces, or brackets
c
ifies a variable, a SAS expression, or an integer
w
ithin the lower and upper bounds of the dimension of the array.
- 535 -
When used in a DO loop, the index variable of the iterative DO statement can reference each element of
the array.
array quarter{4} jan apr jul oct;
do i=1 to 4;
YearGoal=quarter{i}*1.2;
end;
For example, the DO loop above increments the index variable i from the lower bound of the quarter array,
1, to the upper bound, 4. The following sequence illustrates this process:
1
array quarter{4} jan apr jul oct;
do i=1 to 4;
YearGoal=quarter{1}*1.2;
end;
2
array quarter{4} jan apr jul oct;
do i=1 to 4;
YearGoal=quarter{2}*1.2;
end;
3
array quarter{4} jan apr jul oct;
do i=1 to 4;
YearGoal=quarter{3}*1.2;
end;
4
array quarter{4} jan apr jul oct;
do i=1 to 4;
YearGoal=quarter{4}*1.2;
end;
During each iteration of the DO loop, quarter{i} refers to an element of the array quarter in the order
listed.
Let's look at another example of a DATA step that contains an array with a DO loop.
The Health Center of a company conducts a fitness class for its employees. Each week, participants are
weighed so that they can monitor their progress. The weight data, currently stored in kilograms, needs to
be converted to pounds.
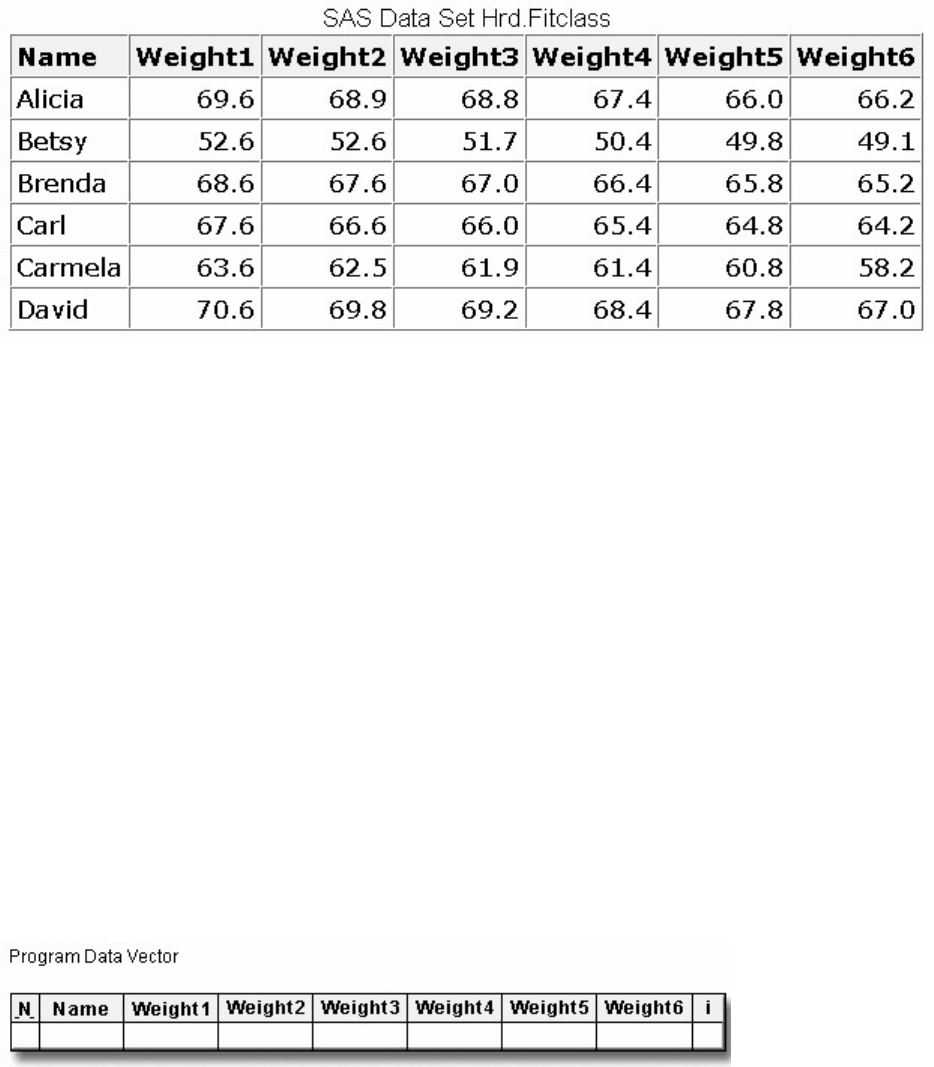
- 536 -
You can use a DO loop to update the variables Weight1 through Weight6 for each observation in the
Hrd.Fitclass data set.
data hrd.convert(drop=i);
set hrd.fitclass;
array wt{6} weight1-weight6;
do i=1 to 6;
wt{i}=wt{i}*2.2046;
end;
run;
Compilation and Execution
To understand how the DO loop processes the array elements, let's examine the compilation and execution
phases of this DATA step.
During compilation, the program data vector is created.
The DATA step is scanned for syntax errors. If there are any syntax errors in the ARRAY statement, they
are detected at this time.
The index values of the array elements are assigned. Note that the array name is not included in the
program data vector. The array exists only for the duration of the DATA step.
During the first iteration of the DATA step, the first observation in Hrd.Fitclass is read into the program
data vector.
data hrd.convert;
set hrd.fitclass;
array wt{6} weight1-weight6;
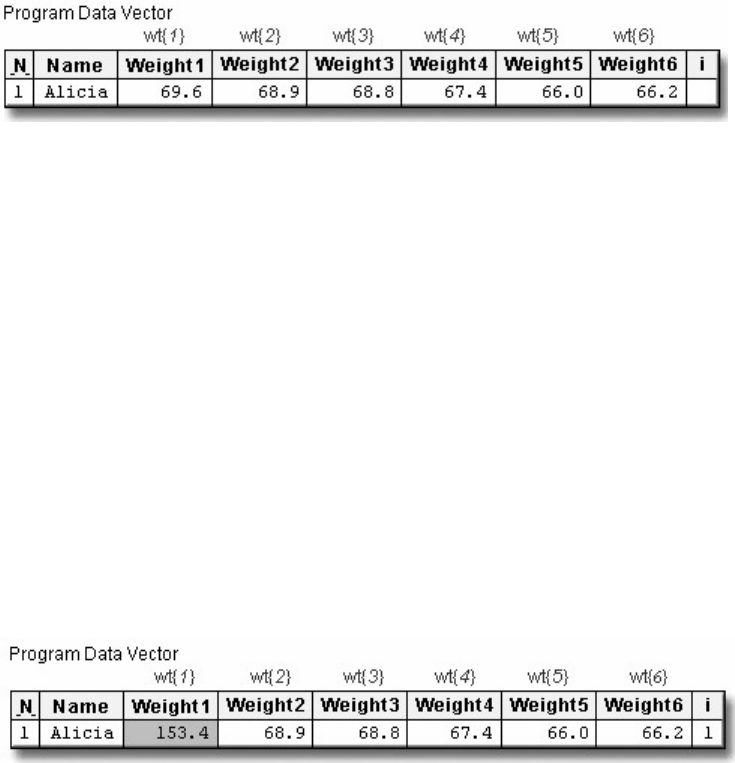
- 537 -
do i=1 to 6;
wt{i}=wt{i}*2.2046;
end;
run;
Because the ARRAY statement is a compile-time only statement, it is ignored during execution. The DO
statement is executed next.
During the first iteration of the DO loop, the index variable i is set to 1. As a result, the array reference
wt{i} becomes wt{1}. Because wt{1} refers to the first array element, Weight1, the value of Weight1 is
converted from kilograms to pounds.
data hrd.convert;
set hrd.fitclass;
array wt{6} weight1-weight6;
do i=1 to 6;
wt{1}=wt{1}*2.2046;
end;
run;
Graphical Display of Array Processing
As the DATA step continues its DO loop iterations, the index variable i is changed from 1 to 2, 3, 4, 5, and
6, causing Weight1 through Weight6 to receive new values in the program data vector.
data hrd.convert;
set hrd.fitclass;
array wt{6} weight1-weight6;
do i=1 to 6;
wt{i}=wt{i}*2.2046;
end;
run;
Using the DIM Function in an Iterative DO Statement
- 538 -
When using DO loops to process arrays, you can also use the DIM function to specify the TO clause of the
iterative DO statement. For a one-dimensional array, specify the array name as the argument for the DIM
function. The function returns the number of elements in the array.
General form, DIM function:
DIM(array-name)
where array-name specifies the array.
In this example, dim(wt) returns a value of 6.
data hrd.convert;
set hrd.fitclass;
array wt{*} weight1-weight6;
do i=1 to dim(wt);
wt{i}=wt{i}*2.2046;
end;
run;
When you use the DIM function, you do not have to re-specify the stop value of an iterative DO statement
if you change the dimension of the array.
data hrd.convert;
set hrd.fitclass;
array wt{*} weight1-weight6;
do i=1 to dim(wt);
wt{i}=wt{i}*2.2046;
end;
run;
data hrd.convert;
set hrd.fitclass;
array wt{*} weight1-weight10;
do i=1 to dim(wt);
wt{i}=wt{i}*2.2046;
end;
run;
Expanding Your Use of Arrays
Creating Variables in an ARRAY Statement
So far, you have learned several ways to reference existing variables in an ARRAY statement. You can
also create variables in an ARRAY statement by omitting the array elements from the statement. If you do
not reference existing variables, SAS automatically creates new variables for you and assigns default
names to them. The default name is the array-name followed by consecutive numbers 1 to the dimension
of the array.
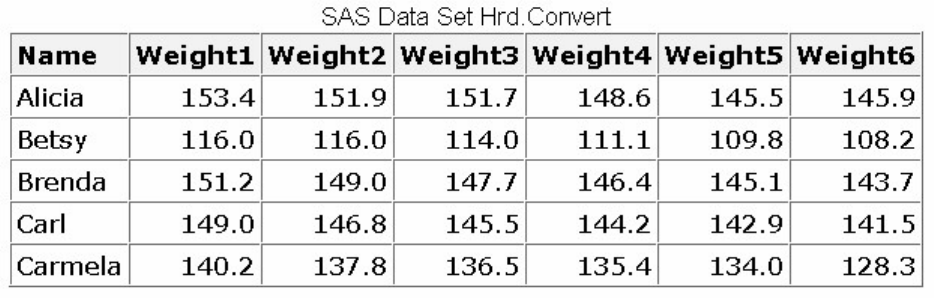
- 539 -
General form, ARRAY statement to create new variables:
ARRAY array-name{dimension};
where
a
y-name specifies the name of the array.
m
ension describes the number and arrangement of array elements.
For example, suppose you need to calculate the weight gain or loss from week to week for each member of
a fitness class, shown below.
You'd like to create variables that contain this weekly difference. To perform the calculation, you first
group the variables Weight1 through Weight6 into an array.
data hrd.diff;
set hrd.convert;
array wt{6} weight1-weight6;
Next, you want to create the new variables to store the differences between the six recorded weights. You
can use an additional ARRAY statement without elements to create the new variables, WgtDiff1 to
WgtDiff5.
data hrd.diff;
set hrd.convert;
array wt{6} weight1-weight6;
array WgtDiff{5};
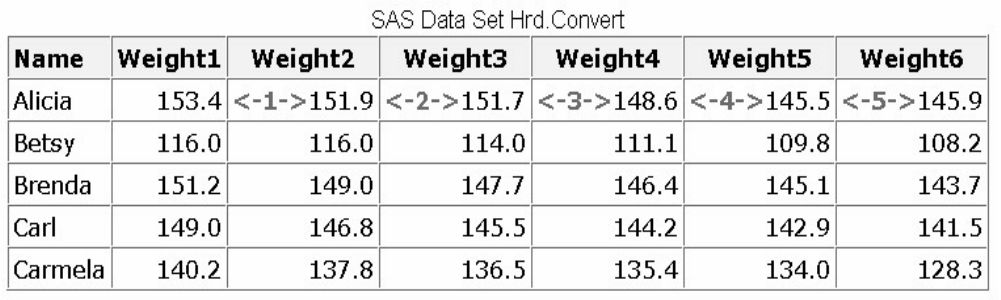
- 540 -
Remember, when creating variables in an ARRAY statement, you do not need to specify array elements as
long as you specify how many elements will be in the array.
array WgtDiff{5};
Default Variable Names
The default variable names are created by concatenating the array name and the numbers 1, 2, 3, and so on,
up to the array dimension.
array WgtDiff{5};
. . . . .
. . . . .
. . . . .
. . . . .
. . . . .
. . . . .
WgtDiff1 WgtDiff2 WgtDiff3 WgtDiff4 WgtDiff5
If you prefer, you can specify individual variable names. To specify variable names, you list each name as
an element of the array. The following ARRAY statement creates the numeric variables Oct12, Oct19,
Oct26, Nov02, and Nov09.
array WgtDiff{5} Oct12 Oct19 Oct26 Nov02 Nov09;
array WgtDiff{5};
. . . . .
. . . . .
. . . . .
. . . . .
. . . . .
. . . . .
Oct12 Oct19 Oct26 Nov02 Nov09
Arrays of Character Variables

- 541 -
To create an array of character variables, add a dollar sign ($) after the array dimension.
array firstname{5} $;
By default, all character variables that are created in an ARRAY statement are assigned a length of 8. You
can assign your own length by specifying the length after the dollar sign.
array firstname{5} $ 24;
The length that you specify is automatically assigned to all variables that are created by the ARRAY
statement.
During the compilation of the DATA step, the variables that this ARRAY statement creates are added to
the program data vector and are stored in the resulting data set.
data hrd.diff;
set hrd.convert;
array wt{6} Weight1-Weight6;
array WgtDiff{5};
When referencing the array elements, be careful not to confuse the array references WgtDiff{1} through
WgtDiff{5} (note the braces) with the variable names WgtDiff1 through WgtDiff5. The program data
vector below shows the relationship between the array references and the corresponding variable names.
Now you can use a DO loop to calculate the differences between each of the recorded weights. Notice that
each value of WgtDiff{i} is calculated by subtracting wt{i} from wt{i+1}. By manipulating the index
variable, you can easily reference any array element.
data hrd.diff;
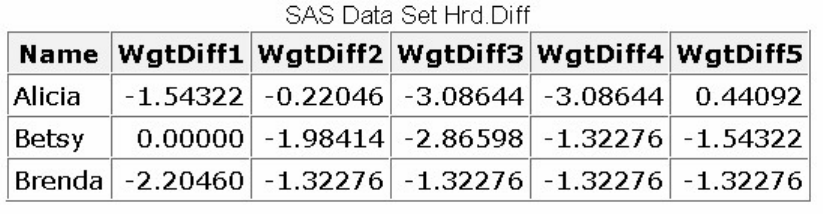
- 542 -
set hrd.convert;
array wt{6} weight1-weight6;
array WgtDiff{5};
do i=1 to 5;
wgtdiff{i}=wt{i+1}-wt{i};
end;
run;
A portion of the resulting data set is shown below.
Assigning Initial Values to Arrays
Sometimes it is useful to assign initial values to elements of an array when you define the array.
array goal{4} g1 g2 g3 g4 (initial values);
To assign initial values in an ARRAY statement:
Place the values after the array elements.
array goal{4} g1 g2 g3 g4 (9000 9300 9600 9900);
Specify one initial value for each corresponding array element.
↓ ↓ ↓ ↓
array goal{4} g1 g2 g3 g4 (9000 9300 9600 9900);
↑ ↑ ↑ ↑
Separate each value with a comma or blank.
↓ ↓ ↓
array goal{4} g1 g2 g3 g4 (9000 9300 9600 9900);
Enclose the initial values in parentheses.
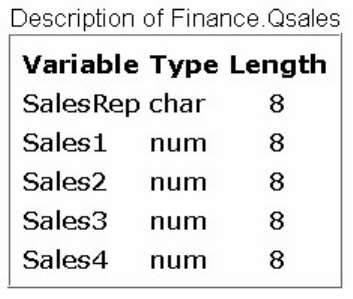
- 543 -
↓ ↓
array goal{4} g1 g2 g3 g4 (9000 9300 9600 9900);
Enclose each character value in quotation marks.
↓ ↓ ↓ ↓ ↓ ↓
array col{3} $ color1-color3 ('red','green','blue');
It's also possible to assign initial values to an array without specifying each array element. The following
statement creates the variables Var1, Var2, Var3, and Var4, and assigns them initial values of 1, 2, 3, and
4:
array Var{4} (1 2 3 4);
For this example, assume that you have the task of comparing the actual sales figures in the Finance.Qsales
data set to the sales goals for each sales representative at the beginning of the year. The sales goals are not
recorded in Finance.Qsales.
The DATA step below reads the Finance.Qsales data set to create the Finance.Report data set. The
ARRAY statement creates an array to process sales data for each quarter.
data finance.report;
set finance.qsales;
array sale{4} sales1-sales4;
To compare the actual sales to the sales goals, you must create the variables for the sales goals and assign
values to them.
data finance.report;
set finance.qsales;
array sale{4} sales1-sales4;
array Goal{4} (9000 9300 9600 9900);
- 544 -
A third ARRAY statement creates the variables Achieved1 through Achieved4 to store the comparison of
actual sales versus sales goals.
data finance.report;
set finance.qsales;
array sale{4} sales1-sales4;
array Goal{4} (9000 9300 9600 9900);
array Achieved{4};
do i=1 to 4;
achieved{i}=100*sale{i}/goal{i};
end;
run;
A DO loop executes four times to calculate the value of each element of the achieved array (expressed as a
percentage).
data finance.report;
set finance.qsales;
array sale{4} sales1-sales4;
array Goal{4} (9000 9300 9600 9900);
array Achieved{4};
do i=1 to 4;
achieved{i}=100*sale{i}/goal{i};
end;
run;
Before submitting this DATA step, you can drop the index variable from the new data set by adding a
DROP= option to the DATA statement.
data finance.report(drop=i);
set finance.qsales;
array sale{4} sales1-sales4;
array Goal{4} (9000 9300 9600 9900);
array Achieved{4};
do i=1 to 4;
achieved{i}=100*sale{i}/goal{i};
end;
run;
This is an example of a simple table-lookup program. The resulting data set contains the variables that
were read from Finance.Qsales, plus the eight variables that were created with ARRAY statements.
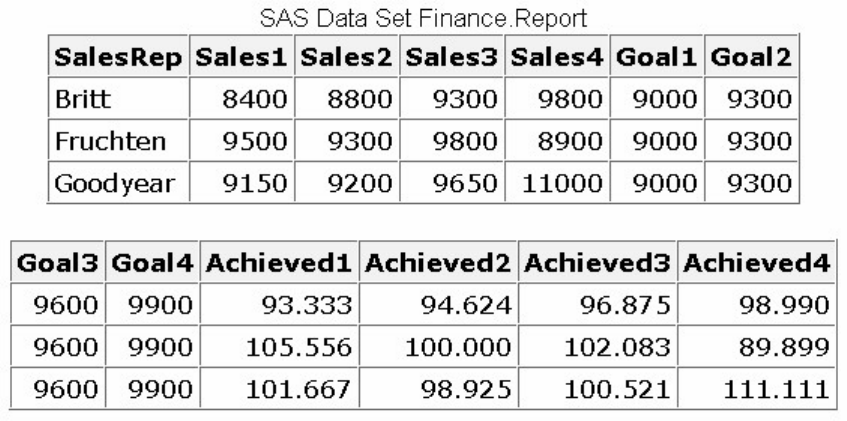
- 545 -
Variables to which initial values are assigned in an ARRAY statement are automatically retained.
The variables Goal1 through Goal4 should not be stored in the data set, because they are needed only to
calculate the values of Achieved1 through Achieved4. The next example shows you how to create
temporary array elements.
Creating Temporary Array Elements
To create temporary array elements for DATA step processing without creating new variables, specify
_TEMPORARY_ after the array name and dimension.
data finance.report(drop=i);
set finance.qsales;
array sale{4} sales1-sales4;
array goal{4} _temporary_ (9000 9300 9600 9900);
array Achieved{4};
do i=1 to 4;
achieved{i}=100*sale{i}/goal{i};
end;
run;
Temporary array elements do not appear in the resulting data set.
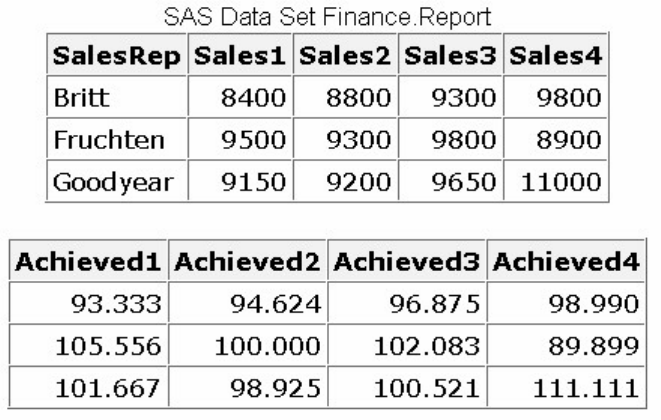
- 546 -
Temporary array elements are useful when the array is needed only to perform a calculation. You can
improve performance time by using temporary array elements.
Understanding Multidimensional Arrays
So far, you have learned how to group variables into one-dimensional arrays. You can also group variables
into table-like structures called multidimensional arrays. This section teaches you how to define and use
two-dimensional arrays, which are a common type of multidimensional array.
Suppose you want to write a DATA step to compare responses on a quiz to the correct answers. As long as
there is only one correct answer per question, this is a simple one-to-one comparison.
Resp1 → Answer1
Resp2 → Answer2
Resp3 → Answer3
Resp4 → Answer4
However, if there is more than one correct answer per question, you must compare each response to each
possible correct answer in order to determine whether there is a match.
Resp1 → Answer1 Answer2 Answer3
Resp2 → Answer4 Answer5 Answer6
Resp3 → Answer7 Answer8 Answer9
Resp4 → Answer10 Answer11 Answer12
You can process the above data more easily by grouping the Answer variables into a two-dimensional
array. Just as you can think of a one-dimensional array as a single row of variables, as in this example ...
Answer1 Answer2 Answer3 Answer4 ... Answer9 Answer10 Answer11 Answer12
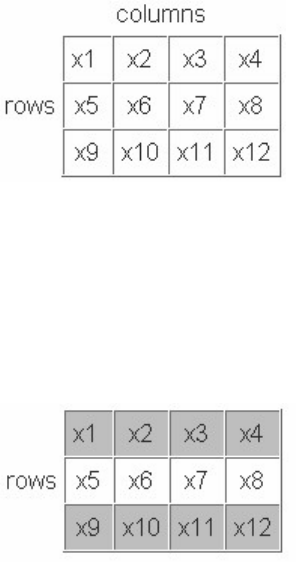
- 547 -
... you can think of a two-dimensional array as multiple rows of variables.
Answer1 Answer2 Answer3
Answer4 Answer5 Answer6
Answer7 Answer8 Answer9
Answer10 Answer11 Answer12
Defining a Multidimensional Array
To define a multidimensional array, you specify the number of elements in each dimension, separated by a
comma. This ARRAY statement defines a two-dimensional array:
array new{3,4} x1-x12;
In a two-dimensional array, the two dimensions can be thought of as a table of rows and columns.
array new{r,c} x1-x12;
The first dimension in the ARRAY statement specifies the number of rows.
↓
array new{3,4} x1-x12;
The second dimension specifies the number of columns.
↓
array new{3,4} x1-x12;

- 548 -
You can reference any element of the array by specifying the two dimensions. In the example below, you
can perform an action on the variable x7 by specifying the array reference new(2,3). You can easily locate
the array element in the table by finding the row (2), then the column (3).
array new{3,4} x1-x12;
new(2,3)=0;
When you define a two-dimensional array, the array elements are grouped in the order in which they are
listed in the ARRAY statement. For example, the array elements x1 through x4 can be thought of as the
first row of the table.
↓ ↓ ↓ ↓
array new{3,4} x1 x2 x3 x4 x5 x6 x7 x8 x9 x10 x11 x12;
The elements x5 through x8 become the second row of the table, and so on.
↓ ↓ ↓ ↓
array new{3,4} x1 x2 x3 x4 x5 x6 x7 x8 x9 x10 x11 x12;
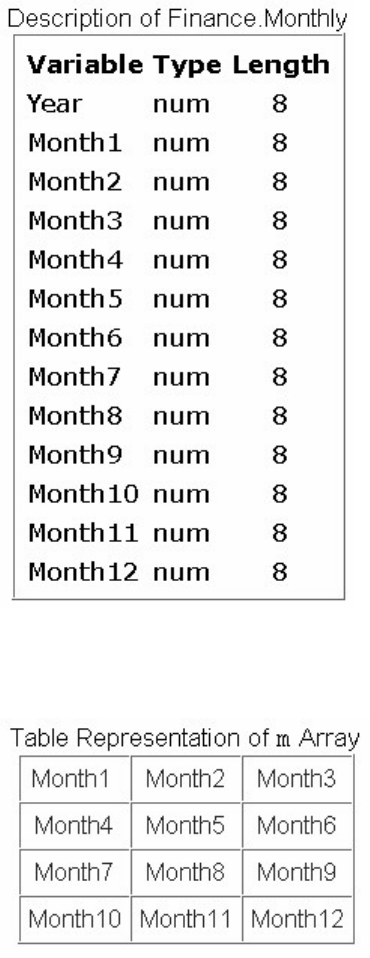
- 549 -
Referencing Elements of a Two-Dimensional Array
Multidimensional arrays are typically used with nested DO loops. The next example uses a
one-dimensional array, a two-dimensional array, and a nested DO loop to re-structure a set of variables.
Your company's sales figures are stored by month in the SAS data set Finance.Monthly. Your task is to
generate a new data set of quarterly sales rather than monthly sales.
Defining the array m{4,3} puts the variables Month1 through Month12 into four groups of three months
(calendar quarters).
data finance.quarters;
set finance.monthly;
array m{4,3} month1-month12;
Defining the array Qtr{4} creates the numeric variables Qtr1, Qtr2, Qtr3, Qtr4, which will be used to sum
the sales for each quarter.
- 550 -
data finance.quarters;
set finance.monthly;
array m{4,3} month1-month12;
array Qtr{4};
A nested DO loop is used to reference the values of the variables Month1 through Month12 and to
calculate the values of Qtr1 through Qtr4. Because the variables i and j are used only for loop processing,
the DROP= option is used to exclude them from the Finance.Quarters data set.
data finance.quarters(drop=i j);
set finance.monthly;
array m{4,3} month1-month12;
array Qtr{4};
do i=1 to 4;
qtr{i}=0;
do j=1 to 3;
qtr{i}+m{i,j};
end;
end;
run;
Each element in the Qtr array represents the sum of one row in the m array. The number of elements in the
Qtr array should match the first dimension of the m array (that is, the number of rows in the m array). The
first DO loop executes once for each of the four elements of the Qtr array.
The assignment statement, qtr{i}=0, sets the value of qtr{i} to zero after each iteration of the first DO loop.
Without the assignment statement, the values of Qtr1, Qtr2, Qtr3, and Qtr4 would accumulate across
iterations of the DATA step due to the qtr{i}+m{i,j} sum statement within the DO loop.
data finance.quarters(drop=i j);
set finance.monthly;
array m{4,3} month1-month12;
array Qtr{4};
do i=1 to 4;
qtr{i}=0;
do j=1 to 3;
qtr{i}+m{i,j};
end;
end;
run;
The second DO loop executes the same number of times as the second dimension of the m array (that is,
the number of columns in each row of the m array).

- 551 -
data finance.quarters(drop=i j);
set finance.monthly;
array m{4,3} month1-month12;
array Qtr{4};
do i=1 to 4;
qtr{i}=0;
do j=1 to 3;
qtr{i}+m{i,j};
end;
end;
run;
To see how the nested DO loop processes these arrays, let's examine the execution of this DATA step.
When this DATA step is compiled, the program data vector is created. The PDV contains the variables
Year, Month1 through Month12, and the new variables Qtr1 through Qtr4. (Only the beginning and ending
portions of the program data vector are represented here.)
data finance.quarters(drop=i j);
set finance.monthly;
array m{4,3} month1-month12;
array Qtr{4};
do i=1 to 4;
qtr{i}=0;
do j=1 to 3;
qtr{i}+m{i,j};
end;
end;
run;
During the first execution of the DATA step, the values of the first observation of Finance.Monthly are
read into the program data vector. When the first DO loop executes the first time, the index variable i is set
to 1.
data finance.quarters(drop=i j);
set finance.monthly;
array m{4,3} month1-month12;
array Qtr{4};
do i=1 to 4; i=1
qtr{i}=0;
do j=1 to 3;
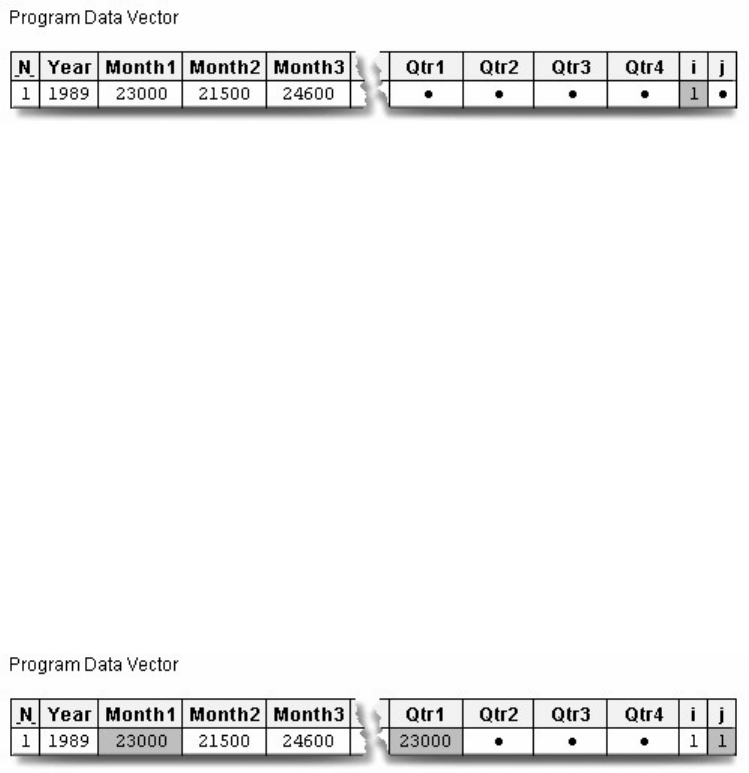
- 552 -
qtr{i}+m{i,j};
end;
end;
run;
During the first iteration of the nested DO loop, the value of Month1, which is referenced by m(i,j), is
added to Qtr1.
data finance.quarters(drop=i j);
set finance.monthly;
array m{4,3} month1-month12;
array Qtr{4};
do i=1 to 4; i=1
qtr{i}=0;
> do j=1 to 3; j=1
qtr(1)+m(1,1);
end;
end;
run;
During the second iteration of the nested DO loop, the value of Month2, which is referenced by m (i,j), is
added to Qtr1.
data finance.quarters(drop=i j);
set finance.monthly;
array m{4,3} month1-month12;
array Qtr{4};
do i=1 to 4; i=1
qtr{i}=0;
> do j=1 to 3; j=2
qtr{1}+m{1,2};
end;
end;
run;
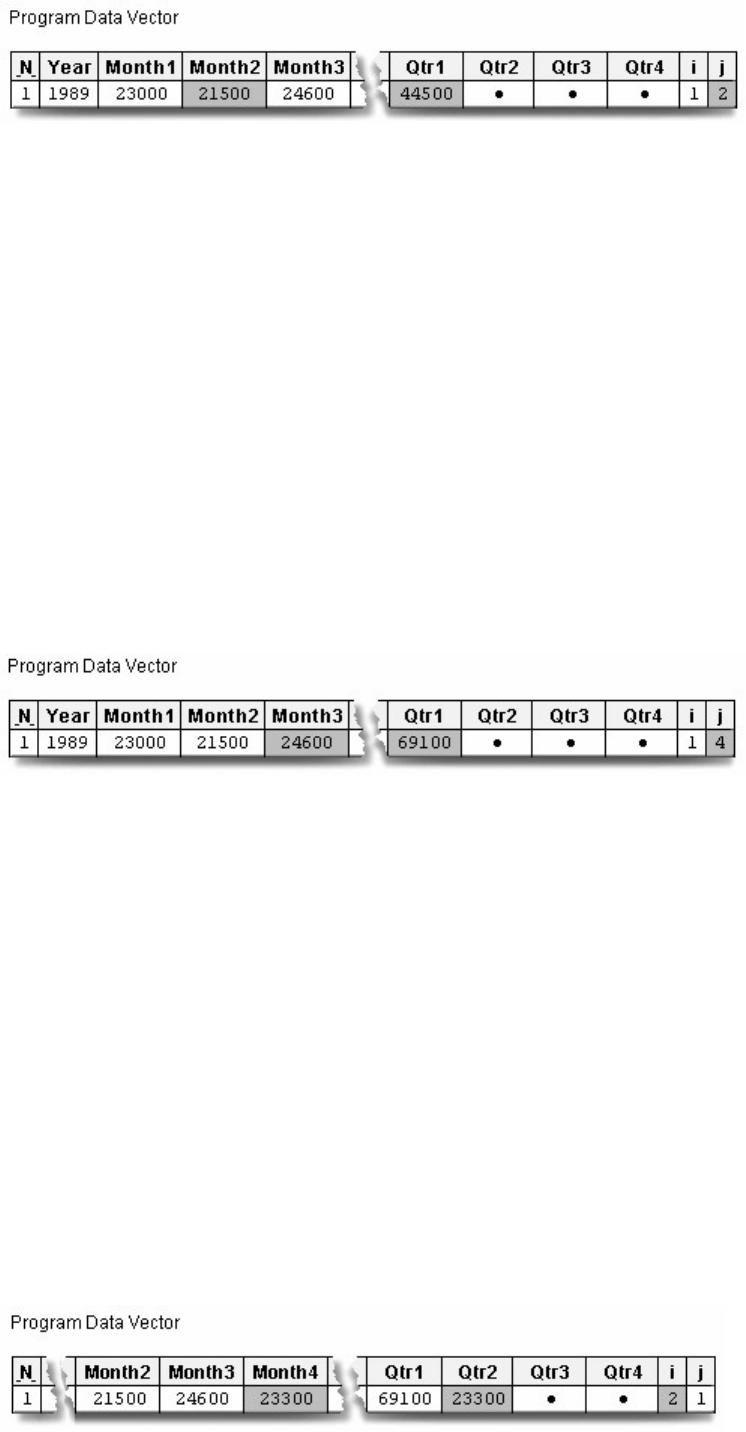
- 553 -
The nested DO loop continues to execute until the index variable j exceeds the stop value, 3. When the
nested DO loop completes execution, the total sales for the first quarter, Qtr1, have been computed.
data finance.quarters(drop=i j);
set finance.monthly;
array m{4,3} month1-month12;
array Qtr{4};
do i=1 to 4; i=1
qtr{i}=0;
> do j=1 to 3; j=3
qtr{1}+m{1,3};
end;
end;
run;
The outer DO loop increments i to 2, and the process continues for the array element Qtr2 and the m array
elements Month4 through Month6.
data finance.quarters(drop=i j);
set finance.monthly;
array m{4,3} month1-month12;
array Qtr{4};
> do i=1 to 4; i=2
qtr{i}=0;
do j=1 to 3; j=1
qtr{i}+m{i,j};
end;
end;
run;
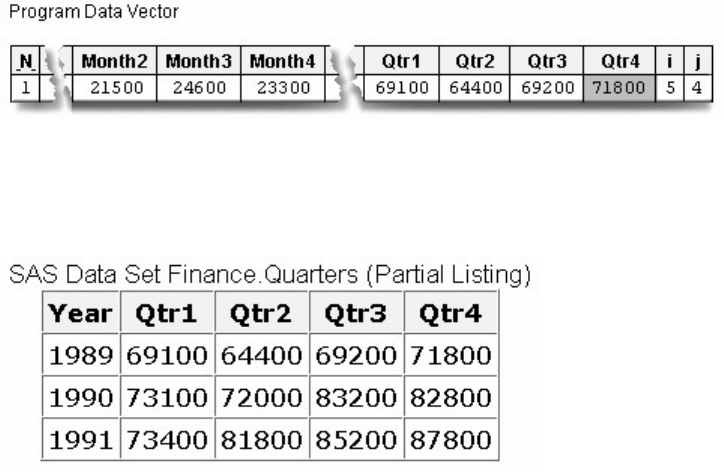
- 554 -
After the outer DO loop completes execution, the end of the DATA step is reached, and the first
observation is written to the data set Finance.Quarters.
data finance.quarters(drop=i j);
set finance.monthly;
array m{4,3} month1-month12;
array Qtr{4};
> do i=1 to 4; i=5 (loop ends)
qtr{i}=0;
do j=1 to 3;
qtr{i}+m{i,j};
end;
end;
run;
What you have seen so far represents the first iteration of the DATA step. All observations in the data set
Finance.Monthly are processed in the same manner. Below is a portion of the resulting data set, which
contains the sales figures grouped by quarters.
Additional Features
You've seen a number of uses for arrays, including creating variables, performing repetitive calculations,
and performing table lookups. You can also use arrays for rotating (transposing) a SAS data set.
When you rotate a SAS data set, you change variables to observations or observations to variables. For
example, suppose you want to rotate the Finance.Funddrive data set to create four output observations
from each input observation.

- 555 -
The following program rotates the data set and lists the first 16 observations in the new data set.
data work.rotate(drop=qtr1-qtr4);
set finance.funddrive;
array contrib{4} qtr1-qtr4;
do Qtr=1 to 4;
Amount=contrib{qtr};
output;
end;
run;
proc print data=rotate(obs=16) noobs;
run;
The First 16 Observations in the New, Rotated Data Set

- 556 -
Chapter Summary
Text Summary
Purpose of SAS Arrays
An array is a temporary grouping of variables under a single name. This can reduce the number of
statements needed to process variables and can simplify the maintenance of DATA step programs.
Defining an Array
To group variables into an array, use an ARRAY statement that specifies the array's name; its dimension
enclosed in braces, brackets, or parentheses; and the elements to include. For example: array sales{4} qtr1
qtr2 qtr3 qtr4;
Variable Lists as Array Elements
You can use a variable list to specify array elements. Depending on the form of the variable list, it can
specify all numeric or all character variables, or a numbered range of variables.
Referencing Elements of an Array
When you define an array in a DATA step, a subscript is assigned to each element. During execution, you
can use an array reference to perform actions on specific array elements. When used in a DO loop, for
example, the index variable of the iterative DO statement can reference each element of the array.
The DIM Function
- 557 -
When using DO loops to process arrays, you can also use the DIM function to specify the TO clause of the
iterative DO statement. When you use the DIM function, you do not have to re-specify the stop value of a
DO statement if you change the dimension of the array.
Creating Variables with the ARRAY Statement
If you don't specify array elements in an ARRAY statement, SAS automatically creates variable names for
you by concatenating the array name and the numbers 1, 2, 3 ... up to the array dimension. To create an
array of character variables, add a dollar sign ($) after the array dimension. By default, all character
variables that are created with an ARRAY statement are assigned a length of 8; however, you can specify a
different length after the dollar sign.
Assigning Initial Values to Arrays
To assign initial values in an ARRAY statement, place the values in parentheses after the array elements,
specifying one initial value for each array element and separating each value with a comma or blank. To
assign initial values to character variables, enclose each value in quotation marks.
Creating Temporary Array Elements
You can create temporary array elements for DATA step processing without creating additional variables.
Just specify _TEMPORARY_ after the array name and dimension. This is useful when the array is needed
only to perform a calculation.
Multidimensional Arrays
To define a multidimensional array, specify the number of elements in each dimension, separated by a
comma. For example, array new{3,4} x1-x12; defines a two-dimensional array, with the first dimension
specifying the number of rows (3) and the second dimension specifying the number of columns (4).
Referencing Elements of a Two-Dimensional Array
Multidimensional arrays are typically used with nested DO loops. If a DO loop processes a
two-dimensional array, you can reference any element within the array by specifying the two dimensions.
Rotating Data Sets
You can use arrays to rotate a data set. Rotating a data set changes variables to observations or
observations to variables.
Syntax
ARRAY array-name{dimension} <elements>;
array-name(subscript)
DIM(array-name)
Sample Programs
data work.report(drop=i);
- 558 -
set master.temps;
array wkday{7} mon tue wed thr fri sat sun;
do i=1 to 7;
wkday{i}=5*(wkday{i}-32)/9;
end;
run;
data hrd.convert(drop=i);
set hrd.fitclass;
array wt{6} weight1-weight6;
do i=1 to dim(wt);
wt{i}=wt{i}*2.2046;
end;
run;
data hrd.diff(drop=i);
set hrd.convert;
array wt{6} weight1-weight6;
array WgtDiff{5};
do i=1 to 5;
wgtdiff{i}=wt{i+1}-wt{i};
end;
run;
data finance.report(drop=i);
set finance.qsales;
array sale{4} sales1-sales4;
array goal{4} _temporary_ (9000 9300 9600 9900);
array Achieved{4};
do i=1 to 4;
achieved{i}=100*sale{i}/goal{i};
end;
run;
data finance.quarters(drop=i j);
set finance.monthly;
array m{4,3} month1-month12;
array Qtr{4};
do i=1 to 4;
qtr{i}=0;
do j=1 to 3;
qtr{i}+m{i,j};
end;
end;
run;
- 559 -
Points to Remember
A SAS array exists only for the duration of the DATA step.
Do not give an array the same name as a variable in the same DATA step. Also, avoid using the name of a SAS function as an
array name; the array will be correct, but you won't be able to use the function in the same DATA step, and a warning will
be written to the SAS log.
You can indicate the dimension of a one-dimensional array with an asterisk (*) as long as you specify the elements of the
array.
When referencing array elements, be careful not to confuse variable names with the array references.
Chapter Quiz
Select the best answer for each question. After completing the quiz, check your answers using the answer
key in the appendix.
Which statement is false regarding an ARRAY statement?
It is an executable statement.
It can be used to create variables.
It must contain either all numeric or all character elements.
It must be used to define an array before the array name can be referenced.
What belongs within the braces of this ARRAY statement?
array contrib{?} qtr1-qtr4;
quarter
quarter*
1-4
4
For the program below, select an iterative DO statement to process all elements in the contrib array.
- 560 -
data work.contrib;
array contrib{4} qtr1-qtr4;
...
contrib{i}=contrib{i}*1.25;
end;
run;
do i=4;
do i=1 to 4;
do until i=4;
do while i le 4;
What is the value of the index variable that references Jul in the statements below?
array quarter{4} Jan Apr Jul Oct;
do i=1 to 4;
yeargoal=quarter{i}*1.2;
end;
1
2
3
4
Which DO statement would not process all the elements in the factors array shown below?
array factors{*} age height weight bloodpr;

- 561 -
do i=1 to dim(factors);
do i=1 to dim(*);
do i=1,2,3,4;
do i=1 to 4;
Which statement below is false regarding the use of arrays to create variables?
The variables are added to the program data vector during the compilation of the DATA step.
You do not need to specify the array elements in the ARRAY statement.
By default, all character variables are assigned a length of eight.
Only character variables can be created.
For the first observation, what is the value of diff{i} at the end of the second iteration of the DO loop?
array wt{*} weight1-weight10;
array diff{9};
do i=1 to 9;
diff{i}=wt{i+1}-wt{i};
end;
15
10
8
- 562 -
-7
Finish the ARRAY statement below to create temporary array elements that have initial values of 9000, 9300, 9600, and
9900.
array goal{4} ... ;
_temporary_ (9000 9300 9600 9900)
temporary (9000 9300 9600 9900)
_temporary_ 9000 9300 9600 9900
(temporary) 9000 9300 9600 9900
Based on the ARRAY statement below, select the array reference for the array element q50.
array ques{3,25} q1-q75;
ques{q50}
ques{1,50}
ques{2,25}
ques{3,0}
Select the ARRAY statement that defines the array in the following program.
data coat;

- 563 -
input category high1-high3 / low1-low3;
array compare{2,3} high1-high3 low1-low3;
do i=1 to 2;
do j=1 to 3;
compare{i,j}=round(compare{i,j}*1.12);
end;
end;
datalines;
5555 9 8 7 6
4 3 2 1
8888 21 12 34 64
13 14 15 16
;
run;
array compare{1,6} high1-high3 low1-low3;
array compare{2,3} high1-high3 low1-low3;
array compare{3,2} high1-high3 low1-low3;
array compare{3,3} high1-high3 low1-low3;
Chapter 16 Reading Raw Data in Fixed Fields
Overview
Review of Column Input
Identifying Nonstandard Numeric Data
Choosing an Input Style
Using Formatted Input
Using Informats
Record Formats
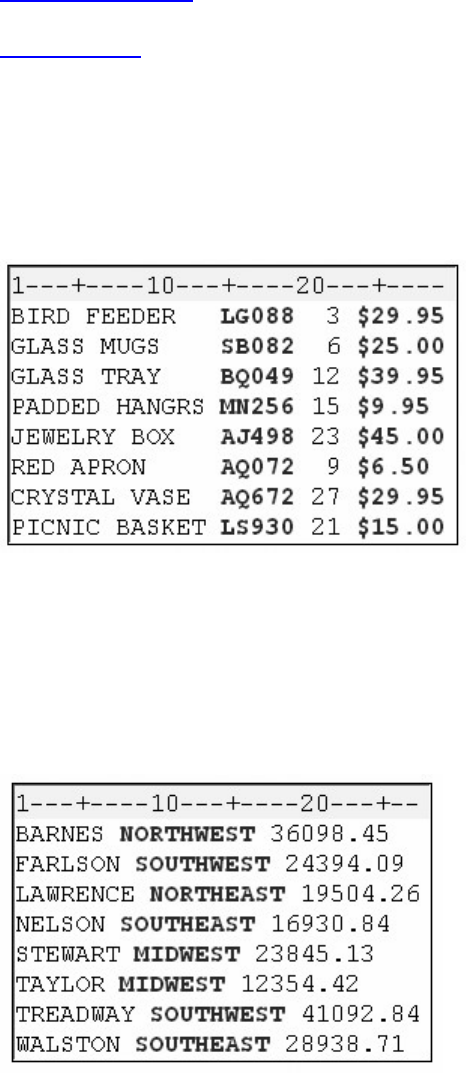
- 564 -
Chapter Summary
Chapter Quiz
Overview
Introduction
Raw data can be organized in several ways.
This external file contains data that is arranged in columns or fixed fields. You can specify a beginning and
ending column for each field. However, this file contains nonstandard data, because one of the variable's
values includes a special character, the dollar sign ($).
This external file contains no special characters, but its data is free-format, meaning that it is not arranged
in columns. Notice that the values for a particular field do not begin and end in the same columns.
How your data is organized and what type of data you have determine which input style you should use to
read the data. SAS provides three primary input styles: column input, formatted input, and list input. This
chapter teaches you how to use column input and formatted input to read standard and nonstandard data
that is arranged in fixed fields.
Objectives
In this chapter, you learn to
distinguish between standard and nonstandard numeric data
read standard fixed-field data
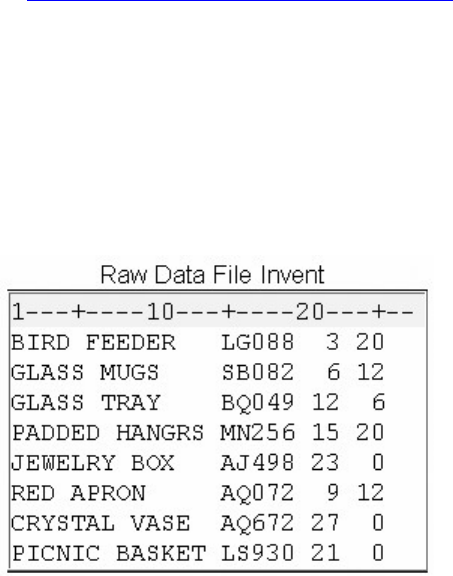
- 565 -
read nonstandard fixed-field data.
Review of Column Input
Overview
In Creating SAS Data Sets from External Files, you learned how to use column input to read raw data that
is stored in an external file.
You can use column input to read the values for Item, IDnum, InStock, and BackOrd from the raw data file
that is referenced by the fileref Invent.
input Item $ 1-13 IDnum $ 15-19 InStock 21-22
BackOrd 24-25;
Notice that the INPUT statement lists the variables with their corresponding column locations in order
from left to right. However, one of the features of column input is the ability to read fields in any order.
For example, you could have read the values for InStock and BackOrd before the values for Item and
IDnum.
input InStock 21-22 BackOrd 24-25 Item $ 1-13
IDnum $ 15-19;
When you print a report that is based on this data set, the variables will be listed in the order in which they
were created by default.
- 566 -
Column Input Features
Column input has several features that make it useful for reading raw data.
It can be used to read character variable values that contain embedded blanks.
input Name $ 1-25;
No placeholder is required for missing data. A blank field is read as missing and does not cause other fields to be read
incorrectly.
input Item $ 1-13 IDnum $ 15-19
InStock 21-22 BackOrd 24-25;
Fields or parts of fields can be re-read.
input Item $ 1-13 IDnum $ 15-19 Supplier $ 15-16
InStock 21-22 BackOrd 24-25;
Fields do not have to be separated by blanks or other delimiters.
- 567 -
input Item $ 1-13 IDnum $ 14-18 InStock 19-20
BackOrd 21-22;
Identifying Nonstandard Numeric Data
Standard Numeric Data
Standard numeric data values can contain only
numbers
decimal points
numbers in scientific, or E, notation (23E4)
minus signs and plus signs.
Some examples of standard numeric data are 15, -15, 15.4, +.05, 1.54E3, and -1.54E-3.
Nonstandard Numeric Data
Nonstandard numeric data includes
values that contain special characters, such as percent signs (%), dollar signs ($), and commas (,)
date and time values
data in fraction, integer binary, real binary, and hexadecimal forms.
The external file referenced by the fileref Empdata contains the personnel information for the technical
writing department of a small computer manufacturer. The fields contain values for each employee's last
name, first name, job title, and annual salary.
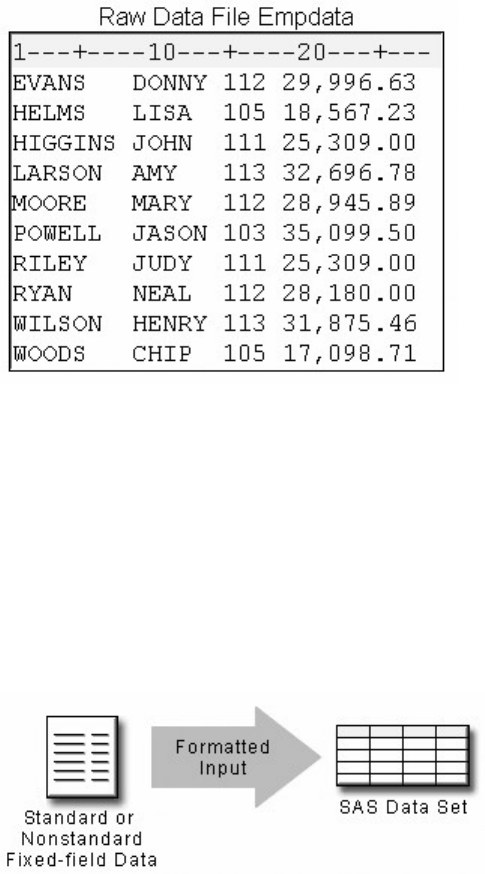
- 568 -
Notice that the values for Salary contain commas. So, the values for Salary are considered to be
nonstandard numeric values.
Choosing an Input Style
Nonstandard data values require an input style that has more flexibility than column input.
You can use formatted input, which combines the features of column input with the ability to read both
standard and nonstandard data.
Whenever you encounter raw data that is organized into fixed fields, you can use
column input to read standard data only
formatted input to read both standard and nonstandard data.
Using Formatted Input
The General Form of Formatted Input
Formatted input is a very powerful method for reading both standard and nonstandard data in fixed fields.
General form, INPUT statement using formatted input:
INPUT <pointer-control> variable informat.;
where
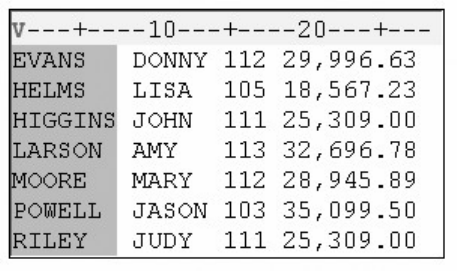
- 569 -
n
te
r
-control positions the input pointer on a specified column
i
able is the name of the variable
o
rmat is the special instruction that specifies how SAS reads the raw data.
In this chapter, you'll work with two column pointer controls.
The @n moves the input pointer to a specific column number.
The +n moves the input pointer forward to a column number that is relative to the current position.
Let's first look at the @n column pointer control.
Using the @n Column Pointer Control
The @n is an absolute pointer control that moves the input pointer to a specific column number. The @
moves the pointer to column n, which is the first column of the field that is being read.
General form, INPUT statement using formatted input and the @npointer control:
INPUT @n variable informat.;
i
able is the name of the variable
o
rmat is a special instruction that specifies how SAS reads the raw data.
Let's use the @n pointer control to locate variable values in the external file Empdata. As you can see, the
values for LastName begin in column 1. We could start with the @1 pointer control.
input @1 LastName $7.
However, the default column pointer location is column 1, so you do not need to use a column pointer
control to read the first field.
input LastName $7.
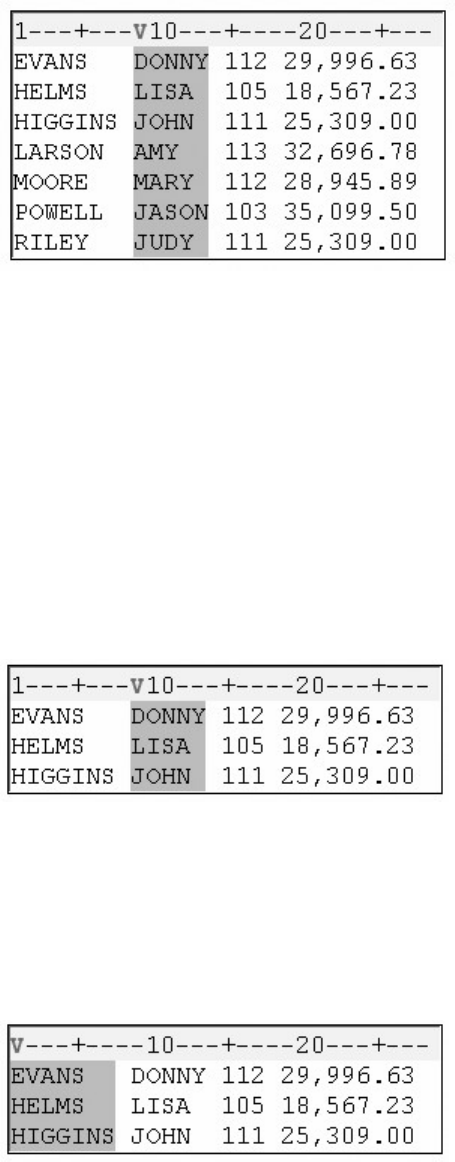
- 570 -
Next, the values for FirstName begin in column 9. To point to column 9, use an @ sign and the column
number in the INPUT statement:
input LastName $7. @9 FirstName $5.
The $7. and $5. informats are explained later in this chapter.
Reading Columns in Any Order
Column pointer controls are very useful. For example, you can use the @n to move a pointer forward or
backward when reading a record.
In this INPUT statement, the value for FirstName is read first, starting in column 9.
input @9 FirstName $5.
Now let's read the values for LastName, which begin in the first column. Here you must use the @n
pointer control to move the pointer back to column 1.
input @9 FirstName $5. @1 LastName $7.
The rest of the INPUT statement specifies the column locations of the raw data value for JobTitle and
Salary.
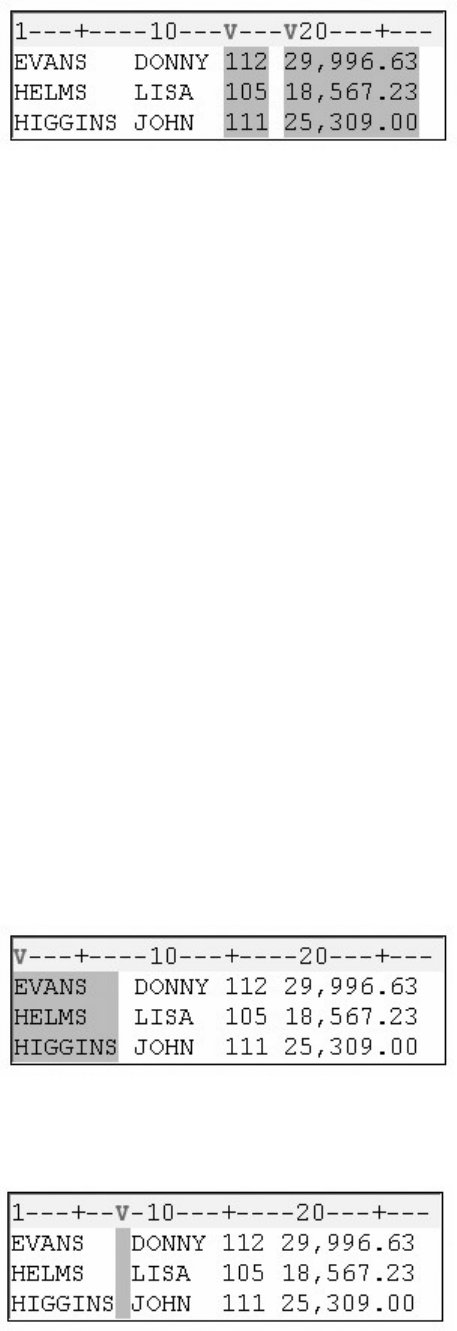
- 571 -
input @9 FirstName $5. @1 LastName $7. @15 JobTitle 3.
@19 Salary comma9.;
The $5., $7., 3., and comma9. informats are explained later in this chapter.
The +n Pointer Control
The +n pointer control moves the input pointer forward to a column number that is relative to the current
position. The + moves the pointer forward n columns.
General form, INPUT statement using formatted input and the +n pointer control:
INPUT +n variable informat.;
i
able is the name of the variable
o
rmat is a special instruction that specifies how SAS reads the raw data.
In order to count correctly, it is important to understand where the column pointer is located after each data
value is read. Let's look at an example.
Suppose you want to read the data from Empdata in the following order: LastName, FirstName, Salary,
JobTitle. Because the values for LastName begin in column 1, a column pointer control is not needed.
input LastName $7.
With formatted input, the column pointer moves to the first column following the field that was just read.
In this example, after LastName is read, the pointer moves to column 8.
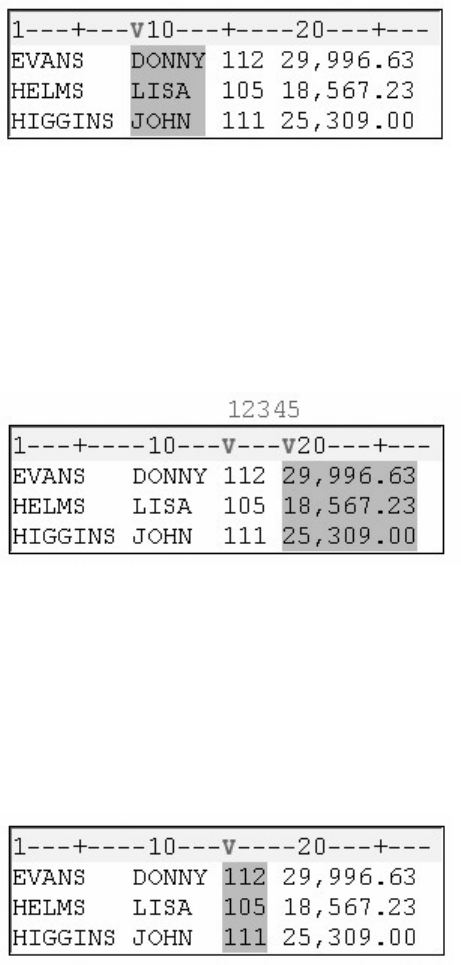
- 572 -
To start reading FirstName, which begins in column 9, you move the column pointer ahead 1 column with
+1.
input LastName $7. +1 FirstName $5.
After reading FirstName, the column pointer moves to column 14. Now you want to skip over the values
for JobTitle and read the values for Salary, which begin in column 19. So you move the column pointer
ahead 5 columns from column 14.
input LastName $7. +1 FirstName $5. +5 Salary comma9.
The last field to be read contains the values for JobTitle. You can use the @n column pointer control to
return to column 15.
input LastName $7. +1 FirstName $5. +5 Salary comma9.
@15 JobTitle 3.;
The $7., $5., comma9., and 3. informats are explained later in this chapter.
You can use the notation +(-n) to move the +n pointer backwards. For more information about the +(-n)
notation, see the SAS documentation.
Using Informats
Overview
Remember that the general form of the INPUT statement for formatted input is:
- 573 -
INPUT <pointer-control> variable informat.;
An informat is an instruction that tells SAS how to read raw data. SAS provides many informats for
reading standard and nonstandard data values. Here is a small sample.
Selected Informats for Reading Data
PERCENTw.d
DATEw.
NENGOw.
$BINARYw.
DATETIMEw.
PDw.d
$VARYINGw.
HEXw.
PERCENTw.
$w.
JULIANw.
TIMEw.
COMMAw.d
MMDDYYw.
w.d
Note that
each informat contains a w value to indicate the width of the raw data field
each informat also contains a period, which is a required delimiter
for some informats, the optional d value specifies the number of implied decimal places
informats for reading character data always begin with a dollar sign ($).
For a complete list of informats, see the SAS documentation.
Reading Character Values
The $w. informat enables you to read character data. The w represents the field width of the data value (the
total number of columns that contain the raw data field).
In the example below, the $ indicates that FirstName is a character variable, the 5 indicates a field width of
five columns, and a period ends the informat.
input @9 FirstName $5.;
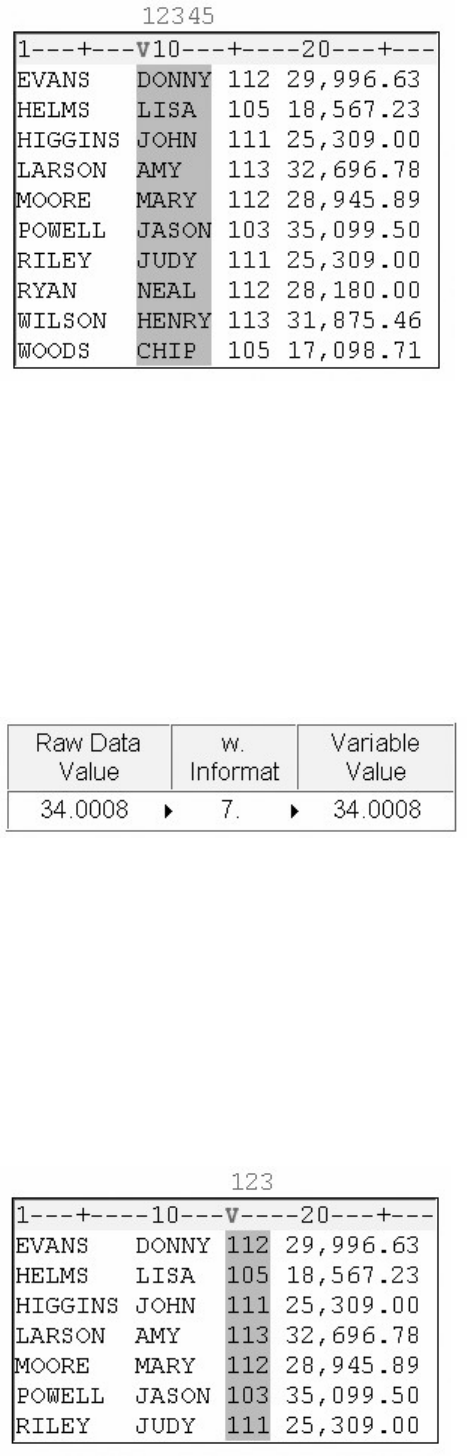
- 574 -
Reading Standard Numeric Data
The informat for reading standard numeric data is the w.d informat.
The w specifies the field width of the raw data value, the period serves as a delimiter, and the d optionally
specifies the number of implied decimal places for the value. The w.d informat ignores any specified d
value if the data already contains a decimal point.
For example, the raw data value shown below contains 6 digits (4 are decimals) and 1 decimal point.
Therefore, the w. informat requires a field width of only 7 to correctly read the raw data value.
In the example shown below, the values for JobTitle in columns 15-17 contain only numbers. Remember
that standard numeric data values can contain only numbers, decimal points, scientific notation, and plus
and minus signs.
A d value is not necessary to read the values for JobTitle. Simply move the column pointer forward 7
spaces to column 15, name the variable, and specify a field width of 3.
input @9 FirstName $5. @1 LastName $7. +7 JobTitle 3.;
- 575 -
Note: Be certain to specify the period in the informat name.
Reading Nonstandard Numeric Data
The COMMAw.d informat is used to read numeric values and to remove embedded
blanks
commas
dashes
dollar signs
percent signs
right parentheses
left parentheses, which are interpreted as minus signs.
The COMMAw.d informat has three parts:
1.
the informat name
COMMA
2.
a value that specifies the width of the field to be read (including dollar signs, decimal
places, or other special characters), followed by a period
w.
3.
an optional value that specifies the number of implied decimal places for a value (not
necessary if the value already contains decimal places).
d
In the example below, the values for Salary contain commas, which means that they are nonstandard
numeric values.
The values for Salary begin in column 19, so use the @n or +n pointer control to point to column 19, and
then name the variable.
data sasuser.empinfo;
infile empdata;
input @9 FirstName $5. @1 LastName $7. +7 JobTitle 3.
@19 Salary;
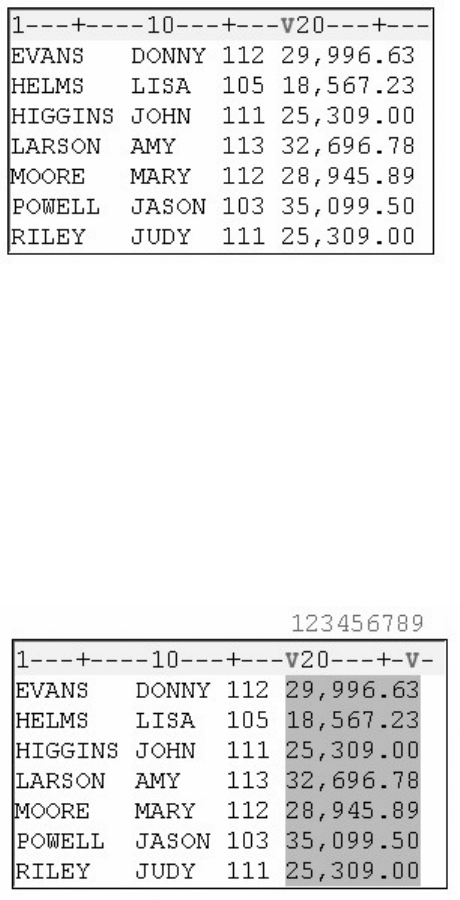
- 576 -
Now add the COMMAw.d informat and specify the field width. The values end in column 27, so the field
width is 9 columns. Add a RUN statement to complete the DATA step.
data sasuser.empinfo;
infile empdata;
input @9 FirstName $5. @1 LastName $7. +7 JobTitle 3.
@19 Salary comma9.;
run;
If you use PROC PRINT to display the data set, the commas are removed from the values for Salary in the
resulting output.
data sasuser.empinfo;
infile empdata;
input @9 FirstName $5. @1 LastName $7. +7 JobTitle 3.
@19 Salary comma9.;
run;
proc print data=sasuser.empinfo;
run;
Output from the PRINT Procedure
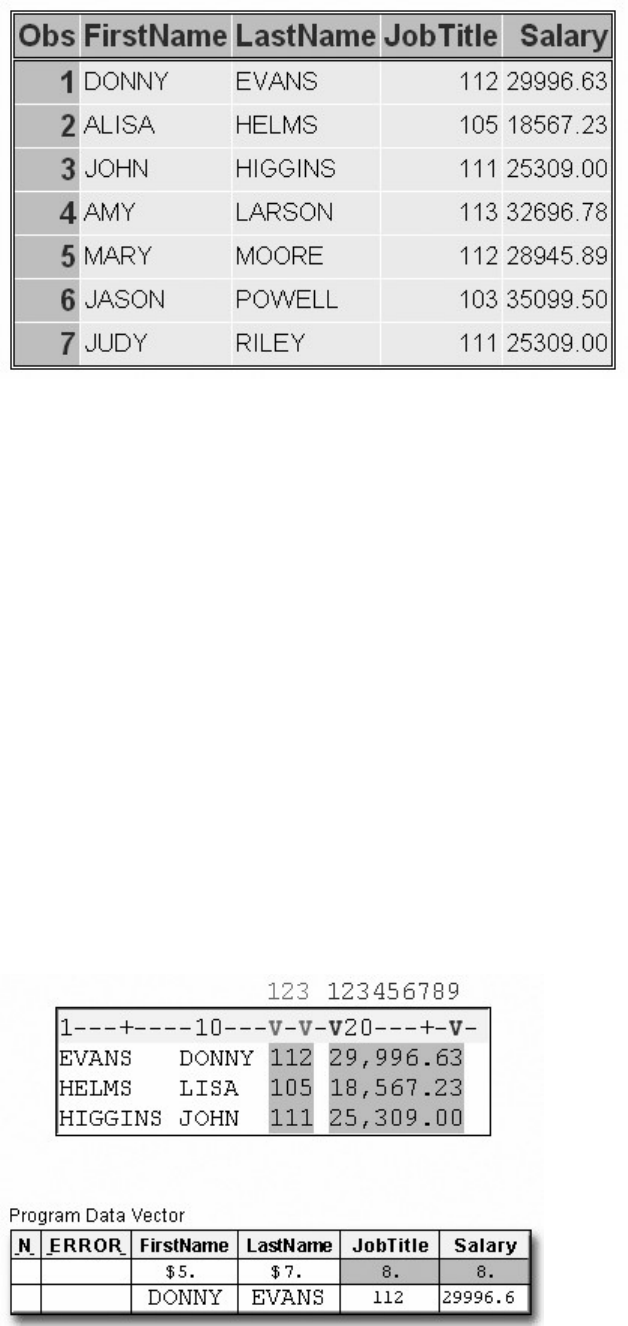
- 577 -
Thus, the COMMAw.d informat does more than simply read the raw data values. It removes special
characters such as commas from numeric data and stores only numeric values in a SAS data set.
DATA Step Processing of Informats
Let's place our INPUT statement in a DATA step and submit it for processing. Remember that after the
DATA step is submitted, it is compiled and then executed.
data sasuser.empinfo;
infile empdata;
input @9 FirstName $5. @1 LastName $7. +7 JobTitle 3.
@19 Salary comma9.;
run;
During the compile phase, the character variables in the program data vector are defined with the exact
length specified by the informat. But notice that the lengths that are defined for JobTitle and Salary in the
program data vector are different from the lengths that are specified by their informats.
Remember, by default, SAS stores numeric values (no matter how many digits the value contains) as
floating-point numbers in 8 bytes of storage. The length of a stored numeric variable is not affected by an
informat's width nor by other column specifications in an INPUT statement.

- 578 -
However, it is still necessary to specify the actual width of a raw data field in an INPUT statement.
Otherwise, if you specify a default field width of 8 for all numeric values, SAS will read inappropriate
variable values when the program executes.
In the following example, the values for JobTitle would contain embedded blanks, which represent invalid
numeric values.
data sasuser.empinfo;
infile empdata;
input @9 FirstName $5. @1 LastName $7.
+7 JobTitle 8. @19 Salary comma8.;
run;
Remember that the w value of the informat represents the width of the field in the raw data file. The values
for JobTitle have a width of only 3 in the raw data file. However, because they are numeric values, SAS
stores them with a default length of 8.
Record Formats
The record format of an external file might affect how data is read with column input and formatted input.
A record format specifies how records are organized in a file. Two common record formats are
fixed-length records and variable-length records.
Fixed-Length Records
External files that have a fixed-length record format have an end-of-record marker after a predetermined
number of columns. A typical record length is 80 columns.
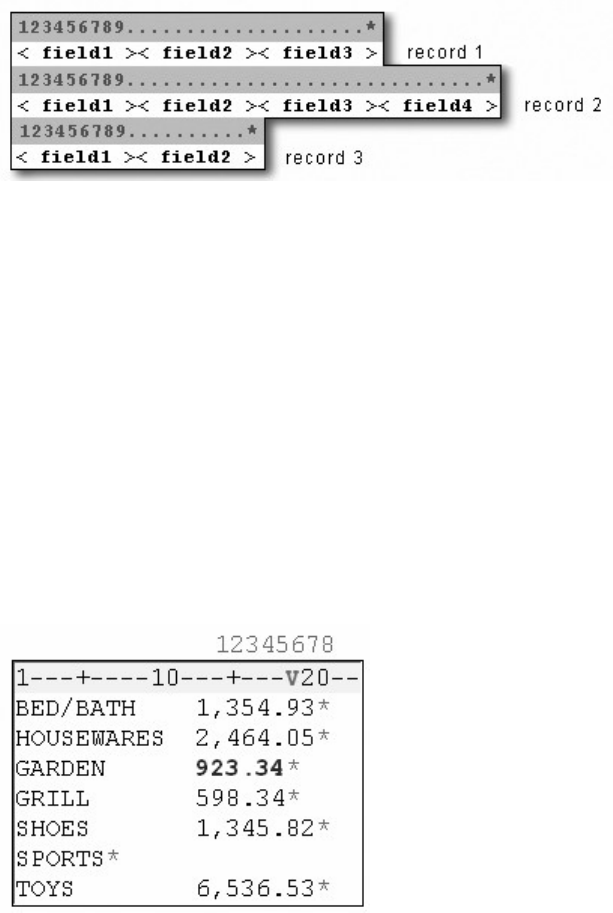
- 579 -
Variable-Length Records
Files that have a variable-length record format have an end-of-record marker after the last field in each
record.
As you can see, the length of each record varies.
Reading Variable-Length Records
When you work with variable-length records that contain fixed-field data, you might have values that are
shorter than others or that are missing. This can cause problems when you try to read the raw data into
your SAS data set.
For example, notice that the following INPUT statement specifies a field width of 8 columns for Receipts.
In the third record, the input pointer encounters an end-of-record marker before the 8th column.
input Dept $ 1-11 @13 Receipts comma8.;
The asterisk symbolizes the end-of-record marker and is not part of the data.
The input pointer moves down to the next record in an attempt to complete the value for Receipts.
However, GRILL is a character value, and Receipts is a numeric variable. Thus, an invalid data error
occurs, and Receipts is set to missing.
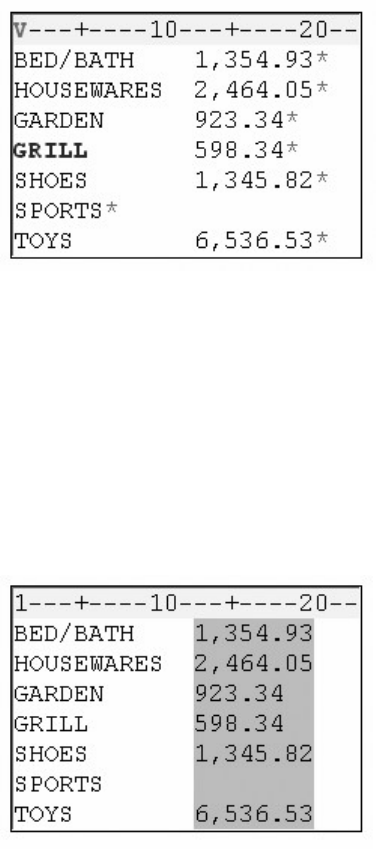
- 580 -
The PAD Option
When reading variable-length records that contain fixed-field data, you can avoid problems by using the
PAD option in the INFILE statement. The PAD option pads each record with blanks so that all data lines
have the same length.
infile receipts pad;
When you use column input or formatted input to read fixed-field data in variable-length records,
remember to determine whether or not you need to use the PAD option. For more information about the
PAD option, see the SAS documentation.
Note: The PAD option is useful only when missing data occurs at the end of a record or when SAS
encounters an end-of-record marker before all fields are completely read.
The default value of the maximum record length is determined by your operating system. If you encounter
unexpected results when reading many variables, you might need to change the maximum record length by
specifying the LRECL=option in the INFILE statement. For more information about the LRECL= option,
see the SAS documentation for your operating environment.
Chapter Summary
Text Summary
Review of Column Input
When data is arranged in columns or fixed fields, you can use column input to read them. With column
input, the beginning and ending column are specified for each field. Character variables are identified by a
dollar ($) sign.
- 581 -
Column input has several features.
Fields can be read in any order.
It can be used to read character variables that contain embedded blanks.
No placeholder is required for missing data. A blank field is read as missing and does not cause other fields to be read
incorrectly.
Fields or parts of fields can be re-read.
Fields do not have to be separated by blanks or other delimiters
It can be used to read standard character and numeric data.
Identifying Nonstandard Numeric Data
Standard numeric data values are values that contain only numbers, scientific notation, decimal points, and
plus and minus signs. When numeric data contains characters such as commas or dollar signs, the data is
considered to be nonstandard.
Nonstandard numeric data includes
values that contain special characters, such as percent signs, dollar signs, and commas
date and time values
data in fraction, integer binary, real binary, and hexadecimal forms.
Choosing an Input Style
SAS provides two input styles for reading data in fixed fields: column input and formatted input. You can
use
column input to read standard data only
formatted input to read both standard and nonstandard data.
Using Formatted Input
Formatted input uses column pointer controls to position the input pointer on a specified column. A
column pointer control is optional when the first variable begins in the first column.
The @n is an absolute pointer control that moves the input pointer to a specific column number. You can
read columns in any order with the @n column pointer control.
The +n is a relative pointer control that moves the input pointer forward to a column number that is
relative to the current position. The +n pointer control cannot move backwards. However, you can use the
notation +(-n) to move the pointer control backwards.
Using Informats
An informat tells SAS how to read raw data. There are informats for reading standard and nonstandard
character and numeric values.
- 582 -
Informats always contain a w value to indicate the width of the raw data field. A period (.) ends the
informat or separates the w value from the optional d value, which specifies the number of implied decimal
places.
Record Formats
A record format specifies how records are organized in a file. The two most common are fixed-length
records and variable-length records.
When you read variable-length records that contain fixed-field data into a SAS data set, there might be
values that are shorter than others or that are missing. The PAD option pads each record with blanks so
that all data lines have the same length.
Syntax
LIBNAME libref 'SAS-data-library';
FILENAME fileref 'filename';
DATA SAS-data-set;
INFILE file-specification;
INPUT <pointer-control> variable informat.;
RUN;
PROC PRINT DATA=SAS-data-set;
RUN;
Sample Program
libname sasuser 'c:\data\sales';
filename vandata 'c:\records\vans.dat';
data sasuser.vansales;
infile vandata;
input +12 Quarter 1. @1 Region $9.
+6 TotalSales comma11.;
run;
proc print data=sasuser.vansales;
run;
Points to Remember
When you use column input or formatted input, the input pointer stops on the column following the last column that was read.
When you use informats, you do not need to specify a d value if the data values already contain decimal places.
Column input can be used to read standard character or numeric data only.
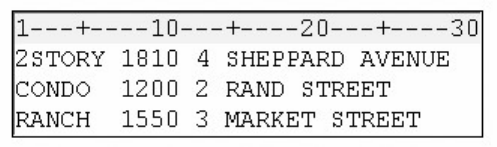
- 583 -
Formatted input can be used to read both standard and nonstandard data.
When reading variable-length records that contain fixed-field data, you can avoid problems by using the PAD option in the
INFILE statement.
Chapter Quiz
Select the best answer for each question. After completing the quiz, check your answers using the answer
key in the appendix.
Which SAS statement correctly uses column input to read the values in the raw data file below in this order: Address (4th
field), SquareFeet (second field), Style (first field), Bedrooms (third field)?
input Address 15-29 SquareFeet 8-11 Style 1-6
Bedrooms 13;
input $ 15-29 Address 8-11 SquareFeet $ 1-6 Style
13 Bedrooms;
input Address $ 15-29 SquareFeet 8-11 Style $ 1-6
Bedrooms 13;
input Address 15-29 $ SquareFeet 8-11 Style 1-6
$ Bedrooms 13;
Which is not an advantage of column input?
It can be used to read character variables that contain embedded blanks.
No placeholder is required for missing data.
Standard as well as nonstandard data values can be read.
Fields do not have to be separated by blanks or other delimiters.
Which is an example of standard numeric data?
-34.245
$24,234.25
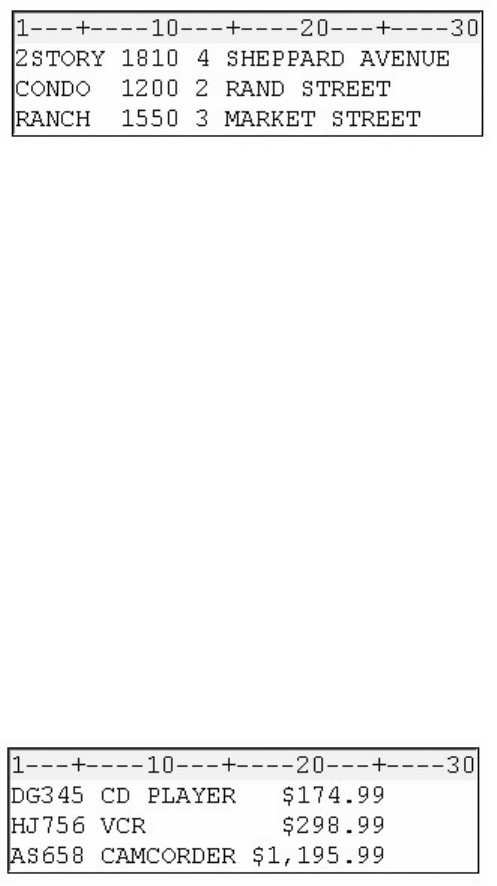
- 584 -
1/2
50%
Formatted input can be used to read
standard free-format data
standard data in fixed fields
nonstandard data in fixed fields
both standard and nonstandard data in fixed fields
Which informat should you use to read the values in column 1-5?
w.
$w.
w.d
COMMAw.d
The COMMAw.d informat can be used to read which of the following values?
12,805
$177.95
18%
all of the above
Which INPUT statement correctly reads the values for ModelNumber (first field) after the values for Item (second field)?
Both Item and ModelNumber are character variables.
input +7 Item $9. @1 ModelNumber $5.;

- 585 -
input +6 Item $9. @1 ModelNumber $5.;
input @7 Item $9. +1 ModelNumber $5.;
input @7 Item $9 @1 ModelNumber 5.;
Which INPUT statement correctly reads the numeric values for Cost (third field)?
input @17 Cost 7.2;
input @17 Cost 9.2.;
input @17 Cost comma7.;
input @17 Cost comma9.;
Which SAS statement correctly uses formatted input to read the values in this order: Item (first field), UnitCost (second field),
Quantity (third field)?
input @1 Item $9. +1 UnitCost comma6.
@18 Quantity 3.;
input Item $9. @11 UnitCost comma6.
@18 Quantity 3.;
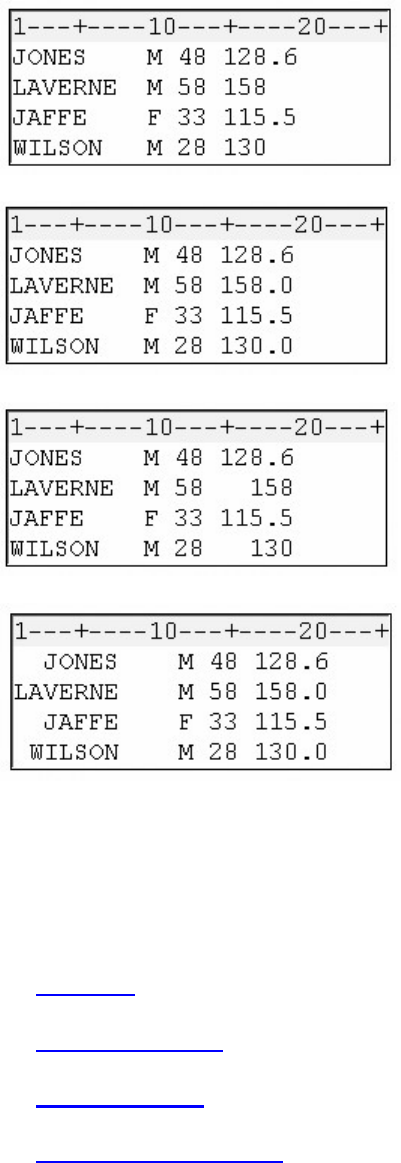
- 586 -
input Item $9. +1 UnitCost comma6.
@18 Quantity 3.;
all of the above
Which raw data file requires the PAD option in the INFILE statement in order to correctly read the data using either column
input or formatted input?
Chapter 17 Reading Free-Format Data
Overview
Free-Format Data
Using List Input
Reading Missing Values
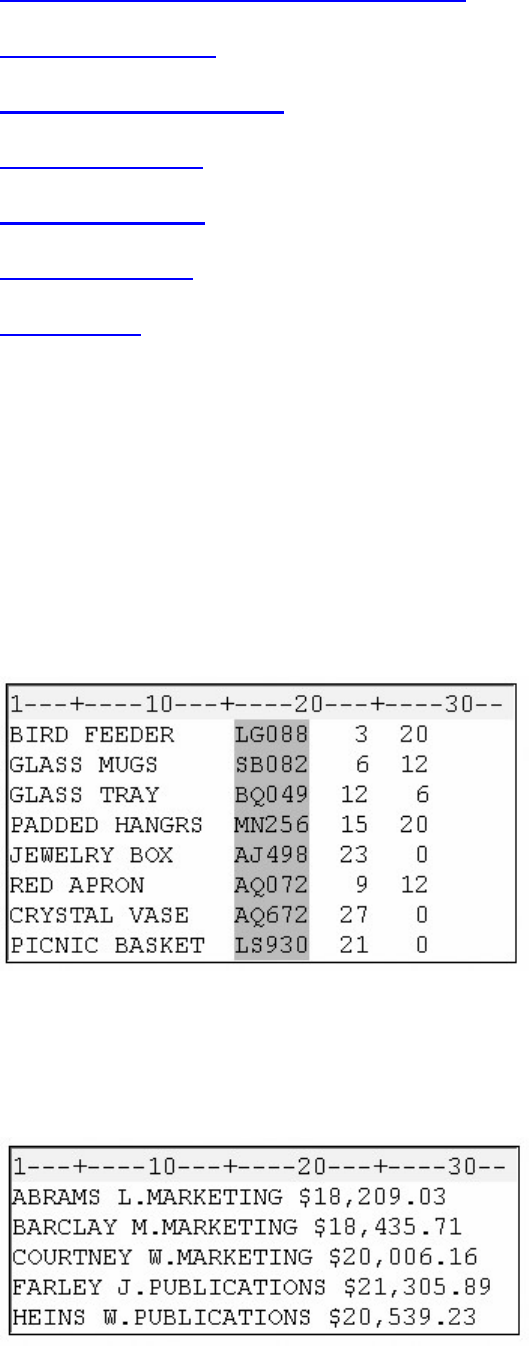
- 587 -
Specifying the Length of Character Variables
Modifying List Input
Creating Free-Format Data
Mixing Input Styles
Additional Features
Chapter Summary
Chapter Quiz
Overview
Introduction
Raw data can be organized in several ways.
This external file contains data that is arranged in columns, or fixed fields. You can specify a beginning
and ending column for each field.
Raw Data in Columns
By contrast, the following external file contains data that is free-format, meaning data that is not arranged
in columns. Notice that the values for a particular field do not begin and end in the same columns.
Raw Data in Free-Format
How your data is organized determines which input style you should use to read the data. SAS provides
three primary input styles: column, formatted, and list input. This chapter teaches you how to use list input
to read free-format data that is not arranged in fixed fields.
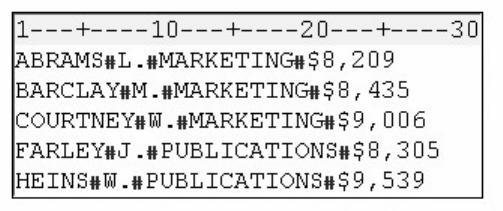
- 588 -
Objectives
In this chapter, you learn to use the INPUT statement with list input to read
free-format data (data that is not organized in fixed fields)
free-format data that is separated by nonblank delimiters, such as commas
free-format data that contains missing values
character values that exceed eight characters
nonstandard free-format data
character values that contain embedded blanks.
In addition, you learn how to mix column, formatted, and list input styles in a single INPUT statement.
Free-Format Data
So far, we have worked with raw data that is in fixed fields. In doing so, we used column input to read
standard data values in fixed fields. We have also used formatted input to read both standard and
nonstandard data in fixed fields.
Suppose you have raw data that is free-format. That is, it is not arranged in fixed fields. The fields are
often separated by blanks or by some other delimiter, as shown below. In this case, column input and
formatted input that you might have used before to read standard and nonstandard data in fixed fields will
not enable you to read all of the values in the raw data file.
Raw Data in Free-Format That Is Separated by Blanks
Using List Input
Overview
List input is a powerful tool for reading both standard and nonstandard free-format data.
General form, INPUT statement using list input:
INPUT variable <$>;
where
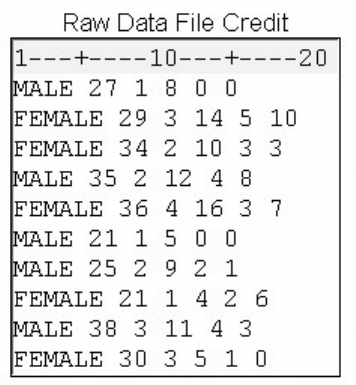
- 589 -
i
able specifies the variable whose value the INPUT statement is to read
p
ecifies that the variable is a character variable.
Suppose you have an external data file like the one shown below. The file, which is referenced by the
fileref Credit, contains the results of a survey on the use of credit cards by males and females in the 18-39
age range.
Raw Data File Creditcard
You need to read the data values for
gender
age
number of bank credit cards
bank card use per month
number of department store credit cards
department store card use per month.
List input might be the easiest input style to use because, as shown in the INPUT statement below, you
simply list the variable names in the same order as the corresponding raw data fields. Remember to
distinguish character variables from numeric variables with dollar signs.
input Gender $ Age Bankcard FreqBank Deptcard FreqDept;
Because list input, by default, does not specify column locations,
all fields must be separated by at least one blank or other delimiter
fields must be read in order from left to right
you cannot skip or re-read fields.
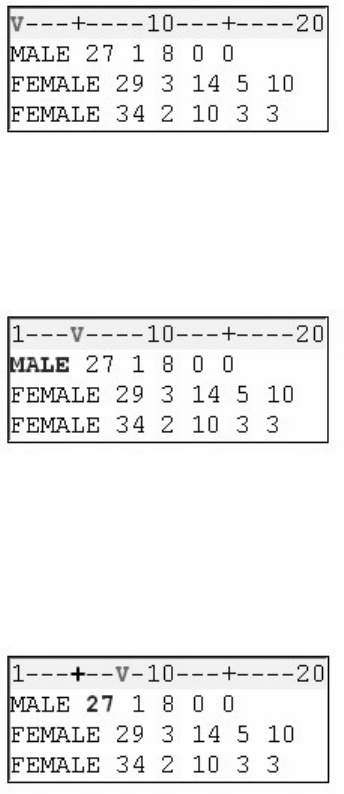
- 590 -
Processing List Input
It's important to remember that list input causes SAS to scan the input lines for values rather than reading
from specific columns. When the INPUT statement is submitted for processing, the input pointer is
positioned at column 1 of the raw data file, as shown below.
data sasuser.creditsurvey;
infile creditcard.dat;
input Gender $ Age Bankcard FreqBank Deptcard
FreqDept;
run;
Raw Data File with the Cursor Positioned at Column 1
SAS reads the first field until it encounters a blank space. The blank space indicates the end of the field,
and the data value is assigned to the program data vector for the first variable in the INPUT statement.
Raw Data File with the Cursor Positioned at the First Blank Space
Next, SAS scans the record until the next nonblank space is found, and the second value is read until
another blank is encountered. Then the value is assigned to its corresponding variable in the program data
vector.
Raw Data File with the Cursor Positioned at the Second Blank Space
This process of scanning ahead to the next nonblank column, reading the data value until a blank is
encountered, and assigning the value to a variable in the program data vector continues until all of the
fields have been read and values have been assigned to variables in the program data vector.
Program Data Vector
- 591 -
When the DATA step has finished executing, you can display the data set with the PRINT procedure. The
following code produces the output below.
proc print data=sasuser.creditsurvey;
run;
Data Set Displayed by PROC PRINT
Working with Delimiters
Most free-format data fields are clearly separated by blanks and are easy to imagine as variables and
observations. But fields can also be separated by other delimiters, such as commas, as shown below.
Raw Data File with Comma Delimiters
- 592 -
When characters other than blanks are used to separate the data values, you can tell SAS which field
delimiter to use. Use the DLM= option in the INFILE statement to specify a delimiter other than a blank
(the default).
General form, DLM= option:
DLM=delimiter(s)
where delimiter(s) specifies a delimiter for list input in either of the following forms:
t
-of-delimiting-characters' specifies one or more characters (up to 200) to read as delimiters. The list of characters must be
enclosed in quotation marks.
racte
r
-variable specifies a character variable whose value becomes the delimiter.
L
IMITER is an alias for the DLM option.
Example
The following program creates the output shown below.
data sasuser.creditsurvey;
infile creditcardcomma.dat dlm=',';
input Gender $ Age Bankcard FreqBank
Deptcard FreqDept;
run;
proc print data=sasuser.creditsurvey;
run;
Output from the DLM= Option
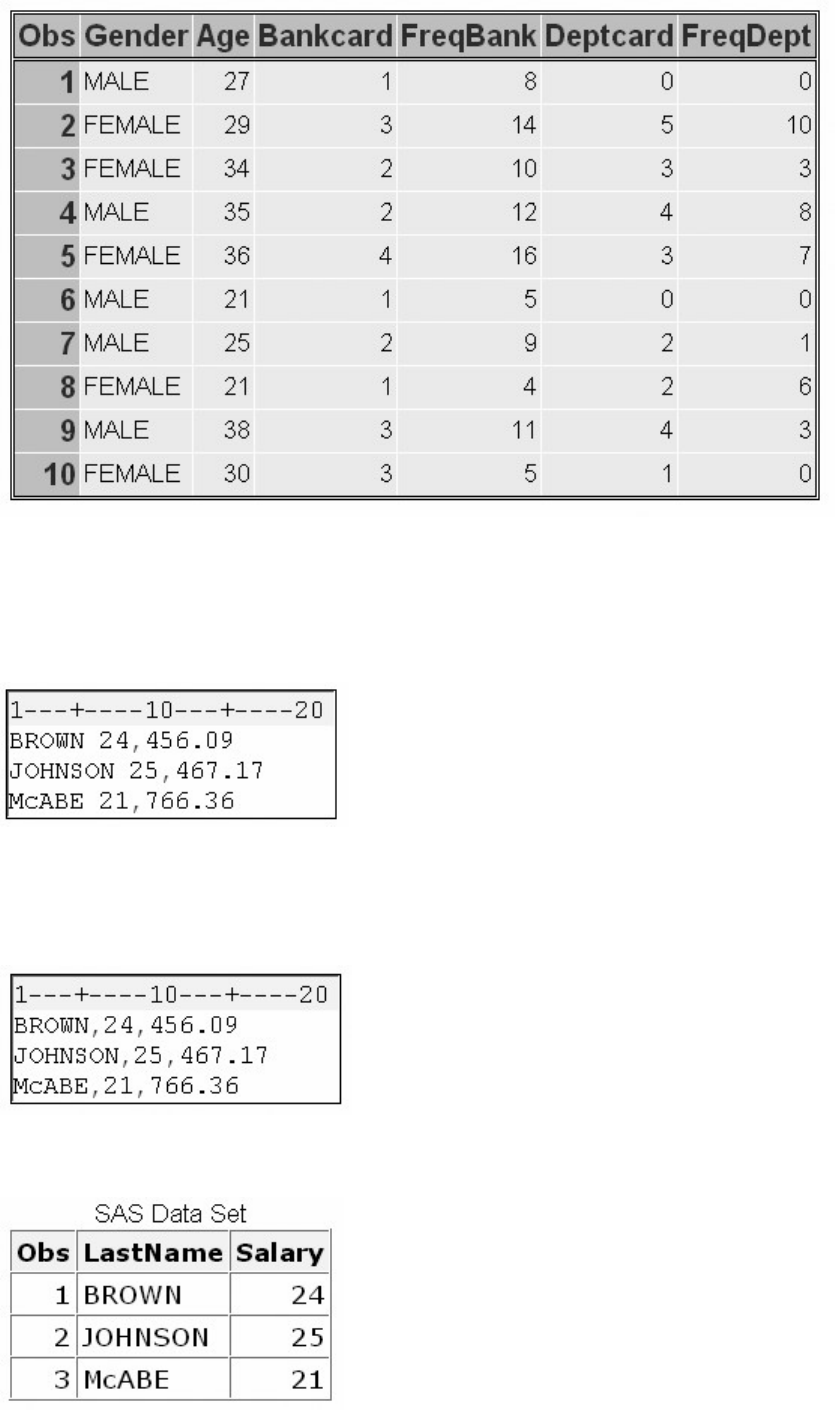
- 593 -
Note: The field delimiter must not be a character that occurs in a data value. For example, the following
raw data file contains values for LastName and Salary. Notice that the values for Salary contain commas.
Raw Data File with Commas in Values
If the field delimiter is also a comma, the fields are identified incorrectly, as shown below.
Raw Data File with Incorrect Use of Commas
Output When Commas Are Used Incorrectly
Later in this chapter you'll learn how to work with data values that contain delimiters.

- 594 -
Reading a Range of Variables
When the variable values in the raw data file are sequential and are separated by a blank (or by another
delimiter), you can specify a range of variables in the INPUT statement. This is especially useful if your
data contains similar variables, such as the answers to a questionnaire.
For example, the following INPUT statement creates five new numeric variables and assigns them the
names Ques1, Ques2, Ques3, and so on. You can also specify a range in the VAR statement with the
PROC PRINT step to list a range of specific variables.
data sasuser.phonesurvey;
infile phonesurvey;
input IDnum $ Ques1-Ques5;
run;
proc print data=sasuser.phonesurvey;
var ques1-ques3;
run;
Raw Data File with Sequential Variables
Output Using Sequential Variable Names
If you specify a range of character variables, both the variable list and the $ sign must be enclosed in
parentheses.
data sasuser.stores;
infile stordata;
input Age (Store1-Store3) ($);
run;
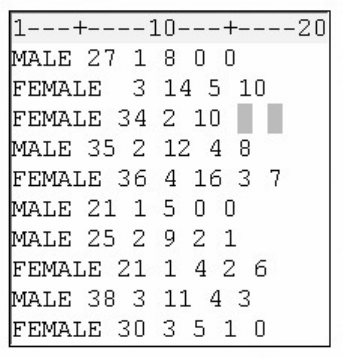
- 595 -
proc print data=sasuser.stores;
run;
You can also specify a range of variables using formatted input. If you specify a range of variables using
formatted input, both the variable list and the informat must be enclosed in parentheses, regardless of the
variable's type.
data sasuser.scores;
infile group3;
input Age (Score1-Score4) (6.);
run;
Limitations of List Input
In its default form, list input places several restrictions on the types of data that can be read:
Although the width of a field can be greater than eight columns, both character and numeric variables have a default length of
8. Character values that are longer than eight characters will be truncated.
Data must be in standard numeric or character format.
Character values cannot contain embedded delimiters.
Missing numeric and character values must be represented by a period or some other character
There are ways to work around these limitations using modified list input, which will be discussed later in
this chapter.
Reading Missing Values
Reading Missing Values at the End of a Record
Suppose that the third person represented in the raw data file below did not answer the questions about
how many department store credit cards she has and about how often she uses them.
Raw Data File with Missing Values at the End of a Record
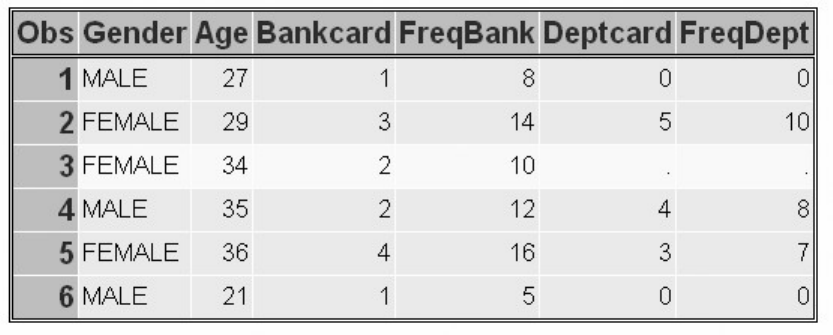
- 596 -
Because the missing values occur at the end of the record, you can use the MISSOVER option in the
INFILE statement to assign the missing values to variables with missing data at the end of a record. The
MISSOVER option prevents SAS from reading the next record if, when using list input, it does not find
values in the current line for all the INPUT statement variables. At the end of the current record, values
that are expected but not found are set to missing.
For the raw data file shown above, the MISSOVER option prevents the fields in the fourth record from
being read as values for Deptcard and FreqDept in the third observation. Note that Deptcard and FreqDept
are set to missing.
data sasuser.creditsurvey;
infile creditcard missover;
input Gender $ Age Bankcard FreqBank
Deptcard FreqDept;
run;
proc print data=sasuser.creditsurvey;
run;
Output Showing Missing Values
The MISSOVER option works only for missing values that occur at the end of the record.
Reading Missing Values at the Beginning or Middle of a Record
Remember that the MISSOVER option works only for missing values that occur at the end of the record.
A different method is required when you use list input to read raw data that contains missing values at the
beginning or middle of a record. Let's see what happens when a missing value occurs at the beginning or
middle of a record.
Suppose the value for Age is missing in the first record.
Raw Data File with Missing Values at the Beginning or Middle of a Record
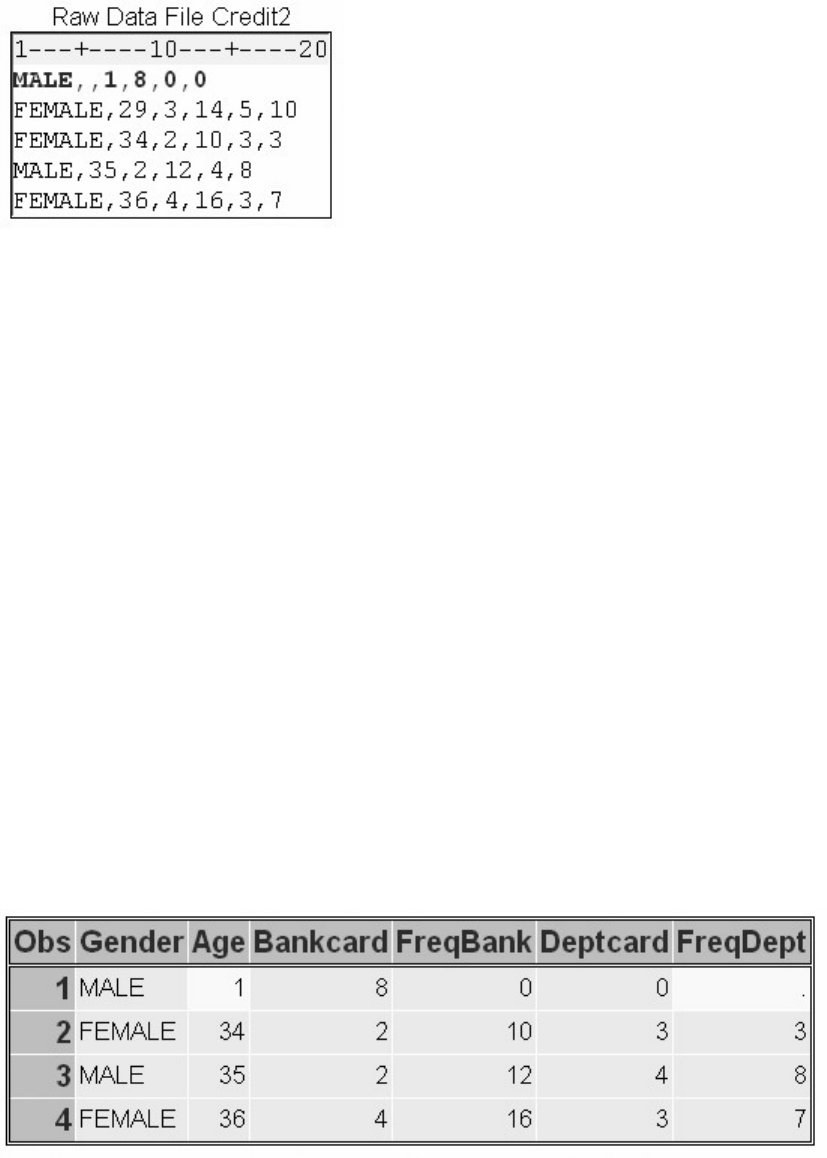
- 597 -
When the program below executes, each field in the raw data file is read one by one. The INPUT statement
tells SAS to read six data values from each record. However, the first record contains only five values.
data sasuser.creditsurvey;
infile credit2 dlm=',';
input Gender $ Age Bankcard FreqBank
Deptcard FreqDept;
run;
proc print data=sasuser.creditsurvey;
run;
The two commas in the first record are interpreted as one delimiter. The incorrect value (1) is read for Age.
The program continues to read subsequent incorrect values for Bankcard (8), FreqBank (0), and Deptcard
(0). The program then attempts to read the character field FEMALE, at the beginning of the second record,
as the value for the numeric variable FreqDept. This causes the value of FreqDept in the first observation
to be interpreted as missing. The input pointer then moves down to the third record to begin reading values
for the second observation. Therefore, the first observation in the data set contains incorrect values and
values from the second record in the raw data file are not included.
Output with Missing Data Records
You can use the Delimiter Sensitive Data (DSD) option in the INFILE statement to correctly read the raw
data. The DSD option changes how SAS treats delimiters when list input is used. Specifically, the DSD
option
sets the default delimiter to a comma
treats two consecutive delimiters as a missing value
removes quotation marks from values.
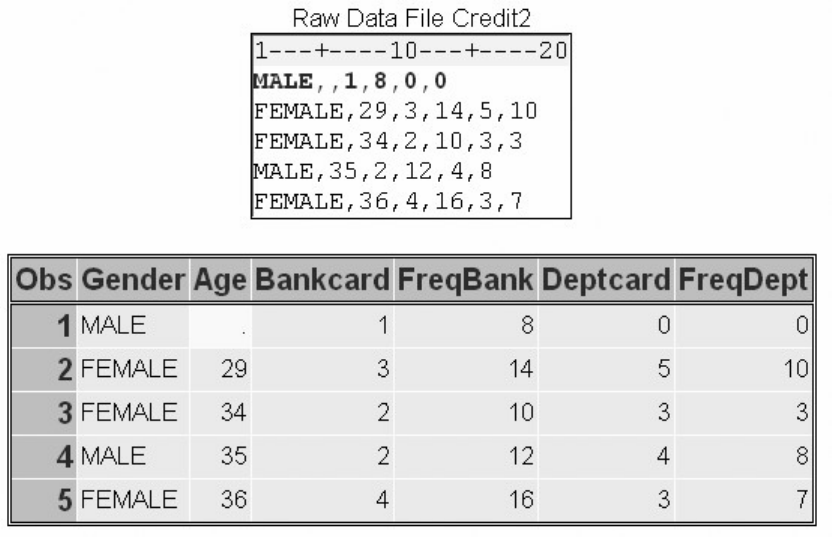
- 598 -
When the following program reads the raw data file, the DSD option sets the default delimiter to a comma
and treats the two consecutive delimiters as a missing value. Therefore, the data is read correctly.
data sasuser.creditsurvey;
infile creditcardcomma.dat dsd;
input Gender $ Age Bankcard FreqBank
Deptcard FreqDept;
run;
proc print data=sasuser.creditsurvey;
run;
DSD Raw Data and Output
If the data uses multiple delimiters or a single delimiter other than a comma, simply specify the delimiter
value(s) with the DLM= option. In the following example, an asterisk (*) is used as a delimiter. However,
the data is still read correctly because of the DSD option.
data sasuser.creditsurvey;
infile credit3.dat dsd dlm='*';
input Gender $ Age Bankcard FreqBank
Deptcard FreqDept;
run;
proc print data=sasuser.creditsurvey;
run;
Raw Data with Multiple Delimiters and Output
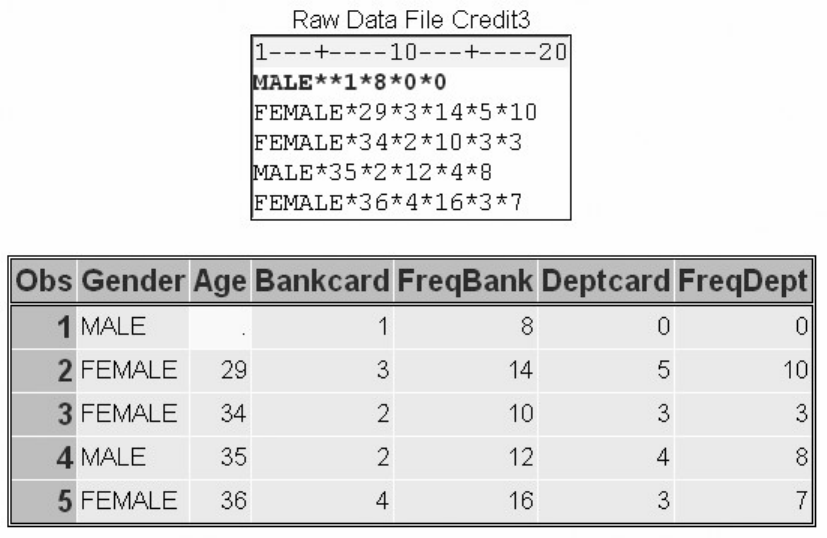
- 599 -
The DSD option can also be used to read raw data when there is a missing value at the beginning of a
record, as long as a delimiter precedes the first value in the record.
data sasuser.creditsurvey;
infile credit4.dat dsd;
input Gender $ Age Bankcard FreqBank
Deptcard FreqDept;
run;
proc print data=sasuser.creditsurvey;
run;
Raw Data with Missing Data and Output
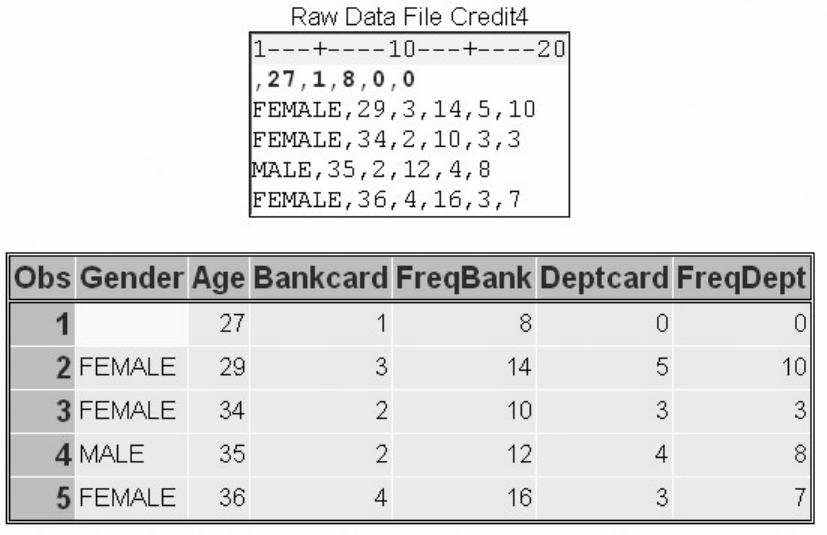
- 600 -
You can also use the DSD and DLM= options to read fields that are delimited by blanks.
data sasuser.creditsurvey;
infile credit5.dat dsd dlm=' ';
input Gender $ Age Bankcard FreqBank
Deptcard FreqDept;
run;
Later in this chapter, you'll learn how to use the DSD option to remove quotation marks from values in raw
data.
Specifying the Length of Character Variables
Overview
Remember that when you use list input to read raw data, character variables are assigned a default length
of 8. Let's see what happens when list input is used to read character variables whose values are longer
than 8.
The raw data file referenced by the fileref Citydata contains 1970 and 1980 population figures for several
large U.S. cities. Notice that some city names are rather long.
Raw Data File with Character Values That Are Longer than 8
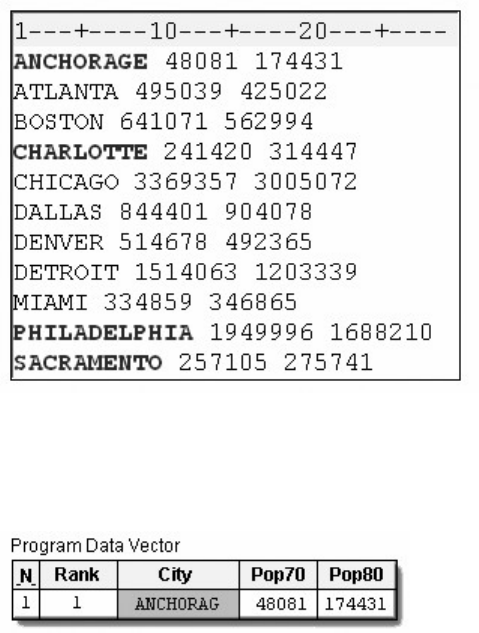
- 601 -
The longer character values are truncated when they are read into the program data vector.
Program Data Vector
PROC PRINT output shows the truncated values for City.
data sasuser.growth;
infile citydata.dat;
input City $ Pop70 Pop80;
run;
proc print data=sasuser.growth;
run;
Output with Truncated Values
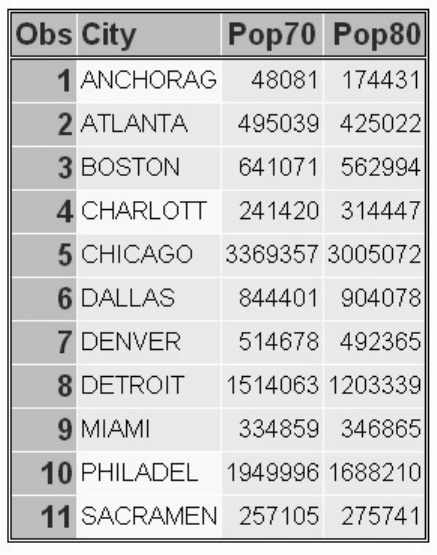
- 602 -
The LENGTH Statement
Remember, variable attributes are defined when the variable is first encountered in the DATA step. In the
program below, the LENGTH statement precedes the INPUT statement and defines both the length and
type of the variable City. A length of 12 has been assigned to accommodate PHILADELPHIA, which is
the longest value for City.
data sasuser.growth;
infile citydata.dat;
length City $ 12;
input city $ Pop70 Pop80;
run;
proc print data=sasuser.growth;
run;
Raw Data File with Character Values That Are Longer than 8
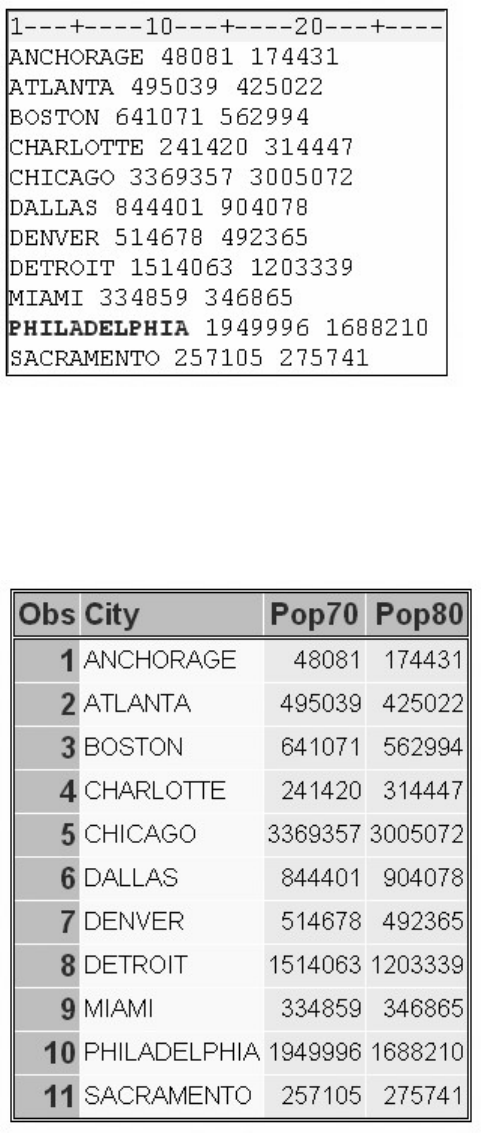
- 603 -
Using this method, you do not need to specify City's type in the INPUT statement. However, leaving the $
in the INPUT statement will not produce an error. Your output should now display the complete values for
City.
Output Using Length Statement
Because variable attributes are defined when the variable is first encountered in the DATA step, a variable
that is defined in a LENGTH statement (if it precedes an INPUT statement) will appear first in the data set,
regardless of the order of the variables in the INPUT statement.
Modifying List Input
Overview
You can make list input more versatile by using modified list input. There are two modifiers that can be
used with list input.
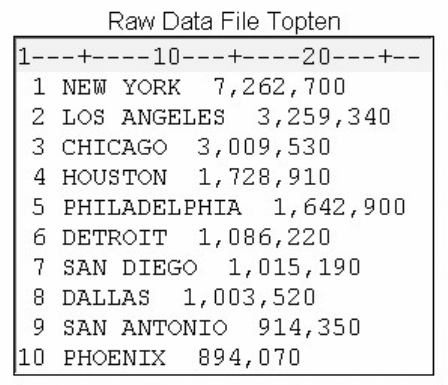
- 604 -
The ampersand (&) modifier is used to read character values that contain embedded blanks.
The colon (:) modifier is used to read nonstandard data values and character values that are longer than eight characters, but
which contain no embedded blanks.
You can use modified list input to read the file shown below. This file contains the names of the ten largest
U.S. cities ranked in order based on their 1986 estimated population figures.
Notice that some of the values for city names contain embedded blanks and are followed by two blanks.
Also, note that the values representing the population of each city are nonstandard numeric values (they
contain commas).
Raw Data File Topten
In the following sections you will learn how to use the ampersand (&) modifier to read the values for city
(City). Then you will learn how the colon (:) modifier can be used to read the nonstandard numeric values
that represent population (Pop86).
Reading Values That Contain Embedded Blanks
The ampersand (&) modifier enables you to read character values that contain single embedded blanks.
The & indicates that a character value that is read with list input might contain one or more single
embedded blanks. The value is read until two or more consecutive blanks are encountered. The & modifier
precedes a specified informat if one is used.
input Rank City &;
In the raw data file shown below, each value of City is followed by two consecutive blanks. There are two
ways that you can use list input to read the values of City.
Using the & Modifier with a LENGTH Statement
As shown below, you can use a LENGTH statement to define the length of City, and then add an &
modifier to the INPUT statement to indicate that the values contain embedded blanks.
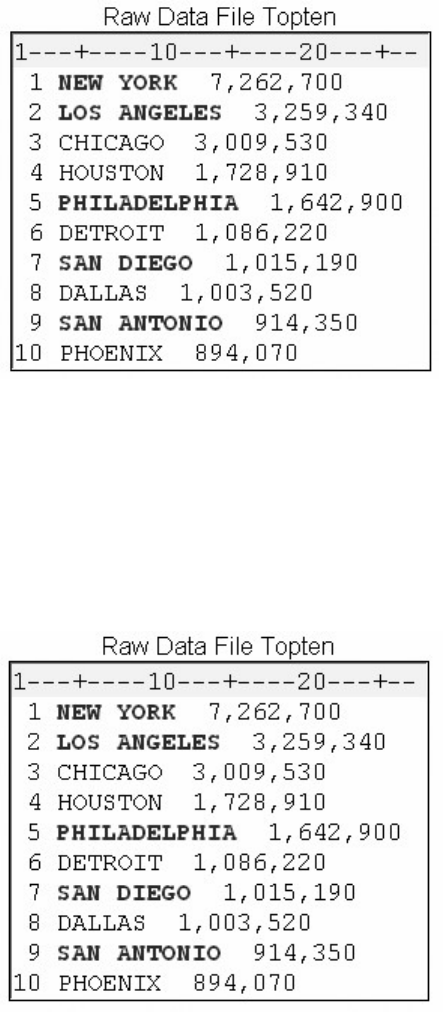
- 605 -
data sasuser.cityrank;
infile topten.dat;
length City $ 12;
input Rank city &;
Raw Data File Topten
Using the & Modifier with an Informat
You can also read the values for City with the & modifier followed by the $w. informat, which reads
standard character values, as shown below. When you do this, the w value in the informat determines the
variable's length and should be large enough to accommodate the longest value.
Raw Data File Topten
Remember that you must use two consecutive blanks as delimiters when you use the & modifier. You
cannot use any other delimiter to indicate the end of each field.
Reading Nonstandard Values
The colon (:) modifier enables you to read nonstandard data values and character values that are longer
than eight characters, but which contain no embedded blanks. The : indicates that values are read until a
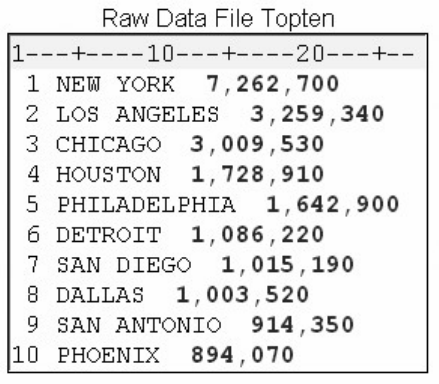
- 606 -
blank (or other delimiter) is encountered, and then an informat is applied. If an informat for reading
character values is specified, the w value specifies the variable's length, overriding the default length.
Notice the values representing the 1986 population of each city in the raw data file below. Because they
contain commas, these values are nonstandard numeric values.
Raw Data File Topten
In order to read these values, you can modify list input with the colon (:) modifier, followed by the
COMMAw.d informat, as shown in the program below. Notice that the COMMAw.d informat does not
specify a w value.
data sasuser.cityrank;
infile topten.dat;
input Rank City & $12.
Pop86 : comma.;
Remember that list input reads each value until the next blank is detected. The default length of numeric
variables is 8, so you don't need to specify a w value to indicate the length of a numeric variable.
This is different from using a numeric informat with formatted input. In that case, you must specify a w
value in order to indicate the number of columns to be read.
Processing the DATA Step
At compile time, the informat $12. in the example below sets the length of City to 12 and stores this
information in the descriptor portion of the data set. During the execution phase, however, the w value of
12 does not determine the number of columns that are read. This is different from the function of informats
in the formatted input style.
data sasuser.cityrank;
infile topten.dat;
input Rank City & $12.
Pop86 : comma.;
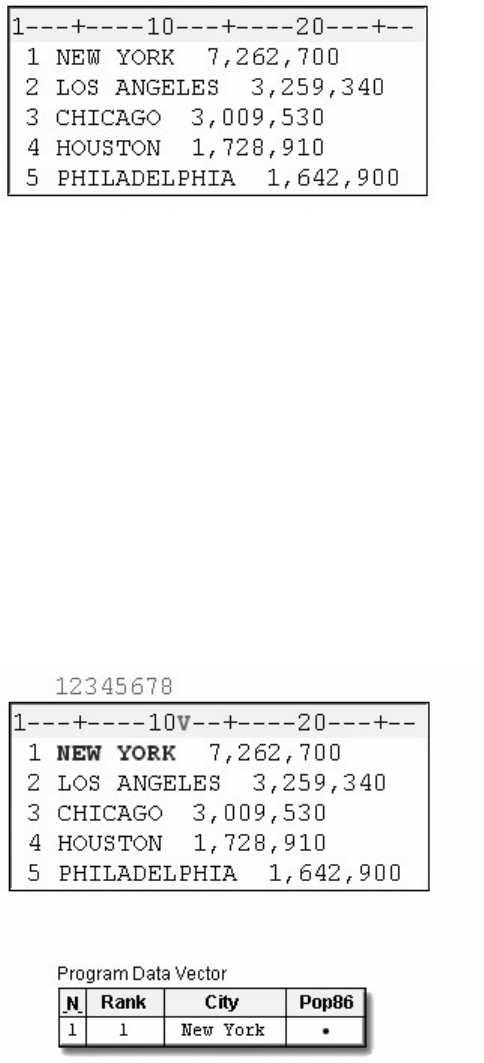
- 607 -
run;
Reading Raw Data File with Character Values That Are Longer than 8
The & modifier indicates that the values for City should be read until two consecutive blanks are
encountered. Therefore, the value NEW YORK is read from column 4 to column 11, a total of only 8
columns. When blanks are encountered in both columns 12 and 13, the value NEW YORK is written to
the program data vector.
data sasuser.cityrank;
infile topten.dat;
input Rank City & $12.
Pop86 : comma.;
run;
Reading City Value from Raw Data File
The input pointer moves forward to the next nonblank column, which is column 14 in the first record. Now
the values for Pop86 are read from column 14 until the next blank is encountered. The COMMAw.d
informat removes the commas, and the value is written to the program data vector.
data sasuser.cityrank;
infile topten.dat input Rank City & $12.
Pop86 : comma.;
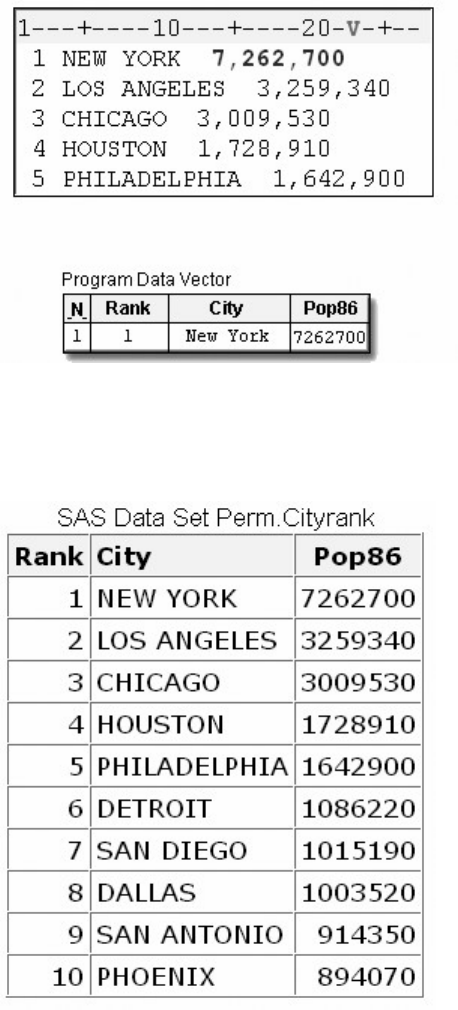
- 608 -
run;
Reading Raw Data File POP86 Value
Notice that the character values for City and Pop86 are stored correctly in the data set.
SAS Data Set Cityrank
Comparing Formatted Input and Modified List Input
As you have seen, informats work differently in modified list input than they do in formatted input. With
formatted input, the informat determines both the length of character variables and the number of columns
that are read. The same number of columns are read from each record.
input @3 City $12.;
Raw Data Showing That the Same Number of Columns Are Read from Each Record
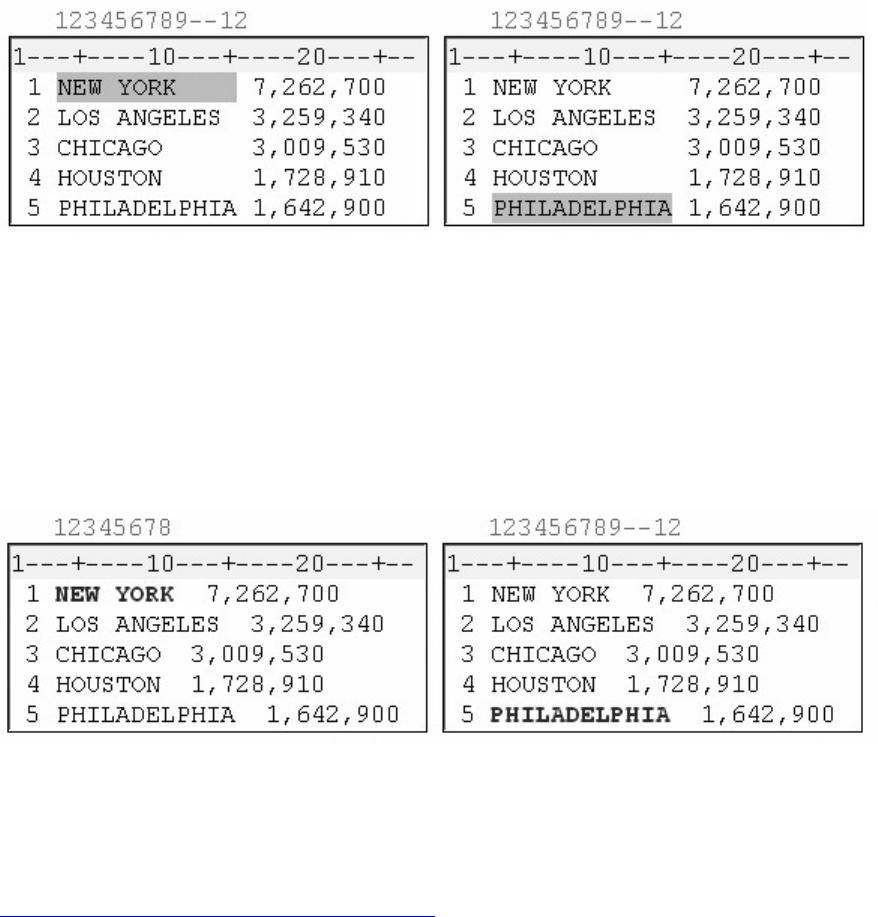
- 609 -
The informat in modified list input determines only the length of the variable, not the number of columns
that are read. Here, the raw data values are read until two consecutive blanks are encountered.
input City & $12.;
Raw Data Showing That Values Are Read until Two Consecutive Blanks Are Encountered
Creating Free-Format Data
Overview
Creating SAS Data Sets from External Files explained how the PUT statement can be used with column
output to write observations from a SAS data set to a raw data file. The PUT statement can also be used
with list output to create free-format raw data files.
List output is similar to list input. With list output, you simply list the names of the variables whose values
you want to write. The PUT statement writes a value, leaves a blank, and then writes the next value.
General form, PUT statement using list output:
PUT variable <: format>;
where
i
able specifies the variable whose value you want to write
e
cedes a format
m
at specifies a format to use for writing the data values.
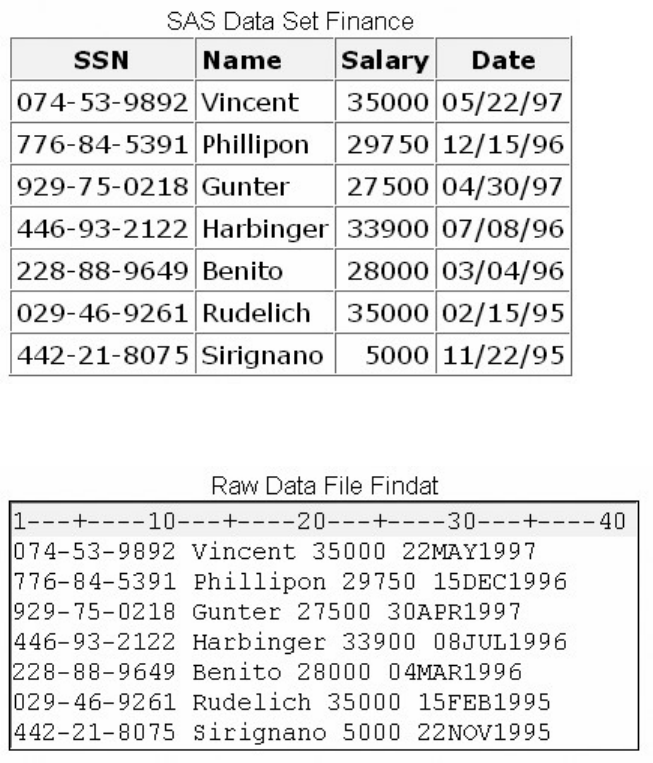
- 610 -
The following program creates the raw data file Findat, using the SAS data set sasuser.Finance. The
DATEw. format is used to write the value of Date in the form DDMMYYYY.
data _null_;
set sasuser.finance;
file 'c:\data\findat.txt';
put ssn name salary date : date9.;
run;
SAS Data Set Finance
Raw Data File Findat
Specifying a Delimiter
You can use the DLM= option with a FILE statement to create a character-delimited raw data file.
data _null_;
set sasuser.finance;
file 'c:\data\findat2' dlm=',';
put ssn name salary date : date9.;
run;
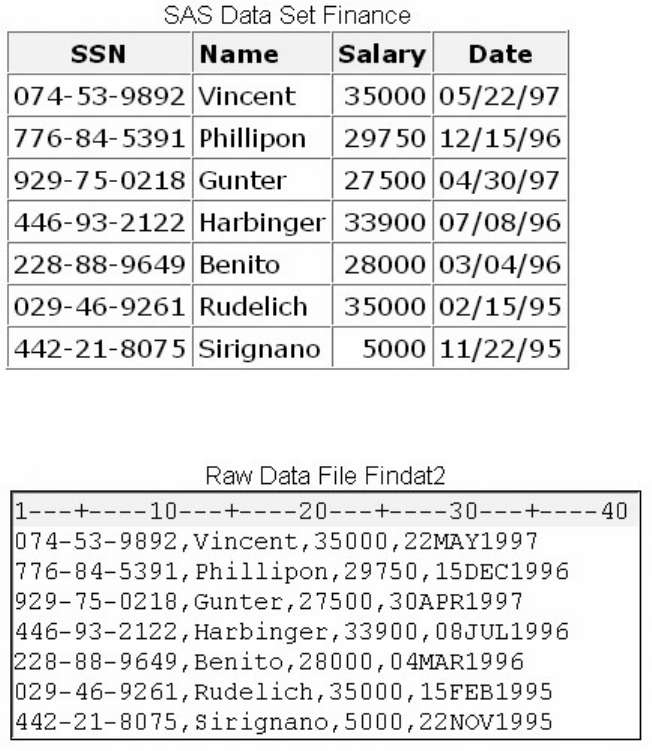
- 611 -
SAS Data Set Finance
Raw Data File Created by the DLM= Option
For creating a simple raw data file, an alternative to the DATA step is the EXPORT procedure.
General form, PROC EXPORT:
PROC EXPORT DATA=SAS-data-set;
OUTFILE=filename <DELIMITER='delimiter'>;
RUN;
where
S
-data-set names the input SAS data set
n
ame specifies the complete path and filename of the output
i
mite
r
specifies the delimiter to separate columns of data in the output file.
For more information about the EXPORT procedure, see the SAS documentation.
Using the DSD Option
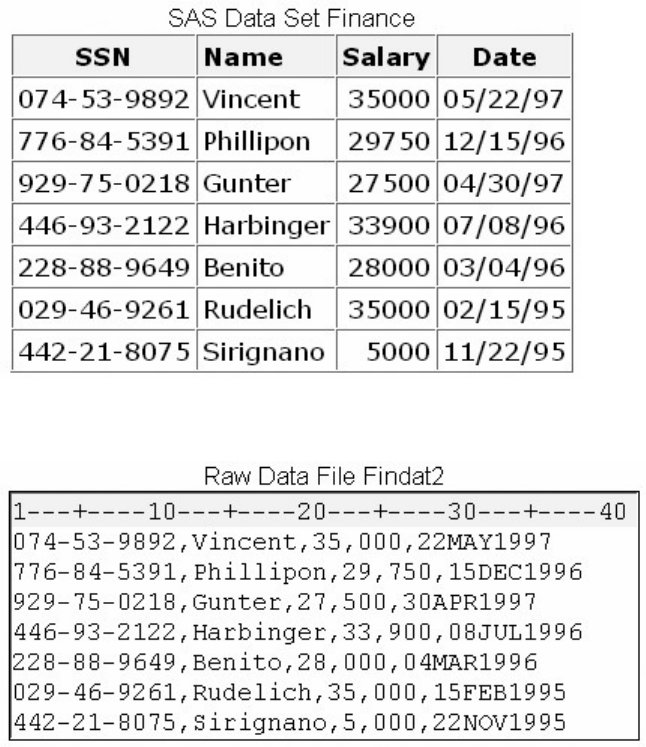
- 612 -
What happens if you need to create a comma-delimited file that requires the use of a format that writes out
values using commas?
If you used the following program, the resulting raw data file would contain five fields rather than four.
data _null_;
set sasuser.finance;
file 'c:\data\findat2' dlm=',';
put ssn name salary : comma6. date : date9.;
run;
SAS Data Set Finance
Raw Data Created with the DLM Option
You can use the DSD option in the FILE statement to specify that data values containing commas should
be enclosed in quotation marks. Remember that the DSD option uses a comma as a delimiter, so a DLM=
option isn't necessary here.
data _null_;
set sasuser.finance;
file 'c:\data\findat2' dsd;
put ssn name salary : comma. date : date9.;
run;
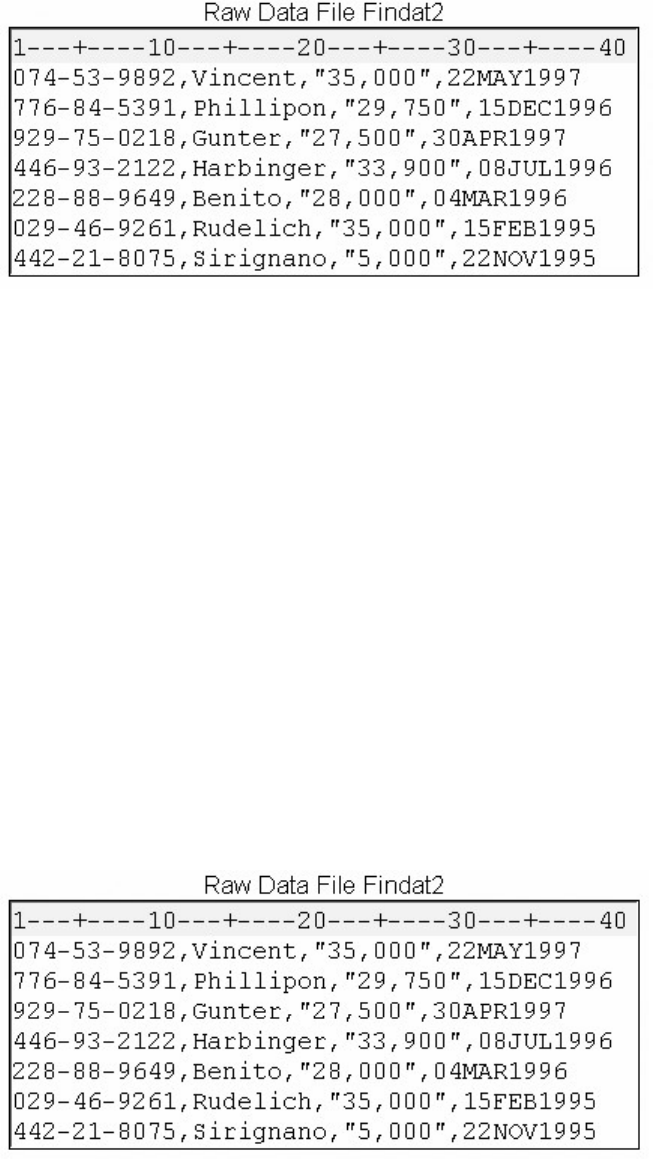
- 613 -
Raw Data Created with the DSD Option
Reading Values That Contain Delimiters within a Quoted String
You can also use the DSD option in an INFILE statement to read values that contain delimiters within a
quoted string. As shown in the following PROC PRINT output, the INPUT statement correctly interprets
the commas within the values for Salary, does not interpret them as delimiters, and removes the quotation
marks from the character strings before the value is stored.
data work.finance2;
infile findat2 dsd;
length SSN $ 11 Name $ 9;
input ssn name Salary : comma. Date : date9.;
run;
proc print data=work.finance2;
format date date9.;
run;
Raw Data File Findat2
Output Created with PROC PRINT
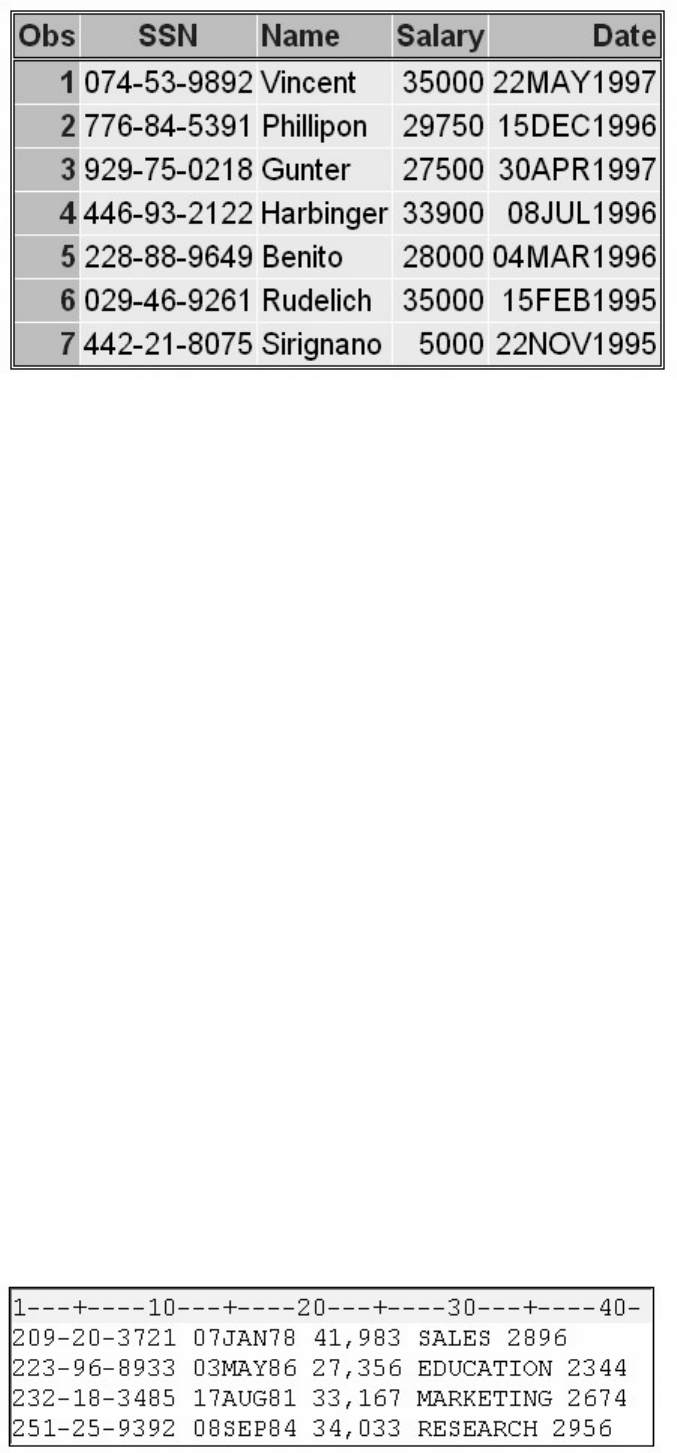
- 614 -
Mixing Input Styles
Evaluating your raw data and choosing the most appropriate input style is a very important task. You have
already worked with three input styles for reading raw data.
Input Styles and the Types of Information They Read
Input
Style
Reads
Column
standard data values in fixed fields
Formatted
standard and nonstandard data values in fixed fields
List
data values that are not arranged in fixed fields, but are separated by blanks or other
delimiters
With some file layouts, you might need to mix input styles in the same INPUT statement in order to read
the data correctly.
Look at the raw data file below and think about how to combine input styles to read these values.
Raw Data Showing Mixed Input Styles

- 615 -
Column input is an appropriate choice for the first field because the values can be read as standard character values and are
located in fixed columns.
The next two fields are also located in fixed columns, but the values require an informat. So, formatted input is a good choice
here.
Values in the fourth field begin in column 28 but do not end in the same column. List input is appropriate here, but notice that
some values are longer than eight characters. You need to use the : format modifier with an informat to read these values.
The last field does not always begin or end in the same column, so list input is the best input style for those values.
Input Styles to Read the Raw Data
Field Description
Starting Column
Field Width
Data Type
Input Style
Social Security #
1
11
character
column
Date of Hire
13
7
date
formatted
Annual Salary
21
6
numeric
formatted
Department
28
5 to 9
character
list
Phone Extension
??
4
character
list
The INPUT statement to read the data should look like this:
data sasuser.mixedstyles;
infile rawdata.dat;
input SSN $ 1-11 @13 HireDate date7.
@21 Salary comma6. Department : $9. Phone $;
run;
proc print data=sasuser.mixedstyles;
run;
When you submit the PRINT procedure, the output displays values for each variable.
Output Created by PROC PRINT
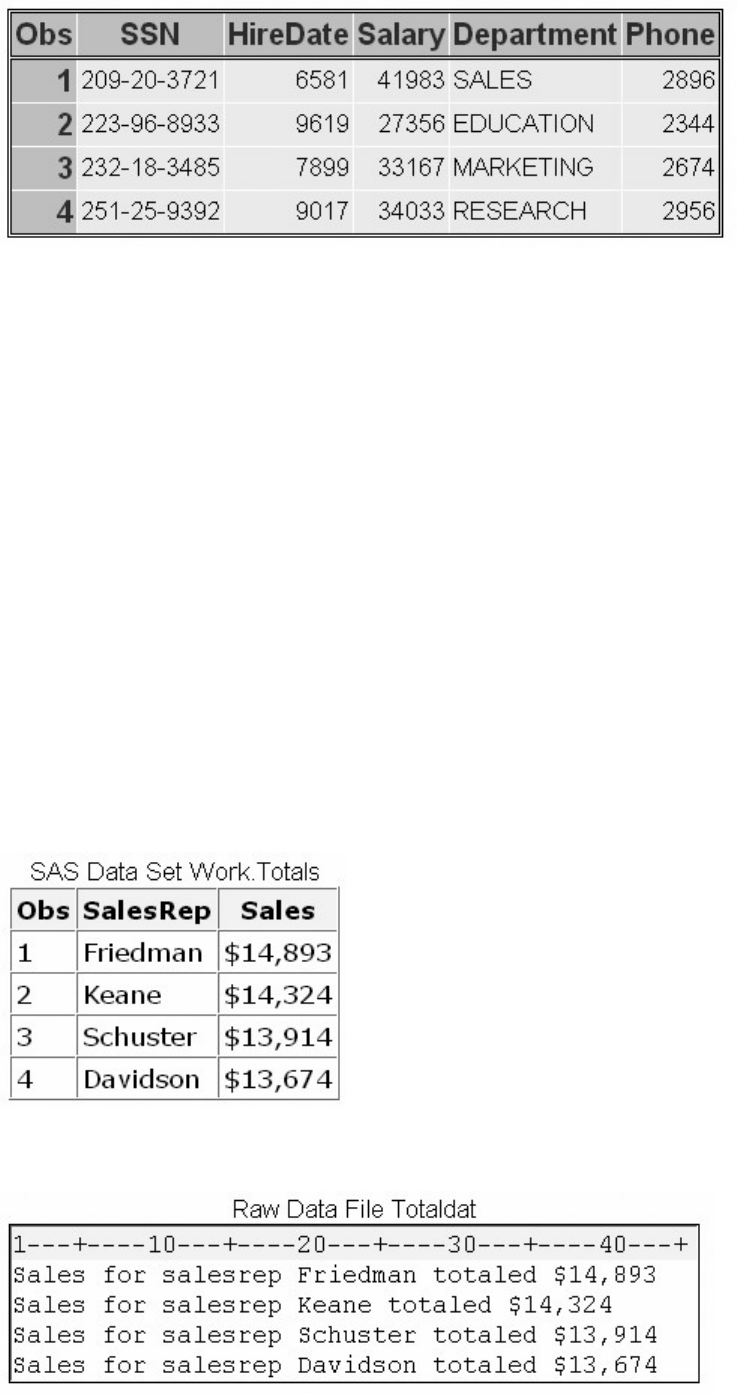
- 616 -
Additional Features
Writing Character Strings and Variable Values
You can use a PUT statement to write both character strings and variable values to a raw data file. To write
out a character string, simply add a character string, enclosed in quotation marks, to the PUT statement. It's
a good idea to include a blank space as the last character in the string to avoid spacing problems.
filename totaldat 'c:\records\junsales.txt';
data _null_;
set work.totals;
file totaldat;
put 'Sales for salesrep ' salesrep
'totaled ' sales : dollar9.;
run;
SAS Data Set Work.Totals
Raw Data File Created Using the PUT Statement
For more information about using the PUT statement to write character strings, see the SAS
documentation.
- 617 -
Chapter Summary
Text Summary
Free-Format Data
External files can contain raw data that is free-format. That is, the data is not arranged in fixed fields. The
fields can be separated by blanks, or by some other delimiter, such as commas.
Using List Input
Free-format data can easily be read with list input because you do not need to specify column locations of
the data. You simply list the variable names in the same order as the corresponding raw data fields. You
must distinguish character variables from numeric variables by using the dollar ($) sign.
When characters other than blanks are used to separate the data values, you can specify the field delimiter
by using the DLM= option in the INFILE statement.
You can also specify a range of variables in the INPUT statement when the variable values in the raw data
file are sequential and are separated by blanks (or by some other delimiter). This is especially useful if
your data contains similar variables, such as the answers to a questionnaire.
In its simplest form, list input places several limitations on the types of data that can be read.
Reading Missing Values
If your data contains missing values at the end of a record, you can use the INFILE statement with the
MISSOVER option to prevent SAS from reading the next record to find the missing values.
If your data contains missing values at the beginning or in the middle of a record, you might be able to use
the DSD option in the INFILE statement to correctly read the raw data. The DSD option sets the default
delimiter to a comma and treats two consecutive delimiters as a missing value.
If the data uses multiple delimiters or a single delimiter other than a comma, you can use both the DSD
option and the DLM= option in the INFILE statement.
The DSD option can also be used to read raw data when there is a missing value at the beginning of a
record, as long as a delimiter precedes the first value in the record.
Specifying the Length of Character Values
You can specify the length of character variables by using the LENGTH statement. The LENGTH
statement enables you to use list input to read character values that are longer than eight characters without
truncating them.
Because variable attributes are defined when the variable is first encountered in the DATA step, the
LENGTH statement precedes the INPUT statement and defines both the length and the type of the
variable.
When you use the LENGTH statement, you do not need to specify the variable type again in the INPUT
statement.
- 618 -
Modifying List Input
Modified list input can be used to read values that contain embedded blanks and nonstandard values.
Modified list input uses two format modifiers:
the ampersand (&) modifier enables you to read character values that contain single embedded blanks
the colon (:) modifier enables you to read nonstandard data values and character values that are longer than eight characters,
but which contain no embedded blanks.
Remember that informats work differently in modified list input than they do in formatted input.
Creating Free-Format Data
You can create a raw data file using list output. With list output, you simply list the names of the variables
whose values you want to write. The PUT statement writes a value, leaves a blank, and then writes the next
value.
You can use the DLM= option with a FILE statement to create a delimited raw data file. You can use the
DSD option in a FILE statement to specify that data values containing commas should be enclosed in
quotation marks. You can also use the DSD option to read values that contain delimiters within a quoted
string.
Mixing Input Styles
With some file layouts, you might need to mix input styles in the same INPUT statement in order to read
the data correctly.
Syntax
Reading Free-Format Data
LIBNAME libref 'SAS-data-library';
FILENAME fileref 'filename';
DATA SAS-data-set;
INFILE file-specification <DLM 'delimiter'> <MISSOVER><DSD>;
LENGTH variable $ length;
INPUT variable<$> <&|:><informat>;
RUN;
PROC PRINT DATA=SAS-data-set;
RUN;
Creating Free-Format Data
LIBNAME libref 'SAS-data-library';
DATA _NULL_;
- 619 -
SET SAS-data-set;
FILE file-specification <DLM 'delimiter'> <DSD>;
PUT variable<: format>;
RUN;
Sample Programs
Reading Free-Format Data
libname sasuser 'c:\records\data';
filename credit 'c:\records\credit.dat';
data sasuser.carduse;
infile creditcard.dat dlm='#' missover;
length LastName $ 14;
input lastname $ Gender $ Age CardType $
Total : comma.;
run;
proc print data=sasuser.carduse;
run;
Creating Raw Data Using List Output
libname sasuser 'c:\records\data';
data _null_;
set sasuser.finance;
file 'c:\accounts\newdata.txt' dsd;
put ssn name salary : comma. date : date9.;
run;
Points to Remember
When you use list input,
fields must be separated by at least one blank or other delimiter.
fields must be read in order, left to right. You cannot skip or re-read fields.
use a LENGTH statement to avoid truncating character values that are longer than eight characters.
In formatted input, the informat determines both the length of character variables and the number of columns that are read.
The same number of columns are read from each record.
The informat in modified list input determines only the length of the variable value, not the number of columns that are read.
Chapter Quiz
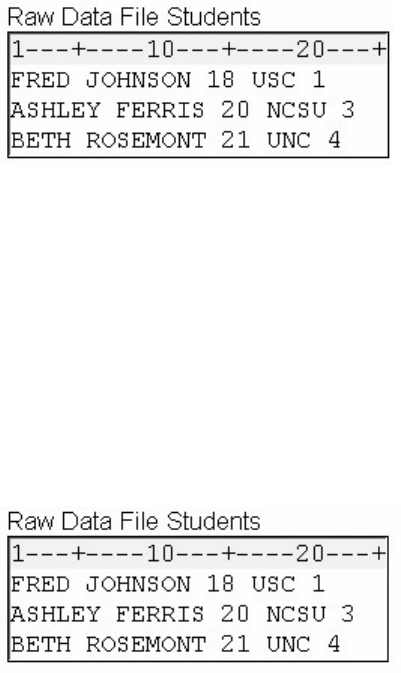
- 620 -
Select the best answer for each question. After completing the quiz, check your answers using the answer
key in the appendix.
The raw data file referenced by the fileref Students contains data that is
Raw Data File Students
arranged in fixed fields
free-format
mixed-format
arranged in columns
Which input style should be used to read the values in the raw data file that is referenced by the fileref Students?
Raw Data File Students
column
formatted
list
mixed
Which SAS program was used to create the raw data file Teamdat from the SAS data set Work.Scores?
SAS Data Set Students and Raw Data File Teamdat
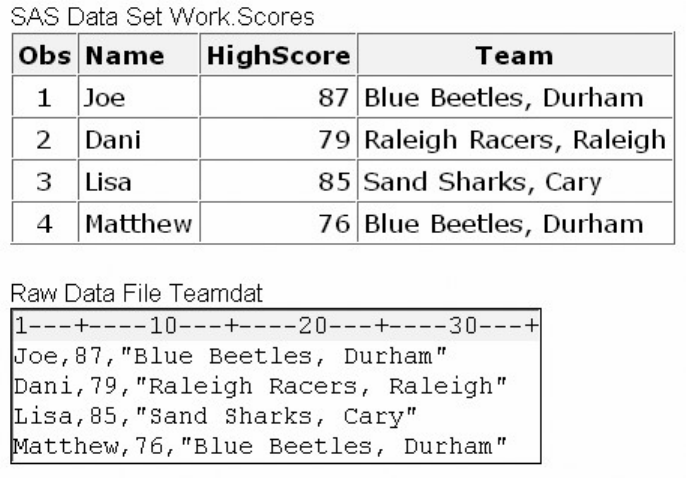
- 621 -
data _null_;
set work.scores;
file 'c:\data\teamdat' dlm=',';
put name highscore team;
run;
data _null_;
set work.scores;
file 'c:\data\teamdat' dlm=' ';
put name highscore team;
run;
data _null_;
set work.scores;
file 'c:\data\teamdat' dsd;
put name highscore team;
run;
data _null_;
set work.scores;
file 'c:\data\teamdat';
put name highscore team;
run;
Which SAS statement reads the raw data values in order and assigns them to the variables shown below?
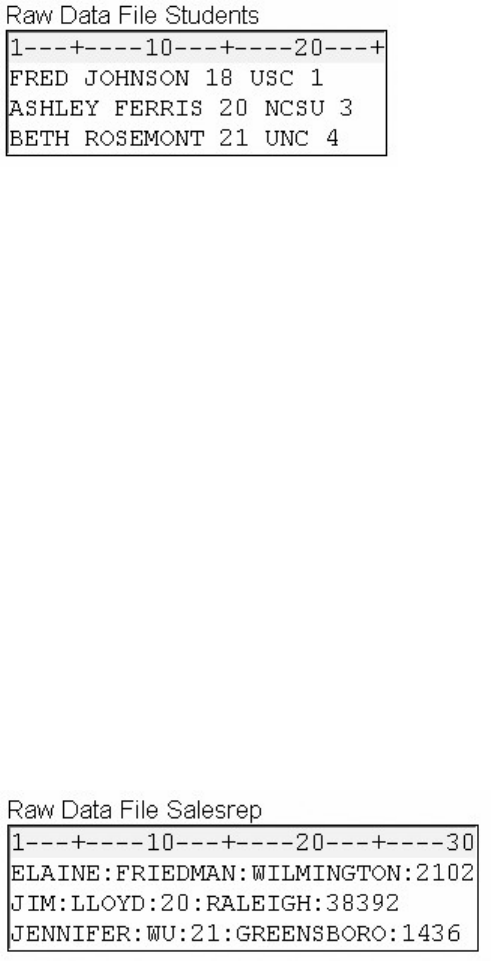
- 622 -
Variables: FirstName (character), LastName (character), Age (numeric), School (character), Class (numeric)
Raw Data File Students
input FirstName $ LastName $ Age School $ Class;
input FirstName LastName Age School Class;
input FirstName $ 1-4 LastName $ 6-12 Age 14-15
School $ 17-19 Class 21;
input FirstName 1-4 LastName 6-12 Age 14-15
School 17-19 Class 21;
Which SAS statement should be used to read the raw data file that is referenced by the fileref Salesrep?
Raw Data File Salesrep
infile salesrep;
infile salesrep ':';
infile salesrep dlm;
infile salesrep dlm=':';
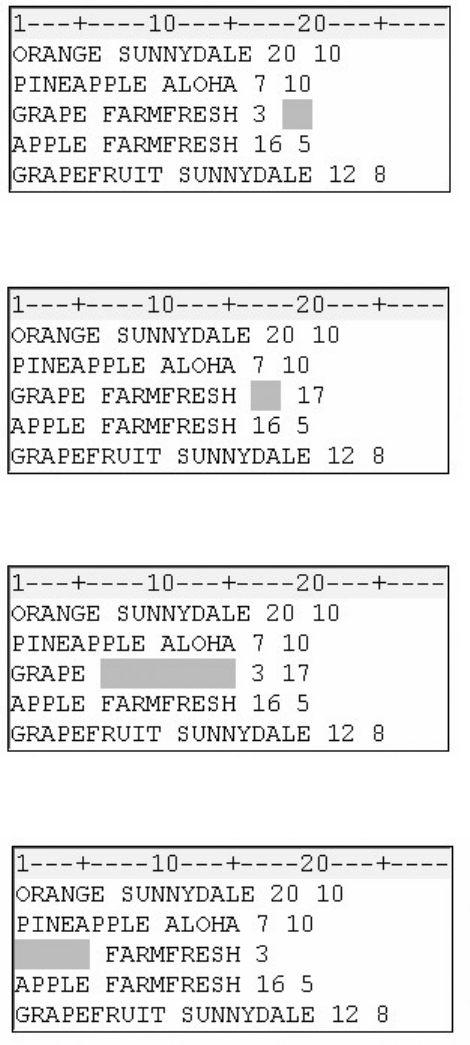
- 623 -
Which of the following raw data files can be read by using the MISSOVER option in the INFILE statement? Spaces for
missing values are highlighted with colored blocks.
Raw Data File with Blank Spaces at the End of Line Three
Raw Data File with Blank Spaces in the Middle of Line Three
Raw Data File with Blank Spaces in the Middle of Line Three
Raw Data File with Blank Spaces at the Beginning of Line Three
Which SAS program correctly reads the data in the raw data file that is referenced by the fileref Volunteer?
Raw Data File Volunteer
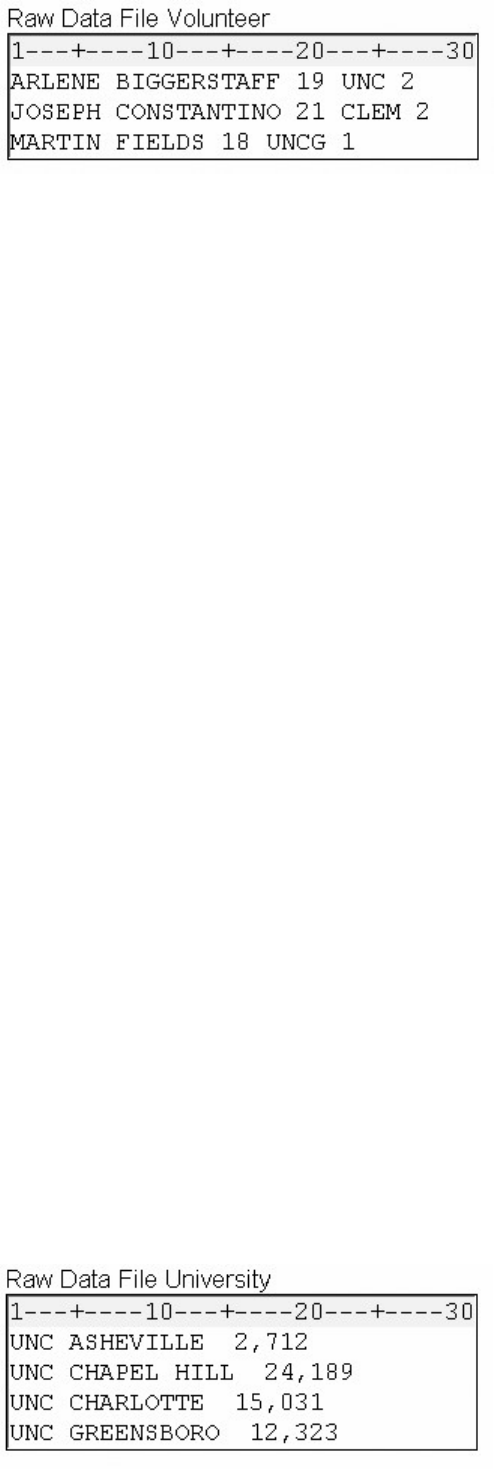
- 624 -
data sasuser.contest;
infile volunteer;
input FirstName $ LastName $ Age
School $ Class;
run;
data sasuser.contest;
infile volunteer;
length LastName $ 11;
input FirstName $ lastname $ Age
School $ Class;
run;
data sasuser.contest;
infile volunteer;
input FirstName $ lastname $ Age
School $ Class; length LastName $ 11;
run;
data sasuser.contest;
infile volunteer;
input FirstName $ LastName $ 11. Age
School $ Class;
run;
Which type of input should be used to read the values in the raw data file that is referenced by the fileref University?
Raw Data File University
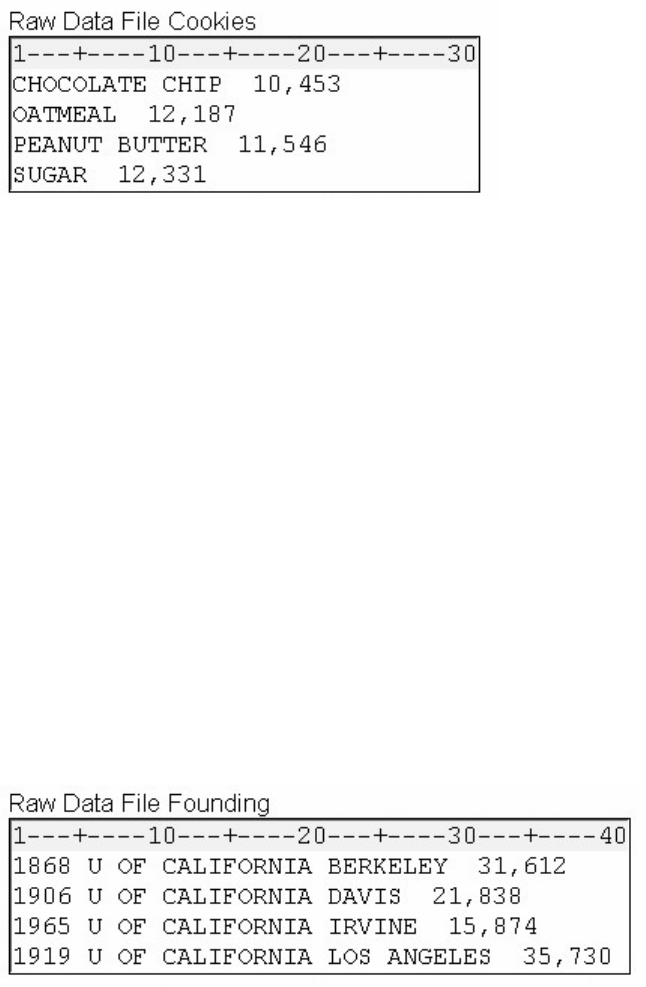
- 625 -
column
formatted
list
modified list
Which SAS statement correctly reads the values for Flavor and Quantity? Make sure the length of each variable can
accommodate the values shown.
Raw Data File Cookies
input Flavor & $9. Quantity : comma.;
input Flavor & $14. Quantity : comma.;
input Flavor : $14. Quantity & comma.;
input Flavor $14. Quantity : comma.;
Which SAS statement correctly reads the raw data values in order and assigns them to these corresponding variables: Year
(numeric), School (character), Enrolled (numeric)?
Raw Data File Founding
input Year School & $27.
Enrolled : comma.;

- 626 -
input Year 1-4 School & $27.
Enrolled : comma.;
input @1 Year 4. +1 School & $27.
Enrolled : comma.;
all of the above
Chapter 18 Reading Date and Time Values
Overview
How SAS Stores Date Values
How SAS Stores Time Values
More about SAS Date and Time Values
Reading Dates and Times with Informats
Using Dates and Times in Calculations
Using Date and Time Formats
Chapter Summary
Chapter Quiz
Overview
Introduction
SAS provides many informats for reading raw data values in various forms. Reading Raw Data in Fixed
Fields explained how informats can be used to read standard and nonstandard data. In this chapter, you
learn how to use a special category of SAS informats called date and time informats. These informats
enable you to read a variety of common date and time expressions. After you read date and time values,
you can also perform calculations with them.
options yearcutoff=1920;
data perm.aprbills;
infile aprdata;
input LastName $8. @10 DateIn mmddyy8. +1 DateOut
mmddyy8. +1 RoomRate 6. @35 EquipCost 6.;
Days=dateout-datein+1;
- 627 -
RoomCharge=days*roomrate;
Total=roomcharge+equipcost;
run;
Program Data Vector
Objectives
In this chapter, you learn how
SAS stores date and time values
to use SAS informats to read common date and time expressions
to handle two-digit year values
to calculate time intervals by subtracting two dates
to multiply a time interval by a rate
to display various date and time values.
How SAS Stores Date Values
Before you read date or time values into a SAS data set or use those values in calculations, you should
understand how SAS stores date and time values.
When you use a SAS informat to read a date, SAS converts it to a numeric date value. A SAS date value is
the number of days from January 1, 1960, to the given date.
SAS Calculation of Date Values
Here are some examples of how the appropriate SAS informat can convert different expressions for the
date January 2, 2000, to a single SAS date value:
Date Expression
SAS Date Informat
SAS Date Value
02Jan00
DATEw.
14611
- 628 -
01-02-2000 MMDDYYw. 14611
02/01/00
DDMMYYw.
14611
2000/01/02
YYMMDDw.
14611
Storing dates and times as numeric values enables you to use dates and times in calculations much as you
would use any other number.
How SAS Stores Time Values
SAS stores time values similar to the way it stores date values. A SAS time value is stored as the number
of seconds since midnight.
SAS Calculation of Time Values
A SAS datetime is a special value that combines both date and time information. A SAS datetime value is
stored as the number of seconds between midnight on January 1, 1960, and a given date and time.
SAS Calculation of Date and Time Values
More about SAS Date and Time Values
As you use SAS date and time values, remember that
SAS date values are based on the Gregorian calendar, and they are valid for dates from A.D. 1582 through A.D. 20,000. Use
caution when working with historical dates. Most of Europe started to use the Gregorian calendar in 1582. Great Britain
and the American colonies adopted it in 1752. Check the adoption date for other parts of the world before making
important calculations.
SAS makes adjustments for leap years but ignores leap seconds.
SAS does not make adjustments for daylight saving time.
Reading Dates and Times with Informats
Overview
You use SAS date and time informats to read date and time expressions and convert them to SAS date and
time values. Like other SAS informats, date and time informats are composed of
- 629 -
an informat name
a field width
a period delimiter.
SAS informat names indicate the form of date expression that can be read using that particular informat.
Here are some examples of common date and time informats:
DATEw.
DATETIMEw.
MMDDYYw.
TIMEw.
As you know, there are several ways to represent a date. For example, all the following expressions
represent the date October 15, 1999. Each of these common date expressions can be read using the
appropriate SAS date informat.
Date Expressions and Corresponding SAS Date Informats
Date Expression
SAS Date Informat
10/15/99
MMDDYYw.
15Oct99
DATEw.
10-15-99
MMDDYYw.
99/10/15
YYMMDDw.
Specifying Informats
Using the INPUT statement with an informat after a variable name is the simplest way to read date and
time values into a variable.
General form, INPUT statement with an informat:
INPUT <pointer-control> variable informat.;
- 630 -
where
n
te
r
-control specifies the absolute or relative position to move the pointer.
i
able is the name of the variable being read.
o
rmat. is any valid SAS informat. Note that the informat includes a final period.
For example, the following INPUT statement uses two informats:
input @15 Style $3. @21 Price 5;
The $w. character informat ($3.) reads values, starting at column 15 of the raw data, into the variable Style.
The w.d numeric informat (5) reads values, starting at column 21, into the variable Price.
Now let's look at some specific date and time informats you can use.
MMDDYYw. Informat
You can tell by its name that the informat MMDDYYw. reads date values in the form 10/15/99.
General form, values read with MMDDYYw. informat:
mmddyy or mmddyyyy
where
is an integer between 01 and 12, representing the month
i
s an integer between 01 and 31, representing the day
o
r yyyy is an integer that represents the year.
In the MMDDYYw. informat, the month, day, and year fields can be separated by blanks or delimiters
such as - or /. If delimiters are present, they must occur between all fields in the values. Remember to
specify a field width that includes not only the month, day, and year values, but any delimiters as well.
Here are some date expressions that you can read using the MMDDYYw. informat:
Date Expressions and Corresponding SAS Date Informats
Date Expression
SAS Date Informat
101599
- 631 -
MMDDYY6.
10/15/99
MMDDYY8.
10 15 99
MMDDYY8.
10-15-1999
MMDDYY10.
DATEw. Informat
The DATEw. informat reads date values in the form 30May2000.
General form, values read with DATEw. informat:
ddmmmyy or ddmmmyyyy
where
i
s an integer from 01 to 31, representing the day
m is the first three letters of the month's name
o
r yyyy is an integer that represents the year.
Blanks or other special characters can appear between the day, month, and year, as long as you increase
the width of the informat to include these delimiters. Here are some date expressions that you can read
using the DATEw. informat:
Date Expressions and Corresponding SAS Date Informats
Date Expression
SAS Date Informat
- 632 -
30May00
DATE7.
30May2000
DATE9.
30-May-2000
DATE11.
TIMEw. Informat
The TIMEw. informat reads values in the form hh:mm:ss.ss.
General form, values read with TIMEw. informat:
hh:mm:ss.ss
where
i
s an integer from 00 to 23, representing the hour
is an integer from 00 to 59, representing the minute
s
is an optional field that represents seconds and hundredths of seconds.
If you do not enter a value for ss.ss, a value of zero is assumed. Here are some examples of time
expressions that you can read using the TIMEw. informat:
Time Expressions and Corresponding SAS Time Informats
TimeExpression
SAS Time Informat
17:00:01.34
TIME11.
17:00
TIME5.
2:34
TIME5.
Notice the last example. The field is only 4 columns wide, but a w value of 5 is specified. Five is the
minimum acceptable field width for the TIMEw. informat. If you specify a w value less than 5, you'll
receive the following error message in the SAS log:

- 633 -
SAS Log
DATETIMEw. Informat
The DATETIMEw. informat reads expressions that are composed of two parts, a date value and a time
value, in the form: ddmmmyy hh:mm:ss.ss.
General form, values read with DATETIMEw. informat:
ddmmmyy hh:mm:ss.ss
where
m
mmyy is the date value, the same form as for the DATEw. informat
time value must be in the form hh:mm:ss.ss
i
s an integer from 00 to 23, representing the hour
is an integer from 00 to 59, representing the minute
s
is an optional field that represents seconds and hundredths of seconds
date value and time value are separated by a blank o
r
other delimiter.
If you do not enter a value for ss.ss, a value of zero is assumed.
Here are some examples of the DATETIMEw. informat. Note that in the time value, you must use
delimiters to separate the values for hour, minutes, and seconds.
Date and Time Expressions and Corresponding SAS Datetime Informats
Date and Time Expression
SAS Datetime Informat
30May2000:10:03:17.2
DATETIME20.
30May00 10:03:17.2
DATETIME18.
- 634 -
30May2000/10:03 DATETIME15.
YEARCUTOFF= SAS System Option
Recall from Referencing Files and Setting Options that the value of the YEARCUTOFF= system option
affects only two-digit year values. A date value that contains a four-digit year value will be interpreted
correctly even if it does not fall within the 100-year span set by the YEARCUTOFF= system option.
Date Expressions with Corresponding Date Informats and Interpretations
Date Expression
SAS Date Informat
Interpreted As
06Oct59
date7.
06Oct1959
17Mar1783
date9.
17Mar1783
However, if you specify an inappropriate field width, you will receive incorrect results. Notice that the
date expression in the table below contains a four-digit year value. The informat specifies a w value that is
too small to read the entire value, so the last two digits of the year are truncated.
Date Expressions with Corresponding Date Informats and Interpretations
Date Expression
SAS Date Informat
Interpreted As
17Mar1783
date7.
17Mar2017
Another problem arises if you use the wrong informat to read a date or time expression. The SAS log
displays an invalid data message, and the variable's values are set to missing.
SAS Log
SAS Log Showing Invalid Data Message
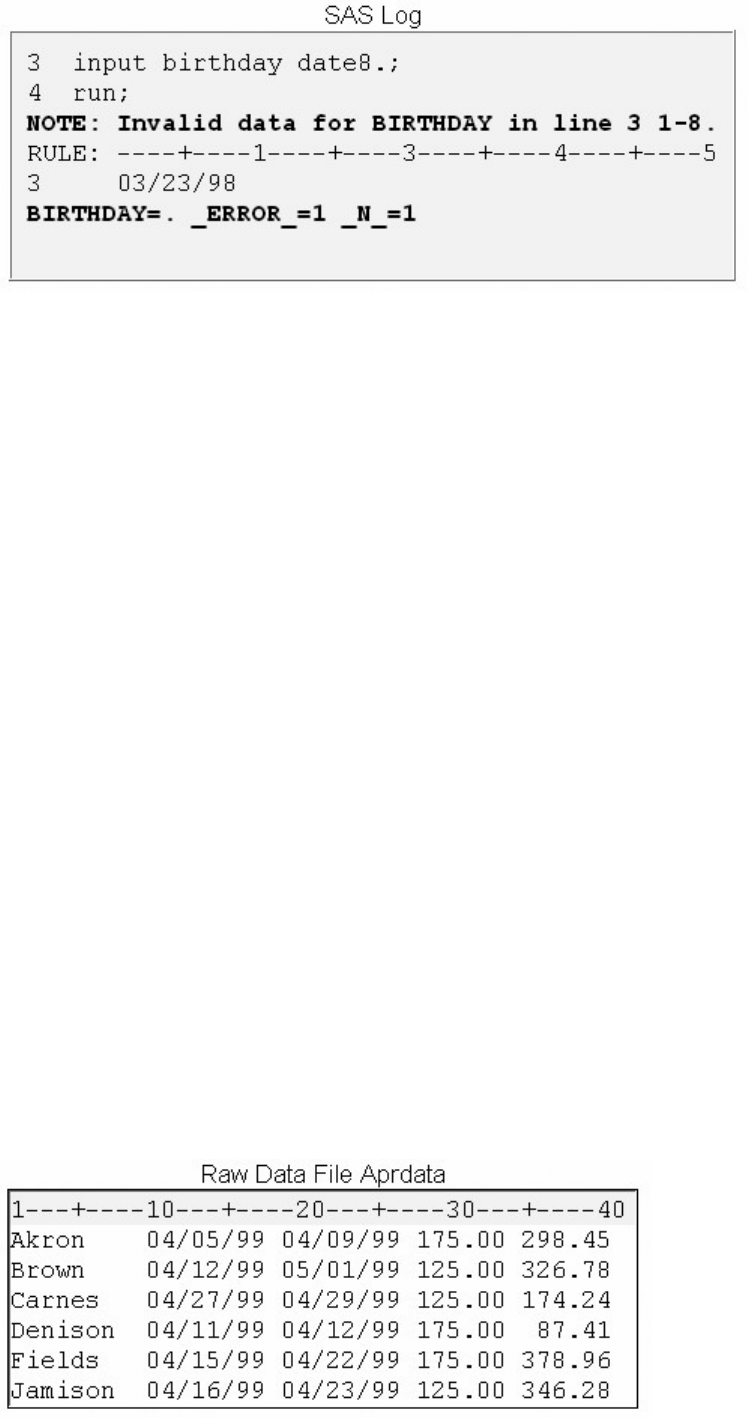
- 635 -
When you work with date and time values,
check the default value of the YEARCUTOFF= system option, and change it if necessary. The default YEARCUTOFF= value
is 1920.
specify the proper informat for reading a date value.
specify the correct field width so that the entire date value is read.
Using Dates and Times in Calculations
In this chapter so far, you've learned how date and time informats read common date and time expressions
in specific forms. Now you will see how converting date and time expressions to numeric SAS date values
can be useful, particularly for determining time intervals or performing calculations.
Suppose you work in the billing department of a small community hospital. It's your job to create a SAS
data set from the raw data file that is referenced by the fileref Aprdata. A portion of the raw data file below
shows data values that represent each patient's
last name
date checked in
date checked out
daily room rate
equipment cost.
Raw Data File Aprdata
- 636 -
The data set that you create must also include variable values that represent how many days each person
stayed in the hospital, the total room charges, and the total of all expenses that each patient incurred. When
building the SAS program, you must first name the data set, identify the raw data file Aprdata, and use
formatted input to read the data.
The following example is shown with the YEARCUTOFF= system option. When you work with two-digit
year data, remember to check the default value of the YEARCUTOFF= option, and change it if necessary.
options yearcutoff=1920;
data perm.aprbills;
infile aprdata;
input LastName $8.
Notice that the values in the second and third fields are in the form mmddyy. To complete the INPUT
statement, add instructions to read the values for RoomRate (fourth field) and EquipCost (fifth field), and
add a semicolon.
options yearcutoff=1920;
data perm.aprbills;
infile aprdata;
input LastName $8. @10 DateIn mmddyy8. +1 DateOut
mmddyy8. +1 RoomRate 6. @35 EquipCost 6.;
Now that the INPUT statement is complete, calculate how many days each patient was hospitalized.
Because DateIn and DateOut are numeric variables, you can simply subtract to find the difference. But
because the dates should be inclusive (patients are charged for both the first and last days), you must add 1
to the difference. Call this new variable Days.
options yearcutoff=1920;
data perm.aprbills;
infile aprdata;
input LastName $8. @10 DateIn mmddyy8. +1 DateOut
mmddyy8. +1 RoomRate 6. @35 EquipCost 6.;
Days=dateout-datein+1;
You can calculate a total room charge by multiplying Days times RoomRate.
options yearcutoff=1920;
data perm.aprbills;
infile aprdata;
input LastName $8. @10 DateIn mmddyy8. +1 DateOut
mmddyy8. +1 RoomRate 6. @35 EquipCost 6.;
Days=dateout-datein+1;
RoomCharge=days*roomrate;
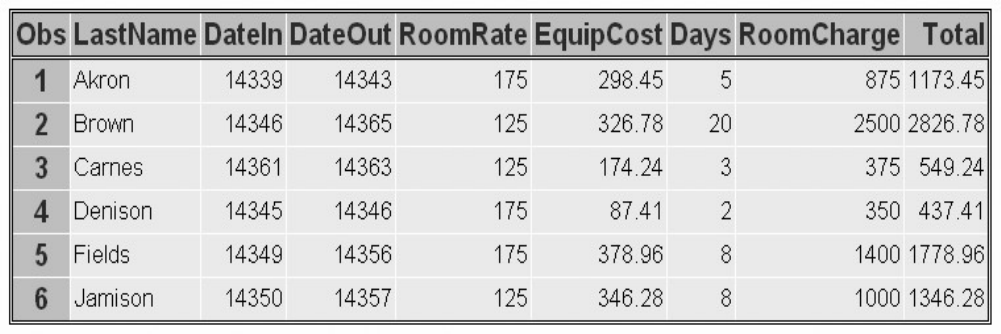
- 637 -
Calculating the total cost for each patient is easy. Create a variable named Total whose value is the sum of
RoomCharge and EquipCost. Then add a PROC PRINT step and a RUN statement to view the new data.
options yearcutoff=1920;
data perm.aprbills;
infile aprdata;
input LastName $8. @10 DateIn mmddyy8. +1 DateOut
mmddyy8. +1 RoomRate 6. @35 EquipCost 6.;
Days=dateout-datein+1;
RoomCharge=days*roomrate;
Total=roomcharge+equipcost;
run;
proc print data=perm.aprbills;
run;
Table Created with PROC PRINT
If the values for DateIn and DateOut look odd to you, remember that these are SAS date values. Applying
a format such as MMDDYY displays them as they appeared in Aprdata. You'll work with some other date
and time formats later in this chapter.
Follow the execution of the program below. When the DATA step executes, the values for DateIn and
DateOut are converted to SAS date values.
options yearcutoff=1920;
data perm.aprbills;
infile aprdata;
input LastName $8. @10 DateIn mmddyy8. +1 DateOut
mmddyy8. +1 RoomRate 6. @35 EquipCost 6.;
Days=dateout-datein+1;
RoomCharge=days*roomrate;
Total=roomcharge+equipcost;
run;
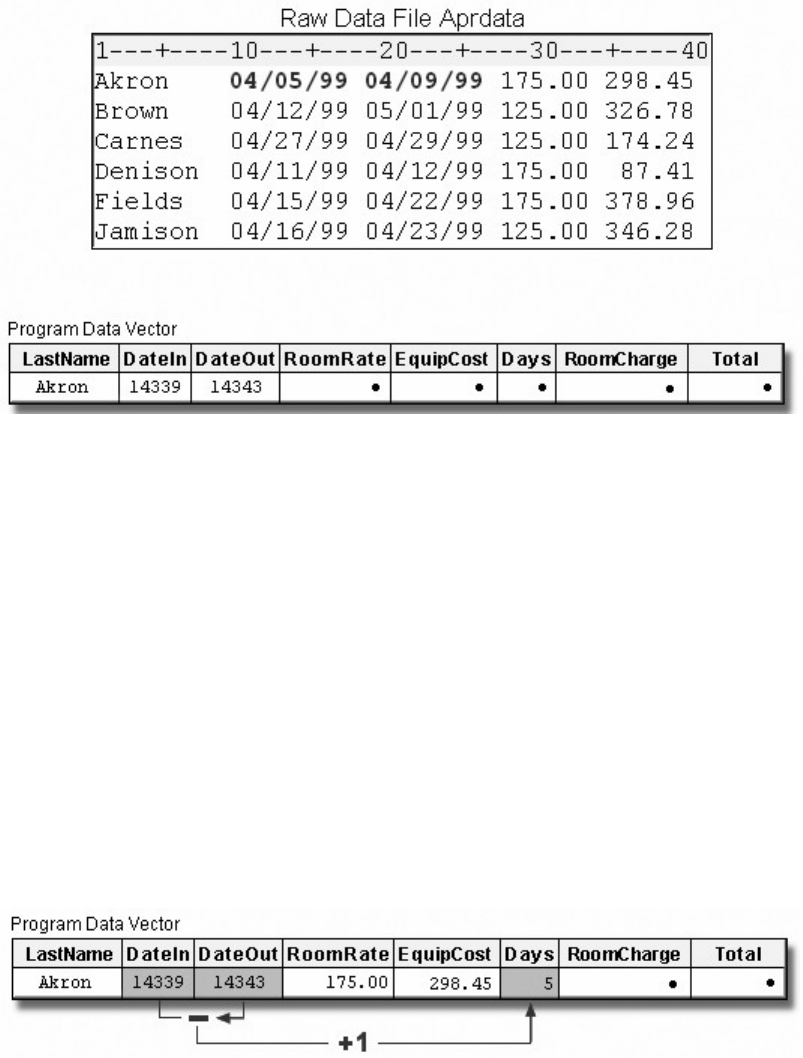
- 638 -
Raw Data File Aprdata and Program Data Vector
After the INPUT statement, Days is created by subtracting DateIn from DateOut and adding 1.
options yearcutoff=1920;
data perm.aprbills;
infile aprdata;
input LastName $8. @10 DateIn mmddyy8. +1 DateOut
mmddyy8. +1 RoomRate 6. @35 EquipCost 6.;
Days=dateout-datein+1;
RoomCharge=days*roomrate;
Total=roomcharge+equipcost;
run;
Program Data Vector
The value for RoomCharge is calculated next. RoomCharge is the product of Days and RoomRate.
options yearcutoff=1920;
data perm.aprbills;
infile aprdata;
input LastName $8. @10 DateIn mmddyy8. +1 DateOut
mmddyy8. +1 RoomRate 6. @35 EquipCost 6.;
Days=dateout-datein+1;
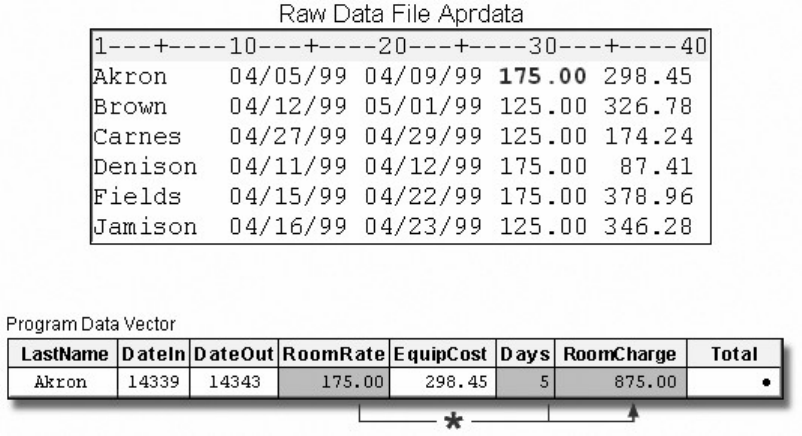
- 639 -
RoomCharge=days*roomrate;
Total=roomcharge+equipcost;
run;
Raw Data File Aprdata and Program Data Vector
The value for Total is the final calculation. Total is the sum of EquipCost and RoomCharge.
options yearcutoff=1920;
data perm.aprbills;
infile aprdata;
input LastName $8. @10 DateIn mmddyy8. +1 DateOut
mmddyy8. +1 RoomRate 6. @35 EquipCost 6.;
Days=dateout-datein+1;
RoomCharge=days*roomrate;
Total=roomcharge+equipcost;
run;
Raw Data File Aprdata and Program Data Vector
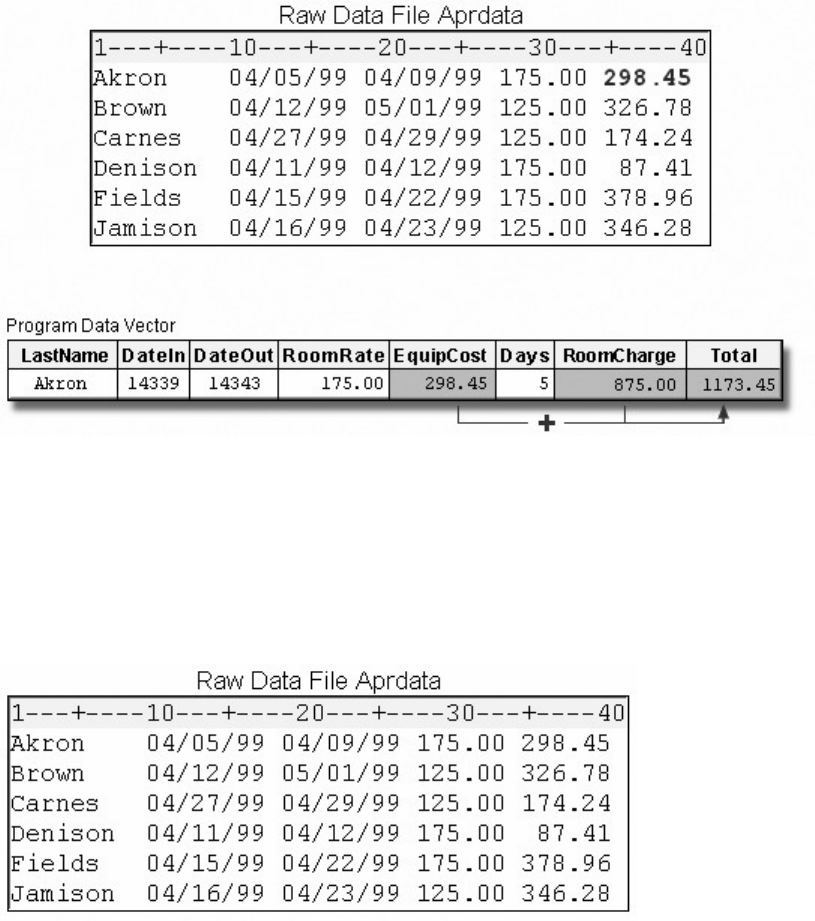
- 640 -
Using Date and Time Formats
Overview
Remember that when Perm.Aprbills is printed, the values for DateIn and DateOut appear as SAS date
values.
options yearcutoff=1920;
data perm.aprbills;
infile aprdata;
input LastName $8. @10 DateIn mmddyy8. +1 DateOut
mmddyy8. +1 RoomRate 6. @35 EquipCost 6.;
Days=dateout-datein+1;
RoomCharge=days*roomrate;
Total=roomcharge+equipcost;
run;
>proc print data=perm.aprbills;
run;
PROC PRINT Output for the above Example
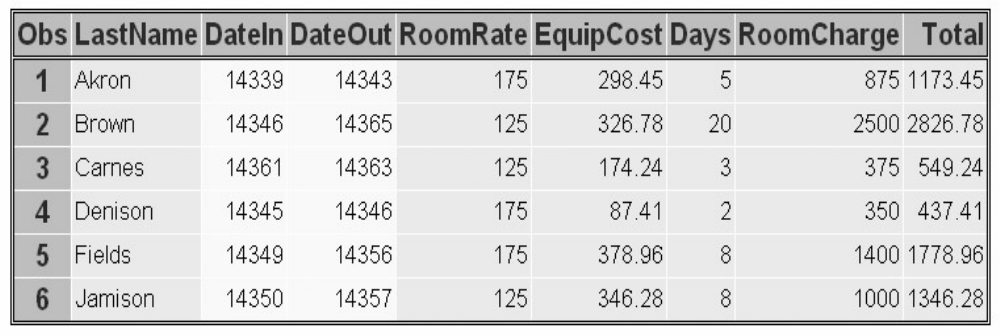
- 641 -
SAS provides many specialized date and time formats that enable you to specify how date and time values
are displayed. Let's look at two date formats: WEEKDATEw. and WORDDATEw.
The WEEKDATEw. Format
You can use the WEEKDATEw. format to write date values in a format that displays the day of the week,
month, day, and year.
General form, WEEKDATEw. format:
WEEKDATEw.
The WEEKDATEw. format writes date values in the form day-of-week, month-name dd, yy (or yyyy).
where
i
s an integer between 01 and 31, representing the day
o
r yyyy is an integer that represents the year.
Note: If the w value is too small to write the complete day of the week and month, SAS abbreviates as
needed.
proc print data=perm.aprbills;
format datein dateout weekdate17.;
run;
PROC PRINT Output for the above Example
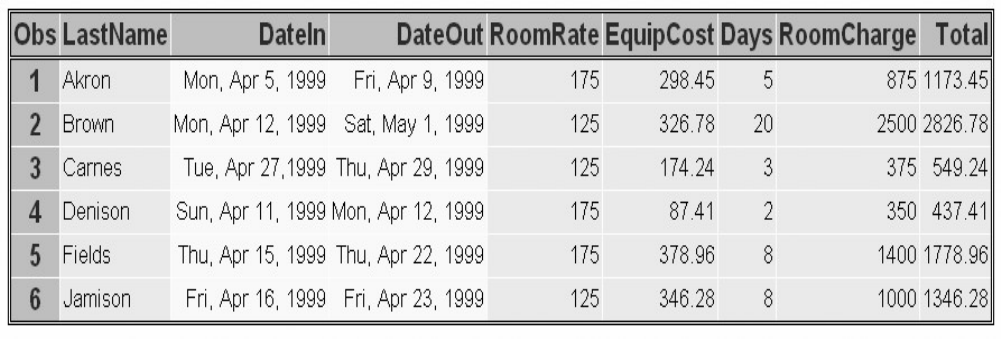
- 642 -
You can vary the results by changing the w value in the format.
FORMAT Statement
Result
format datein weekdate3.;
Mon
format datein weekdate6.;
Monday
format datein weekdate17.;
Mon, Apr 5, 1999
format datein weekdate21.;
Monday, April 5, 1999
The WORDDATEw. Format
The WORDDATEw. format is similar to the WEEKDATEw. format, but it does not display the day of the
week or the two-digit year values.
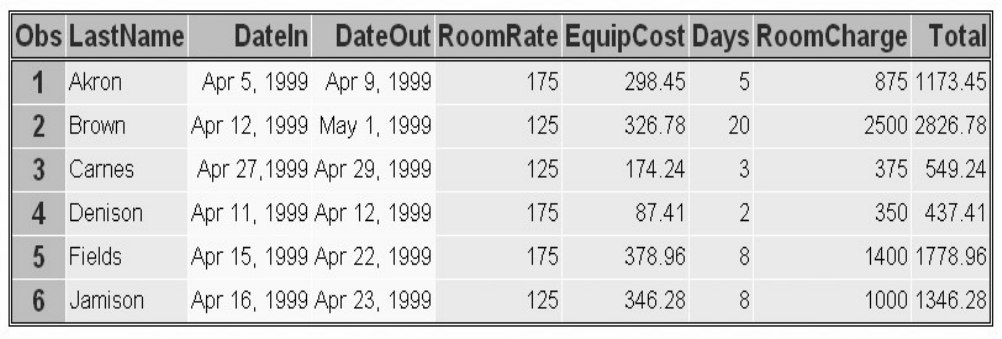
- 643 -
General form, WORDDATEw. format:
WORDDATEw.
The WORDDATEw. format writes date values in the form month-name dd, yyyy.
where
i
s an integer between 01 and 31, representing the day
y
is an integer that represents the year.
Note: If the w value is too small to write the complete month, SAS abbreviates as needed.
proc print data=perm.aprbills;
format datein dateout worddate12.;
run;
PROC PRINT Output for the above Example
You can vary the results by changing the w value in the format.
FORMAT Statements and Corresponding Results
FORMAT Statement
Result
format datein worddate3.;
Apr
format datein worddate5.;
April
- 644 -
format datein worddate14.; April 15, 1999
Remember that you can permanently assign a format to variable values by including a FORMAT statement
in the DATA step.
options yearcutoff=1920;
data work.aprbills;
infile aprdata;
input LastName $8. @10 DateIn mmddyy8. +1 DateOut
mmddyy8. +1 RoomRate 6. @35 EquipCost 6.;
Days=dateout-datein+1;
RoomCharge=days*roomrate;
Total=roomcharge+equipcost;
format datein dateout worddate12.;
run;
proc print data=work.aprbills;
run;
Chapter Summary
Text Summary
How SAS Stores Date and Time Values
SAS stores dates as numeric SAS date values, which represent the number of days from January 1, 1960.
SAS time values are the number of seconds since midnight.
Reading Dates and Times with Informats
Use SAS informats to read date and time expressions and convert them to SAS date and time values.
MMDDYYw. reads dates such as 053090, 05/30/90, or 05 30 1990.
DATEw. reads dates such as 30May1990, 30May90, or 30-May-1990.
TIMEw. reads times such as 17:00, 17:00:01.34, or 2:34.
DATETIMEw. reads dates and times such as 30May1990:10:03:17.2, 30May90 10:03:17.2, or 30May1990/10:03.
Two-digit year values require special consideration. When a two-digit year value is read, SAS defaults to a
year within a 100-year span that is determined by the YEARCUTOFF= system option. The default value
of YEARCUTOFF= is 1920. You can check or reset the value of this option in your SAS session to use a
different 100-year span for date informats.
Using Dates and Times in Calculations
Date and time values can be used in calculations like other numeric values. In addition to tracking time
intervals, SAS date and time values can be used with SAS functions and with complex calculations.
- 645 -
Using Date and Time Formats
SAS provides many specialized date and time formats that enable you to specify how date and time values
are displayed. You can use the WEEKDATEw. format to write date values in the form day-of-week,
month-name dd, yy (or yyyy). You can use the WORDDATEw. format to write date values in the form
month-name dd, yyyy.
Syntax
OPTIONS YEARCUTOFF=yyyy;
DATA SAS-data-set;
INFILE file-specification;
INPUT <pointer-control> variable informat.;
RUN;
PROC PRINT DATA=SAS-data-set;
FORMAT variable format.;
RUN;
Sample Program
options yearcutoff=1920;
data perm.aprbills;
infile aprdata;
input LastName $8. @10 DateIn mmddyy8.
+1 DateOut mmddyy8. +1 RoomRate 6.
@35 EquipCost 6.;
Days=dateout-datein+1;
RoomCharge=days*roomrate;
Total=roomcharge+equipcost;
run;
proc print data=perm.aprbills;
format datein dateout worddate12.;
run;
Points to Remember
SAS makes adjustments for leap years, but not for leap seconds or daylight saving time.
The minimum acceptable field width for the TIMEw. informat is 5. If you specify a w value less than 5, you'll receive an error
message in the SAS log.
The default value of the YEARCUTOFF= option is 1920. When you work with two-digit year data, remember to check the
default value of the YEARCUTOFF= option, and change it if necessary.
- 646 -
The value of the YEARCUTOFF= system option does not affect four-digit year values. Four-digit values are always read
correctly.
Be sure to specify the proper informat for reading a date value, and specify the correct field width so that the entire value is
read.
If SAS date values appear in your program output, use a date format to display them in legible form.
Chapter Quiz
Select the best answer for each question. After completing the quiz, you can check your answers using the
answer key in the appendix.
SAS date values are the number of days since which date?
January 1, 1900
January 1, 1950
January 1, 1960
January 1, 1970
A great advantage of storing dates and times as SAS numeric date and time values is that
they can easily be edited.
they can easily be read and understood.
they can be used in text strings like other character values.
they can be used in calculations like other numeric values.
SAS does not automatically make adjustments for daylight saving time, but it does make adjustments for:
leap seconds
leap years
Julian dates
time zones
An input data file has date expressions in the form 10222001. Which SAS informat should you use to read these dates?
DATE6.
DATE8.
MMDDYY6.
MMDDYY8.
The minimum width of the TIMEw. informat is:
4
- 647 -
5
6
7
Shown below are date and time expressions and corresponding SAS datetime informats. Which date and time expression
cannot be read by the informat that is shown beside it?
30May2000:10:03:17.2 DATETIME20.
30May00 10:03:17.2 DATETIME18.
30May2000/10:03 DATETIME15.
30May2000/1003 DATETIME14.
What is the default value of the YEARCUTOFF= system option?
1920
1910
1900
1930
Suppose your input data file contains the date expression 13APR2009. The YEARCUTOFF= system option is set to 1910.
SAS will read the date as:
13APR1909
13APR1920
13APR2009
13APR2020
Suppose the YEARCUTOFF= system option is set to 1920. An input file contains the date expression 12/08/1925, which is
being read with the MMDDYY8. informat. Which date will appear in your data?
08DEC1920
08DEC1925
08DEC2019
08DEC2025
Suppose your program creates two variables from an input file. Both variables are stored as SAS date values: FirstDay records
the start of a billing cycle, and LastDay records the end of that cycle. The code for calculating the total number of days in
the cycle would be:
TotDays=lastday-firstday;

- 648 -
TotDays=lastday-firstday+1;
TotDays=lastday/firstday;
You cannot use date values in calculations.
Chapter 19 Creating a Single Observation from
Multiple Records
Overview
Using Line Pointer Controls
Reading Multiple Records Sequentially
Reading Multiple Records Non-Sequentially
Combining Line Pointer Controls
Chapter Summary
Chapter Quiz
Overview
Introduction
Information for one observation can be spread out over several raw data file records. You can write
multiple INPUT statements when multiple input records comprise a single observation, as shown below.
input Lname $ 1-8 Fname $ 10-15;
input Department $ 1-12 JobCode $ 15-19;
input Salary comma10.;
Multiple Records Comprising Each Observation
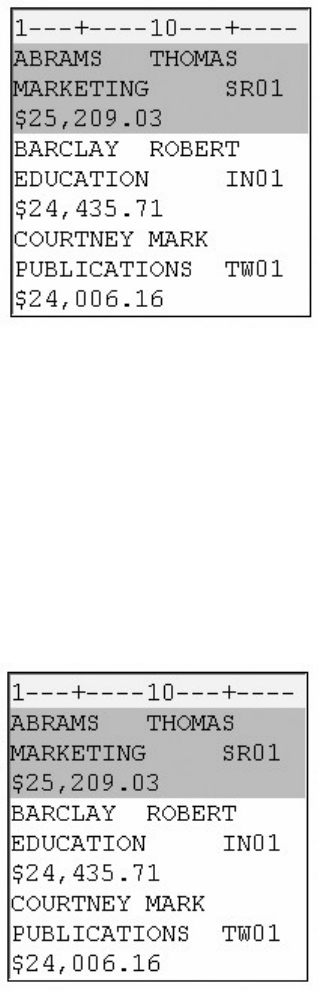
- 649 -
Alternatively, you can write one INPUT statement that contains a line pointer control to specify the
record(s) from which values are to be read.
input #1 Lname $ 1-8 Fname $ 10-15
#2 Department $ 1-12 JobCode $ 15-19
#3 Salary comma10.;
Multiple Records Comprising Each Observation
Objectives
In this chapter, you learn to
read multiple records sequentially and create a single observation
read multiple records non-sequentially and create a single observation.
Using Line Pointer Controls
You know that as SAS reads raw data values, it keeps track of its position with an input pointer. You have
used column pointer controls and column specifications to determine the column placement of the input
pointer.
Input Statements for Column Specifications and Column Pointer Controls
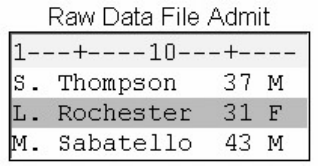
- 650 -
Column Specifications
input Name $ 1-12 Age 15-16 Gender $ 18;
Column Pointer Controls
input Name $12. @15 Age 2. @18 Gender $1.;
But you can also position the input pointer on a specific record by using a line pointer control in the
INPUT statement.
INPUT Statement and Raw Data File Admit
input
#2
Name $ 1-12 Age 15-16 Gender $ 18;
There are two types of line pointer controls.
The forward slash (/) specifies a line location that is relative to the current one.
The #n specifies the absolute number of the line to which you want to move the pointer.
First we'll look at the forward slash (/). Later in the chapter, you'll learn how to use the #n, and you will see
how these two controls can be combined.
Reading Multiple Records Sequentially
The Forward Slash (/) Line Pointer Control
Use the forward slash (/) line pointer control to read multiple records sequentially. The / advances the input
pointer to the next record. The / line pointer control moves the input pointer forward only and must be
specified after the instructions for reading the values in the current record.
The single INPUT statement below reads the values for Lname and Fname in the first record, followed by
the values for Department and JobCode in the second record. Then the value for Salary is read in the third
record.
input Lname $ 1-8 Fname $ 10-15 /
Department $ 1-12 JobCode $ 15-19 /
Salary comma10.;
Multiple Records Comprising Each Observation
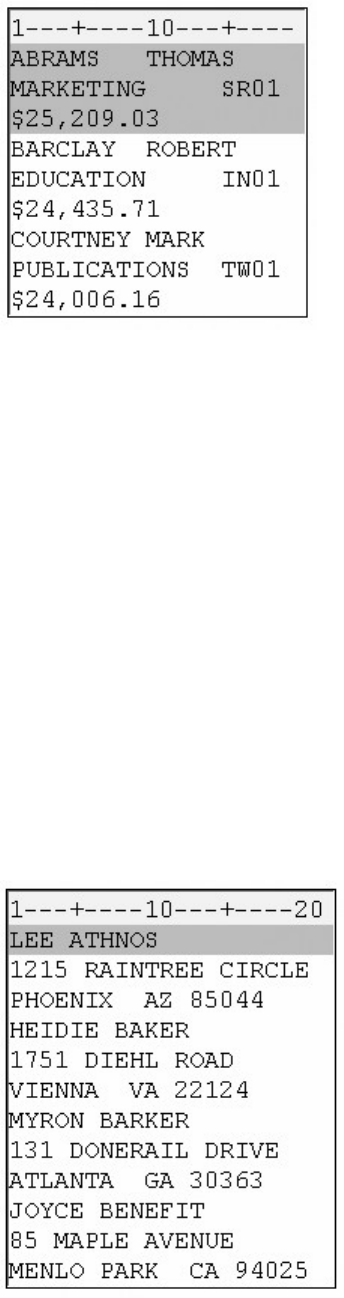
- 651 -
Using the / Line Pointer Control
Look at the forward slash (/) line pointer control in the following example.
The raw data file Memdata contains the mailing list of a professional organization. Your task is to combine
the information for each member into a single observation. We'll begin by reading each member's name,
followed by the street address, and finally the city, state, and zip code.
As you write the instructions to read the values for Fname and Lname, notice that not all of the values for Lname begin in the
same column. So, you should use standard list input to read these values.
data perm.members;
infile memdata;
input Fname $ Lname $
Raw Data File Memdata
Now you want to read the values for Address from the second record. The / line pointer control advances the input pointer to
the next record. At this point the INPUT statement is incomplete, so you should not place a semicolon after the line
pointer control.
data perm.members;
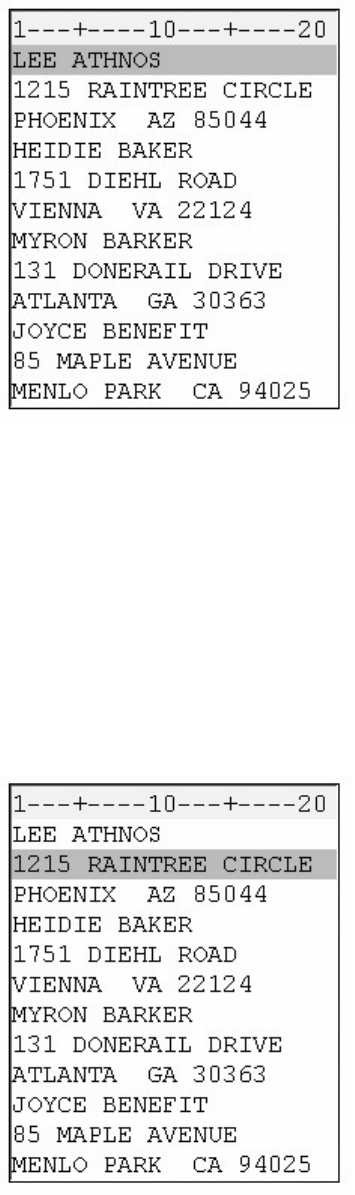
- 652 -
infile memdata;
input Fname $ Lname $ /
Raw Data File Memdata
You can use column input to read the values in the next record as one variable named Address. Then add a line pointer control
to move the input pointer to the next record.
data perm.members;
infile memdata;
input Fname $ Lname $ /
Address $ 1-20 /
Line Pointer Control Advanced One Record
As you write the statements to read the values for City, notice that some of the values are longer than eight characters and
contain embedded blanks. Also note that each value is followed by two consecutive blanks. To read these values, you
should use modified list input with the ampersand (&) modifier.
- 653 -
The values for State and the values for Zip do not begin in the same column. Therefore, you should use list input to read
these values.
data perm.members;
infile memdata;
input Fname $ Lname $ /
Address $ 1-20 /
City & $10. State $ Zip $;
run;
Line Pointer Control Advanced Another Record
Sequential Processing of Multiple Records in the DATA Step
Now that you've learned the basics of using the / line pointer control, let's look at the sequential processing
of multiple records in the DATA step.
The values in the first record are read, and the / line pointer control moves the input pointer to the second
record.
Reading the First Record of the First Observation
- 654 -
The values for Address are read, and the second / line pointer control advances the input pointer to the
third record.
Reading the Second Record of the First Observation
The values for City, State, and Zip are read. The INPUT statement is complete.
Reading the Third Record of the First Observation
The values in the program data vector are written to the data set as the first observation.
The Program Data Vector and the SAS Data Set Perm.Members
Control returns to the top of the DATA step. The variable values are reinitialized to missing.
Reinitializing the Variable Values to Missing
- 655 -
During the second iteration, values for Fname and Lname are read beginning in column 1 of the fourth
record.
Reading the First Record of the Second Observation
The values for Address are read. The / line pointer control advances the input pointer to the fifth record.
Reading the Second Record of the Second Observation
The values for City, State, and Zip are read. The INPUT statement is complete.
Reading the Third Record of the First Observation
- 656 -
The values in the program data vector are written to the data set as the second observation.
The Program Data Vector and the SAS Data Set Perm.Members
After the data set is complete, PROC PRINT output for Perm.Members shows that each observation
contains the complete information for one member.
proc print data=perm.members;
run;
PROC PRINT Output of the Complete Perm.Members Data Set
Number of Records per Observation
Note that the raw data file must contain the same number of records for each observation.
Suppose there are only two records for the second member. Remember, the INPUT statement is set up to
read three records.
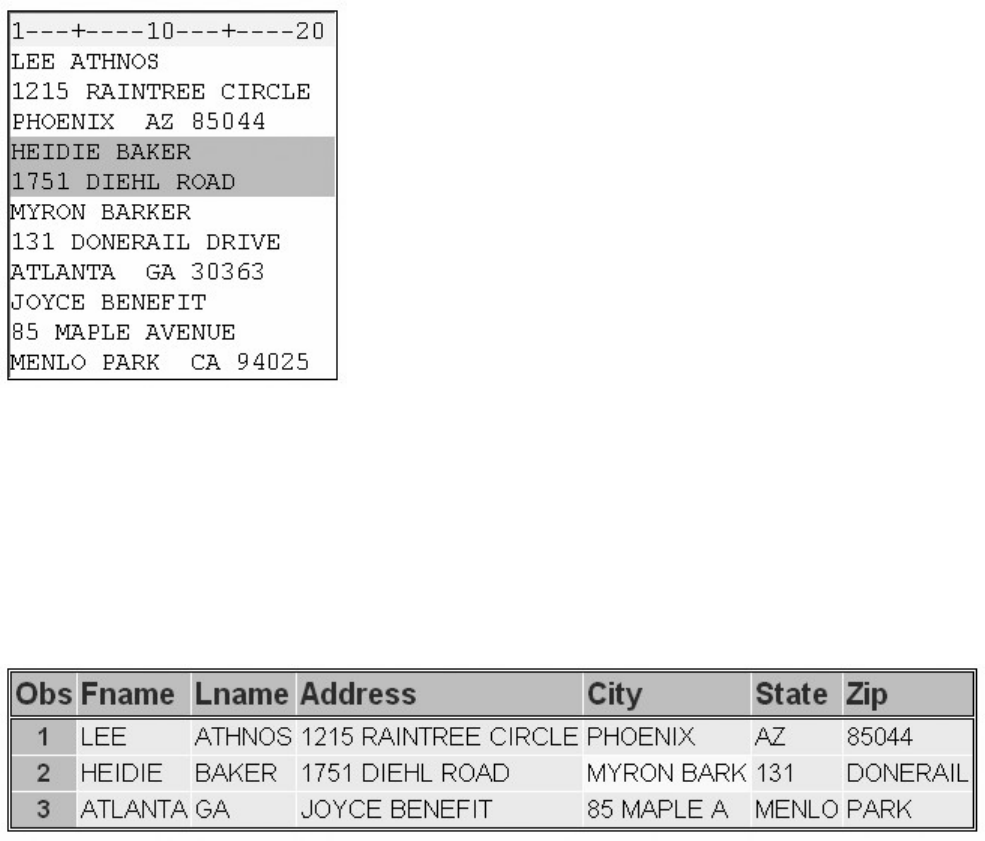
- 657 -
data perm.members;
infile memdata;
input Fname $ Lname $ /
Address $ 1-20 /
City & $10. State $ Zip $;
Raw Data File Memdata
The second member's name and address are read and assigned to corresponding variables. Then the input
pointer advances to the next record, as directed by the INPUT statement, and the third member's name is
read as a value for City.
The INPUT statement looks for a value for State and Zip, so the input pointer advances to the next record
and reads the member's address.
The PROC PRINT output for this data set illustrates the problem.
Before you write the INPUT statement, check whether the raw data file contains the same number of
records for each observation. In this raw data file there are now three records for each observation.
Verifying the Number of Records for Each Observation
- 658 -
For more information about working with raw data files that contain missing records, see the SAS
documentation.
Reading Multiple Records Non-Sequentially
The #n Line Pointer Control
You already know how to read multiple records sequentially by using the / line pointer control. Now let's
look at reading multiple records non-sequentially by using the #n line pointer control.
The #n specifies the absolute number of the line to which you want to move the input pointer. The #n
pointer control can read records in any order; therefore, it must be specified before the instructions for
reading values in a specific record.
The INPUT statement below first reads the values for Department and JobCode in the second record, then
the values for Lname and Fname in the first record. Finally, it reads the value for Salary in the third record.
input #2 Department $ 1-12 JobCode $ 15-19
#1 Lname $ Fname $
#3 Salary comma10.;
The Records of the First Observation
Using the #n Line Pointer Control
- 659 -
Look at the #n line pointer control in the following example.
The raw data file Patdata contains information about the patients of a small group of general surgeons.
The first three records contain a patient's name, address, city, state, and zip code. The fourth record
contains the patient's ID number followed by the name of the primary physician.
Observation Records in a Raw Data File
Suppose you want to read each patient's information in the following order:
ID number (ID)
first name (Fname)
last name (Lname)
address (Address)
city (City)
state (State)
zip (Zip)
doctor (Doctor)
To read the values for ID in the fourth record, specify #4 before naming the variable and defining its attributes.
data perm.patients;
infile patdata;
input #4 ID $5.
Specifying the ID Value in the Fourth Record of an Observation
- 660 -
To read the values for Fname and Lname in the first record, specify #1 before naming the variables and defining their
attributes.
data perm.patients;
infile patdata;
input #4 ID $5.
#1 Fname $ Lname $
Specifying the First Record of an Observation
Use the #n line pointer control to move the input pointer to the second record and read the value for Address.
data perm.patients;
infile patdata;
input #4 ID $5.
#1 Fname $ Lname $
#2 Address $23.
Specifying the Second Record of an Observation
Now move the input pointer to the third record and read the values for City, State, and Zip, in that order.
In this raw data file, the values for City contain eight characters or less and do not contain embedded blanks, so you can
use standard list input to read these values.
data perm.patients;
infile patdata;
input #4 ID $5.
#1 Fname $ Lname $
#2 Address $23.
#3 City $ State $ Zip $
Specifying the Third Record of an Observation
- 661 -
Now you need to move the input pointer down to the fourth record to read the values for Doctor, which begin in column 7.
Don't forget to add a semicolon at the end of the INPUT statement. A RUN statement completes the program.
data perm.patients;
infile patdata;
input #4 ID $5.
#1 Fname $ Lname $
#2 Address $23.
#3 City $ State $ Zip $
#4 @7 Doctor $6.;
run;
Specifying the Doctor Value in the Fourth Record of an Observation
Execution of the DATA Step
The #n pointer controls in the program below cause four records to be read for each execution of the
DATA step.
data perm.patients;
infile patdata;
input #4 ID $5.
#1 Fname $ Lname $
#2 Address $23.
#3 City $ State $ Zip $
#4 @7 Doctor $6.;
run;
The first time the DATA step executes, the first four records are read, and an observation is written to the
data set.
Raw Data File with the First Four Records Highlighted

- 662 -
During the second iteration, the next four records are read, and the second observation is written to the data
set, and so on.
Raw Data File with the Next Four Records Highlighted
The PROC PRINT output of the data set shows how information that was spread over several records has
been condensed into one observation.
proc print data=perm.patients noobs;
run;
PROC PRINT Output of Data Set Perm.Patients
Combining Line Pointer Controls
The forward slash (/) line pointer control and the #n line pointer control can be used together in a SAS
program to read multiple records both sequentially and non-sequentially.
- 663 -
For example, you could use both the / line pointer control and the #n line pointer control to read the
variables in the raw data file Patdata in the following order:
1. ID
2. Fname
3. Lname
4. Address
5. City
6. State
7. Zip
8. Doctor
data perm.patients;
infile patdata;
input #4 ID $5.
#1 Fname $ Lname $ /
Address $23. /
City $ State $ Zip $ /
@7 Doctor $6.;
run;
Raw Data File with the First Four Records Highlighted
To read the values for ID in the fourth record, specify #4 before naming the variable and defining its attributes.
Specify #1 to move the input pointer back to the first record, where the values for Fname and Lname are read.
Because the next record to be read is sequential, you can use the / line pointer control after the variable Lname to move the
input pointer to the second record, where the value for Address is read.
The / line pointer control in the next line directs the input pointer to the third record, where the values for City, State, and Zip
are read.
The final / line pointer control moves the input pointer back to the fourth record, where the value for Doctor is read.
Alternatively, you can use just the #n line pointer control (as shown earlier in this chapter and below) to
read the variables in the order shown above.
- 664 -
data perm.patients;
infile patdata;
input #4 ID $5.
#1 Fname $ Lname $
#2 Address $23.
#3 City $ State $ Zip $
#4 @7 Doctor $6.;
run;
Raw Data File with the First Four Records Highlighted
Chapter Summary
Text Summary
Multiple Records per Observation
Information for one observation can be spread out over several records. You can write one INPUT
statement that contains line pointer controls to specify the record(s) from which values are read.
Reading Multiple Records Sequentially
The forward slash (/) line pointer control is used to read multiple records sequentially. Each time a /
pointer is encountered, the input pointer advances to the next line.
Reading Multiple Records Non-Sequentially
The #n line pointer control is used to read multiple records non-sequentially. The #n specifies the absolute
number of the line to which you want to move the pointer.
Combining Line Pointer Controls
The / line pointer control and the #n line pointer control can be combined within a SAS program to read
multiple records both sequentially and non-sequentially.
Syntax
LIBNAME libref 'SAS-data-library';
- 665 -
FILENAME fileref 'filename';
DATA SAS-data-set;
INFILE file-specification;
INPUT #n variable ...
#n @n variable ... / variable ... / variable ... ;
RUN;
PROC PRINT DATA=SAS-data-set;
RUN;
Sample Program
libname perm 'c:\records\empdata';
filename personel 'c:\records\empdata\new.dat';
data perm.emplist3;
infile personel;
input #2 Department $ 5-16
#1 @16 ID $4. @1 Name $14. /
JobCode 3. /
Salary comma9.;
run;
proc print data=perm.emplist3;
run;
Points to Remember
When a file contains multiple records per observation, depending on the program, the file might need to contain the same
number of records for each observation.
Because the / pointer control can move forward only, the pointer control is specified after the values in the current record are
read.
The #n pointer control can read records in any order and must be specified before the variable names are defined.
A semicolon should be placed at the end of the complete INPUT statement.
Chapter Quiz
Select the best answer for each question. After completing the quiz, check your answers using the answer
key in the appendix.
You can position the input pointer on a specific record by using
column pointer controls.
column specifications.
- 666 -
line pointer controls.
line hold specifiers.
Which pointer control is used to read multiple records sequentially?
@n
+n
/
all of the above
Which pointer control can be used to read records non-sequentially?
@n
#n
+n
/
Which SAS statement correctly reads the values for Fname, Lname, Address, City, State and Zip in order?
Raw Data File
input Fname $ Lname $ /
Address $20. /
City $ State $ Zip $;
input Fname $ Lname $ /;
Address $20. /;
City $ State $ Zip $;
input / Fname $ Lname $
/ Address $20.
City $ State $ Zip $;
- 667 -
input / Fname $ Lname $;
/ Address $20.;
City $ State $ Zip $;
Which INPUT statement correctly reads the values for ID in the fourth record, and then returns to the first record to read the
values for Fname and Lname?
Raw Data File
input #4 ID $5.
#1 Fname $ Lname $;
input #4 ID $ 1-5
#1 Fname $ Lname $;
input #4 ID $
#1 Fname $ Lname $;
all of the above
How many records will be read for each execution of the DATA step?
Raw Data File
- 668 -
data spring.sportswr;
infile newitems;
input #1 Item $ Color $
#3 @8 Price comma6.
#2 Fabric $
#3 SKU $ 1-6;
run;
one
two
three
four
Which INPUT statement correctly reads the values for City, State, and Zip?
Raw Data File
input #3 City $ State $ Zip $;
input #3 City & $11. State $ Zip $;

- 669 -
input #3 City $11. +2 State $2. + 2 Zip $5.;
all of the above
Which program does not read the values in the first record as a variable named Item and the values in the second record as two
variables named Inventory and Type?
Raw Data File
data perm.supplies;
infile instock pad;
input Item & $16. /
Inventory 2. Type $8.;
run;
data perm.supplies;
infile instock pad;
input Item & $16.
/ Inventory 2. Type $8.;
run;
data perm.supplies;
infile instock pad;
input #1 Item & $16.
Inventory 2. Type $8.;
run;
data perm.supplies;
infile instock pad;
input Item & $16.
#2 Inventory 2. Type $8.;
run;
- 670 -
Which INPUT statement reads the values for Lname, Fname, Department, and Salary (in that order)?
Raw Data File
input #1 Lname $ Fname $ /
Department $12. Salary comma10.;
input #1 Lname $ Fname $ /
Department : $12. Salary : comma.;
input #1 Lname $ Fname $
#2 Department : $12. Salary : comma.;
both b and c
Which raw data file poses potential problems when you are reading multiple records for each observation?
Raw Data File
Raw Data File

- 671 -
Raw Data File
Raw Data File
Chapter 20 Creating Multiple Observations from a
Single Record
Overview
Reading Repeating Blocks of Data
Reading the Same Number of Repeating Fields
Reading a Varying Number of Repeating Fields
Chapter Summary
Chapter Quiz
- 672 -
Overview
Introduction
Sometimes raw data files contain data for several observations in one record. Data can be stored in this
manner to reduce the size of the entire data file.
Each record can contain
repeating blocks of data that represent separate observations
Repeating Blocks of Data
an ID field followed by an equal number of repeating fields that represent separate observations
ID Field with Repeating Fields
an ID field followed by a varying number of repeating fields that represent separate observations.
ID Field with Varying Number of Repeating Fields
This chapter shows you several ways of creating multiple observations from a single record.
Objectives
In this chapter, you learn to
create multiple observations from a single record that contains repeating blocks of data
create multiple observations from a single record that contains one ID field followed by the same number of repeating fields
create multiple observations from a single record that contains one ID field followed by a varying number of repeating fields.
Additionally, you learn to
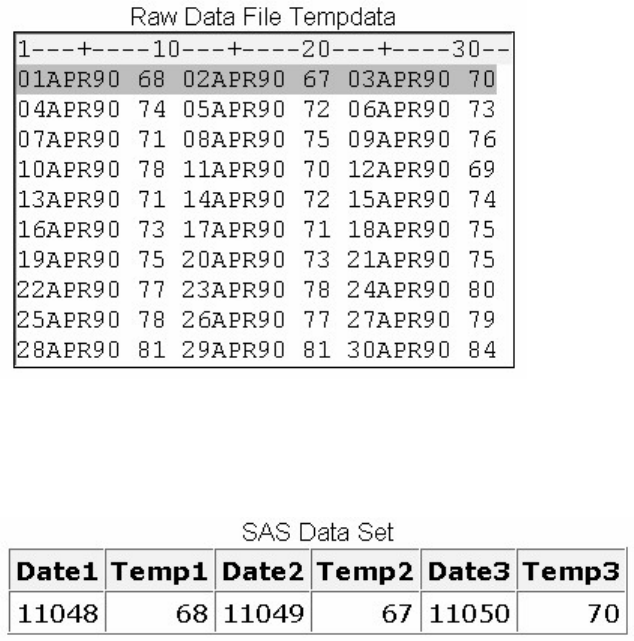
- 673 -
hold the current record across iterations of the DATA step
hold the current record for the next INPUT statement
execute SAS statements based on a variable's value
explicitly write an observation to a data set
execute SAS statements while a condition is true.
Reading Repeating Blocks of Data
Overview
Each record in the file Tempdata contains three blocks of data. Each block contains a date followed by the
day's high temperature in a small city located in the southern United States.
Raw Data File Tempdata
You could write a DATA step that reads each record and creates three different Date and Temp variables.
Three Date and Temp Variables
Alternatively, you could create a separate observation for each block of data in a record. This data set is
better structured for analysis and reporting with SAS procedures.
Separate Observations for Each Block of Data in a Record
- 674 -
Holding the Current Record with a Line-Hold Specifier
You need to hold the current record so the input statement can read, and SAS can output, repeated blocks
of data on the same record. This is easily accomplished by using a line-hold specifier in the INPUT
statement.
SAS provides two line-hold specifiers.
The trailing at sign (@) holds the input record for the execution of the next INPUT statement.
The double trailing at sign (@@) holds the input record for the execution of the next INPUT statement, even across iterations
of the DATA step.
The term trailing indicates that the @ or @@ must be the last item specified in the INPUT statement. For
example,
input Name $20. @; or input Name $20. @@;
This chapter teaches you how the trailing @@ can be used to hold a record across multiple iterations of the
DATA step.
Using the Double Trailing At Sign (@@) to Hold the Current Record
Normally, each time a DATA step executes, the INPUT statement reads the next record. But when you use
the trailing @@, the INPUT statement continues reading from the same record.
Example with the Double Trailing At Sign
Input Score;
Input Score @@;
Raw Data File and Program Data Vector
- 675 -
Raw Data File and Program Data Vector
The double trailing at sign (@@)
works like the trailing @ except it holds the data line in the input buffer across multiple executions of the DATA step
typically is used to read multiple SAS observations from a single data line
should not be used with the @ pointer control, with column input, nor with the MISSOVER option.
A record that is held by the double trailing at sign (@@) is not released until either of the following events
occurs:
the input pointer moves past the end of the record. Then the input pointer moves down to the next record.
Raw Data File
an INPUT statement that has no trailing at sign executes.
input ID $ @@;
.
.
input Department 5.;
The following example requires only one INPUT statement to read the values for Date and HighTemp, but
the INPUT statement must execute three times for each record.
The INPUT statement reads a block of values for Date and HighTemp, and holds the current record by
using the trailing @@. The values in the program data vector are written to the data set as an observation,
and control returns to the top of the DATA step.
data perm.april90;
infile tempdata;
input Date : date. HighTemp @@;
Control Returned to the Top of the DATA Step
- 676 -
In the next iteration, the INPUT statement reads the next block of values for Date and HighTemp from the
same record.
Date and High Temp
Completing the DATA Step
You can add a FORMAT statement to the DATA step to display the date or time values with a specified
format. The FORMAT statement below uses the DATEw. format to display the values for Date in the form
ddmmmyyyy.
data perm.april90;
infile tempdata;
input Date : date. HighTemp @@;
format date date9.;
run;
Displaying Dates in a Specified Format
DATA Step Processing of Repeating Blocks of Data
Complete DATA Step
data perm.april90;
infile tempdata;
input Date : date. HighTemp @@;
format date date9.;
run;
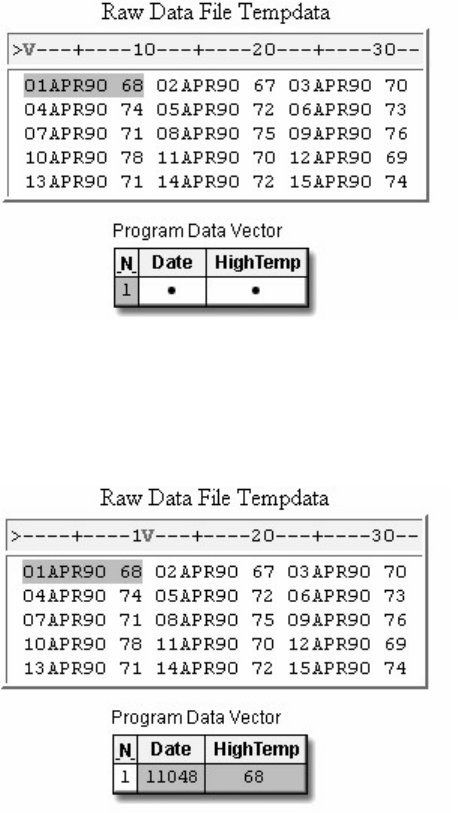
- 677 -
Example
As the execution phase begins, the input pointer rests on column 1 of record 1.
Input Pointer on Column 1 of Record 1
During the first iteration of the DATA step, the first block of values for Date and High Temp are read into
the program data vector.
Reading the First Block of Values
The first observation is written to the data set.
Control Returns to the Top of the DATA Step
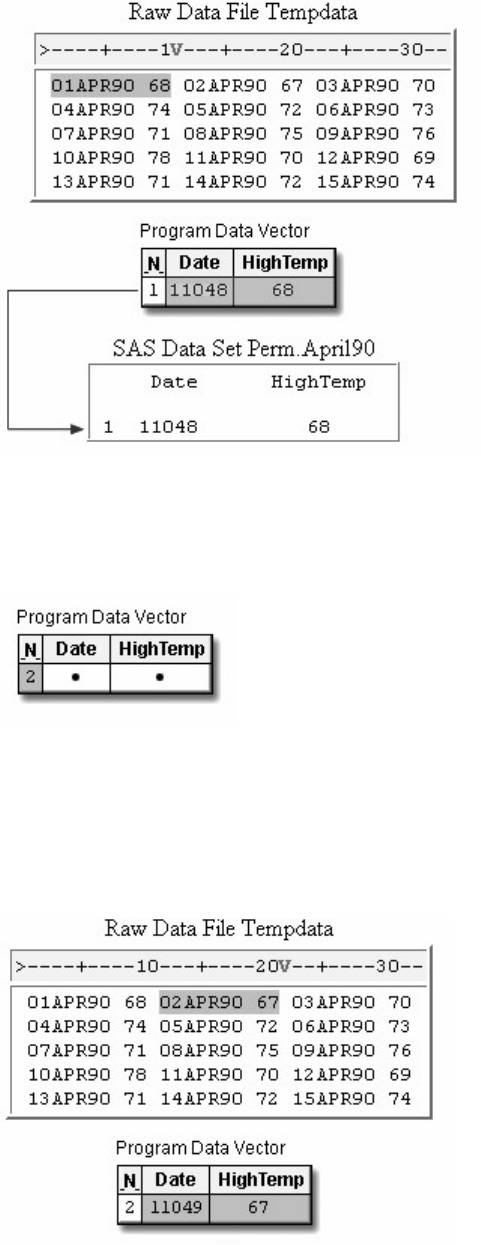
- 678 -
Control returns to the top of the DATA step, and the values are reset to missing.
Reset Values
During the second iteration, the @@ prevents the input pointer from moving down to the next record.
Instead, the INPUT statement reads the second block of values for Date and HighTemp from the first
record.
Reading the Second Block of Values from the First Record
The second observation is written to the data set, and control returns to the top of the DATA step.
Writing the Second Observation to the Data Set
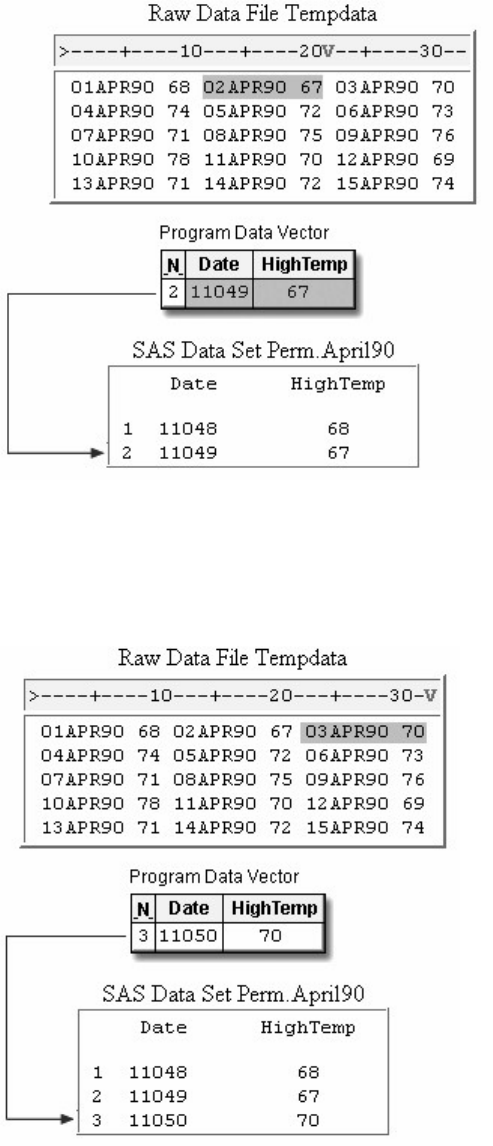
- 679 -
During the third iteration, the last block of values is read and written to the data set as the third
observation.
Writing the Third Observation to the Data Set
During the fourth iteration, the first block of values in the second record is read and written as the fourth
observation.
Writing the Fourth Observation to the Data Set
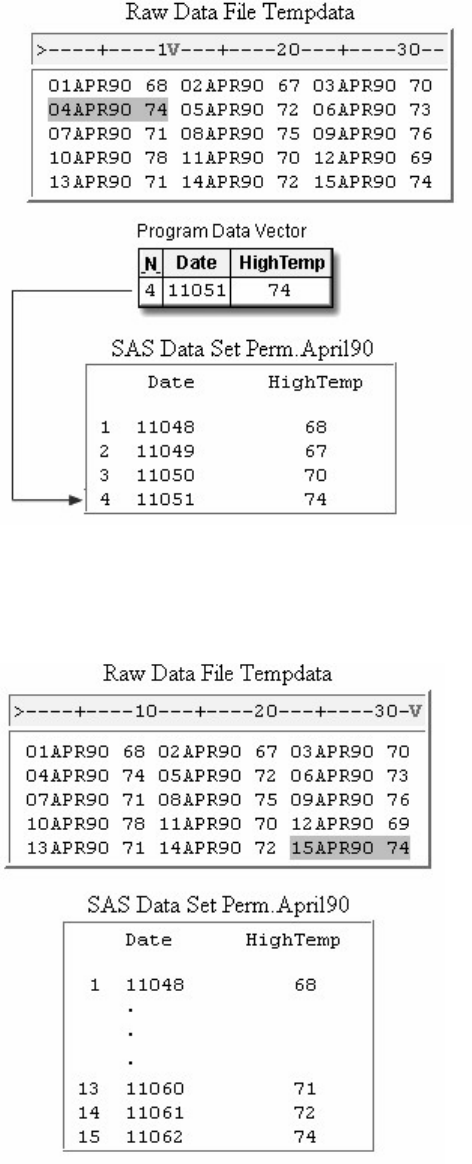
- 680 -
The execution phase continues until the last block of data is read.
Writing the Last Observation to the Data Set
You can display the data set with the PRINT procedure.
proc print data=perm.april90;
run;
PROC PRINT Output of the Data Set.
- 681 -
Reading the Same Number of Repeating Fields
Overview
So far, you have created multiple observations from a single record by executing the DATA step once for
each block of data in a record.
Now, look at another file that is organized differently.
Each record in the file Data97 contains a sales representative's ID number, followed by four repeating
fields that represent his or her quarterly sales totals for 1997.
You want to pair each employee ID number with one quarterly sales total to produce a single observation.
Four observations are generated from each record.
Multiple Fields for the Same ID
- 682 -
To accomplish this, you must execute the DATA step once for each record, repetitively reading and
writing values in one iteration.
This means that a DATA step must
read the value for ID and hold the current record
create a new variable named Quarter to identify the fiscal quarter for each sales figure
read a new value for Sales and write the values to the data set as an observation
continue reading a new value for Sales and writing values to the data set three more times.
Using the Single Trailing At Sign (@) to Hold the Current Record
First, you need to read the value for ID and hold the record so that subsequent values for Sales can be read.
data perm.sales97;
infile data97;
input ID $
Holding a Record
- 683 -
You are already familiar with the trailing @@, which holds the current record across multiple iterations of
the DATA step.
However, in this case, you want to hold the record with the trailing @, so that a second INPUT statement
can read the multiple sales values from a single record within the same iteration of the DATA step. Like
the trailing @@, the single trailing @
enables the next INPUT statement to continue reading from the same record
releases the current record when a subsequent INPUT statement executes without a line-hold specifier.
It's easy to distinguish between the trailing @@ and the trailing @ by remembering that
the double trailing at sign (@@) holds a record across multiple iterations of the DATA step until the end of the record is
reached.
the single trailing at sign (@) releases a record when control returns to the top of the DATA step.
In this example, the first INPUT statement reads the value for ID and uses the trailing @ to hold the
current record for the next INPUT statement in the DATA step.
data perm.sales97;
infile data97;
input ID $ @;
input Sales : comma. @;
output;
Reading the Value for ID
The second INPUT statement reads a value for Sales and holds the record. The COMMAw.d informat in
the INPUT statement reads the numeric value for Sales and removes the embedded commas. An OUTPUT
statement writes the observation to the SAS data set, and the DATA step continues processing.
Notice that the COMMAw.d informat does not specify a w value. Remember that list input reads values
until the next blank is detected. The default length of numeric variables is 8 bytes, so you don't need to
specify a w value to determine the length of a numeric variable.
- 684 -
When all of the repeating fields have been read and output, control returns to the top of the DATA step,
and the record is released.
data perm.sales97;
infile data97;
input ID $ @;
input Sales : comma. @;
output;
input Sales : comma. @;
output;
input Sales : comma. @;
output;
input Sales : comma. @;
output;
run;
Reading the Value for Sales
More Efficient Programming
Each record contains four different values for the variable Sales, so the INPUT statement must execute
four times. Rather than writing four INPUT statements, you can execute one INPUT statement repeatedly
in an iterative DO loop.
Each time the loop executes, you need to write the values for ID, Quarter, and Sales as an observation to
the data set. This is easily accomplished by using the OUTPUT statement.
data perm.sales97;
infile data97;
input ID $ @;
do Quarter=1 to 4;
input Sales : comma. @;
output;
end;
run;
By default, every DATA step contains an implicit OUTPUT statement at the end of the step. Placing an
explicit OUTPUT statement in a DATA step overrides the automatic output, and SAS adds an observation
to a data set only when the explicit OUTPUT statement is executed.
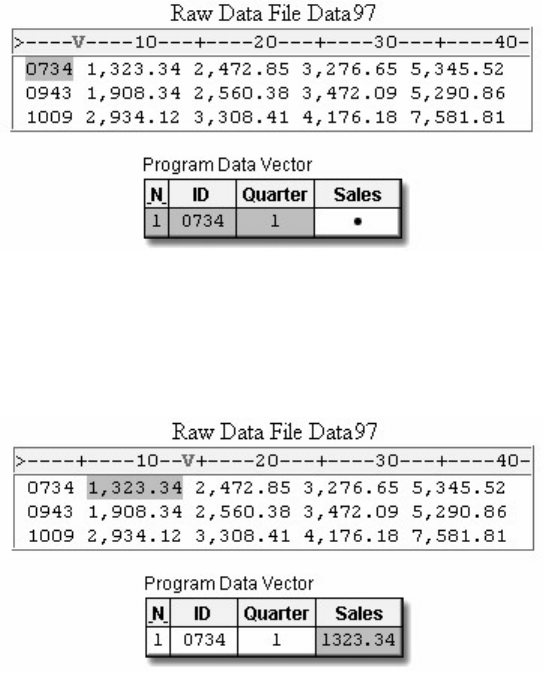
- 685 -
Processing a DATA Step That Contains an Iterative DO Loop
Now that the program is complete, let's see how SAS processes a DATA step that contains an iterative DO
loop.
data perm.sales97;
infile data97;
input ID $ @;
do Quarter=1 to 4;
input Sales : comma. @;
output;
end;
run;
During the first iteration, the value for ID is read and Quarter is initialized to 1 as the loop begins to
execute.
Reading the Value for ID and Initializing Quarter
The INPUT statement reads the first repeating field and assigns the value to Sales in the program data
vector. The @ holds the current record.
Results of the INPUT Statement
The OUTPUT statement writes the values in the program data vector to the data set as the first
observation.
Results of the OUTPUT Statement
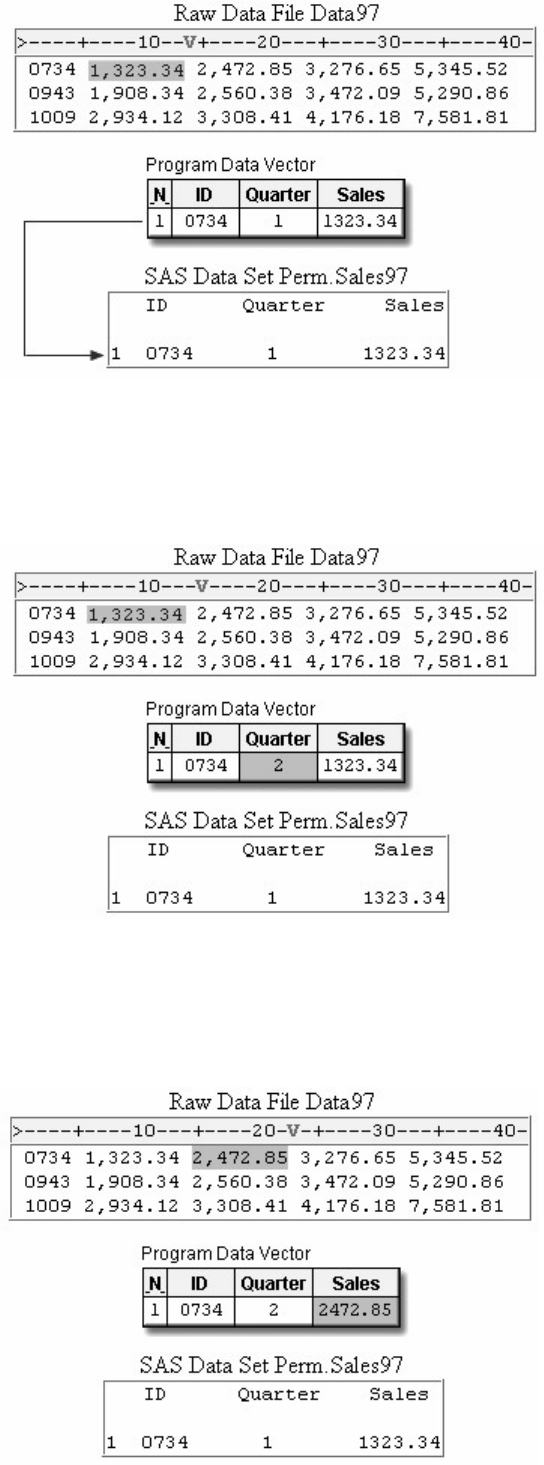
- 686 -
The END statement indicates the bottom of the loop, but control returns to the DO statement, not to the top
of the DATA step. Now the value of Quarter is incremented to 2.
Results of the END Statement
The INPUT statement executes again, reading the second repeating field and storing the value for Sales in
the program data vector.
Results of the Second Reading of the INPUT Statement

- 687 -
The OUTPUT statement writes the values in the program data vector as the second observation.
Results of the Second Reading of the OUTPUT Statement
The loop continues executing while the value for Quarter is 3, and then 4. In the process, the third and
fourth observations are written.
Writing the Third and Fourth Observations
After the fourth observation is written, Quarter is incremented to 5 at the bottom of the DO loop and
control returns to the top of the loop. The loop does not execute again because the value of Quarter is now
greater than 4.
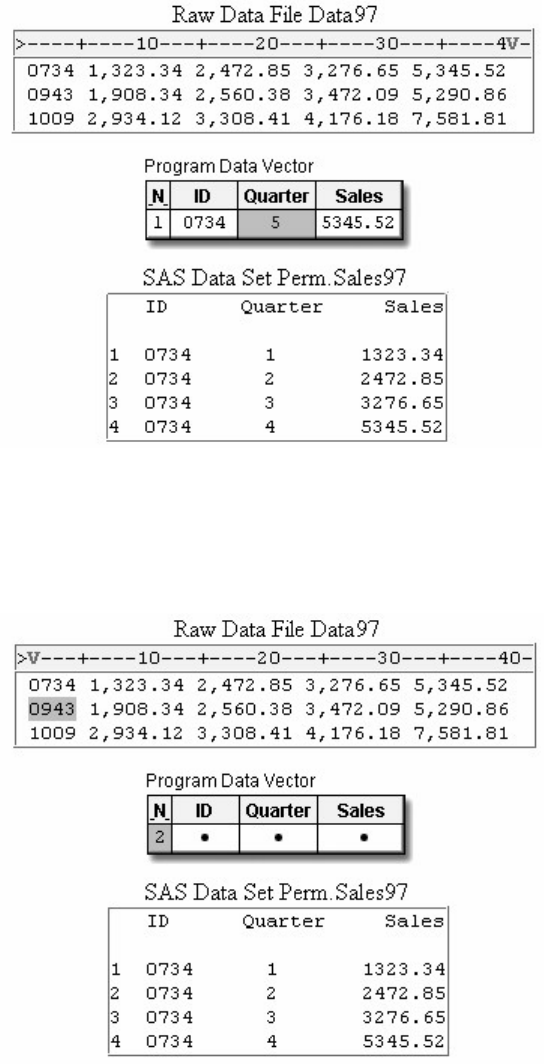
- 688 -
Control returns to the top of the DATA step, and the input pointer moves to column 1 of the next record.
The variable values in the program data vector are reset to missing.
Returning Control to the Top of the DATA Step
When the execution phase is complete, you can display the data set with the PRINT procedure.
proc print data=perm.sales97;
run;
Output of PROC PRINT
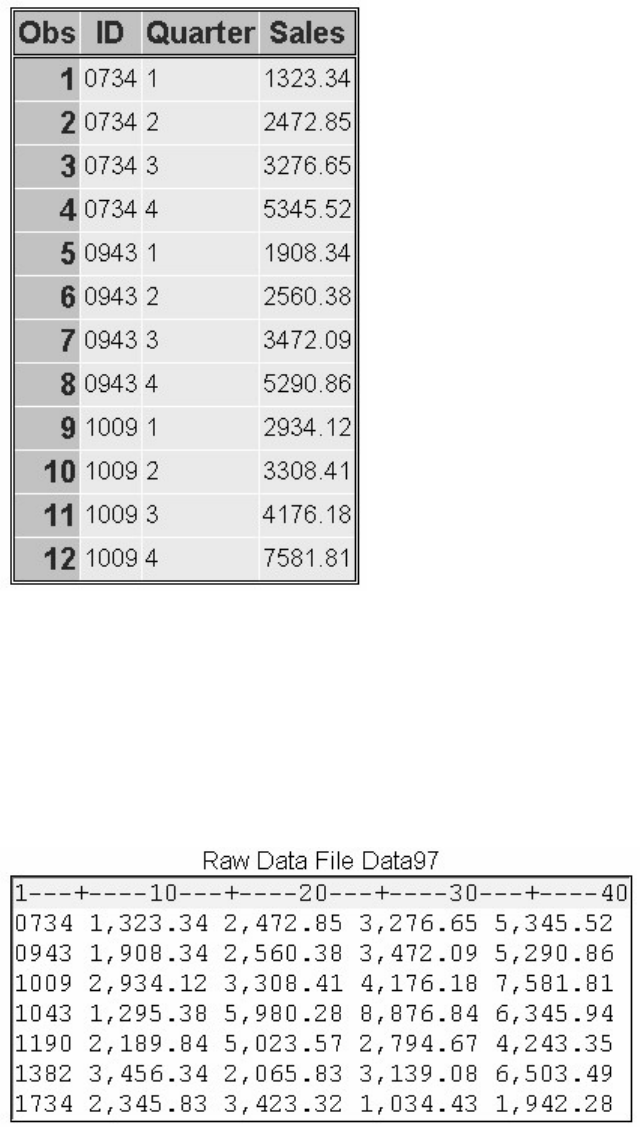
- 689 -
Reading a Varying Number of Repeating Fields
Overview
So far, each record in the file Data97 has contained the same number of repeating fields.
Raw Data File Data97
But suppose that some of the employees quit at various times. Their records might not contain sales totals
for the second, third, or fourth quarter. These records contain a variable number of repeating fields.
Raw Data File Data97 Showing Empty Records
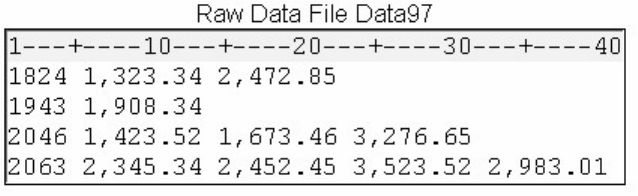
- 690 -
The DATA step that you just wrote won't work with a variable number of repeating fields because now the
value of Quarter is not constant for every record.
data perm.sales97;
infile data97;
input ID $ @;
do Quarter=1 to 4;
input Sales : comma. @;
output;
end;
run;
Using the MISSOVER Option
You can adapt the DATA step to accommodate a varying number of Sales values.
Like the previous example with the same number of repeating fields, your DATA step must read the same
record repeatedly. However, you need to prevent the input pointer from moving to the next record when
there are missing Sales values.
You can use the MISSOVER option in an INFILE statement to prevent SAS from reading the next record
when missing values are encountered at the end of a record. Essentially, records that have a varying
number of repeating fields are records that contain missing values, so you need to specify the MISSOVER
option here as well.
Because there is at least one value for the repeating field, Sales, in each record, the first INPUT statement
reads both the value for ID and the first Sales value for each record. The trailing @ holds the record so that
any subsequent repeating fields can be read.
data perm.sales97;
infile data97 missover;
input ID $ Sales : comma. @;
Holding a Record
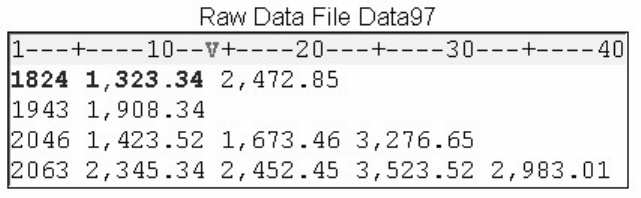
- 691 -
SAS provides several options to control reading past the end of a line. You've seen the MISSOVER option
for setting remaining INPUT statement variables to missing values if the pointer reaches the end of a
record. You can also use other options such as the TRUNCOVER option, which reads column or formatted
input when the last variable that is read by the INPUT statement contains varying-length data. The
TRUNCOVER option assigns the contents of the input buffer to a variable when the field is shorter than
expected.
Other related options include FLOWOVER (the default), STOPOVER, and SCANOVER. For more
information about TRUNCOVER and related options, see the SAS documentation.
Executing SAS Statements While a Condition Is True
Now consider how many times to read each record. Earlier, you created an index variable named Quarter
whose value ranged from 1 to 4 because there were four repeating fields.
Now you want to read the record only while a value for Sales exists. Use a DO WHILE statement instead
of the iterative DO statement, enclosing the expression in parentheses. In the example below, the DO
WHILE statement executes while the value of Sales is not equal to a missing value (which is represented
by a period).
data perm.sales97;
infile data97 missover;
input ID $ Sales : comma. @;
do while (sales ne .);
Creating a Counter Variable
Because the DO WHILE statement does not create an index variable, you can create your own “counter”
variable. You can use a sum statement to increment the value of the counter variable each time the DO
WHILE loop executes.
In the example below, the assignment statement that precedes the loop creates the counter variable Quarter
and assigns it an initial value of zero. Each time the DO WHILE loop executes, the sum statement
increments the value of Quarter by one.
data perm.sales97;
infile data97 missover;
input ID $ Sales : comma. @;
Quarter=0;
do while (sales ne .);
quarter+1;
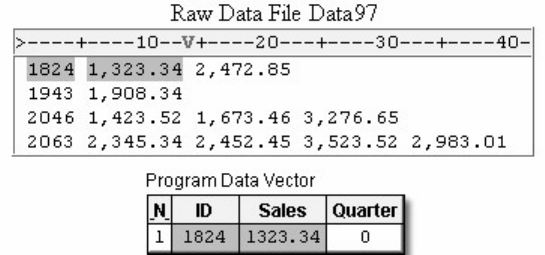
- 692 -
Completing the DO WHILE Loop
Now look at the other statements that should be executed in the DO WHILE loop. First, you need an
OUTPUT statement to write the current observation to the data set. Then, another INPUT statement reads
the next value for Sales and holds the record. You complete the DO WHILE loop with an END statement.
data perm.sales97;
infile data97 missover;
input ID $ Sales : comma. @;
Quarter=0;
do while (sales ne .);
quarter+1;
output;
input sales : comma. @;
end;
run;
Processing a DATA Step That Has a Varying Number of Repeating Fields
This example uses the following DATA step:
data perm.sales97;
infile data97 missover;
input ID $ Sales : comma. @;
Quarter=0;
do while (sales ne .);
quarter+1;
output;
input sales : comma. @;
end;
run;
During the first iteration of the DATA step, values for ID and Sales are read. Quarter is initialized to 0.
Initializing the Value of Quarter to 0
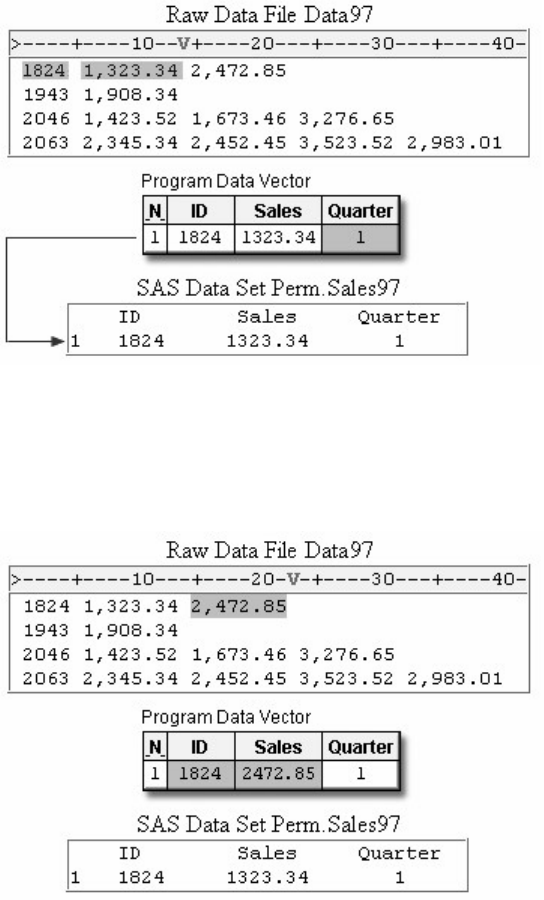
- 693 -
The DO WHILE statement checks to see if Sales has a value, which it does, so the other statements in the
DO loop execute. The Value of Quarter is incremented by 1 and the current observation is written to the
data set.
Executing the DO Loop
The INPUT statement reads the next value for Sales, the end of the loop is reached, and control returns to
the DO WHILE statement.
Returning Control to the DO WHILE Statement
The condition is checked and Sales still has a value, so the loop executes again.
Executing the Loop Again

- 694 -
Quarter is incremented to 2, and the values in the program data vector are written as the second
observation.
The INPUT statement executes again. The MISSOVER option prevents the input pointer from moving to
the next record in search of another value for Sales. Therefore, SALEs receives a missing value.
The end of the loop is reached, and control returns to the DO WHILE statement. Because the condition is
now false, the statements in the loop are not executed and the values in the PDV are not output.
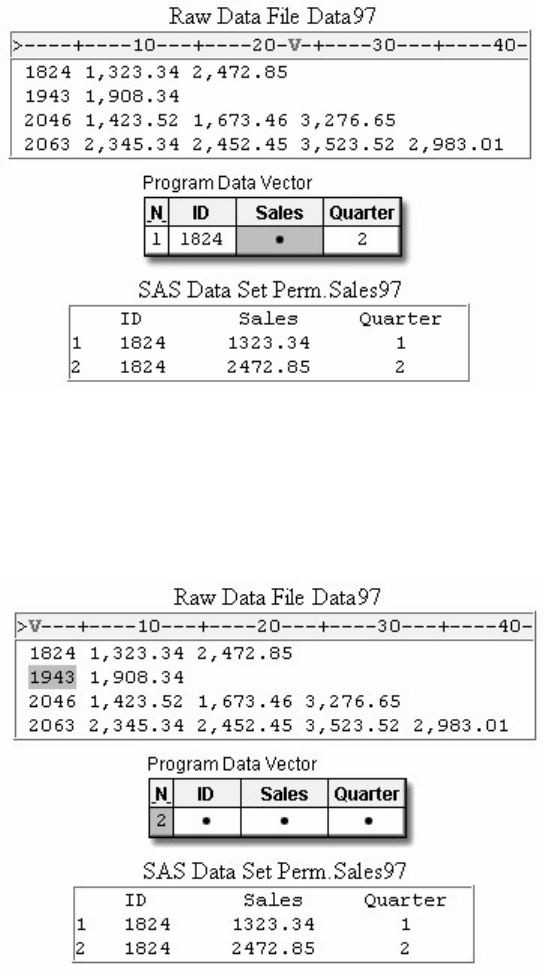
- 695 -
Returning Control the DO WHILE Statement
Instead, control returns to the top of the DATA step, the values in the program data vector are reset to
missing, and the input statement reads the next record. The DATA step continues executing until the end
of the file.
Returning Control to the Top of the DATA Step
PROC PRINT output for the data set shows a varying number of observations for each employee.
proc print data=perm.sales97;
run;
Output of PROC PRINT
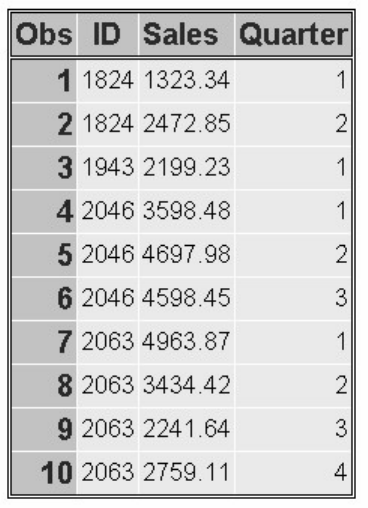
- 696 -
Chapter Summary
Text Summary
File Formats
One raw data record might contain data for several observations. Data might be stored in this manner in
order to reduce the size of the entire file. The data can be organized into
repeating blocks of data
an ID field followed by the same number of repeating fields
an ID field followed by a varying number of repeating fields.
Reading Repeating Blocks of Data
To create multiple observations from a record that contains repeating blocks of data, the INPUT statement
needs to hold the current record until each block of data has been read and written to the data set as an
observation. The DATA step should include statements that
read the first block of values and hold the current record with the double trailing at sign (@@) line-hold specifier
optionally add a FORMAT statement to display date or time values with a specified format
write the first block of values as an observation
execute the DATA step until all repeating blocks have been read.
Reading the Same Number of Repeating Fields
To create multiple observations from a record that contains an ID field and the same number of repeating
fields, you must execute the DATA step once for each record, repetitively reading and writing values in
one iteration. The DATA step should include statements that
- 697 -
read the ID field and hold the current record with the single trailing at sign (@) line-hold specifier
execute SAS statements using an iterative DO loop. The iterative DO loop repetitively processes statements that
read the next value of the repeating field and hold the record with the @ line-hold specifier
explicitly write an observation to the data set by using an OUTPUT statement.
complete the iterative DO loop with an END statement.
Reading a Varying Number of Repeating Fields
To create multiple observations from a record that contains an ID field and a varying number of repeating
fields, you must execute the DATA step once for each record, repetitively reading and writing values in
one iteration while the value of the repeating field is nonmissing. The DATA step should include
statements that
prevent SAS from reading the next record if missing values were encountered in the current record. The MISSOVER option
on the INFILE statement prevents reading the next record.
read the ID field and the first repeating field, and then hold the record with the single trailing at sign (@) line-hold specifier
optionally create a counter variable
execute SAS statements while a condition is true, using a DO WHILE loop. A DO WHILE loop repetitively processes
statements that
optionally increment the value of the counter variable by using a sum statement
explicitly add an observation to the data set by using an OUTPUT statement
read the next value of the repeating field and hold the record with the single trailing at sign (@) line-hold specifier.
complete the DO WHILE loop with an END statement.
Syntax
Repeating Blocks of Data
LIBNAME libref 'SAS-data-library';
FILENAME fileref 'filename';
DATA SAS-data-set;
INFILE file-specification;
INPUT variables @@;
FORMAT date/time-variable format;
RUN;
An ID Field Followed by the Same Number of Repeating Fields
LIBNAME libref 'SAS-data-library';
- 698 -
FILENAME fileref 'filename';
DATA SAS-data-set;
INFILE file-specification;
INPUT id-variable @;
DO index-variable specification;
INPUT repeating-variable @;
OUTPUT;
END;
RUN;
An ID Field Followed by a Varying Number of Repeating Fields
LIBNAME libref 'SAS-data-library';
FILENAME fileref 'filename';
DATA SAS-data-set;
INFILE file-specification MISSOVER;
INPUT id-variable repeating-variable @;
counter-variable=0;
DO WHILE (expression);
counter-variable+1;
OUTPUT;
INPUT repeating-variable @;
END;
RUN;
Sample Programs
Repeating Blocks of Data
libname perm 'c:\records\weather';
filename tempdata 'c:\records\weather\tempdata';
data perm.april90;
infile tempdata;
input Date : date. HighTemp @@;
format date date9.;
run;
An ID Field Followed by the Same Number of Repeating Fields
libname perm 'c:\records\sales';
filename data97 'c:\records\sales\1997.dat';
data perm.sales97;
infile data97;
- 699 -
input ID $ @;
do Quarter=1 to 4;
input Sales : comma. @;
output;
end;
run;
An ID Field Followed by a Varying Number of Repeating Fields
libname perm 'c:\records\sales';
filename data97 'c:\records\sales\1997.dat';
data perm.sales97;
infile data97 missover;
input ID $ Sales : comma. @;
Quarter=0;
do while (sales ne .);
quarter+1;
output;
input sales : comma. @;
end;
run;
Points to Remember
The double trailing at sign (@@) holds a record across multiple iterations of the DATA step until the end of the record is
reached.
The single trailing at sign (@) releases a record when control returns to the top of the DATA step.
Use an END statement to complete DO loops and DO WHILE loops.
Chapter Quiz
Select the best answer for each question. After completing the quiz, check your answers using the answer
key in the appendix.
Which is true for the double trailing at sign (@@)?
It enables the next INPUT statement to read from the current record across multiple iterations of the DATA step.
It must be the last item specified in the INPUT statement.
It is released when the input pointer moves past the end of the record.
all of the above
A record that is being held by a single trailing at sign (@) is automatically released when
the input pointer moves past the end of the record.
- 700 -
the next iteration of the DATA step begins.
another INPUT statement that has an @ executes.
another value is read from the observation.
Which SAS program correctly creates a separate observation for each block of data?
Raw Data File
data perm.produce;
infile fruit;
input Item $ Variety : $10.;
run;
data perm.produce;
infile fruit;
input Item $ Variety : $10. @;
run;
data perm.produce;
infile fruit;
input Item $ Variety : $10. @@;
run;
data perm.produce;
infile fruit @@;
input Item $ Variety : $10.;
run;
Which SAS program reads the values for ID and holds the record for each value of Quantity, so that three observations are
created for each record?
Raw Data File
- 701 -
data work.sales;
infile unitsold;
input ID $;
do week=1 to 3;
input Quantity : comma.;
output;
end;
run;
data work.sales;
infile unitsold;
input ID $ @@;
do week=1 to 3;
input Quantity : comma.;
output;
end;
run;
data work.sales;
infile unitsold;
input ID $ @;
do week=1 to 3;
input Quantity : comma.;
output;
end;
run;
data work.sales;
infile unitsold;
input ID $ @;
do week=1 to 3;
input Quantity : comma. @;
output;
end;
run;
- 702 -
Which SAS statement repetitively executes several statements when the value of an index variable named count ranges from 1
to 50, incremented by 5?
do count=1 to 50 by 5;
do while count=1 to 50 by 5;
do count=1 to 50 + 5;
do while (count=1 to 50 + 5);
Which option below, when used in a DATA step, writes an observation to the data set after each value for Activity has been
read?
do choice=1 to 3;
input Activity : $10. @;
output;
end;
run;
do choice=1 to 3;
input Activity : $10. @;
end;
output;
run;
do choice=1 to 3;
input Activity : $10. @;
end;
run;
both a and b
Which SAS statement repetitively executes several statements while the value of Cholesterol is greater than 200?
do cholesterol > 200;
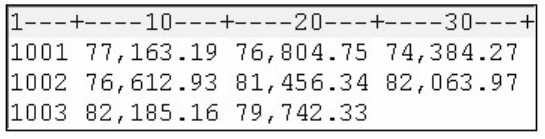
- 703 -
do cholesterol gt 200;
do while (cholesterol > 200);
do while cholesterol > 200;
Which choice below is an example of a sum statement?
totalpay=1;
totalpay+1;
totalpay*1;
totalpay by 1;
Which program creates the SAS data set Perm.Topstore from the raw data file shown below?
Raw Data File
Output from PROC PRINT
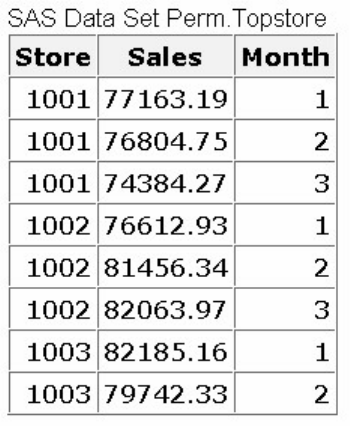
- 704 -
data perm.topstores;
infile sales98 missover;
input Store Sales : comma. @;
do while (sales ne .);
month + 1;
output;
input sales : comma. @;
end;
run;
data perm.topstores;
infile sales98 missover;
input Store Sales : comma. @;
do while (sales ne .);
Month=0;
month + 1;
output;
input sales : comma. @;
end;
run;
data perm.topstores;
infile sales98 missover;
input Store Sales : comma.
Month @;
do while (sales ne .);
month + 1;
input sales : comma. @;
end;
- 705 -
output;
run;
data perm.topstores;
infile sales98 missover;
input Store Sales : comma. @;
Month=0;
do while (sales ne .);
month + 1;
output;
input sales : comma. @;
end;
run;
How many observations are produced by the DATA step that reads this external file?
Raw Data File
data perm.choices;
infile icecream missover;
input Day $ Flavor : $10. @;
do while (flavor ne ' ');
output; input flavor : $10. @;
end;
run;
3
5
12
15
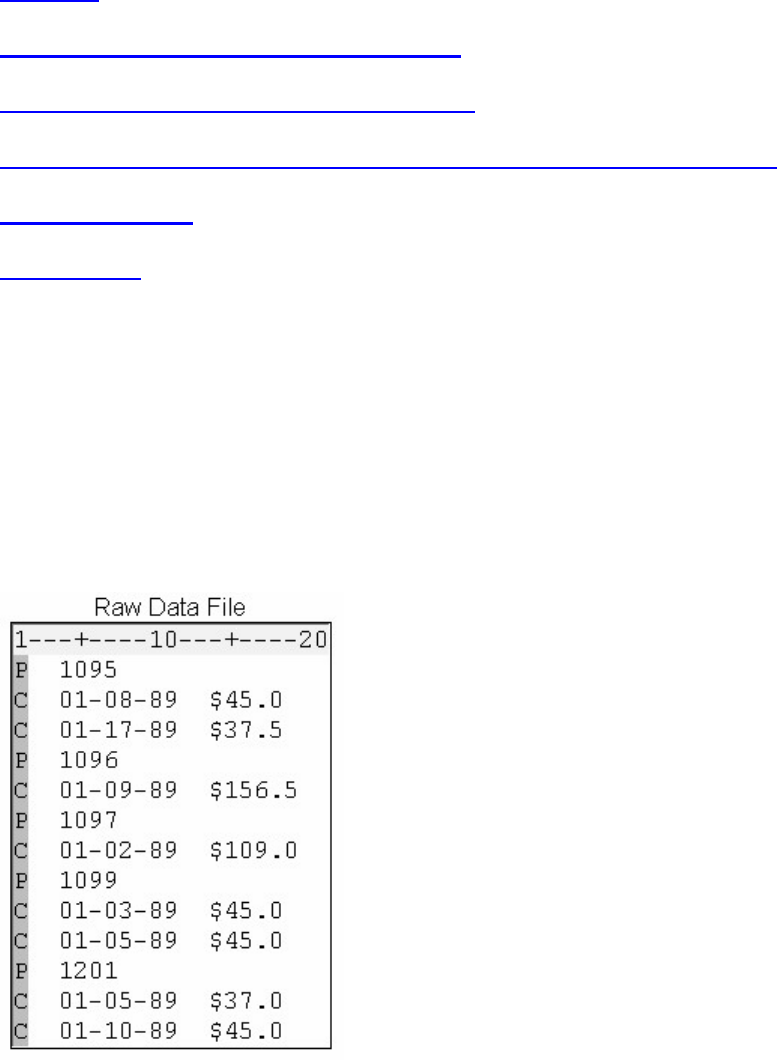
- 706 -
Chapter 21 Reading Hierarchical Files
Overview
Creating One Observation per Detail Record
Creating One Observation per Header Record
Processing a DATA Step That Creates One Observation per Header Record
Chapter Summary
Chapter Quiz
Overview
Introduction
Raw data files can be hierarchical in structure, consisting of a header record and one or more detail records.
Typically, each record contains a field that identifies the record type.
Here, the P indicates a header record that contains a patient's ID number. The C indicates a detail record
that contains the date of the patient's appointment and the charges that the patient has incurred.
You can build a SAS data set from a hierarchical file by creating one observation per detail record,
retaining the patient ID from the header record.
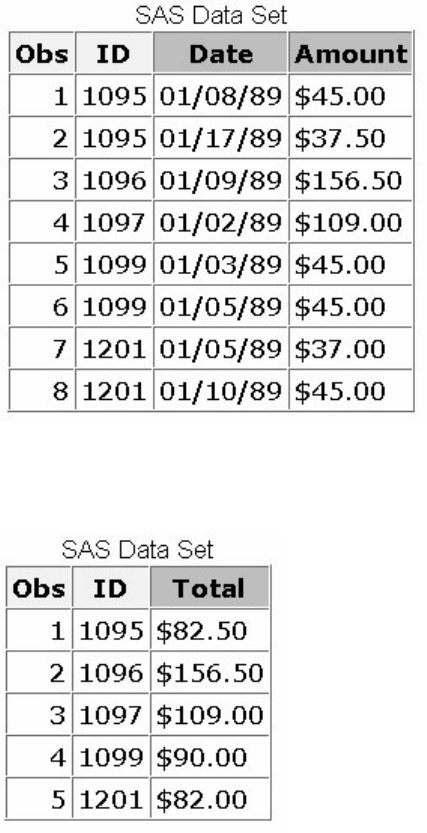
- 707 -
You can also build a SAS data set from a hierarchical file by creating one observation per header record
and combining the information from detail records into summary variables.
In this chapter, you learn how to read from a hierarchical file and create a SAS data set that contains either
one observation per detail record or one observation per header record.
Objectives
In this chapter, you learn to
retain the value of a variable
conditionally execute a SAS statement
determine when the last observation is being processed
conditionally execute multiple SAS statements.
You can also review how to
use a line-hold specifier to hold the current record
explicitly write an observation to a data set.
Creating One Observation per Detail Record
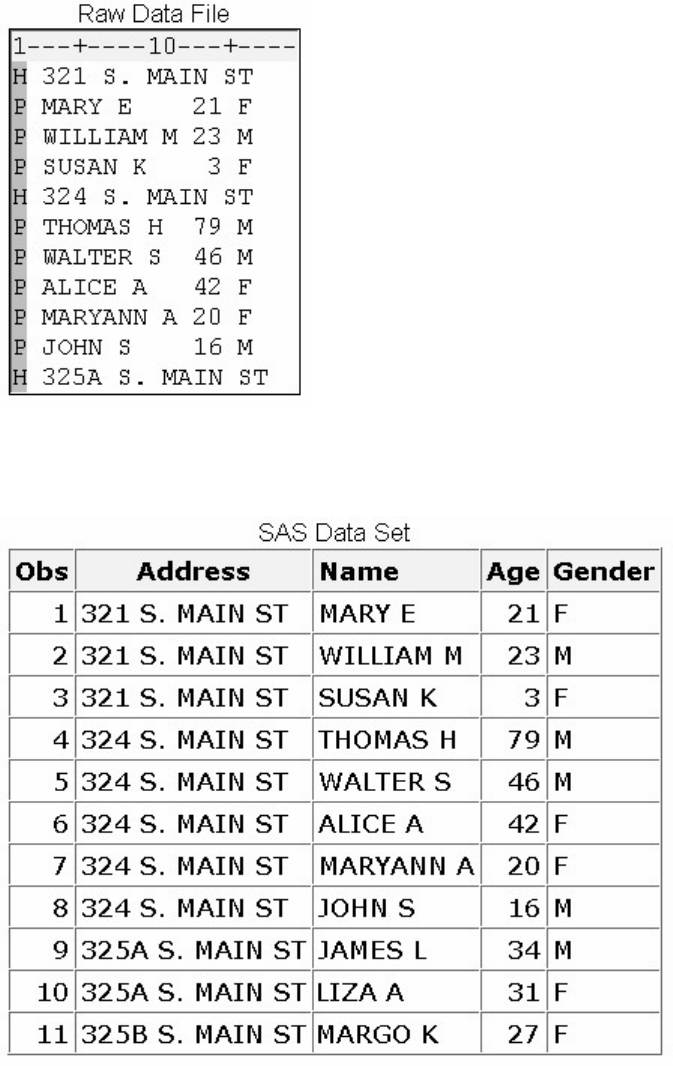
- 708 -
Overview
In order to create one observation per detail record, it is necessary to distinguish between header and detail
records. Having a field that identifies the type of the record makes this task easier.
In the partial raw data file Census, shown below, H indicates a header record that contains a street address,
and P indicates a detail record that contains information about a person who lives at that address.
Let's see how you can create a data set that contains one observation for each person who lives at a specific
address.
Retaining the Values of Variables
As you write the DATA step to read this file, remember that you want to keep the header record as a part
of each observation until the next header record is encountered. To do this, you need to use a RETAIN
statement to retain the values for Address across iterations of the DATA step.
- 709 -
data perm.people;
infile census;
retain Address;
Note: Retain the variable Address so that its value will be available to subsequent iterations of the DATA
step.
Next, read the first field in each record, which identifies the record's type. You also need to use the @
line-hold specifier to hold the current record so that the other values in the record can be read later.
data perm.people;
infile census;
retain Address;
input type $1. @;
Conditionally Executing SAS Statements
You can use the value of type to identify each record. If type is H, you need to execute an INPUT
statement to read the values for Address. However, if type is P, then execute an INPUT statement to read
the values for Name, Age, and Gender.
You can tell SAS to perform a given task based on a specific condition by using an IF-THEN statement.
data perm.people;
infile census;
retain Address;
input type $1. @;
if type='H' then
input @3 address $15.;
- 710 -
Expressions in conditional statements usually involve some kind of comparison. In the example shown
above, a variable is compared to a constant. When the condition is met, the expression is evaluated as true,
and the statement that follows the keyword THEN is executed.
The expression defines a condition so that when the value of type is H, the INPUT statement reads the
values for Address. However, when the value of type is not H, the expression is evaluated as false, and the
INPUT statement is not executed. Notice that the value is enclosed in quotation marks because it is a
character value.
CAUTION:
When you compare values, be sure to express the values exactly as they are coded in the data. For example,
the expression below would evaluate to false because the values in the data are stored in uppercase letters.
if type='h' then ... ;
Reading a Detail Record
Now think about what needs to happen when a detail record is read. Remember, you want to write an
observation to the data set only when the value of type is P.
You can use a subsetting IF statement to check for the condition that type is P. The remaining DATA step
statements execute only when the condition is true. If type is not P, then the values for Name, Age, and
Gender are not read, the values in the program data vector are not written to the data set as an observation,
and control returns to the top of the DATA step. However, Address is retained.
If type is P, Name, Age, and Gender are read, and an observation is written to the data set. Remember that
you want to create an observation for detail records only.
data perm.people;
infile census;
retain Address;
input type $1. @;
if type='H' then input @3 address $15.;
if type='P';
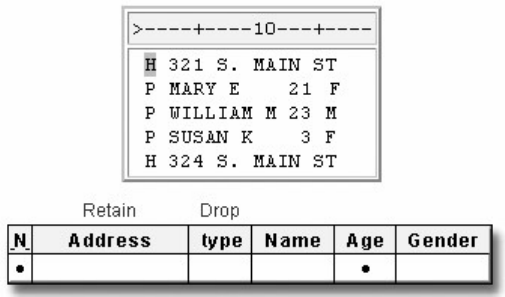
- 711 -
input @3 Name $10. @13 Age 3. @16 Gender $1.;
run;
Dropping Variables
Because type is useful only for identifying a record's type, drop the variable from the data set. The DROP=
option in the DATA statement shown here prevents the variable type from being written to the data set.
data perm.people (drop=type);
infile census;
retain Address;
input type $1. @;
if type='H' then input @3 address $15.;
if type='P';
input @3 Name $10. @13 Age 3. @16 Gender $1.;
run;
Processing a DATA Step That Creates One Observation per Detail Record
Let's see how this DATA step is processed.
data perm.people (drop=type);
infile census;
retain Address;
input type $1. @;
if type='H' then input @3 address $15.;
if type='P';
input @3 Name $10. @13 Age 3. @16 Gender $1.;
run;
At compile time, the variable type is flagged so that its values are not written to the data set. Address is
flagged so that its value is retained across iterations of the DATA step.
As the DATA step begins to execute, the INPUT statement reads the value for type and holds the first
record.
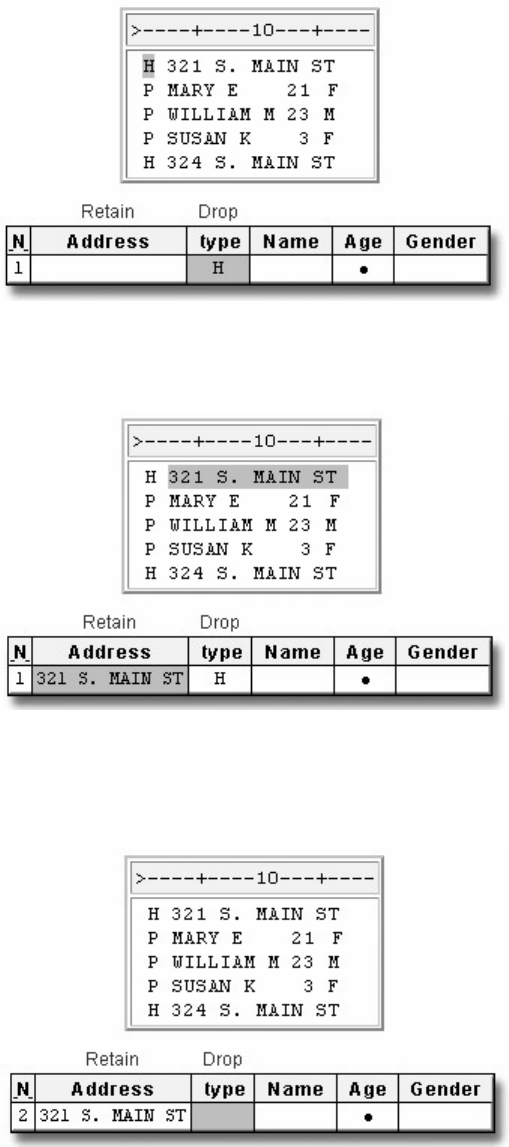
- 712 -
The condition type='H' is checked and found to be true, so the INPUT statement reads the value for
Address in the first record.
Next, the subsetting IF statement checks for the condition type='P'. Because the condition is not true, the
remaining statements are not executed and control returns to the top of the DATA step. The PDV is
initialized but Address is retained.
As the second iteration begins, the input pointer moves to the next record and a new value for type is read.
The condition expressed in the IF-THEN statement is not true, so the statement following the THEN
keyword is not executed.
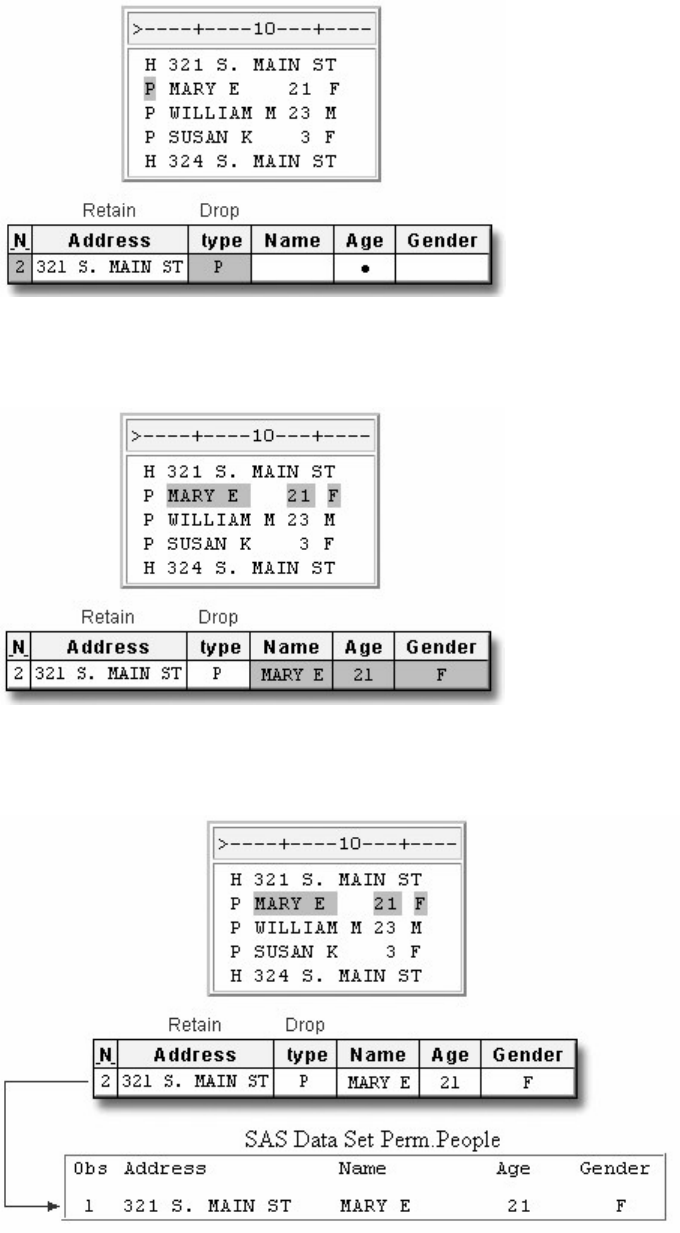
- 713 -
Now the subsetting IF statement checks for the condition type='P'. In this iteration, the condition is true, so
the final INPUT statement reads the values for Name, Age, and Gender.
Then the values in the program data vector are written as the first observation, and control returns to the
top of the DATA step. Notice that the values for type are not included.
As execution continues, observations are produced from the third and fourth records. However, notice that
the fifth record is a header record. During the fifth iteration, the condition type='H' is true, so a new
Address is read into the program data vector, overlaying the previous value.
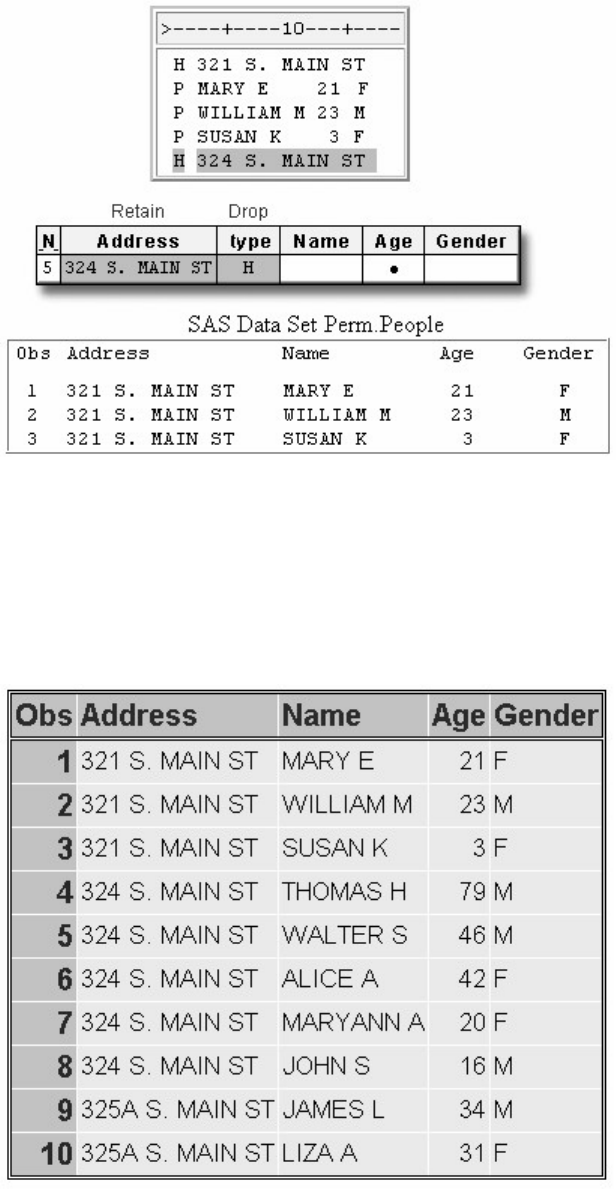
- 714 -
Displaying Your Results
When the execution phase is complete, you can display the data set by using the PRINT procedure. The
first 10 observations are displayed.
Output from the PRINT Procedure
Creating One Observation per Header Record
Overview
In the previous example, you learned how to create one observation per detail record. But suppose you
only want to know how many people reside at each address. You can create a data set that reads each detail
record, counts the number of people, and stores this number in a summary variable.
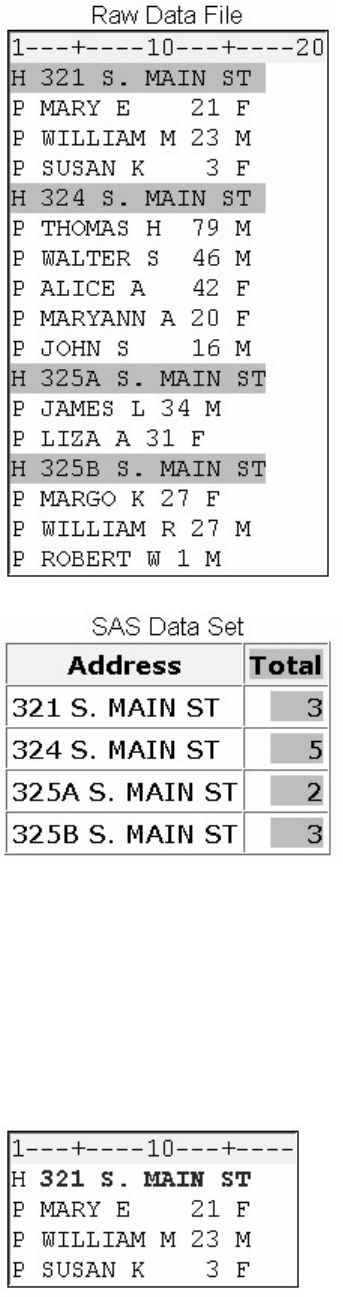
- 715 -
In the example below, this summary variable, Total, is computed for each address. As you can see,
creating one observation per header record condenses a large amount of information into a concise data
set.
As you write the DATA step to read this file, you need to think about performing several tasks. First, the
value of Address must be retained as detail records are read and summarized.
data perm.people;
infile census;
retain Address;
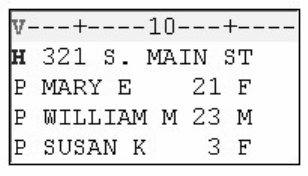
- 716 -
Next, the value of type must be read in order to determine whether the current record is a header record or
a detail record. Add an @ to hold the record so that another INPUT statement can read the remaining
values.
data perm.people;
infile census;
retain Address;
input type $1. @;
When the value of type indicates a header record, several statements need to be executed. When the value
of type indicates a detail record, you need to define an alternative set of actions. Let's look at executing
different sets of statements for each value of type.
DO Group Actions for Header Records
To execute multiple SAS statements based on the value of a variable, you can use a simple DO group with
an IF-THEN statement. When the condition type='H' is true, several statements need to be executed.
data perm.residnts;
infile census;
retain Address;
input type $1. @;
if type='H' then do;
First, you need to determine whether this is the first header record in the external file. You do not want the first header record
to be written as an observation until the related detail records have been read and summarized.
_N_ is an automatic variable whose value is the number of times the DATA step has begun to execute. The expression _n_
> 1 defines a condition where the DATA step has executed more than once. Use this expression in conjunction with the
previous IF-THEN statement to check for these two conditions:
The current record is a header record.
The DATA step has executed more than once.
data perm.residnts;
infile census;
retain Address;
input type $1. @;
if type='H' then do;
if _n_ > 1
- 717 -
When the conditions type='H' and _n_ > 1 are true, an OUTPUT statement is executed. Thus, each header record except for
the first one causes an observation to be written to the data set.
data perm.residnts;
infile census;
retain Address;
input type $1. @;
if type='H' then do;
if _n_ > 1 then output;
An assignment statement creates the summary variable Total and sets its value to 0.
data perm.residnts;
infile census;
retain Address;
input type $1. @;
if type='H' then do;
if _n_ > 1 then output;
Total=0;
An INPUT statement reads the values for Address.
data perm.residnts;
infile census;
retain Address;
input type $1. @;
if type='H' then do;
if _n_ > 1 then output;
Total=0;
input address $ 3-17;
An END statement closes the DO group.
data perm.residnts;
infile census;
retain Address;
input type $1. @;
if type='H' then do;
if _n_ > 1 then output;
Total=0;
input address $ 3-17;
end;
Reading Detail Records
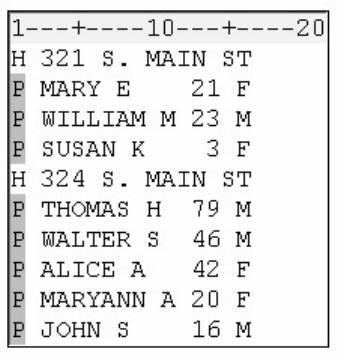
- 718 -
When the value of type is not H, you need to define an alternative action. You can do this by adding an
ELSE statement after the DO group.
Remember that the IF-THEN statement executes a SAS statement when the condition specified in the IF
clause is true. By adding an ELSE statement after the IF-THEN statement, you define an alternative action
to be performed when the IF condition is false.
data perm.residnts;
infile census;
retain Address;
input type $1. @;
if type='H' then do;
if _n_ > 1 then output;
Total=0;
input address $ 3-17;
end;
else
The only other type of record is a detail record, represented by a P. You want to count each person who is
represented by a detail record and store the accumulated value in the summary variable Total. You do not
need to read the values for Name, Age, and Gender.
data perm.residnts;
infile census;
retain Address;
input type $1. @;
if type='H' then do;
if _n_ > 1 then output;
Total=0;
input address $ 3-17;
end;
else if type='P' then
At this point, the value of Total to 0 has already been initialized each time a header record is read. Now, as
each detail record is read, you can increment the value of Total by using a sum statement. In this example
- 719 -
you're counting the number of detail records for each header record, so you increment the value of Total by
1 when the value of type is P.
data perm.residnts;
infile census;
retain Address;
input type $1. @;
if type='H' then do;
if _n_ > 1 then output;
Total=0;
input address $ 3-17;
end;
else if type='P' then total+1;
Remember that a sum statement enables you to add any valid SAS expression to an accumulator variable.
else if type='B' then total+cost;
Remember also that the value generated by a sum statement is automatically retained throughout the
DATA step. That is why it is important to set the value of Total to 0 each time a header record is read.
Determining the End of the External File
Your program writes an observation to the data set only when another header record is read and the DATA
step has executed more than once. But after the last detail record is read, there are no more header records
to cause the last observation to be written to the data set.
data perm.residnts;
infile census;
retain Address;
input type $1. @;
if type='H' then do;
if _n_ > 1 then
output;
Total=0;
input address $ 3-17;
end;
else if type='P'
then total+1;
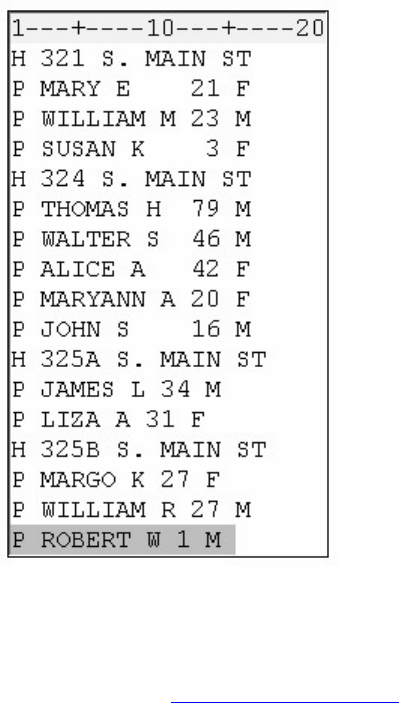
- 720 -
You need to determine when the last record in the file is read so that you can then execute another explicit
OUTPUT statement. You can determine when the current record is the last record in an external file by
specifying the END= option in the INFILE statement. (You learned how to use the END= option with a
SET statement in Reading SAS Data Sets.)
General form, INFILE statement with the END= option:
INFILE file-specification END=variable;
where variable is a temporary numeric variable whose value is 0 until the last line is read and 1after the
last line is read.
Like automatic variables, the END= variable is not written to the data set.
In the following example, the END= variable is defined in the INFILE statement as last. When last has a
value other than 0, the OUTPUT statement writes the final observation to the data set.
data perm.residnts;
infile census end=last;
retain Address;
input type $1. @;
if type='H' then do;
if _n_ > 1 then output;
Total=0;
input address $ 3-17;
end;
else if type='P' then total+1;
if last then output;
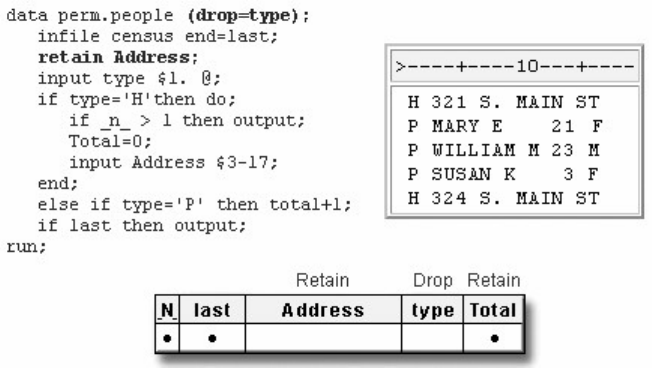
- 721 -
A DROP= option in the DATA statement drops the variable type from the data set, and a RUN statement
completes the DATA step.
data perm.residnts (drop=type);
infile census end=last;
retain Address;
input type $1. @;
if type='H' then do;
if _n_ > 1 then output;
Total=0;
input address $ 3-17;
end;
else if type='P' then total+1;
if last then output;
run;
Processing a DATA Step That Creates One Observation per Header Record
During the compile phase, the variable type is flagged so that later it can be dropped. The value for
Address and Total (SUM statement) are retained.
As the execution begins, _N_ is 1 and last is 0. Total is 0 because of the sum statement.
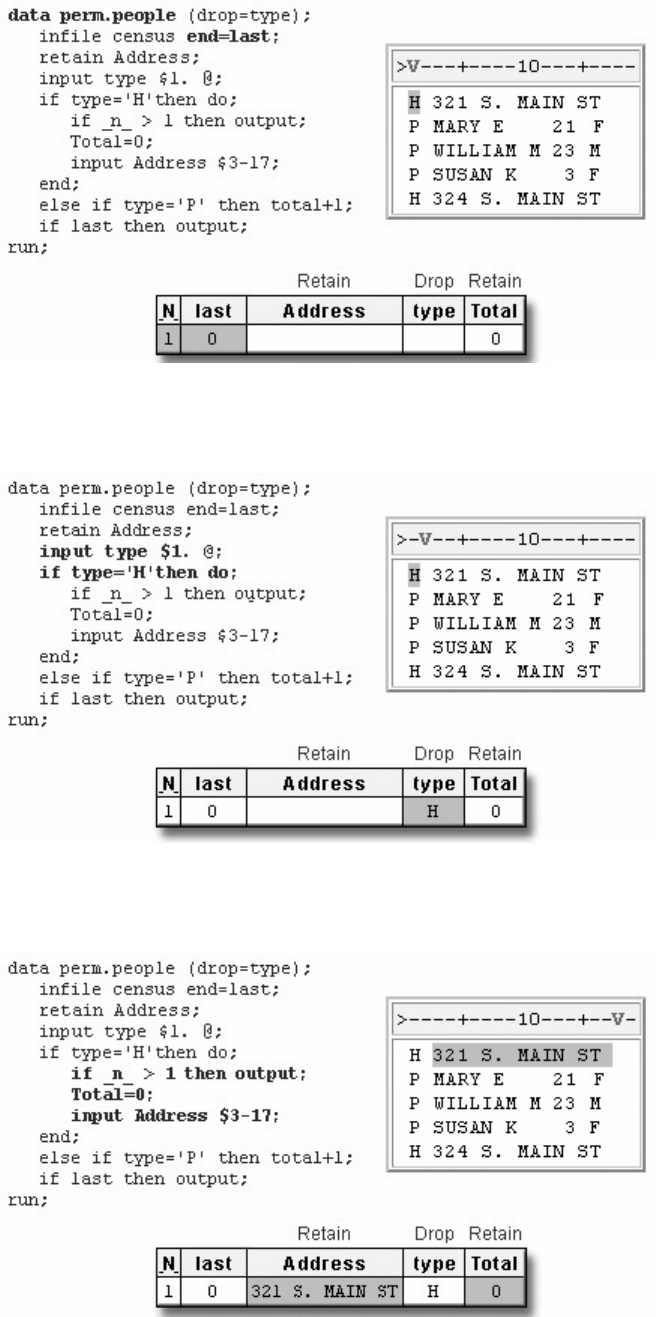
- 722 -
Now the value for type is read, the condition type='H' is true, and therefore the statements in the DO group
execute.
The condition N>1 is not true, so the OUTPUT statement is not executed. However, Total is assigned the
value of 0 and the value for Address is read.
The END statement closes the DO group. The alternative condition expressed in the ELSE statement is not
checked because the first condition, type='H', was true.
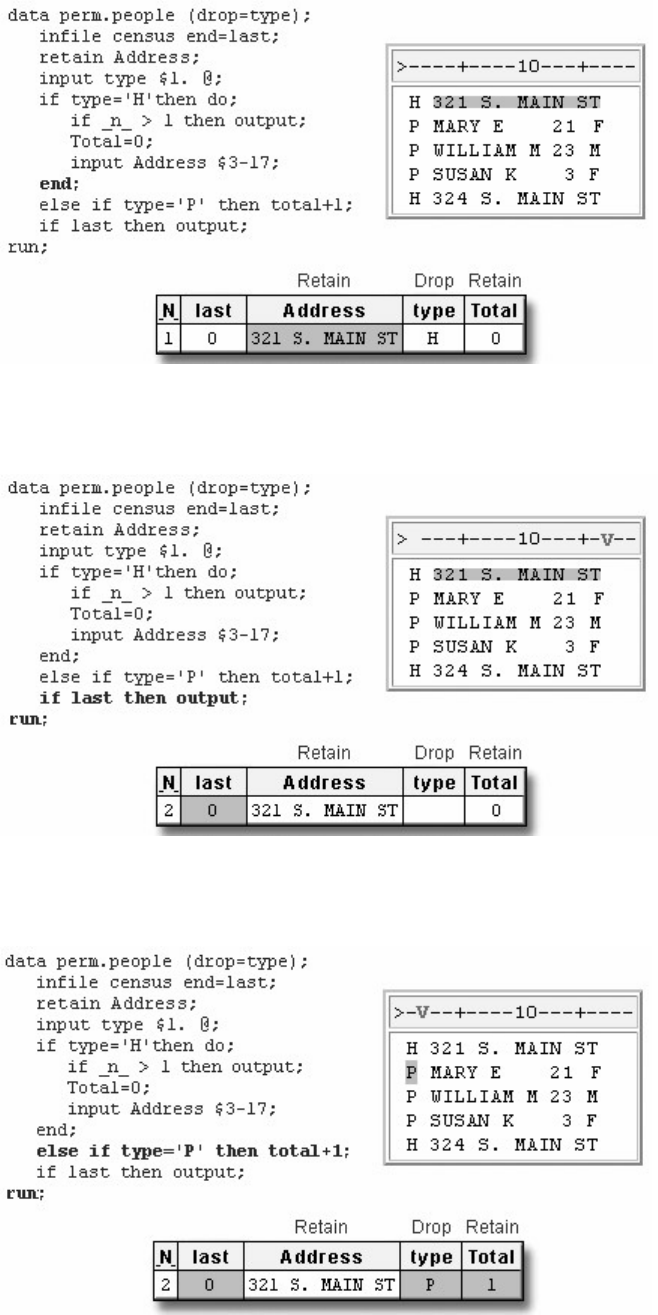
- 723 -
The value of last is still 0, so the OUTPUT statement is not executed. Control returns to the top of the
DATA step.
During the second iteration, the value of type is 'P' and Total is incremented by 1. Again, the value of last
is 0, so control returns to the top of the DATA step.
During the fifth iteration, the value of type is 'H' and _N_ is greater than 1, so the values for Address and
Total are written to the data set as the first observation.
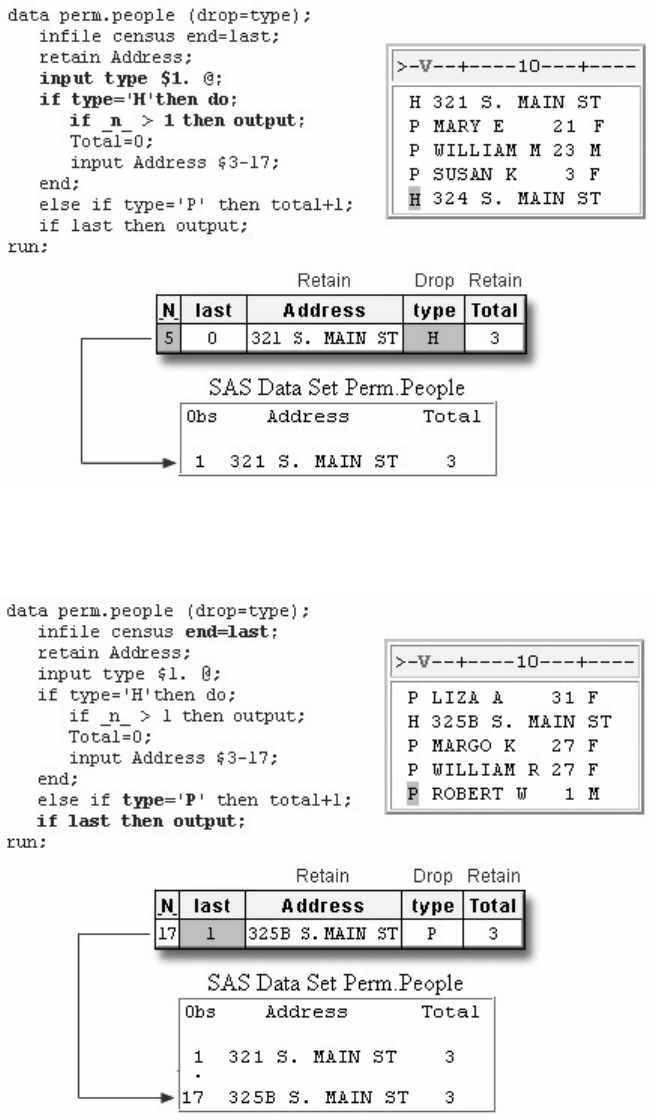
- 724 -
As the last record in the file is read, the variable last is set to 1. Now that the condition for last is true, the
values in the program data vector are written to the data set as the final observation.
Chapter Summary
Text Summary
Hierarchical Raw Data Files
Raw data files can be hierarchical in structure, consisting of a header record and one or more detail records.
You can build a SAS data set from a hierarchical file by creating one observation
per detail record, storing header data with each observation
per header record, combining the information from detail records into summary variables.
- 725 -
Creating One Observation per Detail Record
To create one observation per detail record, it is necessary to distinguish between header and detail records.
Having a field that identifies the type of the record makes this task easier.
As you write the DATA step, use a RETAIN statement to retain header data in the PDV until the next
header record is encountered.
Next, you need to read the field in each record that identifies the record's type. Remember to use the @
line-hold specifier to hold the current value of each record type so that the other values in the record can be
read by subsequent INPUT statements.
Use an IF-THEN statement to check for the condition that the record is a header record. If the record is a
header record, you need to execute an INPUT statement to read values for that record.
You can use a subsetting IF statement to check for the condition that the record is a detail record. If the
record is a detail record, use another INPUT statement to read values in that record.
Use the DROP= option to exclude the variable that identifies each record's type from the output data set.
Creating One Observation per Header Record
Creating one observation per header record condenses a large amount of information into a concise data set.
As you write the DATA step, you need to think about performing several tasks.
As with creating one observation per detail record, use a RETAIN statement to retain header data in the
PDV until the next header record is encountered. Then read the field in each record that identifies the
record's type. Remember to use the @ line-hold specifier to hold the current record so that the other values
in the record can be read by subsequent INPUT statements.
When the record is a header record, multiple statements need to be executed. You can do this by adding a
simple DO group to an IF-THEN statement. Within the DO group, you need to
determine whether this is the first header record in the external file by using the automatic variable _N_
use an OUTPUT statement to write each header record except for the first one to the data set
use an assignment statement to create a summary variable, and set its value to 0
add an INPUT statement to read values in the header record
close the DO group with an END statement.
When the record is a detail record, you need to define an alternative set of actions. You can do this by
adding an ELSE statement after the DO group. As each detail record is read, increment the value of the
summary variable by using a sum statement.
After the last detail record is read, there are no more header records to cause the last observation to be
written to the data set. Determine when the current record is the last record in an external file by specifying
the END= option in the INFILE statement. Again, you can use the DROP= option to exclude the variable
that identifies each record's type from the output data set.
Syntax
- 726 -
Syntax to Create One Observation for Each Detail Record
LIBNAME libref 'SAS-data-library';
FILENAME fileref 'filename';
DATA SAS-data-set (DROP=variable);
INFILE file-specification;
RETAIN variable;
INPUT variable;
IF variable='condition' THEN SAS statement;
IF variable='condition';
SAS-statement;
RUN;
Syntax to Create One Observation for Each Header Record
LIBNAME libref 'SAS-data-library';
FILENAME fileref 'filename';
DATA SAS-data-set (DROP= variable);
INFILE file-specification END=variable;
RETAIN variable;
INPUT variable;
IF variable='condition' THEN DO;
IF _N_ > 1 THEN OUTPUT;
summary-variable=0;
INPUT variable;
END;
ELSE IF variable='condition' THEN
summary-variable+expression;
IF variable THEN OUTPUT;
RUN;
Sample Programs
Program to Create One Observation for Each Detail Record
libname perm 'c:\records\census2k';
filename census 'c:\records\census2k\survey.dat';
data perm.people(drop=type);
infile census;
retain Address;
input type $1. @;
if type='H' then input @3 address $15.;
if type='P';
input @3 Name $10. @13 Age 3. @16 Gender $1.;
run;
- 727 -
Program to Create One Observation for Each Header Record
libname perm 'c:\records\census2k';
filename census 'c:\records\census2k\survey.dat';
data perm.residnts (drop=type);
infile census end=last;
retain Address;
input type $1. @;
if type='H' then do;
if _n_ > 1 then output;
Total=0;
input address $ 3-17;
end;
else if type='P' then total+1;
if last then output;
run;
Points to Remember
As with automatic variables, the END= variable is not written to the data set.
Values are automatically retained when using a sum statement. Therefore, it may be necessary to set the value of the counter
variable back to 0 when a new header is encountered.
Chapter Quiz
Select the best answer for each question. After completing the quiz, check your answers using the answer
key in the appendix.
When you write a DATA step to create one observation per detail record you need to
distinguish between header and detail records.
keep the header record as a part of each observation until the next header record is encountered.
hold the current value of each record type so that the other values in the record can be read.
all of the above
Which SAS statement reads the value for code (in the first field), and then holds the value until an INPUT statement reads the
remaining value in each observation in the same iteration of the DATA step?
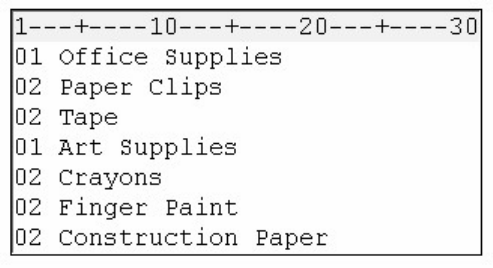
- 728 -
input code $2. @;
input code $2. @@;
retain code;
none of the above
Which SAS statement checks for the condition that Record equals C and executes a single statement to read the values for
Amount?
if record=c then input @3 Amount comma7.;
if record='C' then input @3 Amount comma7.;
if record='C' then do input @3 Amount comma7.;
if record=C then do input @3 Amount comma7.;
After the value for code is read in the sixth iteration, which illustration of the program data vector is correct?
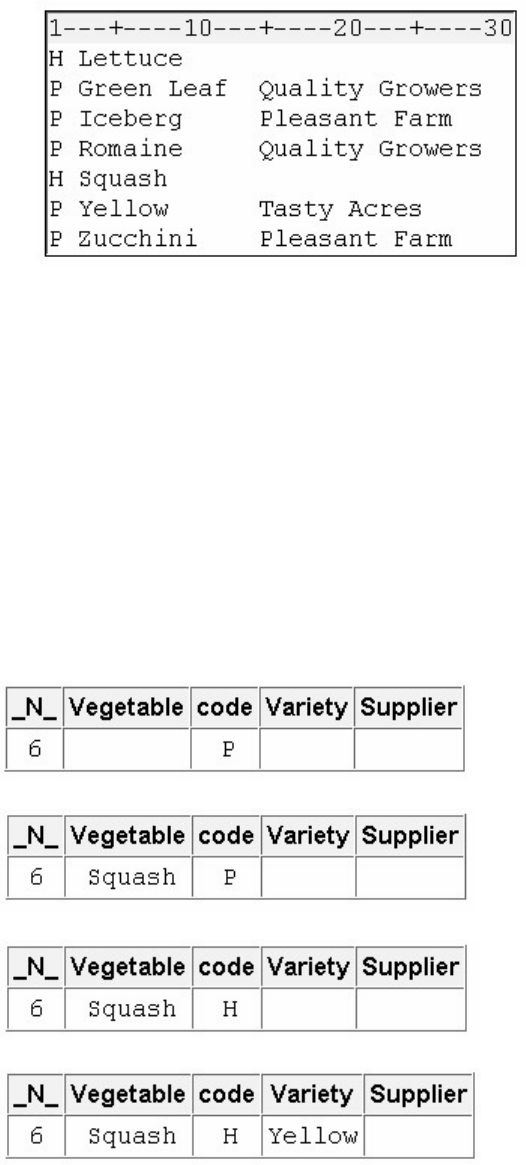
- 729 -
data perm.produce (drop=code);
infile orders;
retain Vegetable;
input code $1. @;
if code='H' then input @3 vegetable $6.;
if code='P';
input @3 Variety : $10. @15 Supplier : $15.;
run;
proc print data=perm.produce;
run;
What happens when the fourth iteration of the DATA step is complete?
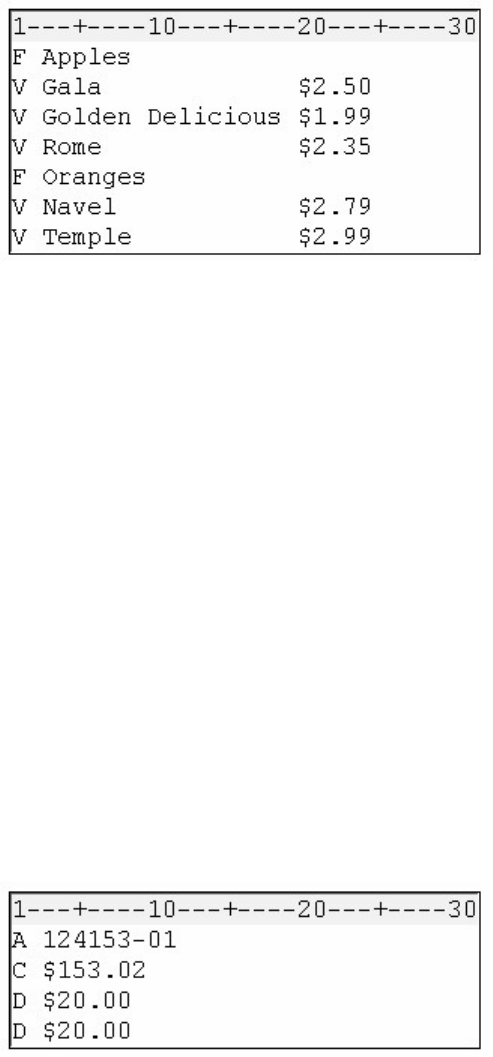
- 730 -
data perm.orders (drop=type);
infile produce;
retain Fruit;
input type $1. @;
if type='F' then input @3 fruit $7.;
if type='V';
input @3 Variety : $16. @20 Price comma5.;
run;
All of the values in the program data vector are written to the data set as the third observation.
All of the values in the program data vector are written to the data set as the fourth observation.
The values for Fruit, Variety, and Price are written to the data set as the third observation.
The values for Fruit, Variety, and Price are written to the data set as the fourth observation.
Which SAS statement indicates that several other statements should be executed when Record has a value of A?
if record='A' then do;
if record=A then do;
if record='A' then;
if record=A then;
- 731 -
Which is true for the following statements (X indicates a header record)?
if code='X' then do;
if _n_ > 1 then output;
Total=0;
input Name $ 3-20;
end;
_N_ equals the number of times the DATA step has begun to execute.
When code='X' and _n_ > 1 are true, an OUTPUT statement is executed.
Each header record causes an observation to be written to the data set.
a and b
What happens when the condition type='P' is false?
if type='P' then input @3 ID $5. @9 Address $20.;
else if type='V' then input @3 Charge 6.;
The values for ID and Address are read.
The values for Charge are read.
type is assigned the value of V.
The ELSE statement is executed.
What happens when last has a value other than zero?
data perm.househld (drop=code);
infile citydata end=last;
retain Address;
input type $1. @;
if code='A' then do;
if _n_ > 1 then output;
Total=0;
input address $ 3-17;
end;
else if code='N' then total+1;
if last then output;
run;
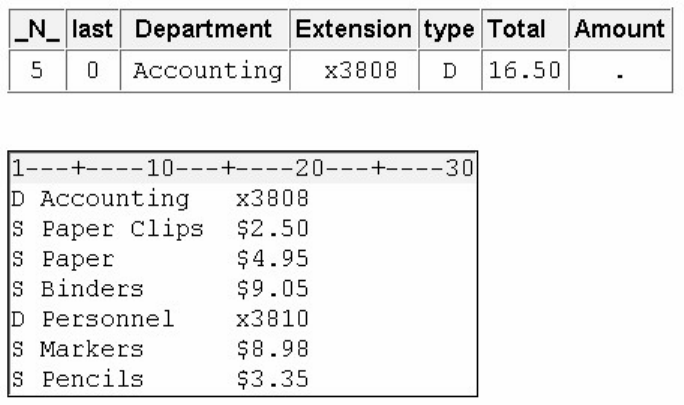
- 732 -
last has a value of 1.
The OUTPUT statement writes the last observation to the data set.
The current value of last is written to the DATA set.
a and b
Based on the values in the program data vector, what happens next?
data work.supplies (drop=type amount);
infile orders end=last;
retain Department Extension;
input type $1. @;
if type='D' then do;
if _n_ > 1 then output;
Total=0;
input @3 department $10. @16 extension $5.;
end;
else if type='S' then do;
input @16 Amount comma5.;
total+amount;
if last then output; end;
run;
All the values in the program data vector are written to the data set as the first observation.
The values for Department, Total, and Extension are written to the data set as the first observation.
The values for Department, Total, and Extension are written to the data set as the fourth observation.
The value of last changes to 1.

- 733 -
Appendix 1 Quiz Answer Keys
Chapter 1: Base Programming
Chapter 2: Referencing Files and Setting Options
Chapter 3: Editing and Debugging SAS Programs
Chapter 4: Creating List Reports
Chapter 5: Creating SAS Data Sets from External Files
Chapter 6: Understanding DATA Step Processing
Chapter 7: Creating and Applying User-Defined Formats
Chapter 8: Producing Descriptive Statistics
Chapter 9: Producing HTML Output
Chapter 10: Creating and Managing Variables
Chapter 11: Reading SAS Data Sets
Chapter 12: Combining SAS Data Sets
Chapter 13: Transforming Data with SAS Functions
Chapter 14: Generating Data with DO Loops
Chapter 15: Processing Variables with Arrays
Chapter 16: Reading Raw Data in Fixed Fields
Chapter 17: Reading Free-Format Data
Chapter 18: Reading Date and Time Values
Chapter 19: Creating a Single Observation from Multiple Records
Chapter 20: Creating Multiple Observations from a Single Record
Chapter 21: Reading Hierarchical Files
Chapter 1: Base Programming
How many observations and variables does the data set below contain?
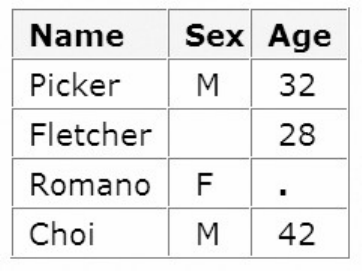
- 734 -
3 observations, 4 variables
3 observations, 3 variables
4 observations, 3 variables
can't tell because some values are missing
Correct answer: c
Rows in the data set are called observations, and columns are called variables. Missing values don't affect the structure of
the data set.
How many program steps are executed when the program below is processed?
data user.tables;
infile jobs;
input date name $ job $;
run;
proc sort data=user.tables;
by name;
run;
proc print data=user.tables;
run;
three
four
five
six
Correct answer: a
When it encounters a DATA, PROC, or RUN statement, SAS stops reading statements and executes the previous step in
the program. The program above contains one DATA step and two PROC steps, for a total of three program steps.
What type of variable is the variable AcctNum in the data set below?
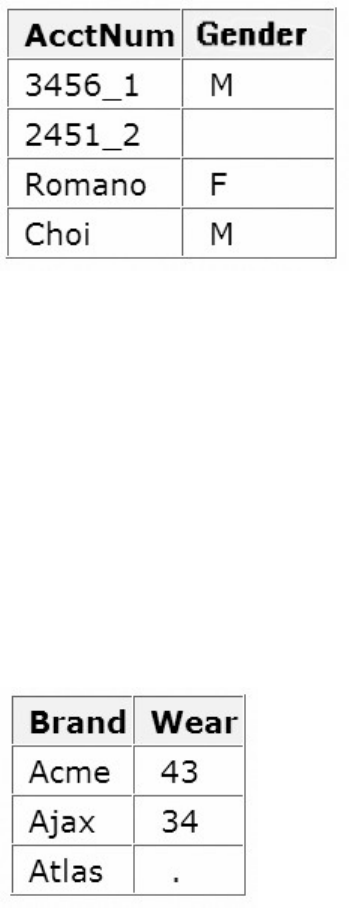
- 735 -
numeric
character
can be either character or numeric
can't tell from the data shown
Correct answer: b
It must be a character variable, because the values contain letters and underscores, which are not valid characters for
numeric values.
What type of variable is the variable Wear in the data set below, assuming that there is a missing value in the data set?
numeric
character
can be either character or numeric
can't tell from the data shown
Correct answer: a
It must be a numeric variable, because the missing value is indicated by a period rather than by a blank.
Which of the following variable names is valid?
4BirthDate
$Cost
_Items_
Tax-Rate
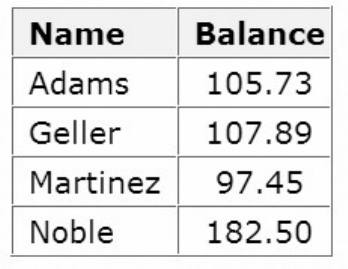
- 736 -
Correct answer: c
Variable names follow the same rules as SAS data set names. They can be 1 to 32 characters long, must begin with a letter
(A-Z, either uppercase or lowercase) or an underscore, and can continue with any combination of numerals, letters, or
underscores.
Which of the following files is a permanent SAS file?
Sashelp.PrdSale
Sasuser.MySales
Profits.Quarter1
all of the above
Correct answer: d
To store a file permanently in a SAS data library, you assign it a libref other than the default Work. For example, by
assigning the libref Profits to a SAS data library, you specify that files within the library are to be stored until you delete
them. Therefore, SAS files in the Sashelp and Sasuser and Profits libraries are permanent files.
In a DATA step, how can you reference a temporary SAS data set named Forecast?
Forecast
Work.Forecast
Sales.Forecast (after assigning the libref Sales)
only a and b above
Correct answer: d
To reference a temporary SAS file in a DATA step or PROC step, you can specify the one-level name of the file (for
example, Forecast) or the two-level name using the libref Work (for example, Work.Forecast).
What is the default length for the numeric variable Balance?
5
6
7
- 737 -
8
Correct answer: d
The numeric variable Balance has a default length of 8. Numeric values (no matter how many digits they contain) are
stored in 8 bytes of storage unless you specify a different length.
How many statements does the following SAS program contain?
proc print data=new.prodsale
label double;
var state day price1 price2; where state='NC';
label state='Name of State'; run;
three
four
five
six
Correct answer: c
The five statements are: 1) the PROC PRINT statement (two lines long); 2) the VAR statement; 3) the WHERE statement
(on the same line as the VAR statement); 4) the LABEL statement; and 5) the RUN statement (on the same line as the
LABEL statement).
What is a SAS library?
collection of SAS files, such as SAS data sets and catalogs
in some operating environments, a physical collection of SAS files
a group of SAS files in the same folder or directory.
all of the above
Correct answer: d
Every SAS file is stored in a SAS library, which is a collection of SAS files, such as SAS data sets and catalogs. In some
operating environments, a SAS library is a physical collection of files. In others, the files are only logically related. In the
Windows and UNIX environments, a SAS library is typically a group of SAS files in the same folder or directory.
Chapter 2: Referencing Files and Setting Options
If you submit the following program, how does the output look?
options pagesize=55 nonumber;
proc tabulate data=clinic.admit;
class actlevel;
var age height weight;
- 738 -
table actlevel,(age height weight)*mean;
run;
options linesize=80;
proc means data=clinic.heart min max maxdec=1;
var arterial heart cardiac urinary;
class survive sex;
run;
The PROC MEANS output has a print line width of 80 characters, but the PROC TABULATE output has no print line width.
The PROC TABULATE output has no page numbers, but the PROC MEANS output has page numbers.
Each page of output from both PROC steps is 55 lines long and has no page numbers, and the PROC MEANS output has a
print line width of 80 characters.
The date does not appear on output from either PROC step.
Correct answer: c
When you specify a system option, it remains in effect until you change the option or end your SAS session, so both
PROC steps generate output that is printed 55 lines per page with no page numbers. If you don't specify a system option,
SAS uses the default value for that system option.
How can you create SAS output in HTML format on any SAS platform?
by specifying system options
by using programming statements
by using SAS windows to specify the result format
you can't create HTML output on all SAS platforms
Correct answer: b
You can create HTML output using programming statements on any SAS platform. In addition, on all except mainframe
platforms, you can use SAS windows to specify HTML as a result format.
In order for the date values 05May1955 and 04Mar2046 to be read correctly, what value must the YEARCUTOFF= option
have?
a value between 1947 and 1954, inclusive
1955 or higher
1946 or higher
any value
Correct answer: d
As long as you specify an informat with the correct field width for reading the entire date value, the YEARCUTOFF=
option doesn't affect date values that have four-digit years.
- 739 -
When you specify an engine for a library, you always specify
the file format for files that are stored in the library.
the version of SAS that you are using.
access to other software vendors' files.
instructions for creating temporary SAS files.
Correct answer: a
A SAS engine is a set of internal instructions that SAS uses for writing to and reading from files in a SAS library. Each
engine specifies the file format for files that are stored in the library, which in turn enables SAS to access files with a
particular format. Some engines access SAS files, and other engines support access to other vendors' files.
Which statement prints a summary of all the files stored in the library named Area51?
proc contents data=area51._all_ nods;
proc contents data=area51 _all_ nods;
proc contents data=area51 _all_ noobs
proc contents data=area51 _all_.nods;
Correct answer: a
To print a summary of library contents with the CONTENTS procedure, use a period to append the _ALL_ option to the
libref. Adding the NODS option suppresses detailed information about the files.
The following PROC PRINT output was created immediately after PROC TABULATE output. Which system options were
specified when the report was created?
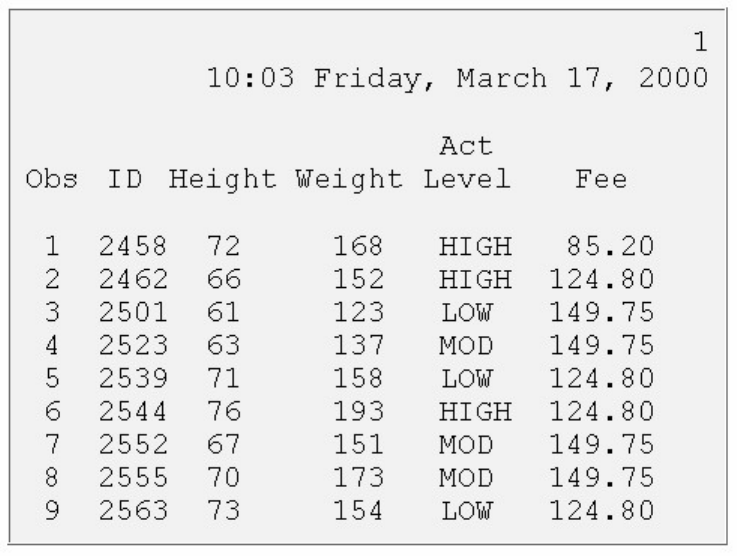
- 740 -
OBS=, DATE, and NONUMBER
NUMBER, PAGENO=1, and DATE
NUMBER and DATE only
none of the above
Correct answer: b
Clearly, the DATE and NUMBER (page number) options are specified. Because the page number on the output is 1, even
though PROC TABULATE output was just produced, PAGENO=1 must also have been specified. If you don't specify
PAGENO=, all output in the Output window is numbered sequentially throughout your SAS session.
Which of the following programs correctly references a SAS data set named SalesAnalysis that is stored in a permanent SAS
library?
data saleslibrary.salesanalysis;
set mydata.quarter1sales;
if sales>100000;
run;
data mysales.totals;
set sales_99.salesanalysis;
if totalsales>50000;
run;
aproc print data=salesanalysis.quarter1;
- 741 -
var sales salesrep month;
run;
proc freq data=1999data.salesanalysis;
tables quarter*sales;
run;
Correct answer: b
Librefs must be 1 to 8 characters long, must begin with a letter or underscore, and can contain only letters, numerals, or
underscores. After you assign a libref, you specify it as the first level in the two-level name for a SAS file.
Which time span is used to interpret two-digit year values if the YEARCUTOFF= option is set to 1950?
1950-2049
1950-2050
1949-2050
1950-2000
Correct answer: a
The YEARCUTOFF= option specifies which 100-year span is used to interpret two-digit year values. The default value of
YEARCUTOFF= is 1920. However, you can override the default and change the value of YEARCUTOFF= to the first
year of another 100-year span. If you specify YEARCUTOFF=1950, then the 100-year span will be from 1950 to 2049.
Assuming you are using SAS code and not special SAS windows, which one of the following statements is false?
LIBNAME statements can be stored with a SAS program to reference the SAS library automatically when you submit the
program.
When you delete a libref, SAS no longer has access to the files in the library. However, the contents of the library still exist on
your operating system.
Librefs can last from one SAS session to another.
You can access files that were created with other vendors' software by submitting a LIBNAME statement.
Correct answer: c
The LIBNAME statement is global, which means that librefs remain in effect until you modify them, cancel them, or end
your SAS session. Therefore, the LIBNAME statement assigns the libref for the current SAS session only. You must
assign a libref before accessing SAS files that are stored in a permanent SAS data library.
What does the following statement do?
libname osiris spss 'c:\myfiles\sasdata\data.spss';
- 742 -
defines a library called Spss using the OSIRIS engine
defines a library called Osiris using the SPSS engine
defines two libraries called Osiris and Spss using the default engine
defines the default library using the OSIRIS and SPSS engines
Correct answer: b
In the LIBNAME statement, you specify the library name before the engine name. Both are followed by the path.
Chapter 3: Editing and Debugging SAS Programs
As you write and edit SAS programs it's a good idea to
begin DATA and PROC steps in column one.
indent statements within a step.
begin RUN statements in column one.
do all of the above.
Correct answer: d
Although you can write SAS statements in almost any format, a consistent layout enhances readability and enables you to
understand the program's purpose. It's a good idea to begin DATA and PROC steps in column one, to indent statements
within a step, to begin RUN statements in column one, and to include a RUN statement after every DATA step or PROC
step.
Suppose you have submitted a SAS program that contains spelling errors. Which set of steps should you perform, in the order
shown, to revise and resubmit the program?
Correct the errors.
Clear the Log window.
Resubmit the program.
Check the Log window.
Correct the errors.
Resubmit the program.
Check the Output window.
Check the Log window.
Correct the errors.
- 743 -
Clear the Log window.
Resubmit the program.
Check the Output window.
Correct the errors.
Clear the Output window.
Resubmit the program.
Check the Output window.
Correct answer: a
To modify programs that contain errors, if you use the Program Editor window, you usually need to recall the submitted
statements from the recall buffer to the Program Editor window, where you can correct the problems. After correcting the
errors, you can resubmit the revised program. However, before doing so, it's a good idea to clear the messages from the
Log window so that you don't confuse the old error messages with the new messages. Remember to check the Log
window again to verify that your program ran correctly.
What happens if you submit the following program?
proc sort data=clinic.stress out=maxrates;
by maxhr;
run;
proc print data=maxrates label double noobs;
label rechr='Recovery Heart Rate;
var resthr maxhr rechr date;
where toler='I' and resthr>90;
sum fee;
run;
Log messages indicate that the program ran successfully.
A “PROC SORT running” message appears at the top of the active window, and a log message may indicate an error in a
statement that seems to be valid.
A log message indicates that an option is not valid or not recognized.
A “PROC PRINT running” message appears at the top of the active window, and a log message may indicate that a quoted
string has become too long or that the statement is ambiguous.
Correct answer: d
The missing quotation mark in the LABEL statement causes SAS to misinterpret the statements in the program. When you
submit the program, SAS is unable to resolve the PROC step, and a "PROC PRINT running" message appears at the top
of the active window.
What generally happens when a syntax error is detected?
- 744 -
SAS continues processing the step.
SAS continues to process the step, and the Log window displays messages about the error.
SAS stops processing the step in which the error occurred, and the Log window displays messages about the error.
SAS stops processing the step in which the error occurred, and the Output window displays messages about the error.
Correct answer: c
Syntax errors generally cause SAS to stop processing the step in which the error occurred. When a program that contains
an error is submitted, messages regarding the problem also appear in the Log window. When a syntax error is detected, the
Log window displays the word ERROR, identifies the possible location of the error, and gives an explanation of the error.
A syntax error occurs when
Some data values are not appropriate for the SAS statements that are specified in a program.
the form of the elements in a SAS statement is correct, but the elements are not valid for that usage.
program statements do not conform to the rules of the SAS language.
none of the above
Correct answer: c
Syntax errors are common types of errors. Some SAS system options and features of the code editing window can help
you identify syntax errors. Other types of errors include data errors and logic errors.
How can you tell whether you have specified an invalid option in a SAS program?
A log message indicates an error in a statement that seems to be valid.
A log message indicates that an option is not valid or not recognized.
The message “PROC running” or “DATA step running” appears at the top of the active window.
You can't tell until you view the output from the program.
Correct answer: b
When you submit a SAS statement that contains an invalid option, a log message notifies you that the option is not valid
or not recognized. You should recall the program, remove or replace the invalid option, check your statement syntax as
needed, and resubmit the corrected program.
Which of the following programs contains a syntax error?
proc sort data=sasuser.mysales;
by region;
run;
dat sasuser.mysales;
set mydata.sales99;
- 745 -
run;
proc print data=sasuser.mysales label;
label region='Sales Region';
run;
none of the above
Correct answer: b
The DATA step contains a misspelled keyword (dat instead of data). However, this is such a common (and easily
interpretable) error that SAS produces only a warning message, not an error.
What should you do after submitting the following program in the Windows or UNIX operating environment?
proc print data=mysales;
where state='NC;
run;
Submit a RUN statement to complete the PROC step.
Recall the program. Then add a quotation mark and resubmit the corrected program.
Cancel the submitted statements. Then recall the program, add a quotation mark, and resubmit the corrected program.
Recall the program. Then replace the invalid option and resubmit the corrected program.
Correct answer: c
This program contains an unbalanced quotation mark. When you have an unbalanced quotation mark, SAS is often unable
to detect the end of the statement in which it occurs. Simply adding a quotation mark and resubmitting your program
usually does not solve the problem. SAS still considers the quotation marks to be unbalanced. To correct the error, you
need to resolve the unbalanced quotation mark before you recall, correct, and resubmit the program.
Which of the following commands opens a file in the code editing window?
file 'd:\programs\sas\newprog.sas'
include 'd:\programs\sas\newprog.sas'
open 'd:\programs\sas\newprog.sas'
all of the above
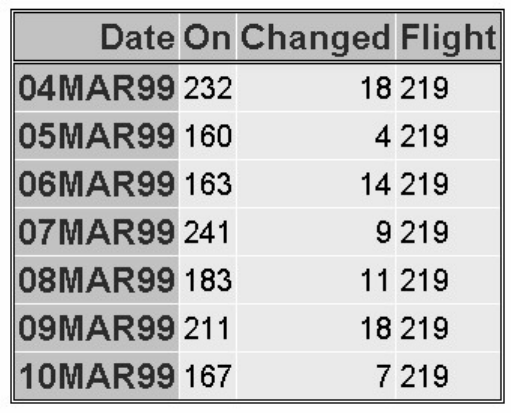
- 746 -
Correct answer: b
One way of opening a file in the code editing window is by using the INCLUDE command. Using the INCLUDE
command enables you to open a single program or combine stored programs in a single window. To save a SAS program,
you can use the FILE command.
Suppose you submit a short, simple DATA step. If the active window displays the message “DATA step running” for a long
time, what probably happened?
You misspelled a keyword.
You forgot to end the DATA step with a RUN statement.
You specified an invalid data set option.
Some data values weren't appropriate for the SAS statements that you specified.
Correct answer: b
Without a RUN statement (or a following DATA or PROC step), the DATA step doesn't execute, so it continues to run.
Unbalanced quotation marks can also cause the “DATA step running” message if relatively little code follows the
unbalanced quotation mark. The other three problems above generate errors in the Log window.
Chapter 4: Creating List Reports
Which PROC PRINT step below creates the following output
proc print data=flights.laguardia noobs;
var on changed flight;
where on>=160;
run;
proc print data=flights.laguardia;
var date on changed flight;
where changed>3;
- 747 -
run;
proc print data=flights.laguardia label;
id date;
var boarded transferred flight;
label boarded='On' transferred='Changed';
where flight='219';
run;
proc print flights.laguardia noobs;
id date;
var date on changed flight;
where flight='219';
run;
Correct answer: c
The DATA= option specifies the data set that you are listing, and the ID statement replaces the Obs column with the
specified variable. The VAR statement specifies variables and controls the order in which they appear, and the WHERE
statement selects rows based on a condition. The LABEL option in the PROC PRINT statement causes the labels specified
in the LABEL statement to be displayed.
Which of the following PROC PRINT steps is correct if labels are not stored with the data set?
proc print data=allsales.totals label;
label region8='Region 8 Yearly Totals';
run;
proc print data=allsales.totals;
label region8='Region 8 Yearly Totals';
run;
proc print data allsales.totals label noobs;
run;
proc print allsales.totals label;
run;
Correct answer: a
- 748 -
You use the DATA= option to specify the data set to be printed. The LABEL option specifies that variable labels appear in
output instead of variable names.
Which of the following statements selects from a data set only those observations for which the value of the variable Style is
RANCH, SPLIT, or TWOSTORY?
where style='RANCH' or 'SPLIT' or 'TWOSTORY';
where style in 'RANCH' or 'SPLIT' or 'TWOSTORY';
where style in (RANCH, SPLIT, TWOSTORY);
where style in ('RANCH','SPLIT','TWOSTORY');
Correct answer: d
In the WHERE statement, the IN operator enables you to select observations based on several values. You specify values
in parentheses and separated by spaces or commas. Character values must be enclosed in quotation marks and must be in
the same case as in the data set.
If you want to sort your data and create a temporary data set named Calc to store the sorted data, which of the following steps
should you submit?
proc sort data=work.calc out=finance.dividend;
run;
proc sort dividend out=calc;
by account;
run;
proc sort data=finance.dividend out=work.calc;
by account;
run;
proc sort from finance.dividend to calc;
by account;
run;
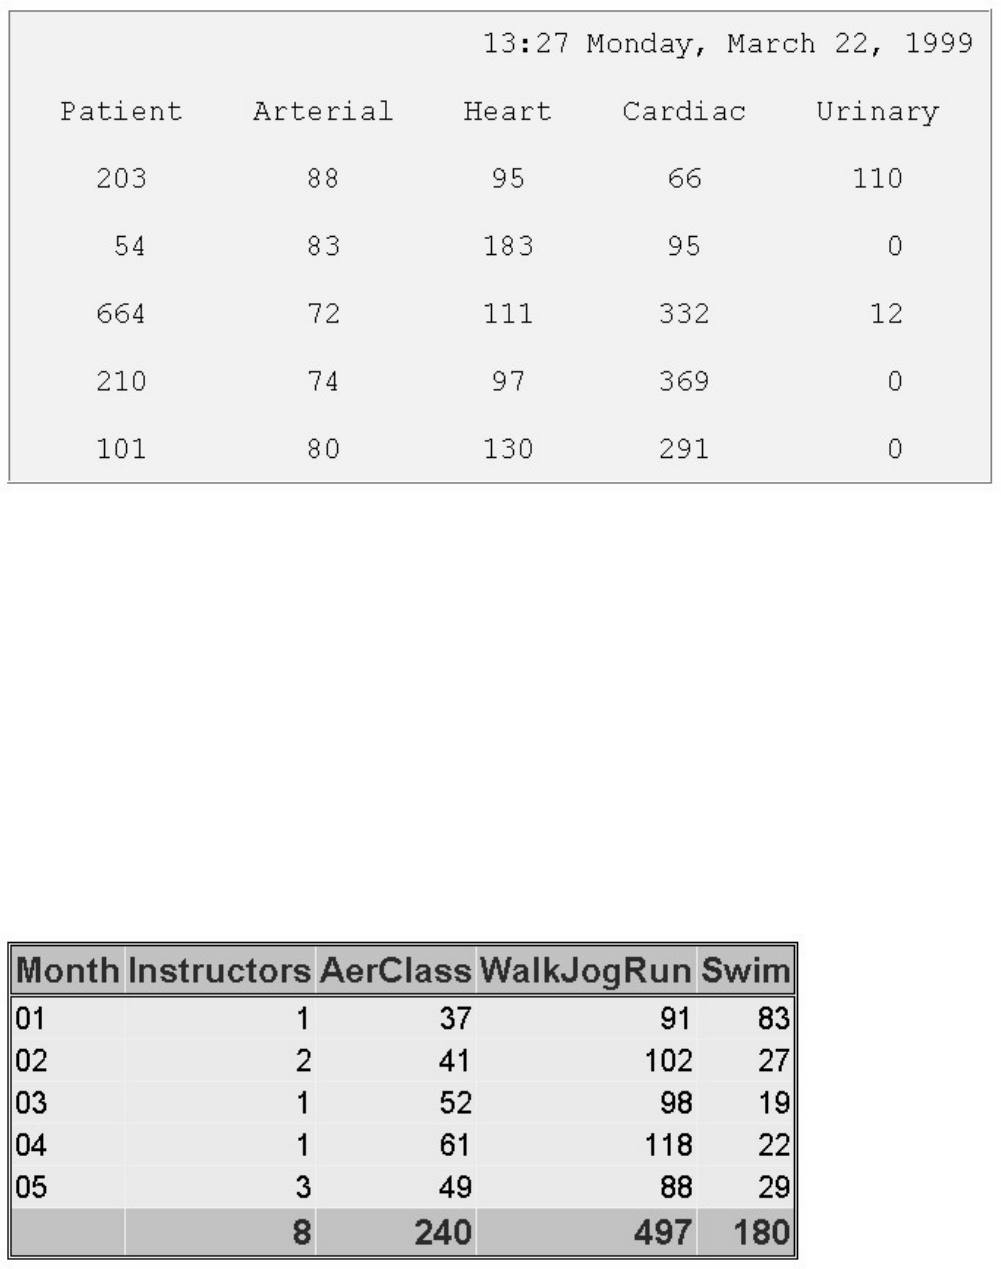
- 749 -
Correct answer: c
In a PROC SORT step, you specify the DATA= option to specify the data set to sort. The OUT= option specifies an output
data set. The required BY statement specifies the variable(s) to use in sorting the data.
Which options are used to create the following PROC PRINT output?
the DATE system option and the LABEL option in PROC PRINT
the DATE and NONUMBER system options and the DOUBLE and NOOBS options in PROC PRINT
the DATE and NONUMBER system options and the DOUBLE option in PROC PRINT
the DATE and NONUMBER system options and the NOOBS option in PROC PRINT
Correct answer: b
The DATE and NONUMBER system options cause the output to appear with the date but without page numbers. In the
PROC PRINT step, the DOUBLE option specifies double spacing, and the NOOBS option removes the default Obs
column.
Which of the following statements can you use in a PROC PRINT step to create this output?
- 750 -
var month instructors;
sum instructors aerclass walkjogrun swim;
var month;
sum instructors aerclass walkjogrun swim;
var month instructors aerclass;
sum instructors aerclass walkjogrun swim;
all of the above
Correct answer: d
You do not need to name the variables in a VAR statement if you specify them in the SUM statement, but you can. If you
choose not to name the variables in the VAR statement as well, then the SUM statement determines their order in the
output.
What happens if you submit the following program?
proc sort data=clinic.diabetes;
run;
proc print data=clinic.diabetes;
var age height weight pulse;
where sex='F';
run
The PROC PRINT step runs successfully, printing observations in their sorted order.
The PROC SORT step permanently sorts the input data set.
The PROC SORT step generates errors and stops processing, but the PROC PRINT step runs successfully, printing
observations in their original (unsorted) order.
The PROC SORT step runs successfully, but the PROC PRINT step generates errors and stops processing.
Correct answer: c
The BY statement is required in PROC SORT. Without it, the PROC SORT step fails. However, the PROC PRINT step
prints the original data set as requested.
If you submit the following program, which output does it create?
proc sort data=finance.loans out=work.loans;
by months amount;
run;
- 751 -
proc print data=work.loans noobs;
var months;
sum amount payment;
where months<360;
run;
- 752 -
Correct answer: a
Column totals appear at the end of the report in the same format as the values of the variables, so b is incorrect.
Work.Loans is sorted by Month and Amount, so c is incorrect. The program sums both Amount and Payment, so d is
incorrect.
Choose the statement below that selects rows in which
the amount is less than or equal to $5000
the account is 101-1092 or the rate equals 0.095.
where amount <= 5000 and
account='101-1092' or rate = 0.095;
where (amount le 5000 and account='101-1092')
or rate = 0.095;
where amount <= 5000 and
(account='101-1092' or rate eq 0.095);
where amount <= 5000 or account='101-1092'
and rate = 0.095;
Correct answer: c
To ensure that the compound expression is evaluated correctly, you can use parentheses to group
account='101-1092' or rate eq 0.095
- 753 -
For example, from the data set above, a and b above select observations 2 and 8 (those that have a rate of 0.095); c selects
no observations; and d selects observations 4 and 7 (those that have an amount less than or equal to 5000).
What does PROC PRINT display by default?
PROC PRINT does not create a default report; you must specify the rows and columns to be displayed.
PROC PRINT displays all observations and variables in the data set. If you want an additional column for observation
numbers, you can request it.
PROC PRINT displays columns in the following order: a column for observation numbers, all character variables, and all
numeric variables.
PROC PRINT displays all observations and variables in the data set, a column for observation numbers on the far left, and
variables in the order in which they occur in the data set.
Correct answer: d
You can remove the column for observation numbers. You can also specify the variables you want, and you can select
observations according to conditions.
Chapter 5: Creating SAS Data Sets from External Files
Which SAS statement associates the fileref Crime with the raw data file C:\States\Data\Crime.dat?
filename crime 'c:\states\data\crime.dat';
filename crime c:\states\data\crime.dat;
fileref crime 'c:\states\data\crime.dat';
filename 'c:\states\data\crime' crime.dat;
Correct answer: a
You assign a fileref by using a FILENAME statement in the same way that you assign a libref by using a LIBNAME
statement.
Filerefs remain in effect until . . .
you change them.
you cancel them.
you end your SAS session.
all of the above
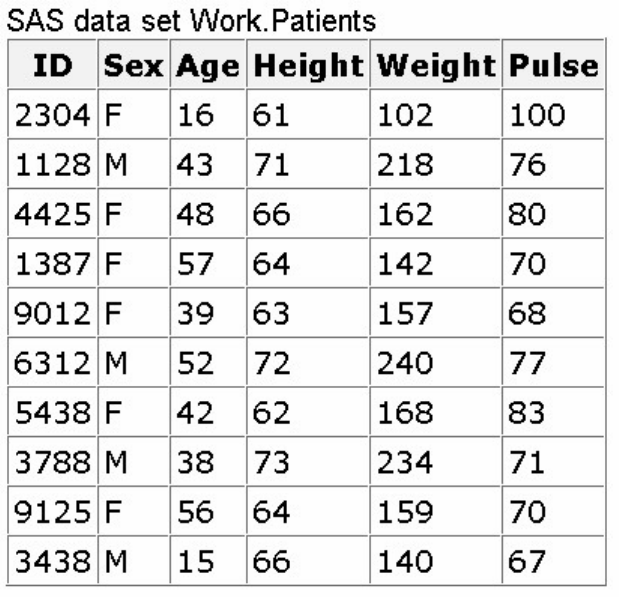
- 754 -
Correct answer: d
Like LIBNAME statements, FILENAME statements are global; they remain in effect until you change them, cancel them,
or end your SAS session.
Which statement identifies a raw data file to be read with the fileref Products and specifies that the DATA step read only
records 1-15?
infile products obs 15;
infile products obs=15;
input products obs=15;
input products 1-15;
Correct answer: b
You use an INFILE statement to specify the raw data file to be read. You can specify a fileref or an actual filename (in
quotation marks). The OBS= option in the INFILE statement enables you to process only records 1 through n.
Which of the following programs correctly writes the observations from the data set below to a raw data file?
- 755 -
data _null_;
set work.patients;
infile 'c:\clinic\patients\referals.dat';
input id 1-4 sex 6 age 8-9 height 11-12
weight 14-16 pulse 18-20;
run;
data referals.dat;
set work.patients;
input id 1-4 sex 6 age 8-9 height 11-12
weight 14-16 pulse 18-20;
run;
data _null_;
set work.patients;
file c:\clinic\patients\referals.dat;
put id 1-4 sex 6 age 8-9 height 11-12
weight 14-16 pulse 18-20;
run;
data _null_;
set work.patients;
file 'c:\clinic\patients\referals.dat';
put id 1-4 sex 6 age 8-9 height 11-12
weight 14-16 pulse 18-20;
run;
Correct answer: d
The keyword _NULL_ in the DATA statement enables you to use the power of the DATA step without actually creating a
SAS data set. You use FILE and PUT statements to write observations from a SAS data set to a raw data file. The FILE
statement specifies the raw data file and the PUT statement describes the lines to write to the raw data file. The filename
and location specified in the FILE statement must be enclosed in quotation marks.
Which raw data file can be read using column input?
- 756 -
all of the above.
Correct answer: b
Column input is appropriate only in some situations. When you use column input, your data must be standard character or
numeric values, and they must be in fixed fields. That is, values for a particular variable must be in the same location in
all records.
Which program creates the PROC PRINT output shown below?
data work.salesrep;
infile empdata;
input ID $ 1-4 LastName $ 6-12
FirstName $ 14-18 City $ 20-29;
run;
proc print data=work.salesrep;
run;
- 757 -
data work.salesrep;
infile empdata;
input ID $ 1-4 Name $ 6-12
FirstName $ 14-18 City $ 20-29;
run;
proc print data=work.salesrep;
run;
data work.salesrep;
infile empdata;
input ID $ 1-4 name1 $ 6-12
name2 $ 14-18 City $ 20-29;
run;
proc print data=work.salesrep;
run;
all of the above.
Correct answer: a
The INPUT statement creates a variable using the name that you assign to each field. Therefore, when you write an
INPUT statement, you need to specify the variable names exactly as you want them to appear in the SAS data set.
Which statement correctly reads the fields in the following order: StockNumber, Price, Item, Finish, Style?
> Field Name Start Column End Column Data Type
StockNumber 1 3 character
Finish 5 9 character
Style 11 18 character
Item 20 24 character
Price 27 32 numeric
input StockNumber $ 1-3 Finish $ 5-9 Style $ 11-18
Item $ 20-24 Price 27-32;
input StockNumber $ 1-3 Price 27-32
- 758 -
Item $ 20-24 Finish $ 5-9 Style $ 11-18;
input $ StockNumber 1-3 Price 27-32 $
Item 20-24 $ Finish 5-9 $ Style 11-18;
input StockNumber $ 1-3 Price $ 27-32
Item $ 20-24 Finish $ 5-9 Style $ 11-18;
Correct answer: b
You can use column input to read fields in any order. You must specify the variable name, identify character variables
with a $, and specify the correct starting and ending column for each field.
Which statement correctly re-defines the values of the variable Income as 100 percent higher?
income=income*1.00;
income=income+(income*2.00);
income=income*2;
income=*2;
Correct answer: c
To re-define the values of the variable Income in an assignment statement, you specify the variable name on the left side
of the equal sign and an appropriate expression including the variable name on the right side of the equal sign.
Which program correctly reads instream data?
data finance.newloan;
input datalines;
if country='JAPAN';
MonthAvg=amount/12;
1998 US CARS 194324.12
1998 US TRUCKS 142290.30
1998 CANADA CARS 10483.44
1998 CANADA TRUCKS 93543.64
1998 MEXICO CARS 22500.57
- 759 -
1998 MEXICO TRUCKS 10098.88
1998 JAPAN CARS 15066.43
1998 JAPAN TRUCKS 40700.34
;
data finance.newloan;
input Year 1-4 Country $ 6-11
Vehicle $ 13-18 Amount 20-28;
if country='JAPAN';
MonthAvg=amount/12;
datalines;
run;
data finance.newloan;
input Year 1-4 Country 6-11
Vehicle 13-18 Amount 20-28;
if country='JAPAN';
MonthAvg=amount/12;
datalines;
1998 US CARS 194324.12
1998 US TRUCKS 142290.30
1998 CANADA CARS 10483.44
1998 CANADA TRUCKS 93543.64
1998 MEXICO CARS 22500.57
1998 MEXICO TRUCKS 10098.88
1998 JAPAN CARS 15066.43
1998 JAPAN TRUCKS 40700.34
;
data finance.newloan;
input Year 1-4 Country $ 6-11
Vehicle $ 13-18 Amount 20-28;
if country='JAPAN';
MonthAvg=amount/12;
datalines;
1998 US CARS 194324.12
1998 US TRUCKS 142290.30
1998 CANADA CARS 10483.44
1998 CANADA TRUCKS 93543.64
1998 MEXICO CARS 22500.57
1998 MEXICO TRUCKS 10098.88
1998 JAPAN CARS 15066.43
1998 JAPAN TRUCKS 40700.34
- 760 -
;
Correct answer: d
To read instream data, you specify a DATALINES statement and data lines, followed by a null statement (single
semicolon) to indicate the end of the input data. Program a contains no DATALINES statement, and the INPUT statement
doesn't specify the fields to read. Program b contains no data lines, and the INPUT statement in program c doesn't specify
the necessary dollar signs for the character variables Country and Vehicle.
Which SAS statement subsets the raw data shown below so that only the observations in which Sex (in the second field) has a
value of F are processed?
if sex=f;
if sex=F;
if sex='F';
a or b
Correct answer: c
To subset data, you can use a subsetting IF statement in any DATA step to process only those observations that meet a
specified condition. Because Sex is a character variable, the value F must be enclosed in quotation marks and must be in
the same case as in the data set.
Chapter 6: Understanding DATA Step Processing
Which of the following is not created during the compilation phase?
the data set descriptor
- 761 -
the first observation
the program data vector
the _N_ and _ERROR_ automatic variables
Correct answer: b
During the compilation phase, the program data vector is created. The program data vector includes the two automatic
variables _N_ and _ERROR_. The descriptor portion of the new SAS data set is created at the end of the compilation
phase. The descriptor portion includes the name of the data set, the number of observations and variables, and the names
and attributes of the variables. Observations are not written until the execution phase.
During the compilation phase, SAS scans each statement in the DATA step, looking for syntax errors. Which of the following
is not considered a syntax error?
incorrect values and formats
invalid options or variable names
missing or invalid punctuation
missing or misspelled keywords
Correct answer: a
Syntax checking can detect many common errors, but it cannot verify the values of variables or the correctness of formats.
Unless otherwise directed, the DATA step executes...
once for each compilation phase.
once for each DATA step statement.
once for each record in the input file.
once for each variable in the input file.
Correct answer: c
The DATA step executes once for each record in the input file, unless otherwise directed.
At the beginning of the execution phase, the value of _N_ is 1, the value of _ERROR_ is 0, and the values of the remaining
variables are set to:
0
1
undefined
missing
Correct answer: d
The remaining variables are initialized to missing. Missing numeric values are represented by periods, and missing
- 762 -
character values are represented by blanks.
Suppose you run a program that causes three DATA errors. What is the value of the automatic variable _ERROR_ when the
observation that contains the third error is processed?
0
1
2
3
Correct answer: b
The default value of _ERROR_ is 0, which means there is no data error. When an error occurs, whether one error or
multiple errors, the value is set to 1.
Which of the following actions occurs at the beginning of an iteration of the DATA step?
The automatic variables _N_ and _ERROR_ are incremented by one.
The DATA step stops execution.
The descriptor portion of the data set is written.
The values of variables created in programming statements are re-set to missing in the program data vector.
Correct answer: d
By default, at the end of the DATA step, the values in the program data vector are written to the data set as an observation,
control returns to the top of the DATA step, the value of the automatic variable _N_ is incremented by one, and the values
of variables created in programming statements are reset to missing. The automatic variable _ERROR_ is reset to 0 if
necessary.
Based on the DATA step shown below, in what order will the variables be stored in the new data set?
data perm.update;
infile invent;
input IDnum $ Item $ 1-13 Instock 21-22
BackOrd 24-25;
Total=instock+backord;
run;
IDnum Item InStock BackOrd Total
Item IDnum InStock BackOrd Total
- 763 -
Total IDnum Item InStock BackOrd
Total Item IDnum InStock BackOrd
Correct answer: a
The order in which variables are defined in the DATA step determines the order in which the variables are stored in the
data set.
If SAS detects syntax errors, then...
data set variables will contain missing values.
the DATA step does not compile.
the DATA step still compiles, but it does not execute.
the DATA step still compiles and executes.
Correct answer: c
When SAS cannot detect syntax errors, the DATA step compiles, but it does not execute.
What is wrong with this program?
data perm.update;
infile invent
input Item $ 1-13 IDnum $ 15-19 Instock 21-22
BackOrd 24-25;
total=instock+backord;
run;
missing semicolon on second line
missing semicolon on third line
incorrect order of variables
incorrect variable type
Correct answer: a
A semicolon is missing from the second line. It will cause an error because the INPUT statement will be interpreted as
invalid INFILE statement options.
Look carefully at this section of a SAS session log. Based on the note, what was the most likely problem with the DATA step?
- 764 -
A keyword was misspelled in the DATA step.
A semicolon was missing from the INFILE statement.
A variable was misspelled in the INPUT statement.
A dollar sign was missing in the INPUT statement.
Correct answer: d
The third line of the log displays the value for IDnum, which is clearly a character value. The fourth line displays the
values in the program data vector and shows a period, the symbol for a missing numeric value, for IDnum, the other
values are correctly assigned. Thus, it appears that numeric values were expected for IDnum. A dollar sign, to indicate
character values, is missing from the INPUT statement.
Chapter 7: Creating and Applying User-Defined Formats
If you don't specify the LIBRARY= option on the PROC FORMAT statement, your formats are stored in Work.Formats, and
they exist ...
only for the current procedure.
only for the current DATA step.
only for the current SAS session.
permanently.
Correct answer: c
If you do not specify the LIBRARY= option, formats are stored in a default format catalog named Work.Formats. As the
libref Work implies, any format that is stored in Work.Formats is a temporary format that exists only for the current SAS
session.
Which of the following statements will store your formats in a permanent catalog?
libname library 'c:\sas\formats\lib';
proc format lib=library
...;
libname library 'c:\sas\formats\lib';
format lib=library
- 765 -
...;
library='c:\sas\formats\lib';
proc format library
...;
library='c:\sas\formats\lib';
proc library
...;
Correct answer: a
To store formats in a permanent catalog, you first write a LIBNAME statement to associate the libref with the SAS data
library in which the catalog will be stored. Then add the LIB= (or LIBRARY=) option to the PROC FORMAT statement,
specifying the name of the catalog.
When creating a format with the VALUE statement, the new format's name
cannot end with a number
cannot end with a period
cannot be the name of a SAS format, and...
cannot be the name of a data set variable.
must be at least two characters long.
must be at least eight characters long.
must begin with a dollar sign ($) if used with a character variable.
Correct answer: d
The name of a format that is created with a VALUE statement must begin with a dollar sign ($) if it applies to a character
variable.
Which of the following FORMAT procedures is written correctly?
proc format lib=library
value colorfmt;
1='Red'
2='Green'
3='Blue'
run;
- 766 -
proc format lib=library;
value colorfmt
1='Red'
2='Green'
3='Blue';
run;
proc format lib=library;
value colorfmt;
1='Red'
2='Green'
3='Blue'
run;
proc format lib=library;
value colorfmt
1='Red';
2='Green';
3='Blue';
run;
Correct answer: b
A semicolon is needed after the PROC FORMAT statement. The VALUE statement begins with the keyword VALUE and
ends with a semicolon after all the labels have been defined.
Which of these is false? Ranges in the VALUE statement can specify...
a single value, such as 24 or 'S'.
a range of numeric values, such as 0-1500.
a range of character values, such as 'A'-'M'.
a list of numeric and character values separated by commas, such as 90,'B',180,'D',270.
Correct answer: d
You can list values separated by commas, but the list must contain either all numeric values or all character values. Data
set variables are either numeric or character.
How many characters can be used in a label?
40
96
- 767 -
200
256
Correct answer: d
When specifying a label, enclose it in quotation marks and limit the label to 256 characters.
Which keyword can be used to label missing numeric values as well as any values that are not specified in a range?
LOW
MISS
MISSING
OTHER
Correct answer: d
MISS and MISSING are invalid keywords, and LOW does not include missing numeric values. The keyword OTHER can
be used in the VALUE statement to label missing values as well as any values that are not specifically included in a range.
You can place the FORMAT statement in either a DATA step or a PROC step. What happens when you place it in a DATA
step?
You temporarily associate the formats with variables.
You permanently associate the formats with variables.
You replace the original data with the format labels.
You make the formats available to other data sets.
Correct answer: b
By placing the FORMAT statement in a DATA step, you permanently associate the defined format with variables.
The format JOBFMT was created in a FORMAT procedure. Which FORMAT statement will apply it to the variable JobTitle
in the program output?
format jobtitle jobfmt;
format jobtitle jobfmt.;
format jobtitle=jobfmt;
format jobtitle='jobfmt';
- 768 -
Correct answer: b
To associate a user-defined format with a variable, place a period at the end of the format name when it is used in the
FORMAT statement.
Which keyword, when added to the PROC FORMAT statement, will display all the formats in your catalog?
CATALOG
LISTFMT
FMTCAT
FMTLIB
Correct answer: d
Adding the keyword FMTLIB to the PROC FORMAT statement displays a list of all the formats in your catalog, along
with descriptions of their values.
Chapter 8: Producing Descriptive Statistics
The default statistics produced by the MEANS procedure are n, mean, minimum, maximum, and...
median
range
standard deviation
standard error of the mean.
Correct answer: c
By default, the MEANS procedure produces the n, mean, minimum, maximum, and standard deviation.
Which statement will limit a PROC MEANS analysis to the variables Boarded, Transfer, and Deplane?
by boarded transfer deplane;
class boarded transfer deplane;
output boarded transfer deplane;
var boarded transfer deplane;
Correct answer: d
- 769 -
To specify the variables that PROC MEANS analyzes, add a VAR statement and list the variable names.
The data set Survey.Health includes the following variables. Which is a poor candidate for PROC MEANS analysis?
IDnum
Age
Height
Weight
Correct answer: a
Unlike Age, Height, or Weight, the values of IDnum are unlikely to yield any useful statistics.
Which of the following statements is true regarding BY group processing?
BY variables must be either indexed or sorted.
Summary statistics are computed for BY variables.
BY group processing is preferred when you are categorizing data that contains few variables.
BY group processing overwrites your data set with the newly grouped observations.
Correct answer: a
Unlike CLASS processing, BY group processing requires that your data already be indexed or sorted in the order of the
BY variables. You might need to run the SORT procedure before using PROC MEANS with a BY group.
Which group processing statement produced the PROC MEANS output shown below?
- 770 -
class sex survive;
class survive sex;
by sex survive;
by survive sex;
Correct answer: b
A CLASS statement produces a single large table, whereas BY group processing creates a series of small tables. The order
of the variables in the CLASS statement determines their order in the output table.
Which program can be used to create the following output?
- 771 -
proc means data=clinic.diabetes;
var age height weight;
class sex;
output out=work.sum_gender
mean=AvgAge AvgHeight AvgWeight;
run;
proc summary data=clinic.diabetes print;
var age height weight; class sex;
output out=work.sum_gender
mean=AvgAge AvgHeight AvgWeight;
run;
proc means data=clinic.diabetes noprint;
var age height weight;
class sex;
output out=work.sum_gender
mean=AvgAge AvgHeight AvgWeight;
run;
Both a and b.
Correct answer: d
You can use either PROC MEANS or PROC SUMMARY to create the table. Adding a PRINT option to the PROC
SUMMARY statement produces the same report as if you used PROC MEANS.
By default, PROC FREQ creates a table of frequencies and percentages for which data set variables?
character variables
numeric variables
both character and numeric variables
none: variables must always be specified

- 772 -
Correct answer: c
By default, PROC FREQ creates a table for all variables in a data set.
Frequency distributions work best with variables that contain
continuous values.
numeric values.
categorical values.
unique values.
Correct answer: c
Both continuous values and unique values can result in lengthy, meaningless tables. Frequency distributions work best
with categorical values.
Which PROC FREQ step produced this two-way table?
proc freq data=clinic.diabetes;
tables height weight;
format height htfmt. weight wtfmt.;
run;
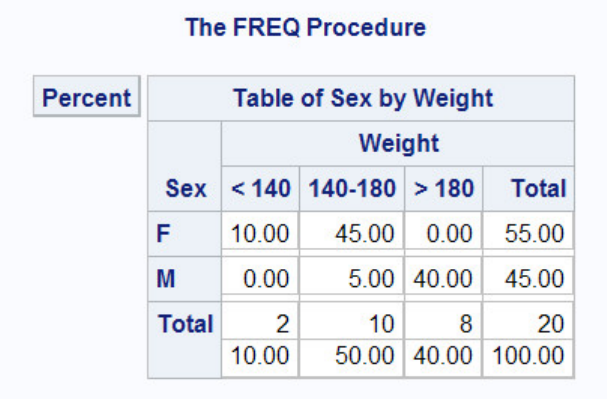
- 773 -
proc freq data=clinic.diabetes;
tables weight height;
format weight wtfmt. height htfmt.;
run;
proc freq data=clinic.diabetes;
tables height*weight;
format height htfmt. weight wtfmt.;
run;
proc freq data=clinic.diabetes;
tables weight*height;
format weight wtfmt. height htfmt.;
run;
Correct answer: d
An asterisk is used to join the variables in a two-way TABLES statement. The first variable forms the table rows. The
second variable forms the table columns.
Which PROC FREQ step produced this table?
proc freq data=clinic.diabetes;
tables sex weight / list;
format weight wtfmt.;
run;
proc freq data=clinic.diabetes;
- 774 -
tables sex*weight / nocol;
format weight wtfmt.;
run;
proc freq data=clinic.diabetes;
tables sex weight / norow nocol;
format weight wtfmt.;
run;
proc freq data=clinic.diabetes;
tables sex*weight / nofreq norow nocol;
format weight wtfmt.;
run;
Correct answer: d
An asterisk is used to join the variables in crosstabulation tables. The only results shown in this table are cell percentages.
The NOFREQ option suppresses cell frequencies, the NOROW option suppresses row percentages, and the NOCOL
option suppresses column percentages.
Chapter 9: Producing HTML Output
Using ODS statements, how many types of output can you generate at once?
1 (only HTML output)
2
3
as many as you want
Correct answer: d
You can generate any number of output types as long as you open the ODS destination for each type of output you want to
create.
If ODS is set to its default settings in the SAS windowing environment for Microsoft Windows and UNIX, , what types of
output are created by the code below?
ods html file='c:\myhtml.htm';
ods pdf file='c:\mypdf.pdf';
HTML and PDF
PDF only
- 775 -
HTML, PDF, and listing
No output is created because ODS is closed by default.
Correct answer: b
HTML output is created by default in the SAS windowing environment for Microsoft Windows and UNIX, so these
statements create HTML and PDF output.
In the SAS windowing environment for Microsoft Windows and UNIX, what is the purpose of closing the HTML destination
in the code shown below?
ods html close;
ods rtf ... ;
It conserves system resources.
It simplifies your program.
It makes your program compatible with other hardware platforms.
It makes your program compatible with previous versions of SAS.
Correct answer: a
By default, in the SAS windowing environment for Microsoft Windows and UNIX, SAS programs produce HTML output.
If you want only RTF output, it's a good idea to close the HTML destination before creating RTF output, as an open
destination uses system resources.
When the code shown below is run, what will the file D:\Output\body.html contain?
ods html body='d:\output\body.html';
proc print data=work.alpha;
run;
proc print data=work.beta;
run;
ods html close;
The PROC PRINT output for Work.Alpha.
The PROC PRINT output for Work.Beta.
The PROC PRINT output for both Work.Alpha and Work.Beta.
Nothing. No output will be written to D:\Output\body.html.
Correct answer: c
When multiple procedures are run while HTML output is open, procedure output is appended to the same body file.
When the code shown below is run, what file will be referenced by the links in D:\Output\contents.html?
- 776 -
ods html body='d:\output\body.html'
contents='d:\output\contents.html'
frame='d:\output\frame.html';
D:\Output\body.html
D:\Output\contents.html
D:\Output\frame.html
There are no links from the file D:\Output\contents.html.
Correct answer: a
The CONTENTS= option creates a table of contents containing links to the body file, D:\Output\body.html.
The table of contents created by the CONTENTS= option contains a numbered heading for
each procedure.
each procedure that creates output.
each procedure and DATA step.
each HTML file created by your program.
Correct answer: b
The table of contents contains a numbered heading for each procedure that creates output.
When the code shown below is run, what will the file D:\Output\frame.html display?
ods html body='d:\output\body.html'
contents='d:\output\contents.html'
frame='d:\output\frame.html';
The file D:\Output\contents.html.
The file D:\Output\frame.html.
The files D:\Output\contents.html and D:\Output\body.html.
It displays no other files.
Correct answer: c
The FRAME= option creates an HTML file that integrates the table of contents and the body file.
What is the purpose of the URL= suboptions shown below?

- 777 -
ods html body='d:\output\body.html' (url='body.html')
contents='d:\output\contents.html'
(url='contents.html')
frame='d:\output\frame.html';
To create absolute link addresses for loading the files from a server.
To create relative link addresses for loading the files from a server.
To allow HTML files to be loaded from a local drive.
To send HTML output to two locations.
Correct answer: b
Specifying the URL= suboption in the file specification provides a URL that ODS uses in the links it creates. Specifying a
simple (one name) URL creates a relative link address to the file.
Which ODS HTML option was used in creating the following table?
format=brown
format='brown'
style=brown
style='brown'
Correct answer: c
You can change the appearance of HTML output by using the STYLE= option in the ODS HTML statement. The style
name doesn't need quotation marks.
What is the purpose of the PATH= option?
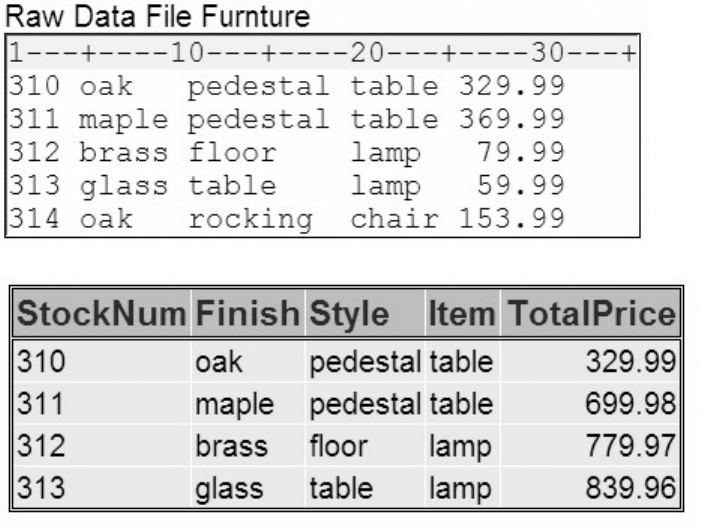
- 778 -
ods html path='d:\output' (url=none)
body='body.html'
contents='contents.html'
frame='frame.html';
It creates absolute link addresses for loading HTML files from a server.
It creates relative link addresses for loading HTML files from a server.
It allows HTML files to be loaded from a local drive.
It specifies the location of HTML file output.
Correct answer: d
You use the PATH= option to specify the location for HTML files to be stored. When you use the PATH= option, you don't
need to specify the full path name for the body, contents, or frame files.
Chapter 10: Creating and Managing Variables
Which program creates the output shown below?
data test2;
infile furnture;
input StockNum $ 1-3 Finish $ 5-9 Style $ 11-18
Item $ 20-24 Price 26-31;
if finish='oak' then delete;
retain TotPrice 100;
totalprice+price;
drop price;
- 779 -
run;
proc print data=test2 noobs;
run;
data test2;
infile furnture;
input StockNum $ 1-3 Finish $ 5-9 Style $ 11-18
Item $ 20-24 Price 26-31;
if finish='oak' and price<200 then delete;
TotalPrice+price;
run;
proc print data=test2 noobs;
run;
data test2(drop=price);
infile furnture;
input StockNum $ 1-3 Finish $ 5-9 Style $ 11-18
Item $ 20-24 Price 26-31;
if finish='oak' and price<200 then delete;
TotalPrice+price;
run;
proc print data=test2 noobs;
run;
data test2;
infile furnture;
input StockNum $ 1-3 Finish $ 5-9 Style $ 11-18
Item $ 20-24 Price 26-31;
if finish=oak and price<200 then delete price;
TotalPrice+price;
run;
proc print data=test2 noobs;
run;
Correct answer: c
Program c correctly deletes the observation in which the value of Finish is oak and the value of Price is less than 200. It
also creates TotalPrice by summing the variable Price down observations, and then drops Price by using the DROP= data
set option in the DATA statement.
How is the variable Amount labeled and formatted in the PROC PRINT output?
data credit;
- 780 -
infile creddata;
input Account $ 1-5 Name $ 7-25 Type $ 27
Transact $ 29-35 Amount 37-50;
label amount='Amount of Loan';
format amount dollar12.2;
run;
proc print data=credit label;
label amount='Total Amount Loaned';
format amount comma10.;
run;
label Amount of Loan, format DOLLAR12.2
label Total Amount Loaned, format COMMA10.
label Amount, default format
The PROC PRINT step does not execute because two labels and two formats are assigned to the same variable.
Correct answer: b
The PROC PRINT output displays the label Total Amount Loaned for the variable Amount and formats this variable using
the COMMA10. format. Temporary labels or formats that are assigned in a PROC step override permanent labels or
formats that are assigned in a DATA step.
Consider the IF-THEN statement shown below. When the statement is executed, which expression is evaluated first?
if finlexam>=95
and (research='A' or
(project='A' and present='A'))
then Grade='A+';
finlexam>=95
research='A'
project='A' and present='A'
research='A' or
(project='A' and present='A')
Correct answer: c

- 781 -
Logical comparisons that are enclosed in parentheses are evaluated as true or false before they are compared to other
expressions. In the example above, the AND comparison within the nested parentheses is evaluated before being
compared to the OR comparison.
Consider the small raw data file and program shown below. What is the value of Count after the fourth record is processed?
data work.newnums;
infile numbers;
input Tens 2-3;
Count+tens;
run;
missing
0
30
70
Correct answer: d
The sum statement adds the result of the expression that is on the right side of the plus sign to the numeric variable that is
on the left side. The new value is then retained for subsequent observations. The sum statement ignores the missing value,
so the value of Count in the fourth observation would be 10+20+0+40, or 70.
Now consider the revised program below. What is the value of Count after the third observation is read?
data work.newnums;
infile numbers;
input Tens 2-3;
retain Count 100;
count+tens;
run;
- 782 -
missing
0
100
130
Correct answer: d
The RETAIN statement assigns an initial value of 100 to the variable Count, so the value of Count in the third
observation would be 100+10+20+0, or 130.
For the observation shown below, what is the result of the IF-THEN statements?
Status Type Count Action Control
Ok 3 12 E Go
if status='OK' and type=3
then Count+1;
if status='S' or action='E'
then Control='Stop';
Count = 12 Control = Go
Count = 13 Control = Stop
Count = 12 Control = Stop
Count = 13 Control = Go
Correct answer: c
You must enclose character values in quotation marks, and you must specify them in the same case in which they appear
- 783 -
in the data set. The value Ok is not identical to OK, so the value of Count is not changed by the IF-THEN statement.
Which of the following can determine the length of a new variable?
the length of the variable's first reference in the DATA step
the assignment statement
the LENGTH statement
all of the above
Correct answer: d
The length of a variable is determined by its first reference in the DATA step. When creating a new character variable,
SAS allocates as many bytes of storage space as there are characters in the reference to that variable. The first reference to
a new variable can also be made with a LENGTH statement or an assignment statement.
Which set of statements is equivalent to the code shown below?
if code='1' then Type='Fixed';
if code='2' then Type='Variable';
if code^='1' and code^='2' then Type='Unknown';
if code='1' then Type='Fixed';
else if code='2' then Type='Variable';
else Type='Unknown';
if code='1' then Type='Fixed';
if code='2' then Type='Variable';
else Type='Unknown';
if code='1' then type='Fixed';
else code='2' and type='Variable';
else type='Unknown';
if code='1' and type='Fixed';
then code='2' and type='Variable';
else type='Unknown';
Correct answer: a
You can write multiple ELSE statements to specify a series of mutually exclusive conditions. The ELSE statement must
immediately follow the IF-THEN statement in your program. An ELSE statement executes only if the previous
- 784 -
IF-THEN/ELSE statement is false.
What is the length of the variable Type, as created in the DATA step below?
data finance.newloan;
set finance.records;
TotLoan+payment;
if code='1' then Type='Fixed';
else Type='Variable';
length type $ 10;
run;
5
8
10
it depends on the first value of Type
Correct answer: a
The length of a new variable is determined by the first reference in the DATA step, not by data values. In this case, the
length of Type is determined by the value Fixed. The LENGTH statement is in the wrong place; it must occur before any
other reference to the variable in the DATA step.
Which program contains an error?
data clinic.stress(drop=timemin timesec);
infile tests;
input ID $ 1-4 Name $ 6-25 RestHR 27-29 MaxHR 31-33
RecHR 35-37 TimeMin 39-40 TimeSec 42-43
Tolerance $ 45;
TotalTime=(timemin*60)+timesec;
SumSec+totaltime;
run;
proc print data=clinic.stress;
label totaltime='Total Duration of Test';
format timemin 5.2;
drop sumsec;
run;
proc print data=clinic.stress(keep=totaltime timemin);
label totaltime='Total Duration of Test';
- 785 -
format timemin 5.2;
run;
data clinic.stress;
infile tests;
input ID $ 1-4 Name $ 6-25 RestHR 27-29 MaxHR 31-33
RecHR 35-37 TimeMin 39-40 TimeSec 42-43
Tolerance $ 45;
TotalTime=(timemin*60)+timesec;
keep id totaltime tolerance;
run;
Correct answer: b
To select variables, you can use a DROP or KEEP statement in any DATA step. You can also use the DROP= or KEEP=
data set options following a data set name in any DATA or PROC step. However, you cannot use DROP or KEEP
statements in PROC steps.
Chapter 11: Reading SAS Data Sets
If you submit the following program, which variables appear in the new data set?
data work.cardiac(drop=age group);
set clinic.fitness(keep=age weight group);
if group=2 and age>40;
run;
none
Weight
Age, Group
Age, Weight, Group
Correct answer: b
The variables Age, Weight, and Group are specified using the KEEP= option in the SET statement. After processing, Age
and Group are dropped in the DATA statement.
Which of the following programs correctly reads the data set Orders and creates the data set FastOrdr?
data catalog.fastordr(drop=ordrtime);
set july.orders(keep=product units price);
if ordrtime<4;
Total=units*price;
run;
- 786 -
data catalog.orders(drop=ordrtime);
set july.fastordr(keep=product units price);
if ordrtime<4;
Total=units*price;
run;
data catalog.fastordr(drop=ordrtime);
set july.orders(keep=product units price
ordrtime);
if ordrtime<4;
Total=units*price;
run;
none of the above
Correct answer: c
You specify the data set to be created in the DATA statement. The DROP= data set option prevents variables from being
written to the data set. Because you use the variable OrdrTime when processing your data, you cannot drop OrdrTime in
the SET statement. If you use the KEEP= option in the SET statement, then you must list OrdrTime as one of the variables
to be kept.
Which of the following statements is false about BY-group processing?
When you use the BY statement with the SET statement:
The data sets listed in the SET statement must be indexed or sorted by the values of the BY variable(s).
The DATA step automatically creates two variables, FIRST. and LAST., for each variable in the BY statement.
FIRST. and LAST. identify the first and last observation in each BY group, respectively.
FIRST. and LAST. are stored in the data set.
Correct answer: d
When you use the BY statement with the SET statement, the DATA step creates the temporary variables FIRST. and LAST.
They are not stored in the data set.
There are 500 observations in the data set Usa. What is the result of submitting the following program?
data work.getobs5;
obsnum=5;
set company.usa(keep=manager payroll) point=obsnum;
stop;
run;
- 787 -
an error
an empty data set
continuous loop
a data set that contains one observation
Correct answer: b
The DATA step outputs observations at the end of the DATA step. However, in this program, the STOP statement stops
processing before the end of the DATA step. An explicit OUTPUT statement is needed in order to produce an observation.
There is no end-of-file condition when you use direct access to read data, so how can your program prevent a continuous
loop?
Do not use a POINT= variable.
Check for an invalid value of the POINT= variable.
Do not use an END= variable.
Include an OUTPUT statement.
Correct answer: b
To avoid a continuous loop when using direct access, either include a STOP statement or use programming logic that
executes a STOP statement when the data step encounters an invalid value of the POINT= variable. If SAS reads an
invalid value of the POINT= variable, it sets the automatic variable _ERROR_ to 1. You can use this information to check
for conditions that cause continuous looping.
Assuming that the data set Company.USA has five or more observations, what is the result of submitting the following
program?
data work.getobs5;
obsnum=5;
set company.usa(keep=manager payroll) point=obsnum;
output;
stop;
run;
an error
an empty data set
a continuous loop
a data set that contains one observation
Correct answer: d
By combining the POINT= option with the OUTPUT and STOP statements, your program can output a single
observation.
- 788 -
Which of the following statements is true regarding direct access of data sets?
You cannot specify END= with POINT=.
You cannot specify OUTPUT with POINT=.
You cannot specify STOP with END=.
You cannot specify FIRST. with LAST.
Correct answer: a
The END= option and POINT= option are incompatible in the same SET statement. Use one or the other in your program.
What is the result of submitting the following program?
data work.addtoend;
set clinic.stress2 end=last;
if last;
run;
an error
an empty data set
a continuous loop
a data set that contains one observation
Correct answer: d
This program uses the END= option to name a temporary variable that contains an end-of-file marker. That variable —
last — is set to 1 when the SET statement reads the last observation of the data set.
At the start of DATA step processing, during the compilation phase, variables are created in the program data vector (PDV),
and observations are set to:
blank
missing
0
there are no observations.
Correct answer: d
At the bottom of the DATA step, the compilation phase is complete, and the descriptor portion of the new SAS data set is
created. There are no observations because the DATA step has not yet executed.
The DATA step executes:
continuously if you use the POINT= option and the STOP statement.

- 789 -
once for each variable in the output data set.
once for each observation in the input data set.
until it encounters an OUTPUT statement.
Correct answer: c
The DATA step executes once for each observation in the input data set. You use the POINT= option with the STOP
statement to prevent continuous looping.
Chapter 12: Combining SAS Data Sets
Which program will combine Brothers.One and Brothers.Two to produce Brothers.Three?
data brothers.three;
set brothers.one;
set brothers.two;
run;
data brothers.three;
set brothers.one brothers.two;
run;
data brothers.three;
set brothers.one brothers.two;
by varx;
run;
data brothers.three;
merge brothers.one brothers.two;
by varx;
run;
Correct answer: a
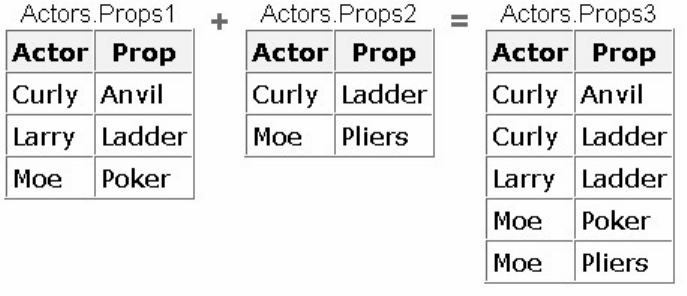
- 790 -
This example is a case of one-to-one matching, which requires multiple SET statements. Where same-named variables
occur, values that are read from the second data set replace those read from the first data set. Also, the number of
observations in the new data set is the number of observations in the smallest original data set.
Which program will combine Actors.Props1 and Actors.Props2 to produce Actors.Props3?
data actors.props3;
set actors.props1;
set actors.props2;
run;
data actors.props3;
set actors.props1 actors.props2;
run;
data actors.props3;
set actors.props1 actors.props2;
by actor;
run;
data actors.props3;
merge actors.props1 actors.props2;
by actor;
run;
Correct answer: c
This is a case of interleaving, which requires a list of data set names in the SET statement and one or more BY variables in
the BY statement. Notice that observations in each BY group are read sequentially, in the order in which the data sets and
BY variables are listed. The new data set contains all the variables from all the input data sets, as well as the total number
of records from all input data sets.
If you submit the following program, which new data set is created?
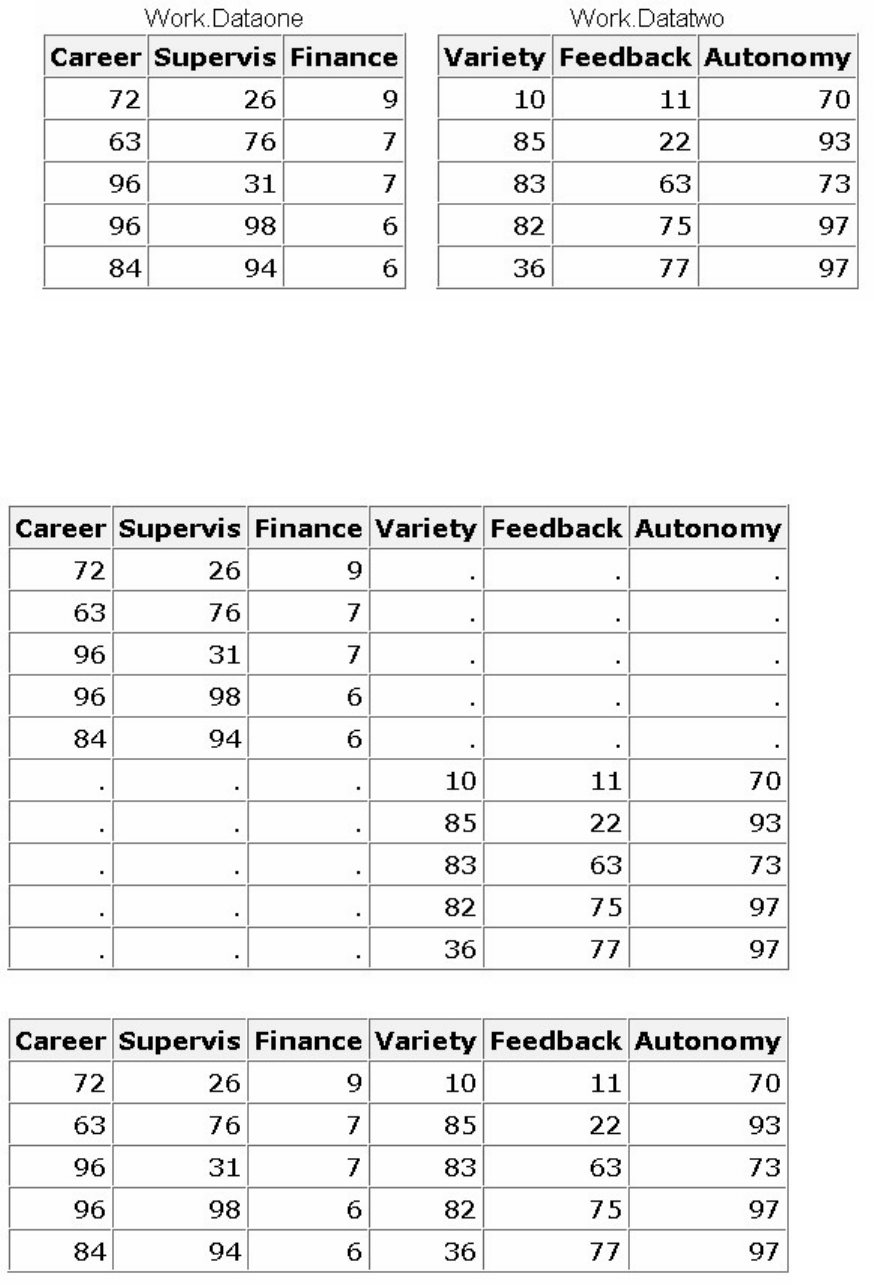
- 791 -
data work.jobsatis;
set work.dataone work.datatwo;
run;
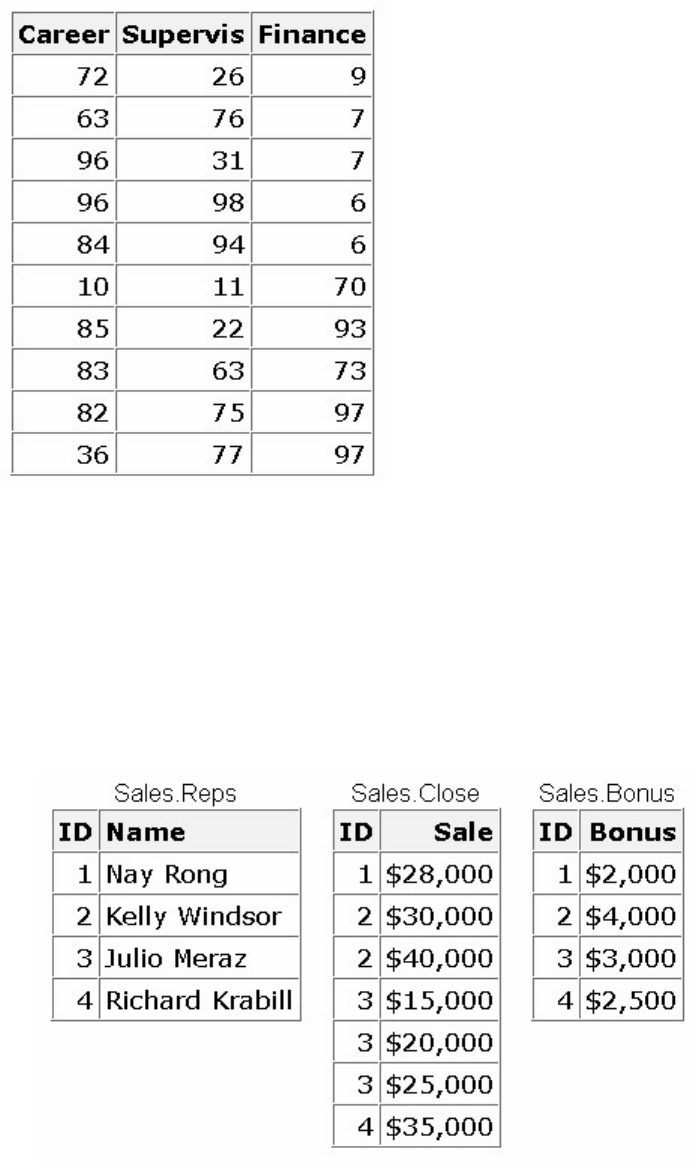
- 792 -
none of the above
Correct answer: a
Concatenating appends the observations from one data set to another data set. The new data set contains the total number
of records from all input data sets, so b is incorrect. All the variables from all the input data sets appear in the new data set,
so c is incorrect.
If you concatenate the data sets below in the order shown, what is the value of Sale in observation 2 of the new data set?
missing
$30,000
$40,000
you cannot concatenate these data sets
Correct answer: a
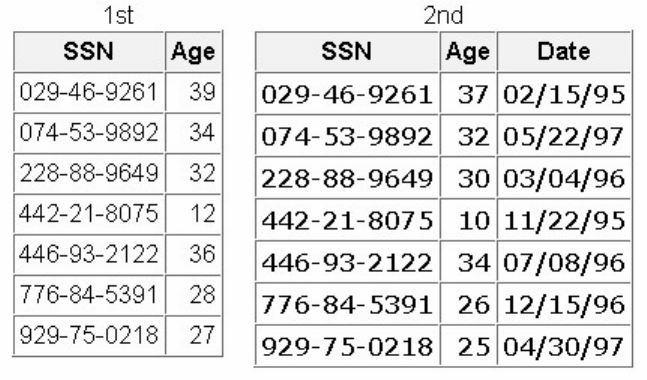
- 793 -
The concatenated data sets are read sequentially, in the order in which they are listed in the SET statement. The second
observation in Sales.Reps does not contain a value for Sale, so a missing value appears for this variable. (Note that if you
merge the data sets, the value of Sale for the second observation is $30,000.)
What happens if you merge the following data sets by the variable SSN?
The values of Age in the 1st data set overwrite the values of Age in the 2nd data set.
The values of Age in the 2nd data set overwrite the values of Age in the 1st data set.
The DATA step fails because the two data sets contain same-named variables that have different values.
The values of Age in the 2nd data set are set to missing.
Correct answer: b
If you have variables with the same name in more than one input data set, values of the same-named variable in the first
data set in which it appears are overwritten by values of the same-named variable in subsequent data sets.
Suppose you merge data sets Health.Set1 and Health.Set2 below:

- 794 -
Which output does the following program create?
data work.merged;
merge health.set1(in=in1) health.set2(in=in2);
by id;
if in1 and in2;
run;
proc print data=work.merged;
run;

- 795 -
none of the above
Correct answer: c
The DATA step uses the IN= data set option and the subsetting IF statement to exclude unmatched observations from the
output data set. So a and b, which contain unmatched observations, are incorrect.
The data sets Ensemble.Spring and Ensemble.Summer both contain a variable named Blue. How do you prevent the values of
the variable Blue from being overwritten when you merge the two data sets?
data ensemble.merged;
merge ensemble.spring(in=blue)
ensemble.summer;
by fabric;
run;

- 796 -
data ensemble.merged;
merge ensemble.spring(out=blue)
ensemble.summer;
by fabric;
run;
data ensemble.merged;
merge ensemble.spring(blue=navy)
ensemble.summer;
by fabric;
run;
data ensemble.merged;
merge ensemble.spring(rename=(blue=navy))
ensemble.summer;
by fabric;
run;
Correct answer: d
Match-merging overwrites same-named variables in the first data set with same-named variables in subsequent data sets.
To prevent overwriting, rename variables by using the RENAME= data set option in the MERGE statement.
What happens if you submit the following program to merge Blood.Donors1 and Blood.Donors2, shown below?
data work.merged;
merge blood.donors1 blood.donors2;
by id;
run
The Merged data set contains some missing values because not all observations have matching observations in the other data
set.
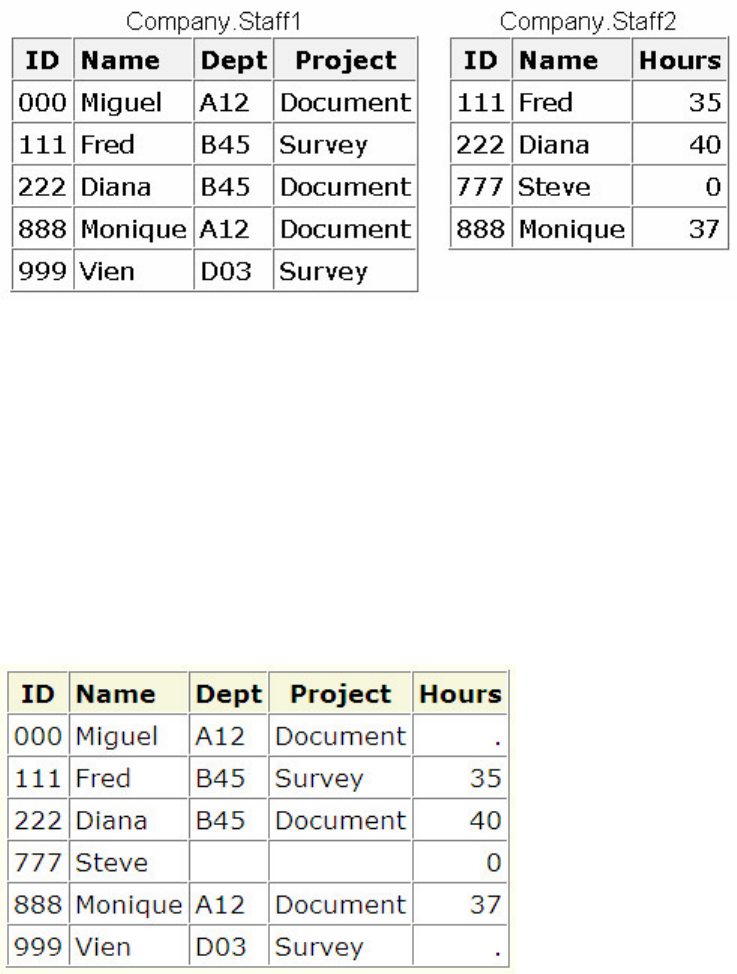
- 797 -
The Merged data set contains eight observations.
The DATA step produces errors.
Values for Units in Blood.Donors2 overwrite values of Units in Blood.Donors1.
Correct answer: c
The two input data sets are not sorted by values of the BY variable, so the DATA step produces errors and stops
processing.
If you merge Company.Staff1 and Company.Staff2 below by ID, how many observations does the new data set contain?
4
5
6
9
Correct answer: c
In this example, the new data set contains one observation for each unique value of ID. The merged data set is shown
below.
If you merge data sets Sales.Reps, Sales.Close, and Sales.Bonus by ID, what is the value of Bonus in the third observation in
the new data set?
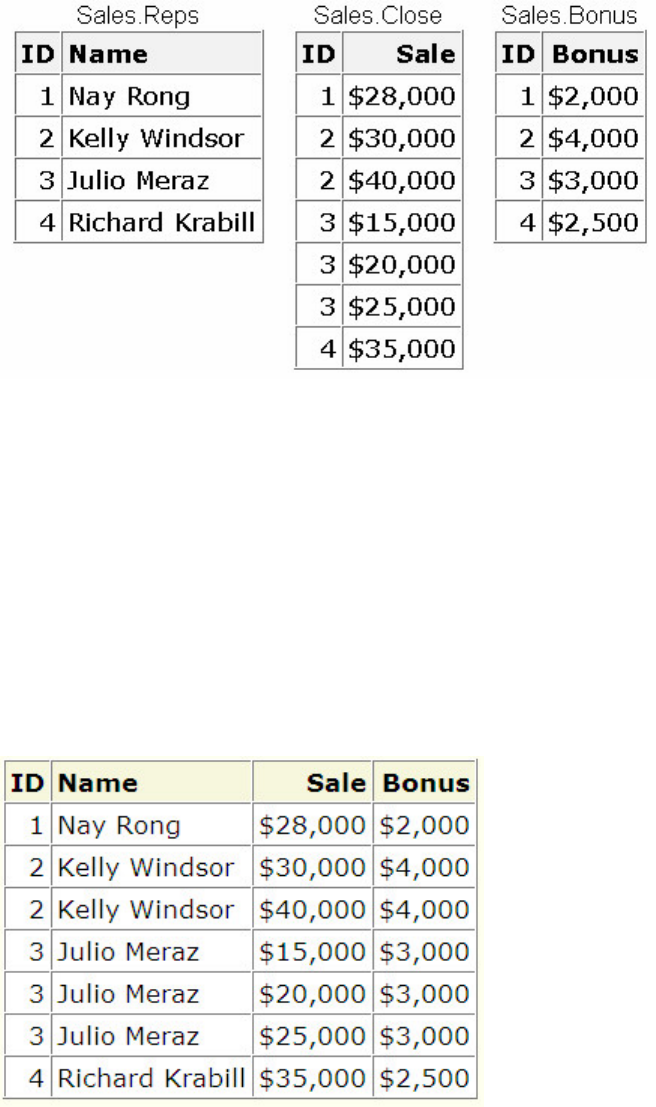
- 798 -
$4,000
$3,000
missing
can't tell from the information given
Correct answer: a
In the new data set, the third observation is the second observation for ID number 2 (Kelly Windsor). The value for Bonus
is retained from the previous observation because the BY variable value didn't change. The new data set is shown below.
Chapter 13: Transforming Data with SAS Functions
Which function calculates the average of the variables Var1, Var2, Var3, and Var4?
mean(var1,var4)
mean(var1-var4)
- 799 -
mean(of var1,var4)
mean(of var1-var4)
Correct answer: d
Use a variable list to specify a range of variables as the function argument. When specifying a variable list, be sure to
precede the list with the word OF. If you omit the word OF, the function argument might not be interpreted as expected.
Within the data set Hrd.Temp, PayRate is a character variable and Hours is a numeric variable. What happens when the
following program is run?
data work.temp;
set hrd.temp;
Salary=payrate*hours;
run;
SAS converts the values of PayRate to numeric values. No message is written to the log.
SAS converts the values of PayRate to numeric values. A message is written to the log.
SAS converts the values of Hours to character values. No message is written to the log.
SAS converts the values of Hours to character values. A message is written to the log.
Correct answer: b
When this DATA step is executed, SAS automatically converts the character values of PayRate to numeric values so that
the calculation can occur. Whenever data is automatically converted, a message is written to the SAS log stating that the
conversion has occurred.
A typical value for the character variable Target is 123,456. Which statement correctly converts the values of Target to
numeric values when creating the variable TargetNo?
TargetNo=input(target,comma6.);
TargetNo=input(target,comma7.);
TargetNo=put(target,comma6.);
TargetNo=put(target,comma7.)
- 800 -
Correct answer: b
You explicitly convert character values to numeric values by using the INPUT function. Be sure to select an informat that
can read the form of the values.
A typical value for the numeric variable SiteNum is 12.3. Which statement correctly converts the values of SiteNum to
character values when creating the variable Location?
Location=dept||'/'||input(sitenum,3.1);
Location=dept||'/'||input(sitenum,4.1);
Location=dept||'/'||put(sitenum,3.1);
Location=dept||'/'||put(sitenum,4.1);
Correct answer: d
You explicitly convert numeric values to character values by using the PUT function. Be sure to select a format that can
read the form of the values.
Suppose the YEARCUTOFF= system option is set to 1920. Which MDY function creates the date value for January 3, 2020?
MDY(1,3,20)
MDY(3,1,20)
MDY(1,3,2020)
MDY(3,1,2020)
Correct answer: c
Because the YEARCUTOFF= system option is set to 1920, SAS sees the two-digit year value 20 as 1920. Four-digit
year values are always read correctly.
The variable Address2 contains values such as Piscataway, NJ. How do you assign the two-letter state abbreviations to a
new variable named State?
- 801 -
State=scan(address2,2);
State=scan(address2,13,2);
State=substr(address2,2);
State=substr(address2,13,2);
Correct answer: a
The SCAN function is used to extract words from a character value when you know the order of the words, when their
position varies, and when the words are marked by some delimiter. In this case, you don't need to specify delimiters,
because the blank and the comma are default delimiters.
The variable IDCode contains values such as 123FA and 321MB. The fourth character identifies sex. How do you assign these
character codes to a new variable named Sex?
Sex=scan(idcode,4);
Sex=scan(idcode,4,1);
Sex=substr(idcode,4);
Sex=substr(idcode,4,1);
Correct answer: d
The SUBSTR function is best used when you know the exact position of the substring to extract from the character value.
You specify the position to start from and the number of characters to extract.
Due to growth within the 919 area code, the telephone exchange 555 is being reassigned to the 920 area code. The data set
Clients.Piedmont includes the variable Phone, which contains telephone numbers in the form 919-555-1234. Which of the
following programs will correctly change the values of Phone?
data work.piedmont(drop=areacode exchange);
set clients.piedmont;
Areacode=substr(phone,1,3);
Exchange=substr(phone,5,3);
- 802 -
if areacode='919' and exchange='555'
then scan(phone,1,3)='920';
run;
data work.piedmont(drop=areacode exchange);
set clients.piedmont;
Areacode=substr(phone,1,3);
Exchange=substr(phone,5,3);
if areacode='919' and exchange='555'
then phone=scan('920',1,3);
run;
data work.piedmont(drop=areacode exchange);
set clients.piedmont;
Areacode=substr(phone,1,3);
Exchange=substr(phone,5,3);
if areacode='919' and exchange='555'
then substr(phone,5,3)='920';
run;
data work.piedmont(drop=areacode exchange);
set clients.piedmont;
Areacode=substr(phone,1,3);
Exchange=substr(phone,5,3);
if areacode='919' and exchange='555'
then phone=substr('920',1,3);
run;
Correct answer: c
The SUBSTR function replaces variable values if it is placed on the left side of an assignment statement. When placed on
the right side (as in Question 7), the function extracts a substring.
Suppose you need to create the variable FullName by concatenating the values of FirstName, which contains first names, and
LastName, which contains last names. What's the best way to remove extra blanks between first names and last names?
data work.maillist;
set retail.maillist;
length FullName $ 40;
fullname=trim firstname||' '||lastname;
run;
- 803 -
data work.maillist;
set retail.maillist;
length FullName $ 40;
fullname=trim(firstname)||' '||lastname;
run;
data work.maillist;
set retail.maillist;
length FullName $ 40;
fullname=trim(firstname)||' '||trim(lastname);
run;
data work.maillist;
set retail.maillist;
length FullName $ 40;
fullname=trim(firstname||' '||lastname);
run;
Correct answer: b
The TRIM function removes trailing blanks from character values. In this case, extra blanks must be removed from the
values of FirstName. Although answer c also works, the extra TRIM function for the variable LastName is unnecessary.
Because of the LENGTH statement, all values of FullName are padded to 40 characters.
Within the data set Furnitur.Bookcase, the variable Finish contains values such as ash/cherry/teak/matte-black.
Which of the following creates a subset of the data in which the values of Finish contain the string walnut? Make the
search for the string case-insensitive.
data work.bookcase;
set furnitur.bookcase;
if index(finish,walnut) = 0;
run;
data work.bookcase;
set furnitur.bookcase;
if index(finish,'walnut') > 0;
run;
data work.bookcase;
set furnitur.bookcase;
if index(lowcase(finish),walnut) = 0;
- 804 -
run;
data work.bookcase;
set furnitur.bookcase;
if index(lowcase(finish),'walnut') > 0;
run;
Correct answer: d
Use the INDEX function in a subsetting IF statement, enclosing the character string in quotation marks. Only those
observations in which the function locates the string and returns a value greater than 0 are written to the data set.
Chapter 14: Generating Data with DO Loops
Which statement is false regarding the use of DO loops?
They can contain conditional clauses.
They can generate multiple observations.
They can be used to combine DATA and PROC steps.
They can be used to read data.
Correct answer: c
DO loops are DATA step statements and cannot be used in conjunction with PROC steps.
During each execution of the following DO loop, the value of Earned is calculated and is added to its previous value. How
many times does this DO loop execute?
data finance.earnings;
Amount=1000;
Rate=.075/12;
do month=1 to 12;
Earned+(amount+earned)*rate;
end;
run;
0
1
12
13
Correct answer: c
- 805 -
The number of iterations is determined by the DO statement's stop value, which in this case is 12.
On January 1 of each year, $5000 is invested in an account. Complete the DATA step below to determine the value of the
account after 15 years if a constant interest rate of ten percent is expected.
data work.invest;
...
Capital+5000;
capital+(capital*.10);
end;
run;
do count=1 to 15;
do count=1 to 15 by 10%;
do count=1 to capital;
do count=capital to (capital*.10);
Correct answer: a
Use a DO loop to perform repetitive calculations starting at 1 and looping 15 times.
In the data set Work.Invest, what would be the stored value for Year?
data work.invest;
do year=1990 to 2004;
Capital+5000;
capital+(capital*.10);
end;
run;
missing
1990
2004
2005
- 806 -
Correct answer: d
At the end of the fifteenth iteration of the DO loop, the value for Year is incremented to 2005. Because this value exceeds
the stop value, the DO loop ends. At the bottom of the DATA step, the current values are written to the data set.
Which of the following statements is false regarding the program shown below?
data work.invest;
do year=1990 to 2004;
Capital+5000;
capital+(capital*.10);
output;
end;
run;
The OUTPUT statement writes current values to the data set immediately.
The last value for Year in the new data set is 2005.
The OUTPUT statement overrides the automatic output at the end of the DATA step.
The DO loop performs 15 iterations.
Correct answer: b
The OUTPUT statement overrides the automatic output at the end of the DATA step. On the last iteration of the DO loop,
the value of Year, 2004, is written to the data set.
How many observations will the data set Work.Earn contain?
data work.earn;
Value=2000;
do year=1 to 20;
Interest=value*.075;
value+interest;
output;
end;
run;
0
1
19
20
Correct answer: d
- 807 -
The number of observations is based on the number of times the OUTPUT statement executes. The new data set has 20
observations, one for each iteration of the DO loop.
Which of the following would you use to compare the result of investing $4,000 a year for five years in three different
banks that compound interest monthly? Assume a fixed rate for the five-year period.
DO WHILE statement
nested DO loops
DO UNTIL statement
a DO group
Correct answer: b
Place the monthly calculation in a DO loop within a DO loop that iterates once for each year. The DO WHILE and DO
UNTIL statements are not used here because the number of required iterations is fixed. A non-iterative DO group would
not be useful.
Which statement is false regarding DO UNTIL statements?
The condition is evaluated at the top of the loop, before the enclosed statements are executed.
The enclosed statements are always executed at least once.
SAS statements in the DO loop are executed until the specified condition is true.
The DO loop must have a closing END statement.
Correct answer: a
The DO UNTIL condition is evaluated at the bottom of the loop, so the enclosed statements are always excecuted at least
once.
Select the DO WHILE statement that would generate the same result as the program below.
data work.invest;
capital=100000;
do until(Capital gt 500000);
Year+1;
capital+(capital*.10);
end;
run;
do while(Capital ge 500000);
do while(Capital=500000);
- 808 -
do while(Capital le 500000);
do while(Capital>500000);
Correct answer: c
Because the DO WHILE loop is evaluated at the top of the loop, you specify the condition that must exist in order to
execute the enclosed statements.
In the following program, complete the statement so that the program stops generating observations when Distance
reaches 250 miles or when 10 gallons of fuel have been used.
data work.go250;
set perm.cars;
do gallons=1 to 10 ... ;
Distance=gallons*mpg;
output;
end;
run;
while(Distance<250)
when(Distance>250)
over(Distance le 250)
until(Distance=250)
Correct answer: a
The WHILE expression causes the DO loop to stop executing when the value of Distance becomes equal to or greater
than 250.
Chapter 15: Processing Variables with Arrays
Which statement is false regarding an ARRAY statement?
It is an executable statement.
It can be used to create variables.
- 809 -
It must contain either all numeric or all character elements.
It must be used to define an array before the array name can be referenced.
Correct answer: a
An ARRAY statement is not an executable statement; it merely defines an array.
What belongs within the braces of this ARRAY statement?
array contrib{?} qtr1-qtr4;
quarter
quarter*
1-4
4
Correct answer: d
The value in parentheses indicates the number of elements in the array. In this case, there are four elements.
For the program below, select an iterative DO statement to process all elements in the contrib array.
data work.contrib;
array contrib{4} qtr1-qtr4;
...
contrib{i}=contrib{i}*1.25;
end;
run;
do i=4;
do i=1 to 4;
- 810 -
do until i=4;
do while i le 4;
Correct answer: b
In the DO statement, you specify the index variable that represents the values of the array elements. Then specify the start
and stop positions of the array elements.
What is the value of the index variable that references Jul in the statements below?
array quarter{4} Jan Apr Jul Oct;
do i=1 to 4;
yeargoal=quarter{i}*1.2;
end;
1
2
3
4
Correct answer: c
The index value represents the position of the array element. In this case, the third element is Jul.
Which DO statement would not process all the elements in the factors array shown below?
array factors{*} age height weight bloodpr;
do i=1 to dim(factors);
do i=1 to dim(*);
do i=1,2,3,4;
do i=1 to 4;
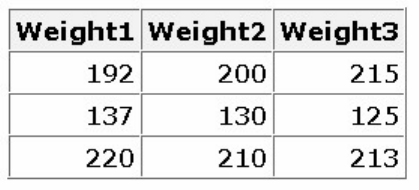
- 811 -
Correct answer: b
To process all the elements in an array, you can either specify the array dimension or use the DIM function with the array
name as the argument.
Which statement below is false regarding the use of arrays to create variables?
The variables are added to the program data vector during the compilation of the DATA step.
You do not need to specify the array elements in the ARRAY statement.
By default, all character variables are assigned a length of eight.
Only character variables can be created.
Correct answer: d
Either numeric or character variables can be created by an ARRAY statement.
For the first observation, what is the value of diff{i} at the end of the second iteration of the DO loop?
array wt{*} weight1-weight10;
array diff{9};
do i=1 to 9;
diff{i}=wt{i+1}-wt{i};
end;
15
10
8
-7
Correct answer: a
At the end of the second iteration, diff{
i
} resolves as follows:
diff{2}=wt{2+1}-wt{2};
diff{2}=215-200
- 812 -
Finish the ARRAY statement below to create temporary array elements that have initial values of 9000, 9300, 9600, and
9900.
array goal{4} ... ;
_temporary_ (9000 9300 9600 9900)
temporary (9000 9300 9600 9900)
_temporary_ 9000 9300 9600 9900
(temporary) 9000 9300 9600 9900
Correct answer: a
To create temporary array elements, specify _TEMPORARY_ after the array name and dimension. Specify an initial value
for each element, separated by either blanks or commas, and enclose the values in parentheses.
Based on the ARRAY statement below, select the array reference for the array element q50.
array ques{3,25} q1-q75;
ques{q50}
ques{1,50}
ques{2,25}
ques{3,0}
Correct answer: c
This two-dimensional array would consist of three rows of 25 elements. The first row would contain q1 through q25, the
second row would start with q26 and end with q50, and the third row would start with q51 and end with q75.

- 813 -
Select the ARRAY statement that defines the array in the following program.
data coat;
input category high1-high3 / low1-low3;
array compare{2,3} high1-high3 low1-low3;
do i=1 to 2;
do j=1 to 3;
compare{i,j}=round(compare{i,j}*1.12);
end;
end;
datalines;
5555 9 8 7 6
4 3 2 1
8888 21 12 34 64
13 14 15 16
;
run;
array compare{1,6} high1-high3 low1-low3;
array compare{2,3} high1-high3 low1-low3;
array compare{3,2} high1-high3 low1-low3;
array compare{3,3} high1-high3 low1-low3;
Correct answer: b
The nested DO loops indicate that the array is named compare and is a two-dimensional array that has two rows and three
columns.
Chapter 16: Reading Raw Data in Fixed Fields
Which SAS statement correctly uses column input to read the values in the raw data file below in this order: Address (4th
field), SquareFeet (second field), Style (first field), Bedrooms (third field)?
- 814 -
input Address 15-29 SquareFeet 8-11 Style 1-6
Bedrooms 13;
input $ 15-29 Address 8-11 SquareFeet $ 1-6 Style
13 Bedrooms;
input Address $ 15-29 SquareFeet 8-11 Style $ 1-6
Bedrooms 13;
input Address 15-29 $ SquareFeet 8-11 Style 1-6
$ Bedrooms 13;
Correct answer: c
Column input specifies the variable's name, followed by a dollar ($) sign if the values are character values, and the
beginning and ending column locations of the raw data values.
Which is not an advantage of column input?
It can be used to read character variables that contain embedded blanks.
No placeholder is required for missing data.
Standard as well as nonstandard data values can be read.
Fields do not have to be separated by blanks or other delimiters.
Correct answer: c
Column input is useful for reading standard values only.
Which is an example of standard numeric data?
-34.245
$24,234.25
1/2
50%
Correct answer: a
A standard numeric value can contain numbers, scientific notation, decimal points, and plus and minus signs. Nonstandard
numeric data includes values that contain fractions or special characters such as commas, dollar signs, and percent signs.
Formatted input can be used to read
- 815 -
standard free-format data
standard data in fixed fields
nonstandard data in fixed fields
both standard and nonstandard data in fixed fields
Correct answer: d
Formatted input can be used to read both standard and nonstandard data in fixed fields.
Which informat should you use to read the values in column 1-5?
w.
$w.
w.d
COMMAw.d
Correct answer: b
The $w. informat enables you to read character data. The w represents the field width of the data value or the total number
of columns that contain the raw data field.
The COMMAw.d informat can be used to read which of the following values?
12,805
$177.95
18%
all of the above
Correct answer: d
The COMMAw.d informat strips out special characters, such as commas, dollar signs, and percent signs, from numeric
data and stores only numeric values in a SAS data set.
Which INPUT statement correctly reads the values for ModelNumber (first field) after the values for Item (second field)?
Both Item and ModelNumber are character variables.
- 816 -
input +7 Item $9. @1 ModelNumber $5.;
input +6 Item $9. @1 ModelNumber $5.;
input @7 Item $9. +1 ModelNumber $5.;
input @7 Item $9 @1 ModelNumber 5.;
Correct answer: b
The +6 pointer control moves the input pointer to the beginning column of Item, and the values are read. Then the @1
pointer control returns to column 1, where the values for ModelNumber are located.
Which INPUT statement correctly reads the numeric values for Cost (third field)?
