6124 810.FH11 810
2014-01-23
: 6124-810 6124-810 images 822 p4dbimg
Open the PDF directly: View PDF ![]() .
.
Page Count: 1
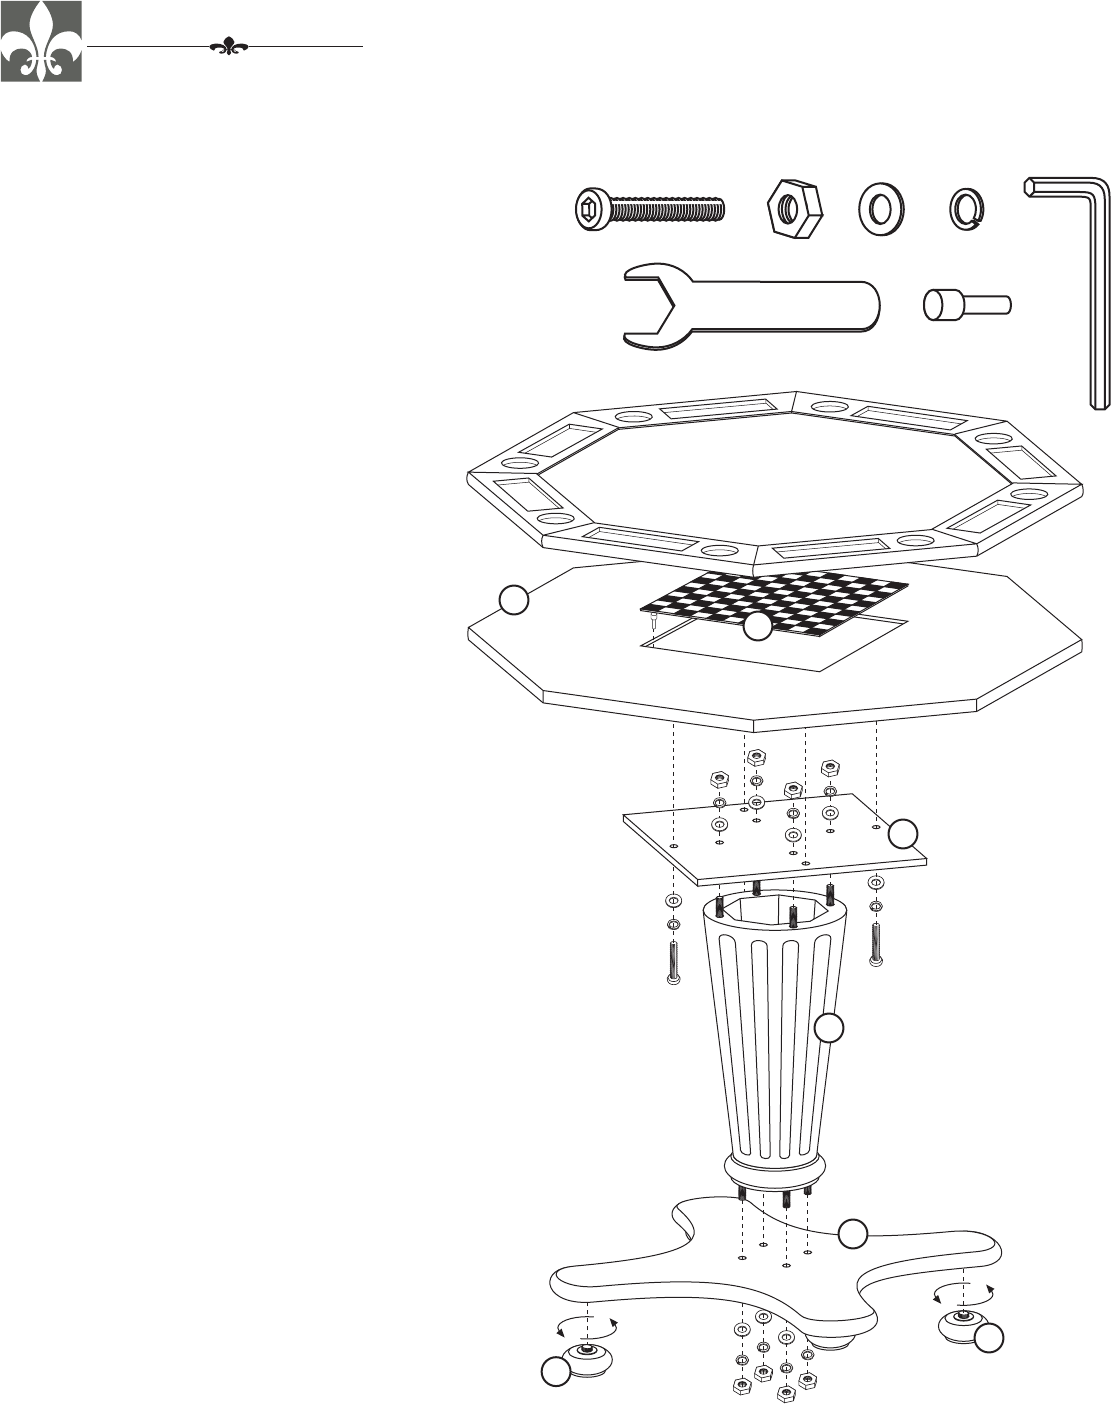
HARDWARE LIST
(4) Allen Bolts - 5/16 x 1-1/2
(8) Hex Nuts - 5/16
(12) Flat Washers - 5/16
(12) Spring Washers - 5/16
(1) Allen Wrench 4mm
(1) Hex Wrench 5/16
(1) Wood Push Rod
A
B
C
D
E
F
I
PARTS LIST
(1) Game Top
(1) Table Top
(1) Game Board
(1) Square Platform
(1) Table Column
(1) Foot Base
(4) Bunn Feet
G
H
J
K
L
M
N
Examine all packaging material for small parts that may have come loose during shipment. Periodic checks are recommended to insure
that all components are in proper position, tight and free from damage. Keep this assembly instruction for future reference. Adult
assembly is required. Customer Service Phone Number: 502-562-0000
A
CARE & MAINTENANCE
:
The touch of a soft cloth is all the maintenance the finish will ever need. Please do not use harsh or abrasive cleaners for
polishing, as they may cause damage to the finish. Periodic checks are recommended to make sure that all bolts, screws and nuts are securely tightened.
Date:
06-10-09
FURNITURE, LLC.
HILLSDALE
AMBASSADOR GAME TABLE
Model #6124-810 Table Top
Model #6124-811 Table Base
BE
STEP 1
Begin assembly by attaching the Table
Column (L) to the Foot Base (M) by
inserting the threads in place and
securing from the bottom using 4 Flat
Washers (C), 4 Spring Washers (D) &
4 Hex Nuts (B). Secure in place using
the Hex Wrench (F) that has been
provided.
STEP 2
Attach each Bunn Foot (N) to the bottom
of the Foot Base (M) by firmly screwing
each in place. Do not overtighten.
CD
F
B
D
C
B
D
C
B
D
C
B
D
C
C
D
A
C
D
A
C
D
B
x4
M
N
K
L
H
G
N
STEP 3
Attach the Square Platform (K) to the top of
the Table Column (L) by guiding the threads
into the open holes and securing from the top
with 4 Flat Washers (C), 4 Spring Washers
(D) & 4 Hex Nuts (B). Secure in place using
the Hex Wrench (F).
STEP 4
Attach the Table Top (G) to the top of the
Square Platform (K) by aligning holes and
securing from the bottom with 4 Allen Bolts
(A), 4 Spring Washers (D) & 4 Flat Washers
(C). Secure in place using the Allen Wrench
(E) that has been provided.
STEP 5
Place the Wood Push Rod (I) into the open
hole on the chessbox (so the Game Board
can be flipped and removed) and insert the
Game Board (J) into the open area on the
Table Top. Once in place carefully center the
Game Top (G) on the top of the Table Top to
complete the assembly.
I
IJ
