937B Digital Combination Vacuum Gauge Controller Operation Manual
User Manual:
Open the PDF directly: View PDF ![]() .
.
Page Count: 120 [warning: Documents this large are best viewed by clicking the View PDF Link!]

O
Part #:
1
M
O
per
a
1
00016467
M
K
S
Mul
a
tion
a
RevC
S
S
e
High
ti-Se
n
a
nd
M
e
rie
s
Vac
u
n
sor
S
M
aint
e
s
9
3
u
um
S
yst
e
e
nan
c
3
7B
e
m
c
e M
a
a
nual

MKS 937B Operation Manual 2
Table of Contents
Package Contents .................................................................................................................................. 7
1 Safety Information ..................................................................................................................... 8
1.1 Symbols Used in this Manual and their definitions ......................................................... 8
1.2 Safety Precautions .......................................................................................................... 8
1.2.1 Safety Procedures and Precautions ............................................................................ 8
2 Specifications .......................................................................................................................... 10
2.1 Controller ....................................................................................................................... 10
2.2 Sensors ......................................................................................................................... 12
2.3 Controller Display Messages ........................................................................................ 16
3 Feature, Control Locations and Dimensions ........................................................................... 17
4 Typical Applications for the Series 937B Controller ................................................................ 19
5 HPS Products Series 937B Multi-Sensor High Vacuum System .......................................... 20
6 Operating the Series 937B Controller ..................................................................................... 22
6.1 Power ............................................................................................................................ 22
6.2 Front Panel Control Lock............................................................................................... 22
6.3 Front Panel Display ....................................................................................................... 22
6.3.1 Standard front panel display ...................................................................................... 22
6.3.2 Large font displays ..................................................................................................... 23
6.4 System Setup ................................................................................................................ 24
6.4.1 Overview of 937B System setup ................................................................................ 24
6.4.2 Display system setup parameters .............................................................................. 25
6.4.3 Change and save a parameter value ......................................................................... 25
6.4.4 Description of the system setup parameters ............................................................. 26
6.5 Channel Setup for Pressure Measurement ................................................................... 30
6.5.1 Overview of 937B Channel setup .............................................................................. 30
6.5.2 Setup for a Capacitance Manometer ......................................................................... 32
6.5.3 Setup for a PR (Pirani)/CP (convection Pirani) sensor .............................................. 34
6.5.4 Setup a Cold Cathode Sensor ................................................................................... 37
6.5.5 Setup a Hot Cathode Sensor ..................................................................................... 40
6.6 Power Control of a Pressure Sensor ............................................................................. 43
6.6.1 Power (including degas) control of a sensor using front panel control button ........... 43
6.6.2 Power (including degas) control of a sensor via 37 pin AIO Dsub connector ........... 44
6.6.3 Power (including degas) control of a sensor using Serial communication commands.45
6.7 Leak Test Using the 937B Controller ............................................................................ 45
6.7.1 Leak test principle applied for the 937B ..................................................................... 45
6.7.2 Procedures for a leak test with the 937B ................................................................... 46
7 Installing Vacuum Sensors ..................................................................................................... 48
7.1 Installing cold cathode sensors ..................................................................................... 48
7.1.1 Locating a Cold Cathode Sensor ............................................................................... 48
7.1.2 Orienting a Cold Cathode Sensor .............................................................................. 48
7.1.3 Managing Contamination in a Cold Cathode Sensor ................................................. 48
7.1.4 Connecting the Series 421/422 Sensor ..................................................................... 48
7.1.5 Connecting the 423 I-MAG Sensor ............................................................................ 49

MKS 937B Operation Manual 3
7.2 Installing hot cathode sensors ....................................................................................... 49
7.2.1 Locating a Hot Cathode Sensor ................................................................................. 49
7.2.2 Preventing Contamination in a Hot Cathode Sensor ................................................. 49
7.2.3 Orienting a hot cathode sensor .................................................................................. 49
7.2.4 Connecting a Hot Cathode Sensor to the vacuum system ........................................ 49
7.2.5 Connecting a Hot Cathode Sensor to the 937B Controller ........................................ 50
7.3 Installing Pirani Sensors ................................................................................................ 52
7.3.1 Locating a Pirani Sensor ............................................................................................ 52
7.3.2 Preventing Contamination in a Pirani Sensor ............................................................ 52
7.3.3 Orienting the Series 317 Pirani Sensor...................................................................... 52
7.3.4 Orienting the Series 345 Pirani Sensor...................................................................... 52
7.3.5 Connecting the Series 317/345 Sensors ................................................................... 52
7.3.6 Preparing the 317 Sensor for Bakeout....................................................................... 54
7.4 Capacitance Manometers - MKS Baratron ................................................................... 54
7.4.1 Installing a Baratron Capacitance Manometer ........................................................... 54
7.4.2 Connecting a Baratron™ Capacitance Manometer ................................................... 54
8 Connecting Relay and Analog Outputs ................................................................................... 56
8.1 Connecting 937B relay outputs ..................................................................................... 56
8.1.1 Pin out for the 937B relay output ............................................................................... 56
8.1.2 Proper setting of a relay ............................................................................................. 57
8.1.3 Relay Inductive Loads and Arc Suppression ............................................................. 58
8.2 Connecting the 937B Analog Output ............................................................................. 58
8.3 Buffered analog output .................................................................................................. 59
8.4 Logarithmic/Linear and combination analog output ...................................................... 69
8.4.1 Logarithmic/Linear analog output ............................................................................... 70
8.4.2 Combination analog output ........................................................................................ 70
8.4.3 Logarithmic/Linear analog output when the gauge power is turned off ..................... 72
9 937B RS232/485 Serial Communication Commands ............................................................. 73
9.1 Communication protocols .............................................................................................. 73
9.2 Pressure reading commands ........................................................................................ 74
9.3 Relay and control setting commands ............................................................................ 75
9.4 Capacitance manometer control commands ................................................................ 76
9.5 Pirani and convection Pirani control commands ........................................................... 76
9.6 Cold cathode control commands ................................................................................... 77
9.7 Hot cathode control commands .................................................................................... 78
9.9 System commands ........................................................................................................ 79
9.10 Error code ...................................................................................................................... 80
9.11 937B ProfiBus communication protocol and commands .............................................. 81
9.11.1 Electrical Connections................................................................................................ 81
9.11.2 ProfiBus GSD protocol ............................................................................................... 81
9.11.3 937 ProfiBus output buffer map ................................................................................. 83
9.11.4 937B ProfiBus input buffer map ................................................................................. 85
10 937A Emulated Operation and RS232/485 Serial Communication Commands ..................... 88
10.1 Operating the 937B controller in 937A emulated operation mode ................................ 88
10.2 Communication protocols .............................................................................................. 90
10.3 Pressure reading commands ........................................................................................ 91
10.4 Relay and control setting commands ............................................................................ 92
10.5 Cold cathode control commands ................................................................................... 92

MKS 937B Operation Manual 4
10.6 User calibration commands ........................................................................................... 93
10.7 System commands ........................................................................................................ 93
10.8 ASCII character table .................................................................................................... 94
11 Maintenance of Series 937B Controller modules ................................................................... 95
11.1 Removing and Installing a Sensor Module .................................................................... 95
11.2 Removing and Installing AIO Module ............................................................................ 96
11.3 Communication Module ................................................................................................. 97
11.4 Power Supply ................................................................................................................ 97
11.5 Mounting the 937B controller ........................................................................................ 98
11.6 AC Power Cord ............................................................................................................. 99
12 Maintenance and Service of HPS Vacuum Sensors ........................................................... 100
12.1 421 Cold cathode sensor ............................................................................................ 100
12.1.1 Cold cathode theory ................................................................................................. 100
12.1.2 Maintenance of Series 421/422 Cold Cathode Sensor ............................................ 101
12.2 Maintenance of Series 423 I-MAG® Cold Cathode Sensor ........................................ 104
12.2.1 Connecting the I-MAG Sensor ................................................................................. 104
12.2.2 Disassembling the I-MAG Sensor ............................................................................ 104
12.2.3 Cleaning the I-MAG Sensor ..................................................................................... 106
12.2.4 Assembling the I-MAG Sensor ................................................................................. 106
12.2.5 Preparing the Sensor for Bakeout ............................................................................ 107
12.3 Maintenance of Low Power Nude and Mini BA hot cathode sensors ......................... 107
12.3.1 Hot cathode theory ................................................................................................... 107
12.3.2 Cleaning the Hot Cathode Sensor ........................................................................... 108
12.3.3 Testing the hot cathode sensor ................................................................................ 109
12.4 Maintenance of Pirani Sensors ................................................................................... 109
12.4.1 Theory of a Pirani pressure sensor .......................................................................... 109
12.4.2 Cleaning the Series 345 Sensor .............................................................................. 110
12.4.3 Cleaning the Series 317 Sensor .............................................................................. 111
12.5 Maintenance of Capacitance Manometer ................................................................... 112
12.5.1 Theory of a capacitance manometer ....................................................................... 112
12.5.2 Repairing the Baratron™ Capacitance Manometer ................................................. 113
13 Spare Parts and Accessories ................................................................................................ 114
14 APPENDIX ............................................................................................................................ 117
14.1 Hot cathode gauge gas correction factors .................................................................. 117
15 Product Warranty .................................................................................................................. 120

MKS 937B Operation Manual 5
List of Figures
Figure 3-1 937B front Panel. .................................................................................................................... 17
Figure 3-2 937B rear panel. ..................................................................................................................... 17
Figure 3-3 937B external dimensions (inches). ......................................................................................... 18
Figure 5-1 937B front view. ........................................................................................................................ 20
Figure 6-1 Standard 937B LCD front panel display for pressure measurement under Leak detection
mode. .................................................................................................................................................. 22
Figure 6-2 A comparison between standard display mode and large font display mode for the 937B LCD
display during pressure measurement. .............................................................................................. 24
Figure 6-3 937B system setup parameters, their default values and ranges. ......................................... 24
Figure 6-4 System setup information displayed on 937B LCD screen. ................................................... 25
Figure 6-5 Setting DAC logarithmic and linear analog output. .................................................................... 28
Figure 6-6 System firmware and serial number information displayed on 937B LCD screen. ................... 29
Figure 6-11 Hot cathode setup information displayed on 937B LCD screen. ........................................... 41
Figure 7-1 13 pin D-Sub connector on the back of 937B HC board. ....................................................... 50
Figure 7-2 LPN gauge cable diagram. ..................................................................................................... 51
Figure 7-3 Mini BA gauge cable diagram. ................................................................................................ 51
Figure 7-4 317/345 cable diagram. .......................................................................................................... 53
Figure 7-5 The wiring diagram for the Capacitance Manometer cable. ................................................... 55
Figure 8-1 Definition of the parameters used for relay control. ................................................................ 57
Figure 8-2 The relay arc suppression network. ....................................................................................... 58
Figure 8-3 Buffered analog output for cold cathode gauges (421/422/423) in N2. .................................. 60
Figure 8-4 Buffered analog output for hot cathode gauges; same as the logarithmic analog output. ..... 62
Figure 8-5 Buffered analog output for a 345 Pirani gauge. ...................................................................... 63
Figure 8-6 Buffered analog output for the 317 convection Pirani gauge. ................................................ 66
Figure 8-7 Buffered analog output for capacitance manometers. ........................................................... 69
Figure 8-8 Setup screen for setting combination channel parameters. ...................................................... 71
Figure 11-1 Instructions for removing AIO module. ................................................................................. 96
Figure 11-2 Instruction for connecting wire on the back of the power cord receptor. .............................. 97
Figure 11-3 The 937B controller power supply. ....................................................................................... 98
Figure 12-1 A comparison of Inverted Magnetron (left) and Penning (right) cold cathode gauges. ...... 100
Figure 12-2 Electron orbits and ion production in an inverted magnetron. ............................................ 101
Figure 12-3 An exploded view of the 421/422 cold cathode gauge assembly. ..................................... 102
Figure 12-4 An exploded view of the Series 423 I-MAG cold cathode gauge sensor. .......................... 105
Figure 12-5 BA gauge structure and electron process inside the gauge. .............................................. 108
Figure 12-6 Filament pin locator for LPN and mini BA gauges. ............................................................. 109
Figure 12-7 Schematic of a Pirani thermal conductivity sensor. ............................................................ 110
Figure 12-8 Natural convection heater transfer in horizontal (left) and vertical (right) sensor tubes. .... 110
Figure 12-9 Exploded view of a MKS Capacitance manometer sensor. ............................................... 112

MKS 937B Operation Manual 6
List of Tables
Table 6-1 Valid gauges for autozeroing capacitance manometers of different ranges. .......................... 33
Table 6-2 Relative ionization correction factor to N2 for different gases. ................................................ 41
Table 6-3 Pin out for ion gauge remote control. ...................................................................................... 45
Table 7-1 Hot cathode connector pin out. ................................................................................................ 50
Table 7-2 Pin assignment for HC sensor type identification. ................................................................... 51
Table 7-3 Pin out for 317/345 cables. ...................................................................................................... 53
Table 7-4 Pin out of the 9 pin D-Sub connector on CM module. ............................................................. 54
Table 8-1 Pin out for the 937B relay output. ............................................................................................ 56
Table 8-2 Pin out for 937B analog output. ............................................................................................... 59
Table 8-3 Buffered analog output when sensor power is off. .................................................................... 59
Table 8-4 Buffered analog output for the cold cathode gauges (421/422/423) in N2. This is 2.4 higher
than the raw analog output as shown in Table 8-5. ........................................................................... 61
Table 8-5 Equations for Cold Cathode gauges (N2) raw analog output. .................................................. 61
Table 8-6 Buffered analog output for the 315/345 Pirani sensors. .......................................................... 64
Table 8-7 Equations for the 315/345 Pirani sensors. ................................................................................ 65
Table 8-8 Buffered analog output for the 317 Convection Pirani sensor. ................................................ 67
Table 8-9 Equations for the 317 Convection Pirani sensor. .................................................................... 68
Table 9-1 937B serial communication wiring diagram. .............................................................................. 73
Table 9-2 937B serial communication command protocol. ........................................................................ 73
Table 9-3 937B pressure reading commands. ........................................................................................... 74
Table 9-4 937B relay and control serial setting commands. ...................................................................... 75
Table 9-5 937B capacitance manometer serial commands. .................................................................... 76
Table 9-6 937B Pirani and Convection Pirani control commands. .......................................................... 76
Table 9-7 937B cold and hot cathode control commands. ...................................................................... 77
Table 9-8 937B cold and hot cathode control commands. ...................................................................... 78
Table 9-13 937B system commands. ...................................................................................................... 80
Table 9-14 937B serial communication error codes. ............................................................................... 80
Table 9-15 937B Profibus electrical connections. ....................................................................................... 81
Table 9-16 937B ProfiBus command list. .................................................................................................... 82
Table 9-17 937B ProfiBus output buffer map.............................................................................................. 84
Table 9-18 937B ProfiBus input buffer map. ............................................................................................... 87
Table 10-1 Description of pin assignment for adapting 937A 15 pin connector to 937B 25 pin connector
for relay output. ................................................................................................................................... 88
Table 10-2 A description of the pin assignments for adapting the 937A 25 pin connector to the 937B 37
pin connector for analog output and gauge control when a dual PR/CM board is installed in slot A. 89
Table 10-3 A description of the pin assignments for adapting the 937A 25 pin connector to the 937B 37
pin connector for analog output and gauge control when a CC board is installed in slot A. .............. 89
Table 10-4 937B serial communication wire diagram. ............................................................................... 90
Table 10-5 The 937A serial communication command protocol.............................................................. 90
Table 10-6 937A pressure reading serial commands. ............................................................................. 91
Table 10-7 The 937A relay and control setting commands. .................................................................... 92
Table 10-8 The 937A cold cathode control commands. .......................................................................... 92
Table 10-9 937A user calibration commands. ......................................................................................... 93
Table 10-10 937A system commands. .................................................................................................... 93
Table 10-11 ASCII character table. .......................................................................................................... 94
Table 12-1 Resistance readings of a normal HC sensor. ...................................................................... 109
Table 12-2 Bridge resistance value for a normal 345 Pirani sensor. ..................................................... 111
Table 12-3 Resistance values for a normal 317 convection enhanced Pirani sensor. .......................... 112

MKS 937B Operation Manual 7
Package Contents
Before unpacking the 937B high vacuum, multi-sensor system controller, check all
surfaces of the packing material for shipping damage.
Please be sure that the 937B system contains the following items:
1 Series 937B controller (with selected modules installed)
1 female, 25-pin Dsub connector for relay output connection
1 male, 37pin Dsub connector for analog output connection
1 10-foot power cord (US customer only)
1 HPSTM Products Series 937B User’s Manual CD
If any items are missing from the package, call HPS® Products Customer Service
Department at 1-303-449-9861 or 1-800-345-1967.
Inspect the 937B system for visible evidence of damage. If it has been damaged in
shipping, notify the carrier immediately. Keep all shipping materials and packaging for
claim verification. Do not return the product to HPS®Products.

MKS 937B Operation Manual 8
1 Safety Information
1.1 Symbols Used in this Manual and their definitions
CAUTION: Risk of electrical shock.
CAUTION: Refer to manual. Failure to read message could result
in personal injury or serious damage to the equipment or both.
CAUTION: Hot surface.
Calls attention to important procedure, practice, or conditions.
Failure to read message could result in damage to the equipment.
1.2 Safety Precautions
1.2.1 Safety Procedures and Precautions
The following general safety precautions must be observed during all phases of operation of this
instrument. Failure to comply with these precautions or with specific warnings elsewhere in this manual
violates safety standards for the intended use of the instrument and may impair the protection provided by
the equipment. MKS Instruments, Inc. assumes no liability for the customer’s failure to comply with these
requirements.
Properly ground the Controller.
This product is grounded through the grounding conductor of the power cord. To avoid electrical shock,
plug the power cord into a properly wired receptacle before connecting it to the product input or output
terminals. A protective ground connection through the grounding conductor in the power cord is essential
for safe operation.
Upon loss of the protective-ground connection, all accessible conductive parts (including knobs and
controls that may appear to be insulating) can render an electrical shock.
Do not substitute parts or modify the instrument.
Do not install substitute parts or perform any unauthorized modification to the instrument. Return the
instrument to an MKS Calibration and Service Center for service and repair to ensure that all safety
features are maintained.

MKS 937B Operation Manual 9
Use proper electrical fittings.
Dangerous voltages are contained within this instrument. All electrical fittings and cables must be of the
type specified, and in good condition. All electrical fittings must be properly connected and grounded.
The Series 937B Controller contains lethal voltages when on.
High voltage is present in the cable and a cold cathode sensor when the Controller is turned on.
Use the proper power source.
This product is intended to operate from a power source that applies a voltage between the supply
conductors, or between either of the supply conductors and ground, not more than that specified in the
manual.
Use the proper fuse.
Only use a fuse of the type, voltage rating, and current rating specified for your product.
Do not operate in explosive environment.
To avoid explosion, do not operate this product in an explosive environment unless it has been specially
certified for such operation.
Service by qualified personnel only.
Operating personnel must not remove instrument covers. Component replacement and internal
adjustments must only be made by qualified service personnel.
Use proper power cord.
Only use a power cord that is in good condition and that meets the input power requirements specified in
the manual.
Only use a detachable cord set with conductors having a cross-sectional area equal to or greater than
0.75 mm2. The power cable should be approved by a qualified agency such as VDE, Semko, or SEV.

MKS 937B Operation Manual 10
2 Specifications1
2.1 Controller
Pressure measuring range2 1 x 10-11 to 2.0 x 10+5 Torr
1 x 10
-11 to 2.6 x 10+5 mbar
1 x 10
-9 to 2.6 x 10+7 Pa
Relay set point range3
CC (Cold Cathode) 2.0 x 10⁻¹⁰ to 5.0 x 10⁻³ Torr
2.7 x 10⁻¹⁰ to 6.5 x 10⁻³ mbar
2.7 x 10⁻⁸ to 6.5 x 10⁻¹ Pa
HC (Hot Cathode) 5.0 x 10⁻¹⁰ to 5.0 x 10⁻³ Torr
6.5 x 10⁻¹⁰ to 6.5 x 10⁻³ mbar
6.5 x 10⁻⁸ to 6.5 x 10⁻¹ Pa
Pirani 2.0 x 10⁻³ to 9.5 x 10+1 Torr
2.7 x 10⁻³ to 1.2 x 10+2 mbar
2.7 x 10⁻¹ to 1.2 x 10+4 Pa
CP (Convection Pirani) 2.0 x 10⁻³ to 9.5 x 10+2 Torr
2.7 x 10⁻³ to 1.2 x 10+3 mbar
2.7 x 10⁻¹ to 1.2 x 10+5 Pa
CM (Capacitance Manometer) 1% to 95% of the measurement range of the head (e.g. 1 Torr
head is1.0 x 10-2 to 9.5 x 10⁻¹ Torr)
Allowed range within which a control gauge may switch on a cold or hot cathode
Pirani 5.0 x 10⁻⁴ to 9.5 x 10⁻¹ Torr
6.5 x 10⁻⁴ to 1.3 x 10⁻¹ mbar
6.5 x 10⁻² to 1.3 x 101 Pa
CP (Convection Pirani) 2.0 x 10⁻³ to 9.5 x 10⁻¹ Torr
2.7 x 10⁻³ to 1.3 x 10⁻¹ mbar
2.7 x 10⁻¹ to 1.3 x 101 Pa
Protection setpoint4
CC & HC 1.0x10⁻⁵ to 1.0x10⁻² torr, default setting: 5.0x10⁻³ Torr
Operating temperature range 5° to 40°C (41° to 104°F)
Storage temperature range -10° to 55°C (14° to 131°F)
Relative humidity 80% maximum for temperatures less than 31°C, decreasing
linearly to 50% maximum at 40°C
Altitude 2000 m (6561 ft) maximum
Insulation coordination Installation (Over-voltage) Category II, Pollution Degree 2
1 Design and/or specifications are subject to change without notice.
2 The measurement range depends upon the sensor options selected.
3 Relay setpoint values are automatically adjusted when pressure unit is changed.
4 The protection setpoint is always enabled in 937B.

MKS 937B Operation Manual 11
Power requirement (nominal) 100 - 240 VAC, 50/60 Hz
Mains voltage Fluctuations not to exceed ±10% of nominal
Power consumption 150 W maximum
Fuse rating, size 2X2A, 250V, Ø 5 mm x 20 mm
Process control relay 12 nonvolatile relays, (4 for each sensor module)
Relay rating SPDT, 2 A @ 30 V resistive
Relay response 150 msec maximum
Analog outputs5 One Buffered and one Logarithmic/Linear for each channel, up to
two (2) wide-range combination logarithmic outputs. Output
impedance = 100 ohms
Number of channels up to 6
Front panel controls Power on-off switch, setup and operational commands can be
accessed via the keypad.
Display 320x240 color QVGA TFT LCD with back lighting.
Pressure units Torr, mbar, Pascal or microns
Update rate LCD display is updated 3 times per second. The pressure/flow
signals are updated every 50 msec.
Leak test 25-segment bar graph with a variable rate audio signal
Sensor module slots 3
Sensor modules channels/module
Cold Cathode single
Hot Cathode single
Pirani/Convection Pirani dual
Capacitance Manometer dual
COMM/Control modules
ProfiBus
Pressure Control
Computer interface Serial – RS-232 and RS-485 9600, 19200, 38400,57600,115200
baud rate selectable
Electronic casing Aluminum
Dimensions (W x D x H) 9½" x 12¼" x 3½" (241 mm x 311 mm x 88 mm)
Size ½ rack, 2U high
Typical weight 8.0 lb (3.6 kg)
CE certification EMC Directive: 2004/108/EEC
Low Voltage Directive: 73/23/EEC
5 Logarithmic/linear and combined logarithmic analog outputs can be customized using the system setup
manual.

MKS 937B Operation Manual 12
2.2 Sensors
Sensor type
CC (Cold Cathode) Series 421 and 422 inverted magnetron
Series 423 I-MAG®
HC (Hot Cathode) Bayard—Alpert (BA) type ionization gauges including HPS MIG
(Miniature Ionization Gauge, or LPN (Low Power Nude), glass
enveloped gauges and UHV nude type.
Pirani Series 345 Pirani
CP (Convection Pirani) Series 317 Convection Pirani
(CM) Capacitance Manometer MKS unheated Baratron® (622A, 623A, 626A, 722A );
MKS 45 C heated Baratron® (624B,D24B, 627B,D27B);
MKS differential Baratron®
Pressure measurement range
CC (Cold Cathode) 1.0 x 10⁻¹¹ to 1.0 x 10⁻² Torr
1.3 x 10⁻¹¹ to 1.3 x 10⁻² mbar
1.3 x 10⁻⁹ to 1.3 x 10+0 Pa
HC (Hot Cathode) 1 .0x 10-10 to 1.0 x 10⁻² Torr
1.3 x 10⁻¹⁰ to 1.3 x 10⁻² mbar
1.3 x 10⁻⁸ to 1.3 x 10+0 Pa
HC with UHV type gauge 2 .0x 10-11 to 1.0 x 10⁻² Torr
2.3 x 10⁻¹¹ to 1.3 x 10⁻² mbar
2.3 x 10⁻¹⁰ to 1.3 x 10+0 Pa
Pirani 5.0 x 10⁻⁴ to 4.0 x 10+2 Torr
6.5 x 10⁻⁴ to 5.2 x 10+2 mbar
6.5 x 10⁻² to 5.2 x 10+4 Pa
CP (Convection Pirani) 1.0 x 10⁻³ to 1.0 x 10+3 Torr
1.3 x 10⁻³ to 1.3 x 10+3 mbar
1.3 x 10⁻¹ to 1.3 x 10+5 Pa
(CM) Capacitance Manometer Three decades below full scale of head, (e.g., 10 Torr head is1.0
x 10-2 to 1.0 x 10+1 Torr)
Response time (Buffered analog output)
CC <40 msec
6
HC <50 msec
Pirani, CP <80 msec
CM <40 msec
Response time (Log/Lin analog output)
CC <50 msec
HC <50 msec
6A fast response (<3 msec) cold cathode board is also available. Please consult the factory for details.

MKS 937B Operation Manual 13
Pirani, CP <80 msec
CM <80 msec
Resolution7
CC & HC 2 significant digits between 10-10 and 10-3 Torr, 1 significant digit
in 10-11 and 10-2 Torr decades
Pirani 2 significant digits between 10-3 and 99 Torr, 1 significant digit
elsewhere within the gauge’s range
CP 2 significant digits
CM 4 significant digits
Repeatability
CC, HC, Pirani, CP 5% of indicated pressure at constant temperature
CM 0.25% of indicated pressure at constant temperature
Calibration gas
CC, HC Nitrogen, Argon
Pirani, CP Air/nitrogen, Argon, Helium
CM Any (gas independent)
Installation orientation
CC, HC, CM, Pirani Any (port down suggested for pressure sensor)
CP Body horizontal only
Materials exposed to vacuum may include
CC Series 421 and 422 – SS 304, Al 6061, silver-copper brazing
alloy, alumina ceramic, Elgiloy®, OFHC® copper
Series 423 – SS 302, SS 304, glass, Al, Inconel X-750®, alumina
ceramic
HC 304 SS, Inconel® X750, glass, tungsten, platinum clad
molybdenum, tantalum, nickel, braze alloy, either yttria coated
iridium or tungsten filament
Pirani 300 series stainless, platinum, alumina ceramic, silver brazing
alloy, nickel 200
CP 300 series stainless, nickel, glass, platinum
CM Inconel
®
Internal volume8
CC Series 421and 422 - 1.8 in3 (30 cm3)
Series 423 - 0.9 in3 (15 cm3)
7 Trailing zeros displayed on LCD screen do not reflect the resolution of the pressure reading.
8 Volume will vary with the type of vacuum connection selected

MKS 937B Operation Manual 14
HC Low power nude tube - zero
Mini BA - 1.4 in3 (23 cm3)
Pirani 0.5 in3 (8 cm3)
CP 2.0 in3 (33 cm3)
CM Type 622A/623A/626A - 0.38 in.3 (6.3 cm3)
Type 722A -0.3 in.3 (4.9 cm3)
Operating temperature range
CC Series 421 - 0° to 70°C (32° to158°F)
Series 422--Versions available that operate up to 250°C.
Series 423 - 0° to 70°C (32° to158°F)
Pirani & HC 0° to 50°C (32° to 122°F)
CP 10° to 50°C (50° to 122°F)
CM 0° to 50°C (32° to 122°F)
Maximum bakeout temperature (Without controller or cables)
CC Series 421 – 250°C (482°F) when backshell subassembly
removed, 125°C (257°F) otherwise
Series 422 and 423 – 400°C (752°F) CF flange version only with
magnet removed
HC 60oC with cable attached
300oC max, with CF, cable removed
150oC, with KF and Viton® seal, cable removed
Pirani 50°C (122°F)
CP 100°C (212°F) RF shielded with coated plastic shell installed
150°C (302°F) Partial shell disassembly required
250°C RF shield via aluminum housing
CM N/A
Radiation (<107 rad)
CC Series 422 with Lemo connector
CP 317 with aluminum housing
Hot cathode sensitivity
LPN 9 Torr-1 (20%)
Mini BA 12 Torr-1 (20%)
Glass BA 7.5 to 25 Torr-1 (depend upon the sensor design)
Hot Cathode filament type
LPN & Mini BA Tungsten (W) or Yittria (Y2O3) coated iridium
Glass BA Tungsten (W), Yittria (Y2O3) coated iridium or
Thoria (ThO) coated iridium
Hot Cathode degas power (E-beam, at grid)

MKS 937B Operation Manual 15
LPN 20 W max
Mini BA 5 W max
Glass BA 50 W max
Ion gauge operating voltages
HC Grid: 180 VDC (normal operation); up to 600 V during degas
Filament bias: 30 VDC
Filament: 1.8 VDC @ 2A
CC 4.0 kVDC
Hot Cathode X-ray limit
LPN & Mini BA 3x10⁻¹⁰ Torr9
Dimensions
CC Series 421 and 422 – 2.26.3 in (56160 mm)
Series 423 – 2.63.4 in (6686 mm)
Mini BA 1.12X2.37 in (2860 mm) with 2-3/4” CF flange
LPN 3.3X1.0 in (83 mm25) with 2-3/4 CF flange, can insert into
NW40 tube.
Pirani 1.3X4.4 in (34112 mm)
CP 1.6X4.4 in (41112 mm)
CM Types 622A, 623A and 626A - 2.64.8 in. (66121 mm)
Type 722A- 1.53.9 in (3899 mm)
Typical Weight (with 2¾” CF Flange)
CC 421and 422 - 2.4 lb (1.1 kg)
423 - 1.8 lb (0.8 kg)
LPN 0.9 lb (0.40 kg) with CF flange
Mini BA 0.816 lb (0.36 kg) with CF flange
Pirani 0.5 lb (0.2 kg)
CP (w/ KF Flange) 0.5 lb (0.2 kg)
Vacuum Connection
CC KF25, KF40, 2-3/4” CF, 8 VCR® -F (1/2”), 1” tubing
LPN 2-3/4” CF (non-rotatable), KF 40
Mini BA KF16, KF25, KF40, 2-3/4” CF, 1-1/3” mini CF, 3/4”,1” OD tubing
Pirani, CP KF16, KF25, 1/8” NPT-M with 1/2” compression seal,
8 VCR
®-F, 4 VCR®-F, 1-1/3" CF (non-rotatable),
2-3/4” CF (non-rotatable)
CM KF16, 8 VCR®-F (1/2”), 8 VCO®-F (1/2”),1-1/3” CF (non-
rotatable), ½” tube
9 The hot cathode X-ray limit can be corrected by using a serial command. See section 9.6 for details.

MKS 937B Operation Manual 16
2.3 Controller Display Messages
X.X0Eee Normal pressure for the Pirani, CP, CC, and HC
X.XXXEe Normal pressure for the Baratron
OVER The pressure is over upper limit (for CC and HC when p > protected
setpoint)
ATM Atmospheric pressure for the Pirani sensor
>1.100Ee CM pressure is over 10% of the full scale
LO<E-11 The CC pressure is below its lower limit, or no CC gauge is connected
LO<E-10 The HC pressure is below its lower limit
LO<E-04 The Pirani pressure is below its lower limit
LO<E-03 The CP pressure is below its lower limit
OFF The HC filament is off, or the CC high voltage is off
WAIT CC and HC startup delay
LowEM The HC off due to low emission current
CTRL_OFF The HC or CC are turned off by the control channel
PROT_OFF The HC or CC are in a protected state
RP_OFF The sensor power is turned off remotely
REDETECT Detecting the sensor type for PR/CP
MISCONN A sensor is improperly connected, or there is a broken filament (Pirani, CP,
CM, HC)
_ _ _ _ No Pirani/CP/HC sensor is detected on the inserted Pirani/CP board
NOBOARD No board is detected in the slot, display only last 5 secs
N2, AR, He Gas type
U User calibration
SPn Activated relay channel (n=1 to 12)
_ _ A relay is enabled, but not activated.
Ctrl The CC/HC is controlled by another gauge (PR/CP)
AZ PR/CP/BR may be auto-zeroed by its control gauge
F1, F2 Active filament
DG The HC is degassing
An, Bn, Cn The channel where the control gauge is installed (n=1, 2)
MKS 937B Operation Manual 17
3 Feature, Control Locations and Dimensions
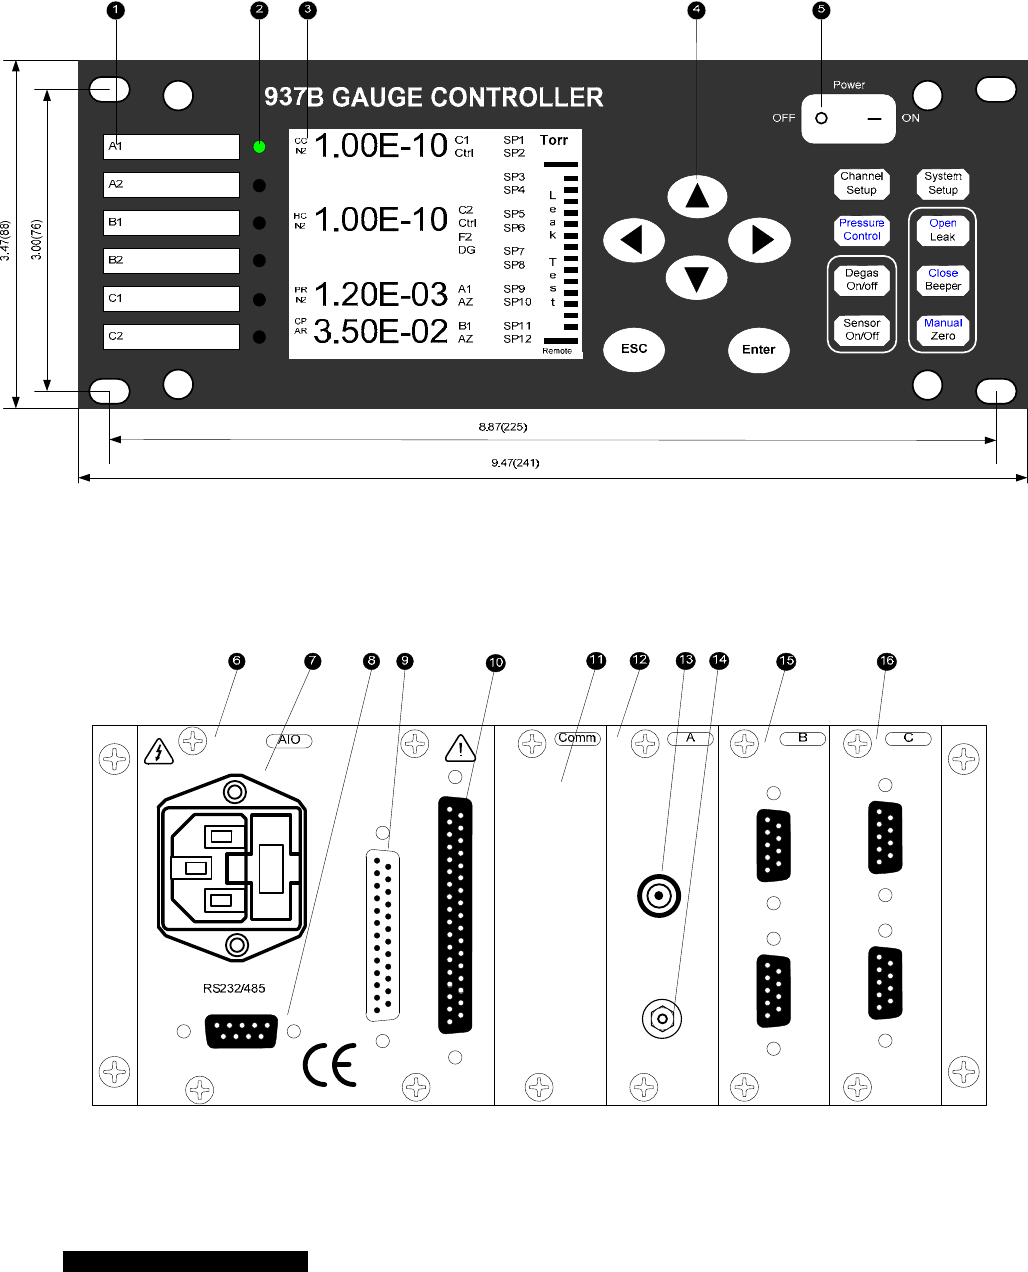
Figure 3-1 937B front Panel.
RELAY OUTOUT
Communication
ANALOG
100 - 240 VAC
50/60 HZ
150 WATTS
FUSE: 2.0 AT
COLD CATHODE
PIRANI
CAPACITANCE MANOMETER
Figure 3-2 937B rear panel.
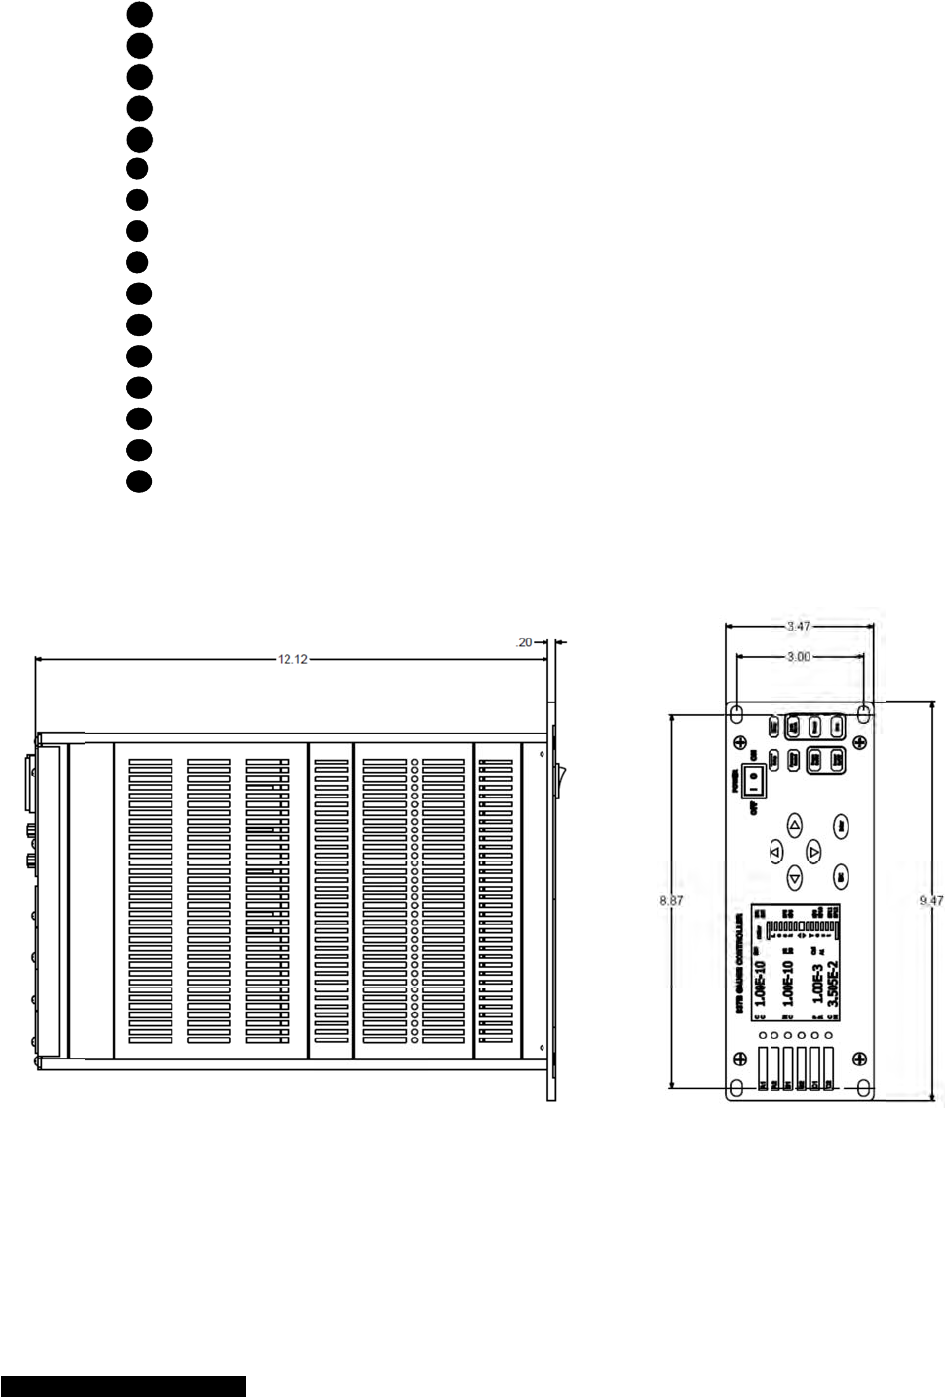
MKS 937
B
B
Operation M
a
1
C
h
2
L
E
3
Li
q
4
P
u
5
P
o
6
A
I
O
7
AC
8
R
S
9
R
e
10
An
11
C
o
12
C
o
13
Hi
g
14
C
u
15
Pi
r
16
C
a
a
nual
Figure
h
annel label
E
D, indicating
q
uid Crystal
D
u
sh Buttons f
o
o
wer Switch
O
Module
C
Power Inlet
S
232/485 Co
m
e
lay Output P
o
n
alog Output
P
o
mmunicatio
n
o
ld Cathode
M
g
h Voltage B
N
u
rrent BNC c
o
r
ani Module
a
pacitance m
a
3-3 937B e
x
active chann
D
isplay
o
r menu navi
g
m
munication
o
rt
P
ort
n
/Valve Contr
o
M
odule
N
C connecto
r
o
nnector
a
nometer Mo
18
x
ternal dime
n
el
g
ation
Port
o
l Module
r
dule
n
sions (inch
e
e
s).

MKS 937B Operation Manual 19
4 Typical Applications for the Series 937B
Controller
The measurement of pressure in high vacuum chambers.
Pressure control in high vacuum systems and process sequencing using relay set points.
Sensing abnormal pressure events and initiating and controlling appropriate security
measures using the relay set points.
Controlling system pressure by using the analog output as the input to an automatic pressure
controller.
Starting or stopping system processes using relay set points.
Measuring backfill pressures.
Leak testing vacuum systems.
Controlling acceleration and light source vacuum systems.
MKS 937
B
5 H
P
Va
T
HE
HPS
®
pressure
listed bel
o
M
M
M
M
M
With thre
e
Series 93
versatility
including:
P
U
T
R
T
T
T
B
Operation M
a
P
S P
r
a
cuum
®
P
RODUCTS
S
m
easuremen
o
w can be co
n
M
KS Baratron
M
KS 423 I-M
A
M
KS Lower p
o
M
KS Series 3
4
M
KS Series 3
1
e
sensor mo
d
7B Controlle
r
and ease-of
-
ressure mea
s
U
nits of the in
d
he type of pr
e
R
elay status (
b
he operating
he control st
a
he auto zero
a
nual
r
oduct
s
Syste
S
ERIES
937B
t between 1
n
nected to th
e
Capacitance
A
G or Series
4
o
wer nude ga
4
5 Pirani sen
s
1
7 Convectio
n
d
ule slots ava
r
can accom
m
-
use in mind,
s
urements fo
r
d
icated press
e
ssure senso
b
oth enabled
status of Hot
a
tus of ion ga
channel for
p
s
Seri
e
m
Multi-Sensor
10
-11
torr to
2
e
937B:
Manometer
s
4
21/422 Cold
uge or mini
B
s
ors (up to 6
)
n
Pirani sens
o
Figure 5-
1
ilable and th
e
m
odate many
with a large
L
r
all sensors
c
ures (Torr, m
r (CM, CC, P
and activate
d
Cathode ga
u
uges
p
irani/CP/CM
20
e
s 937
B
High Vacuu
m
2
10
+5
torr. A
s
with heads
f
Cathode Se
n
B
A Hot Catho
d
o
rs (up to 6)
1
937B fron
t
e
ability to co
n
unique requi
r
L
CD screen t
h
c
onnected to
bar, Pa, micr
R, CP, HC) (
s
d
relays are
d
u
ge (active fil
a
sensors
B Mul
t
m
System pr
o
number of di
f
f
rom 0.02 to
2
n
sors (up to
3
d
e sensors (
u
t
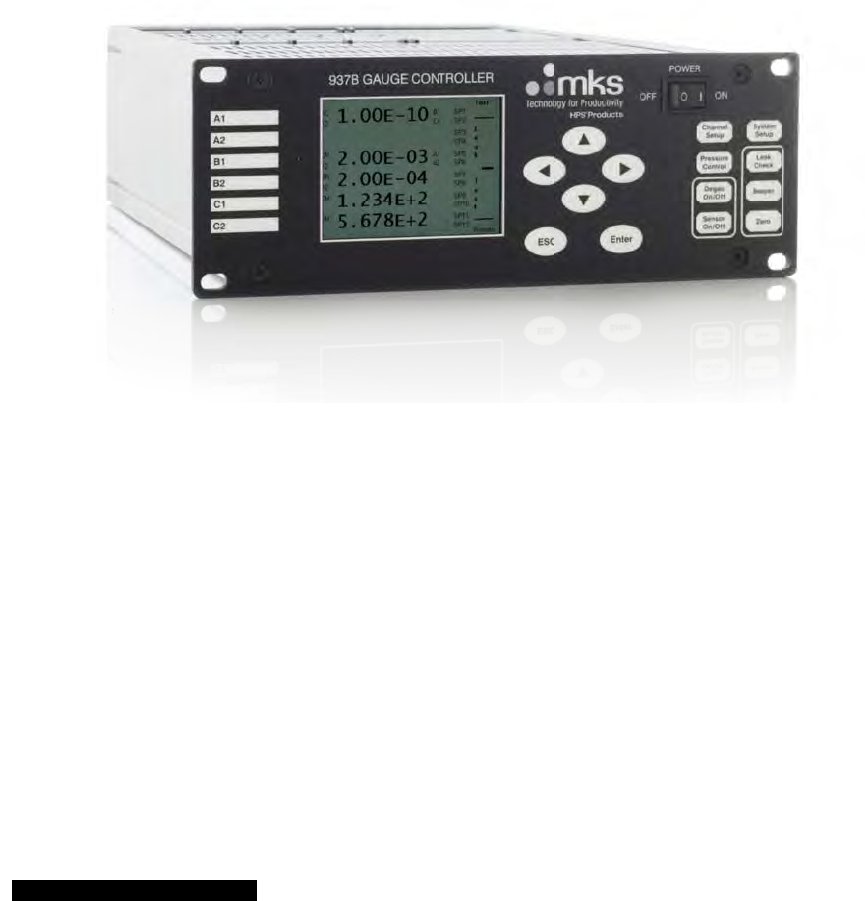
view.
n
figure a vari
e
r
ements and
h
at displays
m
the controlle
r
r
ons)
s
elf-detectin
g
d
isplayed)
a
ment, dega
s
t
i-Sen
s
o
vides accur
a
f
ferent MKS
p
2
0,000 torr (u
3)
u
p to 3)
e
ty of sensor
applications.
m
uch useful i
n
r (up to 6)
g
)
s
)
s
or Hi
g
a
te and reliab
l
p
ressure sen
s
p to 6)
combination
s
It is designe
d
n
formation,
g
h
l
e
s
ors,
s
, the
d
with

MKS 937B Operation Manual 21
Leak checking status (activated by the leak check button)
System self-checking information (board status, sensor status, pressure range, and etc)
Front panel locking status (when REMOTE is displayed, the front panel is locked remotely)
Controller operation is very simple. For example, to access the system setup screen, simply push the
System Setup button. This permits single-screen access and adjustment for all of the control and display
parameters for each sensor connected to the controller. An LED indicates the current active channel and
all of the parameters associated with the sensors are displayed by pushing the Channel Setup button.
In addition to the pressure values displayed on the screen, three types of analog signals are also shown:
Buffered analog outputs for each sensor (up to 6). These buffered analog signals respond
immediately to sensor signal changes, therefore, can be used in critical fast control applications.
Logarithmic/linear analog outputs for each pressure sensor (up to 6) ranging from 0 to 10 V. The
scale for these analog outputs can be adjusted as desired. While these linear signals are
somewhat simpler to deal with than the sensor-dependent buffered analog signals, there is a
longer time delay (<100 msec) due to the signal processing required by the microprocessor.
There are also combined analog outputs (up to 2) available. By combining the sensors with
different measurement ranges (such as Pirani and cold cathode sensors), analog signals with
much wider range are available. This eliminates the requirement for switching/selecting the
sensor. The time delay for these analog outputs is around 100 msec.
Twelve (12) mechanical relays with independently adjustable controller relay set points allow the 937B to
control the operation of critical components in a vacuum system such as valve or a pump. The set point
parameters are nonvolatile, remaining unchanged after powering down or during a power failure. They
may be set or disabled from either the front panel or the optional communications module.
The Controller also has control set points to turn off ion gauges at higher pressures, extending the
operating lifetime before maintenance is required (for both cold cathode or hot cathode).
Direct computer communication is available to control front panel functions or read pressure and other
information remotely. A RS232/485 serial port is available and the communication protocol can be
selected from the System Setup panel.
MKS 937B Operation Manual 22
6 Operating the Series 937B Controller
6.1 Power
Turn the Power switch on the front panel to Off when the Series 937B Controller is not in use. After
turning the Controller off, allow it to remain off for at least 5 sec before turning it back on.
6.2 Front Panel Control Lock
All panel functions are inactive and the Controller remains in pressure measurement mode when the
Controller's front panel controls are locked. REMOTE is displayed at bottom right corner of the LCD
display.
Simultaneously press and to lock or unlock the front panel controls or to display the lock status.
This will toggle the lock and unlock function.
The front panel can also be locked or unlocked with optional serial communications commands. See
RS232/RS485 Communications Commands for more information.
6.3 Front Panel Display
6.3.1 Standard front panel display
A 3.6 inch 320x240 pixel color LCD displays the pressure, control, relay, gauge type, and other critical
information. A label on the left-hand side of the front displays identifies the name of the channel (A1, A2,
B1, B2, C1, C2). An illuminated green LED is used to show the active channel for channel setting
purpose. The standard front panel display for the 937B is shown in Figure 6-1:
CM
U
1.00E-10
1.00E-10
1.20E-03
3.505E-2
C2
Ctrl
F2
DG
C1
Ctrl
L
e
a
k
T
e
s
t
Torr
SP11
SP12
SP9
SP10
SP5
SP7
SP8
SP1
SP2
SP3
-----
PR
N2U
HC
N2
CC
N2
Remote
A1
AZ
B1
AZ
1 2 3 4 5
7
6
A1
A2
B1
B2
C1
C2
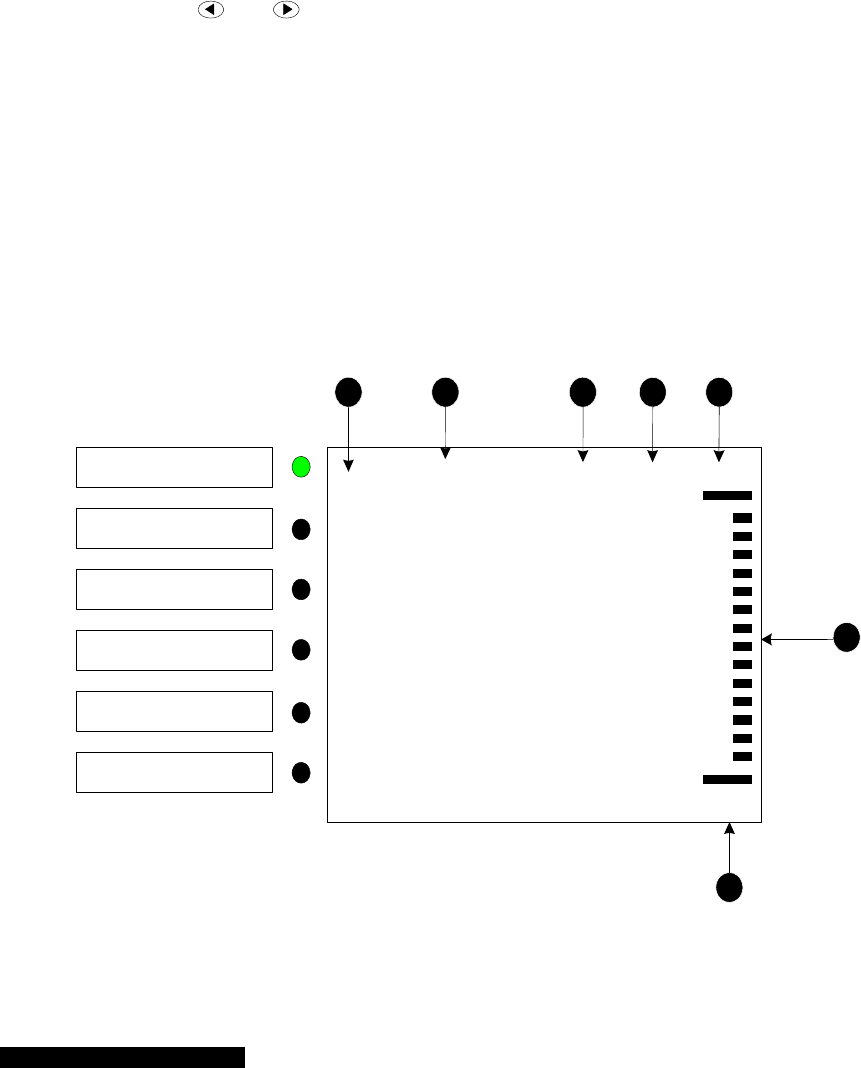
Figure 6-1 Standard 937B LCD front panel display for pressure measurement under Leak
detection mode.

MKS 937B Operation Manual 23
1 Type of sensor detected (CC = cold cathode, HC = hot cathode, PR = Pirani, CP =
convection Pirani, CM = Capacitance manometer, N2, Ar, He = Gas type, U = User
Calibrated)
2 Pressure/flow readings for all of the detected sensors.
3 Control information which includes:
For a cold cathode gauge, C1 Ctrl means the cold cathode gauge is
controlled by channel C1.
For a hot cathode gauge, C2 Ctrl means the hot cathode gauge is controlled
by channel C2. F2 means filament 2 is the active filament, DG means the
gauge is degassing.
For PR/CP/CM, A1 AZ means the PR/CP/CM will be auto-zeroed by the
gauge on Channel A1 (typically, an ion gauge).
4 Relay status: displayed channel = activated relay; ---- = enabled, but, not activated
relay; blank = relay is not yet set.
5 Pressure units (Torr, Pascal, mBar, Microns)
6 Leak checking status; displayed only when the leak check is activated. When active,
the color for the pressure reading of the corresponding sensor turns to blue.
7 Front screen is locked when REMOTE is displayed
Capacitance manometer pressure indication can be toggled between the decimal and
scientific indication on the selected channel (highlighted by the green LED) by pressing
Degas
On/off button.
6.3.2 Large font displays
A special large font pressure display (only for one single channel) is also available to ensure the pressure
readings can be seen in distance. To enter this mode:
1. While in the standard display mode, press either the or the key to select the desired
channel, as indicated by the green LED.
2. Enter the large font display mode by pressing the Enter key.
3. To exit the large font display mode, press the ESC key or the Enter key again.
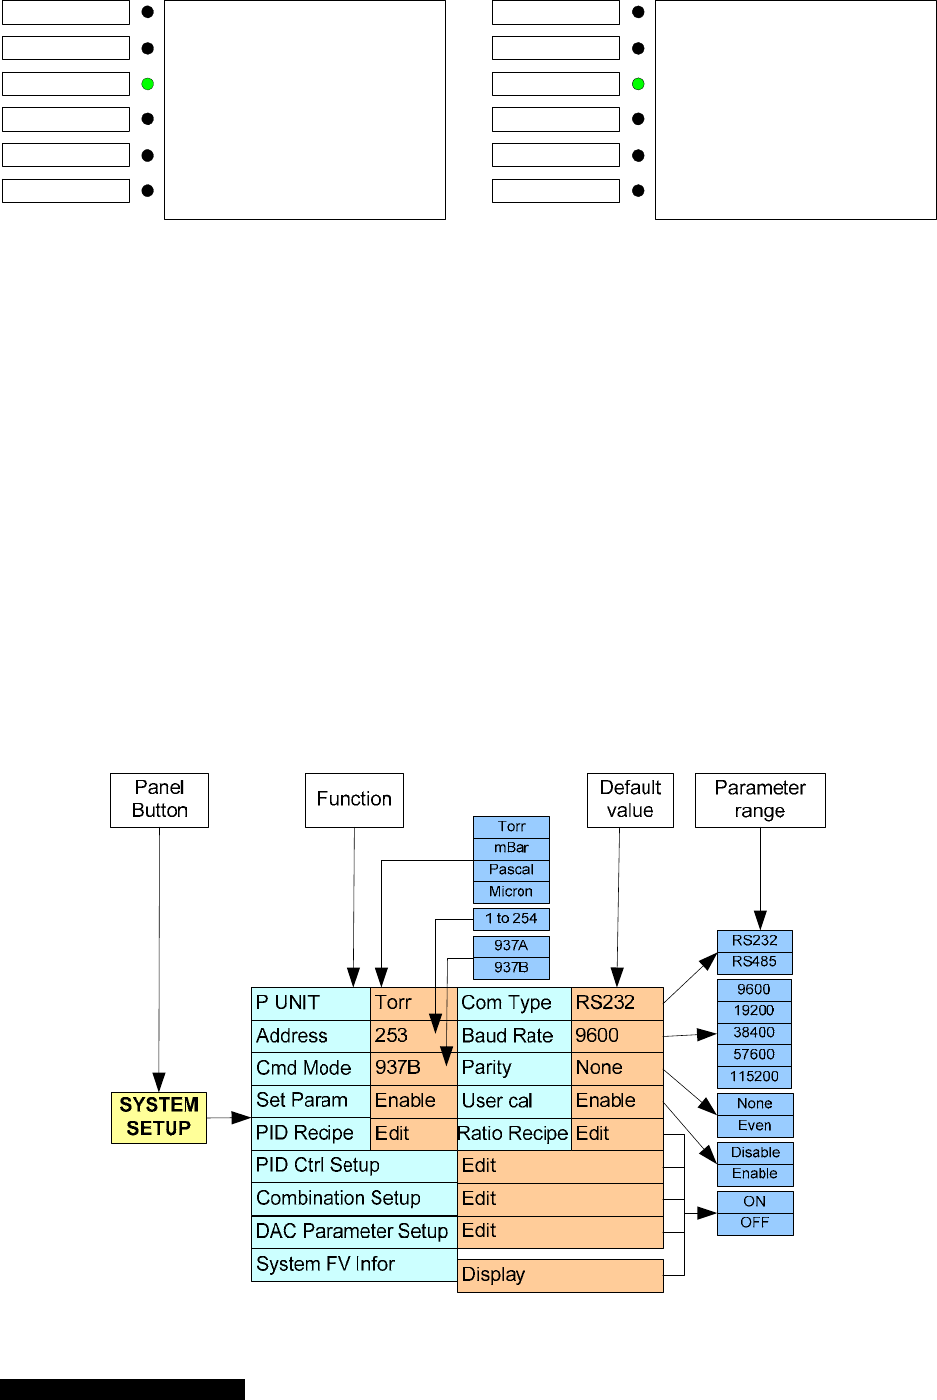
Figure 6-2 shows a comparison between pressure measurements in the standard mode front panel
display and in the large font display mode. When the large font display is selected, one channel is
displayed as large font (B1 as shown in the figure) and the pressure readings for all the detected sensors
are displayed in smaller font of the left side of the LCD.
MKS 937B Operation Manual 24
CP
Ar
1.00E-08
2.10E-06
<1.0E-04
<1.0E-03
C2
Ctrl
C1
Ctrl Torr
SP11
SP12
SP9
SP10
SP5
SP6
SP7
SP8
SP1
SP2
SP3
SP4
PR
N2
CC
N2
CC
N2
A1
AZ
B1
AZ
A1
A2
B1
B2
C1
C2
2.10E-06
<1.0E-04
B1
A1
A2
B1
B2
C1
C2 <1.0E-03
1.00E-08
2.10E-06
Standard Display Large Font Display
Figure 6-2 A comparison between standard display mode and large font display mode for the
937B LCD display during pressure measurement.
6.4 System Setup
6.4.1 Overview of 937B System setup
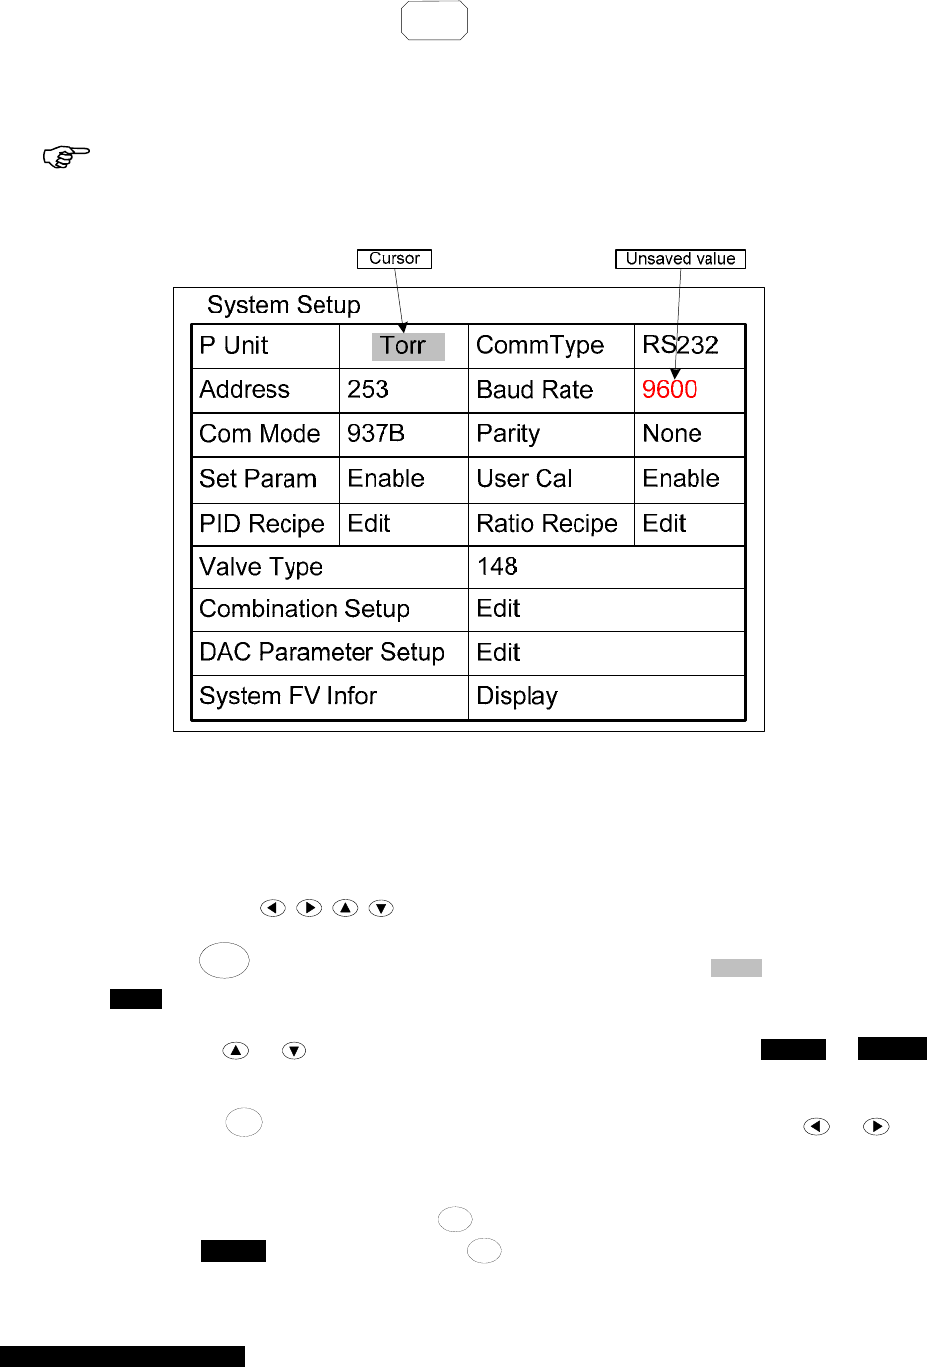
An overview of the 937B system setup parameters is shown in Figure 6-3. The default values and the
selection ranges for these parameters are also shown.
The system setup allows the user to set parameters such as pressure unit, communication protocol,
communication address, baud rate, communication command mode (either matching old 937A, or new
937B), disable/enable set parameter, disable/enable user calibration, and FW versions for the controller
and boards in the controller box.
In addition, the logarithmic/linear analog output for individual channel and combined logarithmic/linear
analog output can be adjusted by setting the DAC parameters.
Figure 6-3 937B system setup parameters, their default values and ranges.
MKS 937B Operation Manual 25
6.4.2 Display system setup parameters
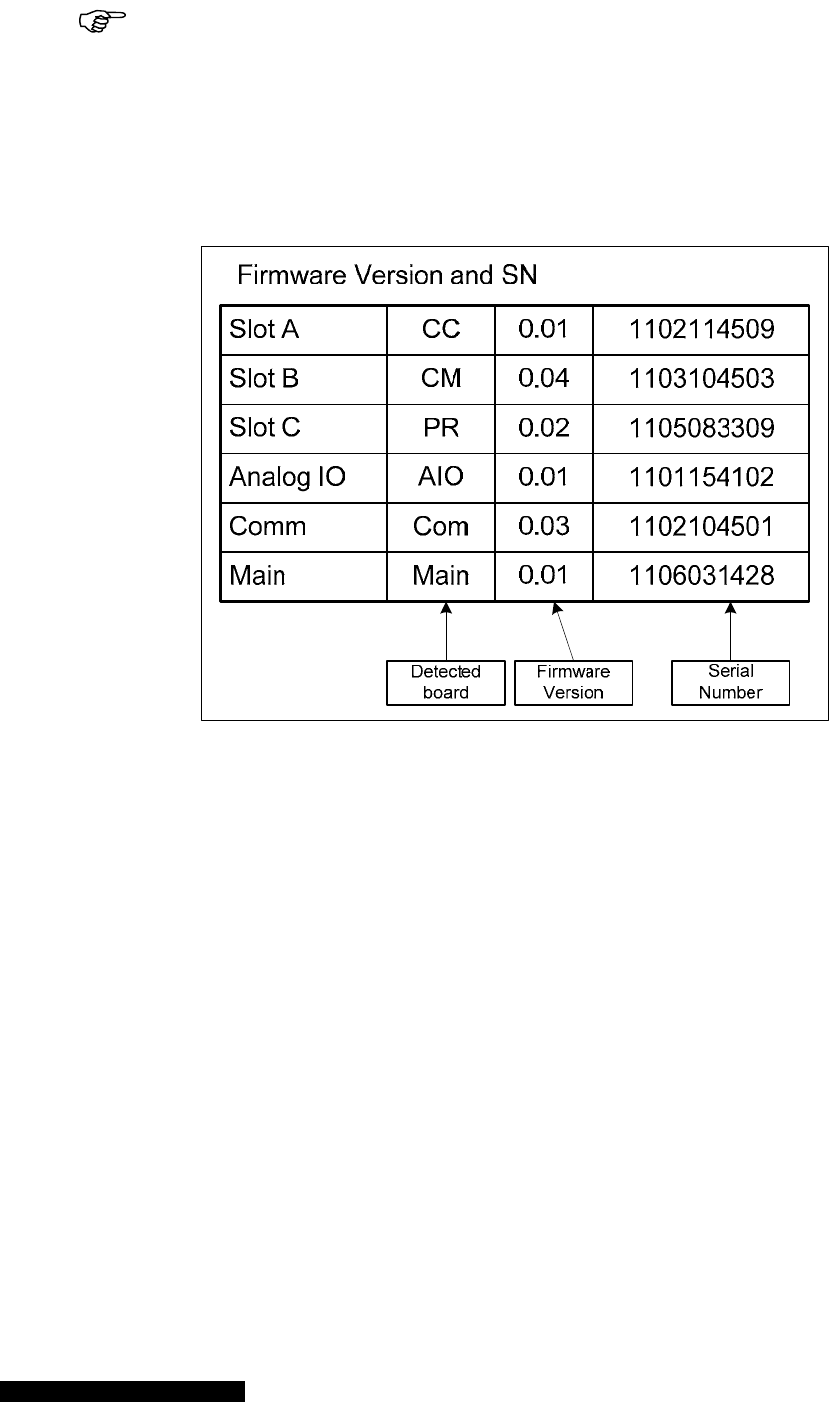
To display the 937B system setup, press the
System
Setup key; the LCD screen display will switch to the
system setup mode, as shown in Figure 6-4. The shaded area in the figure shows the cursor position.
The cursor position is controlled by the arrow keys on the front panel. A parameter indicated in red
indicates that the value has been modified, but not yet saved.
When a parameter value is indicated in red, it means that this value has been changed,
but not yet saved. Exiting the setup mode without performing a save will cause the previous,
unchanged parameter value to be used.
Figure 6-4 System setup information displayed on 937B LCD screen.
6.4.3 Change and save a parameter value
To change and save a system setup parameter value, use the following procedure:
1. Press any of the keys to move the cursor to the parameter to be changed.
2. Press the
Enter key to highlight this parameter value. For example, Torr will change to
Torr .
3. Press either or key to change the parameter value (i.e. to change Pascal to mBar
).
4. Pressing the
ESC key at this point will restore the original parameter; pressing or will
move the cursor away from this parameter, changing the color of the parameter value to red
and it will not be saved.
5. To save an updated value, press the Enter key while the background of the parameter value is
black (i.e. Pascal in this example). After Enter is pressed, the background of the selected

MKS 937B Operation Manual 26
parameter will turn gray ( Pascal in this example). This indicates that the new pressure unit
has been saved.
6. To return to the normal front panel display mode, press the ESC key once after the parameter
values have been changed.
The above procedure for changing a pressure unit applies equally to changing all
other parameters within the 937B.
6.4.4 Description of the system setup parameters
1. P unit
This determines the units used for the pressure displayed on the front panel, the pressure
queried from serial communication, and the pressure setpoint. There are four choices:
Torr, mBar, Pascal, and Microns. The default value is Torr.
2. Comm Type
This sets the Serial communication protocol, either RS232 or RS485. Default value is
RS232.
When the serial communication protocol is changed, the power of the 937B controller
must be reset for the change to take effect.
3. Address
This is the address for RS485 communication. The valid range is from 1 to 254. The
default value is 253. 254 is reserved for broadcasting only.
4. Baud Rate
This sets the baud rate for serial communication. Valid values are 9600, 19200, 38400,
57600, 1152000. The default value is 9600.
5. Com Mode
This allows the use of either new 937B or old 937A serial communication protocols. The
default setting is 937B. When 937A is selected, 937A software can communicate with the
937B controller.
6. Parity
Parity for serial communication.
7. Set Param
When Set Parameter is disabled, none of the channel setup commands can be executed.
However, these values can still be viewed from the display, or queried using serial
communication:
CC Gas Type
User Calibration
AO delay
Protect setpoint
Relay direction, setpoint and hysteresis
Control setpoint Channel, setpoint and hysteresis
HC Gas Type

MKS 937B Operation Manual 27
Degas time
Active Filament
Emission current
Protect setpoint
Relay setpoint, direction and hysteresis
Control setpoint Channel, setpoint and hysteresis
PR/CP Gas Type
Factory Default
Auto Zero
Manual Zero
ATM value and calibration
Relay setpoint, direction and hysteresis
CM Range
Factory Default
Auto Zero
Manual Zero
Relay setpoint, direction and hysteresis
8. User Cal
When User Calibration is disabled, the following commands cannot be executed through
the keypad or through serial communications:
CC User Calibration
HC User Calibration and sensitivity
PR/CP Factory default, Manual Zero, and Manual ATM
CM Factory default and Manual Zero
9. PID Recipe
This is used to set the PID control recipe for controlling system pressure using single
MFC, multiple MFC, or control valve. This function is disabled in 937B, and is available in
946 Vacuum System Controller.
10. Ratio Recipe
This is used to set the recipe for multiple MFC ratio pressure control. This function is
disabled in 937B, and is available in 946 Vacuum System Controller.
11. Valve Type
This allows to selected type for control valve for system pressure control. This function is
disabled in 937B, and is available in 946 Vacuum System Controller.
12. Combination Setup
There are two combination channels available in the 937B. Up to 3 vacuum pressure
sensors can be assigned to each combination channel.
To view or change the combination channel settings, set the Set Combination Ch
parameter to ON and press Enter . Refer to section 8.4 for a more detailed discussion of
the settings for the combination channels.
13. DAC Parameter Setup
The Log/Linear analog output for each individual channel, as well as the combination analog
output can be accessed by adjusting the DAC parameter. To view or modify the DAC parameter,

MKS 937B Operation Manual 28
press
System
Setup and move the cursor to Set DAC Parameter. Select ON and press Enter on the
System Setup screen and the parameters used in determining the DAC logarithmic/linear analog
output are displayed. These parameters can be modified, as shown in Figure 6-5.
Both slope A and offset B must be selected when a logarithmic linear equation is used. The slope
A is the voltage per decade, and the offset B is the desired voltage when the measured
pressure is equal to 1 torr. The valid range for A is from 0.5 to 5, while the valid range for B is
from –20 to 20 V. The default settings are 0.6 and 7.2 for A and B, respectively. If only one
sensor is allowed to be connected to the board (such as HC of single channel CC), only one
equation is displayed (i.e. A1, as shown in Figure 6-5).
Set DAC Parameter
BA
Channel A1 7.20E+06.00E-1
Channel A2
Channel B1
Channel B2
Channel C1
Channel C2
Combined
V=AlogP+B
V=AlogP+B
V=AP
V=AP
V=AlogP+B
V=AlogP+B
Equation
1.00E+2
7.20E+06.00E-1
7.20E+06.00E-1
1.00E+3
7.20E+06.00E-1
Figure 6-5 Setting DAC logarithmic and linear analog output.
Table 6-1 Valid gauges for autozeroing capacitance manometers of different ranges.
A value 1E-2 1E-1 1E+0 1E+1 1E+2 1E+3 1E+4 1E+5 1E+6
Vout, V Pressure, torr
10 1000 100 10 1 1x10-
1
1x10-
2
1x10-
3
1x10-
4
1x10-
5
1 100 10 1 1x10-
1
1x10-
2
1x10-
3
1x10-
4
1x10-
5
1x10-
6
0.1 10 1 0.1 1x10-
2
1x10-
3
1x10-
4
1x10-
5
1x10-
6
1x10-
7
0.01 1 0.1 0.01 1x10-
3
1x10-
4
1x10-
5
1x10-
6
1x10-
7
1x10-
8
Linearized analog output can be used when high analog output resolution is required over a
narrow pressure range. When linear equation is used, the parameter B is always set to zero as it
indicates zero voltage output at high vacuum. The A value means the analog output voltage
when pressure is at 1 torr. Table 6-1 shows the relationship between the linearized analog
output (Vout) and the pressure for different A values. The bold highlighted values are the
pressures with 937B full scale analog output voltage (10V) when corresponding A value is
selected. For example, if 1E-2 is selected, it will have 10 V output at 1000 torr. This will be the
best choice for a 1000 torr Baratron. However, if 1E+2 is selected, the 10V full scale analog
output will occur at 1x10⁻¹ torr, and this might be a good choice for a Pirani if you are interested in
its 1x10⁻¹ to 1x10⁻³ torr measurement range.
MKS 937B Operation Manual 29
Since the measurement ranges for Baratron may vary significantly, please pay
attention in selecting the DAC parameters to ensure proper Log/linear analog voltage
output from the 937B.
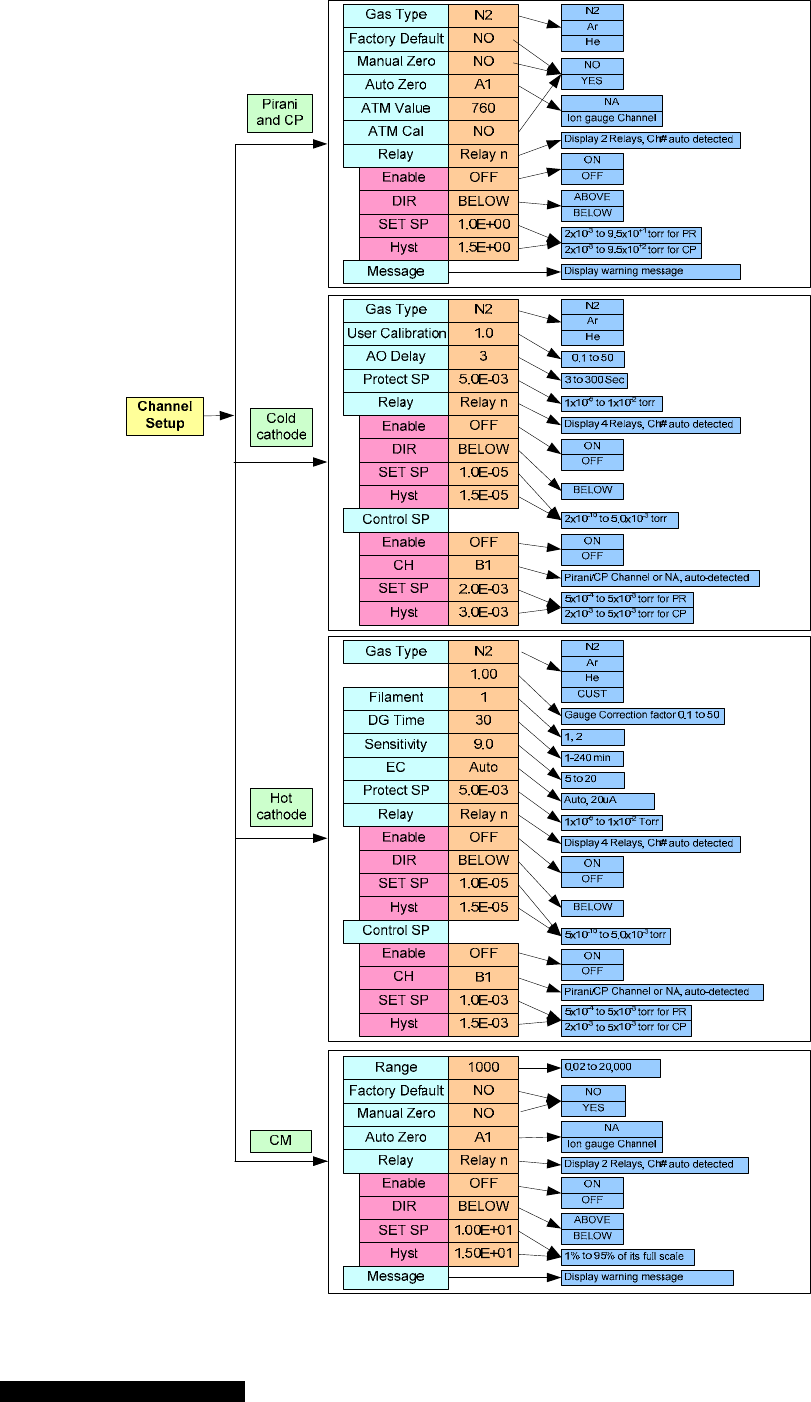
14. System FV Information
The system firmware information for all of the modules installed in the 937B is displayed
when ON is selected. The serial numbers for all detected boards are also displayed, as
shown in Figure 6-5.
Figure 6-6 System firmware and serial number information displayed on 937B LCD screen.

MKS 937B Operation Manual 30
6.5 Channel Setup for Pressure Measurement
6.5.1 Overview of 937B Channel setup
Simple and convenient setting of the parameters associated with the sensor connected to the 937B
controller (such as calibration, gas selection, relay setpoint, control setpoint, and control channel
selection) can be performed using Channel setup.
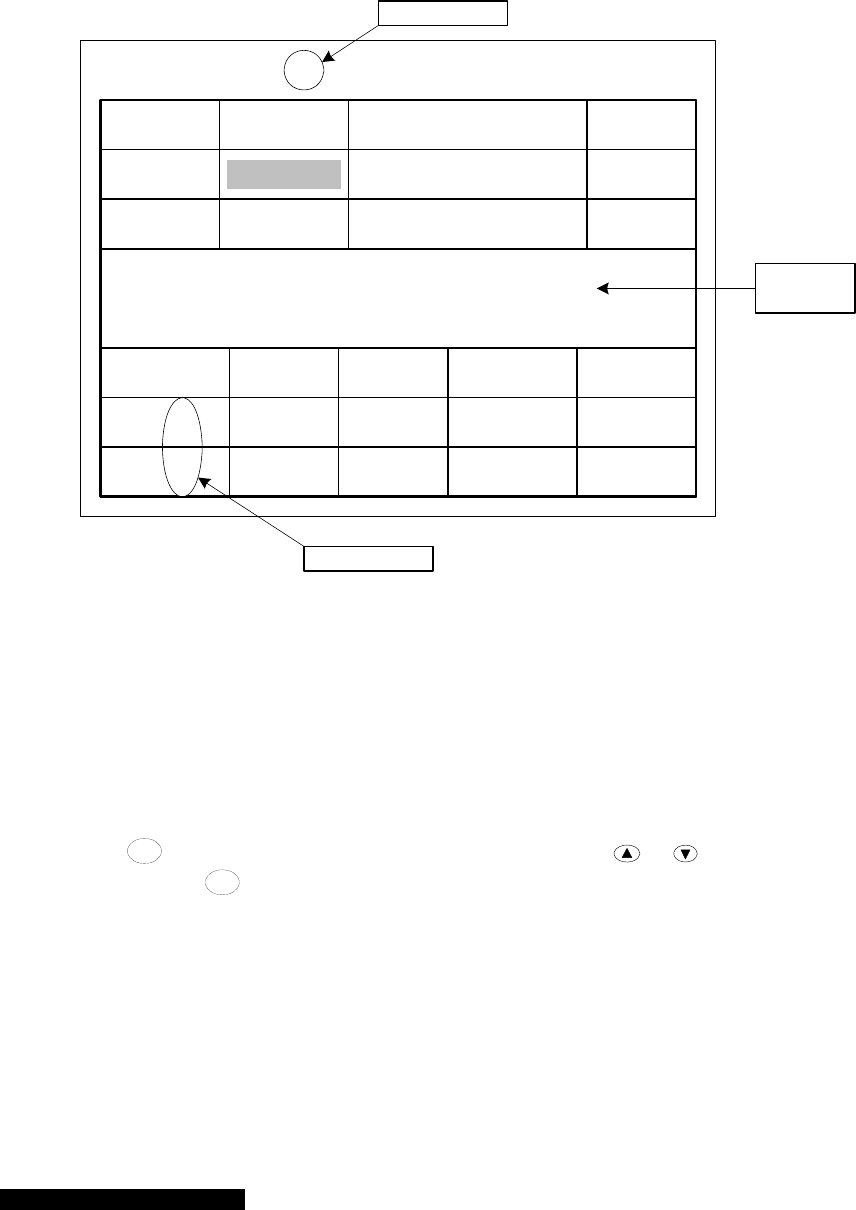
Figure 6-7 shows the channel setup parameters for all of the sensors connected to a 937B controller. The
default values are shown in the brown boxes while the ranges for setup are shown in the blue boxes.
To perform a Channel Setup:
Select the desired channel by pressing either or on the front panel until the green LED on
the left side of the front panel is aligned with the desired channel, as indicated on the LCD
screen.
Once the channel (sensor) is selected, the channel setup panel can be displayed by pressing
Channel
Setup . The keys are used to select the parameter to be changed.
Press
Enter to highlight the parameter value, then press either or to change the parameter
value.
Press
Enter to save the setting.
An overview of the 937B Channel Setup options is shown in Figure 6-7. There are five types of sensor
setup interfaces available. All of the variable parameters associated with the vacuum sensors, along with
the ranges for these parameters are summarized in the Figure. The type of sensor is automatically
detected when the Channel
Setup key is pressed and the corresponding interface will be displayed; no manual
selection is required.
MKS 937B Operation Manual 31
Figure 6-7 937B Channel Setup setting parameters, their default values and ranges.
MKS 937B Operation Manual 32
6.5.2 Setup for a Capacitance Manometer
A capacitance manometer board present in the 937B controller will be automatically detected and
displayed on power-up. At the same time, the connection of the capacitance manometer to the control
board will be checked. If no capacitance manometer is connected, MISCONN will be displayed.
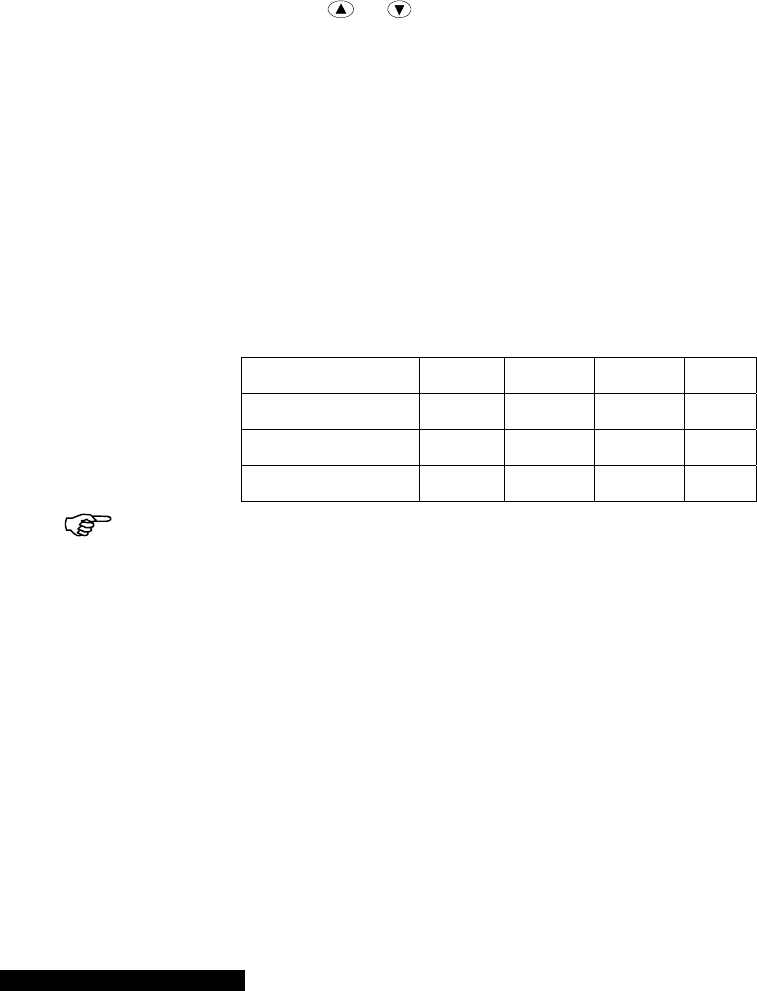
Refer to Figure 6-9 in setting up a capacitance manometer.
Setup CM Gauge A1
Range
Auto Zero
Relay
Relay 02
Relay 01
1.00E+03
Enable DIR SET SP
ABOVE
Hyst
SET 1.00E+01 9.35E+00
BELOWENABLE 3.00E+01 5.35E+01
NA
Factory Default NO
Manual Zero NO
Message
Box
Auto-detected
Auto-detected
CM Type Input Voltage 10VABS
Figure 6-8 Capacitance manometer setup information displayed on the 937B LCD screen.
1. CM Type
ABS (absolute) and DIFF (differential) capacitance manometer can be selected.
2. Input Voltage
The Input Voltage (for the 937B controller) is same as the maximum analog output voltage of the
capacitance manometer. To select the correct value, move the cursor to the Input Voltage box,
press Enter , and this parameter will be highlighted. Use either or to select the correct
voltage. Press Enter to save the correct setting. The valid input voltage ranges for an absolute
capacitance manometer are 10, 5, and 1 V. The default value is 10 V.
The valid input voltage ranges for a differential capacitance manometer are 1B, 5B, 1U, 5U, and
10U V. Here, B represents bi-directional (for example, 1B means ±1 V input voltage, and the
voltage at zero differential pressure is 0 V), and U represents uni-directional (for example, 10U
means 0 to 10 V input voltage, and voltage at zero differential pressure is 5 V, exactly at the
middle of the input range).
3. Range
MKS 937B Operation Manual 33
This parameter is the full-scale pressure range of the capacitance manometer. Valid ranges are
from 1x10⁻² to 2x10+4 Torr; the default setting is 1000 Torr. Only 3 sections are available in each
decade (1, 2, and 5), except between 1,000 to 10,000 torr where 1500 torr is allowed.
For manometer with pressure unit other than torr (such as 1000 mBar full scale), one needs to
change the controller pressure unit to match the unit of the manometer (such as mBar) before
select the appropriate range value.
4. Factory Default
When YES is selected for Factory Default, the Manual Zero data is removed, and its value is
reset to zero (factory default). The default setting is NO.
On the front panel LCD display, a small U under the gauge type indication (i.e CM) will disappear
if the gauge was manually calibrated before (user calibrated).
5. Auto Zero
This allows the use of either or to select a valid gauge for autozeroing i.e. - the Baratron
shown in the table below. The available channel is auto-detected. There is an option of NA which
can be selected if Auto Zero is not required. The autozero will be executed only when
(1) System pressure is less than 10-5xPFS (5 decades lower than the full scale)
(2) The Baratron reading is between 5x10⁻⁴xPFS and 0.05xPFS (0.05% to 5% of the full scale)
When a capacitance manometer is zeroed, a U will be displayed under the gauge type indicator
(CM) to indicate that this manometer has been user calibrated.
You cannot use another capacitance manometer to autozero a capacitance manometer since the
range cannot be auto-detected. Table 7-1 shows the valid gauges that can be used for
autozeroing manometers that have different full-scale ranges.
Table 6-1 Valid gauges for autozeroing capacitance manometers of different ranges.
Full scale of CM CP PR CC HC
1000 Torr Yes Yes Yes Yes
100 Torr No Yes Yes Yes
20 Torr No No Yes Yes
The capacitance manometer and the reference auto-zero sensor must be connected
to the same chamber at all times.
6. Manual Zero
The default setting for the Manual Zero function is NO. When it is set to YES the manometer can
be manually zeroed. To do so, the system pressure must be less than 10-5xPFS (5 decades less
then the full scale). The Manual Zero function will abort if the overall offset is great than 5% of the
full scale.
When a capacitance manometer has been manually zeroed, a U will be displayed under the
gauge type indicator (CM) to indicate that this manometer is user calibrated.
7. Relay
Relays for each capacitance manometer channel are preset (2 per channel), as shown below.
These values are auto-detected.

MKS 937B Operation Manual 34
Sensor location A1 A2 B1 B2 C1 C2
Relay assigned 1 & 2 3 & 4 5 & 6 7 & 8 9 &10 11 & 12
8. Enable
There are three ways to enable a relay:
a. SET: forces the relay to stay in the activated state (closed) regardless of pressure and
setpoint values
b. CLEAR: forces the relay to stay in the deactivated state (open) regardless of pressure
and setpoint values.
c. ENABLE: the relay status is determined by the pressure, setpoint value, and direction.
9. DIR
DIR determines when the relay is activated. If ABOVE is selected, the relay will be activated
when the pressure is above the setpoint (higher than the setpoint pressure). If BELOW is
selected, the relay will be activated when the pressure is below (less than) the setpoint. The
default setting for DIR is BELOW.
Figure 8-1 provides a more a detailed description of the DIR setting.
10. SET SP
The SET SP function allows input of the setpoint value. The range is 1% to 95% of the
manometer’s full scale. The speed of the value change can be increased by continuously
pressing the or key during the setting change.
11. Hyst
When a setpoint value has been changed, the hysteresis value will be changed automatically. If
DIR is set to ABOVE, the hysteresis is automatically set to 0.9xSetpoint; if DIR is set to BELOW,
the hysteresis is automatically set to 1.1xSetpoint.
To modify the hysteresis, move the cursor to the hysteresis value and press Enter . Using the
or key, change the value, then press Enter again to set the value. When DIR has been set to
ABOVE, the maximum hysteresis value permitted for a capacitance manometer is 0.99xSetpoint;
when DIR is set to BELOW, the minimum hysteresis value is 1.01xSetpoint.
6.5.3 Setup for a PR (Pirani)/CP (convection Pirani) sensor
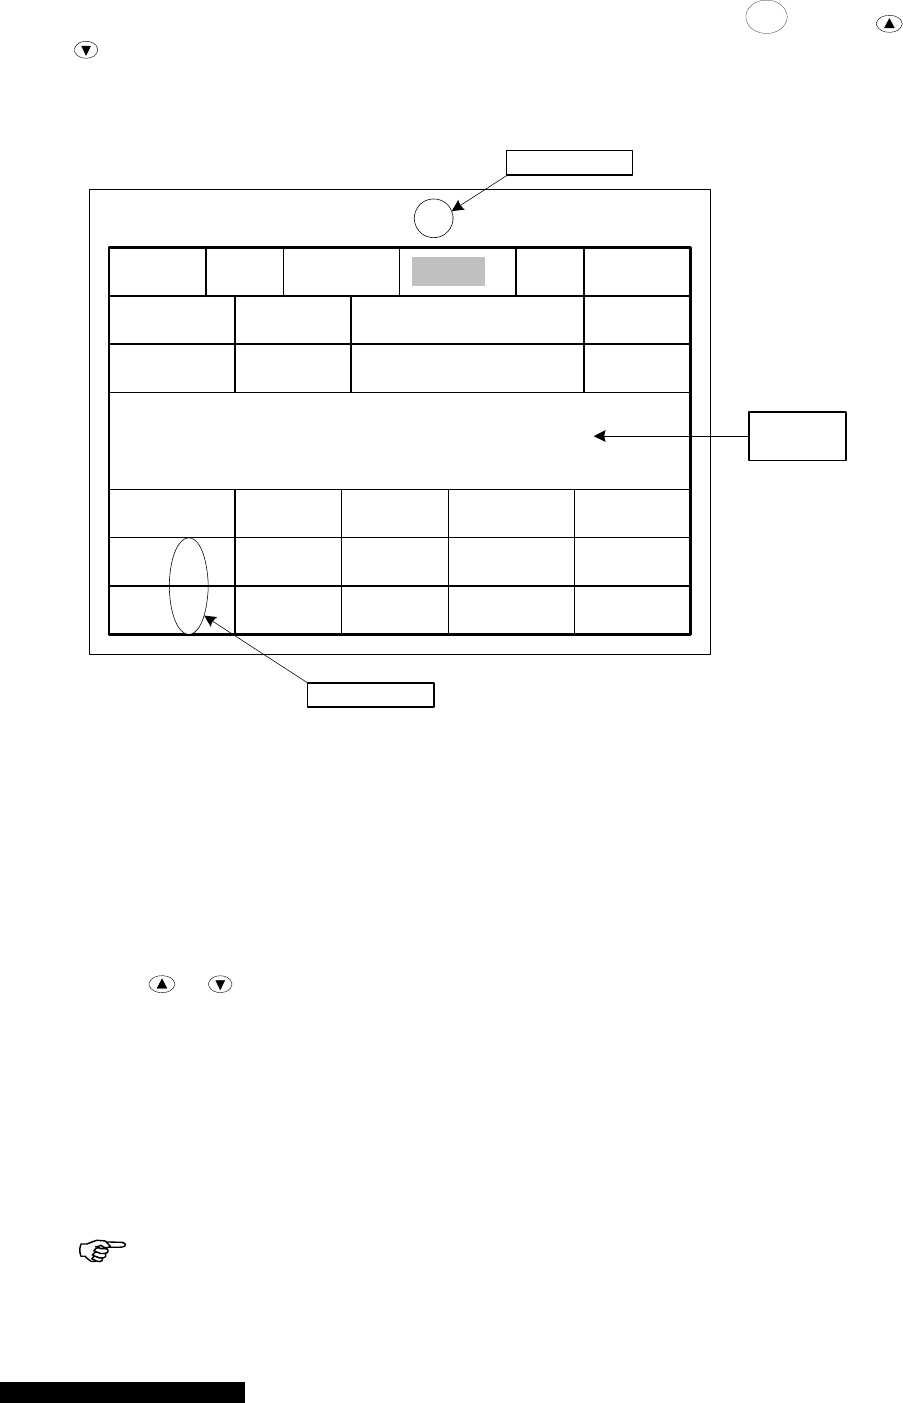
Refer the Figure 6-9 for setting up a Pirani or Convection Pirani sensor.
1. Sensor Type
The Senor Type is often auto-detected during the initial power up the Pirani or Convection Pirani
sensor. If the sensor type is auto-detected, a user cannot change the sensor type from the front
panel. However, when a dummy sensor is connected to the controller, it cannot detect the sensor
automatically. Under this condition, the sensor type can be selected manually, and stored in the
memory. This information will be used as the default sensor type if sensor power is cycled.
2. Gas Type
MKS 937B Operation Manual 35
Select the gas type by moving the cursor to the Gas Type box and pressing Enter . Use the or
keys to select the correct gas type for the sensor. Three gas types (N2, Ar and He) can be
selected. The default setting is N2.
Setup Convection Pirani Gauge C2
Gas Type
Auto Zero
Relay
Relay 12
Relay 11
N2
Enable DIR SET SP
ABOVE
Hyst
ENABLE 1.0E-02 9.0E-03
BELOWCLEAR 3.0E-01 3.3E-01
NA
FD NO
Manual Zero
CP
Message
Box
Auto-detected
Auto-detected
ATM Value 7.6E+02 ATM Cal NO
Sensor
Figure 6-9 Pirani/Convention Pirani setup information that is displayed on the 937B LCD screen.
3. Factory Default
If YES is selected for Factory Default, the Manual Zero and ATM Cal data are restored to the
factory default values. The default setting for the Factory Default function is NO.
A small U under the gauge type indication on the front panel LCD display (PR or CP) will
disappear if the gauge was manually calibrated.
4. Auto Zero
Use the or keys to select a valid gauge for autozeroing the Pirani (PR) or Convection
Pirani (CP). An ion gauge must be used as the zero reference.
The zero will be executed for Pirani only when:
(1) The system pressure is less then 1X10⁻⁶ torr (1x10⁻⁵ torr for Convection Pirani).
(2) The Pirani reading is within the range 5x10⁻⁵ torr (5x10⁻⁴ torr for Convection Pirani)
and 1x10⁻² torr.
The default setting for the Auto Zero function is NO.
Ensure that the Pirani/CP and the reference auto-zero ion gauge sensor are
connected to the same chamber at all times.
5. Manual Zero

MKS 937B Operation Manual 36
The Pirani/CP sensor can be manually zeroed when YES is selected for this function. Ensure that
the system pressure is less than1x10-6 torr (1x10⁻⁵ torr for CP) before executing a Manual Zero.
The Manual Zero function will abort if the overall offset is over 1x10⁻² torr. The default setting for
the Manual Zero function is NO.
6. ATM Value
This value is used to calibrate the Pirani/CP at atmospheric pressure. The default value is 760
torr. Recall that elevation and weather will affect local atmospheric pressures.
7. ATM Cal
When YES is selected for the ATM Cal function, the ATM Value will be entered as the reference
pressure for the ATM calibration of Pirani/CP. The default setting for the ATM Cal function is NO.
8. Relay
Relays for each PR/CP channel are preset (2 per channel) as shown below. These values are
auto-detected.
Sensor location A1 A2 B1 B2 C1 C2
Relay assigned 1 & 2 3 & 4 5 & 6 7 & 8 9 &10 11 & 12
9. Enable
There are three ways to enable a relay:
SET: forces the relay to stay in the activated state (closed) regardless of pressure and
setpoint values
CLEAR: forces the relay to stay in the deactivated state (open) regardless of pressure
and setpoint values.
ENABLE: the relay status is determined by the pressure, setpoint value, and direction.
10. DIR
DIR determines when the relay is activated. If ABOVE is selected, the relay will be activated
when the pressure is above the setpoint (higher than the setpoint pressure). If BELOW is
selected, the relay will be activated when the pressure is below (less than) the setpoint. The
default setting for DIR is BELOW.
Refer to Figure 8-1 for more a detailed description of the direction setting.
11. SET SP
This function allows input of the desired setpoint value. The valid range is 2x10⁻³ to 9.5x10+1 torr
for Pirani gauges, and 2x10⁻³ to 9.5x10+2 Torr for Convection Pirani gauges. The speed of the
value change can be increased by continuously pressing the or key during the setting
change.
12. Hyst
When the setpoint value has been changed, the hysteresis value will be changed automatically. If
DIR is set to ABOVE, the hysteresis will automatically be set to 0.5xSetpoint; if DIR is set to
BELOW, the hysteresis is automatically set to 1.5xSetpoint.

MKS 937B Operation Manual 37
To modify the hysteresis, move the cursor to the hysteresis value, press Enter and use the or
keys to change the value, then press Enter again to set the value. The maximum hysteresis
value permitted for PR/CP gauges is 0.9xSetpoint when DIR is set to ABOVE; the minimum
hysteresis is 1.1xSetpoint when DIR is set to BELOW.
13. Power control of a Pirani or Convection Pirani sensor
Power to the Pirani or Convection Pirani gauges can be turned on or off using the Power On/Off
push button.
Note that when a pyrophoric gas is encountered (such as during the degeneration of cryo-trap), it
is strongly recommended that the filament power of the Pirani or convection Pirani sensor be
turned off to avoid any potential for ignition of the gas.
The power to the Pirani sensor should also be turned off when sensors are “hot swapped” to
avoid any potential for sensor damage.
If the power for a Pirani or convection Pirani is turned off while it is controlling (either AUTO or
SAFE) an ion gauge, the ion gauge will be switched off immediately. To avoid the ion gauge
being turned off at high vacuum (especially, for a cold cathode gauge which may take long time to
start at UHV), it is recommended to disable the control of the ion gauge first before powering off a
Pirani or convection Pirani sensor.
When the power to the Pirani is turned on, a time delay is added to avoid having an ion gauge
being turned on at high pressure when a potential inaccurate transient pressure indication may
occur while the power-up for PR/CP sensor is in progress.
6.5.4 Setup a Cold Cathode Sensor
Please refer the Figure 6-10 for setting a Cold Cathode sensor.
1. Gas Type (GT)
To move the cursor to the Gas Type box, press Enter , then use the or keys to select the
correct gas type for the sensor. Three gas types (N2, Ar and He) can be selected. Default setting
for Gas Type is N2.
2. User Input Calibration Gas Correction Factor (U Cal)
This allows the user to enter different correction factors for cold cathode sensors. This function is
useful, when the calibration gas used is not one of these listed above (N2, Ar or He). The valid
range is 0.1 to 50, and the default setting is 1.0.
3. AO Delay
The Analog Out Delay function prevents the activation of the cold cathode sensor's setpoint
relays and maintains their outputs in the OFF state until the delay has expired. The range is from
3 to 300 seconds and the default value is 3 seconds. When the AO delay is active, WAIT will be
displayed on the front panel rather than a pressure reading.
4. Fast Relay SP
To meet the requirement for fast control of vacuum system (such as to close a valve rapidly to
protect an UHV system), a special cold cathode control module with a fast relay control is
available. The response time is typically less than 3 msec, and the control setpoint for this fast
relay is set via the Fast Relay SP described here. The hysteresis is approximately 15% of the
setpoint value, that is, the relay will be re-energized when the system pressure is 15% below the
setpoint. The default setpoint value is 1x10⁻⁵ torr.
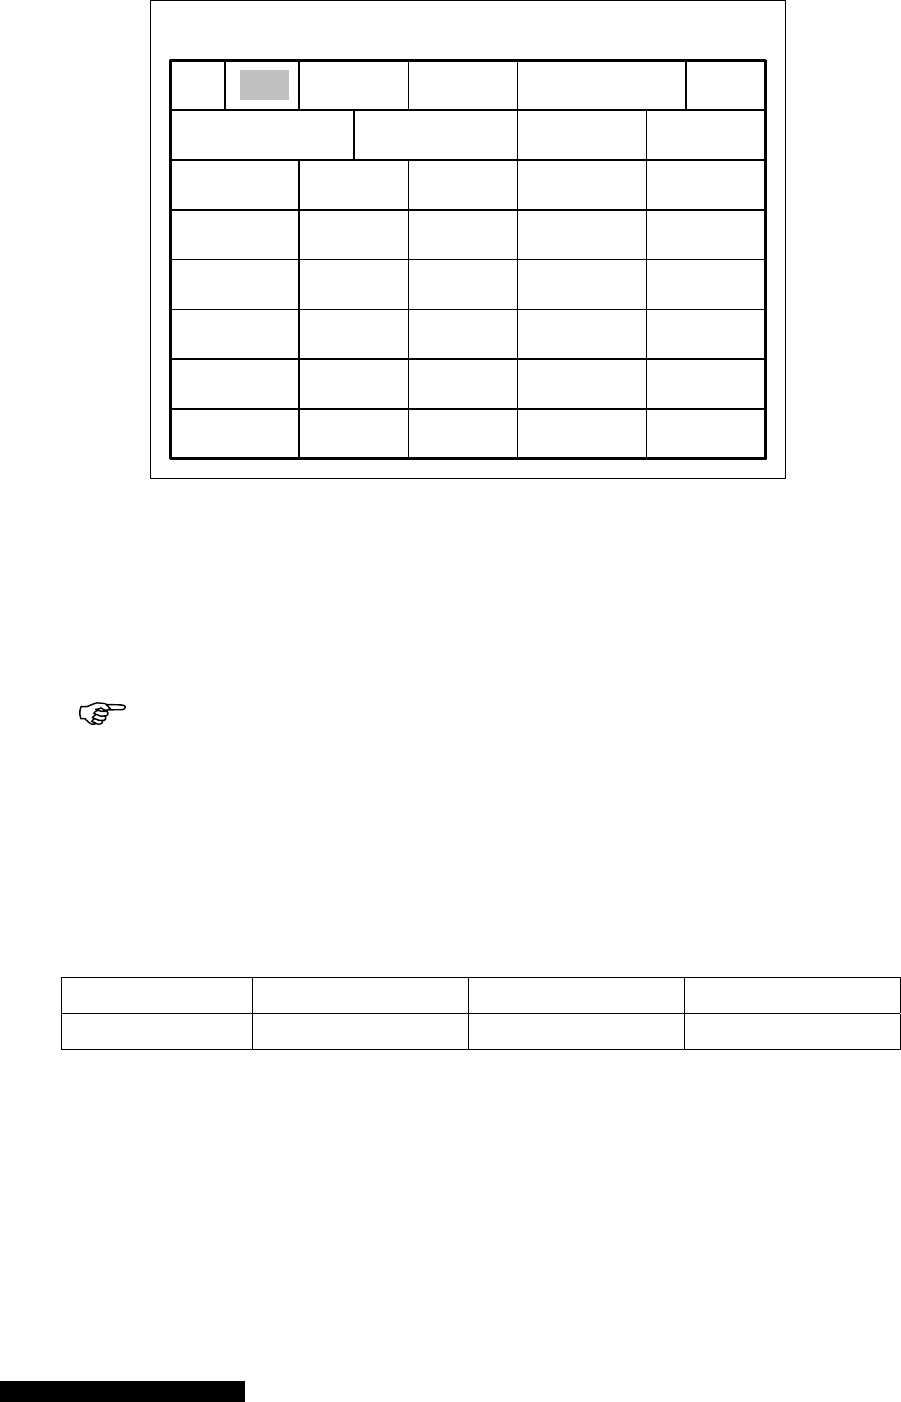
MKS 937B Operation Manual 38
Setup CC Gauge A1
GT
Control SP
Prot SP
N2
5.0E-03
B1AUTO 1.0E-03 1.2E-03
U Cal 1.0E+00
Relay
Relay 02
Relay 01
Enable Dir/Ch SET SP
BELOW
Hyst
SET 1.0E-06 9.0E-07
BELOWCLEAR 3.0E-05 3.3E-05
Relay 04
Relay 03 BELOWENABLE 2.0E-08 1.8E-09
BELOWCLEAR 5.0E-07 5.5E-07
AO Delay 3
Fast Relay SP 1.0E-05
Figure 6-10 Cold cathode setup information as displayed on 937B LCD screen.
5. Protect SP
The Protect Setpoint function will turn the cold cathode high voltage off at the specified pressure
readings. The valid Protect Setpoint range for a cold cathode is 1.0x10⁻⁵ torr to 1.0x10⁻² torr. The
default value is 5.0x10⁻³ torr. It is enabled at all times in the 937B.
When the Protect Setpoint is triggered, the Auto control is disabled. The gauge can
then be turned on only manually or by serial command. This is due to the fact that the
gauge control setpoint should normally act first. When Protect Setpoint is tripped, this
indicates that the control setpoint is not function properly, probably due to an
inappropriate system configuration (control gauge and ion gauges are not connected to a
same volume), or to a control gauge malfunction.
6. Relay
Relays for each channel are preset as shown below. These values are auto-detected. When
single sensor CC board is used, 4 relays are assigned to each cold cathode sensor.
Sensor location A1 B1 C1
Relay assigned 1 & 2 & 3 & 4 5 & 6 & 7 & 8 9 &10 & 11 & 12
7. Enable
There are three ways to set a relay:
SET: forces the relay to stay in the activated state (closed) regardless of pressure and
setpoint values
CLEAR: forces the relay to stay in the deactivated state (open) regardless of pressure
and setpoint values.
ENABLE: the relay status is determined by the pressure, setpoint value, and direction.

MKS 937B Operation Manual 39
8. DIR
To prevent the cold cathode from being turned on at high pressure, the DIR for a cold cathode is
set to BELOW permanently.
Refer Figure 8-1 for more detailed description of the direction setting.
9. SET SP
This function permits input of a desired setpoint value. The valid range is 2x10⁻¹⁰ to 5x10⁻³ torr. To
speed up the value change, hold the or key.
10. Hyst
Once a setpoint value has been changed, the hysteresis value will automatically be changed.
Since the direction is set to BELOW for cold cathode sensor only, the hysteresis will be set to
1.5xSetpoint automatically.
To modify the hysteresis, move the cursor to the hysteresis value and press Enter . Use the or
key to change the value, then press Enter again to set the value. The minimum hysteresis
value for a cold cathode gauge is 1.1xSetpoint; DIR is set to BELOW at all times.
11. Control SP
The Control Setpoint function is used to turn the cold cathode gauge on or off by using a
reference gauge, typically a Pirani, Convention Pirani or a capacitance manometer (≤2 torr full
scale). This function prevents the cold cathode gauge from operating at high pressure, thereby
extending the service life of the cold cathode sensor. Valid Control Setpoint values range from
5x10⁻⁴ to 1x10⁻² torr for a Pirani, from 2x10⁻³ to 1x10⁻² torr for a Convection Pirani gauge, and
from 0.2% of full scale to 2x10⁻² torr for capacitance manometer (≤2T full scale). The default
Control Setpoint value is 5x10⁻³ torr.
If the controlling gauge (PR/CP/CM) and cold cathode gauge are connected to the
same chamber, ensure that the control SP is less than 5x10⁻³ torr; otherwise, the CC
sensor may be damaged due to high operating pressure. The CC sensor may be turned off
by the Protect Setpoint function.
The 1x10⁻² torr upper limit can be extended to 9.5x10⁻¹ torr by using a
@254XCS!ON;FF serial command to cover the condition when the PR/CP/CM and CC are
installed on different location. For example, when the PR/CP/CM is installed on the foreline
between the mechanical and turbo pumps (being used to monitor the mechanical pump
pressure), and the CC is installed on the high vacuum chamber downstream of the turbo
pump.
When the power of PR/CP is turned off, or the cable is unplugged, the CC will be
turned off if the control setpoint is enabled.
When a capacitance manometer (≤2T) is used to control a cold cathode gauge, it is
strongly recommended to enable the AUTOZERO of capacitance manometer as a zero
shift of the manometer may cause damage of the ion gauge.
To set the Control SP, first select the control channel (Dir/Ch). Once a valid channel has been
selected, the Control SP function can be enabled. There are three choices:
AUTO: the high voltage for a cold cathode gauge is controlled solely and
automatically by the controlling gauge (PR/CP). However, if the protection setpoint is

MKS 937B Operation Manual 40
triggered, the auto control will be disabled, and the CC sensor can only be turned on
manually.
SAFE: the high voltage for a cold cathode gauge can be automatically turned off by
the controlling gauge; however, it can only be turned on manually. This keeps the
cold cathode sensor from being turned on at high pressure, especially, when the
controlling gauge is not properly set.
OFF: Even if the control channel is selected, it will not be activated. The cold cathode
must be turned on/off manually.
12. Cold cathode board with fast relay output
When fast control using a cold cathode sensor is required (<15 msec), a cold cathode board with
fast relay output control is available. This fast control is achieved by comparing the buffered
analog output signal with an internal DAC output determined by a serial command
(@254FRCn!d.ddE-ee;FF, where n is the channel number (1, 3, 5), and d.ddE-ee is the pressure
setpoint value). The comparator controls an opto-isolated solid state relay, which enables the fast
control of an external device.
6.5.5 Setup a Hot Cathode Sensor
Refer to Figure 6-11 for setting up a Hot Cathode sensor.
1. Gas Type
Move the cursor to the Gas Type box, press Enter , and use either or key to select the
correct gas type for the sensor. Four gas types (N2, Ar, He and CUST) can be selected.
When N2, Ar, and He are selected, the corresponding gas correction factor is displayed on the
right-hand side of the Gas Type box, and this value cannot be modified. However, when CUST is
selected, a customized gas factor can be entered, and the valid range is from 0.1 to 50. Values
shown in Table 6-2 may be used if the type of gas inside the vacuum chamber is known. More
detailed correction factors are available in Appendix 14.1.
2. Filament
Indicates the number of the filament being used. The valid values are 1 and 2. The default setting
is 1.
Setup HC Gauge A1
Gas Type
Control SP
Protect Setpoint
N2
5.0E-03
B1SAFE 1.0E-03 1.2E-03
1.0
9.0
Relay
Relay 02
Relay 01 SET
Dir/Ch SET SP
BELOW
HystEnable
1.0E-06 9.0E-07
BELOWCLEAR 3.0E-05 3.3E-05
Relay 04
Relay 03 BELOWENABLE 2.0E-08 1.8E-09
BELOWCLEAR 5.0E-07 5.5E-07
Filament 1
30
EC 20 uA
DG Time Sensitivity

MKS 937B Operation Manual 41
Figure 6-7 Hot cathode setup information displayed on 937B LCD screen.
Gas Symbol Relative correction factor to N2
Air 1.00
Argon Ar 1.29
Carbon Dioxide CO2 1.42
Deuterium D2 0.35
Helium He 0.18
Hydrogen H2 0.46
Krypton Kr 1.94
Neon Ne 0.30
Nitrogen N2 1.00
Nitrogen Oxide NO 1.16
Oxygen O2 1.01
Sulfur Hexafluoride SF6 2.50
Water H2O 1.12
Xenon Xe 2.87
Table 6-2 Relative ionization correction factor to N2 for different gases.
3. DG Time
Refers to the degas time set for a hot cathode gauge. The value can be set from 1 to 240 minutes
with a minimum step of 1 minute. The default value is 30 min.
4. Sensitivity
Indicates sensitivity of the hot cathode gauge. Its typical value is 9 Torr-1 for the MKS Low Power
Nude sensor, and 12 Torr-1 for the Mini BA gauges. These default values will be automatically
selected based on the type of sensor being detected if no user-defined sensitivity value is stored.
A user can change the sensitivity, and its valid range is 1 to 50 Torr-1. Once a user-defined
sensitivity is saved, this sensitivity value will be used as default value when powering up a same
type of hot cathode gauge.
If a user changes the sensitivity without a hot cathode gauge being connected, this user-defined
sensitivity value will be saved as the default sensitivity for all the HC sensor types.
5. EC
The Emission Current can be set to 20 uA, 100 uA, Auto20, or Auto100. When Auto is selected,
the emission current is either 20 uA or 100 uA when pressure is higher than 1x10⁻⁴ torr, and
automatically switches to 1 mA when pressure is below 1x10⁻⁴ torr. The default setting for the
Emission Current is 20 uA.
6. Protect SP
The Protect Setpoint is used to turn off the hot cathode high voltage based on its own pressure
readings. The valid protect setpoint range for a hot cathode is 1.0x10⁻⁵ torr to 1.0x10⁻² torr. The
default value is 5.0x10⁻³ torr. The Protect Setpoint is always enabled on 937B.

MKS 937B Operation Manual 42
Once the Protect Setpoint is triggered, the Auto Control will be disabled. The gauge
can be turned on only manually (or by serial command) because the control setpoint
should normally act first. The tripping of the Protect Setpoint indicates that the control
setpoint is not functioning properly, most likely caused by an inappropriate system
configuration (control gauge and ion gauges are not connected to the same volume), or a
control gauge malfunction.
7. Relay
Relays for each channel are preset (4 per channel) as shown below, and auto-detected.
Sensor location A1 B1 C1
Relay assigned 1 & 2 & 3 & 4 5 & 6 & 7 & 8 9 &10 & 11 & 12
8. Enable
There are three ways to enable a relay:
SET: force the relay to activate (close) regardless of pressure and setpoint values
CLEAR: force the relay to deactivate (open) regardless of pressure and setpoint values.
ENABLE: relay status is determined by the pressure, setpoint value, and direction.
9. DIR
To prevent the hot cathode from being turned on at high pressure, the DIR for a hot cathode is
permanently set to BELOW.
Refer to Figure 8-1 for a more detailed description of the direction setting.
10. SET SP
Enables setting of the desired setpoint value. The valid range is 5x10⁻¹⁰ to 5x10⁻³. To speed up
the value change, hold the or key.
11. Hyst
Once the setpoint value is changed, the hysteresis value will be changed automatically. Since the
direction is set to BELOW for the hot cathode sensor only, the hysteresis will be set to
1.5xSetpoint automatically.
To modify the hysteresis, move the cursor to the hysteresis value, press Enter , use the or
key to change the value, and press Enter to set the value. The minimum allowed hysteresis for the
hot cathode is1.1xSetpoint when direction is set to BELOW.
12. Control SP
The Control setpoint is used to turn on or off the hot cathode gauge using a reference gauge,
typically a Pirani or a Convention Pirani. This prevents the hot cathode gauge from operating at
high pressure, and therefore extends the service life of the hot cathode sensor. The valid control
setpoint value is from 5x10⁻⁴ to 1x10⁻² torr for a Pirani, from 2x10⁻³ to 1x10⁻² torr for a Convection
Pirani, or from 0.2% of full scale to 2x10⁻² torr for a capacitance manometer (≤2T full scale). The
default control setpoint value is 5x10⁻³ torr.
If the controlling gauge (PR/CP/CM) and hot cathode gauge are connected to the
same chamber, make sure the control SP is less than 5x10⁻³ torr, otherwise the HC sensor

MKS 937B Operation Manual 43
Degas
On/off
Sensor
On/off
may be damaged due to high operating pressure. The HC sensor can be turned off by the
protect setpoint setting.
The 1x10⁻² torr upper limit can be extended to 9.5x10⁻¹ torr by using a
@254XCS!ON;FF serial command to cover the condition when the PR/CP and CC are
installed on different location. For example, when the PR/CP is installed on the foreline
between the mechanical and turbo pumps (being used to monitor the mechanical pump
pressure), and the CC is installed on the high vacuum chamber downstream of the turbo
pump.
When a capacitance manometer (≤2T) is used to control a hot cathode gauge, it is
strongly recommended to enable the AUTOZERO of capacitance manometer as a zero
shift of the manometer may cause damage of the ion gauge.
To set the Control SP, first select the control channel (Dir/Ch). Once a valid channel is selected,
enable the Control SP. Three choices are available:
AUTO: The filament power for a hot cathode gauge is controlled solely and
automatically by the controlling gauge (PR/CP).
SAFE: The filament power for a hot cathode gauge can be turned off by the
controlling gauge automatically, however, it can only be turned on manually. This
prevents the hot cathode sensor from being turned on at high pressure, especially
when the controlling gauge is not set properly.
OFF: Even if the control channel is selected, it is not activated. The hot cathode
sensor must be turned on/off manually.
6.6 Power Control of a Pressure Sensor
When a pressure sensor is attached on a 937B controller, the power to the pressure sensor may have to
be controlled. For example, turning on a HC sensor at ambient pressure may result in a filament burnout,
and lead to permanent damage of the sensor.
If flammable gas is used (such as during a regeneration of a LN2 cooled cold trap), the PP/CP sensor
must be turned off to avoid potential explosion.
Only the Pirani (PR), the Convectional Pirani (CP), the Cold cathode (CC) and the Hot Cathode (HC)
sensors require power control.
6.6.1 Power (including degas) control of a sensor using front panel control
button
To turn on/off the power for a sensor (PR/CP/CC/HC) using the front panel button, use the following
procedure:
1. Use the or key to select the desired sensor (PR/CP/CC/HC) to be turned
on/off. The active channel (sensor) is indicted by the illuminated green LED on
the front panel.
2. For an ion gauge (CC/HC), make sure the gauge is not controlled automatically
by another gauge (PR/CP). If it is in the AUTO control mode, disable the control
setpoint before using the front panel keypad to operate the ion gauge.
3. The Sensor
On/off key switches the corresponding sensor on and off.

MKS 937B Operation Manual 44
When the ion gauge is turned on, the filament power may turn off automatically if the
pressure is higher than the protection setpoint. (Default is 5x10⁻³ torr, and maximum is 1x10⁻²
torr.)
A cold cathode sensor turns on/off the high voltage to the sensor anode. When cold cathode sensors
are turned on at very low pressures, the sensor may take a long time to start as the discharge
current does not build up immediately.
Prolonged operation at higher pressures will degrade the performance of a cold cathode sensor, due
to contamination of the sensor caused by rapid sputtering inside the cell at high pressure, which
reduces the operating service time before the sensor requires cleaning. Operation at pressures
above 5x10⁻¹ Torr will result in the sensor falsely indicating a much lower pressure, even though this
is very unlikely as the maximum protect setpoint is set to 1x10⁻² torr. This phenomenon is called
rollback, and is due to high concentrations of charge particles that make gas conductive at high
pressure. Avoid operating conditions that could cause rollbacks.
For the hot cathode sensor, operation at high pressure may lead to filament burnout. This is why the
Protection Setpoint is always enabled for ion gauges within 937B so the gauges can automatically
turn off once pressure is higher than the protection setpoint.
To turn on/off the degas power for a hot cathode gauge, the procedure is almost identical to the sensor
power control, except that the
Degas
On/off button is used.
When MKS low power nude or Mini BA gauges are used, these sensors (up to 3) can be
degassed simultaneously. However, if glass BA is used, only one glass BA sensor can be
degassed at a time because of its extremely high degas power consumption (close to 50 W at
grid).
6.6.2 Power (including degas) control of a sensor via 37 pin AIO Dsub
connector
A connected pressure sensor can also be turned on/off by sending a control signal to pin 15 to 20 on the
37pin Dsub connector located on the back of the AIO module as shown in Table 6-3.
To turn off a sensor, pull the pin to the ground. The sensor power is turned off when a microprocessor
detects a falling edge on the input pin, and this turned on the sensor power when a rising edge is
detected.
Since only one hot cathode gauge can be connected to the board, pin 16, 18, 20 are used to control the
filament degas power.
Pi
Description Pin Description
1 Buffered Aout A1 11 Log/Lin Aout C1
2 Buffered Aout A2 12 Log/Lin Aout C2
3 Buffered Aout B1 13 Combination Aout 1
4 Buffered Aout B2 14 Combination Aout 2
5 Buffered Aout C1 15 Power A1
6 Buffered Aout C2 16 Power A2/Degas A1
7 Log/Lin Aout A1 17 Power B1
8 Log/Lin Aout A2 18 Power B2/Degas B1
9 Log/Lin Aout B1 19 Power C1

MKS 937B Operation Manual 45
10 Log/Lin Aout B2 20 Power C2/Degas C1
21 to 37 Ground
Table 6-3 Pin out for ion gauge remote control.
Control pins 15-20 are pulled up by internal circuit, therefore, there is no external voltage
source required to pull up the pin.
6.6.3 Power (including degas) control of a sensor using Serial
communication commands.
The following serial communication command turns on/off the channel power for a sensor
(PR/CP/CC/HC) connected to 937B remotely.
@254CPn!ON;FF
Here, n=1 to 6, which is corresponding to the gauge connected to channels A1, A2, B1, B1, C1
and C2, respectively.
The corresponding response that the command has been sent successfully is
@002ACKON;FF
To turn off an ion gauge, enter the following command:
@254CPn!OFF;FF
The expected response is as follows:
@002ACKOFF;FF
The following serial command turns on/off the degas power for a hot cathode gauge connected to 937B
remotely.
@254DGn!ON;FF
Here, n=1,3,5, which is corresponding to the gauge connected to channels A1, B1, and C1,
respectively.
If the command is properly sent, the corresponding response will be:
@002ACKON;FF
Use the following command to turn off the degas power:
@254DGn!OFF;FF
The expected response is as follows:
@002ACKOFF;FF
6.7 Leak Test Using the 937B Controller
6.7.1 Leak test principle applied for the 937B
A leak test with the Series 937B Controller is not intended to replace mass spectrometer leak detectors. It
offers a simple and inexpensive method for locating leaks in high vacuum systems. Under ideal
MKS 937B Operation Manual 46
conditions, a Pirani sensor can detect leaks as small as 1x10⁻⁴ Torr l/s and the cold/hot cathode sensor
can be used to detect leaks as small as 1x10⁻⁷ Torr l/s.
The principle for detecting a leak with the 937B controller is based on the gas dependency of the
pressure reading for the Pirani (due to thermal conductivity differences between gases) and the ion gauge
(due to the difference in the ionization probability in the gases), that is, when different gases (such as
helium or argon) enter into the vacuum system, a change in gas composition will lead to a change in
“indicated pressure”, thus, indicating a leak in the system.
Leak Test Mode will work with all sensors except the capacitance manometer, which is not gas
dependent. If the LED indicated channel is a capacitance manometer, no leak checking status will be
displayed on the LCD screen.
6.7.2 Procedures for a leak test with the 937B
1. With the controller on, use either the or key to select a desired
sensor (must be a gas dependent sensor, Pirani, Convection Pirani, CCG, or
HCG) with the assistance of the green LED.
2. Pump down the system to base pressure, and make sure the pressure is
stabilized.
3. Press the Leak
Check key to display the leak check status on the LCD screen.
Once the Leak
Check key is pressed, the pressure indication for the corresponding leak
checking channel will turn to blue.
4. Press
Beeper if you want to use the beeper to provide audible assistance for the leak checking.
5. Slowly and methodically probe with a small amount of leak checking gas such as He or Ar (it
must be different from the gas inside the chamber). Flooding the leak with gas or moving the gas
quickly past the leak can confuse the search since system time lags may be significant.
6. A 24-segment, centered-zero bar graph shows pressure changes in the system with greater
sensitivity than the numerical display. The more the bar shows on the screen, the higher the leak
exists in the system. On this graphic display, the black bar at the center is zero. The green bar
indicates a relatively slow leak, while the red bar indicates a large leak in the vacuum system.
7. If the pressure has drifted during the leak checking process, press the Zero key to set the bar
graph and beeper for a new reference pressure.
8. To exit the leak checking mode, just press the Leak
Check key.
The bar graph resolution is non-linear. The first segment offset from the center is highly
sensitive with subsequent segments decreasing in sensitivity.
Since set points remain active in the Leak Test function, the probe gas may change the
indicated pressure enough to switch the relay state. Disable any process control while
probing the vacuum system.
As with any leak testing, many factors can influence the sensitivity of the test. Described in greater detail
below, these include the chamber volume; system pressure; probe gas; type of vacuum pump; location of
the Sensor, leak, and pump; and others such as pumping speed and system tube size.
Beeper
Zero
Leak
Check

MKS 937B Operation Manual 47
Reducing the search area by minimizing the chamber volume will increase the efficiency of the
test.
Sensitivity to gas leaks is also pressure dependent. In general, leak test sensitivity is greater for
lower system pressures.
The Pirani Sensor is sensitive to any probe gas leak lighter or heavier than the gas in the
system. For optimal sensitivity, select a probe gas with the largest difference between its
molecular weight and that of the system gas.
The type of vacuum pump used can also affect the accuracy of the leak test. For moderate size leaks,
pump down the system with a high vacuum pump such as a diffusion or turbo pump, if possible (ion and
cryo pumps are not recommended). Leak testing can be done with a mechanical pump; however, they
may cause cyclical variations in pressure with the rotation of the vanes. This shows up as a large
background noise signal possibly masking the leak signal.
Place the pump away from the suspected leak source and place the sensor between the leak and the
pump to reduce the sensor response time. Vacuum tubing between the suspected leak and the sensor
should be as short and wide as possible to shorten the time required for the probe gas to reach the
sensor.
If the above leak detection method fails to indicate the location of a leak, unexpected high pressures may
be caused by a virtual leak, i.e., outgassing of a system component. You can locate outgassing parts, or
“virtual leaks,” as well as true gas leaks using the rate-of-pressure-rise method below.
1. With the Controller on, pump down the system to a base pressure.
2. Close a valve to isolate the pump.
3. Measure the rise of the pressure over a time interval. A very fast rise indicates a leak.
4. Repeat this procedure as often as necessary.
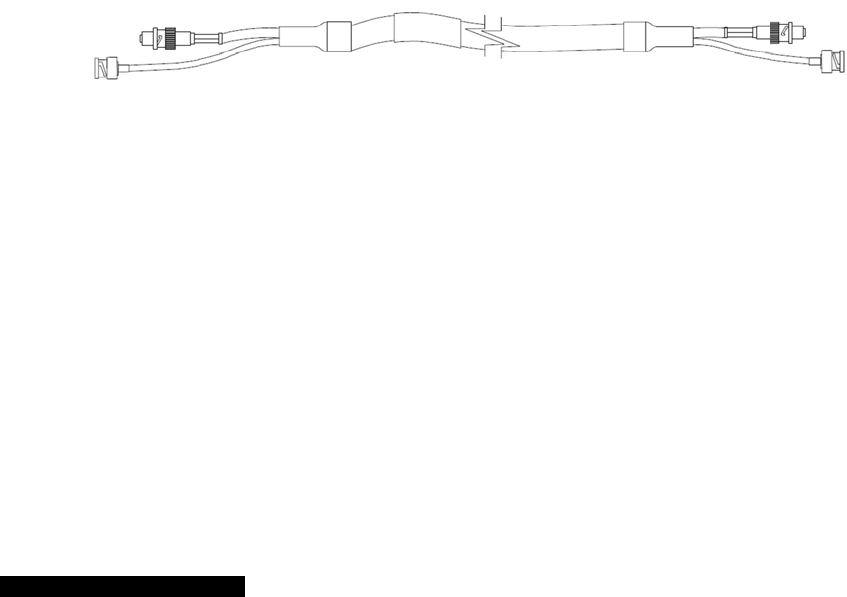
MKS 937
B
7 In
s
7.1
In
s
7.1.1
L
Locate c
o
pressure
s
most rep
r
a sensor
i
other vac
u
7.1.2
O
A
cold ca
t
affect ac
c
helps to
p
7.1.3
M
Do not o
p
the likelih
o
erratic, th
e
if contami
Dependin
7.1.4
C
The Seri
e
SHV and
The Seri
e
Connect
t
H.V. (SH
V
If there is
cable, or
t
Cables a
r
lengths u
p
Some ap
p
through r
e
Use SHV
B
Operation M
a
s
tallin
g
s
talling
c
L
ocating
a
o
ld cathode s
e
s
. Install the
s
r
esentative d
a
i
s installed di
r
u
um wetted
c
O
rienting
a
t
hode sensor
c
uracy. That
b
p
revent conta
m
M
anaging
p
erate a cold
c
o
od of conta
m
e
sensor tub
e
nation is visi
b
g on the deg
r
C
onnectin
e
s 421Cold C
a
BNC connec
t
e
s 422 Cold
C
t
he SHV and
V
connector)
a
any potentia
l
t
he Controlle
r
r
e available f
r
p
to 300 ft.
p
lications ma
y
e
strictive bar
r
and BNC co
n
a
nual
g
Vac
u
c
old cath
o
a
Cold Ca
t
e
nsors in a p
o
ensor away
f
a
ta. Place an
d
r
ectly above
a
c
omponents,
c
a
Cold C
a
can be insta
l
b
eing said, In
s
m
inants from
Contami
n
c
athode gau
g
m
ination due
e
may be con
b
le, the inter
n
r
ee of conta
m
g the Ser
i
a
thode Sens
o
t
ors as show
n
C
athode gaug
BNC connec
t
a
nd Ion Curr
e
l
for stress o
n
r
.
om the facto
r
y
require the
r
iers or throu
g
n
nectors for
a
u
um S
e
o
de sen
s
t
hode Se
n
o
sition suitab
l
f
rom pumps,
g
d
orient the s
e
a
diffusion pu
c
ausing calib
a
thode Se
n
l
led with the
b
s
tallation wit
h
falling into t
h
n
ation in
a
g
e at pressur
e
to high sputt
e
taminated. In
n
al compone
n
m
ination and
a
i
es 421/4
2
o
r and Series
n
below.
e is same as
t
ors to their r
e
e
nt (BNC con
n
the cable, u
s
r
y in standar
d
use of speci
a
g
h a conduit.
C
a
ll application
48
e
nsor
s
s
ors
n
so
r
l
e for the me
a
g
as sources,
e
nsor such t
h
mp oil vapor
r
ation drift.
n
so
r
b
ody set in a
n
h
the vacuum
h
e sensor.
a
Cold Ca
t
e
s above 10
-3
e
ring rate at
h
such a case
n
ts should be
a
pplication, t
h
2
2 Senso
r
937B Contr
o
421 except t
h
e
spective co
n
nector).
s
e separate
s
d
lengths of 1
0
a
l cables, suc
C
ustom cabl
e
s.
s
a
surement pr
o
and strong
m
h
at contamin
a
can contami
n
n
y direction.
T
port facing d
o
t
hode Se
n
Torr for exte
h
igh pressure
, the tube sh
o
replaced usi
n
h
e internal pa
r
o
ller are conn
h
at its end h
a
n
nectors on t
h
s
train relief to
0
, 25, 50, an
d
h as when th
e
e
s can be fa
b
o
cess cham
b
m
agnetic field
s
a
tion is unlike
n
ate the cath
o
T
he operatin
g
o
wn is prefer
n
so
r
e
nded period
s
. If pressure
r
o
uld be visua
n
g an Interna
rts may nee
d
ected using
c
a
s LEMO con
h
e rear panel
avoid dama
g
d
100 feet an
d
e
connection
b
ricated for th
e
b
er or manifol
s
to ensure t
h
ly. For exam
p
o
de, anode,
a
g
position do
e
able since th
i
s
. This will in
c
r
eadings app
e
lly inspected
l Rebuild Kit.
d
to be clean
e
c
oaxial cable
s
nectors.
of the Contr
o
g
e to the sen
s
d
in custom
must be rou
t
ese situation
s
d
h
e
p
le, if
a
nd
e
s not
i
s
c
rease
e
ar
and,
e
d.
s
with
o
ller –
s
or,
t
ed
s
.

MKS 937
B
7.1.5
C
Mount th
e
If the I-M
A
When re
p
damage.
T
Use a co
n
Connect
t
the thum
b
7.2
In
s
7.2.1
L
Locate th
e
pressure.
measure
m
location t
h
any movi
n
sensor.
7.2.2
P
Locate th
e
above a
s
calibratio
n
7.2.3
O
A
hot cat
h
accuracy.
port facin
g
7.2.4
C
HPS
®
Pr
o
tabulatio
n
discoura
g
constitut
e
vacuum
a
measure
m
measure
m
When ins
e
Do not sh
any ques
t
recomme
The HPS
®
recomme
B
Operation M
a
C
onnectin
e
Sensor to a
A
G Sensor h
a
p
lacing the m
a
T
he pins sho
n
ductive, all-
m
t
he cable to t
h
b
screw on to
p
s
talling
h
L
ocating
a
e
sensor in a
Installing th
e
m
ent. In the c
h
at could da
m
n
g mechanis
m
P
reventin
g
e
sensor wh
e
s
ource of eva
p
n
shift.
O
rienting
a
h
ode sensor
c
However, it
i
g
down to ke
e
C
onnectin
o
ducts senso
r
n
. Note: attac
h
g
ed since, in
a
e
a safety haz
a
s outgassing
m
ent. A sens
o
m
ent down to
e
rting a nud
e
ort the elem
e
t
ion of cleara
n
n
ded that th
e
®
nipple inclu
d
n
ded to assu
a
nual
g the 423
grounded va
a
s a CF flang
e
a
gnet, note t
h
u
ld be straig
h
m
etal clamp t
o
h
e Sensor an
p
of the cable
h
ot cath
o
a
Hot Cat
h
position app
r
e
sensor awa
y
ase of a nud
e
m
age the ele
c
m
within the
v
g
Contam
i
e
re contamin
a
p
oration, the
a
hot cat
h
c
an be install
e
i
s recommen
d
e
p contamin
a
g a Hot C
r
s are availab
h
ing gauges
w
a
n overpress
u
ard. Addition
a
and/or perm
e
o
r with a KF f
l
1x10
-7
torr.
e
sensor into
a
e
nts to one a
n
n
ce for the el
e
nude gauge
d
es a screen
r
e the nomin
a
I-MAG S
e
cuum syste
m
e
, remove th
e
h
at it is keyed
h
t and center
e
o
mount a K
F
d to the Seri
e
to make sur
e
o
de sens
o
h
ode Sen
s
r
opriate for th
y
from pump
s
e
gauge, ens
u
c
trode structu
r
v
acuum syste
i
nation in
a
tion is least l
vapor could
c
h
ode sen
s
e
d and oper
a
d
ed that, wh
e
a
nts from falli
n
athode S
e
le with either
w
ith compres
s
u
re condition,
a
lly, the use
o
e
ation throug
l
ange and el
a
a
port, do not
n
other, the ch
e
ctrode struc
t
be mounted
that helps to
a
l rated sensi
49
e
nso
r
m
.
e
magnet firs
t
to the senso
e
d.
F
25 or KF 40
e
s 937B Cont
e
that it is se
c
o
rs
s
o
r
e measurem
e
s
and gas so
u
u
re that ther
e
r
e of the gau
g
m to insure t
h
a Hot Ca
t
ikely. For ex
a
c
ontaminate t
s
o
r
a
ted in any di
r
e
never possi
b
n
g into the s
e
e
nsor to t
a CF type m
e
s
ion type (qu
the gauge c
o
o
f an elastom
h the elasto
m
a
stomer O-rin
bend, dama
g
amber, or an
t
ure or of po
s
in a nipple, (i
prevent ion
c
tivity of the g
a
t
to allow cle
a
o
r body to pro
t
flanged sen
s
t
roller before
t
c
urely in plac
e
e
nt of proces
u
rces gives th
e
is nothing in
g
e. Special c
o
h
at they can
n
t
hode Se
n
a
mple, if the
s
t
he structure
o
r
ection witho
u
b
le, the sens
o
e
nsor.
he vacuu
m
e
tal sealed fl
a
ick connect)
a
o
uld be force
d
m
er seal is no
t
m
er can caus
e
n
g seal is suit
a
g
e, move the
y componen
t
s
sible damag
e
.e. HPS
®
Pro
c
oupling. Thi
s
a
uge.
a
rance for bol
t
ect the feed
t
s
or body for
g
t
urning on yo
e
.
s chamber o
r
e most repre
s
the system
o
o
nsideration
s
n
ot inadverte
n
n
so
r
s
ensor is mo
u
o
r feedthrou
g
u
t compromis
o
r be installed
m syste
m
a
nge, a KF t
y
a
daptors on
a
d
out of the
a
t
recommend
e
e
errors in pr
e
a
ble only for
p
electrodes o
r
t
s inside the
c
e
to the elect
r
o
ducts Part N
u
s
mounting is
l
t installation.
t
hrough pins
f
g
rounding.
ur system. Ti
r
manifold
s
entative pre
o
r mounting
s
hould be gi
v
n
tly damage t
h
u
nted directly
g
h and cause
ing the gaug
e
d
with the vac
u
m
y
pe flange, or
a
tabulation i
s
a
daptor and t
h
e
d for high
e
ssure
p
ressure
r
feedthroug
h
c
hamber. If t
h
r
ode structur
e
u
mber 10088
also
f
rom
ghten
ssure
v
en to
h
e
e
u
um
s
h
us
h
pins.
h
ere is
e
, it is
3069).
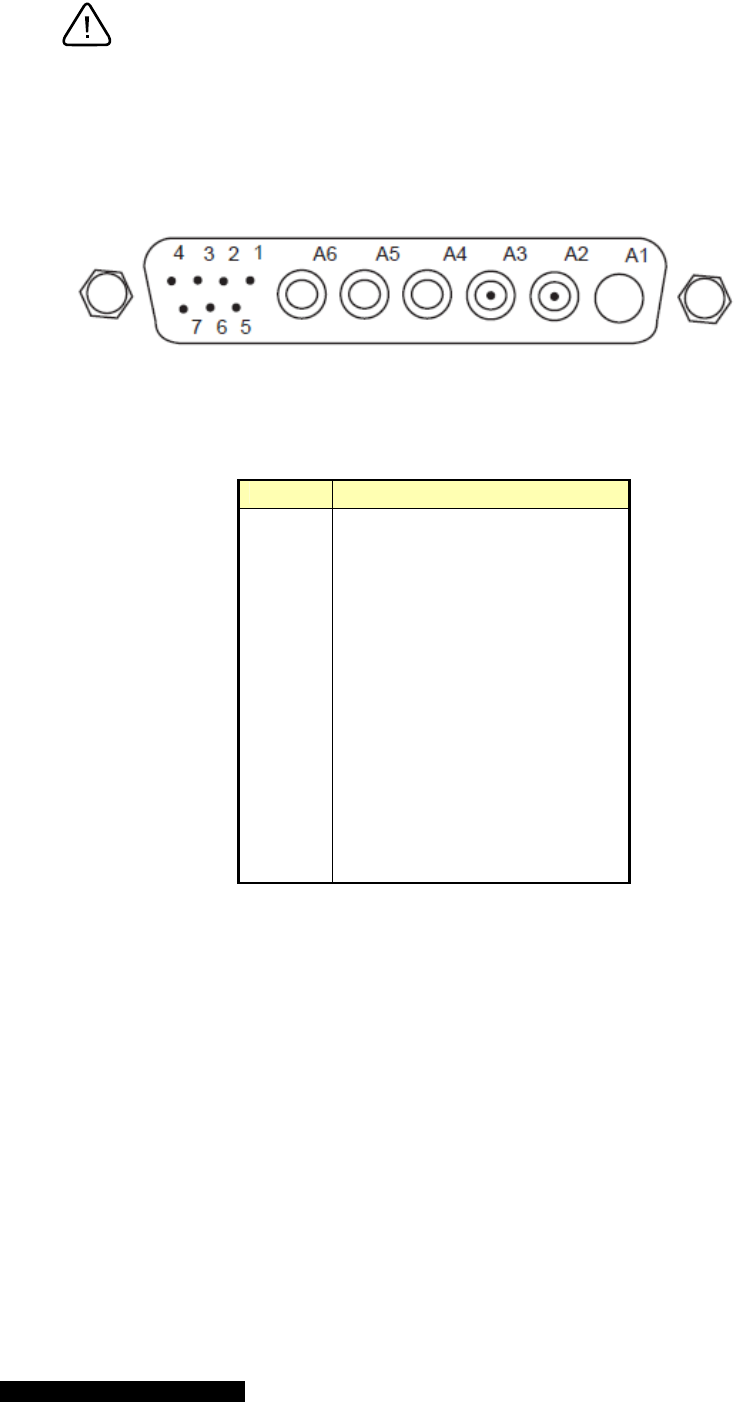
MKS 937B Operation Manual 50
The outside of the nipple can get hot and may burn the skin.
7.2.5 Connecting a Hot Cathode Sensor to the 937B Controller
A sensor cable with a 13 pin D-Sub connector (Figure 7-1) is required for operation and this must be
purchased separately from the 937B Controller system.
Figure 7-1 13 pin D-Sub connector on the back of 937B HC board.
The pin out for the hot cathode connector is described in Table 7-1.
Pin # Description
1 Emission current out
2 Emission current in
3 Factory test
4 Factory test
5 Sensor detect
6 Sensor detect common
7 Sensor detect
A1 Not used
A2 Collector current
A3 Grid
A4 Filament 2
A5 Filament common
A6 Filament 1
Table 7-1 Hot cathode connector pin out.
Pins 5, 6, and 7 are used for sensor identification. Therefore, cable needs to be selected to enable the
proper operation of the hot cathode sensor. The setting of these pins for different hot cathode sensors is
described in Table 7-2.
Figures 7-2 and 7-3 show the cable diagrams for Low Power Nude gauge and mini BA gauge,
respectively.
Since much high power is required to operate hot cathode gauge, especially, during degas process, the
maximum allowed cable length of a hot cathode is restricted to less than 50 ft (15 m), which is
significantly shorter than that is allowed for operating a cold cathode sensor.
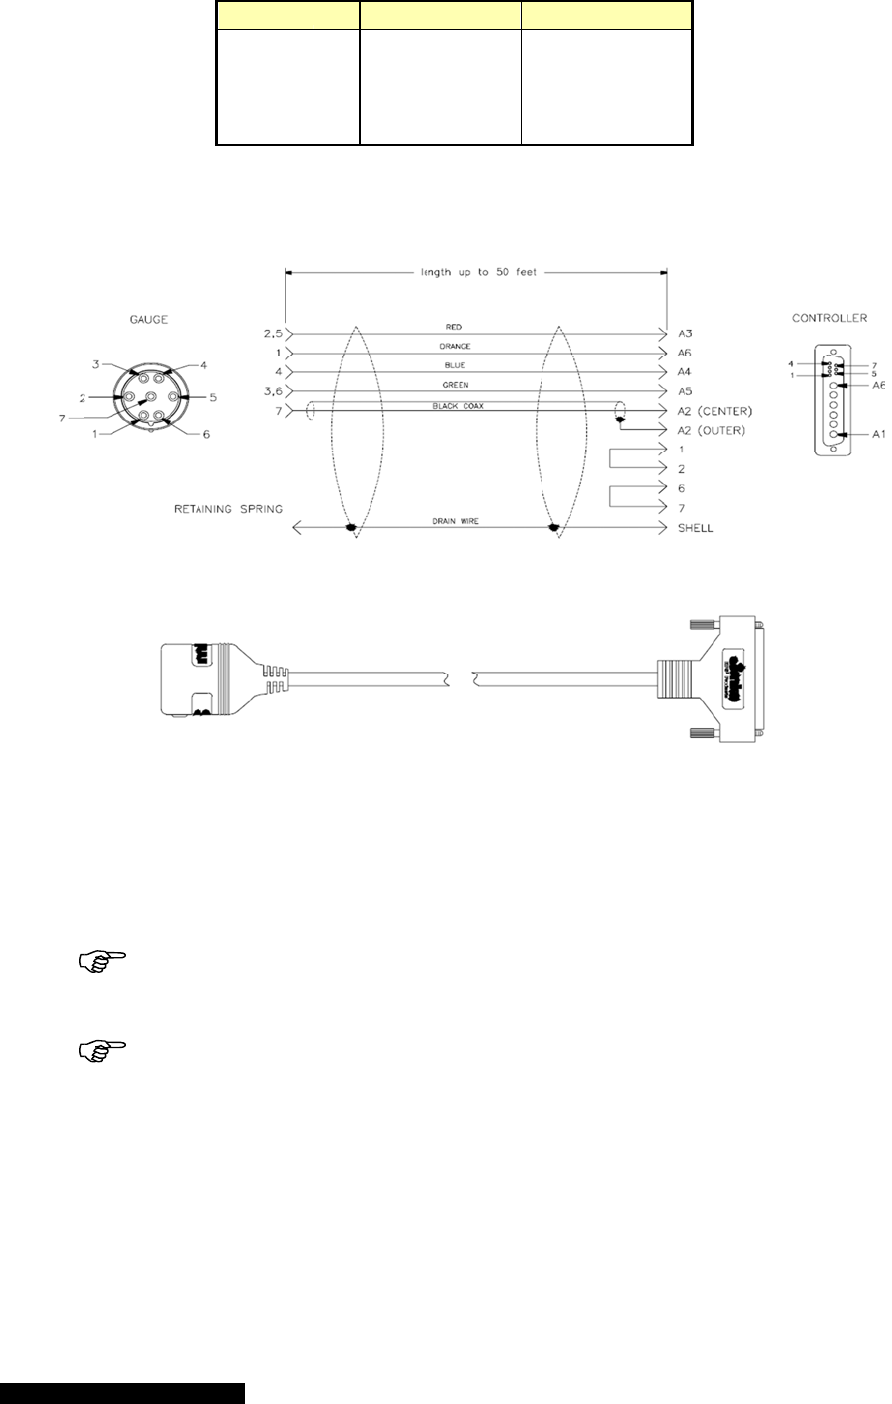
MKS 937
B
When ex
e
controller
.
of the co
n
mating s
c
f
r
t
h
B
Operation M
a
T
a
e
rting force o
n
.
Cables are
a
n
troller at the
c
rew locks to
e
Remov
e
r
om the sen
s
Hot cat
h
erefore onl
y
a
nual
Senso
LPN
Mini B
A
Glass
B
UHV-2
4
a
ble 7-2 Pi
n
Fig
Figu
r
n
the cable,
u
a
vailable in s
t
sensor modu
e
nsure prop
e
e
power fro
m
s
or or contr
o
hode cables
y
cables sup
r
P
G
r
A
No C
o
BA
G
r
4
No C
o
n
assignme
n
ure 7-2 LP
r
e 7-3 Mini
u
se a separat
e
t
andard lengt
le port label
e
e
r electrical c
o
m
the contro
l
o
ller.
have sever
a
plied by HP
S
51
P
in 5
r
ound
N
o
nnection
r
ound
o
nnection
N
n
t for HC sen
N gauge ca
b
BA gauge c
a
e
strain relief
hs of 10, 25
&
e
d “Hot Catho
o
nnection an
d
l
ler before c
o
a
l special ch
S
®
Products
Pin 7
No Connecti
o
Ground
Ground
No Connecti
o
sor type ide
b
le diagram.
a
ble diagra
m
to prevent d
a
&
50 feet onl
y
de”. Tighten
t
d
prevent str
e
o
nnecting o
r
aracteristic
s
should be u
o
n
o
n
ntification.
m
.
a
mage to the
y
. Connect th
e
t
he cable jac
k
e
ss on the co
n
r
disconnec
t
s
, including l
sed.
sensor or
e
cable to th
e
k
screws into
t
n
nector.
t
ing the cabl
e
ethal voltag
e
e
rear
t
he
e
e
s,

MKS 937B Operation Manual 52
7.3 Installing Pirani Sensors
7.3.1 Locating a Pirani Sensor
Locate a Pirani sensor appropriately for measuring a chamber or manifold pressure. Install the sensor
away from pumps and gas sources for the most representative data. Place the sensor in a location with
minimal vibration.
7.3.2 Preventing Contamination in a Pirani Sensor
Locate and orient the Pirani sensor so as to avoid contaminants that might affect the tube's element. For
example, if a sensor is installed directly above a roughing pump oil vapor could contaminate the tube's
filament wire and cause calibration shift.
Install a Pirani sensor with the vacuum port facing downward whenever possible. This helps to prevent
particulate and liquids from falling or flowing into the sensor. The use of a screen or porous filter at the
port can be helpful (i.e. a HPSTM Product seal and centering ring assembly with screen).
7.3.3 Orienting the Series 317 Pirani Sensor
When measuring pressures greater than 1 Torr, the Series 317 Sensor must be
mounted with its axis horizontal.
Measurements below 1 Torr are unaffected by position, but readings will be incorrect at higher pressures.
Incorrect readings could result in under- or over-pressure, damaging equipment or injuring
Mount the Sensor with the vacuum port facing downward to reduce particulates and liquids falling or
flowing into it. The sensors are calibrated in this position.
7.3.4 Orienting the Series 345 Pirani Sensor
Operating position has no effect on accuracy. The Pirani sensor was designed to minimize the effects of
convection. In a standard Pirani system, the output of the sensor changes very little in going from the
horizontal to vertical position.
The Series 345 Pirani sensor exhibits slight convection characteristics near atmospheric pressure.
Therefore, above 30 Torr the best accuracy can be achieved by calibrating the sensor in a vertical
position with the port facing down. The Pirani sensor can be calibrated at any pressure between 600 and
1000 Torr.
7.3.5 Connecting the Series 317/345 Sensors
Use an HPS® adaptive centering ring (HPS® PN 100315821) to fit a KF 16 port to a KF 10 port,.
To install the Sensor with a 1/8" NPT, do not apply torque to the case to tighten the connection. The
Sensor’s vacuum tubing has 9/16" hex flats for tightening. Wrap about two turns of Teflon® tape on the
threads of the Sensor in the direction of the threading to ensure a leak-free seal. Note: positive pressures
can blow the Sensor out of a compression fitting, damaging equipment and possibly injuring personnel.
Do not use a compression mount (quick connect) to attach the Sensor to a system
in positive pressure applications.
A solid electrical connection between the Sensor and the grounded vacuum system
must be provided to shield the tube element from external radiation sources.
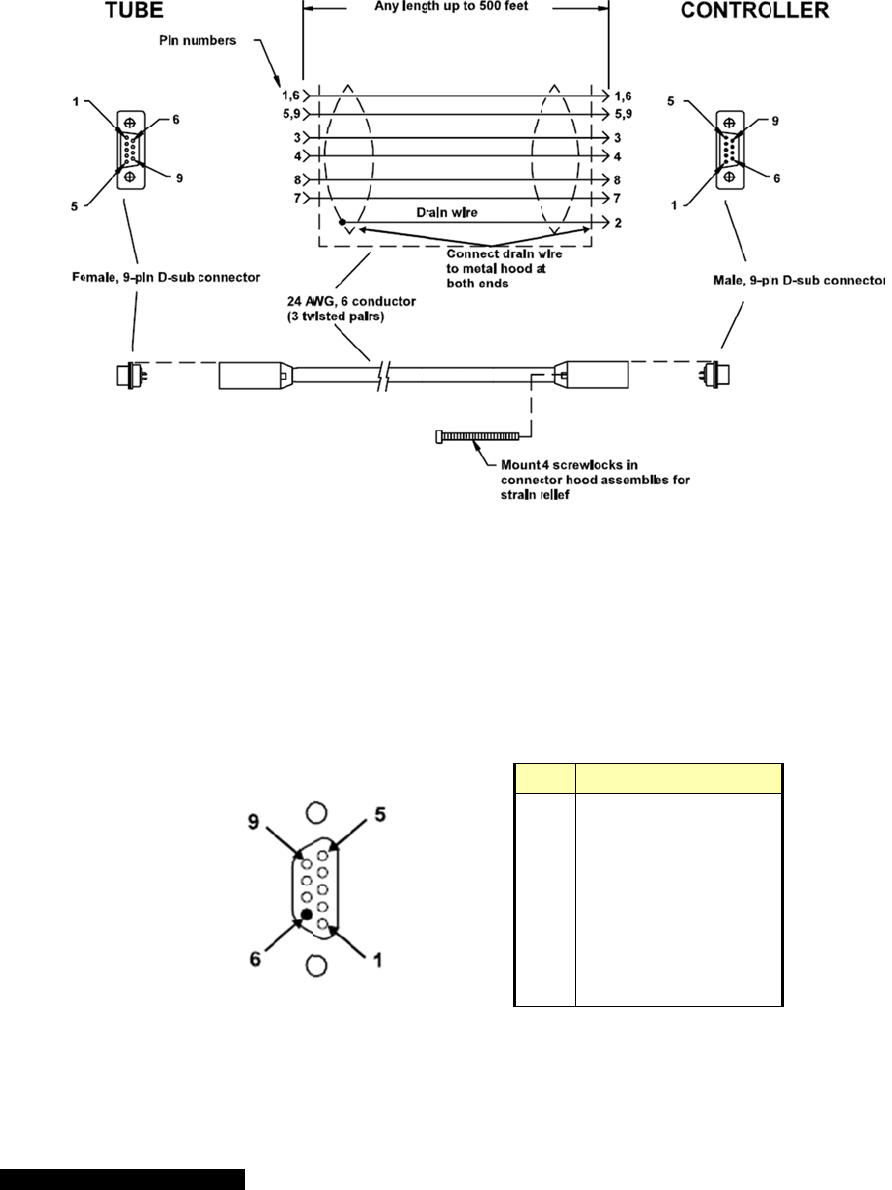
MKS 937
B
In applic
a
screen s
h
so that th
e
The sens
o
4. This c
o
the rear
o
If excess
or the Co
n
custom l
e
Some ap
p
may requ
informati
o
with integ
B
Operation M
a
a
tions where t
h
ould be inst
a
e
flange cont
a
o
r cable is c
o
o
nnector is e
q
o
f the Controll
stress is app
l
n
troller. Cabl
e
e
ngths up to
5
p
lications, (i.
e
ire the use o
f
o
n provided b
e
ral strain reli
e
a
nual
he system m
a
a
lled, and the
a
cts the cent
e
o
nnected to t
h
q
uipped with i
er for good c
o
F
l
ied to the ca
b
e
s are availa
b
5
00 feet.
e
those in whi
f
special cabl
e
e
low. The m
a
e
f for all appli
c
Ta
b
a
y be expos
e
screen and t
u
e
ring ring.
h
e 937B Cont
n
tegral strain
o
ntact and to
i
gure 7-4
3
b
le, use sep
a
b
le from HPS
ch the conne
e
s. Custom c
a
a
ximum lengt
h
c
ations.
b
le 7-3 Pin
53
e
d to large vo
u
bing ground
e
r
oller with th
e
relief. Scre
w
avoid exces
s
17/345 cabl
e
a
rate strain re
in standar
d
ction is route
d
a
bles may b
e
h
of the sens
o
out for 317/
3
P
1
5
2
3
4
7
8
ltage fluctuat
ed. The clam
e
9-pin "D" co
w
the strain re
l
s
stress on th
e
diagram.
lief to preven
d
lengths of 1
d through re
s
e
fabricated f
o
o
r cable is 5
0
345 cables.
P
in Descrip
t
,6 Bridge
d
,9 Bridge
d
2
Chassi
s
3
Signal
+
4
Signal -
7
Bridge
s
8
Bridge
r
ions, a cente
r
m
p must be ti
g
o
nnector as s
h
lief into the
m
e connector
s
t damage to
t
0, 25, 50, an
s
trictive barri
e
o
r these situa
t
0
0 feet. Use
a
t
ion
d
rive +
d
rive -
s
ground
+
s
ensor leg
r
eference leg
r
ing ring with
g
htened prop
e
h
own in Figu
r
m
ating stando
f
s
.
t
he sensor, c
a
d 100 feet a
n
e
rs or a cond
u
t
ions using t
h
a
"D" connect
o
a
e
rly
r
e 7-
f
fs on
a
ble
n
d in
u
it)
h
e
o
r
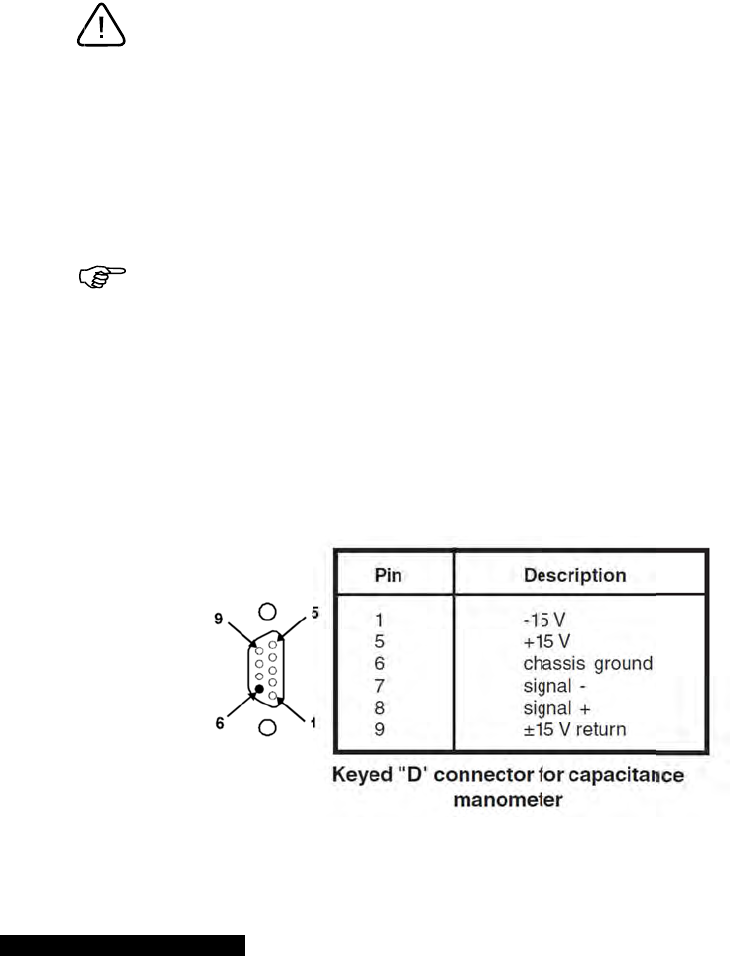
MKS 937
B
7.3.6
P
Remove
t
the conn
e
Sensor c
a
A
new 31
7
7.4
C
a
The Seri
e
Baratron
s
Capacita
n
diaphrag
m
scale ran
g
See an M
manomet
e
m
7.4.1 I
n
Capacita
n
placed a
s
sensing d
(VCR®,
c
s
t
h
7.4.2
C
A
capacit
a
module h
a
shown in
B
Operation M
a
P
reparing
t
he cable fro
m
e
ctor/electron
a
n be baked
u
7
with alumin
a
pacitan
c
e
s 937B Cont
r
s
®
(622A, 623
A
n
ce manome
t
m
. Baratrons
a
g
es from 0.0
2
KS Baratron
e
rs.
Do not
m
ay damage
t
n
stalling
a
n
ce Manome
t
s
ystem with t
h
iaphragm. A
n
ompression,
Due to
t
i
ngle or dou
b
h
e pressure
s
C
onnectin
a
nce manom
e
a
s two femal
e
Table 7-4.
Ta
b
a
nual
the 317 S
m
the Sensor.
ics subasse
m
u
p to 150°C
a
um housing
R
c
e Mano
m
r
oller support
A
, 626A, 722
t
ers measure
a
re widely u
s
2
to 20,000 T
o
instruction m
connect he
a
t
he Baratro
n
a
Baratro
n
t
ers may be
m
h
e Px port fa
c
n
y standard v
KF flange, et
c
t
he failure o
f
b
le metal fe
r
s
ensor, MK
S
g a Barat
r
e
ter head is
c
e
, 9-pin "D" c
o
b
le 7-4 Pin
o
ensor for
Using a #1
P
m
bly separati
n
a
nd the Shiel
d
R
F shielding
c
m
eters -
M
s a number
o
A ), and MK
S
pressure dir
e
ed owing to t
o
rr, each wit
h
anual for co
m
a
ted Baratro
n
n
Module.
n
Capacit
a
m
ounted in a
n
c
ing down to
acuum fitting
c
.). The sens
f
many user
s
r
rule compr
e
S
does not
w
r
on™ Ca
p
c
onnected to
o
nnectors. T
o
ut of the 9
p
54
Bakeout
P
hillips screw
n
g it from the
d
ed Convecti
o
c
an be bake
d
M
KS Bar
a
o
f capacitanc
e
S
45 C heate
d
e
ctly by mea
s
heir accurac
y
h
a 3-decade
m
plete inform
a
n
s with cont
r
a
nce Man
n
y position, h
o
allow conta
m
may be use
d
or port will e
a
s
to follow t
h
e
ssion vacu
u
w
arrant this
p
p
acitance
the module
w
he Pin assig
n
p
in D-Sub c
o
w
driver, remo
v
Sensor. The
o
n Pirani Se
n
d
to 250°C.
a
tron
e
manometer
s
d
Baratrons
®
(
s
uring the de
f
y
and reliabili
t
range.
a
tion on usin
g
r
olled temp
e
omete
r
o
wever, it is r
m
ination to fall
d
to connect t
a
sily carry th
e
h
e proper ti
g
u
m fittings a
n
p
roduct whe
n
Manome
t
w
ith a multico
n
n
ment for the
o
nnector on
v
e the two sc
r
standard Co
n
n
sor can be b
s
, including t
h
(
624B,D24B,
f
lection of a t
h
t
y. They are
a
g
these capa
c
e
ratures hig
h
r
ecommende
d
away from t
h
t
he Baratron
t
e
weight of th
e
g
htening pro
c
n
d the resul
t
n
such fittin
g
t
e
r
n
ductor shiel
d
9-pin D-Sub
CM module.
r
ews at the e
n
n
vection Pira
n
aked up to 1
0
h
e MKS unh
e
627B,D27B)
.
h
in Inconel
®
a
vailable in f
u
c
itance
h
er than 45
o
C
d
that they b
e
h
e pressure
t
o the system
e
transducer.
c
edures for
t
ing damage
g
s are used.
d
ed cable. T
h
connector is
n
d of
n
i
0
0°C.
e
ated
.
u
ll
C
. It
e
to
h
e
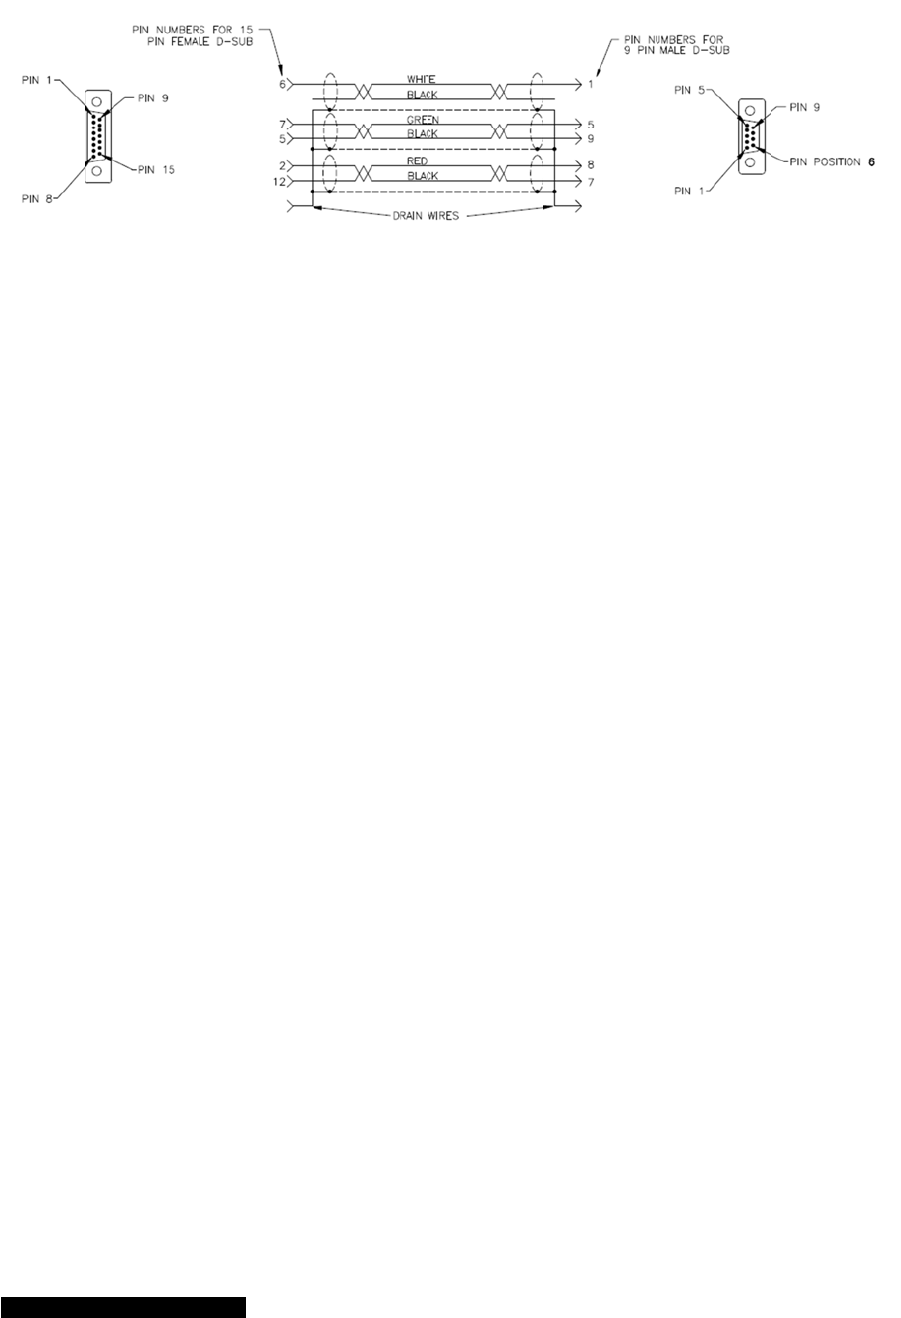
MKS 937
B
A
shielde
d
end is re
q
cable is s
B
Operation M
a
d
cable with
9
q
uired to con
n
h
own in Figu
r
Figure
a
nual
9
pin male D
s
n
ect the Bara
t
r
e 7-5.
7-5 The wi
s
ub on the co
n
t
ron to the m
o
ring diagra
m
55
n
troller end a
o
dule on the
9
m
for the Ca
p
nd a 15 pin
m
9
37B controll
p
acitance M
a
m
ale Dsub en
er. Detailed
w
a
nometer ca
b
d on the Bar
a
w
iring for the
b
le.
a
tron
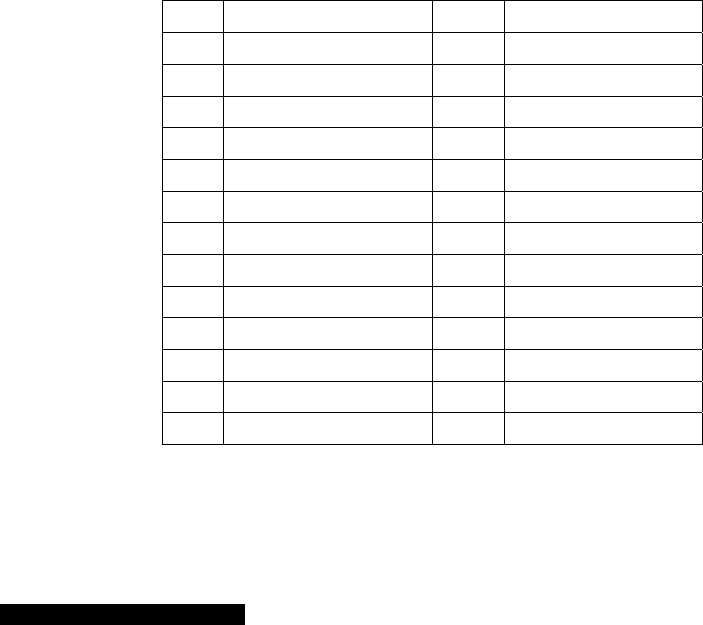
MKS 937B Operation Manual 56
8 Connecting Relay and Analog Outputs
8.1 Connecting 937B relay outputs
There are twelve relays available in the 937B controller. These can be used to control the operation of
devices (such as valves) associated with a vacuum system. Relays can be accessed through the 25 pin
D-Sub connector on the back of the AIP module.
Relays used in the 937B are normally open (NO) SPDT relays. Thus if no is supplied to the controller, no
output signal can be sent. During the 937B power up process, a delay circuit is implemented to ensure
that all of these relays are disabled (i.e. maintained in the normally open state) until reliable control
signals are available.
If normally closed relay outputs are required, an external conversion is required.
Currently, relay activations are determined using the main microprocessor in the 937B. The time required
to process a measured pressure signal therefore results in a relay activation time delay of between 50 to
100 msec.
Analog comparators that facilitate reduced relay response times will be added in future to ensure short
relay response time (less than 5 msec). The main microprocessor will then be used only for setting the
reference values for the comparators.
8.1.1 Pin out for the 937B relay output
Table 8-1 identifies the pins for the male, 25-pin "D" connector on the AIO/Power module that provides
the connection to the relay output. 12 relays are built into the controller and 4 relays are assigned to each
sensor module. If a single sensor module such as a CCG or a HCG is present, all four of these relays are
assigned to the module. If a dual sensor module such as a Pirani, CP, or capacitance manometer is used,
2 relays are assigned to each sensor connected to the module.
Pin Description Pin Description
1 Relay 1 NO 14 Relay 7 NO
2 Relay 1 Common 15 Relay 7 Common
3 Relay 2 NO 16 Relay 8 NO
4 Relay 2 Common 17 Relay 8 Common
5 Relay 3 NO 18 Relay 9 NO
6 Relay 3 Common 19 Relay 9 Common
7 Relay 4 NO 20 Relay 10 NO
8 Relay 4 Common 21 Relay 10 Common
9 Relay 5 NO 22 Relay 11 NO
10 Relay 5 Common 23 Relay 11 Common
11 Relay 6 NO 24 Relay 12 NO
12 Relay 6 Common 25 Relay 12 Common
13 No Connection
Table 8-1 Pin out for the 937B relay output.
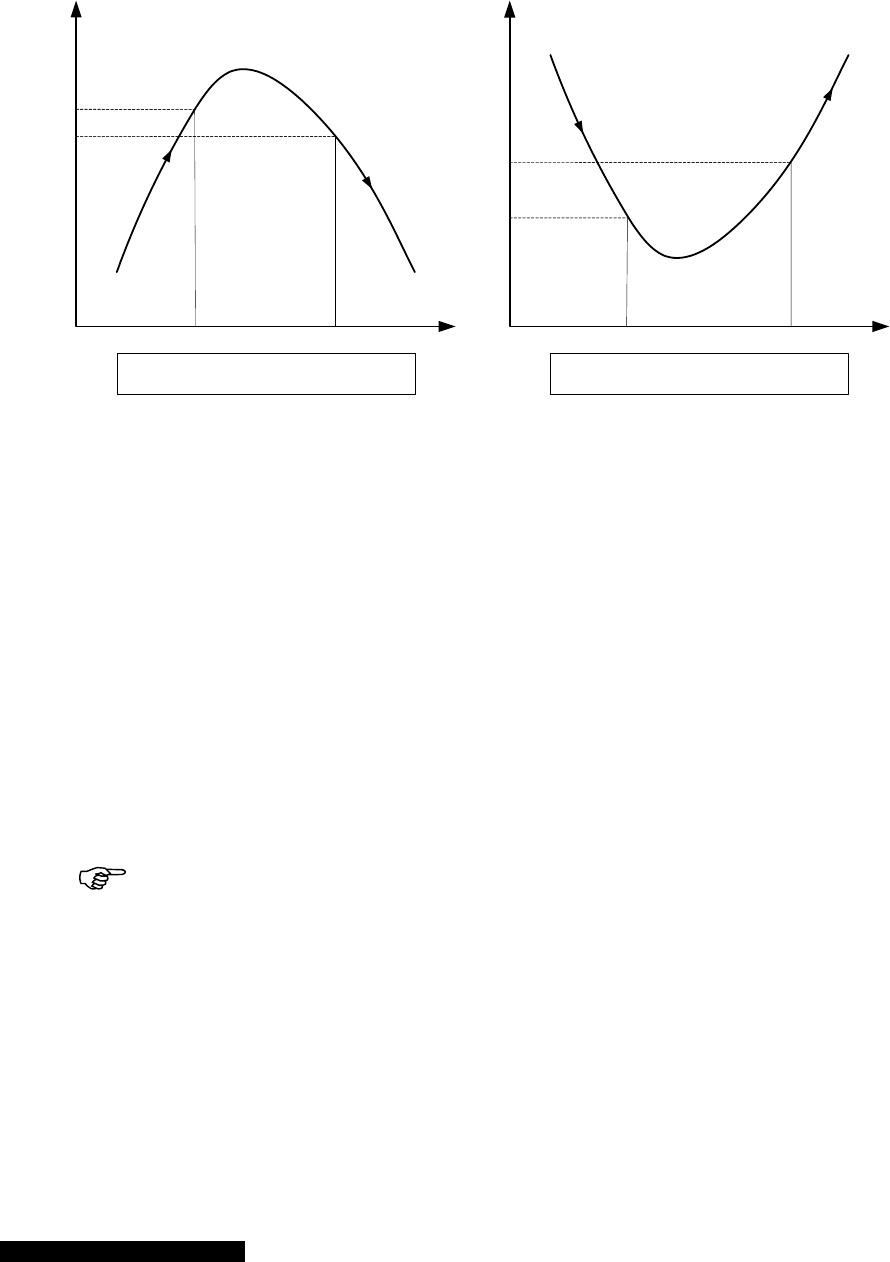
MKS 937B Operation Manual 57
8.1.2 Proper setting of a relay
Several parameters need to be correctly set to properly use the relays in a 937B controller. Figure 8-1
shows that manner in which these parameters are defined.
Figure 8-1 Definition of the parameters used for relay control.
1. Direction
Direction indicates the direction relative to the setpoint when the relay is activated. There are two
choices: ABOVE and BELOW.
When ABOVE is selected, the relay will be activated when the system pressure is higher than the
setpoint. All relays in the 937B are normally open so ABOVE must be selected to close a relay
when the pressure rises above a defined value. For example, the 937B can be used to control a
normally closed roughing by-pass valve in a vacuum system. If the pressure is above certain
value (defined as the roughing pressure), a relay can be activated (i.e. closed) so that power is
sup plied to the solenoid of the NC roughing valve, opening the valve.
When BELOW is selected, the relay will be activated when the system pressure is lower than the
setpoint. A typical application in this case is the control of a high vacuum chamber isolation valve.
Using relay activation in the BELOW mode, a normally closed isolation valve can be opened only
when the system pressure is below its setpoint.
Since an ion gauge (either hot or cold cathode gauge) is turned off when the
pressure is above its protection or control setpoint, only the BELOW direction is permitted
for ion gauges. It is always dangerous to assume that the pressure is above a defined
setpoint when the ion gauge is turned off.
2. Hysteresis
Hysteresis is designed to prevent chattering of the relay. System pressure may fluctuate slightly,
if the hysteresis is set too close to the setpoint value and there is a potential for undesired relay
activation.
For example, when a main high vacuum isolation valve is opened, a small pressure rise may
occur in the vacuum system. If the hysteresis is close to or identical with the pressure setpoint,
Time
Pressure
Setpoint
Hysteresis
Relay
Deactivated Relay
Deactivated
Relay
Activated
ABOVE
1. Relay is activated above the setpoint
2. Hysteresis < Setpoint
Time
Pressure
Setpoint
Hysteresis
Relay
Deactivated Relay
Deactivated
Relay
Activated
BELOW
1. Relay is activated below the setpoint
2. Hysteresis > Setpoint

MKS 937
B
t
h
s
h
T
t
h
W
t
h
n
e
8.1.3
R
If the set
p
the relay
c
suppressi
The valu
e
where C i
voltage in
8.2
C
o
A
nalog o
u
can be u
s
output ca
p
pressure
A
nalog o
u
These si
g
They incl
u
outputs a
r
describe
d
B
Operation M
a
h
e controller
w
h
ould be avo
i
hus, when di
r
h
e direction i
s
W
hen Directio
n
h
e hysteresis
e
ed to be op
t
R
elay Ind
u
p
oint relay is
c
ontacts ma
y
on network,
s
e
s of the cap
a
s in F, R is
volts. C
min
=
o
nnectin
g
u
tputs are ou
t
s
ed to for a v
a
p
ability allow
s
m
easuremen
u
tput signals,
g
nals can be
a
u
de buffered,
r
e simultane
o
d
in Table 8-2
a
nual
w
ill try to shu
t
i
ded. The hy
s
r
ection is set
s
set to BELO
n
is changed
to avoid abo
v
t
imized by th
e
u
ctive Lo
a
used to swit
c
y
interfere wit
h
s
hown sche
m
Figure
8
a
citance C an
C
in , I is the
D
0
.001F and
g
the 93
7
t
put via the 3
7
a
riety of proc
e
s
two sensor
t range.
which can b
e
a
ccessed fro
m
logarithmic,
a
o
usly availabl
e
.
t
the valve. S
u
s
teresis settin
to ABOVE, t
h
W, the hyste
r
in the 937B
c
v
e-mentione
d
e
user.
a
ds and A
r
c
h inductive l
o
h
the controll
e
m
atically in Fi
g
8
-2 The rel
a
d the resista
n
R
I
1
;
10
2
D
C or AC
peak
l
R
min
= 0.5 .
7
B Analo
g
7
-pin connec
t
e
ss control a
n
outputs to b
e
e
sent to a d
a
m
the 37 pin
D
a
nd combina
t
e
from all se
n
58
u
ch an opera
t
g must there
f
h
e hysteresis
r
esis must b
e
c
ontroller, a
d
d
problem. D
e
r
c Suppr
e
o
ads, e.g., so
e
r operation
o
g
ure 8-2, is th
a
y arc supp
r
n
ce R are cal
c
and
I
E
a
0
l
oad current i
g
Output
t
or on the ba
c
n
d other purp
o
e
combined,
p
ta acquisitio
n
D
-sub female
t
ion logarith
m
n
sors. The de
t
ion is detrim
e
f
ore be highe
must be low
e
e
higher than
t
d
efault offset
v
e
pending on t
e
ssion
lenoids, rela
y
o
r reduce rel
a
h
erefore reco
m
r
ession net
w
c
ulated usin
g
E
a5
0
1
n amperes,
E
c
k of the AIO
o
ses. In parti
c
p
roviding the
c
n
system, are
connector o
n
m
ic output. Bu
tailed assign
m
e
ntal to syst
e
e
r than the se
t
e
r than the s
e
the setpoint.
v
alue (about
he applicatio
n
y
s, transform
e
a
y contact life
m
mended.
w
ork.
g
the equatio
n
E
0
E
is the DC
o
module. The
s
c
ular, a com
b
c
ontroller wit
h
available for
n
the back of
ffered and lo
g
m
ent for thes
e
m control an
d
t
point.
e
tpoint, while
10%) is give
n
n
, this value
m
e
rs, etc., arci
n
. An arc
n
s:
o
r AC
peak
sou
r
se analog si
g
b
ined logarith
h
a much wid
e
each sensor
the controlle
r
g
arithmic an
a
e pins is
d
when
n
to
m
ay
n
g of
r
ce
g
nals
mic
e
r
.
r
.
a
log

MKS 937B Operation Manual 59
Pin Description Pin Description
1 Buffered Aout A1 11 Log/Lin Aout C1
2 Buffered Aout A2 12 Log/Lin Aout C2
3 Buffered Aout B1 13 Combination Aout 1
4 Buffered Aout B2 14 Combination Aout 2
5 Buffered Aout C1 15 Power A1
6 Buffered Aout C2 16 Power A2/Degas A1
7 Log/Lin Aout A1 17 Power B1
8 Log/Lin Aout A2 18 Power B2/Degas B1
9 Log/Lin Aout B1 19 Power C1
10 Log/Lin Aout B2 20 Power C2/Degas C1
21 to 37 Ground
Table 8-2 Pin out for 937B analog output.
8.3 Buffered analog output
A buffered analog signal responds immediately to sensor signal changes; it can therefore be used in
critical fast controlling applications.
Buffered analog signals are non-linear and strongly sensor dependent, use these
signals with due caution.
Normal buffered output for the 937B is 0 to 10 V. If a negative buffered voltage is observed, it may be
caused by
No discharge for a cold cathode, or a pressure reading of less than 1x10-11 torr.
Areading below zero for a capacitance manometer (zero adjustment may be required).
The buffered analog outputs for variety of pressure sensors in an unpowered state are shown in Table 8-
3.
Sensor Buffered Analog Output when power is off
Cold Cathode (CC) > 10 V
Hot Cathode (HC) > 10V
Pirani (PR) 0
Convection Pirani (CP) 0
Table 8-3 Buffered analog output when sensor power is off.
A hot cathode gauge uses different emission currents in different pressure ranges and therefore the
analog output depends on the emission current and pressure. To avoid problems, logarithmic analog
output is used as the buffered analog output.
Buffered analog output for the cold cathode, hot cathode, Pirani, convection Pirani and capacitance
manometers are shown in following figures and tables.
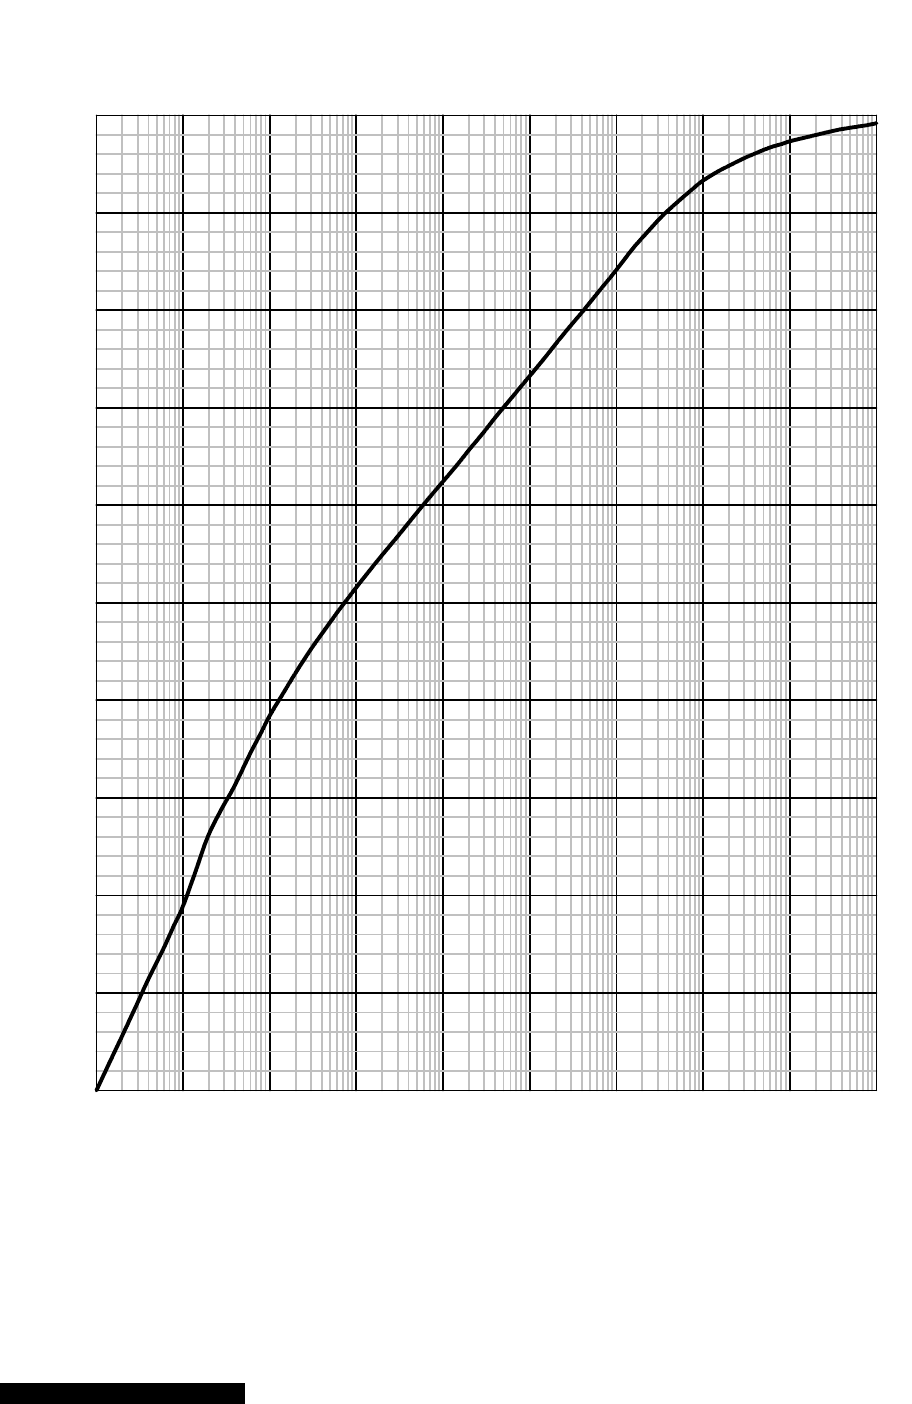
MKS 937B Operation Manual 60
Buffered Cold Cathode Analog Output (N2)
(Series 421 and 423)
Pressure, Torr
10-11 10-10 10-9 10-8 10-7 10-6 10-5 10-4 10-3 10-2
Output Voltage, V
0
1
2
3
4
5
6
7
8
9
10
Figure 8-3 Buffered analog output for cold cathode gauges (421/422/423) in N2.

MKS 937B Operation Manual 61
Pressure, Torr Buffered Vout, V Pressure, Torr Buffered Vout, V
1.0E-11 0.0000 4.0E-07 6.8993
1.5E-11 0.3286 6.0E-07 7.0871
2.0E-11 0.5634 8.0E-07 7.2222
3.0E-11 0.8994 1.0E-06 7.3247
4.0E-11 1.1416 1.5E-06 7.5140
6.0E-11 1.4585 2.0E-06 7.6551
8.0E-11 1.7035 3.0E-06 7.8469
1.0E-10 1.8882 4.0E-06 7.9769
1.5E-10 2.3241 6.0E-06 8.1714
2.0E-10 2.6299 8.0E-06 8.3064
3.0E-10 2.9358 1.0E-05 8.4136
4.0E-10 3.1342 1.5E-05 8.6166
6.0E-10 3.4587 2.0E-05 8.7446
8.0E-10 3.6700 3.0E-05 8.9177
1.0E-09 3.8409 4.0E-05 9.0275
1.5E-09 4.1006 6.0E-05 9.1665
2.0E-09 4.2838 8.0E-05 9.2614
3.0E-09 4.5248 1.0E-04 9.3297
4.0E-09 4.6807 1.5E-04 9.4255
6.0E-09 4.8991 2.0E-04 9.4826
8.0E-09 5.0452 3.0E-04 9.5605
1.0E-08 5.1579 4.0E-04 9.6076
1.5E-08 5.3563 6.0E-04 9.6708
2.0E-08 5.4924 8.0E-04 9.7034
3.0E-08 5.6809 1.0E-03 9.7325
4.0E-08 5.8185 1.5E-03 9.7703
6.0E-08 6.0096 2.0E-03 9.7975
8.0E-08 6.1423 3.0E-03 9.8340
1.0E-07 6.2431 4.0E-03 9.8575
1.5E-07 6.4281 6.0E-03 9.8823
2.0E-07 6.5683 8.0E-03 9.8997
3.0E-07 6.7570 1.0E-02 9.9178
Table 8-4 Buffered analog output for the cold cathode gauges (421/422/423) in N2. This is 2.4
higher than the raw analog output as shown in Table 8-5.
Range Equation
V<2.2V )4259.09901.03941.33546.25exp( 32 VVVP
2.2 V< V <3.71 V
1969.0
7722.5
exp V
P
V>3.71 V
V
V
P0721557.03161.0
2157.4
exp
Table 8-5 Equations for Cold Cathode gauges (N2) raw analog output.

MKS 937B Operation Manual 62
Figure 8-4 Buffered analog output for hot cathode gauges; same as the logarithmic analog
output.
Buffered Hot Cathode Analog Output
Pressure, Torr
10-11 10-10 10-9 10-8 10-7 10-6 10-5 10-4 10-3 10-2
Output Voltage, V
0
1
2
3
4
5
6
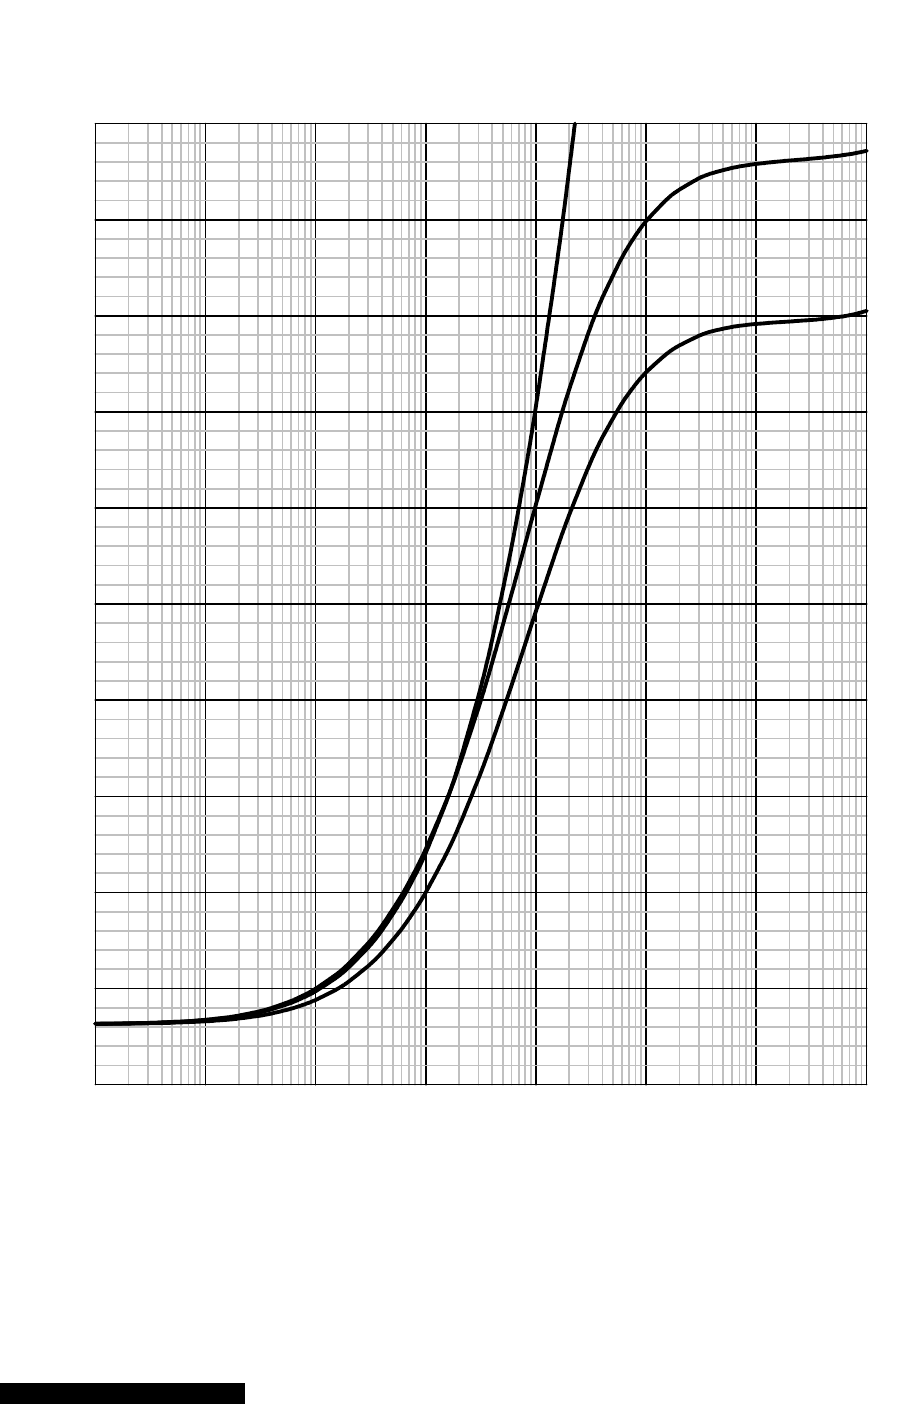
MKS 937B Operation Manual 63
Buffered Pirani Analog Output
(Series 315 & 345)
Pressure, Torr
10-4 10-3 10-2 10-1 100101102103
Output Voltage, V
0
1
2
3
4
5
6
7
8
9
10 He
N2
Ar
Figure 8-5 Buffered analog output for a 345 Pirani gauge.

MKS 937B Operation Manual 64
Pressure, Torr Buffered N2 Vout, V Buffered Ar Vout, V Buffered He Vout, V
1.0E-04 0.6323 0.6324 0.6340
1.5E-04 0.6347 0.6339 0.6362
2.0E-04 0.6372 0.6355 0.6384
3.0E-04 0.6420 0.6385 0.6426
4.0E-04 0.6468 0.6414 0.6469
6.0E-04 0.6563 0.6474 0.6553
8.0E-04 0.6656 0.6533 0.6636
1.0E-03 0.6747 0.6591 0.6718
1.5E-03 0.6970 0.6734 0.6919
2.0E-03 0.7185 0.6875 0.7115
3.0E-03 0.7597 0.7147 0.7490
4.0E-03 0.7985 0.7408 0.7847
6.0E-03 0.8707 0.7905 0.8517
8.0E-03 0.9371 0.8371 0.9138
1.0E-02 0.9988 0.8812 0.9718
1.5E-02 1.1376 0.9824 1.1036
2.0E-02 1.2602 1.0735 1.2211
3.0E-02 1.4727 1.2344 1.4271
4.0E-02 1.6557 1.3751 1.6066
6.0E-02 1.9652 1.6162 1.9148
8.0E-02 2.2254 1.8213 2.1788
1.0E-01 2.4526 2.0015 2.4131
1.5E-01 2.9255 2.3794 2.9143
2.0E-01 3.3095 2.6885 3.3370
3.0E-01 3.9177 3.1815 4.0419
4.0E-01 4.3922 3.5686 4.6294
6.0E-01 5.1070 4.1556 5.5955
8.0E-01 5.6323 4.5898 6.3873
1.0E+00 6.0405 4.9289 7.0651
1.5E+00 6.7597 5.5295 8.4399
2.0E+00 7.2342 5.9282 9.5215
3.0E+00 7.8281 6.4295 11.1701
4.0E+00 8.1874 6.7340
6.0E+00 8.6026 7.0869
8.0E+00 8.8363 7.2858
1.0E+01 8.9862 7.4136
1.5E+01 9.1992 7.5950
2.0E+01 9.3119 7.6909
3.0E+01 9.4294 7.7908
4.0E+01 9.4846 7.8398
6.0E+01 9.5377 7.8835
8.0E+01 9.5638 7.9034
1.0E+02 9.5795 7.9149
1.5E+02 9.6017 7.9306
2.0E+02 9.6146 7.9400
3.0E+02 9.6319 7.9539
4.0E+02 9.6454 7.9664
6.0E+02 9.6693 7.9922
8.0E+02 9.6925 8.0200
1.0E+03 9.7157 8.0502
Table 8-6 Buffered analog output for the 315/345 Pirani sensors.

MKS 937B Operation Manual 65
Range Equation
Nitrogen
0.63<V<9.3 V
1
10-4<p <20 torr
007.1
21
3935.0
303.93 585.1
V
p
9.3 V< V <9.72 V
20 <p< 1
103 torr
8696.0
3
21034.1621.9621.94123
VVp
Argon
0.63<V<7.79 V
1
10-4 <p<20 torr 1
3961.0
63.63 663.1
2
V
p
7.79 V< V <8.05
V
30 <p< 1
103 torr
729.0
4
210464.59386.79386.72959
VVp
Helium
0.63<V<10 V
1
10-4 <3 torr 1
3965.0
4.509287.9
2
V
p
Table 8-7 Equations for the 315/345 Pirani sensors.
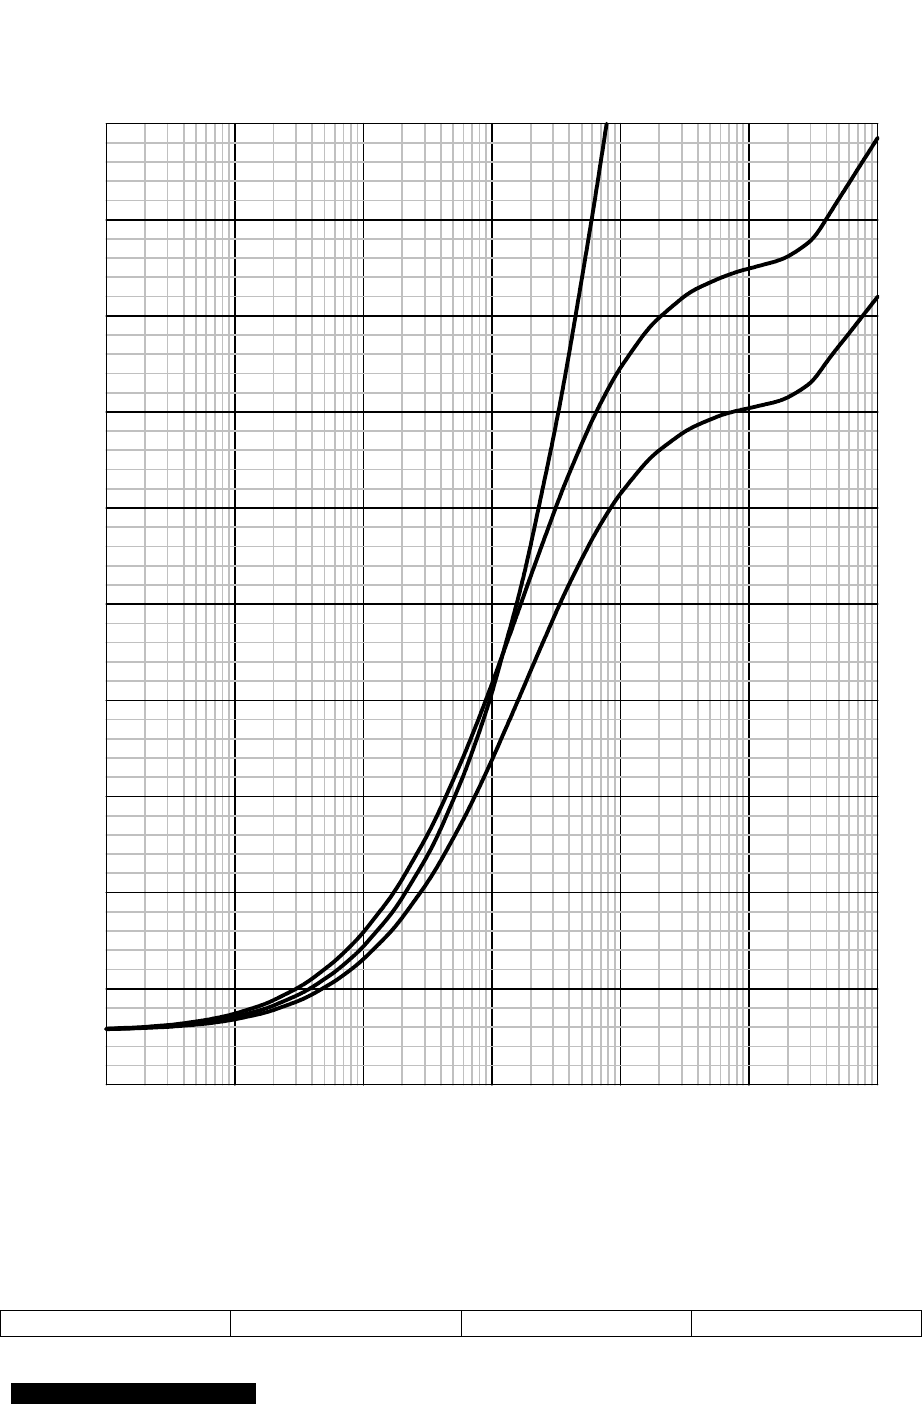
MKS 937B Operation Manual 66
Buffered Convection Pirani Analog Output
(Series 317)
Pressure, Torr
10-3 10-2 10-1 100101102103
Output Voltage, V
0
1
2
3
4
5
6
7
8
9
10 He
N2
Ar
Figure 8-6 Buffered analog output for the 317 convection Pirani gauge.
Pressure, Torr Buffered N2 Vout, V Buffered Ar Vout, V Buffered He Vout, V

MKS 937B Operation Manual 67
1.0E-04 0.5639 0.5674 0.5654
1.5E-04 0.5650 0.5680 0.5663
2.0E-04 0.5660 0.5687 0.5671
3.0E-04 0.5681 0.5699 0.5688
4.0E-04 0.5702 0.5712 0.5705
6.0E-04 0.5744 0.5737 0.5738
8.0E-04 0.5785 0.5762 0.5771
1.0E-03 0.5825 0.5787 0.5803
1.5E-03 0.5925 0.5849 0.5883
2.0E-03 0.6023 0.5909 0.5961
3.0E-03 0.6213 0.6029 0.6114
4.0E-03 0.6397 0.6147 0.6262
6.0E-03 0.6748 0.6375 0.6547
8.0E-03 0.7081 0.6594 0.6818
1.0E-02 0.7397 0.6807 0.7077
1.5E-02 0.8130 0.7309 0.7685
2.0E-02 0.8799 0.7778 0.8244
3.0E-02 0.9993 0.8635 0.9256
4.0E-02 1.1050 0.9410 1.0161
6.0E-02 1.2884 1.0782 1.1755
8.0E-02 1.4465 1.1985 1.3147
1.0E-01 1.5870 1.3066 1.4398
1.5E-01 1.8866 1.5399 1.7110
2.0E-01 2.1371 1.7370 1.9427
3.0E-01 2.5480 2.0637 2.3341
4.0E-01 2.8825 2.3318 2.6645
6.0E-01 3.4139 2.7612 3.2168
8.0E-01 3.8301 3.1003 3.6784
1.0E+00 4.1716 3.3801 4.0811
1.5E+00 4.8207 3.9161 4.9231
2.0E+00 5.2897 4.3067 5.6142
3.0E+00 5.9352 4.8489 6.7300
4.0E+00 6.3647 5.2126 7.6243
6.0E+00 6.9069 5.6749 9.0227
8.0E+00 7.2375 5.9585 10.0998
1.0E+01 7.4611 6.1510 10.9720
1.5E+01 7.7955 6.4399
2.0E+01 7.9814 6.6008
3.0E+01 8.1820 6.7747
4.0E+01 8.2885 6.8671
6.0E+01 8.3954 6.9637
8.0E+01 8.4563 7.0109
1.0E+02 8.4917 7.0396
1.5E+02 8.5547 7.0943
2.0E+02 8.6178 7.1523
3.0E+02 8.7804 7.3037
4.0E+02 9.0106 7.5176
6.0E+02 9.3827 7.8191
8.0E+02 9.6467 8.0330
1.0E+03 9.8515 8.1989
Table 8-8 Buffered analog output for the 317 Convection Pirani sensor.
MKS 937B Operation Manual 68
Range Equation
Nitrogen
0.56<V<8.3 V
1
10-4<p <40
torr
01.1
21
3156.0
327.74
35.3
V
p
8.3 V< V <8.8 V
40 <p< 300 torr
3
210372.5503.8503.85.399
VVp
p>300 torr
9177.0
512.3
exp V
p
Argon
0.56<V<7.00 V
1
10-4<p <60
torr
002.1
21
3205.0
083.51 6.3
V
p
7.00 V< V <7.4 V
60 <p< 300 torr
3
210789.3042.7042.72.411
VVp
P>300 torr
7436.0
063.3
exp V
p
Helium
0.63<V<10 V
1
10-4 <4 torr
017.1
21
3177.0
3.456 93.26
V
p
Table 8-9 Equations for the 317 Convection Pirani sensor.

MKS 937B Operation Manual 69
Buffered Capacitance Manometer Analog Output
Pressure, Torr
10-4 10-3 10-2 10-1 100101102103104
Output Voltage, V
0.01
0.1
1
10 0.1
Full Scale Range (Torr)
1.0 10 100 1000 10,000
Figure 8-7 Buffered analog output for capacitance manometers.
8.4 Logarithmic/Linear and combination analog output
Since most of the buffered analog outputs are non-linear, logarithmically linearized or linear analog
outputs are also provided for each individual sensor. However, since the logarithmic/linear analog

MKS 937B Operation Manual 70
outputs are processed by the microprocessor, these are updated every 50 msec, regardless of the
number of sensors being connected to the controller.
In addition to these Log/Lin analog outputs, 2 combination analog outputs are also available. Up to 3
sensors can be selected for a combination analog output.
8.4.1 Logarithmic/Linear analog output
There are two types of analog output that can be selected for each channel: logarithmic (
BpAV )log( ) or linear ( )pAV . Since these analog outputs are determined by the DACs
inside the controller, they can be modified by setting appropriate DAC parameters in the System Setup
screen shown in Figure 6-6.
The default analog output for the 937B controller is logarithmic having a slope of 0.6V per decade and an
offset of 7.2 V ( 2.7)(6.0 pLogV ). This covers analog output ranging from 0.6 to 9.6 V (equivalent to
a pressure range from 1X10-11 to 1X10⁴ torr).
For detailed setting of the DAC parameters, refer to System Setup, Section 6.4.
8.4.2 Combination analog output
In addition to the logarithmic analog output for each individual sensor, two combination analog outputs
are available. This allows for wider pressure range coverage since a combination output combines the
measurement ranges of multiple gauges.
When capacitance manometers are used in combination, no smoothing is provided in the overlap range.
The 95% rule is use in switching the capacitance manometers. That is, if the reported pressure on the
lower range manometer is greater than 95% of its full scale, the combined analog output will be switched
to the upper range manometer. In other words, the lower range capacitance manometer is used as
master in gauge switching.
When a capacitance manometer and a Pirani/Convection Pirani are used in combination, if the
Pirani/Convection Pirani reading is greater than 5% of the full scale of the capacitance manometer (must
be >500 torr full scale), the combined analog output will switch to the capacitance manometer.
When a capacitance manometer and an ion gauge are used in combination, the ion gauge pressure will
be used as the combined analog output. The combined output will switch to the capacitance manometer
only when the ion gauge is turned off.
If a Pirani/Convection Pirani and an ion gauges are use in combination, a smoothing formula is used for
the combined analog output where sensor ranges overlap (10-3 to 10-4 torr).
To set the combination analog output from the from panel, press the System
Setup button, then move the cursor
to change the Set Combination Ch parameter to On. After pressing Enter , a setup screen will appear, as
shown below:

MKS 937B Operation Manual 71
Set Combination Channel Parameter
Combo #1
Combo #2
High Middle Low
C2 B1 A1
NA NA NA
Enable
Disable
Enable
Figure 8-8 Setup screen for setting combination channel parameters.
Once the combination gauges have been properly selected, enable the combined analog output. If invalid
gauge channels are selected, the Enable parameter will stay in the Disabled mode.
The following rules may be used to simplify the gauge combination configuration.
The combination must include as least two pressure gauges.
NA is used as the parameter when no gauge is assigned
If an ion gauge (either cold cathode or hot cathode) is included in the combination, it must be
assigned as the low pressure range gauge (“Low” in Figure 8.8).
If a Pirani or Convection Pirani gauge is included in the combination, it must be assigned as the
middle pressure range gauge (“Middle” in Figure 8.8).
When a Pirani or Convection Pirani is used in combination, only an ion gauge is allowed to be
assigned as the low pressure range gauge.
Only capacitance manometer is allowed to be assigned as the high pressure range gauge.
When multiple capacitance manometers with same full scale ranges are set to combination, the
output are the average of these gauge outputs.
Pay special attention to the selection of the controlling gauge for the ion gauge;
make sure that both gauges are connected to the same vacuum space at all times, (make
sure no valve is present between these gauges). If a valve between these two gauges is
closed, or if these gauges are connected to different vacuum chambers, it may lead not
only to bad combined pressure readings – it can also destroy an ion gauge sensor.
Combination pressure settings can also be accomplished using following serial commands:
Query the pressure
@254PC1?;FF for corresponding pressure on combined Aout 1 and @254PC2?;FF for the pressure
on combined Aout 2.
Set the gauge combination
MKS 937B Operation Manual 72
@254SPC1!HH,MM,LL;FF and @254SPC2!HH,MM,LL;FF . Here, HH, MM and LL are the gauge
channel (A1, A2, B1, B2, C1, C2, NA) corresponding to the gauge assigned to High, Middle, and Low
range pressure gauges.
Query the gauge combination
@254SPC1?;FF and @254SPC2?;FF .
Enable/disable the combined analog output
@254EPC1!Enable;FF and @254EPC1!Disable;FF .
8.4.3 Logarithmic/Linear analog output when the gauge power is turned off
There are time when the power to a pressure gauge (especially an ion gauge) will be turned off during the
operation. The following table shows the expected logarithmic/linear analog output when the gauge power
is turned off or the combined analog output is disabled.
Gauge type Condition Logarithmic/Linear analog output
CM No CM is connected 0 V
PR & CP only Power off, broken filament >10.5 V
CC & HC only Power off, broken filament >10.5 V
Combined No gauge is assigned 10 V
Table 8-10. The expected logarithmic/linear analog output values when the sensors are
unpowered.
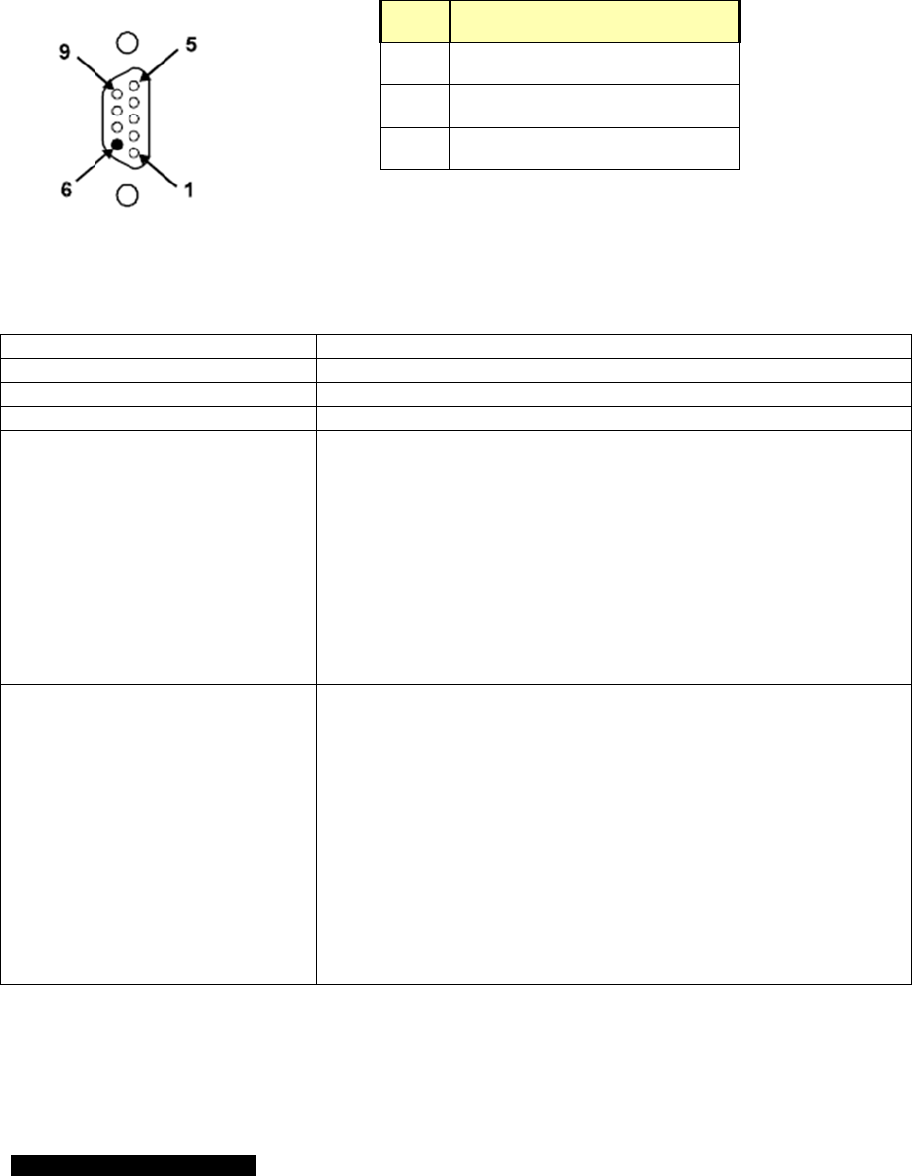
MKS 937
B
9 9
3
C
o
9.1
C
o
Cable len
Cable len
Baud rat
e
Characte
r
Query for
Set form
a
B
Operation M
a
3
7B R
S
o
mma
n
o
mmuni
c
gth with RS2
3
gth with RS4
8
e
r
format
m
a
t
a
t
T
a
nual
S
232/4
8
n
ds
c
ation pr
o
Table 9-1
9
3
2 signals
8
5 signals
T
able 9-2 93
8
5 Ser
o
tocols
9
37B serial
c
50 ft (15 m)
4000 ft (120
0
9600, 19200
8 data bits, 1
@
<aaa><C
o
The corresp
o
@
<aaa>AC
K
Here, <aaa>
<Command
>
<Response
>
For example
@
003PR1?;
and the corr
e
@
003ACK7
.
Here, <aaa>
@
<aaa><C
o
The corresp
o
@
<aaa>AC
K
Here, <aaa>
<Command
>
<Paramete
r>
<Response
>
For example
@001BR!19
and the corr
e
@
001ACK1
9
Here, <aaa>
<Response
>
7B serial co
m
Pin
2
3
5
73
ial Co
m
c
ommunicat
i
0
m)
, 38400, 576
0
stop bit, No
o
mmand>?;
F
o
nding respo
n
K
<Respons
e
: Address, 1
t
>
: Command
s
>
Responses
, to query pr
e
FF
e
sponding re
s
.
602E+2;F
F
=003; <Com
m
o
mmand>!<
p
o
nding respo
n
K
<Respons
e
: address, 1
t
>
Command
s
>
Parameter
>
Responses
, to set new
b
200;F
F
e
sponding re
s
9
200;F
F
=001; <Com
m
>
=192000
m
municatio
n
Descriptio
n
RS485(-)/
R
RS485(+)/
Ground
m
mun
i
on wiring di
0
0, 115200
parity, No ha
FF
n
se is
e
>;F
F
t
o 254
s as describ
e
as describe
d
e
ssure on ch
a
s
ponse is
mand>=PR1
p
arameter>;
F
n
se is
e
>;F
F
t
o 254
s
as describe
d
as described
as describe
d
b
aud rate, us
e
s
ponse is
mand>=BR;
n
command
n
R
S232TxD/(
B
/
RS232RxD/(
A
icatio
n
i
agram.
a
rdware hand
s
e
d in 10.2 to1
0
d
in 10.2 to10
a
nnel A1, us
e
1
; <Respons
e
FF
d
in 10.2 to1
0
in 10.2 to10.
d
in 10.2 to10
e
<Paramete
r>
protocol.
B
)
A
)
n
s
haking
0
.7
.7
e
e
>=7.602E+
2
0
.7
7
.7
r>
=19200;
2

MKS 937B Operation Manual 74
9.2 Pressure reading commands
Command Function Response Meaning
Single Channels
PRn
(n=1 to 6) Read pressure
on Channel n d.d0Eee
(d,e=0 to 9)
Pressure in selected units for PR, CP, CC & HC
d.dddEe
(d,e =0 to 9)
Pressure in selected units for CM
-d.ddEe
(d,e=0 to 9) CM, when CM output is negative.
LO<E-e Gauge e(torr/mbar) e(Pascal) e(micron)
PR 4 2 1
CP 3 1 0
CC 11 9 8
HC 10 8 7
ATM PR when p>450 torr
OFF Cold cathode HV is off, or HC/PR/CP power is off.
RP_OFF HC and CC power is turned off from rear panel
control
WAIT CC or HC startup delay
LowEmis HC off due to low emission
CTRL_OFF CC or HC is off in controlled state
PROT_OFF CC or HC is off in protected state
MISCONN Sensor improperly connected, or broken filament
(PR, CP only)
PRZ Read
pressures on
all channel
6 of above,
separated by
spaces
Same as above
Combination Channels
PCn
(n=1 or 2) Read pressure
on channel n
and its
combination
sensor
d.d0Eee
(d,e=0 to 9)
Combined pressure in selected units
NAK181 Combination disabled
Table 9-3 937B pressure reading commands.

MKS 937B Operation Manual 75
9.3 Relay and control setting commands
Command Parameter Response Function
SPm
(m=1 to 12) d.dd Eee
(d,e=0 to 9) d.dd Eee
(d,e=0 to 9)
Query or set a setpoint for relay m, response with the
current setting value.
If 0 is used as the parameter, the setpoint will be set as
its low limit value.
SHm
(m=1 to 12) d.dd Eee
(d,e=0 to 9) d.dd Eee
(d,e=0 to 9)
Query or set a hysteresis for relay m, response with the
current setting value.
SDm
(m=1 to 12) ABOVE or
BELOW ABOVE or
BELOW Query or set the direction for relay m, response with the
current setting value. For CC and HC, only BELOW can
be selected.
NAK162
For CC and HC as the relay direction is fixed to
BELOW.
ENm
(m=1 to 12) SET,
ENABLE,
or CLEAR
SET,
ENABLE,
or CLEAR
Query or set status for relay m. Response with current
Enable status. ENABLE enables the relay, its status
depends on the pressure and setpoint value, SET forces
relay activation, regardless of pressure, and CLEAR
disable relay.
SSm
(m=1 to 12) SET or
CLEAR Query relay setpoint status, SET is activated, and
CLEAR is disabled.
ENA ddd..ddd
(d=0,1,2) Query the relay status (relay1 relay 2 …relay 12).
0: clear; 1: set; 2: enable.
SSA ddd..ddd
(d=0,1) Query all 12 relay setpoint status (relay1 relay 2 …relay
12).
0: clear; 1: set.
Table 9-4 937B relay and control serial setting commands.

MKS 937B Operation Manual 76
9.4 Capacitance manometer control commands
Command Parameter Response Function
BTn
(n=1 to 6) ABS or
DIFF ABS or
DIFF Query or set the type of capacitance manometer.
Default = ABS.
RNGn
(n=1 to 6) 0.01 to
20000 0.01 to
20000 Query or set the full scale pressure measurement range
for a capacitance manometer. Valid range is from 0.01
to 20000, and default range is 1000 torr.
BVRn
(n=1 to 6) 5 ,10, 1U,
5U, 10U,
1B, 2B
5 ,10, 1U,
5U, 10U,
1B, 2B
Query or set the full scale voltage output range for a
capacitance manometer. Here, U means unidirectioanl,
and B meads bidirectional. Default = 10V.
VACn
(n=1 to 6) OK or NAK Zero an absolute capacitance manometer on channel n.
Execute only when the signal is less than 5% of the full
scale.
ATZn
(n=1 to 6) OK or NAK Zero a differential capacitance manometer on channel n.
AZn
(n=1 to 6) A1, B1,
A2, B2,
C1, C2, NA
A1, B1,
A2, B2,
C1, C2, NA
Query or set capacitance manometer autozero control
channel n, or disable autozero (NA). Execute only when
the signal is less than 5% of the full scale.
Table 9-5 937B capacitance manometer serial commands.
9.5 Pirani and convection Pirani control commands
Command Parameter Response Function
ATMn
(n=1 to 6) d.ddE+ee
(ambient
pressure)
d.ddE+ee Send an atmospheric pressure to perform ATM
calibration. The PR/CP must be at atmospheric pressure
when running ATM calibration.
VACn
(n=1 to 6) OK or NAK Zero a PR/CP on channel n. Execute only when the
pressure reading is less than 1X10⁻² torr.
AZn
(n=1 to 6) A1, B1,
A2, B2,
C1, C2, NA
A1, B1,
A2, B2,
C1, C2, NA
Query or set an autozero (CC or HC) control channel n
for a PR/CP, or disable autozero (NA). Execute only
when the pressure reading is less than 1X10⁻² torr.
GTn
(n=1 to 6) Nitrogen
Argon
Helium
Nitrogen
Argon
Helium
Query or set a gas type for PR/CP on channel n.
CPn
(n=1 to 6) ON or OFF ON or OFF Query the channel power status for PR, CP, HC or high
voltage status for CC.
Turn on/off the channel power for PR, CP, HC, or high
voltage for CC).
Table 9-6 937B Pirani and Convection Pirani control commands.

MKS 937B Operation Manual 77
9.6 Cold cathode control commands
Command Parameter Response Function
PROn
(n=1, 3, 5) d.dd Eee
(d,e=0 to 9) d.dd Eee
(d,e=0 to 9)
Query or set protection setpoint value for ion gauge for
channel n. The valid PRO range is 1x10⁻⁵ to 1x10⁻² torr.
Default value is 5x10⁻³ torr.
CSPn
(n=1, 3, 5) d.dd Eee
(d,e=0 to 9) d.dd Eee
(d,e=0 to 9)
Query and set control setpoint value for an ion gauge on
channel n. Valid CSP range is 5x10⁻⁴ to 1x10⁻² torr for
Pirani, and is 2x10⁻³ to 1x10⁻² torr for convention Pirani.
XSPn
(n=1, 3, 5) ON or OFF ON or OFF Extend the upper control setpoint range from 1x10-
2
torr
to 9.5x10⁻¹ torr.
CHPn
(n=1, 3, 5) d.dd Eee
(d,e=0 to 9) d.dd Eee
(d,e=0 to 9)
Query and set control setpoint hysteresis value for an
ion gauge on channel n. Valid CHP range is 5.5x10⁻⁴ to
1.1x10⁻² torr for Pirani, and is 2.2x10⁻³ to 1.1x10⁻² torr
for convention Pirani. Default value is 1.5X the control
setpoint value.
CSEn
(n=1, 3, 5) A1, B1,
A2, B2,
C1, C2,
OFF
A1, B1,
A2, B2,
C1, C2,
OFF
Query, enable/disable the control channel status for an
ion gauge on channel n.
CTLn
(n=1, 3, 5) AUTO,
SAFE,
OFF
AUTO,
SAFE,
OFF
AUTO: ion gauge can be turned on & off by the
controlling gauge. SAFE, ion gauge can be turned off,
but, not be turned on by the controlling gauge.
UCn
(n=1,3, 5) dd.d
(d=0 to 9) dd.d
(d=0 to 9) Query or set a gas correction factor for a CC gauge on
Channel n. Valid range is from 0.1 to 10.
CPn
(n=1,3, 5) ON or OFF ON or OFF Query the channel power status for PR, CP, HC or high
voltage status for CC.
Turn on/off the channel power for PR, CP, HC, or high
voltage for CC).
GTn
(n=1,3, 5) Nitrogen
Argon
Helium
Nitrogen
Argon
Helium
Query or set a gas type for HC/CC on channel n.
Tn
(n=1,3, 5) W, O, G, P,
C, R Ion gauge status query.
W = WAIT
O = OFF
G = GOOD
P = PROTECT
C = Control
R = Rear panel Ctrl off
TDCn
(n=1,3, 5) d
(d=0 to 9) d
(d=0 to 9) Time delay for staring CCG, 3 to 300 secs
FRCn
(n=1,3,5) d.dd Eee
(d,e=0 to 9) d.dd Eee
(d,e=0 to 9)
Query or set the pressure to trigger fast relay control
output. Only available for special CC board with fast
relay, and the setpoint value needs to between 5x10⁻³ to
2x10⁻¹⁰ torr.
Table 9-7 937B cold and hot cathode control commands.

MKS 937B Operation Manual 78
9.7 Hot cathode control commands
Command Parameter Response Function
PROn
(n=1, 3, 5) d.dd Eee
(d,e=0 to 9) d.dd Eee
(d,e=0 to 9)
Query or set protection setpoint value for ion gauge for
channel n. The valid PRO range is 1x10⁻⁵ to 1x10⁻² torr.
Default value is 5x10⁻³ torr.
CSPn
(n=1, 3, 5) d.dd Eee
(d,e=0 to 9) d.dd Eee
(d,e=0 to 9)
Query and set control setpoint value for an ion gauge on
channel n. Valid CSP range is 5x10⁻⁴ to 1x10⁻² torr for
Pirani, and is 2x10⁻³ to 1x10⁻² torr for convention Pirani.
XSPn
(n=1, 3, 5) ON or OFF ON or OFF Extend the upper control setpoint range from 1x10-
2
torr
to 9.5x10⁻¹ torr.
CHPn
(n=1, 3, 5) d.dd Eee
(d,e=0 to 9) d.dd Eee
(d,e=0 to 9)
Query and set control setpoint hysteresis value for an
ion gauge on channel n. Valid CHP range is 5.5x10⁻⁴ to
1.1x10⁻² torr for Pirani, and is 2.2x10⁻³ to 1.1x10⁻² torr
for convention Pirani. Default value is 1.5X the control
setpoint value.
CSEn
(n=1, 3, 5) A1, B1,
A2, B2,
C1, C2,
OFF
A1, B1,
A2, B2,
C1, C2,
OFF
Query, enable/disable the control channel status for an
ion gauge on channel n.
CTLn
(n=1, 3, 5) AUTO,
SAFE,
OFF
AUTO,
SAFE,
OFF
AUTO: ion gauge can be turned on & off by the
controlling gauge (PR/CP). SAFE, ion gauge can be
turned off, but, not be turned on by the controlling
gauge. If no PR/CP exists, this function can not be
enabled.
AFn
(n=1,3, 5) 1 or 2 1 or 2 Query or set active filament for HC.
ECn
(n=1,3, 5) 20UA
100UA
AUTO20
AUTO100
20UA
100UA
AUTO20
AUTO100
Query or set emission current.
GCn
(n=1,3, 5) dd.d
(d=0 to 9) dd.d
(d=0 to 9) Query or set a gas correction factor for a HC gauge on
Channel n. Valid range is from 0.1 to 50.
CPn
(n=1,3, 5) ON or OFF ON or OFF Query the channel power status for PR, CP, HC or high
voltage status for CC.
Turn on/off the channel power for PR, CP, HC, or high
voltage for CC).
SENn
(n=1,3, 5) dd.d
(d=0 to 9) dd.d
(d=0 to 9) Query or set a gas sensitivity for a HC gauge on
Channel n. Valid range is from 1 to 50.
DGn
(n=1,3, 5) ON or OFF ON or OFF Query the HC degas status
Turn on/off degas
DGTn
(n=1,3, 5) d
(d=5-240) 6
(d=5-240) Query and set the HC degas time.
GTn
(n=1,3, 5) Nitrogen
Argon
Helium
Nitrogen
Argon
Helium
Query or set a gas type for HC/CC on channel n.
Tn
(n=1,3, 5) W, O, P, D,
C, R, F, N Ion gauge status query.
W = WAIT
O = OFF
P = PROTECT
D = DEGAS
C = Control
R = Rear panel Ctrl off
F = HC filament fault
N = No gauge
XRLn
(n=1,3,5) d.dd Eee
(d,e=0 to 9) d.dd Eee
(d,e=0 to 9)
Query or set the X-ray limit for a HC sensor. The valid
range is from 0 to 1X10⁻⁹ torr.
Table 9-8 937B cold and hot cathode control commands.

MKS 937B Operation Manual 79
9.9 System commands
Command Parameter Response Function
AD aaa
(aaa=001 to
253)
aaa
(aaa=001 to
253)
Query or set controller address (1 to 253)
254 is reserved for broadcasting. Default = 253.
BR # # Query or set baud rate
(valid # = 9600, 19200, 38400, 57600, 115200),
default = 9600.
PAR NONE
EVEN
ODD
NONE
EVEN
ODD
Query or set the parity for the controller.
Default=NONE.
CAL Enable
Disable Enable
Disable Enable or disable User Calibration, default =
Enable.
DLY t msec t msec 485 time delay, t must 1 for reliable 485
communication. Default = 8 msec.
DM STD or LRG STD or LRG Display mode: either standard display, or large font
display. Default = STD.
LOCK ON or OFF ON or OFF Enable (ON) or disable (OFF) front panel lock
SPM Enable
Disable Enable
Disable Enable or disable parameter setting, default =
Enable.
MT T1,T2,T3,T4
Display the sensor module type. T1, T2, T3=(CC,
HC, CM, PR, NC). NC= no connection. T4=(NA, PB,
PC)
STn
(n=A, B, C) S1S2
Display the connected sensor type on the specified
module (A, B, or C).
S1,S2=CC,PR,CP,CM,MB,GB,LN,24, NG. NC=no
connection.
U Unit Unit
Pressure unit, Unit=Torr, MBAR, PASCAL, Micron
FDn
(n=1 to 6) OK
Factory default for Pirani sensor module. This will
reset the user calibration to factory default.
FVn
(n=1 to 6) d.dd
(d=0 to 9) Firmware version
n=1=Slot A; n=2=Slot B; n=3=Slot C
n=4=AIO; n=5=COMM; n=6=Main
SN 10 digit SN Display the serial number of the unit.
SPCn
(n=1 or 2) HH,MM,LL
HH,MM,LL Set or query the combination channel setting.
HH: The channel for HP sensor;
MM: The channel for MP sensor;
LL: The channel for LP sensor.
Valid values for HH, MM, or LL are A1, A2, B1, B2,
C1, C2, or NA. Default is NA.
EPCn
(n=1 or 2) Enable
Disable Enable
Disable Enable of disable the combination channel. When
the combination channel is disabled, the output is
10 V.
DLTn
(n=0 to 6) LIN or LOG LIN or LOG Query or set the type of DAC linear (LIN, V=A*P) of
logarithmic linear (LOG, V=A*LogP+B) output.
Default setting is LOG.
DLAn
(n=0 to 6) d.dd Eee
(d,e=0 to 9) d.dd Eee
(d,e=0 to 9)
Query or set the DAC slope parameter A. Default
value is 0.6. Use n=0 for combination output.
Valid range is from 0.5 to 5 when DLT is set to LOG,
and 1E-4 to 1E-8 when DLT is set to LIN.

MKS 937B Operation Manual 80
DLBn
(n=0 to 6) d.dd Eee
(d,e=0 to 9) d.dd Eee
(d,e=0 to 9)
Query or set the DAC offset parameter B. Default
value is 7.2. Use n=0 for combination output.
Valid range is from –20 to 20 when DLT is set to
LOG, and always equals to zero when DLT is set to
LIN.
IU
ON or OFF ON or OFF Force the use of international pressure unit
(Pascal).
XDL Erase the first page of the memory for preparing the
firmware downloading using Sam-BA after power
cycle of the controller.
SEM TXT or
CODE TXT or
CODE Set the NAK error code response. An error text
string is returned if it is set to TXT, while an error
code is returned if it is set to CODE.
Table 9-9 937B system commands.
9.10 Error code
When serial commands are used in communicating with 937B, an error code will be
returned if an invalid command or an invalid parameter is sent. The error code can be
displayed in either in TXT or CODE mode, and can be selected by using
@254SEM!TXT;FF or @254SEM!CODE;FF command, respectively.
937B Error Code
CODE TXT
150 WRONG_GAUGE
151 NO_GAUGE
152 NOT_IONGAUGE
153 NOT_HOTCATHODE
154 NOT_COLDCATHODE
155 NOT_CAPACITANCE_MANOMETER
156 NOT_PIRANI_OR_CTP
157 NOT_PR_OR_CM
160 UNRECOGNIZED_MSG
161 SET_CMD_LOCK
162 RLY_DIR_FIX_FOR_ION
163 INVALID_CHANNEL
164 DIFF_CM
168 NOT_IN_DEGAS
169 INVALID_ARGUMENT
172 VALUE_OUT_OF_RANGE
173 INVALID_CTRL_CHAN
175 CMD_QUERY_BYTE_INVALID
176 NO_GAS_TYPE
177 NOT_485
178 CAL_DISABLED
179 SET_POINT_NOT_ENABLED
181 COMBINATION_DISABLED
182 INTERNATIONAL_UNIT_ONLY
183 GAS_TYPE_DEFINED
195 CONTROL_SET_POINT_ENABLED
199 PRESSURE_TOO_HIGH_FOR_DEGAS
Table 9-10 937B serial communication error codes.

MKS 937B Operation Manual 81
9.11 937B ProfiBus communication protocol and commands
9.11.1 Electrical Connections
Pin Number Description
3 RxD/TxD+
8 RxD/TxD-
6 V+ (+5Vdc)
5 Ground
Table 9-11 937B Profibus electrical connections.
The address for ProfiBus ranges from 00 to 99 (decimal), and can be selected from two switches on the
rear panel of 937B controller
9.11.2 ProfiBus GSD protocol
The GSD File name is 937B0D72.GSD, the ID Number is 0D72 hex. The ProfiBus commands are a
subset of RS232/485 serial commands, and are listed in the following table.
ProfiBus Command Equivalent
RS232 Cmd Parameter
Data Byte Parameter values/range
Autozero Ch A1 AUTZ1 3 Disable
Ch A1, CH A2
Ch B1, CH B2
Ch C1, CH C2
Local Setting
Autozero Ch A2 AUTZ2 4
Autozero Ch B1 AUTZ3 5
Autozero Ch B2 AUTZ4 6
Autozero Ch C1 AUTZ5 7
Autozero Ch C2 AUTZ6 8
Gas Type Ch A1 GT1 9 Nitrogen
Argon
Helium
Custom (HC only)
Local Setting
Gas Type Ch A2 GT2 10
Gas Type Ch B1 GT3 11
Gas Type Ch B2 GT4 12
Gas Type Ch C1 GT5 13
Gas Type Ch C2 GT6 14
Front Panel LOCK 15 Disable/Enable/ Local Setting
Set Parameter SPM 16 Disable/Enable/ Local Setting
Unit U 17 Torr/Mbar/Pascal/ Local Setting
Protection SetPoint Ch A1 PRO1 18 1E-5, 2E-5, 4E-5, 8E-5, 1E-4, 2E-4,
4E-4, 8E-4, 1E-3, 2E-3, 4E-3, 8E-3,
1E-2, Local Setting
Protection SetPoint Ch A2 PRO2 19
Protection SetPoint Ch B1 PRO3 20
Protection SetPoint Ch B2 PRO4 21
Protection SetPoint Ch C1 PRO5 22
Protection SetPoint Ch C2 PRO6 23
Ctrl Chan For Ch A1 CSE1 24 Disable/Ch A1/Ch A2/Ch B1/Ch
B2/Ch C1/Ch C2, Local Setting
Ctrl Chan For Ch A2 CSE2 25
Ctrl Chan For Ch B1 CSE3 26
Ctrl Chan For Ch B2 CSE4 27
Ctrl Chan For Ch C1 CSE5 28
Ctrl Chan For Ch C2 CSE6 29
Ctrl SetPoint Ch A1 CSP1 30 4E-4, 8E-4, 1E-3, 2E-3, 4E-3, 8E-3,
1E-2, Local Setting
Ctrl SetPoint Ch A2 CSP2 31
Ctrl SetPoint Ch B1 CSP3 32

MKS 937B Operation Manual 82
Ctrl SetPoint Ch B2 CSP4 33
Ctrl SetPoint Ch C1 CSP5 34
Ctrl SetPoint Ch C2 CSP6 35
Ctrl Enable Ch A1 CTL1 36 Off/Safe/Auto/ Local Setting
Ctrl Enable Ch A2 CTL2 37
Ctrl Enable Ch B1 CTL3 38
Ctrl Enable Ch B2 CTL4 39
Ctrl Enable Ch C1 CTL5 40
Ctrl Enable Ch C2 CTL6 41
Fast Relay Ctrl Ch A1 FRC1 42 1E-7, 2E-7, 4E-7, 8E-7, 1E-6, 2E-6,
4E-6, 8E-6, 1E-5, 2E-5, 4E-5, 8E-5,
1E-4, Local Setting
Fast Relay Ctrl Ch B1 FRC3 43
Fast Relay Ctrl Ch C1 FRC5 44
HC degas time Ch A1 DGT1 45 3 TO 240
HC degas time Ch A2 DGT2 46
HC degas time Ch B1 DGT3 47
HC degas time Ch B2 DGT4 48
HC degas time Ch C1 DGT5 49
HC degas time Ch C2 DGT6 50
Table 9-12 937B ProfiBus command list.

MKS 937B Operation Manual 83
9.11.3 937 ProfiBus output buffer map
OUTPUT Buffer Map
Offset Size Format Description
0 1 Bit field Bit 0 Enable / Clear Setpoint Relay 1
Bit 1 Enable / Clear Setpoint Relay 2
Bit 2 Enable / Clear Setpoint Relay 3
Bit 3 Enable / Clear Setpoint Relay 4
Bit 4 Enable / Clear Setpoint Relay 5
Bit 5 Enable / Clear Setpoint Relay 6
Bit 6 Enable / Clear Setpoint Relay 7
Bit 7 Enable / Clear Setpoint Relay 8
1 1 Bit field Bit 0 Enable / Clear Setpoint Relay 9
Bit 1 Enable / Clear Setpoint Relay 10
Bit 2 Enable / Clear Setpoint Relay 11
Bit 3 Enable / Clear Setpoint Relay 12
Bit 4 N/A
Bit 5 N/A
Bit 6 N/A
Bit 7 N/A
2 1 Bit field Bit 0 Power CC/HC/PR Channel A1
Bit 1 Power CC/HC/PR Channel A2
Bit 2 Power CC/HC/PR Channel B1
Bit 3 Power CC/HC/PR Channel B2
Bit 4 Power CC/HC/PR Channel C1
Bit 5 Power CC/HC/PR Channel C2
Bit 6 N/A
Bit 7 N/A
3 1 Bit field Bit 0 Setpoint/Close Mode for MFC on Channel A1
Bit 1 Setpoint/Close Mode for MFC on Channel A2
Bit 2 Setpoint/Close Mode for MFC on Channel B1
Bit 3 Setpoint/Close Mode for MFC on Channel B2
Bit 4 Setpoint/Close Mode for MFC on Channel C1
Bit 5 Setpoint/Close Mode for MFC on Channel C2
Bit 6 N/A
Bit 7 PID control enable/disable
4 1 Bit field Bit 0 Degas HC Channel A1
Bit 1 Degas HC Channel A2
Bit 2 Degas HC Channel B1
Bit 3 Degas HC Channel B2
Bit 4 Degas HC Channel C1
Bit 5 Degas HC Channel C2
Bit 6 N/A
Bit 7 N/A
5 1 Bit field Bit 0 Active Filament Select HC Channel A1
Bit 1 Active Filament Select HC Channel A2
Bit 2 Active Filament Select HC Channel B1
Bit 3 Active Filament Select HC Channel B2

MKS 937B Operation Manual 84
Bit 4 Active Filament Select HC Channel C1
Bit 5 Active Filament Select HC Channel C2
Bit 6 N/A
Bit 7 N/A
6 1 Bit field Bit 0 Manual Zero PR/CM/MFC Channel A1
Bit 1 Manual Zero PR/CM/MFC Channel A2
Bit 2 Manual Zero PR/CM/MFC Channel B1
Bit 3 Manual Zero PR/CM/MFC Channel B2
Bit 4 Manual Zero PR/CM/MFC Channel C1
Bit 5 Manual Zero PR/CM/MFC Channel C2
Bit 6 N/A
Bit 7 N/A
7 1 Bit field Bit 0 Factory Default Channel A1
Bit 1 Factory Default Channel A2
Bit 2 Factory Default Channel B1
Bit 3 Factory Default Channel B2
Bit 4 Factory Default Channel C1
Bit 5 Factory Default Channel C2
Bit 6 N/A
Bit 7 N/A
8 4 Float Relay Setpoint Pressure for Relay 1
12 4 Float Relay Setpoint Pressure for Relay 2
Flow Setpoint for Channel A1 (MFC only)
16 4 Float Relay Setpoint Pressure for Relay 3
20 4 Float Relay Setpoint Pressure for Relay 4
Flow Setpoint for Channel A2 (MFC only)
24 4 Float Relay Setpoint Pressure for Relay 5
28 4 Float Relay Setpoint Pressure for Relay 6
Flow Setpoint for Channel B1 (MFC only)
32 4 Float Relay Setpoint Pressure for Relay 7
36 4 Float Relay Setpoint Pressure for Relay 8
Flow Setpoint for Channel B2 (MFC only)
40 4 Float Relay Setpoint Pressure for Relay 9
44 4 Float Relay Setpoint Pressure for Relay 10
Flow Setpoint for Channel C1 (MFC only)
48 4 Float Relay Setpoint Pressure for Relay 11
52 4 Float Relay Setpoint Pressure for Relay 12
Flow Setpoint for Channel C2 (MFC only)
Table 9-13 937B ProfiBus output buffer map.

MKS 937B Operation Manual 85
9.11.4 937B ProfiBus input buffer map
INPUT Buffer Map
Offset Size Format Description
0 4 Float Pressure Channel 1
4 4 Float Pressure Channel 2
8 4 Float Pressure Channel 3
12 4 Float Pressure Channel 4
16 4 Float Pressure Channel 5
20 4 Float Pressure Channel 6
24 1 Byte Status for Channel 1
1 NOGAUGE
2 NEGATIVE
3CONTROL
4HI
5LO
6OFF
7AA
8 PROTECT
9WAIT
10 RP_OFF
11 Degas
12 FAULT
13 OPEN (for MFC only)
14 CLOSE( for MFC only)
15 SETPOINT( for MFC only)
16 PID( for MFC only)
25 1 Byte Status for Channel 2
1 NOGAUGE
2 NEGATIVE
3CONTROL
4HI
5LO
6OFF
7AA
8 PROTECT
9WAIT
10 RP_OFF
11 Degas
12 FAULT
13 OPEN (for MFC only)
14 CLOSE( for MFC only)
15 SETPOINT( for MFC only)
16 PID( for MFC only)
26 1 Byte Status for Channel 3
1 NOGAUGE
2 NEGATIVE
3CONTROL

MKS 937B Operation Manual 86
4HI
5LO
6OFF
7AA
8 PROTECT
9WAIT
10 RP_OFF
11 Degas
12 FAULT
13 OPEN (for MFC only)
14 CLOSE( for MFC only)
15 SETPOINT( for MFC only)
16 PID( for MFC only)
27 1 Byte Status for Channel 4
1 NOGAUGE
2 NEGATIVE
3CONTROL
4HI
5LO
6OFF
7AA
8 PROTECT
9WAIT
10 RP_OFF
11 Degas
12 FAULT
13 OPEN (for MFC only)
14 CLOSE( for MFC only)
15 SETPOINT( for MFC only)
16 PID( for MFC only)
28 1 Byte Status for Channel 5
1 NOGAUGE
2 NEGATIVE
3CONTROL
4HI
5LO
6OFF
7AA
8 PROTECT
9WAIT
10 RP_OFF
11 Degas
12 FAULT
13 OPEN (for MFC only)
14 CLOSE( for MFC only)
15 SETPOINT( for MFC only)
16 PID( for MFC only)
29 1 Byte Status for Channel 6
1 NOGAUGE

MKS 937B Operation Manual 87
2 NEGATIVE
3CONTROL
4HI
5LO
6OFF
7AA
8 PROTECT
9WAIT
10 RP_OFF
11 Degas
12 FAULT
13 OPEN (for MFC only)
14 CLOSE( for MFC only)
15 SETPOINT( for MFC only)
16 PID( for MFC only)
30 1 Bit field Bit 0 Setpoint Relay state Relay 1
Bit 1 Setpoint Relay state Relay 2
Bit 2 Setpoint Relay state Relay 3
Bit 3 Setpoint Relay state Relay 4
Bit 4 Setpoint Relay state Relay 5
Bit 5 Setpoint Relay state Relay 6
Bit 6 Setpoint Relay state Relay 7
Bit 7 Setpoint Relay state Relay 8
31 1 Bit field Bit 0 Setpoint Relay state Relay 9
Bit 1 Setpoint Relay state Relay 10
Bit 2 Setpoint Relay state Relay 11
Bit 3 Setpoint Relay state Relay 12
Bit 4 N/A
Bit 5 N/A
Bit 6 N/A
Bit 7 N/A
32 4 Float Relay Setpoint Pressure for Relay 1
36 4 Float Relay Setpoint Pressure for Relay 2
40 4 Float Relay Setpoint Pressure for Relay 3
44 4 Float Relay Setpoint Pressure for Relay 4
48 4 Float Relay Setpoint Pressure for Relay 5
52 4 Float Relay Setpoint Pressure for Relay 6
56 4 Float Relay Setpoint Pressure for Relay 7
60 4 Float Relay Setpoint Pressure for Relay 8
64 4 Float Relay Setpoint Pressure for Relay 9
68 4 Float Relay Setpoint Pressure for Relay 10
72 4 Float Relay Setpoint Pressure for Relay 11
76 4 Float Relay Setpoint Pressure for Relay 12
80 1 Byte Reserved
81 1 Byte Reserved
Table 9-14 937B ProfiBus input buffer map.
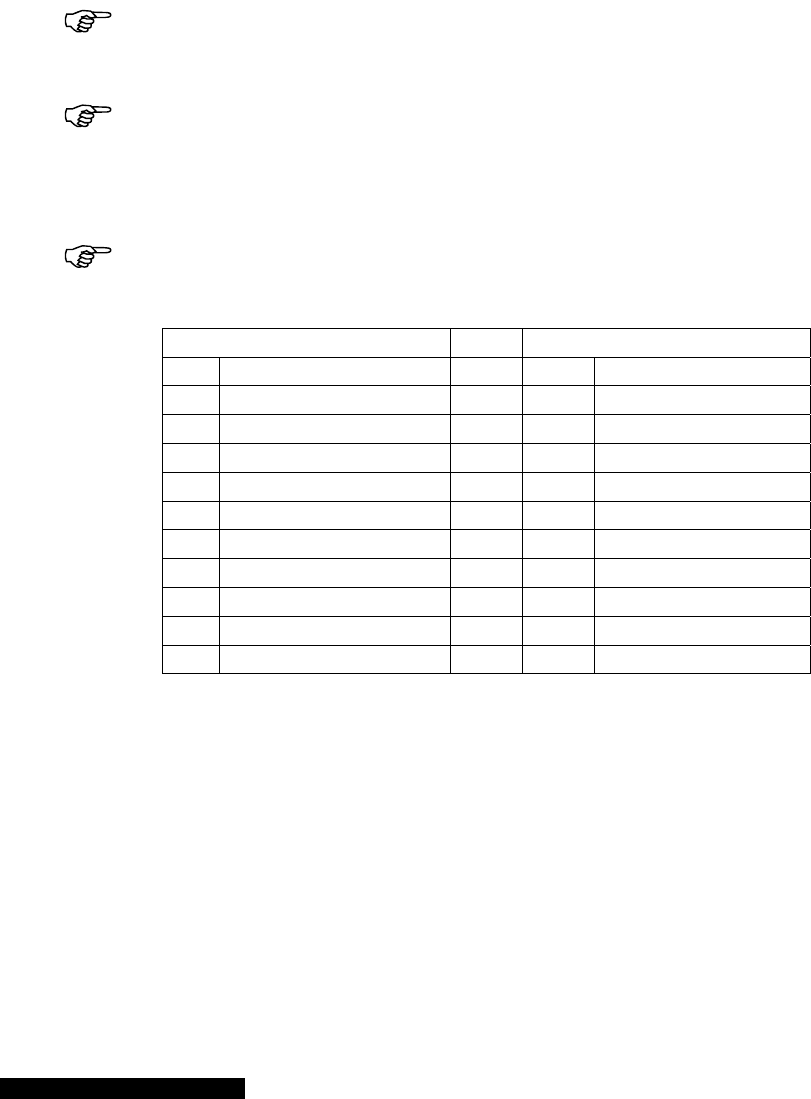
MKS 937B Operation Manual 88
10 937A Emulated Operation and RS232/485
Serial Communication Commands
10.1 Operating the 937B controller in 937A emulated operation mode
The 937B controller can be operated in 937A emulated operation mode. In this mode, the user can
employ existing cables and connectors to obtain identical relay control and analog output. However, since
significantly more relays (12 relays for the 937B vs. 5 relays for the 937A) and sensors can be connected
to the 937B controller, different connectors are used on the 937B, and adaptors are required for the
smooth transition.
When setting the 937B to the 937A operation mode, a cold cathode card has to be
inserted into slot A (equivalent to CC in the 937A) to ensure that the communications
commands work properly.
When setting the 937B to the 937A operation mode, only 5 relay channels can be
controlled via the serial communication commands. Channels 1,2,3,4 and 5 in the 937A
serial commands correspond to Channels 1, 5,7,9 and 11, respectively, in the 937B. These
relays are highlighted in blue on the Channel Setup screen. See the details in Table 10-1 for
adapting the 937A’s 15pin Dsub connector to the new 937B 25pin relay output connector.
With the 937B, there is no normally closed relay connection available!
937B (25 pin Dsub) 937A (15 pin Dsub)
Pin Description Pin Description
1 Relay 1 NO 2 CC NO
2 Relay 1 Common 9 CC Common
9 Relay 5 NO 10 A1 NO
10 Relay 5 Common 11 A1 Common
14 Relay 7 NO 12 A2 NO
15 Relay 7 Common 5 A2 Common
18 Relay 9 NO 13 B1 NO
19 Relay 9 Common 14 B1 Common
22 Relay 11 NO 7 B2 NO
23 Relay 11 Common 15 B2 Common
Table 10-1 Description of pin assignment for adapting 937A 15 pin connector to 937B 25 pin
connector for relay output.
An adaptor is required to adapt the 937A Controller 25pin analog output accessory cable to the 937B
37pin Dsub connector. Detailed descriptions of the pin assignment for the adaptor are shown in Table 10-
2.

MKS 937B Operation Manual 89
937B (37pin Dsub) 937A (25pin Dsub)
Pin Description Pin Description
1 Buffered Aout A1 2 Buffered Aout, CC
3 Buffered Aout B1 3 Buffered Aout, A1
4 Buffered Aout B2 4 Buffered Aout, A2
5 Buffered Aout C1 5 Buffered Aout, B1
6 Buffered Aout C2 6 Buffered Aout, B2
7 Log Aout A1 7 Log Aout, CC
9 Log Aout B1 8 Log Aout, A1
10 Log Aout B2 9 Log Aout, A2
11 Log Aout C1 10 Log Aout, B1
12 Log Aout C2 11 Log Aout, B2
13 Combination Aout 1 1 Combination, CC
15 Ion Gauge ON A1 13 CC disable
21-37
t37
Ground 14-24 Ground
21-37
t37
Ground 25 CC disable return
Table 10-2 A description of the pin assignments for adapting the 937A 25 pin connector to the
937B 37 pin connector for analog output and gauge control when a dual PR/CM board is installed
in slot A.
937B (37pin Dsub) 937A (25pin Dsub)
Pin Description Pin Description
1 Buffered Aout A1 2 Buffered Aout, CC
3 Buffered Aout B1 3 Buffered Aout, A1
4 Buffered Aout B2 4 Buffered Aout, A2
5 Buffered Aout C1 5 Buffered Aout, B1
6 Buffered Aout C2 6 Buffered Aout, B2
7 Log Aout A1 7 Log Aout, CC
9 Log Aout B1 8 Log Aout, A1
11 Log Aout C1 10 Log Aout, B1
12 Log Aout C2 11 Log Aout, B2
13 Combination Aout 1 1 Combination, CC/B1
14 Combination Aout 2 9 Combination A/B2
15 Ion Gauge ON A1 13 CC disable
21-37
t37
Ground 14-24 Ground
21-37 Ground 25 CC disable return
Table 10-3 A description of the pin assignments for adapting the 937A 25 pin connector to the
937B 37 pin connector for analog output and gauge control when a CC board is installed in slot A.
When setting the 937B to 937A operation mode, the old 937A communication cable has to
be re-wired. Ddetails are shown in Table 10-3

MKS 937
B
10.2
C
Cable len
signals
Cable len
signals
Baud rat
e
Characte
r
RS232 fo
RS485 fo
B
Operation M
a
C
ommun
i
gth with RS2
3
gth with RS4
8
e
r
format
r
mat
r
mat
Tab
a
nual
i
cation p
r
Table 10-
4
3
2 50
f
8
5 400
960
8 d
a
<C
o
Th
e
<R
e
Her
<C
o
<R
e
<cr
>
For
and
Her
To
s
RL
Y
and
Her
To
c
atte
abo
$<
A
Her
cha
For
use
For
$1
E
and
He
r
<C
o
Ple
a
prin
le 10-5 Th
e
D
RS485(
-
RS485(
+
Ground
r
otocols
4
937B seria
l
f
t (15 m)
0 ft (1200 m)
0, 19200, 38
4
a
ta bits, 1 sto
o
mmand><c
r
e
correspondi
n
e
sponse><c
r
e:
o
mmand>:
C
e
sponse>:
R
>
: carriage r
e
example, to
q
the corresp
o
e, <Comma
n
s
et a relay se
Y
2=3.2
E
-05<
c
the corresp
o
e, <Comma
n
c
ommunicate
ntion $<A> i
n
ve.
A
><Comman
d
e, $ is the att
racter [0-7F
H
example, if
a
d
in the com
m
example, to
t
E
CC4<cr>
the corresp
o
r
e: attention
o
mmand>=E
a
se avoid to
u
table charac
t
e
937A serial
D
escription
-
)/RS232TxD
/
+
)/RS232Rx
D
90
l
communic
a
4
00, 57600,
1
p bit, Even o
r
r
>
n
g response
i
r
>
C
ommands a
s
R
esponses a
s
e
turn)
q
uery pressu
r
o
nding respo
n
n
d>=P1<cr>;
tpoint for ch
a
c
r>
o
nding respo
n
n
d>=RLY2<c
with controll
e
n
front of RS
2
d
><cr>
e
ntion chara
c
H
, except 24H
a
ddress is set
m
and for 485
t
urn on a col
d
o
nding respo
n
character=$
,
CC4<cr>; <
R
u
se 0H to 20
H
t
ers.
communic
a
New
9
(232
&
/
(B)
2
D
/(A)
3
5
a
tion wire di
a
1
15200
r
No parity, N
is
s
described i
n
s
described in
re on chann
e
n
se is 7.6E+
0
<Response
>
a
nnel 2, use
n
se is OK<cr
>
c
r>; <Respo
n
e
r using RS4
8
2
32 comman
d
c
ter, and A is
($), see the
A
t
to 31H, the
c
address.
d
cathode on
n
se is OK<cr
>
,
<A>=1
(
31
H
R
esponse>=
O
H
as address
a
tion comm
a
9
37B
&
485) Old
R
S
2
3
2
5
a
gram.
o hardware
h
n
11.2 to 11.
6
n
11.2 to 11.6
e
l A1, use P
1
02
>
=7.6E+02<
c
>
n
se>=OK<cr
>
85, just add
a
d
format as d
e
the single a
d
A
SCII table i
n
c
haracter “1”
channel 4, u
s
>
H)
;
O
K<cr>
because the
y
a
nd protocol
.
937A
S
232 Old
R
S
3
2
5
h
andshaking
6
1
<cr>
c
r>
>
a
ddress
e
scribed
d
dress
n
11.7].
should be
s
e
y
are non-
.
937A
S
485
1
9
5

MKS 937B Operation Manual 91
10.3 Pressure reading commands
Command Function Response Meaning
Read Single Channel pressure
Pn
(n=1 to 5) Read pressure
on Channel n d.dEee
dEee
(d,e=0 to 9)
Pressure in selected units (dEee, with 2
leading spaces, in single digit resolution regions
only)
HI>Eee Above range of 10
ee
AA_ Eee At atmosphere (Pirani only, >400 torr, or
equivalent)
LO<Eee Below range of 10
ee
LO CC below range, not stared, or in roll-back
HV_OFF! Cold cathode HV power off
WAIT CC startup delay
CONTROL! CC in controlled state
NEGATIV! CM reading below zero pressure
NOGAUGE! No sensor on channel
MISCONN! Sensor improperly connected, or broken
filament (PR, CP only)
PZ Read pressure
on all channel 5 of above,
separated by
spaces,
ending with
<cr>
Same as above, First 4 responses are padded
with spaces to make a total of 9 characters
each. Channel n response starts with character
number 9n-8
Read combination pressure
Cn
(n=1, 2) Read pressure
on channel n and
its combination
sensor
d.dEee
dEee
(d,e=0 to 9)
Pressure in selected units
HI Above combined range
LO Below combined range
NOGAUGE! Sensor missing/misconnected
Disabled! No ion gauge is assigned to the channel.
Table 10-6 937A pressure reading serial commands.

MKS 937B Operation Manual 92
10.4 Relay and control setting commands
Command Function Response Meaning
RLYn=d.dEee
RLYn =0
RLYn
(n=1 to 5,
d,e=0 to 9)
Set relay setpoint for CH n
Disable relay for CH n
Read setpoint for relay CH n
OK Action taken
OUT! Value to be set is out of range
d.dEee Present value in selected unit
RLHn=d.dEee
RLHn
(n=1 to 5
d,e=0 to 9)
Set Hysteresis value for CH n
Read Hysteresis value for
relay CH n
OK Action taken
d.dEee Present hysteresis value in selected
unit. Default is 1.1X the relay
setpoint value.
CTLn=d.dEee
CTLn =0
CTLn
(n=1,2
d,e=0 to 9)
Set control setpoint for an ion
gauge on CH n
Disable control for an ion
gauge on CH n
Query control setpoint for an
ion gauge on CH n
OK Action taken
OUT! Value to be set is out of range
d.dEee Present setpoint value in selected
unit. Valid range is 5x10⁻⁴ to 9.5x10⁻¹
torr for Pirani, and is 2x10⁻³ to
9.5x10⁻¹ torr for convention Pirani.
NOT ION! Not an ion gauge.
CC Channel PR/CP ctrl Channel
n=1 CC A1, or B1
n=2 A B2
n=2 B A2
PROn=d.dEee
PROn
(n=1,2,4
d,e=0 to 9)
Set ion gauge protection
setpoint for CH n
Query ion gauge protection
setpoint for CH n
OK Action taken
OUT! Value to be set is out of range
d.dEee Present value in selected unit. The
valid range is 1x10⁻⁵ to 1x10⁻² torr.
NOT ION! Not an ion gauge.
ERn Enable setpoint for relay n OK Action taken
XRn Disable setpoint for relay n OK Action taken
Relays Read state of relay 1 to 5 RlyRRRRR
(R=0,1) 0: Inactive (NC closed)
1: Active (NO closed)
Table 10-7 The 937A relay and control setting commands.
10.5 Cold cathode control commands
Command Function Response Meaning
ECCn
(n=1,2,4) Enable CC HV
for CH n OK Action taken
PROTECT! Channel is in protected state.
CONTROL! Channel is in controlled state.
XCCn
(n=1,2,4) Disable CC HV
for CH n OK Action taken
Table 10-8 The 937A cold cathode control commands.

MKS 937B Operation Manual 93
10.6 User calibration commands
Command Function Response Meaning
ATMn=F
ZEROn=F
(n=2 to 5)
Set channel n atmosphere
or zero calibration to factory
setting
OK Action taken
NO CAL! This module type cannot be calibrated.
CALLOCK! Calibration is locked by the XCA
command
OUT! Pressure out of range
ATMn=U
(n=2 to 5) Set the pressure on
channel n to ATM (760 torr) OK
ZEROn=U
(n=2 to 5) Zero the pressure on
channel n OK
Table 10-9 937A user calibration commands.
10.7 System commands
Command Function Response Meaning
EFRONT
XFRONT Enable/Disable front panel
OK Action taken
FRONT Read state of front panel
lock FP FREE
FP LOCK Front panel is enabled.
Front panel is disabled.
ECAL
XCAL Enable/Disable user
calibration
OK Action taken
CAL Read state of user
calibration lock CALFREE
CALLOCK User calibration is enabled.
User calibration is disabled.
ECOM
XCOM Lock the communication
setting including mode,
baud rate, and address
OK Action taken
COM Read state of
communication lock COMFREE
COMLOCK Change of COMM setting is enabled.
Change of COMM setting is disabled.
Tt
(t=0,1,4,8) Set delay in ms for RS-485
time delay OK Action taken
NOT485! Communication is not in multidrop
mode.
TD Read time delay t ms Time delay is t ms.
GAUGES Read sensor module types
presently installed GaT1T2T3
Tn=2
character
module type
in slot CC, A
and B.
Cc: Cold cathode
Pr: Dual Pirani
Cm: Dual capacitance manometer
Nc: No module in slot
Wc: Wrong module in CC slot
VER Read controller module FW
version c.cc,m.mm
(c,m=0 to 9) c.cc: Controller version
m.mm:
Table 10-10 937A system commands.
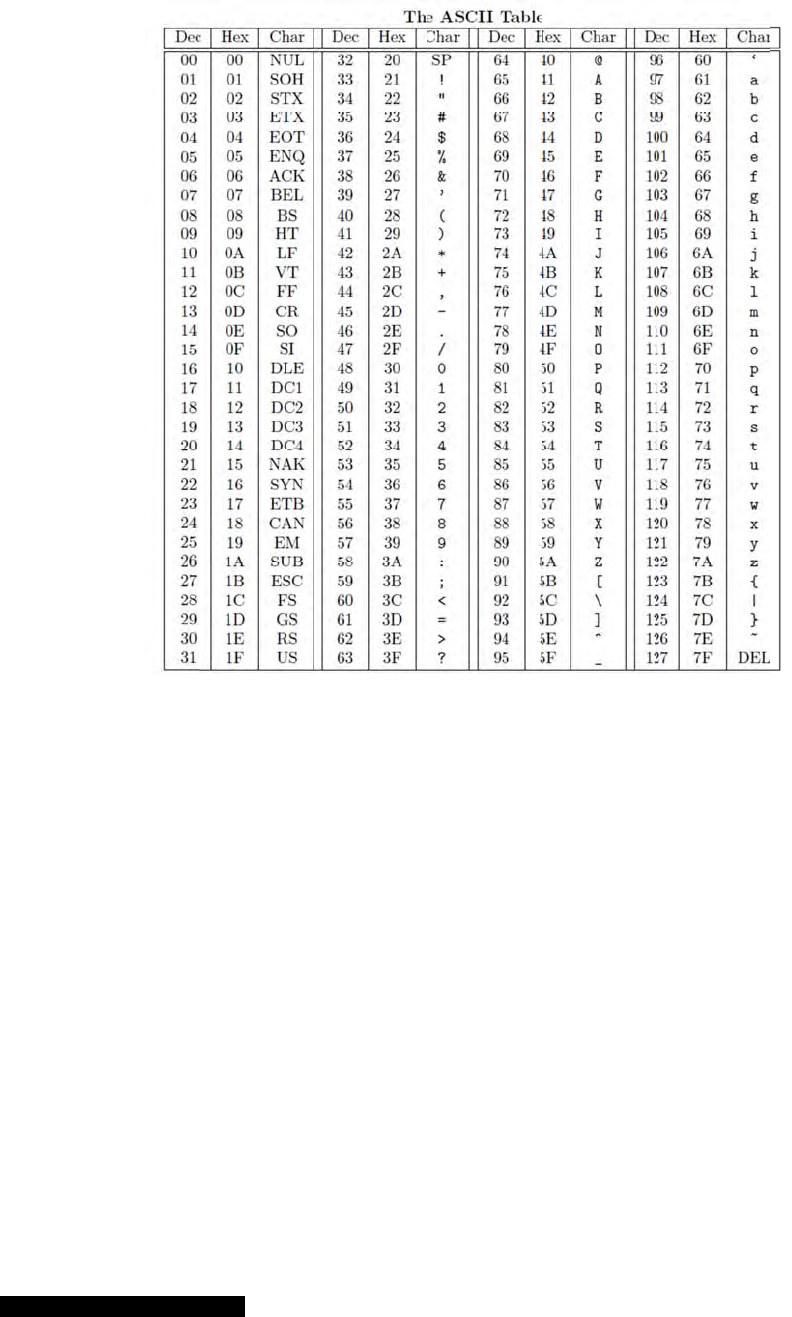
MKS 937
B
10.8
A
B
Operation M
a
A
SCII ch
a
a
nual
a
racter ta
T
a
ble
a
ble 10-11
94
A
SCII character table.

MKS 937B Operation Manual 95
11 Maintenance of Series 937B Controller
modules
There are 3 sensor module slots (A, B, and C) available in the 937B controller. Sensor module plug-in
boards (Pirani/CP, capacitance manometer, cold cathode, hot cathode) can be inserted into any available
slot and the controller will automatically recognize the type of the board in the slot. Typically, 937B
controllers are shipped with customer-specified sensor modules and these are tested at the factory.
To change the factory controller configuration or to remove and adjust the appropriate module, follow the
steps shown below.
11.1 Removing and Installing a Sensor Module
Lethal voltages are present in the controller when it is powered. Disconnect the
power cable before disassembly.
Suitable ESD handling precautions should be followed while installing, configuring
or adjusting the instrument or any modules.
To remove a module for modification,
1. Make sure that the 937B power is off, and that the power cord is disconnected
2. Using a #1 Phillips screwdriver, remove the two screws on the top and bottom of the rear
panel of the sensor module.
3. Use a small, flat-blade screwdriver to gently pry the sensor module away from the rear panel
frame until it slides freely.
4. Carefully slide the module out.
5. Place the module on a static-protected workbench.
To installing a module into 937B,
1. Make sure that the 937B power if off, and that the power cord is disconnected
2. Align the module to fit and slide freely in the card guides, with the internal 32-pin DIN
connector end first.
3. Gently slide the module forward (A, B, or C).
4. Using a #1 Phillips screwdriver, tighten two screws on the top and bottom of the rear panel of
the module.
A sensor module (with 32-pin DIN) can only be inserted into slots A, B or C. It will not
fit into the COMM slot!
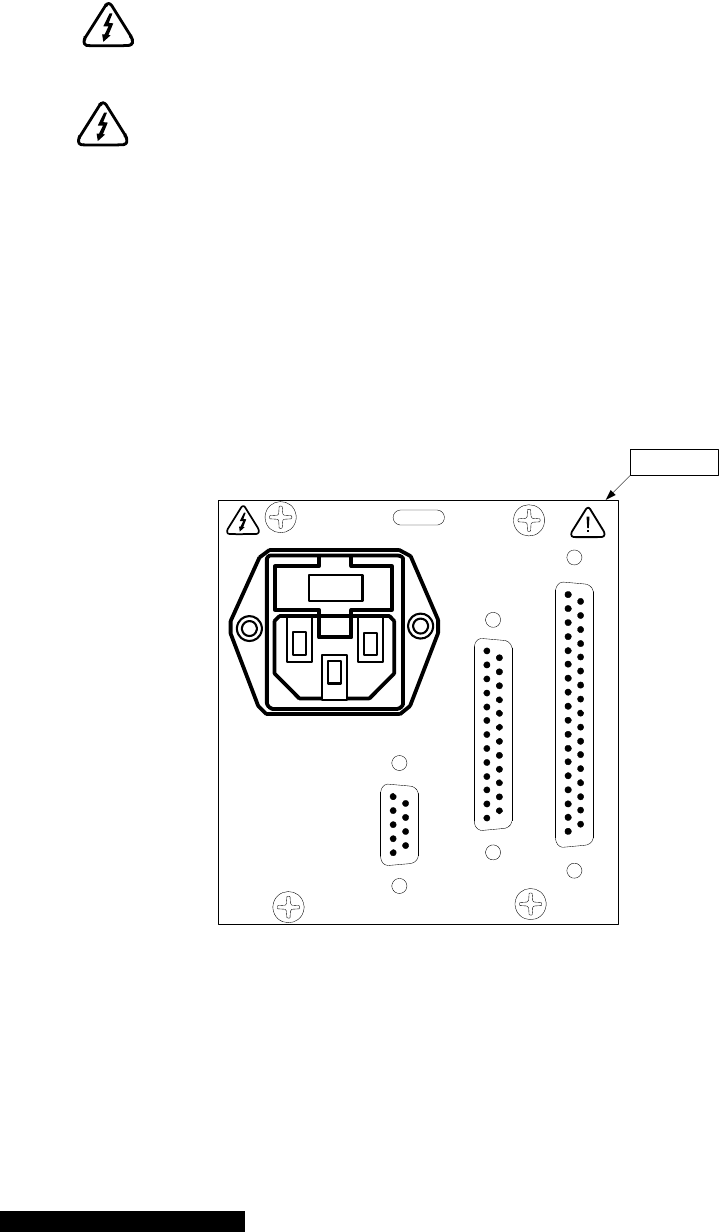
MKS 937B Operation Manual 96
11.2 Removing and Installing AIO Module
In the 937B controller, the power cord receptor, the RS232/485 communication 9-pin Dsub connector, the
25 pin Dsub Relay output connector, and the 37-pin Dsub Analog output connector are all mounted on
the same AIO back panel.
To remove the AIO module, use the following procedure:
Lethal voltages are present in the controller when it is powered. Disconnect the
power cable before disassembly.
Suitable ESD handling precautions should be followed while installing, configuring
or adjusting the instrument or any modules.
1. Make sure that the 937B power is off and that the power cord is disconnected
2. Using a #1 Phillips screwdriver, remove the four (4) screws on the four corner of the rear
panel of the AIO module.
3. Place a small, flat-bladed screwdriver at the top right corner of the AIO module (as shown
below) and gently pry the AIO module away from the rear panel frame until it slides freely.
Figure 11-1 Instructions for removing AIO module.
4. Pull the AIO board out by about 2 inches (5 cm)
5. Use needle-nose pliers to remove the 3 wires (Blue, Brown, and Green/Yellow) connected to
the back of the power cord receptor
6. Carefully slide the module out
7. Place the module on a static-protected workbench
RS232/485
RELAY OUTOUT
ANALOG
AIO
100 - 240 VAC
50/60 HZ
150 WATTS
FUSE: 2.0 AT
Place flat-blade
screw driver here!
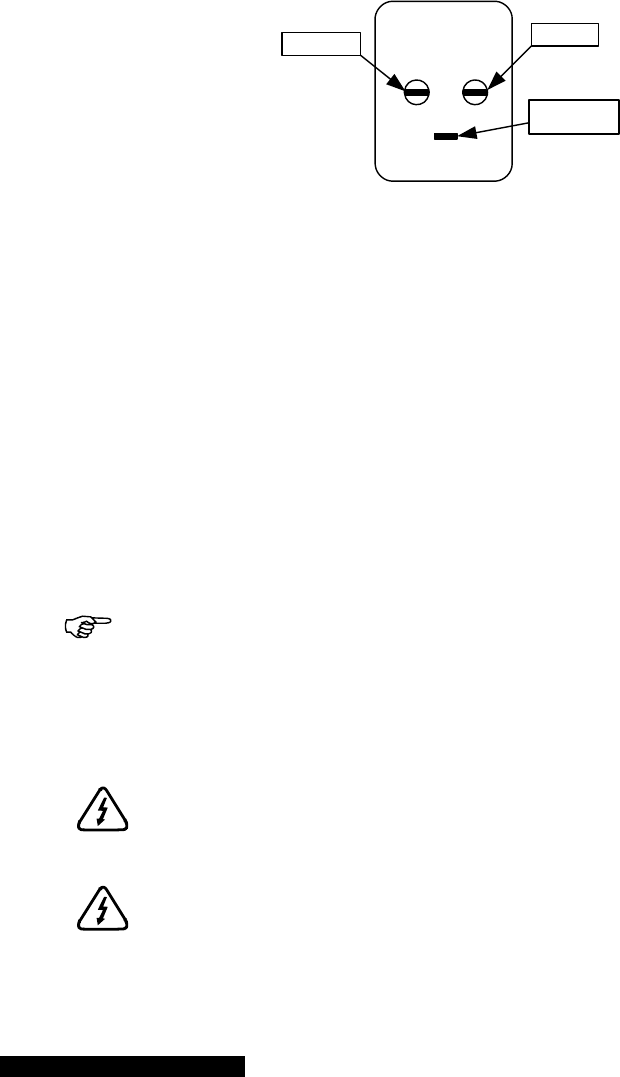
MKS 937B Operation Manual 97
To install the AIO module, please follow the following procedure:
1. Make sure that the 937B power is off and that the power cord is disconnected
2. Align the module to fit and slide freely in the card guides, with the internal 48-pin DIN
connector end first.
3. Gently slide the module forward, and stop when the back end of the module is about 2 inches
(5 cm) away from the back panel frame.
4. Connect 3 wires to the back of the power cord receptor as show below
Figure 11-2 Instruction for connecting wire on the back of the power cord receptor.
5. Gently slide the module forward, and make sure the internal 48-pin DIN connector is
engaged.
6. Using a #1 Phillips screwdriver, tighten four (4) screws on the four corners of the rear panel
of the module.
11.3 Communication Module
The communication module is reserved for future ProfiBus, DeviceNet, or EtherNet communication. At
this time, only ProfiBus communication boards are available.
RS232/485 serial communication is always available on the 937B controller. The 9 pin
D-Sub communications connector is located on the back panel of the AIO/Power module.
11.4 Power Supply
Lethal voltages are present in the controller when it is powered. Disconnect the
power cable before disassembly.
Suitable ESD handling precautions should be followed while installing, configuring
or adjusting the instrument or any modules.
Blue wire
NeutralLine
Ground
Brown wire
Green/yellow
wire
Back View of the
Power Cord Receptor
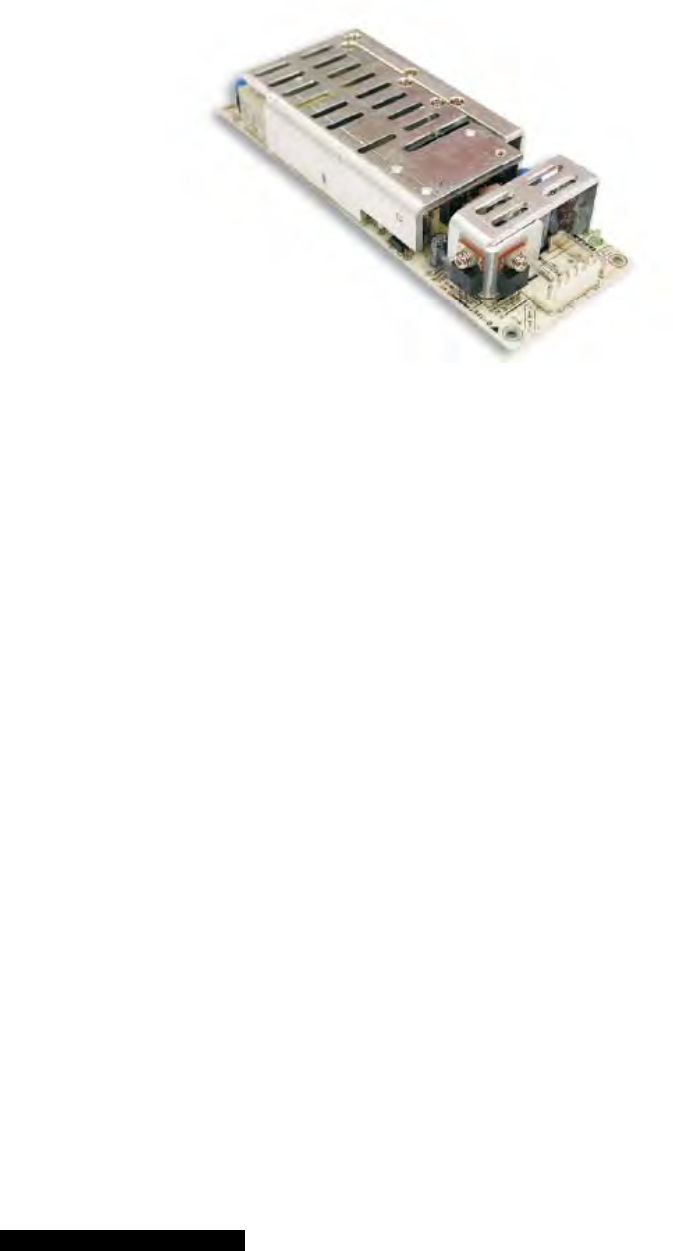
MKS 937B Operation Manual 98
The power supply used on the 937B controller is a 150 Watt, open frame switching power supply. This
power supply is mounted on the right-hand side panel using four screws. Do not remove the power
supply.
Contact HPS™ Products Applications Engineering if it becomes necessary to remove or replace the
power supply.
Figure 11-3 The 937B controller power supply.
11.5 Mounting the 937B controller
The 937B controller was designed for both rack mounting and benchtop use. In both cases, leave at least
1 inch open above the perforated panels to ensure adequate ventilation of the controller. Side clearance
is not required.
To accommodate connectors and cables, leave open about 3 inches of clearance behind the rear panel.
Adhesive backed rubber pads are provided for benchtop use. Remove the adhesive backing from each
pad and apply one to each corner of the bottom surface.
Optional mounting hardware is available for mounting the 937B controller in a 19 inch rack.
Mounting a single 937B controller into a 19" rack (HPS® Part # 100005651)
1. Attach the faceplate (3.5"x5.5") to each side of the 937B front panel using the four 10-32
bolts provided. Secure the bolts with the nuts included in the kit.
2. Secure this assembly to the rack using the ¼" screws provided. It may be necessary to
loosen the 10-32 bolts securing the faceplates in order to align the holes with the
mounting holes on the rack.
Mounting the 937B controller with another ½ rack instrument (HPS® Part # 100007700)
1. Attach the ½ rack instrument to the 937B controller using the small splicing plate and the
four 10-32 bolts provided. The splicing plate is used to connect the front panel of each
instrument together.

MKS 937B Operation Manual 99
2. Secure this assembly to the rack using the ¼"screws provided. It may be necessary to
loosen the 10-32 bolts securing the splicing plate in order to align the holes with the
mounting holes on the rack.
All items in the kit may not be necessary, depending on the mounting configuration.
Contact HPS™ Products Applications Engineering for solutions to other mounting configurations.
11.6 AC Power Cord
The 937B controller includes a standard 100-240 VAC, 50/60 Hz power connection with a female IEC
60320 connector. If the power source is different, use only a harmonized, detachable cord set with
conductors having a cross-sectional area equal to or greater than 0.75 mm2. The power cord should be
approved by a qualified agency such as UL, VDE, Semko, or SEV.
Properly ground the controller and vacuum system.
The 937B Controller is grounded through the ground conductor of the power cord. If the protective ground
connection is lost, all accessible conductive parts may pose a risk of electrical shock. Plug the cord into a
properly grounded outlet only.
Do not exceed the manufacturer's specifications when applying voltage. Electrical
shock may result.
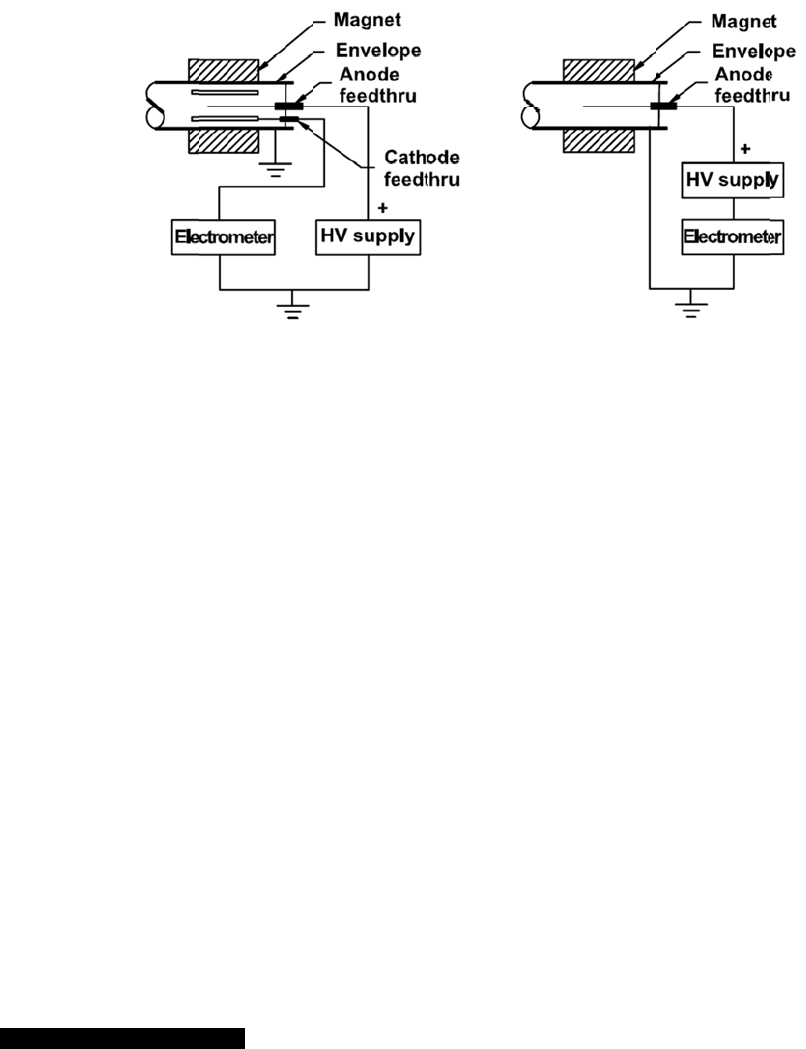
MKS 937
B
12
M
S
e
12.1
4
12.1.1
A
mbient
g
sensitivit
y
are not st
a
isolation
c
allows a
w
Figure 1
2
Cold cath
N
r
e
N
N
D
P
T
c
a
L
e
a
n
A
cold ca
t
between
t
perpendi
c
spiral traj
e
providing
In operati
o
collisions
The relati
o
B
Operation M
a
M
ainte
e
nsors
4
21 Cold
c
Col
d
g
as molecule
s
y
is enhanced
a
ndard Penn
c
ollector, as
s
w
ider range o
2
-1 A com
p
ode ionizatio
n
N
o filament to
e
latively inse
n
N
o X-ray limit
N
o adjustmen
t
D
egassing is
n
roperly desig
he control cir
a
thode sens
o
e
ss power c
o
n
d the senso
r
t
hode sensor
t
hem. The el
e
c
ular to the el
e
e
ctories withi
n
a significant
o
n, a near c
o
between ele
c
o
nship betw
e
a
nual
nance
c
athode
s
d
cathode
s
are ionized
by the pres
e
ing sensors i
n
s
hown in Figu
f
pressure m
e
p
arison of I
n
n
sensors ha
v
break or bur
n
n
sitive to da
m
for lower pre
t
for emission
n
ot needed.
ned sensor t
u
cuit is simple
o
r which has
t
o
nsumption e
n
r
.
consists of
a
e
ctrodes are
s
e
ctric field. T
h
n
the sensor,
i
ncrease in i
o
o
nstant circul
a
c
trons and re
s
e
en sensor c
u
and
S
s
ensor
theory
by a high vol
e
nce of a ma
g
n
that they e
m
re 12-1. This
e
asurement.
n
verted Mag
n
v
e inherent a
d
n
out, which
m
m
age due to v
i
ssure measu
current or fil
a
u
bes can be
c
and reliable,
t
hree.
n
ables the us
cathode an
d
s
urrounded b
y
h
e crossed e
l
increasing t
h
o
nization effic
a
ting electric
a
s
idual gas m
o
u
rrent and pr
e
100
S
ervic
e
tage dischar
g
g
netic field. H
m
ploy an inv
e
makes the s
e
n
etron (left)
a
d
vantages o
v
m
akes the ga
u
i
bration.
rements.
a
ment voltag
e
c
leaned and
r
having only
o
e of significa
n
d
an anode wi
y
a magnet,
a
l
ectric and m
a
h
e chance of
c
iency over a
h
a
l current is tr
a
o
lecules prod
e
ssure is
k
i
e
of H
P
g
e in cold cat
h
PS
Product
s
e
rted magnet
r
e
nsor less s
u
a
nd Penning
v
er hot catho
d
uge immune
e
is needed.
r
eused almo
s
o
ne current l
o
n
tly longer c
a
i
th a potentia
l
a
rranged so t
h
a
gnetic fields
c
ollisions wit
h
h
ot cathode
s
a
pped by the
uce ions that
n
k
P
, where
i
P
S
V
a
hode sensor
s
s
Group’s col
r
on design th
a
u
sceptible to
c
g
(right) cold
d
e sensors.
T
to inrushes
o
s
t indefinitely.
o
op, as com
p
a
bles betwee
n
l
difference o
f
he magnetic
f
cause electr
o
h
gas molecu
s
ensor.
crossed fiel
d
t
are collecte
d
is the senso
r
cuum
s
and gauge
d cathode se
a
t includes a
n
c
ontaminatio
n
cathode ga
u
T
hese include
o
f air. As well,
p
ared with a h
n
the controll
e
f
several kilo
v
f
ield is
ons to follow
les, thereby
d
s in which th
d
by the cath
o
r
ion current,
nsors
n
n
and
u
ges.
:
it is
h
ot
e
r
v
olts
long
e
o
de.
k
is
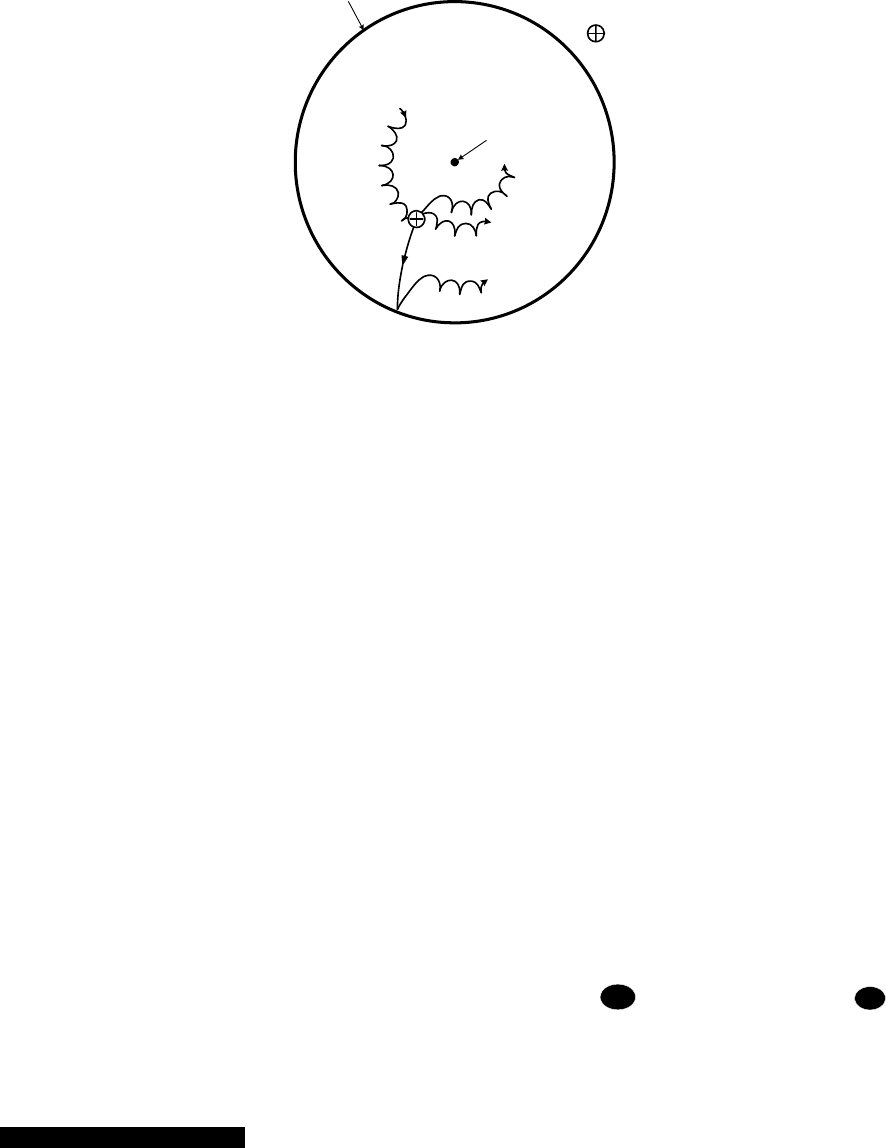
MKS 937B Operation Manual 101
a constant, Pis the pressure, and nis a constant (in the range of 1.00 to 1.15). This equation is valid for
pressures ranging from 10-3 to 10-8 torr, depending on the series resistor used. At pressures around 10-6
torr, the sensitivities of 1 to 10A/Torr are not unusual.
The initiation of electron impact events within a cold cathode sensor depends upon certain chance events
such as field emission or cosmic ray production of the first free electron. Electron-molecule collisions
thereafter produce additional electron/ion pairs during the electrons’ transit between the electrodes. The
discharge rapidly builds to a stable value. Start of the discharge normally requires a very short time at 10-6
torr or above, a few minutes at 10-8 torr, and longer times at lower pressures.
Anode
Cathode
Ion+
e-
e-
e-
Magnetic field
into the page
Figure 12-2 Electron orbits and ion production in an inverted magnetron.
There are issues that should be considered in the design of cold cathode sensors. For instance, at high
pressures the current increases and sputtering of the cathode can become a problem. A large series
resistor reduces sputtering. Voltage across the tube is pressure dependent in the range between 10-4 to
10-2 torr and this can be used to extend the measurement range of the cold cathode to 10-2 torr. Of the
various electrode configurations possible in cold cathode gauges, it has been found that single
feedthrough cold cathodes can suffer from spurious currents due to insulator leakage and field emission
that mask the small, pressure dependent ionization currents.
HPS Products Group cold cathode sensors use an inverted magnetron with separate feedthroughs for
the anode high voltage and the cathode current. This configuration has a cylindrical cathode, a central
wire anode, and an external cylindrical magnet which provides an axial field. The cathode is isolated from
the grounded metal housing. The inverted magnetron geometry produces more stable signal output, and
also works well to low pressure without risk of extinguishing the discharge
.
12.1.2 Maintenance of Series 421/422 Cold Cathode Sensor
12.1.2.1 Disassembling the Series 421/422 Sensor
The Series 421/422 sensor consists of three subassemblies – the backshell; the internal; and the body
subassemblies. Only the internal and body subassemblies are exposed to vacuum.
To disassemble the sensor, remove the backshell subassembly as follows (Steps 1 through 4 are not
necessary when replacing internal parts):
1. Remove the two 4-40 x ¼" Phillips head SEMS screws 2 and slide the backshell 9off of
the sensor.
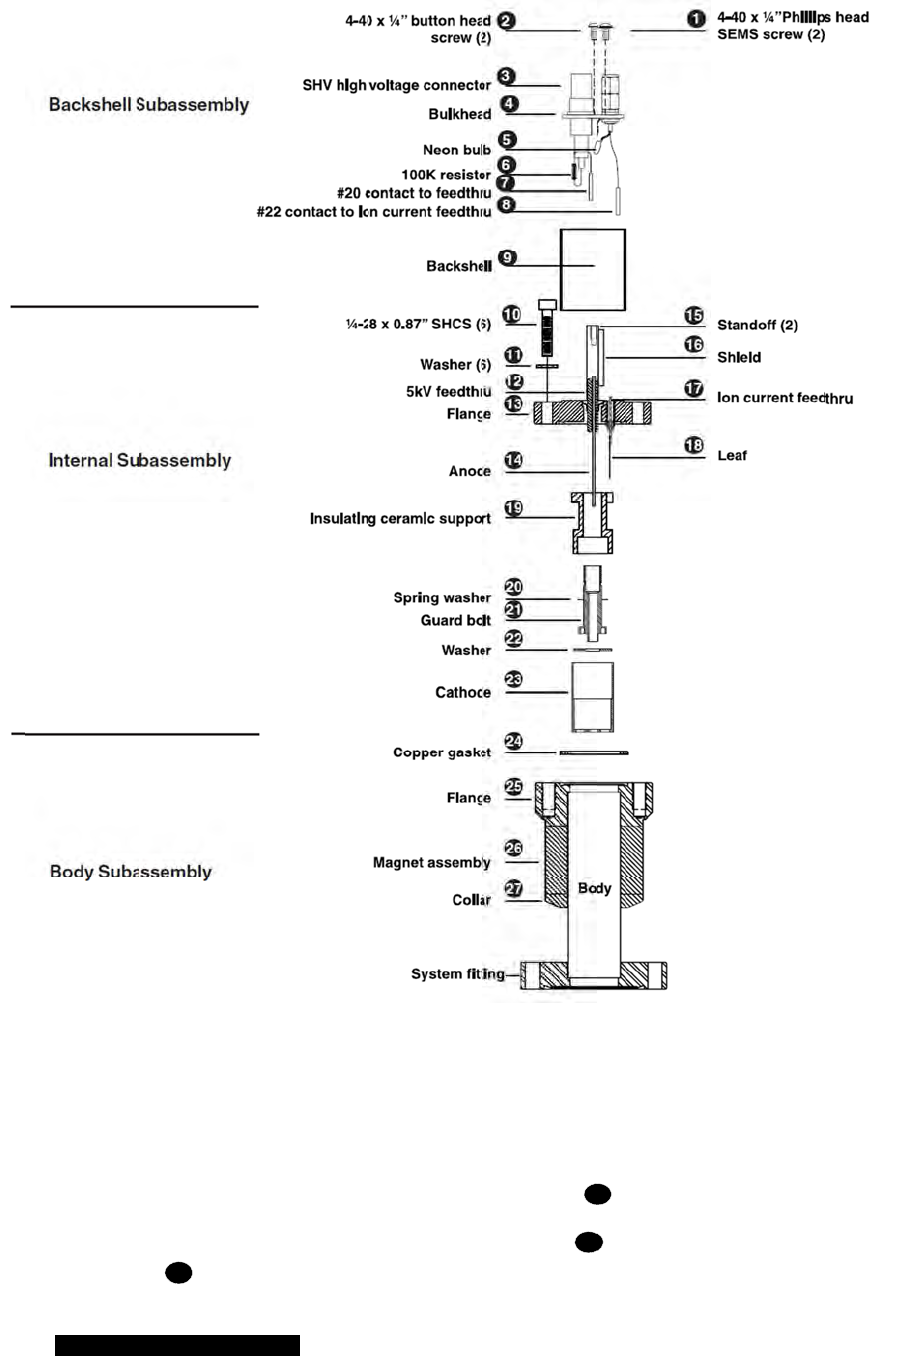
MKS 937
B
2
3
B
Operation M
a
Figure 12-
3
. Remove t
h
. Use needl
e
17
.
a
nual
3
An expl
o
h
e two 4-40
x
e
nose pliers
o
ded view of
x
¼" button h
e
to pull the #
2
102
the 421/422
e
ad screws
1
2
2 contact
8
cold cathod
1
.
carefully off
e gauge ass
of the ion cu
r
embly.
r
rent feedthr
o
o
ugh

MKS 937B Operation Manual 103
4. Pull the #20 contact 7off of the 5kV feedthrough 12 taking the entire bulkhead 4 with it
(do not remove the SHV and BNC connectors from the bulkhead).
5. Remove the six ¼-28 x 0.875" socket head cap screws 10 and pull the back flange 13 free.
Note that these screws are silver-plated for lubricity and should be used only once. They may
be re-lubricated with a dry lubricant such as molybdenum disulfide, though new silver-plated
screws are recommended. The copper gasket 24 must be replaced with a standard 21/8"
CF flange gasket.
The cathode and anode assemblies are attached to the flange.
Disassembly should proceed from the bottom to the top of the internal
assembly drawing.
6. To remove the cathode 23 , release the two integral, spring-loaded ears that are hooked over
the shoulder of the ceramic insulating support 19 .
7. Gently pull up on the ear until it just clears the outer diameter of the ceramic insulating
support 19 .
Position the small Elgiloy® leaf 18 used to connect the ion current feedthrough 17
to the cathode. The rotational position of the cathode with respect to the leaf is not critical,
however, be careful not to bend the leaf.
8. Slide the cathode 23 and washer 22 off of the insulating support.
9. The insulating support is captured by the guard bolt 21 . Remove this using a spanner
wrench and unscrew the guard bolt from the flange 13 .
There is a small curved spring washer 20 under the head of the guard bolt. This
spring washer holds the insulating support tight, preloads the guard bolt to resist
unscrewing due to possible vibration, and provides compliance for differential thermal
expansion during bakeout.
12.1.2.2 Cleaning the Series 421/422 Sensor
Depending on the degree of contamination and application of the sensor, the internal parts may be
cleaned — either ultrasonically, with mild abrasives, or chemically.
Do not touch any vacuum exposed part after cleaning unless wearing gloves.
Ultrasonic cleaning should use only high quality detergents compatible with aluminum (e. g.
ALCONOX®). Scrub surfaces with a mild abrasive to remove most contamination. Scotch-Brite™ or fine
emery cloth may be effective. Rinse with alcohol.
Clean aluminum and ceramic parts chemically in a wash (not recommended for semiconductor
processing), such as a 5 to 20% sodium hydroxide solution, at room temperature (20°C) for one minute.
Follow with a preliminary rinse of deionized water. Remove smut (the black residue left on aluminum
parts) in a 50 to 70% nitric acid dip for about 5 minutes.
12.1.2.3 Assembling the Series 421/422 Sensor
To reassemble the sensor, reverse the order of procedures used during disassembly. Note the following
tightening procedure for the guard bolt. The bolt has a 3/8" 40 thread design that is delicate.

MKS 937B Operation Manual 104
1. Finger tighten the guard bolt to compress the spring washer and then back off one turn.
Do not overtighten as this will remove all compliance from the spring washer and possibly
damage the aluminum 3/8"-40 thread.
2. Verify that the anode 14 is well-centered within the bore of the guard bolt.
3. If it is off center, carefully bend it back into position and continue with the assembly.
12.1.2.4 Preparing the Sensor for Bakeout
The 421/422 sensor, including the LEMO connectors in the bulkhead, will withstand bakeout up to 250°C.
Additionally, the sensor may be operated during bakeout if cables and connectors with appropriate
temperature ratings are used. Cables or connectors rated to temperatures less than the bakeout
temperature need to be disconnected from the sensor for bakeout. In applications requiring repeated
bakeouts, the use of bakable connectors and cables is suggested. To prepare the sensor for bakeout up
to 125°C, remove the high voltage and ion current cables only.
12.1.2.5 Testing a Cold Cathode Sensor
HPS cold cathode sensors contain anode and cathode (collector) electrodes. Test the sensor with an
ohmmeter. There should be no shorts between the electrodes or from the electrodes to the sensor body.
12.2 Maintenance of Series 423 I-MAG® Cold Cathode Sensor
12.2.1 Connecting the I-MAG Sensor
Mount the Sensor to a grounded vacuum system.
If the I-MAG Sensor has a CF flange, remove the magnet to allow clearance for bolt installation. When
replacing the magnet, note that it is keyed to the sensor body to protect the feedthrough pins from
damage. The pins should be straight and centered.
For grounding, use a conductive, all-metal clamp to mount a KF 25 or KF 40 flanged sensor body.
Connect the cable to the sensor and to the 937B Controller before turning on your system. Tighten the
thumbscrew on top of the cable to make sure it is securely in place.
12.2.2 Disassembling the I-MAG Sensor
1. Clean tweezers and clean smooth-jaw, needle-nose pliers are required.
2. Turn off the power to the 937B controller.
3. Loosen the thumbscrew on top of the sensor cable and remove the cable.
4. Loosen the two flat head screws 15 .
5. Remove the magnet 14 .
6. Using the smooth-jaw, needle-nose pliers, firmly grab the compression spring 3 at the
tip closest to the flange.
7. Pull on the compression spring 3 while rotating to free it from the formed groove of the
sensor body 9. Continue to pull until the compression spring 3 is completely free.
8. With the vacuum port facing up, carefully remove the remaining components ( 4
through 8) from the sensor body.
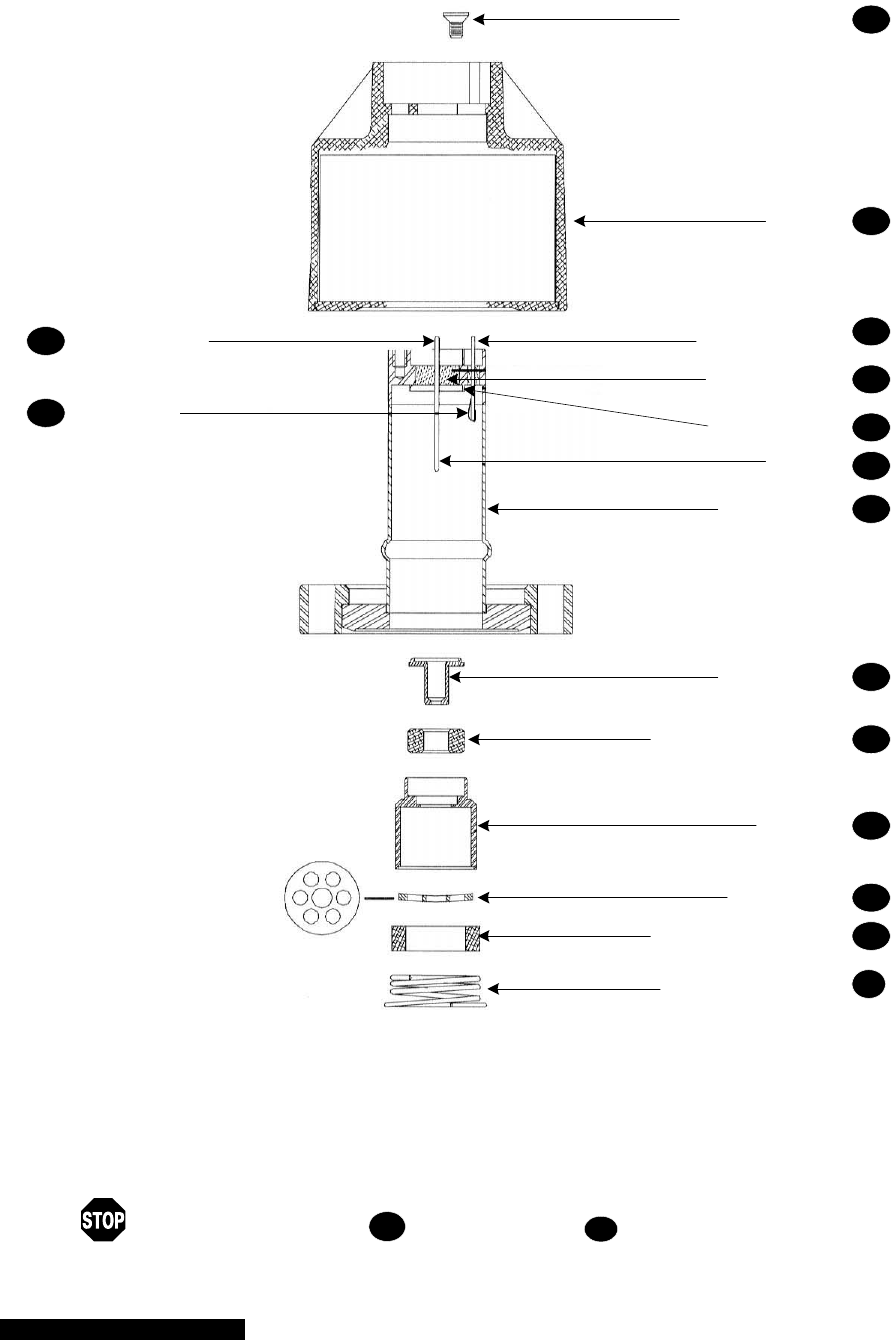
MKS 937B Operation Manual 105
Figure 12-4 An exploded view of the Series 423 I-MAG cold cathode gauge sensor.
Do not bend the anode 10 or the leaf spring 1 on the ion current feedthrough
pin when assembling or disassembling the Sensor.
Leaf Spring
High Voltage
Feedthrough Pin
Flathead Screw (2)
Magnet
Ion Current
Feedthrough Pin
Glass Insulator
Locating Collar
Anode
Sensor Body
Ground Shield
Ceramic Spacer, Small
Cathode
Grid Washer
Ceramic Spacer, Large
Compression Spring
1
2
3
4
5
6
7
8
9
10
11
12
13
14
15
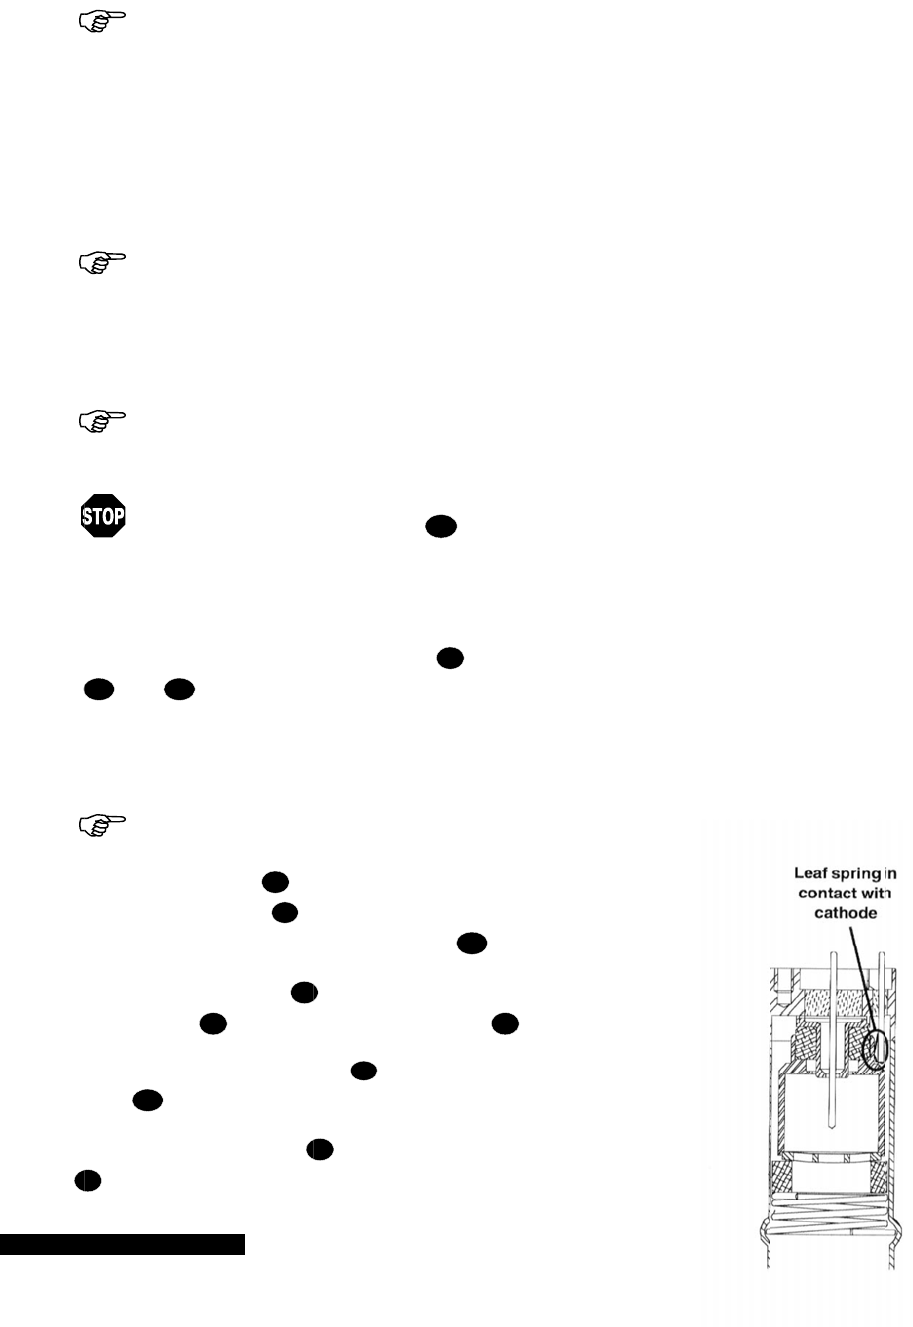
MKS 937
B
12.2.3
Dependin
cleaned
—
Ultrasoni
c
A
LCONO
Scrub wit
h
effective.
h
s
e
s
m
m
u
Each of t
h
Dry all int
e
spacers,
absorbed
12.2.4
1.
R
p
o
s
t
2. I
n
g
r
3. S
s
h
4.
C
B
Operation M
a
Clea
g on the deg
r
—
either ultra
s
Do not
c
ally clean su
X
®).
h
a mild abra
s
Rinse with al
Clean
a
y
droxide so
l
e
miconduct
o
m
ut (the bla
c
m
inutes.
Chem
ltrasonic cl
e
Do not
h
e cleaning
m
e
rnal compo
n
4
and
7
water.
Ass
e
Wear g
l
R
oll the senso
o
rt, check th
e
t
raight and c
e
n
stall the gro
u
r
ound shield
lide the smal
l
h
ield
8
.
C
heck that th
e
6
, as shown
a
nual
ning the I
r
ee of conta
m
s
onically, wit
h
touch any v
a
rfaces using
o
s
ive to remo
v
cohol.
a
luminum an
l
ution, at ro
o
o
r processi
n
c
k residue l
e
ical cleanin
g
e
aning are a
c
damage the
m
ethods desc
r
n
ents and th
e
,
are slightly
p
e
mbling t
h
l
oves and a
s
r body
9
o
n
e
anode
10
f
o
e
ntered with t
h
u
nd shield
8
8
drops int
o
l
ceramic sp
a
e
leaf spring
to the right.
I
-MAG Se
n
m
ination and t
h
mild abrasi
v
a
cuum-expo
o
nly high qu
a
v
e most cont
a
d ceramic p
a
o
m temperat
u
n
g). Follow
w
e
ft on alumi
n
g
should not
c
ceptable.
leaf spring
r
ibed above
s
e
sensor bod
y
p
orous and
w
h
e I-MAG
s
semble wit
h
n
a flat surfa
c
o
r any radial
h
e sensor bo
using twee
z
o
the locatin
g
a
cer
7
over
t
1
will conta
c
I
f not, remov
e
106
n
so
r
he applicatio
n
v
es, or chemi
c
sed part aft
e
a
lity detergen
t
a
mination. Sc
o
a
rts chemic
a
u
re (20°C) f
o
w
ith a prelimi
n
um parts) i
n
be used to
c
1
while cl
e
s
hould be foll
o
y
9
in a cle
a
w
ill require lon
Senso
r
h
clean tools
c
e and, lookin
runout motio
n
d
y
9
for p
r
z
ers. Make s
u
g
collar
11
.
t
he small end
c
t the base o
f
e
the small c
e
n
of the sens
o
c
ally.
e
r cleaning
u
t
s compatibl
e
otch-Brite™
o
a
lly in a was
h
o
r one minut
e
nary rinse
w
n
a 50 to 70
%
c
lean the an
o
e
aning the S
o
wed with m
u
an oven set
a
n
ger drying ti
m
.
g down the
n
. It should b
e
r
oper operati
o
u
re that the
of the groun
f
the cathode
e
ramic space
r
o
r, the intern
a
u
nless weari
n
e
with alumin
u
o
r fine emery
h
such as a
e
(not reco
m
w
ith deionize
d
%
nitric acid
d
o
d
e
; mild a
b
S
ensor.
u
ltiple rinses
o
a
t 150°C. Th
e
m
e in the ove
n
e
o
n.
d
r
a
l parts may
b
n
g gloves.
u
m (i.e.
cloth may b
e
5 to 20% so
d
m
mended for
d
water. Re
m
d
ip for abou
t
b
rasives or
o
f deionized
w
e
two cerami
c
n
to drive off
t
b
e
e
d
ium
m
ove
t
5
w
ater.
c
t
he

MKS 937B Operation Manual 107
7 and the ground shield 8, and gently bend the leaf spring 1 towards the anode 10 and
then replace the ground shield 8 and ceramic spacer 7.
5. Slide the cathode 6, the grid washer 5, and the large ceramic spacer 4 into place. The
grid washer 5 has a concave shape. Refer to the figures to see its installation orientation.
6. Insert the small end of the compression spring 3 into the sensor body 9.
7. Using your thumbs, push the larger end of the spring into the sensor body 9 until it is contained
within the tube's inside diameter.
8. Using the smooth-jaw, needle-nose pliers, work the compression spring 3 down into the sensor
body 9 until it is fully seated in the formed groove.
9. Inspect the ground shield 8 and the grid washer 5 to verify they are centered with respect to
the anode 10 .
10. If adjustment is needed, gently reposition the grid washer/cathode assembly, taking care not to
scratch the grid washer 5.
It is recommended that the resistance between the ion current feedthrough pin 13 and the grid washer
5 be measured to verify that the leaf spring 1 is in contact with the cathode 6. The measurement
should indicate a short circuit between them. There should be an open circuit between the ion current
feedthrough pin 13 and both the high voltage feedthrough pin 2 and the sensor body 9.
Once this procedure is complete, the I-MAG Sensor is ready for installation. If it is not to be installed
immediately, cover the flange with clean, vacuum grade aluminum foil and cap with a flange protector.
12.2.5 Preparing the Sensor for Bakeout
To prepare the sensor for bakeout at up to 400°C, remove the sensor cable and magnet assembly as
described in "Disassembling the I-MAG sensor".
12.3 Maintenance of Low Power Nude and Mini BA hot cathode
sensors
12.3.1 Hot cathode theory
Hot cathode ionization gauges use the electrons emitted from a hot filament (thermionic electrons) to
create ions in a surrounding gas. The ion numbers are in proportion to the ambient gas pressure.
Electrons are accelerated through the gauge by a potential difference between the hot, emitting filament
and a positively charged surrounding grid (anode). The energy acquired by the electrons as they are
accelerated by the electric field in the gauge is sufficient to ionize resident ambient gas molecules. The
positively charged ions created by this collision ionization are attracted to the negatively biased ion
collector within the gauge where they are neutralized by an electron current. The gas molecules are
singly ionized and there is a one–to-one correspondence between the number of ions neutralized and the
magnitude of the neutralizing electron current. Hence the electron current is often called the “ion current”
and this is proportional to the pressure in the gauge. The “ion current” is measured by the electrometer
and converted to a pressure indication on 937B display.
The Bayard Alpert (BA) gauge is one of the most popular types of hot cathodes gauges. They are
available in glass envelopes, or mounted on a flange (the latter configuration is often referred to as a

MKS 937
B
nude gau
g
errors. T
h
exposed
t
of electro
n
electrons
neverthel
e
current c
a
measure
m
The colle
c
kPii
operating
To reduc
e
stimulate
d
to drive o
f
degas pr
o
through t
h
emission
12.3.2
Roughing
grid and
c
gauge ca
n
the grid s
t
A
lthough
electricall
y
leakage
p
may hav
e
s
e
Electron Sourc
e
(Filament)
B
Operation M
a
g
e). The mai
n
h
is is achieve
d
t
o the soft X-
r
n
impact upo
n
by the photo
e
e
ss added to
a
n fully mask
m
ent capabili
t
Figure 1
c
tion ion curr
e
where, kis
condition. T
y
e
the outgass
d
desorption)
f
f any adsorb
e
o
cess is acco
h
e grid (I
2
R d
e
current from
t
Clea
pump oils a
n
c
ollector surf
a
n
remove su
r
t
ructure may
the feedthro
u
y
conductive
p
ath on the in
s
e
to be replac
e
Unlike
w
e
nsor. Atte
m
e
+30V
a
nual
n
advantage
o
d
through the
r
ay emitted fr
o
n
the grid su
r
e
lectric effec
t
the measure
the ion curre
n
t
ies of the B
A
2-5 BA ga
u
e
nt
i
is rela
t
the gauge s
e
y
pical gauge
ing in gauge
on high vac
u
e
d gas mole
c
m
plished eit
h
e
gas). EB de
g
t
he hot catho
ning the
H
n
d other fluid
s
a
ces) contam
i
f
ace contami
require a rep
u
gh insulator
s
pathways m
a
s
ulator that c
a
e
d.
w
ith cold ca
t
m
pts to clea
n
Ion Coll
e
Ele
c
Coll
(Gri
d
A+180V
o
f the BA co
n
adoption of
a
o
m the grid.
X
f
ace since s
o
t
. This photo
e
ment of curr
e
n
t at low pre
s
A
gauge.
u
ge structur
e
t
ed to the pre
e
nsitivity whi
c
sensitivity fo
r
to a negligibl
e
u
um measure
c
ules from th
e
h
er by electro
n
g
as techniqu
e
de.
H
ot Cath
o
s
that conden
i
nate the sen
s
n
ation on the
l
acement of t
h
s
are shielde
d
a
y be formed
a
n produce f
a
t
hode gaug
e
n
the sensor
e
cto
r
c
tron
ector
d
)
108
n
figuration is i
a
small diam
e
X
-ray emissi
o
o
me of these
X
e
lectric curre
n
e
nt determine
s
sure (around
e
and electr
o
ssure Pand
h depends s
t
r
nitrogen is
a
e
level, and
m
m
ent, high te
e
surface of t
h
n
bombardm
e
e
is accompli
s
o
de Sens
o
se and/or de
c
s
or and can
c
of grid and
c
h
e sensor.
d
, in some ap
p
on insulator
s
a
lse low pres
s
e
, it is not ad
v
it may eithe
r
i
ts reduced s
u
e
ter ion colle
c
o
n from the g
r
X
-ray strike t
h
n
t is not relat
e
d by the elec
t
d
1x10
-10
torr)
o
n process i
emission cu
r
t
rongly upon
t
a
round 7.5 to
m
inimize the
e
mperature d
e
h
e anode gri
d
e
nt (EB dega
s
s
hed in the 9
3
or
c
ompose on
s
c
ause calibra
t
c
ollector, how
p
lications co
n
s
urfaces. W
h
s
ure reading.
v
isable to t
h
r
deform or
b
u
sceptibility t
o
c
tor that mini
m
r
id is an unde
h
e ion collect
o
e
d to the pres
trometer. Th
e
and this limi
t
nside the g
a
r
rent
i
by th
e
t
he gauge st
r
15 Torr
-1
.
e
ffect of ESD
e
gassing tec
h
d
. Electrode
h
s
) or by pass
37B controll
e
s
urfaces wit
h
t
ion shift. De
g
w
ever, severe
n
ducting film
s
h
en this happ
e
In these ca
s
h
e clean the
h
b
reak the ga
u
o
X-ray indu
c
m
izes the are
sirable side
e
o
r, releasing
sure but is
e
photoelectri
t
s the pressu
r
a
uge.
e
equation
r
ucture and
(electron
h
niques are u
h
eating durin
g
ing a high cu
r
e
r by increasi
n
h
in the gauge
g
assing of th
e
contaminatio
s
or other for
m
ens it create
s
s
es the sens
o
h
ot cathode
uge structu
r
c
ed
a
e
ffect
c
r
e
sed
g
the
r
rent
n
g the
(i.e.
e
n of
m
s of
s
a
o
r
r
e.
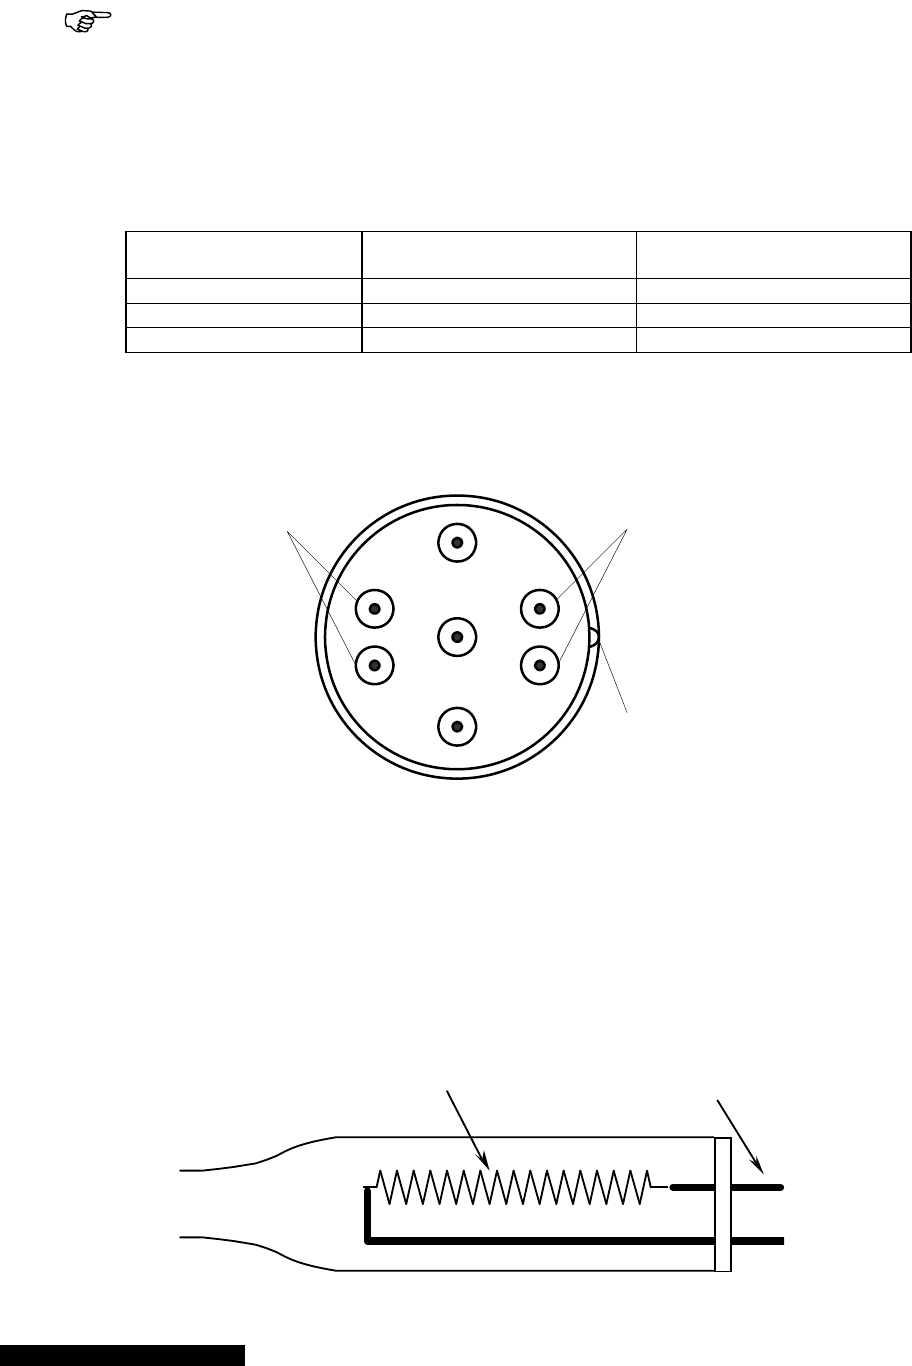
MKS 937B Operation Manual 109
12.3.3 Testing the hot cathode sensor
This test will only identify a non-functional sensor. It will not detect damage from
contamination, misuse or rough handling that can affect the calibration of a hot cathode
gauge.
The most common cause of sensor failure is filament failure. To check for this failure mode, test the
sensor using an ohmmeter with less than 5 mA of current. The resistance readings of a normal hot
cathode sensor are show in table 12-1. The resistance between the two pins of each filament is of
particular importance. This test may be applied to any hot cathode sensor operated by 937B.
Pin Numbers Resistance () for a good
sensor Resistance () for a bad
sensor
Between F1 pins 0 - 5 Open (>100 )
Between F2 pins 0 - 5 Open (>100 )
Any pin to ground/shell >10
6
<10
6
Table 12-1 Resistance readings of a normal HC sensor.
F1 and F2 are identified on the Low Power Nude gauge. For a Mini BA, use the drawing in Figure 12-6 to
located F1 and F2.
F1
F2
Locator
Key Slot
Figure 12-6 Filament pin locator for LPN and mini BA gauges.
12.4 Maintenance of Pirani Sensors
12.4.1 Theory of a Pirani pressure sensor
Both standard Pirani and convection enhanced Pirani gauges can be used with the 937B Controller. In
both cases, measurement is based on gas-dependent thermal conductivity of the gas in the vacuum
environment. A wire suspended from supports (as shown in Figure 12-7) is heated and maintained at a
constant temperature during the measurement process.
To Vacuum
System
Electrical
Leads
Heated Wire

MKS 937B Operation Manual 110
Figure 12-7 Schematic of a Pirani thermal conductivity sensor.
The amount of heat exchanged between the hot wire and cold environment is a function of the pressure
when the distance between the hot wire and the cold environment is comparable to the mean free path of
the gas molecules (less than about ~20X of the mean free path). When gas pressure is higher, the gas
thermal conductivity becomes pressure insensitive and natural convective heat transfer must be
employed to improve the gauge sensitivity. This demands the horizontal placement of the sensor tube (as
shown in Figure 12-8) for a convention enhanced Pirani used to measure pressures greater than 100 torr.
Figure 12-8 Natural convection heater transfer in horizontal (left) and vertical (right) sensor
tubes.
The size (diameter) of gas molecules has significant impact on the Pirani sensor. Since smaller molecules
(such as helium) move faster in the gas, this gas can transfer more heat energy under the same pressure
as compared with a gas composed of heavy molecules (e.g. Argon). This explains why helium is
saturated when the pressure is less than 10 torr.
The standard Pirani sensor will read continuously between 5 x 10⁻⁴ to 100 Torr, and, with lower
resolution, up to atmospheric pressure.
The Convection Pirani sensor design enhances heat transfer at higher pressures through convection.
This sensor will read continuously with full resolution from 1.0 x 10⁻³ to 1000 Torr.
12.4.2 Cleaning the Series 345 Sensor
Roughing pump oils and other fluids condensing or decomposing on the heated filament can contaminate
the sensor. This changes the emissivity of the filament, which in turn can cause the calibration to change,
especially at low pressure.
It is not advisable to clean the sensor. Attempts to clean it may either deform or
break the filament. The deformed filament can cause gauge errors arising from a shift in
the sensor output.
Replace the sensor if it becomes contaminated (see Spare Parts and Accessories).

MKS 937B Operation Manual 111
12.4.2.1 Testing the Series 345 Sensor
This procedure tests function only. Lower levels of sensor damage that are due to
contamination or rough handling can affect calibration, but the tube may still be
functional.
The most common cause of sensor failure is a broken filament (checked from pin 4 to pin 6) due to
improper handling.
Test the sensor using an ohmmeter with less than 5 mA of current. The resistance readings of a normal
Series 345 Sensor measured at atmospheric pressure and at room temperature (20°C) are shown in
Table 12-2.
345 D-Sub Pin # Resistance ()
4 to 7 39
4 to 8 114
6 to 7 31
6 to 8 114
5 to 6 62
3 to 5 345
Table 12-2 Bridge resistance value for a normal 345 Pirani sensor.
12.4.3 Cleaning the Series 317 Sensor
Roughing pump oils and other fluids condensing or decomposing on the heated filament can contaminate
the sensor. This changes the emissivity of the filament, which in turn can cause the calibration to change,
especially at low pressure.
It is not advisable to clean the Sensor. Attempts to clean it may either deform or
break the filament. The deformed filament would then cause additional error due to a shift
in the sensor's output.
Replace the sensor if it becomes contaminated (see Spare Parts and Accessories).
12.4.3.1 Testing the Series 317 Sensor
The most common cause of sensor failure is a broken filament. This might be caused by physical abuse
or sudden venting of the sensor to atmosphere at the inlet port.
1. Using a #1 Phillips head screwdriver, remove the two screws to separate the
connector/electronics subassembly from the end of the sensor.
2. Check the resistance on the sensor's pins listed in the first column in Table 12-3. Test the sensor
using an ohmmeter with less than 5 mA of current. The resistance readings for a normal sensor
measured at atmospheric pressure and at room temperature (20°C) are listed in the middle
column. If the condition shown in the right column exists, the sensor should be replaced.
12.4.3.2 Preparing the 317 Sensor for Bakeout
Remove the cable from the sensor. Using a #1 Phillips head screwdriver remove the two screws at the
end of the connector/electronics subassembly to separate it from the sensor. The standard Convection
Pirani sensor can be baked up to 150°C and the Shielded Convection Pirani sensor can be baked up to
100°C.
A 317 sensor is also available with an aluminum housing. With the electronics removed, It is bakable to
250°C.
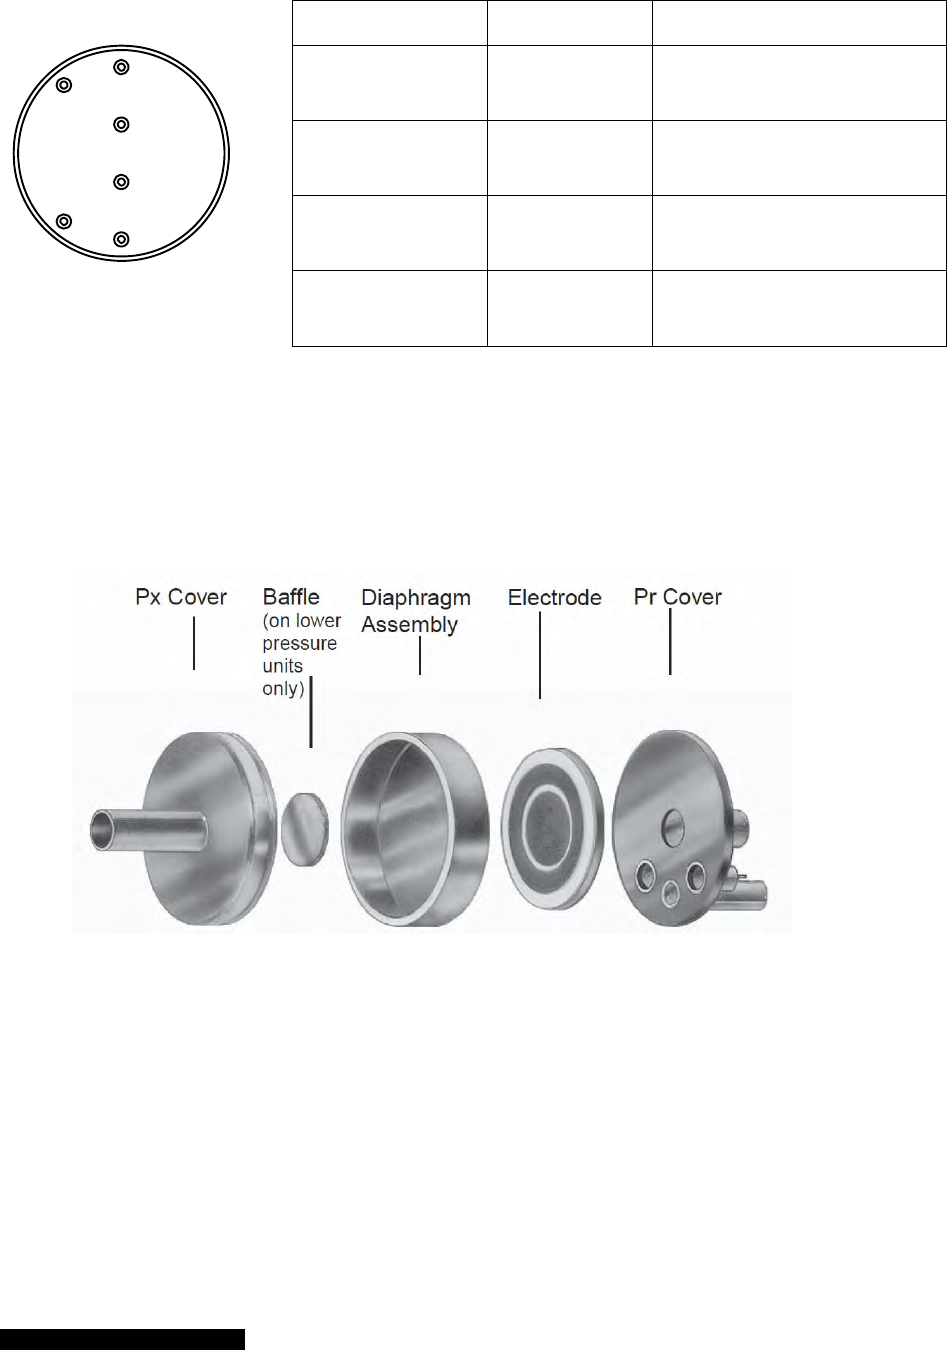
MKS 937B Operation Manual 112
Table 12-3 Resistance values for a normal 317 convection enhanced Pirani sensor.
12.5 Maintenance of Capacitance Manometer
12.5.1 Theory of a capacitance manometer
Figure 12-9 Exploded view of a MKS Capacitance manometer sensor.
MKS capacitance manometers contains a sensor and signal conditioner. The sensor is made up of a
tensioned metal diaphragm, one side of which is exposed to the media whose pressure is to be
measured. The other (reference) side contains an electrode assembly placed in a reference cavity (see
Figure 12-9). Absolute transducers have the reference side factory-sealed under high vacuum (10-7 torr).
The diaphragm deflects with changing pressure — force per unit area — causing a capacitance change
between the diaphragm and the adjacent electrode assembly. The high level output signal, current, or DC
voltage is linear with pressure, amplified, and self-compensated for thermal stability with ambient
temperature changes. Capacitance manometers should be zeroed on installation. This zero adjustment
has no effect on the actual calibration.
Check Resistance () Results
F1 to F2 20 If higher, filament is broken or
burned out.
F1 to sensor port
F2 to sensor port
>20x106 If lower, sensor is damaged or
contaminated.
TC1 to TC2 27 If higher, temperature
compensation winding is
broken.
TC1 to sensor port
TC2 to sensor port
>20x106 If Lower, temperature
compensation winding is
broken.
F1
F2
TC1
TC2
Sensor Tube

MKS 937B Operation Manual 113
12.5.2 Repairing the Baratron™ Capacitance Manometer
Repair by the user is not recommended since replacement or movement of PC board components may
require complete calibration of the unit. Return to MKS for repair.

MKS 937B Operation Manual 114
13 Spare Parts and Accessories
Part #
Accessories
USA power cable 103150001
Half rack mounting kit 100005651
Full rack mounting kit 100007700
937B Instruction Manual 100016467
Rebuild kit for Series 421 100006734
Spanner Wrench for 421 tube rebuild 100005279
Rebuild kit for Series 423 I-MAG® 100002353
Adapter, SMA-F to BNC-M 100016120
Adapter, Connector, SMA-M to BNC-F 100016121
Fuse (2X) inside the inlet power connector 100015755
Module, plug-in
Cold Cathode 100015185
Hot Cathode (MIG/LPN) 100015641
Dual Capacitance Manometer/Piezo 100015267
Dual Standard Pirani/Convection Pirani 100015132
ProfiBus 100015940
Serial Firmware Download Adaptor
Adaptor 100016642
Cable for Capacitance Manometer, Type 722B
10 ft (3.0 m) 100016951
25 ft (7.6 m) 100016952
50 ft (15.2 m) 100016953
Cable for Capacitance Manometer, Type 626B/627D
10 ft (3.0 m) 100007555
25 ft (7.6 m) 100007556
50 ft (15.2 m) 100007557
Custom to 50 ft (15.2 m) 100007558
Cable for Cold Cathode Sensor, Series 431
10 ft (3.0 m) 100016217
25 ft (7.6 m) 100016218
50 ft (15.2 m) 100016219
100 ft (30.5 m) 100016220
Custom to 300 ft (91.4 m) 100016221
Cable for Cold Cathode Sensor, Series 423 I-MAG®
2 ft (0.6 m) 100016295
10 ft (3.0 m) 100016296
25 ft (7.6 m) 100016297
50 ft (15.2 m) 100016298
Custom to 300 ft (91.4 m) 100016299
Cable for Hot Cathode, Mini BA Gauge
10 ft (3.0 m) 100011106
25 ft (7.6 m) 100011107
50 ft (15.2 m) 100011108
Cable for Hot Cathode, Low Power Nude
10 ft (3.0 m) 100010909
25 ft (7.6 m) 100010910
50 ft (15.2 m) 100010911
Cable for 317 Convection Pirani & 345 Pirani Sensor
10 ft (3.0 m) 103170006SH
25 ft (7.6 m) 103170007SH
50 ft (15.2 m) 103170008SH

MKS 937B Operation Manual 115
100 ft (30.5 m) 103170017SH
Custom to 500 ft (152.4 m) 103170009SH
Cable for Series 902 Transducer
10 ft (3.0 m) 100011869
25 ft (7.6 m) 100011870
50 ft (15.2 m) 100011871
Custom (maximum length 50 ft) 100011872
Capacitance Manometer
626B/627B with male Type D connector 626BXXXYZ/627BXXXYZ
Range torr (XXX)
0.1 .1T
1 01T
2 02T
10 11T
20 21T
100 12T
500 52T
1000 13T
Fitting (Y)
1/2” tube A
Swagelok 8 VCR female B
Mini-CF, rotatable C
NW 16 KF D
Swagelok 8 VCO female E
2-3/4” CF, rotatable L
NW 25 KF Q
Accuracy (Z)
Std, 0.25% of Rdg (optional 0.1 torr) E
Std, 0.50% of Rdg, 0.1 torr F
Optional: 0.15% of Rdg D
(10, 100, 1000T only)
722B Compact Absolute Capacitance Manometer 722BXXXYYWGZ
Range torr (XXX)
10 11T
100 12T
1000 13T
10000 14T
Fitting (YY)
1/2” tube BA
Swagelok 4 VCR female CD
Swagelok 8 VCR female CE
Swagelok 8 VCO female DA
mini CF, rotatable HA
NW 16 KF GA
Input/Output (W)
+13 to +32 VDC input, 0-10 VDC output 2
Accuracy (G)
Std, 0.5% of Rdg F
Connector (Z)
9-pin Type D A
Sensor, Series 431 Cold Cathode
KF 25 104310004
KF 40 104310001
2¾" CF 104310002
1" tube 104310003
8 VCR®-F (½") 104310005
Sensor, Series 423 I-MAG® Cold Cathode
KF 25 104230004

MKS 937B Operation Manual 116
KF 40 104230001
2¾" CF 104230002
1" tube 104230003
Sensor, Hot Cathode MIG Gauge, Yr Coated Ir filament
1” OD tube 100011085
Mini CF 100011111
2¾" CF 100011112
KF 25 100011113
KF 40 100011114
KF 16 100011118
3/4" OD tube 100011127
Sensor, Hot Cathode, Low Power Nude
KF 40, W filament 100005987
2¾" CF, W filament 100005980
KF 40, Yr coated Ir filament 100006841
2¾" CF, Yr coated Ir filament 100006842
Sensor, Convection Pirani, Shielded (317)
KF 16 103170010SH
KF25 103170027SH
1/8" NPT-M with ½" Compression Seal Option 103170011SH
8 VCR®-F (½") 103170012SH
4 VCR®-F (¼") 103170029SH
1
1/3" CF (non-rotatable) 103170013SH
2¾" CF (non-rotatable) 103170014SH
Ø 15 mm x 30 mm Tubing 103170016SH
Ø 18 mm x 30 mm Tubing 103170018SH
Sensor, Pirani (345)
KF 16 103150010
1/8" NPT-M with ½" Compression Seal Option 103150011
8 VCR®-F (½") 103450012
1
1/3" CF (non-rotatable) 103450013
2¾" CF (non-rotatable) 103450014
KF25 103450015
Ø 15 mm x 30 mm Tubing 103450016
Ø 18 mm x 30 mm Tubing 103450018
Sensor, Series 902 Piezo Transducer
902 Transducer, NW16KF, RS485 902-1112
902 Transducer, 4 VCR®-F, RS485 902-1212
902 Transducer, 8 VCR®-F, RS485 902-1312
902 Transducer, NW16KF, RS232 902-1113
902 Transducer, 4 VCR®-F, RS232 902-1213
902 Transducer, 8 VCR®-F, RS232 902-1313
902 Transducer, NW16KF, 0-10V 902-1105
902 Transducer, 4 VCR®-F, 0-10V 902-1205
902 Transducer, 8 VCR®-F, 0-10V 902-1305
Please call the HPS® Products Customer Service Department of MKS Vacuum Products Group at 1-303-449-9861 or
1-800-345-1967 to order any of these parts or to receive catalogs for other MKS products.

MKS 937B Operation Manual 117
14 APPENDIX
14.1 Hot cathode gauge gas correction factors
Substance Formula Relative ionization
Gas correction factor
Substance Formula Relative ionization
Gas correction factor
Acetaldehyde C2H4O 2.6 Carbon disulfide CS2 5.0
Acetone (CH3)2CO 3.6 4.7
4.0 4.8
3.6 Carbon monoxide CO 1.05
Acetylene C2H2 1.9 1.05
2.0 1.1
Air 1.0 Carbon tetrachloride CCl4 6.0
0.98 6.3
Ammonia NH3 1.3 Cesium Cs 4.3
1.2 2.0
1.3 4.8
iso-Amylene Iso-C5H10 5.9 Chlorine Cl2 0.68
cyclo-Amylene cyclo-C5H10 5.8 2.6
Argon Ar 1.3 1.6
1.1 Chlorobenzene C6H5Cl 7.0
1.2 Chloroethane C2H5Cl 4.0
0.9 Chloroform CHCl3 4.7
Benzene C6H6 5.9 4.8
5.8 4.8
5.7 Chloromethane CH3Cl 2.6
5.9 3.2
6.0 3.1
Benzoic Acid C6H5COOH 5.5 Cyanogen (CN)2 2.8
Bromine Br 3.8 3.6
Bromomethane CH3Br 3.7 2.7
n-Butane n-C4H10 4.9 Cyclohexylene C6H12 7.9
4.7 6.4
Iso-Butane iso-C4H10 4.6 Deuterium D2 0.35
4.9 0.38
Cadmium Cd 2.3 Dichlorodifluoro-
methane
CCl2F2 2.7
3.4 4.1
Carbon dioxide CO2 1.42 Dichloromethane CH2Cl2 3.7
1.4 Dinitrobenzene C6H4(NO2)2
1.5 o- 7.8
1.5 m- 7.8
1.4 p- 7.6

MKS 937B Operation Manual 118
Ethane C2H6 2.6 Iodomethane CH3I 4.2
2.8 Isoamyl alcohol C5H11OH 2.9
2.5 Isobutylene C4H8 3.6
Ethanol C2H5OH 3.6 Krypton Kr 1.9
2.9 1.7
Ethyl acetate CH3COOC2H5 5.0 1.7
Ethyl ether (C2H5)2O 5.1 Lithium Li 1.9
5.1 Mercury Hg 3.6
Ethylene C2H4 2.3 Methane CH4 1.4
2.4 1.5
2.2 1.6
2.2 to 2.5 1.4 to 1.8
Ethylene oxide (CH2)2O 2.5 1.5
Helium He 0.18 1.5
0.15 Methanol CH3OH 1.8
0.13 1.9
0.12 Methyl acetate CH3COOCH3 4.0
Heptane C7H16 8.6 Methyl ether (CH3)2O 3.0
1,5-Hexadiene 1,5-C6H10 6.4 3.0
Cyclo-Hexadiene Cy-C6H10 6.0 Naphthalene C10H8 9.7
Hexane C6H14 6.6 Neon Ne 0.30
1-Hexane 1-C6H12 5.9 0.31
Cyclo-hexane Cy-C6H10 6.4 Nitrobenzene C6H5NO2 7.2
Hydrogen H2 0.46 Nitrogen N2 1.0
0.38 Nitrotoluene (o-,m-,p-) C6H4CH3NO2 8.5
0.41 Nitric oxide NO 1.3
0.45 1.2
0.44 1.0
Hydrogen Bromide HBr 2.0 Nitrous oxide N2O 1.5
Hydrogen chloride HCl 1.5 1.7
1.6 1.7
2.0 1.3 to 2.1
1.5 Oxygen O2 1.0
Hydrogen cyanide HCN 1.5 1.1
1.6 0.9
Hydrogen fluoride HF 1.4 0.9
Hydrogen iodide HI 3.1 n-Pentane n-C5H17 6.2
Hydrogen sulfide H2S 2.2 6.0
2.2 5.7
2.3 Iso-Pentane i-C5H17 6.0
2.1 Neo-Pentane (CH3)4C 5.7
Iodine I2 5.4 Phenol C6H5OH 6.2

MKS 937B Operation Manual 119
Phosphine PH3 2.6 Sulfur dioxide SO2 2.1
Potassium K 3.6 2.3
Propane C3H8 4.2 Sulfur hexafluoride SF6 2.3
3.7 2.8
3.7 to 3.9 Toluene C6H5CH3 6.8
3.6 Trinitrobenzene C6H3(NO2)3 9.0
Propene oxide C3H6O 3.9 Water H2O 1.1
n-Propene n-C3H6 3.3 1.0
3.2 to 3.7 0.8
cyclo-Propene cy-C3H6 3.6 Xenon Xe 2.87
Rubidium Rb 4.3 2.2
Silver perchlorate AgClO4 3.6 2.4
Sodium Na 3.0 o-Xylene o-C6H4(CH3)2 7.8
Stannic iodide SnI4 6.7 p-Xylene p-C6H4(CH3)2 7.9

MKS 937B Operation Manual 120
15 Product Warranty
Extent of the Warranty
MKS Instruments, Inc., Vacuum Products Group (MKS), warrants the HPS® Products Series 937B High Vacuum, Multi-Sensor System and its
accessories to be free from defects in materials and workmanship for one (1) year from the date of shipment by MKS or authorized
representative to the original purchaser (PURCHASER). Any product or parts of the product repaired or replaced by MKS under this
warranty are warranted only for the remaining unexpired part of its one (1) year original warranty period. After expiration of the applicable
warranty period, the PURCHASER shall be charged MKS’ current prices for parts and labor, plus any transportation for any repairs or
replacement.
ALL EXPRESS AND IMPLIED WARRANTIES, INCLUDING THE IMPLIED WARRANTIES OF MERCHANTABILITY AND FITNESS FOR A
PARTICULAR PURPOSE, ARE LIMITED TO THE WARRANTY PERIOD. NO WARRANTIES, EXPRESS OR IMPLIED, WILL APPLY AFTER THIS
PERIOD.
Warranty Service
The obligations of MKS under this warranty shall be at its option: (1) to repair, replace, or adjust the product so that it meets applicable
product specifications published by MKS or (2) to refund the purchase price.
What Is Not Covered
The product is subject to above terms only if located in the country of the seller from whom the product was purchased. The above
warranties do not apply to:
I. Damages or malfunctions due to failure to provide reasonable and necessary maintenance in accordance with MKS operating
instructions.
II. Damages or malfunctions due to chemical or electrolytic influences or use of the product in working environments outside the
specification.
III. Fuses and all expendable items which by their nature or limited lifetime may not function for a year. If such items fail to give
reasonable service for a reasonable period of time within the warranty period of the product; they will, at the option of MKS, be repaired or
replaced.
IV. Defects or damages caused by modifications and repairs effected by the original PURCHASER or third parties not authorized in
the manual.
Condition of Returned Products
MKS will not accept for repair, replacement, or credit any product which is asserted to be defective by the PURCHASER, or any product for
which paid or unpaid service is desired, if the product is contaminated with potentially corrosive, reactive, harmful, or radioactive materials,
gases, or chemicals.
When products are used with toxic chemicals, or in an atmosphere that is dangerous to the health of humans, or is environmentally unsafe,
it is the responsibility of the PURCHASER to have the product cleaned by an independent agency skilled and approved in the handling and
cleaning of contaminated materials before the product will be accepted by MKS for repair and/or replacement.
In the course of implementing this policy, MKS Customer Service Personnel may inquire of the PURCHASER whether the product has been
contaminated with or exposed to potentially corrosive, reactive, harmful, or radioactive materials, gases, or chemicals when the
PURCHASER requests a return authorization. Notwithstanding such inquiries, it is the responsibility of the PURCHASER to ensure that no
products are returned to MKS which have been contaminated in the aforementioned manner.
Other Rights and Remedies
I. These remedies are exclusive. HPS SHALL NOT BE LIABLE FOR CONSEQUENTIAL DAMAGES, FOR ANTICIPATED OR LOST PROFITS,
INCIDENTAL DAMAGES OR LOSS OF TIME, OR OTHER LOSSES INCURRED BY THE PURCHASER OR BY ANY THIRD PARTY IN
CONNECTION WITH THE PRODUCT COVERED BY THIS WARRANTY, OR OTHERWISE. Some states do not allow exclusion or limitation of
incidental or consequential damage or do not allow the limitation on how long an implied warranty lasts. If such laws apply, the limitations
or exclusions expressed herein may not apply to PURCHASER.
II. Unless otherwise explicitly agreed in writing, it is understood that these are the only written warranties given by HPS. Any statements
made by any persons, including representatives of MKS, which are inconsistent or in conflict with the terms of the warranty shall not be
binding on MKS unless reduced to writing and approved by an authorized officer of MKS.
III. This warranty gives PURCHASER specific legal rights, and PURCHASER may also have other rights which vary from state to state.
IV. For MKS products sold outside of the U.S., contact your MKS representative for warranty information and service.
Warranty Performance
To obtain warranty satisfaction, contact the following: MKS Instruments, Inc., Vacuum Products Group, 5330 Sterling Drive, Boulder, CO
80301, USA, at phone number (303) 449-9861. You may be required to present proof of original purchase.