A GUIDE TO IOS ANIMATION 2.0
A_Guide_to_iOS_Animation_2.0
User Manual:
Open the PDF directly: View PDF ![]() .
.
Page Count: 139 [warning: Documents this large are best viewed by clicking the View PDF Link!]

i
i
给 更好的你
ii
终于有时间更新第二版了
如果你还能看到这段话
那真是真爱了
我在屏幕这边给您鞠一躬
你们的支持是本书继续更新的润滑剂
自打编写之初我就坚持
这必须是一本精致的、视觉优先的电子书
每个人心灵深处都有一种创造欲
享受那种从自己手底打磨出一件美好事物的愉悦的感觉
这本书的创作过程就是这样
更好的第二版 送给更好的你
ii
iii
iii
创作历程
本书的第一版是我业余时间完成的。当时我还在锤子科技上
班。上班一族都有体会,尤其是作为软件工程师这一群体,白天
已经对着电脑写了一天代码,晚上回到家出于本能是拒绝碰代码
的。外加美食和美剧的诱惑,导致在创作第一版的 72 天里,我
有半个月的时间因偷懒而没有推进写书的进度。更疲劳的是,我
需要花费很长时间制作篇幅并不长的素材,几百个纯手工制作的
素材也是这本书最大耗时之处。但好在,我挺过来了。
第二版。第二版原本打算在 12 月份更新的。但还是拖了 2
个月。当时我已经去了另一家公司,然而巨大的工作压力让我呆
了 2 个月就毅然辞职了,这才给第二版的更新带来了时间上的
可能性。
在这本电子书中,我力图通过自己的尝试向所有软件工程师
亦或所有有意出书的朋友证明:如果你有想法,赶紧行动吧。坦
率地讲,一开始我认定写书这种事情离我太远,自己何德何能去
指导别人。但后来我意识到,其实我们所处的社会就是一个分享
的社会。没有人是天生就会写书的,作家亦是如此,更何况作为
一个非文字工作者的软件工程师。如今我已迈出这一步,相信你
也可以。你的能力永远超乎你想象(不是红牛软广)。
KittenYang
iv
目录
第一章:序言
感谢 · · · · · · · · · ii
创作历程 · · · · · · · · · iii
第二章:玩转贝塞尔曲线
KYAnimatedPageControl · · · · · · · · · 6
GooeySlideMenu · · · · · · · · · 13
QQ 未读气泡的拖拽交互 · · · · · · · · · 25
LiquidLoader · · · · · · · · · 28
第三章:Core Animation
模仿 Twitter 启动动画 · · · · · · · · · 35
圆圈遮罩转场动画 · · · · · · · · · 44
任意位置圆圈放大转场动画 · · · · · · · · · 50
Game Center 起泡晃动效果 · · · · · · · · · 50
图片弹跳切换动画 · · · · · · · · · 51
下载按钮动画 · · · · · · · · · 56
一个 loading 动画 · · · · · · · · · 65
第四章:动画中的数学
InteractiveCard · · · · · · · · · 71
锤子邮件下拉刷新动画 · · · · · · · · · 76
模仿 tvOS 卡片悬浮扭动效果 · · · · · · · · · 84
第五章:自定义属性动画
粘性菜单 · · · · · · · · · 91
第六章:其他效果
重力回弹的锁屏界面 · · · · · · · · · 107
UIKitDynamics · · · · · · · · · 114
下雪效果 · · · · · · · · · 122
点赞水花溅起效果 · · · · · · · · · 125
3则 CAReplicatorLayer loading 动画· · · · · · · · ·128
玩转贝塞尔曲线
2
5

⾸先⾮常感谢你能购买正版。你们的⽀持是我给我最⼤的动⼒。
提笔写下第⼀个字,我犹豫了很久,犹豫
该以什么⽅式,什么内容开头。毕竟在我看
来,这是⼀个具有颇具仪式感的时刻,这意味
着这件将贯穿我⼀⽣的事情总算起步了。写书
和写博客的感觉完全不⼀样。⼀本完整的书籍需要考虑更多整体上的连贯性,
语⾔的组织,内容的合理编排来引导读者很顺畅地进⼊你的世界,⽽不像博
客,可以⼀篇⼀篇硬切。好在,⼀切都已踉跄着起步了,虽谈不上万事俱备,
但好⽍已经出发。在这个出发的地⽅,我想留下⼀句话,⽅便时刻提醒我⾃
⼰:「不要因为⾛得太远,就忘了当初为什么出发」。
第⼀章,我们先来聊聊贝塞尔曲线。贝塞尔曲线的发明
⼈是法国雷诺汽车的⼯程师⽪埃尔·贝塞尔。当年他把
贝塞尔曲线应⽤在了雷诺汽车的设计上。贝塞尔曲线
的出现可以说对计算机图形学的发展产⽣了巨⼤的推
动作⽤。我们现在得以在电脑上使⽤ Flash , IIlstrator ,
6
CoralDRAW 和 Photoshop 上制作优美的图形,这其中都离不开贝塞尔曲线
的功劳。
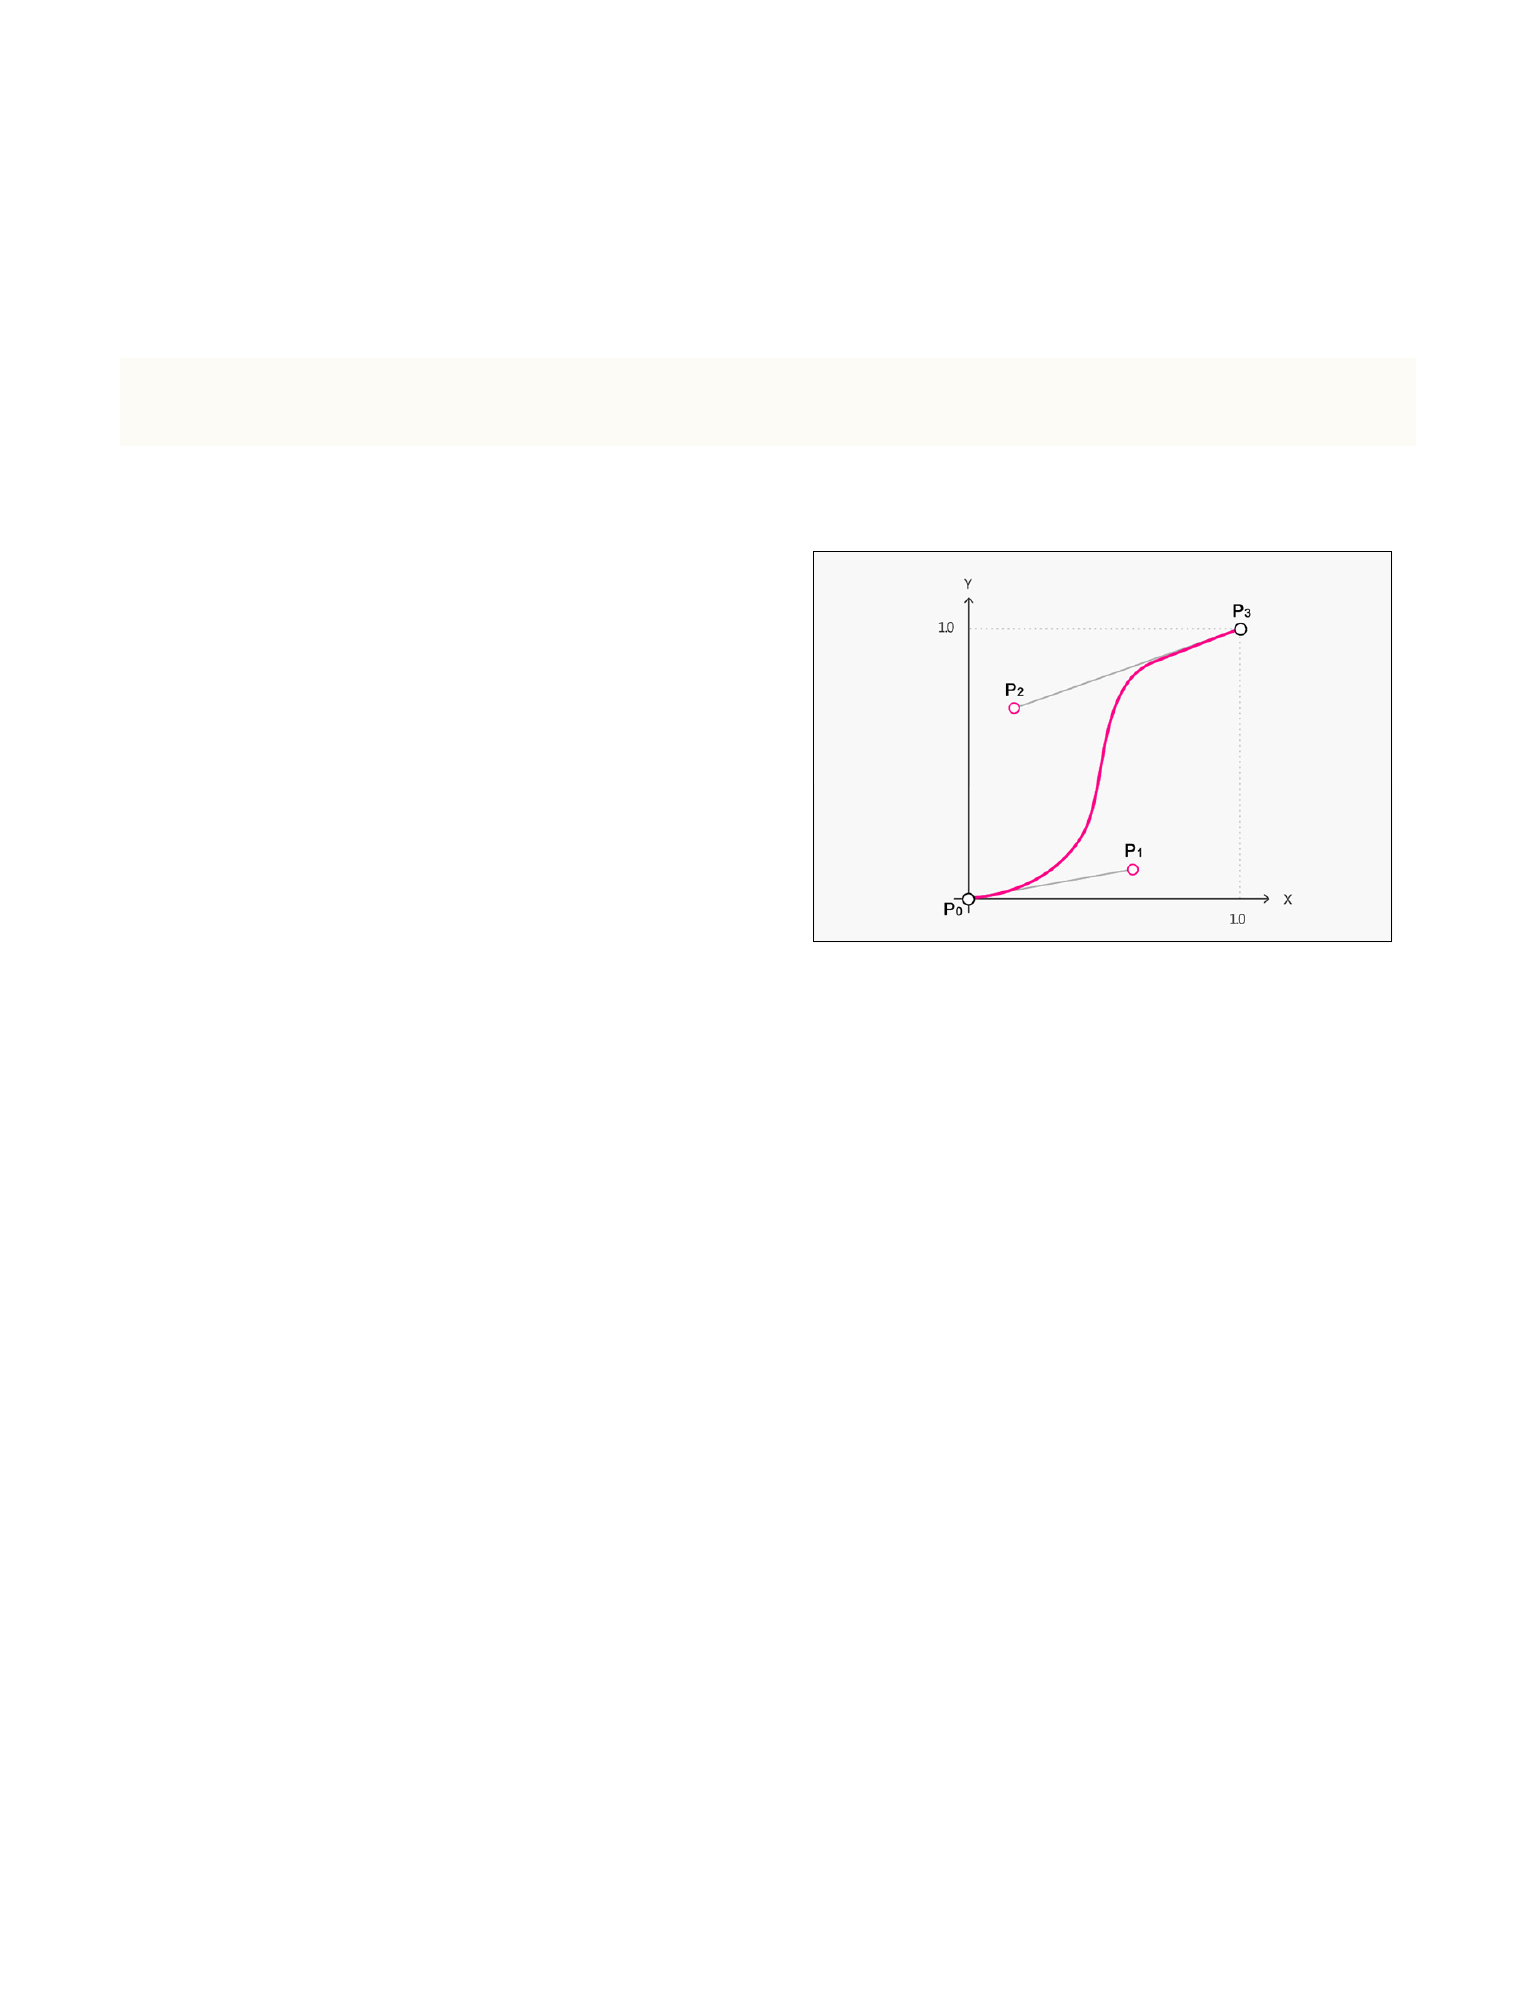
原理铺垫: 给定n+1个数据点,p0(x0 , y0) ... pn(xn , yn),
⽣成⼀条曲线,使得该曲线与这些点所连结的折线相近。
在数学中,这属于逼近问题。在⼏
何中,可以形象地理解为先⽤折线
段连接这些数据点,勾勒出图形的⼤致
轮廓,然后再⽤光滑的曲线去尽可能接
近地拟合这条折线。
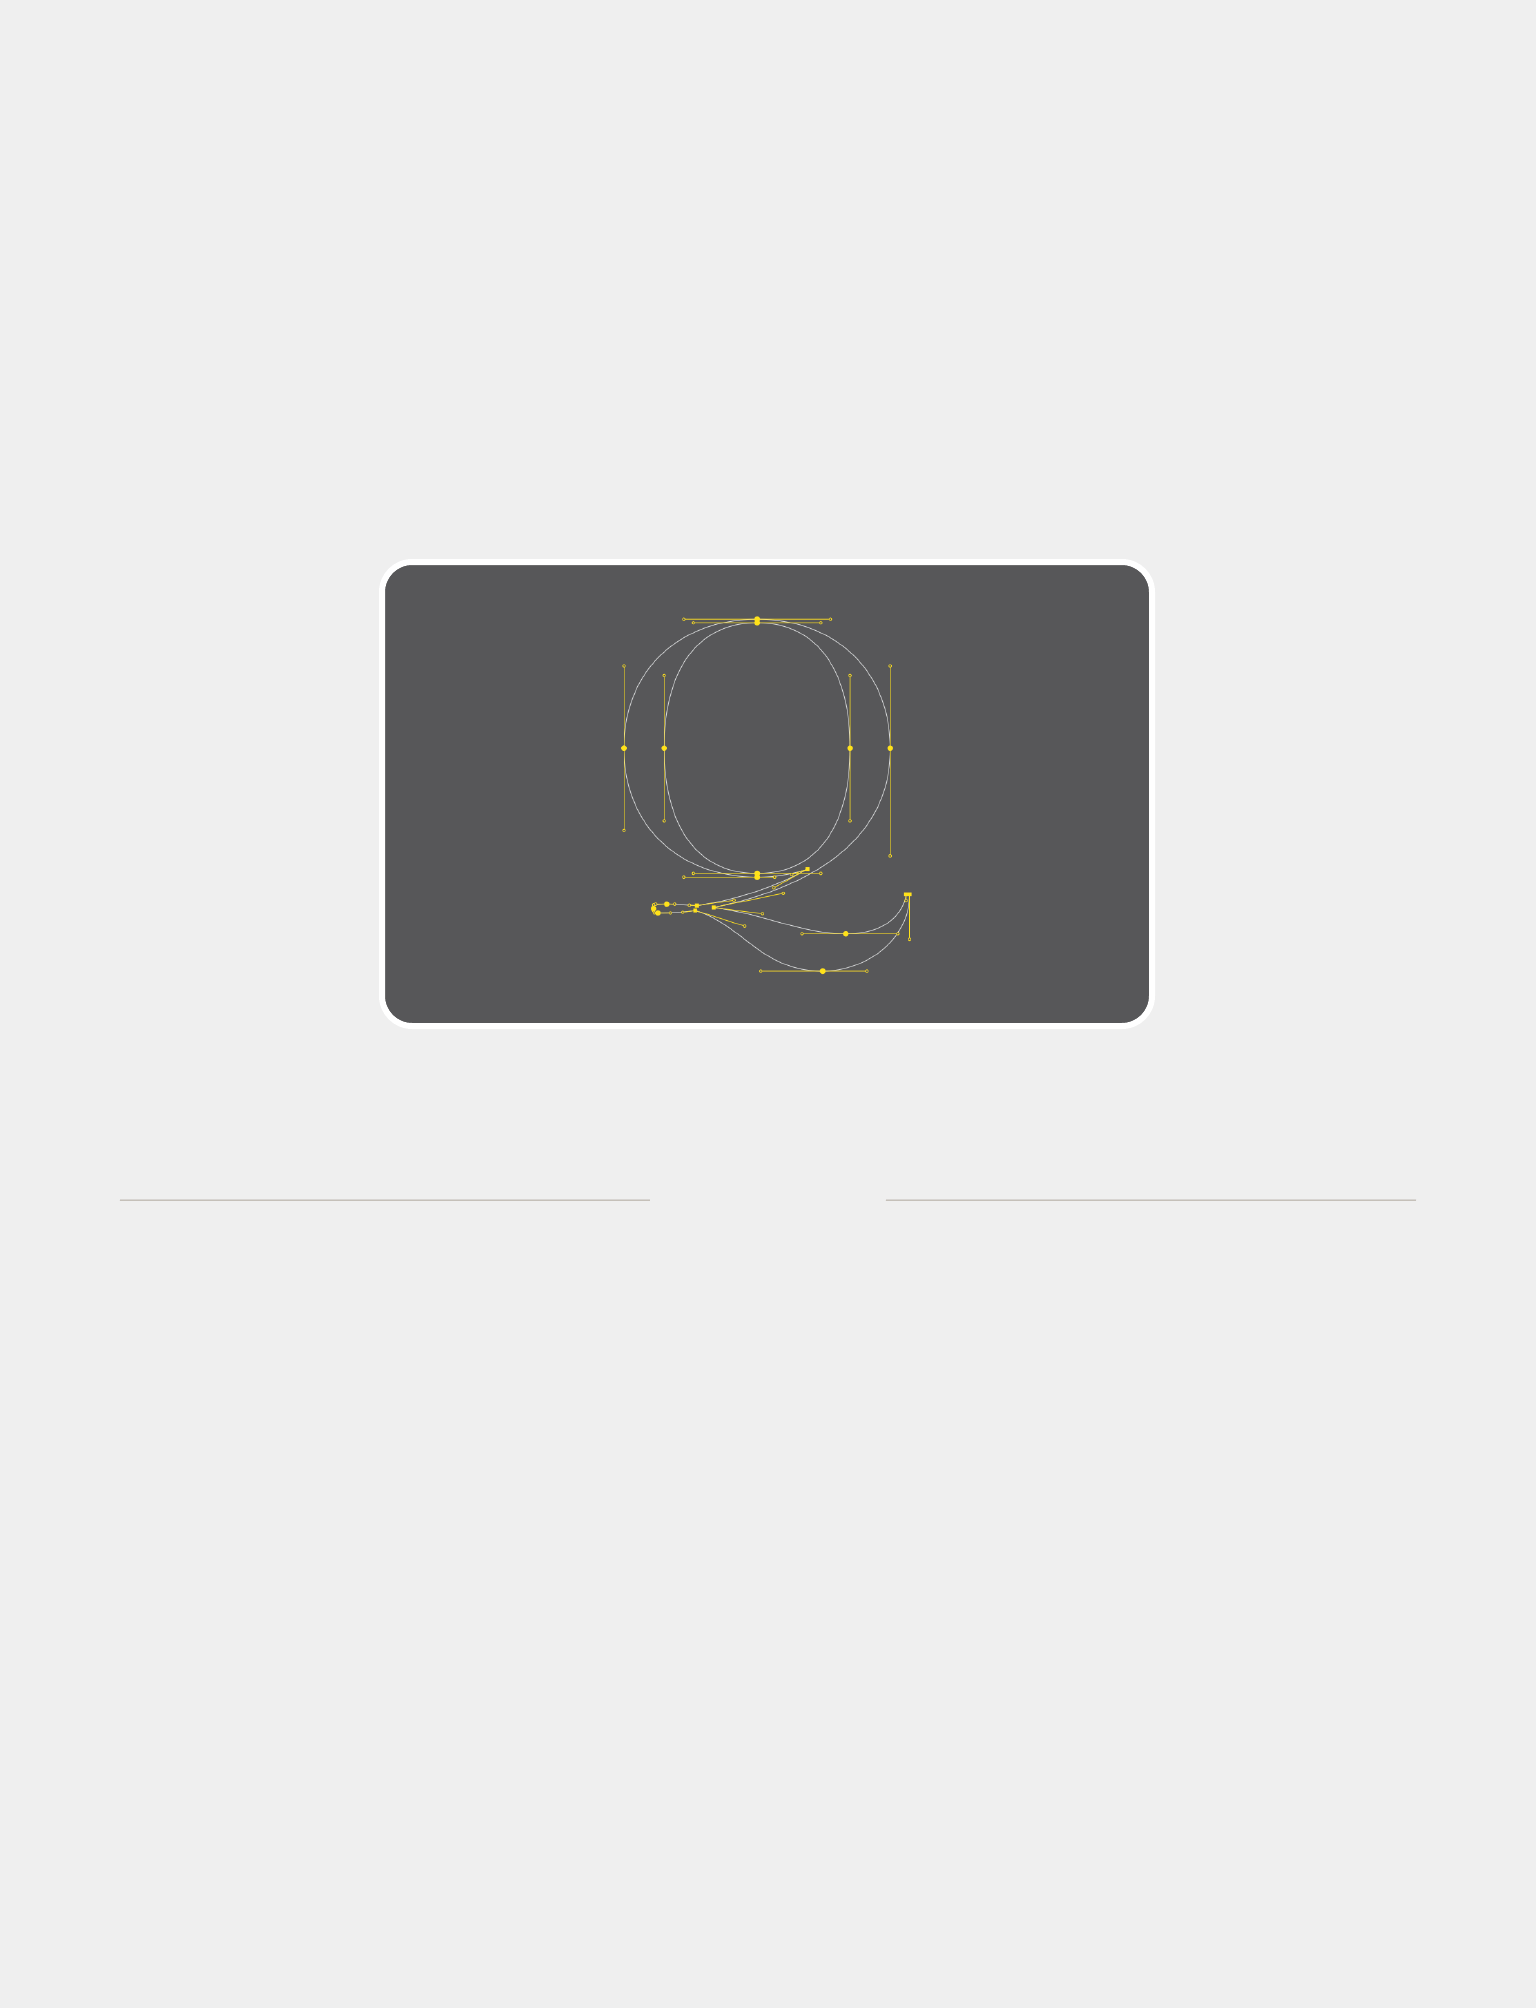
在本章的第⼀节中,我将以 KYAnimatedPageControl 为例,向你介绍
贝塞尔曲线在实际⽣产中的应⽤。你可以通过点击下⽅的
MOVIE 2.1,查看这个 demo
的最终效果。
初看这个效果,直观的感受就是⼩
球发⽣了形变。所以⼀个可⾏的做法
是:我们⽤四条贝塞尔曲线「拼」出这
7
代码来⾃ KYAnimatedPageControl
MOVIE 2.1 ⼩球拖拽形变效果
个⼩球的形状,注意是「拼」出,⽽不是⼀下⼦完整地画出来。有了这
四条单独的曲线,然后,我们只需要单独控制每条贝塞尔曲线的形状,
实时调⽤ layer 的 [self setNeedsDisplay] 以重 绘 -
(void)drawInContext:(CGContextRef)ctx ⽅法,就可以间接地实现控
制⼩球形状的⽬的了。
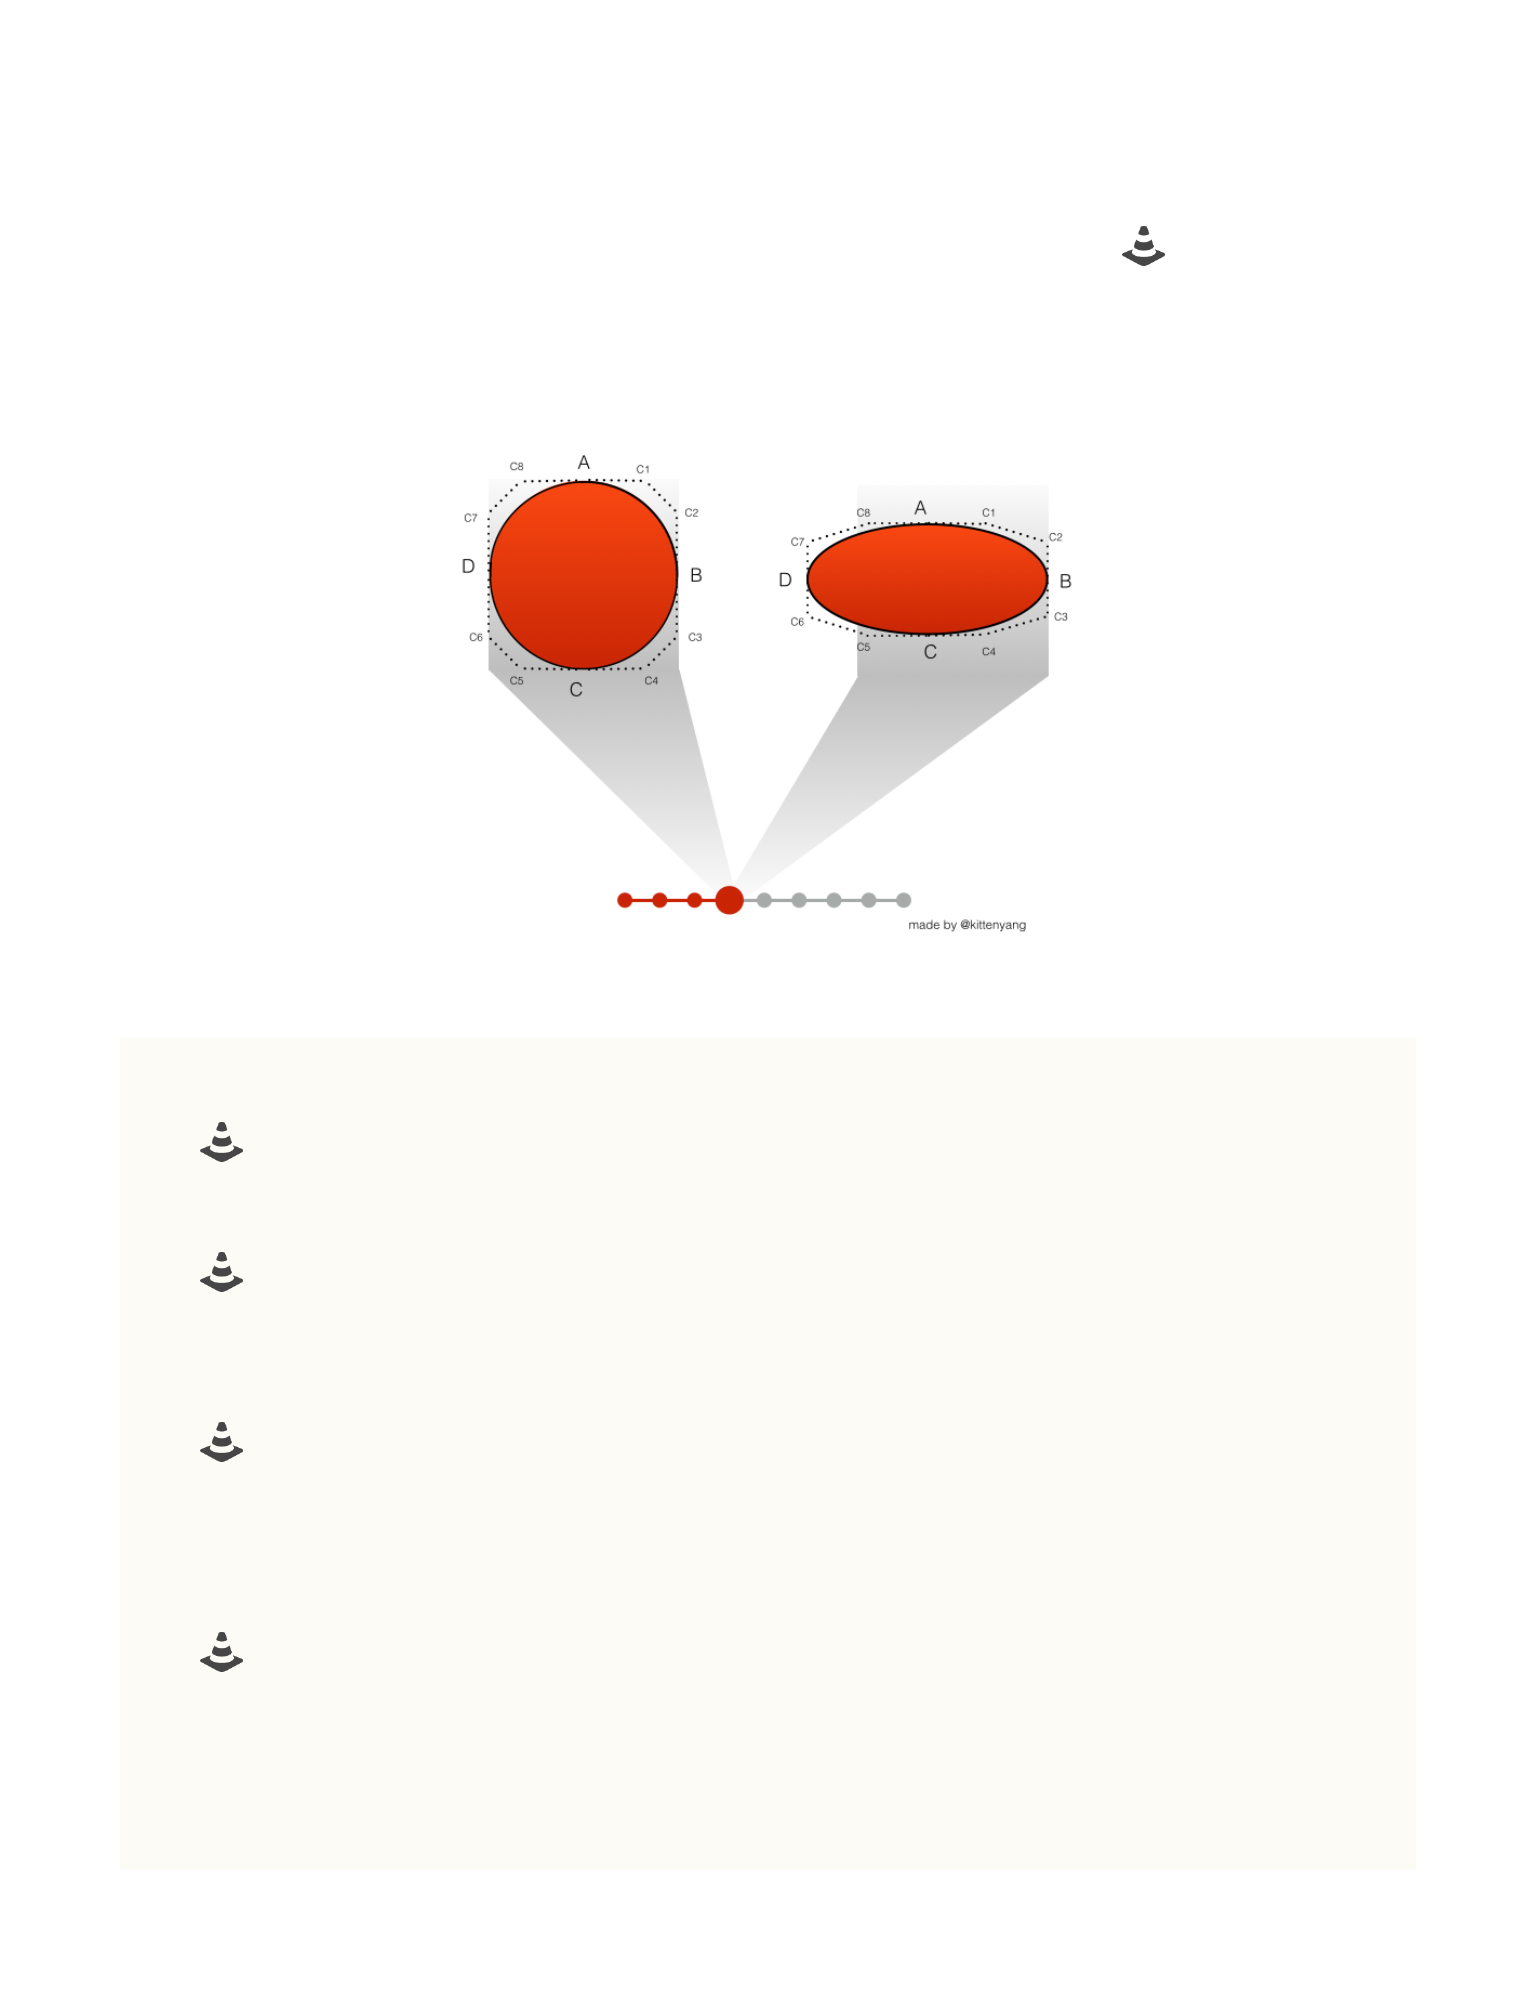
如左侧 KEYNOTE 2.1 所⽰,⼩球由 弧
AB,弧BC,弧CD,弧DA 组成。
其中 弧AB 是⼀条由 A,B 加两个控制
点 C1,C2 ⼀共四个点绘制的三次贝塞
尔曲线。其他弧线段同理。
为了⽅便传达理念,我以 Keynote 的
形式展⽰了这⼀思路。你可以逐帧点
击下⽅的 KEYNOTE 2.2 进⾏预览。双
指 Pinch 可以放⼤观看。
那么问题来了,这些点应该以⼀个
什么样的规律运动呢?
为了⽅便计算各个点的坐标,我们
可以先引⼊⼀个外接矩形,也就是你在
8
⼩球由四段 1/4 圆弧「拼」成,连接完成之后向内填
充颜⾊。
KEYNOTE 2.1 如何「拼」出⼩球
通过各个点的不同规律的运动,产⽣变化的形状
Keynote 2.1 ⼩球各点运动轨迹

右侧 Keynote 中看到的那个被虚线框起来的⿊⾊矩形。
⾸先计算出这个外接矩形的位置。origin 根据中⼼点的 x(y) 减去宽
度(⾼度)的 1/2 获得。
//outsideRectSize 外接矩形边⻓
CGFloat origin_x = self.position.x - outsideRectSize/2 + (pro-
gress - 0.5)*(self.frame.size.width - outsideRectSize);
CGFloat origin_y = self.position.y - outsideRectSize/2;
self.outsideRect = CGRectMake(origin_x, origin_y, outsideRect-
Size, outsideRectSize);
其次我们还需要判断当前是向左滑还是向右滑,左滑的时候 B 动 D
不动;右滑的时候 D 动 B 不动。
//只要外接矩形在左侧,则改变B点;在右边,改变D点
if (progress <= 0.5) {
self.movePoint = POINT_B;
NSLog(@"B点动");
}else{
self.movePoint = POINT_D;
NSLog(@"D点动");
}
9
现在有了矩形的位置,接下来我们计算关键点的坐标就可以完全基于
这个矩形做为参考了。为了便于对照代码,我⽤ Keynote 画出了⽰意
图,⽅便你进⾏对照。
-(void)drawInContext:(CGContextRef)ctx{
CGFloat offset = self.outsideRect.size.width / 3.6;
CGFloat movedDistance = (self.outsideRect.size.width * 1 /
6) * fabs(self.progress-0.5)*2;
CGPoint rectCenter = CGPointMake(self.outsideRect.origin.x
+ self.outsideRect.size.width/2 , self.outsideRect.origin.y +
self.outsideRect.size.height/2);
CGPoint pointA = CGPointMake(rectCenter.x
,self.outsideRect.origin.y + movedDistance);
10

CGPoint pointB = CGPointMake(self.movePoint == POINT_D ?
rectCenter.x + self.outsideRect.size.width/2 : rectCenter.x +
self.outsideRect.size.width/2 + movedDistance*2 ,rectCenter.y);
CGPoint pointC = CGPointMake(rectCenter.x ,rectCenter.y +
self.outsideRect.size.height/2 - movedDistance);
CGPoint pointD = CGPointMake(self.movePoint == POINT_D ?
self.outsideRect.origin.x - movedDistance*2 :
self.outsideRect.origin.x, rectCenter.y);
CGPoint c1 = CGPointMake(pointA.x + offset, pointA.y);
CGPoint c2 = CGPointMake(pointB.x, self.movePoint ==
POINT_D ? pointB.y - offset : pointB.y - offset + movedDis-
tance);
CGPoint c3 = CGPointMake(pointB.x, self.movePoint ==
POINT_D ? pointB.y + offset : pointB.y + offset - movedDis-
tance);
CGPoint c4 = CGPointMake(pointC.x + offset, pointC.y);
CGPoint c5 = CGPointMake(pointC.x - offset, pointC.y);
CGPoint c6 = CGPointMake(pointD.x, self.movePoint ==
POINT_D ? pointD.y + offset - movedDistance : pointD.y + off-
set);
CGPoint c7 = CGPointMake(pointD.x, self.movePoint ==
POINT_D ? pointD.y - offset + movedDistance : pointD.y - off-
set);
CGPoint c8 = CGPointMake(pointA.x - offset, pointA.y);
//圆的边界
UIBezierPath* ovalPath = [UIBezierPath bezierPath];
[ovalPath moveToPoint: pointA];
[ovalPath addCurveToPoint:pointB controlPoint1:c1
controlPoint2:c2];
[ovalPath addCurveToPoint:pointC controlPoint1:c3
controlPoint2:c4];
[ovalPath addCurveToPoint:pointD controlPoint1:c5
controlPoint2:c6];
[ovalPath addCurveToPoint:pointA controlPoint1:c7
controlPoint2:c8];
[ovalPath closePath];
11

//外接虚线矩形
UIBezierPath *rectPath = [UIBezierPath
bezierPathWithRect:self.outsideRect];
CGContextAddPath(ctx, rectPath.CGPath);
CGContextSetStrokeColorWithColor(ctx, [UIColor
blackColor].CGColor);
CGContextSetLineWidth(ctx, 1.0);
CGFloat dash[] = {5.0, 5.0};
CGContextSetLineDash(ctx, 0.0, dash, 2); //1
CGContextStrokePath(ctx); //给线条填充颜⾊
CGContextAddPath(ctx, ovalPath.CGPath);
CGContextSetStrokeColorWithColor(ctx, [UIColor
blackColor].CGColor);
CGContextSetFillColorWithColor(ctx, [UIColor
redColor].CGColor);
CGContextSetLineDash(ctx, 0, NULL, 0); //2
CGContextDrawPath(ctx, kCGPathFillStroke); //同时给线条和线条
包围的内部区域填充颜⾊
//----- 下所有代码全是为了辅助观察 -----
//标记出每个点并连线,⽅便观察,给所有关键点染⾊ -- ⽩⾊,辅助线颜⾊
-- ⽩⾊
CGContextSetFillColorWithColor(ctx, [UIColor
yellowColor].CGColor);
CGContextSetStrokeColorWithColor(ctx, [UIColor
blackColor].CGColor);
NSArray *points = @[[NSValue
valueWithCGPoint:pointA],[NSValue
valueWithCGPoint:pointB],[NSValue
valueWithCGPoint:pointC],[NSValue
valueWithCGPoint:pointD],[NSValue valueWithCGPoint:c1],[NSValue
valueWithCGPoint:c2],[NSValue valueWithCGPoint:c3],[NSValue
valueWithCGPoint:c4],[NSValue valueWithCGPoint:c5],[NSValue
valueWithCGPoint:c6],[NSValue valueWithCGPoint:c7],[NSValue
valueWithCGPoint:c8]];
12

[self drawPoint:points withContext:ctx];
//连接辅助线
UIBezierPath *helperline = [UIBezierPath bezierPath];
[helperline moveToPoint:pointA];
[helperline addLineToPoint:c1];
[helperline addLineToPoint:c2];
[helperline addLineToPoint:pointB];
[helperline addLineToPoint:c3];
[helperline addLineToPoint:c4];
[helperline addLineToPoint:pointC];
[helperline addLineToPoint:c5];
[helperline addLineToPoint:c6];
[helperline addLineToPoint:pointD];
[helperline addLineToPoint:c7];
[helperline addLineToPoint:c8];
[helperline closePath];
CGContextAddPath(ctx, helperline.CGPath);
CGFloat dash2[] = {2.0, 2.0};
CGContextSetLineDash(ctx, 0.0, dash2, 2);
CGContextStrokePath(ctx); //给辅助线条填充颜⾊
}
//在 point 位置画⼀个点,⽅便观察运动情况
-(void)drawPoint:(NSArray *)points
withContext:(CGContextRef)ctx{
for (NSValue *pointValue in points) {
CGPoint point = [pointValue CGPointValue];
CGContextFillRect(ctx, CGRectMake(point.x - 2,point.y -
2,4,4));
}
}
代码中的 (CGContextRef)ctx 字⾯意思是指上下⽂,你可以理解为
⼀块全局的画布。也就是说,⼀旦在某个地⽅改了画布的⼀些属性,之
13
后任何地⽅使⽤该画布属性都是改了之后的。⽐如上⾯在 //1 中把线条
样式改成了虚线,那么在下⽂ //2 中如果不恢复成连续的直线,那么画
出来的依然是虚线样式。
第⼀个 demo 到这⾥就告⼀个段落了。你可以去我的 Github 主页找
到 A-GUIDE-TO-iOS-ANIMATION 这个 repo,⾥⾯有本册电⼦书所有 demo
的源码可供学习,并且提供了 Swift 版本。本节的源码参见
AnimatedCircleDemo。当然我还是强烈建议你亲⾃动⼿写⼀遍。以我局限
的⾃学经历来说,很多东西看的时候以为都会了,但只有真的上⼿才会
暴露好多知识漏洞。如果你现在想接着看下⼀个 demo 的话,你可以继
续。但我还是建议你别急。
这⼀回我们来拆解 GooeySlideMenu 。效果如 MOVIE 2.2
。授⼈与鱼不如授⼈与渔。在介绍这个动画之前,我觉得
我有必要向你分享⼀下我做动画的⼀般性原则。因为如果
你不知道这个通⽤的⽅法论,很可能你学会了我教的这
个,但下次你看到其它动画的时侯就不会分析了,那这就是我对你的不
负责。所以,我必须告诉你我做动画时的⼼得。其中⼀条就是:「善于
14

拆解」。即把⼀个复杂的动画分解为
⼏个分动画,然后再把这些分动画逐
⼀解决。
这是我在看过⼤量动画并亲⼿实践
之后发现的⼀条规律。然⽽有⼀天,
我突然意识到,这条规律不仅仅适⽤
于做动画,这其实是⼀条普世价值观。任何宏观上复杂的事情,都可以
通过⽡解的⽅式细分成⼀个个⼩的 Task ,然后各个击破。咦,这不就
是当年⽼⽑打江⼭的战术吗?
题外话,其实我练习指弹吉他的过程也深刻悟到了这⼀点。指弹吉他
的难度是⽐普通弹唱⼤很多的,因为仅仅凭借两只⼿要同时担任不同乐
器的⼯作。往往乍⼀看⼀⾸指弹吉他谱⼦就直接想放弃了。但通过分解
的⽅式就可以很好地解决这个问题。分解乐谱之后,我不再需要考虑整
篇还有多长才结束,只要就把属于今天的 Task 完成就⾏了,⽽每天的
Task 又不是很难,所以每天都会很有成就感,⾃然就能顺⽔推⾈地进
⾏下去,直到完成既定⽬标。这又让我联想到了番茄⼯作法,把⼀个任
务分成不同的⼩番茄,每个番茄各个击破,直到完成整个任务。这么看
15
MOVIE 2.2 分镜头2 —— 实现蓝⾊视图边界的反
弹动画

来,很多 solution 本质上的理念都是相同的嘛,莫⾮这就是传说中的真
理?
抱歉,我跑题了。下⾯回到主题。
我们先把问题拆解成⼀个淡蓝⾊的
View 从屏幕左侧移⼊,这⼀步成功了,
我们再去考虑实现边界的弯曲。为了保
障不被其他视图遮挡,我决定把它加在
UIWindow 上。就像 MOVIE 2.3 这样:
self.frame =
CGRectMake(-keyWindow.frame.size.width/2-EXTRAAREA, 0,
keyWindow.frame.size.width/2+EXTRAAREA,
keyWindow.frame.size.height);
self.backgroundColor = [UIColor clearColor];
[keyWindow insertSubview:self belowSubview:helperSideView];
你可能会疑问这⾥的 EXTRAAREA 是什么?你可以看⼀下 IMAGE 2.1。
注意到,淡蓝⾊的 SlideMenu 其实并没有全部被蓝⾊填充满,右侧还留
出了 30px(即代码中的 EXTRAAREA ) 的透明区域。理由很简单,因为如果
不这么做,发⽣弹性时向右突出的边界就看不到了。⾄于动画就⾮常简
单了,由于 origin 的末状态为 (0,0),所以可以直接⽤ bounds 。
16
MOVIE 2.3 GooeySlideMenu
[UIView animateWithDuration:0.3 animations:^{
self.frame = self.bounds;
}];
拆解的第⼀步我们已经完成。下⾯我
们继续完成拆解的第⼆步 —— 实现边界的
反弹。效果参见 MOVIE 2.4。
这⾥就涉及到了两个技术点 —— CA-
DisplayLink 以及贝塞尔曲线。贝塞尔曲线
已经在前⾯有所介绍,这⾥介绍⼀下 CA-
DisplayLink。
简单地理解, CADisplayLink 就是
⼀个定时器,每隔 1/60 秒(16.66667ms)
刷新⼀次屏幕。使⽤的时候,我们要把
它添加到⼀个 runloop 中,并给它绑定
⼀个 target 和 selector ,才能在屏幕
以 1/60 秒刷新的时候实时调⽤绑定的
⽅法。
17
MOVIE 2.4 分镜头1 —— 蓝⾊视图从左侧移⼊
IMAGE 2.1 解释为什么需要留出间隙
例如:
self.displayLink = [CADisplayLink displayLinkWithTarget:self
selector:@selector(displayLinkAction:)];
[self.displayLink addToRunLoop:[NSRunLoop mainRunLoop]
forMode:NSDefaultRunLoopMode];
另外,CADisplayLink 中还有⼀些其它属性。
@property(readonly, nonatomic) CFTimeInterval duration;
每帧之间的时间
@property(nonatomic) NSInteger frameInterval;
间隔多少帧调⽤⼀次 selector ⽅法,默认值是 1 ,即每帧都调⽤⼀次。
如果每帧都调⽤⼀次的话,对于 iOS 设备来说那刷新频率就是 60HZ 也就
是每秒 60 次,如果将 frameInterval 设为 2 那么就会两帧调⽤⼀次,也
就是变成了每秒刷新 30 次。
@property(getter=isPaused, nonatomic) BOOL paused;
是否暂停当前的定时器,控制 CADisplayLink 的运⾏。
当我们想结束⼀个 CADisplayLink 的时候,应该调⽤:
-(void)invalidate;
从⽽从 runloop 中彻底删除之前绑定的 target 跟 selector。
由于 CADisplayLink 绑定的⽅法会在每次屏幕刷新时被调⽤,精确度
相当之⾼。正是基于这个特点,CADisplayLink ⾮常适合 UI 的重绘。
18
下⾯又到了算坐标点画贝塞尔曲线的时间
了。我们的⽬标是在 CADisplayLink 绑定的⽅法
-(void)displayLinkAction:(CADisplayLink
*)dis 中实现重绘。这次的计算难度⽐之前 粘
性⼩球 的要⼩很多,因为这⾥我们只需要⼀条
贝塞尔曲线,⽽且只需要⼀个控制点。
⼀图胜千⾔。左图中红⾊的点表⽰控制
点,⿊⾊的两个点表⽰唯⼀⼀条贝塞尔曲线的两个端点,其余线段均⽤
直线连接。
接下来的问题就是,如何控制
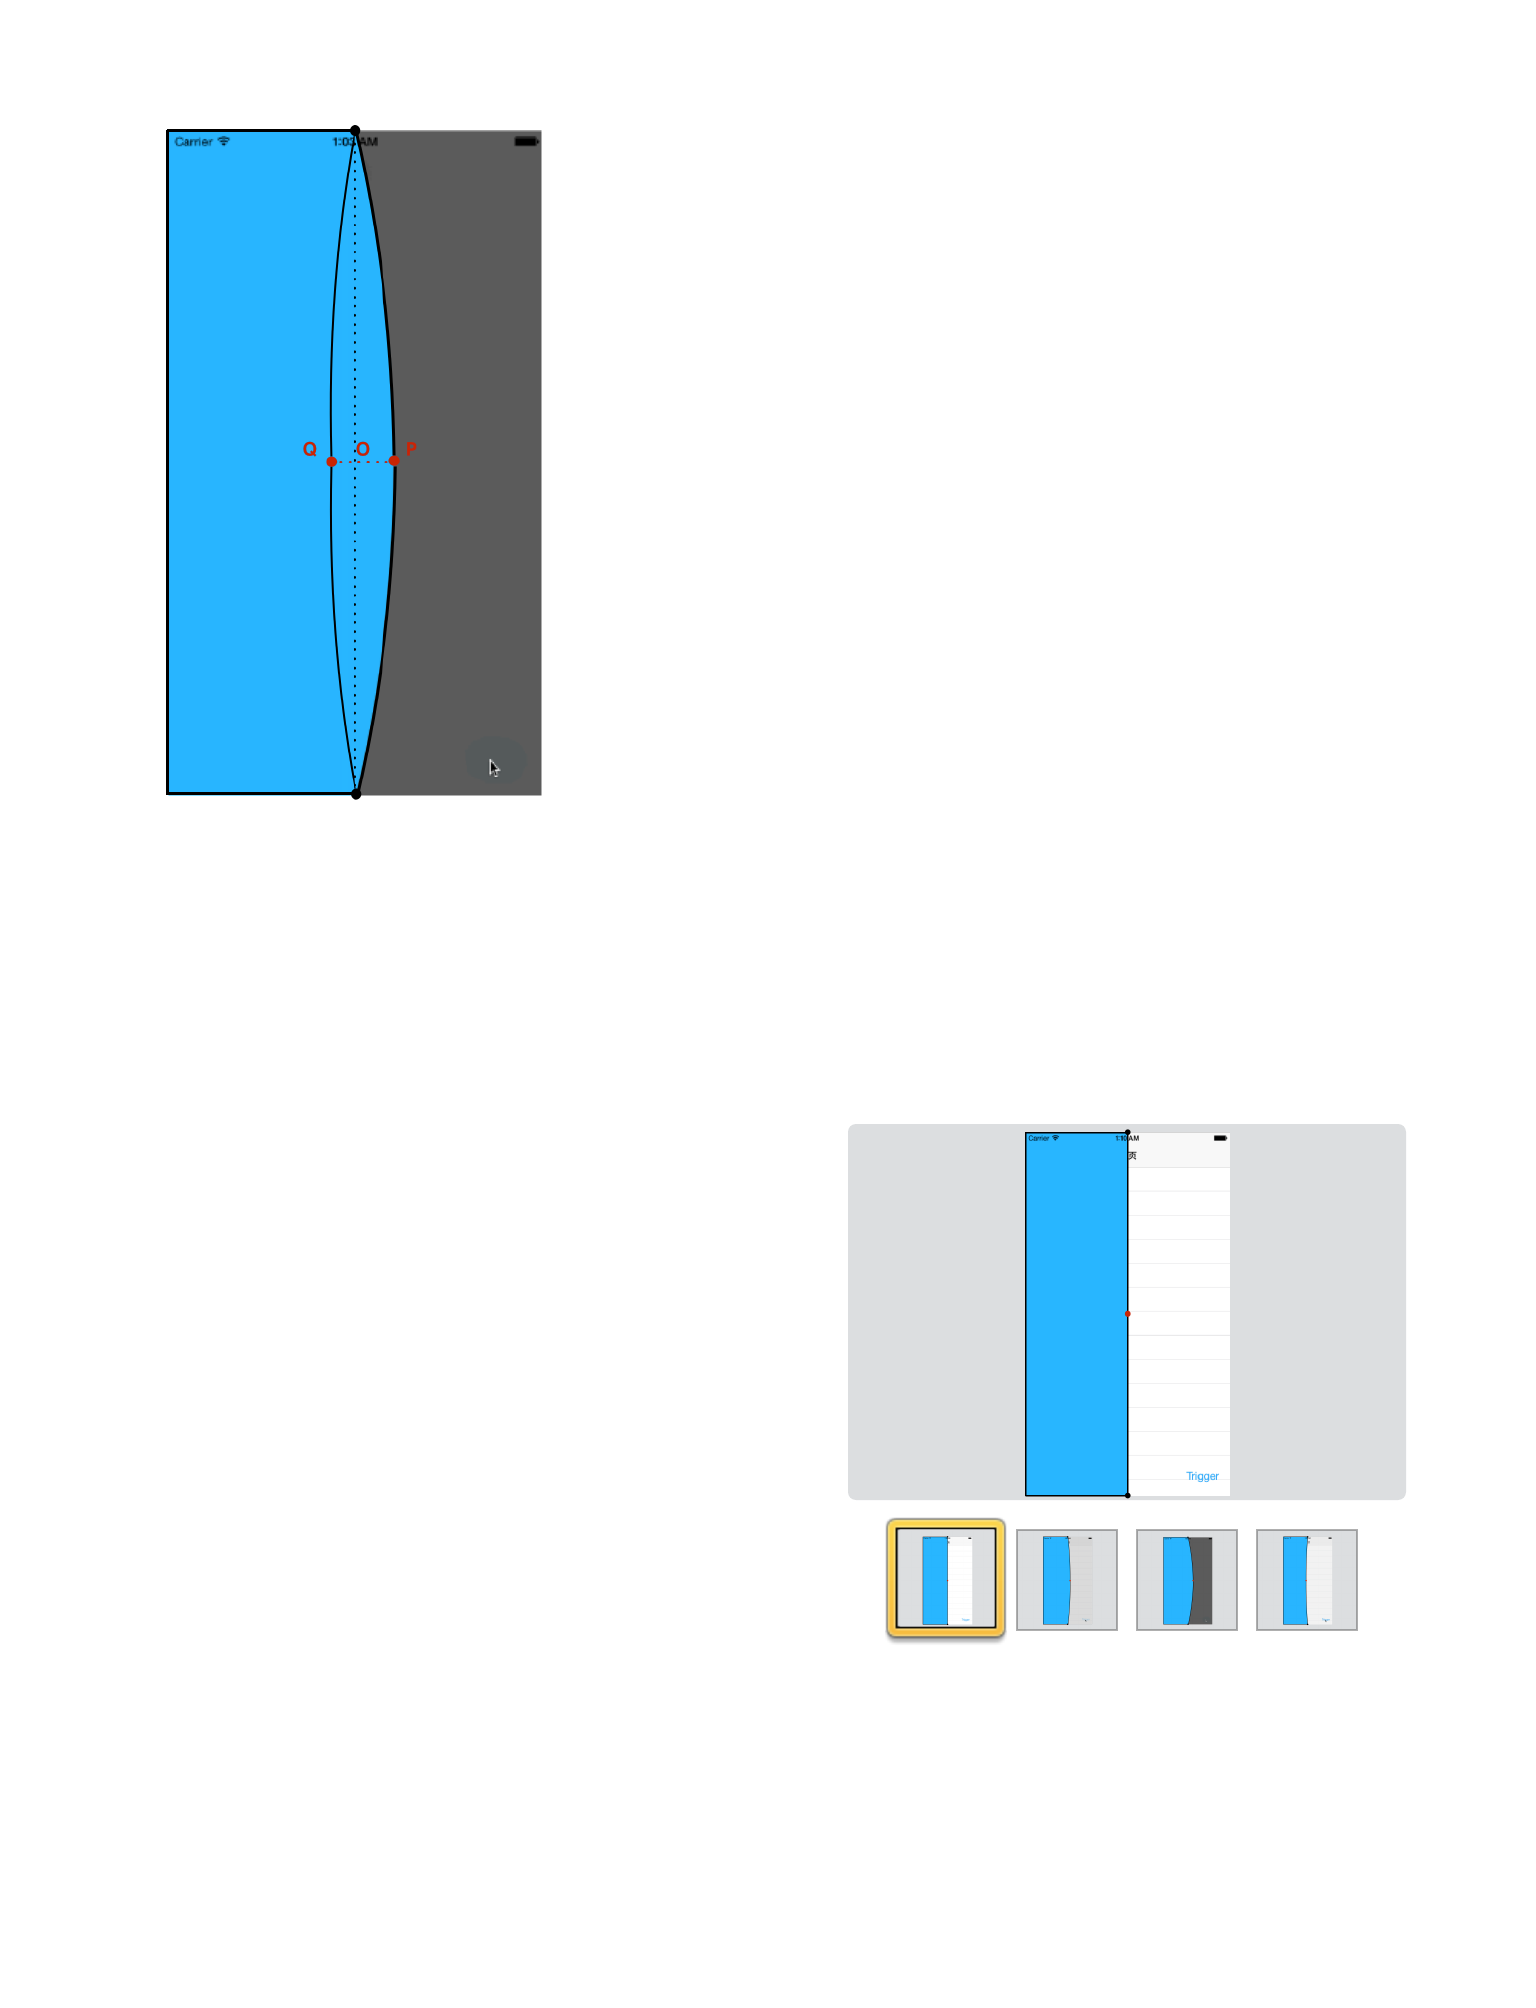
红点的运动? GALLERY 2.1 很好地说明
了红点⾊运动轨迹。如下:当 Menu 弹
出时,那么红点从先 O 点运动到 P
点,再从 P 点运动到 Q 点,最后从 Q
点运动到 O 点;反之,当 Menu 隐藏
时,O -> Q -> P -> O.
那么问题就化归到了数学问题:
GALLERY 2.1 控制点的运动轨迹演⽰
19
“ 如何产⽣⼀组变化的数值,O 增加到某个正数,再从这个正数(也就是最⼤值
P 点)递减到⼀个负数,最后从这个负数(也就是最⼩值 Q 点)递增到 O ?”
这⾥介绍两个思路:
✤ Layer ⾃定义 Property 的动画。
✤ 辅助视图。
因为我们的⽬标很明确,就是需要产⽣⼀组变化的数值,这个数值满
⾜上⾯所述的先递增再递减的规律,⾄于这个实现的过程就可以是上⾯
提到的两种⽅案。考虑到⽅案⼀我会在之后单独拿出⼀章来介绍,所以
这⾥我先介绍辅助视图这个技巧。说
起这个思路,还得多亏我看到了这篇
博客:Recreating Skype's Action Sheet Anima-
tion。
效果请看 MOVIE 2.5 。
没错,我们创建了两个辅助视图,设
置起点和终点都⼀样,利⽤弹性动画
天⽣的回弹特性,我们只要赋予两个
MOVIE 2.5 利⽤两个辅助视图
创建弹性动画
20

辅助视图以不同的动画参数,并且实时计算出两个辅助视图的横坐标 X
之差,就可以间接地得到⼀组从 0 增⾄⼀个正数后,递减⾄⼀个负数,
最后再回到 0的数据。
你也可以点击右侧的 KEYNOTE
2.3 明⽩我的意思,即:
『创建两个辅助视图,设置起点
和终点都⼀样,利⽤弹性动画⾃⾝的
震荡特点,赋予两个辅助视图以不同
的动画参数,实时计算两个辅助视图
的横坐标 X 之差,就可以间接地得
到⼀组从 0 增加到⼀个正数后,递减到⼀个负数,最后再回到 0 的数
据。』
好了,是时候写代码了。
//
-(void)trigger{
if (!triggered) {
[keyWindow insertSubview:blurView belowSubview:self];
[UIView animateWithDuration:0.3 animations:^{
self.frame = self.bounds;
KEYNOTE 2.3 慢动作解释两个辅助视图的
作⽤
21
}];
[self beforeAnimation];
[UIView animateWithDuration:0.7 delay:0.0f
usingSpringWithDamping:0.5f initialSpringVelocity:0.9f
options:UIViewAnimationOptionBeginFromCurrentState | UIViewAni-
mationOptionAllowUserInteraction animations:^{
helperSideView.center =
CGPointMake(keyWindow.center.x,
helperSideView.frame.size.height/2);
} completion:^(BOOL finished) {
[self finishAnimation];
}];
[UIView animateWithDuration:0.3 animations:^{
blurView.alpha = 1.0f;
}];
[self beforeAnimation];
[UIView animateWithDuration:0.7 delay:0.0f
usingSpringWithDamping:0.8f initialSpringVelocity:2.0f
options:UIViewAnimationOptionBeginFromCurrentState | UIViewAni-
mationOptionAllowUserInteraction animations:^{
helperCenterView.center = keyWindow.center;
} completion:^(BOOL finished) {
if (finished) {
UITapGestureRecognizer *tapGes = [[UITapGesture-
Recognizer alloc]initWithTarget:self
action:@selector(tapToUntrigger:)];
[blurView addGestureRecognizer:tapGes];
[self finishAnimation];
}
}];
[self animateButtons];
22
triggered = YES;
}else{
[self tapToUntrigger:nil];
}
}
[self beforeAnimation] 和 [self finishAnimation] ⽤于控制 CA-
DisplayLink 什么时候应该移除。⽤到了动画的累加计数:每开始⼀个动
画时计数器加 1,每停⽌⼀个动画时计数器减 1,当两个动画都完成时,
计数器为 0,此时移除 CADisplayLink。
//
-(void)beforeAnimation{
if (self.displayLink == nil) {
self.displayLink = [CADisplayLink
displayLinkWithTarget:self
selector:@selector(displayLinkAction:)];
[self.displayLink addToRunLoop:[NSRunLoop mainRunLoop]
forMode:NSDefaultRunLoopMode];
}
self.animationCount ++;
}
//
-(void)finishAnimation{
self.animationCount --;
if (self.animationCount == 0) {
[self.displayLink invalidate];
self.displayLink = nil;
23
}
}
以上⼏处代码只是实现了辅助视图的运动以及 Menu 侧滑的运动,接
下来的代码才是重头戏,因为我们要尝试让边界发⽣回弹。
//CADisplayLink
-(void)displayLinkAction:(CADisplayLink *)dis{
CALayer *sideHelperPresentationLayer = (CALayer
*)[helperSideView.layer presentationLayer];
CALayer *centerHelperPresentationLayer = (CALayer
*)[helperCenterView.layer presentationLayer];
CGRect centerRect = [[centerHelperPresentationLayer
valueForKeyPath:@"frame"]CGRectValue];
CGRect sideRect = [[sideHelperPresentationLayer
valueForKeyPath:@"frame"]CGRectValue];
diff = sideRect.origin.x - centerRect.origin.x;
[self setNeedsDisplay];
}
// [self setNeedsDisplay]
- (void)drawRect:(CGRect)rect {
UIBezierPath *path = [UIBezierPath bezierPath];
[path moveToPoint:CGPointMake(0, 0)];
[path
addLineToPoint:CGPointMake(self.frame.size.width-EXTRAAREA,
0)];
[path
addQuadCurveToPoint:CGPointMake(self.frame.size.width-EXTRAAREA
, self.frame.size.height)
24
controlPoint:CGPointMake(keyWindow.frame.size.width/2+diff,
keyWindow.frame.size.height/2)];
[path addLineToPoint:CGPointMake(0,
self.frame.size.height)];
[path closePath];
CGContextRef context = UIGraphicsGetCurrentContext();
CGContextAddPath(context, path.CGPath);
[_menuColor set];
CGContextFillPath(context);
}
我在 后⾯ 提到了 Presentation Layer 的作⽤ —— 即可以实时获取 Layer
属性的当前值。⽽我们的这个 demo 中要获取的正是这两个辅助视图实时
的 X 坐标,从⽽才能计算出 diff。有了这个 diff,我们再调⽤ [self set-
NeedsDisplay]; ( 这个⽅法会触发 UIView 的 drawRect 或 CALayer 的 draw-
RectInContext ),同时在 -(void)drawRect:(CGRect)rect 中绘制边界。曲
线⽤贝塞尔曲线,其余都是直线,⽤ addLineToPoint: 就可以解决。唯⼀需
要注意的是控制点的 X 坐标需要加上 diff:
CGPointMake(keyWindow.frame.size.width/2+diff,
keyWindow.frame.size.height/2)
⾄此, 这个 demo 到这⾥也结束了,剩下的就需要靠你动⼿实践
了。亲⾝体验和看⼀遍的效果是完全不同的。源码我已经上传到了
25
Github,你可以去 GooeySlideMenuDemo 看看。当然,再次提醒,Swift 也
⼀并提供了。
这⼀节我们学习了使⽤ CADisplayLink 以及复习了 Presentation Layer
的功能,还复习了绘制贝塞尔曲线知识。
第三⼩节,我们来尝试复刻⼀下⼿机 QQ ⾥那个起泡拖拽
的交互。见 MOVIE 2.6 。
思路如下:
★
★
UIPanGestureStateChanged
这个交互中,最核⼼的要数计算关键点的通⽤坐标了。⼀图胜千⾔。
下⾯我绘制了⼀幅分析图,⽅便你计算坐标位置,其中 OA ⊥ AB, PB
26
MOVIE 2.6 ⼿机 QQ 起泡拖拽交互

⊥ AB, 且 OA=PB=d/2。 这样⼀来,问题就转化成了⼀个⾼中数学求
点坐标的题⽬了。
我已经在图中计算出六个关键点 A,B,C,D,E,F,G 的坐标位置了。
接下来就是要把数学表达式转化成代码了。⾸先我们创建⼀些需要的变
量:
CGFloat r1;
CGFloat r2;
CGFloat x1;
CGFloat y1;
CGFloat x2;
CGFloat y2;
CGFloat centerDistance;
CGFloat cosDigree;
CGFloat sinDigree;
CGPoint pointA; //A
CGPoint pointB; //B
CGPoint pointD; //D
CGPoint pointC; //C
CGPoint pointO; //O
CGPoint pointP; //P
27
根据上图中的计算公式,我们不难⽤代码表⽰出这⼏个变量:
x1 = backView.center.x;
y1 = backView.center.y;
x2 = self.frontView.center.x;
y2 = self.frontView.center.y;
centerDistance = sqrtf((x2-x1)*(x2-x1) + (y2-y1)*(y2-y1));
if (centerDistance == 0) {
cosDigree = 1;
sinDigree = 0;
}else{
cosDigree = (y2-y1)/centerDistance;
sinDigree = (x2-x1)/centerDistance;
}
r1 = oldBackViewFrame.size.width / 2 - centerDistance/self.viscosity;
pointA = CGPointMake(x1-r1*cosDigree, y1+r1*sinDigree); // A
pointB = CGPointMake(x1+r1*cosDigree, y1-r1*sinDigree); // B
pointD = CGPointMake(x2-r2*cosDigree, y2+r2*sinDigree); // D
pointC = CGPointMake(x2+r2*cosDigree, y2-r2*sinDigree);// C
pointO = CGPointMake(pointA.x + (centerDistance / 2)*sinDigree, pointA.y
+ (centerDistance / 2)*cosDigree);
pointP = CGPointMake(pointB.x + (centerDistance / 2)*sinDigree, pointB.y
+ (centerDistance / 2)*cosDigree);
然后,⽤贝塞尔曲线把这些点连起来,就有了粘性⼩球完整绘制。最
后,我们要做的就是在⼩球绑定的⼿势的 Change ⽅法⾥⾯调⽤这个绘
制函数,已达到⼩球的形状随着⼿指的移动⽽变化,就有了粘性的交互
了。
if (ges.state == UIGestureRecognizerStateChanged){
...
//
[self drawRect];
}
28


下⾯我们来看⼀下 LiquidLoader 是怎么实现的。
⾸先我们来看⼀看架构。
稍微解释⼀下。对外使⽤的类就是 LiquidLoader ,其中⽤到了Liquid-
LoadEffect 这个类,这个类是个基类,有两个⼦类继承于它 —— LiquidLi-
neEffect 和 LiquidCircleEffect ,⽤来实现两种样式。LiquidLoadEffect 这个类中
⽤到了 LiquittableCircle ,这个类⽤来绘制⼩球;除此之外, LiquidLoadEffect
中还⽤到了⼀个「引擎」—— SimpleCircleLiquidEngine,这个引擎的作⽤
就是判断当前静⽌的圆球与运动的圆球之间的距离,从⽽决定是否显⽰
粘连的部分。
具体到代码中。⾸先,国际惯例,创建⼀个定时器 CADisplayLink
,绑定到⼀个⽅法:update() 。这个⽅法中我们去更新⼀个动态变量,
取名为 key ,根据 key 我们来移动⼩球的位置,同时⽤「引擎」来判断
30

移动的⼩球和静⽌的⼩球之间的距离。以上就是主干线。下⾯我挖⼏处
细节和你讲讲。
⾸先,既然⼩球的位置是通过实时改写 center 实现的,那么我们怎
么指定动画的曲线函数呢?⽐如 MOVIE 2.7 中,仔细看你会发现⼩球在
两端有个减速的过程,中间段加速。要实现这样的曲线函数,我们就要
依赖三⾓函数了。
func sineTransform(key: CGFloat) -> CGFloat {
return sin(key * CGFloat(M_PI)) * 0.5 + 0.5
}
通过这个⺴站,我们可以得到如下函数图像:
根据⾼中物理知识我们知道,加速度看斜率,所以图中 key 取值 1
和 2 的时候加速度最⼤,此时⼩球正在经过在中点位置。
我们再来看另⼀个细节:
31

circles.each { circle in
if self.moveCircle != nil {
self.engine?.push(self.moveCircle!, other: circle)
}
}
这段代码也是在 update() ⽅法⾥,通过遍历所有静⽌⼩球,让每个
静⽌的⼩球与运动的⼩球进⾏⽐较,⽐较两球圆⼼之间的距离是否超过
某个事先规定好的阈值。
func isConnected(circle: LiquittableCircle, other: Liquittable-
Circle) -> Bool {
let distance = circle.center.minus(other.center).length()
return distance - circle.radius - other.radius < radius-
Thresh
}
原先的项⺫中并没有设置 duration 的接⼝,我在提交的 pr 中增加
了这个功能。核⼼代码如下:
override func update() {
switch key {
case 0.0...2.0:
key += 2.0/(duration*60)
default:
key = 0.0
}
}
只要让动态变量 key 每次增加的值等于 2.0/总帧数即可。之所以是
2.0 是由三⾓函数决定的,因为上⾯的三⾓函数⼀个周期为 2 。
32


CORE ANIMATION
3
34
这⼀章节,我将会把 Core Animation 技巧做个总结。当然,你不⽤担
⼼我会像学校的⽼师⼀样很枯燥地向你灌输知识点,这是别⼈的做法。
事实上从我局限的切⾝感受来说,我⼀向认为结果导向的学习⽅法才是
最有效率的:「你要去什么地⽅,就直接去你想去的那个地⽅」。所以
贯穿我整册电⼦书的教学模式都是:「我精⼼挑选⼀些涵盖尽可能多知
识点的例⼦,让你直接接触这些⽣动的(半)成品,期间涉及到了知识
点,我再发散出去详细介绍」。通过这些活⽣⽣的案例让你在实战中了
解动画的相关知识。或许你会想,但是这样不够系统性啊,我担⼼⾃⼰
只是学到了冰⼭⼀⾓。我想说的是,朋友,我还是那句话,「等你都准
备好了,或许你就没有动⼒了」。不⽤那么在意这些形式上的东西,你
想想你多少次⼼⾎来潮地准备好了你认为完备的⼀切,结果没坚持⼏天
就半途⽽废了。正所谓「星星之⽕,可以燎原」。知识从来不
是靠看来的,都是靠找来的。我⾃⾝就是这种学习模式的
受益者。通过这种结果导向的⽅式学到的每⼀个知识点
就像⼀颗颗散落的珍珠,随着你越捡越多,当你有⼀
天捡得差不多了,这时你再回过头去看那些当时看⼏
页就犯困的理论书,你会发现⼀切看起来都是那么顺利,
顺便也从全局范畴上对之前零散的知识点进⾏了⼀次结构性的巩固。然
35
后你就会惊喜地发现,所有知识点就像珍珠被串上了线⼀样,⼀切都联
系起来了。
本章第⼀个例⼦,我们来
看看如何实现类似 Twitter
的启动动画。效果请参见
MOVIE 3.1。说实话,当时
我第⼀次打开 Twitter 看到这个效果的
时候,I was totally blown away
在开始之前,我们先了解⼀下 Layer 的 mask 属性。
@property(strong) CALayer *mask;
可以发现 mask 也是⼀个 CALay-
er。所以当我们使⽤时,就需要单独创建⼀
个 CALayer 作为 mask。⽐如我提前准备好了
需要遮罩的图⽚视图 photoImage —— IMAGE
3.1。⼤⼩为 100*100 的 UIImageView ,连好
IBOutlet 。在 ViewController.m 的
36
MOVIE 3.1 模拟 Twitter 的启动动画
IMAGE 3.1 ⼤⼩为 100*100 的 pho-
toImage
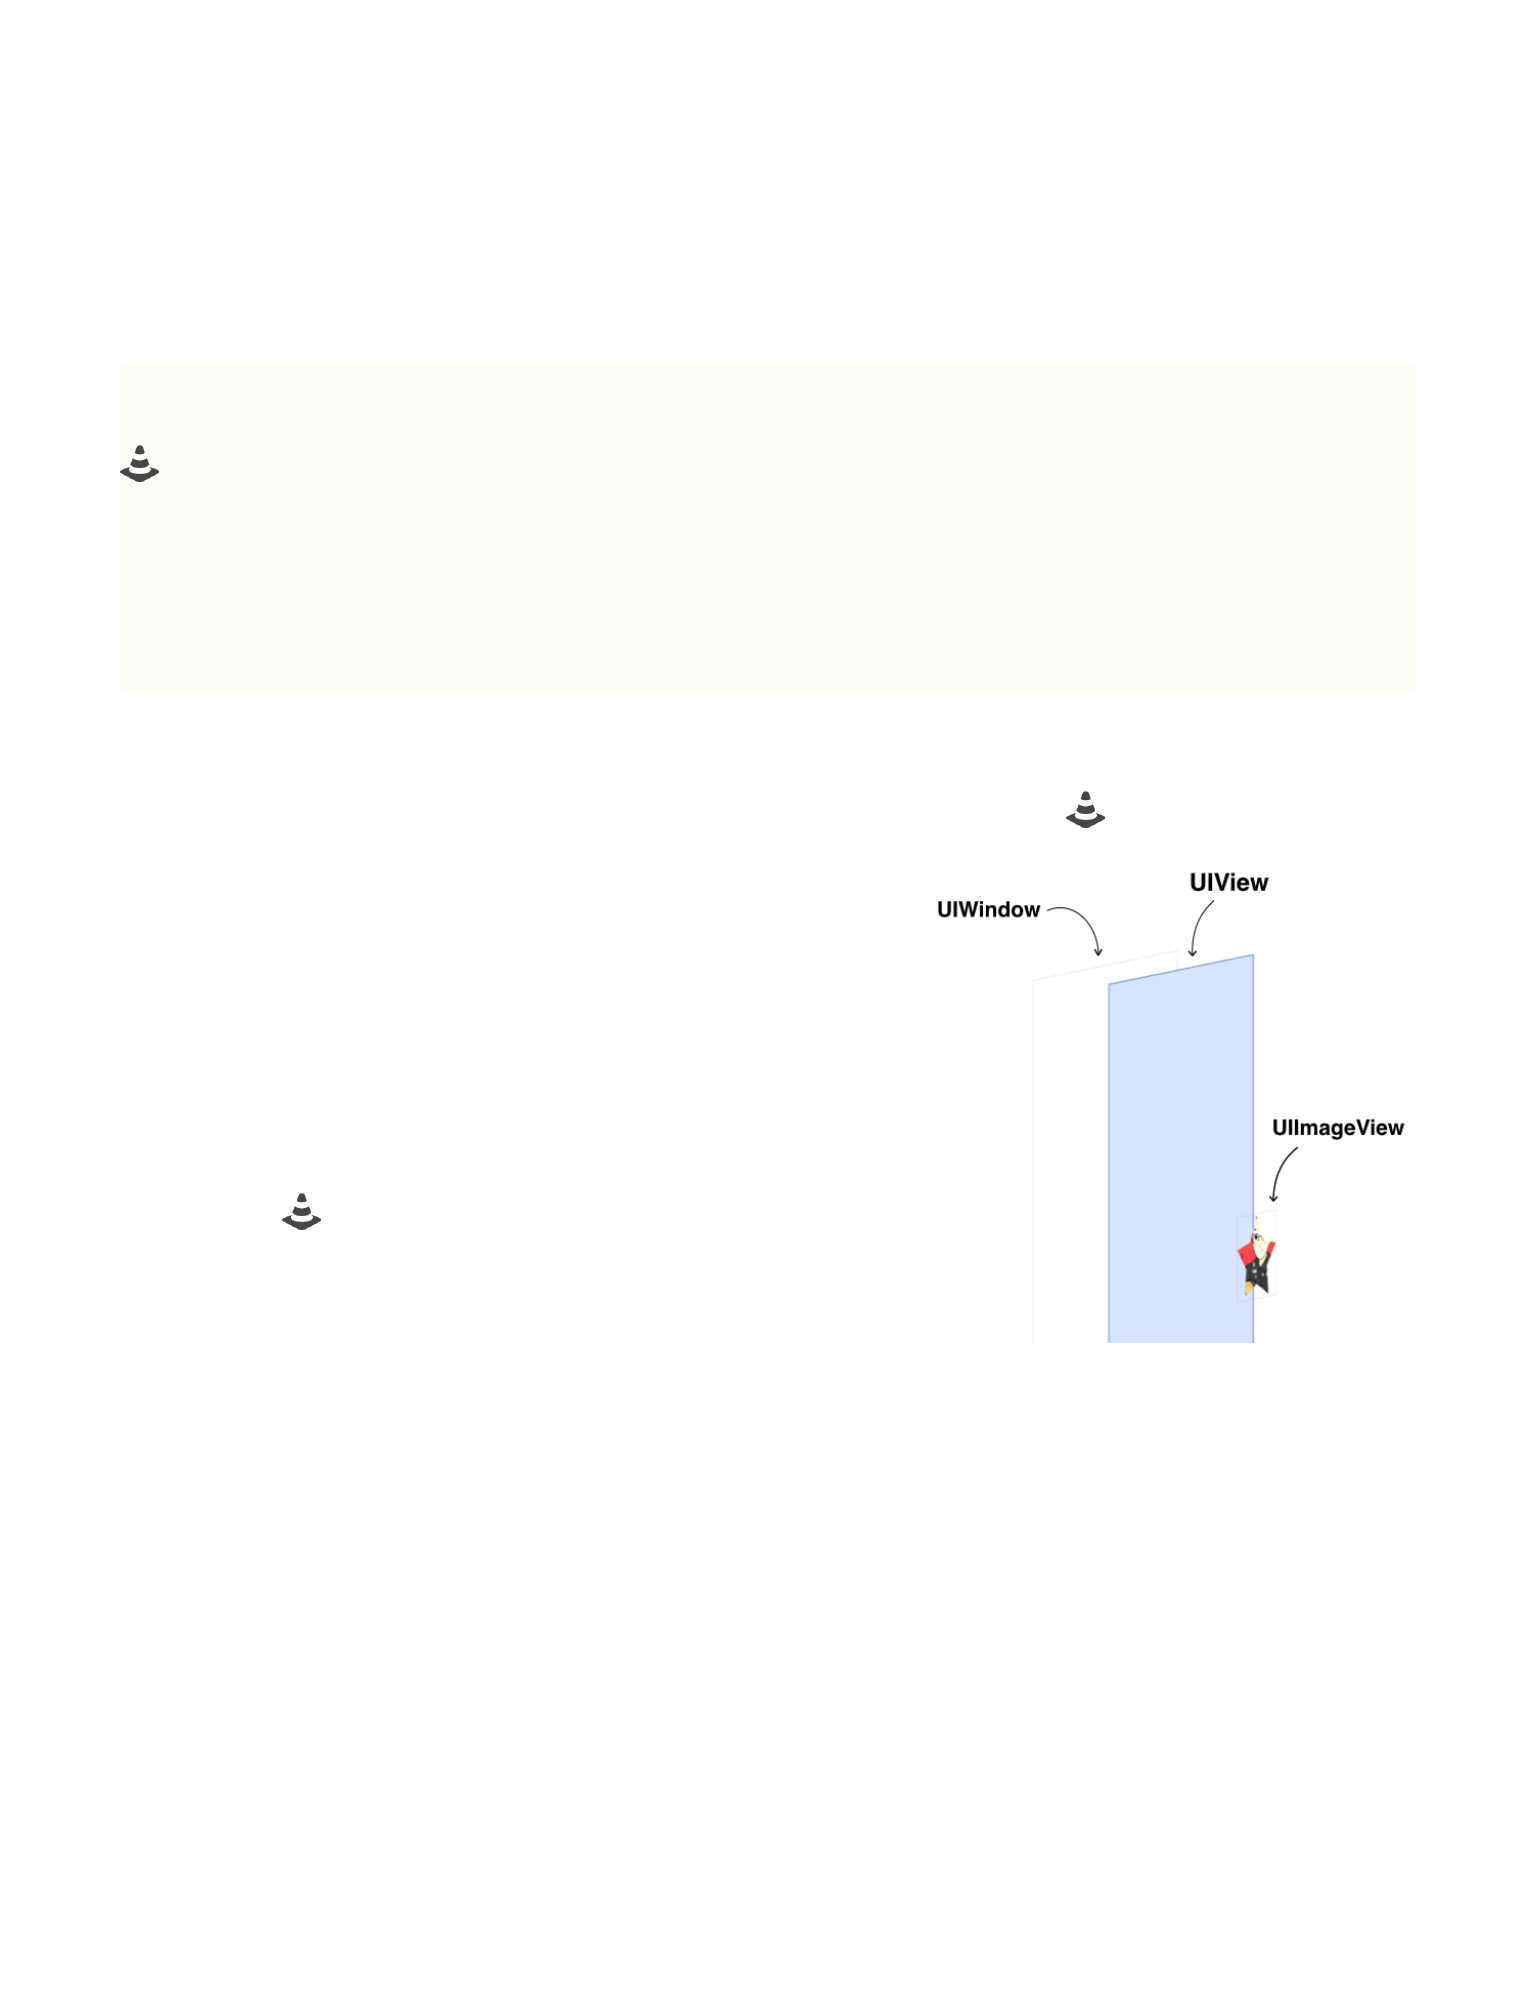
-(void)viewDidLoad ⽅法中创建 mask , 赋值给 photoImage 的 mask 属
性。
CALayer *maskLayer = [CALayer layer];
maskLayer.contents = (id)[UIImage imageNamed:@"logo"]
.CGImage; //必须是CGImageRef
maskLayer.frame = CGRectMake(0, 0,
_photoImage.frame.size.width, _photoImage.frame.size.height);
_photoImage.layer.mask = maskLayer;
运⾏之后,可以看到 photoImage 已经被遮罩了。
通过 View Hierarchy 可以看到视图的层
级关系。为了实现开头那个 zoom out 的欢
迎动画,我把我的的思路⽤ GALLERY 3.1
做了展⽰ 。
解释⼀下,⾸先毫⽆疑问⼀开始显⽰
LaunchScreen 。接下来 LaunchScreen 消失了,即将进⼊ NavigationCon-
troller 时,我们在 -(void)viewDidLoad 中为其设置遮罩,并且把遮罩
的位置约束在和 LaunchScreen 中星星同⼀个位置,这样看起来就好像星
星⼀直停在原地。不过虽然星星的位置不动了,但是 LaunchScreen ⼀
旦结束之后就会露出⼀个⿊底(UIWindow), ⽴刻就露馅。解决⽅法也是
37

简单粗暴,只要把 UIWindow 的背景⾊
改成和 LaunchScreen ⼀样的颜⾊就⾏
了。
下⾯展⽰代码。⾸先在 func ap-
plication didFinishLaunchingWithOp-
tions 中设置 window 的颜⾊:
self.window!.backgroundColor = UIColor(red: 128/255, green: 0/
255, blue: 0/255, alpha: 1)
然后在 -(void)viewDidLoad 中写上如下代码,让 mask 和
navigationController.view 在不同时间做放⼤的动画:
// logo mask
self.navigationController!.view.layer.mask = CALayer()
self.navigationController!.view.layer.mask.contents =
UIImage(named: "logo.png")!.CGImage
self.navigationController!.view.layer.mask.position =
self.view.center
self.navigationController!.view.layer.mask.bounds =
CGRect(x: 0, y: 0, width: 60, height: 60)
// mask
let transformAnimation = CAKeyframeAnimation(keyPath:
"bounds")
transformAnimation.delegate = self
transformAnimation.duration = 1
transformAnimation.beginTime = CACurrentMediaTime() + 1 //
38
顺便说⼀句:这些图都是⽤ Keynote
做的。
GALLERY 3.1 解释启动动画的视图
层级

let initalBounds = NSValue(CGRect:
self.navigationController!.view.layer.mask.bounds)
let secondBounds = NSValue(CGRect: CGRect(x: 0, y: 0, width:
50, height: 50))
let finalBounds = NSValue(CGRect: CGRect(x: 0, y: 0, width:
2000, height: 2000))
transformAnimation.values = [initalBounds, secondBounds,
finalBounds]
transformAnimation.keyTimes = [0, 0.5, 1]
transformAnimation.timingFunctions = [CAMediaTimingFunc-
tion(name: kCAMediaTimingFunctionEaseInEaseOut), CAMediaTiming-
Function(name: kCAMediaTimingFunctionEaseOut)]
transformAnimation.removedOnCompletion = false
transformAnimation.fillMode = kCAFillModeForwards
self.navigationController!.view.layer.mask.addAnimation(transfo
rmAnimation, forKey: "maskAnimation")
// navigationController.view
UIView.animateWithDuration(0.25,
delay: 1.3,
options: UIViewAnimationOptions.TransitionNone,
animations: {
self.navigationController!.view.transform =
CGAffineTransformMakeScale(1.05, 1.05)
},
completion: { finished in
UIView.animateWithDuration(0.3,
delay: 0.0,
options: UIViewAnimationOptions.CurveEaseInOut,
animations: {
self.navigationController!.view.transform =
CGAffineTransformIdentity
},
completion: nil
)
})
39

然⽽,如果你现在运⾏以上的代码,你会发现仍有不⾜。因为 mask
⼀开始就存在,所以你可以在程序启动时就能透过 mask 看到后⾯的视
图。⽽我们希望的是 mask 后⾯的内容是在 mask 扩⼤的过程中逐渐显⽰
出来的,正如⼀开始效果视频中展⽰的那样。这⾥的 solution 就要善于
「作弊」,这也是我在做动画的过程中深谙的⼀个技巧。我们要做的就
是在 NavigationController.view 和 mask 之间再加⼀层背景⾊为⽩⾊的图
层,让这个图层挡住背后的内容,同时这个图层在 mask 动画的同时做
透明度渐变到 0 的动画。
// NavigationController.view mask
var maskBgView = UIView(frame:
self.navigationController!.view.layer.frame)
maskBgView.backgroundColor = UIColor.whiteColor()
self.navigationController!.view.addSubview(maskBgView)
self.navigationController!.view.bringSubviewToFront(maskBgView)
//
UIView.animateWithDuration(0.1,
delay: 1.35,
options: UIViewAnimationOptions.CurveEaseIn,
animations: {
maskBgView.alpha = 0.0
},
completion: { finished in
maskBgView.removeFromSuperview()
})
40

下⾯延伸相关知识。⾸先,我们就来谈谈 CAKeyframeAnimation 。
顾名思义,CAKeyframeAnimation 就相当于 Flash ⾥的关键帧动画 ,如
果你⽤过 Flash 制作动画的话你就知道,如果我们要实现⼀个简单的位
置平移、⼤⼩缩放、形状变换,我们只需要使⽤补间动画就可以实现。
具体操作就是给出动画的起始状态和结束状态两个关键帧,中间的动画
过程只需要设置⼀个补间即可,剩下的事情软件会⾃动完成。⽽这⾥的
起始状态和结束状态的概念,也被沿⽤到了 CAKeyframeAnimation ⾥所
说的关键帧 。
CAKeyframeAnimation 中我们通过 keyPath 就可以指定动画的类型。
⽐如 let transformAnimation = CAKeyframeAnimation(keyPath:
"bounds") 中的 bounds 就是指定了动画类型:让 layer 的 size 发⽣
动画。关于 keyPath 的可选值,你可以查看 CALayer 的 API ⽂档:
/* The bounds of the layer. Defaults to CGRectZero. Animatable.
*/
/** Geometry and layer hierarchy properties. **/
var bounds: CGRect
/* The position in the superlayer that the anchor point of
the layer's
* bounds rect is aligned to. Defaults to the zero point.
Animatable. */
var position: CGPoint
41
/* Defines the anchor point of the layer's bounds rect, as
a point in
* normalized layer coordinates - '(0, 0)' is the bottom
left corner of
* the bounds rect, '(1, 1)' is the top right corner. De-
faults to
* '(0.5, 0.5)', i.e. the center of the bounds rect. Animat-
able. */
var anchorPoint: CGPoint
/* A transform applied to the layer relative to the anchor
point of its
* bounds rect. Defaults to the identity transform. Animat-
able. */
var transform: CATransform3D
......
类似这⼀些 Animatable 的属性,都可以作为 CAAnimation 的 key-
Path 。然后,我们把每个关键帧的对应参数赋值给 CAKeyframeAnima-
tion 的 values 属性。代码中,我设置了3个关键帧,
transformAnimation.values = [initalBounds, secondBounds, final-
Bounds] 并且设置对应的时间点 transformAnimation.keyTimes =
[0, 0.5, 1] ,也就是动画⼀开始时 bounds 处于 initalBounds 状
态;duration ⼀半时间时处于 secondBounds 状态;动画结束时处于
finalBounds 状态。
42

但是我们还要注意。当你给⼀个 CALayer 添加动画的时候,动画其
实并没有改变这个 layer 的实际属性。取⽽代之的,系统会创建⼀个原
始 layer 的拷贝。在⽂档中,苹果称这个原始 layer 为 Model Layer ,⽽
这个复制的 layer 则被称为 Presentation Layer 。 Presentation Layer 的
属性会随着动画的进度实时改变,⽽ Model Layer 中对应的属性则并不
会改变。所以如果你想要获取动画中每个时刻的状态,请使⽤ layer 的
func presentationLayer() -> AnyObject!
Hold on a second. 此时如果你只是做了上⾯的步骤,你会发现效果并
不是我们所想的那样。你会发现动画在结束之后突然回到了初始状态。
这⾥就可以引出 removedOnCompletion 和 fillMode 了。
removedOnCompletion 的官⽅解释是:
/* When true, the animation is removed from the render tree
once its
* active duration has passed. Defaults to YES. */
也就是默认情况下系统会在 duration 时间后⾃动移除这个 CAKey-
frameAnimation当 remove 了某个动画,那么系统就会⾃动销毁这个
layer 的 Presentation Layer ,只留下 Model Layer 。 ⽽前⾯提到 Model
Layer 的属性其实并没有变化,所以也就有了你前⾯看到的结果,视图在
43

⼀瞬间回到了动画的初始状态。要解决这种情况,你需要先把 remove-
dOnCompletion 设置为 false ,然后设置 fillMode 为kCAFillMode-
Forwards 。关于 fillMode ,它有四个值:
• kCAFillModeRemoved 这个是默认值也就是说当动画开始前和动画结束后
动画对layer都没有影响动画结束后layer会恢复到之前的状态。
• kCAFillModeForwards 当动画结束后layer会⼀直保持着动画最后的状态
• kCAFillModeBackwards 这个和 kCAFillModeForwards 是相对的就是在动画开
始前你只要将动画加⼊了⼀个layerlayer便⽴即进⼊动画的初始状态并等待动
画开始你可以这样设定测试代码将⼀个动画加⼊⼀个layer的时候延迟5秒执
⾏然后就会发现在动画没有开始的时候只要动画被加⼊了 layer , layer 便处于
动画初始状态, 动画结束后layer 会恢复到之前的状态。
• kCAFillModeBoth 理解了上⾯两个这个就很好理解了这个其实就是上⾯两个
的合成动画加⼊后⽴即开始,layer便处于动画初始状态动画结束后layer保持
动画最后的状态
你除了可以设置 removedOnCompletion 为 falsefillMode 为
kCAFillModeForwards 外,这⾥还有个 trick ,就是你可以在 addAni-
mation 之前显式地把 Model Layer 的对应属性设置为结束时的状态,这
样同样也能避免之前动画结束后复位的问题。
但设置 removedOnCompletion 和 fillMode 不是正确的⽅式。正确
的做法可以参考 WWDC 2011 中的 session 421 - Core Animation Essen-
tials. 为了保证教程的连贯性,我把视频放在了这章的结尾,你可以在这
章结束之后再看这个 session。
44
除此之外,这个 demo 还有⼀个⽐较关键的地⽅在于需要不断地调
delay 才⾏,确保每个动画都能衔接上。所以⼀个好动画离不开⼀堆好
参数。 这⼀节到这⾥也就结束了。源码请见 。OC/Swift are both sup-
ported.
下⼀个案例也是关于 mask 的应⽤,只不过这回套了⼀个
外⾐ —— 转场动画,顺便也可以介绍⼀下它的使⽤。
先看效果 MOVIE
3.2。
尽管核⼼⽤的依然是 CoreAnima-
tion ,但是⾸先我们先来认识下实现
转场动画的基本步骤。
iOS7 开始苹果推出了⾃定义转场
的 API 。从此,任何可以⽤ CoreAnimation 实现的动画,都可以出现在两
个 ViewController 的切换之间。并且实现⽅式⾼度解耦,这也意味着在
保证代码⼲净的同时想要替换其他动画⽅案时只需简单改⼀个类名就可
以了,真正体会了⼀把⾼颜值代码带来的愉悦感。同时,iOS7 还推出了
45
MOVIE 3.2 圆圈遮罩的转场动画

⼿势驱动的转场动画,同样⾼度解耦。想必随着⼤屏 iPhone 的普及,软
件层⾯的交互优化将显得格外具有意义。如今的 App 要是还不⽀持⼿势
滑动返回,就真的太不骄傲了。
苹果在 UINavigationControllerDelegate 和 UIViewController-
TransitioningDelegate 中给出了⼏个协议⽅法,通过返回类型就可以
很清楚地知
道各⾃的具体作⽤。你只需要重载它们,然后 return ⼀个动画的实例
对象,⼀切都搞定了。使⽤准则就是:UINavigationController push-
ViewController 时重载 UINavigationControllerDelegate 的⽅法;
UIViewController presentViewController 时重载 UIViewController-
TransitioningDelegate 的⽅法。
UINavigationControllerDelegate:
- (nullable id <UIViewControllerInteractiveTransitioning>)
navigationController:(UINavigationController *)navigationCon-
troller interactionControllerForAnimationController:(id
<UIViewControllerAnimatedTransitioning>) animationController;
- (nullable id <UIViewControllerAnimatedTransitioning>)
navigationController:(UINavigationController *)navigationCon-
troller
animationControllerForOperation:(UINavigationControllerOperati
on)operation fromViewController:(UIViewController *)fromVC
toViewController:(UIViewController *)toVC;
46
UIViewControllerTransitioningDelegate:
- (nullable id <UIViewControllerAnimatedTransitioning>) anima-
tionControllerForPresentedController: (UIViewController *)pre-
sented presentingController:(UIViewController *)presenting
sourceController: (UIViewController *)source;
- (nullable id <UIViewControllerAnimatedTransitioning>) anima-
tionControllerForDismissedController: (UIViewController *)dis-
missed;
- (nullable id <UIViewControllerInteractiveTransitioning>)
interactionControllerForPresentation:(id
<UIViewControllerAnimatedTransitioning>)animator;
- (nullable id
<UIViewControllerInteractiveTransitioning>)interactionControll
erForDismissal:(id <UIViewControllerAnimatedTransitioning>)
animator;
那么接下来就体现了解耦带来的好处了。具体步骤:
1、创建继承⾃ NSObject 并且声明 UIViewControllerAnimatedTran-
sitioning 的的动画类。
2、重载 UIViewControllerAnimatedTransitioning 中的协议⽅
法。
UIViewControllerAnimatedTransitioning
@protocol UIViewControllerAnimatedTransitioning <NSObject>
47
// This is used for percent driven interactive transitions, as
well as for container controllers that have companion anima-
tions that might need to
// synchronize with the main animation.
- (NSTimeInterval)transitionDuration:(nullable id
<UIViewControllerContextTransitioning>)transitionContext;
// This method can only be a nop if the transition is interac-
tive and not a percentDriven interactive transition.
- (void)animateTransition:(id
<UIViewControllerContextTransitioning>)transitionContext;
@optional
// This is a convenience and if implemented will be invoked by
the system when the transition context's completeTransition:
method is invoked.
- (void)animationEnded:(BOOL) transitionCompleted;
@end
3、没有了。
在准备动⼿实践之前,我依旧先打算
让你过⽬⼀下动画的实现思路。请看 Key-
note 演⽰ KEYNOTE 3.1。
- (NSTimeInterval)transitionDuration:(id
<UIViewControllerContextTransitioning>)transitionContext{
return self.duration;
}
KEYNOTE 3.1 演⽰遮罩动画的思路
48

- (void)animateTransition:(id
<UIViewControllerContextTransitioning>)transitionContext{
self.transitionContext = transitionContext;
ViewController * fromVC = (ViewController *)[transitionCon-
text
viewControllerForKey:UITransitionContextFromViewControllerKey];
SecondViewController *toVC = (SecondViewController *)[tran-
sitionContext
viewControllerForKey:UITransitionContextToViewControllerKey];
UIView *contView = [transitionContext containerView];
UIButton *button = fromVC.button;
UIBezierPath *maskStartBP = [UIBezierPath
bezierPathWithOvalInRect:button.frame];
[contView addSubview:fromVC.view];
[contView addSubview:toVC.view];
CGPoint finalPoint;
//判断触发点在那个象限,从⽽计算出覆盖的最⼤半径
if(button.frame.origin.x > (toVC.view.bounds.size.width /
2)){
if (button.frame.origin.y <
(toVC.view.bounds.size.height / 2)) {
//第⼀象限
finalPoint = CGPointMake(button.center.x - 0,
button.center.y - CGRectGetMaxY(toVC.view.bounds)+30);
}else{
//第四象限
finalPoint = CGPointMake(button.center.x - 0,
button.center.y - 0);
}
}else{
if (button.frame.origin.y <
(toVC.view.bounds.size.height / 2)) {
//第⼆象限
49
finalPoint = CGPointMake(button.center.x -
CGRectGetMaxX(toVC.view.bounds), button.center.y -
CGRectGetMaxY(toVC.view.bounds)+30);
}else{
//第三象限
finalPoint = CGPointMake(button.center.x -
CGRectGetMaxX(toVC.view.bounds), button.center.y - 0);
}
}
CGFloat radius = sqrt((finalPoint.x * finalPoint.x) +
(finalPoint.y * finalPoint.y));
UIBezierPath *maskFinalBP = [UIBezierPath
bezierPathWithOvalInRect:CGRectInset(button.frame, -radius, -ra-
dius)];
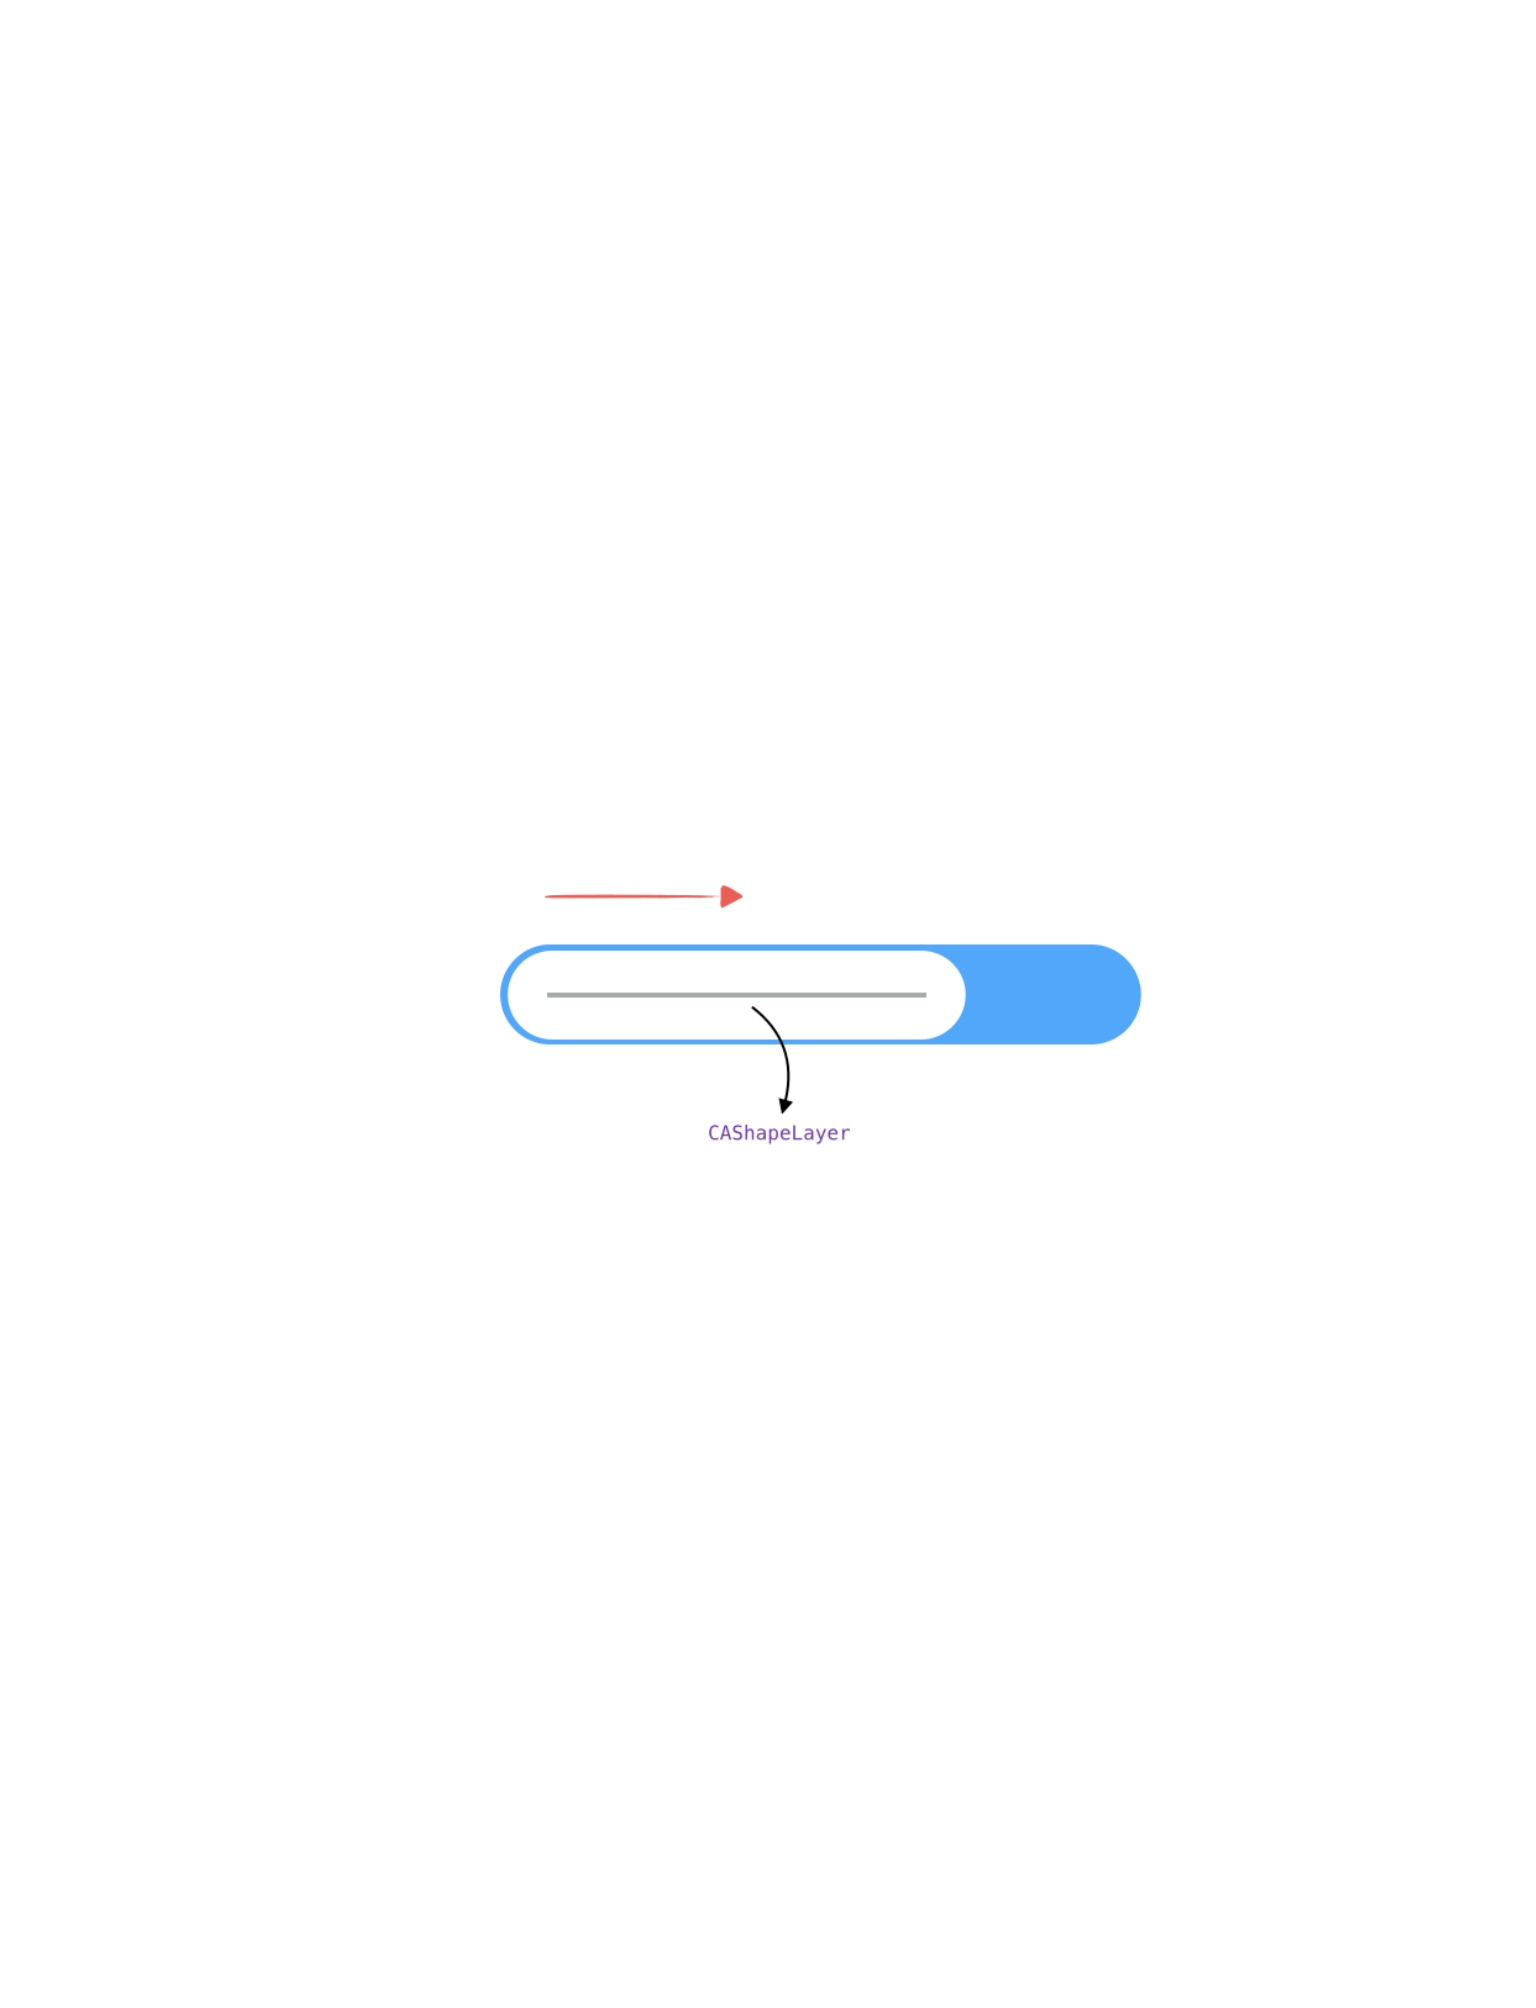
//创建⼀个 CAShapeLayer toView path
CAShapeLayer *maskLayer = [CAShapeLayer layer];
maskLayer.path = maskFinalBP.CGPath; //将它的 path 指定为最终
的 path 来避免在动画完成后会回弹
toVC.view.layer.mask = maskLayer;
CABasicAnimation *maskLayerAnimation = [CABasicAnimation
animationWithKeyPath:@"path"];
maskLayerAnimation.fromValue = (__bridge
id)(maskStartBP.CGPath);
maskLayerAnimation.toValue = (__bridge
id)((maskFinalBP.CGPath));
maskLayerAnimation.duration = [self
transitionDuration:transitionContext];
maskLayerAnimation.timingFunction = [CAMediaTimingFunction
functionWithName:kCAMediaTimingFunctionEaseInEaseOut];
maskLayerAnimation.delegate = self;
[maskLayer addAnimation:maskLayerAnimation forKey:@"path"];
}
#pragma mark - CABasicAnimation的Delegate
50
- (void)animationDidStop:(CAAnimation *)anim
finished:(BOOL)flag{
//告诉 iOS 这个 transition 完成
[self.transitionContext completeTransition:![self. transi-
tionContext transitionWasCancelled]];
//清除 fromVC 的 mask
[self.transitionContext
viewControllerForKey:UITransitionContextFromViewControllerKey].
view.layer.mask = nil;
[self.transitionContext
viewControllerForKey:UITransitionContextToViewControllerKey].vi
ew.layer.mask = nil;
}
到这⾥这个简单的动画就全部结束了。源码请见 KYPingTransitionDe-
mo。 事实上,我们看到的绝⼤多数动画基本都是这些标准动画的叠加。
⽐如平移、缩放、旋转等,只不过这些效果串在⼀起看起来就感觉⾮常
复杂了,更何况动画的时间往往⽐较短 。常⾔道,唯快不破。
顺便,我开源了⼀个类似的转场动画
MOVIE 3.3,只需给定⼀个任意 point ,就
可以通过圆圈放⼤的动画进⾏转场。地址在
A-GUIDE-TO-iOS-ANIMATION 下的 KYBubble-
Transition 。如果你对其中的类似 ⽓泡晃
动效果感兴趣,可以来 KYFloatingBubble 看
51
MOVIE 3.3 ⽓泡放⼤的转场动画
看,没有任何特殊技巧,完全⽤的 Core Animation 基本功。
如果让我站在⽬前局限的⾓度评价⼀下 CoreAnima-
tion 的话,我觉得最⼤感悟就是 ——「⼤道⾄简」。我
看到过的所有真正⽜逼的国外动画师到最后⽤的并不是
什么⿊科技或者深奥的算法来做动画,当然也有,但更
多的还是⽤最基础的 CoreAnimation ,通过各种基本动画的组合
(duration,delay,timeFunction,damping,velocity...),以及合理的参数调
节,让⼀款优秀的动画跃然于屏幕之上。所以下⾯我将尝试给你介绍⼏
个动画,完完全全⽤的就是 CoreAnimation 中的「基本单位」—— transla-
tion、rotation、scale... 打造出乍看起来很「复杂」的动画效果。相信看
完这部分,你就可以应付实际应⽤中绝⼤多数动画需求了,毕竟⽇常还
是 CoreAnimation ⽤到的最多。let’s get started!
52
这个例⼦是⼀个图⽚弹跳切换的效
果,最早出现在锤⼦⽇历中。当你对某⼀
条内容加星之后,就会出现这个活泼的切
换动画。效果参见 MOVIE 3.4 。
动画分为两个阶段:⼀个弹上去的阶
段,⼀个落下来的阶段。弹上去的过程让视图绕 y 轴旋转 90 °,此时第
⼀阶段的动画结束。在代理⽅法 animationDidStop 中开始第⼆个动画
—— 下落。在这个阶段⼀开始⽴刻替换图⽚, 随后在落下的同时让视图
继续旋转 90°。然后你可能有疑问了,这怎么才转了 180° ?那不是动画
结束之后图⽚是反过来的吗?对,所以我们要在下落动画结束之后 re-
moveAllAnimations
代码也⾮常短:
//上弹动画
-(void)animate{
if (animating == YES) {
return;
}
animating = YES;
MOVIE 3.4 图⽚弹跳+翻转动画
53

CABasicAnimation *transformAnima = [CABasicAnimation
animationWithKeyPath:@"transform.rotation.y"];
transformAnima.fromValue = @(0);
transformAnima.toValue = @(M_PI_2);
transformAnima.timingFunction = [CAMediaTimingFunction
functionWithName:kCAMediaTimingFunctionEaseInEaseOut];
CABasicAnimation *positionAnima = [CABasicAnimation
animationWithKeyPath:@"position.y"];
positionAnima.fromValue = @(self.starView.center.y);
positionAnima.toValue = @(self.starView.center.y - 14);
positionAnima.timingFunction = [CAMediaTimingFunction
functionWithName:kCAMediaTimingFunctionEaseOut];
CAAnimationGroup *animGroup = [CAAnimationGroup animation];
animGroup.duration = jumpDuration;
animGroup.fillMode = kCAFillModeForwards;
animGroup.removedOnCompletion = NO;
animGroup.delegate = self;
animGroup.animations = @[transformAnima,positionAnima];
[self.starView.layer addAnimation:animGroup
forKey:@"jumpUp"];
}
//下落动画
- (void)animationDidStop:(CAAnimation *)anim
finished:(BOOL)flag{
if ([anim isEqual:[self.starView.layer
animationForKey:@"jumpUp"]]) {
self.state = self.state==Mark?non_Mark:Mark;
NSLog(@"state:%ld",_state);
CABasicAnimation *transformAnima = [CABasicAnimation
animationWithKeyPath:@"transform.rotation.y"];
transformAnima.fromValue = @(M_PI_2);
transformAnima.toValue = @(M_PI);
54
transformAnima.timingFunction = [CAMediaTimingFunction
functionWithName:kCAMediaTimingFunctionEaseInEaseOut];
CABasicAnimation *positionAnima = [CABasicAnimation
animationWithKeyPath:@"position.y"];
positionAnima.fromValue = @(self.starView.center.y -
14);
positionAnima.toValue = @(self.starView.center.y);
positionAnima.timingFunction = [CAMediaTimingFunction
functionWithName:kCAMediaTimingFunctionEaseIn];
CAAnimationGroup *animGroup = [CAAnimationGroup anima-
tion];
animGroup.duration = downDuration;
animGroup.fillMode = kCAFillModeForwards;
animGroup.removedOnCompletion = NO;
animGroup.delegate = self;
animGroup.animations = @[transformAnima,positionAnima];
[self.starView.layer addAnimation:animGroup
forKey:@"jumpDown"];
}else if([anim isEqual:[self.starView.layer
animationForKey:@"jumpDown"]]){
[self.starView.layer removeAllAnimations];
animating = NO;
}
}
关于两个阶段动画时间上的思考。理论上,在忽略空⽓阻⼒的情况
下,两个阶段的动画⼀定是相等的,⽆论物体的初速度为多少。但是现
实世界中,我们看到的现象是:如果以⼀个初速度往上抛⼀个物体,你
的感觉是物体上抛过程花费的时间短,下落花费的时间长。因为上抛是
55

个减速运动,⽽下落是个加速运动。这个感觉很重要,虽然违背物理规
律,但是我们要做的就是更真实地模拟⼈对现实世界的感知。所以我们
在做动画中需要做这些违背物理规律的事情:即把下落的时间设置得⽐
上弹的长。以期符合真实感知。更何况, CoreAnimation 中是不能设置初
速度的,默认都是从零速度开始运动,所以我们必须通过缩短上抛时间
以此来模拟出这个初速度,让动画看起来更真实。
#define jumpDuration 0.125
#define downDuration 0.215
⼀个优秀动画的特点除了复杂之外,也就是短时间内输出⾜够多的信
息量;另⼀个特点,就是细节决定质量。在这个 demo 中,我在星星弹
跳的底部加了⼀个阴影,随着视图的上弹下落阴影的 bounds 也会有动
画。千万别认为这些属于情怀的东西「然并卵」,⽤户不是傻⼦,你⽤
⼼设置的细节都会被⽤户察觉到。然后别宣传,要等⽤户⾃⼰去发现。
这和提前就告诉⽤户带去的⼼理感受是完全不⼀样的。这些东西也是我
在锤⼦科技⽿濡⽬染学到的,在以后的动画教程中,我除了在介绍技术
层⾯的东西之外,也会额外穿插⼀些⼈性化、感性⽅⾯的⼩⼼得,⼩体
会,拿出来权当供各位参考。好了,⾄于这个阴影动画的时机,我设置
在了两个动画的⼀开始,也就是 animationDidStart 中:
56
- (void)animationDidStart:(CAAnimation *)anim{
if ([anim isEqual:[self.starView.layer
animationForKey:@"jumpUp"]]) {
[UIView animateWithDuration:jumpDuration delay:0.0f
options:UIViewAnimationOptionCurveEaseOut animations:^{
_shadowView.alpha = 0.2;
_shadowView.bounds = CGRectMake(0, 0,
_shadowView.bounds.size.width*1.6,
_shadowView.bounds.size.height);
} completion:NULL];
}else if ([anim isEqual:[self.starView.layer
animationForKey:@"jumpDown"]]){
[UIView animateWithDuration:jumpDuration delay:0.0f
options:UIViewAnimationOptionCurveEaseOut animations:^{
_shadowView.alpha = 0.4;
_shadowView.bounds = CGRectMake(0, 0,
_shadowView.bounds.size.width/1.6,
_shadowView.bounds.size.height);
} completion:NULL];
}
}
第三节到这⾥也就结束了。源码请见 JumpStarDemo。
57
第4节要呈现的效果如 MOVIE 3.5 所⽰:
这是⼀个下载按钮的动画,涉及到了 cornerRadi-
us,bounds,strokeEnd 等
相关属性的动画。
⾸先我们讲讲这个
cornerRadius 。顾名思义,这个属性是⽤来
绘制矩形的圆⾓,具体这个值表⽰的意义是
这样的 。
正如图中展⽰的那样,如果你让想让⼀个正⽅形变成圆形,那么你所
要做的就是把 cornerRadius 这个值变成边长的 1/2。
同理,如果是⼀个矩形,想让两头变为圆⾓,只需要把 cornerRa-
dius 设置成矩形⾼的 1/2 即可 。
设置了 cornerRadius 之后别忘了,记得开启 self.clipsToBounds
= YES; 或者 self.layer.masksToBounds = YES; 把圆⾓之外的部分
「切除」。
这个 demo 并没有⾮常复杂的算法,纯粹就是不同动画在不同时间上
的叠加,只要条理清晰,想清楚⼀个动画结束后该接什么动画就⾏了。
下⾯我们着重看看代码。
MOVIE 3.5 下载按钮动画
58
-(void)tapped:(UITapGestureRecognizer *)tapped{
originframe = self.frame;
if (animating == YES) {
return;
}
for (CALayer *subLayer in self.layer.sublayers) {
[subLayer removeFromSuperlayer];
}
self.backgroundColor = [UIColor colorWithRed:0.0
green:122/255.0 blue:255/255.0 alpha:1.0];
animating = YES;
self.layer.cornerRadius = self.progressBarHeight/2;
CABasicAnimation *radiusAnimation = [CABasicAnimation
animationWithKeyPath:@"cornerRadius"];
radiusAnimation.duration = 0.2f;
radiusAnimation.timingFunction = [CAMediaTimingFunction
functionWithName:kCAMediaTimingFunctionEaseOut];
radiusAnimation.fromValue = @(originframe.size.height/2);
radiusAnimation.delegate = self;
[self.layer addAnimation:radiusAnimation
forKey:@"cornerRadiusShrinkAnim"];
}
-(void)animationDidStart:(CAAnimation *)anim{
if ([anim isEqual:[self.layer
animationForKey:@"cornerRadiusShrinkAnim"]]) {
[UIView animateWithDuration:0.6f delay:0.0f
usingSpringWithDamping:0.6 initialSpringVelocity:0.0
options:UIViewAnimationOptionCurveEaseOut animations:^{
59

self.bounds = CGRectMake(0, 0, _progressBarWidth,
_progressBarHeight);
} completion:^(BOOL finished) {
[self.layer removeAllAnimations];
[self progressBarAnimation];
}];
}
}
圆变成进度条了,接下来就是进度条动画了。正如我上⾯代码中写的
那样,在上⼀个动画结束之后调⽤了 [self progressBarAnimation];
-(void)progressBarAnimation{
CAShapeLayer *progressLayer = [CAShapeLayer layer];
UIBezierPath *path = [UIBezierPath bezierPath];
[path moveToPoint:CGPointMake(_progressBarHeight/2,
self.bounds.size.height/2)];
[path
addLineToPoint:CGPointMake(self.bounds.size.width-_progressBarH
eight/2, self.bounds.size.height/2)];
progressLayer.path = path.CGPath;
progressLayer.strokeColor = [UIColor whiteColor].CGColor;
progressLayer.lineWidth = _progressBarHeight-6;
progressLayer.lineCap = kCALineCapRound;
[self.layer addSublayer:progressLayer];
CABasicAnimation *pathAnimation = [CABasicAnimation
animationWithKeyPath:@"strokeEnd"];
pathAnimation.duration = 2.0f;
pathAnimation.fromValue = @(0.0f);
pathAnimation.toValue = @(1.0f);
pathAnimation.delegate = self;
[pathAnimation setValue:@"progressBarAnimation"
forKey:@"animationName"];
[progressLayer addAnimation:pathAnimation forKey:nil];
}
60
关于进度条动画,我不打算使⽤ popup 的⽅式介绍。我将单独拿出
篇幅来讲讲。
⾸先你要知道这类进度的动画,都是⽤的 strokeEnd 属性。⽽ stro-
keEnd 不是 CALayer 的属性,⽽是其⼦类 CAShapeLayer 的⼀个特有
的属性。所以我们必须创建⼀个 CAShapeLayer. 其次,⼀个必须赋值的
参数就是 path. Demo 中,我们绘制了⼀条直线作为 CAShapeLayer 的
path.
如何设置直线的起始点才能让⽩⾊进度条距离四周的间距相等呢?结
论是 x = _progressBarHeight/2. 证明如下:
因为我们设置了 progressLayer.lineCap = kCALineCapRound; line-
Cap 指的是线段的线帽,也就是决定⼀条线段两段的封⼜样式,有三种
样式可以选择:
61
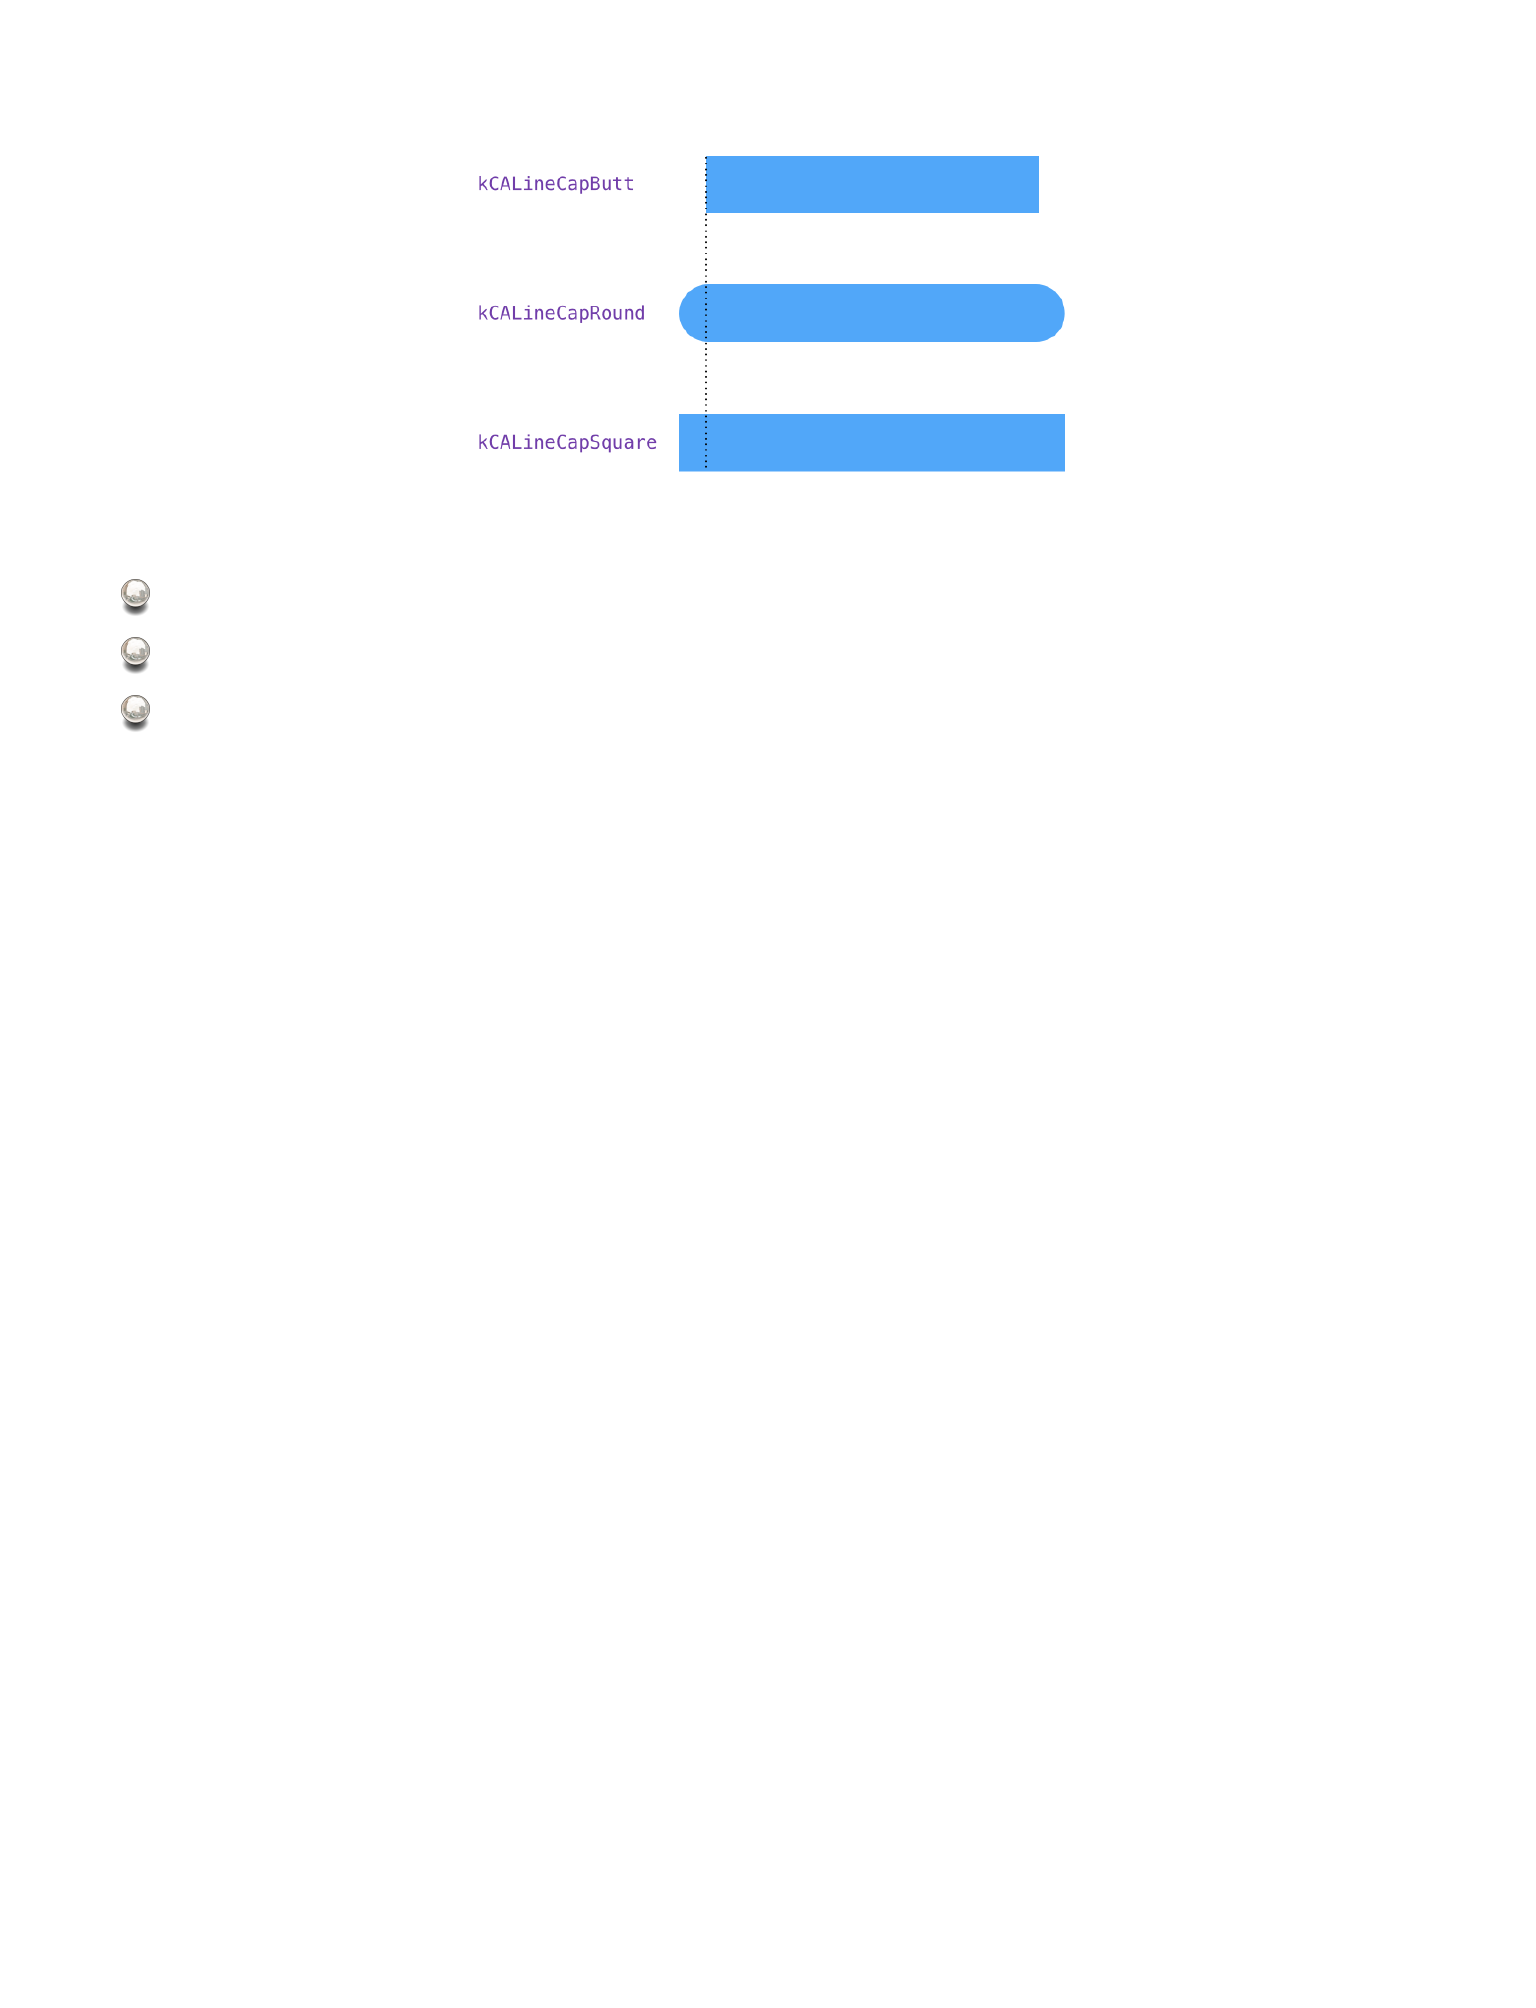
kCALineCapButt: 默认格式,不附加任何形状;
kCALineCapRound: 在线段头尾添加半径为线段 lineWidth ⼀半的半圆;
kCALineCapSquare: 在线段头尾添加半径为线段 lineWidth ⼀半的矩形
由于我们之前设置了 kCALineCapRound, ⽽半圆的半径就是
lineWidth/2, 所以起始点的 x 坐标应该满⾜公式 x = space +
lineWidth/2, 又 ∵ lineWidth = _progressBarHeight - space*2 ∴
x = _progressBarHeight/2, 也就是说起始点的 x 坐标与 lineWidth
的值并没有关系。
所以,只要保证了 path 的起点 x 坐标等于外围进度条(demo 中的
蓝⾊进度条)⾼度的 1/2 ,那么⽆论设置 path 的 lineWidth 为多少都
可以让⽩⾊进度条距离四周的间距相等。
关于 @property CGFloat strokeStart; 和 @property CGFloat
strokeEnd; 这两个属性,正如它的名字⼀样,定义了线段的开始和结
62
束,并且取值都在 [0,1] 之间。默认 strokeStart 为 0,strokeEnd 为
1。通过设置不同的值,可以控制线条的展⽰状态。
注意 [pathAnimation setValue:@"progressBarAnimation"
forKey:@"animationName"]; 这⼀句,就是我们之前说的判断不同 anim
的第⼆种⽅法:KVO.
当进度条动画⾛完后,我们先让进度条做⼀个透明度到 0 的动画,
之后⽴马同时开始⼀个 cornerRadius 动画和⼀个 bounds 动画,让进度
条恢复到圆形状态。
-(void)animationDidStop:(CAAnimation *)anim
finished:(BOOL)flag{
if ([[anim
valueForKey:@"animationName"]isEqualToString:@"progressBarAnima
tion"]){
[UIView animateWithDuration:0.3 animations:^{
for (CALayer *subLayer in self.layer.sublayers) {
subLayer.opacity = 0.0f;
}
} completion:^(BOOL finished) {
if (finished) {
for (CALayer *subLayer in self.layer.sublayers)
{
[subLayer removeFromSuperlayer];
}
self.layer.cornerRadius =
originframe.size.height/2;
63
CABasicAnimation *radiusAnimation = [CABasicAni-
mation animationWithKeyPath:@"cornerRadius"];
radiusAnimation.duration = 0.2f;
radiusAnimation.timingFunction = [CAMediaTiming-
Function functionWithName:kCAMediaTimingFunctionEaseOut];
radiusAnimation.fromValue =
@(_progressBarHeight/2);
radiusAnimation.delegate = self;
[self.layer addAnimation:radiusAnimation
forKey:@"cornerRadiusExpandAnim"];
}
}];
}
}
-(void)animationDidStart:(CAAnimation *)anim{
if ([anim isEqual:[self.layer
animationForKey:@"cornerRadiusExpandAnim"]]){
[UIView animateWithDuration:0.6f delay:0.0f
usingSpringWithDamping:0.6 initialSpringVelocity:0.0
options:UIViewAnimationOptionCurveEaseOut animations:^{
self.bounds = CGRectMake(0, 0,
originframe.size.width, originframe.size.height);
self.backgroundColor = [UIColor
colorWithRed:0.1803921568627451 green:0.8
blue:0.44313725490196076 alpha:1.0];
} completion:^(BOOL finished) {
[self.layer removeAllAnimations];
[self checkAnimation];
//-----
animating = NO;
}];
}
}
64
进度条恢复到圆形状态之后,我们就该进度打勾的动画了。正如你在
上⾯看到的那样,我在代码最后也就是 bounds 动画结束时 removeAl-
lAnimations ,并调⽤了 [self checkAnimation];
打勾动画的思路依然是给⼀个 CAShapeLayer 指定⼀个勾形的 path,
然后进⾏ strokeEnd 的动画。
-(void)checkAnimation{
CAShapeLayer *checkLayer = [CAShapeLayer layer];
UIBezierPath *path = [UIBezierPath bezierPath];
CGRect rectInCircle = CGRectInset(self.bounds,
self.bounds.size.width*(1-1/sqrt(2.0))/2,
self.bounds.size.width*(1-1/sqrt(2.0))/2);
[path moveToPoint:CGPointMake(rectInCircle.origin.x +
rectInCircle.size.width/9, rectInCircle.origin.y +
rectInCircle.size.height*2/3)];
[path addLineToPoint:CGPointMake(rectInCircle.origin.x +
rectInCircle.size.width/3,rectInCircle.origin.y +
rectInCircle.size.height*9/10)];
[path addLineToPoint:CGPointMake(rectInCircle.origin.x +
rectInCircle.size.width*8/10, rectInCircle.origin.y +
rectInCircle.size.height*2/10)];
checkLayer.path = path.CGPath;
checkLayer.fillColor = [UIColor clearColor].CGColor;
checkLayer.strokeColor = [UIColor whiteColor].CGColor;
checkLayer.lineWidth = 10.0;
checkLayer.lineCap = kCALineCapRound;
checkLayer.lineJoin = kCALineJoinRound;
[self.layer addSublayer:checkLayer];
65
CABasicAnimation *checkAnimation = [CABasicAnimation
animationWithKeyPath:@"strokeEnd"];
checkAnimation.duration = 0.3f;
checkAnimation.fromValue = @(0.0f);
checkAnimation.toValue = @(1.0f);
checkAnimation.delegate = self;
[checkAnimation setValue:@"checkAnimation"
forKey:@"animationName"];
[checkLayer addAnimation:checkAnimation forKey:nil];
}
现在你已经学完了这个 demo 。理论上,所有描线的动画你都可以⽤
这种⽅式先指定⼀个 path 然后改变 strokeEnd, strokeStart 来实现。
⽐如我在 上找到的两则动画:
最后,我还想补充的⼀点是关于 CAKeyframeAnimation 中 @prop-
erty CGPathRef path; 这⼀属性。这是经典的路径动画。你只需指定⼀
个指针类型的 CGPathRef ,剩下的事情就交给 CAKeyframeAnimation 吧
—— 视图的 anchorPoint 就会沿着你给出的这条 path 运动。⽐如右侧
Paperclip Loader -by Jokūbas
MOVIE 3.6 线条动画原型 001
Submit -by Lars Lundberg
MOVIE 3.7 线条动画原型 002
66
最后,附上 WWDC 2011 Session 421 —— Core Animation Essentials
68
动画中的数学
4
69

如果要我说我最喜欢哪种类型的动画,我想应该就是这⼀节的主题
——「结合数学知识的动画」。尽管我在前⾯的章节中后多或少都涉及到
了数学知识的使⽤,但毕竟不是主⾓。⽽这⼀章,我将把数学的⾓⾊晋
升到第⼀位置,让数学的魅⼒延伸到程序中来。除此之外,你还必须努
⼒习惯动⼿在纸上画草图,习惯找到数学和程序之间的衔接点。这将会
⾮常有趣,也会很有成就感。
这⼀章的第⼀个知识点,我们来聊聊动画曲线(timingFunction)。
众说周知,我们常⽤的 CoreAnimation 动画曲线只有默认提供的四个
枚举值:
CA_EXTERN NSString * const kCAMediaTimingFunctionLinear
__OSX_AVAILABLE_STARTING (__MAC_10_5, __IPHONE_2_0);
CA_EXTERN NSString * const kCAMediaTimingFunctionEaseIn
__OSX_AVAILABLE_STARTING (__MAC_10_5, __IPHONE_2_0);
CA_EXTERN NSString * const kCAMediaTimingFunctionEaseOut
__OSX_AVAILABLE_STARTING (__MAC_10_5, __IPHONE_2_0);
CA_EXTERN NSString * const kCAMediaTimingFunctionEaseInEase-
Out
__OSX_AVAILABLE_STARTING (__MAC_10_5, __IPHONE_2_0);
70
当然,你完全可以⾃⼰创建时间曲线。使⽤ CAMediaTimingFunction
中的
+ (instancetype)functionWithControlPoints:(float)c1x
:(float)c1y :(float)c2x :(float)c2y;
⽅法就可以创建⼀个 timingFunction
。请看下⽅这幅图,就是对上⾯这个
⽅法的解释。有没有觉得很熟悉,没
错,又是贝塞尔曲线。正如我 前⾯
说的那样,这绝对是对计算机图形学
领域具有⾥程碑意义的学术成果。
具体讲讲⾃定义 timingFunction 的⽅法其中的 c1x, c1y 代表第⼀
个关键点,也就是图中 p1 点, c2x, c2y 代表第⼆个关键点,对应图中
p2 点。从图中可以看出, c1x, c1y,c2x, c2y 的范围都是 [0,1] 。这和 CA-
Layer 的 anchorPoint 很类似。然⽽头疼的是,每次⾃定义都要计算两
个关键点的坐标的确是⼀件让⼈望⽽却步的事情。
不过,历史的经验告诉我们,绝⼤多数问题你都不会是第⼀个想到
的,我们都是站在巨⼈的肩上看更远的风景。尤其对于这种被众多领域
71
普遍使⽤的东西,各种⽅便⽣成贝塞尔曲线关键点的⼯具可谓是层出不
穷。前⼈早就已经开发⼀⼤堆了,步骤简单到只需通过拖拽控制点描绘
出你想要的曲线,⼯具就⽴刻⾃动⽣成了关键点坐标。这⾥推荐我常⽤
的⼀个⼯具,就是这个⽹站 —— Rob La Placa 。或者有款 Xcode插件
—— CATweaker。
然后,我们可以更进⼀步。抛开使
⽤ CAMediaTimingFunction 毕竟这限
制了动画只能从 0 变化到 1,不能做到
完全⾃定义,⽐如先从 0 ease-out 变
化到 1 ,再 ease-in 变化回到 0;或者
更复杂,⽐如想要以震荡曲线 IMAGE
4.1 的规律运动。所以,我们就会很⾃然地想到,如果能把任意⼀条数
学中的函数图像转化成⾃定义的动画曲线,那该有多好。
72
IMAGE 4.1 震荡曲线

这次的案例,我们将介绍实现⼀个平滑的⼿势驱动动画。还是
先请预览最终效果 MOVIE
4.1 。
整体思路是这样的:
设定最⼤滑动距离为 120。
随着滑动距离绝对值(离开初始位置的距离,竖直向上或竖直向下)
的增加,逐渐接近最⼤滑动距离。这个过程中,视图同时做三个变换:
• 第⼀个是 translation .让视图的 center 的位移等于⼿指的位移;
• 其次是 scale . 从 1.0 到 0.8;
• 另⼀个变换是 Rotate(绕 x 轴且带透视效果) ,从0增长到1,之后
⽴即从1减⼩到0。
以上三个分运动叠加在⼀起,就是 MOVIE 4.1 的效果了。
既然是三个分运动,我们还是把他们分解开来,各个击破。 循序渐
进的成就感才是最有持久的。⾸先是位移,这个⾮常容易。
73
MOVIE 4.1 ⼿势驱动动画最终效果

-(void)panGestureRecognized:(UIPanGestureRecognizer *)pan{
static CGPoint initialPoint = currentPhoto.center;
CGFloat factorOfAngle = 0.0f;
CGFloat factorOfScale = 0.0f;
CGPoint transition = [pan translationInView:self.view];
if (pan.state == UIGestureRecognizerStateBegan) {
initialPoint = self.center;
}else if{
if(pan.state == UIGestureRecognizerStateChanged){
self.center = CGPointMake(initialPoint.x,initialPoint.y
+ transition.y);
}
}
}
然后是实现 scale 变换。先确定以什么样的动画曲线进⾏动画:我们
让视图以平滑的⼆次函数曲线从 1.0 缩⼩到 0.8,所以这个差值 0.2 的函
数曲线就可以遵循如下的⼆次函数:
滑动距离到达最⼤规定距
离时,动画也就到达了末状
态,我们使⽤⼀个系数 fac-
torOfScale 。下⾯就可以建模
出⼀道⾼中数学题了:
IMAGE 4.2 scale 的函数图像
74
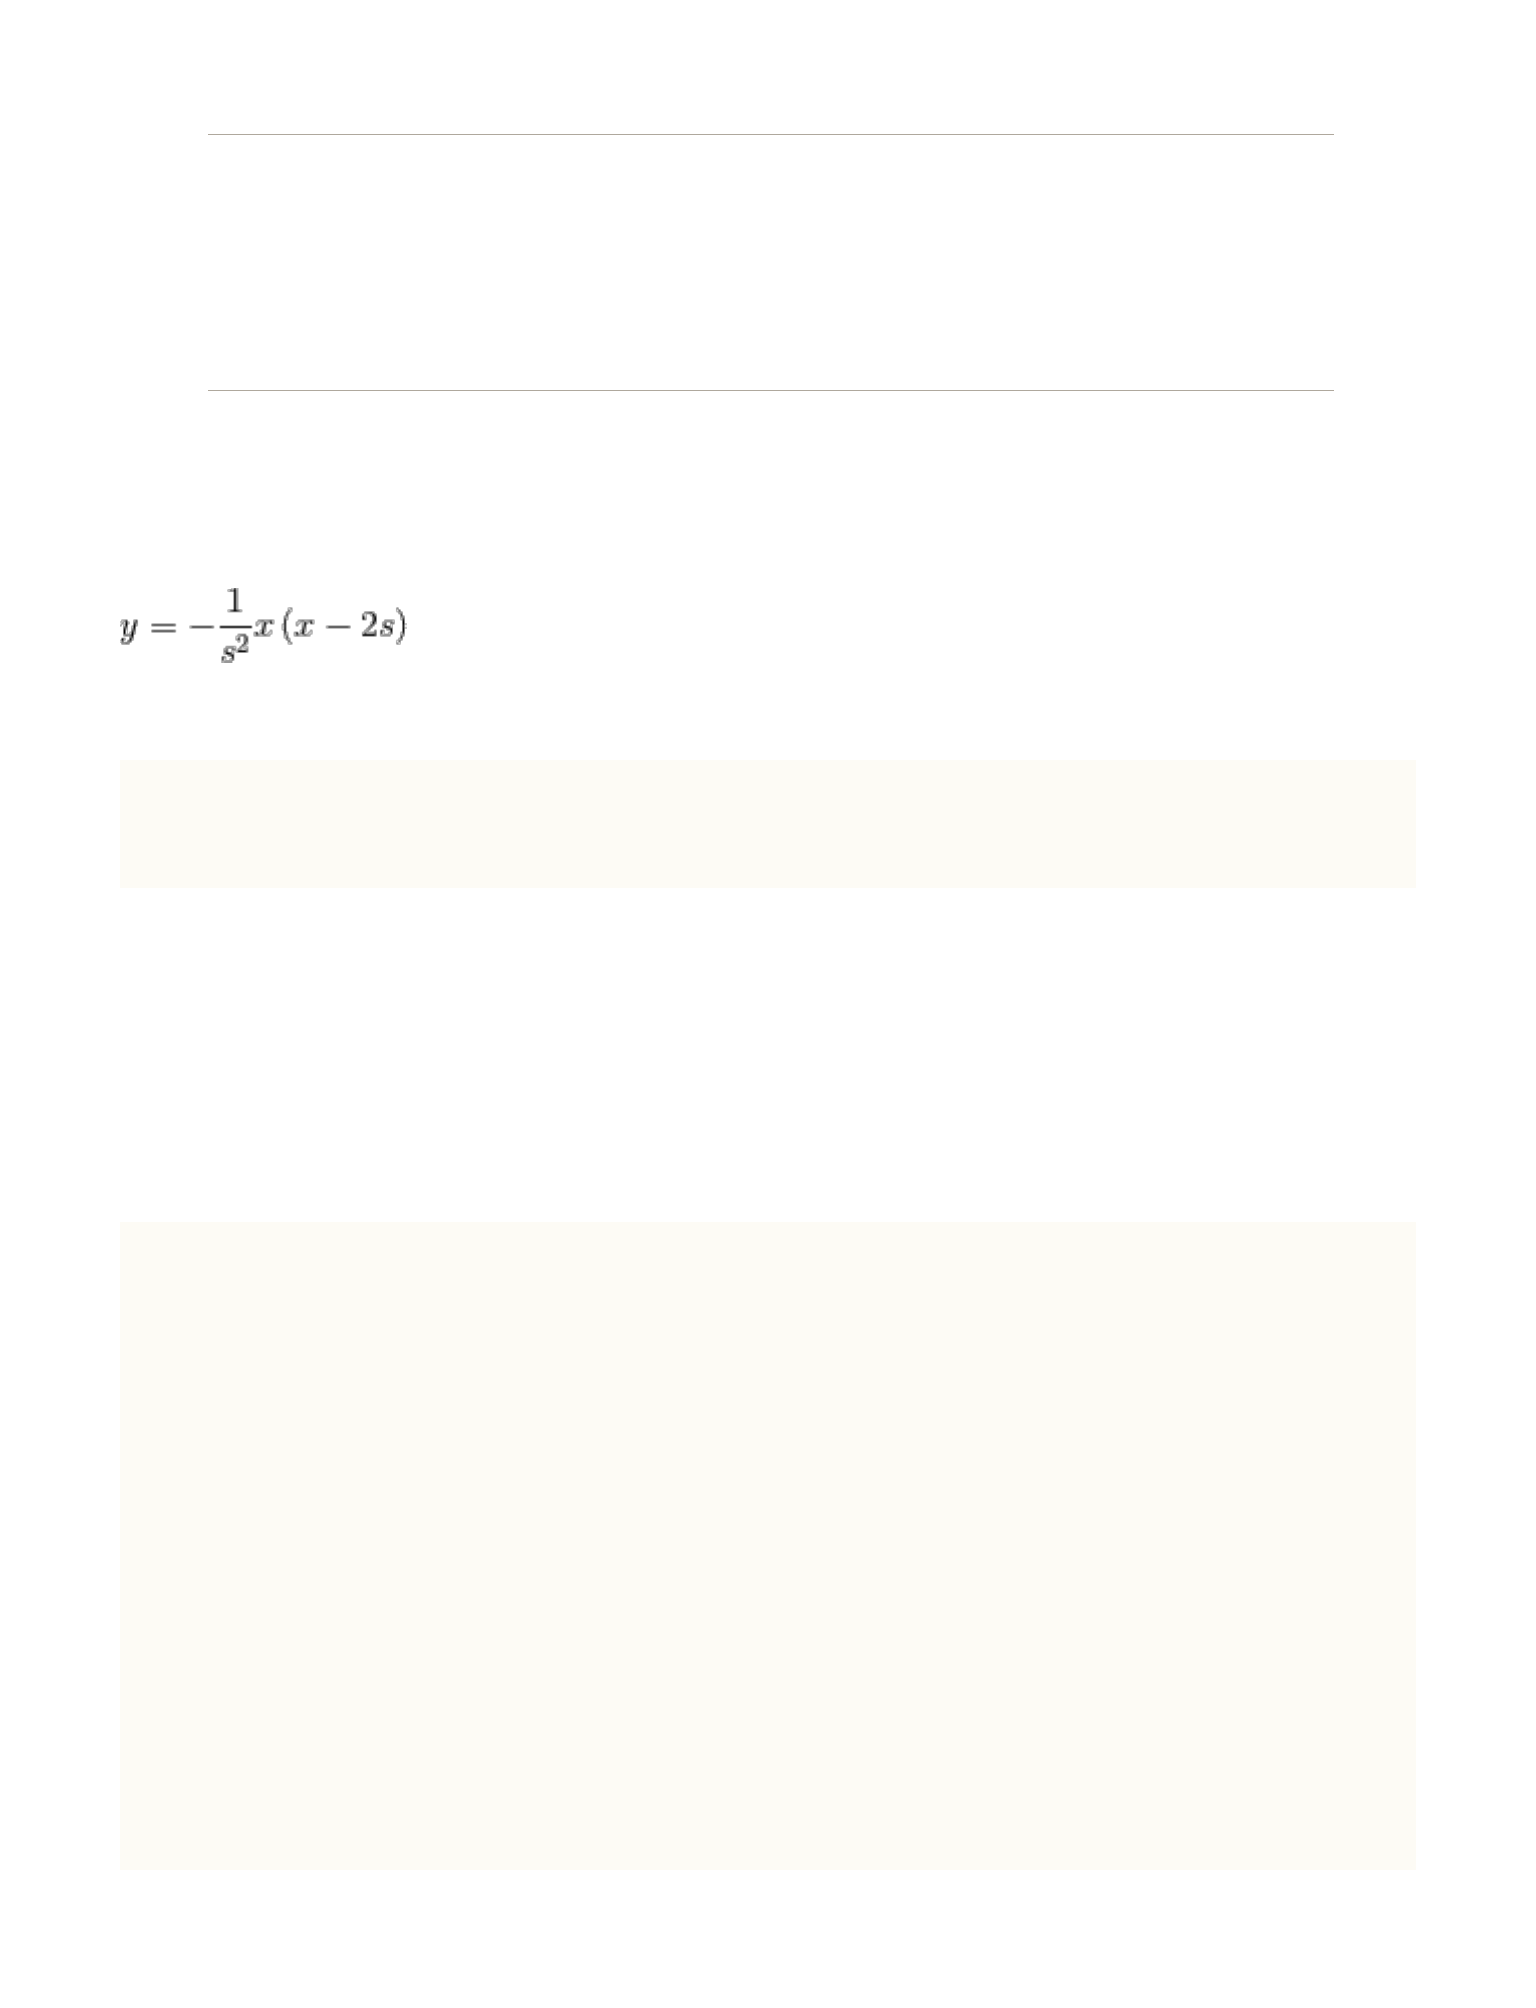
(SCROLLDISTANCE,
1),(0,0)(2*SCROLLDISTANCE,0)
[0,SCROLLDISTANCE]
如果你还记得初中数学知识的话,我们可以很快地求解得到
。转换成代码就是:
factorOfScale =
MAX(0,-1/(SCROLLDISTANCE*SCROLLDISTANCE)*Y*(Y-2*SCROLLDISTANCE)
);
接下来创建⼀个 CATransform3D ,并把这个 CATransform3D 赋值给
layer 的 transform 属性。把这段代码放在⼿势绑定的⽅法中
if(pan.state == UIGestureRecognizerStateChanged){
...
CGFloat Y =MIN(SCROLLDISTANCE,MAX(0,ABS(transition.y)));
//⼀个开⼝向下,顶点(SCROLLDISTANCE,1),过(0,0),
(2*SCROLLDISTANCE,0)的⼆次函数
factorOfScale =
MAX(0,-1/(SCROLLDISTANCE*SCROLLDISTANCE)*Y*(Y-2*SCROLLDISTANCE)
);
CATransform3D t = CATransform3DIdentity;
t = CATransform3DScale(t, 1-factorOfScale*0.2,
1-factorOfScale*0.2, 0);
75

self.layer.transform = t;
...
}
最后就是 Rotate 变换。根据我们设想的那样,我们需要让图⽚先往
⾥转到最⼤值,⽐如
36°;随后向外旋转回
到 0°。结合平滑的运动
曲线,因此很容易想到
右⾯这条函数曲线。
有没有觉得曲线很熟悉是的,同样也可以近似地看成⼀条⼀元⼆次
曲线,变量为 transition.y (准确的说,应该是ABS(transition.y))
,且 0 <= ABS(transition.y) <= SCROLLDISTANCE )。建模完成,又到
了复习⾼中数学知识的时间了:
(SCROLLDISTANCE/2,1),
(0,0)(SCROLLDISTANCE,0)
[0,SCROLLDISTANCE]
IMAGE 4.3 rotate 的函数图像
76
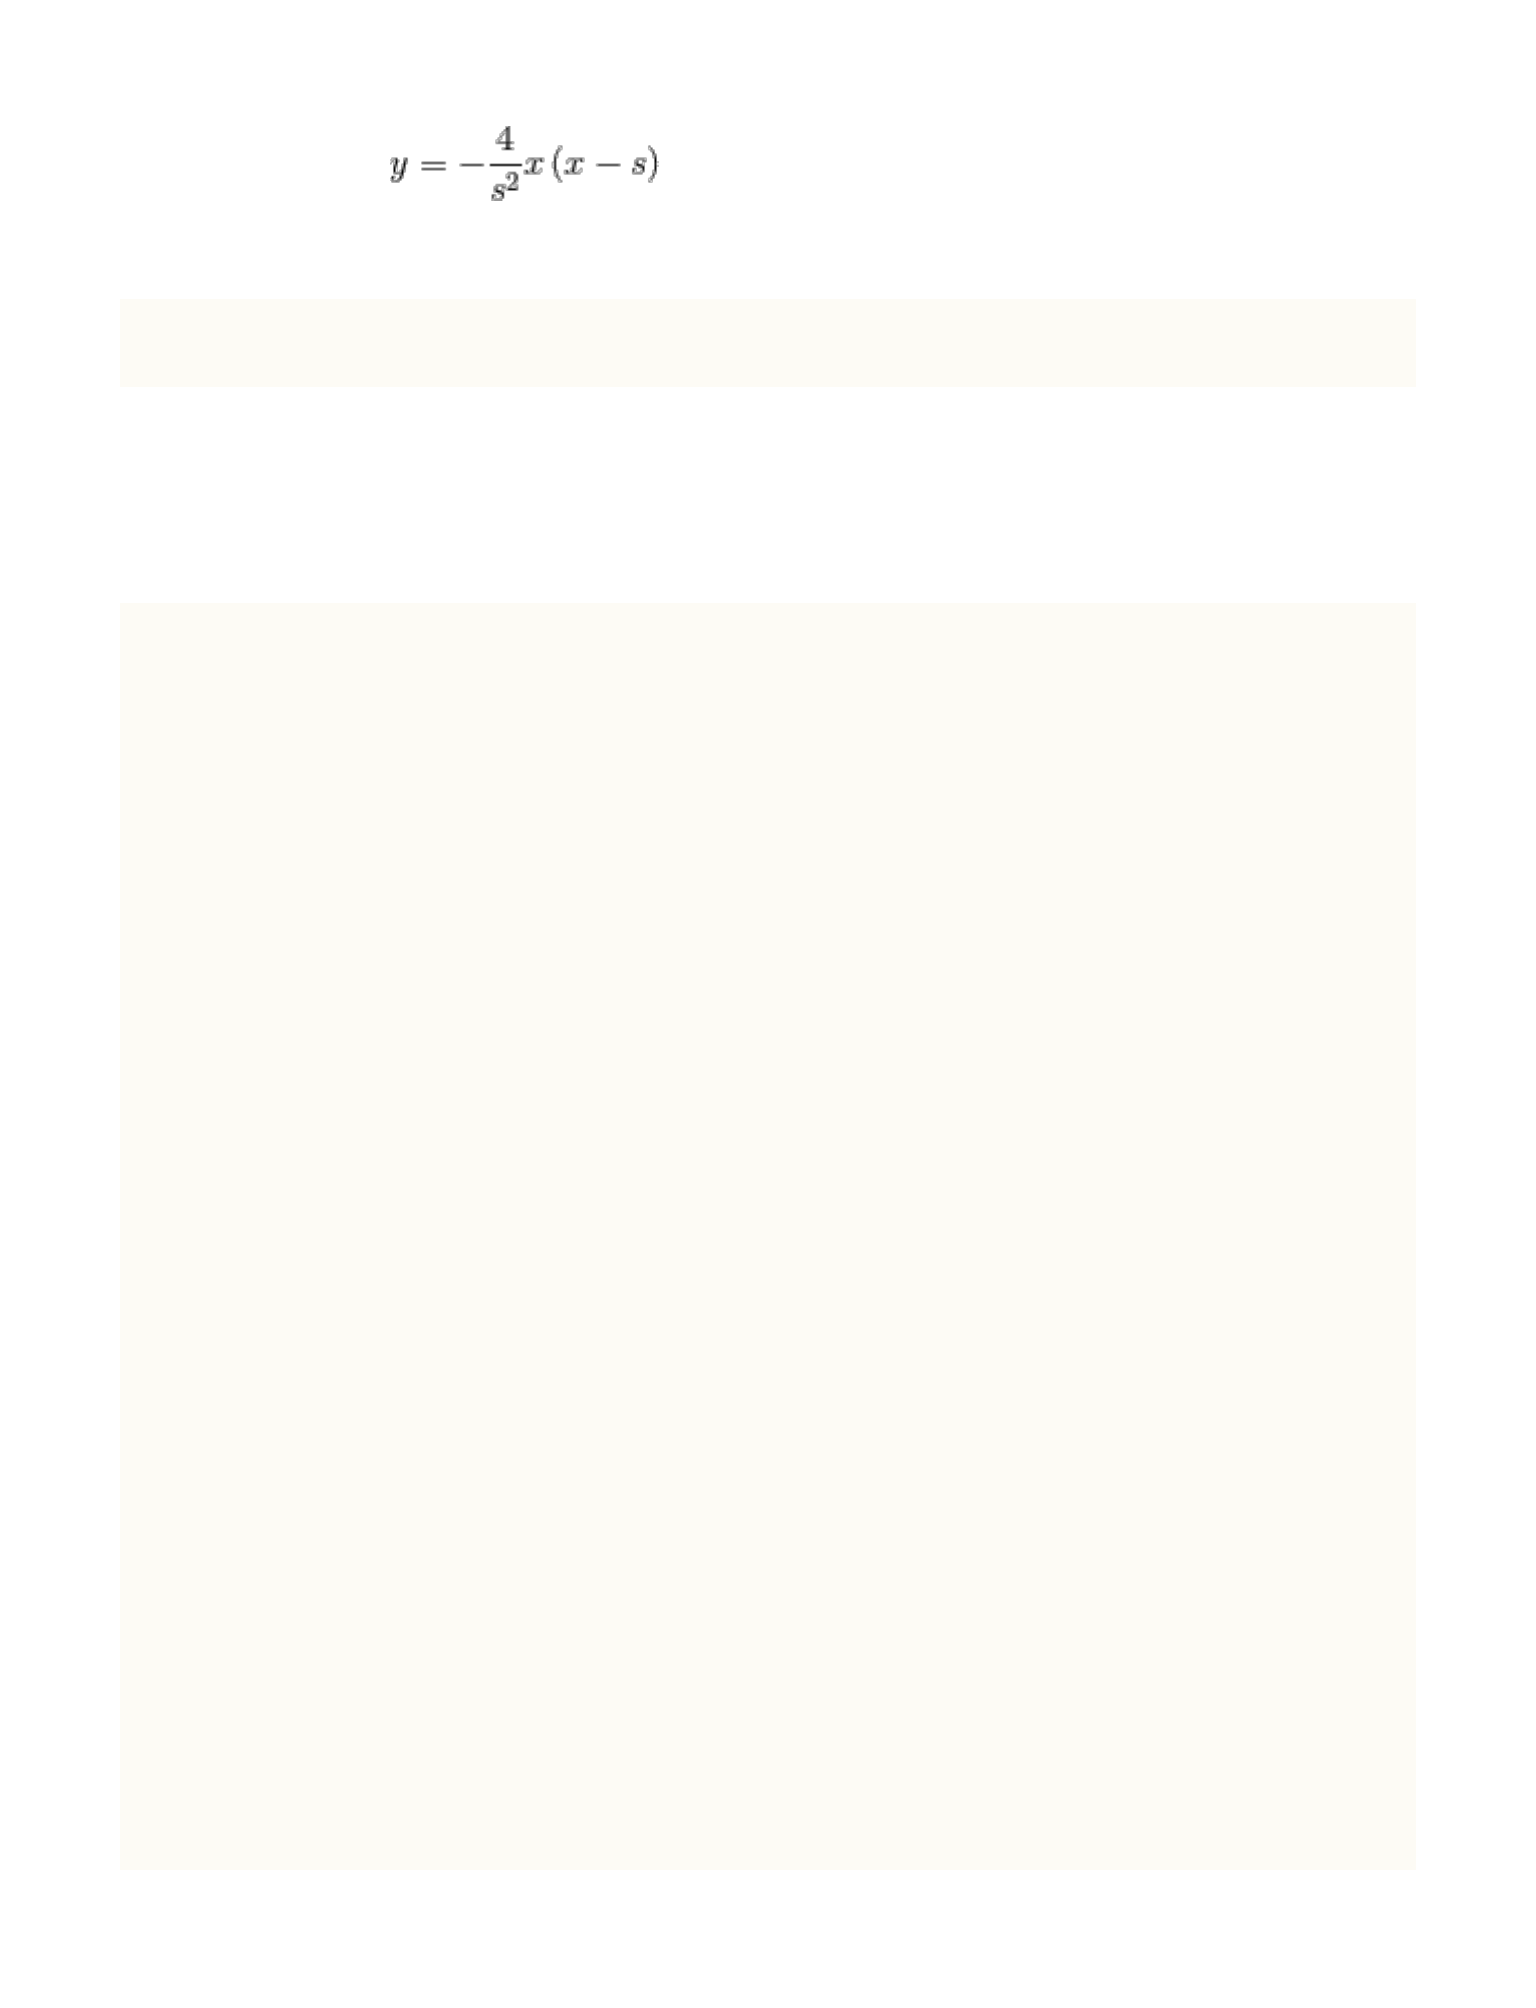
!
factorOfAngle = MAX(0,-4/(SCROLLDISTANCE*SCROLLDISTANCE)*Y*(Y-
SCROLLDISTANCE));
在之前的代码中为 CATransform3D t 追加变换,最终得到的是:
-(void)panGestureRecognized:(UIPanGestureRecognizer *)pan{
static CGPoint initialPoint;
CGFloat factorOfAngle = 0.0f;
CGFloat factorOfScale = 0.0f;
CGPoint transition = [pan
translationInView:self.superview];
if (pan.state == UIGestureRecognizerStateBegan) {
initialPoint = self.center;
}else if(pan.state == UIGestureRecognizerStateChanged){
self.center = CGPointMake(initialPoint.x,initialPoint.y
+ transition.y);
CGFloat Y
=MIN(SCROLLDISTANCE,MAX(0,ABS(transition.y)));
//⼀个开⼝向下,顶点(SCROLLDISTANCE/
2,1),过(0,0),(SCROLLDISTANCE,0)的⼆次函数
factorOfAngle = MAX(0,-4/
(SCROLLDISTANCE*SCROLLDISTANCE)*Y*(Y-SCROLLDISTANCE));
//⼀个开⼝向下,顶点(SCROLLDISTANCE,1),过(0,0),
(2*SCROLLDISTANCE,0)的⼆次函数
factorOfScale =
MAX(0,-1/(SCROLLDISTANCE*SCROLLDISTANCE)*Y*(Y-2*SCROLLDISTANCE)
);
CATransform3D t = CATransform3DIdentity;
77
t.m34 = 1.0/-1000;
t = CATransform3DRotate(t,factorOfAngle*(M_PI/5),
transition.y>0?-1:1, 0, 0);
t = CATransform3DScale(t, 1-factorOfScale*0.2,
1-factorOfScale*0.2, 0);
self.layer.transform = t;
}
}
本节内容到这⾥也就结束了。你可以在 下载到源码。
下⾯这个案例,我把线条动画和数学知识结合在了⼀起。
通过这个案例,可以很好地向你展⽰如何⾃⼰归纳出⼀
个数学公式,并把它⽤到⼀个⾃定义动画中。
⾸先,我们还是先看最终效果 MOVIE 4.2 :
OK,可以看到随着⼿指在屏幕上滑
动距离的改变,线条⼀开始逐渐靠拢,
到达⼀定位置后开始弯曲,最终合并成
了⼀个圆。你可能也已经注意到,我已
经把这个动画封装到了⼀个上拉、下拉
刷新的控件中,并且⽤在了⼤象公会这
78
MOVIE 4.2 ⾃定义的下拉线条动画
款独⽴开发的 App 中。
下⾯让我讲讲我思考这个动画的整个过程。⾸先,最终控制这个动画
进度的是⼀个 CALayer 内部的⾃定义属性:
@property(nonatomic,assign)CGFloat progress;
⽆论你是通过⼿指滑动产⽣偏移量,还是滑动 UISlider 改变⼀个数
值,最终都将转化到这个属性的改变。然后,在这个属性的 setter ⽅法
⾥,我们让 layer 去实时重绘,就像这样:
-(void)setProgress:(CGFloat)progress{
self.curveLayer.progress = progress;
[self.curveLayer setNeedsDisplay];
}
⾄于重绘的算法,这属于细节上要考虑的事了。我们做⼀个动画的步
骤是先把宏观上的思路理清,再去考虑细节上的实现。就像开发⼀个
App ⼀样,⼀开始肯定是先考虑架构,再去往这个框架⾥添砖加⽡,修
修补补。现在,我们对这个动画的整体思路已经清楚了,下⾯开始深⼊
到细节去思考具体算法的实现。我把这个动画分成了两部分:0~0.5
和 0.5~1.0. 什么意思呢?我给你做了两个 Keynote:KEYNOTE 4.1,
KEYNOTE 4.2。
79

还是那句话 ——「善于分
解」。我们先看前半程,也就是
progress 从⼀开始的 0 运动到中
间状态 0.5 的这⼀个阶段。这⼀个
阶段两条线段分别从上⽅和下⽅两
个⽅向向中间运动,直到接触到中
线为⽌。这⼀阶段的画线算法⾮常简单,只要能实时获得 A,B 两点的坐
标,剩下⽤ UIBezierPath 的 moveToPoint,addLineToPoint 就完事
了。所以,问题转换成了求 A,B 两点运动的公式(其实只要求出⼀点,
另⼀点⽆⾮就相差了⼀个线段长度 h)。这⾥我纠结了好久,该⽤什么
⽅式像你介绍计算出这两个公式的过程,最后我能想到的只有通过做
KEYNOTE 4.1 , KEYNOTE 4.2 这两个演⽰⽂稿的⽅式,剩下的就只能意
会不能⾔传了。其实你只要愿意动笔在纸上尝试推演⼀番,并不难求得
这两个点的运动公式:
yA = H/2 + h + (1-2*progress) * (H/2 - h)
yB = H/2 + (1-2*progress) * (H/2 - h)
接下来是动画的第⼆阶段 0.5~1.0。这个阶段有些许复杂:「B 点
保持不动,A 点继续运动到 B 的位置,同时,在顶部根据当前的进度再
80
KEYNOTE 4.1 线条弯曲动画前半程分析

画出圆弧」。视觉上给⼈的感觉就
好像尾巴在逐渐缩短,头部在慢慢
弯曲。
在这个过程中,我们不难先求
得 A 点的坐标是:
yA = H/2 + h - h*(progress - 0.5) *2
⽐较⿇烦的是这个圆弧该怎么画?答案是可以⽤ UIBezierPath 中
提供的
- (void)addArcWithCenter:(CGPoint)center radius:(CGFloat)radius
startAngle:(CGFloat)startAngle endAngle:(CGFloat)endAngle
clockwise:(BOOL)clockwise NS_AVAILABLE_IOS(4_0);
这个⽅法绘制出圆弧。具体算法是:以
CGPointMake(self.frame.size.width/2self.frame.size.height/2)
为圆⼼,10 为半径,按顺时针⽅向,从 M_PI(90°) 的起始⾓度,画
到 2*M_PI 的结束⾓度。
到这⾥,我们只完成了⼀条线段的整个过程。同理,也能获得另⼀条
线段的绘制算法。最后,别忘了线段顶端还有个箭头。绘制箭头的算法
KEYNOTE 4.2 线条弯曲动画前半程和后半程的分析
81
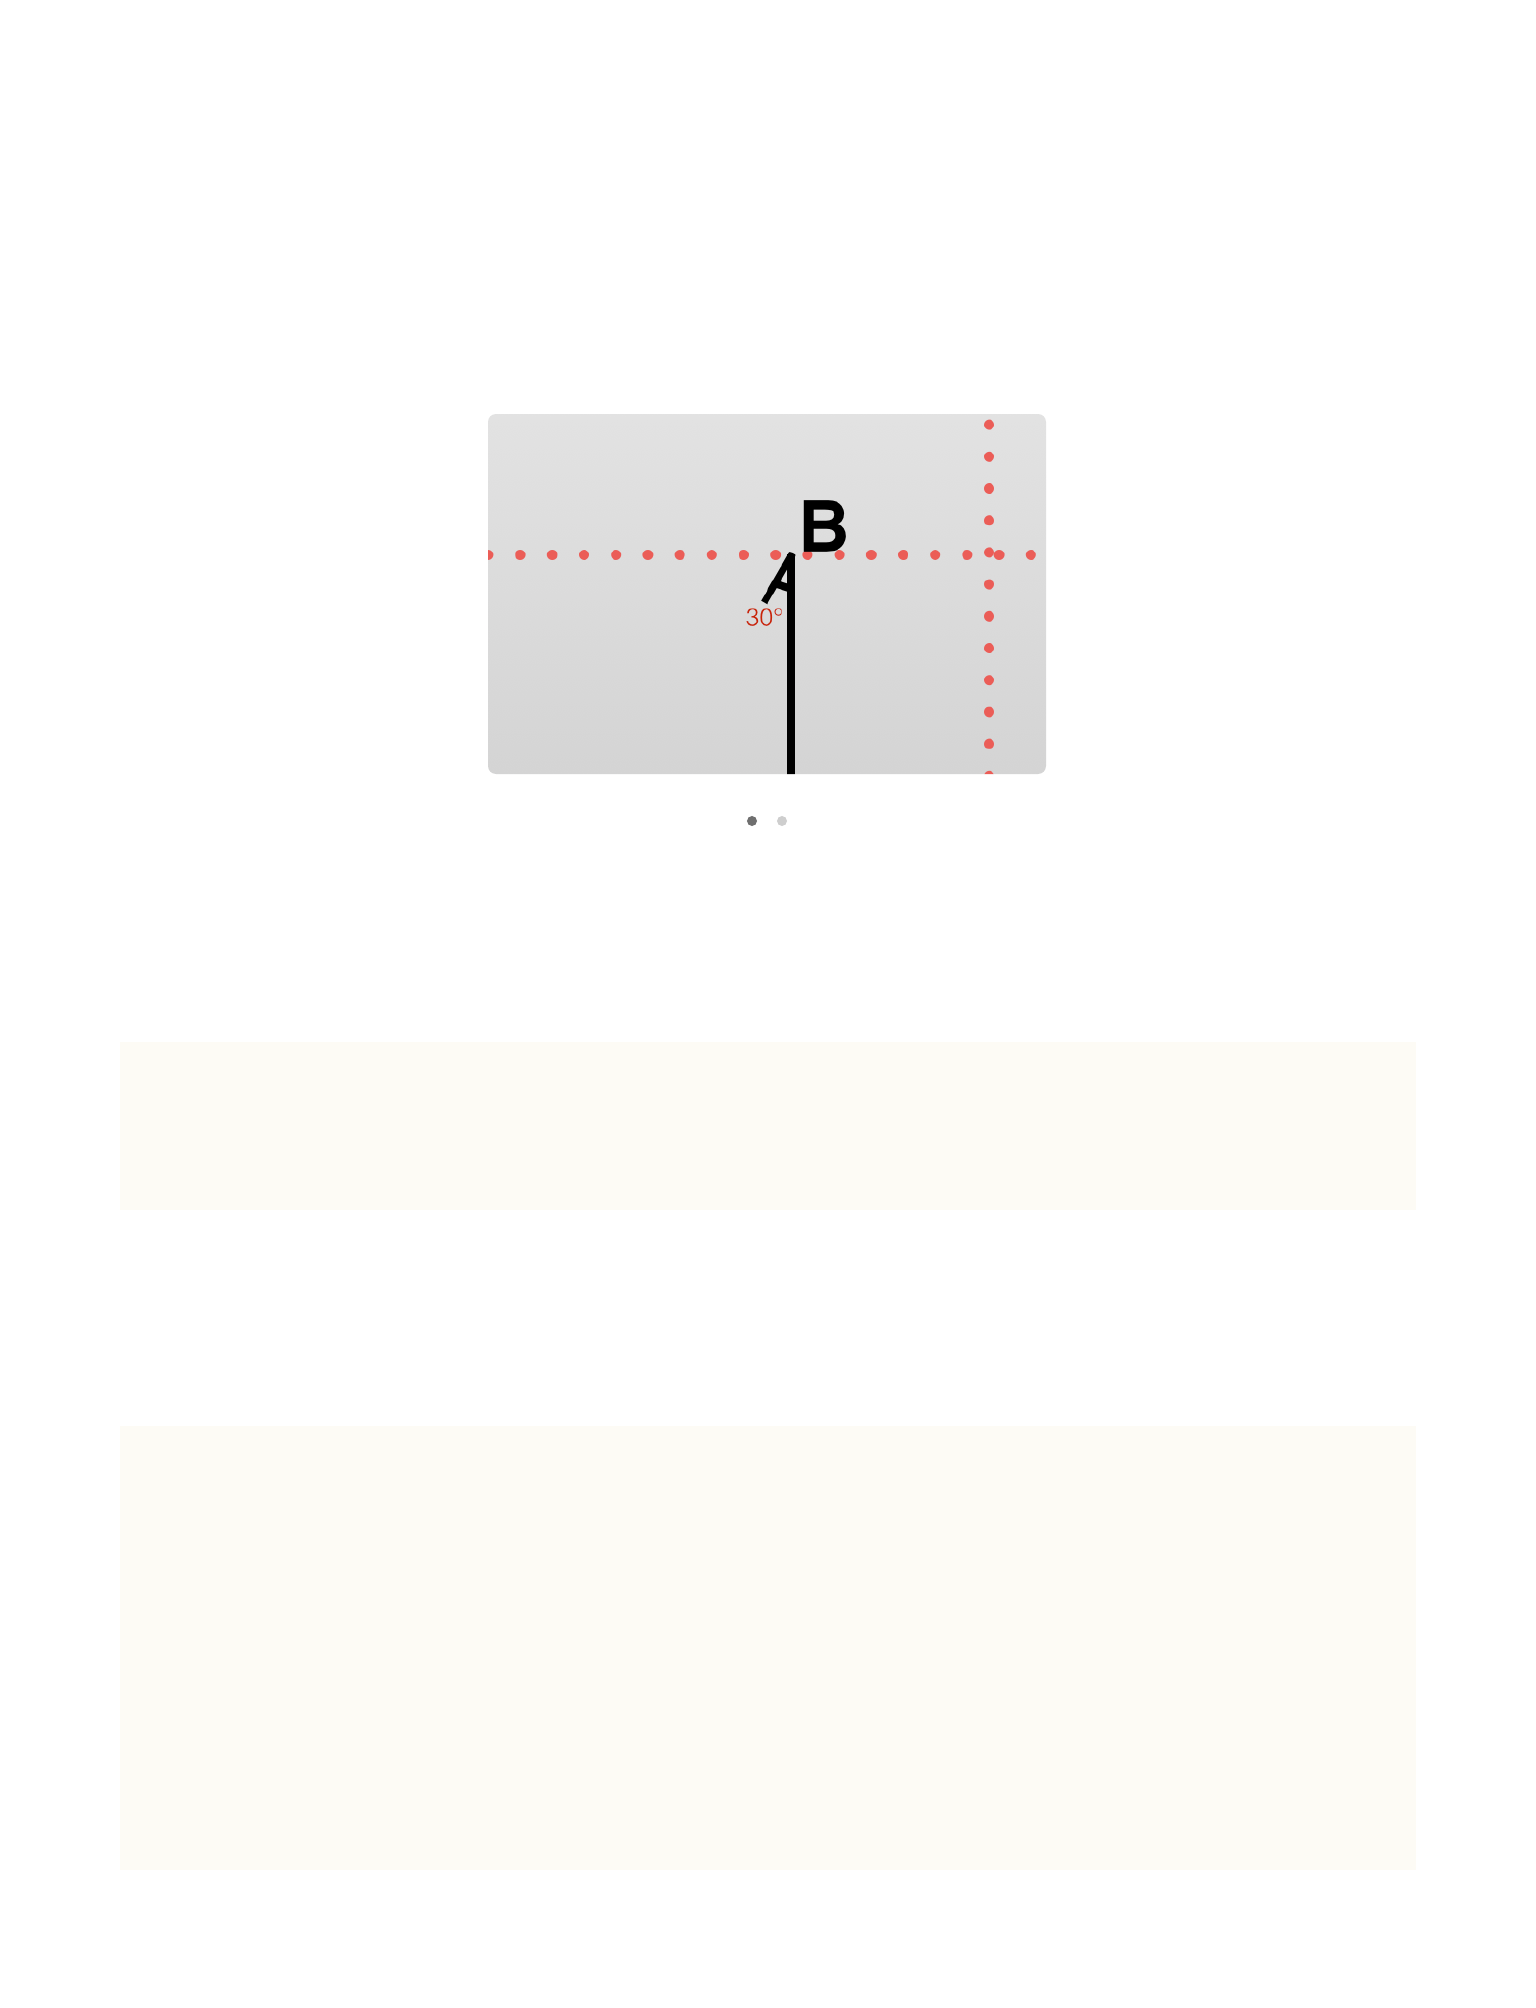
GALLERY 4.1:我们以 B 点作为箭头的起始起点,斜向左下⽅ 30° ⾓延
长 3 个单位。弯曲之后也同理,只需要额外加上线段转过的⾓度即可。
相应的代码就是:
[arrowPath moveToPoint:pointB];
[arrowPath addLineToPoint:CGPointMake(pointB.x - 3*(cosf(De-
gree)), pointB.y + 3*(sinf(Degree)))];
[curvePath1 appendPath:arrowPath];
最终,整个动画完整的绘制算法如下:
-(void)drawInContext:(CGContextRef)ctx{
[super drawInContext:ctx];
UIGraphicsPushContext(ctx);
CGContextRef context = UIGraphicsGetCurrentContext();
//--------- Draw ----------
//Path 1
GALLERY 4.1 掩饰线段顶部箭头的绘制思路
82

UIBezierPath *curvePath1 = [UIBezierPath bezierPath];
curvePath1.lineCapStyle = kCGLineCapRound;
curvePath1.lineJoinStyle = kCGLineJoinRound;
curvePath1.lineWidth = 2.0f;
//arrowPath
UIBezierPath *arrowPath = [UIBezierPath bezierPath];
if (self.progress <= 0.5) {
CGPoint pointA =
CGPointMake(self.frame.size.width/2-Radius, CenterY - Space +
LineLength + (1-2*self.progress)*(CenterY-LineLength));
CGPoint pointB =
CGPointMake(self.frame.size.width/2-Radius, CenterY - Space +
(1-2*self.progress)*(CenterY-LineLength));
[curvePath1 moveToPoint:pointA];
[curvePath1 addLineToPoint:pointB];
//arrow
[arrowPath moveToPoint:pointB];
[arrowPath addLineToPoint:CGPointMake(pointB.x - 3*(cos-
f(Degree)), pointB.y + 3*(sinf(Degree)))];
[curvePath1 appendPath:arrowPath];
}else if (self.progress > 0.5) {
CGPoint pointA =
CGPointMake(self.frame.size.width/2-Radius, CenterY - Space +
LineLength - LineLength*(self.progress-0.5)*2);
CGPoint pointB =
CGPointMake(self.frame.size.width/2-Radius, CenterY - Space);
[curvePath1 moveToPoint:pointA];
[curvePath1 addLineToPoint:pointB];
[curvePath1
addArcWithCenter:CGPointMake(self.frame.size.width/2, CenterY-
Space) radius:Radius startAngle:M_PI endAngle:M_PI + ((M_PI*9/
10) * (self.progress-0.5)*2) clockwise:YES];
//arrow
[arrowPath moveToPoint:curvePath1.currentPoint];
83
[arrowPath
addLineToPoint:CGPointMake(curvePath1.currentPoint.x - 3*(cos-
f(Degree - ((M_PI*9/10) * (self.progress-0.5)*2))),
curvePath1.currentPoint.y + 3*(sinf(Degree - ((M_PI*9/10) *
(self.progress-0.5)*2))))];
[curvePath1 appendPath:arrowPath];
}
//Path 2
UIBezierPath *curvePath2 = [UIBezierPath bezierPath];
curvePath2.lineCapStyle = kCGLineCapRound;
curvePath2.lineJoinStyle = kCGLineJoinRound;
curvePath2.lineWidth = 2.0f;
if (self.progress <= 0.5) {
CGPoint pointA =
CGPointMake(self.frame.size.width/2+Radius, 2*self.progress *
(CenterY + Space - LineLength));
CGPoint pointB =
CGPointMake(self.frame.size.width/2+Radius,LineLength +
2*self.progress*(CenterY + Space - LineLength));
[curvePath2 moveToPoint:pointA];
[curvePath2 addLineToPoint:pointB];
//arrow
[arrowPath moveToPoint:pointB];
[arrowPath addLineToPoint:CGPointMake(pointB.x + 3*(cos-
f(Degree)), pointB.y - 3*(sinf(Degree)))];
[curvePath2 appendPath:arrowPath];
}else if (self.progress > 0.5) {
[curvePath2
moveToPoint:CGPointMake(self.frame.size.width/2+Radius, CenterY
+ Space - LineLength + LineLength*(self.progress-0.5)*2)];
[curvePath2
addLineToPoint:CGPointMake(self.frame.size.width/2+Radius, Cen-
terY + Space)];
[curvePath2
addArcWithCenter:CGPointMake(self.frame.size.width/2, (Cen-
terY+Space)) radius:Radius startAngle:0
endAngle:(M_PI*9/10)*(self.progress-0.5)*2 clockwise:YES];
84

//arrow
[arrowPath moveToPoint:curvePath2.currentPoint];
[arrowPath
addLineToPoint:CGPointMake(curvePath2.currentPoint.x + 3*(cos-
f(Degree - ((M_PI*9/10) * (self.progress-0.5)*2))),
curvePath2.currentPoint.y - 3*(sinf(Degree - ((M_PI*9/10) *
(self.progress-0.5)*2))))];
[curvePath2 appendPath:arrowPath];
}
CGContextSaveGState(context);
CGContextRestoreGState(context);
[[UIColor blackColor] setStroke];
[arrowPath stroke];
[curvePath1 stroke];
[curvePath2 stroke];
UIGraphicsPopContext();
}
你仍然可以在我的Github repo —— A-GUIDE-TO-iOS-ANIMATION 下的
AnimatedCurveDemo 找到对应的源码。
85
第三个例⼦是我在发布本册电
⼦书之前临时加的⼀个例⼦,
也是在看了 9⽉9⽇苹果新品
发布会之后才有的灵感。
效果请看 MOVIE 4.3 。
下⾯我就带你来实现⼀下这个效果。⾸先
我要告诉你的是,这个 demo 的代码⾮常短,
也就 100 ⾏左右。其中⽤到的核⼼⽅法就是 CATransform3DRo-
tate除此之外,没有使⽤到任何其它关于动画的 API。我会毫⽆保留地
向你展⽰我的整个思考过程,相信在看完之后,以后你再遇到类似的问
题也能举⼀反三。
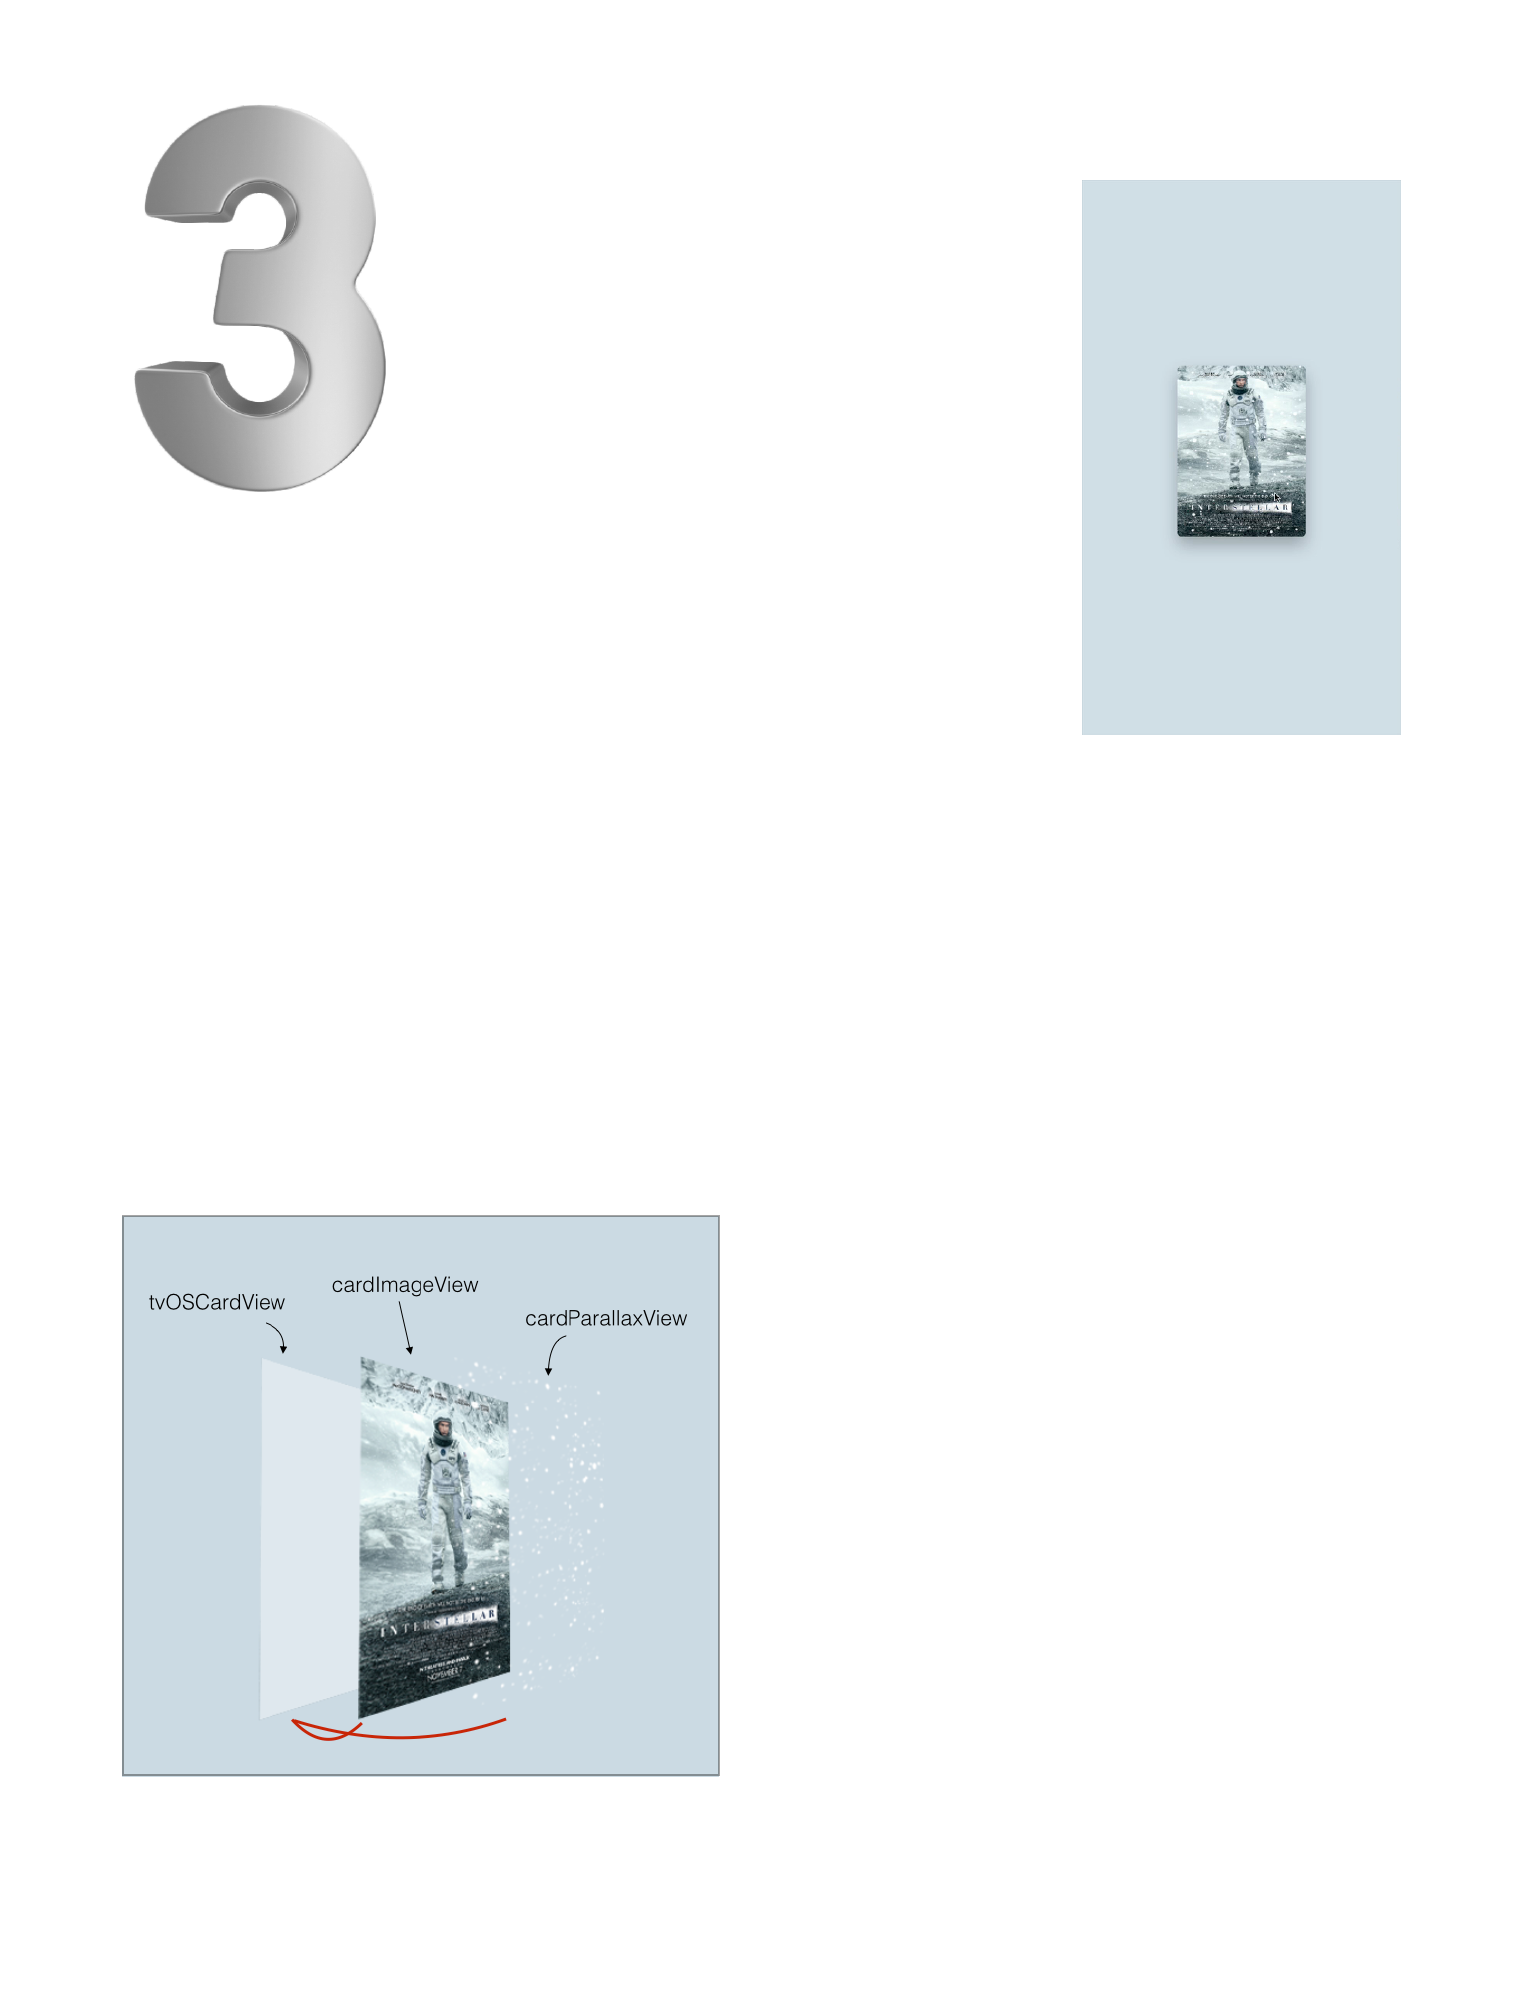
⾸先,我要向你介绍的是整体视图
的层级。
tvOSCardView 是我们对外展⽰的
类,其上⽅有两个 subView —— 分别
是 cardImageView 和 cardParallax-
View。初始化代码如下:
MOVIE 4.3 模拟 tvOS 中的3D浮动效果
86
-(void)setUpSomething{
self.layer.shadowColor = [UIColor blackColor].CGColor;
self.layer.shadowOffset = CGSizeMake(0, 10);
self.layer.shadowRadius = 10.0f;
self.layer.shadowOpacity = 0.3f;
cardImageView = [[UIImageView
alloc]initWithFrame:self.bounds];
cardImageView.image = [UIImage imageNamed:@"poster"];
cardImageView.layer.cornerRadius = 5.0f;
cardImageView.clipsToBounds = YES;
[self addSubview:cardImageView];
UIPanGestureRecognizer *panGes = [[UIPanGestureRecognizer
alloc]initWithTarget:self action:@selector(panInCard:)];
[self addGestureRecognizer:panGes];
cardParallaxView = [[UIImageView
alloc]initWithFrame:cardImageView.frame];
cardParallaxView.image = [UIImage imageNamed:@"5"];
cardParallaxView.layer.transform =
CATransform3DTranslate(cardParallaxView.layer.transform, 0, 0,
200);
[self insertSubview:cardParallaxView
aboveSubview:cardImageView];
}
为什么需要这样设计这样的视图层级是有原因的。注意到了吗?我们
的这个视图带有阴影,但是细⼼的你又会发现,视图同时还带有圆⾓,
⽽圆⾓就必须在设置了 cornerRadius 的同时开启 clipsToBounds 或
layer.masksToBounds如果此时阴影也是加在这个圆⾓的视图上,那么
87
阴影也就会被裁掉。所以这就是为什么我们要把阴影设置在 self.layer
上,然后把圆⾓设置在 cardImageView 上。
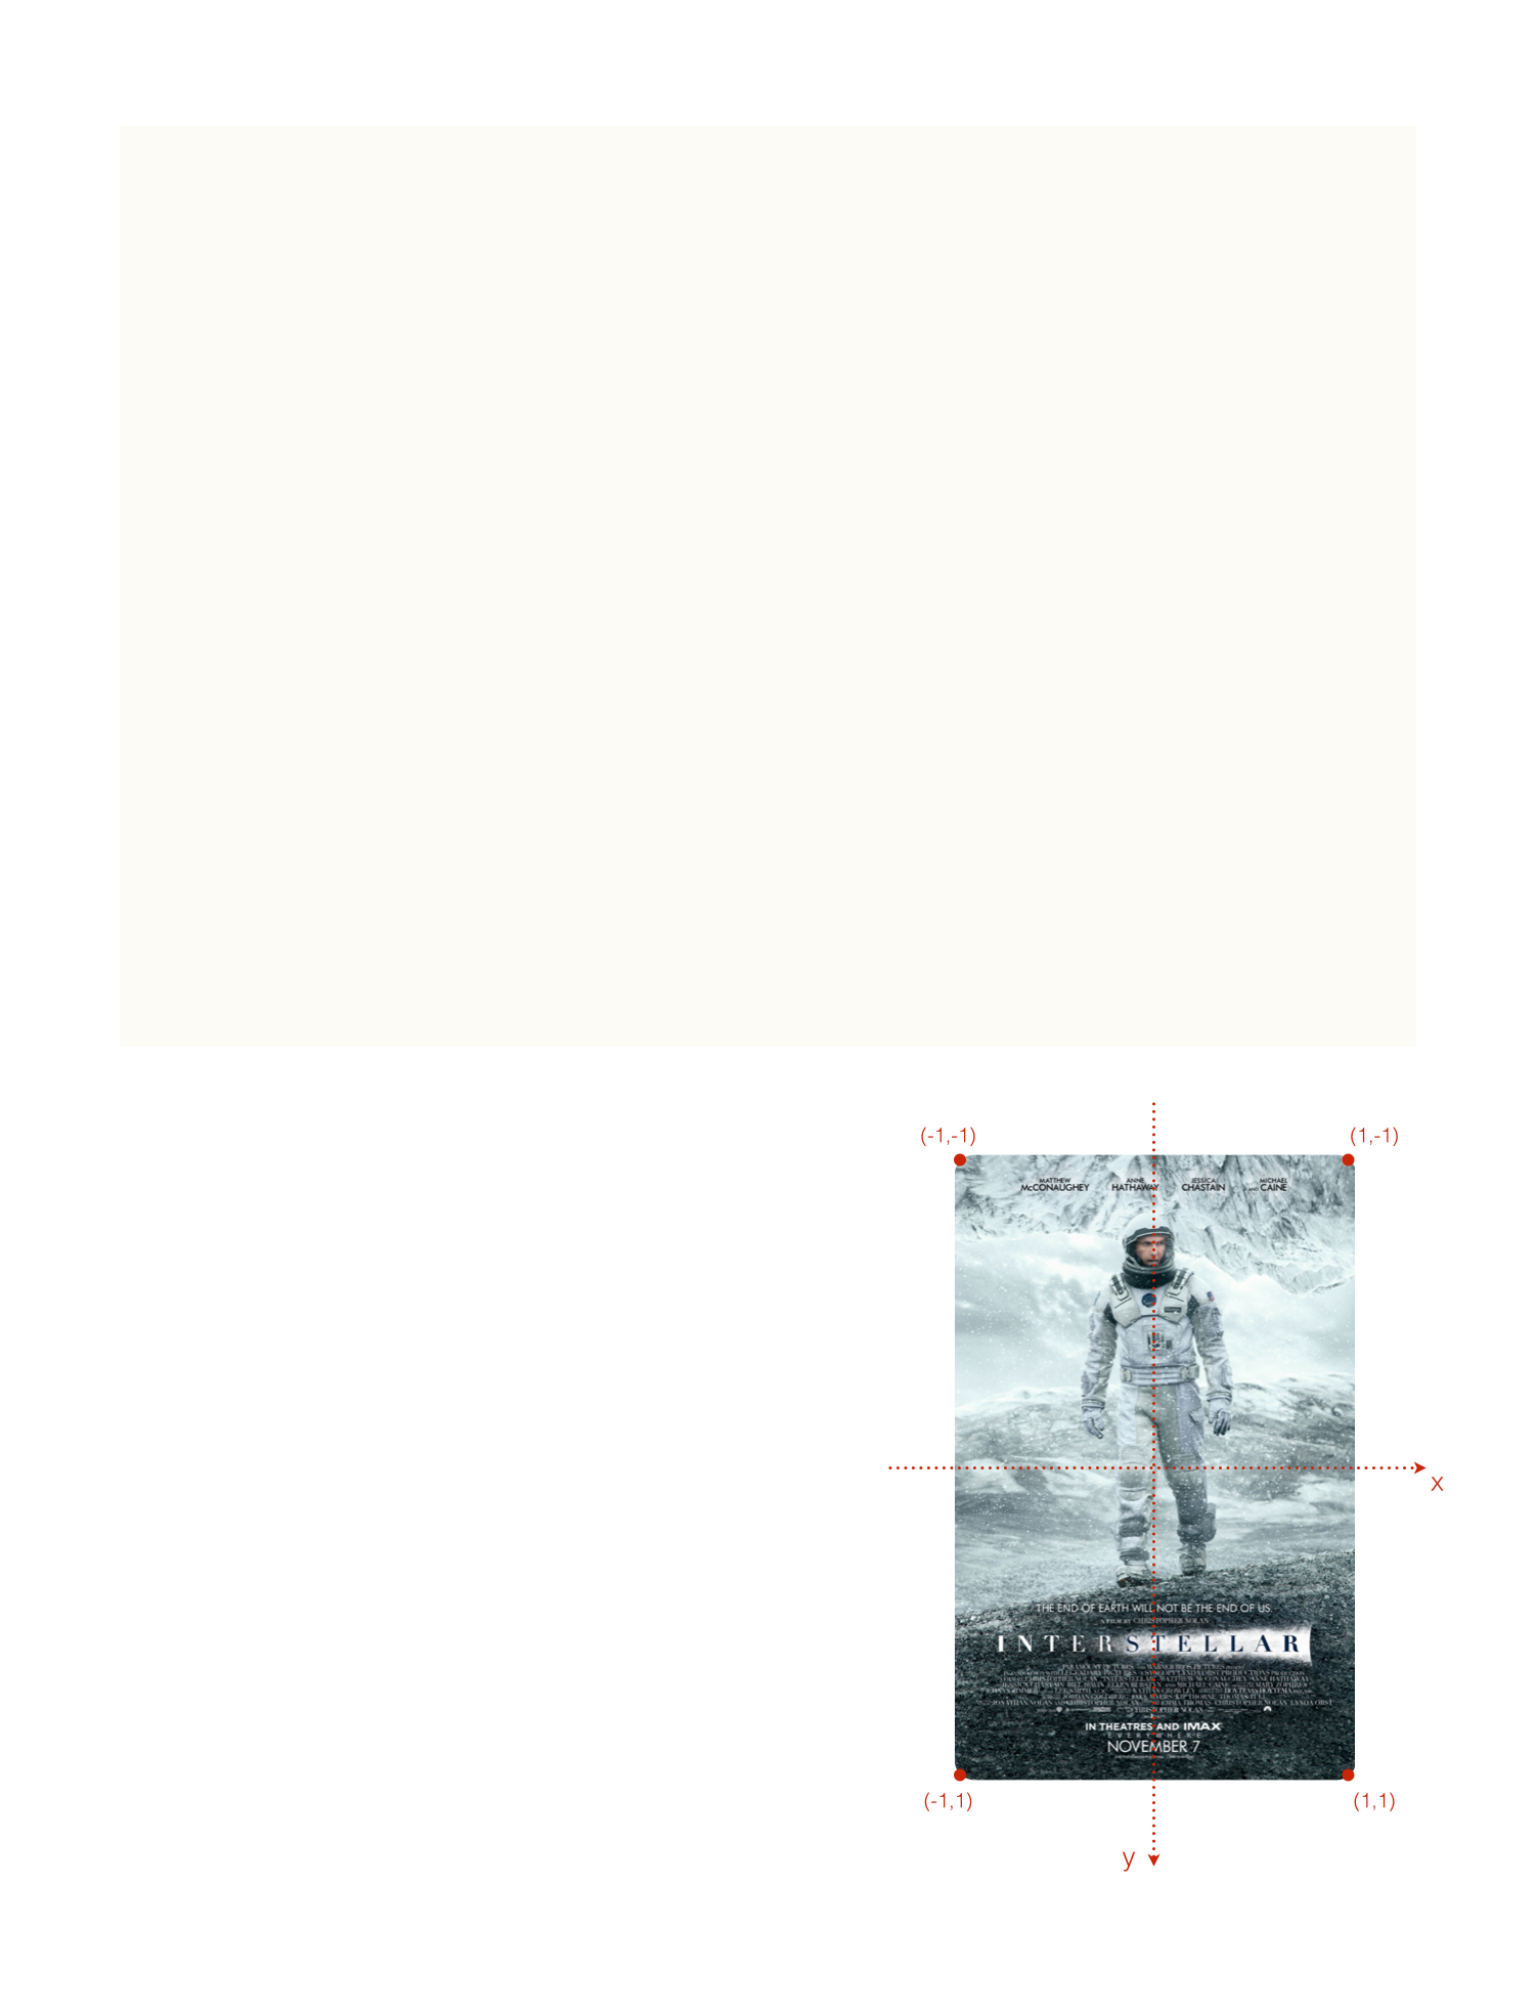
再说说是⼿势控制了。我先不急给你看代码,我先聊聊⼀开始我是怎
么想的。我想要的效果是⼿指移到什么地⽅,什么地⽅就会「突」起
来,并且是绕着视图中点旋转的,⽽默认 iOS 中的坐标系是以左上⾓为
原点,⽔平向左为 x 轴正⽅向,竖直向下为 y 轴正⽅向。所以可以预感
到我们必须以视图中⼼为原点创建⼀个虚拟坐标系,以⽅便后续动画数
值的计算。下⾯给出的代码的作⽤就是 —— 把系统默认的坐标系统转换
成我们虚构的⼀个坐标系统,这个假设的坐标系以视图中⼼为坐标系原
点,就像下图所展⽰的那样:
-(void)panInCard:(UIPanGestureRecognizer *)panGes{
CGPoint touchPoint = [panGes locationInView:self];
if (panGes.state == UIGestureRecognizerStateChanged) {
CGFloat xFactor = MIN(1, MAX(-1,(touchPoint.x -
(self.bounds.size.width/2)) / (self.bounds.size.width/2)));
CGFloat yFactor = MIN(1, MAX(-1,(touchPoint.y -
(self.bounds.size.height/2)) / (self.bounds.size.height/2)));
cardImageView.layer.transform = [self
transformWithM34:1.0/-500 xf:xFactor yf:yFactor];
cardParallaxView.layer.transform = [self
transformWithM34:1.0/-250 xf:xFactor yf:yFactor];
88
}else if (panGes.state == UIGestureRecognizerStateEnded){
[UIView animateWithDuration:0.3 animations:^{
cardImageView.layer.transform = CATransform3DIden-
tity;
cardParallaxView.layer.transform = CATrans-
form3DIdentity;
} completion:NULL];
}
}
-(CATransform3D )transformWithM34:(CGFloat)m34 xf:(CGFloat)xf
yf:(CGFloat)yf{
CATransform3D t = CATransform3DIdentity;
t.m34 = m34;
t = CATransform3DRotate(t, M_PI/9 * xf, 0, 1, 0);
t = CATransform3DRotate(t, M_PI/9 * yf, -1, 0, 0);
return t;
}
代码中,我通过两个转换公式获得了
两个数值 xFactor 和 yFac-
tor,并且取值范围控制在了 [-1,1] ,作
为我们新建的虚拟坐标系下的坐标点。
这样⼀来视图的左上⾓、右上⾓、左下
⾓、右下⾓就分别被转换成了 (-1,-1) ,
(1,-1) , (-1,1) , (1,1) 。然⽽为什么是 1,-
1 呢?
89

我们知道 CATransform3D CATransform3DRotate (CATransform3D t,
CGFloat angle,CGFloat x, CGFloat y, CGFloat z) 这个⽅法在给定⼀
个 弧度制 的⾓度之后,后⾯的 x,y,z 只需要指定⼀个任意正数或零或任
意负数即可。通常我们使⽤ -1,0,1。关于苹果规定的 rotate 正⽅向参见
GALLERY 4.2 。
接下来我就开始尝试把这个
坐标系统运⽤到 CATrans-
form3DRotate 中。先规定最⼤
偏移⾓度为 20°,也就是
M_PI/9 然后我处理的⽅法
依然是分解,把⼀个多纬度动画
拆开为两个分运动逐个分析。我
先分析了绕 x 轴旋转的分运动,也就是随着 yFactor 值从 -1 到 1,视
图从 -20° 转到 20°。由于绕 x 轴旋转的正⽅向是上半部分向外,下部分
向内,因此⼀开始的⽅向为正,与 yFactory ⼀开始的符号刚好相反,所
以把 x 设为 -1 ,即 t = CATransform3DRotate(t, M_PI/9 * yf, -1,
0, 0)
绕 X 轴旋转的正⽅向
GALLERY 4.2 rotation.x/y/z 的正⽅向
90

自定义属性动画
5
92
这⼀节我们将进⼊⼀个全新的动画世界。这绝对是⼀些你未尝涉及过
的动画技巧。掌握了这些技巧,你可以实现很多之前望⽽却步的动效。
它就是 —— ⾃定义属性动画(Custom Property Animation)
⽐如像 MOVIE 5.1 这
种:
事不宜迟,我们赶紧来
看看这个效果的实现。
⾸先,我们创建两个类:Menu
和 MenuLayer 。把 MenuLayer 添加到 Menu 的 layer 上。
Menu 只负责点击事件、以及作为添加 item 的容器,动画的具体实现我
们放在 MenuLayer 中,这也符合 UIView 的 CALayer 的先天使命。
在编写这本电⼦书之前,我就希望我能给带给各位读者的不仅仅只是
问题的答案,更应该是解决问题的过程已经我的思考。这才是能帮助你
脱离这⼏个案例依然能⾃⼰完成动画的根本⽅法论。所以,我不想只给
你说下⼀步应该怎么做,我尽量把我⾃⼰从第⼀眼看到这个动画时的⼼
93
MOVIE 5.1 ⾃定义动画 —— GooeyEffect

理活动到最终实现的整个过程呈现给你,希望能对你以后⾃⼰实现相应
的动画有所借鉴。
我在第⼀眼看到这个动效时,坦率地讲,我真的觉得很难实现。但我
知道,「天下武功唯快不破」。凡是让⼈⽆从下⼿的动效,很⼤程度上
是因为看不清,也就是动画的播放速度快到让你根本不知道它是怎么动
的。那么接下来就很⾃然地会想到,有什么办法可以让动画慢下来呢?
最好是可以⼿动控制关键帧地进⾏逐帧播放。如果你有视频剪辑的经验
那么你就知道最直接的⽅法就是拖⼊ Final Cut Pro 或者 PR 这类剪辑软
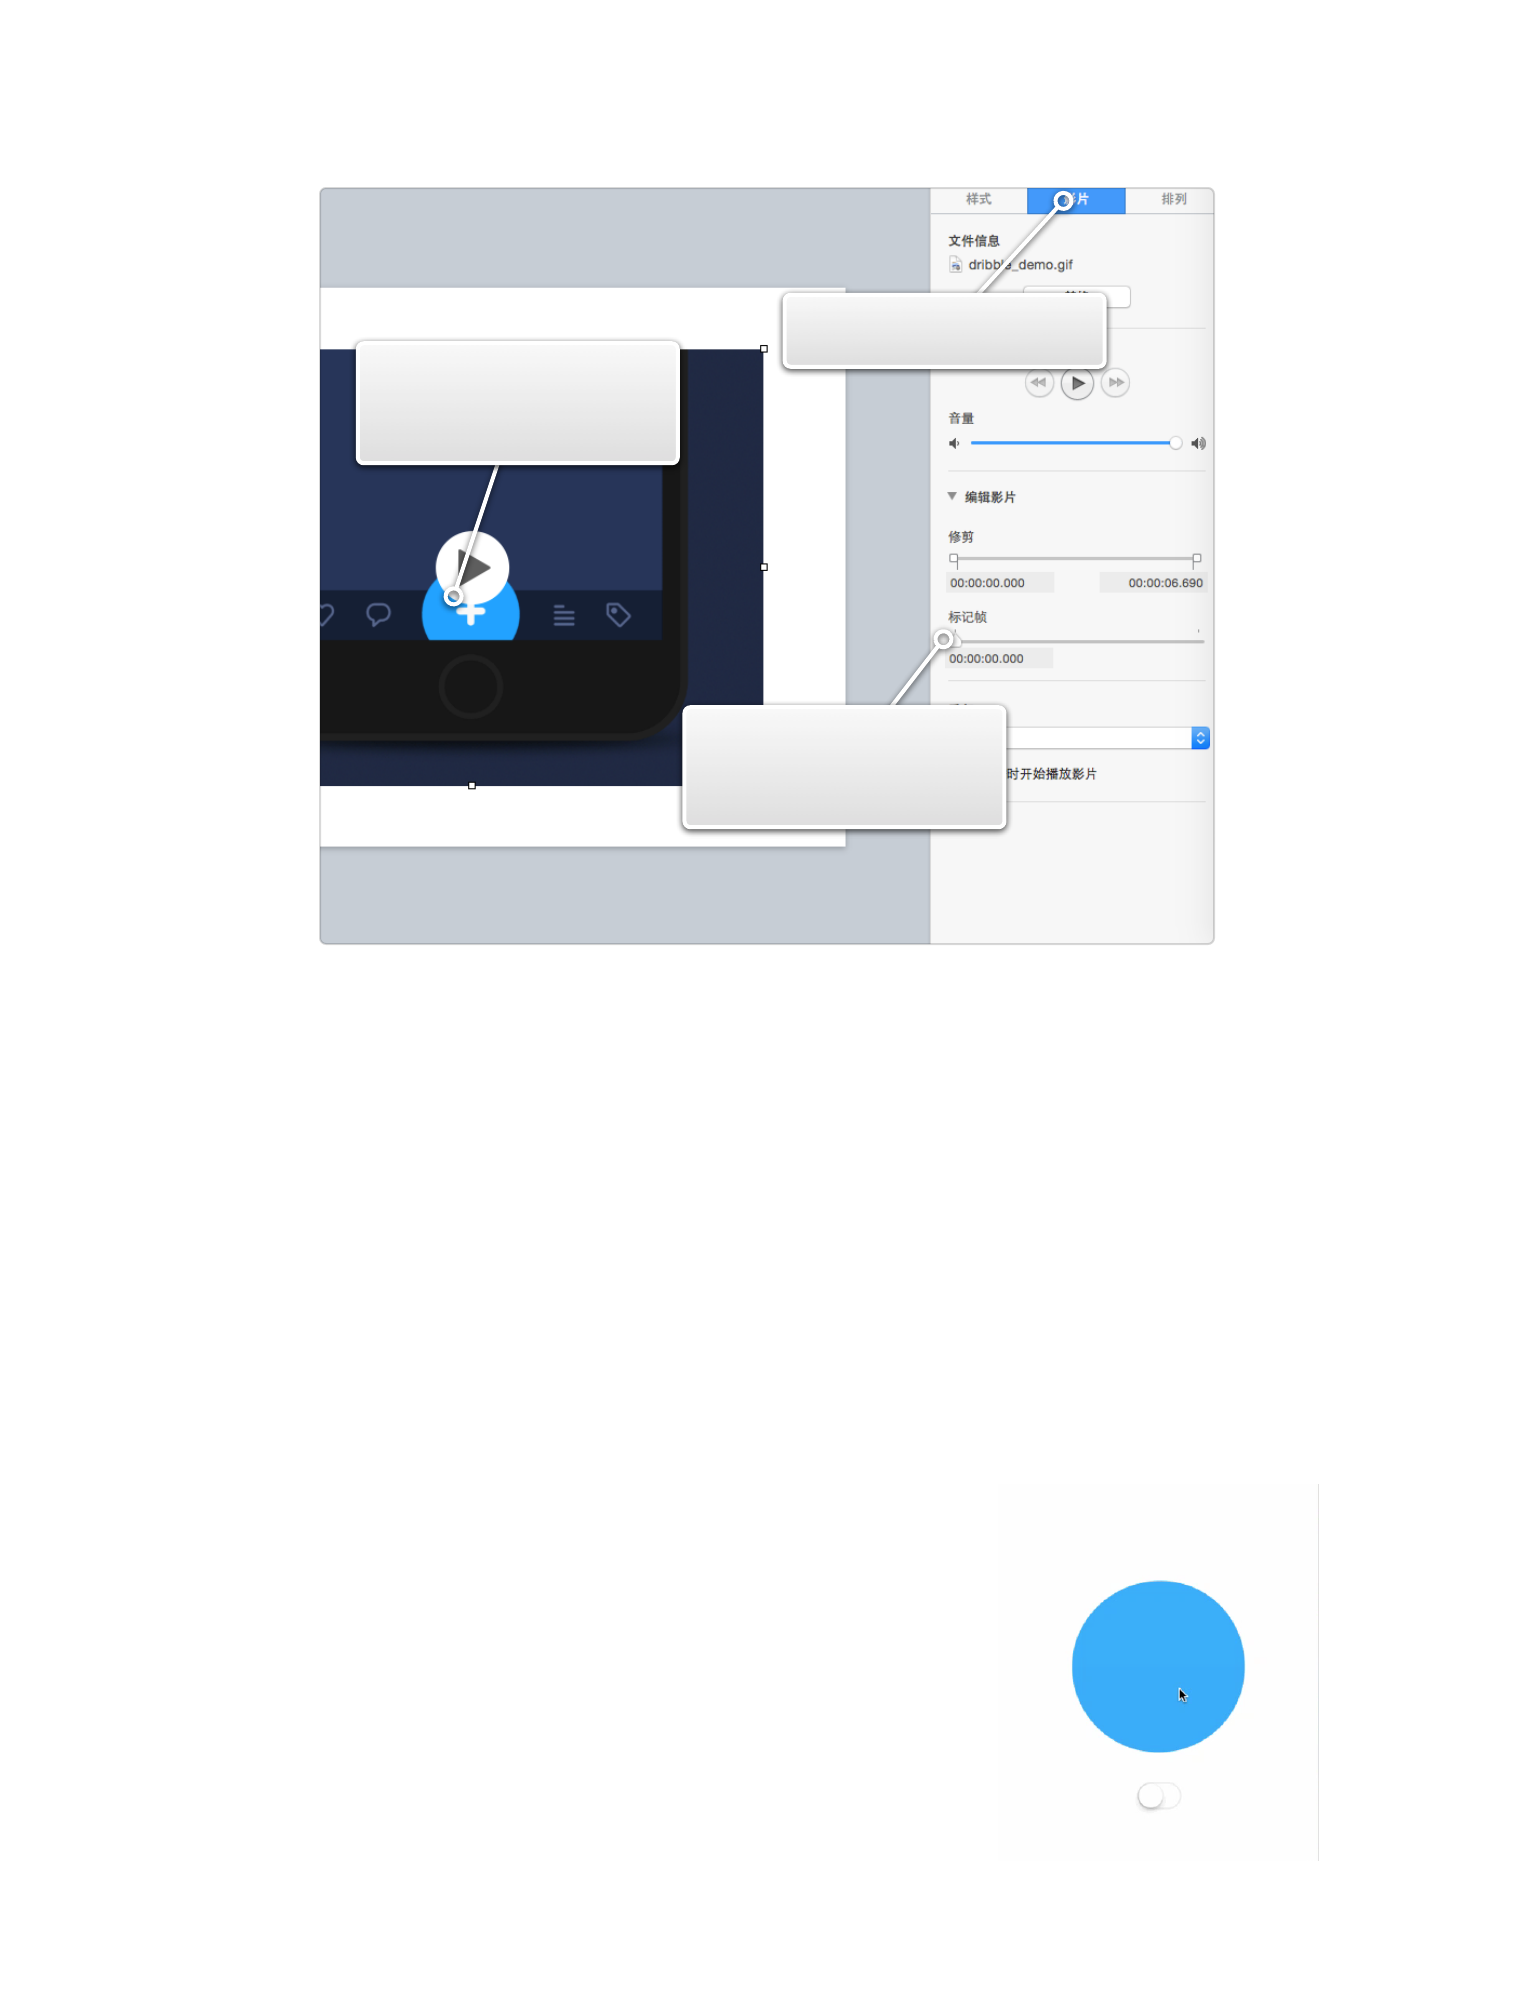
件中,在时间线进⾏逐帧浏览。但归功于我是⼀位重度 Keynote 使⽤
者,我在⼤学中的每次演讲都是在 Keynote 的帮助下完成的,以⾄于熟
悉到我⼀直拿它当 PS ⽤。你之前看到的所有插图都是我在 Keynote 中完
成的。然⽽现在我还要告诉你的是,Keynote 还可以让你逐帧查看视频或
GIF 。
⾸先你需要将⼀个视频或 GIF 拖⼊ Keynote ,然后选中右侧的「影
⽚」板块,通过滑动「标记帧」滑块可以实现逐帧预览。
94
通过对逐帧图⽚的慢动作分析,我很快就有了思路:「依然⽤贝塞尔
曲线拼出⼀个圆,依然通过控制点的运动实现⼩球的形变」。只是这回
关键点的移动规律需要推敲⼀下。 MOVIE 5.2 是我完成的第⼀版初稿。
打开控制点可视化后,你会发现其中
的秘密:⼩球的形变其实就是由于顶上三
个点的运动产⽣的。所以核⼼问题就转化
换成了:如何确定控制点的运动轨迹?到
这⾥我们再理⼀理⽬前的思路:
1、导⼊⼀则 GIF 或者
视频
2、选中「影⽚」
3、滑动「标记帧」查
看逐帧动画
INTERACTIVE 5.1 演⽰如何在 Keynote 中逐帧查看视频或 GIF
95
MOVIE 5.2 Gooey Effect 第⼀版
“ CAKeyframeAnimation layer
layer
”
下⾯我会⼀边给出代码⼀边通过警⽰符号向你做出解释。
+(BOOL)needsDisplayForKey:(NSString *)key{
if ([key isEqualToString:@"xAxisPercent"]) {
return YES;
}
return [super needsDisplayForKey:key];
}
-(void)drawInContext:(CGContextRef)ctx{
CGRect real_rect = CGRectInset(self.frame, OFF,OFF);
CGFloat offset = real_rect.size.width/ 3.6;
CGPoint center = CGPointMake(CGRectGetMidX(self.frame),
CGRectGetMidY(self.frame));
CGFloat moveDistance = _xAxisPercent*(offset);
CGPoint top_left =
CGPointMake(center.x-offset-moveDistance, OFF);
CGPoint top_center = CGPointMake(center.x-moveDistance,
OFF);
CGPoint top_right =
CGPointMake(center.x+offset-moveDistance, OFF);
CGPoint right_top = CGPointMake(CGRectGetMaxX(re-
al_rect), center.y-offset);
CGPoint right_center = CGPointMake(CGRectGetMaxX(re-
al_rect), center.y);
CGPoint right_bottom = CGPointMake(CGRectGetMaxX(re-
al_rect), center.y+offset);
96

CGPoint bottom_left = CGPointMake(center.x-offset,
CGRectGetMaxY(real_rect));
CGPoint bottom_center = CGPointMake(center.x, CGRectGetMa-
xY(real_rect));
CGPoint bottom_right = CGPointMake(center.x+offset,
CGRectGetMaxY(real_rect));
CGPoint left_top = CGPointMake(OFF, center.y-offset);
CGPoint left_center = CGPointMake(OFF, center.y);
CGPoint left_bottom = CGPointMake(OFF, center.y+offset);
UIBezierPath *circlePath = [UIBezierPath bezierPath];
[circlePath moveToPoint:top_center];
[circlePath addCurveToPoint:right_center
controlPoint1:top_right controlPoint2:right_top];
[circlePath addCurveToPoint:bottom_center
controlPoint1:right_bottom controlPoint2:bottom_right];
[circlePath addCurveToPoint:left_center
controlPoint1:bottom_left controlPoint2:left_bottom];
[circlePath addCurveToPoint:top_center
controlPoint1:left_top controlPoint2:top_left];
[circlePath closePath];
CGContextAddPath(ctx, circlePath.CGPath);
CGContextSetFillColorWithColor(ctx, [UIColor
colorWithRed:29.0/255.0 green:163.0/255.0 blue:1
alpha:1].CGColor);
CGContextFillPath(ctx);
}
理论上,我们的 MenuLayer 只需要这两段代码就可以了。但我们还
需要重载 -(id)initWithLayer:(MenuLayer *)layer ⽅法拷贝前⼀个
layer 的相应属性,否则当我们每次调⽤
-(void)drawInContext:(CGContextRef)ctx 当前 layer 的属性都将是缺
省值。
97
-(id)initWithLayer:(MenuLayer *)layer{
self = [super initWithLayer:layer];
if (self) {
//...在这⾥拷⻉layer的所有property
self.showDebug = layer.showDebug;
self.xAxisPercent = layer.xAxisPercent;
}
return self;
}
现在你已经完成了 MenuLayer 中的所有代码。我们回到 Menu 类
中,看看应该如何触发 MenuLayer 的重绘以及如何确定控制点的运动轨
迹。
关于运动轨迹,思路是分解为 3 步。结合 GALLERY 5.1 体会。
✤ 第⼀步:从初始位置开始运动到左
侧最远位置,运动距离为⼩球宽度的1/3.6
倍。
✤ 第⼆步:从左侧最远位置运动到右
侧最远位置。
✤ 第三步:从右侧最远位置以弹性动
画恢复到初始位置。
下⾯的代码是关于 MenuLayer 的重绘。
98
GALLERY 5.1 控制点3个状态下的不同位置
-(void)openAnimation{
CAKeyframeAnimation *openAnimation_1 = [[KYSpringLayerAnima-
tion sharedAnimManager]createBasicAnima:@"xAxisPercent"
duration:0.3 fromValue:@(0) toValue:@(1)];
openAnimation_1.delegate = self;
[self.menuLayer addAnimation:openAnimation_1
forKey:@"openAnimation_1"];
}
我创建了⼀个 CAKeyframeAnimation ⽤来刷新 menuLayer 的
@"xAxisPercent" 属性,又因为 menuLayer 对该属性进⾏了监听,所以
menuLayer 会进⾏重绘。值得注意的是,我使⽤的是⾃定义的动画⽣成
器 —— KYSpringLayerAnimation 这⾥⾯的考量在于,通过这个⾃定
义动画⽣成器,你可以实现各种想要的效果,⽽所需要的仅仅是⼀个曲
线⽅程。
下⾯我们来看看这个动画⽣成器的源码:
-(CAKeyframeAnimation *)createBasicAnima:(NSString *)keypath
duration:(CFTimeInterval)duration fromValue:(id)fromValue
toValue:(id)toValue{
CAKeyframeAnimation *anim = [CAKeyframeAnimation
animationWithKeyPath:keypath];
anim.values = [self basicAnimationValues:fromValue
toValue:toValue duration:duration];
anim.duration = duration;
anim.fillMode = kCAFillModeForwards;
anim.removedOnCompletion = NO;
return anim;
}
99
-(NSMutableArray *) basicAnimationValues:(id)fromValue
toValue:(id)toValue duration:(CGFloat)duration{
NSInteger numOfFrames = duration * 60;
NSMutableArray *values = [NSMutableArray
arrayWithCapacity:numOfFrames];
for (NSInteger i = 0; i < numOfFrames; i++) {
[values addObject:@(0.0)];
}
CGFloat diff = [toValue floatValue] - [fromValue float-
Value];
for (NSInteger frame = 0; frame<numOfFrames; frame++) {
CGFloat x = (CGFloat)frame / (CGFloat)numOfFrames;
CGFloat value = [fromValue floatValue] + diff * x;
values[frame] = @(value);
}
return values;
}
核⼼代码就是 anim.values = [self
basicAnimationValues:fromValue toValue:toValue
duration:duration]; 从⽽产⽣ 60 个数值。为什么是 60 个?因为 iOS
设备的刷新频率就是 60HZ,也就是说,想要达到流畅细腻的动画,60 个
关健帧就⾜够了。然后我们来看看这 60 个数值是如何被创造出来的。
-(NSMutableArray *) basicAnimationValues:(id)fromValue
toValue:(id)toValue duration:(CGFloat)duration{
NSInteger numOfFrames = duration * 60;
NSMutableArray *values = [NSMutableArray
arrayWithCapacity:numOfFrames];
for (NSInteger i = 0; i < numOfFrames; i++) {
100
[values addObject:@(0.0)];
}
CGFloat diff = [toValue floatValue] - [fromValue floatVal-
ue];
for (NSInteger frame = 0; frame<numOfFrames; frame++) {
CGFloat x = (CGFloat)frame / (CGFloat)numOfFrames;
CGFloat value = [fromValue floatValue] + diff * x;
values[frame] = @(value);
}
return values;
}
现在你点击 Menu 视图调⽤ -(void)openAnimation ⽅法就能看到
运动轨迹的第⼀步了。同理,第⼆步到第三步也是⼀样,⽆⾮就是再创
建⼀个 CAKeyframeAnimation
CAKeyframeAnimation *openAnimation_2 = [[KYSpringLayerAnimation
sharedAnimManager]createBasicAnima:@"xAxisPercent" duration:0.3
fromValue:@(1) toValue:@(-1)];
在第⼀步动画 animationDidStop 之后再添加第⼆步的动画。通过
⾃定义动画⽣成器的优势在以上两步中并没有很好体现,因为我们只是
使⽤了⼀个简单的⼀次函数,完全可以⽤ kCAMediaTimingFunctionLin-
ear 这些原⽣曲线代替。但马上你就会⽤它创建⼀个弹性动画,你就能
体会到它的优势了。
101
第三步,就是⼀个弹性动画。唯⼀要做的只是传⼊⼀个震荡⽅程。在
KYSpringLayerAnimation 中做如下处理:
-(CAKeyframeAnimation *)createSpringAnima:(NSString *)keypath
duration:(CFTimeInterval)duration
usingSpringWithDamping:(CGFloat)damping
initialSpringVelocity:(CGFloat)velocity fromValue:(id)fromValue
toValue:(id)toValue{
CGFloat dampingFactor = 10.0;
CGFloat velocityFactor = 10.0;
NSMutableArray *values = [self
springAnimationValues:fromValue toValue:toValue
usingSpringWithDamping:damping * dampingFactor
initialSpringVelocity:velocity * velocityFactor
duration:duration];
CAKeyframeAnimation *anim = [CAKeyframeAnimation
animationWithKeyPath:keypath];
anim.values = values;
anim.duration = duration;
anim.fillMode = kCAFillModeForwards;
anim.removedOnCompletion = NO;
return anim;
}
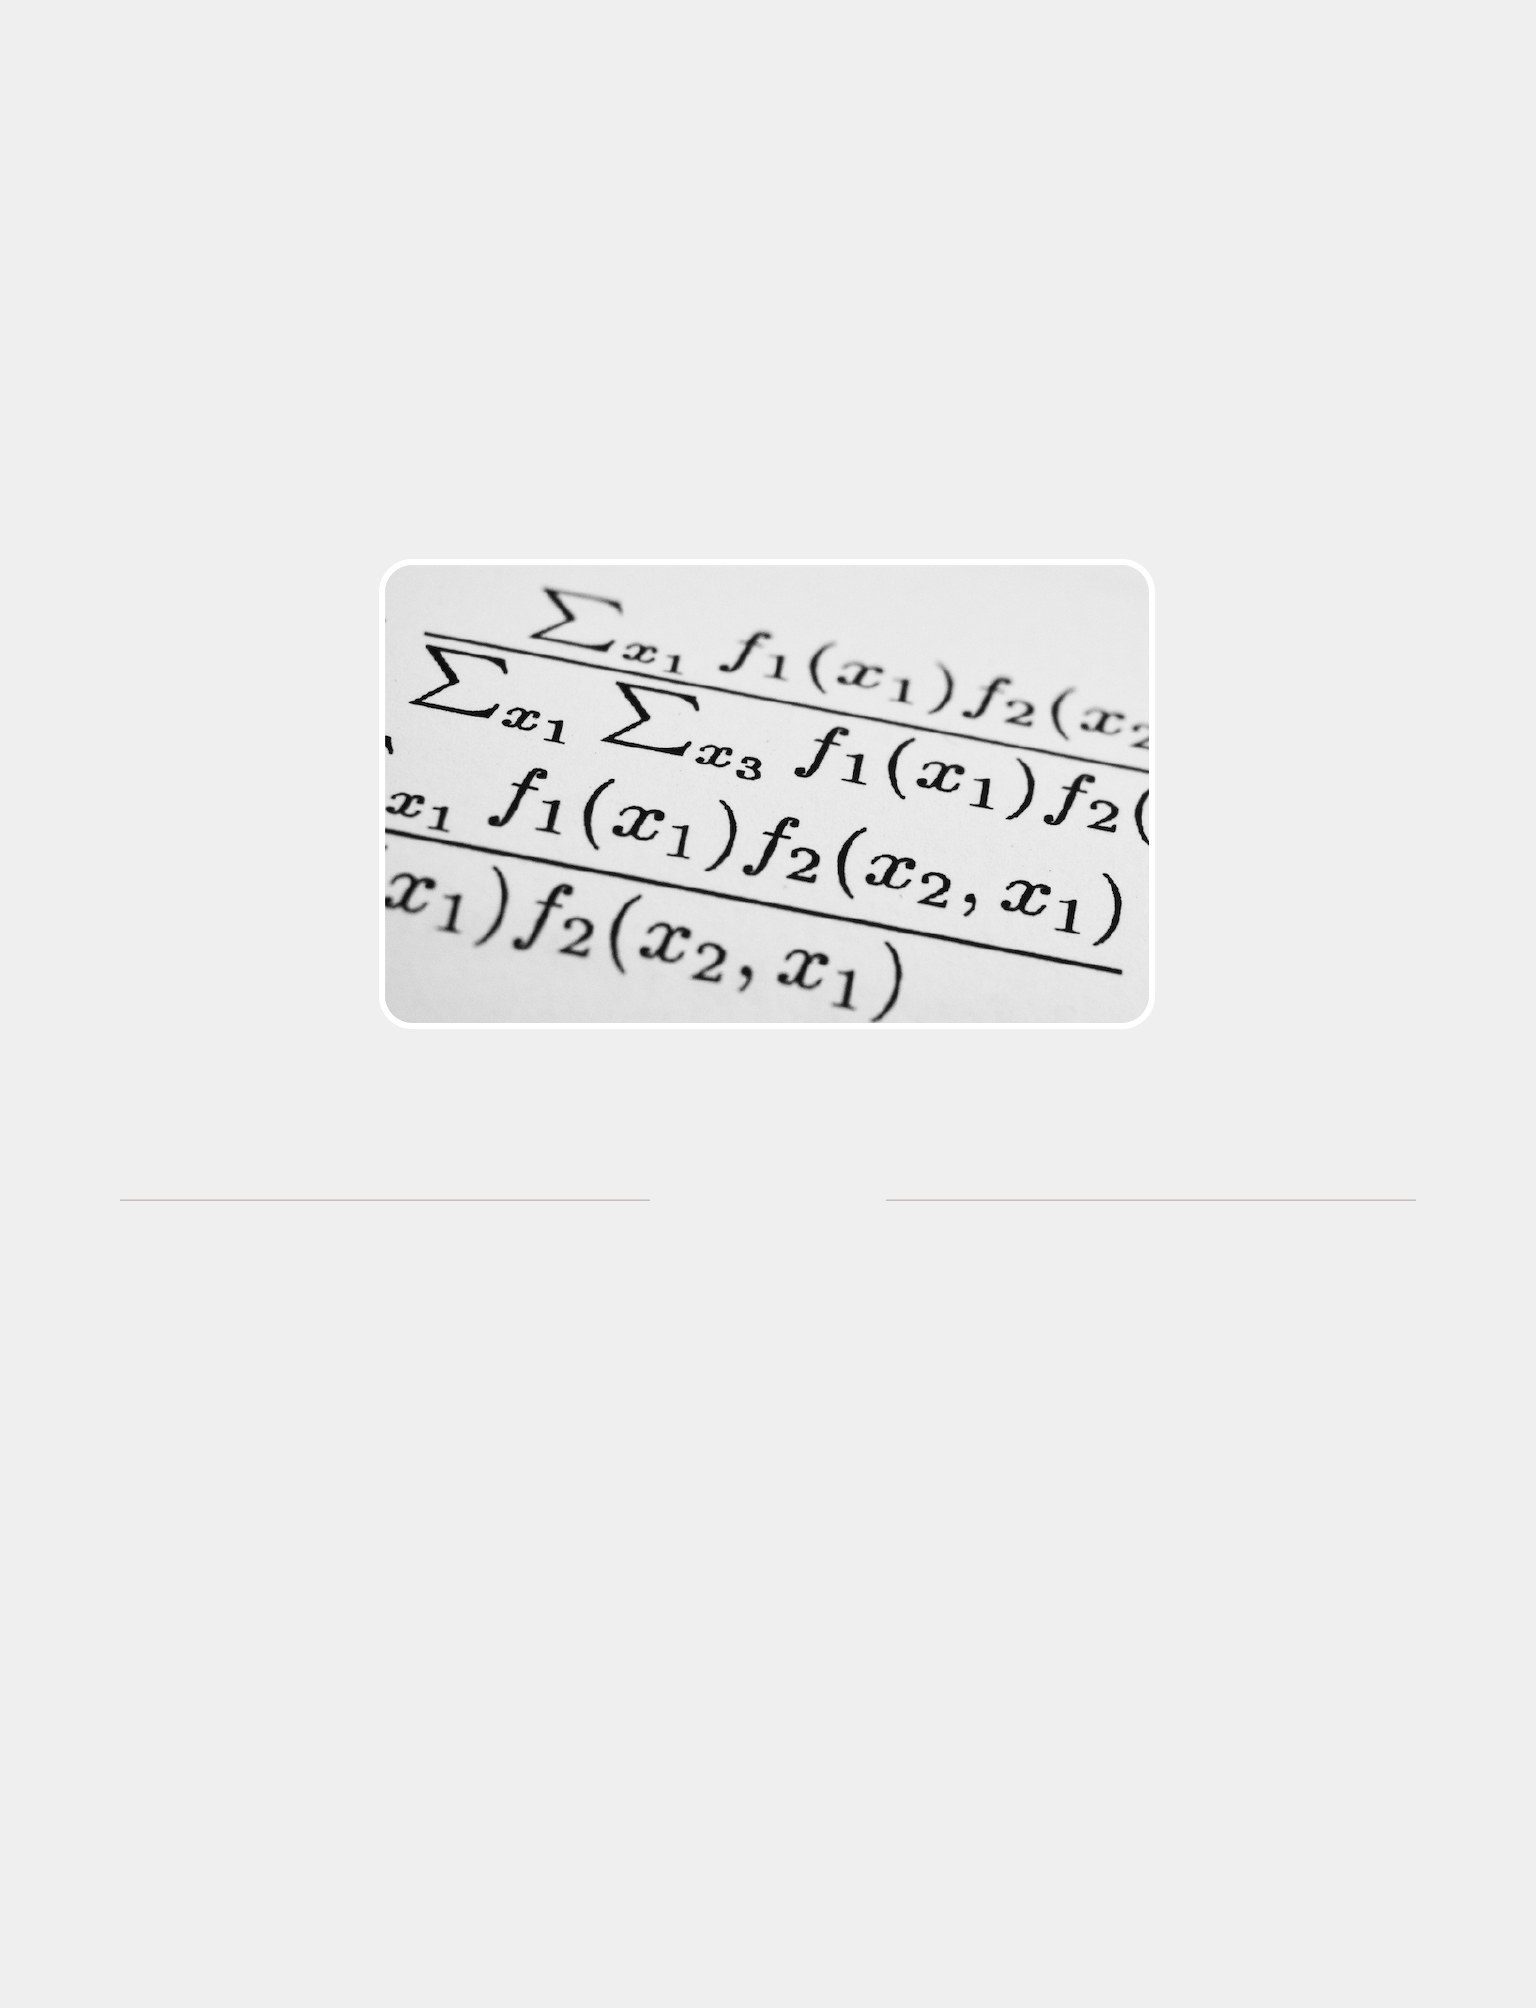
-(NSMutableArray *) springAnimationValues:(id)fromValue
toValue:(id)toValue usingSpringWithDamping:(CGFloat)damping
initialSpringVelocity:(CGFloat)velocity
duration:(CGFloat)duration{
//60个关键帧
NSInteger numOfFrames = duration * 60;
NSMutableArray *values = [NSMutableArray
arrayWithCapacity:numOfFrames];
for (NSInteger i = 0; i < numOfFrames; i++) {
[values addObject:@(0.0)];
}
102
//差值
CGFloat diff = [toValue floatValue] - [fromValue float-
Value];
for (NSInteger frame = 0; frame<numOfFrames; frame++) {
CGFloat x = (CGFloat)frame / (CGFloat)numOfFrames;
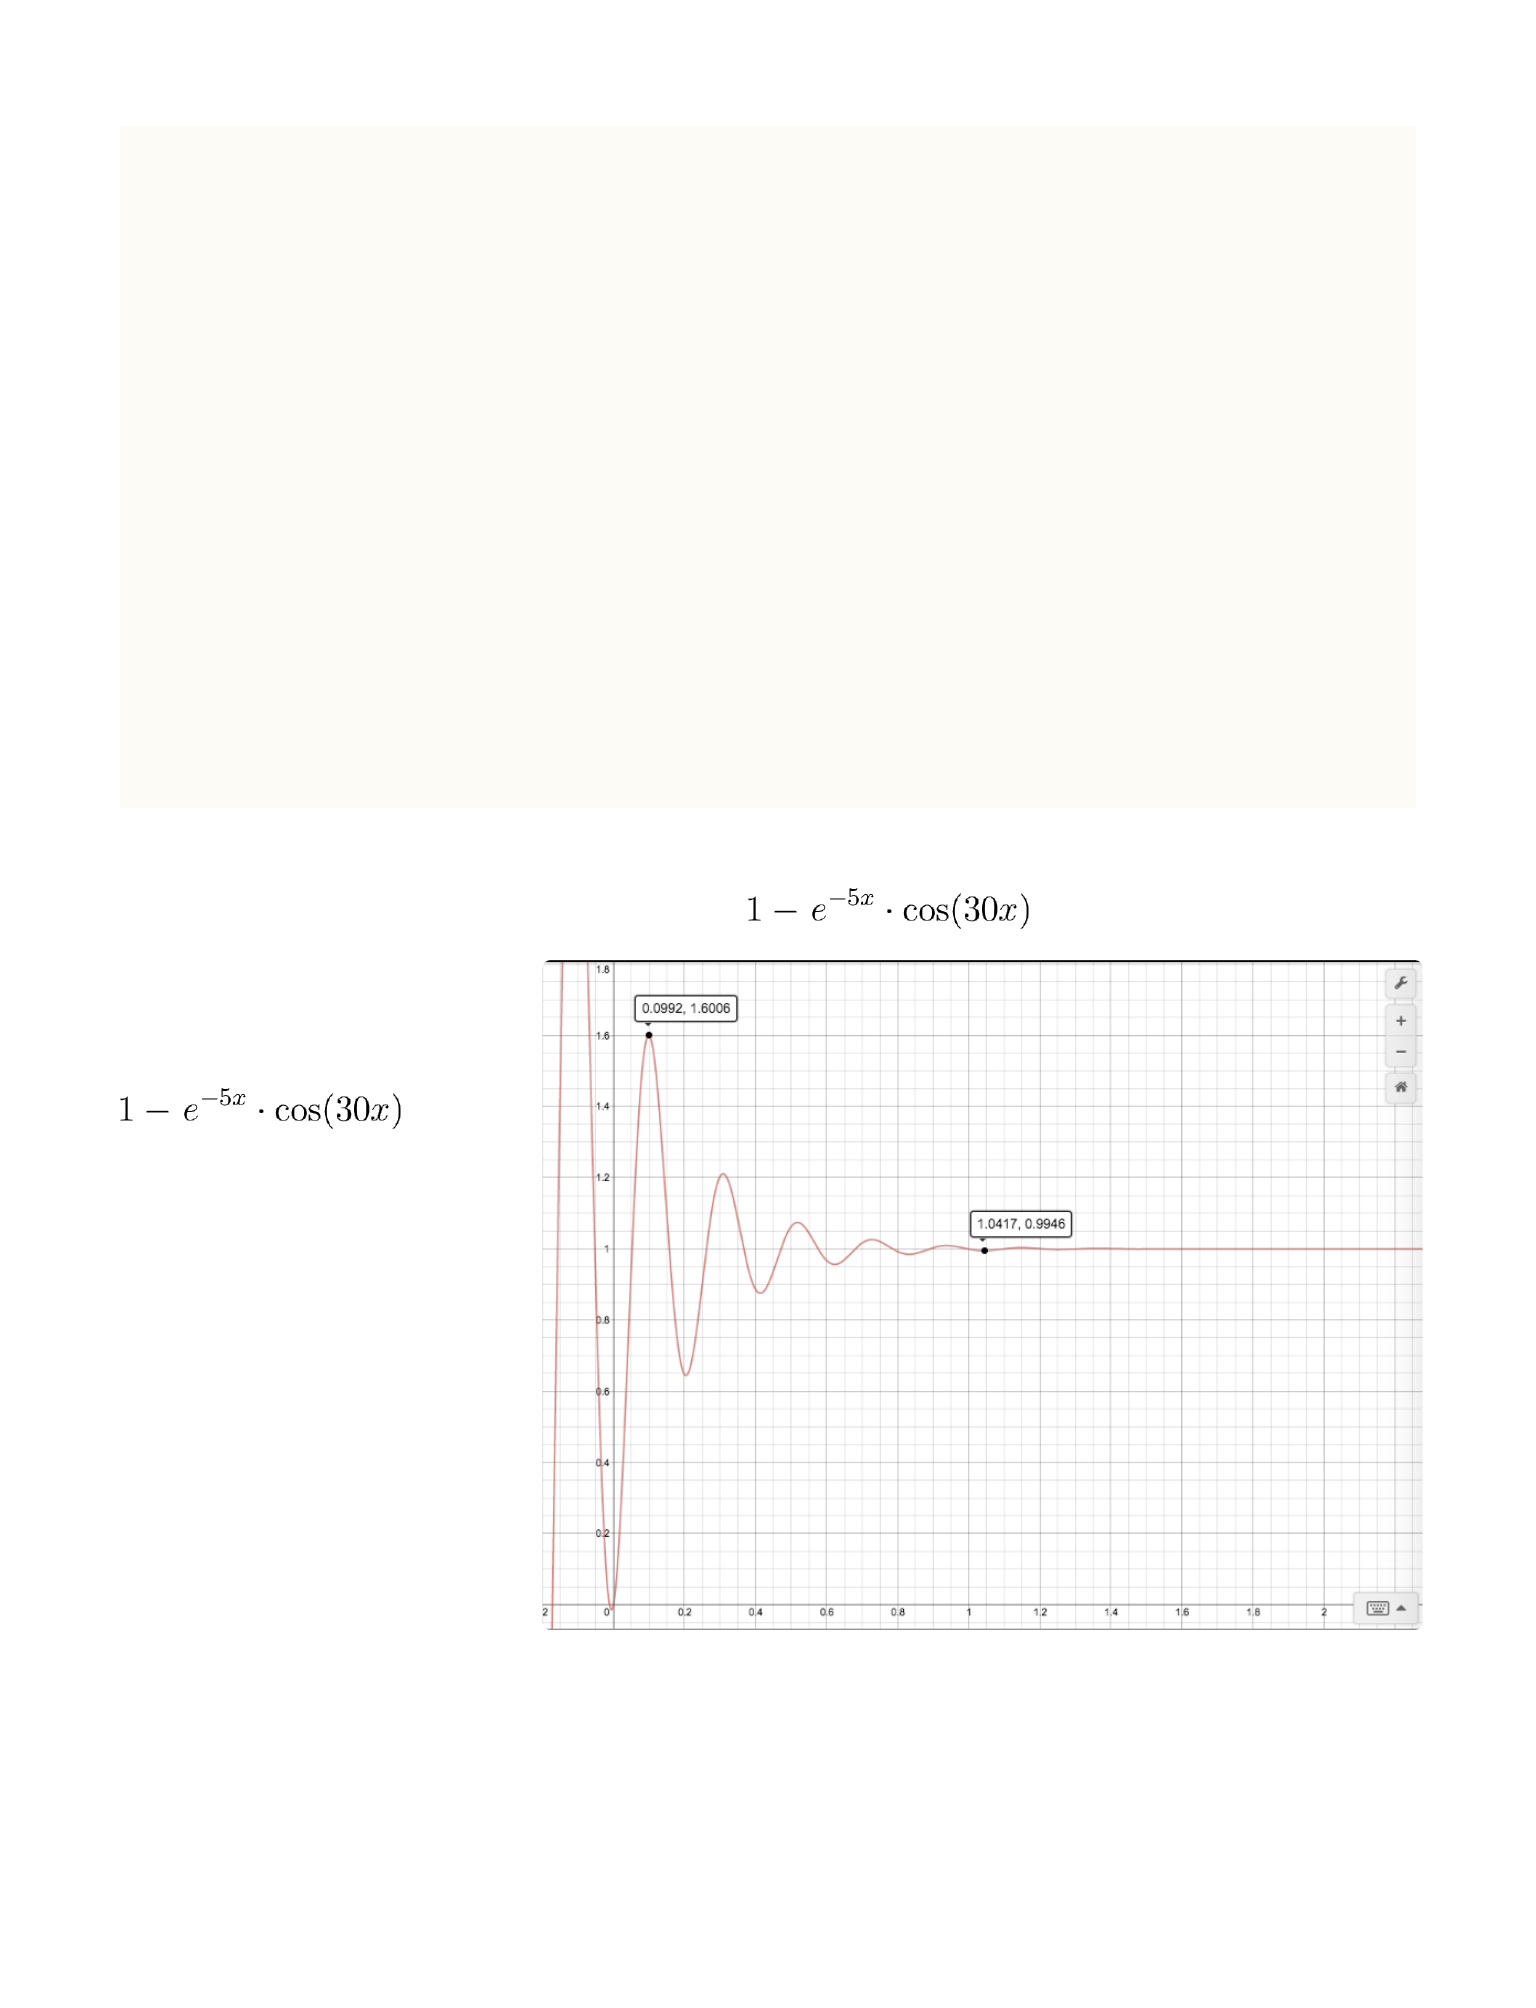
CGFloat value = [toValue floatValue] - diff * (pow(M_E,
-damping * x) * cos(velocity * x)); // y = 1-e^{-5x} * cos(30x)
values[frame] = @(value);
}
return values;
}
这⾥传⼊的是⼀个
震荡函数 :
,如
IMAGE 5.1 所⽰,从⽽
获得了⼀组震荡变化
的值。想要了解更多
关于阻尼振动的知
识,可以点击这⾥查
看维基百科。
当然,此处必须分享⽅便查看函数曲线的⼯具,⽐如这个 ⽹站 。
IMAGE 5.1 y = 的图像
103
接下来使⽤的⽅法还是和之前⼀样,即创建⼀个 CAKeyframeAnima-
tion
CAKeyframeAnimation *openAnimation_3 = [[KYSpringLayerAnima-
tion sharedAnimManager]createSpringAnima:@"xAxisPercent"
duration:1.0 usingSpringWithDamping:0.5
initialSpringVelocity:3.0 fromValue:@(-1) toValue:@(0)];
然后在第⼆步动画的 animationDidStop 之后添加这个动画。
以上,三步动画连起来就有了⼀开始视频中的效果。
其实,我们还可以使⽤ 之前 提到的使⽤辅助视图的⽅法。我们可以
通过控制三个辅助的 UIView 并和上⾯三个⼩点以相同的运动轨迹运动,
通过 UIView 运动过程中的 CALayer 的 Presentation Layer 获取运动过程
中实时的位置,也可以画出⼩球的形状。
IMAGE 5.2 是我改进之后的效果。
你可能注意到了,我仅仅改变了三
个控制点的运动规律。实际上,任何
形状动画都可以⽤控制贝塞尔曲线控
制点的⽅法来做到。在改进的例⼦
中,⽆⾮就是这样三个状态 。
IMAGE 5.2 GooeyMenu 改进效果
104
最后完整的代码如下:
๏ "Menu.m"
CAKeyframeAnimation *openAnimation_1 = [[KYSpringLayerAnima-
tion sharedAnimManager]createBasicAnima:@"xAxisPercent"
duration:0.3 fromValue:@(0) toValue:@(1)];
openAnimation_1.delegate = self;
CAKeyframeAnimation *openAnimation_2 = [[KYSpringLayerAnima-
tion sharedAnimManager]createBasicAnima:@"xAxisPercent"
duration:0.3 fromValue:@(0) toValue:@(1)];
openAnimation_2.delegate = self;
CAKeyframeAnimation *openAnimation_3 = [[KYSpringLayerAnima-
tion sharedAnimManager]createSpringAnima:@"xAxisPercent"
duration:1.0 usingSpringWithDamping:0.5
initialSpringVelocity:3.0 fromValue:@(0) toValue:@(1)];
openAnimation_3.delegate = self;
[_animationQueue addObject:openAnimation_1];
[_animationQueue addObject:openAnimation_2];
[_animationQueue addObject:openAnimation_3];
[self.menuLayer addAnimation:openAnimation_1
forKey:@"openAnimation_1"];
self.userInteractionEnabled = NO;
_menuLayer.animState = STATE1;
GALLERY 5.2 第三个状态使⽤弹性动画
105

๏ "MenuLayer.m"
-(void)drawInContext:(CGContextRef)ctx{
CGRect real_rect = CGRectInset(self.frame, OFF,OFF);
CGFloat offset = real_rect.size.width/ 3.6;
CGPoint center = CGPointMake(CGRectGetMidX(self.frame),
CGRectGetMidY(self.frame));
CGFloat moveDistance_1;
CGFloat moveDistance_2;
CGPoint top_left;
CGPoint top_center;
CGPoint top_right;
if (_animState == STATE1) {
moveDistance_1 = _xAxisPercent*(real_rect.size.width/2
- offset)/2;
top_left =
CGPointMake(center.x-offset-moveDistance_1*2, OFF);
top_center = CGPointMake(center.x-moveDistance_1,
OFF);
top_right = CGPointMake(center.x+offset, OFF);
}else if(_animState == STATE2){
CGFloat hightFactor;
if (_xAxisPercent >= 0.2) {
hightFactor = 1-_xAxisPercent;
}else{
hightFactor = _xAxisPercent;
}
moveDistance_1 = (real_rect.size.width/2 - offset)/2;
moveDistance_2 =
_xAxisPercent*(real_rect.size.width/3);
top_left =
CGPointMake(center.x-offset-moveDistance_1*2 + moveDistance_2,
OFF);
106
top_center = CGPointMake(center.x-moveDistance_1 +
moveDistance_2, OFF);
top_right =
CGPointMake(center.x+offset+moveDistance_2, OFF);
}else if(_animState == STATE3){
moveDistance_1 = (real_rect.size.width/2 - offset)/2;
moveDistance_2 = (real_rect.size.width/3);
CGFloat gooeyDis_1 =
_xAxisPercent*(center.x-offset-moveDistance_1*2 +
moveDistance_2-(center.x-offset));
CGFloat gooeyDis_2 =
_xAxisPercent*(center.x-moveDistance_1 +
moveDistance_2-(center.x));
CGFloat gooeyDis_3 =
_xAxisPercent*(center.x+offset+moveDistance_2-(center.x+offset)
);
top_left =
CGPointMake(center.x-offset-moveDistance_1*2 + moveDistance_2 -
gooeyDis_1, OFF);
top_center = CGPointMake(center.x-moveDistance_1 +
moveDistance_2 - gooeyDis_2, OFF);
top_right =
CGPointMake(center.x+offset+moveDistance_2 - gooeyDis_3, OFF);
}
//和 ⼀样
.....
}
⾃定义动画的这⼀章就先到这⾥了。你可以在 KYGooeyMenuDemo 中
找到本节的源码。
107
其他效果
6
108

这⼀章节的内容,属于⼀些我暂时⽆法归类但
都⾮常有趣的玩意⼉。⽐如我会在这⼀章中介绍
⼀些动画的⼩技巧,或者是⼀些使⽤得⽐较少的
iOS SDK 中的动画类。
本章第⼀节,我打算先介绍的是 ——
UIKitDynamics 。可以说 UIKitDynamics 这个 iOS7 中引⼊的类平常⽤的并
不算多,但是它所展现的视觉效果⼀定是让你印象深刻的。
下⾯我通过⼀个模拟 Smartisan OS 中锁屏界⾯的 demo
给你介绍⼀下 UIKitDynamics 的使⽤⽅法。具体效果请见
MOVIE 6.1 。
在这个效果中,我⼀共
使⽤了五个 Behavior:
UIGravityBehavior
UIPushBehavior
109
MOVIE 6.1 模拟 Smartisan OS 锁屏界⾯
UIAttachmentBehavior
UIDynamicItemBehavior
UICollisionBehavior
以及⼀个物理引擎的容器 UIDynamicAnimator,所有 Behavior 都要加进
UIDynamicAnimator 中才能奏效。
⾸先我们先来实现点击⼀次发⽣弹跳的效果。准备⼯作:设置好封⾯
图,绑定⼀个单击⼿势,准备好所需的 Behavior 以及初始化物理引擎容
器 UIDynamicAnimator:
- (void)viewDidLoad {
[super viewDidLoad];
self.lockScreenView = [[UIImageView
alloc]initWithFrame:self.view.bounds];
self.lockScreenView.image = [UIImage
imageNamed:@"lockScreen"];
self.lockScreenView.contentMode = UIViewContentModeS-
caleToFill;
self.lockScreenView.userInteractionEnabled = YES;
[self.view addSubview:_lockScreenView];
UITapGestureRecognizer *tap = [[UITapGestureRecognizer
alloc]initWithTarget:self action:@selector(tapOnIt:)];
[self.lockScreenView addGestureRecognizer:tap];
}
-(void)viewWillAppear:(BOOL)animated{
[super viewWillAppear:animated];
110
self.animator = [[UIDynamicAnimator
alloc]initWithReferenceView:self.view];
UICollisionBehavior *collisionBehaviour = [[UICollisionBe-
havior alloc]initWithItems:@[self.lockScreenView]];
[collisionBehaviour
setTranslatesReferenceBoundsIntoBoundaryWithInsets:UIEdgeInsets
Make(-_lockScreenView.frame.size.height, 0, 0, 0)];
[self.animator addBehavior:collisionBehaviour];
self.gravityBehaviour = [[UIGravityBehavior alloc]
initWithItems:@[self.lockScreenView]];
self.gravityBehaviour.gravityDirection = CGVectorMake(0.0,
1.0);
self.gravityBehaviour.magnitude = 2.6f;
[self.animator addBehavior:self.gravityBehaviour];
self.pushBehavior = [[UIPushBehavior alloc]
initWithItems:@[self.lockScreenView]
mode:UIPushBehaviorModeInstantaneous];
self.pushBehavior.magnitude = 2.0f;
self.pushBehavior.angle = M_PI;
[self.animator addBehavior:self.pushBehavior];
self.itemBehaviour = [[UIDynamicItemBehavior alloc]
initWithItems:@[self.lockScreenView]];
self.itemBehaviour.elasticity = 0.35f;
[self.animator addBehavior:_itemBehaviour];
}
111
现在,我们处理点击的⼿势,点击⼀次触发⼀个 pushBehav-
ior,并设置它的 pushDirection 为竖直向上的 CGVectorMake(0.0f,
-80.0f)。
-(void)tapOnIt:(UITapGestureRecognizer *)tapGes{
self.pushBehavior.pushDirection = CGVectorMake(0.0f,
-80.0f);
self.pushBehavior.active = YES;
}
接着我们来看看如何实现⼿势拖拽。⾸先处理 UIPanGestureRecog-
nizer。
-(void)panOnIt:(UIPanGestureRecognizer *)panGes{
CGPoint location =
CGPointMake(CGRectGetMidX(_lockScreenView.frame), [panGes
locationInView:self.view].y);
if (panGes.state == UIGestureRecognizerStateBegan) {
[self.animator removeBehavior:self.gravityBehaviour];
self.attachmentBehaviour = [[UIAttachmentBehavior
alloc]initWithItem:self.lockScreenView
attachedToAnchor:location];
[self.animator addBehavior:_attachmentBehaviour];
}else if (panGes.state == UIGestureRecognizerStateChanged){
self.attachmentBehaviour.anchorPoint = location;
}else if (panGes.state == UIGestureRecognizerStateEnded){
112

CGPoint velocity = [panGes
velocityInView:_lockScreenView];
NSLog(@"v:%@",NSStringFromCGPoint(velocity));
[self.animator removeBehavior:_attachmentBehaviour];
_attachmentBehaviour = nil;
if (velocity.y < -1300.0f) {
[self.animator removeBehavior:_gravityBehaviour];
[self.animator removeBehavior:_itemBehaviour];
_gravityBehaviour = nil;
_itemBehaviour = nil;
//gravity
self.gravityBehaviour = [[UIGravityBehavior alloc]
initWithItems:@[self.lockScreenView]];
self.gravityBehaviour.gravityDirection =
CGVectorMake(0.0, -1.0);
self.gravityBehaviour.magnitude = 2.6f;
[self.animator addBehavior:self.gravityBehaviour];
//item
self.itemBehaviour = [[UIDynamicItemBehavior alloc]
initWithItems:@[self.lockScreenView]];
self.itemBehaviour.elasticity = 0.0f;//1.0 完全弹性碰
撞,需要⾮常久才能恢复;
[self.animator addBehavior:_itemBehaviour];
self.pushBehavior.pushDirection =
CGVectorMake(0.0f, -200.0f);
self.pushBehavior.active = YES;
}else{
[self restore];
}
}
}
UIAttachmentBehavior , 从这个名字就可以看出这个动作是有附
着、附加的效果。其实就是视图的锚点 (anchorPoint) 始终和某个指定
113
的点保持⼀段length 距离的效果。这种连接可以是两个 item 之间的连
接 (两个 item 的 anchorPoint 之间的距离),也可以是⼀个 item 和⼀个
点之间的连接。其他⼀些属性:
两个点之间的距离:
@property (readwrite, nonatomic) CGFloat length;
阻尼系数 (0~1 之间;默认为 0):
@property (readwrite, nonatomic) CGFloat damping; // 1: criti-
cal damping
弹性系数 (值越⼤ item 的弹性效果就越明显):
@property (readwrite, nonatomic) CGFloat frequency; // in Hertz
通过这些属性,你可以想象成两个点之间是通过⼀条「⽊棍」刚性连
接着,或者是⼀根「橡⽪筋」弹性连接着。对于这个 de-
mo,⾸先我们在⼿势开始时先确定这个⽬标点:
CGPoint location =
CGPointMake(CGRectGetMidX(_lockScreenView.frame), [panGes
locationInView:self.view].y);
然后创建动作。因为这个 demo 中 item 需要跟⼿,所以我们不需要
弹性也不需要阻尼,都使⽤默认值。然后让 item 的 anchorPoint 跟着
这个⽬标点,想象成两者之间连着⼀根「⽊棍」。
114
最后在⼿势结束时根据移动的速度判断是否成功。
CGPoint velocity = [panGes velocityInView:_lockScreenView];
好了,这个简单的 UIDynamicKit 的
demo 就到这⾥了。源码参见 UIDynam-
icsDemo 。除了 UISnapBehavior 之
外,这个 demo 基本涉及了所有的动
作。类似的弹跳效果还出现在了 Mac OS X 的 dock 中。
⾄于 UISnapBehavior (吸附动作) 其实是所有动作中最简单的。因
为它只有这⼀个⽅法和⼀个属性:
- (instancetype)initWithItem:(id <UIDynamicItem>)item
snapToPoint:(CGPoint)point;
@property (nonatomic, assign) CGFloat damping; // damping value
from 0.0 to 1.0. 0.0 is the least oscillation.
绑定⼀个 item ,指定⼀个吸附
的⽬标点,设置⼀个弹性系数,最
后别忘了加到 UIDynamicAnimator
中,⼀切⼯作就结束了。然后就只
需要静静地看效果(MOVIE 6.2 )。
115
MOVIE 6.2
UISnapBehaior 吸附效果的的简单演⽰

接 下去我们来玩点有意思的。我特意抽出这⼀节向你
介绍 UIKitDynamics 中⼀个神奇的特性 —— Action
Block.
// When running, the dynamic animator calls the action block on
every animation step.
@property (nonatomic,copy) void (^action)(void);
任何⼀个 UIDynamicBehavior 都能够实时调⽤这个 action 。举个
例⼦,⽐如你可以实现下⾯这些效果:
下⾯我就拿第⼆个例⼦作为本章的第⼆个 demo 。⾸先⼀起来看下原
理视频:
116
MOVIE 6.3 UIDynamicBehavior 中 action
的效果⽰范01
MOVIE 6.4 UIDynamicBehavior 中 action
的效果⽰范02
这个动画的思路其实很简单:给
最上⽅的矩形添加 UIGravityBehav-
ior 和 UICollisionBehav-
ior在其下⽅添加三个
UIAttachmentBehavior分别连接着
下⽅最近的对象。同时,我们把第⼀
个灰块、第三个灰块以及⼩球这三个
视图绑定到同⼀个 UIGravityBehavior 上⾯,叫做 viewsGravity,在
viewsGravity 的 action block 中,把第⼀个灰块、第三个灰块作为⼀
条贝塞尔曲线的两个控制点,实时地绘制出这条曲线,也就是你看到的
「绳⼦」的样⼦了。
然后详细看⼀下代码细节:
- (void)viewDidLoad {
[super viewDidLoad];
_panView=[[UIView alloc] initWithFrame:CGRectMake(0, 0,
[[UIScreen mainScreen] bounds].size.width, [[UIScreen main-
Screen] bounds].size.height/2)];
[_panView setAlpha:0.5];
[self.view addSubview:_panView];
[_panView.layer setShadowOffset:CGSizeMake(-1, 2)];
[_panView.layer setShadowOpacity:0.5];
[_panView.layer setShadowRadius:5.0];
[_panView.layer setShadowColor:[UIColor
blackColor].CGColor];
117
MOVIE 6.5 UIDynamicBehavior 中 action 的效果
⽰范02 -- 原理解析

[_panView.layer setMasksToBounds:NO];
[_panView.layer setShadowPath:[UIBezierPath
bezierPathWithRect:_panView.bounds].CGPath];
UIPanGestureRecognizer *pan=[[UIPanGestureRecognizer alloc]
initWithTarget:self action:@selector(PanTheView:)];
[_panView addGestureRecognizer:pan];
CAGradientLayer *grd=[[CAGradientLayer alloc] init];
[grd setFrame:_panView.frame];
grd.colors = [[NSArray alloc] initWithObjects:(__bridge
id)([UIColor colorWithRed:0.0 green:191.0/255.0
blue:255.0/255.0 alpha:1].CGColor),(__bridge id)([UIColor
whiteColor].CGColor), nil];
[_panView.layer addSublayer:grd];
_ballImageView=[[UIImageView alloc]
initWithFrame:CGRectMake(([[UIScreen mainScreen]
bounds].size.width/2)-30, [[UIScreen mainScreen]
bounds].size.height/1.5, 60, 60)];
[_ballImageView setImage:[UIImage imageNamed:@"ball"]];
[self.view addSubview:_ballImageView];
[_ballImageView.layer setShadowOffset:CGSizeMake(-4, 4)];
[_ballImageView.layer setShadowOpacity:0.5];
[_ballImageView.layer setShadowRadius:5.0];
[_ballImageView.layer setShadowColor:[UIColor
blackColor].CGColor];
[_ballImageView.layer setMasksToBounds:NO];
//1
_middleView = [[UIView alloc]
initWithFrame:CGRectMake(_ballImageView.center.x-15, 200, 30,
30)];
[_middleView setBackgroundColor:[UIColor grayColor]];
[self.view addSubview:_middleView];
[_middleView setCenter:CGPointMake(_middleView.center.x,
(_ballImageView.center.y-_panView.center.y)+15)];
//2
118
_topView = [[UIView alloc]
initWithFrame:CGRectMake(_ballImageView.center.x-15, 200, 30,
30)];
[_topView setBackgroundColor:[UIColor grayColor]];
[self.view addSubview:_topView];
[_topView setCenter:CGPointMake(_topView.center.x,
(_middleView.center.y-_panView.center.y)+_panView.center.y/2)];
//3
_bottomView = [[UIView alloc]
initWithFrame:CGRectMake(_ballImageView.center.x-15, 200, 30,
30)];
[_bottomView setBackgroundColor:[UIColor grayColor]];
[self.view addSubview:_bottomView];
[_bottomView setCenter:CGPointMake(_bottomView.center.x,
(_middleView.center.y-_panView.center.y)+_panView.center.y*1.5)
];
[self setUpBehaviors];
}
代码虽然多但就是简单的布局⽽已。唯⼀需要⼀提的就是 CAGradi-
entLayer 。这是 <QuartzCore/CALayer.h> 中的⼀个类,估计平时接触
的机会也⽐较少。其实这个类实现的渐变⾊效果⾮常有⽤,有了它你不
再需要设计师提供的渐变⾊的切图了,⼀个常⽤的场景就是配图的⽂字
背景。
@property(copy) NSArray *colors; //
119
@property(copy) NSArray *locations; //
@[@(0.0),@(0.4),@(1.0)], 0~1
nil
@property CGPoint startPoint;
@property CGPoint endPoint; //[0,0]
[1,1] [.5,0] [.5,1]
下⾯来看⼀下如何初始化 UIKitDynamics。
-(void)setUpBehaviors{
_animator=[[UIDynamicAnimator alloc]
initWithReferenceView:self.view];
_panGravity=[[UIGravityBehavior alloc]
initWithItems:@[_panView]];
[_animator addBehavior:_panGravity];
_viewsGravity=[[UIGravityBehavior alloc]
initWithItems:@[_ballImageView,_topView,_bottomView]];
[_animator addBehavior:_viewsGravity];
__weak ViewController *weakSelf = self;
_viewsGravity.action=^{
NSLog(@"acting");
UIBezierPath *path=[[UIBezierPath alloc] init];
[path moveToPoint:weakSelf.panView.center];
[path addCurveToPoint:weakSelf.ballImageView.center
controlPoint1:weakSelf.topView.center
controlPoint2:weakSelf.bottomView.center];
if (!weakSelf.layer) {
weakSelf.layer=[[CAShapeLayer alloc] init];
weakSelf.layer.fillColor = [UIColor
clearColor].CGColor;
weakSelf.layer.strokeColor = [UIColor
colorWithRed:224.0/255.0 green:0.0/255.0 blue:35.0/255.0
alpha:1.0].CGColor;
120

weakSelf.layer.lineWidth = 5.0;
//Shadow
[weakSelf.layer setShadowOffset:CGSizeMake(-1, 2)];
[weakSelf.layer setShadowOpacity:0.5];
[weakSelf.layer setShadowRadius:5.0];
[weakSelf.layer setShadowColor:[UIColor
blackColor].CGColor];
[weakSelf.layer setMasksToBounds:NO];
[weakSelf.view.layer insertSublayer:weakSelf.layer
below:weakSelf.ballImageView.layer];
}
weakSelf.layer.path=path.CGPath;
};
//UICollisionBehavior
UICollisionBehavior *Collision=[[UICollisionBehavior alloc]
initWithItems:@[_panView]];
[Collision addBoundaryWithIdentifier:@"Left"
fromPoint:CGPointMake(-1, 0) toPoint:CGPointMake(-1, [[UIScreen
mainScreen] bounds].size.height)];
[Collision addBoundaryWithIdentifier:@"Right"
fromPoint:CGPointMake([[UIScreen mainScreen]
bounds].size.width+1,0) toPoint:CGPointMake([[UIScreen main-
Screen] bounds].size.width+1, [[UIScreen mainScreen]
bounds].size.height)];
[Collision addBoundaryWithIdentifier:@"Middle"
fromPoint:CGPointMake(0, [[UIScreen mainScreen]
bounds].size.height/2) toPoint:CGPointMake([[UIScreen main-
Screen] bounds].size.width, [[UIScreen mainScreen]
bounds].size.height/2)];
[_animator addBehavior:Collision];
//3 UIAttachmentBehaviors
UIAttachmentBehavior *attach1=[[UIAttachmentBehavior
alloc]initWithItem:_panView attachedToItem:_topView];
[_animator addBehavior:attach1];
UIAttachmentBehavior *attach2=[[UIAttachmentBehavior alloc]
initWithItem:_topView attachedToItem:_bottomView];
121
[_animator addBehavior:attach2];
UIAttachmentBehavior *attach3=[[UIAttachmentBehavior alloc]
initWithItem:_bottomView offsetFromCenter:UIOffsetMake(0, 0)
attachedToItem:_ballImageView offsetFromCenter:UIOffsetMake(0,
-_ballImageView.bounds.size.height/2)];
[_animator addBehavior:attach3];
//UIDynamicItemBehavior
UIDynamicItemBehavior *PanItem=[[UIDynamicItemBehavior al-
loc]
initWithItems:@[_panView,_topView,_bottomView,_ballImageView]];
PanItem.elasticity=0.5;
[_animator addBehavior:PanItem];
}
我们把 _panView 单独绑定⼀个 UIGravityBehavior把 @[_bal-
lImageView,_topView,_bottomView] 也绑定到⼀个 UIGravityBehavior
上。然后设置⼀个作⽤于 _panView 的 UICollisionBehav-
ior下⾯是关键,我们创建三个 UIAttachmentBehavior 分别让上⼀个
视图 attach 下⽅相邻的视图,想象成「⼀环扣⼀环」的样⼦。
有个细节需要提⼀下,就是这⾥初始化第三个 UIAttachmentBehav-
ior 的时候⽤到了
- (instancetype)initWithItem:(id <UIDynamicItem>)item1
offsetFromCenter:(UIOffset)offset1 attachedToItem:(id <UIDy-
namicItem>)item2 offsetFromCenter:(UIOffset)offset2;
122
这个⽅法。因为我们希望⼩球可以绕顶点转起来,所以把⼩球上的锚点
设置在了⼩球的的顶端,⽽不是⼩球默认的正中⼼,否则你将看不到⼩
球的转动。
接下来是必不可少的⼀⾏代码,在 _panView 的⼿势绑定⽅法中,我
们需要实时调⽤这句:
[_animator updateItemUsingCurrentState:pan.view];
我们来看⼀下官⽅⽂档是怎么说的:
// Update the item state in the animator if an external change
was made to this item
(void)updateItemUsingCurrentState:(id <UIDynamicItem>)item;
Asks a dynamic animator to read the current state of a dynamic item, replacing the
animator’s internal representation of the item’s state.A dynamic animator automati-
cally reads the initial state (position and rotation) of each dynamic item you add to
it, and then takes responsibility for updating the item’s state. If you actively change
the state of a dynamic item after you’ve added it to a dynamic animator, call this
method to ask the animator to read and incorporate the new state.
⽂档中说,当外界变化(⽐如 _panGravity 开始作⽤了)作⽤于
pan.View 上时,去刷新当前 _animator 中所有 item 的 position 和 rota-
tion。⽽这些 item 包括着 _ballImageView,_topView,_bottomView。 po-
123
sition 和 rotation 的变化又会触发 _ballImageView,_topView,_bottom-
View 这三者绑定的_viewsGravity.action. 在这个 action 中实时绘制
⼀条贝塞尔曲线,就有了你看到的⼀条弹性的绳⼦。由于这个 action 会
在动画的每⼀步都会调⽤(on every animation step),所以动画会显
得相当流畅。
这个 demo 主要介绍了 action 的作⽤以及 updateItemUsingCurrent-
State ⽅法的使⽤。掌握了这个技巧,你可以创造出更多神奇的物理特
效。源码详见 DynamicActionBlockDemo。
第三⼩节,我们来聊聊另⼀个⾮常具有视觉冲击⼒的效
果 —— 粒⼦效果( CAEmitterLayer)。在 iOS 5 中,苹
果引⼊了⼀个新的 CALayer ⼦类 —— CAEmitterLay-
er。CAEmitterLayer 是⼀个⾼性能的粒⼦引擎,被⽤
来创建复杂的粒⼦动画如:烟雾,⽕,⾬等效果,并且很好
地控制了性能。
124
关于 CAEmitterLayer,iOS Core Animation: Advanced Tech-
niques 中给出了解释:
“
CAEmitterLayer, CAEmitterCell, CAEmitterCell,
CAEmitterCell,
CAEmitterLayer, CAEmitter-
Cell, CALayer, contents, CGImage,
”
下⾯我们深⼊到头⽂件中,并⽤⼀个 demo 介绍 CAEmitterLayer 的
具体⽤法。
⽐如这个很经典的下雪效果:
代码如下。由于⽐较简单,我直接
⽤尖帽符做了解释。:
CAEmitterLayer *snowEmitter = [CAEmitterLayer layer];
snowEmitter.emitterPosition =
CGPointMake(self.view.bounds.size.width / 2.0, -30);
snowEmitter.emitterSize =
CGSizeMake(self.view.bounds.size.width * 2.0, 0.0);;
125
MOVIE 6.6 CAEmitterLayer 展⽰下雪效果
snowEmitter.emitterShape = kCAEmitterLayerLine;
snowEmitter.emitterMode = kCAEmitterLayerOutline;
CAEmitterCell *snowflake = [CAEmitterCell emitterCell];
snowflake.birthRate = 1.0;
snowflake.lifetime = 120.0;
snowflake.velocity = -10;
snowflake.velocityRange = 10;
snowflake.yAcceleration = 2;
snowflake.emissionRange = 0.5 * M_PI;
snowflake.spinRange = 0.25 * M_PI;
snowflake.contents = (id) [[UIImage imageNamed:@"snow"]
CGImage];
snowflake.color = [[UIColor colorWithRed:0.600 green:0.658
blue:0.743 alpha:1.000] CGColor];
snowEmitter.shadowOpacity = 1.0;
snowEmitter.shadowRadius = 0.0;
snowEmitter.shadowOffset = CGSizeMake(0.0, 1.0);
snowEmitter.shadowColor = [[UIColor whiteColor] CGColor];
snowEmitter.emitterCells = [NSArray
arrayWithObject:snowflake];
[self.view.layer insertSublayer:snowEmitter atIndex:0];
这个简单的 demo 就到这⾥,代码参见 SnowEffectDemo。
126
下⾯我再追加⼀个例⼦,这个例⼦是 Github 上的⼀
个开源库 —— MCFireworksButton。我觉得⾮常具有代
表性。不仅效果出⾊,还涉及到了如何⼿动控制 CAE-
mitterLayer 动画
的开始与结束。这也正是我想额外介
绍的⼀点。
效果参见 MOVIE 6.8。
先看它的初始化代码:
- (void)setup {
CAEmitterCell *explosionCell = [CAEmitterCell emitterCell];
explosionCell.name = @"explosion";
explosionCell.alphaRange = 0.20;
explosionCell.alphaSpeed = -1.0;
explosionCell.lifetime = 0.7;
explosionCell.lifetimeRange = 0.3;
explosionCell.birthRate = 0;
explosionCell.velocity = 40.00;
explosionCell.velocityRange = 10.00;
explosionCell.contents = (id)[[UIImage
imageNamed:@"Like-Blue"] CGImage];
explosionCell.scale = 0.05;
explosionCell.scaleRange = 0.02; // contents
scale
_explosionLayer = [CAEmitterLayer layer];
_explosionLayer.name = @"emitterLayer";
_explosionLayer.emitterShape = kCAEmitterLayerCircle;
MOVIE 6.7 溅出⽔花的点赞效果
127
_explosionLayer.emitterMode = kCAEmitterLayerOutline;
_explosionLayer.emitterPosition =
CGPointMake(CGRectGetMidX(self.bounds),
CGRectGetMidY(self.bounds));
_explosionLayer.emitterSize = CGSizeMake(25, 0);
_explosionLayer.emitterCells = @[explosionCell];
_explosionLayer.renderMode = kCAEmitterLayerOldestFirst;
_explosionLayer.masksToBounds = NO;
[self.layer addSublayer:_explosionLayer];
self.emitterCells = @[explosionCell];
}
!
接下来我们需要⼿动控制动画的开始和结束。还记得前⾯提到的
@property(copy) NSString *name; 吗?想要⼿动控制动画的开始和结
束,我们必须通过 KVC 的⽅式设置 cell 的值才⾏。
动画开始:
- (void)explode {
self.explosionLayer.beginTime = CACurrentMediaTime();
[self.explosionLayer setValue:@500
forKeyPath:@"emitterCells.explosion.birthRate"];
dispatch_time_t delay = dispatch_time(DISPATCH_TIME_NOW,
0.1 * NSEC_PER_SEC);
dispatch_after(delay, dispatch_get_main_queue(), ^{
[self stop];
});
}
对 [self.explosionLayer setValue:@500
forKeyPath:@"emitterCells.explosion.birthRate"]; 这句话的解读
128
是:CAEmitterLayer 根据⾃⼰的 emitterCells 属性找到名叫 explo-
sion 的 cell,并设置它的 birthRate 为 500。从⽽间接地控制了动画的
开始。
同理,停⽌动画的思路也⼀样。通过设置 birthRate 为 0间接地
控制了动画的结束。
动画停⽌:
- (void)stop {
[self.explosionLayer setValue:@0
forKeyPath:@"emitterCells.explosion.birthRate"];
}
!到这⾥,这个 demo 基本就讲完了,你可以在 MCFireworksButton-
Demo 这⾥找到源码。
以上两个 demo 涉及了 CAEmitterLayer 会⽤到的绝⼤多数知识点,
到最后可能真正费时的就是调参数了。没错,参数调节⼀直是⼀个优秀
的动画的重要组成部分。
129
这⼀⼩节,我们讲介绍⼀个很⼩众的类 —— CAReplica-
torLayer 。
我们先来看⼀下它能实现什么样的效果。
从 MOVIE 6.8 中可以看到,每⼀个动
画中都存在好⼏个重复的元素。没错,
这就是 CAReplicatorLayer 的最⼤特
点,可以重复任意个数的元素按你期望
的布局排列,甚⾄,可以让每个元素拥
有动画,制作出这种类似 loading 效果
的视觉效果。
⾸先我们来看⼀下官⽅的解释:
The CAReplicatorLayer class creates a specified number of copies of its sublayers
(the source layer), each copy potentially having geometric, temporal and color transfor-
mations applied to it.
130
MOVIE 6.8 CAReplicatorLayer Demo

简单来说,它⾃⼰能够重建包括⾃⼰在内的 n 个 copies,这些 cop-
ies 是原 layer 中的所有 sublayers,并且任何对原 layer 的 sublayers 设
置的变化是可以积累的 (accumulative) 。我们以视频中的脉冲动画为
例⼦详细介绍⼀下 CAReplicatorLayer 的⽤法。
⾸先画⼀个圆形的 CAShapeLayer ,作为 CAReplicatorLayer 将要复
制的原型,也可以理解为是第⼀个元素,下⾯的代码我设置了第⼀个元
素的起始位置位于 (0,0),在下⾯的介绍中你会认识到这很重要,因为
这决定了接下去的元素该怎么排列。
let pulseLayer = CAShapeLayer()
pulseLayer.frame = bounds
pulseLayer.path = UIBezierPath(ovalInRect:
pulseLayer.bounds).CGPath
pulseLayer.fillColor = color.CGColor
接下来,创建 CAReplicatorLayer ,并且做⼀些必要的初始化。其
中 instanceCount 指定了⼀共显⽰元素的数⽬,instanceDelay 指定了
重复元素之间的时间间隔,单位为秒。最后别忘了把之前创建的 pulse-
Layer 作为⼦图层添加到 CAReplicatorLayer 上。
let replicatorLayer = CAReplicatorLayer()
replicatorLayer.frame = bounds
replicatorLayer.instanceCount = 8
replicatorLayer.instanceDelay = 0.5
replicatorLayer.addSublayer(pulseLayer)
131
pulseLayer.opacity = 0.0
layer.addSublayer(replicatorLayer)
此时,你如果运⾏程序你会看到⼀个居中的圆。不是说有三个吗?没
错,的确有三个,只是重叠在⼀起了(如果你想让每个元素的位置不⼀
样,请继续往下看)。现在我们让每个圆圈动起来,因为 CAReplicator-
Layer 会⾃动复制其上的所有图层,所以我们只要给第⼀个元素加上动
画,之后复制出来的元素都会继承这个动画,又因为前⾯我们设置了 in-
stanceDelay ,所以每个动画都会以相同间隔错开,从⽽连接成⼀个完
整的动画。
下⾯我们来实现具体的动画,这是⼀个 CAAnimationGroup 动画,分
别是透明度 1~0 的动画和缩放 0~1 的动画。
func startToPluse() {
let groupAnimation = CAAnimationGroup()
groupAnimation.animations = [alphaAnimation(), scaleAnima-
tion()]
groupAnimation.duration = 4.0
groupAnimation.autoreverses = false
groupAnimation.repeatCount = HUGE
pulseLayer.addAnimation(groupAnimation, forKey: "groupAnima-
tion")
}
private func alphaAnimation() -> CABasicAnimation{
let alphaAnim = CABasicAnimation(keyPath: "opacity")
alphaAnim.fromValue = NSNumber(float: 1.0)
alphaAnim.toValue = NSNumber(float: 0.0)
return
}
132
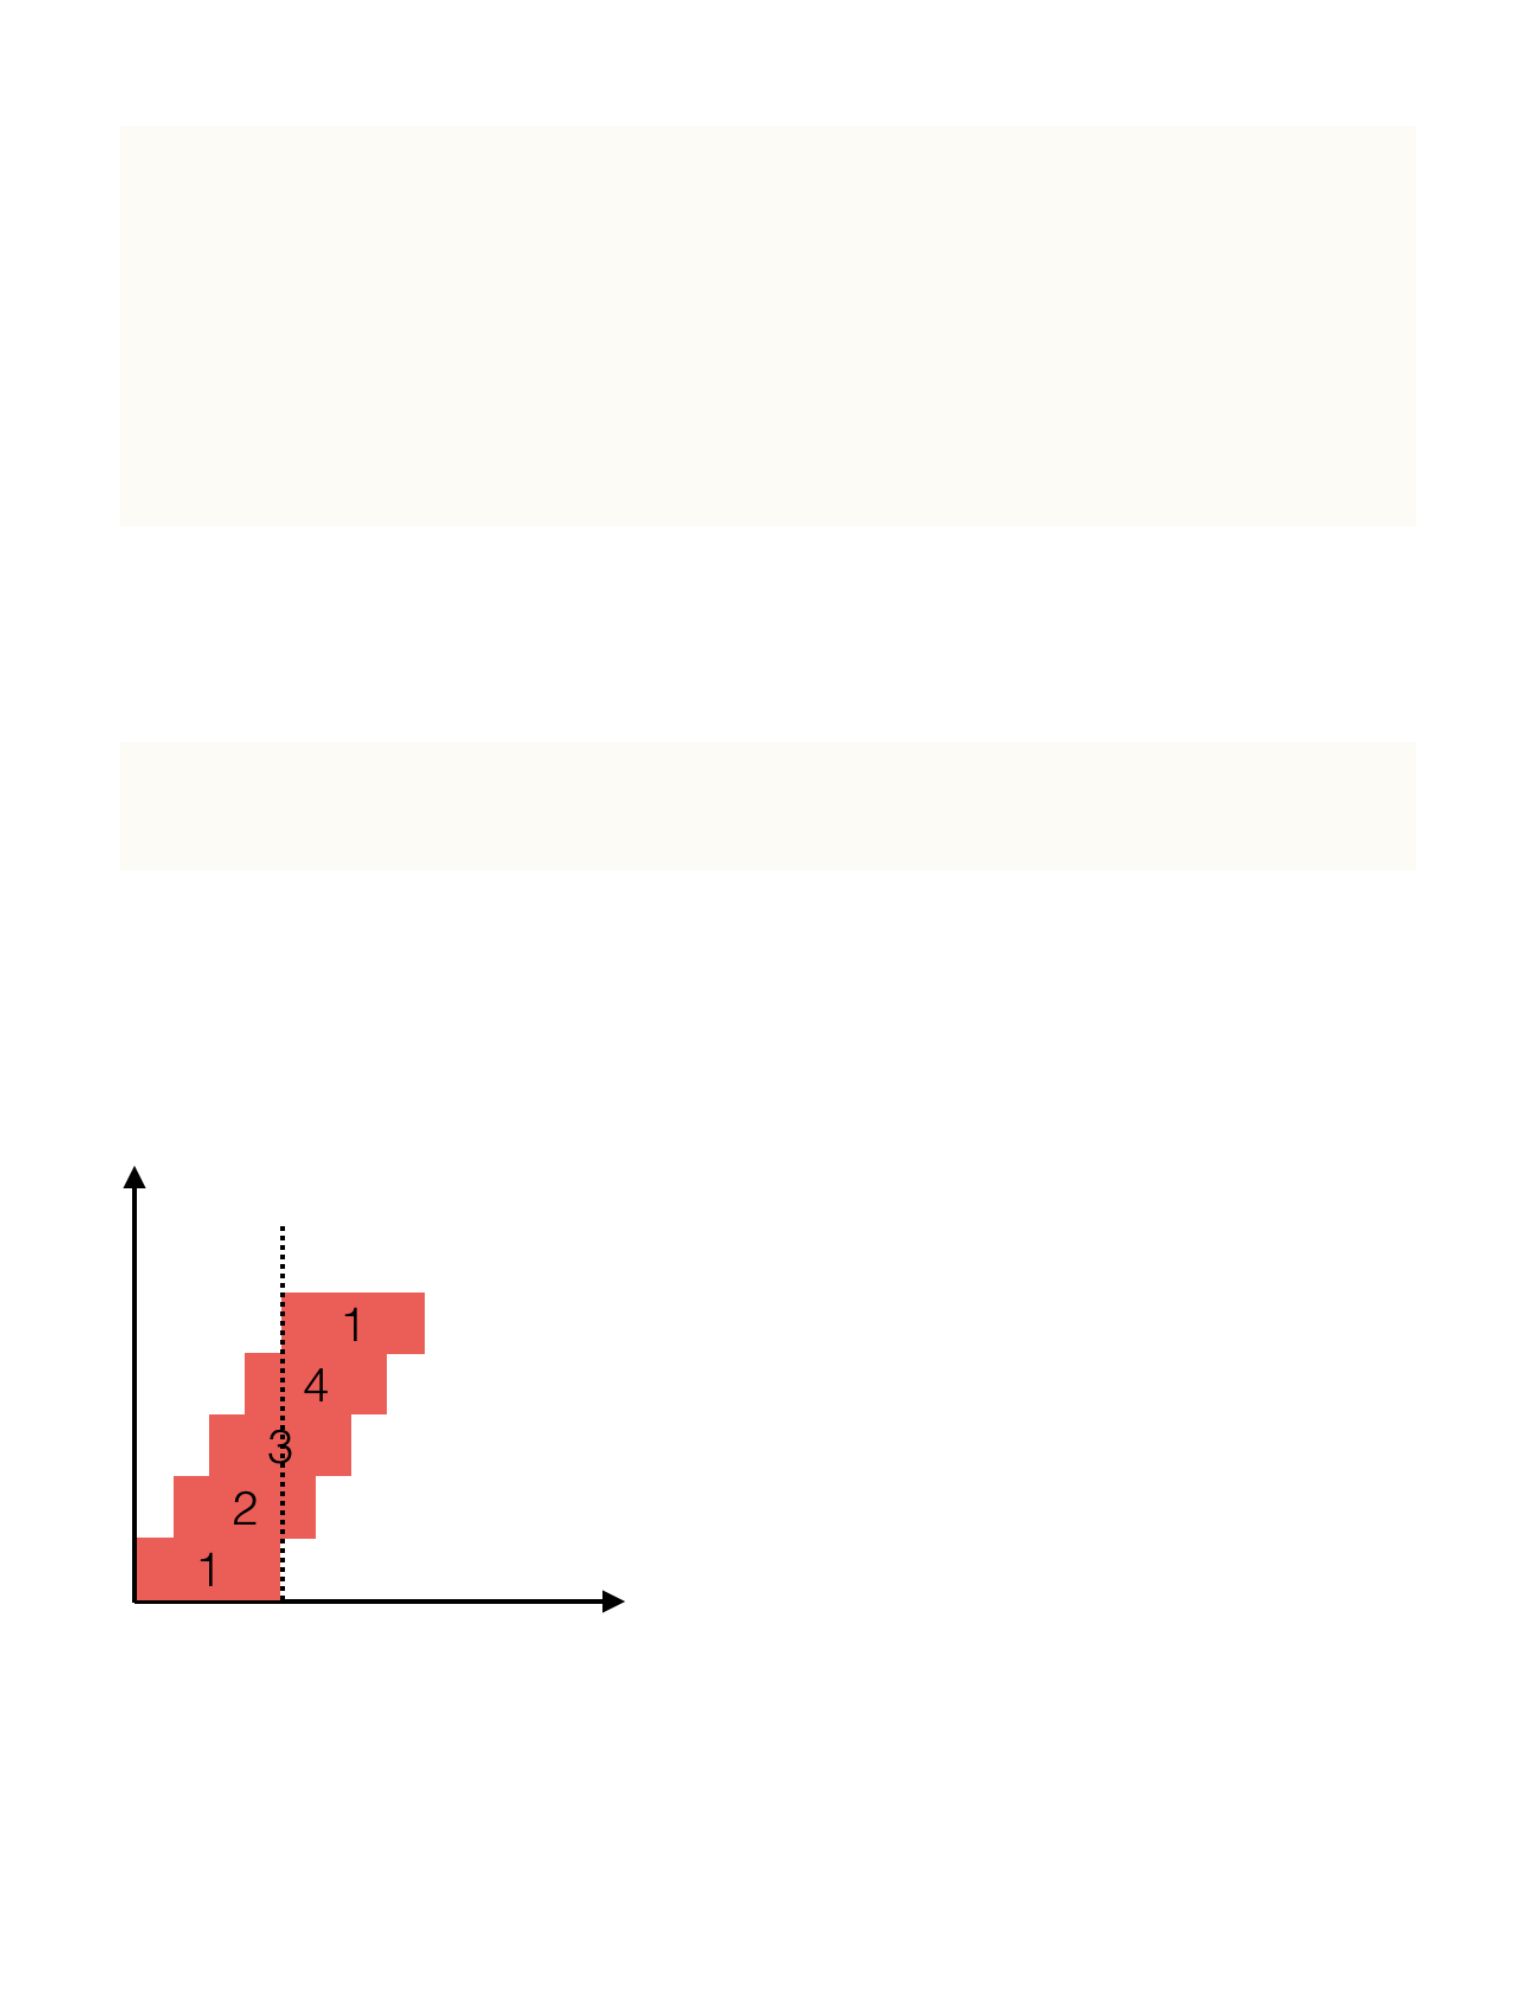
private func scaleAnimation() -> CABasicAnimation{
let scaleAnim = CABasicAnimation(keyPath: "transform")
let t = CATransform3DIdentity
let t2 = CATransform3DScale(t, 0.0, 0.0, 0.0)
scaleAnim.fromValue = NSValue.init(CATransform3D: t2)
let t3 = CATransform3DScale(t, 1.0, 1.0, 0.0)
scaleAnim.toValue = NSValue.init(CATransform3D: t3)
return scaleAnim
}
这⾥我还要特别指出⼀点。你能发现下⾯三个数值之间的关系吗?
replicatorLayer.instanceDelay = 0.5
replicatorLayer.instanceCount = 8
groupAnimation.duration = 4.0
如果你注意到了 0.5*8 = 4.0 的话,请不要怀疑这是个巧合。这是
动画连贯的必要条件。请看下⾯张图。
虚线处是⼀个元素完整动画所需要的时
间。如果此时想让第⼀个元素第⼆遍动画
⽴刻衔接上,那么就必须满⾜:
duration = instanceCount *
instanceDe-
lay必须满从图中也可以看出。
133
到这⾥,我们已经完成了这个动画的全部⼯作。这个动画是最简单的
CAReplicatorLayer 动画,我们只是对 CAReplicatorLayer 有了⼀个简
单的认识,下⾯我们来看看如何实现元素的⾃定义布局。
⽐如上⾯视频⾥的第⼀个动画,三个⽔平排列的翻转⽅块。
这⾥就要介绍 instanceTrans-
form 这个属性了。这是⾃定义布局
的关键。还记得第⼀个元素的坐标
吗?当我们设定了第⼀个元素的坐标,之后的元素的坐标都会根据 in-
stanceTransform 进⾏累加。⽐如这个并排的翻转⽅块,第⼀个元素的
坐标是 (0,height*1/2), 设置 instanceTransform 为
replicatorLayer.instanceTransform = CATransform3DMakeTransla-
tion(translationX, 0, 0) , 所以第⼆个元素的位置就是第⼀个元素的
X 轴坐标平移 translationX 的距离,第三个元素的坐标就是第⼆个元
素的 X 轴坐标平移 translationX 的距离,依此类推。
下⾯我们再来点旋转。⽐如像这个布局该怎么实现?
我们可以设置第⼀个元素的位置位于(0,0),
后⼀个元素始终是前⼀个元素沿 X 轴坐标平移⼀段距
离,同时绕⾃⾝中点旋转 120 度(圆周的三等分)。
134
var transform = CATransform3DIdentity
transform = CATransform3DTranslate(transform, dotSize, 0, 0.0)
transform = CATransform3DRotate(transform,
(CGFloat(360/replicatorLayer.instanceCount)*CGFloat(M_PI))/CGFl
oat(180.0), 0.0, 0.0, 1.0)
replicatorLayer.instanceTransform = transform
考虑到圆形⽆论怎么旋转都⼀样,不利于我们的分析,所以我⽤
了⼀个异形来直观地体现元素之间到底做了怎样的变换。请看下图。
左上⾓的⽅块是第⼀个元素,正朝向为圆⾓向上。
随后,元素中点平移规定距离,再顺时针旋转 120
度,这就是第⼆个元素的位置了。注意!你知道此时第
⼆个元素的坐标系统是怎么样的吗?因为这直接关系到
下⼀个元素的坐标。
右图中我标注了第⼆个元素的坐标⽰意图。
是的,也就是说,当我们设置了 instanceTrans-
form ,发⽣了旋转之后,其坐标轴也发⽣了旋转。
这就很好解释了为什么第三个元素会出现在前两个
元素的下⽅,因为我们规定了后⼀个元素是前⼀个元素
沿着 X 轴正⽅向平移⼀段距离同时绕⾃⾝中点旋转 120 度获得的。
135
相信现在你对 instanceTransform 有了更深刻的理解。下⾯我们来
看⼀看视频中第三个 3*3 的矩阵排列的实现思路。
这⾥我使⽤的⼀个技巧就是
⽤两个 CAReplicatorLayer
。replicatorLayerX 先⽔
平复制出三个圆圈,repli-
catorLayerY 再竖直复制出
三个 replicatorLayerX
就可以创建出⼀个 3*3 排列的矩阵了。
以上三个 demo 我封装到了⼀个库⾥,名字叫
ReplicatorLoaderDemo-Swift
关于 CAReplicatorLayer 其实还有⼀个「隐蔽」技能,就是⽤来做
倒影效果。就像下⾯这种(图⽚来⾃iOS Core Animation: Advanced Tech-
niques)。
136
你只需要设定元素个数为 2 个,然后做⼀个 y ⽅向 -1 的缩放变换
就⾏了。
replicatorLayerX.instanceCount = nbColumn
transform = CATransform3DScale(transform, 1, -1, 0)
137