Scope A2 SDC Localization Guide
User Manual:
Open the PDF directly: View PDF ![]() .
.
Page Count: 99

This document includes data that shall not be duplicated, used, or disclosed – in whole or in part – outside the Government for
any purpose other than to the extent provided in contract DG133W-05-CQ-1067. However, the Government shall have the right
to duplicate, use, or disclose the data to the extent provided in the contract. This restriction does not limit the Government’s right
to use information contained in this data if it is obtained from another source without restriction. The data subject to this
restriction are contained in all sheets.
AWIPS II Site Data Configuration &
Localization: Step-By-Step Guide
Build 11.9
Prepared in Support of AWIPS Software Continuous
Technology Refresh Re-Architecture
Document No. AWP.DOC.TOSCAT.LOC-06.00
17 October 2011
Prepared Under
Contract DG133W-05-CQ-1067
Advanced Weather Interactive Processing System (AWIPS)
Operations and Maintenance
T0013 AWIPS II SCAT Platform Task Order,
Work Assignment 002
Submitted to:
Mr. Walter Scott
Contracting Officer’s Technical Representative
U.S. Department of Commerce
NOAA NWS Office of Science and Technology
Programs and Plans Division, Program Management Branch
SSMC2, OST11, Room 15130
1325 East-West Highway
Silver Spring, MD 20910
By:
Raytheon Technical Services Company LLC
8401 Colesville Road, Suite 800
Silver Spring, MD 20910
AWIPS II Site Data Configuration & Localization: Step-by-Step Guide (Build 11.9)
Contract DG133W-05-CQ-1067 / DCN AWP.DOC.TOSCAT.LOC-06.00 / 17October 2011
Use or disclosure of data contained on this sheet is subject to the restriction on the title page of this document. ii
Change History
Document No. Publication Date Section(s)
Affected Description of Change(s)
AWP.DOC.TOSCAT.LOC-01.00DFT
1 December 2010
All
Original Draft
AWP.DOC.TOSCAT.LOC-01.00
25 February 2011
All
Final document
AWP.DOC.TOSCAT.LOC-02.00
25 March 2011
1, 2, 3, 4, 11, App.
A
Modified Section 1.0 (para. 6,
verification statement)
Modified Section 1.2, Document
Variable Conventions
Added new Section 1.3, CAVE-
Only Configuration
Modified Table 2.1, AWIPS II
Baseline Database Listing (title
only)
Modified Section 2.1, Configuring
the PostgreSQL Database
Engine
Modified Section 2.2, Create and
Import Database Files
Modified Table 3.1-1, LDM
Feedtypes
Modified Table 3.1-4, Radar
Patterns
Modified Section 4.1, Create the
Directory Structure
Added new Section 4.2, Create
FFMP Run Configuration File
Modified Section 11.1, Configure
AvnFPS GUI and Product Files
Modified App. A, LDM Ingest
Checklist (step 2 only)
Modified App. C, Creating
Custom Map Scales

AWIPS II Site Data Configuration & Localization: Step-by-Step Guide (Build 11.9)
Contract DG133W-05-CQ-1067 / DCN AWP.DOC.TOSCAT.LOC-06.00 / 17October 2011
Use or disclosure of data contained on this sheet is subject to the restriction on the title page of this document. iii
Document No. Publication Date Section(s)
Affected Description of Change(s)
AWP.DOC.TOSCAT.LOC-03.00
9 May 2011
1, 2, 3, 4, 5, 9
Modified Section 1.0 (para. 6,
verification statement)
Modified Section 2.3, Updated
FFMP ShapeFiles [WFO Only]
Modified Section 2.4, Update
afos2awiips With Local Changes
Modified Table 3.1-3, Hydrology
Patterns
Modified Section 3.2, Plugin
Ingest Filters
Modified Section 4.3 Progressive
Disclosure Files (including Table
4.3-1)
Modified Section 4.4, Create /
Copy Common Hydrology Files
Into Place
Modified Section 4.5.1, Create /
Edit hydroSitesInUse.txt File
Modified Example 5.2-1, Text of
AWIPS II OAX siteConfig.py
Modified Table 5.2.2-1,
Necessary localConfig.py
Changes From AWIPS I to
AWIPS II
Modified Example 5.2.2-1
Modified Section 5.3, Create /
Edit Subgridding Files
Modified Section 9.0, Create /
Edit CAVE Map Displays
AWP.DOC.TOSCAT.LOC-04.00
9 June 2011
1 – 5, 9 – 11, App.
A
Modified Section 1.0, Introduction
Modified Section 2.3 and retitled
as Update Shape Files
Modified Section 2.4, Update
afos2awips With Local Changes
Modified Section 3.0, SBN Ingest
Configuration (including changes
to 3.1, 3.2, and 3.3)
Modified Table 4.3-1, SPI File
Inputs
Modified Section 4.4,

AWIPS II Site Data Configuration & Localization: Step-by-Step Guide (Build 11.9)
Contract DG133W-05-CQ-1067 / DCN AWP.DOC.TOSCAT.LOC-06.00 / 17October 2011
Use or disclosure of data contained on this sheet is subject to the restriction on the title page of this document. iv
Document No. Publication Date Section(s)
Affected Description of Change(s)
Create/Copy Common Hydrology
Files Into Place
Modified Section 5.2.2, Copy/Edit
localConfig.py (including Table
5.2.2-1, Necessary localConfig.py
Changes From AWIPS I to
AWIPS II)
Modified Table 5.2.3-1, Smartinit
Changes
Modified Section 5.4, Create
MPE.xml Localized Grid
Identification File
Added new Section 5.4 Create
MPE.xml Localized Grid
Identification File
Renumbered Section titled Fix
Ownership and Permissions
(from 5.4 to 5.5)
Modified Section 9.0,
Create/EDIT CAVE Map Displays
(para. 3, bullet 4 only)
Modified Section 10.1 Create/Edit
Satellite Menu
Modified Section 11.1, Configure
AvnFPS GUI and Product Files
(bullet 6 only)
Modified Section 11.2, Copy
AvnFPS Climate Files (bullet 5
only)
Modified App. A, LDM Ingest
Checklist (step 2 only)
AWP.DOC.TOSCAT.LOC-05.00
25 July 2011
1 – 6, 12, App. B,
App. C
Modified Section 1.0, Introduction
Modified Section 2.1, Configuring
the PostgreSQL Database
Engine
Modified Section 2.3, Update
Shape Files
Modified 3.1, Ingest Filter
Configuration
Modified 3.2, Plugin Ingest Filters
Modified 4.2, Create FFMP Run

AWIPS II Site Data Configuration & Localization: Step-by-Step Guide (Build 11.9)
Contract DG133W-05-CQ-1067 / DCN AWP.DOC.TOSCAT.LOC-06.00 / 17October 2011
Use or disclosure of data contained on this sheet is subject to the restriction on the title page of this document. v
Document No. Publication Date Section(s)
Affected Description of Change(s)
Configuration File
Modified 4.3, Progressive
Disclosure Files
Modified 4.4, Create/Copy
Common Hydrology Files Into
Place
Modified 5.3, Create/Edit
Subgridding Files
Modified 6.0,
Correctset_hydro_env
Modified 11.2, Copy AvnFPS
Climate Files
Modified 12.0, Restart EDEX and
Activate MPE Scripts
Modified App. B, WarnGen
Templates
Modified App. C, Creating
Custom Map Scales
AWP.DOC.TOSCAT.LOC-06.00 Xx October 2011 1, 5, 13, App. B,
App. D Modified 1.0, Introduction
(document number only)
Modified 5.2.2, Copy/Edit
localConfig.py (numbered
examples)
Modified 5.4, Create MPE.xml
Localized Grid Identified File (to
add references DHR-MOSAIC
Added Section 13, “Add Text
Triggers”
Modified Appendix B, WarnGen
Templates
Added Appendix D, Adding Grid
Information

AWIPS II Site Data Configuration & Localization: Step-by-Step Guide (Build 11.9)
Contract DG133W-05-CQ-1067 / DCN AWP.DOC.TOSCAT.LOC-06.00 / 17October 2011
Use or disclosure of data contained on this sheet is subject to the restriction on the title page of this document. vi
Table of Contents
Page
1.0 Introduction ............................................................................................................................ 1
1.1 Document Conventions ................................................................................................. 2
1.2 Document Variable Conventions .................................................................................. 2
1.3 CAVE-Only Configuration ........................................................................................... 3
1.4 Notes About Use on ADAM Platform .......................................................................... 4
2.0 Database Configuration ......................................................................................................... 5
2.1 Configuring the PostgreSQL Database Engine............................................................. 5
2.2 Create and Import Database Files ................................................................................. 7
2.2.1 hmdb Database [ WFO Only ] ........................................................................... 7
2.2.2 IHFS Database .................................................................................................... 7
2.2.3 DamCrest Database ............................................................................................. 8
2.2.4 lsrdata Database [ WFO Only ] ........................................................................... 8
2.2.5 Additional Databases [ RFC Only ] .................................................................... 9
2.3 Update Shape Files ....................................................................................................... 9
2.4 Update afos2awips With Local Changes .................................................................... 12
3.0 SBN Ingest Configuration.................................................................................................... 13
3.1 Ingest Filter Configuration .......................................................................................... 13
3.2 Plugin Ingest Filters .................................................................................................... 17
3.3 Distribution Filters ...................................................................................................... 21
4.0 Common Utility Configuration Files ................................................................................... 23
4.1 Create the Directory Structure .................................................................................... 23
4.2 Create FFMP Run Configuration File......................................................................... 23
4.3 Progressive Disclosure Files ....................................................................................... 25
4.4 Create / Copy Common Hydrology Files Into Place .................................................. 26
4.4.1 Create / Edit Site Apps_defaults File ................................................................ 27
4.5 Create Radar, NCEP/Hydro and UpperAir Menu Files .............................................. 29
4.5.1 Create/Edit radarsInUse.txt File........................................................................ 29
4.5.2 Create/Edit the eavConfigTable.txt .................................................................. 32
4.5.3 Create/Edit raobSitesInUse.txt File For Upper Air Menus ............................... 32
4.6 Copy / Edit WarnGen Templates [ WFO Only ] ........................................................ 34
4.7 Disable Fog Monitor [ RFC Only ] ............................................................................. 34
4.8 Correct Permissions and Ownership ........................................................................... 34
5.0 EDEX Utility Configuration Files ....................................................................................... 35
5.1 Create the Directory Structure .................................................................................... 35
5.2 Create/Edit GFE Configuration Files.......................................................................... 35
5.2.1 Copy / Edit siteConfig.py ................................................................................. 35

AWIPS II Site Data Configuration & Localization: Step-by-Step Guide (Build 11.9)
Contract DG133W-05-CQ-1067 / DCN AWP.DOC.TOSCAT.LOC-06.00 / 17October 2011
Use or disclosure of data contained on this sheet is subject to the restriction on the title page of this document. vii
5.2.2 Copy/Edit localConfig.py ................................................................................. 36
5.2.3 Copy / Edit SmartInit Files ............................................................................... 38
5.3 Create / Edit Subgridding Files ................................................................................... 40
5.4 Create MPE.xml and DHR-MOSAIC.xml Localized Grid Identification File .......... 43
5.5 Fix Ownership and Permissions.................................................................................. 46
6.0 Correct set_hydro_env ......................................................................................................... 47
7.0 Edit setup.env ....................................................................................................................... 48
8.0 Create / Edit WarnGen GUI Setup [ WFO Only ] ............................................................... 49
9.0 Create/Edit CAVE Map Displays ........................................................................................ 51
9.1 Create / Edit CAVE Station/Location Plot Information File(s) .................................. 51
10.0 Create / Edit Other CAVE Menus ....................................................................................... 53
10.1 Create / Edit Satellite Menu ........................................................................................ 53
10.2 Configure Local and Regional Warnings Display Menu ............................................ 54
11.0 Configure AvnFPS [ WFO Only ] ....................................................................................... 56
11.1 Configure AvnFPS GUI and Product Files ................................................................. 56
11.2 Copy AvnFPS Climate Files ....................................................................................... 57
12.0 Restart EDEX and Activate MPE Scripts ............................................................................ 58
13.0 Add Text Triggers ................................................................................................................ 59
Appendix A. LDM Ingest Checklist ........................................................................................... A-1
A.1 Deciphering a pqact.conf Entry ................................................................................ A-2
Appendix B. WarnGen Templates .............................................................................................. A-1
B.1 How to Access the Data Contained in a Value Inside a Template ......................... A-16
B.2 Modifying / Editing Templates ............................................................................... A-16
B.2.1 Time Ranges ................................................................................................. A-16
B.2.2 Locking Text ................................................................................................ A-16
B.2.3 Suppress Counties ........................................................................................ A-17
B.2.4 Wrapping Text.............................................................................................. A-17
B.2.5 Adding Bullets.............................................................................................. A-17
B.2.6 Adding “Call To Actions” ............................................................................ A-18
B.2.7 Examples ...................................................................................................... A-18
Appendix C. Creating Custom Map Scales ................................................................................ C-1
Appendix D. Adding Grid Information ..................................................................................... D-1
Part 1. Grid Parameter Definition ...................................................................................... D-1
Part 2. Geospatial Information ........................................................................................... D-2
Part 3. Grid Definition ....................................................................................................... D-3

AWIPS II Site Data Configuration & Localization: Step-by-Step Guide (Build 11.9)
Contract DG133W-05-CQ-1067 / DCN AWP.DOC.TOSCAT.LOC-06.00 / 17October 2011
Use or disclosure of data contained on this sheet is subject to the restriction on the title page of this document. viii
List of Tables
Page
Table 1.2-1. Document Variable Conventions ............................................................................... 3
Table 2-1. AWIPS II Baseline Database Listing ............................................................................ 5
Table 2.3-1. AWIPS II Shape File-To-Table Mapping ................................................................ 10
Table 3.1-1. LDM Feedtypes ........................................................................................................ 13
Table 3.1-2. LDM Action Options ................................................................................................ 15
Table 3.1-3. Hydrology Patterns ................................................................................................... 16
Table 3.2-1. Plugin Filter Filtering Elements ............................................................................... 19
Table 3.2-2. List of Base Plugin Filters ........................................................................................ 19
Table 3.2-3. Plugins That Support Filtering ................................................................................. 20
Table 3.2-4. Fields for Use Within a Plugin Filter XML File ...................................................... 20
Table 4.2-1. FFMP Run Configuration Fields .............................................................................. 23
Table 4.3-1. SPI File Inputs .......................................................................................................... 25
Table 4.5-1. radarsInUse.txt title Lines and Descriptions ............................................................ 30
Table 5.2.2 -1. Necessary localConfig.py Changes From AWIPS I to AWIPS II ........................ 36
Table 5.2.3-1. Smartinit Changes ................................................................................................. 38
Table 5-3-1. Base Model Names and Descriptions ...................................................................... 40
Table 8-1. WarnGen UI config.xml XML Tag Descriptions ........................................................ 49
Table 9-1. Delivered AWIPS-II Base Scale XML Files ............................................................... 51
Table 10.1-1. Satellite Sector Names ............................................................................................ 54
Table B-1. Baseline WarnGen Templates .................................................................................. B-1
Table B-2. Velocity .xml Template Configuration Values ......................................................... B-2
Table B-3. Variables Passed to WarnGen Templates ............................................................... B-10
Table B.2.1-1. Start and End Times for Actions....................................................................... B-16
Table D-1. Important XML Definitions in a grib model definition .xml ................................... D-3
List of Figures
Page
Figure 1-1. Localization in AWIPS II............................................................................................. 1
Figure 3.2-1. Plugin Filter, When Used to Filter Output from a Process ..................................... 18
Figure 3.2-2. Plugin Filter, When Used to Filter the Input of a Process ...................................... 18

AWIPS II Site Data Configuration & Localization: Step-by-Step Guide (Build 11.9)
Contract DG133W-05-CQ-1067 / DCN AWP.DOC.TOSCAT.LOC-06.00 / 17October 2011
Use or disclosure of data contained on this sheet is subject to the restriction on the title page of this document. ix
Acronyms and Abbreviations Used in This Document
ACARS
Aircraft Communications Addressing and Reporting System
ADAM AWIPS Data and Application Migration
AFOS Automation of Field Operations and Services
ASR Airport Surveillance Radar
AvnFPS Aviation Forecast Preparation System
AWIPS
Advanced Weather Interactive Processing System
CAVE Common AWIPS Visualization Environment
CONUS Continental United States; Contiguous United States
CPSBN Communications Processor Satellite Broadcast Network
CWA County Warning Area
CWSU
Center Weather Service Unit
D2D Display 2-Dimensional
DR Discrepancy Report
DVB Digital Video Broadcaster
DX Data Server
EAV
Estimated Actual Velocity
EDEX Enterprise Data EXchange
FFMP Flash Flood Monitoring and Prediction
FNMOC Fleet Numerical Meteorology and Oceanography Center
GFE Graphical Forecast Editor
GMS
Geostationary Meteorological Satellite
GOES Geostationary Operational Environmental Satellite
GUI Graphical User Interface
ICAO International Civil Aviation Organization
ID Identifier; Identification
IHFS
Integrated Hydrologic Forecast System
IP Internet Protocol
km kilometer
LAN Local Area Network
LDM Local Data Manager
LWX
WFO Sterling, Virginia
MPE Multi-sensor Precipitation Estimates
NCDC National Climatic Data Center
NCEP National Centers for Environmental Prediction
NEXRAD Next Generation Weather Radar
NIDS
NEXRAD Information Dissemination Service
NOAA National Oceanic and Atmospheric Administration
NOGAPS Navy Operational Global Atmospheric Prediction System
NWS National Weather Service

AWIPS II Site Data Configuration & Localization: Step-by-Step Guide (Build 11.9)
Contract DG133W-05-CQ-1067 / DCN AWP.DOC.TOSCAT.LOC-06.00 / 17October 2011
Use or disclosure of data contained on this sheet is subject to the restriction on the title page of this document. x
OAX
WFO Omaha, Nebraska
OCONUS Outside Continental United States; Outside Contiguous United States
POI Point-of-Interest
PostgreSQL Postgres Structured Query Language
PX Linux Preprocessor
RAOB RAwinsonde OBservation
RFC River Forecast Center
SBN Satellite Broadcast Network
SCAT Standard Configuration for AWIPS II Testing
SQL
Structured Query Language
TAF
Terminal Aerodrome Forecast
TCP Transmission Control Protocol
UGC Universal Geographic Code
VTEC Valid Time Event Code
VTL
Velocity Template Language
WAN Wide Area Network
WFO Weather Forecast Office
WMO World Meteorological Organization
XML EXtensible Markup Language
AWIPS II Site Data Configuration & Localization: Step-by-Step Guide (Build 11.9)
Contract DG133W-05-CQ-1067 / DCN AWP.DOC.TOSCAT.LOC-06.00 / 17 October 2011
Use or disclosure of data contained on this sheet is subject to the restriction on the title page of this document. 1
1.0 Introduction
Localization adapts (i.e., configures) the AWIPS national baseline software to the unique data
and display requirements of the site. AWIPS II performs localization dynamically at system
startup using data from the localization data environment.
This document is designed as a guide to changing specific files in the localization environment to
configure an EDEX installation to a specific site, and as a guide to adding localization files
needed for launching and running client applications such as CAVE and AlertViz. It supersedes
Raytheon document AWP.DOC.TOSCAT.LOC-05.00, dated 25 July 2011, and all previous
versions of this document.
This document focuses on a SERVER-CLIENT localization paradigm, much like that which
exists on AWIPS I. The steps taken should be sufficient to guide a person familiar with AWIPS I
systems through the creation of a usable AWIPS II localization for an EDEX and CAVE
instance.
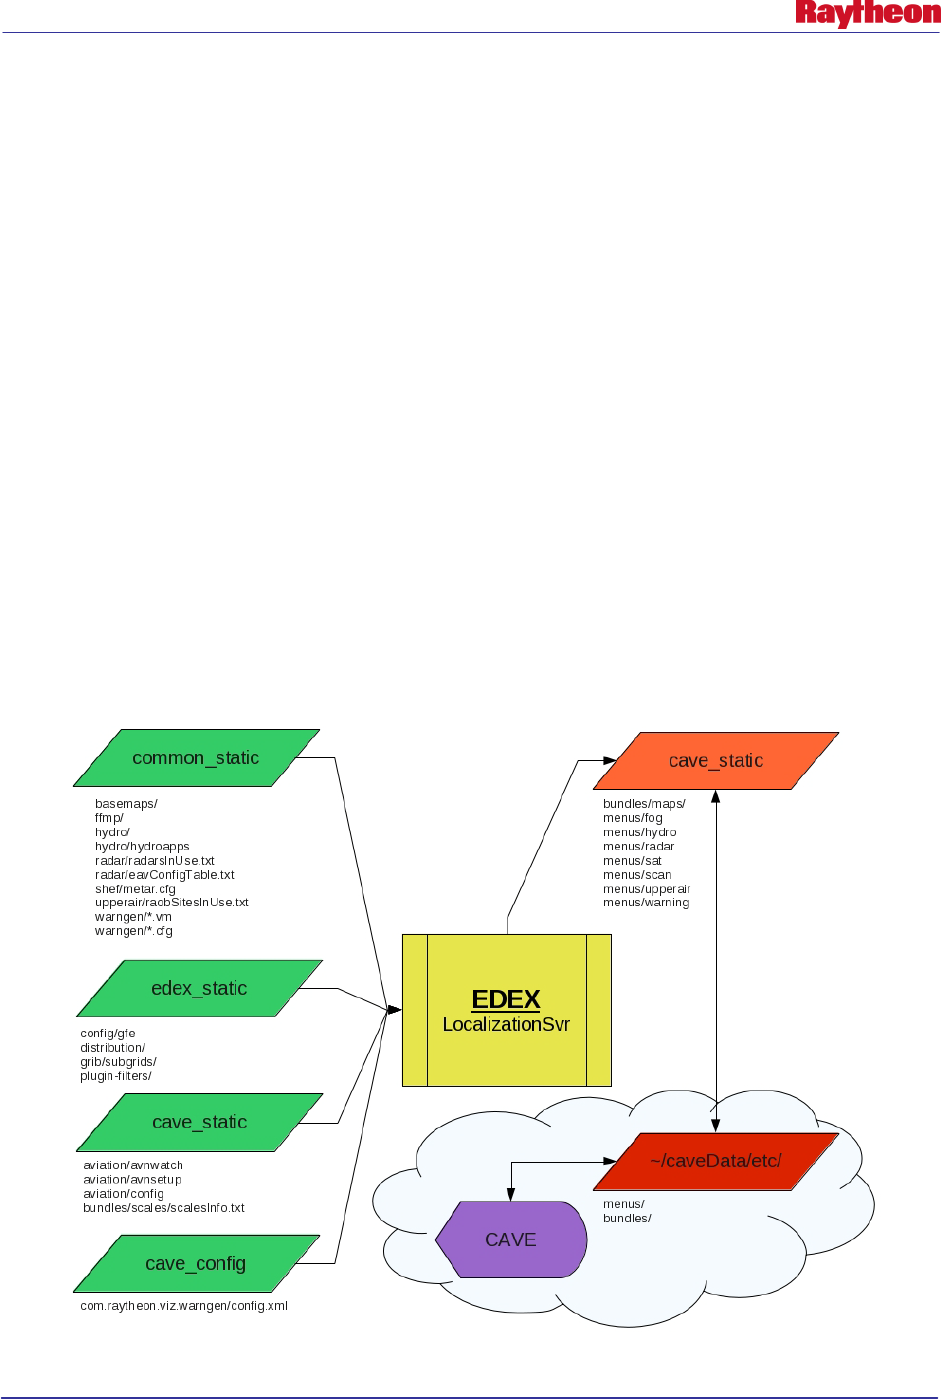
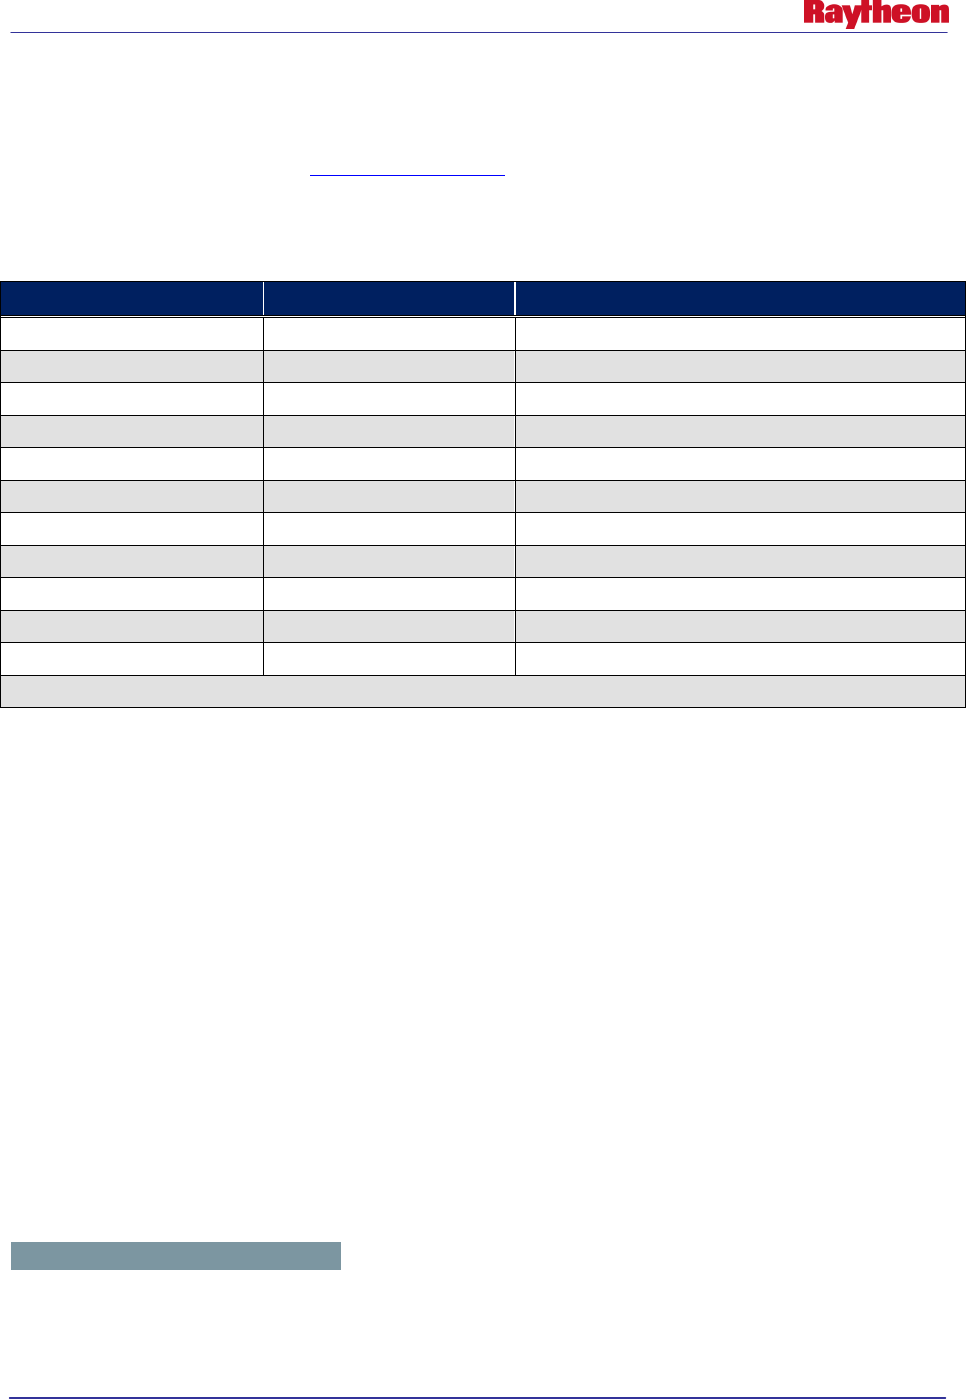
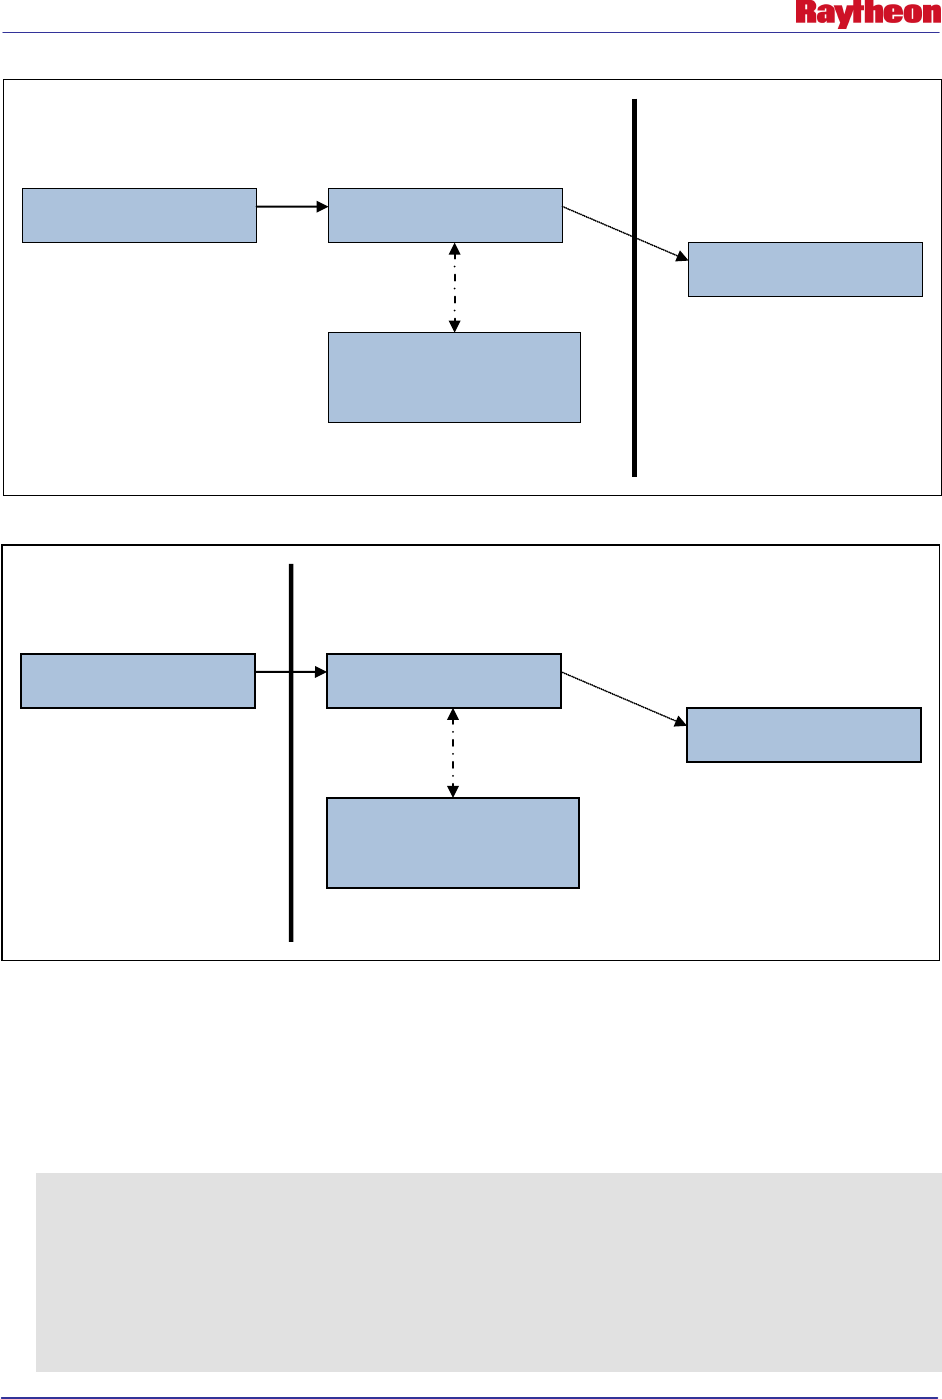
Localization in AWIPS II is done by the EDEX process itself, as opposed to a script
(mainScript.csh) from AWIPS I. Based on specific configuration files, the EDEX process
produces output files, which are then transferred, or downloaded, to the CAVE client when
CAVE starts and then whenever a change to a file has been detected. Figure 1-1 attempts to
describe the flow of configuration on the left, the localization engine (EDEX) in yellow (center),
the output of that localization in orange (top right), and the usage of those localization files via
download to a user’s caveData directory on a workstation in red (bottom right).
Figure 1-1. Localization in AWIPS II
AWIPS II Site Data Configuration & Localization: Step-by-Step Guide (Build 11.9)
Contract DG133W-05-CQ-1067 / DCN AWP.DOC.TOSCAT.LOC-06.00 / 17 October 2011
Use or disclosure of data contained on this sheet is subject to the restriction on the title page of this document. 2
This document focuses on creating the configuration files necessary for EDEX to correctly create
the output files needed for proper baseline operations.
General Note: You should never edit files that are in a base directory tree. Although there are a
few exceptions as of the date of this document's creation, anything beneath a directory named
base in the configuration tree should never be edited. This is analogous to the nationalData
directory in AWIPS I.
Assistance Note: A tool developed under Task Order 0013 is available for all sites that have
installed an ADAM (AWIPS II Data and Application Migration) platform to help collect the files
referenced in this document for moving to a platform which normally may not have access to
those files. The script is collect_files.sh and would be located in the /data/fxa/INSTALL/ADAM
directory. For more information on this script, please see the document titled “AWIPS II Site
Data Configuration Automation Tool” (AWP.DOC.TOSCAT.AUTO-04.00).
This document has been verified to work for AWIPS II Releases Build 11.5 - Build 11.7.
1.1 Document Conventions
When specific commands to be typed are being displayed, the following will be used as the
convention. The user should type on the screen everything following the # symbol. For example:
# ssh dx1
This indicates that the user should secure shell into dx1 (ssh dx1)
At points in the document, it is necessary to reference a command that could be used for multiple
iterations to achieve the same effect. The double bracket will enclose a description of what the
user is to input in place of the notated reference. For example:
[[ database name ]]
This indicates that the user should run the command for as many iterations of the database name
as needed to complete the desired configuration.
When a substitution needs to be made in a command that is to be interpreted by the user, the
following syntax will be used:
<< Site ID >>
This indicates that the user should interpret the correct site identifier to put into the command.
When specific paths are shown, they will be given a background shade, as shown in the
following example:
/awips2/edex
1.2 Document Variable Conventions
Table 1.2-1 defines a list of variables referenced in this document, provides a description of each
variable, and identifies the current location of each variable as of the date of this document.
Wherever a variable occurs in this document, the actual value should be substituted when typing
the commands on an AWIPS system. These are not environment variables at this point in time,
AWIPS II Site Data Configuration & Localization: Step-by-Step Guide (Build 11.9)
Contract DG133W-05-CQ-1067 / DCN AWP.DOC.TOSCAT.LOC-06.00 / 17 October 2011
Use or disclosure of data contained on this sheet is subject to the restriction on the title page of this document. 3
so manual substitution should be made when typing commands that contain references to these
variables.
Note: As of the creation of this document there is no plan to have these be system environment
variables on an AWIPS or ADAM system. The location should be known to the user following
the steps in the document. Normally the value under the expected location is that which an
AWIPS site or ADAM platform would adhere with the exception of the server and cave
platforms. Those, for an ADAM platform only, would all be adam1.
Table 1.2-1. Document Variable Conventions
Environment Variable
Description
Expected Location
$CAVE The hostname of a CAVE workstation lx1, lx2, lx3, etc….
$DB_SERVER
The hostname of the server running the Postgres
database engine
dx1f
$EDEX1 The primary EDEX servers dx3
$EDEX_CONFIG
The location in which the configuration files on the
EDEX servers reside
/awips2/edex/data/utility
$EDEX_DB_HOME
The location in which the database files reside that
control the functionality of the PostgreSQL engine, as
well as the physical storage for the data held within
the tables
/awips2/data [DX1/DX2]
$EDEX_HOME The home location for the EDEX JVM /awips2/edex
$LDM_DOWNSTREAM
The hostname of the server running the downstream
LDM client
dx2f
$LDM_HOST The hostname of the server running the
upstream/feeder LDM host cpsbn1/cpsbn2
$RCM_INSTALL_DIR
The location in which the AWIPS II RadarServer is
installed
/awips2/rcm
$RCM_SERVER
The hostname of the server running the AWIPS II
RadarServer
dx1f
1.3 CAVE-Only Configuration
The instructions in this document are designed to configure an AWIPS II installation to a site
other than OAX. If only CAVE configuration is desired, follow the instructions in these sections:
• Section 3
• Section 4 [Do all except most of section 4.4. The steps in section 4.4.1 need to be followed in
this section without exception.]
• Section 8
• Section 9
• Section 10
• Section 11
• Section 12.

AWIPS II Site Data Configuration & Localization: Step-by-Step Guide (Build 11.9)
Contract DG133W-05-CQ-1067 / DCN AWP.DOC.TOSCAT.LOC-06.00 / 17 October 2011
Use or disclosure of data contained on this sheet is subject to the restriction on the title page of this document. 4
1.4 Notes About Use on ADAM Platform
When using this document to localize an AWIPS II installation on the ADAM platform, it is
important to note that all references to a server, workstation, or other host instances via the
document conventions defined in this section will be adam1. This is due to the fact that not only
do the AWIPS II server instances run on the ADAM platform, but also the visualization
software.
AWIPS II Site Data Configuration & Localization: Step-by-Step Guide (Build 11.9)
Contract DG133W-05-CQ-1067 / DCN AWP.DOC.TOSCAT.LOC-06.00 / 17 October 2011
Use or disclosure of data contained on this sheet is subject to the restriction on the title page of this document. 5
2.0 Database Configuration
An integral part of each system setup is the database, which continues to be housed within a
PostgreSQL Database Engine (www.postgresql.org). Table 2-1 lists the functional database table
and indicates whether they are WFO centric, RFC centric, or both. It also identifies the method
to be used to create each table.
Table 2-1. AWIPS II Baseline Database Listing
Database Name
WFO / RFC / Both
Creation Method
dc_ob7xxx
*
Both
Post installation from backup
fxatext Both On first start of EDEX
hd_ob92xxx
*
Both
Post installation from backup
hmdb
WFO
Post installation from backup
lsrdata
WFO
Post installation from backup
maps
Both
During installation
metadata
Both
On first start of EDEX
ob7_histdata
RFC
Post installation from backup
postgres
Both
N/A (Systems Database)
template0
Both
N/A (Systems Database)
template1
Both
N/A (Systems Database)
* Sites will not see xxx in their output; “xxx” shown in this table will be replaced by the 3-letter AWIPS Site ID.
Those databases not created or populated during software installation or during software startup
should be restored from the latest backup file.
Note: The need to import databases exists if configuration is being performed in order for EDEX
to run as a site other than OAX. If configuration is being done merely to run CAVE in order to
back up an adjacent WFO, there is no need to acquire and import the databases for that site.
In order to proceed, the EDEX server must not be running.
• Stop the EDEX server, first by logging into all EDEX servers issuing the stop command.
# ssh $EDEX1
# service edex_camel stop
• Repeat the previous step for all EDEX client machines.
2.1 Configuring the PostgreSQL Database Engine
Due to the dynamic names of the hydrology (hd_) and damcrest (dc_) databases, and due to the
ability of RFCs to create local databases in the dblocalrfc tablespace, the PostgreSQL database
engine needs to be configured to allow access to these tables. The file that controls access is
$EDEX_DB_HOME/pg_hba.conf. For each database, two lines must be present in this file: one
for local access and one for remote access through tcp protocol. The lines resemble the following
example:
AWIPS II Site Data Configuration & Localization: Step-by-Step Guide (Build 11.9)
Contract DG133W-05-CQ-1067 / DCN AWP.DOC.TOSCAT.LOC-06.00 / 17 October 2011
Use or disclosure of data contained on this sheet is subject to the restriction on the title page of this document. 6
local fxatext all trust
host fxatext all 165.92.XXX.0/24 trust
In the preceding example, XXX would be substituted for the site’s AWIPS LAN third octet. To
configure the database to allow access from all of a site’s CAVE clients, a line for each database
matching the above should be entered.
Note: If a CWSU is hooked to your system, and has an IP outside the local site’s LAN,
additional entries will be necessary to allow connections from these workstations.
Follow these steps to configure the PostgreSQL access for an AWIPS site:
• Log into the database server as user root and change to the $EDEX_DB_HOME directory:
# cd $EDEX_DB_HOME
• Use a text editor (suggested: vi) to edit the pg_hba.conf file and input the lines that will allow
clients on the AWIPS site to access the databases:
# vi pg_hba.conf
• Using table 2.1 to determine which databases you will have installed, insert the lines, or
modify the existing lines to reflect your site’s subnet of the AWIPS WAN, in the
pg_hba.conf file. See the following example, which includes all necessary edits for
configuring site LWX:
local hd_ob92lwx all trust
local dc_ob7lwx all trust
local lsrdata all trust
host hd_ob92lwx all 165.92.52.0/24 trust
host dc_ob7lwx all 165.92.52.0/24 trust
host lsrdata all 165.92.52.0/24 trust
RFC Note: Because a River Forecast Center has the capability now to create local databases,
you will need to reflect each of these local databases in the AWIPS II pg_hba.conf file as
well, following the example above.
• Once you are finished, save and quit:
# :wq!
• If the database was not currently running while these changes were being made, it should be
restarted at this point. If the engine was running, then a control command can be sent to the
postmaster process to force it to reload its configuration files.
# ps aux | grep postgres
If a postmaster process returns, then reload the configuration data:
# su awips –lc “pg_ctl reload –D $EDEX_DB_HOME”
Otherwise, start the database server:
# service edex_postgres start
AWIPS II Site Data Configuration & Localization: Step-by-Step Guide (Build 11.9)
Contract DG133W-05-CQ-1067 / DCN AWP.DOC.TOSCAT.LOC-06.00 / 17 October 2011
Use or disclosure of data contained on this sheet is subject to the restriction on the title page of this document. 7
2.2 Create and Import Database Files
Once the database has been configured to allow connections from your site’s AWIPS LAN, any
databases that are not delivered should be created and populated (if they have not been already).
Find a list of databases currently loaded on the AWIPS system by logging into an AWIPS
machine with the AWIPS II software and environment successfully installed, and following
these steps:
• Open a terminal window, if one is not already open.
• Issue the following command to get a list of currently loaded databases:
# psql –U awips –h $DB_SERVER –l
Note: If prompted for a password, the database user password is ‘awips’
• Compare this list to Table 2-1. AWIPS II Baseline Database Listing.
• Log into the AWIPS II Database Server:
# ssh –l root $DB_SERVER
Logs into the database server as user root
2.2.1 hmdb Database [ WFO Only ]
• Drop and then re-create the hmdb database by issuing the following commands:
Note: Because the database already exists, it must first be dropped before it can be
imported from a backup with the following command:
# dropdb –h $DB_SERVER –U awips hmdb
** Only run this if the database already exists **
Note: If prompted for a password, the database user password is ‘awips’
# createdb –h $DB_SERVER –U awips hmdb
Runs the createdb command giving ownership to database
user awips for each database needed.
Note: If prompted for a password, the database user password is ‘awips’
• Import the most current backups for the databases. AWIPS backup_pgdb cron runs daily at
0522 GMT and puts a backup for each database into
/data/fxa/DAILY_BACKUP/postgres/<day_of_week>. These files can be used to import into
the newly created databases:
# pg_restore –h $DB_SERVER –U awips –d hmdb –Fc
/data/fxa/DAILY_BACKUP/postgres/<< Day Of Week>>/hmdb
Note: The previous command is all on one line, and not two lines.
2.2.2 IHFS Database
• Create the hd_ob92xxx database by issuing the following commands:
Note: Substitute the AWIPS Site ID of the desired site, in lowercase letters, for xxx in the
database name:
AWIPS II Site Data Configuration & Localization: Step-by-Step Guide (Build 11.9)
Contract DG133W-05-CQ-1067 / DCN AWP.DOC.TOSCAT.LOC-06.00 / 17 October 2011
Use or disclosure of data contained on this sheet is subject to the restriction on the title page of this document. 8
# createdb –h $DB_SERVER –E SQL_ASCII –U awips hd_ob92xxx
Runs the createdb command giving ownership to database
user awips for each database needed.
Note: If prompted for a password, the database user password is ‘awips’
• Import the most current backups for the databases. AWIPS backup_pgdb cron runs daily at
0522 GMT and puts a backup for each database into
/data/fxa/DAILY_BACKUP/postgres/<day_of_week>. These files can be used to import into
the newly created databases:
# pg_restore –h $DB_SERVER –U awips –d hd_ob92xxx –Fc
/data/fxa/DAILY_BACKUP/postgres/<< Day Of Week>>/hd_ob92xxx
Note: The previous command is all on one line, and not two lines.
2.2.3 DamCrest Database
• Create the dc_ob7xxx database by issuing the following commands:
Note: Substitute the AWIPS Site ID of the desired site, in lowercase letters, for xxx in the
database name:
# createdb –h $DB_SERVER –U awips dc_ob7xxx
Runs the createdb command giving ownership to database
user awips for each database needed.
Note: If prompted for a password, the database user password is ‘awips’
• Import the most current backups for the databases. AWIPS backup_pgdb cron runs daily at
0522 GMT and puts a backup for each database into
/data/fxa/DAILY_BACKUP/postgres/<day_of_week>. These files can be used to import into
the newly created databases:
# pg_restore –h $DB_SERVER –U awips –d dc_ob7xxx –Fc
/data/fxa/DAILY_BACKUP/postgres/<< Day Of Week>>/dc_ob7xxx
Note: The previous command is all on one line, and not two lines.
2.2.4 lsrdata Database [ WFO Only ]
• Create the lsrdata database by issuing the following commands:
# createdb –h $DB_SERVER –U awips lsrdata
Runs the createdb command giving ownership to database
user awips for each database needed.
Note: If prompted for a password, the database user password is ‘awips’
• Import the most current backups for the databases. AWIPS backup_pgdb cron runs daily at
0522 GMT and puts a backup for each database into
/data/fxa/DAILY_BACKUP/postgres/<day_of_week>. These files can be used to import into
the newly created databases:
AWIPS II Site Data Configuration & Localization: Step-by-Step Guide (Build 11.9)
Contract DG133W-05-CQ-1067 / DCN AWP.DOC.TOSCAT.LOC-06.00 / 17 October 2011
Use or disclosure of data contained on this sheet is subject to the restriction on the title page of this document. 9
# pg_restore –h $DB_SERVER –U awips –d lsrdata –Fc
/data/fxa/DAILY_BACKUP/postgres/<< Day Of Week>>/lsrdata
Note: The previous command is all on one line, and not two lines.
2.2.5 Additional Databases [ RFC Only ]
River Forecast Centers have the ability to create local databases for use with RFC applications.
These databases will need to be imported into the AWIPS II database engine. To retrieve the
names of these databases, on the AWIPS I database server (dx1f) issue the following command:
# psql –l | grep –vE
“(fxatext|dc_ob7|hd_ob|hmdb|ob7_his|postgres|template)”
If the AWIPS I database engine has already been shut down, issue this command on dx1 in order
to find those files that were backed up by the nightly cron (all on one line):
# find /data/fxa/DAILY_BACKUP/postgres/ -regextype posix-egrep -
mtime -1 -type f ! -regex
'/.*(fxatext|dc_ob7...|hd_ob.....|hmdb|ob7_histdata|postgres|temp
late[01])'
The following example shows one possible output:
[root@dx1-krf ~]# find /data/fxa/DAILY_BACKUP/postgres/ -regextype
posix-egrep -mtime -1 -type f ! -regex
'/.*(fxatext|dc_ob7...|hd_ob.....|hmdb|ob7_histdata|postgres|globals
|template[01])'
/data/fxa/DAILY_BACKUP/postgres/Thursday/fastetc
/data/fxa/DAILY_BACKUP/postgres/Thursday/gisrs
/data/fxa/DAILY_BACKUP/postgres/Thursday/hdkrf_testdb
Note the databases below:
________________________________________________________________________
For each database returned, run the createdb and pg_restore commands when the AWIPS II
database engine is installed and running:
# createdb –h $DB_SERVER –U awips [[ dbname ]]
# pg_restore –h $DB_SERVER –U awips –d [[ dbname ]] –Fc
/data/fxa/DAILY_BACKUP/postgres/<< Day Of Week>>/[[ dbname ]]
2.3 Update Shape Files
In AWIPS II, a number of shape files reside within the PostgreSQL database named maps. A
utility named importShapeFiles.sh is provided to help import the files into the database. Table
2.3-1 (taken from mapdata.map_version) lists those shape files imported into the database on
installation and their AWIPS I equivalent file names. Use this table when updating shape files.
AWIPS II Site Data Configuration & Localization: Step-by-Step Guide (Build 11.9)
Contract DG133W-05-CQ-1067 / DCN AWP.DOC.TOSCAT.LOC-06.00 / 17 October 2011
Use or disclosure of data contained on this sheet is subject to the restriction on the title page of this document. 10
Table 2.3-1. AWIPS II Shape File-To-Table Mapping
Table Name
File Name
Table Name
File Name
basins
ba23de09.shp
highway
rd30ap08.shp
cwa
w_15jl09.shp
canada
province.shp
offshore
oz02jn09.shp
specialuse
sua.shp
zone
z_11my10.shp
lowaltitude
vAirways.shp
timezones
tz04nv07.shp
navaid
navaid.shp
firewxaor
cf17jl07.shp
artcc
artcc.shp
latlon10
LatLon10_Ocean.shp
airport
airport.shp
majorrivers rs14fe02.shp highaltitude jAirways.shp
allrivers
rv14fe02.shp
fix
fix.shp
lake
lk24ap09.shp
rfc
rf12ja05.shp
world
world_adm0.shp
isc
cm28fe06.shp
states
s_01au07.shp
marinezones
mz01jn10.shp
customlocations
customlocations.shp
mexico
st_mx.shp
highsea
hz30mr09.shp
firewxzones
fz01my10.shp
interstate
in30ap08.shp
city
ci16ap10.shp
railroad
railrdl020.shp
marinesites
MarineInfo_OB9.2.txt
county
c_15jl09.shp
ffmp_basins
FFMP_aggr_basins.shp
hsa
hs07my09.shp
ffmp_streams
FFMP_ref_sl.shp
The FFMP streams and basins shape files specifically must be localized at a WFO for each site
using the created shapefiles in /data/fxa/nationalData. WFOs only update these files as follows:
• Log into the server hosting the AWIPS II database (DX1 in normal operations) as user root
# ssh –q $DB_SERVER –l root
• Unzip the gzipped versions of the FFMP shape files
# cd /data/fxa/nationalData
# gunzip FFMP_*.shp.gz
• Switch system users to user awips
# su - awips
• Change directories to the directory containing the importShapeFile.sh script
# cd /awips2/static/database.maps (For OB11.4 & OB11.5)
# cd /awips2/database/sqlScripts/share/sql/maps/ (For OB11.6 &
OB11.7)
• Update the ffmp_basins shape files using the site-specific version
# ./importShapeFile.sh
/data/fxa/nationalData/FFMP_aggr_basins.shp mapdata ffmp_basins
0.064,0.016,0.004,0.001 awips
Note: If prompted for a password, the database user password is ‘awips’
AWIPS II Site Data Configuration & Localization: Step-by-Step Guide (Build 11.9)
Contract DG133W-05-CQ-1067 / DCN AWP.DOC.TOSCAT.LOC-06.00 / 17 October 2011
Use or disclosure of data contained on this sheet is subject to the restriction on the title page of this document. 11
Example 2.3-1 shows typical output from this script:
Example 2.3-1
Importing FFMP_aggr_basins.shp into mapdata.ffmp_basins ...
Shapefile type: Polygon
Postgis type: MULTIPOLYGON[2]
psql:<stdin>:29: NOTICE: CREATE TABLE will create implicit sequence
"ffmp_basins_gid_seq" for serial column "ffmp_basins.gid"
psql:<stdin>:29: NOTICE: CREATE TABLE / PRIMARY KEY will create implicit
index "ffmp_basins_pkey" for table "ffmp_basins"
addgeometrycolumn
-----------------------------------------------------------------
mapdata.ffmp_basins.the_geom SRID:4326 TYPE:MULTIPOLYGON DIMS:2
(1 row)
Creating simplification levels 0.064,0.016,0.004,0.001...
Creating simplified geometry level 0.064 ...
Creating simplified geometry level 0.016 ...
Creating simplified geometry level 0.004 ...
Creating simplified geometry level 0.001 ...
• Update the ffmp_streams shape files using the site-specific version
# ./importShapeFile.sh /data/fxa/nationalData/FFMP_ref_sl.shp
mapdata ffmp_streams 0.064,0.016,0.004,0.001 awips
Note: If prompted for a password, the database user password is ‘awips’
Example 2.3-2 shows typical output from this script:
Example 2.3-2
Importing FFMP_ref_sl.shp into mapdata.ffmp_streams ...
Shapefile type: Arc
Postgis type: MULTILINESTRING[2]
psql:<stdin>:27: NOTICE: CREATE TABLE will create implicit sequence
"ffmp_streams_gid_seq" for serial column "ffmp_streams.gid"
psql:<stdin>:27: NOTICE: CREATE TABLE / PRIMARY KEY will create implicit index
"ffmp_streams_pkey" for table "ffmp_streams"
addgeometrycolumn
---------------------------------------------------------------------
mapdata.ffmp_streams.the_geom SRID:4326 TYPE:MULTILINESTRING DIMS:2
(1 row)
Creating simplification levels 0.064,0.016,0.004,0.001...
Creating simplified geometry level 0.064 ...
Creating simplified geometry level 0.016 ...
Creating simplified geometry level 0.004 ...
Creating simplified geometry level 0.001 ...
• Exit the user awips shell back to root.
# exit

AWIPS II Site Data Configuration & Localization: Step-by-Step Guide (Build 11.9)
Contract DG133W-05-CQ-1067 / DCN AWP.DOC.TOSCAT.LOC-06.00 / 17 October 2011
Use or disclosure of data contained on this sheet is subject to the restriction on the title page of this document. 12
• GZIP the FFMP Shape files that were unzipped before
# cd /data/fxa/nationalData
# gzip FFMP_*.shp
2.4 Update afos2awips With Local Changes
If local changes have been made to the site’s afos2awips.txt file, they should be imported into the
AWIPS II system. The functionality of this file has now been moved into the fxatext database
(into a table named afos_to_awips). To make it easy to import a site’s localized version of this
file easily, the site should make edits to the same file it maintained in AWIPS I . When
completed, the file is placed in a national data management directory within the EDEX
installation tree. From there EDEX uses the file to update its database automatically when there
are changes. These steps should be completed for all sites performing an initial site data
configuration.
• Log into the server hosting an AWIPS II EDEX (DX3 in normal operations) as user root:
# ssh –q $EDEX1 –l root
• Switch users to system user awips:
# su – awips
• Copy the file into the ndm directory of the EDEX installation tree:
# cp /awips/fxa/data/afos2awips.txt $EDEX_HOME/data/ndm/
• Ensure the proper ownership and permission:
# chown awips:fxalpha $EDEX_HOME/data/ndm/afos2awips.txt
• Exit from the system user awips shell, and from the ssh connection:
# exit
# exit
AWIPS II Site Data Configuration & Localization: Step-by-Step Guide (Build 11.9)
Contract DG133W-05-CQ-1067 / DCN AWP.DOC.TOSCAT.LOC-06.00 / 17 October 2011
Use or disclosure of data contained on this sheet is subject to the restriction on the title page of this document. 13
3.0 SBN Ingest Configuration
AWIPS II introduces the Unisys Local Data Manager (LDM) as the ingest tool for SBN data. It
replaces the legacy acq_send / acqServer processes from AWIPS I.
The upstream LDM host runs on the CPSBN machines, and listens directly to the SBN stream
from the DVB receivers.
The downstream LDM host runs in conjunction with the DX2F package, and requests products
from the upstream host. Based on a filtering file, only certain products will be sent for ingest into
the system. This is where the ingest filtering takes place now.
3.1 Ingest Filter Configuration
Ingest filtering is controlled through the pqact.conf file, which resides in the /usr/local/ldm/etc
directory. The general syntax of an entry in the file is as follows:
feedtype TAB Regex Pattern
TAB action TAB [arg]
Where TAB is an actual TAB. Lines can, and are, split between new lines at a TAB.
Table 3.1-1 is a list of feedtypes that can be used (reference
http://www.unidata.ucar.edu/software/ldm/ldm-6.7.1/basics/feedtypes/index.html ).
Table 3.1-1. LDM Feedtypes
Primary Name
Alternate Names
Description
PPS FT0 Public Products Service
DDS
FT1, DOMESTIC
Domestic Data Service
HDS
FT2, HRS
High resolution Data Service
IDS
FT3, INTNL
International Data Service
SPARE
FT4
Reserved for IDD use
UNIWISC
FT5, MCIDAS
Satellite imagery and derived products from the
Unidata/Wisconsin Broadcast
PCWS FT6, ACARS ACARS data from commercial aircraft
FSL2
FT7, PROFILER
Wind profiler data
FSL3
FT8
Reserved for NOAA/GSD use
FSL4
FT9
Reserved for NOAA/GSD use
FSL5 FT10 Reserved for NOAA/GSD use
GPSSRC
FT11, NMC1, AFOS
SuomiNet GPS data gathering
CONDUIT
FT12, NMC2, NCEPH
NCEP high-resolution model output
FNEXRAD
FT13, NMC3
NEXRAD Level-III composites
LIGHTNING
FT14,NLDN
Lightning data
WSI
FT15
NEXRAD Level-III (NIDS) radar products and
composites from WSI Corporation
DIFAX FT16 Unidata community-generated replacement for
defunct DIFAX feed
AWIPS II Site Data Configuration & Localization: Step-by-Step Guide (Build 11.9)
Contract DG133W-05-CQ-1067 / DCN AWP.DOC.TOSCAT.LOC-06.00 / 17 October 2011
Use or disclosure of data contained on this sheet is subject to the restriction on the title page of this document. 14
Primary Name
Alternate Names
Description
FAA604
FT17, FAA, 604
FAA604 products for NWS use (private network), but
available for IDD use
GPS
FT18
SuomiNet GPS data
FNMOC
FT19, SEISMIC,
NOGAPS
NOGAPS and COAMP model output from FNMOC
GEM
FT20, CMC
Canadian Meteorological Center GEM model output
NIMAGE
FT21, IMAGE
NOAAport satellite imagery
NTEXT FT22, TEXT NOAAport textual products (for future use)
NGRID
FT23, GRID
NOAAport high-resolution model output
NPOINT
FT24, POINT, NBUFR,
BUFR
NOAAport point products (for future use)
NGRAPH
FT25, GRAPH
NOAAport Redbook Graphics (for future use)
NOTHER
FT26, OTHER
NOAAport miscellaneous products (for future use)
NEXRAD3
FT27, NNEXRAD,
NEXRAD
NEXRAD Level-III products
NEXRAD2
FT28, CRAFT, NEXRD2
NEXRAD Level-II radar data
NXRDSRC
FT29
NCDC NEXRAD Level-II data archiving
EXP FT30 For experiments, testing, etc.
ANY
FT0 | FT1 | FT2 | ... |
FT31
Predefined feed set name for any feed type
NONE
--
Predefined feed set name for
no
feed types (will not
match anything)
DDPLUS
FT0 | FT1
Predefined feed set name for PPS or DDS
WMO FT0 | FT1 | FT2 | FT3 Predefined feed set name for PPS, DDS, HDS, or
IDS
UNIDATA
FT0 | FT1 | FT2 | FT3 |
FT5
Predefined feed set name for PPS, DDS, HDS, IDS,
or UNIWISC
FSL
FT6 | FT7 | FT8 | FT9 |
FT10
Predefined feed set name for PCWS, FSL2, FSL3,
FSL4, or FSL5
NMC
FT11 | FT12 | FT13
Predefined feed set name for AFOS, NMC2, or
NMC3
NPORT FT22 | FT23 | FT24 |
FT25 | FT26 Predefined feed set name for NTEXT, NGRID,
NPOINT, NGRAPH, or NOTHER
Regex Pattern is a regular expression used in pattern matching the LDM stream for ingest.
Action is the action to take on the product once it arrives. Table 3.1-2 describes the possibilities
for action and can be found on LDM’s Web page here:
http://www.unidata.ucar.edu/software/ldm/ldm-current/basics/pqact.conf.html

AWIPS II Site Data Configuration & Localization: Step-by-Step Guide (Build 11.9)
Contract DG133W-05-CQ-1067 / DCN AWP.DOC.TOSCAT.LOC-06.00 / 17 October 2011
Use or disclosure of data contained on this sheet is subject to the restriction on the title page of this document. 15
Table 3.1-2. LDM Action Options
Action
Description
NOOP
Don’t do anything with the product.
FILE
Write the data product to a file using the write() function.
STDIOFILE
Write the data product to a file using the fwrite() function.
DBFILE
Write the data product to a database.
EXEC
Execute a program.
PIPE
Write the product to a program’s standard input.
Arg is any optional arguments for the Action and is generally one of the following:
In general, the syntax for the ARG portion of the line in the pqact.conf file is as seen below:
–overwrite –close –log –edex <tab> /store/path
Where:
<tab> indicates hitting the tab key on the keyboard
/store/path is the path the file should be written to disk.
-overwrite indicates overwrite the file (if exists)
-close indicates to close the file after fwrite() function
-log indicates log the product to the ldmd.log
-edex indicates the sending of data over edexBridge for processing
In order to determine the correct FEEDTYPE above, the following command can be run from a
downstream LDM host.
# ./notifyme –h $LDM_HOST –v –l- -p ‘$REGEX’
Where $REGEX is a regular expression that will match against the type of data which is of
interest. Once a match is found, it is displayed on the screen as seen in Example 3.1-1.
Example 3.1-1
Dec 21 15:52:21 notifyme[32196] INFO: 1522 20101221155220.618 IDS|DDPLUS 11247393 SOAK45
KWBC 211549
Dec 21 15:52:21 notifyme[32196] INFO: 408 20101221155220.618 HDS 11247394 SFUS41 KWBC
211545
The example shows the FEEDTYPE in bold type.
AWIPS I customizes only specific patterns based on the localized site. Tables 3.1-3 and 3.1-4
depict information on each, and where to find the corresponding information.
AWIPS II Site Data Configuration & Localization: Step-by-Step Guide (Build 11.9)
Contract DG133W-05-CQ-1067 / DCN AWP.DOC.TOSCAT.LOC-06.00 / 17 October 2011
Use or disclosure of data contained on this sheet is subject to the restriction on the title page of this document. 16
Table 3.1-3. Hydrology Patterns
AWIPS I Pattern
Information Location
AWIPS II LDM Pattern
^SRU[EMSW][1-9]..(Wxxx)
Wxxx from XXX-hydroSiteConfig.txt file in
/awips/fxa/data/localization/XXX
IDS|DDPLUS ^(SRU[EMSW][1-9].)
(Wxxx)
SRUSRegCode.KWBC
RegCode
from XXX-hydroSiteConfig.txt file
in /awips/fxa/data/localization/XXX IDS|DDPLUS ^(SRUS
RegCode
)
(KWBC)
FOUS...(Rxxx)
Rxxx from XXX-hydroSiteConfig.txt file in
/awips/fxa/data/localization/XXX
IDS|DDPLUS ^(FOUS..) (Rxxx)
FGUS[57]..(Rxxx)
Rxxx from XXX-hydroSiteConfig.txt file in
/awips/fxa/data/localization/XXX
IDS|DDPLUS ^(FGUS[567].)
(Rxxx)
[AF][BS]US...(Wxxx)
Wxxx from XXX-hydroSiteConfig.txt file in
/awips/fxa/data/localization/XXX
IDS|DDPLUS ^([AF][BS]US..)
(Wxxx)
AGUS5..(Rxxx)
Rxxx
from XXX-hydroSiteConfig.txt file in
/awips/fxa/data/localization/XXX IDS|DDPLUS ^(AGUS5.) (
Rxxx
)
AGUS4..(Wxxx)
Wxxx from XXX-hydroSiteConfig.txt file in
/awips/fxa/data/localization/XXX
IDS|DDPLUS ^(AGUS4.) (Wxxx)
[YZ]EI.98.(Rxxx)
Rxxx from XXX-hydroSiteConfig.txt file in
/awips/fxa/data/localization/XXX
ANY ^([YZ]EI.98) (Rxxx)
Note: An example of the first row in the pqact.conf would look like this:
IDS|DDPLUS ^(SRU[EMSW][1-9].) (Wxxx) (..)(..)(..)
FILE -overwrite -log -close -edex /data_store/shef/\4/\1_\2_\3\4\5_(seq).txt
Remember that there are TABs between the different sections of the entry and that Wxxx would be substituted
based on the rules above.
T abl e 3.1-4. R adar Patter ns
AWIPS I Pattern Information Reference
CODE 17 INCLUDE SDUS2??KZZZ
Substitute KZZZ for the reporting site for each radar listed in:
/awips/fxa/data/localizationDataSets/XXX/dialRadars.txt
Reporting sites can be found by issuing the following command:
grep –i xxxy /awips/fxa/data/wmoSiteInfo.txt
Where xxx is the radar ID without the preceding K, P or T.
The following file on DX1 also contains the information needed:
/awips/fxa/data/localizationDataSets/XXX/acq_wmo_parms.sbn.radar
CODE 17 INCLUDE SDUS3??KZZZ
CODE 17 INCLUDE SDUS4??KZZZ
CODE 17 INCLUDE SDUS5??KZZZ
CODE 17 INCLUDE SDUS7??KZZZ
CODE 17 INCLUDE SDUS8??KZZZ
CODE 17 INCLUDE NXUS6??KZZZ
AWIPS II has only one pattern in the pqact.conf file, which lists all KXXX:
NNEXRAD ^(SDUS[234578].|NXUS6.) (K|P|T)(XXX|XXX|XXX|XXX|XXX)
Change the XXX to match each of the reporting sites for the radars listed in dialRadars.txt file. An example of a full
NNEXRAD localized line for site LWX follows. Please note there are only two lines, so word wrap applies (see
Appendix A for more detailed information on LDM acquisition patterns):
NNEXRAD ^(SDUS[234578].|NXUS6.)
(K|P|T)(LWX|BGM|CHS|RLX|ILN|CLE|AKQ|JKL|CTP|MHX|MRX|OKX|PHI)
(..)(..)(..) /p(...)(...)
FILE -overwrite –close –log –edex
/data_store/radar/\2\8/\7/\5\6_\2\8_\7_(seq).rad

AWIPS II Site Data Configuration & Localization: Step-by-Step Guide (Build 11.9)
Contract DG133W-05-CQ-1067 / DCN AWP.DOC.TOSCAT.LOC-06.00 / 17 October 2011
Use or disclosure of data contained on this sheet is subject to the restriction on the title page of this document. 17
Additional patterns can also be found in the acqPatternsAddOn.txt file, which can reside in
/awips/fxa/data/localization/XXX or /data/fxa/customFiles. These patterns should also be added
to the pqact.conf.xxx file in the proper syntax (where xxx is your site ID).
Delivered with the AWIPS II LDM rpm is a baselined pqact.conf.template file which should be
used as a basis for the active pqact.conf file. It should not be edited; rather, it should be copied
into the active pqact.conf file. From there, custom patterns can be concatenated onto the active
file.
Note: ADAM platform’s active file is adam-pqact.conf
To manually edit or add a new filter rule, follow these steps. Utilize Appendix A, LDM Ingest
Checklist, as a tool to help ensure all the correct information is known before proceeding:
• Log into the downstream LDM client host (normally PX2) as user root:
# ssh root@$LDM_DOWNSTREAM
• Change directories to the pqact.conf location on the server:
# cd /usr/local/ldm/etc
• Edit the pqact.conf using a text editor (shown here is vi):
# vi pqact.conf.xxx
• Once you are finished making changes, save the file and exit the editor:
# :wq!
• Check to ensure that the edited file still has the proper syntax using the ldmadmin command:
# su ldm –lc “ldmadmin pqactcheck –f
/usr/local/ldm/etc/pqact.conf.xxx”
Expect the phrase “syntactically correct” for each file you have
configured in ldmadmin-pl.conf
• Concatenate this file with the pqact.conf.template file to create the active pqact.conf file:
# cat pqact.conf.template pqact.conf.xxx > pqact.conf
• Ensure the proper ownership and permissions:
# chown ldm:fxalpha /usr/local/ldm/etc/pqact.conf
• Signal the LDM server to re-read the configuration files:
# su ldm –lc “ldmadmin pqactHUP”
3.2 Plugin Ingest Filters
The purpose of plugin filters is to provide a data filtering capability that is base or site
configurable without recompiling baseline code. This allows a subset of a national data set to be
filtered based upon an area of interest, for example, filtering out the products that are put through
shef decoding to only those in the local CWA of interest.
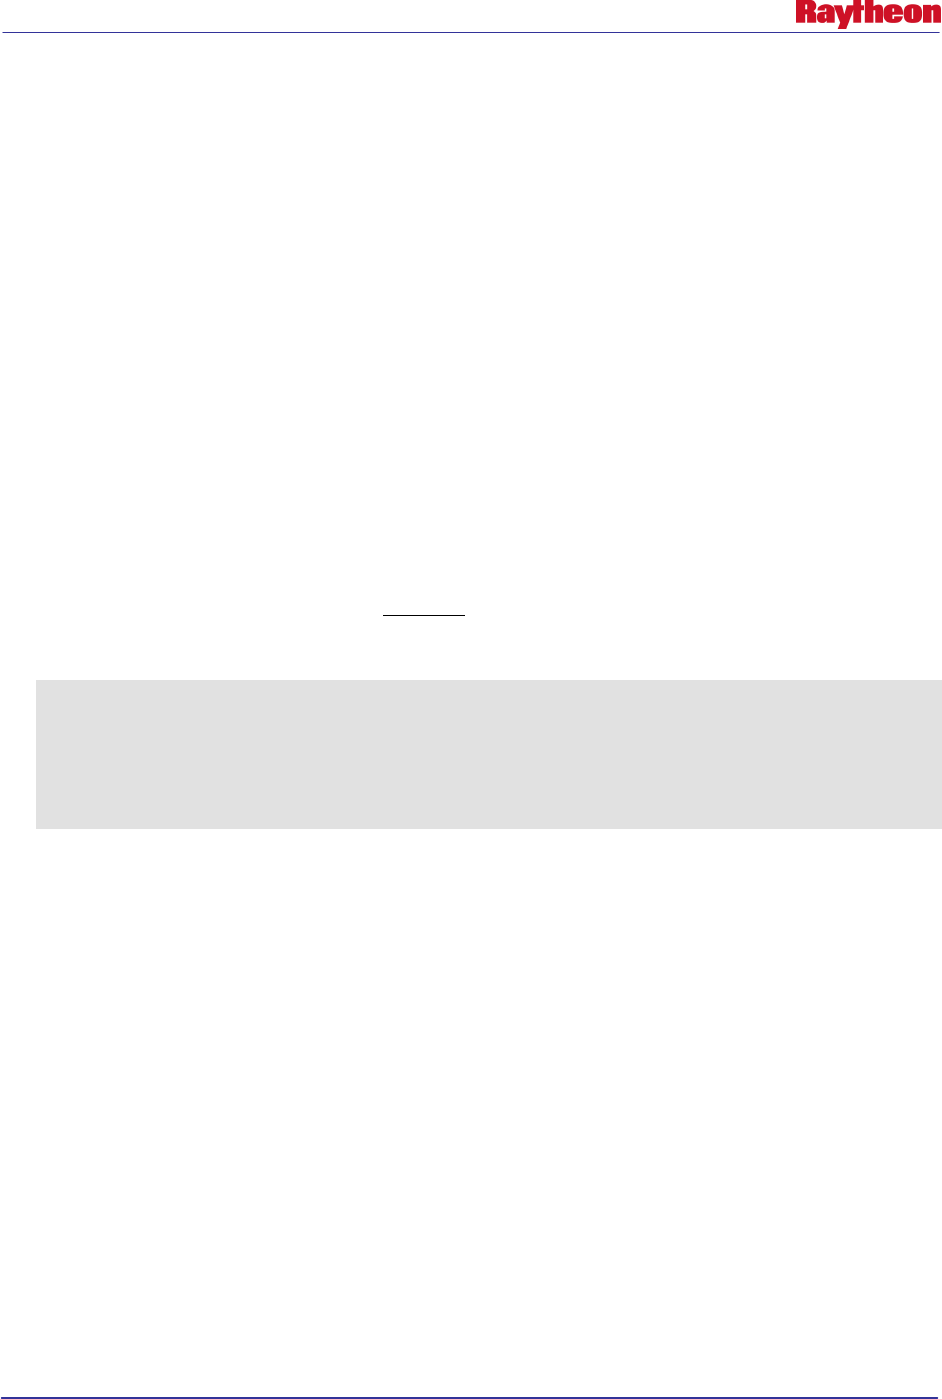
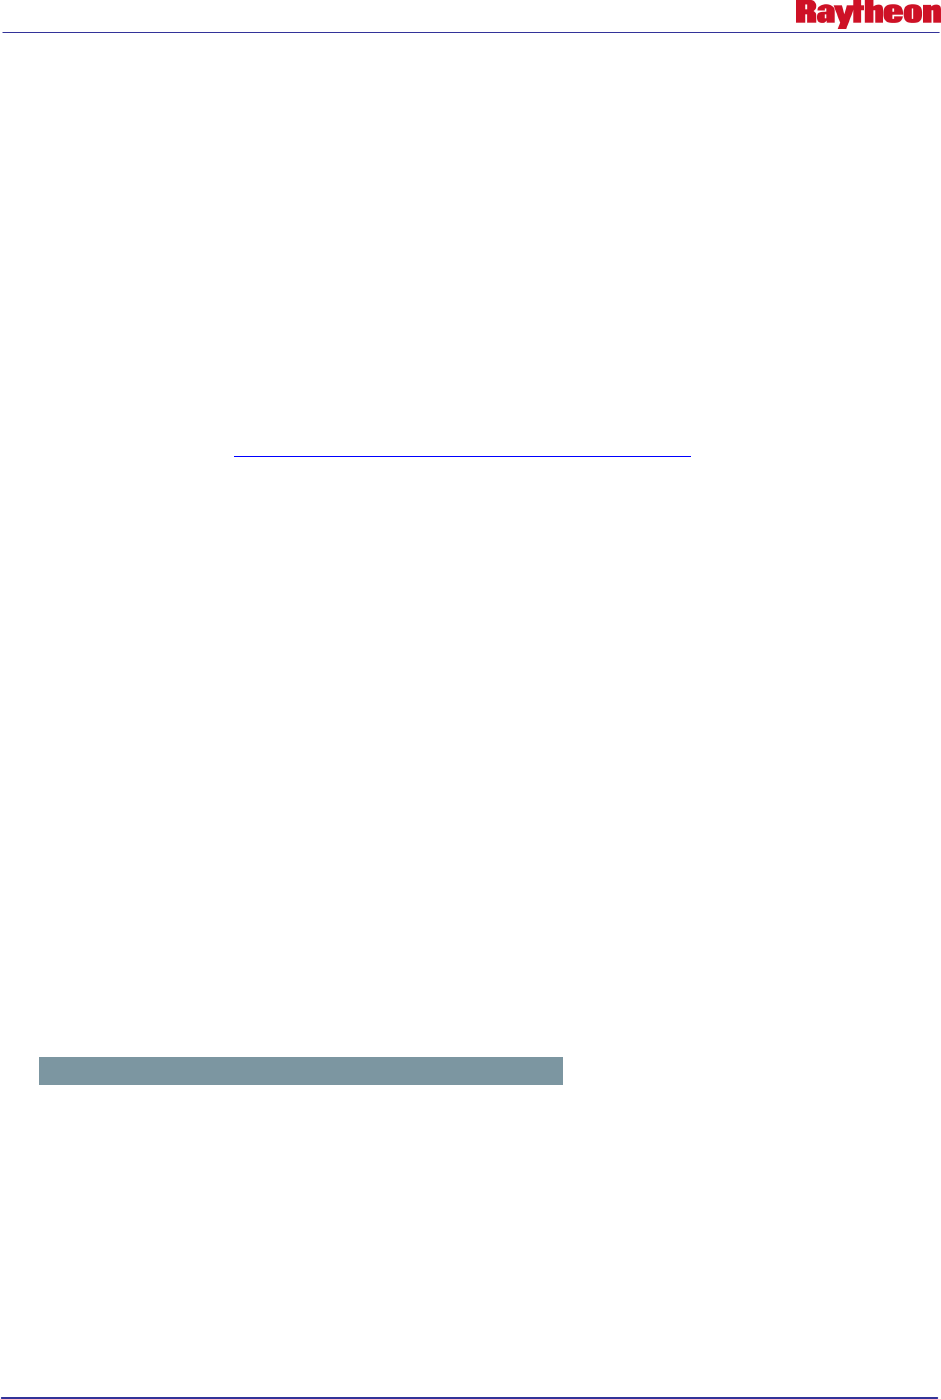
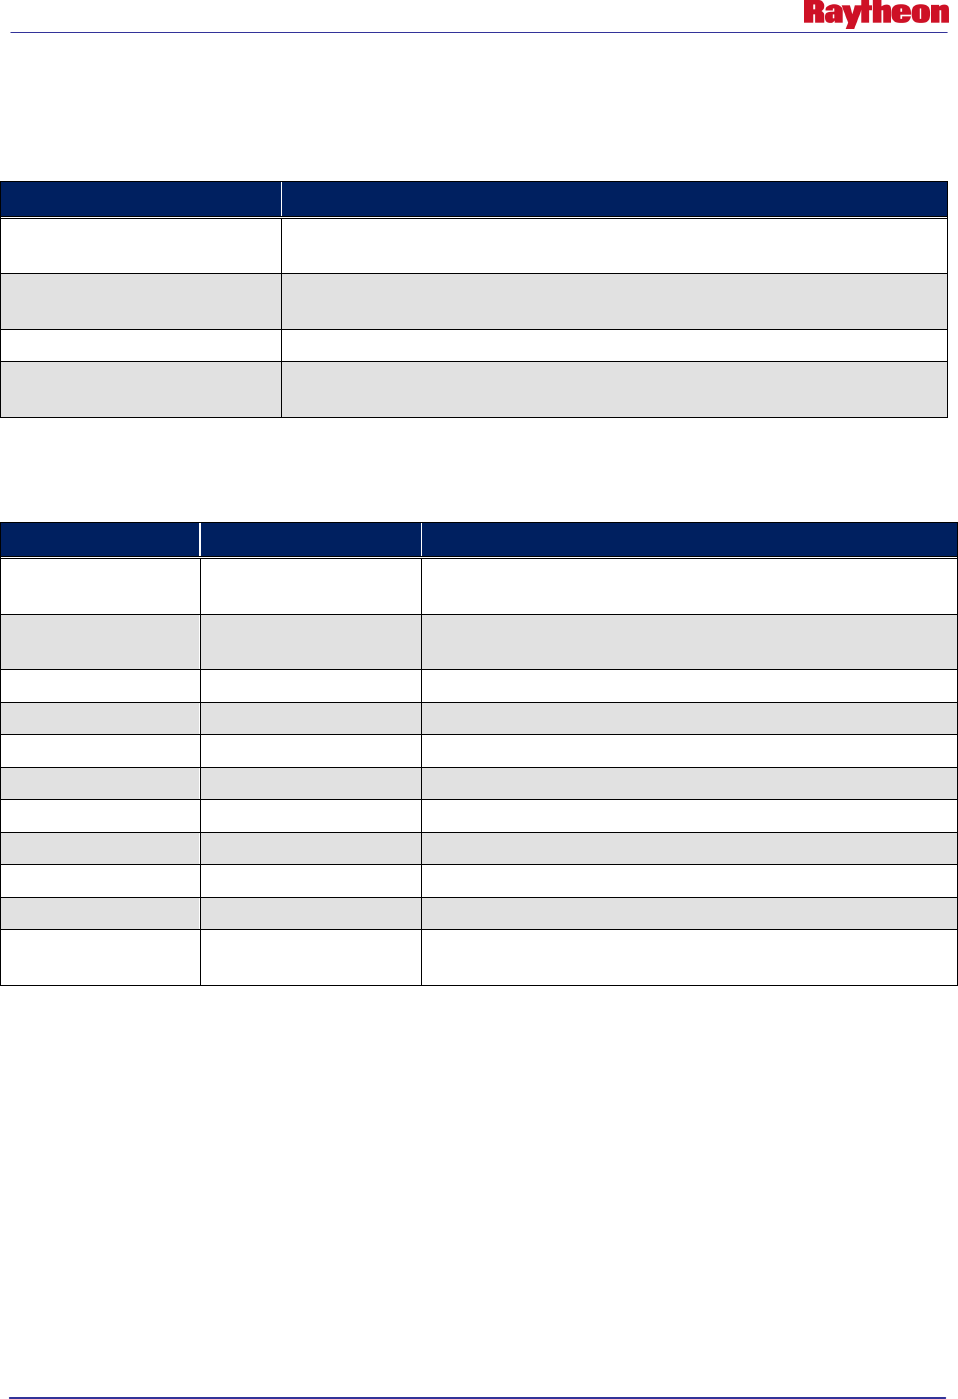
Plugin filters may be used to filter output from a process, as shown in Figure 3.2-1. They may
also be used to filter the input of a process, as shown in Figure 3.2-2.
AWIPS II Site Data Configuration & Localization: Step-by-Step Guide (Build 11.9)
Contract DG133W-05-CQ-1067 / DCN AWP.DOC.TOSCAT.LOC-06.00 / 17 October 2011
Use or disclosure of data contained on this sheet is subject to the restriction on the title page of this document. 18
Figure 3.2-1. Plugin Filter, When Used to Filter Output from a Process
Figure 3.2-2. Plugin Filter, When Used to Filter the Input of a Process
Filtering can be done through EXCLUSION of data, INCLUSION of data, or a combination of
both.
When using INCLUSIVE filtering, the output of the filtering operation returns those records that
match the filtering criteria. The following shows an INCLUSIVE filter that will pass only those
observations within a geographical rectangle which encompasses the OAX CWA.
<pluginDataObjectFilter>
<filterElements xmlns:xsi="http://www.w3.org/2001/XMLSchema-
instance" xsi:type="rectFilterElement">
<filterElementName>OAX.WFO</filterElementName>
<!-- Filter that includes all observations within the Omaha
Valley WFO -->
<filterType>INCLUDE</filterType>
<upperLeftLat>44</upperLeftLat>
BufrAscatDecoder PointAscat
xxxx
Exclude
SouthernHemisphere
BufrAScatPlugin
Downstream
Processing
METARDecoder
MetarToShefFilter
ShefDecoder
Filter Element
ObsPlugin
ShefPlugin

AWIPS II Site Data Configuration & Localization: Step-by-Step Guide (Build 11.9)
Contract DG133W-05-CQ-1067 / DCN AWP.DOC.TOSCAT.LOC-06.00 / 17 October 2011
Use or disclosure of data contained on this sheet is subject to the restriction on the title page of this document. 19
<upperLeftLon>-100</upperLeftLon>
<lowerRightLat>40.0</lowerRightLat>
<lowerRightLon>-94.90</lowerRightLon>
</filterElements>
<filterName>OAX.MetarToShef</filterName>
</pluginDataObjectFilter>
When using EXCLUSIVE filtering, the output of the filtering operation returns those records that
are not matched by the filtering criteria. The following example shows an EXCLUSIVE filter
that will stop all Southern Hemisphere data from being processed by the QuikScat plugin:
<pluginDataObjectFilter>
<filterElements xmlns:xsi="http://www.w3.org/2001/XMLSchema-
instance" xsi:type="rectFilterElement">
<!-- Exclude all southern hemisphere data. -->
<filterElementName>Exclude
SouthernHemisphere</filterElementName>
<filterType>EXCLUDE</filterType>
<upperLeftLat>-0.1</upperLeftLat>
<upperLeftLon>-180.0</upperLeftLon>
<lowerRightLat>-90.0</lowerRightLat>
<lowerRightLon>180.0</lowerRightLon>
</filterElements>
<filterName>Point.QuikScat</filterName>
</pluginDataObjectFilter>
Table 3.2-1 describes filtering elements that can be used as of the date on this document (the xsi:
type=).
Table 3.2-1. Plugin Filter Filtering Elements
Filter Element
Description
RectFilterElement
Select based upon reports contained within a rectangular bounding.
RadiusFilterElement
Select based upon reports within a specified distance from a given
latitude/longitude.
StationIdFilterElement
Select based upon reports matching a specified station identifier. Regular
expressions may be used.
Table 3.2-2 describes a list of present files in the base plugin-filters directory that filter out all
Southern Hemisphere data. Finer-grain filtering may be done within a site-specific plugin-filters
directory.
Table 3.2-2. List of Base Plugin Filters
File Name
Description
ascat_filters.xml
Allows only northern hemisphere ASCAT data to be stored.
modelsounding_filters.xml Allows only northern hemisphere model sounding data to be stored.
pointssmi_filters.xml
Allows only northern hemisphere SSMI data to be stored.
quikscat_filters.xml
Allows only northern hemisphere QUIKSCAT data to be stored.
AWIPS II Site Data Configuration & Localization: Step-by-Step Guide (Build 11.9)
Contract DG133W-05-CQ-1067 / DCN AWP.DOC.TOSCAT.LOC-06.00 / 17 October 2011
Use or disclosure of data contained on this sheet is subject to the restriction on the title page of this document. 20
Table 3.2-3 describes a list of plugins which, as of the date on this document, support plugin
filtering.
Table 3.2-3. Plugins That Support Filtering
Plugin Filter File Name
Description
mesowest_filters.xml As delivered in the OAX localization, this filters out all data except that
within the site's CWA for the mesowest plugin by latitude / longitude.
metarToShefFilter.xml
As delivered in the OAX localization, filters out all data except that within
the site's CWA by latitude/longitude.
modelSounding_filters.xml
--
synopticMetarToShef.xml
As delivered in the OAX localization, filters out all data except that within
the site's CWA by latitude/longitude.
Table 3.2-4 describes a list of fields that can be used within a plugin filter xml file.
Table 3.2-4. Fields for Use Within a Plugin Filter XML File
Filter Tag
Tag Effect
Description
filterElementName
Global
For information purposes only. Appears in EDEX log for tracing
loading and functionality of filters.
filterName Global For information purposes only. Appears in EDEX log for tracing
loading and functionality of filters.
filterType
Global
INCLUDE or EXCLUDE
upperLeftLat
RectFilterElement
Latitude measure for upper left corner point for filter area.
upperLeftLon
RectFilterElement
Longitude measure for upper left corner point for filter area.
lowerRightLat
RectFilterElement
Latitude measure for lower right corner point for filter area.
lowerRightLon
RectFilterElement
Longitude measure for lower right corner point for filter area.
pointLat
RadiusFilterElement
Latitude of center point for radius filtering
pointLon
RadiusFilterElement
Longitude of center point for radius filtering
radius
RadiusFilterElement
Radius around center point to either include or exclude data.
patterns
StationIdFilterElement
Station ID or regular expression to glob multiple station IDs into
station ID filtering element.
Note: Latitude values may range from -90 degrees (south) to 90 degrees (north); longitude values
may range from -180 degrees (west) to 180 degrees (east). If a box must cross the date line (180),
two filter boxes must be created to handle the filtering.
To create, or edit, a plugin filter xml, follow these steps utilizing the delivered filters in the OAX
subdirectory as a guide:
• Log into an EDEX server, if not already logged in:
# ssh root@${EDEX1}
• If the directory does not exist, create the site level plugin-filters edex static configuration
directory and change into the directory:
# mkdir –p ${EDEX_CONFIG}/edex_static/site/<XXX>/plugin-filters

AWIPS II Site Data Configuration & Localization: Step-by-Step Guide (Build 11.9)
Contract DG133W-05-CQ-1067 / DCN AWP.DOC.TOSCAT.LOC-06.00 / 17 October 2011
Use or disclosure of data contained on this sheet is subject to the restriction on the title page of this document. 21
# cd ${EDEX_CONFIG}/edex_static/site/<XXX>/plugin-filters
• Copy the file from the OAX directory and edit using the vi editor:
# cp –a ../../OAX/plugin-filters/[[ filter file ]].xml .
# vi [[ filter file ]].xml
Note: The name of the file should be one listed in Table 3-2.3.
• Enter / edit the fields, ensuring the file looks like the example shown earlier in this section. A
general rule of thumb is to define the area of responsibility for the desired site starting with
its center point. To retrieve a site’s center point, issue the following command:
For WFO sites:
# psql –h $DB_SERVER –U awips –d maps –c “select lat,lon from
mapdata.cwa where wfo=’$SITEID’;”
RFC sites should issue the same command, using their co-located WFO to substitute
for $SITEID
Use the center point, and add and subtract 3 degrees from the latitude to get the upper and
lower latitude. Add and subtract 4 degrees to get the west and east longitude. Adjust as
necessary.
• When finished editing, save and quit:
# :wq!
• Repeat the previous steps for all plugin filter files.
• Ensure proper ownership and permissions:
# chown –R awips:awips
${EDEX_CONFIG}/edex_static/site/<XXX>/plugin-filters
# chmod –R 755 ${EDEX_CONFIG}/edex_static/site/<XXX>/plugin-
filters
3.3 Distribution Filters
AWIPS II introduces another layer of ingest filtering. Before processing a piece of data, EDEX
will determine by its WMO header passed via JMS from QPID which decoder plugins it should
awaken to process the data. It uses XML files full of regular expressions to match the patterns
against the WMO header or file name of the raw data. A piece of data might awaken zero, one or
more plugins which are interested in decoding the data.
Base distribution XML Location: $EDEX_CONFIG/edex_static/distribution/
Site distribution XML Location: $EDEX_CONFIG/edex_static/site/XXX/distribution
Note: Base distribution files should never be edited.
To localize as any site, a distribution xml must be created in the site localization for the
following:
shef.xml

AWIPS II Site Data Configuration & Localization: Step-by-Step Guide (Build 11.9)
Contract DG133W-05-CQ-1067 / DCN AWP.DOC.TOSCAT.LOC-06.00 / 17 October 2011
Use or disclosure of data contained on this sheet is subject to the restriction on the title page of this document. 22
Follow these steps to copy the base file into a site directory, and then edit to match the LDM
pqact pattern for hydro data set up earlier:
• Log into an EDEX server, if not already logged in:
# ssh root@$EDEX1
• If the directory does not exist, create the site-level plugin-filters edex static configuration
directory:
# mkdir –p ${EDEX_CONFIG}/edex_static/site/<XXX>/distribution
• Change directories into the edex_static localization tree and copy the base file into the site-
level directory:
# cd $EDEX_CONFIG/edex_static
# cp –a base/distribution/shef.xml site/XXX/distribution
• Edit/create a file using vi:
# vi shef.xml
• Change the patterns to match the changes you made based on the hydro patterns in section
2.1; then save the file and quit the editor:
# :wq!
• Ensure proper ownership and permissions:
# chown –R awips:awips
${EDEX_CONFIG}/edex_static/site/<XXX>/distribution
# chmod –R 755 ${EDEX_CONFIG}/edex_static/site/<XXX>/distribution
AWIPS II Site Data Configuration & Localization: Step-by-Step Guide (Build 11.9)
Contract DG133W-05-CQ-1067 / DCN AWP.DOC.TOSCAT.LOC-06.00 / 17 October 2011
Use or disclosure of data contained on this sheet is subject to the restriction on the title page of this document. 23
4.0 Common Utility Configuration Files
Files configured in this section are common to EDEX and VIZ applications.
4.1 Create the Directory Structure
Create the directory, replacing XXX with the site ID selected for localization (e.g., LWX) using
a command similar to the following on the EDEX server:
# ssh root@${EDEX1}
# cd ${EDEX_CONFIG}/common_static/site
# mkdir <XXX>
Create, also, the list of subdirectories needed for subsequent steps:
# cd XXX
# mkdir ffmp
# mkdir goessndg
# mkdir hydro
# mkdir modelsndg
# mkdir poessndg
# mkdir radar
# mkdir shef
# mkdir upperair
# mkdir warngen
4.2 Create FFMP Run Configuration File
FFMP user and server side processes depend on a configuration file that defines which data is to
be used for FFMP product creation. The file that controls this setup is the
ffmp/FFMPRunConfig.xml file. Table 4.2-1 addresses the fields and what properties the entries
in this file control.
Table 4.2-1. FFMP Run Configuration Fields
XML Tag Description
<rfc>
Defines an RFC whose flash flood guidance is to be used in the
operation of FFMP.
<product>
Note: At least one product minimum is
necessary for proper FFMP functionality.
Defines a product and source to be used in the operational of FFMP.
Required fields inside the tag (see example 4.2-1):
name: Corresponds to the primary source of one of the products
listed in the FFMPSourceConfig.xml.
key: Corresponds to the site template for this product. Generally the
ICAO of the radar sites in the case of DHR data, and either “hpe” or
“bhpe” for HPN/E.
Note: Be as descriptive as possible with the key, as this will be the
name of the template created by FFMP.

AWIPS II Site Data Configuration & Localization: Step-by-Step Guide (Build 11.9)
Contract DG133W-05-CQ-1067 / DCN AWP.DOC.TOSCAT.LOC-06.00 / 17 October 2011
Use or disclosure of data contained on this sheet is subject to the restriction on the title page of this document. 24
XML Tag Description
<domain>
Creates a domain to define the area of interest for FFMP.
Required fields inside the tag (see example 4.2-1):
primary: Sets as primary domain. Valid values are true or false. Only
one true value per file.
cwa: The three-letter AWIPS ID of the CWA of interest.
Example 4.2-1 shows an example file for site OAX. Use this example as a base template for
creating an FFMPRunConfig.xml file for a new site.
Example 4.2-1
<?xml version=”1.0” encoding=”UTF-8” standalone=”yes”>
<FFMPRunConfig xmlns:ns2=”group”>
<runner>
<rfc>KKRF</rfc>
<rfc>KMSR</rfc>
<product name=”DHR” key=”koax”/>
<product name=”DHR” key=”kuex”/>
<product name=”DHR” key=”kdmx”/>
<product name=”DHRMOSAIC” key=”hpe”/>
<product name=”BDHRMOSAIC” key=”hpe”/>
<domain primary=”true” cwa=”OAX”/>
<domain primary=”false” cwa=”GID”/>
<domain primary=”false” cwa=”DMX”/>
</runner>
</FFMPRunConfig>
Note: If no FFMPRunConfig.xml is generated manually, EDEX will attempt to create a minimal
configuration automatically. This feature is not fully operational, so it is recommended that a
manual setup be created.
To create an FFMP Configuration file for a new site, follow these steps:
• If not already logged in, log into an EDEX server and change to the site-level common utility
configuration directory.:# ssh root@${EDEX1}:
# cd ${EDEX_CONFIG}/common_static/site/XXX
• Copy the OAX version of the FFMPRunConfig.xml into the new site’s directory:
# cp –a ../OAX/ffmp/FFMPRunConfig.xml ffmp/
• Using the vi editor, enter editing mode for the file FFMPRunConfig.xml:
# vi ffmp/FFMPRunConfig.xml
• Change the values for each XML tag to be specific to the new site. At least one <rfc>,
<product> and <domain> field is necessary. Delete any multiple tags that are not necessary.
• Save and exit the vi text editor:
# :wq!
AWIPS II Site Data Configuration & Localization: Step-by-Step Guide (Build 11.9)
Contract DG133W-05-CQ-1067 / DCN AWP.DOC.TOSCAT.LOC-06.00 / 17 October 2011
Use or disclosure of data contained on this sheet is subject to the restriction on the title page of this document. 25
4.3 Progressive Disclosure Files
The use of pre-created AWIPS I progressive disclosure files is necessary for certain portions of
the AWIPS II software. However, AWIPS II Build 11.4 introduced the /awips2/edex/data/ndm
directory, which is used as an input for placing files that create certain spi files. Use Table 4.3-1
to identify which files are necessary to create certain spi files.
Table 4.3-1. SPI File Inputs
Input File Created spi File
/awips/fxa/data/modelBufrStationInfo.txt
modelBufr.spi
/awips/fxa/data/MTR.goodness
/awips/fxa/data/MTR.primary
MTR.spi
/awips/fxa/data/maritimeStationInfo.txt
BUOY.spi
/awips/fxa/data/goesBufrStationInfo.txt
goesBufr.spi
/awips/fxa/data/poesBufrStationInfo.txt
poesBufr.spi
/data/fxa/nationalData/raob.goodness
/data/fxa/nationalData/raob.primary
raob.spi
All spi files are created in the following location:
${EDEX_CONFIG}/common_static/site/XXX/basemaps
Where XXX is the AWIPS site ID as configured by the setup.env file (see Section 7.0)
Any other spi file not listed above as being created will have to be put into the basemaps
directory pre-created.
To put all of these files in place, firs, log into an EDEX server and change directories into the
ndm directory
# ssh root@${EDEX1}
# cd ${EDEX_HOME}/data/ndm
Next, copy the proper files into place from their original locations:
# scp /awips/fxa/data/modelBufrStationInfo.txt .
# scp /awips/fxa/data/MTR.goodness .
# scp /awips/fxa/data/MTR.primary .
# scp /awips/fxa/data/maritimeStationInfo.txt .
# scp /awips/fxa/data/goesBufrStationInfo.txt .
# scp /awips/fxa/data/poesBufrStationInfo.txt .
# scp /data/fxa/nationalData/raob.primary .
# scp /data/fxa/nationalData/raob.goodness .

AWIPS II Site Data Configuration & Localization: Step-by-Step Guide (Build 11.9)
Contract DG133W-05-CQ-1067 / DCN AWP.DOC.TOSCAT.LOC-06.00 / 17 October 2011
Use or disclosure of data contained on this sheet is subject to the restriction on the title page of this document. 26
4.4 Create / Copy Common Hydrology Files Into Place
The use of previously created hydrology files is necessary for certain parts of the AWIPS II
software. Copy these files from their respective AWIPS I locations:
• First, log into an EDEX server and change to the common utility configuration directory for
the desired site:
# ssh root@${EDEX1}
# cd ${EDEX_CONFIG}/common_static/site/<XXX>
Where XXX is the AWIPS ID for the site for which configuration is being performed.
• Save and exit the vi editor
# :wq!
• Create the directory structure necessary for, and then copy the AWIPS I host ascii and binary
file(s) into the new directory with the new file name syntax:
If configuring for a WFO, use these commands:
# mkdir –p hydro/hydroapps/geo_data/host
#cp –r /awips/hydroapps/geo_data/host/ascii
hydro/hydroapps/geo_data/host/
# cp –r /awips/hydroapps/geo_data/host/binary
hydro/hydroapps/geo_data/host/
If configuring for an RFC, use this command:
# mkdir –p hydro/hydroapps/geo_data/xxxxx
# cp –r /awips/hydroapps/geo_data/xxxxx/ascii
hydro/hydroapps/geo_data/xxxxx/
# cp –r /awips/hydroapps/geo_data/host/binary
hydro/hydroapps/geo_data/xxxxx/
Where xxxxx is your 5-letter RFC identifier. For example, RHA is
“marfc”
• If the directory does not exist, create the site-level hydro common configuration directory for
geo data:
# mkdir –p hydro/hydroapps/whfs/local/data/geo
• Copy the AWIPS I local geo data into the new directory with the new file name syntax:
# cp –ar /awips/hydroapps/whfs/local/data/geo/*
hydro/hydroapps/local/data/geo/
• Copy the AWIPS I local MPE-related files into the new directory with the new file name
syntax:
# mkdir –p hydro/hydroapps/precip_proc/local/data/app/mpe
AWIPS II Site Data Configuration & Localization: Step-by-Step Guide (Build 11.9)
Contract DG133W-05-CQ-1067 / DCN AWP.DOC.TOSCAT.LOC-06.00 / 17 October 2011
Use or disclosure of data contained on this sheet is subject to the restriction on the title page of this document. 27
# cp –r /awips/hydroapps/precip_proc/local/data/app/mpe/prism
hydro/hydroapps/precip_proc/local/data/app/mpe/
# cp –r /awips/hydroapps/precip_proc/local/data/app/mpe/misbin
hydro/hydroapps/precip_proc/local/data/app/mpe/
# cp –r
/awips/hydroapps/precip_proc/local/data/app/mpe/utiltriangles
hydro/hydroapps/precip_proc/local/data/app/mpe/
• Copy in XDAT related files [RFC Only]:
# mkdir -p hydro/hydroapps/rfc/xdat/parameters/groups
# cp –r /awips/hydroapps/rfc/xdat/parameters/groups/*
hydro/hydroapps/rfc/xdat/parameters/groups
• Copy the AWIPS I group_definition.cfg file into place for the Time Series application:
# cp
/awips/hydroapps/whfs/local/data/app/timeseries/group_definition.
cfg hydro/
• Ensure proper ownership and permission of the common hydro configuration directory tree:
# chown –R awips:fxalpha hydro
# chmod –R 775 hydro
• Copy the AWIPS I metar.cfg file into the new directory with the new file name syntax:
# cp /awips/hydroapps/whfs/local/data/app/metar2shef/metar.cfg
shef/
• Ensure proper ownership and permission of the common shef configuration directory tree:
# chown –R awips:fxalpha shef
# chmod –R 775 shef
4.4.1 Create / Edit Site Apps_defaults File
A site can use its existing AWIPS I .Apps_defaults_site file for use in the AWIPS II
environment. However, not all of the tokens from the AWIPS I file are necessary for AWIPS II.
As of the date on this document, the following tokens are required for AWIPS II to operate. This
token list will be dynamic in nature and change as more tokens are discovered.
• Copy the AWIPS I .Apps_defaults_site file into the new directory with the new file name
syntax:
# cp /awips/hydroapps/.Apps_defaults_site hydro/Apps_defaults
• Verify that the following tokens ARE NOT defined in the Apps_defaults file, as they need to
remain their AWIPS II baseline definition. If these tokens are present, use the vi editor to edit
the file and remove them.:
apps_dir
mpe_dir
pproc_dir

AWIPS II Site Data Configuration & Localization: Step-by-Step Guide (Build 11.9)
Contract DG133W-05-CQ-1067 / DCN AWP.DOC.TOSCAT.LOC-06.00 / 17 October 2011
Use or disclosure of data contained on this sheet is subject to the restriction on the title page of this document. 28
• Verify that the following tokens ARE defined in the Apps_defaults file for proper EDEX
Hydro functionality. If they are not defined the edit the file to add these tokens in:
# vi hydro/Apps_defaults
If configuring for a WFO:
mpe_site_id : xxx
(where xxx is the lower-case 3 letter identifier of your WFO)
mpe_center_lat : ##.###
(where ##.### is the latitude coordinate of your site’s center
point)
mpe_center_lon : ##.###
(where ##.### is the longitude coordinate of your site’s center
point)
fxa_local_site : XXX
(where XXX is the upper-case 3 letter identifier of your WFO)
If configuring for an RFC:
mpe_site_id : xxx
(where xxx is the lower-case 3 letter identifier of your RFC)
mpe_center_lat : ##.###
(where ##.### is the latitude coordinate of your site’s center
point)
mpe_center_lon : ##.###
(where ##.### is the longitude coordinate of your site’s center
point)
fxa_local_site : XXX
(where XXX is the upper-case 3 letter identifier of your RFC)
rfctb_site_id : xxx
(where xxx is the lower-case 3 letter identifier of your RFC)
st3_rfc : xxxxx
(where xxxxx is the lower-case 5 letter identifier of your RFC)
ifp_rfc : xxxxx
(where xxxxx is the lower-case 5 letter identifier of your RFC)
rfcw_rfcname : xxxxx
(where xxxxx is the lower-case 5 letter identifier of your RFC)
• Ensure proper ownership and permission of the common hydro configuration directory tree:
# chown –R awips:fxalpha hydro/Apps_defaults
AWIPS II Site Data Configuration & Localization: Step-by-Step Guide (Build 11.9)
Contract DG133W-05-CQ-1067 / DCN AWP.DOC.TOSCAT.LOC-06.00 / 17 October 2011
Use or disclosure of data contained on this sheet is subject to the restriction on the title page of this document. 29
# chmod –R 775 hydro/Apps_defaults
4.5 Create Radar, NCEP/Hydro and UpperAir Menu Files
EDEX dynamically creates the files necessary for the CAVE Radar, NCEP/Hydro and UpperAir
menus based on specific input files in the common utility configuration directory tree. Create
these files, using those delivered with the OAX localization as guides:
4.5.1 Create/Edit radarsInUse.txt File
Section Note: As of the date on this document, there is a DR created against the software’s
ability to successfully create the radar menus in CAVE when a site has no ASR or ARSR radars
listed in the radarsInUse.txt configuration file. For this reason, if the desired site does not ingest
an ASR or ARSR radar, please leave the default entries from the OAX version of this file.
Radar menu configuration is done dynamically by the EDEX server when launched based on a
single input file: $EDEX_CONFIG/common_static/site/<XXX>/radar/radarsInUse.txt
The file is split into six main sections which are used by the software to build the menus on the
main CAVE toolbar, and under the Radar menu. To configure the radar menus in CAVE, do the
following:
• If not already logged in, log into an EDEX server and change to the common utility
configuration directory for the desired site:
# ssh root@${EDEX1}
# cd ${EDEX_CONFIG}/common_static/site/<XXX>
• Copy the base version of radarsInUse.txt into the desired site’s directory:
# cp ../../base/radar/radarsInUse.txt radar/
• Change directories to the local site’s common radar configuration directory:
# cd radar
• Edit the radarsInUse.txt file to configure radar menus:
# vi radarsInUse.txt
Table 4.5-1 describes the five main sections used for radar menu configuration. It includes the
title for each section (which is a necessary line in the radarsInUse.txt file) and a description of
what should follow the title line in the file.
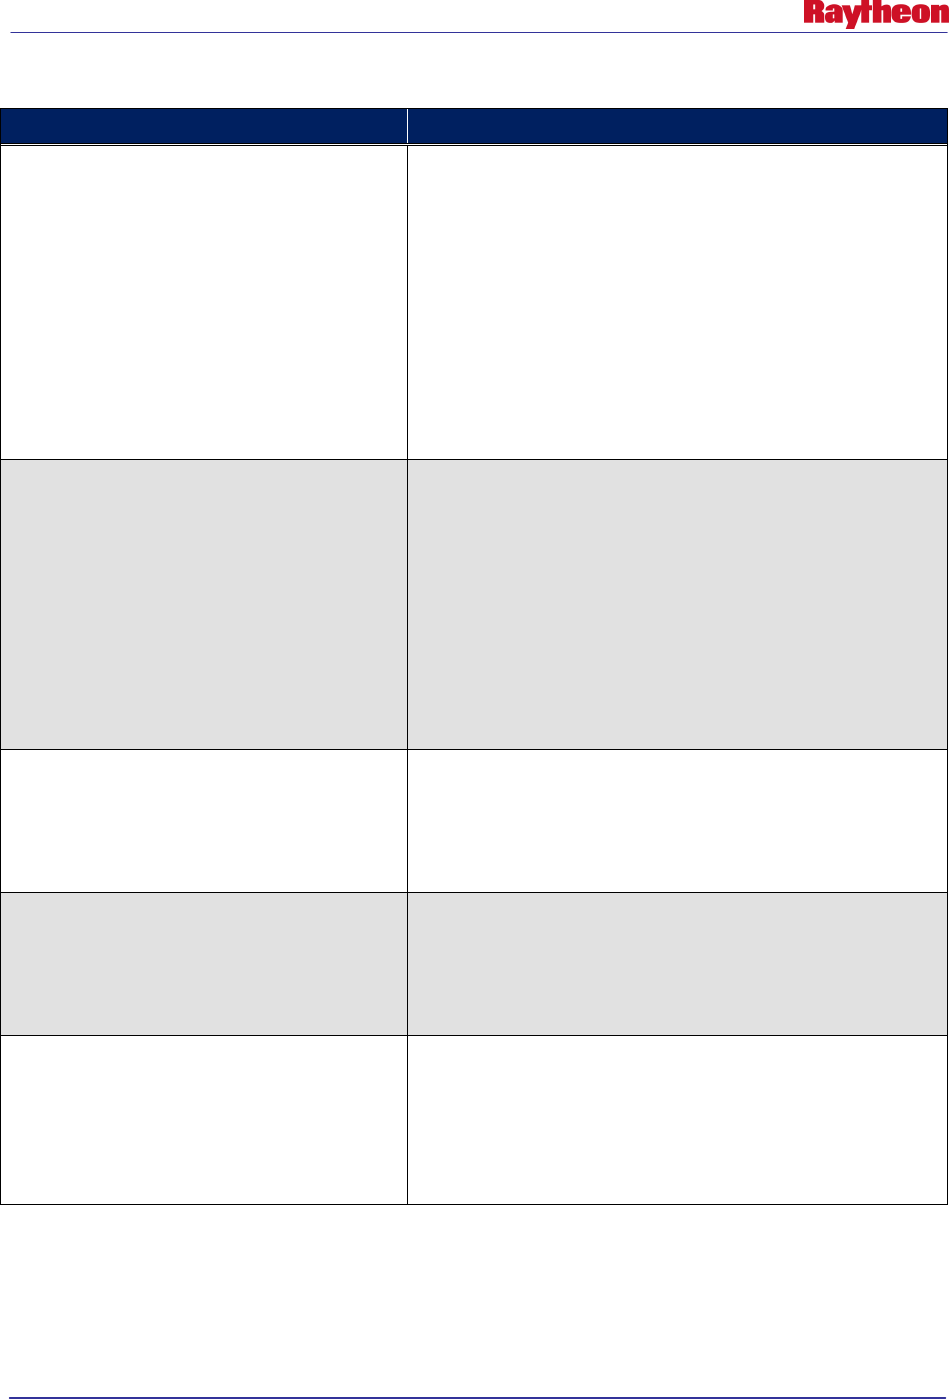
AWIPS II Site Data Configuration & Localization: Step-by-Step Guide (Build 11.9)
Contract DG133W-05-CQ-1067 / DCN AWP.DOC.TOSCAT.LOC-06.00 / 17 October 2011
Use or disclosure of data contained on this sheet is subject to the restriction on the title page of this document. 30
Table 4.5-1. radarsInUse.txt title Lines and Descriptions
radarsInUse.txt Title
Description of What Follows
# LOCAL_RADARS (including terminal) -
MUST HAVE THIS LINE
Includes a list of four-letter radar IDs to list in the main tool bar of
CAVE. Each entry will be a full menu of dedicated radar
products and will be created between the Satellite and Radar
menus. Each ID is separated by a new line character.
In AWIPS I, this is every radar ID listed with a + sign in one of
the following files:
/data/fxa/customFiles/radarsOnMenu.txt
OR
/data/fxa/customFiles/XXX-radarsOnMenu.txt
OR
/awips/fxa/data/localization/XXX/XXX-radarsOnMenu.txt
# DIAL_RADARS - MUST HAVE THIS LINE
Includes a list of four-letter radar IDs to list under the Dial
Radars submenu of the Radars menu in CAVE. Each ID is
separated by a new line character.
In AWIPS I, this is every radar ID not listed with a + sign in one
of the following files:
/data/fxa/customFiles/radarsOnMenu.txt
OR
/data/fxa/customFiles/XXX-radarsOnMenu.txt
OR
/awips/fxa/data/localization/XXX/XXX-radarsOnMenu.txt
# ASR_RADARS - MUST HAVE THIS LINE
Includes a list of four-letter ASR radar (e.g., eeri) IDs to list in the
main tool bar of CAVE. Each entry will get its own menu created
and should be separated by a new line character.
DR 8004 workaround requires you add a radar ID here. Use
eeri.
# ARSR_RADARS - MUST HAVE THIS LINE Includes a list of four-letter ARSR radar (e.g., fqwa) IDs to list in
the main tool bar of CAVE. Each entry will get its own menu
created and should be separated by a new line character.
DR 8004 workaround requires you add a radar ID here. Use
fqwa.
# MOSAIC_RADARS - MUST HAVE THIS
LINE
Includes a list of four-letter radar IDs to load when selecting the
default Mosaic products under the Radar menu. Each ID is
separated by a new line character.
In AWIPS I you can find a list of radars in the
mosaicRadarList.txt file located in the
/awips/fxa/data/localizationDataSets/XXX directory.
An example of a localized radarsInUse.txt file follows.

AWIPS II Site Data Configuration & Localization: Step-by-Step Guide (Build 11.9)
Contract DG133W-05-CQ-1067 / DCN AWP.DOC.TOSCAT.LOC-06.00 / 17 October 2011
Use or disclosure of data contained on this sheet is subject to the restriction on the title page of this document. 31
# DO NOT EDIT LINES BEGINNING WITH '#'
# LOCAL_RADARS (including terminal) - MUST HAVE THIS LINE
koax
tmsp
ktlx
# DIAL_RADARS - MUST HAVE THIS LINE
kabr
kcys
kdmx
kgld
kuex
keax
karx
kmpx
klnx
kdvn
kudx
kfsd
ktwx
tmsp
# ASR_RADARS - MUST HAVE THIS LINE
eeri
# ARSR_RADARS - MUST HAVE THIS LINE
fqwa
# MOSAIC_RADARS - MUST HAVE THIS LINE
koax
kabr
kcys
kdmx
kgld
kuex
keax
karx
kmpx
klnx
kdvn
kudx
kfsd
ktwx
• Save and quit the text editor
# :wq!
Note: The # CWA entry in the OAX version of this file is no longer used by the software, so a
newly created file for another site does not need to include the line.

AWIPS II Site Data Configuration & Localization: Step-by-Step Guide (Build 11.9)
Contract DG133W-05-CQ-1067 / DCN AWP.DOC.TOSCAT.LOC-06.00 / 17 October 2011
Use or disclosure of data contained on this sheet is subject to the restriction on the title page of this document. 32
4.5.2 Create/Edit the eavConfigTable.txt
The EAV display and sample strings are done through the same file as in AWIPS I, the
eavConfigTable.txt. Configure this file by doing the following:
• If not already logged in, log into an EDEX server and change to the common utility
configuration directory for the desired site:
# ssh root@${EDEX1}
# cd ${EDEX_CONFIG}/common_static/site/<XXX>
• Copy the AWIPS I version of eavConfigTable.txt into the desired site’s directory:
# cp /data/fxa/nationalData/eavConfigTable.txt radar/
4.5.3 Create/Edit raobSitesInUse.txt File For Upper Air Menus
The Upper Air RAOB menus are created dynamically with the input of a single common utility
configuration file through the EDEX menu builder.
File Location: ${EDEX_CONFIG}/common_static/site/<XXX>/upperair
The file has two necessary menu lines:
# UPPER_AIR menu
# LOCAL_UPPER_AIR submenu
The EDEX menu builder will look for these lines, and parse the entries that follow to create the
RAOBs that sit on the Upper Air Menu itself, and in the Local submenu of the Upper Air CAVE
dropdown.
Each entry under the template line consists of three pieces of information:
• RAOB icao. This is the four-letter identifier for which the RAOB is best known.
• WMO ID. The WMO ID can be found as the stationed returned from the SQL statement
below, or within the existing AWIPS file /awips/fxa/data/station_table.dat.
• Location Description. The Location Description should match the RAOB icao. This can be
found with the following command on a device that has access to the database server. (Please
note that PostgreSQL must be running for this to work:
# psql –h $DB_SERVER –U awips –d metadata –c “select name,stationid
from common_obs_spatial where catalogtype=22 and icao=’XXXX’;”
Note: Substitute the RAOB icao for XXXX in the above command.
Note: This information can also be found in the AWIPS I files
/data/fxa/nationalData/raobProductButtons.txt, /awips/fxa/data/ICAODICT.TBL, or
/awips/fxa/data/raobStationInfo.txt
An example of the file configured for site OAX follows.
AWIPS II Site Data Configuration & Localization: Step-by-Step Guide (Build 11.9)
Contract DG133W-05-CQ-1067 / DCN AWP.DOC.TOSCAT.LOC-06.00 / 17 October 2011
Use or disclosure of data contained on this sheet is subject to the restriction on the title page of this document. 33
# DO NOT EDIT LINES BEGINNING WITH '#'
# FULLY DEFINES ALL SITES USED FOR THE LOCALIZED UPPER AIR MENU IN
CAVE
# Format is as follows :
# icao city name, state
# KXXX SiteID Anywhere, US
# UPPER_AIR menu
KOAX 72558 Omaha, NE
# LOCAL_UPPER_AIR submenu
KABR 72659 Aberdeen, SD
KBIS 72764 Bismarck, ND
KLBF 72562 North Platte, NE
KMPX 72649 Minneapolis, MN
KOAX 72558 Omaha, NE
KUNR 72662 Rapid City, SD
KTOP 72456 Topeka, KS
To configure the Upper Air Menu, follow these steps:
• Collect the needed RAOB icaos, WMO IDs, and Descriptions from an AWIPS I D2D or the
AWIPS I localization file /awips/fxa/data/localizationDataSets/<XXX>/raobLocalMenus.txt
• If not already logged in, log into an EDEX server and change to the common utility
configuration directory for the desired site:
# ssh root@${EDEX1}
# cd ${EDEX_CONFIG}/common_static/site/<XXX>
• Copy the base version of hydroSitesInUse.txt into the desired site’s directory:
# cp ../../base/upperair/raobSitesInUse.txt upperair/
• Edit the hydroSitesInUse.txt file and, using the example above, change the entries to the
correct entries for the desired site:
# vi upperair/raobSitesInUse.txt
• If not already present, create a line containing this exact text (including the ‘#’ symbol):
# UPPER_AIR menu
• Type in the RAOB icao, WMOID and Description – all separated by a space for each RAOB
desired to be seen under the Upper Air menu of CAVE.
• If not already present, create a line containing this exact text (including the ‘#’ symbol):
# LOCAL_UPPER_AIR submenu
• Type in the RAOB icao, WMOID, and Description – all separated by a space for each RAOB
desired to be seen under the Local submenu of the Upper Air menu of CAVE.
• Save the file and exit the text editor:
# :wq!

AWIPS II Site Data Configuration & Localization: Step-by-Step Guide (Build 11.9)
Contract DG133W-05-CQ-1067 / DCN AWP.DOC.TOSCAT.LOC-06.00 / 17 October 2011
Use or disclosure of data contained on this sheet is subject to the restriction on the title page of this document. 34
4.6 Copy / Edit WarnGen Templates [ WFO Only ]
WarnGen templates are common to both EDEX and VIZ applications.
For more information on editing the templates, please see Appendix B.
4.7 Disable Fog Monitor [ RFC Only ]
River Forecast Centers do not need to run the fog monitor plugin within EDEX. Sites
configuring EDEX to run as an RFC should disable this plugin by following these steps:
• If not already logged in, log into an EDEX server and change to the base level common
utility configuration directory for monitoring plugins:
# ssh root@${EDEX1}
# cd ${EDEX_CONFIG}/common_static/base/monitoring
• Change the token for the fog monitor plugin from true, to false:
# sed –i ‘/fog/s/true/false/1’ MonitorPluginState.xml
4.8 Correct Permissions and Ownership
After making the correct files with proper entries, ownership must be set on the files in the
directory tree.
• If not already logged in, log into an EDEX server and change to the site-level common utility
configuration directory”
# ssh root@${EDEX1}
# cd ${EDEX_CONFIG}/common_static/site/
• Recursively change the ownership and permissions of the site directory created in the
previous steps:
# chown –R awips:fxalpha <XXX>
# chmod –R 755 <XXX>
AWIPS II Site Data Configuration & Localization: Step-by-Step Guide (Build 11.9)
Contract DG133W-05-CQ-1067 / DCN AWP.DOC.TOSCAT.LOC-06.00 / 17 October 2011
Use or disclosure of data contained on this sheet is subject to the restriction on the title page of this document. 35
5.0 EDEX Utility Configuration Files
Files configured in this section are specific to EDEX functionality.
5.1 Create the Directory Structure
Create the directory, replacing XXX with the site ID selected for localization (e.g., LWX) using
a command similar to the following on the EDEX server:
# ssh root@${EDEX1}
# cd ${EDEX_CONFIG}/edex_static/site
# mkdir <XXX>
Create, also, the list of subdirectories needed for subsequent steps:
# cd XXX
# mkdir –p config/gfe
# mkdir –p grib/subgrids
# mkdir smartinit
5.2 Create/Edit GFE Configuration Files
GFE’s siteConfig.py and localConfig.py files are placed within the config/gfe directory for use
by EDEX in its GFE functions.
5.2.1 Copy / Edit siteConfig.py
Copy the siteConfig.py from the delivered OAX localization and use it as a template for creating
the siteConfig.py for the desired site:
• If not already logged in, log into an EDEX server and change to the site-level edex utility
configuration directory:
# ssh root@${EDEX1}
# cd ${EDEX_CONFIG}/edex_static/site/
• Copy the delivered OAX siteConfig.py into the desired site’s directory:
# cp –a OAX/config/gfe/siteConfig.py <XXX>/config/gfe
• Edit the file using a text editor such as vi and replace instances of OAX with the desired
site’s ID. Example 5.2-1 shows the OAX siteConfig.py with the needed changes highlighted
in red::
# vi <XXX>/config/gfe/siteConfig.py
Example 5.2-1: Text of AWIPS II OAX siteConfig.py
import os, socket
GFESUITE_HOME = os.environ['EDEX_HOME']+"/../GFESuite"
GFESUITE_SERVER = "localhost"
GFESUITE_PORT = '98000000'
GFESUITE_SITEID = 'OAX'
GFESUITE_PRDDIR = GFESUITE_HOME+"/products"
GFESUITE_MHSID = 'OAX'
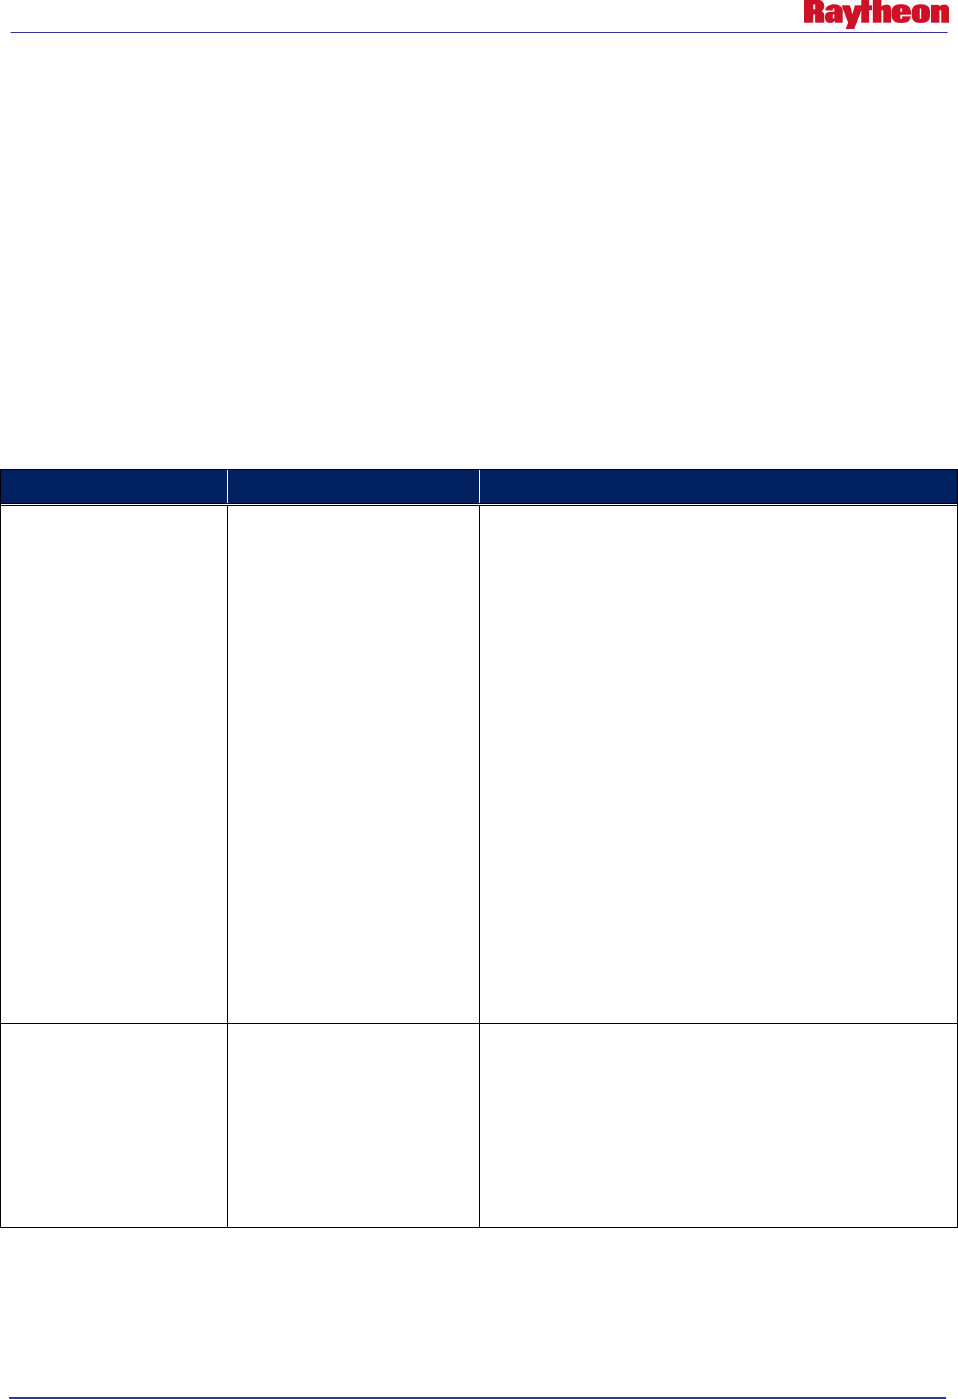
AWIPS II Site Data Configuration & Localization: Step-by-Step Guide (Build 11.9)
Contract DG133W-05-CQ-1067 / DCN AWP.DOC.TOSCAT.LOC-06.00 / 17 October 2011
Use or disclosure of data contained on this sheet is subject to the restriction on the title page of this document. 36
Note: For non-operational sites, the GFESUITE_MHSID should match the ID of your
system. For example, Southern Region Headquarters would put EHU instead of whichever
site is being configured by following this document’s procedures. The GFESUITE_SITEID
must match the AWIPS ID of the site for which the software is being configured.
• Save and exit the text editor:
# :wq!
5.2.2 Copy/Edit localConfig.py
Copy the localConfig.py file from the AWIPS I instance of the file. Certain tokens must be
changed in order to use the file successfully in an AWIPS II environment. Table 5.2.2-1 lists all
known changes needed.
Table 5.2.2-1. Necessary localConfig.py Changes From AWIPS I to AWIPS II
AWIPS I Token
AWIPS II Equivalent
Description
serverConfig.D2DDIRS
serverConfig.D2DMODELS
Change all instances of D2DDIRS to D2DMODELS and
change the arguments passed from the AWIPS I netCDF
directory to the AWIPS II dataURI model name.
Example:
CHANGE
serverConfig.D2DDIRS.append((‘/data/fxa/Grid/net
CDF/CONUS212/SREF/’,’SREF’));
TO
serverConfig.D2DMODELS.append(('SREF21
2', 'SREF'));
You can retrieve the model name from the grib_models
table in the metadata database with the following SQL
statement:
select distinct(modelname) from grib_models; or
from the AWIPS II file
/awips2/edex/data/utility/common_static/base/grid/g
ribModels.xml
Any local model coming
into AWIPS I
Model name may change
based on addition of product
into AWIPS II
If any local model is sent into GFE in AWIPS I, this
model will have to first be added into AWIPS II in order to
utilize in GFE’s localConfig.py. Immediately after copying
this file, comment out any entries pertaining to local
model data until these data sets are added into the
system.
See Table 5.3-1 for baseline model name reference.
• If not already logged in, log into an EDEX server and change to the site level edex utility
configuration directory:
# ssh root@${EDEX1}

AWIPS II Site Data Configuration & Localization: Step-by-Step Guide (Build 11.9)
Contract DG133W-05-CQ-1067 / DCN AWP.DOC.TOSCAT.LOC-06.00 / 17 October 2011
Use or disclosure of data contained on this sheet is subject to the restriction on the title page of this document. 37
# cd ${EDEX_CONFIG}/edex_static/site/
• Copy the AWIPS I GFE localConfig.py into the correct location in the AWIPS II directory
structure:
# cp /awips/GFESuite/primary/etc/SITE/localConfig.py
<XXX>/config/gfe
• Edit the file, making necessary changes to allow for successful AWIPS II EDEX start:
# vi <XXX>/config/gfe/localConfig.py
Example 5.2.2-1 shows an example of converting a line from AWIPS I to AWIPS II
syntax.
Example 5.2.2-1
1. AWIPS I Entry:
#############################
### Add RUC40 database ###
serverConfig.D2DDIRS.append(('/data/fxa/Grid/SBN/netCDF/Grid236/RUC2/',
‘RUC40’))
serverConfig.INITMODULES["myRUC40"] = ["RUC40"]
RUC40 = ('RUC40', GRID, '', NO, NO, 2, 0)
RUC40_Parms = [([QPF, SnowAmt], LT6NG),
([Haines], LT3NG),
([Temp, Td, Wind, MixHgt, TransWind, FzLevel, RH, Sky], TC1),
([MaxT], MaxTTC), ([MinT], MinTTC),
([MaxRH],MaxRHTC),([MinRH],MinRHTC)]
2. Information Gathering For AWIPS-II:
# grep -B1 RUC236 $EDEX_CONFIG/common_static/base/grid/gribModels.xml
<title>RUC40</title>
<name>RUC236</name>
3. AWIPS II Entry:
#############################
### Add RUC40 database ###
serverConfig.D2DMODELS.append(('RUC236','RUC40'))
serverConfig.INITMODULES["myRUC40"] = ["RUC40"]
RUC40 = ('RUC40', GRID, '', NO, NO, 2, 0)
RUC40_Parms = [([QPF, SnowAmt], LT6NG),
([Haines], LT3NG),
([Temp, Td, Wind, MixHgt, TransWind, FzLevel, RH, Sky], TC1),
([MaxT], MaxTTC), ([MinT], MinTTC),
([MaxRH],MaxRHTC),([MinRH],MinRHTC)]
AWIPS II Site Data Configuration & Localization: Step-by-Step Guide (Build 11.9)
Contract DG133W-05-CQ-1067 / DCN AWP.DOC.TOSCAT.LOC-06.00 / 17 October 2011
Use or disclosure of data contained on this sheet is subject to the restriction on the title page of this document. 38
Note: If EDEX is having problems starting after making all the previous changes, just rename
the file to something other than localConfig.py. This file is not necessary for proper
functionality. A restart of EDEX is necessary after renaming.
• When finished, save the file and exit the text editor:
# :wq!
5.2.3 Copy / Edit SmartInit Files
Copy the local SmartInit files from the AWIPS I store location to the AWIPS II location for use
within EDEX.
• If not already logged in, log into an EDEX server and change to the site-level edex utility
configuration directory:
# ssh root@${EDEX1}
# cd ${EDEX_CONFIG}/edex_static/site/
• Copy the AWIPS I GFE smartInit scripts into the correct location in the AWIPS II directory
structure:
# scp /awips/GFESuite/primary/etc/SITE/<script>.py
<XXX>/smartinit/
Repeat this step for every smartInit script.
• As of the creation of this document, Table 5.2.3-1 describes changes that must be made to
allow the smartInit compatible with AWIPS II software. Edit the appropriate scripts and
make the correct changes:
# vi <XXX>/smartinit/<script>.py
Table 5.2.3-1. Smartinit Changes
SmartInit Tool Changes
Numpy to Numeric
Want to continue to use Numeric? Try: import numpy.oldnumeric as Numeric
Numeric's typecode() -> numpy's dtype
awips1: rval = zeros(a.shape, a.typecode())
awips2: rval = zeros(a.shape, a.dtype)
Numeric's Float, Float32, etc in numpy becomes float, float32, etc
awips1: vals = self.fncValue[rec].astype(Float)/10.
awips2: vals = self.fncValue[rec].astype(float)/10.
Numeric's Int, Int32, etc in numpy becomes int, int32, etc
awips1: self.fncValue = self.fncData.createVariable('pop', Int16, ('record','ypts','xpts'))
awips2: self.fncValue = self.fncData.createVariable('pop', int16, ('record','ypts','xpts'))

AWIPS II Site Data Configuration & Localization: Step-by-Step Guide (Build 11.9)
Contract DG133W-05-CQ-1067 / DCN AWP.DOC.TOSCAT.LOC-06.00 / 17 October 2011
Use or disclosure of data contained on this sheet is subject to the restriction on the title page of this document. 39
SmartInit Tool Changes
Multiple Models
Smart inits are capable of using more than one model when calculating a database. The
following code examples (from the NAM40 init) show the differences in using multiple
models in AWIPS II versus AWIPS I.
AWIPS II
class NAM40Forecaster(Forecaster):
def __init__(self):
Forecaster.__init__(self, "NAM40", "NAM40")
# this model is found in two different files, just to be
interesting
self.addSources(["NAM20"])
AWIPS I
##--------------------------------------------------------------------------
class NAM40Forecaster(Forecaster):
def __init__(self):
Forecaster.__init__(self, None, "dummy")
# this model is found in two different files, just to be interesting
me1, newdb = self._getLatest(self._client, "NAM40", "NAM40")
me2, newdb = self._getLatest(self._client, "NAM20", "NAM40")
if me1 is None or me2 is None or me1.modelTime != me2.modelTime:
self._srcme = None
else:
self._srcme = MDB([me1, me2])
self._newme = newdb
##----------------------------------------------------------
## Internal function that returns the source database
##----------------------------------------------------------
def srcdb(self):
return self._srcme
##----------------------------------------------------------
## Internal function that returns the new database
##----------------------------------------------------------
def newdb(self):
return self._newme
• When complete, save and exit the vi text editor:
# :wq!
Note: If EDEX will not start after copying these files into place, it is recommended that the
scripts be copied in one at a time to narrow down the cause of the problem.

AWIPS II Site Data Configuration & Localization: Step-by-Step Guide (Build 11.9)
Contract DG133W-05-CQ-1067 / DCN AWP.DOC.TOSCAT.LOC-06.00 / 17 October 2011
Use or disclosure of data contained on this sheet is subject to the restriction on the title page of this document. 40
5.3 Create / Edit Subgridding Files
Section Note: Subgridding is done automatically by EDEX based on the AWIPS I rules put into
place for each model. The following instructions need only be followed if changes to the
subgridding for specific models is desired. Otherwise, this section may be skipped.
Due to the size of higher-resolution model data, both AWIPS I and AWIPS II clip the grids
around a specific geographic area to improve display performance.
Subgridding in AWIPS II is done by a combination model name and degrees of latitude and
longitude around the configured WFO or RFC’s center point. Note that the site on which EDEX
runs is configured in the setup.env file (reference Section 7.0).
The subgridding files are baselined in the ${EDEX_CONFIG}/edex_static/base/grib/subgrids
directory.
To override one of these files, a site must create a site-level subgrids directory, copy the file into
that directory and change the appropriate lines.
The following is the syntax for the xml file.
<subGridDef>
<modelNames></modelNames>
<referenceModel></referenceModel>
<nx></nx>
<ny></ny>
</subGridDef>
The <modelNames> tag is a space delimited list of the models that use this subgridding
definition. The model names are consistent with the model <name> tag used in gribModels.xml
file which resites in ${EDEX_CONFIG}/common_static/base/grid.
The <referenceModel> is the model coverage to use to generate the subgrid. For example, if the
string RUC130 was between the xml tag, it would then grab the coverage used by the RUC130
model (grid 130).
The nx and ny values are used to generate the box centered around the localized site for the
subgrid. The nx/ny values are the number of grid points to include in the subgridding.
Table 5.3-1 lists and describes all known model names as of the date of this document.
Table 5-3-1. Base Model Names and Descriptions
Model Name (Name)
Description (Title)
Model Name (Name)
Description (Title)
LAPS
LAPS
HI-RTMA
HI-RTMA
MPE
MPE, rfcMPE
PR-RTMA
PR-RTMA
GFSLAMP
GFSLAMP-stn
SREF212
SREF
ETA
NAM80
SREF216
AK-SREF
RUC
RUC80
SREF243
PR-SREF
AVN
GFS180
RTGSSTHR
RTG-SST-HR-Analysis
AWIPS II Site Data Configuration & Localization: Step-by-Step Guide (Build 11.9)
Contract DG133W-05-CQ-1067 / DCN AWP.DOC.TOSCAT.LOC-06.00 / 17 October 2011
Use or disclosure of data contained on this sheet is subject to the restriction on the title page of this document. 41
Model Name (Name)
Description (Title)
Model Name (Name)
Description (Title)
NGM
NGM80
GFSLAMPTstorm
GFSLAMP-Grid
MRF gfsLR ECMWF-HiRes ECMWF-HiRes
GFS201
GFS360
ECMF-NorthernHemisphere
ECMWF-LowRes
mrfNH
gfsLR
ECMF1
ECMWF-LowRes
GFS213
GFS90
ECMF2
ECMWF-LowRes
NGM213 NGM90 ECMF3 ECMWF-LowRes
NGM202
NGM180
ECMF4
ECMWF-LowRes
AVN211
GFS80
ECMF5
ECMWF-LowRes
mesoEta212
NAM40
ECMF6
ECMWF-LowRes
mesoEta215 NAM20 ECMF7 ECMWF-LowRes
WAFS
WAFS
ECMF8
ECMWF-LowRes
ENSEMBLE
GFSensemble
ECMF9
ECMWF-LowRes
ENSEMBLE37
GFSensemble
ECMF10
ECMWF-LowRes
ENSEMBLE38 GFSensemble ECMF11 ECMWF-LowRes
ENSEMBLE39
GFSensemble
ECMF12
ECMWF-LowRes
ENSEMBLE40
GFSensemble
HPCqpfNDFD
HPC
ENSEMBLE41
GFSensemble
NamDNG5
NamDNG5
ENSEMBLE42 GFSensemble HPE HPE
ENSEMBLE43
GFSensemble
BHPE
BiasHPE
ENSEMBLE44
GFSensemble
RaobOA
RaobOA
ETA212
NAMWX
MetarOA
MetarOA
AVN203 GFS190 GlobalWave GlobalWave
MRF203
gfs190
AKwave10
AKwave10
MRF204
GFS150
AKwave4
AKwave4
MRF205
GFS150
EPwave10
EPwave10
NGM207 NGM95 WCwave10 WCwave10
ETA207
NAM95
WCwave4
WCwave4
UKMET-
NorthernHemisphere
UKMET
WNAwave10
WNAwave10
UKMET37
UKMET
WNAwave4
WNAwave4
UKMET38
UKMET
TPCSurgeProb
TPCSurgeProb
UKMET39
UKMET
Aviation
Aviation
UKMET40 UKMET MOSGuide-AK AK-GriddedMOS
UKMET41
UKMET
AK-NamDNG5
AK-NamDNG5
UKMET42
UKMET
HI-NamDNG5
HI-NamDNG5
UKMET43
UKMET
PR-NamDNG5
PR-NamDNG5
UKMET44 UKMET HiResW-ARW-East HiResW-ARW-East
AVN-NorthernHemisphere
GFSGbl
HiResW-ARW-West
HiResW-ARW-West
AVN37
GFSGbl
HiResW-ARW-AK
HiResW-ARW-AK
AWIPS II Site Data Configuration & Localization: Step-by-Step Guide (Build 11.9)
Contract DG133W-05-CQ-1067 / DCN AWP.DOC.TOSCAT.LOC-06.00 / 17 October 2011
Use or disclosure of data contained on this sheet is subject to the restriction on the title page of this document. 42
Model Name (Name)
Description (Title)
Model Name (Name)
Description (Title)
AVN38
GFSGbl
HiResW-ARW-PR
HiResW-ARW-PR
AVN39 GFSGbl HiResW-ARW-HI HiResW-ARW-HI
AVN40
GFSGbl
HiResW-NMM-East
HiResW-NMM-East
AVN41
GFSGbl
HiResW-NMM-West
HiResW-NMM-West
AVN42
GFSGbl
HiResW-NMM-AK
HiResW-NMM-AK
AVN43 GFSGbl HiResW-NMM-PR HiResW-NMM-PR
AVN44
GFSGbl
HiResW-NMM-HI
HiResW-NMM-HI
GWW233
GWW
GLRKwave
GLRKwave
SeaIce
SeaIce
CPCoutlook-Short
CPCoutlook-Short
RFCqpf RFCqpf CPCoutlook-Medium CPCoutlook-Medium
RUC236
RUC40
CPCoutlook-Short-AK
CPCoutlook-Short-AK
AVN225
GFS75
CPCoutlook-Medium-AK
CPCoutlook-Medium-AK
AKWAVE239
AKWAVE
SPCGuide
SPCGuide
WNAWAVE238 WNAwave MSAS MSAS
mesoEta216
AK-NAM40
GfsBufr
GFSBufr
mesoEta217
NAM20
GFSSouthernHemisphere
GFSSouthernHemisphere
ETA218
NAM12
GoesBufr
GoesBufr
ETA242 AK-NAM12 Metar Metar
GLERL
GLERL
Ldad
Ldad
HPCqpf
HPCqpf
DMD
DMD
ENPWAVE253
ENPwave
MDCRS
MDCRS
EtaBufr NAM Bufr
HurWind175
GuamHurWind
PoesBufr
PoesBufr
HurWind250
HawHurWind
Profiler
Profiler
CPCoutlook211
CPCoutlook-Long
Raob
Raob
RTGSST RTG-SST-Analysis VWP VWP
NICICE
NICICE
mesoEta237
PR-NAM12
AK-NICICE
AK-NICICE
FFG-TUA
FFG-TUA
DGEX185
DGEX
FFG-ACR
FFG-ACR
DGEX186 DGEX FFG-STR FFG-STR
HPCGuide
HPCGuide
FFG-RSA
FFG-RSA
GFSGuide
GFSGuide
FFG-ORN
FFG-ORN
GFS212
GFS40
FFG-RHA
FFG-RHA
GFS160 AK-GFS FFG-KRF FFG-KRF
GFS254
PR-GFS
FFG-MSR
FFG-MSR
GFS161
SJU-GFS
FFG-TAR
FFG-TAR
TPCWindProb
TPCWindProb
FFG-PTR
FFG-PTR
MOSGuide MOSGuide FFG-TIR FFG-TIR

AWIPS II Site Data Configuration & Localization: Step-by-Step Guide (Build 11.9)
Contract DG133W-05-CQ-1067 / DCN AWP.DOC.TOSCAT.LOC-06.00 / 17 October 2011
Use or disclosure of data contained on this sheet is subject to the restriction on the title page of this document. 43
Model Name (Name)
Description (Title)
Model Name (Name)
Description (Title)
OPCWave-W-ATL
OPCWave180
FFG-ALR
FFG-ALR
OPCWave181 OPCWave-NE-PAC FFG-FWR FFG-FWR
OPCWave182
OPCWave-TE-PAC
AUTOSPE
SPE
RUC130
RUC13
MANSPE
SPE
RUCIcing
RUCIcing
QPE
QPE
RTMA RTMA RCM RCM
AK-RTMA
AK-RTMA
NCWF
NCWF
NOGAPS
NOGAPS
Create the subgridding file(s) in the ${EDEX_CONFIG}/edex_static/site/<XXX>/grib/subgrids
directory as follows:
• Log into an EDEX server if not already logged in:
# ssh root@${EDEX1}
• Change into the desired site’s subgrids configuration directory:
# cd ${EDEX_CONFIG}/edex_static/site/<XXX>/grib/subgrids
• Using a text editor, like vi, create the subgrid file following the syntax shown above and
using the latitude and longitude coordinates:
# vi subGrid.xml
Note: The file name is arbitrary as long as it ends in .xml. Example 5-3.1 shows four
models being clipped within a specific latitude/longitude box.
Example 5.3-1
<subGridDef>
<modelNames>ETA218 mesoEta212</modelNames>
<referenceModel>ETA218</referenceModel>
<nx>150</nx>
<ny>150</ny>
</subGridDef>
• Once the file is set up, save and exit the text editor:
# :wq!
5.4 Create MPE.xml and DHR-MOSAIC.xml Localized Grid Identification
File
In order for EDEX to recognize the grids for MPE, it is important to set up a site-level grid
definition file for the local MPE grids to be ingested into the system. Otherwise, EDEX will not
recognize them and they will be stored as an UnknownModel.
The definition file will be stored in the following directory:
${EDEX_CONFIG}/edex_static/site/<XXX>/grib/grids
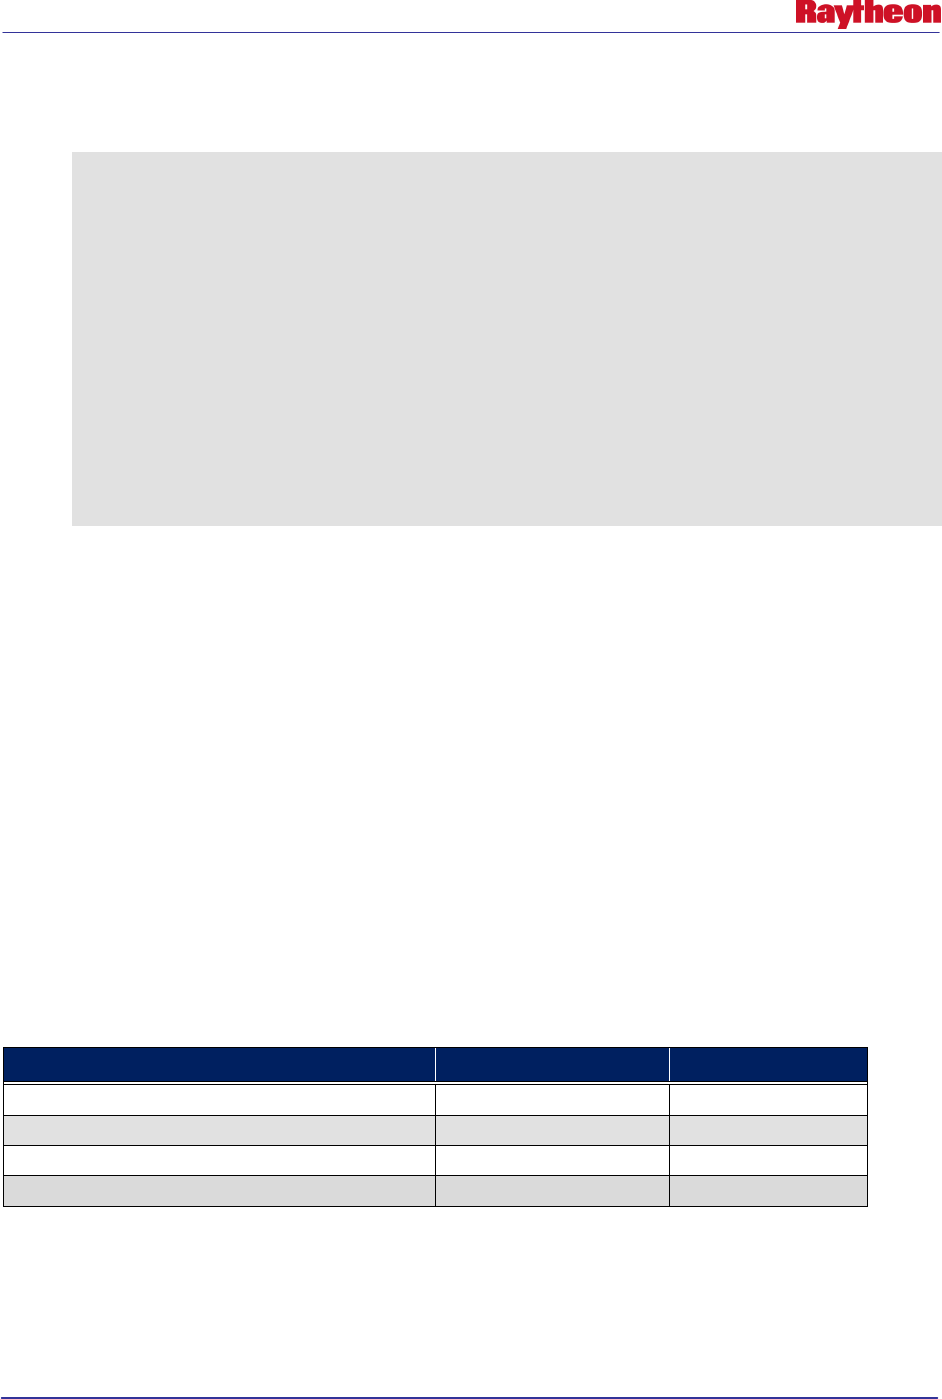
AWIPS II Site Data Configuration & Localization: Step-by-Step Guide (Build 11.9)
Contract DG133W-05-CQ-1067 / DCN AWP.DOC.TOSCAT.LOC-06.00 / 17 October 2011
Use or disclosure of data contained on this sheet is subject to the restriction on the title page of this document. 44
The file name should be MPE.xml for MPE and DHR-MOSAIC.xml for HPE girds, and it
should contain the following information:
<polarStereoGridCoverage>
<name>304</name>
<description>MPE produced grid</description>
<la1>31.79</la1>
<lo1>-121.12</lo1>
<firstGridPointCorner>LowerLeft</firstGridPointCorner>
<nx>112</nx>
<ny>111</ny>
<dx>4.762</dx>
<dy>4.762</dy>
<spacingUnit>km</spacingUnit>
<minorAxis>6356775.0</minorAxis>
<majorAxis>6378160.0</majorAxis>
<lov>-105.0</lov>
</polarStereoGridCoverage
The important fields to localize are in bold above, but also listed below:
<la1>
<lo1>
<nx>
<ny>
<description>
Gather the information you need from the following existing AWIPS I files for use in creation of
the MPE.xml file.
On any AWIPS server, change directories into /awips/fxa/data/localizationDataSets/<XXX> and
look at the file localMPE.txt for MPE, and localHPE.txt for DHR-MOSAIC.xml. Take the
values for Southwest Corner and Columns and Rows. These will be your values above
according to the following table:
localMPE.txt and localHPE.txt value xml value Example
Columns: ##
<nx>##</nx>
<nx>77</nx>
Rows: ##
<ny>##</ny>
<ny>71></ny>
Southwest Corner: ##.#### xx.xxxx
<la1>##.####</la1>
<la1>34.751</la1>
Southwest Corner: xx.xxxx ##.####
<lo1>##.####</lo1>
<lo1>-79.082</lo1>
• If not already logged in, log into an EDEX server (e.g., dx3) and then change to your site’s
localizationDataSets directory and look at the contents of the localMPE.txt file.
# cd /awips/fxa/data/localizationDataSets/<XXX>

AWIPS II Site Data Configuration & Localization: Step-by-Step Guide (Build 11.9)
Contract DG133W-05-CQ-1067 / DCN AWP.DOC.TOSCAT.LOC-06.00 / 17 October 2011
Use or disclosure of data contained on this sheet is subject to the restriction on the title page of this document. 45
# cat localMPE.txt
• Write the information obtained from that file in the spaces provided below for use in the rest
of the MPE.xml creation:
Columns:
Rows:
Southwest Corner (first number):
Southwest Corner (second number):
• Change into the edex_static localization tree, and create the necessary directory structure if it
does not already exist:
# cd ${EDEX_CONFIG}/edex_static/site/<XXX>
# mkdir –p grib/grids
• Copy the base MPE.xml file into the site level directory:
# cp –a ../../base/grib/grids/MPE.xml grib/grids/
# cp –a ../../base/grib/grids/DHR-MOSAIC.xml grib/grids/
• Edit the site-level MPE.xml file, making the following substitutions:
# vi grib/grids/MPE.xml
Change the value in the <la1></la1> tag to match the value recorded above for
Southwest Corner (first number).
Change the value in <lo1></lo1> tag to match the value recorded above for
Southwest Corner (second number).
Change the value in <nx></nx> tag to match the value recorded above for
Columns.
Change the value in <ny></ny> tag to match the value recorded above for Rows.
• If not already logged in, log into an EDEX server (e.g., dx3) and then change to your site’s
localizationDataSets directory and look at the contents of the localMPE.txt file.
# cd /awips/fxa/data/localizationDataSets/<XXX>
# cat localHPE.txt
• Write the information obtained from that file in the spaces provided below for use in the rest
of the DHR-MOSAIC.xml creation:
Columns: ___
Rows:
Southwest Corner (first number):
Southwest Corner (second number):

AWIPS II Site Data Configuration & Localization: Step-by-Step Guide (Build 11.9)
Contract DG133W-05-CQ-1067 / DCN AWP.DOC.TOSCAT.LOC-06.00 / 17 October 2011
Use or disclosure of data contained on this sheet is subject to the restriction on the title page of this document. 46
• Edit the site-level DHR-MOSAIC.xml file, making the following substitutions:
# vi grib/grids/DHR-MOSAIC.xml
Change the value in the <la1></la1> tag to match the value recorded above for
Southwest Corner (first number).
Change the value in <lo1></lo1> tag to match the value recorded above for
Southwest Corner (second number).
Change the value in <nx></nx> tag to match the value recorded above for
Columns.
Change the value in <ny></ny> tag to match the value recorded above for Rows.
• Save and exit the vi text editor:
# :wq!
5.5 Fix Ownership and Permissions
After making the correct files with proper entries, ownership must be set on the files in the
directory tree.
• If not already logged in, log into an EDEX server and change to the site-level common utility
configuration directory:
# ssh root@${EDEX1}
# cd ${EDEX_CONFIG}/edex_static/site/
• Recursively change the ownership and permissions of the site directory created in the
previous steps:
# chown –R awips:fxalpha <XXX>
# chmod –R 755 <XXX>

AWIPS II Site Data Configuration & Localization: Step-by-Step Guide (Build 11.9)
Contract DG133W-05-CQ-1067 / DCN AWP.DOC.TOSCAT.LOC-06.00 / 17 October 2011
Use or disclosure of data contained on this sheet is subject to the restriction on the title page of this document. 47
6.0 Correct set_hydro_env
The set_hydro_env is delivered with a reference to site OAX. This needs to be corrected in order
to function completely as a different site.
• Log into an EDEX server if not already logged in:
# ssh root@${EDEX1}
• Change into the hdf5/hydroapps directory:
# cd ${EDEX_HOME}/data/share/hydroapps
• Change all instances of the string OAX to the desired site’s AWIPS ID:
# sed –i ‘s/OAX/<XXX>/g’ set_hydro_env
• Check for the AW_SITE_IDENTIFIER variable, and if it is set to another site’s ID then
manually change it:
# grep ^AW_SITE_IDENTIFIER set_hydro_env
If the site ID is different from your site, issue the following:
# sed –i "s/LLL/<XXX>/g" set_hydro_env
Where LLL = the current site ID and <XXX> = your site ID.
If the variable AW_SITE_IDENTIFIER didn’t even exist in the set_hydro_env, issue the
following to add it:
# sed –i "/^#AWIPS_MODIFICATION_BLOCK/aAW_SITE_IDENTIFIER=<XXX>"
set_hydro_env
Note: The above is all on one line and <XXX> = your site ID.
AWIPS II Site Data Configuration & Localization: Step-by-Step Guide (Build 11.9)
Contract DG133W-05-CQ-1067 / DCN AWP.DOC.TOSCAT.LOC-06.00 / 17 October 2011
Use or disclosure of data contained on this sheet is subject to the restriction on the title page of this document. 48
7.0 Edit setup.env
The master file that controls to which databases EDEX connects and which site EDEX runs is
named setup.env. This file contains environment variables necessary for proper EDEX function.
Carefully edit this file to configure for the desired site’s databases and site identifier.
• Log into an EDEX server if not already logged in:
# ssh root@${EDEX1}
• Change into the EDEX bin directory:
# cd ${EDEX_HOME}/bin
• Using a text editor, such as vi, edit the file:
# vi setup.env
• Change the following tokens to match the desired site’s ID:
export AW_SITE_IDENTIFIER=OAX
export DC_DB_NAME=dc_ob7oax
export HD_DB_NAME=hd_ob83oax
• Save and exit the vi text editor:
# :wq!
• Copy the file to any other servers that are to run the EDEX camel servers:
# scp –p setup.env $EDEX:$(pwd)
Note: Repeat the previous step for each server running the EDEX camel servers,
substituting the proper hostnames for $EDEX above.
AWIPS II Site Data Configuration & Localization: Step-by-Step Guide (Build 11.9)
Contract DG133W-05-CQ-1067 / DCN AWP.DOC.TOSCAT.LOC-06.00 / 17 October 2011
Use or disclosure of data contained on this sheet is subject to the restriction on the title page of this document. 49
8.0 Create / Edit WarnGen GUI Setup [ WFO Only ]
The WarnGen GUI from CAVE is set up through xml files that reside on the EDEX server.
These files control some variables that are passed to the WarnGen velocity templates as well as
dropdown selections and default radio button selections when WarnGen is launched.
Table 8-1 describes the XML tags used in this file. with a brief description:
Table 8-1. WarnGen UI config.xml XML Tag Descriptions
XML Tag Description
warngenOfficeShort
The office description included in the heading of the warning.
warngenOfficeLoc
The short office description included in the heading of the warning.
backupCWAs
A comma-separated list of sites that appear in the Backup pull-down menu
in the Warngen GUI, including a description of the site to be included in
the template.
Format: XXX/DESCRIPTION
Each entry for a site must include both the XXX and the DESCRIPTION,
where XXX is the AWIPS Site ID.
defaultTemplate
The WarnGen template identifier of the template whose radio button is
selected by default when the WarnGen GUI is launched.
mainWarngenProducts
A comma-separated list of templates that appear under “Product Type” on
the Warngen GUI and are selectable via radio buttons.
Format: <warngen template id>/<template description>
otherWarngenProducts
A comma-separated list of templates that appear under the Other
dropdown selector in the Warngen GUI within the “Product Type” section.
Format: <warngen template id>/<template description>
followupRefreshDelay
Timer delay in milliseconds to update the start and stop time in the
WarnGen GUI.
siteNode
Provides a default site node if one cannot be found in the afos2awips table
within the metadata database. This field is unused if an entry is found in
the table.
Configure this xml by using the delivered version in the OAX configuration tree.
• Log into an EDEX server if not already logged in:
# ssh root@$EDEX1
• Change into the CAVE utility configuration site-level directory tree:
# cd ${EDEX_CONFIG}/cave_config/site
• Create the necessary directory structure if it doesn’t already exist:
# mkdir –p <XXX>/com.raytheon.viz.warngen
• Copy the OAX version of the needed XML file into the desired site’s directory:
# cp OAX/com.raytheon.viz.warngen/config.xml
<XXX>/com.raytheon.viz.warngen/

AWIPS II Site Data Configuration & Localization: Step-by-Step Guide (Build 11.9)
Contract DG133W-05-CQ-1067 / DCN AWP.DOC.TOSCAT.LOC-06.00 / 17 October 2011
Use or disclosure of data contained on this sheet is subject to the restriction on the title page of this document. 50
• Edit the file using the vi text editor:
# vi <XXX>/com.raytheon.viz.warngen/config.xml
• Replace the <warngenOfficeShort> tag value (OMAHA/VALLEY NE) with the value found
in the AWIPS I input file /awips/fxa/data/localization/XXX/XXX-wwaConfig.txt,
/data/fxa/customFiles/wwaConfig.txt or /data/fxa/customFiles/XXX-wwaConfig.txt on the
line starting with @@@OFFH .
• Replace the <warngenOfficeLoc> tag value (OMAHA) with the value found in the AWIPS I
input file /awips/fxa/data/localization/XXX/XXX-wwaConfig.txt,
/data/fxa/customFiles/wwaConfig.txt or /data/fxa/customFiles/XXX-wwaConfig.txt on the
line starting with @@@OFFT. Note: Omit the word “IN” at the beginning of the string taken
from the wwaConfig.txt.
• Replace the <backupCWAs> tag value(s) with the value(s) found in the AWIPS I input file
input file /awips/fxa/data/localization/XXX/XXX-wwaConfig.txt,
/data/fxa/customFiles/wwaConfig.txt or /data/fxa/customFiles/XXX-wwaConfig.txt on the
line starting with @@@SBID .
• Replace the <siteNode> tag value (OMA) with the value of the desired site’s CCC node
commonly found in the AWIPS I input file /awips/fxa/data/localization/XXX/XXX-
mainConfig.txt on the line starting with @@@CCC .
• Save and exit the text editor:
# :wq!
• Recursively change the ownership and permissions of the site directory created in the
previous steps:
# chown –R awips:fxalpha <XXX>
# chmod –R 755 <XXX>
AWIPS II Site Data Configuration & Localization: Step-by-Step Guide (Build 11.9)
Contract DG133W-05-CQ-1067 / DCN AWP.DOC.TOSCAT.LOC-06.00 / 17 October 2011
Use or disclosure of data contained on this sheet is subject to the restriction on the title page of this document. 51
9.0 Create/Edit CAVE Map Displays
CAVE maps and map selector pulldown are configured through XML bundle files that reside on
the EDEX server. The AWIPS II software delivers baseline XML bundle files that can be used as
part of a new site’s configuration. Table 9-1 describes these files.
Table 9-1. Delivered AWIPS-II Base Scale XML Files
XML File Name
Description
NHemisphere.xml Default Northern Hemisphere view for a CONUS WFO or RFC
NorthAmerican.xml
Default North American view for a CONUS WFO or RFC
CONUS.xml Default view of Continental U.S.
Map bundle files can be localized on a site or user level, and are placed in the CAVE utility static
configuration directory tree.
Create the map files by doing the following:
• Log into an EDEX server if not already logged in:
# ssh root@${EDEX1}
• Change into the CAVE utility static configuration site-level directory tree:
# cd ${EDEX_CONFIG}/cave_static/site
• Create the necessary directory structure if it doesn’t already exist:
# mkdir –p <XXX>
• Unpack the delivered map bundle XMLs from the provided tarball. The tarball can be found
within the AWIPSII_AUTOMATION_TOOL.tgz (current version found at
https://collaborate.nws.noaa.gov/trac/siteconfig/wiki/ADAM):
# tar –xzvf /data/fxa/INSTALL/ADAM/cave_static_site.tar.gz
./<XXX>/bundles/scales/*
• Remove any files that are listed in Table 9-1.
• If additional scales are needed / desired, refer to Appendix C to create new scales.
• Set up the desired site’s scalesInfo.xml file, which described the default order inside CAVE
that the maps will display. Use the delivered OAX version as a template:
# cp OAX/bundles/scales/scalesInfo.xml <XXX>/bundles/scales
# vi <XXX>/bundles/scales/scalesInfo.xml
• For most CONUS WFO sites, the entries in the scalesInfo.xml will not change. After changes
are made, if needed, save and exit the XML file.
# :wq!
9.1 Create / Edit CAVE Station/Location Plot Information File(s)
The station plot information (.spi) and location plot information (.lpi) files used in AWIPS can
be re-used within CAVE for local display.
Stage the files by following these steps:

AWIPS II Site Data Configuration & Localization: Step-by-Step Guide (Build 11.9)
Contract DG133W-05-CQ-1067 / DCN AWP.DOC.TOSCAT.LOC-06.00 / 17 October 2011
Use or disclosure of data contained on this sheet is subject to the restriction on the title page of this document. 52
• Log into an EDEX server if not already logged in:
# ssh root@${EDEX1}
• Change into the CAVE utility static configuration site-level directory tree:
# cd ${EDEX_CONFIG}/cave_static/site
• Create the necessary directory structure if it doesn’t already exist:
# mkdir –p <XXX>/basemaps
• Copy the cities.lpi, and ldad*.spi file(s) into place:
# scp /awips/fxa/data/localizationDataSets/XXX/cities.lpi
<XXX>/basemaps/
# scp /awips/fxa/data/localizationDataSets/XXX/ldad*.spi
<XXX>/basemaps
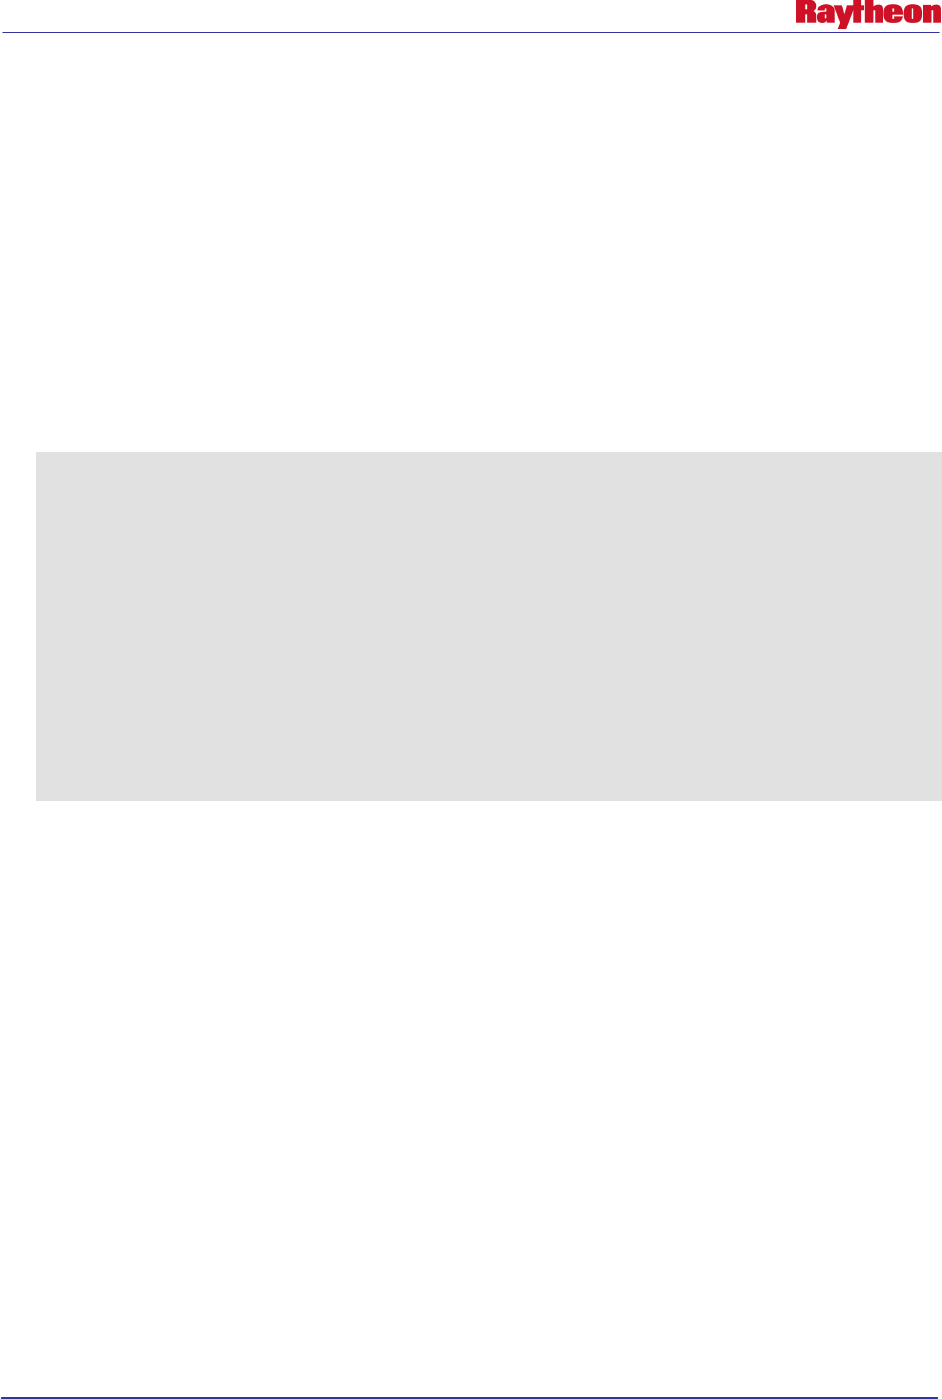
AWIPS II Site Data Configuration & Localization: Step-by-Step Guide (Build 11.9)
Contract DG133W-05-CQ-1067 / DCN AWP.DOC.TOSCAT.LOC-06.00 / 17 October 2011
Use or disclosure of data contained on this sheet is subject to the restriction on the title page of this document. 53
10.0 Create / Edit Other CAVE Menus
10.1 Create / Edit Satellite Menu
Note: Most sites will not need to follow the steps outlined in this section, but reading through the
section will provide information for making that determination.
The satellite menu in CAVE may need to be configured for OCONUS sites based on the desired
site’s location. EDEX will attempt to create a version of a localized menu based on the
configured AW_SITE_IDENTIFIERS center point. If changes have to be made, using the
delivered base index.xml as a template in configuring the menu for the desired site.
An example of the file is listed in Example 10.1-1.
Example 10.1-1
<menuContributionFile>
<include installTo="menu:satellite?after=GROUP1"
fileName="menus/satellite/baseSatellite.xml">
<substitute key="sector0" value="West CONUS"/>
<substitute key="sector1" value="East CONUS"/>
<substitute key="sector2" value="Supernational"/>
<substitute key="sector3" value="Northern Hemisphere
Composite"/>
<substitute key="entity" value="GOES%"/>
</include>
<include installTo="menu:satellite?after=GROUP2"
fileName="menus/satellite/basePOESImagery.xml">
</include>
</menuContributionFile>
Changing the values of each sector affects which satellite image is rendered on each scale. Each
sector has its own resolution. The East and West CONUS images are highly preferable for
CONUS sites because they provide the images with the highest resolution, whereas the
Supernational sector provides less resolution and will only be loaded if the first two are not
available, which generally happens on a larger scale.
Images can be combined when their reach does not cover the full extent of a scale. For example,
on a CONUS scale sector0 and sector1 (East and West CONUS) images are combined to provide
full CONUS coverage of satellite images.
In general, the higher-resolution products should be listed first. For configuring the software for
a site which necessitates a change (OCONUS, for example), follow these steps to configure the
file:
• Log into an EDEX server if not already logged in:
# ssh root@${EDEX1}
• Change into the CAVE utility static configuration site level directory tree:
# cd ${EDEX_CONFIG}/cave_static/site

AWIPS II Site Data Configuration & Localization: Step-by-Step Guide (Build 11.9)
Contract DG133W-05-CQ-1067 / DCN AWP.DOC.TOSCAT.LOC-06.00 / 17 October 2011
Use or disclosure of data contained on this sheet is subject to the restriction on the title page of this document. 54
• Create the necessary directory structure if it doesn’t already exist:
# mkdir –p <XXX>/menus/satellite
• Copy the OAX version of index.xml into the desired site’s sat directory:
# cp ../base/menus/satellite/index.xml <XXX>/menus/satellite/
• Use a text editor, like vi, to edit the file and insert the proper values into the values for
sector0 through sector4. Utilize Table 10.1-1, which describes the different sectors available
(as provided by the satellite_sector_ids table of the metadata database).
Table 10.1-1. Satellite Sector Names
Sector Name
Northern Hemisphere Composite
East CONUS
West CONUS
Alaska Regional
Alaska National
Hawaii Regional
Hawaii National
Puerto Rico Regional
Puerto Rico National
Supernational
NH Composite – Meteosat-GOES E-GOES W-GMS
• Save and exit the text editor:
# :wq!
10.2 Configure Local and Regional Warnings Display Menu
The Local and Regional Warnings Display menu is configured through an XML configuration
file that resides in the CAVE utility static configuration directory tree.
File Name: ${EDEX_CONFIG}/cave_static/site/<XXX>/warnings/index.xml
Configure the desired site’s Local and Regional Warnings Display by using the delivered OAX
version as a template:
• Log into an EDEX server if not already logged in:
# ssh root@${EDEX1}
• Change into the CAVE utility static configuration site level directory tree:
# cd ${EDEX_CONFIG}/cave_static/site
• Create the necessary directory structure if it doesn’t already exist:
# mkdir –p <XXX>/menus/warnings
• Copy the OAX version of index.xml into the desired site’s sat directory:
# cp OAX/menus/warnings/index.xml <XXX>/menus/warnings/
AWIPS II Site Data Configuration & Localization: Step-by-Step Guide (Build 11.9)
Contract DG133W-05-CQ-1067 / DCN AWP.DOC.TOSCAT.LOC-06.00 / 17 October 2011
Use or disclosure of data contained on this sheet is subject to the restriction on the title page of this document. 55
• Using a text editor, such as vi, edit the index.xml to configure the file for the desired site:
# vi <XXX>/menus/warnings/index.xml
• Change the value of the following xml line so that value= the AWIPS identifier of the desired
site:
<substitute key=”site” value=”KOAX”
• Change the value of the following xml line so that value= the surrounding site’s identifiers
desired to be shown when regional warnings is selected:
<substitute key=”sites” value=”KABR, KFSD, KUNR, KBIS, KFGF, KBOU,
KGJT, KPUB, KCYS, KRIW, KGID, KLBF, KOAX, KDDC, KGLD, KICT, KTOP,
KEAX, KLSX, KSGF, KDMX, KDVN, KDLH, KMPX, KARX, KGRB, KMKX, KILX,
KLOT, KJKL, KLMK, KPAH, KIND, KIWX, KAPX, KDTX, KGRR, KMQT”
Note: If it is not known which sites to input in the beginning, a good starting point is to issue
the following command and use this as a starting point:
# grep ^<XXX> /data/fxa/nationalData/allAdjacentWFOs.txt | cut –
f2 –d’|’ | cut –c5-
Remember to put “K” or “P” in front of each site ID and to separate them by commas when
editing the index.xml file.
• Save and exit the XML file:
# :wq!
• Recursively change the ownership and permissions of the site directory created in the
previous steps:
# chown –R awips:fxalpha <XXX>
# chmod –R 755 <XXX>
AWIPS II Site Data Configuration & Localization: Step-by-Step Guide (Build 11.9)
Contract DG133W-05-CQ-1067 / DCN AWP.DOC.TOSCAT.LOC-06.00 / 17 October 2011
Use or disclosure of data contained on this sheet is subject to the restriction on the title page of this document. 56
11.0 Configure AvnFPS [ WFO Only ]
The AvnFPS application is run from the CAVE environment, and is configured within the
CAVE utility static configuration tree.
11.1 Configure AvnFPS GUI and Product Files
Configure AvnFPS by using some of the delivered files from the OAX configuration as
templates.
• Log into an EDEX server if not already logged in:
# ssh root@${EDEX1}
• Change into the CAVE utility static configuration site-level directory tree:
# cd ${EDEX_CONFIG}/cave_static/site
• Create the necessary directory structure if it doesn’t already exist:
# mkdir –p <XXX>/aviation/avnsetup <XXX>/aviation/avnwatch
<XXX>/aviation/config
• Copy the TAF configuration directories from the AWIPS I setup location,
/awips/adapt/avnfps/etc/tafs:
# cp –r /awips/adapt/avnfps/etc/tafs <XXX>/aviation/config
Note: If there is no DEFAULT file listing, then the default AvnFPS template, AvnFPS, will
not work. If this file does not exist for the site data configuration from AWIPS I, please
create it. It should contain the name of the default cfg file without .cfg. For example, if the
default cfg file was LLL_Tafs.cfg, the entry in DEFAULT should be LLL_Tafs.
• Current DR #7926 (fixed in build 11.3 so this step may be SKIPPED if configuring an 11.3
or newer release), opened against the use of AWIPS I AvnFPS cfg files in AWIPS II,
requires the following step to be run for proper functionality of AvnFPS:
# sed –i ‘/idents/s/, /,/g’ <XXX>/aviation/config/tafs/*.cfg
• Copy the current ids.cfg file into the config directory:
# cp –r /awips/adapt/avnfps/etc/ids.cfg <XXX>/aviation/config/
# sed –i ‘/^file/d ' <XXX>/aviation/config/ids.cfg
• Remove the XXXX tafs directory if it exists:
# rm –rf <XXX>/aviation/config/tafs/XXXX
Note: In this case, the XXXX is a literal XXXX. The directory that is being removed is
actually named XXXX and this does not insinuate any substitution. However, the <XXX> is
still an indication to substitute that string with the site ID of the site for which configuration
is being performed.
• Copy the OAX-configured version of aviationForecasterConfig.xml to the desired site’s
avnwatch directory:
# cp OAX/aviation/avnwatch/aviationForecasterConfig.xml
<XXX>/aviation/avnwatch/

AWIPS II Site Data Configuration & Localization: Step-by-Step Guide (Build 11.9)
Contract DG133W-05-CQ-1067 / DCN AWP.DOC.TOSCAT.LOC-06.00 / 17 October 2011
Use or disclosure of data contained on this sheet is subject to the restriction on the title page of this document. 57
• Edit the aviationForecasterConfig.xml file and localize for the desired site. Utilize the
AWIPS I file /awips/adapt/avnfps/etc/forecasters as a reference. The forecaster user names
must match their workstation login names for transmission to be enabled. Be sure to
doublecheck this:
# vi <XXX>/aviation/avnwatch/aviationForecasterConfig.xml
• When finished, save the file and exit the vi session:
# :wq!
• Ensure proper ownership and permissions:
# chown –R awips:fxalpha <XXX>
# chmod –R 755 <XXX>
11.2 Copy AvnFPS Climate Files
Copy the desired site’s AvnFPS climate files into the proper AWIPS II directory for use with
AWIPS II AvnFPS.
• Log into an EDEX server if not already logged in:
# ssh root@${EDEX1}
• Change into the HDF5 data repository tree:
# cd ${EDEX_HOME}/data/share
• Create the necessary directory structure if it doesn’t already exist:
# mkdir –p aviation
• Copy all the files from the AWIPS I data location into the newly created directory:
# cp /data/adapt/avnfps/climate/* aviation/
# cp /awips/adapt/avnfps/etc/ish-* aviation/
• Ensure proper ownerships and permissions:
# chown -R awips:fxalpha aviation
# chmod –R 775 aviation

AWIPS II Site Data Configuration & Localization: Step-by-Step Guide (Build 11.9)
Contract DG133W-05-CQ-1067 / DCN AWP.DOC.TOSCAT.LOC-06.00 / 17 October 2011
Use or disclosure of data contained on this sheet is subject to the restriction on the title page of this document. 58
12.0 Restart EDEX and Activate MPE Scripts
At this point EDEX can be restarted on all machines running an EDEX instance.
• Start the EDEX server, first by logging into all EDEX servers issuing the start command.
# ssh $EDEX1
# service edex_camel start
• Repeat the previous step for all EDEX client machines.
• On DX3 or DX4 (not both), issue the following commands to activate MPE.
# su - awips
# export EDEX_HOME=/awips2/edex
# export apps_dir=/awips2/edex/data/share/hydroapps
# . $apps_dir/set_hydro_env
# cd $apps_dir/precip_proc/bin
# ./run_create_mpe_gage_file
Note: Answer Y when prompted
# ./run_create_mpe_station_lists
# ./run_create_freezing_station_list
# ./run_create_mpe_climo_lists
# ./run_create_triangles
# ./run_create_mpe_beam_height_file
# ./run_mpe_fieldgen 3
# rm -f
/awips2/edex/data/share/hydroapps/precip_proc/local/data/app/mpe/
grid_masks/*
# ./run_dqc_preprocessor

AWIPS II Site Data Configuration & Localization: Step-by-Step Guide (Build 11.9)
Contract DG133W-05-CQ-1067 / DCN AWP.DOC.TOSCAT.LOC-06.00 / 17 October 2011
Use or disclosure of data contained on this sheet is subject to the restriction on the title page of this document. 59
13.0 Add Text Triggers
Once EDEX is running, it is possible to add text triggers. Text triggers are added through a
command line interface tool, textdb. This command is located in /awips2/fxa/bin but should be
in the path of all users on all machines.
In order to load a text trigger into the database, the following command can be used:
textdb –pil –a CCCNNNXXX /path/to/myScript.sh
It is possible to put arguments to the script that is desired to be run on text product storage by
using quotation marks. An example is:
textdb –pil –a CCCNNNXXX “/path/to/myScript.sh -f “
It is very important to keep these rules in mind when loading triggers:
• Triggers are run by the EDEX engine on either DX3 or DX4.
• Triggers are run by system user awips, which means that this user must have execute
permissions on the trigger script.
• Triggers should be stored in, and executed from, the location /localapps/runtime/scripts,
which is an NFS volume accessible from both DX3 and DX4.
In AWIPS I, triggers were loaded in by mainScript.csh after compiling baseline scripts and
adding on those in the /data/fxa/siteConfig/textApps/siteTrigger.template file.
In AWIPS II this function will be completed by the AWIPS II Automation Tool
config_awips2.sh. It will read the same files as in AWIPS I, so you will need only to continue
and maintain the siteTrigger.template file.
AWIPS II Site Data Configuration & Localization: Step-by-Step Guide (Build 11.9)
Contract DG133W-05-CQ-1067 / DCN AWP.DOC.TOSCAT.LOC-06.00 / 17 October 2011
Use or disclosure of data contained on this sheet is subject to the restriction on the title page of this document. A-1
Appendix A. LDM Ingest Checklist
In order to add a line to the pqact.conf or pqact.local file for LDM ingest, certain information is
necessary. The following is a general checklist of information that can be used when adding new
data from the SBN into the system.
Note the WMO header or pattern for desired product:
Note the LDM FEEDTYPE for the desired product:
Note the raw archive location for the desired product:
Create entry in the pqact.conf or pqact.local file:
Restart or send HUP to ldmd process.
To find this information the following steps might prove useful.
1. Find the WMO header or pattern for the desired product.
If the product is being ingested into an AWIPS I system, look at the
/data/fxa/customFiles/acqPatternAddOns.txt file. It is possible that you will discover the
WMO pattern needed for ingesting. A listing of WMO header bulletins can also be found
starting at the following URL: http://www.nws.noaa.gov/tg/table.html
2. Find the LDM FEEDTYPE for the desired product.
In all cases, the FEEDTYPE “ALL” will match all the FEEDTYPES listed in Table 3-1.1
of this Localization Guide. However, tools are available that may help identify the proper
FEEDTYPE, if that is of interest. As user ldm the following commands might be useful:
# ldmadmin watch
This command will show all data coming from the upstream LDM server. This
should be every product that the upstream is ingesting. Watching can identify
specific feedtypes of the products being ingested. A sample output of the
command follows.
-bash-3.2$ ldmadmin watch
(Type ^D when finished)
Jan 21 14:44:44 pqutil INFO: 5219 20110121144443.333 NEXRAD3 56308488 SDUS26 KSGX 211440
/pN1QNKX !nids/
Jan 21 14:44:44 pqutil INFO: 36388 20110121144443.334 HDS 56308489 YAWD74 KWBG 211400
/mRUC2 !grib/ncep/RUC2/#236/201101211400/F003/DIST/cld base/
Jan 21 14:44:44 pqutil INFO: 7621 20110121144443.345 NEXRAD3 56308490 SDUS51 KLWX 211443
/pN0VLWX
Jan 21 14:44:44 pqutil INFO: 3846 20110121144443.348 NEXRAD3 56308491 SDUS31 KOKX 211439
/pN1POKX
Jan 21 14:44:44 pqutil INFO: 119137 20110121144444.274 NGRID 12387336 MTAZ98 KWBE 211200
!grib2/ncep/NMM_89/#255/201101211200F081/TMXK03/0 - NONE
# notifyme –l- -h $LDM_HOST -v –p ‘<WMO ID Pattern>’
This command will print to the screen every product available from <LDM
Upstream IP/Hostname> that matches <WMO ID Pattern>. For example, the
following would print all products starting T available from CPSBN2:
notifyme –l- -h cpsbn2 –v –p ‘^T.*’
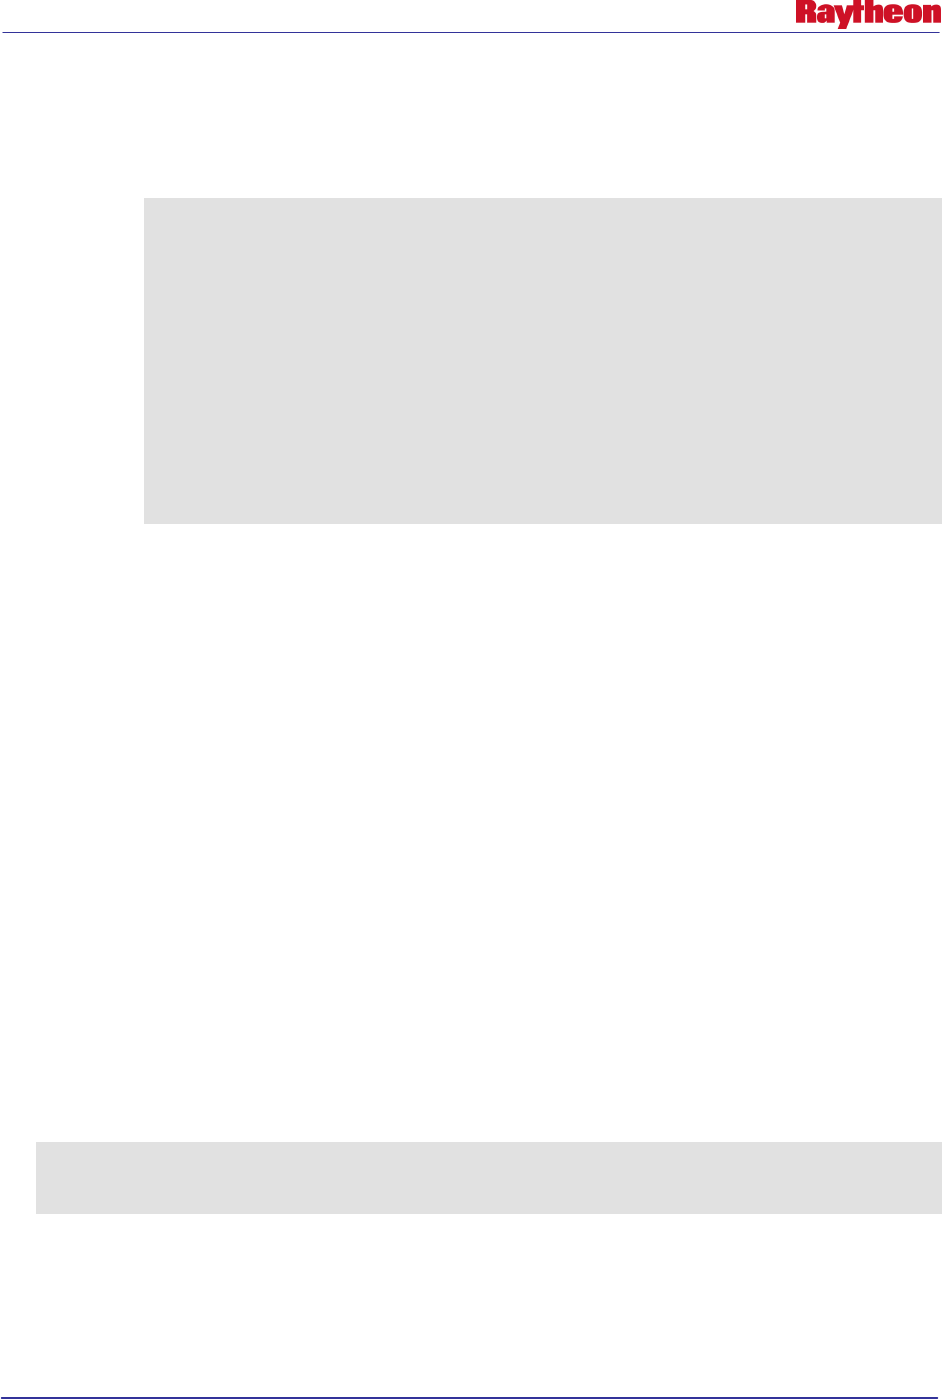
AWIPS II Site Data Configuration & Localization: Step-by-Step Guide (Build 11.9)
Contract DG133W-05-CQ-1067 / DCN AWP.DOC.TOSCAT.LOC-06.00 / 17 October 2011
Use or disclosure of data contained on this sheet is subject to the restriction on the title page of this document. A-2
Note: The pattern passed to notifyme, and put into the pqact.conf file, must be a valid
regular expression.
A sample output of the command follows.
-bash-3.2$ notifyme -l- -v -h adam1 -p '^sat.*TI.*'
Jan 21 15:17:37 notifyme[6887] NOTE: Starting Up: adam1: 20110121151737.886
TS_ENDT {{ANY, "^sat.*TI.*"}}
Jan 21 15:17:37 notifyme[6887] NOTE: LDM-5 desired product-class:
20110121151737.886 TS_ENDT {{ANY, "^sat.*TI.*"}}
Jan 21 15:17:37 notifyme[6887] INFO: Resolving adam1 to 165.92.24.36 took 0.000398
seconds
Jan 21 15:17:37 notifyme[6887] NOTE: NOTIFYME(adam1): OK
Jan 21 15:19:33 notifyme[6887] INFO: 26096 20110121151933.179 NIMAGE 47222
satz/ch1/GOES-13/SOUND-14.06/20110121 1446/EAST-CONUS/10km/ TIGE43 KNES 211446
Jan 21 15:19:34 notifyme[6887] INFO: 72646 20110121151934.390 NIMAGE 47223
satz/ch1/GOES-13/SOUND-11.03/20110121 1446/EAST-CONUS/10km/ TIGE48 KNES 211446
Jan 21 15:19:38 notifyme[6887] INFO: 58914 20110121151938.479 NIMAGE 47224
satz/ch1/GOES-13/SOUND-7.43/20110121 1446/EAST-CONUS/10km/ TIGE50 KNES 211446
Jan 21 15:19:40 notifyme[6887] INFO: 51259 20110121151940.513 NIMAGE 47225
satz/ch1/GOES-13/SOUND-7.02/20110121 1446/EAST-CONUS/10km/ TIGE51 KNES 211446
Jan 21 15:19:44 notifyme[6887] INFO: 45947 20110121151944.599 NIMAGE 47226
satz/ch1/GOES-13/SOUND-6.51/20110121 1446/EAST-CONUS/10km/ TIGE52 KNES 211446
Both of these commands will give other information that can be used in writing the data
to disk in the raw archive in a more useful format.
3. Note the raw archive location for the product.
In general, the raw archive used is /data_store/<product type>. For example, radar
products are put into a subtree of /data_store/radar based on the information. It is good
practice to continue to follow this paradigm. However, as long as the –edex argument is
used in the pqact.conf entry, the product should be decoded no matter where the physical
storage location ends up as long as the EDEX server has access to that location.
4. Create the pqact.conf entry.
Following the format described in Section 3.1 of this Localization Guide, add the entry
into the pqact.conf file. See deciphering a pqact.conf entry below for more information
on syntax.
5. Restart or send HUP signal to LDM server.
Following the steps listed in Section 3.1, restart or send a HUP signal to the LDM server.
A.1 Deciphering a pqact.conf Entry
Use the following reference to help decipher a pqact.conf entry.
NNEXRAD ^(SDUS[2-8].|NXUS6.)
(K|P|T)(LWX|BGM|CHS|RLX|ILN|CLE|AKQ|JKL|CTP|MHX|MRX|OKX|PHI) (..)(..)(..) /p(...)(...)
FILE -overwrite -log -close -edex
/data_store/radar/\2\8/\7/\5\6_\2\8_\7_(seq).rad
The first part, NNEXRAD is the FEEDTYPE as described in Table 3-1.1 of this Localization
Guide.
The Regular Expression describes any product starting with SDUS and follows with any
number between 2 and 8 OR starting with NXUS6.
AWIPS II Site Data Configuration & Localization: Step-by-Step Guide (Build 11.9)
Contract DG133W-05-CQ-1067 / DCN AWP.DOC.TOSCAT.LOC-06.00 / 17 October 2011
Use or disclosure of data contained on this sheet is subject to the restriction on the title page of this document. A-3
The () store that string into the variable \1 which can be used when storing to physical disk.
(K|P|T) matches either a K, P or T and stores that to the variable \2 .
(LWX|BGM|CHS|RLX|ILN|CLE|AKQ|JKL|CTP|MHX|MRX|OKX|PHI) matches any of
those site IDs and stores it to variable \3 .
(..)(..)(..) matches the next 6 characters of any type and stores them in pairs to \4, \5 and \6
respectively.
/p matches the exact string /p
(...)(...) matches the next 6 characters of any type and stores them in trios to \7 and \8 .
So the following line would match this entry in pqact and store in the following location:
Product:
NEXRAD3 56424268 SDUS51 KLWX 211529 /pTZLDCA !nids/
Storage Location:
/data_store/radar/KDCA/TZL/1529_KDCA_TZL_56424268.rad

AWIPS II Site Data Configuration & Localization: Step-by-Step Guide (Build 11.9)
Contract DG133W-05-CQ-1067 / DCN AWP.DOC.TOSCAT.LOC-6.00 / 17 October 2011
Use or disclosure of data contained on this sheet is subject to the restriction on the title page of this document. B-1
Appendix B. WarnGen Templates
WarnGen templates can be used on a user, site, or base level. Base templates should never be
edited, and are stored on the EDEX localization server in the following directory:
$EDEX_HOME/data/utility/common_static/base/warngen
In order to localize a baseline template, the .cfg and .vm files should be copied to the site-
specific directory and edited there. To copy the files, the following commands can be used:
• Log into an EDEX server as user root:
# ssh –q –l root $EDEX1
• Change directories to the site-specific WarnGen template directory:
# cd $EDEX_CONFIG/common_static/site/XXX/warngen
• Using Table B-1 as a reference, use the localization perspective of CAVE to create SITE
level versions of the desired templates (Right Click, Copy To --> SITE), or copy the desired
.xml and .vm files into place:
# cp –a ../../../base/warngen/template.(xml|vm) .
Note: Replace the word TEMPLATE above with one of the file names in Table B-1. Note
the case of the file name and copy appropriately.
• Use the localization perspective to make the necessary or desired changes.
Table B-1. Baseline WarnGen Templates
File Name Description
dambreak.cfg
Flash Flood Warning configuration
dambreakffs.cfg
Flash Flood Warning configuration
eww.cfg Extreme Wind Warning configuration
ewws.cfg
Extreme Wind Warning followup configuration
ffs.cfg
Flash Flood Statement configuration
ffw.cfg
Flash Flood Warning configuration
fla.cfg
Areal Flood Advisory configuration
flas.cfg
Areal Flood Advisory configuration
fls.cfg
Flood Statement configuration
flw.cfg
Flood Warning configuration
marinestatement.cfg Areal Flood Advisory configuration
severethunderstorm.cfg Severe Thunderstorm Warning configuration
shortterm.cfg
Short Term Forecast configuration
smw.cfg
Special Marine Warning configuration
smws.cfg
Marine Wx Statement - follow SMW configuration
SVS.cfg
Severe Weather Statement configuration
sws.cfg
Special Weather Statement configuration
tornado.cfg
Tornado Warning configuration
AWIPS II Site Data Configuration & Localization: Step-by-Step Guide (Build 11.9)
Contract DG133W-05-CQ-1067 / DCN AWP.DOC.TOSCAT.LOC-6.00 / 17 October 2011
Use or disclosure of data contained on this sheet is subject to the restriction on the title page of this document. B-2
WarnGen templates are created using velocity template language (VTL) with supporting
configurations in an xml formatted file with an .xml extension. More information on this can be
found at:
http://svn.apache.org/repos/asf/velocity/engine/tags/V_1_0_1/docs/vtl-reference-
guide.html
http://click.sourceforge.net/docs/velocity/vtl-reference-guide.html
Site-level templates and product configuration files will be stored in the following location on
the EDEX localization server:
$EDEX_HOME/data/utility/common_static/site/XXX/warngen
Where XXX is a site's localization ID. Site-specific templates should also be named in the
following manner, substituting the site ID for XXX:
<templateName>_XXX
For example: dambreak_OAX
Each warning velocity template will have a corresponding configuration xml file. This
configuration will set different variables that can dynamically change how WarnGen acts
depending on the warning type. It is important to note that each configuration must start and end
with a <warngenConfig> and </warngenConfig> tag. Also, comments can be maintained with
<!-- comment -->. Table B-2 describes fields that can be used in velocity template .xml files.
Table B-2. Velocity .xml Template Configuration Values
Value
Description
<maps>
Maps contained within <map></map> will get loaded with this template. Refer to
'Maps' menu in CAVE. The various menu items are also the different maps that
can be loaded with each template.
<follow-ups>
Each associated follow-up should be contained within <followup></followup>.
Each follow-up will become available when the appropriate time range permits.
<pehnsigs>
Each associated phen sig should be contained within <phensig></phensig>.
<enableRestart>
Enables/disables user from selecting the Restart button on the GUI. This is usually
set to false for follow-up configuration files. Because this variable is usually set to
false for follow-ups, this also controls if the 'Drag me to storm' text will become
available.
<enableDamBreakThreat>
Enables/disables the 'Dam Break Threat Area' button. This is mainly used for dam
break templates.
<autoLockText>
Enables/disables the system to lock text based on various patterns. Refer to
Locking Text section of this appendix for more information.
<includeWatches>
Each watch to be included should be contained within
<includedWatch></incluedWatch>. The only two possible values are 'torWatches'
and 'svrWatches'. Refer to includeWatchAreaBuffer in the Area Configuration for
more information.
<durations>
Each available duration should be contained with <duration></duration>. The
default duration should be contained with <defaultDuration></defaultDuration>.
However, default duration should not be included within <durations></durations>.

AWIPS II Site Data Configuration & Localization: Step-by-Step Guide (Build 11.9)
Contract DG133W-05-CQ-1067 / DCN AWP.DOC.TOSCAT.LOC-6.00 / 17 October 2011
Use or disclosure of data contained on this sheet is subject to the restriction on the title page of this document. B-3
Value
Description
<bulletActionGroups>
The bullet action group maintains all bulletActionGroups and should be contained
with <bulletActionGroups></bulletActionGroups>. Within the bulletActionGroup is a
<bulletActionGroup></bulletActionGroup> which contains all the available bullets
for the associated action, phen, and sig.
Example:
<bulletActionGroups>
<bulletActionGroup action=”NEW” phen=”TO” sig=”W”>
<bullets>
<!-- List of bullets for a NEW, Tornado Warning -->
</bullets>
</bulletActionGroup>
<bulletActionGroup action=”COR” phen=”TO” sig=”W”>
<bullets>
<!-- List of bullets for a COR, Tornado Warning -->
</bullets>
</bulletActionGroup>
</bulletActionGroups>
<bullets>
The bullets populate the selection list in the WarnGen dialog. Each bullet should
be contained in a <bullet> tag. The following are the different parameters available
to a bullet:
• bulletName: An id that is passed to the template when a bullet is selected. This
name should be unique as it can be used as an identifier with the velocity files.
However, 'siteimminent' and 'sitefailed' are reserved bullet names for dam
breaks.
• bulletText: The text presented to the user in the selection list.
• bulletGroup: Only one bullet can be selected per bulletGroup.
• bulletType: 'title' is unselectable.
• parseString: If this string MATCHES a phrase in the follow-up warning, then the
associated bullet will automatically be highlighted in the selection list for a
follow-up.
If there are multiple strings that need to be tested, the escape character '"'
needs to be placed before and after the phrase to be matched. For example,
parseString=”"LINE OF SEVERE
THUNDERSTORMS""SQUALL"”. If the warning text contains
“LINE OF SEVERE THUNDERSTORMS” and “SQUALL”, then the associated
bullet will be highlighted.
Furthermore, if a phrase begins with '-' and is not in the warning text, then the
associated bullet will always be highlighted. For example, parseString=”"-
SQUALL"”.
• loadMap: Refer to ‘Maps’ menu in CAVE. The various menu items are also the
different maps that can be load with each template.
•
floodSeverity: Used to highlight the correct severity on a correction.

AWIPS II Site Data Configuration & Localization: Step-by-Step Guide (Build 11.9)
Contract DG133W-05-CQ-1067 / DCN AWP.DOC.TOSCAT.LOC-6.00 / 17 October 2011
Use or disclosure of data contained on this sheet is subject to the restriction on the title page of this document. B-4
Value
Description
<damInfoBullets>
The bullets populate the selection list in the WarnGen dialog. Each bullet should
be contained in a <damInfoBullet> tag. The following are the different parameters
available to a bullet:
• bulletName: An id that is passed to the template when a bullet is selected. This
name should be unique as it can be used an an identifier with the velocity files.
• bulletText: The text presented to the user in the selection list.
• bulletGroup: Shoud use either ‘dam’ or ‘scenario’.
• bulletType: ‘title’ is unselectable.
• Cords: The lat/lon coordinates in the format usually found at the bottom of the
warnings (i.e., LAT … LON 3981 7868 3980 7861 3972 7862 3972 7874)
Include: <include file=”filename.txt”/>
The include allows an external file to be inserted in the configuration file. This
functionality is useful when a user wants to list dam info bullets in a separate file.
The format of the include tag is <include file=”filename.txt”/> where filename is
the name of the file including the extension of the file (i.e., .txt). The file to be
included will follow the rules of localization: user, site, then base.
<areaConfig> Specifies how the area portion of the warning is generated. This configuration is
mainly used for determining the impacted counties in the 1st bullet. The following
are the different parameters available to the areaConfig:
• inclusionPercent: If an area greater than this percentage of area is covered,
include it in the warning.
• inclusionAndOr: AND – both inclusionPercent and inclusionArea must pass in
order to be included. OR – either inclusionPercent or inclusionArea can pass to
be included.
• inclusionArea: If an area greater than this is covered, include it in the warning
(square kilometers).
• areaField: The column name of the areaSource that contains the name of the
area (i.e., COUNTYNAME, NAME).
• parentAreaField: The column name of the parentSource that contains the name
of the parent (i.e., NAME).
• areaNotationField: The column in the areaSource that contains the key used to
map to the correct area notation. Look at countTypes.txt.
• areaNotationTranslationFile:Translation file to look up an area notation. File
located in /edex/data/utility/common_static/base/warngen.
• fipsField:The name of the attribute that retrieves the fips.
• pointField:The column name in the pointSource that contatins the name of the
point.
• sortBy: Can sort by 'name', 'parent','size',partOfArea,partOfParent,areaNotation,
fips.
• pointFilter: Controls that point to include based on the WARNGENLEV of the
point. WARNGENLEV is a value from 1 to 3 where 1 is the highest priority:
o key WARNGENLEV (column name in the pointSource)
o value 1, 2, or 3 (can only be a single value), 0 does nothing
o
type: INCLUSIVE – include only points that match the value

AWIPS II Site Data Configuration & Localization: Step-by-Step Guide (Build 11.9)
Contract DG133W-05-CQ-1067 / DCN AWP.DOC.TOSCAT.LOC-6.00 / 17 October 2011
Use or disclosure of data contained on this sheet is subject to the restriction on the title page of this document. B-5
Value
Description
EXCLUSIVE-exclude only points that match the value
For example, INCLUSIVE 1, will only include points that are
WARNGENLEV 1, EXCLUSIVE 3, will only include points that are
WARNGENLEV 1 and 2.
• includeWatchAreaBuffer: The number of MILES the warning polygon will be
increased to include nearby watches
• otherPoints:
o maxCount: The max number of points to be returned
o includeAreaPoints: true/false, don't add name if already available for the
1st bullet
o includeClosestPoints: true/false, don't add name if already avaialbe for 3rd
bullet
o sortBy: Can sort by 'distance', 'name', 'warngenlev, 'population',
'lat','lon','area','parentArea'
Example:
<areaConfig>
<inclusionPercent>0.00</inclusionPercent>
<inclusionAndOr>AND</inclusionAndOr>
<inclusionArea>10</inclusionArea>
<maxCount>20</maxCount>
<areaField>COUNTYNAME</areaField>
<parentAreaField>NAME</parentAreaField>
<areaNotationField>STATE</areaNotationField>
<areaNotationTranslationFile>countyTypes.txt</areaNotationTranslationFile>
<fipsField>FIPS</fipsField>
<pointField>NAME</pointField>
<sortBy>
<sort>parent</sort>
</sortBy>
<pointFilter>
<key>WARNGENLEV</key>
<value>1</value>
<type>INCLUSIVE</type>
</pointFilter>
<includedWatchAreaBuffer>25</includedWatchAreaBuffer>
<otherPoints>
<maxCount>50</maxCount>
<includeAreaPoints>false</includeAreaPoints>
<includeClosestPoints>false</includeClosestPoints>
<sortBy>
<sort>warngenlev</sort>
<sort>population</sort>
</sortBy>
</otherPoints>
</areaConfig>

AWIPS II Site Data Configuration & Localization: Step-by-Step Guide (Build 11.9)
Contract DG133W-05-CQ-1067 / DCN AWP.DOC.TOSCAT.LOC-6.00 / 17 October 2011
Use or disclosure of data contained on this sheet is subject to the restriction on the title page of this document. B-6
Value
Description
<closestPointsConfig>
This configuration determines how the closest points to the storms are generated.
This configuration is usually applied to the 3rd bullet. The following are the different
parameters:
• numberOfPoints: Number of the closestPoints to generate
• unitDistance: The output unit. Refer to the API javax.measure.unit.NonSI and
javax.measure.unit.SI for Length notations
• unitSpeed: The output speed. Refer to the API javax.measure.unit.NonSI and
javax.measure.unit.SI for Velocity notations
• pointField: The field out of the pointSource that is used for naming the point
• pointFilter: Controls which point to include based on the WARNGENLEV of the
point. WARNGENLEV is a value from 1 to 3 where 1 is the highest priority.
o key WARNGENLEV (column name in the pointSource)
o value 1, 2, or 3 (can only be a single value), 0 does nothing
o type: INCLUSIVE – include only points that match the value
EXCLUSIVE-exclude only points that match the value
For example, INCLUSIVE 1, will only include points that are
WARNGENLEV 1, EXCLUSIVE 3, will only include points that are
WARNGENLEV 1 and 2
• sortBy: Can sort by 'distance', 'name', 'warngenlev, 'population',
'lat','lon','area','parentArea'
Example:
<closestPointsConfig>
<numberOfPoints>2</numberOfPoints>
<unitDistance>mi</unitDistance>
<unitSpeed>mph</unitSpeed>
<pointField>NAME</pointField>
<pointFilter>
<key>WARNGENLEV</key>
<value>0</value>
<type>EXCLUSIVE</type>
</pointFilter>
<sortBy>
<sort>warngenlev</sort>
</sortBy>
</closestPointsConfig>
<pathcastConfig>
This configuration indicates that a track product is generated to determine the
areas the storm will pass under. This is mainly for the 4th bullet and used if type 1
is selected. Refer to the macros contained in the VM_global_library.vm. The
following are the different parameters:
• enabled: 0 to disable path cast, 1 to enable path cast.
• defaultSpeedKt: Default speed in knots to generate the storm track if a recent
track was not issued or if there is not STI data.
• defaultDirection: Default direction (0 degrees is South) to generate the storm
track if a recent track was not issued or if there is not STI data.
• nearThreshold: Specifies a distance in miles that indicates how close a storm
can be to a location to be included in the path cast.
AWIPS II Site Data Configuration & Localization: Step-by-Step Guide (Build 11.9)
Contract DG133W-05-CQ-1067 / DCN AWP.DOC.TOSCAT.LOC-6.00 / 17 October 2011
Use or disclosure of data contained on this sheet is subject to the restriction on the title page of this document. B-7
Value
Description
•
interval: The interval to round the time of each path cast to.
• maxCount: The max number of points to include in each path cast.
• pointFilter: Controls which point to include based on the WARNGENLEV of the
point. WARNGENLEV is a value from 1 to 3 where 1 is the highest priority.
o key WARNGENLEV (column name in the pointSource)
o value 1, 2, or 3 (can only be a single value), 0 does nothing
o type: INCLUSIVE – include only points that match the value
EXCLUSIVE-exclude only points that match the value
For example, INCLUSIVE 1, will only include points that are
WARNGENLEV 1, EXCLUSIVE 3, will only include points that are
WARNGENLEV 1 and 2
• areaField: The column name in the areaSource table that contains the name of
the area.
• parentAreaField: The column name in the areaSource that contains the parent
of the area (i.e., State).
• areaNotationField: The column name in the areaSource that contains the key
used to map to the correct areaNotation. Look at countyTypes.txt.
• areaNotationTranslationFile: Translation file to look up an area notation. File
located in /edex/data/utility/common_static/base/warngen.
• sortBy: Can sort EACH path cast by 'distance', 'name', 'warngenlev,
'population', 'lat','lon','area','parentArea'.
Example:
<pathcastConfig>
<enabled>1</enabled>
<defaultSpeedKt>20</defaultSpeedKt>
<defaultDirection>45</defaultDirection>
<nearThreshold>8.0</nearThreshold>
<interval>5</interval>
<maxCount>4</maxCount>
<pointField>Name</pointField>
<pointFilter>
<key>WARNGENLEV</key>
<value>0</value>
<type>EXCLUSIVE</type>
</pointFilter>
<areaField>COUNTYNAME</areaField>
<parentAreaField>STATE</parentAreaField>
<areaNotationField>STATE</areaNotationField>
<areaNotationTranslationFile>countyTypes.txt</areaNotat
ionTranslationFile>
<sortBy>
<sort>distance</sort>
</sortBy>
</pathcastConfig>
AWIPS II Site Data Configuration & Localization: Step-by-Step Guide (Build 11.9)
Contract DG133W-05-CQ-1067 / DCN AWP.DOC.TOSCAT.LOC-6.00 / 17 October 2011
Use or disclosure of data contained on this sheet is subject to the restriction on the title page of this document. B-8
Value
Description
<geospatialConfig>
This configuration maintains global variables (i.e., pointSource, areaSource,
parentAreaSource) used by area configuration, closest points configuration, and
path cast configuration. This configuration also initializes WarnGen to gather all the
areas within the CWA. The following are the different parameters:
• pointSource: The name of the table that reads the points from (i.e. City,
MarineSites).
• areaSource: The name of the table that reads the areas from (i.e County,
MarineZones).
• parentAreaSource: The name of the table that reads the parent areas from (i.e.,
States).
• timezoneSource: The name of the time zone table (i.e., TIMEZONES)
• timezoneField: The name of the column in the timezoneSource that contains
the time zones.
• maskSource: The name of the table that will determine if the warning area
should be hatched (i.e. CWA, MarineZones).
• maskFilter : Upon initialization this will gather all the areas that have a WFO
that matches that CAVE is localized to:
o key WFO
o value $warngenCWaFilter
o type: INCLUSIVE/EXCLUSIVE
Example:
<geospatialConfig>
<pointSource>City</pointSource>
<areaSource>County</areaSource>
<parentAreaSource>States</parentAreaSource>
<timezoneSource>TIMEZONES</timezoneSource>
<timezoneField>TIME_ZONE</timezoneField>
<maskSource>CWA</maskSource>
<maskFilter>
<key>WFO</key>
<value>$warngenCWAFilter</value>
<type>INCLUSIVE</type>
</maskFilter>
</geospatialConfig>
AWIPS II Site Data Configuration & Localization: Step-by-Step Guide (Build 11.9)
Contract DG133W-05-CQ-1067 / DCN AWP.DOC.TOSCAT.LOC-6.00 / 17 October 2011
Use or disclosure of data contained on this sheet is subject to the restriction on the title page of this document. B-9
Value
Description
<localConfigs>
This configuration is to be used if a user wants to add extra points that are not
available in the City table. Each local config should be contained within
<localConfig></localConfig>. Refer to importMarkersInfo.sh and/or
importPointsInfo.sh on how to import local points. The following are the different
parameters:
• pointSource:
• pointField:
• variable:
• pointFilter:
• maxCount
• sortBy:
Example:
<localConfigs>
<localConfig>
<pointSource>i180mm</pointSource>
<pointField>Name</pointField>
<variable>i180mm</variable>
<pointFilter>
<key>WARNGENLEV</key>
<value>0</value>
<type>EXCLUSIVE</type>
</pointFilter>
<maxCount>50</maxCount>
<sortBy>
<sort>Name</sort>
</sortBy>
</localConfig>
</localConfigs>
<riverBasinConfig>
This configuration will make available the basinSource to allow basin names to be
retrieved if they intersect the warning polygon.
Example:
<riverBasinConfig>
<basinSource>basins</basinSource>
<nameField>name</nameField>
<maskFilter>
<key>cwa</key>
<value>$warngenCWAFilter</value>
<type>INCLUSIVE</type>
</maskFilter>
</riverBasinConfig>
WarnGen passes various Java objects to the velocity templates that can contain various
information or be a utility object that can be used in generating a warning. Some Java objects
have their API available on the internet, which can provide more information on the available
methods the objects provide. It is important to understand that some objects derive information
for tables that are set in the associated configuration file.
AWIPS II Site Data Configuration & Localization: Step-by-Step Guide (Build 11.9)
Contract DG133W-05-CQ-1067 / DCN AWP.DOC.TOSCAT.LOC-6.00 / 17 October 2011
Use or disclosure of data contained on this sheet is subject to the restriction on the title page of this document. B-10
Header
It is very important that the first two lines of your template is the WMO Header and the PIL
information as this information will be parsed by the text workstation and placed in the header
block of a text editor.
${WMOId} ${vtecOffice} 000000 ${BBBId}
TOR${siteId}
VM_global_library.vm
VM_global_library.vm contains various macros that can be referenced by all templates.
Therefore, it is highly recommended that this file NOT be modified. Each macro performs
common functions that can be used in calculating and generating text. However, a user does not
necessarily have to use the macros to produce text (i.e., fourthbullet), but can develop his or her
own printing algorithm. The function name is referenced by the first parameter of the macro
while the following parameters are the required parameters. For example, the
macro#macro(direction $d) is called by direction(90). The appropriate macro will be recognized
and produce the appropriate text based on the parameters.
#parse
The #parse macro is function Velocity supported function that can be used to import a file into a
.vm file. The important thing to note is that imported files have to be saved in the base directory.
Table B-3 describes variables from the Java WarnGen plug-in code that are passed to the
velocity templates for WarnGen products
Table B-3. Variables Passed to WarnGen Templates
Value
Description
vtecOffice
The 4-letter id that generated the warning (i.e. KOAX); Usually used in the VTEC
siteId A String:
The 3-letter WFO set in Localization used for creating the PIL.
officeShort
String set in site localization config.xml by “
warngenOfficeShort
”.
officeLoc
String set in site localization config.xml by “
warngenLocation
”
backupSite
The backup site selected in the 'Backup' selection area.
BBBid
A string that keeps track of the number of corrections performed on a warning.
(i.e., CCA)
localtimezone
Time zone derived when calculating the areas. Commonly used when using the
secondBullet macro.
This is a required field. Refer to the secondBullet macro for more info.
secondtimezone
If the Warning spans multiple time zones, the second Time Zone is stored here.
Will only become available if the path cast has an additional timezone.
stormType
Used to indicate if the warning is for a single storm or a line of storms.
If the value is “line” then it is a line of storms or “single” if it is a single storm.
now Date object of the current time.
AWIPS II Site Data Configuration & Localization: Step-by-Step Guide (Build 11.9)
Contract DG133W-05-CQ-1067 / DCN AWP.DOC.TOSCAT.LOC-6.00 / 17 October 2011
Use or disclosure of data contained on this sheet is subject to the restriction on the title page of this document. B-11
Value
Description
start
Date value representing the start time of the warning.
expire Date value representing the expiration time of the warning.
event
Date value representing the time of occurance of the warning.
ugcline
A list of the ugc or zones of each affected area. This variable depends on the
affected areas (i.e. county or marine zones).
ugclinecan
A list of the ugc or zonesof each county or zone that was canceled.
areaPoly
An array of Coordinates of the warning polygon.
movementSpeed
Double representing the speed of the storm based on the track. The speed units
can defined in the closestPointsConfig.unitSpeed configuration..
movementDirectionRounded
Double representing the rounded direction of the storm track in degree where 0 is
south.
The possible values are 0, 90, 135, 180, 225, 270, 315. This variable is
commonly used with the macro direction to give a general description if the storm
is moving NORTH, NORTHEAST, WEST, etc.
movementDirection Double representing direction of the storm track in degrees where 0 is South.
movementInKnots
Double representing the movement speed in Knots. This is mainly used when
generating the TML line of the warning.
action The action the warning is performing: NEW, COR, EXT, CON, CAN, and EXP.
CANCON is an action indicating there were canceled areas and continued areas.
This action is mainly used to help rendering both.
etn
Event Tracking Number
phenomena
String representing the two letter VTEC pp field.
WMOid
WarnGen automatically sets this variable to TTAAii.
When the text is sent to text workstation, text workstation replaces it with the
appropriate WMO header retrieved from the afos_to_awips table.
bullets
An array of Strings that contain all the bullets that were selected.
eventLocation
The coordinate of the event. This is commonly used in the 3
rd
bullet
Array of Point2D values (java.awt.geom.Point2D):
otherPoints
Array of ClosestPoint objects.
This array is used when type 2 or 3 is passed to the fourthBullet. Refer to
areaConfig.otherPoints to sort the array.
A ClosestPoint object has the following members:
name
population
warngenlev
distance
AWIPS II Site Data Configuration & Localization: Step-by-Step Guide (Build 11.9)
Contract DG133W-05-CQ-1067 / DCN AWP.DOC.TOSCAT.LOC-6.00 / 17 October 2011
Use or disclosure of data contained on this sheet is subject to the restriction on the title page of this document. B-12
Value
Description
pathCast
An array of PathCast objects.
Each PathCast object is grouped by 'time' in ascending order. This array is only
used when type 1 is passed to fourthBullet. The following are members:
• points: All the points (i.e. Cities) that are listed for the path cast in the form of
an array of ClosestPoint objects.
• Area: Refer to pathCastConfg.areaField.
• areaNotation: Can be either COUNTY, PARISH, ZONE. Refer to
countyTypes.txt.
• parentArea: Refer to pathCastConfig.parentAreaField.
• timeZone.
•
time: Time of the path cast.
closestPoints
An array of ClosestPoint objects closest to the event. A ClosestPoint object has
the following members:
• Name: Name of the point, such as the city name or marine site name
• Area: The name of the area, such as the county name.
• parentArea: The name of the parent area, such as the state.
• point: Coordinate of the point.
• distance: Distance from point to the event.
• roundedDistance: Distance as a rounded integer without any decimals.
• azimuth: The angle of point from the event. In other words, the point is
relative to the event. Because the event is the reference, the azimuth needs
180 subtracted in order for the city to become the reference for the event.
• roundedAzimuth: Azimuth to the closest 45 degree intervals.
• oppositeAzimuth: 180 degrees from the azimuth.
• oppositeRoundedAzimuth: 180 degrees from the roundedAzimuth.
• population: Population in the city. This variable is not available for marine
sites or locally added cities or markers.
•
Warngenlev: Priority level where 1 is the highest.
areas
An array of AffectedAreas object. This object is usually used in the 1
st
bullet. An
AffectedAreas object has the following members:
• Name: The name of the area affected. Refer to areaConfig.areaField.
• partOfArea: NORTH, NORTHEAST, EAST, etc.
• areaNotation: The notation of the area affected (COUNTY, PARISH, etc.).
Refer to countyTypes.txt.
• partOfParentRegion: NORTH, NORTHEAST, EAST, etc.
• parentRegion: The name of the parent region that is affected. Refer to
areaConfig.parentAreaSource.
• fips: fips county number.
• stateabbr: State abbreviation (i.e., NE for Nebraska).
• points: If applicable, a list of the points that are affected.
• timezone.
•
size: Size of the area.
cancelareas
An ArrayList of AffectedAreas objects that are canceled from the original warning.
This is commonly used in follow up velocity files.
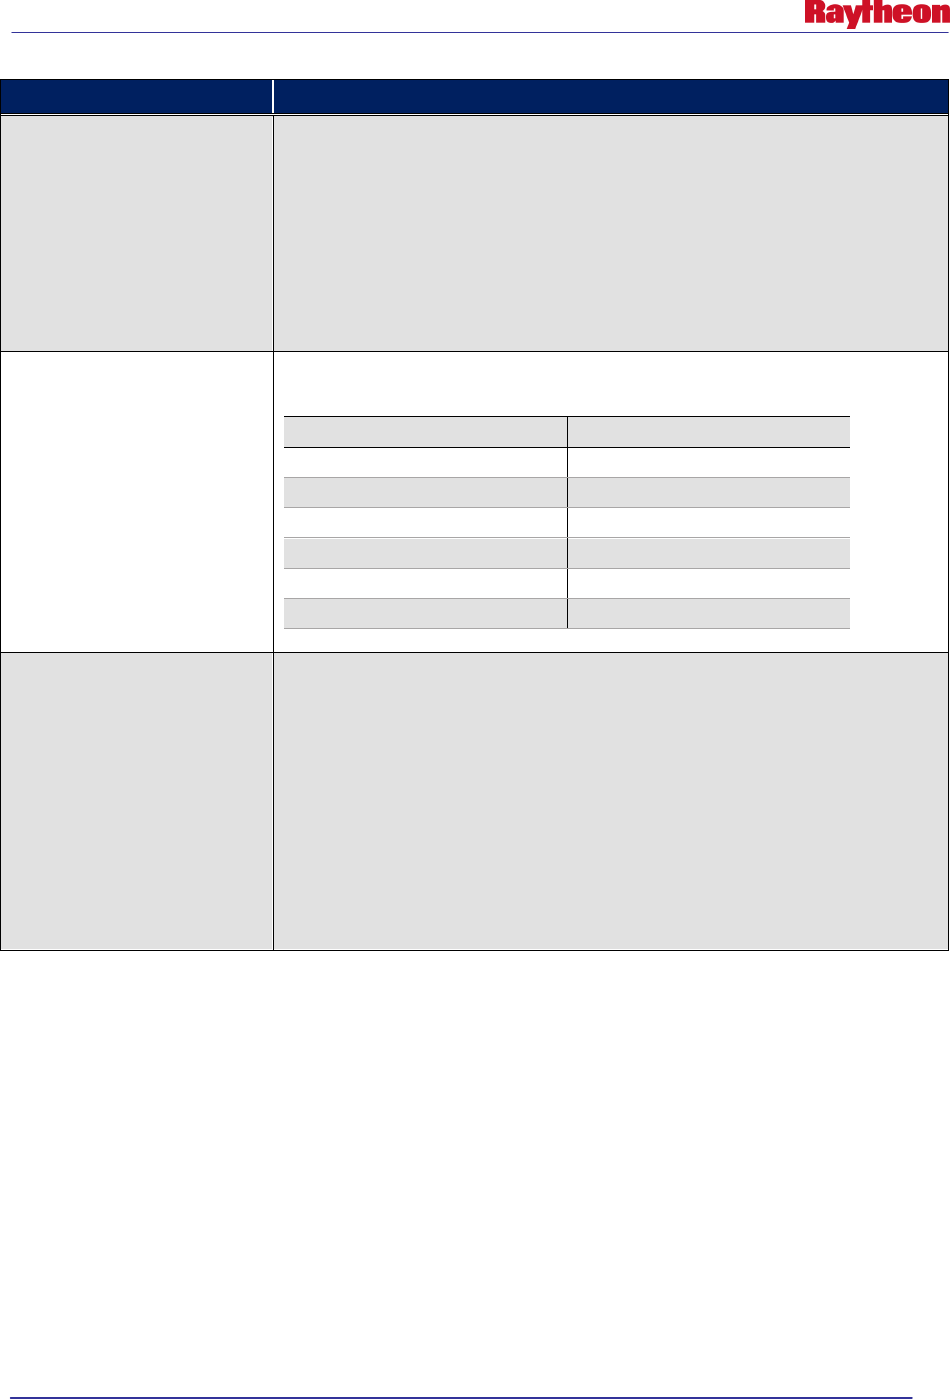
AWIPS II Site Data Configuration & Localization: Step-by-Step Guide (Build 11.9)
Contract DG133W-05-CQ-1067 / DCN AWP.DOC.TOSCAT.LOC-6.00 / 17 October 2011
Use or disclosure of data contained on this sheet is subject to the restriction on the title page of this document. B-13
Value
Description
pointComparator
Allows two closest point array objects to be combined and sorted. The key
method to use is combine. The first two parameters are the two closest point
object arrays to be combined. The following parameters can be an N number of
Strings that the newly combined array will be sorted by ('distance', 'name',
'warngenlev, 'population', 'lat','lon','area','parentArea').
For example,:
${pointComparator.combine(${otherPoints},${i80mm},”war
ngenlev”)}.
TimeFormat
Used along with the dateUtil object. The following are all the possible variables.
Refer to the Java API SimpleDateFormat for more information.
Hashtable Key
Hashtable Value
header
hmm a z EEE MM d yyyy
plain
hmm a z EEEE
clock
hmm a z EEEE
ymdthmz
yyMMdd'T'HHmm'Z'
ddhhmm ddHHmm
Time
HHmm
list
ListTool object.
Refer to API for org.apache.velocity.tools.generic.ListTool for more information.
Method use examples:
$primes is an array of integers containing {2, 3, 5,
7}
$lists.size($primes) -> 4
$lists.get($primes, 2) -> 5
$lists.set($primes, 2, 1) -> (primes[2] becomes 1)
$lists.get($primes, 2) -> 1
$lists.isEmpty($primes) -> false
$lists.contains($primes, 7) -> true

AWIPS II Site Data Configuration & Localization: Step-by-Step Guide (Build 11.9)
Contract DG133W-05-CQ-1067 / DCN AWP.DOC.TOSCAT.LOC-6.00 / 17 October 2011
Use or disclosure of data contained on this sheet is subject to the restriction on the title page of this document. B-14
Value
Description
mathUtil
WarnGenMathTool
(extends org.apache.velocity.tools.generic.MathTool).
Used for rounding to the nearest 5 or 10, for example, of a specific value.
For instance, wind speeds in the third bullet should be rounded to the nearest 5
MPH so they should call this method with the arguments (windSpeed, 5). There
are two available methods for this object aside from the methods in MathTools:
roundToInt(value, multiple) -
roundTo5(value) – calls roundToInt(value,5)
Methods:
(http://velocity.apache.org/tools/devel/javadoc/org/apache/velocity/tools/generic/
MathTool.html)
$mathUtil.roundTo5(num)
$mathUtil.roundToInt(num, multiple)
$mathUtil.abs(num)
$mathUtil.add(num1, num2)
$mathUtil.ceil(num1)
$mathUtil.div(num1, num2)
$mathUtil.floor(num1)
$mathUtil.getAverage(nums)
$mathUtil.getRandom()
$mathUtil.Total(nums)
$mathUtil.matchType(num1, num2)
$mathUtil.max(num1, num2)
$mathUtil.min(num1, num2)
$mathUtil.mod(num1, num2)
$mathUtil.mul(num1, num2)
$mathUtil.pow(num1, num2)
$mathUtil.random(num1, num2)
$mathUtil.round(num1)
$mathUtil.roundTo(decimals, num2)
$mathUtil.sub(num1, num2)
$mathUtil.toDouble(num1)
$mathUtil.toInteger(num1)
$mathUtil.toNumber(num1)
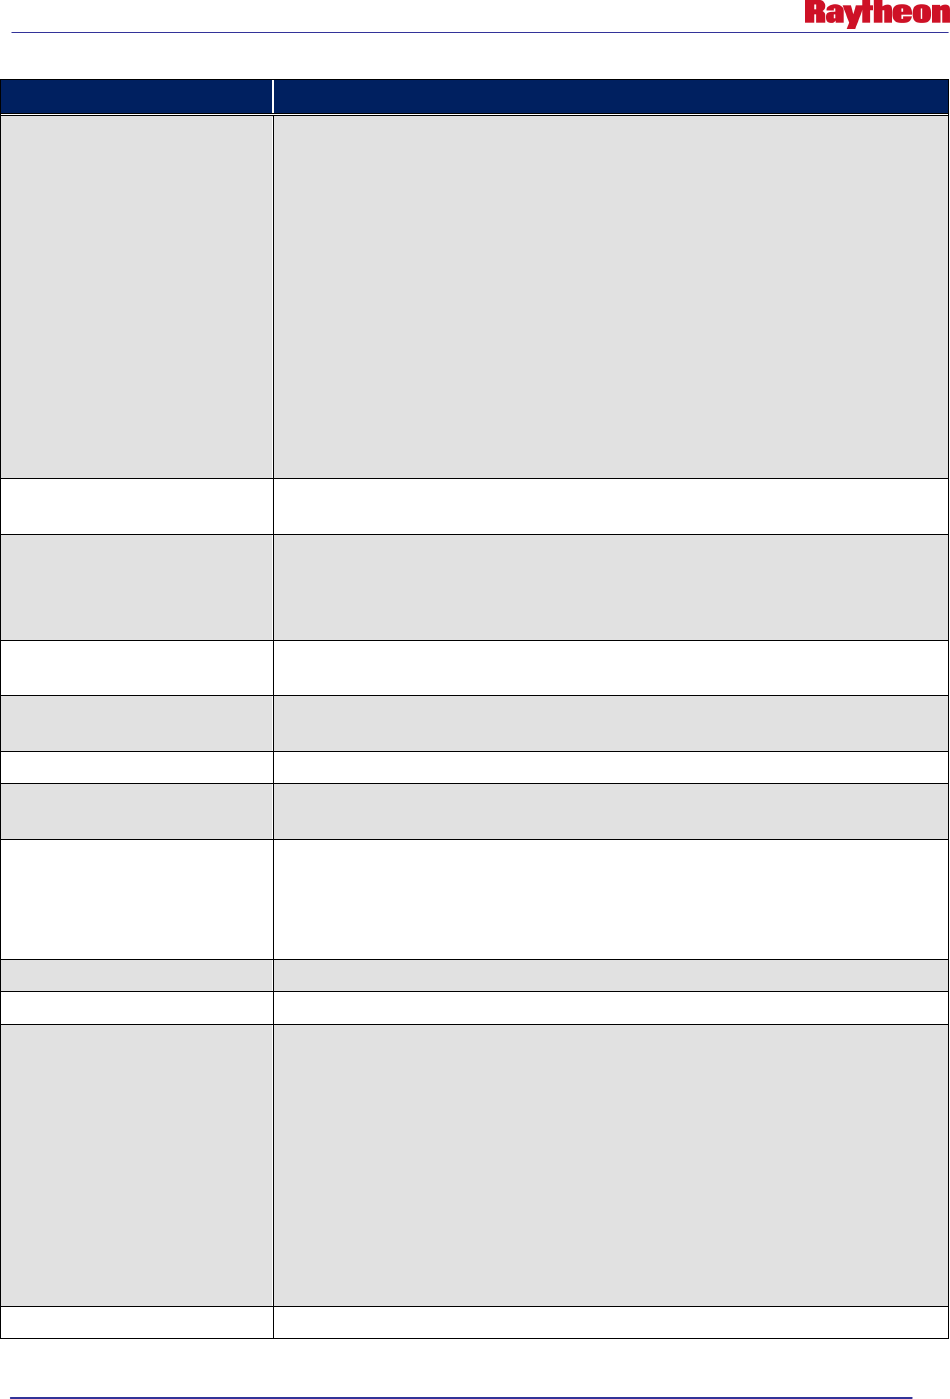
AWIPS II Site Data Configuration & Localization: Step-by-Step Guide (Build 11.9)
Contract DG133W-05-CQ-1067 / DCN AWP.DOC.TOSCAT.LOC-6.00 / 17 October 2011
Use or disclosure of data contained on this sheet is subject to the restriction on the title page of this document. B-15
Value
Description
dateUtil
A DateUtil object can format a Date object (i.e. start) into a particular display
string based on the passed timeFormat. Refer to timeFormat to see the all the
possible types. The most useful method to use is format(date, timeFormat,
interval, timezone).
dateUtil (com.raytheon.viz.warngen.util.DateUtil).
Methods:
$dateUtil.format(Date,
$dateUtil.format(Date,
$dateUtil.format(Date,TimeZone)
$dateUtil.format(Date,DateFormat)
DateFormat, Interval)
DateFormat, Interval,
DateFormat, TimeZone)
productClass
The single letter indicating if the warning is in operational mode (O) or test mode
(T).
floodseverity This is usually used in follow up hydro products. The value is derived from the
HTEC of the initial warning. The flood severity is set in the velocity template using
conditional logic based on the bullets selected in the dialog. Minor flood = 1,
moderate flood = 2, major flood = 3.
floodic The immediate cause from the initial warning. This is commonly used in follow
ups.
ic
The immediate cause used in the HTEC. Common values are ER, DR, GO, IJ,
RS, SM, DM.
includedWatches
An array of the included watches mentioned in the config.
riverdrainages
An array of the names of the basins that are included in the warning polygon.
Refer to River Basin Configuarion for more info
specialCorText
The raw message of the record to be corrected without the WMO header line and
the the PIL line.
The VTEC in the raw message is updated to have a COR action.
This variable is made available if there is no change in the storm track
stationary
True or false if there are no time points (i.e. only a single frame)
user
Username
watches
A WatchUtil object that can gather tornado and/or severe thunderstorm watches
within the watch area.
The areaConfig.includedWatchAreaBuffer is used to determine whether to
include the watch or not. The WatchUtil has two useful methods:
• getTorWatches
• getSvrWatches
These methods return an array list of WeatherAdvisoryWatch objects that have
the available variables: phensig, endTime, parentRegion, partOfParentRegion. It
is important to note that the endTime is set to the latest time in the array list.
zoneslist
Similar to ugcline but contains the zones instead of counties.
AWIPS II Site Data Configuration & Localization: Step-by-Step Guide (Build 11.9)
Contract DG133W-05-CQ-1067 / DCN AWP.DOC.TOSCAT.LOC-6.00 / 17 October 2011
Use or disclosure of data contained on this sheet is subject to the restriction on the title page of this document. B-16
B.1 How to Access the Data Contained in a Value Inside a Template
In general, any String, primitive type method, or attribute can be accessed directly within the
WarnGen template using the following syntax:
String or primitive type: ${myStringValue}
In the above context, myStringValue was a String passed directly into the template:
String method: ${dateUtil.format(${pc.time}, ${timeFormat.clock},
${localtimezone})}
In the above context:
dateUtil is a com.raytheon.viz.warngen.util.DateUtil Object that contains the method
format, which accepts 3 arguments.
${pc.time} (a date value from the pathCast) is replaced by the time attribute of the pc
object.
${timeFormat.clock} is replaced by the SimpleDateFormat addressed in the timeFormat
Hashtable by “clock”; ${localtimezone} is replaced by the localtimezone object.
B.2 Modifying / Editing Templates
WarnGen templates should be accessed and modified through the Localization perspective
within CAVE.
Note: Any line that begins with a pound (#) symbol or any variable surrounded by $ {} could
potentially be dangerous to alter.
B.2.1 Time Ranges
Table B.2.1-1 defines the time ranges in which actions will become available. 'Start Time' and
'End Time' are defined as the start time and the end time of the warning, respectivley.
Table B.2.1-1. Start and End Times for Actions
Action
Start
End
NEW (Reissue)
End Time – 20 minutes
End Time + 30 minutes
CON
Start Time
End Time – 5 minutes
CAN
Start Time
End Time – 10 minutes
EXP
End Time – 10 minutes
End Time + 10 minutes
EXT
Start Time
End Time – 5 minutes
COR
Start Time
Start Time + 10 minutes
B.2.2 Locking Text
Lock texts appear as blue text in the text workstation and cannot be modified. Locked text are
defaulted to certain strings. However, additional lines in the template can also be locked by
surrounding it with the tags <L> and </L>. If the pattern used to auto lock the text does not

AWIPS II Site Data Configuration & Localization: Step-by-Step Guide (Build 11.9)
Contract DG133W-05-CQ-1067 / DCN AWP.DOC.TOSCAT.LOC-6.00 / 17 October 2011
Use or disclosure of data contained on this sheet is subject to the restriction on the title page of this document. B-17
satisfy the user, auto lock can be turned off in the .cfg files. A list of strings that automatically
get locked follows:
• UGC LIST ( NEC053-021-177-212215-)
• VTEC (/O.NEW.KOAX.TO.W.0001.110221T2143Z-110221T2215Z/)
• HTEC
• Bulletin (BULLETIN – EAS ACTIVATION REQUESTED)
• Warning Type (TORNADO WARNING)
• Site (NATIONAL WEATHER SERVICE OMAHA/VALLEY NE)
• Date (343 PM CST MON FEB 21 2011)
• First Bullet Header (* TORNADO WARNING FOR...)
• County Names (DODGE COUNTY)
• Second Bullet (* UNTIL 415 PM CST)
• Cancel/Expire line
• CTA Start Marker (PRECAUTIONARY/PREPAREDNESS ACTIONS...)
• CTA End Marker (&&)
• Polygon Coordinates (LAT...LON 4144 9663 4155 9677 4174 9657 4174 9655
• 4182 9649 4163 9624 4144 9657)
• Time Motion Location (TIME...MOT...LOC 2143Z 225DEG 20KT 4153 9662 )
• Segment Terminator ($$)
B.2.3 Suppress Counties
If a user wants to suppress the part of areas description for an area, such as (NORTH SARPY),
the user can create a file named 'counties.suppress'. The file should be placed in the localized
WarnGen directory (i.e., the same directory where localized template files are placed). Each line
in the file will correspond to a particular county. For example, 'NEC177' is for the Nebraska
county 177. However, if the user only wants to suppress the part of areas NORTH and SOUTH,
the user can add ':ns' to end of the line. The same will hold true if only the user wants to suppress
EAST and WEST with ':ew'.
B.2.4 Wrapping Text
WarnGen has an internal algorithm that will wrap the text. However, the process will also indent
bullet sub-lines (i.e., not the first line of the bullet). A bullet is indicated by the asterisks (*).
There may be a time when a path cast may be too long, and that it will wrap. However, in a
follow-up there are no asterisks. Therefore, a path cast lines, if too long, will not indent.
B.2.5 Adding Bullets
Bullets can be added to WarnGen by editing or creating a site- or user-level .xml configuration
file.
AWIPS II Site Data Configuration & Localization: Step-by-Step Guide (Build 11.9)
Contract DG133W-05-CQ-1067 / DCN AWP.DOC.TOSCAT.LOC-6.00 / 17 October 2011
Use or disclosure of data contained on this sheet is subject to the restriction on the title page of this document. B-18
Look at the <bullets> tag in an existing template. Note that it contains several existing bullets,
and that additional bullets can be added by following the basic pattern <bullet bulletName=”x”
bulletText=”y”> in the proper order.
After the bullet has been successfully added to .cfg file, the associated .vm file must be modified
to take that bullet into account.
B.2.6 Adding “Call To Actions”
When adding a Call To Action statement, Example #4 in this appendix should be followed.
First, check to see if the list containing the bulletName is using an if statement. Insert the text for
the Call To Action on the following line, followed by an empty line. Finally, finish the if
statement with a #end.
B.2.7 Examples
The following VTL examples are taken directly from the severethunderstorm.vm template:
Example #1
#if(${mode}==”test” || ${mode}==”practice”)
TEST...SEVERE THUNDERSTORM WARNING...TEST
#else
SEVERE THUNDERSTORM WARNING
#end
Example #1 is a typical if statement. If the mode is set to test or practice, then “TEST...SEVERE
THUNDERSTORM WARNING...TEST” is printed to the SVR product; otherwise, “SEVERE
THUNDERSTORM WARNING” is printed.
Example #2
${officeLong} HAS ISSUED A
Example #2 will output “THE NATIONAL WEATHER SERVICE IN OMAHA HAS ISSUED
A” if officeLong is set correctly in the com.raytheon.viz.warngen/config.xml.
Example #3
#if(${list.contains($bullets, "doppler")})
#if(${stormType} == "line")
#set ($report = "NATIONAL WEATHER SERVICE DOPPLER RADAR
INDICATED A LINE OF SEVERE THUNDERSTORMS")
#else
#set ($report = "NATIONAL WEATHER SERVICE DOPPLER RADAR
INDICATED A SEVERETHUNDERSTORM")
#end
AWIPS II Site Data Configuration & Localization: Step-by-Step Guide (Build 11.9)
Contract DG133W-05-CQ-1067 / DCN AWP.DOC.TOSCAT.LOC-6.00 / 17 October 2011
Use or disclosure of data contained on this sheet is subject to the restriction on the title page of this document. B-19
#end
Example #3 shows a compound control structure.
If the bullets list sent from WarnGen contains the “doppler” bullet (as indicated by the
bulletName in severethunderstorm.cfg), the inner if statement is reached.
At that point, if the stormType is equal to line, then the report text is set to a message indicating a
line of storms. Otherwise, the report text is set to a message indicating a single storm. Finally,
the first #end completes the stormType if statement, and the second #end completes the
list.contains if statement.
Example #4
#if(${list.contains($bullets, "torWatchRemainsInEffect")})
${testMessage}A TORNADO WATCH REMAINS IN EFFECT FOR THE WARNED AREA.
IF A TORNADO IS SPOTTED... ACT QUICKLY AND MOVE TO A PLACE OF SAFETY
IN A STURDY STRUCTURE...SUCH AS A BASEMENT OR SMALL INTERIOR ROOM.
#end
This example is a typical Call To Action line and should be replicated for any additional Call To
Action lines.
The line beginning with #if determines if the torWatchRemainsInEffect bullet is highlighted in
WarnGen. If it is, the contents of the testMessage variable are printed, followed by the next three
lines of text. The #if statement ends at the #end line.
Example #5
#foreach (${city} in ${pc.points})
#if(${city.roundedDistance} < 3)
## close enough to not need azran, considered OVER the area
${city.name}##
#else
## needs azran information
${city.roundedDistance} MILES #direction(${city.roundedAzimuth}) OF
${city.name}##
#end
#end
This example shows a “foreach” loop.
pc.points is an array of cities affected by the pathcast of the storm. These objects should not be
modified, but they can be used and displayed.
The loop covers the first line until the fine line of the example for each item in the array
pc.points. Each item in this array is temporarily renamed to city when it goes through the rest of
AWIPS II Site Data Configuration & Localization: Step-by-Step Guide (Build 11.9)
Contract DG133W-05-CQ-1067 / DCN AWP.DOC.TOSCAT.LOC-6.00 / 17 October 2011
Use or disclosure of data contained on this sheet is subject to the restriction on the title page of this document. B-20
the template. The #if statement checks if the roundedDistance of the city (which determines how
far the city is from the pathcast) is less than 3 miles. If this is true, the city’s name is printed.
Otherwise, the roundedDistance is printed to indicate in the warning that the storm is
roundedDistance miles in roundedAzimuth direction of the city.
AWIPS II Site Data Configuration & Localization: Step-by-Step Guide (Build 11.9)
Contract DG133W-05-CQ-1067 / DCN AWP.DOC.TOSCAT.LOC-06.00 / 17October 2011
Use or disclosure of data contained on this sheet is subject to the restriction on the title page of this document. C-1
Appendix C. Creating Custom Map Scales
Adding new scales to CAVE can be done without the use of localization scripts. New map
projects are created through the CAVE menu, saved as a CAVE bundle and then copied to the
EDEX server for use. These steps can be used to create a custom map scale, and add it to the
scale dropdown in the D2D perspective of CAVE.
Generally, the following information is needed to create a new map. Use the following as an
information collection guide before continuing. Utilize the Lat/Lon sampling feature on a blank
map to find values for each of the following:
Central Meridian (°) __________________ (East/West)
Latitude Of Origin (°) __________________ (North/South)
Lower Left Corner Latitude (°) __________________
Lower Left Corner Longitude (°) __________________
Upper Right Corner Latitude (°) __________________
Upper Right Corner Longitude (°) __________________
Note: This information can be retrieved from AWIPS I files with the tool maksuparg. Find the
scale file for the customized AWIPS I scale in the /awips/fxa/data/localizationDataSets/XXX
directory. From there, run the command maksuparg FILENAME.sup where FILENAME is the
name of the scale. An example of the expected output follows.
maksuparg regionalScale.sup
maksuparg 3 25.000000 -95.000000 25.000000
l 34.343422 -86.801041 49.222343 -58.918396
l 52.075909 -85.166916 31.691475 -64.714157
x 0.046138 0.173107 -0.761975 -0.635005
o 42.471703 -73.894989 998.277192 998.277192 998.276958 998.276958
o 25.000000 -95.000000 -762.554509 2861.088761 -1066.558964 3165.092723
The key to decoding this is as follows:
• The number after the word maksuparg on the second line dictates the scale. Use the
following table to associate a number to a scale:
Scale Number Scale Name
1
Stereographic
2
Othrographic
3
Lambert Conformal (around 1 SP)
4
Azimuthal Equal Area
5 Gnomonic
• The numbers following the scale number are Latitude of Origin and Central Meridian
respectively.
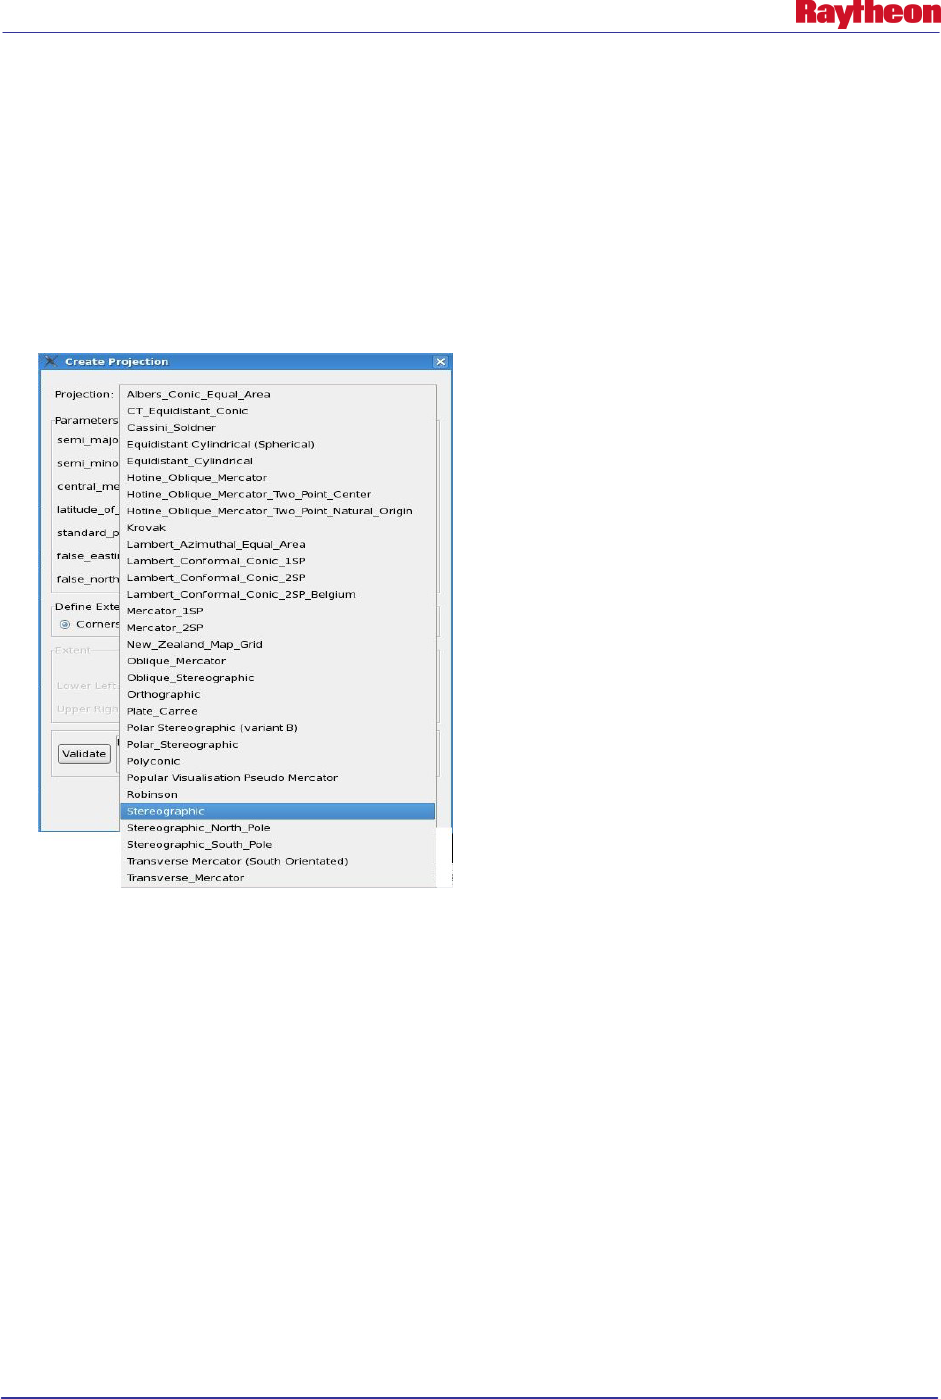
AWIPS II Site Data Configuration & Localization: Step-by-Step Guide (Build 11.9)
Contract DG133W-05-CQ-1067 / DCN AWP.DOC.TOSCAT.LOC-06.00 / 17October 2011
Use or disclosure of data contained on this sheet is subject to the restriction on the title page of this document. C-2
• The numbers on the second line, following the string l, are the coordinates of the lower
lefthand corner (lat lon) and upper righthand corner (lat lon) respectively.
1. With CAVE launched, follow this guide to open the Map Projection GUI:\
CAVE New Map Projection…
2. Select the projection type appropriate for the desired map scale from the drop-down selector
as shown in Example C-1.
Example C-1. Projection Drop Down List
3. Fill in the appropriate information as collected above; then select the Validate button. If
successfully validated, hit the OK button.
Note: If the input boxes for the Lower Left and Upper Right extents are grayed out, or not
editable, try clicking on the radio button for Corners, or pressing the Validate button.
4. If the map is not as desired, repeat steps 1 through 3, changing the input values as necessary
to project the desired map.
5. Once the desired map is projected, save as a CAVE bundle by following these menu
selections:
CAVE → Load/Save Displays → Save Editor Display…
6. Save the file into a temporary location (e.g., /tmp) with a unique file name.
7. Copy the file to an EDEX server into the
${EDEX_CONFIG}/cave_static/site/<XXX>/bundles/scales directory and ensure the proper
permissions:
AWIPS II Site Data Configuration & Localization: Step-by-Step Guide (Build 11.9)
Contract DG133W-05-CQ-1067 / DCN AWP.DOC.TOSCAT.LOC-06.00 / 17October 2011
Use or disclosure of data contained on this sheet is subject to the restriction on the title page of this document. C-3
# scp /tmp/NewMap.xml
$EDEX:${EDEX_CONFIG}/cave_static/site/<XXX>/bundles/scales
# ssh root@$EDEX
# chown –R awips:fxalpha
${EDEX_CONFIG}/cave_static/site/<XXX>/bundles/scales
# chmod –R 775 ${EDEX_CONFIG}/cave_static/site/<XXX>/bundles/scales
8. While logged into the EDEX server from previous step, edit the scalesInfo.xml using vi.
Follow the syntax of a file to add a new <mapScale> tag just below the </mapScales> final
tag as seen below:
# vi
${EDEX_CONFIG}/cave_static/site/<XXX>/bundles/scales/scaleInfo.xml
<mapScales>
<mapScale displayName=”N. Hemisphere” fileName=”NHemisphere.xml”>
<partId id=”com.raytheon.uf.viz.d2d.ui.map.SideView:sideView1”/>
</mapScale>
<mapScale displayName=”North American” fileName=”NorthAmerican.xml”>
<partId id=”com.raytheon.uf.viz.d2d.ui.map.SideView:sideView2”/>
</mapScale>
<mapScale displayName=”CONUS” fileName=”CONUS.xml”>
<partId id=”com.raytheon.uf.viz.d2d.ui.map.glmap.GLMapEditor”/>
</mapScale>
<mapScale displayName=”Regional” fileName=”Regional.xml”>
<partId id=”com.raytheon.uf.viz.d2d.ui.map.SideView:sideView3”/>
</mapScale>
<mapScale displayName=”State(s)” fileName=”States.xml”>
<partId id=”com.raytheon.uf.viz.d2d.ui.map.SideView:sideView4”/>
</mapScale>
<mapScale displayName=”WFO” fileName=”WFO.xml”>
</mapScale>
<mapScale displayName=”NewMap” fileName=”NewMap.xml”>
</mapScale>
</mapScales>
9. Save and exit when finished editing the file:
# :wq!
10. Restarting CAVE is necessary to see the new map projection in the map selector dropdown.

AWIPS II Site Data Configuration & Localization: Step-by-Step Guide (Build 11.9)
Contract DG133W-05-CQ-1067 / DCN AWP.DOC.TOSCAT.LOC-06.00 / 17 October 2011
Use or disclosure of data contained on this sheet is subject to the restriction on the title page of this document. D-1
Appendix D. Adding Grid Information
Part 1. Grid Parameter Definition
AWIPS II attempts to organize grid parameter definitions in the following way:
Grib 1 Format:
1. Center
2. Subcenter
3. Parameter Table Version
4. Parameter number
Grib 2 Format:
1. Center
2. Subcenter
3. Meteorological Discipline
4. Category (varies by discipline)
5. Parameter number (varies by category)
AWIPS II attempts to have as many parameters defined as possible. This step can be skipped at
first to test just getting the model into the system.
The grib 2 parameters are stored in the localization hierarchy of
/awips2/edex/data/utility/edex_static/base/grib/tables
The hierarchy is laid out according to center and subcenter. So, the path would be
/awips2/edex/data/utility/edex_static/base/grib/tables/center/subcente
r/parameter.table
According to the Grib 2 specification, parameter numbers below 192 are standard parameters.
Parameter numbers above 192 are reserved for local use, meaning the center/subcenter may
define these to be whatever they wish them to be.
The -1 center om the tables directory contains the standard parameters.
Upon startup, these tables are read and cached for quick access by the grib decoder. The grib 2
decoder keys directly into these tables and determines the parameter information directly. The
grib 1 decoder requires several intermediate steps for transforming the grib 1 table version and
parameter number into the corresponding grib 2 discipline, category, and number. Sometimes,
centers may reuse other centers' parameter lookup tables. For example, center 74 actually uses
center 7's parameter lookup table. A file called grib1ParamTableMap provides a mapping for
centers that reuse other centers’ lookup tables. After the appropriate center/subcenter/table
version is determined, the corresponding discipline, category, and parameter number are
retrieved from another mapping file. The conversions are listed in a file called
grib1ParameterConvTable.xml. These mappings correspond to the grib1->grib2 parameter

AWIPS II Site Data Configuration & Localization: Step-by-Step Guide (Build 11.9)
Contract DG133W-05-CQ-1067 / DCN AWP.DOC.TOSCAT.LOC-06.00 / 17 October 2011
Use or disclosure of data contained on this sheet is subject to the restriction on the title page of this document. D-2
mappings found here:
http://www.nco.ncep.noaa.gov/pmb/docs/grib2/GRIB2_parmeter_conversion_table.html. Several
mappings were also added to this core set to accommodate additional data from other centers and
subcenters. The file, in AWIPS II, is located in
/awips2/edex/data/utility/common_static/base/grid
Additionally, AWIPS I overrides some abbreviations for several parameters. If an AWIPS
parameter abbreviation is provided, that abbreviation will be used instead of the abbreviation
provided by the center/subcenter. AWIPS I also goes a step further in renaming some
parameters. Two files, master_grib1_lookup.txt and master_grib2_lookup.txt, use the center,
subcenter, generating process, and spatial information to transform the parameters further.
Part 2. Geospatial Information
Both grib 1 and grib 2 provide geospatial information in the GDS section of the raw grib file.
This information defines the projection of the data and where it is located on a map. A series of
XML files define the known projections and geospatial information for the grib information
which the AWIPS II system ingests. The following is the location for the baseline definition
files:
/awips2/edex/data/utility/edex_static/base/grib/grids
Check here to see if the grid you are ingesting already has geospatial information defined. For
example, if you are ingesting the ETA/NAM past 60 hours, the geospatial information has
already been defined.
Site specific files will need to be created in:
/awips2/edex/data/utility/edex_static/site/LLL/grib/grids
How do I get my geospatial information?
There are two ways you can get this information. Either through the wgrib program, which is not
covered in this guide, or by dropping one piece of the raw grib file into
/awips2/edex/data/manual.
Here is some of the information you will need to get and record for creating a geospatial xml file:
PROJECTION (lamber conformal, polar stereographic, etc)
LA1
LO1
FIRST GRID POINT CENTER
NX
NY
DX
DY
SPACING UNITS
LOV
AWIPS II Site Data Configuration & Localization: Step-by-Step Guide (Build 11.9)
Contract DG133W-05-CQ-1067 / DCN AWP.DOC.TOSCAT.LOC-06.00 / 17 October 2011
Use or disclosure of data contained on this sheet is subject to the restriction on the title page of this document. D-3
LATIN1
LATIN2
Part 3. Grid Definition
The final step is to define the model information. This information is contained with the
gribModels.xml file which resides in the following location:
/awips2/edex/data/utility/common_static/base/grid/
This file is analogous to the gridSourceTable.template in AWIPS I. An example of one of the
entries in this file follows.
<model>
<title>RUC40</title>
<name>RUC236</name>
<center>7</center>
<subcenter>0</subcenter>
<grid>236</grid>
<process>
<id>105</id>
</process>
<paramInfo>ruc236</paramInfo>
<dt>1</dt>
</model>
Note that the <grid> tag in this file references back to the <name> tag in the geospatial
definition file.
Table D-1 provides descriptions of the fields from the gribModels.xml file.
Table D-1. Important XML Definitions in a grib model definition .xml
XML Tag Description
<model>
Beginning of grid information section
<title>
Title of model - does NOT have to be unique
<name>
Name of model - must be UNIQUE
<center>
<subcenter>
<grid>
Grid - specified by the <name> tag of a grid definition file
<process>
List of generating process
<id>
ID of generating process
<dt> The time step of the model in hours
To create this file, follow these steps:
1. Navigate to the directory in which these files are housed. This should be a site level
directory, in the following location:
/awips2/edex/data/utility/common_static/site/LLL/grid/

AWIPS II Site Data Configuration & Localization: Step-by-Step Guide (Build 11.9)
Contract DG133W-05-CQ-1067 / DCN AWP.DOC.TOSCAT.LOC-06.00 / 17 October 2011
Use or disclosure of data contained on this sheet is subject to the restriction on the title page of this document. D-4
2. Create the file, and add in the appropriate information. The following is an example
which comes from the above HRRR example. Remember to choose a name of the file
that is representative of the model:
vi HRRR.xml
<?xml version="1.0" encoding="UTF-8"?>
<gribModelSet>
<model>
<title>HRRR</title>
<name>HRRR</name>
<center>59</center>
<subcenter>0</subcenter>
<grid>9001</grid>
<process>
<id>125</id>
</process>
<dt>1</dt>
</model>
</gribModelSet>
NOTE: The <grid> MUST match the <name> field in the geospatial information xml.
The rest of the information comes from the steps gathered above. <dt> is the time step of
the model in hours. For example, the normal ETA is in 6-hr steps. RUC is 1 hr.
3. Ensure the proper ownership and permissions.
