Access 2016 In Practice Guided Project 1 2 Instructions AC2016
User Manual:
Open the PDF directly: View PDF ![]() .
.
Page Count: 6
Data
Type
Fi
eld
Name
I
Short
Text
Address
Short
Text
City
Short
Text
l State
Short
Text
ZIPCotle
Hype
rli
nk
Emai!Address
Short
Text
CellPhoneNumber
USING MICROSOFT ACCESS 2016 Guided Project 1-2
Guided Project 1-2
American River Cycling Club is a local cycling club. For this project, you create a database, containing one table, to store
information about club members. After creating the database, add fields into the table, edit field properties, enter records,
modify the datasheet layout, import data and sort and filter the data in the table. This project has been modified for use
in SIMnet®.
Skills Covered in This Project
• Create a table. • Enter records.
• Edit the default primary key. • Change the datasheet layout.
• Add a new field into a table. • Import records.
• Edit properties in Datasheet view. • Sort data in a table.
• Save a table. • Filter data in a table.
IMPORTANT: Download the resource file(s) needed for this project from the Resources link. Make sure to extract the
file(s) after downloading the resources zipped folder. Please visit the SIMnet instant help for step-by-step instructions.
Step 1:
Download
start file
1. Open the AC2016-GuidedProject-1-2 database start file.
a. Enable content in the security warning.
b. The file will be renamed automatically to include your name. Change the project file name if
directed to do so by your instructor.
c. Click the Table button [Create tab, Tables group] to create a new table. A new table opens
in Datasheet view.
2. Edit the default primary key and add new fields into the table.
a. Double-click the cell containing the ID field name (column header).
b. Type MemberID in the Field name and press the Enter key. The Click to Add column to the
right is selected so you can add the next field into the table.
c. Select the Short Text data type for this new field.
d. Type FirstName in the Field1 column header and press the Enter key.
e. Select the Short Text data type.
f. Type LastName in the Field1 column header and press the Enter key.
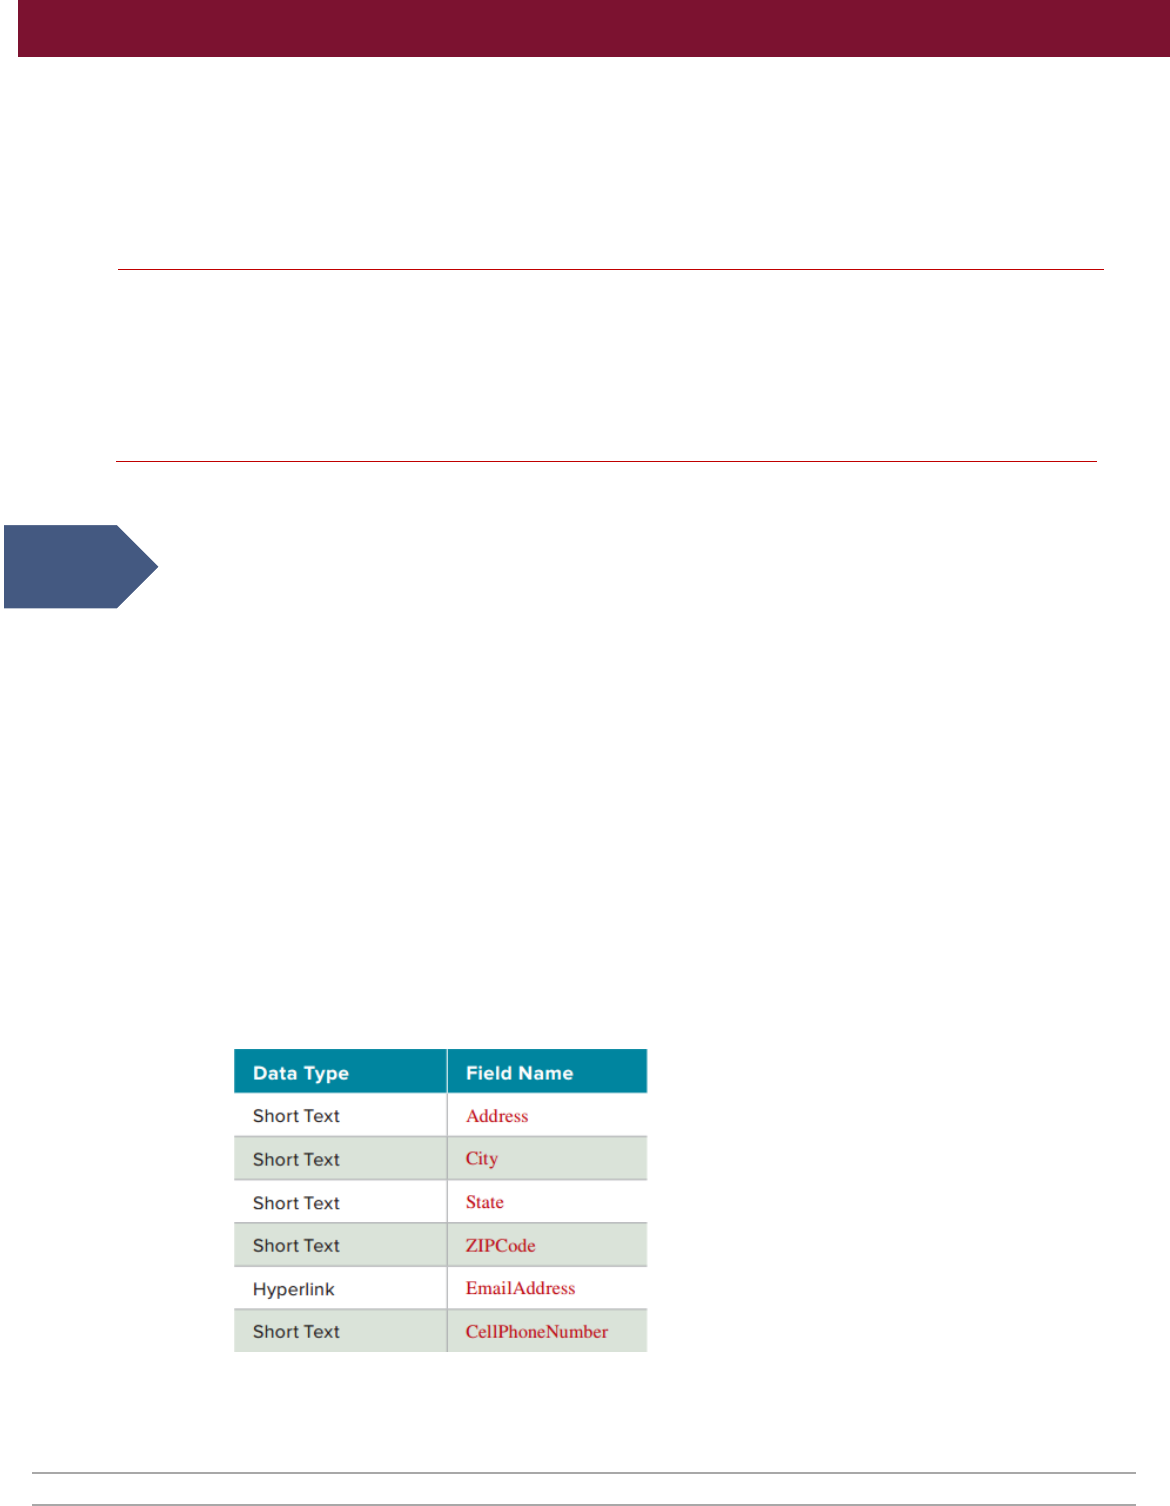
g. Add the remaining fields into the table using the information in the nearby table. Remember
that you select the data type first and then enter the field name. After you enter the last field
name, CellPhoneNumber, press the down arrow key to remain in that column.
h. Press Ctrl+S to save all of the modifications you have made to the table.
i. Type Members as the new table name.
j. Click OK.
Access 2016 Chapter 1 Creating a Database and Tables Last Updated: 12/29/17 Page 1
Last Name 25
Address
45
C
ity
25
State 2
ZIIPCode ZIP 5
Email
Address
Em
ail N/A
CellP
honeNu
mber
Cell
Pho
ne
12
USING MICROSOFT ACCESS 2016 Guided Project 1-2
3. Edit the field properties of the Members table.
a. Click the MemberID field name.
b. Click the Name & Caption button [Table Tools Fields tab, Properties group].
c. Type Member ID
in the Caption property. Because the field names in this table provide
a clear description of the content, it is not necessary to enter anything into the
Description property.
d. Click OK.
e. Select the FirstName field name.
f. Click the Name & Caption button [Table Tools Fields tab, Properties group].
g. Type First Name
in the Caption property.
h. Click OK.
i. Type 20
in the Field Size property [Table Tools Fields tab, Properties group].
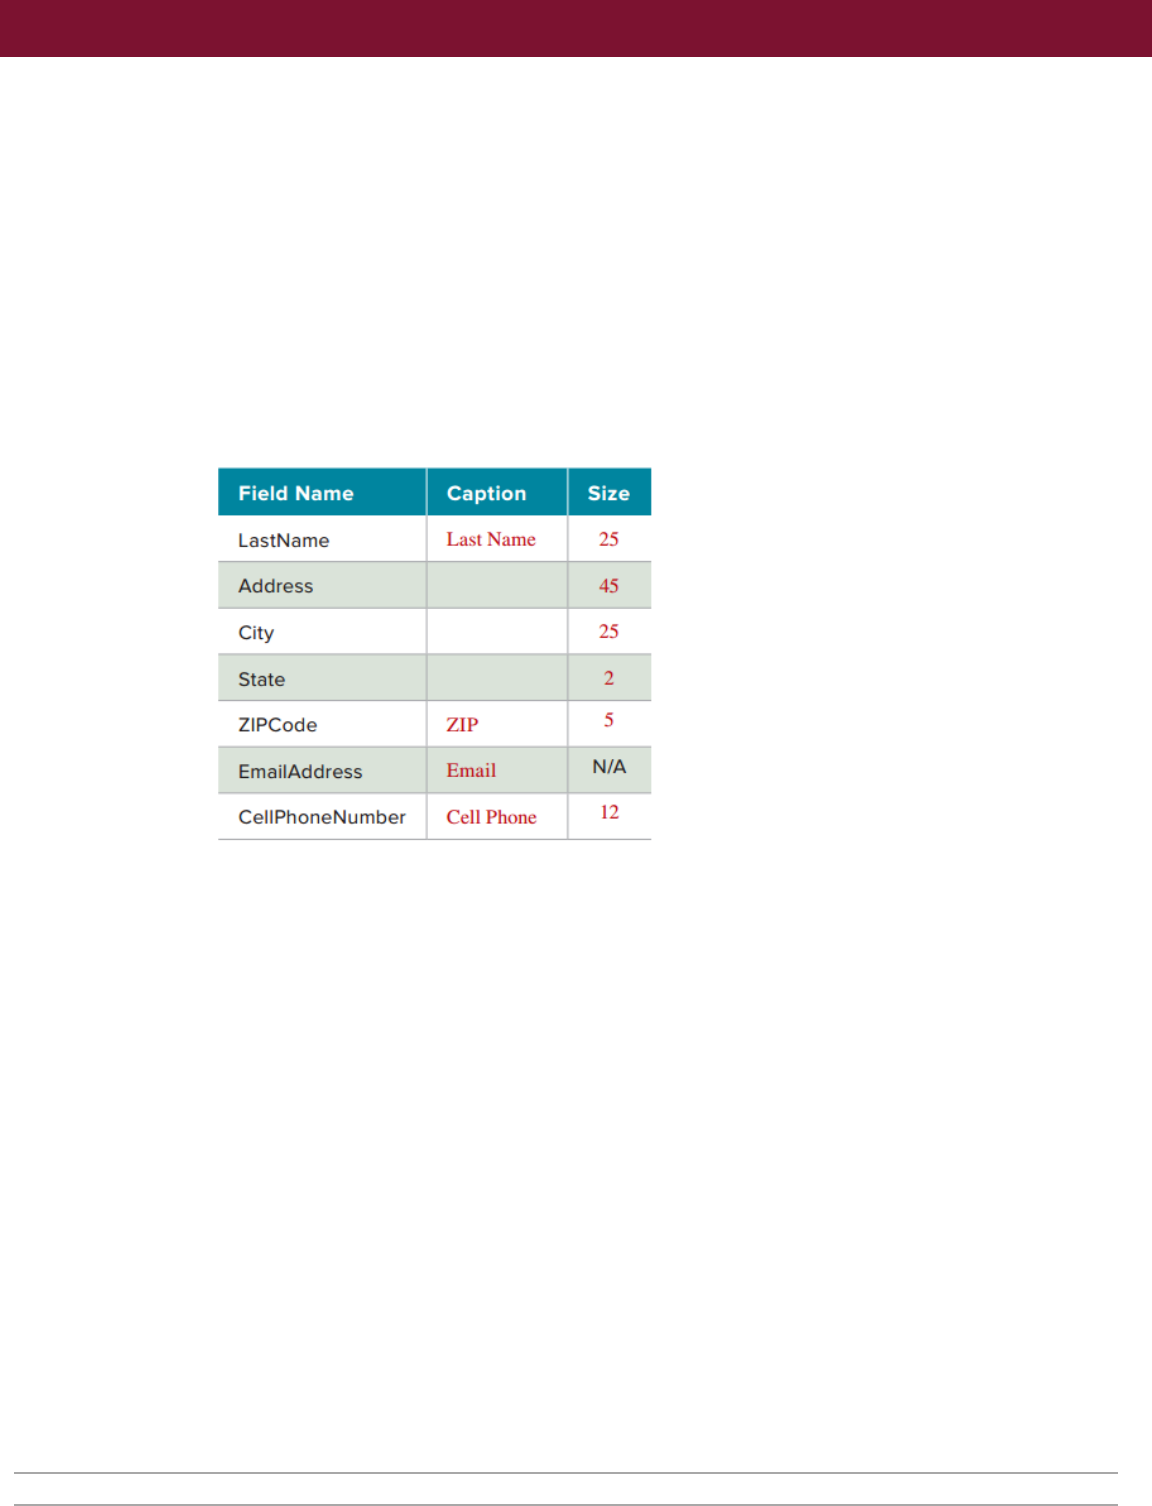
j. Change the remaining field properties in the table using the following information:
k. Click the Save button to save the changes to the table. With the changes to the field
properties saved, the table is ready for you to begin to enter data records. Remember that
even though you have changed the caption that displays as the column header in
Datasheet view, the field names have not changed.
4. Enter the member records into the Members table.
a. Click the FirstName cell in the append row.
b. Type Geneva. The Pencil icon displays, indicating that this record has not yet been saved.
c. Press the Tab key to move to the next field.
d. Type Lingle
in the LastName field. Press the Tab key to move to the next field.
e. Type 1850 Stoneridge Court
in the Address field. Press the Tab key.
f. Type Cameron Park
in the City field. Press the Tab key.
g. Type CA
in the
State
field. Press the Tab
key.
h.
Type
95682
in the
ZIPCode
field. Press the Tab
key.
i.
Type
glingle@gmail.com
in the
EmailAddress
field.
Press the Tab
key.
j.
Type
780-886-6625
in the
CellPhoneNumber
field.
Press the Tab
key. The Pencil icon no longer
displays. You
move to the
MemberID
field in the
append row.
Access 2016 Chapter 1 Creating a Database and Tables Last Updated: 12/29/17 Page 2
FirstName
hiiifi::·IP
·
ffiiiii-lllmFJiM/1
EmailAddress
CellPhoneNumber
Cheryl Wilson 7105 High Folsom CA 95630 cwilson@mcc.com 916-451-8325
Street I I I I
Ryan Thomas 2227 Auburn CA 95602 rthomas@gmail.com 916-753-5586
Alexandra
Drive
Roy l
"""'"
705 First Rocklin CA [ 95677 [
my
@
<001<at
,;,m.,om • 780-886-2471
Street
USING MICROSOFT ACCESS 2016 Guided Project 1-2
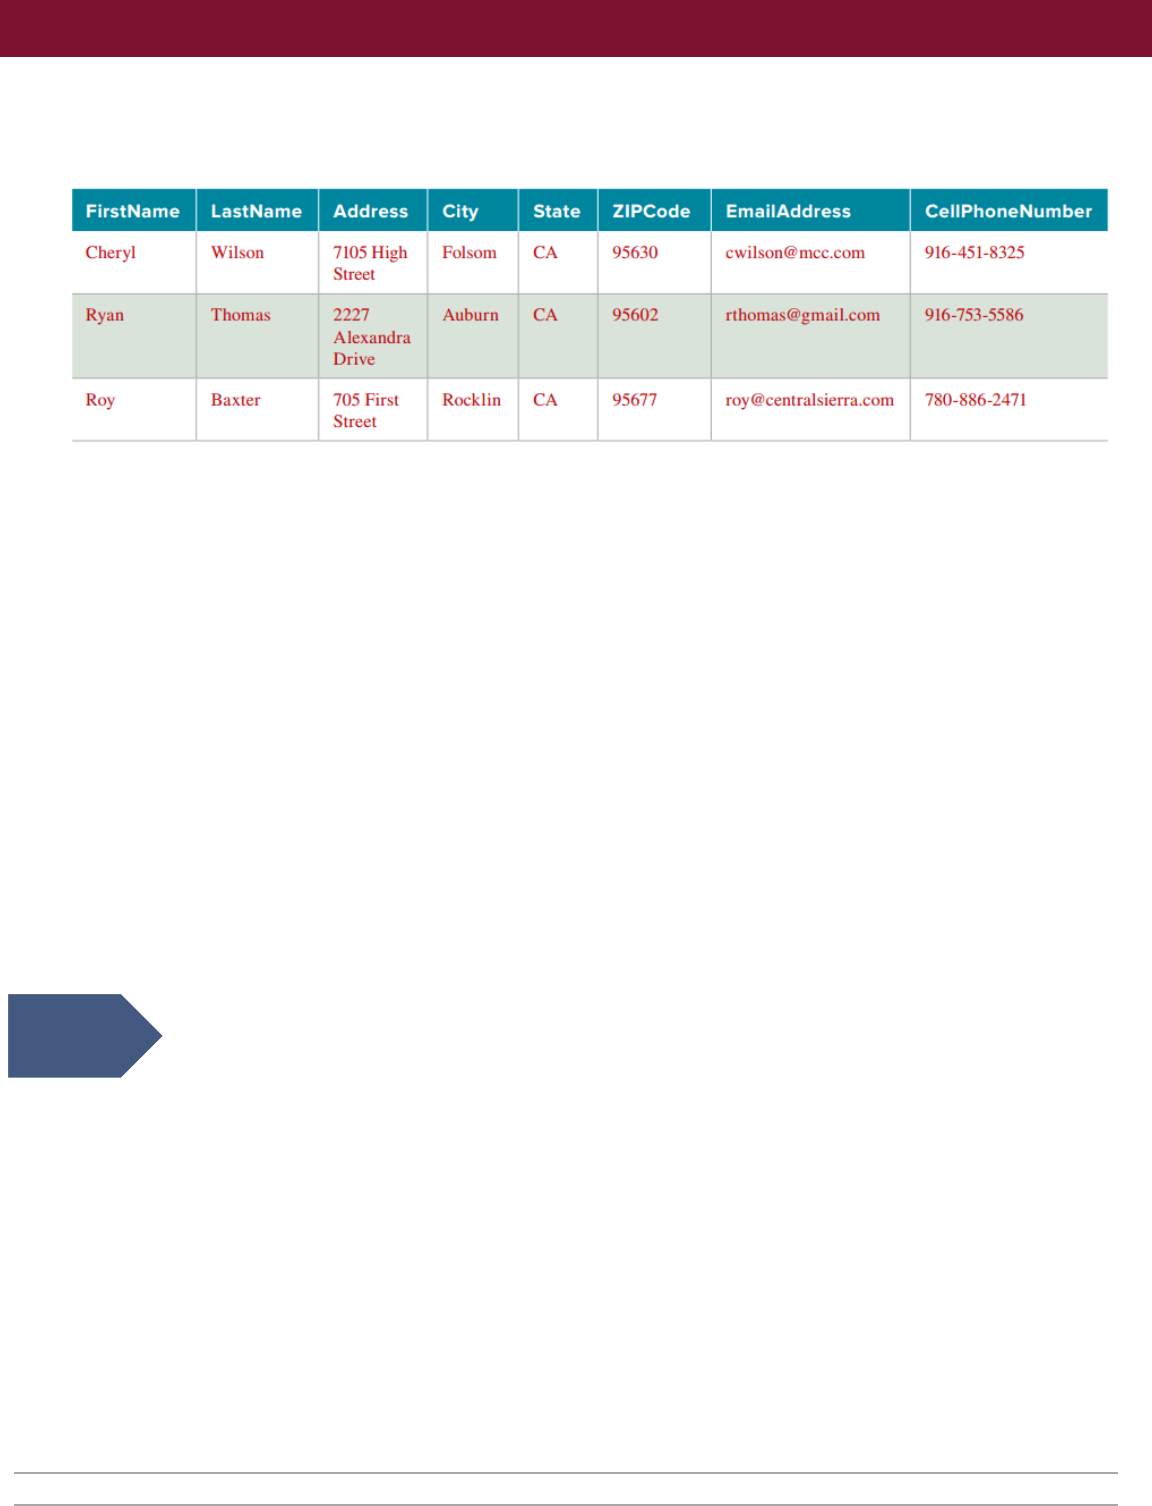
k. Tab to the next field. Enter the following information into the Members table. Remember that
after you tab out of the CellPhoneNumber field you move to the MemberID field. Since that
is an AutoNumber field, do not enter a value and simply tab to the next field.
5. Change the layout of the Members table.
a. Click to select the ZIP column.
b. Right-click to open the context menu.
c. Select Field Width.
d. Type 7
in the Column Width cell.
e. Click OK to close the dialog box.
f. Click the Center Alignment button [Home tab, Text Formatting group].
g. Click to select the State column.
h. Place your pointer on the right border of the State field name.
i. Double-click the resize arrow to adjust the Field Width using AutoFit.
j. Click the Center Alignment button.
k. Click the Alternate Row Color drop-down list [Home tab, Text Formatting group] and select
Blue-Gray, Text 2, Lighter 80% (fourth column, second row in the Theme Colors category).
l. Press Ctrl+S to save the changes to the layout.
m. Close the Members table by clicking the X in the right corner.
6. Import data from Excel into the Members table.
a. Click the Excel button [External Data tab, Import & Link group] to launch the Get External
Data – Excel Spreadsheet dialog box.
b.
c.
d.
Click the Browse button to launch the File Open dialog box.
Locate and select the MembersDataFile-01 Excel file. (Downloaded from the Resources link.)
Click the Open button. The File Open dialog box closes.
e. Select the Append a copy of the records to the table radio button.
f. Click the drop-down arrow in the table name box and select the Members table if needed.
g. Click OK to launch the Import Spreadsheet Wizard. The data records should display in the
Import Spreadsheet Wizard window.
h. Click the Next button to advance to the next page of the Import Spreadsheet Wizard.
i. Verify that the Import to Table box contains the Members table.
j. Click Finish.
k. Click the Close button.
Download
resources
Access 2016 Chapter 1 Creating a Database and Tables Last Updated: 12/29/17 Page 3
;!!I Membets
"--
-----~----~---------~---------------~
•
Member
ID • IFirst Name • Last Name · ' Address • City • I State • ZI
IP
• Email • Cell Phorie •
g
Ge
neva Lingle 1.850
S1
one
rlclJ
C.a
meron
Pa
rle
CA
95682 gllngle@gmal 780-886-6625
J~ 2 Cheryl Wilsori 7105
Hi
gh Stn Folsom
CA
95630
cwi
lson@mcc.. 916-451-8325
I
r
I
*
3 Ryirn
4
Roy
5 Margaret
6 Rick
7
Melan
ie
8 Sue
g,
Ke
lsey
10 Rick
11 Kareri
12 Robyn
13 John
14 Randy
(New)
Thomas
Baxter
Jepsor;i
OePont@
Figueroa
Schooler
Kro'II
Hermer;in
Graves
Cons'ilantini
Burgess
Otemrnins
Recor
d: H l
of
14 • •1
"'
I
~
No Finer I
S<!,arch
2227
Al'
@xarid1
Aubum
7
05
IIFlrst
51if
,
eE
Rocklin
28861 Newca!
fa
ir Oaks
8364
Marsha'
II
Rosevill'e
4511
Johnson
Cameron
P:ark
4183 Braxton Rocklin
306
7th
Street
Roseville
9035 Masi
Ori
F
air
Oaks
6003 Ashl
and
Lincoln
9581
Magnoli; Roseville
8S741
A.u'ben1
Roseville
7336 Le
ster
R,
A.u
'
bum
1
II
• I
CA
CA
CA
CA
CA
CA
CA
CA
CA
CA
CA
CA
95602
rthomas@gm,
916-753-5586
95677 roy@centralsi 780-886-
24
71
95628 margaret@sa.l 780-862-9851
95661
deponte@hott
916-450-3329
95682
mfig
ueroa@pl 916-450-3336
9S677 sschooler@gn 780·824-3525
95661 kkroll@hotma 780-88,6-
2457
95628
rickh@gmail.c
916-450-67
19
95648 kgrnves@phre 916-450-3892
95661 rob.yn@gmail. 780-886-
2471
9566 ' jbu
rge
ss@h
ot
780
·88,6-
5862
95602 rdemmins@pl 916-450.3330
I
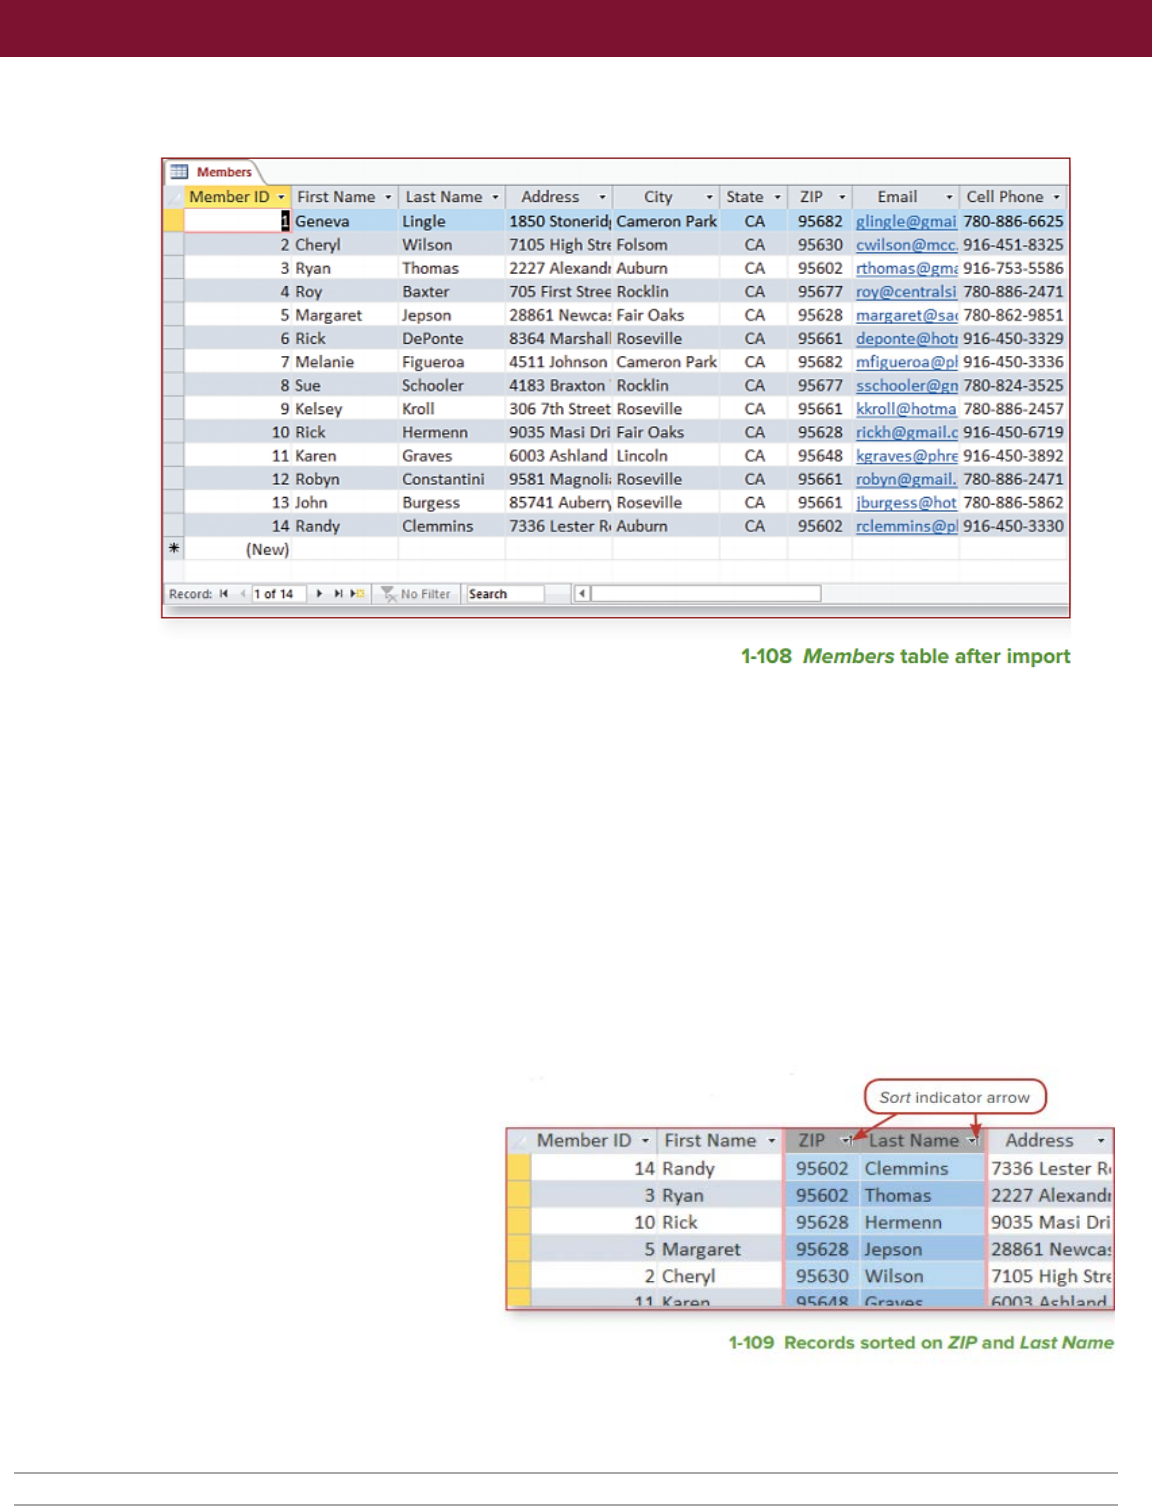
1-108
Members
table
after
import
Member
ID
• Fi
rst
Name
• Address
14
Randy
95
6
02
Clem
m
ins
7336
Lester
R1
3 Ryan
95602
Thom
as
2227
Alexandr
10
Rick
95628
He
rme
nn
9035
Mas
i D
ri
5
Margaret
95628
Jepson
28861
Newca!
2 Cheryl
956
30
Wils
on
7105
Hi
ghS
t
rE
1. 1
l(e,ron
Qt;:hJIR
r:..-!:!i,
.1
.0.
e
,:;nn-=t
Achl<>nrl
1-109
Records
sorted
on
ZIP
and
Last
Name
USING MICROSOFT ACCESS 2016 Guided Project 1-2
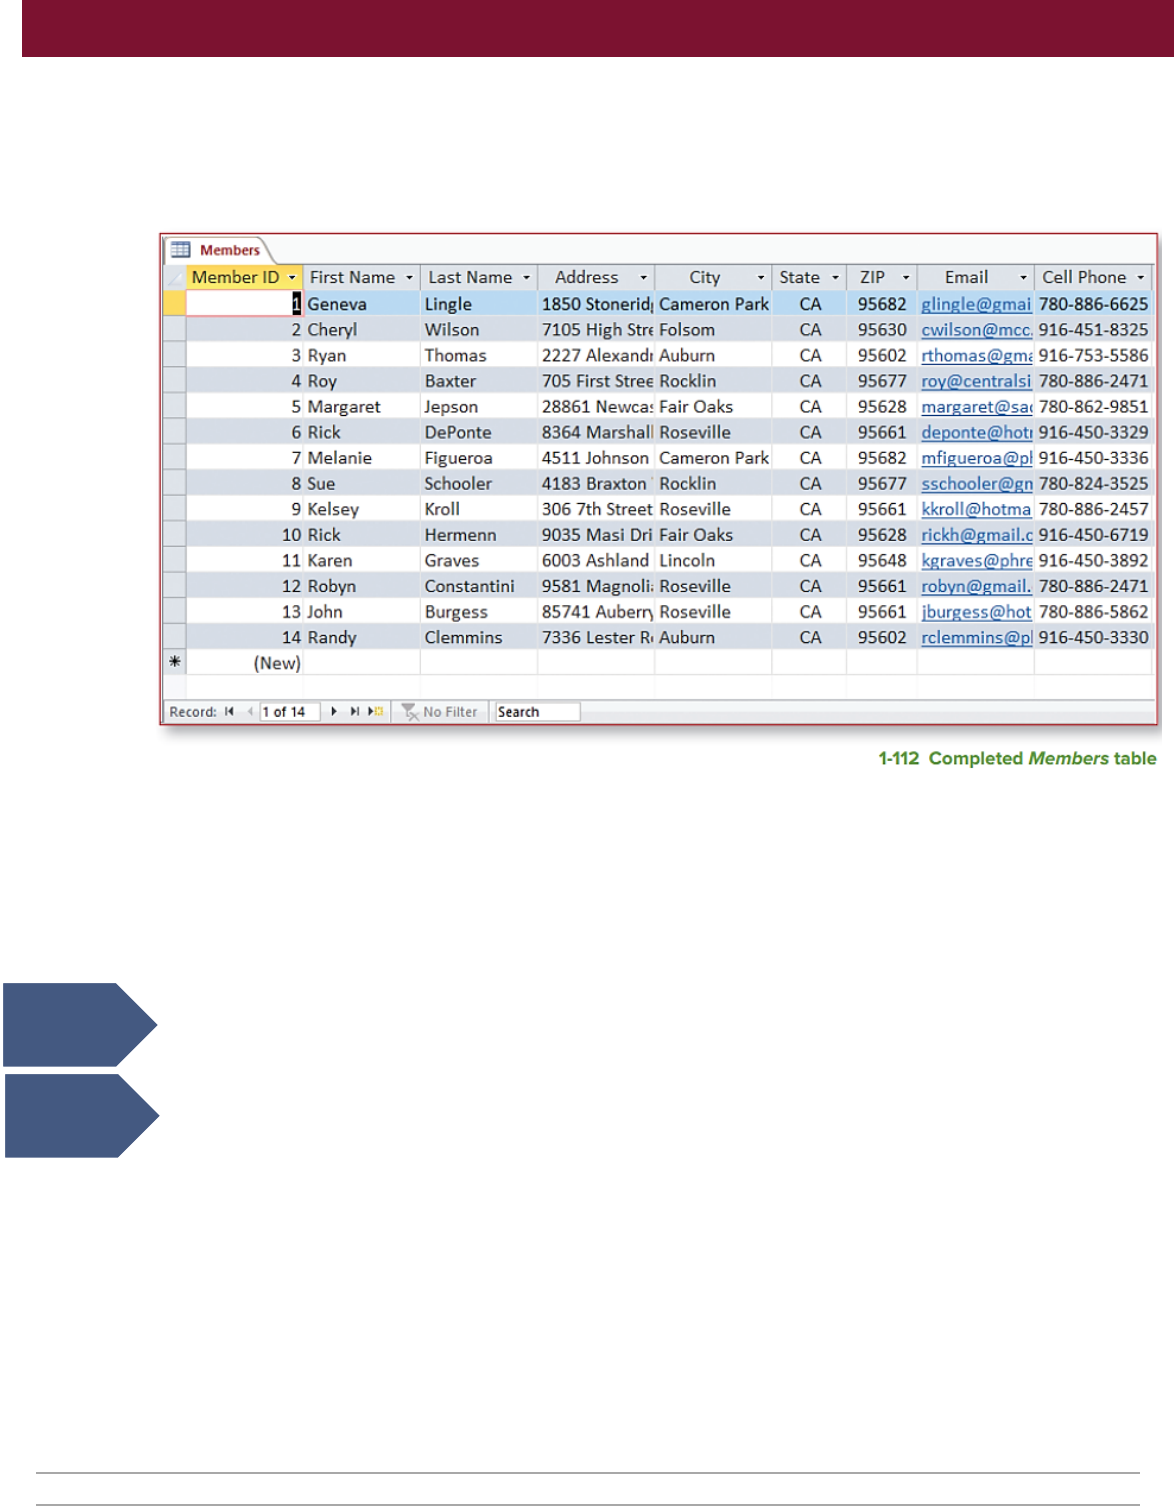
7. Open the Members table in Datasheet view. Your table should contain the 14 records shown in
Figure 1-108.
8. Sort the Members table.
a. Click the drop-down arrow to the right of the City field name.
b. Select Sort A to Z on the drop-down list. The records display in ascending order by the City
field.
c. Click the Remove Sort button [Home tab, Sort & Filter group] to remove the sort criteria.
d. Click to select the ZIP column.
e. Click, hold, and drag the pointer to move the ZIP column to the left of the Last Name
column.
f. Click anywhere to deselect the ZIP column.
g. Click and hold the pointer over the ZIP column. With the selection pointer still displayed, drag
the pointer to the Last Name column. Release the pointer.
h. Click the Ascending button [Home tab, Sort & Filter group]. The records display in ascending
order by the ZIP column. In cases of the same ZIP code, the records are sorted in ascending
order by the last name.
Your table should look
similar to Figure 1-109.
i. Click the Remove Sort
button [Home tab, Sort &
Filter group] to remove the
sort criteria.
j. Move the ZIP column to
the right of the State
column.
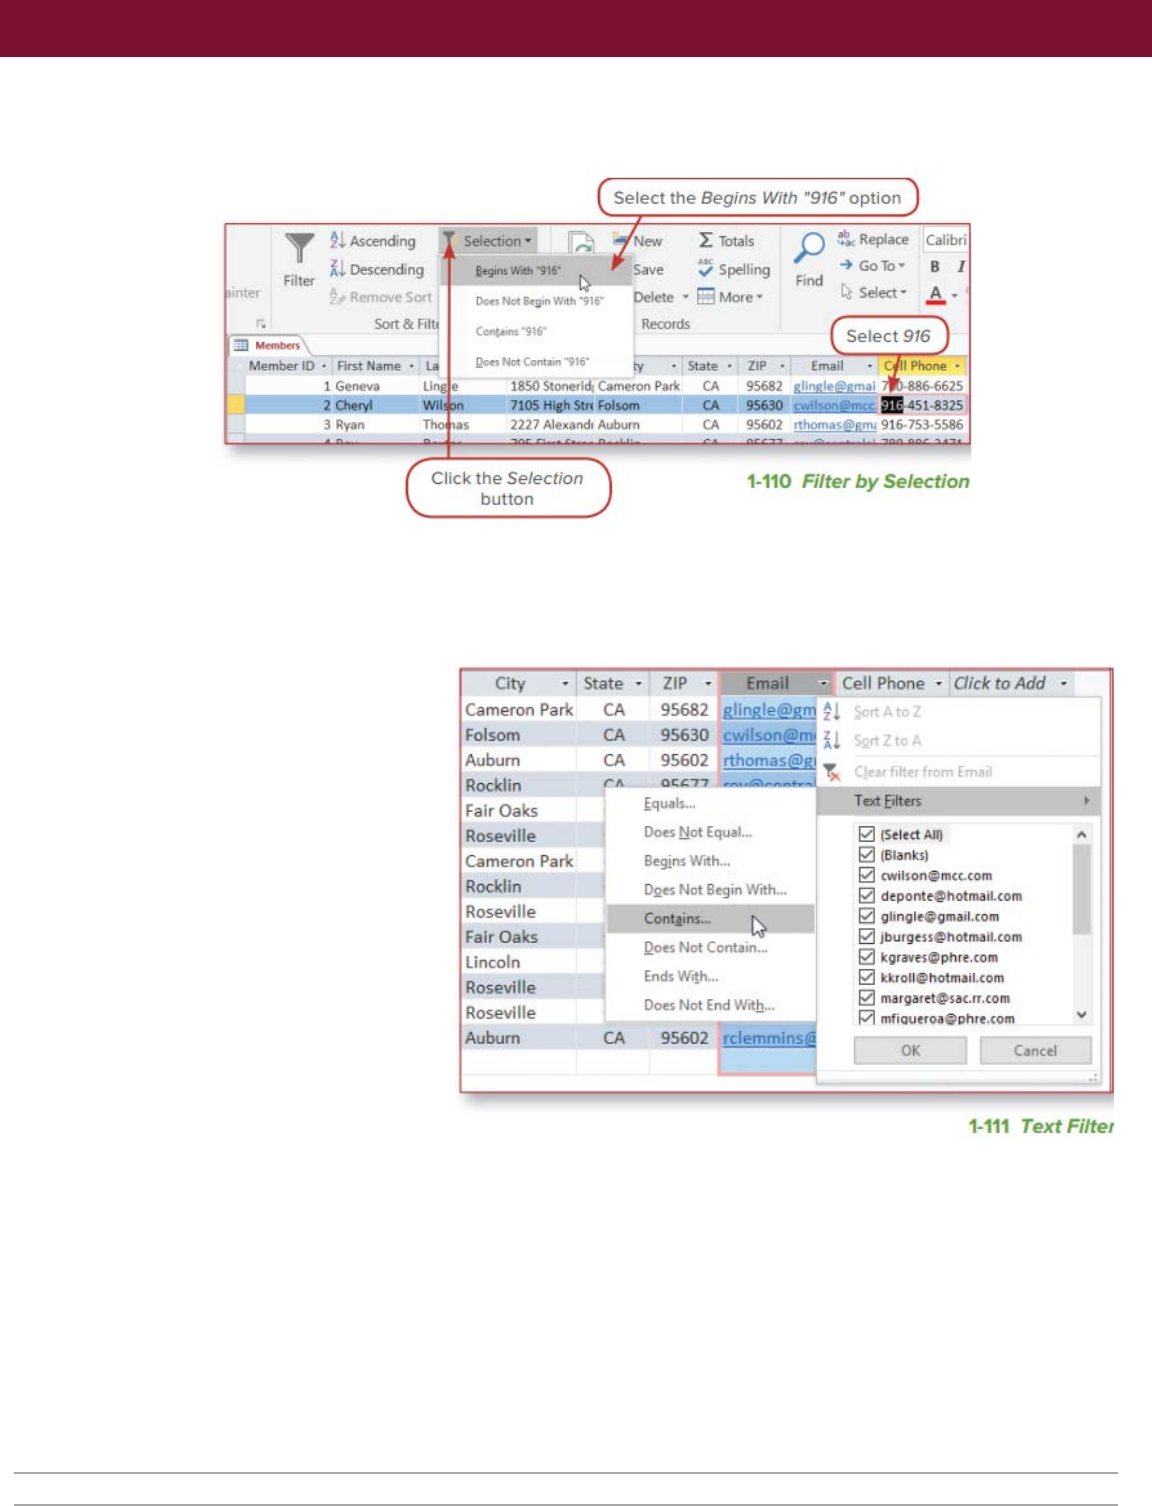
9. Filter the Members table using
Filter by Selection.
a. Select 916 in the Cell Phone cell for Member ID 2.
b. Click the Selection button [Home tab, Sort & Filter group].
Access 2016 Chapter 1 Creating a Database and Tables Last Updated: 12/29/17 Page 4
inter
T U
Ase.ending
Uoestendng
Filie.-
Son:&
ri1
:J
Momb<f•
Membe.-lD •
1
G@neva.
2
C1i@ryl
3
Ryan
SelKtJon •
ew
:I
Totals
:,
Spelling
D lcte • Mote •
(Gnf,,
916
Remrds
Qor> Ni,t Coot•RI
~16"
ty
1850
5tcmetlcl,i
Cameror>
l'ar
7105
High
SW
Folsom
222 7 Ale~
nd1
Auburn
State
CA
CA
CA
ZlP
•
95682
95630
95602
p
Find
at
Replace
-+
GoTo•
~
Select·
Calibri
8 I
.A
·
Select916
Email - C
II
Phone •
gli')J!le@'fill:!L 6-6625
,,..,, ~51-8325
rthom,n@gm~ 916-753-
SS86
Cilek
the
Selection
button
1-110
Filter
by
Selection
City .
Sae
.
ZIP
. Cell
Phone
. OicktoAdd
Cam
ero
n Park
CA
95682
Fol.som CA 95630
lt
Auburn
CA 95602 r r
r'l
EIT'
I
Rocklin
rll
O<;.t;T7
Fair
Oaks
fquals
... T
ext
f.ilteri
Roseville Does
Not
Equ.al..
121
IS~
l!t'IAIQ
Cameron
Park Begins
W,
h .. , 0 IBla
nlo)
Roe
lin
121
,;w
il~on@mcu,;,m
Dg~
Not
Begin With ...
121
deponl~hotmai
l.
~om
Roseville
Con
t,!ins
...
0 gli
ng
l,@gmail,com
Fair
Oaks
121
Jtlurgm
notmalUom
Linco
ln
~oes
Not
Contain,~ 0
lc"
raves@phre.com
Roseville End$ W,th .. ,
121
kkroll@tiOtni~iLtom
Do~
Not End With.,,
~
m.argare
,t sac.rr.tom
.Rosevllle
Pl
mfiQu~,o~@phre
.t
o111
Auburn CA 95602 rc.lemmlns@
OK
Canc~l
.
,.
I
"
1-111
Text Filter
USING MICROSOFT ACCESS 2016 Guided Project 1-2
c. Select Begins with “916” from the drop-down list (Figure 1-110). The datasheet should display
only the seven members who have a cell phone area code of 916.
d. Click the drop-down arrow to the right of the Cell Phone field name.
e. Select Clear filter from Cell Phone to remove the filter.
10. Filter the datasheet using a Text Filter.
a. Click the drop-down arrow to the right of the Email field name.
b. Select Text Filters on
the drop-down list and
select Contains from
the second drop-
down list (Figure 1-
111). Notice in Figure
1-111 that the second
drop-down list displays
to the left. The exact
position varies based
on the width of your
screen and location of
the Access window.
c. Type gmail in the Email
contains box.
d. Click OK. The
datasheet should
display only the five members who have gmail as part of their email addresses.
e. Click the Toggle Filter button [Home tab, Sort & Filter group] to switch back to viewing all the
records.
f. Click the Toggle Filter button again to switch back to the filtered records.
g. Click the drop-down arrow to the right of the Email field name.
h. Select Clear filter from Email to remove the filter.
11. Close the Members table by clicking the X in the right corner. Select the No button in the dialog
box. Do not save any of the changes made to the table.
Access 2016 Chapter 1 Creating a Database and Tables Last Updated: 12/29/17 Page 5
~
M
em
ber
s
Member ID •
Fi
rst Name • Last Name •
Geneva
l
f-
----
--
*
2
Ch
eryl
3
Ry
an
4
Roy
5 M argaret
6 Rick
7 M elanie
8
Sue
9 Kelsey
10 Rick
11
Ka
ren
12 Robyn
13
Jo
hn
14
Ra
ndy
(New)
Lingle
Wil
son
Thomas
Baxter
Jep
so
n
DePonte
Figueroa
Schooler
Kroll
Hermenn
Graves
Co
nstantini
Burgess
Cliemmins
Address Ci
ty
• State •
1850 Stoneridt Cameron Park
CA
7105 High Stn Folsom
2227 Ale
xa
nd
r Auburn
705
Fi
rst
St
re
e
Rock
lin
28861
New
ca
! Fair Oaks
8364 Mars
ha
ll Roseville
45
11
Jo
hns
on
Cameron
Pa
rk
4183 Bra
xt
on
Rocklin
306 7th St reet Roseville
90
3S
Masi
Or
i Fair Oaks
6003
As
hla
nd
Li
nc
oln
95
81 Magnoli,
Ro
se
ville
857
41
Auber
ri
Roseville
73
36 Lester R, Auburn
CA
CA
CA
CA
CA
CA
CA
CA
CA
CA
CA
CA
CA
ZIP • Email • Cell Phone •
95682 gllngle@gmai 780-886-662S
95630 cwilson@mcc. 916-451-8325
9S602 rthomas@gm, 916-7S3-S586
95677 roy@centralsi 780-886-2471
95628 margaret@sa< 780-862-9851
95661 deponte@hotr 916-450-3329
95682 mf igueroa@pl 916-450-3336
95677 sschooler@gn 780-824-3525
95661 kkrol l@hotrna 780-886-2457
95628 rickh@gmail.c 916-450-6719
95648 kgrav
es@
p
hre
916-
450
-3892
95661 robyn@gmail. 780-886-2471
9S661
jb
urgess@h
ot
780-886-5862
95602
rdemmins@p
l 916-450-3330
1-112
Completed
Members
table
USING MICROSOFT ACCESS 2016 Guided Project 1-2
Step 2
Upload &
Save
Step 3
Grade my
Project
12. Review the completed Members table.
a. Double-click the Members table to view the table. The table should be similar to Figure 1-112.
Note that the sorting and filtering changes were not saved.
b. Close the table by clicking the X in the right corner.
13. Add database properties using the Database Properties dialog box.
a. Click the File tab to open the Backstage view. The Info button should be selected.
b. Click the View and Edit Database Properties link to open the Database Properties dialog box.
c. Type American River Members in the Title area.
d. Type Taylor Mathos in the Author area.
e. Type ARCC in the Company area.
f. Click OK to save the changes.
14. Close the database.
15. Upload and save your project file.
16. Submit project for grading.
Access 2016 Chapter 1 Creating a Database and Tables Last Updated: 12/29/17 Page 6
