Access 2016 In Practice Guided Project 5 1 Instructions AC2016
User Manual:
Open the PDF directly: View PDF ![]() .
.
Page Count: 4
l Access Objects
...
«
Sea
rc
h...
P
Tables
~
Faculty
Queries
~
Faculty Extended
Forms
tID
Faculty Details
=g Faculty
list
Reports
All Faculty
Emergency Contact Information
Faculty Address
Book
Faculty by Department
Faculty by Type
Faculty Phone List
5-95
Navigation Pane
showing
all
objects
USING MICROSOFT ACCESS 2016 Guided Project 5-1
Step 1:
Download
start file
Guided Project 5-1
For this project, you create a new database based on the Faculty template. You explore the functionality of the database,
modify the table and query, and enhance the database by adding a new table and creating a relationship using the Lookup
Wizard. This project has been modified for use in SIMnet®.
Skills Covered in This Project
• Review and modify template objects.
• Create a new table.
• Define a new relationship with the Lookup
Wizard.
• Use multiple columns in a lookup field.
• View and edit relationship properties.
• Edit properties of the lookup field.
1. Open the Faculty-05 database start file.
2. The file will be renamed automatically to include your name. Change the project file name if
directed to do so by your instructor.
3. Enable content in the security warning.
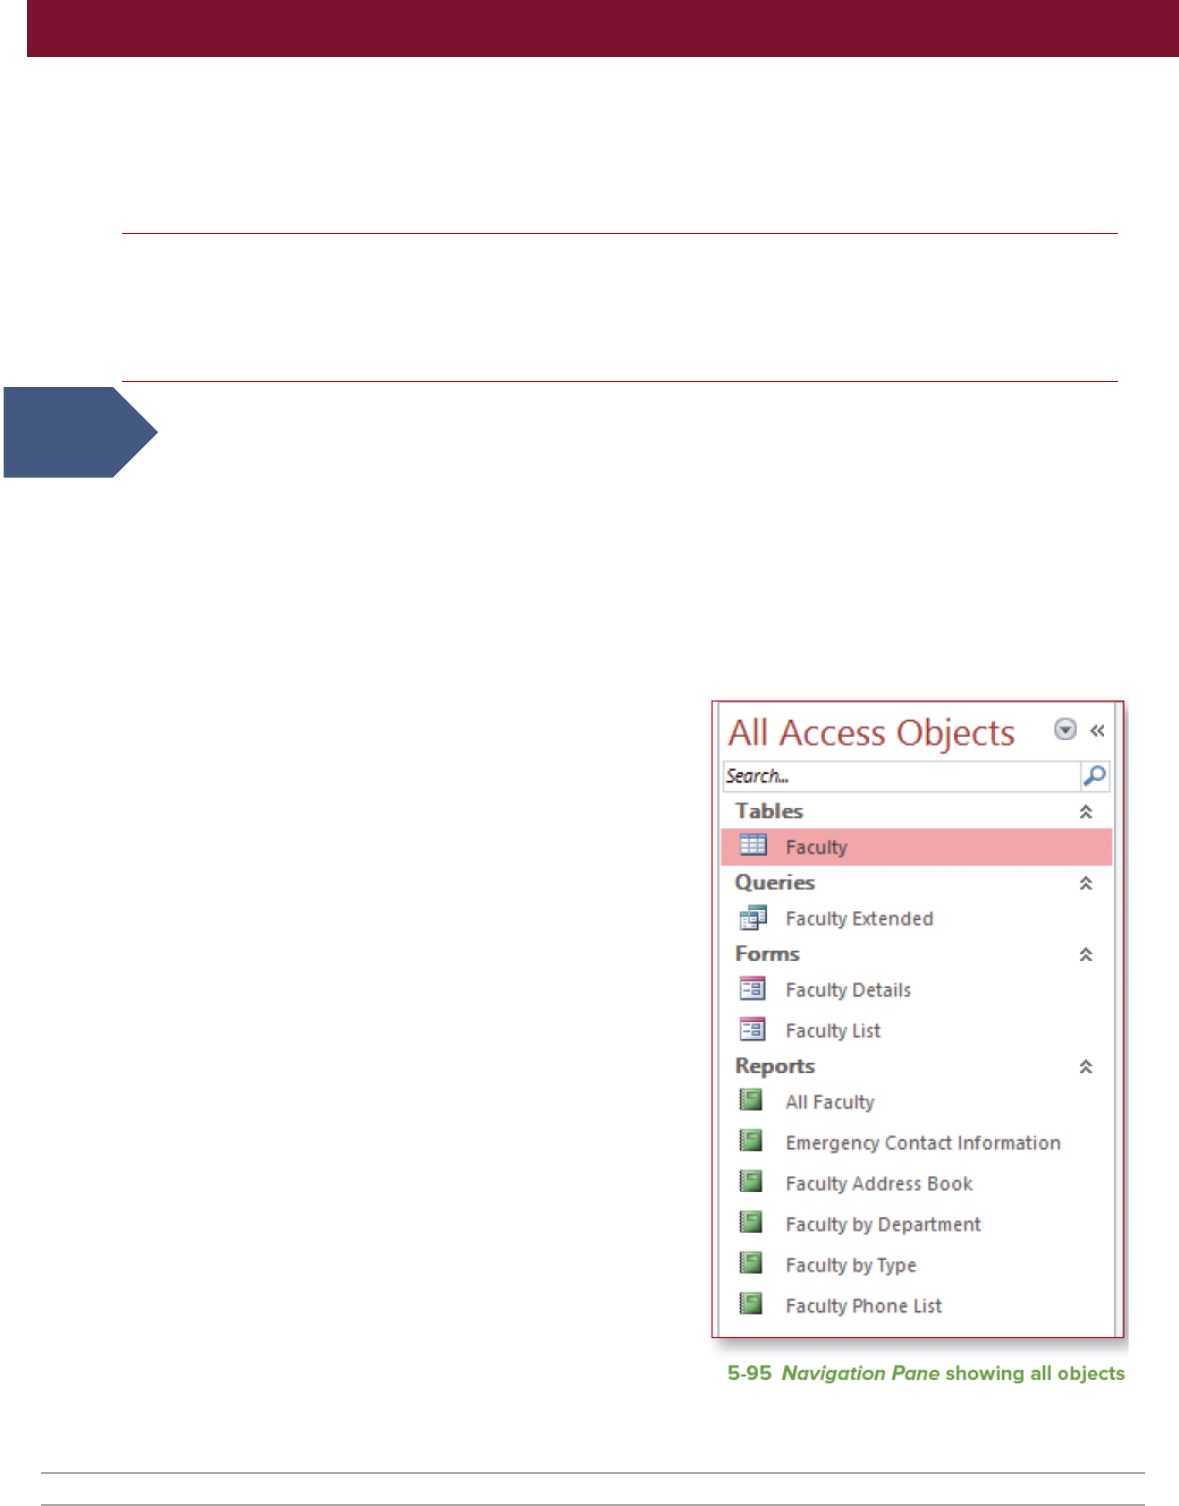
4. Explore the Navigation Pane, objects, and relationships.
a. Click the Shutter Bar Open/Close Button to open the Navigation Pane.
b. Click the Navigation Pane arrow to open the Navigation menu.
c. Select the Object Type category. The Navigation Pane updates to show all of the objects
(Figure 5-95).
d. Open the Faculty Details form to get a sense
of the design of this template.
e. Close the Faculty Details form.
f. Open the Faculty List form.
g. Click the Reports drop-down arrow on the
Faculty List form and select the All Faculty
report. The report displays but there are no
faculty records shown.
h. Close the report.
i. Close the Faculty List form.
5. Modify the Faculty table as several fields are not
needed and others require changes.
a. Open the Faculty table in Design view.
b. Select the Company field and click the Delete
Rows button [Table Tools Design tab, Tools
group]. Click Yes in the Message Box
informing you that the index for this field will
also be deleted.
c. Delete the ID Number, Fax Number,
Country/Region, and Web Page fields.
d. Change the Field Name of the Education
Level/Degree field to Highest Degree.
e. Select the Department field.
f. Click the Lookup tab.
g. Edit the Row Source property and add ;“Art”; “History”; “Music” to the list.
h. Save and close the table.
Access 2016 Chapter 5, Advanced Relationships, and Macros Last Updated: 1/10/18 Page 1

ield:
File
As·
11
1f
11
_Q
Cnntnr.t
Na
Table:
:I:
Totals
Sort: Ascer
----
Table -ames
;;J
Show: E
~~
,..
LU
-
Criteria:
[~
r-
~
or:
...
£aste
~
l~
,B.u
ild
...
Z
oom
...
~
£ropert
i
es
..
.
5-96
Context
menu
ID--FK
Number
Must
match a value in the
ID
field
in
the Faculty
tab1e
Degree
J Short Text J Type
of
degree earne<l 150
DegreeYear
Number
Year degree was awarded
Institution Short Text Institution granting the degree 50
USING MICROSOFT ACCESS 2016 Guided Project 5-1
6. Edit the Faculty Extended query.
a. Open the Faculty Extended query in Design view. This query uses the company field you
deleted from the table. As a result, you need to update the query.
b. Click the File As cell in the Field row, right-click to open the context menu, and select the
Zoom button (Figure 5-96) to open the Zoom window.
c. Delete [Company], from the expression. Note: You must delete the comma that appears
after [Company] for the query to work correctly.
d. Click OK.
e. Click the Contact Name cell in the Field
row, right-click to open the context menu,
and select the Zoom button to open the
Zoom window.
f. Delete [Company], from the expression.
g. Click OK.
h. Save and run the query. The query
executes but no records display.
i. Close the query.
7. Explore the Faculty Details form and add
records into the database.
a. Open the Faculty Details form. Note that
the form opens in a separate window and
you cannot switch to Design view while the
form is in Form view. This is a result of property settings and macros attached to the form.
b. Click the First Name text box and enter Bruce. Note that the Web Page, Fax Number, and
Country/Region text boxes display #Name? because the links back to the table fields are invalid.
c. Click the Last Name text box and type Elkins.
d. Click the Save and New button on the form.
e. Click the First Name text box and enter Charlotte. Note that the Web Page, Fax Number,
and Country/Region text boxes display #Name? because the links back to the table fields
are invalid.
f. Click in the Last Name text box and type Liu.
g. Click the Save and New button on the form.
h. Close the form. Don’t make any changes to remove the text boxes that are no longer
valid in this exercise since you will not use this database later, although those changes
must be made before putting the database into operation.
8. Add a second table into the database.
a. Click the Table Design button [Create tab, Tables group].
b. Add fields into the table using the following information:
Access 2016 Chapter 5, Advanced Relationships, and Macros Last Updated: 1/10/18 Page 2
vailable
Fie
lds: Selected
Fie
lds:
.
12.:]
ID
;,
Date of Bir
th
First N
am
e
Fa
ajty
ID
>>
Departm
ent
Fa
ajty
Tw e <
Offic
e
1-ig
he~
t Degree
~
Fo
aJSAr
ea
...,
5-97
Select
fields
in
the
Lookup Wizard
USING MICROSOFT ACCESS 2016 Guided Project 5-1
c. Designate the DegreeID field as the primary key.
d. Select the Degree field.
e. Click the Lookup tab.
f. Select Combo Box in the Display Control property box.
g. Select Value List in the Row Source Type property box.
h. Type “High School Diploma”; “G.E.D.”; “Bachelor’s Degree”; “Master’s Degree”; “Ph.D.” in the
Row Source property box.
i. Select the DegreeYear field and click the General tab.
j. Type #### in the Input Mask property box.
k. Save the table as Degrees.
9. Create a relationship using the Lookup Wizard.
a. Click the Data Type property box of the ID-FK field, click the drop-down arrow to display
the list of data types, and then select Lookup Wizard to launch the wizard.
b. Select the I want the lookup field to get the values from another table or query radio
button and click Next.
c. Select the Faculty table and click Next.
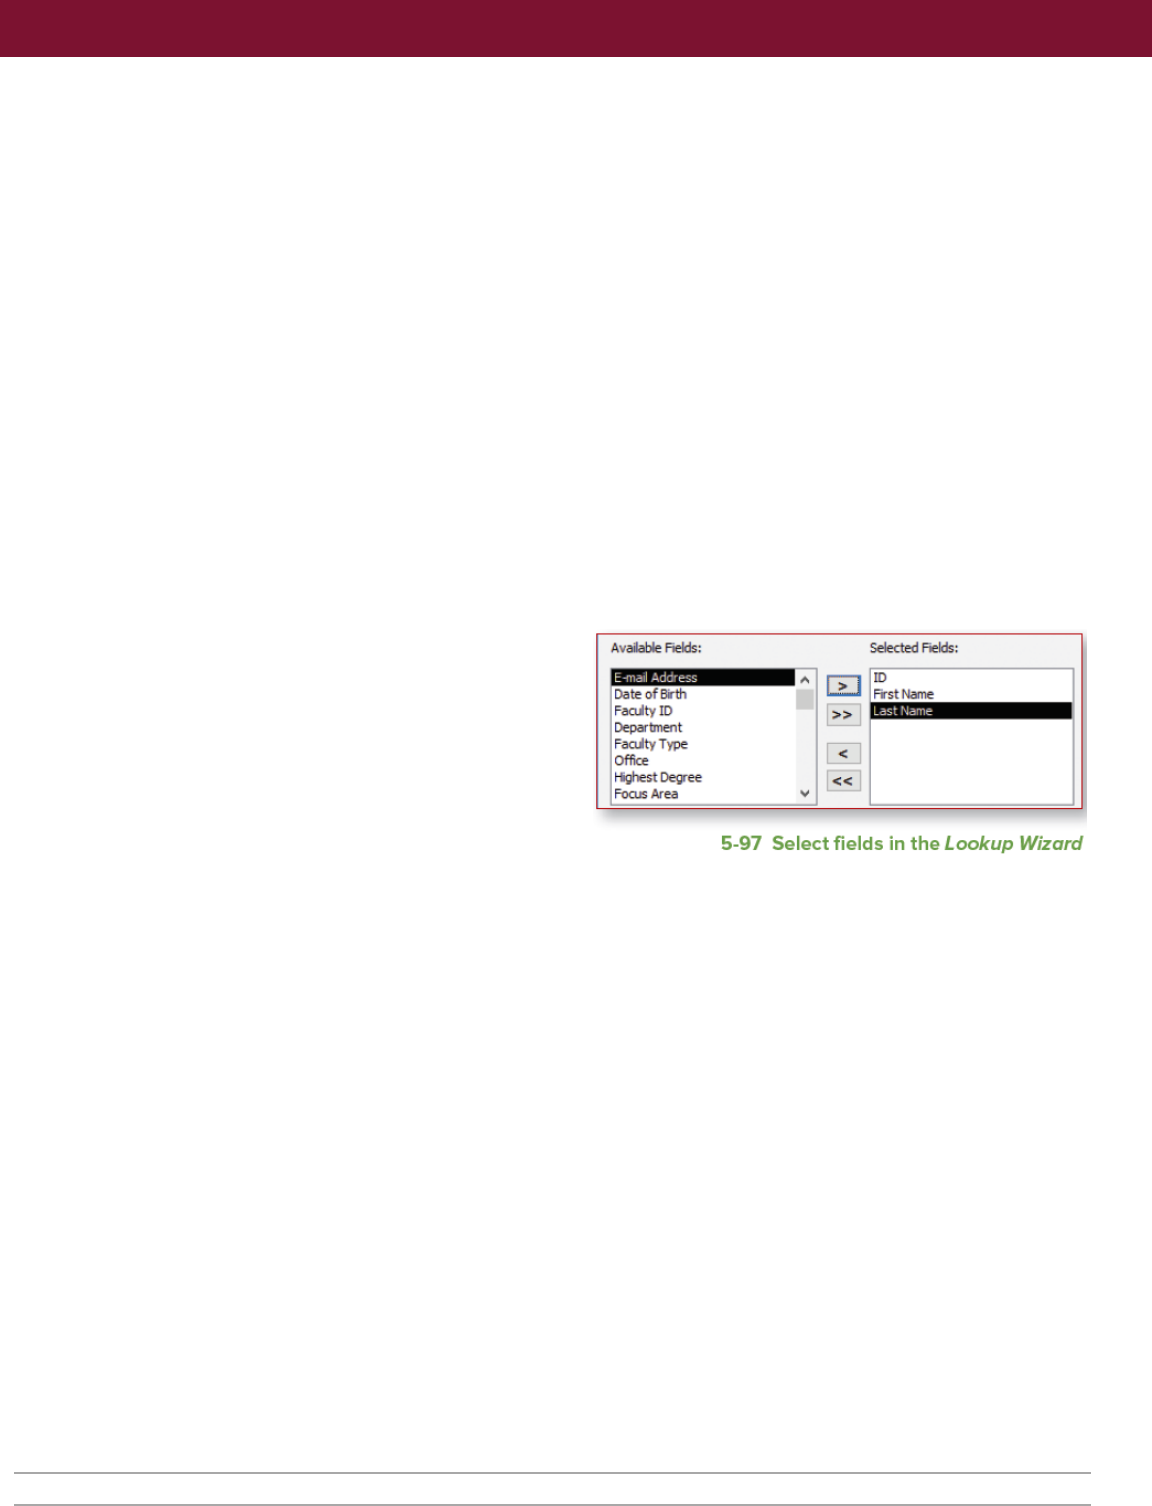
d. Select ID from the list of Available Fields and click the Move Single Field button to move
the field into the Selected Fields window.
e. Move the First Name and Last Name
fields (Figure 5-97).
f. Click Next.
g. Don’t sort on any fields and click
Next.
h. Deselect the Hide key column check
box and click Next.
i. Select the ID field to store in the
table and click Next.
j. Check the Enable Data Integrity box and the Cascade Delete radio button.
k. Click Finish to complete the wizard. A Lookup Wizard dialog box displays.
l. Click Yes to save the changes to the table so that Access can create the relationship.
m. Select the ID-FK field and click the Lookup tab.
n. Click the Column Widths property box.
o. Change the entry so it reads .5"; 1"; 1". The ID column does not need to be as wide as the
name columns.
p. Save the table. If a dialog box displays informing you that the table has changed since
the last time you opened it, click Yes to save your changes.
q. Close the table.
10. Edit the relationship.
a. Click the Relationships button [Database Tools tab, Relationships group] to open the
Relationships window.
b. Select the relationship line.
c. Click Edit Relationships [Relationship Tools Design tab, Tools group].
d. Select the Cascade Update Related Fields check box.
e. Click OK.
f. Click Save to save the changes made to the relationships.
g. Close the Relationships window.
Access 2016 Chapter 5, Advanced Relationships, and Macros Last Updated: 1/10/18 Page 3

Degrees ~---,-,
---
-------,-------
.-1
Di,gri,i,
ID • ID -
Fl
oe,gre,e, T
oi,gri,,avi,a
r •
* (New) 0
2
Li
u
5-98
Drop-down list for the ID-FK field
USING MICROSOFT ACCESS 2016 Guided Project 5-1
Step 2
Upload &
Save
Step 3
Grade my
Project
11. Add records into the Degrees table.
a. Open the Degrees table in Datasheet view.
b. Click the ID-FK field, click the drop-down arrow and select Bruce Elkins (Figure 5-98). The
DegreeID column is narrower because of the property changes you made in step 9o.
c. Select Ph.D. from the drop-down list in the Degree field.
d. Type 2012 in the DegreeYear field.
e. Type University of Arizona in the Institution
field.
f. Click the ID-FK field, click the drop-down
arrow, and select Charlotte Liu.
g. Select Ph.D. from the drop-down list in the
Degree field.
h. Type 2015 in the DegreeYear field.
i. Type Rutgers in the Institution field.
j. Save and close the table.
12. Test the cascade delete property of the relationship.
a. Open the Faculty table in Datasheet view.
b. Click the plus sign on Bruce Elkin’s row to see his related degree records.
c. Click the minus sign.
d. Click the row selector box for Bruce Elkin’s record in the table.
e. Click the Delete button [Home tab, Records group]. A warning message displays alerting
you that you will delete related records in another table.
f. Click Yes.
g. Close the table.
h. Open the Degrees tables in Datasheet view to verify that the record was deleted.
i. Close the table.
13. Close the database.
14. Upload and save your project file.
15. Submit project for grading.
Access 2016 Chapter 5, Advanced Relationships, and Macros Last Updated: 1/10/18 Page 4
