ACR CAS Portal User Guide LCSR
User Manual:
Open the PDF directly: View PDF ![]() .
.
Page Count: 60
- Revisions
- Table of Content
- 1. Introduction
- 2. User Interface
- 3. Forms and Data DICTIONARY
- 4. Data Collection
- 4.1. Data Collection Overview
- 4.2. Manual Data Entry
- 1
- 2
- 3
- 4
- 4.1
- 4.2
- 4.2.1 Register New Case
- 4.2.2 Register New Case for Returning Patients
- 4.2.3 Registration
- 4.2.4 Exam
- 4.2.5 Section A 'General’
- 4.2.6 Section B ‘Follow-up within 1 year’
- 4.2.7 Section C ‘Additional Risk Factors’ Additional risk factors are optional
- 4.3
- 4.3.1
- 4.3.2 Saving a Partially Completed Form
- 4.3.3 Finding a Form
- 4.3.4 Editing an ‘In-Progress’ or ‘Completed’ Form
- 4.3.5 Cancelling a Case
- 4.3.
- 4.4.
- 4.5. Flat File Upload
- 4.6. Web-based Data Transmission & Vendor Certification Process
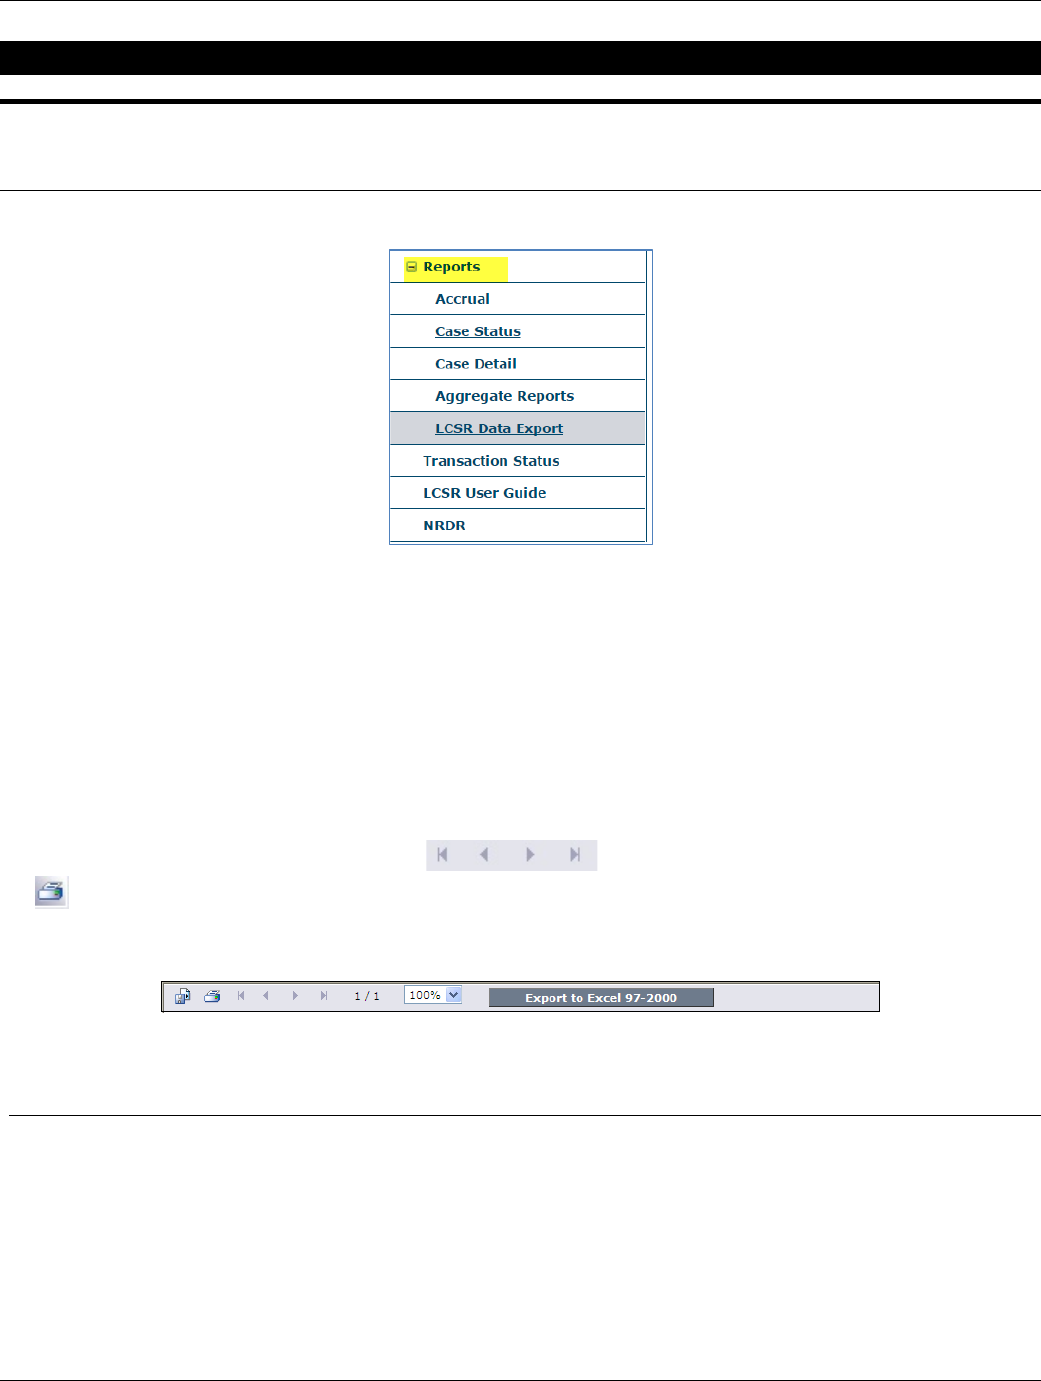
- 5. Reports
- 6. registry management
- 7. Glossary
- Appendix 1
- Appendix 2
- Appendix 3
The American College of Radiology
Lung Cancer Screening Registry
(LCSR)
User Guide
June 29, 2017
American College of Radiology
1891 Preston White Drive
Reston, VA 20191-4397
Copyright © 2017, American College of Radiology. All rights reserved.
LCSR User Guide
Revisions
Date Description of Revisions
September 2, 2015 Original issue
February 1, 2016 4.1.5 Replaced ‘Canceling a Case’ with current instructions and screen shots
February 25, 2016 4.3 Upload Data File
4.4 Web-based Data Transmission
Appendix 1 LCSR Data Upload File Specifications v1
March 9, 2016 Appendix 1 How to Change Your Computer Settings
Appendix 2 LCSR Data Upload File Specifications v1
March 28, 2016 4.4 Removed IT document hypertext links
April 18, 2016 Appendix 2 LCSR Data Upload File Specifications v1.2
Appendix 3 NRDR LCSR Data Mapping and Business Rules for Data Upload
May 26, 2016 Appendix 2 Other comorbidities, other specify If Patient_Other_Comorbidities includes 8, then
Patient_Other_Comorbidities_Spec is required (removed ‘is 2’)
Appendix 1 Added corrections to number 1, 6, 10 and 11. Replaced pic at number 11.
July 25, 2016 Data Entry Convention. First and Last Names now require a minimum of 1 character instead of 2.
4.3.1 Data fields such as “Other, specify” can now accept up to 255 characters rather than the previous
45.
Modified Appendix 1. Deleted Excel document language. Inserted additional .csv and .txt language.
August 9, 2016 Date of follow-up; Required when submitting Follow-Up for a case; cannot be a future date (updated)
September 20, 2016 `4.2.2 Register New Case for Returning Patients – added as a new section
`Added “Of Note” comments to Patient SSN, Medicare Beneficiary ID, Register New Case for Returning
Patients, Registration, Appendix 1, Editing an ‘In-Progress’ or ‘Completed’ Form, Section A 'General’,
and Radiologist (reading) sections
`4.5.3 LCSR File Upload Status - updated
`Patient ID has been removed from New Case Registration Search filter, Registration form, Exam form,
Case Status Report forms, and all Registration & Cancellation form email notifications
`6.1.1 Adding or Removing Participating Physicians - updated
`LCSR Introduction Webinar – link to PPT has been added to Section 1, Introduction
November 15, 2016 4.4 Web-based Data Transmission & Vendor Certification Process (added)
December 19, 2016
Appendix 3, Number_Of_Packs_Year_Smoking, Unknown = 999
Appendix 3, Number_Of_Years_Since_Quit, Unknown = 99
March 24, 2017 Appendix 3, Patient Height and Weight, Unknown = 0
April 24, 2017 M_Status, added M1c
May 22, 2017 Appendix 3, Overall Stage, Mappings/Definitions, N3 has been removed. ‘Unknown’ has been added.
June 6, 2017 Appendix 3, Overall Stage, Valid Values/format, N3 has been removed. Unknown’ has been added.
June 29, 2017 Appendix 3, Added column ‘A’ to display row number
Appendix 3, changed the order of ‘Ordering practitioner NPI’ to appear after ‘Radiologist Reading NPI’
June 29, 2017 2

LCSR User Guide
THIS PAGE INTENTIONALLY LEFT BLANK
June 29, 2017 3

LCSR User Guide
Table of Content
REVISIONS ................................................................................................................................... 2
TABLE OF CONTENT .................................................................................................................. 4
1. INTRODUCTION ..................................................................................................................... 6
2. USER INTERFACE ................................................................................................................. 6
2.1. User Interface Overview ................................................................................................ 6
2.2. Login ............................................................................................................................. 7
2.3. Navigation ..................................................................................................................... 7
3. FORMS AND DATA DICTIONARY ......................................................................................... 8
3.1. Entire Form Package ..................................................................................................... 8
3.2. Case Registration Form ................................................................................................ 8
3.3. Exam Form .................................................................................................................... 8
3.4. Data Dictionary .............................................................................................................. 8
4. DATA COLLECTION .............................................................................................................. 8
4.1. Data Collection Overview .............................................................................................. 8
4.2. Manual Data Entry......................................................................................................... 9
4.2.1 Register New Case ........................................................................................... 10
4.2.2 Register New Case for Returning Patients ....................................................... 12
4.2.3 Registration ...................................................................................................... 13
4.2.4 Exam ................................................................................................................ 14
4.2.5 Section A 'General’ ........................................................................................... 15
4.2.6 Section B ‘Follow-up within 1 year’ ................................................................... 16
4.2.7 Section C ‘Additional Risk Factors’ Additional risk factors are optional ............ 18
4.3.2 Saving a Partially Completed Form .................................................................. 19
4.3.3 Finding a Form ................................................................................................. 19
4.3.4 Editing an ‘In-Progress’ or ‘Completed’ Form ................................................... 20
4.3.5 Cancelling a Case ............................................................................................ 22
4.5. Flat File Upload ........................................................................................................... 24
4.5.1 Populate and Configure the LCSR Data File .................................................... 24
4.5.2 Upload LCSR Data File Instructions ................................................................. 24
4.5.3 LCSR File Upload Status .................................................................................. 25
4.6. Web-based Data Transmission & Vendor Certification Process ................................. 27
5. REPORTS ............................................................................................................................. 28
5.1. Reports Overview ........................................................................................................ 28
5.2. Accrual ........................................................................................................................ 28
5.3. Case Status ................................................................................................................. 29
5.4. Case Detail .................................................................................................................. 30
5.5. Aggregate Reports ...................................................................................................... 31
5.6. LCSR Data Export ....................................................................................................... 31
6. REGISTRY MANAGEMENT ................................................................................................. 32
6.1. Registration Information .............................................................................................. 32
June 29, 2017 4

LCSR User Guide
6.1.1. Adding or Removing Participating Physicians .................................................. 33
6.1.2. Adding or Removing Facility Users ................................................................... 36
7. GLOSSARY .......................................................................................................................... 36
APPENDIX 1 ................................................................................................................................ 38
APPENDIX 2 ................................................................................................................................ 44
APPENDIX 3 ................................................................................................................................ 49
June 29, 2017 5

LCSR User Guide
1. INTRODUCTION
The American College of Radiology’s Lung Cancer Screening Registry (LCSR) is part of the National Radiology Data Registry
(NRDR), a web-based collection of registries related to various radiological procedures. The LCSR allows facilities to collect
data about lung cancer screening procedures, including patients’ demographic information, medical history and risk factors,
procedure indications, and follow-up information. Data from each procedure are entered on the following forms:
1. Case Registration Form
2. Exam Form
The LCSR also provides online reports summarizing case status information.
The LCSR shares patient, physician and user dictionaries with the other registries included in NRDR. Consequently, information
entered in the dictionaries/Manage Patient/Manage Physician lists, need only be entered once, regardless of the number of
registries/databases in which a facility participates. Certain fields on the LCSR forms are automatically populated using data
from these dictionaries/lists, whenever you enter a patient, physician or user ID.
*Before you begin the process of LCSR Registration, Data Collection and Submission, Report Review or adding reading
radiologists, we highly recommend that you watch the audio version 30-minute PowerPoint presentation located on our LCSR
webpage. Its speed can be adjusted to your learning requirements and needs.
After launching the LCSR Introduction Webinar, go to the Tool Bar and locate and click on the ‘Slide Show’ tab, and then click on
‘From Beginning’. The slide deck will begin with audio at the first slide.
You can access the LCSR through the NRDR website at http://nrdr.acr.org. If you have any questions or difficulties using the
website, please contact the NRDR Help Desk, at nrdr@acr.org or 1-800-227-5463, extension 3535.
For more information on NRDR, refer to the NRDR User Guide, available on the NRDR website.
2. USER INTERFACE
2.1. User Interface Overview
You must have a user type, user name and password to log in to the LCSR. Once logged in, you will have access to data from
your facility only. The person who registers your facility in NRDR is known as the Facility Administrator, and is assigned a user
type, user name and password during the NRDR registration process. Other users at your site are assigned a user type, user
name and password when he or she is added to the NRDR user dictionary. For information about the registration process,
refer to Section 2, “Getting Started”, in the NRDR User Guide. For information about adding users to the user dictionary, refer
to Section 6.3.1, “Adding Users”, in the NRDR User Guide.
June 29, 2017 6
LCSR User Guide
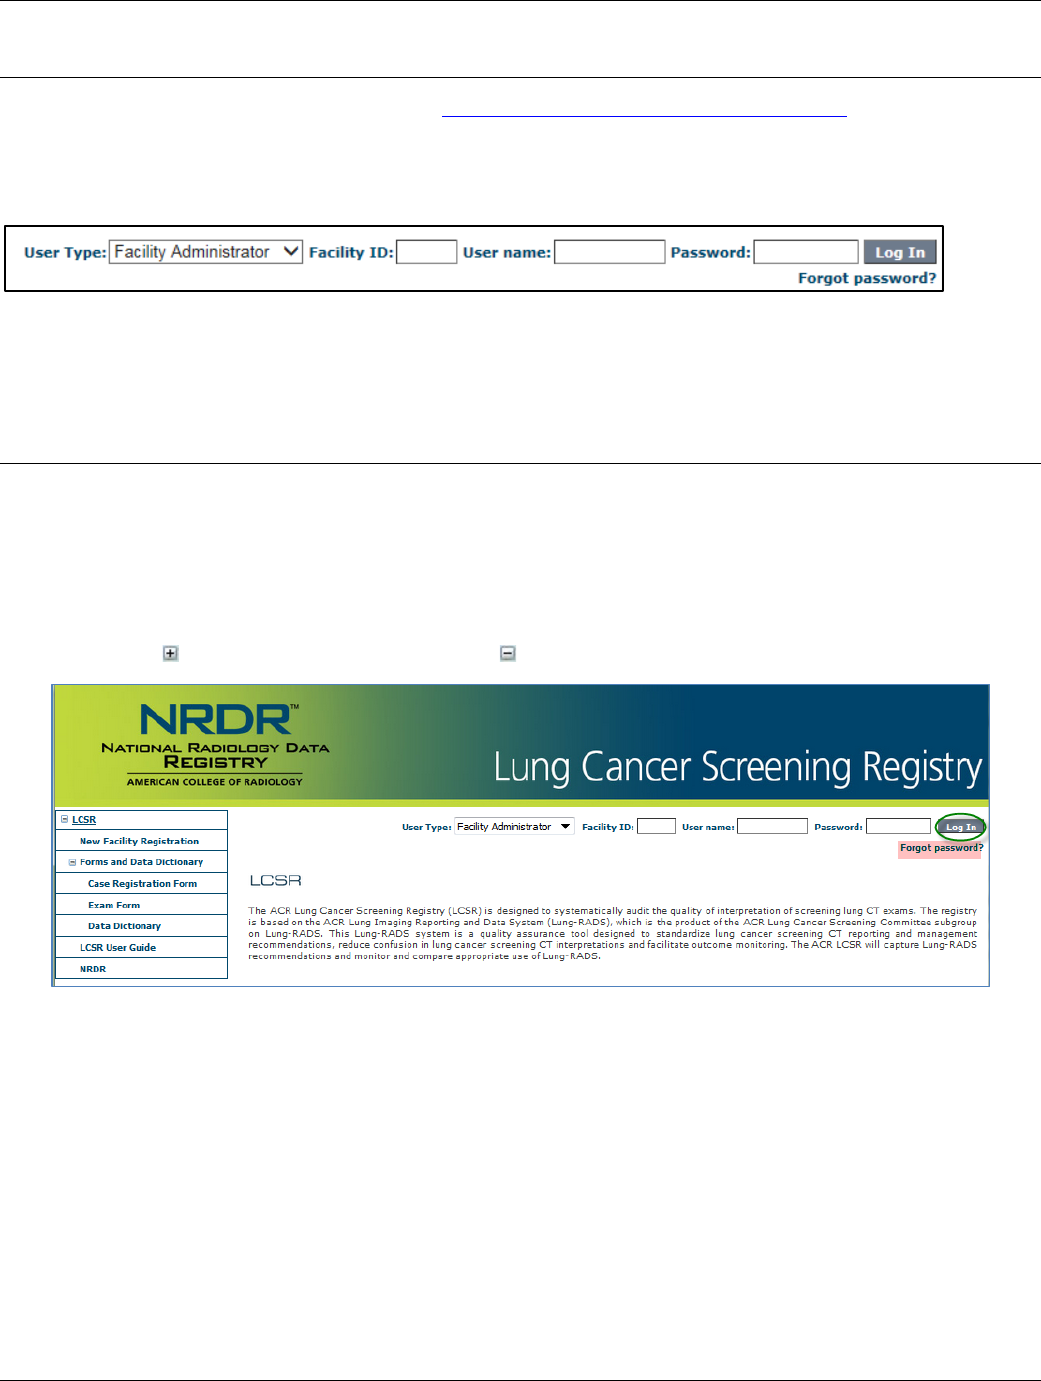
2.2. Login
To log in to the LCSR, access the NRDR home page at https://nrdr.acr.org/Portal/Nrdr/Main/page.aspx and click “LCSR” on the
left side.
Select your user type from the drop-down list and pause while the page is refreshed. Fill in your user name, facility ID and
password and click the “Log In” button.
Login
If this is the first time you have logged in using a temporary password, that is, a password generated for you by the NRDR
system, you will be asked to changed it (refer to Section 4.5, “Changing Passwords”, in the NRDR User Guide).
2.3. Navigation
The top part of each page is a status bar showing your user type, user name, and facility ID. A “Logout” button also appears.
Click this button to terminate your session. If you have not yet logged in, these fields will be blank, and a “Log In” button
appears. Enter your login information and click the “Log In” button to begin your session. A link to the online help pages
appears in the upper right corner of some pages.
The left part of each page in the LCSR contains the LCSR menu. The menu is comprised of a list of links giving you access to
various registry functions. LCSR pages are distinguished from other pages in the NRDR system by the LCSR banner at the top of
the page. Click the button to expand a menu item, or the button to collapse it.
LCSR Banner and Menu
Filters are available on most data entry pages. You can use these filters to search for a form from a specific case. A case is a set
of forms related to one exam. A case includes a Case Registration form and an Exam Form.
Throughout this document, “Submit” refers to the action you take when you have completed data entry for a form, and you
want the entries to be recorded in the registry. “Save” refers to the action you take when you have partially completed a form
and you want to continue data entry at a later date. The entries you made prior to the “Save” action will appear on the form
when you continue data entry, but they will not be recorded in the registry until you perform the “Submit” action. You also
perform the “Save” action when you want to make changes to a previously submitted form.
If you have entered invalid data or performed an incorrect action, the system will display a red error message next to the
invalid item, if applicable, and at the bottom of the page.
‼ Note: Do not use the “Back” button on your browser to navigate to a form; doing so will prevent your data from being
stored in the registry. Always use the “Data Collection” menu items to navigate to a form.
June 29, 2017 7
LCSR User Guide
3. FORMS AND DATA DICTIONARY
Click a form title under “Forms and Data Dictionary” to view or print a paper copy of the form.
3.1. Entire Form Package
You can view and print all LCSR forms at once by clicking “Entire Form Package” under “Forms and Data Dictionary” in the LCSR
menu.
Note: The use of these printable LCSR forms is optional and is for the facility’s workflow only. All data recorded on the printed
forms will need to be provided to the NRDR via submission to your registered facility, according to the requirements as indicated
in this User Guide. Do not mail these forms to the ACR.
3.2. Case Registration Form
The Case Registration form is the first form to be completed when recording a lung cancer screening exam. A new form is
required for each exam, even if you have previously recorded a different lung cancer screening exam for this patient. You can
view and print the Case Registration form by clicking “Case Registration Form” under “Forms and Data Dictionary” in the LCSR
menu. Refer to Section 1, “Register New Case”, below, for instructions on completing the form.
Note: The use of these printable LCSR forms is optional and is for the facility’s workflow only. All data recorded on the printed
forms will need to be provided to the NRDR via submission to your registered facility, according to the requirements as
indicated in this User Guide. Do not mail these forms to the ACR.
3.3. Exam Form
Complete the Exam Form during or after the lung cancer screening exam. You can view and print the Exam Form by clicking
“Exam Form” under “Forms and Data Dictionary” in the LCSR menu. Refer to Section 4.2.4, “Exam”, below, for instructions on
completing the form.
Note: The use of these printable LCSR forms is optional and is for the facility’s workflow only. All data recorded on the printed
forms will need to be provided to the NRDR via submission to your registered facility, according to the requirements as
indicated in this User Guide. Do not mail these forms to the ACR.
3.4. Data Dictionary
You can view and print a list of data element definitions by clicking “Data Dictionary” under “Forms and Data Dictionary” in the
LCSR menu.
4. DATA COLLECTION
4.1. Data Collection Overview
Throughout this document, “Submit” refers to the action you take when you have completed data entry for a form, and you
want the entries to be recorded in the registry. “Save” refers to the action you take when you have partially completed a form
and you want to continue data entry at a later date. The entries you made prior to the “Save” action will appear on the form
when you continue data entry, but they will not be recorded in the registry until you perform the “Submit” action. You also
perform the “Save” action when you want to make changes to a previously submitted form.
June 29, 2017 8

LCSR User Guide
‼ Note: for security purposes, your session will terminate automatically after 20 minutes of inactivity. Any entries you
may have made since clicking the “Save” button will be lost.
4.2. Manual Data Entry
In general the procedure for data collection is as follows:
1. Print paper copies of the data collection forms by selecting links under “Forms and Data Dictionary” from the LCSR
menu. If you have a Master – Child registration for a multi-center facility, all exam data for the LCSR should be entered
at the Child facility level (avoid entering data directly into the Master facility).
Note: The use of these printable LCSR forms is optional and is for the facility’s workflow only. All data recorded on the
printed forms will need to be provided to the NRDR via submission to your registered facility, according to the
requirements as indicated in this User Guide. Do not mail these forms to the ACR.
2. The following forms are required for each facility contributing LCSR data:
Case Registration Form
Exam Form
Alternately, you may log in to NRDR and enter data directly for a patient. Any individual with a facility user account
can log in and enter data.
3. Select “Entire Form Package” to print all forms at once.
4. Record the information requested on the paper forms.
5. If this is the first time a procedure has been recorded in NRDR for the patient, the information you enter in the
“Patient Information” section of the Case Registration Form will automatically create a patient record in the ‘Manage
Patient’ list.
6. Enter data from each of the required forms, starting with the Case Registration form, by selecting the corresponding
link under “Data Collection” from the LCSR menu. After completing each form, click the “Submit” button at the
bottom of the page. Forms must be entered in the following order:
Case Registration Form
Exam Form
7. If errors are detected when you click the “Submit” button, they will be flagged in messages that appear in red next to
the appropriate field and at the bottom of the page. You must correct these errors and click the “Submit” button
again before you can proceed to the next form. If no errors are detected, a confirmation message will appear. In the
case of the Case Registration Form, the message will include a link to the next data collection form, that is, the Exam
Form. You may either continue with data entry, or log in at a later time to resume the process.
Use the button to view data element definitions.
Use the and buttons to show or hide form sections.
‼ Note: Do not use the “Back” button on your browser to navigate to a form; doing so will prevent your data from being
stored in the registry. Always use the “Data Collection” menu items to navigate to a form.
June 29, 2017 9
LCSR User Guide
4.2.1 Register New Case
Every new case should be a low dose lung screening CT (baseline or annual screening).
For example, if a patient had a baseline (or annual screening) LDCT lung screening and has another one greater than 12 months
later, the LDCT at >12 months should be submitted to the data registry as a new case. However, if a patient returns less than
12 months from the baseline (or annual screening) then that exam must be included in Section B of the LDCT case that
preceded it.
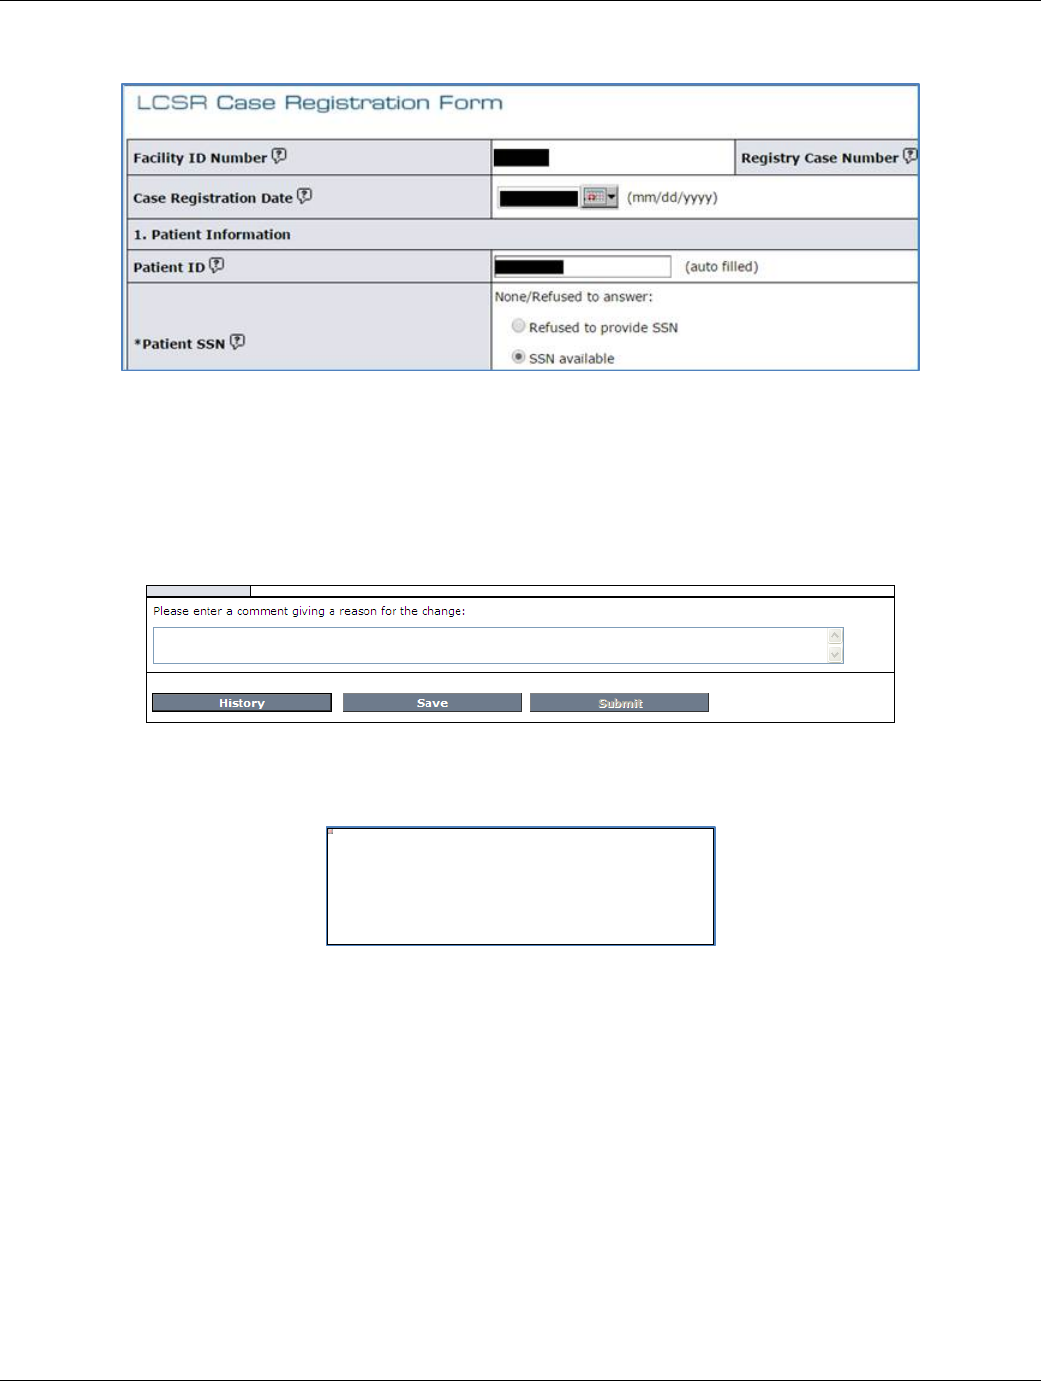
You register a new case by clicking “Register New Case” under “Data Collection” in the LCSR menu. Complete the form as
follows:
Facility ID Number
This field is populated automatically.
Case Registration Date
Enter the date that the paper form was completed. If paper forms were not used, then the date can be the same as
the day you began the new case.
Patient Information
Enter the patient information requested in Section 1, “Patient Information”, of the Case Registration form. Fields
marked with an asterisk (*) are required. Specific instructions for each field are as follows:
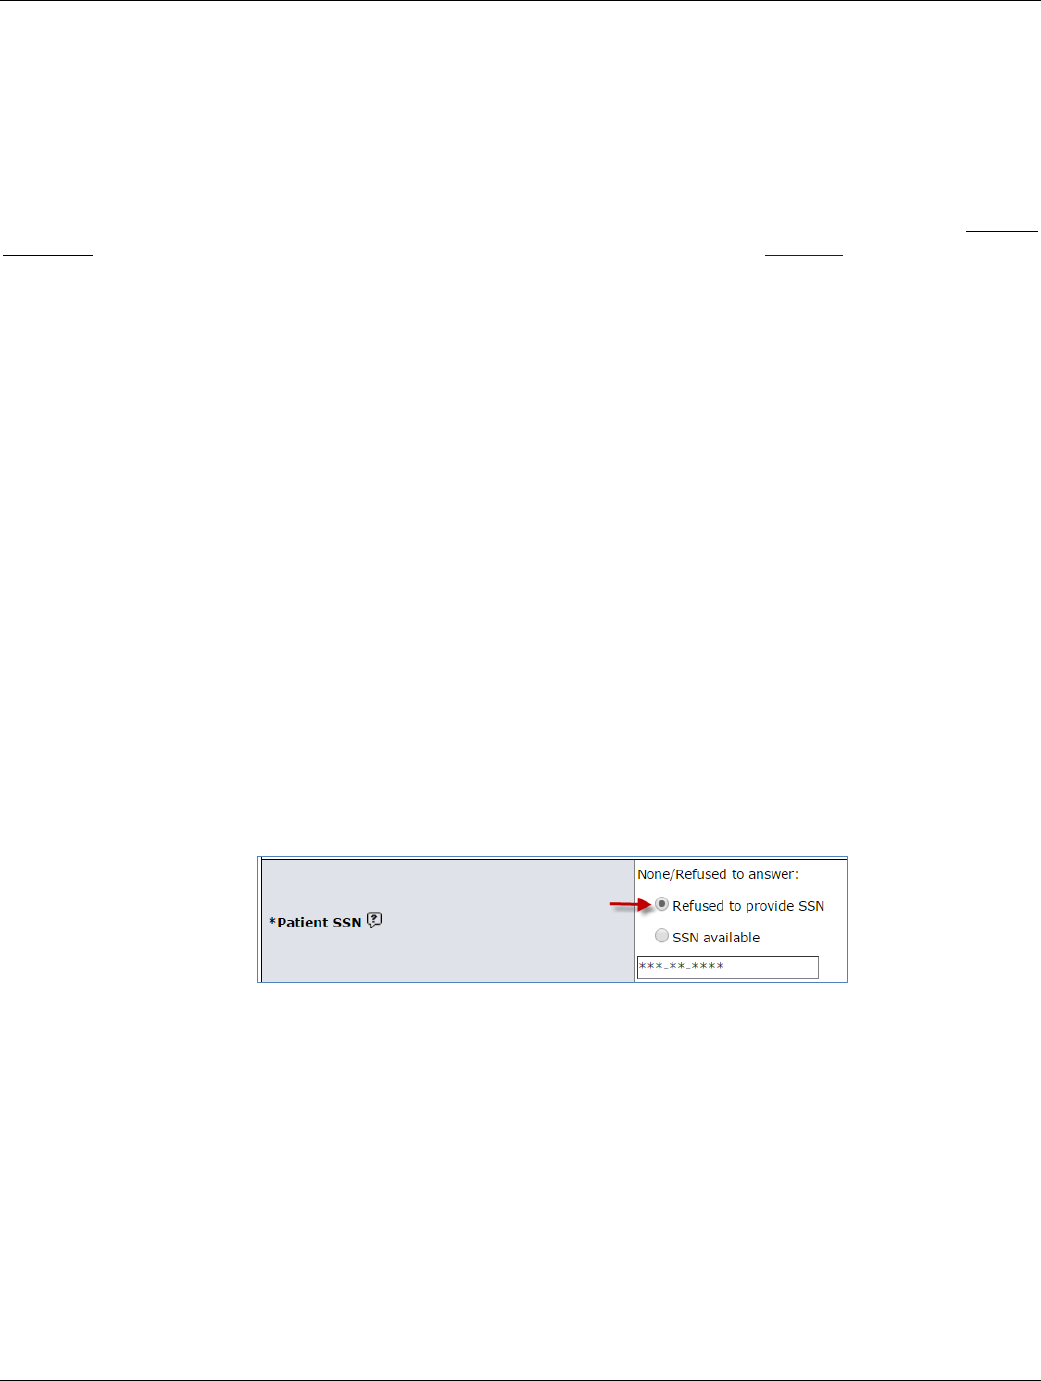
*Patient SSN
Patient SSN (Social Security Number) must have the following format: NNN-NN-NNNN, where N is a digit; all
digits are required.
Of note: If the patient refused to provide a SSN or you are not in possession of the SSN for any reason, the
response to ‘None/Refused to Answer’ is to click inside the radio button next to the ‘Refused to provide SSN’.
This will prevent the appearance of an error message at the bottom of the form when you click on the Submit
button.
*If you do have the SSN, then click ‘SSN Available’ and provide such in the data field beneath.
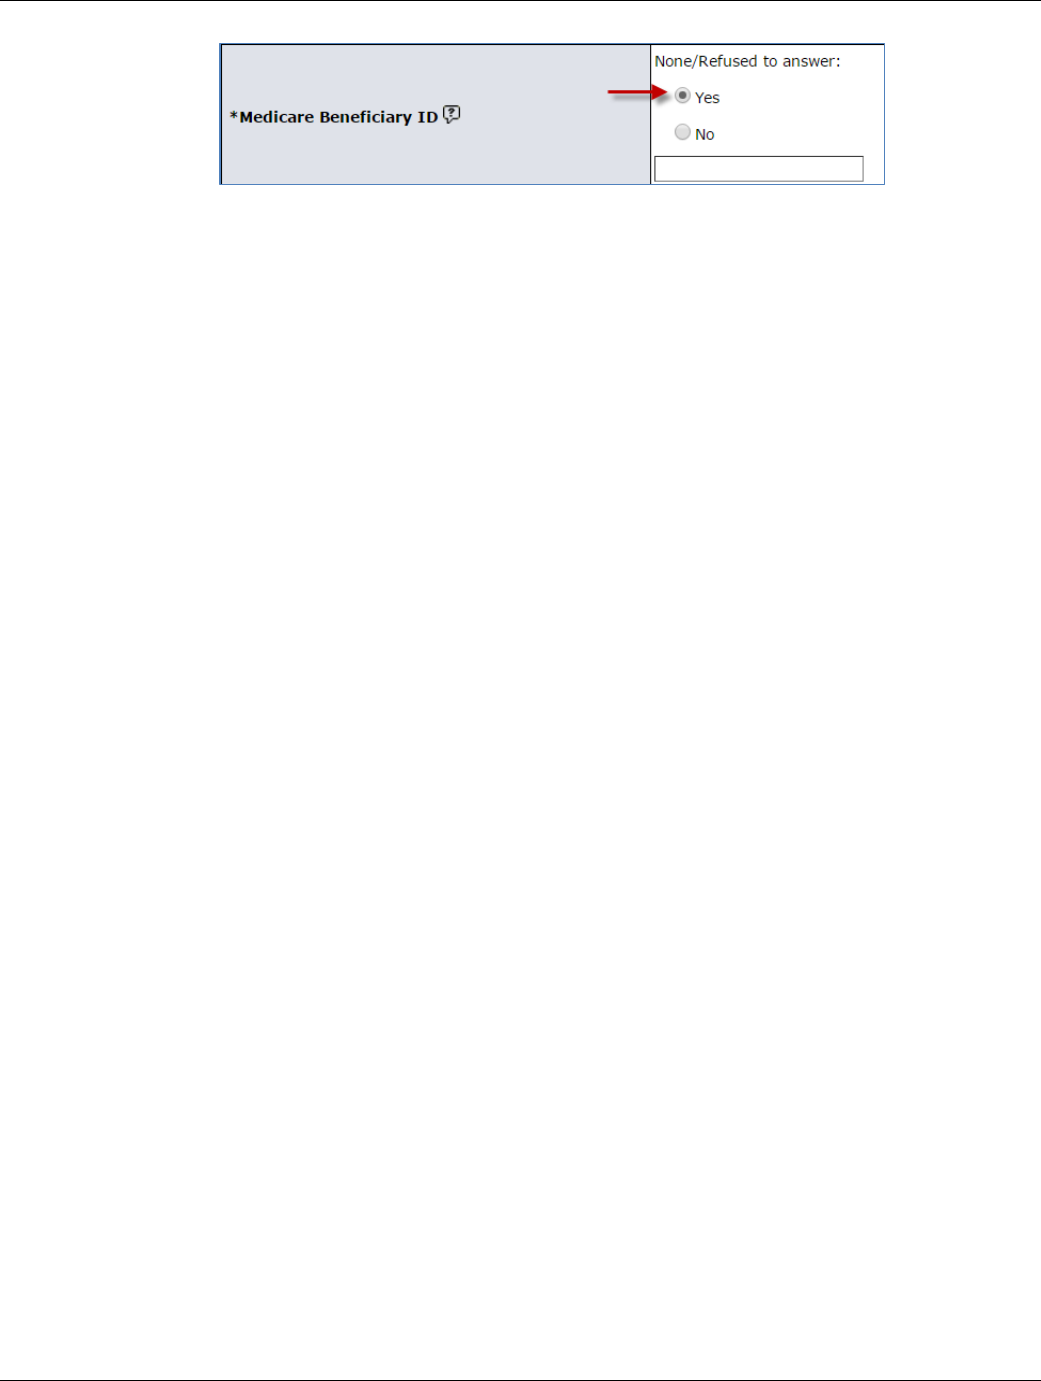
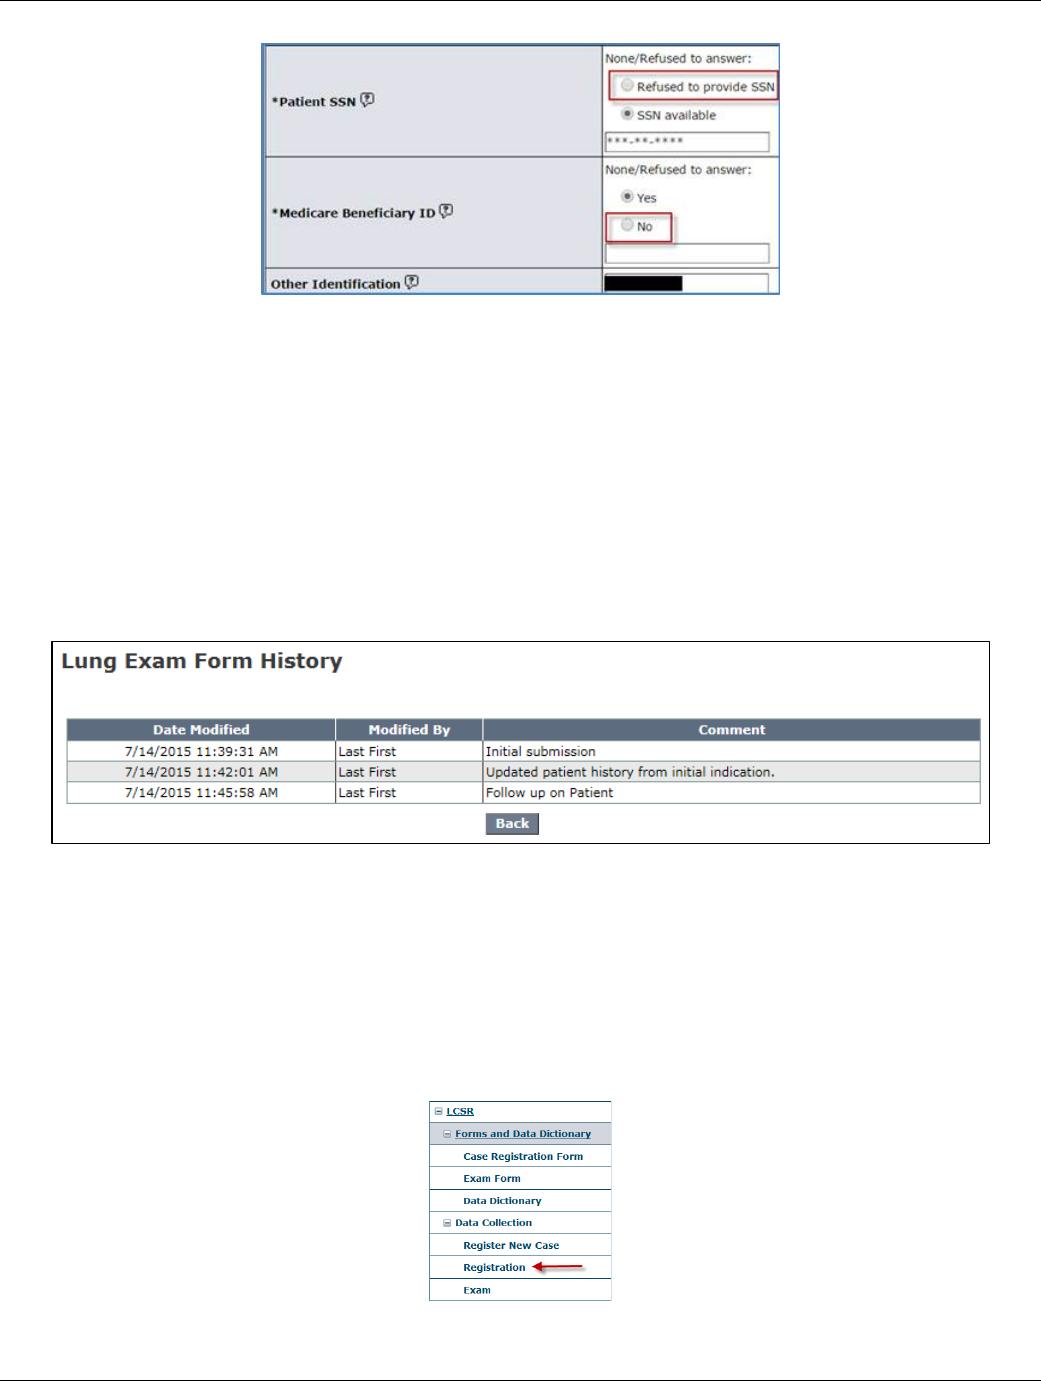
*Medicare Beneficiary ID
The Medicare Beneficiary ID is required for Medicare reimbursement. This ID is also known as the Medicare
Health Insurance Claim Number. Enter this field without any special characters. For example, if a beneficiary ID is
123-34-5678A, enter it as 123345678A.
Of note: If the patient refused to provide a Medicare Beneficiary ID or you are not in possession of the Medicare
Beneficiary ID for any reason, the response to ‘None/Refused to Answer’ is to click inside the radio button next to
the word ‘Yes’. This will prevent the appearance of an error message at the bottom of the form when you click on
the Submit button.
*If you are in possession of the Medicare Beneficiary ID, please click “No” and provide the ID in the data field
beneath.
June 29, 2017 10
LCSR User Guide
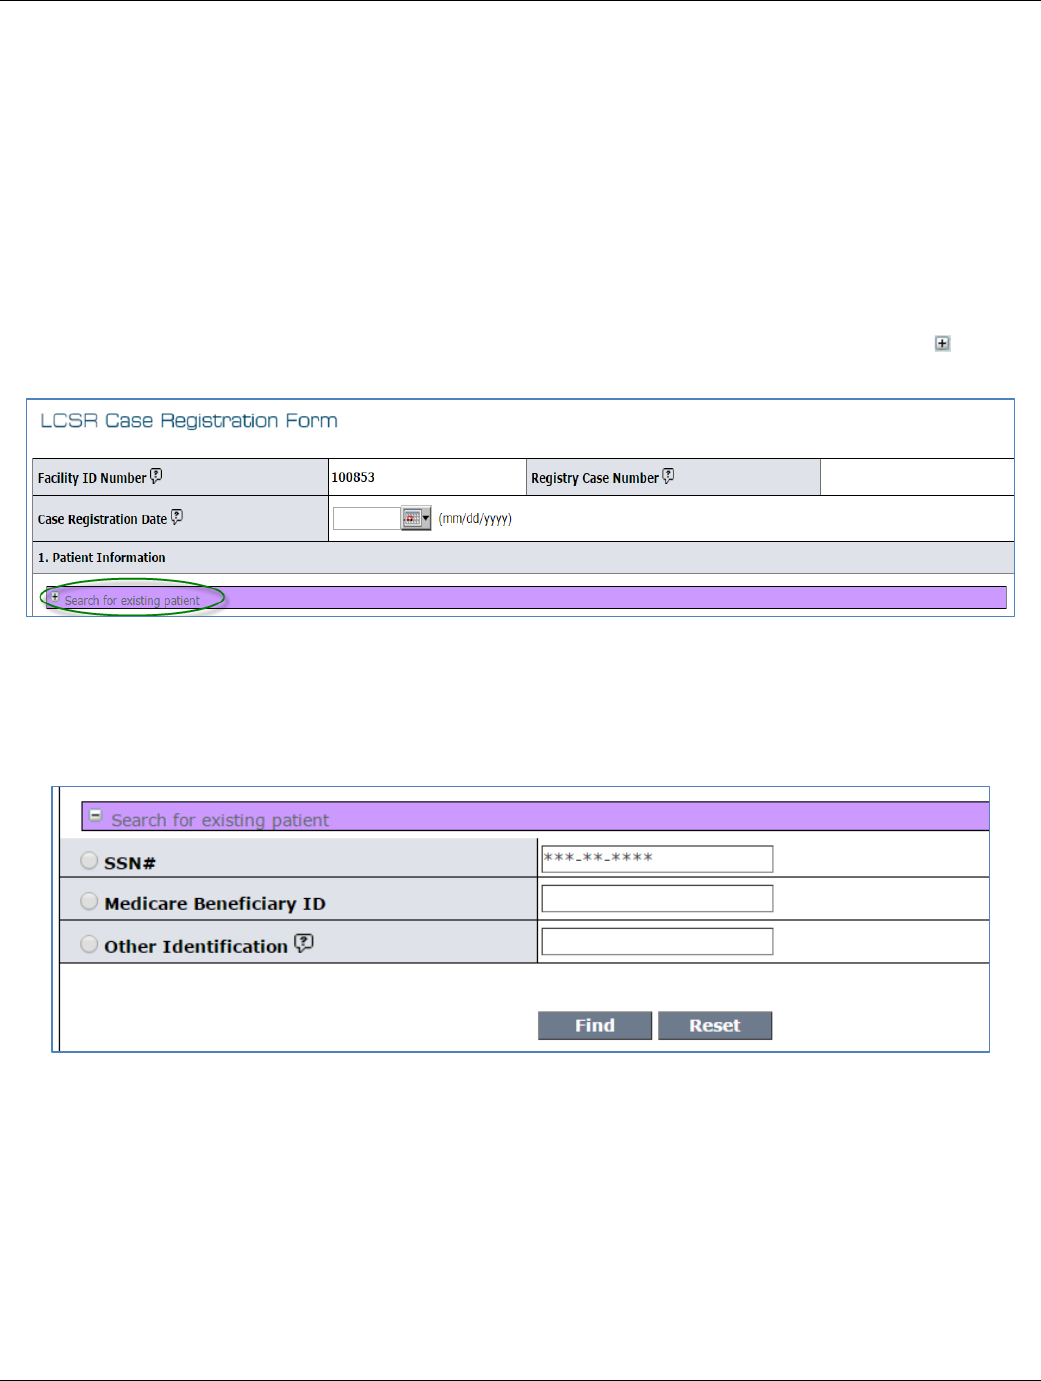
Other Identification
If neither the Patient SSN nor Medicare Beneficiary ID is provided, then the Other Identification field must be
filled in. It must be a code that uniquely identifies the patient within your practice, such as a medical record
number.
Last Name
First Name
Refer to Section 4.3, “Data Entry Conventions”, above.
Middle Name
Middle Name is optional. If entered, it must start with a letter. The remaining characters can be letters, or the
characters" ' ", "-", or "." .
*Date of Birth
Date of Birth must be at least 3 weeks prior to the current date.
Race
Select the patient’s race(s) as identified by the patient. More than one race may be selected.
Patient ethnicity
Select whether the patient is of Hispanic origin, as identified by the patient.
Health insurance
Select all that apply.
Date of Death
Enter the patient’s date of death in mm/dd/yyyy format, if applicable.
*Examination date
Enter the date the exam was completed in mm/dd/yyyy format. The date must not be greater than the current
date.
Name of person who completed the paper form
This is the name of the person who performed the data collection for the exam. If this person’s name was not
previously entered in a case record, then type the person’s first and last name in the corresponding data fields. In
the future, the name will appear in the drop-down list. If the name was previously entered, simply click the arrow
and select it from the drop-down list.
Note: If the paper forms were not used, please populate this field nonetheless. It can contain the name of the
person completing the on-line data submission.
Name of person submitting this form
Submission Date
These fields are filled in automatically.
Click the “Submit” button. You must correct any errors before proceeding to the Exam form. If no errors are detected, a
confirmation message and a link to the Exam form will appear. The case will be assigned an “In Progress” status until the Exam
form is completed and submitted as well.
June 29, 2017 11
LCSR User Guide
4.2.2 Register New Case for Returning Patients
For all returning patients, go to LCSR Data Collection on the LCSR Menu, click on Register New Case, and click the button to
expand the purple Search bar.
Search Bar
Use one of the three key identifiers (the SSN, the Medicare Beneficiary ID, or Other Identification) to locate your returning
patient and then click Find.
Patient Search Filter
The LCSR software will locate the returning patient and auto-populate all data fields in Section 1 of the Case Registration form
with the data stored in the ‘Manage Patient’ list. The ‘Manage Patient’ list would have been auto-populated with the patient’s
profile information during the first New Case registration. In order to prevent duplicating a patient profile, we heavily suggest
careful data entry while providing one or more of the three key patient identifiers.
Please do NOT populate any of the data fields in the new case until after the patient’s profile has been imported into your
current Register New Case form. You may then scroll down the remaining registration form and populating such with current
data, new exam date, etc.
You may click the Submit button if all the required data fields have been completed, if they have not, an error message will
appear across the bottom of the form indicating the data fields that need completion. Once you have completed the form, click
June 29, 2017 12
LCSR User Guide
Submit to advance to the Exam form. If you do not have the data in order to complete the registration form, you can click the
Save button to return to it later, to edit, and then click Submit to advance to the Exam form.
Of note: the LCSR software cannot advance any user to the Exam form until the required data fields, marked with an asterisk,
and are populated.
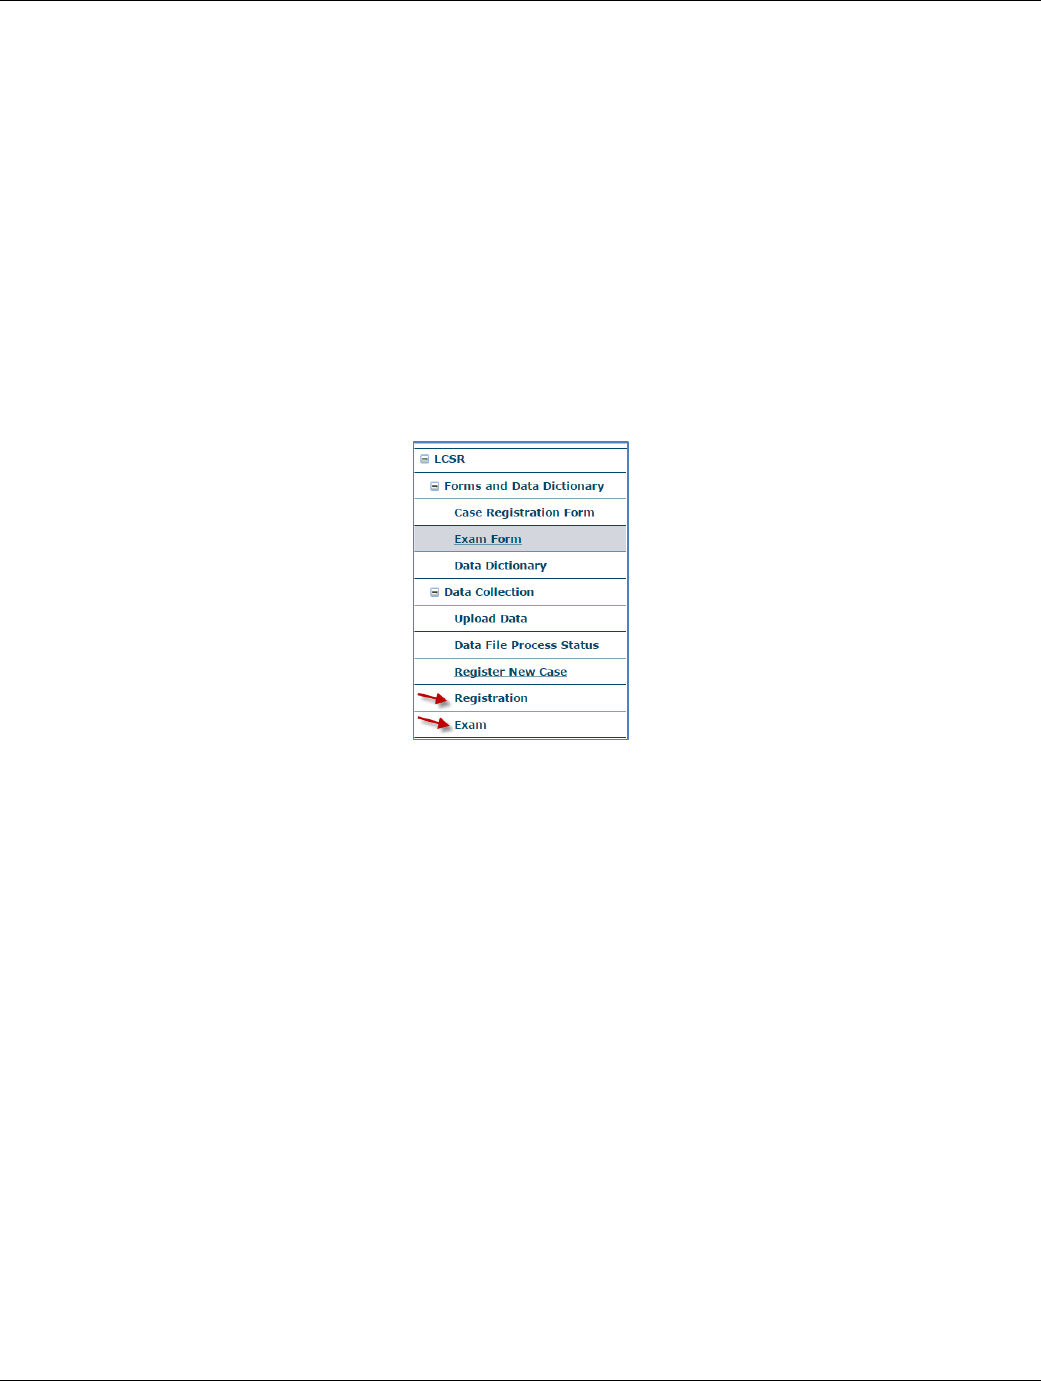
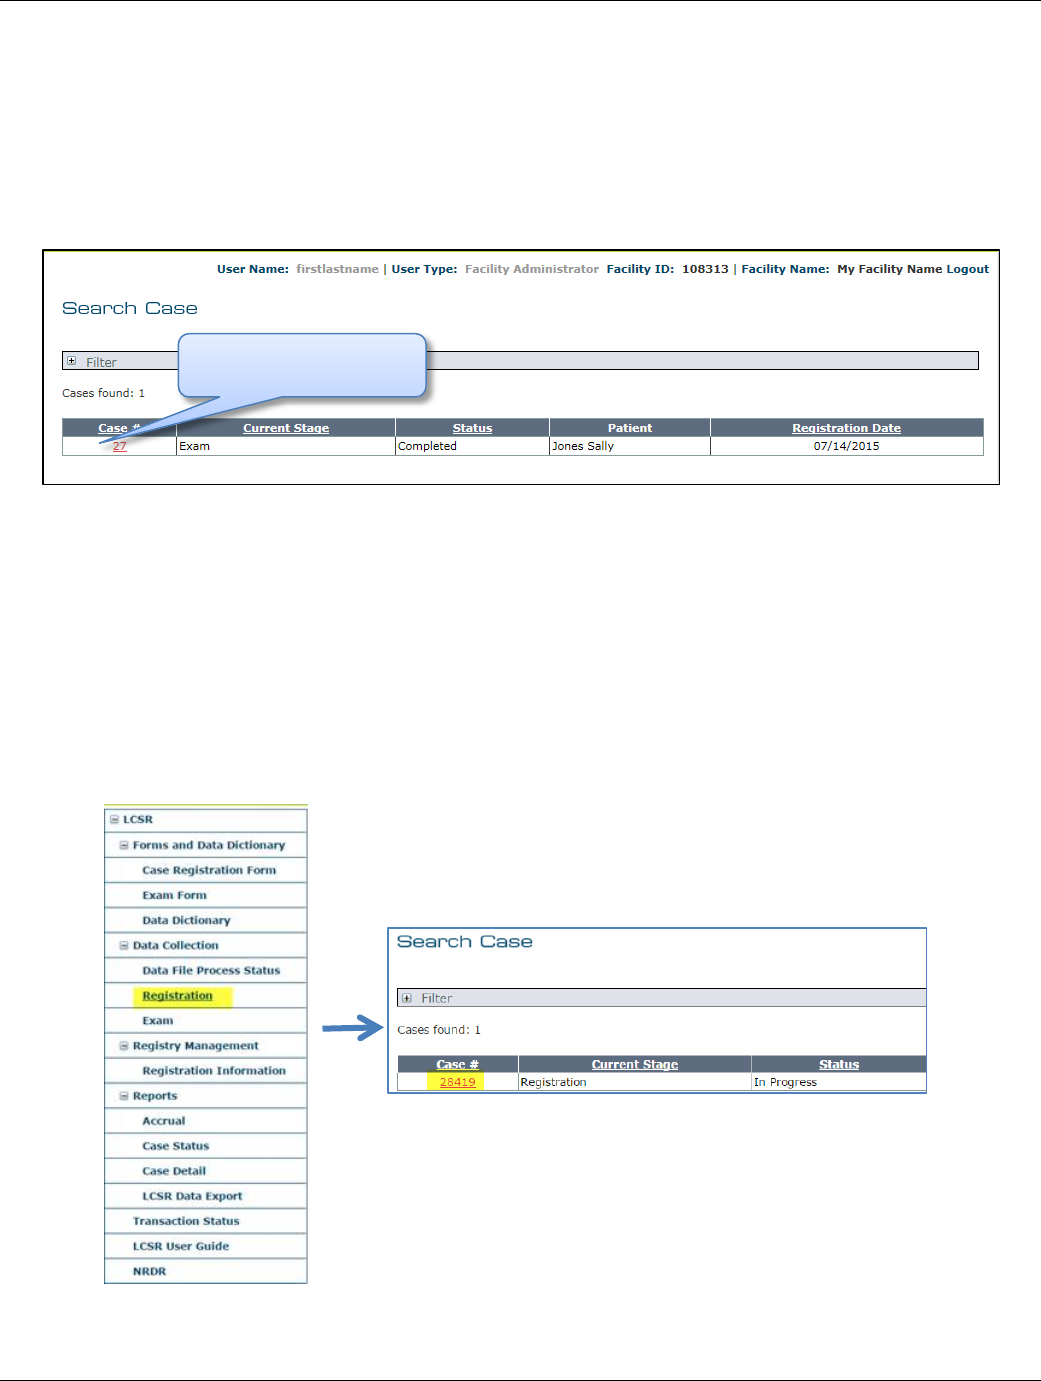
4.2.3 Registration
The “Registration” link located on the LCSR menu is used for editing Case Registration forms that have already been saved or
submitted. The Registration form and the Exam form cannot be edited from the same link on the LCSR menu.
To edit a case Registration form, you must select the Registration link on the side menu. To access the Exam form, you must
select the Exam link on the side menu. Follow the remaining instructions to edit the existing form.
To edit a registration form:
1. Click the “Registration” link in the LCSR menu.
June 29, 2017 13
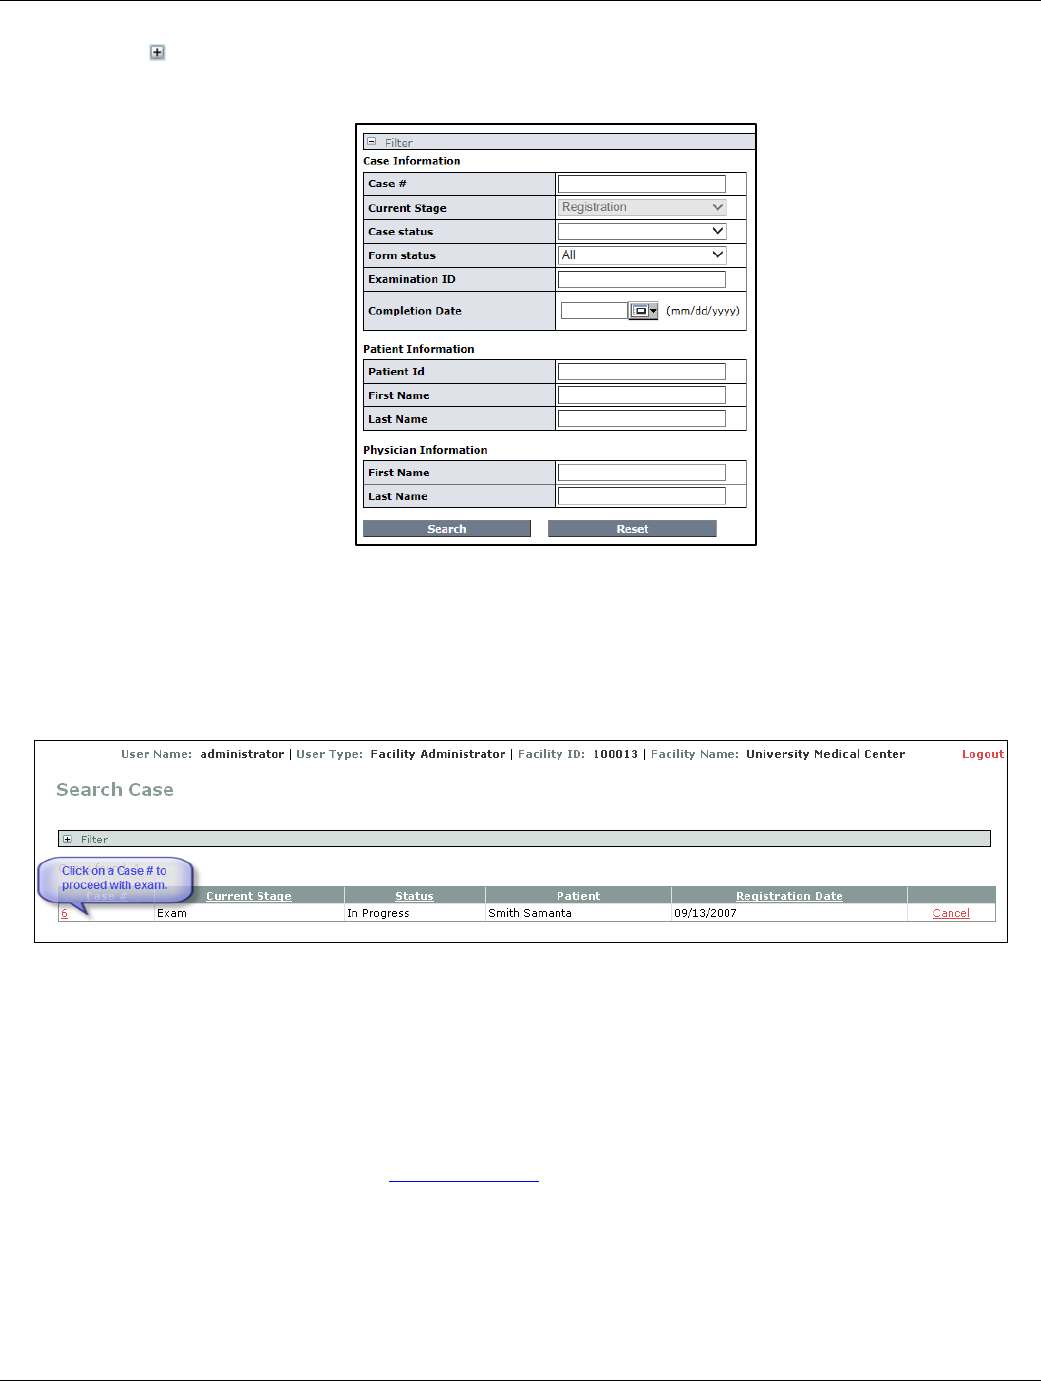
LCSR User Guide
2. Click the button on the search bar, next to “Filter”. The following box appears:
Case Registration Search Filter
3. Narrow the list of forms in the search results by entering values in one or more of the other fields that appear in the
box.
4. Click “Search”. A list of Case Registration forms matching the search criteria appears. You can also click “Reset” to
clear the search fields and start again.
Case Registration Search Results
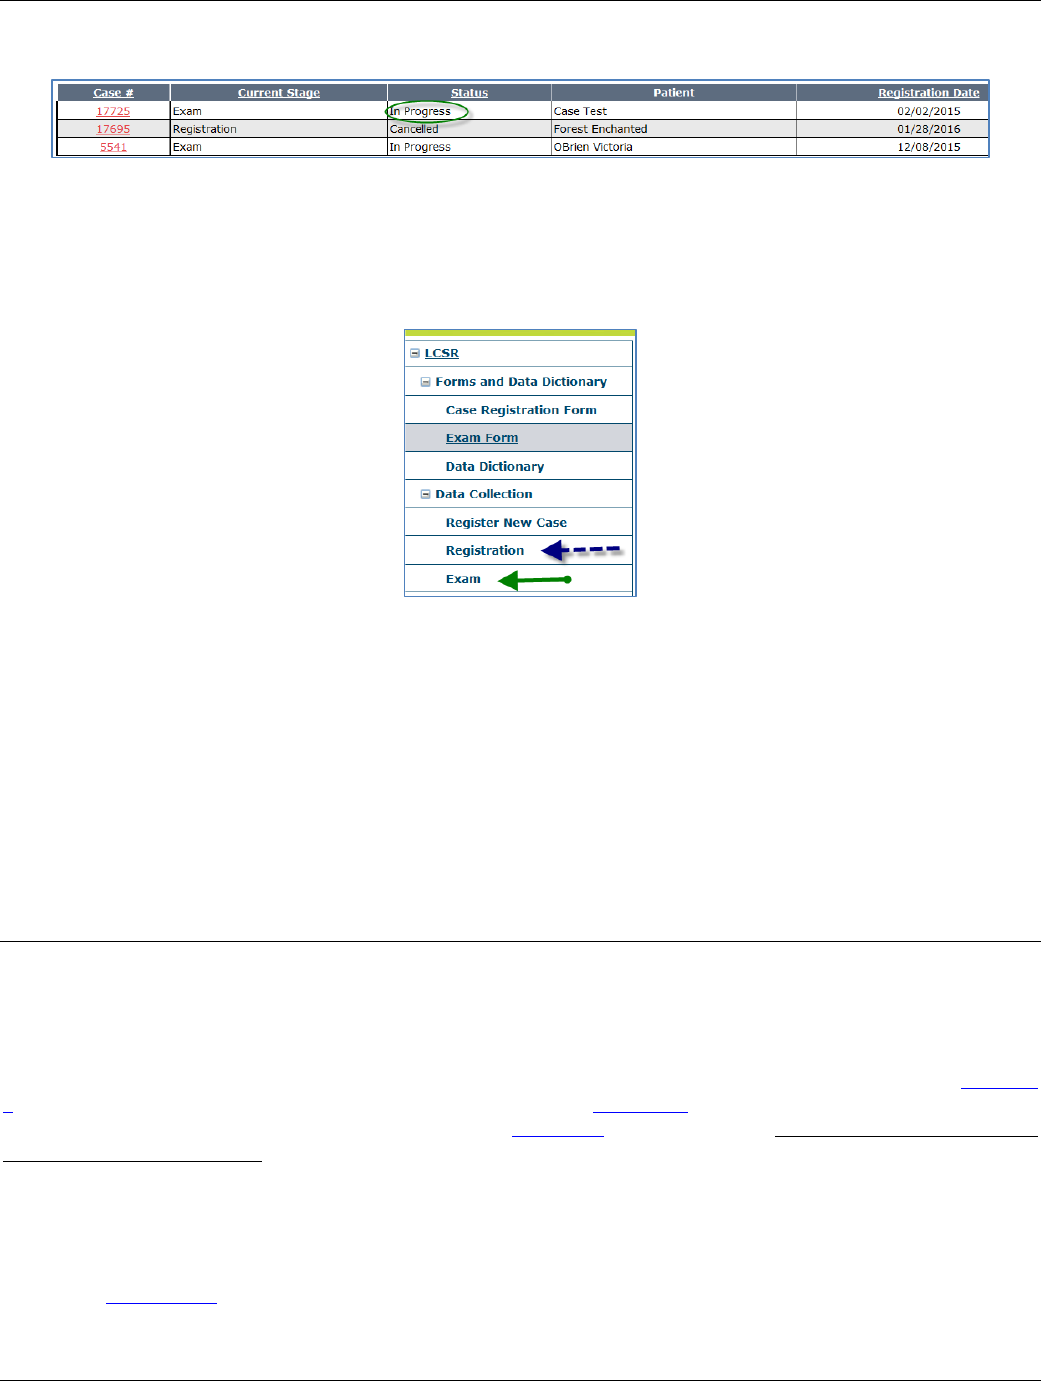
5. Click the case number of the form you want to edit.
Of note: If you are editing a form that has been submitted (by clicking on the Submit button) then you cannot Submit the form
again, however, you will be able to save the form by first adding comments in the comment box, and then by clicking the Save
button. Any new data that has been saved will be incorporated in the next reporting cycle.
Please keep in mind, if you want to register a new case, click the “Register New Case” link under “Data Collection” in the LCSR
menu and follow the instructions as detailed in Register New Case section of this document.
4.2.4 Exam
After you submit the registration form, a link to the Exam form will appear. You can also access the Exam form by clicking
“Exam” under “Data Collection” in the LCSR menu. Complete the form by selecting from among the options presented on the
June 29, 2017 14

LCSR User Guide
form, and filling in the blank fields. All fields are required unless otherwise indicated below. Specific instructions for each field
are as follows:
Facility ID Number
Registry Case Number
Patient First Name
Patient Last Name
Examination Date
These fields are auto-populated with data that was provided in the case registration form.
4.2.5 Section A 'General’
Smoking Status
For current or former smokers, estimate the number of pack-years. One pack-year is the equivalent of smoking one
pack of cigarettes per day for one year. For example, 10 pack-years is the equivalent of smoking one pack of cigarettes
per day for ten years, or two packs of cigarettes per day for five years.
Did physician provide smoking cessation guidance to patient?
Indicate “yes” if guidance was provided by either the imaging or ordering physician.
Is there documentation of shared decision making?
Select the appropriate response.
Patient’s Height
Enter patient’s height in inches.
Of note: If you do not know the patient’s height, please enter the number 0 in the data field. However, moving
forward, we expect you to provide the correct data. The expectation of complete and correct data is specified in the
participation agreement signed by all participating facilities.
Patient’s Weight
Enter patient’s weight in pounds.
Of note: If you do not know the patient’s weight, please enter the number 0 in the data field. However, moving
forward, we expect you to provide the correct data. The expectation of complete and correct data is specified in the
participation agreement signed by all participating facilities.
Other comorbidities listed on patient record that limit life expectancy
Select all that apply.
Cancer related history
Select all that apply.
Radiologist (reading)
Of Note: The physician’s name must be selected from the drop-down list. In order for a physician to be listed as the
reading radiologist, he or she must be listed in the ‘Manage Physician’ list and on the ‘LCSR Registration Information’
page. See Registration Information, below, for data entry instructions to add reading radiologists on both physician
lists. The Physician NPI is filled in automatically from the ‘Manage Physician’ list.
Ordering Practitioner
Enter the first and last name and NPI of the ordering practitioner.
Indication for Exam
Select the appropriate response.
June 29, 2017 15
LCSR User Guide
Modality
Select the appropriate modality.
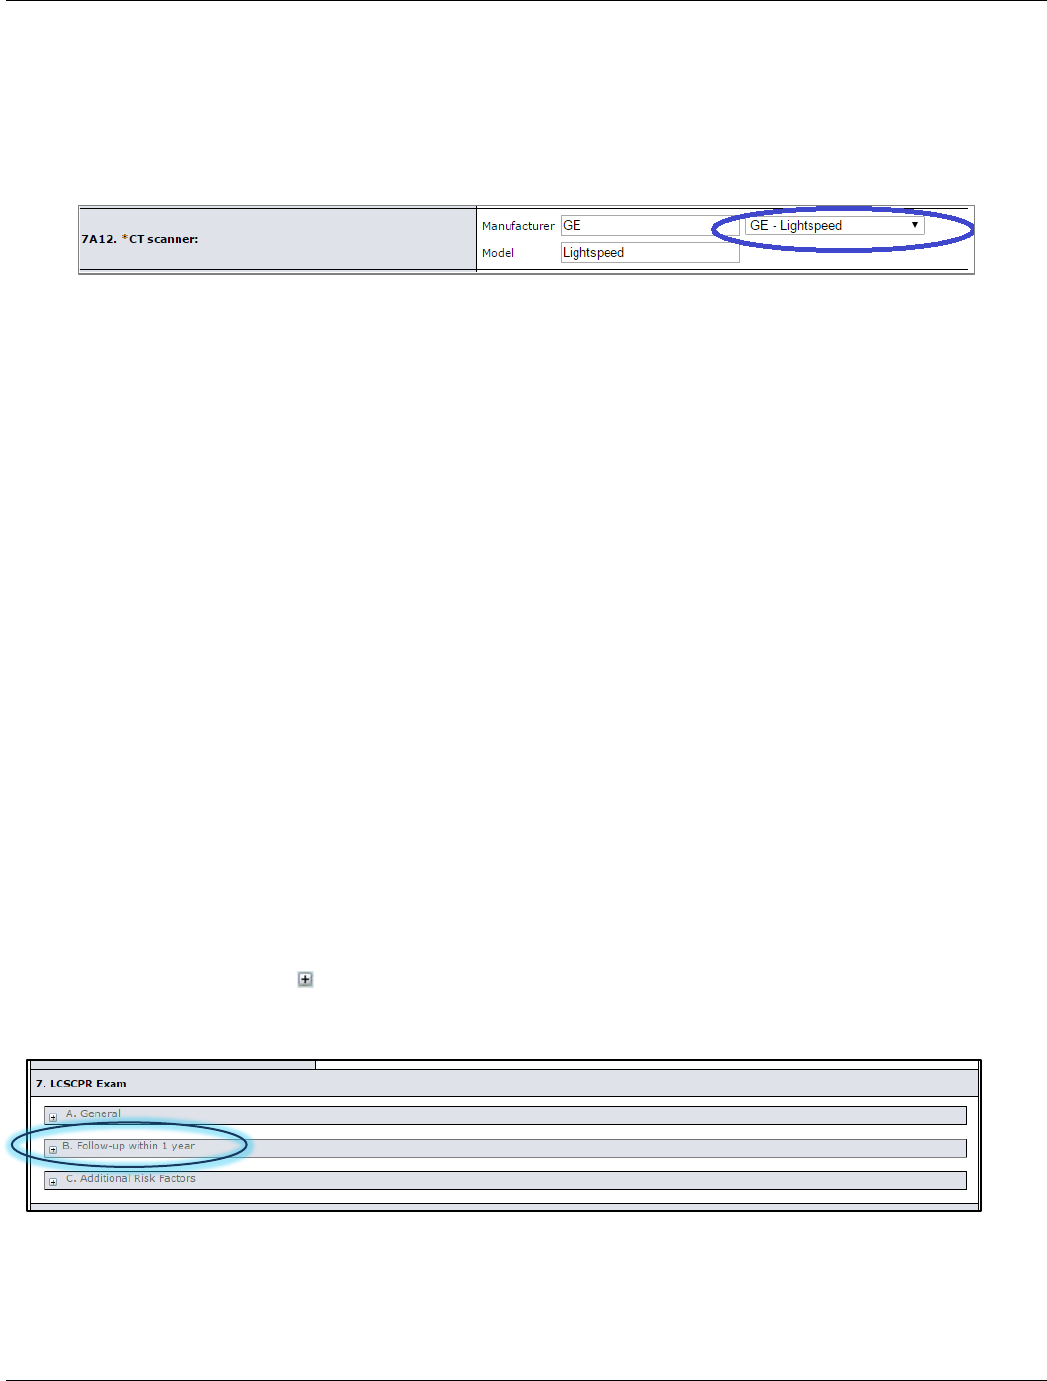
CT scanner
Enter the manufacturer and model of the CT scanner used to perform the exam.
If the scanner has already been entered on a previous record, you can use the drop down box to select the scanner.
Screening CT Radiation Exposure
Enter the exam parameters. Tube current-time, tube voltage, scanning time, scanning volume and pitch are optional.
CT Exam Results by Lung-RADS Category
Select the appropriate response.
Other clinically significant or potentially significant abnormalities – CT exam result modifier S
Select the appropriate response.
Prior history of lung cancer – CT exam result modifier C
Select the appropriate response.
Years since prior diagnosis of lung cancer
Enter number of years as whole number.
4.2.6 Section B ‘Follow-up within 1 year’
A follow-up record may be added for an exam at any time during the year between screening exams. If more than one exam
form exists for a patient, enter the follow-up record on the most recent exam form whose exam date is less than or equal to
the date of follow-up.
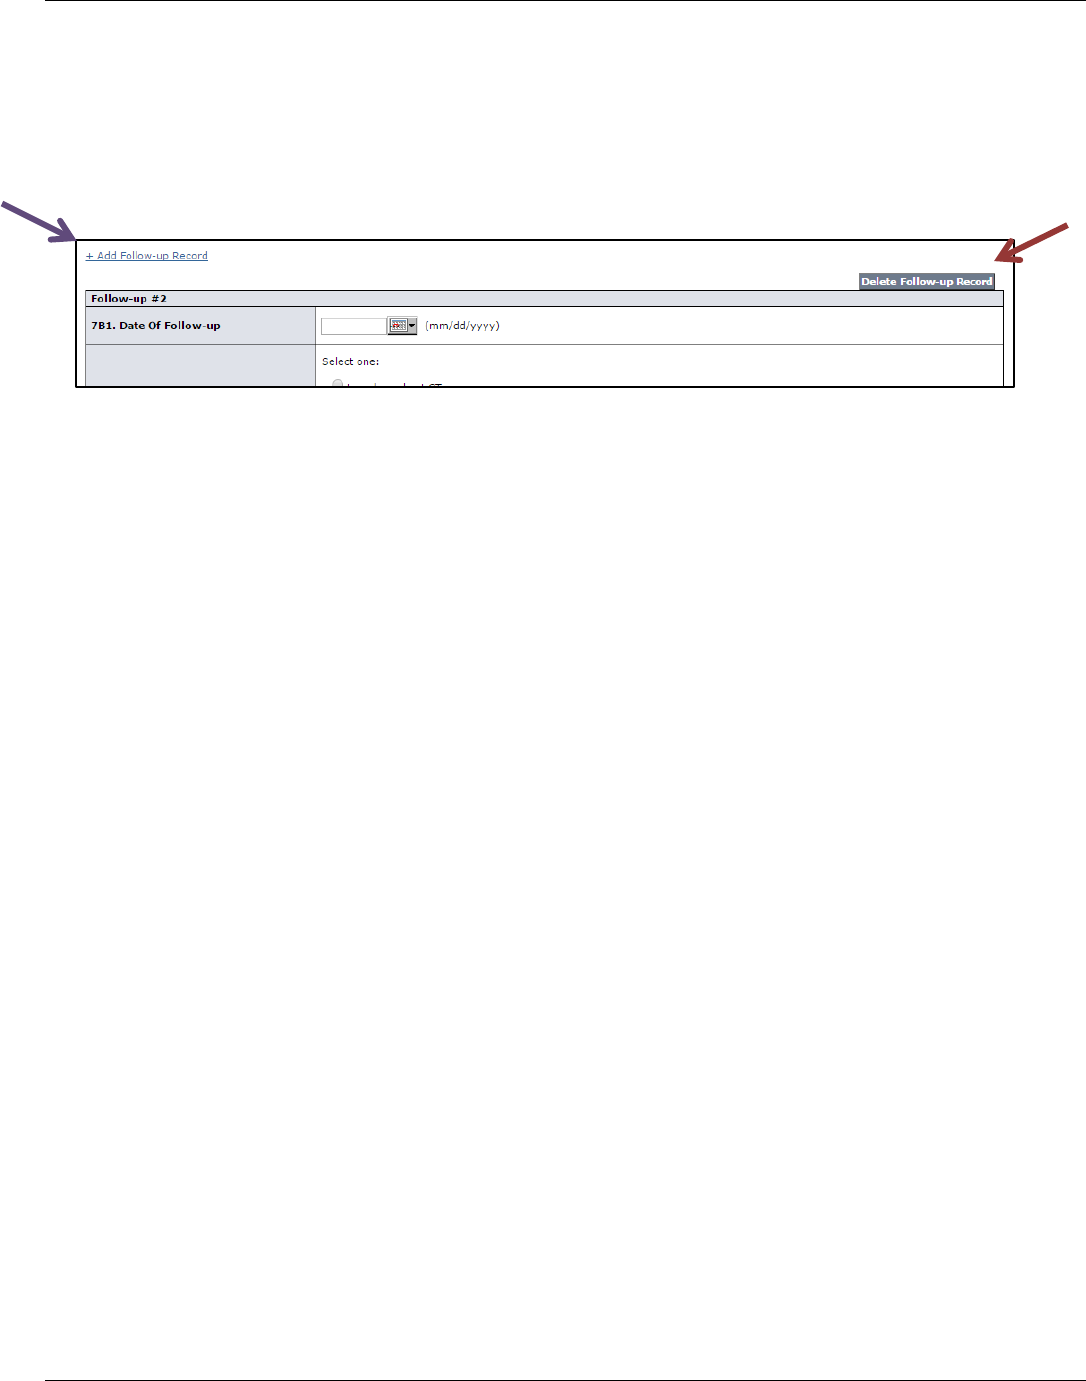
4.2.6.1 Adding Follow-up to a Case
You may add follow-up data to a submitted case by clicking “Exam” under Data Collection for the LCSR menu. Click the
corresponding Case # for the patient for whom you want to add follow-up data. The submitted Exam form will display
previously saved information. Click to expand “B. Follow-up within 1 year”:
June 29, 2017 16
LCSR User Guide
Then click “Add Follow-up Record”. You may enter all required and/or applicable information for the follow-up record.
Remember to click “Save” to add the follow-up data to the Exam form. Every follow-up procedure should have a record on the
Exam form. If you need to remove the record, you may use the “Delete Follow-up Record” button to remove the follow-up
information from the Exam form.
Date of Follow-up
Please enter date in mm/dd/yyyy format.
Follow-up diagnostic
Select appropriate the response.
(The following apply for procedures that resulted in a tissue diagnosis. Not applicable for imaging follow-up.)
Tissue Diagnosis
Select the appropriate response.
Tissue Diagnosis Method
Select the appropriate response.
Location from which sample was obtained
Select all responses that apply.
Histology
Select the appropriate response.
Stage- Clinical or pathologic
Select the appropriate response.
Overall stage
Select the appropriate response.
T Status
Select the appropriate response.
N Status
Select the appropriate response.
M Status
Select the appropriate response.
Period of follow-up for incidence (in months)
Enter number of months as a whole number.
June 29, 2017 17

LCSR User Guide
4.2.7 Section C ‘Additional Risk Factors’ Additional risk factors are optional
Education level
Select patient’s highest level of education
Radiation exposure - documented high exposure levels
Select the appropriate response.
Occupational exposures to agents that are identified specifically as carcinogens targeting the lungs
Select all responses that apply.
History of cancers that is associated with an increased risk of developing a new primary lung cancer
Select all responses that apply.
Lung cancer in first-degree relative
Select the appropriate response.
Family history of lung cancer, other than first-degree relative
Select the appropriate response.
COPD (chronic obstructive pulmonary disease)
Select the appropriate response.
Pulmonary Fibrosis
Select the appropriate response.
Second hand smoke exposure
Select the appropriate response.
Name of Person Who Completed the Paper Form
This is the name of the person who performed the data collection for the exam. If this person’s name was not
previously entered in a case record, then type the person’s first and last name in the corresponding data fields. In the
future, the name will appear in the drop-down list. If the name was previously entered, simply click the arrow and
select it from the drop-down list.
Note: If the paper forms were not used, please populate this field nonetheless. It can contain the name of the person
completing the on-line data submission.
Name of Person Submitting This Form
Submission Date
These fields are filled in automatically.
Click the “Submit” button when the form is complete. The case will be assigned “Completed” status.
4.3.1.1 Data Entry Conventions
Please note the following when entering data:
Dates must be entered in mm/dd/yyyy format.
First and last names must be 45 characters long or less. At least 1 characters must be from the characters from "A” to
“Z", "a” to “z", or " ' ". Additional characters can include a hyphen (“-").
June 29, 2017 18
LCSR User Guide
Data elements defined as alphanumeric, other than first and last names, must include the characters “A-Z”, “a-z”, “0-
9” or “_” (underlining) only.
Entries must not contain leading or trailing blanks.
Sections 1 and 4.2.4 contain information regarding the format used for entries on specific forms. Clicking the
button that appears next to some entries will also display format information in many cases.
Many items on the LCSR forms provide a list of possible values, as well as a field labeled “other, specify” where an
alternative value may be provided. Unless otherwise specified, entries in these fields must be 255 characters long or
less.
4.3.2 Saving a Partially Completed Form
If you want to save a partially completed form, click the “Save” button at the bottom of the form. You will be able to continue
entering data on the form at a later time. You will not be able to start entering data on an Exam form until the corresponding
Case Registration form is complete.
If you end your session without clicking the “Save” button, or without correcting errors after clicking the “Submit” button, your
entries will be lost.
‼ Note: for security purposes, your session will terminate automatically after 20 minutes of inactivity. Any entries you
may have made since clicking the “Save” button will be lost.
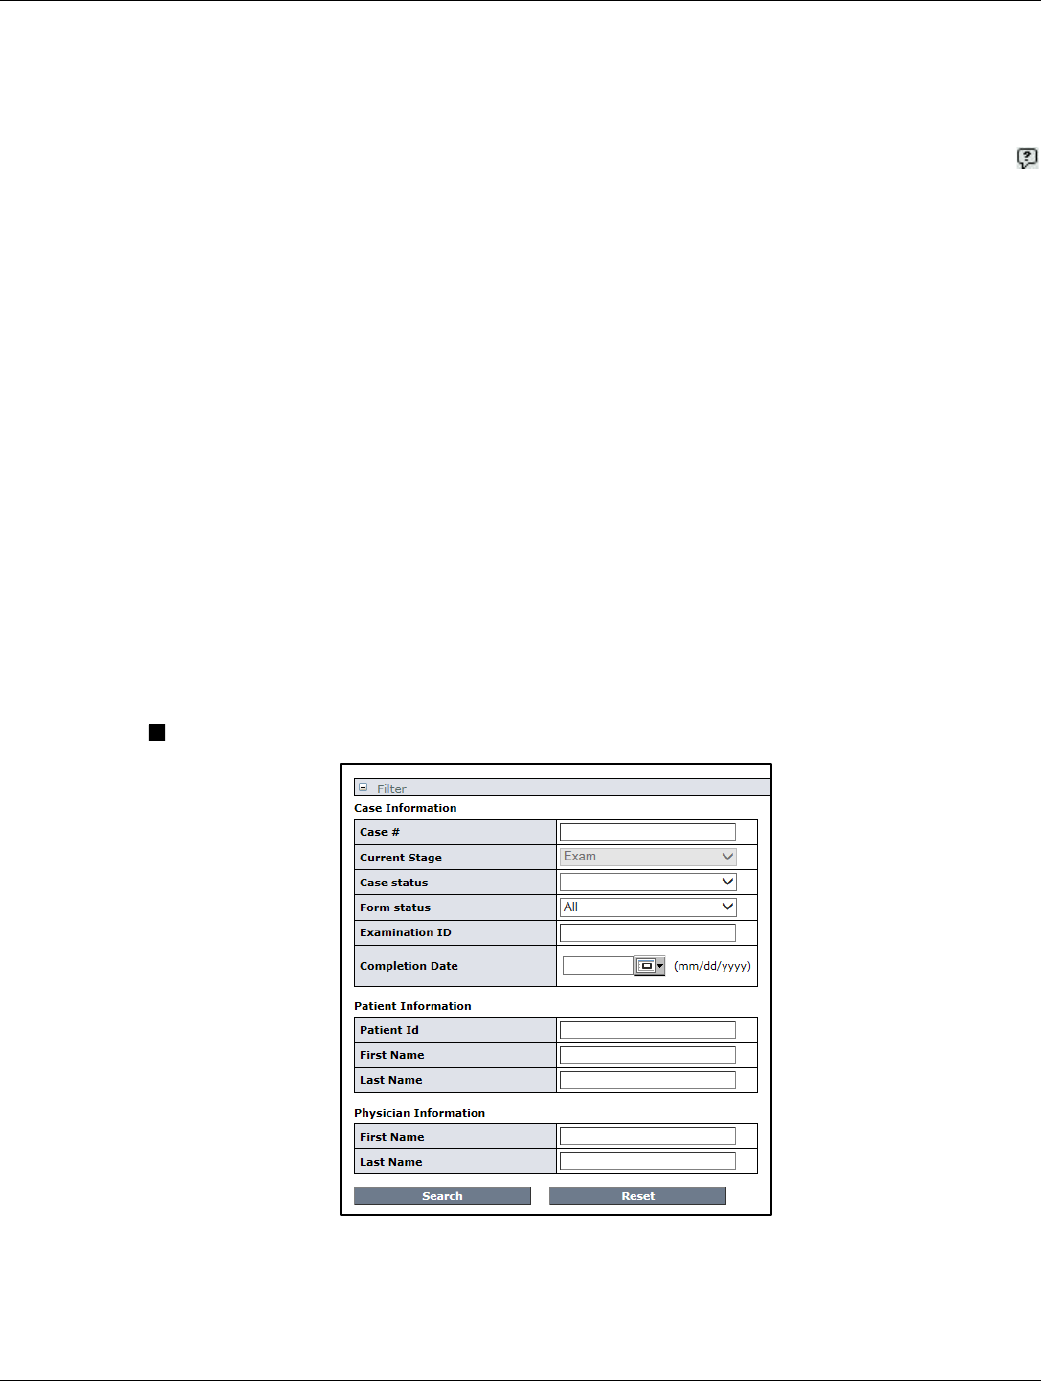
4.3.3 Finding a Form
To find a form that has already been saved or submitted, do the following:
1. Click “Registration” or “Exam” under “Data Collection” in the LCSR menu.
2. Click the button on the search bar, next to “Filter”. The following box appears:
Form Search Filter
3. To find all forms, leave the “Form Status” field unchanged as “All”. To find only forms that have already been
submitted, change “Form Status” from “All” to “Submitted” using the drop-down list. To find forms that have been
saved but not submitted, change “Form Status” to “Available”. To find forms that have been cancelled, change “Form
June 29, 2017 19
LCSR User Guide
Status” to “Cancelled”. You can narrow the list of forms in the search results by entering values in one or more of the
other search fields, such as “First Name” or “Last Name”.
4. Click “Search”. A list of forms matching your search criteria appears. You can also click “Reset” to clear the search
fields and start again.
Search Results
5. Click the ‘Case ID’ to launch the form.
4.3.4 Editing an ‘In-Progress’ or ‘Completed’ Form
To complete an In-Progress case record, or to make changes to a previously submitted case record, go to LCSR menu on the
left-hand side, and click on Registration to view the case list. Click on the ‘Case ID’ within the case list to launch the case record.
LCSR Case List Table
Once the case registration record is open; you may complete or edit the desired data fields, scroll to the bottom and click
‘Submit’ to complete a form. After you have submitted a form, you cannot submit it again, however you can save any edits you
have made to the form.
Click on a Case # to proceed
with exam.
June 29, 2017 20
LCSR User Guide
Of Note: Additional edits that have been made to a form between reporting cycles will be reflected in the next report.
LCSR Case Registration Form
If you have made edits to a previously submitted form, then you must enter a comment in the field at the bottom of the page,
to explaining the changes made to the form. Comments cannot exceed 250 characters. Afterwards, you may click the “Save”
button.
Field for Entering Change Description
If any errors appear in red, scroll up the form and make the corrections.
Save and Submit Options
Of note:
1. -if you receive an error that requires an SSN and you do not have one, scroll to the top to locate the SSN data field, and click
inside the ‘Refused to provide SSN’ to remove the error message.
2. -If you receive an error that requires a Medicare Beneficiary ID but your patient is not enrolled in Medicare, scroll to the top
of the form, and click inside the ‘Yes’ circle for ‘None/Refused to Answer’ to remove the error message.
3. -If the SSN and Medicare Beneficiary ID have not been provided, you must provide some other form of identification, eg.,
medical record number, in the ‘Other Identification’ field.
It is imperative to provide one of the three key patient identification methods above in order to proceed to the Exam form.
This image cannot currently be displayed.
June 29, 2017 21
LCSR User Guide
Patient SSN, MBI and Other ID
Once the errors have been corrected, go to the bottom, complete the comment section, and click ‘Submit’. The page will
refresh with a message to advance to the Exam form where you can continue with data entry.
‼ Note: The system does not save historical data. Once you save a form with changes, the values that were previously in
the edited fields are lost.
When you make a change to a form that has previously been submitted, the system saves your name, the date the change was
made, and the corresponding comment. You can click the “History” button at the bottom of the page to view information
about previous changes.
History Display
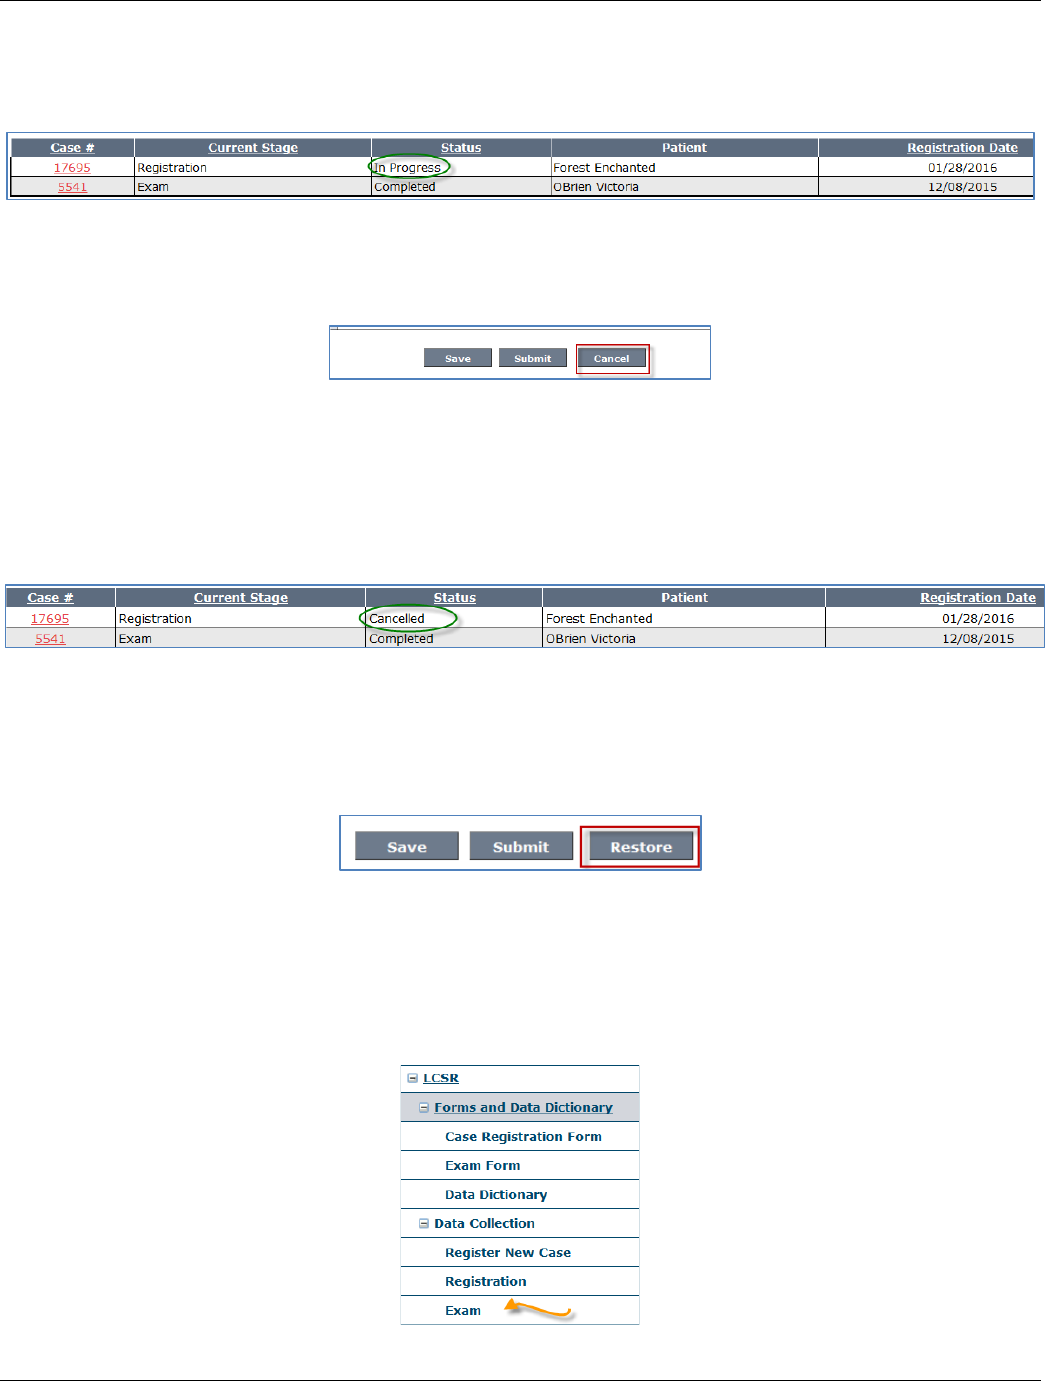
4.3.5 Cancelling a Case
To cancel a case, click ‘Registration’ under “Data Collection” on the LCSR menu. Click ‘Registration’ and allow the page to
refresh (note: It is not possible to delete a record permanently). The status for the list of cases may vary. For ‘In Progress’ and
‘Completed’ status case records, please review the procedures as indicated below.
LCSR Menu Options
June 29, 2017 22
LCSR User Guide
A. ‘In Progress’ status when both the Registration and Exam Forms Have Been ‘Saved’: Locate the case record you want
to cancel from the list of cases. Click on the ‘Case #’ to open the case record. Scroll to the bottom of the case to locate
the ‘Cancel’ button.
Registration: Case Record List
Click ‘Cancel’ to change the ‘In Progress’ status to ‘Canceled’ status.
Registration Form ‘In Progress’ Showing “Cancel” Button
To review the change in status, click ‘Registration’ from the menu, and reopen the list of cases. The revised case list will show
the change in status as ‘Cancelled’.
Registration: Case Record List with Cancelled Status Record
If you canceled a case record in error, go to the case list from the ‘Registration’ link (to open the list of cases), select the record
using the ‘Case #’, scroll to the bottom and click ‘Restore.’
Restoring a Case Previously Canceled
B. ‘In Progress’ status when only the Registration Form Has Been ‘Saved’: If there is only a submitted case registration
form (and no exam form) then the registration record status will be ‘In Progress’ and cannot be accessed using the
‘Registration’ link on the menu. You must use the ‘Exam’ link to open and access the case list. Select the case record
from the list by using the ‘Case #’, allow the form to open and scroll to the end of the form. Click ‘Cancel’.
LCSR Menu Options
June 29, 2017 23
LCSR User Guide
Exam: Case Record List with In-Progress Status Record
C. ‘Completed’ status: Cancelling a ‘Completed’ case record is a two-step process if both the Registration and the Exam
form have both been ‘Submitted’. Make sure to cancel the exam form first by doing the following:
LCSR Menu Options
1. Go to the ‘Exam’ link on the menu (green arrow), click on it to open the list of cases. Click on the case record using the
‘Case #’ to open it, then scroll to the bottom and click on the ‘Cancel’ button.
2. Once the ‘exam’ form is canceled, click on the ‘Registration’ link (blue arrow) on the menu to view the list of case
records. You will notice that your Registration form is now in the ‘In Progress’ status; select the case record using the
‘Case #’, when the case opens, scroll to the bottom and click the ‘Cancel’ button.
To review the change in status, click ‘Registration’ from the menu, and reopen the list of cases. The revised case list will show
the change in status as ‘Cancelled’.
4.5. Flat File Upload
Rather than entering one case at a time according to the manual entry data process, you can upload many case records at a
time using the specifications and instructions provided below.
4.5.1 Populate and Configure the LCSR Data File
Before using the file specifications to create your data file, you may need to change the settings on your PC first (See Appendix
1 for change settings instruction). Afterward, use the information in Appendix 2 to configure the data file itself. All data
mapping definitions and business rules have been provided in Appendix 3 for a flat file upload and must be adhered to in order
to facilitate a successful upload.
4.5.2 Upload LCSR Data File Instructions
1. Log in to NRDR portal using your log-in credentials and password
2. Click the LCSR link located on the menu on the left-hand side of the page
3. Click the Upload Data link
June 29, 2017 24
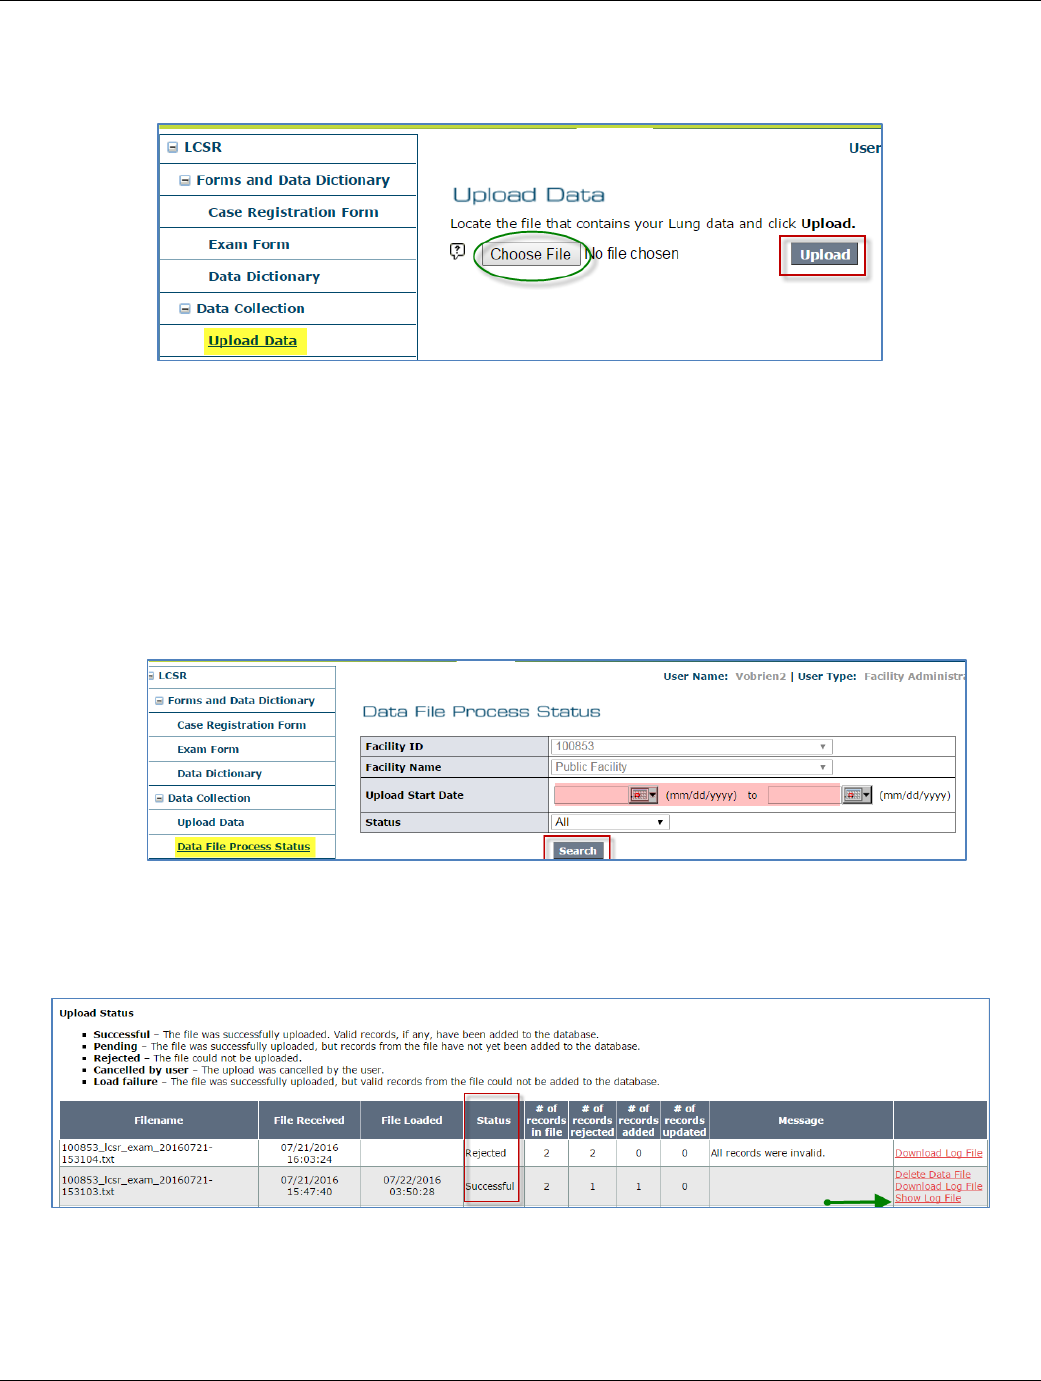
LCSR User Guide
4. Click Choose File to select your data file
5. Click Upload
LCSR Upload Data page
Note: The NRDR does not load the data files right away; they are placed in a queue and will be loaded by a
scheduled job.
4.5.3 LCSR File Upload Status
The data file upload status can be checked using Data File Process Status located on the LCSR menu. If you have
many data file uploads to review consider using a query by date, otherwise, leave the date range blank to view all
your data file uploads.
LCSR Data File Process Status
1. The ‘Status’ column displays the file upload status. The Upload File Status table also lists the ‘# of records in
the file’, ‘# of records rejected’, ‘# of records added’, and the ‘# of records updated’.
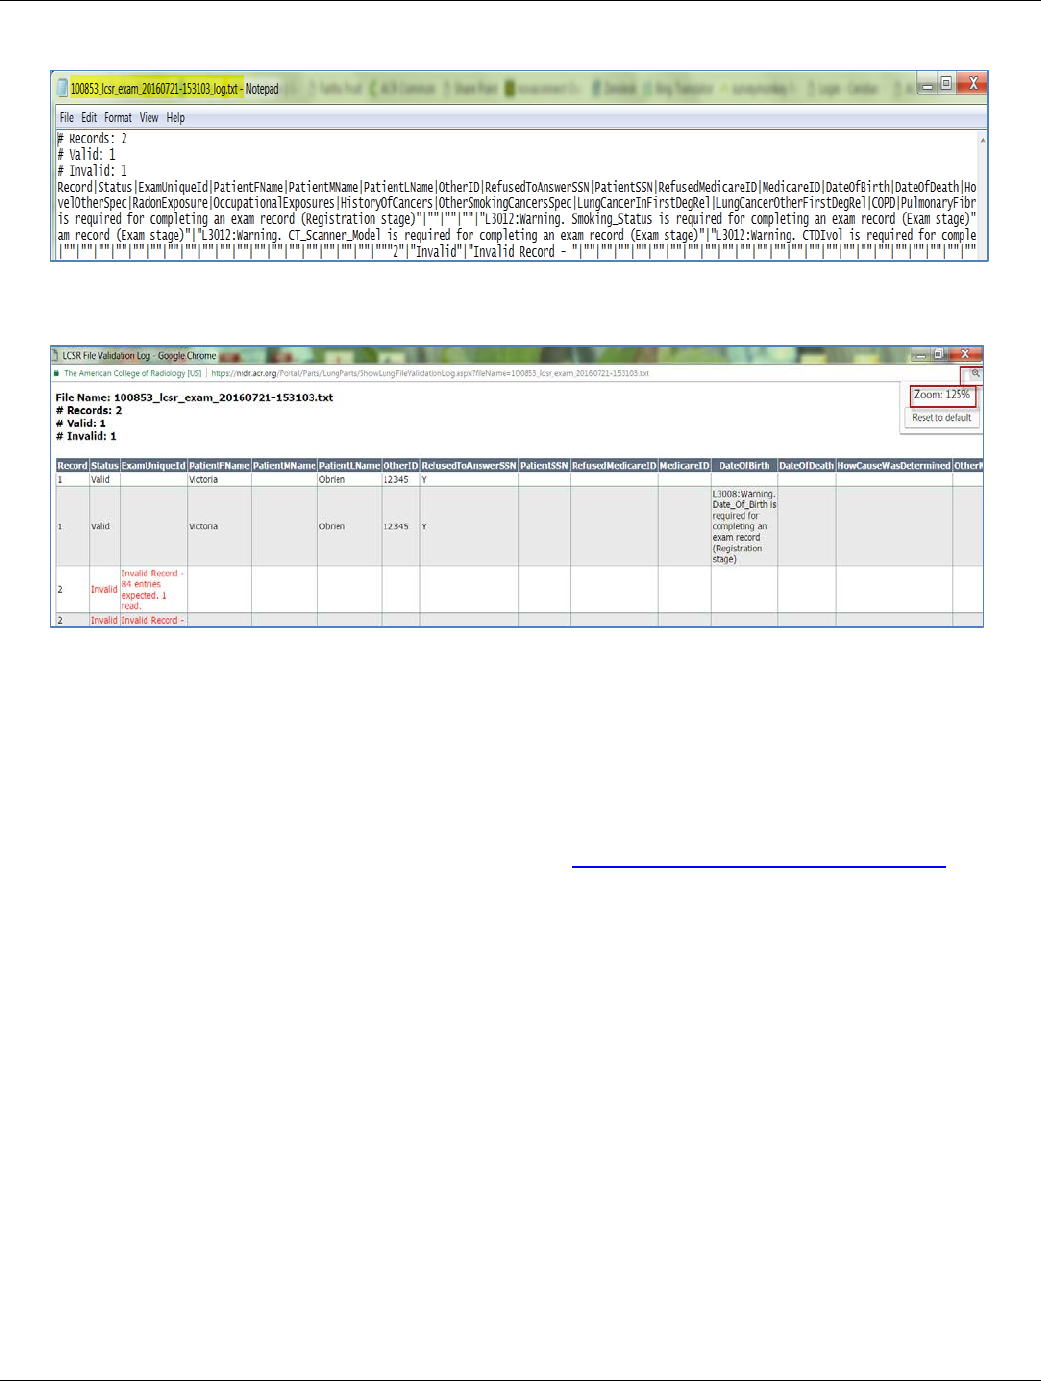
2. The log files (far right column) will display error messages/warnings for invalid/rejected cases and can be
downloaded and opened in Excel. You may select from the ‘Download Log File’ to view the data in .txt, or,
you may select ‘Show Log File’ which displays messages in a cleaner format. We recommend ‘Show Log File’
for users who are not familiar with .txt documents.
June 29, 2017 25
LCSR User Guide
Download Log File - Sample
Show Log File - sample
3. For files that are successfully uploaded, the cases will be uploaded to the database. However, the case
status (whether Completed or In-Progress) cannot be determined from the Upload File Status table. Users
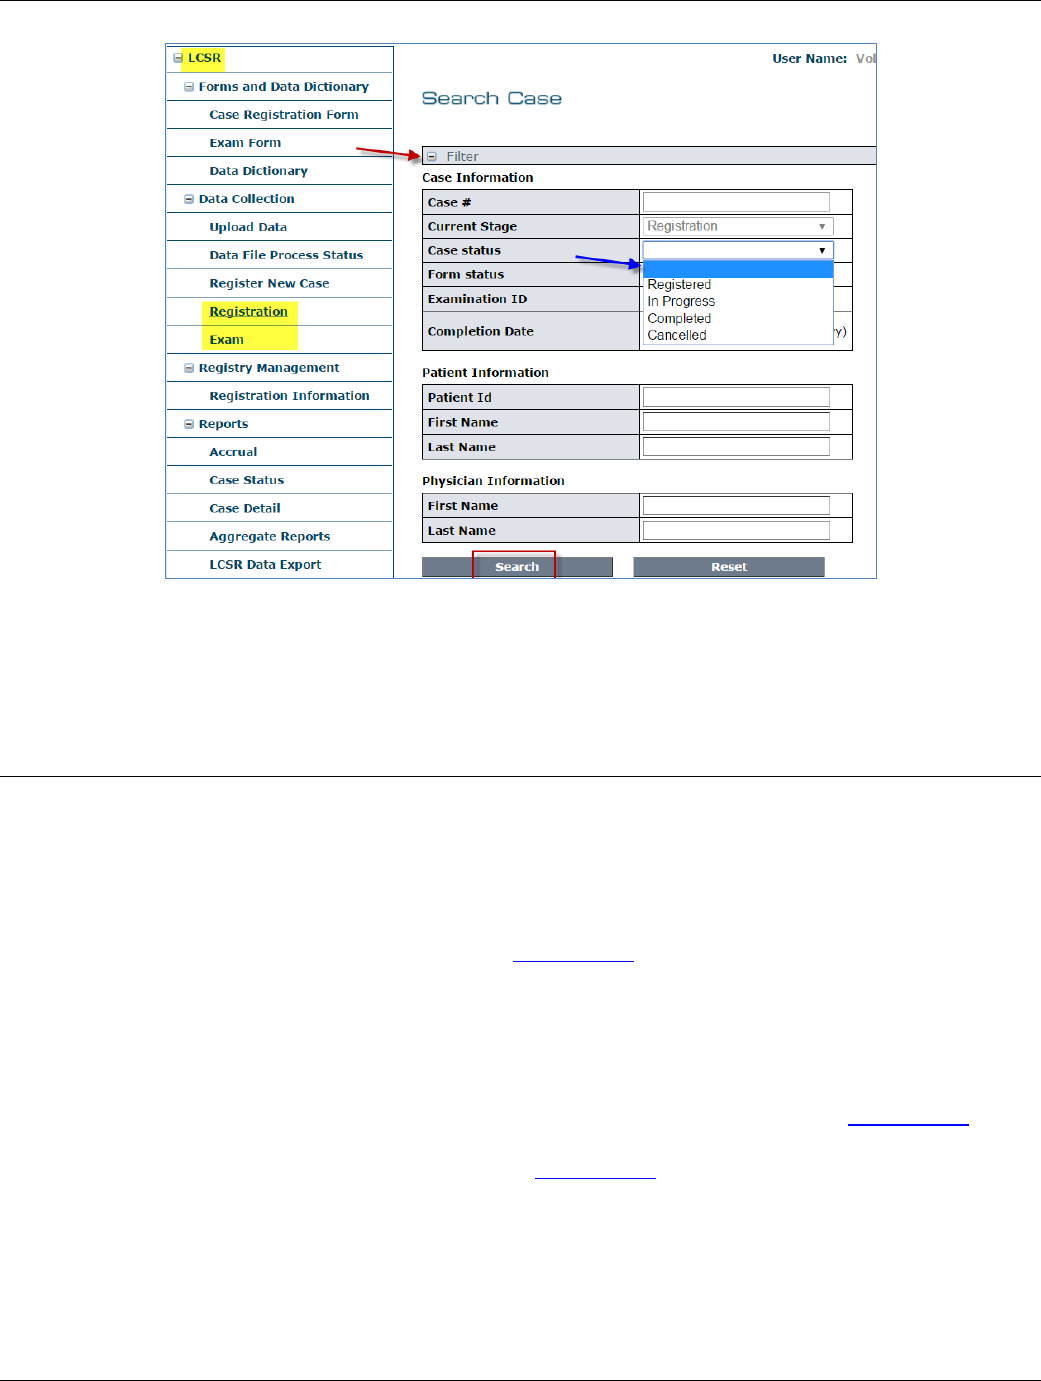
will have to navigate to ‘Registration’ or ‘Exam’ located on the LCSR menu. Click on ‘Filter’ to open the
filter window (red arrow), and choose from ‘Case Status’ (blue arrow) to review any In-progress case
records which will be in need of completion.
To complete a case record, please review instructions for “Editing an In-Progress or Completed Form” in the
sections above.
June 29, 2017 26
LCSR User Guide
LCSR Registration/Exam Search Case
4.6. Web-based Data Transmission & Vendor Certification Process
Thank you for your interest in submitting data electronically to the LCSR. Software vendors and interested facilities
are required to be authenticated by the ACR Connect service in order to submit data to the LCSR registry. Our ACR
Connect Authentication Service document is available upon request and describes the necessary steps for data
submission.
1. Request the following documents below via email to nrdr@acr.org.
• ACR Connect Authentication Service
• ACR LCSR JSON Mapping
• NRDR LCSR Exam Data Exchange
2. Once received, please review the documents. If you have any questions, send an e-mail to nrdr@acr.org
requesting clarification.
3. When you are ready to begin testing, send an e-mail to nrdr@acr.org to request credentials to our testing
environment.
June 29, 2017 27
LCSR User Guide
5. REPORTS
5.1. Reports Overview
You can view the following reports from the LCSR website. Make your report type selection directly from the LCSR menu.
Accrual Report (available to Facility Administrators and Registry Administrators only)
Case Status Report
Case Detail Report
Aggregate Reports (provided by ACR on a quarterly reporting cycle)
LCSR Data Export
o Case Report
o Exam Report
You can only view data from your own facility. Reports are displayed in new browser windows. To navigate report pages shown
as HTML documents, use the navigation buttons: To print a report shown as an HTML document, click
the button. To zoom in on or out of a report shown as an HTML document, select a scale percent from the drop-down list.
To export a report shown as an HTML document, in Excel format, click the “Export to Excel 97-2000” button in the toolbar at
the top of the page:
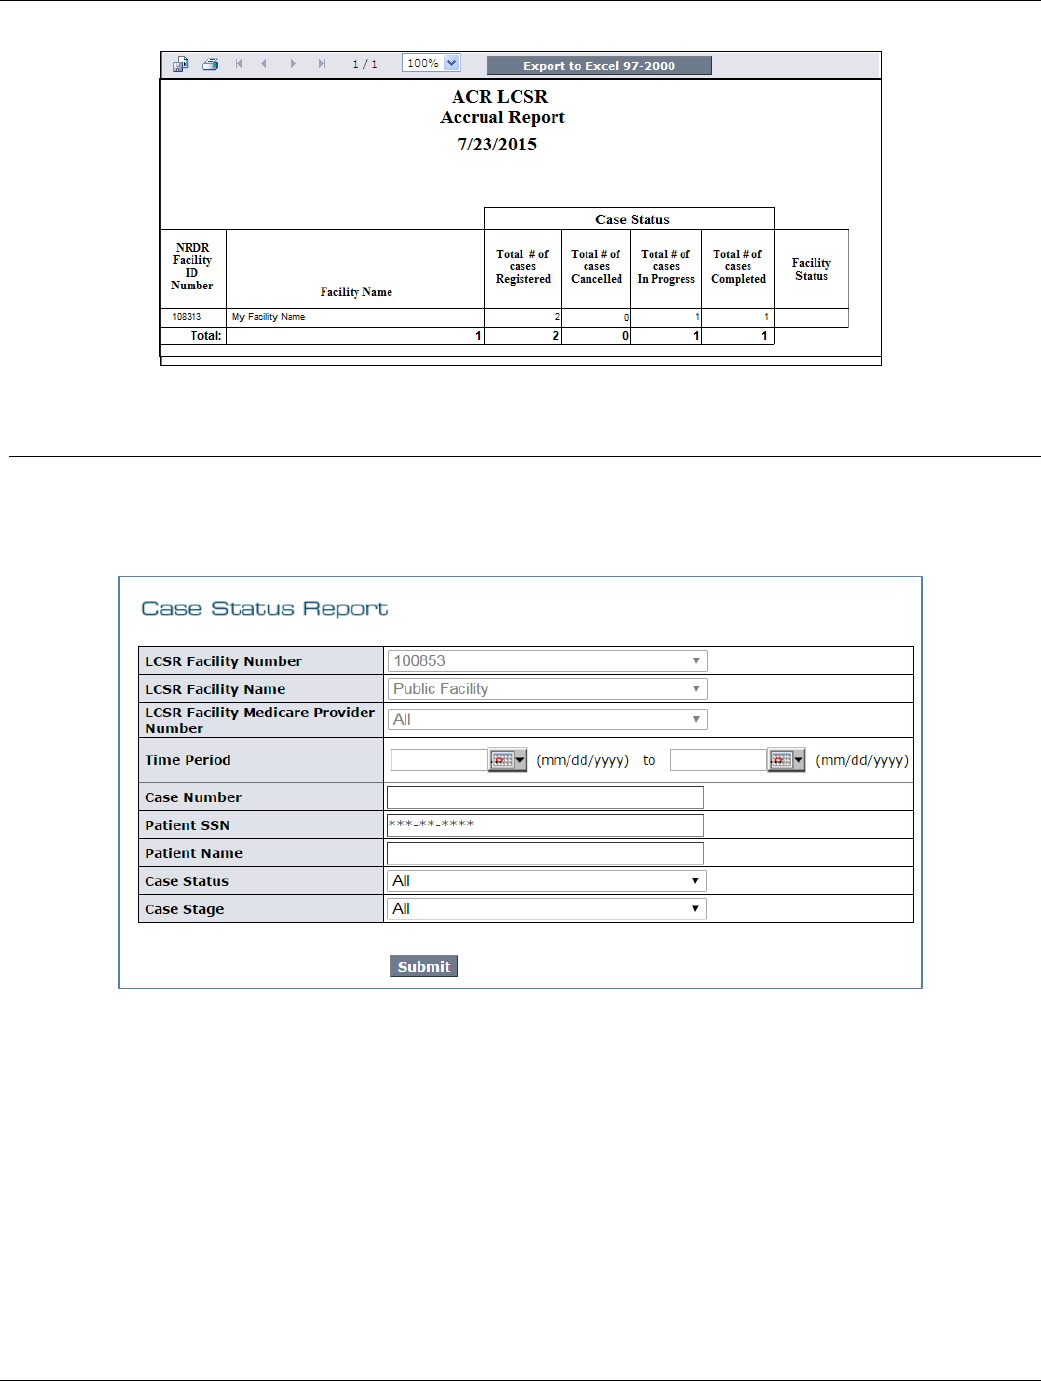
5.2. Accrual
The Accrual Report shows the number of cases that have been registered, cancelled and completed at your facility, as well as
the number of cases in progress. To view the report, click “Accrual” under “Reports” in the LCSR menu. The report appears as
an HTML document. Only Facility Administrators and Registry Administrators can view this report.
June 29, 2017 28
LCSR User Guide
LCSR Accrual Report
5.3. Case Status
The Case Status Report shows patient ID, patient SSN, physician, case status, and form submission dates for each case. All users
can view this report.
To view the report, click “Case Status” under “Reports” in the LCSR menu. The Case Status Report filter appears:
Case Status Report Filter
The LCSR Facility Number, LCSR Facility Name and LCSR Facility Medicare Provider Number are automatically filled in and
cannot be changed. You can narrow the cases that will appear in the report by entering search criteria in any of the other
fields shown. If you leave all fields blank, the report will include all cases for your facility.
To run the report, click the “Submit” button. The report will appear in a new window as an Excel spreadsheet.
June 29, 2017 29
LCSR User Guide
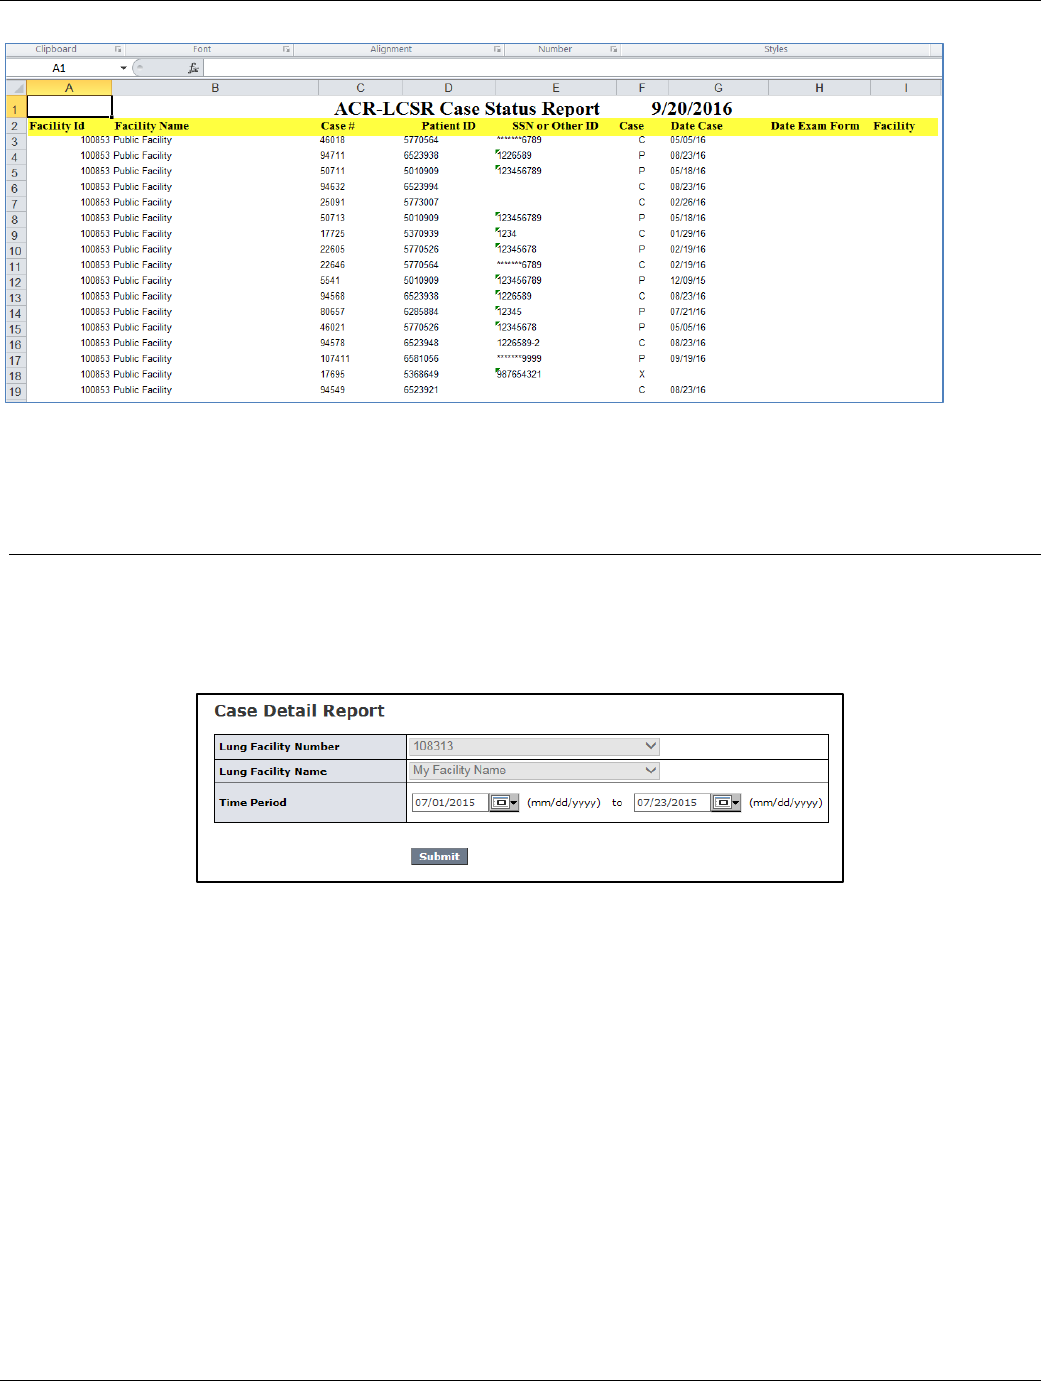
Case Status Report Results - Sample
5.4. Case Detail
The Case Detail Report shows most data elements from each case, with one row per case. All users can view this report.
To view the report, click “Case Detail” under “Reports” in the LCSR menu. The Case Detail Report filter appears:
Case Detail Report Filter
The LCSR Facility Number and LCSR Facility Name are automatically filled in and cannot be changed. You can narrow the cases
that will appear in the report by entering search criteria in any of the other fields shown. If you leave all fields blank, the report
will include all cases for your facility.
To run the report, click the “Submit” button. The report will appear in a new window as an Excel spreadsheet.
June 29, 2017 30
LCSR User Guide
Case Detail Report Result- Sample
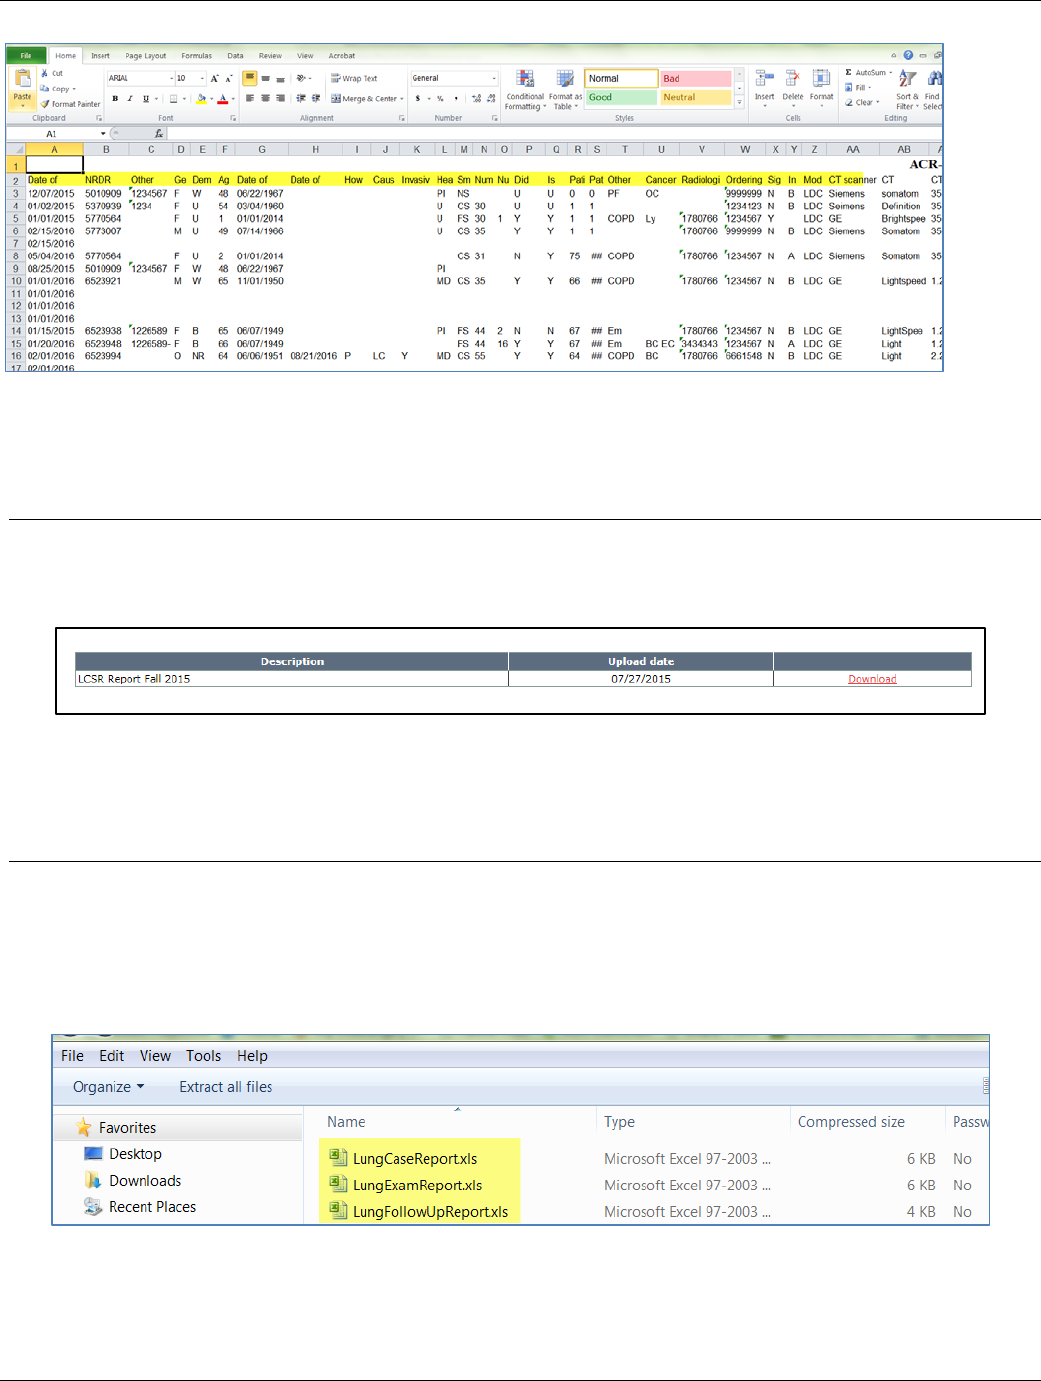
5.5. Aggregate Reports
At the end of each reporting period, your facility will be provided with a report comparing your data with aggregate data from
other LCSR facilities. You can view a list of these reports by clicking “Download Reports” in the LCSR menu.
List of reports available for downloading
You can download a report by clicking the “Download” link on this page.
5.6. LCSR Data Export
Clicking “LCSR Data Export” in the LCSR Menu generates three tables: the Lung Case Report, the Lung Exam Report and the
Lung Follow-Up Report. These reports show your facility’s data as provided in the registration and exam forms. Each table
opens in a new window as an Excel spreadsheet and may appear as a zip file. Click on the zip file to allow the reports to
populate to your PC.
There is no filter to restrict the data displayed; data from all forms submitted by your facility will be included.
LCSR Data Export
Each file can then be opened as an Excel document from your PC.
June 29, 2017 31

LCSR User Guide
Lung Case Report - Result (Detail) Sample
Lung Exam Report - Result (Detail) Sample
Lung Follow-up - Result (Detail) Sample
6. REGISTRY MANAGEMENT
6.1. Registration Information
You can view information about your facility’s LCSR registration by clicking “Registration Information” under “Registry
Management” in the LCSR menu.
June 29, 2017 32
LCSR User Guide
If your facility is not an LCSR participant, and you are the Facility Administrator, you can register for the LCSR by entering the
number of participating radiologists in the first field and clicking the “Registration” button. Refer to Section 2.3.4, “Lung
Cancer Screening Registration”, in the NRDR User Guide for more information.
6.1.1. Adding or Removing Participating Physicians
In order for a physician to be listed as the reading radiologist on a LCSR Exam Form, he or she must be listed as a LCSR
participant in the ‘Manage Physician’ list. You can indicate that a physician is a LCSR participant by clicking the “Add Physician”
button on the “Registration Information” page.
Of Note: An adding reading radiologist to the NRDR and LCSR data pages is a two-step process. First add the radiologists’
information to “Manage Physicians” list on the NRDR Homepage for your facility’s registration as specified below in Step 1,
then import the radiologists’ names to the LCSR Registration Information page by following the instructions below in Step 2.
Once the reading radiologists’ names appear in both places their names and NPI numbers will populate in the Exam forms’
drop-down list.
For security reasons, we ask that facilities maintain control of who has access to their accounts. Towards that end, I have
provided instructions below to help you manage your facility’s Physicians’ users.
Step 1 - How to Add Physicians to the ‘Manage Physician’ List
You must be either the Facility Administrator or a Registry Administrator to complete this task.
Log into your facility as you normally would.
1. Go to the link for ‘Manage Physicians’ which appears in the menu on the left-hand side of your page. Click on Manage
Physicians to open the page.
2. Two options will appear on screen: the Physician Upload option or the on-line Questionnaire. Both options have been
described below.
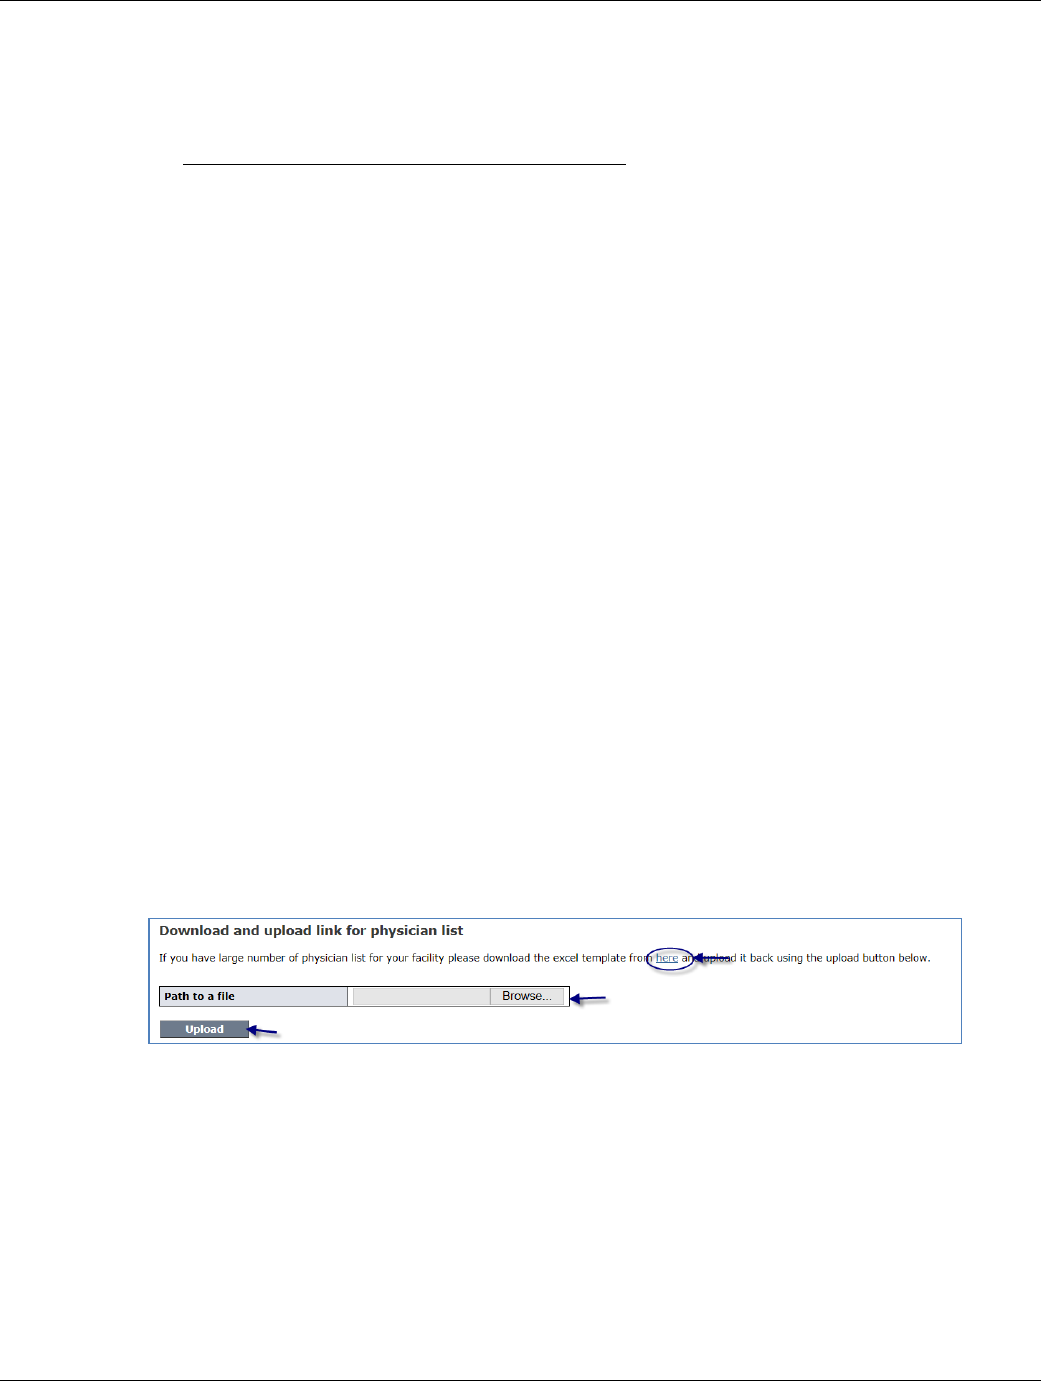
a. Physician Upload Option: If you have many radiologists that need to be added to the Manage Physician
dictionaries for several registered facilities, you may want to consider the Physician Excel Upload option. In stead
of completing the online questionnaire mutiple times, go to the upload option which appears above the
questionnaire. Click the ‘here’ link to launch the Excel spreadsheet, add all of your physician information, save the
document to your PC, and then browse to select it & upload to the dictionary. The document can be used for any
facility so long as you change the Facility ID number on the spreadsheet to match the facility ID you are working
with.
b. On-line Questionnaire Option: If you have only a few radiologists in your group that you want to add to the
Manage Physician list, then this option is the better tool to work with. The instructions for such have been
provided below in detail.
i. Complete the questionnaire by completing all the required responses (see questionnaire below).
ii. If the physician you are adding is going to participate in the PQRS, click the ‘Yes’ radio button (see green
highlight) and then create a User Name for the physician so that access the PQRS Physician Portal
becomes available.
a. Example of a User Name convention: use the first letter of the first name and the entire last
name;
b. My name is Victoria Obrien, using the convention above, my User Name would be VObrien.
June 29, 2017 33
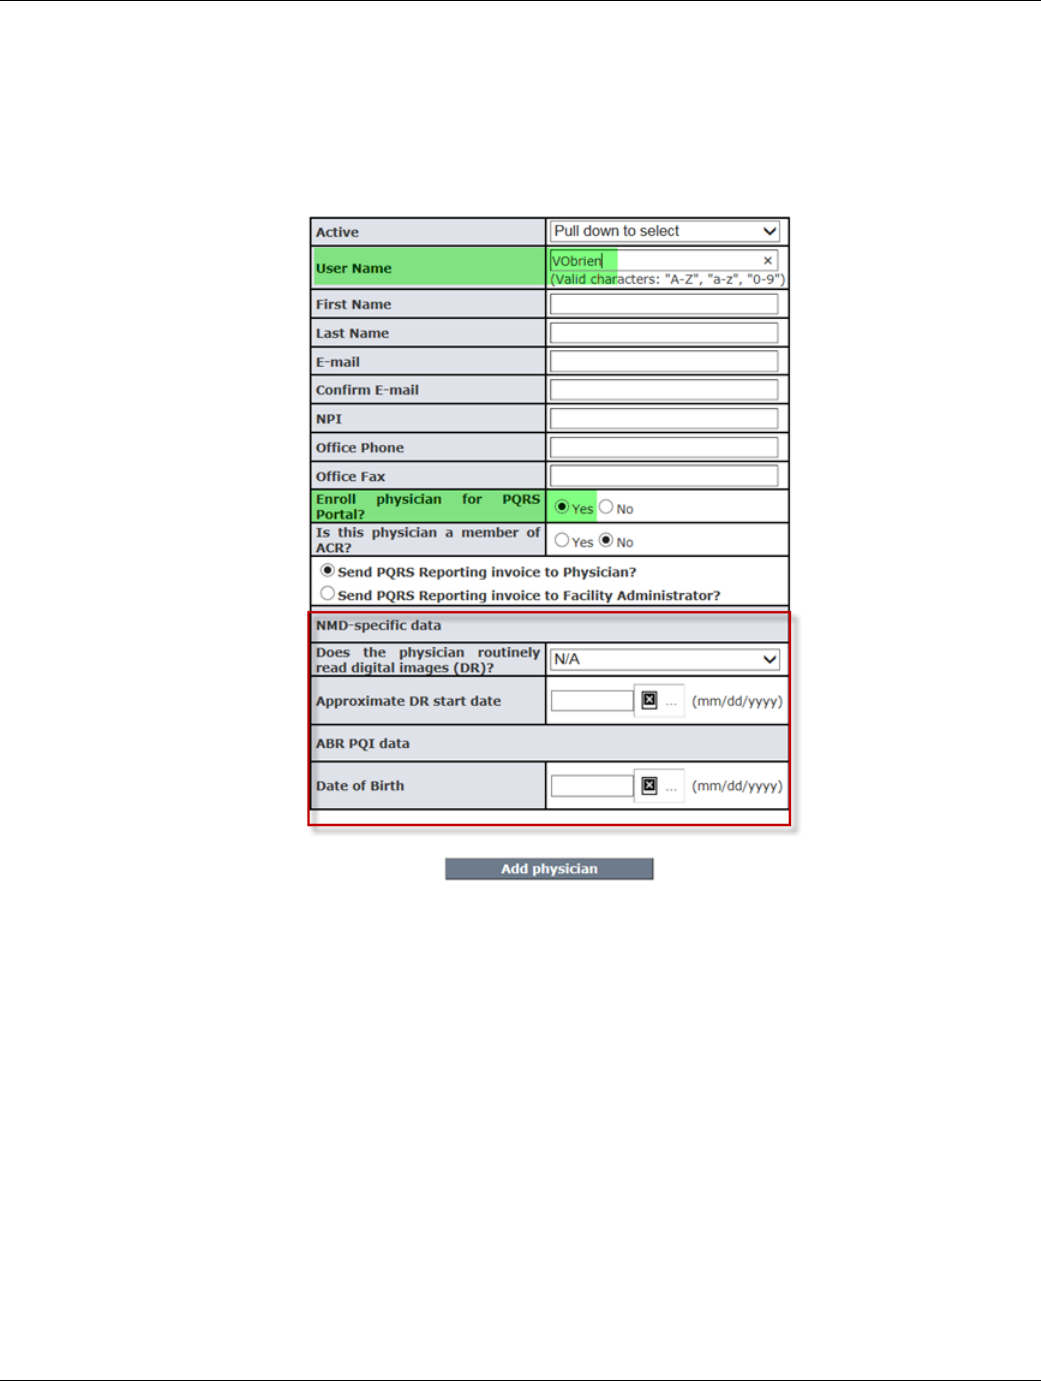
LCSR User Guide
i. If the physician is NOT going to participate in the PQRS option then this step can be
skipped.
ii. For the purposes of LCSR, this step is not needed and can be skipped.
iii. The fields within the red box do not apply to LCSR reading radiologists and can be
skipped.
iii. Once the fields have been completed, click Submit. Then follow directions in Step 2.
June 29, 2017 34
LCSR User Guide
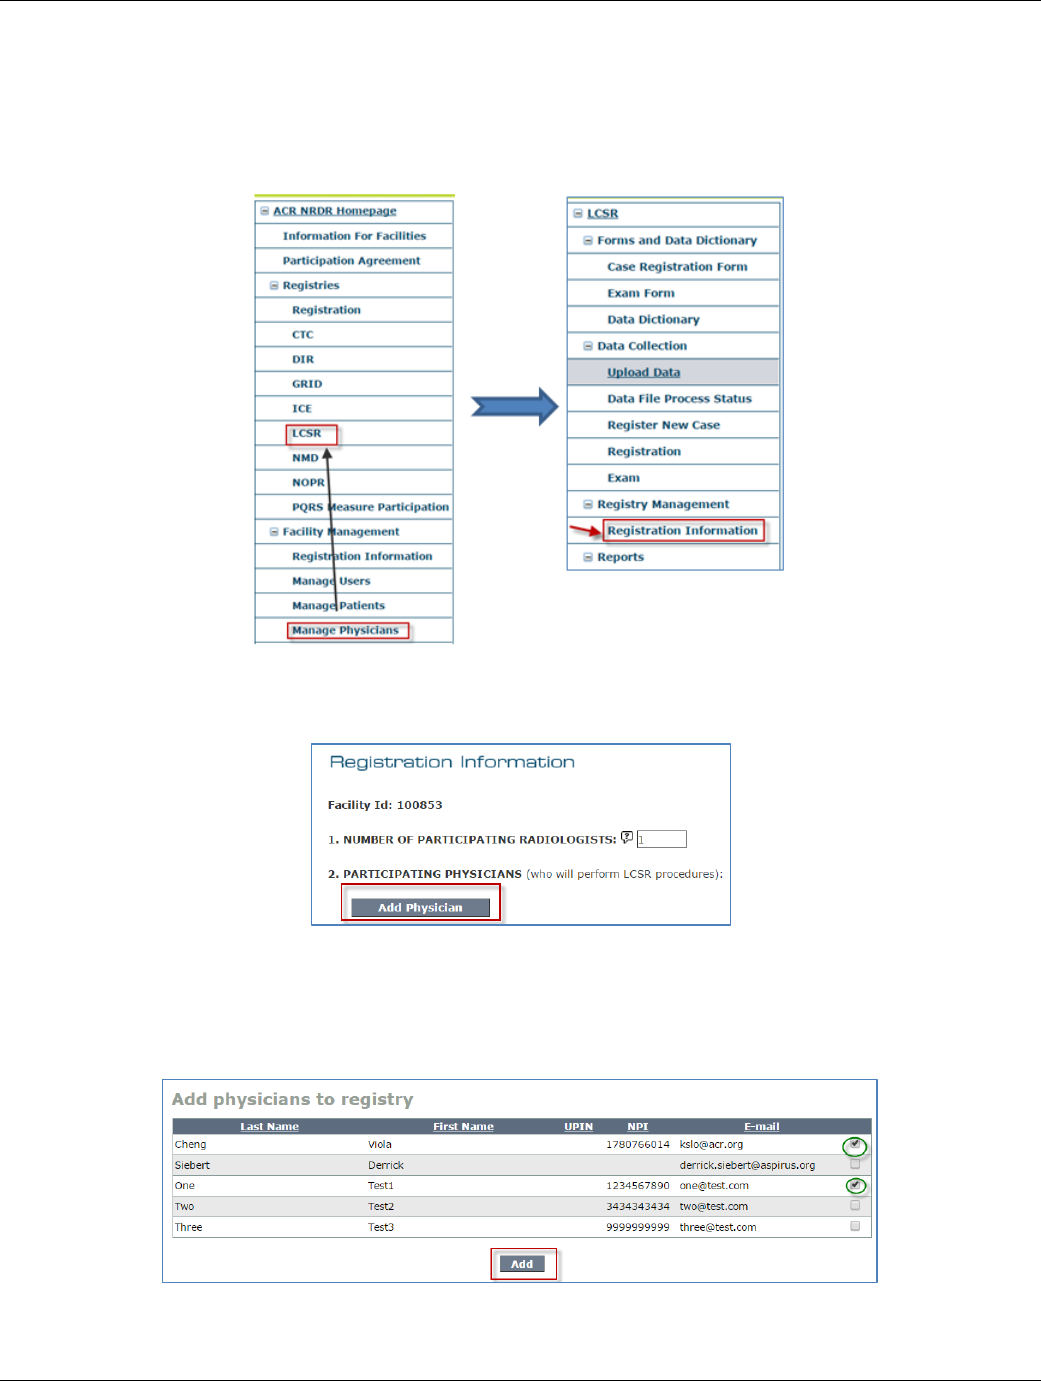
Step 2: Importing Radiologists Names and NPI Numbers
Go to the link for ‘LCSR’ which appears in the menu on the left-hand side of your page. Click on ‘LCSR’ to launch the LCSR
menu. Once on the LCSR menu, look for ‘Registration Information’ and click to launch the page
When the Registration Information page opens, it will display several questions, go to Question 2 ‘Participating Physicians’ and
click on the ‘Add Physician’ button.
"Add Physician" Button on the LCSR “Registration Information” Page
After you have made entries in the ‘Manage Physician’ list, the list of physicians will appear in a pop-up box. Checkboxes will be
located to the right-hand side of the physician names that were added during the Manage Physician process. Click inside the
checkbox for all physicians you would like to be displayed in the Exam form drop-down box option, and then click ‘Add’.
Adding a Physician as a LCSR Participant
June 29, 2017 35

LCSR User Guide
All physician names that you selected will also appear beneath Question 2, ‘Participating Physicians’ on the LCSR’s Registration
Information page.
Participating Physicians
You can remove a physician’s association with LCSR by clicking the Remove link next to his or her name on the “Participating
Physicians” list. The physician will remain in the NRDR ‘Manage Physician’ list, however, and LCSR forms previously entered for
the physician will not be affected.
The ability to add and remove physicians is not available to Facility Users.
6.1.2. Adding or Removing Facility Users
You can add Facility Users who are authorized to perform data entry in LCSR by clicking the “Add Facility User” button.
"Add Facility User" Button on the “Registration Information” Page
Facility Users must exist in the user dictionary before you can add them as LCSR users. Refer to Section 6.3.1, “Adding Users”,
in the NRDR User Guide for instructions on how to add users to the User Dictionary.
You can remove a Facility User’s association with LCSR by clicking the Remove link next to his or her name on the “Staff” list. The
user will remain in the NRDR User Dictionary, however, and LCSR forms previously entered by the user will not be affected.
The ability to add and remove Facility Users is available to Facility Administrators and Registry Administrators only.
If you want to add or remove Facility Administrators or Registry Administrators, you must do so in the NRDR User Dictionary.
Refer to the NRDR User Guide, Section 6.3, “User Dictionary”, for additional information.
7. GLOSSARY
ACR American College of Radiology
Case A set of forms related to one exam. A case includes a Case Registration form and Exam form.
June 29, 2017 36

LCSR User Guide
CT Computed Tomography
Facility Administrator
The person performing the NRDR registration process. The Facility Administrator has access to certain administrative
functions that are unavailable to other staff members. Only one staff member at a facility may act as Facility
Administrator. Refer to Section 4.2, “Facility Administrators”, in the NRDR User Guide, for additional information.
Facility User
A person designated by a Facility Administrator or Registry Administrator as having data entry functions for a specific
registry. Refer to Section 4.4, “Facility Users”, in the NRDR User Guide, for additional information.
LCSR menu
A list of links that appears on the left side of the LCSR home page and other LCSR pages. LCSR pages are distinguished
from pages belonging to other registries by the LCSR banner at the top of the page.
NPI National Provider Identifier
NRDR National Radiology Data Registry
Registry Administrator
A person designated by the Facility Administrator as having certain administrative functions for a specific registry.
Refer to Section 4.3, “Registry Administrators”, in the NRDR User Guide, for additional information.
SSN Social Security Number
June 29, 2017 37

LCSR User Guide
APPENDIX 1
HOW TO CONVERT THE LCSR UPLOAD TEMPLATE TO A .TXT FILE
The NRDR LCSR has provided an ‘Upload Template for LCSR Record Layout’ as a suggested method for populating the
required and optional data fields as described in Appendix 2 and 3 below. It is not required that you use this formatting tool. It
is your responsibility to verify that the data contained in the resulting txt file are correct.
In order to convert an Upload Template file to the specifications required for a successful data flat file upload, detailed
instructions have been provided here.
1. Click the Windows button on the bottom left of your screen. These steps will change your PC settings to insure that
leading zeros in the Upload Template will be retained and that it will produce a pipe delimited .txt file.
2. Click Control panel
June 29, 2017 38

LCSR User Guide
3. Click Region and language
4. Click the drop down arrow for Short Date and change your setting to MM/dd/yyyy and click Apply. This new setting
will insure that leading zeros will be retained in the Upload Template.
June 29, 2017 39

LCSR User Guide
5. Next, go to Additional settings
6. In the List separator field, replace (comma) with | (vertical bar). Do not use the drop down arrow. Place your cursor in
the field, delete the comma and insert the vertical bar Using the Shift + vertical bar key (see pic of key board for
location of the vertical bar key)
June 29, 2017 40
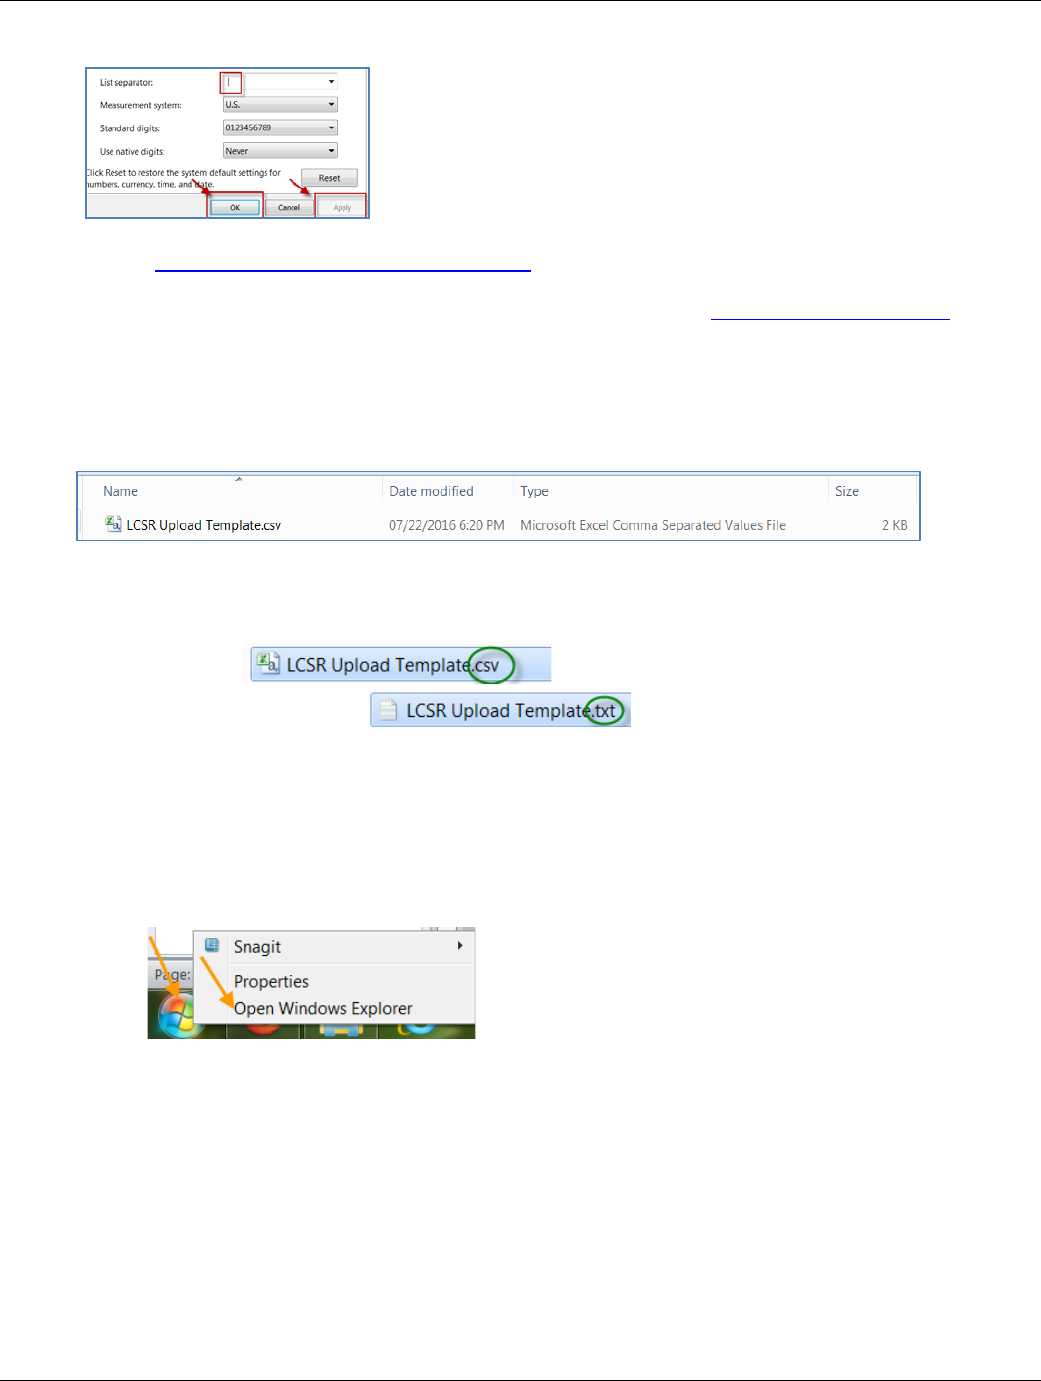
LCSR User Guide
7. Click Apply, then OK
8. Open the Upload Template for LCSR Record Layout, and save to your PC. In the example below, the downloaded
template is named LCSR Upload Template and the file exention is .csv
9. Enter Data: Complete each data field with patient exam data according to the Business Rules in Appendix 3. Make
sure the first row of the Upload Template has a column header for each of the 84 columns, regardless of whether they
are populated or not. Before entering data in the “Other ID” and “Medicare Beneficiary ID” columns, change the cell
formats to “Text”.
10. When you have completed the data entry, save the file.
11. Find the file you just saved (ending with .csv) and right click over the file name (do not open the document) and
manualy delete the csv letters which appear on the righ-hand side of the dot (.) in the file name and replace it with
txt.
a. File as .csv
b. File after converting to .txt
12. If you cannot locate the file you just saved and you cannot see the file extention ending with .csv, the following
instructions will display the file extention inorder to select the correct document.
Note: Each version of Windows has a different set of steps to follow for showing the file extension. It would help to
know the version of Windows your computer is using.
Below are instructions for Windows 7:
a) Start Windows Explorer
b) Click Organize.
c) Click Folder and search options.
June 29, 2017 41
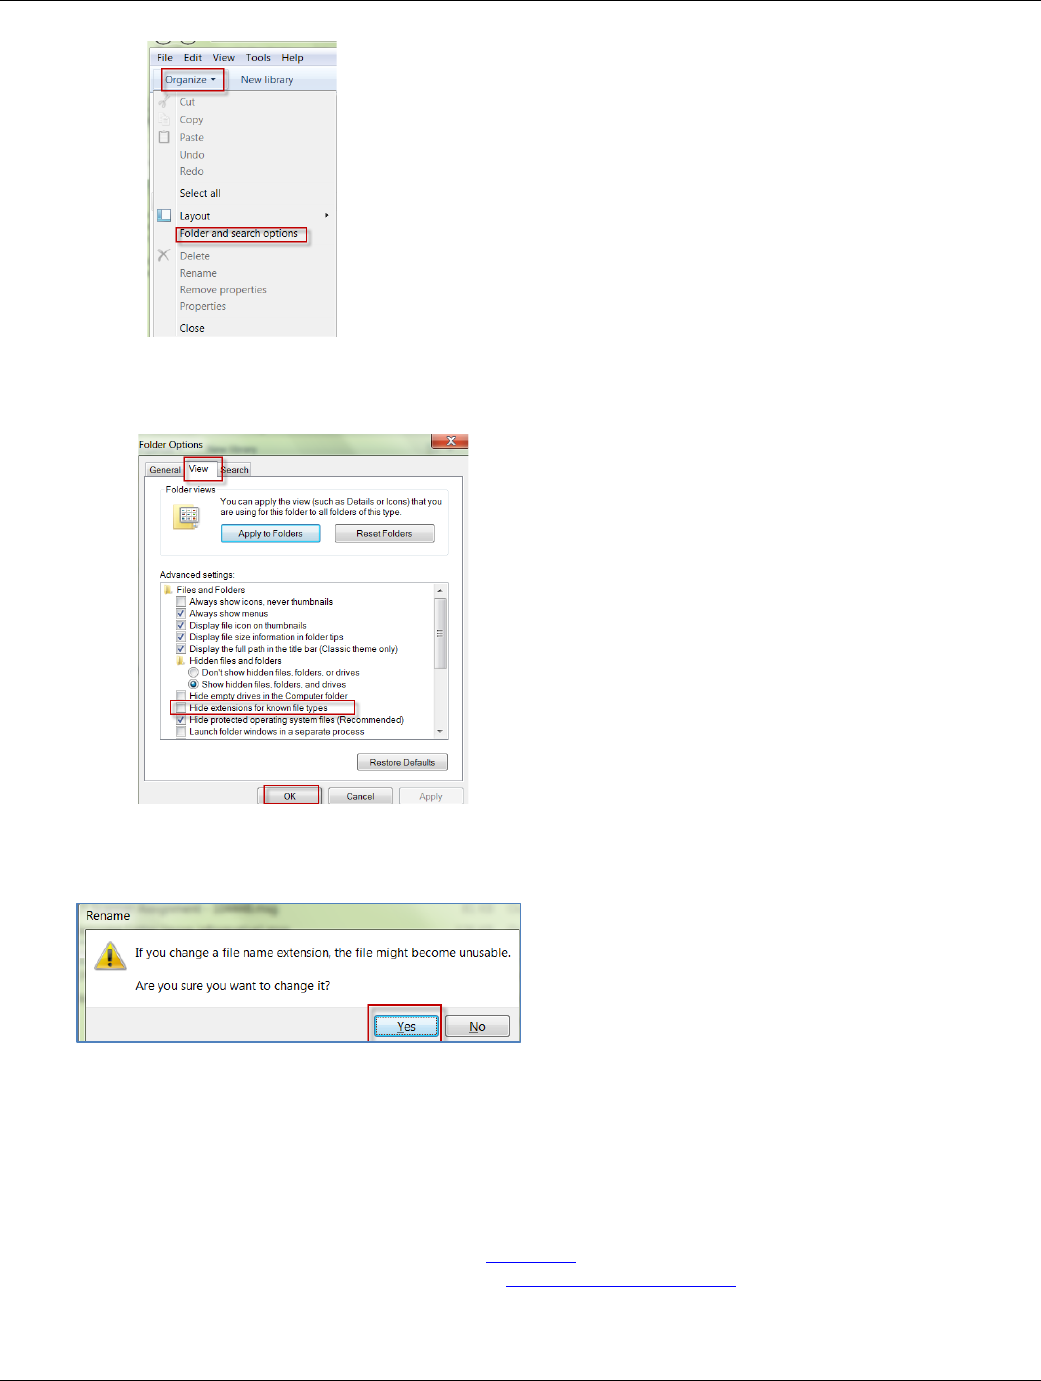
LCSR User Guide
d) Click the View tab.
e) Scroll down until you notice Hide extensions for known file types, un-check this by clicking the check box (To
hide file name extensions, you will have to check this box).
f) Click OK
13. During the course of changing a file extention from .csv to .txt, you might receive a warning message like the one
below. Please click YES to proceed. Once your document is in the .txt format, it can be uploaded to the LCSR.
If you have any difficulty performing the settings above, please contact your IT department to assist you with this
process.
Once your settings have been established, proceed to the file specifications in Appendix 2 and Business Rules for
populating the template with content in Appendix 3.
Of note: the most common errors that occur during a flat file upload are:
1. Incorrect document file name as specified in Appendix 2
2. Content within the template did not follow the Business Rules in Appendix 3
Make certain each cell in the template has the correct permissible reponse:
June 29, 2017 42

LCSR User Guide
For example, the word ‘No’ does not meet the Business Rule requirements. All ‘No’ entries must be replaced with a captial
letter ‘N’. All ‘Yes’ responses should be ‘Y’ and so on.
June 29, 2017 43
LCSR User Guide
APPENDIX 2
NRDR - LCSR Data File Specifications for Manual Upload (v1.2)
The LCSR allows you to upload lung cancer screen exam data in bulk using the manual upload function in the NRDR portal. You
may use the pre-formatted Upload Template document to begin populating the fields discussed here and in Appendix 3. It is
not required that you use the ‘Upload Template for LCSR Record Layout’ however it is available for your use.
The LCSR Exam data file specifications are listed as follows:
1. The data file is a delimited text file.
2. The maximum recommended file size is 40 M.
3. The filename extension is ‘.txt’.
4. The file naming convention is lcsr_exam_yyyymmdd-hrmiss; yyyymmdd-hrmiss is the time stamp at the time the file
is created, where
yyyy is the 4 digit year,
mm is the 2 digit month,
dd is the 2 digit day,
hr is the 2 digit hour in military time format,
mi is the 2 digit minute, and
ss is the 2 digit second
Example: lcsr_exam_20160306-181224.txt
5. The data file must contain at least one record.
6. Each line must contain one and only one record; record delimiter is the CARRIAGE RETURN character followed by the
LINE FEED character.
7. No header row (if you are using the template, the header row will display as a rejected record however the remaining
patient data will be retained)
8. Each record must begin at the first position of a line.
9. Each record has 84 data elements.
10. Each data element must be positioned in the order specified below:
Data element
position
Data Element
1
Exam Unique ID
2
Patient First Name
3
Patient Middle Name
4
Patient Last Name
5
Other ID
6
Refused To Answer SSN
7
Patient SSN
8
Refused Medicare ID
9
Medicare Beneficiary ID
10
Date Of Birth
11
Date Of Death
12
How Cause Was Determined
June 29, 2017 44

LCSR User Guide
13
Other Method Of Determining
14
Cause Of Death
15
Non Lung Cancer Cause
16
Death Within 30 Days
17
Patient Sex
18
Patient Race
19
Patient Ethnicity
20
Health Insurance
21
Smoking Status
22
Number Of Packs Year Smoking
23
Number Of Years Since Quit
24
Did Physician Provide Guidance
25
Doc Of Shared Dec Making
26
Patient Height
27
Patient Weight
28
Patient Other Comorbidities
29
Patient Other Comorbidities Spec
30
Cancer Related History
31
Cancer Related History Other Spec
32
Radiologist Reading NPI
33
Ordering Practitioner NPI
34
Ordering Practitioner First Name
35
Ordering Practitioner Last Name
36
Exam Date
37
Signs Or Symptoms Of Lung Cancer
38
Indication Of Exam
39
Modality
40
CT Scanner Manufacturer
41
CT Scanner Model
42
CTDIvol
43
DLP
44
Tube Current Time
45
Tube Voltage
46
Scanning Time
47
Scanning Volume
48
Pitch
49
Reconstructed Image Width
50
CT Exam Result Lung RADS
51
Reason For Recall
52
CT Exam Result Modifier S
53
What Were The Other Findings
June 29, 2017 45

LCSR User Guide
54
Mass Spec
55
Other Int Lung Disease
56
Other Int Lung Disease Spec
57
CT Exam Result Modifier C
58
Years Since Prior Diagnosis
59
Education Level
60
Education Level Other Spec
61
Radon Exposure
62
Occupational Exposures
63
History Of Cancers
64
Other_Smoking Cancers Spec
65
Lung Cancer In First Deg Rel
66
Lung Cancer Other First Deg Rel
67
COPD
68
Pulmonary Fibrosis
69
Second Hand Smoke Exposure
70
Date Of Follow-Up
71
Follow-Up Diagnostic
72
Follow-Up Diagnostic Other Spec
73
Tissue Diagnosis
74
Tissue Diagnosis Method
75
Location From Sample Obtained
76
Location Other Spec
77
Histology
78
Histology Non-Small Cell LC
79
Other Non-Small Cell LC Histology Spec
80
Stage Clinical Or Pathologic
81
Overall Stage
82
T Status
83
N Status
84
M Status
11. Each data element is separated by the vertical bar character ‘|’; if there is no answer for a data element you should
write the ‘|’ character immediately after the previous ‘|’. Do not use the SPACE character to substitute for no data
value.
Example: Let’s use the first nine data elements as an example. Suppose we only have data for Patient first
name, Patient last name, Patient Medicare id, and we refuse to provide patient SSN, then the data should be
written as:
|John||Doe||Y||N|A-123456|
12. The data mapping and business rules are outlined in Exam and Follow-up sections of the ACR-LCSR-Data-Mapping
Appendix 3. The Transaction Header section does not apply to the data file used by the Data File Upload process; it is
used by the Web Services interface.
June 29, 2017 46

LCSR User Guide
Explanations on the Valid values/format, Mappings/definitions and Business rules columns:
a. Acceptable values and data format. For most data elements the LCSR validates their values and/or formats.
Refer to the Valid values/format column on ACR-LCSR-Data-Mapping for the acceptable values and data
formats.
Examples:
i. The element “Refused to provide patient’s social security number” accepts ‘Y’ or ‘N’ as a valid value.
Any other value provided will result in an error and the file upload will not be successful.
ii. “Patient Social Security Number” accepts only 9 digits in the nnn-nn-nnnn format.
iii. “How cause of death was determined” accepts one value, the valid values are 1,2,3,4,5,6,or 8. The
Mappings/definitions column on ACR-LCSR-Data-Mapping lists the options/text for each value.
iv. “Number of packs-per year of smoking” accepts only whole numbers between 1 and 999.
v. “Number of years since quit” accepts only whole numbers between 1 and 99.
vi. All dates have to be in mm/dd/yyyy format.
b. Data elements that accept more than one value. If a data element accepts multiple answers, each value
must be separated by the comma character ‘,’ in the data file. These data elements are indicated as “Select
all that apply” under the Mapping/definitions column.
Example:
i. “Patient race” accepts multiple values. If a patient has the “American Indian” and “Alaska native”
race, it should be written as:
|1,2|
c. Data dependency. Some data elements need to be populated depending on a) whether another element is
populated or b) the value of another element. These conditions are listed under Business Rules column on
the ACR-LCSR-Data-Mapping Excel file.
Examples:
i. One of the patient identifiers must be provided: Other ID, Patient SSN, and Medicare Beneficiary ID.
ii. “Patient Social Security Number” is required only if “Refused to provide patient’s social security
number” has a value of ‘N’. This field has to be left blank if “Refused to provide patient’s social
security number” is ‘Y’.
iii. If “Smoking status” is 1, 2 or 4, then “Number of packs-year of smoking” is required; otherwise
“Number of packs-year of smoking” should be left blank
iv. If “Smoking status” is 2 , then “Number of years since quit” is required; otherwise “Number of years
since quit” should be left blank
v. If “Follow-up diagnostic” is 4, 5 or 6, then “Tissue Diagnosis” is required. If Follow-up diagnostic
value is 7, then “Tissue Diagnosis” is optional. Otherwise, “Tissue diagnosis” is not required.
vi. If “How cause of death was determined” has a value 8 (Other), then “Other method of determining
cause of death, specify” is required; otherwise, this element should be left blank.
d. Optional data elements. The data elements that are marked as “Optional” under the Business Rules column
are not required for submission, that is, a record will not be rejected if an optional field is missing. However,
if you do know them, we expect you to provide them. This expectation of complete data is specified in the
participation agreement signed by all participating facilities.
June 29, 2017 47

LCSR User Guide
13. The key identifier for an exam record is the exam date and patient Id (Other ID, Patient SSN or Medicare Beneficiary
Id). If you want to update an already uploaded record you can submit subsequent record(s) with the same key
identifier. The system will ignore data elements with no values in the subsequent records and will not clear the values
uploaded earlier. To clear any values you will have to use the LCSR web form on the NRDR portal to manually remove
them.
14. When an exam record is uploaded with data missing for one or more required or conditionally required data
elements, warning messages are generated in the log file, the exam will still be created with an “In progress” status.
You will have to use the LCSR web form on the NRDR portal to manually populate the missing data and then submit
the exam.
In order to have a “complete” status on an exam record, you must submit the data elements marked as “Required” or
conditionally required as indicated under the Business Rules column.
15. The relationship of Exam and Follow-up records is one-to-many. If you are submitting multiple follow-up records for
an exam in the same data file, each follow-up record must occupy one row with the same key identifier on the exam
record.
June 29, 2017 48
LCSR User Guide
APPENDIX 3
NRDR - LCSR Data Mapping and Business Rules for Flat File Upload
LCSR Data
Element Attribute Format
Note: The
required data
elements in
this column
are the
minimum
data elements
required to
submit an
exam record
and create a
"skeleton"
exam record
in the LCSR
Valid Values/format Mappings/ Definitions
Business Rules
Note: the data elements
indicated as Required in this
column are required to
create a complete
exam/follow-up record in
LCSR.
If you do not have values for
the required elements you
will receive warning
messages but the exam
record will still be created.
Exam Data (Required)
1
Exam_Uniqu
e_ID
Exam_Unique_ID
string
N
max length is 50 characters
Optional
You may provide an identifier
to link back to your internal
record.
Note that this is not the key
identifier of an exam record
in LCSR. The exam date and
patient ID make up the key
identifier.
2
Patient's first
name
Patient_First_Na
me
string
N
max length is 45 characters
Optional
If providing first name, at
least 1 characters are
needed.
3
Patient's
middle name
Patient_Middle_
Name
string
N
max length is 45 characters
Optional
If providing middle name, at
least 1 character is needed.
4
Patient's last
name
Patient_Last_Na
me
string
N
max length is 45 characters
Optional
If providing last name, at
least 2 characters are
needed.
5
Patient ID
Other_ID
string
We require a
patient
identifier; you
can provide
either the
Other_ID,
Patient_SSN
or
Medicare_Ben
eficiary_ID.
see Business
Rule
max length is 50 characters
One of the following patient
identifiers must be provided:
Other_ID, Patient_SSN,
Medicare_Beneficiary_ID.
You may use the patient's
MR# as Other_ID
6
Refused to
provide
patient's
social
security
number
Refused_To_Ans
wer_SSN
string
N
Y, N
Select one:
Y - Yes;
N - No
Required
June 29, 2017 49

LCSR User Guide
7
Patient
Social
Security
Number
Patient_SSN
string
We require a
patient
identifier; you
can provide
either the
Other_ID,
Patient_SSN
or
Medicare_Ben
eficiary_ID.
see Business
Rule
9-digits, nnn-nn-nnnn
if Refused_To_Answer_SSN is
'Y' then you must leave this
field blank;
if Refused_To_Answer_SSN is
'N' then you must provide
Patient_SSN;
One of the following patient
identifiers must be provided:
Other_ID, Patient_SSN,
Medicare_Beneficiary_ID
8
Refused to
provide
patient's
Medicare
beneficiary
ID
Refused_Medica
re_ID
string
N
Y, N
Select one:
Y - Yes;
N - No
Required
9
Medicare
Beneficiary
ID
Medicare_Benefi
ciary_ID
string
We require to
have a patient
identifier; you
can provide
either the
Other_ID,
Patient_SSN
or
Medicare_Ben
eficiary_ID.
see Business
Rule
max length is 12 characters
You must provide
Medicare_Beneficiary_ID if
this is for Medicare
reimbursement.
if Refused_Medicare_ID is 'Y'
then you must leave this field
blank;
if Refused_Medicare_ID is 'N'
then you must provide
Medicare_Beneficiary_ID;
One of the following patient
identifiers must be provided:
Other_ID, Patient_SSN,
Medicare_Beneficiary_ID
10
Patient's
date of birth
Date_Of_Birth
string
N
format mm/dd/yyyy
Required
Cannot be a future date;
must be <= Date_Of_Death
11
Patient's
date of
death
Date_Of_Death
string
N
format mm/dd/yyyy
Optional
Cannot be a future date;
must be >= Date_Of_Birth
12
How cause
of death was
determined
How_Cause_Was
_Determined
string
N
1,2,3,4,5,6,8
Select one:
1 - 'Autopsy Report';
2 - 'Death Certificate' ;
3 - 'Medical Record' ;
4 - 'Physician';
5 - 'Relative or Friend';
6 - 'Social Security Death
Index';
8 - 'Other'
Optional
Only applicable if
Date_of_Death is provided
13
Other
method of
determining
cause of
death,
specify
Other_Method_
Of_Determining
string
N
max length is 255 characters
Optional
If
How_Cause_Was_Determine
d is 8, then
Other_Method_Of_Determin
ing is applicable
otherwise, this field should
be left blank
June 29, 2017 50

LCSR User Guide
14
Cause of
death
Cause_Of_Death
string
N
1,2,9
Select one:
1 -'Lung cancer' ;
2- 'Non-lung cancer cause,
specify if known' ;
9- 'Cannot determine'
Required if Date_of_Death is
provided
15
Non lung-
cancer
cause,
specify
Non_Lung_Canc
er_Cause
string
N
max length is 255 characters
Optional
If Cause_of_Death is 2 then
Non_Lung_Cancer_Cause is
applicable;
otherwise, this field should
be left blank
16
Invasive
procedure
within in the
30 days
preceding
date of
death
Death_Within_3
0_Days
string
N
N, Y, U
Select one:
N - No;
Y - Yes;
U - 'Unknown'
If Date_of_Death is provided
then Death_Within_30_Days
is required.
Otherwise, this field should
be left blank
17
Patient sex
Patient_Sex
string
N
M,F,O,U
Select one:
M - 'Male';
F - 'Female';
O - 'Other';
U - 'Unknown'
Required
18
Patient race
Patient_Race
array of
number
N
1,2,3,4,5,6,9,10
Select all that apply:
1 - American Indian
2 - Alaska native
3 - Asian
4 - Black or African American
5 - Native Hawaiian or Pacific
Islander
6 - White
9 - Not reported
10 - Unknown
Optional
19
Patient
ethnicity
(Hispanic
origin)
Patient_Ethnicity
string
N
0,1,8,9
Select one:
0 - 'Not Hispanic or Latino';
1 - 'Hispanic or Latino' ;
8 - 'Not reported' ;
9 - 'Unknown'
Optional
20
Health
insurance
Health_Insuranc
e
array of
number
N
1,2,3,4,5
Select all that apply:
1 - 'Medicare';
2 - 'Medicaid';
3 - 'Private insurance';
4 - 'Self pay ';
5 - 'Unknown '
Optional
21
Smoking
status
Smoking_Status
string
N
1,2,3,4,9
Select one:
1 - 'Current smoker';
2 - 'Former smoker' ;
3 - 'Never smoker' ;
4 - 'Smoker, current status
unknown';
9 - 'Unknown if ever smoked'
Required
22
Number of
packs-year
of smoking
Number_Of_Pac
ks_Year_Smokin
g
number
N
between 1 and 999
If Smoking_Status is 1, 2 or 4
then
Number_Of_Packs_Year_Sm
oking is required;
otherwise, this field should
be left blank.
June 29, 2017 51

LCSR User Guide
23
Number of
years since
quit
Number_Of_Yea
rs_Since_Quit
number
N
between 1 and 99
If Smoking_Status is 2 then
Number_Of_Years_Since_Qu
it is required.
Otherwise, this field should
be left blank.
24
Did
physician
provide
smoking
cessation
guidance to
patient?
Did_Physician_Pr
ovide_Guidance
string
N
N,Y,U
Select one:
N - No;
Y - Yes;
U - 'Unknown'
Required
25
Is there
documentati
on of shared
decision
making?
Doc_Of_Shared_
Dec_Making
string
N
N,Y,U
Select one:
N - No;
Y - Yes;
U - 'Unknown'
Required
26
Patient
height
(inches)
Patient_Height
string
N
0-99
0 - Unknown
99 - Unknown
Required
27
Patient
weight (lbs)
Patient_Weight
string
N
0-999
0 - Unknown
999 - Unknown
Required
28
Other
comorbiditie
s listed on
patient
record that
limit life
expectancy
Patient_Other_C
omorbidities
array of
number
N
0,1,2,3,4,5,6,7,8
Select all that apply:
0 - 'COPD' ;
1 - 'Emphysema';
2 - 'Pulmonary fibrosis';
3 - 'Coronary artery disease';
4 - 'Congestive heart failure ';
5 - 'Peripheral vascular
disease';
6 - 'Lung cancer';
7 - 'Cancer other than lung
cancer ';
8 - 'Other, please specify'
Optional
29
Other
comorbiditie
s, other
specify
Patient_Other_C
omorbidities_Sp
ec
string
N
max length is 255 characters
Optional
If
Patient_Other_Comorbidities
is 8, then
Patient_Other_Comorbidities
_Spec is applicable;
otherwise, this field should
be left blank
30
Cancer
related
history
Cancer_Related_
History
array of
number
N
0,1,2,3,4,5,6,7
Select all that apply:
0 - Prior history of lung
cancer
1 - lymphoma
2- H&N cancer
3 - bladder cancer
4 - esophageal cancer
5 - Pulmonary fibrosis
6 - Other cancer, please
specify
7- Other
Optional
June 29, 2017 52

LCSR User Guide
31
Cancer
related
history,
other specify
Cancer_Related_
History_Other_S
pec
string
N
max length is 255 characters
Optional
If Cancer_Related_History is
6, then
Cancer_Related_History_Oth
er_Spec is required;
otherwise, this field should
be left blank
32
Radiologist
(reading) NPI
Radiologist_Read
ing_NPI
string
N
10-digits
Required
Reading radiologist must
exist in the NRDR Physician
dictionary.
33
Ordering
practitioner
NPI
Ordering_Practiti
oner_NPI
string
N
10-digits
Required
34
Ordering
practitioner
first name
Ordering_Practiti
oner_First_Name
string
N
max length is 50 characters
Optional
35
Ordering
practitioner
last name
Ordering_Practiti
oner_Last_Name
string
N
max length is 50 characters
Optional
36
Exam date
Exam_Date
string
Y
format mm/dd/yyyy
Required
Cannot be a future date
37
Signs or
symptoms of
lung cancer
Signs_Or_Sympt
oms_Of_Lung_C
ancer
string
N
Y, N
Select one:
Y - Yes;
N - No
Required
38
Indication of
exam
Indication_Of_Ex
am
string
N
1,2
Select one:
1 - 'Baseline scan' ;
2 - 'Annual screen'
If
Signs_Or_Symptoms_Of_Lun
g_Cancer is 'N', then
Indication_Of_Exam is
required;
otherwise, this field should
be left blank
39
Modality
Modality
string
N
1,2
Select one:
1 - 'Low dose chest CT' ;
2 - 'Routine chest CT'
Required
40
CT scanner
manufacture
r
CT_Scanner_Ma
nufacturer
string
N
max length is 50 characters
Required
41
CT scanner
model
CT_Scanner_Mo
del
string
N
max length is 50 characters
Required
42
CTDlvol
(mGy)
CTDIvol
string
N
format nnn.nn
0.01<= CTDlvol <= 999.99
Required
Whole number is acceptable.
Decimal place is optional, if
provided limit to 2 digits.
43
DLP
(mGy*cm)
DLP
string
N
format nnnn.nn
0.01<= DLP <= 9999.99
Required
Whole number is acceptable.
Decimal place is optional, if
provided limit to 2 digits.
44
Tube
current-time
(mAs)
Tube_Current_Ti
me
string
N
format nnn
0<= Tube_Current_Time <=
999
Optional
45
Tube voltage
(kV)
Tube_Voltage
string
N
format nnn
0<= Tube_Voltage <= 999
Optional
46
Scanning
time (s)
Scanning_Time
string
N
format nnn.nn
0.01<= Scanning_Time <=
999.99
Optional
Whole number is acceptable.
Decimal place is optional, if
provided limit to 2 digits.
June 29, 2017 53

LCSR User Guide
47
Scanning
volume (cm)
Scanning_Volum
e
string
N
format nnn.nn
0.01<= Scanning_Volume <=
999.99
Optional
Whole number is acceptable.
Decimal place is optional, if
provided limit to 2 digits.
48
Pitch
Pitch
string
N
format nn.nnn
0.000<= Pitch <= 99.999
Optional
49
Reconstructe
d image
width
(nominal
width of
reconstructe
d image
along z-axis)
(mm)
Reconstructed_I
mage_Width
string
N
format n.nn
0.01<=
Reconstructed_Image_Width
<= 9.99
Required
Whole number is acceptable.
Decimal place is optional, if
provided limit to 2 digits.
50
CT exam
result by
Lung-RADS
category
CT_Exam_Result
_Lung_RADS
string
N
0,1,2,3,4A,4B,4X
Select one:
0 - 'recalls (incomplete
screen)';
1 - 'normal, continue annual
screening';
2 - 'benign appearance or
behavior, continue annual
screening';
3 - '6 month CT
recommended';
4A - '3 month CT
recommended; may consider
PET/CT';
4B - 'Additional diagnostics
and/or tissue sampling
recommended';
4X - 'Additional diagnostics
and/or tissue sampling';
Required
51
Reason for
recall
Reason_For_Rec
all
string
N
I,N,M,E,OBa
Select one:
I - 'Incomplete coverage' ;
N - 'Noise' ;
M - 'Respiratory motion';
E - 'Expiration';
OBa - 'Obscured by acute
abnormality'
If
CT_Exam_Result_Lung_RADS
is 0, then Reason_For_Recall
is required;
otherwise, this field should
be left blank.
52
Other
clinically
significant or
potentially
significant
abnormalitie
s - CT exam
result
modifier S
CT_Exam_Result
_Modifier_S
string
N
Y, N
Select one:
Y - Yes;
N - No
Required
53
What were
the other
findings
What_Were_The
_Other_Findings
array of
number
N
0,1,2,3,4
Select all that apply:
0 - 'Aortic aneurysm' ;
1 - 'Coronary arterial
calcification moderate or
severe';
2 - 'Pulmonary fibrosis ' ;
3 - 'Mass (check neck,
mediastinum, liver, kidneys,
other) ';
4- 'Other interstitial lung
disease';
Optional
If
CT_Exam_Result_Modifer_S
is 'Y', then
What_Were_Other_Findings
is required;
otherwise, this field should
be left blank
June 29, 2017 54

LCSR User Guide
54
Mass,
specify
Mass_Spec
string
N
max length is 255 characters
Optional
If
What_Were_The_Other_Fin
dings is 3, then Mass_Spec is
required;
otherwise, this field should
be left blank
55
Other
interstitial
lung disease
Other_Int_Lung_
Disease
string
N
1,8,9
Select one:
1 -'UIP/IPF' ;
8 - 'ILD, other, please specify
' ;
9 - 'ILD, unknown';
Optional
If
What_Were_The_Other_Fin
dings is 4, then
Other_Int_Lung_Disease is
applicable;
otherwise, this field should
be left blank
56
Other
interstitial
lung disease,
specify
Other_Int_Lung_
Disease_Spec
string
N
max length is 255 characters
If Other_Int_Lung_Disease is
8, then
Other_Int_Lung_Disease_Spe
c is required;
otherwise, this field should
be left blank
57
Prior history
of lung
cancer - CT
exam result
modifier C
CT_Exam_Result
_Modifier_C
string
N
other findings
Select one:
N - No;
Y - Yes;
U - 'Unknown'
Required
58
Year since
prior
diagnosis of
lung cancer
Years_Since_Prio
r_Diagnosis
string
N
format: nn
1 <=
Years_Since_Prior_Diagnosis
<= 99
Optional
59
Education
level
Education_Level
string
N
1,2,3,4,5,6,7,8,99
Select one:
1 - '8th grade or less' ;
2 - '9-11th grade' ;
3 - 'High school graduate or
high school equivalency' ;
4 - 'Post high school
training, other than college' ;
5 - 'Associate degree / some
college' ;
6 - 'Bachelor’s degree';
7 - 'Graduate or Professional
school' ;
8 - 'Other, specify';
99 - 'Unknown / I prefer not
to answer'
Optional
60
Education
level, other
Education_Level
_Other_Spec
string
N
max length is 255 characters
Optional
If Education_Level is 8, then
Education_Level_Other_Spec
is required;
otherwise, this field should
be left blank
61
Radon
exposure -
documented
high
exposure
levels
Radon_Exposure
string
N
Y, N
Select one:
Y - Yes;
N - No
Optional
June 29, 2017 55

LCSR User Guide
62
Occupational
exposures to
agents that
are
identified
specifically
as
carcinogens
targeting the
lungs
Occupational_Ex
posures
array of
number
N
0,1,2,3,4,5,6,7
Select all that apply:
0 - 'Silica';
1 - 'Cadmium';
2 - 'Asbestos';
3 - 'Arsenic';
4 - 'Beryllium' ;
5 - 'Chromium ';
6 - 'Diesel fumes';
7 - 'Nickel '
Optional
63
History of
cancers that
are
associated
with an
increased
risk of
developing a
new primary
lung cancer
History_Of_Canc
ers
array of
number
N
0,1,2,3,4
Select all that apply:
0 - 'Prior lung cancer';
1 - 'Lymphoma' ;
2 - 'Head and neck;
3 - 'Bladder cancer ';
4 - 'Other smoking-related
cancers, specify '
Optional
64
History of
cancers that
are
associated
with an
increased
risk of
developing a
new primary
lung cancer -
other
smoking-
related
cancers,
specify
Other_Smoking_
Cancers_Spec
string
N
max length is 255 characters
Optional
If History_Of_Cancers is 4,
then
Other_Smoking_Cancers_Spe
c is required;
otherwise, this field should
be left blank
65
Lung cancer
in first-
degree
relative
(mother,
father,
sister,
brother,
daughter or
son with
history of
lung cancer)
Lung_Cancer_In_
First_Deg_Rel
string
N
N,Y,U
Select one:
N - No;
Y - Yes;
U - 'Unknown'
Optional
66
Family
history of
lung cancer,
other than
first-degree
relative
Lung_Cancer_Ot
her_First_Deg_R
el
string
N
N,Y,U
Select one:
N - No;
Y - Yes;
U - 'Unknown'
Optional
67
COPD
COPD
string
N
Y, N
Select one:
Y - Yes;
N - No
Optional
68
Pulmonary
fibrosis
Pulmonary_Fibro
sis
string
N
Y, N
Select one:
Y - Yes;
N - No
Optional
69
Second hand
smoke
exposure
Second_Hand_S
moke_Exposure
string
N
N,Y,U
Select one:
N - No;
Y - Yes;
U - 'Unknown'
Optional
Follow-up Data (optional)
70
Date of
follow-up
Date_Of_Follow_
Up
string
Y
format mm/dd/yyyy
Required when submitting
Follow-Up for a case; cannot
June 29, 2017 56

LCSR User Guide
be a future date
71
Follow-up
diagnostic
Follow_Up_Diag
nostic
string
Y
1,2,3,4,5,6,7
Select one:
1 -'Low dose chest CT';
2 - 'Routine chest CT' ;
3 - 'PET/CT' ;
4 - 'Bronchoscopy' ;
5 - 'Non-surgical biopsy' ;
6 - 'Resection' ;
7 - 'Other, specify '
Required
72
Follow-up
diagnostic
other,
specify
Follow_Up_Diag
nostic_Other_Sp
ec
string
N
max length is 255 characters
If Follow_Up_Diagnostic is 7,
then
Follow_Up_Diagnostic_Other
_Spec is required;
otherwise, this field should
be left blank
73
Tissue
diagnosis
Tissue_Diagnosis
string
N
1,2,3,4,5,6,7
Select one:
1 - 'Benign';
2 - 'Malignant - invasive lung
cancer' ;
3 - 'Malignant - Minimally
invasive lung cancer' ;
4 - 'Malignant - NON-lung
cancer' ;
5 - 'Malignant -
adenocarcinoma in situ' ;
6 - 'Premalignancy - atypical
adenomatous hyperplasia' ;
7 - 'Non-diagnostic'
If Follow_Up_Diagnostic is 4,
5 or 6 then Tissue_Diagnosis
is required;
If Follow_Up_Diagnostic is 7
then Tissue_Diagnosis is
optional;
otherwise, this field should
be left blank
74
Tissue
diagnosis
method
Tissue_Diagnosis
_Method
string
N
1,2,3
Select one:
1 - 'Percutaneous' ;
2 - 'Bronchoscopic' ;
3 - 'Surgical'
If Tissue_Diagnosis is
populated, then
Tissue_Diagnosis_Method is
required;
otherwise, this field should
be blank
75
Location
from which
sample was
obtained
Location_From_S
ample_Obtained
string
N
0,1,2,3,4,5,6,7,8,9,10,11
Select one:
0 - 'Left Hilum ';
1 - 'Lingula of the Lung ';
2 - 'Left Lower Lobe of Lung
';
3 - 'Left Upper Lobe of Lung
';
4 - 'Right Hilum';
5 - 'Right Lower Lobe of Lung
';
6 - 'Right Middle Lobe of
Lung ' ;
7 - 'Right Middle and Right
Lower Lobes of Lung ';
8 - 'Right Upper and Right
Middle Lobes of Lung ';
9- 'Right Upper Lobe of
Lung';
10 - 'Other';
11 - 'Unknown'
If Tissue_Diagnosis is
populated, then
Location_From_Sample_Obt
ained is required;
otherwise, this field should
be blank
June 29, 2017 57

LCSR User Guide
76
Location
other,
specify
Location_Other_
Spec
string
N
max length is 255 characters
If
Location_From_Sample_Obt
ained is 10, then
Location_Other_Spec is
required;
otherwise, this field should
be left blank
77
Histology
Histology
string
N
1,2,3,4
Select one:
1 - 'Non-small cell lung
cancer' ;
2 - 'High grade
neuroendocrine tumor (small
cell lung cancer)' ;
3 - 'Low grade
neuroendocrine tumor
(carcinoid)';
4 - 'Intermediate grade
neuroendocrine tumor
(Atypical carcinoid)'
If Tissue_Diagnosis is 2, 3, or
5 then, Histology is required;
If Tissue_Diagnosis is 4 then,
Histology is applicable but
optional;
otherwise, this field should
be blank
78
Histology -
Non-small
cell lung
cancer
Histology_Non_S
mall_Cell_LC
string
N
1,2,3,4,5,6
Select one:
1 - 'Invasive
adenocarcinoma' ;
2 - 'Squamous cell
carcinoma' ;
3 - 'Adenosquamous cell
carcinoma';
4 - 'Undifferentiated or
poorly differentiated
carcinoma' ;
5 - 'Large cell carcinoma' ;
6 - 'Other, specify'
Required & Conditional
If Histology is 1, then
Histology_Non_Small_Cell_L
C is required;
otherwise, this field should
be blank
79
Other non-
small cell
lung cancer
histology,
specify
Other_Non_Smal
l_Cell_LC_Histolo
gy_Spec
string
N
max length is 255 characters
If
Histology_Non_Small_Cell_L
C is 6, then
Other_Non_Small_Cell_LC_Hi
stology_Spec is required;
otherwise, this field should
be left blank
80
Stage -
Clinical or
pathologic?
Stage_Clinical_O
r_Pathologic
number
N
1,2,9
Select one:
1 - 'Clinical' ;
2 - 'Pathologic' ;
9 - 'Unknown'
If Tissue_Diagnosis is 2, 3, or
5 then,
Stage_Clinical_Or_Pathologic
is required;
If Tissue_Diagnosis is 4 then,
Stage_Clinical_Or_Pathologic
is applicable but optional;
otherwise, this field should
be blank
81
Overall stage
Overall_Stage
string
N
IA,IB,IIA,IIB,IIIA,IIIB,IV, Unknown
Select one:
IA
IB
IIA
IIB
IIIA
IIIB
IV
Unknown
If Tissue_Diagnosis is 2, 3, or
5 then, Overall_Stage is
required;
If Tissue_Diagnosis is 4 or 7
then, Overall_Stage is
applicable but optional;
otherwise, this field should
be blank
June 29, 2017 58

LCSR User Guide
82
T status
T_Status
string
N
TX,T1a,T1b,T2a,T2b,T3,T4,99
Select one:
Tx
T1a
T1b
T2a
T2b
T3
T4
99
Optional & Conditional
if Tissue_Diagnosis is
populated then T_Status is
applicable;
otherwise, this field should
be blank
83
N status
N_Status
string
N
NX,N0,N1,N2,N3
Select one:
NX
N0
N1
N2
N3
Optional
if Tissue_Diagnosis is
populated then N_Status is
applicable;
otherwise, this field should
be blank
84
M status
M_Status
string
N
MX,M0,M1a,M1b
Select one:
MX
M0
M1a
M1b
M1c
Optional
if Tissue_Diagnosis is
populated then M_Status is
applicable;
otherwise, this field should
be blank
June 29, 2017 59

LCSR User Guide
THIS PAGE INTENTIONALLY LEFT BLANK
June 29, 2017 60
