AField Guide To Fermentation
User Manual:
Open the PDF directly: View PDF ![]() .
.
Page Count: 63

A FIELD GUIDE TO
FERMENTATION
A FIELD GUIDE TO FERMENTATION
by Arielle Johnson and Lars Williams

This book belongs to

a field guide to fermentation · 32 · noma
Introduction WHAT IS IN THIS BOOK AND HOW DO I USE IT?
Chapter One WHAT IS FERMENTATION AND WHY DO WE DO IT?
Chapter Two LACTO-FERMENTATION
Chapter Three KOMBUCHA
Chapter Four VINEGAR
Chapter Five KOJI
Chapter Six MISO AND SHOYU
Chapter Seven GARUM
Epilogue FERMENTATION....
Appendix A CONTROL AND SAFETY WITH FERMENTATION
Appendix B THE TOOLS OF FERMENTATION
Glossary
5
7
21
31
41
53
67
79
87
93
105
116
A Field Guide to Fermentation
A field guide to fermentation
All rights reserved © 2016 · noma
Written by Arielle Johnson and Lars Williams
Illustrations by Arielle Johnson
Design by Tombola, Jan Rasmussen
Printed by Dystan & Rosenberg
Paper – Munken Pure

4 · noma a field guide to fermentation · 5
What is in this book
and how do I use it?
Introduction
Each section of this book starts with the most basic prac-
tical information to do a fermentation for a noma recipe
successfully. So if you only need to know exactly what to
add to pumpkin juice to make pumpkin vinegar, or what
the correct proportions of ingredients for a hazelnut miso
are, that information comes first.
If you want to understand why you need to add each in-
gredient, or what role each step plays in creating the fi-
nal product, this information follows each basic recipe, in
increasing depth and complexity. Besides learning some
cool stuff, such as the fundamental reasons for specific sa-
linity, temperature, alcohol, or humidity, you can also use
this deeper background information to develop new fer-
mentations, or figure out what processes are likely to work
well with different ingredients.

6 · noma a field guide to fermentation · 7
What is fermentation
and why do we do it?
Chapter One
a field guide to fermentation · 98 · noma
Fermentation is one of the many tools we use for preparing ingredients for the
menu at noma. You might be most familiar with fermentation as the process
that creates alcohol in wine and beer, or that causes bread dough to rise, or that
makes kimchi or sauerkraut sour.
At its most basic, fermentation is the transformation of food by various mi-
croorganisms (bacteria, molds, and yeasts and fungi) and the enzymes they
produce.1 It is essential for the production of a wide range of foods and bever-
ages, each with a distinct and varied flavor profile. Kimchi, wine, bread dough,
vinegar, and soy sauce, while all tasting different, each owe their origin to the
action of microorganisms.
Fermenting towards end-products as diverse as wine and kimchi, or squid
garum and creme fraiche, is a matter of starting with different ingredients, and
working with different microbes. The microbes—across human cultures gen-
erally, and at noma in particular—that we use for fermentation are yeasts and
molds (both types of fungi) and acetic and lactic bacteria.
Why would you want to transform food with microbes in the first place? We do so
simply because it’s delicious. Throughout history, fermentation has been used for
several different purposes. It can preserve perishable foods—making sauerkraut
from cabbage extends its usable life, for example. Fermentation can also make foods
easier or safer to eat, removing cyanide from cassava and the historically indigestible
sugar lactose from dairy products. Other microbes create intoxicating substances
such as alcohol. Finally, fermentation is often used for flavor—the purpose of cam-
embert or sauternes is less about nutrition than deliciousness.
At noma, we ferment primarily for flavor. Rather than aiming for shelf-stabil-
ity or specific health properties, the processes we use and the ways we use
them are directed by the flavors they produce. This enables us to better utilize
highly-flavored and short-seasoned ingredients. We can develop complex and
interesting flavors in commodity and waste products, like dried yellow peas
and squid trim. We can also create flavor profiles, like sourness and umami,
that are not widely-occurring in Nordic products. Rather than attempting an
1 Per Sandor Katz, Godfather of the modern fermentation revival and MAD Symposium speaker in 2013
exhaustive coverage of fermentation in all its possible forms, or even every sin-
gle product fermented at noma, this book is rather an illustration of functional
fermenting for flavor.
It takes some know-how to transform raw ingredients and microbes from start
to finish, and to cultivate the kinds of flavors we want to work with instead of
swampy, boozy, moldy, chemical-like, or rotten ones. One part of this is un-
derstanding what types of fermentations (and therefore, what general flavor
profiles) are possible for a raw product, based on its basic makeup of proteins,
sugars, fats, starches, and water. The other part of this is understanding what
temperature and humidity ranges, acidity, salt, sugar, alcohol, and oxygen lev-
els or additions are necessary for creating a hospitable environment for par-
ticular types of microbes to grow and ferment happily while excluding others.
The flavors produced by fermentation (see table) are diverse and often radi-
cally different from those of the ingredients we start with. Many of them are
produced directly from the fermenting microbes’ digestive processes. When
these microbes extract energy from their surroundings, sugars are converted
to alcohols and acids and large, relatively flavorless molecules, like starches
and proteins, are broken down into smaller pieces, which due to their new siz-
es and shapes have different tastes and smells.
Fermenting microbes have a lot of other metabolic processes that keep them
alive besides ‘eating’— they need to build and break down proteins, maintain
their cell membranes, and deal with shortages and surpluses of different ami-
no acids. The molecules they produce in doing these things (secondary me-
tabolites) are often small,volatile, and have flavors, too: fruity, creamy, buttery,
cheesy, winey, pickley, ferment-y, pungent, vinegary, bready, floral, sulfury,
popcorny, rosy, vegetal, almondy, honeylike, leathery, haylike, spicy, and fatty
flavors can all be created this way. Aging or heating fermented foods can lead to
further reactions between fermentation by-products creating other, different
flavors such as balsamic-y, burnt sugar, dried fruit, caramelized, toasty, choc-
olatey, malty, meaty, roasty, cheesy, and nutty. See the table below for more
details on these flavors, molecules, and microbes responsible for them.

a field guide to fermentation · 1110 · noma
Flavor Example Compounds Type of microbe Type of fermentation Formation (if known)
sour lactic acid lactic acid bacteria lacto-fermentation, miso sugars converted into lactic acid
sour and pun-
gent-smelling
acetic acid acetic acid bacteria vinegar, miso ethyl alcohol converted into acetic acid
sweet sugars- glucose especially Aspergillus oryzae koji starches broken down into indicidual
units (sugar molecules)
umami free glutamic acid Aspergillus oryzae miso, garum proteins broken down into individual
units (amino acids, glutamic acid is one
of these)
fruity esters such as ethyl decanoate (generic
fruity) or isoamyl acetate (banana-fruity)
Yeast, acetic bacteria, lactic bacteria wine, beer, vinegar, miso an alcohol produced from fermenta-
tion (ethyl alcohol, isobutanol, isoamyl
alcohol) binds chemically with a fatty/
organic acid (acetic acid, decanoic acid).
Secondary metabolite related to cell
growth and balances of oxygen, fatty
acids, and other components that the
cell takes-up
nail polish remover ethyl acetate yeast, acetic acid bacteria vinegar, miso acetic acid reacts with ethyl alcohol to
form ethyl acetate
creamy acetoin lactic acid bacteria lacto-fermentation especially but not exclusively
dairy
byproduct of LAB consuming small
amounts of citric acid for energy
buttery diacetyl lactic acid bacteria lacto-fermentation especially but not exclusively
dairy
byproduct of LAB consuming small
amounts of citric acid for energy
cheesy (blue cheese) butyric acid Penicillium roquefortii
+ fat-degrading molds
anything with fats whole fats broken down into free fatty
acids (lipolysis)
old cooking oil/paint aldhydes especially hexenal and nonenal oxidation rather than fermentation anything with fats whole fats broken down into fatty
acids, then oxidatively degraded into
aldehydes
cheesy (parmesan) aldehydes, hexanoic acid, others yeast, lactic acid bacteria lactic & alcoholic fermentations
winey "fusel" alcohols-butanol, isoamyl alcohol yeast, lactic acid bacteria lactic & alcoholic fermentations byproduct of yeasts breaking down
amino acids as a nitrogen source
pickley/ferment-y 4-hexenoic acid lactic acid bacteria lacto-fermentations fatty acid metabolism
pungent/vinegary acetic acid acetic bacteria vinegar primary metabolite of acetic bacteria
bready (several compounds) yeast alcoholic fermentations
floral phenethyl alcohol yeast alcoholic fermentations metabolite of yeast breaking down ami-
no acid phenylalanine
sulfur hydrogen sulfide yeast alcoholic fermentations byproduct of yeasts synthesizing sul-
fur-containing amino acids
popcorn/basmati rice 2-acetyl pyrroline lactic acid bacteria, Aspergillus oryzae lacto-fermentations & koji
rose phenethyl alcohol, phenethyl acetate yeast alcoholic fermentations
almondy benzaldehyde yeast alcoholic fermentations
honey large esters and phenethyl esters yeast, possibly LAB alcoholic fermentations & lacto-fermentations
leather phenolic compounds yeasts alcoholic fermentations esp at a higher temperature

a field guide to fermentation · 1312 · noma
Flavor Example Compounds Type of microbe Type of fermentation Formation (if known)
hay/barnyard 4-ethyl phenol Brettanomyces yeast spontaneous alcoholic fermentations
spicy/smoky 4-vinyl guaiacol, 4-ethylguaiacol and other
phenols
yeasts spontaneous or warm-temperature alcoholic fermen-
tations
fatty & coconutty delta-decalactone and other lactones yeast, lactic acid bacteria alcoholic & lacto-fermentations
balsamic
Maillard Reaction Products Aged products you started with koji
free amino acids (broken down proteins)
reacting with reducing sugars
(broken down starch/carbohydrates)
burnt sugar
dried fruit
caramelization
toasty
chocolate
malt
meat
roasted
cheesy
nutty
a field guide to fermentation · 1514 · noma
a field guide to fermentation · 1716 · noma
Notes
What microbes are we using?
Most often, we're using lactic acid bacteria, acetic bacteria, molds, and yeasts
(molds and yeast are both types of fungi). Fungi and bacteria are both microbes,
but fungi aren't a type of bacteria and bacteria aren't a type of fungi. Therefore,
in speaking about the fermentation process, using the term microbe, or micro-
organism, will be the most correct.
So what is a bacteria and what is a fungus and when do I use them?
Acetic and lactic acid bacteria are, obviously, both bacteria; yeasts and molds
are both types of fungi. We use wild lactic acid bacteria for our lacto-fermen-
tation, which converts sugars into sour-tasting lactic acid. We use acetic bac-
teria to convert alcohol into acetic acid to make vinegar. We use yeasts like
Saccharomyces cerevisiae and Brettanomyces bruxellensis to convert sugars into
alcohol. We use Aspergillus oryzae, a mold, for the enzymes it creates to break
starches into sugars and proteins into amino acids.
What is fermentation, please tell me in technical detail?
In the strict biochemical sense, fermentation is a metabolic process where mi-
crobes convert sugars into another substance in the absence of oxygen. In a
colloquial sense, fermentation is the transformation of food by microbes and
the enzymes produced by those microbes. The difference, basically, is that
lactic fermentations and alcoholic fermentations are true biochemical fer-
mentations, because they involve microbes converting sugars into lactic acid
or alcohol in a process that doesn't involve oxygen. Since growing Aspergillus
oryzae on grains, converting wine into vinegar with acetic bacteria, or doing
controlled proteolysis of beef with salt and koji for a few months to make beef
garum do involve transformation of foods with microbes and their enzymes,
we call them fermentations in our day-to-day conversations and in this book.
a field guide to fermentation · 1918 · noma
How did all of these fermentations develop at noma?
Some time ago, we began to dedicate a significant amount of time to developing
our ‘toolbox’ of fermentations at noma to explore the flavor possibilities in our
region.
Pickling in vinegar developed early on as an important component of the noma
larder— it is a simple way to reliably save the large amounts of plant products
available in the spring, summer, and autumn months for the cold and fairly bar-
ren winter. Elderflowers and berries, ramson buds, and hip roses are all excel-
lent pickled in vinegar, or heavily salted and then pickled in vinegar. The way
these flavors changed, grew, and ‘opened up’ during this preservation process
became an inspiration for investigating other types of fermentation processes
as a path to new flavors. Souring and ‘pickling,’ lacto-fermentation, growing
koji mold, Pea-so, grasshopper garum and then meat garum gradually were in-
corporated into the repertoire.
The current fermentation program is a logical extension of preservation tech-
niques used extensively in Scandinavia for millennia. Salting, pickling, smok-
ing, drying, and lye curing (a technique akin to nixtamalization), are all ancient
techniques for preserving food in this region, and fall into what we loosely
term ‘fermentation.’ The tremendous abundance during the summer needed to
be preserved in order to survive the long harsh winters. Lacto-fermentations
of milk products, such as skyr, were an important protein source, although far
more critical were the sauerkraut type fermentations of vegetables as a source
of necessary vitamins.
Anyway, it was a small cognitive leap to apply the sauerkraut process to oth-
er products like carrots, beets, and then every type of vegetable, fruit, mush-
rooms—more or less everything we could get our hands on, with various levels
of success. Some of this was inspired by research into other cultures, wheth-
er the process, such as the multitude of steps involved in making a Japanese
miso, or the product, such as the garum (salted fermented fish sauce) of Roman
age. We began a series of trials with the ingredients around us, and the suc-
cesses and failures led us to look into what was happening on a fundamental
level—thus making the leap from merely considering the fermentations as in-
dividual products to using them as a set of tools with which to manipulate and
shape raw materials, as one would use a knife or saute pan.
The garums began as a series of rather awful failures with mackerel and her-
ring. Oily, evil tasting 5 liter containers of salted fish oozing yellowish fat. Ob-
viously there was room for improvement— what could we change? The garum-
style ferment is an enzymatic one, carried out by the digestive juices of the
fish’s own stomach. The trials we had been doing with miso involved making
a molded barley with Aspergillus orzyzae, which develops enzymes to break
down starches for a food source, but also produces enzymes to break down
proteins as a secondary metabolic process. In the case of miso, this is used to
break down the proteins in the soybeans to simpler amino acids, particular-
ly glutamic acid. It occurred to us that this moldy barley could be the tool to
better process the offcuts from fish. Within 10 weeks we had a far more tasty
garum, dark and full flavored as a quality Nam Pla, which often takes a year
or two to age properly. Unfortunately, the fats from these oily fish were still
present, and lent a distinct ‘harbour’ harshness to the garum, so it could not be
qualified as a success. We were able to eventually remove the bulk of these via
ice filtering and centrifuging the solution, but we felt that the process itself was
stronger than the particular product it had produced.
In a sense, we had created a ‘tool’ of a recipe—a certain amount of molded bar-
ley with its enzymatic properties to break down proteins, water to absorb the
flavor, and a certain amount of salt to limit the types of fermentations to one:
enzymatic. All that was missing was a main ingredient to slot into our new
‘tool.’ At the time, the closest thing at hand (laughably, in retrospect) was a kilo
of grasshoppers, as we were, and still are, confounded and compelled by the
lack of insects in the Western diet. Into the blender they went, and into then
into the recipe ‘tool’ of barley, water, salt and temperature of 50°C. At the time
we were using a second-hand heating blanket (like grandma had) and an old
flamingo box, which René found hilarious, as he had never seen a heating blan-
ket before. Within 10 weeks, we had a rich, malt colored liquid with intense

20 · noma
Lacto-fermentation
Salted and soured fruits, vegetables, mushrooms, grains, etc.
Process:
Sugars fermented into lactic acid by lactic acid bacteria, usually in a
slightly salty and anaerobic environment
Necessary components:
Raw produce, salt, vacuum bag
Chapter Two
soya-like umami, but also with touches of dark, almost Mexican mole-like fla-
vors. We thought this one qualified as a success. From here on, we more or less
stuffed every type of protein we could think of into our new ‘tool’—shellfish,
chicken, pork, crustaceans, lean fish, liver, eggs, cod sperm, etc and etc. Most
were okay, some were horrifying, but some were real successes. The offcuts of
squid, the bits and scrap that normally wound up in the bin, transformed into
an unctuous jet black delight. Beef scraps formed an intense liquid with all the
punch and nuances of a well hung rib eye steak.
The particular nascence of our garum, and the resulting development into the
product range which we now have and continue to expand, is emblematic of
how we strive to develop new techniques and foundations for the menu. A bit
of inspiration from Ancient Greece, quick trials to get a feeling ‘in the fingers
for the process’— followed by some childlike curiosity and child-labor-like
hours of hard work culminated in a win.
Although we have now been incorporating these techniques into our menu for
many years now, we still feel that we are merely scratching at the surface; that
a depth of possibilities still waits to be discovered.
a field guide to fermentation · 21
a field guide to fermentation · 2322 · noma
Basic Recipe: Lacto-fermented plums
1000g Red Plums, preferably organic
20g Fine Salt (no iodine)
Weigh washed, cut in half, and seeded plums. Calculate 2% of the weight of the
plums (so, 20g if you have 1 kilo of plums) and add that amount of fine, non-io-
dized salt to the plums. Gently combine the plums and salt so that the salt is
very evenly distributed.
Lay the salted plums neatly in one layer in a very large vacuum bag, so that
there is adequate space left in the bag for the gas produced by the lacto-fer-
mentation to expand. Seal in a vacuum sealer, removing all the air.
IMPORTANT:
Don't try to lacto-ferment with less than 1.5% salt, it will prob-
ably turn yeasty or moldy and you'll have a bad time.
Put the sealed bags in a secondary container (think cambro, not milk crate), in
a room where they will stay at 25°C, and check the bags every day. When they
swell up like balloons, open them and taste the fruit.
When the fruit is ready, it will be somewhat salty, softer than when you started
but not mushy or disintegrated, tangy, and have a somewhat pickled flavor.
a field guide to fermentation · 2524 · noma
able even after they’ve been frozen. More importantly, it creates a lot of nice
flavors: a very pleasant tanginess, for one, and also a really special depth and
complexity. For instance, the Barley Koji is somewhat interesting on its own,
nice smell, a bit sweet. But lacto-fermented, the Barley Koji is intensely fruity,
the sweetness balanced by a complex sourness, a citrus fruit-white wine-noilly
pratt reduction-tropical fruit, grain-broth lovechild.
How do I know when it's ready?
The level of “fermentedness” you’re aiming for will depend on what you’re
fermenting and what you’re trying to use it for. For instance, if you are going to
ferment plums, the ideal starting point is a very ripe, yet still firm plum. When
finished the plum will be a bit softer, yet still maintain a desirable texture, and a
sweet/sour balance. Poor quality plums (say, which are a bit mealy and not that
sweet) will fall apart into an average tasting sludge. If you are looking to fer-
ment something like green gooseberries, the textures will be quite a bit firmer,
both at the onset and completion of the process, and more care should be taken
to balance the initial tartness of the berry with the eventual sourness.
What is happening here, microbiologically speaking?
Lactic acid bacteria (LAB) are eating some of the sugar in the fruit and con-
verting it to lactic acid (which makes the fruit more acidic) and carbon dioxide
(which makes the bag swell up). LAB are incredibly common in nature—they
live on your skin, in the air, and on the surface of fruits and vegetables. Many
of them have evolved to survive and grow in salty environments that would
kill or inhibit most other microorganisms, including most spoilage bacteria/
molds/yeasts.
Over the course of a lacto-fermentation, different species of LAB will dominate
the process. Lacto-fermentation is usually kicked off by Leuconostoc mesen-
teroides, which begin consuming sugars and produce lactic acid, acetic acid,
carbon dioxide, and ethanol, as well as a smaller amount of a variety of flavorful
compounds. Once L. mesenteroides has raised the acid concentration to about
0.3%, Lactobacillus plantarum becomes the dominant fermenter, consuming
sugar and producing lactic acid to reach levels of 1.5-2%. If there is any sugar
Lacto-fermentation Notes
Why a big vacuum bag?
Lacto-fermentation needs to be protected from oxygen, and produces a lot of
carbon dioxide gas (which needs space to expand).
Why 2% salt?
A salty environment inhibits the growth of most spoilage bacteria and yeasts,
but lactic acid bacteria have a much higher tolerance to salt. This way, you're
suppressing the microbes you don't want and encouraging the ones you do. For
a while, we experimented with salt levels between 0.5% and 3% for ferment-
ing various ingredients and found that 3% salt tended to taste too salty, and
that 1.5% and (especially) lower concentrations tended to let other microbial
processes, like molding or yeasting, happen too often. 2% is a happy medium
between salty flavor and controlling the fermentation.
Why shake the bag?
To make sure the salt coats all the fruit and mixes with the juices to make an
evenly salty environment.
Why seal the bag under vacuum?
Many spoilage bacteria need oxygen to grow; this prevents unwanted foreign
bacterial growth and also stops the fruit getting oxidized and browned.
Why put the bags in a cambro?
It’s very possible that at least one bag will burst and leak. Since you put them in
a cambro, you didn’t leave a mess for someone else to clean up.
Why ferment at 25°C ?
Colder temperatures will slow down the fermentation, while warmer tempera-
tures can lead to spoilage or inferior flavor.
Why would I want to lacto-ferment something in the first place?
Lacto-fermenting ingredients helps preserve them and makes them quite us-
a field guide to fermentation · 2726 · noma
decays. Furthermore, the small amount of lacto-fermentation that occurs
tends to break down the already extremely volatile and delicate compounds
that we associate with ‘green’, ‘fresh’ or ‘grassy,’ which are often part of the
plant’s defense system, and once broken result in ‘swampy, moldy and more or
less unbearably unpleasant.’
Lacto-fermentation Variations
Lacto Berries
Use a mixture of crushed and whole berries (crush half of them) so there's
more liquid fermenting around the fruit.
Lacto Ceps
Freeze and then thaw cep mushrooms in a vacuum bag and ferment them as
for fruit, above, with all the liquid they give off (use 2% of the weight of cep +
liquid in salt). There will be quite a lot of juice at the end of the fermentation
period. There are often multiple uses that come from the different aspects of
the lactic fermentation. We often use the resulting liquid very differently than
solid matter being fermented. For instance, with lactic fermented ceps the liq-
uid is excellent for adjusting the acidity of savory sauces, or simply spraying/
drizzling on vegetables or even seafood. The solid fermented ceps we may soak
in birch syrup and dry into a chewy sweet/sour almost-candy. Or simply dry
into a ‘leather’ that can be used as is, or cut into small intensely-flavored ac-
cents. Or added to something umami-rich like pea-so for a delicious paste.
Crème Fraîche
Lacto-fermentation is responsible for the tangy flavor of cultured dairy (yo-
gurts, cheeses, creme fraiche, skyr, etc). It differs from plant product lacto-fer-
mentation in that dairy lacto-fermentation is usually inoculated with pure
strains rather than spontaneously fermented, is not necessarily salted to start
the fermentation, and involves different species of lactic bacteria more adapt-
ed to metabolizing lactose (the primary sugar in milk).
left at this point, the fermentation is finished off by Lactobacillus brevis, which
produces more lactic acid along with acetic acid and ethanol. This complexi-
ty is why temperature curves are often used in lacto-fermentation, especially
with creme fraiche. Often the LAB is inoculated into cold cream, allowed to
come to room temperature for 24 or so hours and then cooled down in the
fridge- this changes the taste as some of the bacteria have their flavor profiles
highlighted and others subdued.
Lacto-fermentation Trouble-Shooting
The fruit simply isn’t getting sour:
Lactic fermentation is the conversion of sugars into lactic acids. If the fruit is
not ripe enough, there is a lack of natural sugars, and the bacteria struggle to
do their thing. Another possibility again originates in the fruit—if it has been
sprayed with insecticides or fungicides, it is very possible that this is having an
adverse effect on the LAB, especially its ability to produce acid. As we do not
add a bacterial culture for inoculation, and depend on the wild strain native
on the surface of the item to be fermented, the ideal product is organic and
straight from the farm. Also check the salt you are using—there is some evi-
dence that the iodine often added may suppress bacterial growth.
The fruit is moldy, or a white paste is seen, or a substantial boozy/wine flavor
and odor is present:
This is most likely a salt problem. The amount of salt may have been incorrect.
The bag may not have been shaken well enough to distribute the salt, leaving
some parts of the product over salted, and some were left without protection
from undesirable microbes. It is important to remember to lay the bags flat—
the brine that results from the product losing water will protect it. If the bag is
standing in such a way that the liquid is unevenly dispersed, then the fermen-
tation will be equally uneven.
I tried a lactic fermentation of green plants and it tastes horrible:
There’s often not a lot of sugar for the lactic bacteria to eat, and having pre-
vented other microbes from entering the equation, the plant material simply

a field guide to fermentation · 29
Notes
28 · noma
Cured/Lactofermented Meats
Lacto-fermentation is an important process for preservation and creating fla-
vor in cured meats, especially sausages and others made from ground meats.
Since whole-muscle cured meats like coppa or prosciutto start as essential-
ly sterile on the inside, any microbial transformations happen on or close to
the surface, and not throughout the whole muscle. Either by fermenting the
small amounts of sugars naturally occurring in animal tissue, or the addition-
al grains, sugars, or powdered milk incorporated into the mixture, lactic acid
bacteria create preservative properties and the sourness in summer sausage,
nduja, and others.
Other incidental lacto-fermentations:
Lacto-fermentation is an important step in making miso—the creation of acidi-
ty out of the sugar liberated from starches by the koji enzymes (if this sentence
makes no sense, take a look at the koji and miso chapters) is important for both
the flavor development and preservation of miso. This is a slower process in
misos than in fruits or vegetables, generally, because misos have a higher salt
content. Lactic acid bacteria are the main fermenter in water kefir grains (also
called tibicos) and are also present, though not the most dominant fermenter,
in kombucha. There exist lactic acid bacteria that happily live in alcoholic en-
vironments that play a role in the winemaking process, feeding either from the
grape sugars or from citric and malic acid. These can play a desired role, soft-
ening the acidity of the wine, or can create strange properties like a “mousy”
aroma or stringiness from ropy polysaccharides.

30 · noma
Notes
Kombucha
A slightly sweet, lightly acidic beverage
Process:
Flavorful sugar solution such as tea or juice fermented into acetic
acid by a symbiotic colony of yeast and acetic bacteria
Necessary components:
Sweet liquid, kombucha mother/SCOBY, air
Chapter Three
a field guide to fermentation · 31
a field guide to fermentation · 3332 · noma
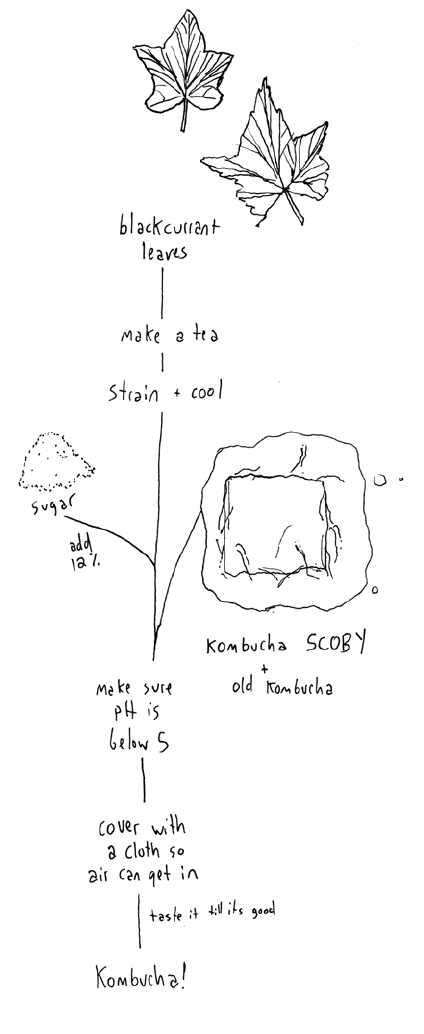
Basic Recipe: Herb Kombucha
1000g Filtered Water
5g Dried Tea or Herbs
120g Sugar
100g Previously Made Kombucha
Kombucha Mother (SCOBY)
Make a 12% (12 Brix when measured by a refractometer) syrup of water and
white sugar (120g of sugar for every liter of water).
Calculate 0.3-0.5% (3 to 5 grams per liter) by weight of the syrup and add that
weight of dry herbs to the syrup. Heat together to 80°C to infuse for 5 minutes.
Strain, cool, and add a kombucha mother, also called a pellicle or SCOBY,
which looks like a floppy mat or jellyfish, and enough already-made kombucha
to lower the pH to 5 (measured with a pH meter). This should be approximate-
ly 10% of the total liquid weight.
Cover the mixture with a clean cloth (not a sealed lid) and let sit at 20-22°C for
7 to 10 days until the kombucha is acidic and slightly vinegary. The pH should
be 3.7 by a pH meter. Unless for a specific use that requires it to be very acidic,
use, refrigerate, or freeze before the kombucha is aggressively vinegary.
Store the SCOBY that has formed in the kombucha in a container covered with
more kombucha until you need to inoculate another batch.
When the kombucha is ready it will be noticeably sour and have some vinegar
aroma, with a bit of residual sweetness. If it is very sweet it is not finished yet;
if the vinegariness is very irritating or pungent, it is over-fermented.
a field guide to fermentation · 3534 · noma
What if I want to store my SCOBY for a long time?
You can also store the mother in the fridge, covered in kombucha. It will es-
sentially go dormant and will require a few days in sweetened tea, at room
temperature, with access to oxygen to get back up to speed when you want to
use it again.
How does kombucha fermentation work?
There are various species of yeasts and bacteria in the SCOBY that gets added
to the sweetened tea. The yeasts ferment the sugars in the tea into alcohol, and
the bacteria consume the alcohol and produce acetic acid, converting a sweet
liquid into an acidic, slightly alcoholic one. The yeasts present include Saccha-
romyces and Zygosaccharomyces, and the bacteria include the acetic bacteria
Acetobacter and Gluconacetobacter, and frequently include lactic acid bacteria
as well.
Why isn't this kombucha fizzy like other kombuchas you can get for drinking?
Kombuchas that you buy commercially have usually been re-fermented in the
bottle; the yeast part of the fermentation produces carbon dioxide gas, which
makes the drink fizzy if the container is sealed and the gas builds up. This kom-
bucha recipe isn't directly intended for drinking as a fizzy beverage, but you
can make it into one by putting it in a closed container that can hold pressure
(for example, clean old soda bottles) when it is still slightly sweet and letting it
re-ferment in the bottle.
What if I want to make Kombucha but don't have a SCOBY or mother?
The short answer is, you can't; you need kombucha to make kombucha. If you
have an unpasteurized, already-made kombucha, you can inoculate a new
batch of kombucha with that successfully, though it can be a somewhat slow-
er fermentation process. If you have neither on hand, it's possible to order a
SCOBY online.
Kombucha Notes
Why syrup?
The microbes that ferment the kombucha feed on sugar.
Why herbs?
Because you want it to taste like something, right? The herbs may be dried, like a
tea, or fresh, like pineapple weed. Black tea is traditional, herb teas and juices will
also work. But the only requirement is that the product be flavorful and have the
appropriate Brix. We have made a very sucessful infusion of the husks of black
garlic- delicious taste and the residual garlic paste provided enough sugar in itself.
Why is it cooled after infusion?
If you add a starter to a hot liquid, the microbes will die.
Why start at pH 5?
Lower pH = more acid, which is inhospitable to mold, etc. Kombucha higher than
pH 5 tends to get moldy.
What the hell is a SCOBY?
Kombucha is fermented by a colony of yeasts and bacteria (kind of like sour-
dough). They form into a slimy mat as they grow, called a mother or a scoby. You
make kombucha by using a mother from a previous batch, and adding the whole
mat into a fresh batch of sweetened tea.
Okay, but why do they call it a SCOBY?
SCOBY is actually an acronym that stands for Symbiotic Colony Of Bacteria and
Yeasts. A SCOBY is usually found as multiple species of bacteria and yeasts bound
together in a slimy mat or biofilm of hydrocolloidal cellulose secreted by the mi-
crobes.
a field guide to fermentation · 3736 · noma
Kombucha Variations
Fresh herbs can be added to the sweetened tea + SCOBY for cold infusion to add
extra depth of flavor. Honey can be used as the sugar source—but since honey
often harbors a wide range of wild yeasts and other microbes, you should boil
the honey-kombucha base so the SCOBY microbes don't have to fight off other
species to do their thing.
Lemon Verbena Kombucha
Use lemon verbena or a mixture of lemon verbena and lemon thyme in the
above recipe.
Blackcurrant Leaf Kombucha
Add dried blackcurrant leaves at 5 grams per liter (0.5%) to infuse in water at
70°C for 25-30 minutes (sealed or covered in plastic wrap), strain, and then
sugar added at 100 g/L (10%). Add kombucha mother and ferment, as above in
basic recipe. (Blackcurrant leaves are not as aggressively flavorful as verbena
and other herbs, and require a higher ratio and longer steeping time)
Elderflower Syrup Kombucha
Adding a kombucha mother to elderflower syrup containing 30% sugar (30
Brix) will make a very sweet elderflower kombucha. Diluting this syrup to 15
brix makes for a lighter, more traditional-tasting, drier kombucha.
Juice Kombucha
Juices (carrot, apple) can be used to make juice kombucha. The carrots you use
should be as sweet a variety as possible; check the brix of the juice and adjust if
it is below 8-10 brix. Apple juice makes a very delicious kombucha.
Rose Pulp Kombucha
This is a Kombucha that we make from the left-over pulp from a rose oil pro-
duction, which is simply wild beach roses blended with oil. Once the oil had
been fully pressed out of the pulp, we mix that pulp with a 12% sugar solution,
Kombucha Trouble-Shooting
There is a stringy jellyfish-looking translucent horrible thing floating in my
kombucha:
That is unfortunately what the SCOBY looks like. It shouldn’t be fuzzy, moldy,
black, or other strange colors though.
The SCOBY looks fuzzy or moldy, or smells cheesy:
It probably got infected with mold: If you can peel off the top layers of the Sco-
by and throw them away, the bottom part might be salvageable. To avoid this,
make sure the top of the SCOBY doesn’t get too dry (ladle a little kombucha
over it as it ferments), and make sure the liquid you’re making into kombucha
is at least somewhat acidic (pH below 5) to stop molds from growing. Also, if
there is not enough sugar, the Scoby can die, or not grow fast enough to com-
pete with the molds.
The kombucha tastes like straight vinegar:
When the kombucha scoby ferments, it is eating sugars and creating alcohol,
then converting the alcohol to acid. If you let it go too long all the sugars will
get converted into acid. You can’t really reverse this process but the kombucha
is still OK to use to start a new batch. This is also a method for creating some-
thing rather close to a traditional vinegar, but much faster.

a field guide to fermentation · 39
Notes
38 · noma
allow it to steep overnight, strain the liquid (taking care to skim the oil) and use
that as a base for the Kombucha.
Milk Kombucha
Milk, with a good deal of care, can be used to make kombucha. It is critical
to incorporate a sufficient amount of liquid mother in the form of a previous
batch of kombucha, without lowering the pH too much. With some attention,
it is possible for the kombucha to thicken the milk and lend a pleasant acid-
ity. If the fermentation is allowed to continue for too long, the pH will drop
too low, denaturing the proteins and splitting the milk. If the milk Kombucha
spends only 2 days at 20°C and then put in the fridge, it’s possible to set it, like
a fresh cheese.
Kombucha Crème Fraîche
800g Milk
200g Cream
200g Kombucha- Elderflower Kombucha works very well for this.
Incorporate the ingredients. Ferment at 20°C for one day, then place in the
fridge to finish fermenting for two more days.

40 · noma
Notes
Vinegar
Sour liquid fermented from an alcoholic mixture
Process:
Ethyl alcohol fermented into acetic acid by acetic bacteria,
with lots of oxygen
Necessary components:
Liquid, alcohol, vinegar starter, air
Chapter Four
a field guide to fermentation · 41
a field guide to fermentation · 4342 · noma
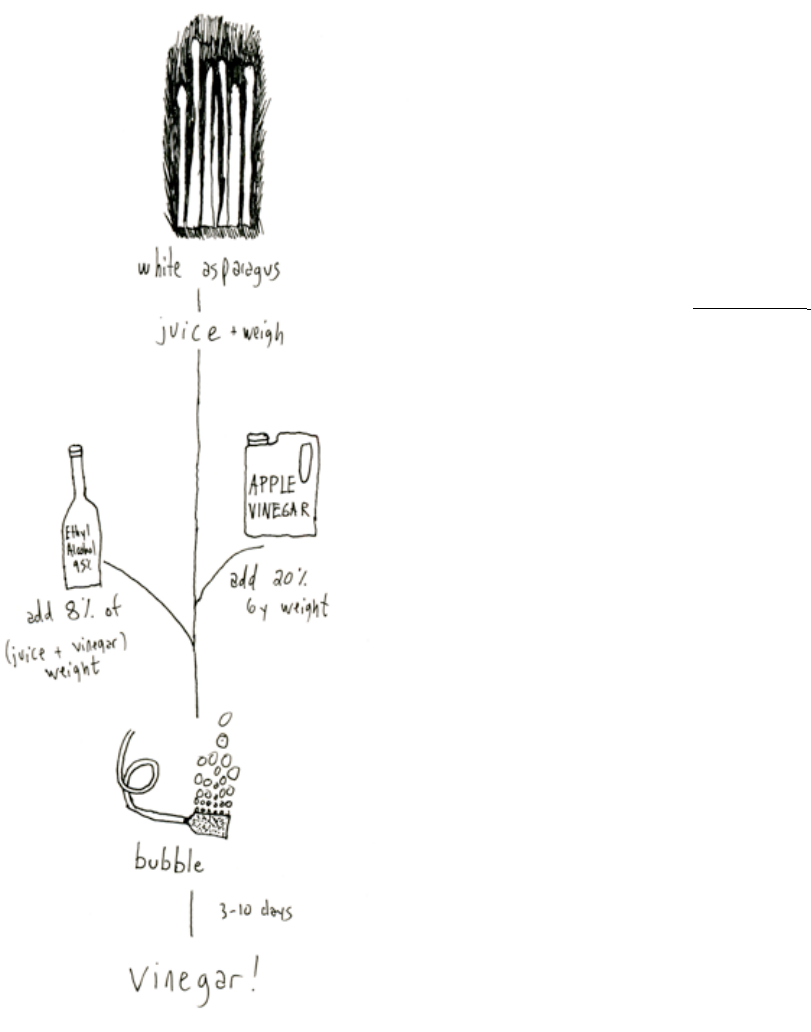
Basic Recipe: Single-Step Juice Vinegar
1000g Juice
200g Unpasteurized Vinegar
96g Ethanol
Weigh the juice. Calculate 20% of this weight and add that amount of unpas-
teurized vinegar. Calculate 8% of the total weight you have (juice + unpasteur-
ized vinegar) and add that amount of high-proof (96%) ethanol.
IMPORTANT:
the alcohol you add MUST be food-grade. Everclear, overproof
vodka or rum, or food-grade 96% ethanol are all fine. Anything labeled “100%”
or “Denatured” will contain unsafe or poisonous substances. Perversely, “100%
Ethanol” has had benzene or something else nasty added to it to de-water it
and should therefore be avoided. It’s only possible to get 95-96% ethyl alcohol
via distillation, so this is the highest possible purity you will be able to find
that hasn’t definitely had something weird done to it. If it says that it has had
isopropyl alcohol or methyl ethyl ketone or any other chemical name that’s not
ethyl alcohol or water added to it, don’t use it for food. Ethyl alcohol for torches
or stoves should NEVER be used to make vinegar.
Put the mixture of juice, unpasteurized vinegar, and ethanol in a container
large enough that it leaves you some headspace, about 25% of the total volume
of vinegar.
Take an aquarium air pump, attach tubing and an airstone, and bubble the mix-
ture with the airstone.
Cover the container with cheesecloth, netting, or a blue cloth to let air in and
keep flies out.
Don't ever totally seal a container of in-process vinegar. Oxygen is essential for
the fermentation to work.
a field guide to fermentation · 4544 · noma
Advanced Recipe
Elderflower and Elderberry Wine Vinegar
Elderflower Wine Fermentation:
Take a tube of White Labs WLP 650 (Brettanomyces bruxellensis) or WLP 568
(Belgian Saison Yeast Blend) yeast out of the fridge to come to room tempera-
ture before you begin. WLP 650 will make a sweeter vinegar, and WLP 568 will
make a drier vinegar.
Take 8.5 L of elderflower syrup that is 60 Brix and put it in a 30-L bucket
(which you have already sprayed down the inside of with food grade alcohol)
with 8.5 L of filtered water. Measure and write down the exact Brix level; it
should be about 30 (28-32) Brix but make sure you note the exact value and
write it down on the bucket. You will need this initial measurement later to
gauge how far the fermentation has gone.
Gently shake the tube of yeast to make sure the yeast sludge that is caked on
the side is fully suspended in the liquid. Pour the entire tube of yeast into the
bucket, stir it well (with a clean, alcohol-sprayed whisk or spoon) to incorpo-
rate and aerate it slightly, and put the lid on the bucket with an airlock in the
lid. Make sure the airlock is filled with water to the line, and that the airlock
is capped.
As the yeast ferments the sugars in the elderflower syrup, the lid will puff up
slightly and the airlock will slowly bubble.
As the fermentation progresses, check the Brix value with a refractometer
every few days. Enter the starting brix (which you wrote down, right?) and
the current brix into the “Monitor Ferment Progress with a Refractometer”
calculator available online at the website VinoCalc http://www.musther.net/
vinocalc.html#monitorferment, and read Residual Sugar and Current Alcohol
values it calculates. For a sweet vinegar, the alcohol percentage should be be-
tween 2% and 4% alcohol. For a dry vinegar, the alcohol percentage should be
between 8% and 10% alcohol.
Taste the vinegar every day. When it is finished it will be vinegary but should
still have some of the fresh taste of the juice you started with. If it is still very
hot-alcoholic, or smells like nail polish remover, it should be bubbled and ox-
ygenated more.
Vinegar Notes
Why add unpasteurized vinegar?
Raw (unpasteurized) vinegar has acetic bacteria living in it, and so it acts as a
starter or inoculant to get the fermentation going. Vinegar also makes the fer-
mentation mixture a more hospitable environment for acetic bacteria to chill
out and grow in.
Why are we adding alcohol?
The alcohol is what gets turned into acetic acid by the acetic bacteria. No al-
cohol, no vinegar.
Why an aquarium air pump and airstone?
Acetic bacteria need oxygen to live, and by bubbling in lots of oxygen they can
create vinegar in about a week instead of a few months, which is how long it
often takes without aeration.
a field guide to fermentation · 4746 · noma
Elderberry and Vinegar Fermentation:
Once the wine has been fermented to the desired level of alcohol, inoculate
with vinegar starter and add elderberries.
For a sweet vinegar (with WLP 650 Yeast): add 3600g of apple vinegar and
2125g of ripe elderberries (stems removed) to the 30-L bucket with the wine.
For a dry vinegar (with WLP 568 Yeast): add 4250g of apple vinegar and 9000g
of ripe elderberries (stems removed) to the 30-L bucket with the wine.
Keep the lid off of each bucket and cover the open bucket with cheesecloth or
other breathable material, and tie off the material so it is secure and flies can't
get in. Let the vinegar age and ferment for 3-6 months at 25-30°C. Stir in the
elderberries that float to the top periodically.
More Vinegar Notes
Why do we start with sugar and yeast?
We need alcohol to make vinegar. Instead of adding alcohol to juice directly
like for a single-step juice vinegar, we're using yeast to convert sugar into alco-
hol, then converting that alcohol into acetic acid.
Why does the elderflower syrup get diluted?
With too much sugar, the yeast will either not be able to ferment at all, or we
would get a ridiculously alcoholic, ridiculously sweet wine. But the syrup will
be more stable and takes up less space for storage if it is 60% sugar.
How do you decide to do a yeast fermentation or add alcohol?
Key questions to ask yourself are,
• is the ingredient you want to make into vinegar yeast-fermentable—does
it have sugars in it?
• will the flavor changes that occur during yeast fermentation add or de-
tract from its flavor?
• how delicate or unstable is the ingredient you're using?
If you had grapes, you could juice them and add alcohol, but it wouldn't taste
anything like wine, and a vinegar you'd make out of this would be quite sweet
compared to wine vinegar and lack complexity. On the other hand, things like
celery, asparagus, or pumpkin have some sugar in them, but not enough to
make enough alcohol to get a stable vinegar. Generally 8% alcohol will make a
good, stable vinegar; sugar levels of at least 14 Brix are necessary to reach this
level of alcohol. Celery juice, if it sits at room temperature for too long (which
it would have to to ferment into wine), tends to lose some of its fresh flavor and
get muddied, and doesn't necessarily benefit from having a winey background
flavor. Most of this we figured out by trial and error, but generally the more
green/vegetal an ingredient is, the less likely it is to be good as a wine, and the
sweeter/more tannic/fruity and concentrated an ingredient is, the more likely
it is to be good as a wine.
What's the deal with the yeast?
Like many of our techniques, we picked these yeasts empirically, i.e. through
trial and error. Saison yeast is a blend of yeasts that includes Brettanomyces
species as well as the more standard Saccharomyces cerevisiae (which is the
species typically used for wine, beer, and bread). Brettanomyces is a genus of
wild yeasts that are pretty slow fermenters, and adds some complexity via very
subtle barnyard-y and funky flavors (these flavors are much more pronounced
in wines and beers with a significant Brett-fermented component). This isn't
to say that regular wine or beer yeast won't work, though.
Where can I find more information on alcoholic fermentations?
Generally, we only produce alcohol at noma to eventually ferment it into vin-
egar. We've experimented with beer-brewing and mead and winemaking; but,
generally, unless it’s destined for vinegar, we leave the production of alcohols
to our more talented friends like Mikkeller or Aqua Vitae Sydfyn, not to men-
tion our many wine suppliers.
a field guide to fermentation · 4948 · noma
Why is this one not bubbled with an aquarium pump? How do you decide to do an active
or a passive aeration?
Some ingredients make a better vinegar if they are bubbled or otherwise aerated to very
rapidly acetify them, other make a better vinegar if they age for a while and acetify slowly.
Generally, lower-sugar and lower-acid, vegetal or green-tasting ingredients (such as squash
and pumpkin, celery, fennel tops, asparagus, parsley) are make better fast vinegars: the
fast increase in acidity helps protect them from mold and other sources of off-flavors, and
once they lose their fresh flavors they don’t really develop more complexity. More winelike,
fruity, or already-fermented ingredients (elderflower wine, elderberries, beer) often devel-
op complexity by a more drawn-out fermentation and so can make a good vinegar either by
passive or active aeration.
Vinegar Trouble-Shooting
The vinegar is boozy and not very acidic:
You probably need to wait longer. Acetic fermentation can be somewhat slow especially
if you’re not bubbling air through it. If you need it very soon, try bubbling a lot more air
through it. Also, sulfur added as a preservative to wines and some beers, fruits, etc. will
inhibit the growth of acetic acid bacteria—so try to start with more natural, unsulfured stuff
to begin with.
The vinegar tastes like nail polish remover:
It might not be finished, or it might not be getting enough air—the nail polish remover
comes from leftover alcohol reacting with the acetic acid. Try airing it out or bubbling more
air through it, or leave it and check again in a few days.
Vinegar Variations
Juice Vinegars
Pumpkin juice, white asparagus juice, celery juice, and fennel top juice all
make great vinegars.
Tea Vinegars
Pine tea and other teas work as a substitute for the juice in the above recipe.
Wine or Beer Vinegars
If you have wine already, like cherry wine from Frederiksdal, you can use that
with 20% vinegar starter and skip adding any additional alcohol. This tech-
nique also works with wine you make yourself, beer, sake, etc.

a field guide to fermentation · 5150 · noma
NotesNotes

52 · noma
Notes
Koji
Steamed then mold-inoculated grains
Process:
Aspergillus oryzae mold grows on grains, breaking down their starches
and proteins for food, releasing useful enzymes in the process
Necessary components:
Grains, steam oven, Aspergillus oryzae spores
Chapter Five
a field guide to fermentation · 53
a field guide to fermentation · 5554 · noma
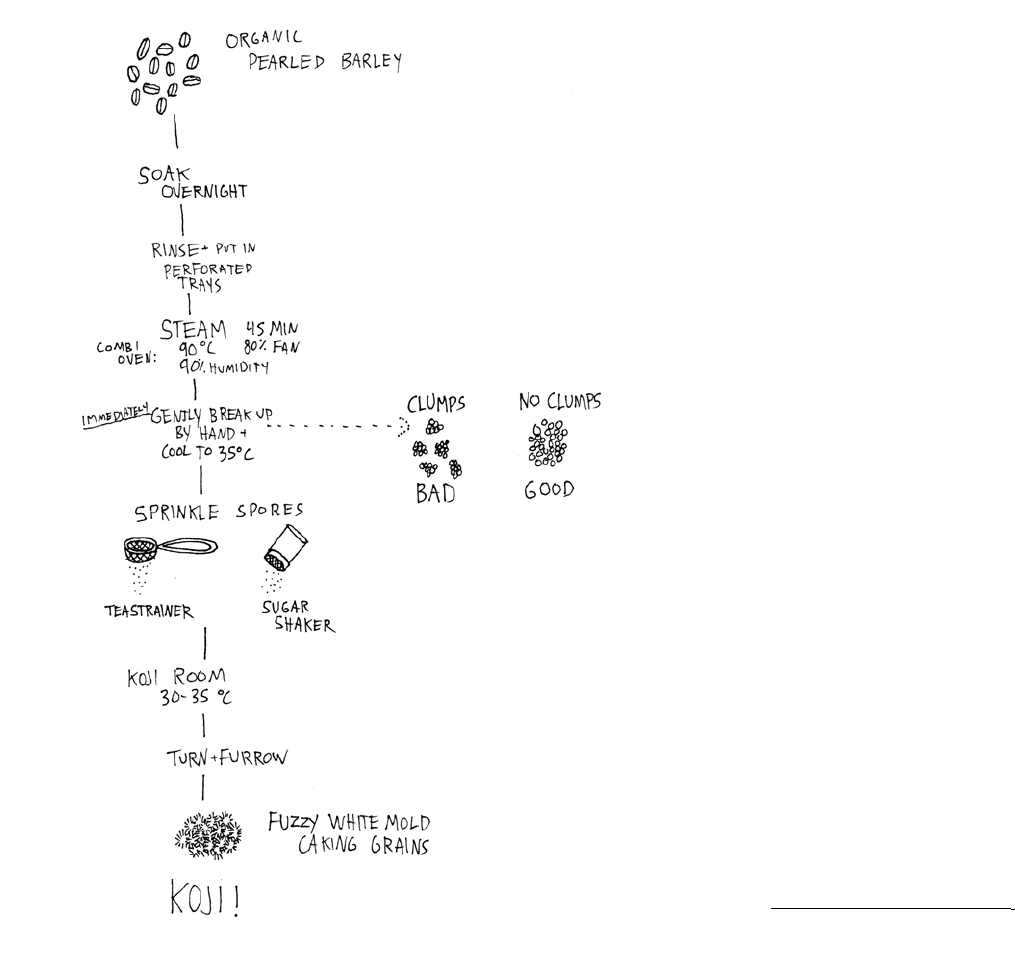
Basic Recipe: Barley Koji
Steaming
Soak pearled organic barley in cold water in the refrigerator overnight.
The next morning, put the soaked barley in perforated gastro trays, rinse it with
cold water in the sink, and steam it in the combi oven at 92°C, 90% humidity, and
fan speed 80%.
Take the barley out of the oven, and break it up gently into individual grains with
your hands while it’s hot, which helps stop it from getting too wet and clumpy (try
wearing two pairs of gloves to do this). Discard any barley that’s become very soft
and overcooked from pooling water or condensed steam. All the grains should be
separate, cooked through, and firm, but not soft, mushy, or slimy.
Inoculation
Divide the barley up into several perforated gastros in a depth of about 4 cm.
Wearing gloves, put spores of Aspergillus oryzae into a small tea strainer and
tap the strainer over the cooled steamed barley. Do one light pass with the
spores in the tea strainer, mix/fold the barley with your hands to incorporate
the spores, then do two more light passes each followed by folding the barley to
mix the spores in. If you’re using spores you grew yourself, put the dried sporu-
lated koji in a powdered sugar shaker and shake it on in three passes.
Mold Growth
Cover each tray with a very clean cloth that you’ve soaked in water and wrung
out well. Put the trays of inoculated barley in a clean, warm room (not an oven)
with the temperature set to 33°C and humidity of at least 80%. Ideally, tem-
perature should be controlled through a PID box; insert the temperature probe
into the inoculated barley for the duration of the mold growth phase.
EXTREMELY IMPORTANT:
During the mold growth process it is very easy
for the koji to overheat and kill itself. WATCH THE TEMPERATURE of the
koji and make sure it doesn't go above 39°C.
a field guide to fermentation · 5756 · noma
After about 24 hours, the barley should be showing some visible mold growth.
Gently crumble it with your hands into individual grains, fold the outer grains
into the center of the tray so it is well-mixed, and make two shallow, even-
ly-spaced furrows all the way down the middle of the barley in the long direc-
tion to make three long rows of heaped barley in the tray.
Let the mold grow on the barley for about 12 hours more, until the white mold
of the Aspergillus binds the barley together into a solid cake and looks slightly
fuzzy. At this point, the barley will taste sweet and slightly fruity, with a savory
and mushroom-y aftertaste. Try to stop before it looks extremely fuzzy, with
tiny balls of mold among the mold hairs— at this point, it is starting to produce
spores (sporulate) and won't be as tasty or effective.
Use the koji right away or refrigerate for up to three days. Cool the koji in its
trays in the walk-in before putting it in a container. To store for longer, put it in
vacuum bags, freeze, and then seal to store in the freezer.
Koji Notes
Why pearled barley?
Removing the barley husk makes it easier for the mold to reach the starch in
the grain, and it will ferment the grains more completely. It's possible to make
un-pearled or unpolished grains into koji, but they tend to sporulate faster and
don't get as sweet.
Why soak and steam the barley?
The ideal medium for growing Aspergillus is hydrated, but separate and rel-
atively firm grains. Boiling the grains tends to over-hydrate them and make
them too wet and mushy. This makes it too easy for the mold to grow quickly
just on the surface instead of expending energy to produce enzymes to pen-
etrate to the middle of the grain. We want the enzymes so we want to cre-
ate conditions that make it a little trickier for the mold cells to grow too fast.
Over-hydrated grains also tend to stick together and create poor conditions for
airflow, choking and killing the growing mold below the immediate surface
layer of the grains
Why crumble the barley up by hand?
This ensures that the barley cools off evenly and gives up its extra moisture,
that each grain gets evenly coated with spores, and that air can get to each
grain.
Why inoculate with mold spores?
Unlike beer, sourdough, or other yeast and lactic fermentations, it's not pos-
sible to simply “back-slop” or inoculate a new batch of koji by adding a small
amount of finished koji or miso to new barley grains. Instead, the mold has to
be grown past the stage in its life-cycle when it's useful for miso, koji water, etc.
and until it enters its reproductive phase and starts producing spores. These
spores are like seeds for new koji, and by collecting them and sprinkling them
on freshly steamed grains, you can grow a new mold colony (your koji!)
a field guide to fermentation · 5958 · noma
Why the high humidity?
The mold needs the environment to be relatively moist to grow properly, but
not actually wet.
Why 33°C?
The barley needs to be pretty warm for the mold to grow on it properly, and in
the 30-35°C range it produces a lot of useful enzymes that break down starch-
es into sugars (which are sweet and can be fermented) and proteins into free
amino acids (which have an umami flavor and can break down into aromatic
compounds).
Why furrow the inoculated barley?
Starting about 24 hours after inoculation, the koji can heat itself up to 40-45°C
or higher, which is hot enough to kill the mold cells; furrowing helps dissipate
some of this heat. The mixing also incorporates the parts where the mold is
growing faster, leading to a more evenly fermented final product.
Why do I have to be so careful with the temperature?
Koji and Aspergillus oryzae are very sensitive to temperature—as mentioned
in the recipe, the mold can give off enough heat during its growth phase that
it can cook itself to death. But besides ensuring that your mold actually sur-
vives, controlling temperature will also determine how effective the koji is at
second-stage fermentations you want to use it for. Pretty much all living cells
produce enzymes, which are protein molecules that build, break down, or alter
other molecules; they are the machinery that, on a molecular level, perform the
processes that keep a cell alive. Enzymes are usually named as “the thing they
break down”+ “ase.” If you see a world ending in “-ase,” there is a good chance
it is the name of an enzyme, and the word(s) coming before “-ase” describe
its function or the molecule that it breaks down. The two classes of enzymes
in koji that are most useful to us are proteases and amylases. Proteases break
down proteins into their component amino acids, and amylases break down
starches (made of amylose and amylopectin) into their component sugars.
These processes are useful because free amino acids are delicious and taste like
umami, and they also break down and react with other molecules to make new
molecules with complex flavors; sugars are also tasty, but more importantly
can be fermented into new flavors by lactic bacteria, acetic bacteria, and yeasts.
Whether the koji you produce is richer in amylases or proteases—whether it is
more effective at breaking down proteins or starches—depends on tempera-
ture. Proteases are produced more effectively close to 30°C, and much less
effectively at higher temperatures (38°C or higher), whereas amylases are pro-
duced well at both temperatures. To dial in a particular balance, it is essential
to maintain precise temperature control of the koji while it is growing.
Why can't I just put it in the Rational or Combi Oven?
While a Rational can be set to 30°C, it has temperature spikes and drops when
holding at 30°C. It will drop down to 20°C at some points, which is not great
for keeping the barley growing; it will also spike to 40°C or more for about
10 minutes at a time, which will kill the mold and your koji. More gentle and
precise temperature control is needed, which can be accomplished in a heated
room or in a chest-freezer sized box, especially with the heating controlled
by a PID box (the kind of temperature control that sous vide machines have).
Why all this fuss? Why do I want to make koji?
Acknowledgement: out of any of the techniques in this book, koji-making is
probably the most finicky and the biggest pain in the ass to figure out. It needs
to be exposed to air, but not so much that it dries out; it needs to be kept within
a relatively narrow temperature range, which means warming it at some points
of the process and cooling it at others; it needs to be kept very humid but not
so humid that water starts to condense on the surface of the grains; it needs
to be tended to at several time-points in its fermentation period; and the nec-
essary amount of, and parameters for, soaking and steaming vary widely for
more uncommon but interesting ingredients like buckwheat or bread. How-
ever, with a few technical interventions, it can be made pretty reproducibly.
Currently we use a 3-4 sq. meter room, where a humidity sensor controls a
fogger, and the temperature in the room is controlled by a PID box connect-
ed to a thermometer and an infrared heating panel. We’ve also used a broom
closet with a space heater and home humidifier, and a chest freezer lined with
an under-floor heating mat with heating and cooling cycles controlled by PID
a field guide to fermentation · 6160 · noma
and open containers of water for humidity. A decent amount of air circulation
is necessary for avoiding over-heating, so producing koji in small styrofoam
coolers or thermal boxes is more likely to result in dead koji.
Once you put in the work and attention to make it, koji has possibly-endless,
near-magical abilities to create flavors and transform other ingredients, en-
abled by the enzymes produced by Aspergillus oryzae as it grows. These break
down large molecules into smaller components—starches into sugars, and pro-
teins into amino acids. These molecules have flavors of their own, fuel further
fermentation processes, and react and break down to make more flavors. Many
of the most interesting uses for koji kill off the remaining mold cells (with salt
and/or lack of oxygen) and hijack their enzymes to transform a second ingre-
dient like peas, beef, or rye bread.
Koji Trouble-Shooting
The Koji is a solid, white slab or cake and smells pleasantly fruity/bread-y/
floral/ mushroomy and tastes sweet:
Congratulations, you did it right!
The Koji is slimy and smells like feet, rotting onions or something equally
unpleasant:
The Aspergillus oryzae spores weren’t able to grow, and a spoilage bacteria/
mold took over. This usually happens when the grains are too wet, and air can’t
get to the stuff on the bottom and it all kind of putrifies. If you boil the barley or
whatever other grains you’re using (quinoa, millet, buckwheat, anything with a
husk that is hard to steam) this often happens. It’s also possible that you didn’t
let the grains cool off enough before you inoculated them, and the Aspergillus
died at that point. Definitely throw it out and start over.
The Koji is sticky and there’s not really any mold growth and it smells like
rotten banana/fruit:
The koji probably got overheated—if you start the growth in the early after-
noon, this often happens in the morning or afternoon the next day - and this
killed the Aspergillus cells, and a heat-tolerant bacteria called Bacillus subtilis
started growing instead. This is useless for fermenting anything else and you
should throw it away.
The Koji has a bunch of black spots or black fuzzy mold on it:
This seems to happen when the barley is too damp. Make sure that the perfo-
rated tray you’re using has lots of holes that extend as far to the sides as possi-
ble to ensure maximum airflow and avoid condensation. Also make sure that
you discard any barley that has become waterlogged and soft from being over-
steamed before you inoculate. You’ll often be able to catch a batch that’s going
to go wrong when you do the first turning; if you see any areas that are getting
black specks on the barley, or that feel particularly sticky, discard these and
the rest of the tray might still be usable. This might be a mutation in the As-
pergillus oryzae—all koji molds started out as black and were bred and mutated
to become white—or it might be another species; in any case, don’t use it for
anything.
The temperature of the Koji keeps going to 40°C or higher:
The koji produces heat as it grows. You need to keep an eye on the temperature
and help dissipate that heat - break up the koji with your hands, fold it over it-
self, and make furrows in the barley. You can also try cooling the room actively
at this point, and keeping some space around each tray for air to circulate and
stop heat buildup.
I made Lacto Koji Water and it smells like rotten eggs:
First, throw it away and don’t use it. Second, make sure you use twice as much
water as koji and 2% salt, and check it every day. Also make sure that all your
equipment/hands are very clean.
a field guide to fermentation · 6362 · noma
Uses for Koji
Lacto Koji Water
Take 500 g of finished koji, 1000g of filtered water, and 30g of fine salt. Blitz
in a Thermomix to combine, and seal in a vacuum bag as close to 99% vacuum
as possible without bubbling over. Let ferment for 3 days at 25°C until the bag
is swelled. The Lacto Koji Water should taste clean, fruity, lightly acidic, and
creamy, with no eggy aroma.
Roasted Koji Sauce (Mole)
750g Roasted Koji
1000g Cream
600g Milk
Roasted Koji
Break the Koji down into small as possible pieces and roast it 160°C. Turn or
shake the koji every 10 min to get an even roast on it. After approximately 1
hour the Koji should smell a bit like roasted coffee and also should have the
colour of it.
After it’s cooled down, combine 750g roasted Koji with 1 liter of cream in a
vacuum bag it and allow to infuse overnight in the fridge. Once rehydrated, add
600g of milk and blitz in a Thermomix on 70°C to a paste consistency. Pass it
through a sauce net while still warm. Place into vacuum bags when cool and
store frozen.
Koji Salt
300g fresh koji
300g salt
300g water
Blitz the ingredients in a blender and reserve in the fridge. This is an excellent
cure for meats, particularly game birds.
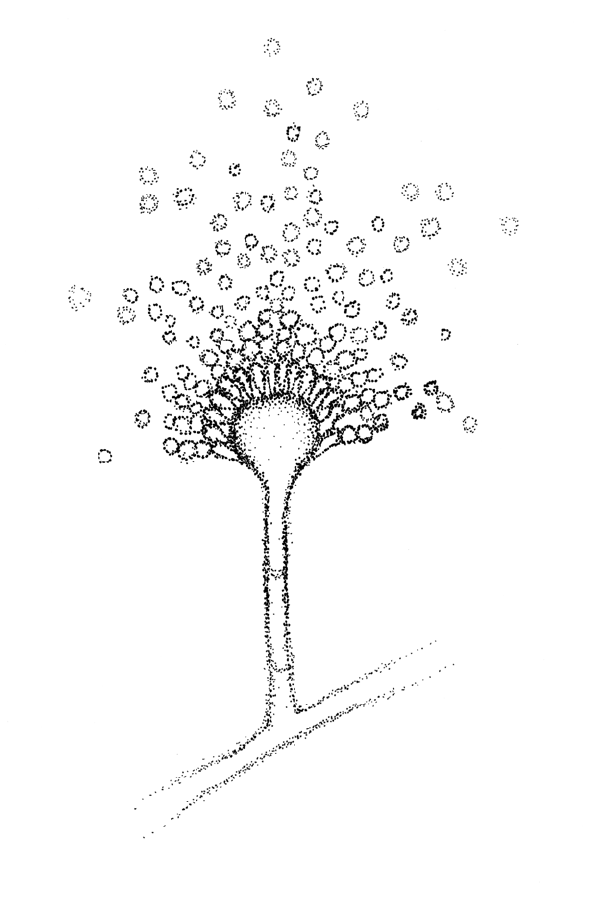
Aspergillus oryzae conidiophore (spore cell)

a field guide to fermentation · 65
Notes
64 · noma
Misos, Shoyus and Garums
Koji can also be used as a component in more complex fermentations involv-
ing different proteins. Misos and Shoyus (chapter 6) at noma involve koji and
legumes, nuts, grains, leftover vegetables, seeds, or coffee ; Garums (chapter 7)
involve animal proteins.

66 · noma
Notes
Miso and Shoyu
Nuts, legumes, grains, or other plant material fermented
and aged with koji and salt
Process:
Koji enzymes break down starches in legumes into sugars, which are
fermented by lactic bacteria, yeasts, and acetic bacteria;
proteins are broken into umami flavors
Necessary components:
Koji; yellow peas, nuts, or bread; salt; bucket; rock
Chapter Six
a field guide to fermentation · 67
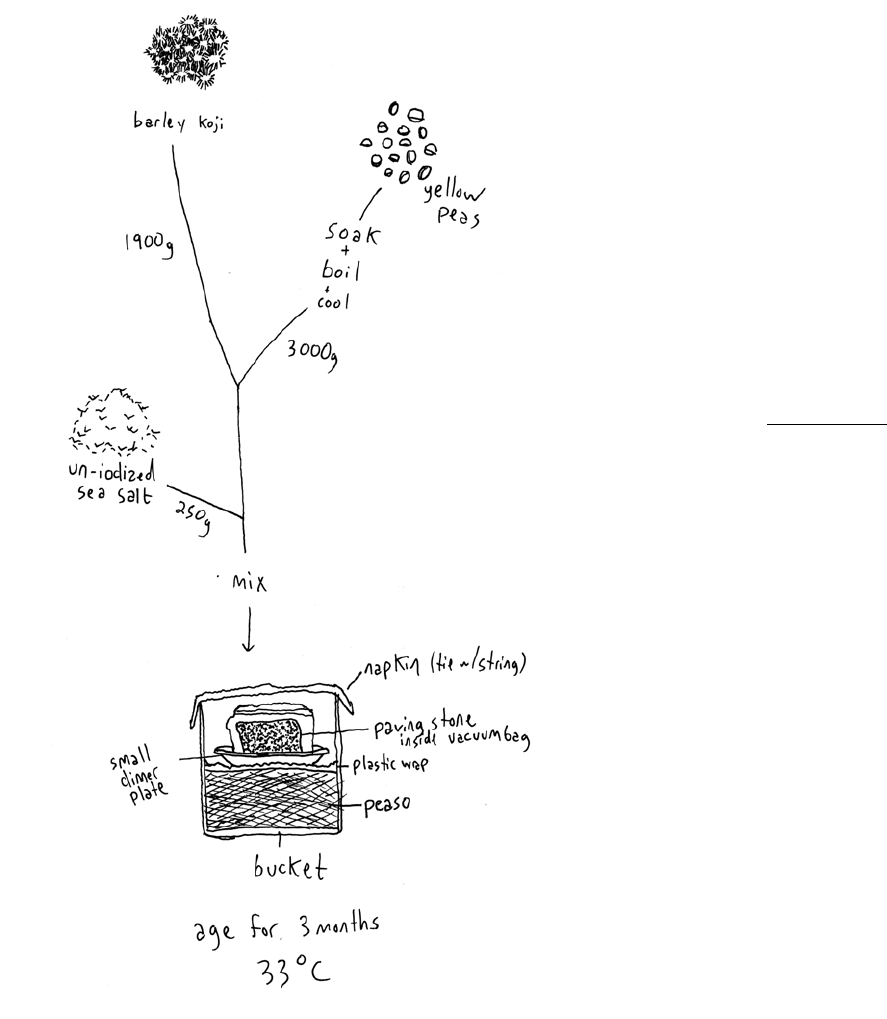
a field guide to fermentation · 6968 · noma
Basic Recipe: Pea-so (Yellow Pea Miso)
3000g Cooked Yellow Peas
1900g Inoculated Barley Koji
200g Fine Salt
Soak approximately 2000g dried yellow peas in cold water overnight. Strain
and wash. Weigh the peas—they will increase by roughly 50% in weight. Seal
3000g of the soaked peas in a vacuum bag with 1000g of water and cook in a
steam oven at 100°C for 2 hours. Cool down to room temperature. Strain the
peas and reserve the cooking water.
Mix 3000g of cooked yellow peas and 1900g of finished Barley Koji (inoculat-
ed, molded pearl barley—see section 4 for more information).
IMPORTANT:
The moisture content of the mixture is extremely important,
and will determine the success and flavor of the final product. Too much water
will encourage an excessive activity in the onset of the fermentation, leading to
an aggressive acidity or sharpness. Too little water and very little will happen.
Take a small amount in your hand and clench your fist—the substrate should
form a dense, bound paste. If a little sort of oozes between your fingers it is too
wet, and if it remains crumbly, it is too dry.
When the yellow pea-koji mixture is the correct consistency, weigh it and add
4% of that weight in fine, non-iodized salt. For this recipe that will be approx-
imately 200g. Mix it well to make sure it is homogenous, and put the mixture
into a 12L nonreactive container, taking care that there are no air pockets.
Cover the surface with cling film, ensuring the surface is not exposed to air.
Place a plate on top of the clingfilm and load with 5 kg of weight (a clean paving
stone in a vacuum bag, or a 5L container of water are ideal). Cover the contain-
er with a cloth to prevent contamination from flies, etc., and secure the cloth
with a rubber band or string. Age the pea-so for at least 3 months, and up to
6 months, at an ambient temperature of 25-33°C. The aged pea-so should be
lightly acidic but not overly sour.
a field guide to fermentation · 7170 · noma
Pea-so Notes
Why peas and why koji?
What you're doing here is using the enzymes created by Aspergillus oryzae
(when it fermented the barley into koji) to break down the starches and pro-
teins in another legume or grain, in this case yellow peas, to flavorful and fer-
mentable components. Koji is needed to supply these enzymes, and yellow
peas are the protein source.
Why 4% salt?
To age at room temperature safely and develop good flavors, salt is needed to
impede spoilage bacteria and encourage lactic acid bacteria to grow. Generally,
the longer the miso is going to age, the more salt you need to add (or, the more
salt you add, the longer it needs to ferment).
Why weight the pea-so?
Weighting the pea-so helps prevent air pockets, and pushes excess liquid to
the surface. It also keeps most of the pea-so surface out of contact with air,
while letting it breathe and off-gas as needed. The weight placed on the pea-so
should be approximately equal to the weight of the miso.
Why not just vacuum-seal the pea-so?
Completely sealing the miso will keep it out of contact with oxygen. But we
want a little bit of contact with the air to let off any gaseous products of the
fermentation and break down/oxidize some of the mid-fermentation aromas
which can smell somewhat like nail polish remover. The pea-so is undergoing
lactic, yeast, and acetic fermentations as it ages, and being under a cloth, plate,
and plastic wrap instead of a hard seal helps stop it from getting too yeasty or
boozy.
Why cook off or freeze the pea-so?
Cooking will kill off all the microbes in the pea-so, as well as denaturing (basi-
cally, breaking) the enzymes present. Skipping this step means the fermenta-
tion will keep going as the pea-so is stored, altering its flavor. Freezing will also
radically slow the fermentation and aging process. Cooking off the pea-so also
remediates any off-flavors, like the aforementioned nail polish remover smell,
that sometimes develop during the fermentation, especially if you made the
pea-so on the wetter side.
Why use yellow peas in particular?
When we began looking into making a miso-style fermentation, but with Nor-
dic ingredients, it was necessary to find an analogue to soybeans, which are
in no way Nordic. The point of making a miso is to develop umami flavors by
breaking down proteins in an unfermented ingredient with the enzymes de-
veloped by the molded barley koji, so we needed something that was high in
protein. Fortunately the Danish Technical University (DTU) publishes infor-
mation about the nutritional breakdown of various Danish food plants; on their
website we found that yellow peas have a particularly high amount of protein,
so we made a “pea-so” out of yellow peas that turned out to be very tasty.
The pea-so can be frozen at this point, or cooked off and passed before using in
dishes or further storage.
If not being frozen, the peaso should be cooked off and passed before using in
dishes or further storage.
a field guide to fermentation · 7372 · noma
Miso Style Trouble-Shooting
The miso is bubbling:
This is normal, especially at the beginning of the fermentation.
The miso is quite boozy and sweet and has a Hefeweizen-banana smell:
You are at the yeast-growing phase of the miso fermentation; if you want it to
be quite sour and have more umami flavor, you need to let it continue going for
a while longer, so that the acetic and lactic fermentations can happen, and the
proteases in the koji (which act more slowly) can do their thing.
There is some white mold on the surface or around the edges of the miso:
This is fairly normal. To stop lots and lots of mold from forming you can (light-
ly!) sprinkle non-iodized salt over the surface of the miso before you put plastic
wrap and a plate on top of it.
The miso smells like nail polish-remover:
Fermenting miso is a balance between too much air circulation, which allows
not-so-good molds to grow, and not enough. If you don’t have enough air cir-
culation and off-gassing, odd flavors can build up. So make sure you haven’t
sealed off your miso completely with plastic, and don’t try to ferment it in a
vacuum bag.
The miso smells like blue cheese, or like rancid fats:
These are the flavors that happen from fats, especially milk fats, breaking down
enzymatically yielding blue cheese flavors, or from unsaturated nut fats oxidiz-
ing and yielding rancid, paintlike flavors. If you can press or spin out the fats
from your substrate, you’ll avoid these flavors.
The miso has just become very acidic very quickly:
This is often an issue of excess circulation, where there has been too much air
and water available for the yeast and acidic bacteria, and they have propagated
at a higher than desired rate. Too much liquid in the mix and/or not enough
weight pressing evenly on the miso can also cause this.
Miso Variations
Rye-so (Rye Bread Miso)
Take 3000g of Danish Rye Bread, and blitz to a crumble. Add 2000g of blitzed
koji, and mix in water until a proper firm-paste consistency is achieved. (This
may be almost 2L) Calculate 4% of total weight (allowing for the salt in the
Rye Bread, which in our case is 1.7%) and add this amount of fine non-iodized
salt, and incorporate thoroughly in a nonreactive container. Cover the surface
with clingfilm, a plate, and a weight as above for pea-so, and age for at least 3-6
weeks.
Nut Miso (Hazel-so, Wal-so, Pumpkin-so)
Take 3000g dry nut pulp (leftover from making nut oil) and 2000g of blitzed
koji, and mix in water until a proper firm-paste consistency is achieved. (This
may be almost 2L) Calculate 4% of total weight and add this amount of fine
non-iodized salt, and incorporate thoroughly in a nonreactive container. Cover
the surface with clingfilm, a plate, and a weight as above for pea-so, and age
for at least 3-6 weeks (start tasting after 10 days). The nut miso are especially
sensitive to excess water content, and will be very sour if too much is added,
so it’s better to err on the side of dry. If after 10 days the mixture is still too
dry, compact, and sandy textured, mix in a small amount of water with 4% salt
dissolved in it until it has more of a paste-like consistency.
Flavored Pea-so (here we often use byproducts from other processes)
3000g Cooked Yellow Peas
1900g Inoculated Barley Koji
500g Elderflower, Wild Rose, Thyme, etc. (We use the leftover pulp from
oil production for this) If using fresh pine, limit to 5% (250g here)
200g Fine Salt
Combine and ferment as for Pea-so recipe.
a field guide to fermentation · 7574 · noma
Bread-so
2000g Bread Koji
3000g Toasted Bread
Filtered Water for consistency
4% Salt of above weight
First, make bread koji: take leftover sourdough bread, remove crust, and cut
into a rough macedoine. Lightly dust with Aspergillus oryzae spores and place
in a suitable environment for mold growth (see Koji section for more detailed
instructions)
Take another batch of leftover bread, toast to a golden brown and blitz to a
crumble. Mix with the finished Bread Koji, add water just until a firm paste is
achieved. Calculate 4% salt, and incorporate with a large stick blender. Press
firmly into a suitable container, cover surface with clingfilm, and load with 5kg
of weight.
Vegetable Shoyu
1000g Vegetable (pumpkin scrap leftover from juicing for pumpkin shoyu,
or cabbage juice from leftover cooked cabbages for cabbage shoyu)
100g Koji
44g Salt
Blend well, put in a bucket, cover with clingfilm, and age at 60C for 3 weeks.
Strain and use the liquid.
Coffee Shoyu
4000g Koji
1000g Spent Coffee Grounds (after brewing coffee)
5000g Filtered Water
200g Salt
Blend well and age at 60°C for 4-6 weeks. Strain and use the liquid.
Dryad's Saddle Shoyu
1000g Dryad’s Saddle Mushroom, blended to a paste
200g Koji
300g Filtered Water
60g Salt
Incorporate all the ingredients with a large stick blender. Place in a suitable
container with the surface covered with clingfilm. Age at 33°C for 6 weeks.
Press through a superbag.

a field guide to fermentation · 7776 · noma
NotesNotes

78 · noma
Notes
a field guide to fermentation · 79
Garum
Animal proteins, aged with koji and salt
Process:
Controlled enzymatic breakdown of animal proteins by koji in a
highly salty environment
Necessary components:
Koji, animal protein, salt
Chapter Seven
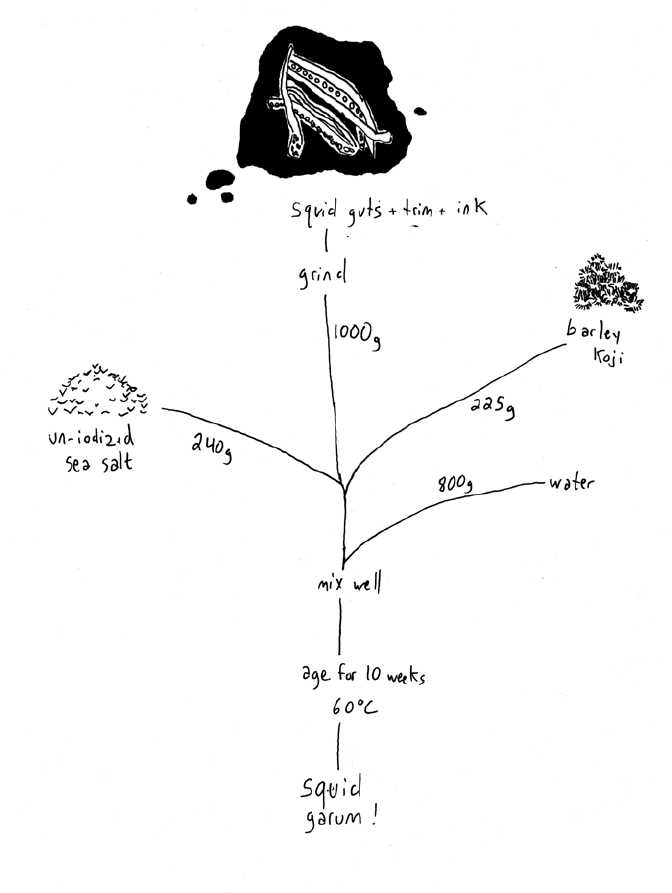
a field guide to fermentation · 8180 · noma
Basic Recipe: Grasshopper Garum
(Fermented Grasshopper and Koji Sauce)
1000g Protein
225g Barley Koji
300g Filtered Water
240g Fine Salt
Blend 600g of wax moth larvae (they come frozen, in boxes) and 400g of grass-
hoppers well in a thermomix or blender to make a paste.
Incorporate the grasshopper and larvae paste with 240g of fine salt, 300g of
filtered water, and 225g of finished barley koji in a non-reactive container.
Press plastic wrap onto the surface of the garum to keep it out of direct contact
with the air. Incubate the garum at 60°C for 10 weeks. A PID box with heating
and a temperature sensor is useful for this (see Appendix B for more details).
The mixture will separate into liquid at the bottom and solids at the top. The
liquid (garum) will be a golden brown, and the solids a lighter orangey-brown.
The garum should smell meaty, toasty, and slightly cheesy (like parmesan, not
like blue cheese, camembert, or tallegio).
Decant the liquid at the bottom with a pipette or siphon, then blitz and pass the
solids through a fine sauce net before use.
a field guide to fermentation · 8382 · noma
Garum Notes
What is going on in this recipe?
You're breaking down the proteins in the insects into delicious free amino ac-
ids (what are very umami) and other tasty flavors, and controlling this break-
down/slow rot with high levels of salt.
Why grasshoppers and wax moth larvae?
Insects contain high levels of protein, which on its own doesn't have a lot of
flavor. But, when these proteins are broken down into amino acids by the pro-
teolytic enzymes (proteases) in the koji, rich umami taste develops as well as
other toasty and cheesy flavors.
Why salt?
For grasshopper garum you add about 11% salt, which is 3 times as much as for
misos. This percentage of salt will slow most microbial activity, including lac-
tic acid bacteria, to the point where garum won't develop much acidity and is
instead more of a controlled rot/enzymatic breakdown of the meat and larvae
proteins.
Why Koji?
Koji has a lot of enzymes in it that are good at breaking down proteins, which
helps speed up the process of producing garum; this speeded-up breakdown
also allows for the use of less salt for a more versatile sauce.
Why hold at 60°C?
Heating up the garum helps it break down the meat protein faster, and at 60°C
the umami flavor and caramelized flavors are most emphasized; at higher tem-
peratures it will ferment faster but can taste over-browned.
Why do you call it garum?
Garum was one of the most popular sauces in the ancient Roman era, and was
made much like Thai or Vietnamese fish sauces are today, with the flesh and
guts of small fish and lots of salt left to ferment and break down over time. We
add koji instead of fish guts to supply the protein-digesting enzymes, but the
process is similar. The garums we produce at noma are also similar in process
to the chiang and miso produced in ancient China and Japan from rice qu/koji,
meats, and salt before soybeans were widely used.
Garum Trouble-Shooting
This just seems very sketchy.
Actually the garums are the safest, simplest and easiest of the ferments to con-
trol. The high heat, and relatively high salt content protect them from the great
majority of unwanted microbes.
The fish/shellfish garum smells….really dodgy.
Sorry. It always does in the beginning. This is normal. Man the fuck up. But if
after a while it smells like the ocean took a dump on a dead whale, you should
start with fresher fish/squid/etc next time.
So….I left it alone like you said, and it’s gone from really dodgy-fishmarket
to pure death-smell.
It cannot be reiterated enough that the product must be extremely fresh. This
process is not for the things you forgot about in the fridge and that already
smell like a street urchin with the black plague. If it’s not fresh enough to eat,
it’s not fresh enough to preserve.

a field guide to fermentation · 85
Notes
84 · noma
Garum Variations
Beef Garum
600g Beef, ground
400g wax moth larvae
800g filtered water
240g salt
Blend 400g wax moth larvae in a blender or Thermomix until smooth.
Mix this puree by hand with 600g of raw beef trim or ground beef, 225g barley
koji, 800g filtered water, and 240g of salt until well-combined.
Cover, ferment, and process as for grasshopper garum, above.
Squid Garum
1000g Squid Trim
225g barley koji
800g water
240g fine salt
Grind the koji, water, salt, and squid trim (guts, ink, tentacles, everything ex-
cept the clear pen or gladius) into a rough puree using a Thermomix, robot
coupe, or meat grinder.
Cover and ferment as for grasshopper garum, above.
This recipe works well with any kind of very fresh shellfish trim. Lobster bod-
ies, mahogany or razor clam scraps, the goop leftover from cleaning sea ur-
chins—these have all made fantastic garums.

86 · noma
Notes
Fermentation…
Epilogue
a field guide to fermentation · 87
a field guide to fermentation · 8988 · noma
Some time ago we were showing a pair of chefs from a two star restaurant
around our fermentation kitchen, going through the different processes, and
the multiple applications they are associated with. After about thirty minutes
or so of careful, attentive nods of comprehension the senior of the two inter-
rupted me, his brow furrowed. “So—is that fermentation?” pointing at the vin-
egar room, “Or is that?” gesturing to the steam filled chamber of ‘koji.’ Despite
my efforts to the contrary, everything had remained a mystery, a hall of smoke
and mirrors. Some of the cooks at our restaurant have a similarly vague grasp of
what methods lead to which results, only aware that products go over to the lab
to be put into buckets or bags, and after some period of time come back tasting
remarkably different.
It is important to remember that fermentation is cooking. There are different
tools, different timeframes, perhaps a new skill set to learn, but nothing more
dramatic than learning to make sauces, work a grill, or proper butchery. Com-
mon sense and curiosity must balance each other, as always. “How dangerous is
all this?” is a common question we field from guests. The answer is that it’s no
more dangerous than cooking anything else. If a person cooks fish they should
know how to tell if it is fresh enough to eat. The same is obvious for vegetables.
Bread, wine, and beer are often made by home cooks with impunity, because
these fermentations are part of our culture. The methods outlined here only
require the same care and attention that would be a part of any cookery.
This Field Guide is only intended to be a primer to the processes of fermenta-
tion, a framework to build upon. The hope is that by sharing a few successes
and a lot of failures, we can further a collaboration in the greater community,
where we might all benefit from each other's work. The ingredients we have
used here are merely the ones we find around us—if pistachios grow in your
part of the world, make a miso out of those, or if you come across sumac in your
landscape, that would be ideal for a kombucha.
The greatest successes often seem obvious in hindsight, and may come upon
one with a resounding slap of the forehead, or in complete serendipity. The
Hazel-So of which we are currently fond was borne on both: we had struggled
to make a sufficiently umami-rich and flavorsome hazelnut miso-style ferment
because of the high amount of oil in the nuts which would impart a distinct
rancidity after a week or so. Some time later, we began to press our own oils,
mostly hazelnut, and after binning the dry and somewhat tasteless left-overs
from the nut press we had one of those head-slapping moments— this ‘garbage’
(which of course was only that because of the way we thought of it) was exactly
what we had needed for the miso-style ferment. All of the hazelnut besides the
oil. So now we occasionally find ourselves pressing oil just to have the ‘garbage’
left-overs for making the Hazel-so.
The Squid Garum was similar in a way; laden with the knowledge of how gar-
ums were historically made from the innards of Mediterranean fish, it still
somehow took us a while to make the cognitive leap to the guts of the squid
we had been throwing in the bin. Now we make a range of delicious fermented
sauces from every scrap of shellfish and meat that gets processed by the restau-
rant.
In the end, this ‘head-slapping,’ however frustrating, should be seen with opti-
mism—it indicates that, despite working on these things for several years, we
are only scratching at the surface, with a wealth of discoveries waiting to be
stumbled upon. In finding these there will of course be questions, unknowns,
wandering off the common path and forays into dead ends and unexplored ter-
ritory. Many things you may try might not be easily Googleable, might require
trolling through patents and academic papers to get an opaque suggestion
about what you should be doing, but that’s the whole point. We attempt to re-
tain our skillset while discarding our biases and routines. It is always the lines
we cannot see, our preconceptions, that are the hardest to cross.
There are steps you can take to ensure that you’re not setting yourself up for
failure. Cleanliness, sanitation, and exhaustive tasting as each process evolves
are paramount. Flavor dominates, and flavor is the strongest tool you have to tell
you if everything is working as it should. Of course, each of these techniques is
only as good as the ingredients you put into them; lacto-fermenting shit quality
cherries only leads to shitty lacto-fermented cherries. Lacto-fermenting beau-

a field guide to fermentation · 91
Notes
90 · noma
tiful wild cherries in their prime will allow the sublime to emerge. The same
is true for Squid Garum—it is a technique that transforms a waste product into
something really special, but it can’t save bad fish; good Squid Garum comes
from product that is good, fresh, and high quality to begin with. Perhaps the
most critical thing to remember is that nature will not be denied; life finds a
way. Something is going to grow. The best bet is to provide an advantage at the
outset for the species that you would like to win.
We established a Fermentation Kitchen at our restaurant as we began to incor-
porate these techniques into our entire menu, from the first bite to the desserts
and petits fours, and as we expanded the techniques we have used for many
years. Now practically every ingredient, whether oil, vinegar, spice, or umami
rich paste, is painstakingly produced at the restaurant, which gives us certain
flavors that cannot be reproduced elsewhere—beautiful local produce trans-
formed by the microbes around them, a logical extension of time and place as
seen through the paradigm of deliciousness. If one were to bring Copenhagen
ryebread to New York, and make Rye-so there, it would taste different, due to
the local microbes. There is a palpable joy in tasting something new, and trav-
eling to savour something which tastes of its place, its landscape.
But there is an even greater joy in creating or discovering a new flavour, and we
hope that you will not only try to replicate the recipes here, but embark on your
own explorations, so that we in turn may be inspired.

92 · noma
Notes
a field guide to fermentation · 93
Control and Safety with
Fermentations
Appendix A
a field guide to fermentation · 9594 · noma
“Controlling” a fermentation means making sure only the microbes you want
to grow are growing, and that they're producing optimal flavors.
The basic methods for controllingways you control a fermentation are through
salt, pH/acidity, water activity, oxygen levels, temperature, food/energy
source/substrate, and inoculation. Necessary controls for each type of fermen-
tation are included in specific recipes; this is a more general discussion about
what these controls are and how they work.
For any of these fermentations, a clean workspace, clean hands, and washing
your ingredients are the most basic safety parameters you can follow, as is be-
ing sure to throw away anything you feel unsure about or that smells “off.”
A note on botulism
Botulism is a very rare but potentially fatal paralytic illness caused by botuli-
numm toxin, a neurotoxin produced by the bacterium Clostridium botulinum.
The reason you should care about it is that, unlike most other forms of spoilage,
it is not detectable by smell. C. botulinum requires a protein source, a relatively
warm temperature, and a completely anaerobic, low-salt, low-acid, low-sugar
environment to grow. For this reason it tends to grow in improperly canned
meat and improperly preserved fish. Acidity levels below pH 4.6, or salt levels
above 7%, are each able to protect from botulism. Salty, acidic foods that have
lactic bacteria growing in them are even safer. So, for protein-rich fermenta-
tions, rapid acidification and sufficient levels of salt, as well as avoiding a com-
pletely oxygen-free environment, are all essential for safety. This doesn’t mean
you should be afraid of them, but that you should be especially cautious about
doing these fermentations properly.
Salt
If you’re doing lacto-fermentation (e.g. lacto plums) or fermenting anything
with koji (koji water, miso, shoyu, garum) you’re going to be using salt.
Lactic acid bacteria (LAB) are able to tolerate salt concentrations that most
yeasts, molds, and other bacteria can’t grow in, so salting is an effective way
to control what types of microorganisms can grow. We use salt concentration
ranges between 2% and 4% to suppress spoilage bacteria and molds and let lac-
tic acid bacteria proliferate and produce an acidic environment. We use higher
salt levels, around 11%, to suppress LAB along with other microbes and enzy-
matically ferment and break down animal proteins in a controlled manner for
garums. For anything that’s not acidic (below pH 4.6), and not going to become
acidifed by lactic or acetic bacteria (for example, garums) salt levels well above
7% should always be used to ensure safety from dangerous microbes like Clos-
tridium botulinum.
Acidity and pH
Acidity inhibits the growth of molds and other spoilage microorganisms. Lac-
tic and acetic bacteria both produce acidity as they ferment, which helps pre-
serve the products we make with them—lactic fermentations, vinegars, shoyu,
miso—and also makes them taste sour. Acidity is manipulated in vinegars and
kombuchas, and created in the course of these and lactic fermentations, as well
as in shoyus and misos
Acids taste sour—lactic acid, acetic acid, citric acid, ascorbic acid (vitamin C),
and malic acid are all organic acids which may be familiar to you. Most fruits
produce varied ratios of citric, malic, and ascorbic acid. Lactic acid is produced
by lactic acid bacteria as a by-product of their use of sugar as fuel; acetic acid is
a similar by-product of the metabolism of acetic bacteria fueled by ethyl alcohol.
Molecules which create acidity and have a sour taste do so because when dis-
solved in water, a hydrogen ion (or several hydrogens in some cases) detaches
itself from the main body of the molecule. The more hydrogen ions that are
dissolved in a solution, the more acidic it is and the more sour it tastes.
a field guide to fermentation · 9796 · noma
pH is a measure of acidity; somewhat confusingly, pH is a reverse scale, which
means that the lower the pH, the higher the level of acid (measured as hydro-
gen ions) present. A pH of 7 is completely neutral; below 7 is acidic and above
7 is alkaline/basic.
Higher levels of acidity (or lower pH levels) create less hospitable environ-
ments for the microbes that would ruin a fermentation or render it unsafe—
including many molds, Clostridium botulinum (the bacteria responsible for
botulism), and other spoilage and pathogenic organisms.
Generally, the rule of thumb where foods are safe is pH 4.6—at or below this
level, there is enough acidity to halt the growth of dangerous microorganisms
like Clostridium botulinum, which can grow in low-acid, low-salt, low-sugar,
low-oxygen environments.
(It’s also possible to use high alkalinity to preserve foods; Chinese century
eggs, which are cured in lye, are one example of this. We don’t really have a
dedicated taste receptor for alkalinity the way we do for acidity so alkaline
foods tend to taste slightly bitter or soapy).
In aerobic conditions, a low pH can help stop the growth of undesirable sur-
face molds that would cause spoilage.
Oxygen
Certain processes like mold growth and acetic fermentation, can only happen
in the presence of oxygen, so when we would prefer these not to occur, we
remove oxygen from the fermentation environment by sealing in a vacuum bag
or with an airlock. When we do want them to happen, like to make koji or vin-
egar, we make sure that a lot of oxygen is available.
Microbes and the fermentation processes they perform can generally be divid-
ed into those requiring oxygen (aerobic) and those which require or prefer the
absence of oxygen (anaerobic). Yeasts and lactic acid bacteria both perform
fermentations without oxygen (recall that these follow the strict biochemical
definition of fermentation). Acetic bacteria and Aspergillus oryzae both re-
quire oxygen to make vinegar and koji, respectively.
Temperature
Controlling temperature lets you control the speed at which you’re ferment-
ing and the growth of different types of microbes, both of which are import-
ant for safety and flavor. You can manipulate temperature to make the things
you want to grow, grow very fast; or amp up the activity of different enzymes
which can speed up flavor development (we heat misos to 33-35°C and Garums
to 50-60°C to boost amylase and protease activity). You can also slow down
things you don’t want to grow and prevent off-flavors—lacto-fermentations of
fruits and vegetables are kept at a lower temperature than misos to slow yeast
growth, for example. See the section on temperature control later in the book
for examples of target ranges.
Substrate
You can think of using substrate (the ingredient or material you’re fermenting)
to control the fermentation process in two ways:
1. Deciding on a product you want to end up with, like lacto-fermented
berries, kombucha, or garum, and then picking a substrate that has the
right composition to make that product, like berries, something that can
be made into tea, or something to grow the koji and a tasty fresh animal
protein.
2. You have a lot of ingredient X (for example, clam guts) and want to fer-
ment it. Based on your understanding of the composition of ingredient X
and how different fermentation processes work, you can figure out what
you need to add or do to make these act effectively on it, or what is the ide-
al fermentation to use with it (in the case of clam guts, probably a garum.)
a field guide to fermentation · 9998 · noma
Understanding the relationships between substrate composition and microbe
happiness is probably the most important tool for experimenting with fermen-
tation successfully. This lets you know what you CAN do based on what you
have, and what’s likely to be a nonstarter. This isn’t to say that you shouldn’t
experiment and take a chance on something which might not work—but that
knowing the basics will make your experimentation smarter, faster, and more
delicious.
Some of these substrate basics:
• if there are no sugars, it won’t lacto-ferment.
• if you don’t have any alcohol, you can’t make vinegar.
• Aspergillus oryzae can thrive on starches, but not so well on cellulose. Cel-
lulose is made out of linked glucose molecules but has different linkages
that the amylase enzymes in starches aren’t able to chomp on. So koji will
grow rather poorly on unstarchy vegetable matter.
• misos and garums develop flavor by breaking down starches and proteins
into small building blocks—flavor comes from these building blocks (sug-
ars and amino acids) and the things they break down and are transformed
into (see pages 9-15 on the flavors of fermentation.) So the thing you’re
trying to make into miso should have starch and protein in it if you want
it to taste good.
This book is just a guide—something that seemingly has the right character-
istics for a fermentation might not actually work very well, but it’s difficult to
know until you experiment. Different grains, for example, have the starchiness
and protein content that should make excellent koji, but their husks or the way
they take up and hold water might mean that the cooking technique you use for
pearl barley doesn’t work for, say, quinoa or buckwheat. It might take several
tries to get something new to work.
Inoculation
Some fermentations will proceed quite happily from microbes that are hang-
ing around in the environment—this is how we do lactic fermentations, and
it’s the basis for natural winemaking. In other situations, it is useful in the be-
ginning to add a dose of the microbes you want to be the dominant actors in
your fermentation, so you can make sure that they outcompete less desirable
or dangerous strains.
This is especially important in dicier conditions where the microbes that grow
spontaneously may have nasty side effects; if you’re making conditions to in-
tentionally encourage mold growth, you want to make sure the right kind of
mold is growing.
Some fermentations won’t proceed at all without inoculation. The community
of yeasts and bacteria that transforms sweetened tea into kombucha doesn’t re-
ally exist or hang around in the wild—it needs to be inoculated by transferring
a community from old kombucha to new kombucha.
Things you definitely want to inoculate:
Koji, kombucha
Things we generally inoculate but can also grow spontaneously:
Alcoholic yeast fermentations, acetic fermentations
Things we don’t generally inoculate because we get more interesting flavors
without inoculation, (but control what microbes can grow via the preceding
methods):
Lactofermentations, misos, shoyus, garums.

a field guide to fermentation · 101100 · noma
Baker’s Percentages for Fermentation
Congratulations! You read all the recipes and understand how they work. If
you have an odd amount of a base ingredient and know how to use baker’s per-
centages you can scale each recipe to any weight using the proportions below.
Recipe Base Calculate and Add
Lacto-fermen-
tation Fruit, Ceps 100% Salt 2%
Kombucha (Tea) Tea 100%
Sugar 12%
Old Kombucha 10%
Kombucha
(Juice) Juice 100% Old Kombucha 10%
Vinegar Juice 100%
Apple Vinegar 20%
High-Proof Alcohol 9.60%
Pea-so
Cooked yellow peas and
some of their cooking
water*
100%
Barley Koji 64%
Salt** 8.30%
Rye-so/Nut-so Rye Bread, Nuts, Seeds, etc 100%
Barley Koji 67%
Water* 83%
Salt** 6.50%
Vegetable Shoyu Vegetable Pulp 100%
Koji 10%
Salt 4%
Coffee Shoyu Coffee Grounds 100%
Koji 400%
Water 500%
Salt 20%
Garum
VERY fresh squid trim,
clam scraps, grasshoppers+
grubs, etc
100%
Koji 22.5%
Water 80%
Salt 24%
* Water additions for peaso, rye-so, nuts-so, etc. are best done by feel- these are just a guideline.
** For these recipes, it’s better to NOT use a baker’s percentage, add water by feel, and THEN add salt based on the
final weight of base, koji, and water.
Overall Ingredient Percentages in Each Recipe
Recipe Base Additional Ingredients
Lacto-fermen-
tation Fruit, Ceps 98% Salt 2%
Kombucha (Tea) Tea 82%
Sugar 10%
Old Kombucha 8%
Kombucha
(Juice) Juice 91% Old Kombucha 9%
Vinegar Juice 77%
Apple Vinegar 15%
High-Proof Alcohol 8%
Pea-so
Cooked yellow peas and
some of their cooking
water*
58%
Barley Koji 38%
Salt** 4%
Rye-so/Nut-so Rye Bread, Nuts, Seeds, etc 38%
Barley Koji 26%
Water* 32%
Salt** 4%
Vegetable Shoyu Vegetable Pulp 87%
Koji 9%
Salt 4%
Coffee Shoyu Coffee Grounds 10%
Koji 39%
Water 49%
Salt 2%
Garum
VERY fresh squid trim,
clam scraps, grasshoppers+
grubs, etc
44%
Koji 10%
Water 35%
Salt 11%
* Water percentage approximate—water should be added to these recipes according to feel.
** For these recipes, calculate salt addition last, AFTER water additon.

a field guide to fermentation · 103102 · noma
NotesNotes

104 · noma
Notes
a field guide to fermentation · 105
The Tools of Fermentation
Appendix B
a field guide to fermentation · 107106 · noma
Oxygen control: vacuum bags, buckets, cloth lids, air-
locks, and bubblers
As you may have gathered in reading sections on specific fermentations, con-
trolling exposure to oxygen (removing it or encouraging it) is an important fac-
tor for doing a successful fermentation. Lactic and yeast fermentations should
be protected from oxygen; miso and garum fermentations shouldn't be left
open to the atmosphere but shouldn't be totally oxygen-free (anaerobic), and
vinegar, kombucha, and koji fermentations need a plentiful supply of oxygen.
The tools we use for controlling exposure to oxygen for each fermentation are
mentioned in their respective chapters. Here they will be discussed in more
detail.
Oxygen exclusion: vacuum bags and airlocks
A good way to prevent oxygen from reaching a fermentation is by removing it
and then sealing the fermenting mixture. This is what we do with lactic fer-
mentations, which are sealed with salt in a vacuum bag until the fermentation
is done. At this point, the bag will have swelled up with carbon dioxide gas,
which is a byproduct of the fermentation process. This illustrates one limita-
tion of vacuum bags: they are good at keeping what's in them contained, but
they aren't good at letting gas out.
For fermentations that produce a very large amount of carbon dioxide, such
as alcoholic fermentations with yeast—which usually involve more sugar and
therefore more carbon dioxide—a device called an airlock is especially use-
ful. An airlock is a small, usually plastic device that is filled with water and
seals a small opening in a bucket or jug holding a fermentation. As carbon di-
oxide builds up, it increases in pressure, which is released by bubbling through
the water in the airlock. The atmosphere on the other side can't push its way
into the container through the water because it's at a lower pressure. So, oxy-
gen-rich atmospheric air is kept out, carbon dioxide can be released, and the
fermentation keeps going without mold growth or oxidation.
Passive barriers: clingfilm hats and cloth lids
For miso and garum fermentations, it’s useful to protect the surface of the
product from direct air contact, which can lead to mold growth. However, bet-
ter flavor results if the fermenting mixture is not completely sealed off from
air. Some of the fermentation processes seem to perform better if they’re not
strictly anaerobic. Letting in some air also improves the flavor and prevents
solvent or nail-polish-like off-flavors, either by breaking down the ethyl ace-
tate that is responsible or letting it off-gas. For both of these we press clingfilm
onto the surface of the miso or garum as a kind of “hat,” but leave the edges
loose.
Any fermentation that gets airflow from the atmosphere needs to be protected
from fruit flies and errant mold spores by some kind of air-permeable lid. We
cover misos, garums, kombuchas, and vinegar fermentations with a cloth se-
cured by a rubber band or string.
Active oxygenation: bubblers
Acetic bacteria require oxygen to ferment alcohol into vinegar, and will grow
and ferment faster if they are supplied with lots of oxygen. To make a vinegar
quickly, we circulate air into the fermentation. For volumes between 3-10 L,
we usually use an aquarium air pump and an airstone, which we buy from a
pet store. These airstones use a pump to forces atmospheric air down a tube
and through a porous stone, which makes tiny bubbles of the air and increases
the surface area exposed to oxygen of the liquid in which they are submerged.
For larger amounts of vinegar (up to 18 L), we use a dedicated vinegar ma-
chine (which would be used for very small test batches in a commercial vine-
gar brewery) which aerates the vinegar by forcing it through a small aperture
called a venturi aspirator, which effectively increases the oxygen contact and
fermentation speed of the vinegar mixture.
a field guide to fermentation · 109108 · noma
Humidity
Avoiding dry-out is generally more of an issue for fermentation and aging than
removing humidity. For fermentation in a closed environment (like a wine
fridge or disused freezer), keeping an open, full container of water near the
heat source is usually good at maintaining humidity levels. If you have a ded-
icated room for growing koji or aging misos or garums, a domestic humidifier
can work well for the same purpose. We have used both of these strategies
effectively; in our current set-up we have a built-in humidification system that
has a humidity sensor and an ultrasonic fogger, which monitors levels itself
and doesn’t need to be refilled but otherwise works like a fancy humidifier.
If you have the luxury of being able to set humidity levels, the ranges you want
to aim for are:
Lactofermentation: 40-50% relative humidity
Kombucha: 50-60% relative humidity (to avoid excessive evaporation)
Vinegar: 50-60% relative humidity (to avoid excessive evaporation)
Koji: 80-90% relative humidity
Miso: 50-60% relative humidity (to avoid excessive evaporation)
Garum: 65-70% relative humidity (to avoid excessive evaporation)
Cured Meats: 70% relative humidity, with good air circulation
Temperature control: PID boxes and heating sources
Keeping a precise, level temperature is important for controlling the rate of a
fermentation and what is growing in it, both of which have an important im-
pact on flavor.
These are the working ranges for each of the processes in this book and others
you might want to do:
Lactofermentation: 20-30 °C
Kombucha: 20-25°C
Vinegar: 25-30°C
Koji: 28-33°C
Miso: 28-33°C
Garum: 60°C
Yogurt and Creme Fraiche: 38-43°C
Cured Meats: 10-15°C
Sake: 10-15°C
Fruit Wines: 21-30°C if you're trying to extract color/tannins, 7-15°C for
delicate, not very tannic ingredients
Beer: 17-25°C for ale, 8-14°C for lager (warmer = fruity, banana, buttery off-
flavors)
Most of these temperatures fall somewhere in between refrigerator tempera-
tures (1-5°C) and temperatures you can reliably set ovens to (40°C plus). Note
that even though you can often set nicer combi ovens like a Rational to 30°C,
the temperature will often spike a lot higher (40°C+) briefly during its heating
cycle, which can kill off the microbes you're trying to cultivate at 30°C.
If you're going to get serious about doing these fermentations, you will have a
much easier and better time with some kind of accurate heat control. For this,
we highly recommend using a PID temperature controller to control your heat
source. A PID box is connected to an electrical power source, a temperature
sensor and a heat source. “PID” stands for “Proportional Integral Derivative”
which means that the box uses calculus to figure out heating rate and heating
output (based on the readings it gets from the temperature sensor) and sends
a certain amount of current through the heat source to keep a very stable tem-
perature. Auber, Brainchild, and Eurotherm all make good PID boxes.
For a heat source, you want something that can heat a fairly odd-shaped area
pretty evenly. We have used heating blankets, seedling mats, and (most often)
under-floor heating mesh for this. Under-floor heating mesh is sold in rolls to
put down under a bathroom or other floor to heat it radiantly, and can be used
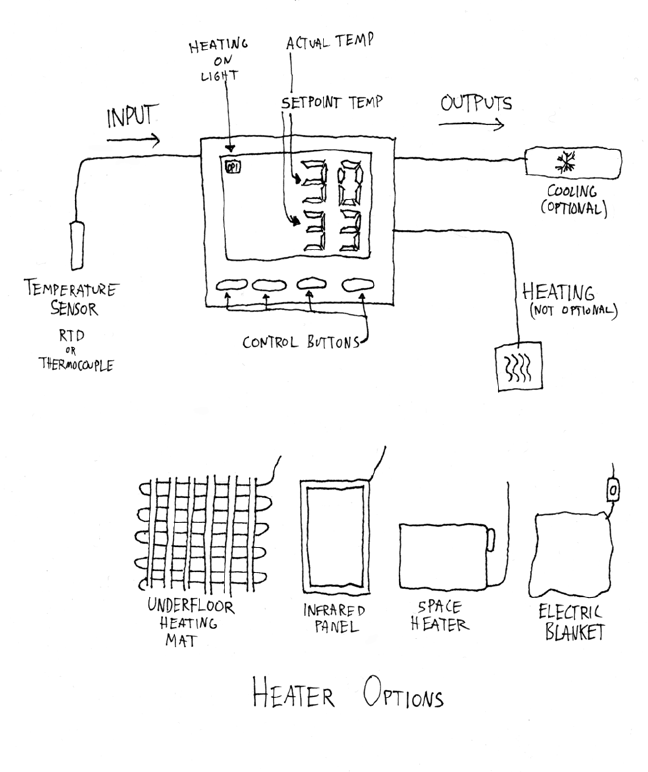
a field guide to fermentation · 111110 · noma
to line a styrofoam thermal box, an unplugged chest freezer or refrigerator, or
almost any other container. You could theoretically make individual jackets,
each controlled by PID box, for fermentation containers out of this. The heat-
ing wires that make up the mesh tend to get quite hot to the touch, so while the
heat will spread through the air pretty evenly they can melt or soften tempera-
ture-sensitive materials like soft plastic or styrofoam when in direct contact.
For larger rooms, we have had success wiring PID boxes to large infrared heat-
ing panels, which gently but effectively heat up an entire room. If they are ceil-
ing-mounted and the flooring material is a dark material, this can cause heat
to radiate from the floor and more evenly heat the room. Theoretically, a space
heater could also be used to heat a room. Some PID boxes come with a stan-
dard plug-in connector for heating sources, but many need to be hard-wired
(and floor heating mesh, wall mounted panels, etc. don't usually come wired
with plugs).
K-type thermocouples and RTD sensors are the most accessible and easy to
find if the PID controller you have doesn't come with a sensor. RTD sensors are
more accurate and thermocouples have a much wider working temperature
range and are easier to wire, but the wire is fairly expensive. (Besides fermen-
tation, you can do cool things with a PID box like put the thermocouple sensor
inside a Green Egg grill, and use a fan pointed at the coals as a “heat source” to
keep the grill at a stable 1000°C for a long time. If you want to try anything very
high-temperature, use a thermocouple).
Measuring sugar: refractometers and hydrometers
For kombucha and yeast fermentations, you will need to measure sugar to
make sure it is within the correct range for the amount of acidity or alcohol
you ultimately want to reach.
Glass Hydrometer: measures sugar by density. You fill a tall container (like a
graduated cylinder) with the sample you want to measure, and gently drop the
hydrometer, which is a long hollow glass piece with a wider, weighted bottom PID box schematic
a field guide to fermentation · 113112 · noma
and a thinner top with a measurement scale printed inside. The hydrometer
will float higher in a more sugary solution, which is denser, than in a less sug-
ary solution, which is less dense. When it is floating evenly and not bobbing
up and down, you can read the specific gravity (density compared to water)
or Brix (% dissolved sugars) at the line where the handle of the hydrometer
emerges from the solution. These are inexpensive and don't require calibra-
tion, but are easy to break and require large sample volumes to float in.
Refractometer: measures sugar by refraction, or how much it bends light that
passes through it. One version is a totally analog model, where you put a few
drops of sample on an angled glass plate, close a cover over it, then hold it up to
the light and read the brix from a scale visible through an eyepiece. These are
less expensive than a digital meter, but usually only read up to 30-35 Brix and
can be annoying to train someone to use properly. A digital refractometer (the
Hanna company makes good ones) can be had for about $170 in the US, and
will read accurately up to 85 Brix. To operate these, you drip a small amount
of sample on a ~8-mm wide glass plate and press a button; it measures the re-
fractive index and displays a Brix value. If you're going to do a lot of measuring
this is a worthwhile investment. An analog model is slightly lighter and more
portable if you plan on taking it to a farm or something like that.
Measuring acidity: pH meters
pH is an essential measurement of acidity for making kombucha, vinegar, and
miso. The simplest and cheapest method for this is pH paper, which turns dif-
ferent colors according to pH which are then matched to a reference chart.
This is not a terribly precise method, but is useful for a quick check and doesn't
require calibration, though the color the paper turnsbecomes can be affect-
ed by the color of the sample. A digital pH meter is a worthwhile investment,
and a small pen-style model usually runs $40-100. It should occasionally be
calibrated using standard solutions, which will most likely also be sold from
wherever you bought your pH meter (Amazon.com, lab supply company,
homebrewing and winemaking shops, for example). For measuring the pH of
miso, you should get something called a double-junction probe, as a standard
pH meter will get proteins stuck to it in a way that can't be cleaned.
If you need to take a lot of pH measurements, and especially if you need to
record pH measurements, buying a digital pH meter that connects to the
headphone jack of an iPhone/iPad is a good idea. We use a model called the
SAM-1, which is produced by an American company called Sensorex. This runs
about $200-250 for the iPhone adaptor and a spear-tip, double-junction (pro-
tein-safe) probe. This model can also email you a spreadsheet of readings from
your phone.

a field guide to fermentation · 115114 · noma
NotesNotes
a field guide to fermentation · 117116 · noma
Glossary
acetic acid
The acid that makes vinegar sour, produced from ethyl alcohol by acetic acid bacteria.
amino acid
A building block for proteins, which are folded-up long chains of amino acids. One amino acid in
particular, glutamic acid (also called glutamate), is responsible for the sensation of umami taste:
the richness in kelp, aged meats and cheese, tomatoes, and miso. We do fermentations like miso or
garum where proteins get broken down into amino acids to create this umami flavor.
amylase
An enzyme that breaks down starch molecules into sugar molecules. Amylases play a big role in
fermentation, for example in the malting process for making beer from starchy barley grains, and in
the process of growing koji from Aspergillus oryzae spores on barley or rice grains. They are a power-
ful tool for making unfermentable ingredients more fermentable—for example, in making miso, the
sugars that are created initially by the amylase in koji can then be fermented by lactic acid bacteria
and salt-tolerant yeasts, creating complex flavors and preservation that wouldn't have been possible
without this initial starch-digesting (amylytic) step.
Aspergillus oryzae
A mold originally from East Asia, which we use to make koji. We use koji for making miso, garum,
shoyu, and koji water. Aspergillus oryzae converts starches into sugars and proteins into amino acids
as part of its growth process and metabolism, and we take advantage of this and use koji to intention-
ally ferment carbohydrate- and protein-rich ingredients.
backslop
To inoculate a new fermentation by adding a finished, active fermentation to it. We make new vin-
egar by backslopping old vinegar into fresh, alcoholic liquid—the acetic bacteria living in the old
vinegar grows in the new liquid and turns it all into vinegar. Some beer brewers will backslop yeast
from a finished batch of beer into a new batch.
bacteria
Bacteria generally speaking are some of the oldest and most abundant organisms on earth, and un-
like fungi and animal cells, are Prokaryotic (have no cell nuclei or other membrane-bound cell or-
ganelles), whereas fungi and animals are Eukaryotic (have their DNA inside nuclei, and specialized
organelles inside the cell like the mitochondria, ribosomes, etc.) Bacteria we use for fermentation
include lactic acid bacteria (LAB) and acetic acid bacteria (AAB). Both of these produce acids—LAB
produce lactic acid from sugars, and AAAB produce acetic acid from alcohol. LAB are used to fer-
ment sauerkraut, lacto fruits and mushrooms, koji water, and miso as well as yogurt, creme fraiche
and cheese. AAB primarily ferment vinegar and kombucha and also create some acidity in misos.
LAB can ferment and grow without oxygen (and many species prefer it) and AAB need oxygen to
ferment and grow.
carbohydrate
A sugar or a molecule made of many sugar molecules linked together. Also called a saccharide— glu-
cose is a monosaccharide, sucrose is a disaccharide, and starch and cellulose are polysaccharides.
enzyme
For the purposes of fermentation, an enzyme is a protein produced by a microbe to break down or
chemically transform a molecule. For example, Aspergillus oryzae produces enzymes called proteas-
es that break down a protein, which is a long chain of amino acids, into individual amino acids. En-
zymes are usually named as "the thing they break down"+"ase" so, prote-ase breaks down proteins
and amyl-ase breaks down starches (called "amylum" in Latin). More technically speaking, enzymes
are produced in all living cells, and are the machinery that allows life to exist on a cellular level by
catalyzing necessary bio-reactions that would otherwise happen very slowly or not at all.
ferment
Through fermentation we can make vinegar, kombucha, koji, miso, garum, sauerkraut, yogurt, beer,
wine, and bread. We use "fermentation" generally to mean growing microbes in an ingredient and
using their metabolic processes and enzymes to transform that ingredient. Very technically speaking,
fermentation is also a metabolic process that releases energy from organic molecules (often, but not
always, sugars) in the absence of oxygen.
fungus
The two fungi we use most often are Aspergillus oryzae (a mold, which converts starches into sugars
and proteins into amino acids) for making koji, and Saccharomyces cerevisiae (a yeast, which con-
verts sugars into ethyl alcohol) for making bread, wine, and beer. Mushrooms, molds, and yeasts are
all types of fungus. Fungi can't photosynthesize their own food (as a plant would) and so they have to
digest materials in their environment to get energy. To do this many of them produce enzymes which
break down (technically speaking, they hydrolyze) molecules like starch, cellulose, and lignin.
garum
Historically, an ancient Greco-Roman condiment made from salted fish guts and innards allowed to
ferment for months or years. The salt prevented the garum from spoiling, and the proteins in the fish
were broken down by the proteases present in all cells and also in the fish's digestive tracts. We use
the term garum to refer to any animal protein fermented enzymatically and with salt added, although
we use the proteases in koji rather than in guts.
inoculate
You can kickstart a fermentation by adding a dose of the microbes you want to use at the beginning.
Sometimes this means adding a pure culture—for example, a particular strain of yeast or spores from a
specific mold. For some fermentations you can also add a little bit of a finished fermentation to a new
one to inoculate it, such as adding old vinegar to a new batch of vinegar. This old-to-new inoculation
is also called backslopping.
inoculum
The stuff you use to inoculate a fermentation. For example, a pure strain of yeast, pure koji spores,
or old vinegar.
koji
Making koji lets us make miso, garum, and other complex, rich-tasting things from relatively simple
starting ingredients. Koji is what you get when you grow the mold Aspergillus oryzae on steamed,
cooled grains in a humid warm place for two days— the koji is the mold + the grains, which get bound
together into a kind of slab or cake by the mold mycelium. Koji is rich in enzymes produced by the
mold, especially amylase (which breaks starches down into sugars) and protease (which breaks pro-
tein down into free amino acids). These enzymes make the grains of the koji sweet and umami-tast-
ing, and when you mix koji with another ingredient (like soybeans, which is how you make miso in
Japan, or yellow peas, which is how we make miso here), they will also break down that ingredient's
starches and proteins, creating fermentable sugars for yeasts and lactic acid bacteria to ferment, and
umami flavors.
lactic acid
The sour acid in yogurt, sauerkraut, and other lacto-fermented products. It is an organic acid pro-
duced by lactic acid bacteria (LAB) from sugar, often in slightly salty environments. Producing lactic
acid slows down the growth of other less acid-tolerant microbes which might cause spoilage, giving
the lactic acid bacteria less competition and making fermented food safer for us to eat.
lactic acid bacteria
The bacteria we use for making sauerkraut, cultured dairy, lacto plums, etc. It's a group of bacteria
that consume sugar and produce lactic acid as a waste product of their metabolism. Many species of
Lactic Acid Bacteria (also abbreviated as LAB) are present on our skin and on the outside of plants,
and will often begin fermenting plants, dairy, etc. without inoculation by a pure strain. The process
a field guide to fermentation · 119118 · noma
of intentionally using LAB to ferment sugars into acid is called lactofermentation, and is enhanced by
adding small amounts of salt (2-8%) which LAB can tolerate but other microorganisms cannot, and
removing oxygen, which stops spoilage by mold.
lacto-fermentation
Fermenting the sugars in an ingredient into lactic acid, using lactic acid bacteria.
metabolism/metabolize
The chemical transformations that an organism uses to live. Often this means that a cell getting en-
ergy from metabolizing one organic molecule into a different organic molecule. For example, yeast
like Saccharomyces cerevisiae primarily get their energy from metabolizing sugar into ethyl alcohol,
and lactic acid bacteria by metabolizing sugar into lactic acid. We take advantage of the metabolic
processes of microbes to do lactofermentation and to make beer, vinegar, and koji.
microbe
Another name for a microorganism.
microorganism
A living organism that is microscopically small. We use microorganisms such as bacteria, yeasts, and
molds for fermentation. Pretty much any surface that hasn't been very recently sterilized is covered
in microorganisms, which are also found on our skin, in our intestines, in the soil, and pretty much
everywhere else on earth. Yeasts and molds are both types of fungi which, like animal cells, have a
separate nucleous holding DNA and various other separate structures called organelles that carry out
the cell's reproductive and metabolic processes. Bacteria (like acetic bacteria and lactic bacteria) are
an older, smaller, and simpler life-form with little internal structure, no organelles, and DNA floating
around without a nucleus.
miso
A salty, umami-rich, sometimes sweet, sometimes tangy, sometimes very funky-smelling fermented
paste from Japan made in two fermentation stages. In the first stage, steamed rice, barley, or soybeans
are cooled and dusted with spores of Aspergillus oryzae mold, which is allowed to grow for about two
days to make koji. The koji is mixed with boiled soybeans and salt and then left to ferment and age for
2 weeks to 2 years. Miso can also be thought of a process, and a template for transforming ingredients
through fermentation. We borrow the technique of making miso and use Nordic ingredients—pearl
barley in place of rice for the koji, and protein-rich yellow peas instead of soybeans to make Pea-so.
mold
A mold is a type of fungus. Molds form microscopic filaments called hyphae, with the mold cells
themselves existing inside the hyphae. The interconnected network of hyphae that forms is called
mycelium. The network of the mycelium will usually penetrate the material that the mold is using
for food, and the mold cells produce enzymes that it secretes through the tips of the hyphae to break
down and extract energy from the materials in its food source. The mold that we use the most is
Aspergillus oryzae, for making koji. In koji, the mycelium looks like a fluffy white mat that holds the
grains of rice or barley together. The mycelium eventually produces spores on the end of the hyphae,
which makes it look extra-fluffy and sometimes green, and these spores can be used to inoculate or
'seed' another batch of koji.
pH
A measurement of acidity or alkalinity. The lower the pH, the more acidic something is— so pH is use-
ful to know if you're relying on acidity as a preservative, for example in vinegar, lactofermentations,
or kombucha. Acids have a pH lower than 7, pure water has a pH of 7, and alkaline substances have a
pH above 7. Wine has a pH around 4, stomach acid about 1. A pH of 4 is 10 times as acidic as a pH of
5, and a pH of 3 is 10 times more acidic than a pH of 4. Technically pH is the negative log base 10 of
hydronium ion concentration so pH 3 would have 0.001 moles of acid per liter.
protease/proteolytic enzyme
An enzyme that breaks down proteins into their amino acid building blocks. One of these, glutamic
acid, is responsible for umami flavor. Aspergillus oryzae produces proteases that make miso, shoyu,
and our garums rich in umami flavor.
protein
A molecule made from a long chain of chemically linked amino acids. Muscle fibers and enzymes are
both made of different specialized proteins. Protein chains are folded into shapes that help them do
their jobs and unfolding these shapes is what gives cooked eggs, meats, and cheese their harder tex-
ture. Individual amino acids, especially glutamic acid or glutamate, have a flavor called "umami" that
we intentionally break down proteins with enzymes in miso and garum to develop.
proteolysis
The process of breaking down proteins (which are made from long chains or strings of linked amino
acids) into individual free amino acids. This happens in miso and garum, because of the proteolytic
enzymes produced by Aspegillus oryzae in koji.
spore
Like a seed for a fungus. We use Aspergillus oryzae to inoculate barley to make koji. The spore is a
specialized cell that the fungus produces to spread itself to new locations once it starts running out
of food in its current home. Spores are also called conidia, and are produced on stalks called conid-
iophores at the tips of the fibers called hyphae that molds build to live in. This makes it easy for the
spores to be dispersed through the air.
starch
Found in grains, potatoes, etc. A molecule made of many glucose molecules linked together chemi-
cally in a long string or chain. Starch can be converted into sugar molecules by breaking these chains
down, which is what Aspergillus oryzae does that makes it useful for fermentation. Starch is made
from two different types of sugar chains, amylose (which is one long chain like a string) and amy-
lopectin, which has many branched chains connected together (it looks like a tree branch or root).
Amylose gets broken down more slowly by amylases than amylopectin does, and starches tend to be
more sticky or waxy the more amylopectin they contain.
substrate
Substrate has different meanings depending on the context. For microbial growth and fermentation, it
refers to the material that the microbes grow in and ferment. In the context of enzymes, the substrate is
the molecule that is being modified or broken down by the enzyme (into a product or products.)
sugar
A sweet-tasting, soluble carbohydrate (also called a saccharide) that can bind to other sugar mole-
cules in chains to make larger molecules. Glucose and fructose are important monosaccharides, and
sucrose or table sugar is a disaccharide made from a glucose and a fructose bound together. Many
microbes (lactic acid bacteria, yeasts) feed on sugars directly. Some other microbes (like Aspergillus
oryzae mold) produce enzymes to break down polysaccharides into smaller sugar molecules.
vinegar
Vinegar is what you get when you ferment an alcoholic liquid (like wine, beer, cider, etc.) with acetic
acid bacteria and give them lots of oxygen.
yeast
Yeast in a culinary sense usually means the species Saccharomyces cerevesiae, which is the microbe
responsible for creating alcohol in beer and wine and making bread rise. Yeasts are a type of fungus,
although unlike mold, they stay in single-cell form and don't make interconnected networks. Other
yeasts you might encounter in fermented foods are Brettanomyces and Torula species, sometimes
more broadly called "wild" yeasts.

120 · noma
Notes
