AKS2018 Kubernetes Guide
User Manual:
Open the PDF directly: View PDF ![]() .
.
Page Count: 56
http://www.paloaltonetworks.com
© 2018 Palo Alto Networks. Proprietary and Confidential
AKS-Kubernetes-Lab.
.
.
.
.
Securing.your.container.
workloads.in.Kubernetes.
!
!
!
!
!
!
.. !

AKS-Kubernetes-Lab Page 2
Table!of!Contents!
About the Azure Kubernetes Service Terraform Template ................................................ 3
Support Policy .................................................................................................................. 4
Instances Used ................................................................................................................. 4
Prerequisites .................................................................................................................... 4
Download GitHub files ..................................................................................................... 5
Azure Service Principal Creation ....................................................................................... 6
Bootstrap storage account creation .................................................................................. 8
SSH keys .......................................................................................................................... 16
Deploy the Terraform Template ...................................................................................... 18
Review what was deployed ....................................................................................... 21
Task 1 – Look around Azure console ........................................................................................................... 21
Task 2 – Review the Kubernetes Cluster ..................................................................................................... 26
Task 3 – Connect to the Kubernetes Cluster ............................................................................................... 27
Task!3!–!Log!into!the!firewall ................................................................................................................... 28
Launch a two tiered WordPress application .................................................................... 32
Task 1 – WordPress Application Deployment YAML file ............................................................................. 32
Task 2 – Launch the Application ................................................................................................................. 35
Launch a two tiered Guestbook application .................................................................... 37
Task 1 – Guestbook Application Deployment YAML file ............................................................................. 37
Task 2 – Launch the Application ................................................................................................................. 40
Explore the newly deployed applications ........................................................................ 41
Securing Inbound Traffic ................................................................................................. 44
Task 1 – Azure Application Gateway IP Address ......................................................................................... 44
Task 2 – Update the Firewall’s Address Objects ......................................................................................... 45
Task 3 – Connect to the Guestbook Frontend ............................................................................................ 47
Securing Outbound Traffic ............................................................................................... 51
Task 1 – Add Outbound Route .................................................................................................................... 51
Lab Termination .............................................................................................................. 54
Conclusion ...................................................................................................................... 56
!
!
AKS-Kubernetes-Lab Page 3
About.the.Azure.Kubernetes.Service.Terraform.
Template.
Azure Kubernetes Service (AKS) Terraform Templates are files that can deploy, configure, and launch
AZURE resources such as Resource Groups, VNETS, subnets, security groups, application gateways, route
tables, Kubernetes clusters, and more. These templates are used for ease of deployment and are key to any
cloud deployment model.
For more information on Templates refer to Google’s documentation
https://docs.microsoft.com/en-us/azure/terraform/
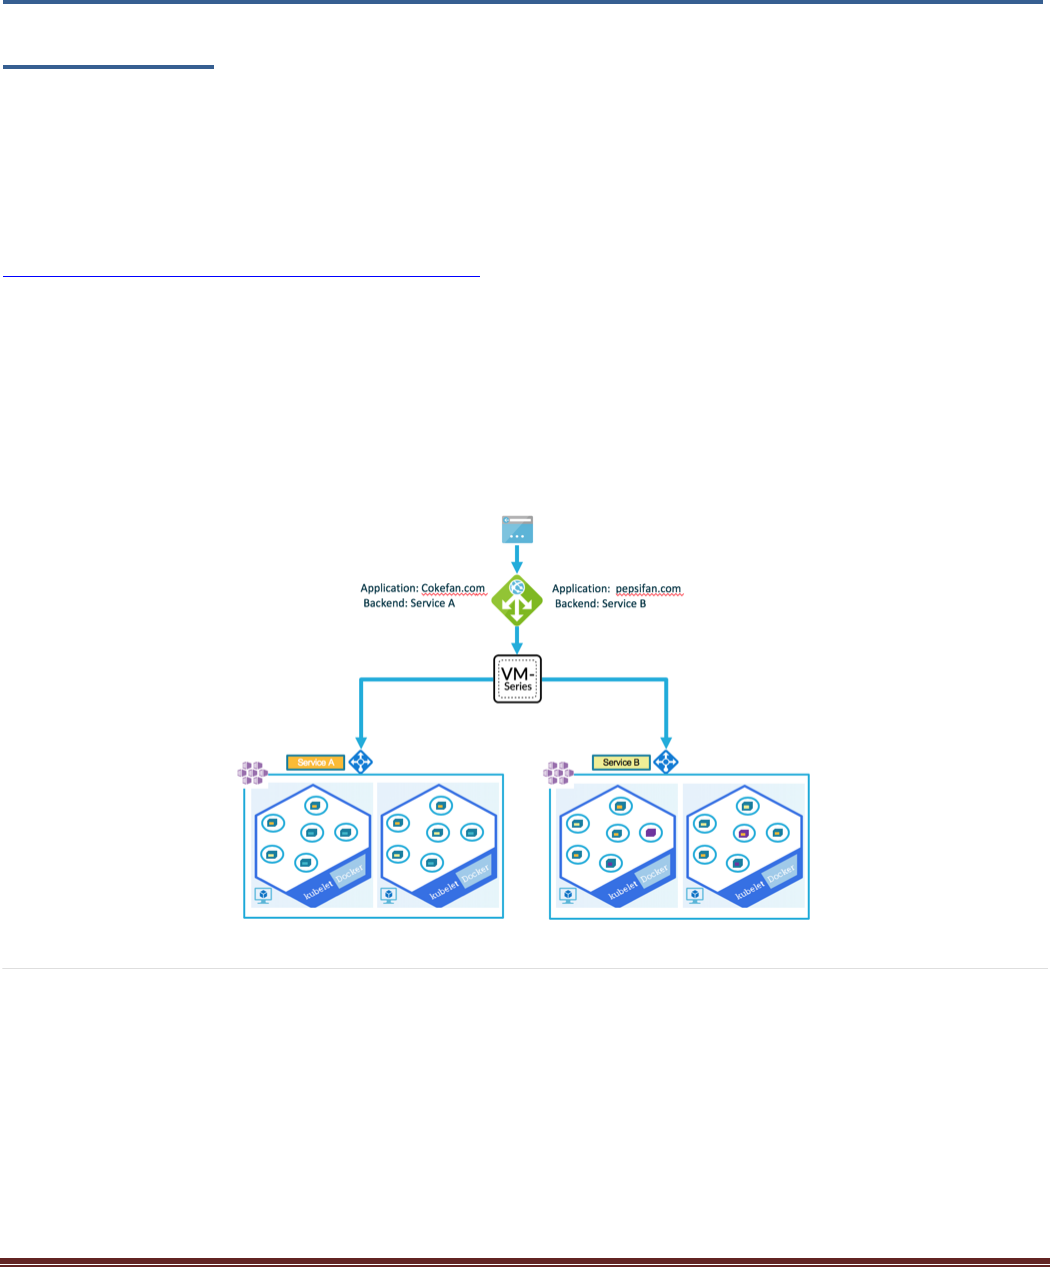
This document will walk through the setup and deployment of a Terraform template that deploys the AKS
infrastructure and a Palo Alto Networks VM-Series firewall that provides advanced protection for the
Kubernetes cluster North/South traffic. During the deployment the template will create two Azure resource
groups. One that has the infrastructure including the bootstrapped VM-Series Firewall and another with the
k8s cluster resources. The guide also walks through the deployment of two separate applications. Each 2-
tier application consists of database and web pods. After completing this guide, the following infrastructure
will be instantiated:
AKS-Kubernetes-Lab Page 4
Support.Policy.
This template is released under an as-is, best effort, support policy. These scripts should be seen
as community supported and Palo Alto Networks will contribute our expertise as and when
possible. We do not provide technical support or help in using or troubleshooting the components
of the project through our normal support options such as Palo Alto Networks support teams, or
ASC (Authorized Support Centers) partners and backline support options. The underlying product
used (the VM-Series firewall) by the scripts or templates are still supported, but the support is only for the
product functionality and not for help in deploying or using the template or script itself.
Instances.Used.
When deploying this Terraform template the following machine types are used:
Instance
Machine Type
QTY
PayGo Bundle 1 – VM-Series Firewall
Standard_D3_v2
1
Kubernetes Ubuntu Cluster Nodes
Standard_D3_v2
2
Internal Load Balancer
1
Application Gateway
1
Note: There are Azure costs associated with each machine type launched, please refer to the Microsoft
instance pricing page https://azure.microsoft.com/en-us/pricing/details/virtual-machines/windows/
Prerequisites.
Here are the prerequisites required to successfully launch this template:
• Terraform application - Instructions on the installation can be found here:
https://www.terraform.io/intro/getting-started/install.html
• Azure account- Account creation instructions can be found here: https://azure.microsoft.com/en-
us/resources/videos/sign-up-for-microsoft-azure/
• Azure command-line tool – Instructions for doing this can be found here:
https://docs.microsoft.com/en-us/cli/azure/install-azure-cli?view=azure-cli-latest
• Kubernetes command-line tool – Instructions for doing this can be found here:
https://kubernetes.io/docs/tasks/tools/install-kubectl/
AKS-Kubernetes-Lab Page 5
Download.GitHub.files..
In this activity, you will:
Download a zip copy of the GitHub files used for this lab
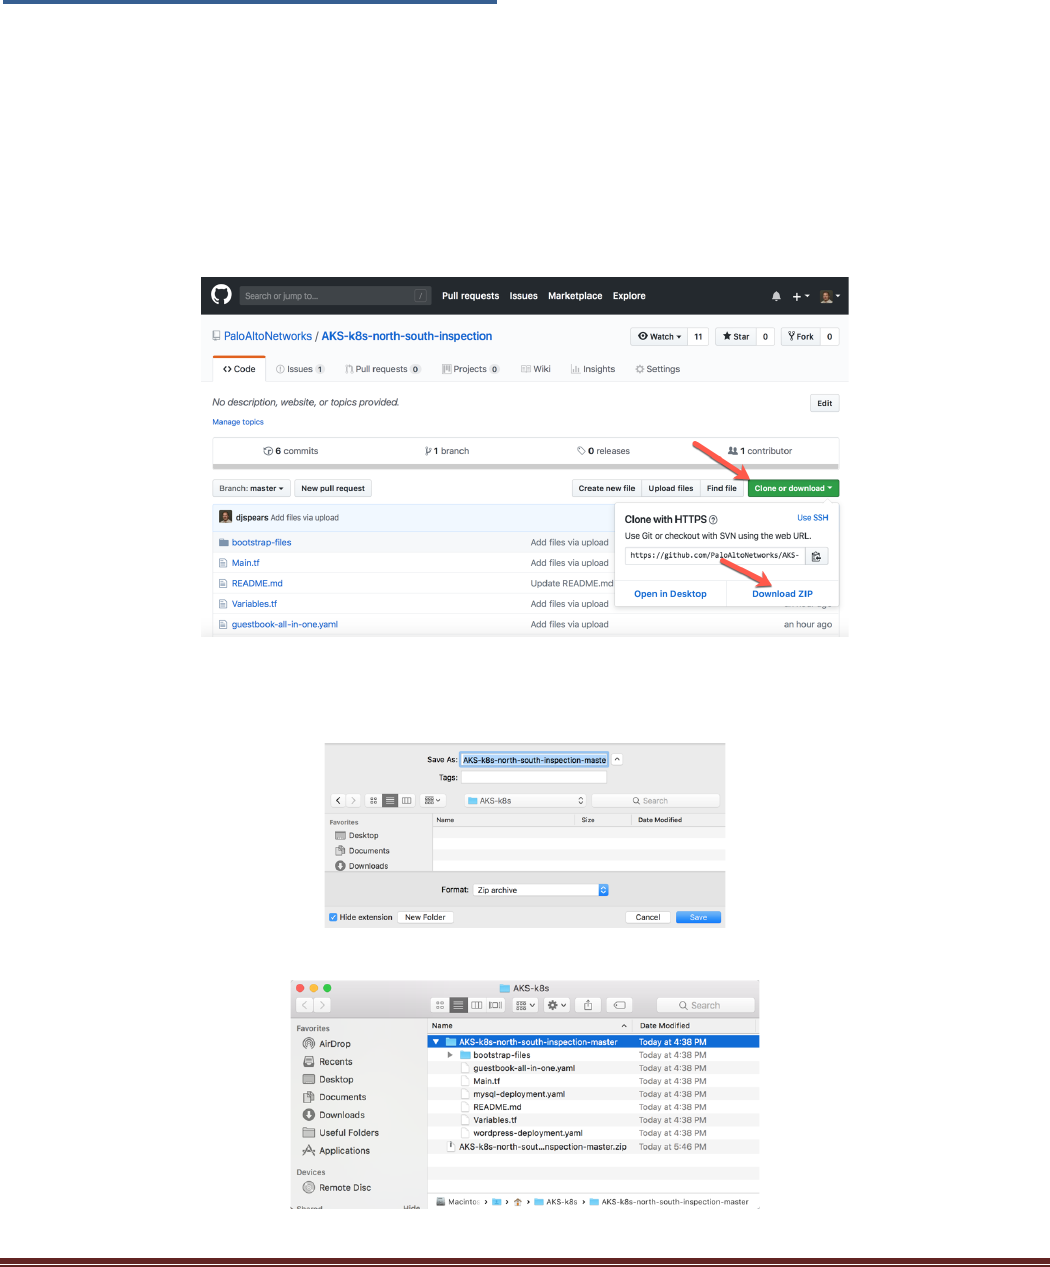
During this lab, the Terraform templates and Kubernetes (k8s) command will be executed from a local
computer. This lab requires some customization of the terraform files. To download the files from GitHub,
click on the Clone or download drop down and select Download ZIP.
Save the zip file to a new directory. This directory will be used to deploy the Terraform template and will
automatically keep the Terraform state files so the deployment can be managed in the future:
Unzip the files:
AKS-Kubernetes-Lab Page 6
Azure.Service.Principal.Creation..
In this activity, you will:
Authenticate to an Azure subscription via the Azure command line tool
Create a Service Principal with the appropriate RBAC to deploy a kubernetes (k8s) cluster
Update the Terraform Variables.tf file with the Service Principal information needed to execute
Microsoft has documented the steps to create a service principal that can be used to deploy a k8s cluster.
That document can be found here: https://docs.microsoft.com/en-us/azure/container-
service/kubernetes/container-service-kubernetes-service-principal
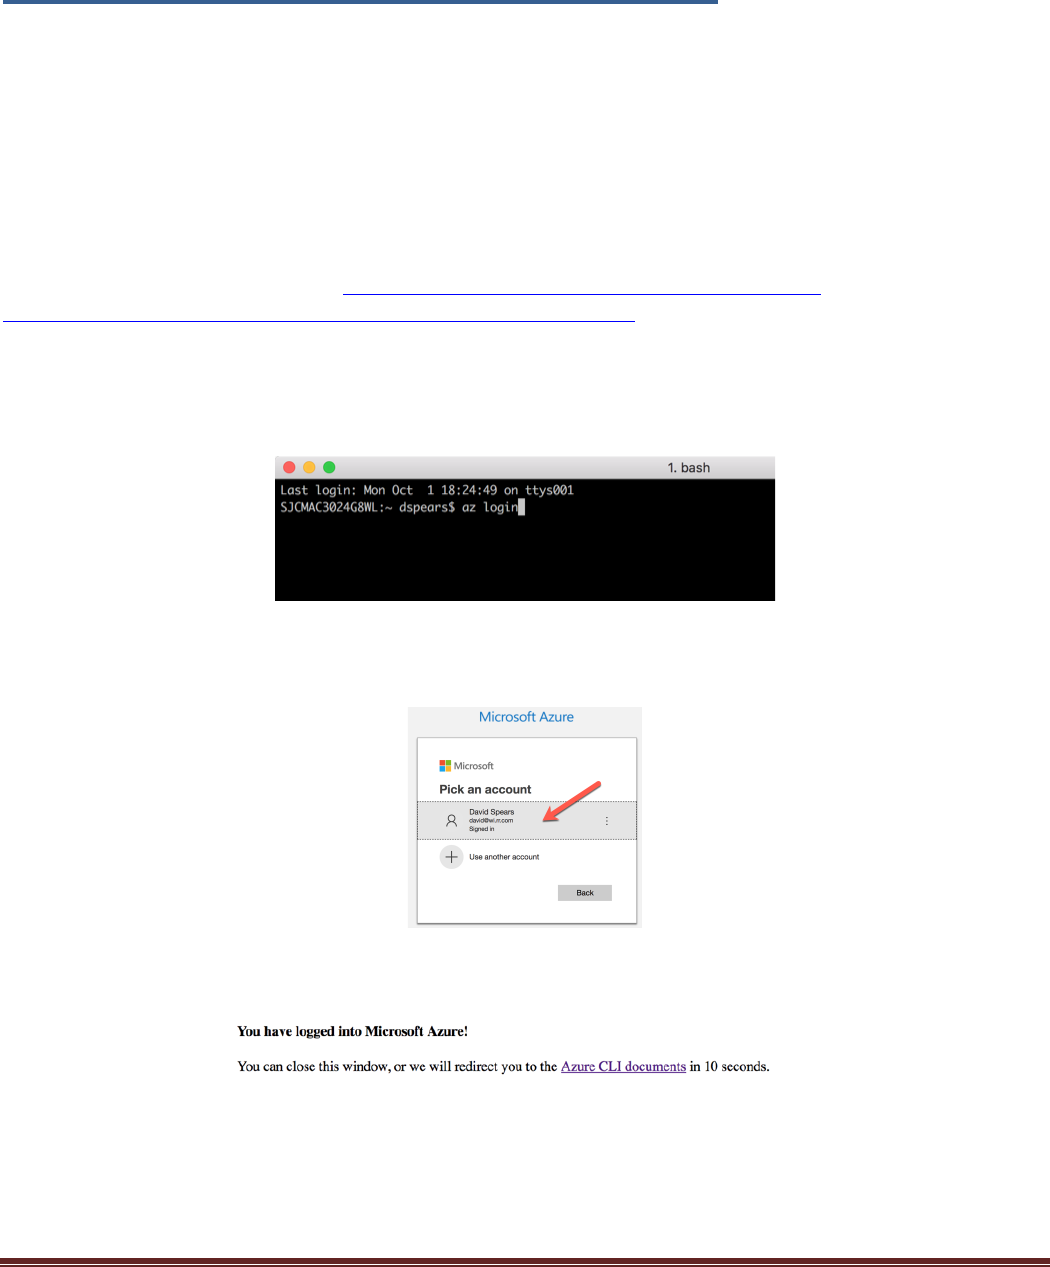
This guide assumes that the perquisites have been completed and the Azure command line tool has been
installed. Open a terminal window and type the command az login to authenticate the command line tool to
the appropriate subscription:
Next a browser window should open that will give the option to select the Azure account associate with the
subscription that will get the deployment:
Once the account has been selected, the following message will appear:
AKS-Kubernetes-Lab Page 7
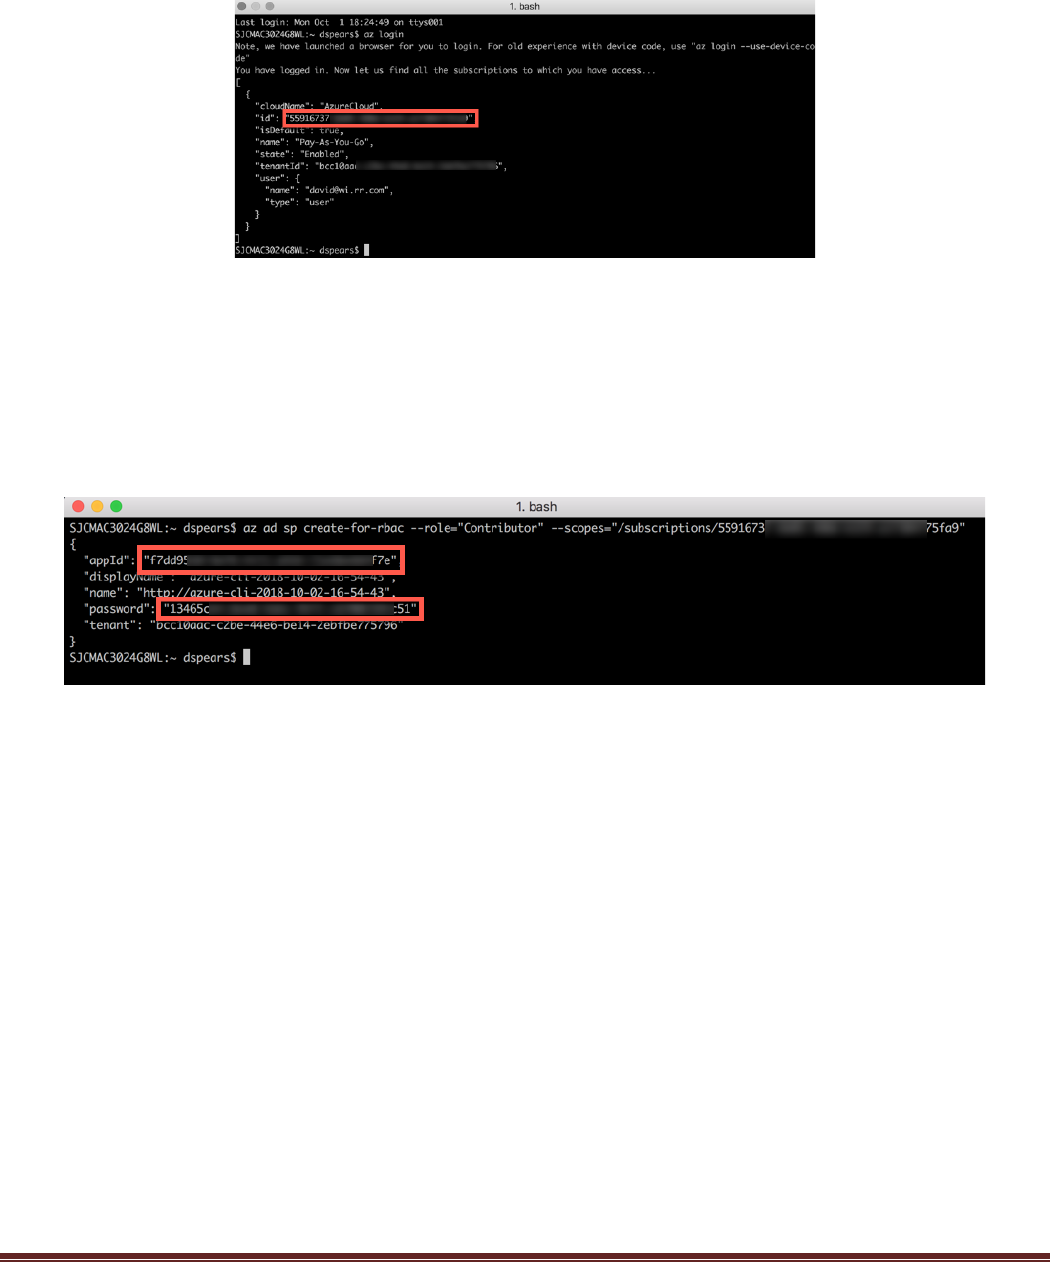
Check the terminal window. There should be confirmation that the login process was a success:
Copy the “id” from the output. This is the subscription id for the service principal. To be able to deploy a
k8s cluster in Azure the service principal must have the “contributor” role. Use the following command to
create the service principal:
$ az ad sp create-for-rbac --role="Contributor" --scopes="/subscriptions/<id>"
where “id” is the subscription id copied from the last step:
The Terraform deployment files consist of a main, variables, and output files. The Variables.tf file contains
information that is easily modified and commonly changed for various situations. The variables in the
Variables.tf file are used by the Main.tf file during deployment. Deploying this Terraform template in
Azure does require modification of the Variable.tf file to include deployment-specific information.

AKS-Kubernetes-Lab Page 8
Copy the “appId” and “password” fields from the service principal creation output. These are needed for the
terraform script and need to be added to the Variables.tf file. Open an editor of your choice and update
these fields and save the file:
Bootstrap.storage.account.creation..
In this activity, you will:
Create an Azure Resource Group and deploy a storage account
Create a file share with the folder structure needed to bootstrap the VM-Series Firewall
Copy the files to the Azure file share needed for bootstrapping
Update the Terraform Variables.tf file with the Azure storage access key that will allow the VM-Series Firewall
to bootstrap
The terraform template is going to bootstrap the initial VM-Series firewall configuration. To accomplish
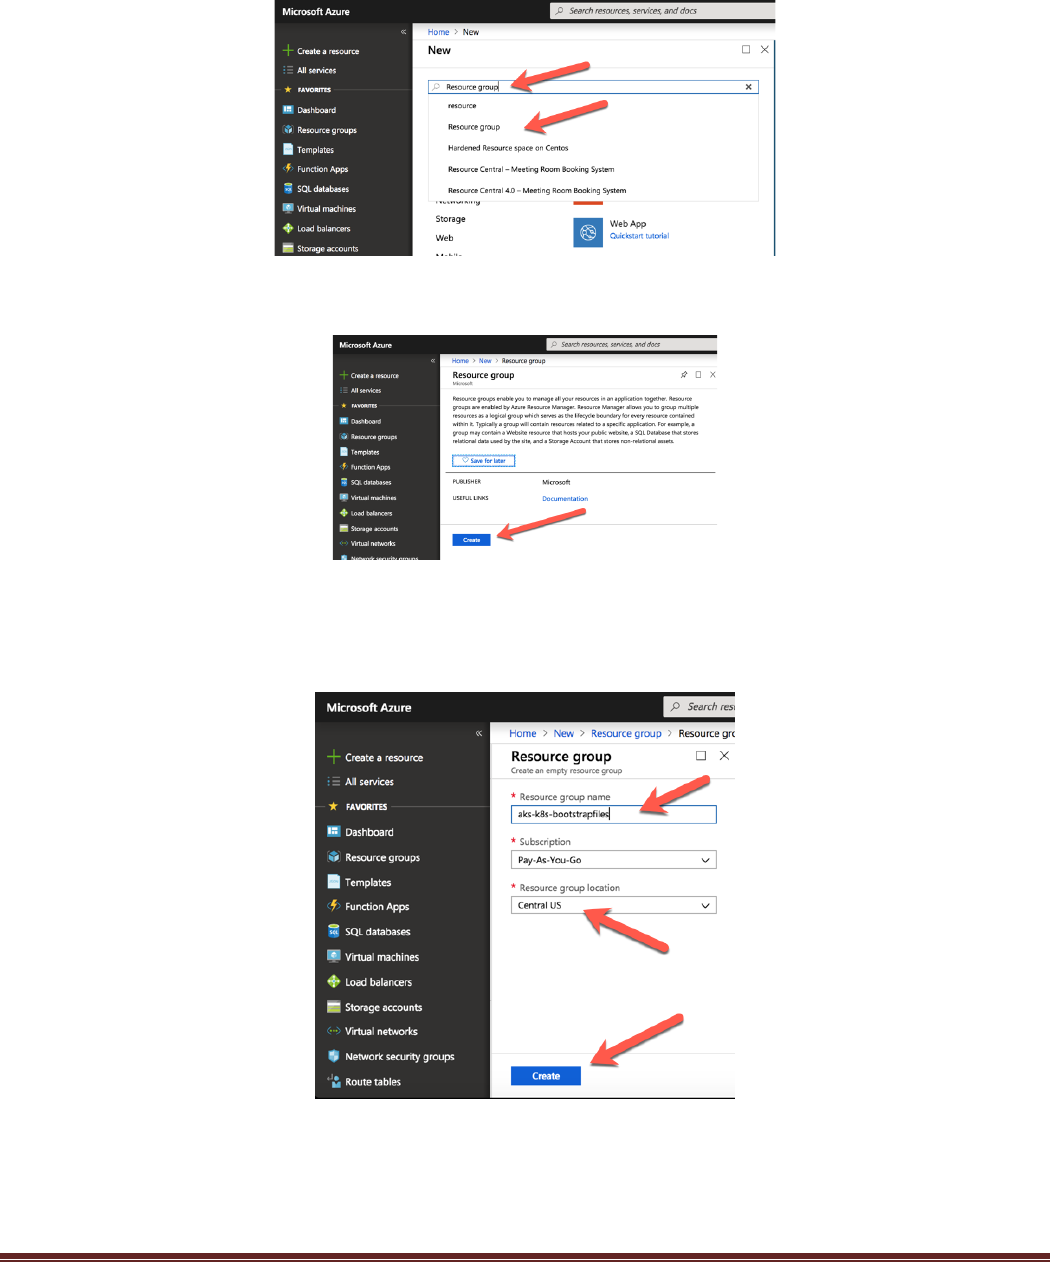
this an Azure storage account will be created with the appropriate files. To start, open the Azure Portal and
create a new resource group. Click on the “+ Create a resource” link:
AKS-Kubernetes-Lab Page 9
Next enter “Resource group” in the search and select Resource group:
Next select “Create” to create:
In the next window, create a resource group name and select the Resource group location. It is
recommended for this lab to use the same location that the terraform script deploys in. The default setting is
Central US. Click “Create” to create the Resource group.
AKS-Kubernetes-Lab Page 10
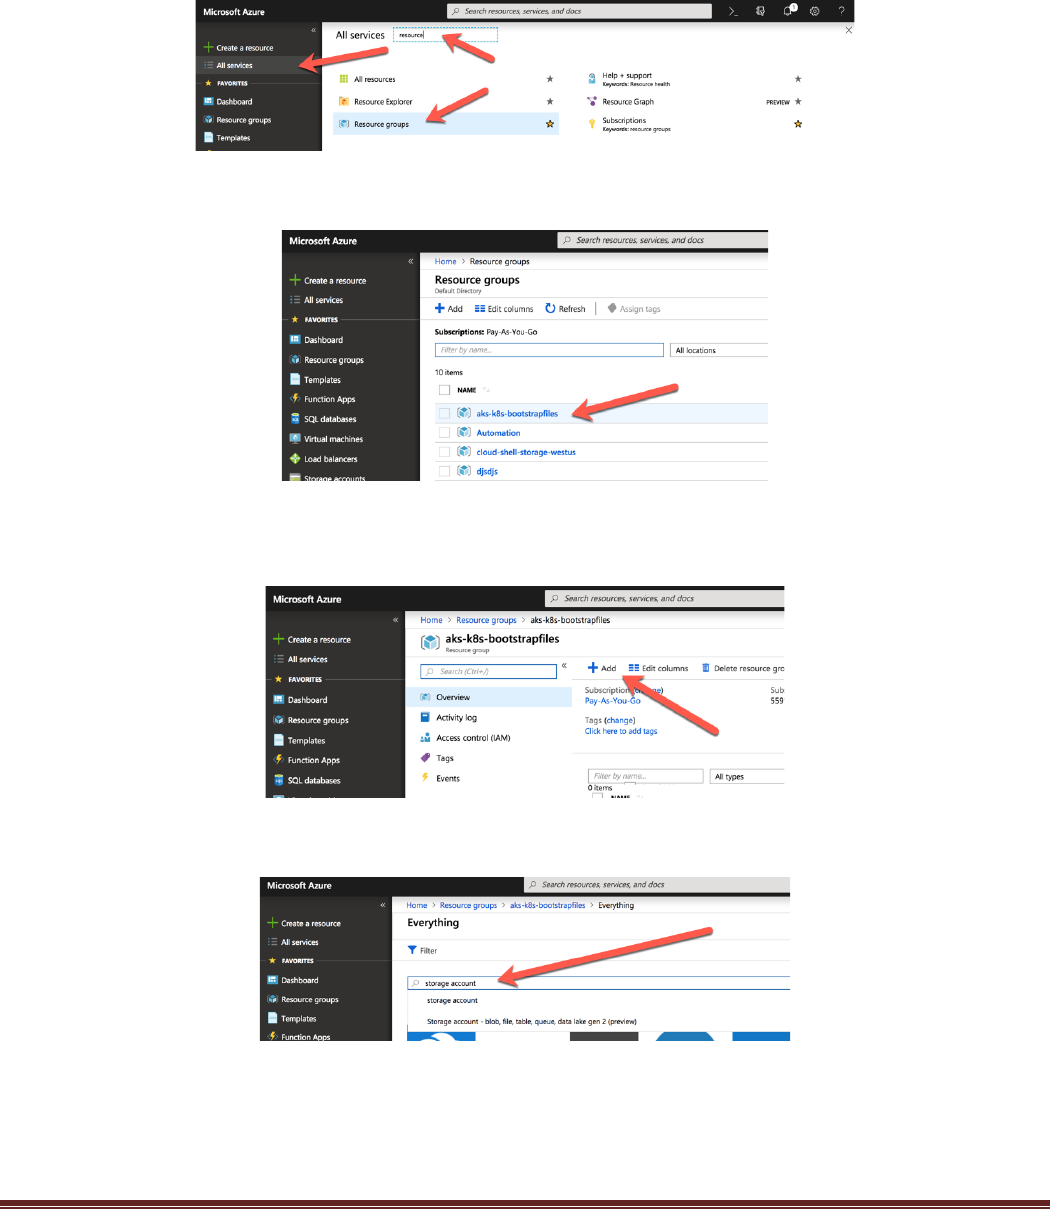
Navigate to the new Resource group. If a favorite is not available, click the “All Services” option on the left
Nav and type “resource” in the All services search window. Click on Resource groups to open all the
resources.
Now click the newly created Resource group:
Once in the resource group the next step is to create a storage account. Click on the plus sign to add a
resource in the resource group:
Type storage account in the search field:

AKS-Kubernetes-Lab Page 11
Select the Storage account published by Microsoft:
Next click “Create”:
Make sure the Resource group is correct. Enter a Storage account name and select the same location as the
rest of the deployment. Finally click “Review and create”
Once the validation is complete, select Create:
AKS-Kubernetes-Lab Page 12
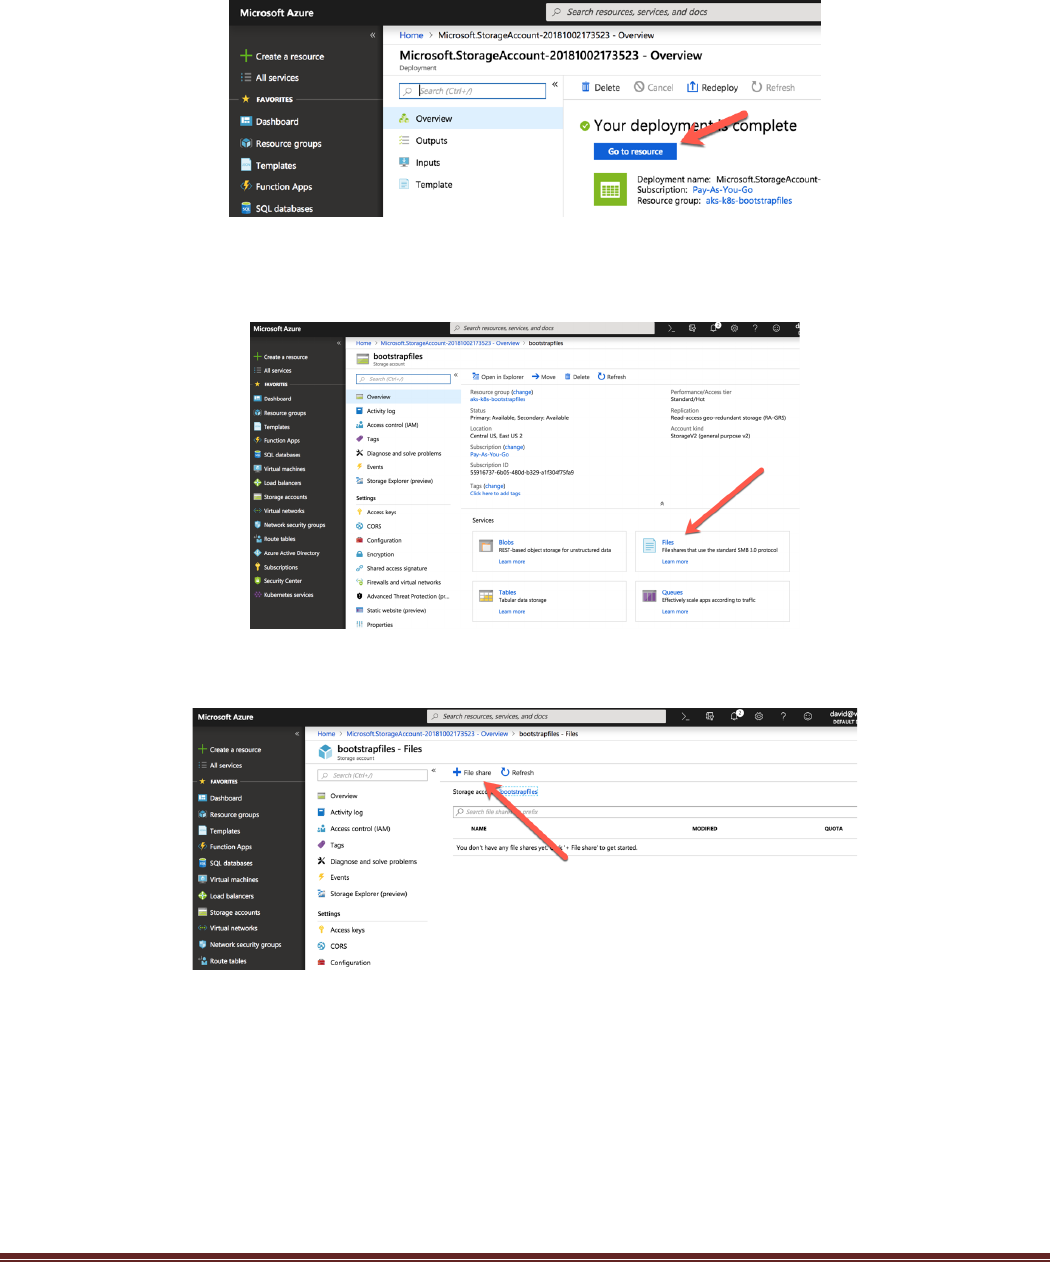
After the deployment is complete, click on the go to resource button:
Once the storage account is open. Click on the Files section. This is where the folders and files to bootstrap
the firewall will be placed.
Next click the plus sign to create a new File Share:
AKS-Kubernetes-Lab Page 13
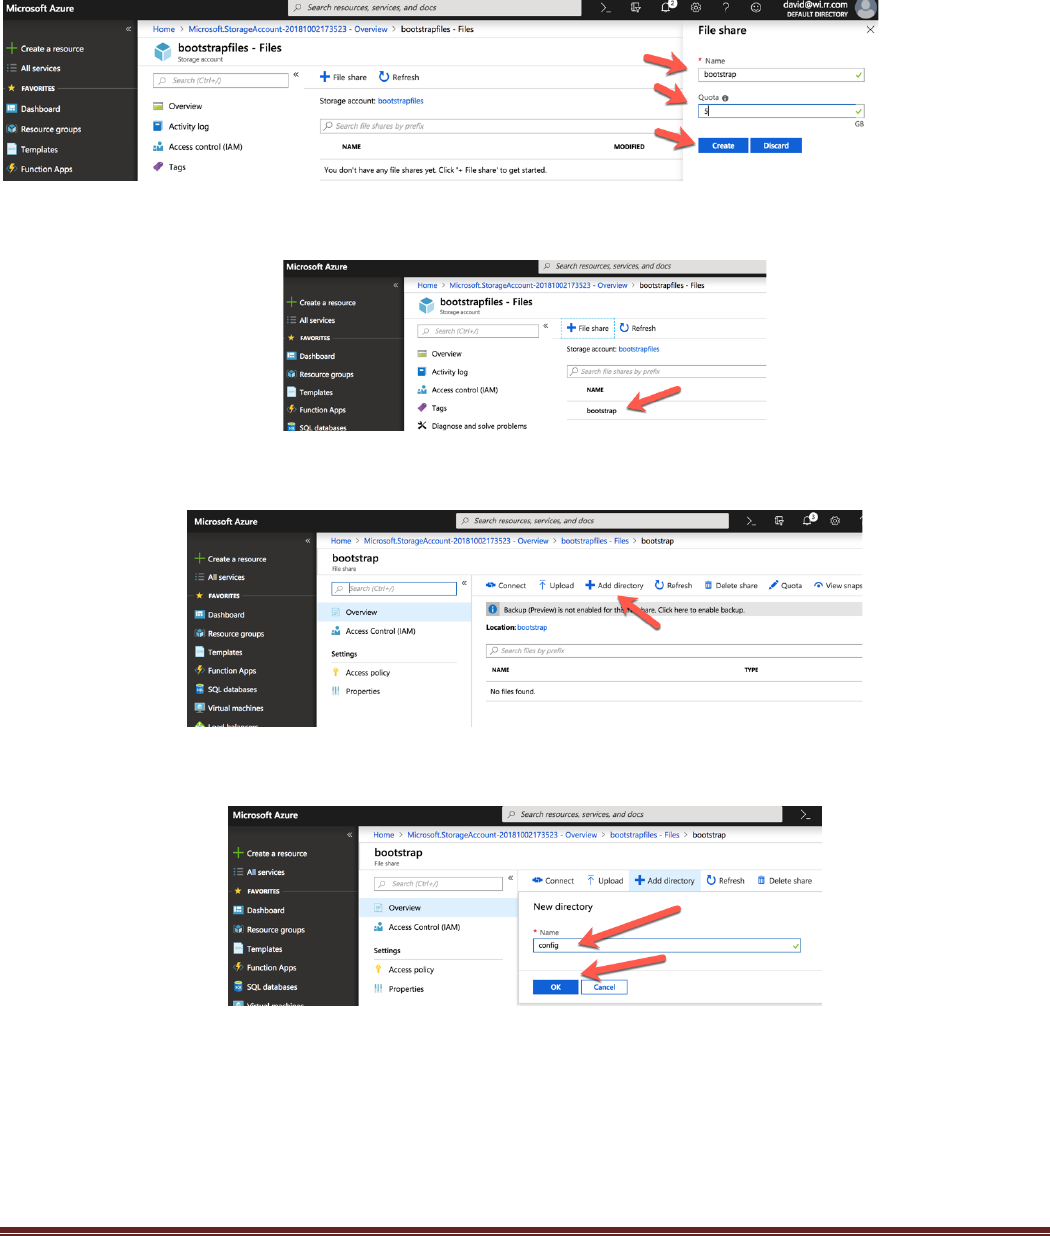
When the dialogue window opens, enter the file share information and click create. Note: The Name will be
used to update the Variables.tf file in a few steps:
Click on the newly created file share:
Click on the “Add directory” to create a directory:
Enter config and click ok:
AKS-Kubernetes-Lab Page 14
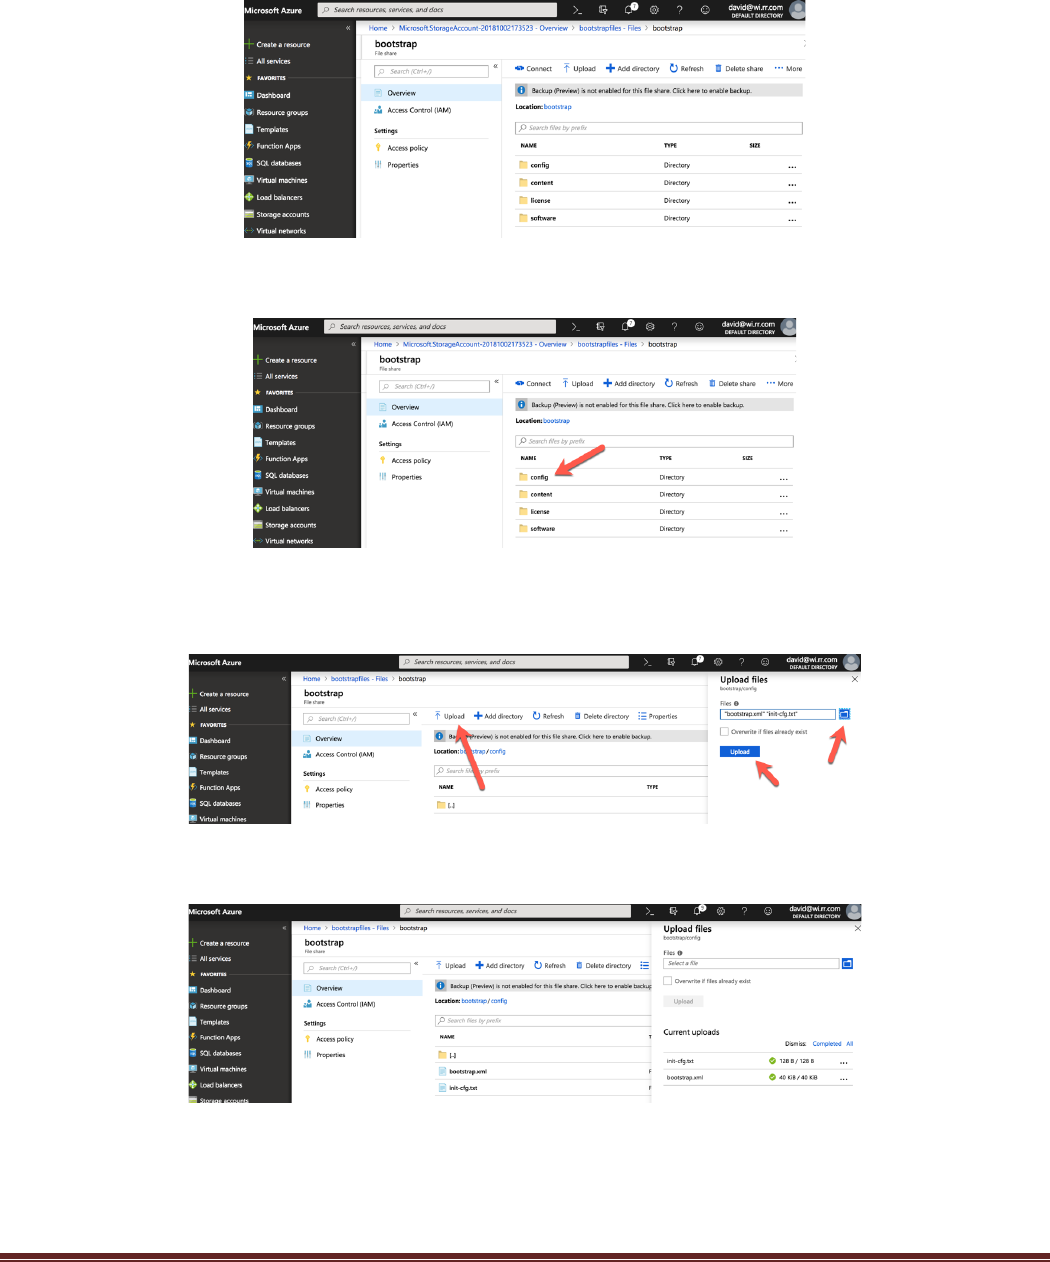
Repeat this step to create a content, license, and software directory. It is important that all 4 directories are
present:
Click on the config folder:
Click “Upload”. When the upload blade opens, select the folder browse and navigate to the files previously
downloaded from GitHub. Select the bootstrap.xml and init-cfg.txt. Then click “Upload”:
Once the files have been uploaded, they should be visible in the directory:
AKS-Kubernetes-Lab Page 15
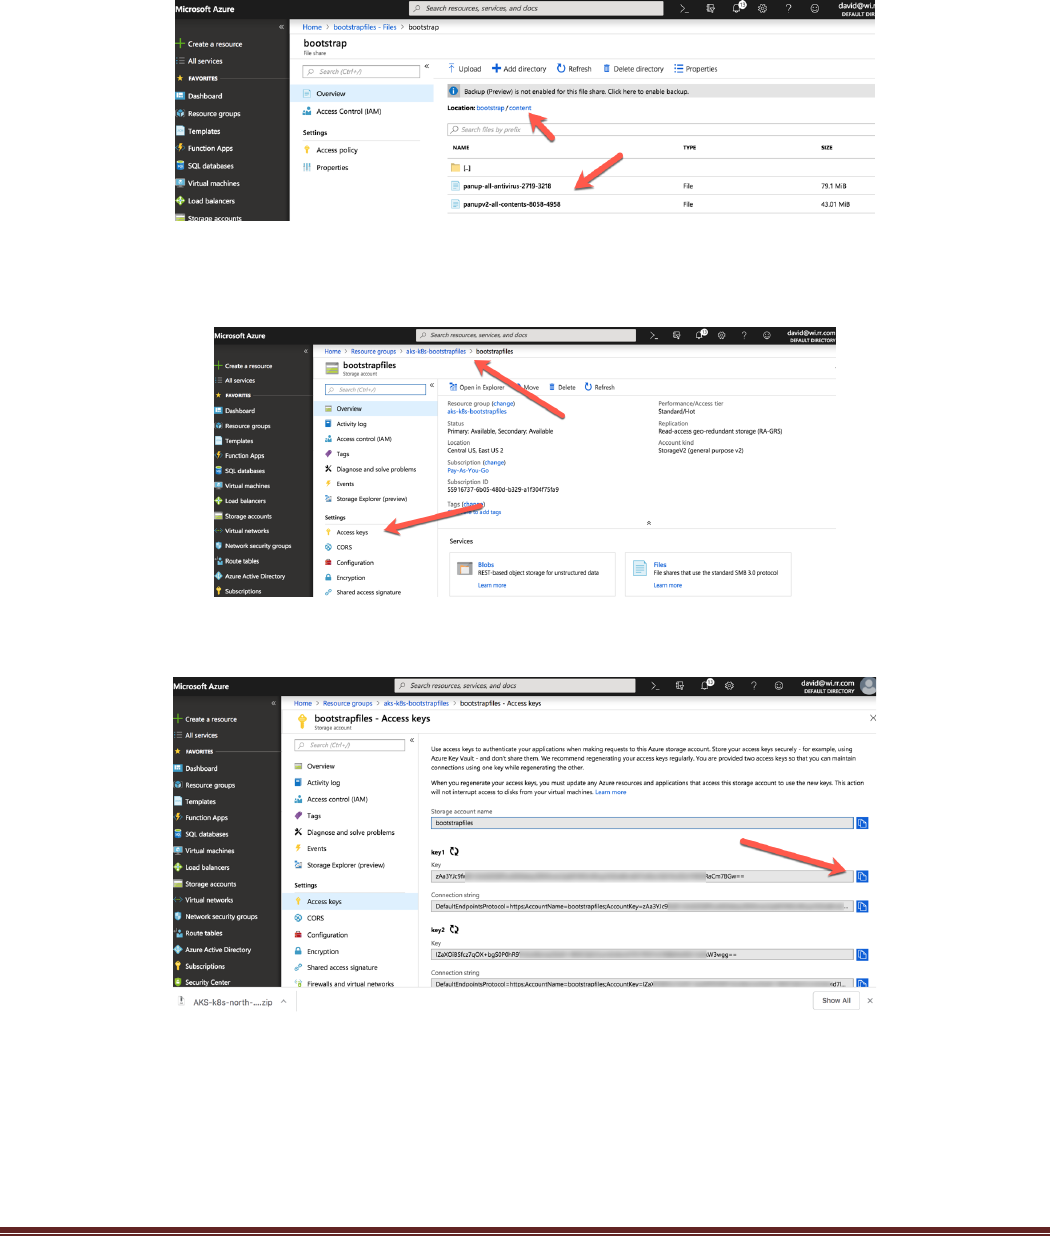
It is also possible to add content updates to the content directory that will get loaded into the firewall during
the bootstrapping process. The follow figure shows some content files uploaded to the content directory:
The next step is to identify the Access Key and update the Terraform Variables.tf file. Navigate to the
Storage account and click Access keys:
Next click the copy button to copy the access key for the storage account:

AKS-Kubernetes-Lab Page 16
Open the Variables.tf file in an editor and update the custom data variable. The access key, storage account
name, and share name need to be added:
This is a screen shot of the file with the updated information:
SSH.keys..
In this activity, you will:
Generate SSH Keys – if needed
Update the Terraform Variables.tf with the path to the SSH keys
The Terraform Variables.tf file has an option for supplying ssh keys that can be used to log into the
Kubernetes nodes after deployment.
AKS-Kubernetes-Lab Page 17
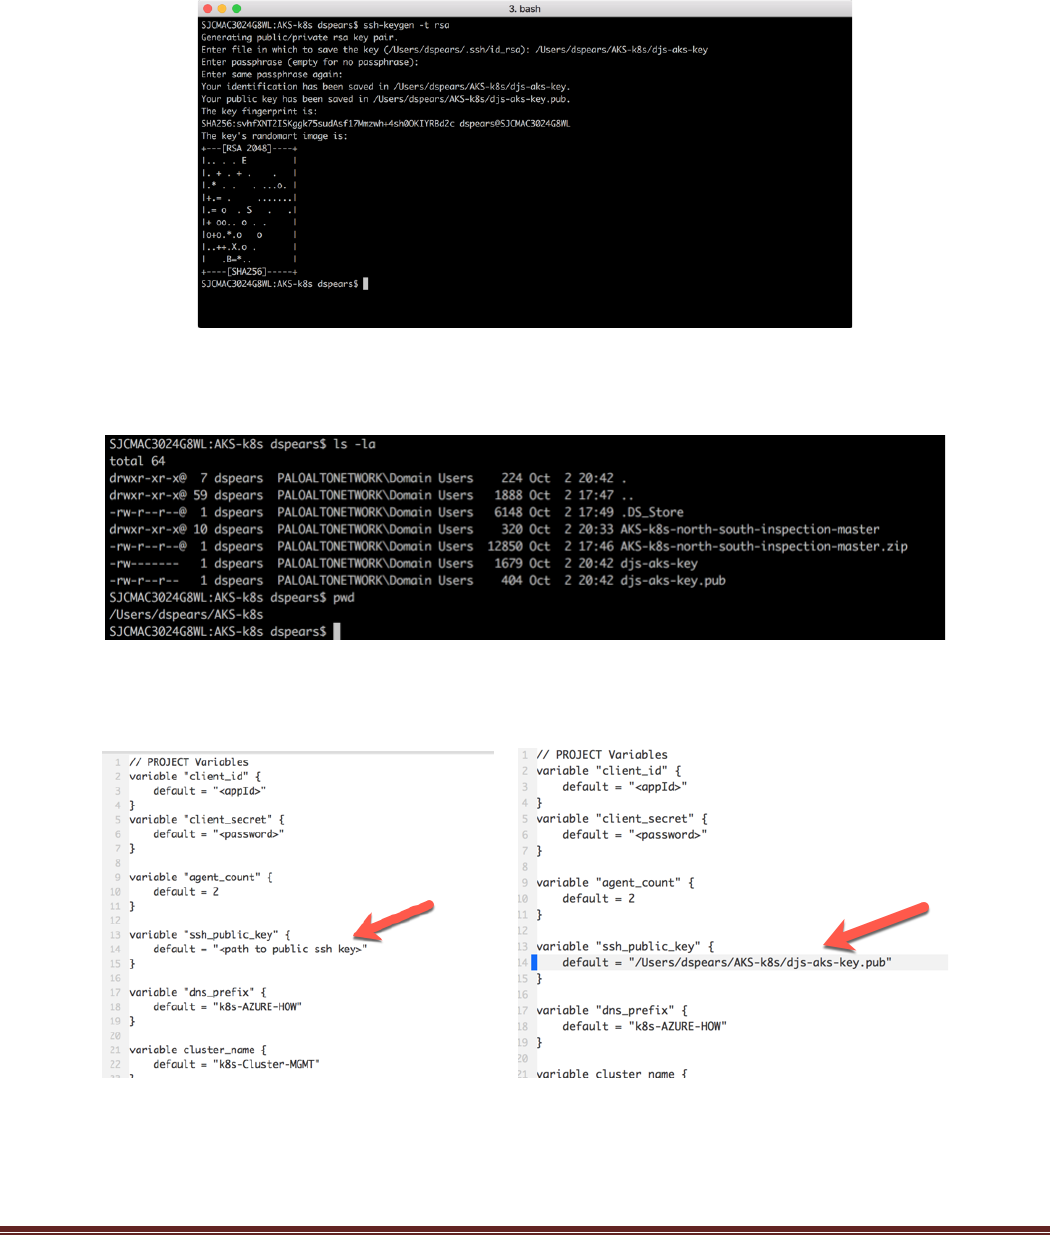
If you do not already have an SSH key, the follow example shows how to create an SSH key on a Mac using
the ssh-keygen -t rsa command:
In the previous example the keys were generated and stored in the same directory as the other lab files. The
public and private keys can be seen using the ls -la command.
Next edit the Terraform Variables.tf file to include the path to the public SSH key. The following diagram
shows the field that needs to be updated and the field after it has been updated:
AKS-Kubernetes-Lab Page 18
Deploy.the.Terraform.Template.
In this activity, you will:
Authenticate to Azure via the Azure command line tool
Initialize Terraform and download the appropriate plugins
Apply the Terraform template
Open a terminal shell and navigate to the directory containing the Terraform template files.
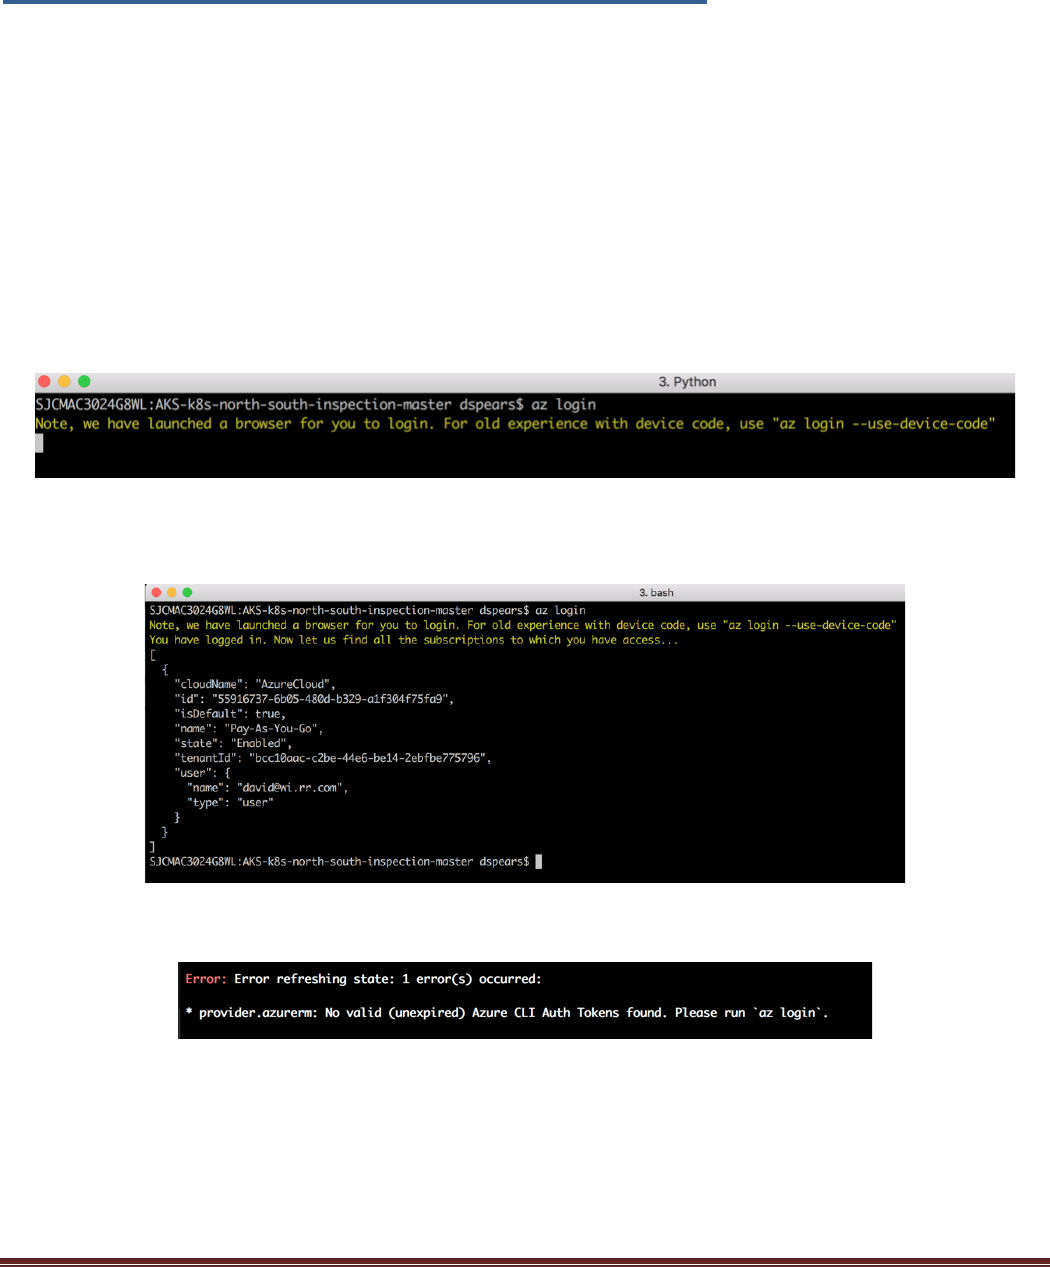
The Azure cli tool token obtained earlier has most likely expired. Use the “az login” login command to get
a new token:
After getting redirected to the Microsoft Azure Login and completing the login process successfully, the
following prompt will be displayed:
As a note, the following error message is displayed when the azure cli tool token has expired:
AKS-Kubernetes-Lab Page 19
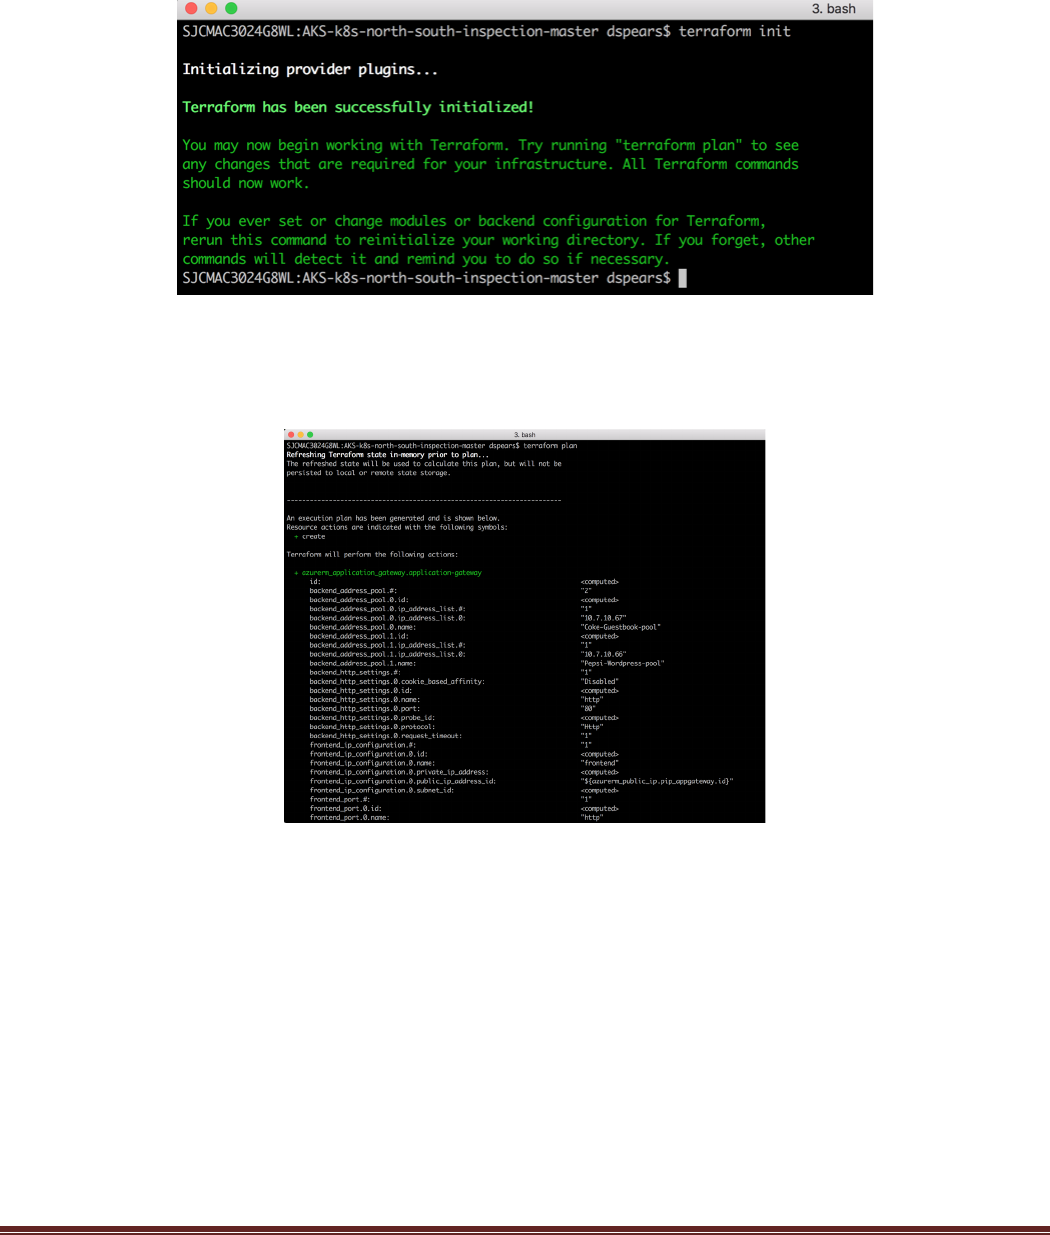
Ensure you are in the directory with the Main.tf and Variables.tf files and execute the “terraform init”
command which will initialize terraform and ensure all the provider plugins are download and up to date:
Once the terraform init has completed run the terraform plan command. This will show what changes will
be implemented with the terraform script. This will also identify if there are any errors detected with the
terraform files:

AKS-Kubernetes-Lab Page 20
Now run the terraform apply command to deploy the template. At the action prompt enter yes.
It will take a few minutes to complete. If all goes well, Terraform will output; “Apply Complete!” and
provide some additional output information about the resources deployed:
AKS-Kubernetes-Lab Page 21
Review what was deployed
In this activity, you will:
Review the resources that have been launched
Inspect k8s cluster
Log into the VM-Series firewall
Confirm bootstrap success
Task 1 – Look around Azure console
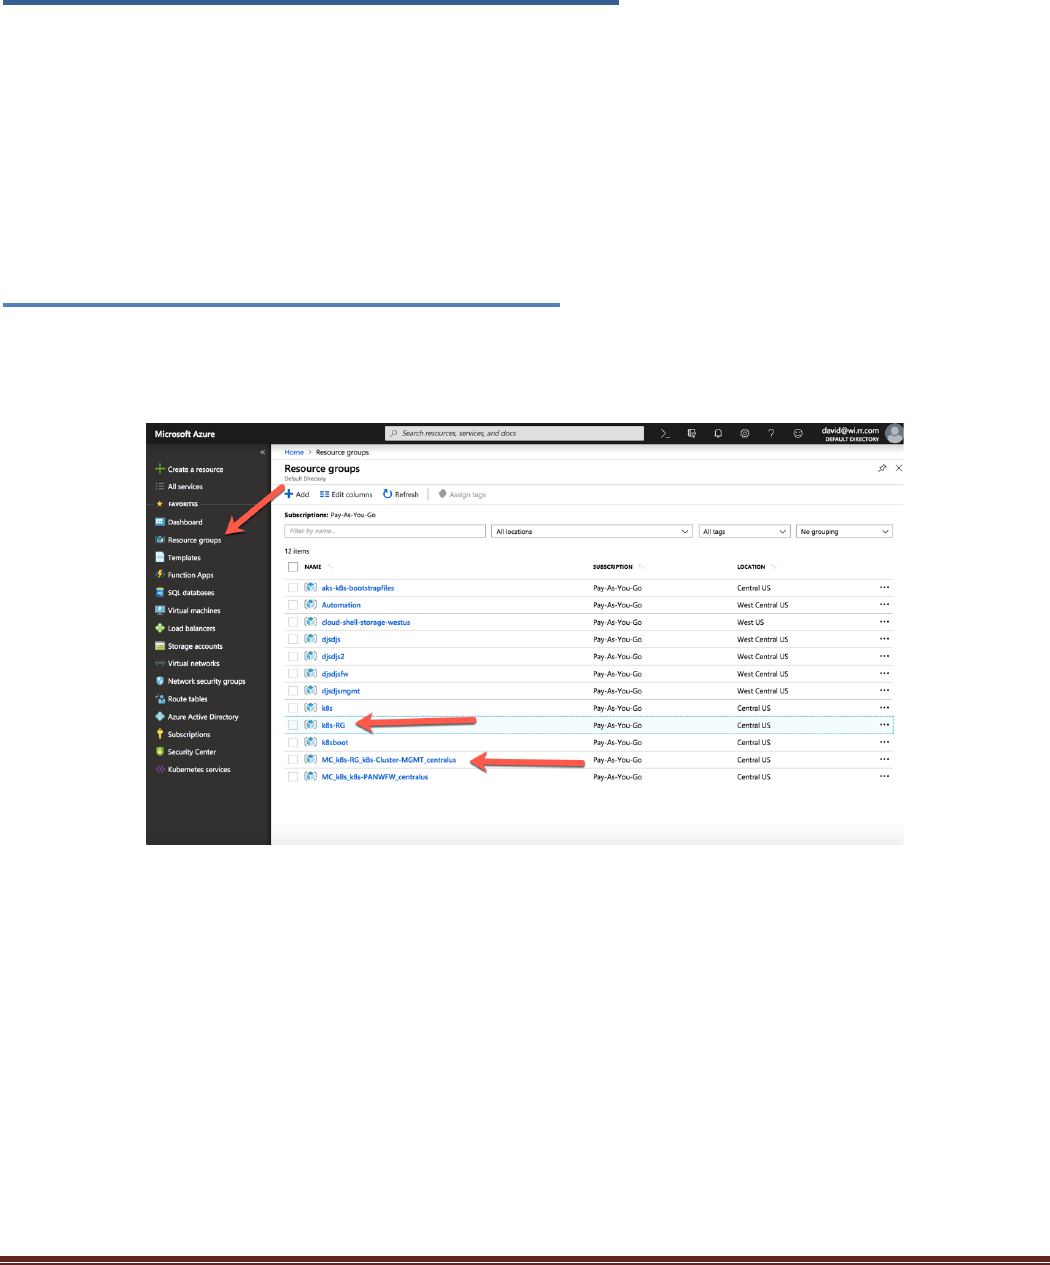
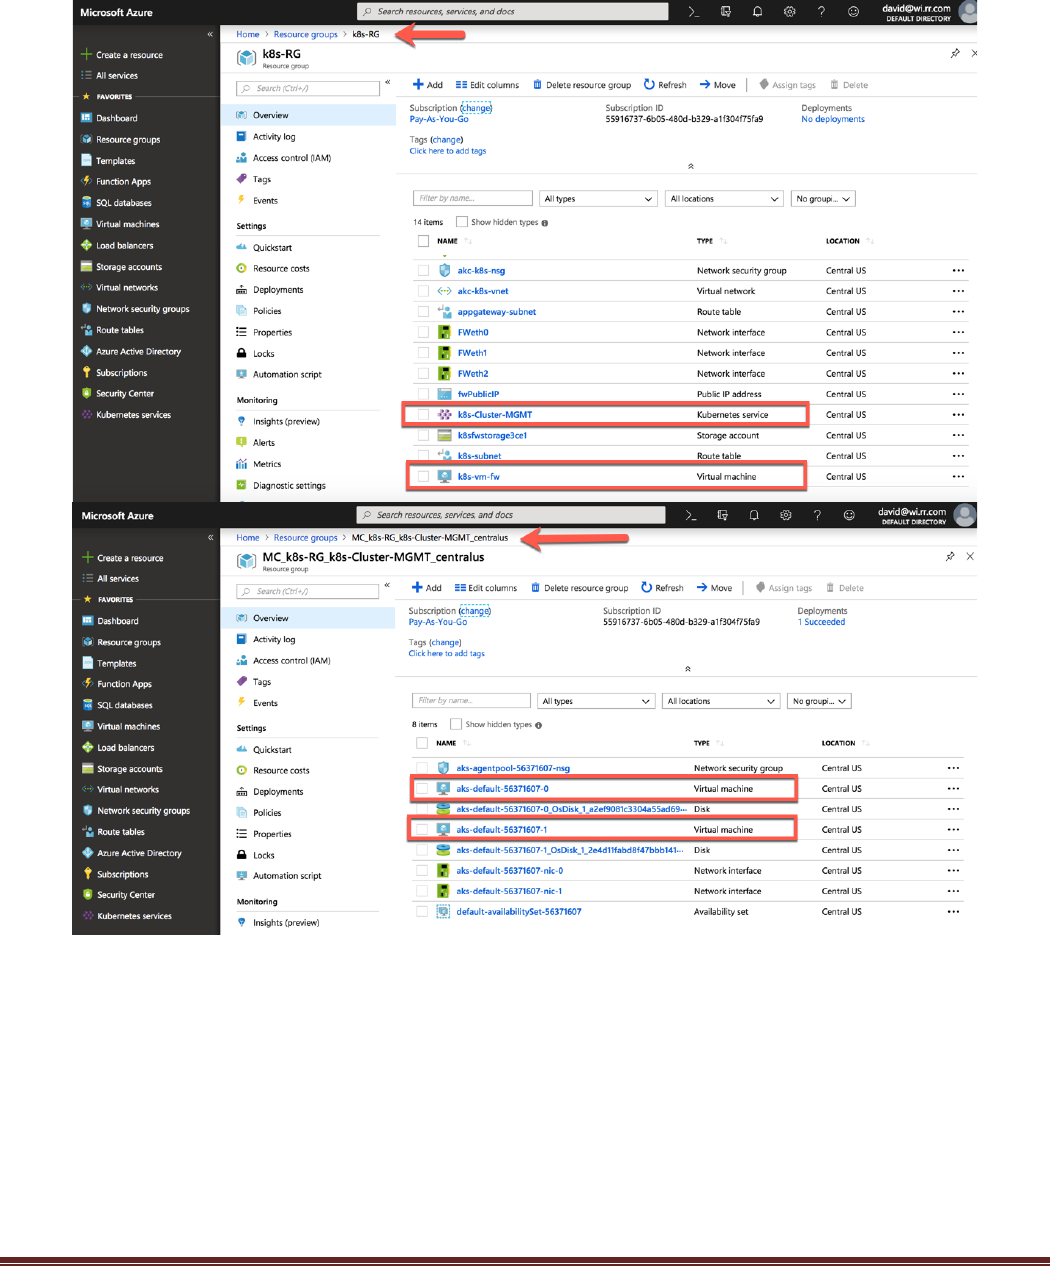
Navigate to Resource Groups. Notice that there are two resource groups that were deployed. The first one,
k8s-RG, has the infrastructure that was defined in the Terraform template. The second has the k8s nodes
and associated resources.
AKS-Kubernetes-Lab Page 22
Open the two resource groups to view what has been deployed:
There should be 1 firewall, 1 k8s service master, and two k8s nodes displayed.
AKS-Kubernetes-Lab Page 23
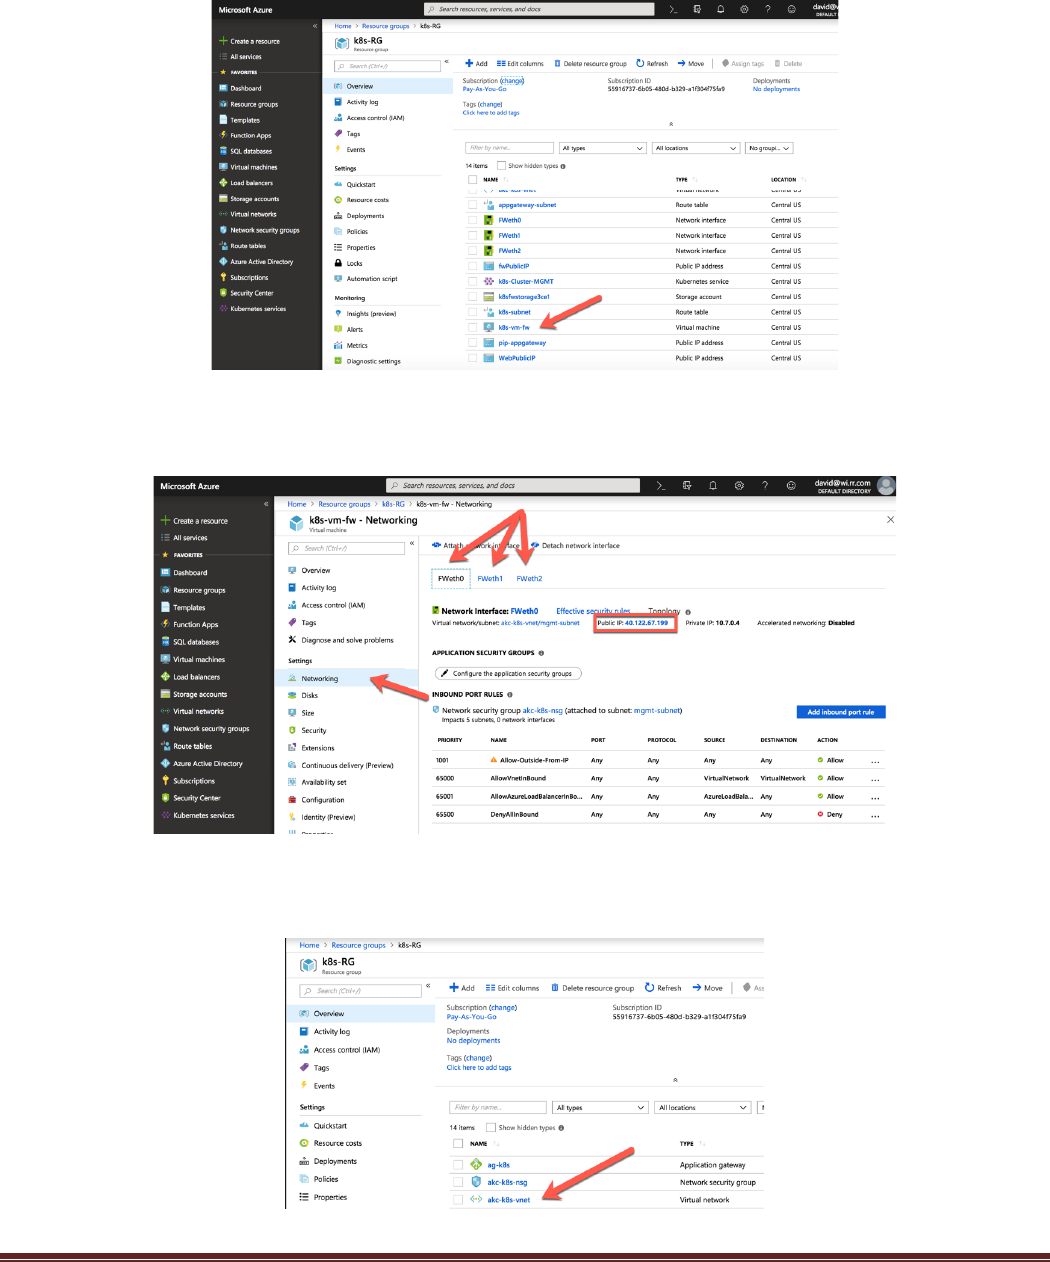
Click on the firewall to open a detailed view of the deployed firewall:
Explore the options on the firewall. One interesting area to review is the Networking section. The IP
address and security information for each interface can be identified:
Navigate to akc-k8s-vnet virtual network in the k8s-RG resource group to see the different networks that
have been created as part of the lab.
AKS-Kubernetes-Lab Page 24
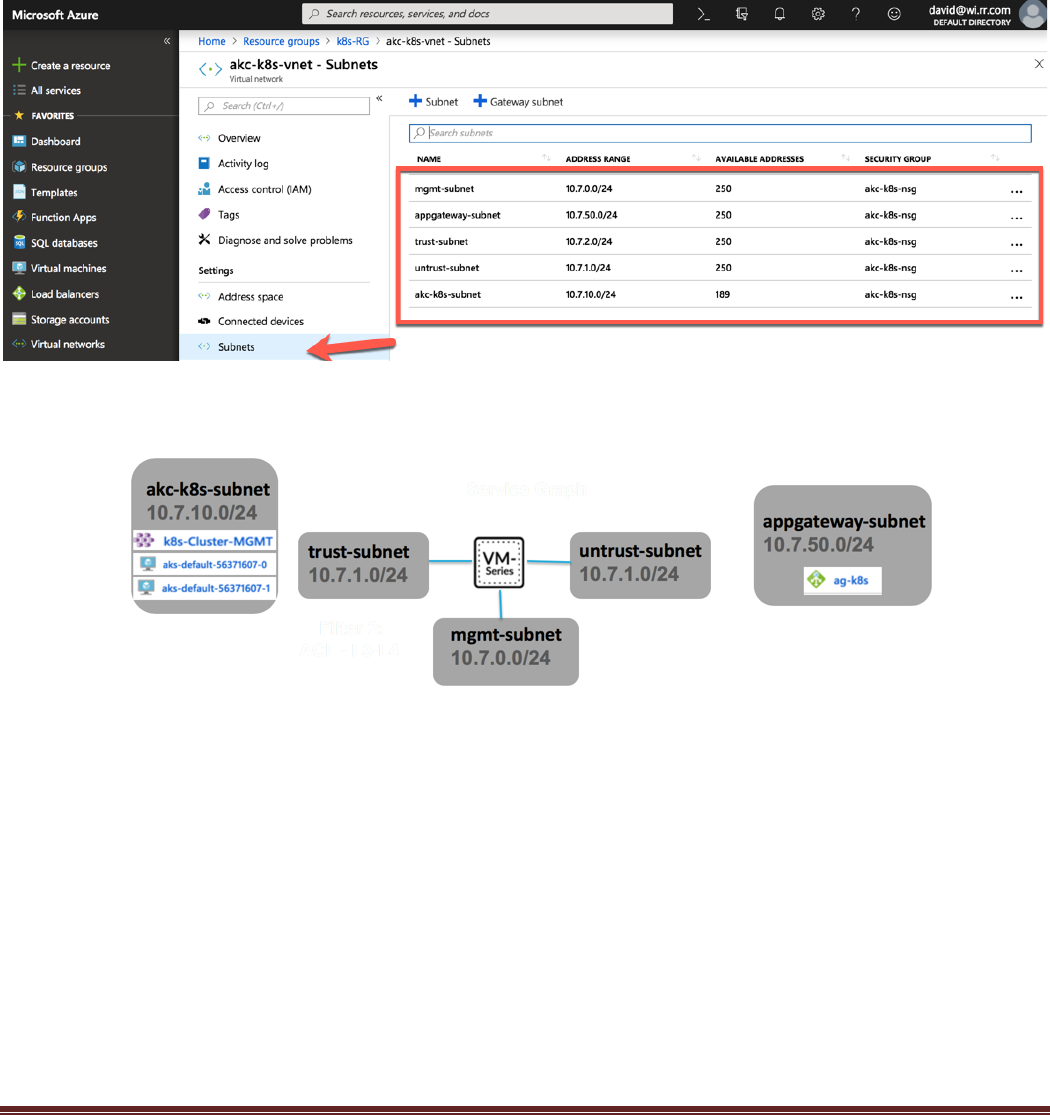
Click Subnets on the left Nav. You should see 5 subnets:
• mgmt-subnet, trust and untrust are used by the firewall
• appgateway-subnet is used by the application gateway
• akc-k8s-subnet is where the k8s nodes and load balancing services are deployed
The following diagram describes the network topology of what has been deployed:
AKS-Kubernetes-Lab Page 25
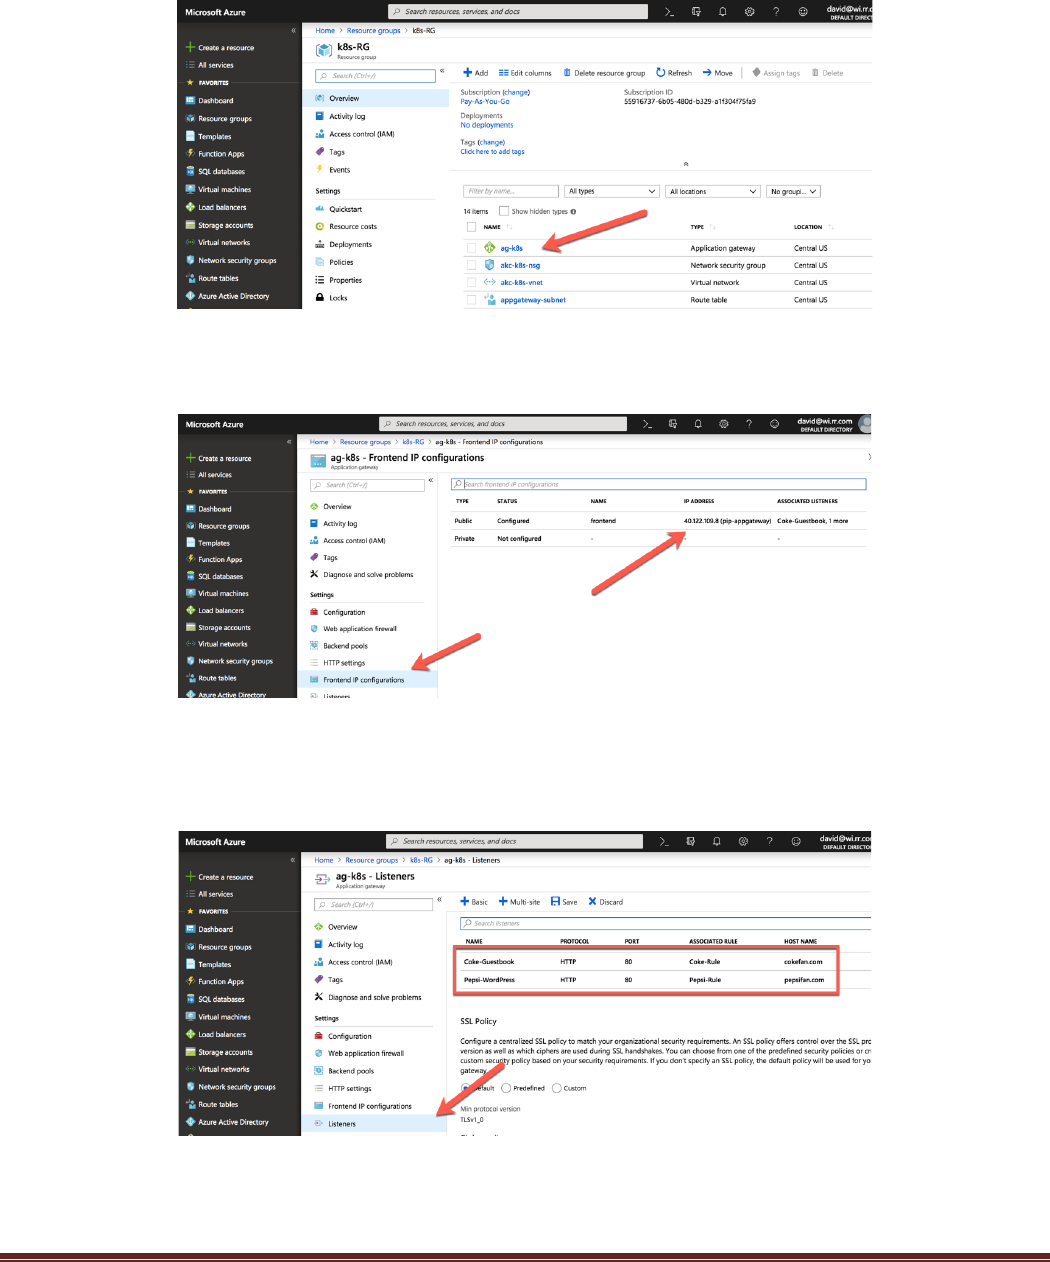
Next Navigate to the k8s-RG resource group and open the application gateway:
Click on the Frontend IP configurations options on the left Nav and notice that there is a single front-end IP
address. The application gateways only support a single frontend address. This address will be needed later
in the lab.
Next, go to Listeners on the left Nav. Notice that there are two listeners. This lab will leverage the
Applications Gateway’s ability to do host header redirection to send traffic to the correct internal load
balancer address based on the http request.
Feel free to navigate through other parts of the Azure Console. This will come in handy in activities later on.
AKS-Kubernetes-Lab Page 26
Task 2 – Review the Kubernetes Cluster
Kubernetes is a portable, extensible, open-source orchestrator that is used to manage containerized
workloads. Kubernetes has a large and rapidly growing ecosystem. The portability of Kubernetes allows for
workloads to be migrated between various clouds (public or private). Further documentation is available at:
https://kubernetes.io/docs/concepts/overview/what-is-kubernetes/
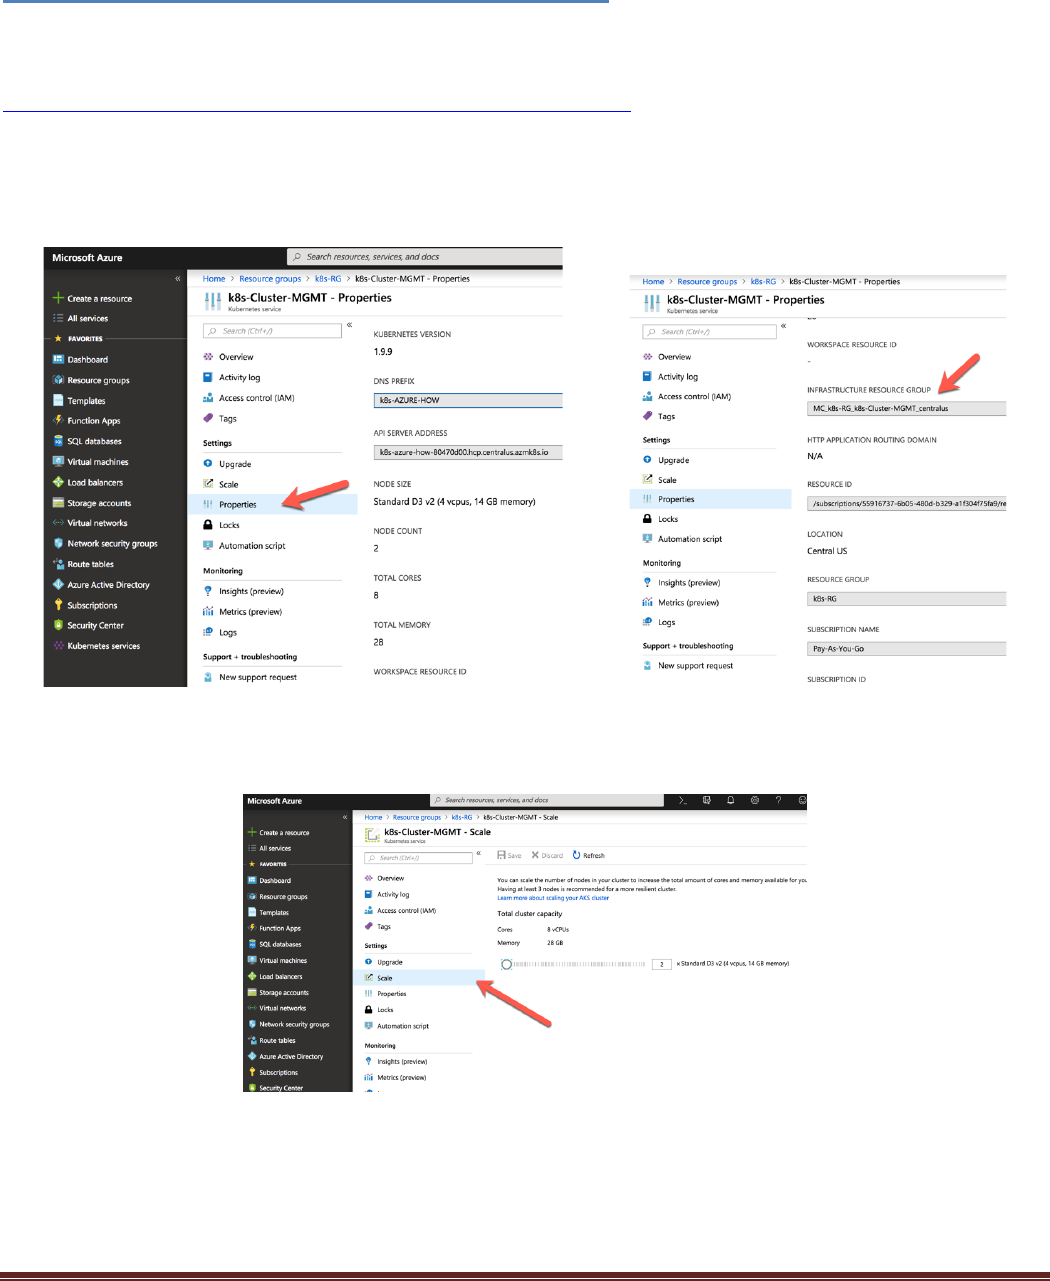
Navigate to the k8s-RG resource group and click on the k8s-Cluster-MGMT resource. Click on Properties
in the k8s-Cluster-MGMT blade. This will show the k8s version, number of nodes deployed, and the
infrastructure resource group that was created to deploy k8s resources. This is where the k8s nodes get
deployed.
Clicking on the Scale link in the left Navigation displays the current number of nodes. From here the
number of nodes deployed in the cluster can be increased or decreased.
AKS-Kubernetes-Lab Page 27
Task 3 – Connect to the Kubernetes Cluster
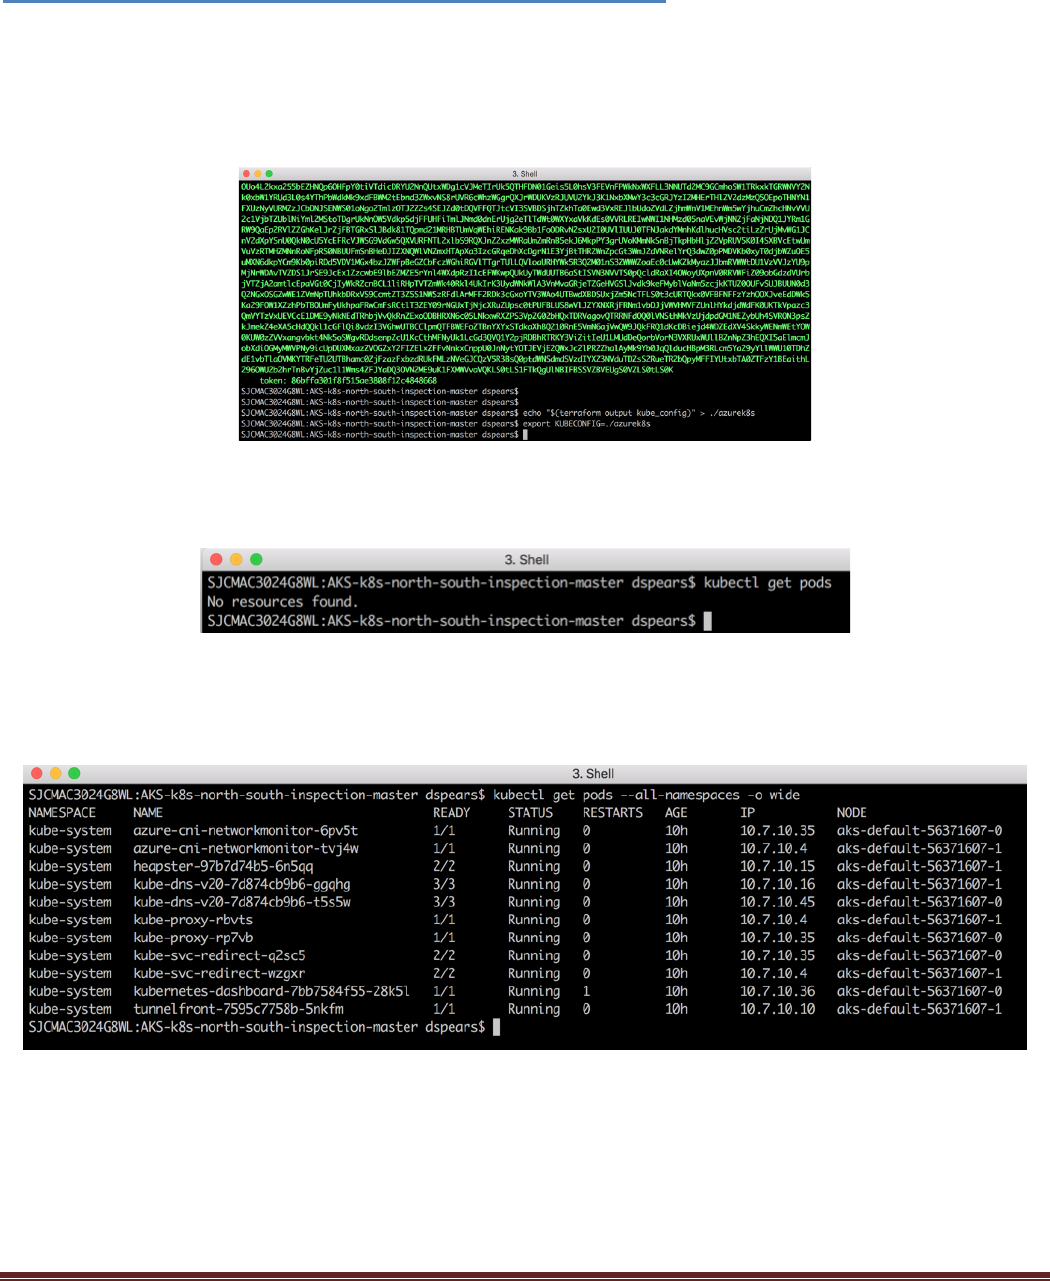
Navigate back to the terminal window used to deploy the Terraform script. In order to run Kubctl
commands, the Kubernetes config from the Terraform state need to be captured and stored in a file
that kubectl can read. Execute the following commands in the same directory that the terraform files are in:
$ echo "$(terraform output kube_config)" > ./azurek8s
$ export KUBECONFIG=./azurek8s
Let’s explore some pods and services that have deployed. Run this command in the cloud shell:
$ kubectl get pods
Since we have not deployed any resources this is normal. Now let us see what system pods have been
deployed. Run this command in the shell:
$ kubectl get pods --all-namespaces -o wide
AKS-Kubernetes-Lab Page 28
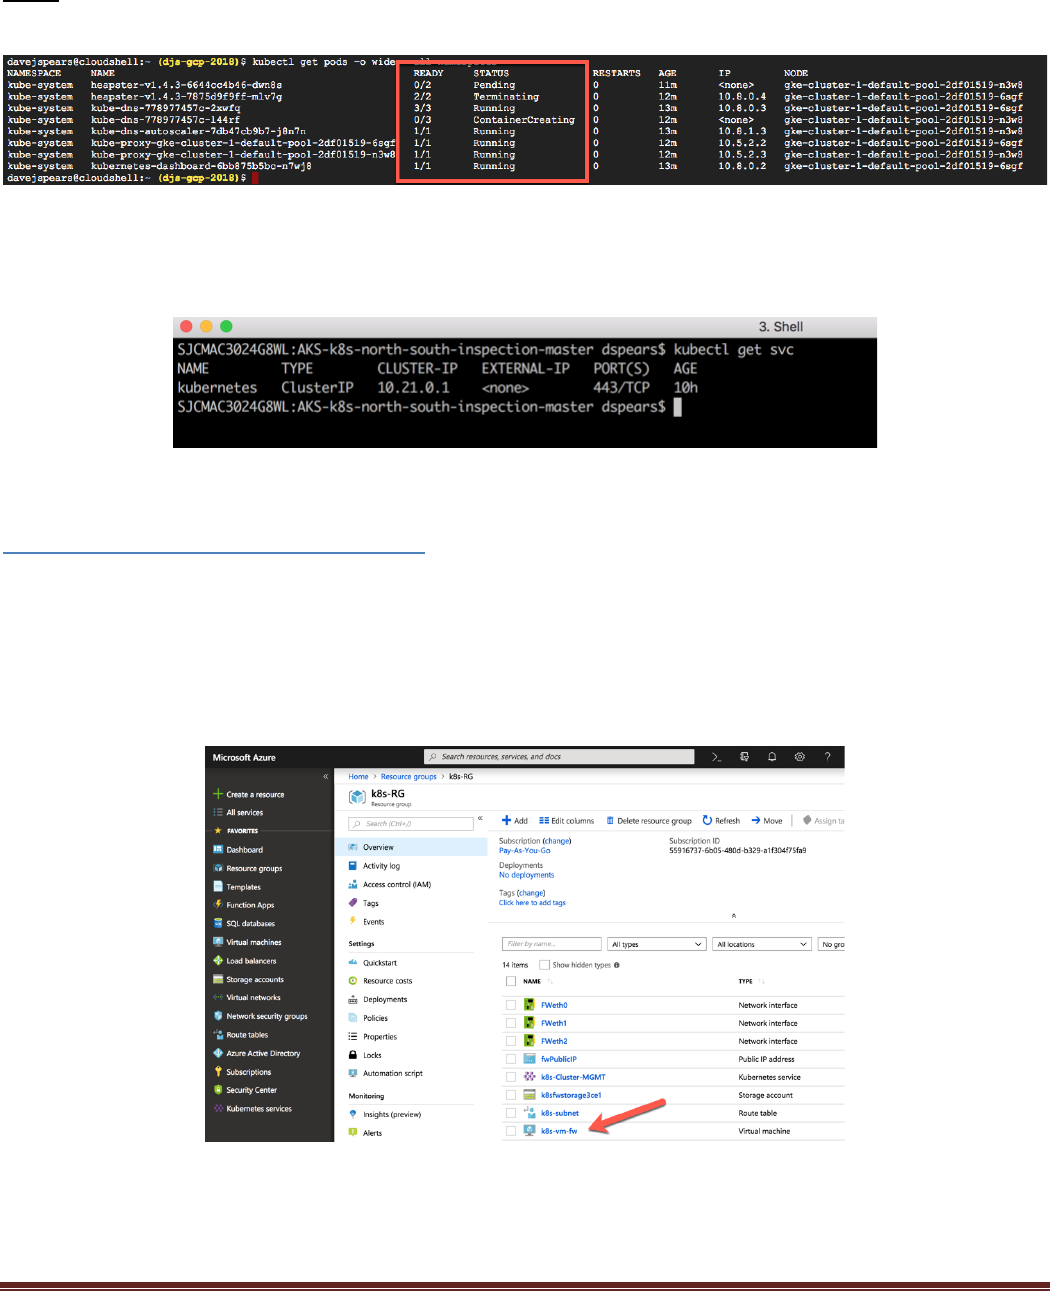
Note: If the output does not show all the pods in a running state, wait and rerun the kubectl get pods --all-
namespaces -o wide command until they do. An example of this is state is in the following screen-print:
Now let us see what services have been deployed as part of the system:
Run the following in the shell:
$ kubectl get svc
As you can see no services besides the system cluster have been deployed.
Task.3.–.Log.into.the.firewall.
The VM-Series firewall deployed as part of the lab has been bootstrapped. Bootstrapping is a feature of the
VM-Series firewall that allows you to load a pre-defined configuration into the firewall during boot-up. This
ensures that the firewall is configured and ready at initial boot-up, thereby removing the need for manual
configuration. The bootstrapping feature also enables automated deployment of the VM-Series.
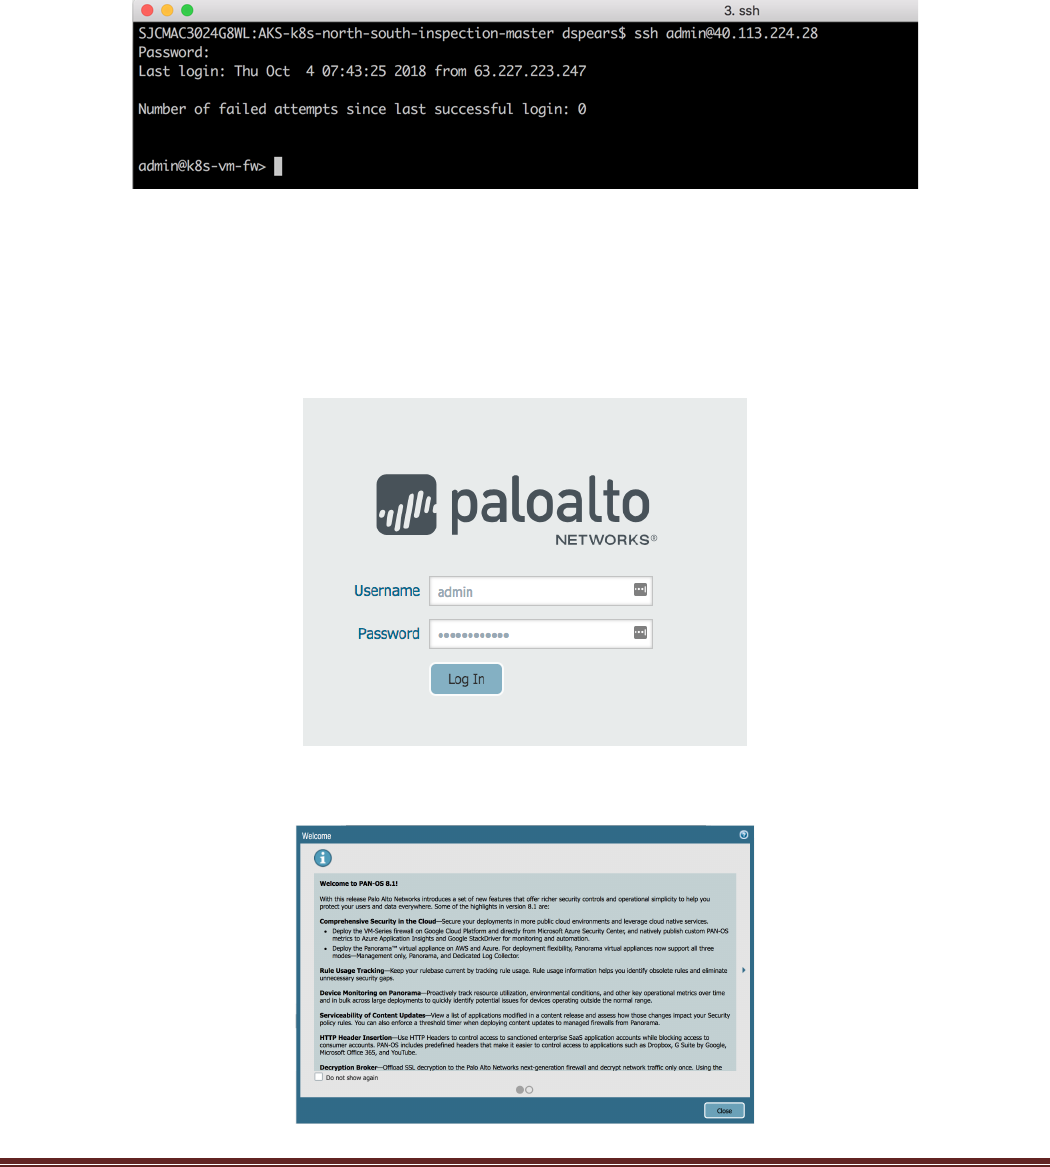
Navigate to the k8s-RG resource group and click on the VM-Series firewall Virtual machine:

AKS-Kubernetes-Lab Page 29
Click on Networking in the left Nav. Copy the Public IP of FWeth0 which is the mgmt interface of the VM-
Series firewall:
Open another browser tab and navigate to the firewall management interface:
If you get a security exception, please ignore for this lab and proceed to the firewall login page. The VM-
Series firewall by default uses a self-signed certificate which causes the exception. Depending on how
quickly you do this, you might see the following message. It is normal and part of the bootup process:
AKS-Kubernetes-Lab Page 30
If you wish to SSH into the FW, the following syntax can be used:
$ ssh admin@<ip address of firewall>
The password is: Pal0Alt0@123 -yes, those are zeros.
When presented with the login screen you should be able to login to the firewall using (Hint: It’s a good
idea to jot this password down or save it to a notepad as you will regularly need it):
username: admin
password: Pal0Alt0@123 -yes, those are zeros.
Once logged in you will see a welcome screen, dismiss the welcome dialog box by clicking Close.

AKS-Kubernetes-Lab Page 31
Click the Policies tab and you will notice a predefined security policy which was imported using the
bootstrapping feature. There are also some predefined NAT policies:
Click on the Dashboard tab, check to verify that the firewall has a serial number. The image defined in the
terraform template is a Pay as you Go bundle2. This was used because a license will be required to view the
logs later in the lab. If you added content files in the bootstrap folder, you should also see that these have
been uploaded.

AKS-Kubernetes-Lab Page 32
Launch.a.two.tiered.WordPress.application.
In this activity, you will:
Optionally: Explore the application’s manifest file
Launch a two-tier WordPress application within your cluster
In this activity we will start using Kubernetes specific terms such as Pods, Services, etc.
Here is a good primer: https://kubernetes.io/docs/concepts/workloads/pods/pod-overview/
Task 1 – WordPress Application Deployment YAML file
WordPress is a piece of software which has become one of the most widely used content management
systems. It is open source, licensed under the GPL, and written in PHP.
WordPress allows users to create and edit websites through a central administrative dashboard, which
includes a text editor for modifying content, menus and various design elements. WordPress provides
plugins which provide additional functionality through WordPress Plugin Directory. Plugins can be installed
through either upload or by one-click installation through the WordPress Plugin Library.
This lab will deploy the following simple WordPress application on the cluster nodes created during the
Terraform template deployment:
As you can see this is a two-tiered application with Pods that are dedicated to front-end WordPress services
and backend MYSQL DB services.
AKS-Kubernetes-Lab Page 33
If interested, the following section dives a bit deeper into the templates being used to create this application.
There are two application manifests for this deployment. The first is for the MYSQL DB and the second is
for the WordPress frontend. Optionally, open the links below it in a browser of your choice to view the files.
https://github.com/PaloAltoNetworks/AKS-k8s-north-south-inspection/blob/master/mysql-deployment.yaml
and
https://github.com/PaloAltoNetworks/AKS-k8s-north-south-inspection/blob/master/wordpress-
deployment.yaml
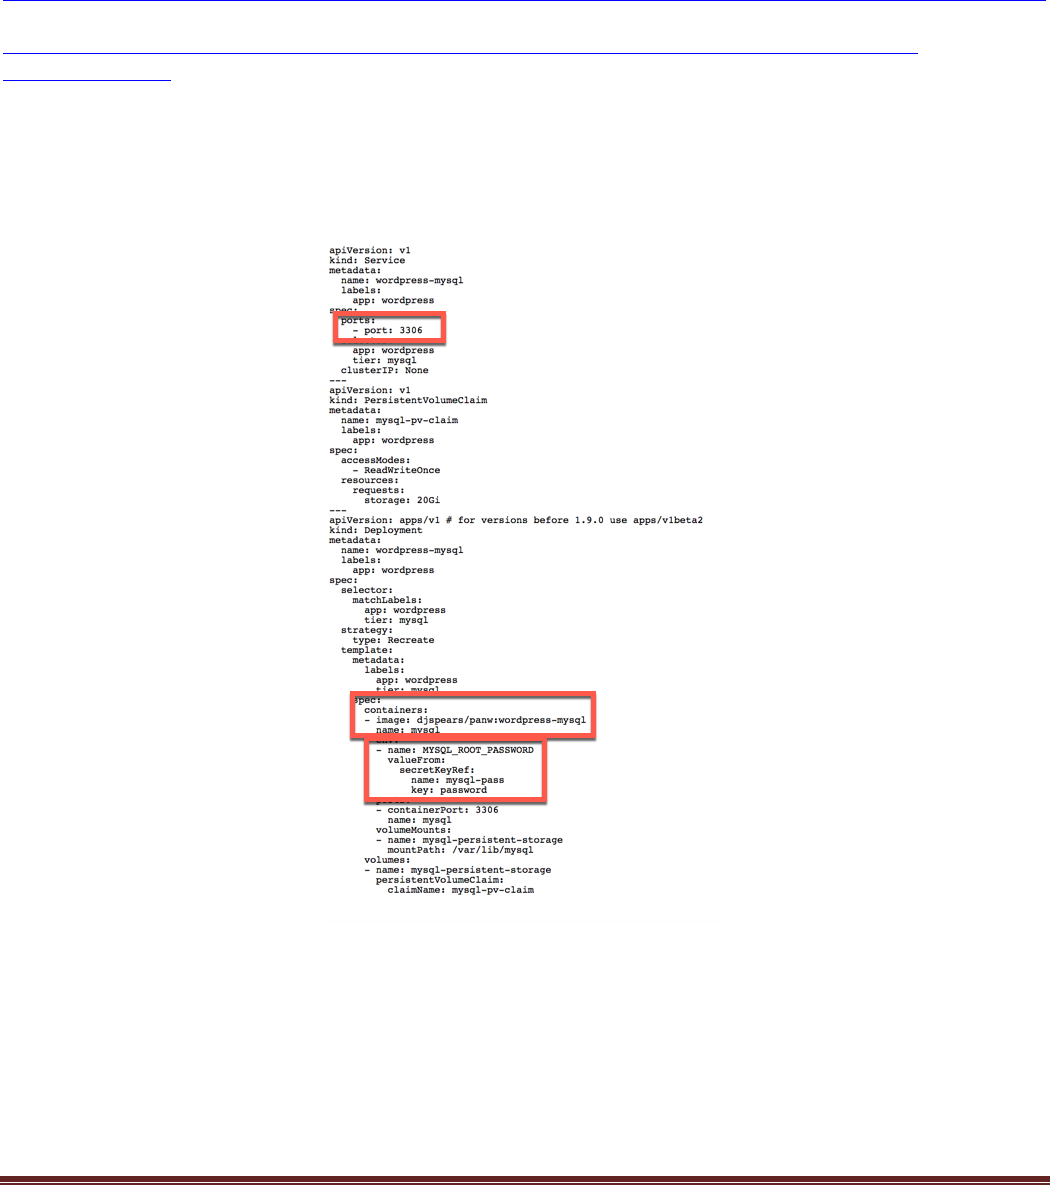
The manifest file declares various aspects of the application. For instance, it tells the orchestrator what type
of resources you intend to deploy. In this case we will first deploy a MYSQL DB server and then a
WordPress Frontend.
MYSQL Service:
Some things to notice are the listening port, 3306, the container image, and the credentials that will be used
during the deployment.
AKS-Kubernetes-Lab Page 34
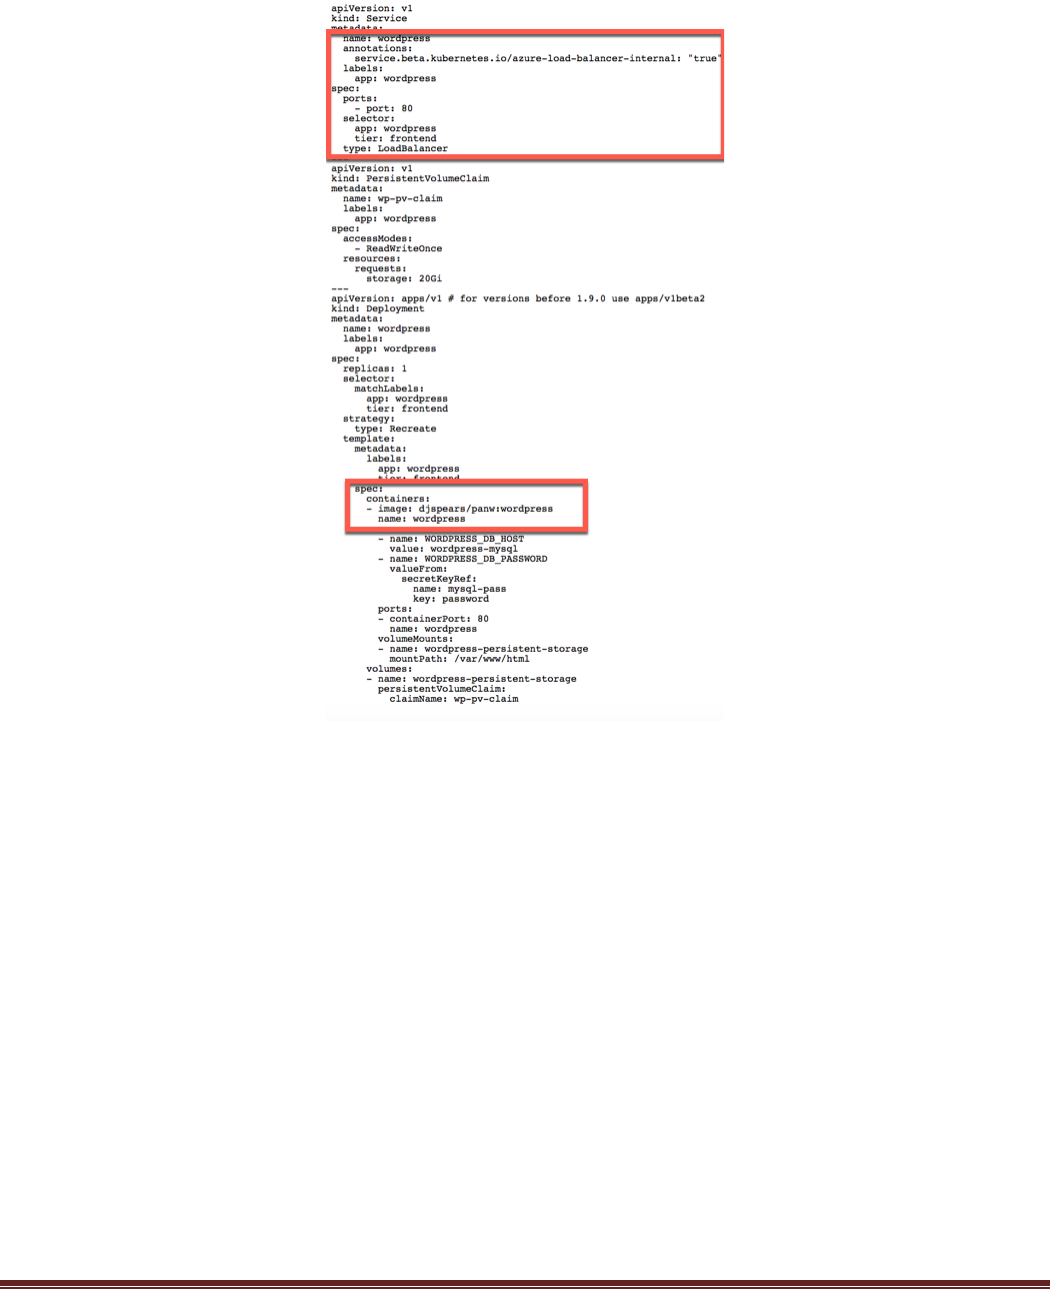
Wordpress-Frontend :
Highlighted in this file are the area that specifies the load balancer service and also the container image.
Even though we have two tiers in our application, only one (the frontend service) is exposed to the outside
world via a load balancer. The annotation listed above tells AKS and Kubernetes that the load balancer
would be of type: Internal.
AKS-Kubernetes-Lab Page 35
Task 2 – Launch the Application
As mentioned previously, the application deployment will be done in two steps. The first step will be to
deploy the MYSQL DB server. One of the parameters that needs to be passed to the DB server is a root
password. To do this securely, the kubectl secrets command will be used. Kubectl secrets are objects
intended to hold sensitive information, such as passwords, OAuth tokens, and ssh keys. Putting this
information in a secret is safer and more flexible than putting it verbatim in a pod definition or in a docker
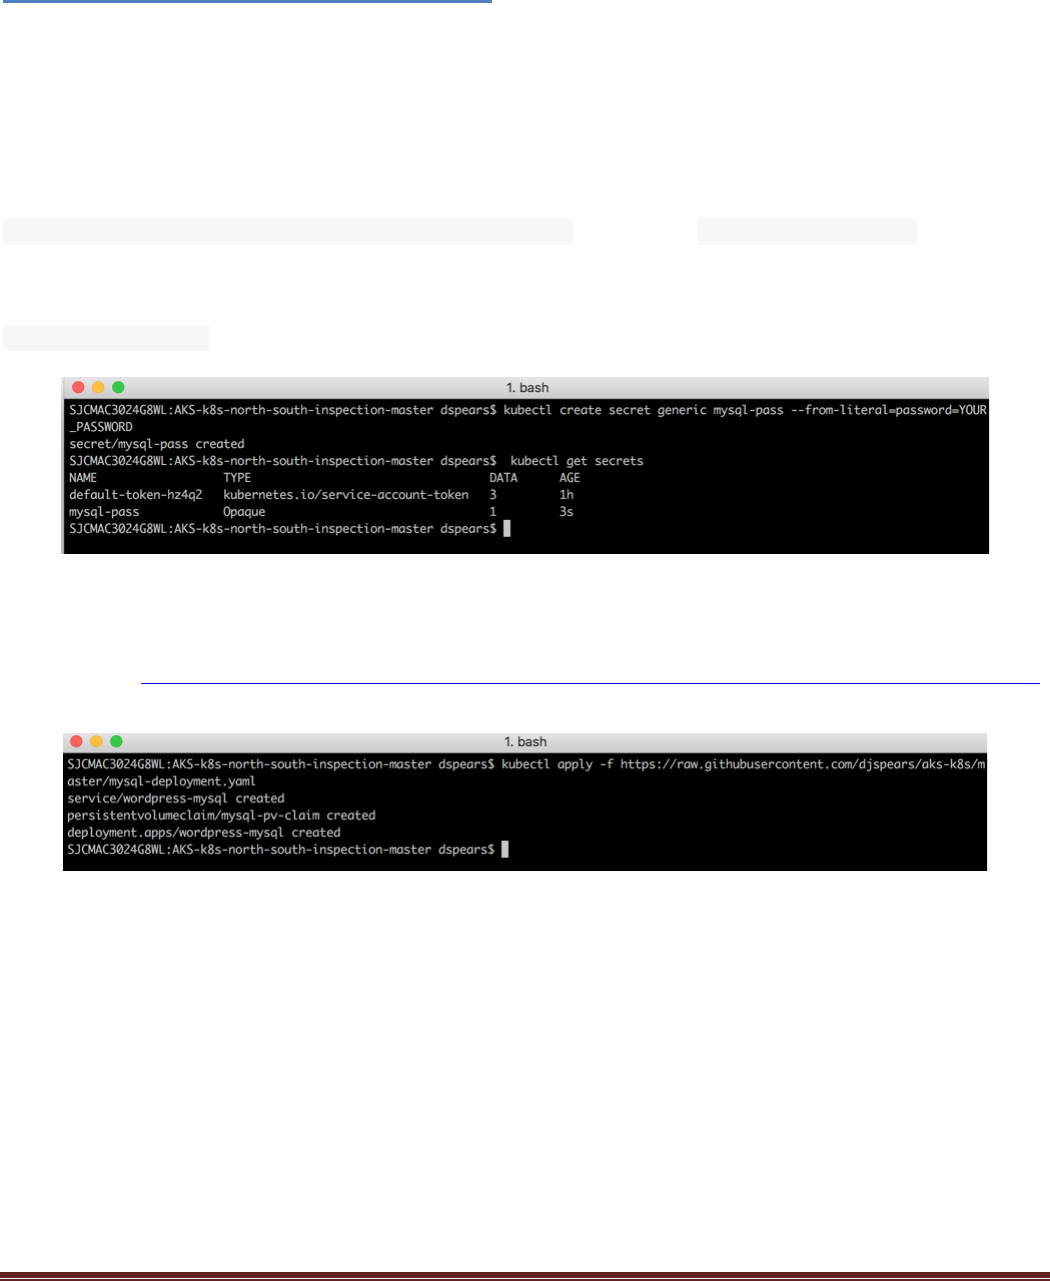
image. To create a secret, execute the following commands in the terminal window:
$ kubectl create secret generic mysql-pass --from-literal=password=YOUR_PASSWORD
And the following command will verify that the secrets have been stored
$ kubectl get secrets
Now the MYSQL pod can be deployed. To do this, execute the following command:
$ kubectl apply -f https://raw.githubusercontent.com/PaloAltoNetworks/AKS-k8s-north-south-inspection/master/mysql-deployment.yaml
You should see the services and deployments being created. Next, validate the new pods in your cluster
have been created. In your terminal execute:
$ kubectl get pods -o wide
AKS-Kubernetes-Lab Page 36
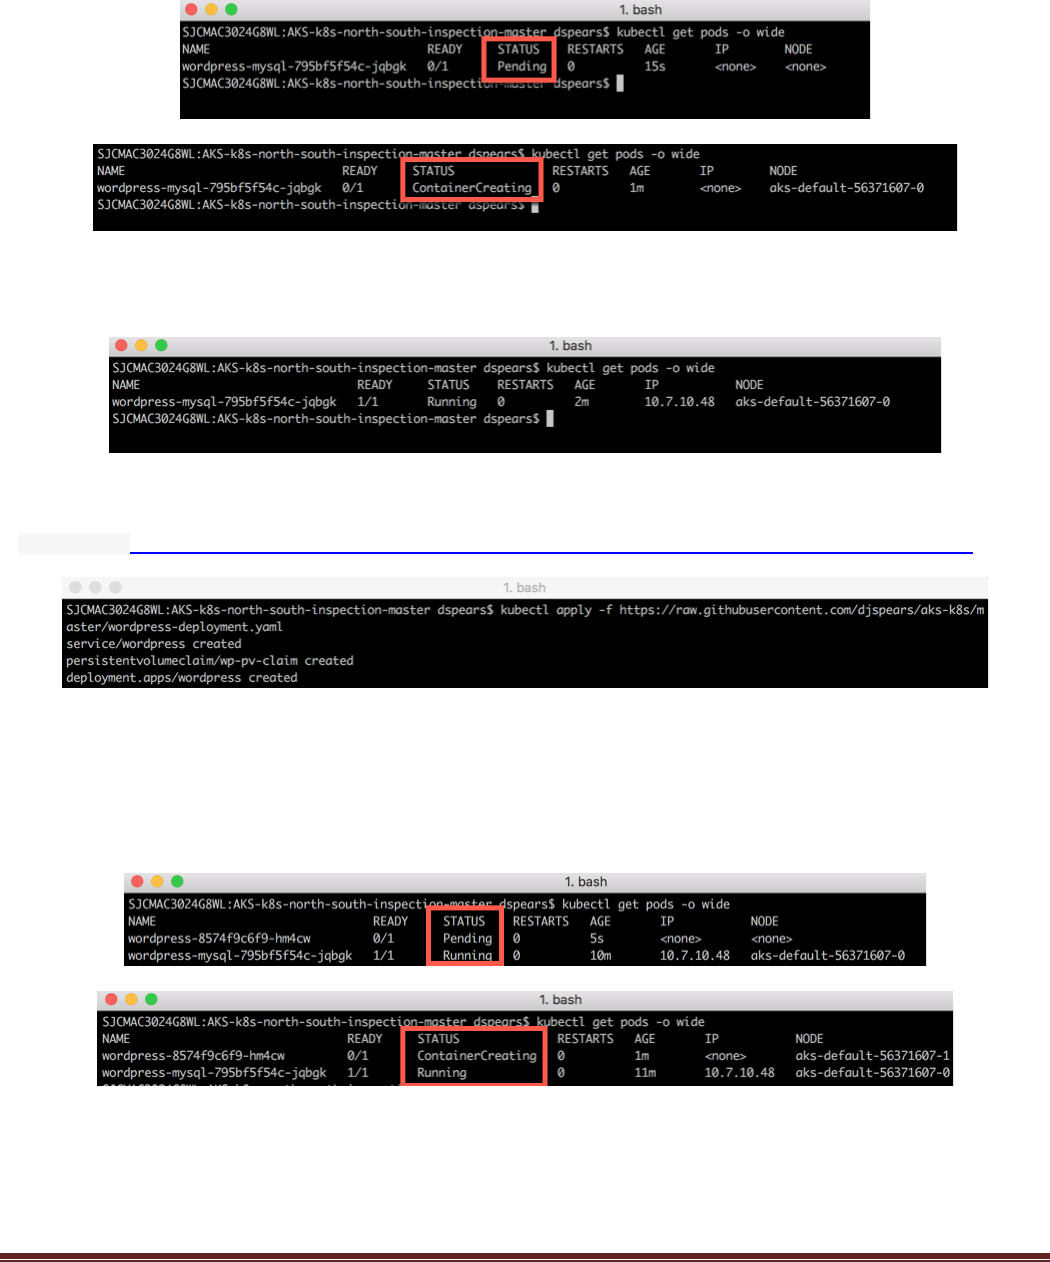
You may see the status as Pending or ContainerCreating. This is usually a normal situation:
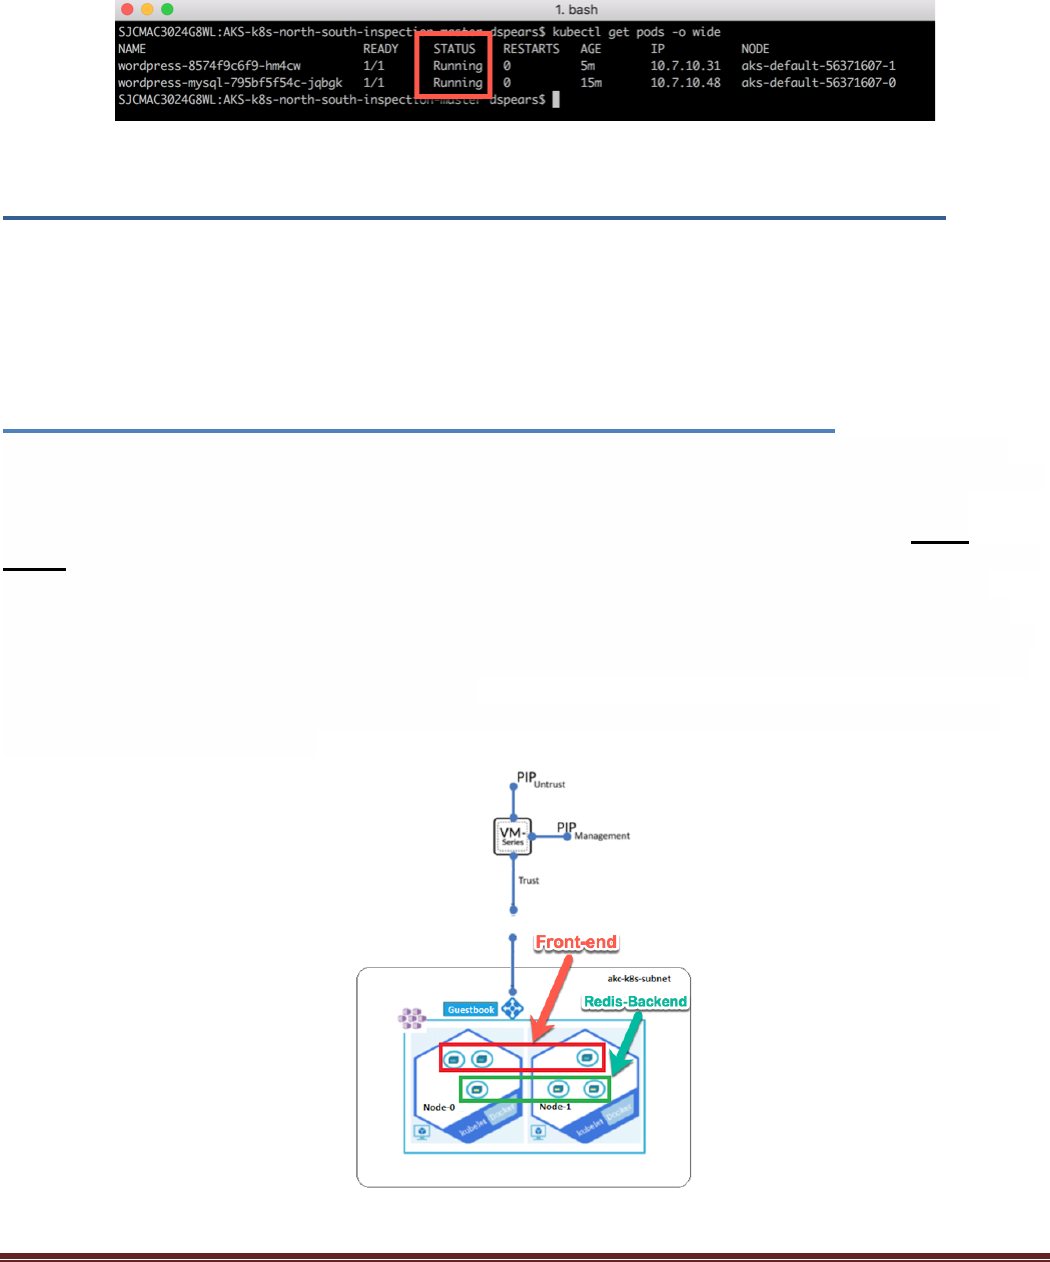
By executing the kubectl get pods -o wide again, you start seeing that the Ready and Status of pods change
as they start up. Verify that the pod gets to a running status.
With the MYSQL DB Running, create the WordPress frontend by executing the following command:
$ kubectl apply -f https://raw.githubusercontent.com/PaloAltoNetworks/AKS-k8s-north-south-inspection/master/wordpress-deployment.yaml
Next, validate the new pods in your cluster have been created. In your terminal execute:
$ kubectl get pods -o wide
Again, you may see the status as Pending or ContainerCreating. This is usually a normal situation:
AKS-Kubernetes-Lab Page 37
Again, verify that the pod gets to a running status.
Launch.a.two.tiered.Guestbook.application.
In this activity, you will:
Optionally: Explore the application’s manifest file
Launch a two-tier WordPress application within your cluster
Task 1 – Guestbook Application Deployment YAML file
Guestbooks have been used by businesses for many years as a way to connect with customers and obtain
contact information for future events and promotions. Today, businesses such as popular retail stores, 5-star
hotels and even small family-owned B & B’s are turning to iPad guestbook apps to help them gather
information and enhance the customer’s “in-biz” experience. Acquiring email addresses and a social
media following is a crucial part of any marketing plan. With much of the population using computers on a
daily basis, an email marketing plan is of the utmost importance. Using a guest book app in your store
makes collecting email addresses a snap and offers enticing features with which the traditional paper and
pen guestbook just can’t compete. The guestbook application we will build and secure today could be used
for Hotel website visits, shopping sites or any other business that wants to keep track of their customer and
provide them with promotions or advertisements.
This lab will deploy the following simple Guestbook application on the cluster nodes created during the
Terraform template deployment:
AKS-Kubernetes-Lab Page 38
As you can see this is a two-tiered application with Pods that are dedicated to front-end web services and
backend DB services.
If interested, the following section dives a bit deeper into the templates being used to create this application.
This is a link to the application manifest. Optionally, click the link below and open it in a browser of your
choice.
https://github.com/PaloAltoNetworks/AKS-k8s-north-south-inspection/blob/master/guestbook-all-in-one.yaml
The manifest file in this case we will deploy a 2-tier simple redis application with a fronted and backend
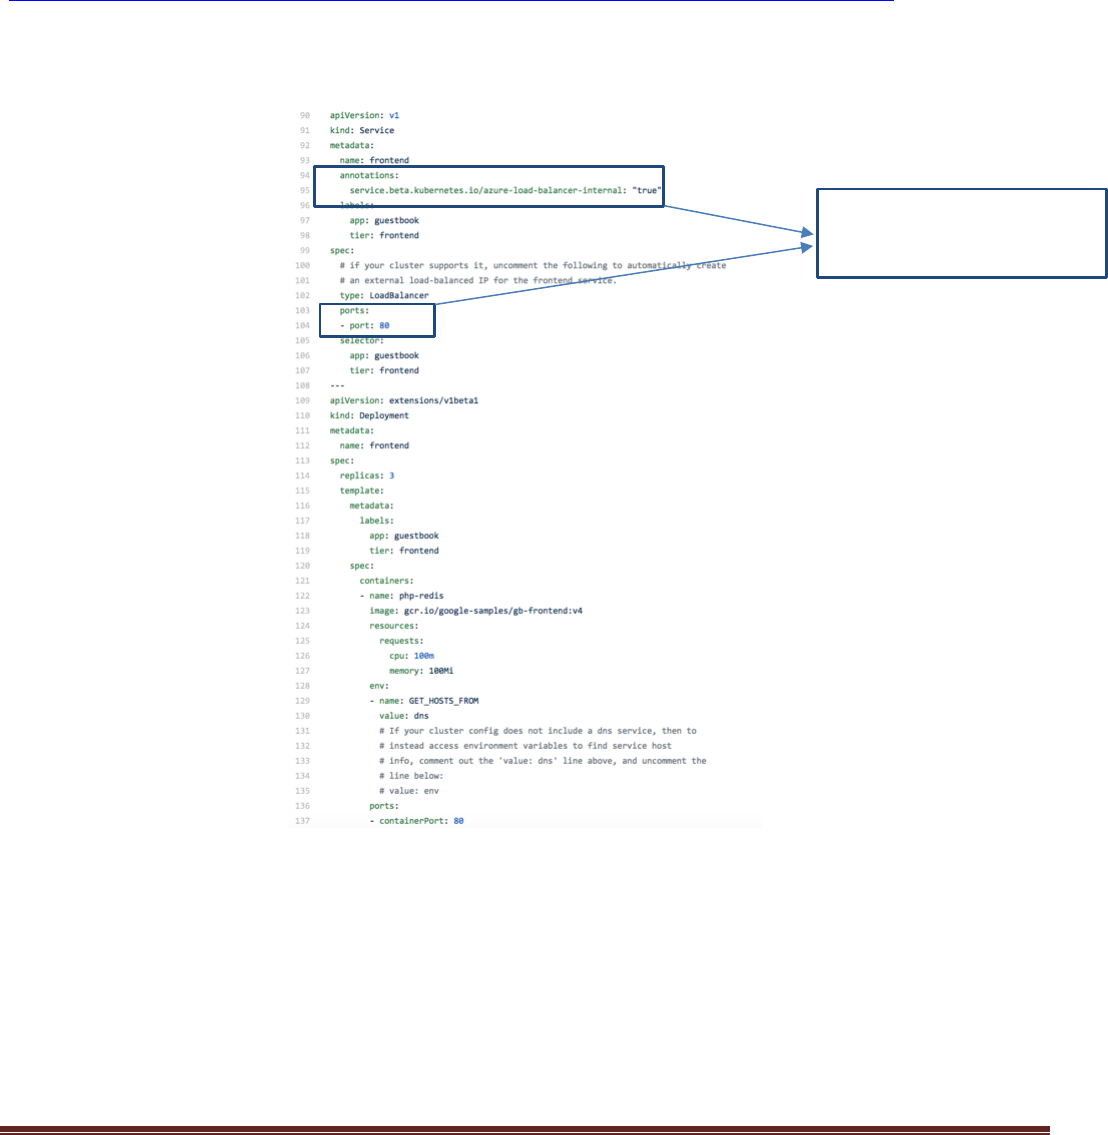
tier. The backend tier will consist of a redis-master and redis-slave for db redundancy. Front-end Service:
This tells the orchestrator that the
service will be exposed via an
internal load balancer

AKS-Kubernetes-Lab Page 39
Redis-backend-master :
Redis-backend-slave:
AKS-Kubernetes-Lab Page 40
Even though there are two tiers in the application, only one (the frontend service) is exposed to the outside
world via a load balancer. The annotation listed above tells GCP and Kubernetes that the load balancer
would be of type: Internal.
Task 2 – Launch the Application
Back in terminal shell type the following command to deploy the application pods:
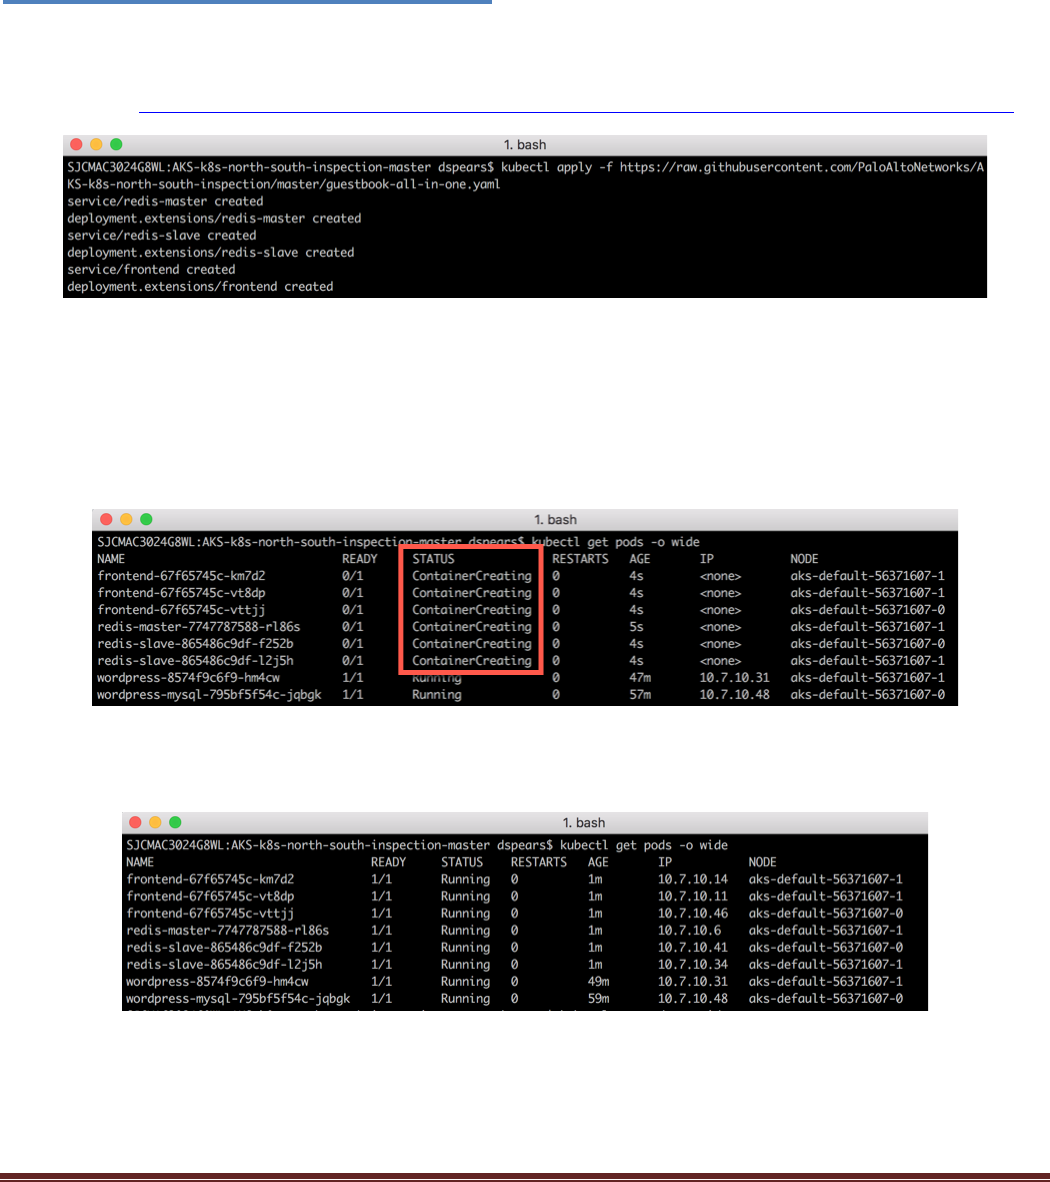
$ kubectl apply -f https://raw.githubusercontent.com/PaloAltoNetworks/AKS-k8s-north-south-inspection/master/guestbook-all-in-one.yaml
You should see the services and deployments being created. Next, validate the new pods in your cluster
have been created. In your terminal execute:
$ kubectl get pods -o wide
You may see the status as Pending or ContainerCreating. This is usually a normal situation:
By executing the kubectl get pods -o wide again, you start seeing that the Ready and Status of pods change
as they start up. Verify that the pods gets to a running status.
AKS-Kubernetes-Lab Page 41
Explore.the.newly.deployed.applications.
In this activity, you will:
Explore aspects of the application deployments
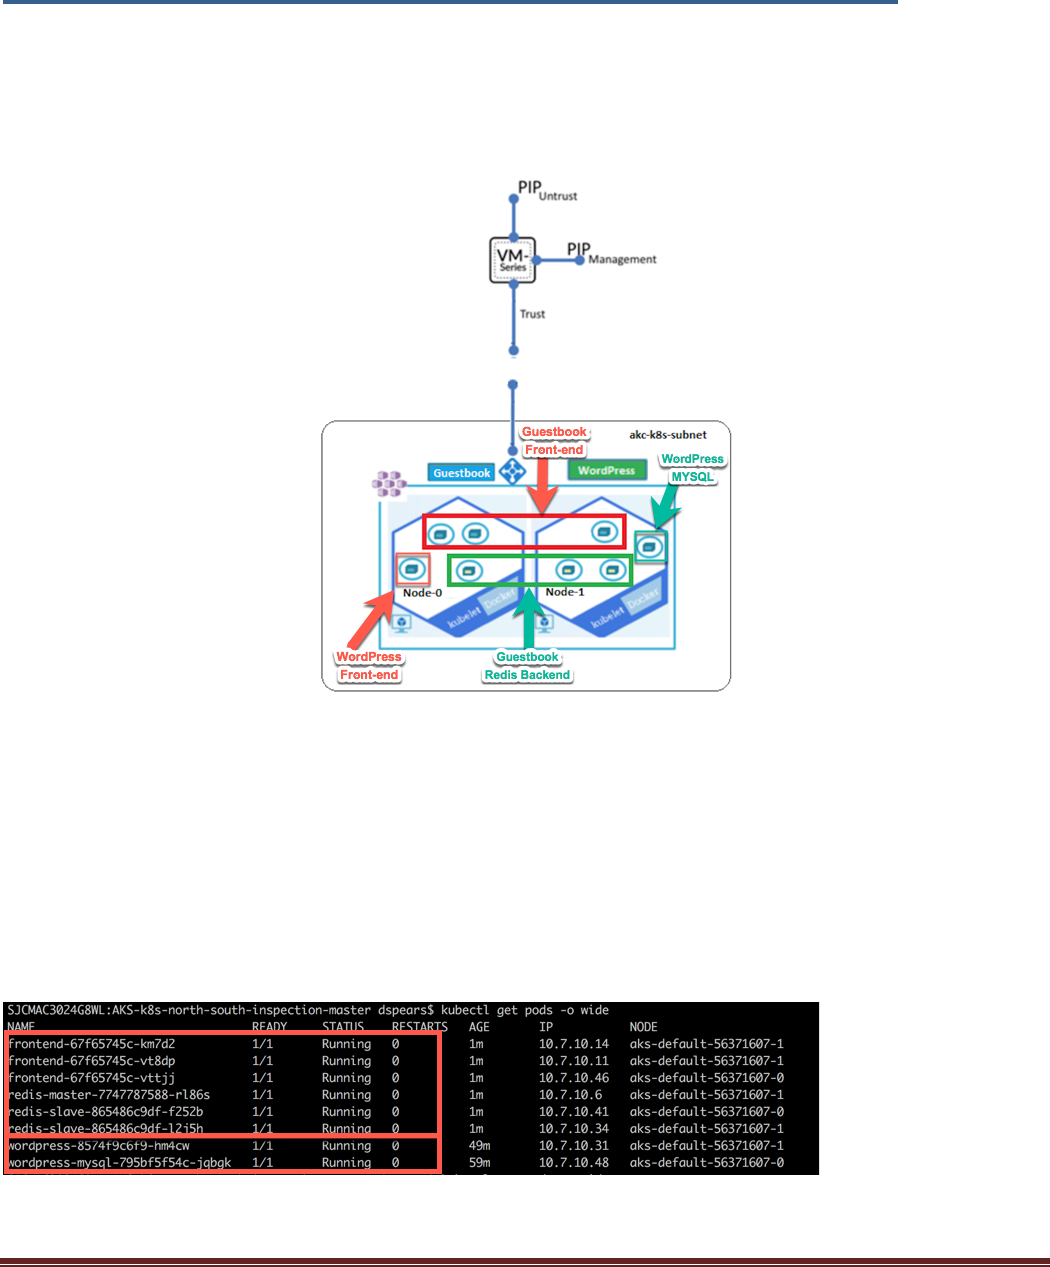
The following diagram shows what has been instantiated:
Let’s validate this by listing the new pods in your cluster. In your terminal window execute:
$ kubectl get pods -o wide
You should see the pods for both the WordPress and Guestbook Application:

AKS-Kubernetes-Lab Page 42
Next let’s look at the load balancing service for the front-end pod. Execute the following command in the
shell:
$ kubectl get svc
You can see there is a load balancer External IP for both the frontend Guestbook application and an External
IP address for the WordPress server. Note that the IP address is in the 10.7.10.0/24 subnet. This is one of
the subnets that was deployed in the Azure VNET during the Terraform execution.
These load balancer IP addresses can be seen via the Azure Dashboard as well. Navigate to the Resource
Groups and click on the “MC_k8s-RG_k8s-Cluster-MGMT_centralus” Resource group. This group was
created automatically for the k8s node resources.
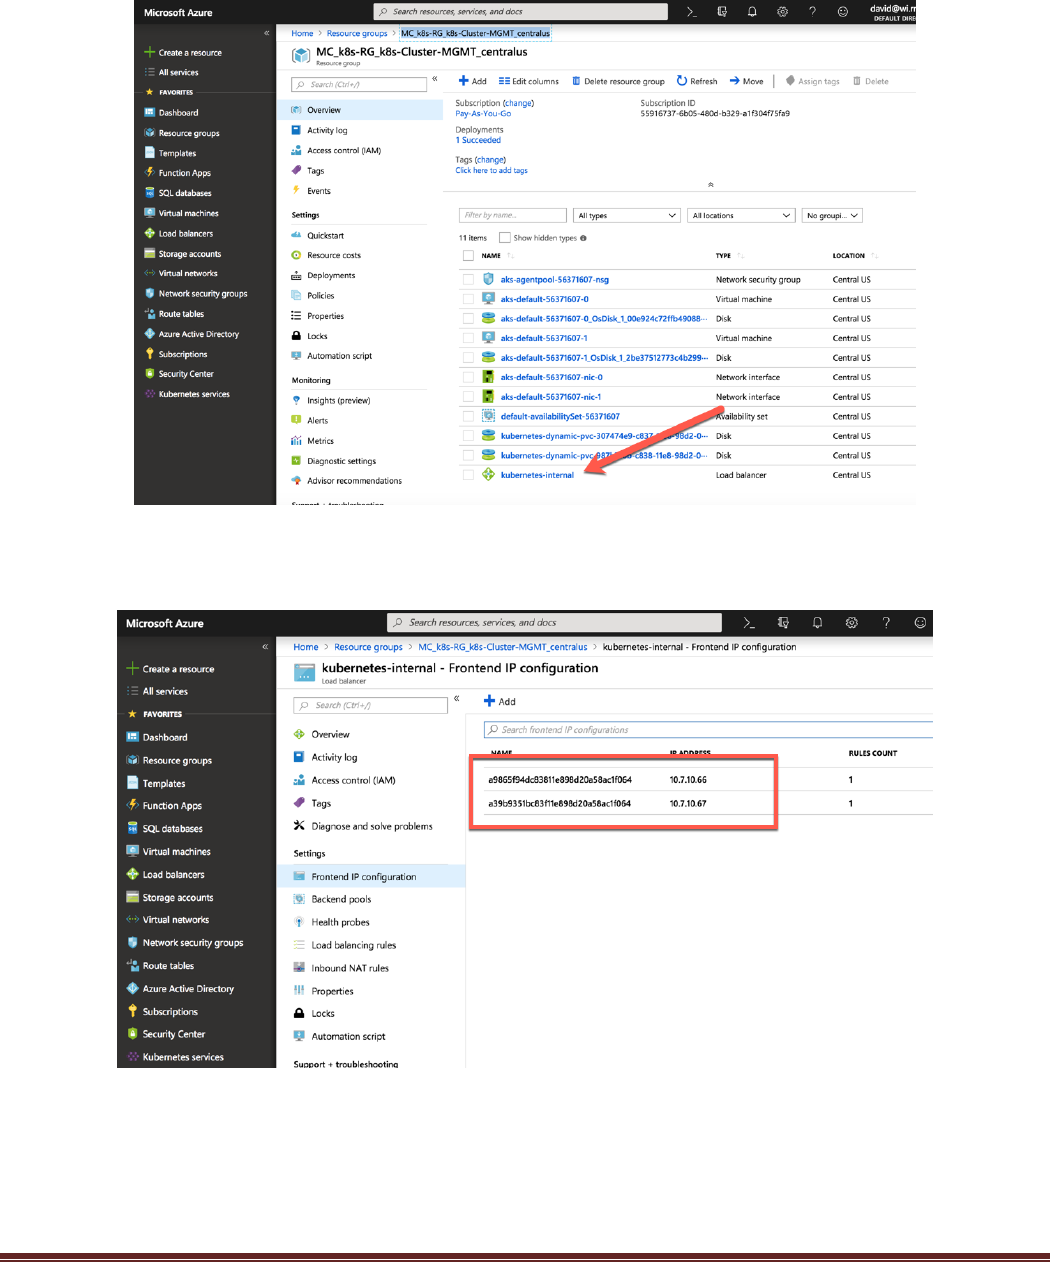
AKS-Kubernetes-Lab Page 43
Click on the Kubernetes-internal Load balancer:
Click on the Frontend IP configuration on the left Nav. The application load balancer IP ADDRESS are
displayed:
AKS-Kubernetes-Lab Page 44
Securing.Inbound.Traffic.
In this activity, you will:
Secure traffic that is inbound to your frontend services
Validate that traffic is visible in the Firewall logs
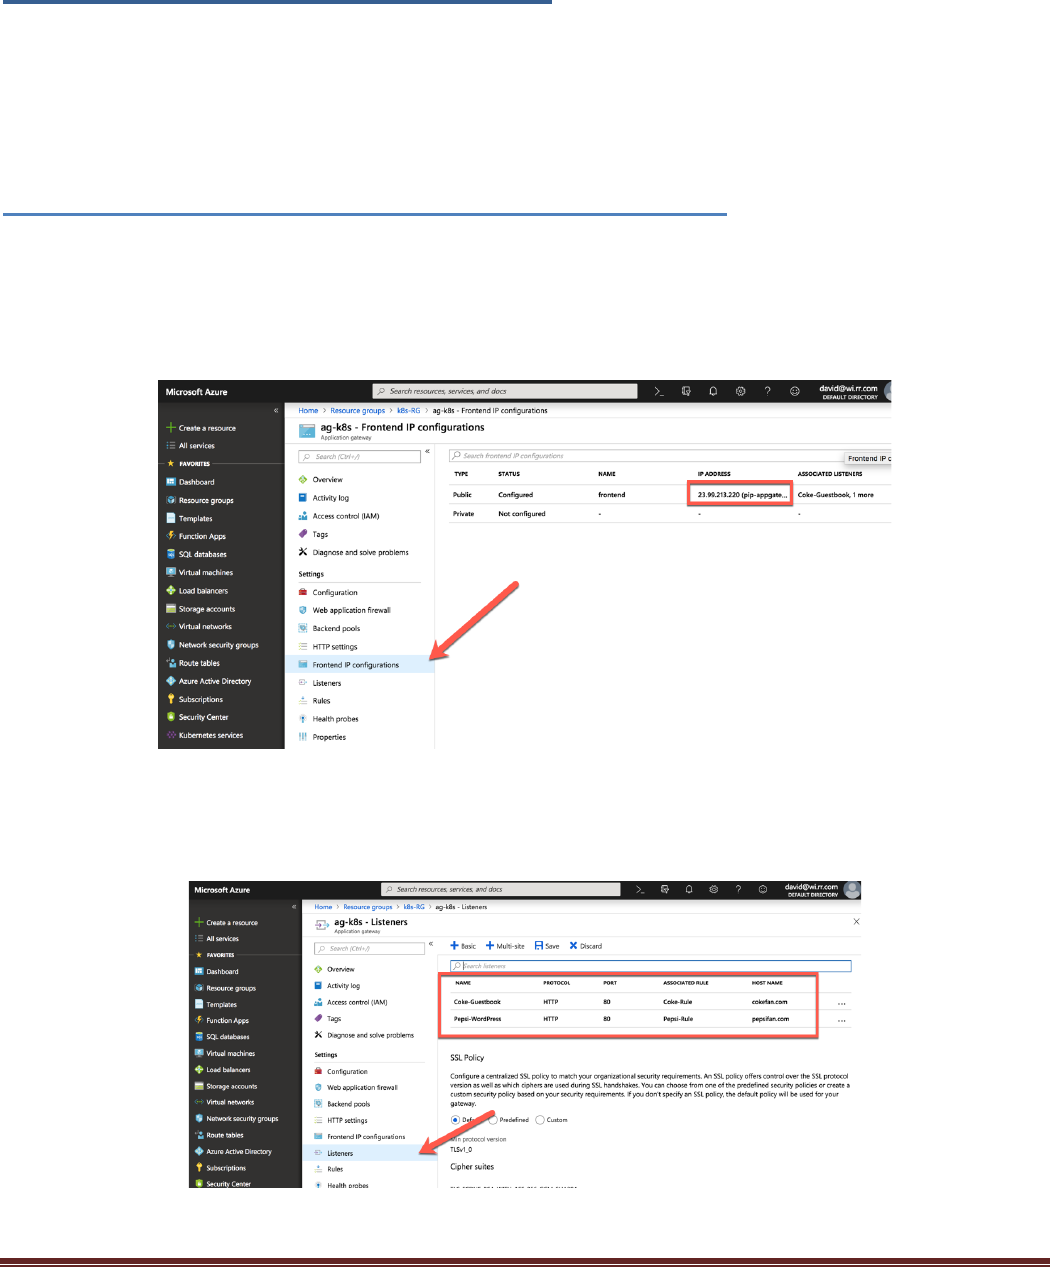
Task 1 – Azure Application Gateway IP Address
This Terraform deployment created an Azure Application gateway in front of the VM-Series firewall. As
previous discussed, the Application Gateway is configured to do host header redirection. In order for this to
function the frontend IP addresses must be identified and a few hosts entries need to be made on the testing
machine. Open the Application Gateway Frontend IP configurations in the Resource groups > k8s-RG >
ag-k8s blade:
Copy this address as it will be needed to create a DNS entry in the local host file. Go to Application
Gateway Listeners on the left Nav to see the DNS entries that the Application Gateway is configured to
serve.

AKS-Kubernetes-Lab Page 45
Open the local hosts file and create a pepsifan.com and cokefan.com entry. Each entry will have the IP
address of the Application Gateway Frontend IP address:
Task 2 – Update the Firewall’s Address Objects
Open the VM-Series firewall. This design is not using any NATs for the inbound traffic flow. The
bootstrapped configuration should have the correct addressing but this task will validate that.
Click the Objects Tab and navigate to “Addresses” on the left. The Addresses used in the policy are defined
here:
Open the terminal window and check that the Address objects are correct. Execute the following command
to verify the nodes:
$ kubectl get nodes -o wide

AKS-Kubernetes-Lab Page 46
Next enter the “kubectl get svc” command to verify the lb-svc-ip’s:
If a change is needed, make the changes and click the commit link on the top right
AKS-Kubernetes-Lab Page 47
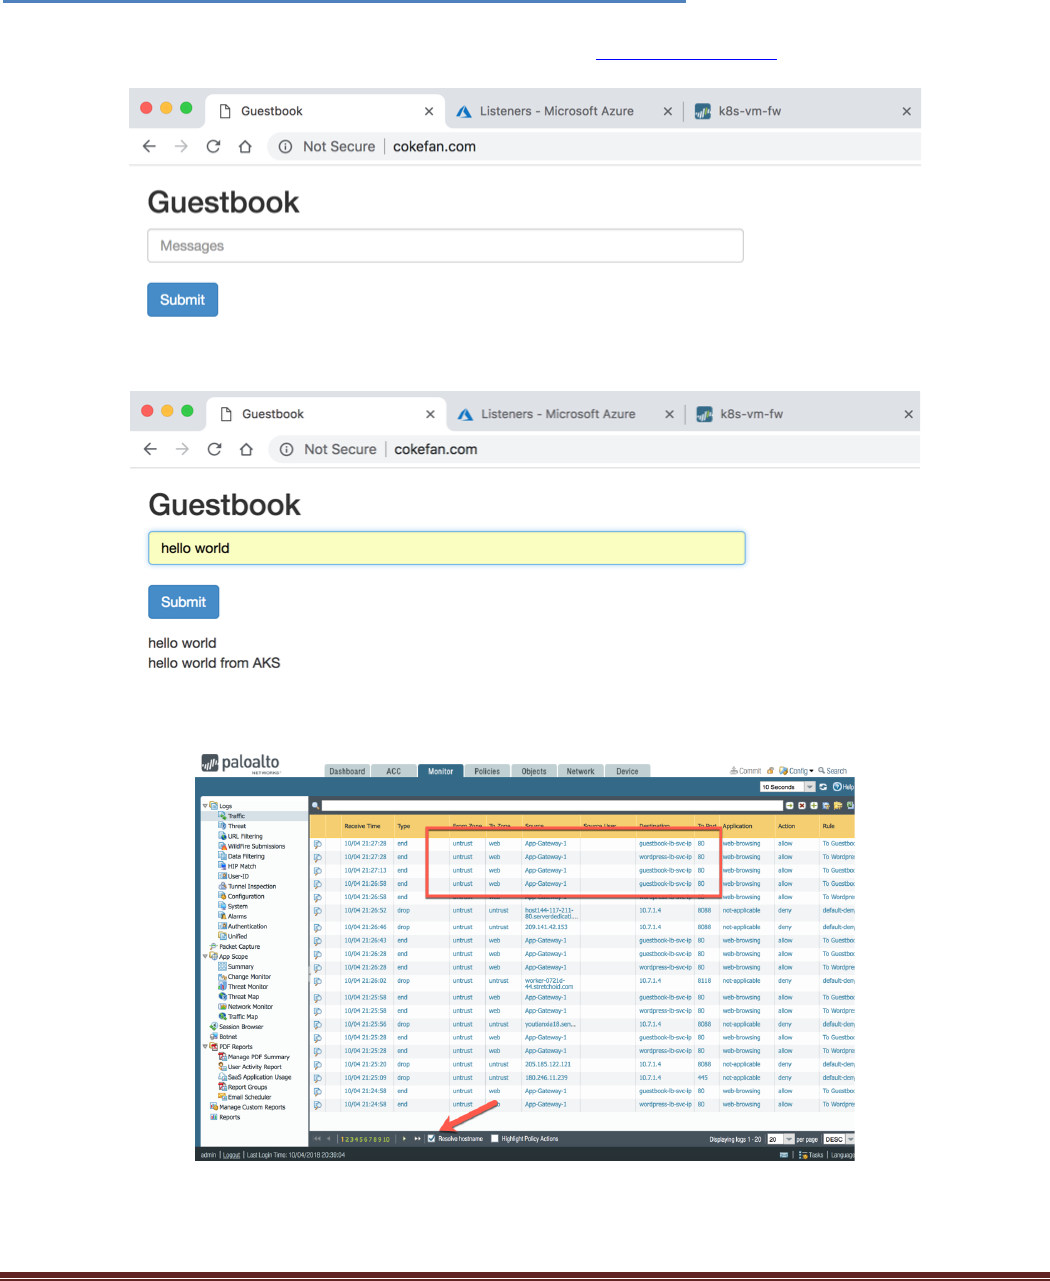
Task 3 – Connect to the Guestbook Frontend
The VM-Series is now protecting your Kubernetes workload. In order to connect to the guestbook’s
frontend service, you will open a browser and navigate to the http://cokefan.com website:
Enter something in the Messages box and click submit. The messages should be echoed below:
Open the VM-Series firewall monitor tab and validate that traffic is flowing through the firewall:
ProTip: Tick the Resolve hostname to make the logs more readable.
AKS-Kubernetes-Lab Page 48
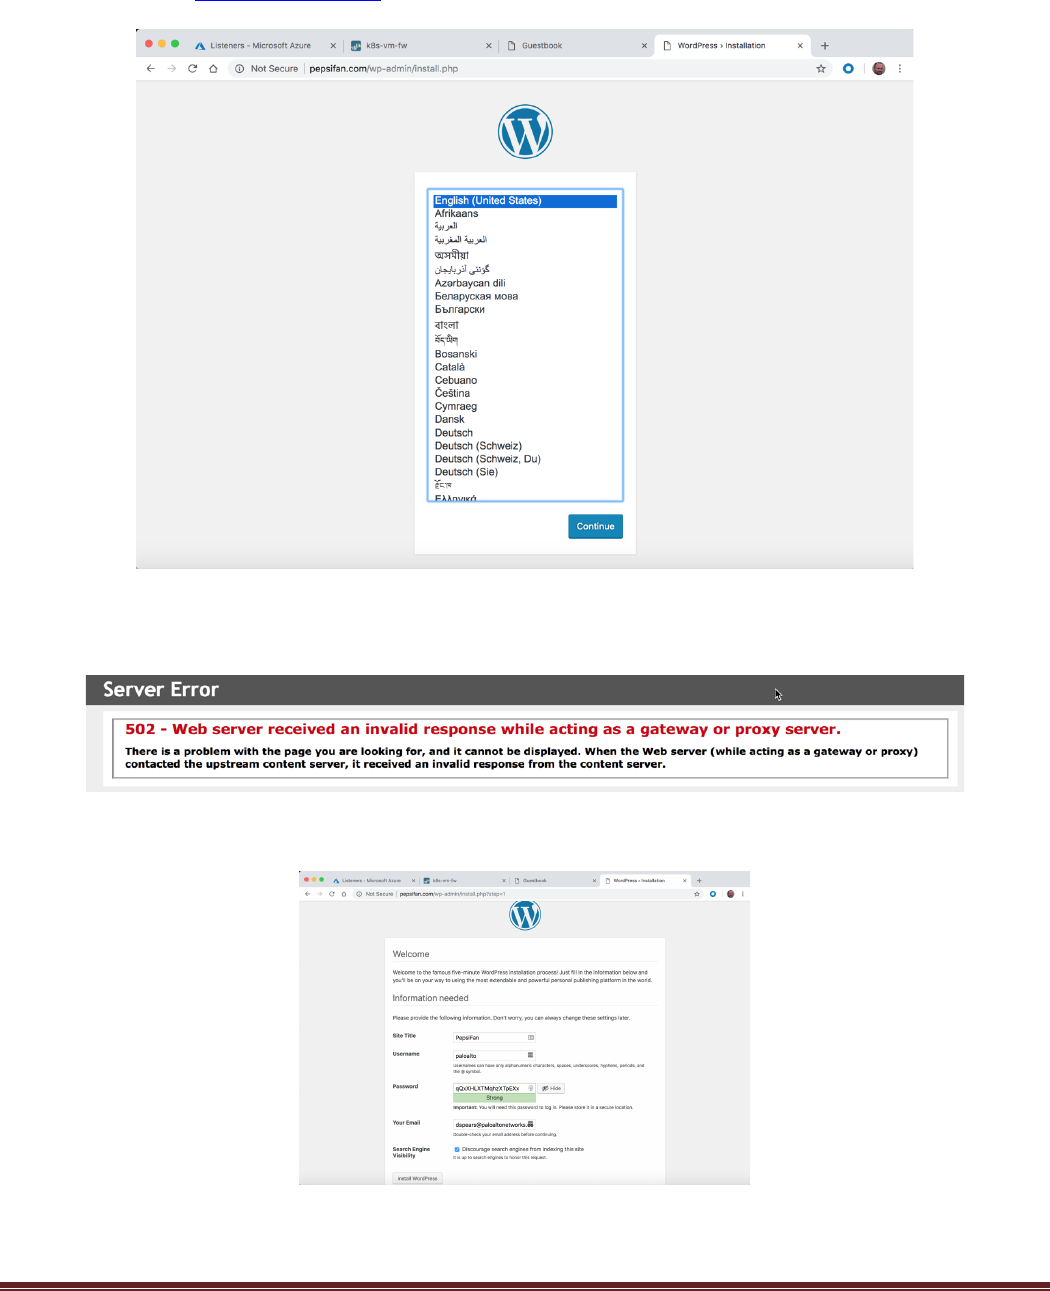
Now check that the http://pepsifan.com site works. Open a new tab and open the pepsifan.com site:
You may see the following error message. This is usually because the WordPress website takes a little time
to get up and running. Click refresh a few times to get to the next step:
You should see the WordPress install page. Click Continue if you wish to go through the installation
process:
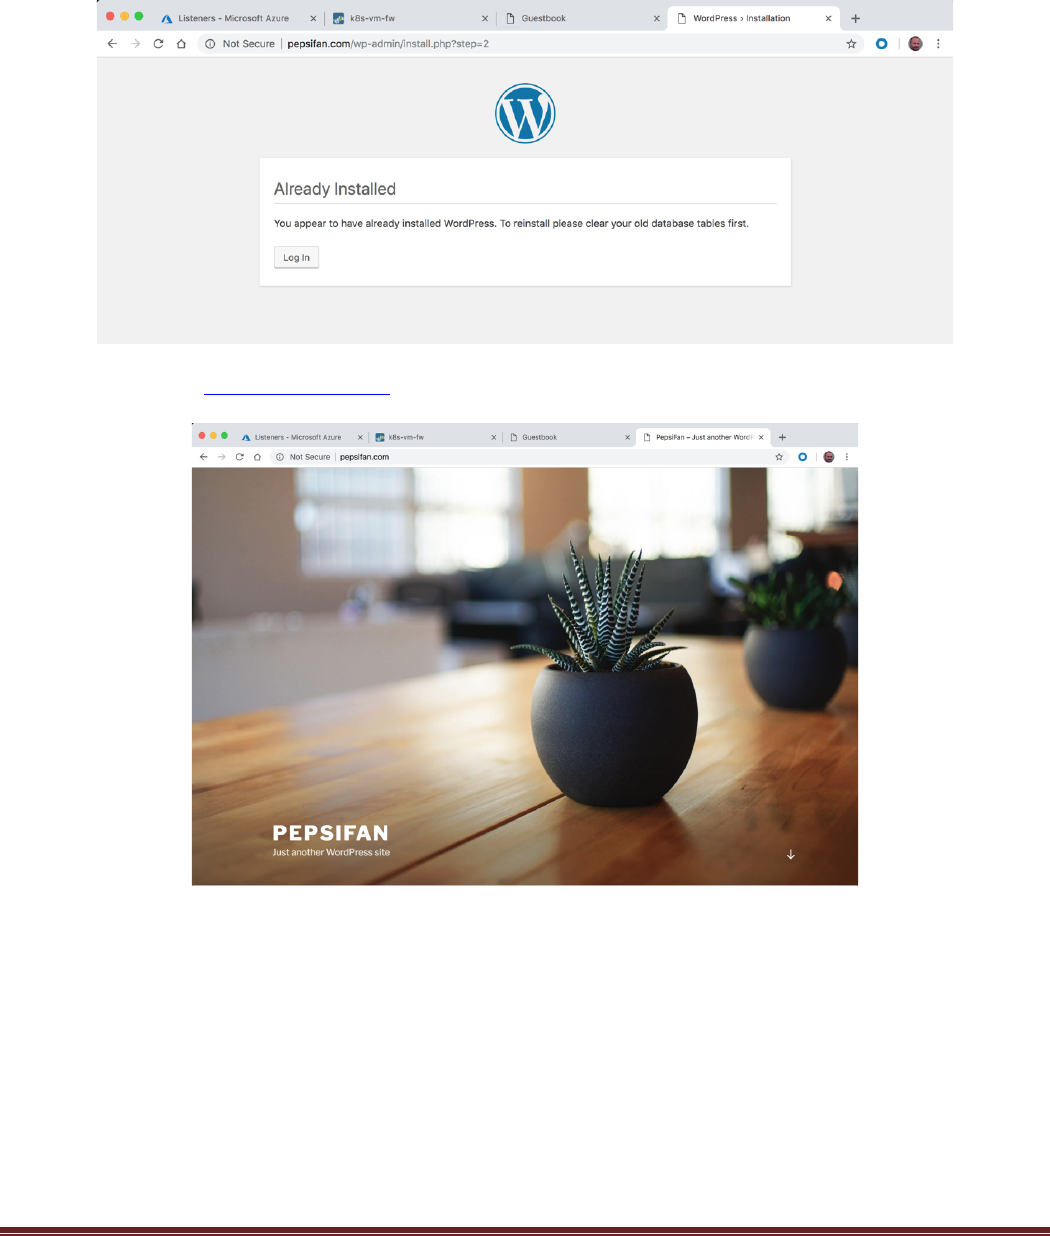
AKS-Kubernetes-Lab Page 49
After pressing Install WordPress, you might see a 502 error from the Application Gateway. If you press
refresh a few times you should see the following:
Go to the root of the http://pepsifan.com site and you should now see the default theme:

AKS-Kubernetes-Lab Page 50
Verify that the pepsifan.com traffic is running through the firewall:
AKS-Kubernetes-Lab Page 51
Securing.Outbound.Traffic.
In this activity, you will:
Secure outbound traffic from the cluster nodes
Validate traffic is in the Firewall logs
Task 1 – Add Outbound Route
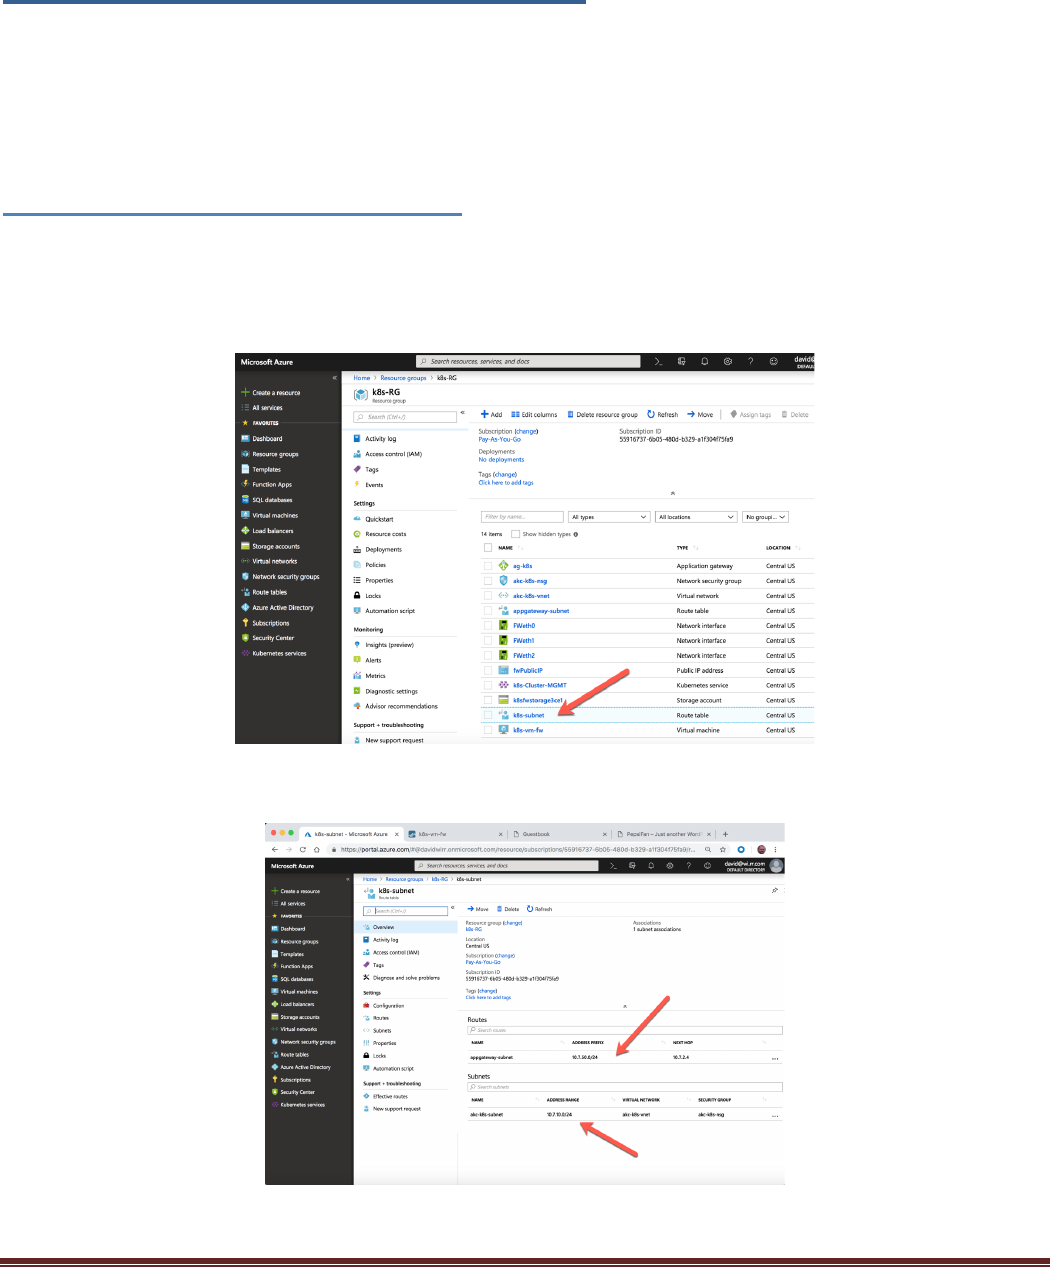
To secure any traffic that is originating from within the cluster we need to add a user defined route (UDR) to
the routing table on the VNET subnet that the nodes are on. In this deployment that is the 10.7.10.0/24
subnet which is labeled akc-k8s-subnet. Navigate to the k8s-RG resource group and click on the k8s-subnet
route tab:
You can see a route to the app gateway subnet and that this is assigned to the 10.7.10.0/24 subnet:
AKS-Kubernetes-Lab Page 52
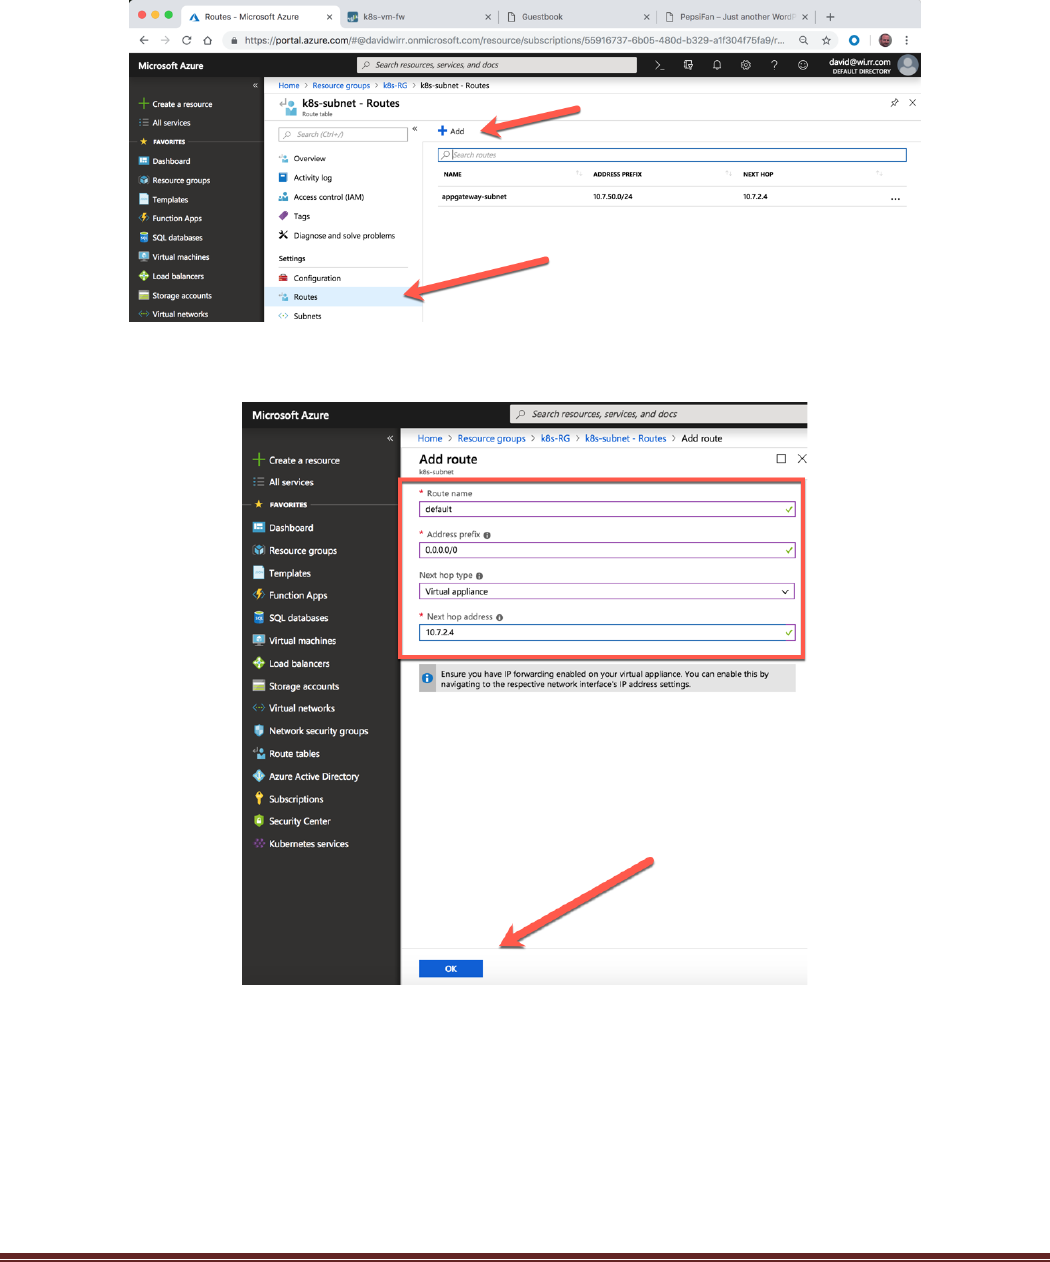
Click on Routes on the left NAV and the click the “+Add” to add a new route:
Create a route with the following Parameters:
Route name: default
Address prefix: 0.0.0.0/0
Next hop type: Virtual Appliance
Next hop address: 10.7.2.4
And then click Create

AKS-Kubernetes-Lab Page 53
The new route should appear in the list:
Navigate back to the firewall monitor tab and you can now see outbound traffic as well from the cluster
nodes.
These source addresses are the instance addresses of the Kubernetes cluster node servers:
AKS-Kubernetes-Lab Page 54
Lab.Termination.
One advantage of Terraform is that it provides the ability to remove the deployment so it is not incurring
ongoing cost but could be easily instantiated at a later time for testing and demonstrations. To destroy the
lab, go to the terminal prompt and navigate to the directory that was used to deploy the environment and
execute:
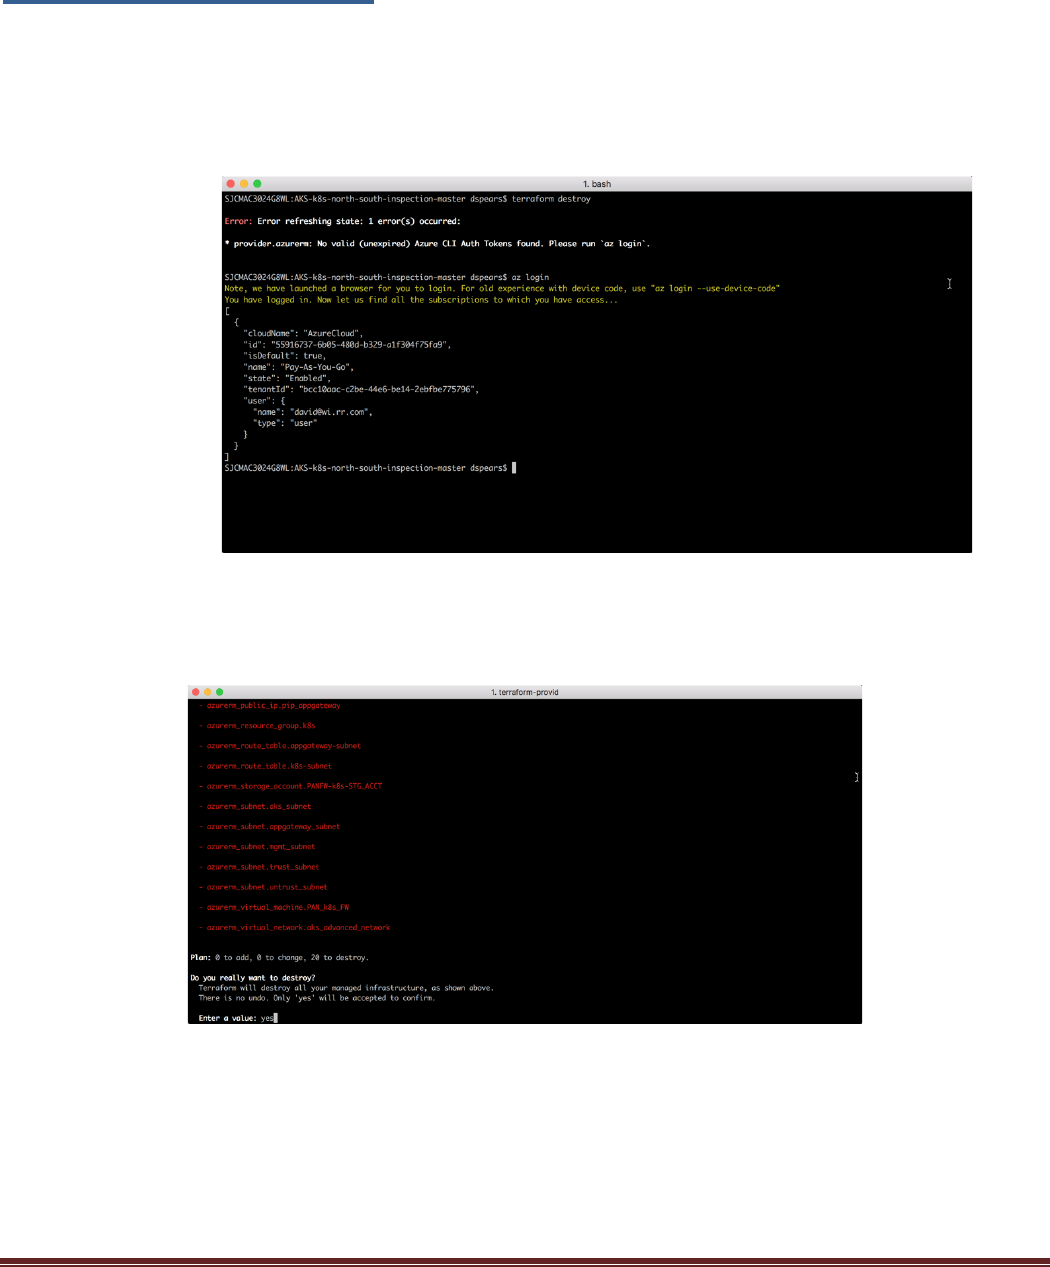
$ terraform destroy
If an error message appears regarding the CLI Auth Tokens, run the az login command to get a new token.
Terraform will show the list of items that will be removed. Type yes at the prompt to start the process:
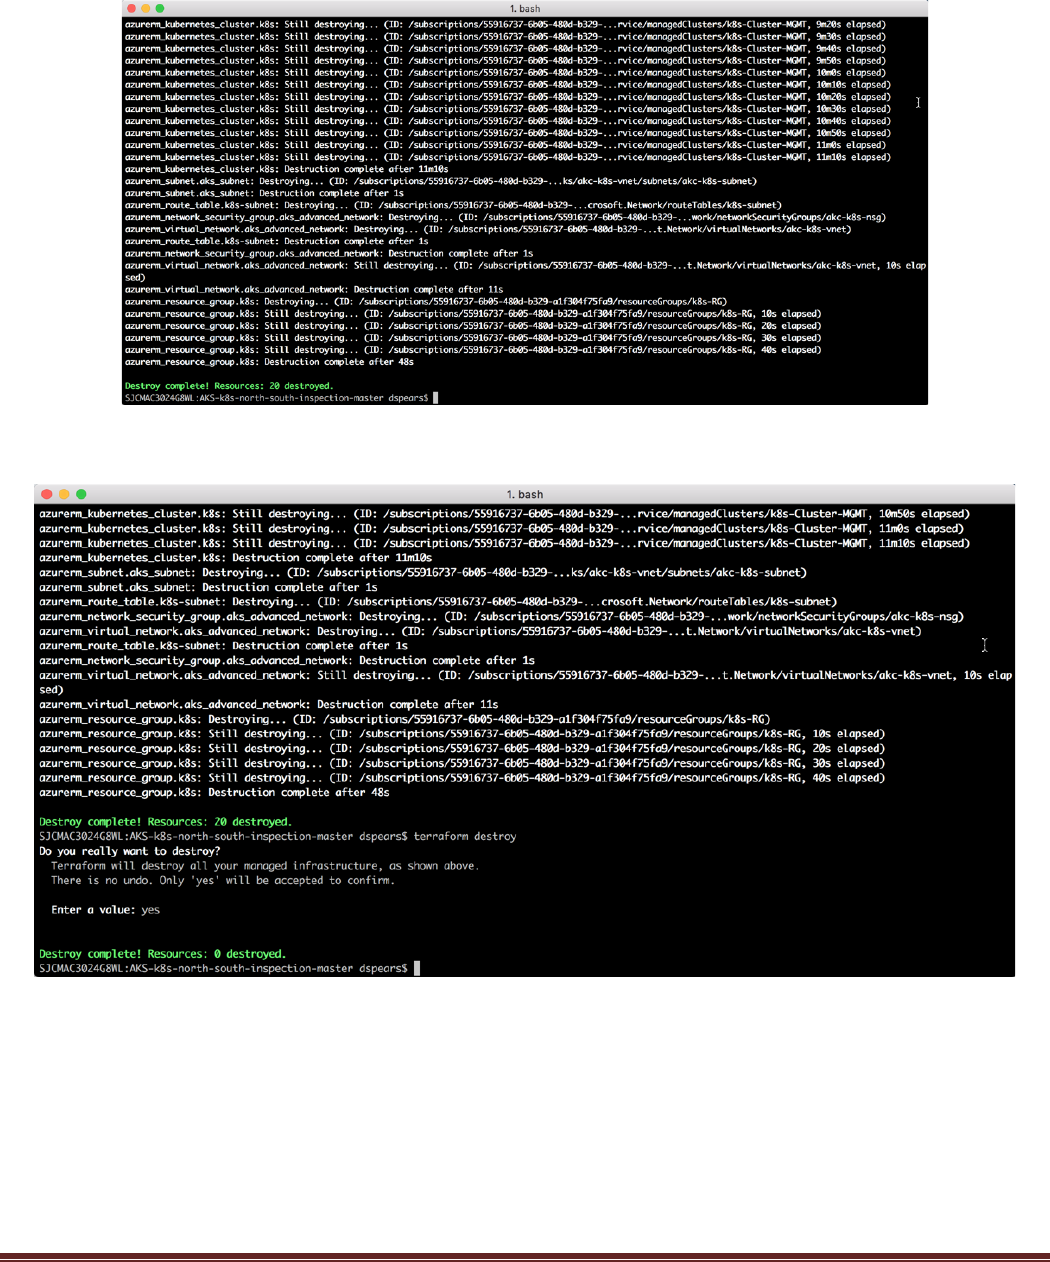
AKS-Kubernetes-Lab Page 55
This should result in the complete removal of all the resources:
This can be validated by executing the terraform destroy command one more time:

AKS-Kubernetes-Lab Page 56
At any point in the future, it is possible to come back to this directory and simply run the
terraform apply command and quickly install the environment again:
End of Activity
Conclusion.
Congratulations! You have now successfully integrated the VM-Series firewall to gain visibility into
North/South traffic for two container application hosted in a Kubernetes cluster.
