AMP Installation Guide
User Manual:
Open the PDF directly: View PDF ![]() .
.
Page Count: 72
- AMP installation guide
- Supported OS versions
- System requirements
- Recommended folder structure
- Before you start (tips)
- Installing Java
- Installing PostgreSQL
- Installing Maven
- Installing Tomcat
- Installing MonetDB and MonetMonitor
- Installing Apache HTTP Server
- Installing the Version Control System (git)
- Building and starting AMP | Upgrading AMP
- How to setup SSL with Let's Encrypt
- Installing the IATI Import Tool as a service
- How to setup automatic backup
- How to setup automatic log rotation
- Post install configuration
- Cookies over https and http
- AMP 3.0 Installation/Upgrade Highlights

1. AMP installation guide . . . . . . . . . . . . . . . . . . . . . . . . . . . . . . . . . . . . . . . . . . . . . . . . . . . . . . . . . . . . . . . . . . . . . . . . . . . . . . . . . 2
1.1 Supported OS versions . . . . . . . . . . . . . . . . . . . . . . . . . . . . . . . . . . . . . . . . . . . . . . . . . . . . . . . . . . . . . . . . . . . . . . . . . . . . 2
1.2 System requirements . . . . . . . . . . . . . . . . . . . . . . . . . . . . . . . . . . . . . . . . . . . . . . . . . . . . . . . . . . . . . . . . . . . . . . . . . . . . . 3
1.3 Recommended folder structure . . . . . . . . . . . . . . . . . . . . . . . . . . . . . . . . . . . . . . . . . . . . . . . . . . . . . . . . . . . . . . . . . . . . . 3
1.4 Before you start (tips) . . . . . . . . . . . . . . . . . . . . . . . . . . . . . . . . . . . . . . . . . . . . . . . . . . . . . . . . . . . . . . . . . . . . . . . . . . . . . 4
1.5 Installing Java . . . . . . . . . . . . . . . . . . . . . . . . . . . . . . . . . . . . . . . . . . . . . . . . . . . . . . . . . . . . . . . . . . . . . . . . . . . . . . . . . . . 8
1.6 Installing PostgreSQL . . . . . . . . . . . . . . . . . . . . . . . . . . . . . . . . . . . . . . . . . . . . . . . . . . . . . . . . . . . . . . . . . . . . . . . . . . . . . 9
1.7 Installing Maven . . . . . . . . . . . . . . . . . . . . . . . . . . . . . . . . . . . . . . . . . . . . . . . . . . . . . . . . . . . . . . . . . . . . . . . . . . . . . . . . . 13
1.8 Installing Tomcat . . . . . . . . . . . . . . . . . . . . . . . . . . . . . . . . . . . . . . . . . . . . . . . . . . . . . . . . . . . . . . . . . . . . . . . . . . . . . . . . . 13
1.9 Installing MonetDB and MonetMonitor . . . . . . . . . . . . . . . . . . . . . . . . . . . . . . . . . . . . . . . . . . . . . . . . . . . . . . . . . . . . . . . . 18
1.9.1 Compiling from sources, Sci-L 6 guide . . . . . . . . . . . . . . . . . . . . . . . . . . . . . . . . . . . . . . . . . . . . . . . . . . . . . . . . . . . 21
1.10 Installing Apache HTTP Server . . . . . . . . . . . . . . . . . . . . . . . . . . . . . . . . . . . . . . . . . . . . . . . . . . . . . . . . . . . . . . . . . . . . 21
1.10.1 RedHat guide for Apache HTTP Server Configuration - mirror . . . . . . . . . . . . . . . . . . . . . . . . . . . . . . . . . . . . . . . . 47
1.10.2 Reverse proxy article mirror . . . . . . . . . . . . . . . . . . . . . . . . . . . . . . . . . . . . . . . . . . . . . . . . . . . . . . . . . . . . . . . . . . 53
1.11 Installing the Version Control System (git) . . . . . . . . . . . . . . . . . . . . . . . . . . . . . . . . . . . . . . . . . . . . . . . . . . . . . . . . . . . . 54
1.12 Building and starting AMP | Upgrading AMP . . . . . . . . . . . . . . . . . . . . . . . . . . . . . . . . . . . . . . . . . . . . . . . . . . . . . . . . . . 55
1.13 How to setup SSL with Let's Encrypt . . . . . . . . . . . . . . . . . . . . . . . . . . . . . . . . . . . . . . . . . . . . . . . . . . . . . . . . . . . . . . . . 57
1.14 Installing the IATI Import Tool as a service . . . . . . . . . . . . . . . . . . . . . . . . . . . . . . . . . . . . . . . . . . . . . . . . . . . . . . . . . . . . 59
1.15 How to setup automatic backup . . . . . . . . . . . . . . . . . . . . . . . . . . . . . . . . . . . . . . . . . . . . . . . . . . . . . . . . . . . . . . . . . . . . 63
1.16 How to setup automatic log rotation . . . . . . . . . . . . . . . . . . . . . . . . . . . . . . . . . . . . . . . . . . . . . . . . . . . . . . . . . . . . . . . . . 65
1.17 Post install configuration . . . . . . . . . . . . . . . . . . . . . . . . . . . . . . . . . . . . . . . . . . . . . . . . . . . . . . . . . . . . . . . . . . . . . . . . . . 66
1.18 Cookies over https and http . . . . . . . . . . . . . . . . . . . . . . . . . . . . . . . . . . . . . . . . . . . . . . . . . . . . . . . . . . . . . . . . . . . . . . . 70
1.19 AMP 3.0 Installation/Upgrade Highlights . . . . . . . . . . . . . . . . . . . . . . . . . . . . . . . . . . . . . . . . . . . . . . . . . . . . . . . . . . . . . 70

AMP installation guide
This is a page meant to guide a user through the necessary steps of installing AMP on a server.
Contents:
Supported OS versions
System requirements
Recommended folder structure
Before you start
Installing software
Installing Java
Installing PostgreSQL
Installing Maven
Installing Tomcat
Installing MonetDB and MonetMonitor
Installing the Apache HTTP Server
Installing the Version Control System (git)
Building and starting AMP | Upgrading AMP
How to setup SSL with Let's Encrypt
Installing the IATI Import Tool as a service
How to setup automatic backup
How to setup automatic log rotation
Public portal Installation
Post install configuration
Cookies over https and http
AMP 3.0 Installation/Upgrade Highlights
Supported OS versions
Next: System requirements
This document contains a list of operating systems supported by AMP.
Basically, it works on any system on which you can install the required version of PostgreSQL (9.4) and Java (Java SE 8). It might even run on
Solaris (not tested).
When choosing a Linux distribution, you're advised to pick an LTS (Long-Term Support) if available. One can check for how long a distributive will
receive updates – for instance, Scientific Linux 6 will keep receiving full updates till Q2 2017, and maintenance updates till 2020-11-30. Ubuntu
LTS will keep the
The logic behind this is that generally, a server shouldn't be bothered too much with periodic upgrades unless you really need them for
performance, stability, or security reasons. Scientific Linux, CentOS and RedHat are the recommnended versions, since they're mostly
unencumbered by UI packages and are designed with stability in mind.
Linux:
Ubuntu
Debian
Scientific Linux
CentOS
any other modern version with a decent user base (as stated above, it might run on almost anything, but installing it on something exotic
might be difficult to maintain later).
If you can choose, then pick up Debian or Scientific Linux based on customer preference (Deb vs RPM-based distro), though CentOS
should work well too.

FreeBSD (not covered by documentation, but Linux guides can be useful for guidance).
Windows:
Windows Vista
Windows 7
Windows 8
Windows 8.1
Windows 10
Windows Server 2008
Windows Server 2008 R2
Windows Server 2012
Windows Server 2012 R2
Recommended, from the above: Windows Server 2008 [R2] or Windows Server 2012 [R2].
Next: System requirements
System requirements
Next: Recommended folder structure
Hardware requirements:
CPU: 2.5 GHz quadcore
RAM: 6 GB for versions prior to 2.10
12 GB minimal for versions starting from 2.10; 16 GB for a moderately stable performance; 32 GB recommended for optimal
performance.
HDD: at least 50 GB free space
Software requirements
OS: Linux, Windows (see for details)here
Java: Java SE 8
PostgreSQL 9.4
Apache HTTP server
Apache Tomcat 7 Web Server
git
Maven
Recommended folder structure
Next: Before you start
This article elaborates on the recommended folder structure for server containing AMP installations.
On Linux
Needed packages for GIS Download Image
In order for GIS Download image feature to work, in LINUX installations, it is needed to have the following fonts' related
packages installed
fontconfig
dejavu-fonts-common
libfontenc xorg-x11-font-utils
xorg-x11-fonts-Type1
fontpackages-filesystem
urw-fonts libXfont
For a full version, go here: Linux filesystem guidelines
If you're too lazy to read that, click here
System-wide custom scripts must be put to /usr/local/bin or to /usr/local/sbin (if supposed to be run by root only).
Personal scripts belong to your own bin directory, i.e. ~/bin.
Websites must be nested under /var/www directory (e.g. /var/www/google/index.html).
Databases must be located under /var (e.g. /var/lib/mysql, /var/lib/pgsql/data or simply /var/data).
Standalone packages must be put to /opt/PACKAGENAME or /opt/VENDOR/PACKAGENAME, e.g. /opt/counterstrike
If you want a separate user to run the program, create the account like this:
# useradd -r -m -d /opt/counterstrike cstrike (creates a system user cstrike, whose home dir is created at /opt/counterstrike; -r option is a Red
Hat extension for setting the UID below
500, meaning a non-human user).
Additional information:
http://refspecs.linuxfoundation.org/FHS_2.3/fhs-2.3.html
http://en.wikipedia.org/wiki/Filesystem_Hierarchy_Standard
( )http://goo.gl/vuesc http://docs.redhat.com/docs/en-US/Red_Hat_Enterprise_Linux/6/html/Storage_Administration_Guide/ch-filesystem.html
On Windows
There are no universally accepted guidelines on the way Windows folders should be organized. Some pieces of advice, though:
Applications should be installed under (or if it's a x86-32 application). C:\Program Files Program Files (x86)
It is most advised to keep websites AMP source files and AMP backups on a separate drive ( , ). D:\AMP\src D:\AMP\backups
Scripts should be kept under or .D:\AMP\scripts D:\AMP\bat
Before you start (tips)
Next: Installing Java
This page contains tips to generally enhance your AMP installation or upgrade experience, and tips regarding checking that the system is ready to
embrace AMP.
Linux tips
Windows tips
Before performing an upgrade, be sure to perform the following steps:
Backup databases ( you can find scripts that do it):here
AMP Postgres database
AMP Public Portal Postgres database
Backup sources:
Tomcat app
Drupal app
Configuration files
Postgres
Tomcat
Apache
MonetMonitor
Scripts Maven script for building AMP
Database backup scripts
Carefully check for any specific details on the country installation page

Generally, SCP is considered to be faster than SFTP, especially on high latency connections. There are plenty of detailed explanations on google
for the reasons why, and detailed differences and comparisons.
Linux tips:
Check the version of your Linux distributive:
uname -a:
[root@localhost ~]$ uname -a
Linux localhost.localdomain 3.11.10-301.fc20.x86_64 #1 SMP Thu Dec 5
14:01:17 UTC 2013 x86_64 x86_64 x86_64 GNU/Linux
or :cat /proc/version
[root@localhost ~]$ cat /proc/version
Linux version 3.11.10-301.fc20.x86_64
(mockbuild@bkernel01.phx2.fedoraproject.org) (gcc version 4.8.2 20131017
(Red Hat 4.8.2-1) (GCC) ) #1 SMP Thu Dec 5 14:01:17 UTC 2013
or : lsb_release -a
SSH options for slow connections
If the client and server CPUs are fast, but the network connection is slow, it's usually helpful to enable traffic compression and disable
public key negotiation (if not used). Same arguments also apply to and .scp sftp
ssh -C -o CompressionLevel=9 -o PubkeyAuthentication=no
root@example.org
alias ssh-slow='ssh -C -o CompressionLevel=9 -o
PubkeyAuthentication=no'
Remote access as AMP user
You can create a new non-root Linux user for AMP for remote connections access, the user name can be called “amp” or "support",
and you should set a secure password. Consider configuring remote access with private keys.

root@localhost ~ $ lsb_release -a
No LSB modules are available.
Distributor ID: LinuxMint
Description: Linux Mint 17 Qiana
Release: 17
Codename: qiana
or :cat /etc/redhat-release
[root@localhost ~]$ cat /etc/redhat-release
Fedora release 20 (Heisenbug)
Check free space:
df -h:
[root@localhost ~]$ df -h
Filesystem Size Used Avail Use% Mounted on
/dev/mapper/fedora-root 50G 4.9G 42G 11% /
devtmpfs 12G 0 12G 0% /dev
tmpfs 12G 0 12G 0% /dev/shm
tmpfs 12G 620K 12G 1% /run
tmpfs 12G 0 12G 0% /sys/fs/cgroup
tmpfs 12G 8.0K 12G 1% /tmp
/dev/sda1 477M 66M 382M 15% /boot
/dev/mapper/fedora-home 1.6T 69M 1.5T 1% /home
Check available RAM:
cat /proc/meminfo | grep MemTotal:
root@localhost ~ $ cat /proc/meminfo | grep MemTotal
MemTotal: 7888536 kB
If you're running CentOS 7:
By default, CentOS 7 has a service installed. If you are unfamiliar with its syntax or usage and would prefer using iptables, here are the firewalld
steps to disable firewalld:
sudo systemctl stop firewalld
sudo systemctl disable firewalld
If you want to stop or disable iptables:
sudo systemctl stop iptables
sudo systemctl disable iptables
1.
Check the model of the CPU:
cat /proc/cpuinfo:
root@localhost ~ $ cat /proc/cpuinfo | grep "model name"
model name : Intel(R) Core(TM) i3-4000M CPU @ 2.40GHz
model name : Intel(R) Core(TM) i3-4000M CPU @ 2.40GHz
model name : Intel(R) Core(TM) i3-4000M CPU @ 2.40GHz
model name : Intel(R) Core(TM) i3-4000M CPU @ 2.40GHz
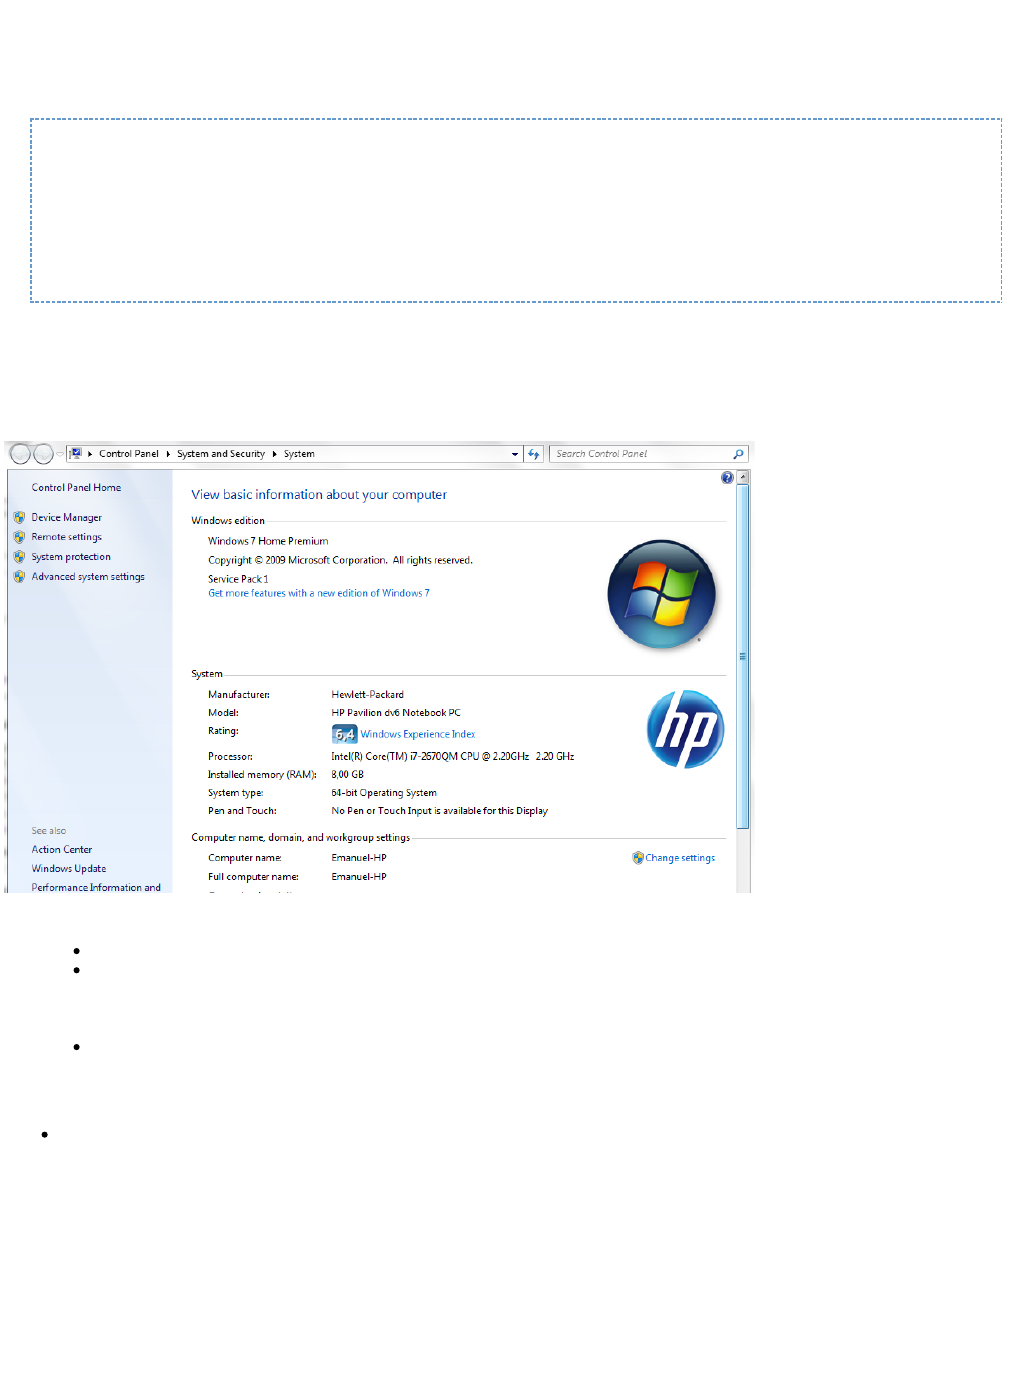
Windows tips:
Open System by clicking the button Start
, right-clicking , and then clicking .Computer Properties
System presents a summary view of basic details about your computer, including:
Windows edition. Lists information about the version of Windows running on your computer.
System. Displays your computer's Windows Experience Index base score, which is a number that describes the overall capability of
your computer. Your computer's processor type, speed, and quantity are listed, if your computer uses multiple processors. For
example, if your computer has two processors, you will see "(2 processors)" displayed. Also displayed is how much random access
memory (RAM) is installed and, in some cases, how much of the memory is usable by Windows.
Computer name, domain, and workgroup settings. Displays your computer's name and workgroup or domain information. You can
change this information and add user accounts by clicking .Change settings
Windows activation. Activation verifies that your copy of Windows is genuine.
2. Disk space
Open Computer by clicking the Start button
, and then clicking Computer.
Click the hard disk you want to check.
The total size and available free space appear in the Details pane at the bottom of the folder window.

Installing Java
Next: Installing PostgreSQL
This page contains a guide on installing Java, necessary for running AMP.
Linux
Windows
On Linux
There are two types of installation packages.
Java on Linux Platforms
This is an archive binary file that can be installed by anyone (not only the root users), in any location that you can write to. However,
only the root user can install Java into the system location.
Java on RPM-based Linux Platforms
32-bit / 64-bit RPM-based Linux platforms, such as Red Hat and SuSE, use a RPM binary file (.rpm) in the system location. You must
be root to perform this installation.
Generic note
Since AMP is not checked out as a packaged application, but as sources that are compiled on the target machine instead, one needs to
install the Java Development Kit (JDK), not only the Java Runtime Environment (JRE). Without the JDK, one will not be able to build
and deploy AMP to the application server (Tomcat), since JRE lacks the compilation possibilities.
The JRE is included by any JDK package, so there's no need to install JDK and JRE on the same machine.
Try to avoid installing several different versions of JDK on the same machine, since they can generate confusion for both developers
and applications. If an installation requires that you have different versions installed, try reanalyzing your problem. Maybe you don't
actually need to, and it can be solved in a different way.
For Java 8 JDK:
Go to and download the file youhttp://www.oracle.com/technetwork/java/javase/downloads/jdk8-downloads-2133151.html
need.
Alternately, go to oracle.com -> Downloads -> Java SE -> Java SE (you should land on the Java SE 8 page) -> JDK
Alternately, install openjdk-8-jdk from repositories (Debian-derived) or java-1.8.0-openjdk-devel (RedHat-derived).

1.
2.
3. a.
b.
c.
4. a. i.
1.
2.
3.
4.
Download the appropriate JDK and save it to /usr/java directory
Unpack jdk-8u101-linux-x64.tar.gz in the /usr/java directory using tar -xzf:
tar -xzf jdk-8u101-linux-x64.tar.gz
This will create the directory /usr/java/jdk1.8.0_101. This will be our JAVA_HOME.
To set the JAVA_HOME, do either of the following:
Edit for root and all users that might be interested in using Java by adding the following lines:~/.bash_profile
~/.bash_profile
JAVA_HOME="/usr/java/jdk1.8.0_101"
export JAVA_HOME
PATH=$JAVA_HOME/bin:$PATH
export PATH
Edit (on RedHat-derived systems) or (on Debian-deriver systems) and add the following lines:/etc/bashrc /etc/bash.bashrc
~/.bash_profile
JAVA_HOME="/usr/java/jdk1.8.0_101"
export JAVA_HOME
PATH=$JAVA_HOME/bin:$PATH
export PATH
export JAVA_HOME=$(readlink -f /usr/bin/javac | sed
"s:/bin/javac::")
To make sure it's instantly applied system-wide, you have to run it ( ). Otherwise, you can log out & logsource /etc/bash.bashrc
in. These operations require you to be root.
Add a file called java_home.sh to /etc/profile.d with the following lines. To make sure your config is not changed if Java is
updated, mostly if installed with yum that is likely to change. Notice that javac should be accesible in path
~/.bash_profile
export JAVA_HOME=$(readlink -f /usr/bin/javac | sed
"s:/bin/javac::")
Verify that JAVA_HOME has been set correctly:
echo $JAVA_HOME
result should be: /usr/java/jdk1.8.0_101
On Windows
The JDK for Windows arrives as an installation package. Just launch it as any other executable and follow the instructions.
To add JAVA_HOME to PATH, do the following:
Locate your Java installation (should be somewhere under Program Files)
Click and type in "environment variables" and select the entry that highlights up OR goStart
Computer->Properties->Advanced->Environment Variables
Enter the variable name as "JAVA_HOME" and the value – the path from p.1
Click OK, click Apply Changes.

1. a.
b.
c.
2. a. i.
ii.
b. i.
3. a.
b.
4. a. i.
ii.
iii.
iv.
b. i.
c. i.
5. a.
6. a.
Installing PostgreSQL
Next: Installing Maven
PostgreSQL (or Postgres, or sometimes abbreviated as pg) is an open-source object-relational database system. AMP uses it for storage of data
and settings. Without a functional database server, AMP is unable to start.
Throughout this guide, it is assumed you will select the version , since PostgreSQL 9.4 is the version AMP 2.12 is using. 9.4
Commands are written in bold. If something is enclosed in the signs "smaller than" and "larger than" (like: ), itsudo apt-get install <application>
is assumed that you replace the whole enclosed word or phrase with an appropriate argument (so it would become ). sudo apt-get install sl
Installing PostgreSQL on Linux
Installing PostgreSQL on Windows
Restoring a database from a backup on Linux
Restoring a database from a backup on Windows
Installing PostgreSQL on Linux
It is most advised to install Postgres via software repositories – this way, you'll be able to later upgrade it with much less pain than if you download
the sources and build it.
If at any moment this guide doesn't make sense, try following the instructions from the . After all, this guide was madeofficial PostgreSQL site
mostly following that guide.
Add the repository:
For RedHat-based Linux distributions (RHEL, Oracle Enterprise, CentOS, Scientific Linux, Fedora): select the one that
corresponds to your system from and download it (if all you have is console access,http://yum.postgresql.org/repopackages.php
just copy the link and run in the directory you want to save the rpm).wget <link>
For Debian-based Linux distributions: follow the instructions from to add thehttp://www.postgresql.org/download/linux/debian/
repository to the package manager.
For Ubuntu-based Linux distributions: follow the instructions from to add thehttp://www.postgresql.org/download/linux/ubuntu/
repository to the package manager.
Install the package:
For RedHat-based Linux distributions (you need to be root for this, so an implied stands in front of all commands): sudo
yum install <name of the rpm you have just downloaded>
yum install postgresql94-server postgresql94-contrib
For Debian or Ubuntu-based:
apt-get install postgresql-9.4 postgresql-contrib-9.4
Configure auto-startup (relevant for RedHat-based Linux distros only. Once again, you need to be root for this):
service postgresql-9.4 initdb
chkconfig postgresql-9.4 on
Install :postgis
For CentOS 6/ CentOS 6.5 you also need to install the package, and then add some symlinks:hdf5
yum install hdf5
cd /usr/lib64
ln -s libhdf5_hl.so.8 libhdf5_hl.so.6
ln -s libhdf5.so.8 libhdf5.so.6
For RedHat-based Linux distributions (again, don't forget to be root for this):
yum install postgis2_94
For Debian or Ubuntu-based Linux distributions (the UbuntuGIS project):
apt-get install postgresql-9.4-postgis-2.1
Attempt to start the PostgreSQL server (need to be root):
service postgresql-9.4 start
Check that it's working (run this not as root):
psql (should output )psql: FATAL: role "<your_username>" does not exist
AMP database naming convention
AMP databases are usually called following the convention: like , amp_<client country name>_<major version>, amp_moldova_210 amp
etc._ethiopia_211

1. a.
b.
c.
2.
3. a.
b. i.
ii.
c.
d.
e.
f.
g. i.
h. i.
i.
j. i.
4.
5.
Configuring PostgreSQL on Linux
After having installed Postgres, one should better create a user to access the server, and a database to work on:
Switch to the user 'postgres':
sudo su - postgres (if you're not root) or (if you're the root user)su - postgres
createuser amp
createdb amp_<client country name>_<major version to be installed>
Restore the database from a backup.
Login to the psql prompt:
psql
alter user amp with encrypted password '<password (it's usually 'amp123')>';
Note: it's not necessary to use this password. You can use any other password, provided you mention it in the country
installation document.
Output should be: ALTER ROLE
grant all privileges on database <database_name> to amp;
grant all privileges on all tables in schema public to amp;
grant all privileges on all tables in schema tiger to amp;
grant all privileges on all tables in schema topology to amp;
ALTER ROLE amp WITH SUPERUSER;
this needs to be done so the user would be able to create DB backups
check that the extension has been added:unaccent
\dx
(this will list all extensions installed on the database)
Add the extension so the amp_locator table gets created:POSTGIS
POSTGIS script
-- Enable PostGIS (includes raster)
CREATE EXTENSION if not exists postgis;
-- Enable Topology
CREATE EXTENSION if not exists postgis_topology;
-- fuzzy matching needed for Tiger
CREATE EXTENSION if not exists fuzzystrmatch;
-- Enable US Tiger Geocoder
CREATE EXTENSION if not exists postgis_tiger_geocoder;
SET search_path TO "$user", public, tiger;
\q to exit the psql prompt
Optimize PostgreSQL for better AMP performance, .following this document
Add .auto-backup
Restoring a database from a backup on Linux
If it's an archive – extract it. (for .7z – ; for .tar.gz – ; for .tar.bz2 – )7za e <filename.7z> tar xzvf <filename.tar.gz> tar xjvf <filename.tar.bz2>
Move it to a location accessible to the postgres user (/tmp is a good place).
Change to the user postgres.
If it's a text dump, run ( and to be replaced with your corresponding values)psql dbname < filename dbname filename
If it's a binary dump, run pg_restore -d dbname filename
The servers on the staging (Jenkins) server follow the convention amp-<country name>-<major version>-<dev or stg>-<tomcat version:
tc7 or tc6>.
Postgis troubleshooting
If restoring database fails due Postgis extensions, check Postgis installation troubleshooting
1.
2.
3.
4.
5.
6.
7.
8.
1.
2.
3.
4.
1.
2.
3.
4.
Installing PostgreSQL on Windows
Download & install
Go to -> Download -> Windows -> Download -> Win x86-64 (Version 9.4.9) postgresql.org
Run the freshly downloaded file.
Click Next->Next->Next->[type in a password for the user postgres] Next -> [not advised to change the default port, which is 5432] ->
Next -> Next ->[Accept Stack Builder] -> Install
In Stack Builder, select Spatial Extensions->PostGIS 2.2 -> Next -> Next -> Next (uncheck Skip Installation)
Once again, click "Next" several times, install PostGIS in the PostgreSQL 9.3 folder
You will be asked several questions over the run of the installation - click "yes".
Click Close.
Click Finish in the Stack Builder.
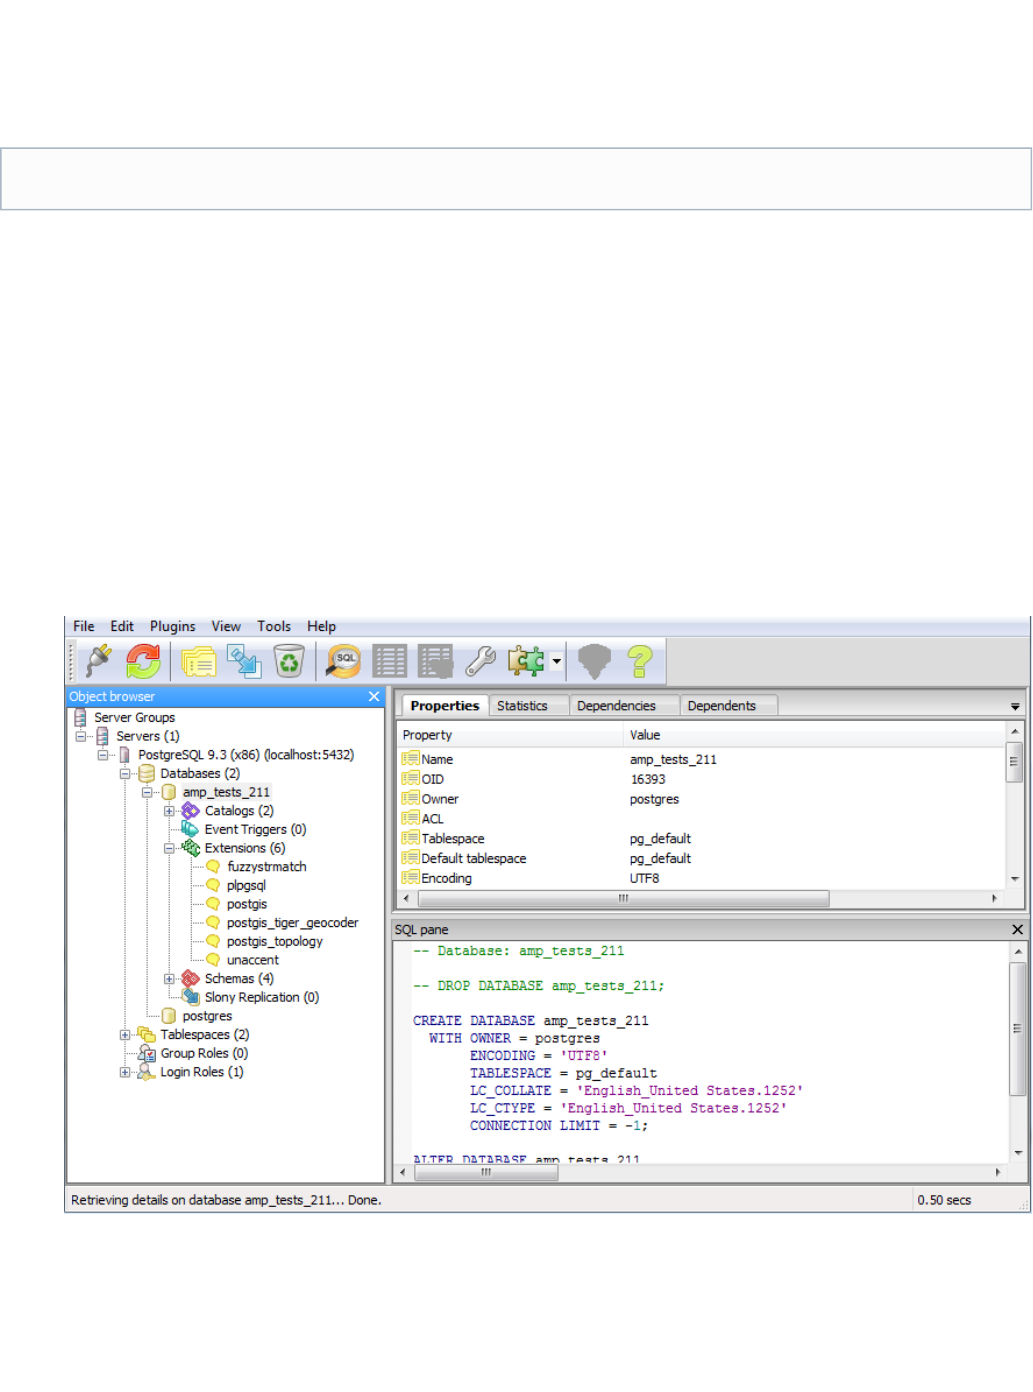
Configure
Start pgAdmin III.
Double-click on PostgreSQL 9.4 (x86) (localhost:5432) to connect to the server.
Right-click on Databases->New Database... -> [enter name of the database] -> OK
To check whether all necessary extensions have been installed for the database, expand under "Extensions" (you're looking for the three
extensions and ):postgis unaccent
Restoring a database from a backup on Windows
If it's an archive – extract it. (right-click on the archive -> extract here...)
Start pgAdmin III.
Double-click on PostgreSQL 9.4
The x64 version might occasionally be problematic to install – fall back to the -32 distribution if that is the case.

4.
5.
6.
7.
1.
2.
3.
4.
1.
2.
3.
4.
5.
6.
Right-click on the database you're trying to restore -> Restore...
Browse for the file
Click "restore"
Run the SQL statement from below (replace DOMAIN_NAME with whatever domain name you're using; for local development,localhost
or, let's say, for the Moldova production server):amp.gov.md
UPDATE dg_site_domain SET site_domain = 'DOMAIN_NAME';
Installing Maven
Next: Installing Tomcat
This page details on the installation of Apache Maven for the needs of AMP.
Maven is a software project management and comprehension tool – essentially, it manages and oversees the process of building AMP.
Linux
Windows
Installing Maven on Linux
Download (with wget, for instance) release 3.2.5 from the Apache server:
wget http://apache.xfree.com.ar/maven/maven-3/3.2.5/binaries/apache-maven-3.2.5-bin.tar.gz
Extract the archive. It is recommended to place it under /opt:
cd /opt
tar xzvf apache-maven-3.2.5-bin.tar.gz
Edit /etc/bash.bashrc (for instance, with nano: ) and add the following lines (obviously, save the file after you'renano /etc/bash.bashrc
done):
export M2_HOME=/opt/apache-maven-3.2.5
export PATH=${M2_HOME}/bin:${PATH}
Verify whether the installation happened successfully. Log in into a new console window (or log out, then log in) and run:
mvn -version
Installing Maven on Windows
Download and unzip the distribution archive, i.e. http://apache.xfree.com.ar/maven/maven-3/3.2.5/binaries/apache-maven-3.2.5-bin.zip a
to the directory you wish to install Maven 3.2.5. These instructions assume you chose pache-maven-3.2.5-bin.zip C:\Program
. The subdirectory apache-maven-3.2.5 will be created from the archive.Files\Apache Software Foundation
Add the M2_HOME environment variable by opening up the system properties (WinKey + Pause), selecting the "Advanced" tab, and the
"Environment Variables" button, then adding the variable in the user variables with the value C:\Program Files\ApacheM2_HOME
Software Foundation\apache-maven-3.2.5. Be sure to omit any quotation marks around the path even if it contains spaces. : ForNote
Maven 2.0.9, also be sure that the M2_HOME doesn't have a '\' as last character.
In the same dialog, add the M2 environment variable in the user variables with the value %M2_HOME%\bin.
In the same dialog, update/create the Path environment variable in the user variables and prepend the value %M2% to add Maven
available in the command line.
In the same dialog, make sure that JAVA_HOME exists in your user variables or in the system variables and it is set to the location of
your JDK, e.g. C:\Program Files\Java\jdk1.7.0_51 and that %JAVA_HOME%\bin is in your Path environment variable.
Open a command prompt (Winkey + R then type cmd) and run mvn --version to verify that it is correctly installed.new
Currently, the latest working version of Maven for AMP is 3.2.5.

Installing Tomcat
Next: Installing the Apache HTTP Server
Apache Tomcat is an application server; the recent versions of AMP (at least from 2.8 upwards) use Tomcat 7.
Linux
Windows
Installing Tomcat 7 on Linux
Creating a Tomcat user
First of all, it is highly advised to create a separate user to run the Tomcat service. Running Tomcat as root introduces the unnecessary risk that a
compromised Tomcat instance could yield control over your entire server.
Thus, creating a user with low privileges to run Tomcat should be standard practice when installing new instances.
As a root user (or appending "sudo" before every command), do the following:
$ groupadd tomcat
$ useradd -s /sbin/nologin -g tomcat -d /path/to/tomcat tomcat
$ passwd -l tomcat
This command creates a new user named 'tomcat' belonging to the tomcat group, with the /sbin/nologin/ shell and a locked password. If you
would ever need to run something as tomcat, you can do that with sudo su -s /bin/bash -c '<command>' monetdb
Downloading Tomcat
The latest stable release can always be found on the Apache Tomcat on Apache's website.download page
If all the access you have is a console – copy the link and paste it after wget (example: wget http://apache-mirror.rbc.ru/pub/apache/tomcat/to
mcat-7/v7.0.65/bin/apache-tomcat-7.0.65.tar.gz)
Move distribution into a separate folder and uncompress the archive
It is recommended to place Tomcat under /opt/tomcat7.
As a root user:
mkdir /opt/tomcat7
cp apache-tomcat-7.0.57.tar.gz /opt/tomcat7
cd /opt/tomcat7
tar xzvf apache-tomcat-7.0.57.tar.gz
Change permissions
The previously created user must have read and write access to the tomcat7 folder, and there's no one but you that can grant it:tomcat
IMPORTANT: Tomcat Version
Please do not use a tomcat version later than since a bug in the old filter widget manifests with that version7.0.67

$ chown -R tomcat /opt/tomcat7
$ chmod 775 /opt/tomcat7/apache-tomcat-7.0.57/webapps
Configure environment variables
touch /opt/tomcat7/apache-tomcat-7.0.57/bin/setenv.sh
With your favourite text editor, insert the following into the file you have just created:
#!/bin/sh
#if you have a dynamic java installation that auto updates the following
can be used to automatically calculate java home based on your java
installation
export JAVA_HOME=$(readlink -f /usr/bin/javac | sed "s:/bin/javac::")
# Configure CATALINA_OPTS not JAVA_OPTS because we don't need this options
for "stop" command
CATALINA_OPTS="-server -Xmx12g -Djava.awt.headless=true
-Dorg.apache.jasper.compiler.Parser.STRICT_QUOTE_ESCAPING=false
-Dorg.apache.jasper.compiler.Parser.STRICT_WHITESPACE=false
-Dorg.apache.catalina.loader.WebappClassLoader.ENABLE_CLEAR_REFERENCES=fal
se -Djava.net.preferIPv4Stack=true"
Add Tomcat to auto-startup
As root, create /etc/init.d/tomcat7 with the following contents ( ):make sure to modify the directory in which tomcat resides
The configuration above contained the 'maxpermsize' once upon a day. Since Java 8, PermGen space was replaced with Metaspace –
which cannot be limited. See for a pretty good explanation.
Locale
Please not that if you are using a non English environment you need to add the following vm arguments -Duser.country=US
-Duser.language=en

tomcat7
#!/bin/sh
#
#
# chkconfig: 35 99 14
# description: Starts and stops the Tomcat daemon.
#
tomcat=/opt/tomcat7/apache-tomcat-7.0.57
startup=$tomcat/bin/startup.sh
shutdown=$tomcat/bin/shutdown.sh
user=tomcat
start() {
echo -n $"Starting Tomcat service: "
su - $user -c $startup
echo $?
}
stop() {
echo -n $"Stopping Tomcat service: "
su - $user -c $shutdown
echo $?
}
restart() {
stop
start
}
status() {
ps -aef | grep tomcat | grep headless | grep -v status | grep -v
grep
}
# Handle the different input options
case "$1" in
start)
start
;;
stop)
stop
;;
status)
status
;;
restart)
restart
;;
*)
echo $"Usage: $0 {start|stop|restart|status}"
exit 1
esac
exit 0

Start Tomcat
Run service tomcat7 start
Install Tomcat7 on Windows
Downloading Tomcat
The latest stable release can always be found on the Apache Tomcat on Apache's website.download page
You'll probably need the 32/64-bit Windows Service Installer.
Installing Tomcat7
Run the installer (if you're not the administrator, or the User Account Control is turned on, a dialog prompt will appear, asking you whether you're
sure you want to install it – yes, you're sure).
Install it (it's a typical Windows installer, next-next-next-install-finish).
Configuring Tomcat7
Go to New (system variable) and input there aComputer -> Properties -> Advanced system settings -> Advanced -> Environment variables... ->
variable called CATALINA_HOME, pointing to your Tomcat installation (for instance, )C:\Program Files\Apache Software Foundation\Tomcat 7.0
A system tray icon named 'Tomcat 7' will appear after the installation – right-click on it and select 'configure'.
On the tab: (this will ensure Tomcat is started at every Windows startup). General Set -> Automatic Startup type
On the tab: (this will ensure Tomcat is started even if no user is logged on, and will behave justLog on Set Log on as -> Local System Account
like any other SYSTEM service).
On the tab: , Set the log path to the place you would like to have your logs stored (better on a different drive than theLogging Set Level -> Info
system one). You can also set "redirect stdout" and "redirect stderror" to a logfile.
On the tab: add the following lines Java
-Xmx8192m
-Djava.awt.headless=true
-Dorg.apache.jasper.compiler.Parser.STRICT_WHITESPACE=false
-Dorg.apache.jasper.compiler.Parser.STRICT_QUOTE_ESCAPING=false
AJP Connector
Make sure AJP connector is enabled. It is specified in conf/server.xml and is usually enabled by default. Example:
<Connector port="8009" protocol="AJP/1.3" redirectPort="8443" />
The first option specifies the maximum size of the memory allocation pool (8 GB, in this case); the second option ensures proper
functionality for a server with no display, keyboard, or mouse being present; the third option is bound to the fact that some of the .jsp
files contained in AMP do not follow the strict recommendations of strict quote escaping (no double-quotes within double-quotes).
Without these options, included AMP won't start properly.
1.
2.
Tomcat URL encoding issues
While POST parameters are decoded using encoding specified in header this is not true for query parameters. By default tomcatContent-Type
parses query parameters using encoding. Starting with version , in non (which is the default),ISO-8859-1 8.0.0-RC3 strict servlet compliance
tomcat uses UTF-8 encoding for query parameters. This whole paragraph could be deleted if we upgrade to Tomcat or newer.8.0.0-RC3
How to deal with tomcat versions prior to ? Simple answer is to configure server.xml, in <Connector> element add this attribute:8.0.0-RC3
URIEncoding="UTF-8".
To confirm that configuration worked create a report and in it's name use UTF-8 characters.
More on this issue here: https://wiki.apache.org/tomcat/FAQ/CharacterEncoding
Installing MonetDB and MonetMonitor
Next: Installing the Apache HTTP Server
MonetDB is an open source column-oriented database management system, used by the Mondrian report engine of AMP.
It was mandatory to install it from AMP 2.10 to AMP 2.11 (wouldn't start otherwise).
MonetDB on Linux
MonetDB on Windows
MonetMonitor
Installing MonetDB on Linux
To exclude MonetDB from auto-update on RedHat-based distros of Linux:
Edit the file /etc/yum.conf and add the following line to the bottom of the file. If you already have excluded packages, just add the
monetdb packages at the end.
exclude=MonetDB.x86_64 MonetDB-SQL-server5.x86_64 MonetDB-client.x86_64 MonetDB-stream.x86_64
MonetDB5-server.x86_64
For :Scientific Linux
MonetDB stock repos are built for Fedora, they cause unmet dependency issues with Scientific Linux. To fix this, we built local RPMs
which are available for any DG internal server by default:
MonetDB is not needed anymore on AMP 2.12 installations.
If you're upgrading a server and find it installed, you can safely uninstall it once you're sure the client doesn't have the
intention to rollback to AMP 2.11 or 2.10.
MonetDB versions released before Jan 2014 are too unstable. MonetDB versions released after Oct 2014 introduce a regression that
makes it considerably slower.
Therefore, make sure to
1) turn off auto-update
2) install a version in between the landmarks above.

2.
a.
3.
1.
2.
3. a.
b.
4.
5.
a.
6.
i.
b.
c.
d.
e.
yum install MonetDB-SQL-server5 MonetDB-client
To initially build the packages, we did the following:
Building RPM
wget
http://dev.monetdb.org/downloads/Fedora/source/MonetDB-11.17.21-20140
725.src.rpm
rpm -i MonetDB-11.17.21-20140725.src.rpm
rpmbuild --sign -ba *.spec
# install the required dependencies, repeat till done
rpm --resign MonetDB-11.17.21-20140725.src.rpm
Then we uploaded the signed source and binary packages to the local repository, which triggered repo metadata update.
The built packages can also be downloaded for deployment outside DG (see from yumutils).yumdownloader(1)
See also: https://www.monetdb.org/downloads/Fedora/source/
If, for whatever reason, the above doesn't work for you (can't find the rpm, or something else) – here's a guide on how
to compile from sources: Compiling from sources, Sci-L 6 guide
For , , or :Fedora Debian Ubuntu
Install MonetDB from here: , please follow the instructions relevant for your operating system.https://www.monetdb.org/Downloads
Debian-based Linux users, please goto here: https://www.monetdb.org/Documentation/UserGuide/Downloads/UbuntuDebian
Configuring MonetDB on Linux
AMP uses the default account for connecting to MonetDB (user: monetdb, password: monetdb).
choose a location on disk for storing the MonetDB databases (Monet calls these "dbfarm directory"). For example purposes /opt/monetd
b/dbfarm
Create a Linux user for monetdb:
sudo useradd -M monetdb
sudo usermod -L monetdb
Make monetdb owner of the farm: sudo chown monetdb:monetdb /opt/monetdb
All the commands from below should be run as the monetdb user. This means every command should be run as sudo su -s /bin/bash -c
'<command>' monetdb
If the command returns "monetdbd: command not found", run and write the full path (for instance, whereis monetdbd '/usr/local
). /bin/monetdbd create /opt/monetdb/dbfarm'
create a dbfarm in the chosen location:
monetdbd create /opt/monetdb/dbfarm
please notice that and are distinct programs which do different thingsmonetdb monetdbd
steps 1 - 4: this is it for the one-time configuration of MonetDB!
To start MonetDB on a given computer, run
monetdbd start /opt/monetdb/dbfarm
a given dbfarm can contain an arbitrary number of databases. AMP uses a database for each corresponding PostgreSQL
database it is running off. For example, AMP running off the "amp_moldova_210" postgres database will use a corresponding
"amp_moldova_210" monetdb database
since monetdb lacks a "CREATE DATABASE" command, you have to create a database before starting up AMP. Creating a
database is a two-step process: firstly you create a database and then you "release it from maintenance mode".

6.
e.
f.
g.
1.
2.
3.
4.
5.
$ monetdb create amp_moldova_210
$ monetdb release amp_moldova_210
at this point the database is ok for usage in any app (AMP including)
if you have trashed a database and want it purged, you have to stop & delete it
$ monetdb stop amp_moldova_210
$ monetdb destroy amp_moldova_210
then goto step g for recreating the database.
Version pinning
MonetDB versions newer than Oct2014 SP4 are known to be very slow performing ETL (around 50x-70x slower than Oct2014SP4 - https://jira.dgf
). Versions tested to work tolerably well with AMP are SP2 (Jan2014) - SP4 (Oct2014). oundation.org/browse/AMP-21074 Whatever OS or variant
thereof you install AMP on, make sure that MonetDB is between Jan2014 and Oct2014 and that autoupdate is explicitly disabled for for
MonetDB.
To check whether versionlock is installed, run:
cat /etc/yum/pluginconf.d/versionlock.list
version pinning on CentOS & friends
# install specific version
yum install MonetDB{,-{client,server,stream,SQL-server5}}-11.19.15
# lock MonetDB
yum install yum-plugin-versionlock
yum versionlock MonetDB\*
Installing MonetDB on Windows
Download a proper version (see the warning above about versions!) from . https://www.monetdb.org/downloads/Windows/
Install it (typical Windows installer, next-next-next-finish).
Open M5Server.bat, located in the MonetDB installation folder, and edit the database name to match your PostgreSQL AMP database
name (amp_<servername>_<major version>).
Save M5Server.bat
Launch M5Server.bat.
Installing MonetMonitor
The guide can be found here: How to install MonetMonitor
Stopping MonetMonitor

1.
2.
3.
4.
5.
6.
7.
8.
9.
10.
11.
12.
13. a.
b.
On Windows: <MonetMonitor path>\yajsw-stable-11.11\bat\stopService.bat
On Linux: <MonetMonitor path>/yajsw-stable-11.11/bin/stopDaemon.sh
Depending on the installation, you might want to stop monetdbd itself: su <monetdb_user> -c monetdbd stop <monetdb_farm_path>
Uninstalling MonetMonitor
On Windows: <MonetMonitor path>\yajsw-stable-11.11\bat\uninstallService.bat
On Linux: <MonetMonitor path>/yajsw-stable-11.11/bin/uninstallDaemon.sh
Compiling from sources, Sci-L 6 guide
Here's a tiny guide on how to compile MonetDB from sources on Scientific Linux 6, clean install:
Download (with wget, for instance)https://www.monetdb.org/downloads/sources/Oct2014-SP4/MonetDB-11.19.15.tar.bz2
Create a directory (let's say monet-build), cd to it
tar xjf MonetDB-11.19.15.tar.bz2
cd MonetDB-11.19.15
sudo yum install gcc
sudo yum install bison
sudo yum install openssl-devel.x86_64
sudo yum install pcre-devel.x86_64
sudo yum install libxml2-devel.x86_64
./configure
make
sudo make install
clean up after yourself:
cd ../../
rm -rf monet-build
Installing Apache HTTP Server
Next: Installing git (version control)
This page details the installation of the Apache HTTP Server (the web server recommended for use with AMP).
For amp-cms (public portal) configurations, go here (and follow the instructions for the Apache part):
[Linux] Create a production environment for amp-cms (Public Portal v2.10)
[Windows] Create a production environment for amp-cms (Public Portal v2.10+)
For dev environments:
[Linux] Create a development environment for amp-cms (Public Portal v2.11)
Linux
Windows
Apache HTTP Server on Linux
Configuring Apache
It will be split in parts, followed by comments detailing each part.
First of all, httpd.conf:

httpd.conf part 1
#
# This is the main Apache server configuration file. It contains the
# configuration directives that give the server its instructions.
# See <URL:http://httpd.apache.org/docs/2.2/> for detailed information.
# In particular, see
# <URL:http://httpd.apache.org/docs/2.2/mod/directives.html>
# for a discussion of each configuration directive.
#
#
# Do NOT simply read the instructions in here without understanding
# what they do. They're here only as hints or reminders. If you are
unsure
# consult the online docs. You have been warned.
#
# The configuration directives are grouped into three basic sections:
# 1. Directives that control the operation of the Apache server process as
a
# whole (the 'global environment').
# 2. Directives that define the parameters of the 'main' or 'default'
server,
# which responds to requests that aren't handled by a virtual host.
# These directives also provide default values for the settings
# of all virtual hosts.
# 3. Settings for virtual hosts, which allow Web requests to be sent to
# different IP addresses or hostnames and have them handled by the
# same Apache server process.
#
# Configuration and logfile names: If the filenames you specify for many
# of the server's control files begin with "/" (or "drive:/" for Win32),
the
# server will use that explicit path. If the filenames do *not* begin
# with "/", the value of ServerRoot is prepended -- so "logs/foo.log"
# with ServerRoot set to "/etc/httpd" will be interpreted by the
# server as "/etc/httpd/logs/foo.log".
#
This is the introduction – it's there for a generic explanation of what this file is.
httpd.conf part 2
### Section 1: Global Environment
#
# The directives in this section affect the overall operation of Apache,
# such as the number of concurrent requests it can handle or where it
# can find its configuration files.
#
#
# Don't give away too much information about all the subcomponents
# we are running. Comment out this line if you don't mind remote sites

# finding out what major optional modules you are running
ServerTokens OS
#
# ServerRoot: The top of the directory tree under which the server's
# configuration, error, and log files are kept.
#
# NOTE! If you intend to place this on an NFS (or otherwise network)
# mounted filesystem then please read the LockFile documentation
# (available at
<URL:http://httpd.apache.org/docs/2.2/mod/mpm_common.html#lockfile>);
# you will save yourself a lot of trouble.
#
# Do NOT add a slash at the end of the directory path.
#
ServerRoot "/etc/httpd"
#
# PidFile: The file in which the server should record its process
# identification number when it starts. Note the PIDFILE variable in
# /etc/sysconfig/httpd must be set appropriately if this location is
# changed.
#
PidFile run/httpd.pid
#
# Timeout: The number of seconds before receives and sends time out.
#
Timeout 60
#
# KeepAlive: Whether or not to allow persistent connections (more than
# one request per connection). Set to "Off" to deactivate.
#
KeepAlive Off
#
# MaxKeepAliveRequests: The maximum number of requests to allow
# during a persistent connection. Set to 0 to allow an unlimited amount.
# We recommend you leave this number high, for maximum performance.
#
MaxKeepAliveRequests 100
#
# KeepAliveTimeout: Number of seconds to wait for the next request from the
# same client on the same connection.
#
KeepAliveTimeout 15
##
## Server-Pool Size Regulation (MPM specific)
##
# prefork MPM
# StartServers: number of server processes to start
# MinSpareServers: minimum number of server processes which are kept spare
# MaxSpareServers: maximum number of server processes which are kept spare
# ServerLimit: maximum value for MaxClients for the lifetime of the server
# MaxClients: maximum number of server processes allowed to start
# MaxRequestsPerChild: maximum number of requests a server process serves
<IfModule prefork.c>

StartServers 8
MinSpareServers 5
MaxSpareServers 20
ServerLimit 256
MaxClients 256
MaxRequestsPerChild 4000
</IfModule>
# worker MPM
# StartServers: initial number of server processes to start
# MaxClients: maximum number of simultaneous client connections
# MinSpareThreads: minimum number of worker threads which are kept spare
# MaxSpareThreads: maximum number of worker threads which are kept spare
# ThreadsPerChild: constant number of worker threads in each server process
# MaxRequestsPerChild: maximum number of requests a server process serves
<IfModule worker.c>
StartServers 4
MaxClients 300
MinSpareThreads 25
MaxSpareThreads 75
ThreadsPerChild 25
MaxRequestsPerChild 0
</IfModule>
#
# Listen: Allows you to bind Apache to specific IP addresses and/or
# ports, in addition to the default. See also the <VirtualHost>
# directive.
#
# Change this to Listen on specific IP addresses as shown below to
# prevent Apache from glomming onto all bound IP addresses (0.0.0.0)

#
#Listen 12.34.56.78:80
Listen 80
The directive specifies is shown in the response headers about the server. Not very relevant. is good enough. ServerTokens what OS
The directive specifies the base directory of the daemon – no need to change it. (/etc/httpd for RedHat-based configs, /etc/apache2ServerRoot
for Debian-based).
The doesn't really need to be changed either. It's the place where the server will record its process ID (PID). PidFile
The directive defines, in seconds, the amount of time that the server waits for receipts and transmissions during communications. ForTimeout
very slow connections, one might increase it, otherwise, 60 is sufficient.
The set on "on" might improve, to a tiny margin, speed and reduce CPU usage, but increases memory quite dramatically. In mostKeepAlive
configurations, it's kept "off", so this would be recommended here too.
The is usually set to 100, though is irrelevant if KeepAlive is off. Just in case, don't set it to 0 (infinite). MaxKeepAliveRequests
The is set to 15 by default, recommended to be set from 1 to 5 by most bloggers, yet again, irrelevant if it's off. KeepAliveTimeout
The Prefork and Worker parts are multi-processing modules (MPMs) – worker is used for high traffic server, prefork is used for environments that
require thread safe handling. AMP uses prefork. If you really feel like it, you can remove the part configuring Worker.
The directive specifies which is the port Apache listens to. Leave at 80. Listen
httpd.conf part 3
#
# Dynamic Shared Object (DSO) Support
#
# To be able to use the functionality of a module which was built as a DSO
you
# have to place corresponding `LoadModule' lines at this location so the
# directives contained in it are actually available _before_ they are used.
# Statically compiled modules (those listed by `httpd -l') do not need
# to be loaded here.
#
# Example:
# LoadModule foo_module modules/mod_foo.so
#
LoadModule auth_basic_module modules/mod_auth_basic.so
LoadModule auth_digest_module modules/mod_auth_digest.so
LoadModule authn_file_module modules/mod_authn_file.so
LoadModule authn_alias_module modules/mod_authn_alias.so
LoadModule authn_anon_module modules/mod_authn_anon.so
LoadModule authn_dbm_module modules/mod_authn_dbm.so
LoadModule authn_default_module modules/mod_authn_default.so
LoadModule authz_host_module modules/mod_authz_host.so
LoadModule authz_user_module modules/mod_authz_user.so
LoadModule authz_owner_module modules/mod_authz_owner.so
LoadModule authz_groupfile_module modules/mod_authz_groupfile.so
LoadModule authz_dbm_module modules/mod_authz_dbm.so
LoadModule authz_default_module modules/mod_authz_default.so
LoadModule ldap_module modules/mod_ldap.so
LoadModule authnz_ldap_module modules/mod_authnz_ldap.so
LoadModule include_module modules/mod_include.so

LoadModule log_config_module modules/mod_log_config.so
LoadModule logio_module modules/mod_logio.so
LoadModule env_module modules/mod_env.so
LoadModule ext_filter_module modules/mod_ext_filter.so
LoadModule mime_magic_module modules/mod_mime_magic.so
LoadModule expires_module modules/mod_expires.so
LoadModule deflate_module modules/mod_deflate.so
LoadModule headers_module modules/mod_headers.so
LoadModule usertrack_module modules/mod_usertrack.so
LoadModule setenvif_module modules/mod_setenvif.so
LoadModule mime_module modules/mod_mime.so
LoadModule dav_module modules/mod_dav.so
LoadModule status_module modules/mod_status.so
LoadModule autoindex_module modules/mod_autoindex.so
LoadModule info_module modules/mod_info.so
LoadModule dav_fs_module modules/mod_dav_fs.so
LoadModule vhost_alias_module modules/mod_vhost_alias.so
LoadModule negotiation_module modules/mod_negotiation.so
LoadModule dir_module modules/mod_dir.so
LoadModule actions_module modules/mod_actions.so
LoadModule speling_module modules/mod_speling.so
LoadModule userdir_module modules/mod_userdir.so
LoadModule alias_module modules/mod_alias.so
LoadModule substitute_module modules/mod_substitute.so
LoadModule rewrite_module modules/mod_rewrite.so
LoadModule proxy_module modules/mod_proxy.so
LoadModule proxy_balancer_module modules/mod_proxy_balancer.so
LoadModule proxy_ftp_module modules/mod_proxy_ftp.so
LoadModule proxy_http_module modules/mod_proxy_http.so
LoadModule proxy_ajp_module modules/mod_proxy_ajp.so
LoadModule proxy_connect_module modules/mod_proxy_connect.so
LoadModule cache_module modules/mod_cache.so
LoadModule suexec_module modules/mod_suexec.so
LoadModule disk_cache_module modules/mod_disk_cache.so
LoadModule cgi_module modules/mod_cgi.so
LoadModule version_module modules/mod_version.so
#
# The following modules are not loaded by default:
#
#LoadModule asis_module modules/mod_asis.so
#LoadModule authn_dbd_module modules/mod_authn_dbd.so
#LoadModule cern_meta_module modules/mod_cern_meta.so
#LoadModule cgid_module modules/mod_cgid.so
#LoadModule dbd_module modules/mod_dbd.so
#LoadModule dumpio_module modules/mod_dumpio.so
#LoadModule filter_module modules/mod_filter.so
#LoadModule ident_module modules/mod_ident.so
#LoadModule log_forensic_module modules/mod_log_forensic.so
#LoadModule unique_id_module modules/mod_unique_id.so
#
#
# Load config files from the config directory "/etc/httpd/conf.d".
#

Include conf.d/*.conf
#
# ExtendedStatus controls whether Apache will generate "full" status
# information (ExtendedStatus On) or just basic information (ExtendedStatus
# Off) when the "server-status" handler is called. The default is Off.
#
#ExtendedStatus On
#
# If you wish httpd to run as a different user or group, you must run
# httpd as root initially and it will switch.
#
# User/Group: The name (or #number) of the user/group to run httpd as.
# . On SCO (ODT 3) use "User nouser" and "Group nogroup".
# . On HPUX you may not be able to use shared memory as nobody, and the
# suggested workaround is to create a user www and use that user.
# NOTE that some kernels refuse to setgid(Group) or semctl(IPC_SET)
# when the value of (unsigned)Group is above 60000;
# don't use Group #-1 on these systems!
#
User apache

Group apache
Some modules are used, some unused are commented out. Unless you know really well what you're doing, at your own risk, modify this section –
otherwise, leave as it is here.
The is there to include vhost configurations (one server might hold several different virtual hosts). This implies two things –Include conf.d/*.conf
one, everything under {apache_home}/conf.d will be included, and second, you can keep vhost-specific settings separated.
The parameter can be set to 'Off' in an explicit manner, or just commented out. Better set to 'Off'. ExtendedStatus
The and parameters imply who is the user to run the httpd daemon. It's certainly not advised to run it as 'root', and it's cleaner if youUser Group
run it as the 'apache' user. Just leave it as 'apache'.
httpd.conf part 4
### Section 2: 'Main' server configuration
#
# The directives in this section set up the values used by the 'main'
# server, which responds to any requests that aren't handled by a
# <VirtualHost> definition. These values also provide defaults for
# any <VirtualHost> containers you may define later in the file.
#
# All of these directives may appear inside <VirtualHost> containers,
# in which case these default settings will be overridden for the
# virtual host being defined.
#
#
# ServerAdmin: Your address, where problems with the server should be
# e-mailed. This address appears on some server-generated pages, such
# as error documents. e.g. admin@your-domain.com
#
ServerAdmin root@localhost
#
# ServerName gives the name and port that the server uses to identify
itself.
# This can often be determined automatically, but we recommend you specify
# it explicitly to prevent problems during startup.
#
# If this is not set to valid DNS name for your host, server-generated
# redirections will not work. See also the UseCanonicalName directive.
#
# If your host doesn't have a registered DNS name, enter its IP address
here.
# You will have to access it by its address anyway, and this will make
# redirections work in a sensible way.
#
#ServerName www.example.com:80
ServerName 89.32.239.51
#
# UseCanonicalName: Determines how Apache constructs self-referencing
# URLs and the SERVER_NAME and SERVER_PORT variables.

# When set "Off", Apache will use the Hostname and Port supplied
# by the client. When set "On", Apache will use the value of the
# ServerName directive.
#
UseCanonicalName Off
#
# DocumentRoot: The directory out of which you will serve your
# documents. By default, all requests are taken from this directory, but
# symbolic links and aliases may be used to point to other locations.
#
DocumentRoot "/var/www/html"
#
# Each directory to which Apache has access can be configured with respect
# to which services and features are allowed and/or disabled in that
# directory (and its subdirectories).
#
# First, we configure the "default" to be a very restrictive set of
# features.
#
<Directory />

Options FollowSymLinks
AllowOverride None
</Directory>
The parameter specifies the email that is shown to the user if an Apache problem occurred while rendering the page. ServerAdmin root@localho
means you might receive mails only from local users (on the server) and read them with the unix app as . You may specify a realst mail root
email, if there is such a request from the client.
The parameter defines the request scheme, hostname and port – used when creating redirection URLs. It's also used to uniquelyServerName
identify a virtual host. Technically, you should specify the server name here – for instance, demo.ampsite.net:80. If is set toUseCanonicalName
Off, ServerName loses a part of its relevance.
The parameter should be set to Off. UseCanonicalName
The "/var/www/html" is not relevant due to the nature of the way content is supplied to the server. Leave it at that.DocumentRoot
The set of directives is there for ignoring .htaccess (we don't have a static webserver) and allowing symlinks in work. <Directory />
httpd.conf part 5
#
# Note that from this point forward you must specifically allow
# particular features to be enabled - so if something's not working as
# you might expect, make sure that you have specifically enabled it
# below.
#
#
# This should be changed to whatever you set DocumentRoot to.
#
<Directory "/var/www/html">
#
# Possible values for the Options directive are "None", "All",
# or any combination of:
# Indexes Includes FollowSymLinks SymLinksifOwnerMatch ExecCGI MultiViews
#
# Note that "MultiViews" must be named *explicitly* --- "Options All"
# doesn't give it to you.
#
# The Options directive is both complicated and important. Please see
# http://httpd.apache.org/docs/2.2/mod/core.html#options
# for more information.
#
Options Indexes FollowSymLinks
#
# AllowOverride controls what directives may be placed in .htaccess files.
# It can be "All", "None", or any combination of the keywords:
# Options FileInfo AuthConfig Limit
#
AllowOverride None
#
# Controls who can get stuff from this server.
#

Order allow,deny
Allow from all
</Directory>
#
# UserDir: The name of the directory that is appended onto a user's home
# directory if a ~user request is received.
#
# The path to the end user account 'public_html' directory must be
# accessible to the webserver userid. This usually means that ~userid
# must have permissions of 711, ~userid/public_html must have permissions
# of 755, and documents contained therein must be world-readable.
# Otherwise, the client will only receive a "403 Forbidden" message.
#
# See also: http://httpd.apache.org/docs/misc/FAQ.html#forbidden
#
<IfModule mod_userdir.c>
#
# UserDir is disabled by default since it can confirm the presence
# of a username on the system (depending on home directory
# permissions).
#
UserDir disabled
#
# To enable requests to /~user/ to serve the user's public_html
# directory, remove the "UserDir disabled" line above, and uncomment
# the following line instead:
#
#UserDir public_html

</IfModule>
This section describes what's happening in /var/www/html. Just copy this.
httpd.conf part 6
#
# DirectoryIndex: sets the file that Apache will serve if a directory
# is requested.
#
# The index.html.var file (a type-map) is used to deliver content-
# negotiated documents. The MultiViews Option can be used for the
# same purpose, but it is much slower.
#
DirectoryIndex index.html index.html.var
httpd.conf part 7
#
# DirectoryIndex: sets the file that Apache will serve if a directory
# is requested.
#
# The index.html.var file (a type-map) is used to deliver content-
# negotiated documents. The MultiViews Option can be used for the
# same purpose, but it is much slower.
#
DirectoryIndex index.html index.html.var
#
# AccessFileName: The name of the file to look for in each directory
# for additional configuration directives. See also the AllowOverride
# directive.
#
AccessFileName .htaccess
#
# The following lines prevent .htaccess and .htpasswd files from being
# viewed by Web clients.
#
<Files ~ "^\.ht">
Order allow,deny
Deny from all
Satisfy All
</Files>
#
# TypesConfig describes where the mime.types file (or equivalent) is
# to be found.
#

TypesConfig /etc/mime.types
#
# DefaultType is the default MIME type the server will use for a document
# if it cannot otherwise determine one, such as from filename extensions.
# If your server contains mostly text or HTML documents, "text/plain" is
# a good value. If most of your content is binary, such as applications
# or images, you may want to use "application/octet-stream" instead to
# keep browsers from trying to display binary files as though they are
# text.
#
DefaultType text/plain
#
# The mod_mime_magic module allows the server to use various hints from the
# contents of the file itself to determine its type. The MIMEMagicFile
# directive tells the module where the hint definitions are located.
#
<IfModule mod_mime_magic.c>
# MIMEMagicFile /usr/share/magic.mime
MIMEMagicFile conf/magic
</IfModule>
#
# HostnameLookups: Log the names of clients or just their IP addresses
# e.g., www.apache.org (on) or 204.62.129.132 (off).
# The default is off because it'd be overall better for the net if people
# had to knowingly turn this feature on, since enabling it means that
# each client request will result in AT LEAST one lookup request to the
# nameserver.
#

HostnameLookups Off
This section revolves around avoiding showing the .htaccess file to browsers, and content type binding.
httpd.conf part 8
#
# ErrorLog: The location of the error log file.
# If you do not specify an ErrorLog directive within a <VirtualHost>
# container, error messages relating to that virtual host will be
# logged here. If you *do* define an error logfile for a <VirtualHost>
# container, that host's errors will be logged there and not here.
#
ErrorLog logs/error_log
#
# LogLevel: Control the number of messages logged to the error_log.
# Possible values include: debug, info, notice, warn, error, crit,
# alert, emerg.
#
LogLevel warn
#
# The following directives define some format nicknames for use with
# a CustomLog directive (see below).
#
LogFormat "%h %l %u %t \"%r\" %>s %b \"%{Referer}i\" \"%{User-Agent}i\""
combined
LogFormat "%h %l %u %t \"%r\" %>s %b" common
LogFormat "%{Referer}i -> %U" referer
LogFormat "%{User-agent}i" agent
# "combinedio" includes actual counts of actual bytes received (%I) and
sent (%O); this
# requires the mod_logio module to be loaded.
#LogFormat "%h %l %u %t \"%r\" %>s %b \"%{Referer}i\" \"%{User-Agent}i\" %I
%O" combinedio
This configures logfile format and location.
httpd.conf part 9
# For a single logfile with access, agent, and referer information
# (Combined Logfile Format), use the following directive:
#
CustomLog logs/access_log combined
#
# Optionally add a line containing the server version and virtual host
# name to server-generated pages (internal error documents, FTP directory

# listings, mod_status and mod_info output etc., but not CGI generated
# documents or custom error documents).
# Set to "EMail" to also include a mailto: link to the ServerAdmin.
# Set to one of: On | Off | EMail
#
ServerSignature On
#
# Aliases: Add here as many aliases as you need (with no limit). The format
is
# Alias fakename realname
#
# Note that if you include a trailing / on fakename then the server will
# require it to be present in the URL. So "/icons" isn't aliased in this
# example, only "/icons/". If the fakename is slash-terminated, then the
# realname must also be slash terminated, and if the fakename omits the
# trailing slash, the realname must also omit it.
#
# We include the /icons/ alias for FancyIndexed directory listings. If you
# do not use FancyIndexing, you may comment this out.
#
Alias /icons/ "/var/www/icons/"
<Directory "/var/www/icons">
Options Indexes MultiViews FollowSymLinks
AllowOverride None
Order allow,deny
Allow from all
</Directory>
#
# WebDAV module configuration section.
#
<IfModule mod_dav_fs.c>
# Location of the WebDAV lock database.
DAVLockDB /var/lib/dav/lockdb
</IfModule>
#
# ScriptAlias: This controls which directories contain server scripts.
# ScriptAliases are essentially the same as Aliases, except that
# documents in the realname directory are treated as applications and
# run by the server when requested rather than as documents sent to the
client.
# The same rules about trailing "/" apply to ScriptAlias directives as to
# Alias.
#
ScriptAlias /cgi-bin/ "/var/www/cgi-bin/"
#
# "/var/www/cgi-bin" should be changed to whatever your ScriptAliased
# CGI directory exists, if you have that configured.
#
<Directory "/var/www/cgi-bin">
AllowOverride None
Options None
Order allow,deny
Allow from all

</Directory>
#
# IndexOptions: Controls the appearance of server-generated directory
# listings.
#
IndexOptions FancyIndexing VersionSort NameWidth=* HTMLTable Charset=UTF-8
#
# AddIcon* directives tell the server which icon to show for different
# files or filename extensions. These are only displayed for
# FancyIndexed directories.
#
AddIconByEncoding (CMP,/icons/compressed.gif) x-compress x-gzip
AddIconByType (TXT,/icons/text.gif) text/*
AddIconByType (IMG,/icons/image2.gif) image/*
AddIconByType (SND,/icons/sound2.gif) audio/*
AddIconByType (VID,/icons/movie.gif) video/*
AddIcon /icons/binary.gif .bin .exe
AddIcon /icons/binhex.gif .hqx
AddIcon /icons/tar.gif .tar
AddIcon /icons/world2.gif .wrl .wrl.gz .vrml .vrm .iv
AddIcon /icons/compressed.gif .Z .z .tgz .gz .zip
AddIcon /icons/a.gif .ps .ai .eps
AddIcon /icons/layout.gif .html .shtml .htm .pdf
AddIcon /icons/text.gif .txt
AddIcon /icons/c.gif .c
AddIcon /icons/p.gif .pl .py
AddIcon /icons/f.gif .for
AddIcon /icons/dvi.gif .dvi
AddIcon /icons/uuencoded.gif .uu
AddIcon /icons/script.gif .conf .sh .shar .csh .ksh .tcl
AddIcon /icons/tex.gif .tex
AddIcon /icons/bomb.gif core
AddIcon /icons/back.gif ..
AddIcon /icons/hand.right.gif README
AddIcon /icons/folder.gif ^^DIRECTORY^^
AddIcon /icons/blank.gif ^^BLANKICON^^
#
# DefaultIcon is which icon to show for files which do not have an icon
# explicitly set.
#
DefaultIcon /icons/unknown.gif
#
# AddDescription allows you to place a short description after a file in
# server-generated indexes. These are only displayed for FancyIndexed
# directories.
# Format: AddDescription "description" filename
#
#AddDescription "GZIP compressed document" .gz
#AddDescription "tar archive" .tar
#AddDescription "GZIP compressed tar archive" .tgz
#
# ReadmeName is the name of the README file the server will look for by

# default, and append to directory listings.
#
# HeaderName is the name of a file which should be prepended to
# directory indexes.
ReadmeName README.html
HeaderName HEADER.html
#
# IndexIgnore is a set of filenames which directory indexing should ignore
# and not include in the listing. Shell-style wildcarding is permitted.
#
IndexIgnore .??* *~ *# HEADER* README* RCS CVS *,v *,t

This section doesn't contain anything AMP-specific – details location of the cgi-bin folder (containing Perl scripts – we don't really need that, but
yet again, our server isn't php-based).
IndexOption describes the appearance of index pages – when a folder is accessed and its direct contents are shown (that's typical for software
release folders).
Files are also enhanced with file icons, described here.
httpd.conf part 10
#
# DefaultLanguage and AddLanguage allows you to specify the language of
# a document. You can then use content negotiation to give a browser a
# file in a language the user can understand.
#
# Specify a default language. This means that all data
# going out without a specific language tag (see below) will
# be marked with this one. You probably do NOT want to set
# this unless you are sure it is correct for all cases.
#
# * It is generally better to not mark a page as
# * being a certain language than marking it with the wrong
# * language!
#
# DefaultLanguage nl
#
# Note 1: The suffix does not have to be the same as the language
# keyword --- those with documents in Polish (whose net-standard
# language code is pl) may wish to use "AddLanguage pl .po" to
# avoid the ambiguity with the common suffix for perl scripts.
#
# Note 2: The example entries below illustrate that in some cases
# the two character 'Language' abbreviation is not identical to
# the two character 'Country' code for its country,
# E.g. 'Danmark/dk' versus 'Danish/da'.
#
# Note 3: In the case of 'ltz' we violate the RFC by using a three char
# specifier. There is 'work in progress' to fix this and get
# the reference data for rfc1766 cleaned up.
#
# Catalan (ca) - Croatian (hr) - Czech (cs) - Danish (da) - Dutch (nl)
# English (en) - Esperanto (eo) - Estonian (et) - French (fr) - German (de)
# Greek-Modern (el) - Hebrew (he) - Italian (it) - Japanese (ja)
# Korean (ko) - Luxembourgeois* (ltz) - Norwegian Nynorsk (nn)
# Norwegian (no) - Polish (pl) - Portugese (pt)
# Brazilian Portuguese (pt-BR) - Russian (ru) - Swedish (sv)
# Simplified Chinese (zh-CN) - Spanish (es) - Traditional Chinese (zh-TW)
#
AddLanguage ca .ca

AddLanguage cs .cz .cs
AddLanguage da .dk
AddLanguage de .de
AddLanguage el .el
AddLanguage en .en
AddLanguage eo .eo
AddLanguage es .es
AddLanguage et .et
AddLanguage fr .fr
AddLanguage he .he
AddLanguage hr .hr
AddLanguage it .it
AddLanguage ja .ja
AddLanguage ko .ko
AddLanguage ltz .ltz
AddLanguage nl .nl
AddLanguage nn .nn
AddLanguage no .no
AddLanguage pl .po
AddLanguage pt .pt
AddLanguage pt-BR .pt-br
AddLanguage ru .ru
AddLanguage sv .sv
AddLanguage zh-CN .zh-cn
AddLanguage zh-TW .zh-tw
# LanguagePriority allows you to give precedence to some languages
# in case of a tie during content negotiation.
#
# Just list the languages in decreasing order of preference. We have
# more or less alphabetized them here. You probably want to change this.
#
LanguagePriority en ca cs da de el eo es et fr he hr it ja ko ltz nl nn no
pl pt pt-BR ru sv zh-CN zh-TW
#
# ForceLanguagePriority allows you to serve a result page rather than
# MULTIPLE CHOICES (Prefer) [in case of a tie] or NOT ACCEPTABLE (Fallback)
# [in case no accepted languages matched the available variants]
#
ForceLanguagePriority Prefer Fallback
#
# Specify a default charset for all content served; this enables
# interpretation of all content as UTF-8 by default. To use the
# default browser choice (ISO-8859-1), or to allow the META tags
# in HTML content to override this choice, comment out this
# directive:
#
AddDefaultCharset UTF-8
#
# AddType allows you to add to or override the MIME configuration
# file mime.types for specific file types.
#
#AddType application/x-tar .tgz
#

# AddEncoding allows you to have certain browsers uncompress
# information on the fly. Note: Not all browsers support this.
# Despite the name similarity, the following Add* directives have nothing
# to do with the FancyIndexing customization directives above.
#
#AddEncoding x-compress .Z
#AddEncoding x-gzip .gz .tgz
# If the AddEncoding directives above are commented-out, then you
# probably should define those extensions to indicate media types:
#
AddType application/x-compress .Z
AddType application/x-gzip .gz .tgz
#
# MIME-types for downloading Certificates and CRLs
#
AddType application/x-x509-ca-cert .crt
AddType application/x-pkcs7-crl .crl

The above section maps languages to content language. This is pretty typical to most httpd installations, and there's no real reason to mess with
it. It wouldn't affect the way multilingual works on AMP.
httpd.conf part 11
#
# For type maps (negotiated resources):
# (This is enabled by default to allow the Apache "It Worked" page
# to be distributed in multiple languages.)
#
AddHandler type-map var
#
# Filters allow you to process content before it is sent to the client.
#
# To parse .shtml files for server-side includes (SSI):
# (You will also need to add "Includes" to the "Options" directive.)
#
AddType text/html .shtml
AddOutputFilter INCLUDES .shtml
#
# Action lets you define media types that will execute a script whenever
# a matching file is called. This eliminates the need for repeated URL
# pathnames for oft-used CGI file processors.
# Format: Action media/type /cgi-script/location
# Format: Action handler-name /cgi-script/location
#
#
# Customizable error responses come in three flavors:
# 1) plain text 2) local redirects 3) external redirects
#
# Some examples:
#ErrorDocument 500 "The server made a boo boo."
#ErrorDocument 404 /missing.html
#ErrorDocument 404 "/cgi-bin/missing_handler.pl"
#ErrorDocument 402 http://www.example.com/subscription_info.html
#
#
# Putting this all together, we can internationalize error responses.
#
# We use Alias to redirect any /error/HTTP_<error>.html.var response to
# our collection of by-error message multi-language collections. We use
# includes to substitute the appropriate text.
#
# You can modify the messages' appearance without changing any of the
# default HTTP_<error>.html.var files by adding the line:
#
# Alias /error/include/ "/your/include/path/"
#
# which allows you to create your own set of files by starting with the

# /var/www/error/include/ files and
# copying them to /your/include/path/, even on a per-VirtualHost basis.
#
Alias /error/ "/var/www/error/"
<IfModule mod_negotiation.c>
<IfModule mod_include.c>
<Directory "/var/www/error">
AllowOverride None
Options IncludesNoExec
AddOutputFilter Includes html
AddHandler type-map var
Order allow,deny
Allow from all
LanguagePriority en es de fr
ForceLanguagePriority Prefer Fallback
</Directory>
# ErrorDocument 400 /error/HTTP_BAD_REQUEST.html.var
# ErrorDocument 401 /error/HTTP_UNAUTHORIZED.html.var
# ErrorDocument 403 /error/HTTP_FORBIDDEN.html.var
# ErrorDocument 404 /error/HTTP_NOT_FOUND.html.var
# ErrorDocument 405 /error/HTTP_METHOD_NOT_ALLOWED.html.var
# ErrorDocument 408 /error/HTTP_REQUEST_TIME_OUT.html.var
# ErrorDocument 410 /error/HTTP_GONE.html.var
# ErrorDocument 411 /error/HTTP_LENGTH_REQUIRED.html.var
# ErrorDocument 412 /error/HTTP_PRECONDITION_FAILED.html.var
# ErrorDocument 413 /error/HTTP_REQUEST_ENTITY_TOO_LARGE.html.var
# ErrorDocument 414 /error/HTTP_REQUEST_URI_TOO_LARGE.html.var
# ErrorDocument 415 /error/HTTP_UNSUPPORTED_MEDIA_TYPE.html.var
# ErrorDocument 500 /error/HTTP_INTERNAL_SERVER_ERROR.html.var
# ErrorDocument 501 /error/HTTP_NOT_IMPLEMENTED.html.var
# ErrorDocument 502 /error/HTTP_BAD_GATEWAY.html.var
# ErrorDocument 503 /error/HTTP_SERVICE_UNAVAILABLE.html.var
# ErrorDocument 506 /error/HTTP_VARIANT_ALSO_VARIES.html.var
</IfModule>
</IfModule>

Error pages should be customized AMP-side (on Tomcat). Therefore, this part is mostly ignored (unless something is badly misconfigured, or
Tomcat became unresponsive).
httpd.conf part 12
#
# The following directives modify normal HTTP response behavior to
# handle known problems with browser implementations.
#
BrowserMatch "Mozilla/2" nokeepalive
BrowserMatch "MSIE 4\.0b2;" nokeepalive downgrade-1.0 force-response-1.0
BrowserMatch "RealPlayer 4\.0" force-response-1.0
BrowserMatch "Java/1\.0" force-response-1.0
BrowserMatch "JDK/1\.0" force-response-1.0
#
# The following directive disables redirects on non-GET requests for
# a directory that does not include the trailing slash. This fixes a
# problem with Microsoft WebFolders which does not appropriately handle
# redirects for folders with DAV methods.
# Same deal with Apple's DAV filesystem and Gnome VFS support for DAV.
#
BrowserMatch "Microsoft Data Access Internet Publishing Provider"
redirect-carefully
BrowserMatch "MS FrontPage" redirect-carefully
BrowserMatch "^WebDrive" redirect-carefully
BrowserMatch "^WebDAVFS/1.[0123]" redirect-carefully
BrowserMatch "^gnome-vfs/1.0" redirect-carefully
BrowserMatch "^XML Spy" redirect-carefully
BrowserMatch "^Dreamweaver-WebDAV-SCM1" redirect-carefully
AddType application/x-shockwave-flash .swf
AddHandler application/x-shockwave-flash .swf
This is the end of httpd.conf.
Next, there are different ways to configure.
Here's a working example:
httpd.conf part 13
NameVirtualHost *:80
<VirtualHost *:80>
ServerName moldova.ampsite.net
Redirect permanent / http://amp.gov.md/
</VirtualHost>

<VirtualHost *:80>
ServerName amp.gov.md
ServerAlias localhost
RewriteEngine On
# Deny robots access to some URLs (some robots do not read robots.txt or
cache its content for a period of time)
RewriteCond %{HTTP_USER_AGENT} \bBaiduspider [NC,OR]
RewriteCond %{HTTP_USER_AGENT} \bGooglebot [NC,OR]
RewriteCond %{HTTP_USER_AGENT} \bAhrefsBot [NC,OR]
RewriteCond %{HTTP_USER_AGENT} \bbingbot [NC,OR]
RewriteCond %{HTTP_USER_AGENT} \bYandex [NC,OR]
RewriteCond %{HTTP_USER_AGENT} \bSosospider [NC,OR]
RewriteCond %{HTTP_USER_AGENT} \bExabot [NC,OR]
RewriteCond %{HTTP_USER_AGENT} \bDotBot [NC,OR]
RewriteCond %{HTTP_USER_AGENT} \bSlurp [NC,OR]
RewriteCond %{HTTP_USER_AGENT} \bSogou [NC]
RewriteRule
^(.*)(saikuui|viewNewAdvancedReport|xlsExport|pdfExport|csvExport|wicket|e
xportActToWord|showActivityLog|contentrepository|esrigis|launchDashboard|j
s|repository|css|script|portal/activities)(.*)$ empty.txt [L]
#Enable this rule instead to deny robots access completely
#RewriteRule ^(.*)$ empty.txt
ProxyRequests Off
ProxyPreserveHost On
AddOutputFilterByType DEFLATE text/html text/xml text/plain
text/css text/javascript application/x-javascript application/json
<IfModule mod_expires.c>
ExpiresActive on
#ExpiresDefault A0
#ExpiresDefault "access plus 0 seconds"
ExpiresByType image/gif "access plus 12 hours 1 seconds"
ExpiresByType image/png "access plus 12 hours 1 seconds"
ExpiresByType text/css "access plus 12 hours 1 seconds"
ExpiresByType application/x-javascript "access plus 12 hours 1
seconds"
ExpiresByType text/javascript "access plus 12 hours 1 seconds"
ExpiresByType image/jpeg "access plus 12 hours 1 seconds"
</IfModule>
<LocationMatch "(\.(do))|(^/$)">
Header Set Cache-Control "max-age=0, no-store, no-cache"
</LocationMatch>
CustomLog "/var/log/httpd/custom-access-mold-prod.log" combined
<IfModule proxy_module>
<Proxy *>
Order deny,allow
Allow from *
</Proxy>

#JkMount /* worker1
<IfModule proxy_ajp_module>
# TODO: confirm if we need ProxyVia On, seems needed only when
ProxyRequests On is used, but we MUST have "ProxyRequests Off"
ProxyVia On
ProxyPass /arcgis http://localhost:6080/arcgis
ProxyPassReverse /arcgis http://localhost:6080/arcgis
ProxyPass / ajp://localhost:8009/
ProxyPassReverse / ajp://localhost:8009/
ProxyPassReverseCookiePath / /
</IfModule>
<Location />
Order allow,deny
Allow from all
</Location>
</IfModule>

</VirtualHost>
Apache HTTP Server on Windows
Download Apache HTTP Server
The Apache HTTP Server Project itself does not provide binary releases of software, only source code..
You can obtain a binary package from numerous binary distributions available like:
ApacheHaus
Apache Lounge
BitNami WAMP Stack
WampServer
XAMPP
Customizing Apache for Windows: Apache is configured by the files in the subdirectory. These are the same files used to configureconf
the Unix version, but there are a few different directives for Apache on Windows.
Running Apache as a Service:
Apache comes with a utility called the Apache Service Monitor. With it you can see and manage the state of all installed Apache services on any
machine on your network. To be able to manage an Apache service with the monitor, you have to first install the service (either automatically via
the installation or manually).
You can install Apache as a Windows NT service as follows from the command prompt at the Apache subdirectory:bin
httpd.exe -k install
If you need to specify the name of the service you want to install, use the following command. You have to do this if you have several different
service installations of Apache on your computer. If you specify a name during the install, you have to also specify it during any other -k operation.
httpd.exe -k install -n "MyServiceName"
If you need to have specifically named configuration files for different services, you must use this:

httpd.exe -k install -n "MyServiceName" -f "c:\files\my.conf"
If you use the first command without any special parameters except , the service will be called and the configuration will-k install Apache2.4
be assumed to be .conf\httpd.conf
Removing an Apache service is easy. Just use:
httpd.exe -k uninstall
Testing the Installation
After starting Apache (either in a console window or as a service) it will be listening on port 80 (unless you changed the directive in theListen
configuration files or installed Apache only for the current user). To connect to the server and access the default page, launch a browser and enter
this URL:
http://localhost/
Apache should respond with a welcome page and you should see "It Works!". If nothing happens or you get an error, look in the fileerror.log
in the subdirectory. If your host is not connected to the net, or if you have serious problems with your DNS (Domain Name Service)logs
configuration, you may have to use this URL:
http://127.0.0.1/
If you happen to be running Apache on an alternate port, you need to explicitly put that in the URL:
http://127.0.0.1:8080/
Once your basic installation is working, you should configure it properly by editing the files in the subdirectory. Again, if you change theconf
configuration of the Windows NT service for Apache, first attempt to start it from the command line to make sure that the service starts with no
errors.
Because Apache share the same port with another TCP/IP application, you may need to stop, uninstall or reconfigure certain othercannot
services before running Apache. These conflicting services include other WWW servers, some firewall implementations, and even some client
applications (such as Skype) which will use port 80 to attempt to bypass firewall issues.
Windows server troubleshooting
Installing Apache on Windows with SSL can cause some inestabilities, slowness and connection lost (we had these problems on Timor-Leste), if
you experience these symptoms, the only way to solve them is restarting Apache and there are no useful error messages on event viewer/apache
logs then these settings could help you:
AcceptFilter http none
AcceptFilter https none
EnableSendfile Off
EnableMMAP off
These changes where made in httpd.conf file.
RedHat guide for Apache HTTP Server Configuration - mirror


Chapter 2. The Apache HTTP Server
2.1. The Apache HTTP Server and SELinux2.2. Types2.3. Booleans2.4. Configuration examples2.4.1. Running a static site2.4.2.
Sharing NFS and CIFS volumes2.4.3. Sharing files between services2.4.4. Changing port numbers

The Apache HTTP Server provides an open-source HTTP server with the current HTTP standards. [3]
In Red Hat Enterprise Linux, the package provides the Apache HTTP Server. Run the command to see if the packagehttpd rpm -q httpd httpd
is installed. If it is not installed and you want to use the Apache HTTP Server, run the following command as the root user to install it:
~]# yum install httpd

2.1. The Apache HTTP Server and SELinux

1.
2.
3.
1.
2.
3.
4.
When SELinux is enabled, the Apache HTTP Server ( ) runs confined by default. Confined processes run in their own domains, and arehttpd
separated from other confined processes. If a confined process is compromised by an attacker, depending on SELinux policy configuration, an
attacker's access to resources and the possible damage they can do is limited. The following example demonstrates the processeshttpd
running in their own domain. This example assumes the , , and packages arehttpd setroubleshoot setroubleshoot-server policycoreutils-python
installed:
Run the command to confirm SELinux is running in enforcing mode:getenforce
~]$ getenforce
Enforcing
The command returns when SELinux is running in enforcing mode.getenforce Enforcing
Run the command as the root user to start :service httpd start httpd
~]# service httpd start
Starting httpd: [ OK ]
Run the command to view the processes:ps -eZ | grep httpd httpd
~]$ ps -eZ | grep httpd
unconfined_u:system_r:httpd_t:s0 ? 00:00:00 httpd2850
unconfined_u:system_r:httpd_t:s0 ? 00:00:00 httpd2852
unconfined_u:system_r:httpd_t:s0 ? 00:00:00 httpd2853
unconfined_u:system_r:httpd_t:s0 ? 00:00:00 httpd2854
unconfined_u:system_r:httpd_t:s0 ? 00:00:00 httpd2855
unconfined_u:system_r:httpd_t:s0 ? 00:00:00 httpd2856
unconfined_u:system_r:httpd_t:s0 ? 00:00:00 httpd2857
unconfined_u:system_r:httpd_t:s0 ? 00:00:00 httpd2858
unconfined_u:system_r:httpd_t:s0 ? 00:00:00 httpd2859
The SELinux context associated with the processes is . The second last part of thehttpd unconfined_u:system_r:httpd_t:s0
context, , is the type. A type defines a domain for processes and a type for files. In this case, the processes are runninghttpd_t httpd
in the domain.httpd_t
SELinux policy defines how processes running in confined domains (such as ) interact with files, other processes, and the system inhttpd_t
general. Files must be labeled correctly to allow access to them. For example, can read files labeled with the httpd httpd httpd_sys_conten
type, but cannot write to them, even if Linux (DAC) permissions allow write access. Booleans must be enabled to allow certain behavior, sucht_t
as allowing scripts network access, allowing access to NFS and CIFS volumes, and being allowed to execute Common Gatewayhttpd httpd
Interface (CGI) scripts.
When is configured so listens on a port other than TCP ports 80, 443, 488, 8008, 8009, or 8443, the /etc/httpd/conf/httpd.conf httpd s
command must be used to add the new port number to SELinux policy configuration. The following example demonstratesemanage port
configuring to listen on a port that is not already defined in SELinux policy configuration for , and, as a consequence, failinghttpd httpd httpd
to start. This example also demonstrates how to then configure the SELinux system to allow to successfully listen on a non-standard porthttpd
that is not already defined in the policy. This example assumes the package is installed. Run each command in the example as the roothttpd
user: Run the command to confirm is not running:service httpd status httpd
~]# service httpd status
httpd is stopped
If the output differs, run the command to stop the process:service httpd stop
~]# service httpd stop
Stopping httpd: [ OK ]
Run the command to view the ports SELinux allows to listen on:semanage port -l | grep -w http_port_t httpd
~]# semanage port -l | grep -w http_port_t
http_port_t tcp 80, 443, 488, 8008, 8009, 8443
Edit as the root user. Configure the option so it lists a port that is not configured in SELinux/etc/httpd/conf/httpd.conf Listen
policy configuration for . In this example, is configured to listen on port 12345:httpd httpd
# Change this to Listen on specific IP addresses as shown below to
# prevent Apache from glomming onto all bound IP addresses (0.0.0.0)
#
#Listen 12.34.56.78:80
Listen 127.0.0.1:12345
Run the command to start :service httpd start httpd
~]# service httpd start
Starting httpd: (13)Permission denied: make_sock: could not bind to address 127.0.0.1:12345
no listening sockets available, shutting down
Unable to open logs [FAILED]

4.
5.
6.
7.
8.
An SELinux denial similar to the following is logged:
setroubleshoot: SELinux is preventing the httpd (httpd_t) from binding to port 12345. For complete
SELinux messages. run sealert -l f18bca99-db64-4c16-9719-1db89f0d8c77
For SELinux to allow to listen on port 12345, as used in this example, the following command is required:httpd
~]# semanage port -a -t http_port_t -p tcp 12345
Run again to start and have it listen on the new port:service httpd start httpd
~]# service httpd start
Starting httpd: [ OK ]
Now that SELinux has been configured to allow to listen on a non-standard port (TCP 12345 in this example), startshttpd httpd
successfully on this port.
To prove that is listening and communicating on TCP port 12345, open a telnet connection to the specified port and issue a HTTPhttpd
GET command, as follows:
~]# telnet localhost 12345
Trying 127.0.0.1...
Connected to localhost.
Escape character is '^]'.
GET / HTTP/1.0
HTTP/1.1 200 OK
Date: Wed, 02 Dec 2009 14:36:34 GMT
Server: Apache/2.2.13 (Red Hat)
Accept-Ranges: bytes
Content-Length: 3985
Content-Type: text/html; charset=UTF-8
[...continues...]
[3] Refer to the page for more information.Apache HTTP Server Project
Reverse proxy article mirror
This is a mirror of the article originally hosted at , in the case it becomeshttp://linuxnextgen.blogspot.ru/2012/01/reverse-proxy-in-apache.html
inaccessible or gets otherwise deleted:
Introduction:
A reverse proxy is a gateway for servers, it can be used whenever multiple web servers must be accessible via a single public IP address.
The web servers listen on different ports in the same machine, with the same local IP address or, possibly, on different machines and different
local IP addresses altogether. The reverse proxy analyses each incoming call and delivers it to the right server within the local area network.
Release:
RedHat Enterprise Linux
Apache 2.x
Problem:
Configure Apache webserver as a reverse proxy server
Solution:
1) Install the required rpm
# yum install httpd
2) Enable the proxy related modules in the httpd.conf file
# vi /etc/httpd/conf/httpd.conf
LoadModule proxy_module modules/mod_proxy.so
LoadModule proxy_http_module modules/mod_proxy_http.so
3) Add the below entries to the http configuration file.

# vi /etc/httpd/conf/httpd.conf
<IfModule mod_proxy.c>
ProxyRequests Off
<Proxy *>
Order deny,allow
Allow from all
</Proxy>
ProxyPreserveHost On
ProxyVia On
SSLProxyEngine on
ProxyPass /webdav http://ServerIP:8080/webdav
ProxyPassReverse /webdav http://ServerIP:8080/webdav
</IfModule>
Note: In the above sample all the request comes to /webdav URL redirect to the another tomcat server. For example Apache server IP is 10.0.0.1
and the tomcat server IP is 10.0.0.2, then the request like http://10.0.0.2/webdav will be redirect to http://10.0.0.2:8080/webdav
4) To enable logging for the reverse proxy, add the below lines in the configuration file
# vi /etc/httpd/conf/httpd.conf
<IfModule mod_proxy.c>
CustomLog logs/access_proxy.log combined
ErrorLog logs/error_proxy.log
</IfModule>
5) Restart the httpd service
# /etc/init.d/httpd restart
Installing the Version Control System (git)
Next: Building and starting AMP | Upgrading AMP
Git is the source version control used for AMP since 2.12.
First of all, go to and make sure you have access to the repository. https://github.com/devgateway/amp
For installation on a production server you do not have to actually install git – it's enough to . download the zipball
Downloading code
Essentially, there are two approaches to obtaining the AMP source code:
git clone
downoad the source zipball
The approach is recommended for developer installations. git clone
The is recommended for servers, due to the usually weak Internet connection our clients' servers have. download the source zipball

1. a.
b.
c.
i.
d.
e.
Downloading the zipball approach
Since AMP is in a private repo, simply using won't work. You will have to create in your github profile. wget a temporary token
After that, use curl (replace %TOKEN% with your token):
curl -H "Authorization: token %TOKEN%" -L > amp.ziphttps://api.github.com/repos/devgateway/amp/zipball
Afterwards, you can remove the access token from your profile.
You can install curl from repositories on pretty much any distribution on Linux, or download it from forhttps://curl.haxx.se/download.html
Windows.
Installing git
The git installation process is very well documented. Go here: https://git-scm.com/downloads
Git clone approach
This alternative gives you the whole history of commits related to the repository. It's not really needed on production servers, since upgrading or
applying hotfixes would be done by obtaining a fresh tag.
The command is . It will prompt you for the user / pass. git clone <url>
It's easier to get it via HTTPS, but if it doesn't work for whatever reason – on how to setup an SSH key on your account. here's the link
Building and starting AMP | Upgrading AMP
Next: Setting up automatic backup
This page describes the necessary steps for building & starting AMP.
The following steps are valid for performing an upgrade of AMP as well.
Linux
Windows
On Linux
Create a database backup ( ):you can skip this step if it's a fresh first installation
If it doesn't exist already, create ~/bin/amp_pg_backup.sh ( )touch ~/bin/amp_pg_backup.sh
chmod +x ~/bin/amp_pg_backup.sh
insert with your favourite text editor the following lines (replacing <server_name> and <version>):
DBNAME="amp_<server_name>_<version>
cdate=$(date +%Y_%m_%d-%H.%M)
pg_dump -vFc -Z 0 -h localhost -U postgres -w $DBNAME | 7za a -si
"$DB_NAME_$cdate_pre_upgrade.sql.7z"
Check the username and pass for creating the database backup on the corresponding , if thiscountry installation page
doesn't work.
example: pg_dump -vFc -Z 0 -h localhost -U postgres -w amp_moldova_211 | 7za a -si "$amp_moldova_02_11_2015_pre
_upgrade.sql.7z"
execute the script: ~/bin/amp_pg_backup.sh
(optional, but highly recommended) Validate the database backup (download it to your local machine, unpack it, and restore to a

1.
e.
2. a.
b.
c.
3. a.
b.
c.
d.
e.
4.
5.
6.
7. a.
b.
c.
d. i.
ii.
8.
9. a.
b.
c.
new database).
If it managed to restore properly, which can be checked with a returning someselect count(*) from amp_activity_version
number, the backup is OK.
Now you're good to check out AMP from the SVN repository:
mkdir /opt/AMP/AMP_<version> (example: AMP_2_10_22)
cd /opt/AMP/AMP_<version>
svn export https://svn.dgfoundation.org/amp/tags/AMP_<version>/amp
Now you're good to build AMP.
If it doesn't exist already, create ~/bin/amp_mvn_build.sh ( )touch ~/bin/amp_mvn_build.sh
chmod +x ~/bin/amp_mvn_build.sh
insert with your favourite text editor the following lines ( to the relevant databasedon't forget to modify <amp_dbname_version>
name)
For versions prior to 2.12.7:
mvn clean generate-resources process-resources -Dapidocs=true
-DserverName=local -Djdbc.db=amp_dbname_version -Djdbc.user=amp
-Djdbc.password=amp -Djdbc.port=5432
For version 2.12.7 and later:
mvn clean package -Dapidocs=true -DserverName=local
-Djdbc.db=amp_dbname_version -Djdbc.user=amp -Djdbc.password=amp
-Djdbc.port=5432
Verify that the PostgreSQL user and pass (jdbc.user and jdbc.password) are correct by checking the corresponding country
. installation page
Execute the script: ~/bin/amp_mvn_build.sh
Stop tomcat:
/etc/init.d/tomcat stop
or
service tomcat7 stop
Delete the symlink to the application (replace <version> with your version of Tomcat):
rm /opt/apache-tomcat-7.0.<version>/webapps/ROOT
Create a new symbolic link:
ln -s /opt/AMP_<amp_version>/amp /opt/apache-tomcat-7.0.<version>/webapps/ROOT
If the version to be installed is 2.10 or greater:
Download from the ZIP file corresponding to the country of the installation you'rehttp://download.geonames.org/export/dump/
working on.
The names of the zip files are based on the 2-letter ISO code for countries (http://userpage.chemie.fu-berlin.de/diverse/doc/ISO_
). 3166.html
Extract the archive it and rename the <TWO-letter-code-file>.txt to . (This file is used on AMP startup to populate agazeteer.csv
table with the locations for a given country)
Copy the file in the /doc directory under the AMP installation.
Configure the latitude and longitude for the country you are installing AMP:
Login as Administrator (the country installation page can help you with getting the credentials, or the AMP online URLs
page), go to Global Settings
Fill in the latitude and longitude for the country
Start Tomcat:
/etc/init.d/tomcat start
or
service tomcat7 start
Verify that AMP has managed to start properly:
Go to the external address this server is visible at (again, check the for that)country installation page
Attempt to use AMP a bit: log in, see that tabs are loading, run a report, create an activity, add a document, open GIS, open
dashboards.
Check Tomcat logs (usually under the tomcat directory / logs): check whether there any patches that failed to apply, or any
exceptions having been thrown.

1.
2.
3.
4.
5.
6.
7. a.
b.
c.
d. i.
ii.
8.
9. a.
b.
c.
On Windows
Create a database backup (go to pgadmin III, right-click on your database->backup)
Check out AMP using TortoiseSVN (https://svn.dgfoundation.org/amp/tags/AMP_<version>/amp)
Stop the tomcat service (from the Administration tools -> Services app)
Open a console, cd to the folder to which you have exported AMP.
Build AMP (don't forget to modify <server_name>, <version>, and check the jdbc password, port and user in the corresponding country
) :installation page
mvn clean generate-resources process-resources -Dapidocs=true -DserverName=local
-Djdbc.db=amp_<server_name>_<version> -Djdbc.user=amp -Djdbc.password=amp123 -Djdbc.port=5432
Open a console and create a symlink on c:\amp\tomcat\webapps to the AMP version your upgrading to:
mklink /J <path_to_tomcat>\webapps\ROOT <path_to_AMP> (example: mklink /J C:\AMP\Tomcat\webapps\ROOT
)C:\AMP\src\AMP_2_10_12
If the version to be installed is 2.10 or greater:
Download from the ZIP file corresponding to the country of the installation you'rehttp://download.geonames.org/export/dump/
working on.
The names of the zip files are based on the 2-letter ISO code for countries (http://userpage.chemie.fu-berlin.de/diverse/doc/ISO_
). 3166.html
Extract the archive it and rename the <TWO-letter-code-file>.txt to . (This file is used on AMP startup to populate agazeteer.csv
table with the locations for a given country)
Make sure you have file extensions being shown ("hide file extensions for known file types" disabled under Folder options)
Copy the file in the /doc directory under the AMP installation.
Configure the latitude and longitude for the country you are installing AMP:
Login as Administrator (the country installation page can help you with getting the credentials, or the AMP online URLs
page), go to Global Settings
Fill in the latitude and longitude for the country
Start tomcat.
Verify that AMP managed to start properly:
Go to the external address this server is visible at (again, check the for that)country installation page
Attempt to use AMP a bit: log in, see that tabs are loading, run a report, create an activity, add a document, open GIS, open
dashboards.
Check Tomcat logs (usually under the tomcat directory / logs): check whether there any patches that failed to apply, or any
exceptions having been thrown.
How to setup SSL with Let's Encrypt
Assuming:
OS is Linux
Apache Http server is used as a proxy
Apache tomcat is installed
AMP is deployed
Apache http proxy is configured properly
Port 443 is not blocked by firewall and is accessible from Internet
Step 1 - Switch to AJP proxy
This step may not be necessary. Skip this step if in apache configuration you can find the following lines:
ProxyPass / ajp://localhost:8009/
ProxyPassReverse / ajp://localhost:8009/
Enable AJP connector by editing Tomcat's server.xml and add the following connector:
<Connector port="8009" protocol="AJP/1.3" redirectPort="8443" />
Restart tomcat.
Reconfigure Apache by enabling proxy_ajp module. Usually can be done via a symlink (may depend on apache version):

$ ln -s /etc/apache2/mods-available/proxy_ajp.load
/etc/apache2/mods-enabled/proxy_ajp.load
Configure VirtualHost and replace http proxy with ajp proxy:
# before
ProxyPass / http://localhost:8080/
ProxyPassReverse / http://localhost:8080/
# after
ProxyPass / ajp://localhost:8009/
ProxyPassReverse / ajp://localhost:8009/
Note that protocol changed from http to ajp and ports also changed. It is very important to keep / at the end.
Restart apache.
Step 2 - Install certbot
Execute these commands:
$ mkdir /opt/certbot
$ cd /opt/certbot
$ wget https://dl.eff.org/certbot-auto
$ chmod a+x certbot-auto
Step 3 - Retrieve certificates
During this process you will have to answer a few question:
Which domains must be protected? Choose all domains in use by AMP.
Which email to use for notifications about expiring certificates? Use email of the responsible person.
Add httphttps redirect? Answer yes.
$ sudo ./opt/certbot/certbot-auto --apache
Step 4 - Update apache config
Once certificates are installed we want to disable proxy for http requests since those requests will be redirected to https.
Certbot during setup copies the config of VirtualHost *:80 to VirtualHost *:443. Thus we can simplify http config by removing everything except the
redirect rule:

1.
2.
3.
1.
2.
3.
4.
5.
<VirtualHost *:80>
RewriteEngine on
RewriteCond %{SERVER_NAME} =amp.domain1.org [OR]
RewriteCond %{SERVER_NAME} =amp.domain2.net
RewriteRule ^ https://%{SERVER_NAME}%{REQUEST_URI} [END,NE,R=permanent]
</VirtualHost>
Step 5 - Schedule certificate renewal
Check if certificates can be renewed successfully with:
$ sudo ./opt/certbot/certbot-auto renew --dry-run
Add cron job:
Edit cron file via: crontab -e
Add this line: 0 1,4 * * * sleep $(expr $RANDOM % 60)m; ./opt/certbot/certbot-auto renew
Exit saving changes, for vi: <ESC>:wq<ENTER
Installing the IATI Import Tool as a service
Installing
Upgrading
Installing
This is an installation page for the IATI Import tool, hosted on Development Gateway's .github
These steps are important for having the IATI import tool start on server startup. Since it's a Java application, was picked as a portableYAJSW
service wrapper (so that the difference between configuring it as a Windows versus Linux service would be minimal).
On Linux, it means that one will be able to start the service by running , poll its status by running sudo service iati_import start sudo service
, and stop it with .iati_import status sudo service iati_import stop
The recommended version is . The 12.xx versions are in beta, and the functionality provided by 11.11 is sufficient for theYAJSW 11.11 (stable)
task at hand. It is highly recommended to use that version. If you desperately long for the freshest versions of this application, do so at your own
risk.
The IATI import tool requires a 1.8 JDK.
Platform-independent steps
Create a folder / directory which will be the home directory for the app. It is suggested to place it next to the AMP files (usually, it's
c:\amp\iati_import, on Windows, and /opt/iati_import for linux)
Download and unpack it into the folder mentioned above. YAJSW 11.11
Check out the source for the IATI import tool, either with git or by downloading the .zip from . here
Build the application, according to the steps in readme.md (on the front page of the project). This document does not cover
troubleshooting of the app's building process.
After installation, do not forget to document your changes in the corresponding . country installation page
To download YAJSW on Linux with wget via command line, execute wget https://sourceforge.net/projects/yajsw/files/yajsw/yajsw-
stable-11.11/yajsw-stable-11.11.zip

5.
1.
Platform-specific steps
On Windows
On Linux
Windows
Create a file called setup.bat, with the following contents, in iatiimport-master/import-core/:
setup.bat
@echo off
call:spawn java -DAMPStaticProcessor.baseURL="localhost" -jar
%cd%\\import-ui-0.0.9-SNAPSHOT.jar
call:spawn %cd%\\yajsw-stable-11.11\bat\genConfig.bat %PID%
exit /b
:spawn command args
:: sets %PID% on completion
setlocal
set "PID="
set "return="
set "args=%*"
set "args=%args:\=\\%"
for /f "tokens=2 delims==;" %%I in (
'wmic process call create "%args:"=\"%" ^| find "ProcessId"'
) do set "return=%%I"
endlocal & set "PID=%return: =%"
goto :EOF
Below is the explanation of what the code does.

1.
2. a.
b.
c.
d.
3.
4.
5. a.
b.
c.
d.
e.
f.
g.
h.
6.
7.
8.
setup.bat explained
@echo off
::runs a process with the IATI tool server
call:spawn java -DAMPStaticProcessor.baseURL="localhost" -jar
%cd%\\import-ui-0.0.9-SNAPSHOT.jar
::runs the genConfig script of YAJSW
call:spawn %cd%\\yajsw-stable-11.11\bat\genConfig.bat %PID%
::exits the batch
exit /b
:spawn command args
:: sets %PID% on completion. 'setlocal' means it limits the scope of
variables to local scope
setlocal
set "PID="
set "return="
set "args=%*"
set "args=%args:\=\\%"
::wmic will output several lines of text, among which will be the
ProcessId
::so it iterates through the lines and matches with the one containing
ProcessId
for /f "tokens=2 delims==;" %%I in (
'wmic process call create "%args:"=\"%" ^| find "ProcessId"'
) do set "return=%%I"
::ends global scope and sets the PID to something
endlocal & set "PID=%return: =%"
goto :EOF
Edit the script if that is needed:
java executable address (if you have several JREs installed)
baseURL
location of yajsw
JAR file name
Open a command line ; with administrative rights cd to {iati importer home folder}/iatiimport-master/import-core
run from the console. This will open several command line prompts – one running the genconfig, the other running thesetup.bat
application itself.
Once the wrapper configuration is done, open with any text editor {yajsw home}/conf/wrapper.conf and verify the following parameters:
wrapper.working.dir
wrapper.console.title
wrapper.ntservice.name
wrapper.ntservice.displayname
wrapper.ntservice.description
wrapper.java.app.jar
wrapper.java.command
wrapper.java.additional.??
run {yajsw home}/bat/installService.bat
run {yajsw home}/bat/startService.bat
Verify that it started up properly, by going to http://{HOSTNAME}:8080/importer/system/status. The response should be "{status:OK}"
If installation fails
If the script fail while generating the YAJSW config (saying it cannot find the PID), try specifying the full path to the Java
executable (like: "c:\program files\oracle\java\java.exe") instead of just 'java'.

1.
2. a.
b.
c.
d.
3.
4.
5.
6.
7. a.
b.
c.
d.
e.
f.
g.
h.
8.
9. a.
b.
10.
11.
12.
13.
1.
2.
Linux
Create a file called setup.sh, with the contents:
setup.sh
#!/bin/bash
/usr/java/jdk1.8.0_65/bin/java -DAMPStaticProcessor.baseURL=localhost
-jar import-ui/target/import-ui-0.0.9-SNAPSHOT.jar > /dev/null &
sleep 1s
PID=`ps -ef|grep SNAPSHOT | grep -v "grep" | awk '{ print $2 }'`
if [[ -z "$PID" ]]; then
echo "Process didn't start properly!"
else
echo "Generating config..."
yajsw-stable-11.11/bin/genConfig.sh "$PID"
sleep 1s
echo "Killing process..."
kill "$PID"
fi
nano yajsw-stable-11.11/conf/wrapper.conf
Edit the file accordingly to your setup:
baseURL
java exec location
JAR name
text editor of choice (if you dislike nano, or don't have it installed and don't want it installed).
run chmod +x yajsw-stable-11.11/bin/*
Create a user for the iati_import tool: useradd -m -d /opt/iati_import/ -s /usr/sbin/nologin -c "IATI import tool daemon user"
iati_import
Make the folder accessible to everyone, for the time being: chmod -R 777 /opt/iati_import
Make the user above owner of the directory: chown -R iati_import /opt/iati_import
run . Your text editor of choice will pop up, allowing you to investigate and edit the parameters: ./setup.sh
wrapper.working.dir
wrapper.console.title
wrapper.ntservice.name
wrapper.ntservice.displayname
wrapper.ntservice.description
wrapper.java.app.jar
wrapper.java.command
wrapper.java.additional.??
Save the file in your text editor (ctrl+x -> y for nano).
Check that the service runs smoothly: sudo yajsw-stable-11.11/bin/runConsole.sh
If it doesn't work throwing an exception along the lines of "create storage", know that the import tool creates a database storage
in the home directory of the user it runs from. Make sure that the user directory of the user is the one where the tooliati_import
is located.
If it stop short of "created process with pid XXXX", you might have to run another chown (from point 6 above).
Install the service: sudo yajsw-stable-11.11/bin/installDaemon.sh
Start the service: sudo yajsw-stable-11.11/bin/startDaemon.sh
Modify the directory's permissions back (after it was 777-ed): sudo chmod -R 755 /opt/iati_import
Verify that it started up properly by visiting http://{HOSTNAME}:8080/importer/system/status (for instance, running it through curl)
Upgrading
To upgrade an already installed service, you would have to perform three steps:
Stop and uninstall the service.
Edit the file yajsw-stable-11.11/conf/wrapper.conf, the line starting with "wrapper.java.app.jar" – write the path to the new executable

2.
3. there
Install and start the service.
How to setup automatic backup
This is the final step of AMP installation. Please go to the corresponding and carefully document what modifications havecountry installation page
been done to the server.
AMP Postgres backups - Linux
AMP Postgres backups - Windows
Public Portal backups (any OS)
Piwik backups (any OS)
AMP Postgres backups
Automatic jobs on Linux are set up with the help of (a job is called ). cron crontab
Below is an example of a backup script and its conf file (to keep settings separate). Just copy / paste it to a text editor (gedit, nano, vi, emacs,
whichever suits you).
db_backup.sh
#!/bin/sh
cdate=`date +%d%b%Y-%H%M`
DUMPS_DIR="/home/support/db_backups"
DBNAME="amp_tests_210"
export PGPASSFILE=~/.pgpass;
pg_dump -vFc -Z 0 -h localhost -U postgres -w $DBNAME >
$DUMPS_DIR/$DBNAME_$cdate.plsql
7za a $DUMPS_DIR/$DBNAME_$cdate.7z $DUMPS_DIR/$DBNAME_$cdate.plsql
rm $DUMPS_DIR/$DBNAME_$cdate.plsql
rm $DUMPS_DIR/$DBNAME_.7z
cp $DUMPS_DIR/$DBNAME_$cdate.7z $DUMPS_DIR/$DBNAME_210_.7z
Below is a more complex script, intended to perform a backup rotation: keep last 14 days for a daily backup, last 6 weeks for a weekly backup,
and keep monthly backups indefinitely.

db_backup.sh
#!/bin/bash -e
cdate=$(date +%Y_%m_%d-%H.%M)
. /etc/pg_dump.conf
DIR="$DUMPS_DIR/$1"
case $1 in
daily)
#export PGPASSFILE=~/.pgpass;
test -d "$DIR" || mkdir -p "$DIR"
pg_dump -vFc -Z 0 -h localhost -U postgres -w $DBNAME | \
7za a -si "$DIR"/"$DBNAME"_"$cdate".sql.7z
DAYS_TO_KEEP=$DAYS_TO_KEEP_DAILY
;;
weekly|monthly)
test -d "$DIR" || mkdir -p "$DIR"
DAILY_DIR="$DUMPS_DIR/daily"
FRESHEST_BACKUP="$DAILY_DIR/$(ls -1t "$DAILY_DIR" | head -n1)"
ln "$DAILY_DIR/$FRESHEST_BACKUP" "$DIR"
if [ $1 = weekly ]; then
DAYS_TO_KEEP=$DAYS_TO_KEEP_WEEKLY
fi
;;
*)
echo The argument must be one of: daily, weekly, monthly >&2
exit 1
esac
# cleanup
if [ -n "$DAYS_TO_KEEP" ]; then
find "$DIR" -maxdepth 1 -mtime +$DAYS_TO_KEEP -type f -name "*.7z" -delete
fi
pg_dump.conf
DUMPS_DIR="/home/support/db_backups"
DBNAME="amp_tests_210"
#parameter constants
DAYS_TO_KEEP_DAILY=14
DAYS_TO_KEEP_WEEKLY=42
Since Mondrian was removed in , we can disable the backup of the tables "mondrian_*" and "etl_*". For tracing of existingAMP 2.12
Mondrian configs, it can be enabled back as needed for countries that will use Mondrian via standalone Saiku.
E.g. original:
pg_dump -vFc -Z 0 -h localhost -U postgres -w $DBNAME
without Mondrian tables:

1. a.
2.
3.
1.
The part of the topic is achieved with the help of . automatic cron
To add a job to crontab, do the following:
crontab -e
a prompt will appear, asking you to select an editor
append the following to the existing text, implying you're using the script from above:
0 3 * * * /home/support/db_backup.sh daily
30 3 * * 1 /home/support/db_backup.sh weekly
31 3 1 * * /home/support/db_backup.sh monthly
This will peform a daily backup every day at 03.00, a weekly backup every Sunday at 03.30, and a monthly backup every first day of the
month at 03.31. (the pattern is minutes - hours - day of month - month - day of week, and a asterisk is a placeholder for "any").
Save the file (in whichever editor you opened it; , then answering in the case of nano). ctrl+x y
Windows
AMP database scheduled backup and upload to ampdev repository (Windows servers)
Public Portal backups
Use the procedure described under AMP Postgres backups, using the configured database name. If you don't know it, it can be found under the
path (under an array containing database settings). <amp_cms_sources_directory>/sites/default/settings.custom.php
Piwik backups
Piwik uses MySQL. Use the same Postgres rotation script from above (depeding on your system), but replace the line
pg_dump -vFc -Z 0 -h localhost -U postgres -w $DBNAME
with the line
mysqldump --databases -u -ppiwik_db_name mysql_user password
replacing and (note the lack of space between and the password) with the corresponding values. Thesepiwik_db_name, mysql_user password -p
should be obtained from the pagecountry installation
How to setup automatic log rotation
Log files tend to grow very large, since most applications writing those logs don't perform log rotation by themselves.
For Linux, logrotate is used.
To setup log rotation for an application:
pg_dump -vFc -Z 0 -h localhost -T 'mondrian_*' -T 'etl_*' -U postgres
-w $DBNAME
For the Windows scripts we should use "" instead of '' (E.g.: -T "mondrian_*")

1.
2. a.
b.
c.
d.
3.
4.
5.
1.
a.
b.
c. i.
ii.
Install (should be in the repository of whichever package manager you're using)logrotate
Think which log files you want rotated. The advised once are:
<tomcat home>/logs/catalina.out
<tomcat home>/logs/local.log
<monetmonitor home>/logfile.log
<monetdb home>/merovingian.log
As a superuser, create an entry for the logs related to amp: nano /etc/logrotate.d/dg_amp
The structure of a logrotate configuration file is – you have blocks, each block defines how a specific log file should be treated:
/opt/tomcat/apache-tomcat-7.0.61/logs/catalina.out {
daily
rotate 14
nocompress
}
/opt/tomcat/apache-tomcat-7.0.61/logs/local.log {
daily
rotate 14
nocompress
}
Add one such block for every log to be rotated.
Create a cron job from root to run it:
0 3 * * * logrotate /etc/logrotate.d/dg_amp
For Windows, do the same thing as above, with .logRotateWin
Post install configuration
Flushing permissions: Since permissions modules are not linked with database constraints we need to flush permissions to ensure we
have latest template objects in permissions tables. We can have two alternatives, one is to apply the already working permissions in case
the country uses permissions. The other is just to apply the blank permission scheme
Connect to the database and run the following query
delete from perm_map;
delete from perm_gate_action;
delete from perm_gate_parameter;
delete from perm_gate_permission;
delete from perm_comp_permission_map;
delete from perm_comp_permission;
delete from perm_permission;
Restart the server (AMP)
In case the country does not use permissions do the following steps to grant all permissions to all objects
Log in as admin
Click on permission manager
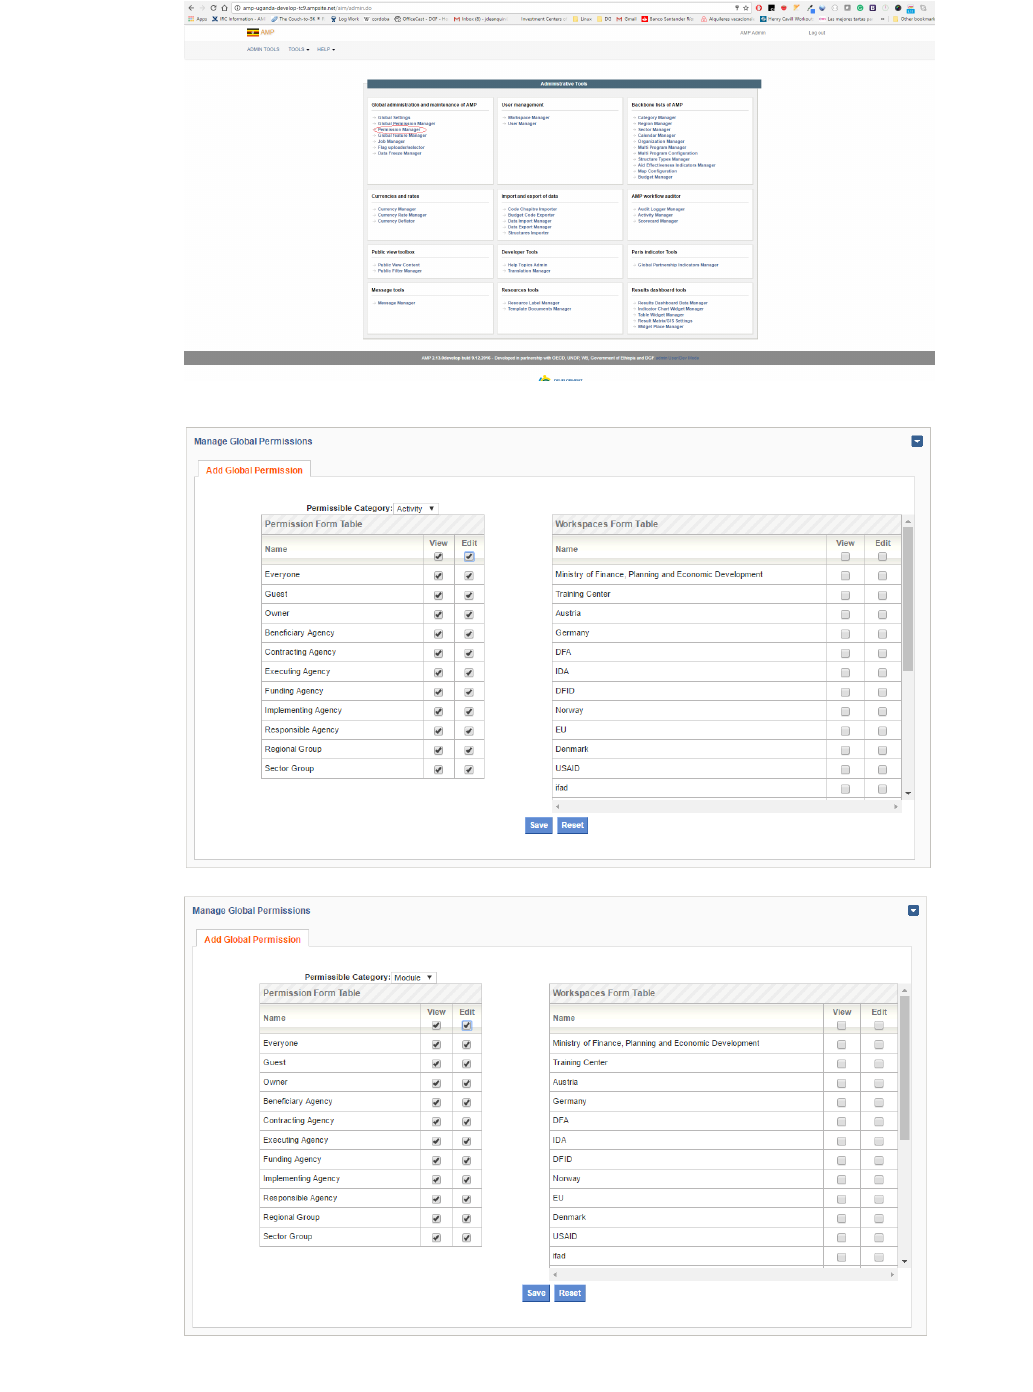
1.
c.
ii.
iii.
iv.
v.
In permissible category select activity and click every checkbox by clicking edit and view as seen in the image. Click
save
In permissible category select click module to check edit and view to select all objects. Click save
In permissible category select click feature to check edit and view to select all objects. Click save
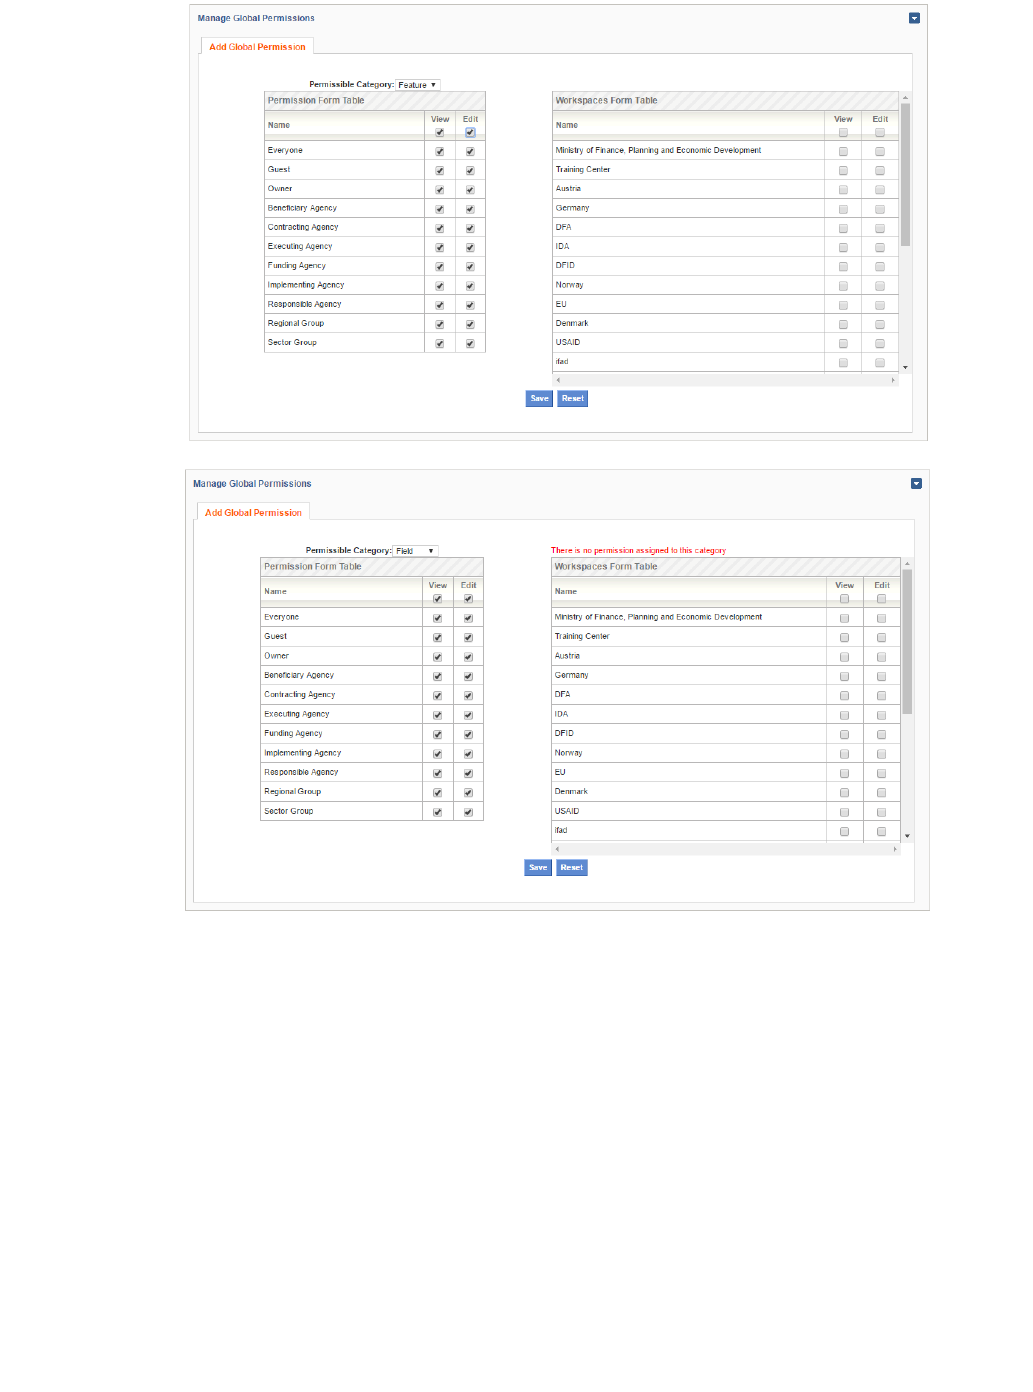
1.
c.
v.
vi.
vii.
d. i.
In permissible category select click field to check edit and view to select all objects. Click save
Restart the server and permissions should be applied now.
in case the country uses permissions do the following
Got to Global permission manager in a server running a version BEFORE you upgrade it to latest version
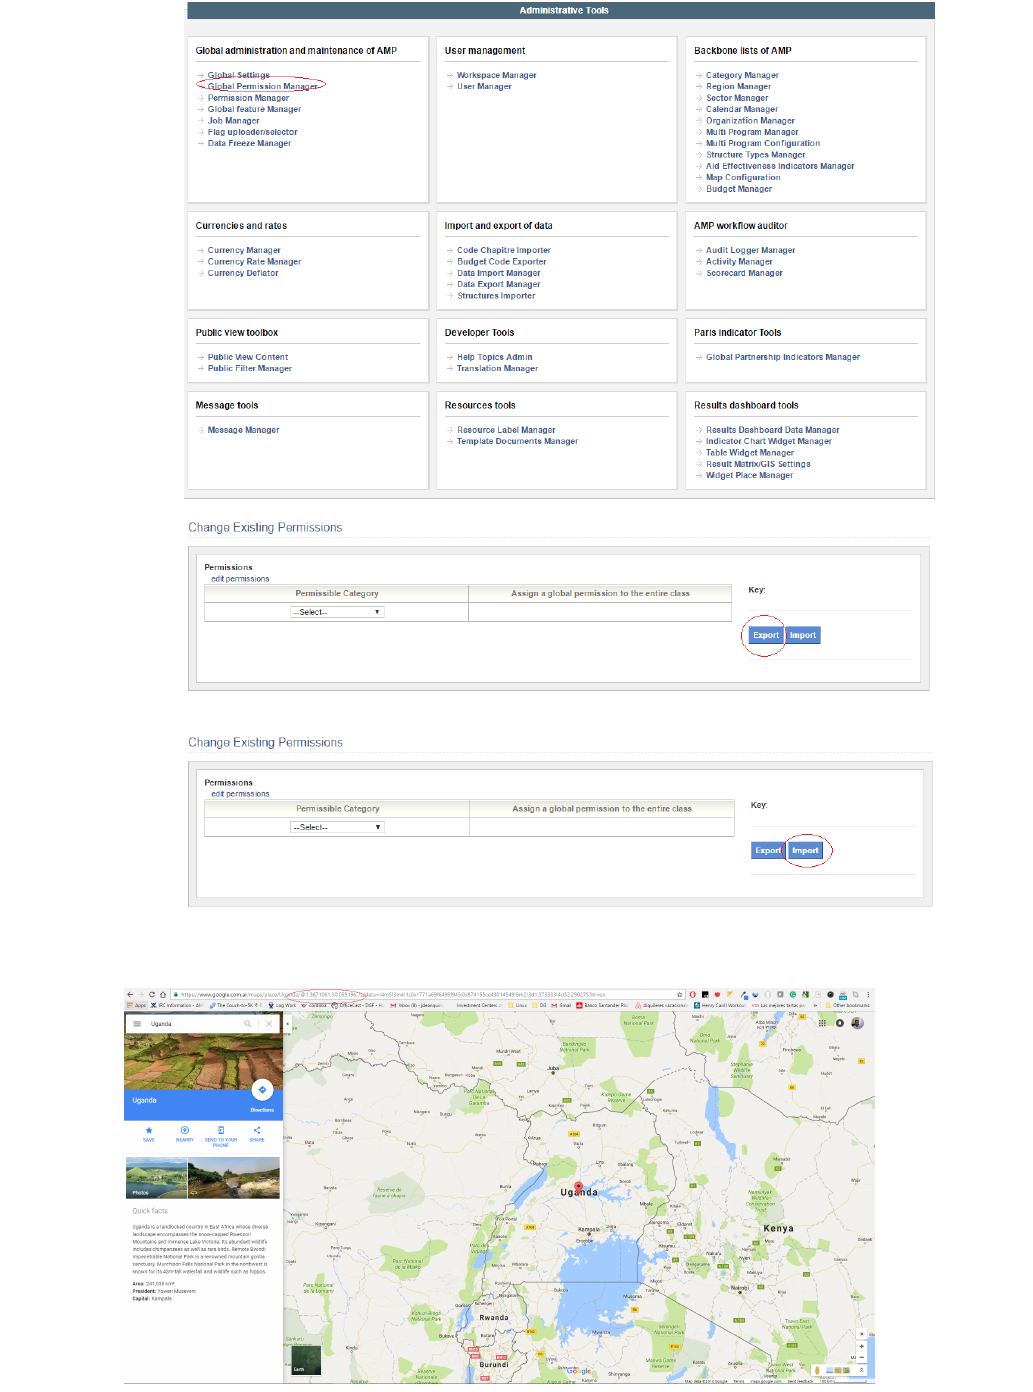
1.
d. i.
ii.
iii.
iv.
2. a.
b.
Click on export
Once the server is upgraded go again to Global Permission Manager and click import, choose the file you have backed
up from the old server.
Restart the server and permissions should be applied by now
Configure latitude and longitude
Get the lat and log from the center of the country. If you dont have it you can go to google maps, google the country. In our
example Uganda
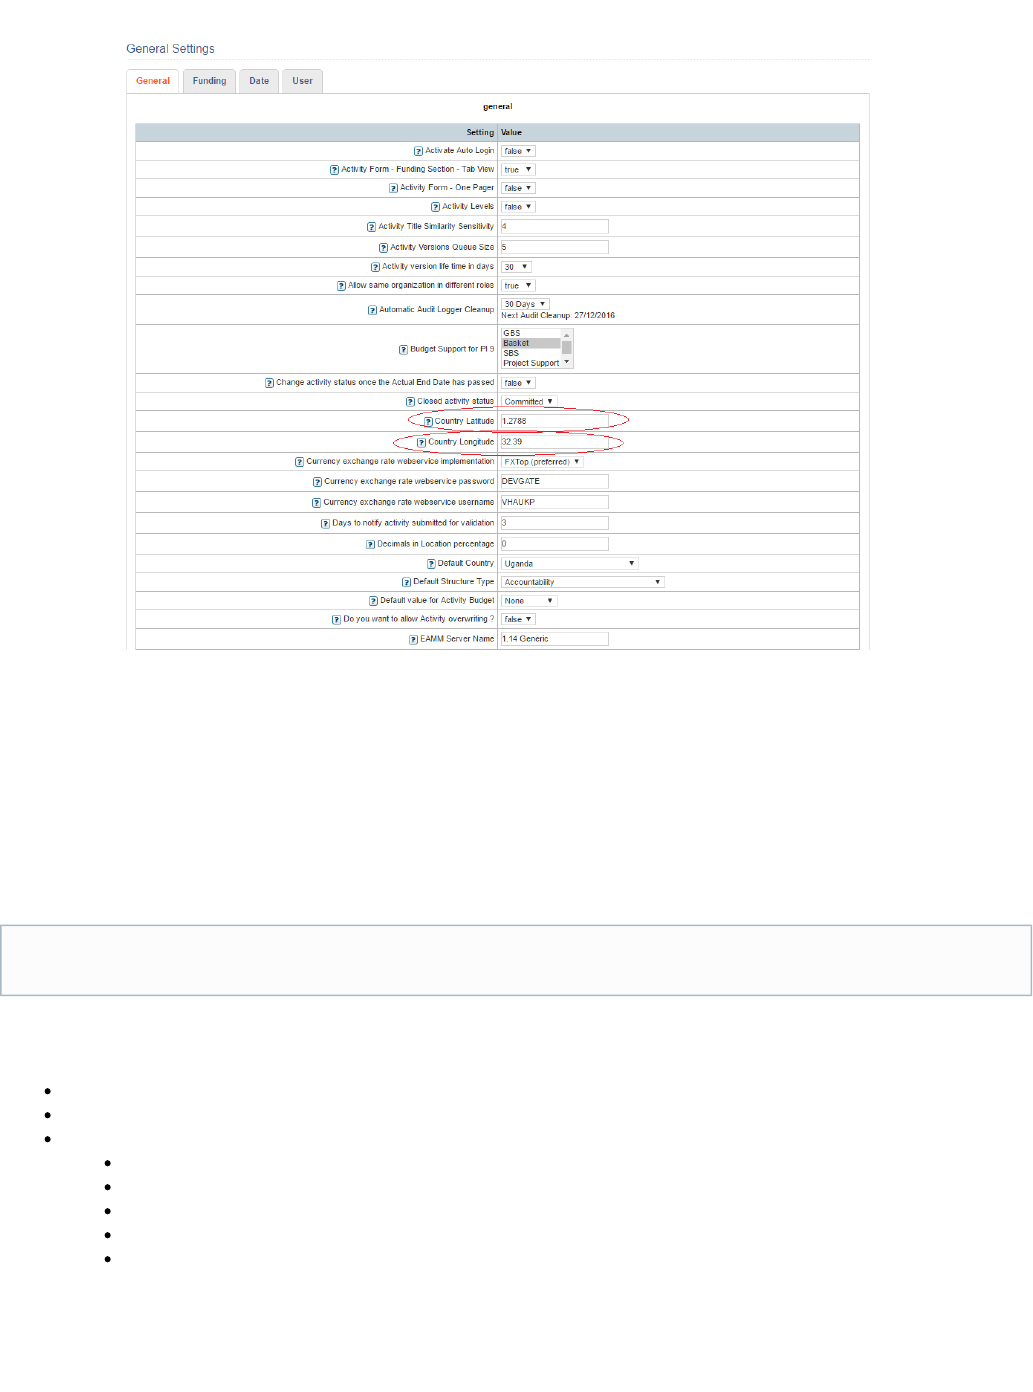
2. a.
b. In the URL, you will see to numbers after the @ sign separated with a coma. The first number is the latitude the seconde one is
the longitude. With those values go to global settings and update the corresponding parameters
Cookies over https and http
Once tomcat is configured to work with https it will send JSESSIONID cookie with secure=true flag. This means that browser will send back this
cookie only if request is done over https.
For the case when tomcat serves both http and https requests we might get into a situation where logins over http no longer work. Once a
JSESSIONID cookie was created over https, it will not be sent over http. Thus once you login over https you cannot have the same session over
http. Actually, while secure cookie exist no new sessions will be allowed over http. So even if we try to login over http, browser will not allow it
because http responses can't overwrite secure cookies. The only way to get out of this situation is to get rid of the cookie by either: cleaning
cookies or restarting browser.
AMP 3.0 Installation/Upgrade Highlights
Http Compression
SSL Configuration
AMP Offline Configuration
Global Settings
AMP Offline compatibility
AMP Registry
AMP Offline Jobs
AMP Offline releases
Http Compression
Make sure that Apache HTTP server is configured to compress responses. Module mod_deflate must be enabled and application/json mime type
must be added to AddOutputFilterByType parameter. More .here
This situation happens only when http requests are not redirected to https. Normally all production environments will use redirect. This
is something we can see in our QA environment.
SSL Configuration
AMP 3.0+ is mandatory to use SSL configuration. The API expects to run either over SSL or within a secured local network. As part of the country
, PM will arrange with the customer the SSL certificate to use.checklist
Letsencrypt option is likely to be picked up.
AMP Offline Configuration
Global Settings
Name Default Stg (test) Server Action
AMP Offline Enabled false true Enable (set to "true")
AMP Registry URL https://amp-registry.ampsite.net/ https://amp-registry-stg.ampsite.net/ Change if it's different.
AMP Offline compatibility
Review and update if needed AMP AMP Offline . Important: Do not edit the record directly in the database in the statedcompatibility document
before it shows how you can do it via AMP API
AMP Registry
For countries that have AMP Offline enabled, Tomcat must be started with AMP_REGISTRY_SECRET_TOKEN environment variable. The value
is <ISO2 Country Code> + sha256(<ISO2 Country Code> + <AMP Registry Private Key>). For example country code is TD and private key is
privateKey001. To compute it from terminal on Linux execute:
developer@local:~$ echo -n TDprivateKey001 | sha256sum
2ada36404da480faa17b7f051185f7d54a70c923430de5c72c269d2317d0827d -
Thus the value of the token is: TD2ada36404da480faa17b7f051185f7d54a70c923430de5c72c269d2317d0827d
Actual private key for AMP Registry is specified in /opt/amp-registry/application.properties on sulfur (see for mode details).AMP Registry
Environment variable should be set in $TOMCAT_HOME/conf/setenv.sh. Ex:
setenv.sh
###
export
AMP_REGISTRY_SECRET_TOKEN=TD2ada36404da480faa17b7f051185f7d54a70c923430de5
c72c269d2317d0827d
###
AMP Offline Jobs
AMP Offline related jobs are executed only if AMP Offline is enabled in AMP Admin Global Settings. Also in future version it will disallow AMP
Offline clients sync up.
AMP_REGISTRY_SECRET_TOKEN environment variable is specified environments. Otherwise multiple AMPonly in production
deployments of the same country will overwrite details from AMP Registry.
Job Description Check
Register with AMP Registry Pushes AMP domain settings to the AMP
Registry app.
During AMP Offline first time setup, the user
will link the client to the country from a list.
The list of countries will provided by AMP
Registry. This way the user won't need to
enter the URL manually.
AMP Registry app stores correctly AMP
domain settings.
Download AMP Offline releases Downloads new compatible releases from
AMP Registry app. There is a list of installers in AMP Offline
Download page.
The Jobs should execute automatically on first startup if AMP Offline setting was already enabled. You can also run them manually.
A useful test can be to download an installer to check that during setup page you see the country that is being upgraded and once you configure
to link to it, you can see that the correct URLs are available under Tools Settings page.
AMP Offline releases
Path AMP_HOME/amp-offline/releases
If AMP_HOME environment variable is not defined then it will default to ~/.amp.
AMP will act as a proxy between AMP Registry running from DG network (where all releases are stored) and AMP Offline client. AMP will handle
the cleanup of irrelevant installers. If for some unexpected reason it doesn't work and you need to clean them up manually, then do not remove th
installer for each platform.e most recent critical
If there is a known internet connection downtime, then make sure to reschedule these jobs so that they can succeed.
