AN INTRO GUIDE TO PROCESS, CONSUMABLES, FORMULAS & SET UP FOR ANALOG PHOTOBOOTHS P A&A Studios Chica
User Manual:
Open the PDF directly: View PDF ![]() .
.
Page Count: 9
© 2018 A&A Studios, Inc. | The Photobooth Architects | www.aastudiosinc.com | 7947 Ogden Ave. Lyons, Illinois 60534 | 312.278.1144 | mail@aastudiosinc.com
AN INTRO GUIDE TO PROCESS, CONSUMABLES, FORMULAS & SET-UP FOR ANALOG PHOTOBOOTHS
By Anthony Vizzari
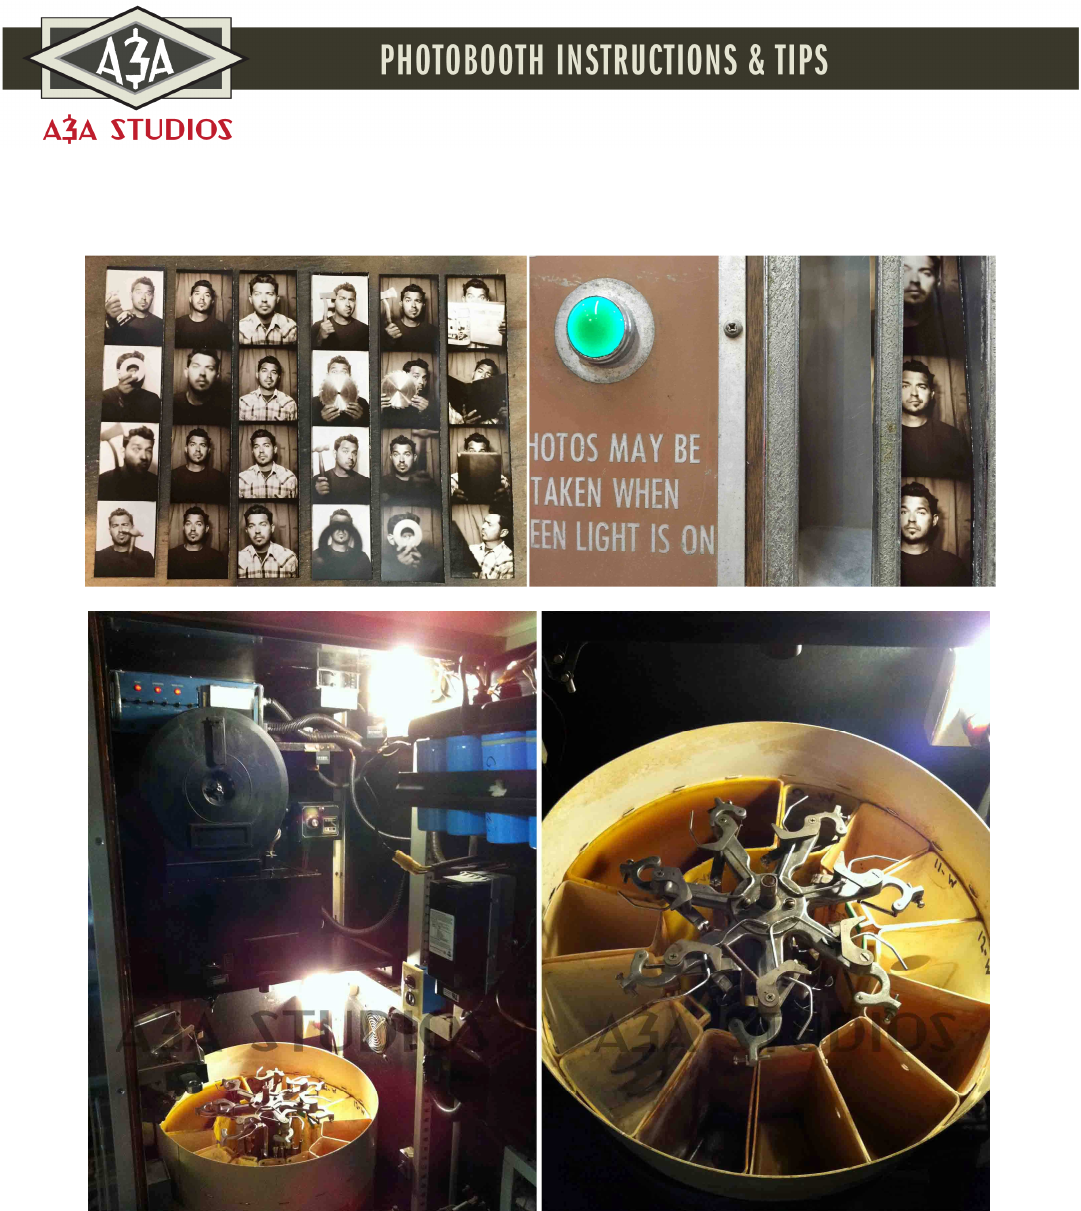
Inside a Vintage Model-21 Photo-Me AP10 System Photobooth (showing tanks, arms, spider assembly, plate camera & paper magazine)
At A&A Studios, we are constantly fielding calls about where to buy photobooth paper and chemistry. Over the years, we have sold
many types of photographic papers and chemicals. For a myriad of reasons, A&A Studios has transitioned out of such sales mainly
due to poor profit margins, lack of demand, and the amazing hassle of shipping chemistry both domestically and internationally.
With all that said, we felt that the best way to keep these vintage photobooths alive was to spread the love and share the
information that we have gained through much trial, error, and experience! So, here goes it....!
© 2018 A&A Studios, Inc. | The Photobooth Architects | www.aastudiosinc.com | 7947 Ogden Ave. Lyons, Illinois 60534 | 312.278.1144 | mail@aastudiosinc.com
HOW AN ANALOG PHOTOBOOTH PROCESS WORKS (BRIEFLY)
Many people assume that photo booths use "direct positive" paper. While there have been versions of direct positive paper
specifically for photobooths made in the past by Kodak and other suppliers, the "reversal process" is the standard method. In short,
there is no negative and the paper is nothing special. It's simply a negative-to-positive silver gelatin photographic, RC based paper
that is reverse processed to form a "positive" image.
For those who are new to analog photo booths, we will quickly outline how a common Auto-Photo or Photo-Me (c.1940-1990) analog
photobooth works. If you are already a pro and just want some chemical recipes and info, skip to that section below.
The paper lives on a large roll enclosed in light tight "film magazine". Once the photobooth session is initiated, the mechanical
camera inside the booth will pull a strip of paper from the magazine down across a transport in front of a prism that properly orients
the image. A focal plane shutter will turn as the paper moves across each flash (exposure). Once the session is complete, a "spider
assembly" on top of a "transmission" will kick out an "arm" initiate by a "trigger". That arm will grab the paper from the "feed down"
unit and then move the strip through a series of tanks, "dipping and dunking" in each tank with a slight agitation. The tanks are
comprised of water baths, developer, bleach, clearing agent, and toner. Once the strip reaches the last tank, the arm will output the
strip via the "delivery" unit to the user outside of the booth. In case you are wondering... yes, there are many opportunities here for
error and mistakes. Hence, this process is not for the faint at heart. The classic photobooth is system of electromechanical parts,
gears, solenoids, relays, and switches that all need to be perfectly aligned to make the process work. Add some photographic
principals and you have a challenging machine that has a steep learning curve from the start. Being a NASA engineer or having a
background in photography isn't necessarily going to help you. These old school photobooths require patience, electrical and
mechanical knowledge and great attention to detail. Ironically, photography takes a back seat.
PHOTOBOOTH PAPER
For the purpose of this article, we will focus on black and white chemicals and paper. Almost any paper that can be cut to size in
proper rolls can be used in a photobooth. However, the best and easiest paper to use currently on the market is called "Minutka", by
Slavich Trade House of Russia. Slavich has changed their paper bases and finishes often, for reasons that are not entirely clear. It
might be that they make batches based on whatever base they can find that is the most economical or commercially available.
Therefore, sometimes you will find the paper with an "embossed" stipple type finish, glossy, or an "embossed glossy" which is more
of a satin finish. The embossed glossy is arguably their best paper. We also have used custom cut Kodak papers, Ilford, Foma,
Oriental, and so on with great success. However, these papers tend to have a lower "P-Value" (kind of like an ISO) and thus, require
more development time, higher temperatures, and extended tank baths. Therefore, these other papers need more knowledge and
attention to detail. For those with less experience, it's advised that you start with the easier Slavich paper. With that in mind, the
chemical recipes provided in the article will be geared toward Slavich paper. Footnotes will be provided for use with other papers
and misc. tips & tricks. To purchase Slavich paper direct, visit this link: SLAVICH PHOTOBOOTH PAPER ONLINE STORE
PHOTOBOOTH CHEMISTRY
As alluded to prior, a standard B&W negative-to-positive, silver-gelatin, RC photographic paper is employed. There is no
intermediate "film" negative and this is not a "direct positive" process. Therefore, in layman's terms, to produce a positive, it is
necessary to "reverse" the negative image on the paper. This is done using what is called a "reversal process". However, unlike the
more common darkroom reversal process with a second exposure, photobooths use a "fogging toner / redeveloper" so that no
second exposure is required. The Thiourea in the toner provides both the fogging agent for redevelopment, and, that nice sepia
tone. (Mixed with Sodium Hydroxide, it's also the culprit for that sulfur egg smell that sometimes accompanies a photobooth. If you
want to learn more about the how and why, aka the science behind the chemistry, dig into your local library or the forums on APUG.
For our purpose, we will simply explain what chemicals are needed and how to configure your tanks.
DISCLAIMER
The following information is provided as a courtesy: A&A Studios, Inc. assumes no responsibility for personal injury, death, or
equipment damage that may be caused by the following products or procedures. The following chemicals and instructions are to be
used at your own risk. Wear goggles, gloves, respirator and always dispose of chemicals according to local, state and federal laws.
Read all MSDS provided with your chemistry.
© 2018 A&A Studios, Inc. | The Photobooth Architects | www.aastudiosinc.com | 7947 Ogden Ave. Lyons, Illinois 60534 | 312.278.1144 | mail@aastudiosinc.com
NOTE: ON SAFETY & DISPOSAL: Whenever handling any chemical, be certain to follow all MSDS instructions and wear proper
protection to avoid health hazards (Eyes, skin, respiratory, etc.) When disposing of chemicals, do so with respect to the environment
and law. Contact your local authorities concerning environmental protection to determine proper method s of storing and disposing
your chemicals, in accordance with the law.
NOTE: ON INDIVIDUAL PREFERENCES
Individual users may have different preferences, equipment, or usage patterns that affect the performance of their consumables. It
is always suggested that you run tests to find what works best for your situation. Your ratios / mix may vary based on individual
usage & temperature. Developer temperatures range 80°F - 110°F. (The higher the temperature, the faster and stronger the in-tank
development time (as well as the amount of evaporation). Use the following mixtures as a starting point for your processing. If you
are not using your booth on a daily basis, it is suggested that you empty your photobooth of chemistry and store the chemicals in
sealed containers. This will extend the life of your chemistry.
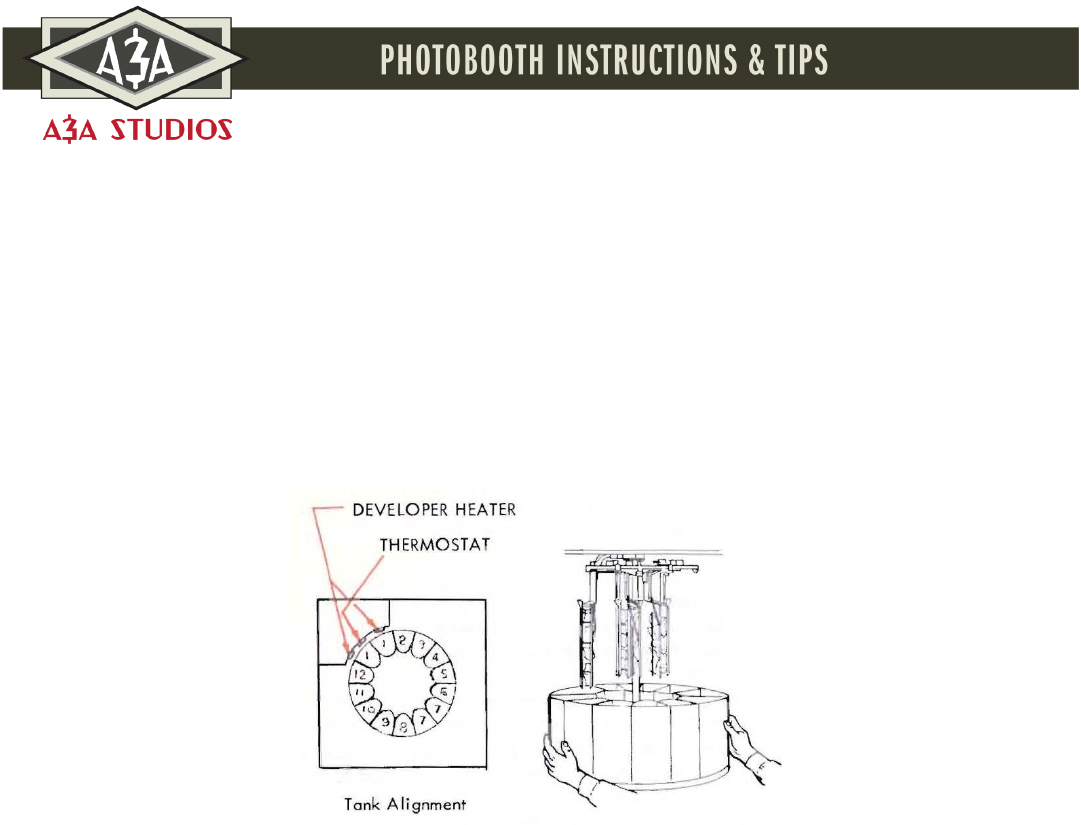
B&W TANK ORDER: (For Slavich Minutka Paper) Tanks from left to right are as follows. (See Diagram)
#1 Developer
#1 Developer
#2 Water or additional developer
#3 Water
#4 Bleach
#5 Water
#6 Water
#7 Clearing Powder
#7 Clearing Powder
#8 Water
#9 Toner
#10 Water
#11 Water
#12 Water (under the feed down -- where the paper comes out of the camera)
Note: Some users may choose a different tank order based on personal preference. This is suggested as a starting point to work from.

© 2018 A&A Studios, Inc. | The Photobooth Architects | www.aastudiosinc.com | 7947 Ogden Ave. Lyons, Illinois 60534 | 312.278.1144 | mail@aastudiosinc.com
MIX YOUR OWN CHEMICALS? OR, BUY READYMADE KITS?
If you don't want to spend a lot of time messing around or hunting for raw ingredients, buy a kit or pre-made baths from one these
suppliers:
• Foto-Mat Entertainment (California)
• PSI | Photo Systems Inc. (Michigan)
Personally, I like to do a mix of readymade Clayton developer and bleach concentrate while preparing my own clearing agent and
toner. This is what we use most often at A&A Studios:
• DEVELOPER: Clayton RAD 5 (Developer & Replenisher): Divide 128oz among tanks #1 and top-off with water. Add extra
developer to tank #2 as "booster", if needed. Start with a 1:1 ratio for booster.
• BLEACH: Clayton Development Systems Cleaner: **While this sounds like a cleaning agent, it's actually a bleaching agent
that can also be used for cleaning some processing systems. This is a fabulous high-concentrate bleach but handle with
care! Use 12-16oz of concentrate to tank #4 and top-off with water. Adjust ratio as desired.
• CLEARING AGENT: Tanks #7. See Recipe Below.
• TONER: Tanks #9. See Recipe Below.
• CLAYTON CHEMICAL INFO: http://www.claytonchem.com/products or call 310.635.5503 and ask for Lowell Huff
CHEMICAL MIXTURES / FORMULAS, ALTERNATES & SUPPLIERS
DEVELOPER:
Ilford 2000RT, a readymade concentrate, is also a suitable developer and readily available in the North America and Internationally.
Start with 128oz over tanks. Photobooth developers need to be STRONG, often at 9 parts Developer Concentrate to 1 part Water
(9:1). Most pre-made hydroquinone based developer concentrates will work for the photobooth reversal process.
Developer can be VERY expensive to produce on your own. Therefore, it's often better to buy pre-mixed concentrates. However, if
you just have to mix your own, there are a plethora of formulas to start with. Try out these other formulas on your own and start
with lower ratio if desired, but if you are getting dark photos and you are wide open, have a temp over 90F and have full
flash/strobe power, your developer is too weak and needs to be adjusted.
DEVELOPER FORMULAS:
FORMULA #1 : Hydroquinone Developer (As Recommended by Slavich)
• Sodium sulphite (anhydrous) - 70,5 g
• Phenidone - 0,4
• Hydroquinone - 32,5 g
• Potassium bromide - 6,0 g
• Sodium hydroxide - 40,0 g
• Water - up to 1 liter x4 and mix to 128oz of concentrate. Add to developer tanks top off to 160oz (2 tanks).
FORMULA #2 : Hydroquinone - Caustic Developer (Kodak D8 - Modified from Photo Lab Index 6-03)
• Water : 24oz
• Sodium Sulfite : 90grams
• Hydroquinone : 45grams
• Sodium Hydroxide (Caustic Soda) : 37grams
• Potassium Bromide : 30grams
• Water : 32oz
• Multiply x3 to x4 and mix to 128oz of concentrate. Add to developer tanks top off to 160oz (2 tanks).
© 2018 A&A Studios, Inc. | The Photobooth Architects | www.aastudiosinc.com | 7947 Ogden Ave. Lyons, Illinois 60534 | 312.278.1144 | mail@aastudiosinc.com
FORMULA #3: High Contrast Developer (Kodak D19 - Modified from Photo Lab Index 6-14)
• Water : 16oz
• Elon : 2grams
• Sodium Sulfite : 96grams
• Hydroquinone : 10grams
• Sodium Carbonate : 48grams
• Potassium Bromide : 5grams
• Water : 32oz
• Multiply x3 to x4 and mix to 128oz of concentrate. Add to developer tanks top off to 160oz (2 tanks).
FORMULA #4: Standard Reversal Developer (Kodak D88 - Modified from Photo Lab Index 6-80)
• Water : 24oz
• Sodium Sulfite : 49grams
• Hydroquinone : 25grams
• Boric Acid Crystals : 5.5grams
• Potassium Bromide : 3grams
• Sodium Hydroxide (Caustic Soda) : 25grams
• Water : 32oz
• Multiply x3 to x4 and mix to 128oz of concentrate. Add to developer tanks top off to 160oz (2 tanks).
**Developer mixtures, types and strength can vary greatly. Multiple experiments should be made to achieve desired results with respect to
longevity, paper type, temperature, etc. The above noted mixtures should be a starting point for such experiments.
BLEACH: Be sure to use HOT and COLD water where specified for proper dilution as this is critical when working with acids. It is
imperative that protective goggles, gloves, and mask be worn when working with this chemical and any product containing Sodium
Bichromate.
• Potassium dichromate OR Sodium Bichromate – 160g (MIX INTO 26 OUNCES of HOT WATER)
• Sulphuric acid OR Sodium Bisulfate– 320g (MIX INTO 52 OUNCES of COLD WATER!)
• Add entire solution to tank #4 and top off with water as needed.
CLEARING AGENT (Powder): Clearing Agent, AKA Hypo, is simply straight sodium sulfite (565 grams per batch, straight into the tanks
or pre-mix in a 1gl container). This can be purchased in 50lb bags at standard or food grade for $40-$75 per bag. I have found no
difference in technical/photo grade over food grade sodium sulfite. If you were working on prints in the darkroom, I might suggest a
higher grade... but for a photobooth, standard food grade works just fine. You can buy this in bulk from Univar.
Slowly dissolve (565 grams) of sodium sulfite in approximately 3 quarts of warm water at 85°F (32°C) and mix until dissolved. Add
water to bring to 1 gallon (stock). Add 1 gallon stock solution to clearing tanks #7 (160oz tank) and top off with water. 128oz stock :
32oz water.
© 2018 A&A Studios, Inc. | The Photobooth Architects | www.aastudiosinc.com | 7947 Ogden Ave. Lyons, Illinois 60534 | 312.278.1144 | mail@aastudiosinc.com
TONER: Toner is typically made of (A) Thiourea AKA Thiocarbomide (B) Sodium or Potassium Hydroxide AKA Lye or caustic soda and
(C) Water.
To make you own TONER from sodium hydroxide powder (AKA lye):
• Wear gloves and eye protection as needed
• Add 60-75 grams of Sodium Hydroxide (AKA Lye / Caustic Soda) to 16oz-20oz of hot water.
• Next, add 10-12grams of Thiourea and mix.
• Stir as needed.
• Add this mixture into the toner tank #9 and top the tank off with warm water. ***Or, bottle it and add later.
• Make 5-10 batches in advance if you can. It will keep if you have it in an air tight bottle.
To make TONER from sodium hydroxide, 50% solution (liquid):
• Mix 8oz of sodium hydroxide (liquid 50% solution) with the 10g-12grams of Thiourea.
• Add+8-10oz of hot water to make one batch of toner.
• Very dangerous to skin... use gloves!
• Add this mixture into the toner tank #9 and top the tank off with warm water. ***Or, bottle it and add later.
CHEMICAL SUPPLIERS FOR RAW OR BULK INGREDIENTS:
• http://www.bostick-sullivan.com
• http://stores.photoformulary.com/bulk-chemicals/
• http://www.univar.com
• When in doubt - Google It! There are plenty of chemicals suppliers throughout the world.
ADDITIONAL NOTES, TIPS & TRICKS
REPLENISHMENT: As your photobooth chemicals evaporate, you can top off your tanks with water until they are no longer suitable
for use. However, this method will decrease the life of your chemistry. It is recommended that you make “working” solutions to
replenish your chemistry to extend life. These working ratios may be stronger or weaker, depending on your desired results.
TechChem supplies single batch mixes that can be used to make working stocks, or, change just one tank of developer.
AGITATION: For best results stir chemistry daily and/or regularly. If practicable, use tank agitatators on the developer and bleach
tanks, in addition to arms equipped with agitators.
DEVELOPER MIX: The developer mixtures may be increases or decreased to achieve desired results. For instance, 1lb of powder may
be used per 160oz developer tank if the temperature and aperture is adjusted accordingly. (Open aperture / increased temperature
and so forth).
TEMPERATURE: Temperature is key to good looking photos! Cold bleach and developer will especially yield muddy, underdeveloped
and streaky photos. The life of a developer can also be extended by increasing the temperature over the life of the chemistry. Start
your chemicals at a lower temperature and slowly raise it, as required, to your maximum desired temperature.

© 2018 A&A Studios, Inc. | The Photobooth Architects | www.aastudiosinc.com | 7947 Ogden Ave. Lyons, Illinois 60534 | 312.278.1144 | mail@aastudiosinc.com
MECHANICAL CHANGES TO MANIPULATE DEVELOPMENT & EXPOSURE: Photobooth strip development is a dance between
temperature, chemical strength, aperture, strobe power, and time in the tanks. Here are a few simple hacks to try:
• Use a larger pulley wheel on your transmission. Using a larger wheel will make the transmission move SLOWER. This will
increase wait times for the user, BUT, it will also help with overall development. The slower the transmission, the longer the
strip will be in the development bath. This is even more important with slower P-Value paper types.
• Adjust your aperture. Start with a smaller aperture F11-16 and as chemical life decreases, open all the way up to F2.8-4.5,
or as allowed by your lens.
• Add MORE light!! Modify you upper strobe box and add a "slave strobe" with anywhere from (2) 45ws slaves to as high as
250-300ws monolight strobes.
• BOUNCE LIGHT!! Make sure your photobooth roof is white! If it isn't, paint or add a white bounce square. If there is one,
your side panel should also be white. it also highly advised to back your curtains with white fabric. The more white you
have, the more bounce, and better exposure yielded.
ADDITIONAL CARE AND MAINTENCE SUGGESTIONS
1. Use only clean tanks. Wash and rinse before each and every chemical change. Clean chemically with used bleach solution every 60
days or more often if required.
2. Stir and mix chemicals only with a hard rubber, plastic or glass rod and rinse between mixing of different solutions.
3. To avoid possible contamination of one chemical by another mix in operational sequence, ie... Developer. Bleach, Clearing and
Toner.
4. Keep paper carriers clean and free from chemical deposits. Contamination will produce inferior prints and shorten the life of the
chemicals. All paper carriers on all Models should be rinsed in hot water at each Chemical Change.
5. To ensure consistently good quality photographs. For best results, chemicals should be changed every 500 photo strips or once
every 4 to 6 weeks, whichever comes first.
6. The developer temperature should be set between 90°F to 110°F. Local conditions and various equipment settings may require
different settings. Whenever possible, and safe, it is best that your photobooth be left on 24 hours a day. If it is necessary to
disconnect the photobooth at night or for service, be sure to turn it back on at least 2 hours before use to ensure proper processing
temperature.
CHEMICAL SOLUTION TESTS
The purpose of these tests is to isolate chemicals which may be the cause of sub-standard photographs. Tests should be made only:
1. Following the complete change of chemicals and the replenishing of remaining tanks with fresh water.
2. With the developer temperature set correctly and the Iris adjusted correctly.
TESTING DEVELOPER SOLUTION: This test is made with the Studio door open and by pressing the maintenance button and/or key.
As the carrier leaves the developer tanks (No. I) the emulsion side of the paper should be a deep black. If it is grey or mottled, run
several more strips and if condition does not improve change the solution.
TESTING BLEACH SOLUTION: Bleaching solution (Tank No.4) should remove all traces of black on emulsion side of paper. If it fails to
do this after observing two or three strips then the solution has not been properly mixed or is over diluted (not strong enough).
© 2018 A&A Studios, Inc. | The Photobooth Architects | www.aastudiosinc.com | 7947 Ogden Ave. Lyons, Illinois 60534 | 312.278.1144 | mail@aastudiosinc.com
TESTING CLEARING SOLUTION: Clearing action (Tanks No.7) should remove all traces of the orange bleach stain. If not, check that all
crystals have dissolved or that the solution is strong enough. Add more sodium sulfite, increase temperature, or both to combat
bleach stains.
TESTING TONER SOLUTION: The Toner solution (Tank No.9) must be checked independent of the developing, bleaching and clearing
solutions by running a separate strip through the complete cycle with the cabinet door closed. Presuming that the developing,
bleaching and clearing solutions have been satisfactory. the photo strip as it enters tank #9 should be white. The toner action should
bring out the latent image or unexposed (dark areas) in sharp contrast to the exposed portion (white areas). The blacker the blacks
the whiter the white, and a full graduation of tones between these extremes, the better the print. Take particular note of the border
frames around each print. If they are a deep black and the dark areas of the photograph do not contrast sharply with the white areas
check developer temperature to ensure it is not too high.
**Please feel free to share all of the information provided with others in our community... but be sure to credit A&A Studios and
link back to this page, as we have spent a good deal of time to test, explain and provide all of this data to keep these vintage
photobooth and analog photography alive well into the future!
FOOTNOTES:
1. As noted within this article, the chemical formulas and tank configurations are primarily for Slavich Minutka reversal paper.
These formulas and reversal process can be used with almost any traditional B&W negative-to-positive papers, often with
varying results. A&A Studios has identified several papers that work well in the photobooth process. We have had these
papers made by Kodak, Ilford and Foma cut to size and they work quite well at a fraction of the cost of Slavich. However,
they have lower P-Values than Slavich. Therefore, to utilize these papers in a photobooth it requires a tank reconfiguration
that accommodates 3-4 strong developer tanks (320oz over 4 tanks) at the start of the process. In addition, it helps to boost
the flash with slaves. For more info or to try these papers, please call or email us directly.
2. It should be noted that heat belts, in our opinion, are better than the singular prob/heater set-up. Older machines can be
modified to work with a heat belt. Or, you may also consider heating the entire chemical cabinet with a space heater
system (at your own risk and proceed with caution).
3. This article has dealt primarily with B&W paper. Color paper requires a different chemical set and different tank
configuration. The process used to produce color analog photobooth strips was "Ilfochrome" or more commonly called,
Cibachrome. This paper was discontinued in 2011 by Ilford and no known modern paper of a similar type is being produced.
Sales of Ilforchrome AKA "Photo-me Chrome" can be found via US and Canadian suppliers, but they are selling old stock.
Therefore, if you want a stock of color, buy it now and keep it frozen! At A&A Studios, we have had success in reversal
processing traditional color papers such as Fuji Crystal Archive and various Kodak stocks. However, long stability and color
rendition was problematic. We have been testing other color methods and formulas, but have put it on the back burner for
now.
4. Version 3.11.2018

© 2018 A&A Studios, Inc. | The Photobooth Architects | www.aastudiosinc.com | 7947 Ogden Ave. Lyons, Illinois 60534 | 312.278.1144 | mail@aastudiosinc.com
