Bay Trail T Intel(R) TXE FW Bring Up Guide 0.87 APL Secure Tokens 1.0
User Manual: APL Secure Tokens Guide 1.0
Open the PDF directly: View PDF ![]() .
.
Page Count: 18

Apollo Lake Secure Tokens Guide
Revision 1.0
June 2016
Intel Confidential

2 Intel Confidential User Guide
INFORMATION IN THIS DOCUMENT IS PROVIDED IN CONNECTION WITH INTEL PRODUCTS. NO LICENSE,
EXPRESS OR IMPLIED, BY ESTOPPEL OR OTHERWISE, TO ANY INTELLECTUAL PROPERTY RIGHTS IS GRANTED
BY THIS DOCUMENT. EXCEPT AS PROVIDED IN INTEL'S TERMS AND CONDITIONS OF SALE FOR SUCH
PRODUCTS, INTEL ASSUMES NO LIABILITY WHATSOEVER AND INTEL DISCLAIMS ANY EXPRESS OR IMPLIED
WARRANTY, RELATING TO SALE AND/OR USE OF INTEL PRODUCTS INCLUDING LIABILITY OR WARRANTIES
RELATING TO FITNESS FOR A PARTICULAR PURPOSE, MERCHANTABILITY, OR INFRINGEMENT OF ANY PATENT,
COPYRIGHT OR OTHER INTELLECTUAL PROPERTY RIGHT.
A "Mission Critical Application" is any application in which failure of the Intel Product could result, directly or
indirectly, in personal injury or death. SHOULD YOU PURCHASE OR USE INTEL'S PRODUCTS FOR ANY SUCH
MISSION CRITICAL APPLICATION, YOU SHALL INDEMNIFY AND HOLD INTEL AND ITS SUBSIDIARIES,
SUBCONTRACTORS AND AFFILIATES, AND THE DIRECTORS, OFFICERS, AND EMPLOYEES OF EACH, HARMLESS
AGAINST ALL CLAIMS COSTS, DAMAGES, AND EXPENSES AND REASONABLE ATTORNEYS' FEES ARISING OUT
OF, DIRECTLY OR INDIRECTLY, ANY CLAIM OF PRODUCT LIABILITY, PERSONAL INJURY, OR DEATH ARISING IN
ANY WAY OUT OF SUCH MISSION CRITICAL APPLICATION, WHETHER OR NOT INTEL OR ITS SUBCONTRACTOR
WAS NEGLIGENT IN THE DESIGN, MANUFACTURE, OR WARNING OF THE INTEL PRODUCT OR ANY OF ITS PARTS.
Intel may make changes to specifications and product descriptions at any time, without notice. Designers must
not rely on the absence or characteristics of any features or instructions marked "reserved" or "undefined". Intel
reserves these for future definition and shall have no responsibility whatsoever for conflicts or incompatibilities
arising from future changes to them. The information here is subject to change without notice. Do not finalize a
design with this information.
The products described in this document may contain design defects or errors known as errata which may cause
the product to deviate from published specifications. Current characterized errata are available on request.
Contact your local Intel sales office or your distributor to obtain the latest specifications and before placing your
product order.
Copies of documents which have an order number and are referenced in this document, or other Intel literature,
may be obtained by calling 1-800-548-4725, or go to: http://www.intel.com/design/literature.htm
*Other names and brands may be claimed as the property of others.
Copyright © 2016, Intel Corporation. All rights reserved.

User Guide Intel Confidential 3
Contents
Contents
1 Introduction ...................................................................................................... 5
1.1 Goal ...................................................................................................... 5
1.2 Pre-Requisites ........................................................................................ 5
1.3 Tools Used In This Document ................................................................... 5
1.4 Terminology ........................................................................................... 6
2 Overview of Secure Tokens ................................................................................. 7
2.1 Introduction ........................................................................................... 7
2.2 Preparing the Platform to Accept Secure Tokens ......................................... 7
3 Creation of Secure Tokens .................................................................................. 8
3.1 Introduction ........................................................................................... 8
3.2 Installing Intel® PFT ................................................................................ 8
3.3 Launching Intel® PFT token module ........................................................... 8
3.4 Set General Settings ............................................................................... 9
3.5 Create the Token .................................................................................. 12
4 Injection of Token on Platform........................................................................... 16
4.1 Introduction ......................................................................................... 16
4.2 Injection .............................................................................................. 16
4.2.1 Injection using Intel® FPT ......................................................... 16
4.2.2 Injection using DnX ................................................................. 16
4.2.3 Building a Token into the Firmware Image .................................. 17
4.3 Clearing of Token .................................................................................. 18
4.4 Debugging Secure Token Injection .......................................................... 18
4 Intel Confidential User Guide
Revision History
Revision Number
Description
Revision Date
0.4
Initial Release
December 2015
0.6
Removal of Lifecycle token, and DnX validation
against OEM Key Manifest
Removed mention of alternate R&D keys
January 2016
1.0
Emphasis of dependency on Mobile Signing Utility
Removal of mention of Broxton (BXT) platform
June 2016

Introduction
User Guide Intel Confidential 5
1 Introduction
This document gives an overview of Secure Tokens for the Apollo Lake
platform.
1.1 Goal
The goal of this guide is to train the user to:
1. Prepare his platform to work with Secure Tokens
2. Create Secure Tokens
3. Inject Secure Tokens to the platform
4. Clear Secure Token from platform after use.
1.2 Pre-Requisites
The user should download and install the following applications, included
in the firmware kit:
Intel® Platform Flash Tool (PFT)
Mobile Signing Utility for Broxton. Note that the Intel® PFT
will fail to generate tokens if the Mobile Signing Utility is
not installed.
Intel® Flash Programming Tool (FPT)
An overview of the signing and manifesting process is described in:
APL Signing and Manifesting Guide
which is included in the firmware kits.
1.3 Tools Used In This Document
The following tools are used within this document:
Intel® Platform Plash Tool (PFT)
Intel® Flash Programming Tool (FPT)
Introduction
6 Intel Confidential User Guide
1.4 Terminology
Table 1- Terminology
Term
Description
DnX
Download and Execute
EOM
End of Manufacture
Intel FIT
Intel® Flash Image Tool
IBB
Initial Boot Block
IBBL
Initial Boot Block Loader
IFWI
Integrated Firmware Image
ISH
Integrated Sensor Hub
OBB
OEM Boot Block
SUT
System Under Test

Overview of Secure Tokens
User Guide Intel Confidential 7
2 Overview of Secure Tokens
2.1 Introduction
Secure Tokens are used in the APL platform to allow operations
otherwise blocked.
The OEM Unlock Token unlocks debug capabilities such as
North Peak debug messages
ISH debug
Intel® TXE debug interfaces when Secure Boot is not in legacy
mode
Tokens are digitally signed so that the target platform knows to accept
them.
2.2 Preparing the Platform to Accept Secure
Tokens
Secure Tokens must be digitally signed, to ensure that the target
platform will authorize them.
APL platforms are manufactured with an OEM Key Manifest as part of
the IFWI image. One of the fields in the OEM Key Manifest is for the
OEM Unlock Token. Theis should be populated with the hash of the
public key, matching the private key with which the token will be
signed. A token whose key does not match the relevant hash in the
OEM Key Manifest will be rejected by the platform.
An overview of the signing and manifesting process is described in:
APL Signing and Manifesting Guide
which is included in the firmware kits.
Creation of Secure Tokens
8 Intel Confidential User Guide
3 Creation of Secure Tokens
3.1 Introduction
The Intel® Platform Flash Tool (PFT) includes a module which is the tool
provided for Secure Token creation on APL platforms.
The module supports many platforms, and displays many options not
supported on the APL platform. This guide will only cover the POR
features, and show how to create Secure Tokens for APL platforms.
3.2 Installing Intel® PFT
Install the Intel® Platform Flash Tool (PFT) and the Mobile Signing Utility
for Broxton, both included in the firmware kit. Note that the Intel®
PFT will fail to generate tokens if the Mobile Signing Utility is not
installed.
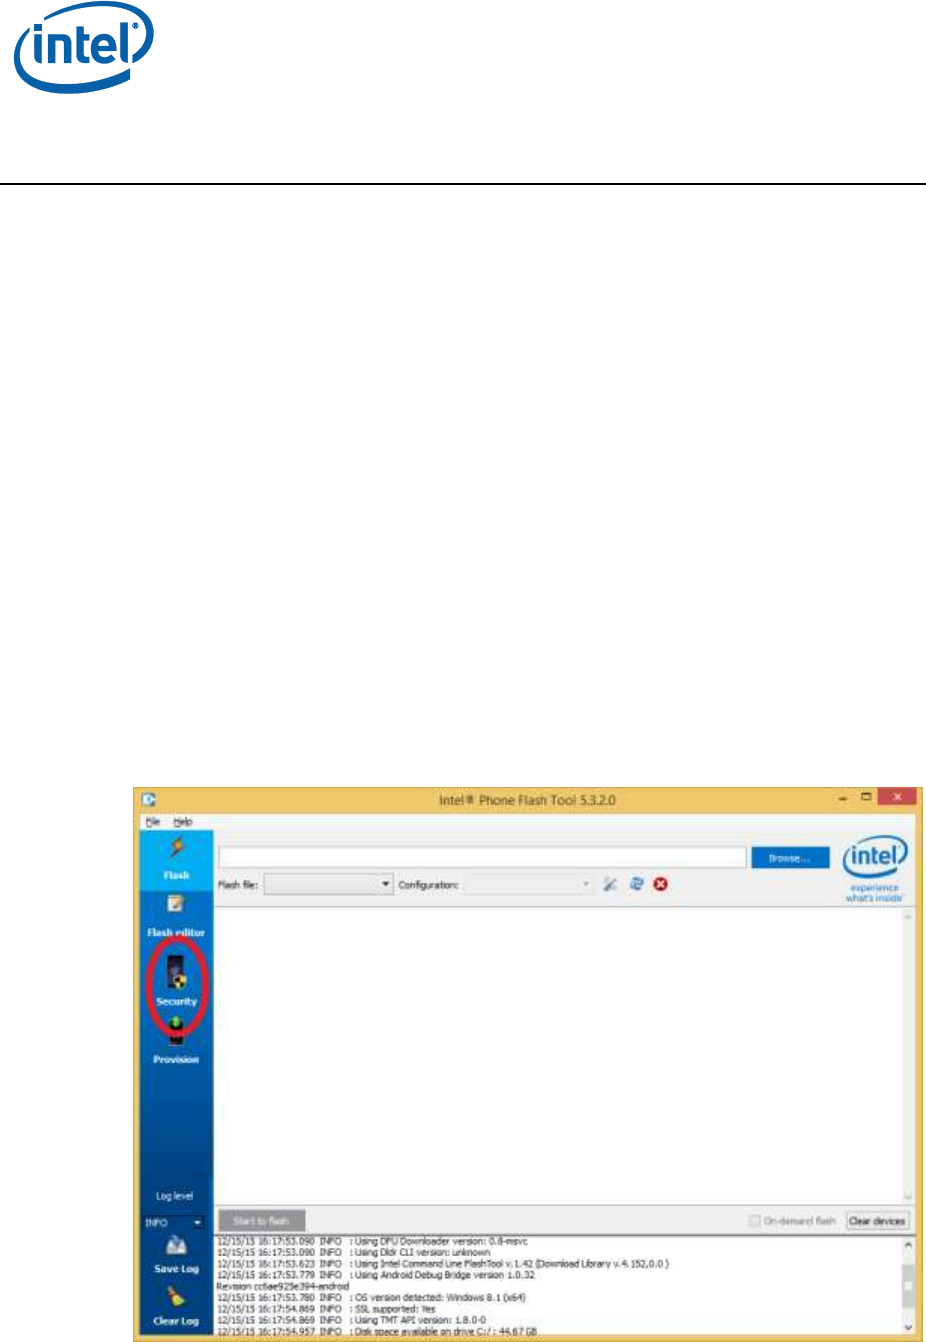
3.3 Launching Intel® PFT token module
Open Intel® Platform Flash Tool (PFT), and click on the Security button
in the left margin.

Creation of Secure Tokens
User Guide Intel Confidential 9
This will change the UI to that of the token creation module.
3.4 Set General Settings
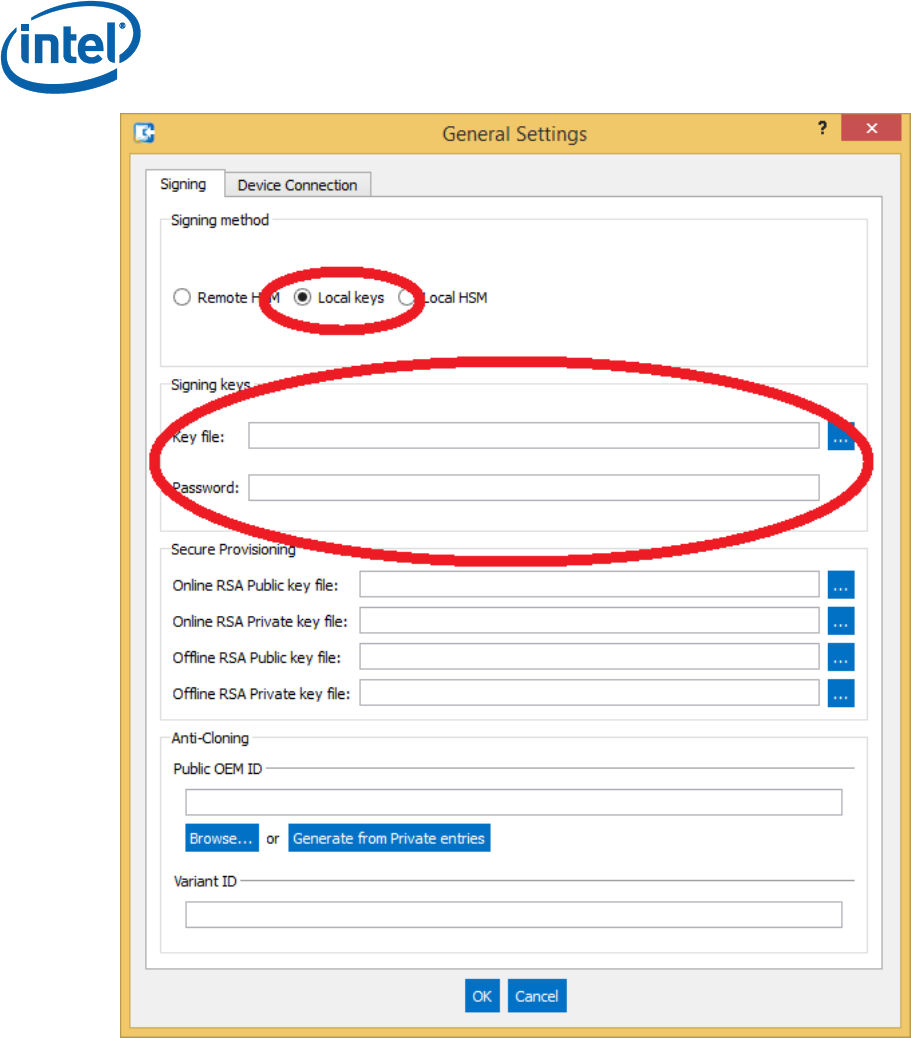
Click on the Security menu item, and then General Settings.
This will open the General Settings Dialog.
Ensure to select Local Keys as the Signing method, and then you can
enter the file with the private key for signing the tokens in the Key File
field. NOTE: If key is not password protected, currently Intel® PFT
does not manage to create the token. You should enter the password
in the Password field.
To create a password protected private key, using OpenSSL, using for
example ‘foobar’ as the password, run the following command from
the CLI:
# openssl.exe genrsa -passout pass:foobar -out privkey_pwd.pem 2048
Creation of Secure Tokens
10 Intel Confidential User Guide
Click on the Device Connection tab to set behaviors for creating
tokens specific to particular platforms.
To use DnX to retrieve platform part ID information, and to inject or
erase tokens, select the checkbox ‘Force to use DnX mode’. You will
then also need to enter the Firmware DnX module, which is a binary
file included in the firmware kit.
If you select the checkbox ‘Automatically get device data when
generating tokens’, then every token will be created with the Part ID
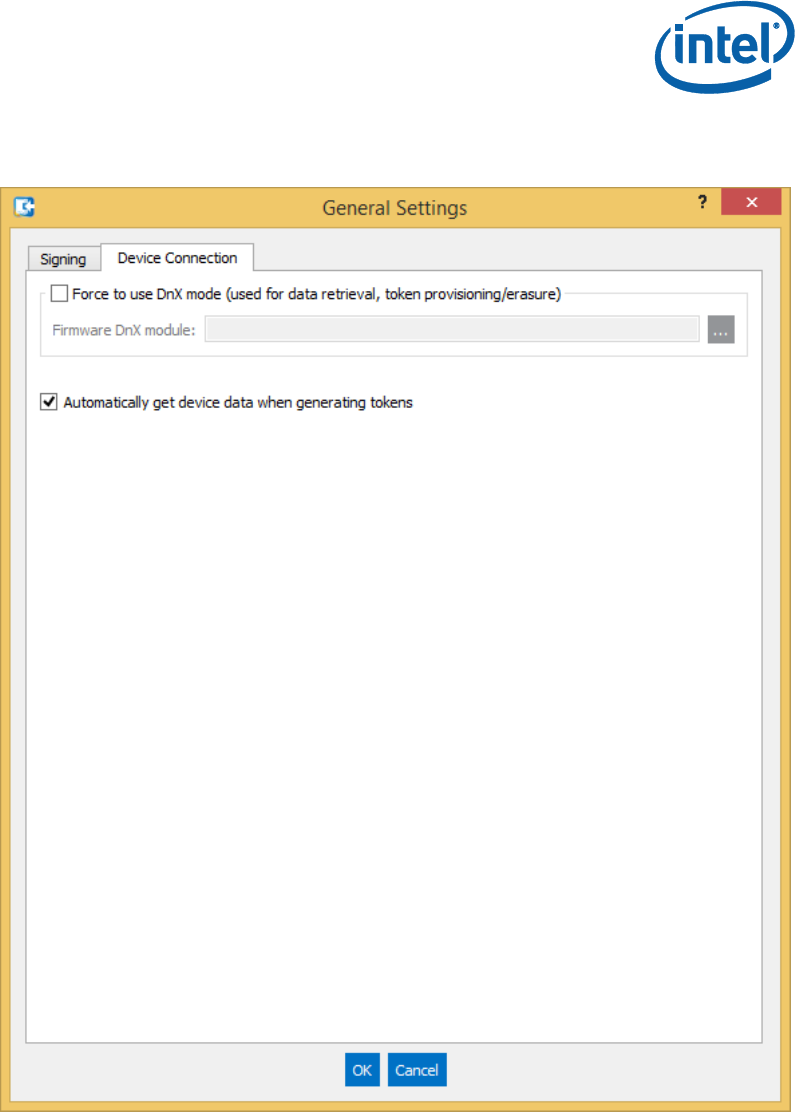
Creation of Secure Tokens
User Guide Intel Confidential 11
information of the target platform, and will only be valid on that
platform.
Creation of Secure Tokens
12 Intel Confidential User Guide
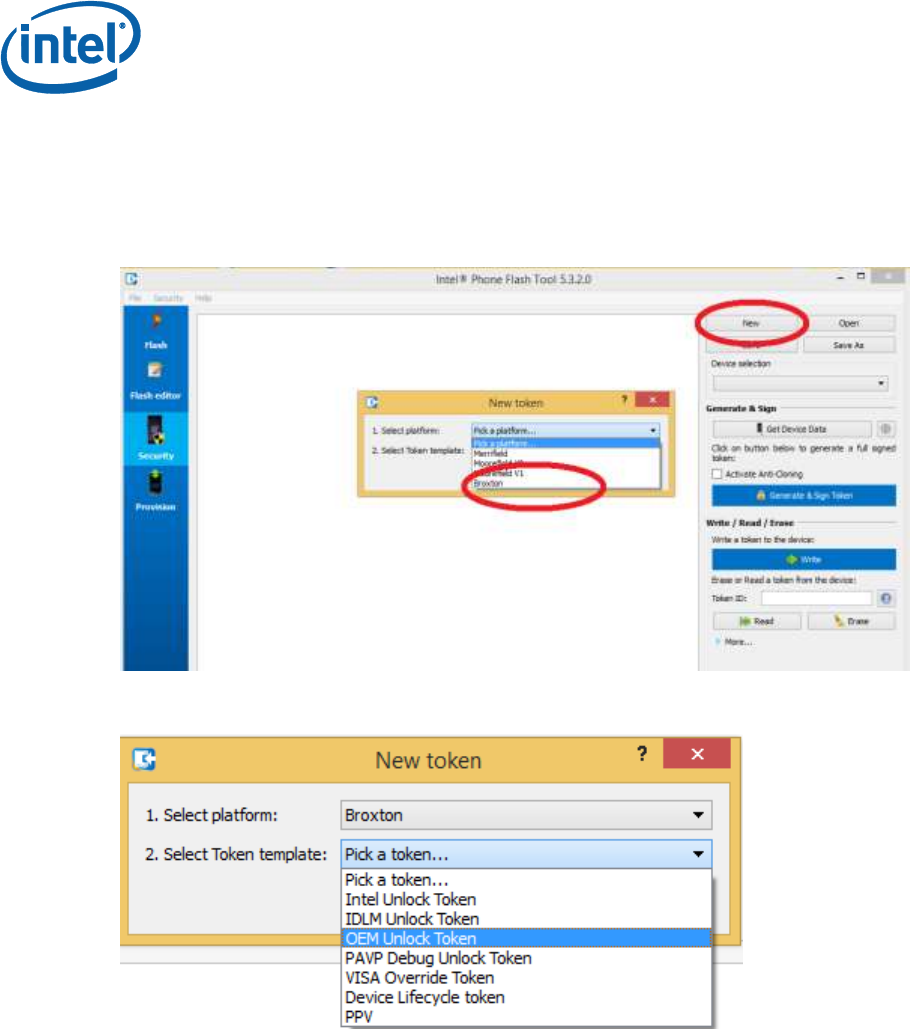
3.5 Create the Token
Click on the New button, and then select Broxton as the target
platform, and OEM Unlock Token as the token template for an OEM
Unlock Token. All other options are not supported for customers.
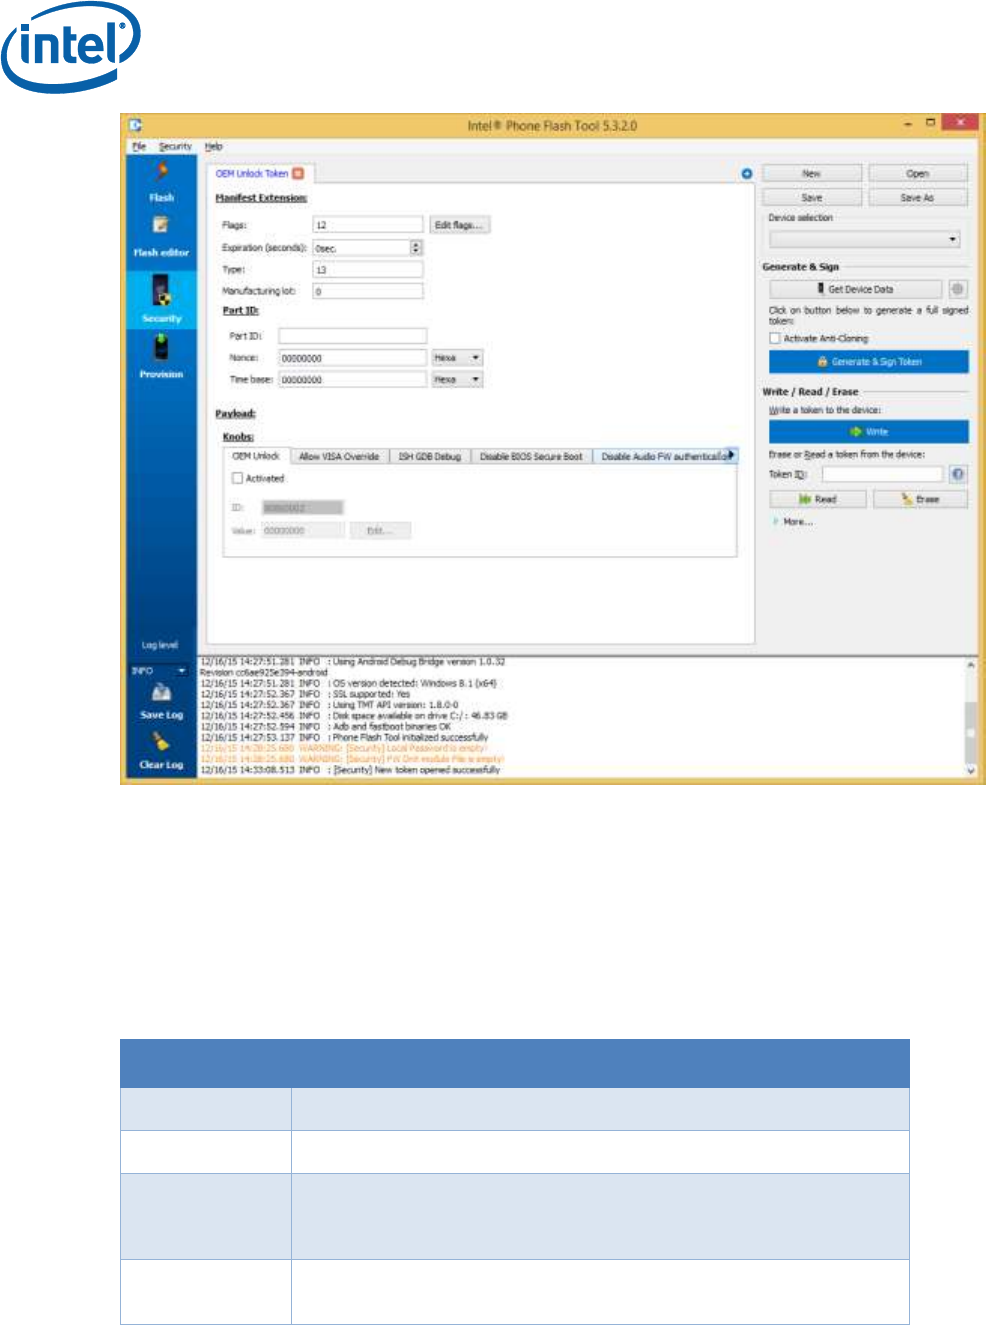
There are multiple options that can now be set for the token
(depending on which token is selected). Leave all of them with
defaults, except for the following:

Creation of Secure Tokens
User Guide Intel Confidential 13
In the Flags section, you can set
Globally valid. This means that the token can be used on any
platform whose token key hash matches that of the token, and
is not tied to a particular platform ID.
No Anti-replay. Anti-Replay protection stops a token being re-
used on the same device after it has been cleared. This option is
only relevant for tokens tied to a particular platform ID.
No expiration. This means that the token has no time limit.
Token expiration is only relevant on tokens with anti-replay,
because otherwise you can re-use the token.
In the main screen you can set:
Expiration timeout (if relevant)
Part ID. This is only relevant for a token that is not Globally
Valid.
You can retrieve the Part ID data using Intel® FPT, by calling
# FPT.exe –GETPID <file>
which will retrieve the part ID into a file. You can open the file
to copy and paste the data into the relevant fields.
It is far better to set the General Setting ‘Automatically get
the device data when generating tokens’, and then to
uncheck the Globally valid flag in the flags section. This will
then get the Part ID data directly from the platform as the
token is generated, and generate the token specifically for that
platform. This requires a USB connection between the
management console, and the target platform, and also that
you have enabled the DnX option in the General Settings Dialog.
Creation of Secure Tokens
14 Intel Confidential User Guide
In the Payload section, you can set the ‘Knobs’ for the token. These
define what the token allows/disables on the platform. You can
check/uncheck the checkbox inside each tab to add the knob to the
token, and then edit the value of the token by clicking the Edit button
and selecting from the radio buttons inside. Do not attempt to change
the value manually. The knobs available vary depending on the token
being created. Here is an explanation of the various knobs:
Knob
Meaning
OEM Unlock
Allow an OEM (Orange) unlock
VISA override
Override default VISA signal coloring
Enable DCI
Enable DCI on the platform when the BIOS/OS provides no
mechanism for a user to enable debug. This option is gated by
the ‘Enable_DCI_Policy’ FPF
ISH GDB
Debug
Enable ISH GDB support
Creation of Secure Tokens
User Guide Intel Confidential 15
Knob
Meaning
Disable BIOS
Secure Boot
0: Secure Boot enforced. This means BIOS BPM is validated
using a production key rooted in the OEM key manifest.
2: Secure boot disabled. All secure boot flows are disabled. In
reality, this means that the BIOS BPM is not validated.
Disable Audio
FW
Authentication
0: Enforce production Audio (ADSP) FW image authentication
2: Disable Audio (ADSP) FW image authentication
Disable ISH
FW
Authentication
0: Enforce ISH FW image authentication
2: Disable ISH FW image authentication
Disable Image
FW
Authentication
0: Enforce Imaging Unit (iUnit) FW image authentication
2: Disable Imaging Unit (iUnit) FW image authentication
Injection of Token on Platform
16 Intel Confidential User Guide
4 Injection of Token on Platform
4.1 Introduction
Tokens can be injected into a platform using the HECI interface, and
tools such as FPT, or using DnX. The PFT tool, used for creating
tokens, can also be directly used to inject the token using DnX, via a
UI button. Some tokens can also be compiled into the firmware image,
using FIT.
4.2 Injection
4.2.1 Injection using Intel® FPT
The OEM Unlock Token can be injected into a platform using Intel®
FPT, running on the platform OS. The token will be read by the
firmware on the next platform reset, so the machine should be
rebooted after injection. It will remain there until it is erased, or the
firmware is re-flashed, erasing the token. Intel recommends never
releasing to customers a platform with an erased OEM Unlock Token,
but to re-flash the full firmware image instead.
Operation
Command Line
Lists the token ID currently on the
system
Fpt.exe - LISTTOKENS
Writes the token where the filename
is the token name
Fpt.exe -WRITETOKEN<file>
Delete the token for the token ID
provided
FPT.exe - ERASETOKEN<pid>
Note that these APIs are unable to give any indication if the token
passed validation or not.
4.2.2 Injection using DnX
The OEM Unlock Token can be injected into a platform using DnX. This
requires the management console to be connected to the target
platform with a USB cable. The target machine must enter into DnX

Injection of Token on Platform
User Guide Intel Confidential 17
mode. Depending on OEM implementation, there may be an explicit
hardware trigger for this. Alternatively, connecting the target system
to the management console should enter the target system into DnX
mode until the DnX timeout is reached. The DnX APIs for tokens are
only available while the target system is in DnX mode.
The token will be read and validated by the firmware on the next
platform reset, so the machine should be rebooted after injection. It
will remain there until it is erased, or the firmware is re-flashed,
erasing the token. Intel recommends never releasing to customers a
platform with an erased OEM Unlock Token, but to re-flash the full
firmware image instead.
The DnX token API is supported by the Intel® PFT command line:
Operation
Command Line
Read token in slot 0 to
read_token.bin
dnxFwDownloader.exe --command readtoken --fw_dnx
DNXP_0x1.bin --path read_token.bin --slot 0
Write token
OEMUnlock.bin to slot 0
dnxFwDownloader.exe --command writetoken --fw_dnx
DNXP_0x1.bin --token OEMUnlock.bin --slot 0
Erase token in slot 0
dnxFwDownloader.exe --command erasetoken --fw_dnx
DNXP_0x1.bin --slot 0
Note that each of the DnX commands requires the passing of the DnX
binary DNXP_0x1.bin to the platform. This binary file is included in the
firmware kit.
Note that the APIs are unable to give any indication if the OEM Unlock
token passed validation or not.
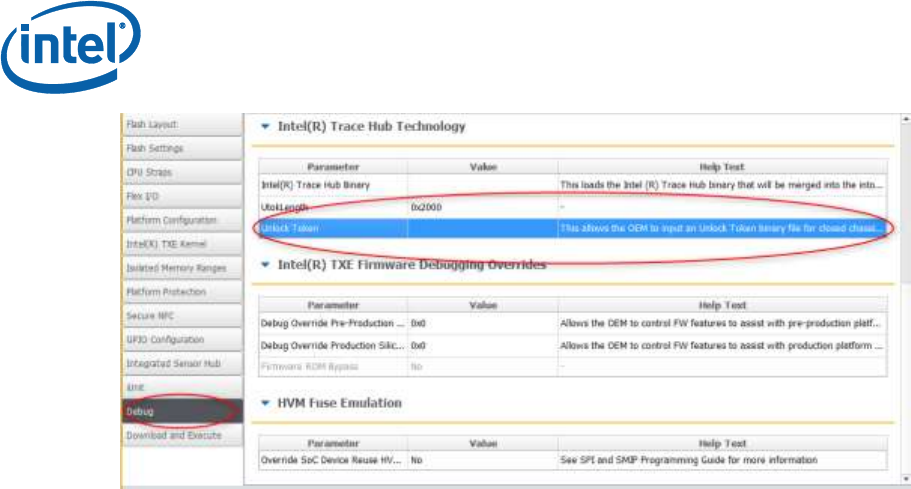
4.2.3 Building a Token into the Firmware Image
The OEM Unlock Token can be compiled directly into the firmware
image when it is built, using FIT.
It is entered in the Debug tab, in the Unlock Token field. An image
prepared this way can be used for debug purposes, but should never
be burned on production systems.
Injection of Token on Platform
18 Intel Confidential User Guide
4.3 Clearing of Token
The OEM Unlock token survives a reboot, and must be erased using
the FPT or DnX APIs described above. Intel recommends never
releasing to customers a platform with an erased OEM Unlock Token,
but to re-flash the full firmware image instead.
4.4 Debugging Secure Token Injection
The OEM Unlock Token is only examined by firmware at system boot,
and so the injection API cannot return any failure codes. In the event
that the token is failing to unlock the platform, North Peak messages
must be examined, as they indicate why a token was rejected.
