ARS Wireless Manual
User Manual: ARS Wireless Manual
Open the PDF directly: View PDF ![]() .
.
Page Count: 10
ARS Wireless: Using the Handheld
ARS Wireless allows you the flexibility to perform some functions of the ARS system through
mobile technology. ARS Wireless provides you the mobility of using laptops or handhelds to
perform a variety of tasks to increase productivity by reducing the time of tasks and data entry
into the system.
ARS Wireless is supported on Window Operating System devices that have Wi-Fi
capabilities and a built-in scanner, or the capability of interfacing with a scanner.
ARS Wireless is available for ARS System Version 5 and 6.
Requires Wi-Fi/Wireless Network in place and operating.
o It is recommended to take a walk around your facility and know where any dead
zones are.
o Adjust location of equipment if need be to accommodate any dead zones, may
require an Access Point versus a Wi-Fi Router for better signal.
ARS Wireless performs the following features:
Item Check
Physical Counts
Receiving
Verify Serial Number
Wireless Register
Item Checks
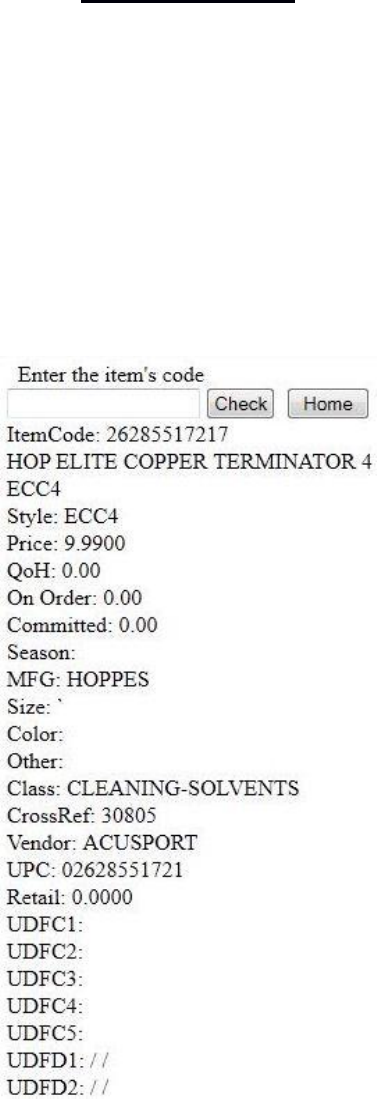
The Item Check feature will display information about an item. The item is entered into the
Handheld by scanning the UPC code or entering the item code on the keypad.
To perform an Item Check using the Handheld:
1. Login to the Wireless Main Page.
2. Select the Item Check button from the application menu.
3. Enter the item number by scanning or enter the number using the keypad.
a. If the item number corresponds to an item in the system, the following
information for that item will display on the screen: item code, description,
price, quantity-on-hand, quantity-on-order, and committed quantities.

Physical Counts
Physical Counts can be performed in one of two ways: by scanning an item and then prompting
for a quantity or by scanning each individual item adding a quantity of one each time.
**Before using Physical Counts on a handheld, a physical count form must be created at the IMS
and Quantity-on-hand values must be refreshed.
At the IMS:
1. Select Process, Select Physical Count.
2. Select the New button from the basic toolbar.
3. Add Physical Count Form Displays.
4. Enter a name for the physical count.
5. Select the filter button and add filter specifications to specify which items should be
included on the count.
For more information on Physical Count and Filtering, see the IMS User Manual.
To Perform Physical Count on Handheld (Overview)
1. Login to the Wireless Main Page.
2. Select either the Physical Count button or the Physical Count Scan button.
a. Physical Count – Performs a physical count by scanning an item and then a
manually entering in a quantity.
b. Physical Count Scan – Performs a Physical Count by scanning each
individual item.
Physical Count on the Handheld
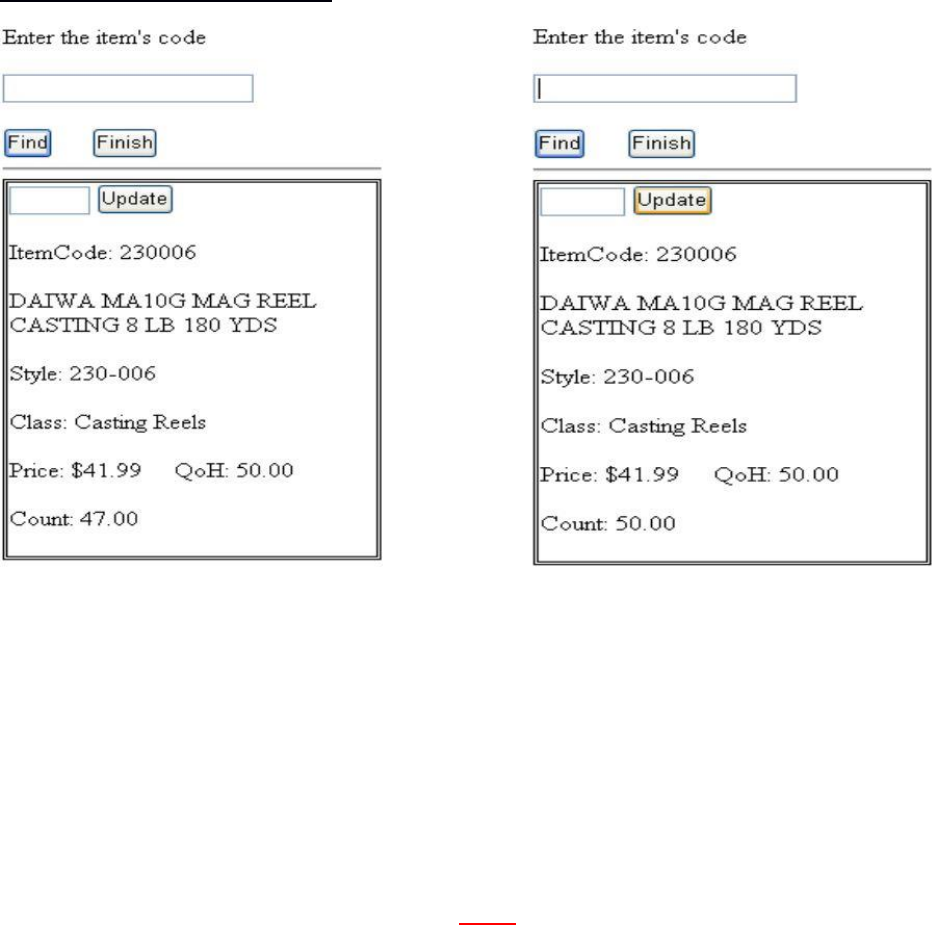
Once an item code has been entered during a Physical Count, a form similar to the one
displayed below will show.
1. Select physical Count Group from the List.
2. Scan or enter the item in the Item Code field.
3. Enter the quantity of items that have been counted manually.
4. Enter Quantities in the entry field adjacent to the Update button.
5. Select the Update button to adjust the count quantity listed on the bottom of the form.
When the item is first counted, the count quantity is the same as the quantity-on-hand, however
after the item is counted adjusted quantities are added to the count quantity.
Example: Of 50 fishing reels, 47 were counted using the count quantity update as seen above. Later the
three missing reels were found. To correct the count quantity enter 3 and update, this will adjust the cont
quantity from 47 to 50. (Do not enter 50 because you have already entered a count of 47 and only need to
update the 3 found items. Updating 50 would add 50 more to the previously counted 47 and creating a total
of 97)
*NOTE: To determine if an item was counted, login to the IMS. In Physical Count-Detail,
items with a check in the “Counted” Column were counted. To reset counted values, select
Refresh QOH’s button from the Physical Count Data grid.
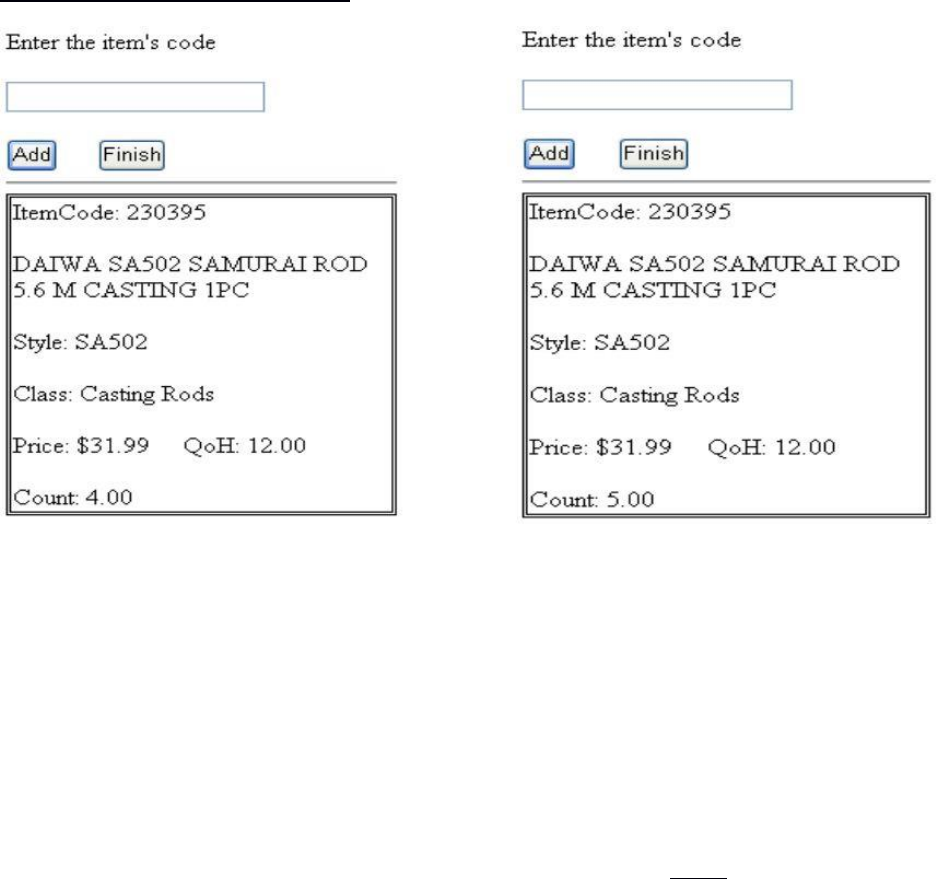
Physical Count Scan on Handheld
Each time an item is added using the Physical Count Scan, the count quantity will increment by
one (1).
1. Select the Physical Count Group from the list.
2. Scan or enter the item being counted. Each time am item is scanned or entered, a quantity
of one will be added to the count.
3. Scan/enter each item until all of the items have been scanned.
Before the item is counted, the count quantity will be the same as the Quantity-on-Hand. When it
is counted the quantity will increase by increments of one (1). If am Item is previously counted
and a Physical Count Scan is performed, a quantity of one (1) will be added to the previously
counted quantity.
Example: Four (4) fishing rods were previously counted using the handheld. When adding one more using
the Physical Count Scan, the count quantity increments by one (1)
*NOTE: To determine if an item was counted, login to the IMS. In Physical Count-Detail,
items with a check in the “Counted” Column were counted. To reset counted values, select
Refresh QOH’s button from the Physical Count Data grid.
Receiving
The Handheld can be used to count receiving quantities. There are two (2) ways to do this 1)
scan one item and them be prompted for the quantity; 2) scan each individual item and a quantity
of one (1) is added each time. (This is similar to the Physical Count steps)
1. Login to the Wireless Main Page.
2. Select the Receiving button.
3. Select an Invoice to add the items to, or select New to create a new invoice (Steps below)
Existing Invoice in the Handheld
1. Select an invoice to add items to.
2. Scan or enter the item code of the item being received.
3. Enter the quantity received in the Quantity Received field.
4. Adjust the Cost field if incorrect. (The initial cost is the Last Cost, which is found at the
IMS under Item>Modify)
5. Select the Update button to add this item to the Invoice.
6. When all items have been added, select the Finish button. The invoice may be found in
the IMS in Process>Receive by Invoice where it may be updated.
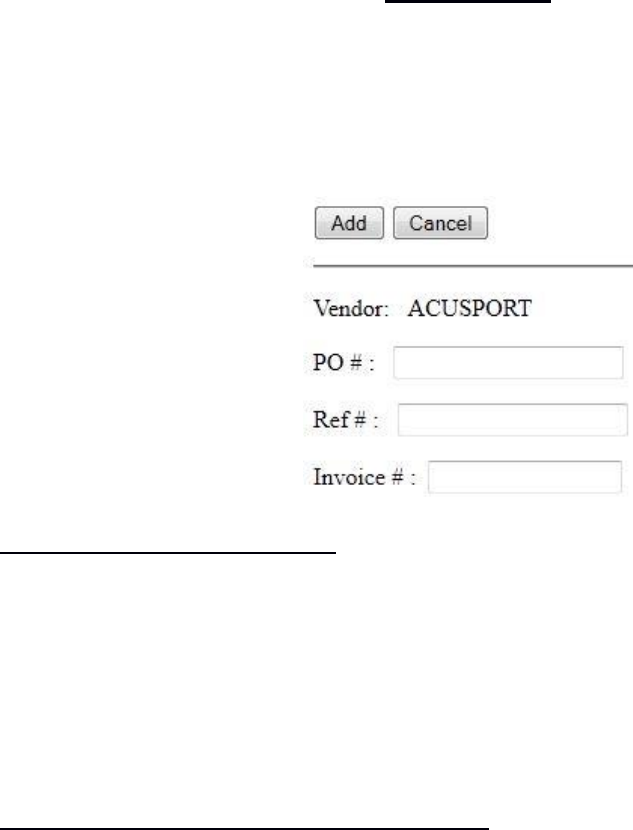
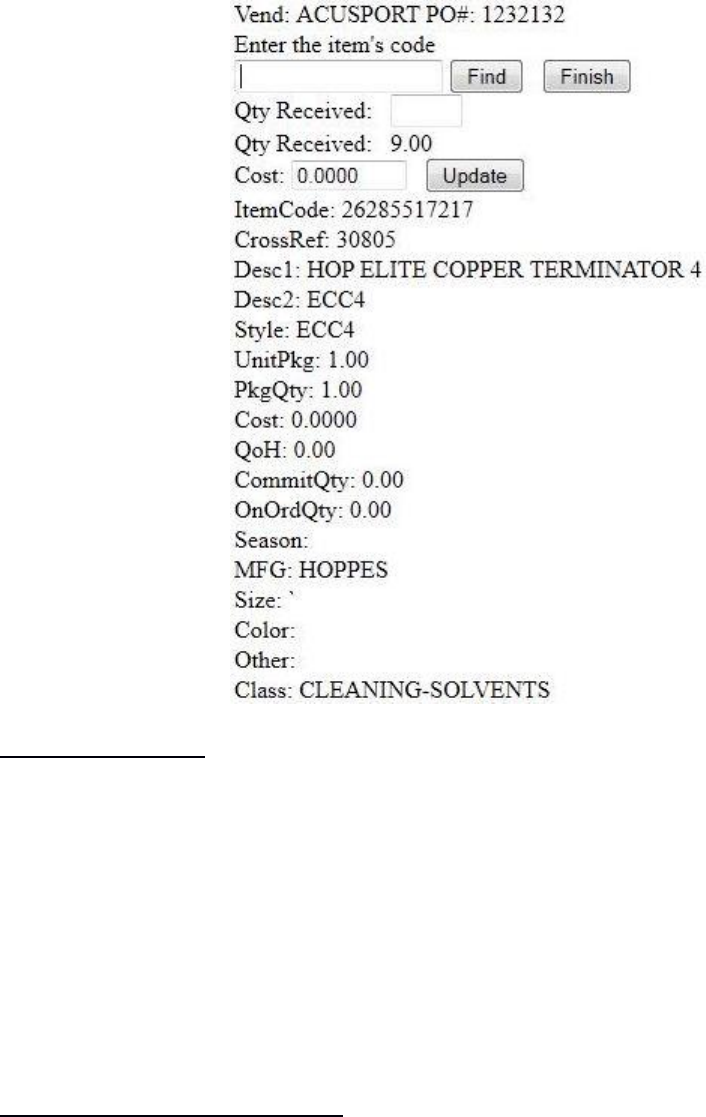
New Invoice in the Handheld Click on receiving
1. Click New.
2. Select the Vendor.
3. Enter the PO#, Ref# or the Invoice# and click Add.
4. Scan or enter the item code of the item being received. A window similar to the one
below displays.
5. Enter the quantity received in the Quantity Received field.
6. Adjust the Cost field if incorrect. (The initial cost is the Last Cost, which is found at the
IMS under Item>Modify)
7. Select the Update button to add this item to the Invoice.
8. Repeat until all items are entered.
9. Click Finish.
In the IMS for PO’s
1. Click Process - EDI Receiving.
2. Highlight the one you just created and click on Sync PO or Add to PO.
a. Sync PO – syncs the items from EDI to the PO, only ones matching will sync.
b. Add to PO – adds the items from EDI to the PO as new items on the PO.
3. Highlight the PO or create a new one and click OK.
4. The PO should be updated with the received quantity now.
*FYI If the PO was already in the IMS the Vendor should have Rec Zero checked in the vendor
setup.
If you are creating the PO from within EDI Receiving you don’t want Rec Zero checked
in the vendor setup.
In the IMS for Receive by invoice
1. Click Process – EDI Receiving.
2. Highlight the one you just created and click on Rec Invc.
3. Highlight the Invoice or create a new invoice and click OK.
4. The Receive by Invoice should be updated with the received quantity now.
Receiving Scan works the same way but you don’t enter a quantity, it adds one to the quantity
received each time you scan an item. (Similar to the Physical Count)
Verify Serial Number
To perform the Verify Serial Number function using a Handheld
At the IMS
1. Select Process, Select Verify Serial #.
2. Create a new Group by selecting the New button or use an existing Group.
3. Select the group containing the serial numbers to be verified.
4. Select the Refresh QOH’s button to populate the data grid.
Once this is Complete
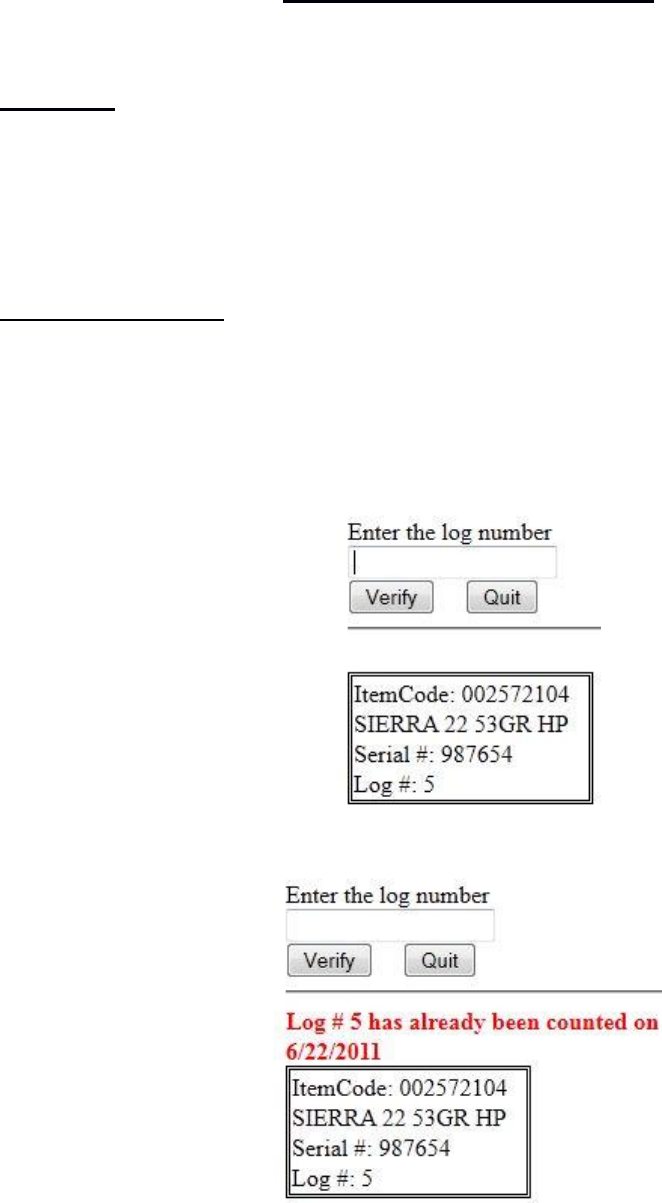
1. Login to the Wireless Main Page.
2. Select the Verify Serial # button.
3. Select the Serial Group.
4. Enter the Log Number for the serial item being verified. Information about this item will
be displayed.
5. If an item has already been counted, a message displays in red.
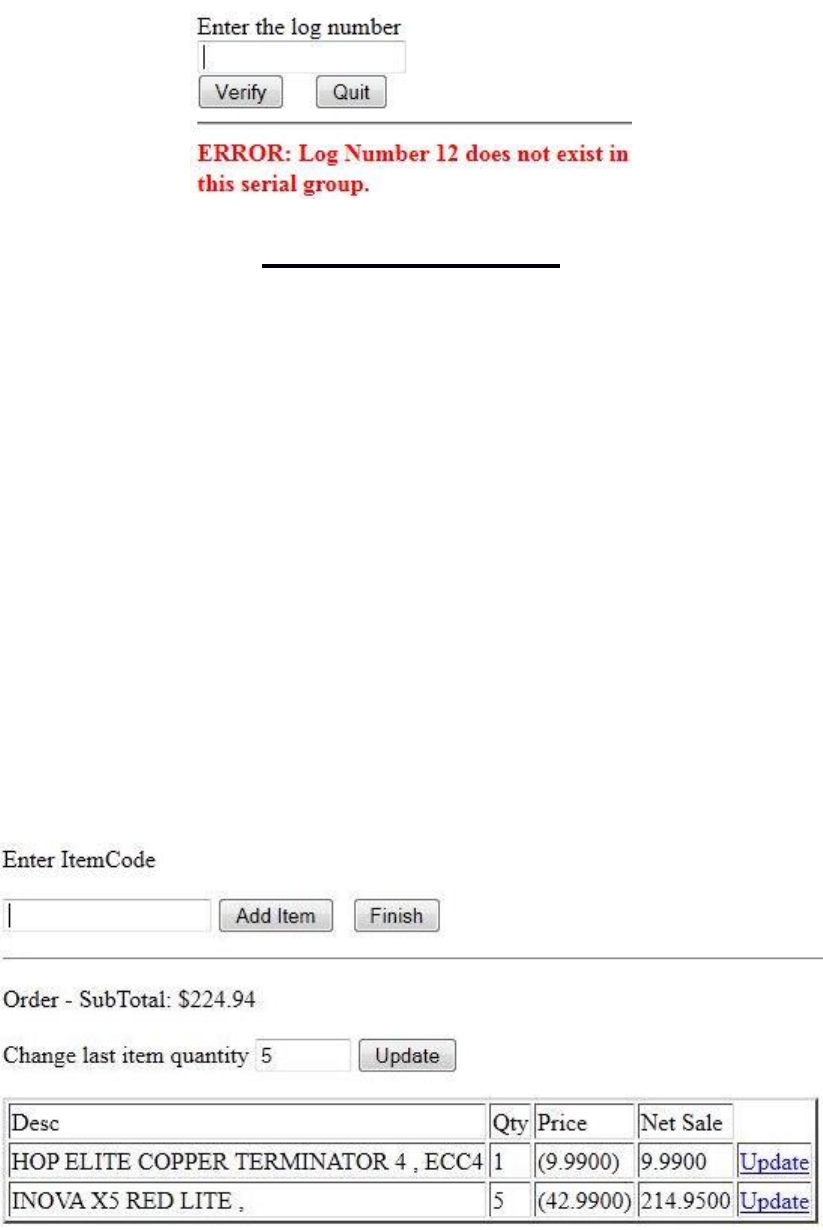
6. If an item does not exist in the serial group an error message displays in red.
Wireless Register
The Handheld may be used to “pre-scan” customers. This is called the “Wireless Register”.
1. Login to the Wireless Main Page.
2. Select the Wireless Register button from the Application Menu.
3. Add an item by using the scanner or entering the item code and selecting the Add
Item button.
a. Item Information Displays (see below).
4. Enter the Purchase Quantity. Select Update button to refresh the item and subtotal
price. The order must be updated to reflect accurate prices, and each item must be
updated individually when the quantity is changed.
5. Select Finish button when all items have been added.
6. A prompt for the customer’s name displays.
7. Enter customer’s name. This will be used to recall the sale at the register for payment.
8. When the message, “This order is complete. Please direct customer to the register for
payment.” displays, the order is suspended at the Point-of-Sale.
9. Select Start Over button to begin another sale.
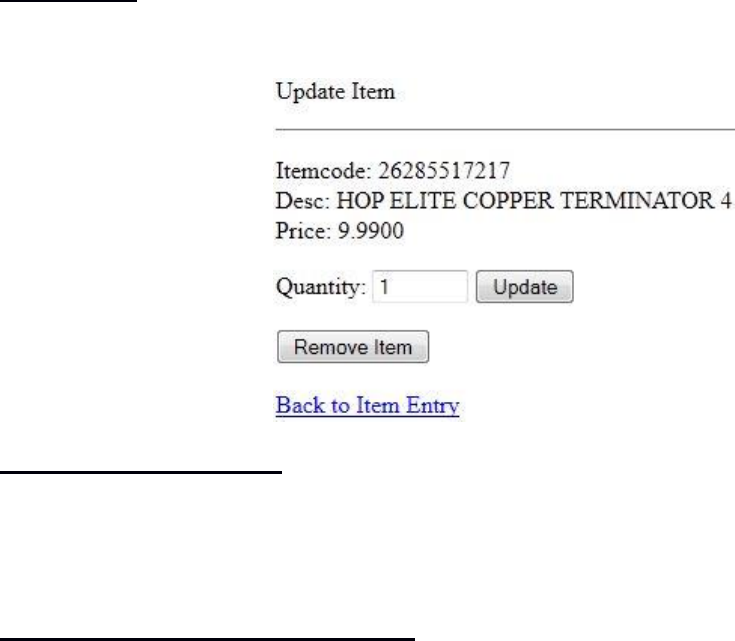
Remove Item
1. To remove an item from the transaction window, select Update then Remove Item button.
Recalling a Global Suspend
When a sale is performed at the wireless register, the transaction is suspended at the register. To
complete the transaction, it must be recalled at the register using the Recall Global Suspend
feature.
To recall Global Suspend at the Register
1. Select Point-of-Sale (F2).
2. Enter P.I.N. number and mail number (optional).
3. Select Toggle (F12) twice.
4. Select Recall Global Suspend(F4).
5. At the prompt, enter the customer’s name to recall their suspended transaction. This field
is not case-sensitive.
OR
6. Select the List button to browse a list of suspended transactions.
7. Complete transaction.
