AWS CodeCommit User Guide Code Commit
User Manual:
Open the PDF directly: View PDF ![]() .
.
Page Count: 174 [warning: Documents this large are best viewed by clicking the View PDF Link!]
- AWS CodeCommit
- Table of Contents
- What Is AWS CodeCommit?
- Setting Up for AWS CodeCommit
- More Information About Connection Protocols and AWS CodeCommit
- Compatibility for AWS CodeCommit, Git, and Other Components
- Setup for SSH Users Not Using the AWS CLI
- Setup Steps for HTTPS Connections to AWS CodeCommit Repositories on Linux, OS X, or Unix
- Setup Steps for HTTPS Connections to AWS CodeCommit Repositories on Windows
- Setup Steps for SSH Connections to AWS CodeCommit Repositories on Linux, OS X, or Unix
- Setup Steps for SSH Connections to AWS CodeCommit Repositories on Windows
- Getting Started with AWS CodeCommit
- Getting Started with AWS CodeCommit Tutorial
- Git with AWS CodeCommit Tutorial
- Step 1: Create an AWS CodeCommit Repository
- Step 2: Create a Local Repo
- Step 3: Create Your First Commit
- Step 4: Push Your First Commit
- Step 5: Share the AWS CodeCommit Repository and Push and Pull Another Commit
- Step 6: Create and Share a Branch
- Step 7: Create and Share a Tag
- Step 8: Set Up Access Permissions
- Step 9: Clean Up
- Product and Service Integrations with AWS CodeCommit
- Create an AWS CodeCommit Repository
- Share an AWS CodeCommit Repository
- Migrate to AWS CodeCommit
- Migrate a Git Repository to AWS CodeCommit
- Migrate Local or Unversioned Content to AWS CodeCommit
- Migrate a Repository Incrementally
- Step 0: Determine Whether to Migrate Incrementally
- Step 1: Install Prerequisites and Add the AWS CodeCommit Repository as a Remote
- Step 2: Create the Script to Use for Migrating Incrementally
- Step 3: Run the Script and Migrate Incrementally to AWS CodeCommit
- Appendix: Sample Script incremental-repo-migration.py
- Connect to an AWS CodeCommit Repository
- Browse the Contents of an AWS CodeCommit Repository
- Manage Triggers for an AWS CodeCommit Repository
- Create the Resource and Add Permissions for AWS CodeCommit
- Example: Create an AWS CodeCommit Trigger for an Amazon SNS Topic
- Example: Create an AWS CodeCommit Trigger for an AWS Lambda Function
- Edit Triggers for an AWS CodeCommit Repository
- Test Triggers for an AWS CodeCommit Repository
- Delete Triggers from an AWS CodeCommit Repository
- View Commit Details in AWS CodeCommit
- Advanced Tasks in AWS CodeCommit
- View AWS CodeCommit Repository Details
- View Branch Details in AWS CodeCommit
- View Tag Details in AWS CodeCommit
- Create a Branch in AWS CodeCommit
- Create a Tag in AWS CodeCommit
- Create a Commit in AWS CodeCommit
- Change Branch Settings in AWS CodeCommit
- Change AWS CodeCommit Repository Settings
- Synchronize Changes Between a Local Repo and an AWS CodeCommit Repository
- Delete a Branch in AWS CodeCommit
- Delete a Tag in AWS CodeCommit
- Delete an AWS CodeCommit Repository
- Push Commits to an Additional Git Repository
- Troubleshooting AWS CodeCommit
- Access Error: Prompted for User Name When Connecting to an AWS CodeCommit Repository
- Access Error: Public Key Denied When Connecting to an AWS CodeCommit Repository
- Access Error: Public Key Uploads Successfully to IAM But Connection Fails on Linux, OS X, or Unix Systems
- Access Error: Encryption Key Access Denied for an AWS CodeCommit Repository from the Console or the AWS CLI
- Authentication Challenge: Authenticity of Host Can't Be Established When Connecting to an AWS CodeCommit Repository
- Console Error: Cannot Browse the Code in an AWS CodeCommit Repository from the Console
- Git Error: error: RPC failed; result=56, HTTP code = 200 fatal: The remote end hung up unexpectedly
- Git Error: Too many reference update commands
- Git Error: push via HTTPS is broken in some versions of Git
- Git Error: 'gnutls_handshake() failed'
- Git Error: Git cannot find the AWS CodeCommit repository or does not have permission to access the repository
- IAM Error: 'Invalid format' when attempting to add a public key to IAM
- Git for Mac OS X: I Configured the Credential Helper Successfully, but Now I Am Denied Access to My Repository (403)
- Git for Windows: I Installed Git for Windows, but I Am Denied Access to My Repository (403)
- Trigger Error: A Repository Trigger Does Not Run When Expected
- Turn on Debugging
- AWS CodeCommit Command Line Reference
- Basic Git Commands
- AWS CodeCommit User Access Permissions Reference
- Temporary Access to AWS CodeCommit Repositories
- Encryption for AWS CodeCommit Repositories
- Limits in AWS CodeCommit
- AWS CodeCommit User Guide Document History
- AWS Glossary

AWS CodeCommit
User Guide
API Version 2015-04-13

AWS CodeCommit User Guide

AWS CodeCommit User Guide
AWS CodeCommit: User Guide
Copyright © 2016 Amazon Web Services, Inc. and/or its affiliates. All rights reserved.
Amazon's trademarks and trade dress may not be used in connection with any product or service that is not Amazon's, in any
manner that is likely to cause confusion among customers, or in any manner that disparages or discredits Amazon. All other
trademarks not owned by Amazon are the property of their respective owners, who may or may not be affiliated with, connected to,
or sponsored by Amazon.

AWS CodeCommit User Guide
Table of Contents
What Is AWS CodeCommit? .......................................................................................................... 1
Introducing AWS CodeCommit ................................................................................................ 1
How Does AWS CodeCommit Work? ....................................................................................... 2
How Is AWS CodeCommit Different from File Versioning in Amazon S3? ....................................... 3
How Do I Get Started with AWS CodeCommit? ......................................................................... 3
Where Can I Learn More About Git? ....................................................................................... 3
Setting Up ................................................................................................................................... 4
More Information About Connection Protocols and AWS CodeCommit ........................................... 4
Compatibility for AWS CodeCommit, Git, and Other Components ................................................. 5
For SSH Users Not Using the AWS CLI ................................................................................... 5
Step 1: Associate Your Public Key with Your IAM User ....................................................... 6
Step 2: Add AWS CodeCommit to Your SSH Configuration ................................................. 6
Next Steps ................................................................................................................... 7
For HTTPS Connections on Linux, OS X, or Unix ...................................................................... 7
Step 1: Initial Configuration for AWS CodeCommit ............................................................. 7
Step 2: Install Git .......................................................................................................... 9
Step 3: Set Up the Credential Helper ............................................................................... 9
Step 4: Connect to the AWS CodeCommit Console and Clone the Repository ....................... 10
Next Steps ................................................................................................................. 11
For HTTPS Connections on Windows .................................................................................... 11
Step 1: Initial Configuration for AWS CodeCommit ........................................................... 11
Step 2: Install Git ........................................................................................................ 12
Step 3: Set Up the Credential Helper ............................................................................. 13
Step 4: Connect to the AWS CodeCommit Console and Clone the Repository ....................... 14
Next Steps ................................................................................................................. 15
For SSH Connections on Linux, OS X, or Unix ........................................................................ 15
Step 1: Initial Configuration for AWS CodeCommit ........................................................... 15
Step 2: Install Git ........................................................................................................ 16
Step 3: Configure Credentials on Linux, OS X, or Unix ...................................................... 16
Step 4: Connect to the AWS CodeCommit Console and Clone the Repository ....................... 19
Next Steps ................................................................................................................. 19
For SSH Connections on Windows ........................................................................................ 19
Step 1: Initial Configuration for AWS CodeCommit ........................................................... 20
Step 2: Install Git ........................................................................................................ 20
Step 3: Configure Credentials on Windows ..................................................................... 21
Step 4: Connect to the AWS CodeCommit Console and Clone the Repository ....................... 24
Next Steps ................................................................................................................. 24
Getting Started ........................................................................................................................... 25
AWS CodeCommit Tutorial ................................................................................................... 25
Step 1: Create an AWS CodeCommit Repository ............................................................. 26
Step 2: Browse the Contents of Your Repository .............................................................. 27
Step 3: Create a Trigger for Your Repository ................................................................... 31
Step 4: Next Steps ...................................................................................................... 32
Step 5: Clean Up ........................................................................................................ 33
Git with AWS CodeCommit Tutorial ....................................................................................... 33
Step 1: Create an AWS CodeCommit Repository ............................................................. 34
Step 2: Create a Local Repo ........................................................................................ 34
Step 3: Create Your First Commit .................................................................................. 35
Step 4: Push Your First Commit .................................................................................... 35
Step 5: Share the AWS CodeCommit Repository and Push and Pull Another Commit ............. 35
Step 6: Create and Share a Branch ............................................................................... 37
Step 7: Create and Share a Tag ................................................................................... 38
Step 8: Set Up Access Permissions ............................................................................... 39
Step 9: Clean Up ........................................................................................................ 41
Product and Service Integrations ................................................................................................... 43
API Version 2015-04-13
iv

AWS CodeCommit User Guide
Integration with Other AWS Services ...................................................................................... 43
Integration Examples from the Community .............................................................................. 44
Blog Posts ................................................................................................................. 44
Code Samples ............................................................................................................ 45
Create a Repository .................................................................................................................... 46
Use the AWS CodeCommit Console to Create a Repository ...................................................... 46
Use the AWS CLI to Create an AWS CodeCommit Repository ................................................... 47
Share a Repository ..................................................................................................................... 49
Choose the Connection Protocol to Share with Your Users ........................................................ 49
Create IAM Policies for Your Repository ................................................................................. 50
Create an IAM Group for Repository Users ............................................................................. 51
Share the Connection Information with Your Users ................................................................... 51
Migrate to AWS CodeCommit ....................................................................................................... 53
Migrate a Git Repository to AWS CodeCommit ........................................................................ 53
Step 0: Setup Required for Access to AWS CodeCommit .................................................. 54
Step 1: Create an AWS CodeCommit Repository ............................................................. 56
Step 2: Clone the Repository and Push to the AWS CodeCommit Repository ........................ 57
Step 3: View Files in AWS CodeCommit ......................................................................... 58
Step 4: Share the AWS CodeCommit Repository ............................................................. 58
Migrate Content to AWS CodeCommit .................................................................................... 60
Step 0: Setup Required for Access to AWS CodeCommit .................................................. 61
Step 1: Create an AWS CodeCommit Repository ............................................................. 63
Step 2: Migrate Local Content to the AWS CodeCommit Repository .................................... 64
Step 3: View Files in AWS CodeCommit ......................................................................... 65
Step 4: Share the AWS CodeCommit Repository ............................................................. 65
Migrate a Repository in Increments ........................................................................................ 67
Step 0: Determine Whether to Migrate Incrementally ......................................................... 67
Step 1: Install Prerequisites and Add the AWS CodeCommit Repository as a Remote ............. 68
Step 2: Create the Script to Use for Migrating Incrementally ............................................... 69
Step 3: Run the Script and Migrate Incrementally to AWS CodeCommit ............................... 69
Appendix: Sample Script incremental-repo-migration.py ......................................... 70
Connect to a Repository ............................................................................................................... 76
Prerequisites for Connecting to an AWS CodeCommit Repository ............................................... 76
Connect to the AWS CodeCommit Repository by Cloning the Repository ..................................... 77
Connect a Local Repo to the AWS CodeCommit Repository ...................................................... 78
Browse the Contents of a Repository ............................................................................................. 79
Browse the Contents of an AWS CodeCommit Repository ......................................................... 79
Manage Triggers for a Repository .................................................................................................. 81
Create the Resource and Add Permissions for AWS CodeCommit .............................................. 81
Create a Trigger for an Amazon SNS Topic ............................................................................ 82
Create a Trigger to an Amazon SNS Topic for an AWS CodeCommit Repository (Console) ...... 82
Create a Trigger to an Amazon SNS Topic for an AWS CodeCommit Repository (AWS CLI) .... 84
Create a Trigger for a Lambda Function ................................................................................. 88
Create the Lambda Function ......................................................................................... 88
Create a Trigger for the Lambda Function in an AWS CodeCommit Repository (Console) ........ 91
Create a Trigger to a Lambda Function for an AWS CodeCommit Repository (AWS CLI) ......... 92
Edit Triggers for a Repository ............................................................................................... 95
Edit a Trigger for a Repository (Console) ........................................................................ 96
Edit a Trigger for a Repository (AWS CLI) ...................................................................... 96
Test Triggers for a Repository ............................................................................................... 97
Test a Trigger for a Repository (Console) ....................................................................... 97
Test a Trigger for a Repository (AWS CLI) ...................................................................... 97
Delete Triggers from a Repository ......................................................................................... 98
Delete a Trigger from a Repository (Console) .................................................................. 99
Delete a Trigger from a Repository (AWS CLI) ................................................................ 99
View Commit Details .................................................................................................................. 101
Browse Commits in a Repository ......................................................................................... 101
Browse the Commit History of a Repository ................................................................... 101
API Version 2015-04-13
v

AWS CodeCommit User Guide
View a Graph of the Commit History of a Repository ....................................................... 102
Use Git to View Commit Details .......................................................................................... 104
Advanced Tasks ........................................................................................................................ 107
View Repository Details ...................................................................................................... 107
Use the AWS CodeCommit Console to View Repository Details ........................................ 108
Use Git to View AWS CodeCommit Repository Details .................................................... 108
Use the AWS CLI to View AWS CodeCommit Repository Details ...................................... 109
View Branch Details ........................................................................................................... 112
Use Git to View Branch Details ................................................................................... 112
Use the AWS CLI to View Branch Details ..................................................................... 112
Use the AWS CodeCommit Console to View Branch Details ............................................. 114
View Tag Details ............................................................................................................... 114
Use Git to View Tag Details ........................................................................................ 114
Create a Branch ................................................................................................................ 115
Use Git to Create a Branch ........................................................................................ 116
Use the AWS CLI to Create a Branch .......................................................................... 116
Create a Tag .................................................................................................................... 117
Use Git to Create a Tag ............................................................................................. 117
Create a Commit ............................................................................................................... 118
Change Branch Settings ..................................................................................................... 120
Use the AWS CodeCommit Console to Change Branch Settings ....................................... 120
Use Git to Change Branch Settings .............................................................................. 120
Use the AWS CLI to Change Branch Settings ................................................................ 121
Change Repository Settings ................................................................................................ 122
Use the AWS CodeCommit Console to Change Repository Settings .................................. 122
Use the AWS CLI to Change AWS CodeCommit Repository Settings ................................. 123
Sync Changes Between Repositories ................................................................................... 124
Delete a Branch ................................................................................................................ 125
Use Git to Delete a Branch ......................................................................................... 125
Delete a Tag .................................................................................................................... 126
Use Git to Delete a Tag ............................................................................................. 126
Delete a Repository ........................................................................................................... 127
Use the AWS CodeCommit Console to Delete a Repository ............................................. 127
Delete a Local Repo .................................................................................................. 127
Use the AWS CLI to Delete an AWS CodeCommit Repository .......................................... 127
Push Commits to Two Repositories ...................................................................................... 128
Troubleshooting ......................................................................................................................... 132
Access Error: Prompted for User Name When Connecting to an AWS CodeCommit Repository ...... 133
Access Error: Public Key Denied When Connecting to an AWS CodeCommit Repository ............... 133
Access Error: Public Key Uploads Successfully to IAM But Connection Fails on Linux, OS X, or
Unix Systems .................................................................................................................... 133
Access Error: Encryption Key Access Denied for an AWS CodeCommit Repository from the
Console or the AWS CLI .................................................................................................... 134
Authentication Challenge: Authenticity of Host Can't Be Established When Connecting to an AWS
CodeCommit Repository ..................................................................................................... 134
Console Error: Cannot Browse the Code in an AWS CodeCommit Repository from the Console ...... 135
Git Error: error: RPC failed; result=56, HTTP code = 200 fatal: The remote end hung up
unexpectedly ..................................................................................................................... 135
Git Error: Too many reference update commands ................................................................... 135
Git Error: push via HTTPS is broken in some versions of Git .................................................... 135
Git Error: 'gnutls_handshake() failed' .................................................................................... 136
Git Error: Git cannot find the AWS CodeCommit repository or does not have permission to access
the repository .................................................................................................................... 136
IAM Error: 'Invalid format' when attempting to add a public key to IAM ....................................... 136
Git for Mac OS X: I Configured the Credential Helper Successfully, but Now I Am Denied Access
to My Repository (403) ....................................................................................................... 136
Git for Windows: I Installed Git for Windows, but I Am Denied Access to My Repository (403) ......... 137
Trigger Error: A Repository Trigger Does Not Run When Expected ............................................ 138
API Version 2015-04-13
vi

AWS CodeCommit User Guide
Turn on Debugging ............................................................................................................ 138
Command Line Reference .......................................................................................................... 140
Basic Git Commands ................................................................................................................. 142
Configuration Variables ...................................................................................................... 142
Remote Repositories .......................................................................................................... 143
Commits ........................................................................................................................... 144
Branches .......................................................................................................................... 144
Tags ................................................................................................................................ 145
Access Permissions Reference .................................................................................................... 147
Attach a Policy to an IAM User ........................................................................................... 149
Create a Policy That Enables Cross-Account Access to an Amazon SNS Topic ........................... 150
Create a Policy for AWS Lambda Integration ......................................................................... 151
Action and Resource Syntax ............................................................................................... 152
Branches .................................................................................................................. 153
Git Pull and Push ...................................................................................................... 153
Information About Committed Code .............................................................................. 154
Repositories .............................................................................................................. 154
Triggers ................................................................................................................... 156
AWS CodePipeline Integration ..................................................................................... 156
Temporary Access ..................................................................................................................... 158
Step 1: Complete the Prerequisites ...................................................................................... 159
Step 2: Get Temporary Access Credentials ........................................................................... 159
Step 3: Configure the AWS CLI with Your Temporary Access Credentials ................................... 159
Step 4: Access the AWS CodeCommit Repositories ............................................................... 160
Encryption ................................................................................................................................ 161
Encryption Context ............................................................................................................ 162
Limits ....................................................................................................................................... 163
Document History ...................................................................................................................... 165
AWS Glossary .......................................................................................................................... 167
API Version 2015-04-13
vii

AWS CodeCommit User Guide
Introducing AWS CodeCommit
What Is AWS CodeCommit?
AWS CodeCommit is a version control service hosted by Amazon Web Services that you can use to
privately store and manage assets (such as documents, source code, and binary files) in the cloud. For
information about pricing for AWS CodeCommit, see Pricing.
Topics
•Introducing AWS CodeCommit (p. 1)
•How Does AWS CodeCommit Work? (p. 2)
•How Is AWS CodeCommit Different from File Versioning in Amazon S3? (p. 3)
•How Do I Get Started with AWS CodeCommit? (p. 3)
•Where Can I Learn More About Git? (p. 3)
Introducing AWS CodeCommit
AWS CodeCommit is a secure, highly scalable, managed source control service that hosts private
Git repositories. AWS CodeCommit eliminates the need for you to manage your own source control
system or worry about scaling its infrastructure. You can use AWS CodeCommit to store anything from
code to binaries. It supports the standard functionality of Git, so it works seamlessly with your existing
Git-based tools.
With AWS CodeCommit, you can:
•Benefit from a fully managed service hosted by AWS. AWS CodeCommit provides high service
availability and durability and eliminates the administrative overhead of managing your own
hardware and software. There is no hardware to provision and scale and no server software to
install, configure, and update.
•Store your code securely. AWS CodeCommit repositories are encrypted at rest as well as in
transit.
•Easily scale your version control projects. AWS CodeCommit repositories can scale up to
meet your development needs. The service can handle repositories with large numbers of files or
branches, large file sizes, and lengthy revision histories.
•Store anything, anytime. AWS CodeCommit has no limit on the size of your repositories or on the
file types you can store.
•Integrate with other AWS and third-party services. AWS CodeCommit keeps your repositories
close to your other production resources in the AWS cloud, which helps increase the speed and
API Version 2015-04-13
1
AWS CodeCommit User Guide
How Does AWS CodeCommit Work?
frequency of your development lifecycle. It is integrated with IAM and can be used with other AWS
services and in parallel with other repositories.
•Easily migrate files from other remote repositories. You can migrate to AWS CodeCommit from
any Git-based repository.
•Use the Git tools you already know. AWS CodeCommit supports Git commands as well as its own
AWS CLI commands and APIs.
Self-hosted version control systems have many potential drawbacks, including:
• Expensive per-developer licensing fees.
• High hardware maintenance costs.
• High support staffing costs.
• Limits on the amount and types of files that can be stored and managed.
• Limits on the number of branches, the amount of version history, and other related metadata that can
be stored.
How Does AWS CodeCommit Work?
AWS CodeCommit will seem familiar to users of Git-based repositories, but even those unfamiliar will
find the transition to AWS CodeCommit relatively simple. AWS CodeCommit provides a console for
the easy creation of repositories and the listing of existing repositories and branches. In a few simple
steps, users can find information about a repository and clone it to their computer, creating a local repo
where they can make changes and then push them to the AWS CodeCommit repository. Users can
work from the command line on their local machines or use a GUI-based editor.
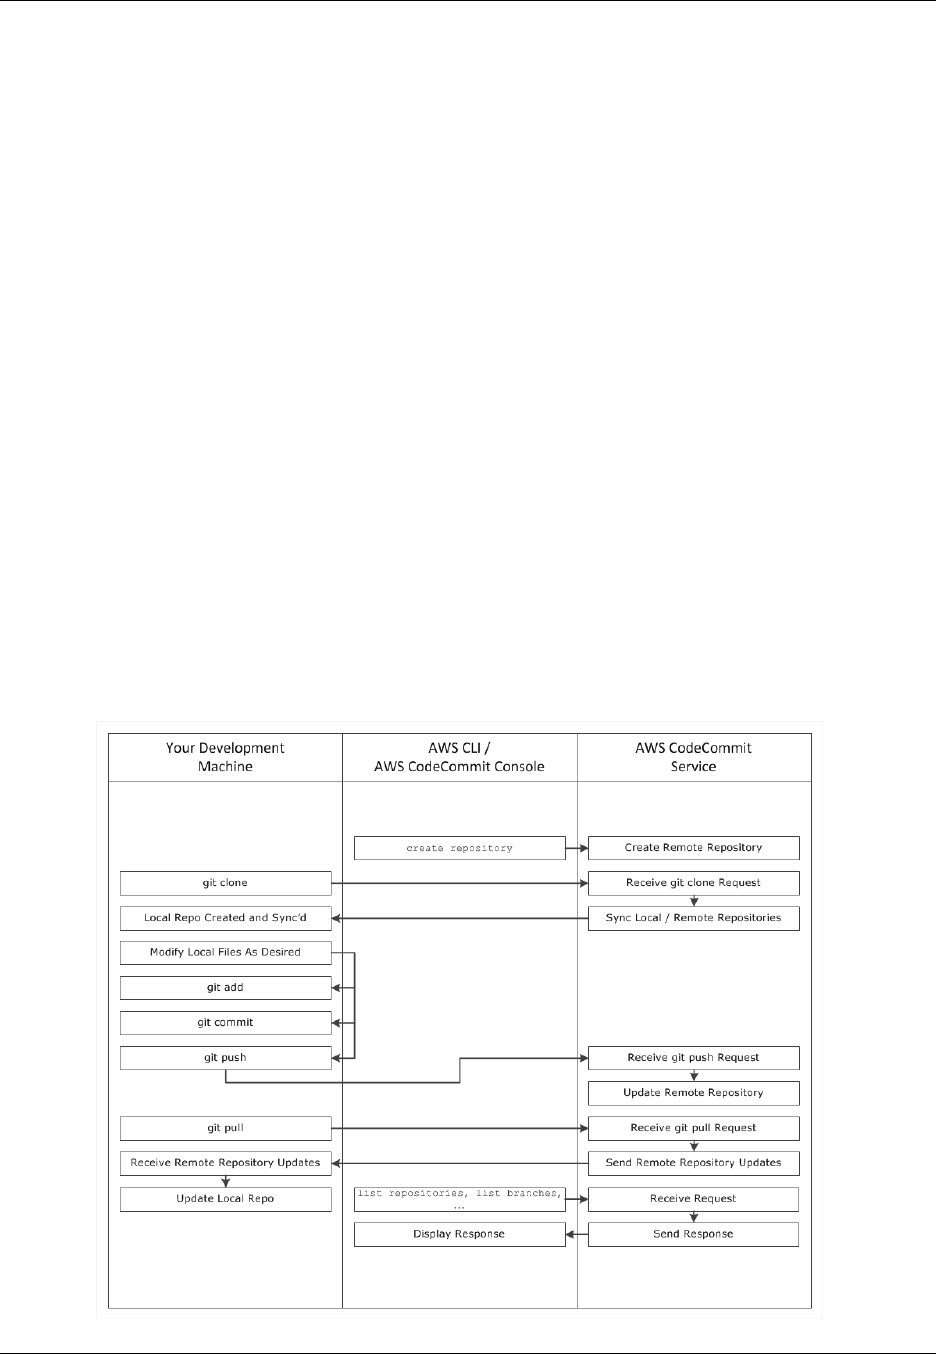
The following figure shows how you use your development machine, the AWS CLI or AWS
CodeCommit console, and the AWS CodeCommit service to create and manage repositories:
API Version 2015-04-13
2

AWS CodeCommit User Guide
How Is AWS CodeCommit Different
from File Versioning in Amazon S3?
1. Use the AWS CLI or the AWS CodeCommit console to create an AWS CodeCommit repository.
2. From your development machine, use Git to run git clone, specifying the name of the AWS
CodeCommit repository. This will create a local repo that connects to the AWS CodeCommit
repository.
3. Use the local repo on your development machine to modify (add, edit, and delete) files, and then
run git add to stage the modified files locally. Run git commit to commit the files locally, and then
run git push to send the files to the AWS CodeCommit repository.
4. Download changes from other users. Run git pull to synchronize the files in the AWS
CodeCommit repository with your local repo. This ensures you're working with the latest version of
the files.
You can use the AWS CLI or the AWS CodeCommit console to track and manage your repositories.
How Is AWS CodeCommit Different from File
Versioning in Amazon S3?
AWS CodeCommit is designed for team software development. It manages batches of changes
across multiple files, which can occur in parallel with changes made by other developers. Amazon
S3 versioning supports the recovery of past versions of files, but it's not focused on collaborative file
tracking features that software development teams need.
How Do I Get Started with AWS CodeCommit?
To get started with AWS CodeCommit:
1. Follow the steps in Setting Up (p. 4) to prepare your development machines.
2. Follow the steps in one or more of the tutorials in Getting Started (p. 25).
3. Create (p. 46) version control projects in AWS CodeCommit or migrate (p. 53) version control
projects to AWS CodeCommit.
Where Can I Learn More About Git?
If you don't know it already, you should learn how to use Git (p. 142). Here are some helpful
resources:
•Pro Git, an online version of the Pro Git book. Written by Scott Chacon. Published by Apress.
•Git cheat sheet, the absolute minimum number of commands you need to know to work with Git.
Created by Nina Jaeschke.
•Git Immersion, a try-it-yourself guided tour that walks you through the fundamentals of using Git.
Published by Neo Innovation, Inc.
•Git Reference, an online quick reference that can also be used as a more in-depth Git tutorial.
Published by the GitHub team.
•Git Cheat Sheet with basic Git command syntax. Published by the GitHub team.
•Git Pocket Guide. Written by Richard E. Silverman. Published by O'Reilly Media, Inc.
API Version 2015-04-13
3
AWS CodeCommit User Guide
More Information About Connection
Protocols and AWS CodeCommit
Setting Up for AWS CodeCommit
AWS CodeCommit setup will vary depending on the operating system and connection protocol you will
use to connect to an AWS CodeCommit repository. The information in this topic can help you choose
which steps to follow.
My computer
is running My repository
connection
protocol
Setup instructions
Shell or shell
emulator with
an existing
public/private
key pair
SSH For SSH Users Not Using the AWS CLI (p. 5)
Linux, OS X, or
Unix HTTPS For HTTPS Connections on Linux, OS X, or Unix (p. 7)
Linux, OS X, or
Unix SSH For SSH Connections on Linux, OS X, or Unix (p. 15)
Windows HTTPS For HTTPS Connections on Windows (p. 11)
Windows SSH For SSH Connections on Windows (p. 19)
More Information About Connection Protocols
and AWS CodeCommit
You can use either HTTPS or SSH to connect to an AWS CodeCommit repository. When you use
Git to interact with an AWS CodeCommit repository (for example, whenever you call git clone, git
push, or git pull), Git provides credentials to AWS CodeCommit. If you plan to connect to a repository
that someone else has already created, that person might have provided instructions or an URL that
indicates which protocol to use. If the URL starts with https://, follow the setup instructions for HTTPS
connections. If the URL starts with ssh://, follow the setup instructions for SSH connections.
If you have not yet created any AWS CodeCommit repositories, or if you plan to connect to an existing
repository but the repository owner has not indicated a preferred protocol, the following list can help
you decide which connection type to use.
API Version 2015-04-13
4
AWS CodeCommit User Guide
Compatibility for AWS CodeCommit,
Git, and Other Components
•HTTPS: With HTTPS connections, you allow Git to use a cryptographically signed version of your
IAM user credentials or Amazon EC2 instance role whenever Git needs to authenticate with AWS
to interact with AWS CodeCommit repositories. To do this, you configure a credential helper for Git
on your local machine. A credential helper is included in the AWS CLI on Linux, OS X, or Unix, and
included as part of the AWS SDK for .NET for Windows operating systems. Without this credential
helper, you would need to manually sign and resubmit a cryptographic version of your IAM user
credentials whenever Git must authenticate with AWS. The credential helper manages this process
for you automatically.
•SSH: With SSH connections, you create public and private key files on your local machine that Git
and AWS CodeCommit use for SSH authentication. You associate the public key with your IAM
user. You store the private key on your local machine. Because SSH requires manual creation and
management of public and private key files, you might find HTTPS simpler and easier to use with
AWS CodeCommit.
Compatibility for AWS CodeCommit, Git, and
Other Components
When working with AWS CodeCommit, you will use Git, and might use other programs as well. The
following table provides the latest guidance for version compatibility.
Version Compatibility Information for AWS CodeCommit
Component Version
Git AWS CodeCommit supports Git versions 1.7.9
and later.
Curl AWS CodeCommit requires curl 7.33 and later.
However, there is a known issue with HTTPS
and curl update 7.41.0. For specific issues with
curl, see Troubleshooting (p. 132).
Setup for SSH Users Not Using the AWS CLI
If you want to use SSH connections for your repository, you can connect to AWS CodeCommit without
installing the AWS CLI. The AWS CLI includes commands that will be useful later when using and
managing AWS CodeCommit repositories, but it is not required for initial setup.
This topic assumes:
• You have set up an IAM user with the policies or permissions required for AWS CodeCommit as well
as the IAMUserSSHKeys managed policy or equivalent permissions required for uploading keys.
For more information, see Access Permissions Reference (p. 147).
• You already have, or know how to create, a public/private key pair. We strongly recommend you use
a secure passphrase for your SSH key.
• You are familiar with SSH, your Git client, and its configuration files.
• If you are using Windows, you have installed a command-line utility, such as Git Bash, that emulates
the bash shell.
If you need more guidance, follow the detailed instructions in For SSH Connections on Linux, OS X, or
Unix (p. 15) or For SSH Connections on Windows (p. 19).
API Version 2015-04-13
5

AWS CodeCommit User Guide
Step 1: Associate Your Public Key with Your IAM User
Topics
•Step 1: Associate Your Public Key with Your IAM User (p. 6)
•Step 2: Add AWS CodeCommit to Your SSH Configuration (p. 6)
•Next Steps (p. 7)
Step 1: Associate Your Public Key with Your IAM
User
1. Sign in to the Identity and Access Management (IAM) console at https://console.aws.amazon.com/
iam/.
2. In the IAM console, in the navigation pane, choose Users, and from the list of users, choose your
IAM user.
3. On the user details page, choose the Security Credentials tab, and then choose Upload SSH
key.
4. Paste the contents of your SSH public key into the field, and then choose Upload SSH Key.
Tip
The public/private key pair must be SSH-2 RSA, in OpenSSH format, and contain 2048
bits. The key will look similar to this:
ssh-rsa EXAMPLE-
AfICCQD6m7oRw0uXOjANBgkqhkiG9w0BAQUFADCBiDELMAkGA1UEBhMCVVMxCzAJB
gNVBAgTAldBMRAwDgYDVQQHEwdTZWF0dGxlMQ8wDQYDVQQKEwZBbWF6b24xFDASBgNVBAsTC0lBTSBDb2
5zb2xlMRIwEAYDVQQDEwlUZXN0Q2lsYWMxHzAdBgkqhkiG9w0BCQEWEG5vb25lQGFtYXpvbi5jb20wHhc
NMTEwNDI1MjA0NTIxWhcNMTIwNDI0MjA0NTIxWjCBiDELMAkGA1UEBhMCVVMxCzAJBgNVBAgTAldBMRAw
DgYDVQQHEwdTZWF0dGxlMQ8wDQYDVQQKEwZBbWF6b24xFDAS=EXAMPLE user-
name@ip-192-0-2-137
IAM accepts public keys in the OpenSSH format only. If you provide your public key in
another format, you will see an error message stating the key format is not valid.
5. Copy the SSH key ID (for example, APKAEIBAERJR2EXAMPLE) and close the console.
Step 2: Add AWS CodeCommit to Your SSH
Configuration
1. At the terminal (Linux, OS X, or Unix) or bash emulator (Windows), edit your SSH configuration file
by typing cat>> ~/.ssh/config:
Host git-codecommit.us-east-1.amazonaws.com
User Your-SSH-Key-ID, such as APKAEIBAERJR2EXAMPLE
IdentityFile Your-Private-Key-File, such as ~/.ssh/codecommit_rsa or
~/.ssh/id_rsa
Tip
If you have more than one SSH configuration, make sure you include the blank
lines before and after the content. Save the file by pressing the Ctrl and d keys
simultaneously.
2. Run the following command to test your SSH configuration:
API Version 2015-04-13
6

AWS CodeCommit User Guide
Next Steps
ssh git-codecommit.us-east-1.amazonaws.com
Type the passphrase for your SSH key file when prompted. If everything is configured correctly,
you should see the following success message:
You have successfully authenticated over SSH. You can use Git to interact
with AWS CodeCommit.
Interactive shells are not supported. Connection to git-codecommit.us-
east-1.amazonaws.com closed by remote host.
Next Steps
You have completed the prerequisites. Follow the steps in the Git with AWS CodeCommit
Tutorial (p. 33) tutorial to start using AWS CodeCommit.
To connect to an existing repository, follow the steps in Connect to a Repository (p. 76). To create a
repository, follow the steps in Create a Repository (p. 46).
Setup Steps for HTTPS Connections to AWS
CodeCommit Repositories on Linux, OS X, or
Unix
Before you can connect to AWS CodeCommit for the first time, you must complete the initial
configuration steps. This topic walks you through the steps to set up your computer and AWS profile,
connect to an AWS CodeCommit repository, and clone that repository to your computer, also known as
creating a local repo. If you're new to Git, you might also want to review the information in Where Can I
Learn More About Git? (p. 3).
Topics
•Step 1: Initial Configuration for AWS CodeCommit (p. 7)
•Step 2: Install Git (p. 9)
•Step 3: Set Up the Credential Helper (p. 9)
•Step 4: Connect to the AWS CodeCommit Console and Clone the Repository (p. 10)
•Next Steps (p. 11)
Step 1: Initial Configuration for AWS
CodeCommit
Follow these steps to set up an AWS account, create and configure an IAM user, and install the AWS
CLI.
To create and configure an IAM user for accessing AWS CodeCommit
1. Create an AWS account by going to http://aws.amazon.com and choosing Sign Up.
2. Create an IAM user, or use an existing one, in your AWS account. Make sure you have an access
key ID and a secret access key associated with that IAM user. For more information, see Creating
an IAM User in Your AWS Account.
API Version 2015-04-13
7
AWS CodeCommit User Guide
Step 1: Initial Configuration for AWS CodeCommit
Tip
AWS CodeCommit requires AWS Key Management Service. If you are using an existing
IAM user, make sure there are no policies attached to the user that expressly deny
the AWS KMS actions required by AWS CodeCommit. For more information, see
Encryption (p. 161).
3. Sign in to the Identity and Access Management (IAM) console at https://console.aws.amazon.com/
iam/.
4. In the IAM console, in the navigation pane, choose Policies, and from the list of policies, choose
AWSCodeCommitFullAccess.
5. On the Policy Details page, choose the Attached Entities tab, and then choose Attach.
6. On the Attach Policy page, select the check box next to the IAM user you just created, and then
choose Attach Policy.
Tip
You can attach this policy to any IAM user who requires full access to all AWS
CodeCommit features or any IAM group whose users require full access. To learn more
about sharing access to repositories with other groups and users, see Share an AWS
CodeCommit Repository (p. 49).
To install and configure the AWS CLI
1. On your local machine, download and install the AWS CLI. This is a prerequisite for interacting
with AWS CodeCommit from the command line. For more information, see Getting Set Up with the
AWS Command Line Interface.
Note
AWS CodeCommit works only with AWS CLI versions 1.7.38 and later. To determine
which version of the AWS CLI you have installed, run the aws --version command.
To upgrade an older version of the AWS CLI to the latest version, follow the instructions
in Uninstalling the AWS CLI, and then follow the instructions in Installing the AWS
Command Line Interface.
2. Run this command to verify the AWS CodeCommit commands for the AWS CLI are installed:
aws codecommit help
This command should return a list of AWS CodeCommit commands.
3. Configure the AWS CLI with the configure command, as follows:
aws configure
When prompted, specify the AWS access key and AWS secret access key of the IAM user you will
use with AWS CodeCommit. Also, be sure to specify the us-east-1 region when prompted for
the default region name. AWS CodeCommit works with this region only. When prompted for the
default output format, specify json. For example:
AWS Access Key ID [None]: Type your target AWS access key ID here, and
then press Enter
AWS Secret Access Key [None]: Type your target AWS secret access key here,
and then press Enter
Default region name [None]: Type us-east-1 here, and then press Enter
Default output format [None]: Type json here, and then press Enter
For more information about IAM, access keys, and secret keys, see How Do I Get Credentials?
and Managing Access Keys for IAM Users.
API Version 2015-04-13
8
AWS CodeCommit User Guide
Step 2: Install Git
Step 2: Install Git
To work with files, commits, and other information in AWS CodeCommit repositories, you must install
Git on your local machine. AWS CodeCommit supports Git versions 1.7.9 and later.
To install Git, we recommend websites such as Git Downloads.
Note
Git is an evolving, regularly updated platform. Occasionally, a feature change might affect the
way it works with AWS CodeCommit. If you encounter issues with a specific version of Git and
AWS CodeCommit, review the information in Troubleshooting (p. 132).
Step 3: Set Up the Credential Helper
1. From the terminal, use Git to run git config, specifying the use of the Git credential helper with the
AWS credential profile, and enabling the Git credential helper to send the path to repositories:
git config --global credential.helper '!aws codecommit credential-helper
$@'
git config --global credential.UseHttpPath true
Tip
The credential helper will use the default AWS credential profile or the Amazon EC2
instance role. You can specify a profile to use, such as CodeCommitProfile, if you
have created a specific AWS credential profile to use with AWS CodeCommit:
git config --global credential.helper '!aws --
profile CodeCommitProfile codecommit credential-helper $@'
If your profile name contains spaces, make sure you enclose the name in quotation marks
(").
You can configure profiles per repository instead of globally by using --local instead of
--global.
The Git credential helper writes the following value to ~/.gitconfig:
[credential]
helper = !aws --profile CodeCommitProfile codecommit credential-helper
$@
UseHttpPath = true
Important
If you want to use a different IAM user on the same local machine for AWS CodeCommit,
you must run the git config command again and specify a different AWS credential
profile.
2. Run git config --global --edit to verify the preceding value has been written to ~/.gitconfig. If
successful, you should see the preceding value (in addition to values that may already exist in the
Git global configuration file). To exit, typically you would type :q, and then press Enter.
If you experience problems after you configure your credential helper, see Troubleshooting AWS
CodeCommit (p. 132).
Important
If you are using OS X, use the following steps to ensure the credential helper is
configured correctly.
API Version 2015-04-13
9

AWS CodeCommit User Guide
Step 4: Connect to the AWS CodeCommit
Console and Clone the Repository
3. If you are using OS X, use HTTPS to connect to an AWS CodeCommit repository (p. 76). After
you connect to an AWS CodeCommit repository with HTTPS for the first time, subsequent access
will fail after about fifteen minutes. The default Git version on OS X uses the Keychain Access
utility to store credentials. For security measures, the password generated for access to your AWS
CodeCommit repository is temporary, so the credentials stored in the keychain will stop working
after about 15 minutes. To prevent these expired credentials from being used, you must either:
• Install a version of Git that does not use the keychain by default.
• Configure the Keychain Access utility to not provide credentials for AWS CodeCommit
repositories.
1. Open the Keychain Access utility. (You can use Finder to locate it.)
2. Search for git-codecommit.us-east-1.amazonaws.com. Highlight the row, open the
context menu or right-click it, and then choose Get Info.
3. Choose the Access Control tab.
4. In Always allow access by these applications, choose git-credential-osxkeychain,
and then choose the minus sign to remove it from the list.
Note
After removing git-credential-osxkeychain from the list, you will see a pop-up
dialog whenever you run a Git command. Choose Deny to continue. If you find the
pop-ups too disruptive, here are some alternate options:
• Connect to AWS CodeCommit using SSH instead of HTTPS. For more
information, see For SSH Connections on Linux, OS X, or Unix (p. 15).
• In the Keychain Access utility, on the Access Control tab for git-
codecommit.us-east-1.amazonaws.com, choose the Allow all applications
to access this item (access to this item is not restricted) option. This will
prevent the pop-ups, but the credentials will eventually expire (on average,
this takes about 15 minutes) and you will see a 403 error message. When this
happens, you must delete the keychain item in order to restore functionality.
• Install a version of Git that does not use the keychain by default.
Step 4: Connect to the AWS CodeCommit
Console and Clone the Repository
If an administrator has already sent you the name and connection details for the AWS CodeCommit
repository, you can skip this step and clone the repository directly.
1. Open the AWS CodeCommit console at https://console.aws.amazon.com/codecommit.
2. Choose the repository you want to connect to from the list. This opens the Settings page for that
repository.
Note
If you see a Welcome page instead of a list of repositories, there are no repositories
associated with your AWS account. To create a repository, see Create an AWS
CodeCommit Repository (p. 46) or follow the steps in the Git with AWS CodeCommit
Tutorial (p. 33) tutorial.
3. Copy the HTTPS URL to use when connecting to the repository.
4. Open a terminal and from the /tmp directory, use the URL to clone the repository with the git
clone command. For example, to clone a repository named MyDemoRepo to a local repo named
my-demo-repo:
API Version 2015-04-13
10

AWS CodeCommit User Guide
Next Steps
git clone https://git-codecommit.us-east-1.amazonaws.com/v1/repos/
MyDemoRepo my-demo-repo
For more information about how to connect to repositories, see Connect to the AWS CodeCommit
Repository by Cloning the Repository (p. 77).
Next Steps
You have completed the prerequisites. Follow the steps in the Git with AWS CodeCommit
Tutorial (p. 33) tutorial to start using AWS CodeCommit.
Setup Steps for HTTPS Connections to AWS
CodeCommit Repositories on Windows
Before you can connect to AWS CodeCommit for the first time, you must complete the initial
configuration steps. This topic walks you through the steps to set up your computer and AWS profile,
connect to an AWS CodeCommit repository, and clone that repository to your computer, also known as
creating a local repo. If you're new to Git, you might also want to review the information in Where Can I
Learn More About Git? (p. 3).
Topics
•Step 1: Initial Configuration for AWS CodeCommit (p. 11)
•Step 2: Install Git (p. 12)
•Step 3: Set Up the Credential Helper (p. 13)
•Step 4: Connect to the AWS CodeCommit Console and Clone the Repository (p. 14)
•Next Steps (p. 15)
Step 1: Initial Configuration for AWS
CodeCommit
Follow these steps to set up an AWS account, create and configure an IAM user, and install the AWS
CLI. The AWS CLI includes a credential helper that you will configure for HTTPS connections to your
AWS CodeCommit repositories.
To create and configure an IAM user for accessing AWS CodeCommit
1. Create an AWS account by going to http://aws.amazon.com and choosing Sign Up.
2. Create an IAM user, or use an existing one, in your AWS account. Make sure you have an access
key ID and a secret access key associated with that IAM user. For more information, see Creating
an IAM User in Your AWS Account.
Tip
AWS CodeCommit requires AWS Key Management Service. If you are using an existing
IAM user, make sure there are no policies attached to the user that expressly deny
the AWS KMS actions required by AWS CodeCommit. For more information, see
Encryption (p. 161).
3. Sign in to the Identity and Access Management (IAM) console at https://console.aws.amazon.com/
iam/.
API Version 2015-04-13
11
AWS CodeCommit User Guide
Step 2: Install Git
4. In the IAM console, in the navigation pane, choose Policies, and from the list of policies, choose
AWSCodeCommitFullAccess.
5. On the Policy Details page, choose the Attached Entities tab, and then choose Attach.
6. On the Attach Policy page, select the check box next to the IAM user you just created, and then
choose Attach Policy.
Tip
You can attach this policy to any IAM user who requires full access to all AWS
CodeCommit features or any IAM group whose users require full access. To learn more
about sharing access to repositories with other groups and users, see Share an AWS
CodeCommit Repository (p. 49).
To install and configure the AWS CLI
1. On your local machine, download and install the AWS CLI. This is a prerequisite for interacting
with AWS CodeCommit from the command line. For more information, see Getting Set Up with the
AWS Command Line Interface.
Note
AWS CodeCommit works only with AWS CLI versions 1.7.38 and later. To determine
which version of the AWS CLI you have installed, run the aws --version command.
To upgrade an older version of the AWS CLI to the latest version, follow the instructions
in Uninstalling the AWS CLI, and then follow the instructions in Installing the AWS
Command Line Interface.
2. Run this command to verify the AWS CodeCommit commands for the AWS CLI are installed:
aws codecommit help
This command should return a list of AWS CodeCommit commands.
3. Configure the AWS CLI with the configure command, as follows:
aws configure
When prompted, specify the AWS access key and AWS secret access key of the IAM user you will
use with AWS CodeCommit. Also, be sure to specify the us-east-1 region when prompted for
the default region name. AWS CodeCommit works with this region only. When prompted for the
default output format, specify json. For example:
AWS Access Key ID [None]: Type your target AWS access key ID here, and
then press Enter
AWS Secret Access Key [None]: Type your target AWS secret access key here,
and then press Enter
Default region name [None]: Type us-east-1 here, and then press Enter
Default output format [None]: Type json here, and then press Enter
For more information about IAM, access keys, and secret keys, see How Do I Get Credentials?
and Managing Access Keys for IAM Users.
Step 2: Install Git
To work with files, commits, and other information in AWS CodeCommit repositories, you must install
Git on your local machine. AWS CodeCommit supports Git versions 1.7.9 and later.
API Version 2015-04-13
12
AWS CodeCommit User Guide
Step 3: Set Up the Credential Helper
To install Git, we recommend websites such as Git for Windows. If you use this link to install Git, you
can accept all of the installation default settings except for the following:
• When prompted during the Adjusting your PATH environment step, select the Use Git from the
Windows Command Prompt option.
• On the Configuring extra options page, make sure the Enable Git Credential Manager option
is cleared. Although you can choose to install the Git Credential Manager, it is not compatible with
AWS CodeCommit. If you install it, you must manually modify your .gitconfig file to use the credential
helper for AWS CodeCommit. Otherwise, you will not be able to connect to your AWS CodeCommit
repository.
Note
Git is an evolving, regularly updated platform. Occasionally, a feature change might affect the
way it works with AWS CodeCommit. If you encounter issues with a specific version of Git and
AWS CodeCommit, review the information in Troubleshooting (p. 132).
Step 3: Set Up the Credential Helper
The AWS CLI includes a Git credential helper you can use with AWS CodeCommit. The Git credential
helper requires an AWS credential profile, which stores a copy of an IAM user's AWS access key ID
and AWS secret access key (along with a default region name and default output format). The Git
credential helper uses this information to automatically authenticate with AWS CodeCommit so you
don't need to type this information every time you use Git to interact with AWS CodeCommit.
1. Open a command prompt and use Git to run git config, specifying the use of the Git credential
helper with the AWS credential profile, which enables the Git credential helper to send the path to
repositories:
git config --global credential.helper "!aws codecommit credential-helper
$@"
git config --global credential.UseHttpPath true
The Git credential helper writes the following to the .gitconfig file:
[credential]
helper = !aws codecommit credential-helper $@
UseHttpPath = true
Important
• If you are using a Bash emulator instead of the Windows command line, you must use
single quotes instead of double quotes.
• The credential helper will use the default AWS profile or the Amazon EC2 instance role.
If you have created an AWS credential profile to use, such as CodeCommitProfile,
you can modify the command as follows to use it instead:
git config --global credential.helper "!aws codecommit credential-
helper --profile CodeCommitProfile $@"
This will write the following to the .gitconfig file:
[credential]
helper = !aws codecommit credential-helper --
profile=CodeCommitProfile $@
API Version 2015-04-13
13
AWS CodeCommit User Guide
Step 4: Connect to the AWS CodeCommit
Console and Clone the Repository
UseHttpPath = true
• If your profile name contains spaces, you must edit your .gitconfig file after you run
this command to enclose it in single quotes ('); otherwise, the credential helper will not
work.
• If your installation of Git for Windows included the Git Credential Manager utility, you
will see 403 errors or prompts to provide credentials into the Credential Manager utility
after the first few connection attempts. The most reliable way to solve this problem is
to uninstall and then reinstall Git for Windows without the option for the Git Credential
Manager utility, as it is not compatible with AWS CodeCommit. If you want to keep
the Git Credential Manager utility, you must perform additional configuration steps
to also use AWS CodeCommit, including manually modifying the .gitconfig file to
specify the use of the credential helper for AWS CodeCommit when connecting to AWS
CodeCommit. Remove any stored credentials from the Credential Manager utility (you
can find this utility in Control Panel). Once you have removed any stored credentials,
add the following to your .gitconfig file, save it, and then try connecting again from a
new command prompt window:
[credential "https://git-codecommit.us-east-1.amazonaws.com"]
helper = !aws codecommit credential-helper $@
UseHttpPath = true
Additionally, you might have to re-configure your git config settings by specifying --
system instead of --global or --local before all connections work as expected.
• If you want to use different IAM users on the same local machine for AWS
CodeCommit, you should specify git config --local instead of git config --global, and
run the configuration for each AWS credential profile.
2. Run git config --global --edit to verify the preceding values have been written to
the .gitconfig file for your user profile (by default, %HOME%\.gitconfig or drive:\Users
\UserName\.gitconfig). If successful, you should see the preceding values (in addition to
values that may already exist in the Git global configuration file). To exit, typically you would type
:q and then press Enter.
Step 4: Connect to the AWS CodeCommit
Console and Clone the Repository
If an administrator has already sent you the name and connection details for the AWS CodeCommit
repository, you can skip this step and clone the repository directly.
1. Open the AWS CodeCommit console at https://console.aws.amazon.com/codecommit.
2. Choose the repository you want to connect to from the list. This opens the Settings page for that
repository.
Note
If you see a Welcome page instead of a list of repositories, there are no repositories
associated with your AWS account. To create a repository, see Create an AWS
CodeCommit Repository (p. 46) or follow the steps in the Git with AWS CodeCommit
Tutorial (p. 33) tutorial.
3. Copy the HTTPS URL to use when connecting to the repository.
4. Open a command prompt and use the URL to clone the repository with the git clone command.
The local repo will be created in a subdirectory of the directory where you run the command. For
example, to clone a repository named MyDemoRepo to a local repo named my-demo-repo:
API Version 2015-04-13
14

AWS CodeCommit User Guide
Next Steps
git clone https://git-codecommit.us-east-1.amazonaws.com/v1/repos/
MyDemoRepo my-demo-repo
For more information about how to connect to repositories, see Connect to the AWS CodeCommit
Repository by Cloning the Repository (p. 77).
Next Steps
You have completed the prerequisites. Follow the steps in the Git with AWS CodeCommit
Tutorial (p. 33) tutorial to start using AWS CodeCommit.
Setup Steps for SSH Connections to AWS
CodeCommit Repositories on Linux, OS X, or
Unix
Before you can connect to AWS CodeCommit for the first time, you must complete the initial
configuration steps. This topic walks you through the steps to set up your computer and AWS profile,
connect to an AWS CodeCommit repository, and clone that repository to your computer, also known as
creating a local repo. If you're new to Git, you might also want to review the information in Where Can I
Learn More About Git? (p. 3).
Topics
•Step 1: Initial Configuration for AWS CodeCommit (p. 15)
•Step 2: Install Git (p. 16)
•Step 3: Configure Credentials on Linux, OS X, or Unix (p. 16)
•Step 4: Connect to the AWS CodeCommit Console and Clone the Repository (p. 19)
•Next Steps (p. 19)
Step 1: Initial Configuration for AWS
CodeCommit
Follow these steps to set up an AWS account, create an IAM user, and configure access to AWS
CodeCommit.
To create and configure an IAM user for accessing AWS CodeCommit
1. Create an AWS account by going to http://aws.amazon.com and choosing Sign Up.
2. Create an IAM user, or use an existing one, in your AWS account. Make sure you have an access
key ID and a secret access key associated with that IAM user. For more information, see Creating
an IAM User in Your AWS Account.
Tip
AWS CodeCommit requires AWS Key Management Service. If you are using an existing
IAM user, make sure there are no policies attached to the user that expressly deny
the AWS KMS actions required by AWS CodeCommit. For more information, see
Encryption (p. 161).
API Version 2015-04-13
15

AWS CodeCommit User Guide
Step 2: Install Git
3. Sign in to the Identity and Access Management (IAM) console at https://console.aws.amazon.com/
iam/.
4. In the IAM console, in the navigation pane, choose Policies, and from the list of policies, choose
AWSCodeCommitFullAccess.
5. On the Policy Details page, choose the Attached Entities tab, and then choose Attach.
6. On the Attach Policy page, select the check box next to the IAM user you just created, and then
choose Attach Policy.
Tip
You can attach this policy to any IAM user who requires full access to all AWS
CodeCommit features or any IAM group whose users require full access. To learn more
about sharing access to repositories with other groups and users, see Share an AWS
CodeCommit Repository (p. 49).
Note
If you want to use AWS CLI commands with AWS CodeCommit, install the AWS CLI. For
more information, see Command Line Reference (p. 140).
Step 2: Install Git
To work with files, commits, and other information in AWS CodeCommit repositories, you must install
Git on your local machine. AWS CodeCommit supports Git versions 1.7.9 and later.
To install Git, we recommend websites such as Git Downloads.
Note
Git is an evolving, regularly updated platform. Occasionally, a feature change might affect the
way it works with AWS CodeCommit. If you encounter issues with a specific version of Git and
AWS CodeCommit, review the information in Troubleshooting (p. 132).
Step 3: Configure Credentials on Linux, OS X, or
Unix
SSH and Linux, OS X, or Unix: Set Up the Public and
Private Keys for Git and AWS CodeCommit
1. From the terminal on your local machine, run the ssh-keygen command, and follow the on-screen
directions to save the file to the .ssh directory for your profile.
Note
Be sure to check with your system administrator about where key files should be stored
and which file naming pattern should be used.
For example:
$ ssh-keygen
Generating public/private rsa key pair.
Enter file in which to save the key (/home/user-name/.ssh/id_rsa): Type /
home/your-user-name/.ssh/ and a file name here, for example /home/your-
user-name/.ssh/codecommit_rsa
Enter passphrase (empty for no passphrase): <Type a passphrase, and then
press Enter>
API Version 2015-04-13
16
AWS CodeCommit User Guide
Step 3: Configure Credentials on Linux, OS X, or Unix
Enter same passphrase again: <Type the passphrase again, and then press
Enter>
Your identification has been saved in /home/user-name/.ssh/codecommit_rsa.
Your public key has been saved in /home/user-name/.ssh/codecommit_rsa.pub.
The key fingerprint is:
45:63:d5:99:0e:99:73:50:5e:d4:b3:2d:86:4a:2c:14 user-name@client-name
The key's randomart image is:
+--[ RSA 2048]----+
| E.+.o*.++|
| .o .=.=o.|
| . .. *. +|
| ..o . +..|
| So . . . |
| . |
| |
| |
| |
+-----------------+
2. Run the following command to display the value of the public key file:
cat ~/.ssh/codecommit_rsa.pub
Copy this value. It will look similar to the following:
ssh-rsa EXAMPLE-
AfICCQD6m7oRw0uXOjANBgkqhkiG9w0BAQUFADCBiDELMAkGA1UEBhMCVVMxCzAJB
gNVBAgTAldBMRAwDgYDVQQHEwdTZWF0dGxlMQ8wDQYDVQQKEwZBbWF6b24xFDASBgNVBAsTC0lBTSBDb2
5zb2xlMRIwEAYDVQQDEwlUZXN0Q2lsYWMxHzAdBgkqhkiG9w0BCQEWEG5vb25lQGFtYXpvbi5jb20wHhc
NMTEwNDI1MjA0NTIxWhcNMTIwNDI0MjA0NTIxWjCBiDELMAkGA1UEBhMCVVMxCzAJBgNVBAgTAldBMRAw
DgYDVQQHEwdTZWF0dGxlMQ8wDQYDVQQKEwZBbWF6b24xFDAS=EXAMPLE user-
name@ip-192-0-2-137
3. Sign in to the Identity and Access Management (IAM) console at https://console.aws.amazon.com/
iam/.
4. In the IAM console, in the navigation pane, choose Policies, and from the list of policies, choose
IAMUserSSHKeys.
5. On the Policy Details page, choose the Attached Entities tab, and then choose Attach.
6. On the Attach Policy page, select the check box next to the IAM users or groups who will upload
public keys, and then choose Attach Policy.
Tip
This policy, or one that has the iam:UploadSSHPublicKey action set to Allow, must be
applied to any IAM user who will access AWS CodeCommit repositories using SSH, or
any IAM group whose users will use SSH. For more information, see Managed Policies
and Inline Policies.
7. In the IAM console, in the navigation pane, choose Users, and from the list of users, choose your
IAM user.
8. On the user details page, choose the Security Credentials tab, and then choose Upload SSH
key.
9. Paste the contents of your SSH public key into the field, and then choose Upload SSH Key.
10. Copy or save the information in SSH Key ID (for example, APKAEIBAERJR2EXAMPLE).
API Version 2015-04-13
17
AWS CodeCommit User Guide
Step 3: Configure Credentials on Linux, OS X, or Unix
11. On your local machine, use a text editor to create a config file in the ~/.ssh directory, and then add
the following lines to the file, where the value for User is the SSH Key ID you copied earlier:
Host git-codecommit.*.amazonaws.com
User APKAEIBAERJR2EXAMPLE
IdentityFile ~/.ssh/codecommit_rsa
Note
If you gave your file a different name, replace codecommit_rsa with that file name.
Save and name this file config.
12. From the terminal, run the following command to change the permissions for the config file:
chmod 600 config
13. Run the following command to test your SSH configuration:
ssh git-codecommit.us-east-1.amazonaws.com
You will be asked to confirm the connection because git-codecommit.us-
east-1.amazonaws.com is not yet included in your known hosts file. The AWS CodeCommit
server fingerprint is displayed as part of the verification:
Public fingerprints for AWS CodeCommit
Server Cryptographic hash type Fingerprint
git-codecommit.us-
east-1.amazonaws.com MD5 a6:9c:7d:bc:35:f5:d4:5f:8b:ba:6f:c8:bc:d4:83:84
git-codecommit.us-
east-1.amazonaws.com SHA256 eLMY1j0DKA4uvDZcl/
KgtIayZANwX6t8+8isPtotBoY
After you have confirmed the connection, you should see confirmation that you have added the
server to your known hosts file and a successful connection message. If you do not see a success
message, double-check that you saved the config file in the ~/.ssh directory of the IAM user you
configured for access to AWS CodeCommit, and that you specified the correct private key file.
For information to help you troubleshoot problems, run the ssh command with the -v parameter:
ssh -v git-codecommit.us-east-1.amazonaws.com
API Version 2015-04-13
18

AWS CodeCommit User Guide
Step 4: Connect to the AWS CodeCommit
Console and Clone the Repository
Step 4: Connect to the AWS CodeCommit
Console and Clone the Repository
If an administrator has already sent you the name and connection details for the AWS CodeCommit
repository, you can skip this step and clone the repository directly.
1. Open the AWS CodeCommit console at https://console.aws.amazon.com/codecommit.
2. Choose the repository you want to connect to from the list. This opens the Settings page for that
repository.
Note
If you see a Welcome page instead of a list of repositories, there are no repositories
associated with your AWS account. To create a repository, see Create an AWS
CodeCommit Repository (p. 46) or follow the steps in the Git with AWS CodeCommit
Tutorial (p. 33) tutorial.
3. Copy the SSH URL to use when connecting to the repository.
4. Open a terminal and from the /tmp directory, use the URL to clone the repository using the git
clone command. For example, to clone a repository named MyDemoRepo to a local repo named
my-demo-repo:
git clone ssh://git-codecommit.us-east-1.amazonaws.com/v1/repos/MyDemoRepo
my-demo-repo
For more information about how to connect to repositories, see Connect to the AWS CodeCommit
Repository by Cloning the Repository (p. 77).
Next Steps
You have completed the prerequisites. Follow the steps in the Git with AWS CodeCommit
Tutorial (p. 33) tutorial to start using AWS CodeCommit.
Setup Steps for SSH Connections to AWS
CodeCommit Repositories on Windows
Before you can connect to AWS CodeCommit for the first time, you must complete the initial
configuration steps. This topic walks you through the steps to set up your computer and AWS profile,
connect to an AWS CodeCommit repository, and clone that repository to your computer, also known as
creating a local repo. If you're new to Git, you might also want to review the information in Where Can I
Learn More About Git? (p. 3).
Topics
•Step 1: Initial Configuration for AWS CodeCommit (p. 20)
•Step 2: Install Git (p. 20)
•Step 3: Configure Credentials on Windows (p. 21)
•Step 4: Connect to the AWS CodeCommit Console and Clone the Repository (p. 24)
•Next Steps (p. 24)
API Version 2015-04-13
19

AWS CodeCommit User Guide
Step 1: Initial Configuration for AWS CodeCommit
Step 1: Initial Configuration for AWS
CodeCommit
Follow these steps to set up an AWS account, create an IAM user, and configure access to AWS
CodeCommit.
To create and configure an IAM user for accessing AWS CodeCommit
1. Create an AWS account by going to http://aws.amazon.com and choosing Sign Up.
2. Create an IAM user, or use an existing one, in your AWS account. Make sure you have an access
key ID and a secret access key associated with that IAM user. For more information, see Creating
an IAM User in Your AWS Account.
Tip
AWS CodeCommit requires AWS Key Management Service. If you are using an existing
IAM user, make sure there are no policies attached to the user that expressly deny
the AWS KMS actions required by AWS CodeCommit. For more information, see
Encryption (p. 161).
3. Sign in to the Identity and Access Management (IAM) console at https://console.aws.amazon.com/
iam/.
4. In the IAM console, in the navigation pane, choose Policies, and from the list of policies, choose
AWSCodeCommitFullAccess.
5. On the Policy Details page, choose the Attached Entities tab, and then choose Attach.
6. On the Attach Policy page, select the check box next to the IAM user you just created, and then
choose Attach Policy.
Tip
You can attach this policy to any IAM user who requires full access to all AWS
CodeCommit features or any IAM group whose users require full access. To learn more
about sharing access to repositories with other groups and users, see Share an AWS
CodeCommit Repository (p. 49).
Note
If you want to use AWS CLI commands with AWS CodeCommit, install the AWS CLI. For
more information, see Command Line Reference (p. 140).
Step 2: Install Git
To work with files, commits, and other information in AWS CodeCommit repositories, you must install
Git on your local machine. AWS CodeCommit supports Git versions 1.7.9 and later.
To install Git, we recommend websites such as Git for Windows. If you use this link to install Git, you
can accept all of the installation default settings except for the following:
• When prompted during the Adjusting your PATH environment step, select the Use Git from the
Windows Command Prompt option.
• On the Configuring extra options page, make sure the Enable Git Credential Manager option
is cleared. Although you can choose to install the Git Credential Manager, it is not compatible with
AWS CodeCommit. If you install it, you must manually modify your .gitconfig file to use the credential
helper for AWS CodeCommit. Otherwise, you will not be able to connect to your AWS CodeCommit
repository.
API Version 2015-04-13
20
AWS CodeCommit User Guide
Step 3: Configure Credentials on Windows
Note
Git is an evolving, regularly updated platform. Occasionally, a feature change might affect the
way it works with AWS CodeCommit. If you encounter issues with a specific version of Git and
AWS CodeCommit, review the information in Troubleshooting (p. 132).
Step 3: Configure Credentials on Windows
SSH and Windows: Set Up the Public and Private Keys for
Git and AWS CodeCommit
1. Install putty.exe, plink.exe, puttygen.exe, and pageant.exe on your local machine. (These
applications include an SSH client, a command-line interface to the PuTTY back ends, and an
SSH authentication agent for PuTTY and Plink.) For convenience, consider installing all of these
programs in a folder under your Program Files (x86) directory.
2. Configure your Path environment variable with the path to the programs you just installed. Open
System, and on the Advanced tab, choose Environment Variables. Edit the Path system
variable to add the path to those programs (for example, c:\Program Files (x86)\PuTTY).
Alternatively, you can use the setx command from an administrative command prompt to add the
path to putty.exe, plink.exe, puttygen.exe, and pageant.exe.
3. From the command line on your local machine, create an environment variable named Git_SSH
and set it to the plink.exe location on your local machine. Unlike the previous step, when you
create this environment variable, you must include the executable file as part of the location.
To create and set this environment variable, from an administrative command prompt, run the
following command, where path-to-plink.exe is the path to plink.exe and includes the
executable name, for example %programfiles(x86)%\PuTTY\plink.exe:
setx Git_SSH "path-to-plink.exe"
Note
You cannot use a new environment variable from the command prompt session where
you created it. After running the setx command to create the Git_SSH variable, close the
administrative command prompt and then open a new one.
In some system configurations, setting the Git_SSH variable in a path that includes a
space will cause subsequent calls to Git_SSH to fail because the path is not recognized
beyond the space. For example, if your path to plink.exe includes C:\Program Files
(x86), you might see an error message stating "'C:\Program' is not recognized as a
command" when calling Git_SSH. To solve this problem, consider the following solutions:
• Use a system variable (such as %programfiles(x86)%) for paths that contain spaces
instead of the literal path in the Git_SSH environment variable.
• Create a symbolic link to plink.exe and use that in the variable.
• Install plink.exe in a location that does not have spaces in the path, and use that
location for the environment variable.
4. Generate an SSH-2 RSA public/private key pair. To do this:
1. Run puttygen.exe.
2. In Parameters, choose SSH-2 RSA.
3. In the Number of bits in a generated key box, type 2048.
4. Choose Generate. When prompted, be sure to move your mouse over the blank area.
5. After the public key appears, type a passphrase in the Key passphrase and Confirm
passphrase boxes.
API Version 2015-04-13
21

AWS CodeCommit User Guide
Step 3: Configure Credentials on Windows
Note
When you use Git to interact with an AWS CodeCommit repository, you will need to
type this passphrase. Check with your system administrator about where key files
should be stored and which file naming pattern should be used.
6. Choose Save private key. Save the private key file to a location and with a file name that's
easy for you to remember (for example, MyKeyforCodeCommit). The private key file will be
given a file extension of .ppk (for example, MyKeyforCodeCommit.ppk).
7. Copy the public key as displayed in the Public key for pasting into Open SSH
authorized_keys file text box. You will need this public key when you associate the public/
private key pair with your IAM user.
8. In the system tray, right-click the Pageant program icon and choose Add Key.
Note
If you do not see a Pageant program icon, run pageant.exe, and repeat this step
again.
9. Browse to and select the private key file (the .ppk file), and then choose Open. Type the
passphrase when prompted.
Important
Pageant must be running, and your private key file must be loaded into Pageant,
whenever you use SSH with Windows to interact with an AWS CodeCommit
repository.
5. Now add the public key to your IAM user:
1. Sign in to the Identity and Access Management (IAM) console at https://
console.aws.amazon.com/iam/.
2. In the IAM console, in the navigation pane, choose Policies, and from the list of policies,
choose IAMUserSSHKeys.
3. On the Policy Details page, choose the Attached Entities tab, and then choose Attach.
4. On the Attach Policy page, select the check box next to the IAM users or groups who will
upload public keys, and then choose Attach Policy.
Tip
This policy, or one that has the iam:UploadSSHPublicKey action set to Allow,
must be applied to any IAM user who will access AWS CodeCommit repositories
using SSH, or any IAM group whose users will use SSH. For more information, see
Managed Policies and Inline Policies.
5. In the IAM console, in the navigation pane, choose Users, and from the list of users, choose
your IAM user.
6. On the user details page, choose the Security Credentials tab, and then choose Upload
SSH key.
7. Paste the contents of your SSH public key into the field, and then choose Upload SSH Key.
Tip
This is the public key value you copied from the Public key for pasting into Open
SSH authorized_keys file text box in puttygen.
IAM accepts public keys in the OpenSSH format only. If you provide your public key
in another format, you will see an error message stating the key format is not valid.
8. After you have uploaded the key, copy or save the information in SSH Key ID (for example,
APKAEIBAERJR2EXAMPLE).
6. Store information about the AWS CodeCommit SSH endpoint and server public key in your local
machine's registry. To do this:
1. Create a file with the .reg file extension, add the following information exactly as shown, and
then save the file to any location on your local machine:
API Version 2015-04-13
22
AWS CodeCommit User Guide
Step 3: Configure Credentials on Windows
Windows Registry Editor Version 5.00
[HKEY_CURRENT_USER\Software\SimonTatham\PuTTY\SshHostKeys]
"rsa2@22:git-codecommit.us-
east-1.amazonaws.com"="AAAAB3NzaC1yc2EAAAADAQABAAABAQCdut7aOM5Zh16OJ
+GOP75O7x5oyHKAiA1ieuySetj/hAq4VrAuZV5R2TypZJcKBaripOtTc/
Sr0FOU4YvxUla40PPH8N1lbDp6Pnc4BexKsrt2kz+
+TqIKx5FHmUQV3mit16kxRwHey3dv030+qXBDo3WPQjm2+JLoq0XcadpnCAMCd3ChaBnDRM
+51GZbuEFilpZsxUchUzl0gseC+shYOBd7TqxTlIhj/56d/
YF1kq7RMZYrwBnyYdVhpLeUJCeYjyx/O6FPSezNTLiinz5jjioWZATgn+G8feL/hIsk8g
+7JoIcb2muUlymdxs+8l2lS+8MXqT0q9ohT+Knhb2j"
For reference, the AWS CodeCommit server fingerprint is:
Public fingerprints for AWS CodeCommit
Server Cryptographic hash type Fingerprint
git-codecommit.us-
east-1.amazonaws.com MD5 a6:9c:7d:bc:35:f5:d4:5f:8b:ba:6f:c8:bc:d4:83:84
git-codecommit.us-
east-1.amazonaws.com SHA256 eLMY1j0DKA4uvDZcl/
KgtIayZANwX6t8+8isPtotBoY
2. Double-click the .reg file to run it, and follow the on-screen directions to add the information to
your local machine's registry.
7. From the command line, run putty.exe and configure a session profile for SSH commands.
1. In the PuTTY Configuration window, in the Category navigation bar, expand Connection,
and then choose Data. In the Auto-login username text box, type the SSH key ID you copied
earlier (for example, APKAEIBAERJR2EXAMPLE).
2. Return to the Category navigation bar, expand SSH, and then choose Auth. In Authentication
parameters, choose Browse, navigate to the directory where you saved the .ppk file, highlight
it in the list, and then choose Open.
3. Return to the Category navigation bar, choose Session, and in Host Name, type git-
codecommit.us-east-1.amazonaws.com. In Saved Sessions, type git-codecommit.us-
east-1.amazonaws.com again, and then choose Save.
4. To test the connection, choose Open. A dialog box should appear with a success message. A
PuTTY error message will also appear because interactive shell connections are not supported.
8. From the command line, run the following command to test your SSH configuration and that your
environment variable is set (Git_SSH. If you gave the variable a different name, be sure to use
that name instead). Make sure that you include the SSH key ID you copied down earlier (for
example, APKAEIBAERJR2EXAMPLE):
%Git_SSH% -ssh Your-SSH-Key-ID@git-codecommit.us-east-1.amazonaws.com
If you see a success message, along with a fatal error notification that the server unexpectedly
closed the network connection, your public and private keys are now set up. If you do not see
these messages, double-check that your SSH public key has been uploaded to IAM and is
associated with your IAM user. You can view the details of your IAM user account in the IAM
console.
Tip
If you see an error message stating that "'%Git_SSH% is not recognized as an
internal or external command, operable program or batch file.", then
either the environment variable was not set, you chose a different name for the variable,
API Version 2015-04-13
23

AWS CodeCommit User Guide
Step 4: Connect to the AWS CodeCommit
Console and Clone the Repository
or you are using the same command prompt window that you used to create the variable
with the setx command. Make sure that you have typed the correct variable name, that
you are using a newly-opened command prompt window with administrative permissions,
and that typing echo %Git_SSH% at the command line provides the full path to the
plink.exe file.
If your %Git_SSH% variable contains spaces in its path, you might need to enclose the
variable in quotes:
"%Git_SSH%" -ssh Your-SSH-Key-ID@git-codecommit.us-
east-1.amazonaws.com
Step 4: Connect to the AWS CodeCommit
Console and Clone the Repository
If an administrator has already sent you the name and connection details for the AWS CodeCommit
repository, you can skip this step and clone the repository directly.
1. Open the AWS CodeCommit console at https://console.aws.amazon.com/codecommit.
2. Choose the repository you want to connect to from the list. This opens the Settings page for that
repository.
Note
If you see a Welcome page instead of a list of repositories, there are no repositories
associated with your AWS account. To create a repository, see Create an AWS
CodeCommit Repository (p. 46) or follow the steps in the Git with AWS CodeCommit
Tutorial (p. 33) tutorial.
3. Copy the SSH URL to use when connecting to the repository.
4. Open a command prompt and use the URL to clone the repository using the git clone command
and the SSH key ID for the public key you uploaded to IAM. The local repo will be created in a
subdirectory of the directory where you run the command. For example, to clone a repository
named MyDemoRepo to a local repo named my-demo-repo:
git clone ssh://Your-SSH-Key-ID@git-codecommit.us-east-1.amazonaws.com/v1/
repos/MyDemoRepo my-demo-repo
For more information about how to connect to repositories, see Connect to the AWS CodeCommit
Repository by Cloning the Repository (p. 77).
Next Steps
You have completed the prerequisites. Follow the steps in the Git with AWS CodeCommit
Tutorial (p. 33) tutorial to start using AWS CodeCommit.
API Version 2015-04-13
24

AWS CodeCommit User Guide
AWS CodeCommit Tutorial
Getting Started with AWS
CodeCommit
The easiest way to get started with AWS CodeCommit is to follow the steps in AWS CodeCommit
Tutorial (p. 25). If you are new to Git as well as AWS CodeCommit, you should also consider
following the steps in Git with AWS CodeCommit Tutorial (p. 33). This will help you familiarize
yourself with AWS CodeCommit as well as the basics of using Git when interacting with your AWS
CodeCommit repositories.
You can also follow the tutorial in Simple Pipeline Walkthrough with AWS CodePipeline and AWS
CodeCommit to learn how to use your AWS CodeCommit repository as part of a continuous delivery
pipeline.
The tutorials in this section assume you have completed the prerequisites and setup (p. 4), including:
• Assigning permissions to the IAM user.
• Setting up credential management for HTTPS or SSH connections on the local machine you will use
for this tutorial.
• Configuring the AWS CLI if you want to use the command line or terminal for all operations, including
creating the repository.
Topics
•Getting Started with AWS CodeCommit Tutorial (p. 25)
•Git with AWS CodeCommit Tutorial (p. 33)
Getting Started with AWS CodeCommit
Tutorial
If you're new to AWS CodeCommit, this tutorial will help you learn how to use its features. In this
tutorial, you will create a repository in AWS CodeCommit. After you create a local copy of that repo
API Version 2015-04-13
25

AWS CodeCommit User Guide
Step 1: Create an AWS CodeCommit Repository
(a local repo) and push some changes to the AWS CodeCommit repository, you will browse the files
you pushed. You can also create a trigger for your repository, one that responds to events in your
repository by sending a notification from an Amazon Simple Notification Service (Amazon SNS) topic.
If you are not familiar with Git, you might want to complete the Git with AWS CodeCommit
Tutorial (p. 33) in addition to this tutorial. After you finish this tutorial, you should have enough
practice to start using AWS CodeCommit for your own projects and in team environments.
Important
Before you begin this tutorial, you must complete the prerequisites and setup (p. 4), including:
• Assigning permissions to the IAM user.
• Setting up credential management for HTTPS or SSH connections on the local machine you
will use for this tutorial.
• Configuring the AWS CLI if you want to use the command line or terminal for all operations,
including creating the repository.
Topics
•Step 1: Create an AWS CodeCommit Repository (p. 26)
•Step 2: Browse the Contents of Your Repository (p. 27)
•Step 3: Create a Trigger for Your Repository (p. 31)
•Step 4: Next Steps (p. 32)
•Step 5: Clean Up (p. 33)
Step 1: Create an AWS CodeCommit Repository
In this step, you will use the AWS CodeCommit console to create the AWS CodeCommit repository
you will use for this tutorial. If you already have a repository you want to use for this tutorial, you can
skip this step.
Note
Depending on your usage, you might be charged for creating or accessing a repository. For
more information, see Pricing on the AWS CodeCommit product information page.
To create the AWS CodeCommit repository (console)
1. Open the AWS CodeCommit console at https://console.aws.amazon.com/codecommit.
2. On the welcome page, choose Get Started Now. (If a Dashboard page appears instead of the
welcome page, choose Create new repository.)
3. On the Create new repository page, in the Repository name box, type MyDemoRepo.
4. In the Description box, type My demonstration repository.
5. Choose Create repository to create an empty AWS CodeCommit repository named
MyDemoRepo.
API Version 2015-04-13
26
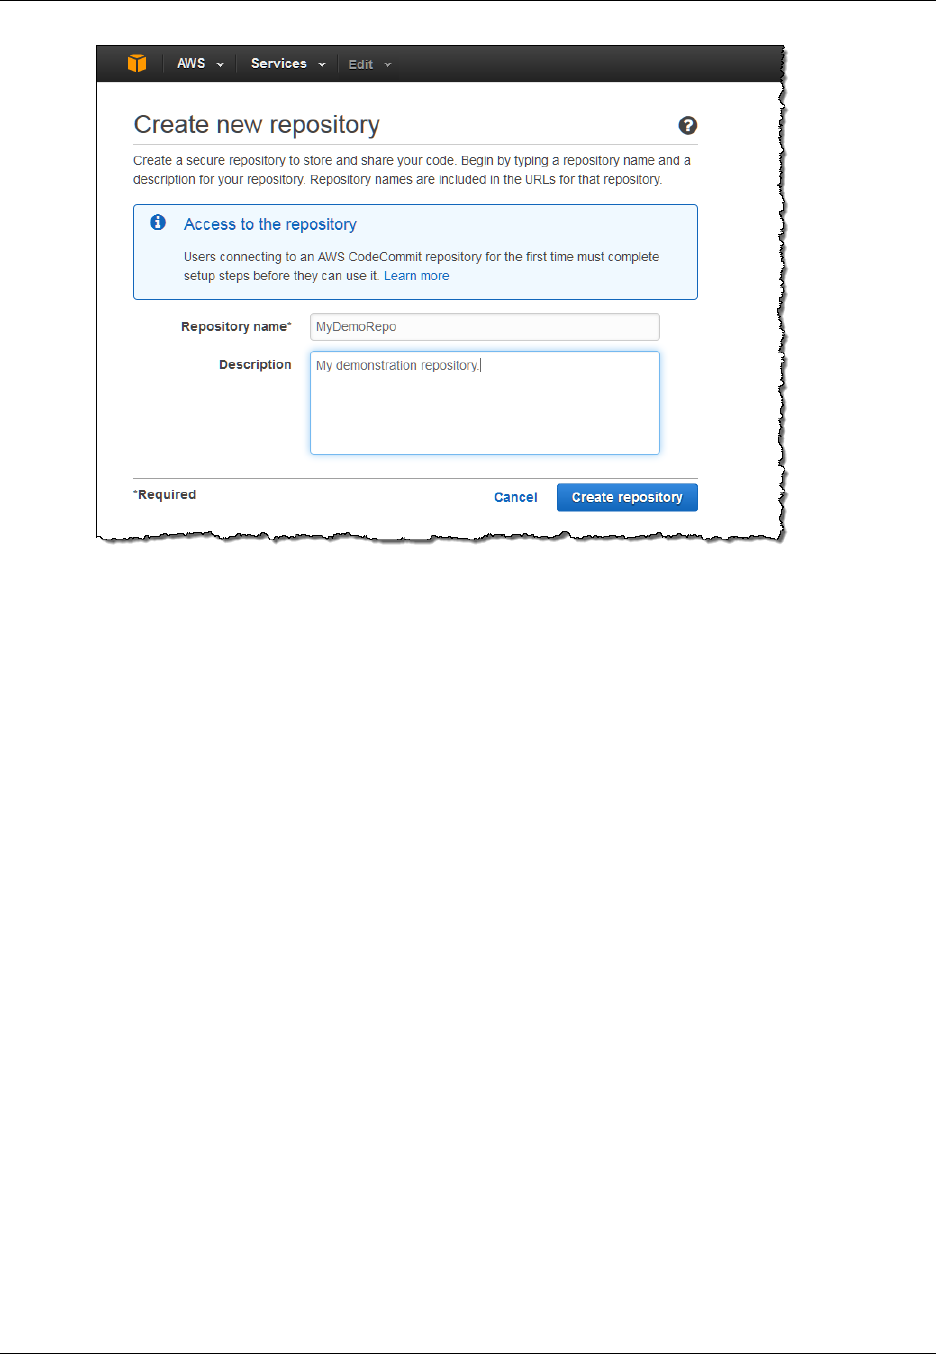
AWS CodeCommit User Guide
Step 2: Browse the Contents of Your Repository
Note
If you use a name other than MyDemoRepo for your repository, be sure to substitute it for ours
in the remaining steps of this tutorial.
Now that you have an AWS CodeCommit repository, from your local computer, create a local repo by
cloning the empty AWS CodeCommit repository. Add some files to the local repo and push them to the
AWS CodeCommit repository. If you are not sure how to do this, follow the steps in Step 2: Create a
Local Repo (p. 34) or Connect to a Repository (p. 76).
After you have added some files to the AWS CodeCommit repository, you can view them from the
console.
Step 2: Browse the Contents of Your Repository
In this step, you will browse the contents of your repository. You can use the AWS CodeCommit
console to review the files in a repository or to quickly read the contents of a file. This can help you
determine which branch to check out or whether to create a local copy of a repository.
1. From the AWS CodeCommit console, choose MyDemoRepo from the list of repositories.
2. The contents of the repository are displayed in the default branch for your repository. To change
the view to another branch, choose the view selector button, and then choose the branch you want
to view from the list.
API Version 2015-04-13
27
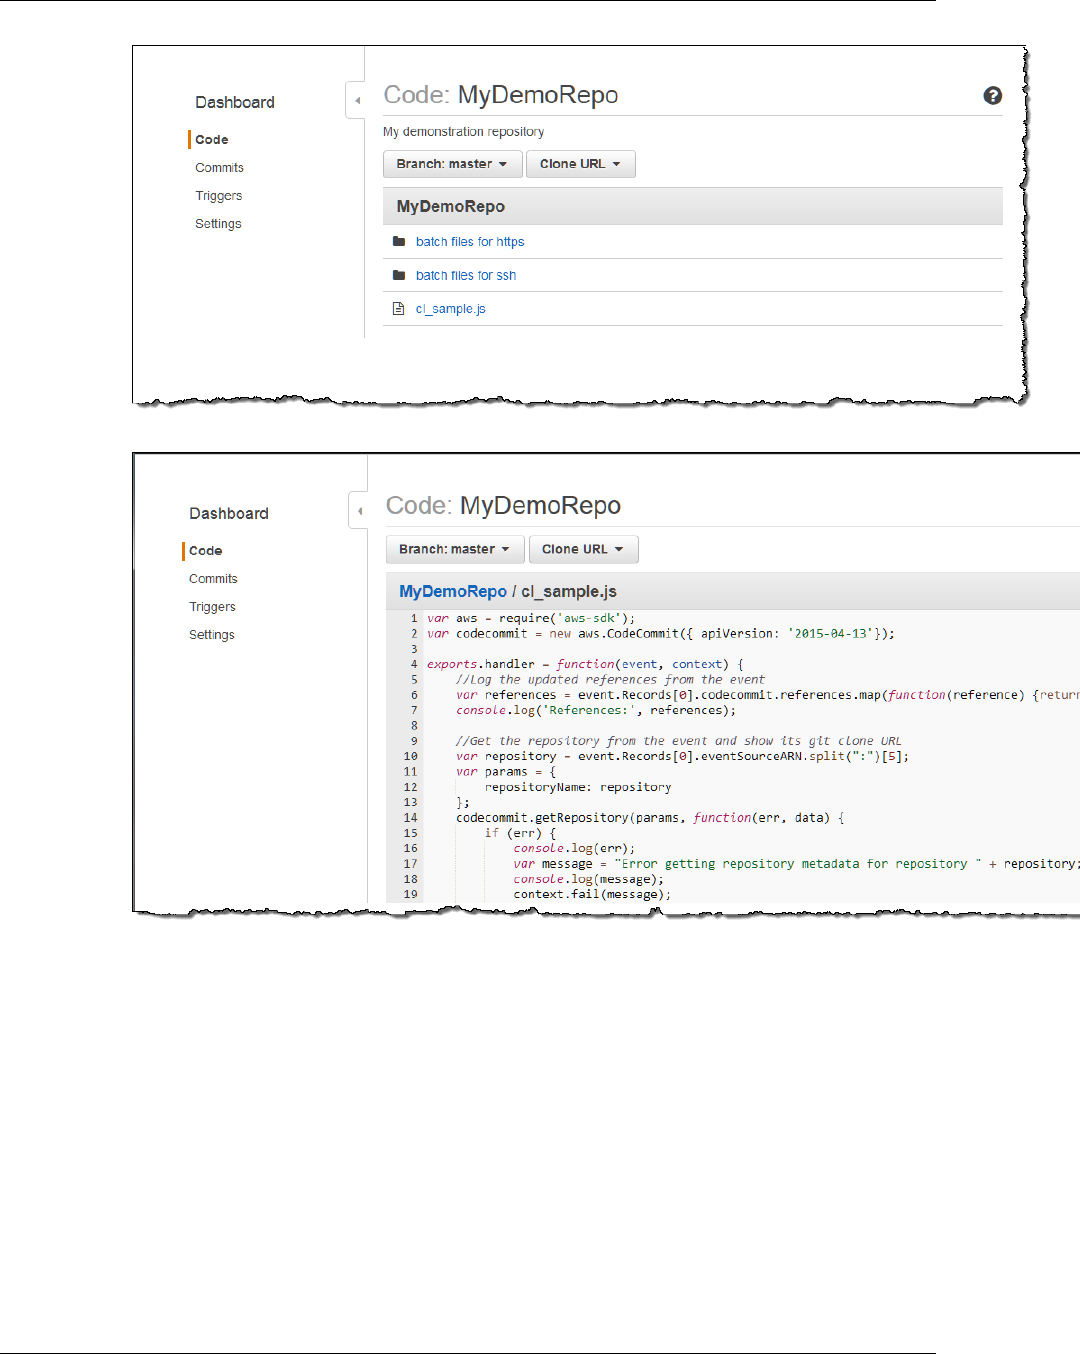
AWS CodeCommit User Guide
Step 2: Browse the Contents of Your Repository
3. To view the contents of a file in your repository, choose the file from the list.
For more information, see Browse the Contents of a Repository (p. 79).
You can also browse the commit history of a repository. This can help you identify changes made in a
repository, including when and by whom those changes were made.
1. In the navigation pane for a repository, choose Commits. In the commit history view, a history of
commits for the repository in the default branch will be displayed, in reverse chronological order.
API Version 2015-04-13
28

AWS CodeCommit User Guide
Step 2: Browse the Contents of Your Repository
2. Review the commit history by branch or by tag, and get details about commits by author, date, and
more. For more information, see Browse the Commit History of a Repository (p. 101).
3. In the navigation pane, choose Commit Visualizer.
API Version 2015-04-13
29
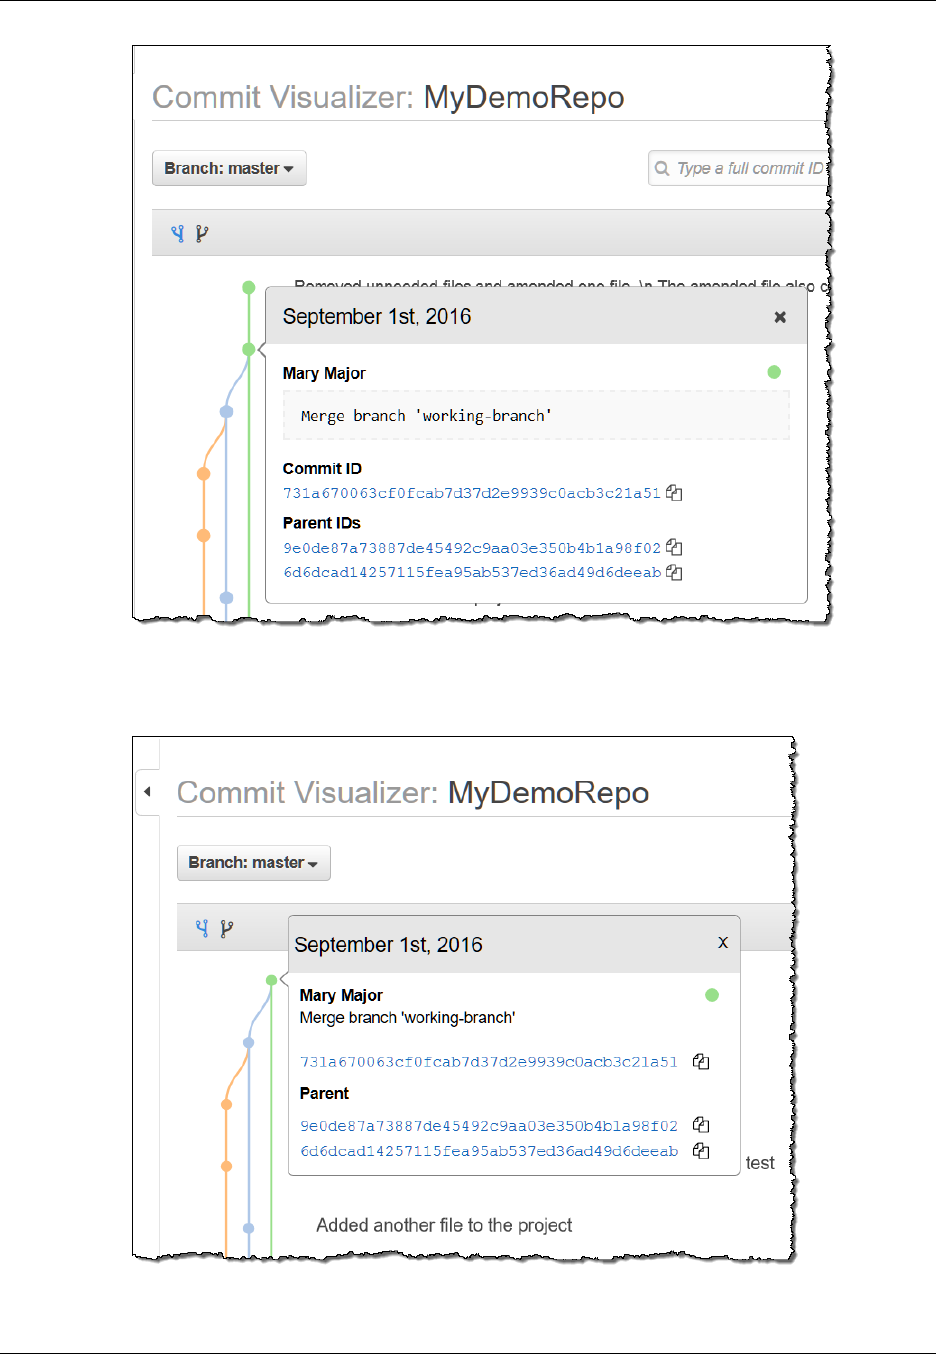
AWS CodeCommit User Guide
Step 2: Browse the Contents of Your Repository
The commit graph is displayed, with the subject line for each commit shown next to its point in the
graph. The subject line display is limited to 80 characters.
4. To see more details about a commit point, choose the point in the graph.
API Version 2015-04-13
30
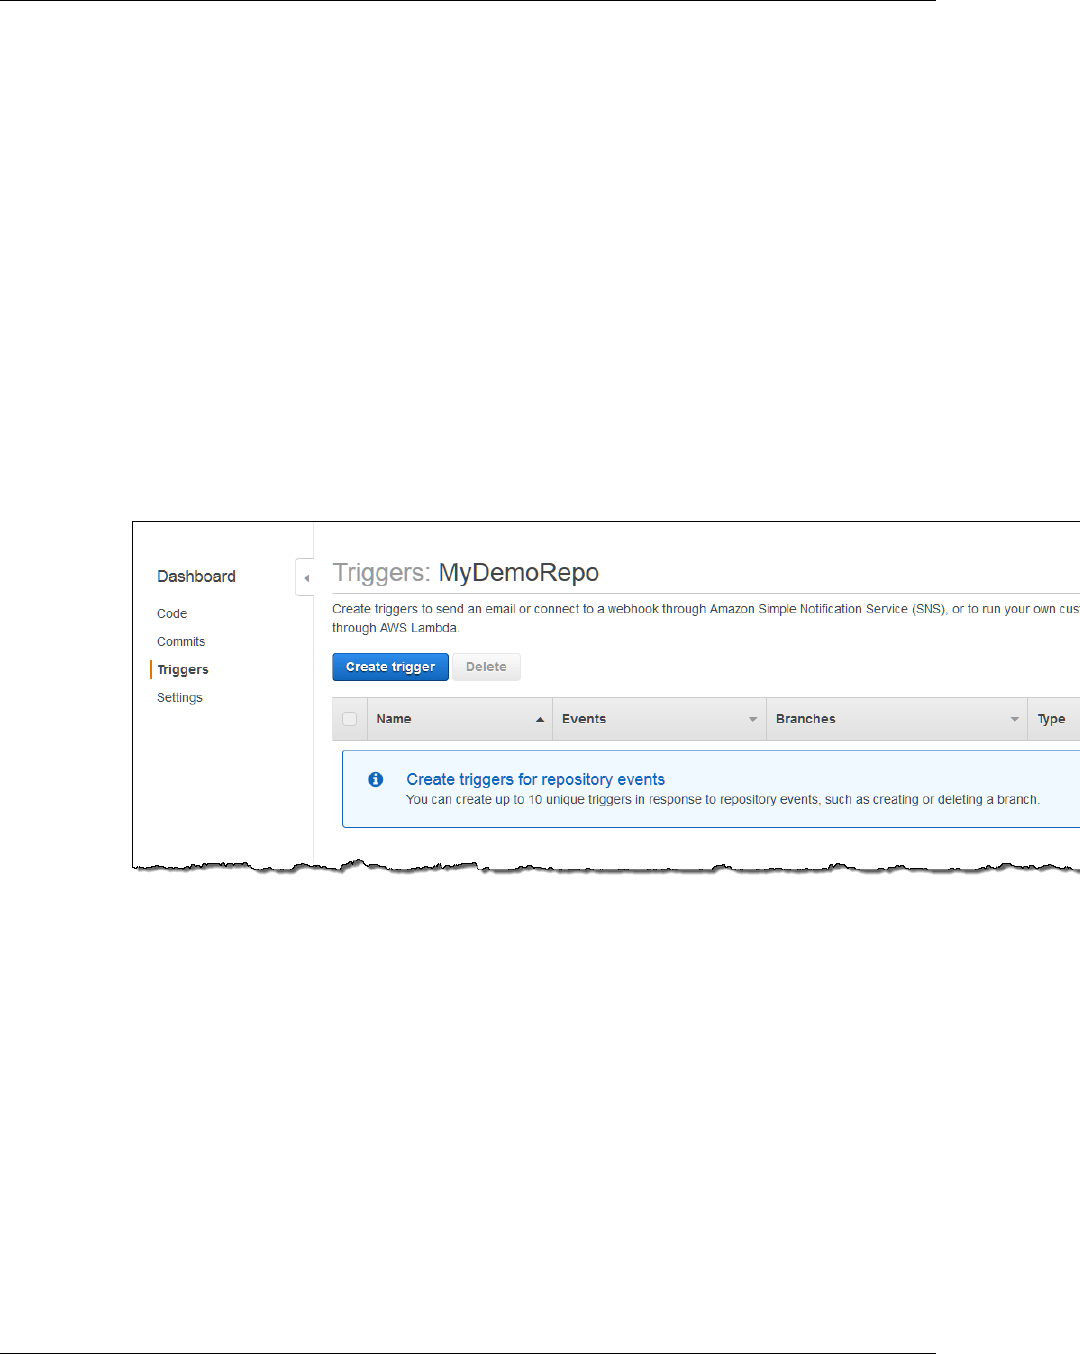
AWS CodeCommit User Guide
Step 3: Create a Trigger for Your Repository
You can review the information in the detail pane, copy commit and parent commit IDs, render
a new graph, and more. For more information, see View a Graph of the Commit History of a
Repository (p. 102).
Now that you have reviewed the content of your repository, consider whether you want to create a
trigger, an action that is taken in response to events in that repository, such as code pushes.
Step 3: Create a Trigger for Your Repository
In this step, you will review the basics of configuring your repository so that code pushes or other
events trigger another action (for example, sending a notification from Amazon SNS or invoking a
function in AWS Lambda). For steps and code samples, see Create a Trigger for an Amazon SNS
Topic (p. 82) and Create a Trigger for a Lambda Function (p. 88).
Important
Before you can configure a trigger, you must first create the Amazon SNS topic or AWS
Lambda function.
1. In the Dashboard navigation pane for your repository MyDemoRepo, choose Triggers.
2. On the Triggers page for the repository, choose Create trigger.
3. Complete the configuration of the trigger according to your business needs. For more information,
see Create a Trigger for an Amazon SNS Topic (p. 82) and Create a Trigger for a Lambda
Function (p. 88).
API Version 2015-04-13
31
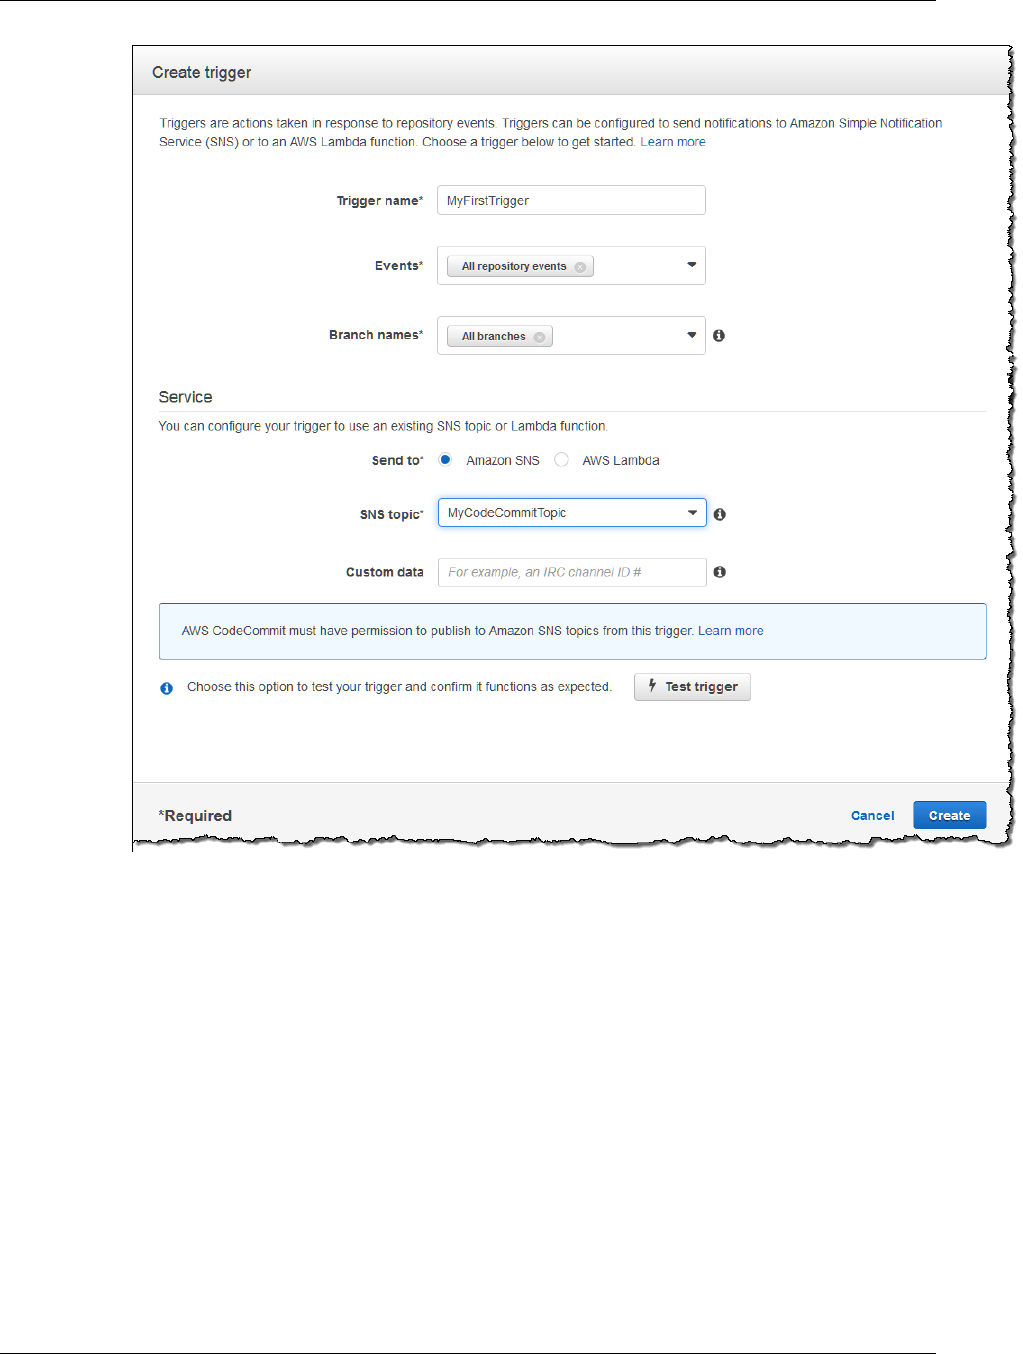
AWS CodeCommit User Guide
Step 4: Next Steps
For more information about creating and managing triggers for a repository, see Manage Triggers for a
Repository (p. 81).
Step 4: Next Steps
Now that you have familiarized yourself with AWS CodeCommit and some of its features, consider
doing the following:
• If you are new to Git and AWS CodeCommit or want to review examples of using Git with AWS
CodeCommit, continue to the Git with AWS CodeCommit Tutorial (p. 33) tutorial.
• If you want to work with others in an AWS CodeCommit repository, see Share a
Repository (p. 49).
• If you want to migrate a repository to AWS CodeCommit, follow the steps in Migrate to AWS
CodeCommit (p. 53).
• If you want to add your repository to a continuous delivery pipeline, follow the steps in Simple
Pipeline Walkthrough.
• If you want to learn more about products and services that integrate with AWS CodeCommit,
including examples from the community, see Product and Service Integrations (p. 43).
API Version 2015-04-13
32

AWS CodeCommit User Guide
Step 5: Clean Up
Step 5: Clean Up
In this step, you will delete the AWS CodeCommit repository you used in this tutorial, so you won't
continue to be charged for the storage space.
Important
After you delete this repository, you will no longer be able to clone it to any local repo or
shared repo. You will also no longer be able to pull data from it, push data to it, or perform any
Git operations, from any local repo or shared repo. This action cannot be undone.
If you configured one or more triggers for your repository, deleting the repository does not
delete the Amazon SNS topics or Lambda functions you configured as the targets of those
triggers. Be sure to delete those resources if they are no longer needed.
To delete the AWS CodeCommit repository
1. Open the AWS CodeCommit console at https://console.aws.amazon.com/codecommit.
2. On the Dashboard page, in the list of repositories, choose MyDemoRepo.
3. In the navigation pane, choose Settings.
4. On the Settings page, in Delete repository, choose Delete repository.
5. In the box next to Type the name of the repository to confirm deletion, type MyDemoRepo, and
then choose Delete.
Git with AWS CodeCommit Tutorial
If you are new to Git and AWS CodeCommit, this tutorial will help you learn some simple commands
to get you started. If you are already familiar with Git, you can skip this tutorial and go to AWS
CodeCommit Tutorial (p. 25).
In this tutorial, you will create a repository that represents a local copy of the AWS CodeCommit
repository, which we will refer to here and in the rest of the documentation as a local repo.
After you create the local repo, you will make some changes to it. Then you will send (push) your
changes to the AWS CodeCommit repository.
You will also simulate a team environment where two users will independently commit changes to their
local repo and push those changes to the AWS CodeCommit repository. The users will then pull the
changes from the AWS CodeCommit repository to their own local repo to see the changes the other
user made.
You will also create branches and tags and manage some access permissions in the AWS
CodeCommit repository.
After you finish this tutorial, you should have enough practice with the core Git and AWS CodeCommit
concepts to use them for your own projects and in team environments.
This tutorial assumes you have completed the prerequisites and setup (p. 4), including:
• Assigning permissions to the IAM user.
• Setting up credential management for HTTPS or SSH connections on the local machine you will use
for this tutorial.
• Configuring the AWS CLI if you want to use the command line or terminal for all operations, including
creating the repository.
Topics
•Step 1: Create an AWS CodeCommit Repository (p. 34)
•Step 2: Create a Local Repo (p. 34)
API Version 2015-04-13
33

AWS CodeCommit User Guide
Step 1: Create an AWS CodeCommit Repository
•Step 3: Create Your First Commit (p. 35)
•Step 4: Push Your First Commit (p. 35)
•Step 5: Share the AWS CodeCommit Repository and Push and Pull Another Commit (p. 35)
•Step 6: Create and Share a Branch (p. 37)
•Step 7: Create and Share a Tag (p. 38)
•Step 8: Set Up Access Permissions (p. 39)
•Step 9: Clean Up (p. 41)
Step 1: Create an AWS CodeCommit Repository
In this step, you will use the AWS CodeCommit console to create the repository you will use for this
tutorial.
You can skip this step if you already have an AWS CodeCommit repository you want to use.
Note
Depending on your usage, you might be charged for creating or accessing a repository. For
more information, see Pricing on the AWS CodeCommit product information page.
To create the AWS CodeCommit repository (console)
1. Open the AWS CodeCommit console at https://console.aws.amazon.com/codecommit.
2. On the welcome page, choose Get Started Now. (If a Dashboard page appears instead of the
welcome page, choose Create new repository.)
3. On the Create new repository page, in the Repository name box, type MyDemoRepo.
4. In the Description box, type My demonstration repository.
5. Choose Create repository to create an empty AWS CodeCommit repository named
MyDemoRepo.
Note
The remaining steps in this tutorial assume you have named your AWS CodeCommit
repository MyDemoRepo. If you use a name other than MyDemoRepo, be sure to substitute it
for ours throughout this tutorial.
For more information about creating repositories, including how to create a repository from the terminal
or command line, see Create a Repository (p. 46).
Step 2: Create a Local Repo
In this step, you will set up a local repo on your local machine to connect to your repository. To do this,
you will select a directory on your local machine that will represent the local repo. You will use Git to
clone and initialize a copy of your empty AWS CodeCommit repository inside of that directory. Then
you will specify the user name and email address that will be used to annotate your commits.
1. Open the AWS CodeCommit console at https://console.aws.amazon.com/codecommit.
2. On the Dashboard page, choose the name of the repository you want to share.
3. On the Code page, choose Clone URL, and then choose the protocol you want your users to use.
4. Copy the displayed URL for the connection protocol your users will use when connecting to your
AWS CodeCommit repository.
5. Send your users the connection information along with any other instructions, such as installing
the AWS CLI, configuring a profile, or installing Git. Make sure to include the configuration
information for the connection protocol (for example, for HTTPS, configuring the credential helper
for Git).
API Version 2015-04-13
34

AWS CodeCommit User Guide
Step 3: Create Your First Commit
Step 3: Create Your First Commit
In this step, you will create your first commit in your local repo. To do this, you will create two example
files in your local repo. You will use Git to stage the change to, and then commit the change to, your
local repo.
1. Use a text editor to create the following two example text files in your directory. Name these files
cat.txt and dog.txt:
cat.txt
-------
The domestic cat (Felis catus or Felis silvestris catus) is a small,
usually furry, domesticated, and carnivorous mammal.
dog.txt
-------
The domestic dog (Canis lupus familiaris) is a canid that is known as
man's best friend.
2. Run git add to stage the change:
git add cat.txt dog.txt
3. Run git commit to commit the change:
git commit -m "Added cat.txt and dog.txt"
Tip
To see details about the commit you just made, run git log.
Step 4: Push Your First Commit
In this step, you will push the commit from your local repo to your AWS CodeCommit repository.
Run git push to push your commit through the default remote name Git uses for your AWS
CodeCommit repository (origin), from the default branch in your local repo (master):
git push -u origin master
Tip
After you have pushed files to your AWS CodeCommit repository, you can use the AWS
CodeCommit console to view the contents. For more information, see Browse the Contents of
a Repository (p. 79).
Step 5: Share the AWS CodeCommit Repository
and Push and Pull Another Commit
In this step, you will share information about the AWS CodeCommit repository with a fellow team
member, who will use this information to get a local copy, make some changes to it, and then push the
modified local copy to your AWS CodeCommit repository. You will then pull the changes from the AWS
CodeCommit repository to your local repo.
API Version 2015-04-13
35
AWS CodeCommit User Guide
Step 5: Share the AWS CodeCommit
Repository and Push and Pull Another Commit
In this tutorial, you will simulate the fellow user by having Git create a directory separate from the one
you created in step 2 (p. 34). (Typically, this directory would be on a different machine.) This new
directory will be a copy of your AWS CodeCommit repository. Any changes you make to the existing
directory or this new directory will be made independently. The only way to identify changes to these
directories is to pull from the AWS CodeCommit repository.
Even though they're on the same local machine, we will call the existing directory your local repo and
the new directory the shared repo.
From the new directory, you will get a separate copy of the AWS CodeCommit repository. You will then
add a new example file, commit the changes to the shared repo, and then push the commit from the
shared repo to your AWS CodeCommit repository.
Lastly, you will pull the changes from your repository to your local repo and then browse it to see the
changes committed by the other user.
1. Switch to the /tmp directory or the c:\temp directory.
2. Run git clone to pull down a copy of the repository into the shared repo:
For HTTPS:
git clone https://git-codecommit.us-east-1.amazonaws.com/v1/repos/
MyDemoRepo shared-demo-repo
For SSH:
git clone ssh://git-codecommit.us-east-1.amazonaws.com/v1/repos/MyDemoRepo
shared-demo-repo
Note
When you clone a repository using SSH on Windows operating systems, you must add
the SSH key ID to the connection string as follows:
git clone ssh://Your-SSH-Key-ID@git-codecommit.us-
east-1.amazonaws.com/v1/repos/MyDemoRepo my-demo-repo
For more information, see For SSH Connections on Windows (p. 19).
In this command, MyDemoRepo represents the name of your AWS CodeCommit repository.
shared-demo-repo represents the name of the directory Git will create in the /tmp directory or
the c:\temp directory. After Git creates the directory, Git will pull down a copy of your repository
into the shared-demo-repo directory.
3. Switch to the shared-demo-repo directory:
(For Linux, OS X, or Unix) cd /tmp/shared-demo-repo
(For Windows) cd c:\temp\shared-demo-repo
4. Run git config to add another user name and email address represented by placeholders
other-user-name and other-email-address (for example, John Doe and
johndoe@example.com). This will make it easier to determine which commits the other user
made:
git config --local user.name "other-user-name"
git config --local user.email other-email-address
API Version 2015-04-13
36
AWS CodeCommit User Guide
Step 6: Create and Share a Branch
5. Use a text editor to create the following example text file in the shared-demo-repo directory.
Name the file horse.txt:
horse.txt
-------
The horse (Equus ferus caballus) is one of two extant subspecies of Equus
ferus.
6. Run git add to stage the change to the shared repo:
git add horse.txt
7. Run git commit to commit the change to the shared repo:
git commit -m "Added horse.txt"
8. Run git push to push your initial commit through the default remote name Git uses for your AWS
CodeCommit repository (origin), from the default branch in your local repo (master):
git push -u origin master
9. Switch back to your local repo and run git pull to pull into your local repo the commit the shared
repo made to the AWS CodeCommit repository. Then run git log to see the commit that was
initiated from the shared repo.
Step 6: Create and Share a Branch
In this step, you will create a branch in your local repo, make a few changes, and then push the branch
to your AWS CodeCommit repository. You will then pull the branch to the shared repo from your AWS
CodeCommit repository.
A branch allows you to independently develop a different version of the repository's contents (for
example, to work on a new software feature without affecting the work of your team members). When
that feature is stable, you merge the branch into a more stable branch of the software.
You will use Git to create the branch and then point it to the very first commit you made. You will use
Git to push the branch to the AWS CodeCommit repository. You will then switch to your shared repo
and use Git to pull the new branch into your shared local repo and explore the branch.
1. From your local repo, run git checkout, specifying the name of the branch (for example,
MyNewBranch) and the ID of the first commit you made in the local repo.
If you don't know the commit ID, run git log to get it. Make sure the commit has your user
name and email address, not the user name and email address of the other user. This is to
simulate, for example, that master is a stable version of the AWS CodeCommit repository and the
MyNewBranch branch is for some new, relatively unstable feature:
git checkout -b MyNewBranch commit-ID
2. Run git push to send the new branch from the local repo to the AWS CodeCommit repository:
git push origin MyNewBranch
3. Now, pull the branch into the shared repo and check your results:
1. Switch to the shared repo directory (shared-demo-repo).
API Version 2015-04-13
37
AWS CodeCommit User Guide
Step 7: Create and Share a Tag
2. Pull in the new branch (git fetch origin).
3. Confirm the branch has been pulled in (git branch --all displays a list of all branches for the
repository).
4. Switch to the new branch (git checkout MyNewBranch).
5. Confirm you have switched to the MyNewBranch branch. To do this, you can run git status
or git branch. The output will show which branch you are on. In this case, it should be
MyNewBranch.
6. View the list of commits in the branch (git log).
Here's the list of Git commands to call:
git fetch origin
git branch --all
git checkout MyNewBranch
git branch or git status
git log
4. Switch back to the master branch and view its list of commits. The Git commands should look like
this:
git checkout master
git log
5. Switch back to the master branch in your local repo. You can run git status or git branch. The
output will indicate which branch you are on. In this case, it should be master. The Git commands
should look like this:
git checkout master
git branch or git status
Step 7: Create and Share a Tag
In this step, you will create two tags in your local repo, associate the tags with commits, and then
push the tags to your AWS CodeCommit repository. You will then pull the changes from the AWS
CodeCommit repository to the shared repo.
A tag is used to give a human-readable name to a commit (or branch or even another tag). You would
do this, for example, if you want to tag a commit as "v2.1." A commit, branch, or tag can have any
number of tags associated with it, but an individual tag can be associated with only one commit,
branch, or tag. In this tutorial, you'll tag one commit as "release" and one as "beta."
You will use Git to create the new tags, pointing the release tag to the first commit you made and the
beta tag to the commit made by the other user. You will then use Git to push the tags to the AWS
CodeCommit repository. Then you will switch to your shared repo and use Git to pull the tags into your
shared local repo and explore the tags.
1. From your local repo, run git tag, specifying the new tag's name (release) and the ID of the first
commit you made in the local repo.
If you don't know the commit ID, run git log to get it. Make sure the commit has your user name
and email address, not the user name and email address of the other user. This is to simulate, for
example, that your commit is a stable version of the AWS CodeCommit repository:
API Version 2015-04-13
38
AWS CodeCommit User Guide
Step 8: Set Up Access Permissions
git tag release commit-ID
Run git tag again to tag the commit from the other user with the beta tag. This is to simulate that
the commit is for some new, relatively unstable feature:
git tag beta commit-ID
2. Run git push --tags to send the tags to the AWS CodeCommit repository.
3. Now pull the tags into the shared repo and check your results:
1. Switch to the shared repo directory (shared-demo-repo).
2. Pull in the new tags (git fetch origin).
3. Confirm the tags have been pulled in (git tag displays a list of tags for the repository).
4. View information about each tag (git log release and git log beta).
Here's the list of Git commands to call:
git fetch origin
git tag
git log release
git log beta
4. Try this out in the local repo, too:
git log release
git log beta
Step 8: Set Up Access Permissions
In this step, you will learn how to give a user permission to synchronize the shared repo with the AWS
CodeCommit repository. This is an optional step recommended for users interested in learning about
controlling access to AWS CodeCommit repositories.
To do this, you will use the IAM console to create an IAM user, who, by default, does not have
permissions to synchronize the shared repo with the AWS CodeCommit repository. You can run git
pull to verify this. If the new user doesn't have permission to synchronize, the command will not work.
Then you will go back to the IAM console and apply a policy that allows the user to use git pull. Again,
you can run git pull to verify this.
This step assumes you have permissions to create IAM users in your AWS account. If you do not have
these permissions, then you cannot perform the procedures in this step. Skip ahead to Step 9: Clean
Up (p. 41) to clean up the resources you used for your tutorial.
1. Sign in to the Identity and Access Management (IAM) console at https://console.aws.amazon.com/
iam/.
Be sure to sign in with the same user name and password you used in Setting Up (p. 4).
2. In the navigation pane, choose Users, and then choose Create New Users.
3. In the first Enter User Names box, type an example user name (for example, JaneDoe-
CodeCommit). Select the Generate an access key for each user box, and choose Create.
4. Choose Show User Security Credentials. Make note of the access key ID and secret access key
or choose Download Credentials.
API Version 2015-04-13
39

AWS CodeCommit User Guide
Step 8: Set Up Access Permissions
5. Supply the credentials of the IAM user by following the instructions in Step 3: Set Up the
Credential Helper (p. 9) or Step 3: Set Up the Credential Helper (p. 13).
If you want to use SSH, set up the user with public and private keys by following the instructions in
Step 3: Configure Credentials on Linux, OS X, or Unix (p. 16) or Step 3: Configure Credentials on
Windows (p. 21).
6. Run git pull. The following error should appear:
For HTTPS:
fatal: unable to access 'https://git-codecommit.us-east-1.amazonaws.com/
v1/repos/repository-name/': The requested URL returned error: 403.
For SSH:
fatal: unable to access 'ssh://git-codecommit.us-east-1.amazonaws.com/v1/
repos/repository-name/': The requested URL returned error: 403.
The error appears because the new user doesn't have permission to synchronize the shared repo
with the AWS CodeCommit repository.
7. Return to the IAM console. In the navigation pane, choose Policies, and then choose Create
Policy. (If a Get Started button appears, choose it, and then choose Create Policy.)
8. Next to Create Your Own Policy, choose Select.
9. In the Policy Name box, type a name (for example, CodeCommitAccess-GettingStarted).
10. In the Policy Document box, type the following, which allows an IAM user to pull from any
repository associated with the IAM user:
{
"Version": "2012-10-17",
"Statement": [
{
"Effect": "Allow",
"Action": [
"codecommit:GitPull"
],
"Resource": "*"
}
]
}
Tip
If you want the IAM user to be able to push commits to any repository associated with the
IAM user, type this instead:
{
"Version": "2012-10-17",
"Statement": [
{
"Effect": "Allow",
"Action": [
"codecommit:GitPull",
"codecommit:GitPush"
],
"Resource": "*"
}
] API Version 2015-04-13
40

AWS CodeCommit User Guide
Step 9: Clean Up
}
For information about other AWS CodeCommit action and resource permissions you can
give to users, see Access Permissions Reference (p. 147).
11. In the navigation pane, choose Users.
12. Choose the example user name (for example, JaneDoe-CodeCommit) to which you want to
attach the policy.
13. Choose the Permissions tab.
14. In Managed Policies, choose Attach Policy.
15. Select the CodeCommitAccess-GettingStarted policy you just created, and then choose
Attach Policy.
16. Run git pull. This time the command should work and an Already up-to-date message
should appear.
17. If you are using HTTPS, switch to your original credentials. For more information, see the
instructions in Step 3: Set Up the Credential Helper (p. 9) or Step 3: Set Up the Credential
Helper (p. 13).
If you are using SSH, switch to your original keys. For more information, see Step 3: Configure
Credentials on Linux, OS X, or Unix (p. 16) or Step 3: Configure Credentials on Windows (p. 21).
You've now reached the end of this tutorial.
Step 9: Clean Up
In this step, you will delete the AWS CodeCommit repository you used in this tutorial, so you won't
continue to be charged for the storage space.
You will also remove the local repo and shared repo on your local machine because they won't be
needed after you delete the AWS CodeCommit repository.
Important
After you delete this repository, you will no longer be able to clone it to any local repo or
shared repo. You will also no longer be able to pull data from it, or push data to it, from any
local repo or shared repo. This action cannot be undone.
To delete the AWS CodeCommit repository (console)
1. Open the AWS CodeCommit console at https://console.aws.amazon.com/codecommit.
2. On the Dashboard page, in the list of repositories, choose MyDemoRepo.
3. In the navigation pane, choose Settings.
4. On the Settings page, in Delete repository, choose Delete repository.
5. In the box next to Type the name of the repository to confirm deletion, type MyDemoRepo, and
then choose Delete.
To delete the AWS CodeCommit repository (AWS CLI)
Run the delete-repository (p. 127) command:
aws codecommit delete-repository --repository-name MyDemoRepo
To delete the local repo and shared repo
For Linux, OS X, or Unix:
API Version 2015-04-13
41

AWS CodeCommit User Guide
Step 9: Clean Up
cd /tmp
rm -rf /tmp/my-demo-repo
rm -rf /tmp/shared-demo-repo
For Windows:
cd c:\temp
rd /s /q c:\temp\my-demo-repo
rd /s /q c:\temp\shared-demo-repo
API Version 2015-04-13
42

AWS CodeCommit User Guide
Integration with Other AWS Services
Product and Service Integrations
with AWS CodeCommit
By default, AWS CodeCommit is integrated with a number of AWS services. You can also use AWS
CodeCommit with products and services outside of AWS. The following information can help you
configure AWS CodeCommit to integrate with the products and services you use.
Note
You can automatically build and deploy commits to an AWS CodeCommit repository by
integrating with AWS CodePipeline. To learn more, follow the steps in the AWS for DevOps
Getting Started Guide.
Topics
•Integration with Other AWS Services (p. 43)
•Integration Examples from the Community (p. 44)
Integration with Other AWS Services
AWS CodeCommit is integrated with the following AWS services:
AWS CodePipeline AWS CodePipeline is a continuous delivery service you can use to model,
visualize, and automate the steps required to release your software. You can
configure AWS CodePipeline to use an AWS CodeCommit repository as a
source action in a pipeline, and automate building, testing, and deploying your
changes.
Learn more:
•Simple Pipeline Walkthrough with AWS CodePipeline and AWS
CodeCommit
AWS Key
Management
Service
AWS KMS is a managed service that makes it easy for you to create and
control the encryption keys used to encrypt your data. By default, AWS
CodeCommit uses AWS KMS to encrypt repositories.
Learn more:
•Encryption (p. 161)
API Version 2015-04-13
43

AWS CodeCommit User Guide
Integration Examples from the Community
AWS Lambda Lambda lets you run code without provisioning or managing servers. You can
configure triggers for AWS CodeCommit repositories that will invoke Lambda
functions in response to repository events.
Learn more:
•Create a Trigger for a Lambda Function (p. 88)
•AWS Lambda Developer Guide
Amazon Simple
Notification
Service
Amazon SNS is a web service that enables applications, end users, and
devices to instantly send and receive notifications from the cloud. You can
configure triggers for AWS CodeCommit repositories that will send Amazon
SNS notifications in response to repository events. You can also use Amazon
SNS notifications to integrate with other AWS services. For example, you can
use an Amazon SNS notification to send messages to an Amazon Simple
Queue Service queue.
Learn more:
•Create a Trigger for an Amazon SNS Topic (p. 82)
•Amazon Simple Notification Service Developer Guide
Integration Examples from the Community
The following sections provide links to blog posts, articles, and community-provided examples.
Note
These links are provided for informational purposes only, and should not be considered
either a comprehensive list or an endorsement of the content of the examples. AWS is not
responsible for the content or accuracy of external content.
Topics
•Blog Posts (p. 44)
•Code Samples (p. 45)
Blog Posts
•Using AWS CodeCommit with Git Repositories in Multiple AWS Accounts
Learn how to clone your AWS CodeCommit repository and, in one command, configure the
credential helper to use a specific IAM role for connections to that repository.
Published November 2015
•Using AWS CodeCommit and GitHub Credential Helpers
Learn how to configure your gitconfig file to work with both AWS CodeCommit and GitHub credential
helpers.
Published September 2015
•Using AWS CodeCommit from Eclipse
Learn how to use the EGit tools in Eclipse to work with AWS CodeCommit.
Published August 2015
•AWS CodeCommit with Amazon EC2 Role Credentials
API Version 2015-04-13
44

AWS CodeCommit User Guide
Code Samples
Learn how to use an instance profile for Amazon EC2 when configuring automated agent access to
an AWS CodeCommit repository.
Published July 2015
•AWS CodeCommit and SourceTree Setup Tutorial with SSH Keys
Learn how to use AWS CodeCommit and Atlassian SourceTree to manage your local repositories.
Published July 2015
•Integrating AWS CodeCommit with Jenkins
Learn how to use AWS CodeCommit and Jenkins to support two simple continuous integration (CI)
scenarios.
Published July 2015
•Integrating AWS CodeCommit with Review Board
Learn how to integrate AWS CodeCommit into a development workflow using the Review Board
code review system.
Published July 2015
Code Samples
The following are code samples that might be of interest to AWS CodeCommit users.
•Mac OS X Script to Periodically Delete Cached Credentials in the OS X Certificate Store
If you use the credential helper for AWS CodeCommit on Mac OS X, you are likely familiar with the
problem with cached credentials. This script demonstrate one solution.
Author: Nico Coetzee
Published February 2016
API Version 2015-04-13
45

AWS CodeCommit User Guide
Use the AWS CodeCommit
Console to Create a Repository
Create an AWS CodeCommit
Repository
Use AWS CLI or the AWS CodeCommit console to create a new, empty AWS CodeCommit repository.
These instructions assume you have already completed the steps in Setting Up (p. 4).
Note
Depending on your usage, you might be charged for creating or accessing a repository. For
more information, see Pricing on the AWS CodeCommit product information page.
Topics
•Use the AWS CodeCommit Console to Create a Repository (p. 46)
•Use the AWS CLI to Create an AWS CodeCommit Repository (p. 47)
Use the AWS CodeCommit Console to Create
a Repository
To create a new AWS CodeCommit repository (console):
1. Open the AWS CodeCommit console at https://console.aws.amazon.com/codecommit.
2. On the Dashboard page, choose Create new repository. (If a welcome page appears instead of
the Dashboard page, choose Get Started Now.)
3. On the Create new repository page, in Repository name, type a name for the repository.
Note
This name must be unique across an AWS account.
4. Optionally, in the Description box, type a description for the repository. This can help you and
other users identify the purpose of the repository.
Note
The description field for a repository accepts all HTML characters and all valid
Unicode characters. If you are an application developer using the GetRepository or
BatchGetRepositories APIs and plan to display the repository description field in a
web browser, see the AWS CodeCommit API Reference for additional guidance.
5. Choose Create repository. An empty repository will be created in AWS CodeCommit with the
name and description you specified.
API Version 2015-04-13
46

AWS CodeCommit User Guide
Use the AWS CLI to Create an
AWS CodeCommit Repository
After you create a repository, you can connect to it and start adding code. To learn more, see Connect
to a Repository (p. 76). You can also add your repository to a continuous delivery pipeline. To learn
more, see Simple Pipeline Walkthrough.
To get information about the new AWS CodeCommit repository, such as the URLs to use when cloning
the repository, choose the repository's name from the list.
To share this repository with others, you will need to send them the HTTPS or SSH link to use to
clone the repository. Make sure they have the permissions required to access the repository. For more
information, see Share a Repository (p. 49) and Access Permissions Reference (p. 147).
Use the AWS CLI to Create an AWS
CodeCommit Repository
To create a new AWS CodeCommit repository (CLI):
1. Run the create-repository command, specifying:
• A name that uniquely identifies the AWS CodeCommit repository (with the --repository-
name option).
Note
This name must be unique across an AWS account.
• Optionally, a comment about the AWS CodeCommit repository (with the --repository-
description option).
For example, to create an AWS CodeCommit repository named MyDemoRepo with the description
"My demonstration repository":
aws codecommit create-repository --repository-name MyDemoRepo --
repository-description "My demonstration repository"
Note
The description field for a repository accepts all HTML characters and all valid
Unicode characters. If you are an application developer using the GetRepository or
BatchGetRepositories APIs and plan to display the repository description field in a
web browser, see the AWS CodeCommit API Reference for additional guidance.
2. If successful, this command outputs a repositoryMetadata object with the following
information:
• The description (repositoryDescription).
• The unique, system-generated ID (repositoryId).
• The name (repositoryName).
• The ID of the AWS account associated with the AWS CodeCommit repository (accountId).
Here is some example output, based on the preceding example command:
{
"repositoryMetadata": {
"repositoryName": "MyDemoRepo",
"repositoryDescription": "My demonstration repository",
"repositoryId": "f7579e13-b83e-4027-aaef-650c0EXAMPLE",
API Version 2015-04-13
47

AWS CodeCommit User Guide
Use the AWS CLI to Create an
AWS CodeCommit Repository
"accountId": "creator-account-ID"
}
}
3. Note the AWS CodeCommit repository's name and ID. You will need them to monitor and change
information about the AWS CodeCommit repository, especially if you use AWS CLI.
If you forget the AWS CodeCommit repository's name or ID, follow the instructions in Use the AWS
CLI to View AWS CodeCommit Repository Details (p. 109).
After you create a repository, you can connect to it and start adding code. To learn more, see Connect
to a Repository (p. 76). You can also add your repository to a continuous delivery pipeline. To learn
more, see Simple Pipeline Walkthrough.
API Version 2015-04-13
48

AWS CodeCommit User Guide
Choose the Connection Protocol
to Share with Your Users
Share an AWS CodeCommit
Repository
After you have created an AWS CodeCommit repository, you can share it with other users. First,
decide which protocol to recommend to users when connecting to your repository: HTTPS or SSH.
Then send the URL and connection information to the users with whom you want to share the
repository. Depending on your security requirements, sharing a repository may also require creating
an IAM group, applying managed policies to that group, and editing IAM policies to refine access. This
topic will walk you through these steps.
These instructions assume you have already completed the steps in Setting Up (p. 4) and Create a
Repository (p. 46).
Note
Depending on your usage, you might be charged for creating or accessing a repository. For
more information, see Pricing on the AWS CodeCommit product information page.
Topics
•Choose the Connection Protocol to Share with Your Users (p. 49)
•Create IAM Policies for Your Repository (p. 50)
•Create an IAM Group for Repository Users (p. 51)
•Share the Connection Information with Your Users (p. 51)
Choose the Connection Protocol to Share with
Your Users
When you create a repository in AWS CodeCommit, two endpoints are generated: one for HTTPS
connections and one for SSH connections. Both provide secure connections over a network. Your
users can use either protocol. Both endpoints remain active regardless of which protocol you
recommend to your users.
HTTPS connections require an AWS access key, which your repository users must configure in the
credential helper included in the AWS CLI. This configuration is usually easier for the users of your
repository to set up and use. SSH connections require your users to generate a public-private key pair,
store the public key, associate the public key with their IAM user, configure their known hosts file on
their local computer, and create and maintain a config file on their local computers. Because this is a
API Version 2015-04-13
49

AWS CodeCommit User Guide
Create IAM Policies for Your Repository
more complex configuration process, we recommend you choose HTTPS for your connections to AWS
CodeCommit.
For more information about HTTPS, SSH, Git, and remote repositories, consult your Git
documentation. For a general overview of communication protocols and how each communicates with
remote repositories, see Git on the Server - The Protocols.
Note
Although Git supports a variety of connection protocols, AWS CodeCommit does not support
connections with unsecured protocols, such as the local protocol or generic HTTP.
Create IAM Policies for Your Repository
AWS provides three managed policies in IAM for AWS CodeCommit. These policies cannot be edited
and apply to all repositories associated with your AWS account. However, you can use these policies
as templates to create your own custom managed policies that apply only to the repository you
want to share. If you are using HTTPS, you will need to create only one customer managed policy.
Create a copy of AWSCodeCommitPowerUser, a managed policy that allows your users to pull and
push changes to and from the repository and create branches and new repositories. Your customer
managed policy will apply specifically to the repository you want to share. For more information about
managed policies and IAM users, see Managed Polices and IAM Users and Groups.
Tip
For more fine-grained control over access to your repository, you can create more than one
customer managed policy and apply the policies to different IAM users and groups.
To review the contents of the policy and the other managed policies for AWS CodeCommit and
learn more about creating and applying permissions by using policies, see Access Permissions
Reference (p. 147).
Create a customer managed policy for your repository
1. Sign in to the Identity and Access Management (IAM) console at https://console.aws.amazon.com/
iam/.
2. In the Dashboard navigation area, choose Policies, and then choose Create Policy.
3. On the Create Policy page, next to Copy an AWS Managed Policy, choose Select.
4. On the Copy an AWS Managed Policy page, type AWSCodeCommitPowerUser in the Search
Policies search box. Choose Select next to that policy name.
5. On the Review Policy page, in Policy Name, type a new name for the policy (for example,
AWSCodeCommitPowerUser-MyDemoRepo).
In the Policy Document text box, replace the "*" portion of the Resource line with the Amazon
Resource Name (ARN) of the AWS CodeCommit repository. For example:
"Resource": [
"arn:aws:codecommit:us-east-1:80398EXAMPLE:MyDemoRepo"
]
Tip
To find the ARN for the AWS CodeCommit repository, go to the AWS CodeCommit
console and choose the repository name from the list. For more information, see View
Repository Details (p. 107).
If you want this policy to apply to more than one repository, add each repository as a resource by
specifying its ARN. Include a comma between each resource statement, as shown in the following
example:
API Version 2015-04-13
50

AWS CodeCommit User Guide
Create an IAM Group for Repository Users
"Resource": [
"arn:aws:codecommit:us-east-1:80398EXAMPLE:MyDemoRepo",
"arn:aws:codecommit:us-east-1:80398EXAMPLE:MyOtherDemoRepo"
]
6. Choose Validate Policy. After it is validated, choose Create Policy.
Create an IAM Group for Repository Users
To manage access to your repository, create an IAM group for its users, add IAM users to that group,
and then attach the customer managed policy you created in the previous step.
If you use SSH, you must attach another managed policy to the IAMUserSSHKeys group, the IAM
managed policy that allows users to upload their SSH public key and associate it with the IAM user
they use to connect to AWS CodeCommit.
1. Sign in to the Identity and Access Management (IAM) console at https://console.aws.amazon.com/
iam/.
2. In the Dashboard navigation area, choose Groups, and then choose Create New Group.
3. On the Set Group Name page, in the Group Name box, type a name for the group (for example,
MyDemoRepoGroup), and then choose Next Step. Consider including the repository name as part
of the group name.
Note
This name must be unique across an AWS account.
4. On the Attach Policy page, select the check box next to the customer managed policy you
created in the previous section (for example, AWSCodeCommitPowerUser-MyDemoRepo).
If your users will use HTTPS to connect to your repository, choose Next Step.
If your users will use SSH to connect to your repository, select the check box next to
IAMUserSSHKeys, and then choose Next Step.
5. On the Review page, choose Create Group. The group will be created in IAM with the specified
policies already attached. It will appear in the list of groups associated with your AWS account.
6. Choose your group from the list.
7. On the group summary page, choose the Users tab, and then choose Add Users to Group. On
the list that shows all users associated with your AWS account, select the check boxes next to the
users to whom you want to allow access to the AWS CodeCommit repository, and then choose
Add Users.
Tip
You can use the Search box to quickly find users by name.
8. When you have added your users, close the IAM console.
Share the Connection Information with Your
Users
1. Open the AWS CodeCommit console at https://console.aws.amazon.com/codecommit.
2. On the Dashboard page, choose the name of the repository you want to share.
3. On the Code page, choose Clone URL, and then choose the protocol you want your users to use.
API Version 2015-04-13
51

AWS CodeCommit User Guide
Share the Connection Information with Your Users
4. Copy the displayed URL for the connection protocol your users will use when connecting to your
AWS CodeCommit repository.
5. Send your users the connection information along with any other instructions, such as installing
the AWS CLI, configuring a profile, or installing Git. Make sure to include the configuration
information for the connection protocol (for example, for HTTPS, configuring the credential helper
for Git).
The following example email provides information for users connecting to the MyDemoRepo repository
with the HTTPS connection protocol. This email assumes the user has already installed Git and is
familiar with using it:
I've created an AWS CodeCommit repository for us to use while working on our
project. The name of the repository is MyDemoRepo.
Here's what you need to do in order to get started using it:
1. Install the AWS CLI on your development machine. (If you need
instructions, you can find them here.)
2. Configure a credential helper for your profile. From the terminal or
command prompt, run aws configure --profile CodeCommitProfile to set up a
profile
to use with AWS CodeCommit. Replace the red steps with your own information:
AWS Access Key ID [None]: Type your AWS access key ID here, and then
press Enter
AWS Secret Access Key [None]: Type your AWS secret access key here, and
then press Enter
Default region name [None]: Type us-east-1 here, and then press Enter
Default output format [None]: Type json here, and then press Enter
3. Configure Git to use the AWS CodeCommit credential helper. From the
terminal or command prompt, run the following two commands:
git config --global credential.helper '!aws --profile CodeCommitProfile
codecommit credential-helper $@'
git config --global credential.UseHttpPath true
4. Switch to a directory of your choice and clone the AWS CodeCommit
repository to your local machine by running the following command:
git clone https://git-codecommit.us-east-1.amazonaws.com/v1/repos/
MyDemoRepo my-demo-repo
That's it! If you'd like to learn more about using AWS CodeCommit, you can
start with the tutorial here (p. 35).
You can find complete setup instructions in Setting Up (p. 4).
API Version 2015-04-13
52

AWS CodeCommit User Guide
Migrate a Git Repository to AWS CodeCommit
Migrate to AWS CodeCommit
You can migrate a Git repository to an AWS CodeCommit repository in a number of ways: by cloning
it, mirroring it, migrating all or just some of the branches, and so on. You can also migrate local,
unversioned content on your computer to AWS CodeCommit.
The following topics demonstrate some of the ways you can choose to migrate a repository. Your
steps may vary, depending on the type, style, or complexity of your repository and the decisions you
make about what and how you want to migrate. For very large repositories, you might want to consider
migrating incrementally (p. 67).
Note
You can migrate to AWS CodeCommit from other version control systems, such as Perforce,
Subversion, or TFS, but you will have to migrate to Git first.
For more options, see your Git documentation.
Alternatively, you can review the information about migrating to Git in the Pro Git book by
Scott Chacon and Ben Straub.
Topics
•Migrate a Git Repository to AWS CodeCommit (p. 53)
•Migrate Content to AWS CodeCommit (p. 60)
•Migrate a Repository in Increments (p. 67)
Migrate a Git Repository to AWS CodeCommit
You can migrate an existing Git repository to an AWS CodeCommit repository. The procedures in this
topic walk you through the process of migrating a project hosted on another Git repository to AWS
CodeCommit. As part of this process, you will:
• Complete the initial setup required for AWS CodeCommit.
• Create an AWS CodeCommit repository.
• Clone the repository and push it to AWS CodeCommit.
• View files in the AWS CodeCommit repository.
• Share the AWS CodeCommit repository with your team.
API Version 2015-04-13
53
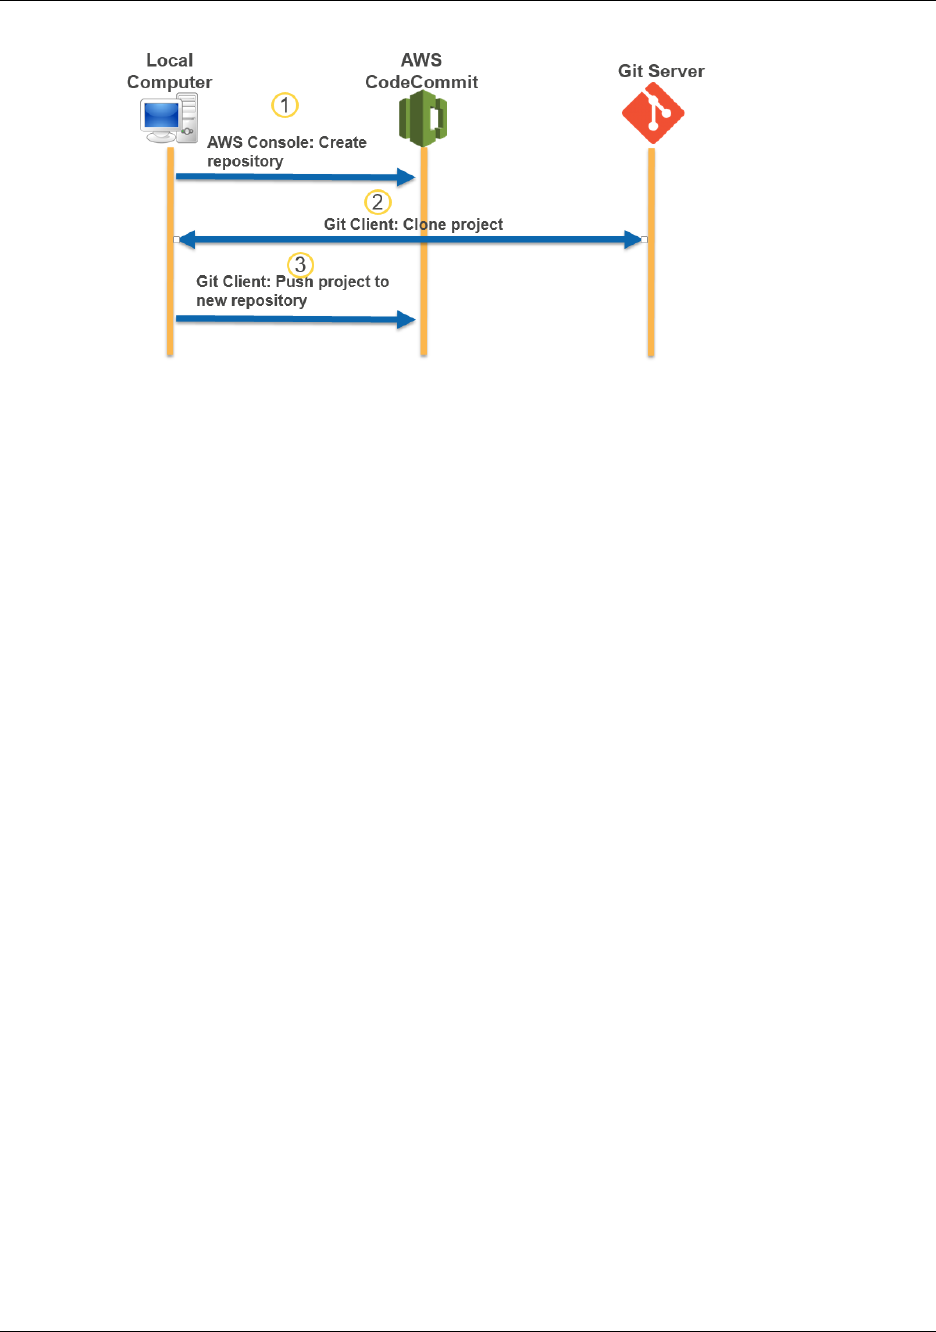
AWS CodeCommit User Guide
Step 0: Setup Required for
Access to AWS CodeCommit
Topics
•Step 0: Setup Required for Access to AWS CodeCommit (p. 54)
•Step 1: Create an AWS CodeCommit Repository (p. 56)
•Step 2: Clone the Repository and Push to the AWS CodeCommit Repository (p. 57)
•Step 3: View Files in AWS CodeCommit (p. 58)
•Step 4: Share the AWS CodeCommit Repository (p. 58)
Step 0: Setup Required for Access to AWS
CodeCommit
Before you can migrate a repository to AWS CodeCommit, you must create and configure an IAM user
for AWS CodeCommit and configure your local computer for access. You should also install the AWS
CLI to manage AWS CodeCommit. Although you can perform most AWS CodeCommit tasks without it,
the AWS CLI offers flexibility when working with Git at the command line or terminal.
If you are already set up for AWS CodeCommit, you can skip ahead to Step 1: Create an AWS
CodeCommit Repository (p. 56).
To create and configure an IAM user for accessing AWS CodeCommit
1. Create an AWS account by going to http://aws.amazon.com and choosing Sign Up.
2. Create an IAM user, or use an existing one, in your AWS account. Make sure you have an access
key ID and a secret access key associated with that IAM user. For more information, see Creating
an IAM User in Your AWS Account.
Tip
AWS CodeCommit requires AWS Key Management Service. If you are using an existing
IAM user, make sure there are no policies attached to the user that expressly deny
the AWS KMS actions required by AWS CodeCommit. For more information, see
Encryption (p. 161).
3. Sign in to the Identity and Access Management (IAM) console at https://console.aws.amazon.com/
iam/.
4. In the IAM console, in the navigation pane, choose Policies, and from the list of policies, choose
AWSCodeCommitFullAccess.
5. On the Policy Details page, choose the Attached Entities tab, and then choose Attach.
API Version 2015-04-13
54
AWS CodeCommit User Guide
Step 0: Setup Required for
Access to AWS CodeCommit
6. On the Attach Policy page, select the check box next to the IAM user you just created, and then
choose Attach Policy.
Tip
You can attach this policy to any IAM user who requires full access to all AWS
CodeCommit features or any IAM group whose users require full access. To learn more
about sharing access to repositories with other groups and users, see Share an AWS
CodeCommit Repository (p. 49).
To install and configure the AWS CLI
1. On your local machine, download and install the AWS CLI. This is a prerequisite for interacting
with AWS CodeCommit from the command line. For more information, see Getting Set Up with the
AWS Command Line Interface.
Note
AWS CodeCommit works only with AWS CLI versions 1.7.38 and later. To determine
which version of the AWS CLI you have installed, run the aws --version command.
To upgrade an older version of the AWS CLI to the latest version, follow the instructions
in Uninstalling the AWS CLI, and then follow the instructions in Installing the AWS
Command Line Interface.
2. Run this command to verify the AWS CodeCommit commands for the AWS CLI are installed:
aws codecommit help
This command should return a list of AWS CodeCommit commands.
3. Configure the AWS CLI with the configure command, as follows:
aws configure
When prompted, specify the AWS access key and AWS secret access key of the IAM user you will
use with AWS CodeCommit. Also, be sure to specify the us-east-1 region when prompted for
the default region name. AWS CodeCommit works with this region only. When prompted for the
default output format, specify json. For example:
AWS Access Key ID [None]: Type your target AWS access key ID here, and
then press Enter
AWS Secret Access Key [None]: Type your target AWS secret access key here,
and then press Enter
Default region name [None]: Type us-east-1 here, and then press Enter
Default output format [None]: Type json here, and then press Enter
For more information about IAM, access keys, and secret keys, see How Do I Get Credentials?
and Managing Access Keys for IAM Users.
Next, you must install Git.
•For Linux, OS X, or Unix:
To work with files, commits, and other information in AWS CodeCommit repositories, you must install
Git on your local machine. AWS CodeCommit supports Git versions 1.7.9 and later.
To install Git, we recommend websites such as Git Downloads.
API Version 2015-04-13
55

AWS CodeCommit User Guide
Step 1: Create an AWS CodeCommit Repository
Note
Git is an evolving, regularly updated platform. Occasionally, a feature change might affect
the way it works with AWS CodeCommit. If you encounter issues with a specific version of
Git and AWS CodeCommit, review the information in Troubleshooting (p. 132).
•For Windows:
To work with files, commits, and other information in AWS CodeCommit repositories, you must install
Git on your local machine. AWS CodeCommit supports Git versions 1.7.9 and later.
To install Git, we recommend websites such as Git for Windows. If you use this link to install Git, you
can accept all of the installation default settings except for the following:
• When prompted during the Adjusting your PATH environment step, select the Use Git from the
Windows Command Prompt option.
• On the Configuring extra options page, make sure the Enable Git Credential Manager option
is cleared. Although you can choose to install the Git Credential Manager, it is not compatible
with AWS CodeCommit. If you install it, you must manually modify your .gitconfig file to use the
credential helper for AWS CodeCommit. Otherwise, you will not be able to connect to your AWS
CodeCommit repository.
Note
Git is an evolving, regularly updated platform. Occasionally, a feature change might affect
the way it works with AWS CodeCommit. If you encounter issues with a specific version of
Git and AWS CodeCommit, review the information in Troubleshooting (p. 132).
AWS CodeCommit supports both HTTPS and SSH authentication. To complete setup, you must
configure either a credential helper (HTTPS) or an SSH key pair (SSH) to use when accessing AWS
CodeCommit.
• For HTTPS on Linux, OS X, or Unix, see Set Up the Credential Helper (Linux, OS X, or Unix) (p. 9).
• For SSH on Linux, OS X, or Unix, see SSH and Linux, OS X, or Unix: Set Up the Public and Private
Keys for Git and AWS CodeCommit (p. 16).
• For HTTPS on Windows, see Set Up the Credential Helper (Windows) (p. 13).
• Because SSH is not natively supported on most Windows operating systems, configuration is
more complex, and is therefore not recommended for this tutorial. If you would like to use SSH
on Windows, see SSH and Windows: Set Up the Public and Private Keys for Git and AWS
CodeCommit (p. 21).
Step 1: Create an AWS CodeCommit Repository
In this section, you will use the AWS CodeCommit console to create the AWS CodeCommit repository
you will use for the rest of this tutorial. To use the AWS CLI to create the repository, see Use the AWS
CLI to Create an AWS CodeCommit Repository (p. 47).
1. Open the AWS CodeCommit console at https://console.aws.amazon.com/codecommit.
2. On the Dashboard page, choose Create new repository. (If a welcome page appears instead of
the Dashboard page, choose Get Started Now.)
3. On the Create new repository page, in Repository name, type a name for the repository.
Note
This name must be unique across an AWS account.
4. Optionally, in the Description box, type a description for the repository. This can help you and
other users identify the purpose of the repository.
API Version 2015-04-13
56
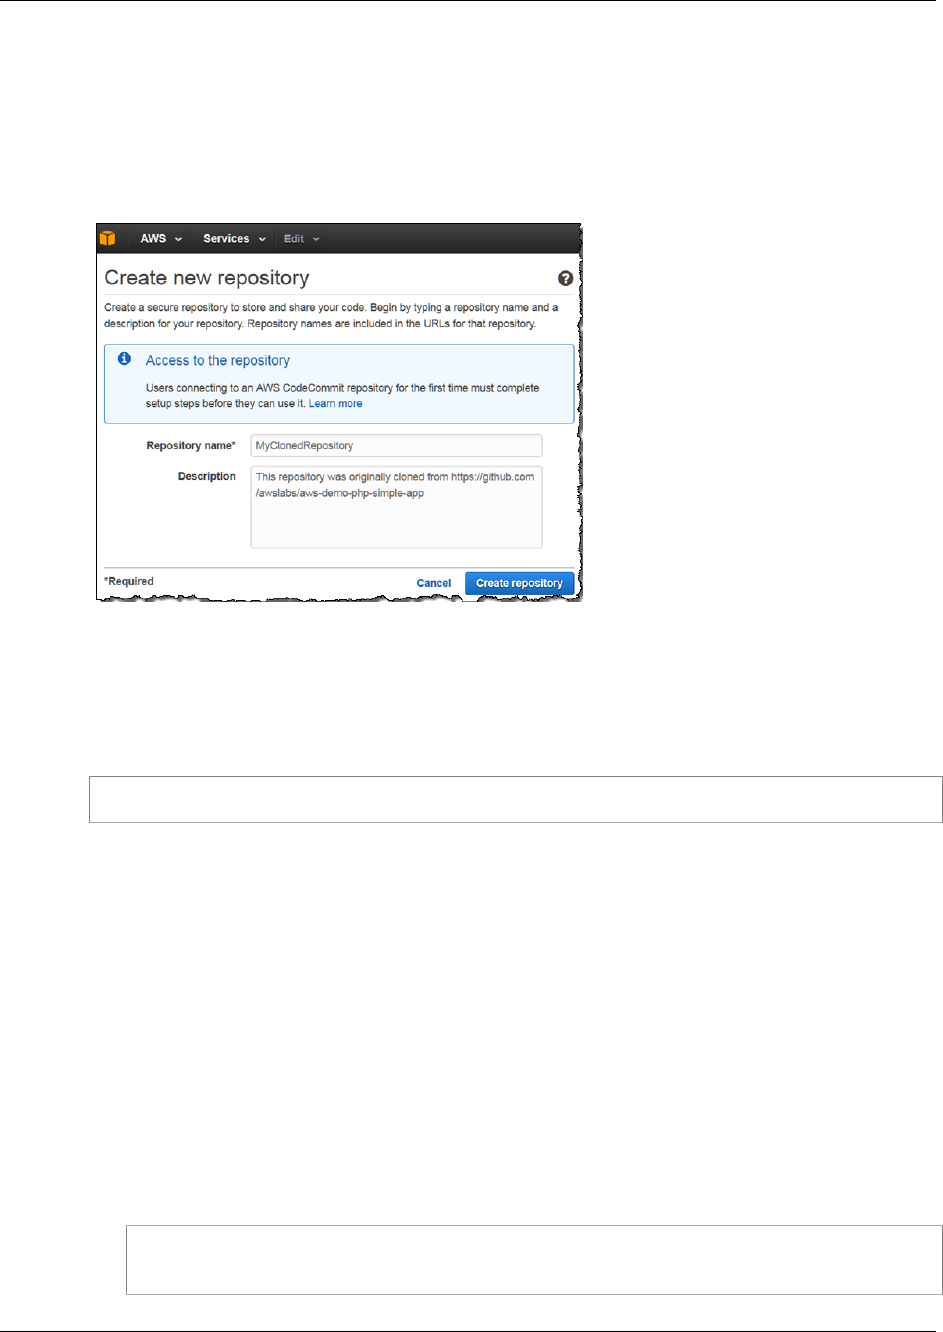
AWS CodeCommit User Guide
Step 2: Clone the Repository and Push
to the AWS CodeCommit Repository
Note
The description field for a repository accepts all HTML characters and all valid
Unicode characters. If you are an application developer using the GetRepository or
BatchGetRepositories APIs and plan to display the repository description field in a
web browser, see the AWS CodeCommit API Reference for additional guidance.
5. Choose Create repository. An empty repository will be created in AWS CodeCommit with the
name and description you specified.
After it is created, the repository will appear in the list of repositories in your dashboard. In the URL
column, choose the copy icon, and then choose the protocol (SSH or HTTPS) you will use to connect
to AWS CodeCommit. Copy the URL.
For example, if you named your repository MyClonedRepository and you are using SSH, the URL
would look like the following:
ssh://git-codecommit.us-east-1.amazonaws.com/v1/repos/MyClonedRepository
You will need this URL later in Step 2: Clone the Repository and Push to the AWS CodeCommit
Repository (p. 57).
Step 2: Clone the Repository and Push to the
AWS CodeCommit Repository
In this section, you will clone an existing Git repository to your local computer, creating what is called
a local repo. You will then push the contents of the local repo to the AWS CodeCommit repository you
created earlier.
1. From the terminal or command prompt on your local computer, run the git clone command to
clone a copy of the remote repository into a new folder named aws-codecommit-demo. The
following example clones a sample application created for AWS demonstration purposes and
hosted on GitHub (https://github.com/awslabs/aws-demo-php-simple-app.git) to a
local repo in a directory named aws-codecommit-demo.
git clone --mirror https://github.com/awslabs/aws-demo-php-simple-
app.git aws-codecommit-demo
API Version 2015-04-13
57
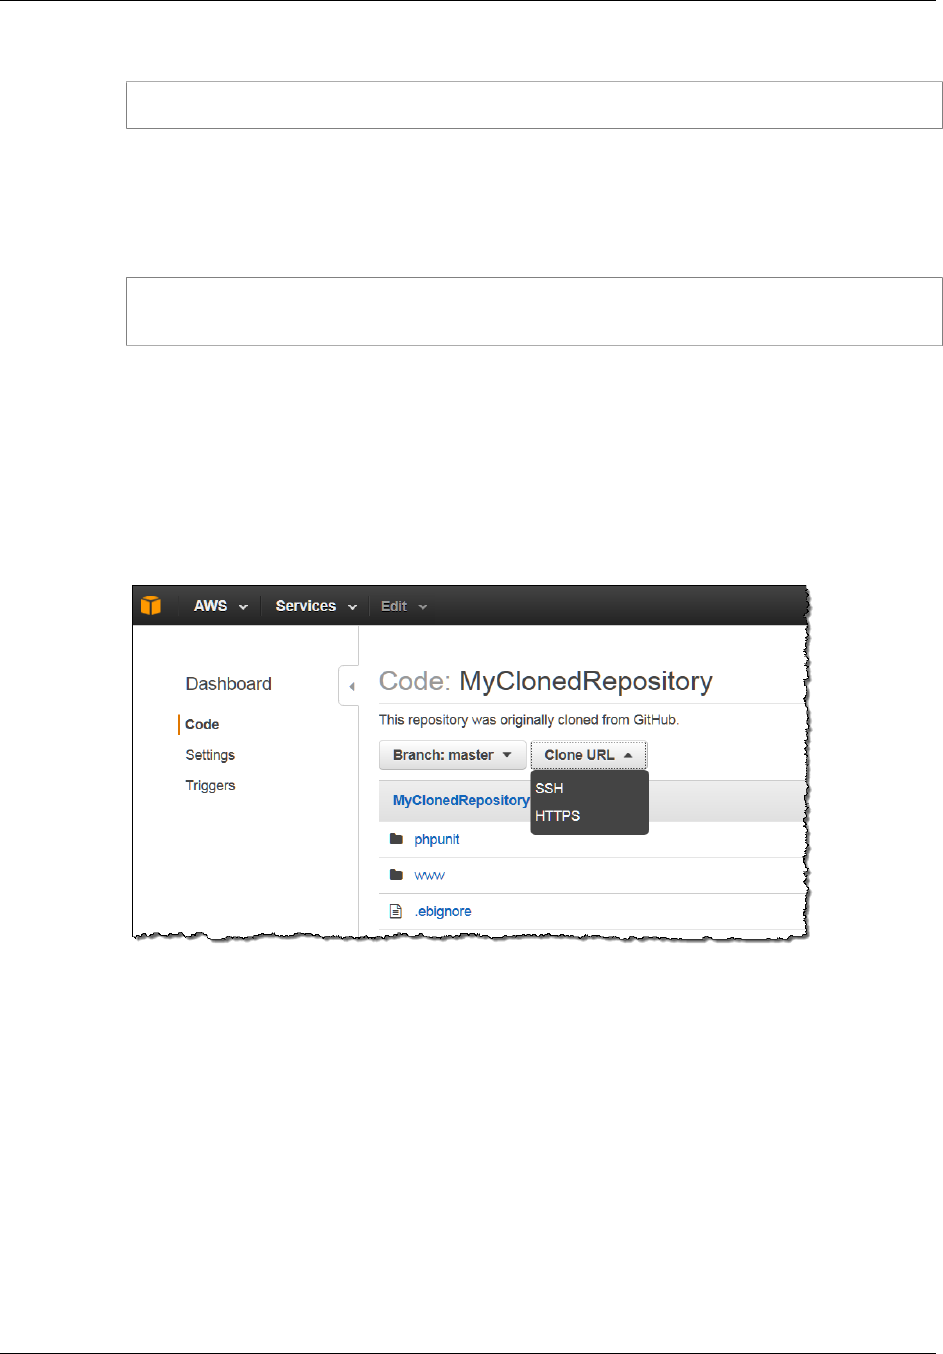
AWS CodeCommit User Guide
Step 3: View Files in AWS CodeCommit
2. Change directories to the directory where you made the clone.
cd aws-codecommit-demo
3. Run the git push command, specifying the URL and name of the destination AWS CodeCommit
repository and the --all option. (This is the URL you copied in Step 1: Create an AWS
CodeCommit Repository (p. 56)).
For example, if you named your repository MyClonedRepository and you are set up to use
SSH, you would type the following command:
git push ssh://git-codecommit.us-east-1.amazonaws.com/v1/
repos/MyClonedRepository --all
Step 3: View Files in AWS CodeCommit
After you have pushed the contents of your directory, you can use the AWS CodeCommit console to
quickly view all of the files in that repository.
1. Open the AWS CodeCommit console at https://console.aws.amazon.com/codecommit.
2. Choose the name of the repository from the list (for example, MyClonedRepository).
3. View the files in the repository for the branches, the clone URLs, the settings, and more.
Step 4: Share the AWS CodeCommit Repository
When you create a repository in AWS CodeCommit, two endpoints are generated: one for HTTPS
connections and one for SSH connections. Both provide secure connections over a network. Your
users can use either protocol. Both endpoints remain active no matter which protocol you recommend
to your users. Before you can share your repository with others, you must create IAM policies that
allow access to your repository to other users. Provide those access instructions to your users.
Create a customer managed policy for your repository
1. Sign in to the Identity and Access Management (IAM) console at https://console.aws.amazon.com/
iam/.
2. In the Dashboard navigation area, choose Policies, and then choose Create Policy.
3. On the Create Policy page, next to Copy an AWS Managed Policy, choose Select.
API Version 2015-04-13
58
AWS CodeCommit User Guide
Step 4: Share the AWS CodeCommit Repository
4. On the Copy an AWS Managed Policy page, type AWSCodeCommitPowerUser in the Search
Policies search box. Choose Select next to that policy name.
5. On the Review Policy page, in Policy Name, type a new name for the policy (for example,
AWSCodeCommitPowerUser-MyDemoRepo).
In the Policy Document text box, replace the "*" portion of the Resource line with the Amazon
Resource Name (ARN) of the AWS CodeCommit repository. For example:
"Resource": [
"arn:aws:codecommit:us-east-1:80398EXAMPLE:MyDemoRepo"
]
Tip
To find the ARN for the AWS CodeCommit repository, go to the AWS CodeCommit
console and choose the repository name from the list. For more information, see View
Repository Details (p. 107).
If you want this policy to apply to more than one repository, add each repository as a resource by
specifying its ARN. Include a comma between each resource statement, as shown in the following
example:
"Resource": [
"arn:aws:codecommit:us-east-1:80398EXAMPLE:MyDemoRepo",
"arn:aws:codecommit:us-east-1:80398EXAMPLE:MyOtherDemoRepo"
]
6. Choose Validate Policy. After it is validated, choose Create Policy.
To manage access to your repository, create an IAM group for its users, add IAM users to that group,
and then attach the customer managed policy you created in the previous step.
If you use SSH, you must attach another managed policy to the IAMUserSSHKeys group. This IAM
managed policy allows users to upload their SSH public key and associate it with the IAM user they
use to connect to AWS CodeCommit.
1. Sign in to the Identity and Access Management (IAM) console at https://console.aws.amazon.com/
iam/.
2. In the Dashboard navigation area, choose Groups, and then choose Create New Group.
3. On the Set Group Name page, in the Group Name box, type a name for the group (for example,
MyDemoRepoGroup), and then choose Next Step. Consider including the repository name as part
of the group name.
Note
This name must be unique across an AWS account.
4. On the Attach Policy page, select the check box next to the customer managed policy you
created in the previous section (for example, AWSCodeCommitPowerUser-MyDemoRepo).
If your users will use HTTPS to connect to your repository, choose Next Step.
If your users will use SSH to connect to your repository, select the check box next to
IAMUserSSHKeys, and then choose Next Step.
5. On the Review page, choose Create Group. The group will be created in IAM with the specified
policies already attached. It will appear in the list of groups associated with your AWS account.
6. Choose your group from the list.
7. On the group summary page, choose the Users tab, and then choose Add Users to Group. On
the list that shows all users associated with your AWS account, select the check boxes next to the
API Version 2015-04-13
59
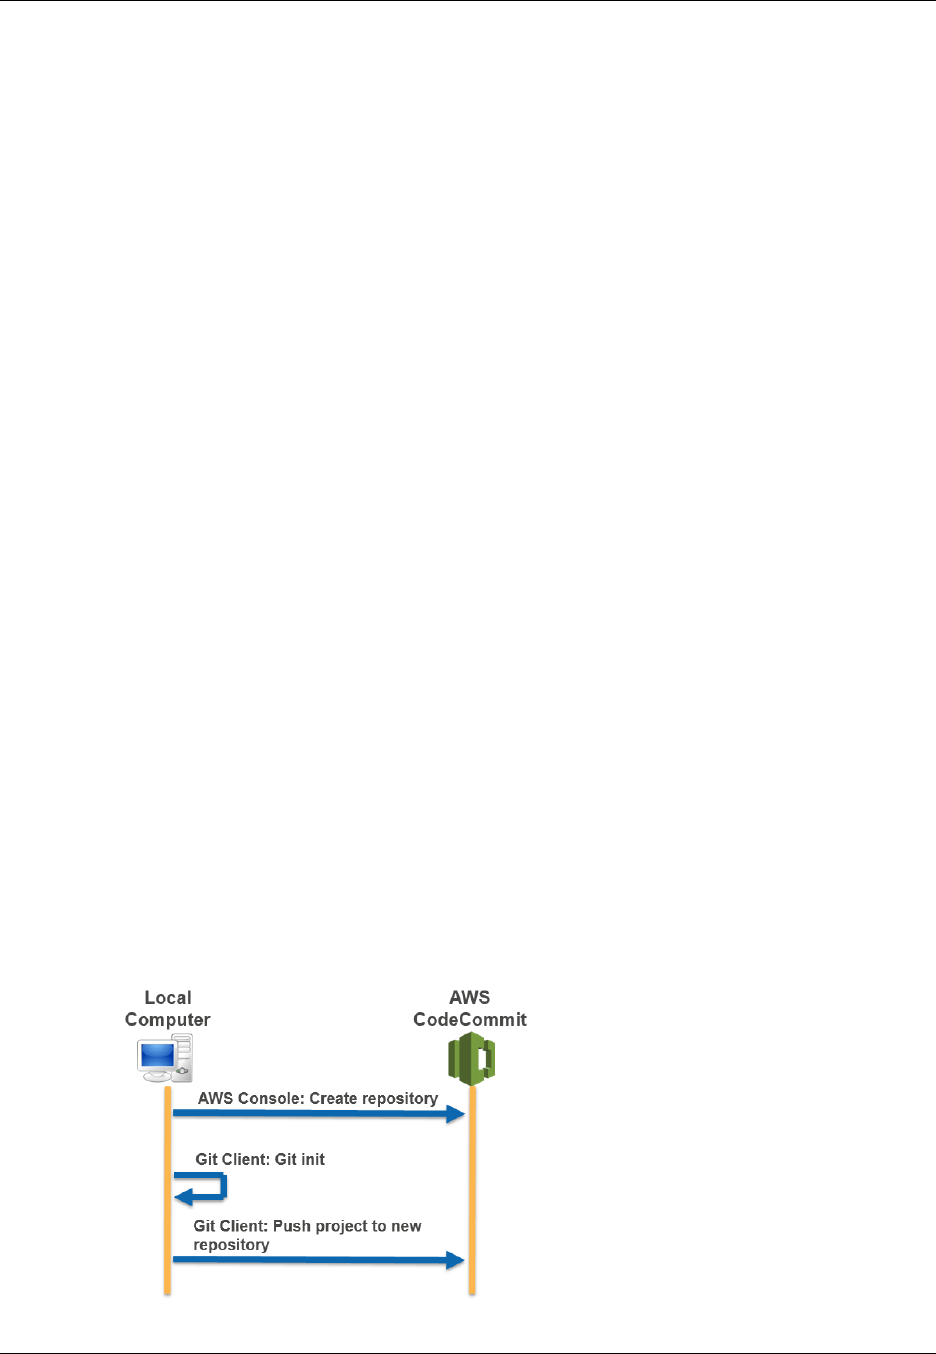
AWS CodeCommit User Guide
Migrate Content to AWS CodeCommit
users to whom you want to allow access to the AWS CodeCommit repository, and then choose
Add Users.
Tip
You can use the Search box to quickly find users by name.
8. When you have added your users, close the IAM console.
After you have created an IAM user that will access AWS CodeCommit using the policy group and
policies you configured, send that user the connection information they will use to connect to the
repository.
1. Open the AWS CodeCommit console at https://console.aws.amazon.com/codecommit.
2. On the Dashboard page, choose the name of the repository you want to share.
3. On the Code page, choose Clone URL, and then choose the protocol you want your users to use.
4. Copy the displayed URL for the connection protocol your users will use when connecting to your
AWS CodeCommit repository.
5. Send your users the connection information along with any other instructions, such as installing
the AWS CLI, configuring a profile, or installing Git. Make sure to include the configuration
information for the connection protocol (for example, for HTTPS, configuring the credential helper
for Git).
Migrate Local or Unversioned Content to AWS
CodeCommit
The procedures in this topic walk you through the process of migrating an existing project or local
content on your computer to an AWS CodeCommit repository. As part of this process, you will:
• Complete the initial setup required for AWS CodeCommit.
• Create an AWS CodeCommit repository.
• Place a local folder under Git version control and push the contents of that folder to the AWS
CodeCommit repository.
• View files in the AWS CodeCommit repository.
• Share the AWS CodeCommit repository with your team.
API Version 2015-04-13
60

AWS CodeCommit User Guide
Step 0: Setup Required for
Access to AWS CodeCommit
Topics
•Step 0: Setup Required for Access to AWS CodeCommit (p. 61)
•Step 1: Create an AWS CodeCommit Repository (p. 63)
•Step 2: Migrate Local Content to the AWS CodeCommit Repository (p. 64)
•Step 3: View Files in AWS CodeCommit (p. 65)
•Step 4: Share the AWS CodeCommit Repository (p. 65)
Step 0: Setup Required for Access to AWS
CodeCommit
Before you can migrate local content to AWS CodeCommit, you must create and configure an IAM
user for AWS CodeCommit and configure your local computer for access. You should also install the
AWS CLI to manage AWS CodeCommit. Although you can perform most AWS CodeCommit tasks
without it, the AWS CLI offers flexibility when working with Git.
If you are already set up for AWS CodeCommit, you can skip ahead to Step 1: Create an AWS
CodeCommit Repository (p. 63).
To create and configure an IAM user for accessing AWS CodeCommit
1. Create an AWS account by going to http://aws.amazon.com and choosing Sign Up.
2. Create an IAM user, or use an existing one, in your AWS account. Make sure you have an access
key ID and a secret access key associated with that IAM user. For more information, see Creating
an IAM User in Your AWS Account.
Tip
AWS CodeCommit requires AWS Key Management Service. If you are using an existing
IAM user, make sure there are no policies attached to the user that expressly deny
the AWS KMS actions required by AWS CodeCommit. For more information, see
Encryption (p. 161).
3. Sign in to the Identity and Access Management (IAM) console at https://console.aws.amazon.com/
iam/.
4. In the IAM console, in the navigation pane, choose Policies, and from the list of policies, choose
AWSCodeCommitFullAccess.
5. On the Policy Details page, choose the Attached Entities tab, and then choose Attach.
6. On the Attach Policy page, select the check box next to the IAM user you just created, and then
choose Attach Policy.
Tip
You can attach this policy to any IAM user who requires full access to all AWS
CodeCommit features or any IAM group whose users require full access. To learn more
about sharing access to repositories with other groups and users, see Share an AWS
CodeCommit Repository (p. 49).
To install and configure the AWS CLI
1. On your local machine, download and install the AWS CLI. This is a prerequisite for interacting
with AWS CodeCommit from the command line. For more information, see Getting Set Up with the
AWS Command Line Interface.
Note
AWS CodeCommit works only with AWS CLI versions 1.7.38 and later. To determine
which version of the AWS CLI you have installed, run the aws --version command.
API Version 2015-04-13
61
AWS CodeCommit User Guide
Step 0: Setup Required for
Access to AWS CodeCommit
To upgrade an older version of the AWS CLI to the latest version, follow the instructions
in Uninstalling the AWS CLI, and then follow the instructions in Installing the AWS
Command Line Interface.
2. Run this command to verify the AWS CodeCommit commands for the AWS CLI are installed:
aws codecommit help
This command should return a list of AWS CodeCommit commands.
3. Configure the AWS CLI with the configure command, as follows:
aws configure
When prompted, specify the AWS access key and AWS secret access key of the IAM user you will
use with AWS CodeCommit. Also, be sure to specify the us-east-1 region when prompted for
the default region name. AWS CodeCommit works with this region only. When prompted for the
default output format, specify json. For example:
AWS Access Key ID [None]: Type your target AWS access key ID here, and
then press Enter
AWS Secret Access Key [None]: Type your target AWS secret access key here,
and then press Enter
Default region name [None]: Type us-east-1 here, and then press Enter
Default output format [None]: Type json here, and then press Enter
For more information about IAM, access keys, and secret keys, see How Do I Get Credentials?
and Managing Access Keys for IAM Users.
Next, you must install Git.
•For Linux, OS X, or Unix:
To work with files, commits, and other information in AWS CodeCommit repositories, you must install
Git on your local machine. AWS CodeCommit supports Git versions 1.7.9 and later.
To install Git, we recommend websites such as Git Downloads.
Note
Git is an evolving, regularly updated platform. Occasionally, a feature change might affect
the way it works with AWS CodeCommit. If you encounter issues with a specific version of
Git and AWS CodeCommit, review the information in Troubleshooting (p. 132).
•For Windows:
To work with files, commits, and other information in AWS CodeCommit repositories, you must install
Git on your local machine. AWS CodeCommit supports Git versions 1.7.9 and later.
To install Git, we recommend websites such as Git for Windows. If you use this link to install Git, you
can accept all of the installation default settings except for the following:
• When prompted during the Adjusting your PATH environment step, select the Use Git from the
Windows Command Prompt option.
• On the Configuring extra options page, make sure the Enable Git Credential Manager option
is cleared. Although you can choose to install the Git Credential Manager, it is not compatible
with AWS CodeCommit. If you install it, you must manually modify your .gitconfig file to use the
credential helper for AWS CodeCommit. Otherwise, you will not be able to connect to your AWS
CodeCommit repository. API Version 2015-04-13
62

AWS CodeCommit User Guide
Step 1: Create an AWS CodeCommit Repository
Note
Git is an evolving, regularly updated platform. Occasionally, a feature change might affect
the way it works with AWS CodeCommit. If you encounter issues with a specific version of
Git and AWS CodeCommit, review the information in Troubleshooting (p. 132).
AWS CodeCommit supports both HTTPS and SSH authentication. To complete setup, you must
configure either a credential helper (HTTPS) or an SSH key pair (SSH) to use when accessing AWS
CodeCommit.
• For HTTPS on Linux, OS X, or Unix, see Set Up the Credential Helper (Linux, OS X, or Unix). (p. 9)
• For SSH on Linux, OS X, or Unix, see SSH and Linux, OS X, or Unix: Set Up the Public and Private
Keys for Git and AWS CodeCommit (p. 16).
• For HTTPS on Windows, see Set Up the Credential Helper (Windows) (p. 13).
• Because SSH is not natively supported on most Windows operating systems, configuration is
more complex, and is therefore not recommended for this tutorial. If you would like to use SSH
on Windows, see SSH and Windows: Set Up the Public and Private Keys for Git and AWS
CodeCommit (p. 21).
Step 1: Create an AWS CodeCommit Repository
In this section, you will use the AWS CodeCommit console to create the AWS CodeCommit repository
you will use for the rest of this tutorial. To use the AWS CLI to create the repository, see Use the AWS
CLI to Create an AWS CodeCommit Repository (p. 47).
1. Open the AWS CodeCommit console at https://console.aws.amazon.com/codecommit.
2. On the Dashboard page, choose Create new repository. (If a welcome page appears instead of
the Dashboard page, choose Get Started Now.)
3. On the Create new repository page, in Repository name, type a name for the repository.
Note
This name must be unique across an AWS account.
4. Optionally, in the Description box, type a description for the repository. This can help you and
other users identify the purpose of the repository.
Note
The description field for a repository accepts all HTML characters and all valid
Unicode characters. If you are an application developer using the GetRepository or
BatchGetRepositories APIs and plan to display the repository description field in a
web browser, see the AWS CodeCommit API Reference for additional guidance.
5. Choose Create repository. An empty repository will be created in AWS CodeCommit with the
name and description you specified.
API Version 2015-04-13
63
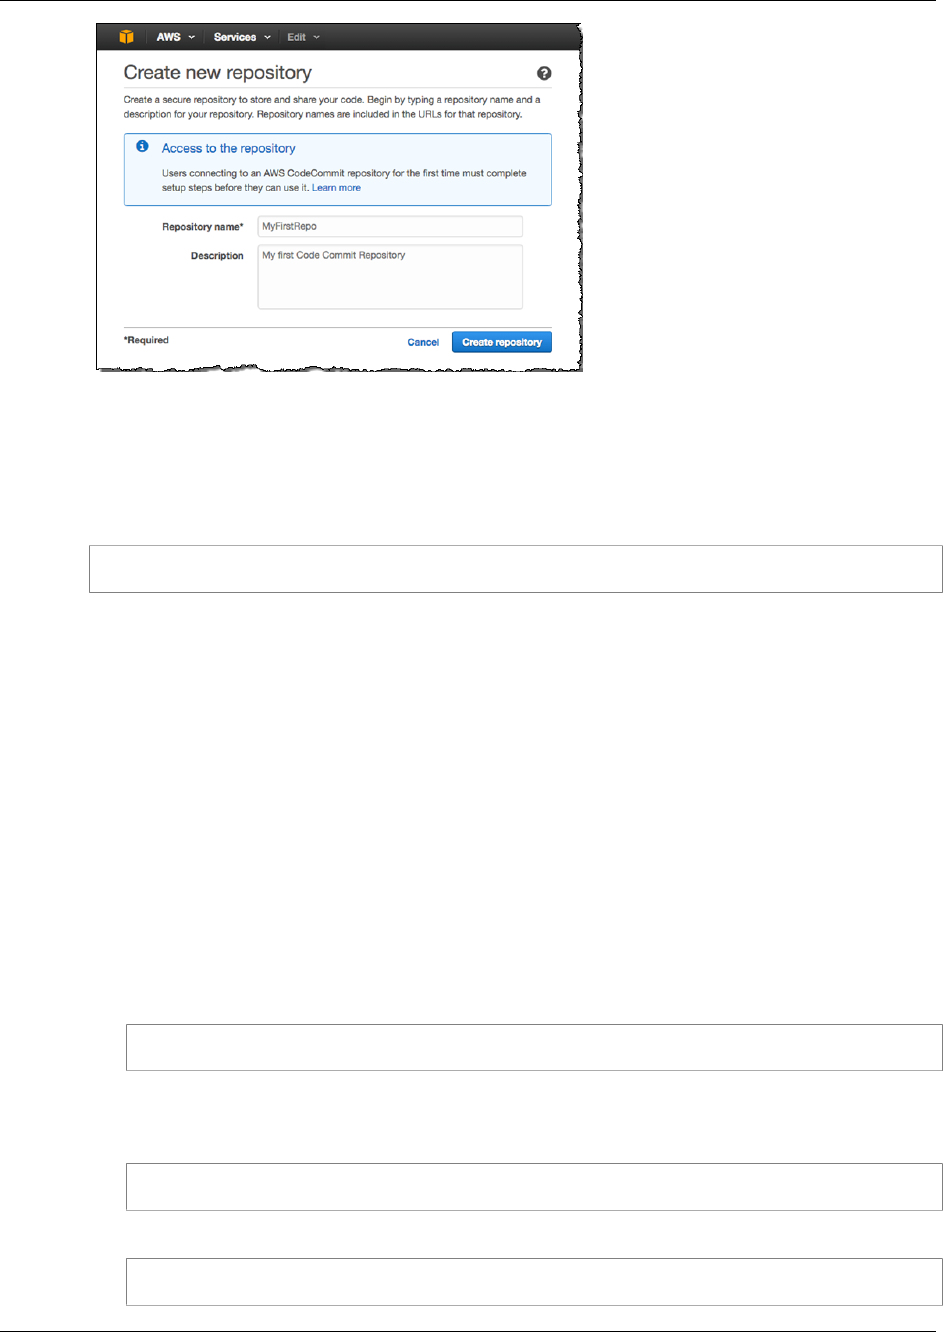
AWS CodeCommit User Guide
Step 2: Migrate Local Content to
the AWS CodeCommit Repository
After it is created, the repository will appear in the list of repositories in your dashboard. In the URL
column, choose the copy icon, and then choose the protocol (SSH or HTTPS) you will use to connect
to AWS CodeCommit. Copy the URL.
For example, if you named your repository MyFirstRepo and you are using SSH, the URL would look
like the following:
ssh://git-codecommit.us-east-1.amazonaws.com/v1/repos/MyFirstRepo
You will need this URL later in Step 2: Migrate Local Content to the AWS CodeCommit
Repository (p. 64).
Step 2: Migrate Local Content to the AWS
CodeCommit Repository
Now that you have an AWS CodeCommit repository, you can choose a directory on your local
computer to convert into a local Git repository. The git init command can be used to either convert
existing, unversioned content to a Git repository or, if you do not yet have files or content, to initialize a
new, empty repository.
1. From the terminal or command line on your local computer, change directories to the directory you
want to use as the source for your repository.
2. Run the git init command to initialize Git version control in the directory. This will create a .git
subdirectory in the root of the directory that enables version control tracking. The .git folder also
contains all of the required metadata for the repository.
git init
3. Add the files you want to add to version control. In this tutorial, you will run the git add command
with the . specifier to add all of the files in this directory. For other options, consult your Git
documentation.
git add .
4. Create a commit for the added files with a commit message.
git commit –m "Initial commit"
API Version 2015-04-13
64
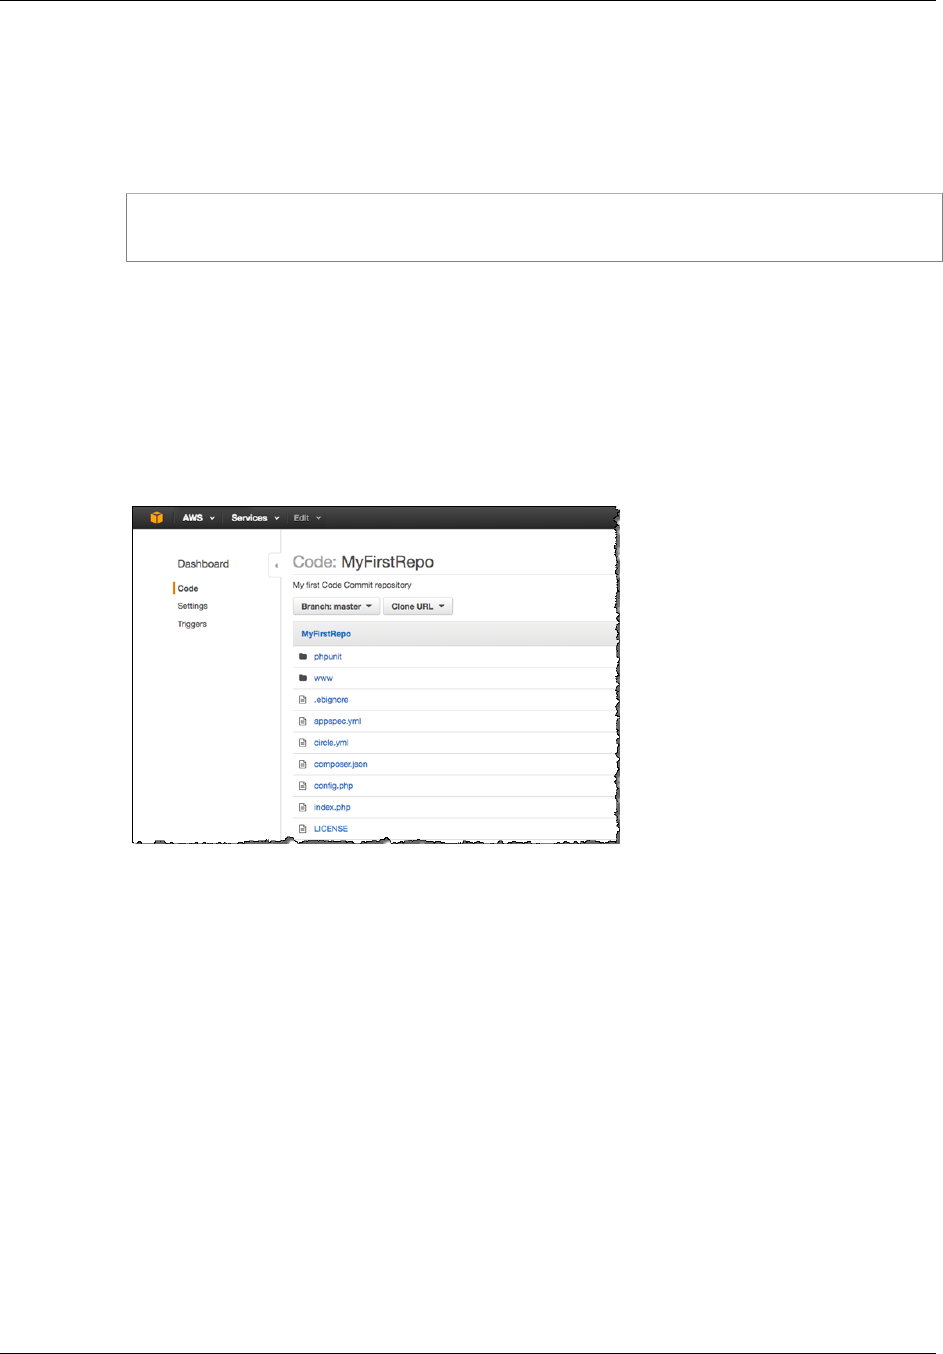
AWS CodeCommit User Guide
Step 3: View Files in AWS CodeCommit
5. Run the git push command, specifying the URL and name of the destination AWS CodeCommit
repository and the --all option. (This is the URL you copied in Step 1: Create an AWS
CodeCommit Repository (p. 63).)
For example, if you named your repository MyFirstRepo and you are set up to use SSH, you
would type the following command:
git push ssh://git-codecommit.us-east-1.amazonaws.com/v1/repos/MyFirstRepo
--all
Step 3: View Files in AWS CodeCommit
After you have pushed the contents of your directory, you can use the AWS CodeCommit console to
quickly view all of the files in the repository.
1. Open the AWS CodeCommit console at https://console.aws.amazon.com/codecommit.
2. Choose the name of the repository from the list (for example, MyFirstRepository).
3. View the files in the repository for the branches, the clone URLs, the settings, and more.
Step 4: Share the AWS CodeCommit Repository
When you create a repository in AWS CodeCommit, two endpoints are generated: one for HTTPS
connections and one for SSH connections. Both provide secure connections over a network. Your
users can use either protocol. Both endpoints remain active no matter which protocol you recommend
to your users. Before you can share your repository with others, you must create IAM policies that
allow access to your repository to other users. Provide those access instructions to your users.
Create a customer managed policy for your repository
1. Sign in to the Identity and Access Management (IAM) console at https://console.aws.amazon.com/
iam/.
2. In the Dashboard navigation area, choose Policies, and then choose Create Policy.
3. On the Create Policy page, next to Copy an AWS Managed Policy, choose Select.
4. On the Copy an AWS Managed Policy page, type AWSCodeCommitPowerUser in the Search
Policies search box. Choose Select next to that policy name.
5. On the Review Policy page, in Policy Name, type a new name for the policy (for example,
AWSCodeCommitPowerUser-MyDemoRepo).
API Version 2015-04-13
65
AWS CodeCommit User Guide
Step 4: Share the AWS CodeCommit Repository
In the Policy Document text box, replace the "*" portion of the Resource line with the Amazon
Resource Name (ARN) of the AWS CodeCommit repository. For example:
"Resource": [
"arn:aws:codecommit:us-east-1:80398EXAMPLE:MyDemoRepo"
]
Tip
To find the ARN for the AWS CodeCommit repository, go to the AWS CodeCommit
console and choose the repository name from the list. For more information, see View
Repository Details (p. 107).
If you want this policy to apply to more than one repository, add each repository as a resource by
specifying its ARN. Include a comma between each resource statement, as shown in the following
example:
"Resource": [
"arn:aws:codecommit:us-east-1:80398EXAMPLE:MyDemoRepo",
"arn:aws:codecommit:us-east-1:80398EXAMPLE:MyOtherDemoRepo"
]
6. Choose Validate Policy. After it is validated, choose Create Policy.
To manage access to your repository, create an IAM group for its users, add IAM users to that group,
and then attach the customer managed policy you created in the previous step to the group.
If you use SSH, you must attach another managed policy to the IAMUserSSHKeys group. This IAM
managed policy allows users to upload their SSH public key and associate it with the IAM user they
use to connect to AWS CodeCommit.
1. Sign in to the Identity and Access Management (IAM) console at https://console.aws.amazon.com/
iam/.
2. In the Dashboard navigation area, choose Groups, and then choose Create New Group.
3. On the Set Group Name page, in the Group Name box, type a name for the group (for example,
MyDemoRepoGroup), and then choose Next Step. Consider including the repository name as part
of the group name.
Note
This name must be unique across an AWS account.
4. On the Attach Policy page, select the check box next to the customer managed policy you
created in the previous section (for example, AWSCodeCommitPowerUser-MyDemoRepo).
If your users will use HTTPS to connect to your repository, choose Next Step.
If your users will use SSH to connect to your repository, select the check box next to
IAMUserSSHKeys, and then choose Next Step.
5. On the Review page, choose Create Group. The group will be created in IAM with the specified
policies already attached. It will appear in the list of groups associated with your AWS account.
6. Choose your group from the list.
7. On the group summary page, choose the Users tab, and then choose Add Users to Group. On
the list that shows all users associated with your AWS account, select the check boxes next to the
users to whom you want to allow access to the AWS CodeCommit repository, and then choose
Add Users.
Tip
You can use the Search box to quickly find users by name.
API Version 2015-04-13
66

AWS CodeCommit User Guide
Migrate a Repository in Increments
8. When you have added your users, close the IAM console.
After you have created an IAM user that will access AWS CodeCommit using the policy group and
policies you configured, send that user the connection information they will use to connect to the
repository.
1. Open the AWS CodeCommit console at https://console.aws.amazon.com/codecommit.
2. On the Dashboard page, choose the name of the repository you want to share.
3. On the Code page, choose Clone URL, and then choose the protocol you want your users to use.
4. Copy the displayed URL for the connection protocol your users will use when connecting to your
AWS CodeCommit repository.
5. Send your users the connection information along with any other instructions, such as installing
the AWS CLI, configuring a profile, or installing Git. Make sure to include the configuration
information for the connection protocol (for example, for HTTPS, configuring the credential helper
for Git).
Migrate a Repository Incrementally
When migrating to AWS CodeCommit, consider pushing your repository in increments or chunks to
reduce the chances an intermittent network issue or degraded network performance will cause the
entire push to fail. By using incremental pushes with a script like the following, you can restart the
migration and push only those commits that did not succeed on the earlier attempt.
The procedures in this topic show you how to create and run a script that will migrate your repository in
increments and repush only those increments that did not succeed until the migration is complete.
These instructions assume you have already completed the steps in Setting Up (p. 4) and Create a
Repository (p. 46).
Topics
•Step 0: Determine Whether to Migrate Incrementally (p. 67)
•Step 1: Install Prerequisites and Add the AWS CodeCommit Repository as a Remote (p. 68)
•Step 2: Create the Script to Use for Migrating Incrementally (p. 69)
•Step 3: Run the Script and Migrate Incrementally to AWS CodeCommit (p. 69)
•Appendix: Sample Script incremental-repo-migration.py (p. 70)
Step 0: Determine Whether to Migrate
Incrementally
There are several factors to consider to determine the overall size of your repository and whether to
migrate incrementally. The most obvious is the overall size of the artifacts in the repository. Factors
such as the accumulated history of the repository can also contribute to size. A repository with years
of history and branches can be very large, even though the individual assets are not. There are a
number of strategies you can pursue to make migrating these repositories simpler and more efficient,
such as using a shallow clone strategy when cloning a repository with a long history of development,
or turning off delta compression for large binary files. You can research options by consulting your
Git documentation, or you can choose to set up and configure incremental pushes for migrating your
repository using the sample script included in this topic, incremental-repo-migration.py.
You might want to configure incremental pushes if one or more of the following conditions is true:
API Version 2015-04-13
67
AWS CodeCommit User Guide
Step 1: Install Prerequisites and Add the
AWS CodeCommit Repository as a Remote
• The repository you want to migrate has more than five years of history.
• Your internet connection is subject to intermittent outages, dropped packets, slow response, or other
interruptions in service.
• The overall size of the repository is larger than 2 GB and you intend to migrate the entire repository.
• The repository contains large artifacts or binaries that do not compress well, such as large image
files with more than five tracked versions.
• You have previously attempted a migration to AWS CodeCommit and received an "Internal Service
Error" message.
Even if none of the above conditions are true, you can still choose to push incrementally.
Step 1: Install Prerequisites and Add the AWS
CodeCommit Repository as a Remote
You can create your own custom script, which will have its own prerequisites. If you choose to use the
sample included in this topic, you must first install its prerequisites, as well as clone the repository to
your local computer and add the AWS CodeCommit repository as a remote for the repository you want
to migrate.
Set up to run incremental-repo-migration.py
1. On your local computer, install Python 2.6 or later, if it is not already installed. For more
information and the latest versions, see the Python website.
2. On the same computer, install GitPython, which is a Python library used to interact with Git
repositories, if it is not already installed. For more information, see the GitPython documentation.
3. Use the git clone --mirror command to clone the repository you want to migrate to your local
computer. From the terminal (Linux, OS X, or Unix) or the command prompt (Windows), use the git
clone --mirror command to create a local repo for the repository, including the directory where you
want to create the local repo. For example, to clone a Git repository named MyMigrationRepo
with a URL of https://example.com/my-repo/ to a directory named my-repo:
git clone --mirror https://example.com/my-repo/MyMigrationRepo.git my-repo
You should see output similar to the following, which indicates the repository has been cloned into
a bare local repo named my-repo:
Cloning into bare repository 'my-repo'...
remote: Counting objects: 20, done.
remote: Compressing objects: 100% (17/17), done.
remote: Total 20 (delta 5), reused 15 (delta 3)
Unpacking objects: 100% (20/20), done.
Checking connectivity... done.
4. Change directories to the local repo for the repository you just cloned (for example, my-repo).
From that directory, use the git remote add DefaultRemoteName RemoteRepositoryURL
command to add the AWS CodeCommit repository as a remote repository for the local repo.
Note
When pushing large repositories, consider using SSH instead of HTTPS. When pushing
a large change, a large number of changes, or a large repository, long-running HTTPS
connections are often terminated prematurely due to networking issues or firewall
settings. For more information about setting up AWS CodeCommit for SSH, see For SSH
Connections on Linux, OS X, or Unix (p. 15) or For SSH Connections on Windows (p. 19).
API Version 2015-04-13
68
AWS CodeCommit User Guide
Step 2: Create the Script to
Use for Migrating Incrementally
For example, to add the SSH endpoint for an AWS CodeCommit repository named
MyDestinationRepo as a remote repository for the remote named codecommit, use the following
command:
git remote add codecommit ssh://git-codecommit.us-east-1.amazonaws.com/v1/
repos/MyDestinationRepo
Tip
Because this is a clone, the default remote name (origin) will already be in use. You
must use another remote name. Although the example uses codecommit, you can use
any name you want. Use the git remote show command to review the list of remotes set
for your local repo.
5. Use the git remote -v command to display the fetch and push settings for your local repo and
confirm they are set correctly. For example:
codecommit ssh://git-codecommit.us-east-1.amazonaws.com/v1/repos/
MyDestinationRepo (fetch)
codecommit ssh://git-codecommit.us-east-1.amazonaws.com/v1/repos/
MyDestinationRepo (push)
Tip
If you still see fetch and push entries for a different remote repository (for example,
entries for origin), remove them using the git remote set-url --delete command.
Step 2: Create the Script to Use for Migrating
Incrementally
These steps assume you will use the incremental-repo-migration.py sample script.
1. Open a text editor and paste the contents of the sample script (p. 70) into an empty document.
2. Save the document in a documents directory (not the working directory of your local repo) and
name it incremental-repo-migration.py. Make sure the directory you choose is one
configured in your local environment or path variables, so you can run the Python script from a
command line or terminal.
Step 3: Run the Script and Migrate Incrementally
to AWS CodeCommit
Now that you have created your incremental-repo-migration.py script, you can use it to
incrementally migrate a local repo to an AWS CodeCommit repository. By default, the script pushes
commits in batches of 1,000 commits and attempts to use the Git settings for the directory from which
it is run as the settings for the local repo and remote repository. You can use the options included in
incremental-repo-migration.py to configure other settings, if necessary.
1. From the terminal or command prompt, change directories to the local repo you want to migrate.
2. From that directory, type the following command:
python incremental-repo-migration.py
3. The script runs and shows progress at the terminal or command prompt. Some large repositories
will be slow to show progress. The script will stop if a single push fails three times. You can then
API Version 2015-04-13
69
AWS CodeCommit User Guide
Appendix: Sample Script
incremental-repo-migration.py
rerun the script, and it will start from the batch that failed. You can rerun the script until all pushes
succeed and the migration is complete.
Tip
You can run incremental-repo-migration.py from any directory as long as you use
the -l and -r options to specify the local and remote settings to use. For example, to use
the script from any directory to migrate a local repo located at /tmp/my-repo to a remote
nicknamed codecommit:
python incremental-repo-migration.py -l "/tmp/my-repo" -r "codecommit"
You might also want to use the -b option to change the default batch size used when pushing
incrementally. For example, if you are regularly pushing a repository with very large binary
files that change often and are working from a location that has restricted network bandwidth,
you might want to use the -b option to change the batch size to 500 instead of 1,000. For
example:
python incremental-repo-migration.py -b 500
This will push the local repo incrementally in batches of 500 commits. If you decide to change
the batch size again when migrating the repository (for example, if you decide to decrease the
batch size after an unsuccessful attempt), remember to use the -c option to remove the batch
tags before resetting the batch size with -b:
python incremental-repo-migration.py -c
python incremental-repo-migration.py -b 250
Important
Do not use the -c option if you want to rerun the script after a failure. The -c option removes
the tags used to batch the commits. Use the -c option only if you want to change the batch
size and start again, or if you decide you no longer want to use the script.
Appendix: Sample Script incremental-repo-migration.py
For your convenience, we have developed a sample Python script, incremental-repo-
migration.py, for pushing a repository incrementally. This script is an open source code sample and
provided as-is.
# Copyright 2015 Amazon.com, Inc. or its affiliates. All Rights Reserved.
Licensed under the Amazon Software License (the "License").
# You may not use this file except in compliance with the License. A copy of
the License is located at
# http://aws.amazon.com/asl/
# This file is distributed on an "AS IS" BASIS, WITHOUT WARRANTIES OR
CONDITIONS OF ANY KIND, express or implied. See the License for
# the specific language governing permissions and limitations under the
License.
#!/usr/bin/env python
import os
import sys
from optparse import OptionParser
from git import Repo, TagReference, RemoteProgress, GitCommandError
API Version 2015-04-13
70

AWS CodeCommit User Guide
Appendix: Sample Script
incremental-repo-migration.py
class PushProgressPrinter(RemoteProgress):
def update(self, op_code, cur_count, max_count=None, message=''):
op_id = op_code & self.OP_MASK
stage_id = op_code & self.STAGE_MASK
if op_id == self.WRITING and stage_id == self.BEGIN:
print("\tObjects: %d" % max_count)
class RepositoryMigration:
MAX_COMMITS_TOLERANCE_PERCENT = 0.05
PUSH_RETRY_LIMIT = 3
MIGRATION_TAG_PREFIX = "codecommit_migration_"
def migrate_repository_in_parts(self, repo_dir, remote_name,
commit_batch_size, clean):
self.next_tag_number = 0
self.migration_tags = []
self.walked_commits = set()
self.local_repo = Repo(repo_dir)
self.remote_name = remote_name
self.max_commits_per_push = commit_batch_size
self.max_commits_tolerance = self.max_commits_per_push *
self.MAX_COMMITS_TOLERANCE_PERCENT
try:
self.remote_repo = self.local_repo.remote(remote_name)
self.get_remote_migration_tags()
except (ValueError, GitCommandError):
print("Could not contact the remote repository. The most common
reasons for this error are that the name of the remote repository is
incorrect, or that you do not have permissions to interact with that remote
repository.")
sys.exit(1)
if clean:
self.clean_up(clean_up_remote=True)
return
self.clean_up()
print("Analyzing repository")
head_commit = self.local_repo.head.commit
sys.setrecursionlimit(max(sys.getrecursionlimit(),
head_commit.count()))
# tag commits on default branch
leftover_commits = self.migrate_commit(head_commit)
self.tag_commits([commit for (commit, commit_count) in
leftover_commits])
# tag commits on each branch
for branch in self.local_repo.heads:
leftover_commits = self.migrate_commit(branch.commit)
self.tag_commits([commit for (commit, commit_count) in
leftover_commits])
# push the tags
self.push_migration_tags()
API Version 2015-04-13
71

AWS CodeCommit User Guide
Appendix: Sample Script
incremental-repo-migration.py
# push all branch references
for branch in self.local_repo.heads:
print("Pushing branch %s" % branch.name)
self.do_push_with_retries(ref=branch.name)
# push all tags
print("Pushing tags")
self.do_push_with_retries(push_tags=True)
self.get_remote_migration_tags()
self.clean_up(clean_up_remote=True)
print("Migration to CodeCommit was successful")
def migrate_commit(self, commit):
if commit in self.walked_commits:
return []
pending_ancestor_pushes = []
commit_count = 1
if len(commit.parents) > 1:
# This is a merge commit
# Ensure that all parents are pushed first
for parent_commit in commit.parents:
pending_ancestor_pushes.extend(self.migrate_commit(parent_commit))
elif len(commit.parents) == 1:
# Split linear history into individual pushes
next_ancestor, commits_to_next_ancestor =
self.find_next_ancestor_for_push(commit.parents[0])
commit_count += commits_to_next_ancestor
pending_ancestor_pushes.extend(self.migrate_commit(next_ancestor))
self.walked_commits.add(commit)
return self.stage_push(commit, commit_count, pending_ancestor_pushes)
def find_next_ancestor_for_push(self, commit):
commit_count = 0
# Traverse linear history until we reach our commit limit, a merge
commit, or an initial commit
while len(commit.parents) == 1 and commit_count <
self.max_commits_per_push and commit not in self.walked_commits:
commit_count += 1
self.walked_commits.add(commit)
commit = commit.parents[0]
return commit, commit_count
def stage_push(self, commit, commit_count, pending_ancestor_pushes):
# Determine whether we can roll up pending ancestor pushes into this
push
combined_commit_count = commit_count + sum(ancestor_commit_count for
(ancestor, ancestor_commit_count) in pending_ancestor_pushes)
if combined_commit_count < self.max_commits_per_push:
API Version 2015-04-13
72

AWS CodeCommit User Guide
Appendix: Sample Script
incremental-repo-migration.py
# don't push anything, roll up all pending ancestor pushes into
this pending push
return [(commit, combined_commit_count)]
if combined_commit_count <= (self.max_commits_per_push +
self.max_commits_tolerance):
# roll up everything into this commit and push
self.tag_commits([commit])
return []
if commit_count >= self.max_commits_per_push:
# need to push each pending ancestor and this commit
self.tag_commits([ancestor for (ancestor, ancestor_commit_count)
in pending_ancestor_pushes])
self.tag_commits([commit])
return []
# push each pending ancestor, but roll up this commit
self.tag_commits([ancestor for (ancestor, ancestor_commit_count) in
pending_ancestor_pushes])
return [(commit, commit_count)]
def tag_commits(self, commits):
for commit in commits:
self.next_tag_number += 1
tag_name = self.MIGRATION_TAG_PREFIX + str(self.next_tag_number)
if tag_name not in self.remote_migration_tags:
tag = self.local_repo.create_tag(tag_name, ref=commit)
self.migration_tags.append(tag)
elif self.remote_migration_tags[tag_name] != str(commit):
print("Migration tags on the remote do not match the local
tags. Most likely your batch size has changed since the last time you
ran this script. Please run this script with the --clean option, and try
again.")
sys.exit(1)
def push_migration_tags(self):
print("Will attempt to push %d tags" % len(self.migration_tags))
self.migration_tags.sort(key=lambda tag:
int(tag.name.replace(self.MIGRATION_TAG_PREFIX, "")))
for tag in self.migration_tags:
print("Pushing tag %s (out of %d tags), commit %s" % (tag.name,
self.next_tag_number, str(tag.commit)))
self.do_push_with_retries(ref=tag.name)
def do_push_with_retries(self, ref=None, push_tags=False):
for i in range(0, self.PUSH_RETRY_LIMIT):
if i == 0:
progress_printer = PushProgressPrinter()
else:
progress_printer = None
try:
if push_tags:
infos = self.remote_repo.push(tags=True,
progress=progress_printer)
elif ref is not None:
API Version 2015-04-13
73

AWS CodeCommit User Guide
Appendix: Sample Script
incremental-repo-migration.py
infos = self.remote_repo.push(refspec=ref,
progress=progress_printer)
else:
infos = self.remote_repo.push(progress=progress_printer)
success = True
if len(infos) == 0:
success = False
else:
for info in infos:
if info.flags & info.UP_TO_DATE or info.flags &
info.NEW_TAG or info.flags & info.NEW_HEAD:
continue
success = False
print(info.summary)
if success:
return
except GitCommandError as err:
print(err)
if push_tags:
print("Pushing all tags failed after %d attempts" %
(self.PUSH_RETRY_LIMIT))
elif ref is not None:
print("Pushing %s failed after %d attempts" % (ref,
self.PUSH_RETRY_LIMIT))
print("For more information about the cause of this error,
run the following command from the local repo: 'git push %s %s'" %
(self.remote_name, ref))
else:
print("Pushing all branches failed after %d attempts" %
(self.PUSH_RETRY_LIMIT))
sys.exit(1)
def get_remote_migration_tags(self):
remote_tags_output = self.local_repo.git.ls_remote(self.remote_name,
tags=True).split('\n')
self.remote_migration_tags = dict((tag.split()[1].replace("refs/
tags/",""), tag.split()[0]) for tag in remote_tags_output if
self.MIGRATION_TAG_PREFIX in tag)
def clean_up(self, clean_up_remote=False):
tags = [tag for tag in self.local_repo.tags if
tag.name.startswith(self.MIGRATION_TAG_PREFIX)]
# delete the local tags
TagReference.delete(self.local_repo, *tags)
# delete the remote tags
if clean_up_remote:
tags_to_delete = [":" + tag_name for tag_name in
self.remote_migration_tags]
self.remote_repo.push(refspec=tags_to_delete)
parser = OptionParser()
parser.add_option("-l", "--local",
action="store", dest="localrepo", default=os.getcwd(),
API Version 2015-04-13
74

AWS CodeCommit User Guide
Appendix: Sample Script
incremental-repo-migration.py
help="The path to the local repo. If this option is not
specified, the script will attempt to use current directory by default. If
it is not a local git repo, the script will fail.")
parser.add_option("-r", "--remote",
action="store", dest="remoterepo", default="codecommit",
help="The name of the remote repository to be used as the
push or migration destination. The remote must already be set in the local
repo ('git remote add ...'). If this option is not specified, the script
will use 'codecommit' by default.")
parser.add_option("-b", "--batch",
action="store", dest="batchsize", default="1000",
help="Specifies the commit batch size for pushes. If not
explicitly set, the default is 1,000 commits.")
parser.add_option("-c", "--clean",
action="store_true", dest="clean", default=False,
help="Remove the temporary tags created by migration from
both the local repo and the remote repository. This option will not do any
migration work, just cleanup. Cleanup is done automatically at the end of
a successful migration, but not after a failure so that when you re-run the
script, the tags from the prior run can be used to identify commit batches
that were not pushed successfully.")
(options, args) = parser.parse_args()
migration = RepositoryMigration()
migration.migrate_repository_in_parts(options.localrepo, options.remoterepo,
int(options.batchsize), options.clean)
API Version 2015-04-13
75

AWS CodeCommit User Guide
Prerequisites for Connecting to
an AWS CodeCommit Repository
Connect to an AWS CodeCommit
Repository
When you connect to an AWS CodeCommit repository for the first time, you typically clone its
contents to your local machine. Alternatively, if you already have a local repo, you can add an AWS
CodeCommit repository as a remote. This topic provides instructions for connecting to an AWS
CodeCommit repository. If you want to migrate an existing repository to AWS CodeCommit, see
Migrate to AWS CodeCommit (p. 53).
Note
Depending on your usage, you might be charged for creating or accessing a repository. For
more information, see Pricing on the AWS CodeCommit product information page.
Topics
•Prerequisites for Connecting to an AWS CodeCommit Repository (p. 76)
•Connect to the AWS CodeCommit Repository by Cloning the Repository (p. 77)
•Connect a Local Repo to the AWS CodeCommit Repository (p. 78)
Prerequisites for Connecting to an AWS
CodeCommit Repository
Before you can connect to an AWS CodeCommit repository:
• You must have configured your local computer with the software and settings required to connect to
AWS CodeCommit. For more information, see Setting Up (p. 4).
• You must have the name of the AWS CodeCommit repository to which you want to connect.
If you have not yet created an AWS CodeCommit repository, follow the instructions in Create a
Repository (p. 46), note the name of the new AWS CodeCommit repository, and return to this page.
If you have an AWS CodeCommit repository but you do not know its name, follow the instructions in
View Repository Details (p. 107).
• You must have a location on your local machine to store a local copy of the AWS CodeCommit
repository to which you will be connecting. (This local copy of the AWS CodeCommit repository is
API Version 2015-04-13
76
AWS CodeCommit User Guide
Connect to the AWS CodeCommit
Repository by Cloning the Repository
known as a local repo.) You then switch to and run Git commands from that location. For example,
you could use /tmp (for Linux, OS X, or Unix) or c:\temp (for Windows).
Note
You can use any directory you want. If you use a different directory than /tmp or c:\temp,
be sure to substitute it for ours when you follow these instructions.
Connect to the AWS CodeCommit Repository
by Cloning the Repository
If you do not already have a local repo, follow the steps in this procedure to clone the AWS
CodeCommit repository to your local machine.
1. Complete the prerequisites, including Setting Up (p. 4).
Important
If you have not completed setup, you will not be able to connect to or clone the repository.
2. From the /tmp directory or the c:\temp directory, use Git to run the clone command, as shown
in the following example:
For HTTPS:
git clone https://git-codecommit.us-east-1.amazonaws.com/v1/repos/
MyDemoRepo my-demo-repo
For SSH:
git clone ssh://git-codecommit.us-east-1.amazonaws.com/v1/repos/MyDemoRepo
my-demo-repo
In this example, MyDemoRepo represents the name of your AWS CodeCommit repository; my-
demo-repo represents the name of the directory Git will create in the /tmp directory or the c:
\temp directory.
Note
When you use SSH on Windows operating systems to clone a repository, you must add
the SSH key ID to the connection string as follows:
git clone ssh://Your-SSH-Key-ID@git-codecommit.us-
east-1.amazonaws.com/v1/repos/MyDemoRepo my-demo-repo
For more information, see For SSH Connections on Windows (p. 19).
After Git creates the directory, it will pull down a copy of your AWS CodeCommit repository into
the newly created directory.
If the AWS CodeCommit repository is new or otherwise empty, you will see a message that you
are cloning an empty repository. This is expected.
Note
If you receive an error that Git can't find the AWS CodeCommit repository or that you
don't have permission to connect to the AWS CodeCommit repository, make sure you
completed the prerequisites (p. 4), including assigning permissions to the IAM user and
setting up your IAM user credentials for Git and AWS CodeCommit on the local machine.
Also, make sure you specified the correct repository name.
API Version 2015-04-13
77

AWS CodeCommit User Guide
Connect a Local Repo to the
AWS CodeCommit Repository
After you successfully connect your local repo to your AWS CodeCommit repository, you are now
ready to start running Git commands from the local repo to create commits, branches, and tags and
push to and pull from the AWS CodeCommit repository.
Connect a Local Repo to the AWS
CodeCommit Repository
Complete the following steps if you already have a local repo and want to add an AWS CodeCommit
repository as the remote repository. If you already have a remote repository and want to push your
commits to AWS CodeCommit as well as that other remote repository, follow the steps in Push
Commits to Two Repositories (p. 128) instead.
1. Complete the prerequisites (p. 76).
2. From the command prompt or terminal, switch to your local repo directory and run the git remote
add command to add the AWS CodeCommit repository as a remote repository for your local repo.
For example, the following command adds the remote nicknamed origin to https://git-
codecommit.us-east-1.amazonaws.com/v1/repos/MyDemoRepo:
For HTTPS:
git remote add origin https://git-codecommit.us-east-1.amazonaws.com/v1/
repos/MyDemoRepo
For SSH:
git remote add origin ssh://git-codecommit.us-east-1.amazonaws.com/v1/
repos/MyDemoRepo
This command returns nothing.
3. To verify you have added the AWS CodeCommit repository as a remote for your local repo, run
the git remote -v command , which should create output similar to the following:
For HTTPS:
origin https://git-codecommit.us-east-1.amazonaws.com/v1/repos/MyDemoRepo
(fetch)
origin https://git-codecommit.us-east-1.amazonaws.com/v1/repos/MyDemoRepo
(push)
For SSH:
origin ssh://git-codecommit.us-east-1.amazonaws.com/v1/repos/MyDemoRepo
(fetch)
origin ssh://git-codecommit.us-east-1.amazonaws.com/v1/repos/MyDemoRepo
(push)
After you successfully connect your local repo to your AWS CodeCommit repository, you are ready to
start running Git commands from the local repo to create commits, branches, and tags, and to push to
and pull from the AWS CodeCommit repository.
API Version 2015-04-13
78

AWS CodeCommit User Guide
Browse the Contents of an
AWS CodeCommit Repository
Browse the Contents of an AWS
CodeCommit Repository
After you connect to an AWS CodeCommit repository, you can clone it to a local repo or use the AWS
CodeCommit console to browse its contents. This topic provides instructions for browsing the content
of an AWS CodeCommit repository by using the console.
Note
For active AWS CodeCommit users, there is no charge for browsing code from the AWS
CodeCommit console. For information about when additional charges may apply, see Pricing.
Browse the Contents of an AWS CodeCommit
Repository
You can use the AWS CodeCommit console to review the files contained in a repository or to quickly
read the contents of a file. This can help you determine which branch to check out or whether you want
to create a local copy of a repository.
To browse the content of a repository
1. Open the AWS CodeCommit console at https://console.aws.amazon.com/codecommit.
2. On the Dashboard page, from the list of repositories, choose the repository you want to browse.
3. In the Code view, browse the contents of the default branch for your repo.
To change the view to a different branch or tag, choose the view selector button. Either choose a
branch or tag name from the drop-down list, or in the filter box, type the name of the branch or tag,
and then choose it from the list.
4. Do one of the following:
• To view the contents of a directory, choose it from the list. You can choose any of the directories
in the navigation list to return to that directory view. You can also use the up arrow at the top of
the directory list.
• To view the contents of a file, choose it from the list. If the file is larger than the commit object
limit, it cannot be displayed in the console, and instead must be viewed in a local repo. For more
information, see Limits (p. 163). To exit the file view, from the code navigation bar, choose the
directory you want to view.
API Version 2015-04-13
79

AWS CodeCommit User Guide
Browse the Contents of an
AWS CodeCommit Repository
Note
If you choose a binary file, a warning message will appear asking you to confirm you want
to display the contents. To view the file, choose Show file contents. If you do not want to
view the file, from the code navigation bar, choose the directory you want to view.
If you choose a markdown file (.md), use the Rendered Markdown and Markdown
Source buttons to toggle between the rendered and syntax views.
API Version 2015-04-13
80

AWS CodeCommit User Guide
Create the Resource and Add
Permissions for AWS CodeCommit
Manage Triggers for an AWS
CodeCommit Repository
You can configure an AWS CodeCommit repository so that code pushes or other events trigger
actions, such as sending a notification from Amazon Simple Notification Service (Amazon SNS) or
invoking a function in AWS Lambda. You can create up to ten triggers for each AWS CodeCommit
repository.
Triggers are commonly configured to:
• Send emails to subscribed users every time someone pushes to the repository.
• Notify an external build system to start a build after someone pushes to the main branch of the
repository.
Scenarios like notifying an external build system require writing a Lambda function to interact with other
applications. The email scenario simply requires creating an Amazon SNS topic.
In this topic, you will learn how to set permissions that allow AWS CodeCommit to trigger actions
in Amazon SNS and Lambda. You will also find links to examples for creating, editing, testing, and
deleting triggers.
Topics
•Create the Resource and Add Permissions for AWS CodeCommit (p. 81)
•Example: Create an AWS CodeCommit Trigger for an Amazon SNS Topic (p. 82)
•Example: Create an AWS CodeCommit Trigger for an AWS Lambda Function (p. 88)
•Edit Triggers for an AWS CodeCommit Repository (p. 95)
•Test Triggers for an AWS CodeCommit Repository (p. 97)
•Delete Triggers from an AWS CodeCommit Repository (p. 98)
Create the Resource and Add Permissions for
AWS CodeCommit
You can integrate Amazon SNS topics and Lambda functions with triggers in AWS CodeCommit, but
you must first create and then configure resources with a policy that allows AWS CodeCommit the
API Version 2015-04-13
81

AWS CodeCommit User Guide
Create a Trigger for an Amazon SNS Topic
permissions to interact with those resources. You must create the resource in the same region as the
AWS CodeCommit repository. For example, if the repository is in US East (N. Virginia) (us-east-1), the
Amazon SNS topic or Lambda function must be in US East (N. Virginia).
• For Amazon SNS topics, you do not need to configure additional IAM policies or permissions if the
Amazon SNS topic is created using the same account as the AWS CodeCommit repository. You can
create the AWS CodeCommit trigger as soon as you have created and subscribed to the Amazon
SNS topic.
• For more information about creating topics in Amazon SNS, see the Amazon SNS documentation.
• For information about using Amazon SNS to send messages to Amazon SQS queues, see
Sending Messages to Amazon SQS Queues.
• For information about using Amazon SNS to invoke a Lambda function, see Invoking Lambda
Functions.
• If you want to configure your trigger to use an Amazon SNS topic in another AWS account, you
must first configure that topic with a policy that allows AWS CodeCommit to publish to that topic.
For more information, see Create a Policy That Enables Cross-Account Access to an Amazon SNS
Topic (p. 150).
• Triggers that invoke Lambda functions require more consideration. If you want your trigger to run a
Lambda function directly (instead of using an Amazon SNS topic to invoke the Lambda function), you
must include a policy to allow AWS CodeCommit to invoke the function. For more information, see
Create a Policy for AWS Lambda Integration (p. 151).
Example: Create an AWS CodeCommit Trigger
for an Amazon SNS Topic
You can create a trigger for an AWS CodeCommit repository so that events in that repository trigger
notifications from an Amazon Simple Notification Service (Amazon SNS) topic. You might want to
create a trigger to an Amazon SNS topic to enable users to subscribe to notifications about repository
events, such as the deletion of branches. You can also take advantage of the integration of Amazon
SNS topics with other services, such as Amazon Simple Queue Service (Amazon SQS) and AWS
Lambda.
Note
You must point the trigger to an existing Amazon SNS topic that will be the action taken
in response to repository events. For more information about creating and subscribing to
Amazon SNS topics, see Getting Started with Amazon Simple Notification Service.
Topics
•Create a Trigger to an Amazon SNS Topic for an AWS CodeCommit Repository
(Console) (p. 82)
•Create a Trigger to an Amazon SNS Topic for an AWS CodeCommit Repository (AWS
CLI) (p. 84)
Create a Trigger to an Amazon SNS Topic for an
AWS CodeCommit Repository (Console)
1. Open the AWS CodeCommit console at https://console.aws.amazon.com/codecommit.
2. From the list of repositories, choose the repository where you want to create triggers for repository
events.
API Version 2015-04-13
82

AWS CodeCommit User Guide
Create a Trigger to an Amazon SNS Topic for
an AWS CodeCommit Repository (Console)
3. In the Dashboard navigation pane for the repository, choose Triggers.
4. On the triggers page for the repository, choose Create trigger.
5. In the Create trigger pane, do the following:
• In Trigger name, type a name for the trigger, such as MyFirstTrigger.
• In Events, select the repository events that will trigger the Amazon SNS topic to send
notifications.
If you choose All repository events, you cannot choose any other events. To choose a subset
of events, remove All repository events, and then choose one or more events from the list.
For example, if you want the trigger to run only when a user creates a branch or tag in the AWS
CodeCommit repository, remove All repository events, and then choose Create branch or
tag.
• If you want the trigger to apply to all branches of the repository, in Branches, choose All
branches. Otherwise, choose Specific branches. The default branch for the repository will
be added by default. You can keep or delete this branch from the list. Choose up to ten branch
names from the list of repository branches.
• In Send to, choose Amazon SNS.
• In Amazon SNS Topic, choose a topic name from the list, or choose Add an Amazon SNS
topic ARN and then type the ARN for the function.
• In Custom data, optionally provide any information you want included in the notification sent
by the Amazon SNS topic (for example, an IRC channel name developers use when discussing
development in this repository). This field is a string. It cannot be used to pass any dynamic
parameters.
API Version 2015-04-13
83

AWS CodeCommit User Guide
Create a Trigger to an Amazon SNS Topic for
an AWS CodeCommit Repository (AWS CLI)
6. Optionally, choose Test trigger. This step will help you confirm have correctly configured access
between AWS CodeCommit and the Amazon SNS topic. It will use the Amazon SNS topic to send
a test notification using data from your repository, if available. If no real data is available, the test
notification will contain sample data.
7. Choose Create to finish creating the trigger.
Create a Trigger to an Amazon SNS Topic for an
AWS CodeCommit Repository (AWS CLI)
You can also use the command line to create a trigger for an Amazon SNS topic in response to AWS
CodeCommit repository events, such as when someone pushes a commit to your repository.
To create a trigger for an Amazon SNS topic
1. Open a plain-text editor and create a JSON file that specifies:
• The Amazon SNS topic name.
API Version 2015-04-13
84

AWS CodeCommit User Guide
Create a Trigger to an Amazon SNS Topic for
an AWS CodeCommit Repository (AWS CLI)
• The repository and branches you want to monitor with this trigger. (If you do not specify any
branches, the trigger will apply to all branches in the repository.)
• The events that will activate this trigger.
Save the file.
For example, to create a trigger for a repository named MyDemoRepo that will publish all repository
events to an Amazon SNS topic named MySNSTopic for two branches, master and preprod:
{
"repositoryName": "MyDemoRepo",
"triggers": [
{
"name": "MyFirstTrigger",
"destinationArn": "arn:aws:sns:us-
east-1:80398EXAMPLE:MySNSTopic",
"customData": "",
"branches": [
"master", "preprod"
],
"events": [
"all"
]
}
]
}
There must be a trigger block in the JSON for each trigger for a repository. To create more than
one trigger for the repository, include more than one trigger block in the JSON. Remember that
all triggers created in this file are for the specified repository. You cannot create triggers for
multiple repositories in a single JSON file. For example, if you wanted to create two triggers for
a repository, you could create a JSON file with two trigger blocks. In the following example, no
branches are specified for the second trigger, so that trigger will apply to all branches:
{
"repositoryName": "MyDemoRepo",
"triggers": [
{
"name": "MyFirstTrigger",
"destinationArn": "arn:aws:sns:us-
east-1:80398EXAMPLE:MySNSTopic",
"customData": "",
"branches": [
"master", "preprod"
],
"events": [
"all"
]
},
{
"name": "MySecondTrigger",
"destinationArn": "arn:aws:sns:us-
east-1:80398EXAMPLE:MySNSTopic2",
"customData": "",
"branches": [],
"events": [
API Version 2015-04-13
85
AWS CodeCommit User Guide
Create a Trigger to an Amazon SNS Topic for
an AWS CodeCommit Repository (AWS CLI)
"updateReference", "deleteReference"
]
}
]
}
You can create triggers for events you specify, such as when a commit is pushed to a repository.
Event types include:
•all for all events in the specified repository and branches.
•updateReference for when commits are pushed to the specified repository and branches.
•createReference for when a new branch or tag is created in the specified repository.
•deleteReference for when a branch or tag is deleted in the specified repository.
Note
You can use more than one event type in a trigger. However, if you specify all, you
cannot specify other events.
To see the full list of valid event types, at the terminal or command prompt, type aws codecommit
put-repository-triggers help.
In addition, you can include a string in customData (for example, an IRC channel name
developers use when discussing development in this repository). This field is a string. It cannot be
used to pass any dynamic parameters. This string will be appended as an attribute to the AWS
CodeCommit JSON returned in response to the trigger.
2. At a terminal or command prompt, optionally run the test-repository-triggers command. This test
uses sample data from the repository (or generates sample data if no data is available) to send a
notification to the subscribers of the Amazon SNS topic. For example, the following is used to test
that the JSON in the trigger file named trigger.json is valid and that AWS CodeCommit can
publish to the Amazon SNS topic:
aws codecommit test-repository-triggers --cli-input-json
file://trigger.json
If successful, this command returns information similar to the following:
{
"successfulExecutions": [
"MyFirstTrigger"
],
"failedExecutions": []
}
3. At a terminal or command prompt, run the put-repository-triggers command to create the trigger
in AWS CodeCommit. For example, to use a JSON file named trigger.json to create the
trigger:
aws codecommit put-repository-triggers --cli-input-json
file://trigger.json
This command returns a configuration ID, similar to the following:
{
"configurationId": "0123456-I-AM-AN-EXAMPLE"
API Version 2015-04-13
86

AWS CodeCommit User Guide
Create a Trigger to an Amazon SNS Topic for
an AWS CodeCommit Repository (AWS CLI)
}
4. To view the configuration of the trigger, run the get-repository-triggers command, specifying the
name of the repository:
aws codecommit get-repository-triggers --repository-name MyDemoRepo
This command returns the structure of all triggers configured for the repository, similar to the
following:
{
"configurationId": "0123456-I-AM-AN-EXAMPLE",
"triggers": [
{
"events": [
"all"
],
"destinationArn": "arn:aws:sns:us-
east-1:80398EXAMPLE:MySNSTopic",
"branches": [
"master",
"preprod"
],
"name": "MyFirstTrigger",
"customData": "Project ID 12345"
}
]
}
5. To test the functionality of the trigger itself, make and push a commit to the repository where you
configured the trigger. You should see a response from the Amazon SNS topic. For example, if
you configured the Amazon SNS topic to send an email, you should see an email from Amazon
SNS in the email account subscribed to the topic.
The following is example output from an email sent from Amazon SNS in response to a push to an
AWS CodeCommit repository:
{
"Records":[
{
"awsRegion":"us-east-1",
"codecommit":{
"references" : [
{
"commit":"317f8570EXAMPLE",
"created":true,
"ref":"refs/heads/NewBranch"
},
{
"commit":"4c925148EXAMPLE",
"ref":"refs/heads/preprod",
}
]
},
"eventId":"11111-EXAMPLE-ID",
"eventName":"ReferenceChange",
"eventPartNumber":1,
"eventSource":"aws:codecommit",
API Version 2015-04-13
87

AWS CodeCommit User Guide
Create a Trigger for a Lambda Function
"eventSourceARN":"arn:aws:codecommit:us-
east-1:80398EXAMPLE:MyDemoRepo",
"eventTime":"2016-02-09T00:08:11.743+0000",
"eventTotalParts":1,
"eventTriggerConfigId":"0123456-I-AM-AN-EXAMPLE",
"eventTriggerName":"MyFirstTrigger",
"eventVersion":"1.0",
"customData":"Project ID 12345",
"userIdentityARN":"arn:aws:iam::80398EXAMPLE:user/JaneDoe-
CodeCommit",
}
]
}
Example: Create an AWS CodeCommit Trigger
for an AWS Lambda Function
You can create a trigger for an AWS CodeCommit repository so that events in the repository will invoke
a Lambda function. In this example, you will create a Lambda function that returns the URL used to
clone the repository to an Amazon CloudWatch log.
Topics
•Create the Lambda Function (p. 88)
•Create a Trigger for the Lambda Function in an AWS CodeCommit Repository (Console) (p. 91)
•Create a Trigger to a Lambda Function for an AWS CodeCommit Repository (AWS CLI) (p. 92)
Create the Lambda Function
Before you create the trigger in AWS CodeCommit, create the function you want to run in Lambda.
The following steps include a sample Lambda function. The sample is available in two languages:
JavaScript and Python. The function returns the URLs used for cloning a repository to a CloudWatch
log.
To create a Lambda function using a Lambda blueprint
1. Sign in to the AWS Management Console and open the AWS Lambda console at https://
console.aws.amazon.com/lambda/.
2. On the Lambda Functions page, choose Create a Lambda function. (If you have not used
Lambda before, choose Get Started Now.)
3. On the Select blueprint page, choose Skip.
4. On the Configure function page, in Name, type a name for the function (for example,
MyCodeCommitFunction). Optionally, in Description, type a description for the function. If you
want to create a sample JavaScript function, in Runtime, choose Node.js. If you want to create a
sample Python function, choose Python 2.7.
5. In Lambda function code, choose Edit code inline, and then replace the hello world code with
one of the two following samples.
For Node.js:
var aws = require('aws-sdk');
API Version 2015-04-13
88

AWS CodeCommit User Guide
Create the Lambda Function
var codecommit = new aws.CodeCommit({ apiVersion: '2015-04-13' });
exports.handler = function(event, context) {
//Log the updated references from the event
var references =
event.Records[0].codecommit.references.map(function(reference) {return
reference.ref;});
console.log('References:', references);
//Get the repository from the event and show its git clone URL
var repository = event.Records[0].eventSourceARN.split(":")[5];
var params = {
repositoryName: repository
};
codecommit.getRepository(params, function(err, data) {
if (err) {
console.log(err);
var message = "Error getting repository metadata for
repository " + repository;
console.log(message);
context.fail(message);
} else {
console.log('Clone URL:',
data.repositoryMetadata.cloneUrlHttp);
context.succeed(data.repositoryMetadata.cloneUrlHttp);
}
});
};
For Python:
import json
import boto3
codecommit = boto3.client('codecommit')
def lambda_handler(event, context):
#Log the updated references from the event
references = { reference['ref'] for reference in event['Records'][0]
['codecommit']['references'] }
print("References: " + str(references))
#Get the repository from the event and show its git clone URL
repository = event['Records'][0]['eventSourceARN'].split(':')[5]
try:
response = codecommit.get_repository(repositoryName=repository)
print("Clone URL: " +response['repositoryMetadata']
['cloneUrlHttp'])
return response['repositoryMetadata']['cloneUrlHttp']
except Exception as e:
print(e)
print('Error getting repository {}. Make sure it
exists and that your repository is in the same region as this
function.'.format(repository))
raise e
6. In Lambda function handler and role, do the following:
API Version 2015-04-13
89
AWS CodeCommit User Guide
Create the Lambda Function
• In Handler, leave the default value as derived from the function (index.handler for the
Node.js sample or lambda_function.lambda_handler for the Python sample).
• In Role, choose *Basic execution role from the list. In the IAM console, choose Allow to create
the role, and then return to the Lambda console. A value of lambda_basic_execution should
now be displayed for Role.
Note
If you choose a different role or a different name for the role, be sure to use it in the
steps in this topic.
7. Choose Next.
8. On the Review page, review the settings for the function, and then choose Create function.
To allow AWS CodeCommit to run the function
1. Open a plain-text editor and create a JSON file that specifies the Lambda function name, the
details of the AWS CodeCommit repository, and the actions you want to allow in Lambda, similar
to the following:
{
"FunctionName": "MyCodeCommitFunction",
"StatementId": "1",
"Action": "lambda:InvokeFunction",
"Principal": "codecommit.amazonaws.com",
"SourceArn": "arn:aws:codecommit:us-east-1:80398EXAMPLE:MyDemoRepo",
"SourceAccount": "80398EXAMPLE"
}
2. Save the file as a JSON file with a name that is easy for you to remember (for example,
AllowAccessfromMyDemoRepo.json).
3. At the terminal (Linux, OS X, or Unix) or command line (Windows), run the aws lambda add-
permissions command to add a permission to the resource policy associated with your Lambda
function, using the JSON file you just created:
aws lambda add-permission --cli-input-json
file://AllowAccessfromMyDemoRepo.json
This command returns the JSON of the policy statement you just added, similar to the following:
{
"Statement": "{\"Condition\":{\"StringEquals\":{\"AWS:SourceAccount
\":\"80398EXAMPLE\"},\"ArnLike\":{\"AWS:SourceArn\":
\"arn:aws:codecommit:us-east-1:80398EXAMPLE:MyDemoRepo\"}},\"Action
\":[\"lambda:InvokeFunction\"],\"Resource\":\"arn:aws:lambda:us-
east-1:80398EXAMPLE:function:MyCodeCommitFunction\",\"Effect\":\"Allow\",
\"Principal\":{\"Service\":\"codecommit.amazonaws.com\"},\"Sid\":\"1\"}"
}
For more information about resource policies for Lambda functions, see AddPermission and The
Pull/Push Event Models in the Lambda User Guide.
4. Sign in to the Identity and Access Management (IAM) console at https://console.aws.amazon.com/
iam/.
5. In the Dashboard navigation pane, choose Roles, and in the list of roles, select
lambda_basic_execution.
API Version 2015-04-13
90

AWS CodeCommit User Guide
Create a Trigger for the Lambda Function in
an AWS CodeCommit Repository (Console)
6. On the summary page for the role, choose the Permissions tab, and in the Inline Policies
section, choose Create Role Policy.
7. On the Set Permissions page, choose Policy Generator, and then choose Select.
8. On the Edit Permissions page, do the following:
• In Effect, choose Allow.
• In AWS Service, choose AWS CodeCommit.
• In Actions, select GetRepository.
• In Amazon Resource Name (ARN), type the ARN for the repository (for example,
arn:aws:codecommit:us-east-1:80398EXAMPLE:MyDemoRepo).
Choose Add Statement, and then choose Next Step.
9. On the Review Policy page, choose Apply Policy.
Your policy statement should look similar to the following example:
{
"Version": "2012-10-17",
"Statement": [
{
"Sid": "Stmt11111111",
"Effect": "Allow",
"Action": [
"codecommit:GetRepository"
],
"Resource": [
"arn:aws:codecommit:us-east-1:80398EXAMPLE:MyDemoRepo"
]
}
]
}
Create a Trigger for the Lambda Function in an
AWS CodeCommit Repository (Console)
After you have created the Lambda function, you can create a trigger in AWS CodeCommit that will run
the function in response to the repository events you specify.
Note
Before you can successfully test or run the trigger for the example, you must configure the
policies that allow AWS CodeCommit to invoke the function and the Lambda function to get
information about the repository. For more information, see To allow AWS CodeCommit to run
the function (p. 90).
To create a trigger for the Lambda function
1. Open the AWS CodeCommit console at https://console.aws.amazon.com/codecommit.
2. From the list of repositories, choose the repository where you want to create triggers for repository
events.
3. In the Dashboard navigation pane for the repository, choose Triggers.
4. On the triggers page for the repository, choose Create trigger.
5. In the Create trigger pane, do the following:
API Version 2015-04-13
91

AWS CodeCommit User Guide
Create a Trigger to a Lambda Function for
an AWS CodeCommit Repository (AWS CLI)
• In Trigger name, type a name for the trigger (for example, MyLambdaFunctionTrigger).
• In Events, choose the repository events that will trigger the Lambda function.
If you choose All repository events, you cannot choose any other events. If you want to
choose a subset of events, clear All repository events, and then choose the events you want
from the list. For example, if you want the trigger to run only when a user creates a tag or a
branch in the AWS CodeCommit repository, remove All repository events, and then choose
Create branch or tag.
• If you want the trigger to apply to all branches of the repository, in Branches, choose All
branches. Otherwise, choose Specific branches. The default branch for the repository will
be added by default. You can keep or delete this branch from the list. Choose up to ten branch
names from the list of repository branches.
• In Send to, choose AWS Lambda.
• In Lambda function ARN, choose the function name from the list, or choose Add an AWS
Lambda function ARN and then type the ARN for the function.
• In Custom data, optionally provide information you want included in the Lambda function (for
example, the name of the IRC channel used by developers to discuss development in the
repository). This field is a string. It cannot be used to pass any dynamic parameters.
6. Optionally, choose Test trigger. This option will attempt to invoke the function with sample data
about your repository, including the most recent commit ID for the repository. (If no commit history
exists, sample values consisting of zeroes will be generated instead.) This will help you confirm
you have correctly configured access between AWS CodeCommit and the Lambda function.
7. Choose Create to finish creating the trigger.
8. To verify the functionality of the trigger, make and push a commit to the repository where you
configured the trigger. You should see a response from the Lambda function on the Monitoring
tab for that function in the Lambda console. From the Monitoring tab, choose View logs in
CloudWatch. The CloudWatch console will open in a new tab and display events for your
function. Select the log stream from the list that corresponds to the time you pushed your commit.
You should see event data similar to the following:
START RequestId: 70afdc9a-EXAMPLE Version: $LATEST
2015-11-10T18:18:28.689Z 70afdc9a-EXAMPLE References: [ 'refs/
heads/master' ]
2015-11-10T18:18:29.814Z 70afdc9a-EXAMPLE Clone URL: https://git-
codecommit.us-east-1.amazonaws.com/v1/repos/MyDemoRepo
END RequestId: 70afdc9a-EXAMPLE
REPORT RequestId: 70afdc9a-EXAMPLE Duration: 1126.87 ms Billed Duration:
1200 ms Memory Size: 128 MB Max Memory Used: 14 MB
Create a Trigger to a Lambda Function for an
AWS CodeCommit Repository (AWS CLI)
You can also use the command line to create a trigger for a Lambda function in response to AWS
CodeCommit repository events, such as when someone pushes a commit to your repository.
To create a trigger for an Lambda function
1. Open a plain-text editor and create a JSON file that specifies:
• The Lambda function name.
• The repository and branches you want to monitor with this trigger. (If you do not specify any
branches, the trigger will apply to all branches in the repository.)
API Version 2015-04-13
92

AWS CodeCommit User Guide
Create a Trigger to a Lambda Function for
an AWS CodeCommit Repository (AWS CLI)
• The events that will activate this trigger.
Save the file.
For example, if you want to create a trigger for a repository named MyDemoRepo that will publish
all repository events to a Lambda function named MyCodeCommitFunction for two branches,
master and preprod:
{
"repositoryName": "MyDemoRepo",
"triggers": [
{
"name": "MyLambdaFunctionTrigger",
"destinationArn": "arn:aws:lambda:us-
east-1:80398EXAMPLE:function:MyCodeCommitFunction",
"customData": "",
"branches": [
"master", "preprod"
],
"events": [
"all"
]
}
]
}
There must be a trigger block in the JSON for each trigger for a repository. To create more
than one trigger for a repository, include additional blocks in the JSON. Remember that all
triggers created in this file are for the specified repository. You cannot create triggers for multiple
repositories in a single JSON file. For example, if you wanted to create two triggers for a
repository, you could create a JSON file with two trigger blocks. In the following example, no
branches are specified in the second trigger block, so that trigger will apply to all branches:
{
"repositoryName": "MyDemoRepo",
"triggers": [
{
"name": "MyLambdaFunctionTrigger",
"destinationArn": "arn:aws:lambda:us-
east-1:80398EXAMPLE:function:MyCodeCommitFunction",
"customData": "",
"branches": [
"master", "preprod"
],
"events": [
"all"
]
},
{
"name": "MyOtherLambdaFunctionTrigger",
"destinationArn": "arn:aws:lambda:us-
east-1:80398EXAMPLE:function:MyOtherCodeCommitFunction",
"customData": "",
"branches": [],
"events": [
"updateReference", "deleteReference"
API Version 2015-04-13
93
AWS CodeCommit User Guide
Create a Trigger to a Lambda Function for
an AWS CodeCommit Repository (AWS CLI)
]
}
]
}
You can create triggers for events you specify, such as when a commit is pushed to a repository.
Event types include:
•all for all events in the specified repository and branches.
•updateReference for when commits are pushed to the specified repository and branches.
•createReference for when a new branch or tag is created in the specified repository.
•deleteReference for when a branch or tag is deleted in the specified repository.
Note
You can use more than one event type in a trigger. However, if you specify all, you
cannot specify other events.
To see the full list of valid event types, at the terminal or command prompt, type aws codecommit
put-repository-triggers help.
In addition, you can include a string in customData (for example, an IRC channel name
developers use when discussing development in this repository). This field is a string. It cannot be
used to pass any dynamic parameters. This string will be appended as an attribute to the AWS
CodeCommit JSON returned in response to the trigger.
2. At a terminal or command prompt, optionally run the test-repository-triggers command. For
example, the following is used to test that the JSON file named trigger.json is valid and that
AWS CodeCommit can trigger the Lambda function. This test uses sample data to trigger the
function if no real data is available.
aws codecommit test-repository-triggers --cli-input-json
file://trigger.json
If successful, this command returns information similar to the following:
{
"successfulExecutions": [
"MyLambdaFunctionTrigger"
],
"failedExecutions": []
}
3. At a terminal or command prompt, run the put-repository-triggers command to create the trigger
in AWS CodeCommit. For example, to use a JSON file named trigger.json to create the
trigger:
aws codecommit put-repository-triggers --cli-input-json
file://trigger.json
This command returns a configuration ID, similar to the following:
{
"configurationId": "0123456-I-AM-AN-EXAMPLE"
}
API Version 2015-04-13
94

AWS CodeCommit User Guide
Edit Triggers for a Repository
4. To view the configuration of the trigger, run the get-repository-triggers command, specifying the
name of the repository:
aws codecommit get-repository-triggers --repository-name MyDemoRepo
This command returns the structure of all triggers configured for the repository, similar to the
following:
{
"configurationId": "0123456-I-AM-AN-EXAMPLE",
"triggers": [
{
"events": [
"all"
],
"destinationArn": "arn:aws:lambda:us-
east-1:80398EXAMPLE:MyCodeCommitFunction",
"branches": [
"master",
"preprod"
],
"name": "MyLambdaFunctionTrigger",
"customData": "Project ID 12345"
}
]
}
5. To test the functionality of the trigger, make and push a commit to the repository where you
configured the trigger. You should see a response from the Lambda function on the Monitoring
tab for that function in the Lambda console. From the Monitoring tab, choose View logs in
CloudWatch. The CloudWatch console will open in a new tab and display events for your
function. Select the log stream from the list that corresponds to the time you pushed your commit.
You should see event data similar to the following:
START RequestId: 70afdc9a-EXAMPLE Version: $LATEST
2015-11-10T18:18:28.689Z 70afdc9a-EXAMPLE References: [ 'refs/
heads/master' ]
2015-11-10T18:18:29.814Z 70afdc9a-EXAMPLE Clone URL: https://git-
codecommit.us-east-1.amazonaws.com/v1/repos/MyDemoRepo
END RequestId: 70afdc9a-EXAMPLE
REPORT RequestId: 70afdc9a-EXAMPLE Duration: 1126.87 ms Billed Duration:
1200 ms Memory Size: 128 MB Max Memory Used: 14 MB
Edit Triggers for an AWS CodeCommit
Repository
You can edit the triggers that have been created for an AWS CodeCommit repository. You can change
the events and branches for the trigger, the action taken in response to the event, and other settings.
Topics
•Edit a Trigger for a Repository (Console) (p. 96)
•Edit a Trigger for a Repository (AWS CLI) (p. 96)
API Version 2015-04-13
95

AWS CodeCommit User Guide
Edit a Trigger for a Repository (Console)
Edit a Trigger for a Repository (Console)
1. Open the AWS CodeCommit console at https://console.aws.amazon.com/codecommit.
2. From the list of repositories, choose the repository where you want to edit a trigger for repository
events.
3. In the Dashboard navigation pane for the repository, choose Triggers.
4. From the list of triggers for the repository, select the trigger you want to edit, and then choose Edit.
5. Make the changes you want to the trigger, and then choose Update to save your changes.
Edit a Trigger for a Repository (AWS CLI)
1. At a terminal (Linux, OS X, or Unix) or command prompt (Windows), run the get-repository-
triggers command to create a JSON file with the structure of all of the triggers configured for your
repository. For example, to create a JSON file named MyTriggers.json with the structure of all
of the triggers configured for a repository named MyDemoRepo:
aws codecommit get-repository-triggers --repository-name MyDemoRepo
>MyTriggers.json
This command returns nothing, but a file named MyTriggers.json is created in the directory
where you ran the command.
2. Edit the JSON file in a plain-text editor and make changes to the trigger block of the trigger you
want to edit. Replace the configurationId pair with a repositoryName pair. Save the file.
For example, if you want to edit a trigger named MyFirstTrigger in the repository named
MyDemoRepo so that it applies to all branches, you would replace configurationId with
repositoryName, and remove the specified master and preprod branches in red italic
text. By default, if no branches are specified, the trigger will apply to all branches in the
repository:
{
"repositoryName": "MyDemoRepo",
"triggers": [
{
"destinationArn": "arn:aws:sns:us-
east-1:80398EXAMPLE:MyCodeCommitTopic",
"branches": [
"master",
"preprod"
],
"name": "MyFirstTrigger",
"customData": "",
"events": [
"all"
]
}
]
}
3. At the terminal or command line, run the put-repository-triggers command. This will update all
triggers for the repository, including the changes you made to the MyFirstTrigger trigger:
API Version 2015-04-13
96
AWS CodeCommit User Guide
Test Triggers for a Repository
aws codecommit put-repository-triggers --repository-name MyDemoRepo
file://MyTriggers.json
This command returns a configuration ID, similar to the following:
{
"configurationId": "0123456-I-AM-AN-EXAMPLE"
}
Test Triggers for an AWS CodeCommit
Repository
You can test the triggers that have been created for an AWS CodeCommit repository. Testing involves
running the trigger with sample data from your repository, including the most recent commit ID. If
no commit history exists for the repository, sample values consisting of zeroes will be generated
instead. Testing triggers helps you confirm you have correctly configured access between AWS
CodeCommit and the target of the trigger, whether that is an AWS Lambda function or an Amazon
Simple Notification Service notification.
Topics
•Test a Trigger for a Repository (Console) (p. 97)
•Test a Trigger for a Repository (AWS CLI) (p. 97)
Test a Trigger for a Repository (Console)
1. Open the AWS CodeCommit console at https://console.aws.amazon.com/codecommit.
2. From the list of repositories, choose the repository where you want to test a trigger for repository
events.
3. In the Dashboard navigation pane for the repository, choose Triggers.
4. Choose the trigger you want to edit from the list of triggers, and then choose Edit.
5. In the Edit trigger dialog box, choose Test trigger. You will see a success or failure message.
If successful, you will also see a corresponding action response from the Lambda function or the
Amazon SNS topic.
Test a Trigger for a Repository (AWS CLI)
1. At a terminal (Linux, OS X, or Unix) or command prompt (Windows), run the get-repository-
triggers command to create a JSON file with the structure of all of the triggers configured for your
repository. For example, to create a JSON file named TestTrigger.json with the structure of all
of the triggers configured for a repository named MyDemoRepo:
aws codecommit get-repository-triggers --repository-name MyDemoRepo
>TestTrigger.json
This command creates a file named TestTriggers.json in the directory where you ran the
command.
API Version 2015-04-13
97
AWS CodeCommit User Guide
Delete Triggers from a Repository
2. Edit the JSON file in a plain-text editor and make the changes to the trigger statement. Replace
the configurationId pair with a repositoryName pair. Save the file.
For example, if you want to test a trigger named MyFirstTrigger in the repository named
MyDemoRepo so that it applies to all branches, you would replace the configurationId with
repositoryName and then save a file that looks similar to the following as TestTrigger.json:
{
"repositoryName": "MyDemoRepo",
"triggers": [
{
"destinationArn": "arn:aws:sns:us-
east-1:80398EXAMPLE:MyCodeCommitTopic",
"branches": [
"master",
"preprod"
],
"name": "MyFirstTrigger",
"customData": "",
"events": [
"all"
]
}
]
}
3. At the terminal or command line, run the test-repository-triggers command. This will update all
triggers for the repository, including the changes you made to the MyFirstTrigger trigger:
aws codecommit test-repository-triggers --cli-input-json
file://TestTrigger.json
This command returns a response similar to the following:
{
"successfulExecutions": [
"MyFirstTrigger"
],
"failedExecutions": []
}
Delete Triggers from an AWS CodeCommit
Repository
You might want to delete triggers if they are no longer being used. You cannot undo the deletion of a
trigger, but you can re-create one.
Note
If you configured one or more triggers for your repository, deleting the repository does not
delete the Amazon SNS topics or Lambda functions you configured as the targets of those
triggers. Be sure to delete those resources, too, if they are no longer needed.
Topics
•Delete a Trigger from a Repository (Console) (p. 99)
API Version 2015-04-13
98

AWS CodeCommit User Guide
Delete a Trigger from a Repository (Console)
•Delete a Trigger from a Repository (AWS CLI) (p. 99)
Delete a Trigger from a Repository (Console)
1. Open the AWS CodeCommit console at https://console.aws.amazon.com/codecommit.
2. From the list of repositories, choose the repository where you want to delete triggers for repository
events.
3. In the Dashboard navigation pane for the repository, choose Triggers.
4. Select the triggers you want to delete from the list of triggers, and then choose Delete.
5. In the dialog box, choose Delete to confirm.
Delete a Trigger from a Repository (AWS CLI)
1. At a terminal (Linux, OS X, or Unix) or command prompt (Windows), run the get-repository-
triggers command to create a JSON file with the structure of all of the triggers configured for your
repository. For example, to create a JSON file named MyTriggers.json with the structure of all
of the triggers configured for a repository named MyDemoRepo:
aws codecommit get-repository-triggers --repository-name MyDemoRepo
>MyTriggers.json
This command creates a file named MyTriggers.json in the directory where you ran the
command.
2. Edit the JSON file in a plain-text editor and remove the trigger block for the trigger you want to
delete. Replace the configurationId pair with a repositoryName pair. Save the file.
For example, if you want to remove a trigger named MyFirstTrigger from the repository named
MyDemoRepo, you would replace configurationId with repositoryName, and remove the
statement in red italic text:
{
"repositoryName": "MyDemoRepo",
"triggers": [
{
"destinationArn": "arn:aws:sns:us-
east-1:80398EXAMPLE:MyCodeCommitTopic",
"branches": [
"master",
"preprod"
],
"name": "MyFirstTrigger",
"customData": "",
"events": [
"all"
]
},
{
"destinationArn": "arn:aws:lambda:us-
east-1:80398EXAMPLE:function:MyCodeCommitJSFunction",
"branches": [],
"name": "MyLambdaTrigger",
"events": [
"all"
API Version 2015-04-13
99
AWS CodeCommit User Guide
Delete a Trigger from a Repository (AWS CLI)
]
}
]
}
3. At the terminal or command line, run the put-repository-triggers command. This will update the
triggers for the repository and delete the MyFirstTrigger trigger:
aws codecommit put-repository-triggers --repository-name MyDemoRepo
file://MyTriggers.json
This command returns a configuration ID, similar to the following:
{
"configurationId": "0123456-I-AM-AN-EXAMPLE"
}
Note
To delete all triggers for a repository named MyDemoRepo, your JSON file would look
similar to this:
{
"repositoryName": "MyDemoRepo",
"triggers": []
}
API Version 2015-04-13
100

AWS CodeCommit User Guide
Browse Commits in a Repository
View Commit Details in AWS
CodeCommit
You can use the AWS CodeCommit console to browse the history of commits in a repository. This
can help you identify changes made in a repository, including when and by whom they were made,
and when specific commits were merged into a particular branch. Viewing the history of commits for a
branch might also help you understand the difference between branches. If you use tagging, you can
also quickly view the commits that were labelled with a specific tag. At the command line, you can use
Git to view details about the commits in a local repo or an AWS CodeCommit repository.
Browse Commits in a Repository
You can use the AWS CodeCommit console to browse the history of commits to a repository. You
can also view a graph of the commits in the repository and its branches over time. This can help you
understand the history of the repository, including when changes were made.
Note
Using the git rebase command to rebase a repository will change the history of a repository,
which might cause commits to appear out of order. For more information about how
rebasing works and its effects on commit history, see Git Branching-Rebasing or your Git
documentation.
Topics
•Browse the Commit History of a Repository (p. 101)
•View a Graph of the Commit History of a Repository (p. 102)
Browse the Commit History of a Repository
You can browse the commit history for a specific branch or tag of the repository, including information
about the commiter and the commit message. You can also view the code for a specific commit.
To browse the history of commits (console)
1. Open the AWS CodeCommit console at https://console.aws.amazon.com/codecommit.
2. On the Dashboard page, from the list of repositories, choose the repository for which you want to
review the commit history.
API Version 2015-04-13
101

AWS CodeCommit User Guide
View a Graph of the Commit History of a Repository
3. In the navigation pane, choose Commits. In the commit history view, a history of commits for the
repository in the default branch will be displayed, in reverse chronological order of the commit
date. Date and time are in coordinated universal time (UTC). You can view the commit history
of a different branch by choosing the view selector button and then choosing a different branch
from the list. You can also view commits that have a specific tag, if you are using tags in your
repository.
4. Do one or more of the following:
• To view the email associated with the author of the commit, hover over the user name.
• To view the full commit ID, hover over the abbreviated commit ID. To copy it, choose the copy
icon. You can use either the abbreviated or full commit ID at the command line to compare
commits (p. 105), show the changes included in these commits (p. 105), and more.
• To view the code as it was at the time of a commit, choose the code icon for that commit (< / >).
The contents of the repository as they were at the time of that commit will be displayed in the
Code view. The view selector button will display the abbreviated commit ID instead of a branch
or tag.
• If the full commit subject is too long to fit in the initial view, choose the arrow next to the
message. The commit message box expands to display up to 5,000 characters of the subject
and message.
• To collapse the list of commits for a particular date, choose the arrow next to that date.
View a Graph of the Commit History of a
Repository
You can view a graph of the commits made to a repository. The Commit Visualizer view is a directed
acyclic graph (DAG) representation of all the commits made to a branch of the repository. This
API Version 2015-04-13
102
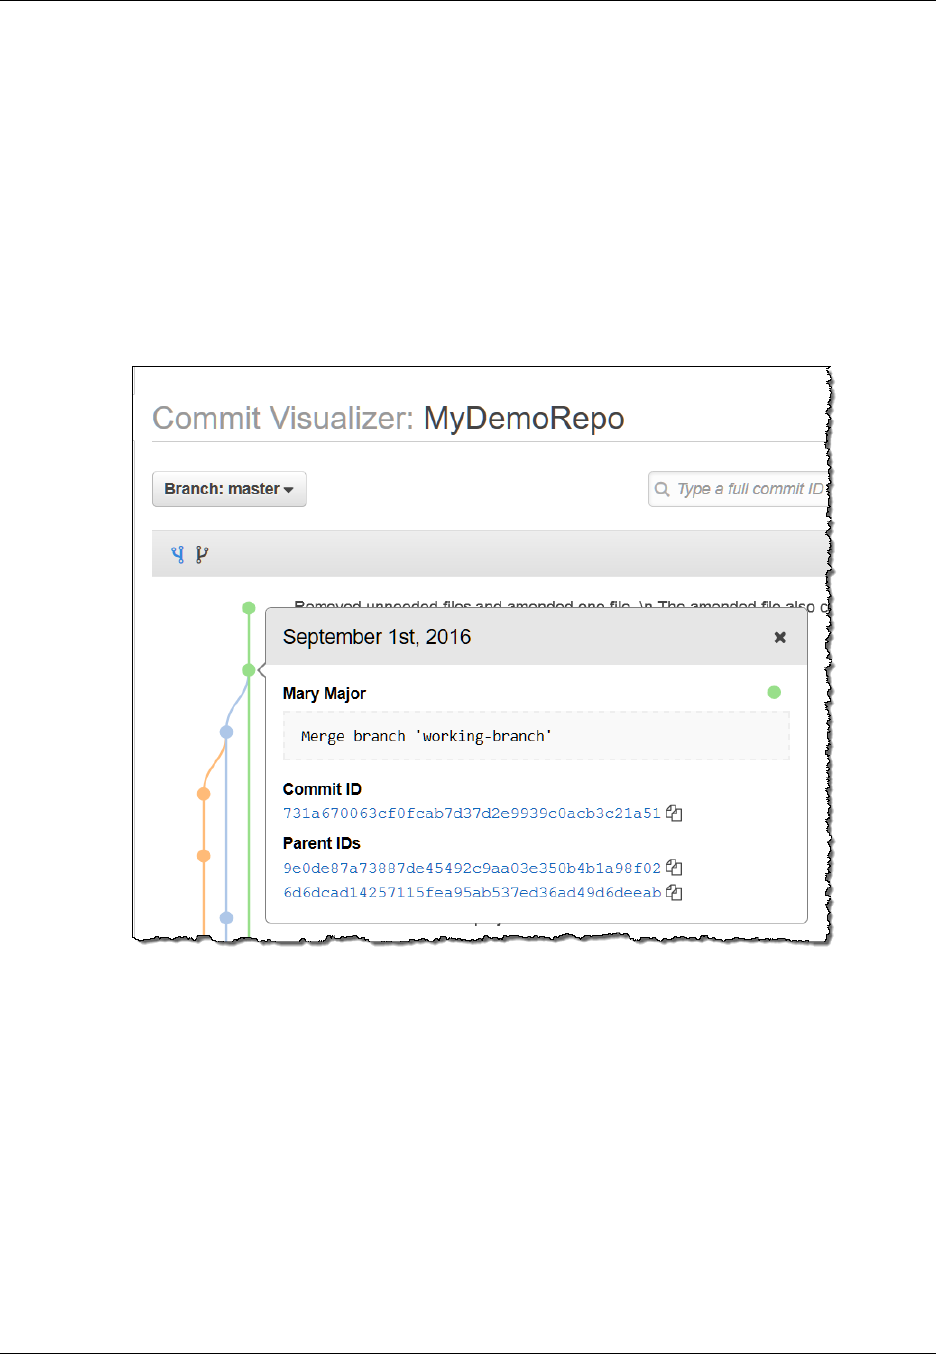
AWS CodeCommit User Guide
View a Graph of the Commit History of a Repository
graphical representation can help you understand when particular commits and associated features
were added or merged. It can also help you pinpoint when a particular change was made in relation to
other changes.
Note
Commits that are merged using the fast-forward method will not appear as separate lines in
the graph of commits.
To view a graph of commits (console)
1. Open the AWS CodeCommit console at https://console.aws.amazon.com/codecommit.
2. On the Dashboard page, from the list of repositories, choose the repository for which you want to
view a commit graph.
3. In the navigation pane, choose Commit Visualizer.
The commit graph is displayed, with the subject for each commit message shown next to that
point in the graph. You can use the direction buttons to change which side of the graph shows
branches.
Note
The graph can display up to 35 branches on a page. If there are more than 35 branches,
the graph will be too complex to display. You can simplify the view in two ways: by using
the view selector button to instead show the graph for a specific branch, or by pasting a
full commit ID into the search box to render the graph from that commit.
4. To see more details about a particular commit point, choose the point in the graph.
API Version 2015-04-13
103

AWS CodeCommit User Guide
Use Git to View Commit Details
The detail view shows the date of the commit, the name of the committer, the subject and contents
of the commit message (up to 200 characters), the full commit ID, and the commit IDs of any
parents of the commit. If the commit is a merge made by any method other than fast-forward,
multiple parent IDs will be shown. To copy a commit ID, choose the copy icon next to that ID.
5. To render a new graph from a particular commit, choose the commit ID in the detail view. The view
selector button changes to the abbreviated commit ID.
Use Git to View Commit Details
Before you follow these steps, you should have already connected the local repo to the AWS
CodeCommit repository and committed changes. For instructions, see Connect to a Repository (p. 76).
API Version 2015-04-13
104
AWS CodeCommit User Guide
Use Git to View Commit Details
To show the changes for the most recent commit to a repository, run the git show command.
git show
The command produces output similar to the following:
commit 4f8c6f9d
Author: Mary Major <mary.major@example.com>
Date: Mon May 23 15:56:48 2016 -0700
Added bumblebee.txt
diff --git a/bumblebee.txt b/bumblebee.txt
new file mode 100644
index 0000000..443b974
--- /dev/null
+++ b/bumblebee.txt
@@ -0,0 +1 @@
+A bumblebee, also written bumble bee, is a member of the bee genus Bombus,
in the family Apidae.
\ No newline at end of file
Note
In this and the following examples, commit IDs have been abbreviated. The full commit IDs
are not shown.
You can also use the git show command with the commit ID to view the changes that occurred for a
commit:
git show 94ba1e60
commit 94ba1e60
Author: John Doe <johndoe@example.com>
Date: Mon May 23 15:39:14 2016 -0700
Added horse.txt
diff --git a/horse.txt b/horse.txt
new file mode 100644
index 0000000..080f68f
--- /dev/null
+++ b/horse.txt
@@ -0,0 +1 @@
+The horse (Equus ferus caballus) is one of two extant subspecies of Equus
ferus.
To see the differences between two commits, run the git diff command and include the two commit
IDs.
git diff ce22850d 4f8c6f9d
In this example, the difference between the two commits is that two files were added. The command
produces output similar to the following:
diff --git a/bees.txt b/bees.txt
API Version 2015-04-13
105
AWS CodeCommit User Guide
Use Git to View Commit Details
new file mode 100644
index 0000000..cf57550
--- /dev/null
+++ b/bees.txt
@@ -0,0 +1 @@
+Bees are flying insects closely related to wasps and ants, and are known for
their role in pollination and for producing honey and beeswax.
diff --git a/bumblebee.txt b/bumblebee.txt
new file mode 100644
index 0000000..443b974
--- /dev/null
+++ b/bumblebee.txt
@@ -0,0 +1 @@
+A bumblebee, also written bumble bee, is a member of the bee genus Bombus,
in the family Apidae.
\ No newline at end of file
To use Git to view details about the commits in a local repo, run the git log command:
git log
If successful, this command produces output similar to the following:
commit 317f8570
Author: John Doe <johndoe@example.com>
Date: Tue Sep 23 13:49:51 2014 -0700
Added horse.txt
commit 4c925148
Author: Jane Doe <janedoe@example.com>
Date: Mon Sep 22 14:54:55 2014 -0700
Added cat.txt and dog.txt
To show only commit IDs and messages, run the git log --pretty=oneline command:
git log --pretty=oneline
If successful, this command produces output similar to the following:
317f8570 Added horse.txt
4c925148 Added cat.txt and dog.txt
For more options, see your Git documentation.
API Version 2015-04-13
106

AWS CodeCommit User Guide
View Repository Details
Advanced Tasks in AWS
CodeCommit
After you are comfortable with the basic operations, you can complete the following advanced tasks.
Topics
•View Repository Details (p. 107)
•View Branch Details (p. 112)
•View Tag Details (p. 114)
•Create a Branch (p. 115)
•Create a Tag (p. 117)
•Create a Commit (p. 118)
•Change Branch Settings (p. 120)
•Change Repository Settings (p. 122)
•Sync Changes Between Repositories (p. 124)
•Delete a Branch (p. 125)
•Delete a Tag (p. 126)
•Delete a Repository (p. 127)
•Push Commits to Two Repositories (p. 128)
View AWS CodeCommit Repository Details
To view information about available repositories, you can use:
• Git from a local repo connected to the AWS CodeCommit repository.
• the AWS CLI.
• the AWS CodeCommit console.
These instructions assume you have already completed the steps in Setting Up (p. 4).
Topics
•Use the AWS CodeCommit Console to View Repository Details (p. 108)
•Use Git to View AWS CodeCommit Repository Details (p. 108)
•Use the AWS CLI to View AWS CodeCommit Repository Details (p. 109)
API Version 2015-04-13
107

AWS CodeCommit User Guide
Use the AWS CodeCommit
Console to View Repository Details
Use the AWS CodeCommit Console to View
Repository Details
Use the AWS CodeCommit console to quickly view all repositories created with your AWS account.
1. Open the AWS CodeCommit console at https://console.aws.amazon.com/codecommit.
2. Choose the name of the repository from the list.
3. In the navigation pane, choose Settings. This page displays details about the repository.
Use Git to View AWS CodeCommit Repository
Details
To use Git from a local repo to view details about AWS CodeCommit repositories, run the git remote
show command.
The following steps assume you have already connected the local repo to the AWS CodeCommit
repository. For instructions, see Connect to a Repository (p. 76).
1. Run the git remote show remote-name command, where remote-name is the alias of the AWS
CodeCommit repository (by default, origin).
Tip
To get a list of AWS CodeCommit repository names along with their URLs, run the git
remote -v command.
For example, to view details about the AWS CodeCommit repository with the alias origin:
git remote show origin
2. For HTTPS:
* remote origin
Fetch URL: https://git-codecommit.us-east-1.amazonaws.com/v1/repos/
MyDemoRepo
Push URL: https://git-codecommit.us-east-1.amazonaws.com/v1/repos/
MyDemoRepo
HEAD branch: (unknown)
Remote branches:
MyNewBranch tracked
master tracked
Local ref configured for 'git pull':
MyNewBranch merges with remote MyNewBranch (up to date)
Local refs configured for 'git push':
MyNewBranch pushes to MyNewBranch (up to date)
master pushes to master (up to date)
For SSH:
* remote origin
Fetch URL: ssh://git-codecommit.us-east-1.amazonaws.com/v1/repos/
MyDemoRepo
Push URL: ssh://git-codecommit.us-east-1.amazonaws.com/v1/repos/
MyDemoRepo
HEAD branch: (unknown)
API Version 2015-04-13
108

AWS CodeCommit User Guide
Use the AWS CLI to View AWS
CodeCommit Repository Details
Remote branches:
MyNewBranch tracked
master tracked
Local ref configured for 'git pull':
MyNewBranch merges with remote MyNewBranch (up to date)
Local refs configured for 'git push':
MyNewBranch pushes to MyNewBranch (up to date)
master pushes to master (up to date)
Tip
To look up the SSH key ID for your IAM user, open the IAM console and expand Security
Credentials on the IAM user details page. The SSH key ID can be found in SSH Keys
for AWS CodeCommit.
For more options, see your Git documentation.
Use the AWS CLI to View AWS CodeCommit
Repository Details
To use AWS CLI commands with AWS CodeCommit, install the AWS CLI. For more information, see
Command Line Reference (p. 140).
To use the AWS CLI to view repository details, run the following commands:
•list-repositories (p. 109) to view a list of AWS CodeCommit repository names and their
corresponding IDs.
•get-repository (p. 110) to view information about a single AWS CodeCommit repository.
•batch-get-repositories (p. 110) to view information about multiple repositories in AWS
CodeCommit.
To view a list of AWS CodeCommit repositories
1. Run the list-repositories command, for example:
aws codecommit list-repositories
You can use the optional --sort-by or --order options to change the order of returned
information.
2. If successful, this command outputs a repositories object containing the names and IDs of all
existing repositories in AWS CodeCommit associated with the AWS account.
Here is some example output based on the preceding command:
{
"repositories": [
{
"repositoryName": "MyDemoRepo"
"repositoryId": "f7579e13-b83e-4027-aaef-650c0EXAMPLE",
},
{
"repositoryName": "MyOtherDemoRepo"
"repositoryId": "cfc29ac4-b0cb-44dc-9990-f6f51EXAMPLE"
}
API Version 2015-04-13
109

AWS CodeCommit User Guide
Use the AWS CLI to View AWS
CodeCommit Repository Details
]
}
To view details about a single AWS CodeCommit
repository
1. Run the get-repository command, specifying the name of the AWS CodeCommit repository with
the --repository-name option.
Tip
To get the AWS CodeCommit repository's name, run the list-repositories (p. 109)
command.
For example, to view details about an AWS CodeCommit repository named MyDemoRepo:
aws codecommit get-repository --repository-name MyDemoRepo
2. If successful, this command outputs a repositoryMetadata object with the following
information:
• The repository's name (repositoryName).
• The repository's description (repositoryDescription).
• The repository's unique, system-generated ID (repositoryId).
• The ID of the AWS account associated with the repository (accountId).
Here is some example output, based on the preceding example command:
{
"repositoryMetadata": {
"creationDate": 1429203623.625,
"defaultBranch": "master",
"repositoryName": "MyDemoRepo",
"cloneUrlSsh": "ssh://ssh://git-codecommit.us-
east-1.amazonaws.com/v1/repos//v1/repos/MyDemoRepo",
"lastModifiedDate": 1430783812.0869999,
"repositoryDescription": "My demonstration repository",
"cloneUrlHttp": "https://codecommit.us-east-1.amazonaws.com/
v1/repos/MyDemoRepo",
"repositoryId": "f7579e13-b83e-4027-aaef-650c0EXAMPLE",
"Arn": "arn:aws:codecommit:us-east-1:80398EXAMPLE:MyDemoRepo
"accountId": "111111111111"
}
}
To view details about multiple AWS CodeCommit
repositories
1. Run the batch-get-repositories command with the --repository-names option. Add a space
between each AWS CodeCommit repository name.
Tip
To get the names of the repositories in AWS CodeCommit, run the list-
repositories (p. 109) command.
API Version 2015-04-13
110

AWS CodeCommit User Guide
Use the AWS CLI to View AWS
CodeCommit Repository Details
For example, to view details about two AWS CodeCommit repositories named MyDemoRepo and
MyOtherDemoRepo:
aws codecommit batch-get-repositories --repository-names MyDemoRepo
MyOtherDemoRepo
2. If successful, this command outputs an object with the following information:
• A list of any AWS CodeCommit repositories that could not be found
(repositoriesNotFound).
• A list of AWS CodeCommit repositories (repositories). Each AWS CodeCommit repository's
name is followed by:
• The repository's description (repositoryDescription).
• The repository's unique, system-generated ID (repositoryId).
• The ID of the AWS account associated with the repository (accountId).
Here is some example output, based on the preceding example command:
{
"repositoriesNotFound": [],
"repositories": [
{
"creationDate": 1429203623.625,
"defaultBranch": "master",
"repositoryName": "MyDemoRepo",
"cloneUrlSsh": "ssh://git-codecommit.us-
east-1.amazonaws.com/v1/repos//v1/repos/MyDemoRepo",
"lastModifiedDate": 1430783812.0869999,
"repositoryDescription": "My demonstration repository",
"cloneUrlHttp": "https://codecommit.us-
east-1.amazonaws.com/v1/repos/MyDemoRepo",
"repositoryId": "f7579e13-b83e-4027-aaef-650c0EXAMPLE",
"Arn": "arn:aws:codecommit:us-
east-1:80398EXAMPLE:MyDemoRepo
"accountId": "111111111111"
},
{
"creationDate": 1429203623.627,
"defaultBranch": "master",
"repositoryName": "MyOtherDemoRepo",
"cloneUrlSsh": "ssh://git-codecommit.us-
east-1.amazonaws.com/v1/repos//v1/repos/MyOtherDemoRepo",
"lastModifiedDate": 1430783812.0889999,
"repositoryDescription": "My other demonstration
repository",
"cloneUrlHttp": "https://codecommit.us-
east-1.amazonaws.com/v1/repos/MyOtherDemoRepo",
"repositoryId": "cfc29ac4-b0cb-44dc-9990-f6f51EXAMPLE",
"Arn": "arn:aws:codecommit:us-
east-1:80398EXAMPLE:MyOtherDemoRepo
"accountId": "111111111111"
}
],
"repositoriesNotFound": []
}
API Version 2015-04-13
111
AWS CodeCommit User Guide
View Branch Details
View Branch Details in AWS CodeCommit
To view details about the branches in an AWS CodeCommit repository, you can use Git from a
local repo connected to the AWS CodeCommit repository. You can also use AWS CLI and the AWS
CodeCommit console.
Topics
•Use Git to View Branch Details (p. 112)
•Use the AWS CLI to View Branch Details (p. 112)
•Use the AWS CodeCommit Console to View Branch Details (p. 114)
Use Git to View Branch Details
To use Git from a local repo to view details about both the local and remote tracking branches for an
AWS CodeCommit repository, run the git branch command.
The following steps assume you have already connected the local repo to the AWS CodeCommit
repository. For instructions, see Connect to a Repository (p. 76).
1. Run the git branch command, specifying the --all option:
git branch --all
2. If successful, this command returns output similar to the following:
MyNewBranch
* master
remotes/origin/MyNewBranch
remotes/origin/master
The asterisk (*) appears next to the currently open branch. The entries after that are remote
tracking references.
Tip
git branch shows just your local branches.
git branch -r shows just your remote branches.
git checkout existing-branch-name switches to the specified branch name and, if git
branch is run immediately afterward, displays it with an asterisk (*).
git remote update remote-name updates your local repo with the list of available AWS
CodeCommit repository branches. (To get a list of AWS CodeCommit repository names,
along with their URLs, run the git remote -v command.)
For more options, see your Git documentation.
Use the AWS CLI to View Branch Details
To use AWS CLI commands with AWS CodeCommit, install the AWS CLI. For more information, see
Command Line Reference (p. 140).
To use the AWS CLI to view details about the branches in an AWS CodeCommit repository, run one or
more of the following commands:
•list-branches (p. 112) to view a list of branch names.
API Version 2015-04-13
112

AWS CodeCommit User Guide
Use the AWS CLI to View Branch Details
•get-branch (p. 113) to view information about a specific branch.
To view a list of branch names
1. Run the list-branches command, specifying the name of the AWS CodeCommit repository (with
the --repository-name option).
Tip
To get the name of the AWS CodeCommit repository, run the list-repositories (p. 109)
command.
For example, to view details about the branches in an AWS CodeCommit repository named
MyDemoRepo:
aws codecommit list-branches --repository-name MyDemoRepo
2. If successful, this command outputs a branchNameList object, with an entry for each branch.
Here is some example output based on the preceding example command:
{
"branches": [
"MyNewBranch",
"master"
]
}
To view information about a branch
1. Run the get-branch command, specifying:
• The repository name (with the --repository-name option).
• The branch name (with the --branch-name option).
For example, to view information about a branch named MyNewBranch in an AWS CodeCommit
repository named MyDemoRepo:
aws codecommit get-branch --repository-name MyDemoRepo --branch-name
MyNewBranch
2. If successful, this command outputs the name of the branch and the ID of the last commit made to
the branch.
Here is some example output based on the preceding example command:
{
"branch": {
"branchName": "MyNewBranch",
"commitID": "317f8570EXAMPLE"
}
}
API Version 2015-04-13
113

AWS CodeCommit User Guide
Use the AWS CodeCommit
Console to View Branch Details
Use the AWS CodeCommit Console to View
Branch Details
Use the AWS CodeCommit console to quickly view the name of the default branch for your repository.
1. Open the AWS CodeCommit console at https://console.aws.amazon.com/codecommit.
2. In the list of repositories, choose the name of the repository.
3. In the navigation pane, choose Settings.
4. The name of the branch used as the default for the repository is displayed next to Default branch.
To view a list of all branches, review the list in the Default branch drop-down list.
View Tag Details in AWS CodeCommit
Use Git to view details about tags in a local repo.
Use Git to View Tag Details
To use Git to view details about tags in a local repo, run one of the following commands:
•git tag (p. 114) to view a list of tag names.
•git show (p. 114) to view information about a specific tag.
•git ls-remote (p. 115) to view information about tags in an AWS CodeCommit repository.
Tip
To ensure that your local repo is updated with all of the tags in the AWS CodeCommit
repository, run git fetch followed by git fetch --tags.
The following steps assume you have already connected the local repo to the AWS CodeCommit
repository. For instructions, see Connect to a Repository (p. 76).
To view a list of tags in a local repo
1. Run the git tag command:
git tag
2. If successful, this command outputs information similar to the following:
beta
release
Note
If no tags have been defined, git tag returns nothing.
For more options, see your Git documentation.
To view information about a tag in a local repo
1. Run the git show tag-name command. For example, to view information about a tag named
beta, run:
API Version 2015-04-13
114
AWS CodeCommit User Guide
Create a Branch
git show beta
2. If successful, this command outputs information similar to the following:
commit 317f8570...ad9e3c09
Author: John Doe <johndoe@example.com>
Date: Tue Sep 23 13:49:51 2014 -0700
Added horse.txt
diff --git a/horse.txt b/horse.txt
new file mode 100644
index 0000000..df42ff1
--- /dev/null
+++ b/horse.txt
@@ -0,0 +1 @@
+The horse (Equus ferus caballus) is one of two extant subspecies of Equus
ferus
\ No newline at end of file
Note
To exit the output of the tag information, type :q.
For more options, see your Git documentation.
To view information about tags in an AWS CodeCommit
repository
1. Run the git ls-remote --tags command.
git ls-remote --tags
2. If successful, this command outputs a list of the tags in the AWS CodeCommit repository similar to
the following:
129ce87a...70fbffba refs/tags/beta
785de9bd...59b402d8 refs/tags/release
If no tags have been defined, git ls-remote --tags returns a blank line.
For more options, see your Git documentation.
Create a Branch in AWS CodeCommit
To create a branch in an AWS CodeCommit repository, you can use Git from a local repo connected to
the AWS CodeCommit repository. You can also use the AWS CLI.
Topics
•Use Git to Create a Branch (p. 116)
•Use the AWS CLI to Create a Branch (p. 116)
API Version 2015-04-13
115
AWS CodeCommit User Guide
Use Git to Create a Branch
Use Git to Create a Branch
To use Git from a local repo to create a branch in an AWS CodeCommit repository and then push that
branch to the AWS CodeCommit repository, follow these steps.
These steps assume you have already connected the local repo to the AWS CodeCommit repository.
For instructions, see Connect to a Repository (p. 76).
1. Create a new branch in your local repo by running the git checkout -b new-branch-name
command, where new-branch-name is the name of the new branch.
For example, the following command creates a new branch named MyNewBranch in the local
repo:
git checkout -b MyNewBranch
2. To push the new branch from the local repo to the AWS CodeCommit repository, run the git push
remote-name new-branch-name command, where remote-name is the nickname the local
repo uses for the AWS CodeCommit repository and new-branch-name is the name of the new
branch.
For example, to push a new branch in the local repo named MyNewBranch to the AWS
CodeCommit repository with the nickname origin:
git push origin MyNewBranch
Tip
If you add the -u option to git push (for example, git push -u origin master), then in the
future you can run git push without remote-name branch-name. Upstream tracking
information will be set. To get upstream tracking information, run git remote show remote-
name (for example, git remote show origin).
To see a list of all of your local and remote tracking branches, run git branch --all.
To set up a branch in the local repo that is connected to an existing branch in the AWS
CodeCommit repository, run git checkout remote-branch-name.
For more options, see your Git documentation.
Use the AWS CLI to Create a Branch
To use AWS CLI commands with AWS CodeCommit, install the AWS CLI. For more information, see
Command Line Reference (p. 140).
To use the AWS CLI to create a branch in an AWS CodeCommit repository and then push that branch
to the AWS CodeCommit repository, follow these steps.
1. Run the create-branch command, specifying:
• The name of the AWS CodeCommit repository where the branch will be created (with the --
repository-name option).
Tip
To get the name of the AWS CodeCommit repository, run the list-repositories (p. 109)
command.
• The name of the new branch (with the --branch-name option).
• The ID of the commit to which the new branch will point (with the --commit-id option).
API Version 2015-04-13
116
AWS CodeCommit User Guide
Create a Tag
For example, to create a new branch named MyNewBranch that points to commit ID
99132ab0...9f31c968 in an AWS CodeCommit repository named MyDemoRepo:
aws codecommit create-branch --repository-name MyDemoRepo --branch-name
MyNewBranch --commit-id 99132ab0...9f31c968
This command produces output only if there are errors.
2. To update your local repo's list of available AWS CodeCommit repository branches with the new
remote branch name, run git remote update remote-name.
For example, to update your local repo's list of available branches for the AWS CodeCommit
repository with the nickname origin:
git remote update origin
Tip
You can view all remote branches by running git branch --all, but until you update your
local repo's list, the remote branch you created will not appear in the list.
3. To set up a branch in the local repo that is connected to the new branch in the AWS CodeCommit
repository, run git checkout remote-branch-name.
Tip
To get a list of AWS CodeCommit repository names, along with their URLs, run the git remote
-v command.
Create a Tag in AWS CodeCommit
To create a tag in an AWS CodeCommit repository, you can use Git from a local repo connected to the
AWS CodeCommit repository.
Use Git to Create a Tag
To use Git from a local repo to create a tag in an AWS CodeCommit repository, follow these steps.
These steps assume you have already connected the local repo to the AWS CodeCommit repository.
For instructions, see Connect to a Repository (p. 76).
1. Run the git tag new-tag-name commit-id command, where new-tag-name is the new tag's
name and commit-id is the ID of the commit to associate with the tag.
For example, the following command creates a new tag named beta and associates it with the
commit ID dc082f9a...af873b88:
git tag beta dc082f9a...af873b88
2. To push the new tag from the local repo to the AWS CodeCommit repository, run the git push
remote-name new-tag-name command, where remote-name is the name of the AWS
CodeCommit repository and new-tag-name is the name of the new tag.
For example, to push a new tag named beta to an AWS CodeCommit repository named origin:
API Version 2015-04-13
117
AWS CodeCommit User Guide
Create a Commit
git push origin beta
Tip
To push all new tags from your local repo to the AWS CodeCommit repository, run git push --
tags.
To ensure your local repo is updated with all of the tags in the AWS CodeCommit repository,
run git fetch followed by git fetch --tags.
For more options, see your Git documentation.
Create a Commit in AWS CodeCommit
Follow these steps to use Git to create a commit in a local repo. If the local repo is connected to
an AWS CodeCommit repository, you use Git to push the commit from the local repo to the AWS
CodeCommit repository.
1. Complete the prerequisites, including Setting Up (p. 4).
Important
If you have not completed setup, you will not be able to connect or commit to the
repository.
2. Make sure you are creating a commit in the desired branch. To see a list of available branches
and find out which branch you are currently set to use, run git branch. All branches will be
displayed. An asterisk (*) will appear next to your current branch. To switch to a different branch,
run git checkout branch-name.
3. Make a change to the branch (such as adding, modifying, or deleting a file).
For example, in the local repo, create a file named bird.txt with the following text:
bird.txt
--------
Birds (class Aves or clade Avialae) are feathered, winged, two-legged,
warm-blooded, egg-laying vertebrates.
4. Run git status, which should indicate that bird.txt has not yet been included in any pending
commit:
...
Untracked files:
(use "git add <file>..." to include in what will be committed)
bird.txt
5. Run git add bird.txt to include the new file in the pending commit.
6. If you run git status again, you should see output similar to the following. It indicates that
bird.txt is now part of the pending commit or staged for commit:
...
Changes to be committed:
(use "git reset HEAD <file>..." to unstage)
new file: bird.txt
API Version 2015-04-13
118

AWS CodeCommit User Guide
Create a Commit
7. To finalize the commit, run git commit with the -m option (for example, git commit -m "Adding
bird.txt to the repository.") The -m option creates the commit message.
8. If you run git status again, you should see output similar to the following. It indicates that the
commit is ready to be pushed from the local repo to the AWS CodeCommit repository:
...
nothing to commit, working directory clean
9. Before you push the finalized commit from the local repo to the AWS CodeCommit repository,
you can see what will be pushed by running git diff --stat remote-name/branch-name, where
remote-name is the nickname the local repo uses for the AWS CodeCommit repository and
branch-name is the name of the branch to compare.
Tip
To get the nickname, run git remote. To get a list of branch names, run git branch. An
asterisk (*) will appear next to the current branch. You can also run git status to get the
current branch name.
Note
If you cloned the repository, from the local repo's perspective, remote-name is not the
name of the AWS CodeCommit repository. When you clone a repository, remote-name
is set automatically to origin.
For example, git diff --stat origin/master would show output similar to the following:
bird.txt | 1 +
1 file changed, 1 insertion(+)
Of course, the output assumes you have already connected the local repo to the AWS
CodeCommit repository. (For instructions, see Connect to a Repository (p. 76).)
10. When you're ready to push the commit from the local repo to the AWS CodeCommit repository,
run git push remote-name branch-name, where remote-name is the nickname the local repo
uses for the AWS CodeCommit repository and branch-name is the name of the branch to push to
the AWS CodeCommit repository.
For example, running git push origin master would show output similar to the following:
For HTTPS:
Counting objects: 7, done.
Delta compression using up to 4 threads.
Compressing objects: 100% (4/4), done.
Writing objects: 100% (5/5), 516 bytes | 0 bytes/s, done.
Total 5 (delta 2), reused 0 (delta 0)
remote:
To https://git-codecommit.us-east-1.amazonaws.com/v1/repos/MyDemoRepo
b9e7aa6..3dbf4dd master -> master
For SSH:
Counting objects: 7, done.
Delta compression using up to 4 threads.
Compressing objects: 100% (4/4), done.
Writing objects: 100% (5/5), 516 bytes | 0 bytes/s, done.
Total 5 (delta 2), reused 0 (delta 0)
remote:
To ssh://git-codecommit.us-east-1.amazonaws.com/v1/repos/MyDemoRepo
API Version 2015-04-13
119

AWS CodeCommit User Guide
Change Branch Settings
b9e7aa6..3dbf4dd master -> master
Tip
If you add the -u option to git push (for example, git push -u origin master), then
you only need to run git push in the future because upstream tracking information has
been set. To get upstream tracking information, run git remote show remote-name (for
example, git remote show origin).
For more options, see your Git documentation.
Change Branch Settings in AWS CodeCommit
To change a repository's branch settings in an AWS CodeCommit repository, you can use Git from
a local repo connected to the AWS CodeCommit repository. You can also use the AWS CLI and the
AWS CodeCommit console.
Topics
•Use the AWS CodeCommit Console to Change Branch Settings (p. 120)
•Use Git to Change Branch Settings (p. 120)
•Use the AWS CLI to Change Branch Settings (p. 121)
Use the AWS CodeCommit Console to Change
Branch Settings
To use the AWS CodeCommit console to change the default branch in an AWS CodeCommit
repository, follow these steps.
1. Open the AWS CodeCommit console at https://console.aws.amazon.com/codecommit.
2. In the list of repositories, choose the name of the repository where you want to change settings.
3. In the navigation pane, choose Settings.
4. To change the default branch, from the Default branch drop-down list, choose a different branch,
choose Save changes, and then choose Change default.
Use Git to Change Branch Settings
To use Git from a local repo to change a branch's settings in an AWS CodeCommit repository, run the
following command:
•git reset (p. 120) to change the commit to which a branch points.
To use Git to change the commit to which a branch points
To use Git from a local repo to change the commit to which a branch points, follow these steps.
These steps assume you have already connected the local repo to the AWS CodeCommit repository.
For instructions, see Connect to a Repository (p. 76).
1. Run git checkout branch-name where branch-name is the name of the branch.
API Version 2015-04-13
120
AWS CodeCommit User Guide
Use the AWS CLI to Change Branch Settings
Tip
To get a list of branch names, run git branch --all.
2. Run git reset --hard new-commit-id or git reset --soft new-commit-id where new-commit-
id is the new commit where the branch will point.
The --hard option resets the index and the working tree; any changes to tracked files in the
working tree before new-commit-id are discarded.
The --soft option does not touch the index file or the working tree; this leaves all your changed
files to be committed.
For example, to point the branch named MyNewBranch to the commit ID dc082f9a...af873b88
while resetting the index and working tree and discarding any changes to tracked files in the
working tree before commit ID dc082f9a...af873b88:
git checkout MyNewBranch
git reset --hard dc082f9a...af873b88
3. To push the changed branch from the local repo to the AWS CodeCommit repository, run the git
push remote-name changed-branch-name command, where remote-name is the nickname
the local repo uses for the AWS CodeCommit repository and changed-branch-name is the
name of the changed branch.
For example, to push a changed branch named MyNewBranch to an AWS CodeCommit repository
with the nickname origin:
git push origin MyNewBranch
For more options, see your Git documentation.
Use the AWS CLI to Change Branch Settings
To use AWS CLI commands with AWS CodeCommit, install the AWS CLI. For more information, see
Command Line Reference (p. 140).
To use the AWS CLI to change a repository's branch settings in an AWS CodeCommit repository, run
the following command:
•update-default-branch (p. 121) to change the default branch.
To change the default branch
1. Run the update-default-branch command, specifying:
• The name of the AWS CodeCommit repository where the default branch will be updated (with
the --repository-name option).
Tip
To get the name of the AWS CodeCommit repository, run the list-repositories (p. 109)
command.
• The name of the new default branch (with the --default-branch-name option).
Tip
To get the name of the branch, run the list-branches (p. 112) command.
API Version 2015-04-13
121

AWS CodeCommit User Guide
Change Repository Settings
2. For example, to change the default branch to MyNewBranch in an AWS CodeCommit repository
named MyDemoRepo:
aws codecommit update-default-branch --repository-name MyDemoRepo --
default-branch-name MyNewBranch
This command produces output only if there are errors.
For more options, see your Git documentation.
Change AWS CodeCommit Repository
Settings
To change the settings of an AWS CodeCommit repository, such as its description or name, you can
use the AWS CLI and the AWS CodeCommit console.
Important
Changing a repository's name may break any local repos that use the old name in their
remote URL. Run the git remote set-url command to update the remote URL to use the new
repository's name.
Topics
•Use the AWS CodeCommit Console to Change Repository Settings (p. 122)
•Use the AWS CLI to Change AWS CodeCommit Repository Settings (p. 123)
Use the AWS CodeCommit Console to Change
Repository Settings
To use the AWS CodeCommit console to change an AWS CodeCommit repository's settings in AWS
CodeCommit, follow these steps.
1. Open the AWS CodeCommit console at https://console.aws.amazon.com/codecommit.
2. In the list of repositories, choose the name of the repository where you want to change settings.
3. In the navigation pane, choose Settings.
4. To change the name of the repository, type a new name in the Name text box, choose Change
name, and then choose Change name again.
Important
Changing the name of the AWS CodeCommit repository will change the SSH and HTTPS
URLs that users need to connect to the repository. Users will not be able to connect to
this repository until they update their connection settings. Also, because the repository's
ARN will change, changing the repository name will invalidate any IAM user policies that
rely on this repository's ARN.
To connect to the repository after the name is changed, each user must use the git
remote set-url command and specify the new URL to use. For example, if you changed
the name of the repository from MyDemoRepo to MyRenamedDemoRepo, users who use
HTTPS to connect to the repository would run the following Git command:
git remote set-url origin https://git-codecommit.us-
east-1.amazonaws.com/v1/repos/MyRenamedDemoRepo
API Version 2015-04-13
122

AWS CodeCommit User Guide
Use the AWS CLI to Change AWS
CodeCommit Repository Settings
Users who use SSH to connect to the repository would run the following Git command:
git remote set-url origin ssh://git-codecommit.us-
east-1.amazonaws.com/v1/repos/MyRenamedDemoRepo
For more options, see your Git documentation.
5. To change the repository's description, modify the text in the Description text box, and then
choose Save changes.
Note
The description field for a repository accepts all HTML characters and all valid
Unicode characters. If you are an application developer using the GetRepository or
BatchGetRepositories APIs and plan to display the repository description field in a
web browser, see the AWS CodeCommit API Reference for additional guidance.
6. To change the default branch, choose a different branch from the Default branch drop-down list,
choose Save changes, and then choose Change default.
7. To delete the repository, choose Delete repository. In the box next to Type the name of the
repository to confirm deletion, type the repository's name, and then choose Delete.
Important
After you delete this repository in AWS CodeCommit, you will no longer be able to clone
it to any local repo or shared repo. You will also no longer be able to pull data from it, or
push data to it, from any local repo or shared repo. This action cannot be undone.
Use the AWS CLI to Change AWS CodeCommit
Repository Settings
To use AWS CLI commands with AWS CodeCommit, install the AWS CLI. For more information, see
Command Line Reference (p. 140).
To use AWS CLI to change an AWS CodeCommit repository's settings in AWS CodeCommit, run one
or more of the following commands:
•update-repository-description (p. 123) to change an AWS CodeCommit repository's description.
•update-repository-name (p. 124) to change an AWS CodeCommit repository's name.
To change an AWS CodeCommit repository's description
1. Run the update-repository-description command, specifying:
• The name of the AWS CodeCommit repository (with the --repository-name option).
Tip
To get the name of the AWS CodeCommit repository, run the list-
repositories (p. 109) command.
• The new repository description (with the --repository-description option).
Note
The description field for a repository accepts all HTML characters and all valid
Unicode characters. If you are an application developer using the GetRepository or
BatchGetRepositories APIs and plan to display the repository description field in a
web browser, see the AWS CodeCommit API Reference for additional guidance.
API Version 2015-04-13
123

AWS CodeCommit User Guide
Sync Changes Between Repositories
For example, to change the description for the AWS CodeCommit repository named MyDemoRepo
to This description was changed:
aws codecommit update-repository-description --repository-name MyDemoRepo
--repository-description "This description was changed"
This command produces output only if there are errors.
2. To verify the changed description, run the get-repository command, specifying the name of the
AWS CodeCommit repository whose description you changed with the --repository-name
option.
The output of the command will show the changed text in repositoryDescription.
To change an AWS CodeCommit repository's name
1. Run the update-repository-name command, specifying:
• The current name of the AWS CodeCommit repository (with the --old-name option).
Tip
To get the AWS CodeCommit repository's name, run the list-repositories (p. 109)
command.
• The new name of the AWS CodeCommit repository (with the --new-name option).
For example, to change the repository named MyDemoRepo to MyRenamedDemoRepo:
aws codecommit update-repository-name --old-name MyDemoRepo --new-name
MyRenamedDemoRepo
This command produces output only if there are errors.
Important
Changing the name of the AWS CodeCommit repository will change the SSH and HTTPS
URLs that users need to connect to the repository. Users will not be able to connect to
this repository until they update their connection settings. Also, because the repository's
ARN will change, changing the repository name will invalidate any IAM user policies that
rely on this repository's ARN.
2. To verify the changed name, run the list-repositories command and review the list of repository
names.
Synchronize Changes Between a Local Repo
and an AWS CodeCommit Repository
You use Git to synchronize changes between a local repo and the AWS CodeCommit repository
connected to the local repo.
To push changes from the local repo to the AWS CodeCommit repository, run git push remote-name
branch-name.
To pull changes to the local repo from the AWS CodeCommit repository, run git pull remote-name
branch-name.
API Version 2015-04-13
124
AWS CodeCommit User Guide
Delete a Branch
For both pushing and pulling, remote-name is the nickname the local repo uses for the AWS
CodeCommit repository; branch-name is the name of the branch on the AWS CodeCommit repository
to push to or pull from.
Tip
To get the nickname the local repo uses for the AWS CodeCommit repository, run git remote.
To get a list of branch names, run git branch. An asterisk (*) appears next to the name of the
current branch. (Alternatively, run git status to show the current branch name.)
Note
If you cloned the repository, from the local repo's perspective, remote-name is not the name
of the AWS CodeCommit repository. When you clone a repository, remote-name is set
automatically to origin.
For example, to push changes from the local repo to the master branch in the AWS CodeCommit
repository with the nickname origin:
git push origin master
Similarly, to pull changes to the local repo from the master branch in the AWS CodeCommit repository
with the nickname origin:
git pull origin master
Tip
If you add the -u option to git push, you will set upstream tracking information. For example,
if you run git push -u origin master), in the future you can run git push and git pull without
remote-name branch-name. To get upstream tracking information, run git remote show
remote-name (for example, git remote show origin).
For more options, see your Git documentation.
Delete a Branch in AWS CodeCommit
To delete a branch in an AWS CodeCommit repository, use Git from a local repo connected to the
AWS CodeCommit repository.
Note
You cannot use these instructions to delete a repository's default branch. If you want to
delete the default branch, you must create a new branch, make the new branch the default
branch, and then delete the old branch. To learn how to create a new branch, see Create a
Branch (p. 115). To learn how to make a branch the default branch, see Change Branch
Settings (p. 120).
Use Git to Delete a Branch
To use Git from a local repo to delete a branch in an AWS CodeCommit repository, follow these steps.
These steps assume you have already connected the local repo to the AWS CodeCommit repository.
For instructions, see Connect to a Repository (p. 76).
1. To delete the branch from the local repo, run the git branch -d branch-name command where
branch-name is the name of the branch you want to delete.
Tip
To get a list of branch names, run git branch --all.
API Version 2015-04-13
125
AWS CodeCommit User Guide
Delete a Tag
For example, to delete a branch in the local repo named MyNewBranch:
git branch -d MyNewBranch
2. To delete the branch from the AWS CodeCommit repository, run the git push remote-name --
delete branch-name command where remote-name is the nickname the local repo uses for the
AWS CodeCommit repository and branch-name is the name of the branch you want to delete
from the AWS CodeCommit repository.
Tip
To get a list of AWS CodeCommit repository names along with their URLs, run the git
remote -v command.
For example, to delete a branch named MyNewBranch in the AWS CodeCommit repository named
origin:
git push origin --delete MyNewBranch
Tip
This command will not delete a branch if it is the default branch.
For more options, see your Git documentation.
Delete a Tag in AWS CodeCommit
To delete a tag in an AWS CodeCommit repository, use Git from a local repo connected to the AWS
CodeCommit repository. .
Use Git to Delete a Tag
To use Git from a local repo to delete a tag in an AWS CodeCommit repository, follow these steps.
These steps assume you have already connected the local repo to the AWS CodeCommit repository.
For instructions, see Connect to a Repository (p. 76).
1. To delete the tag from the local repo, run the git tag -d tag-name command where tag-name is
the name of the tag you want to delete.
Tip
To get a list of tag names, run git tag.
For example, to delete a tag in the local repo named beta:
git tag -d beta
2. To delete the tag from the AWS CodeCommit repository, run the git push remote-name --delete
tag-name command where remote-name is the nickname the local repo uses for the AWS
CodeCommit repository and tag-name is the name of the tag you want to delete from the AWS
CodeCommit repository.
Tip
To get a list of AWS CodeCommit repository names along with their URLs, run the git
remote -v command.
For example, to delete a tag named beta in the AWS CodeCommit repository named origin:
API Version 2015-04-13
126

AWS CodeCommit User Guide
Delete a Repository
git push origin --delete beta
Delete an AWS CodeCommit Repository
To delete a local repo, use your local machine's directory and file management tools. To delete an
AWS CodeCommit repository, use the AWS CLI or the AWS CodeCommit console.
Topics
•Use the AWS CodeCommit Console to Delete a Repository (p. 127)
•Delete a Local Repo (p. 127)
•Use the AWS CLI to Delete an AWS CodeCommit Repository (p. 127)
Use the AWS CodeCommit Console to Delete a
Repository
To use the AWS CodeCommit console to delete an AWS CodeCommit repository, follow these steps.
Important
After you delete an AWS CodeCommit repository, you will no longer be able to clone it to any
local repo or shared repo. You will also no longer be able to pull data from it, or push data to it,
from any local repo or shared repo. This action cannot be undone.
1. Open the AWS CodeCommit console at https://console.aws.amazon.com/codecommit.
2. In the list of repositories, choose the name of the repository you want to delete.
3. In the navigation pane, choose Settings.
4. Choose Delete repository. In the box next to Type the name of the repository to confirm
deletion, type the repository's name, and then choose Delete. The repository is permanently
deleted.
Delete a Local Repo
Use your local machine's directory and file management tools to delete the directory that contains the
local repo.
Deleting a local repo does not delete any AWS CodeCommit repository to which it might be connected.
Use the AWS CLI to Delete an AWS CodeCommit
Repository
To use AWS CLI commands with AWS CodeCommit, install the AWS CLI. For more information, see
Command Line Reference (p. 140).
To use the AWS CLI to delete an AWS CodeCommit repository, run the delete-repository command,
specifying the name of the AWS CodeCommit repository to delete (with the --repository-name
option).
Important
After you delete an AWS CodeCommit repository, you will no longer be able to clone it to any
local repo or shared repo. You will also no longer be able to pull data from it, or push data to it,
from any local repo or shared repo. This action cannot be undone.
API Version 2015-04-13
127
AWS CodeCommit User Guide
Push Commits to Two Repositories
Tip
To get the AWS CodeCommit repository's name, run the list-repositories (p. 109) command.
For example, to delete a repository named MyDemoRepo:
For Linux, OS X, or Unix:
aws codecommit delete-repository \
--repository-name MyDemoRepo
For Windows:
aws codecommit delete-repository --repository-name MyDemoRepo
If successful, the ID of the AWS CodeCommit repository that was permanently deleted will appear in
the output:
{
"repositoryId": "f7579e13-b83e-4027-aaef-650c0EXAMPLE"
}
Deleting an AWS CodeCommit repository does not delete any local repos that may be connected to it.
Push Commits to an Additional Git Repository
You can configure your local repo to push changes to two remote repositories. For example, you might
want to continue using your existing Git repository solution while you try out AWS CodeCommit. Follow
these basic steps to push changes in your local repo to both AWS CodeCommit and a separate Git
repository.
Tip
If you do not have a current Git repository, you can create an empty one on a service other
than AWS CodeCommit and then migrate your AWS CodeCommit repository to it. You should
follow steps similar to the ones in Migrate to AWS CodeCommit (p. 53).
1. From the command prompt or terminal, switch to your local repo directory and run the git remote -
v command. You should see output similar to the following:
For HTTPS:
origin https://git-codecommit.us-east-1.amazonaws.com/v1/repos/MyDemoRepo
(fetch)
origin https://git-codecommit.us-east-1.amazonaws.com/v1/repos/MyDemoRepo
(push)
For SSH:
origin ssh://git-codecommit.us-east-1.amazonaws.com/v1/repos/MyDemoRepo
(fetch)
origin ssh://git-codecommit.us-east-1.amazonaws.com/v1/repos/MyDemoRepo
(push)
2. Run the git remote set-url --add --push origin git-repository-name command where git-
repository-name is the URL and name of the Git repository where you want to host your code.
This changes the push destination of origin to that Git repository.
API Version 2015-04-13
128
AWS CodeCommit User Guide
Push Commits to Two Repositories
Note
git remote set-url --add --push overrides the default URL for pushes, so you will have to
run this command twice, as demonstrated in later steps.
For example, the following command changes the push of origin to some-URL/
MyDestinationRepo:
git remote set-url --add --push origin some-URL/MyDestinationRepo
This command returns nothing.
Tip
If you are pushing to a Git repository that requires credentials, make sure you configure
those credentials in a credential helper or in the configuration of the some-URL string;
otherwise, your pushes to that repository will fail.
3. Run the git remote -v command again, which should create output similar to the following:
For HTTPS:
origin https://git-codecommit.us-east-1.amazonaws.com/v1/repos/MyDemoRepo
(fetch)
origin some-URL/MyDestinationRepo (push)
For SSH:
origin ssh://git-codecommit.us-east-1.amazonaws.com/v1/repos/MyDemoRepo
(fetch)
origin some-URL/MyDestinationRepo (push)
4. Now add the AWS CodeCommit repository. Run git remote set-url --add --push origin again,
this time with the URL and repository name of your AWS CodeCommit repository.
For example, the following command adds the push of origin to https://git-codecommit.us-
east-1.amazonaws.com/v1/repos/MyDemoRepo:
For HTTPS:
git remote set-url --add --push origin https://git-codecommit.us-
east-1.amazonaws.com/v1/repos/MyDemoRepo
For SSH:
git remote set-url --add --push origin ssh://git-codecommit.us-
east-1.amazonaws.com/v1/repos/MyDemoRepo
This command returns nothing.
5. Run the git remote -v command again, which should create output similar to the following:
For HTTPS:
origin https://git-codecommit.us-east-1.amazonaws.com/v1/repos/MyDemoRepo
(fetch)
origin some-URL/MyDestinationRepo (push)
API Version 2015-04-13
129
AWS CodeCommit User Guide
Push Commits to Two Repositories
origin https://git-codecommit.us-east-1.amazonaws.com/v1/repos/MyDemoRepo
(push)
For SSH:
origin ssh://git-codecommit.us-east-1.amazonaws.com/v1/repos/MyDemoRepo
(fetch)
origin some-URL/MyDestinationRepo (push)
origin ssh://git-codecommit.us-east-1.amazonaws.com/v1/repos/MyDemoRepo
(push)
You now have two Git repositories as the destination for your pushes, but your pushes will go to
some-URL/MyDestinationRepo first. If the push to that repository fails, your commits will not be
pushed to either repository.
Tip
If the other repository requires credentials you want to enter manually, consider changing
the order of the pushes so that you push to AWS CodeCommit first. Run git remote set-
url --delete to delete the repository that is pushed to first, and then run git remote set-url
--add to add it again so that it becomes the second push destination in the list.
For more options, see your Git documentation.
6. To verify you are now pushing to both remote repositories, use a text editor to create the following
text file in your local repo:
bees.txt
-------
Bees are flying insects closely related to wasps and ants, and are known
for their role in pollination and for producing honey and beeswax.
7. Run git add to stage the change in your local repo:
git add bees.txt
8. Run git commit to commit the change in your local repo:
git commit -m "Added bees.txt"
9. To push the commit from the local repo to your remote repositories, run git push -u remote-
name branch-name where remote-name is the nickname the local repo uses for the remote
repositories and branch-name is the name of the branch to push to the repository.
Tip
You only have to use the -u option the first time you push. The upstream tracking
information will be set.
For example, running git push -u origin master would show the push went to both remote
repositories in the expected branches, with output similar to the following:
For HTTPS:
Counting objects: 5, done.
Delta compression using up to 4 threads.
Compressing objects: 100% (3/3), done.
Writing objects: 100% (3/3), 5.61 KiB | 0 bytes/s, done.
Total 3 (delta 1), reused 0 (delta 0)
To some-URL/MyDestinationRepo
a5ba4ed..250f6c3 master -> master
API Version 2015-04-13
130

AWS CodeCommit User Guide
Push Commits to Two Repositories
Counting objects: 5, done.
Delta compression using up to 4 threads.
Compressing objects: 100% (3/3), done.
Writing objects: 100% (3/3), 5.61 KiB | 0 bytes/s, done.
Total 3 (delta 1), reused 0 (delta 0)
remote:
To https://git-codecommit.us-east-1.amazonaws.com/v1/repos/MyDemoRepo
a5ba4ed..250f6c3 master -> master
For SSH:
Counting objects: 5, done.
Delta compression using up to 4 threads.
Compressing objects: 100% (3/3), done.
Writing objects: 100% (3/3), 5.61 KiB | 0 bytes/s, done.
Total 3 (delta 1), reused 0 (delta 0)
To some-URL/MyDestinationRepo
a5ba4ed..250f6c3 master -> master
Counting objects: 5, done.
Delta compression using up to 4 threads.
Compressing objects: 100% (3/3), done.
Writing objects: 100% (3/3), 5.61 KiB | 0 bytes/s, done.
Total 3 (delta 1), reused 0 (delta 0)
remote:
To ssh://git-codecommit.us-east-1.amazonaws.com/v1/repos/MyDemoRepo
a5ba4ed..250f6c3 master -> master
For more options, see your Git documentation.
API Version 2015-04-13
131

AWS CodeCommit User Guide
Troubleshooting AWS
CodeCommit
The following information might help you troubleshoot common issues in AWS CodeCommit.
Topics
•Access Error: Prompted for User Name When Connecting to an AWS CodeCommit
Repository (p. 133)
•Access Error: Public Key Denied When Connecting to an AWS CodeCommit Repository (p. 133)
•Access Error: Public Key Uploads Successfully to IAM But Connection Fails on Linux, OS X, or
Unix Systems (p. 133)
•Access Error: Encryption Key Access Denied for an AWS CodeCommit Repository from the
Console or the AWS CLI (p. 134)
•Authentication Challenge: Authenticity of Host Can't Be Established When Connecting to an AWS
CodeCommit Repository (p. 134)
•Console Error: Cannot Browse the Code in an AWS CodeCommit Repository from the
Console (p. 135)
•Git Error: error: RPC failed; result=56, HTTP code = 200 fatal: The remote end hung up
unexpectedly (p. 135)
•Git Error: Too many reference update commands (p. 135)
•Git Error: push via HTTPS is broken in some versions of Git (p. 135)
•Git Error: 'gnutls_handshake() failed' (p. 136)
•Git Error: Git cannot find the AWS CodeCommit repository or does not have permission to access
the repository (p. 136)
•IAM Error: 'Invalid format' when attempting to add a public key to IAM (p. 136)
•Git for Mac OS X: I Configured the Credential Helper Successfully, but Now I Am Denied Access to
My Repository (403) (p. 136)
•Git for Windows: I Installed Git for Windows, but I Am Denied Access to My Repository
(403) (p. 137)
•Trigger Error: A Repository Trigger Does Not Run When Expected (p. 138)
•Turn on Debugging (p. 138)
API Version 2015-04-13
132

AWS CodeCommit User Guide
Access Error: Prompted for User Name When
Connecting to an AWS CodeCommit Repository
Access Error: Prompted for User Name
When Connecting to an AWS CodeCommit
Repository
Problem: When you try to use Git to communicate with an AWS CodeCommit repository, a message
appears prompting you for your AWS user name.
Possible fixes: Configure your AWS profile or make sure the profile you are using is the one you
configured for working with AWS CodeCommit. For more information about setting up, see Setting Up
(p. 4). For more information about IAM, access keys, and secret keys, see Managing Access Keys for
IAM Users and How Do I Get Credentials?.
Access Error: Public Key Denied When
Connecting to an AWS CodeCommit
Repository
Problem: When you try to use an SSH endpoint to communicate with an AWS CodeCommit
repository, an error message appears containing the phrase Error: public key denied.
Possible fixes: Configure a public and private SSH key pair, and then associate the public key with
your IAM user. For more information about configuring SSH, see For SSH Connections on Linux, OS
X, or Unix (p. 15) and For SSH Connections on Windows (p. 19).
Access Error: Public Key Uploads
Successfully to IAM But Connection Fails on
Linux, OS X, or Unix Systems
Problem: When you try to connect to an SSH endpoint to communicate with an AWS CodeCommit
repository, either when testing the connection or cloning a repository, the connection fails or is refused.
Possible fixes: The SSH Key ID assigned to your public key in IAM might not be associated with your
connection attempt. You might not have configured a config file (p. 18), or you might have provided the
ID of the IAM user instead of the key ID.
The SSH Key ID can be found in the IAM console in the profile for your IAM user:
API Version 2015-04-13
133

AWS CodeCommit User Guide
Access Error: Encryption Key Access
Denied for an AWS CodeCommit Repository
from the Console or the AWS CLI
Try testing the connection with the following command:
ssh Your-SSH-Key-ID@git-codecommit.us-east-1.amazonaws.com
If you see a success message after confirming the connection, your SSH Key ID is valid. Edit your
config file to associate your connection attempts with your public key in IAM. If you do not want to edit
your config file for some reason, you can preface all connection attempts to your repository with your
SSH Key ID. For example, if you wanted to clone a repository named MyDemoRepo without modifying
your config file to associate your connection attempts, you would type the following command:
git clone ssh://Your-SSH-Key-ID@git-codecommit.us-east-1.amazonaws.com/v1/
repos/MyDemoRepo my-demo-repo
For more information, see For SSH Connections on Linux, OS X, or Unix (p. 15).
Access Error: Encryption Key Access Denied
for an AWS CodeCommit Repository from the
Console or the AWS CLI
Problem: When you try to access AWS CodeCommit from the console or the AWS CLI, an error
message appears containing the phrase EncryptionKeyAccessDeniedException or User is
not authorized for the KMS default master key for CodeCommit 'aws/codecommit'
in your account.
Possible fixes: The most common cause for this error is that your AWS account is not subscribed
to AWS Key Management Service, which is required for AWS CodeCommit. Open the IAM console,
choose Encryption Keys, and then choose Get Started Now. If you see a message that you are not
currently subscribed to the AWS Key Management Service service, follow the instructions on that page
to subscribe. For more information about AWS CodeCommit and AWS Key Management Service, see
Encryption (p. 161).
Authentication Challenge: Authenticity of Host
Can't Be Established When Connecting to an
AWS CodeCommit Repository
Problem: When you try to use an SSH endpoint to communicate with an AWS CodeCommit
repository, a warning message appears containing the phrase The authenticity of host
'host-name' can't be established.
Possible fixes: Your credentials might not be set up correctly. Follow the instructions in For SSH
Connections on Linux, OS X, or Unix (p. 15) or For SSH Connections on Windows (p. 19).
If you have followed those steps and the problem persists, someone might be attempting a man-in-the-
middle attack. When you see the following message, type no, and press Enter.
Are you sure you want to continue connecting (yes/no)?
API Version 2015-04-13
134

AWS CodeCommit User Guide
Console Error: Cannot Browse the Code in an
AWS CodeCommit Repository from the Console
Make sure the fingerprint and public key for AWS CodeCommit connections match those documented
in the SSH setup topics before you continue with the connection.
Console Error: Cannot Browse the Code in
an AWS CodeCommit Repository from the
Console
Problem: When you try to browse the contents of a repository from the console, an error message
appears denying access.
Possible fixes: The most common cause for this error is that an IAM policy applied to your AWS
account denies one or more of the permissions required for browsing code from the AWS CodeCommit
console. For more information about AWS CodeCommit access permissions and browsing, see Access
Permissions Reference (p. 147).
Git Error: error: RPC failed; result=56, HTTP
code = 200 fatal: The remote end hung up
unexpectedly
Problem: When pushing a large change, a large number of changes, or a large repository, long-
running HTTPS connections are often terminated prematurely due to networking issues or firewall
settings.
Possible fixes: Push with SSH instead, or when migrating a large repository, follow the steps in
Migrate a Repository in Increments (p. 67).
Git Error: Too many reference update
commands
Problem: The maximum number of reference updates per push is 2,000. This error appears when the
push contains more than 2,000 reference updates.
Possible fixes: Try pushing branches and tags individually with git push --all and git push
--tags. If you have too many tags, split the tags into multiple pushes. For more information, see
Limits (p. 163).
Git Error: push via HTTPS is broken in some
versions of Git
Problem: An issue with the curl update to 7.41.0 causes SSPI-based digest authentication to fail.
Known affected versions of Git include 1.9.5.msysgit.1.
Possible fixes: Check your version of Git for known issues or use an earlier or later version. For more
information about mysysgit, see Push to HTTPS Is Broken in the GitHub forums.
API Version 2015-04-13
135

AWS CodeCommit User Guide
Git Error: 'gnutls_handshake() failed'
Git Error: 'gnutls_handshake() failed'
Problem: In Linux, when you try to use Git to communicate with an AWS CodeCommit repository, an
error message appears containing the phrase error: gnutls_handshake() failed.
Possible fixes: Compile Git against OpenSSL. For one approach, see "Error: gnutls_handshake()
failed" When Connecting to HTTPS Servers in the Ask Ubuntu forums.
Alternatively, use SSH instead of HTTPS to communicate with AWS CodeCommit repositories.
Git Error: Git cannot find the AWS
CodeCommit repository or does not have
permission to access the repository
Problem: A trailing slash in the connection string can cause connection attempts to fail.
Possible fixes: Make sure that you have provided the correct name and connection string for
the repository, and that there are no trailing slashes. For more information, see Connect to a
Repository (p. 76).
IAM Error: 'Invalid format' when attempting to
add a public key to IAM
Problem: In IAM, when attempting to set up to use SSH with AWS CodeCommit, an error message
appears containing the phrase Invalid format when you attempt to add your public key.
Possible fixes: IAM accepts public keys in the OpenSSH format only. If you provide your public key
in another format, or if the key does not contain the required number of bits, you will see this error.
This problem most commonly occurs when the public/private key pairs are generated on Windows
computers. To generate a key pair and copy the OpenSSH format required by IAM, see Generate a
public/private key pair (p. 21).
Git for Mac OS X: I Configured the Credential
Helper Successfully, but Now I Am Denied
Access to My Repository (403)
Problem: On Mac OS X, the credential helper does not seem to access or use your credentials as
expected.
Possible fixes: The default version of Git released on OS X uses the Keychain Access utility to
save generated credentials. For security reasons, the password generated for access to your AWS
CodeCommit repository is temporary, so the credentials stored in the keychain will stop working after
about 15 minutes. If you are only accessing Git with AWS CodeCommit, try the following:
1. Using Terminal, determine where Git is installed on the local machine:
API Version 2015-04-13
136

AWS CodeCommit User Guide
Git for Windows: I Installed Git for Windows,
but I Am Denied Access to My Repository (403)
$ which git
/usr/local/git/bin/git
2. Find your Git configuration file. You can use the Finder utility or you can use the find command
with superuser permissions (for example, $ sudo find -name ".gitconfig"). Edit the Git config file:
$ nano /usr/local/git/etc/gitconfig
3. Comment out the following line of text:
# helper = osxkeychain
If, however, you are accessing other repositories with Git, you can configure the Keychain Access
utility so that it does not supply credentials for your AWS CodeCommit repositories. To configure the
Keychain Access utility:
1. Open the Keychain Access utility. (You can use Finder to locate it.)
2. Search for git-codecommit.us-east-1.amazonaws.com. Highlight the row, open the context
(right-click) menu, and then choose Get Info.
3. Choose the Access Control tab.
4. In Always allow access by these applications, choose git-credential-osxkeychain, and
then choose the minus sign to remove it from the list.
Note
After removing git-credential-osxkeychain from the list, you will see a pop-up
dialog box whenever you run a Git command. Choose Deny to continue. If you find the
pop-ups too disruptive, here are some alternatives:
• Connect to AWS CodeCommit using SSH instead of HTTPS. For more information, see
For SSH Connections on Linux, OS X, or Unix (p. 15).
• In the Keychain Access utility, on the Access Control tab for git-codecommit.us-
east-1.amazonaws.com, choose the Allow all applications to access this item
(access to this item is not restricted) option. This will prevent the pop-ups, but the
credentials will eventually expire (on average, this takes about 15 minutes) and you will
see a 403 error message. When this happens, you must delete the keychain item in
order to restore functionality.
• Install a version of Git that does not use the keychain by default.
• Consider a scripting solution for deleting the keychain item. To view a community-
generated sample of a scripted solution, see Mac OS X Script to Periodically Delete
Cached Credentials in the OS X Certificate Store (p. 45) in Product and Service
Integrations (p. 43).
Git for Windows: I Installed Git for Windows,
but I Am Denied Access to My Repository
(403)
Problem: By default, Git for Windows installs a Git Credential Manager utility that is not compatible
with AWS CodeCommit. When installed, it will cause connections to AWS CodeCommit to fail even
API Version 2015-04-13
137
AWS CodeCommit User Guide
Trigger Error: A Repository Trigger
Does Not Run When Expected
if the credential helper has been installed with the AWS CLI and configured for connections to AWS
CodeCommit.
Possible fixes: If possible, uninstall and reinstall Git for Windows. When installing Git for Windows,
clear the check box for the option for installing the Git Credential Manager utility. If you installed the Git
Credential Manager or another credential management utility and you do not want to uninstall it, you
can modify your .gitconfig file and add specific credential management for AWS CodeCommit:
1. Open Control Panel, choose Credential Manager, and remove any stored credentials for AWS
CodeCommit.
2. Open your .gitconfig file in any plain-text editor, such as Notepad.
Note
If you work with multiple Git profiles, you might have both local and global .gitconfig files.
Be sure to edit the appropriate file.
3. Add the following section to your .gitconfig file:
[credential "https://git-codecommit.us-east-1.amazonaws.com"]
helper = !aws codecommit credential-helper $@
UseHttpPath = true
4. Save the file, and then open a new command line session before you attempt to connect again.
You can also use this approach if you want to use the credential helper for AWS CodeCommit when
connecting to AWS CodeCommit repositories and another credential management system when
connecting to other hosted repositories, such as GitHub repositories.
To reset which credential helper is used as the default, you can use the --system option instead of --
global or --local when running the git config command.
Trigger Error: A Repository Trigger Does Not
Run When Expected
Problem: One or more triggers configured for a repository does not appear to run or does not run as
expected.
Possible fixes: If the target of the trigger is a AWS Lambda function, make sure you have configured
the function's resource policy for access by AWS CodeCommit. For more information, see Create a
Policy for AWS Lambda Integration (p. 151).
Alternatively, edit the trigger and make sure the events for which you want to trigger actions have been
selected and that the branches for the trigger include the branch where you want to see responses to
actions. Try changing the settings for the trigger to All repository events and All branches and then
testing the trigger. For more information, see Edit Triggers for a Repository (p. 95).
Turn on Debugging
Problem: I want to turn on debugging to get more information about my repository and how Git is
executing commands.
Possible fixes: Try the following:
1. At the terminal or command prompt, run the following commands on your local machine before
running Git commands:
API Version 2015-04-13
138

AWS CodeCommit User Guide
Turn on Debugging
On Linux, OS X, or Unix:
export GIT_TRACE_PACKET=1
export GIT_TRACE=1
export GIT_CURL_VERBOSE=1
On Windows:
set GIT_TRACE_PACKET=1
set GIT_TRACE=1
set GIT_CURL_VERBOSE=1
Note
Setting GIT_CURL_VERBOSE is useful for HTTPS connections only. SSH does not use the
libcurl library.
2. To get more information about your Git repository, create a shell script similar to the following, and
then run the script:
#!/bin/sh
gc_output=`script -q -c 'git gc' | grep Total`
object_count=$(echo $gc_output | awk -F ' |\(|\)' '{print $2}')
delta_count=$(echo $gc_output | awk -F ' |\(|\)' '{print $5}')
verify_pack_output=`git verify-pack -v objects/pack/pack-*.pack .git/
objects/pack/pack-*.pack 2>/dev/null`
largest_object=$(echo "$verify_pack_output" | grep blob | sort -k3nr |
head -n 1 | awk '{print $3/1024" KiB"}')
largest_commit=$(echo "$verify_pack_output" | grep 'tree\|commit\|tag' |
sort -k3nr | head -n 1 | awk '{print $3/1024" KiB"}')
longest_delta_chain=$(echo "$verify_pack_output" | grep chain | tail -n 1
| awk -F ' |:' '{print $4}')
branch_count=`git branch -a | grep remotes/origin | grep -v HEAD | wc -l`
if [ $branch_count -eq 0 ]; then
branch_count=`git branch -l | wc -l`
fi
echo "Size: `git count-objects -v | grep size-pack | awk '{print $2}'`
KiB"
echo "Branches: $branch_count"
echo "Tags: `git show-ref --tags | wc -l`"
echo "Commits: `git rev-list --all | wc -l`"
echo "Objects: $object_count"
echo "Delta objects: $delta_count"
echo "Largest blob: $largest_object"
echo "Largest commit/tag/tree: $largest_commit"
echo "Longest delta chain: $longest_delta_chain"
3. If these steps do not provide enough information for you to resolve the issue on your own, ask for
help on the AWS CodeCommit forum. Be sure to include relevant output from these steps in your
post.
API Version 2015-04-13
139
AWS CodeCommit User Guide
AWS CodeCommit Command
Line Reference
This reference will help you learn how to use AWS CLI.
To install and configure the AWS CLI
1. On your local machine, download and install the AWS CLI. This is a prerequisite for interacting
with AWS CodeCommit from the command line. For more information, see Getting Set Up with the
AWS Command Line Interface.
Note
AWS CodeCommit works only with AWS CLI versions 1.7.38 and later. To determine
which version of the AWS CLI you have installed, run the aws --version command.
To upgrade an older version of the AWS CLI to the latest version, follow the instructions
in Uninstalling the AWS CLI, and then follow the instructions in Installing the AWS
Command Line Interface.
2. Run this command to verify the AWS CodeCommit commands for the AWS CLI are installed:
aws codecommit help
This command should return a list of AWS CodeCommit commands.
3. Configure the AWS CLI with the configure command, as follows:
aws configure
When prompted, specify the AWS access key and AWS secret access key of the IAM user you will
use with AWS CodeCommit. Also, be sure to specify the us-east-1 region when prompted for
the default region name. AWS CodeCommit works with this region only. When prompted for the
default output format, specify json. For example:
AWS Access Key ID [None]: Type your target AWS access key ID here, and
then press Enter
AWS Secret Access Key [None]: Type your target AWS secret access key here,
and then press Enter
Default region name [None]: Type us-east-1 here, and then press Enter
Default output format [None]: Type json here, and then press Enter
API Version 2015-04-13
140

AWS CodeCommit User Guide
For more information about IAM, access keys, and secret keys, see How Do I Get Credentials?
and Managing Access Keys for IAM Users.
To view a list of all available AWS CodeCommit commands, run the following command:
aws codecommit help
To view information about a specific AWS CodeCommit command, run the following command, where
command-name is the name of the command (for example, create-repository):
aws codecommit command-name help
To learn how to use the commands in AWS CLI, go to one or more of the following sections:
•batch-get-repositories (p. 110)
•create-branch (p. 116)
•create-repository (p. 47)
•delete-repository (p. 127)
•get-branch (p. 113)
•get-repository (p. 110)
•get-repository-triggers (p. 96)
•list-branches (p. 112)
•list-repositories (p. 109)
•put-repository-triggers (p. 96)
•test-repository-triggers (p. 97)
•update-default-branch (p. 121)
•update-repository-description (p. 123)
•update-repository-name (p. 124)
API Version 2015-04-13
141

AWS CodeCommit User Guide
Configuration Variables
Basic Git Commands
You can use Git to work with a local repo and the AWS CodeCommit repository to which you've
connected the local repo.
The following are some basic examples of frequently used Git commands.
For more options, see your Git documentation.
Topics
•Configuration Variables (p. 142)
•Remote Repositories (p. 143)
•Commits (p. 144)
•Branches (p. 144)
•Tags (p. 145)
Configuration Variables
Lists all configuration variables. git config --list
Lists only local configuration variables. git config --local -l
Lists only system configuration variables. git config --system -l
Lists only global configuration variables. git config --global -l
Sets a configuration variable in the specified
configuration file. git config [--local | --global | --
system] variable-name variable-value
Edits a configuration file directly. Can also
be used to discover the location of a specific
configuration file. To exit edit mode, typically you
type :q (to exit without saving changes) or :wq
git config [--local | --global | --
system] --edit
API Version 2015-04-13
142

AWS CodeCommit User Guide
Remote Repositories
(to save changes and then exit), and then press
Enter.
Remote Repositories
Initializes a local repo in preparation for
connecting it to an AWS CodeCommit repository. git init
Can be used to set up a connection between
a local repo and a remote repository (such as
an AWS CodeCommit repository) using the
specified nickname the local repo has for the
AWS CodeCommit repository and the specified
URL to the AWS CodeCommit repository.
git remote add remote-name remote-url
Creates a local repo by making a copy of an
AWS CodeCommit repository at the specified
URL, in the specified subfolder of the current
folder on the local machine. This command also
creates a remote tracking branch for each branch
in the cloned AWS CodeCommit repository and
creates and checks out an initial branch that
is forked from the current default branch in the
cloned AWS CodeCommit repository.
git clone remote-url local-subfolder-
name
Shows the nickname the local repo uses for the
AWS CodeCommit repository. git remote
Shows the nickname and the URL the local
repo uses for fetches and pushes to the AWS
CodeCommit repository.
git remote -v
Pushes finalized commits from the local repo
to the AWS CodeCommit repository, using
the specified nickname the local repo has
for the AWS CodeCommit repository and the
specified branch. Also sets up upstream tracking
information for the local repo during the push.
git push -u remote-name branch-name
Pushes finalized commits from the local repo to
the AWS CodeCommit repository after upstream
tracking information is set.
git push
Pulls finalized commits to the local repo from
the AWS CodeCommit repository, using the
specified nickname the local repo has for the
AWS CodeCommit repository and the specified
branch
git pull remote-name branch-name
Pulls finalized commits to the local repo from
the AWS CodeCommit repository after upstream
tracking information is set.
git pull
Disconnects the local repo from the AWS
CodeCommit repository, using the specified
nickname the local repo has for the AWS
CodeCommit repository.
git remote rm remote-name
API Version 2015-04-13
143

AWS CodeCommit User Guide
Commits
Commits
Shows what has or hasn't been added to the
pending commit in the local repo. git status
Shows what has or hasn't been added to the
pending commit in the local repo in a concise
format.
(M = modified, A = added, D = deleted, and so on)
git status -sb
Shows changes between the pending commit
and the latest commit in the local repo. git diff HEAD
Adds specific files to the pending commit in the
local repo. git add [file-name-1 file-name-2
file-name-N | file-pattern]
Adds all new, modified, and deleted files to the
pending commit in the local repo. git add
Begins finalizing the pending commit in the
local repo, which displays an editor to provide a
commit message. After the message is entered,
the pending commit is finalized.
git commit
Finalizes the pending commit in the local repo,
including specifying a commit message at the
same time.
git commit -m "Some meaningful commit
comment"
Lists recent commits in the local repo. git log
Lists recent commits in the local repo in a graph
format. git log --graph
Lists recent commits in the local repo in a
predefined condensed format. git log --pretty=oneline
Lists recent commits in the local repo in a
predefined condensed format, with a graph. git log --graph --pretty=oneline
Lists recent commits in the local repo in a custom
format, with a graph.
(For more options, see Git Basics - Viewing the
Commit History)
git log --graph --pretty=format:"%H
(%h) : %cn : %ar : %s"
Branches
Lists all branches in the local repo with an
asterisk (*) displayed next to your current
branch.
git branch
Pulls information about all existing branches in
the AWS CodeCommit repository to the local
repo.
git fetch
API Version 2015-04-13
144

AWS CodeCommit User Guide
Tags
Lists all branches in the local repo and remote
tracking branches in the local repo. git branch -a
Lists only remote tracking branches in the local
repo. git branch -r
Creates a new branch in the local repo using the
specified branch name. git branch new-branch-name
Switches to another branch in the local repo
using the specified branch name. git checkout other-branch-name
Creates a new branch in the local repo using the
specified branch name, and then switches to it. git checkout -b new-branch-name
Pushes a new branch from the local repo to
the AWS CodeCommit repository using the
specified nickname the local repo has for the
AWS CodeCommit repository and the specified
branch name. Also sets up upstream tracking
information for the branch in the local repo during
the push.
git push -u remote-name new-branch-
name
Creates a new branch in the local repo using the
specified branch name. Then connects the new
branch in the local repo to an existing branch
in the AWS CodeCommit repository, using the
specified nickname the local repo has for the
AWS CodeCommit repository and the specified
branch name.
git branch --track new-branch-name
remote-name/remote-branch-name
Merges changes from another branch in the local
repo to the current branch in the local repo. git merge from-other-branch-name
Deletes a branch in the local repo unless it
contains work that has not been merged. git branch -d branch-name
Deletes a branch in the AWS CodeCommit
repository using the specified nickname the local
repo has for the AWS CodeCommit repository
and the specified branch name. (Note the use of
the colon (:).)
git push remote-name :branch-name
Tags
Lists all tags in the local repo. git tag
Pulls all tags from the AWS CodeCommit
repository to the local repo. git fetch --tags
Shows information about a specific tag in the
local repo. git show tag-name
Creates a "lightweight" tag in the local repo. git tag tag-name commit-id-to-point-
tag-at
Pushes a specific tag from the local repo to
the AWS CodeCommit repository using the git push remote-name tag-name
API Version 2015-04-13
145

AWS CodeCommit User Guide
Tags
specified nickname the local repo has for the
AWS CodeCommit repository and the specified
tag name.
Pushes all tags from the local repo to the AWS
CodeCommit repository using the specified
nickname the local repo has for the AWS
CodeCommit repository.
git push remote-name --tags
Deletes a tag in the local repo. git tag -d tag-name
Deletes a tag in the AWS CodeCommit
repository using the specified nickname the local
repo has for the AWS CodeCommit repository
and the specified tag name. (Note the use of the
colon (:).)
git push remote-name :tag-name
API Version 2015-04-13
146

AWS CodeCommit User Guide
AWS CodeCommit User Access
Permissions Reference
You can use IAM to allow users to work with only certain AWS CodeCommit resources and perform
only certain actions against those resources. For example, you might want to do this if you have a set
of users to whom you want to give read-only access to certain information in AWS CodeCommit; you
may have another set of users to whom you want to give the ability to only pull from AWS CodeCommit
repositories, and so on.
In the Setting Up (p. 4) instructions, you attached the AWSCodeCommitFullAccess managed policy to
an IAM user. That policy statement looked similar to this:
{
"Version": "2012-10-17",
"Statement" : [
{
"Effect" : "Allow",
"Action" : [
"codecommit:*"
],
"Resource" : "*"
}
]
}
The statement allows the IAM user to perform all available actions in AWS CodeCommit with all
available AWS CodeCommit resources associated with the AWS account. In practice, you might not
want to give all IAM users this much access.
IAM includes three different managed policies to help you manage access to AWS CodeCommit
repositories:
• AWSCodeCommitFullAccess
• AWSCodeCommitPowerUser
• AWSCodeCommitReadOnly
API Version 2015-04-13
147

AWS CodeCommit User Guide
You can apply the managed policies to IAM users or groups. You can also use these policies as
templates for your own policies to restrict permissions to a single repository, instead of all repositories
in AWS CodeCommit, which is the default setting.
• For an example of creating a customer managed policy for a specific AWS CodeCommit repository,
see Create IAM Policies for Your Repository (p. 50).
• For information about assuming roles, see Assuming a Role.
• For information about providing temporary access to AWS CodeCommit repositories, see Temporary
Access (p. 158).
The AWSCodeCommitFullAccess managed policy allows a user to perform all actions in AWS
CodeCommit with no restrictions. It contains the following policy statement:
{
"Version": "2012-10-17",
"Statement": [
{
"Effect": "Allow",
"Action": [
"codecommit:*"
],
"Resource": "*"
}
]
}
The AWSCodeCommitPowerUser managed policy allows users access to most of the functionality of
AWS CodeCommit, but does not allow users to delete AWS CodeCommit repositories. It contains the
following policy statement:
{
"Version": "2012-10-17",
"Statement": [
{
"Effect": "Allow",
"Action": [
"codecommit:BatchGetRepositories",
"codecommit:Get*",
"codecommit:List*",
"codecommit:CreateRepository",
"codecommit:CreateBranch",
"codecommit:Put*",
"codecommit:Test*",
"codecommit:Update*",
"codecommit:GitPull",
"codecommit:GitPush"
],
"Resource": "*"
}
]
}
You might want to modify this policy to apply to a specific AWS CodeCommit repository, instead of
all resources ("*"). You can then attach a modified version of this policy to IAM users or groups for
more precise control of your AWS CodeCommit resources. For examples, see Action and Resource
Syntax (p. 152) later in this topic.
API Version 2015-04-13
148
AWS CodeCommit User Guide
Attach a Policy to an IAM User
The AWSCodeCommitReadOnly managed policy allows users to list all available repositories and pull
content from, but not push changes to, the AWS CodeCommit repositories. It contains the following
policy statement:
{
"Version": "2012-10-17",
"Statement": [
{
"Effect": "Allow",
"Action": [
"codecommit:BatchGetRepositories",
"codecommit:Get*",
"codecommit:List*",
"codecommit:GitPull"
],
"Resource": "*"
}
]
}
Important
In addition to permissions granted to the user by managed policies or inline polices, AWS
CodeCommit requires permissions for AWS KMS actions the first time a repository is created.
An IAM user does not need explicit Allow permissions for these actions, but when creating
the first repository, the user must not have any policies attached that set the following
permissions to Deny:
"kms:Encrypt",
"kms:Decrypt",
"kms:ReEncrypt",
"kms:GenerateDataKey",
"kms:GenerateDataKeyWithoutPlaintext",
"kms:DescribeKey"
For more information about encryption and AWS CodeCommit, see Encryption (p. 161).
Topics
•Attach a Policy to an IAM User (p. 149)
•Create a Policy That Enables Cross-Account Access to an Amazon SNS Topic (p. 150)
•Create a Policy for AWS Lambda Integration (p. 151)
•Action and Resource Syntax (p. 152)
Attach a Policy to an IAM User
To attach a policy that restricts an IAM user to certain actions and resources in AWS CodeCommit, do
the following:
1. Sign in to the Identity and Access Management (IAM) console at https://console.aws.amazon.com/
iam/.
2. In the IAM console, in the navigation pane, choose Policies, and then choose Create Policy. (If a
Get Started button appears, choose it, and then choose Create Policy.)
3. Next to Create Your Own Policy, choose Select.
4. In the Policy Name box, type any value that will be easy to refer to later, if necessary.
API Version 2015-04-13
149

AWS CodeCommit User Guide
Create a Policy That Enables Cross-
Account Access to an Amazon SNS Topic
5. In the Policy Document box, type a policy that follows this format, and then choose Create
Policy:
{
"Version": "2012-10-17",
"Statement" : [
{
"Effect" : "Allow",
"Action" : [
"action-statement"
],
"Resource" : [
"resource-statement"
]
},
{
"Effect" : "Allow",
"Action" : [
"action-statement"
],
"Resource" : [
"resource-statement"
]
}
]
}
In the preceding statement, for action-statement and resource-statement, specify the
AWS CodeCommit actions and resources the IAM user is allowed to perform or access. (By
default, the IAM user will not have permissions unless a corresponding Allow statement is
explicitly stated.) You can add additional statements, as needed. The following sections describe
the format of allowed actions and resources for AWS CodeCommit. Syntax examples are provided
in these sections.
6. In the navigation pane, choose Users.
7. Choose the name of the IAM user to whom you want to attach the policy.
8. Choose the Permissions tab.
9. In Managed Policies, choose Attach Policy.
10. Select the policy that you just created, and then choose Attach Policy.
Create a Policy That Enables Cross-Account
Access to an Amazon SNS Topic
You can configure an AWS CodeCommit repository so that code pushes or other events trigger
actions, such as sending a notification from Amazon Simple Notification Service (Amazon SNS). You
do not need to configure additional IAM policies or permissions if you create the Amazon SNS topic
with the same account used to create the AWS CodeCommit repository. You can create the topic, and
then create the trigger for the repository. For more information, see Create a Trigger for an Amazon
SNS Topic (p. 82).
However, if you want to configure your trigger to use an Amazon SNS topic in another AWS account,
you must first configure that topic with a policy that allows AWS CodeCommit to publish to that topic.
From that other account, open the Amazon SNS console, choose the topic from the list, and in Other
topic actions, choose Edit topic policy. From the Advanced tab, modify the policy for the topic to
API Version 2015-04-13
150

AWS CodeCommit User Guide
Create a Policy for AWS Lambda Integration
allow AWS CodeCommit to publish to that topic. For example, if the policy is the default policy, you
would modify the policy as follows, changing the items in red italic text to match the values for
your repository, Amazon SNS topic, and account:
{
"Version": "2008-10-17",
"Id": "__default_policy_ID",
"Statement": [
{
"Sid": "__default_statement_ID",
"Effect": "Allow",
"Principal": {
"AWS": "*"
},
"Action": [
"SNS:Subscribe",
"SNS:ListSubscriptionsByTopic",
"SNS:DeleteTopic",
"SNS:GetTopicAttributes",
"SNS:Publish",
"SNS:RemovePermission",
"SNS:AddPermission",
"SNS:Receive",
"SNS:SetTopicAttributes"
],
"Resource": "arn:aws:sns:us-east-1:111111111111:NotMySNSTopic",
"Condition": {
"StringEquals": {
"AWS:SourceOwner": "111111111111"
}
}
},
{
"Sid": "CodeCommit-Policy_ID",
"Effect": "Allow",
"Principal": {
"Service": "codecommit.amazonaws.com"
},
"Action": "SNS:Publish",
"Resource": "arn:aws:sns:us-east-1:111111111111:NotMySNSTopic",
"Condition": {
"StringEquals": {
"AWS:SourceArn": "arn:aws:codecommit:us-
east-1:80398EXAMPLE:MyDemoRepo",
"AWS:SourceAccount": "80398EXAMPLE"
}
}
}
]
}
Create a Policy for AWS Lambda Integration
You can configure an AWS CodeCommit repository so that code pushes or other events trigger
actions, such as invoking a function in AWS Lambda. For more information, see Create a Trigger for a
Lambda Function (p. 88).
API Version 2015-04-13
151
AWS CodeCommit User Guide
Action and Resource Syntax
If you want your trigger to run a Lambda function directly (instead of using an Amazon SNS topic
to invoke the Lambda function), you must include a policy similar to the following in the function's
resource policy:
{
"Statement":{
"StatementId":"Id-1",
"Action":"lambda:InvokeFunction",
"Principal":"codecommit.amazonaws.com",
"SourceArn":"arn:aws:codecommit:us-east-1:80398EXAMPLE:MyDemoRepo",
"SourceAccount":"80398EXAMPLE"
}
}
You must also use the Lambda AddPermission command to grant permission for AWS CodeCommit
to invoke the function. For an example, see the To allow AWS CodeCommit to run the function (p. 90)
section of Create a Trigger for a Lambda Function (p. 88).
For more information about resource policies for Lambda functions, see AddPermission and The Pull/
Push Event Models in the Lambda User Guide.
Action and Resource Syntax
The following sections describe the format for specifying actions and resources.
Actions follow this general format:
codecommit:action
Where action is an available AWS CodeCommit operation, such as ListRepositories or
CreateBranch. To allow an action, use the "Effect" : "Allow" clause. To explicitly deny an
action, use the "Effect" : "Deny" clause. By default, all actions are denied, unless specified
otherwise in any other attached policy.
Currently, only AWS CodeCommit repositories are allowed as resources. Specified resources are
allowed (or denied) for the specified action.
Resources follow this general format:
arn:aws:codecommit:region:account:resource-specifier
Where region is a target region (such as us-east-1), account is the AWS account ID, and
resource-specifier is the repository name. Wildcard (*) characters can be used to specify a
partial repository name.
For example, the following specifies the AWS CodeCommit repository named MyDemoRepo registered
to the AWS account 111111111111 in the region us-east-1:
arn:aws:codecommit:us-east-1:111111111111:MyDemoRepo
The following specifies any AWS CodeCommit repository that begins with the name MyDemo registered
to the AWS account 111111111111 in the region us-east-1:
arn:aws:codecommit:us-east-1:111111111111:MyDemo*
API Version 2015-04-13
152

AWS CodeCommit User Guide
Branches
Topics
•Branches (p. 153)
•Git Pull and Push (p. 153)
•Information About Committed Code (p. 154)
•Repositories (p. 154)
•Triggers (p. 156)
•AWS CodePipeline Integration (p. 156)
Branches
Allowed actions include:
•CreateBranch to create a branch in an AWS CodeCommit repository.
•GetBranch to get details about a branch in an AWS CodeCommit repository.
•ListBranches to get a list of branches in an AWS CodeCommit repository.
•UpdateDefaultBranch to change the default branch in an AWS CodeCommit repository.
The following example allows the specified user to get details about branches in the AWS CodeCommit
repository named MyDemoRepo:
{
"Version": "2012-10-17",
"Statement" : [
{
"Effect" : "Allow",
"Action" : [
"codecommit:GetBranch"
],
"Resource" : "arn:aws:codecommit:us-east-1:111111111111:MyDemoRepo"
}
]
}
Git Pull and Push
In AWS CodeCommit, GitPull affects any Git client command where data is retrieved from the
server, including git fetch, git clone, and so on. Similarly, GitPush affects any Git client command
where data is sent to the server. Allowed actions include:
•GitPull to pull information from an AWS CodeCommit repository to a local repo.
•GitPush to push information from a local repo to an AWS CodeCommit repository.
The following example allows the specified user to pull from, and push to, the AWS CodeCommit
repository named MyDemoRepo:
{
"Version": "2012-10-17",
"Statement" : [
{
"Effect" : "Allow",
"Action" : [
API Version 2015-04-13
153

AWS CodeCommit User Guide
Information About Committed Code
"codecommit:GitPull",
"codecommit:GitPush"
],
"Resource" : "arn:aws:codecommit:us-east-1:111111111111:MyDemoRepo"
}
]
}
Information About Committed Code
Allowed actions include:
•GetBlob to view the encoded content of an individual file in an AWS CodeCommit repository from
the AWS CodeCommit console.
•GetCommit to return information about a commit.
•GetCommitHistory to return information about the history of commits in a repository.
•GetObjectIdentifier to resolve blobs, trees, and commits to their identifier.
•GetReferences to return all references, such as branches and tags.
•GetTree to view the contents of a specified tree in an AWS CodeCommit repository from the AWS
CodeCommit console.
Note
Setting GetTree to Deny will prevent users from navigating the contents of a repository in
the console, but will not block users from viewing the contents of a file in the repository (for
example, if they are sent a link to the file in email). Setting GetBlob to Deny will prevent
users from viewing the contents of files, but will not block users from browsing the structure
of a repository. Setting GetCommit to Deny will prevent users from retrieving details about
commits. Setting GetObjectIdentifier to Deny will block most of the functionality of code
browsing.
If you set all three of these actions to Deny in a policy, a user with that policy will not be able
to browse code in the AWS CodeCommit console.
The following example allows the specified user to use the AWS CodeCommit console to view the
contents of files in the AWS CodeCommit repository named MyDemoRepo, but will not allow that user to
browse the contents of the repository or navigate its structure:
{
"Version": "2012-10-17",
"Statement" : [
{
"Effect" : "Allow",
"Action" : [
"codecommit:GetBlob",
"codecommit:GetObjectIdentifier"
],
"Resource" : "arn:aws:codecommit:us-east-1:111111111111:MyDemoRepo"
}
]
}
Repositories
Allowed actions include:
API Version 2015-04-13
154

AWS CodeCommit User Guide
Repositories
•BatchGetRepositories to get information about multiple repositories in AWS CodeCommit in an
AWS account. In Resource, you must specify the names of all of the AWS CodeCommit repositories
for which a user is allowed (or denied) information.
•CreateRepository to create an AWS CodeCommit repository.
•DeleteRepository to delete an AWS CodeCommit repository.
•GetRepository to get information about a single AWS CodeCommit repository.
•ListRepositories to get a list of the names and system IDs of multiple AWS CodeCommit
repositories for an AWS account. The only allowed value for Resource for this action is all
repositories (*).
•UpdateRepositoryDescription to change the description of an AWS CodeCommit repository.
•UpdateRepositoryName to change the name of an AWS CodeCommit repository. In Resource,
you must specify both the AWS CodeCommit repositories that are allowed to be changed and the
new repository names.
The following example allows the specified user to get information about the AWS CodeCommit
repository named MyDestinationRepo and all AWS CodeCommit repositories that start with the
name MyDemo:
{
"Version": "2012-10-17",
"Statement" : [
{
"Effect" : "Allow",
"Action" : [
"codecommit:BatchGetRepositories"
],
"Resource" : [
"arn:aws:codecommit:us-east-1:111111111111:MyDestinationRepo",
"arn:aws:codecommit:us-east-1:111111111111:MyDemo*"
]
}
]
}
The following example allows the specified user to get a list of the names and repository IDs of all AWS
CodeCommit repositories to which the user has access:
{
"Version": "2012-10-17",
"Statement" : [
{
"Effect" : "Allow",
"Action" : [
"codecommit:ListRepositories"
],
"Resource" : "*"
}
]
}
The following example allows the specified user to change the name of an AWS CodeCommit
repository from MyDemoRepo to MyRenamedDemoRepo or from MyRenamedDemoRepo to MyDemoRepo:
{
"Version": "2012-10-17",
API Version 2015-04-13
155

AWS CodeCommit User Guide
Triggers
"Statement" : [
{
"Effect" : "Allow",
"Action" : [
"codecommit:UpdateRepositoryName"
],
"Resource" : [
"arn:aws:codecommit:us-east-1:111111111111:MyDemoRepo",
"arn:aws:codecommit:us-east-1:111111111111:MyRenamedDemoRepo"
]
}
]
}
Triggers
Allowed actions include:
•GetRepositoryTriggers to return information about triggers configured for a repository.
•PutRepositoryTriggers to create, edit, or delete triggers for a repository.
•TestRepositoryTriggers to test the functionality of a repository trigger by sending data to the
topic or function configured for the trigger.
The following example allows the specified user to use the AWS CodeCommit console to view
information about triggers configured in the AWS CodeCommit repository named MyDemoRepo, but
would not allow that user to create, edit, delete, or test them:
{
"Version": "2012-10-17",
"Statement" : [
{
"Effect" : "Allow",
"Action" : [
"codecommit:GetRepositoryTriggers",
],
"Resource" : "arn:aws:codecommit:us-east-1:111111111111:MyDemoRepo"
}
]
}
AWS CodePipeline Integration
Some permissions are required in order for AWS CodePipeline to use an AWS CodeCommit repository
in a source action for a pipeline. All of these permissions must be granted to the service role for AWS
CodePipeline for integration to work as expected. If these permissions are not set in the service role or
are set to Deny, the pipeline will not run automatically when a change is made to the repository, and
changes cannot be released manually. Allowed actions include:
•GetBranch to get details about a branch in an AWS CodeCommit repository.
•GetCommit to return information about a commit to the service role for AWS CodePipeline.
•UploadArchive to allow the service role for AWS CodePipeline to upload repository changes into a
pipeline.
•GetUploadArchiveStatus to determine the status of the upload of the archive: whether it is in
progress, complete, cancelled, or if an error occurred.
API Version 2015-04-13
156

AWS CodeCommit User Guide
AWS CodePipeline Integration
•CancelUploadArchive to cancel the upload of an archive to a pipeline.
The following example shows the portion of a policy for the AWS CodePipeline service role that must
be included or added in order for AWS CodePipeline to be able to use an AWS CodeCommit repository
in a source action for a pipeline:
{
"Action": [
"codecommit:CancelUploadArchive",
"codecommit:GetBranch",
"codecommit:GetCommit",
"codecommit:GetUploadArchiveStatus",
"codecommit:UploadArchive"
],
"Resource": "*",
"Effect": "Allow"
}
API Version 2015-04-13
157

AWS CodeCommit User Guide
Temporary Access to AWS
CodeCommit Repositories
You can allow users temporary access your AWS CodeCommit repositories. Typically, you do this to
allow IAM users to access AWS CodeCommit repositories in separate AWS accounts (a technique
known as cross-account access). You can also do this for users who want to (or must) authenticate
through methods such as:
• Security Assertion Markup Language (SAML)
• Multi-factor authentication (MFA)
• Federation
• Login with Amazon
• Amazon Cognito
• Facebook
• Google
• OpenID Connect (OIDC)-compatible identity provider
Note
The following information applies only to the use of HTTPS to connect to AWS CodeCommit
repositories. You cannot use SSH to connect to AWS CodeCommit repositories with
temporary access credentials.
Tip
You don't need to complete the following instructions if all of the following requirements are
true:
• You are signed in to an Amazon EC2 instance.
• You are using Git and HTTPS to connect from the Amazon EC2 instance to AWS
CodeCommit repositories.
• The Amazon EC2 instance has an attached IAM instance profile that contains the access
permissions described in Setting Up.
• You have correctly installed and configured the Git credential helper on the Amazon EC2
instance as described in Setting Up.
Amazon EC2 instances that meet the preceding requirements are already set up to
communicate temporary access credentials to AWS CodeCommit on your behalf.
To give users temporarily access to your AWS CodeCommit repositories, complete the following steps.
API Version 2015-04-13
158

AWS CodeCommit User Guide
Step 1: Complete the Prerequisites
Step 1: Complete the Prerequisites
Complete the appropriate setup steps to provide a user with temporary access to your AWS
CodeCommit repositories:
• For cross-account access, see Walkthrough: Delegating Access Across AWS Accounts Using IAM
Roles.
• For SAML and federation, see Using Your Organization's Authentication System to Grant Access to
AWS Resources and About AWS STS SAML 2.0-based Federation.
• For MFA, see Using Multi-Factor Authentication (MFA) Devices with AWS and Creating Temporary
Security Credentials to Enable Access for IAM Users.
• For Login with Amazon, Amazon Cognito, Facebook, Google, or any OIDC-compatible identity
provider, see About AWS STS Web Identity Federation.
Regardless of the setup steps you follow, use the information in Access Permissions
Reference (p. 147) to specify the AWS CodeCommit permissions you want to temporarily grant the
user.
Step 2: Get Temporary Access Credentials
Depending on the way you set up temporary access, instruct the user to get temporary access
credentials through one of the following approaches:
• For cross-account access, call the AWS CLI assume-role command or call the AWS STS
AssumeRole API.
• For SAML, call the AWS CLI assume-role-with-saml command or the AWS STS
AssumeRoleWithSAML API.
• For federation, call the AWS CLI assume-role or get-federation-token commands or the AWS STS
AssumeRole or GetFederationToken APIs.
• For MFA, call the AWS CLI get-session-token command or the AWS STS GetSessionToken API.
• For Login with Amazon, Amazon Cognito, Facebook, Google, or any OIDC-compatible
identity provider, call the AWS CLI assume-role-with-web-identity command or the AWS STS
AssumeRoleWithWebIdentity API.
Regardless of the AWS CLI command or API the user calls, the user should receive back a set of
temporary access credentials, which include an AWS access key ID, a secret access key, and a
session token. The user must note these three values because they will be used in the next step.
Step 3: Configure the AWS CLI with Your
Temporary Access Credentials
The user must configure his or her development machine to use those credentials to access the AWS
CodeCommit repositories:
1. Follow the instructions in Setting Up (p. 4) to set up the AWS CLI. Use the aws configure
command to configure a profile.
Note
Before you continue, make sure the git config file is configured to use the AWS profile you
configured in the AWS CLI.
API Version 2015-04-13
159
AWS CodeCommit User Guide
Step 4: Access the AWS CodeCommit Repositories
2. Use one of the following approaches to associate the temporary access credentials with the user's
AWS CLI named profile. Do not use the aws configure command.
• In the ~/.aws/credentials file (for Linux) or the %UserProfile%.aws\credentials
file (for Windows), add to the user's AWS CLI named profile the aws_access_key_id,
aws_secret_access_key, and aws_session_token setting values, for example:
[CodeCommitProfileName]
aws_access_key_id=TheAccessKeyID
aws_secret_access_key=TheSecretAccessKey
aws_session_token=TheSessionToken
Or:
• Set the AWS_ACCESS_KEY_ID, AWS_SECRET_ACCESS_KEY, and
AWS_SESSION_TOKEN environment variables, for example:
For Linux, OS X, or Unix:
export AWS_ACCESS_KEY_ID=TheAccessKey
export AWS_SECRET_ACCESS_KEY=TheSecretAccessKey
export AWS_SESSION_TOKEN=TheSessionToken
For Windows:
set AWS_ACCESS_KEY_ID=TheAccessKey
set AWS_SECRET_ACCESS_KEY=TheSecretAccessKey
set AWS_SESSION_TOKEN=TheSessionToken
For more information about either approach, see Configuring the AWS Command Line Interface in
the AWS Command Line Interface User Guide.
3. Set up the Git credential helper for Linux, OS X, or Unix (p. 7) or for Windows (p. 11) with the
user's AWS CLI named profile that is associated with the temporary access credentials. As you
follow these directions, do not call the aws configure command. You already specified temporary
access credentials through the credentials file or the environment variables. Also, if you use
environment variables instead of the credentials file to store temporary access credentials, in the
Git credential helper, specify default as the profile name.
Step 4: Access the AWS CodeCommit
Repositories
Assuming the user has followed the instructions in Connect to a Repository (p. 76) to connect to the
AWS CodeCommit repositories, the user then uses Git to call git clone, git push, and git pull to
clone, push to, and pull from, the AWS CodeCommit repositories to which he or she has temporary
access.
When the user uses AWS CLI and specifies the AWS CLI named profile associated with the temporary
access credentials, then results scoped to that AWS CLI named profile will be returned.
If the user receives the 403: Forbidden error in response to calling a Git command or a command
in AWS CLI, it's likely the temporary access credentials have expired. The user must go back to Step
2 (p. 159) and get a new set of temporary access credentials.
API Version 2015-04-13
160

AWS CodeCommit User Guide
Encryption for AWS CodeCommit
Repositories
Data in AWS CodeCommit repositories is encrypted in transit and at rest. When data is pushed into
an AWS CodeCommit repository (for example, by calling git push), AWS CodeCommit encrypts
the received data as it is stored in the repository. When data is pulled from an AWS CodeCommit
repository (for example, by calling git pull), AWS CodeCommit decrypts the data and then sends it to
the caller. This assumes the IAM user associated with the push or pull request has been authenticated
by AWS. Data sent or received is transmitted using the HTTPS or SSH encrypted network protocols.
The first time you create an AWS CodeCommit repository in a new region in your AWS account, AWS
CodeCommit creates an AWS-managed key in that same region in AWS Key Management Service
(AWS KMS) that is used only by AWS CodeCommit (the aws/codecommit key). This key is created
and stored in your AWS account. AWS CodeCommit uses this AWS-managed key to encrypt and
decrypt the data in this and all other AWS CodeCommit repositories within that region in your AWS
account.
Important
AWS CodeCommit performs the following AWS KMS actions against the default key aws/
codecommit. An IAM user does not need explicit permissions for these actions, but the user
must not have any attached policies that deny these actions for the aws/codecommit key.
Specifically, your AWS account must not have any of the following permissions set to deny
when creating your first repository:
•"kms:Encrypt"
•"kms:Decrypt"
•"kms:ReEncrypt"
•"kms:GenerateDataKey"
•"kms:GenerateDataKeyWithoutPlaintext"
•"kms:DescribeKey"
To see information about the AWS-managed key generated by AWS CodeCommit, do the following:
1. Sign in to the Identity and Access Management (IAM) console at https://console.aws.amazon.com/
iam/.
2. In the service navigation pane, choose Encryption Keys. (If a welcome page appears, choose
Get Started Now.)
API Version 2015-04-13
161

AWS CodeCommit User Guide
Encryption Context
3. In Filter, choose the region for your repository. For example, if the repository was created in us-
east-1, make sure the filter is set to US East (N. Virginia).
4. In the list of encryption keys, choose the AWS-managed key with the alias aws/codecommit.
Basic information about the AWS-managed key will be displayed.
You cannot change or delete this AWS-managed key. You cannot use a customer-managed key in
AWS KMS to encrypt or decrypt data in AWS CodeCommit repositories.
Encryption Context
Each service integrated with AWS KMS specifies an encryption context for both the encryption and
decryption operations. The encryption context is additional authenticated information AWS KMS uses
to check for data integrity. When specified for the encryption operation, it must also be specified in the
decryption operation or decryption will fail. AWS CodeCommit uses the AWS CodeCommit repository
ID for the encryption context. You can find the repository ID by using the get-repository command
or by viewing repository details in the AWS CodeCommit console. Search for the AWS CodeCommit
repository ID in AWS CloudTrail logs to understand which encryption operations were taken on which
key in AWS KMS to encrypt or decrypt data in the AWS CodeCommit repository.
For more information about AWS KMS, see the AWS Key Management Service Developer Guide.
API Version 2015-04-13
162
AWS CodeCommit User Guide
Limits in AWS CodeCommit
The following table describes limits in AWS CodeCommit. For information about limits that can be
changed, see AWS Service Limits.
Number of repositories No more than 1,000 per AWS account.
Number of references in a single push Maximum of 4,000, including create, delete, and
update. There is no limit on the overall number of
references in the repository.
Number of triggers in a repository No more than 10.
Repository names Any combination of letters, numbers, periods,
underscores, and dashes between 1 and 100
characters in length. Repository names cannot
end in .git and cannot contain any of the following
characters: ! ? @ # $ % ^ & * ( ) + = { } [ ] | \ / > <
~ ` ‘ “ ; :
Trigger names Any combination of letters, numbers, periods,
underscores, and dashes between 1 and 100
characters in length. Trigger names cannot
contain spaces or commas.
Repository descriptions Any combination of characters between 0
and 1,000 characters in length. Repository
descriptions are optional.
Metadata for a commit No more than 6 MB for the combined metadata
for a commit (for example, the combination of
author information, date, parent commit list, and
commit messages).
Note
There is no limit on the number of files
or the total size of all files in a single
commit, as long as the metadata does
not exceed 6 MB and a single blob does
not exceed 2 GB.
API Version 2015-04-13
163

AWS CodeCommit User Guide
Git blob size No more than 2 GB.
Note
There is no limit on the number of files
or the total size of all files in a single
commit, as long as the metadata does
not exceed 6 MB and a single blob does
not exceed 2 GB.
Custom data for triggers This is a string field limited to 1,000 characters. It
cannot be used to pass any dynamic parameters.
Graph display of branches in the Commit
Visualizer 35 per page. If there are more than 35 branches
on a single page, the graph will not display.
API Version 2015-04-13
164
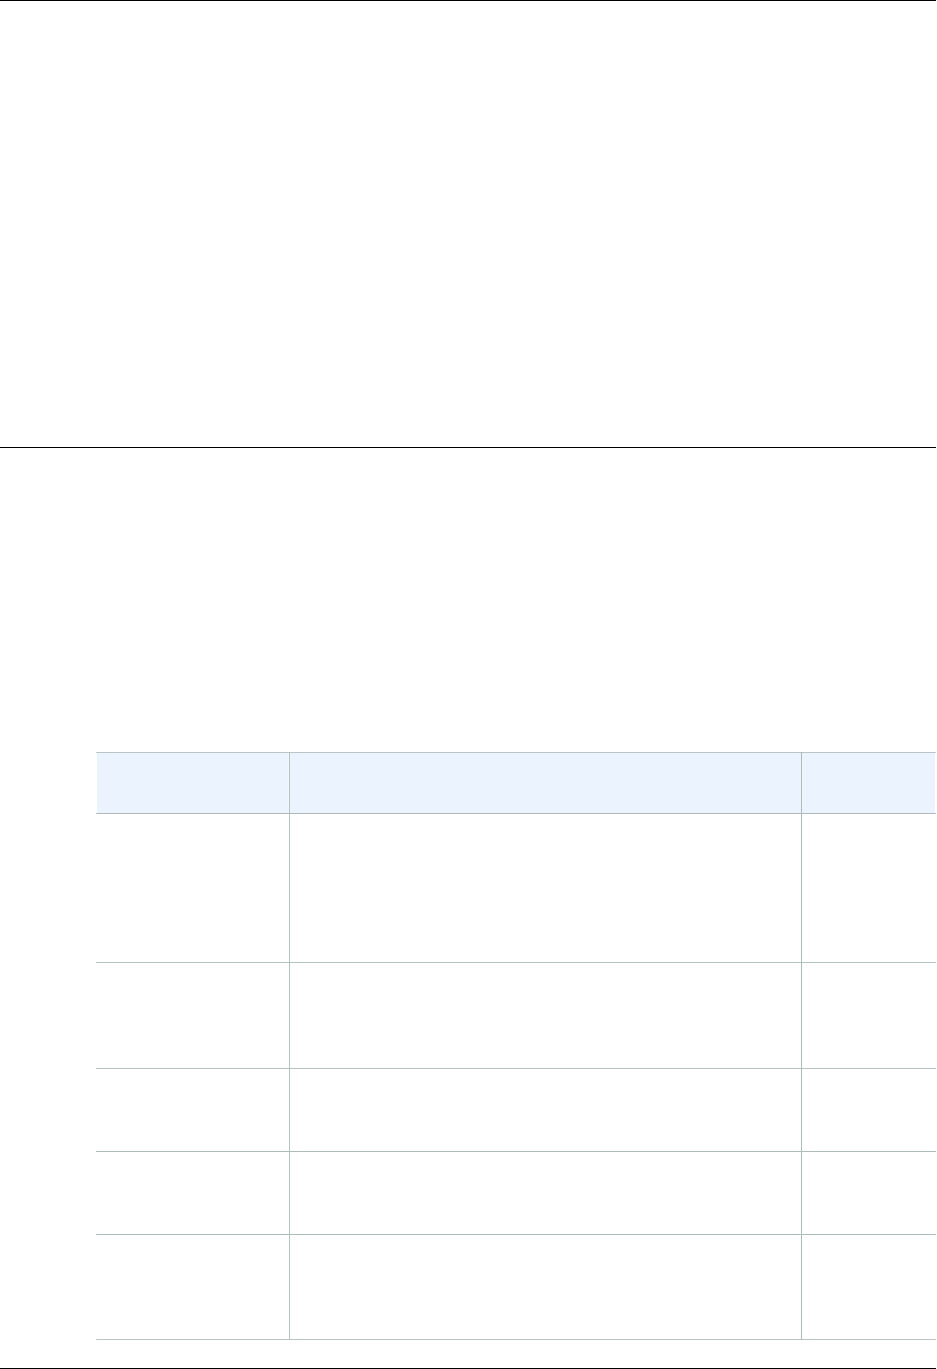
AWS CodeCommit User Guide
AWS CodeCommit User Guide
Document History
The following table describes the important changes to the documentation since the last release of the
AWS CodeCommit User Guide.
•API version: 2015-04-13
•Latest documentation update: September 14, 2016
Change Description Date
Changed
Topic update The View Commit Details (p. 101) and AWS CodeCommit
Tutorial (p. 25) topics have been updated to include
information about the Commit Visualizer in the AWS
CodeCommit console. The Limits (p. 163) topic has been
updated with the increase to the number of references
allowed in a single push.
September
14, 2016
Topic update The View Commit Details (p. 101) and AWS CodeCommit
Tutorial (p. 25) topics have been updated to include
information about viewing the history of commits in the AWS
CodeCommit console.
July 28, 2016
New topics The Migrate a Git Repository to AWS CodeCommit (p. 53)
and Migrate Local or Unversioned Content to AWS
CodeCommit (p. 60) topics have been added.
June 29, 2016
Topic update Minor updates have been made to the
Troubleshooting (p. 132) and For HTTPS Connections on
Windows (p. 11) topics.
June 22, 2016
Topic update The Product and Service Integrations (p. 43) and Access
Permissions Reference (p. 147) topics have been
updated to include information about integration with AWS
CodePipeline.
April 18, 2016
API Version 2015-04-13
165

AWS CodeCommit User Guide
Change Description Date
Changed
New topics The Manage Triggers for a Repository (p. 81) section
has been added. New topics include examples, including
policy and code samples, of how to create, edit, and delete
triggers.
March 7,
2016
New topic The Product and Service Integrations (p. 43) topic
has been added. Minor updates have been made to
Troubleshooting (p. 132).
March 7,
2016
Topic update In addition to the MD5 server fingerprint, the SHA256 server
fingerprint for AWS CodeCommit has been added to For
SSH Connections on Linux, OS X, or Unix (p. 15) and For
SSH Connections on Windows (p. 19).
December 9,
2015
New topic The Browse the Contents of a Repository (p. 79) topic
has been added. New issues have been added to
Troubleshooting (p. 132). Minor improvements and fixes
have been made throughout the user guide.
October 5,
2015
New topic The For SSH Users Not Using the AWS CLI (p. 5) topic has
been added. The topics in the Setting Up (p. 4) section have
been streamlined. Guidance to help users determine which
steps to follow for their operating systems and preferred
protocols has been provided.
August 5,
2015
Topic update Clarification and examples have been added to the SSH key
ID steps in SSH and Linux, OS X, or Unix: Set Up the Public
and Private Keys for Git and AWS CodeCommit (p. 16) and
SSH and Windows: Set Up the Public and Private Keys for
Git and AWS CodeCommit (p. 21).
July 24, 2015
Topic update Steps in SSH and Windows: Set Up the Public and Private
Keys for Git and AWS CodeCommit (p. 21) have been
updated to address an issue with IAM and saving the public
key file.
July 22, 2015
Topic update Troubleshooting (p. 132) has been updated with navigation
aids. More troubleshooting information for credential
keychain issues has been added.
July 20, 2015
Topic update More information about AWS Key Management Service
permissions has been added to Encryption (p. 161) and
Access Permissions Reference (p. 147).
July 17, 2015
Topic update Another section has been added to Troubleshooting (p. 132)
with information about troubleshooting issues with AWS Key
Management Service.
July 10, 2015
Initial release This is the initial release of the AWS CodeCommit User
Guide.July 9, 2015
API Version 2015-04-13
166

