AWS CodeDeploy User Guide Code Deploy
User Manual:
Open the PDF directly: View PDF ![]() .
.
Page Count: 305 [warning: Documents this large are best viewed by clicking the View PDF Link!]
- AWS CodeDeploy
- Table of Contents
- What Is AWS CodeDeploy?
- Getting Started with AWS CodeDeploy
- Step 1: Provision an IAM User
- Step 2: Install or Upgrade and Then Configure the AWS CLI
- Step 3: Create a Service Role for AWS CodeDeploy
- Step 4: Create an IAM Instance Profile for Your Amazon EC2 Instances
- Step 5: Try the AWS CodeDeploy Create Deployment Walkthrough
- Video Walkthrough of a Sample AWS CodeDeploy Deployment
- Prerequisites
- Start the Walkthrough
- Step 1: Welcome
- Step 2: Instance Settings
- Step 3: Application Name
- Step 4: Revision
- Step 5: Deployment Group
- Step 6: Service Role
- Step 7: Deployment Configuration
- Step 8: Review
- Clean Up Deployment Walkthrough Resources
- Product and Service Integrations with AWS CodeDeploy
- Integration with Other AWS Services
- Integration with Partner Products and Services
- Integration Examples from the Community
- AWS CodeDeploy Tutorials
- Tutorial: Deploy WordPress to an Amazon EC2 Instance (Amazon Linux or Red Hat Enterprise Linux and Linux, OS X, or Unix)
- Step 1: Launch an Amazon Linux or Red Hat Enterprise Linux Amazon EC2 Instance
- Step 2: Configure Your Source Content to Deploy to the Amazon Linux or Red Hat Enterprise Linux Amazon EC2 Instance
- Step 3: Upload Your WordPress Application to Amazon S3
- Step 4: Deploy Your WordPress Application
- Step 5: Update and Redeploy Your WordPress Application
- Step 6: Clean Up Your WordPress Application and Related Resources
- Tutorial: Deploy a "Hello, World!" Application with AWS CodeDeploy (Windows Server)
- Step 1: Launch a Windows Server Amazon EC2 Instance
- Step 2: Configure Your Source Content to Deploy to the Windows Server Amazon EC2 Instance
- Step 3: Upload Your "Hello, World!" Application to Amazon S3
- Step 4: Deploy Your "Hello, World!" Application
- Step 5: Update and Redeploy Your "Hello, World!" Application
- Step 6: Clean Up Your "Hello, World!" Application and Related Resources
- Tutorial: Deploy an Application to an On-Premises Instance with AWS CodeDeploy (Windows Server, Ubuntu Server, or Red Hat Enterprise Linux)
- Tutorial: Deploy an Application to an Auto Scaling Group Using AWS CodeDeploy
- Tutorial: Deploy an Application from GitHub Using AWS CodeDeploy
- Prerequisites
- Step 1: Set Up a GitHub Account
- Step 2: Create a GitHub Repository
- Step 3: Upload a Sample Application to Your GitHub Repository
- Step 4: Provision an Instance
- Step 5: Deploy the Application to the Instance
- Step 6: Monitor and Verify the Deployment
- Step 7: Clean Up
- To delete a AWS CloudFormation stack (if you used the AWS CloudFormation template to create an Amazon EC2 instance)
- To manually deregister and clean up an on-premises instance (if you provisioned an on-premises instance)
- To manually terminate an Amazon EC2 instance (if you manually launched an Amazon EC2 instance)
- To delete the AWS CodeDeploy deployment component records
- To delete your GitHub repository
- Tutorial: Deploy WordPress to an Amazon EC2 Instance (Amazon Linux or Red Hat Enterprise Linux and Linux, OS X, or Unix)
- Working with the AWS CodeDeploy Agent
- Operating Systems Supported by the AWS CodeDeploy Agent
- Communication Protocol and Port for the AWS CodeDeploy Agent
- AWS SDK for Ruby (aws-sdk-core) Support for the AWS CodeDeploy Agent
- Supported Versions of the AWS CodeDeploy Agent
- Application Revision and Log File Cleanup
- Managing AWS CodeDeploy Agent Operations
- Working with Instances for AWS CodeDeploy
- Creating an Instance for AWS CodeDeploy (AWS CLI or Amazon EC2 Console)
- Creating an Amazon EC2 Instance for AWS CodeDeploy (AWS CloudFormation Template)
- Configuring an Amazon EC2 Instance to Work with AWS CodeDeploy
- View Instance Details with AWS CodeDeploy
- On-Premises Instances with AWS CodeDeploy
- Configuring an On-Premises Instance to Work with AWS CodeDeploy
- Prerequisites for Configuring an On-Premises Instance
- Configure and Register an On-Premises Instance (CLI)
- Manually Configure and Register an On-Premises Instance
- Step 1: Create an IAM User on Behalf of the On-Premises Instance
- Step 2: Assign Permissions to the IAM User
- Step 3: Get the IAM User Credentials
- Step 4: Add a Configuration File to the On-Premises Instance
- Step 5: Install and Configure the AWS CLI
- Step 6: Set the AWS_REGION Environment Variable (Ubuntu Server and RHEL Only)
- Step 7: Install the AWS CodeDeploy Agent
- Step 8: Register the On-Premises Instance with AWS CodeDeploy
- Step 9: Tag the On-Premises Instance
- Step 10: Deploy Application Revisions to the On-Premises Instance
- Step 11: Track Deployments to the On-Premises Instance
- Next Steps
- Get Information About a Single On-Premises Instance
- Get Information About Multiple On-Premises Instances
- Deregister an On-Premises Instance
- Automatically Uninstall the AWS CodeDeploy Agent and Remove the Configuration File from an On-Premises Instance
- Manually Remove On-Premises Instance Tags from an On-Premises Instance
- Manually Deregister an On-Premises Instance
- AWS CodeDeploy Instance Health
- Working with Deployment Groups in AWS CodeDeploy
- Working with Applications in AWS CodeDeploy
- Working with Deployment Groups in AWS CodeDeploy
- Working with Application Revisions for AWS CodeDeploy
- Plan a Revision for AWS CodeDeploy
- Add an Application Specification File to a Revision for AWS CodeDeploy
- Choose an AWS CodeDeploy Repository Type
- Push a Revision for AWS CodeDeploy to Amazon S3
- View Application Revision Details with AWS CodeDeploy
- Register an Application Revision in Amazon S3 with AWS CodeDeploy
- Working with Deployments in AWS CodeDeploy
- Create a Deployment with AWS CodeDeploy
- View Deployment Details with AWS CodeDeploy
- Deploy a Revision with AWS CodeDeploy
- Stop a Deployment with AWS CodeDeploy
- Redeploy and Roll Back a Deployment with AWS CodeDeploy
- Deploy an Application in a Different AWS Account
- Step 1: Create an S3 Bucket in Either Account
- Step 2: Grant Amazon S3 Bucket Permissions to the Production Account's IAM Instance Profile
- Step 3: Create Resources and a Cross-Account Role in the Production Account
- Step 4: Upload the Application Revision to Amazon S3 Bucket
- Step 5: Assume the Cross-Account Role and Deploy Applications
- Monitoring Deployments in AWS CodeDeploy
- Automated Monitoring Tools
- Manual Monitoring Tools
- Monitoring Deployments with Amazon CloudWatch Tools
- Monitoring Deployments with AWS CloudTrail
- Monitoring Deployments with Amazon SNS Event Notifications
- AWS CodeDeploy AppSpec File Reference
- AWS CodeDeploy User Access Permissions Reference
- AWS CodeDeploy Agent Configuration Reference
- AWS CloudFormation Templates for AWS CodeDeploy Reference
- AWS CodeDeploy Resource Kit Reference
- AWS CodeDeploy Limits
- Troubleshooting AWS CodeDeploy
- General Troubleshooting Issues
- General Troubleshooting Checklist
- AWS CodeDeploy deployment resources are supported in certain regions only
- Required IAM roles are not available
- Avoid concurrent deployments to the same Amazon EC2 instance
- Using some text editors to create AppSpec files and shell scripts can cause deployments to fail
- Using Finder in Mac OS to bundle an application revision can cause deployments to fail
- Troubleshoot Deployment Issues
- Troubleshooting a failed ApplicationStop deployment lifecycle event
- Troubleshooting a failed DownloadBundle deployment lifecycle event with "UnknownError: not opened for reading"
- Windows PowerShell scripts fail to use the 64-bit version of Windows PowerShell by default
- Long-running processes can cause deployments to fail
- Troubleshoot Deployment Group Issues
- Troubleshoot Instance Issues
- Tags must be set correctly
- AWS CodeDeploy agent must be installed and running on instances
- Deployments do not fail for up to an hour when an instance is terminated during a deployment
- Analyzing log files to investigate deployment failures on instances
- Create a new AWS CodeDeploy log file if it was accidentally deleted
- Deployment or redeployment of the same files to the same instance locations fail with the error "File already exists at location"
- Troubleshooting “InvalidSignatureException – Signature expired: [time] is now earlier than [time]” deployment errors
- Troubleshoot Auto Scaling Issues
- General Auto Scaling troubleshooting
- Terminating or rebooting an Auto Scaling instance may cause deployments to fail
- Avoid associating multiple deployment groups with a single Auto Scaling group
- Amazon EC2 instances in an Auto Scaling group fail to launch and receive the error "Heartbeat Timeout"
- Mismatched Auto Scaling lifecycle hooks might cause automatic deployments to Auto Scaling groups to stop or fail
- Error Codes for AWS CodeDeploy
- General Troubleshooting Issues
- AWS CodeDeploy Resources
- Document History
- AWS Glossary

AWS CodeDeploy
User Guide
API Version 2014-10-06

AWS CodeDeploy User Guide

AWS CodeDeploy User Guide
AWS CodeDeploy: User Guide
Copyright © 2016 Amazon Web Services, Inc. and/or its affiliates. All rights reserved.
Amazon's trademarks and trade dress may not be used in connection with any product or service that is not Amazon's, in any
manner that is likely to cause confusion among customers, or in any manner that disparages or discredits Amazon. All other
trademarks not owned by Amazon are the property of their respective owners, who may or may not be affiliated with, connected to,
or sponsored by Amazon.

AWS CodeDeploy User Guide
Table of Contents
What Is AWS CodeDeploy? ........................................................................................................... 1
Video Introduction to AWS CodeDeploy ................................................................................... 1
Benefits of AWS CodeDeploy ................................................................................................. 1
Overview of a Deployment ..................................................................................................... 2
We Want to Hear from You .................................................................................................... 3
Key Components .................................................................................................................. 3
Deployments ........................................................................................................................ 4
Deployment Components ............................................................................................... 4
Deployment Workflow .................................................................................................... 5
Setting Up Instances ..................................................................................................... 7
Uploading Your Application Revision ................................................................................ 8
Creating Your Application and Deployment Groups ............................................................ 8
Deploying Your Application Revision ................................................................................ 8
Updating Your Application .............................................................................................. 8
Stopped and Failed Deployments .................................................................................... 8
Redeployments and Deployment Rollbacks ....................................................................... 9
Application Specification Files ................................................................................................. 9
How the AWS CodeDeploy Agent Uses the AppSpec File ................................................. 10
Getting Started ........................................................................................................................... 11
Step 1: Provision an IAM User .............................................................................................. 11
Step 2: Install or Upgrade and Then Configure the AWS CLI ..................................................... 13
Step 3: Create a Service Role .............................................................................................. 13
Create a Service Role (Console) ................................................................................... 14
Create a Service Role (CLI) .......................................................................................... 15
Get the Service Role ARN (Console) ............................................................................. 17
Get the Service Role ARN (CLI) .................................................................................... 17
Step 4: Create an IAM Instance Profile ................................................................................... 17
Create an IAM Instance Profile for Your Amazon EC2 Instances (CLI) ................................. 18
Create an IAM Instance Profile for Your Amazon EC2 Instances (Console) ........................... 20
Get the IAM Instance Profile Name (CLI) ........................................................................ 21
Step 5: Try the Create Deployment Walkthrough ...................................................................... 21
Video Walkthrough of a Sample AWS CodeDeploy Deployment .......................................... 22
Prerequisites .............................................................................................................. 22
Start the Walkthrough .................................................................................................. 23
Step 1: Welcome ........................................................................................................ 24
Step 2: Instance Settings ............................................................................................. 24
Step 3: Application Name ............................................................................................. 25
Step 4: Revision ......................................................................................................... 25
Step 5: Deployment Group ........................................................................................... 25
Step 6: Service Role ................................................................................................... 25
Step 7: Deployment Configuration .................................................................................. 26
Step 8: Review ........................................................................................................... 26
Clean Up Deployment Walkthrough Resources ................................................................ 26
Product and Service Integrations ................................................................................................... 28
Integration with Other AWS Services ...................................................................................... 28
Auto Scaling ............................................................................................................... 31
Elastic Load Balancing ................................................................................................. 32
Integration with Partner Products and Services ........................................................................ 33
GitHub ....................................................................................................................... 36
Integration Examples from the Community .............................................................................. 39
Blog posts .................................................................................................................. 39
Videos ....................................................................................................................... 39
Tutorials ..................................................................................................................................... 41
Tutorial: Deploy WordPress to a Non-Windows Instance ........................................................... 41
Step 1: Launch an Amazon EC2 Instance ....................................................................... 42
API Version 2014-10-06
iv

AWS CodeDeploy User Guide
Step 2: Configure Your Source Content .......................................................................... 43
Step 3: Upload Your Application to Amazon S3 ............................................................... 47
Step 4: Deploy Your Application .................................................................................... 50
Step 5: Update and Redeploy Your Application ................................................................ 53
Step 6: Clean Up ........................................................................................................ 56
Tutorial: Deploy a HelloWorld Application to a Windows Server Instance ...................................... 58
Step 1: Launch an Amazon EC2 Instance ....................................................................... 59
Step 2: Configure Your Source Content .......................................................................... 60
Step 3: Upload Your Application to Amazon S3 ............................................................... 62
Step 4: Deploy Your Application .................................................................................... 65
Step 5: Update and Redeploy Your Application ................................................................ 68
Step 6: Clean Up ........................................................................................................ 71
Tutorial: Deploy an Application to an On-Premises Instance ....................................................... 73
Prerequisites .............................................................................................................. 73
Step 1: Configure the On-Premises Instance ................................................................... 73
Step 2: Create a Sample Application Revision ................................................................. 74
Step 3: Bundle and Upload Your Application Revision to Amazon S3 ................................... 77
Step 4: Deploy Your Application Revision ....................................................................... 77
Step 5: Verify Your Deployment .................................................................................... 77
Step 6: Clean Up Resources ........................................................................................ 78
Tutorial: Deploy to an Auto Scaling Group .............................................................................. 79
Prerequisites .............................................................................................................. 79
Step 1: Create and Configure the Auto Scaling Group ....................................................... 80
Step 2: Deploy the Application to the Auto Scaling Group .................................................. 87
Step 3: Check Your Results .......................................................................................... 92
Step 4: Increase the Number of Amazon EC2 Instances in the Auto Scaling Group ................ 94
Step 5: Check Your Results Again ................................................................................. 95
Step 6: Clean Up ........................................................................................................ 96
Tutorial: Deploying from GitHub ............................................................................................. 97
Prerequisites .............................................................................................................. 98
Step 1: Set Up a GitHub Account .................................................................................. 98
Step 2: Create a GitHub Repository ............................................................................... 98
Step 3: Upload a Sample Application to Your GitHub Repository ....................................... 100
Step 4: Provision an Instance ...................................................................................... 102
Step 5: Deploy the Application to the Instance ............................................................... 102
Step 6: Monitor and Verify the Deployment .................................................................... 106
Step 7: Clean Up ...................................................................................................... 107
Working with the AWS CodeDeploy Agent .................................................................................... 109
Operating Systems Supported by the AWS CodeDeploy Agent ................................................. 109
Supported Amazon EC2 AMI Operating Systems .......................................................... 109
Supported On-Premises Operating Systems .................................................................. 110
Communication Protocol and Port for the AWS CodeDeploy Agent ............................................ 110
AWS SDK for Ruby (aws-sdk-core) Support for the AWS CodeDeploy Agent ............................... 110
Supported Versions of the AWS CodeDeploy Agent ................................................................ 110
Application Revision and Log File Cleanup ............................................................................ 113
Managing AWS CodeDeploy Agent Operations ...................................................................... 114
Verify the AWS CodeDeploy Agent Is Running ............................................................... 114
Determine the Version of the AWS CodeDeploy Agent .................................................... 115
Install or Reinstall the AWS CodeDeploy Agent .............................................................. 116
Update the AWS CodeDeploy Agent ............................................................................ 120
Working with Instances .............................................................................................................. 122
Creating an Instance (AWS CLI or Amazon EC2 Console) ....................................................... 123
Launch an Amazon EC2 Instance (CLI ) ....................................................................... 123
Launch an Amazon EC2 Instance (Console) .................................................................. 127
Creating an Instance (AWS CloudFormation Template) ........................................................... 130
Launch an Amazon EC2 Instance with the AWS CloudFormation Template (AWS CLI) .......... 131
Launch an Amazon EC2 Instance with the AWS CloudFormation Template (Console) ........... 133
Configuring an Amazon EC2 Instance .................................................................................. 135
API Version 2014-10-06
v

AWS CodeDeploy User Guide
Step 1: Verify an IAM Instance Profile Is Attached to Your Amazon EC2 Instance ................. 135
Step 2: Verify the Attached IAM Instance Profile Has the Correct Access Permissions ........... 136
Step 3: Tag the Amazon EC2 Instance ......................................................................... 137
Step 4: Install the AWS CodeDeploy Agent on the Amazon EC2 Instance ........................... 138
View Instance Details ......................................................................................................... 138
View Instance Details (Console) .................................................................................. 138
View Instance Details (CLI) ......................................................................................... 138
On-Premises Instances ...................................................................................................... 139
Comparing On-Premises Instances to Amazon EC2 Instances .......................................... 139
Deploying Applications with AWS CodeDeploy to On-Premises Instances ........................... 140
Configuring an On-Premises Instance ................................................................................... 140
Prerequisites for Configuring an On-Premises Instance .................................................... 141
Configure and Register an On-Premises Instance (CLI) ................................................... 142
Manually Configure and Register an On-Premises Instance .............................................. 145
Next Steps ............................................................................................................... 155
Instance Health ................................................................................................................. 160
Health Status ............................................................................................................ 160
Minimum Healthy Instances and Deployments ............................................................... 161
Working with Deployment Configurations ....................................................................................... 164
Predefined Deployment Configurations .................................................................................. 164
Create a Deployment Configuration ...................................................................................... 166
View Deployment Configuration Details ................................................................................. 166
View Deployment Configuration Details (Console) ........................................................... 166
View Deployment Configuration (CLI) ........................................................................... 167
Delete a Deployment Configuration ...................................................................................... 167
Working with Applications ........................................................................................................... 168
Create an Application ......................................................................................................... 168
Create an Application (Console) .................................................................................. 169
Create an Application (CLI) ......................................................................................... 171
View Application Details ..................................................................................................... 172
View Application Details (Console) ............................................................................... 172
View Application Details (CLI) ..................................................................................... 172
Rename an Application ...................................................................................................... 172
Delete an Application ......................................................................................................... 173
Delete an Application (Console) ................................................................................... 173
Delete an Application (AWS CLI) ................................................................................. 173
Working with Deployment Groups ................................................................................................ 174
Create a Deployment Group ............................................................................................... 174
Create a Deployment Group (Console) ......................................................................... 175
Create a Deployment Group (CLI) ................................................................................ 177
View Deployment Group Details .......................................................................................... 177
View Deployment Group Details (Console) .................................................................... 177
View Deployment Group Details (CLI) ........................................................................... 178
Change Deployment Group Settings ..................................................................................... 178
To Change Deployment Group Settings (Console) .......................................................... 178
To Change Deployment Group Settings (CLI) ................................................................ 180
Delete a Deployment Group ................................................................................................ 181
Delete a Deployment Group (Console) .......................................................................... 181
Delete a Deployment Group (CLI) ................................................................................ 182
Working with Application Revisions .............................................................................................. 183
Plan a Revision ................................................................................................................. 183
Add an AppSpec File ......................................................................................................... 184
AppSpec file Template with Instructions ........................................................................ 184
Choose a Repository Type ................................................................................................. 187
Push a Revision ................................................................................................................ 188
View Application Revision Details ......................................................................................... 189
View Application Revision Details (Console) .................................................................. 189
View Application Revision Details (CLI) ......................................................................... 190
API Version 2014-10-06
vi

AWS CodeDeploy User Guide
Register an Application Revision .......................................................................................... 190
To register a revision in Amazon S3 with AWS CodeDeploy (CLI) ..................................... 191
To register a revision in GitHub with AWS CodeDeploy (CLI) ............................................ 191
Working with Deployments .......................................................................................................... 193
Create a Deployment ......................................................................................................... 193
To specify information about a revision stored in an Amazon S3 bucket .............................. 194
To specify information about a revision stored in a GitHub repository ................................. 195
View Deployment Details .................................................................................................... 196
View Deployment Details (Console) .............................................................................. 196
View Deployment Details (CLI) .................................................................................... 196
Deploy a Revision ............................................................................................................. 197
Deploy a Revision (Console) ....................................................................................... 198
Deploy a Revision (CLI) ............................................................................................. 200
Related topics ........................................................................................................... 202
Stop a Deployment ............................................................................................................ 202
Stop a deployment (console) ....................................................................................... 202
Stop a deployment (CLI) ............................................................................................. 202
Redeploy and Roll Back a Deployment ................................................................................. 203
Deploy an Application in a Different AWS Account .................................................................. 204
Step 1: Create an S3 Bucket in Either Account .............................................................. 205
Step 2: Grant Amazon S3 Bucket Permissions to the Production Account's IAM Instance
Profile ...................................................................................................................... 205
Step 3: Create Resources and a Cross-Account Role in the Production Account .................. 206
Step 4: Upload the Application Revision to Amazon S3 Bucket ......................................... 207
Step 5: Assume the Cross-Account Role and Deploy Applications ..................................... 207
Monitoring Deployments ............................................................................................................. 208
Automated Tools ............................................................................................................... 208
Manual Tools .................................................................................................................... 210
Monitoring Deployments with Amazon CloudWatch Tools ........................................................ 210
Monitoring Deployments with CloudWatch Alarms ........................................................... 210
Monitoring Deployments with Amazon CloudWatch Events ............................................... 212
Monitoring Deployments with AWS CloudTrail ........................................................................ 214
AWS CodeDeploy Information in CloudTrail ................................................................... 214
Understanding AWS CodeDeploy Log File Entries .......................................................... 215
Monitoring Deployments with Amazon SNS Event Notifications ................................................. 216
Grant Amazon SNS Permissions to a Service Role ......................................................... 217
Create a Trigger for an AWS CodeDeploy Event ............................................................ 218
Edit a Trigger in a Deployment Group .......................................................................... 222
Delete a Trigger from a Deployment Group ................................................................... 224
JSON Data Formats for Triggers ................................................................................. 225
AppSpec File Reference ............................................................................................................. 227
AppSpec File Structure ....................................................................................................... 227
AppSpec 'files' Section ............................................................................................... 228
AppSpec 'permissions' Section .................................................................................... 232
AppSpec 'hooks' Section ............................................................................................ 235
AppSpec File Example ....................................................................................................... 239
AppSpec File Spacing ........................................................................................................ 240
Validate Your AppSpec File ................................................................................................ 241
User Access Permissions Reference ............................................................................................ 242
Attach a Managed Policy for AWS CodeDeploy to an IAM User ................................................ 243
Attach Your Own Policy to an IAM User ............................................................................... 244
Action and Resource Syntax for AWS CodeDeploy Access Permissions ..................................... 245
Applications .............................................................................................................. 246
Application Revisions ................................................................................................. 247
Deployments ............................................................................................................. 248
Deployment Configurations ......................................................................................... 250
Deployment Groups ................................................................................................... 251
Instances .................................................................................................................. 252
API Version 2014-10-06
vii

AWS CodeDeploy User Guide
On-Premises Instances .............................................................................................. 254
Agent Configuration Reference .................................................................................................... 256
Related Topics .................................................................................................................. 258
AWS CloudFormation Template Reference .................................................................................... 259
Resource Kit Reference ............................................................................................................. 261
Resource Kit File List ......................................................................................................... 261
Displaying a List of the Resource Kit Files ............................................................................ 262
Downloading the Resource Kit Files ..................................................................................... 263
Limits ....................................................................................................................................... 265
Applications ...................................................................................................................... 265
Application Revisions ......................................................................................................... 265
Deployments ..................................................................................................................... 266
Deployment Configurations ................................................................................................. 266
Deployment Groups ........................................................................................................... 267
Instances .......................................................................................................................... 267
Troubleshooting ......................................................................................................................... 268
General Troubleshooting Issues ........................................................................................... 268
General Troubleshooting Checklist ............................................................................... 268
AWS CodeDeploy deployment resources are supported in certain regions only .................... 269
Required IAM roles are not available ............................................................................ 270
Avoid concurrent deployments to the same Amazon EC2 instance .................................... 270
Using some text editors to create AppSpec files and shell scripts can cause deployments to
fail ........................................................................................................................... 270
Using Finder in Mac OS to bundle an application revision can cause deployments to fail ........ 271
Troubleshoot Deployment Issues ......................................................................................... 271
Troubleshooting a failed ApplicationStop deployment lifecycle event .................................. 271
Troubleshooting a failed DownloadBundle deployment lifecycle event with "UnknownError:
not opened for reading" .............................................................................................. 272
Windows PowerShell scripts fail to use the 64-bit version of Windows PowerShell by default ... 273
Long-running processes can cause deployments to fail .................................................... 273
Troubleshoot Deployment Group Issues ................................................................................ 275
Tagging an instance as part of a deployment group does not automatically deploy your
application to the new instance .................................................................................... 275
Troubleshoot Instance Issues .............................................................................................. 275
Tags must be set correctly .......................................................................................... 275
AWS CodeDeploy agent must be installed and running on instances .................................. 275
Deployments do not fail for up to an hour when an instance is terminated during a
deployment ............................................................................................................... 276
Analyzing log files to investigate deployment failures on instances ..................................... 276
Create a new AWS CodeDeploy log file if it was accidentally deleted ................................. 278
Deployment or redeployment of the same files to the same instance locations fail with the
error "File already exists at location" ............................................................................. 278
Troubleshooting “InvalidSignatureException – Signature expired: [time] is now earlier than
[time]” deployment errors ............................................................................................ 279
Troubleshoot Auto Scaling Issues ........................................................................................ 279
General Auto Scaling troubleshooting ........................................................................... 279
Terminating or rebooting an Auto Scaling instance may cause deployments to fail ................ 280
Avoid associating multiple deployment groups with a single Auto Scaling group ................... 281
Amazon EC2 instances in an Auto Scaling group fail to launch and receive the error
"Heartbeat Timeout" ................................................................................................... 281
Mismatched Auto Scaling lifecycle hooks might cause automatic deployments to Auto
Scaling groups to stop or fail ....................................................................................... 282
Error Codes ...................................................................................................................... 283
Related Topics .......................................................................................................... 285
Resources ................................................................................................................................ 286
Reference Guides and Support Resources ............................................................................ 286
Samples ........................................................................................................................... 286
Blogs ............................................................................................................................... 286
API Version 2014-10-06
viii

AWS CodeDeploy User Guide
AWS Software Development Kits and Tools .......................................................................... 287
Document History ...................................................................................................................... 288
AWS Glossary .......................................................................................................................... 296
API Version 2014-10-06
ix

AWS CodeDeploy User Guide
Video Introduction to AWS CodeDeploy
What Is AWS CodeDeploy?
AWS CodeDeploy is part of a family of AWS deployment services that includes AWS Elastic Beanstalk,
AWS CodePipeline, AWS CloudFormation, and AWS OpsWorks. AWS CodeDeploy coordinates
application deployments to Amazon EC2 instances, on-premises instances, or both. (On-premises
instances are physical devices that are not Amazon EC2 instances.)
An application can contain deployable content like code, web, and configuration files, executables,
packages, scripts, and so on. AWS CodeDeploy deploys applications from Amazon S3 buckets and
GitHub repositories.
You do not need to make changes to your existing code to use AWS CodeDeploy. You can use AWS
CodeDeploy to control the pace of deployment across Amazon EC2 instances and to define the actions
to be taken at each stage.
AWS CodeDeploy works with various systems for configuration management, source control,
continuous integration, continuous delivery, and continuous deployment. For more information, see
Product and Service Integrations.
Topics
•Video Introduction to AWS CodeDeploy (p. 1)
•Benefits of AWS CodeDeploy (p. 1)
•Overview of a Deployment (p. 2)
•We Want to Hear from You (p. 3)
•AWS CodeDeploy Key Components (p. 3)
•AWS CodeDeploy Deployments (p. 4)
•AWS CodeDeploy Application Specification Files (p. 9)
Video Introduction to AWS CodeDeploy
This short video (2:10) describes how AWS CodeDeploy automates code deployments to Amazon
EC2 instances, making it easier for you to rapidly release new features, eliminate downtime during
deployment, and avoid the need for error-prone, manual operations.
Video Walkthrough of an AWS CodeDeploy Deployment.
Benefits of AWS CodeDeploy
AWS CodeDeploy offers these benefits:
API Version 2014-10-06
1
AWS CodeDeploy User Guide
Overview of a Deployment
•Automated deployments. AWS CodeDeploy fully automates your application deployments
across your development, test, and production environments. AWS CodeDeploy scales with your
infrastructure so that you can deploy to one instance or thousands.
•Minimize downtime. AWS CodeDeploy helps maximize your application availability by performing
rolling updates across your Amazon EC2 instances and tracking application health according to rules
you configure. You can stop and roll back deployments if there are errors.
•Centralized control. You can launch and track the status of your deployments through the AWS
CodeDeploy console or the AWS CLI. You will receive a report that lists when each application
revision was deployed and to which Amazon EC2 instances.
•Easy to adopt. AWS CodeDeploy is platform-agnostic and works with any application. You can
easily reuse your setup code. AWS CodeDeploy can also integrate with your software release
process or continuous delivery toolchain.
Overview of a Deployment
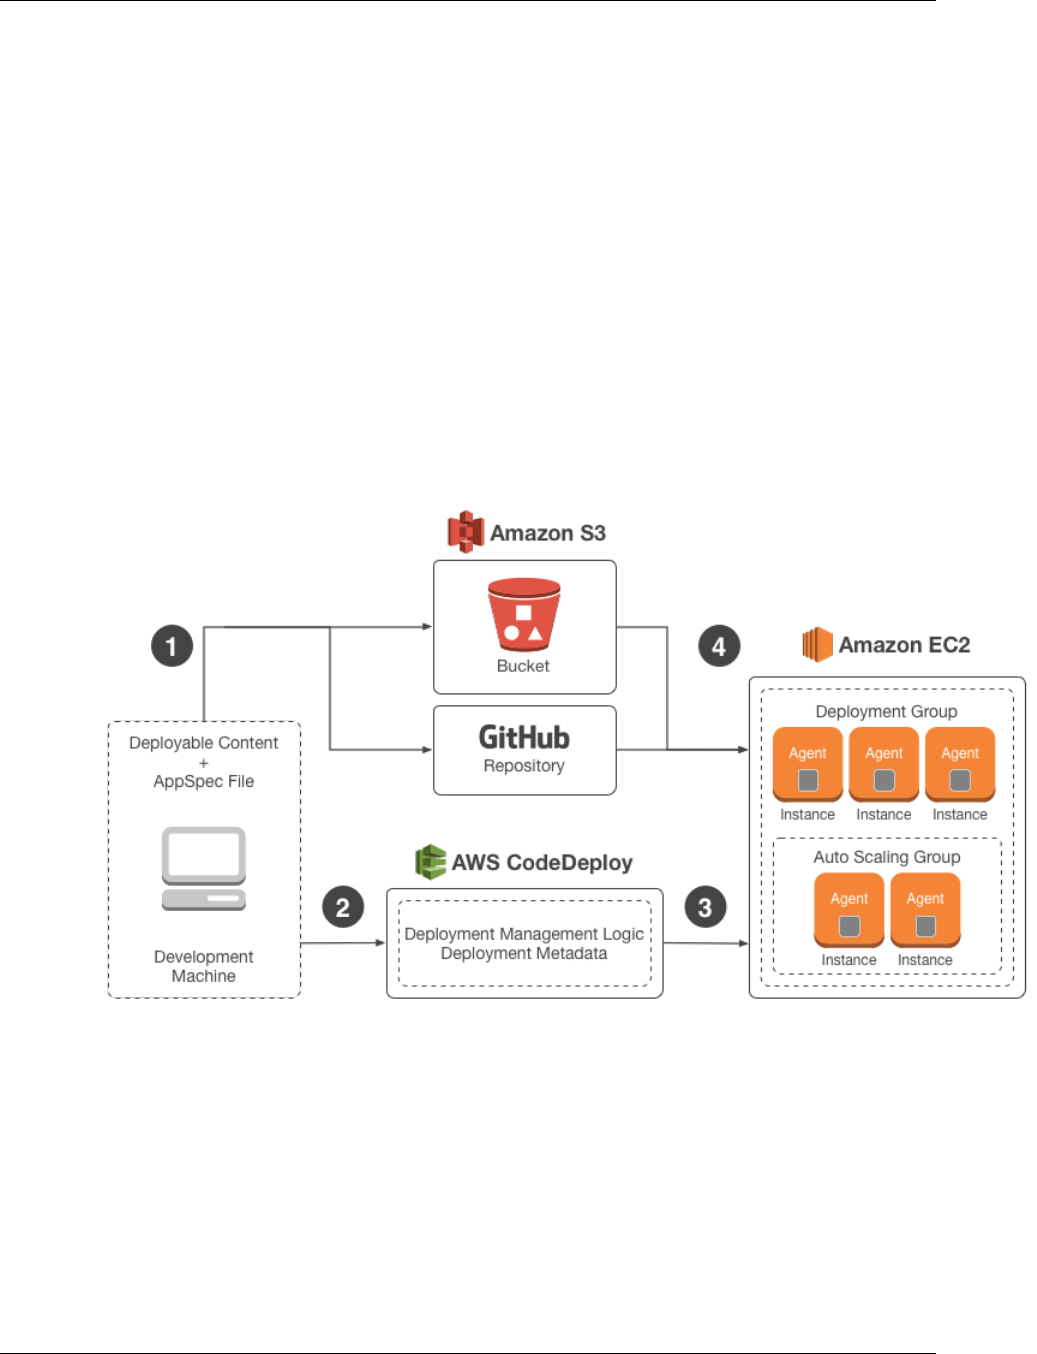
The following diagram illustrates the flow of a typical AWS CodeDeploy deployment:
Here's how it works:
1. First, you create deployable content on your local development machine or similar environment, and
then you add an application specification file (AppSpec file). The AppSpec file is unique to AWS
CodeDeploy; it defines the deployment actions you want AWS CodeDeploy to execute. You bundle
your deployable content and the AppSpec file into an archive file, and then upload it to an Amazon
S3 bucket or a GitHub repository. This archive file is called an application revision (or simply a
revision).
2. Next, you provide AWS CodeDeploy with information about your deployment, such as which
Amazon S3 bucket or GitHub repository to pull the revision from and which set of Amazon EC2
instances to deploy its contents to. AWS CodeDeploy calls a set of Amazon EC2 instances a
API Version 2014-10-06
2

AWS CodeDeploy User Guide
We Want to Hear from You
deployment group. A deployment group contains individually tagged Amazon EC2 instances,
Amazon EC2 instances in Auto Scaling groups, or both.
Each time you successfully upload a new application revision that you want to deploy to the
deployment group, that bundle is set as the target revision for the deployment group. In other words,
the application revision that is currently targeted for deployment is the target revision. This is also
the revision that will be pulled for automatic deployments.
3. Next, the AWS CodeDeploy agent on each instance polls AWS CodeDeploy to determine what and
when to pull from the specified Amazon S3 bucket or GitHub repository.
4. Finally, the AWS CodeDeploy agent on each instance pulls the target revision from the specified
Amazon S3 bucket or GitHub repository and, using the instructions in the AppSpec file, deploys the
contents to the instance.
AWS CodeDeploy keeps a record of your deployments so that you can get information such as
deployment status, deployment configuration parameters, instance health, and so on.
We Want to Hear from You
We welcome your feedback. To contact us, visit the AWS CodeDeploy forum.
Topics
•Key Components (p. 3)
•Deployments (p. 4)
•Application Specification Files (p. 9)
AWS CodeDeploy Key Components
Before you start working with the service, you should familiarize yourself with the components of AWS
CodeDeploy that are referred to in this user guide.
Application: A name that uniquely identifies the application you want to deploy. AWS CodeDeploy
uses this name to ensure the correct combination of revision, deployment configuration, and
deployment group are referenced during a deployment.
Deployment configuration: A set of deployment rules and deployment success and failure conditions
used by AWS CodeDeploy during a deployment.
Deployment group: A set of individual instances. A deployment group contains individually tagged
instances, Amazon EC2 instances in Auto Scaling groups, or both. For information about Amazon
EC2 instance tags, see Working with Tags Using the Console. For information about on-premises
instances, see On-Premises Instances (p. 139). For information about Auto Scaling, see Auto
Scaling (p. 31).
IAM instance profile: An IAM role that you attach to your Amazon EC2 instances. This profile
includes the permissions required to access the Amazon S3 buckets or GitHub repositories where the
API Version 2014-10-06
3

AWS CodeDeploy User Guide
Deployments
applications that will be deployed by AWS CodeDeploy are stored. For more information, see Step 4:
Create an IAM Instance Profile (p. 17).
Revision: An archive file containing source content—source code, web pages, executable files, and
deployment scripts—along with an application specification file (AppSpec file). Revisions are stored
in Amazon S3 buckets or GitHub repositories. For Amazon S3, a revision is uniquely identified by its
Amazon S3 object key and its ETag, version, or both. For GitHub, a revision is uniquely identified by its
commit ID.
Service role: An IAM role that grants permissions to an AWS service so it can access AWS resources.
The policies you attach to the service role determine which AWS resources the service can access and
the actions it can perform with those resources. For AWS CodeDeploy, a service role is used to read
either the tags applied to the instances or the Auto Scaling group names associated with the instances.
This enables AWS CodeDeploy to identify instances to which it can deploy applications. For more
information, see Step 3: Create a Service Role (p. 13).
Target revision: The most recent version of the application revision that you have uploaded to your
repository and want to deploy to the instances in a deployment group. In other words, the application
revision currently targeted for deployment is the target revision. This is also the revision that will be
pulled for automatic deployments.
For information about other major components in the AWS CodeDeploy workflow, see the following
topics:
•Choose a Repository Type (p. 187)
•Deployments (p. 4)
•Application Specification Files (p. 9)
•Instance Health (p. 160)
•Working with the AWS CodeDeploy Agent (p. 109)
•On-Premises Instances (p. 139)
AWS CodeDeploy Deployments
This page provides information about the components and workflow of deployments in AWS
CodeDeploy.
Topics
•Deployment Components (p. 4)
•Deployment Workflow (p. 5)
•Setting Up Instances (p. 7)
•Uploading Your Application Revision (p. 8)
•Creating Your Application and Deployment Groups (p. 8)
•Deploying Your Application Revision (p. 8)
•Updating Your Application (p. 8)
•Stopped and Failed Deployments (p. 8)
•Redeployments and Deployment Rollbacks (p. 9)
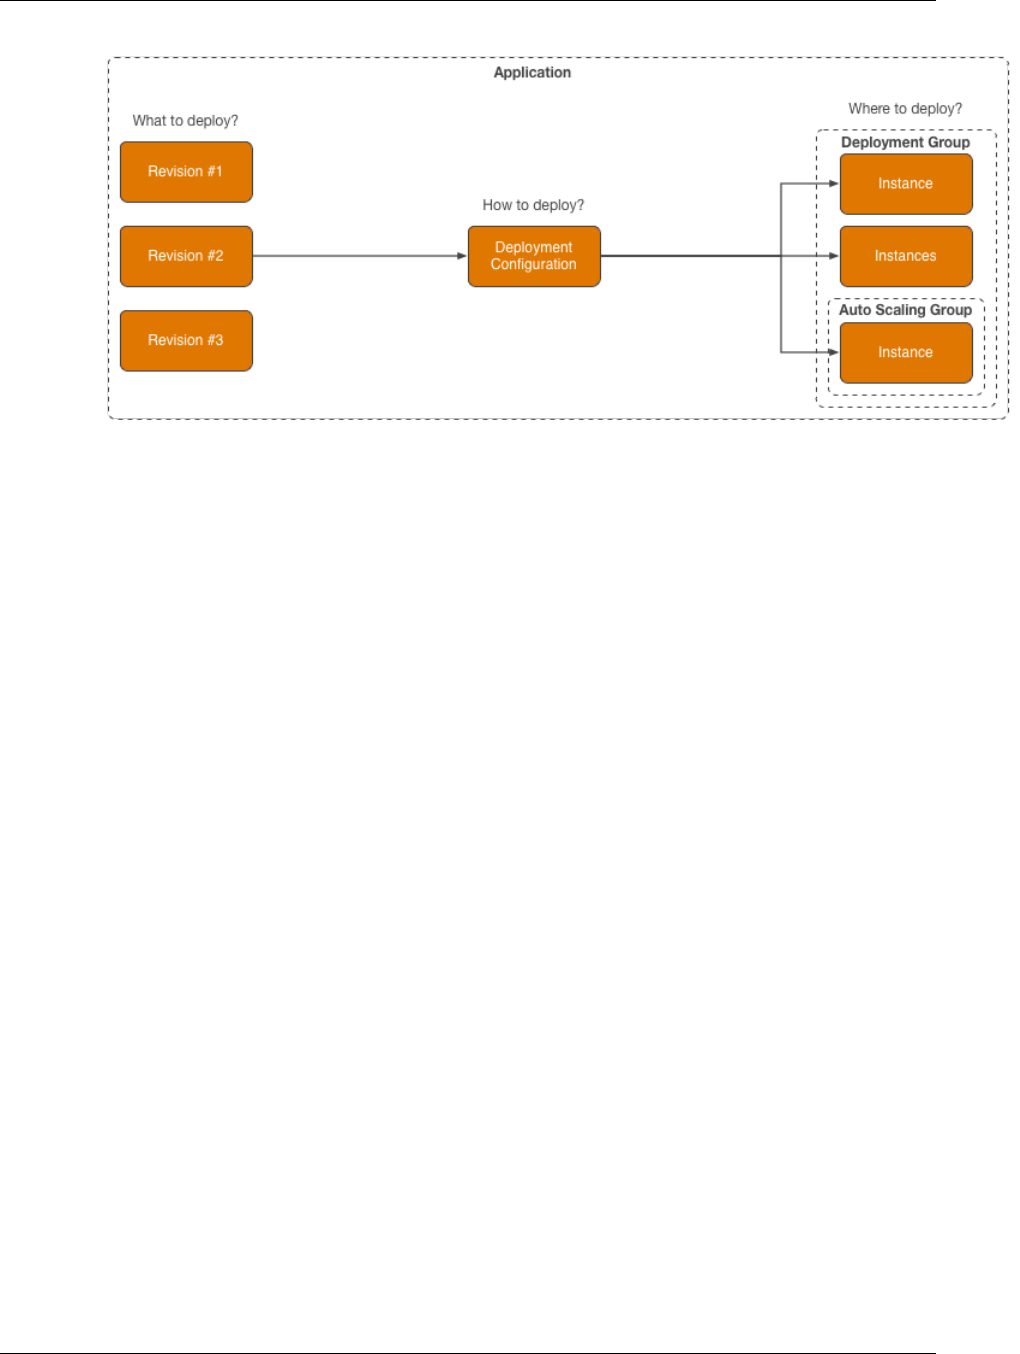
Deployment Components
The following diagram shows how the components in an AWS CodeDeploy deployment relate to one
another.
API Version 2014-10-06
4
AWS CodeDeploy User Guide
Deployment Workflow
Deployment Workflow
The following diagram shows the major steps in the deployment of application revisions in AWS
CodeDeploy:
API Version 2014-10-06
5

AWS CodeDeploy User Guide
Deployment Workflow
These steps include:
1. Creating an application by specifying a name that uniquely represents the application revisions
you want to deploy. AWS CodeDeploy uses this name during a deployment to make sure it is
referencing the correct deployment components, such as the deployment group, deployment
configuration, and application revision. For more information, see Create an Application (p. 168).
2. Setting up a deployment group by specifying the instances to which you want to deploy your
application revisions. You can specify the tags applied to the instances, the Auto Scaling group
names, or a combination of both. If you specify tags, AWS CodeDeploy deploys to instances that
have at least one of the specified tags applied. These instances must be configured to be used in
a deployment (that is, they must be tagged or belong to an Auto Scaling group) and have the AWS
CodeDeploy agent installed and running.
We provide you with an AWS CloudFormation template that you can use to quickly set up an
Amazon EC2 instance based on Amazon Linux or Windows Server. We also provide you with the
API Version 2014-10-06
6

AWS CodeDeploy User Guide
Setting Up Instances
standalone AWS CodeDeploy agent so that you can install it on Amazon Linux, Ubuntu Server, Red
Hat Enterprise Linux (RHEL), or Windows Server instances. For more information, see Create a
Deployment Group (p. 174).
You can also specify the following options:
•Amazon SNS notifications — Create triggers that will send notifications to subscribers of
an Amazon SNS topic when specified events, such as success or failure events, occur in
deployments and instances. For more information, see Monitoring Deployments with Amazon
SNS Event Notifications (p. 216).
•Alarm-based deployment management — Implement Amazon CloudWatch alarm monitoring to
stop deployments when your metrics exceed or fall below the thresholds set in CloudWatch.
•Automatic deployment rollbacks — Configure a deployment to roll back automatically to the
previously known good revision when a deployment fails or an alarm threshold is met.
3. Specifying a deployment configuration by determining to how many instances to simultaneously
deploy your application revisions and describing the success and failure conditions for the
deployment. For more information, see View Deployment Configuration Details (p. 166).
4. Uploading an application revision to Amazon S3 or GitHub. In addition to the files you want to deploy
and any scripts you want to run during the deployment, you must include an application specification
file (AppSpec file). This file contains deployment instructions, such as where to copy the files
onto each instance and at what point in time to run deployment scripts. For more information, see
Working with Application Revisions (p. 183).
5. Deploying your application revision to the deployment group. The AWS CodeDeploy agent on each
participating instance in the deployment group copies your application revision from Amazon S3 or
GitHub to the instance. The AWS CodeDeploy agent then unbundles the revision, and using the
AppSpec file, copies the files into the specified locations and executes any deployment scripts. For
more information, see Deploy a Revision (p. 197).
6. Checking the deployment results. For more information, see Monitoring Deployments (p. 208).
7. Redeploying a revision. You might want to do this if you need to fix a bug in the source content,
or run the deployment scripts in a different order, or address a failed deployment. To do this,
you rebundle your revised source content, any deployment scripts, and the AppSpec file into a
new revision, and then upload the revision to the Amazon S3 bucket or GitHub repository. You
then execute a new deployment to the same deployment group with the new revision. For more
information, see Deploy a Revision (p. 197).
Setting Up Instances
You need to set up instances before you can deploy application revisions. If an application revision
requires three production servers and two backup servers, you will launch or use five instances.
To manually provision instances: API Version 2014-10-06
7

AWS CodeDeploy User Guide
Uploading Your Application Revision
1. Install the AWS CodeDeploy agent on the instances. The AWS CodeDeploy agent can be installed
on Amazon Linux, Ubuntu Server, RHEL, and Windows Server instances.
2. Enable tagging, if you are using tags to identify instances in a deployment group. AWS CodeDeploy
relies on tags to identify and group instances into AWS CodeDeploy deployment groups. Although
the Getting Started tutorials used both, you can simply use a key or a value to define a tag for a
deployment group.
3. Launch Amazon EC2 instances with an IAM instance profile attached. The IAM instance profile must
be attached to an Amazon EC2 instance as it is launched in order for the AWS CodeDeploy agent to
verify the identity of the instance.
4. Create a service role. Provide service access so that AWS CodeDeploy can expand the tags in your
AWS account.
The AWS CloudFormation template does all of this for you automatically. It creates and configures
new, single Amazon EC2 instances based on Amazon Linux or Windows Server with the AWS
CodeDeploy agent already installed. For more information, see Working with Instances (p. 122).
Uploading Your Application Revision
Place an AppSpec file under the root folder in your application's source content folder structure. For
more information, see Application Specification Files (p. 9).
Bundle the application's source content folder structure into an archive file format such as zip, tar, or
compressed tar. Upload the archive file (the revision) to an Amazon S3 bucket or GitHub repository.
Note
The tar and compressed tar archive file formats (.tar and .tar.gz) are not supported for
Windows Server instances.
Creating Your Application and Deployment
Groups
An AWS CodeDeploy deployment group identifies a collection of instances based on their tags, Auto
Scaling group names, or both. Multiple application revisions can be deployed to the same instance,
and an application revision can be deployed to multiple instances. For example, you could add a tag
of "Prod" to the three production servers and "Backup" to the two backup servers. These two tags can
be used to create two different deployment groups in the AWS CodeDeploy application, giving you the
ability to choose which set of servers (or both) should participate in a deployment.
Deploying Your Application Revision
Now you're ready to deploy your application revision from Amazon S3 or GitHub to the deployment
group. You can use the AWS CodeDeploy console or the create-deployment command. There are
parameters you can specify to control your deployment, including the revision, deployment group, and
deployment configuration.
Updating Your Application
You can make updates to your application and then use the AWS CodeDeploy console or call the
create-deployment command to push a revision.
Stopped and Failed Deployments
You can use the AWS CodeDeploy console or the stop-deployment command to stop a deployment.
When you attempt to stop the deployment, one of three things will happen:
API Version 2014-10-06
8

AWS CodeDeploy User Guide
Redeployments and Deployment Rollbacks
• The deployment will stop, and the operation will return a status of succeeded. In this case, no more
deployment lifecycle events will be run on the deployment group for the stopped deployment. Some
files may have already been copied to, and some scripts may have already been run on, one or more
of the instances in the deployment group.
• The deployment will not immediately stop, and the operation will return a status of pending. In this
case, some deployment lifecycle events may still be running on the deployment group. Some files
may have already been copied to, and some scripts may have already been run on, one or more of
the instances in the deployment group. After the pending operation is complete, subsequent calls to
stop the deployment will return a status of succeeded.
• The deployment cannot stop, and the operation will return an error. For more information, see
ErrorInformation and Common Errors in the AWS CodeDeploy API Reference.
Like stopped deployments, failed deployments may result in some deployment lifecycle events
having already been run on one or more of the instances in the deployment group. To find out why
a deployment failed, you can use the AWS CodeDeploy console, call the get-deployment-instance
command, or analyze the log files on the failed instance. For more information about AWS CodeDeploy
log files, see Application Revision and Log File Cleanup (p. 113).
Note
The causes of many deployment failures can be identified by reviewing the log files created
during the deployment process. For simplicity, we recommend using Amazon CloudWatch
Logs to centrally monitor log files instead of viewing them instance by instance. For
information, see View AWS CodeDeploy Logs in CloudWatch Logs Console.
Redeployments and Deployment Rollbacks
AWS CodeDeploy implements rollbacks by redeploying, as a new deployment, a previously deployed
revision.
You can configure a deployment group to automatically roll back deployments when certain conditions
are met, including when a deployment fails or an alarm monitoring threshold is met. You can also
override the rollback settings specified for a deployment group in an individual deployment.
You can also choose to roll back a failed deployment by manually redeploying a previously deployed
revision.
In all cases, the new or rolled-back deployment is assigned its own deployment ID, and the list of
deployments you can view in AWS CodeDeploy indicates which ones are the result of an automatic
deployment.
For more information, see Redeploy and Roll Back a Deployment (p. 203).
AWS CodeDeploy Application Specification
Files
An application specification file (AppSpec file), which is unique to AWS CodeDeploy, is a YAML-
formatted file used to:
• Map the source files in your application revision to their destinations on the instance.
• Specify custom permissions for deployed files.
• Specify scripts to be run on each instance at various stages of the deployment process.
The AppSpec file is used to manage each deployment as a series of lifecycle events. Lifecycle event
hooks, which are defined in the file, allow you to run scripts on an instance after most deployment
API Version 2014-10-06
9

AWS CodeDeploy User Guide
How the AWS CodeDeploy
Agent Uses the AppSpec File
lifecycle events. AWS CodeDeploy runs only those scripts specified in the file, but those scripts can call
other scripts on the instance. You can run any type of script as long as it is supported by the operating
system running on the instances.
For information about how to create a well-formed AppSpec file, see AppSpec File
Reference (p. 227).
How the AWS CodeDeploy Agent Uses the
AppSpec File
During deployment, the AWS CodeDeploy agent looks up the name of the current event in the hooks
section of the AppSpec file. If the event is not found, the AWS CodeDeploy agent moves on to the
next step. If the event is found, the AWS CodeDeploy agent retrieves the list of scripts to execute. The
scripts are run sequentially, in the order in which they appear in the file. The status of each script is
logged in the AWS CodeDeploy agent log file on the instance.
If a script runs successfully, it returns an exit code of 0 (zero).
For information about AWS CodeDeploy agent log files, see Working with the AWS CodeDeploy
Agent (p. 109).
During the Install event, the AWS CodeDeploy agent uses the mappings defined in the files section of
the AppSpec file to determine which folders or files to copy from the revision to the instance.
If the AWS CodeDeploy agent installed on the operating system doesn't match what's listed in the
AppSpec file, the deployment will fail.
API Version 2014-10-06
10

AWS CodeDeploy User Guide
Step 1: Provision an IAM User
Getting Started with AWS
CodeDeploy
Before you use AWS CodeDeploy for the first time, you must complete a number of prerequisite setup
steps.
To begin, you must sign up for an AWS account. To sign up, go to http://aws.amazon.com/ and choose
Create an AWS Account.
Then you can continue with the rest of the setup tasks in this section.
Topics
•Step 1: Provision an IAM User (p. 11)
•Step 2: Install or Upgrade and Then Configure the AWS CLI (p. 13)
•Step 3: Create a Service Role for AWS CodeDeploy (p. 13)
•Step 4: Create an IAM Instance Profile for Your Amazon EC2 Instances (p. 17)
•Step 5: Try the AWS CodeDeploy Create Deployment Walkthrough (p. 21)
Step 1: Provision an IAM User
Follow these instructions to prepare an IAM user to use AWS CodeDeploy:
1. Create an IAM user or use an existing one associated with your AWS account. For more
information, see Creating an IAM User in IAM User Guide.
2. Grant the IAM user access to AWS CodeDeploy—and AWS services and actions AWS
CodeDeploy depends on—by attaching the following policy to the IAM user:
{
"Version": "2012-10-17",
"Statement" : [
{
"Effect" : "Allow",
"Action" : [
"autoscaling:*",
"codedeploy:*",
"ec2:*",
"elasticloadbalancing:*",
"iam:AddRoleToInstanceProfile",
"iam:CreateInstanceProfile",
API Version 2014-10-06
11

AWS CodeDeploy User Guide
Step 1: Provision an IAM User
"iam:CreateRole",
"iam:DeleteInstanceProfile",
"iam:DeleteRole",
"iam:DeleteRolePolicy",
"iam:GetInstanceProfile",
"iam:GetRole",
"iam:GetRolePolicy",
"iam:ListInstanceProfilesForRole",
"iam:ListRolePolicies",
"iam:ListRoles",
"iam:PassRole",
"iam:PutRolePolicy",
"iam:RemoveRoleFromInstanceProfile",
"s3:*"
],
"Resource" : "*"
}
]
}
To learn how to attach a policy to an IAM user, see Working with Policies. To learn how to restrict
users to a limited set of AWS CodeDeploy actions and resources, see User Access Permissions
Reference (p. 242).
You can use the AWS CloudFormation templates provided in this documentation to launch
Amazon EC2 instances that are compatible with AWS CodeDeploy. To use AWS CloudFormation
templates to create applications, deployment groups, or deployment configurations, you must
grant the IAM user access to AWS CloudFormation—and AWS services and actions that AWS
CloudFormation depends on—by attaching an additional policy to the IAM user, as follows:
{
"Version": "2012-10-17",
"Statement": [
{
"Effect": "Allow",
"Action": [
"cloudformation:*"
],
"Resource": "*"
}
]
}
For information about other AWS services listed in these statements, see:
•Overview of AWS IAM Policies
•Controlling User Access to Your Load Balancer
•Controlling Access to Your Auto Scaling Resources
•Controlling AWS CloudFormation Access with AWS Identity and Access Management
API Version 2014-10-06
12
AWS CodeDeploy User Guide
Step 2: Install or Upgrade and
Then Configure the AWS CLI
Step 2: Install or Upgrade and Then Configure
the AWS CLI
To call AWS CodeDeploy commands from the AWS CLI on a local development machine, you must
install the AWS CLI. AWS CodeDeploy commands first became available in version 1.6.1 of the AWS
CLI. AWS CodeDeploy commands for working with on-premises instances became available in 1.7.19
of the AWS CLI.
If you have an older version of the AWS CLI installed, you must upgrade it so the AWS CodeDeploy
commands will be available. You can call aws --version to check the version.
To install or upgrade the AWS CLI:
1. Follow the instructions in Installing the AWS Command Line Interface to install or upgrade the
AWS CLI.
2. To configure the AWS CLI, see Configuring the AWS Command Line Interface and Managing
Access Keys for IAM Users.
Important
When you configure the AWS CLI, you will be prompted to specify an AWS region.
Specify one of the supported regions listed in Region and Endpoints in the AWS General
Reference.
3. To verify the installation or upgrade, call the following command from the AWS CLI:
aws deploy help
If successful, this command displays a list of available AWS CodeDeploy commands.
Step 3: Create a Service Role for AWS
CodeDeploy
In AWS, service roles are used to grant permissions to an AWS service so it can access AWS
resources. The policies that you attach to the service role determine which AWS resources the service
can access and what it can do with those resources.
The service role you create for AWS CodeDeploy must be granted the permissions to access the
instances to which you will deploy applications. These permissions enable AWS CodeDeploy to read
the tags applied to the instances or the Auto Scaling group names associated with the instances.
Do not confuse the IAM service role with the IAM user roles used to work with AWS CodeDeploy
or the IAM instance profile used to launch Amazon EC2 instances that are compatible with
AWS CodeDeploy. For information about user role permissions, see User Access Permissions
Reference (p. 242). For information about creating an IAM instance profile, see Step 4: Create
an IAM Instance Profile (p. 17).
The permissions you add to the service role specify the operations AWS CodeDeploy can perform
when it accesses your Amazon EC2 instances and Auto Scaling groups. To add these permissions,
attach an AWS-supplied policy, AWSCodeDeployRole, to the service role. You can review the
details of AWSCodeDeployRole and other AWS CodeDeploy policies in User Access Permissions
Reference (p. 242).
API Version 2014-10-06
13

AWS CodeDeploy User Guide
Create a Service Role (Console)
As part of setting up the service role, you also update its trust relationship to specify the endpoints to
which you want to grant it access.
You can create a service role with the IAM console, the AWS CLI, or the IAM APIs.
Topics
•Create a Service Role (Console) (p. 14)
•Create a Service Role (CLI) (p. 15)
•Get the Service Role ARN (Console) (p. 17)
•Get the Service Role ARN (CLI) (p. 17)
Create a Service Role (Console)
1. Sign in to the Identity and Access Management (IAM) console at https://console.aws.amazon.com/
iam/.
Important
Make sure you are signed in to the AWS Management Console with the same account
information you used in Getting Started (p. 11).
2. In the navigation pane, choose Roles, and then choose Create New Role.
3. In the Role Name box, give the service role a name (for example, CodeDeployServiceRole),
and then choose Next Step.
4. On the Select Role Type page, with AWS Service Roles selected, next to AWS CodeDeploy,
choose Select.
5. On the Attach Policy page, select the box next to the AWSCodeDeployRole policy, and then
choose Next Step.
The AWSCodeDeployRole policy provides the permissions required for your service role to read
the tags on your instances or identify your Amazon EC2 instances by Auto Scaling group names.
By default, this policy also includes a trust relationship that grants your service role access to all of
the endpoints currently supported by AWS CodeDeploy. You can restrict the service role's access
to only those endpoints you specify.
6. Note the value of the Role ARN field. You will need it later when you create deployment groups. If
you forget the value, follow the instructions in Get the Service Role ARN (Console) (p. 17).
7. Choose Create Role.
8. If you want this service role to have permission to access all currently supported endpoints, you
are finished with this procedure.
If you want to restrict this service role from accessing all endpoints, in the list of roles, browse to
and choose the role you just created, and continue with the next step.
9. Under Trust Relationships, choose Edit Trust Relationship.
10. You should see the following policy, which provides the service role permission to access all
supported endpoints:
{
"Version": "2012-10-17",
"Statement": [
{
"Sid": "",
"Effect": "Allow",
"Principal": {
"Service": [
"codedeploy.amazonaws.com"
]
API Version 2014-10-06
14

AWS CodeDeploy User Guide
Create a Service Role (CLI)
},
"Action": "sts:AssumeRole"
}
]
}
To grant the service role access to only some supported endpoints, replace the contents of the
Policy Document box with the following policy, remove the lines for the endpoints to which you
want to exclude access, and then choose Update Trust Policy.
{
"Version": "2012-10-17",
"Statement": [
{
"Sid": "",
"Effect": "Allow",
"Principal": {
"Service": [
"codedeploy.us-east-1.amazonaws.com",
"codedeploy.us-west-1.amazonaws.com",
"codedeploy.us-west-2.amazonaws.com",
"codedeploy.ap-northeast-1.amazonaws.com",
"codedeploy.ap-northeast-2.amazonaws.com",
"codedeploy.ap-south-1.amazonaws.com",
"codedeploy.ap-southeast-1.amazonaws.com",
"codedeploy.ap-southeast-2.amazonaws.com",
"codedeploy.eu-central-1.amazonaws.com",
"codedeploy.eu-west-1.amazonaws.com",
"codedeploy.sa-east-1.amazonaws.com"
]
},
"Action": "sts:AssumeRole"
}
]
}
Note
Do not use a comma after the last endpoint in the list.
For more information about creating service roles, see Creating a Role to Delegate Permissions to an
AWS Service in the IAM User Guide.
Create a Service Role (CLI)
1. On your development machine, create a text file named, for example, CodeDeployDemo-
Trust.json. This file will be used to allow AWS CodeDeploy to work on your behalf.
Do one of the following:
• To grant access to all supported regions, save the following content in the file:
{
"Version": "2012-10-17",
"Statement": [
{
"Sid": "",
API Version 2014-10-06
15

AWS CodeDeploy User Guide
Create a Service Role (CLI)
"Effect": "Allow",
"Principal": {
"Service": [
"codedeploy.amazonaws.com"
]
},
"Action": "sts:AssumeRole"
}
]
}
• To grant access to only some supported regions, type the following content into the file, and
remove the lines for the regions to which you want to exclude access:
{
"Version": "2012-10-17",
"Statement": [
{
"Sid": "",
"Effect": "Allow",
"Principal": {
"Service": [
"codedeploy.us-east-1.amazonaws.com",
"codedeploy.us-west-1.amazonaws.com",
"codedeploy.us-west-2.amazonaws.com",
"codedeploy.ap-northeast-1.amazonaws.com",
"codedeploy.ap-northeast-2.amazonaws.com",
"codedeploy.ap-south-1.amazonaws.com",
"codedeploy.ap-southeast-1.amazonaws.com",
"codedeploy.ap-southeast-2.amazonaws.com",
"codedeploy.eu-central-1.amazonaws.com",
"codedeploy.eu-west-1.amazonaws.com",
"codedeploy.sa-east-1.amazonaws.com"
]
},
"Action": "sts:AssumeRole"
}
]
}
Note
Do not use a comma after the last endpoint in the list.
2. From the same directory, call the create-role command to create a service role named
CodeDeployServiceRole based on the information in the text file you just created:
aws iam create-role --role-name CodeDeployServiceRole --assume-role-
policy-document file://CodeDeployDemo-Trust.json
In the command's output, note the value of the Arn entry under the Role object. You will need it
later when you create deployment groups. If you forget the value, follow the instructions in Get the
Service Role ARN (CLI) (p. 17).
3. Call the attach-role-policy command to give the service role named CodeDeployServiceRole
the permissions based on the IAM managed policy named AWSCodeDeployRole:
API Version 2014-10-06
16
AWS CodeDeploy User Guide
Get the Service Role ARN (Console)
aws iam attach-role-policy --role-name CodeDeployServiceRole --policy-arn
arn:aws:iam::aws:policy/service-role/AWSCodeDeployRole
For more information about creating service roles, see Creating a Role for an AWS Service in the IAM
User Guide.
Get the Service Role ARN (Console)
To use the IAM console to get the ARN of the service role:
1. Sign in to the Identity and Access Management (IAM) console at https://console.aws.amazon.com/
iam/.
2. In the navigation pane, choose Roles.
3. In the Search box, type CodeDeployServiceRole, and then press Enter.
4. Choose CodeDeployServiceRole.
5. Note the value of the Role ARN field.
Get the Service Role ARN (CLI)
To use the AWS CLI to get the ARN of the service role, call the get-role command against the service
role named CodeDeployServiceRole:
aws iam get-role --role-name CodeDeployServiceRole --query "Role.Arn" --
output text
The value returned is the ARN of the service role.
Step 4: Create an IAM Instance Profile for Your
Amazon EC2 Instances
Your Amazon EC2 instances need permission to access the Amazon S3 buckets or GitHub
repositories where the applications that will be deployed by AWS CodeDeploy are stored. To launch
Amazon EC2 instances that are compatible with AWS CodeDeploy, you must create an additional IAM
role, an instance profile. These instructions show you how to create an IAM instance profile to attach to
your Amazon EC2 instances. This role gives AWS CodeDeploy permission to access the Amazon S3
buckets or GitHub repositories where your applications are stored.
Do not confuse the IAM instance profile with the IAM service role that gives AWS CodeDeploy
permission to access your instances or the IAM user roles used to work with AWS CodeDeploy.
For information about user role permissions, see User Access Permissions Reference (p. 242).
For information about creating a service role, see Step 3: Create a Service Role (p. 13).
You can create an IAM instance profile with the AWS CLI, the IAM console, or the IAM APIs.
Note
You must attach an IAM instance profile to an Amazon EC2 instance as you launch it. You
cannot attach an IAM instance profile to an Amazon EC2 instance that has already been
launched. For more information, see Instance Profiles.
API Version 2014-10-06
17

AWS CodeDeploy User Guide
Create an IAM Instance Profile for
Your Amazon EC2 Instances (CLI)
Topics
•Create an IAM Instance Profile for Your Amazon EC2 Instances (CLI) (p. 18)
•Create an IAM Instance Profile for Your Amazon EC2 Instances (Console) (p. 20)
•Get the IAM Instance Profile Name (CLI) (p. 21)
Create an IAM Instance Profile for Your Amazon
EC2 Instances (CLI)
In these steps, we assume you have already followed the instructions in Getting Started (p. 11).
1. On your development machine, create a text file named CodeDeployDemo-EC2-Trust.json.
Paste the following content, which allows Amazon EC2 to work on your behalf:
{
"Version": "2012-10-17",
"Statement": [
{
"Sid": "",
"Effect": "Allow",
"Principal": {
"Service": "ec2.amazonaws.com"
},
"Action": "sts:AssumeRole"
}
]
}
2. In the same directory, create a text file named CodeDeployDemo-EC2-Permissions.json.
Paste the following content:
{
"Version": "2012-10-17",
"Statement": [
{
"Action": [
"s3:Get*",
"s3:List*"
],
"Effect": "Allow",
"Resource": "*"
}
]
}
Note
We recommend that you restrict this policy to only those Amazon S3 buckets your
Amazon EC2 instances must access. Make sure to give access to the Amazon S3
buckets that contain the AWS CodeDeploy agent. Otherwise, an error may occur when
the AWS CodeDeploy agent is installed or updated on the instances. For example:
{
"Version": "2012-10-17",
"Statement": [
{
API Version 2014-10-06
18
AWS CodeDeploy User Guide
Create an IAM Instance Profile for
Your Amazon EC2 Instances (CLI)
"Effect": "Allow",
"Action": [
"s3:Get*",
"s3:List*"
],
"Resource": [
"arn:aws:s3:::codedeploydemobucket/*",
"arn:aws:s3:::aws-codedeploy-us-east-1/*",
"arn:aws:s3:::aws-codedeploy-us-west-1/*",
"arn:aws:s3:::aws-codedeploy-us-west-2/*",
"arn:aws:s3:::aws-codedeploy-ap-northeast-1/*",
"arn:aws:s3:::aws-codedeploy-ap-northeast-2/*",
"arn:aws:s3:::aws-codedeploy-ap-south-1/*",
"arn:aws:s3:::aws-codedeploy-ap-southeast-1/*",
"arn:aws:s3:::aws-codedeploy-ap-southeast-2/*",
"arn:aws:s3:::aws-codedeploy-eu-central-1/*",
"arn:aws:s3:::aws-codedeploy-eu-west-1/*",
"arn:aws:s3:::aws-codedeploy-sa-east-1/*"
]
}
]
}
3. From the same directory, call the create-role command to create an IAM role named
CodeDeployDemo-EC2-Instance-Profile, based on the information in the first file:
aws iam create-role --role-name CodeDeployDemo-EC2-Instance-Profile --
assume-role-policy-document file://CodeDeployDemo-EC2-Trust.json
4. From the same directory, call the put-role-policy command to give the role named
CodeDeployDemo-EC2-Instance-Profile the permissions based on the information in the
second file:
aws iam put-role-policy --role-name CodeDeployDemo-EC2-Instance-Profile
--policy-name CodeDeployDemo-EC2-Permissions --policy-document file://
CodeDeployDemo-EC2-Permissions.json
5. Call the create-instance-profile command followed by the add-role-to-instance-profile
command to create an IAM instance profile named CodeDeployDemo-EC2-Instance-Profile.
The instance profile allows Amazon EC2 to pass the IAM role named CodeDeployDemo-EC2-
Instance-Profile to an Amazon EC2 instance when the instance is first launched:
aws iam create-instance-profile --instance-profile-name CodeDeployDemo-
EC2-Instance-Profile
aws iam add-role-to-instance-profile --instance-profile-name
CodeDeployDemo-EC2-Instance-Profile --role-name CodeDeployDemo-EC2-
Instance-Profile
If you need to get the name of the IAM instance profile, see Get the IAM Instance Profile Name
(CLI) (p. 21).
You've now created an IAM instance profile to attach to your Amazon EC2 instances. For more
information, see IAM Roles for Amazon EC2 in the Amazon EC2 User Guide.
API Version 2014-10-06
19

AWS CodeDeploy User Guide
Create an IAM Instance Profile for Your
Amazon EC2 Instances (Console)
Create an IAM Instance Profile for Your Amazon
EC2 Instances (Console)
1. Sign in to the Identity and Access Management (IAM) console at https://console.aws.amazon.com/
iam/.
Important
Make sure you are signed in to the AWS Management Console with the same account
information you used in Getting Started (p. 11).
2. In the IAM console, in the navigation pane, choose Policies, and then choose Create Policy. (If a
Get Started button appears, choose it, and then choose Create Policy.)
3. Next to Create Your Own Policy, choose Select.
4. In the Policy Name box, type CodeDeployDemo-EC2-Permissions.
5. In the Policy Document box, paste the following:
{
"Version": "2012-10-17",
"Statement": [
{
"Action": [
"s3:Get*",
"s3:List*"
],
"Effect": "Allow",
"Resource": "*"
}
]
}
Note
We recommend that you restrict this policy to only those Amazon S3 buckets your
Amazon EC2 instances must access. Make sure to give access to the Amazon S3
buckets that contain the AWS CodeDeploy agent. Otherwise, an error may occur when
the AWS CodeDeploy agent is installed or updated on the instances. For example:
{
"Version": "2012-10-17",
"Statement": [
{
"Effect": "Allow",
"Action": [
"s3:Get*",
"s3:List*"
],
"Resource": [
"arn:aws:s3:::codedeploydemobucket/*",
"arn:aws:s3:::aws-codedeploy-us-east-1/*",
"arn:aws:s3:::aws-codedeploy-us-west-1/*",
"arn:aws:s3:::aws-codedeploy-us-west-2/*",
"arn:aws:s3:::aws-codedeploy-ap-northeast-1/*",
"arn:aws:s3:::aws-codedeploy-ap-northeast-2/*",
"arn:aws:s3:::aws-codedeploy-ap-south-1/*",
"arn:aws:s3:::aws-codedeploy-ap-southeast-1/*",
"arn:aws:s3:::aws-codedeploy-ap-southeast-2/*",
"arn:aws:s3:::aws-codedeploy-eu-central-1/*",
API Version 2014-10-06
20

AWS CodeDeploy User Guide
Get the IAM Instance Profile Name (CLI)
"arn:aws:s3:::aws-codedeploy-eu-west-1/*",
"arn:aws:s3:::aws-codedeploy-sa-east-1/*"
]
}
]
}
6. Choose Create Policy.
7. In the navigation pane, choose Roles, and then choose Create New Role.
8. In the Role Name box, give the IAM instance profile a name like CodeDeployDemo-EC2-
Instance-Profile, and then choose Next Step.
9. On the Select Role Type page, next to Amazon EC2, choose Select.
10. On the Attach Policy page, select the box next to CodeDeployDemo-EC2-Permissions, and
then choose Next Step.
11. Choose Create Role.
You've now created an IAM instance profile to attach to your Amazon EC2 instances. For more
information, see IAM Roles for Amazon EC2 in the Amazon EC2 User Guide.
Get the IAM Instance Profile Name (CLI)
To get the name of the IAM instance profile you created, call the list-instance-profiles-for-role
command against the IAM role named CodeDeployDemo-EC2-Instance-Profile:
aws iam list-instance-profiles-for-role --role-name CodeDeployDemo-EC2-
Instance-Profile --query "InstanceProfiles[0].InstanceProfileName" --output
text
The value returned is the IAM instance profile name.
Note
You cannot use the IAM console to get the IAM instance profile name.
Step 5: Try the AWS CodeDeploy Create
Deployment Walkthrough
This walkthrough guides you through the steps required to deploy a revision to one or more Amazon
EC2 instances. For this walkthrough, we assume you have no prior experience with AWS CodeDeploy
and have not yet created any resources, such as applications, application revisions, or deployment
groups in AWS CodeDeploy .
This walkthrough refers to components and concepts that are unique to AWS CodeDeploy. To
familiarize yourself with them before you start, see Key Components (p. 3).
API Version 2014-10-06
21

AWS CodeDeploy User Guide
Video Walkthrough of a Sample
AWS CodeDeploy Deployment
Not what you're looking for?
• To create a deployment that uses an existing application, revision, deployment group, or
custom deployment configuration in AWS CodeDeploy, follow the instructions in Deploy a
Revision (p. 197).
• To practice deploying to on-premises instances instead of Amazon EC2 instances, see
Tutorial: Deploy an Application to an On-Premises Instance (p. 73).
Topics
•Video Walkthrough of a Sample AWS CodeDeploy Deployment (p. 22)
•Prerequisites (p. 22)
•Start the Walkthrough (p. 23)
•Step 1: Welcome (p. 24)
•Step 2: Instance Settings (p. 24)
•Step 3: Application Name (p. 25)
•Step 4: Revision (p. 25)
•Step 5: Deployment Group (p. 25)
•Step 6: Service Role (p. 25)
•Step 7: Deployment Configuration (p. 26)
•Step 8: Review (p. 26)
•Clean Up Deployment Walkthrough Resources (p. 26)
Video Walkthrough of a Sample AWS
CodeDeploy Deployment
This short video (5:01) walks you through a sample AWS CodeDeploy deployment using the AWS
CodeDeploy console.
Video Walkthrough of an AWS CodeDeploy Deployment.
Prerequisites
If you want AWS CodeDeploy to create some sample Amazon EC2 instances, you must have an
Amazon EC2 instance key pair. To create an Amazon EC2 instance key pair, follow the instructions in
Creating Your Key Pair Using Amazon EC2. Be sure your Amazon EC2 instance key pair is created
in one of the regions listed in Region and Endpoints in the AWS General Reference. You must create
an Amazon EC2 instance key pair before you start this walkthrough. Otherwise, it will not appear in the
Key Pair Name drop-down list on the Instance Settings page.
If you use the AWS CloudFormation template to launch Amazon EC2 instances, the calling IAM
user must have access to AWS CloudFormation and AWS services and actions on which AWS
CloudFormation depends. If you have not followed the steps in Getting Started (p. 11) to provision
the calling IAM user, you must at least attach the following policy:
{
"Version": "2012-10-17",
"Statement": [
{
"Effect": "Allow",
API Version 2014-10-06
22

AWS CodeDeploy User Guide
Start the Walkthrough
"Action": [
"cloudformation:*",
"codedeploy:*",
"ec2:*",
"iam:AddRoleToInstanceProfile",
"iam:CreateInstanceProfile",
"iam:CreateRole",
"iam:DeleteInstanceProfile",
"iam:DeleteRole",
"iam:DeleteRolePolicy",
"iam:GetRole",
"iam:PassRole",
"iam:PutRolePolicy",
"iam:RemoveRoleFromInstanceProfile"
],
"Resource": "*"
}
]
}
The following portion of the policy is what grants the calling IAM user access to the IAM actions
required to create the service role.
{
"Version": "2012-10-17",
"Statement": [
{
"Effect": "Allow",
"Action": [
"iam:CreateRole",
"iam:PutRolePolicy"
],
"Resource": "*"
}
]
}
The following portion of the policy is what grants the calling IAM user permission to create applications
and deployment groups and deploy applications.
{
"Version": "2012-10-17",
"Statement": [
{
"Effect": "Allow",
"Action": [
"codedeploy:*"
],
"Resource": "*"
}
]
}
Start the Walkthrough
To start the walkthrough:
API Version 2014-10-06
23

AWS CodeDeploy User Guide
Step 1: Welcome
1. Sign in to the AWS Management Console and open the AWS CodeDeploy console at https://
console.aws.amazon.com/codedeploy.
Note
Sign in with the same account or IAM user information you used in Getting
Started (p. 11).
2. If an introductory page appears, choose Get Started Now. If the Applications page appears, in
Additional Information, choose Create Deployment Walkthrough.
Step 1: Welcome
Choose Sample Deployment, and then choose Next Step.
Step 2: Instance Settings
If you have Amazon EC2 instances that are already configured for use in AWS CodeDeploy
deployments, choose Skip This Step, read and follow the instructions, and then proceed to Step 3:
Application Name (p. 25).
If you want AWS CodeDeploy to launch a new set of Amazon EC2 instances:
1. Next to Operating System, choose Amazon Linux or Windows Server.
Important
You may be billed for the Amazon EC2 instances launched by AWS CodeDeploy, so
be sure to terminate them after you've completed the walkthrough. In this walkthrough,
an AWS CloudFormation template is used to launch these Amazon EC2 instances. To
delete the AWS CloudFormation stack created to launch the Amazon EC2 instances, see
Deleting a Stack on the AWS CloudFormation Console. The stack name will start with
CodeDeploySampleStack.
2. From the Key Pair Name drop-down list, choose the Amazon EC2 instance key pair you will use
to connect to the Amazon EC2 instances.
Note
To create an Amazon EC2 instance key pair, follow the instructions in Creating Your
Key Pair Using Amazon EC2. Be sure your key pair is created in one of the regions
listed in Region and Endpoints in the AWS General Reference. The new Amazon EC2
instance key pair may not appear in the Key Pair Name drop-down list until you restart
the walkthrough.
3. Leave the defaults for Tag Key and Value. AWS CodeDeploy will use this tag key and value to
locate the instances during deployments.
If you want to override the proposed tag key and value (for example, if you are running through
this walkthrough multiple times without terminating any previously created Amazon EC2
instances), we suggest you leave the tag key of Name in the Key box and type a different tag value
in the Value box. For information about Amazon EC2 instance tags, see Tagging Your Amazon
EC2 Resources.
4. Choose Launch Instances.
If you choose See more details in AWS CloudFormation, the AWS CloudFormation console will
open in a separate web browser tab. Look for a stack that starts with CodeDeploySampleStack.
When CREATE_COMPLETE appears in the Status column, your Amazon EC2 instances have
been launched. (This may take several minutes.)
5. To continue, choose Next Step.
API Version 2014-10-06
24

AWS CodeDeploy User Guide
Step 3: Application Name
Step 3: Application Name
In the Application Name box, leave the proposed application name or, if you prefer, type a different
name, and choose Next Step.
Step 4: Revision
Review the information about our sample application revision, and choose Next Step.
Tip
If you want to examine the content of our sample revision, choose Download Sample
Bundle, and follow your web browser's instructions to download and view the content.
If you chose Skip This Step in Step 2: Instance Settings (p. 24), from the Revision Type drop-
down list, choose the type of application revision that corresponds to the Amazon EC2 instances type
(Amazon Linux or Windows Server).
Step 5: Deployment Group
1. In the Deployment Group Name box, leave the proposed deployment group name or, if you
prefer, type a different name.
2. The key and value of the key-value pair you specified in the Instance Settings page (for example,
Name and CodeDeployDemo) should appear.
If you chose Skip This Step in Step 2: Instance Settings (p. 24), in Add Instances, overwrite
the values of the Key and Value boxes with the key and value of the key-value pair for your
Amazon EC2 instances.
Optionally, if your Amazon EC2 instances have multiple key-value pairs, you can type them into
the blank row. A new blank row appears so you can add another key-value pair. You can add up to
10 key-value pairs. Choose the remove icon to remove a key-value pair from the list.
Tip
AWS CodeDeploy displays the number of instances that match each key-value pair. To
view instances in the Amazon EC2 console, click the number.
If you are using our AWS CloudFormation template to launch new Amazon EC2
instances, and the number is larger than you're expecting, choose Cancel, start the
walkthrough from the beginning, and in Step 2: Instance Settings (p. 24), specify a
tag value different from the default . (Be sure to delete the AWS CloudFormation stack to
terminate the Amazon EC2 instances.)
If you are using your own Amazon EC2 instances, add a new tag key and value to your
Amazon EC2 instances, and then specify a tag key and value different from the default in
Add Instances.
3. If you have an Auto Scaling group to add to the deployment group, choose Search by Auto
Scaling Group Names, and then type the Auto Scaling group name. You can add up to 10 Auto
Scaling groups. Choose the remove icon to remove an Auto Scaling group from the list.
Tip
AWS CodeDeploy displays the number of Amazon EC2 instances that match each Auto
Scaling group name. To view instances in the Amazon EC2 console, click the number.
4. Choose Next Step.
Step 6: Service Role
Choose Create a new service role or Use an existing service role.
API Version 2014-10-06
25

AWS CodeDeploy User Guide
Step 7: Deployment Configuration
If you are using this walkthrough for the first time, we recommend you choose Create a new service
role, choose Next Step to accept the default name, and then proceed to Step 7: Deployment
Configuration (p. 26).
If you already have a service role, choose Use an existing service role, choose it from the Role
Name drop-down list, and then choose Next Step.
Step 7: Deployment Configuration
1. To use a built-in configuration for this deployment, choose Default Deployment Configurations.
To create your own configuration for this deployment, choose Create Custom Deployment
Configuration.
2. If you chose Default Deployment Configurations and want to use a configuration different
from the one selected, next to the desired configuration, choose Select. Choose Next Step, and
proceed to Step 8: Review (p. 26).
3. If you chose Create Custom Deployment Configuration:
a. In the Deployment Config Name box, type a unique name for the configuration.
b. Use the Number or Percentage box to type either the number or percentage of total Amazon
EC2 instances that should be available during the deployment.
c. Choose Next Step.
Step 8: Review
1. If you need to make changes, choose one of the Edit links. After you've made your changes,
choose Next Step until you return to the Step 8: Review page, and then choose Deploy Now.
2. Choose the Refresh button next to the table to get deployment status. To get information about
the deployment, see View Instance Details (Console) (p. 138).
3. Our sample revision deploys a single web page to each instance. You can use your web browser
to verify the deployment was successful by going to http://PublicDNS for each instance (for
example, http://ec2-01-234-567-890.compute-1.amazonaws.com). The web page will
display a message of congratulations.
To get the public DNS value, in the Amazon EC2 console, choose the Amazon EC2 instance. On
the Description tab, look for the value in Public DNS.
Clean Up Deployment Walkthrough Resources
To avoid future charges, you must clean up the resources used in this walkthrough. If you used our
AWS CloudFormation template to launch Amazon EC2 instances, delete the AWS CloudFormation
stack. This will terminate the instances and their associated resources.
If you launched your own Amazon EC2 instances just for this walkthrough, you should terminate them.
Optionally, you can delete the deployment component records associated with this walkthrough from
the AWS CodeDeploy console.
To delete the AWS CloudFormation stack
1. Sign in to the AWS Management Console and open the AWS CloudFormation console at https://
console.aws.amazon.com/cloudformation/.
2. In the Stack Name column, select the box for the stack starting with CodeDeploySampleStack.
3. Choose Delete Stack.
API Version 2014-10-06
26

AWS CodeDeploy User Guide
Clean Up Deployment Walkthrough Resources
4. When prompted, choose Yes, Delete. The Amazon EC2 instances will be terminated. The
associated IAM instance profile and service role will be deleted.
To terminate Amazon EC2 instances
1. Sign in to the AWS Management Console and open the Amazon EC2 console at https://
console.aws.amazon.com/ec2/.
2. In the navigation pane, under Instances, choose Instances.
3. Select the box for each Amazon EC2 instance to terminate.
4. Choose Actions, point to Instance State, and then choose Terminate.
5. When prompted, choose Yes, Terminate.
To delete AWS CodeDeploy deployment component
records
1. Sign in to the AWS Management Console and open the AWS CodeDeploy console at https://
console.aws.amazon.com/codedeploy.
Note
Sign in with the same account or IAM user information you used in Getting
Started (p. 11).
2. If the Applications page does not appear, on the AWS CodeDeploy menu, choose Applications.
3. On the Applications page, choose the application to delete.
4. At the bottom of the Application details page, choose Delete application.
5. When prompted, type the name of the application, and then choose Delete.
All records about the application and its associated deployment groups, revisions, and
deployments will be deleted.
API Version 2014-10-06
27

AWS CodeDeploy User Guide
Integration with Other AWS Services
Product and Service Integrations
with AWS CodeDeploy
By default, AWS CodeDeploy is integrated with a number of AWS services and partner products and
services. The following information can help you configure AWS CodeDeploy to integrate with the
products and services you use.
•Integration with Other AWS Services (p. 28)
•Integration with Partner Products and Services (p. 33)
•Integration Examples from the Community (p. 39)
Integration with Other AWS Services
AWS CodeDeploy is integrated with the following AWS services:
Amazon
CloudWatch Amazon CloudWatch is a monitoring service for AWS cloud resources and
the applications you run on AWS. You can use Amazon CloudWatch to
collect and track metrics, collect and monitor log files, and set alarms. AWS
CodeDeploy supports the following CloudWatch tools:
•CloudWatch Alarms for monitoring your deployments and stopping them
when your specified monitoring metrics exceed or fall below the thresholds
you specify in a CloudWatch alarm rule. To use alarm monitoring, you first
set up an alarm in CloudWatch, and then add it in AWS CodeDeploy to the
application or deployment group where deployments should stop when the
alarm is activated.
Learn more:
•Creating CloudWatch Logs Alarms
•Amazon CloudWatch Events for detecting and reacting to changes in the
state of an instance or a deployment in your AWS CodeDeploy operations.
Then, based on rules you create, CloudWatch Events will invoke one or
API Version 2014-10-06
28

AWS CodeDeploy User Guide
Integration with Other AWS Services
more target actions when a deployment or instance enters the state you
specify in a rule.
Learn more:
•Monitoring Deployments with Amazon CloudWatch Events (p. 212)
•Amazon CloudWatch Logs for monitoring the three types of logs created
by the AWS CodeDeploy agent without having to sign in to instances one at
a time.
Learn more:
•View AWS CodeDeploy Logs in the Amazon CloudWatch Console
Auto Scaling AWS CodeDeploy supports Auto Scaling, an AWS web service that can
automatically launch Amazon EC2 instances based on criteria you specify (for
example, limits exceeded for specified CPU utilization, disk reads or writes,
or inbound or outbound network traffic over a specified time interval). This
enables you to scale up a group of Amazon EC2 instances whenever you
need them and then use AWS CodeDeploy to deploy application revisions to
the additional Amazon EC2 instances automatically. Auto Scaling terminates
those Amazon EC2 instances when they are no longer needed.
Learn more:
•Auto Scaling (p. 31)
•Tutorial: Deploy to an Auto Scaling Group (p. 79)
•Under the Hood: AWS CodeDeploy and Auto Scaling Integration
AWS CloudTrail AWS CodeDeploy is integrated with AWS CloudTrail, a service that captures
API calls made by or on behalf of AWS CodeDeploy in your AWS account and
delivers the log files to an Amazon S3 bucket you specify. CloudTrail captures
API calls from the AWS CodeDeploy console, from AWS CodeDeploy
commands through the AWS CLI, or from the AWS CodeDeploy APIs directly.
Using the information collected by CloudTrail, you can determine which
request was made to AWS CodeDeploy, the source IP address from which the
request was made, who made the request, when it was made, and so on.
Learn more:
•Monitoring Deployments with AWS CloudTrail (p. 214)
API Version 2014-10-06
29

AWS CodeDeploy User Guide
Integration with Other AWS Services
AWS CodePipeline AWS CodePipeline is a continuous delivery service you can use to model,
visualize, and automate the steps required to release your software in a
continuous delivery process. You can use AWS CodePipeline to define
your own release process so that the service builds, tests, and deploys your
code every time there is a code change. For example, you may have three
deployment groups for an application: Beta, Gamma, and Prod. You can set
up a pipeline so that each time there is a change in your source code, the
updates are deployed to each deployment group, one by one.
You can configure AWS CodePipeline to use AWS CodeDeploy to deploy your
code to Amazon EC2 instances, on-premise instances, or both.
You can create the AWS CodeDeploy application, deployment, and
deployment group to use in a deploy action in a stage either before you create
the pipeline or in the Create Pipeline wizard.
Learn more:
•AWS for DevOps Getting Started Guide — Learn how to use AWS
CodePipeline with AWS CodeDeploy to continuously deliver and deploy
source code in AWS CodeCommit repositories to Amazon EC2 instances.
•Simple Pipeline Walkthrough (Amazon S3 Bucket)
•Simple Pipeline Walkthrough (AWS CodeCommit Repository)
•Four-Stage Pipeline Tutorial
Elastic Load
Balancing AWS CodeDeploy supports Elastic Load Balancing, a service that
automatically distributes incoming application traffic across multiple Amazon
EC2 instances. When you run an application such as a web service, the
corresponding Amazon EC2 instances will most likely be registered with
Elastic Load Balancing load balancers. When you're ready to use AWS
CodeDeploy to deploy code to one of those Amazon EC2 instances, you
don't want the load balancers to continue sending traffic to the Amazon EC2
instance during the deployment. You can coordinate this kind of deployment
by using deployment lifecycle event scripts in AWS CodeDeploy to deploy new
code to Amazon EC2 instances that are registered with load balancers.
AWS CodeDeploy integrates with both types of Elastic Load Balancing load
balancers: Classic load balancer and Application load balancer.
Learn more:
•What Is Elastic Load Balancing?
•What Is a Classic Load Balancer?
•What Is an Application Load Balancer?
•Integrating AWS CodeDeploy with Elastic Load Balancing (p. 32)
•Classic Load Balancer Sample Scripts for AWS CodeDeploy (GitHub)
•Application Load Balancer Sample Scripts for AWS CodeDeploy (GitHub)
Topics
•Auto Scaling (p. 31)
•Elastic Load Balancing (p. 32)
API Version 2014-10-06
30

AWS CodeDeploy User Guide
Auto Scaling
Integrating AWS CodeDeploy with Auto Scaling
AWS CodeDeploy supports Auto Scaling, an AWS service that can launch Amazon EC2 instances
automatically according to conditions you define. These conditions can include limits exceeded in a
specified time interval for CPU utilization, disk reads or writes, or inbound or outbound network traffic.
Auto Scaling terminates the instances when they are no longer needed. For more information, see
What Is Auto Scaling?.
When new Amazon EC2 instances are launched as part of an Auto Scaling group, AWS CodeDeploy
can deploy your revisions to the new instances automatically. You can also coordinate deployments in
AWS CodeDeploy with Amazon EC2 instances registered with Elastic Load Balancing load balancers.
For more information, see Elastic Load Balancing (p. 32).
Note
Be aware that you might encounter issues if you associate multiple deployment groups with a
single Auto Scaling group. If one deployment fails, for example, the instance will begin to shut
down, but the other deployments that were running can take an hour to time out. For more
information, see Avoid associating multiple deployment groups with a single Auto Scaling
group (p. 281) and Under the Hood: AWS CodeDeploy and Auto Scaling Integration.
Topics
•Deploying AWS CodeDeploy Applications to Auto Scaling Groups (p. 31)
•Auto Scaling Behaviors with AWS CodeDeploy (p. 32)
•Using a Custom AMI with AWS CodeDeploy and Auto Scaling (p. 32)
Deploying AWS CodeDeploy Applications to Auto Scaling
Groups
To deploy an AWS CodeDeploy application revision to an Amazon EC2 Auto Scaling group:
1. Create or locate an IAM instance profile that allows the Auto Scaling group to work with Amazon
S3.
Note
You can also use AWS CodeDeploy to deploy revisions from GitHub repositories to Auto
Scaling groups. Although Amazon EC2 instances still require an IAM instance profile, the
profile doesn't need any additional permissions to deploy from a GitHub repository. For
more information, see Step 4: Create an IAM Instance Profile (p. 17).
2. Create or use an Auto Scaling group, specifying the IAM instance profile.
3. Create or locate a service role that allows AWS CodeDeploy to create a deployment group that
contains the Auto Scaling group.
4. Create a deployment group with AWS CodeDeploy, specifying the Auto Scaling group name and
service role.
5. Use AWS CodeDeploy to deploy your revision to the deployment group that contains the Auto
Scaling group.
For more information, see Tutorial: Deploy to an Auto Scaling Group (p. 79).
API Version 2014-10-06
31

AWS CodeDeploy User Guide
Elastic Load Balancing
Auto Scaling Behaviors with AWS CodeDeploy
The execution order of custom lifecycle hook events cannot be
predetermined
You can add your own lifecycle hooks to Auto Scaling groups to which AWS CodeDeploy deploys.
However, the order in which those custom lifecycle hook events are executed cannot be predetermined
in relation to AWS CodeDeploy default deployment lifecycle events. For example, if you add a custom
lifecycle hook named ReadyForSoftwareInstall to an Auto Scaling group, you cannot know
beforehand whether it will be executed before the first, or after the last, AWS CodeDeploy default
deployment lifecycle event.
To learn how to add custom lifecycle hooks to an Auto Scaling group, see Adding Lifecycle Hooks.
Deleting Auto Scaling groups causes deployment failures for associated
deployment groups
If you add an Auto Scaling group to a deployment group, and then delete the Auto Scaling group, all
future deployments to that deployment group will fail.
Using a Custom AMI with AWS CodeDeploy and Auto
Scaling
You have two options for specifying the base AMI to use when new Amazon EC2 instances are
launched in an Auto Scaling group:
• You can specify a base custom AMI that already has the AWS CodeDeploy agent installed. Because
the agent is already installed, this option launches new Amazon EC2 instances more quickly than the
other option. However, this option provides a greater likelihood that initial deployments of Amazon
EC2 instances will fail, especially if the AWS CodeDeploy agent is out of date. If you choose this
option, we recommend you regularly update the AWS CodeDeploy agent in your base custom AMI.
• You can specify a base AMI that doesn't have the AWS CodeDeploy agent installed and have the
agent installed as each new instance is launched in an Auto Scaling group. Although this option
launches new Amazon EC2 instances more slowly than the other option, it provides a greater
likelihood that initial deployments of instances will succeed. This option uses the most recent version
of the AWS CodeDeploy agent.
Integrating AWS CodeDeploy with Elastic Load
Balancing
Elastic Load Balancing is an AWS service that automatically distributes incoming application traffic
across multiple Amazon EC2 instances in multiple Availability Zones. AWS CodeDeploy integrates
with both types of load balancers supported by Elastic Load Balancing: Classic load balancers and
Application load balancers.
A Classic load balancer makes routing and load balancing decisions either at the transport layer (TCP/
SSL) or the application layer (HTTP/HTTPS), and support either EC2-Classic or a VPC. An Application
load balancer makes routing and load balancing decisions at the application layer (HTTP/HTTPS),
supports path-based routing, and can route requests to one or more ports on each EC2 instance or
container instance in your virtual private cloud (VPC).
For more information about Elastic Load Balancing, see the following topics:
•What is Elastic Load Balancing?
API Version 2014-10-06
32

AWS CodeDeploy User Guide
Integration with Partner Products and Services
•What is a Classic Load Balancer?
•What is an Application Load Balancer?
When you run an application, including a web service, your Amazon EC2 instances will most likely
be registered with Elastic Load Balancing load balancers. When you use AWS CodeDeploy to deploy
code to one of those Amazon EC2 instances, you don't want the load balancers to send traffic to the
instance during the deployment. You can use deployment lifecycle event scripts in AWS CodeDeploy
to deploy code to Amazon EC2 instances that are registered with load balancers.
Note
You can also coordinate deployments in AWS CodeDeploy with Amazon EC2 instances that
are part of an Auto Scaling group. For more information, see Auto Scaling (p. 31).
In the AWS CodeDeploy Samples repository on GitHub, we provide instructions and samples
you can adapt to use AWS CodeDeploy with the Classic load balancer and the Application
load balancer. These repositories include three sample scripts—register_with_elb.sh,
deregister_from_elb.sh, and common_functions.sh—that provide all of the code you need to
get going. Simply edit the placeholders in these three scripts, and then reference these scripts from
your appspec.yml file.
To coordinate deployments in AWS CodeDeploy with Amazon EC2 instances that are registered with
Elastic Load Balancing load balancers, do the following:
1. Download the samples for the type of load balancer you want to use:
•Classic load balancer
•Application load balancer
2. Make sure each of your target Amazon EC2 instances has the AWS CLI installed.
3. Make sure each of your target Amazon EC2 instances has an IAM instance profile attached with,
at minimum, the elasticloadbalancing:* and autoscaling:* permissions.
4. Include in your application's source code directory the deployment lifecycle event scripts
(register_with_elb.sh, deregister_from_elb.sh, and common_functions.sh).
5. In the appspec.yml for the application revision, provide instructions for AWS CodeDeploy
to run the register_with_elb.sh script during the ApplicationStart event and the
deregister_from_elb.sh script during the ApplicationStop event.
6. If the instance is part of an Auto Scaling group, you can skip this step.
In the common_functions.sh script:
• If you are using the Classic load balancer, specify the names of the Elastic Load Balancing load
balancers in ELB_LIST="", and make any changes you need to the other deployment settings
in the file.
• If you are using the Application load balancer, specify the names of the Elastic Load Balancing
target group names in TARGET_GROUP_LIST="", and make any changes you need to the other
deployment settings in the file.
7. Bundle your application's source code, the appspec.yml, and the deployment lifecycle event
scripts into an application revision, and then upload the revision. Deploy the revision to the
Amazon EC2 instances. During the deployment, the deployment lifecycle event scripts will
deregister the Amazon EC2 instance with the load balancers, wait for the connection to drain,
and then re-register the Amazon EC2 instance with the load balancers after the deployment is
complete.
Integration with Partner Products and Services
AWS CodeDeploy has built-in integration for the following partner products and services:
API Version 2014-10-06
33

AWS CodeDeploy User Guide
Integration with Partner Products and Services
Ansible If you already have a set of Ansible playbooks, but just need somewhere to
run them, the template for Ansible and AWS CodeDeploy demonstrates how
a couple of simple deployment hooks will ensure Ansible is available on the
local deployment instance and will run the playbooks. Alternatively, if you
already have a process for building and maintaining your inventory, there's
also an Ansible module you can use to install and run the AWS CodeDeploy
agent.
Learn more:
•Ansible and AWS CodeDeploy
Atlassian –
Bamboo and
Bitbucket
The AWS CodeDeploy task for Bamboo compresses the directory that
contains an AppSpec file into a .zip file, uploads the file to Amazon S3, and
then starts the deployment according to the configuration provided in the AWS
CodeDeploy application.
Atlassian Bitbucket support for AWS CodeDeploy enables you to push code
to Amazon EC2 instances directly from the Bitbucket UI, on demand, to any
of your deployment groups. This means that after you update code in your
Bitbucket repository, you do not have to sign in to your continuous integration
(CI) platform or Amazon EC2 instances to run a manual deployment process.
Learn more:
•Using the AWS CodeDeploy Task for Bamboo
•Announcing Atlassian Bitbucket Support for AWS CodeDeploy
Chef AWS provides two template samples for integrating Chef and AWS
CodeDeploy. The first is a Chef cookbook that will install and start the
AWS CodeDeploy agent. This allows you to continue managing your host
infrastructure with Chef while using AWS CodeDeploy. The second sample
template demonstrates how to use AWS CodeDeploy to orchestrate the
running of cookbooks and recipes with chef-solo on each node.
Learn more:
•Chef and AWS CodeDeploy
CircleCI CircleCI provides an automated testing and continuous integration and
deployment toolset. After you create an IAM role in AWS to use with CircleCI
and configure your deployment parameters in your circle.yml file, you can use
CircleCI with AWS CodeDeploy to create application revisions, upload them to
an Amazon S3 bucket, and then initiate and monitor your deployments.
Learn more:
•Continuous Deployment with AWS CodeDeploy
CloudBees You can use the AWS CodeDeploy Jenkins plugin, available on CloudBees
DEV@cloud, as a post-build action. For example, at the end of a continuous
delivery pipeline, you can use it to deploy an application revision to your fleet
of servers.
Learn more:
•AWS CodeDeploy Jenkins Plugin Now Available on DEV@cloud
API Version 2014-10-06
34

AWS CodeDeploy User Guide
Integration with Partner Products and Services
Codeship You can use Codeship to deploy application revisions through AWS
CodeDeploy. You can use the Codeship UI to add AWS CodeDeploy to a
deployment pipeline for a branch.
Learn more:
•Deploy to AWS CodeDeploy
•AWS CodeDeploy Integration on Codeship
GitHub You can use AWS CodeDeploy to deploy application revisions from GitHub
repositories. You can also trigger a deployment from a GitHub repository
whenever the source code in that repository is changed.
Learn more:
•GitHub (p. 36)
•Tutorial: Deploying from GitHub (p. 97)
•Automatically Deploy from GitHub Using AWS CodeDeploy
HashiCorp Consul You can use the open-source HashiCorp Consul tool to help ensure the health
and stability of your application environment when you deploy applications
in AWS CodeDeploy. You can use Consul to register applications to be
discovered during deployment, put applications and nodes in maintenance
mode to omit them from deployments, and stop deployments if target
instances become unhealthy.
Learn more:
•AWS CodeDeploy Deployments with HashiCorp Consul
Jenkins The AWS CodeDeploy Jenkins plugin provides a post-build step for your
Jenkins project. Upon a successful build, it will zip the workspace, upload to
Amazon S3, and start a new deployment.
Learn more:
•AWS CodeDeploy Jenkins Plugin
•Setting Up the Jenkins Plugin for AWS CodeDeploy
Puppet Labs AWS provides sample templates for Puppet and AWS CodeDeploy. The first
is a Puppet module that will install and start the AWS CodeDeploy agent. This
allows you to continue managing your host infrastructure with Puppet while
using AWS CodeDeploy. The second sample template demonstrates how to
use AWS CodeDeploy to orchestrate the running of modules and manifests
with a masterless puppet on each node.
Learn more:
•Puppet and AWS CodeDeploy
SaltStack You can integrate SaltStack infrastructure with AWS CodeDeploy. You can
use the AWS CodeDeploy module to install and run the AWS CodeDeploy
agent on your minions or, with a couple of simple deployment hooks, you can
use AWS CodeDeploy to orchestrate the running of your Salt States.
Learn more:
•SaltStack and AWS CodeDeploy
API Version 2014-10-06
35

AWS CodeDeploy User Guide
GitHub
Solano Labs After your build has passed its tests in Solano CI, a script will run to prepare
your application for release. The aws deploy push command will package
and push your application through AWS CodeDeploy, and then optionally
deploy the application revision to a deployment group and confirm it has been
deployed. You can also set up automatic AWS CodeDeploy deployments from
your CI build.
Learn more:
•AWS CodeDeploy Deployments from Solano CI Builds
TeamCity You can use the AWS CodeDeploy Runner plugin to deploy applications
directly from TeamCity. The plugin adds a TeamCity build step that prepares
and uploads an application revision to an Amazon S3 bucket, registers the
revision in an AWS CodeDeploy application, creates a AWS CodeDeploy
deployment and, if you choose, waits for the deployment to be completed.
Learn more:
•AWS CodeDeploy Runner (Download)
•AWS CodeDeploy Runner Plugin (Documentation)
Travis CI You can configure Travis CI to trigger a deployment in AWS CodeDeploy after
a successful build.
Learn more:
•Travis CI and AWS CodeDeploy Deployments
Topics
•GitHub (p. 36)
Integrating AWS CodeDeploy with GitHub
AWS CodeDeploy supports GitHub, a web-based code hosting and sharing service. AWS CodeDeploy
can deploy application revisions stored in GitHub repositories or Amazon S3 buckets to instances.
Topics
•Video Introduction to AWS CodeDeploy Integration with GitHub (p. 36)
•Deploying AWS CodeDeploy Revisions from GitHub (p. 36)
•GitHub Behaviors with AWS CodeDeploy (p. 37)
Video Introduction to AWS CodeDeploy Integration with
GitHub
This short video (5:20) demonstrates how to automate application deployments with AWS CodeDeploy
from your existing GitHub workflows.
Video Introduction to AWS CodeDeploy integration with GitHub.
Deploying AWS CodeDeploy Revisions from GitHub
To deploy an application revision from a GitHub repository to instances:
API Version 2014-10-06
36

AWS CodeDeploy User Guide
GitHub
1. Create a revision that's compatible with AWS CodeDeploy and the Amazon EC2 instance type to
which you will deploy.
To create a compatible revision, follow the instructions in Plan a Revision (p. 183) and Add an
AppSpec File (p. 184).
2. Use a GitHub account to add your revision to a GitHub repository.
To create a GitHub account, see Join GitHub. To create a GitHub repository, see Create a Repo.
3. Use the Create New Deployment page in the AWS CodeDeploy console or the AWS CLI create-
deployment command to deploy your revision from your GitHub repository to target instances
configured for use in AWS CodeDeploy deployments.
If you want to call the create-deployment command, you must first use the Create New
Deployment page of the console to give AWS CodeDeploy permission to interact with GitHub
on behalf of your preferred GitHub account for the specified application. You only need to do this
once per application.
To learn how to use the Create New Deployment page to deploy from a GitHub repository, see
Create a Deployment (p. 193).
To learn how to call the create-deployment command to deploy from a GitHub repository, see
Deploy a Revision (CLI) (p. 200).
To learn how to prepare instances for use in AWS CodeDeploy deployments, see Working with
Instances (p. 122).
For more information, see Tutorial: Deploying from GitHub (p. 97).
GitHub Behaviors with AWS CodeDeploy
Topics
•GitHub Authentication with Applications in AWS CodeDeploy (p. 37)
•AWS CodeDeploy Interaction with Private and Public GitHub Repositories (p. 38)
•AWS CodeDeploy Interaction with Organization-Managed GitHub Repositories (p. 38)
•Automatically Deploy from GitHub with AWS CodeDeploy (p. 39)
GitHub Authentication with Applications in AWS CodeDeploy
After you give AWS CodeDeploy permission to interact with GitHub, the association between that
GitHub account and application is stored in AWS CodeDeploy. You can link the application to a
different GitHub account. You can also revoke permission for AWS CodeDeploy to interact with
GitHub.
To link a different GitHub account to an application in AWS CodeDeploy
1. Sign in to the AWS Management Console and open the AWS CodeDeploy console at https://
console.aws.amazon.com/codedeploy.
Note
Sign in with the same account or IAM user information you used in Getting
Started (p. 11).
2. On the AWS CodeDeploy menu, choose Deployments.
3. Choose Create New Deployment.
API Version 2014-10-06
37

AWS CodeDeploy User Guide
GitHub
Note
You don't have to create a new deployment. This is currently the only way to link a
different GitHub account to an application.
4. From the Application drop-down list, choose the application you want to link to a different GitHub
account.
5. Next to Revision Type, choose My application is stored in GitHub.
6. Choose Reconnect to GitHub. You will be prompted to authorize AWS CodeDeploy to interact
with GitHub on behalf of your GitHub account for the selected application.
Note
If you don't see a Reconnect to GitHub link, then you have not yet given AWS
CodeDeploy permission to interact with GitHub. To give permission for the first time,
choose Connect to GitHub, and then go to the next step.
If you see a blank web page that briefly appears and then disappears, and you don't see
a Reconnect with GitHub link or a Connect with GitHub button, you have already given
AWS CodeDeploy permission to interact with GitHub, and you are currently signed in to
GitHub. To see the Reconnect with GitHub link, sign out of GitHub, and then repeat the
steps in this section.
7. If you are not already signed in to GitHub, follow the instructions on the Sign in page to sign in
with the GitHub account to which you want to link the application.
8. Choose Authorize application. GitHub gives AWS CodeDeploy permission to interact with
GitHub on behalf of the signed-in GitHub account for the selected application.
9. If you do not want to create a deployment, choose Cancel.
To revoke permission for AWS CodeDeploy to interact with GitHub
1. Sign in to GitHub using credentials for the GitHub account in which you want to revoke AWS
CodeDeploy permission.
2. Open the GitHub Applications page, locate AWS CodeDeploy in the list of authorized
applications, and then follow the GitHub procedure for revoking authorization for an application.
AWS CodeDeploy Interaction with Private and Public GitHub
Repositories
AWS CodeDeploy supports the deployment of applications from private and public GitHub repositories.
When you give AWS CodeDeploy permission to access GitHub on your behalf, AWS CodeDeploy
will have read-write access to all of the private GitHub repositories to which your GitHub account has
access. However, AWS CodeDeploy only reads from GitHub repositories. It will not write to any of your
private GitHub repositories.
AWS CodeDeploy Interaction with Organization-Managed GitHub
Repositories
By default, GitHub repositories that are managed by an organization (as opposed to your account's
own private or public repositories) do not grant access to third-party applications, including AWS
CodeDeploy. Your deployment will fail if an organization's third-party application restrictions are
enabled in GitHub and you attempt to deploy code from its GitHub repository. There are two ways to
resolve this issue.
• As an organization member, you can ask the organization owner to approve access to AWS
CodeDeploy. The steps for requesting this access depend on whether you have already authorized
AWS CodeDeploy for your individual account:
• If you have authorized access to AWS CodeDeploy in your account, see Requesting Organization
Approval for Your Authorized Applications.
API Version 2014-10-06
38

AWS CodeDeploy User Guide
Integration Examples from the Community
• If you have not yet authorized access to AWS CodeDeploy in your account, see Requesting
Organization Approval for Third-Party Applications.
• The organization owner can disable all third-party application restrictions for the organization. For
information, see Disabling Third-Party Application Restrictions for Your Organization.
For more information, see About Third-Party Application Restrictions.
Automatically Deploy from GitHub with AWS CodeDeploy
You can trigger a deployment from a GitHub repository whenever the source code changes. For
instructions, see Automatically Deploy from GitHub Using AWS CodeDeploy.
Integration Examples from the Community
The following sections provide links to blog posts, articles, and community-provided examples.
Note
These links are provided for informational purposes only, and should not be considered
either a comprehensive list or an endorsement of the content of the examples. AWS is not
responsible for the content or accuracy of external content.
Blog posts
•Automating AWS CodeDeploy Provisioning in AWS CloudFormation
Learn how to provision the deployment of an application in AWS CodeDeploy by using AWS
CloudFormation.
Published January 2016
•AWS Toolkit for Eclipse Integration with AWS CodeDeploy (Part 1)
AWS Toolkit for Eclipse Integration with AWS CodeDeploy (Part 2)
AWS Toolkit for Eclipse Integration with AWS CodeDeploy (Part 3)
Learn how Java developers can use the AWS CodeDeploy plugin for Eclipse to deploy web
applications to AWS directly from Eclipse development environments.
Published February 2015
•Automatically Deploy from GitHub Using AWS CodeDeploy
Learn how automatic deployments from GitHub to AWS CodeDeploy can be used to create an end-
to-end pipeline — from source control to your testing or production environments.
Published December 2014
Videos
•Hosting ASP.NET 5 Apps in AWS with Docker and AWS CodeDeploy
API Version 2014-10-06
39

AWS CodeDeploy User Guide
Videos
Learn how AWS CodeDeploy can be used to deploy ASP.NET 5 applications to an Internet
Information Services (IIS) server on Microsoft Windows operating systems.
Hosting ASP.NET 5 Apps in AWS with Docker and AWS CodeDeploy
Published October 2015
Duration: 47:37
•Mastering AWS CodeDeploy with Jenkins and Puppet
Learn how to use the open-source tools Jenkins and Puppet with AWS CodeDeploy.
Mastering AWS CodeDeploy with Jenkins and Puppet
Published May 2015
Duration: 49:31
API Version 2014-10-06
40

AWS CodeDeploy User Guide
Tutorial: Deploy WordPress
to a Non-Windows Instance
AWS CodeDeploy Tutorials
This section includes some tutorials to help you learn how to use AWS CodeDeploy.
If you haven't completed it already, we recommend you start with Step 5: Try the Create Deployment
Walkthrough (p. 21). It requires no prior experience with AWS CodeDeploy. It guides you through the
steps required to deploy one of our sample application revisions to Amazon EC2 instances.
Important
Before you begin, complete the prerequisites in Getting Started (p. 11).
The procedures in these tutorials provide suggestions for the location in which to store files
(for example, c:\temp) and the names to give to buckets, subfolders, or files (for example,
codedeploydemobucket, HelloWorldApp, and CodeDeployDemo-EC2-Trust.json, respectively), but you
are not required to use them. Just be sure to substitute your file locations and names as you perform
the procedures.
Topics
•Tutorial: Deploy WordPress to an Amazon EC2 Instance (Amazon Linux or Red Hat Enterprise
Linux and Linux, OS X, or Unix) (p. 41)
•Tutorial: Deploy a "Hello, World!" Application with AWS CodeDeploy (Windows Server) (p. 58)
•Tutorial: Deploy an Application to an On-Premises Instance with AWS CodeDeploy (Windows
Server, Ubuntu Server, or Red Hat Enterprise Linux) (p. 73)
•Tutorial: Deploy an Application to an Auto Scaling Group Using AWS CodeDeploy (p. 79)
•Tutorial: Deploy an Application from GitHub Using AWS CodeDeploy (p. 97)
Tutorial: Deploy WordPress to an Amazon EC2
Instance (Amazon Linux or Red Hat Enterprise
Linux and Linux, OS X, or Unix)
In this tutorial, you will deploy WordPress, an open source blogging tool and content management
system based on PHP and MySQL, to a single Amazon EC2 instance running Amazon Linux or Red
Hat Enterprise Linux (RHEL).
API Version 2014-10-06
41

AWS CodeDeploy User Guide
Step 1: Launch an Amazon EC2 Instance
Not what you're looking for?
• To practice deploying to an Amazon EC2 instance running Windows Server instead, see
Tutorial: Deploy a HelloWorld Application to a Windows Server Instance (p. 58).
• To practice deploying to an on-premises instance instead of an Amazon EC2 instance, see
Tutorial: Deploy an Application to an On-Premises Instance (p. 73).
This tutorial builds on concepts introduced in Step 5: Try the Create Deployment Walkthrough (p. 21). If
you have not yet completed it, you may want to start there first.
This tutorial's steps are presented from the perspective of a local development machine running Linux,
OS X, or Unix. Although you can complete most of these steps on a local machine running Windows,
you will need to adapt the steps that cover commands such as chmod and wget, applications such as
sed, and directory paths such as /tmp.
Before you start this tutorial, you must complete the prerequisites in Getting Started (p. 11). These
include configuring your IAM user account, installing or upgrading the AWS CLI, and creating an IAM
instance profile and a service role.
•Step 1: Launch an Amazon EC2 Instance (p. 42)
•Step 2: Configure Your Source Content (p. 43)
•Step 3: Upload Your Application to Amazon S3 (p. 47)
•Step 4: Deploy Your Application (p. 50)
•Step 5: Update and Redeploy Your Application (p. 53)
•Step 6: Clean Up (p. 56)
Step 1: Launch an Amazon Linux or Red Hat
Enterprise Linux Amazon EC2 Instance
To deploy the WordPress application with AWS CodeDeploy, you'll need an Amazon EC2 instance
running Amazon Linux or Red Hat Enterprise Linux (RHEL).
Follow the instructions in Working with Instances (p. 122). When you get to the part in those
instructions about assigning an Amazon EC2 instance tag to the instance, be sure to specify the tag
key of Name and the tag value of CodeDeployDemo. (If you specify a different tag key or tag value,
then the instructions in Step 4: Deploy Your Application (p. 50) may produce unexpected results.)
After you've followed the instructions to launch the Amazon EC2 instance, return to this page, and
continue to the next section. Do not continue on to Create an Application (p. 168) as a next step.
Connect to Your Amazon Linux or RHEL Amazon EC2
Instance
After your new Amazon EC2 instance is launched, follow these instructions to practice connecting to it.
1. Use the ssh command (or an SSH-capable terminal emulator like PuTTY) to connect to your
Amazon Linux or RHEL Amazon EC2 instance. You will need the public DNS address of the
instance and the private key for the key pair you used when you started the Amazon EC2
instance. For more information, see Connect to Your Instance.
API Version 2014-10-06
42
AWS CodeDeploy User Guide
Step 2: Configure Your Source Content
For example, if the public DNS address is ec2-01-234-567-890.compute-1.amazonaws.com,
and your Amazon EC2 instance key pair for SSH access is named codedeploydemo.pem, you
would type:
ssh -i /path/to/codedeploydemo.pem ec2-
user@ec2-01-234-567-890.compute-1.amazonaws.com
Replace /path/to/codedeploydemo.pem with the path to your .pem file and the example DNS
address with the address to your Amazon Linux or RHEL Amazon EC2 instance.
Note
If you receive an error about your key file's permissions being too open, you will need to
restrict its permissions to give access only to the current user (you). For example, with the
chmod command on Linux, OS X, or Unix, type:
chmod 400 /path/to/codedeploydemo.pem
2. After you are signed in, you will see the AMI banner for the Amazon EC2 instance. For Amazon
Linux, it should look like this:
__| __|_ )
_| ( / Amazon Linux AMI
___|\___|___|
3. You can now sign out of the running Amazon EC2 instance.
Caution
Do not stop or terminate the Amazon EC2 instance. Otherwise, AWS CodeDeploy won't
be able to deploy to it.
Step 2: Configure Your Source Content to
Deploy to the Amazon Linux or Red Hat
Enterprise Linux Amazon EC2 Instance
Now it's time to configure your application's source content so you have something to deploy to the
instance.
Topics
•Get the Source Code (p. 43)
•Create Scripts to Run Your Application (p. 45)
•Add an Application Specification File (p. 46)
Get the Source Code
For this tutorial, you'll deploy the WordPress content publishing platform from your development
machine to the target Amazon EC2 instance. To get the WordPress source code, you can use built-
in command-line calls. Or, if you have Git installed on your development machine, you can use that
instead.
API Version 2014-10-06
43

AWS CodeDeploy User Guide
Step 2: Configure Your Source Content
For these steps, we assume you'll download a copy of the WordPress source code to the /tmp
directory on your development machine. (You can choose any directory you like, but remember to
substitute your chosen location for /tmp wherever it is specified in these steps.)
Topics
•To get a copy of the WordPress source code (built-in command-line calls) (p. 44)
•To get a copy of the WordPress source code (Git) (p. 44)
To get a copy of the WordPress source code (built-in command-line
calls)
1. Call the wget command to download a copy of the WordPress source code, as a .zip file, to the
current directory:
wget https://github.com/WordPress/WordPress/archive/master.zip
2. Call the unzip, mkdir, cp, and rm commands to unpack the master .zip file into the /tmp/
WordPress_Temp directory (folder), copy its unzipped contents to the /tmp/WordPress
destination folder, and then delete the temporary /tmp/WordPress_Temp folder and master file.
Run the commands one at a time:
unzip master -d /tmp/WordPress_Temp
mkdir -p /tmp/WordPress
cp -paf /tmp/WordPress_Temp/WordPress-master/* /tmp/WordPress
rm -rf /tmp/WordPress_Temp
rm -f master
This leaves you with a clean set of WordPress source code files in the /tmp/WordPress folder.
To get a copy of the WordPress source code (Git)
1. Download and install Git on your development machine.
2. In the /tmp/WordPress folder, call the git init command.
3. Call the git clone command to clone the public WordPress repository, making your own copy of it
in the /tmp/WordPress destination folder:
git clone https://github.com/WordPress/WordPress.git /tmp/WordPress
This leaves you with a clean set of WordPress source code files in the /tmp/WordPress folder.
API Version 2014-10-06
44
AWS CodeDeploy User Guide
Step 2: Configure Your Source Content
Create Scripts to Run Your Application
Next, you will create a folder and scripts in the directory. AWS CodeDeploy will use these scripts to
set up and deploy your application revision on the target Amazon EC2 instance. You can use any text
editor to create the scripts.
1. Create a scripts directory in your copy of the WordPress source code:
mkdir -p /tmp/WordPress/scripts
2. Create an install_dependencies.sh file in /tmp/WordPress/scripts. Add the following
lines to the file. This install_dependencies.sh script will install Apache, MySQL, and PHP. It
will also add MySQL support to PHP.
#!/bin/bash
yum groupinstall -y "Web Server" "MySQL Database" "PHP Support"
yum install -y php-mysql
3. Create a stop_server.sh file in /tmp/WordPress/scripts. Add the following lines to the file.
This stop_server.sh script will stop Apache and MySQL.
#!/bin/bash
isExistApp=`pgrep httpd`
if [[ -n $isExistApp ]]; then
service httpd stop
fi
isExistApp=`pgrep mysqld`
if [[ -n $isExistApp ]]; then
service mysqld stop
fi
4. Create a start_server.sh file in /tmp/WordPress/scripts. Add the following lines to the
file. This start_server.sh script will start Apache and MySQL.
#!/bin/bash
service httpd start
service mysqld start
5. Finally, create a change_permissions.sh script in /tmp/WordPress/scripts. This will be
used to change the folder permissions in Apache.
#!/bin/bash
chmod -R 755 /var/www/html/WordPress
6. Give all of the scripts executable permissions. On the command line, type:
chmod +x /tmp/WordPress/scripts/*
API Version 2014-10-06
45

AWS CodeDeploy User Guide
Step 2: Configure Your Source Content
Add an Application Specification File
Next, you will add an application specification file (AppSpec file), a YAML-formatted file used by AWS
CodeDeploy to:
• Map the source files in your application revision to their destinations on the target Amazon EC2
instance.
• Specify custom permissions for deployed files.
• Specify scripts to be run on the target Amazon EC2 instance during the deployment.
The AppSpec file must be named appspec.yml. It must be placed in the application's source code's
root directory.
With your text editor, create a file named appspec.yml. Add the following lines to the file:
version: 0.0
os: linux
files:
- source: /
destination: /var/www/html/WordPress
hooks:
BeforeInstall:
- location: scripts/install_dependencies.sh
timeout: 300
runas: root
AfterInstall:
- location: scripts/change_permissions.sh
timeout: 300
runas: root
ApplicationStart:
- location: scripts/start_server.sh
timeout: 300
runas: root
ApplicationStop:
- location: scripts/stop_server.sh
timeout: 300
runas: root
AWS CodeDeploy will use this AppSpec file to copy all of the files in the /tmp/WordPress folder
on the development machine to the /var/www/html/WordPress folder on the target Amazon EC2
instance. During the deployment, AWS CodeDeploy will run the specified scripts as root in the /
var/www/html/WordPress/scripts folder on the target Amazon EC2 instance at specified events
during the deployment lifecycle, such as BeforeInstall and AfterInstall. If any of these scripts
take longer than 300 seconds (5 minutes) to run, AWS CodeDeploy will stop the deployment and mark
the deployment as failed.
For more information about these settings, see the AppSpec File Reference (p. 227).
Important
The locations and numbers of spaces between each of the items in this file are important. If
the spacing is incorrect, AWS CodeDeploy will raise an error that may be difficult to debug.
For more information, see AppSpec File Spacing (p. 240).
API Version 2014-10-06
46

AWS CodeDeploy User Guide
Step 3: Upload Your Application to Amazon S3
Step 3: Upload Your WordPress Application to
Amazon S3
Now you will prepare and upload your source content to a location from which AWS CodeDeploy can
deploy it. The following instructions show you how to provision an Amazon S3 bucket, prepare the
application revision's files for the bucket, bundle the revision's files, and then push the revision to the
bucket.
Note
Although it's not covered in this tutorial, you can use AWS CodeDeploy to deploy applications
from GitHub repositories to instances. For more information, see GitHub (p. 36).
Topics
•Provision an Amazon S3 Bucket (p. 47)
•Prepare the Application's Files for the Bucket (p. 49)
•Bundle the Application's Files into a Single Archive File and Push the Archive File (p. 49)
Provision an Amazon S3 Bucket
Create a storage container or bucket in Amazon S3—or use an existing bucket. Make sure you can
upload the revision to the bucket and that Amazon EC2 instances used in deployments can download
the revision from the bucket.
You can use the AWS CLI, the Amazon S3 console, or the Amazon S3 APIs to create an Amazon S3
bucket. After you create the bucket, make sure to give access permissions to the bucket and your IAM
user.
Note
Bucket names must be unique across Amazon S3 for all AWS accounts. If you
aren't able to use codedeploydemobucket, try a different bucket name, such as
codedeploydemobucket followed by a dash and your initials or some other unique identifier.
Then be sure to substitute your bucket name for codedeploydemobucket wherever you see
it throughout this tutorial.
The Amazon S3 bucket must be created in the same AWS region where your target Amazon
EC2 instances are launched. For example, if you create the bucket in the US East (N. Virginia)
Region, then your target Amazon EC2 instances must be launched in the US East (N.
Virginia) Region.
Topics
•To create an Amazon S3 bucket (CLI) (p. 47)
•To create an Amazon S3 bucket (console) (p. 47)
•Give permissions to the Amazon S3 bucket and your IAM user (p. 48)
To create an Amazon S3 bucket (CLI)
Call the mb command to create an Amazon S3 bucket named codedeploydemobucket:
aws s3 mb s3://codedeploydemobucket
To create an Amazon S3 bucket (console)
1. Open the Amazon S3 console at https://console.aws.amazon.com/s3/.
2. In the Amazon S3 console, choose Create Bucket.
API Version 2014-10-06
47

AWS CodeDeploy User Guide
Step 3: Upload Your Application to Amazon S3
3. In the Bucket Name box, type a name for the bucket.
4. In the Region list, choose the target region, and then choose Create.
Give permissions to the Amazon S3 bucket and your IAM user
You must have permissions to upload to the Amazon S3 bucket. You can specify these permissions
through an Amazon S3 bucket policy. For example, the following Amazon S3 bucket policy
allows AWS account 111122223333 to upload anywhere in the Amazon S3 bucket named
codedeploydemobucket:
{
"Statement": [
{
"Action": ["s3:PutObject"],
"Effect": "Allow",
"Resource": "arn:aws:s3:::codedeploydemobucket/*",
"Principal": {
"AWS": [
"111122223333"
]
}
}
]
}
Now is a good time to verify the Amazon S3 bucket will allow download requests from each
participating Amazon EC2 instance. You can specify this through an Amazon S3 bucket policy. For
example, the following Amazon S3 bucket policy allows any Amazon EC2 instance with an attached
IAM instance profile containing the ARN arn:aws:iam::80398EXAMPLE:role/CodeDeployDemo to
download from anywhere in the Amazon S3 bucket named codedeploydemobucket:
{
"Statement": [
{
"Action": ["s3:Get*", "s3:List*"],
"Effect": "Allow",
"Resource": "arn:aws:s3:::codedeploydemobucket/*",
"Principal": {
"AWS": [
"arn:aws:iam::80398EXAMPLE:role/CodeDeployDemo"
]
}
}
]
}
For information about how to generate and attach an Amazon S3 bucket policy, see Bucket Policy
Examples.
Your account must have permission to upload the revision to the Amazon S3 bucket. One way to
specify this is through an IAM policy. The following custom IAM user policy allows your IAM user to
upload revisions anywhere in the Amazon S3 bucket named codedeploydemobucket:
{
"Version":"2012-10-17",
API Version 2014-10-06
48

AWS CodeDeploy User Guide
Step 3: Upload Your Application to Amazon S3
"Statement":[
{
"Effect":"Allow",
"Action":["s3:PutObject"],
"Resource":"arn:aws:s3:::codedeploydemobucket/*"
}
]
}
For information about how to create and attach an IAM policy, see Working with Policies.
Prepare the Application's Files for the Bucket
Make sure the WordPress application files, the AppSpec file, and the scripts are organized on your
development machine similar to the following:
/tmp/
|--WordPress/
|-- appspec.yml
|-- scripts/
| |-- install_dependencies.sh
| |-- change_permissions.sh
| |-- start_server.sh
| |-- stop_server.sh
|-- wp-admin/
| |-- (various files...)
|-- wp-content/
| |-- (various files...)
|-- wp-includes/
| |-- (various files...)
|-- index.php
|-- license.txt
|-- readme.html
|-- (various files ending with .php...)
Bundle the Application's Files into a Single Archive File
and Push the Archive File
Bundle the WordPress application files and the AppSpec file into an archive file (known as an
application revision).
Note
You may be charged for storing objects in a bucket and for transferring application revisions
into and out of a bucket. For more information, see Amazon S3 Pricing.
1. On the development machine, switch to the folder where the files are stored:
cd /tmp/WordPress
Note
If you don't switch to this folder, then the file bundling will start at your current folder. For
example, if your current folder is /tmp instead of /tmp/WordPress, then the bundling
will start with files and subfolders in the tmp folder, which may include more than the
WordPress subfolder.
2. Call the create-application command to register a new application named WordPress_App:
API Version 2014-10-06
49
AWS CodeDeploy User Guide
Step 4: Deploy Your Application
aws deploy create-application --application-name WordPress_App
3. Call the AWS CodeDeploy push command to bundle the files together, upload the revisions to
Amazon S3, and register information with AWS CodeDeploy about the uploaded revision, all in
one action.
aws deploy push \
--application-name WordPress_App \
--s3-location s3://codedeploydemobucket/WordPressApp.zip \
--ignore-hidden-files
This command bundles the files from the current directory (excluding any hidden files) into a single
archive file named WordPressApp.zip, uploads the revision to the codedeploydemobucket
bucket, and registers information with AWS CodeDeploy about the uploaded revision.
Step 4: Deploy Your WordPress Application
Now you will deploy the sample WordPress application revision you uploaded to Amazon S3. You
will use the AWS CLI or the AWS CodeDeploy console to deploy the revision and monitor the
deployment's progress. After the application revision is successfully deployed, you will check the
results.
Topics
•Deploy Your Application Revision with AWS CodeDeploy (p. 50)
•Monitor and Troubleshoot Your Deployment (p. 52)
•Verify Your Deployment (p. 53)
Deploy Your Application Revision with AWS CodeDeploy
Topics
•To deploy your application revision (CLI) (p. 50)
•To deploy your application revision (console) (p. 51)
To deploy your application revision (CLI)
1. First, the deployment will need a corresponding deployment group. However, before you create
the deployment group, you will need a service role ARN. A service role is an IAM role that gives a
service permission to act on your behalf. In this case, the service role will give AWS CodeDeploy
permission to access your Amazon EC2 instances to expand (read) their Amazon EC2 instance
tags.
You should have already followed the instructions in Create a Service Role (CLI) (p. 15) to create
a service role. To get the ARN of the service role, see Get the Service Role ARN (CLI) (p. 17).
2. Now that you have the ARN, call the create-deployment-group command to create a deployment
group named WordPress_DepGroup, associated with the application named WordPress_App,
using the Amazon EC2 tag named CodeDeployDemo and deployment configuration named
CodeDeployDefault.OneAtATime, with the service role ARN:
aws deploy create-deployment-group \
--application-name WordPress_App \
--deployment-group-name WordPress_DepGroup \
API Version 2014-10-06
50

AWS CodeDeploy User Guide
Step 4: Deploy Your Application
--deployment-config-name CodeDeployDefault.OneAtATime \
--ec2-tag-filters Key=Name,Value=CodeDeployDemo,Type=KEY_AND_VALUE \
--service-role-arn serviceRoleARN
Note
The create-deployment-group command provides support for creating triggers that result
in the sending of Amazon SNS notifications to topic subscribers about specified events in
deployments and instances. The command also supports options for automatically rolling
back deployments and setting up alarms to stop deployments when certain monitoring
thresholds are met in Amazon CloudWatch Alarms. Commands for these actions are
excluded from the sample in this tutorial.
3. Now call the create-deployment command to create a deployment associated
with the application named WordPress_App, the deployment configuration named
CodeDeployDefault.OneAtATime, and the deployment group named WordPress_DepGroup,
using the application revision named WordPressApp.zip in the bucket named
codedeploydemobucket:
aws deploy create-deployment \
--application-name WordPress_App \
--deployment-config-name CodeDeployDefault.OneAtATime \
--deployment-group-name WordPress_DepGroup \
--s3-location
bucket=codedeploydemobucket,bundleType=zip,key=WordPressApp.zip
To deploy your application revision (console)
1. Before you use the AWS CodeDeploy console to deploy your application revision, you will need
a service role ARN. A service role is an IAM role that gives a service permission to act on your
behalf. In this case, the service role will give AWS CodeDeploy permission to access your Amazon
EC2 instances to expand (read) their Amazon EC2 instance tags.
You should have already followed the instructions in Create a Service Role (Console) (p. 14) to
create a service role. To get the ARN of the service role, see Get the Service Role ARN (Console)
(p. 17).
2. Now that you have the ARN, you use the AWS CodeDeploy console to deploy your application
revision:
Sign in to the AWS Management Console and open the AWS CodeDeploy console at https://
console.aws.amazon.com/codedeploy.
Note
Sign in with the same account or IAM user information you used in Getting
Started (p. 11).
3. If the Applications page is not displayed, on the AWS CodeDeploy menu, choose Applications.
4. In the list of applications, choose WordPress_App.
5. Under Deployment groups, choose Create deployment group.
6. In the Deployment Group Name box, type WordPress_DepGroup.
7. In the list of tags, choose Amazon EC2 from the Tag Type drop-down list.
8. In the Key box, type Name.
9. In the Value box, type CodeDeployDemo.
Note
After you type CodeDeployDemo, a 1 should appear under Instances to confirm AWS
CodeDeploy found one matching Amazon EC2 instance.
API Version 2014-10-06
51

AWS CodeDeploy User Guide
Step 4: Deploy Your Application
10. In the Deployment Config drop-down list, choose CodeDeployDefault.OneAtATime.
11. In the Service Role ARN drop-down list, choose the service role ARN, and then choose Create
Deployment Group.
12. On the AWS CodeDeploy menu, choose Deployments.
13. Choose Create New Deployment.
14. In the Application drop-down list, choose WordPress_App.
15. In the Deployment Group drop-down list, choose WordPress_DepGroup.
16. Next to Repository Type, choose My application is stored in Amazon S3. In the Revision
Location box, type the location of the sample WordPress application revision you previously
uploaded to Amazon S3. To get the location:
1. Open the Amazon S3 console at https://console.aws.amazon.com/s3/.
2. In the All Buckets list, choose codedeploydemobucket (or the name of the bucket where
you uploaded your application revision).
3. In the list of objects, choose WordPressApp.zip.
4. If the Properties pane is not displayed, choose the Properties button.
5. In the Properties pane, copy the value of the Link field to your clipboard.
It might look something like this:
https://s3.amazonaws.com/codedeploydemobucket/WordPressApp.zip
6. Return to the AWS CodeDeploy console, and in the Revision Location box, paste the Link
field value.
17. If a message appears in the File Type list stating the file type could not be detected, choose .zip
in the list of file types.
18. (Optional) Type a comment in the Deployment Description box.
19. From the Deployment Config drop-down list, choose CodeDeployDefault.OneAtATime.
20. Choose Deploy Now. Information about your newly created deployment will appear on the
Deployments page.
Tip
To get the current status of the deployment, choose the Refresh button next to the table.
Monitor and Troubleshoot Your Deployment
Topics
•To monitor and troubleshoot your deployment (CLI) (p. 52)
•To monitor and troubleshoot your deployment (console) (p. 53)
To monitor and troubleshoot your deployment (CLI)
1. Get the deployment's ID by calling the list-deployments command against the application named
WordPress_App and the deployment group named WordPress_DepGroup:
aws deploy list-deployments --application-name WordPress_App --deployment-
group-name WordPress_DepGroup --query 'deployments' --output text
2. Call the get-deployment command with the deployment ID:
aws deploy get-deployment --deployment-id deploymentID --query
'deploymentInfo.status' --output text
API Version 2014-10-06
52

AWS CodeDeploy User Guide
Step 5: Update and Redeploy Your Application
3. The command will return the deployment's overall status. If successful, the value will be
Succeeded.
If the overall status is Failed, you can call commands such as list-deployment-instances and get-
deployment-instance to troubleshoot. For more troubleshooting options, see Analyzing log files to
investigate deployment failures on instances (p. 276).
To monitor and troubleshoot your deployment (console)
On the Deployments page in the AWS CodeDeploy console, you can monitor your deployment's
status in the Status column.
Tip
To get the current status of the deployment, choose the Refresh button above the table.
To get more information about your deployment, especially if the Status column value has any value
other than Succeeded:
1. In the Deployments table, choose the arrow next to the deployment ID. After a deployment fails, a
message that describes the reason for the failure will appear in Details.
2. In Instances, choose View All Instances. More information about the deployment will be
displayed. After a deployment fails, you may be able to determine on which Amazon EC2
instances and at which step the deployment failed.
Note
If you don't see Instances, choose the Refresh button above the table. After the Status
column changes from In Progress to Created, Instances should appear.
3. If you want to do more troubleshooting, you can use a technique like the one described in View
Instance Details (p. 138). You can also analyze the deployment log files on an Amazon EC2
instance. For more information, see Analyzing log files to investigate deployment failures on
instances (p. 276).
Verify Your Deployment
After your deployment is successful, verify your WordPress installation is working. Use the public DNS
address of the Amazon EC2 instance, followed by /WordPress, to view your site in a web browser.
(To get the public DNS value, in the Amazon EC2 console, choose the Amazon EC2 instance, and on
the Description tab, look for the value of Public DNS.)
For example, if the public DNS address of your Amazon EC2 instance is
ec2-01-234-567-890.compute-1.amazonaws.com, you would use the following URL:
http://ec2-01-234-567-890.compute-1.amazonaws.com/WordPress
Step 5: Update and Redeploy Your WordPress
Application
Now that you've successfully deployed your application revision, update the WordPress code on the
development machine, and then use AWS CodeDeploy to redeploy the site. You should be able to see
the code changes on the Amazon EC2 instance.
Topics
•Set Up the WordPress Site (p. 54)
•Modify the Site (p. 54)
•Redeploy the Site (p. 54)
API Version 2014-10-06
53
AWS CodeDeploy User Guide
Step 5: Update and Redeploy Your Application
Set Up the WordPress Site
To see the effects of the code change, finish setting up the WordPress site so that you have a fully
functional installation.
1. Type your site's URL into your web browser. The URL is the public DNS address of
the Amazon EC2 instance plus a /WordPress extension. For this example WordPress
site (and example Amazon EC2 instance public DNS address), the URL is http://
ec2-01-234-567-890.compute-1.amazonaws.com/WordPress.
2. If you haven't set up the site yet, the WordPress default configuration page will appear. Choose
Create a Configuration File.
3. On the database configuration page, type the following values to use the default MySQL database:
•Database Name: test
•User Name: root
•Password: Leave blank.
•Database Host: localhost
•Table Prefix: wp_
Choose Submit to set up the database.
4. Continue the site setup. On the Welcome page, fill in any values you want, and choose Install
WordPress. When the installation is complete, you will be able to sign in to your dashboard.
Modify the Site
To modify the WordPress site, go to the application's folder on your development machine:
cd /tmp/WordPress
To modify some of the site's colors, in the wp-content/themes/twentyfifteen/style.css file,
use a text editor or sed to change #fff to #768331.
On Linux or other systems with GNU sed, use:
sed -i 's/#fff/#768331/g' wp-content/themes/twentyfifteen/style.css
On Mac OS X, Unix, or other systems with BSD sed, use:
sed -i '' 's/#fff/#768331/g' wp-content/themes/twentyfifteen/style.css
Redeploy the Site
Now that you've modified the site's code, use Amazon S3 and AWS CodeDeploy to redeploy the site.
Bundle and upload the changes to Amazon S3, as described in Bundle the Application's Files
into a Single Archive File and Push the Archive File (p. 49). (As you follow those instructions,
remember you do not need to create an application.) Give the new revision the same key as before
(WordPressApp.zip). Upload it to the same Amazon S3 bucket you created earlier (for example,
codedeploydemobucket).
Use the AWS CLI, the AWS CodeDeploy console, or the AWS CodeDeploy APIs to redeploy the site.
API Version 2014-10-06
54

AWS CodeDeploy User Guide
Step 5: Update and Redeploy Your Application
Topics
•To redeploy the site (CLI) (p. 55)
•To redeploy the site (console) (p. 55)
To redeploy the site (CLI)
Call the create-deployment command to create a deployment based on the newly uploaded
revision. Use the application named WordPress_App, the deployment configuration named
CodeDeployDefault.OneAtATime, the deployment group named WordPress_DepGroup, and the
revision named WordPressApp.zip in the bucket named codedeploydemobucket:
aws deploy create-deployment \
--application-name WordPress_App \
--deployment-config-name CodeDeployDefault.OneAtATime \
--deployment-group-name WordPress_DepGroup \
--s3-location
bucket=codedeploydemobucket,bundleType=zip,key=WordPressApp.zip
You can check the status of the deployment, as described in Monitor and Troubleshoot Your
Deployment (p. 52).
After AWS CodeDeploy has redeployed the site, revisit the site in your web browser to verify the
colors have been changed. (You may need to refresh your browser.) If the colors have been changed,
congratulations! You have successfully modified and redeployed your site!
To redeploy the site (console)
1. Sign in to the AWS Management Console and open the AWS CodeDeploy console at https://
console.aws.amazon.com/codedeploy.
Note
Sign in with the same account or IAM user information you used in Getting
Started (p. 11).
2. On the AWS CodeDeploy menu, choose Deployments.
3. Choose Create New Deployment.
4. On the Create New Deployment page:
1. In the Application list, choose WordPress_App.
Note
If no entries are displayed, make sure the correct region is selected. On the
navigation bar, in the region selector, choose one of one of the regions listed in
Region and Endpoints in the AWS General Reference. AWS CodeDeploy supports
these regions only.
2. In the Deployment Group list, choose WordPress_DepGroup.
3. In the Revision Type area, choose My application is stored in Amazon S3, and then copy
your revision's Amazon S3 link into the Revision Location box. To find the link value:
1. In a separate browser tab:
Sign in to the AWS Management Console and open the Amazon S3 console at https://
console.aws.amazon.com/s3/.
Browse to and open codedeploydemobucket, and then choose your revision,
WordPressApp.zip.
2. If the Properties pane is not visible in the Amazon S3 console, choose the Properties
button.
API Version 2014-10-06
55

AWS CodeDeploy User Guide
Step 6: Clean Up
3. In the Properties pane, copy the value of the Link field into the Revision Location box
in the AWS CodeDeploy console.
4. If a message appears saying the file type could not be detected, choose .zip.
5. Leave the Deployment Description box blank.
6. In the Deployment Config list, choose CodeDeployDefault.OneAtATime, and then choose
Deploy Now.
To update the deployment's status, choose the Refresh button above the table.
You can check the status of the deployment, as described in Monitor and Troubleshoot Your
Deployment (p. 52).
After AWS CodeDeploy has redeployed the site, revisit the site in your web browser to verify
the colors have been changed. (You may need to refresh your browser.) If the colors have
been changed, congratulations! You have successfully modified and redeployed your site!
Step 6: Clean Up Your WordPress Application
and Related Resources
You've now successfully made an update to the WordPress code and redeployed the site. To avoid
ongoing charges for resources you created for this tutorial, you should delete:
• Any AWS CloudFormation stacks (or terminate any Amazon EC2 instances, if you created them
outside of AWS CloudFormation).
• Any Amazon S3 buckets.
• The WordPress_App application in AWS CodeDeploy.
You can use the AWS CLI, the AWS CloudFormation, Amazon S3, Amazon EC2, and AWS
CodeDeploy consoles, or the AWS APIs to perform the cleanup.
Topics
•To clean up resources (CLI) (p. 56)
•To clean up resources (console) (p. 57)
•What's Next? (p. 58)
To clean up resources (CLI)
1. If you used our AWS CloudFormation template for this tutorial, call the delete-stack command
against the stack named CodeDeployDemoStack. This will terminate all accompanying Amazon
EC2 instances and delete all accompanying IAM roles the stack created:
aws cloudformation delete-stack --stack-name CodeDeployDemoStack
2. To delete the Amazon S3 bucket, call the rm command with the --recursive switch against the
bucket named codedeploydemobucket. This will delete the bucket and all objects in the bucket:
aws s3 rm s3://codedeploydemobucket --recursive
3. To delete the WordPress_App application, call the delete-application command. This will also
delete all associated deployment group records and deployment records for the application:
API Version 2014-10-06
56

AWS CodeDeploy User Guide
Step 6: Clean Up
aws deploy delete-application --application-name WordPress_App
If you did not use the AWS CloudFormation stack for this tutorial, call the terminate-instances
command to terminate any Amazon EC2 instances you manually created. Supply the ID of the Amazon
EC2 instance to terminate:
aws ec2 terminate-instances --instance-ids instanceId
To clean up resources (console)
If you used our AWS CloudFormation template for this tutorial, delete the associated AWS
CloudFormation stack.
1. Sign in to the AWS Management Console and open the AWS CloudFormation console at https://
console.aws.amazon.com/cloudformation/.
2. In the By Name box, type the AWS CloudFormation stack name you created earlier (for example,
CodeDeployDemoStack).
3. Choose the stack name, and then choose Delete Stack.
AWS CloudFormation deletes the stack, terminates all accompanying Amazon EC2 instances, and
deletes all accompanying IAM roles.
To terminate Amazon EC2 instances you created outside of an AWS CloudFormation stack:
1. Sign in to the AWS Management Console and open the Amazon EC2 console at https://
console.aws.amazon.com/ec2/.
2. Choose Instances.
3. In the Search Instances box, type the name of the Amazon EC2 instance you want to terminate
(for example, CodeDeployDemo), and then press Enter.
4. Choose the Amazon EC2 instance name.
5. Choose Actions, point to Instance State, and then choose Terminate. When prompted, choose
Yes, Terminate.
Repeat these steps for each instance.
To delete the Amazon S3 bucket:
1. Sign in to the AWS Management Console and open the Amazon S3 console at https://
console.aws.amazon.com/s3/.
2. In the All Buckets list, browse to and choose the name of the Amazon S3 bucket you created
earlier (for example, codedeploydemobucket).
3. Before you can delete a bucket, you must first delete its contents. Select all of the files in the
bucket, such as WordPressApp.zip. Choose Actions, and then choose Delete. When prompted
to confirm the deletion, choose OK.
4. After the bucket is empty, you can delete the bucket. Choose All Buckets. In the All Buckets list,
right-click the bucket name, choose Delete, and when prompted to confirm, choose OK.
To delete the WordPress_App application from AWS CodeDeploy:
1. Sign in to the AWS Management Console and open the AWS CodeDeploy console at https://
console.aws.amazon.com/codedeploy.
API Version 2014-10-06
57
AWS CodeDeploy User Guide
Tutorial: Deploy a HelloWorld Application
to a Windows Server Instance
Note
Sign in with the same account or IAM user information you used in Getting
Started (p. 11).
2. On the AWS CodeDeploy menu, choose Applications.
3. In the list of applications, choose WordPress_App.
4. At the bottom of the Application details page, choose Delete application.
5. When prompted, type the name of the application to confirm you want to delete it, and then choose
Delete.
What's Next?
If you've arrived here, congratulations! You have successfully completed an AWS CodeDeploy
deployment, and then updated your site's code and redeployed it.
Tutorial: Deploy a "Hello, World!" Application
with AWS CodeDeploy (Windows Server)
In this tutorial, you will deploy a single web page to a single Windows Server Amazon EC2 instance
running Internet Information Services (IIS) as its web server. This web page will display a simple "Hello,
World!" message.
Not what you're looking for?
• To practice deploying to an Amazon Linux or Red Hat Enterprise Linux (RHEL) Amazon EC2
instance instead, see Tutorial: Deploy WordPress to a Non-Windows Instance (p. 41).
• To practice deploying to an on-premises instance instead, see Tutorial: Deploy an Application
to an On-Premises Instance (p. 73).
This tutorial builds on concepts that were introduced in the Step 5: Try the Create Deployment
Walkthrough (p. 21). If you have not yet completed it, you may want to do that first.
This tutorial's steps are presented from a Windows perspective. Although you can complete most of
these steps on a local machine running Linux, OS X, or Unix, you will need to adapt those that cover
Windows-based directory paths such as c:\temp. Also, if you want to connect to the Amazon EC2
instance, you will need a client application that is capable of connecting through Remote Desktop
Protocol (RDP) to the Amazon EC2 instance running Windows Server. (Windows includes an RDP
connection client application by default.)
Before you start this tutorial, you must complete the prerequisites in Getting Started (p. 11), including
configuring your IAM user, installing or upgrading the AWS CLI, and creating an IAM instance profile
and a service role.
•Step 1: Launch an Amazon EC2 Instance (p. 59)
•Step 2: Configure Your Source Content (p. 60)
•Step 3: Upload Your Application to Amazon S3 (p. 62)
•Step 4: Deploy Your Application (p. 65)
API Version 2014-10-06
58

AWS CodeDeploy User Guide
Step 1: Launch an Amazon EC2 Instance
•Step 5: Update and Redeploy Your Application (p. 68)
•Step 6: Clean Up (p. 71)
Step 1: Launch a Windows Server Amazon EC2
Instance
To deploy the "Hello, World!" application with AWS CodeDeploy, you'll need an Amazon EC2 instance
running Windows Server.
Follow the instructions in Working with Instances (p. 122). When you get to the part in those
instructions about assigning an Amazon EC2 instance tag to the instance, be sure to specify the tag
key of Name and the tag value of CodeDeployDemo. (If you specify a different tag key or tag value,
then the instructions in Step 4: Deploy Your Application (p. 65) may produce unexpected results.)
After you've followed the instructions to launch the Amazon EC2 instance, return to this page, and
continue to the next section. Do not continue on to Create an Application (p. 168) as a next step.
Connect to Your Amazon EC2 Instance
After your Amazon EC2 instance is launched, follow these instructions to practice connecting to it.
Note
In these instructions, we assume you are running Windows and the Windows Desktop
Connection client application. For information, see Connecting to Your Windows Instance
Using RDP. You may need to adapt these instructions for other operating systems or other
RDP connection client applications.
1. Sign in to the AWS Management Console and open the Amazon EC2 console at https://
console.aws.amazon.com/ec2/.
2. In the navigation pane, under Instances, choose Instances.
3. Browse to and choose your Windows Server instance in the list.
4. Choose Connect.
5. Choose Get Password.
6. Choose Browse. Browse to and choose the Amazon EC2 instance key pair file associated with
the Windows Server Amazon EC2 instance, and then choose Open.
7. Choose Decrypt Password. Make a note of the password that is displayed.
8. Choose Download Remote Desktop File, and then open the file.
9. If you are prompted to connect even though the publisher of the remote connection can't be
identified, proceed.
10. When prompted for a password, type the password you noted in step 7, and then proceed. (If your
RDP connection client application prompts you for a user name, type Administrator.)
11. If you are prompted to connect even though the identify of the remote computer cannot be verified,
proceed.
12. After you are connected, the desktop of the Amazon EC2 instance running Windows Server is
displayed.
13. You can now sign out of the running Amazon EC2 instance.
Caution
Do not stop or terminate the instance. Otherwise, AWS CodeDeploy won't be able to
deploy to it.
API Version 2014-10-06
59
AWS CodeDeploy User Guide
Step 2: Configure Your Source Content
Step 2: Configure Your Source Content to
Deploy to the Windows Server Amazon EC2
Instance
Now it's time to configure your application's source content so you have something you can deploy
to the Amazon EC2 instance. For this tutorial, you'll deploy a single web page to the Amazon EC2
instance running Windows Server, which will run Internet Information Services (IIS) as its web server.
This web page will display a simple "Hello, World!" message.
Topics
•Create the Web Page (p. 60)
•Create a Script to Run Your Application (p. 61)
•Add an Application Specification File (p. 61)
Create the Web Page
1. Create a subdirectory (subfolder) named HelloWorldApp in your c:\temp folder, and then
switch to that folder.
mkdir c:\temp\HelloWorldApp
cd c:\temp\HelloWorldApp
Note
You don't have to use the location of c:\temp or the subfolder name of
HelloWorldApp. If you use a different location or subfolder name, be sure to use it
throughout this tutorial.
2. Use a text editor to create a file inside of the folder. Name the file index.html.
notepad index.html
3. Add the following HTML code to the file, and then save the file.
<!DOCTYPE html PUBLIC "-//W3C//DTD HTML 4.01 Transitional//EN" "http://
www.w3.org/TR/html4/loose.dtd">
<html>
<head>
<title>Hello, World!</title>
<style>
body {
color: #ffffff;
background-color: #0188cc;
font-family: Arial, sans-serif;
font-size:14px;
}
</style>
</head>
<body>
<div align="center"><h1>Hello, World!</h1></div>
<div align="center"><h2>You have successfully deployed an application
using AWS CodeDeploy</h2></div>
<div align="center">
API Version 2014-10-06
60
AWS CodeDeploy User Guide
Step 2: Configure Your Source Content
<p>What to do next? Take a look through the <a href="http://
docs.aws.amazon.com/codedeploy">AWS CodeDeploy Documentation</a>.</p>
</div>
</body>
</html>
Create a Script to Run Your Application
Next, you will create a script that AWS CodeDeploy will use to set up the web server on the target
Amazon EC2 instance.
1. In the same subfolder where the index.html file is saved, use a text editor to create another file.
Name the file before-install.bat.
notepad before-install.bat
2. Add the following batch script code to the file, and then save the file.
REM Install Internet Information Server (IIS).
c:\Windows\Sysnative\WindowsPowerShell\v1.0\powershell.exe -Command
Import-Module -Name ServerManager
c:\Windows\Sysnative\WindowsPowerShell\v1.0\powershell.exe -Command
Install-WindowsFeature Web-Server
Add an Application Specification File
Next, you will add an application specification file (AppSpec file) in addition to the web page and batch
script file. The AppSpec file is a YAML-formatted file used by AWS CodeDeploy to:
• Map the source files in your application revision to their destinations on the instance.
• Specify scripts to be run on the instance during the deployment.
The AppSpec file must be named appspec.yml. It must be placed in the application source code's
root folder.
1. In the same subfolder where the index.html and before-install.bat files are saved, use a
text editor to create another file. Name the file appspec.yml.
notepad appspec.yml
2. Add the following YAML code to the file, and then save the file.
version: 0.0
os: windows
files:
- source: \index.html
destination: c:\inetpub\wwwroot
hooks:
BeforeInstall:
- location: \before-install.bat
timeout: 900
API Version 2014-10-06
61

AWS CodeDeploy User Guide
Step 3: Upload Your Application to Amazon S3
AWS CodeDeploy will use this AppSpec file to copy the index.html file in the application source
code's root folder to the c:\inetpub\wwwroot folder on the target Amazon EC2 instance. During the
deployment, AWS CodeDeploy will run the before-install.bat batch script on the target Amazon
EC2 instance during the BeforeInstall deployment lifecycle event. If this script takes longer than
900 seconds (15 minutes) to run, AWS CodeDeploy will stop the deployment and mark the deployment
to the Amazon EC2 instance as failed.
For more information about these settings, see the AppSpec File Reference (p. 227).
Important
The locations and numbers of spaces between each of the items in this file are important. If
the spacing is incorrect, AWS CodeDeploy will raise an error that may be difficult to debug.
For more information, see AppSpec File Spacing (p. 240).
Step 3: Upload Your "Hello, World!" Application
to Amazon S3
Now you will prepare and upload your source content to a location from which AWS CodeDeploy can
deploy it. The following instructions show you how to provision an Amazon S3 bucket, prepare the
application revision's files for the bucket, bundle the revision's files, and then push the revision to the
bucket.
Note
Although it's not covered in this tutorial, you can use AWS CodeDeploy to deploy applications
from GitHub repositories to instances. For more information, see GitHub (p. 36).
Topics
•Provision an Amazon S3 Bucket (p. 62)
•Prepare the Application's Files for the Bucket (p. 64)
•Bundle the Application's Files into a Single Archive File and Push the Archive File (p. 64)
Provision an Amazon S3 Bucket
Create a storage container or bucket in Amazon S3—or use an existing bucket. Make sure you can
upload the revision to the bucket and that Amazon EC2 instances used in deployments can download
the revision from the bucket.
You can use the AWS CLI, the Amazon S3 console, or the Amazon S3 APIs to create an Amazon S3
bucket. After you create the bucket, make sure to give access permissions to the bucket and your IAM
user.
Note
Bucket names must be unique across Amazon S3 for all AWS accounts. If you
aren't able to use codedeploydemobucket, try a different bucket name, such as
codedeploydemobucket followed by a dash and your initials or some other unique identifier.
Then be sure to substitute your bucket name for codedeploydemobucket wherever you see
it throughout this tutorial.
The Amazon S3 bucket must be created in the same AWS region in which your target
Amazon EC2 instances are launched. For example, if you create the bucket in the US East (N.
Virginia) Region, then your target Amazon EC2 instances must be launched in the US East
(N. Virginia) Region.
Topics
•To create an Amazon S3 bucket (CLI) (p. 63)
•To create an Amazon S3 bucket (console) (p. 63)
API Version 2014-10-06
62

AWS CodeDeploy User Guide
Step 3: Upload Your Application to Amazon S3
•Give Permissions to the Amazon S3 Bucket and Your IAM User (p. 63)
To create an Amazon S3 bucket (CLI)
Call the mb command to create an Amazon S3 bucket named codedeploydemobucket:
aws s3 mb s3://codedeploydemobucket
To create an Amazon S3 bucket (console)
1. Open the Amazon S3 console at https://console.aws.amazon.com/s3/.
2. In the Amazon S3 console, choose Create Bucket.
3. In the Bucket Name box, type a name for the bucket.
4. In the Region list, choose the target region, and then choose Create.
Give Permissions to the Amazon S3 Bucket and Your IAM User
You must have permissions to upload to the Amazon S3 bucket. You can specify these permissions
through an Amazon S3 bucket policy. For example, the following Amazon S3 bucket policy
allows AWS account 111122223333 to upload anywhere in the Amazon S3 bucket named
codedeploydemobucket:
{
"Statement": [
{
"Action": ["s3:PutObject"],
"Effect": "Allow",
"Resource": "arn:aws:s3:::codedeploydemobucket/*",
"Principal": {
"AWS": [
"111122223333"
]
}
}
]
}
Now is a good time to verify the Amazon S3 bucket will allow download requests from each
participating Amazon EC2 instance. You can specify this through an Amazon S3 bucket policy. For
example, the following Amazon S3 bucket policy allows any Amazon EC2 instance with an attached
IAM instance profile containing the ARN arn:aws:iam::80398EXAMPLE:role/CodeDeployDemo to
download from anywhere in the Amazon S3 bucket named codedeploydemobucket:
{
"Statement": [
{
"Action": ["s3:Get*", "s3:List*"],
"Effect": "Allow",
"Resource": "arn:aws:s3:::codedeploydemobucket/*",
"Principal": {
"AWS": [
"arn:aws:iam::80398EXAMPLE:role/CodeDeployDemo"
]
}
API Version 2014-10-06
63

AWS CodeDeploy User Guide
Step 3: Upload Your Application to Amazon S3
}
]
}
For information about how to generate and attach an Amazon S3 bucket policy, see Bucket Policy
Examples.
Your account must have permission to upload the revision to the Amazon S3 bucket. One way to
specify this is through an IAM policy. The following IAM policy allows your IAM user to upload revisions
anywhere in the Amazon S3 bucket named codedeploydemobucket:
{
"Version":"2012-10-17",
"Statement":[
{
"Effect":"Allow",
"Action":["s3:PutObject"],
"Resource":"arn:aws:s3:::codedeploydemobucket/*"
}
]
}
For information about how to create and attach an IAM policy, see Working with Policies.
Prepare the Application's Files for the Bucket
Make sure the web page, the AppSpec file, and the script are organized on your development machine
like this:
c:\
|-- temp\
|--HelloWorldApp\
|-- appspec.yml
|-- before-install.bat
|-- index.html
Bundle the Application's Files into a Single Archive File
and Push the Archive File
Bundle the files into an archive file (known as an application revision).
Note
You may be charged for storing objects in a bucket and for transferring application revisions
into and out of a bucket. For more information, see Amazon S3 Pricing.
1. On the development machine, switch to the folder where the files are stored:
cd c:\temp\HelloWorldApp
Note
If you don't switch to this folder, then the file bundling will start at your current folder. For
example, if your current folder is c:\temp instead of c:\temp\HelloWorldApp, the
bundling will start with files and subfolders in the c:\temp folder, which may include
more than the HelloWorldApp subfolder.
API Version 2014-10-06
64
AWS CodeDeploy User Guide
Step 4: Deploy Your Application
2. Call the create-application command to register a new application named HelloWorld_App with
AWS CodeDeploy:
aws deploy create-application --application-name HelloWorld_App
3. Call the AWS CodeDeploy push command to bundle the files together, upload the revisions to
Amazon S3, and register information with AWS CodeDeploy about the uploaded revision, all in
one action.
aws deploy push --application-name HelloWorld_App --s3-location s3://
codedeploydemobucket/HelloWorld_App.zip --ignore-hidden-files
This command bundles the files from the current directory (excluding any hidden files) into a single
archive file named HelloWorld_App.zip, uploads the revision to the codedeploydemobucket
bucket, and registers information with AWS CodeDeploy about the uploaded revision.
Step 4: Deploy Your "Hello, World!" Application
Now you will deploy the sample "Hello, World!" application revision you uploaded to Amazon S3.
You will use the AWS CLI or the AWS CodeDeploy console to deploy the revision and monitor the
deployment's progress. After the application revision is successfully deployed, you will check the
results.
Topics
•Deploy Your Application Revision with AWS CodeDeploy (p. 65)
•Monitor and Troubleshoot Your Deployment (p. 67)
•Verify Your Deployment (p. 68)
Deploy Your Application Revision with AWS CodeDeploy
Topics
•To deploy your application revision (CLI) (p. 65)
•To deploy your application revision (console) (p. 66)
To deploy your application revision (CLI)
1. First, the deployment will need a corresponding deployment group. However, before you create
the deployment group, you will need a service role ARN. A service role is an IAM role that gives a
service permission to act on your behalf. In this case, the service role will give AWS CodeDeploy
permission to access your Amazon EC2 instances to expand (read) their Amazon EC2 instance
tags.
You should have already followed the instructions in Create a Service Role (CLI) (p. 15) to create
a service role. To get the ARN of the service role, see Get the Service Role ARN (CLI) (p. 17).
2. Now that you have the ARN, call the create-deployment-group command to create a deployment
group named HelloWorld_DepGroup, associated with the application named HelloWorld_App,
using the Amazon EC2 instance tag named CodeDeployDemo and deployment configuration
named CodeDeployDefault.OneAtATime, with the service role ARN:
aws deploy create-deployment-group --application-name HelloWorld_App
--deployment-group-name HelloWorld_DepGroup --deployment-
config-name CodeDeployDefault.OneAtATime --ec2-tag-filters
API Version 2014-10-06
65

AWS CodeDeploy User Guide
Step 4: Deploy Your Application
Key=Name,Value=CodeDeployDemo,Type=KEY_AND_VALUE --service-role-
arn serviceRoleARN
Note
The create-deployment-group command provides support for creating triggers that result
in the sending of Amazon SNS notifications to topic subscribers about specified events in
deployments and instances. The command also supports options for automatically rolling
back deployments and setting up alarms to stop deployments when certain monitoring
thresholds are met in Amazon CloudWatch Alarms. Commands for these actions are
excluded from the sample in this tutorial.
3. Now call the create-deployment command to create a deployment associated with
the application named HelloWorld_App, the deployment configuration named
CodeDeployDefault.OneAtATime, and the deployment group named HelloWorld_DepGroup,
using the application revision named HelloWorld_App.zip in the bucket named
codedeploydemobucket:
aws deploy create-deployment --application-name HelloWorld_App
--deployment-config-name CodeDeployDefault.OneAtATime --
deployment-group-name HelloWorld_DepGroup --s3-location
bucket=codedeploydemobucket,bundleType=zip,key=HelloWorld_App.zip
To deploy your application revision (console)
1. Before you use the AWS CodeDeploy console to deploy your application revision, you will need
a service role ARN. A service role is an IAM role that gives a service permission to act on your
behalf. In this case, the service role will give AWS CodeDeploy permission to access your Amazon
EC2 instances to expand (read) their Amazon EC2 instance tags.
You should have already followed the instructions in Create a Service Role (Console) (p. 14) to
create a service role. To get the ARN of the service role, see Get the Service Role ARN (Console)
(p. 17).
2. Now that you have the ARN, you can use the AWS CodeDeploy console to deploy your application
revision.
Sign in to the AWS Management Console and open the AWS CodeDeploy console at https://
console.aws.amazon.com/codedeploy.
Note
Sign in with the same account or IAM user information you used in Getting
Started (p. 11).
3. If the Applications page is not displayed, on the AWS CodeDeploy menu, choose Applications.
4. In the list of applications, choose HelloWorld_App.
5. Under Deployment groups, choose Create deployment group.
6. In the Deployment Group Name box, type HelloWorld_DepGroup.
7. In the list of tags, choose Amazon EC2 from the Tag Type drop-down list.
8. In the Key box, type Name.
9. In the Value box, type CodeDeployDemo.
Note
After you type CodeDeployDemo, a 1 should appear under Instances to confirm AWS
CodeDeploy found one matching Amazon EC2 instance.
10. In the Deployment Config drop-down list, choose CodeDeployDefault.OneAtATime.
11. In the Service Role ARN drop-down list, choose the service role ARN, and then choose Create
Deployment Group.
API Version 2014-10-06
66

AWS CodeDeploy User Guide
Step 4: Deploy Your Application
12. On the AWS CodeDeploy menu, choose Deployments.
13. Choose Create New Deployment.
14. In the Application drop-down list, choose HelloWorld_App.
15. In the Deployment Group drop-down list, choose HelloWorld_DepGroup.
16. In the Revision Type area, choose My application is stored in Amazon S3, and then in the
Revision Location box, type the location of the sample "Hello, World!" application revision you
previously uploaded to Amazon S3. To get the location:
1. Open the Amazon S3 console at https://console.aws.amazon.com/s3/.
2. In the All Buckets list, choose codedeploydemobucket (or the name of the bucket where
you uploaded your application revision).
3. In the list of objects, choose HelloWorld_App.zip.
4. If the Properties pane is not displayed, choose the Properties button.
5. In the Properties pane, copy the value of the Link field to your clipboard.
It might look something like this:
https://s3.amazonaws.com/codedeploydemobucket/HelloWorld_App.zip
6. Return to the AWS CodeDeploy console, and in the Revision Location box, paste the Link
field value.
17. If a message appears in the File Type list stating the file type could not be detected, choose .zip
in the list of file types.
18. (Optional) Type a comment in the Deployment Description box.
19. From the Deployment Config drop-down list, choose CodeDeployDefault.OneAtATime.
20. Choose Deploy Now. Information about your newly created deployment will appear on the
Deployments page.
Tip
To update the deployment's current status, choose the Refresh button next to the table.
Monitor and Troubleshoot Your Deployment
Topics
•To monitor and troubleshoot your deployment (CLI) (p. 67)
•To monitor and troubleshoot your deployment (console) (p. 68)
To monitor and troubleshoot your deployment (CLI)
1. Get the deployment's ID by calling the list-deployments command against the application named
HelloWorld_App and the deployment group named HelloWorld_DepGroup:
aws deploy list-deployments --application-name HelloWorld_App --
deployment-group-name HelloWorld_DepGroup --query "deployments" --output
text
2. Call the get-deployment command with the deployment ID:
aws deploy get-deployment --deployment-id deploymentID --query
"deploymentInfo.status" --output text
3. The command will return the deployment's overall status. If successful, the value will be
Succeeded.
API Version 2014-10-06
67

AWS CodeDeploy User Guide
Step 5: Update and Redeploy Your Application
If the overall status is Failed, you can call commands such as list-deployment-instances and get-
deployment-instance to troubleshoot. For more troubleshooting options, see Analyzing log files to
investigate deployment failures on instances (p. 276).
To monitor and troubleshoot your deployment (console)
On the Deployments page in the AWS CodeDeploy console, you can monitor your deployment's
status in the Status column.
Tip
To update the deployment's current status, choose the Refresh button next to the table.
To get more information about your deployment, especially if the Status column value has any value
other than Succeeded:
1. In the Deployments table, choose the arrow next to the deployment ID. After a deployment fails, a
message that describes the reason for the failure will appear in Details.
2. In Instances, choose View All Instances. More information about the deployment will be
displayed. After a deployment fails, you may be able to determine on which Amazon EC2
instances and at which step the deployment failed.
Note
If you don't see Instances, choose the Refresh button above the table. After the Status
column changes from In Progress to Created, Instances should appear.
3. If you want to do more troubleshooting, you can use a technique like View Instance
Details (p. 138). You can also analyze the deployment log files on a Amazon EC2
instance. For more information, see Analyzing log files to investigate deployment failures on
instances (p. 276).
Verify Your Deployment
After your deployment is successful, verify your WordPress installation is working. Use the public DNS
address of the Amazon EC2 instance to view the web page in a web browser. (To get the public DNS
value, in the Amazon EC2 console, choose the Amazon EC2 instance, and on the Description tab,
look for the value in Public DNS.)
For example, if the public DNS address of your Amazon EC2 instance is
ec2-01-234-567-890.compute-1.amazonaws.com, you would use the following URL:
http://ec2-01-234-567-890.compute-1.amazonaws.com/WordPress
If successful, you should see a "Hello, World!" web page.
Step 5: Update and Redeploy Your "Hello,
World!" Application
Now that you've successfully deployed your application revision, on the development machine,
make an update to the web page's code, and then use AWS CodeDeploy to redeploy the site. After
redeployment, you should be able to see the changes on the Amazon EC2 instance.
Topics
•Modify the Web Page (p. 69)
•Redeploy the Site (p. 69)
API Version 2014-10-06
68

AWS CodeDeploy User Guide
Step 5: Update and Redeploy Your Application
Modify the Web Page
1. Go to your c:\temp\HelloWorldApp subfolder and use a text editor to modify the index.html
file:
cd c:\temp\HelloWorldApp
notepad index.html
2. Revise the contents of the index.html file to change the background color and some of the text
on the web page, and then save the file:
<!DOCTYPE html PUBLIC "-//W3C//DTD HTML 4.01 Transitional//EN" "http://
www.w3.org/TR/html4/loose.dtd">
<html>
<head>
<title>Hello Again, World!</title>
<style>
body {
color: #ffffff;
background-color: #66cc00;
font-family: Arial, sans-serif;
font-size:14px;
}
</style>
</head>
<body>
<div align="center"><h1>Hello Again, World!</h1></div>
<div align="center"><h2>You have successfully deployed a revision of an
application using AWS CodeDeploy</h2></div>
<div align="center">
<p>What to do next? Take a look through the <a href="http://
docs.aws.amazon.com/codedeploy">AWS CodeDeploy Documentation</a>.</p>
</div>
</body>
</html>
Redeploy the Site
Now that you've modified the code, use Amazon S3 and AWS CodeDeploy to redeploy the web page.
Bundle and upload the changes to Amazon S3 as described in Bundle the Application's Files into a
Single Archive File and Push the Archive File (p. 64). (As you follow those instructions, you do not
need to create a new application.) Give the revision the same key as before (HelloWorld_App.zip).
Upload it to the same Amazon S3 bucket you created earlier (for example, codedeploydemobucket).
Use the AWS CLI or the AWS CodeDeploy console to redeploy the site.
Topics
•To redeploy the site (CLI) (p. 69)
•To redeploy the site (console) (p. 70)
To redeploy the site (CLI)
Call the create-deployment command to create a deployment based on the uploaded revision,
again using the application named HelloWorld_App, the deployment configuration named
API Version 2014-10-06
69

AWS CodeDeploy User Guide
Step 5: Update and Redeploy Your Application
CodeDeployDefault.OneAtATime, the deployment group named HelloWorld_DepGroup, and the
revision named HelloWorld_App.zip in the bucket named codedeploydemobucket:
aws deploy create-deployment --application-name HelloWorld_App
--deployment-config-name CodeDeployDefault.OneAtATime --
deployment-group-name HelloWorld_DepGroup --s3-location
bucket=codedeploydemobucket,bundleType=zip,key=HelloWorld_App.zip
You can check the status of the new deployment, as described in Monitor and Troubleshoot Your
Deployment (p. 67).
When AWS CodeDeploy has redeployed the site, revisit the site in your web browser to verify that
the background color and text on the web page have been changed. (You may need to refresh your
browser.) If the background color and text has been changed, then congratulations! You've modified
and redeployed your site!
To redeploy the site (console)
1. Sign in to the AWS Management Console and open the AWS CodeDeploy console at https://
console.aws.amazon.com/codedeploy.
Note
Sign in with the same account or IAM user information you used in Getting
Started (p. 11).
2. On the AWS CodeDeploy menu, choose Deployments.
3. Choose Create New Deployment.
4. On the Create New Deployment page:
1. In the Application list, choose HelloWorld_App.
2. In the Deployment Group list, choose HelloWorld_DepGroup.
3. In the Revision Type area, choose My application is stored in Amazon S3, and then copy
the Amazon S3 link for your revision into the Revision Location box.
To find the link value:
1. Sign in to the AWS Management Console and open the Amazon S3 console at https://
console.aws.amazon.com/s3/.
Browse to and open codedeploydemobucket, and then choose your revision,
HelloWorld_App.zip, in the Amazon S3 console.
2. If the Properties pane is not visible in the Amazon S3 console, choose the Properties
button.
3. In the Properties pane, copy the value of the Link field into the Revision Location box
in the AWS CodeDeploy console.
4. In the File Type list, if a message appears stating that the file type could not be detected,
choose .zip.
5. Leave the Deployment Description box blank.
6. In the Deployment Config list, choose CodeDeployDefault.OneAtATime, and then choose
Deploy Now.
Choose the Refresh button above the table to get status on the deployment.
You can check the status of the deployment as described in Monitor and Troubleshoot Your
Deployment (p. 67).
When AWS CodeDeploy has redeployed the site, revisit the site in your web browser to verify
that the background color and text on the web page have been changed. (You may need to
API Version 2014-10-06
70
AWS CodeDeploy User Guide
Step 6: Clean Up
refresh your browser.) If the background color and text has been changed, congratulations!
You've modified and redeployed your site!
Step 6: Clean Up Your "Hello, World!"
Application and Related Resources
You've now successfully made an update to the "Hello, World!" code and redeployed the site. To
avoid ongoing charges for resources you created to complete this tutorial, you should delete any AWS
CloudFormation stacks (or terminate any Amazon EC2 instances, if you manually created them outside
of AWS CloudFormation). You should also delete any Amazon S3 buckets that you created just for this
tutorial, and the HelloWorld_App application in AWS CodeDeploy.
You can use the AWS CLI, the AWS CloudFormation, Amazon S3, Amazon EC2, and AWS
CodeDeploy consoles, or the AWS APIs to clean up resources.
Topics
•To use clean up resources (CLI) (p. 71)
•To clean up resources (console) (p. 71)
•What's Next? (p. 72)
To use clean up resources (CLI)
1. If you used the AWS CloudFormation stack for this tutorial, delete the stack by calling the delete-
stack command against the stack named CodeDeployDemoStack. This will terminate all
accompanying Amazon EC2 instances and delete all accompanying IAM roles originally created
by the stack.
aws cloudformation delete-stack --stack-name CodeDeployDemoStack
2. To delete the Amazon S3 bucket, call the rm command with the --recursive switch against the
bucket named codedeploydemobucket. This will delete the bucket and all objects in the bucket.
aws s3 rm s3://codedeploydemobucket --recursive
3. To delete the HelloWorld_App application from AWS CodeDeploy, call the delete-application
command. This will delete all associated deployment group records and deployment records for
the application.
aws deploy delete-application --application-name HelloWorld_App
4. If you did not use the AWS CloudFormation stack for this tutorial, call the terminate-instances
command to terminate Amazon EC2 instances you manually created. Supply the ID of the
Amazon EC2 instance to terminate.
aws ec2 terminate-instances --instance-ids instanceId
To clean up resources (console)
If you used our AWS CloudFormation template for this tutorial, delete the associated AWS
CloudFormation stack.
API Version 2014-10-06
71

AWS CodeDeploy User Guide
Step 6: Clean Up
1. Sign in to the AWS Management Console and open the AWS CloudFormation console at https://
console.aws.amazon.com/cloudformation/.
2. In the By Name box, type the AWS CloudFormation stack name (for example,
CodeDeployDemoStack).
3. Choose the stack name.
4. Choose Delete Stack. This will delete the stack, terminate all accompanying Amazon EC2
instances, and delete all accompanying IAM roles.
To terminate Amazon EC2 instances you created outside of an AWS CloudFormation stack:
1. Sign in to the AWS Management Console and open the Amazon EC2 console at https://
console.aws.amazon.com/ec2/.
2. In the Instances area, choose Instances.
3. In the Search Instances box, type the name of Amazon EC2 instance you want to terminate, and
then press Enter.
4. Choose the Amazon EC2 instance.
5. Choose Actions, point to Instance State, and then choose Terminate. When prompted, choose
Yes, Terminate. Repeat these steps for any additional Amazon EC2 instances.
To delete the Amazon S3 bucket:
1. Sign in to the AWS Management Console and open the Amazon S3 console at https://
console.aws.amazon.com/s3/.
2. In the All Buckets list, browse to and choose the name of the Amazon S3 bucket (for example,
codedeploydemobucket).
3. Before you can delete a bucket, you must first delete its contents. Select all of the files in the
bucket, such as HelloWorld_App.zip. Choose Actions, and then choose Delete. When
prompted to confirm the deletion, choose OK.
4. You can now delete the bucket. Choose All Buckets. In the All Buckets list, right-click the bucket
name, and then choose Delete. When prompted to confirm the deletion, choose OK.
To delete the HelloWorld_App application from AWS CodeDeploy:
1. Sign in to the AWS Management Console and open the AWS CodeDeploy console at https://
console.aws.amazon.com/codedeploy.
Note
Sign in with the same account or IAM user information you used in Getting
Started (p. 11).
2. On the AWS CodeDeploy menu, choose Applications.
3. At the bottom of the Application details page, choose Delete application.
4. When prompted, type the name of the application to confirm you want to delete it, and then choose
Delete.
What's Next?
If you've arrived here, you have successfully completed a deployment with AWS CodeDeploy.
Congratulations!
API Version 2014-10-06
72
AWS CodeDeploy User Guide
Tutorial: Deploy an Application
to an On-Premises Instance
Tutorial: Deploy an Application to an On-
Premises Instance with AWS CodeDeploy
(Windows Server, Ubuntu Server, or Red Hat
Enterprise Linux)
This tutorial helps you gain experience with AWS CodeDeploy by guiding you through the deployment
of a sample application revision to a single on-premises instance—that is, a physical device that is
not an Amazon EC2 instance—running Windows Server, Ubuntu Server, or Red Hat Enterprise Linux
(RHEL). For information about on-premises instances and how they work with AWS CodeDeploy, see
On-Premises Instances (p. 139).
Not what you're looking for?
• To practice deploying to an Amazon EC2 instance running Amazon Linux or RHEL, see
Tutorial: Deploy WordPress to a Non-Windows Instance (p. 41).
• To practice deploying to an Amazon EC2 instance running Windows Server, see Tutorial:
Deploy a HelloWorld Application to a Windows Server Instance (p. 58).
This tutorial builds on concepts introduced in the Step 5: Try the Create Deployment
Walkthrough (p. 21). If you have not yet completed it, you may want to do that first.
Topics
•Prerequisites (p. 73)
•Step 1: Configure the On-Premises Instance (p. 73)
•Step 2: Create a Sample Application Revision (p. 74)
•Step 3: Bundle and Upload Your Application Revision to Amazon S3 (p. 77)
•Step 4: Deploy Your Application Revision (p. 77)
•Step 5: Verify Your Deployment (p. 77)
•Step 6: Clean Up Resources (p. 78)
Prerequisites
Before you start this tutorial, you must complete the prerequisites in Getting Started (p. 11), which
include configuring your IAM user, installing or upgrading the AWS CLI, and creating a service role.
You do not have to create an IAM instance profile as described in the prerequisites. On-premises
instances do not use IAM instance profiles.
The physical device you will configure as an on-premises instance must be running one of the
operating systems listed in Operating Systems Supported by the AWS CodeDeploy Agent (p. 109).
Step 1: Configure the On-Premises Instance
Before you can deploy to your on-premises instance, you must configure it. Follow the instructions in
Configuring an On-Premises Instance (p. 140), and then return to this page.
API Version 2014-10-06
73

AWS CodeDeploy User Guide
Step 2: Create a Sample Application Revision
Step 2: Create a Sample Application Revision
In this step, you'll create a sample application revision to deploy to your on-premises instance.
Because it is difficult to know which software and features are already installed—or are allowed to
be installed by your organization's policies—on your on-premises instance, the sample application
revision we offer here simply uses batch scripts (for Windows Server) or shell scripts (for Ubuntu
Server and RHEL) to write text files to a location on your on-premises instance. One file is written
for each of several AWS CodeDeploy deployment lifecycle events, including Install, AfterInstall,
ApplicationStart, and ValidateService. During the BeforeInstall deployment lifecycle event, a script
will run to remove old files written during previous deployments of this sample and create a location on
your on-premises instance to which to write the new files.
Note
This sample application revision may fail to be deployed if any of the following are true:
• The user account that starts the AWS CodeDeploy agent on the on-premises instance does
not have permission to execute scripts.
• The user account does not have permission to create or delete folders in the locations listed
in the scripts.
• The user account does not have permission to create text files in the locations listed in the
scripts.
Tip
If you configured a Windows Server instance and want to deploy a different sample, you
may want to use the one in Step 2: Configure Your Source Content (p. 60) in the Tutorial:
Deploy a HelloWorld Application to a Windows Server Instance (p. 58) tutorial.
If you configured a RHEL instance and want to deploy a different sample, you may want
to use the one in Step 2: Configure Your Source Content (p. 43) in the Tutorial: Deploy
WordPress to a Non-Windows Instance (p. 41) tutorial.
Currently, there is no alternative sample for Ubuntu Server.
1. On your development machine, create a subdirectory (subfolder) named CodeDeployDemo-
OnPrem that will store the sample application revision's files, and then switch to the subfolder. For
this example, we assume you'll use the c:\temp folder as the root folder for Windows Server or
the /tmp folder as the root folder for Ubuntu Server and RHEL. If you use a different folder, be
sure to substitute it for ours throughout this tutorial:
For Windows:
mkdir c:\temp\CodeDeployDemo-OnPrem
cd c:\temp\CodeDeployDemo-OnPrem
For Linux, OS X, or Unix:
mkdir /tmp/CodeDeployDemo-OnPrem
cd /tmp/CodeDeployDemo-OnPrem
2. In the root of the CodeDeployDemo-OnPrem subfolder, use a text editor to create two files named
appspec.yml and install.txt:
appspec.yml for Windows Server:
version: 0.0
os: windows
files:
API Version 2014-10-06
74

AWS CodeDeploy User Guide
Step 2: Create a Sample Application Revision
- source: .\install.txt
destination: c:\temp\CodeDeployExample
hooks:
BeforeInstall:
- location: .\scripts\before-install.bat
timeout: 900
AfterInstall:
- location: .\scripts\after-install.bat
timeout: 900
ApplicationStart:
- location: .\scripts\application-start.bat
timeout: 900
ValidateService:
- location: .\scripts\validate-service.bat
timeout: 900
appspec.yml for Ubuntu Server and RHEL:
version: 0.0
os: linux
files:
- source: ./install.txt
destination: /tmp/CodeDeployExample
hooks:
BeforeInstall:
- location: ./scripts/before-install.sh
timeout: 900
AfterInstall:
- location: ./scripts/after-install.sh
timeout: 900
ApplicationStart:
- location: ./scripts/application-start.sh
timeout: 900
ValidateService:
- location: ./scripts/validate-service.sh
timeout: 900
For more information about AppSpec files, see Add an AppSpec File (p. 184) and AppSpec File
Reference (p. 227).
install.txt:
The Install deployment lifecycle event successfully completed.
3. Under the root of the CodeDeployDemo-OnPrem subfolder, create a scripts subfolder, and then
switch to it:
For Windows:
mkdir c:\temp\CodeDeployDemo-OnPrem\scripts
cd c:\temp\CodeDeployDemo-OnPrem\scripts
For Linux, OS X, or Unix:
mkdir -p /tmp/CodeDeployDemo-OnPrem/scripts
API Version 2014-10-06
75

AWS CodeDeploy User Guide
Step 2: Create a Sample Application Revision
cd /tmp/CodeDeployDemo-OnPrem/scripts
4. In the root of the scripts subfolder, use a text editor to create four files named before-
install.bat, after-install.bat, application-start.bat, and validate-
service.bat for Windows Server, or before-install.sh, after-install.sh,
application-start.sh, and validate-service.sh for Ubuntu Server and RHEL:
For Windows Server:
before-install.bat:
set FOLDER=%HOMEDRIVE%\temp\CodeDeployExample
if exist %FOLDER% (
rd /s /q "%FOLDER%"
)
mkdir %FOLDER%
after-install.bat:
cd %HOMEDRIVE%\temp\CodeDeployExample
echo The AfterInstall deployment lifecycle event successfully completed. >
after-install.txt
application-start.bat:
cd %HOMEDRIVE%\temp\CodeDeployExample
echo The ApplicationStart deployment lifecycle event successfully
completed. > application-start.txt
validate-service.bat:
cd %HOMEDRIVE%\temp\CodeDeployExample
echo The ValidateService deployment lifecycle event successfully
completed. > validate-service.txt
For Ubuntu Server and RHEL:
before-install.sh:
#!/bin/bash
export FOLDER=/tmp/CodeDeployExample
if [ -d $FOLDER ]
then
rm -rf $FOLDER
fi
mkdir -p $FOLDER
after-install.sh:API Version 2014-10-06
76
AWS CodeDeploy User Guide
Step 3: Bundle and Upload Your
Application Revision to Amazon S3
#!/bin/bash
cd /tmp/CodeDeployExample
echo "The AfterInstall deployment lifecycle event successfully completed."
> after-install.txt
application-start.sh:
#!/bin/bash
cd /tmp/CodeDeployExample
echo "The ApplicationStart deployment lifecycle event successfully
completed." > application-start.txt
validate-service.sh:
#!/bin/bash
cd /tmp/CodeDeployExample
echo "The ValidateService deployment lifecycle event successfully
completed." > validate-service.txt
unset FOLDER
5. For Ubuntu Server and RHEL only, make sure the four shell scripts have execute permissions:
chmod +x ./scripts/*
Step 3: Bundle and Upload Your Application
Revision to Amazon S3
Before you can deploy your application revision, you'll need to bundle the files, and then upload the file
bundle to an Amazon S3 bucket. Follow the instructions in Create an Application (p. 168) and Push
a Revision (p. 188). (Although you can give the application and deployment group any name, we
recommend you use CodeDeploy-OnPrem-App for the application name and CodeDeploy-OnPrem-
DG for the deployment group name.) After you have completed those instructions, return to this page.
Note
Alternatively, you can upload the file bundle to a GitHub repository and deploy it from there.
For more information, see GitHub (p. 36).
Step 4: Deploy Your Application Revision
After you've uploaded your application revision to an Amazon S3 bucket, try deploying it to your on-
premises instance. Follow the instructions in Deploy a Revision (p. 197), and then return to this page.
Step 5: Verify Your Deployment
To verify the deployment was successful, follow the instructions in View Deployment Details (p. 196),
and then return to this page.
API Version 2014-10-06
77
AWS CodeDeploy User Guide
Step 6: Clean Up Resources
If the deployment was successful, you'll find four text files in the c:\temp\CodeDeployExample
folder (for Windows Server) or /tmp/CodeDeployExample (for Ubuntu Server and RHEL).
If the deployment failed, follow the troubleshooting steps in View Instance Details (p. 138) and
Troubleshoot Instance Issues (p. 275). Make any required fixes, rebundle and upload your
application revision, and then try the deployment again.
Step 6: Clean Up Resources
To avoid ongoing charges for resources you created for this tutorial, delete the Amazon S3 bucket if
you'll no longer be using it. You can also clean up associated resources, such as the application and
deployment group records in AWS CodeDeploy and the on-premises instance.
You can use the AWS CLI or a combination of the AWS CodeDeploy and Amazon S3 consoles and the
AWS CLI to clean up resources.
Clean Up Resources (CLI)
To delete the Amazon S3 bucket
• Call the rm command along with the --recursive switch against the bucket (for example,
codedeploydemobucket). The bucket and all objects in the bucket will be deleted.
aws s3 rm s3://your-bucket-name --recursive
To delete the application and deployment group records in AWS CodeDeploy
• Call the delete-application command against the application (for example, CodeDeploy-OnPrem-
App). The records for the deployment and deployment group will be deleted.
aws deploy delete-application --application-name your-application-name
To deregister the on-premises instance and delete the IAM user
• Call the deregister command against the on-premises instance and region:
aws deploy deregister --instance-name your-instance-name --delete-iam-user
--region your-region
Note
If you do not want to delete the IAM user associated with this on-premises instance, use
the --no-delete-iam-user option instead.
To uninstall the AWS CodeDeploy agent and remove the configuration file from the on-
premises instance
• From the on-premises instance, call the uninstall command:
aws deploy uninstall
You have now completed all of the steps to clean up the resources used for this tutorial.
API Version 2014-10-06
78

AWS CodeDeploy User Guide
Tutorial: Deploy to an Auto Scaling Group
Clean Up Resources (Console)
To delete the Amazon S3 bucket
1. Sign in to the AWS Management Console and open the Amazon S3 console at https://
console.aws.amazon.com/s3/.
2. Choose the icon next to the bucket you want to delete (for example, codedeploydemobucket),
but do not choose the bucket itself.
3. Choose Actions, and then choose Delete.
4. When prompted to delete the bucket, choose OK.
To delete the application and deployment group records in AWS CodeDeploy
1. Sign in to the AWS Management Console and open the AWS CodeDeploy console at https://
console.aws.amazon.com/codedeploy.
Note
Sign in with the same account or IAM user information you used in Getting
Started (p. 11).
2. If the list of applications does not appear, on the AWS CodeDeploy menu, choose Applications.
3. Choose the name of the application you want to delete (for example, CodeDeploy-OnPrem-App).
4. At the bottom of the Application details page, choose Delete application.
5. When prompted, type the name of the application to confirm you want to delete it, and then choose
Delete.
You cannot use the AWS CodeDeploy console to deregister the on-premises instance or uninstall the
AWS CodeDeploy agent. Follow the instructions in To deregister the on-premises instance and delete
the IAM user (p. 78).
Tutorial: Deploy an Application to an Auto
Scaling Group Using AWS CodeDeploy
In this tutorial, you'll use AWS CodeDeploy to deploy an application revision to an Auto Scaling group.
For information about Auto Scaling integration with AWS CodeDeploy, see Auto Scaling (p. 31).
Topics
•Prerequisites (p. 79)
•Step 1: Create and Configure the Auto Scaling Group (p. 80)
•Step 2: Deploy the Application to the Auto Scaling Group (p. 87)
•Step 3: Check Your Results (p. 92)
•Step 4: Increase the Number of Amazon EC2 Instances in the Auto Scaling Group (p. 94)
•Step 5: Check Your Results Again (p. 95)
•Step 6: Clean Up (p. 96)
Prerequisites
For this tutorial, we assume you have already completed all of the steps in Getting Started (p. 11),
including setting up and configuring the AWS CLI and creating an IAM instance profile
API Version 2014-10-06
79

AWS CodeDeploy User Guide
Step 1: Create and Configure the Auto Scaling Group
(CodeDeployDemo-EC2-Instance-Profile) and a service role (CodeDeployDemo). A service role
is a special type of IAM role that gives a service permission to act on your behalf.
If you want to deploy an application revision to an Auto Scaling group of Ubuntu Server Amazon
EC2 instances, you can create and use the sample revision in Step 2: Create a Sample Application
Revision (p. 74)in the Tutorial: Deploy an Application to an On-Premises Instance (p. 73) tutorial.
Otherwise, you will need to create and use a revision that is compatible with an Ubuntu Server instance
and AWS CodeDeploy. We also provide sample revisions for Amazon Linux, Windows Server, and
Red Hat Enterprise Linux (RHEL) Amazon EC2 instances. To create a revision on your own, see
Working with Application Revisions (p. 183).
Step 1: Create and Configure the Auto Scaling
Group
In this step, you'll create an Auto Scaling group that contains a single Amazon Linux, RHEL, or
Windows Server Amazon EC2 instance. In a later step, you will instruct Auto Scaling to add one more
Amazon EC2 instance, and AWS CodeDeploy will deploy your revision to it.
Topics
•To create and configure the Auto Scaling group (CLI) (p. 80)
•To create and configure the Auto Scaling group (console) (p. 84)
To create and configure the Auto Scaling group (CLI)
1. Call the create-launch-configuration command to create an Auto Scaling launch configuration.
Before you call this command, you'll need the ID of an AMI that works for this tutorial, represented
by the placeholder imageID. You'll also need the name of an Amazon EC2 instance key pair to
enable access to the Amazon EC2 instance, represented by the placeholder keyName. Finally,
you will need instructions to install the latest version of the AWS CodeDeploy agent.
To get the ID of an AMI that works with this tutorial:
1. Open the Amazon EC2 console at https://console.aws.amazon.com/ec2/.
2. In the navigation pane, under Instances, choose Instances, and then choose Launch
Instance.
3. On the Quick Start tab of the Choose an Amazon Machine Image page, note the ID of the
AMI next to Amazon Linux AMI, Red Hat Enterprise Linux 7.1, Ubuntu Server 14.04 LTS,
or Microsoft Windows Server 2012 R2.
Note
If you have a custom version of an AMI that is compatible with AWS CodeDeploy,
choose it here instead of browsing through the Quick Start tab. For information
about using a custom AMI with AWS CodeDeploy and Auto Scaling, see Using a
Custom AMI with AWS CodeDeploy and Auto Scaling (p. 32).
For the Amazon EC2 instance key pair, use the name of your Amazon EC2 instance key pair.
To install the latest version of the AWS CodeDeploy agent, on your development machine, create
a file named instance-setup.sh (for an Amazon Linux, Ubuntu Server or RHEL Amazon
EC2 instance) or instance-setup.txt (for a Windows Server Amazon EC2 instance) with the
following contents.
Note
If you have a custom version of an AMI that is compatible with AWS CodeDeploy, you
don't need to create the instance-setup.sh or instance-setup.txt file.
API Version 2014-10-06
80

AWS CodeDeploy User Guide
Step 1: Create and Configure the Auto Scaling Group
For Amazon Linux and RHEL Amazon EC2 instances:
#!/bin/bash
yum -y update
yum install -y ruby
yum install -y aws-cli
cd /home/ec2-user
aws s3 cp s3://bucket-name/latest/install . --region region-name
chmod +x ./install
./install auto
bucket-name represents one of the following:
•aws-codedeploy-us-east-1 for instances in the US East (N. Virginia) region
•aws-codedeploy-us-west-1 for instances in the US West (N. California) region
•aws-codedeploy-us-west-2 for instances in the US West (Oregon) region
•aws-codedeploy-ap-south-1 for instances in the Asia Pacific (Mumbai) region
•aws-codedeploy-ap-northeast-2 for instances in the Asia Pacific (Seoul) region
•aws-codedeploy-ap-southeast-1 for instances in the Asia Pacific (Singapore) region
•aws-codedeploy-ap-southeast-2 for instances in the Asia Pacific (Sydney) region
•aws-codedeploy-ap-northeast-1 for instances in the Asia Pacific (Tokyo) region
•aws-codedeploy-eu-central-1 for instances in the EU (Frankfurt) region
•aws-codedeploy-eu-west-1 for instances in the EU (Ireland) region
•aws-codedeploy-sa-east-1 for instances in the South America (São Paulo) region
region-name represents one of the following:
•us-east-1 for instances in the US East (N. Virginia) region
•us-west-1 for instances in the US West (N. California) region
•us-west-2 for instances in the US West (Oregon) region
•ap-south-1 for instances in the Asia Pacific (Mumbai) region
•ap-northeast-2 for instances in the Asia Pacific (Seoul) region
•ap-southeast-1 for instances in the Asia Pacific (Singapore) region
•ap-southeast-2 for instances in the Asia Pacific (Sydney) region
•ap-northeast-1 for instances in the Asia Pacific (Tokyo) region
•eu-central-1 for instances in the EU (Frankfurt) region
•eu-west-1 for instances in the EU (Ireland) region
•sa-east-1 for instances in the South America (São Paulo) region
For Ubuntu Server Amazon EC2 instances:
#!/bin/bash
apt-get -y update
apt-get -y install awscli
apt-get -y install ruby2.0
cd /home/ubuntu
aws s3 cp s3://bucket-name/latest/install . --region region-name
chmod +x ./install
./install auto API Version 2014-10-06
81

AWS CodeDeploy User Guide
Step 1: Create and Configure the Auto Scaling Group
bucket-name represents one of the following:
•aws-codedeploy-us-east-1 for instances in the US East (N. Virginia) region
•aws-codedeploy-us-west-1 for instances in the US West (N. California) region
•aws-codedeploy-us-west-2 for instances in the US West (Oregon) region
•aws-codedeploy-ap-south-1 for instances in the Asia Pacific (Mumbai) region
•aws-codedeploy-ap-northeast-2 for instances in the Asia Pacific (Seoul) region
•aws-codedeploy-ap-southeast-1 for instances in the Asia Pacific (Singapore) region
•aws-codedeploy-ap-southeast-2 for instances in the Asia Pacific (Sydney) region
•aws-codedeploy-ap-northeast-1 for instances in the Asia Pacific (Tokyo) region
•aws-codedeploy-eu-central-1 for instances in the EU (Frankfurt) region
•aws-codedeploy-eu-west-1 for instances in the EU (Ireland) region
•aws-codedeploy-sa-east-1 for instances in the South America (São Paulo) region
region-name represents one of the following:
•us-east-1 for instances in the US East (N. Virginia) region
•us-west-1 for instances in the US West (N. California) region
•us-west-2 for instances in the US West (Oregon) region
•ap-south-1 for instances in the Asia Pacific (Mumbai) region
•ap-northeast-2 for instances in the Asia Pacific (Seoul) region
•ap-southeast-1 for instances in the Asia Pacific (Singapore) region
•ap-southeast-2 for instances in the Asia Pacific (Sydney) region
•ap-northeast-1 for instances in the Asia Pacific (Tokyo) region
•eu-central-1 for instances in the EU (Frankfurt) region
•eu-west-1 for instances in the EU (Ireland) region
•sa-east-1 for instances in the South America (São Paulo) region
For Windows Server Amazon EC2 instances:
<powershell>
New-Item -Path c:\temp -ItemType "directory" -Force
powershell.exe -Command Read-S3Object -BucketName bucket-name/latest -Key
codedeploy-agent.msi -File c:\temp\codedeploy-agent.msi
Start-Process -Wait -FilePath c:\temp\codedeploy-agent.msi -WindowStyle
Hidden
</powershell>
bucket-name represents one of the following:
•aws-codedeploy-us-east-1 for instances in the US East (N. Virginia) region
•aws-codedeploy-us-west-1 for instances in the US West (N. California) region
•aws-codedeploy-us-west-2 for instances in the US West (Oregon) region
•aws-codedeploy-ap-south-1 for instances in the Asia Pacific (Mumbai) region
•aws-codedeploy-ap-northeast-2 for instances in the Asia Pacific (Seoul) region
•aws-codedeploy-ap-southeast-1 for instances in the Asia Pacific (Singapore) region
•aws-codedeploy-ap-southeast-2 for instances in the Asia Pacific (Sydney) region
•aws-codedeploy-ap-northeast-1 for instances in the Asia Pacific (Tokyo) region
API Version 2014-10-06
82
AWS CodeDeploy User Guide
Step 1: Create and Configure the Auto Scaling Group
•aws-codedeploy-eu-central-1 for instances in the EU (Frankfurt) region
•aws-codedeploy-eu-west-1 for instances in the EU (Ireland) region
•aws-codedeploy-sa-east-1 for instances in the South America (São Paulo) region
Call the create-launch-configuration command.
For Linux, OS X, or Unix:
aws autoscaling create-launch-configuration \
--launch-configuration-name CodeDeployDemo-AS-Configuration \
--image-id imageID \
--key-name keyName \
--iam-instance-profile CodeDeployDemo-EC2-Instance-Profile \
--instance-type t1.micro \
--user-data file://path/to/instance-setup.sh
For Windows:
aws autoscaling create-launch-configuration --launch-configuration-name
CodeDeployDemo-AS-Configuration --image-id imageID --key-name keyName --
iam-instance-profile CodeDeployDemo-EC2-Instance-Profile --instance-type
t1.micro --user-data file://path/to/instance-setup.txt
Note
If you have a custom version of an AMI that is compatible with AWS CodeDeploy, omit
the --user-data option in the preceding command.
These commands create an Auto Scaling launch configuration named CodeDeployDemo-AS-
Configuration, based on the specified image ID, applying the specified IAM instance profile and
Amazon EC2 instance key pair, and running the command to install the latest version of the AWS
CodeDeploy agent. This launch configuration is based on the t1.micro Amazon EC2 instance type.
2. Call the create-auto-scaling-group command to create an Auto Scaling group. You will need the
name of one of the Availability Zones in one of the regions listed in Region and Endpoints in the
AWS General Reference, represented by the placeholder availabilityZone.
Tip
To view a list of Availability Zones in a region, call:
aws ec2 describe-availability-zones --region regionName
For example, to view a list of Availability Zones in the US West (Oregon) Region, call:
aws ec2 describe-availability-zones --region us-west-2
For Linux, OS X, or Unix:
aws autoscaling create-auto-scaling-group \
--auto-scaling-group-name CodeDeployDemo-AS-Group \
--launch-configuration-name CodeDeployDemo-AS-Configuration \
--min-size 1 \
--max-size 1 \
--desired-capacity 1 \
--availability-zones availabilityZone
API Version 2014-10-06
83

AWS CodeDeploy User Guide
Step 1: Create and Configure the Auto Scaling Group
For Windows:
aws autoscaling create-auto-scaling-group --auto-scaling-group-name
CodeDeployDemo-AS-Group --launch-configuration-name CodeDeployDemo-
AS-Configuration --min-size 1 --max-size 1 --desired-capacity 1 --
availability-zones availabilityZone
These commands create an Auto Scaling group named CodeDeployDemo-AS-Group based on
the Auto Scaling launch configuration named CodeDeployDemo-AS-Configuration. This Auto
Scaling group has only one Amazon EC2 instance, and it is created in the specified Availability
Zone.
3. Call the describe-auto-scaling-groups command against CodeDeployDemo-AS-Group:
aws autoscaling describe-auto-scaling-groups --auto-scaling-group-names
CodeDeployDemo-AS-Group --query "AutoScalingGroups[0].Instances[*].
[HealthStatus, LifecycleState]" --output text
Do not proceed until the returned values show Healthy and InService.
To create and configure the Auto Scaling group (console)
1. Open the Amazon EC2 console at https://console.aws.amazon.com/ec2/.
2. In the global navigation bar, make sure one of the regions listed in Region and Endpoints in the
AWS General Reference is selected. Auto Scaling resources are tied to the region you specify,
and AWS CodeDeploy is supported in certain regions only.
3. In the navigation bar, under Auto Scaling, choose Launch Configurations.
4. Choose Create launch configuration.
5. On the Quick Start tab of the Choose AMI page, next to Amazon Linux AMI, Red Hat
Enterprise Linux 7.2, Ubuntu Server 14.04 LTS, or Microsoft Windows Server 2012 R2 Base,
choose Select.
Note
If you have a custom version of an AMI that already has the AWS CodeDeploy agent
installed, choose it here instead. For information about using a custom AMI with AWS
CodeDeploy and Auto Scaling, see Using a Custom AMI with AWS CodeDeploy and Auto
Scaling (p. 32).
6. On the Choose Instance Type page, leave the defaults, and choose Next: Configure details.
7. On the Configure details page, in the Name box, type CodeDeployDemo-AS-Configuration.
In the IAM role box, choose the IAM instance profile you created earlier (CodeDeployDemo-EC2-
Instance-Profile).
Expand Advanced Details, and in the User data box, type the following.
Note
If you are using a custom version of an AMI that already has the AWS CodeDeploy agent
installed, skip this step.
For Amazon Linux and RHEL Amazon EC2 instances:
#!/bin/bash
yum -y update
yum install -y ruby
yum install -y aws-cli
API Version 2014-10-06
84

AWS CodeDeploy User Guide
Step 1: Create and Configure the Auto Scaling Group
cd /home/ec2-user
aws s3 cp s3://bucket-name/latest/install . --region region-name
chmod +x ./install
./install auto
bucket-name represents one of the following:
•aws-codedeploy-us-east-1 for instances in the US East (N. Virginia) region
•aws-codedeploy-us-west-1 for instances in the US West (N. California) region
•aws-codedeploy-us-west-2 for instances in the US West (Oregon) region
•aws-codedeploy-ap-south-1 for instances in the Asia Pacific (Mumbai) region
•aws-codedeploy-ap-northeast-2 for instances in the Asia Pacific (Seoul) region
•aws-codedeploy-ap-southeast-1 for instances in the Asia Pacific (Singapore) region
•aws-codedeploy-ap-southeast-2 for instances in the Asia Pacific (Sydney) region
•aws-codedeploy-ap-northeast-1 for instances in the Asia Pacific (Tokyo) region
•aws-codedeploy-eu-central-1 for instances in the EU (Frankfurt) region
•aws-codedeploy-eu-west-1 for instances in the EU (Ireland) region
•aws-codedeploy-sa-east-1 for instances in the South America (São Paulo) region
region-name represents one of the following:
•us-east-1 for instances in the US East (N. Virginia) region
•us-west-1 for instances in the US West (N. California) region
•us-west-2 for instances in the US West (Oregon) region
•ap-south-1 for instances in the Asia Pacific (Mumbai) region
•ap-northeast-2 for instances in the Asia Pacific (Seoul) region
•ap-southeast-1 for instances in the Asia Pacific (Singapore) region
•ap-southeast-2 for instances in the Asia Pacific (Sydney) region
•ap-northeast-1 for instances in the Asia Pacific (Tokyo) region
•eu-central-1 for instances in the EU (Frankfurt) region
•eu-west-1 for instances in the EU (Ireland) region
•sa-east-1 for instances in the South America (São Paulo) region
For Ubuntu Server Amazon EC2 instances:
#!/bin/bash
apt-get -y update
apt-get -y install awscli
apt-get -y install ruby2.0
cd /home/ubuntu
aws s3 cp s3://bucket-name/latest/install . --region region-name
chmod +x ./install
./install auto
bucket-name represents one of the following:
•aws-codedeploy-us-east-1 for instances in the US East (N. Virginia) region
•aws-codedeploy-us-west-1 for instances in the US West (N. California) region
•aws-codedeploy-us-west-2 for instances in the US West (Oregon) region
•aws-codedeploy-ap-south-1 for instances in the Asia Pacific (Mumbai) region
API Version 2014-10-06
85

AWS CodeDeploy User Guide
Step 1: Create and Configure the Auto Scaling Group
•aws-codedeploy-ap-northeast-2 for instances in the Asia Pacific (Seoul) region
•aws-codedeploy-ap-southeast-1 for instances in the Asia Pacific (Singapore) region
•aws-codedeploy-ap-southeast-2 for instances in the Asia Pacific (Sydney) region
•aws-codedeploy-ap-northeast-1 for instances in the Asia Pacific (Tokyo) region
•aws-codedeploy-eu-central-1 for instances in the EU (Frankfurt) region
•aws-codedeploy-eu-west-1 for instances in the EU (Ireland) region
•aws-codedeploy-sa-east-1 for instances in the South America (São Paulo) region
region-name represents one of the following:
•us-east-1 for instances in the US East (N. Virginia) region
•us-west-1 for instances in the US West (N. California) region
•us-west-2 for instances in the US West (Oregon) region
•ap-south-1 for instances in the Asia Pacific (Mumbai) region
•ap-northeast-2 for instances in the Asia Pacific (Seoul) region
•ap-southeast-1 for instances in the Asia Pacific (Singapore) region
•ap-southeast-2 for instances in the Asia Pacific (Sydney) region
•ap-northeast-1 for instances in the Asia Pacific (Tokyo) region
•eu-central-1 for instances in the EU (Frankfurt) region
•eu-west-1 for instances in the EU (Ireland) region
•sa-east-1 for instances in the South America (São Paulo) region
For Windows Server Amazon EC2 instances:
<powershell>
New-Item -Path c:\temp -ItemType "directory" -Force
powershell.exe -Command Read-S3Object -BucketName bucket-name/latest -Key
codedeploy-agent.msi -File c:\temp\codedeploy-agent.msi
Start-Process -Wait -FilePath c:\temp\codedeploy-agent.msi -WindowStyle
Hidden
</powershell>
bucket-name represents one of the following:
•aws-codedeploy-us-east-1 for instances in the US East (N. Virginia) region
•aws-codedeploy-us-west-1 for instances in the US West (N. California) region
•aws-codedeploy-us-west-2 for instances in the US West (Oregon) region
•aws-codedeploy-ap-south-1 for instances in the Asia Pacific (Mumbai) region
•aws-codedeploy-ap-northeast-2 for instances in the Asia Pacific (Seoul) region
•aws-codedeploy-ap-southeast-1 for instances in the Asia Pacific (Singapore) region
•aws-codedeploy-ap-southeast-2 for instances in the Asia Pacific (Sydney) region
•aws-codedeploy-ap-northeast-1 for instances in the Asia Pacific (Tokyo) region
•aws-codedeploy-eu-central-1 for instances in the EU (Frankfurt) region
•aws-codedeploy-eu-west-1 for instances in the EU (Ireland) region
•aws-codedeploy-sa-east-1 for instances in the South America (São Paulo) region
Leave the rest of the defaults, and choose Skip to review.
8. On the Review page, choose Create launch configuration.
API Version 2014-10-06
86

AWS CodeDeploy User Guide
Step 2: Deploy the Application
to the Auto Scaling Group
Note
In a production environment, we recommend that you restrict access to Amazon EC2
instances. For more information, see Tips for Securing Your EC2 Instance.
9. In the Select an existing key pair or create a new key pair dialog box, select Choose an
existing key pair. In the Select a key pair drop-down list, choose the Amazon EC2 instance
key pair you created or used in previous steps. Select I acknowledge that I have access to the
selected private key file (key-file-name.pem), and that without this file, I won't be able to
log into my instance, and then choose Create launch configuration.
10. Choose Create an Auto Scaling group using this launch configuration.
11. On the Configure Auto Scaling group details page, in the Group name box, type
CodeDeployDemo-AS-Group. In the Group size box, leave the default. In the Availability
Zone(s) box, choose an Availability Zone in one of the regions listed in Region and Endpoints in
the AWS General Reference. Leave the rest of the defaults, and choose Next: Configure scaling
policies.
Note
If Launch into EC2-Classic does not appear in the Network list, and you are not able to
select a default virtual private cloud (VPC), choose or create a VPC and subnet. For more
information, see Your VPC and Subnets.
12. On the 2. Configure scaling policies page, leave Keep this group at its initial size selected,
and choose Next: Configure Notifications.
13. Skip the step for configuring notifications, and choose Review.
14. Choose Create Auto Scaling group, and then choose Close.
15. In the navigation bar, with Auto Scaling Groups selected, choose CodeDeployDemo-AS-Group,
and then choose the Instances tab. Do not proceed until the value of InService appears in the
Lifecycle column and the value of Healthy appears in the Health Status column.
Step 2: Deploy the Application to the Auto
Scaling Group
In this step, you'll deploy the revision to the single Amazon EC2 instance in the Auto Scaling group.
Topics
•To create the deployment (CLI) (p. 87)
•To create the deployment (console) (p. 90)
To create the deployment (CLI)
1. Call the create-application command to create an application named SimpleDemoApp:
aws deploy create-application --application-name SimpleDemoApp
2. You should have already created a service role by following the instructions in Step 3: Create
a Service Role (p. 13). The service role will give AWS CodeDeploy permission to access your
Amazon EC2 instances to expand (read) their tags. You will need the service role ARN. To get the
service role ARN, follow the instructions in Get the Service Role ARN (CLI) (p. 17).
3. Now that you have a service role ARN, call the create-deployment-group command to
create a deployment group named SimpleDemoDG, associated with the application named
SimpleDemoApp, using the Auto Scaling group named CodeDeployDemo-AS-Group and
deployment configuration named CodeDeployDefault.OneAtATime, with the specified service
role ARN.
API Version 2014-10-06
87
AWS CodeDeploy User Guide
Step 2: Deploy the Application
to the Auto Scaling Group
Note
The create-deployment-group command provides support for creating triggers that result
in the sending of Amazon SNS notifications to topic subscribers about specified events in
deployments and instances. The command also supports options for automatically rolling
back deployments and setting up alarms to stop deployments when certain monitoring
thresholds are met in Amazon CloudWatch Alarms. Commands for these actions are
excluded from the sample in this tutorial.
For Linux, OS X, or Unix:
aws deploy create-deployment-group \
--application-name SimpleDemoApp \
--auto-scaling-groups CodeDeployDemo-AS-Group \
--deployment-group-name SimpleDemoDG \
--deployment-config-name CodeDeployDefault.OneAtATime \
--service-role-arn serviceRoleARN
For Windows:
aws deploy create-deployment-group --application-name SimpleDemoApp
--auto-scaling-groups CodeDeployDemo-AS-Group --deployment-group-name
SimpleDemoDG --deployment-config-name CodeDeployDefault.OneAtATime --
service-role-arn serviceRoleARN
4. Call the create-deployment command to create a deployment associated with
the application named SimpleDemoApp, the deployment configuration named
CodeDeployDefault.OneAtATime, the deployment group named SimpleDemoDG, using the
revision at the specified location.
For Amazon Linux and RHEL Amazon EC2 instances, calling from Linux, OS X, or Unix:
aws deploy create-deployment \
--application-name SimpleDemoApp \
--deployment-config-name CodeDeployDefault.OneAtATime \
--deployment-group-name SimpleDemoDG \
--s3-location bucket=bucket,bundleType=zip,key=samples/latest/
SampleApp_Linux.zip
bucket is one of the following:
•aws-codedeploy-us-east-1 (for the US East (N. Virginia) region)
•aws-codedeploy-us-west-1 (for the US West (N. California) region)
•aws-codedeploy-us-west-2 (for the US West (Oregon) region)
•aws-codedeploy-ap-south-1 (for the Asia Pacific (Mumbai) region)
•aws-codedeploy-ap-northeast-2 (for the Asia Pacific (Seoul) region)
•aws-codedeploy-ap-southeast-1 (for the Asia Pacific (Singapore) region)
•aws-codedeploy-ap-southeast-2 (for the Asia Pacific (Sydney) region)
•aws-codedeploy-ap-northeast-1 (for the Asia Pacific (Tokyo) region)
•aws-codedeploy-eu-central-1 (for the EU (Frankfurt) region)
•aws-codedeploy-eu-west-1 (for the EU (Ireland) region)
•aws-codedeploy-sa-east-1 (for the South America (São Paulo) region)
For Amazon Linux and RHEL Amazon EC2 instances, calling from Windows:
API Version 2014-10-06
88
AWS CodeDeploy User Guide
Step 2: Deploy the Application
to the Auto Scaling Group
aws deploy create-deployment --application-name SimpleDemoApp --
deployment-config-name CodeDeployDefault.OneAtATime --deployment-group-
name SimpleDemoDG --s3-location bucket=bucket,bundleType=zip,key=samples/
latest/SampleApp_Linux.zip
For Windows Server Amazon EC2 instances, calling from Linux, OS X, or Unix:
aws deploy create-deployment \
--application-name SimpleDemoApp \
--deployment-config-name CodeDeployDefault.OneAtATime \
--deployment-group-name SimpleDemoDG \
--s3-location bucket=bucket,bundleType=zip,key=samples/latest/
SampleApp_Windows.zip
bucket is one of the following:
•aws-codedeploy-us-east-1 (for the US East (N. Virginia) region)
•aws-codedeploy-us-west-1 (for the US West (N. California) region)
•aws-codedeploy-us-west-2 (for the US West (Oregon) region)
•aws-codedeploy-ap-south-1 (for the Asia Pacific (Mumbai) region)
•aws-codedeploy-ap-northeast-2 (for the Asia Pacific (Seoul) region)
•aws-codedeploy-ap-southeast-1 (for the Asia Pacific (Singapore) region)
•aws-codedeploy-ap-southeast-2 (for the Asia Pacific (Sydney) region)
•aws-codedeploy-ap-northeast-1 (for the Asia Pacific (Tokyo) region)
•aws-codedeploy-eu-central-1 (for the EU (Frankfurt) region)
•aws-codedeploy-eu-west-1 (for the EU (Ireland) region)
•aws-codedeploy-sa-east-1 (for the South America (São Paulo) region)
For Windows Server Amazon EC2 instances, calling from Windows:
aws deploy create-deployment --application-name SimpleDemoApp --
deployment-config-name CodeDeployDefault.OneAtATime --deployment-group-
name SimpleDemoDG --s3-location bucket=bucket,bundleType=zip,key=samples/
latest/SampleApp_Windows.zip
Note
Currently, AWS CodeDeploy does not provide a sample revision to deploy to Ubuntu
Server Amazon EC2 instances. To create a revision on your own, see Working with
Application Revisions (p. 183).
5. Call the get-deployment command to make sure the deployment was successful.
Before you call this command, you will need the ID of the deployment, which should have been
returned by the call to the create-deployment command. If you need to get the deployment ID
again, call the list-deployments command against the application named SimpleDemoApp and
the deployment group named SimpleDemoDG:
aws deploy list-deployments --application-name SimpleDemoApp --deployment-
group-name SimpleDemoDG --query "deployments" --output text
Now, call the get-deployment command using the deployment ID:
API Version 2014-10-06
89

AWS CodeDeploy User Guide
Step 2: Deploy the Application
to the Auto Scaling Group
aws deploy get-deployment --deployment-id deploymentID --query
"deploymentInfo.status" --output text
Do not continue until the returned value is Succeeded.
To create the deployment (console)
1. You should have already created a service role by following the instructions in Step 3: Create
a Service Role (p. 13). The service role will give AWS CodeDeploy permission to access your
instances to expand (read) their tags. Before you use the AWS CodeDeploy console to deploy
your application revision, you will need the service role ARN. To get the service role ARN, follow
the instructions in Get the Service Role ARN (Console) (p. 17).
2. Now that you have the service role ARN, you can use the AWS CodeDeploy console to deploy
your application revision.
Sign in to the AWS Management Console and open the AWS CodeDeploy console at https://
console.aws.amazon.com/codedeploy.
Note
Sign in with the same account or IAM user information you used in Getting
Started (p. 11).
3. If the Applications page does not appear, on the AWS CodeDeploy menu, choose Applications.
4. Choose Create New Application.
5. In the Application Name box, type SimpleDemoApp.
6. In the Deployment Group Name box, type SimpleDemoDG.
7. Choose Auto Scaling Group from the Tag Type drop-down list.
8. In the box next to Auto Scaling Group, type CodeDeployDemo-AS-Group.
9. From the Deployment Config drop-down list, choose CodeDeployDefault.OneAtATime.
10. From the Service Role ARN drop-down list, choose the service role ARN.
11. Choose Create Application.
12. In the Application details page, in the Deployment groups area, next to SimpleDemoDG,
choose the arrow to see the deployment group details.
13. Select the button next to SimpleDemoDG. In the Actions menu, choose Deploy new revision.
14. In the Repository Type area, choose My application is stored in Amazon S3, and then in the
Revision Location box, type one of the following:
For Amazon Linux and RHEL Amazon EC2 instances:
For Amazon EC2 instances launched in the US
East (N. Virginia) Region http://s3.amazonaws.com/aws-
codedeploy-us-east-1/samples/
latest/SampleApp_Linux.zip
For Amazon EC2 instances launched in the US
West (N. California) Region http://s3-us-west-1.amazonaws.com/
aws-codedeploy-us-west-1/samples/
latest/SampleApp_Linux.zip
For Amazon EC2 instances launched in the US
West (Oregon) Region http://s3-us-west-2.amazonaws.com/
aws-codedeploy-us-west-2/samples/
latest/SampleApp_Linux.zip
API Version 2014-10-06
90

AWS CodeDeploy User Guide
Step 2: Deploy the Application
to the Auto Scaling Group
For Amazon EC2 instances launched in the
Asia Pacific (Mumbai) Region http://s3-ap-south-1.amazonaws.com/
aws-codedeploy-ap-south-1/samples/
latest/SampleApp_Linux.zip
For Amazon EC2 instances launched in the
Asia Pacific (Seoul) Region http://s3-ap-
northeast-2.amazonaws.com/aws-
codedeploy-ap-northeast-2/samples/
latest/SampleApp_Linux.zip
For Amazon EC2 instances launched in the
Asia Pacific (Singapore) Region http://s3-ap-
southeast-1.amazonaws.com/aws-
codedeploy-ap-southeast-1/samples/
latest/SampleApp_Linux.zip
For Amazon EC2 instances launched in the
Asia Pacific (Sydney) Region http://s3-ap-
southeast-2.amazonaws.com/aws-
codedeploy-ap-southeast-2/samples/
latest/SampleApp_Linux.zip
For Amazon EC2 instances launched in the
Asia Pacific (Tokyo) Region http://s3-ap-
northeast-1.amazonaws.com/aws-
codedeploy-ap-northeast-1/samples/
latest/SampleApp_Linux.zip
For Amazon EC2 instances launched in the EU
(Frankfurt) Region http://s3-eu-
central-1.amazonaws.com/aws-
codedeploy-eu-central-1/samples/
latest/SampleApp_Linux.zip
For Amazon EC2 instances launched in the EU
(Ireland) Region http://s3-eu-west-1.amazonaws.com/
aws-codedeploy-eu-west-1/samples/
latest/SampleApp_Linux.zip
For Amazon EC2 instances launched in the
South America (São Paulo) Region http://s3-sa-east-1.amazonaws.com/
aws-codedeploy-sa-east-1/samples/
latest/SampleApp_Linux.zip
For Windows Server Amazon EC2 instances:
For Amazon EC2 instances launched in the US
East (N. Virginia) Region http://s3.amazonaws.com/aws-
codedeploy-us-east-1/samples/
latest/SampleApp_Windows.zip
For Amazon EC2 instances launched in the US
West (N. California) Region http://s3-us-west-1.amazonaws.com/
aws-codedeploy-us-west-1/samples/
latest/SampleApp_Windows.zip
For Amazon EC2 instances launched in the US
West (Oregon) Region http://s3-us-west-2.amazonaws.com/
aws-codedeploy-us-west-2/samples/
latest/SampleApp_Windows.zip
For Amazon EC2 instances launched in the
Asia Pacific (Mumbai) Region http://s3-ap-south-1.amazonaws.com/
aws-codedeploy-ap-south-1/samples/
latest/SampleApp_Windows.zip
API Version 2014-10-06
91

AWS CodeDeploy User Guide
Step 3: Check Your Results
For Amazon EC2 instances launched in the
Asia Pacific (Seoul) Region http://s3-ap-
northeast-2.amazonaws.com/aws-
codedeploy-ap-northeast-2/samples/
latest/SampleApp_Windows.zip
For Amazon EC2 instances launched in the
Asia Pacific (Singapore) Region http://s3-ap-
southeast-1.amazonaws.com/aws-
codedeploy-ap-southeast-1/samples/
latest/SampleApp_Windows.zip
For Amazon EC2 instances launched in the
Asia Pacific (Sydney) Region http://s3-ap-
southeast-2.amazonaws.com/aws-
codedeploy-ap-southeast-2/samples/
latest/SampleApp_Windows.zip
For Amazon EC2 instances launched in the
Asia Pacific (Tokyo) Region http://s3-ap-
northeast-1.amazonaws.com/aws-
codedeploy-ap-northeast-1/samples/
latest/SampleApp_Windows.zip
For Amazon EC2 instances launched in the EU
(Frankfurt) Region http://s3-eu-
central-1.amazonaws.com/aws-
codedeploy-eu-central-1/samples/
latest/SampleApp_Windows.zip
For Amazon EC2 instances launched in the EU
(Ireland) Region http://s3-eu-west-1.amazonaws.com/
aws-codedeploy-eu-west-1/samples/
latest/SampleApp_Windows.zip
For Amazon EC2 instances launched in the
South America (São Paulo) Region http://s3-sa-east-1.amazonaws.com/
aws-codedeploy-sa-east-1/samples/
latest/SampleApp_Windows.zip
For Ubuntu Server Amazon EC2 instances, type the location of your custom application revision
stored in Amazon S3.
15. Leave the Deployment Description box blank.
16. With CodeDeployDefault.OneAtATime selected in the Deployment Config drop-down list,
choose Deploy Now.
Tip
To update the deployment's current status, refresh the page in your browser.
If Failed appears instead of Succeeded, you may want to try some of the techniques
in Monitor and Troubleshoot Your Deployment (p. 52) (using the application name of
SimpleDemoApp and the deployment group name of SimpleDemoDG).
Step 3: Check Your Results
In this step, you'll check to see that AWS CodeDeploy installed the SimpleDemoApp revision on the
single Amazon EC2 instance in the Auto Scaling group.
Topics
•To check the results (CLI) (p. 93)
•To check the results (console) (p. 93)
API Version 2014-10-06
92
AWS CodeDeploy User Guide
Step 3: Check Your Results
To check the results (CLI)
First, you'll need the public DNS of the Amazon EC2 instance.
Use the AWS CLI to get the public DNS of the Amazon EC2 instance in the Auto Scaling group by
calling the describe-instances command.
Before you call this command, you will need the ID of the Amazon EC2 instance. To get the ID, call the
describe-auto-scaling-groups against CodeDeployDemo-AS-Group as you did before:
aws autoscaling describe-auto-scaling-groups --auto-
scaling-group-names CodeDeployDemo-AS-Group --query
"AutoScalingGroups[0].Instances[*].InstanceId" --output text
Now call the describe-instances command:
aws ec2 describe-instances --instance-id instanceID --query
"Reservations[0].Instances[0].PublicDnsName" --output text
The returned value is the public DNS of the Amazon EC2 instance.
Using a web browser, show the SimpleDemoApp revision deployed to that Amazon EC2 instance,
using a URL like the following:
http://ec2-01-234-567-890.compute-1.amazonaws.com
If you see the congratulations page, you've successfully used AWS CodeDeploy to deploy a revision to
a single Amazon EC2 instance in an Auto Scaling group!
Next, you'll add an Amazon EC2 instance to the Auto Scaling group. After Auto Scaling adds the
Amazon EC2 instance, AWS CodeDeploy will deploy your revision to the new instance.
To check the results (console)
First, you'll need the public DNS of the Amazon EC2 instance.
Open the Amazon EC2 console at https://console.aws.amazon.com/ec2/.
In the Amazon EC2 navigation pane, under Auto Scaling, choose Auto Scaling Groups, and then
choose the CodeDeployDemo-AS-Group entry.
On the Instances tab, choose the Amazon EC2 instance ID in the list.
On the Instances page, on the Description tab, note the Public DNS value. It should look something
like this: ec2-01-234-567-890.compute-1.amazonaws.com.
Using a web browser, show the SimpleDemoApp revision deployed to that Amazon EC2 instance,
using a URL like the following:
http://ec2-01-234-567-890.compute-1.amazonaws.com
If you see the congratulations page, you've successfully used AWS CodeDeploy to deploy a revision to
a single Amazon EC2 instance in an Auto Scaling group!
API Version 2014-10-06
93
AWS CodeDeploy User Guide
Step 4: Increase the Number of Amazon
EC2 Instances in the Auto Scaling Group
Next, you'll add an Amazon EC2 instance to the Auto Scaling group. After Auto Scaling adds the
Amazon EC2 instance, AWS CodeDeploy will deploy your revision to the new Amazon EC2 instance.
Step 4: Increase the Number of Amazon EC2
Instances in the Auto Scaling Group
In this step, you'll instruct the Auto Scaling group to create an additional Amazon EC2 instance. After
Auto Scaling creates the instance, AWS CodeDeploy will deploy your revision to it.
Topics
•To scale up the number of Amazon EC2 instances in the Auto Scaling group (CLI) (p. 94)
•To scale up the number of Amazon EC2 instances in the deployment group (console) (p. 94)
To scale up the number of Amazon EC2 instances in the
Auto Scaling group (CLI)
1. Call the update-auto-scaling-group command to increase the Amazon EC2 instances in the Auto
Scaling group named CodeDeployDemo-AS-Group from one to two.
For Linux, OS X, or Unix:
aws autoscaling update-auto-scaling-group \
--auto-scaling-group-name CodeDeployDemo-AS-Group \
--min-size 2 \
--max-size 2 \
--desired-capacity 2
For Windows:
aws autoscaling update-auto-scaling-group --auto-scaling-group-name
CodeDeployDemo-AS-Group --min-size 2 --max-size 2 --desired-capacity 2
2. Make sure the Auto Scaling group now has two Amazon EC2 instances. Call the describe-auto-
scaling-groups command against CodeDeployDemo-AS-Group:
aws autoscaling describe-auto-scaling-groups --auto-scaling-group-names
CodeDeployDemo-AS-Group --query "AutoScalingGroups[0].Instances[*].
[HealthStatus, LifecycleState]" --output text
Do not proceed until both of the returned values show Healthy and InService.
To scale up the number of Amazon EC2 instances in the
deployment group (console)
1. In the Amazon EC2 navigation bar, under Auto Scaling, choose Auto Scaling Groups, and then
choose CodeDeployDemo-AS-Group.
2. Choose Actions, and then choose Edit.
3. On the Details tab, in the Desired, Min, and Max boxes, type 2, and then choose Save.
4. Choose the Instances tab. The new Amazon EC2 instance should appear in the list. (If the
instance does not appear, you may need to choose the Refresh button a few times.) Do not
API Version 2014-10-06
94
AWS CodeDeploy User Guide
Step 5: Check Your Results Again
proceed until the value of InService appears in the Lifecycle column and the value of Healthy
appears in the Health Status column.
Step 5: Check Your Results Again
In this step, you'll check to see if AWS CodeDeploy installed the SimpleDemoApp revision on the new
instance in the Auto Scaling group.
Topics
•To check automatic deployment results (CLI) (p. 95)
•To check automatic deployment results (console) (p. 96)
To check automatic deployment results (CLI)
1. Before you call the get-deployment command, you will need the ID of the automatic
deployment. To get the ID, call the list-deployments command against the application named
SimpleDemoApp and the deployment group named SimpleDemoDG:
aws deploy list-deployments --application-name SimpleDemoApp --deployment-
group-name SimpleDemoDG --query "deployments" --output text
There should be two deployment IDs. Use the one you have not yet used in a call to the get-
deployment command:
aws deploy get-deployment --deployment-id deploymentID --query
"deploymentInfo.[status, creator]" --output text
In addition to the deployment status, you should see autoScaling in the command output.
(autoScaling means Auto Scaling created the deployment.)
Do not proceed until the deployment status shows Succeeded.
2. Before you call the describe-instances command, you will need the ID of the new Amazon EC2
instance. To get this ID, make another call to the describe-auto-scaling-groups command
against CodeDeployDemo-AS-Group:
aws autoscaling describe-auto-scaling-groups --auto-
scaling-group-names CodeDeployDemo-AS-Group --query
"AutoScalingGroups[0].Instances[*].InstanceId" --output text
Now make a call to the describe-instances command:
aws ec2 describe-instances --instance-id instanceID --query
"Reservations[0].Instances[0].PublicDnsName" --output text
In the output of the describe-instances command, note the public DNS for the new Amazon EC2
instance.
3. Using a web browser, show the SimpleDemoApp revision deployed to that Amazon EC2 instance,
using a URL like the following:
http://ec2-01-234-567-890.compute-1.amazonaws.com
API Version 2014-10-06
95

AWS CodeDeploy User Guide
Step 6: Clean Up
If the congratulations page appears, you've used AWS CodeDeploy to deploy a revision to a
scaled-up Amazon EC2 instance in an Auto Scaling group!
To check automatic deployment results (console)
1. Sign in to the AWS Management Console and open the AWS CodeDeploy console at https://
console.aws.amazon.com/codedeploy.
Note
Sign in with the same account or IAM user information you used in Getting
Started (p. 11).
2. On the AWS CodeDeploy menu, choose Deployments. The Deployments page displays
information about the deployment Auto Scaling created. Normally, you would create a deployment
on your own, but Auto Scaling created one on your behalf to deploy your revision to the new
Amazon EC2 instance.
Tip
To update the deployment's current status, use refresh the page in your browser.
3. After Succeeded is displayed for the deployment status, verify the results on the instance. You will
first need to get the public DNS of the instance:
4. In the Amazon EC2 navigation pane, under Auto Scaling, choose Auto Scaling Groups, and
then choose the CodeDeployDemo-AS-Group entry.
5. On the Instances tab, choose the ID of the new Amazon EC2 instance.
6. On the Instances page, on the Description tab, note the Public DNS value. It should look
something like this: ec2-01-234-567-890.compute-1.amazonaws.com.
Show the SimpleDemoApp revision deployed to the instance using a URL like the following:
http://ec2-01-234-567-890.compute-1.amazonaws.com
If the congratulations page appears, you've used AWS CodeDeploy to deploy a revision to a scaled-up
Amazon EC2 instance in an Auto Scaling group!
Step 6: Clean Up
In this step, you'll delete the Auto Scaling group to avoid ongoing charges for resources you used
during this tutorial, . Optionally, you can delete the Auto Scaling configuration and AWS CodeDeploy
deployment component records.
Topics
•To clean up resources (CLI) (p. 96)
•To clean up resources (console) (p. 97)
To clean up resources (CLI)
1. Delete the Auto Scaling group by calling the delete-auto-scaling-group command against
CodeDeployDemo-AS-Group. This will also terminate the Amazon EC2 instances.
aws autoscaling delete-auto-scaling-group --auto-scaling-group-name
CodeDeployDemo-AS-Group --force-delete
API Version 2014-10-06
96

AWS CodeDeploy User Guide
Tutorial: Deploying from GitHub
2. Optionally, delete the Auto Scaling launch configuration by calling the delete-launch-
configuration command against the launch configuration named CodeDeployDemo-AS-
Configuration:
aws autoscaling delete-launch-configuration --launch-configuration-name
CodeDeployDemo-AS-Configuration
3. Optionally, delete the application from AWS CodeDeploy by calling the delete-application
command against the application named SimpleDemoApp. This will also delete all associated
deployment, deployment group, and revision records.
aws deploy delete-application --application-name SimpleDemoApp
To clean up resources (console)
1. Delete the Auto Scaling group. This will also terminate the Amazon EC2 instances:
Sign in to the AWS Management Console and open the Amazon EC2 console at https://
console.aws.amazon.com/ec2/.
2. In the Amazon EC2 navigation pane, under Auto Scaling, choose Auto Scaling Groups, and
then choose the CodeDeployDemo-AS-Group entry.
3. Choose Actions, choose Delete, and then choose Yes, Delete.
4. Optionally, delete the launch configuration. In the navigation bar, under Auto Scaling, choose
Launch Configurations, and then choose CodeDeployDemo-AS-Configuration.
5. Choose Actions, choose Delete launch configuration, and then choose Yes, Delete.
6. Optionally, delete the application from AWS CodeDeploy. This will also delete all associated
deployment, deployment group, and revision records. Open the AWS CodeDeploy console at
https://console.aws.amazon.com/codedeploy.
7. On the AWS CodeDeploy menu, choose Applications.
8. In the list of applications, choose SimpleDemoApp.
9. On the Application details page, choose Delete application.
10. When prompted, type the name of the application to confirm you want to delete it, and then choose
Delete.
Tutorial: Deploy an Application from GitHub
Using AWS CodeDeploy
In this tutorial, you'll use AWS CodeDeploy to deploy a sample application revision from GitHub to
a single Amazon EC2 instance running Amazon Linux, a single Red Hat Enterprise Linux (RHEL)
instance, or a single Windows Server instance. For information about GitHub integration with AWS
CodeDeploy, see GitHub (p. 36).
Note
You can also use AWS CodeDeploy to deploy an application revision from GitHub to an
Ubuntu Server instance. You can use the sample revision described in Step 2: Create a
Sample Application Revision (p. 74) in Tutorial: Deploy an Application to an On-Premises
Instance (p. 73), or you can create a revision compatible with an Ubuntu Server instance
and AWS CodeDeploy. To create your own revision, see Plan a Revision (p. 183) and Add
an AppSpec File (p. 184).
Topics
API Version 2014-10-06
97

AWS CodeDeploy User Guide
Prerequisites
•Prerequisites (p. 98)
•Step 1: Set Up a GitHub Account (p. 98)
•Step 2: Create a GitHub Repository (p. 98)
•Step 3: Upload a Sample Application to Your GitHub Repository (p. 100)
•Step 4: Provision an Instance (p. 102)
•Step 5: Deploy the Application to the Instance (p. 102)
•Step 6: Monitor and Verify the Deployment (p. 106)
•Step 7: Clean Up (p. 107)
Prerequisites
Before you start this tutorial, do the following:
• Install Git on your local machine. To install Git, see Git Downloads.
• Complete the steps in Getting Started (p. 11), including installing and configuring the AWS CLI.
This is especially important if you want to use the AWS CLI to deploy a revision from GitHub to the
instance.
Step 1: Set Up a GitHub Account
You will need a GitHub account to create a GitHub repository where the revision will be stored. If you
already have a GitHub account, skip ahead to Step 2: Create a GitHub Repository (p. 98).
1. Go to https://github.com/join.
2. Type a user name, your email address, and a password.
3. Choose Sign up for GitHub, and then follow the instructions.
Step 2: Create a GitHub Repository
You will need a GitHub repository to store the revision.
If you already have a GitHub repository, be sure to substitute its name for CodeDeployGitHubDemo
throughout this tutorial, and then skip ahead to Step 3: Upload a Sample Application to Your GitHub
Repository (p. 100).
1. On the GitHub home page, do one of the following:
• In Your repositories, choose New repository.
• On the navigation bar, choose Create new (+), and then choose New repository.
2. In the Create a new repository page, do the following:
• In the Repository name box, type CodeDeployGitHubDemo.
• Select Public.
Note
Selecting the default Public option means that anyone can see this repository.
Although you can select the Private option to limit who can see and commit to the
repository, this option may result in additional charges from GitHub.
• Clear the Initialize this repository with a README check box. You will create a README.md
file manually in the next step instead.
• Choose Create repository.
API Version 2014-10-06
98
AWS CodeDeploy User Guide
Step 2: Create a GitHub Repository
3. Follow the instructions to use the command line to create the repository.
Tip
If you have enabled two-factor authentication on GitHub, make sure you enter your
personal access token instead of your GitHub login password if prompted for a password.
For information, see Providing Your 2FA Authentication Code.
For Linux, OS X, or Unix:
1. From the terminal, run the following commands, one at a time, where user-name is your
GitHub user name:
mkdir /tmp/CodeDeployGitHubDemo
cd /tmp/CodeDeployGitHubDemo
touch README.md
git init
git add README.md
git commit -m "My first commit"
git remote add origin https://github.com/user-name/
CodeDeployGitHubDemo.git
git push -u origin master
2. Leave the command prompt open in the /tmp/CodeDeployGitHubDemo location.
For Windows:
1. From a command prompt running as an administrator, run the following commands, one at a
time:
mkdir c:\temp\CodeDeployGitHubDemo
cd c:\temp\CodeDeployGitHubDemo
notepad README.md
2. In Notepad, save the README.md file. Close Notepad. Run the following commands, one at a
time, where user-name is your GitHub user name:
git init
API Version 2014-10-06
99
AWS CodeDeploy User Guide
Step 3: Upload a Sample Application
to Your GitHub Repository
git add README.md
git commit -m "My first commit"
git remote add origin https://github.com/user-name/
CodeDeployGitHubDemo.git
git push -u origin master
3. Leave the command prompt open in the c:\temp\CodeDeployGitHubDemo location.
Step 3: Upload a Sample Application to Your
GitHub Repository
In this step, you will copy a sample revision from a public Amazon S3 bucket to your GitHub repository.
Note
If you use one of your revisions instead of our sample revision, your revision must:
• Follow the guidelines in Plan a Revision (p. 183) and Add an AppSpec File (p. 184).
• Work with the corresponding instance type.
• Be accessible from your GitHub dashboard.
If your revision meets these requirements, skip ahead to Step 5: Deploy the Application to the
Instance (p. 102).
If you're deploying to an Ubuntu Server instance, you'll need to upload to your GitHub
repository a revision compatible with an Ubuntu Server instance and AWS CodeDeploy. For
more information, see Plan a Revision (p. 183) and Add an AppSpec File (p. 184).
With your terminal or administrative command prompt still open in, for example, the /tmp/
CodeDeployGitHubDemo location (for Linux, OS X, or Unix) or c:\temp\CodeDeployGitHubDemo
(for Windows), run the following commands, one at a time:
To push our sample revision to an Amazon EC2 instance running Amazon Linux or RHEL:
(Amazon S3 copy command)
git add SampleApp_Linux.zip
git commit -m "Added Linux sample app"
git push
Where (Amazon S3 copy command) is one of the following:
•aws s3 cp s3://aws-codedeploy-us-east-1/samples/latest/SampleApp_Linux.zip .
--region us-east-1 for the US East (N. Virginia) region
API Version 2014-10-06
100
AWS CodeDeploy User Guide
Step 3: Upload a Sample Application
to Your GitHub Repository
•aws s3 cp s3://aws-codedeploy-us-west-1/samples/latest/SampleApp_Linux.zip .
--region us-west-1 for the US West (N. California) Region
•aws s3 cp s3://aws-codedeploy-us-west-2/samples/latest/SampleApp_Linux.zip .
--region us-west-2 for the US West (Oregon) region
•aws s3 cp s3://aws-codedeploy-ap-south-1/samples/latest/
SampleApp_Linux.zip . --region ap-south-1 for the Asia Pacific (Mumbai) region
•aws s3 cp s3://aws-codedeploy-ap-northeast-2/samples/latest/
SampleApp_Linux.zip . ---region ap-northeast-2 for the Asia Pacific (Seoul) region
•aws s3 cp s3://aws-codedeploy-ap-southeast-1/samples/latest/
SampleApp_Linux.zip . --region ap-southeast-1 for the Asia Pacific (Singapore) Region
•aws s3 cp s3://aws-codedeploy-ap-southeast-2/samples/latest/
SampleApp_Linux.zip . --region ap-southeast-2 for the Asia Pacific (Sydney) region
•aws s3 cp s3://aws-codedeploy-ap-northeast-1/samples/latest/
SampleApp_Linux.zip . ---region ap-northeast-1 for the Asia Pacific (Tokyo) region
•aws s3 cp s3://aws-codedeploy-eu-central-1/samples/latest/
SampleApp_Linux.zip . --region eu-central-1 for the EU (Frankfurt) Region
•aws s3 cp s3://aws-codedeploy-eu-west-1/samples/latest/SampleApp_Linux.zip .
--region eu-west-1 for the EU (Ireland) region
•aws s3 cp s3://aws-codedeploy-sa-east-1/samples/latest/SampleApp_Linux.zip .
--region sa-east-1 for the South America (São Paulo) Region
To push our sample revision to a Windows Server instance:
(Amazon S3 copy command)
git add SampleApp_Windows.zip
git commit -m "Added Windows sample app"
git push
Where (Amazon S3 copy command) is one of the following:
•aws s3 cp s3://aws-codedeploy-us-east-1/samples/latest/
SampleApp_Windows.zip . --region us-east-1 for the US East (N. Virginia) region
•aws s3 cp s3://aws-codedeploy-us-west-1/samples/latest/
SampleApp_Windows.zip . --region us-west-1 for the US West (N. California) Region
•aws s3 cp s3://aws-codedeploy-us-west-2/samples/latest/
SampleApp_Windows.zip . --region us-west-2 for the US West (Oregon) region
•aws s3 cp s3://aws-codedeploy-ap-south-1/samples/latest/
SampleApp_Windows.zip . --region ap-south-1 for the Asia Pacific (Mumbai) region
•aws s3 cp s3://aws-codedeploy-ap-northeast-2/samples/latest/
SampleApp_Windows.zip . --region ap-northeast-2 for the Asia Pacific (Seoul) region
•aws s3 cp s3://aws-codedeploy-ap-southeast-1/samples/latest/
SampleApp_Windows.zip . --region ap-southeast-1 for the Asia Pacific (Singapore)
Region
•aws s3 cp s3://aws-codedeploy-ap-southeast-2/samples/latest/
SampleApp_Windows.zip . --region ap-southeast-2 for the Asia Pacific (Sydney) region
API Version 2014-10-06
101

AWS CodeDeploy User Guide
Step 4: Provision an Instance
•aws s3 cp s3://aws-codedeploy-ap-northeast-1/samples/latest/
SampleApp_Windows.zip . --region ap-northeast-1 for the Asia Pacific (Tokyo) region
•aws s3 cp s3://aws-codedeploy-eu-central-1/samples/latest/
SampleApp_Windows.zip . --region eu-central-1 for the EU (Frankfurt) Region
•aws s3 cp s3://aws-codedeploy-eu-west-1/samples/latest/
SampleApp_Windows.zip . --region eu-west-1 for the EU (Ireland) region
•aws s3 cp s3://aws-codedeploy-sa-east-1/samples/latest/
SampleApp_Windows.zip . --region sa-east-1 for the South America (São Paulo) Region
To push your own revision to an Ubuntu Server instance, copy your revision into your local repo, and
then call the following:
git add your-revision-file-name
git commit -m "Added Ubuntu app"
git push
Step 4: Provision an Instance
In this step, you will create an Amazon EC2 instance running Amazon Linux or a Windows Server,
Ubuntu Server, or RHEL instance configured for use in AWS CodeDeploy deployments. Follow the
instructions in Working with Instances (p. 122), and then return to this page. If you already have an
instance configured for use in AWS CodeDeploy deployments, go to the next step.
After you have successfully launched the instance and verified the AWS CodeDeploy agent is running,
go to the next step.
Step 5: Deploy the Application to the Instance
In this step, you will use the AWS CodeDeploy console or the AWS CLI to deploy the sample revision
from your GitHub repository to your instance. If you're using one of our sample revisions to deploy to
an Amazon EC2 instance running Amazon Linux, RHEL, or Windows Server, our sample revision is a
single web page deployed to the instance.
To deploy the revision (console)
1. Sign in to the AWS Management Console and open the AWS CodeDeploy console at https://
console.aws.amazon.com/codedeploy.
Note
Sign in with the same account or IAM user information you used in Getting
Started (p. 11).
2. If the Applications page is not displayed, on the AWS CodeDeploy menu, choose Applications.
3. Choose Create New Application.
4. In the Application Name box, type CodeDeployGitHubDemo-App.
5. In the Deployment Group Name box, type CodeDeployGitHubDemo-DepGrp.
6. Choose a tag type for your instance.
If you're deploying to an Amazon EC2 instance, choose Amazon EC2 from the Tag Type drop-
down list. In the Key and Value boxes, type the Amazon EC2 instance tag key and value that was
applied to your Amazon EC2 instance as part of Step 4: Provision an Instance (p. 102).
If you're deploying to an on-premises instance, choose On-Premises Instance from the Tag Type
drop-down list. In the Key and Value boxes, type the on-premises instance tag key and value that
was applied to your on-premises instance as part of Step 4: Provision an Instance (p. 102).
API Version 2014-10-06
102

AWS CodeDeploy User Guide
Step 5: Deploy the Application to the Instance
7. In the Deployment Config drop-down list, leave the default of CodeDeployDefault.OneAtATime.
8. In the Service Role ARN drop-down list, choose the service role ARN. (Follow the instructions in
Get the Service Role ARN (Console) (p. 17) to find the service role ARN.)
9. Choose Create Application.
10. On the Application details page, in Deployment groups, choose the button next to
CodeDeployGitHubDemo-DepGrp.
11. In the Actions menu, choose Deploy new revision.
12. On the Create New Deployment page, in the Revision Type area, choose My application is
stored in GitHub.
13. Choose Connect with GitHub. The web page that appears will prompt you to authorize AWS
CodeDeploy to interact with GitHub for the application named CodeDeployGitHubDemo-App.
Note
If you see a Reconnect with GitHub link instead of a Connect with GitHub button,
this is expected behavior. Do not choose the link. Continue to the next step. For
information about why this happens, see GitHub Authentication with Applications in AWS
CodeDeploy (p. 37).
If you see a blank web page that briefly appears and then disappears, and you do not see
a Reconnect with GitHub link or a Connect with GitHub button, this is also expected
behavior. Continue to the next step. For information about why this happens, see GitHub
Authentication with Applications in AWS CodeDeploy (p. 37).
14. Follow the instructions on the Sign in page to sign in with your GitHub account.
15. On the Authorize application page, choose Authorize application.
16. On the AWS CodeDeploy Create New Deployment page, in the Repository Name box, type the
GitHub user name you used to sign in, followed by a forward slash (/), followed by the name of
the repository where you pushed your application revision (for example, My-GitHub-User-Name/
CodeDeployGitHubDemo).
If you are unsure of the value to type, or if you want to specify a different repository:
1. In a separate web browser tab, go to your GitHub dashboard.
2. In Your repositories, hover your mouse pointer over the target repository name. A tooltip
appears, displaying the GitHub user or organization name, followed by a forward slash
character (/), followed by the name of the repository. Type this displayed value into the
Repository Name box.
Tip
If the target repository name is not displayed in Your repositories, use the
Search GitHub box to find the target repository and corresponding GitHub user or
organization name.
17. In the Commit ID box, type the ID of the commit associated with the push of your application
revision to GitHub.
If you are unsure of the value to type:
1. In a separate web browser tab, go to your GitHub dashboard.
2. In Your repositories, choose CodeDeployGitHubDemo.
3. In the list of commits, find and copy the commit ID associated with the push of your
application revision to GitHub. This ID is typically 40 characters in length and consists of both
letters and numbers. (Do not use the shorter version of the commit ID, which is typically the
first 10 characters of the longer version.)
4. Paste the commit ID into the Commit ID box.
18. Leave the Deployment Description box blank.
19. Leave the Deployment Config drop-down list at the default of CodeDeployDefault.OneAtATime,
and choose Deploy Now.
API Version 2014-10-06
103
AWS CodeDeploy User Guide
Step 5: Deploy the Application to the Instance
Now that you've used the AWS CodeDeploy console to deploy the revision to the instance, you can
skip ahead to Step 6: Monitor and Verify the Deployment (p. 106).
To deploy the revision (CLI)
1. Call the create-application command to create an application in AWS CodeDeploy named
CodeDeployGitHubDemo-App:
aws deploy create-application --application-name CodeDeployGitHubDemo-App
2. Call the create-deployment-group command to create a deployment group named
CodeDeployGitHubDemo-DepGrp:
• If you're deploying to an Amazon EC2 instance, EC2-tag-key is the Amazon EC2 instance
tag key that was applied to your Amazon EC2 instance as part of Step 4: Provision an
Instance (p. 102).
• If you're deploying to an Amazon EC2 instance, EC2-tag-value is the Amazon EC2 instance
tag value that was applied to your Amazon EC2 instance as part of Step 4: Provision an
Instance (p. 102).
• If you're deploying to an on-premises instance, on-premise-tag-key is the on-premises
instance tag key that was applied to your on-premises instance as part of Step 4: Provision an
Instance (p. 102).
• If you're deploying to an on-premises instance, on-premise-tag-value is the on-premises
instance tag value that was applied to your on-premises instance as part of Step 4: Provision an
Instance (p. 102).
•service-role-ARN is a service role ARN. (Follow the instructions in Get the Service Role
ARN (CLI) (p. 17) to find the service role ARN.)
aws deploy create-deployment-group --application-name
CodeDeployGitHubDemo-App --ec2-tag-filters Key=EC2-tag-
key,Type=KEY_AND_VALUE,Value=EC2-tag-value --on-premises-tag-filters
Key=on-premises-tag-key,Type=KEY_AND_VALUE,Value=on-premises-tag-value
--deployment-group-name CodeDeployGitHubDemo-DepGrp --service-role-
arn service-role-ARN
Note
The create-deployment-group command provides support for creating triggers that result
in the sending of Amazon SNS notifications to topic subscribers about specified events in
deployments and instances. The command also supports options for automatically rolling
back deployments and setting up alarms to stop deployments when certain monitoring
thresholds are met in Amazon CloudWatch Alarms. Commands for these actions are
excluded from the sample in this tutorial.
3. Before you can call any AWS CLI commands that interact with GitHub (such as the create-
deployment command, which you will call next), you must give AWS CodeDeploy permission
to use your GitHub user account to interact with GitHub for the CodeDeployGitHubDemo-App
application. Currently, you must use the AWS CodeDeploy console to do this.
Sign in to the AWS Management Console and open the AWS CodeDeploy console at https://
console.aws.amazon.com/codedeploy.
Note
Sign in with the same account or IAM user information you used in Getting
Started (p. 11).
4. On the AWS CodeDeploy menu, choose Deployments.
5. Choose Create New Deployment.
API Version 2014-10-06
104

AWS CodeDeploy User Guide
Step 5: Deploy the Application to the Instance
Note
You will not be creating a new deployment. This is currently the only way to give AWS
CodeDeploy permission to interact with GitHub on behalf of your GitHub user account.
6. From the Application drop-down list, choose CodeDeployGitHubDemo-App.
7. From the Deployment Group drop-down list, choose CodeDeployGitHubDemo-DepGrp.
8. In the Revision Type area, choose My application is stored in GitHub.
9. Choose Connect With GitHub.
Note
If you see a Reconnect with GitHub link instead of a Connect with GitHub button,
this is expected behavior. Do not choose the link. Continue to the next step. For
information about why this happens, see GitHub Authentication with Applications in AWS
CodeDeploy (p. 37).
If you see a blank web page that briefly appears and then disappears, and you don't see
a Reconnect with GitHub link or a Connect with GitHub button, this also expected
behavior. Continue to the next step. For information about why this happens, see GitHub
Authentication with Applications in AWS CodeDeploy (p. 37).
10. Follow the instructions on the Sign in page to sign in with your GitHub user name or email and
password.
11. On the Authorize application page, choose Authorize application.
12. On the AWS CodeDeploy Create New Deployment page, choose Cancel.
13. Call the create-deployment command to deploy the revision from your GitHub repository to the
instance, where:
•repository is your GitHub account name, followed by a forward-slash (/), followed by the
name of your repository (CodeDeployGitHubDemo), for example, MyGitHubUserName/
CodeDeployGitHubDemo.
If you are unsure of the value to use, or if you want to specify a different repository:
1. In a separate web browser tab, go to your GitHub dashboard.
2. In Your repositories, hover your mouse pointer over the target repository name. A tooltip
appears, displaying the GitHub user or organization name, followed by a forward slash (/),
followed by the name of the repository. This is the value to use.
Tip
If the target repository name does not appear in Your repositories, use the
Search GitHub box to find the target repository and corresponding GitHub user or
organization name.
•commitId is the commit associated with the version of the application revision you pushed to
your repository (for example, f835159a...528eb76f).
If you are unsure of the value to use:
1. In a separate web browser tab, go to your GitHub dashboard.
2. In Your repositories, choose CodeDeployGitHubDemo.
3. In the list of commits, find the commit ID associated with the push of your application
revision to GitHub. This ID is typically 40 characters in length and consists of both letters
and numbers. (Do not use the shorter version of the commit ID, which is typically the first 10
characters of the longer version.) Use this value.
For Linux, OS X, or Unix:
aws deploy create-deployment \
API Version 2014-10-06
105
AWS CodeDeploy User Guide
Step 6: Monitor and Verify the Deployment
--application-name CodeDeployGitHubDemo-App \
--deployment-config-name CodeDeployDefault.OneAtATime \
--deployment-group-name CodeDeployGitHubDemo-DepGrp \
--description "My GitHub deployment demo" \
--github-location repository=repository,commitId=commitId
For Windows:
aws deploy create-deployment --application-name CodeDeployGitHubDemo-App
--deployment-config-name CodeDeployDefault.OneAtATime --deployment-group-
name CodeDeployGitHubDemo-DepGrp --description "My GitHub deployment demo"
--github-location repository=repository,commitId=commitId
Step 6: Monitor and Verify the Deployment
In this step, you will use either the AWS CodeDeploy console or the AWS CLI to verify the success of
the deployment. You will use your web browser to view the web page that was deployed to the Amazon
EC2 instance running Amazon Linux or the Windows Server or RHEL instance.
Note
If you're deploying to an Ubuntu Server instance, use your own testing strategy to determine
whether the deployed revision works as expected on the instance, and then go to the next
step.
To monitor and verify the deployment (console)
1. If the Deployments page is not displayed, on the AWS CodeDeploy menu, choose Deployments.
2. In the list of deployments, look for the row with an Application value of
CodeDeployGitHubDemo-App and a Deployment group value of CodeDeployGitHubDemo-
DepGrp. If Succeeded or Failed do not appear in the Status column, choose the Refresh button
periodically.
3. If Failed appears in the Status column, follow the instructions in View Instance Details
(Console) (p. 138) to troubleshoot the deployment.
4. If Succeeded appears in the Status column, you can now verify the deployment through your web
browser. Our sample revision deploys a single web page to the instance. If you're deploying to
an Amazon EC2 instance, in your web browser, go to http://PublicDNS for the instance (for
example, http://ec2-01-234-567-890.compute-1.amazonaws.com).
5. If you can see the web page, then congratulations! Now that you've successfully used AWS
CodeDeploy to deploy a revision from GitHub, you can skip ahead to Step 7: Clean Up (p. 107).
To monitor and verify the deployment (CLI)
1. Call the list-deployments command to get the deployment ID for the application named
CodeDeployGitHubDemo-App and the deployment group named CodeDeployGitHubDemo-
DepGrp:
aws deploy list-deployments --application-name CodeDeployGitHubDemo-App --
deployment-group-name CodeDeployGitHubDemo-DepGrp --query "deployments" --
output text
2. Call the get-deployment command, supplying the ID of the deployment in the output from the list-
deployments command:
API Version 2014-10-06
106
AWS CodeDeploy User Guide
Step 7: Clean Up
aws deploy get-deployment --deployment-id deployment-ID --query
"deploymentInfo.[status, creator]" --output text
3. If Failed is returned, follow the instructions in View Instance Details (Console) (p. 138) to
troubleshoot the deployment.
4. If Succeeded is returned, you can now try verifying the deployment through your web
browser. Our sample revision is a single web page deployed to the instance. If you're
deploying to an Amazon EC2 instance, you can view this page in your web browser by
going to http://PublicDNS for the Amazon EC2 instance (for example, http://
ec2-01-234-567-890.compute-1.amazonaws.com).
5. If you can see the web page, then congratulations! You have successfully used AWS CodeDeploy
to deploy from your GitHub repository.
Step 7: Clean Up
To avoid further charges for resources you used during this tutorial, you must terminate the Amazon
EC2 instance and its associated resources. Optionally, you can delete the AWS CodeDeploy
deployment component records associated with this tutorial. If you were using a GitHub repository just
for this tutorial, you can delete it now, too.
To delete a AWS CloudFormation stack (if you used the
AWS CloudFormation template to create an Amazon EC2
instance)
1. Sign in to the AWS Management Console and open the AWS CloudFormation console at https://
console.aws.amazon.com/cloudformation/.
2. In the Stack Name column, select the box next to the stack starting with
CodeDeploySampleStack.
3. Choose Delete Stack.
4. When prompted, choose Yes, Delete. The Amazon EC2 instance and the associated IAM
instance profile and service role will be deleted.
To manually deregister and clean up an on-premises
instance (if you provisioned an on-premises instance)
1. Use the AWS CLI to call the deregister command against the on-premises instance represented
here by your-instance-name and the associated region by your-region:
aws deploy deregister --instance-name your-instance-name --delete-iam-user
--region your-region
2. From the on-premises instance, call the uninstall command:
aws deploy uninstall
API Version 2014-10-06
107

AWS CodeDeploy User Guide
Step 7: Clean Up
To manually terminate an Amazon EC2 instance (if you
manually launched an Amazon EC2 instance)
1. Sign in to the AWS Management Console and open the Amazon EC2 console at https://
console.aws.amazon.com/ec2/.
2. In the navigation pane, under Instances, choose Instances.
3. Select the box next to the Amazon EC2 instance you want to terminate. Choose Actions, point to
Instance State, and then choose Terminate.
4. When prompted, choose Yes, Terminate.
To delete the AWS CodeDeploy deployment component
records
1. Sign in to the AWS Management Console and open the AWS CodeDeploy console at https://
console.aws.amazon.com/codedeploy.
Note
Sign in with the same account or IAM user information you used in Getting
Started (p. 11).
2. If the Applications page is not displayed, on the AWS CodeDeploy menu, choose Applications.
3. Choose CodeDeployGitHubDemo-App.
4. At the bottom of the Application details page, choose Delete application.
5. When prompted, type the name of the application to confirm you want to delete it, and then choose
Delete.
To delete your GitHub repository
1. Open your GitHub dashboard.
2. In Your repositories, choose CodeDeployGitHubDemo.
3. In the repository navigation pane, choose Settings.
4. In Danger Zone, choose Delete this repository.
5. When prompted, type CodeDeployGitHubDemo, and then choose I understand the
consequences, delete this repository.
6. On your local computer, delete the /tmp/CodeDeployGitHubDemo folder and its contents (for
Linux, OS X, or Unix) or the c:\temp\CodeDeployGitHubDemo folder and its contents (for
Windows).
API Version 2014-10-06
108

AWS CodeDeploy User Guide
Operating Systems Supported
by the AWS CodeDeploy Agent
Working with the AWS
CodeDeploy Agent
The AWS CodeDeploy agent is a software package that, when installed and configured on an instance,
enables that instance to be used in AWS CodeDeploy deployments.
A configuration file is placed on the instance when the agent is installed. This file is used to specify
how the agent works. This configuration file specifies directory paths and other settings for AWS
CodeDeploy to use as it interacts with the instance. You can change some of the configuration options
in the file. For information about working with the AWS CodeDeploy agent configuration file, see Agent
Configuration Reference (p. 256).
For more information about working with the AWS CodeDeploy agent, such as steps for installing,
updating, and verifying versions, see Managing AWS CodeDeploy Agent Operations (p. 114).
Topics
•Operating Systems Supported by the AWS CodeDeploy Agent (p. 109)
•Communication Protocol and Port for the AWS CodeDeploy Agent (p. 110)
•AWS SDK for Ruby (aws-sdk-core) Support for the AWS CodeDeploy Agent (p. 110)
•Supported Versions of the AWS CodeDeploy Agent (p. 110)
•Application Revision and Log File Cleanup (p. 113)
•Managing AWS CodeDeploy Agent Operations (p. 114)
Operating Systems Supported by the AWS
CodeDeploy Agent
Supported Amazon EC2 AMI Operating Systems
The AWS CodeDeploy agent has been tested on the following Amazon EC2 AMI operating systems:
• Amazon Linux 2014.09.1, 2015.03, 2016.03.0, 2016.03.1
• Ubuntu Server 14.04 LTS
• Windows Server 2008 R2 and Windows Server 2012 R2
API Version 2014-10-06
109

AWS CodeDeploy User Guide
Supported On-Premises Operating Systems
• Red Hat Enterprise Linux (RHEL) 7.x
The AWS CodeDeploy agent is available as open source for you to adapt to your needs. It can be used
with other Amazon EC2 AMI operating systems. For more information, go to the AWS CodeDeploy
Agent repository in GitHub.
Supported On-Premises Operating Systems
The AWS CodeDeploy agent has been tested on the following on-premises operating systems:
• Ubuntu Server 14.04 LTS
• Windows Server 2008 R2 and Windows Server 2012 R2
• Red Hat Enterprise Linux (RHEL) 7.x
The AWS CodeDeploy agent is available as open source for you to adapt to your needs. It can be used
with other on-premises instance operating systems. For more information, go to the AWS CodeDeploy
Agent repository in GitHub.
Communication Protocol and Port for the AWS
CodeDeploy Agent
The AWS CodeDeploy agent communicates outbound using HTTPS over port 443.
AWS SDK for Ruby (aws-sdk-core) Support for
the AWS CodeDeploy Agent
Versions of the AWS CodeDeploy agent earlier than 1.0.1.880 are compatible only with version 2.1.2
and earlier versions of the AWS SDK for Ruby (aws-sdk-core 2.1.2). If you are using a version of the
AWS CodeDeploy agent earlier than 1.0.1.880, we recommend that you update to the latest version.
For information, see the following:
•Determine the Version of the AWS CodeDeploy Agent (p. 115)
•Install or Reinstall the AWS CodeDeploy Agent (p. 116)
The latest version of the AWS SDK for Ruby compatible the AWS CodeDeploy Agent is aws-sdk-core
2.3.
Supported Versions of the AWS CodeDeploy
Agent
Your instances must be running a supported version of the AWS CodeDeploy agent. The current
minimum supported version is 1.0.1.854. If you are running an earlier version, deployments to your
instances may fail.
The following table lists the currently supported versions of the AWS CodeDeploy agent and the
features and enhancements included with each release.
API Version 2014-10-06
110

AWS CodeDeploy User Guide
Supported Versions of the AWS CodeDeploy Agent
Version Release date Details
1.0.1.1011.1 August 17, 2016 Enhancement: Removed the
changes introduced by version
1.0.1.1011 due to issues with
shell support. This version of the
agent is functionally equivalent
to version 1.0.1.998 released on
July 11, 2016.
1.0.1.1011 August 15, 2016 The AWS CodeDeploy agent for
Linux, OS X, or Unix instances
has been updated with the
following changes. For Windows
Server instances, the latest
version remains 1.0.1.998.
Feature: Added support for
invoking the AWS CodeDeploy
agent using the bash shell on
operating systems where the
systemd init system is in use.
Enhancement: Enabled support
for all versions of Ruby 2.x in
the AWS CodeDeploy agent
and the AWS CodeDeploy
agent updater. Updated AWS
CodeDeploy agents are no
longer dependent on Ruby 2.0
only. (Ruby 2.0 is still required
for deb and rpm versions of
the AWS CodeDeploy agent
installer.)
1.0.1.998 July 11, 2016 Enhancement: Fixed
support for running the AWS
CodeDeploy agent with user
profiles other than root. The
variable named USER is replaced
by CODEDEPLOY_USER to avoid
conflicts with environmental
variables.
API Version 2014-10-06
111

AWS CodeDeploy User Guide
Supported Versions of the AWS CodeDeploy Agent
Version Release date Details
1.0.1.966 June 16, 2016 Feature: Introduced support for
running the AWS CodeDeploy
agent with user profiles other
than root.
Enhancement: Fixed support
for specifying the number of
application revisions you want
the AWS CodeDeploy agent to
archive for a deployment group.
Enhancement: Made the AWS
CodeDeploy agent compatible
with version 2.3 of the AWS
SDK for Ruby (aws-sdk-core
2.3).
Enhancement: Fixed issues
with UTF-8 encoding during
deployments.
Enhancement: Improved
accuracy when identifying
process names.
1.0.1.950 March 24, 2016 Feature: Added installation
proxy support.
Enhancement: Updated
the installation script to not
download the AWS CodeDeploy
agent if the latest version is
already installed.
1.0.1.934 February 11, 2016 Feature: Introduced support
for specifying the number of
application revisions you want
the AWS CodeDeploy agent to
archive for a deployment group.
1.0.1.880 January 11, 2016 Enhancement: Made the AWS
CodeDeploy agent compatible
with version 2.2 of the AWS
SDK for Ruby (aws-sdk-core
2.2). Version 2.1.2 is still
supported.
API Version 2014-10-06
112

AWS CodeDeploy User Guide
Application Revision and Log File Cleanup
Version Release date Details
1.0.1.854 November 17, 2015 Feature: Introduced support for
the SHA-256 hash algorithm.
After March 31, 2016, all
installations of the AWS
CodeDeploy agent must be
updated, at minimum, to version
1.0.1.854 or deployments will
fail.
Feature: Introduced version
tracking support in .version
files.
Feature: Made the deployment
group ID available through the
use of an environment variable.
Enhancement: Added support
for monitoring AWS CodeDeploy
agent logs using Amazon
CloudWatch Logs.
For related information, see the following:
•Determine the Version of the AWS CodeDeploy Agent (p. 115)
•Install or Reinstall the AWS CodeDeploy Agent (p. 116)
For a history of AWS CodeDeploy agent versions, see the Release Repository on GitHub.
Application Revision and Log File Cleanup
The AWS CodeDeploy agent archives revisions and log files on instances. The AWS CodeDeploy
agent cleans up these artifacts to conserve disk space.
Application revision deployment logs: You can use the :max_revisions: option in the agent
configuration file to specify the number of application revisions to archive by entering any positive
integer. AWS CodeDeploy also archives the log files for those revisions. All others are deleted, with the
exception of the log file of the last successful deployment. That log file will always be retained, even if
the number of failed deployments exceeds the number of retained revisions. If no value is specified,
AWS CodeDeploy will retain the five most recent revisions in addition to the currently deployed
revision.
AWS CodeDeploy logs: For Amazon Linux, Ubuntu Server, and RHEL instances, the AWS
CodeDeploy agent rotates the log files under the /var/log/aws/codedeploy-agent folder. The
log file is rotated at 00:00:00 (instance time) daily. Log files are deleted after seven days. The naming
pattern for rotated log files is codedeploy-agent.YYYYMMDD.log.
Topics
•Managing AWS CodeDeploy Agent Operations (p. 114)
API Version 2014-10-06
113
AWS CodeDeploy User Guide
Managing AWS CodeDeploy Agent Operations
Managing AWS CodeDeploy Agent Operations
The instructions in this section show you how to install, uninstall, reinstall, or update the AWS
CodeDeploy agent and how to verify the AWS CodeDeploy agent is running.
Topics
•Verify the AWS CodeDeploy Agent Is Running (p. 114)
•Determine the Version of the AWS CodeDeploy Agent (p. 115)
•Install or Reinstall the AWS CodeDeploy Agent (p. 116)
•Update the AWS CodeDeploy Agent (p. 120)
Verify the AWS CodeDeploy Agent Is Running
This section describes commands to run if you suspect the AWS CodeDeploy agent has stopped
running on an instance.
Topics
•Verify the AWS CodeDeploy agent for Amazon Linux or RHEL is running (p. 114)
•Verify the AWS CodeDeploy agent for Ubuntu Server is running (p. 114)
•Verify the AWS CodeDeploy agent for Windows Server is running (p. 115)
Verify the AWS CodeDeploy agent for Amazon Linux or
RHEL is running
To see if the AWS CodeDeploy agent is installed and running, sign in to the instance, and run the
following command:
sudo service codedeploy-agent status
If the command returns an error, the AWS CodeDeploy agent is not installed. Install it as described in
Install or reinstall the AWS CodeDeploy agent for Amazon Linux or RHEL (p. 117).
If the AWS CodeDeploy agent is installed and running, you should see a message like The AWS
CodeDeploy agent is running.
If you see a message like error: No AWS CodeDeploy agent running, start the service and run
the following two commands, one at a time:
sudo service codedeploy-agent start
sudo service codedeploy-agent status
Verify the AWS CodeDeploy agent for Ubuntu Server is
running
To see if the AWS CodeDeploy agent is installed and running, sign in to the instance, and run the
following command:
API Version 2014-10-06
114
AWS CodeDeploy User Guide
Determine the Version of the AWS CodeDeploy Agent
sudo service codedeploy-agent status
If the command returns an error, the AWS CodeDeploy agent is not installed. Install it as described in
Install or reinstall the AWS CodeDeploy agent for Ubuntu Server (p. 118).
If the AWS CodeDeploy agent is installed and running, you should see a message like The AWS
CodeDeploy agent is running.
If you see a message like error: No AWS CodeDeploy agent running, start the service and run
the following two commands, one at a time:
sudo service codedeploy-agent start
sudo service codedeploy-agent status
Verify the AWS CodeDeploy agent for Windows Server is
running
To see if the AWS CodeDeploy agent is installed and running, sign in to the instance, and run the
following command:
powershell.exe -Command Get-Service -Name codedeployagent
You should see output similar to the following:
Status Name DisplayName
------ ---- -----------
Running codedeployagent CodeDeploy Host Agent Service
If the command returns an error, the AWS CodeDeploy agent is not installed. Install it as described in
Install or reinstall the AWS CodeDeploy agent for Windows Server (p. 119).
If Status shows anything other than Running, start the service with the following command:
powershell.exe -Command Start-Service -Name codedeployagent
You can restart the service with the following command:
powershell.exe -Command Restart-Service -Name codedeployagent
You can stop the service with the following command:
powershell.exe -Command Stop-Service -Name codedeployagent
Determine the Version of the AWS CodeDeploy
Agent
You can determine the version of the AWS CodeDeploy agent running on your instance in two ways.
API Version 2014-10-06
115
AWS CodeDeploy User Guide
Install or Reinstall the AWS CodeDeploy Agent
First, starting with version 1.0.1.854 of the AWS CodeDeploy agent, you can view the version number
in a .version file on the instance. The following table shows the location and sample version string
for each of the supported operating systems.
Operating system File location Sample agent_version string
Amazon Linux and Red Hat
Enterprise Linux (RHEL) /opt/codedeploy-
agent/.version
OFFICIAL_1.0.1.854_rpm
Ubuntu Server /opt/codedeploy-
agent/.version
OFFICIAL_1.0.1.854_deb
Windows Server C:\ProgramData\Amazon
\CodeDeploy\.version
OFFICIAL_1.0.1.854_msi
Second, you can run a command on an instance to determine the version of the AWS CodeDeploy
agent.
Topics
•Determine the version on Amazon Linux or RHEL (p. 116)
•Determine the version on Ubuntu Server (p. 116)
•Determine the version on Windows Server (p. 116)
Determine the version on Amazon Linux or RHEL
Sign in to the instance and run the following command:
sudo yum info codedeploy-agent
Determine the version on Ubuntu Server
Sign in to the instance and run the following command:
sudo dpkg -s codedeploy-agent
Determine the version on Windows Server
Sign in to the instance and run the following command:
sc qdescription codedeployagent
Install or Reinstall the AWS CodeDeploy Agent
If you suspect the AWS CodeDeploy agent is missing or not working, you can run commands on an
instance to install or reinstall it.
Topics
•Install or reinstall the AWS CodeDeploy agent for Amazon Linux or RHEL (p. 117)
•Install or reinstall the AWS CodeDeploy agent for Ubuntu Server (p. 118)
•Install or reinstall the AWS CodeDeploy agent for Windows Server (p. 119)
API Version 2014-10-06
116
AWS CodeDeploy User Guide
Install or Reinstall the AWS CodeDeploy Agent
Install or reinstall the AWS CodeDeploy agent for Amazon
Linux or RHEL
Sign in to the instance, and run the following commands, one at a time.
Note
In the fourth command, /home/ec2-user represents the default user name for an Amazon
Linux or RHEL Amazon EC2 instance. If your instance was created using a custom AMI, the
AMI owner might have specified a different default user name.
1. sudo yum update
sudo yum install ruby
sudo yum install wget
cd /home/ec2-user
wget https://bucket-name.s3.amazonaws.com/latest/install
chmod +x ./install
sudo ./install auto
Type y if prompted.
bucket-name represents one of the following:
•aws-codedeploy-us-east-1 for instances in the US East (N. Virginia) region
•aws-codedeploy-us-west-1 for instances in the US West (N. California) region
•aws-codedeploy-us-west-2 for instances in the US West (Oregon) region
•aws-codedeploy-ap-south-1 for instances in the Asia Pacific (Mumbai) region
•aws-codedeploy-ap-northeast-2 for instances in the Asia Pacific (Seoul) region
•aws-codedeploy-ap-southeast-1 for instances in the Asia Pacific (Singapore) region
•aws-codedeploy-ap-southeast-2 for instances in the Asia Pacific (Sydney) region
•aws-codedeploy-ap-northeast-1 for instances in the Asia Pacific (Tokyo) region
•aws-codedeploy-eu-central-1 for instances in the EU (Frankfurt) region
•aws-codedeploy-eu-west-1 for instances in the EU (Ireland) region
•aws-codedeploy-sa-east-1 for instances in the South America (São Paulo) region
2. sudo service codedeploy-agent status
If the AWS CodeDeploy agent is installed and running, you should see a message like The AWS
CodeDeploy agent is running.
If you see a message like error: No AWS CodeDeploy agent running, start the service and
run the following two commands, one at a time:
API Version 2014-10-06
117
AWS CodeDeploy User Guide
Install or Reinstall the AWS CodeDeploy Agent
sudo service codedeploy-agent start
sudo service codedeploy-agent status
To uninstall the AWS CodeDeploy agent, sign in to the instance and run the following command:
sudo yum erase codedeploy-agent
Install or reinstall the AWS CodeDeploy agent for Ubuntu
Server
Sign in to the instance, and run the following commands, one at a time.
Note
In the fifth command, /home/ubuntu represents the default user name for an Ubuntu Server
instance. If your instance was created using a custom AMI, the AMI owner might have
specified a different default user name.
1. sudo apt-get update
sudo apt-get install python-pip
sudo apt-get install ruby2.0
sudo apt-get install wget
cd /home/ubuntu
wget https://bucket-name.s3.amazonaws.com/latest/install
chmod +x ./install
sudo ./install auto
Type y if prompted.
bucket-name represents one of the following:
•aws-codedeploy-us-east-1 for instances in the US East (N. Virginia) region
•aws-codedeploy-us-west-1 for instances in the US West (N. California) region
•aws-codedeploy-us-west-2 for instances in the US West (Oregon) region
•aws-codedeploy-ap-south-1 for instances in the Asia Pacific (Mumbai) region
•aws-codedeploy-ap-northeast-2 for instances in the Asia Pacific (Seoul) region
•aws-codedeploy-ap-southeast-1 for instances in the Asia Pacific (Singapore) region
API Version 2014-10-06
118
AWS CodeDeploy User Guide
Install or Reinstall the AWS CodeDeploy Agent
•aws-codedeploy-ap-southeast-2 for instances in the Asia Pacific (Sydney) region
•aws-codedeploy-ap-northeast-1 for instances in the Asia Pacific (Tokyo) region
•aws-codedeploy-eu-central-1 for instances in the EU (Frankfurt) region
•aws-codedeploy-eu-west-1 for instances in the EU (Ireland) region
•aws-codedeploy-sa-east-1 for instances in the South America (São Paulo) region
region-name represents one of the following:
•us-east-1 for instances in the US East (N. Virginia) region
•us-west-1 for instances in the US West (N. California) region
•us-west-2 for instances in the US West (Oregon) region
•ap-south-1 for instances in the Asia Pacific (Mumbai) region
•ap-northeast-2 for instances in the Asia Pacific (Seoul) region
•ap-southeast-1 for instances in the Asia Pacific (Singapore) region
•ap-southeast-2 for instances in the Asia Pacific (Sydney) region
•ap-northeast-1 for instances in the Asia Pacific (Tokyo) region
•eu-central-1 for instances in the EU (Frankfurt) region
•eu-west-1 for instances in the EU (Ireland) region
•sa-east-1 for instances in the South America (São Paulo) region
2. sudo service codedeploy-agent status
If the AWS CodeDeploy agent is installed and running, you should see a message like The AWS
CodeDeploy agent is running.
If you see a message like error: No AWS CodeDeploy agent running, start the service and
run the following two commands, one at a time:
sudo service codedeploy-agent start
sudo service codedeploy-agent status
To uninstall the AWS CodeDeploy agent, sign in to the instance and run the following command:
sudo dpkg -r codedeploy-agent
Install or reinstall the AWS CodeDeploy agent for
Windows Server
Sign in to the instance, and run the following commands, one at a time:
New-Item –Path "c:\temp" –ItemType "directory" -Force
powershell.exe -Command Read-S3Object -BucketName bucket-name -Key latest/
codedeploy-agent.msi -File c:\temp\codedeploy-agent.msi
c:\temp\codedeploy-agent.msi /quiet /l c:\temp\host-agent-install-log.txt
API Version 2014-10-06
119
AWS CodeDeploy User Guide
Update the AWS CodeDeploy Agent
powershell.exe -Command Get-Service -Name codedeployagent
bucket-name represents one of the following:
•aws-codedeploy-us-east-1 for instances in the US East (N. Virginia) region
•aws-codedeploy-us-west-1 for instances in the US West (N. California) region
•aws-codedeploy-us-west-2 for instances in the US West (Oregon) region
•aws-codedeploy-ap-south-1 for instances in the Asia Pacific (Mumbai) region
•aws-codedeploy-ap-northeast-2 for instances in the Asia Pacific (Seoul) region
•aws-codedeploy-ap-southeast-1 for instances in the Asia Pacific (Singapore) region
•aws-codedeploy-ap-southeast-2 for instances in the Asia Pacific (Sydney) region
•aws-codedeploy-ap-northeast-1 for instances in the Asia Pacific (Tokyo) region
•aws-codedeploy-eu-central-1 for instances in the EU (Frankfurt) region
•aws-codedeploy-eu-west-1 for instances in the EU (Ireland) region
•aws-codedeploy-sa-east-1 for instances in the South America (São Paulo) region
If the AWS CodeDeploy agent is installed and running, after the Get-Service command call, you
should see output similar to the following:
Status Name DisplayName
------ ---- -----------
Running codedeployagent CodeDeploy Host Agent Service
To uninstall the AWS CodeDeploy agent, sign in to the instance and run the following three commands,
one at a time:
wmic
product where name="CodeDeploy Host Agent" call uninstall /nointeractive
exit
Alternatively, sign in to the instance, and in Control Panel, open Programs and Features, choose
CodeDeploy Host Agent, and then choose Uninstall.
Update the AWS CodeDeploy Agent
For all supported operating systems except Windows Server, the AWS CodeDeploy agent is updated
automatically when a new version is released. You can also force updates on all supported operating
systems by running a command on an instance.
Topics
•Update on Amazon Linux or RHEL (p. 121)
•Update on Ubuntu Server (p. 121)
•Update on Windows Server (p. 121)
API Version 2014-10-06
120

AWS CodeDeploy User Guide
Update the AWS CodeDeploy Agent
Update on Amazon Linux or RHEL
After the AWS CodeDeploy agent (codedeploy-agent.noarch.rpm) is installed on an instance, it
will be updated automatically within 24 hours of the release of a new version. The update time cannot
be easily cancelled or rescheduled. If a deployment is in progress during the update, the current
deployment lifecycle event will finish first. After the update is complete, the deployment will resume with
the next deployment lifecycle event.
If you want to force an update of the AWS CodeDeploy agent, sign in to the instance, and run the
following command:
sudo /opt/codedeploy-agent/bin/install auto
Update on Ubuntu Server
After the AWS CodeDeploy agent (codedeploy-agent_all.deb) is installed on an instance, it will
be updated automatically within 24 hours of the release of a new version. The update time cannot
be easily cancelled or rescheduled. If a deployment is in progress during the update, the current
deployment lifecycle event will finish first. After the update is complete, the deployment will resume with
the next deployment lifecycle event.
If you want to force an update of the AWS CodeDeploy agent, sign in to the instance, and run the
following command:
sudo /opt/codedeploy-agent/bin/install auto
Update on Windows Server
The AWS CodeDeploy agent (codedeploy-agent.msi) is not updated automatically upon release of
a new version. To update the AWS CodeDeploy agent after it has been installed on an instance, follow
the instructions in Install or reinstall the AWS CodeDeploy agent for Windows Server (p. 119).
API Version 2014-10-06
121

AWS CodeDeploy User Guide
Working with Instances for AWS
CodeDeploy
AWS CodeDeploy supports deployments to instances running Amazon Linux, Ubuntu Server, Red Hat
Enterprise Linux (RHEL), and Windows Server. To launch or configure these types of instances for use
in deployments, follow these instructions:
I want to launch a new Amazon Linux or
Windows Server Amazon EC2 instance. To launch the Amazon EC2 instance with the
least amount of effort, see Creating an Instance
(AWS CloudFormation Template) (p. 130).
To launch the Amazon EC2 instance mostly on
your own, see Creating an Instance (AWS CLI or
Amazon EC2 Console) (p. 123).
I want to launch a new Ubuntu Server or RHEL
Amazon EC2 instance. See Creating an Instance (AWS CLI or Amazon
EC2 Console) (p. 123).
I want to configure an Amazon Linux, Windows
Server, Ubuntu Server, or RHEL Amazon EC2
instance.
See Configuring an Amazon EC2
Instance (p. 135).
I want to configure a Windows Server, Ubuntu
Server, or RHEL on-premises instance (physical
devices that are not Amazon EC2 instances).
See Configuring an On-Premises
Instance (p. 140).
To prepare Amazon EC2 instances in Auto Scaling groups, you must follow some additional steps. For
more information, see Auto Scaling (p. 31).
Topics
•Creating an Instance (AWS CLI or Amazon EC2 Console) (p. 123)
•Creating an Instance (AWS CloudFormation Template) (p. 130)
•Configuring an Amazon EC2 Instance (p. 135)
•View Instance Details (p. 138)
•On-Premises Instances (p. 139)
•Configuring an On-Premises Instance (p. 140)
•Instance Health (p. 160)
API Version 2014-10-06
122

AWS CodeDeploy User Guide
Creating an Instance (AWS
CLI or Amazon EC2 Console)
Creating an Instance for AWS CodeDeploy
(AWS CLI or Amazon EC2 Console)
These instructions show you how to launch a new Amazon EC2 instance that is configured for use in
AWS CodeDeploy deployments. As part of this process, you will create an IAM instance profile.
You can use our AWS CloudFormation template to launch an Amazon EC2 instance running Amazon
Linux or Windows Server that is already configured for use in AWS CodeDeploy deployments. We
do not provide an AWS CloudFormation template for Amazon EC2 instances running Ubuntu Server
or Red Hat Enterprise Linux (RHEL). For alternatives to the use of the template, see Working with
Instances (p. 122).
You can use the Amazon EC2 console, AWS CLI, or Amazon EC2 APIs to launch an Amazon EC2
instance.
Launch an Amazon EC2 Instance (CLI )
Follow the instructions in Getting Started (p. 11) to set up and configure the AWS CLI and create an
IAM instance profile named CodeDeployDemo-EC2-Instance-Profile.
1. If you are creating an Amazon EC2 instance running Windows Server, call the create-security-
group and authorize-security-group-ingress commands to create a security group that allows
RDP access (which is not allowed by default) and, alternatively, HTTP access:
aws ec2 create-security-group --group-name CodeDeployDemo-Windows-
Security-Group --description "For launching Windows Server images for use
with AWS CodeDeploy"
aws ec2 authorize-security-group-ingress --group-name CodeDeployDemo-
Windows-Security-Group --to-port 3389 --ip-protocol tcp --cidr-ip
0.0.0.0/0 --from-port 3389
aws ec2 authorize-security-group-ingress --group-name CodeDeployDemo-
Windows-Security-Group --to-port 80 --ip-protocol tcp --cidr-ip 0.0.0.0/0
--from-port 80
Note
For demonstration purposes, these commands create a security group that allows
unrestricted access for RDP through port 3389 and, alternatively, HTTP through port
80. As a best practice, we recommend restricting access to the RDP and HTTP ports.
AWS CodeDeploy does not require unrestricted port access and does not require HTTP
access. For more information, see Tips for Securing Your Amazon EC2 Instance.
2. On your development machine, create a file named instance-setup.sh (for Amazon EC2
instances running Amazon Linux, Ubuntu Server, or RHEL) or instance-setup.txt (for
Amazon EC2 instances running Windows Server) that contains the following contents.
As the Amazon EC2 instance is launched, this script will download the AWS CodeDeploy agent
from the specified Amazon S3 location and then install it on the instance.
Here are the contents of the instance-setup.sh file (Amazon Linux and RHEL):
#!/bin/bash
yum -y update
yum install -y ruby
yum install -y aws-cli
cd /home/ec2-user
aws s3 cp s3://bucket-name/latest/install . --region region-name
API Version 2014-10-06
123

AWS CodeDeploy User Guide
Launch an Amazon EC2 Instance (CLI )
chmod +x ./install
./install auto
bucket-name represents one of the following:
•aws-codedeploy-us-east-1 for instances in the US East (N. Virginia) region
•aws-codedeploy-us-west-1 for instances in the US West (N. California) region
•aws-codedeploy-us-west-2 for instances in the US West (Oregon) region
•aws-codedeploy-ap-south-1 for instances in the Asia Pacific (Mumbai) region
•aws-codedeploy-ap-northeast-2 for instances in the Asia Pacific (Seoul) region
•aws-codedeploy-ap-southeast-1 for instances in the Asia Pacific (Singapore) region
•aws-codedeploy-ap-southeast-2 for instances in the Asia Pacific (Sydney) region
•aws-codedeploy-ap-northeast-1 for instances in the Asia Pacific (Tokyo) region
•aws-codedeploy-eu-central-1 for instances in the EU (Frankfurt) region
•aws-codedeploy-eu-west-1 for instances in the EU (Ireland) region
•aws-codedeploy-sa-east-1 for instances in the South America (São Paulo) region
region-name represents one of the following:
•us-east-1 for instances in the US East (N. Virginia) region
•us-west-1 for instances in the US West (N. California) region
•us-west-2 for instances in the US West (Oregon) region
•ap-south-1 for instances in the Asia Pacific (Mumbai) region
•ap-northeast-2 for instances in the Asia Pacific (Seoul) region
•ap-southeast-1 for instances in the Asia Pacific (Singapore) region
•ap-southeast-2 for instances in the Asia Pacific (Sydney) region
•ap-northeast-1 for instances in the Asia Pacific (Tokyo) region
•eu-central-1 for instances in the EU (Frankfurt) region
•eu-west-1 for instances in the EU (Ireland) region
•sa-east-1 for instances in the South America (São Paulo) region
Here are the contents of the instance-setup.sh (Ubuntu Server):
#!/bin/bash
apt-get -y update
apt-get -y install awscli
apt-get -y install ruby2.0
cd /home/ubuntu
aws s3 cp s3://bucket-name/latest/install . --region region-name
chmod +x ./install
./install auto
bucket-name represents one of the following:
•aws-codedeploy-us-east-1 for instances in the US East (N. Virginia) region
•aws-codedeploy-us-west-1 for instances in the US West (N. California) region
•aws-codedeploy-us-west-2 for instances in the US West (Oregon) region
•aws-codedeploy-ap-south-1 for instances in the Asia Pacific (Mumbai) region
•aws-codedeploy-ap-northeast-2 for instances in the Asia Pacific (Seoul) region
API Version 2014-10-06
124

AWS CodeDeploy User Guide
Launch an Amazon EC2 Instance (CLI )
•aws-codedeploy-ap-southeast-1 for instances in the Asia Pacific (Singapore) region
•aws-codedeploy-ap-southeast-2 for instances in the Asia Pacific (Sydney) region
•aws-codedeploy-ap-northeast-1 for instances in the Asia Pacific (Tokyo) region
•aws-codedeploy-eu-central-1 for instances in the EU (Frankfurt) region
•aws-codedeploy-eu-west-1 for instances in the EU (Ireland) region
•aws-codedeploy-sa-east-1 for instances in the South America (São Paulo) region
region-name represents one of the following:
•us-east-1 for instances in the US East (N. Virginia) region
•us-west-1 for instances in the US West (N. California) region
•us-west-2 for instances in the US West (Oregon) region
•ap-south-1 for instances in the Asia Pacific (Mumbai) region
•ap-northeast-2 for instances in the Asia Pacific (Seoul) region
•ap-southeast-1 for instances in the Asia Pacific (Singapore) region
•ap-southeast-2 for instances in the Asia Pacific (Sydney) region
•ap-northeast-1 for instances in the Asia Pacific (Tokyo) region
•eu-central-1 for instances in the EU (Frankfurt) region
•eu-west-1 for instances in the EU (Ireland) region
•sa-east-1 for instances in the South America (São Paulo) region
Here are the contents of the instance-setup.txt (Windows Server):
<powershell>
New-Item -Path c:\temp -ItemType "directory" -Force
powershell.exe -Command Read-S3Object -BucketName bucket-name/latest -Key
codedeploy-agent.msi -File c:\temp\codedeploy-agent.msi
Start-Process -Wait -FilePath c:\temp\codedeploy-agent.msi -WindowStyle
Hidden
</powershell>
bucket-name represents one of the following:
•aws-codedeploy-us-east-1 for instances in the US East (N. Virginia) region
•aws-codedeploy-us-west-1 for instances in the US West (N. California) region
•aws-codedeploy-us-west-2 for instances in the US West (Oregon) region
•aws-codedeploy-ap-south-1 for instances in the Asia Pacific (Mumbai) region
•aws-codedeploy-ap-northeast-2 for instances in the Asia Pacific (Seoul) region
•aws-codedeploy-ap-southeast-1 for instances in the Asia Pacific (Singapore) region
•aws-codedeploy-ap-southeast-2 for instances in the Asia Pacific (Sydney) region
•aws-codedeploy-ap-northeast-1 for instances in the Asia Pacific (Tokyo) region
•aws-codedeploy-eu-central-1 for instances in the EU (Frankfurt) region
•aws-codedeploy-eu-west-1 for instances in the EU (Ireland) region
•aws-codedeploy-sa-east-1 for instances in the South America (São Paulo) region
3. From the same directory where you created the instance-setup.sh or instance-setup.txt
file, you will call the run-instances command to create and launch the Amazon EC2 instance.
Before you call this command, you will need to collect the following:
API Version 2014-10-06
125
AWS CodeDeploy User Guide
Launch an Amazon EC2 Instance (CLI )
• The ID of an Amazon Machine Image (AMI) (amiID) you will use for the instance. To get the ID,
see Finding a Suitable AMI.
• The name of the type of Amazon EC2 instance (instanceType) you will create, such as
t1.micro. For a list, see Amazon EC2 Instance Types.
• The name of an Amazon EC2 instance key pair (keyName) to enable SSH access to an Amazon
EC2 instance running Amazon Linux, Ubuntu Server, or RHEL or RDP access to an Amazon
EC2 instance running Windows Server.
Important
Type the key pair name only, not the key pair file extension.
To find a key pair name, open the Amazon EC2 console at https://console.aws.amazon.com/
ec2. In the navigation pane, under Network & Security, choose Key Pairs, and note the key
pair name in the list.
To generate a key pair, see Creating Your Key Pair Using Amazon EC2. Be sure you create
the key pair in one of the regions listed in Region and Endpoints in AWS General Reference.
Otherwise, you won't be able to use the Amazon EC2 instance key pair with AWS CodeDeploy.
To call the run-instances command to launch an Amazon EC2 instance running Amazon Linux,
Ubuntu Server, or RHEL and attach the IAM instance profile you created in Step 4: Create an IAM
Instance Profile (p. 17):
aws ec2 run-instances \
--image-id amiID \
--key-name keyName \
--user-data file://instance-setup.sh \
--count 1 \
--instance-type instanceType \
--iam-instance-profile Name=CodeDeployDemo-EC2-Instance-Profile
Note
This command creates a default security group for the Amazon EC2 instance that allows
access to several ports, including unrestricted access for SSH through port 22 and,
alternatively, HTTP through port 80. As a best practice, we recommend restricting access
to the SSH and HTTP ports only. AWS CodeDeploy does not require unrestricted port
access and does not require HTTP port access. For more information, see Tips for
Securing Your Amazon EC2 Instance.
To call the run-instances command to launch an Amazon EC2 instance running Windows Server
and attach the IAM instance profile you created in Step 4: Create an IAM Instance Profile (p. 17):
aws ec2 run-instances --image-id amiID --key-name keyName --user-data
file://instance-setup.txt --count 1 --instance-type instanceType --iam-
instance-profile Name=CodeDeployDemo-EC2-Instance-Profile --security-
groups CodeDeployDemo-Windows-Security-Group
These commands launch a single Amazon EC2 instance with the specified AMI, key pair, and
instance type, with the specified IAM instance profile, and run the specified script during launch.
4. Note the value of the InstanceID in the output. If you forget this value, you can get it later by
calling the describe-instances command against the Amazon EC2 instance key pair.
aws ec2 describe-instances --filters "Name=key-name,Values=keyName" --
query "Reservations[*].Instances[*].[InstanceId]" --output text
API Version 2014-10-06
126

AWS CodeDeploy User Guide
Launch an Amazon EC2 Instance (Console)
Use the instance ID to call the create-tags command, which tags the Amazon EC2 instance so
that AWS CodeDeploy can find it later during a deployment. In the following example, the tag is
named CodeDeployDemo, but you can specify any Amazon EC2 instance tag you want.
aws ec2 create-tags --resources instanceID --tags
Key=Name,Value=CodeDeployDemo
To verify the Amazon EC2 instance has been launched and passed all checks, use the instance ID
to call the describe-instance-status command.
aws ec2 describe-instance-status --instance-ids instanceID --query
"InstanceStatuses[*].InstanceStatus.[Status]" --output text
If the instance has been launched and passed all checks, ok will appear in the output:
To verify the AWS CodeDeploy agent is running on the instance, see Managing AWS CodeDeploy
Agent Operations (p. 114), and then return to this page. After you do this, the Amazon EC2 instance
will be ready for use in AWS CodeDeploy deployments. The next step is to proceed to Create an
Application (p. 168).
Launch an Amazon EC2 Instance (Console)
We assume you have already followed the instructions in Getting Started (p. 11) and created an IAM
instance profile named CodeDeployDemo-EC2-Instance-Profile.
1. Sign in to the AWS Management Console and open the Amazon EC2 console at https://
console.aws.amazon.com/ec2/.
Important
Make sure you are signed in to the AWS Management Console with the same account
information you used in Getting Started (p. 11).
2. In the navigation pane, choose Instances, and then choose Launch Instance.
3. On the Step 1: Choose an Amazon Machine Image page, from the Quick Start tab, choose an
AMI. For Amazon Linux, Ubuntu Server, and RHEL, next to the latest 64-bit AMI, choose Select.
For Windows Server, we recommend an AMI like Microsoft Windows Server 2012 R2.
4. On the Step 2: Choose an Instance Type page, choose any available Amazon EC2 instance
type, and then choose Next: Configure Instance Details.
5. On the Step 3: Configure Instance Details page, in the IAM role list, choose the IAM instance
profile you created in Step 4: Create an IAM Instance Profile (p. 17).
Note
If neither Launch into EC2-Classic nor a default virtual private cloud (VPC) is displayed
in the Network list, and you are not able to select a different Amazon EC2 instance type
that supports launching into EC2-Classic, you must choose an Amazon VPC and subnet,
or choose Create new VPC or Create new subnet or both. For more information, see
Your VPC and Subnets.
6. Expand Advanced Details.
7. Next to User data, with the As text option selected, type the following to install the AWS
CodeDeploy agent as the Amazon EC2 instance is launched.
For Amazon Linux or RHEL:
#!/bin/bash
yum -y update
API Version 2014-10-06
127

AWS CodeDeploy User Guide
Launch an Amazon EC2 Instance (Console)
yum install -y ruby
yum install -y aws-cli
cd /home/ec2-user
aws s3 cp s3://bucket-name/latest/install . --region region-name
chmod +x ./install
./install auto
bucket-name represents one of the following:
•aws-codedeploy-us-east-1 for instances in the US East (N. Virginia) region
•aws-codedeploy-us-west-1 for instances in the US West (N. California) region
•aws-codedeploy-us-west-2 for instances in the US West (Oregon) region
•aws-codedeploy-ap-south-1 for instances in the Asia Pacific (Mumbai) region
•aws-codedeploy-ap-northeast-2 for instances in the Asia Pacific (Seoul) region
•aws-codedeploy-ap-southeast-1 for instances in the Asia Pacific (Singapore) region
•aws-codedeploy-ap-southeast-2 for instances in the Asia Pacific (Sydney) region
•aws-codedeploy-ap-northeast-1 for instances in the Asia Pacific (Tokyo) region
•aws-codedeploy-eu-central-1 for instances in the EU (Frankfurt) region
•aws-codedeploy-eu-west-1 for instances in the EU (Ireland) region
•aws-codedeploy-sa-east-1 for instances in the South America (São Paulo) region
region-name represents one of the following:
•us-east-1 for instances in the US East (N. Virginia) region
•us-west-1 for instances in the US West (N. California) region
•us-west-2 for instances in the US West (Oregon) region
•ap-south-1 for instances in the Asia Pacific (Mumbai) region
•ap-northeast-2 for instances in the Asia Pacific (Seoul) region
•ap-southeast-1 for instances in the Asia Pacific (Singapore) region
•ap-southeast-2 for instances in the Asia Pacific (Sydney) region
•ap-northeast-1 for instances in the Asia Pacific (Tokyo) region
•eu-central-1 for instances in the EU (Frankfurt) region
•eu-west-1 for instances in the EU (Ireland) region
•sa-east-1 for instances in the South America (São Paulo) region
For Ubuntu Server:
#!/bin/bash
apt-get -y update
apt-get -y install awscli
apt-get -y install ruby2.0
cd /home/ubuntu
aws s3 cp s3://bucket-name/latest/install . --region region-name
chmod +x ./install
./install auto
bucket-name represents one of the following:
•aws-codedeploy-us-east-1 for instances in the US East (N. Virginia) region
•aws-codedeploy-us-west-1 for instances in the US West (N. California) region
API Version 2014-10-06
128

AWS CodeDeploy User Guide
Launch an Amazon EC2 Instance (Console)
•aws-codedeploy-us-west-2 for instances in the US West (Oregon) region
•aws-codedeploy-ap-south-1 for instances in the Asia Pacific (Mumbai) region
•aws-codedeploy-ap-northeast-2 for instances in the Asia Pacific (Seoul) region
•aws-codedeploy-ap-southeast-1 for instances in the Asia Pacific (Singapore) region
•aws-codedeploy-ap-southeast-2 for instances in the Asia Pacific (Sydney) region
•aws-codedeploy-ap-northeast-1 for instances in the Asia Pacific (Tokyo) region
•aws-codedeploy-eu-central-1 for instances in the EU (Frankfurt) region
•aws-codedeploy-eu-west-1 for instances in the EU (Ireland) region
•aws-codedeploy-sa-east-1 for instances in the South America (São Paulo) region
region-name represents one of the following:
•us-east-1 for instances in the US East (N. Virginia) region
•us-west-1 for instances in the US West (N. California) region
•us-west-2 for instances in the US West (Oregon) region
•ap-south-1 for instances in the Asia Pacific (Mumbai) region
•ap-northeast-2 for instances in the Asia Pacific (Seoul) region
•ap-southeast-1 for instances in the Asia Pacific (Singapore) region
•ap-southeast-2 for instances in the Asia Pacific (Sydney) region
•ap-northeast-1 for instances in the Asia Pacific (Tokyo) region
•eu-central-1 for instances in the EU (Frankfurt) region
•eu-west-1 for instances in the EU (Ireland) region
•sa-east-1 for instances in the South America (São Paulo) region
For Windows Server:
<powershell>
New-Item -Path c:\temp -ItemType "directory" -Force
powershell.exe -Command Read-S3Object -BucketName bucket-name/latest -Key
codedeploy-agent.msi -File c:\temp\codedeploy-agent.msi
Start-Process -Wait -FilePath c:\temp\codedeploy-agent.msi -WindowStyle
Hidden
</powershell>
bucket-name represents one of the following:
•aws-codedeploy-us-east-1 for instances in the US East (N. Virginia) region
•aws-codedeploy-us-west-1 for instances in the US West (N. California) region
•aws-codedeploy-us-west-2 for instances in the US West (Oregon) region
•aws-codedeploy-ap-south-1 for instances in the Asia Pacific (Mumbai) region
•aws-codedeploy-ap-northeast-2 for instances in the Asia Pacific (Seoul) region
•aws-codedeploy-ap-southeast-1 for instances in the Asia Pacific (Singapore) region
•aws-codedeploy-ap-southeast-2 for instances in the Asia Pacific (Sydney) region
•aws-codedeploy-ap-northeast-1 for instances in the Asia Pacific (Tokyo) region
•aws-codedeploy-eu-central-1 for instances in the EU (Frankfurt) region
•aws-codedeploy-eu-west-1 for instances in the EU (Ireland) region
•aws-codedeploy-sa-east-1 for instances in the South America (São Paulo) region
8. Leave the rest of the items on this page unchanged, and choose Next: Add Storage.
API Version 2014-10-06
129

AWS CodeDeploy User Guide
Creating an Instance (AWS CloudFormation Template)
9. Leave the Step 4: Add Storage page unchanged, and choose Next: Tag Instance.
10. On the Step 5: Tag Instance page, with Name displayed in the Key box, type CodeDeployDemo
in the Value box, and then choose Next: Configure Security Group.
Important
The contents of the Key and Value boxes are case-sensitive.
11. On the Step 6: Configure Security Group page, leave the Create a new security group option
selected.
A default SSH role will be configured for Amazon EC2 instances running Amazon Linux, Ubuntu
Server, or RHEL. A default RDP role will be configured for Amazon EC2 instances running
Windows Server.
12. If you want to open the HTTP port, choose the Add Rule button, and from the Type drop-down
list, choose HTTP. Accept the default Source value of Anywhere 0.0.0.0/0, and then choose
Review and Launch.
Note
In a production environment, we recommend restricting access to the SSH, RDP,
and HTTP ports, instead of specifying Anywhere 0.0.0.0/0. AWS CodeDeploy does
not require unrestricted port access and does not require HTTP access. For more
information, see Tips for Securing Your Amazon EC2 Instance.
If a Boot from General Purpose (SSD) dialog box appears, follow the instructions, and then
choose Next.
13. Leave the Step 7: Review Instance Launch page unchanged, and choose Launch.
14. In the Select an existing key pair or create a new key pair dialog box, choose either Choose
an existing key pair or Create a new key pair. If you've already configured an Amazon EC2
instance key pair, you can choose it here.
If you don't already have an Amazon EC2 instance key pair, choose Create a new key pair and
give it a name, such as codedeploydemo. Choose Download Key Pair to download the Amazon
EC2 instance key pair to your computer.
Important
You must have a key pair if you want to access your Amazon EC2 instance with SSH or
RDP.
15. Choose Launch Instances.
16. Choose the ID for your Amazon EC2 instance. Do not continue until the instance has been
launched and passed all checks.
To verify the AWS CodeDeploy agent is running on the instance, see Managing AWS CodeDeploy
Agent Operations (p. 114), and then return to this page. After you do this, the Amazon EC2 instance
will be ready for use in AWS CodeDeploy deployments. The next step is to proceed to Create an
Application (p. 168).
Creating an Amazon EC2 Instance for AWS
CodeDeploy (AWS CloudFormation Template)
You can use our AWS CloudFormation template to quickly launch an Amazon EC2 instance running
Amazon Linux or Windows Server. You can use the AWS CLI, the AWS CodeDeploy console, or the
AWS APIs to launch the instance with the template. In addition to launching the instance, the template
does the following:
• Instructs AWS CloudFormation to give the instance permission to participate in AWS CodeDeploy
deployments.
API Version 2014-10-06
130

AWS CodeDeploy User Guide
Launch an Amazon EC2 Instance with the
AWS CloudFormation Template (AWS CLI)
• Tags the instance so AWS CodeDeploy can find it during a deployment.
• Installs and runs the AWS CodeDeploy agent on the instance.
You don't have to use our AWS CloudFormation to set up an Amazon EC2 instance. For alternatives,
see Working with Instances.
We do not provide an AWS CloudFormation template for Amazon EC2 instances running Ubuntu
Server or Red Hat Enterprise Linux (RHEL).
Important
If you use the AWS CloudFormation template to launch Amazon EC2 instances, the calling
IAM user must have access to AWS CloudFormation and AWS services and actions on which
AWS CloudFormation depends. If you have not followed the steps in Getting Started (p. 11) to
provision the calling IAM user, you must at least attach the following policy:
{
"Version": "2012-10-17",
"Statement": [
{
"Effect": "Allow",
"Action": [
"cloudformation:*",
"codedeploy:*",
"ec2:*",
"iam:AddRoleToInstanceProfile",
"iam:CreateInstanceProfile",
"iam:CreateRole",
"iam:DeleteInstanceProfile",
"iam:DeleteRole",
"iam:DeleteRolePolicy",
"iam:GetRole",
"iam:PassRole",
"iam:PutRolePolicy",
"iam:RemoveRoleFromInstanceProfile"
],
"Resource": "*"
}
]
}
Topics
•Launch an Amazon EC2 Instance with the AWS CloudFormation Template (AWS CLI) (p. 131)
•Launch an Amazon EC2 Instance with the AWS CloudFormation Template (Console) (p. 133)
Launch an Amazon EC2 Instance with the AWS
CloudFormation Template (AWS CLI)
Follow the instructions in Getting Started (p. 11) to install and configure the AWS CLI for use with AWS
CodeDeploy.
Before you call the create-stack command, you must have an Amazon EC2 instance key pair to
enable SSH access to the Amazon EC2 instance running Amazon Linux or RDP access to the Amazon
EC2 instance running Windows Server. Type the key pair name only, not the key pair file extension.
API Version 2014-10-06
131

AWS CodeDeploy User Guide
Launch an Amazon EC2 Instance with the
AWS CloudFormation Template (AWS CLI)
To find a key pair name, open the Amazon EC2 console at https://console.aws.amazon.com/ec2. In the
navigation pane, under Network & Security, choose Key Pairs, and note the key pair name in the list.
To generate a key pair, see Creating Your Key Pair Using Amazon EC2. Be sure the key pair
is created in one of the regions listed in Region and Endpoints in the AWS General Reference.
Otherwise, you won't be able to use the instance key pair with AWS CodeDeploy.
1. Use our AWS CloudFormation template in a call to the create-stack command. This stack will
launch a new Amazon EC2 instance with the AWS CodeDeploy agent installed.
To launch an Amazon EC2 instance running Amazon Linux:
aws cloudformation create-stack \
--stack-name CodeDeployDemoStack \
--template-url templateURL \
--parameters ParameterKey=InstanceCount,ParameterValue=1
ParameterKey=InstanceType,ParameterValue=t1.micro \
ParameterKey=KeyPairName,ParameterValue=keyName
ParameterKey=OperatingSystem,ParameterValue=Linux \
ParameterKey=SSHLocation,ParameterValue=0.0.0.0/0
ParameterKey=TagKey,ParameterValue=Name \
ParameterKey=TagValue,ParameterValue=CodeDeployDemo \
--capabilities CAPABILITY_IAM
To launch an Amazon EC2 instance running Windows Server:
aws cloudformation create-stack --stack-name
CodeDeployDemoStack --template-url templateURL --
parameters ParameterKey=InstanceCount,ParameterValue=1
ParameterKey=InstanceType,ParameterValue=t1.micro
ParameterKey=KeyPairName,ParameterValue=keyName
ParameterKey=OperatingSystem,ParameterValue=Windows
ParameterKey=SSHLocation,ParameterValue=0.0.0.0/0
ParameterKey=TagKey,ParameterValue=Name
ParameterKey=TagValue,ParameterValue=CodeDeployDemo --capabilities
CAPABILITY_IAM
templateURL is one of the following:
•http://s3.amazonaws.com/aws-codedeploy-us-east-1/templates/latest/
CodeDeploy_SampleCF_Template.json (for the US East (N. Virginia) region)
•http://s3-us-west-1.amazonaws.com/aws-codedeploy-us-west-1/templates/
latest/CodeDeploy_SampleCF_Template.json (for the US West (N. California) region)
•http://s3-us-west-2.amazonaws.com/aws-codedeploy-us-west-2/templates/
latest/CodeDeploy_SampleCF_Template.json (for the US West (Oregon) region)
•http://s3-ap-south-1.amazonaws.com/aws-codedeploy-ap-south-1/templates/
latest/CodeDeploy_SampleCF_Template.json (for the Asia Pacific (Mumbai) region)
•http://s3-ap-northeast-2.amazonaws.com/aws-codedeploy-ap-northeast-2/
templates/latest/CodeDeploy_SampleCF_Template.json (for the Asia Pacific (Seoul)
region)
•http://s3-ap-southeast-1.amazonaws.com/aws-codedeploy-ap-southeast-1/
templates/latest/CodeDeploy_SampleCF_Template.json (for the Asia Pacific
(Singapore) region)
•http://s3-ap-southeast-2.amazonaws.com/aws-codedeploy-ap-southeast-2/
templates/latest/CodeDeploy_SampleCF_Template.json (for the Asia Pacific (Sydney)
region)
API Version 2014-10-06
132

AWS CodeDeploy User Guide
Launch an Amazon EC2 Instance with the
AWS CloudFormation Template (Console)
•http://s3-ap-northeast-1.amazonaws.com/aws-codedeploy-ap-northeast-1/
templates/latest/CodeDeploy_SampleCF_Template.json (for the Asia Pacific (Tokyo)
region)
•http://s3-eu-central-1.amazonaws.com/aws-codedeploy-eu-central-1/
templates/latest/CodeDeploy_SampleCF_Template.json (for the EU (Frankfurt)
region)
•http://s3-eu-west-1.amazonaws.com/aws-codedeploy-eu-west-1/templates/
latest/CodeDeploy_SampleCF_Template.json (for the EU (Ireland) region)
•http://s3-sa-east-1.amazonaws.com/aws-codedeploy-sa-east-1/templates/
latest/CodeDeploy_SampleCF_Template.json (for the South America (São Paulo)
region)
This command creates an AWS CloudFormation stack named CodeDeployDemoStack, using the
AWS CloudFormation template in the specified Amazon S3 bucket. The Amazon EC2 instance
is based on the t1.micro instance type, but you can use any type. It is tagged with the value
CodeDeployDemo, but you can tag it with any value. It has the specified instance key pair applied.
2. Call the describe-stacks command to verify the AWS CloudFormation stack named
CodeDeployDemoStack was successfully created:
aws cloudformation describe-stacks --stack-name CodeDeployDemoStack --
query "Stacks[0].StackStatus" --output text
Do not proceed until the value CREATE_COMPLETE is returned.
To verify the AWS CodeDeploy agent is running on the Amazon EC2 instance, see Managing AWS
CodeDeploy Agent Operations (p. 114), and then proceed to Create an Application (p. 168).
Launch an Amazon EC2 Instance with the AWS
CloudFormation Template (Console)
Before you begin, you must have an instance key pair to enable SSH access to the Amazon EC2
instance running Amazon Linux or RDP access to the instance running Windows Server. Type the key
pair name only, not the key pair file extension.
To find a key pair name, open the Amazon EC2 console at https://console.aws.amazon.com/ec2. In the
navigation pane, under Network & Security, choose Key Pairs, and note the key pair name in the list.
To generate a new key pair, see Creating Your Key Pair Using Amazon EC2. Be sure the key pair is
created in one of the regions listed in Region and Endpoints in AWS General Reference. Otherwise,
you won't be able to use the instance key pair with AWS CodeDeploy.
1. Sign in to the AWS Management Console and open the AWS CloudFormation console at https://
console.aws.amazon.com/cloudformation/.
Important
Sign in to the AWS Management Console with the same account you used in Getting
Started (p. 11). On the navigation bar, in the region selector, choose one of the regions
listed in Region and Endpoints in AWS General Reference. AWS CodeDeploy supports
these regions only.
2. Choose Create Stack.
3. In the Name box, type a name for the stack (for example, CodeDeployDemoStack).
4. In Template, choose Specify an Amazon S3 template URL. In the box, type one of the following,
and then choose Next.
API Version 2014-10-06
133

AWS CodeDeploy User Guide
Launch an Amazon EC2 Instance with the
AWS CloudFormation Template (Console)
•http://s3.amazonaws.com/aws-codedeploy-us-east-1/templates/latest/
CodeDeploy_SampleCF_Template.json (for the US East (N. Virginia) region)
•http://s3-us-west-1.amazonaws.com/aws-codedeploy-us-west-1/templates/
latest/CodeDeploy_SampleCF_Template.json (for the US West (N. California) region)
•http://s3-us-west-2.amazonaws.com/aws-codedeploy-us-west-2/templates/
latest/CodeDeploy_SampleCF_Template.json (for the US West (Oregon) region)
•http://s3-ap-south-1.amazonaws.com/aws-codedeploy-ap-south-1/templates/
latest/CodeDeploy_SampleCF_Template.json (for the Asia Pacific (Mumbai) region)
•http://s3-ap-northeast-2.amazonaws.com/aws-codedeploy-ap-northeast-2/
templates/latest/CodeDeploy_SampleCF_Template.json (for the Asia Pacific (Seoul)
region)
•http://s3-ap-southeast-1.amazonaws.com/aws-codedeploy-ap-southeast-1/
templates/latest/CodeDeploy_SampleCF_Template.json (for the Asia Pacific
(Singapore) region)
•http://s3-ap-southeast-2.amazonaws.com/aws-codedeploy-ap-southeast-2/
templates/latest/CodeDeploy_SampleCF_Template.json (for the Asia Pacific (Sydney)
region)
•http://s3-ap-northeast-1.amazonaws.com/aws-codedeploy-ap-northeast-1/
templates/latest/CodeDeploy_SampleCF_Template.json (for the Asia Pacific (Tokyo)
region)
•http://s3-eu-central-1.amazonaws.com/aws-codedeploy-eu-central-1/
templates/latest/CodeDeploy_SampleCF_Template.json (for the EU (Frankfurt)
region)
•http://s3-eu-west-1.amazonaws.com/aws-codedeploy-eu-west-1/templates/
latest/CodeDeploy_SampleCF_Template.json (for the EU (Ireland) region)
•http://s3-sa-east-1.amazonaws.com/aws-codedeploy-sa-east-1/templates/
latest/CodeDeploy_SampleCF_Template.json (for the South America (São Paulo)
region)
5. In Parameters, type the following, and then choose Next.
• For InstanceCount, type the number of instances you want to launch. (We recommend you
leave the default of 1.)
• For InstanceType, type the instance type you want to launch (or leave the default of t1.micro).
• For KeyPairName, type the instance key name.
• For OperatingSystem box, type Windows to launch instances running Windows Server (or
leave the default of Linux).
• For SSHLocation, type the IP address range to use for connecting to the instance with SSH or
RDP (or leave the default of 0.0.0.0/0).
Important
The default of 0.0.0.0/0 is provided for demonstration purposes only. AWS
CodeDeploy does not require Amazon EC2 instances to have unrestricted access to
ports. As a best practice, we recommend restricting access to SSH (and HTTP) ports.
For more information, see Tips for Securing Your Amazon EC2 Instance.
• For TagKey, type the instance tag key AWS CodeDeploy will use to identify the instances
during deployment (or leave the default of Name).
• For TagValue, type the instance tag value AWS CodeDeploy will use to identify the instances
during deployment (or leave the default of CodeDeployDemo).
6. On the Options page, leave the Key and Value boxes blank, and choose Next.
Important
AWS CloudFormation tags are different from AWS CodeDeploy tags. AWS
CloudFormation uses tags to simplify administration of your infrastructure. AWS
API Version 2014-10-06
134

AWS CodeDeploy User Guide
Configuring an Amazon EC2 Instance
CodeDeploy uses tags to identify Amazon EC2 instances. You specified AWS
CodeDeploy tags on the Specify Parameters page.
7. On the Review page, in Capabilities, select the I acknowledge that this template might cause
AWS CloudFormation to create IAM resources box, and then choose Create.
After AWS CloudFormation has created the stack and launched the Amazon EC2 instances, in
the AWS CloudFormation console, CREATE_COMPLETE will be displayed in the Status column.
This process can take several minutes.
To verify the AWS CodeDeploy agent is running on the Amazon EC2 instances, see Managing AWS
CodeDeploy Agent Operations (p. 114), and then proceed to Create an Application (p. 168).
Configuring an Amazon EC2 Instance to Work
with AWS CodeDeploy
These instructions show you how to configure an Amazon EC2 instance running Amazon Linux,
Ubuntu Server, Red Hat Enterprise Linux (RHEL), or Windows Server for use in AWS CodeDeploy
deployments.
Note
If you do not have an Amazon EC2 instance, you can use the AWS CloudFormation template
to launch one running Amazon Linux or Windows Server. We do not provide a template for
Ubuntu Server or RHEL.
To perform the steps on this page:
• An IAM instance profile with permissions to participate in AWS CodeDeploy deployments must be
attached to your instance.
For information about how to create an Amazon EC2 instance, see Working with
Instances (p. 122).
• Your Amazon EC2 instance must be tagged.
• The AWS CodeDeploy agent must be installed and running on the Amazon EC2 instance.
If the agent is not running, deployments will appear to be stalled in a pending state.
Step 1: Verify an IAM Instance Profile Is
Attached to Your Amazon EC2 Instance
1. Sign in to the AWS Management Console and open the Amazon EC2 console at https://
console.aws.amazon.com/ec2/.
2. In the navigation pane, under Instances, choose Instances.
3. Browse to and choose your Amazon EC2 instance in the list.
4. In the details pane, on the Description tab, note the value in the IAM role field, and then proceed
to the next section.
If the field is empty, you cannot use the Amazon EC2 instance. Stop and create an Amazon EC2
instance using the information in Working with Instances (p. 122).
API Version 2014-10-06
135

AWS CodeDeploy User Guide
Step 2: Verify the Attached IAM Instance
Profile Has the Correct Access Permissions
Step 2: Verify the Attached IAM Instance Profile
Has the Correct Access Permissions
1. Open the Identity and Access Management (IAM) console at https://console.aws.amazon.com/
iam/.
2. In the navigation pane, choose Roles.
3. Browse to and choose the IAM role name you noted in step 4 of the previous section.
Note
If you want to use the service role generated by the AWS CloudFormation template
instead of one you created by following the instructions in Step 3: Create a Service
Role (p. 13), note the following:
In some versions of our AWS CloudFormation template, the display name of the
IAM instance profile generated and attached to the Amazon EC2 instances is not
the same as the display name in the IAM console. For example, the IAM instance
profile might have a display name of CodeDeploySampleStack-expnyi6-
InstanceRoleInstanceProfile-IK8J8A9123EX, while the IAM instance profile in
the IAM console might have a display name of CodeDeploySampleStack-expnyi6-
InstanceRole-C5P33V1L64EX.
To help you identify the instance profile in the IAM console, you'll see the prefix of
CodeDeploySampleStack-expnyi6-InstanceRole is the same for both. For
information about why these display names might be different, see Instance Profiles.
4. Choose the Trust Relationships tab. If there is no entry in Trusted Entities that reads The
identity provider(s) ec2.amazonaws.com, you cannot use this Amazon EC2 instance. Stop and
create an Amazon EC2 instance using the information in Working with Instances (p. 122).
If there is an entry that reads The identity provider(s) ec2.amazonaws.com, and you will be
storing your applications in GitHub repositories only, then skip ahead to Step 3: Tag the Amazon
EC2 Instance (p. 137).
If there is an entry that reads The identity provider(s) ec2.amazonaws.com, and you will be
storing your applications in Amazon S3 buckets, choose the Permissions tab.
5. If there is a policy in the Managed Policies area, choose the policy's name, and then choose Edit.
If there is a policy in Inline Policies, under Actions, choose Edit Policy.
6. If you will be storing your applications in Amazon S3 buckets, in the Policy Document box, make
sure "s3:Get*" and "s3:List*" are in the list of specified actions.
It may look something like this:
{"Statement":[{"Resource":"*","Action":[
... Some actions may already be listed here ...
"s3:Get*","s3:List*"
... Some more actions may already be listed here ...
],"Effect":"Allow"}]}
Or it may look something like this:
{
"Version": "2012-10-17",
"Statement": [
{
"Action": [
... Some actions may already be listed here ...
"s3:Get*",
"s3:List*"
API Version 2014-10-06
136

AWS CodeDeploy User Guide
Step 3: Tag the Amazon EC2 Instance
... Some more actions may already be listed here ...
],
...
}
]
}
If "s3:Get*" and "s3:List*" are not in the list of specified actions, choose Edit to add them,
and then choose Save. (If neither "s3:Get*" or "s3:List*" is the last action in the list, be sure
to add a comma after the action, so the policy document will validate.)
Note
We recommend that you restrict this policy to only those Amazon S3 buckets your
Amazon EC2 instances must access. Make sure to give access to the Amazon S3
buckets that contain the AWS CodeDeploy agent. Otherwise, an error may occur when
the AWS CodeDeploy agent is installed or updated on the instances. For example:
{
"Version": "2012-10-17",
"Statement": [
{
"Effect": "Allow",
"Action": [
"s3:Get*",
"s3:List*"
],
"Resource": [
"arn:aws:s3:::codedeploydemobucket/*",
"arn:aws:s3:::aws-codedeploy-us-east-1/*",
"arn:aws:s3:::aws-codedeploy-us-west-1/*",
"arn:aws:s3:::aws-codedeploy-us-west-2/*",
"arn:aws:s3:::aws-codedeploy-ap-northeast-1/*",
"arn:aws:s3:::aws-codedeploy-ap-northeast-2/*",
"arn:aws:s3:::aws-codedeploy-ap-south-1/*",
"arn:aws:s3:::aws-codedeploy-ap-southeast-1/*",
"arn:aws:s3:::aws-codedeploy-ap-southeast-2/*",
"arn:aws:s3:::aws-codedeploy-eu-central-1/*",
"arn:aws:s3:::aws-codedeploy-eu-west-1/*",
"arn:aws:s3:::aws-codedeploy-sa-east-1/*"
]
}
]
}
Step 3: Tag the Amazon EC2 Instance
For instructions about how to tag the Amazon EC2 instance so that AWS CodeDeploy can find it during
a deployment, see Working with Tags in the Console, and then return to this page.
Note
You can tag the Amazon EC2 instance with any key and value you like. Just make sure to
specify this key and value when you deploy to it.
API Version 2014-10-06
137

AWS CodeDeploy User Guide
Step 4: Install the AWS CodeDeploy
Agent on the Amazon EC2 Instance
Step 4: Install the AWS CodeDeploy Agent on
the Amazon EC2 Instance
For instructions about how to install the AWS CodeDeploy agent on the Amazon EC2 instance and
verify it is running, see Managing AWS CodeDeploy Agent Operations (p. 114), and then proceed to
Create an Application (p. 168).
View Instance Details with AWS CodeDeploy
You can use the AWS CodeDeploy console, the AWS CLI, or the AWS CodeDeploy APIs to view
details about instances used in a deployment.
For information about using AWS CodeDeploy API actions to view instances, see
GetDeploymentInstance, ListDeploymentInstances, and ListOnPremisesInstances.
Topics
•View Instance Details (Console) (p. 138)
•View Instance Details (CLI) (p. 138)
View Instance Details (Console)
To view instance details:
1. Sign in to the AWS Management Console and open the AWS CodeDeploy console at https://
console.aws.amazon.com/codedeploy.
Note
Sign in with the same account or IAM user information you used in Getting Started (p. 11).
2. On the AWS CodeDeploy menu, choose Deployments.
Note
If no entries are displayed, make sure the correct region is selected. On the navigation bar,
in the region selector, choose one of one of the regions listed in Region and Endpoints in
the AWS General Reference. AWS CodeDeploy supports these regions only.
3. To display deployment details, choose the arrow next to the deployment ID that corresponds to the
instance.
4. In Instances, choose View All Instances.
5. To see information about individual deployment lifecycle events for an instance, on the deployment
details page, in the Events column, choose View Events.
Tip
If Failed is displayed for any of the lifecycle events, on the instance details page, choose
View Logs, View in EC2, or both. You can find troubleshooting tips in Troubleshoot
Instance Issues (p. 275).
6. If you want to see more information about an Amazon EC2 instance, but View in EC2 is not
available on the instance details page, return to the deployment details page, and in the Instance ID
column, choose the ID of the Amazon EC2 instance.
View Instance Details (CLI)
To use the AWS CLI to view instance details, call either the get-deployment-instance command
or the list-deployment-instances command.
API Version 2014-10-06
138

AWS CodeDeploy User Guide
On-Premises Instances
To view details about a single instance, call the get-deployment-instance command, specifying:
• The unique deployment ID. To get the deployment ID, call the list-deployments command.
• The unique instance ID. To get the instance ID, call the list-deployment-instances command.
To view a list of IDs for instances used in a deployment, call the list-deployment-instances command,
specifying:
• The unique deployment ID. To get the deployment ID, call the list-deployments command.
• Optionally, whether to include only specific instance IDs by their deployment status. (If not specified,
all matching instance IDs will be listed, regardless of their deployment status.)
On-Premises Instances with AWS CodeDeploy
An on-premises instance is any physical device that is not an Amazon EC2 instance that can run the
AWS CodeDeploy agent and connect to public AWS service endpoints. You can use AWS CodeDeploy
to simultaneously deploy an application to Amazon EC2 instances running in the cloud and to desktop
PCs running in your office.
Comparing On-Premises Instances to Amazon
EC2 Instances
The following table compares on-premises instances and Amazon EC2 instances:
Subject On-Premises Instances Amazon EC2 Instances
Requires you to install and
run a version of the AWS
CodeDeploy agent that's
compatible with the operating
system running on the instance.
Yes Yes
Requires the instance to be
able to connect to the AWS
CodeDeploy service.
Yes Yes
Requires an IAM instance
profile to be attached to the
instance. The IAM instance
profile must have permissions
to participate in AWS
CodeDeploy deployments. For
information, see Step 4: Create
an IAM Instance Profile (p. 17).
No Yes
Requires you to create an IAM
user for each instance, and
requires you to store the IAM
user's account credentials in
plain text on the corresponding
instance.
Yes No
Requires you to register each
instance with AWS CodeDeploy
before you can deploy to it.
Yes No
API Version 2014-10-06
139

AWS CodeDeploy User Guide
Deploying Applications with AWS
CodeDeploy to On-Premises Instances
Subject On-Premises Instances Amazon EC2 Instances
Requires you to tag each
instance before AWS
CodeDeploy can deploy to it.
Yes Yes
Can participate in Auto Scaling
and Elastic Load Balancing
scenarios as part of AWS
CodeDeploy deployments.
No Yes
Can be deployed from Amazon
S3 buckets and GitHub
repositories.
Yes Yes
Can support triggers that
prompt the sending of SMS
or email notifications when
specified events occur in
deployments or instances.
Yes Yes
Is subject to being billed for
associated deployments. Yes No
Deploying Applications with AWS CodeDeploy
to On-Premises Instances
To deploy an AWS CodeDeploy application revision to an on-premises instance:
1. Configure each on-premises instance, register it with AWS CodeDeploy, and then tag it. You
can use the AWS CLI or you can do this yourself. For more information, see Configuring an On-
Premises Instance (p. 140).
2. Deploy application revisions to the on-premises instance. To experiment with creating and
deploying a sample application revision to a correctly configured and registered on-premises
instance, see Tutorial: Deploy an Application to an On-Premises Instance (p. 73).
If you don't want an on-premises instance to be used in deployments anymore, you can simply
remove the on-premises instance tags from the deployment groups. For a more robust approach,
remove the on-premises instance tags from the instance. You can also explicitly deregister an on-
premises instance so it can no longer be used in any deployments. For more information, see Next
Steps (p. 155).
Configuring an On-Premises Instance to Work
with AWS CodeDeploy
These instructions show you how to configure an on-premises instance—that is, a physical device that
is not an Amazon EC2 instance—and then register and tag it with AWS CodeDeploy so it can be used
in deployments. These instructions also show you how to use AWS CodeDeploy to get information
about on-premises instances and deregister an on-premises instance after you're no longer planning to
deploy to it.
For information about on-premises instances and how they work with AWS CodeDeploy, see On-
Premises Instances (p. 139).
API Version 2014-10-06
140

AWS CodeDeploy User Guide
Prerequisites for Configuring
an On-Premises Instance
Topics
•Prerequisites for Configuring an On-Premises Instance (p. 141)
•Configure and Register an On-Premises Instance (CLI) (p. 142)
•Manually Configure and Register an On-Premises Instance (p. 145)
•Next Steps (p. 155)
Prerequisites for Configuring an On-Premises
Instance
The IAM user you will be using to register the on-premises instance with AWS CodeDeploy must have
permissions to complete the registration (and to deregister the on-premises instance, as needed). In
addition to the policy described in Getting Started (p. 11), make sure the calling IAM user also has the
following additional policy attached:
{
"Version": "2012-10-17",
"Statement": [
{
"Effect": "Allow",
"Action": [
"iam:CreateAccessKey",
"iam:CreateUser",
"iam:DeleteAccessKey",
"iam:DeleteUser",
"iam:DeleteUserPolicy",
"iam:ListAccessKeys",
"iam:ListUserPolicies",
"iam:PutUserPolicy",
"iam:GetUser"
],
"Resource": "*"
}
]
}
The device you want to prepare, register, and tag as an on-premises instance with AWS CodeDeploy
must meet the following minimum requirements:
• The on-premises instance must be running a supported operating system. For a list, see Operating
Systems Supported by the AWS CodeDeploy Agent (p. 109).
If your operating system is not supported, the AWS CodeDeploy agent is available as open source
for you to adapt to your needs. For more information, see the AWS CodeDeploy Agent repository in
GitHub.
• The on-premises instance must be able to connect to public AWS service endpoints to communicate
with the AWS CodeDeploy service.
Note
The AWS CodeDeploy agent communicates outbound using HTTPS over port 443.
• The local or network account used on the on-premises instance to configure the on-premises
instance must be able to run either as sudo or root (for Ubuntu Server) or as an administrator (for
Windows Server).
If your device meets these requirements, continue with the following steps.
API Version 2014-10-06
141

AWS CodeDeploy User Guide
Configure and Register an On-Premises Instance (CLI)
Configure and Register an On-Premises Instance
(CLI)
To configure an on-premises instance and register and tag it with AWS CodeDeploy with the least
amount of effort, follow these instructions. Alternatively, if you want to configure an on-premises
instance and register and tag it with AWS CodeDeploy mostly on your own, follow the instructions in
Manually Configure and Register an On-Premises Instance (p. 145).
Topics
•Step 1: Install and Configure the AWS CLI on the On-Premises Instance (p. 142)
•Step 2: Call the Register Command (p. 143)
•Step 3: Call the Install Command (p. 144)
•Step 4: Deploy Application Revisions to the On-Premises Instance (p. 145)
•Step 5: Track Deployments to the On-Premises Instance (p. 145)
Step 1: Install and Configure the AWS CLI on the On-
Premises Instance
1. Install the AWS CLI on the on-premises instance. Follow the instructions in Getting Set Up with the
AWS Command Line Interface in the AWS Command Line Interface User Guide.
Note
AWS CodeDeploy commands for working with on-premises instances are available in
AWS CLI version 1.7.19 and later. If you have the AWS CLI already installed, call aws --
version to check its version.
2. Configure the AWS CLI on the on-premises instance. Follow the instructions in Configuring the
AWS Command Line Interface in AWS Command Line Interface User Guide.
Important
As you configure the AWS CLI (for example, by calling the aws configure command),
be sure to specify the secret key ID and secret access key of an IAM user who has, at
minimum, the following AWS access permissions in addition to the permissions specified
in Prerequisites for Configuring an On-Premises Instance (p. 141). This establishes the
correct permissions for downloading and installing the AWS CodeDeploy agent on the on-
premises instance. The complete set of access permissions should look similar to this:
{
"Version": "2012-10-17",
"Statement" : [
{
"Effect" : "Allow",
"Action" : [
"codedeploy:*",
"iam:CreateAccessKey",
"iam:CreateUser",
"iam:DeleteAccessKey",
"iam:DeleteUser",
"iam:DeleteUserPolicy",
"iam:ListAccessKeys",
"iam:ListUserPolicies",
"iam:PutUserPolicy",
"iam:GetUser",
"tag:GetTags",
"tag:GetResources"
API Version 2014-10-06
142

AWS CodeDeploy User Guide
Configure and Register an On-Premises Instance (CLI)
],
"Resource" : "*"
},
{
"Effect" : "Allow",
"Action" : [
"s3:Get*",
"s3:List*"
],
"Resource" : [
"arn:aws:s3:::aws-codedeploy-us-east-1/*",
"arn:aws:s3:::aws-codedeploy-us-west-1/*",
"arn:aws:s3:::aws-codedeploy-us-west-2/*",
"arn:aws:s3:::aws-codedeploy-ap-northeast-1/*",
"arn:aws:s3:::aws-codedeploy-ap-northeast-2/*",
"arn:aws:s3:::aws-codedeploy-ap-south-1/*",
"arn:aws:s3:::aws-codedeploy-ap-southeast-1/*",
"arn:aws:s3:::aws-codedeploy-ap-southeast-2/*",
"arn:aws:s3:::aws-codedeploy-eu-central-1/*",
"arn:aws:s3:::aws-codedeploy-eu-west-1/*",
"arn:aws:s3:::aws-codedeploy-sa-east-1/*"
]
}
]
}
Step 2: Call the Register Command
For this step, we assume you are registering the on-premises instance from the on-premises instance
itself. You can also register an on-premises instance from a separate device or instance that has the
AWS CLI installed and configured as described in the preceding step.
Use the AWS CLI to call the register command, specifying:
• A name that uniquely identifies the on-premises instance to AWS CodeDeploy (with the --
instance-name option).
Important
To help identify the on-premises instance later, especially for debugging purposes, we
strongly recommend that you specify a name that maps to some unique characteristic of
the on-premises instance (for example, the serial number or some unique internal asset
identifier, if applicable). If you specify a MAC address for a name, be aware that MAC
addresses contain characters that AWS CodeDeploy does not allow, such as colon (:). For
a list of allowed characters, see Limits (p. 265).
• Optionally, the ARN of an existing IAM user that you want to associate with this on-premises
instance (with the --iam-user-arn option). To get the ARN of an IAM user, call the get-user
command, or choose the IAM user name in the Users section of the IAM console and then find the
User ARN value in the Summary section. If this option is not specified, AWS CodeDeploy will create
a new IAM user on your behalf in your AWS account and associate it with the on-premises instance.
Important
If you specify the --iam-user-arn option, you must also manually create the on-premises
instance configuration file, as described in Step 4: Add a Configuration File to the On-
Premises Instance (p. 150).
You can associate only one IAM user with only one on-premises instance. Trying to
associate a single IAM user with multiple on-premises instances can result in errors,
failed deployments to those on-premises instances, or deployments to those on-premises
instances that are stuck in a perpetual pending state.
API Version 2014-10-06
143

AWS CodeDeploy User Guide
Configure and Register an On-Premises Instance (CLI)
• Optionally, a set of on-premises instance tags (with the --tags option) that AWS CodeDeploy will
use to identify the set of Amazon EC2 instances to which to deploy. Specify each tag with Key=tag-
key,Value=tag-value (for example, Key=Name,Value=Beta Key=Name,Value=WestRegion).
If this option is not specified, no tags will be registered. To register tags later, call the add-tags-to-on-
premises-instances command.
• Optionally, the AWS region where the on-premises instance will be registered with AWS CodeDeploy
(with the --region option). This must be one of the supported regions listed in Region and
Endpoints in AWS General Reference (for example, us-west-2). If this option is not specified, the
default AWS region associated with the calling IAM user will be used.
For example:
aws deploy register --instance-name AssetTag12010298EX --iam-user-
arn arn:aws:iam::80398EXAMPLE:user/CodeDeployUser-OnPrem --tags
Key=Name,Value=CodeDeployDemo-OnPrem --region us-west-2
The register command does the following:
1. If no existing IAM user is specified, creates a new IAM user, attaches the required permissions to
it, and generates a corresponding secret key and secret access key. The on-premises instance
will use this IAM user and its permissions and credentials to authenticate and interact with AWS
CodeDeploy.
2. Registers the on-premises instance with AWS CodeDeploy.
3. If specified, associates in the AWS CodeDeploy system the tags that are specified with the --tags
option with the registered on-premises instance name.
4. If a new IAM user was created, also creates the required configuration file in the same directory from
which the register command was called.
If this command encounters any errors, an error message appears, describing how you can manually
complete the remaining steps. Otherwise, a success message appears, describing how to call the
install command as listed in the next step.
Step 3: Call the Install Command
From the on-premises instance, use the AWS CLI to call the install command, specifying:
• The path to the configuration file (with the --config-file option).
• Optionally, whether to replace the configuration file that already exists on the on-premises instance
(with the --override-config option). If not specified, the existing configuration file will not be
replaced.
• Optionally, the AWS region where the on-premises instance will be registered with AWS CodeDeploy
(with the --region option). This must be one of the supported regions listed in Region and
Endpoints in AWS General Reference (for example, us-west-2). If this option is not specified, the
default AWS region associated with the calling IAM user will be used.
• Optionally, a custom location from which to install the AWS CodeDeploy agent (with the --agent-
installer option). This option is useful for installing a custom version of the AWS CodeDeploy
agent that AWS CodeDeploy does not officially support (such as a custom version based on the
AWS CodeDeploy agent repository in GitHub). The value must be the path to an Amazon S3 bucket
that contains either an AWS CodeDeploy agent installation script (for Linux- or Unix-based operating
systems, similar to the install file in the AWS CodeDeploy agent repository in GitHub) or to an AWS
CodeDeploy agent installer package (.msi) file (for Windows-based operating systems). If this option
is not specified, AWS CodeDeploy will make its best attempt to install from its own location an
officially supported version of the AWS CodeDeploy agent that is compatible with the operating
system on the on-premises instance.
API Version 2014-10-06
144

AWS CodeDeploy User Guide
Manually Configure and Register
an On-Premises Instance
For example:
aws deploy install --override-config --config-file /tmp/
codedeploy.onpremises.yml --region us-west-2 --agent-installer s3://aws-
codedeploy-us-west-2/latest/codedeploy-agent.msi
The install command does the following:
1. Checks whether the on-premises instance is an Amazon EC2 instance. If it is, an error message
appears.
2. If the on-premises instance configuration file does not already exist with the expected file name and
location on the on-premises instance (for Ubuntu Server and Red Hat Enterprise Linux (RHEL)), this
is /etc/codedeploy-agent/conf/codedeploy.onpremises.yml. For Windows Server, this is
C:\ProgramData\Amazon\CodeDeploy\conf.onpremises.yml). If the --override-config
option was specified, creates or overwrites the file.
3. Installs the AWS CodeDeploy agent on the on-premises instance and then starts it.
Step 4: Deploy Application Revisions to the On-Premises
Instance
You are now ready to deploy application revisions to the registered and tagged on-premises instance.
You deploy application revisions to on-premises instances in a way similar to deploying application
revisions to Amazon EC2 instances. For instructions, see Deploy a Revision (p. 197). These
instructions link to prerequisites, including creating an application, creating a deployment group, and
preparing an application revision. If you need a simple sample application revision to deploy, you
can create the one described in Step 2: Create a Sample Application Revision (p. 74) in the Tutorial:
Deploy an Application to an On-Premises Instance (p. 73).
Important
If you choose to reuse an existing AWS CodeDeploy service role as part of creating a
deployment group that targets on-premises instances, you must include Tag:get* to the
Action portion of the service role's policy statement. For more information, see Step 3:
Create a Service Role (p. 13).
Step 5: Track Deployments to the On-Premises Instance
After you deploy an application revision to registered and tagged on-premises instances, you can track
the deployment's progress.
You track deployments to on-premises instances in a way similar to tracking deployments to Amazon
EC2 instances. For instructions, see View Deployment Details (p. 196).
For more options, see Next Steps (p. 155).
Manually Configure and Register an On-
Premises Instance
To configure an on-premises instance and register and tag it with AWS CodeDeploy mostly on your
own, follow these instructions.
Topics
•Step 1: Create an IAM User on Behalf of the On-Premises Instance (p. 146)
API Version 2014-10-06
145
AWS CodeDeploy User Guide
Manually Configure and Register
an On-Premises Instance
•Step 2: Assign Permissions to the IAM User (p. 147)
•Step 3: Get the IAM User Credentials (p. 149)
•Step 4: Add a Configuration File to the On-Premises Instance (p. 150)
•Step 5: Install and Configure the AWS CLI (p. 151)
•Step 6: Set the AWS_REGION Environment Variable (Ubuntu Server and RHEL Only) (p. 152)
•Step 7: Install the AWS CodeDeploy Agent (p. 153)
•Step 8: Register the On-Premises Instance with AWS CodeDeploy (p. 153)
•Step 9: Tag the On-Premises Instance (p. 154)
•Step 10: Deploy Application Revisions to the On-Premises Instance (p. 154)
•Step 11: Track Deployments to the On-Premises Instance (p. 155)
Step 1: Create an IAM User on Behalf of the On-Premises
Instance
Create an IAM user that the on-premises instance will use to authenticate and interact with AWS
CodeDeploy. You can use the AWS CLI or the IAM console to create a new IAM user.
Important
You must create a separate IAM user for each participating on-premises instance. If you
try to reuse an individual IAM user for multiple on-premises instances, you may not be able
to successfully resister or tag those on-premises instances with AWS CodeDeploy, and
deployments to those on-premises instances may be stuck in a perpetual pending state or fail
altogether.
To create the IAM user (CLI)
1. Call the create-user command (with the --user-name option), specifying a name for the IAM user
(for example, CodeDeployUser-OnPrem):
aws iam create-user --user-name CodeDeployUser-OnPrem
2. In the output of the call to the create-user command, note the value of the Arn field. You
will need the user ARN later in Step 8: Register the On-Premises Instance with AWS
CodeDeploy (p. 153).
3. Call the create-access-key command, specifying the name of the newly created user (with the --
user-name option):
aws iam create-access-key --user-name CodeDeployUser-OnPrem
4. In the output of the call to the create-access-key command, note the value of the AccessKeyId
and SecretAccessKey fields. You will need them later in Step 4: Add a Configuration File to the
On-Premises Instance (p. 150).
Important
This will be the only time that you will have access to this secret access key. If you forget
or lose access to this secret access key, you will need to generate a new one, which you
can learn to do later in Step 3: Get the IAM User Credentials (p. 149).
To create the IAM user (console)
1. Sign in to the Identity and Access Management (IAM) console at https://console.aws.amazon.com/
iam/.
2. In the navigation pane, choose Users.
API Version 2014-10-06
146

AWS CodeDeploy User Guide
Manually Configure and Register
an On-Premises Instance
3. Choose Create New Users.
4. In the first Enter User Names box, type a name for the IAM user (for example,
CodeDeployUser-OnPrem).
5. With the Generate an access key for each user box already selected, choose Create.
6. Choose Show User Security Credentials and make a note of the access key ID and the secret
access key. You will need this information later in Step 4: Add a Configuration File to the On-
Premises Instance (p. 150). Alternatively, you can choose Download Credentials to save a
copy of the access key ID and the secret access key to a convenient location.
Important
Unless you make a note of or download the credentials, this will be the only time you will
have access to this secret access key. If you forget or lose access to this secret access
key, you will need to generate a new one, which you can learn to do later in Step 3: Get
the IAM User Credentials (p. 149).
7. Choose Close to return to the list of users.
8. In the list of users, choose the name of the newly created IAM user.
9. In the Summary area, note the value of the User ARN field. You will need this information later in
Step 4: Add a Configuration File to the On-Premises Instance (p. 150) and Step 8: Register the
On-Premises Instance with AWS CodeDeploy (p. 153).
Step 2: Assign Permissions to the IAM User
If your on-premises instance will be deploying application revisions from Amazon S3 buckets, you must
assign to the IAM user the permissions to interact with those buckets. You can use the AWS CLI or the
IAM console to assign permissions.
Note
If you will be deploying application revisions only from GitHub repositories, skip this step and
go directly to Step 3: Get the IAM User Credentials (p. 149). (You will still need information
about the IAM user that you created earlier in Step 1: Create an IAM User on Behalf of the
On-Premises Instance (p. 146). It will be used in later steps.)
To assign permissions (CLI)
1. Create a file with the following policy contents on the Amazon EC2 instance or device
you are using to call the AWS CLI. Name the file something like CodeDeploy-OnPrem-
Permissions.json, and then save the file.
{
"Version": "2012-10-17",
"Statement": [
{
"Action": [
"s3:Get*",
"s3:List*"
],
"Effect": "Allow",
"Resource": "*"
}
]
}
Note
We recommend that you restrict this policy to only those Amazon S3 buckets your on-
premises instance needs to access. If you restrict this policy, make sure to also give
access to the Amazon S3 buckets that contain the AWS CodeDeploy agent. Otherwise,
API Version 2014-10-06
147

AWS CodeDeploy User Guide
Manually Configure and Register
an On-Premises Instance
an error may occur whenever the AWS CodeDeploy agent is installed or updated on the
associated on-premises instance. For example:
{
"Version": "2012-10-17",
"Statement": [
{
"Effect": "Allow",
"Action": [
"s3:Get*",
"s3:List*"
],
"Resource": [
"arn:aws:s3:::codedeploydemobucket/*",
"arn:aws:s3:::aws-codedeploy-us-east-1/*",
"arn:aws:s3:::aws-codedeploy-us-west-1/*",
"arn:aws:s3:::aws-codedeploy-us-west-2/*",
"arn:aws:s3:::aws-codedeploy-ap-northeast-1/*",
"arn:aws:s3:::aws-codedeploy-ap-northeast-2/*",
"arn:aws:s3:::aws-codedeploy-ap-south-1/*",
"arn:aws:s3:::aws-codedeploy-ap-southeast-1/*",
"arn:aws:s3:::aws-codedeploy-ap-southeast-2/*",
"arn:aws:s3:::aws-codedeploy-eu-central-1/*",
"arn:aws:s3:::aws-codedeploy-eu-west-1/*",
"arn:aws:s3:::aws-codedeploy-sa-east-1/*"
]
}
]
}
2. Call the put-user-policy command, specifying the name of the IAM user (with the --user-name
option), a name for the policy (with the --policy-name option), and the path to the newly
created policy document (with the --policy-document option). For example, assuming that the
CodeDeploy-OnPrem-Permissions.json file is in the same directory (folder) from which you're
calling this command:
aws iam put-user-policy --user-name CodeDeployUser-OnPrem --policy-name
CodeDeploy-OnPrem-Permissions --policy-document file://CodeDeploy-OnPrem-
Permissions.json
To assign permissions (console)
1. Open the Identity and Access Management (IAM) console at https://console.aws.amazon.com/
iam/.
2. In the navigation pane, choose Policies, and then choose Create Policy. (If a Get Started button
appears, choose it, and then choose Create Policy.)
3. Next to Create Your Own Policy, choose Select.
4. In the Policy Name box, type a name for this policy (for example, CodeDeploy-OnPrem-
Permissions).
5. In the Policy Document box, type or paste the following permissions expression, which allows
AWS CodeDeploy to deploy application revisions from any Amazon S3 bucket specified in the
policy to the on-premises instance on behalf of the IAM user account:
{
"Version": "2012-10-17",
API Version 2014-10-06
148

AWS CodeDeploy User Guide
Manually Configure and Register
an On-Premises Instance
"Statement": [
{
"Action": [
"s3:Get*",
"s3:List*"
],
"Effect": "Allow",
"Resource": "*"
}
]
}
6. Choose Create Policy.
7. In the navigation pane, choose Users.
8. In the list of users, browse to and choose the name of the IAM user you created in Step 1: Create
an IAM User on Behalf of the On-Premises Instance (p. 146).
9. Choose the Permissions tab.
10. In the Managed Policies area, choose Attach Policy.
11. Select the policy named CodeDeploy-OnPrem-Permissions, and then choose Attach Policy.
Step 3: Get the IAM User Credentials
Get the secret key ID and the secret access key for the IAM user. You will need them for Step 4: Add
a Configuration File to the On-Premises Instance (p. 150). You can use the AWS CLI or the IAM
console to get the secret key ID and the secret access key.
Note
If you already have the secret key ID and the secret access key, skip this step and go directly
to Step 4: Add a Configuration File to the On-Premises Instance (p. 150).
To get the credentials (CLI)
1. Call the list-access-keys command, specifying the name of the IAM user (with the --user-name
option) and querying for just the access key IDs (with the --query and --output options). For
example:
aws iam list-access-keys --user-name CodeDeployUser-OnPrem --query
"AccessKeyMetadata[*].AccessKeyId" --output text
2. If no keys appear in the output or information about only one key appears in the output, call
the create-access-key command, specifying the name of the IAM user (with the --user-name
option):
aws iam create-access-key --user-name CodeDeployUser-OnPrem
In the output of the call to the create-access-key command, note the value of the AccessKeyId
and SecretAccessKey fields. You will need this information in Step 4: Add a Configuration File to
the On-Premises Instance (p. 150).
Important
This will be the only time you will have access to this secret access key. If you forget or
lose access to this secret access key, you will need to generate a new one by following
the steps in Step 3: Get the IAM User Credentials (p. 149).
3. If, however, two access keys are already listed, you must delete at least one of them by calling the
delete-access-key command, specifying the name of the IAM user (with the --user-name option)
API Version 2014-10-06
149

AWS CodeDeploy User Guide
Manually Configure and Register
an On-Premises Instance
and the ID of the access key to delete (with the --access-key-id option). Then call the create-
access-key command, as described earlier in this step. Here's an example of calling the delete-
access-key command:
aws iam delete-access-key --user-name CodeDeployUser-OnPrem --access-key-
id access-key-ID
Important
If you call the delete-access-key command to delete one of these access keys, and
an on-premises instance is already using this access key as described in Step 4: Add
a Configuration File to the On-Premises Instance (p. 150), you will need to follow the
instructions in Step 4: Add a Configuration File to the On-Premises Instance (p. 150)
again to specify a different access key ID and secret access key associated with this
IAM user. Otherwise, any deployments to that on-premises instance may be stuck in a
perpetual pending state or fail altogether.
To get the credentials (console)
1. 1. Open the Identity and Access Management (IAM) console at https://
console.aws.amazon.com/iam/.
2. If the list of users is not displayed, in the navigation pane, choose Users.
3. In the list of users, browse to and choose the name of the IAM user you created in Step 1:
Create an IAM User on Behalf of the On-Premises Instance (p. 146).
2. Choose the Security Credentials tab.
3. If no keys or only one key is listed, choose Create Access Key.
If two access keys are listed, you must delete at least one of them. Choose Delete next to one of
the access keys, and then choose Create Access Key.
Important
If you choose Delete next to one of these access keys, and an on-premises instance
is already using this access key as described in Step 4: Add a Configuration File to the
On-Premises Instance (p. 150), you will need to follow the instructions in Step 4: Add
a Configuration File to the On-Premises Instance (p. 150) again to specify a different
access key ID and secret access key associated with this IAM user. Otherwise, any
deployments to that on-premises instance may be stuck in a perpetual pending state or
fail altogether.
4. Choose Show User Security Credentials and note the access key ID and secret access
key. You will need this information for the next step. Alternatively, you can choose Download
Credentials to save a copy of the access key ID and the secret access key.
Important
Unless you make a note of or download the credentials, this will be the only time you will
have access to this secret access key. If you forget or lose access to this secret access
key, you will need to generate a new one by following the steps in Step 3: Get the IAM
User Credentials (p. 149).
5. Choose Close to return to the Users > IAM User Name page.
Step 4: Add a Configuration File to the On-Premises
Instance
Add a configuration file to the on-premises instance, using root or administrator permissions. This
configuration file will be used to declare the IAM user credentials and the target AWS region to be used
for AWS CodeDeploy. The file must be added to a specific location on the on-premises instance; the
API Version 2014-10-06
150

AWS CodeDeploy User Guide
Manually Configure and Register
an On-Premises Instance
file must include the IAM user's ARN, secret key ID, secret access key, and the target AWS region; and
the file must follow a specific format.
1. Create a file named codedeploy.onpremises.yml (for an Ubuntu Server or RHEL on-premises
instance) or conf.onpremises.yml (for a Windows Server on-premises instance) in the
following location on the on-premises instance:
• For Ubuntu Server: /etc/codedeploy-agent/conf
• For Windows Server: C:\ProgramData\Amazon\CodeDeploy
2. Use a text editor to add the following information to the newly created
codedeploy.onpremises.yml or conf.onpremises.yml file:
---
aws_access_key_id: secret-key-id
aws_secret_access_key: secret-access-key
iam_user_arn: IAM-user-ARN
region: supported-region
Where:
•secret-key-id is the corresponding IAM user's secret key ID you noted in Step 1: Create
an IAM User on Behalf of the On-Premises Instance (p. 146) or Step 3: Get the IAM User
Credentials (p. 149).
•secret-access-key is the corresponding IAM user's secret access key you noted in Step 1:
Create an IAM User on Behalf of the On-Premises Instance (p. 146) or Step 3: Get the IAM
User Credentials (p. 149).
•IAM-user-ARN is the corresponding IAM user's ARN you noted earlier in Step 1: Create an IAM
User on Behalf of the On-Premises Instance (p. 146).
•supported-region is the identifier of a region supported by AWS CodeDeploy where your
AWS CodeDeploy applications, deployment groups, and application revisions are located (for
example, us-west-2). For a list of regions, see Region and Endpoints in the AWS General
Reference.
Important
If you chose Delete next to one of the access keys in Step 3: Get the IAM User
Credentials (p. 149), and your on-premises instance is already using the associated
access key ID and secret access key, you will need to follow the instructions in Step 4:
Add a Configuration File to the On-Premises Instance (p. 150) to specify a different
access key ID and secret access key associated with this IAM user. Otherwise, any
deployments to your on-premises instance may be stuck in a perpetual pending state or
fail altogether.
Step 5: Install and Configure the AWS CLI
Install and configure the AWS CLI on the on-premises instance. (The AWS CLI will be used in Step 7:
Install the AWS CodeDeploy Agent (p. 153) to download and install the AWS CodeDeploy agent on
the on-premises instance.)
1. To install the AWS CLI on the on-premises instance, follow the instructions in Getting Set Up with
the AWS Command Line Interface in the AWS Command Line Interface User Guide.
Note
AWS CodeDeploy commands for working with on-premises instances became available
starting with version 1.7.19 of the AWS CLI. If you have a version of the AWS CLI already
installed, you can check its version by calling aws --version.
API Version 2014-10-06
151

AWS CodeDeploy User Guide
Manually Configure and Register
an On-Premises Instance
2. To configure the AWS CLI on the on-premises instance, follow the instructions in Configuring the
AWS Command Line Interface in the AWS Command Line Interface User Guide.
Important
As you configure the AWS CLI (for example, by calling the aws configure command),
be sure to specify the secret key ID and secret access key of an IAM user that has, at
minimum, the following AWS access permissions in addition to the access permissions
specified in the Prerequisites for Configuring an On-Premises Instance (p. 141). This
establishes the correct permissions for you to download and install the AWS CodeDeploy
agent on the on-premises instance:
{
"Version": "2012-10-17",
"Statement" : [
{
"Effect" : "Allow",
"Action" : [
"codedeploy:*"
],
"Resource" : "*"
},
{
"Effect" : "Allow",
"Action" : [
"s3:Get*",
"s3:List*"
],
"Resource" : [
"arn:aws:s3:::aws-codedeploy-us-east-1/*",
"arn:aws:s3:::aws-codedeploy-us-west-1/*",
"arn:aws:s3:::aws-codedeploy-us-west-2/*",
"arn:aws:s3:::aws-codedeploy-eu-central-1/*",
"arn:aws:s3:::aws-codedeploy-eu-west-1/*",
"arn:aws:s3:::aws-codedeploy-ap-northeast-1/*",
"arn:aws:s3:::aws-codedeploy-ap-northeast-2/*",
"arn:aws:s3:::aws-codedeploy-ap-south-1/*",
"arn:aws:s3:::aws-codedeploy-ap-southeast-1/*",
"arn:aws:s3:::aws-codedeploy-ap-southeast-2/*",
"arn:aws:s3:::aws-codedeploy-sa-east-1/*"
]
}
]
}
These access permissions can be assigned to either the IAM user you created in Step
1: Create an IAM User on Behalf of the On-Premises Instance (p. 146) or to a different
IAM user. To assign these permissions to an IAM user, follow the instructions in Step
1: Create an IAM User on Behalf of the On-Premises Instance (p. 146), using these
access permissions instead of the ones in that step.
Step 6: Set the AWS_REGION Environment Variable
(Ubuntu Server and RHEL Only)
If you are not running Ubuntu Server or RHEL on your on-premises instance, skip this step and go
directly to Step 7: Install the AWS CodeDeploy Agent (p. 153).
API Version 2014-10-06
152

AWS CodeDeploy User Guide
Manually Configure and Register
an On-Premises Instance
Otherwise, prepare to install the AWS CodeDeploy agent on an Ubuntu Server or RHEL on-
premises instance and enable the Ubuntu Server or RHEL on-premises instance to update the
AWS CodeDeploy agent whenever a new version becomes available. You do this by setting the
AWS_REGION environment variable on the Ubuntu Server or RHEL on-premises instance to the
identifier of one of the regions supported by AWS CodeDeploy. We recommend that you set the value
to the region where your AWS CodeDeploy applications, deployment groups, and application revisions
are located (for example, us-west-2). For a list of regions, see Region and Endpoints in the AWS
General Reference.
To set the environment variable, call the following from the terminal:
export AWS_REGION=supported-region
Where supported-region is the region identifier (for example, us-west-2).
Step 7: Install the AWS CodeDeploy Agent
Install the AWS CodeDeploy agent on the on-premises instance:
• For an Ubuntu Server on-premises instance, follow the instructions in Install or reinstall the AWS
CodeDeploy agent for Ubuntu Server (p. 118), and then return to this page.
• For a RHEL on-premises instance, follow the instructions in Install or reinstall the AWS CodeDeploy
agent for Amazon Linux or RHEL (p. 117), and then return to this page.
• For a Windows Server on-premises instance, follow the instructions in Install or reinstall the AWS
CodeDeploy agent for Windows Server (p. 119), and then return to this page.
Step 8: Register the On-Premises Instance with AWS
CodeDeploy
Note
The instructions in this step assume you are registering the on-premises instance from the
on-premises instance itself. You can also register an on-premises instance from a separate
device or instance that has the AWS CLI installed and configured as described in Step 5:
Install and Configure the AWS CLI (p. 151).
Use the AWS CLI to register the on-premises instance with AWS CodeDeploy so that it can participate
in deployments.
1. Before you can use the AWS CLI, you will need the user ARN of the IAM user you created in Step
1: Create an IAM User on Behalf of the On-Premises Instance (p. 146). If you don't already have
the user ARN, call the get-user command, specifying the name of the IAM user (with the --user-
name option) and querying for just the user ARN (with the --query and --output options):
aws iam get-user --user-name CodeDeployUser-OnPrem --query "User.Arn" --
output text
2. Call the register-on-premises-instance command, specifying:
• A name that uniquely identifies the on-premises instance to AWS CodeDeploy (with the --
instance-name option).
Important
To help identify the on-premises instance later, especially for debugging purposes, we
strongly recommend that you specify a name that maps to some unique characteristic
of the on-premises instance (for example, the serial number or some unique internal
asset identifier, if applicable). If you specify a MAC address as a name, be aware that
API Version 2014-10-06
153
AWS CodeDeploy User Guide
Manually Configure and Register
an On-Premises Instance
MAC addresses contain characters that AWS CodeDeploy does not allow, such as
colon (:). For a list of allowed characters, see Limits (p. 265).
• The user ARN of the IAM user you created in Step 1: Create an IAM User on Behalf of the On-
Premises Instance (p. 146) (with the --iam-user-arn option).
For example:
aws deploy register-on-premises-instance --instance-name
AssetTag12010298EX --iam-user-arn arn:aws:iam::80398EXAMPLE:user/
CodeDeployUser-OnPrem
Step 9: Tag the On-Premises Instance
You can use either the AWS CLI or the AWS CodeDeploy console to tag the on-premises instance.
(AWS CodeDeploy uses on-premises instance tags to identify the correct sets of deployment targets
during a deployment.)
To tag the on-premises instance (CLI)
• Call the add-tags-to-on-premises-instances command, specifying:
• The name that uniquely identifies the on-premises instance (with the --instance-names
option).
• The name of the on-premises instance tag key and tag value you want to use (with the --
tags option). You must specify both a name and value; AWS CodeDeploy does not allow on-
premises instance tags that have values only.
For example:
aws deploy add-tags-to-on-premises-instances --instance-names
AssetTag12010298EX --tags Key=Name,Value=CodeDeployDemo-OnPrem
To tag the on-premises instance (console)
1. Sign in to the AWS Management Console and open the AWS CodeDeploy console at https://
console.aws.amazon.com/codedeploy.
Note
Sign in with the same account or IAM user information you used in Getting
Started (p. 11).
2. If the On-Premises Instances page is not displayed, choose On-Premises Instances.
3. In the list of on-premises instances, choose the arrow next to the name of the on-premises
instance you want to tag.
4. In the list of tags, select or type the desired tag key and tag value. After you type the tag key and
tag value, another row appears. You can repeat this for up to 10 tags. (To remove a tag, choose
the delete icon ( ) in the row for the tag you want to remove.)
5. After you have added tags, choose Update Tags.
Step 10: Deploy Application Revisions to the On-Premises
Instance
You are now ready to deploy application revisions to the registered and tagged on-premises instance.
API Version 2014-10-06
154

AWS CodeDeploy User Guide
Next Steps
You deploy application revisions to on-premises instances in a way similar to deploying application
revisions to Amazon EC2 instances. For instructions, see Deploy a Revision (p. 197). These
instructions include a link to prerequisites, including creating an application, creating a deployment
group, and preparing an application revision. If you need a simple sample application revision to
deploy, you can create the one described in Step 2: Create a Sample Application Revision (p. 74) in
the Tutorial: Deploy an Application to an On-Premises Instance (p. 73).
Important
If you choose to reuse an AWS CodeDeploy service role as part of creating a deployment
group that targets on-premises instances, you must include Tag:get* to the Action portion
of the service role's policy statement. For more information, see Step 3: Create a Service
Role (p. 13).
Step 11: Track Deployments to the On-Premises Instance
After you deploy an application revision to registered and tagged on-premises instances, you can track
the deployment's progress.
You track deployments to on-premises instances in a way similar to tracking deployments to Amazon
EC2 instances. For instructions, see View Deployment Details (p. 196).
Next Steps
Follow the instructions in this section for additional tasks, such as getting more information about,
removing tags from, and uninstalling and deregistering on-premises instances.
Topics
•Get Information About a Single On-Premises Instance (p. 155)
•Get Information About Multiple On-Premises Instances (p. 156)
•Deregister an On-Premises Instance (p. 156)
•Automatically Uninstall the AWS CodeDeploy Agent and Remove the Configuration File from an
On-Premises Instance (p. 158)
•Manually Remove On-Premises Instance Tags from an On-Premises Instance (p. 158)
•Manually Deregister an On-Premises Instance (p. 159)
Get Information About a Single On-Premises Instance
You can get information about a single on-premises instance by following the instructions in View
Deployment Details (p. 196). You can use the AWS CLI or the AWS CodeDeploy console to get more
information about a single on-premises instance.
To get information about a single on-premises instance (CLI)
• Call the get-on-premises-instance command, specifying the name that uniquely identifies the on-
premises instance (with the --instance-name option):
aws deploy get-on-premises-instance --instance-name AssetTag12010298EX
To get information about a single on-premises instance (console)
1. Sign in to the AWS Management Console and open the AWS CodeDeploy console at https://
console.aws.amazon.com/codedeploy.
API Version 2014-10-06
155

AWS CodeDeploy User Guide
Next Steps
Note
Sign in with the same account or IAM user information you used in Getting
Started (p. 11).
2. If the On-Premises Instances page is not displayed, choose On-Premises Instances.
3. In the list of on-premises instances, choose the arrow next to the name of the on-premises
instance. Details about the on-premises instance are displayed.
Get Information About Multiple On-Premises Instances
You can get information about on-premises instances by following the instructions in View Deployment
Details (p. 196). You can use the AWS CLI or the AWS CodeDeploy console to get more information
about on-premises instances.
To get information about multiple on-premises instances (CLI)
1. For a list of on-premises instance names, call the list-on-premises-instances command, specifying:
• Whether to get information about all registered or deregistered on-premises instances (with the
--registration-status option and Registered or Deregistered, respectively). If you
omit this, then both registered and deregistered on-premises instance names are returned.
• Whether to get information only about on-premises instances tagged with specific on-premises
instance tags (with the --tag-filters option). For each on-premises instance tag, specify
the Key, Value, and Type (which should always be KEY_AND_VALUE). Separate multiple on-
premises instance tags with spaces between each Key, Value, and Type triplet.
For example:
aws deploy list-on-premises-instances --registration-status Registered
--tag-filters Key=Name,Value=CodeDeployDemo-OnPrem,Type=KEY_AND_VALUE
Key=Name,Value=CodeDeployDemo-OnPrem-Beta,Type=KEY_AND_VALUE
2. For more detailed information, call the batch-get-on-premises-instances command, with the names
of the on-premises instances to get information about (with the --instance-names option):
aws deploy batch-get-on-premises-instances --instance-names
AssetTag12010298EX AssetTag09920444EX
To get information about multiple on-premises instances (console)
1. Sign in to the AWS Management Console and open the AWS CodeDeploy console at https://
console.aws.amazon.com/codedeploy.
Note
Sign in with the same account or IAM user information you used in Getting
Started (p. 11).
2. If the On-Premises Instances page is not displayed, choose On-Premises Instances.
Information about the on-premises instances is displayed.
Deregister an On-Premises Instance
Typically, you deregister an on-premises instance after you're no longer planning to deploy to it. When
you deregister an on-premises instance, even though the on-premises instance may be part of a
API Version 2014-10-06
156

AWS CodeDeploy User Guide
Next Steps
deployment group's on-premises instance tags, the on-premises instance will not be included in any
deployments. You can use the AWS CLI to deregister on-premises instances.
Note
You cannot use the AWS CodeDeploy console to deregister an on-premises instance. Also,
deregistering an on-premises instance does not disassociate any on-premises instance tags
that are associated with the on-premises instance; it does not uninstall the AWS CodeDeploy
agent from the on-premises instance; and it does not remove the on-premises instance
configuration file from the on-premises instance.
To use the AWS CodeDeploy console to perform some (but not all) of the activities in this
section, see the AWS CodeDeploy console section of Manually Deregister an On-Premises
Instance (p. 159).
To manually disassociate any associated on-premises instance tags, see Manually Remove
On-Premises Instance Tags from an On-Premises Instance (p. 158).
To automatically uninstall the AWS CodeDeploy agent and remove the configuration file
from the on-premises instance, see Automatically Uninstall the AWS CodeDeploy Agent and
Remove the Configuration File from an On-Premises Instance (p. 158).
To manually uninstall only the AWS CodeDeploy agent from the on-premises instance, see
Managing AWS CodeDeploy Agent Operations (p. 114).
Use the AWS CLI to call the deregister command, specifying:
• The name that uniquely identifies the on-premises instance to AWS CodeDeploy (with the --
instance-name option).
• Optionally, whether to delete the IAM user associated with the on-premises instance (with the --
delete-iam-user option, the default). If you do not want to delete the IAM user associated with
the on-premises instance, specify the --no-delete-iam-user option.
• Optionally, the AWS region where the on-premises instance was registered with AWS CodeDeploy
(with the --region option). This must be one of the supported regions listed in Region and
Endpoints in the AWS General Reference (for example, us-west-2). If this option is not specified,
the default AWS region associated with the calling IAM user will be used.
For example:
aws deploy deregister --instance-name AssetTag12010298EX --delete-iam-user --
region us-west-2
The deregister command does the following:
1. Deregisters the on-premises instance with AWS CodeDeploy.
2. If specified, deletes the IAM user associated with the on-premises instance.
After you deregister an on-premises instance, you cannot create a replacement on-premises instance
with the same name or the same associated IAM user name until AWS CodeDeploy deletes its records
about the deregistered on-premises instance. This typically takes about 24 hours.
If this command encounters any errors, an error message appears, describing how you can manually
complete the remaining steps. Otherwise, a success message appears, describing how to call the
uninstall command.
API Version 2014-10-06
157
AWS CodeDeploy User Guide
Next Steps
Automatically Uninstall the AWS CodeDeploy Agent and
Remove the Configuration File from an On-Premises
Instance
Typically, you uninstall the AWS CodeDeploy agent and remove the configuration file from an on-
premises instance after you're no longer planning to deploy to it.
Note
Automatically uninstalling the AWS CodeDeploy agent and removing the configuration file
from an on-premises instance does not deregister an on-premises instance; it does not
disassociate any on-premises instance tags associated with the on-premises instance; and it
does not delete the IAM user associated with the on-premises instance.
To automatically deregister the on-premises instance, see Deregister an On-Premises
Instance (p. 156).
To manually deregister the on-premises instance, see Manually Deregister an On-Premises
Instance (p. 159).
To manually disassociate any associated on-premises instance tags, see Manually Remove
On-Premises Instance Tags from an On-Premises Instance (p. 158).
To manually uninstall the AWS CodeDeploy agent from the on-premises instance, see
Managing AWS CodeDeploy Agent Operations (p. 114).
To manually delete the associated IAM user, see Deleting an IAM User from Your AWS
Account.
From the on-premises instance, use the AWS CLI to call the uninstall command.
For example:
aws deploy uninstall
The uninstall command does the following:
1. Stops the running AWS CodeDeploy agent on the on-premises instance.
2. Uninstalls the AWS CodeDeploy agent from the on-premises instance.
3. Removes the configuration file from the on-premises instance. (For Ubuntu Server and RHEL, this is
/etc/codedeploy-agent/conf/codedeploy.onpremises.yml. For Windows Server, this is C:
\ProgramData\Amazon\CodeDeploy\conf.onpremises.yml.)
Manually Remove On-Premises Instance Tags from an On-
Premises Instance
Typically, you remove an on-premises instance tag from an on-premises instance when that tag is no
longer being used, or you want to remove the on-premises instance from any deployment groups that
rely on that tag. You can use the AWS CLI or the AWS CodeDeploy console to remove on-premises
instance tags from on-premises instances.
You do not need to remove the on-premises instance tags from an on-premises instance before you
deregister it.
Manually removing on-premises instance tags from an on-premises instance does not deregister the
instance; it does not uninstall the AWS CodeDeploy agent from the instance; it does not remove the
configuration file from the instance; and it does not delete the IAM user associated with the instance.
To automatically deregister the on-premises instance, see Deregister an On-Premises
Instance (p. 156).
API Version 2014-10-06
158
AWS CodeDeploy User Guide
Next Steps
To manually deregister the on-premises instance, see Manually Deregister an On-Premises
Instance (p. 159).
To automatically uninstall the AWS CodeDeploy agent and remove the configuration file from the
on-premises instance, see Automatically Uninstall the AWS CodeDeploy Agent and Remove the
Configuration File from an On-Premises Instance (p. 158).
To manually uninstall just the AWS CodeDeploy agent from the on-premises instance, see Managing
AWS CodeDeploy Agent Operations (p. 114).
To manually delete the associated IAM user, see Deleting an IAM User from Your AWS Account.
To remove on-premises instance tags from an on-premises instance (CLI)
• Call the remove-tags-from-on-premises-instances, specifying:
• The names that uniquely identify the on-premises instance (with the --instance-names
option).
• The names and values of the tags you want to remove (with the --tags option).
For example:
aws deploy remove-tags-from-on-premises-instances --instance-names
AssetTag12010298EX --tags Key=Name,Value=CodeDeployDemo-OnPrem
To remove on-premises instance tags from an on-premises instance (console)
1. Sign in to the AWS Management Console and open the AWS CodeDeploy console at https://
console.aws.amazon.com/codedeploy.
Note
Sign in with the same account or IAM user information you used in Getting
Started (p. 11).
2. If the On-Premises Instances page is not displayed, choose On-Premises Instances.
3. In the list of on-premises instances, choose the arrow next to the name of the on-premises
instance from which you want to remove tags.
4. In the Tags area, choose the delete icon ( ) in the row next to each tag you want to remove.
5. After you have deleted the tags, choose Update Tags.
Manually Deregister an On-Premises Instance
Typically, you deregister an on-premises instance after you're no longer planning to deploy to it. You
use the AWS CLI to manually deregister on-premises instances.
Manually deregistering an on-premises instance does not uninstall the AWS CodeDeploy agent; it does
not remove the configuration file from the instance; it does not delete the IAM user associated with the
instance; and it does not remove any tags associated with the instance.
To automatically uninstall the AWS CodeDeploy agent and remove the configuration file from the
on-premises instance, see Automatically Uninstall the AWS CodeDeploy Agent and Remove the
Configuration File from an On-Premises Instance (p. 158).
To manually uninstall only the AWS CodeDeploy agent, see Managing AWS CodeDeploy Agent
Operations (p. 114).
API Version 2014-10-06
159

AWS CodeDeploy User Guide
Instance Health
To manually delete the associated IAM user, see Deleting an IAM User from Your AWS Account.
To manually remove only the associated on-premises instance tags, see Manually Remove On-
Premises Instance Tags from an On-Premises Instance (p. 158).
• Call the deregister-on-premises-instance command, specifying the name that uniquely identifies
the on-premises instance (with the --instance-name option):
aws deploy deregister-on-premises-instance --instance-name
AssetTag12010298EX
After you deregister an on-premises instance, you cannot create a replacement instance with the
same name or the same associated IAM user name until AWS CodeDeploy deletes its records
about the deregistered on-premises instance. This typically takes about 24 hours.
AWS CodeDeploy Instance Health
AWS CodeDeploy monitors the health status of the instances in a deployment group. It fails
deployments if the number of healthy instances falls below the minimum number of healthy instances
that have been specified for the deployment group.
This number can be specified in the following ways:
• As minimum-healthy-hosts when you use the create-deployment-config command in the AWS
CLI.
• As Value in the MinimumHealthyHosts data type in the AWS CodeDeploy API.
• As MinimumHealthyHosts when you use AWS::CodeDeploy::DeploymentConfig in an AWS
CloudFormation template.
Health Status
AWS CodeDeploy assigns two health status values to each instance: revision health and instance
health.
Revision health
Revision health is based on the application revision currently installed on the instance. It has the
following status values:
• Current: The revision installed on the instance matches the revision for the deployment group's
last successful deployment.
• Old: The revision installed on the instance matches an older version of the application.
• Unknown: The application revision has not been installed successfully on the instance.
Instance health
Instance health is based on whether deployments to an instance have been successful. It has the
following values:
• Healthy: The last deployment to the instance was successful.
• Unhealthy: The attempt to deploy a revision to the instance failed, or a revision has not yet been
deployed to the instance.
AWS CodeDeploy uses revision health and instance health to schedule the deployment to the
deployment group's instances in the following order:
1. Unhealthy instance health.
API Version 2014-10-06
160

AWS CodeDeploy User Guide
Minimum Healthy Instances and Deployments
2. Unknown revision health.
3. Old revision health.
4. Current revision health.
If the overall deployment succeeds, the revision is updated and the deployment group's health status
values are updated to reflect the latest deployment.
• All current instances that had a successful deployment remain current. Otherwise, they become
unknown.
• All old or unknown instances that had a successful deployment become current. Otherwise, they
remain old or unknown.
• All healthy instances that had a successful deployment remain healthy. Otherwise, they become
unhealthy.
• All unhealthy instances that had a successful deployment become healthy. Otherwise, they remain
unhealthy.
If the overall deployment fails or is stopped:
• Each instance to which AWS CodeDeploy attempted to deploy the application revision has its
instance health set to healthy or unhealthy, depending on whether the deployment attempt for that
instance succeeded or failed.
• Each instance to which AWS CodeDeploy did not attempt to deploy the application revision retains
its current instance health value.
• The deployment group's revision remains the same.
Minimum Healthy Instances and Deployments
AWS CodeDeploy allow you to specify a minimum number of healthy instances for the deployment for
two main purposes:
• To determine whether the overall deployment succeeds or fails. Deployment succeeds if the
application revision was successfully deployed to at least the minimum number of healthy instances.
• To determine the number of instances that must be healthy during a deployment to allow the
deployment to proceed.
You can specify the minimum number of healthy instances for your deployment group as a number
of instances or as a percentage of the total number of instances. If you specify a percentage, then at
the start of the deployment, AWS CodeDeploy converts the percentage to the equivalent number of
instances, rounding up any fractional instances.
AWS CodeDeploy tracks the health status of the deployment group's instances during the deployment
process and uses the deployment's specified minimum number of healthy instances to determine
whether to continue the deployment. The basic principle is that a deployment must never cause the
number of healthy instances to fall below the minimum number you have specified. The one exception
to this rule is when a deployment group initially has less than the specified minimum number of healthy
instances. In that case, the deployment process does not reduce the number of healthy instances any
further.
AWS CodeDeploy starts the deployment process by attempting to deploy the application revision to the
deployment group's unhealthy instances. For each successful deployment, AWS CodeDeploy changes
the instance's health status to healthy and adds it to the deployment group's healthy instances. AWS
CodeDeploy then compares the current number of healthy instances to the specified minimum number
of healthy instances.
API Version 2014-10-06
161

AWS CodeDeploy User Guide
Minimum Healthy Instances and Deployments
• If the number of healthy instances is less than or equal to the specified minimum number of healthy
instances, AWS CodeDeploy cancels the deployment to ensure the number of healthy instances
doesn't decrease with more deployments.
• If the number of healthy instances is greater than the specified minimum number of healthy
instances by at least one, AWS CodeDeploy deploys the application revision to the original set of
healthy instances.
If a deployment to a healthy instance fails, AWS CodeDeploy changes that instance's health status to
unhealthy. As the deployment progresses, AWS CodeDeploy updates the current number of healthy
instances and compares it to the specified minimum number of healthy instances. If the number of
healthy instances falls to the specified minimum number at any point in the deployment process, AWS
CodeDeploy stops the deployment. This practice prevents the possibility the next deployment will fail,
dropping the number of healthy instances below the specified minimum number.
Note
Make sure the minimum number of healthy instances you specify is less than the total number
of instances in the deployment group. If you specify a percentage value, remember it will be
rounded up. Otherwise, when the deployment starts, the number of healthy instances will
already be less than or equal to the specified minimum number of healthy instances, and AWS
CodeDeploy will immediately fail the overall deployment.
AWS CodeDeploy also uses the specified minimum number of healthy instances and the actual
number of healthy instances to determine whether and how to deploy the application revision to
multiple instances. By default, AWS CodeDeploy deploys the application revision to as many instances
as it can without any risk of having the number of healthy instances fall below the specified minimum
number of healthy instances. For example:
• If your deployment group has 10 instances and you set the minimum healthy instances number to 9,
AWS CodeDeploy deploys to one instance at a time.
• If your deployment group has 10 instances and you set the minimum healthy instances number to 0,
AWS CodeDeploy deploys to every instance at the same time.
The following examples assume a deployment group with 10 instances.
Minimum healthy instances: 95%
AWS CodeDeploy rounds the minimum healthy instances number up to 10 instances, which
equals the number of healthy instances. The overall deployment immediately fails without
deploying the revision to any instances.
Minimum healthy instances: 9
AWS CodeDeploy deploys the revision to one instance at a time. If any of these deployments fail,
AWS CodeDeploy immediately fails the overall deployment. The exception to this rule is that if the
last instance fails, the deployment still succeeds.
Minimum healthy instances: 8
AWS CodeDeploy deploys the revision to two instances at a time. If two of these deployments fail,
AWS CodeDeploy immediately fails the overall deployment. The exception to this rule is that if the
last instance is the second to fail, the deployment still succeeds.
Minimum healthy instances: 0
AWS CodeDeploy deploys the revision to the entire deployment group at once. The deployment
group can't have fewer than 0 healthy instances, so the overall deployment cannot fail.
Minimum healthy instances: 9
AWS CodeDeploy first deploys the revision to the unhealthy instance.
• If any deployment fails, the number of healthy instances equals the minimum healthy instances
number, so the overall deployment immediately fails. The exception to this rule is that if the last
instance fails, the deployment still succeeds.
• If any deployment succeeds, the deployment group now has 10 healthy instances. AWS
CodeDeploy continues the deployment, one instance at a time, until any deployment fails or the
API Version 2014-10-06
162

AWS CodeDeploy User Guide
Minimum Healthy Instances and Deployments
overall deployment is complete. The exception to this rule is that if the last instance fails, the
deployment still succeeds.
API Version 2014-10-06
163

AWS CodeDeploy User Guide
Predefined Deployment Configurations
Working with Deployment Groups
in AWS CodeDeploy
A deployment configuration is a set of deployment rules and deployment success and failure conditions
used by AWS CodeDeploy during a deployment. The deployment configuration specifies the number or
percentage of instances that must remain available at any time during a deployment.
You can use one of the three predefined deployment configurations provided by AWS or create
a custom deployment configuration that better meets your requirements. If you don't specify a
deployment configuration, AWS CodeDeploy uses the CodeDeployDefault.OneAtATime deployment
configuration.
To view a list of deployment configurations already registered to your AWS account, see View
Deployment Configuration Details (p. 166).
Predefined Deployment Configurations in
AWS
The following table lists the predefined deployment configurations provided by AWS.
Deployment Configuration Description
CodeDeployDefault.AllAtOnce Attempts to deploy an application revision to as
many instances as possible at once. The status
of the overall deployment will be displayed as
Succeeded if the application revision is deployed
to one or more of the instances. The status
of the overall deployment will be displayed as
Failed if the application revision is not deployed
to any of the instances. Using an example of
nine instances, CodeDeployDefault.AllAtOnce
will attempt to deploy to all nine instances at
API Version 2014-10-06
164

AWS CodeDeploy User Guide
Predefined Deployment Configurations
Deployment Configuration Description
once. The overall deployment will succeed
if deployment to even a single instance is
successful; it will fail only if deployments to all
nine instances fail.
CodeDeployDefault.HalfAtATime Deploys to up to half of the instances at a time
(with fractions rounded down). The overall
deployment succeeds if the application revision
is deployed to at least half of the instances (with
fractions rounded up); otherwise, the deployment
fails. In the example of nine instances, it will
deploy to up to four instances at a time. The
overall deployment succeeds if deployment
to five or more instances succeed; otherwise,
the deployment fails. The deployment may be
successfully deployed to some instances even if
the overall deployment fails.
CodeDeployDefault.OneAtATime Deploys the application revision to only one
instance at a time.
For deployment groups that contain more than
one instance:
• The overall deployment succeeds if the
application revision is deployed to all of
the instances. The exception to this rule
is if deployment to the last instance fails,
the overall deployment still succeeds. This
is because AWS CodeDeploy allows only
one instance at a time to be taken offline
with the CodeDeployDefault.OneAtATime
configuration.
• The overall deployment fails as soon as the
application revision fails to be deployed to any
but the last instance. The deployment may be
successfully deployed to some instances even
if the overall deployment fails.
• In an example using nine instances, it will
deploy to one instance at a time. The overall
deployment succeeds if deployment to the
first eight instances is successful; the overall
deployment fails if deployment to any of the
first eight instances fails.
For deployment groups that contain only one
instance, the overall deployment is successful
only if deployment to the single instance is
successful
Topics
•Create a Deployment Configuration (p. 166)
•View Deployment Configuration Details (p. 166)
•Delete a Deployment Configuration (p. 167)
API Version 2014-10-06
165
AWS CodeDeploy User Guide
Create a Deployment Configuration
Create a Deployment Configuration with AWS
CodeDeploy
You can use the AWS CLI, the AWS CodeDeploy APIs, or an AWS CloudFormation template to create
custom deployment configurations. You cannot use the AWS CodeDeploy console. For information
about using an AWS CloudFormation template to create a deployment configuration, see AWS
CloudFormation Template Reference (p. 259).
To use the AWS CLI to create a deployment configuration, call the create-deployment-config
command, specifying:
• A name that uniquely identifies the deployment configuration. This name must be unique across
all of the deployment configurations you create with AWS CodeDeploy associated with your AWS
account.
• The minimum number or percentage of healthy instances that should be available at any time during
the deployment. For more information, see Instance Health (p. 160).
The following example creates a deployment configuration named ThreeQuartersHealthy that require
75% of target instances to remain healthy during a deployment:
aws deploy create-deployment-config --deployment-config-name
ThreeQuartersHealthy --minimum-healthy-hosts type=FLEET_PERCENT,value=75
View Deployment Configuration Details with
AWS CodeDeploy
You can use the AWS CodeDeploy console, the AWS CLI, or the AWS CodeDeploy APIs to view
details about deployment configurations associated with your AWS account. For descriptions of the
predefined AWS CodeDeploy deployment configurations, see CreateDeploymentGroup.
Topics
•View Deployment Configuration Details (Console) (p. 166)
•View Deployment Configuration (CLI) (p. 167)
View Deployment Configuration Details
(Console)
To use the AWS CodeDeploy console to view a list of deployment configuration names:
1. Sign in to the AWS Management Console and open the AWS CodeDeploy console at https://
console.aws.amazon.com/codedeploy.
Note
Sign in with the same account or IAM user information you used in Getting Started (p. 11).
2. On the AWS CodeDeploy menu, choose Deployment Configurations to see a list of deployment
configuration names and criteria for each deployment configuration.
API Version 2014-10-06
166
AWS CodeDeploy User Guide
View Deployment Configuration (CLI)
Note
If no entries are displayed, make sure the correct region is selected. On the navigation bar,
in the region selector, choose one of one of the regions listed in Region and Endpoints in
the AWS General Reference. AWS CodeDeploy supports these regions only.
View Deployment Configuration (CLI)
To use the AWS CLI to view deployment configuration details, call either the get-deployment-
config command or the list-deployment-configs command.
To view details about a single deployment configuration, call the get-deployment-config command,
specifying the unique deployment configuration name.
To view details about multiple deployment configurations, call the list-deployments command
.
Delete a Deployment Configuration with AWS
CodeDeploy
You can use the AWS CLI or the AWS CodeDeploy APIs to delete custom deployment configurations
associated with your AWS account. You cannot delete built-in deployment configurations,
such as CodeDeployDefault.AllAtOnce, CodeDeployDefault.HalfAtATime, and
CodeDeployDefault.OneAtATime.
Caution
You cannot delete a custom deployment configuration that is still in use. If you delete an
unused, custom deployment configuration, you will no longer be able to associate it with new
deployments and new deployment groups. This action cannot be undone.
To use the AWS CLI to delete a deployment configuration, call the delete-deployment-config
command, specifying the deployment configuration name. To view a list of deployment configuration
names, call the list-deployment-configs command.
The following example deletes a deployment configuration named ThreeQuartersHealthy.
aws deploy delete-deployment-config --deployment-config-name
ThreeQuartersHealthy
API Version 2014-10-06
167

AWS CodeDeploy User Guide
Create an Application
Working with Applications in
AWS CodeDeploy
After you configure instances, but before you can deploy a revision, you must create an application in
AWS CodeDeploy. An application is simply a name used by AWS CodeDeploy to ensure the correct
revision, deployment configuration, and deployment group are referenced during a deployment.
Use the following information to determine how to proceed next:
I haven't created instances yet See Working with Instances (p. 122), and then
return to this page.
I haven't created an application yet. See Create an Application (p. 168)
I have already created an application, but I
haven't created a deployment group. See Create a Deployment Group (p. 174).
I have already created an application and
deployment group, but I haven't created an
application revision.
See Working with Application
Revisions (p. 183).
I have already created an application and a
deployment group, and I have already uploaded
my application revision. I'm ready to deploy.
See Deploy a Revision (p. 197).
Topics
•Create an Application (p. 168)
•View Application Details (p. 172)
•Rename an Application (p. 172)
•Delete an Application (p. 173)
Create an Application with AWS CodeDeploy
You can use the AWS CodeDeploy console, the AWS CLI, the AWS CodeDeploy APIs, or an AWS
CloudFormation template to create applications.
To view a list of applications already registered to your AWS account, see View Application
Details (p. 172). For information about using an AWS CloudFormation template to create an
application, see AWS CloudFormation Template Reference (p. 259).
API Version 2014-10-06
168

AWS CodeDeploy User Guide
Create an Application (Console)
Topics
•Create an Application (Console) (p. 169)
•Create an Application (CLI) (p. 171)
Create an Application (Console)
To use the AWS CodeDeploy console to create an application:
Caution
Do not follow these steps if:
• You have not prepared your instances to be used in AWS CodeDeploy deployments. To set
up your instances, follow the instructions in Working with Instances (p. 122), and then follow
the steps in this topic.
• You want to create an application that uses a custom deployment configuration, but you
have not yet created the deployment configuration. Follow the instructions in Create a
Deployment Configuration (p. 166), and then follow the steps in this topic.
• You do not have a service role that trusts AWS CodeDeploy with, at minimum, the trust and
permissions described in Step 3: Create a Service Role (p. 13). To create and configure a
service role, follow the instructions in Step 3: Create a Service Role (p. 13), and then follow
the steps in this topic.
1. Sign in to the AWS Management Console and open the AWS CodeDeploy console at https://
console.aws.amazon.com/codedeploy.
Note
Sign in with the same account or IAM user information you used in Getting Started (p. 11).
2. If the Applications page does not appear, on the AWS CodeDeploy menu, choose Applications.
3. Choose Create New Application.
4. In the Application Name box, type the application's name. (In an AWS account, an AWS
CodeDeploy application name can be used only once per region. You can reuse an application
name in different regions.)
5. In the Deployment Group Name box, type a name that describes the deployment group.
Note
If you want to use the same settings used in another deployment group (including the
deployment group name; tags, Auto Scaling group names, or both; and the deployment
configuration), specify those settings on this page. Although this new deployment group
and the existing deployment group will have the same name, AWS CodeDeploy treats
them as separate deployment groups, because they are each associated with separate
applications.
6. In the list of tags, select the tag type and fill in the Key and Value boxes with the value of the key-
value pair you will use to tag the instances.
As you begin adding key-value pair information, a new row appears for you to add another key-value
pair if desired. You can repeat this step for up to 10 key-value pairs.
API Version 2014-10-06
169

AWS CodeDeploy User Guide
Create an Application (Console)
Tip
As AWS CodeDeploy finds instances that match each specified key-value pair, it displays
the number of matching instances. To see more information about the instances, click the
number.
To remove a key-value pair from the list, choose the remove icon.
7. In the Deployment Config list, choose the deployment configuration.
8. (Optional) Create Amazon SNS notification triggers.
You can add triggers to an AWS CodeDeploy deployment group to receive notifications about
events related to deployments or instances in that deployment group. These notifications are sent to
recipients who are subscribed to an Amazon SNS topic you have made part of the trigger's action.
You must have already set up the Amazon Simple Notification Service topic to which this trigger
will point, and AWS CodeDeploy must have permission to publish to the topic from this deployment
group. If you have not yet completed these setup steps, you can add triggers to the deployment
group later.
• If you want to create a trigger now to receive notifications about deployment and instance events
in the deployment group for this application, choose Create trigger. For more information, see
Monitoring Deployments with Amazon SNS Event Notifications (p. 216).
9. (Optional) Add Amazon CloudWatch alarms.
You can configure a deployment to stop when an Amazon CloudWatch alarm detects that a metric
has fallen below or exceeded a defined threshold.
You must have already created the alarm in CloudWatch before you can add it here.
a. To add alarm monitoring to the deployment group, choose Add alarm.
b. In Alarm name, type the name of a CloudWatch alarm you have already set up to monitor this
deployment.
You must enter the CloudWatch alarm exactly as it was created in CloudWatch. To view a list of
alarms, open the CloudWatch console at https://console.aws.amazon.com/cloudwatch/, and then
choose ALARM.
API Version 2014-10-06
170

AWS CodeDeploy User Guide
Create an Application (CLI)
10.(Optional) If you want deployments to proceed without taking into account any alarms you have
added, choose Ignore alarm configuration.
This choice is useful when you want to temporarily deactivate alarm monitoring for a deployment
group without having to add the same alarms again later.
11.(Optional) If you want deployments to proceed in the event that AWS CodeDeploy is unable to
retrieve alarm status from Amazon CloudWatch, choose Continue deployments even if alarm
status is unavailable.
Tip
This option corresponds with ignorePollAlarmFailure in the AlarmConfiguration object in
the AWS CodeDeploy API.
12.(Optional) Configure automatic rollback options.
You can enable deployments to roll back to the most recent known good revision when something
goes wrong by choosing one or both of the following:
•Roll back when a deployment fails. AWS CodeDeploy will redeploy the last known good
revision as a new deployment.
•Roll back when alarm thresholds are met. If you added an alarm to this application in the
previous step, AWS CodeDeploy will redeploy the last known good revision when one or more of
the specified alarms is activated.
Tip
To temporarily disregard a rollback configuration, choose Disable rollbacks. This choice
is useful when you want to temporarily disable automatic rollbacks without having to set up
the same configuration again later.
13.In the Service Role ARN box, choose an Amazon Resource Name (ARN) for a service role that
trusts AWS CodeDeploy with, at minimum, the trust and permissions described in Step 3: Create a
Service Role (p. 13). To get the service role ARN, see Get the Service Role ARN (Console) (p. 17).
14.Choose Create Application.
The next step is to prepare a revision to deploy to the application and deployment group. For
instructions, see Working with Application Revisions (p. 183).
Create an Application (CLI)
To use the AWS CLI to create an application, call the create-application command, specifying a name
that uniquely represents the application. (In an AWS account, an AWS CodeDeploy application name
can be used only once per region. You can reuse an application name in different regions.)
After you create an application, the next step is to create a deployment group, which specifies the
instances to which to deploy revisions. For instructions, see Create a Deployment Group (p. 174).
After you create the deployment group, the next step is to prepare a revision to deploy to the
application and deployment group. For instructions, see Working with Application Revisions (p. 183).
API Version 2014-10-06
171

AWS CodeDeploy User Guide
View Application Details
View Application Details with AWS
CodeDeploy
You can use the AWS CodeDeploy console, the AWS CLI, or the AWS CodeDeploy APIs to view
details about all applications associated with your AWS account.
Topics
•View Application Details (Console) (p. 172)
•View Application Details (CLI) (p. 172)
View Application Details (Console)
To use the AWS CodeDeploy console to view application details:
1. Sign in to the AWS Management Console and open the AWS CodeDeploy console at https://
console.aws.amazon.com/codedeploy.
Note
Sign in with the same account or IAM user information you used in Getting Started (p. 11).
2. On the AWS CodeDeploy menu, choose Applications.
Note
If no entries are displayed, make sure the correct region is selected. On the navigation bar,
in the region selector, choose one of one of the regions listed in Region and Endpoints in
the AWS General Reference. AWS CodeDeploy supports these regions only.
3. To view additional application details, choose the application name in the list.
View Application Details (CLI)
To use the AWS CLI to view application details, call the get-application command, the batch-get-
applicationcommand, or the list-applications command.
To view details about a single application, call the get-application command, specifying the application
name.
To view details about multiple applications, call the batch-get-applications command, specifying
multiple application names.
To view a list of application names, call the list-applications command.
Rename an AWS CodeDeploy Application
You can use the AWS CLI or the AWS CodeDeploy APIs to change the name of an application.
To view a list of application names, use the AWS CLI to call the list-applications command.
For information about using the AWS CLI to change an application name, see update-application.
For information about using the AWS CodeDeploy APIs to change an application name, see
API_UpdateApplication.
API Version 2014-10-06
172

AWS CodeDeploy User Guide
Delete an Application
Delete an Application in AWS CodeDeploy
You can use the AWS CodeDeploy console, the AWS CLI, or an AWS CodeDeploy API action
to delete applications. For information about using the AWS CodeDeploy API action, see
DeleteApplication.
Caution
Deleting an application removes information about the application from the AWS CodeDeploy
system, including all related deployment group information and deployment details. It does
not remove any related application revisions from instances on which the revisions may be
installed nor does it delete revisions from Amazon S3 buckets where the revisions may be
stored. It also does not terminate any Amazon EC2 instances or deregister any on-premises
instances. This action cannot be undone.
Topics
•Delete an Application (Console) (p. 173)
•Delete an Application (AWS CLI) (p. 173)
Delete an Application (Console)
To use the AWS CodeDeploy console to delete an application:
1. Sign in to the AWS Management Console and open the AWS CodeDeploy console at https://
console.aws.amazon.com/codedeploy.
Note
Sign in with the same account or IAM user information you used in Getting
Started (p. 11).
2. If the Applications page does not appear, on the AWS CodeDeploy menu, choose Applications.
3. In the list of applications, choose the name of the application you want to delete.
4. At the bottom of the Application details page, choose Delete application.
5. When prompted, type the name of the application to confirm you want to delete it, and then choose
Delete.
Delete an Application (AWS CLI)
To use the AWS CLI to delete an application, call the delete-application command, specifying the
application name. To view a list of application names, call the list-applications command.
API Version 2014-10-06
173

AWS CodeDeploy User Guide
Create a Deployment Group
Working with Deployment Groups
in AWS CodeDeploy
After you complete the steps in Create an Application (p. 168), you must specify a deployment group
so that AWS CodeDeploy can deploy your revisions to instances.
A deployment group is a set of individual instances targeted for a deployment. A deployment group
contains individually tagged instances, Amazon EC2 instances in Auto Scaling groups, or both.
To view a list of deployment groups already associated with your AWS account, see View Deployment
Group Details (p. 177).
For information about Amazon EC2 instance tags, see Working with Tags Using the Console. For
information about on-premises instances, see On-Premises Instances (p. 139). For information about
Auto Scaling, see Auto Scaling (p. 31).
Topics
•Create a Deployment Group (p. 174)
•View Deployment Group Details (p. 177)
•Change Deployment Group Settings (p. 178)
•Delete a Deployment Group (p. 181)
Create a Deployment Group with AWS
CodeDeploy
You can use the AWS CodeDeploy console, the AWS CLI, the AWS CodeDeploy APIs, or an
AWS CloudFormation template to create deployment groups. For information about using an AWS
CloudFormation template to create a deployment group, see AWS CloudFormation Template
Reference (p. 259).
As part of creating a deployment group, you must specify a service role. For more information, see
Step 3: Create a Service Role (p. 13).
Caution
Do not follow these steps if:
API Version 2014-10-06
174

AWS CodeDeploy User Guide
Create a Deployment Group (Console)
• You have not prepared your instances to be used in AWS CodeDeploy deployments. To set
up your instances, follow the instructions in Working with Instances (p. 122), and then follow
the steps in this topic.
• You want to create a deployment group that uses a custom deployment configuration, but
you have not yet created the deployment configuration. Follow the instructions in Create a
Deployment Configuration (p. 166), and then follow the steps in this topic.
• You do not have a service role that trusts AWS CodeDeploy with, at minimum, the trust and
permissions described in Step 3: Create a Service Role (p. 13). To create and configure a
service role, follow the instructions in Step 3: Create a Service Role (p. 13), and then follow
the steps in this topic.
Topics
•Create a Deployment Group (Console) (p. 175)
•Create a Deployment Group (CLI) (p. 177)
Create a Deployment Group (Console)
To use the AWS CodeDeploy console to create a deployment group:
1. Sign in to the AWS Management Console and open the AWS CodeDeploy console at https://
console.aws.amazon.com/codedeploy.
Note
Sign in with the same account or IAM user information you used in Getting Started (p. 11).
2. On the AWS CodeDeploy menu, choose Applications.
3. On the Applications page, choose the name of the application to associate with a deployment
group.
4. Choose Create deployment group.
5. In the Deployment Group Name field, type a name that describes the deployment group to which
you'll be deploying application revisions.
6. In the list of tags, choose the tag type. For the Key and Value fields, type the values of the key-
value pair you used to tag the instances. You can tag up to 10 key-value pairs.
As AWS CodeDeploy finds instances that match each specified key-value pair, it displays the
number of matching instances. To see more information about the instances, click the number.
Note
You can use wildcards in the Value field to identify all instances tagged in certain patterns,
such as similar Amazon EC2 instance, cost center, and group names, and so on. For
example, if you select Name in the Key field and type GRP-*a in the Value field, AWS
CodeDeploy identifies all instances that fit that pattern, such as GRP-1a, GRP-2a, and
GRP-XYZ-a.
The Value field is case-sensitive.
API Version 2014-10-06
175

AWS CodeDeploy User Guide
Create a Deployment Group (Console)
To remove a key-value pair from the list, choose the remove icon.
7. In the Deployment Config list, choose the deployment configuration.
8. (Optional) In the Triggers area, choose Create trigger to create a trigger that pushes notifications
about deployment and instance events to those who are subscribed to an Amazon Simple
Notification Service topic. For more information, see Monitoring Deployments with Amazon SNS
Event Notifications (p. 216).
9. (Optional) If you want a deployment to stop when an Amazon CloudWatch alarm detects that a
metric has fallen below or exceeded a defined threshold, choose Add alarm. In Alarm name, type
the name of a CloudWatch alarm you have already set up to monitor this deployment.
You must enter the CloudWatch alarm exactly as it was created in CloudWatch. To view a list of
alarms, open the CloudWatch console at https://console.aws.amazon.com/cloudwatch/, and then
choose ALARM.
10.(Optional) If you want deployments to proceed without taking into account any alarms you have
added, choose Ignore alarm configuration.
This option is useful when you want to temporarily deactivate alarm monitoring for a deployment
group without having to add the same alarms again later.
11.(Optional) If you want deployments to proceed in the event that AWS CodeDeploy is unable to
retrieve alarm status from Amazon CloudWatch, choose Continue deployments even if alarm
status is unavailable.
Tip
This option corresponds with ignorePollAlarmFailure in the AlarmConfiguration object in
the AWS CodeDeploy API.
12.(Optional) If you want a deployment to roll back to the most recent known good revision when
something goes wrong, choose one or both of the following:
•Roll back when a deployment fails. AWS CodeDeploy will redeploy the last known good
revision as a new deployment.
•Roll back when alarm thresholds are met. If you added an alarm to this application in the
previous step, AWS CodeDeploy will redeploy the last known good revision when one or more of
the specified alarms is activated.
Tip
To temporarily disregard a rollback configuration, choose Disable rollbacks.
13.In the Service Role ARN field, choose an Amazon Resource Name (ARN) for the service role that
trusts AWS CodeDeploy with, at minimum, the trust and permissions described in Step 3: Create a
Service Role (p. 13). To get the service role ARN, see Get the Service Role ARN (Console) (p. 17).
14.Choose Create Deployment Group.
API Version 2014-10-06
176

AWS CodeDeploy User Guide
Create a Deployment Group (CLI)
Create a Deployment Group (CLI)
To use the AWS CLI to create a deployment group, call the create-deployment-group command,
specifying:
• The application name. To view a list of application names, call the list-applications command.
• A name for the deployment group. This name must be unique for each application associated with
the deployment group.
• Information about the tags or Auto Scaling group names that identifies the instances to be included
in the deployment group.
• The Amazon Resource Name (ARN) identifier of the service role that allows AWS CodeDeploy to act
on behalf of your AWS account when interacting with other related AWS services. To get the service
role ARN, see Get the Service Role ARN (CLI) (p. 17). For more information about service roles,
see Roles Terms and Concepts in IAM User Guide.
• (Optional) The name of an existing deployment configuration. To view a list of deployment
configurations, see View Deployment Configuration Details (p. 166). If not specified, AWS
CodeDeploy uses a default deployment configuration.
• (Optional) Commands to create a trigger that pushes notifications about deployment and instance
events to those who are subscribed to an Amazon Simple Notification Service topic. For more
information, see Monitoring Deployments with Amazon SNS Event Notifications (p. 216).
• Optional) Commands to add one or more existing CloudWatch alarms to the deployment group that
will be activated if a metric specified in an alarm falls below or exceeds a defined threshold.
• Optional) Commands for a deployment to roll back to the last known good revision when a
deployment fails or a CloudWatch alarm is activated.
View Deployment Group Details with AWS
CodeDeploy
You can use the AWS CodeDeploy console, the AWS CLI, or the AWS CodeDeploy APIs to view
details about all deployment groups associated with an application.
Topics
•View Deployment Group Details (Console) (p. 177)
•View Deployment Group Details (CLI) (p. 178)
View Deployment Group Details (Console)
To use the AWS CodeDeploy console to view deployment group details:
1. Sign in to the AWS Management Console and open the AWS CodeDeploy console at https://
console.aws.amazon.com/codedeploy.
Note
Sign in with the same account or IAM user information you used in Getting Started (p. 11).
2. If the Applications page does not appear, on the AWS CodeDeploy menu, choose Applications.
3. On the Applications page, choose the application name associated with the deployment group.
Note
If no entries are displayed, make sure the correct region is selected. On the navigation bar,
in the region selector, choose one of one of the regions listed in Region and Endpoints in
the AWS General Reference. AWS CodeDeploy supports these regions only.
API Version 2014-10-06
177

AWS CodeDeploy User Guide
View Deployment Group Details (CLI)
4. To view details about an individual deployment group, in Deployment groups, choose the arrow
next to the deployment group.
View Deployment Group Details (CLI)
To use the AWS CLI to view deployment group details, call either the get-deployment-group
command or the list-deployment-groups command.
To view details about a single deployment group, call the get-deployment-group command, specifying:
• The application name associated with the deployment group. To get the application name, call the
list-applications command.
• The deployment group name. To get the deployment group name, call the list-deployment-groups
command.
To view a list of deployment group names, call the list-deployment-groups command, specifying the
application name associated with the deployment groups. To get the application name, call the list-
applications command.
Change Deployment Group Settings with AWS
CodeDeploy
You can use the AWS CodeDeploy console, the AWS CLI, or the AWS CodeDeploy APIs to change
the settings of a deployment group.
Caution
Do not use these steps if you want the deployment group to use a not-yet-created
custom deployment group. Instead, follow the instructions in Create a Deployment
Configuration (p. 166), and then return to this topic. Do not use these steps if you want the
deployment group to use a different, not-yet-created service role. The service role must trust
AWS CodeDeploy with, at minimum, the permissions described in Step 3: Create a Service
Role (p. 13). To create and configure a service role with the correct permissions, follow the
instructions in Step 3: Create a Service Role (p. 13), and then return to this topic.
Topics
•To Change Deployment Group Settings (Console) (p. 178)
•To Change Deployment Group Settings (CLI) (p. 180)
To Change Deployment Group Settings
(Console)
To use the AWS CodeDeploy console to change deployment group settings:
1. Sign in to the AWS Management Console and open the AWS CodeDeploy console at https://
console.aws.amazon.com/codedeploy.
Note
Sign in with the same account or IAM user information you used in Getting Started (p. 11).
2. On the AWS CodeDeploy menu, choose Applications.
API Version 2014-10-06
178

AWS CodeDeploy User Guide
To Change Deployment Group Settings (Console)
3. In the list of applications, choose the application that is associated with the deployment group you
want to change.
Note
If no entries are displayed, make sure the correct region is selected. On the navigation bar,
in the region selector, choose one of one of the regions listed in Region and Endpoints in
the AWS General Reference. AWS CodeDeploy supports these regions only.
4. In the Application details page, in Deployment groups, choose the button next to the deployment
group you want to change.
5. On the Actions menu, choose Edit.
6. In the Deployment Group Name box, type a different name, if you want to change the group
deployment name. Otherwise, leave the current name.
Note
Deployment group names must be unique per application.
7. In the list of tags, in the Key and Value boxes, change or add tags types and key-value pair values,
if you want to change them. Otherwise, leave the current set of key-value pairs. (For information
about Amazon EC2 tags, see Working with Tags Using the Console.)
If you add a key-value pair, a new row appears for you to add another, if necessary. You can repeat
this step for up to 10 key-value pairs.
Tip
AWS CodeDeploy displays the number of instances that match the specified key-value pair.
Choose the number to see more information about the instances.
To remove a key-value pair from the list, choose the corresponding remove icon.
8. In the Deployment Config list, choose a different deployment configuration, if you want to change
it. Otherwise, leave the current deployment configuration.
9. In the Triggers area, create or modify triggers to receive notifications in SMS or email for the
deployment or instance events you want to track. For information, see Monitoring Deployments with
Amazon SNS Event Notifications (p. 216).
10.In the Alarms area, add or change the name of an alarm that you have already created in
CloudWatch for monitoring this deployment.
You must enter the CloudWatch alarm exactly as it was created in CloudWatch. To view a list of
existing alarms, open the CloudWatch console at https://console.aws.amazon.com/cloudwatch/, and
then choose ALARM.
11.If you want deployments to proceed without taking into account any alarms you have added, choose
Ignore alarm configuration.
API Version 2014-10-06
179

AWS CodeDeploy User Guide
To Change Deployment Group Settings (CLI)
This option is useful when you want to temporarily deactivate alarm monitoring for a deployment
group without having to add the same alarms again later.
12.If you want deployments to proceed in the event that AWS CodeDeploy is unable to retrieve
alarm status from Amazon CloudWatch, choose Continue deployments even if alarm status is
unavailable.
Tip
This option corresponds with ignorePollAlarmFailure in the AlarmConfiguration object in
the AWS CodeDeploy API.
13.In the Rollbacks area, adjust one or both of the following:
•Roll back when a deployment fails. AWS CodeDeploy will redeploy the last known good
revision as a new deployment.
•Roll back when alarm thresholds are met. If you added an alarm to this application in the
previous step, AWS CodeDeploy will redeploy the last known good revision when one or more of
the specified alarms is activated.
Tip
To temporarily disregard a rollback configuration, choose Disable rollbacks.
14.In the Service Role ARN box, choose a different Amazon Resource Name (ARN) corresponding to
a service role that trusts AWS CodeDeploy with, at minimum, the trust and permissions described in
Step 3: Create a Service Role (p. 13), if you want to change it. Otherwise, leave the current service
role ARN. (To get the service role ARN, see Get the Service Role ARN (Console) (p. 17).)
15.If you want to deploy the last successful revision to the deployment group, select the Deploy
changes made to deployment group name box, and then choose Save & Deploy Now. When
prompted, choose Deploy Now. AWS CodeDeploy updates the deployment group's information,
starts a deployment of the last successful revision to the deployment group based on changes you
specified, and displays the Deployments page.
Note
The Deploy changes made to deployment group name check box will appear only if
there was a last successful deployment to this deployment group.
16.If you want to update the deployment group's information with your changes, but do not want to
deploy any applications to the deployment group at this time, clear the Deploy changes made
to deployment group name box, and then choose Save. AWS CodeDeploy will update the
deployment group's information, but will not deploy any applications to the deployment group.
To Change Deployment Group Settings (CLI)
To use the AWS CLI to change deployment group settings, call the update-deployment-group
command, specifying:
• The application name. To view a list of application names, call the list-applications command.
• The current deployment group name. To view a list of deployment group names, call the list-
deployment-groups command.
• (Optional) A different deployment group name.
• (Optional) Replacement tags that uniquely identify the instances to be included in the deployment
group.
API Version 2014-10-06
180

AWS CodeDeploy User Guide
Delete a Deployment Group
• (Optional) A different Amazon Resource Name (ARN) corresponding to a service role that allows
AWS CodeDeploy to act on your AWS account's behalf when interacting with other related AWS
services. To get the service role ARN, see Get the Service Role ARN (CLI) (p. 17). For more
information about service roles, see Roles Terms and Concepts in IAM User Guide.
• (Optional) The names of replacement Auto Scaling groups to be added to the deployment group.
• (Optional) The name of the deployment configuration. To view a list of deployment configurations,
see View Deployment Configuration Details (p. 166). (If not specified, AWS CodeDeploy uses a
specific default deployment configuration.)
• (Optional) Commands to create or update a trigger that publishes to a topic in Amazon Simple
Notification Service, so that subscribers to that topic receive notifications about deployment and
instance events in this deployment group. For information, see Monitoring Deployments with Amazon
SNS Event Notifications (p. 216).
• (Optional) Commands to add one or more existing CloudWatch alarms to the deployment group that
will be activated if a metric specified in an alarm falls below or exceeds a defined threshold.
• (Optional) Commands for a deployment to roll back to the last known good revision when a
deployment fails or a CloudWatch alarm is activated.
Delete a Deployment Group with AWS
CodeDeploy
You can use the AWS CodeDeploy console, the AWS CLI, or the AWS CodeDeploy APIs to delete
deployment groups associated with your AWS account.
Caution
If you delete a deployment group, all details associated with that deployment group will also
be deleted from AWS CodeDeploy. The instances used in the deployment group will remain
unchanged. This action cannot be undone.
Topics
•Delete a Deployment Group (Console) (p. 181)
•Delete a Deployment Group (CLI) (p. 182)
Delete a Deployment Group (Console)
To use the AWS CodeDeploy console to delete a deployment group:
1. Sign in to the AWS Management Console and open the AWS CodeDeploy console at https://
console.aws.amazon.com/codedeploy.
Note
Sign in with the same account or IAM user information you used in Getting Started (p. 11).
2. On the AWS CodeDeploy menu, choose Applications.
3. In the list of applications, choose the name of the application associated with the deployment group.
4. On the Application details page, in Deployment groups, choose the button next to the
deployment group you want to delete.
5. On the Actions menu, choose Delete.
6. When prompted, type the name of the deployment group to confirm you want to delete it, and then
choose Delete.
API Version 2014-10-06
181

AWS CodeDeploy User Guide
Delete a Deployment Group (CLI)
Delete a Deployment Group (CLI)
To use the AWS CLI to delete a deployment group, call the delete-deployment-group command,
specifying:
• The name of the application associated with the deployment group. To view a list of application
names, call the list-applications command.
• The name of the deployment group associated with the application. To view a list of deployment
group names, call the list-deployment-groups command.
API Version 2014-10-06
182

AWS CodeDeploy User Guide
Plan a Revision
Working with Application
Revisions for AWS CodeDeploy
In AWS CodeDeploy, a revision contains a version of the source files AWS CodeDeploy will deploy to
your instances or scripts AWS CodeDeploy will run on your instances.
You plan the revision, add an AppSpec file to the revision, and then push the revision to Amazon S3 or
GitHub. After you push the revision, you can deploy it.
Topics
•Plan a Revision (p. 183)
•Add an AppSpec File (p. 184)
•Choose a Repository Type (p. 187)
•Push a Revision (p. 188)
•View Application Revision Details (p. 189)
•Register an Application Revision (p. 190)
Plan a Revision for AWS CodeDeploy
Good planning makes deploying revisions to instances much easier.
Start by creating an empty root directory (folder) on the development machine. This is where you will
store the source files (such as text and binary files, executables, packages, and so on) to be deployed
to the instances or scripts to be run on the instances.
For example, at the /tmp/ root folder in Linux, OS X, or Unix or the c:\temp root folder in Windows:
/tmp/ or c:\temp (root folder)
|--content (subfolder)
| |--myTextFile.txt
| |--mySourceFile.rb
| |--myExecutableFile.exe
| |--myInstallerFile.msi
| |--myPackage.rpm
| |--myImageFile.png
|--scripts (subfolder)
| |--myShellScript.sh
| |--myBatchScript.bat
| |--myPowerShellScript.ps1
API Version 2014-10-06
183
AWS CodeDeploy User Guide
Add an AppSpec File
|--appspec.yml
The root folder should also include an application specification file (AppSpec file), as shown here. For
more information, see Add an AppSpec File (p. 184).
Add an Application Specification File to a
Revision for AWS CodeDeploy
Without an AppSpec file, AWS CodeDeploy cannot map the source files in your application revision to
their destinations or run scripts at various stages of the deployment.
Each revision must contain only one AppSpec file.
To add an AppSpec file to a revision:
1. Copy the template into a text editor.
2. Modify the template as needed.
3. Use a YAML validator to check the validity of your AppSpec file.
4. Save the file as appspec.yml in the root directory of the revision.
5. Run one of the following commands to verify that you have placed your AppSpec file in the root
directory:
• For Linux, OS X, or Unix:
find /path/to/root/directory -name appspec.yml
There will be no output if the AppSpec file is not found there.
• For Windows:
dir path\to\root\directory\appspec.yml
A File Not Found error will be displayed if the AppSpec file is not stored there.
6. Push the revision to Amazon S3 or GitHub.
For instructions, see Push a Revision (p. 188).
AppSpec file Template with Instructions
# This is an appspec.yml template file for use with AWS CodeDeploy.
# The lines in this template starting with the hashtag symbol are
# instructional comments and can be safely left in the file or
# ignored.
# For help completing this file, see the "AppSpec File Reference" in the
# "AWS CodeDeploy User Guide" at
# http://docs.aws.amazon.com/codedeploy/latest/userguide/app-spec-ref.html
version: 0.0
# Specify "os: linux" if this revision targets Amazon Linux,
# Red Hat Enterprise Linux (RHEL), or Ubuntu Server
# instances.
API Version 2014-10-06
184

AWS CodeDeploy User Guide
AppSpec file Template with Instructions
# Specify "os: windows" if this revision targets Windows Server instances.
# (You cannot specify both "os: linux" and "os: windows".)
os: linux
# os: windows
# During the Install deployment lifecycle event (which occurs between the
# BeforeInstall and AfterInstall events), copy the specified files
# in "source" starting from the root of the revision's file bundle
# to "destination" on the Amazon EC2 instance.
# Specify multiple "source" and "destination" pairs if you want to copy
# from multiple sources or to multiple destinations.
# If you are not copying any files to the Amazon EC2 instance, then remove
the
# "files" section altogether. A blank or incomplete "files" section
# may cause associated deployments to fail.
files:
- source:
destination:
- source:
destination:
# For deployments to Amazon Linux, Ubuntu Server, or RHEL instances,
# you can specify a "permissions"
# section here that describes special permissions to apply to the files
# in the "files" section as they are being copied over to
# the Amazon EC2 instance.
# For more information, see the documentation.
# If you are deploying to Windows Server instances,
# then remove the
# "permissions" section altogether. A blank or incomplete "permissions"
# section may cause associated deployments to fail.
permissions:
- object:
pattern:
except:
owner:
group:
mode:
acls:
-
context:
user:
type:
range:
type:
-
# If you are not running any commands on the Amazon EC2 instance, then
remove
# the "hooks" section altogether. A blank or incomplete "hooks" section
# may cause associated deployments to fail.
hooks:
# For each deployment lifecycle event, specify multiple "location" entries
# if you want to run multiple scripts during that event.
# You can specify "timeout" as the number of seconds to wait until failing
the deployment
# if the specified scripts do not run within the specified time limit for
the
# specified event. For example, 900 seconds is 15 minutes. If not
specified,
# the default is 1800 seconds (30 minutes).
API Version 2014-10-06
185

AWS CodeDeploy User Guide
AppSpec file Template with Instructions
# Note that the maximum amount of time that all scripts must finish
executing
# for each individual deployment lifecycle event is 3600 seconds (1 hour).
# Otherwise, the deployment will stop and AWS CodeDeploy will consider the
deployment
# to have failed to the Amazon EC2 instance. Make sure that the total
number of seconds
# that are specified in "timeout" for all scripts in each individual
deployment
# lifecycle event does not exceed a combined 3600 seconds (1 hour).
# For deployments to Amazon Linux, Ubuntu Server, or RHEL instances,
# you can specify "runas" in an event to
# run as the specified user. For more information, see the documentation.
# If you are deploying to Windows Server instances,
# remove "runas" altogether.
# If you do not want to run any commands during a particular deployment
# lifecycle event, remove that event declaration altogether. Blank or
# incomplete event declarations may cause associated deployments to fail.
# During the ApplicationStop deployment lifecycle event, run the commands
# in the script specified in "location" starting from the root of the
# revision's file bundle.
ApplicationStop:
- location:
timeout:
runas:
- location:
timeout:
runas:
# During the BeforeInstall deployment lifecycle event, run the commands
# in the script specified in "location".
BeforeInstall:
- location:
timeout:
runas:
- location:
timeout:
runas:
# During the AfterInstall deployment lifecycle event, run the commands
# in the script specified in "location".
AfterInstall:
- location:
timeout:
runas:
- location:
timeout:
runas:
# During the ApplicationInstall deployment lifecycle event, run the commands
# in the script specified in "location".
ApplicationStart:
- location:
timeout:
runas:
- location:
timeout:
runas:
# During the ValidateService deployment lifecycle event, run the commands
# in the script specified in "location".
ValidateService:
- location:
API Version 2014-10-06
186

AWS CodeDeploy User Guide
Choose a Repository Type
timeout:
runas:
- location:
timeout:
runas:
Choose an AWS CodeDeploy Repository Type
In order to deploy your application code to one or more instances, your code must be bundled into
an archive file and placed in a location where AWS CodeDeploy can access it during the deployment
process. This storage location is called a repository. As part of the deployment process, you bundle
your deployable content and an AppSpec file into an archive file, and then upload it to one of the
repository types supported by AWS CodeDeploy.
AWS CodeDeploy currently supports the following repository types:
Amazon S3 Amazon Simple Storage Service (Amazon S3) is the AWS solution for secure,
scalable object storage. Amazon S3 stores data as objects in buckets. An
object consists of a file and, optionally, any metadata that describes that file.
To store an object in Amazon S3, you upload the file you want to store to a
bucket. When you upload a file, you can set permissions and metadata on the
object.
Learn more:
•Create a Bucket in Amazon S3
•Push a Revision (p. 188)
•Automatically Deploy from Amazon S3 Using AWS CodeDeploy
GitHub You can store your application revisions in GitHub repositories. You can
trigger a deployment from a GitHub repository whenever the source code in
that repository is changed.
Learn more:
•GitHub (p. 36)
•Tutorial: Deploying from GitHub (p. 97)
•Automatically Deploy from GitHub Using AWS CodeDeploy
Bitbucket You can push code to Amazon EC2 instances directly from the Bitbucket
UI to any of your deployment groups without having to sign in to your
continuous integration (CI) platform or Amazon EC2 instances to run a manual
deployment process. Bitbucket first pushes the code to an Amazon S3 bucket
you have specified, and from there deploys the code. After the initial setup to
support this process is complete, however, the code you push from Bitbucket
is automatically deployed to your instances without any intermediate steps.
Learn more:
•Atlassian Bitbucket Support for AWS CodeDeploy
API Version 2014-10-06
187

AWS CodeDeploy User Guide
Push a Revision
Push a Revision for AWS CodeDeploy to
Amazon S3
After you plan your revision as described in Plan a Revision (p. 183) and add an AppSpec file to the
revision as described in Add an AppSpec File (p. 184), you are ready to bundle the component files
and push the revision to Amazon S3. After you push the revision, you can use AWS CodeDeploy to
deploy the revision from Amazon S3 to the instances.
Note
AWS CodeDeploy can also be used to deploy revisions that have been pushed to GitHub. For
more information, see your GitHub documentation.
We assume you have already followed the instructions in Getting Started (p. 11) to set up the AWS
CLI. This is especially important for calling the push command described later.
Be sure you have an Amazon S3 bucket. Follow the instructions in Create a Bucket.
The target Amazon S3 bucket must be created or exist in the same region as the target instances. For
example, if you want to deploy a revision to some instances in the US East (N. Virginia) Region and
other instances in the US West (Oregon) Region, then you must have one bucket in the US East (N.
Virginia) Region with one copy of the revision and another bucket in the US West (Oregon) Region
with another copy of the same revision. In this scenario, you would then need to create two separate
deployments, one in the US East (N. Virginia) Region and another in the US West (Oregon) Region,
even though the revision is the same in both regions and buckets.
You must have permissions to upload to the Amazon S3 bucket. You can specify these permissions
through an Amazon S3 bucket policy. For example, the following Amazon S3 bucket policy
allows AWS account 111122223333 to upload anywhere in the Amazon S3 bucket named
codedeploydemobucket:
{
"Statement": [
{
"Action": ["s3:PutObject"],
"Effect": "Allow",
"Resource": "arn:aws:s3:::codedeploydemobucket/*",
"Principal": {
"AWS": [
"111122223333"
]
}
}
]
}
To learn how to generate and attach an Amazon S3 bucket policy, see Bucket Policy Examples.
The IAM user who is calling the push command must have, at minimum, permissions to upload the
revision to each target Amazon S3 bucket. For example, the following policy allows the IAM user to
upload revisions anywhere in the Amazon S3 bucket named codedeploydemobucket:
{
"Version":"2012-10-17",
"Statement":[
{
"Effect":"Allow",
API Version 2014-10-06
188
AWS CodeDeploy User Guide
View Application Revision Details
"Action":["s3:PutObject"],
"Resource":"arn:aws:s3:::codedeploydemobucket/*"
}
]
}
To learn how to create and attach an IAM policy, see Working with Policies.
To bundle and push the revision in a single command, from the command line, switch to the root
directory (folder) of the revision, and then call the push command.
For example, to bundle the component files into a revision starting from the current directory,
associated with the application named WordPress_App, to an Amazon S3 bucket named
codedeploydemobucket, with a revision name of WordPressApp.zip, call the push command as
follows:
In Linux, OS X, or Unix:
aws deploy push \
--application-name WordPress_App \
--description "This is a revision for the application WordPress_App" \
--ignore-hidden-files \
--s3-location s3://codedeploydemobucket/WordPressApp.zip \
--source .
In Windows:
aws deploy push --application-name WordPress_App --description "This is a
revision for the application WordPress_App" --ignore-hidden-files --s3-
location s3://codedeploydemobucket/WordPressApp.zip --source .
After the push is successful, you can use the AWS CLI or the AWS CodeDeploy console to deploy the
revision from Amazon S3 to the instances. For instructions, see Deploy a Revision (p. 197).
View Application Revision Details with AWS
CodeDeploy
You can use the AWS CodeDeploy console, the AWS CLI, or the AWS CodeDeploy APIs to view
details about all application revisions that are registered to your AWS account for a specified
application.
For information about registering a revision, see Register an Application Revision (p. 190).
Topics
•View Application Revision Details (Console) (p. 189)
•View Application Revision Details (CLI) (p. 190)
View Application Revision Details (Console)
To view application revision details:
1. Sign in to the AWS Management Console and open the AWS CodeDeploy console at https://
console.aws.amazon.com/codedeploy.
API Version 2014-10-06
189

AWS CodeDeploy User Guide
View Application Revision Details (CLI)
Note
Sign in with the same account or IAM user information you used in Getting Started (p. 11).
2. On the AWS CodeDeploy menu, choose Applications.
3. On the Applications page, choose the name of the application with revision details you want to
view.
Note
If no entries are displayed, make sure the correct region is selected. On the navigation bar,
in the region selector, choose one of one of the regions listed in Region and Endpoints in
the AWS General Reference. AWS CodeDeploy supports these regions only.
4. On the Application details page, under Revisions, review the list of revisions that are registered
for the application. Choose the arrow next to a revision for more details.
View Application Revision Details (CLI)
To use the AWS CLI to view an application revision, call either the get-application-revision command
or the list-application-revisions command.
To view details about a single application revision, call the get-application-revision command,
specifying:
• The application name. To get the application name, call the list-applications command.
• For a revision stored in GitHub, the GitHub repository name and the ID of the commit that references
the application revision that was pushed to the repository.
• For a revision stored in Amazon S3, the Amazon S3 bucket name containing the revision; the name
and file type of the uploaded archive file; and, optionally, the archive file's Amazon S3 version
identifier and ETag. If the version identifier, ETag, or both were specified during a call to register-
application-revision, they must be specified here.
To view details about multiple application revisions, call the list-application-revisions command,
specifying:
• The application name. To get the application name, call the list-applications command.
• Optionally, to view details for Amazon S3 application revisions only, the Amazon S3 bucket name
containing the revisions.
• Optionally, to view details for Amazon S3 application revisions only, a prefix string to limit the search
to Amazon S3 application revisions. (If not specified, AWS CodeDeploy will list all matching Amazon
S3 application revisions.)
• Optionally, whether to list revision details based on whether each revision is the target revision of a
deployment group. (If not specified, AWS CodeDeploy will list all matching revisions.)
• Optionally, the column name and order by which to sort the list of revision details. (If not specified,
AWS CodeDeploy will list results in an arbitrary order.)
You can list all revisions or only those revisions stored in Amazon S3. You cannot list only those
revisions stored in GitHub.
Register an Application Revision in Amazon
S3 with AWS CodeDeploy
If you've already called the push command to push an application revision to Amazon S3, you don't
need to register the revision. However, if you upload a revision to Amazon S3 through other means
API Version 2014-10-06
190

AWS CodeDeploy User Guide
To register a revision in Amazon
S3 with AWS CodeDeploy (CLI)
and want the revision to appear in the AWS CodeDeploy console or through the AWS CLI, follow these
steps to register the revision first.
If you've pushed an application revision to a GitHub repository and want the revision to appear in the
AWS CodeDeploy console or through the AWS CLI, you must also follow these steps.
You can use only the AWS CLI or the AWS CodeDeploy APIs to register application revisions in
Amazon S3 or GitHub.
Topics
•To register a revision in Amazon S3 with AWS CodeDeploy (CLI) (p. 191)
•To register a revision in GitHub with AWS CodeDeploy (CLI) (p. 191)
To register a revision in Amazon S3 with AWS
CodeDeploy (CLI)
1. Upload the revision to Amazon S3.
2. Call the register-application-revision command, specifying:
• The application name. To view a list of application names, call the list-applications command.
• Information about the revision to be registered:
• The name of the Amazon S3 bucket that contains the revision.
• The name and file type of the uploaded revision.
Note
The tar and compressed tar archive file formats (.tar and .tar.gz) are not supported
for Windows Server instances.
• Optionally, the revision's Amazon S3 version identifier. (If the version identifier is not specified,
AWS CodeDeploy will use the most recent version.)
• Optionally, the revision's ETag. (If the ETag is not specified, AWS CodeDeploy will skip object
validation.)
• Optionally, any description you want to associate with the revision.
Tip
Information about a revision in Amazon S3 can be specified on the command line, using this
syntax as part of the register-application-revision call. (version and eTag are optional.)
--s3-location bucket=string,key=string,bundleType=tar|tgz|
zip,version=string,eTag=string
To register a revision in GitHub with AWS
CodeDeploy (CLI)
1. Upload the revision to your GitHub repository.
2. Call the register-application-revision command, specifying:
• The application name. To view a list of application names, call the list-applications command.
• Information about the revision to be registered:
• The GitHub user or group name assigned to the repository that contains the revision, followed
by a forward slash (/), followed by the repository name.
API Version 2014-10-06
191

AWS CodeDeploy User Guide
To register a revision in GitHub
with AWS CodeDeploy (CLI)
• The ID of the commit that references the revision in the repository.
• Optionally, any description you want to associate with the revision.
Tip
Information about a revision in GitHub can be specified on the command line, using this
syntax as part of the register-application-revision call:
--github-location repository=string,commitId=string
API Version 2014-10-06
192

AWS CodeDeploy User Guide
Create a Deployment
Working with Deployments in
AWS CodeDeploy
In AWS CodeDeploy, a deployment is the process, and the components involved in the process, of
deploying content to one or more instances. This content can consist of code, web, and configuration
files, executables, packages, scripts, and so on. AWS CodeDeploy deploys content that is stored in a
source repository, according to the configuration rules you provide.
For more information, see Overview of a Deployment (p. 2).
Topics
•Create a Deployment (p. 193)
•View Deployment Details (p. 196)
•Deploy a Revision (p. 197)
•Stop a Deployment (p. 202)
•Redeploy and Roll Back a Deployment (p. 203)
•Deploy an Application in a Different AWS Account (p. 204)
Create a Deployment with AWS CodeDeploy
You can create a deployment by:
• Following the instructions in Deploy a Revision (p. 197).
• Using the AWS CLI and calling the create-deployment command.
• Using the Create New Deployment page in the AWS CodeDeploy console.
You might want to use this page if you are creating a deployment on one page and you already have
instances, an application, a deployment group, a revision, and a deployment configuration.
In these steps, we assume you have already followed the instructions in Working with
Instances (p. 122), Create an Application (p. 168), and Working with Application Revisions (p. 183).
Caution
Do not follow these steps if you want to create a deployment that uses a custom deployment
configuration, but have not created the deployment configuration. Follow the instructions in
Create a Deployment Configuration (p. 166), and then follow the steps in this topic.
You cannot follow these steps if you are using your own application to deploy your own
revision from an Amazon S3 bucket and the Amazon S3 bucket is in an AWS region different
API Version 2014-10-06
193

AWS CodeDeploy User Guide
To specify information about a revision
stored in an Amazon S3 bucket
from your target instances. You must first copy the revision to an Amazon S3 bucket that is in
the same region as your target instances, and then you can follow the steps in this topic.
1. Sign in to the AWS Management Console and open the AWS CodeDeploy console at https://
console.aws.amazon.com/codedeploy.
Note
Sign in with the same account or IAM user information you used in Getting
Started (p. 11).
2. On the AWS CodeDeploy menu, choose Deployments.
3. On the Deployments page, choose Create New Deployment.
4. In the Application list, choose the name of the application you want to use for this deployment.
5. In the Deployment Group box, choose the name of the deployment group associated with the
application.
6. Next to Revision Type, choose the repository type your revision is stored in:
•My application is stored in Amazon S3 — For information, see To specify information about a
revision stored in an Amazon S3 bucket below, and then return to step 7.
•My application is stored in GitHub — For information, see To specify information about a
revision stored in a GitHub repository (p. 195) below, and then return to step 7.
•
7. Optionally, in the Deployment Description box, type a description for this deployment.
8. In the Deployment Config list, choose the deployment configuration.
9. Optional: In the Override rollbacks area, you can specify different automatic rollback options for
this deployment than were specified for the deployment group, if any.
Note
For information about rollbacks in AWS CodeDeploy, see Redeployments and
Deployment Rollbacks (p. 9) and Redeploy and Roll Back a Deployment (p. 203).
Choose from the following:
• • Roll back when a deployment fails — AWS CodeDeploy will redeploy the last known good
revision as a new deployment.
•Roll back when alarm thresholds are met — If alarms were added to the deployment
group, AWS CodeDeploy will redeploy the last known good revision when one or more of the
specified alarms is activated.
•Disable rollbacks — Do not perform rollbacks for this deployment.
10. Choose Deploy Now.
To track the status of your deployment, see View Deployment Details (p. 196).
To specify information about a revision stored in
an Amazon S3 bucket
1. Copy your revision's Amazon S3 link into the Revision Location box. To find the link value:
1. In a separate browser tab:
Sign in to the AWS Management Console and open the Amazon S3 console at https://
console.aws.amazon.com/s3/.
Browse to and choose your revision.
API Version 2014-10-06
194

AWS CodeDeploy User Guide
To specify information about a
revision stored in a GitHub repository
2. If the Properties pane is not visible, choose the Properties button.
3. In the Properties pane, copy the value of the Link field into the Revision Location box in the
AWS CodeDeploy console.
To specify an ETag (a file checksum) as part of the revision location:
• If the Link field value ends in ?versionId=versionId, add &etag= and the ETag to the end
of the Link field value.
• If the Link field value does not specify a version ID, add ?etag= and the ETag to the end of the
Link field value.
Note
Although it's not as easy as copying the value of the Link field, you can also type the
revision location in one of the following formats:
s3://bucketName/folders/objectName
s3://bucketName/folders/objectName?versionId=versionId
s3://bucketName/folders/objectName?etag=etag
s3://bucketName/folders/objectName?versionId=versionId&etag=etag
bucketName.s3.amazonaws.com/folders/objectName
2. If a message appears in the File Type list that says the file type could not be detected, choose the
revision's file type. Otherwise, accept the detected file type.
To specify information about a revision stored in
a GitHub repository
1. Choose Connect with GitHub.
Note
If you see a Reconnect with GitHub link instead of a Connect with GitHub button,
this is expected behavior. Do not choose the link. Continue to the next step. For
information about why this happens, see GitHub Authentication with Applications in AWS
CodeDeploy (p. 37).
If you see a blank web page that briefly appears and then disappears, and you don't see
a Reconnect with GitHub link or a Connect with GitHub button, this is also expected
behavior. Continue to the next step. For information about why this happens, see GitHub
Authentication with Applications in AWS CodeDeploy (p. 37).
2. If you are prompted to sign in to GitHub, follow the instructions on the Sign in page. Sign in with
your GitHub user name or email and password.
3. If an Authorize application page appears, choose Authorize application.
4. On the Create New Deployment page, in the Repository Name box, type the GitHub user or
organization name that contains the revision, followed by a forward slash (/), followed by the
name of the repository that contains the revision. If you are unsure of the value to type:
1. In a separate web browser tab, go to your GitHub dashboard.
2. In the Your repositories area, hover your mouse pointer over the target repository name. A
tooltip appears, displaying the GitHub user or organization name, followed by a forward slash
(/), followed by the name of the repository. Type this displayed value into the Repository
name box.
Tip
If the target repository name is not visible in the Your repositories area, use
the Search GitHub box to find the target repository name and GitHub user or
organization name.
API Version 2014-10-06
195

AWS CodeDeploy User Guide
View Deployment Details
5. In the Commit ID box, type the ID of the commit that refers to the revision in the repository. If you
are unsure of the value to type:
1. In a separate web browser tab, go to your GitHub dashboard.
2. In the Your repositories area, choose the repository name that contains the target commit.
3. In the list of commits, find and copy the commit ID that refers to the revision in the repository.
This ID is typically 40 characters in length and consists of both letters and numbers. (Do not
use the shorter version of the commit ID, which is typically the first 10 characters of the longer
version of the commit ID.)
4. Paste the commit ID into the Commit ID box.
View Deployment Details with AWS
CodeDeploy
You can use the AWS CodeDeploy console, the AWS CLI, or the AWS CodeDeploy APIs to view
details about deployments associated with your AWS account.
Topics
•View Deployment Details (Console) (p. 196)
•View Deployment Details (CLI) (p. 196)
View Deployment Details (Console)
To use the AWS CodeDeploy console to view deployment details:
1. Sign in to the AWS Management Console and open the AWS CodeDeploy console at https://
console.aws.amazon.com/codedeploy.
Note
Sign in with the same account or IAM user information you used in Getting Started (p. 11).
2. On the AWS CodeDeploy menu, choose Deployments to view a list of deployments and their
details.
Note
If no entries are displayed, make sure the correct region is selected. On the navigation bar,
in the region selector, choose one of one of the regions listed in Region and Endpoints in
the AWS General Reference. AWS CodeDeploy supports these regions only.
3. To see more details for a single deployment, in Deployments, choose the deployment ID.
View Deployment Details (CLI)
To use the AWS CLI to view deployment details, call the get-deployment command or the batch-
get-deployments command. You can call the list-deployments command to get a list of
unique deployment IDs to use as inputs to the get-deployment command and the batch-get-
deployments command.
To view details about a single deployment, call the get-deployment command, specifying the unique
deployment identifier. To get the deployment ID, call the list-deployments command.
To view details about multiple deployments, call the batch-get-deployments command, specifying
multiple unique deployment identifiers. To get the deployment IDs, call the list-deployments command.
To view a list of deployment IDs, call the list-deployments command, specifying:
API Version 2014-10-06
196

AWS CodeDeploy User Guide
Deploy a Revision
• The name of the application associated with the deployment. To view a list of application names, call
the list-applications command.
• The name of the deployment group associated with the deployment. To view a list of deployment
group names, call the list-deployment-groups command.
• Optionally, whether to include details about deployments by their deployment status. (If not specified,
all matching deployments will be listed, regardless of their deployment status.)
• Optionally, whether to include details about deployments by their deployment creation start times
or end times, or both. (If not specified, all matching deployments will be listed, regardless of their
creation times.)
Deploy a Revision with AWS CodeDeploy
After you have prepared your instances as described in Working with Instances (p. 122), created the
application as described in Create an Application (p. 168), and prepared your revision as described in
Working with Application Revisions (p. 183), you are ready to deploy your revision to the instances.
You can use the AWS CodeDeploy console, the AWS CLI, or the AWS CodeDeploy APIs to deploy
revisions that you have already pushed to Amazon S3 or GitHub.
Caution
You cannot start these steps if:
• You want to use, but have not yet created, a custom deployment configuration to deploy
your revision. Follow the instructions in Create a Deployment Configuration (p. 166), and
then follow the steps here.
• You want to deploy a revision from an Amazon S3 bucket, but the target instances cannot
download the revision from the bucket. You can create an Amazon S3 bucket policy like the
example provided here.
This Amazon S3 bucket policy allows any Amazon EC2 instance with an attached
IAM instance profile containing the ARN arn:aws:iam::80398EXAMPLE:role/
CodeDeployDemo to download from anywhere in the Amazon S3 bucket named
codedeploydemobucket:
{
"Statement": [
{
"Action": ["s3:Get*", "s3:List*"],
"Effect": "Allow",
"Resource": "arn:aws:s3:::codedeploydemobucket/*",
"Principal": {
"AWS": [
"arn:aws:iam::80398EXAMPLE:role/CodeDeployDemo"
]
}
}
]
}
The following Amazon S3 bucket policy allows any on-premises instance with an associated
IAM user containing the ARN arn:aws:iam::80398EXAMPLE:user/CodeDeployUser to
download from anywhere in the Amazon S3 bucket named codedeploydemobucket:
{
API Version 2014-10-06
197

AWS CodeDeploy User Guide
Deploy a Revision (Console)
"Statement": [
{
"Action": ["s3:Get*", "s3:List*"],
"Effect": "Allow",
"Resource": "arn:aws:s3:::codedeploydemobucket/*",
"Principal": {
"AWS": [
"arn:aws:iam::80398EXAMPLE:user/CodeDeployUser"
]
}
}
]
}
To learn how to generate and attach an Amazon S3 bucket policy, see Bucket Policy
Examples.
• You are deploying your own application revision from an Amazon S3 bucket, and the bucket
is in an AWS region different from your target instances. To proceed, you must first copy the
revision to an Amazon S3 bucket that is in the same region as your target instances, and
then you can follow these steps.
Topics
•Deploy a Revision (Console) (p. 198)
•Deploy a Revision (CLI) (p. 200)
•Related topics (p. 202)
Deploy a Revision (Console)
To use the AWS CodeDeploy console to deploy a revision:
1. Prepare the instances, create the application, and push the revision.
2. Sign in to the AWS Management Console and open the AWS CodeDeploy console at https://
console.aws.amazon.com/codedeploy.
Note
Sign in with the same account or IAM user information you used in Getting
Started (p. 11).
3. On the AWS CodeDeploy menu, choose Applications.
4. Choose the application from the list that corresponds to the revision you want to deploy.
5. On the Application details page, in Deployment groups, choose the button next to the
deployment group to which the revision will be deployed.
Note
If you have a previously deployed revision associated with this application, in Revisions,
from the drop-down list next to the revision, choose Deploy revision, follow the
directions, and skip the rest of the steps on this page. To track the status of your
deployment, see View Deployment Details (p. 196).
6. On the Actions menu, choose Deploy new revision.
7. In the Revision Type area, if the revision is stored in an Amazon S3 bucket, choose My
application is stored in Amazon S3. Otherwise, choose My application is stored in GitHub.
Complete one of the following sets of instructions to specify information about the revision and
then deploy it.
API Version 2014-10-06
198

AWS CodeDeploy User Guide
Deploy a Revision (Console)
To specify information about a revision stored in an
Amazon S3 bucket
1. Copy the Amazon S3 link for your revision into the Revision Location box. To find the link value:
1. In a separate browser tab, sign in to the Amazon S3 console:
Sign in to the AWS Management Console and open the Amazon S3 console at https://
console.aws.amazon.com/s3/.
Browse to and choose your revision.
2. If the Properties pane is not visible in the Amazon S3 console, choose the Properties button.
3. Copy the value of the Link field into the Revision Location box in the AWS CodeDeploy
console.
If you want to specify an ETag as part of the revision location:
• If the Link field value ends in ?versionId=versionId, add &etag= and the ETag to the end
of the Link field value.
• If the Link field value does not specify a version ID, add ?etag= and the ETag to the end of the
Link field value.
Note
Although it's not as easy as copying the value of the Link field, you can type any of the
following formats into the Revision Location box:
s3://bucketName/folders/objectName
s3://bucketName/folders/objectName?versionId=versionId
s3://bucketName/folders/objectName?etag=etag
s3://bucketName/folders/objectName?versionId=versionId&etag=etag
bucketName.s3.amazonaws.com/folders/objectName
2. If a message appears in the File Type list saying the file type could not be detected, choose the
revision's file type.
3. Optionally, in the Deployment Description box, type a description for this deployment.
4. In the Deployment Config list, choose the deployment configuration.
5. Choose Deploy Now.
To track the status of your deployment, see View Deployment Details (p. 196).
To specify information about a revision stored in a GitHub
repository
1. Choose Connect with GitHub.
Note
If you see a Reconnect with GitHub link instead of a Connect with GitHub button, do
not choose the link. Continue to the next step. For information about why this happens,
see GitHub Authentication with Applications in AWS CodeDeploy (p. 37).
If you see a blank web page that briefly appears and then disappears, and you do not
see a Reconnect with GitHub link or a Connect with GitHub button, continue to the
next step. For information about why this happens, see GitHub Authentication with
Applications in AWS CodeDeploy (p. 37).
2. If you are prompted to sign in to GitHub, follow the instructions on the Sign in page.
API Version 2014-10-06
199

AWS CodeDeploy User Guide
Deploy a Revision (CLI)
3. If an Authorize application page appears, choose Authorize application.
4. On the Create New Deployment page, in the Repository Name box, type the GitHub user or
organization name associated with the repository that contains the revision, followed by a forward
slash (/), followed by the name of the repository that contains the revision. If you are unsure of the
value to type:
1. In a separate web browser tab, go to your GitHub dashboard.
2. In the Your repositories area, hover your mouse pointer over the target repository name. A
tooltip appears, displaying the GitHub user or organization name, followed by a forward slash
(/), followed by the name of the repository. Type this value into the Repository Name box.
Tip
If the target repository name does not appear in Your repositories, use the Search
GitHub box.
5. In the Commit ID box, type the ID of the commit that refers to the revision in the repository. If you
are unsure of the value to type:
1. In a separate web browser tab, go to your GitHub dashboard.
2. In the Your repositories area, choose the repository name that contains the target commit.
3. In the list of commits, find and copy the commit ID for the revision. This ID is typically 40
characters in length and consists of both letters and numbers. Do not use the shorter version
of the commit ID.
4. Paste the commit ID into the Commit ID box.
6. Optionally, in the Deployment Description box, type a description for this deployment.
7. In the Deployment Config list, choose the deployment configuration.
8. Choose Deploy Now.
To track the status of your deployment, see View Deployment Details (p. 196).
Deploy a Revision (CLI)
To use the AWS CLI to deploy a revision:
1. Prepare the instances, create the application, and push the revision.
2. If you want to deploy a revision from an Amazon S3 bucket, skip ahead to the next step to call the
create-deployment command. If you want to deploy a revision from a GitHub repository, you must
first give AWS CodeDeploy permission to interact with GitHub on behalf of your GitHub account.
Currently, you must do this through the AWS CodeDeploy console. You will only need to do it once
for an application:
1. Sign in to the AWS Management Console and open the AWS CodeDeploy console at https://
console.aws.amazon.com/codedeploy.
Note
Sign in with the same account or IAM user information you used in Getting
Started (p. 11).
2. On the AWS CodeDeploy menu, choose Deployments.
3. Choose Create New Deployment.
Note
You will not be creating a new deployment. This is currently the only way to give AWS
CodeDeploy permission to interact with GitHub on behalf of your GitHub user account.
4. In the Application drop-down list, choose the application you want to link to your GitHub user
account.
5. In the Deployment Group drop-down list, choose any available deployment group.
API Version 2014-10-06
200

AWS CodeDeploy User Guide
Deploy a Revision (CLI)
6. Next to Revision Type, choose My application revision is stored in GitHub.
7. Choose Connect With GitHub.
Note
If you see a Reconnect with GitHub link:
You may have already authorized AWS CodeDeploy to interact with GitHub on behalf
of a different GitHub account for the application.
You may have revoked authorization for AWS CodeDeploy to interact with GitHub
on behalf of the signed-in GitHub account for all applications linked to in AWS
CodeDeploy.
For more information, see GitHub Authentication with Applications in AWS
CodeDeploy (p. 37).
8. If you are not already signed in to GitHub, follow the instructions on the Sign in page.
9. On the Authorize application page, choose Authorize application.
10. Now that AWS CodeDeploy has permission, choose Cancel, and continue using the AWS CLI.
3. Call the create-deployment command, specifying:
• An application name. To view a list of application names, call the list-applications command.
• An Amazon EC2 deployment group name. To view a list of deployment group names, call the list-
deployment-groups command.
• Information about the revision to be deployed:
For revisions stored in Amazon S3:
• The Amazon S3 bucket name containing the revision.
• The name and file type of the uploaded revision.
Note
The tar and compressed tar archive file formats (.tar and .tar.gz) are not supported for
Windows Server instances.
• Optionally, the Amazon S3 version identifier for the revision. (If the version identifier is not
specified, AWS CodeDeploy will use the most recent version.)
• Optionally, the ETag for the revision. (If the ETag is not specified, AWS CodeDeploy will skip
object validation.)
For revisions stored in GitHub:
• The GitHub user or group name assigned to the repository that contains the revision, followed
by a forward slash (/), followed by the repository name.
• The commit ID for the revision.
• Optionally, the name of a deployment configuration to use. To view a list of deployment
configurations, call the list-deployment-configs command. (If not specified, AWS CodeDeploy will
use a specific default deployment configuration.)
• Optionally, whether you want the deployment to an instance to continue to the BeforeInstall
deployment lifecycle event if the ApplicationStop deployment lifecycle event fails.
• Optionally, a description for the deployment.
Note
Use this syntax as part of the create-deployment call to specify information about a revision
in Amazon S3 directly on the command line. (The version and eTag are optional.)
--s3-location bucket=string,key=string,bundleType=tar|tgz|
zip,version=string,eTag=string
Use this syntax as part of the create-deployment call to specify information about a revision
in GitHub directly on the command line:
API Version 2014-10-06
201

AWS CodeDeploy User Guide
Related topics
--github-location repository=string,commitId=string
To get information about revisions that have been pushed already, call the list-application-
revisions command.
To track the status of your deployment, see View Deployment Details (p. 196).
Related topics
Automatically Deploy from Amazon S3 Using AWS CodeDeploy
Stop a Deployment with AWS CodeDeploy
You can use the AWS CodeDeploy console, the AWS CLI, or the AWS CodeDeploy APIs to stop
deployments associated with your AWS account.
Caution
Stopping a deployment can leave some or all of the instances in your deployment groups
in an indeterminate deployment state. For more information, see Stopped and Failed
Deployments (p. 8).
Topics
•Stop a deployment (console) (p. 202)
•Stop a deployment (CLI) (p. 202)
Stop a deployment (console)
1. Sign in to the AWS Management Console and open the AWS CodeDeploy console at https://
console.aws.amazon.com/codedeploy.
Note
Sign in with the same account or IAM user information you used in Getting Started (p. 11).
2. On the AWS CodeDeploy menu, choose Deployments.
Note
If no entries are displayed, make sure the correct region is selected. On the navigation bar,
in the region selector, choose one of one of the regions listed in Region and Endpoints in
the AWS General Reference. AWS CodeDeploy supports these regions only.
3. In the Actions column for the deployment you want to stop, choose Stop.
Note
If a Stop button does not appear in the Actions column, the deployment has progressed to
a point where it cannot be stopped.
Stop a deployment (CLI)
Call the stop-deployment command, specifying the deployment ID. To view a list of deployment IDs,
call the list-deployments command.
API Version 2014-10-06
202

AWS CodeDeploy User Guide
Redeploy and Roll Back a Deployment
Redeploy and Roll Back a Deployment with
AWS CodeDeploy
AWS CodeDeploy rolls back deployments by redeploying a previously deployed revision of an
application as a new deployment. These rolled-back deployments are technically new deployments,
with new deployment IDs, rather than restored versions of a previous deployment.
Deployments can be rolled back automatically or manually.
Automatic Rollbacks
You can configure a deployment group or deployment to automatically roll back when a deployment
fails or when a monitoring threshold you specify is met. In this case, the last known good version of an
application revision is deployed. You configure automatic rollbacks when you create an application or
create or update a deployment group.
When you create a new deployment, you can also choose to override the automatic rollback
configuration that were specified for the deployment group.
Tip
You can use Amazon Simple Notification Service to receive a notification whenever a
deployment is rolled back automatically. For information, see Monitoring Deployments with
Amazon SNS Event Notifications (p. 216).
For more information about configuring automatic rollbacks, see the following topics:
•Create an Application (p. 168)
•Create a Deployment Group (p. 174)
•Change Deployment Group Settings (p. 178)
•Create a Deployment (p. 193)
Manual Rollbacks
If you have not set up automatic rollbacks, you can manually roll back a deployment by creating a new
deployment
that uses any previously deployed application revision and following the steps to redeploy a revision.
You might do this if an application has gotten into an unknown state. Rather than spending a lot of time
troubleshooting, you can redeploy the application to a known working state. For more information, see
Deploy a Revision (p. 197).
Note
If you remove an instance from a deployment group, AWS CodeDeploy does not uninstall
anything that might have already been installed on that instance.
Rollback and Redeployment Workflow
When automatic rollback is initiated, or when you manually initiate a redeployment or manual
rollback, AWS CodeDeploy first tries to remove from each participating instance all files that were last
successfully installed. AWS CodeDeploy does this by checking the cleanup file:
/opt/codedeploy-agent/deployment-root/deployment-instructions/deployment-
group-ID-cleanup file (for Amazon Linux, Ubuntu Server, and RHEL instances)
C:\ProgramData\Amazon\CodeDeploy\deployment-instructions\deployment-group-ID-
cleanup file (for Windows Server instances)
API Version 2014-10-06
203
AWS CodeDeploy User Guide
Deploy an Application in a Different AWS Account
If it exists, AWS CodeDeploy uses the cleanup file to remove from the instance all listed files before
starting the new deployment.
For example, the first two text files and two script files were already deployed to an Amazon EC2
instance running Windows Server, and the scripts created two more text files during deployment
lifecycle events:
c:\temp\a.txt (previously deployed by AWS CodeDeploy)
c:\temp\b.txt (previously deployed by AWS CodeDeploy)
c:\temp\c.bat (previously deployed by AWS CodeDeploy)
c:\temp\d.bat (previously deployed by AWS CodeDeploy)
c:\temp\e.txt (previously created by c.bat)
c:\temp\f.txt (previously created by d.bat)
The cleanup file will list only the first two text files and two script files:
c:\temp\a.txt
c:\temp\b.txt
c:\temp\c.bat
c:\temp\d.bat
Before the new deployment, AWS CodeDeploy will remove only the first two text files and the two script
files, leaving the last two text files untouched:
c:\temp\a.txt will be removed
c:\temp\b.txt will be removed
c:\temp\c.bat will be removed
c:\temp\d.bat will be removed
c:\temp\e.txt will remain
c:\temp\f.txt will remain
As part of this process, AWS CodeDeploy will not try to revert or otherwise reconcile any actions
taken by any scripts in previous deployments during subsequent redeployments, whether manual or
automatic rollbacks. For example, if the c.bat and d.bat files contain logic to not re-create the e.txt
and f.txt files if they already exist, then the old versions of e.txt and f.txt will remain untouched
whenever AWS CodeDeploy runs c.bat and d.bat in subsequent deployments. You can add logic
to c.bat and d.bat to always check for and delete old versions of e.txt and f.txt before creating
new ones.
Deploy an Application in a Different AWS
Account
Organizations commonly have multiple AWS accounts that they use for different purposes (for
example, one for system administration tasks and another for development, test, and production tasks
or one associated with development and test environments and another associated with the production
environment).
Although you might perform related work in different accounts, AWS CodeDeploy deployment groups
and the Amazon EC2 instances to which they deploy are strictly tied to the accounts under which
they were created. You cannot, for example, add an instance that you launched in one account to a
deployment group in another.
Assume you have two AWS accounts: your development account and your production account.
You work primarily in the development account, but you want to be able kick off deployments in
API Version 2014-10-06
204

AWS CodeDeploy User Guide
Step 1: Create an S3 Bucket in Either Account
your production account without a full set of credentials there or without having to sign out of the
development account and in to the production account.
After following the cross-account configuration steps, you can initiate deployments that belong to
another of your organization’s accounts without needing a full set of credentials for that other account.
You do this, in part, by using a capability provided by the AWS Security Token Service (AWS STS) that
grants you temporary access to that account.
Step 1: Create an S3 Bucket in Either Account
In either the development account or the production account:
• If you have not already done so, create an Amazon S3 bucket where the application revisions for the
production account will be stored. For information, see Create a Bucket in Amazon S3. You can even
use the same bucket and application revisions for both accounts, deploying the same files to your
production environment that you tested and verified in your development account.
Step 2: Grant Amazon S3 Bucket Permissions to
the Production Account's IAM Instance Profile
If the Amazon S3 bucket you created in step 1 is in your production account, this step is not required.
The role you assume later will already have access to this bucket because it is also in the production
account.
If you created the Amazon S3 bucket in the development account, do the following:
• In the production account, create an IAM instance profile. For information, see Step 4: Create an IAM
Instance Profile (p. 17).
Note
Make note of the ARN for this IAM instance profile. You will need to add it to the cross-
bucket policy you create next.
• In the development account, give access to the Amazon S3 bucket you created in the development
account to the IAM instance profile you just created in your production account. For information, see
Example 2: Bucket Owner Granting Cross-Account Bucket Permissions.
Note the following as you complete the process of granting cross-account bucket permissions:
• In the sample walkthrough, Account A represents your development account and Account B
represents your production account.
• When you perform the Account A (development account) tasks, modify the following bucket policy
to grant cross-account permissions instead of using the sample policy provided in the walkthrough.
{
"Version": "2012-10-17",
"Statement": [
{
"Sid": "Cross-account permissions",
"Effect": "Allow",
"Principal": {
"AWS": "arn:aws:iam::account-id:role/role-name"
},
"Action": [
"s3:Get*",
"s3:List*"
],
"Resource": [
API Version 2014-10-06
205

AWS CodeDeploy User Guide
Step 3: Create Resources and a Cross-
Account Role in the Production Account
"arn:aws:s3:::bucket-name/*"
]
}
]
}
account-id represents the account number of the production account where you just created the
IAM instance profile.
role-name represents the name of the IAM instance profile you just created.
bucket-name represents the name of the bucket you created in step 1. Be sure to include the /*
after the name of your bucket to provide access to each of the files inside the bucket.
Step 3: Create Resources and a Cross-Account
Role in the Production Account
In your production account:
• Create your AWS CodeDeploy resources — application, deployment group, deployment
configuration, Amazon EC2 instances, Amazon EC2 instance profile, service role, and so on —
using the instructions in this guide.
• Create an additional role, a cross-account IAM role, that a user in your development account can
assume to perform AWS CodeDeploy operations in this production account.
Use the Walkthrough: Delegate Access Across AWS Accounts Using IAM Roles as a guide to help
you create the cross-account role. Instead of adding the sample permissions in the walkthrough to
your policy document, you should attach, at minimum, the following two AWS-supplied policies to the
role:
•AmazonS3FullAccess: Required only if the S3 bucket is in the development account. Provides
the assumed production account role with full access to the Amazon S3 services and resources in
the development account, where the revision is stored.
•AWSCodeDeployDeployerAccess: Enables an IAM user to register and deploy revisions.
If you want to create and manage deployment groups and not just initiate deployments, add the
AWSCodeDeployFullAccess policy instead of the AWSCodeDeployDeployerAccess policy. For
more information about using IAM managed policies to grant permissions for AWS CodeDeploy
tasks, see Attach a Managed Policy for AWS CodeDeploy to an IAM User (p. 243).
You can attach additional policies if you want to perform tasks in other AWS services while using this
cross-account role.
Important
As you create the cross-account IAM role, make a note of the details you will need to gain
access to the production account.
To use the AWS Management Console to switch roles, you will need to supply either of the
following:
• A URL for accessing the production account with the assumed role's credentials. You will
find the URL on the Review page, which is displayed at the end of the cross-account role
creation process.
• The name of the cross-account role and either the account ID number or alias.
To use the AWS CLI to switch roles, you will need to supply the following:
API Version 2014-10-06
206

AWS CodeDeploy User Guide
Step 4: Upload the Application
Revision to Amazon S3 Bucket
• The ARN of the cross-account role you will assume.
Step 4: Upload the Application Revision to
Amazon S3 Bucket
In the account in which you created the Amazon S3 bucket:
• Upload your application revision to the Amazon S3 bucket. For information, see Push a
Revision (p. 188).
Step 5: Assume the Cross-Account Role and
Deploy Applications
In the development account, you can use the AWS CLI or the AWS Management Console to assume
the cross-account role and initiate the deployment in the production account.
For instructions about how to use the AWS Management Console to switch roles and initiate
deployments, see Switching to a Role (AWS Management Console) and Deploy a Revision
(Console) (p. 198).
For instructions about how to use the AWS CLI to assume the cross-account role and initiate
deployments, see Switching to an IAM Role (AWS Command Line Interface) and Deploy a Revision
(CLI) (p. 200).
For more information about assuming a role through AWS STS, see AssumeRole in the AWS Security
Token Service User Guide and assume-role in the AWS CLI Command Reference.
Related topic:
•AWS CodeDeploy: Deploying from a Development Account to a Production Account
API Version 2014-10-06
207

AWS CodeDeploy User Guide
Automated Tools
Monitoring Deployments in AWS
CodeDeploy
Monitoring is an important part of maintaining the reliability, availability, and performance of AWS
CodeDeploy and your AWS solutions. You should collect monitoring data from all of the parts of your
AWS solution so that you can more easily debug a multi-point failure if one occurs. Before you start
monitoring AWS CodeDeploy; however, you should create a monitoring plan that includes answers to
the following questions:
• What are your monitoring goals?
• What resources will you monitor?
• How often will you monitor these resources?
• What monitoring tools will you use?
• Who will perform the monitoring tasks?
• Who should be notified when something goes wrong?
The next step is to establish a baseline for normal AWS CodeDeploy performance in your environment,
by measuring performance at various times and under different load conditions. As you monitor AWS
CodeDeploy, store historical monitoring data so that you can compare it with current performance data,
identify normal performance patterns and performance anomalies, and devise methods to address
issues.
For example, if you're using AWS CodeDeploy, you can monitor the status of deployments and
target instances. When deployments or instances fail, you might need to reconfigure an application
specification file, reinstall or update the AWS CodeDeploy agent, update settings in an application or
deployment group, or make changes to instance settings or an AppSpec file.
To establish a baseline, you should, at a minimum, monitor the following items:
• Deployment events and status
• Instance events and status
Automated Monitoring Tools
AWS provides various tools that you can use to monitor AWS CodeDeploy. You can configure some
of these tools to do the monitoring for you, while some of the tools require manual intervention. We
recommend that you automate monitoring tasks as much as possible.
API Version 2014-10-06
208

AWS CodeDeploy User Guide
Automated Tools
You can use the following automated monitoring tools to watch AWS CodeDeploy and report when
something is wrong:
•Amazon CloudWatch Alarms – Watch a single metric over a time period that you specify, and
perform one or more actions based on the value of the metric relative to a given threshold over a
number of time periods. The action is a notification sent to an Amazon Simple Notification Service
(Amazon SNS) topic or Auto Scaling policy. CloudWatch alarms do not invoke actions simply
because they are in a particular state; the state must have changed and been maintained for a
specified number of periods. For more information, see Monitoring Deployments with Amazon
CloudWatch Tools (p. 210).
For information about updating your service role to work with CloudWatch alarm monitoring, see
Grant CloudWatch Permissions to an AWS CodeDeploy Service Role (p. 211). For information
about adding CloudWatch alarm monitoring to your AWS CodeDeploy operations, see Create
an Application (p. 168), Create a Deployment Group (p. 174), or Change Deployment Group
Settings (p. 178).
•Amazon CloudWatch Logs – Monitor, store, and access your log files from AWS CloudTrail or
other sources. For more information, see Monitoring Log Files in the Amazon CloudWatch Developer
Guide.
For information about using the CloudWatch console to view AWS CodeDeploy logs, see View AWS
CodeDeploy Logs in the CloudWatch Console.
•Amazon CloudWatch Events – Match events and route them to one or more target functions
or streams to make changes, capture state information, and take corrective action. For more
information, see Using Events in the Amazon CloudWatch Developer Guide.
For information about using CloudWatch Events in your AWS CodeDeploy operations, see
Monitoring Deployments with Amazon CloudWatch Events (p. 212).
•AWS CloudTrail Log Monitoring – Share log files between accounts, monitor CloudTrail log files
in real time by sending them to CloudWatch Logs, write log processing applications in Java, and
validate that your log files have not changed after delivery by CloudTrail. For more information, see
Working with CloudTrail Log Files in the AWS CloudTrail User Guide.
For information about using CloudTrail with AWS CodeDeploy, see Monitoring Deployments with
AWS CloudTrail (p. 214).
•Amazon Simple Notification Service — Configure event-driven triggers to receive SMS or
email notifications about deployment and instance events, such as success or failure. For more
information, see Create a Topic and What Is Amazon Simple Notification Service.
For information about setting up Amazon SNS notifications for AWS CodeDeploy, see Monitoring
Deployments with Amazon SNS Event Notifications (p. 216).
API Version 2014-10-06
209

AWS CodeDeploy User Guide
Manual Tools
Manual Monitoring Tools
Another important part of monitoring AWS CodeDeploy involves manually monitoring those items that
the CloudWatch alarms don't cover. The AWS CodeDeploy, CloudWatch, and other AWS console
dashboards provide an at-a-glance view of the state of your AWS environment. We recommend that
you also check the log files on AWS CodeDeploy deployments.
• AWS CodeDeploy console shows:
• The status of deployments
• The date and time of each last attempted and last successful deployment of a revision
• The number of instances that succeeded, failed, were skipped, or are in progress in a deployment
• The status of on-premises instances
• The date and time when on-premises instances were registered or deregistered
• CloudWatch home page shows:
• Current alarms and status
• Graphs of alarms and resources
• Service health status
In addition, you can use CloudWatch to do the following:
• Create customized dashboards to monitor the services you care about
• Graph metric data to troubleshoot issues and discover trends
• Search and browse all your AWS resource metrics
• Create and edit alarms to be notified of problems
Monitoring Deployments with Amazon
CloudWatch Tools
You can monitor AWS CodeDeploy deployments using the following CloudWatch tools: Amazon
CloudWatch Events, CloudWatch alarms, and Amazon CloudWatch Logs.
Reviewing the logs created by the AWS CodeDeploy agent and deployments can help you
troubleshoot the causes of deployment failures. As an alternative to reviewing AWS CodeDeploy logs
on one instance at a time, you can use CloudWatch Logs to monitor all logs in a central location.
For information about using the CloudWatch console to view AWS CodeDeploy logs, see View AWS
CodeDeploy Logs in the CloudWatch Console.
For information about using CloudWatch alarms and CloudWatch Events to monitor your AWS
CodeDeploy deployments, see the following topics.
Topics
•Monitoring Deployments with CloudWatch Alarms in AWS CodeDeploy (p. 210)
•Monitoring Deployments with Amazon CloudWatch Events (p. 212)
Monitoring Deployments with CloudWatch
Alarms in AWS CodeDeploy
You can create a CloudWatch alarm for an instance or Auto Scaling group you are using in your AWS
CodeDeploy operations. An alarm watches a single metric over a time period you specify and performs
API Version 2014-10-06
210

AWS CodeDeploy User Guide
Monitoring Deployments with CloudWatch Alarms
one or more actions based on the value of the metric relative to a given threshold over a number of
time periods. CloudWatch alarms do not invoke actions simply because they are in a particular state;
the state must have changed and been maintained for a specified number of periods.
Using native CloudWatch alarm functionality, you can specify any of the actions supported by
CloudWatch when an instance you are using in a deployment fails, such as sending an Amazon SNS
notification or stopping, terminating, rebooting, or recovering an instance. For your AWS CodeDeploy
operations, you can configure a deployment group to stop a deployment whenever any CloudWatch
alarm you associate with the deployment group is activated.
You can associate up to ten CloudWatch alarms with an AWS CodeDeploy deployment group. If any of
the specified alarms are activated, the deployment stops, and the status is updated to Stopped. To use
this option, you must grant CloudWatch permissions to your AWS CodeDeploy service role.
For information about setting up CloudWatch alarms in the CloudWatch console, see Creating Amazon
CloudWatch Alarms in the Amazon CloudWatch Developer Guide.
For information about associating a CloudWatch alarm with a deployment group in AWS CodeDeploy,
see Create a Deployment Group (p. 174) and Change Deployment Group Settings (p. 178).
Topics
•Grant CloudWatch Permissions to an AWS CodeDeploy Service Role (p. 211)
Grant CloudWatch Permissions to an AWS CodeDeploy
Service Role
Before you can use CloudWatch alarm monitoring with your deployments, the service role you use in
your AWS CodeDeploy operations must be granted permission to access the CloudWatch resources.
To grant CloudWatch permissions to a service role
1. Sign in to the Identity and Access Management (IAM) console at https://console.aws.amazon.com/
iam/.
Important
Make sure you are signed in to the AWS Management Console with the same account
information you used in Getting Started (p. 11).
2. In the IAM console, in the navigation pane, choose Roles.
3. Choose the name of the service role you use in your AWS CodeDeploy operations.
4. On the Permissions tab, in the Inline Policies area, choose Create Role Policy.
–or–
If the Create Role Policy button is not available, expand the Inline Policies area, and then
choose click here.
5. On the Set Permissions page, choose Custom Policy, and then choose Select.
6. On the Review Policy page, in the Policy Name field, type a name to identify this policy, such as
CWAlarms.
7. Paste the following into the Policy Document field:
{
"Version": "2012-10-17",
"Statement": [
{
API Version 2014-10-06
211

AWS CodeDeploy User Guide
Monitoring Deployments with
Amazon CloudWatch Events
"Effect": "Allow",
"Action": "cloudwatch:DescribeAlarms",
"Resource": "*"
}
]
}
8. Choose Apply Policy.
Monitoring Deployments with Amazon
CloudWatch Events
You can use Amazon CloudWatch Events to detect and react to changes in the state of an instance
or a deployment (an "event") in your AWS CodeDeploy operations. Then, based on rules you create,
CloudWatch Events will invoke one or more target actions when a deployment or instance enters
the state you specify in a rule. Depending on the type of state change, you might want to send
notifications, capture state information, take corrective action, initiate events, or take other actions.
You can select the following types of targets when use CloudWatch Events as part of your AWS
CodeDeploy operations:
• AWS Lambda functions
• Amazon Kinesis streams
• Amazon SQS queues
• Built-in targets (CloudWatch alarm actions)
• Amazon SNS topics
The following are some use cases:
• Use a Lambda function to pass a notification to a Slack channel whenever deployments fail.
• Push data about deployments or instances to a Amazon Kinesis stream to support comprehensive,
real-time status monitoring.
• Use CloudWatch alarm actions to automatically stop, terminate, reboot, or recover Amazon EC2
instances when a deployment or instance event you specify occurs.
The remainder of this topic describes the basic procedure for creating a CloudWatch Events rule
for AWS CodeDeploy. Before you create event rules for use in your AWS CodeDeploy operations,
however, you should do the following:
• Complete the CloudWatch Events prerequisites. For information, see Amazon CloudWatch Events
Prerequisites.
• Familiarize yourself with events, rules, and targets in CloudWatch Events. For more information,
see What Is Amazon CloudWatch Events? and New CloudWatch Events – Track and Respond to
Changes to Your AWS Resources.
• Create the target or targets you will use in your event rules.
To create a CloudWatch Events rule for AWS CodeDeploy:
1. Open the CloudWatch console at https://console.aws.amazon.com/cloudwatch/.
2. In the navigation pane, choose Events.
3. Choose Create rule, and then under Event selector, choose CodeDeploy state change
notification.
API Version 2014-10-06
212
AWS CodeDeploy User Guide
Monitoring Deployments with
Amazon CloudWatch Events
4. Specify a detail type:
• To make a rule that applies to all state changes of both instances and deployments, choose Any
detail type, and then skip to step 6.
• To make a rule that applies to instances only, choose Specific detail type, and then choose
CodeDeploy Instance State-change Notification.
• To make a rule that applies to deployments only, choose Specific detail type, and then choose
CodeDeploy Deployment State-change Notification.
5. Specify the state changes the rule applies to:
• To make a rule that applies to all state changes, choose Any state.
• To make a rule that applies to some state changes only, choose Specific state(s), and then
choose one or more status values from the list. The following table lists the status values you
can choose:
Deployment status values Instance status values
STOPPED
CREATED
FAILED
SUCCEEDED
Failed
InProgress
Succeeded
6. Specify which AWS CodeDeploy applications the rule applies to:
• To make a rule that applies to all applications, choose Any application, and then skip to step 8.
• To make a rule that applies to one application only, choose Specific application, and then
choose the name of the application from the list.
7. Specify which deployment groups the rule applies to:
• To make a rule that applies to all deployment groups associated with the selected application,
choose Any deployment group.
• To make a rule that applies to only one of the deployment groups associated with the selected
application, choose Specific deployment group(s), and then choose the name of the
deployment group from the list.
8. Review your rule setup to make sure it meets your event-monitoring requirements.
The following shows the setup for an event rule that will be processed whenever a deployment
fails to any instance in the MyDeploymentFleet deployment group for the application named
MyCodeDeployApp:
API Version 2014-10-06
213
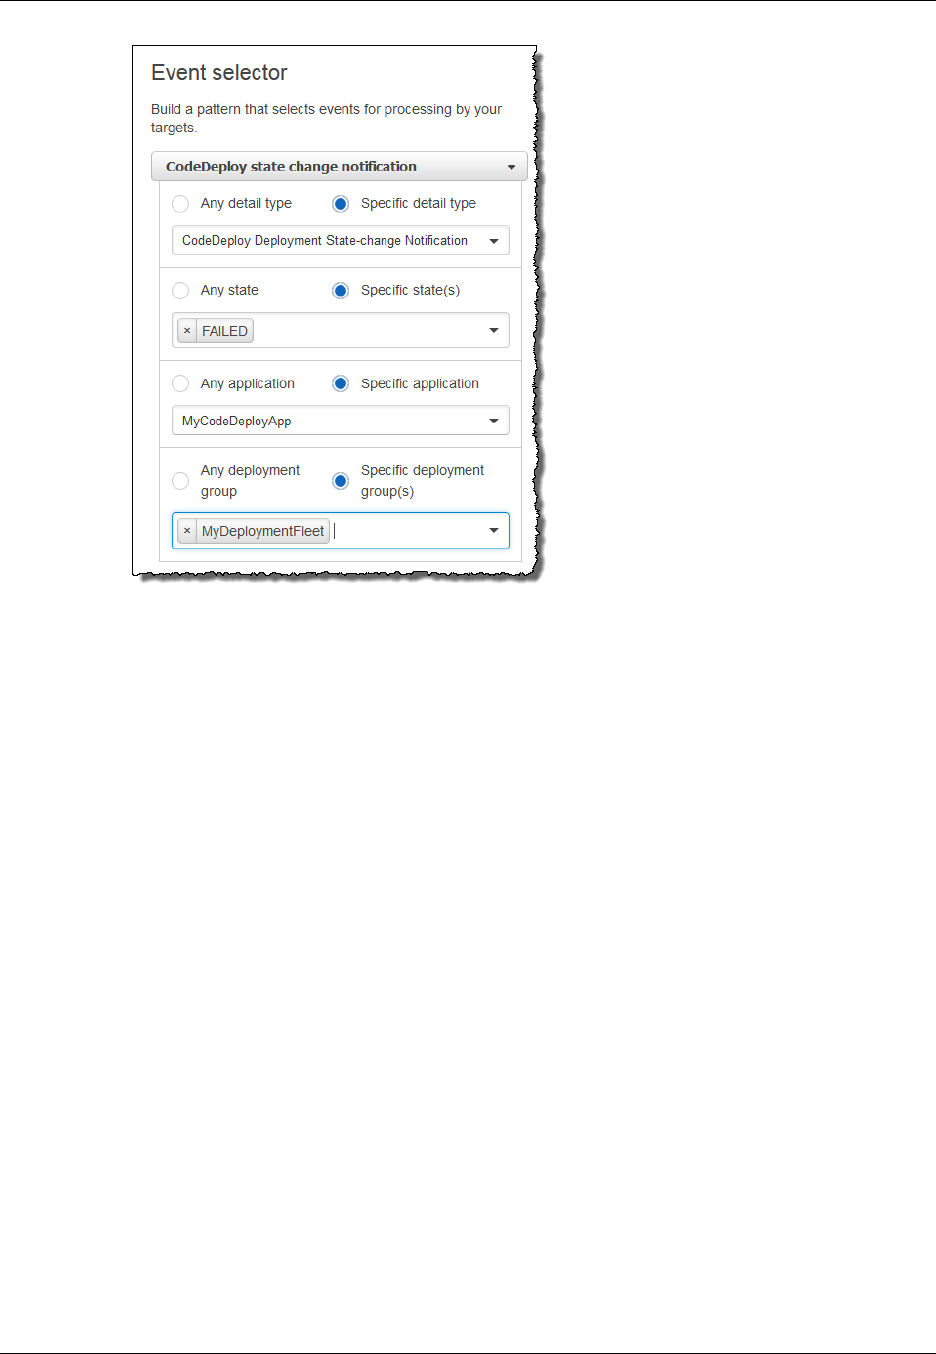
AWS CodeDeploy User Guide
Monitoring Deployments with AWS CloudTrail
9. In the Targets area, in the Select target type list, choose the type of target you have prepared to
use with this rule, and then configure any additional options required by that type.
10. On the Configure rule details screen, type a name and description for the rule, and then choose
the State box to enable to rule now.
11. If you're satisfied with the rule, choose Create rule.
Monitoring Deployments with AWS CloudTrail
AWS CodeDeploy is integrated with CloudTrail, a service that captures API calls made by or on behalf
of AWS CodeDeploy in your AWS account and delivers the log files to an Amazon S3 bucket you
specify. CloudTrail captures API calls from the AWS CodeDeploy console, from AWS CodeDeploy
commands through the AWS CLI, or from the AWS CodeDeploy APIs directly. Using the information
collected by CloudTrail, you can determine which request was made to AWS CodeDeploy, the source
IP address from which the request was made, who made the request, when it was made, and so on.
To learn more about CloudTrail, including how to configure and enable it, see AWS CloudTrail User
Guide.
AWS CodeDeploy Information in CloudTrail
When CloudTrail logging is enabled in your AWS account, API calls made to AWS CodeDeploy actions
are tracked in log files. AWS CodeDeploy records are written together with other AWS service records
in a log file. CloudTrail determines when to create and write to a new file based on a time period and
file size.
All of the AWS CodeDeploy actions are logged and documented in the AWS CodeDeploy Command
Line Reference and the AWS CodeDeploy API Reference. For example, calls to create deployments,
delete applications, and register application revisions generate entries in CloudTrail log files.
Every log entry contains information about who generated the request. The user identity information
in the log helps you determine whether the request was made with root or IAM user credentials, with
API Version 2014-10-06
214

AWS CodeDeploy User Guide
Understanding AWS CodeDeploy Log File Entries
temporary security credentials for a role or federated user, or by another AWS service. For more
information, see the userIdentity field in the CloudTrail Event Reference.
You can store your log files in your bucket for as long as you want, but you can also define Amazon S3
lifecycle rules to archive or delete log files automatically. By default, Amazon S3 server-side encryption
(SSE) is used to encrypt your log files.
You can have CloudTrail publish Amazon SNS notifications when new log files are delivered. For more
information, see Configuring Amazon SNS Notifications for CloudTrail.
You can also aggregate AWS CodeDeploy log files from multiple AWS regions and multiple AWS
accounts into a single Amazon S3 bucket. For more information, see Receiving CloudTrail Log Files
from Multiple Regions.
Understanding AWS CodeDeploy Log File
Entries
CloudTrail log files can contain one or more log entries where each entry is made up of multiple JSON-
formatted events. A log entry represents a single request from any source and includes information
about the requested action, any parameters, the date and time of the action, and so on. The log entries
are not guaranteed to be in any particular order. That is, they are not an ordered stack trace of the
public API calls.
The following example shows a CloudTrail log entry that demonstrates the AWS CodeDeploy create
deployment group action:
{
"Records": [{
"eventVersion": "1.02",
"userIdentity": {
"type": "AssumedRole",
"principalId": "AKIAI44QH8DHBEXAMPLE:203.0.113.11",
"arn": "arn:aws:sts::123456789012:assumed-role/example-role/203.0.113.11",
"accountId": "123456789012",
"accessKeyId": "AKIAIOSFODNN7EXAMPLE",
"sessionContext": {
"attributes": {
"mfaAuthenticated": "false",
"creationDate": "2014-11-27T03:57:36Z"
},
"sessionIssuer": {
"type": "Role",
"principalId": "AKIAI44QH8DHBEXAMPLE",
"arn": "arn:aws:iam::123456789012:role/example-role",
"accountId": "123456789012",
"userName": "example-role"
}
}
},
"eventTime": "2014-11-27T03:57:36Z",
"eventSource": "codedeploy.amazonaws.com",
"eventName": "CreateDeploymentGroup",
"awsRegion": "us-west-2",
"sourceIPAddress": "203.0.113.11",
"userAgent": "example-user-agent-string",
"requestParameters": {
"applicationName": "ExampleApplication",
API Version 2014-10-06
215

AWS CodeDeploy User Guide
Monitoring Deployments with
Amazon SNS Event Notifications
"serviceRoleArn": "arn:aws:iam::123456789012:role/example-instance-group-
role",
"deploymentGroupName": "ExampleDeploymentGroup",
"ec2TagFilters": [{
"value": "CodeDeployDemo",
"type": "KEY_AND_VALUE",
"key": "Name"
}],
"deploymentConfigName": "CodeDeployDefault.HalfAtATime"
},
"responseElements": {
"deploymentGroupId": "7d64e680-e6f4-4c07-b10a-9e117EXAMPLE"
},
"requestID": "86168559-75e9-11e4-8cf8-75d18EXAMPLE",
"eventID": "832b82d5-d474-44e8-a51d-093ccEXAMPLE",
"eventType": "AwsApiCall",
"recipientAccountId": "123456789012"
},
... additional entries ...
]
}
Monitoring Deployments with Amazon SNS
Event Notifications
You can add triggers to an AWS CodeDeploy deployment group to receive notifications about events
related to deployments or instances in that deployment group. These notifications are sent to recipients
who are subscribed to an Amazon SNS topic you have made part of the trigger's action.
You can receive notifications for AWS CodeDeploy events in SMS messages or email messages.
You can also use the JSON data that is created when a specified event occurs in other ways, such as
sending messages to Amazon SQS queues or invoking a function in AWS Lambda. For a look at the
structure of the JSON data provided for deployment and instance triggers, see JSON Data Formats for
AWS CodeDeploy Triggers (p. 225).
You might choose to use triggers to receive notifications if:
• You are a developer who needs to know when a deployment fails or stops so you can troubleshoot it.
• You are a system administrator who needs to know how many instances fail in order to monitor the
health of your Amazon EC2 fleet.
• You are a manager who wants an at-a-glance count of deployment and instance events, which you
can get through filtering rules that route different types of notifications into folders in your desktop
email client.
You can create up to 10 triggers for each AWS CodeDeploy deployment group, for any of the following
event types.
For deployments:
• Success
• Failure
• Started
• Stopped
API Version 2014-10-06
216

AWS CodeDeploy User Guide
Grant Amazon SNS Permissions to a Service Role
• Rollback
• All deployment events
For instances:
• Success
• Failure
• Started
• All instance events
Topics
•Grant Amazon SNS Permissions to a Service Role (p. 217)
•Create a Trigger for an AWS CodeDeploy Event (p. 218)
•Edit a Trigger in a Deployment Group (p. 222)
•Delete a Trigger from a Deployment Group (p. 224)
•JSON Data Formats for Triggers (p. 225)
Grant Amazon SNS Permissions to an AWS
CodeDeploy Service Role
Before your triggers can generate notifications, the service role you use in your AWS CodeDeploy
operations must be granted permission to access the Amazon SNS resources.
To grant Amazon SNS permissions to a service role
1. Sign in to the Identity and Access Management (IAM) console at https://console.aws.amazon.com/
iam/.
Important
Make sure you are signed in to the AWS Management Console with the same account
information you used in Getting Started (p. 11).
2. In the IAM console, in the navigation pane, choose Roles.
3. Choose the name of the service role you use in your AWS CodeDeploy operations.
4. On the Permissions tab, in the Inline Policies area, choose Create Role Policy.
–or–
If the Create Role Policy button is not available, expand the Inline Policies area, and then
choose click here.
5. On the Set Permissions page, choose Custom Policy, and then choose Select.
6. On the Review Policy page, in the Policy Name field, type a name to identify this policy, such as
SNSPublish.
7. Paste the following into the Policy Document field:
{
"Version": "2012-10-17",
"Statement": [
{
"Effect": "Allow",
"Action": "sns:Publish",
"Resource": "*"
API Version 2014-10-06
217

AWS CodeDeploy User Guide
Create a Trigger for an AWS CodeDeploy Event
}
]
}
8. Choose Apply Policy.
Create a Trigger for an AWS CodeDeploy Event
You can create a trigger that publishes an Amazon Simple Notification Service (Amazon SNS) topic
for an AWS CodeDeploy deployment or instance event. Then, when that event occurs, all subscribers
to the associated topic will receive notifications through the endpoint specified in the topic, such as an
SMS message or email message. Amazon SNS offers multiple methods for subscribing to topics.
Before you create a trigger, you must set up the Amazon SNS topic to which the trigger will point. For
information, see Create a Topic. When you create a topic, we recommend you give it a name that will
identify its purpose, in formats such as Topic-group-us-west-3-deploy-fail or Topic-group-
project-2-instance-stop.
You must also grant Amazon SNS permissions to an AWS CodeDeploy service role before
notifications can be sent for your trigger. For information, see Grant Amazon SNS Permissions to an
AWS CodeDeploy Service Role (p. 217).
After you have created the topic, you can add subscribers. For information about creating, managing,
and subscribing to topics, see What Is Amazon Simple Notification Service.
Create a Trigger to Send Notifications for AWS
CodeDeploy Events (Console)
You can use the AWS CodeDeploy console to create triggers for an AWS CodeDeploy event. At the
end of the setup process, a test notification message is sent to ensure that both permissions and
trigger details are set up correctly.
To create a trigger for an AWS CodeDeploy event
1. Sign in to the AWS Management Console and open the AWS CodeDeploy console at https://
console.aws.amazon.com/codedeploy.
Note
Sign in with the same account or IAM user information you used in Getting
Started (p. 11).
2. On the Applications page, choose the name of the application for which triggers will be sent.
3. On the Applications details page, choose the arrow next to the deployment group for which
triggers will be sent.
4. In the Triggers area, choose Create trigger.
5. In the Create trigger pane, do the following:
• In Trigger name, type a name for the trigger that makes it easy to identify its purpose. We
recommend formats such as Trigger-group-us-west-3-deploy-fail or Trigger-
group-eu-central-instance-stop.
• In Events, choose the event type or types that will trigger the Amazon SNS topic to send
notifications.
• In Amazon SNS topic, choose the name of topic you created for sending notifications for this
trigger.
6. Choose Create trigger.
API Version 2014-10-06
218

AWS CodeDeploy User Guide
Create a Trigger for an AWS CodeDeploy Event
AWS CodeDeploy will send a test notification to confirm you have correctly configured access
between AWS CodeDeploy and the Amazon SNS topic. Depending on the endpoint type you
selected for the topic, and if you are subscribed to the topic, you will receive confirmation in an
SMS message or email message.
Create a Trigger to Send Notifications for AWS
CodeDeploy Events (CLI)
You can use the CLI to include triggers when you create a deployment group, or you can add triggers
to an existing deployment group.
To create a trigger to send notifications for a new deployment group
Create a JSON file to configure the deployment group, and then run the create-deployment-group
command using the --cli-input-json option.
The simplest way to create the JSON file is to use the --generate-cli-skeleton option to get a
copy of the JSON format, and then provide the required values in a plain-text editor.
1. Run the following command, and then copy the results into a plain-text editor.
aws deploy create-deployment-group --generate-cli-skeleton
2. Add the name of an existing AWS CodeDeploy application to the output:
{
"applicationName": "TestApp-us-east-1",
"deploymentGroupName": "",
"deploymentConfigName": "",
"ec2TagFilters": [
{
"Key": "",
"Value": "",
"Type": ""
}
],
"onPremisesInstanceTagFilters": [
{
"Key": "",
"Value": "",
"Type": ""
}
],
"autoScalingGroups": [
""
],
"serviceRoleArn": "",
"triggerConfigurations": [
{
"triggerName": "",
"triggerTargetArn": "",
"triggerEvents": [
""
]
}
]
API Version 2014-10-06
219

AWS CodeDeploy User Guide
Create a Trigger for an AWS CodeDeploy Event
}
3. Provide values for the parameters you want to configure.
When you use the create-deployment-group command, you must provide, at a minimum, values
for the following parameters:
•applicationName: The name of an application already created in your account.
•deploymentGroupName: A name for the deployment group you are creating.
•serviceRoleArn: The ARN of an existing service role set up for AWS CodeDeploy in your
account. For information, see Step 3: Create a Service Role (p. 13).
In the triggerConfigurations section, provide values for the following parameters:
•triggerName: The name you want to give the trigger so you can easily identify it. We
recommend formats such as Trigger-group-us-west-3-deploy-fail or Trigger-
group-eu-central-instance-stop.
•triggerTargetArn: The ARN of the Amazon SNS topic you created to associate with your
trigger, in this format: arn:aws:sns:us-east-1:80398EXAMPLE:NewTestTopic.
•triggerEvents: The type of event or events for which you want to
trigger notifications. You can specify one or more event types, separating
multiple event type names with commas (for example, "triggerEvents":
["DeploymentSuccess","DeploymentFailure","InstanceFailure"]). When you add
more than one event type, notifications for all those types are sent to the topic you specified,
rather than to a different topic for each one. You can choose from the following event types:
• DeploymentStart
• DeploymentSuccess
• DeploymentFailure
• DeploymentStop
• DeploymentRollback
• InstanceStart
• InstanceSuccess
• InstanceFailure
The following configuration example creates a deployment group named dep-group-ghi-789-2
for an application named TestApp-us-east-1 and a trigger that will prompt the sending of
notifications whenever a deployment starts, succeeds, or fails:
{
"applicationName": "TestApp-us-east-1",
"deploymentConfigName": "CodeDeployDefault.OneAtATime",
"deploymentGroupName": "dep-group-ghi-789-2",
"ec2TagFilters": [
{
"Key": "Name",
"Value": "Project-ABC",
"Type": "KEY_AND_VALUE"
}
],
"serviceRoleArn": "arn:aws:iam::444455556666:role/AnyCompany-service-
role",
"triggerConfigurations": [
{
"triggerName": "Trigger-group-us-east-1",
API Version 2014-10-06
220

AWS CodeDeploy User Guide
Create a Trigger for an AWS CodeDeploy Event
"triggerTargetArn": "arn:aws:sns:us-east-1:80398EXAMPLE:us-
east-deployments",
"triggerEvents": [
"DeploymentStart",
"DeploymentSuccess",
"DeploymentFailure"
]
}
]
}
4. Save your updates as a JSON file, and then call that file using the --cli-input-json option
when you run the create-deployment-group command:
aws deploy create-deployment-group --cli-input-json file://filename.json
At the end of the creation process, you will receive a test notification message that indicates both
permissions and trigger details are set up correctly.
To create a trigger to send notifications for an existing deployment group
To use the AWS CLI to add triggers for AWS CodeDeploy events to an existing deployment group,
create a JSON file to update the deployment group, and then run the update-deployment-group
command using the --cli-input-json option.
The simplest way to create the JSON file is to run the get-deployment-group command to get a copy
of the deployment group's configuration, in JSON format, and then update the parameter values in a
plain-text editor.
1. Run the following command, and then copy the results into a plain-text editor.
aws deploy get-deployment-group --application-name application --
deployment-group-name deployment-group
2. Delete the following from the output:
• At the beginning of the output, delete { "deploymentGroupInfo":.
• At the end of the output, delete }.
• Delete the row containing deploymentGroupId.
• Delete the row containing deploymentGroupName.
The contents of your text file should now look similar to the following:
{
"applicationName": "TestApp-us-east-1",
"deploymentConfigName": "CodeDeployDefault.OneAtATime",
"autoScalingGroups": [],
"ec2TagFilters": [
{
"Type": "KEY_AND_VALUE",
"Value": "Project-ABC",
"Key": "Name"
}
],
"triggerConfigurations": [],
API Version 2014-10-06
221

AWS CodeDeploy User Guide
Edit a Trigger in a Deployment Group
"serviceRoleArn": "arn:aws:iam::444455556666:role/AnyCompany-service-
role",
"onPremisesInstanceTagFilters": []
}
3. In the triggerConfigurations section, add data for the triggerEvents,
triggerTargetArn, and triggerName parameters. For information about trigger configuration
parameters, see TriggerConfig.
The contents of your text file should now look similar to the following. This code will prompt
notifications to be sent whenever a deployment starts, succeeds, or fails.
{
"applicationName": "TestApp-us-east-1",
"deploymentConfigName": "CodeDeployDefault.OneAtATime",
"autoScalingGroups": [],
"ec2TagFilters": [
{
"Type": "KEY_AND_VALUE",
"Value": "Project-ABC",
"Key": "Name"
}
],
"triggerConfigurations": [
{
"triggerEvents": [
"DeploymentStart",
"DeploymentSuccess",
"DeploymentFailure"
],
"triggerTargetArn": "arn:aws:sns:us-east-1:80398EXAMPLE:us-
east-deployments",
"triggerName": "Trigger-group-us-east-1"
}
],
"serviceRoleArn": "arn:aws:iam::444455556666:role/AnyCompany-service-
role",
"onPremisesInstanceTagFilters": []
}
4. Save your updates as a JSON file, and then run the update-deployment-group command using
the --cli-input-json option. Be sure to include the --current-deployment-group-name
option and substitute the name of your JSON file for filename:
aws deploy update-deployment-group --current-deployment-group-
name deployment-group-name --cli-input-json file://filename.json
At the end of the creation process, you will receive a test notification message that indicates both
permissions and trigger details are set up correctly.
Edit a Trigger in an AWS CodeDeploy
Deployment Group
If your notification requirements change, you can modify your trigger rather than create a new one.
API Version 2014-10-06
222

AWS CodeDeploy User Guide
Edit a Trigger in a Deployment Group
Modify an AWS CodeDeploy Trigger (Console)
1. Sign in to the AWS Management Console and open the AWS CodeDeploy console at https://
console.aws.amazon.com/codedeploy.
Note
Sign in with the same account or IAM user information you used in Getting
Started (p. 11).
2. On the Applications page, choose the name of the application associated with the deployment
group where you will modify a trigger.
3. On the Application details page, choose the arrow next to the deployment group where you will
edit a trigger.
4. In the Triggers area, locate the name of the trigger you want to modify, and then choose the
pencil icon at the end of its row.
5. Update the trigger name, selected events, or Amazon SNS topic, and then choose Save.
Modify an AWS CodeDeploy Trigger (CLI)
To use the AWS CLI to change trigger details for AWS CodeDeploy events when you update a
deployment group, create a JSON file to define changes to the deployment group's properties, and
then run the update-deployment-group command with the --cli-input-json option.
The simplest way to create the JSON file is to run the get-deployment-group command to get the
current deployment group details in JSON format, and then edit the required values in a plain-text
editor.
1. Run the following command, substituting the names of your application and deployment group for
application and deployment-group:
aws deploy get-deployment-group --application-name application --
deployment-group-name deployment-group
2. Copy the results of the command into a plain-text editor and then delete the following:
• At the beginning of the output, delete { "deploymentGroupInfo":.
• At the end of the output, delete }.
• Delete the row containing deploymentGroupId.
• Delete the row containing deploymentGroupName.
The contents of your text file should now look similar to the following:
{
"applicationName": "TestApp-us-east-1",
"deploymentConfigName": "CodeDeployDefault.OneAtATime",
"autoScalingGroups": [],
"ec2TagFilters": [
{
"Type": "KEY_AND_VALUE",
"Value": "East-1-Instances",
"Key": "Name"
}
],
"triggerConfigurations": [
{
API Version 2014-10-06
223

AWS CodeDeploy User Guide
Delete a Trigger from a Deployment Group
"triggerEvents": [
"DeploymentStart",
"DeploymentSuccess",
"DeploymentFailure",
"DeploymentStop"
],
"triggerTargetArn": "arn:aws:sns:us-
east-1:111222333444:Trigger-group-us-east-1",
"triggerName": "Trigger-group-us-east-1"
}
],
"serviceRoleArn": "arn:aws:iam::444455556666:role/AnyCompany-service-
role",
"onPremisesInstanceTagFilters": []
}
3. Change any parameters, as necessary. For information about trigger configuration parameters,
see TriggerConfig.
4. Save your updates as a JSON file, and then run the update-deployment-group command using
the --cli-input-json option. Be sure to include the --current-deployment-group-name
option and substitute the name of your JSON file for filename:
aws deploy update-deployment-group --current-deployment-group-
name deployment-group-name --cli-input-json file://filename.json
At the end of the creation process, you will receive a test notification message that indicates both
permissions and trigger details are set up correctly.
Delete a Trigger from an AWS CodeDeploy
Deployment Group
Because there is a limit of 10 triggers per deployment group, you might want to delete triggers if they
are no longer being used. You cannot undo the deletion of a trigger, but you can re-create one.
Delete a Trigger from a Deployment Group (Console)
1. Sign in to the AWS Management Console and open the AWS CodeDeploy console at https://
console.aws.amazon.com/codedeploy.
Note
Sign in with the same account or IAM user information you used in Getting
Started (p. 11).
2. On the Applications page, choose the application associated with the deployment group from
which you want to delete a trigger.
3. On the Application details page, choose the arrow next to the deployment group.
4. In the Triggers area, locate the name of the trigger to delete, choose the button at the end of
its row, and then choose Delete.
Delete a Trigger from a Deployment Group (CLI)
To use the CLI to delete a trigger, call the update-deployment-group command, with empty trigger
configuration parameters, specifying:
API Version 2014-10-06
224

AWS CodeDeploy User Guide
JSON Data Formats for Triggers
• The name of the application associated with the deployment group. To view a list of application
names, call the list-applications command.
• The name of the deployment group associated with the application. To view a list of deployment
group names, call the list-deployment-groups command.
For example:
aws deploy update-deployment-group --application-name application-name --
current-deployment-group-name deployment-group-name --trigger-configurations
JSON Data Formats for AWS CodeDeploy
Triggers
You can use the JSON output that is created when a trigger for a deployment or instance is activated
in a custom notification workflow, such as sending messages to Amazon SQS queues or invoking a
function in AWS Lambda.
Note
This guide does not address how to configure notifications using JSON. For information about
using Amazon SNS to send messages to Amazon SQS queues, see Sending Amazon SNS
Messages to Amazon SQS Queues. For information about using Amazon SNS to invoke a
Lambda function, see Invoking Lambda Functions Using Amazon SNS Notifications.
The following examples show the structure of the JSON output available with AWS CodeDeploy
triggers.
Sample JSON Output for Instance-Based Triggers
{
"region": "us-east-1",
"accountId": "111222333444",
"eventTriggerName": "trigger-group-us-east-instance-succeeded",
"deploymentId": "d-75I7MBT7C",
"instanceId": "arn:aws:ec2:us-east-1:444455556666:instance/i-496589f7",
"lastUpdatedAt": "1446744207.564",
"instanceStatus": "Succeeded",
"lifecycleEvents": [
{
"LifecycleEvent": "ApplicationStop",
"LifecycleEventStatus": "Succeeded",
"StartTime": "1446744188.595",
"EndTime": "1446744188.711"
},
{
"LifecycleEvent": "BeforeInstall",
"LifecycleEventStatus": "Succeeded",
"StartTime": "1446744189.827",
"EndTime": "1446744190.402"
}
//More lifecycle events might be listed here
]
}
Sample JSON Output for Deployment-Based Triggers
API Version 2014-10-06
225

AWS CodeDeploy User Guide
JSON Data Formats for Triggers
{
"region": "us-west-1",
"accountId": "111222333444",
"eventTriggerName": "Trigger-group-us-west-3-deploy-failed",
"applicationName": "ProductionApp-us-west-3",
"deploymentId": "d-75I7MBT7C",
"deploymentGroupName": "dep-group-def-456",
"createTime": "1446744188.595",
"completeTime": "1446744190.402",
"deploymentOverview": {
"Failed": "10",
"InProgress": "0",
"Pending": "0",
"Skipped": "0",
"Succeeded": "0"
},
"status": "Failed",
"errorInformation": {
"ErrorCode": "IAM_ROLE_MISSING",
"ErrorMessage": "IAM Role is missing for deployment group: dep-group-
def-456"
}
}
API Version 2014-10-06
226

AWS CodeDeploy User Guide
AppSpec File Structure
AWS CodeDeploy AppSpec File
Reference
This section is a reference only. For a conceptual overview of the AppSpec file, see Application
Specification Files (p. 9).
The application specification file (AppSpec file) is a YAML-formatted file used by AWS CodeDeploy to
determine:
• what it should install onto your instances from your application revision in Amazon S3 or GitHub.
• which lifecycle event hooks to run in response to deployment lifecycle events.
An AppSpec file must be named appspec.yml and it must be placed in the root of an application's
source code's directory structure. Otherwise, deployments will fail.
After you have a completed AppSpec file, you bundle it, along with the content to deploy, into
an archive file (zip, tar, or compressed tar). For more information, see Working with Application
Revisions (p. 183).
Note
The tar and compressed tar archive file formats (.tar and .tar.gz) are not supported for
Windows Server instances.
After you have a bundled archive file (known in AWS CodeDeploy as a revision), you upload it to
an Amazon S3 bucket or Git repository. Then you use AWS CodeDeploy to deploy the revision. For
instructions, see Deploy a Revision (p. 197).
Topics
•AppSpec File Structure (p. 227)
•AppSpec File Example (p. 239)
•AppSpec File Spacing (p. 240)
•Validate Your AppSpec File (p. 241)
AppSpec File Structure
The AppSpec file has the following high-level structure:
API Version 2014-10-06
227
AWS CodeDeploy User Guide
AppSpec 'files' Section
version: 0.0
os: operating-system-name
files:
source-destination-files-mappings
permissions:
permissions-specifications
hooks:
deployment-lifecycle-event-mappings
In this structure:
version
This section specifies the version of the AppSpec file. Do not change this value. It is required.
Currently the only allowed value is 0.0. It is reserved by AWS CodeDeploy for future use.
os This section specifies theoperating system value of the instance to which you will deploy. It is
required. The following values can be specified:
•linux – The instance is an Amazon Linux, Ubuntu Server, or RHEL instance.
•windows – The instance is a Windows Server instance.
filesThis section specifies the names of files that should be copied to the instance during the
deployment's Install event.
For more information, see AppSpec 'files' Section (p. 228).
permissions
This section specifies how special permissions, if any, should be applied to the files in the files
section as they are being copied over to the instance. This section applies to Amazon Linux,
Ubuntu Server, and Red Hat Enterprise Linux (RHEL) instances only.
For more information see, AppSpec 'permissions' Section (p. 232).
hooks
This section specifies scripts to run at specific deployment lifecycle events during the deployment.
For more information, see AppSpec 'hooks' Section (p. 235).
Topics
•AppSpec 'files' Section (p. 228)
•AppSpec 'permissions' Section (p. 232)
•AppSpec 'hooks' Section (p. 235)
AppSpec 'files' Section
Provides information to AWS CodeDeploy about which files from your application revision should be
installed on the instance during the deployment's Install event. This section is required only if you will
be copying files from your revision to locations on the instance during deployment.
This section has the following structure:
files:
- source: source-file-location
destination: destination-file-location
Multiple source and destination pairs can be set.
API Version 2014-10-06
228

AWS CodeDeploy User Guide
AppSpec 'files' Section
The source instruction identifies a file or directory from your revision to copy to the instance:
• If source refers to a file, only the specified file will be copied to the instance.
• If source refers to a directory, then all files in the directory will be copied to the instance.
• If source is a single slash (/), then all of the files from your revision will be copied to the instance.
The paths used in source are relative paths, starting from the root of your revision.
The destination instruction identifies the location on the instance where the files should be copied.
This must be a fully qualified path.
Here's an example files section for an Amazon Linux, Ubuntu Server, or RHEL instance.
files:
- source: Config/config.txt
destination: /webapps/Config
- source: source
destination: /webapps/myApp
In this example, the following two operations will be performed during the Install event:
1. Copy the Config/config.txt file in your revision to the /webapps/Config/config.txt path
on the instance.
2. Recursively copy all of the files in your revision's source directory to the /webapps/myApp
directory on the instance.
'files' section examples
The following examples show how to specify the files section. Although these examples describe
Windows Server file and directory (folder) structures, they can easily be adapted for Amazon Linux,
Ubuntu Server, and RHEL instances.
For the following examples, we assume these files appear in the root of source:
•appspec.yml
•my-file.txt
•my-file-2.txt
•my-file-3.txt
# 1) Copy only my-file.txt to the destination folder c:\temp.
#
files:
- source: .\my-file.txt
destination: c:\temp
#
# Result:
# c:\temp\my-file.txt
#
# ---------------------
#
# 2) Copy only my-file-2.txt and my-file-3.txt to the destination folder c:
\temp.
#
files:
API Version 2014-10-06
229

AWS CodeDeploy User Guide
AppSpec 'files' Section
- source: my-file-2.txt
destination: c:\temp
- source: my-file-3.txt
destination: c:\temp
#
# Result:
# c:\temp\my-file-2.txt
# c:\temp\my-file-3.txt
#
# ---------------------
#
# 3) Copy my-file.txt, my-file-2.txt, and my-file-3.txt (along with the
appspec.yml file) to the destination folder c:\temp.
#
files:
- source: \
destination: c:\temp
#
# Result:
# c:\temp\appspec.yml
# c:\temp\my-file.txt
# c:\temp\my-file-2.txt
# c:\temp\my-file-3.txt
For the following examples, we assume the appspec.yml appears in the root of source along with a
folder named my-folder that contains three files:
•appspec.yml
•my-folder\my-file.txt
•my-folder\my-file-2.txt
•my-folder\my-file-3.txt
# 4) Copy the 3 files in my-folder (but do not copy my-folder itself) to the
destination folder c:\temp.
#
files:
- source: .\my-folder
destination: c:\temp
#
# Result:
# c:\temp\my-file.txt
# c:\temp\my-file-2.txt
# c:\temp\my-file-3.txt
#
# ---------------------
#
# 5) Copy my-folder and its 3 files to my-folder within the destination
folder c:\temp.
#
files:
- source: .\my-folder
destination: c:\temp\my-folder
#
# Result:
# c:\temp\my-folder\my-file.txt
# c:\temp\my-folder\my-file-2.txt
API Version 2014-10-06
230

AWS CodeDeploy User Guide
AppSpec 'files' Section
# c:\temp\my-folder\my-file-3.txt
#
# ---------------------
#
# 6) Copy the 3 files in my-folder to other-folder within the destination
folder c:\temp.
#
files:
- source: .\my-folder
destination: c:\temp\other-folder
#
# Result:
# c:\temp\other-folder\my-file.txt
# c:\temp\other-folder\my-file-2.txt
# c:\temp\other-folder\my-file-3.txt
#
# ---------------------
#
# 7) Copy only my-file-2.txt and my-file-3.txt to my-folder within the
destination folder c:\temp.
#
files:
- source: .\my-folder\my-file-2.txt
destination: c:\temp\my-folder
- source: .\my-folder\my-file-3.txt
destination: c:\temp\my-folder
#
# Result:
# c:\temp\my-folder\my-file-2.txt
# c:\temp\my-folder\my-file-3.txt
#
# ---------------------
#
# 8) Copy only my-file-2.txt and my-file-3.txt to other-folder within the
destination folder c:\temp.
#
files:
- source: .\my-folder\my-file-2.txt
destination: c:\temp\other-folder
- source: .\my-folder\my-file-3.txt
destination: c:\temp\other-folder
#
# Result:
# c:\temp\other-folder\my-file-2.txt
# c:\temp\other-folder\my-file-3.txt
#
# ---------------------
#
# 9) Copy my-folder and its 3 files (along with the appspec.yml file) to the
destination folder c:\temp.
#
files:
- source: \
destination: c:\temp
#
# Result:
# c:\temp\appspec.yml
# c:\temp\my-folder\my-file.txt
# c:\temp\my-folder\my-file-2.txt
API Version 2014-10-06
231

AWS CodeDeploy User Guide
AppSpec 'permissions' Section
# c:\temp\my-folder\my-file-3.txt
AppSpec 'permissions' Section
The permissions section specifies how special permissions, if any, should be applied to the files and
directories/folders in the files section after they are copied to the instance. Multiple object instructions
can be specified. This section is optional. It applies to Amazon Linux, Ubuntu Server, and RHEL
instances only.
This section has the following structure:
permissions:
- object: object-specification
pattern: pattern-specification
except: exception-specification
owner: owner-account-name
group: group-name
mode: mode-specification
acls:
- acls-specification
context:
user: user-specification
type: type-specification
range: range-specification
type:
- object-type
The instructions are as follows:
•object – Required. This is a set of file system objects (files or directories/folders) that the specified
permissions will be applied to after the file system objects are copied to the instance.
•pattern – Optional. Specifies a pattern to apply permissions. If specified with the special characters
"**", or if not specified altogether, the specified permissions will be applied to all matching files or
directories, depending on the type.
•except – Optional. Specifies any exceptions to pattern.
•owner – Optional. The name of the owner of object. If not specified, all existing owners applied to
the original file or directory/folder structure will remain unchanged after the copy operation.
•group – Optional. The name of the group for object. If not specified, all existing groups applied to
the original file or directory/folder structure will remain unchanged after the copy operation.
•mode – Optional. An integer specifying the octal mode for the permissions to be applied to object.
For example, 644 represents read and write permissions for the owner, read-only permissions for
the group, and read-only permissions for all other users; while 4755 represents the setuid attribute
being set, full control permissions for the owner, read and execute permissions for the group, and
read and execute permissions for all other users. (For additional examples, see the Linux chmod
command documentation.) If mode is not specified, all existing modes applied to the original file or
directory/folder structure will remain unchanged after the copy operation.
•acls – Optional. A list of character strings representing one or more Access Control List (ACL)
entries applied to object. For example, u:bob:rw represents read and write permissions for user
bob. (For additional examples, see ACL entry format examples in the Linux setfacl command
documentation.) Multiple ACL entries an be specified. If acls is not specified, any existing ACLs
applied to the original file or directory/folder structure will remain unchanged after the copy operation.
These will replace any existing ACLs.
Note
Setting unnamed users, unnamed groups, or other similar ACL entries will cause the
AppSpec file to fail. Use mode to specify these types of permissions instead.
API Version 2014-10-06
232

AWS CodeDeploy User Guide
AppSpec 'permissions' Section
•context – Optional. For Security-Enhanced Linux (SELinux)-enabled instances, a list of security-
relevant context labels to apply to the copied objects. Labels are specified as keys containing user,
type, and range. (For more information, see the SELinux documentation.) If not specified, any
existing labels applied to the original file or directory/folder structure will remain unchanged after the
copy operation.
•user – Optional. The SELinux user.
•type – Optional. The SELinux type name.
•range – Optional. The SELinux range specifier. This has no effect unless Multi-Level Security
(MLS) and Multi-Category Security (MCS) is enabled on the machine. If MLS/MCS is not enabled,
range defaults to s0.
•type – Optional. The types of objects to apply the specified permissions to. This can be set to file
or directory. If file is specified, the permissions will be applied only to files that are immediately
contained within object after the copy operation (and not to object itself). If directory is specified,
the permissions will be recursively applied to all directories/folders that are anywhere within object
after the copy operation (but not to object itself).
'permissions' section example
The following example shows how to specify the permissions section with the object, pattern,
except, owner, mode, and type instructions. This example applies to Amazon Linux, Ubuntu Server,
and RHEL instances only. In this example, assume the following files and folders are copied to the
instance in this hierarchy:
/tmp
`-- my-app
|-- my-file-1.txt
|-- my-file-2.txt
|-- my-file-3.txt
|-- my-folder-1
| |-- my-file-4.txt
| |-- my-file-5.txt
| `-- my-file-6.txt
`-- my-folder-2
|-- my-file-7.txt
|-- my-file-8.txt
|-- my-file-9.txt
`-- my-folder-3
The following AppSpec file shows how to set permissions on these files and folders after they are
copied:
version: 0.0
os: linux
# Copy over all of the folders and files with the permissions they
# were originally assigned.
files:
- source: ./my-file-1.txt
destination: /tmp/my-app
- source: ./my-file-2.txt
destination: /tmp/my-app
- source: ./my-file-3.txt
destination: /tmp/my-app
- source: ./my-folder-1
destination: /tmp/my-app/my-folder-1
- source: ./my-folder-2
API Version 2014-10-06
233

AWS CodeDeploy User Guide
AppSpec 'permissions' Section
destination: /tmp/my-app/my-folder-2
# 1) For all of the files in the /tmp/my-app folder ending in -3.txt
# (for example, just my-file-3.txt), owner = adm, group = wheel, and
# mode = 464 (-r--rw-r--).
permissions:
- object: /tmp/my-app
pattern: "*-3.txt"
owner: adm
group: wheel
mode: 464
type:
- file
# 2) For all of the files ending in .txt in the /tmp/my-app
# folder, but not for the file my-file-3.txt (for example,
# just my-file-1.txt and my-file-2.txt),
# owner = ec2-user and mode = 444 (-r--r--r--).
- object: /tmp/my-app
pattern: "*.txt"
except: [my-file-3.txt]
owner: ec2-user
mode: 444
type:
- file
# 3) For all the files in the /tmp/my-app/my-folder-1 folder except
# for my-file-4.txt and my-file-5.txt, (for example,
# just my-file-6.txt), owner = operator and mode = 646 (-rw-r--rw-).
- object: /tmp/my-app/my-folder-1
pattern: "**"
except: [my-file-4.txt, my-file-5.txt]
owner: operator
mode: 646
type:
- file
# 4) For all of the files that are immediately under
# the /tmp/my-app/my-folder-2 folder except for my-file-8.txt,
# (for example, just my-file-7.txt and
# my-file-9.txt), owner = ec2-user and mode = 777 (-rwxrwxrwx).
- object: /tmp/my-app/my-folder-2
pattern: "**"
except: [my-file-8.txt]
owner: ec2-user
mode: 777
type:
- file
# 5) For all folders at any level under /tmp/my-app that contain
# the name my-folder but not
# /tmp/my-app/my-folder-2/my-folder-3 (for example, just
# /tmp/my-app/my-folder-1 and /tmp/my-app/my-folder-2),
# owner = ec2-user and mode = 555 (dr-xr-xr-x).
- object: /tmp/my-app
pattern: "*my-folder*"
except: [tmp/my-app/my-folder-2/my-folder-3]
owner: ec2-user
mode: 555
type:
- directory
# 6) For the folder /tmp/my-app/my-folder-2/my-folder-3,
# group = wheel and mode = 564 (dr-xrw-r--).
- object: /tmp/my-app/my-folder-2
API Version 2014-10-06
234

AWS CodeDeploy User Guide
AppSpec 'hooks' Section
group: wheel
mode: 564
type:
- directory
The resulting permissions are as follows:
-r--r--r-- ec2-user root my-file-1.txt
-r--r--r-- ec2-user root my-file-2.txt
-r--rw-r-- adm wheel my-file-3.txt
dr-xr-xr-x ec2-user root my-folder-1
-rw-r--r-- root root my-file-4.txt
-rw-r--r-- root root my-file-5.txt
-rw-r--rw- operator root my-file-6.txt
dr-xr-xr-x ec2-user root my-folder-2
-rwxrwxrwx ec2-user root my-file-7.txt
-rw-r--r-- root root my-file-8.txt
-rwxrwxrwx ec2-user root my-file-9.txt
dr-xrw-r-- root wheel my-folder-3
The following example shows how to specify the permissions section with the addition of the acls and
context instructions. This example applies to Amazon Linux, Ubuntu Server, and RHEL instances only.
permissions:
- object: /var/www/html/WordPress
pattern: "**"
except: [/var/www/html/WordPress/ReadMe.txt]
owner: bob
group: writers
mode: 644
acls:
- u:mary:rw
- u:sam:rw
- m::rw
context:
user: unconfined_u
type: httpd_sys_content_t
range: s0
type:
- file
AppSpec 'hooks' Section
The hooks section of the AppSpec file contains mappings that link deployment lifecycle event hooks to
one or more scripts. If an event hook is not present, then no operation is executed for that event. This
section is required only if you will be running scripts as part of the deployment.
The available event hooks are:
1. ApplicationStop – This deployment lifecycle event occurs even before the application revision
is downloaded. You can use this event if you want to gracefully stop the application or remove
currently installed packages in preparation of a deployment. The AppSpec file and scripts used for
this deployment lifecycle event are from the last successfully deployed application revision.
API Version 2014-10-06
235

AWS CodeDeploy User Guide
AppSpec 'hooks' Section
Note
An AppSpec file does not exist on an instance before you deploy to it. For this reason, the
ApplicationStop hook will not run the first time you deploy to the instance. You can use
the ApplicationStop hook the second time you deploy to an instance.
To determine the location of the last successfully deployed application revision, the
AWS CodeDeploy agent looks up the location listed in the deployment-group-
id_last_successful_install file. This file is located in:
/opt/codedeploy-agent/deployment-root/deployment-instructions folder on Amazon
Linux, Ubuntu Server, and RHEL Amazon EC2 instances.
C:\ProgramData\Amazon\CodeDeploy\deployment-instructions folder on Windows
Server Amazon EC2 instances.
To troubleshoot a deployment that fails during the ApplicationStop deployment lifecycle event, see
Troubleshooting a failed ApplicationStop deployment lifecycle event (p. 271).
2. DownloadBundle – During this deployment lifecycle event, the AWS CodeDeploy agent copies the
application revision files to a temporary location:
/opt/codedeploy-agent/deployment-root/deployment-group-id/deployment-
id/deployment-archive folder on Amazon Linux, Ubuntu Server, and RHEL Amazon EC2
instances.
C:\ProgramData\Amazon\CodeDeploy\deployment-group-id\deployment-
id\deployment-archive folder on Windows Server Amazon EC2 instances.
This event is reserved for the AWS CodeDeploy agent and cannot be used to run scripts.
To troubleshoot a deployment that fails during the DownloadBundle deployment lifecycle event,
see Troubleshooting a failed DownloadBundle deployment lifecycle event with "UnknownError: not
opened for reading" (p. 272).
3. BeforeInstall – You can use this deployment lifecycle event for preinstall tasks, such as decrypting
files and creating a backup of the current version.
4. Install – During this deployment lifecycle event, the AWS CodeDeploy agent copies the revision
files from the temporary location to the final destination folder. This event is reserved for the AWS
CodeDeploy agent and cannot be used to run scripts.
API Version 2014-10-06
236

AWS CodeDeploy User Guide
AppSpec 'hooks' Section
5. AfterInstall – You can use this deployment lifecycle event for tasks such as configuring your
application or changing file permissions.
6. ApplicationStart – You typically use this deployment lifecycle event to restart services that were
stopped during ApplicationStop.
7. ValidateService – This is the last deployment lifecycle event. It is used to verify the deployment was
completed successfully.
These event hooks occur in the order in which they are described here.
Note
The Start, DownloadBundle, Install, and End events in the deployment cannot be scripted,
which is why they appear in gray in this diagram. However, you can edit the files section of
the AppSpec file to affect what's installed during the Install event.
This section has the following structure:
hooks:
deployment-lifecycle-event-name
- location: script-location
timeout: timeout-in-seconds
runas: user-name
You can include the following elements in a hook entry after the deployment lifecycle event name:
location
Required. The location of the script file for the revision.
timeout
Optional. The number of seconds to allow the script to execute before it is considered to have
failed. The default is 3600 seconds (1 hour).
Note
3600 seconds (1 hour) is the maximum amount of time allowed for script execution for
each deployment lifecycle event. If scripts exceed this limit, the deployment will stop and
API Version 2014-10-06
237

AWS CodeDeploy User Guide
AppSpec 'hooks' Section
the deployment to the instance will fail. Make sure the total number of seconds specified
in timeout for all scripts in each deployment lifecycle event do not exceed this limit.
runas
Optional. The user to impersonate when running the script. By default, this is the AWS
CodeDeploy agent running on the instance. AWS CodeDeploy does not store passwords, so
the user cannot be impersonated if the runas user needs a password. This element applies to
Amazon Linux and Ubuntu Server instances only.
During each deployment lifecycle event, hook scripts can access the following environment variables:
APPLICATION_NAME
The name of the application in AWS CodeDeploy that corresponds to the current deployment (for
example, WordPress_App).
DEPLOYMENT_ID
The ID AWS CodeDeploy has assigned to the current deployment (for example, d-AB1CDEF23).
DEPLOYMENT_GROUP_NAME
The name of the deployment group in AWS CodeDeploy that corresponds to the current
deployment (for example, WordPress_DepGroup).
DEPLOYMENT_GROUP_ID
The ID of the deployment group in AWS CodeDeploy that corresponds to the current deployment
(for example, b1a2189b-dd90-4ef5-8f40-4c1c5EXAMPLE).
LIFECYCLE_EVENT
The name of the current deployment lifecycle event (for example, AfterInstall).
These environment variables are local to each deployment lifecycle event.
The following script changes the listening port on an Apache HTTP Server to 9090 instead of 80 if the
value of DEPLOYMENT_GROUP_NAME is equal to Staging. This script must be invoked during the
BeforeInstall deployment lifecycle event:
if [ "$DEPLOYMENT_GROUP_NAME" == "Staging" ]
then
sed -i -e 's/Listen 80/Listen 9090/g' /etc/httpd/conf/httpd.conf
fi
The following script example changes the verbosity level of messages recorded in its error log from the
warning to debug if the value of the DEPLOYMENT_GROUP_NAME environment variable is equal to
Staging. This script must be invoked during the BeforeInstall deployment lifecycle event:
if [ "$DEPLOYMENT_GROUP_NAME" == "Staging" ]
then
sed -i -e 's/LogLevel warn/LogLevel debug/g' /etc/httpd/conf/httpd.conf
fi
The following script example replaces the text in the specified web page with text that displays the
value of these environment variables. This script must be invoked during the AfterInstall deployment
lifecycle event:
#!/usr/bin/python
import os
strToSearch="<h2>This application was deployed using AWS CodeDeploy.</h2>"
strToReplace="<h2>This page for "+os.environ['APPLICATION_NAME']+"
application and "+os.environ['DEPLOYMENT_GROUP_NAME']+" deployment
API Version 2014-10-06
238

AWS CodeDeploy User Guide
AppSpec File Example
group with "+os.environ['DEPLOYMENT_GROUP_ID']+" deployment group ID
was generated by a "+os.environ['LIFECYCLE_EVENT']+" script during
"+os.environ['DEPLOYMENT_ID']+" deployment.</h2>"
fp=open("/var/www/html/index.html","r")
buffer=fp.read()
fp.close()
fp=open("/var/www/html/index.html","w")
fp.write(buffer.replace(strToSearch,strToReplace))
fp.close()
hooks Example
Here is an example of a hooks entry:
hooks:
AfterInstall:
- location: Scripts/RunResourceTests.sh
timeout: 180
The Scripts/RunResourceTests.sh script will be run during the AfterInstall stage of the
deployment process. The deployment will be unsuccessful if it takes the script more than 180 seconds
(3 minutes) to run.
AppSpec File Example
Here is an example of an AppSpec file for an Amazon Linux, Ubuntu Server, or RHEL instance.
version: 0.0
os: linux
files:
- source: Config/config.txt
destination: /webapps/Config
- source: source
destination: /webapps/myApp
hooks:
BeforeInstall:
- location: Scripts/UnzipResourceBundle.sh
- location: Scripts/UnzipDataBundle.sh
AfterInstall:
- location: Scripts/RunResourceTests.sh
timeout: 180
ApplicationStart:
- location: Scripts/RunFunctionalTests.sh
timeout: 3600
ValidateService:
- location: Scripts/MonitorService.sh
timeout: 3600
runas: codedeployuser
For a Windows Server instance, change os: linux to os: windows. Also, you must fully qualify the
destination paths (for example, c:\temp\webapps\Config and c:\temp\webapps\myApp). Do
not include the runas element.
API Version 2014-10-06
239

AWS CodeDeploy User Guide
AppSpec File Spacing
Here is the sequence of events during deployment:
1. Run the script located at Scripts/UnzipResourceBundle.sh.
2. If the previous script returned an exit code of 0 (success), run the script located at Scripts/
UnzipDataBundle.sh.
3. Copy the file from the path of Config/config.txt to the path /webapps/Config/config.txt.
4. Recursively copy all the files in the source directory to the /webapps/myApp directory.
5. Run the script located at Scripts/RunResourceTests.sh with a timeout of 180 seconds (3
minutes).
6. Run the script located at Scripts/RunFunctionalTests.sh with a timeout of 3600 seconds (1
hour).
7. Run the script located at Scripts/MonitorService.sh as the user codedeploy with a timeout of
3600 seconds (1 hour).
AppSpec File Spacing
The following is the correct format for AppSpec file spacing. The numbers in square brackets indicate
the number of spaces that must occur between items. For example, [4] means to insert four spaces
between the items. AWS CodeDeploy will raise an error that may be difficult to debug if the locations
and number of spaces in an AppSpec file are not correct.
version:[1]version-number
os:[1]operating-system-name
files:
[2]-[1]source:[1]source-files-location
[4]destination:[1]destination-files-location
permissions:
[2]-[1]object:[1]object-specification
[4]pattern:[1]pattern-specification
[4]except:[1]exception-specification
[4]owner:[1]owner-account-name
[4]group:[1]group-name
[4]mode:[1]mode-specification
[4]acls:
[6]-[1]acls-specification
[4]context:
[6]user:[1]user-specification
[6]type:[1]type-specification
[6]range:[1]range-specification
[4]type:
[6]-[1]object-type
hooks:
[2]deployment-lifecycle-event-name:
[4]-[1]location:[1]script-location
[6]timeout:[1]timeout-in-seconds
[6]runas:[1]user-name
Here is an example of a conforming AppSpec file:
version: 0.0
os: linux
files:
- source: /
destination: /var/www/html/WordPress
API Version 2014-10-06
240
AWS CodeDeploy User Guide
Validate Your AppSpec File
hooks:
BeforeInstall:
- location: scripts/install_dependencies.sh
timeout: 300
runas: root
AfterInstall:
- location: scripts/change_permissions.sh
timeout: 300
runas: root
ApplicationStart:
- location: scripts/start_server.sh
timeout: 300
runas: root
ApplicationStop:
- location: scripts/stop_server.sh
timeout: 300
runas: root
For more information about spacing, see the YAML specification.
Validate Your AppSpec File
You can use a YAML validator to validate your AppSpec file.
To verify that you have placed your AppSpec file in the root directory of the application's source
content's directory structure, run one of the following commands:
For Linux, OS X, or Unix:
find /path/to/root/directory -name appspec.yml
If the AppSpec file is not located there, there will be no output.
For Windows:
dir path\to\root\directory\appspec.yml
If the AppSpec file is not located there, a "File Not Found" error will be displayed.
API Version 2014-10-06
241
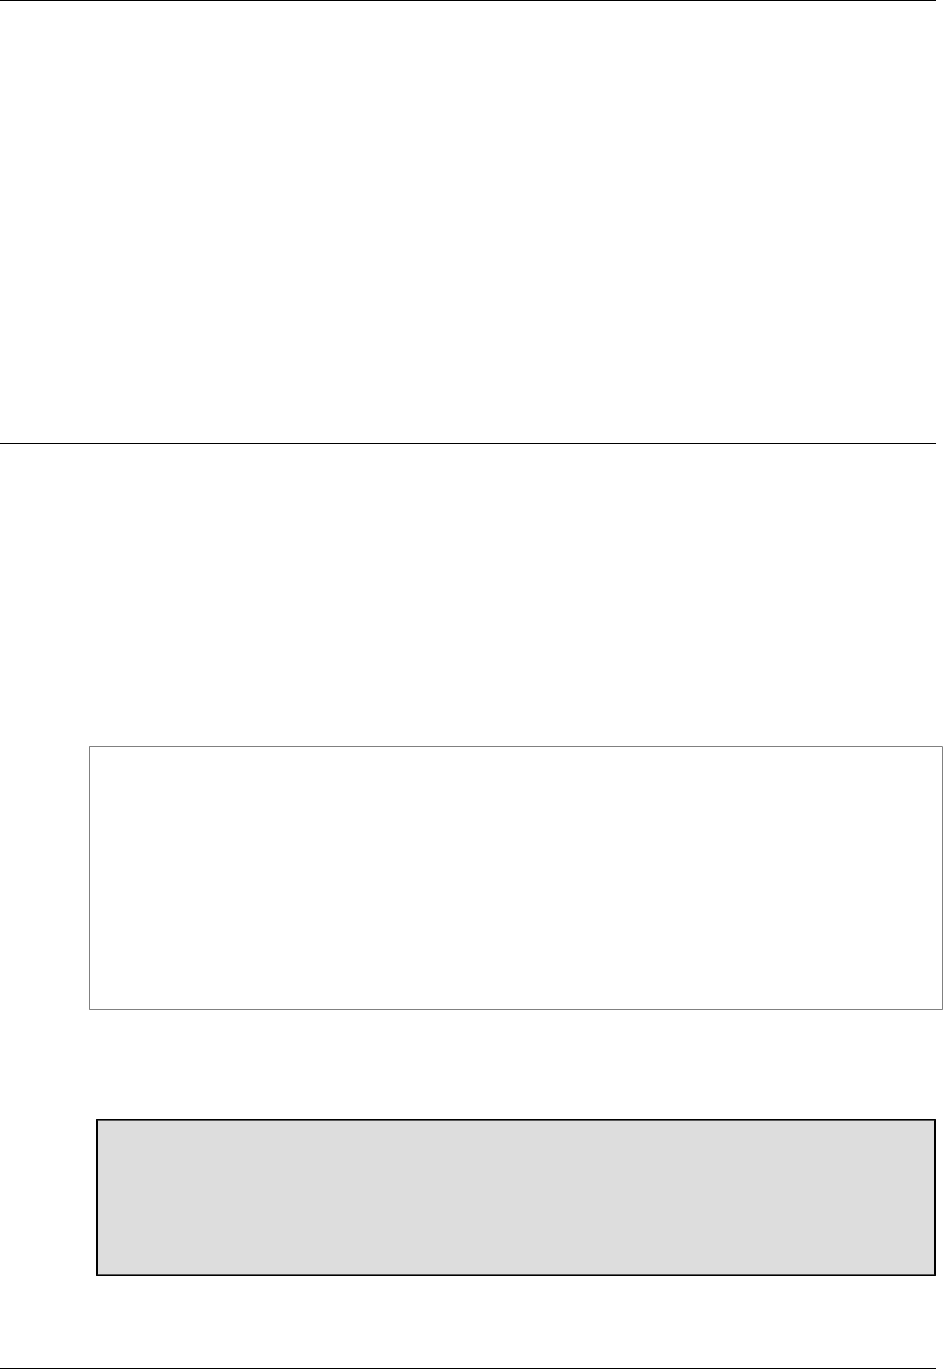
AWS CodeDeploy User Guide
AWS CodeDeploy User Access
Permissions Reference
You can use IAM to limit IAM users' access to AWS CodeDeploy resources and actions performed
against those resources. You might want to do this, for example, if you have a set of IAM users to
whom you want to give read-only access; another to whom you want to grant permissions to deploy
applications to certain deployment groups; and so on.
In the Step 1: Provision an IAM User (p. 11) instructions, you attached a policy to an IAM user that
provides universal AWS CodeDeploy access:
{
"Version": "2012-10-17",
"Statement" : [
{
"Effect" : "Allow",
"Action" : "codedeploy:*",
"Resource" : "*"
},
...
]
}
This policy allows the IAM user to perform all available actions in AWS CodeDeploy with all available
AWS CodeDeploy resources associated with the IAM user. In practice, you may not want to give all
IAM users this much access.
Do not confuse IAM user permissions with either the IAM instance profile used to launch
Amazon EC2 instances that are compatible with AWS CodeDeploy or with the IAM service
role that gives AWS CodeDeploy permissions to access your instances. For information about
creating an IAM instance profile, see Step 4: Create an IAM Instance Profile (p. 17). For
information about creating a service role, see Step 3: Create a Service Role (p. 13).
The following topics provide more information about managing access permissions for AWS
CodeDeploy.
API Version 2014-10-06
242

AWS CodeDeploy User Guide
Attach a Managed Policy for
AWS CodeDeploy to an IAM User
Topics
•Attach a Managed Policy for AWS CodeDeploy to an IAM User (p. 243)
•Attach Your Own Policy to an IAM User (p. 244)
•Action and Resource Syntax for AWS CodeDeploy Access Permissions (p. 245)
Attach a Managed Policy for AWS CodeDeploy
to an IAM User
The easiest way to attach a policy to an IAM user is to use an IAM managed policy. IAM provides the
following managed policies for AWS CodeDeploy:
•AWSCodeDeployDeployerAccess, which enables an IAM user to register and deploy revisions.
{
"Version": "2012-10-17",
"Statement": [
{
"Action": [
"codedeploy:Batch*",
"codedeploy:CreateDeployment",
"codedeploy:Get*",
"codedeploy:List*",
"codedeploy:RegisterApplicationRevision"
],
"Effect": "Allow",
"Resource": "*"
}
]
}
•AWSCodeDeployFullAccess, which provides an IAM user with full access to AWS CodeDeploy
resources.
{
"Version": "2012-10-17",
"Statement": [
{
"Action": "codedeploy:*",
"Effect": "Allow",
"Resource": "*"
}
]
}
•AWSCodeDeployReadOnlyAccess, which provides an IAM user with only read-only access to AWS
CodeDeploy resources.
{
"Version": "2012-10-17",
"Statement": [
{
"Action": [
"codedeploy:Batch*",
API Version 2014-10-06
243

AWS CodeDeploy User Guide
Attach Your Own Policy to an IAM User
"codedeploy:Get*",
"codedeploy:List*"
],
"Effect": "Allow",
"Resource": "*"
}
]
}
•AWSCodeDeployRole, which enables AWS CodeDeploy to identify Amazon EC2 instances by their
Amazon EC2 tags or Auto Scaling group names, and on-premises instances by their on-premises
instance tags, and to deploy application revisions to them accordingly.
{
"Version": "2012-10-17",
"Statement": [
{
"Effect": "Allow",
"Action": [
"autoscaling:CompleteLifecycleAction",
"autoscaling:DeleteLifecycleHook",
"autoscaling:DescribeAutoScalingGroups",
"autoscaling:DescribeLifecycleHooks",
"autoscaling:PutLifecycleHook",
"autoscaling:RecordLifecycleActionHeartbeat",
"ec2:DescribeInstances",
"ec2:DescribeInstanceStatus",
"tag:GetTags",
"tag:GetResources",
"sns:Publish",
"cloudwatch:DescribeAlarms"
],
"Resource": "*"
}
]
}
To attach a managed policy to an IAM user:
1. Sign in to the Identity and Access Management (IAM) console at https://console.aws.amazon.com/
iam/.
2. In the navigation pane, choose Users.
3. Choose the IAM user to whom you will attach the policy.
4. Choose the Permissions tab.
5. In the Managed Policies area, choose Attach Policy.
6. Select the managed policy, and then choose Attach Policy.
Attach Your Own Policy to an IAM User
You can attach your own policy to an IAM user:
1. Sign in to the Identity and Access Management (IAM) console at https://console.aws.amazon.com/
iam/.
API Version 2014-10-06
244

AWS CodeDeploy User Guide
Action and Resource Syntax for AWS
CodeDeploy Access Permissions
2. In the IAM console, in the navigation pane, choose Policies, and then choose Create Policy. (If a
Get Started button appears, choose it, and then choose Create Policy.)
3. Next to Create Your Own Policy, choose Select.
4. In the Policy Name box, type any value that will be easy you to refer to later, if needed.
5. In the Policy Document box, type a policy that follows this format, and then choose Create
Policy:
{
"Version": "2012-10-17",
"Statement" : [
{
"Effect" : "Allow",
"Action" : [
"action-statement"
],
"Resource" : [
"resource-statement"
]
},
{
"Effect" : "Allow",
"Action" : [
"action-statement"
],
"Resource" : [
"resource-statement"
]
}
]
}
In the preceding statement, replace action-statement and resource-statement with the
actions and resources you want to allow the IAM user to perform and access. By default, the IAM
user will not have permissions unless an Allow statement is explicitly stated.
6. In the navigation pane, choose Users.
7. Choose the IAM user to whom you will attach the policy.
8. Choose the Permissions tab.
9. In the Managed Policies area, choose Attach Policy.
10. Select the policy you just created, and then choose Attach Policy.
Action and Resource Syntax for AWS
CodeDeploy Access Permissions
Actions follow this general format:
codedeploy:action
Where action is an available AWS CodeDeploy operation, such as CreateApplication or
DeleteDeploymentGroup.
Resources follow this general format:
API Version 2014-10-06
245
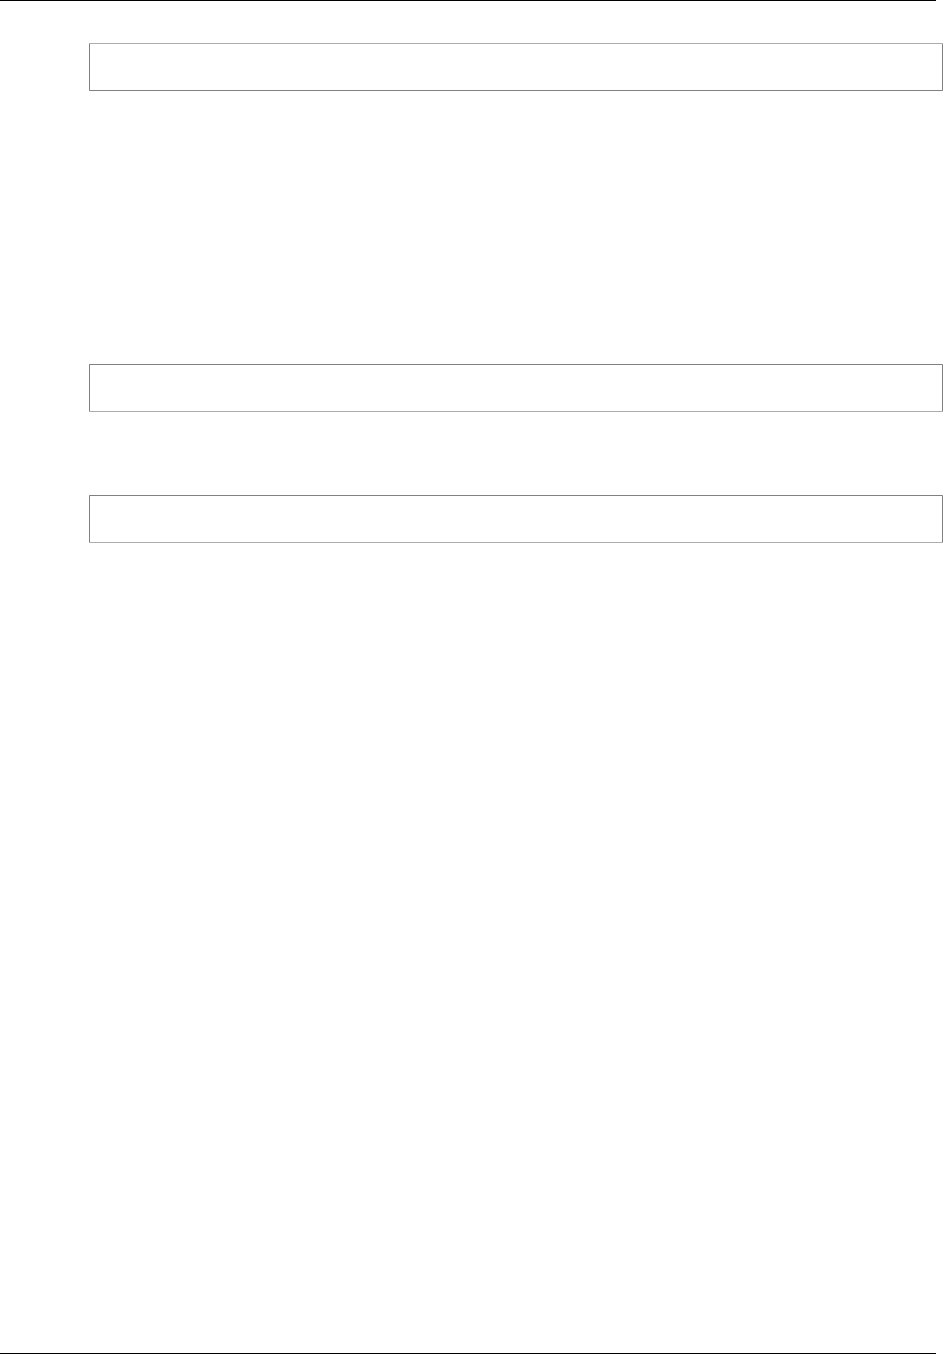
AWS CodeDeploy User Guide
Applications
arn:aws:codedeploy:region:account:resource-type:resource-specifier
Where region is a target region (such as us-east-1).
account is the AWS account ID.
resource-type is the target type of resource (such as deploymentconfig for deployment
configurations).
resource-specifier is the target resource (such as WordPress_App for an application or * for all
resources of that resource type).
For example, the following specifies the RegisterApplicationRevision action:
codedeploy:RegisterApplicationRevision
While the following specifies the application named WordPress_App registered to the AWS account
80398EXAMPLE in the region us-east-1:
arn:aws:codedeploy:us-east-1:80398EXAMPLE:application:WordPress_App
Topics
•Applications (p. 246)
•Application Revisions (p. 247)
•Deployments (p. 248)
•Deployment Configurations (p. 250)
•Deployment Groups (p. 251)
•Instances (p. 252)
•On-Premises Instances (p. 254)
Applications
Allowed actions include:
•BatchGetApplications, to get information about multiple applications associated with the IAM
user.
•CreateApplication, to create an application associated with the IAM user.
•DeleteApplication, to delete an application associated with the IAM user.
•GetApplication, to get information about a single application associated with the IAM user.
•ListApplications, to get information about all applications associated with the IAM user.
•UpdateApplication, to change information about an application associated with the IAM user.
Note
For UpdateApplication, you must have UpdateApplication permissions for both the old
application name and the new application name.
Allowed resources include:
•application:application-name (valid for all application actions, except
BatchGetApplications and ListApplications)
API Version 2014-10-06
246

AWS CodeDeploy User Guide
Application Revisions
where application-name is the complete name of an application.
•application:partial-application-name* (valid for all application actions, except
BatchGetApplications and ListApplications)
where partial-application-name is the partial name of an application and * represents any
series of remaining characters.
•application:* (valid for all application actions)
where * represents all applications.
The following example allows the specified user to get information about the application named
WordPress_App in the us-east-1 region:
{
"Version": "2012-10-17",
"Statement" : [
{
"Effect" : "Allow",
"Action" : [
"codedeploy:GetApplication"
],
"Resource" : [
"arn:aws:codedeploy:us-east-1:80398EXAMPLE:application:WordPress_App"
]
}
]
}
Application Revisions
Allowed actions include:
•BatchGetApplicationRevisions, to get information about multiple application revisions
associated with the IAM user.
•GetApplicationRevision, to get information about a single application revision for an application
associated with the IAM user.
•ListApplicationRevisions, to get information about all application revisions for an application
associated with the IAM user.
•RegisterApplicationRevision, to register information about an application revision for an
application associated with the IAM user.
Allowed resources include:
•application:application-name (valid for all application revision actions, except
ListApplicationRevisions)
where application-name is the complete name of an application.
•application:partial-application-name* (valid for all application revision actions, except
ListApplicationRevisions)
where partial-application-name is the partial name of an application and * represents any
series of remaining characters.
•application:* (valid for all application revision actions)
API Version 2014-10-06
247

AWS CodeDeploy User Guide
Deployments
where * represents all applications.
The following example allows the specified user to register application revisions for the application
named WordPress_App in the us-east-1 region:
{
"Version": "2012-10-17",
"Statement" : [
{
"Effect" : "Allow",
"Action" : [
"codedeploy:RegisterApplicationRevision"
],
"Resource" : [
"arn:aws:codedeploy:us-east-1:80398EXAMPLE:application:WordPress_App"
]
}
]
}
Deployments
Allowed actions include:
•BatchGetDeployments, to get information about multiple deployments associated with the IAM
user.
•CreateDeployment, to create a deployment for an application associated with the IAM user.
•GetDeployment, to get information about a single deployment to a deployment group for an
application associated with the IAM user.
•ListDeployments, to get information about all deployments to a deployment group associated with
the IAM user, or to get all deployments associated with the IAM user.
•StopDeployment, to stop a deployment to a deployment group for an application associated with
the IAM user.
Note
When you specify CreateDeployment permissions, you must also specify
GetDeploymentConfig permissions for the deployment configuration and
GetApplicationRevision or RegisterApplicationRevision permissions for the
application revision.
Allowed resources include:
•deploymentgroup:application-name/deployment-group-name (valid for all deployment
actions)
where application-name is the complete name of an application.
where deployment-group-name is the complete name of a deployment group associated with the
application.
•deploymentgroup:partial-application-name*/deployment-group-name (valid for all
deployment actions)
where partial-application-name is the partial name of an application and * represents any
series of remaining characters.
API Version 2014-10-06
248

AWS CodeDeploy User Guide
Deployments
where deployment-group-name is the complete name of a deployment group associated with any
matching application.
•deploymentgroup:application-name/partial-deployment-group-name* (valid for all
deployment actions)
where application-name is the complete name of an application.
where partial-deployment-group-name is the partial name of a deployment group associated
with the matching application and * represents any series of remaining characters.
•deploymentgroup:partial-application-name*/partial-deployment-group-name*
(valid for all deployment actions)
where partial-application-name is the partial name of an application and * represents any
series of remaining characters.
where partial-deployment-group-name is the partial name of a deployment group associated
with any matching application and * represents any series of remaining characters.
•deploymentgroup:application-name/* (valid for all deployment actions except for
BatchGetDeployments; valid for ListDeployments when providing a specific deployment group,
but not when listing all of the deployments associated with the IAM user)
where application-name is the name of an application and * represents any deployment group
associated with the matching application.
•deploymentgroup:partial-application-name*/* (valid for all deployment actions)
where partial-application-name is the partial name of an application and * represents any
series of remaining characters.
where * represents any deployment group associated with the matching applications.
•deploymentgroup:* (valid for all deployment actions, including BatchGetDeployments)
where * represents all deployments.
The following example allows the specified user to create deployments for the deployment group
named WordPress_DepGroup associated with the application named WordPress_App, the custom
deployment configuration named ThreeQuartersHealthy, and any application revisions associated
with the application named WordPress_App. All of these resources are associated with the us-
east-1 region.
{
"Version": "2012-10-17",
"Statement" : [
{
"Effect" : "Allow",
"Action" : [
"codedeploy:CreateDeployment"
],
"Resource" : [
"arn:aws:codedeploy:us-
east-1:80398EXAMPLE:deploymentgroup:WordPress_App/WordPress_DepGroup"
]
},
{
"Effect" : "Allow",
"Action" : [
"codedeploy:GetDeploymentConfig"
API Version 2014-10-06
249

AWS CodeDeploy User Guide
Deployment Configurations
],
"Resource" : [
"arn:aws:codedeploy:us-
east-1:80398EXAMPLE:deploymentconfig:ThreeQuartersHealthy"
]
},
{
"Effect" : "Allow",
"Action" : [
"codedeploy:GetApplicationRevision"
],
"Resource" : [
"arn:aws:codedeploy:us-east-1:80398EXAMPLE:application:WordPress_App"
]
}
]
}
Deployment Configurations
Allowed actions include:
•CreateDeploymentConfig, to create a custom deployment configuration associated with the IAM
user.
•DeleteDeploymentConfig, to delete a custom deployment configuration associated with the IAM
user.
•GetDeploymentConfig, to get information about a single deployment configuration associated with
the IAM user.
•ListDeploymentConfigs, to get information about all deployment configurations associated with
the IAM user.
Allowed resources include:
•deploymentconfig:custom-deployment-configuration-name (valid for all deployment
configuration actions except ListDeploymentConfigs)
where custom-deployment-configuration-name is the complete name of a custom
deployment configuration.
•deploymentconfig:partial-custom-deployment-configuration-name* (valid for all
deployment configuration actions except ListDeploymentConfigs)
where partial-custom-deployment-configuration-name is the partial name of a custom
deployment configuration and * represents any series of remaining characters.
•deploymentconfig:predefined-deployment-configuration-name (valid for all deployment
configuration actions except ListDeploymentConfigs)
where predefined-deployment-configuration-name is the name of a built-in deployment
configuration, such as CodeDeployDefault.OneAtATime.
•deploymentconfig:partial-predefined-deployment-configuration-name* (valid for all
deployment configuration actions except ListDeploymentConfigs)
where partial-predefined-deployment-configuration-name is the partial name of a built-
in deployment configuration and * represents any series of remaining characters.
•deploymentconfig:* (valid for all of the preceding deployment configuration actions, including
ListDeploymentConfigs)
API Version 2014-10-06
250

AWS CodeDeploy User Guide
Deployment Groups
where * represents all deployment configurations.
The following example allows the specified user to get information about the custom deployment
configuration named ThreeQuartersHealthy in the us-east-1 region.
{
"Version": "2012-10-17",
"Statement" : [
{
"Effect" : "Allow",
"Action" : [
"codedeploy:GetDeploymentConfig"
],
"Resource" : [
"arn:aws:codedeploy:us-
east-1:80398EXAMPLE:deploymentconfig:ThreeQuartersHealthy"
]
}
]
}
Deployment Groups
Allowed actions include:
•BatchGetDeploymentGroups, to get information about multiple deployment groups associated
with the IAM user.
•CreateDeploymentGroup, to create a deployment group for an application associated with the IAM
user.
•DeleteDeploymentGroup, to delete a deployment group for an application associated with the IAM
user.
•GetDeploymentGroup, to get information about a single deployment group for an application
associated with the IAM user.
•ListDeploymentGroups, to get information about all deployment groups for an application
associated with the IAM user.
•UpdateDeploymentGroup, to change information about a single deployment group for an
application associated with the IAM user.
Note
For UpdateDeploymentGroup actions that involve changing a deployment group's name,
you must have UpdateDeploymentGroup permissions for both the old and new deployment
group name.
Allowed resources include:
•deploymentgroup:application-name/deployment-group-name (valid for all deployment
group actions, except ListDeploymentGroups)
where application-name is the complete name of an application.
where deployment-group-name is the complete name of a deployment group associated with the
matching application.
•deploymentgroup:partial-application-name*/deployment-group-name (valid for all
deployment group actions, except ListDeploymentGroups)
API Version 2014-10-06
251

AWS CodeDeploy User Guide
Instances
where partial-application-name is the partial name of an application and * represents any
series of remaining characters
where deployment-group-name is the complete name of a deployment group associated with any
matching application.
•deploymentgroup:application-name/partial-deployment-group-name* (valid for all
deployment group actions, except ListDeploymentGroups)
where application-name is the complete name of an application.
where partial-deployment-group-name is the partial name of a deployment group associated
with the matching application and * represents any series of remaining characters.
•deploymentgroup:partial-application-name*/partial-deployment-group-name*
(valid for all deployment group actions, except ListDeploymentGroups)
where partial-application-name is the partial name of an application and * represents any
series of remaining characters.
where partial-deployment-group-name is the partial name of a deployment group associated
with any matching application and * represents any series of remaining characters.
•deploymentgroup:application-name/* (valid for all deployment group actions, including
ListDeploymentGroups)
where application-name is the name of an application.
where * represents any deployment group associated with the matching application.
•deploymentgroup:partial-application-name*/* (valid for all deployment group actions,
including ListDeploymentGroups)
where partial-application-name is the partial name of an application and * represents any
series of remaining characters.
where * represents any deployment groups associated with the matching applications.
The following example allows the user to delete the deployment group named WordPress_DepGroup
associated with the application named WordPress_Appin the us-east-1 region.
{
"Version": "2012-10-17",
"Statement" : [
{
"Effect" : "Allow",
"Action" : [
"codedeploy:DeleteDeploymentGroup"
],
"Resource" : [
"arn:aws:codedeploy:us-
east-1:80398EXAMPLE:deploymentgroup:WordPress_App/WordPress_DepGroup"
]
}
]
}
Instances
Allowed actions include:
API Version 2014-10-06
252

AWS CodeDeploy User Guide
Instances
•BatchGetDeploymentInstances, to get information about multiple instances in a deployment
associated with the IAM user.
•GetDeploymentInstance, to get information about a single instance in a deployment associated
with the IAM user.
•ListDeploymentInstances, to get information about all instances in a deployment associated
with the IAM user.
Allowed resources include:
•deploymentgroup:application-name/deployment-group-name (valid for all instance
actions)
where application-name is the complete name of an application.
where deployment-group-name is the complete name of a deployment group associated with the
matching application.
•deploymentgroup:partial-application-name*/deployment-group-name (valid for all
instance actions)
where partial-application-name is the partial name of an application and * represents any
series of remaining characters.
where deployment-group-name is the complete name of a deployment group associated with any
matching application.
•deploymentgroup:application-name/partial-deployment-group-name* (valid for all
instance actions)
where application-name is the complete name of an application.
where partial-deployment-group-name is the partial name of a deployment group associated
with the matching application and * represents any series of remaining characters.
•deploymentgroup:partial-application-name*/partial-deployment-group-name*
(valid for all instance actions)
where partial-application-name is the partial name of an application and * represents any
series of remaining characters.
where partial-deployment-group-name is the partial name of a deployment group associated
with any matching application and * represents any series of remaining characters.
•deploymentgroup:application-name/* (valid for all instance actions)
where application-name is the name of an application and * represents any deployment group
associated with the matching application.
•deploymentgroup:partial-application-name*/* (valid for all instance actions)
where partial-application-name is the partial name of an application and * represents any
series of remaining characters.
where * represents any deployment groups associated with the matching applications.
The following example allows the user to get information about all of the instances in deployments
associated with the deployment group named WordPress_DepGroup associated with the application
named WordPress_Appin the us-east-1 region.
{
"Version": "2012-10-17",
API Version 2014-10-06
253

AWS CodeDeploy User Guide
On-Premises Instances
"Statement" : [
{
"Effect" : "Allow",
"Action" : [
"codedeploy:ListDeploymentInstances"
],
"Resource" : [
"arn:aws:codedeploy:us-
east-1:80398EXAMPLE:deploymentgroup:WordPress_App/WordPress_DepGroup"
]
}
]
}
On-Premises Instances
Allowed actions include:
•AddTagsToOnPremisesInstances, to add tags to one or more on-premises instances.
•BatchGetOnPremisesInstances, to get information about one or more on-premises instances.
•DeregisterOnPremisesInstance, to deregister an on-premises instance.
•GetOnPremisesInstance, to get information about a single on-premises instance.
•ListOnPremisesInstances, to get a list of one or more on-premises instance names.
•RegisterOnPremisesInstance, to register an on-premises instance.
•RemoveTagsFromOnPremisesInstances, to remove tags from one or more on-premises
instances.
Allowed resources include:
•instance/instance-ID (valid for all on-premises instance actions except for
BatchGetOnPremisesInstances and ListOnPremisesInstances)
where instance-ID is the complete ID of an on-premises instance.
•instance/partial-instance-ID* (valid for all on-premises instance actions except for
BatchGetOnPremisesInstances and ListOnPremisesInstances)
where partial-instance-ID is a partial on-premises instance ID and * represents any series of
remaining characters.
•instance/* (valid for all on-premises instance actions except for
BatchGetOnPremisesInstances and ListOnPremisesInstances)
where * represents any available on-premises instance.
•* (valid for all on-premises instance actions)
where * represents any available on-premises instance.
The following example allows the user to get information about any single on-premises instance that
begins with the ID of AssetTag in the us-east-1 region.
{
"Version": "2012-10-17",
"Statement" : [
{
"Effect" : "Allow",
API Version 2014-10-06
254

AWS CodeDeploy User Guide
On-Premises Instances
"Action" : [
"codedeploy:GetOnPremisesInstance"
],
"Resource" : [
"arn:aws:codedeploy:us-east-1:80398EXAMPLE:instance/AssetTag*"
]
}
]
}
API Version 2014-10-06
255

AWS CodeDeploy User Guide
AWS CodeDeploy Agent
Configuration Reference
When the AWS CodeDeploy agent is installed, a configuration file is placed on the instance. This
configuration file specifies directory paths and other settings for AWS CodeDeploy to use as it interacts
with the instance. You can change some of the configuration options in the file.
For Amazon Linux, Ubuntu Server, and Red Hat Enterprise Linux (RHEL) instances, the configuration
file is named codedeployagent.yml. It is placed in the /etc/codedeploy-agent/conf directory.
For Windows Server instances, the configuration file is named conf.yml. It is placed in the C:
\ProgramData\Amazon\CodeDeploy directory.
The configuration settings include:
:log_aws_wire: Set to true for the AWS CodeDeploy agent
to capture wire logs from Amazon S3 and
write them to a file named codedeploy-
agent.wire.log in the location pointed to by
the :log_dir: setting.
Caution
You should set :log_aws_wire: to true
only for the amount of time required to
capture wire logs. The codedeploy-
agent.wire.log file can grow to a
very large size quickly. The wire log
output in this file might contain sensitive
information, including the plain-text
contents of files transferred into, or
out of, Amazon S3 while this setting
was set to true. The wire logs contain
information about all Amazon S3 activity
associated with the AWS account while
this setting was set to true, not just
activity related to AWS CodeDeploy
deployments.
The default setting is false.
API Version 2014-10-06
256

AWS CodeDeploy User Guide
This setting applies to all instance types. You
must add this configuration setting to Windows
Server instances to be able to use it.
:log_dir: The folder on the instance where log files related
to AWS CodeDeploy agent operations are
stored.
The default setting is '/var/log/aws/
codedeploy-agent' for Amazon Linux,
Ubuntu Server, and RHEL instances and C:
\ProgramData\Amazon\CodeDeploy\log for
Windows Server instances.
:pid_dir: The folder where codedeploy-agent.pid is
stored.
This file contains the process ID (PID) of the
AWS CodeDeploy agent. The default setting is
'/opt/codedeploy-agent/state/.pid'.
This setting applies to Amazon Linux, Ubuntu
Server, and RHEL instances only.
:program_name: The AWS CodeDeploy agent program name.
The default setting is codedeploy-agent.
This setting applies to Amazon Linux, Ubuntu
Server, and RHEL instances only.
:root_dir: The folder where related revisions, deployment
history, and deployment scripts on the instance
are stored.
The default setting is '/opt/codedeploy-
agent/deployment-root' for Amazon Linux,
Ubuntu Server, and RHEL instances and C:
\ProgramData\Amazon\CodeDeploy for
Windows Server instances.
:verbose: Set to true for the AWS CodeDeploy agent to
print debug messages log files on the instance.
The default setting is false for Amazon Linux,
Ubuntu Server, and RHEL instances and true
for Windows Server instances.
:wait_between_runs: The interval, in seconds, between AWS
CodeDeploy agent polling of AWS CodeDeploy
for pending deployments.
The default setting is 1.
API Version 2014-10-06
257

AWS CodeDeploy User Guide
Related Topics
:on_premises_config_file: For on-premises instances, the path to an
alternate location for the configuration file named
codedeploy.onpremises.yml (for Ubuntu
Server and RHEL) or conf.onpremises.yml
(for Windows Server).
By default, these files are stored
in /etc/codedeploy-agent/
conf/codedeploy.onpremises.yml
for Ubuntu Server and RHEL
and C:\ProgramData\Amazon
\CodeDeploy\conf.onpremises.yml for
Windows Server.
Available in version 1.0.1.686 and later versions
of the AWS CodeDeploy agent.
:proxy_uri: (Optional) The HTTP proxy through which
you want the AWS CodeDeploy agent to
connect to AWS for your AWS CodeDeploy
operations. Use a format similar to https://
user:password@my.proxy:443/path?
query.
Available in version 1.0.1.824 and later versions
of the AWS CodeDeploy agent.
:max_revisions: (Optional) The number of application revisions
for a deployment group that you want the AWS
CodeDeploy agent to archive. Any revisions that
exceed the number specified are deleted.
Enter any positive integer. If no value is
specified, AWS CodeDeploy will retain the five
most recent revisions in addition to the currently
deployed revision.
Supported in version 1.0.1.966 and later versions
of the AWS CodeDeploy agent.
Related Topics
Working with the AWS CodeDeploy Agent (p. 109)
Managing AWS CodeDeploy Agent Operations (p. 114)
API Version 2014-10-06
258

AWS CodeDeploy User Guide
AWS CloudFormation Templates
for AWS CodeDeploy Reference
In addition to the other methods available to you in AWS CodeDeploy, you can use AWS
CloudFormation templates to perform the following tasks:
• Create applications.
• Create deployment groups and specify a target revision.
• Create deployment configurations.
• Create Amazon EC2 instances.
AWS CloudFormation is a service that helps you model and set up your AWS resources using
templates. An AWS CloudFormation template is a text file whose format complies with the JSON
standard. You create a template that describes all of the AWS resources you want, and AWS
CloudFormation takes care of provisioning and configuring those resources for you.
For more information, see What Is AWS CloudFormation? and Working with AWS CloudFormation
Templates in AWS CloudFormation User Guide.
If you plan to use AWS CloudFormation templates that are compatible with AWS CodeDeploy in
your organization, as an administrator, you must grant access to AWS CloudFormation and to the
AWS services and actions on which AWS CloudFormation depends. To grant permissions to create
applications, deployment groups, and deployment configurations, attach the following policy to the IAM
users who will work with AWS CloudFormation:
{
"Version": "2012-10-17",
"Statement": [
{
"Effect": "Allow",
"Action": [
"cloudformation:*"
],
"Resource": "*"
}
]
}
API Version 2014-10-06
259
AWS CodeDeploy User Guide
For more information about managed policies, see the following topics:
• To view the policy that must be attached to IAM users who will create Amazon EC2 instances, see
Creating an Instance (AWS CloudFormation Template) (p. 130).
• For information about attaching policies to IAM users, see Working with Managed Policies in IAM
User Guide.
• To learn how to restrict users to a limited set of AWS CodeDeploy actions and resources, see Attach
a Managed Policy for AWS CodeDeploy to an IAM User (p. 243).
The following table shows the actions an AWS CloudFormation template can perform on your behalf
and includes links to more information about the AWS resource types and their property types you can
add to an AWS CloudFormation template.
Action AWS CloudFormation Resource Type
Create an AWS CodeDeploy application. AWS::CodeDeploy::Application
Create and specify the details for a deployment
group to be used to deploy your application
revisions. ¹
AWS::CodeDeploy::DeploymentGroup
Create a set of deployment rules, deployment
success conditions, and deployment failure
conditions that AWS CodeDeploy will use during
a deployment.
AWS::CodeDeploy::DeploymentConfig
Create an Amazon EC2 instance. ² AWS::EC2::Instance
¹ If you specify the version of the application revision that you want to be deployed as part
of the deployment group, your target revision will be deployed as soon as the provisioning
process is complete. For more information about template configuration, see AWS CodeDeploy
DeploymentGroup Deployment Revision S3Location and AWS CodeDeploy DeploymentGroup
Deployment Revision GitHubLocation in the AWS CloudFormation User Guide.
² We provide templates you can use to create Amazon EC2 instances in the regions in which AWS
CodeDeploy is supported. For more information about using these templates, see Creating an
Instance (AWS CloudFormation Template) (p. 130).
API Version 2014-10-06
260
AWS CodeDeploy User Guide
Resource Kit File List
AWS CodeDeploy Resource Kit
Reference
Many of the files AWS CodeDeploy relies on are stored in publicly available, AWS region-specific
Amazon S3 buckets. We call this collection of files the AWS CodeDeploy Resource Kit.
Topics
•Resource Kit File List (p. 261)
•Displaying a List of the Resource Kit Files (p. 262)
•Downloading the Resource Kit Files (p. 263)
Resource Kit File List
The following table lists the files in the AWS CodeDeploy Resource Kit.
File Description
VERSION A file used by AWS CodeDeploy agents to
update themselves as they are running on
instances.
codedeploy-agent.noarch.rpm The AWS CodeDeploy agent for Amazon Linux
and Red Hat Enterprise Linux (RHEL). There
may be several files with the same base file
name, but different versions (such as -1.0-0).
codedeploy-agent_all.deb The AWS CodeDeploy agent for Ubuntu Server.
There may be several files with the same
base file name, but different versions (such as
_1.0-0).
codedeploy-agent.msi The AWS CodeDeploy agent for Windows
Server. There may be several files with the same
base file name, but different versions (such as
-1.0-0).
install A file you can use to more easily install the AWS
CodeDeploy agent.
API Version 2014-10-06
261
AWS CodeDeploy User Guide
Displaying a List of the Resource Kit Files
File Description
CodeDeploy_SampleCF_Template.json An AWS CloudFormation template you can
use to launch from one to three Amazon EC2
instances running Amazon Linux or Windows
Server. There may be several files with the same
base file name, but different versions (such as
-1.0.0).
SampleApp_Linux.zip A sample application revision you can deploy
to an Amazon EC2 instance running Amazon
Linux or to a Ubuntu Server or RHEL instance.
There may be several files with the same base
file name, but different versions (such as -1.0).
SampleApp_Windows.zip A sample application revision you can deploy to a
Windows Server instance. There may be several
files with the same base file name, but different
versions (such as -1.0).
Displaying a List of the Resource Kit Files
To view a list of files, use the aws s3 ls command for your region.
Note
The files in each bucket are designed to work with resources in the corresponding region.
aws s3 ls --recursive s3://aws-codedeploy-us-east-1
aws s3 ls --recursive s3://aws-codedeploy-us-west-1
aws s3 ls --recursive s3://aws-codedeploy-us-west-2
aws s3 ls --recursive s3://aws-codedeploy-ap-northeast-1
aws s3 ls --recursive s3://aws-codedeploy-ap-northeast-2
aws s3 ls --recursive s3://aws-codedeploy-ap-south-1
aws s3 ls --recursive s3://aws-codedeploy-ap-southeast-1
aws s3 ls --recursive s3://aws-codedeploy-ap-southeast-2
aws s3 ls --recursive s3://aws-codedeploy-eu-central-1
aws s3 ls --recursive s3://aws-codedeploy-eu-west-1
API Version 2014-10-06
262
AWS CodeDeploy User Guide
Downloading the Resource Kit Files
aws s3 ls --recursive s3://aws-codedeploy-sa-east-1
Downloading the Resource Kit Files
To download a file, use the aws s3 cp command for your region.
Note
Be sure to use the period (.) near the end. This downloads the file to your current directory.
The following commands download a single file named SampleApp_Linux.zip from one of the
buckets' /samples/latest/ folders:
aws s3 cp s3://aws-codedeploy-us-east-1/samples/latest/SampleApp_Linux.zip .
--region us-east-1
aws s3 cp s3://aws-codedeploy-us-west-1/samples/latest/SampleApp_Linux.zip .
--region us-west-1
aws s3 cp s3://aws-codedeploy-us-west-2/samples/latest/SampleApp_Linux.zip .
--region us-west-2
aws s3 cp s3://aws-codedeploy-ap-northeast-1/samples/latest/
SampleApp_Linux.zip . --region ap-northeast-1
aws s3 cp s3://aws-codedeploy-ap-northeast-2/samples/latest/
SampleApp_Linux.zip . --region ap-northeast-2
aws s3 cp s3://aws-codedeploy-ap-south-1/samples/latest/SampleApp_Linux.zip .
--region ap-south-1
aws s3 cp s3://aws-codedeploy-ap-southeast-1/samples/latest/
SampleApp_Linux.zip . --region ap-southeast-1
aws s3 cp s3://aws-codedeploy-ap-southeast-2/samples/latest/
SampleApp_Linux.zip . --region ap-southeast-2
aws s3 cp s3://aws-codedeploy-eu-central-1/samples/latest/
SampleApp_Linux.zip . --region eu-central-1
aws s3 cp s3://aws-codedeploy-eu-west-1/samples/latest/SampleApp_Linux.zip .
--region eu-west-1
aws s3 cp s3://aws-codedeploy-sa-east-1/samples/latest/SampleApp_Linux.zip .
--region sa-east-1
To download all of the files, use one of the following commands for your region:
API Version 2014-10-06
263
AWS CodeDeploy User Guide
Downloading the Resource Kit Files
aws s3 cp --recursive s3://aws-codedeploy-us-east-1 . --region us-east-1
aws s3 cp --recursive s3://aws-codedeploy-us-west-1 . --region us-west-1
aws s3 cp --recursive s3://aws-codedeploy-us-west-2 . --region us-west-2
aws s3 cp --recursive s3://aws-codedeploy-ap-northeast-1 . --region ap-
northeast-1
aws s3 cp --recursive s3://aws-codedeploy-ap-northeast-2 . --region ap-
northeast-2
aws s3 cp --recursive s3://aws-codedeploy-ap-south-1 . --region ap-south-1
aws s3 cp --recursive s3://aws-codedeploy-ap-southeast-1 . --region ap-
southeast-1
aws s3 cp --recursive s3://aws-codedeploy-ap-southeast-2 . --region ap-
southeast-2
aws s3 cp --recursive s3://aws-codedeploy-eu-central-1 . --region eu-
central-1
aws s3 cp --recursive s3://aws-codedeploy-eu-west-1 . --region eu-west-1
aws s3 cp --recursive s3://aws-codedeploy-sa-east-1 . --region sa-east-1
API Version 2014-10-06
264

AWS CodeDeploy User Guide
Applications
AWS CodeDeploy Limits
The following tables describe limits in AWS CodeDeploy.
Note
You can request a limit increase for some AWS CodeDeploy limits. You cannot increase the
limit on the number of hours a deployment can run.
Topics
•Applications (p. 265)
•Application Revisions (p. 265)
•Deployments (p. 266)
•Deployment Configurations (p. 266)
•Deployment Groups (p. 267)
•Instances (p. 267)
Applications
Number of applications associated with an AWS
account in a single region 40
Number of characters in an application name 100
Characters allowed in an application name Letters (a-z, A-Z), numbers (0-9), periods (.),
underscores (_), + (plus signs), = (equals signs),
, (commas), @ (at signs), - (minus signs).
Number of applications that can be passed to the
BatchGetApplications API action 100
Application Revisions
Number of characters in an application revision
name 100
Allowed file types for application revisions Archive files with the extension .zip or .tar
and compressed archive files with the extension
.tar.gz.
API Version 2014-10-06
265

AWS CodeDeploy User Guide
Deployments
An archive or compressed archive file that is
compatible with AWS CodeDeploy must contain
a single application specification file (AppSpec
file) with the file name appspec.yml.
Deployments
Number of concurrent deployments to a
deployment group¹ 1
Number of concurrent deployments associated
with an AWS account² 10
Number of hours a deployment can run 8
Number of seconds until an individual
deployment lifecycle event fails if not completed 3600
Number of characters in a deployment
description 100
Number of deployments that can be passed to
the BatchGetDeployments API action 100
¹ This limit is intended to prevent accidental, concurrent deployments of the same application to the
same deployment group.
² Each deployment to a scaled-up Amazon EC2 instance in an Auto Scaling group counts as a
single concurrent deployment. If the scaled-up Amazon EC2 instance is associated with multiple
applications, then additional concurrent deployment for each application would be generated. For
example, an Auto Scaling group that scales up by five Amazon EC2 instances and is associated with
a single application would generate five concurrent deployments. If the same five scaled-up Amazon
EC2 instances are associated with two additional applications, this would generate ten additional
concurrent deployments.
Deployment Configurations
Number of custom deployment configurations
associated with an AWS account 25
Allowed values for a minimum healthy instances
setting of HOST_COUNT Any positive integer or 0 (zero). Zero (0) results
in deployment to all instances at once.
Allowed values for a minimum healthy instances
setting of FLEET_PERCENT Any positive integer less than 100 or 0 (zero).
Zero (0) results in deployment to all instances at
once.
Number of characters in a custom deployment
configuration name 100
Characters allowed in a custom deployment
configuration name Letters (a-z, A-Z), numbers (0-9), periods (.),
underscores (_), + (plus signs), = (equals signs),
, (commas), @ (at signs), - (minus signs).
Disallowed prefixes in a custom deployment
configuration name CodeDeployDefault.
API Version 2014-10-06
266

AWS CodeDeploy User Guide
Deployment Groups
Deployment Groups
Number of deployment groups associated with a
single application 50
Number of tags in a deployment group 10
Number of Auto Scaling groups in a deployment
group 10
Number of characters in a deployment group
name 100
Characters allowed in a deployment group name Letters (a-z, A-Z), numbers (0-9), periods (.),
underscores (_), + (plus signs), = (equals signs),
, (commas), @ (at signs), - (minus signs).
Instances
Number of instances in a single deployment 50
Number of characters in a tag key 128
Number of characters in a tag value 256
Number of instances that can be passed to the
BatchGetOnPremisesInstances API action 100
Required version of AWS SDK for Ruby (aws-
sdk-core) 2.1.2 or earlier for AWS CodeDeploy agent
versions earlier than 1.0.1.880.
2.2 or earlier for AWS CodeDeploy agent version
1.0.1.880 and later.
API Version 2014-10-06
267

AWS CodeDeploy User Guide
General Troubleshooting Issues
Troubleshooting AWS
CodeDeploy
Use the topics in this section to help solve problems and errors you might encounter when using AWS
CodeDeploy.
Note
The causes of many deployment failures can be identified by reviewing the log files created
during the deployment process. For simplicity, we recommend using Amazon CloudWatch
Logs to centrally monitor log files instead of viewing them instance by instance. For
information, see View AWS CodeDeploy Logs in CloudWatch Logs Console.
Topics
•General Troubleshooting Issues (p. 268)
•Troubleshoot Deployment Issues (p. 271)
•Troubleshoot Deployment Group Issues (p. 275)
•Troubleshoot Instance Issues (p. 275)
•Troubleshoot Auto Scaling Issues (p. 279)
•Error Codes for AWS CodeDeploy (p. 283)
General Troubleshooting Issues
Topics
•General Troubleshooting Checklist (p. 268)
•AWS CodeDeploy deployment resources are supported in certain regions only (p. 269)
•Required IAM roles are not available (p. 270)
•Avoid concurrent deployments to the same Amazon EC2 instance (p. 270)
•Using some text editors to create AppSpec files and shell scripts can cause deployments to
fail (p. 270)
•Using Finder in Mac OS to bundle an application revision can cause deployments to fail (p. 271)
General Troubleshooting Checklist
You can use the following checklist to troubleshoot a failed deployment.
API Version 2014-10-06
268

AWS CodeDeploy User Guide
AWS CodeDeploy deployment resources
are supported in certain regions only
1. See View Deployment Details (p. 196) and View Instance Details (p. 138) to determine why the
deployment failed. If you are unable to determine the cause, continue to the rest of the items in this
checklist.
2. Check whether you have correctly configured the instances:
• Was the instance launched with an Amazon EC2 key pair specified? For more information, see
Amazon EC2 Key Pairs in Amazon EC2 User Guide for Linux Instances.
• Was the instance launched with the correct IAM instance profile? For more information, see
Configuring an Amazon EC2 Instance (p. 135) and Step 4: Create an IAM Instance Profile (p. 17).
• Was the instance tagged? For more information, see Working with Tags in the Console in
Amazon EC2 User Guide for Linux Instances.
• Is the AWS CodeDeploy agent installed and running on the instance? For more information, see
Managing AWS CodeDeploy Agent Operations (p. 114).
3. Check the application and deployment group settings:
• To check your application settings, see View Application Details (p. 172).
• To check your deployment group settings, see View Deployment Group Details (p. 177).
4. Confirm the application revision is correctly configured:
• Check the format of your AppSpec file. For more information, see Add an AppSpec File (p. 184)
and AppSpec File Reference (p. 227).
• Check your Amazon S3 bucket or GitHub repository to verify your application revision is in the
expected location.
• Review the details of your AWS CodeDeploy application revision to ensure that it is registered
correctly. For information, see View Application Revision Details (p. 189).
• If you're deploying from Amazon S3, check your Amazon S3 bucket to verify AWS CodeDeploy
has been granted permissions to download the application revision. For information about bucket
policies, see Deploy a Revision (p. 197).
• If you're deploying from GitHub, check your GitHub repository to verify AWS CodeDeploy has
been granted permissions to download the application revision. For more information, see Deploy
a Revision (p. 197) and GitHub Authentication with Applications in AWS CodeDeploy (p. 37).
5. Check whether the service role is correctly configured. For information, see Step 3: Create a Service
Role (p. 13).
6. Confirm you followed the steps in Getting Started (p. 11) to:
• Attach policies to the IAM user.
• Install or upgrade and configure the AWS CLI.
• Create an IAM instance profile and a service role.
For more information, see User Access Permissions Reference (p. 242).
7. Confirm you are using AWS CLI version 1.6.1 or later. To check the version you have installed, call
aws --version.
If you are still unable to troubleshoot your failed deployment, review the other issues in this topic.
AWS CodeDeploy deployment resources are
supported in certain regions only
If you do not see or cannot access applications, deployment groups, instances, or other deployment
resources from the AWS CLI or the AWS CodeDeploy console, make sure you're referencing one of
the regions listed in Region and Endpoints in AWS General Reference.
Amazon EC2 instances and Auto Scaling groups that will be used in AWS CodeDeploy deployments
must be launched and created in one of these regions.
API Version 2014-10-06
269

AWS CodeDeploy User Guide
Required IAM roles are not available
If you're using the AWS CLI, run the aws configure command from the AWS CLI. Then you can
view and set your default region.
If you're using the AWS CodeDeploy console, on the navigation bar, from the region selector, choose
one of the supported regions.
Required IAM roles are not available
If you rely on an IAM instance profile or a service role that was created as part of an AWS
CloudFormation stack, if you delete the stack, all IAM roles are deleted, too. This may be why the IAM
role is no longer displayed in the IAM console and AWS CodeDeploy no longer works as expected. To
fix this problem, you must manually re-create the deleted IAM role.
Avoid concurrent deployments to the same
Amazon EC2 instance
As a best practice, you should avoid situations that would result in more than one attempted
deployment to an Amazon EC2 instance at the same time. In cases where commands from different
deployments compete to run on a single instance, the deployments can time out and fail for the
following reasons:
• AWS CodeDeploy's timeout logic expects all of the steps in a deployment process to be completed in
five minutes or less.
• The AWS CodeDeploy agent can process only one deployment command at a time.
• It's not possible to control the order in which deployments occur if more than one deployment
attempts to run at the same time.
AWS CodeDeploy logic considers a deployment to have failed if its steps are not complete within five
minutes, even if a deployment process is otherwise running as expected. The five-minute limit can be
exceeded if commands from multiple deployments are being sent to the AWS CodeDeploy agent at the
same time.
For information about other challenges you might face with concurrent deployments in Auto Scaling
groups, see Avoid associating multiple deployment groups with a single Auto Scaling group (p. 281).
Using some text editors to create AppSpec files
and shell scripts can cause deployments to fail
Some text editors introduce non-conforming, non-printing characters into files. If you use text editors
to create or modify AppSpec files or shell script files to run on Amazon Linux, Ubuntu Server, or RHEL
instances, then any deployments that rely on these files might fail. When AWS CodeDeploy uses these
files during a deployment, the presence of these characters can lead to hard-to-troubleshoot AppSpec
file validation failures and script execution failures.
In the AWS CodeDeploy console, on the event details page for the deployment, choose View Logs.
(Alternatively, you use the AWS CLI to call the get-deployment-instance command.) Look for errors like
"invalid character," "command not found," or "file not found."
To address this issue, we recommend the following:
• Do not use text editors that automatically introduce non-printing characters such as carriage returns
(^M characters) into your AppSpec files and shell script files.
• Use text editors that display non-printing characters such as carriage returns in your AppSpec
files and shell script files, so you can find and remove any that may be automatically or randomly
API Version 2014-10-06
270

AWS CodeDeploy User Guide
Using Finder in Mac OS to bundle an application
revision can cause deployments to fail
introduced. For examples of these types of text editors, search the Internet for "text editor show
carriage returns."
• Use text editors running on Amazon Linux, Ubuntu Server, or RHEL instances to create shell script
files that run on Amazon Linux, Ubuntu Server, or RHEL instances. For examples of these types of
text editors, search the Internet for "Linux shell script editor."
• If you must use a text editor in Windows or Mac OS to create shell script files to run on Amazon
Linux, Ubuntu Server, or RHEL instances, use a program or utility that converts text in Windows or
Mac OS format to Unix format. For examples of these programs and utilities, search the Internet
for "DOS to UNIX" or "Mac to UNIX." Be sure to test the converted shell script files on the target
operating systems.
Using Finder in Mac OS to bundle an application
revision can cause deployments to fail
Deployments might fail if you use the Finder graphical user interface (GUI) application on a Mac to
bundle (zip) an AppSpec file and related files and scripts into an application revision archive (.zip) file.
This is because Finder creates an intermediate __MACOSX folder in the .zip file and places component
files into it. AWS CodeDeploy cannot find the component files, which results in a failed deployment.
To address this issue, we recommend you use the AWS CLI to call the push command, which zips the
component files into the expected structure. Alternatively, you can use Terminal instead of the GUI to
zip the component files. Terminal does not create an intermediate __MACOSX folder.
Troubleshoot Deployment Issues
Topics
•Troubleshooting a failed ApplicationStop deployment lifecycle event (p. 271)
•Troubleshooting a failed DownloadBundle deployment lifecycle event with "UnknownError: not
opened for reading" (p. 272)
•Windows PowerShell scripts fail to use the 64-bit version of Windows PowerShell by
default (p. 273)
•Long-running processes can cause deployments to fail (p. 273)
Troubleshooting a failed ApplicationStop
deployment lifecycle event
A deployment can fail during the ApplicationStop deployment lifecycle event for one of the following
reasons:
• The AWS CodeDeploy agent finds the deployment-group-id_last_successful_install
file in the correct location, but the location listed in the deployment-group-
id_last_successful_install file does not exist.
On Amazon Linux, Ubuntu Server, and RHEL instances, this file must exist in /opt/
codedeploy-agent/deployment-root/deployment-instructions.
On Windows Server instances, the file must be stored in the C:\ProgramData\Amazon
\CodeDeploy\deployment-instructions folder.
• In the location listed in the deployment-group-id_last_successful_install file, either the
AppSpec file is invalid or the scripts do not run successfully.
API Version 2014-10-06
271

AWS CodeDeploy User Guide
Troubleshooting a failed DownloadBundle
deployment lifecycle event with
"UnknownError: not opened for reading"
Use the AWS CodeDeploy console to investigate why a deployment might have failed during this
event. On the event details page for the deployment, in the ApplicationStop row, choose View Logs.
Alternatively, use the AWS CLI to call the get-deployment-instance command.
Note
The causes of many deployment failures can be identified by reviewing the log files created
during the deployment process. For simplicity, we recommend using Amazon CloudWatch
Logs to centrally monitor log files instead of viewing them instance by instance. For
information, see View AWS CodeDeploy Logs in CloudWatch Logs Console.
You must use the AWS CLI, not the AWS CodeDeploy console, to recover from a deployment that
failed during the ApplicationStop deployment lifecycle event. Call the create-deployment command,
set the --ignore-application-stop-failures option, and deploy the application revision again.
The deployment will continue even if the ApplicationStop deployment lifecycle event fails again.
Troubleshooting a failed DownloadBundle
deployment lifecycle event with "UnknownError:
not opened for reading"
If you are trying to deploy an application revision from Amazon S3, and the deployment fails during the
DownloadBundle deployment lifecycle event with the "UnknownError: not opened for reading" error:
• There was internal Amazon S3 service error. Deploy the application revision again.
• The IAM instance profile on your Amazon EC2 instance does not have permissions to access the
application revision in Amazon S3. For information about Amazon S3 bucket policies, see Push a
Revision (p. 188) and Deploy a Revision (p. 197).
• The instances to which you will deploy are associated with one region (for example, US West
(Oregon)), but the Amazon S3 bucket that contains the application revision is associated with
another region (for example, US East (N. Virginia)). Make sure the application revision is in an
Amazon S3 bucket associated with the same region as the instances.
On the event details page for the deployment, in the Download bundle row, choose View Logs.
Alternatively, use the AWS CLI to call the get-deployment-instance command. If this error occurred,
there should be an error in the output with the error code "UnknownError" and the error message "not
opened for reading."
To determine the reason for this error:
1. Enable wire logging on at least one of the instances, and then deploy the application revision
again.
2. Examine the wire logging file to find the error. Common error messages for this issue include the
phrase "access denied."
3. After you have examined the log files, we recommend that you disable wire logging to reduce log
file size and the amount of sensitive information that may appear in the output in plain text on the
instance in the future.
To learn how to find the wire logging file and enable and disable wire logging, see :log_aws_wire: in
Working with the AWS CodeDeploy Agent (p. 109).
API Version 2014-10-06
272

AWS CodeDeploy User Guide
Windows PowerShell scripts fail to use the 64-
bit version of Windows PowerShell by default
Windows PowerShell scripts fail to use the 64-bit
version of Windows PowerShell by default
If a Windows PowerShell script running as part of a deployment relies on 64-bit functionality (for
example, because it consumes more memory than a 32-bit application will allow or calls libraries that
are offered only in a 64-bit version), the script may crash or otherwise not run as expected. This is
because, by default, AWS CodeDeploy uses the 32-bit version of Windows PowerShell to run Windows
PowerShell scripts that are part of an application revision.
Add code like the following to the beginning of any script that must run with the 64-bit version of
Windows PowerShell:
# Are you running in 32-bit mode?
# (\SysWOW64\ = 32-bit mode)
if ($PSHOME -like "*SysWOW64*")
{
Write-Warning "Restarting this script under 64-bit Windows PowerShell."
# Restart this script under 64-bit Windows PowerShell.
# (\SysNative\ redirects to \System32\ for 64-bit mode)
& (Join-Path ($PSHOME -replace "SysWOW64", "SysNative") powershell.exe) -
File `
(Join-Path $PSScriptRoot $MyInvocation.MyCommand) @args
# Exit 32-bit script.
Exit $LastExitCode
}
# Was restart successful?
Write-Warning "Hello from $PSHOME"
Write-Warning " (\SysWOW64\ = 32-bit mode, \System32\ = 64-bit mode)"
Write-Warning "Original arguments (if any): $args"
# Your 64-bit script code follows here...
# ...
Although the file path information in this code may seem counterintuitive, 32-bit Windows PowerShell
uses a path like:
c:\Windows\SysWOW64\WindowsPowerShell\v1.0\powershell.exe
64-bit Windows PowerShell uses a path like:
c:\Windows\System32\WindowsPowerShell\v1.0\powershell.exe
Long-running processes can cause deployments
to fail
For deployments to Amazon Linux, Ubuntu Server, and RHEL instances, if you have a deployment
script that starts a long-running process, AWS CodeDeploy may spend a long time waiting in the
deployment lifecycle event and then fail the deployment. This is because if the process runs longer
API Version 2014-10-06
273
AWS CodeDeploy User Guide
Long-running processes can
cause deployments to fail
than the foreground and background processes in that event are expected to take, AWS CodeDeploy
stops and fails the deployment, even if the process is still running as expected.
For example, an application revision contains two files in its root, after-install.sh and sleep.sh.
Its AppSpec file contains the following instructions:
version: 0.0
os: linux
files:
- source: ./sleep.sh
destination: /tmp
hooks:
AfterInstall:
- location: after-install.sh
timeout: 60
The after-install.sh file runs during the AfterInstall application lifecycle event. Here are its
contents:
#!/bin/bash
/tmp/sleep.sh
The sleep.sh file contains the following, which suspends program execution for three minutes (180
seconds), simulating some long-running process:
#!/bin/bash
sleep 180
When after-install.sh calls sleep.sh, sleep.sh will start and keep running for three minutes
(180 seconds), which is two minutes (120 seconds) past the time AWS CodeDeploy expects
sleep.sh (and, by relation, after-install.sh) to stop running. After the timeout of one minute (60
seconds), AWS CodeDeploy stops and fails the deployment at the AfterInstall application lifecycle
event, even though sleep.sh continues to run as expected. The following error is displayed:
Script at specified location: after-install.sh failed to complete in 60
seconds.
You cannot simply add an ampersand (&) in after-install.sh to run sleep.sh in the background.
#!/bin/bash
# Do not do this.
/tmp/sleep.sh &
Doing so can leave the deployment in a pending state for up to the default one-hour deployment
lifecycle event timeout period, after which AWS CodeDeploy stops and fails the deployment at the
AfterInstall application lifecycle event as before.
In after-install.sh, call sleep.sh as follows, which enables AWS CodeDeploy to continue after
the process starts running:
#!/bin/bash
/tmp/sleep.sh > /dev/null 2> /dev/null < /dev/null &
In the preceding call, sleep.sh is the name of the process you want to start running in the
background, redirecting stdout, stderr, and stdin to /dev/null.
API Version 2014-10-06
274

AWS CodeDeploy User Guide
Troubleshoot Deployment Group Issues
Troubleshoot Deployment Group Issues
Tagging an instance as part of a deployment
group does not automatically deploy your
application to the new instance
AWS CodeDeploy does not automatically deploy your application to a newly tagged instance. You
must create a new deployment in the deployment group.
You can use AWS CodeDeploy to enable automatic deployments to new Amazon EC2 instances in
Auto Scaling groups. For more information, see Auto Scaling (p. 31).
Troubleshoot Instance Issues
Topics
•Tags must be set correctly (p. 275)
•AWS CodeDeploy agent must be installed and running on instances (p. 275)
•Deployments do not fail for up to an hour when an instance is terminated during a
deployment (p. 276)
•Analyzing log files to investigate deployment failures on instances (p. 276)
•Create a new AWS CodeDeploy log file if it was accidentally deleted (p. 278)
•Deployment or redeployment of the same files to the same instance locations fail with the error
"File already exists at location" (p. 278)
•Troubleshooting “InvalidSignatureException – Signature expired: [time] is now earlier than [time]”
deployment errors (p. 279)
Tags must be set correctly
Use the list-deployment-instances command to confirm the instances used for a deployment are
tagged correctly. If an Amazon EC2 instance is missing in the output, use the Amazon EC2 console
to confirm the tags have been set on the instance. For more information, see Working with Tags in the
Console in the Amazon EC2 User Guide for Linux Instances.
Note
If you tag an instance and immediately use AWS CodeDeploy to deploy an application to
it, the instance might not be included in the deployment. This is because it can take several
minutes before AWS CodeDeploy can read the tags . We recommend that you wait at least
five minutes between the time you tag an instance and attempt to deploy to it.
AWS CodeDeploy agent must be installed and
running on instances
To verify the AWS CodeDeploy agent is installed and running on an instance, see Verify the AWS
CodeDeploy Agent Is Running (p. 114).
To install, uninstall, or reinstall the AWS CodeDeploy agent, see Install or Reinstall the AWS
CodeDeploy Agent (p. 116).
API Version 2014-10-06
275
AWS CodeDeploy User Guide
Deployments do not fail for up to an hour when
an instance is terminated during a deployment
Deployments do not fail for up to an hour when
an instance is terminated during a deployment
AWS CodeDeploy provides a one-hour window for each deployment lifecycle event to run to
completion. This provides ample time for long-running scripts.
If anything occurs that prevents scripts from running to completion while a lifecycle event is in progress
(for example, if an instance is terminated or the AWS CodeDeploy agent is shut down), it might take up
to an hour for the status of the deployment to be displayed as Failed. This is true even if the timeout
period specified in the script is shorter than an hour. This is because when the instance is terminated,
the AWS CodeDeploy agent will shut down and will be unable to process any additional scripts.
If an instance is terminated between lifecycle events or before the first lifecycle event step starts,
however, the timeout occurs after just five minutes.
Analyzing log files to investigate deployment
failures on instances
If the status of an instance in the deployment has any status other than Succeeded, you can
review the deployment log file to help identify the problem. For instructions, see View Instance
Details (p. 138).
Note
The causes of many deployment failures can be identified by reviewing the log files created
during the deployment process. For simplicity, we recommend using Amazon CloudWatch
Logs to centrally monitor log files instead of viewing them instance by instance. For
information, see View AWS CodeDeploy Logs in CloudWatch Logs Console.
To analyze the deployment log file on instances where a
deployment failed
Sign in to the instance, and then do one of the following:
For an Amazon Linux, Ubuntu Server, or RHEL instance, type the following command to open the
AWS CodeDeploy agent log file:
less /var/log/aws/codedeploy-agent/codedeploy-agent.log
Type the following commands to browse the log file for error messages:
Command Result
& ERROR Show just the error messages in the log file. Use
a single space before and after the word ERROR.
/ ERROR Search for the next error message.¹
? ERROR Search for the previous error message.² Use a
single space before and after the word ERROR.
GGo to the end of the log file.
gGo to the start of the log file.
API Version 2014-10-06
276
AWS CodeDeploy User Guide
Analyzing log files to investigate
deployment failures on instances
Command Result
qExit the log file.
hLearn about additional commands.
¹ After you type / ERROR , type n for the next error message. Type N for the previous error
message.
² After you type ? ERROR , type n for the next error message, or type N for the previous error
message.
You can also type the following command to open an AWS CodeDeploy scripts log file:
less /opt/codedeploy-agent/deployment-root/deployment-group-ID/deployment-ID/
logs/scripts.log
Type the following commands to browse the log file for error messages:
Command Result
/stderr Show just the error messages in the log file.
/stderr Search for the next error message.¹
?stderr Search for the previous error message.²
GGo to the end of the log file.
gGo to the start of the log file.
qExit the log file.
hLearn about additional commands.
¹After you type /stderr, type n for the next error message forward. Type N for the previous error
message backward.
² After you type ?stderr, type n for the next error message backward. Type N for the previous error
message forward.
For a Windows Server instance, type the following command to open the AWS CodeDeploy agent
log file:
notepad C:\ProgramData\Amazon\CodeDeploy\log\codedeploy-agent-log.txt
To browse the log file for error messages, press CTRL+F, type ERROR [, and then press Enter to find
the first error.
Type the following command to open an AWS CodeDeploy scripts log file:
notepad C:\ProgramData\Amazon\CodeDeploy\deployment-group-ID\deployment-
ID\logs\scripts.log
To browse the log file for error messages, press CTRL+F, type stderr, and then press Enter to find
the first error.
API Version 2014-10-06
277
AWS CodeDeploy User Guide
Create a new AWS CodeDeploy log
file if it was accidentally deleted
Create a new AWS CodeDeploy log file if it was
accidentally deleted
If you accidentally delete the deployment log file on an instance, AWS CodeDeploy does not create a
replacement log file. To create a new log file, sign in to the instance, and then run these commands:
For an Amazon Linux, Ubuntu Server, or RHEL instance, run these commands in this order, one at
a time:
sudo service codedeploy-agent stop
sudo service codedeploy-agent
For a Windows Server instance:
powershell.exe -Command Restart-Service -Name codedeployagent
Deployment or redeployment of the same files
to the same instance locations fail with the error
"File already exists at location"
If AWS CodeDeploy tries to copy files to an Amazon EC2 instance that already exists in the specified
location, the deployment for that instance will fail, and you may see the error message "File already
exists at location location-name."
If you try to redeploy files with the same names and locations, the redeployment will have a better
chance of succeeding if you specify the application name and the deployment group with the same
underlying deployment group ID you used before. AWS CodeDeploy uses the underlying deployment
group ID to identify files to remove before a redeployment.
Deploying new files or redeploying the same files to the same locations on instances can fail for these
reasons:
• You specified a different application name for a redeployment of the same revision to the same
instances. The redeployment will fail because even if the deployment group name is the same, the
use of a different application name means a different underlying deployment group ID will be used.
• You deleted and re-created a deployment group for an application and then tried to redeploy the
same revision to the deployment group. The redeployment will fail because even if the deployment
group name is the same, AWS CodeDeploy will reference a different underlying deployment group
ID.
• You deleted an application and deployment group in AWS CodeDeploy, then created a new
application and deployment group with the same names as the ones you deleted. After that, you tried
to redeploy a revision that had been deployed to the previous deployment group to the new one with
the same name. The redeployment will fail because even though the application and deployment
group names are the same, AWS CodeDeploy still references the ID of the deployment group you
deleted.
• You deployed a revision to a deployment group and then deployed the same revision to another
deployment group to the same instances. The second deployment will fail because AWS
CodeDeploy will reference a different underlying deployment group ID.
• You deployed a revision to one deployment group and then deployed another revision to another
deployment group to the same instances. There is at least one file with the same name and in the
API Version 2014-10-06
278

AWS CodeDeploy User Guide
Troubleshooting “InvalidSignatureException
– Signature expired: [time] is now
earlier than [time]” deployment errors
same location that the second deployment group tries to deploy. The second deployment will fail
because AWS CodeDeploy will not remove the existing file before the second deployment starts.
Both deployments will reference different deployment group IDs.
• You deployed a revision in AWS CodeDeploy, but there is at least one file with the same name and
in the same location. The deployment will fail because, by default, AWS CodeDeploy will not remove
the existing file before the deployment starts.
To address these situations, do one of the following:
• Remove the files from the locations and instances to which they were previously deployed, and then
try the deployment again.
• In your revision's AppSpec file, in either the ApplicationStop or BeforeInstall deployment lifecycle
events, specify a custom script to delete files in any locations that match the files your revision is
about to install.
• Deploy or redeploy the files to locations or instances that were not part of previous deployments.
• Before you delete an application or a deployment group, deploy a revision that contains an AppSpec
file that specifies no files to copy to the instances. For the deployment, specify the application name
and deployment group name that use the same underlying application and deployment group IDs
as those you are about to delete. (You can use the get-deployment-group command to retrieve the
deployment group ID.) AWS CodeDeploy will use the underlying deployment group ID and AppSpec
file to remove all of the files it installed in the previous successful deployment.
Troubleshooting “InvalidSignatureException
– Signature expired: [time] is now earlier than
[time]” deployment errors
AWS CodeDeploy requires accurate time references in order to perform its operations. If your
instance's date and time are not set correctly, they may not match the signature date of your
deployment request, which AWS CodeDeploy will therefore reject.
To avoid deployment failures related to incorrect time settings, see the following topics:
•Setting the Time for Your Linux Instance
•Setting the Time for a Windows Instance
Troubleshoot Auto Scaling Issues
Topics
•General Auto Scaling troubleshooting (p. 279)
•Terminating or rebooting an Auto Scaling instance may cause deployments to fail (p. 280)
•Avoid associating multiple deployment groups with a single Auto Scaling group (p. 281)
•Amazon EC2 instances in an Auto Scaling group fail to launch and receive the error "Heartbeat
Timeout" (p. 281)
•Mismatched Auto Scaling lifecycle hooks might cause automatic deployments to Auto Scaling
groups to stop or fail (p. 282)
General Auto Scaling troubleshooting
Deployments to Amazon EC2 instances in an Auto Scaling group can fail for the following reasons:
API Version 2014-10-06
279

AWS CodeDeploy User Guide
Terminating or rebooting an Auto Scaling
instance may cause deployments to fail
•Auto Scaling continuously launches and terminates Amazon EC2 instances. If AWS
CodeDeploy cannot automatically deploy your application revision, Auto Scaling will continuously
launch and terminate Amazon EC2 instances.
Disassociate the Auto Scaling group from the AWS CodeDeploy deployment group or change
the configuration of your Auto Scaling group so that the desired number of instances matches the
current number of instances (thus preventing Auto Scaling from launching any more Amazon EC2
instances). For more information, see Change Deployment Group Settings (p. 178) or Configuring
Your Auto Scaling Groups.
•The AWS CodeDeploy agent is unresponsive. The AWS CodeDeploy agent may not be installed
if initialization scripts (for example, cloud-init scripts) that run immediately after an Amazon EC2
instance is launched or started take more than one hour to run. AWS CodeDeploy has a one-hour
timeout for the AWS CodeDeploy agent to respond to pending deployments. To address this issue,
move your initialization scripts into your AWS CodeDeploy application revision.
•An Amazon EC2 instance in an Auto Scaling group reboots during a deployment. Your
deployment can fail if an Amazon EC2 instance is rebooted during a deployment or the AWS
CodeDeploy agent is shut down while processing a deployment command. For more information,
see Terminating or rebooting an Auto Scaling instance may cause deployments to fail (p. 280).
•Multiple application revisions are deployed simultaneously to the same Amazon EC2 instance
in an Auto Scaling group. Deploying multiple application revisions to the same Amazon EC2
instance in an Auto Scaling group at the same time can fail if one of the deployments has scripts that
run for more than a few minutes. Do not deploy multiple application revisions to the same Amazon
EC2 instances in an Auto Scaling group.
•A deployment fails for new Amazon EC2 instances that are launched as part of an Auto
Scaling group. Typically in this scenario, running the scripts in a deployment can prevent the
launching of Amazon EC2 instances in the Auto Scaling group. (Other Amazon EC2 instances in the
Auto Scaling group may appear to be running normally.) To address this issue, make sure that all
other scripts are complete first:
•AWS CodeDeploy agent is not included in your AMI : If you use the cfn-init command to install
the AWS CodeDeploy agent while launching a new instance, place the agent installation script at
the end of the cfn-init section of your AWS CloudFormation template.
•AWS CodeDeploy agent is included in your AMI : If you include the AWS CodeDeploy agent
in your AMI, configure it so that the agent is in a Stopped state when the instance is created, and
then include a script for starting the agent as the final step in your cfn-init script library.
.
Terminating or rebooting an Auto Scaling
instance may cause deployments to fail
If an Amazon EC2 instance is launched through Auto Scaling, and the instance is then terminated or
rebooted, deployments to that instance may fail for the following reasons:
• During an in-progress deployment, a scale-in event or any other termination event will cause the
instance to detach from the Auto Scaling group and then terminate. Because the deployment cannot
be completed, it fails.
• The instance is rebooted, but it takes more than five minutes for the instance to start. AWS
CodeDeploy considers this to be a timeout. The service will fail all current and future deployments to
the instance.
To address this issue:
• In general, make sure all deployments are complete before the instance is terminated or rebooted.
Make sure all deployments start after the instance has started or been rebooted.
API Version 2014-10-06
280

AWS CodeDeploy User Guide
Avoid associating multiple deployment
groups with a single Auto Scaling group
• If you specify a Windows Server base Amazon Machine Image (AMI) for an Auto Scaling
configuration, and you use the EC2Config service to set the computer name of the instance, this
behavior can cause deployments to fail. To disable this behavior, in the Windows Server base
AMI, on the General tab of the Ec2 Service Properties dialog box, clear the Set Computer
Name box. After you clear this box, this behavior will be disabled for all new Windows Server Auto
Scaling instances launched with that Windows Server base AMI. For Windows Server Auto Scaling
instances on which this behavior enabled, you do not need to clear this box. Simply redeploy failed
deployments to those instances after they have been rebooted.
Avoid associating multiple deployment groups
with a single Auto Scaling group
As a best practice, you should associate only one deployment group with each Auto Scaling group.
This is because if Auto Scaling scales up an instance that has hooks associated with multiple
deployment groups, it sends notifications for all of the hooks at once. This causes multiple deployments
to each instance to begin at the same time. When multiple deployments send commands to the AWS
CodeDeploy agent at the same time, the five-minute limit in the AWS CodeDeploy timeout logic may be
exceeded. (AWS CodeDeploy logic considers a deployment to have failed if its steps are not complete
within five minutes, even if a deployment process is otherwise running as expected.)
It's not possible to control the order in which deployments occur if more than one deployment attempts
to run at the same time.
Finally, if deployment to any instance fails, Auto Scaling immediately terminates the instance. When
that first instance shuts down, the other deployments that were running will begin to fail. Because
AWS CodeDeploy has a one-hour timeout for the AWS CodeDeploy agent to respond to pending
deployments, it can take up to 60 minutes for each instance to time out.
For more information about problems with attempting multiple deployments to an instance at the same
time, see Avoid concurrent deployments to the same Amazon EC2 instance (p. 270).
For more information about Auto Scaling, see Under the Hood: AWS CodeDeploy and Auto Scaling
Integration.
Amazon EC2 instances in an Auto Scaling group
fail to launch and receive the error "Heartbeat
Timeout"
An Auto Scaling group might fail to launch new Amazon EC2 instances, generating a message similar
to the following:
Launching a new Amazon EC2 instance <instance-Id>. Status Reason:
Instance failed to complete user's Lifecycle Action: Lifecycle Action with
token<token-Id> was abandoned: Heartbeat Timeout.
This message usually indicates that an application in AWS CodeDeploy was deleted before its
associated deployment groups were updated or deleted.
When you delete an application or deployment group, AWS CodeDeploy attempts to clean up any
Auto Scaling hooks associated with it, but some hooks might remain. If you run a command to delete a
deployment group, the leftover hooks will be returned in the output; however, if you run a command to
delete an application, the leftover hooks will not appear in the output.
API Version 2014-10-06
281

AWS CodeDeploy User Guide
Mismatched Auto Scaling lifecycle hooks
might cause automatic deployments
to Auto Scaling groups to stop or fail
Therefore, as a best practice, you should delete all deployment groups associated with an application
before you delete the application. You can use the command output to identify the lifecycle hooks that
must be deleted manually.
If you are receiving a “Heartbeat Timeout” error message, you can determine whether leftover lifecycle
hooks are the cause and resolve the problem by doing the following:
1. Run either the update-deployment-group command or delete-deployment-group command.
Examine the output of the call. If the output contains a hooksNotCleanedUp structure with a list
of Auto Scaling lifecycle hooks, leftover lifecycle hooks are most likely the cause of the error.
2. Call the describe-lifecycle-hooks command, specifying the name of the Auto Scaling group
associated with the Amazon EC2 instances that fail to launch. In the output, look for any Auto
Scaling lifecycle hook names that correspond to the hooksNotCleanedUp structure you identified
in step 1. Alternatively, look for Auto Scaling lifecycle hook names that contain the name of the
deployment group.
3. Call the delete-lifecycle-hook command for each Auto Scaling lifecycle hook. Specify the Auto
Scaling group and lifecycle hook.
If you delete (from an Auto Scaling group) all of the Auto Scaling lifecycle hooks that were created by
AWS CodeDeploy, then AWS CodeDeploy will no longer deploy to Amazon EC2 instances that are
scaled up as part of that Auto Scaling group.
Mismatched Auto Scaling lifecycle hooks might
cause automatic deployments to Auto Scaling
groups to stop or fail
Auto Scaling and AWS CodeDeploy use lifecycle hooks to determine which application revisions
should be deployed to which Amazon EC2 instances after they are launched in Auto Scaling groups.
Automatic deployments can stop or fail if lifecycle hooks and information about these hooks do not
match exactly in Auto Scaling and AWS CodeDeploy.
If deployments to an Auto Scaling group are failing, see if the lifecycle hook names in Auto Scaling and
AWS CodeDeploy match. If not, use these AWS CLI command calls.
First, get the list of lifecycle hook names for both the Auto Scaling group and the deployment group:
1. Call the describe-lifecycle-hooks command, specifying the name of the Auto Scaling
group associated with the deployment group in AWS CodeDeploy. In the output, in the
LifecycleHooks list, make a note of each LifecycleHookName value.
2. Call the get-deployment-group command, specifying the name of the deployment group
associated with the Auto Scaling group. In the output, in the autoScalingGroups list, find each
item whose name value matches the Auto Scaling group name, and then make a note of the
corresponding hook value.
Now compare the two sets of lifecycle hook names. If they match exactly, character for character, then
this is not the issue. You may want to try other Auto Scaling troubleshooting steps described elsewhere
in this section.
However, if the two sets of lifecycle hook names do not match exactly, character for character, do the
following:
1. If there are lifecycle hook names in the describe-lifecycle-hooks command output that are not
also in the get-deployment-group command output, then do the following:
API Version 2014-10-06
282
AWS CodeDeploy User Guide
Error Codes
1. For each lifecycle hook name in the describe-lifecycle-hooks command output, call the
delete-lifecycle-hook command.
2. Call the update-deployment-group command, specifying the name of the original Auto Scaling
group. AWS CodeDeploy will create new, replacement lifecycle hooks in the Auto Scaling
group and associate the lifecycle hooks with the deployment group. Automatic deployments
should now resume as new instances are added to the Auto Scaling group.
2. If there are lifecycle hook names in the get-deployment-group command output that are not also
in the describe-lifecycle-hooks command output, then do the following:
1. Call the update-deployment-group command, but do not specify the name of the original Auto
Scaling group.
2. Call the update-deployment-group command again, but this time specify the name of the
original Auto Scaling group. AWS CodeDeploy will re-create the missing lifecycle hooks in the
Auto Scaling group. Automatic deployments should now resume as new instances are added
to the Auto Scaling group.
After you get the two sets of lifecycle hook names to match exactly, character for character, application
revisions should be deployed again, but only to new instances as they are added to the Auto Scaling
group. Deployments will not occur automatically to instances already in the Auto Scaling group.
Error Codes for AWS CodeDeploy
This topic provides reference information about AWS CodeDeploy errors.
Error Code Description
AGENT_ISSUE
The deployment failed because of a problem
with the AWS CodeDeploy agent. Make sure the
agent is installed and running on all instances in
this deployment group.
Learn more:
•Verify the AWS CodeDeploy Agent Is
Running (p. 114)
•Install or Reinstall the AWS CodeDeploy
Agent (p. 116)
•Working with the AWS CodeDeploy
Agent (p. 109)
HEALTH_CONSTRAINTS
The overall deployment failed because too many
individual instances failed deployment, too few
healthy instances are available for deployment,
or some instances in your deployment group are
experiencing problems.
Learn more:
•Instance Health (p. 160)
•Troubleshoot Instance Issues (p. 275)
•Troubleshoot Deployment Issues (p. 271)
The deployment can’t start because the minimum
number of healthy instances, as defined
API Version 2014-10-06
283

AWS CodeDeploy User Guide
Error Codes
Error Code Description
HEALTH_CONSTRAINTS_INVALID by your deployment configuration, are not
available. You can reduce the required number of
healthy instances by updating your deployment
configuration or increase the number of instances
in this deployment group.
Learn more:
•Instance Health (p. 160)
•Working with Instances (p. 122)
IAM_ROLE_MISSING
The deployment failed because no service role
exists with the service role name specified for the
deployment group. Make sure you are using the
correct service role name.
Learn more:
•Step 3: Create a Service Role (p. 13)
•Change Deployment Group Settings (p. 178)
IAM_ROLE_PERMISSIONS
AWS CodeDeploy does not have the permissions
required to assume a role, or the IAM role you're
using does't give you permission to perform
operations in an AWS service.
Learn more:
•Step 1: Provision an IAM User (p. 11)
•Step 3: Create a Service Role (p. 13)
•Step 4: Create an IAM Instance Profile (p. 17)
AUTO_SCALING_IAM_ROLE_PERMISSIONS
The service role associated with your deployment
group does not have the permission required to
perform operations in the following AWS service.
Learn more:
•Step 3: Create a Service Role (p. 13)
•Creating a Role to Delegate Permissions to an
AWS Service
OVER_MAX_INSTANCES
The deployment failed because more instances
are targeted for deployment than are allowed for
your account. To reduce the number of instances
targeted for this deployment, update the tag
settings for this deployment group or delete some
of the targeted instances. Alternatively, you can
contact AWS Support to request a limit increase.
Learn more:
•Change Deployment Group Settings (p. 178)
•Limits (p. 265)
•Request a Limit Increase
API Version 2014-10-06
284

AWS CodeDeploy User Guide
Related Topics
Error Code Description
THROTTLED
The deployment failed because more requests
were made than are permitted for AWS
CodeDeploy by an IAM role. Try reducing the
number of requests.
Learn more:
•Query API Request Rate
UNABLE_TO_SEND_ASG
The deployment failed because the deployment
group isn’t configured correctly with its Auto
Scaling group. In the AWS CodeDeploy
console, delete the Auto Scaling group from the
deployment group, and then add it again.
Learn more:
•Under the Hood: AWS CodeDeploy and Auto
Scaling Integration
Related Topics
Troubleshooting (p. 268)
API Version 2014-10-06
285

AWS CodeDeploy User Guide
Reference Guides and Support Resources
AWS CodeDeploy Resources
The following related resources can help you as you work with AWS CodeDeploy.
Reference Guides and Support Resources
•AWS CodeDeploy API Reference — Descriptions, syntax, and usage examples about AWS
CodeDeploy actions and data types, including common parameters and error codes.
•AWS CodeDeploy Technical FAQs — Top questions from customers about AWS CodeDeploy.
•AWS CodeDeploy Release Notes — A high-level overview of the current and past releases,
specifically notes about new features, corrections, and known issues.
•AWS Support Center — The hub for creating and managing your AWS Support cases. Also includes
links to other resources, such as forums, technical FAQs, service health status, and AWS Trusted
Advisor.
•AWS Support Plans — The primary web page for information about AWS Support plans.
•Contact Us — A central contact point for inquiries concerning AWS billing, account, events, abuse,
and other issues.
•AWS Site Terms — Detailed information about our copyright and trademark; your account, license,
and site access; and other topics.
Samples
•AWS CodeDeploy Samples on GitHub — Samples and template scenarios for AWS CodeDeploy.
•AWS CodeDeploy Jenkins Plugin — Jenkins plugin for AWS CodeDeploy.
•AWS CodeDeploy Agent — Open-source version of the AWS CodeDeploy agent.
Blogs
•AWS Application Management Blog — Insights for developers, system administrators, and
architects.
API Version 2014-10-06
286

AWS CodeDeploy User Guide
AWS Software Development Kits and Tools
AWS Software Development Kits and Tools
The following AWS SDKs and tools support solution development with AWS CodeDeploy:
•AWS SDK for Java
•AWS SDK for JavaScript
•AWS SDK for .NET
•AWS SDK for PHP
•AWS SDK for Python (Boto)
•AWS SDK for Ruby
• AWS Toolkit for Eclipse — Parts 1, 2, and 3.
•AWS Tools for Windows PowerShell — A set of Windows PowerShell cmdlets that expose the
functionality of the AWS SDK for .NET in the PowerShell environment.
•AWS CodeDeploy Cmdlets in the AWS Tools for PowerShell — A set of Windows PowerShell
cmdlets that expose the functionality of AWS CodeDeploy in the PowerShell environment.
•AWS Command Line Interface — A uniform command line syntax for accessing AWS services. The
AWS CLI uses a single setup process to enable access for all supported services.
•AWS CodeDeploy Command Line Reference — A set of AWS CodeDeploy commands that can be
run from the AWS CLI.
•AWS Developer Tools — Links to developer tools and resources that provide documentation, code
samples, release notes, and other information to help you build innovative applications with AWS
CodeDeploy and AWS.
API Version 2014-10-06
287

AWS CodeDeploy User Guide
Document History
The following table describes the major changes made to this user guide to support new and enhanced
functionality since the last release of the AWS CodeDeploy User Guide.
•API version: 2014-10-06
•Latest documentation update: September 15, 2016
Change Description Date
Changed
Updated topics AWS CodeDeploy now integrates with Amazon CloudWatch
alarms, making it possible to stop a deployment if there is
a change in the state of a specified alarm for a number of
consecutive periods, as specified in the alarm threshold.
AWS CodeDeploy also now supports automatically rolling
back a deployment if certain conditions are met, such as a
deployment failure or an activated alarm.
A number of topics have been updated to reflect these
changes, including Create an Application (p. 168), Create
a Deployment Group (p. 174), Change Deployment Group
Settings (p. 178), Deployments (p. 4), Redeploy and Roll
Back a Deployment (p. 203), and Product and Service
Integrations with AWS CodeDeploy (p. 28), along with a new
topic, Monitoring Deployments with CloudWatch Alarms in
AWS CodeDeploy (p. 210).
September
15, 2016
New and updated
topics AWS CodeDeploy now provides integration with Amazon
CloudWatch Events. You can use CloudWatch Events to
initiate one or more actions when changes are detected in
the state of a deployment or the state of an instance that
belongs to an AWS CodeDeploy deployment group. You
can incorporate actions that invoke AWS Lambda functions;
that publish to Amazon Kinesis streams or Amazon SNS
topics; that push messages to Amazon SQS queues; or
that, in turn, trigger CloudWatch alarm actions. For more
information, see Monitoring Deployments with Amazon
CloudWatch Events (p. 212).
September 9,
2016
API Version 2014-10-06
288

AWS CodeDeploy User Guide
Change Description Date
Changed
Topic updates The topics Integrating AWS CodeDeploy with Elastic
Load Balancing (p. 32) and Integration with Other AWS
Services (p. 28) have been updated to reflect an additional
load balancing option. AWS CodeDeploy now supports
the Classic load balancer and Application load balancer
available in Elastic Load Balancing.
August 11,
2016
Topic updates AWS CodeDeploy is now available in the Asia Pacific
(Mumbai) Region (ap-south-1). Several topics, including
those containing instructions for setting up the AWS
CodeDeploy agent, were updated to reflect the availability of
this new region.
June 27, 2016
Topic updates AWS CodeDeploy is now available in the Asia Pacific
(Seoul) Region (ap-northeast-2). Several topics, including
those containing instructions for setting up the AWS
CodeDeploy agent, were updated to reflect the availability of
this new region.
The table of contents has been reorganized to include
sections for instances, deployment configurations,
applications, deployment groups, revisions, and
deployments. A new section has been added for AWS
CodeDeploy tutorials. For better usability, several long
topics, including AppSpec File Reference (p. 227),
User Access Permissions Reference (p. 242), and
Troubleshooting (p. 268), have been divided into shorter
topics. Configuration information for the AWS CodeDeploy
agent has been moved to a new topic, Agent Configuration
Reference (p. 256).
June 15, 2016
New and updated
topics Error Codes for AWS CodeDeploy (p. 283) provides
information about some of the error messages that might be
displayed when AWS CodeDeploy deployments fail.
The following sections in Troubleshooting (p. 268) were
updated to better assist with resolving deployment problems:
•Amazon EC2 instances in an Auto Scaling group fail to
launch and receive the error "Heartbeat Timeout" (p. 281)
•Avoid concurrent deployments to the same Amazon EC2
instance (p. 270)
•Avoid associating multiple deployment groups with a
single Auto Scaling group (p. 281)
April 20, 2016
Topic updates AWS CodeDeploy is now available in the South America
(São Paulo) Region (sa-east-1). Several topics, including
those containing instructions for setting up the AWS
CodeDeploy agent, were updated to reflect the availability of
this new region.
Working with the AWS CodeDeploy Agent (p. 109) was
updated to reflect the new :max_revisions: configuration
option, which you use to specify the number of application
revisions for a deployment group that you want the AWS
CodeDeploy agent to archive.
March 10,
2016
API Version 2014-10-06
289

AWS CodeDeploy User Guide
Change Description Date
Changed
New and updated
topics AWS CodeDeploy now supports adding triggers to a
deployment group to receive notifications about events
related to deployments or instances in that deployment
group. These notifications are sent to recipients who are
subscribed to an Amazon Simple Notification Service topic
you have made part of the trigger's action. You can also
use JSON data that is created when a trigger is fired in your
own customized notification workflow. For more information,
see Monitoring Deployments with Amazon SNS Event
Notifications (p. 216).
Procedures were updated to reflect the redesign of the
Application details page.
The Deployments do not fail for up to an hour when an
instance is terminated during a deployment (p. 276) section
in Troubleshooting (p. 268) has been updated.
Limits (p. 265) was updated to reflect revised limits for the
number of deployment groups that can be associated with a
single application; the allowed values for minimum healthy
instances settings; and required versions of the AWS SDK
for Ruby (aws-sdk-core).
February 17,
2016
New and updated
topics AWS CodeDeploy is now available in the US West (N.
California) region (us-west-1). Several topics, including
those containing instructions for setting up the AWS
CodeDeploy agent, were updated to reflect the addition of
this new region.
Choose a Repository Type (p. 187) lists and describes the
repository types now supported by AWS CodeDeploy. This
new topic will be updated as support for other repository
types is introduced.
Managing AWS CodeDeploy Agent Operations (p. 114)
was updated with information about the new .version file
added to instances to report the current version of the AWS
CodeDeploy agent, as well as information about supported
versions of the agent.
Syntax highlighting for code samples, including JSON and
YAML examples, has been added to the user guide.
Add an AppSpec File (p. 184) has been reorganized as step-
by-step instructions.
January 20,
2016
New topic Deploy an Application in a Different AWS Account (p. 204)
describes the setup requirements and process for initiating
deployments that belong to another of your organization’s
accounts, without needing a full set of credentials for that
other account. This is most useful for organizations that
use multiple accounts for different purposes, such as one
associated with development and test environments and
another associated with the production environment.
December 30,
2015
API Version 2014-10-06
290

AWS CodeDeploy User Guide
Change Description Date
Changed
Topic update The Product and Service Integrations with AWS
CodeDeploy (p. 28) topic has been redesigned. It now
includes a section for integration examples from the
community, with lists of blog posts and video examples
related to AWS CodeDeploy integrations.
December 16,
2015
Topic updates AWS CodeDeploy is now available in the Asia Pacific
(Singapore) Region (ap-southeast-1). Several topics,
including those containing instructions for setting up the
AWS CodeDeploy agent, were updated to reflect the
availability of this new region.
December 9,
2015
Topic updates Working with the AWS CodeDeploy Agent (p. 109) was
updated to reflect the new :proxy_uri: option in the AWS
CodeDeploy agent configuration file.
AppSpec File Reference (p. 227) was updated with
information about using a new environment variable,
DEPLOYMENT_GROUP_ID, which hook scripts can access
during a deployment lifecycle event.
December 1,
2015
Topic update Step 3: Create a Service Role (p. 13) was updated to
reflect a new procedure for creating a service role for AWS
CodeDeploy and to incorporate other improvements.
November 13,
2015
Topic updates AWS CodeDeploy is now available in the EU (Frankfurt)
Region (eu-central-1). Several topics, including those
containing instructions for setting up the AWS CodeDeploy
agent, were updated to reflect the availability of this new
region.
The Troubleshooting (p. 268) topic was updated with
information about ensuring that time settings on instances
are accurate.
October 19,
2015
New topics AWS CloudFormation Template Reference (p. 259) was
published to reflect new AWS CloudFormation support for
AWS CodeDeploy actions.
Created a Key Components (p. 3) topic and introduced
definition of a target revision.
October 1,
2015
Topic updates Create a Deployment Group (p. 174) was updated to reflect
the ability to locate instances for a deployment group using
wildcard searches.
Instance Health (p. 160) was updated to clarify the concept
of minimum healthy instances.
August 31,
2015
Topic updates AWS CodeDeploy is now available in the Asia Pacific
(Tokyo) Region (ap-northeast-1). Several topics, including
those containing instructions for setting up the AWS
CodeDeploy agent, were updated to reflect the availability of
this new region.
August 19,
2015
API Version 2014-10-06
291

AWS CodeDeploy User Guide
Change Description Date
Changed
Topic updates AWS CodeDeploy now supports deployments to Red
Hat Enterprise Linux (RHEL) on-premises instances and
Amazon EC2 instances. For more information, see the
following topics:
•Operating Systems Supported by the AWS CodeDeploy
Agent (p. 109)
•Working with Instances (p. 122)
•Tutorial: Deploy WordPress to a Non-Windows
Instance (p. 41)
•Tutorial: Deploy an Application to an On-Premises
Instance (p. 73)
June 23, 2015
Topic update AWS CodeDeploy now provides a set of environment
variables your deployment scripts can use during
deployments. These environment variables include
information such as the name of the current AWS
CodeDeploy application, deployment group, and deployment
lifecycle event, as well as the current AWS CodeDeploy
deployment identifier. For more information, see the end of
the AppSpec 'hooks' Section (p. 235) section in the AppSpec
File Reference (p. 227).
May 29, 2015
Topic updates AWS CodeDeploy now provides a set of AWS managed
policies in IAM that you can use instead of manually creating
the equivalent policies on your own. These include:
• A policy for enabling an IAM user to register revisions with
AWS CodeDeploy only and then deploy them through
AWS CodeDeploy.
• A policy for providing an IAM user with full access to AWS
CodeDeploy resources.
• A policy for providing an IAM user with read-only access
to AWS CodeDeploy resources.
• A policy to attach to a service role so that AWS
CodeDeploy can identify Amazon EC2 instances by their
Amazon EC2 tags, on-premises instance tags, or Auto
Scaling group names and deploy application revisions to
them accordingly.
For more information, see the Attach a Managed Policy for
AWS CodeDeploy to an IAM User (p. 243) section in the
User Access Permissions Reference (p. 242).
May 29, 2015
Topic updates AWS CodeDeploy is now available in the EU (Ireland)
Region (eu-west-1) and the Asia Pacific (Sydney) Region
(ap-southeast-2). Several topics, including those containing
instructions for setting up the AWS CodeDeploy agent, were
updated to reflect the availability of these new regions.
May 7, 2015
API Version 2014-10-06
292

AWS CodeDeploy User Guide
Change Description Date
Changed
New topics AWS CodeDeploy now supports deployments to on-
premises instance and Amazon EC2 instances. The
following topics were added to describe this new support:
•On-Premises Instances (p. 139)
•Tutorial: Deploy an Application to an On-Premises
Instance (p. 73)
•Configuring an On-Premises Instance (p. 140)
April 2, 2015
New topic AWS CodeDeploy Resources (p. 286) was added. April 2, 2015
Topic update Troubleshooting (p. 268) was updated:
• A new Long-running processes can cause deployments
to fail (p. 273) section describes steps you can take to
identify and address deployment failures due to long-
running processes.
• The General Auto Scaling troubleshooting (p. 279)
section was updated to show that AWS CodeDeploy
has increased its Auto Scaling timeout logic for the AWS
CodeDeploy agent from five minutes to one hour.
• A new Mismatched Auto Scaling lifecycle hooks might
cause automatic deployments to Auto Scaling groups to
stop or fail (p. 282) section describes steps you can take
to identify and address failed automatic deployments to
Auto Scaling groups.
April 2, 2015
Topic updates The following topics were updated to reflect new
recommendations for creating your own custom policies and
then attaching them to users and roles in IAM:
•Configuring an Amazon EC2 Instance (p. 135)
•Step 4: Create an IAM Instance Profile (p. 17)
•Step 3: Create a Service Role (p. 13)
•User Access Permissions Reference (p. 242)
Two sections were added to Troubleshooting (p. 268):
•General Troubleshooting Checklist (p. 268)
•Windows PowerShell scripts fail to use the 64-bit version
of Windows PowerShell by default (p. 273)
The AppSpec 'hooks' Section (p. 235) section in the
AppSpec File Reference (p. 227) was updated to more
accurately describe the available deployment lifecycle
events.
February 12,
2015
API Version 2014-10-06
293

AWS CodeDeploy User Guide
Change Description Date
Changed
Topic updates A new section was added to Troubleshooting (p. 268):
Amazon EC2 instances in an Auto Scaling group fail to
launch and receive the error "Heartbeat Timeout" (p. 281).
A CloudBees section was added to Product and Service
Integrations with AWS CodeDeploy (p. 28).
January 28,
2015
Topic updates The following sections were added to
Troubleshooting (p. 268):
•Using some text editors to create AppSpec files and shell
scripts can cause deployments to fail (p. 270)
•Using Finder in Mac OS to bundle an application revision
can cause deployments to fail (p. 271)
•Troubleshooting a failed ApplicationStop deployment
lifecycle event (p. 271)
•Troubleshooting a failed DownloadBundle deployment
lifecycle event with "UnknownError: not opened for
reading" (p. 272)
•General Auto Scaling troubleshooting (p. 279)
Information was added to the Step 5: Try the Create
Deployment Walkthrough (p. 21) to clarify that certain
permissions are required for the calling IAM user,
specifically:
•Step 2: Instance Settings (p. 24) notes that certain
permissions are required to use the walkthrough's AWS
CloudFormation template.
•Step 6: Service Role (p. 25) notes that certain permissions
are required to create a service role as part of the
walkthrough.
•Step 8: Review (p. 26) notes that certain permissions are
required to create applications and deployment groups
and to deploy applications.
For information about the required permissions, see
Prerequisites (p. 22).
January 20,
2015
New topics The Product and Service Integrations with AWS
CodeDeploy (p. 28) section was updated to include the
following topics
•Auto Scaling (p. 31)
•Tutorial: Deploy to an Auto Scaling Group (p. 79)
•Monitoring Deployments with AWS CloudTrail (p. 214)
•Elastic Load Balancing (p. 32)
•GitHub (p. 36)
•Tutorial: Deploying from GitHub (p. 97)
January 9,
2015
API Version 2014-10-06
294

AWS CodeDeploy User Guide
Change Description Date
Changed
Topic updates • The Automatically Deploy from GitHub with AWS
CodeDeploy (p. 39) section was added to GitHub (p. 36).
You can now automatically trigger a deployment from
a GitHub repository whenever the source code in that
repository is changed.
• The Troubleshoot Auto Scaling Issues (p. 279) section
was added to Troubleshooting (p. 268). This new section
describes how to troubleshoot common issues with
deploying to Auto Scaling groups.
• The new subsection "files Examples" was added to the
AppSpec 'files' Section (p. 228) section of AppSpec File
Reference (p. 227). This new subsection includes several
examples of how to use the files section of an AppSpec
file to instruct AWS CodeDeploy to copy specific files or
folders to specific locations on an Amazon EC2 instance
during a deployment.
January 8,
2015
New topic Monitoring Deployments with AWS CloudTrail (p. 214) was
added. AWS CodeDeploy is integrated with AWS CloudTrail,
a service that captures API calls made by or on behalf of
AWS CodeDeploy in your AWS account and delivers the log
files to an Amazon S3 bucket that you specify.
December 17,
2014
Topic update The Step 2: Instance Settings (p. 24) section in Step 5: Try
the Create Deployment Walkthrough (p. 21) was updated. December 3,
2014
Initial public release This is the initial public release of the AWS CodeDeploy
User Guide.November 12,
2014
API Version 2014-10-06
295

