AWS CodePipeline User Guide Code Pipeline
User Manual:
Open the PDF directly: View PDF ![]() .
.
Page Count: 178 [warning: Documents this large are best viewed by clicking the View PDF Link!]
- AWS CodePipeline
- Table of Contents
- What Is AWS CodePipeline?
- AWS CodePipeline Concepts
- Product and Service Integrations with AWS CodePipeline
- Setting Up AWS CodePipeline
- Getting Started with AWS CodePipeline
- Simple Pipeline Walkthrough (Amazon S3 Bucket)
- Step 1: Create an Amazon S3 Bucket for Your Application
- Step 2: Create AWS CodeDeploy Resources to Deploy the Sample Application
- Step 3: Create Your First Pipeline in AWS CodePipeline
- Step 4: Add Another Stage to Your Pipeline
- Step 5: Disable and Enable Transitions Between Stages in AWS CodePipeline
- Step 6: Clean Up Resources
- Simple Pipeline Walkthrough (AWS CodeCommit Repository)
- Step 1: Create an AWS CodeCommit Repository and Local Repo
- Step 2: Add Sample Code to Your AWS CodeCommit Repository
- Step 3: Create an Amazon EC2 Instance and Install the AWS CodeDeploy Agent
- Step 4: Create an Application in AWS CodeDeploy
- Step 5: Create Your First Pipeline in AWS CodePipeline
- Step 6: Modify Code in Your AWS CodeCommit Repository
- Step 7: Optional Stage Management Tasks
- Step 8: Clean Up Resources
- Getting Started by Creating a Four-Stage Pipeline
- Simple Pipeline Walkthrough (Amazon S3 Bucket)
- Create a Pipeline in AWS CodePipeline
- Edit a Pipeline in AWS CodePipeline
- Managing Approval Actions in AWS CodePipeline
- Configuration Options for Manual Approval Actions in AWS CodePipeline
- Setup and Workflow Overview for Approval Actions in AWS CodePipeline
- Grant Approval Permissions to an IAM User in AWS CodePipeline
- Grant Amazon SNS Permissions to an AWS CodePipeline Service Role
- Add a Manual Approval Action to a Pipeline in AWS CodePipeline
- Approve or Reject an Approval Action in AWS CodePipeline
- JSON Data Format for Manual Approval Notifications in AWS CodePipeline
- Retry Failed Actions in AWS CodePipeline
- Disable or Enable Transitions in AWS CodePipeline
- Delete a Pipeline in AWS CodePipeline
- Monitoring Pipelines with AWS CodePipeline
- Advanced Tasks in AWS CodePipeline
- Create and Add a Custom Action in AWS CodePipeline
- Manually Release a Change to a Pipeline in AWS CodePipeline
- Create a Pipeline in AWS CodePipeline That Uses Resources from Another AWS Account
- Integrate AWS Lambda Functions into Pipelines in AWS CodePipeline
- Troubleshooting AWS CodePipeline
- Pipeline Error: A pipeline configured with AWS Elastic Beanstalk returns an error message: "Deployment failed. The provided role does not have sufficient permissions: Service:AmazonElasticLoadBalancing"
- Pipeline Error: A source action returns the insufficient permissions message: "Could not access the AWS CodeCommit repository repository-name. Make sure that the pipeline IAM role has sufficient permissions to access the repository."
- Pipeline Error: A Jenkins build or test action runs for a long time and then fails due to lack of credentials or permissions
- Pipeline Error: My GitHub source stage contains Git submodules, but AWS CodePipeline doesn't initialize them
- Pipeline Error: I receive a pipeline error that includes the following message: "PermissionError: Could not access the GitHub repository"
- Pipeline Error: A pipeline created in one AWS region using a bucket created in another AWS region returns an "InternalError" with the code "JobFailed"
- Need Help with a Different Issue?
- AWS CodePipeline Access Permissions Reference
- Create a Customer Managed Policy for AWS CodePipeline
- Create a Policy for an Amazon S3 Bucket to Use as the Artifact Store for AWS CodePipeline
- Attach a Policy to an IAM User or Group
- Edit a Policy for an IAM Service Role
- Attach or Edit a Policy for Jenkins Integration with AWS CodePipeline
- Configure Cross-Account Access to a Pipeline
- Use AWS Resources Associated with Another Account in a Pipeline
- Operation and Resource Syntax
- AWS CodePipeline Command Line Reference
- AWS CodePipeline Pipeline Structure Reference
- Encryption for Artifacts Stored in Amazon S3 for AWS CodePipeline
- Limits in AWS CodePipeline
- AWS CodePipeline User Guide Document History
- AWS Glossary

AWS CodePipeline
User Guide
API Version 2015-07-09

AWS CodePipeline User Guide

AWS CodePipeline User Guide
AWS CodePipeline: User Guide
Copyright © 2016 Amazon Web Services, Inc. and/or its affiliates. All rights reserved.
Amazon's trademarks and trade dress may not be used in connection with any product or service that is not Amazon's, in any
manner that is likely to cause confusion among customers, or in any manner that disparages or discredits Amazon. All other
trademarks not owned by Amazon are the property of their respective owners, who may or may not be affiliated with, connected to,
or sponsored by Amazon.

AWS CodePipeline User Guide
Table of Contents
What Is AWS CodePipeline? .......................................................................................................... 1
Video Introduction to AWS CodePipeline .................................................................................. 1
What Can I Do with AWS CodePipeline? ................................................................................ 1
A Quick Look at AWS CodePipeline ........................................................................................ 2
How Do I Get Started with AWS CodePipeline? ........................................................................ 2
We Want to Hear from You .................................................................................................... 3
Concepts ..................................................................................................................................... 4
Continuous Delivery and Integration ......................................................................................... 4
How AWS CodePipeline Works ............................................................................................... 4
Running a Pipeline ................................................................................................................ 8
Product and Service Integrations ..................................................................................................... 9
Integration with Other AWS Services ....................................................................................... 9
Integration with Partner Products and Services ........................................................................ 11
Integration Examples from the Community .............................................................................. 14
Blog posts .................................................................................................................. 14
Videos ....................................................................................................................... 16
Setting Up .................................................................................................................................. 18
Step 1: Create an AWS Account ........................................................................................... 18
Step 2: Create or Use an IAM User ....................................................................................... 18
Step 3: Use an IAM Managed Policy to Assign AWS CodePipeline Permissions to the IAM User ....... 18
Step 4: Install the AWS CLI .................................................................................................. 19
Step 5: Open the Console for AWS CodePipeline .................................................................... 20
Next Steps ......................................................................................................................... 20
Getting Started ........................................................................................................................... 21
Simple Pipeline Walkthrough (Amazon S3 Bucket) ................................................................... 21
Create an Amazon S3 Bucket ....................................................................................... 22
Create AWS CodeDeploy Resources ............................................................................. 23
Create Your First Pipeline ............................................................................................ 25
Add Another Stage ...................................................................................................... 28
Disable and Enable Transitions Between Stages .............................................................. 33
Clean Up Resources ................................................................................................... 34
Simple Pipeline Walkthrough (AWS CodeCommit Repository) .................................................... 35
Create an AWS CodeCommit Repository ........................................................................ 36
Download, Commit and Push Your Code ........................................................................ 36
Create an Amazon EC2 Instance and Install the AWS CodeDeploy Agent ............................ 37
Create an Application in AWS CodeDeploy ..................................................................... 39
Create Your First Pipeline ............................................................................................ 40
Update Code in Your AWS CodeCommit Repository ......................................................... 44
Optional Stage Management Tasks ................................................................................ 45
Clean Up Resources ................................................................................................... 46
Four-Stage Pipeline Tutorial .................................................................................................. 46
Set Up Prerequisites .................................................................................................... 46
Create a Pipeline ........................................................................................................ 49
Add More Stages ........................................................................................................ 50
Clean Up Resources ................................................................................................... 53
Create a Pipeline ........................................................................................................................ 54
Create a Pipeline (Console) .................................................................................................. 54
Create a Pipeline (CLI) ........................................................................................................ 57
Create the JSON file ................................................................................................... 57
Run the create-pipeline Command ................................................................................. 59
Edit a Pipeline ............................................................................................................................ 60
Edit a Pipeline (Console) ...................................................................................................... 60
Edit a Pipeline (AWS CLI) .................................................................................................... 62
Managing Approval Actions in Pipelines ......................................................................................... 65
Configuration Options for Manual Approval Actions .................................................................. 65
API Version 2015-07-09
iv

AWS CodePipeline User Guide
Prerequisites and Process for Approval Actions ....................................................................... 66
Grant Approval Permissions to an IAM User in AWS CodePipeline .............................................. 67
Grant Approval Permission to All Pipelines and Approval Actions ........................................ 67
Specify Approval Permission for Specific Pipelines and Approval Actions ............................. 68
Grant Amazon SNS Permissions to a Service Role .................................................................. 69
Add a Manual Approval Action .............................................................................................. 69
Add a Manual Approval Action to an AWS CodePipeline Pipeline (Console) .......................... 70
Add a Manual Approval Action to an AWS CodePipeline Pipeline (CLI) ................................ 71
Approve or Reject an Approval Action .................................................................................... 73
Approve or Reject an Approval Action (Console) .............................................................. 74
Approve or Reject an Approval Request (CLI) ................................................................. 74
JSON Data Format for Manual Approval Notifications ............................................................... 75
Retry Failed Actions .................................................................................................................... 77
Retry Failed Actions (Console) .............................................................................................. 78
Retry Failed Actions (CLI) .................................................................................................... 78
Disable or Enable Transitions ....................................................................................................... 80
Disable or Enable Transitions (Console) ................................................................................. 80
Disable or Enable Transitions (CLI) ........................................................................................ 82
Delete a Pipeline ........................................................................................................................ 83
Delete a Pipeline (Console) .................................................................................................. 83
Delete a Pipeline (CLI) ......................................................................................................... 83
Monitoring Pipelines .................................................................................................................... 85
Logging API Calls with CloudTrail .......................................................................................... 86
AWS CodePipeline Information in CloudTrail ................................................................... 86
Understanding AWS CodePipeline Log File Entries .......................................................... 86
View a Pipeline ................................................................................................................... 88
View a Pipeline (Console) ............................................................................................ 88
View a Pipeline (CLI) ................................................................................................... 90
View Current Source Revision Details in a Pipeline .................................................................. 92
View Current Source Revision Details in a Pipeline (Console) ............................................ 92
View Current Source Revision Details in a Pipeline (CLI) ................................................... 93
Advanced Tasks ......................................................................................................................... 95
Create a Custom Action for a Pipeline .................................................................................... 95
Create a Custom Action (CLI) ....................................................................................... 96
Create a Job Worker for Your Custom Action .................................................................. 99
Add a Custom Action to a Pipeline ............................................................................... 103
Manually Rerun a Pipeline .................................................................................................. 105
Manually Rerun a Revision Through a Pipeline (Console) ................................................ 106
Manually Start a Pipeline ( CLI) ................................................................................... 106
Create a Pipeline That Uses Resources from Another Account ................................................. 106
Prerequisite: Create an AWS KMS Encryption Key ......................................................... 107
Step 1: Set Up Account Policies and Roles ................................................................... 108
Step 2: Edit the Pipeline ............................................................................................. 114
Integrate Lambda Functions into Pipelines ............................................................................ 116
Step 1: Create a Pipeline ........................................................................................... 117
Step 2: Create the Lambda Function ............................................................................ 117
Step 3: Add the Lambda Function to a Pipeline in the AWS CodePipeline Console ............... 121
Step 4: Test the Pipeline with the Lambda function ......................................................... 122
Step 5: Next Steps .................................................................................................... 123
Example JSON Event ................................................................................................ 123
Additional Sample Functions ....................................................................................... 124
Troubleshooting ......................................................................................................................... 134
Pipeline Error: A pipeline configured with AWS Elastic Beanstalk returns an error
message: "Deployment failed. The provided role does not have sufficient permissions:
Service:AmazonElasticLoadBalancing" .................................................................................. 134
Pipeline Error: A source action returns the insufficient permissions message: "Could not access
the AWS CodeCommit repository repository-name. Make sure that the pipeline IAM role has
sufficient permissions to access the repository." ..................................................................... 135
API Version 2015-07-09
v

AWS CodePipeline User Guide
Pipeline Error: A Jenkins build or test action runs for a long time and then fails due to lack of
credentials or permissions .................................................................................................. 136
Pipeline Error: My GitHub source stage contains Git submodules, but AWS CodePipeline doesn't
initialize them .................................................................................................................... 136
Pipeline Error: I receive a pipeline error that includes the following message: "PermissionError:
Could not access the GitHub repository" ............................................................................... 136
Pipeline Error: A pipeline created in one AWS region using a bucket created in another AWS
region returns an "InternalError" with the code "JobFailed" ....................................................... 137
Need Help with a Different Issue? ........................................................................................ 138
Access Permissions Reference .................................................................................................... 139
Create a Customer Managed Policy for AWS CodePipeline ...................................................... 141
Create a Policy for an Amazon S3 Bucket to Use as the Artifact Store for AWS CodePipeline ......... 142
Attach a Policy to an IAM User or Group .............................................................................. 143
Edit a Policy for an IAM Service Role ................................................................................... 144
Review the Default AWS CodePipeline Service Role Policy .............................................. 144
Add Permissions for Other AWS Services ..................................................................... 146
Remove Permissions for Unused AWS Services ............................................................ 147
Attach or Edit a Policy for Jenkins Integration with AWS CodePipeline ....................................... 148
Configure Cross-Account Access to a Pipeline ....................................................................... 148
Use AWS Resources Associated with Another Account in a Pipeline .......................................... 150
Operation and Resource Syntax .......................................................................................... 153
Pipelines .................................................................................................................. 154
Stages ..................................................................................................................... 154
Actions ..................................................................................................................... 155
Jobs ........................................................................................................................ 156
Command Line Reference .......................................................................................................... 157
Pipeline Structure Reference ....................................................................................................... 158
Pipeline and Stage Structure Requirements in AWS CodePipeline ............................................. 158
Action Structure Requirements in AWS CodePipeline .............................................................. 159
Encryption ................................................................................................................................ 164
Limits ....................................................................................................................................... 166
Document History ...................................................................................................................... 169
AWS Glossary .......................................................................................................................... 172
API Version 2015-07-09
vi

AWS CodePipeline User Guide
Video Introduction to AWS CodePipeline
What Is AWS CodePipeline?
AWS CodePipeline is a continuous delivery service you can use to model, visualize, and automate the
steps required to release your software. You can quickly model and configure the different stages of a
software release process. AWS CodePipeline automates the steps required to release your software
changes continuously. For information about pricing for AWS CodePipeline, see Pricing.
Topics
•Video Introduction to AWS CodePipeline (p. 1)
•What Can I Do with AWS CodePipeline? (p. 1)
•A Quick Look at AWS CodePipeline (p. 2)
•How Do I Get Started with AWS CodePipeline? (p. 2)
•We Want to Hear from You (p. 3)
Video Introduction to AWS CodePipeline
This short video (3:06) describes how AWS CodePipeline builds, tests, and deploys your code every
time there is a code change, based on the release process models you define.
Video Introduction to AWS CodePipeline.
What Can I Do with AWS CodePipeline?
You can use AWS CodePipeline to help you automatically build, test, and deploy your applications in
the cloud. Specifically, you can:
•Automate your release processes: AWS CodePipeline fully automates your release process
from end to end, starting from your source repository through build, test, and deployment. You can
prevent changes from moving through a pipeline by including a manual approval action in any stage
except a Source stage. You can automatically release when you want, in the way you want, on the
systems of your choice, across one instance or multiple instances.
•Establish a consistent release process: Define a consistent set of steps for every code change.
AWS CodePipeline runs each stage of your release according to your criteria.
•Speed up delivery while improving quality: You can automate your release process to allow your
developers to test and release code incrementally and speed up the release of new features to your
customers.
API Version 2015-07-09
1

AWS CodePipeline User Guide
A Quick Look at AWS CodePipeline
•Use your favorite tools: You can incorporate your existing source, build, and deployment tools
into your pipeline. For a full list of AWS services and third-party tools currently supported by AWS
CodePipeline, see Product and Service Integrations (p. 9).
•View progress at-a-glance: You can review real-time status of your pipelines, check the details
of any alerts, retry failed actions, view details about the source revisions used in the latest pipeline
execution in each stage, and manually rerun any pipeline.
A Quick Look at AWS CodePipeline
The following diagram shows an example release process using AWS CodePipeline.
In this example, when developers commit changes to a source repository, AWS CodePipeline
automatically detects the changes. Those changes are built, and if any tests are configured, those tests
are run. After the tests are complete, the built code is deployed to staging servers for testing. From
the staging server, AWS CodePipeline runs additional tests, such as integration or load tests. Upon
the successful completion of those tests, AWS CodePipeline deploys the tested and approved code to
production instances.
AWS CodePipeline can deploy applications to Amazon EC2 instances by using AWS CodeDeploy,
AWS Elastic Beanstalk, or AWS OpsWorks. Developers can also use the integration points provided
with AWS CodePipeline to plug in other tools or services, including build services, test providers, or
other deployment targets or systems.
A pipeline can be as simple or as complex as your release process requires.
How Do I Get Started with AWS CodePipeline?
To get started with AWS CodePipeline:
1. Learn how AWS CodePipeline works by reading the Concepts (p. 4) section.
2. Prepare to use AWS CodePipeline by following the steps in Setting Up (p. 18).
API Version 2015-07-09
2

AWS CodePipeline User Guide
We Want to Hear from You
3. Experiment with AWS CodePipeline by following the steps in the Getting Started (p. 21)
tutorials.
4. Use AWS CodePipeline for your new or existing projects by following the steps in Create a
Pipeline (p. 54).
We Want to Hear from You
We welcome your feedback. To contact us, visit the AWS CodePipeline Forum.
API Version 2015-07-09
3

AWS CodePipeline User Guide
Continuous Delivery and Integration
AWS CodePipeline Concepts
You will find modelling and configuring your automated release process easier if you understand the
concepts and terms used in AWS CodePipeline, as well as some of the underlying concepts of release
automation. Here are some concepts to know about as you use AWS CodePipeline.
Topics
•Continuous Delivery and Integration with AWS CodePipeline (p. 4)
•How AWS CodePipeline Works (p. 4)
•Running a Pipeline (p. 8)
Continuous Delivery and Integration with AWS
CodePipeline
AWS CodePipeline is a continuous delivery service that automates the building, testing, and
deployment of your software into production.
Continuous delivery is a software development methodology where the release process is automated.
Every software change is automatically built, tested, and deployed to production. Before the final push
to production, a person, an automated test, or a business rule decides when the final push should
occur. Although every successful software change can be immediately released to production with
continuous delivery, not all changes need to be released right away.
Continuous integration is a software development practice where members of a team use a version
control system and integrate their work frequently to the same location, such as a master branch. Each
change is built and verified by means of tests and other verifications in order to detect any integration
errors as quickly as possible. Continuous integration is focused on automatically building and testing
code, as compared to continuous delivery, which automates the entire software release process up to
production.
How AWS CodePipeline Works
AWS CodePipeline helps you create and manage your release process workflow with pipelines. A
pipeline is a workflow construct that describes how software changes go through a release process.
API Version 2015-07-09
4
AWS CodePipeline User Guide
How AWS CodePipeline Works
You can create as many pipelines as you need within the limits of AWS and AWS CodePipeline, as
described in Limits (p. 166).
The following diagram and accompanying descriptions introduce you to some of the terms unique to
AWS CodePipeline and how these concepts relate to each other:
• You can use the AWS CodePipeline console, the AWS Command Line Interface (AWS CLI), the
AWS SDKs, or any combination of these to create and manage your pipelines.
When you create your first pipeline using the console, AWS CodePipeline creates a single
Amazon S3 bucket in the same region as the pipeline to store items for all pipelines in that region
associated with your account. Every time you create another pipeline within that region in the
console, AWS CodePipeline creates a folder in that bucket for that pipeline, and uses that folder
to store artifacts for your pipeline as the automated release process runs. This bucket is named
codepipeline-region-1234567EXAMPLE, where region is the AWS region in which you created
the pipeline, and 1234567EXAMPLE is a ten-digit random number that ensures the bucket name is
unique.
If you create a pipeline using the AWS CLI, you can choose any Amazon S3 bucket to store the
artifacts for that pipeline, as long as that bucket is in the same region as the pipeline.
• A revision is a change made to a source that is configured in a source action for AWS CodePipeline,
such as a pushed commit to a GitHub repository or an AWS CodeCommit repository, or an update to
a file in a versioned Amazon S3 bucket. Each revision is run separately through the pipeline. Multiple
revisions can be processed in the same pipeline, but each stage can process only one revision at a
time. Revisions are run through the pipeline as soon as a change is made in the location specified in
the source stage of the pipeline.
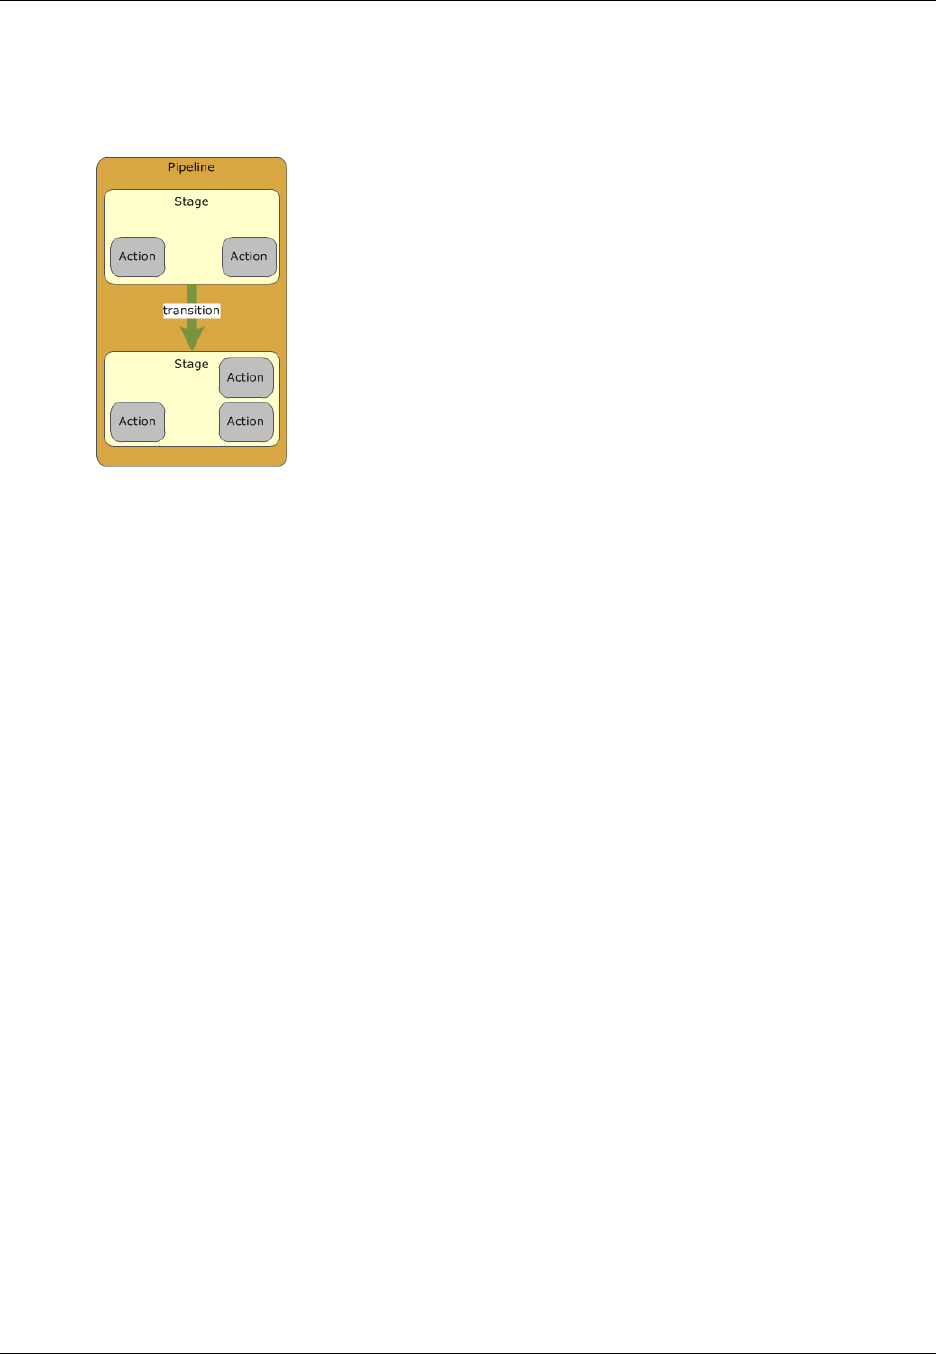
• AWS CodePipeline breaks up your workflow into a series of stages. For example, there might be a
build stage, where code is built and tests are run. There are also deployment stages, where code
updates are deployed to run-time environments. You can configure multiple parallel deployments
to different environments in the same deployment stage. You can label each stage in the release
process for better tracking, control, and reporting (for example "Source," "Build," and "Beta").
Each stage has a unique name within a pipeline, and contains a sequence of actions as part of
its workflow. A stage can only process one revision at a time. A revision must run through a stage
API Version 2015-07-09
5
AWS CodePipeline User Guide
How AWS CodePipeline Works
before the next revision can run through it. All actions configured for a stage must be completed
successfully before the stage is considered complete. After a stage is complete, the pipeline will
automatically transition the revision and its artifacts created by the actions in that stage to the next
stage in the pipeline. You can manually disable and enable these transitions. For more information
about stage requirements and structure, see Pipeline and Stage Structure Requirements in AWS
CodePipeline (p. 158).
• Every stage contains at least one action, which is some kind of task performed on the artifact in
that stage. Pipeline actions occur in a specified order, in sequence or in parallel, as determined
in the configuration of the stage. For example, a beta stage might contain a deploy action, which
deploys code to one or more staging servers. You can configure a stage with a single action to
start, and then add additional actions to that stage as needed. For more information, see Edit a
Pipeline (p. 60) and Action Structure Requirements in AWS CodePipeline (p. 159).
After a revision starts running through a pipeline, AWS CodePipeline copies files or changes that will
be worked upon by the actions and stages in the pipeline to the Amazon S3 bucket. These objects
are referred to as artifacts, and might be the source for an action (input artifacts) or the output of an
action (output artifacts). An artifact can be worked upon by more than one action.
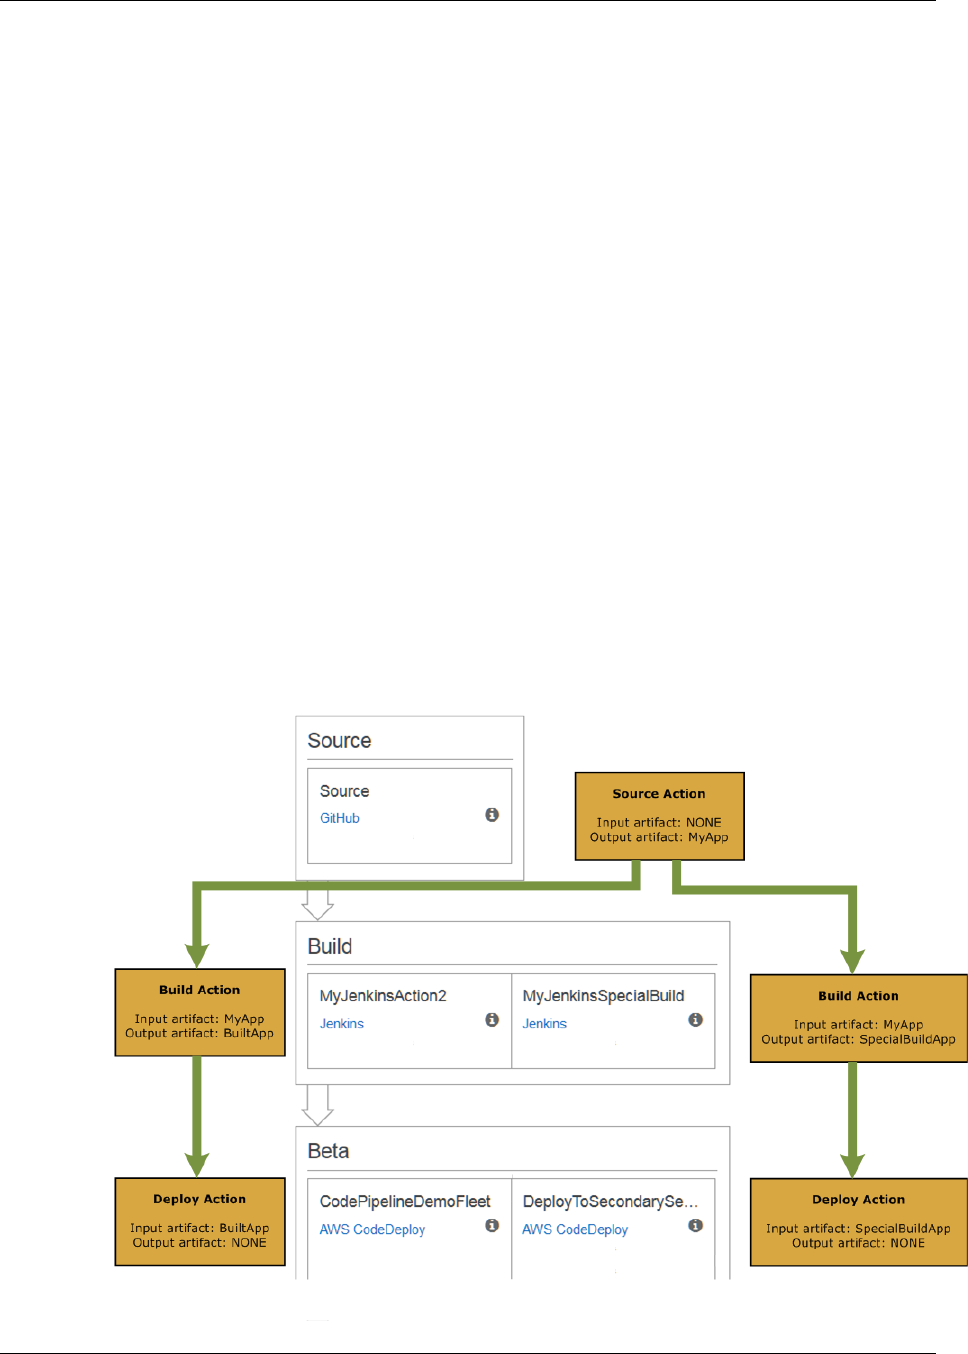
• Every action has a type. Depending on the type, the action might have an input artifact, which is
the artifact it consumes or works on over the course of the action run; an output artifact, which is
the output of the action; or both. Every output artifact must have a unique name within the pipeline.
Every input artifact for an action must match the output artifact of an action earlier in the pipeline,
whether that action is immediately prior to the action in a stage or runs in a stage several stages
earlier. The following illustration demonstrates how input artifacts and output artifacts are produced
and consumed within a pipeline:
API Version 2015-07-09
6

AWS CodePipeline User Guide
How AWS CodePipeline Works
• A transition is the act of a revision in a pipeline continuing from one stage to the next in a workflow.
In the AWS CodePipeline console, transition arrows connect stages together to show the order in
which the stages will happen. When a stage is complete, by default the revision will transition to
the next stage in the pipeline. You can disable a transition from one stage to the next. When you
do, your pipeline will run all actions in the stages before that transition, but will not run any stages
or actions after that stage until you enable that transition. This is a simple way to prevent changes
from running through the entire pipeline. After you enable the transition, the most recent revision that
ran successfully through the previous stages will be run through the stages after that transition. If all
transitions are enabled, the pipeline runs continuously; every revision will be deployed as part of a
successful run through the pipeline (continuous deployment).
• Because only one revision can run through a stage at a time, AWS CodePipeline will batch any
revisions that have completed the previous stage until the next stage is available. If a more recent
revision completes running through the stage, the batched revision will be replaced by the most
current revision.
• An approval action prevents a pipeline from transitioning to the next action until permission is
granted (for example, by receiving manual approval from an authorized IAM user). You might use
an approval action when you want the pipeline to continue only after a successful code review, for
example, or you want to control the time at which a pipeline transitions to a final Production stage.
In this case, you can add a manual approval action to a stage just before Production, and approve it
yourself when you're ready to release changes to the public.
• A failure is an action in a stage that does not complete successfully. If one action fails in a stage, the
revision does not transition to the next action in the stage or the next stage in the pipeline. Whenever
a failure occurs, no further transitions will occur in the pipeline for that revision. AWS CodePipeline
will pause the pipeline until you manually retry the stage that contains the failed actions or start the
pipeline again for that revision, or until another revision is made in a source stage action.
• A pipeline runs automatically when a change is made in the source location as defined in a source
action in a pipeline, or when you manually start the pipeline from the AWS CLI. After a pipeline
starts, the revision runs through every stage and action in the pipeline. You can view details of the
last run of each action in a pipeline on the pipeline view page.
The following diagram shows two stages in an example pipeline in the AWS CodePipeline console. It
includes an action in each stage and the enabled transition between the two stages.
API Version 2015-07-09
7
AWS CodePipeline User Guide
Running a Pipeline
Running a Pipeline
A pipeline starts automatically as soon as it has been created. The pipeline might appear to pause
when waiting for events, such as the start of the next action in a sequence, but it is still running. When
the pipeline completes the processing of the revision, it will wait until the next revision occurs in the
source location as defined in the pipeline. As soon as a change is detected in that source location, the
pipeline will begin running it through its stages and actions.
You cannot manually stop a pipeline after it has been created, but you can disable transitions between
stages to prevent stages and actions from running or add an approval action to the pipeline to pause
the execution until the action is manually approved. To ensure a pipeline does not run, you can also
delete a pipeline or edit the actions in a source stage to point to a source location where no changes
are being made. If you delete a pipeline for this purpose, make sure that you make a copy of its JSON
structure first. That way you can easily restore the pipeline when you want to re-create it. For more
information, see Create a Pipeline (CLI) (p. 57).
You can manually run the last revision through the pipeline again. For more information, see Manually
Rerun a Pipeline (p. 105). You can also retry individual actions that have not been completed
successfully. For more information, see Retry Failed Actions (p. 77).
API Version 2015-07-09
8

AWS CodePipeline User Guide
Integration with Other AWS Services
Product and Service Integrations
with AWS CodePipeline
By default, AWS CodePipeline is integrated with a number of AWS services and partner products and
services. The following information can help you configure AWS CodePipeline to integrate with the
products and services you use.
Topics
•Integration with Other AWS Services (p. 9)
•Integration with Partner Products and Services (p. 11)
•Integration Examples from the Community (p. 14)
Integration with Other AWS Services
AWS CodePipeline is integrated with the following AWS services:
Amazon Simple
Storage Service
(Amazon S3)
Amazon S3 is storage for the Internet. You can use Amazon S3 to store and
retrieve any amount of data at any time, from anywhere on the web. You can
configure AWS CodePipeline to use a versioned Amazon S3 bucket as the
source stage for your code. You must first create the bucket and then enable
versioning on it before you can create a pipeline that uses the bucket as part
of a source action within a stage.
When you use the console to create your first pipeline, AWS CodePipeline
creates a single Amazon S3 bucket to store items for all pipelines associated
with your account. Every time you create another pipeline in the console,
AWS CodePipeline creates a folder in that bucket for that pipeline and
uses that folder to store artifacts for your pipeline as the automated release
process runs. This bucket is named codepipeline-region-1234567EXAMPLE,
where region is the AWS region in which you created the pipeline and
1234567EXAMPLE is a ten-digit random number that ensures the bucket name
is unique. If you use the AWS CLI to create a pipeline, you can choose any
Amazon S3 bucket to store the artifacts for that pipeline. You might choose to
do this if you are concerned about exceeding the limits of Amazon S3 buckets
allowed for your account.
Learn more:
API Version 2015-07-09
9

AWS CodePipeline User Guide
Integration with Other AWS Services
•Create an Amazon S3 Bucket (p. 22)
•Create a Pipeline (CLI) (p. 57)
AWS CloudTrail CloudTrail captures AWS API calls and related events made by or on behalf
of an AWS account and delivers log files to an Amazon S3 bucket that you
specify. You can configure CloudTrail to capture API calls from the AWS
CodePipeline console, AWS CodePipeline commands from the AWS CLI, and
from the AWS CodePipeline API.
Learn more:
•Logging API Calls with CloudTrail (p. 86)
AWS CodeCommit AWS CodeCommit is a version control service hosted by AWS that you can
use to privately store and manage assets (such as documents, source code,
and binary files) in the cloud. You can configure AWS CodePipeline to use
a branch in an AWS CodeCommit repository as the source stage for your
code. You must first create the repository and associate it with a working
directory on your local machine before you can create a pipeline that uses the
branch as part of a source action within a stage. You can connect to the AWS
CodeCommit repository by either creating a new pipeline or editing an existing
one.
Learn more:
•Simple Pipeline Walkthrough (AWS CodeCommit Repository) (p. 35)
•AWS for DevOps Getting Started Guide — Learn how to use AWS
CodePipeline to continuously deliver and deploy source code in AWS
CodeCommit repositories to deployment targets in AWS CodeDeploy,
Elastic Beanstalk, and AWS OpsWorks.
AWS CodeDeploy AWS CodeDeploy coordinates application deployments to Amazon
EC2 instances, on-premise instances, or both. You can configure AWS
CodePipeline to use AWS CodeDeploy to deploy your code. You can create
the AWS CodeDeploy application, deployment, and deployment group to use
in a deploy action within a stage either before you create the pipeline or when
you use the Create Pipeline wizard.
Learn more:
•Create AWS CodeDeploy Resources (p. 23)
•Explore Continuous Delivery in AWS with the Pipeline Starter Kit
AWS Elastic
Beanstalk Elastic Beanstalk is an easy-to-use service for deploying and scaling web
applications and services developed with Java, .NET, PHP, Node.js, Python,
Ruby, Go, and Docker on familiar servers such as Apache, Nginx, Passenger,
and IIS. You can configure AWS CodePipeline to use Elastic Beanstalk to
deploy your code. You can create the Elastic Beanstalk application and
environment to use in a deploy action within a stage either before you create
the pipeline or when you use the Create Pipeline wizard.
Learn more:
•Elastic Beanstalk Walkthrough
•Create a Pipeline (p. 54)
API Version 2015-07-09
10

AWS CodePipeline User Guide
Integration with Partner Products and Services
AWS Key
Management
Service
AWS KMS is a managed service that makes it easy for you to create and
control the encryption keys used to encrypt your data. By default, AWS
CodePipeline uses AWS KMS to encrypt artifacts for pipelines stored in
Amazon S3 buckets.
Learn more:
•Encryption (p. 164)
AWS Lambda Lambda lets you run code without provisioning or managing servers. You can
configure AWS CodePipeline to use Lambda functions to add flexibility and
functionality to your pipelines. You can create the Lambda function to add as
an action in a stage either before you create the pipeline or when you use the
Create Pipeline wizard.
Learn more:
•Integrate Lambda Functions into Pipelines (p. 116)
AWS OpsWorks AWS OpsWorks is a configuration management service that helps you
configure and operate applications of all shapes and sizes using Chef.
You can define the application’s architecture and the specification of each
component including package installation, software configuration and
resources such as storage. You can configure AWS CodePipeline to use AWS
OpsWorks to deploy your code in conjunction with custom Chef cookbooks
and applications in AWS OpsWorks.
•Custom Chef Cookbooks – AWS OpsWorks uses Chef Cookbooks to
handle tasks such as installing and configuring packages and deploying
applications.
•Applications – An AWS OpsWorks applications consists of code that you
want to run on an application server. The application code is stored in a
repository, such as an Amazon S3 bucket.
You create the AWS OpsWorks stack and layer you want to use before you
create the pipeline. You can create the AWS OpsWorks application to use in a
deploy action within a stage either before you create the pipeline or when you
use the Create Pipeline wizard.
AWS CodePipeline support for AWS OpsWorks is currently available in the
US East (N. Virginia) Region (us-east-1) only.
Learn more:
•Using AWS CodePipeline with AWS OpsWorks
•Cookbooks and Recipes
•AWS OpsWorks Apps
Integration with Partner Products and Services
AWS CodePipeline has built-in integration for the following partner products and services outside of
AWS.
GitHub You can configure AWS CodePipeline to use a GitHub repository as the
source stage for your code. You must have previously created a GitHub
API Version 2015-07-09
11

AWS CodePipeline User Guide
Integration with Partner Products and Services
account and at least one GitHub repository. You can connect to the GitHub
repository by either creating a new pipeline or editing an existing one.
The first time you add a GitHub repository to a pipeline, you will be asked
to authorize AWS CodePipeline access to your repositories. To integrate
with GitHub, AWS CodePipeline uses OAuth tokens and requires two
GitHub scopes: admin:repo_hook, which is used to detect when you have
committed and pushed changes to the repository, and repo, which is used
to read and pull artifacts from public and private repositories into a pipeline.
For more information about GitHub scopes, see the GitHub Developer API
Reference.
Tip
There is a limit to the number of OAuth tokens you can use in GitHub
for a particular application, such as AWS CodePipeline. If you plan
on creating multiple pipelines or GitHub source actions, you can
configure a personal access token, and then use that OAuth token for
all of your GitHub actions. For more information, see To configure a
pipeline to use a personal access token from GitHub (p. 136).
Access for AWS CodePipeline is configured for all repositories to which that
GitHub account has access; it cannot currently be configured for individual
repositories. You can revoke this access from GitHub by choosing Settings,
choosing Applications, and then, under Authorized applications, finding
AWS CodePipeline in the list of authorized applications and choosing Revoke.
Revoking access will immediately prevent AWS CodePipeline from accessing
any GitHub repositories previously configured for access with that GitHub
account.
If you want to limit the access AWS CodePipeline has to specific set of
repositories, create a GitHub account, grant that account access to only the
repositories you want to integrate with AWS CodePipeline, and then use that
account when configuring AWS CodePipeline to use GitHub repositories for
source stages in pipelines.
Learn more:
•Four-Stage Pipeline Tutorial (p. 46)
API Version 2015-07-09
12

AWS CodePipeline User Guide
Integration with Partner Products and Services
Jenkins You can configure AWS CodePipeline to use Jenkins CI to build or test your
code in one or more actions in a pipeline. You must have previously created
a Jenkins project and installed and configured the AWS CodePipeline Plugin
for Jenkins for that project. You can connect to the Jenkins project by either
creating a new pipeline or editing an existing one.
Access for Jenkins is configured on a per-project basis. You must install
the AWS CodePipeline Plugin for Jenkins on every Jenkins instance you
want to use with AWS CodePipeline. In addition, you must configure AWS
CodePipeline access to the Jenkins project. You should secure your Jenkins
project by configuring it to accept HTTPS/SSL connections only. If your
Jenkins project is installed on an Amazon EC2 instance, consider providing
your AWS credentials by installing the AWS CLI on each instance and
configuring an AWS profile on those instances with the IAM user profile and
AWS credentials you want to use for connections between AWS CodePipeline
and Jenkins, rather than adding them or storing them through the Jenkins web
interface.
Learn more:
•Accessing Jenkins
•Four-Stage Pipeline Tutorial (p. 46)
CloudBees You can configure AWS CodePipeline to use CloudBees to build or test your
code in one or more actions in a pipeline.
Learn more:
•CloudBees documentation for integrating the CloudBees Jenkins platform
with AWS CodePipeline for running your build and test jobs
Apica You can configure AWS CodePipeline to use Apica to test your code in one or
more actions in a pipeline.
Learn more:
•Apica documentation for setting up with AWS CodePipeline
BlazeMeter You can configure AWS CodePipeline to use BlazeMeter to test your code in
one or more actions in a pipeline.
Learn more:
•BlazeMeter documentation for testing with AWS CodePipeline
Ghost Inspector You can configure AWS CodePipeline to use Ghost Inspector to test your
code in one or more actions in a pipeline.
Learn more:
•Ghost Inspector documentation for service integration with AWS
CodePipeline
HPE StormRunner
Load You can configure AWS CodePipeline to use HPE StormRunner Load in one
or more actions in a pipeline.
Learn more:
•HPE StormRunner Load documentation for integrating with AWS
CodePipeline
API Version 2015-07-09
13

AWS CodePipeline User Guide
Integration Examples from the Community
Runscope You can configure AWS CodePipeline to use Runscope to test your code in
one or more actions in a pipeline.
Learn more:
•Runscope documentation for integrating with AWS CodePipeline
Solano CI You can configure AWS CodePipeline to use Solano Labs to build and test
your code in one or more actions in a pipeline.
Learn more:
•Solano Labs documentation for using Solano CI with AWS CodePipeline
XebiaLabs You can configure AWS CodePipeline to use XebiaLabs to deploy your code
in one or more actions in a pipeline.
Learn more:
•XebiaLabs documentation for using XL Deploy with AWS CodePipeline
Integration Examples from the Community
The following sections provide links to blog posts, articles, and community-provided examples.
Note
These links are provided for informational purposes only, and should not be considered
either a comprehensive list or an endorsement of the content of the examples. AWS is not
responsible for the content or accuracy of external content.
Blog posts
•Create a Pipeline for AWS Elastic Beanstalk in AWS CodePipeline using CloudFormation and
CodeCommit
Learn how to implement continuous delivery in an AWS CodePipeline pipeline for an application in
AWS Elastic Beanstalk. All AWS resources are provisioned automatically through the use of an AWS
CloudFormation template. This walkthrough also incorporates AWS CodeCommit and AWS Identity
and Access Management (IAM).
Published May 2016
•Automate AWS CodeCommit and AWS CodePipeline in AWS CloudFormation
Use AWS CloudFormation to automate the provisioning of AWS resources for a continuous delivery
pipeline that uses AWS CodeCommit, AWS CodePipeline, AWS CodeDeploy, and AWS Identity and
Access Management.
Published April 2016
•Create a Cross-Account Pipeline in AWS CodePipeline
Learn how to automate the provisioning of cross-account access to pipelines in AWS CodePipeline
by using AWS Identity and Access Management. Includes examples in an AWS CloudFormation
template.
API Version 2015-07-09
14

AWS CodePipeline User Guide
Blog posts
Published March 2016
•Exploring ASP.NET Core Part 2: Continuous Delivery
Learn how to create a full continuous delivery system for an ASP.NET Core application using AWS
CodeDeploy and AWS CodePipeline.
Published March 2016
•Create a Pipeline Using the AWS CodePipeline Console
Learn how to use the AWS CodePipeline console to create a two-stage pipeline in a walkthrough
based on the AWS CodePipeline Four-Stage Pipeline Tutorial (p. 46).
Published March 2016
•Mocking AWS CodePipeline Pipelines with AWS Lambda
Learn how to invoke a Lambda function that lets you visualize the actions and stages in an AWS
CodePipeline software delivery process as you design it, before the pipeline is operational. As you
design your pipeline structure, you can use the Lambda function to test whether your pipeline will
complete successfully.
Published February 2016
•Running AWS Lambda Functions in AWS CodePipeline using AWS CloudFormation
Learn how to create an AWS CloudFormation stack that provisions all the AWS resources used in
the user guide task Integrate Lambda Functions into Pipelines (p. 116).
Published February 2016
•Provisioning Custom AWS CodePipeline Actions in AWS CloudFormation
Learn how to use AWS CloudFormation to provision custom actions in AWS CodePipeline.
Published January 2016
•Provisioning AWS CodePipeline with AWS CloudFormation
Learn how to provision a basic continuous delivery pipeline in AWS CodePipeline using AWS
CloudFormation.
Published December 2015
•Building Continuous Deployment on AWS with AWS CodePipeline, Jenkins, and Elastic
Beanstalk
Learn how to use GitHub, AWS CodePipeline, Jenkins, and Elastic Beanstalk to create a deployment
pipeline for a web application that is updated automatically every time you change your code.
API Version 2015-07-09
15

AWS CodePipeline User Guide
Videos
Published December 2015
•Continuous Delivery for a PHP Application Using AWS CodePipeline, Elastic Beanstalk, and
Solano Labs
Learn how to use Solano CI with AWS CodePipeline to test a PHP application using PHPUnit, and
then deploy the application to Elastic Beanstalk.
Published December 2015
•Performance Testing in Continuous Delivery Using AWS CodePipeline and BlazeMeter
Learn how to inject automated load tests at the right places in the AWS CodePipeline delivery
workflow with BlazeMeter’s native AWS CodePipeline integration.
Published September 2015
•Deploying from AWS CodePipeline to AWS OpsWorks Using a Custom Action and AWS
Lambda
Learn how to configure your pipeline and the AWS Lambda function to deploy to AWS OpsWorks
using AWS CodePipeline.
Published July 2015
•Automated Delivery Acceptance Test Nirvana: Powered by AWS CodePipeline, CloudWatch,
and BlazeMeter
Learn how to use AWS CodePipeline, CloudWatch, and BlazeMeter to create a continuous delivery
workflow that reduces time to release and increases test coverage for developers during the release.
Published July 2015
Videos
•Create a Pipeline Using the AWS CodePipeline Console
Learn how to use the AWS CodePipeline console to create a pipeline that utilizes AWS CodeDeploy
and Amazon S3.
Create a Pipeline Using the AWS CodePipeline Console
Published March 2016
Duration: 8:53
•Solano CI and AWS CodePipeline
API Version 2015-07-09
16

AWS CodePipeline User Guide
Videos
View a demo setup and successful run of AWS CodePipeline using Solano CI.
Solano CI and AWS CodePipeline
Published November 2015
Duration: 3:07
•Apica and AWS CodePipeline Setup Guide
Learn how to set up Apica LoadTest with AWS CodePipeline.
Apica and AWS CodePipeline Setup Guide
Published July 2015
Duration: 2:59
API Version 2015-07-09
17

AWS CodePipeline User Guide
Step 1: Create an AWS Account
Setting Up AWS CodePipeline
Before you can use AWS CodePipeline for the first time, you must complete the following steps.
Topics
•Step 1: Create an AWS Account (p. 18)
•Step 2: Create or Use an IAM User (p. 18)
•Step 3: Use an IAM Managed Policy to Assign AWS CodePipeline Permissions to the IAM
User (p. 18)
•Step 4: Install the AWS CLI (p. 19)
•Step 5: Open the Console for AWS CodePipeline (p. 20)
•Next Steps (p. 20)
Step 1: Create an AWS Account
Create an AWS account, if you haven't done so already, by going to http://aws.amazon.com/ and
choosing Sign Up.
Step 2: Create or Use an IAM User
Create an IAM user or use an existing one in your AWS account. Make sure that you have an AWS
access key ID and an AWS secret access key associated with that IAM user. For more information,
see Creating an IAM User in Your AWS Account.
Step 3: Use an IAM Managed Policy to Assign
AWS CodePipeline Permissions to the IAM
User
You must give the IAM user permissions to interact with AWS CodePipeline. The quickest way to do
this is to apply the AWSCodePipelineFullAccess managed policy to the IAM user.
API Version 2015-07-09
18

AWS CodePipeline User Guide
Step 4: Install the AWS CLI
To grant permissions to an IAM user using the AWS Management Console
1. Sign in to the Identity and Access Management (IAM) console at https://console.aws.amazon.com/
iam/.
2. In the IAM console, in the navigation pane, choose Policies, and then choose the
AWSCodePipelineFullAccess managed policy from the list of policies.
3. On the Policy Details page, choose the Attached Entities tab, and then choose Attach.
4. On the Attach Policy page, select the check box next to the IAM users or groups, and then
choose Attach Policy.
Note
The AWSCodePipelineFullAccess policy provides access to all AWS CodePipeline
actions and resources that the IAM user has access to, as well as all possible
actions when creating stages in a pipeline, such as creating stages that include AWS
CodeDeploy, Elastic Beanstalk, or Amazon S3. As a best practice, you should grant
individuals only the permissions they need to perform their duties. For more information
about how to restrict IAM users to a limited set of AWS CodePipeline actions and
resources, see Access Permissions Reference (p. 139).
Step 4: Install the AWS CLI
To install and configure the AWS CLI
1. On your local machine, download and install the AWS CLI. This will enable you to interact with
AWS CodePipeline from the command line. For more information, see Getting Set Up with the
AWS Command Line Interface.
Note
AWS CodePipeline works only with AWS CLI versions 1.7.38 and later. To determine
which version of the AWS CLI that you may have installed, run the command aws --
version. To upgrade an older version of the AWS CLI to the latest version, follow the
instructions in Uninstalling the AWS CLI, and then follow the instructions in Installing the
AWS Command Line Interface.
2. Configure the AWS CLI with the configure command, as follows:
aws configure
When prompted, specify the AWS access key and AWS secret access key of the IAM user that
you will use with AWS CodePipeline. When prompted for the default region name, specify the
region where you will create the pipeline, such as us-east-1. When prompted for the default
output format, specify json. For example:
AWS Access Key ID [None]: Type your target AWS access key ID here, and
then press Enter
AWS Secret Access Key [None]: Type your target AWS secret access key here,
and then press Enter
Default region name [None]: Type us-east-1 here, and then press Enter
Default output format [None]: Type json here, and then press Enter
Note
For more information about IAM, access keys, and secret keys, see Managing Access
Keys for IAM Users and How Do I Get Credentials?.
For more information about the regions and endpoints available for AWS CodePipeline,
see Regions and Endpoints.
API Version 2015-07-09
19

AWS CodePipeline User Guide
Step 5: Open the Console for AWS CodePipeline
Step 5: Open the Console for AWS
CodePipeline
• Sign in to the AWS Management Console and open the AWS CodePipeline console at http://
console.aws.amazon.com/codepipeline.
Next Steps
You have completed the prerequisites. You can begin using AWS CodePipeline. To start working with
AWS CodePipeline, see the Getting Started (p. 21).
API Version 2015-07-09
20

AWS CodePipeline User Guide
Simple Pipeline Walkthrough (Amazon S3 Bucket)
Getting Started with AWS
CodePipeline
After you complete the steps in Setting Up (p. 18), you can try one of the walkthroughs:
I want to create a pipeline that uses AWS
CodeDeploy to deploy a sample application from
an Amazon S3 bucket to Amazon EC2 instances
running Amazon Linux.
See Simple Pipeline Walkthrough (Amazon S3
Bucket) (p. 21).
I want to create a pipeline that uses AWS
CodeDeploy to deploy a sample application from
an AWS CodeCommit repository to an Amazon
EC2 instance running Amazon Linux.
See Simple Pipeline Walkthrough (AWS
CodeCommit Repository) (p. 35).
Note
There is a Four-Stage Pipeline Tutorial (p. 46) that shows how to create a pipeline that
gets source code from a GitHub repository, uses Jenkins to build and test the source code,
and then uses AWS CodeDeploy to deploy the built and tested source code to Amazon EC2
instances running Amazon Linux or Microsoft Windows Server. Because this tutorial builds on
concepts covered in the walkthroughs, we recommend you complete at least one of them first.
If you want to try AWS CodePipeline with AWS CodeDeploy without setting up all the required
resources, try the Pipeline Starter Kit. The starter kit sets up a complete pipeline that builds
and deploys a sample application in just a few steps, using an AWS CloudFormation template
to create the pipeline and all of its resources in the US East (N. Virginia) Region.
Simple Pipeline Walkthrough (Amazon S3
Bucket)
The easiest way to get started with AWS CodePipeline is to use the Create Pipeline wizard in the
AWS CodePipeline console to create a simple pipeline.
In this walkthrough, you will create a two-stage pipeline that uses a versioned Amazon S3 bucket and
AWS CodeDeploy to release a sample application. After you create this simple pipeline, you will add an
additional stage and then disable and enable the transition between stages.
Not what you're looking for? To create a simple pipeline using an AWS CodeCommit branch as a code
repository, see Simple Pipeline Walkthrough (AWS CodeCommit Repository) (p. 35).
API Version 2015-07-09
21

AWS CodePipeline User Guide
Create an Amazon S3 Bucket
Before you begin this walkthrough, you should complete the prerequisites in Setting Up (p. 18).
Topics
•Step 1: Create an Amazon S3 Bucket for Your Application (p. 22)
•Step 2: Create AWS CodeDeploy Resources to Deploy the Sample Application (p. 23)
•Step 3: Create Your First Pipeline in AWS CodePipeline (p. 25)
•Step 4: Add Another Stage to Your Pipeline (p. 28)
•Step 5: Disable and Enable Transitions Between Stages in AWS CodePipeline (p. 33)
•Step 6: Clean Up Resources (p. 34)
Step 1: Create an Amazon S3 Bucket for Your
Application
You can store your source files or applications in any versioned location. For the purposes of this
walkthrough, you will create an Amazon S3 bucket for the sample applications (one for Linux, OS X, or
Unix and one for Windows) and enable versioning on that bucket. After you have enabled versioning,
you will copy the sample applications to that bucket. If you want to use an existing Amazon S3 bucket,
see Enable Versioning for a Bucket, copy the sample applications to that bucket, and skip ahead to
Create AWS CodeDeploy Resources (p. 23). If you want to use a GitHub repository for your source
instead of an Amazon S3 bucket, copy the sample applications to that repository, and skip ahead to
Create AWS CodeDeploy Resources (p. 23).
To create an Amazon S3 bucket
1. Sign in to the AWS Management Console and open the Amazon S3 console at https://
console.aws.amazon.com/s3/.
2. Choose Create Bucket.
3. In Bucket Name, type a name for your bucket, such as awscodepipeline-demobucket-
example-date.
Note
Because all bucket names in Amazon S3 must be unique, use one of your own, not the
name shown in the example. You can change the example name just by adding the date
to it. Make a note of this name because you will use it for the rest of this tutorial.
In the Region drop-down box, choose the region where you will create your pipeline, such as US
West (Oregon), and then choose Create.
4. In the console for your bucket, choose Properties, expand Versioning, and then choose Enable
Versioning.
When versioning is enabled, Amazon S3 saves every version of every object in the bucket.
5. Next, you will download a sample from a GitHub repository and save it into a folder or directory on
your local computer.
Important
Do not use the Clone or download or Download ZIP buttons in the GitHub repositories.
This creates a nested folder structure that does not work with AWS CodeDeploy.
1. Open the GitHub repository that hosts the sample.
• For Linux, OS X, or Unix: https://github.com/awslabs/aws-codepipeline-s3-aws-
codedeploy_linux
• For Windows: https://github.com/awslabs/AWSCodePipeline-S3-
AWSCodeDeploy_Windows
API Version 2015-07-09
22

AWS CodePipeline User Guide
Create AWS CodeDeploy Resources
2. Choose the dist folder.
3. Choose the file name.
• For Linux, OS X, or Unix: aws-codepipeline-s3-aws-codedeploy_linux.zip
• For Windows: AWSCodePipeline-S3-AWSCodeDeploy_Windows.zip
4. Choose View Raw, and then save the sample file to your local computer.
6. In the Amazon S3 console for your bucket, choose Upload, and follow the instructions to upload
your .zip files into the bucket.
Step 2: Create AWS CodeDeploy Resources to
Deploy the Sample Application
You can use Elastic Beanstalk or AWS CodeDeploy to deploy your code for staging or into production.
In this walkthrough, you will use the Create Deployment Walkthrough wizard in AWS CodeDeploy to
create your deployment resources.
To create an AWS CodeDeploy automated deployment
1. Open the AWS CodeDeploy console at https://console.aws.amazon.com/codedeploy in the region
where you intend to create your pipeline. For example, if you intend to create your pipeline in US
East (N. Virginia), choose that region in the region selector.
For more information about the regions and endpoints available for AWS CodePipeline, see
Regions and Endpoints.
If you see the Applications page instead of the Welcome page, in the Additional Information
section, choose Create Deployment Walkthrough.
2. On the Welcome page, choose Sample Deployment, and then choose Next Step.
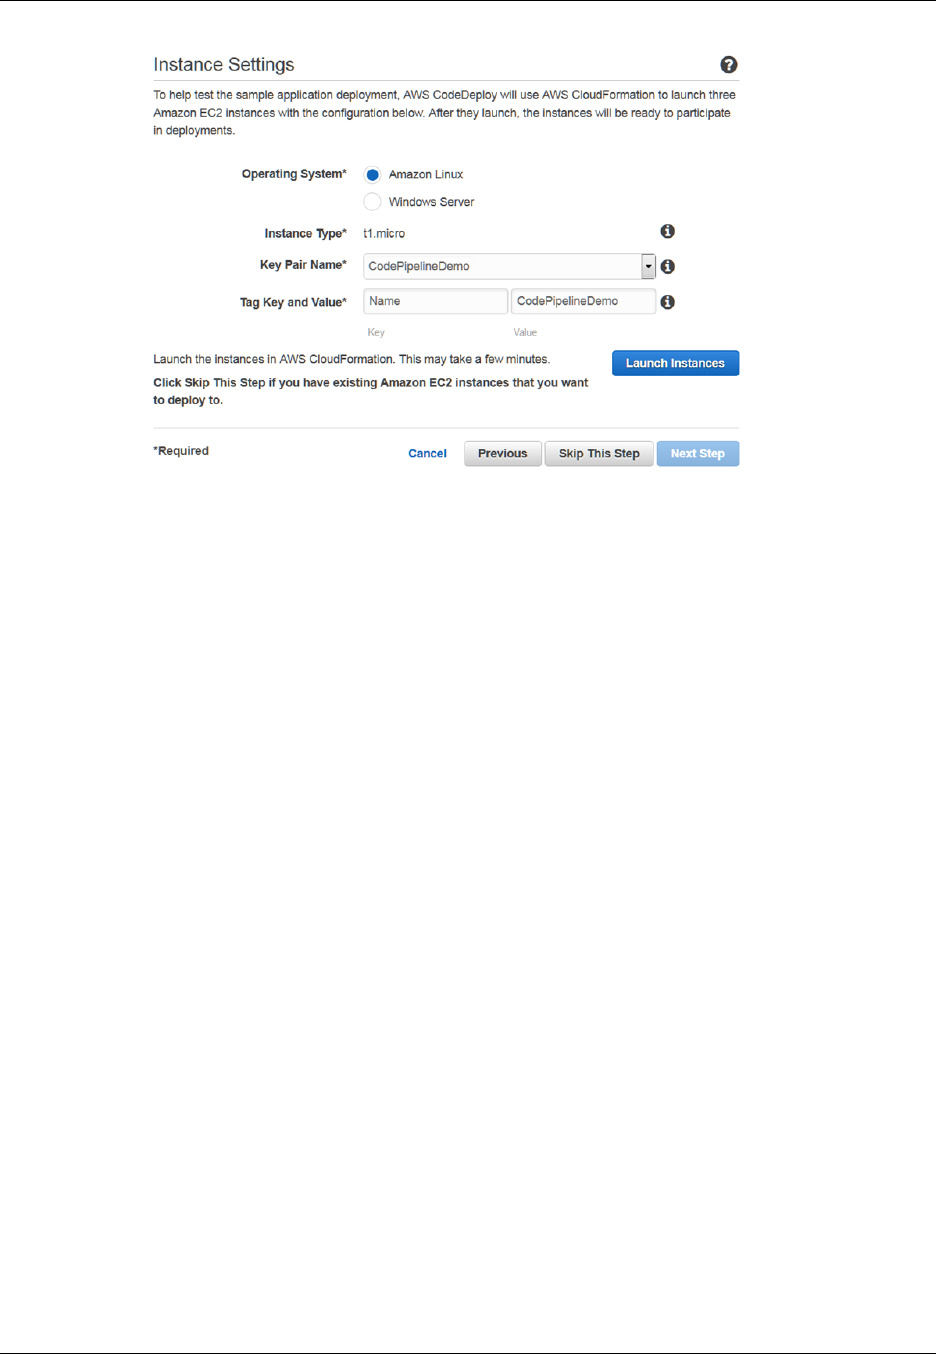
3. On the Instance Settings page, do the following:
1. Choose the operating system and Amazon EC2 instance key pair you want to use. Your choice
of operating system will determine which sample application you will specify when you create
your pipeline.
Important
If you choose Linux, OS X, or Unix, you will use aws-codepipeline-s3-aws-
codedeploy_linux.zip.
If you choose Windows, you will use AWSCodePipeline-S3-
AWSCodeDeploy_Windows.zip.
2. From the Key Pair Name drop-down list, choose the name of the Amazon EC2 instance key
pair you will use to connect to the Amazon EC2 instances after they are launched.
3. In Tag Key and Value, leave the Key name unchanged. In Value, type CodePipelineDemo.
4. Choose Launch Instances.
API Version 2015-07-09
23
AWS CodePipeline User Guide
Create AWS CodeDeploy Resources
For more information about each of these choices, see Instance Settings.
4. After your instances have been created, choose Next Step.
5. On the Application Name page, in Application Name, type CodePipelineDemoApplication,
and then choose Next Step.
6. On the Revision page, choose Next Step.
7. On the Deployment Group page, in Deployment Group Name , type
CodePipelineDemoFleet, and then choose Next Step.
8. On the Service Role page, from the Service Role drop-down box, choose Use an existing
service role. In the Role Name list, choose the service role you want to use, and then choose
Next Step.
Note
If no service roles appear in Role Name, or if you do not have a service role you want to
use, choose Create a new service role or follow the steps in Create a Service Role.
The service role you create or use for AWS CodeDeploy is different from the service role
you will create for AWS CodePipeline.
9. On the Deployment Configuration page, choose Next Step.
10. On the Review page, choose Deploy Now. The sample application for AWS CodeDeploy is
deployed to each of the Amazon EC2 instances.
11. After the sample application is successfully deployed, verify the deployment in your web browser
by going to http://PublicDNS for each Amazon EC2 instance in the deployment. To get the
public DNS value for an Amazon EC2 instance, in the Amazon EC2 console, select the instance,
and look for the Public DNS value on the Description tab.
The web page will display links to the AWS CodeDeploy documentation.
Note
This web page is not the one you will deploy and release with the pipeline you will create
in the next section.
For more information about AWS CodeDeploy, see Getting Started with AWS CodeDeploy.
API Version 2015-07-09
24
AWS CodePipeline User Guide
Create Your First Pipeline
Step 3: Create Your First Pipeline in AWS
CodePipeline
In this part of the walkthrough, you will create the pipeline. The sample will run automatically through
the pipeline.
To create an AWS CodePipeline automated release process
1. Sign in to the AWS Management Console and open the AWS CodePipeline console at http://
console.aws.amazon.com/codepipeline.
2. On the introductory page, choose Get started.
If you see the Welcome page, choose Create pipeline.
3. In Step 1: Name, in Pipeline name, type MyFirstPipeline, and then choose Next step.
Note
If you choose another name for your pipeline, be sure to use that name instead of
MyFirstPipeline for the rest of this walkthrough. After you create a pipeline, you
cannot change its name. Pipeline names are subject to some limitations. For more
information, see Limits (p. 166).
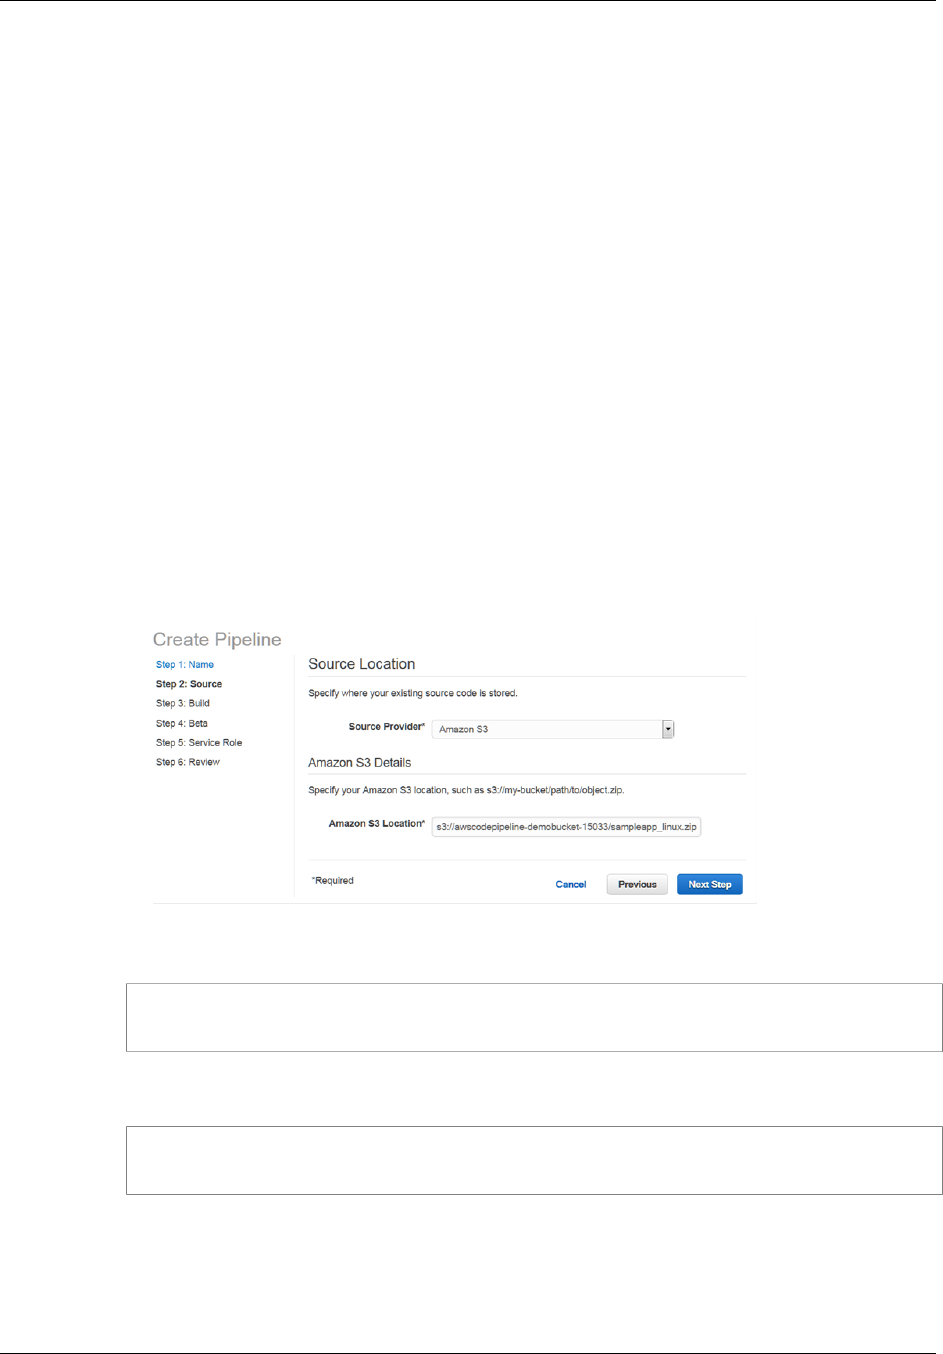
4. In Step 2: Source, in Source provider, choose Amazon S3. In Amazon S3 location, type
the name of the Amazon S3 bucket you created in Create an Amazon S3 Bucket (p. 22)
and the sample file you copied to that bucket. If you chose Linux, OS X, or Unix, use
aws-codepipeline-s3-aws-codedeploy_linux.zip. If you chose Windows, use
AWSCodePipeline-S3-AWSCodeDeploy_Windows.zip. Choose Next step.
For example, if you named your bucket awscodepipeline-demobucket-example-date and
you chose Amazon Linux for your Amazon EC2 instances in AWS CodeDeploy, you would type:
s3://awscodepipeline-demobucket-example-date/aws-codepipeline-s3-aws-
codedeploy_linux.zip
If you named your bucket awscodepipeline-demobucket-example-date and you chose
Windows for your Amazon EC2 instances in AWS CodeDeploy, you would type:
s3://awscodepipeline-demobucket-example-date/AWSCodePipeline-S3-
AWSCodeDeploy_Windows.zip
Note
If you chose to copy the sample application to a GitHub repository instead of an
Amazon S3 bucket, choose GitHub from the list of source providers, and then follow the
instructions. For more information, see Create a Pipeline (Console) (p. 54).
API Version 2015-07-09
25

AWS CodePipeline User Guide
Create Your First Pipeline
5. In Step 3: Build, choose No Build, and then choose Next step.
Note
Configuring a build requires a build server or system. You can walk through the steps for
setting up build resources and creating a pipeline that uses those resources in the next
tutorial, Four-Stage Pipeline Tutorial (p. 46).
6. In Step 4: Beta, in Deployment Provider, choose AWS CodeDeploy. In Application name,
type CodePipelineDemoApplication, or choose the Refresh button, and then choose the
application name from the list. In Deployment group, type CodePipelineDemoFleet, or choose
it from the list, and then choose Next step.
Note
The name "Beta" is the name given by default to this stage of the pipeline, just as
"Source" is the name given to the first stage of the pipeline.
7. In Step 5: Service Role, choose Create role.
On the IAM console page that describes the AWS-CodePipeline-Service role that will be created
for you, choose Allow.
On the Step 5: Service Role page where AWS-CodePipeline-Service appears in Role name,
choose Next step.
Note
Service role creation is only required the first time you create a pipeline in AWS
CodePipeline. If a service role has already been created, you will be able to choose it
from the drop-down list of roles. Because the drop-down list will display all IAM service
roles associated with your account, if you choose a name different from the default, be
sure that the name is recognizable as the service role for AWS CodePipeline.
8. In Step 6: Review, review the information, and then choose Create pipeline.
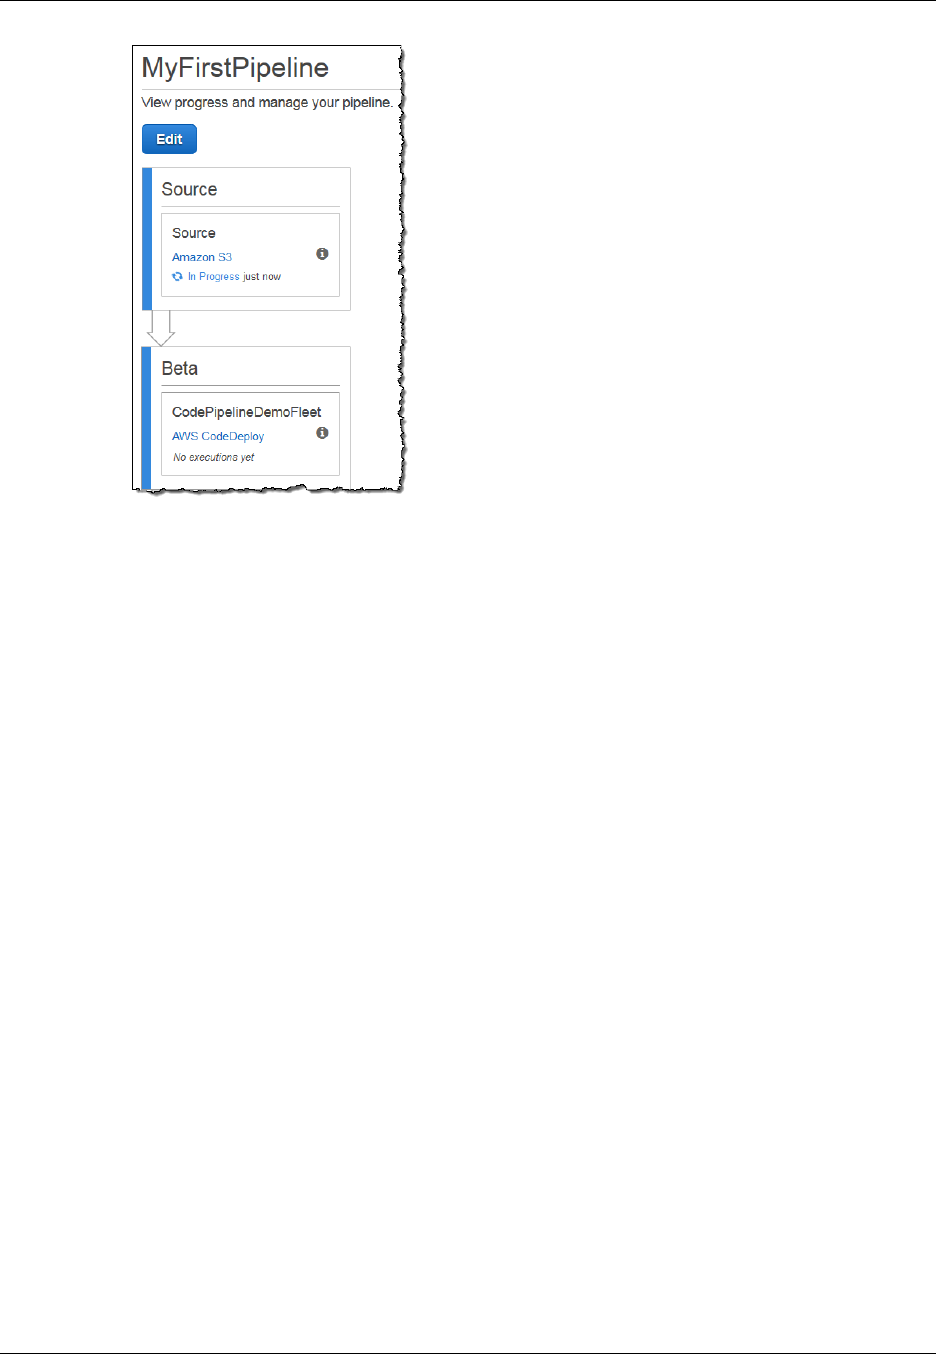
9. The pipeline automatically starts to run. You can view progress and success and failure messages
as the AWS CodePipeline sample deploys a web page to each of the Amazon EC2 instances in
the AWS CodeDeploy deployment.
API Version 2015-07-09
26
AWS CodePipeline User Guide
Create Your First Pipeline
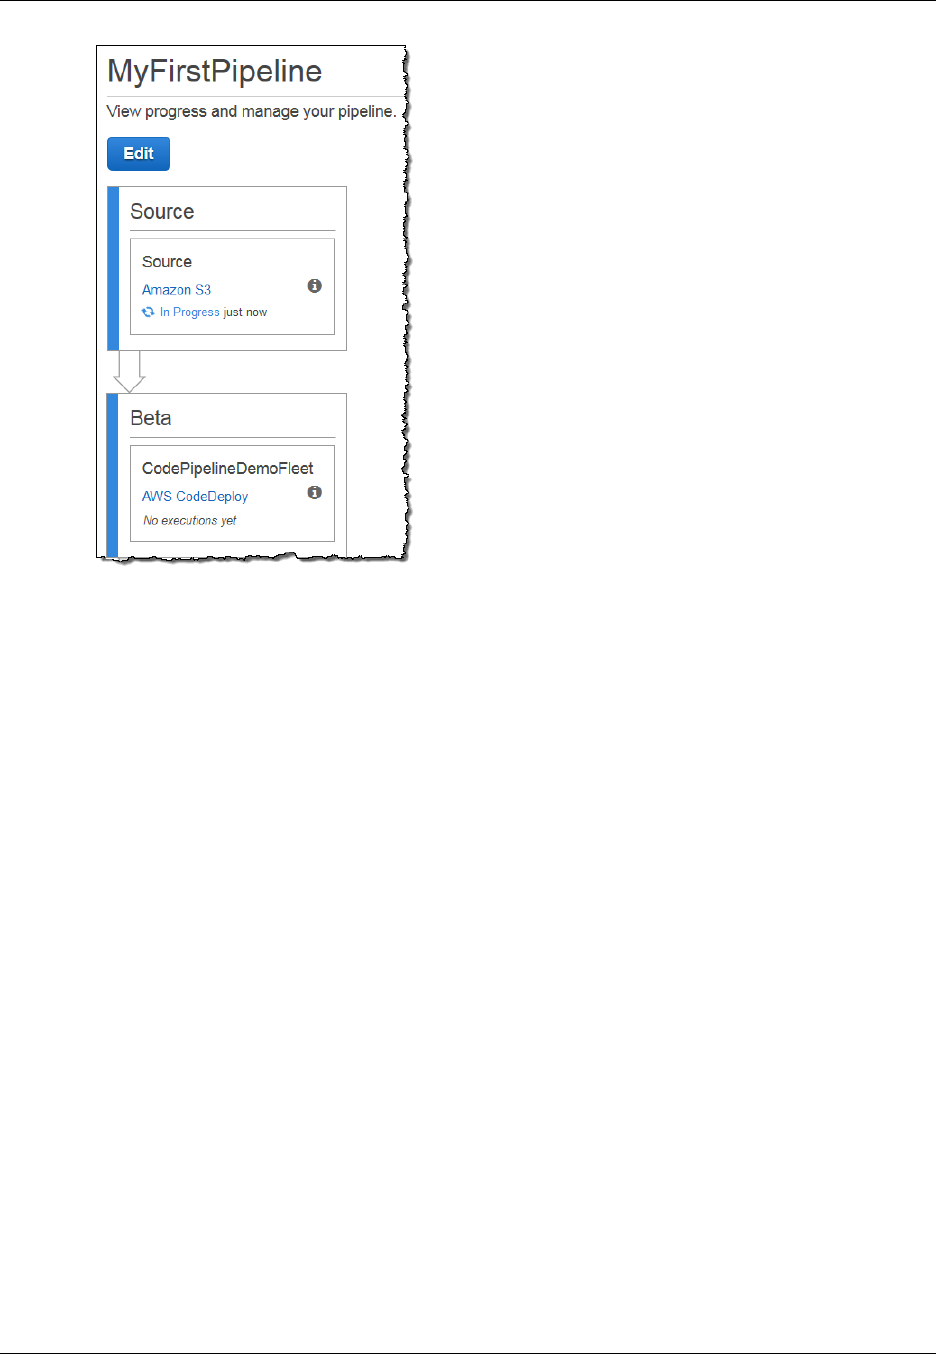
Congratulations! You just created a simple pipeline in AWS CodePipeline. The pipeline has two
stages: a source stage named Source, which automatically detects changes in the versioned sample
application stored in the Amazon S3 bucket and pulls those changes into the pipeline, and a Beta
stage that deploys those changes to Amazon EC2 instances with AWS CodeDeploy. Now, verify the
results.
To verify your pipeline ran successfully
1. View the initial progress of the pipeline. The status of each stage will change from No executions
yet to In Progress, and then to either Succeeded or Failed. The pipeline should complete the
first run within a few minutes.
2. After Succeeded is displayed for the action status, in the status area for the Beta stage, choose
Details.
3. In the Deployment Details section, in Instance ID, choose the instance ID of one of the
successfully deployed instances.
4. On the Description tab, in Public DNS, copy the address, and then paste it into the address bar
of your web browser.
The following page is the sample application you uploaded to your Amazon S3 bucket.
API Version 2015-07-09
27
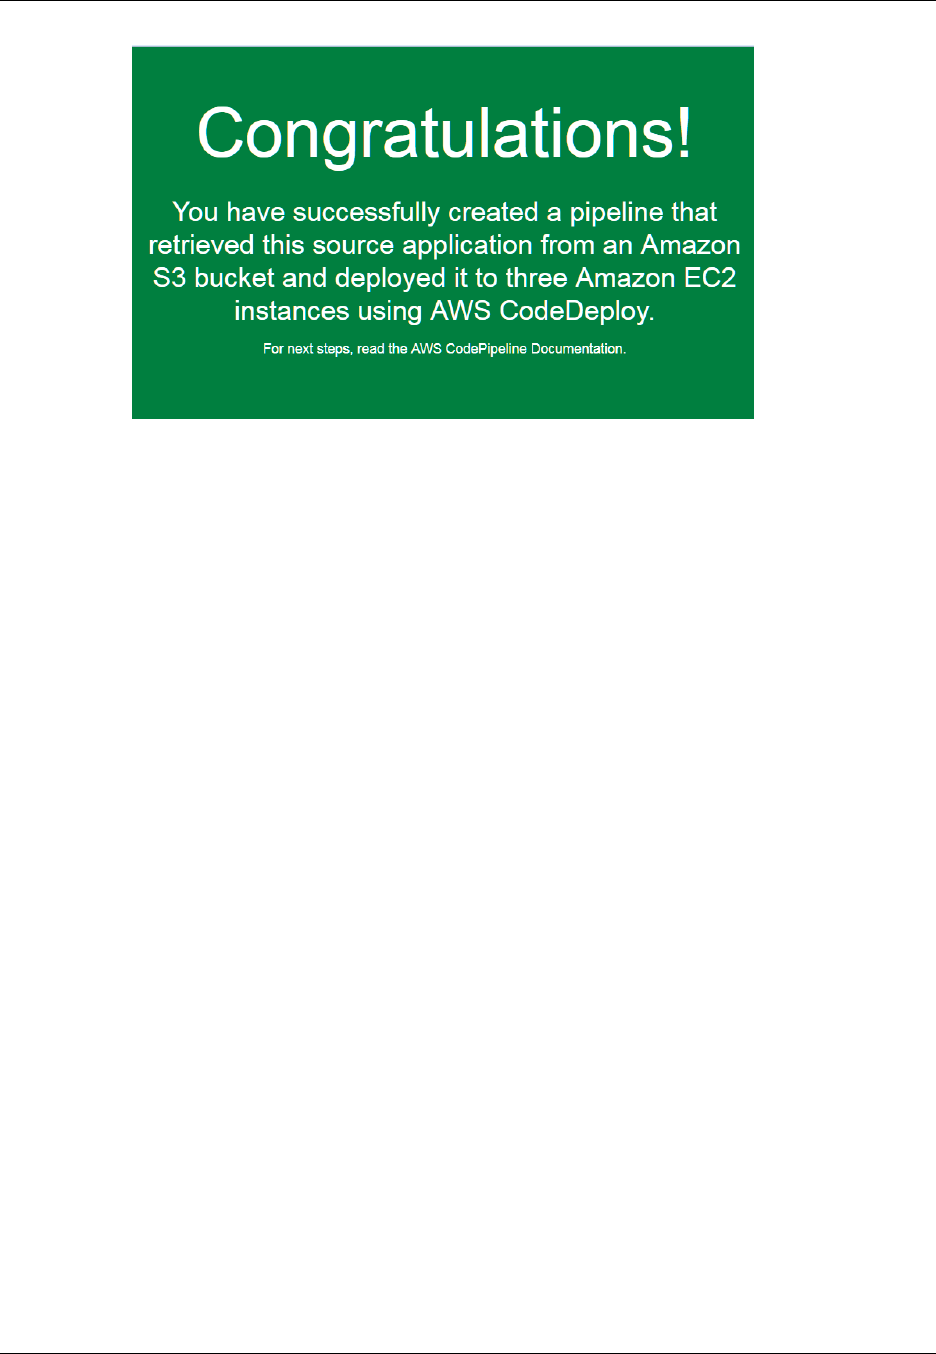
AWS CodePipeline User Guide
Add Another Stage
For more information about stages, actions, and how pipelines work, see Concepts (p. 4).
Step 4: Add Another Stage to Your Pipeline
Now add another stage in the pipeline to deploy from beta servers to production servers using AWS
CodeDeploy. First, you will create another deployment group in the CodePipelineDemoApplication in
AWS CodeDeploy. Then you will add a stage that includes an action that uses this deployment group.
To add another stage, you will use the AWS CodePipeline console or the AWS CLI to retrieve and
manually edit the structure of the pipeline in a JSON file, and then run the update-pipeline command
to update the pipeline with your changes.
Topics
•Create a Second Deployment Group in AWS CodeDeploy (p. 28)
•Add the Deployment Group as Another Stage in Your Pipeline (p. 29)
Create a Second Deployment Group in AWS CodeDeploy
Note
In this part of the walkthrough, you will create a second deployment group, but deploy
to the same Amazon EC2 instances as before. This is for demonstration purposes only.
It is purposely designed to fail in order to show you how errors are displayed in AWS
CodePipeline.
To create a second deployment group in AWS CodeDeploy
1. Open the AWS CodeDeploy console at https://console.aws.amazon.com/codedeploy.
2. Choose Applications, and in the list of applications, choose CodePipelineDemoApplication.
3. In Deployment Groups, choose Create New Deployment Group.
4. On the Create New Deployment Group page, in Deployment Group Name, type a name for the
second deployment group, such as CodePipelineProductionFleet. In Key, leave the setting
as Name, but in Value, choose CodePipelineDemo from the list. Leave the default configuration
for Deployment Configuration. In Service Role, choose the same service role you used for the
initial deployment, and then choose Create Deployment Group.
API Version 2015-07-09
28
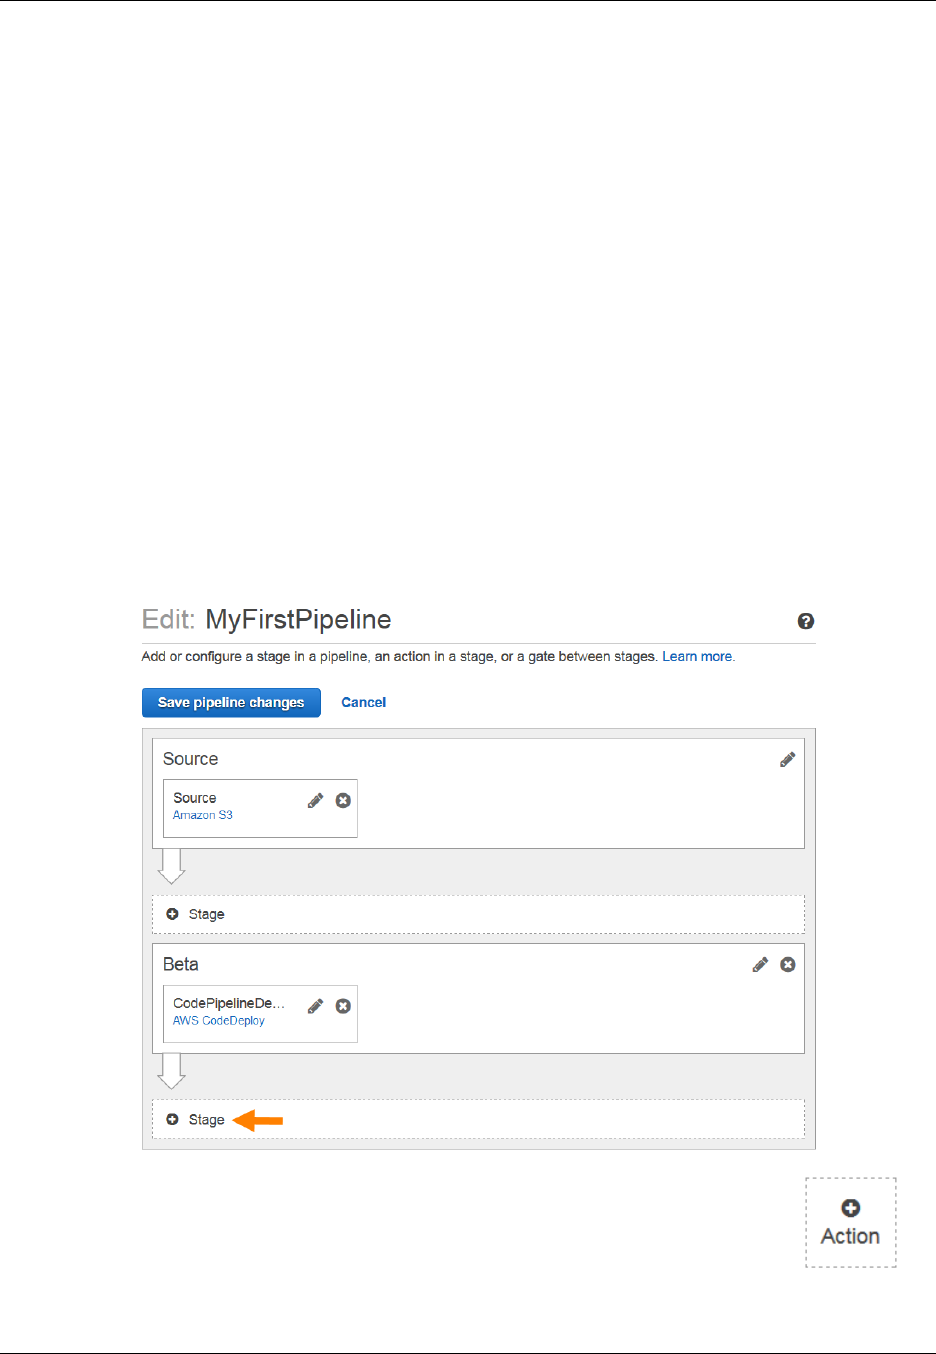
AWS CodePipeline User Guide
Add Another Stage
Add the Deployment Group as Another Stage in Your
Pipeline
Now that you have another deployment group, you can add a stage that uses this deployment group
to deploy to the same Amazon EC2 instances you used earlier. You can use the AWS CodePipeline
console or the AWS CLI to add this stage.
Topics
•Create a Third Stage (Console) (p. 29)
•Create a Third Stage (CLI) (p. 31)
Create a Third Stage (Console)
You can use the AWS CodePipeline console to add a new stage that uses the new deployment group.
Because this deployment group is deploying to the Amazon EC2 instances you've already used, the
deploy action in this stage will fail.
1. Sign in to the AWS Management Console and open the AWS CodePipeline console at http://
console.aws.amazon.com/codepipeline.
2. In Name, choose the name of the pipeline you created, MyFirstPipeline.
3. On the pipeline details page, choose Edit.
4. On the Edit page, choose + Stage to add a stage immediately after the Beta stage.
5.
In the name field for the new stage, type Production, and then choose + Action ( ).
6. In the Action category drop-down list, choose Deploy. In Action name, type Deploy-Second-
Deployment. In Deployment provider, choose AWS CodeDeploy from the drop-down list. In
API Version 2015-07-09
29

AWS CodePipeline User Guide
Add Another Stage
the AWS CodeDeploy section, in Application Name, choose CodePipelineDemoApplication
from the drop-down list, as you did when you created the pipeline. In Deployment Group, choose
the deployment group you just created, CodePipelineProductionFleet. In the Input artifacts
section, type MyApp in Name, and then choose Add action.
Tip
The name of the input artifact, MyApp, was created automatically for you in the Create
Pipeline wizard as the output artifact of the source action. Every action has an input
artifact (the artifact the action works on), an output artifact (the product or result of
the action), or both, depending on the action type. In this example, the deploy action
inputs the output of the source action in the source stage, MyApp, and deploys it.
Because the action configured for the previous stage (Beta) has already deployed the
application to the same Amazon EC2 instances, this action will fail. For more information
about input and output artifacts and the structure of pipelines, see Pipeline Structure
Reference (p. 158).
7. On the Edit page, choose Save pipeline changes. In the Save pipeline changes dialog box,
choose Save and continue.
8. Although the new stage has been added to your pipeline, a status of No executions yet is
displayed because no changes have triggered another run of the pipeline. You will have to
manually rerun the last revision to see how the pipeline runs now that it has been edited. On the
pipeline details page, choose Release change. This will run the most recent revision available in
each source location specified in a source action through the pipeline.
Alternatively, to use the AWS CLI to rerun the pipeline, from a terminal (Linux, OS X, or Unix) or
command prompt (Windows), run the start-pipeline-execution command, specifying the name of
the pipeline. This will run the application in your source bucket through the pipeline for a second
time.
aws codepipeline start-pipeline-execution --name MyFirstPipeline
This command returns a pipelineExecutionId object.
9. Return to the AWS CodePipeline console and choose MyFirstPipeline in the list of pipelines to
open the view page for that pipeline.
The pipeline shows three stages and the state of the artifact running through those three stages. It
might take up to five minutes for the pipeline to run through all stages. You'll see the deployment
succeeds on the first two stages, just as before, but the Production stage shows the Deploy-
Second-Deployment action failed.
API Version 2015-07-09
30
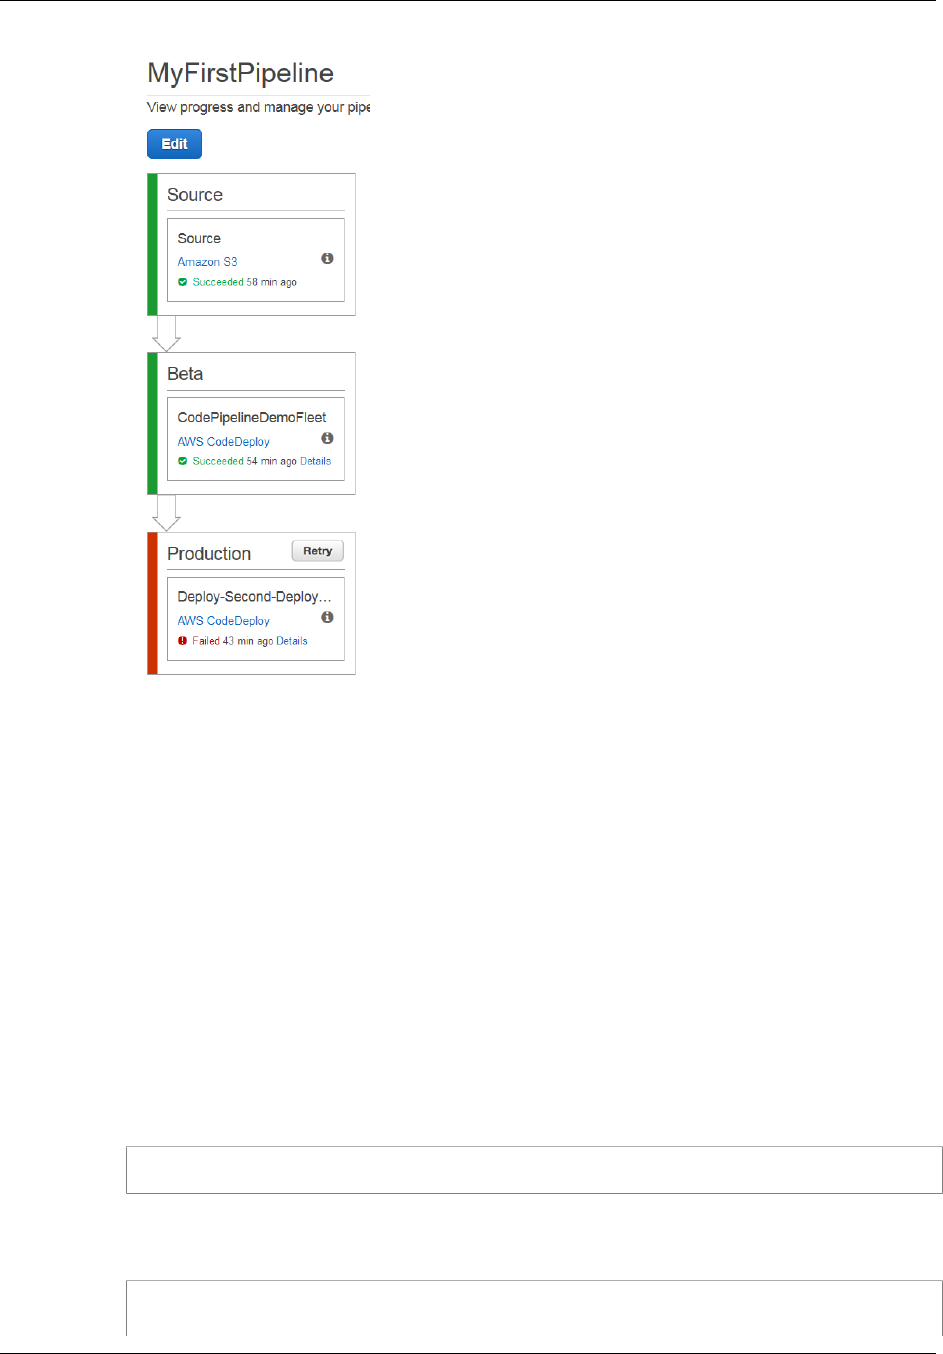
AWS CodePipeline User Guide
Add Another Stage
10. In the Deploy-Second-Deployment action, choose Details. You will be redirected to the details
page for the AWS CodeDeploy deployment. In this case, the failure is the result of the first
instance group deploying to all of the Amazon EC2 instances, leaving no instances for the second
deployment group.
Note
This failure is by design, to demonstrate what happens when there is a failure in a
pipeline stage.
Create a Third Stage (CLI)
Although using the AWS CLI to add a stage to your pipeline is more complex than using the console, it
provides more visibility into the structure of the pipeline.
To create a third stage for your pipeline
1. Open a terminal session (Linux, OS X, or Unix) or command prompt (Windows) and run
the get-pipeline command to display the structure of the pipeline you just created. For
MyFirstPipeline, you would type the following command:
aws codepipeline get-pipeline --name "MyFirstPipeline"
This command returns the structure of MyFirstPipeline. The first part of the output should look
similar to the following:
{
"pipeline": {
API Version 2015-07-09
31

AWS CodePipeline User Guide
Add Another Stage
"roleArn": "arn:aws:iam::80398EXAMPLE:role/AWS-CodePipeline-
Service",
"stages": [
...
}
2. Copy and paste this structure into a plain-text editor, and save the file as pipeline.json. For
convenience, save this file in the same directory where you run the aws codepipeline commands.
Tip
You can pipe the JSON directly into a file with the get-pipeline command as follows:
aws codepipeline get-pipeline --name MyFirstPipeline >pipeline.json
3. Copy the Beta stage section and paste it after the first two stages. Because it is a deploy stage,
just like the Beta stage, you will use it as a template for the third stage.
4. Change the name of the stage and the deployment group details, and then save the file.
The following example shows the JSON you will add to the pipeline.json file after the Beta stage.
Edit the emphasized elements with new values. Remember to include a comma to separate the
Beta and Production stage definitions.
,
{
"name": "Production",
"actions": [
{
"inputArtifacts": [
{
"name": "MyApp"
}
],
"name": "Deploy-Second-Deployment",
"actionTypeId": {
"category": "Deploy",
"owner": "AWS",
"version": "1",
"provider": "CodeDeploy"
},
"outputArtifacts": [],
"configuration": {
"ApplicationName": "CodePipelineDemoApplication",
"DeploymentGroupName": "CodePipelineProductionFleet"
},
"runOrder": 1
}
]
}
5. Run the update-pipeline command, specifying the name of the pipeline and the pipeline JSON
file, similar to the following:
aws codepipeline update-pipeline --cli-input-json file://pipeline.json
This command returns the entire structure of the updated pipeline.
6. Run the start-pipeline-execution command, specifying the name of the pipeline. This will run the
application in your source bucket through the pipeline for a second time.
API Version 2015-07-09
32
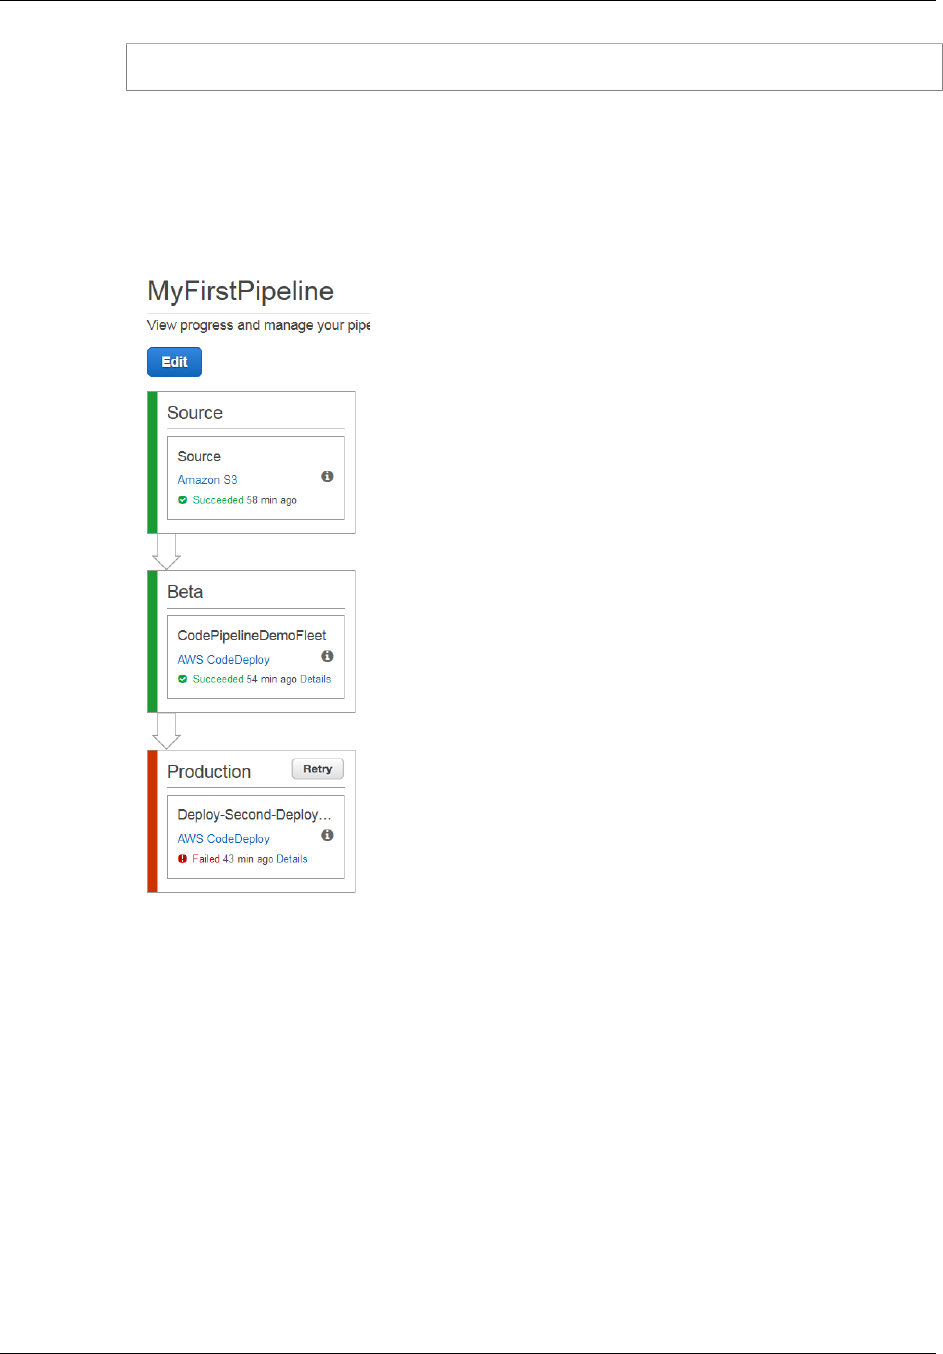
AWS CodePipeline User Guide
Disable and Enable Transitions Between Stages
aws codepipeline start-pipeline-execution --name MyFirstPipeline
This command returns a pipelineExecutionId object.
7. Open the AWS CodePipeline console and choose MyFirstPipeline from the list of pipelines.
The pipeline shows three stages and the state of the artifact running through those three stages.
It might take up to five minutes for the pipeline to run through all stages. Although the deployment
succeeds on the first two stages, just as before, the Production stage shows that the Deploy-
Second-Deployment action failed.
8. In the Deploy-Second-Deployment action, choose Details to see details of the failure. You will
be redirected to the details page for the AWS CodeDeploy deployment. In this case, the failure
is the result of the first instance group deploying to all of the Amazon EC2 instances, leaving no
instances for the second deployment group.
Note
This failure is by design, to demonstrate what happens when there is a failure in a
pipeline stage.
Step 5: Disable and Enable Transitions Between
Stages in AWS CodePipeline
You can enable or disable the transition between stages in a pipeline. Disabling the transition between
stages allows you to manually control transitions between one stage and another. For example, you
might want to run the first two stages of a pipeline, but disable transitions to the third stage until you are
ready to deploy to production, or while you troubleshoot a problem or failure with that stage.
API Version 2015-07-09
33

AWS CodePipeline User Guide
Clean Up Resources
To disable and enable transitions between stages in an AWS CodePipeline pipeline
1. Open the AWS CodePipeline console and choose MyFirstPipeline from the list of pipelines.
2. On the details page for the pipeline, choose the arrow that indicates the transition between the
second stage, Beta, and the third stage that you added in the previous section, Production.
3. In the Disable Transition dialog box, type a reason for disabling the transition between the
stages, and then choose Disable.
The arrow between stages displays an icon and color change indicating that the transition has
been disabled.
4. Upload your sample again to the Amazon S3 bucket. Because the bucket is versioned,
this change will automatically start the pipeline. For information, see Upload the sample
application (p. 23).
5. Return to the details page for your pipeline and watch the status of the stages. The pipeline view
will change to show progress and success on the first two stages, but no changes will occur on the
third stage. This process might take a few minutes.
6. Enable the transition by choosing the arrow that indicates the transition has been disabled
between the two stages. In the Enable Transition dialog box, choose Enable. The stage will
begin running in a few minutes and attempt to process the artifact that has already been run
through the first two stages of the pipeline.
Note
If you want this third stage to succeed, edit the CodePipelineProductionFleet deployment
group before you enable the transition, and specify a different set of Amazon EC2
instances where you will deploy the application. For more information about how to do
this, see Change Deployment Group Settings. If you create more Amazon EC2 instances,
you may incur additional costs.
Step 6: Clean Up Resources
You can use some of the resources you created in this walkthrough for the tutorial, Four-Stage Pipeline
Tutorial (p. 46). For example, you can reuse the AWS CodeDeploy application and deployment.
However, after you complete this and any other tutorials, you should delete the pipeline and the
resources it uses, so that you will not be charged for the continued use of those resources. First, delete
the pipeline, then the AWS CodeDeploy application and its associated Amazon EC2 instances, and
finally, the Amazon S3 bucket.
API Version 2015-07-09
34

AWS CodePipeline User Guide
Simple Pipeline Walkthrough
(AWS CodeCommit Repository)
To clean up the resources used in this tutorial
1. To clean up your AWS CodePipeline resources, follow the instructions in Delete a Pipeline in AWS
CodePipeline (p. 83).
2. To clean up your AWS CodeDeploy resources, follow the instructions in Clean Up Deployment
Walkthrough Resources.
3. To delete the Amazon S3 bucket, follow the instructions in Deleting or Emptying an Amazon S3
Bucket. If you do not intend to create more pipelines, delete the Amazon S3 bucket created for
storing your pipeline artifacts. For more information about this bucket, see Concepts (p. 4).
Simple Pipeline Walkthrough (AWS
CodeCommit Repository)
The easiest way to get started with AWS CodePipeline is to use the Create Pipeline wizard in the
AWS CodePipeline console to create a simple pipeline.
In this walkthrough, you will use AWS CodePipeline to deploy code that is maintained in an AWS
CodeCommit repository to a single Amazon EC2 instance. You will use AWS CodeDeploy as the
deployment service.
Not what you're looking for? To create a simple pipeline using a versioned Amazon S3 bucket as a
code repository, see Simple Pipeline Walkthrough (Amazon S3 Bucket) (p. 21).
After you complete this walkthrough, you should have enough practice with AWS CodeCommit
concepts to use it as a repository in your pipelines.
Before you begin, make sure you have completed the following tasks:
•Configure an IAM user
•Install and configure the AWS CLI
In addition, make sure to complete these service-specific tasks:
•AWS CodeCommit: Install Git and configure credentials
•AWS CodeDeploy: Create an IAM instance profile and an AWS CodeDeploy service role
•AWS CodePipeline: Assign AWS CodePipeline permissions to the IAM user role
Note
If you have already completed the Simple Pipeline Walkthrough (Amazon S3
Bucket) (p. 21) tutorial, but not yet cleaned up its resources, you will need to create
different names for many of the resources you used in that tutorial. For example, instead of
MyFirstPipeline, you might name your pipeline MySecondPipeline.
Topics
•Step 1: Create an AWS CodeCommit Repository and Local Repo (p. 36)
•Step 2: Add Sample Code to Your AWS CodeCommit Repository (p. 36)
•Step 3: Create an Amazon EC2 Instance and Install the AWS CodeDeploy Agent (p. 37)
•Step 4: Create an Application in AWS CodeDeploy (p. 39)
•Step 5: Create Your First Pipeline in AWS CodePipeline (p. 40)
•Step 6: Modify Code in Your AWS CodeCommit Repository (p. 44)
•Step 7: Optional Stage Management Tasks (p. 45)
•Step 8: Clean Up Resources (p. 46)
API Version 2015-07-09
35

AWS CodePipeline User Guide
Create an AWS CodeCommit Repository
Step 1: Create an AWS CodeCommit Repository
and Local Repo
To start this walkthrough, you will create a repository in AWS CodeCommit. Your pipeline will get
source code from this repository when it runs. You will also create a local repository where you
maintain and update code before pushing it to the AWS CodeCommit repository.
Important
AWS CodeCommit is currently supported in the US East (N. Virginia) (us-east-1) Region only.
Be sure to complete all of the steps in this tutorial with this AWS region selected.
Follow the first two procedures in the Git with AWS CodeCommit Tutorial in the AWS CodeCommit
User Guide:
•Step 1: Create an AWS CodeCommit Repository
•Step 2: Create a Local Repo
Tip
For information about connecting to a local repo you create, see Connect to an AWS
CodeCommit Repository.
After you complete these two procedures, return to this page and continue to the next step. Do not
continue to the third step in the AWS CodeCommit tutorial. You will complete different steps in this
tutorial instead.
Step 2: Add Sample Code to Your AWS
CodeCommit Repository
In this step, you will download code for a sample application that was created for an AWS CodeDeploy
sample walkthrough, and add it to your AWS CodeCommit repository.
1. Download the following file:
•SampleApp_Linux.zip.
2. Unzip the files from SampleApp_Linux.zip into the local directory you created in the previous
procedure (for example, /tmp/my-demo-repo or c:\temp\my-demo-repo).
Be sure to place the files directly into your local repository. Do not include a SampleApp_Linux
folder. In Linux, OS X, or Unix, for example, your directory and file hierarchy should look like this:
/tmp
|my-demo-repo
|-- appspec.yml
|-- index.html
|-- LICENSE.txt
`-- scripts
|-- install_dependencies
|-- start_server
`-- stop_server
3. Change directories to your local repo:
(For Linux, OS X, or Unix) cd /tmp/my-demo-repo
(For Windows) cd c:\temp\my-demo-repo
API Version 2015-07-09
36

AWS CodePipeline User Guide
Create an Amazon EC2 Instance and
Install the AWS CodeDeploy Agent
4. Run the following command to stage all of your files at once:
git add -A
5. Run the following command to commit the files with a commit message:
git commit -m "Added sample application files"
6. Run the following command to push the files from your local repo to your AWS CodeCommit
repository:
git push
7. The files you downloaded and added to your local repo have now been added to the master
branch in your AWS CodeCommit MyDemoRepo repository and are ready to be included in a
pipeline.
Step 3: Create an Amazon EC2 Instance and
Install the AWS CodeDeploy Agent
In this step, you will create the Amazon EC2 instance to which you will deploy a sample application. As
part of this process, you will install the AWS CodeDeploy agent on the instance. The AWS CodeDeploy
agent is a software package that enables an instance to be used in AWS CodeDeploy deployments.
To launch an instance
1. Open the Amazon EC2 console at https://console.aws.amazon.com/ec2/.
2. From the console dashboard, choose Launch Instance.
3. On the Step 1: Choose an Amazon Machine Image (AMI) page, locate the row for the HVM
edition of the Amazon Linux AMI, and then choose Select. (This AMI is labeled "Free tier eligible"
and can be found at the top of the list.)
Note
These basic configurations, called Amazon Machine Images (AMIs), serve as templates
for your instance. This walkthrough can be completed with any of the free tier eligible
AMIs. For simplicity, we will use the HVM edition of the Amazon Linux AMI.
4. On the Step 2: Choose an Instance Type page, choose the free tier eligible t2.micro type as
the hardware configuration for your instance, and then choose Next: Configure Instance Details.
5. On the Step 3: Configure Instance Details page, do the following:
• In Number of instances, enter 1.
• In Auto-assign Public IP, choose Enable.
• In IAM role, choose an IAM role that has been configured for use as an IAM instance profile
for use with AWS CodeDeploy. If you do not have an IAM instance profile, choose Create new
IAM role and follow the instructions in Create an IAM Instance Profile for Your Amazon EC2
Instances.
Note
For the purposes of this walkthrough, you can use the following unrestricted policy
in your IAM instance profile for AWS CodeDeploy. For pipelines you use in your
development workflows, you might create a more restrictive bucket policy.
{
"Version": "2012-10-17",
API Version 2015-07-09
37

AWS CodePipeline User Guide
Create an Amazon EC2 Instance and
Install the AWS CodeDeploy Agent
"Statement": [
{
"Action": [
"s3:Get*",
"s3:List*"
],
"Effect": "Allow",
"Resource": "*"
}
]
}
6. On the Step 3: Configure Instance Details page, expand Advanced Details, and in the User
data field, type the following:
#!/bin/bash
yum -y update
yum install -y ruby
yum install -y aws-cli
cd /home/ec2-user
aws s3 cp s3://aws-codedeploy-us-east-1/latest/install . --region us-
east-1
chmod +x ./install
./install auto
This code will install the AWS CodeDeploy agent on your instance as it is created. If you prefer,
you can connect to your Linux instance using SSH and install the AWS CodeDeploy agent
manually after the instance is created.
7. Leave the rest of the items on the Step 3: Configure Instance Details page unchanged. Choose
Next: Add Storage, leave the Step 4: Add Storage page unchanged, and then choose Next:
Tag Instance.
8. On the Tag Instance page, with Name displayed in the Key box, type MyCodePipelineDemo in
the Value box, and then choose Next: Configure Security Group.
Important
The Key and Value boxes are case-sensitive.
9. On the Step 6: Configure Security Group page, do the following:
• Next to Assign a security group, choose Create a new security group.
• In the row for SSH, under Source, choose My IP.
• Choose Add Rule, choose HTTP, and then under Source, choose My IP.
10. Choose Review and Launch.
11. On the Review Instance Launch page, choose Launch, and then do one of the following when
prompted for a key pair:
• If you already have a key pair to use with Amazon EC2 instances, select Choose an existing
key pair, and then select your key pair.
• If you have not created a key pair yet, select Create a new key pair, enter a name for the key
pair, and then choose Download Key Pair. This is your only chance to save the private key file.
Be sure to download it. Save the private key file in a safe place. You'll need to provide the name
of your key pair when you launch an instance; you'll need to provide the corresponding private
key each time you connect to the instance. For more information, see Amazon EC2 Key Pairs.
API Version 2015-07-09
38

AWS CodePipeline User Guide
Create an Application in AWS CodeDeploy
Caution
Don't select the Proceed without a key pair option. If you launch your instance without
a key pair, you can't connect to it if you need to troubleshoot issues with the AWS
CodeDeploy agent.
When you are ready, select the acknowledgement check box, and then choose Launch
Instances.
12. Choose View Instances to close the confirmation page and return to the console.
13. You can view the status of the launch on the Instances page. When you launch an instance, its
initial state is pending. After the instance starts, its state changes to running, and it receives a
public DNS name. (If the Public DNS column is not displayed, choose the Show/Hide icon, and
then select Public DNS.)
14. It can take a few minutes for the instance to be ready for you to connect to it. Check that your
instance has passed its status checks. You can view this information in the Status Checks
column.
If you want to confirm that the AWS CodeDeploy agent is configured correctly, you can connect to your
Linux instance using SSH and then verify the AWS CodeDeploy agent is running.
Step 4: Create an Application in AWS
CodeDeploy
In AWS CodeDeploy, an application is an identifier, in the form of a name, for the code you want to
deploy. AWS CodeDeploy uses this name to ensure the correct combination of revision, deployment
configuration, and deployment group are referenced during a deployment. You will select the name
of the AWS CodeDeploy application you create in this step when you create your pipeline later in this
walkthrough.
To create an application in AWS CodeDeploy
1. Open the AWS CodeDeploy console at https://console.aws.amazon.com/codedeploy.
2. If the Applications page does not appear, on the AWS CodeDeploy menu, choose Applications.
3. Choose Create New Application.
4. In the Application Name box, type MyDemoApplication.
5. In the Deployment Group Name box, type MyDemoDeploymentGroup.
6. In the Search by Tags list, select the Amazon EC2 tag type, choose Name in the Key box, and in
the Value box, type MyCodePipelineDemo.
Important
You must choose the same value for the Name key here that you assigned to your
Amazon EC2 instance when you created it. If you tagged your instance with something
other than MyCodePipelineDemo, be sure to use it here.
7. In the Deployment Config list, choose CodeDeployDefault.OneAtaTime.
8. In the Service Role ARN box, choose an Amazon Resource Name (ARN) for a service role
that trusts AWS CodeDeploy with, at minimum, the trust and permissions described in Create a
Service Role for AWS CodeDeploy. To get the service role ARN, see Get the Service Role ARN
(Console).
9. Choose Create Application.
API Version 2015-07-09
39
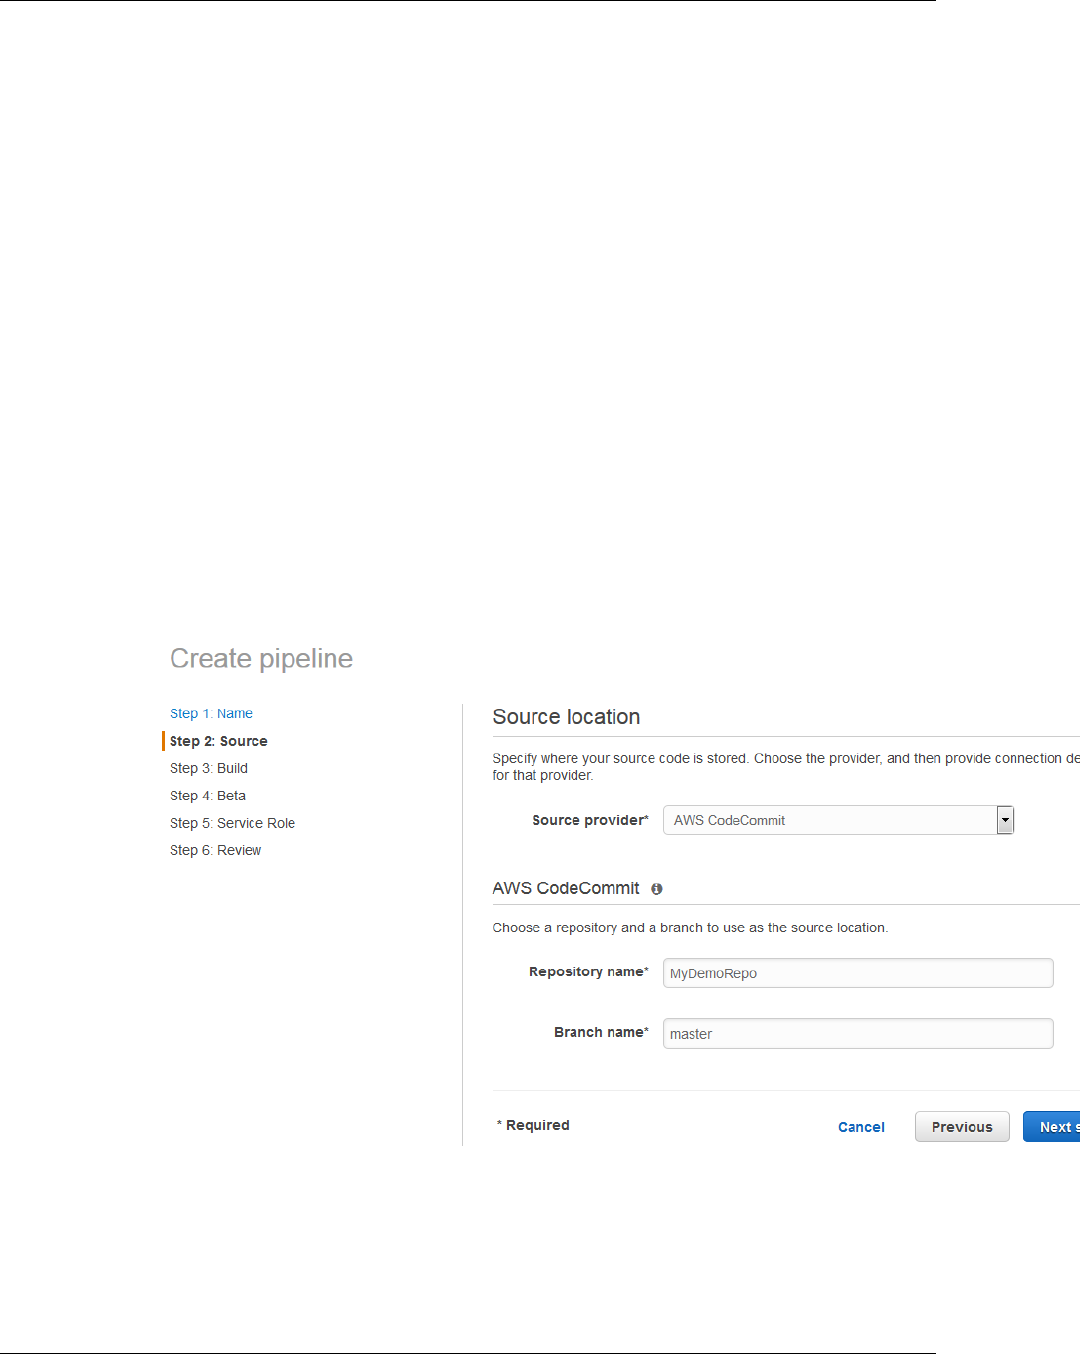
AWS CodePipeline User Guide
Create Your First Pipeline
Step 5: Create Your First Pipeline in AWS
CodePipeline
You're now ready to create and run your first pipeline.
To create an AWS CodePipeline automated release process
1. Sign in to the AWS Management Console and open the AWS CodePipeline console at http://
console.aws.amazon.com/codepipeline.
2. On the introductory page, choose Get started.
If you see the All pipelines page, choose Create pipeline.
3. In Step 1: Name, in Pipeline name, type MyFirstPipeline, and then choose Next step.
Note
If you choose another name for your pipeline, be sure to use it instead of
MyFirstPipeline in the remaining steps of this walkthrough. After you create a
pipeline, you cannot change its name. Pipeline names are subject to some limitations. For
more information, see Limits (p. 166).
4. In Step 2: Source, in Source provider, choose AWS CodeCommit. In Repository name, choose
the name of the AWS CodeCommit repository you created in Create an AWS CodeCommit
Repository (p. 36). In Branch name, choose the name of the branch that contains your latest
code update. Unless you created a different branch on your own, only master will be available.
Choose Next step.
5. In Step 3: Build, choose No Build, and then choose Next step.
Note
In this walkthrough, you are deploying code that requires no build service.
6. In Step 4: Beta, in Deployment provider, choose AWS CodeDeploy. In Application name, type
MyDemoApplication, or choose the Refresh button, and then choose the application name from
API Version 2015-07-09
40

AWS CodePipeline User Guide
Create Your First Pipeline
the list. In Deployment group, type MyDemoDeploymentGroup, or choose it from the list, and
then choose Next step.
Note
The name "Beta" is the name given by default to this stage of the pipeline, just as
"Source" is the name given to the first stage of the pipeline.
7. In Step 5: Service Role, you will choose the IAM role to give AWS CodePipeline permission to
use resources in your account. Service role creation is only required the first time you create a
pipeline in AWS CodePipeline.
If you have not already created a service role for AWS CodePipeline:
1. Choose Create role.
2. On the IAM console page that describes the AWS-CodePipeline-Service role that will be
created for you, choose Allow. After you create the role, AWS-CodePipeline-Service will
appear in Role name on the Step 5: Service Role page.
3. Choose Next step.
If you already have a service role for AWS CodePipeline, you must ensure that it includes the
permissions needed to work with AWS CodeCommit. If your service role was created after April
18, 2016, it includes the necessary permissions. If it was created on or before April 18, 2016, you
may need to follow these steps:
1. Sign in to the Identity and Access Management (IAM) console at https://
console.aws.amazon.com/iam/.
2. In the IAM console, in the navigation pane, choose Roles, and then choose your AWS-
CodePipeline-Service role from the list of roles.
3. On the Permissions tab, in Inline Policies, in the row for your service role policy, choose Edit
Policy.
API Version 2015-07-09
41
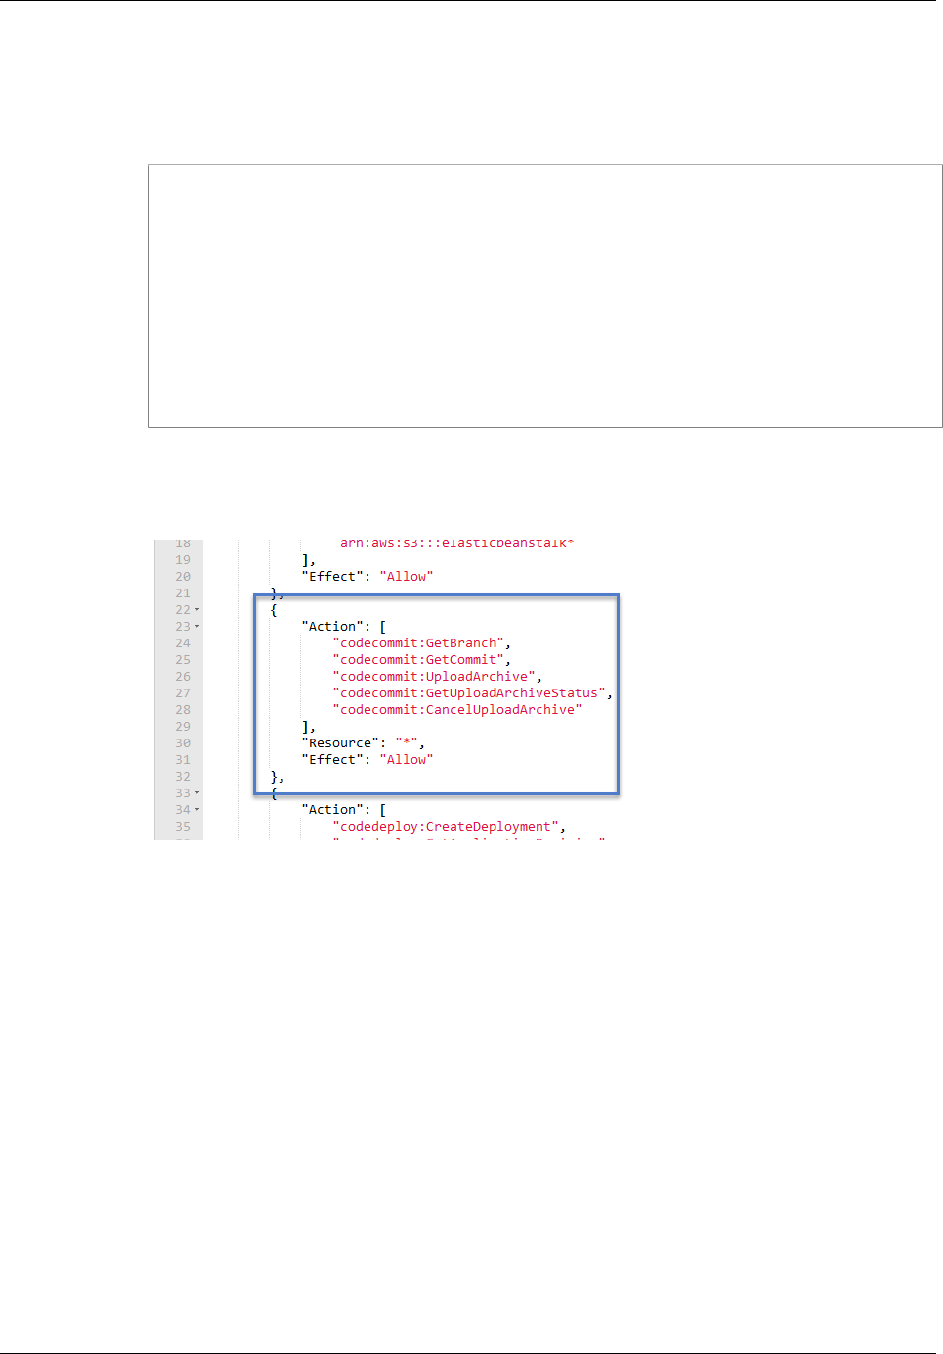
AWS CodePipeline User Guide
Create Your First Pipeline
Tip
Your service role has a name in a format similar to oneClick_AWS-
CodePipeline-1111222233334.
4. In the Policy Document box, add the following to your policy statement:
{
"Action": [
"codecommit:GetBranch",
"codecommit:GetCommit",
"codecommit:UploadArchive",
"codecommit:GetUploadArchiveStatus",
"codecommit:CancelUploadArchive"
],
"Resource": "*",
"Effect": "Allow"
},
The permissions might appear in your policy document like this after you add them:
5. Choose Validate Policy to ensure the policy contains no errors. When the policy is error-free,
choose Apply Policy.
6. In the Step 5: Service Role page, in Role name, choose the name of your service role for
AWS CodePipeline.
Because the drop-down list will display all IAM service roles associated with your account, if you
choose a name different from the default, be sure that the name is recognizable as the service
role for AWS CodePipeline.
7. Choose Next step.
8. In Step 6: Review, review the information, and then choose Create pipeline.
9. The pipeline automatically starts to run. You can view progress and success and failure messages
as the AWS CodePipeline sample deploys the web page to the Amazon EC2 instance in the AWS
CodeDeploy deployment.
API Version 2015-07-09
42
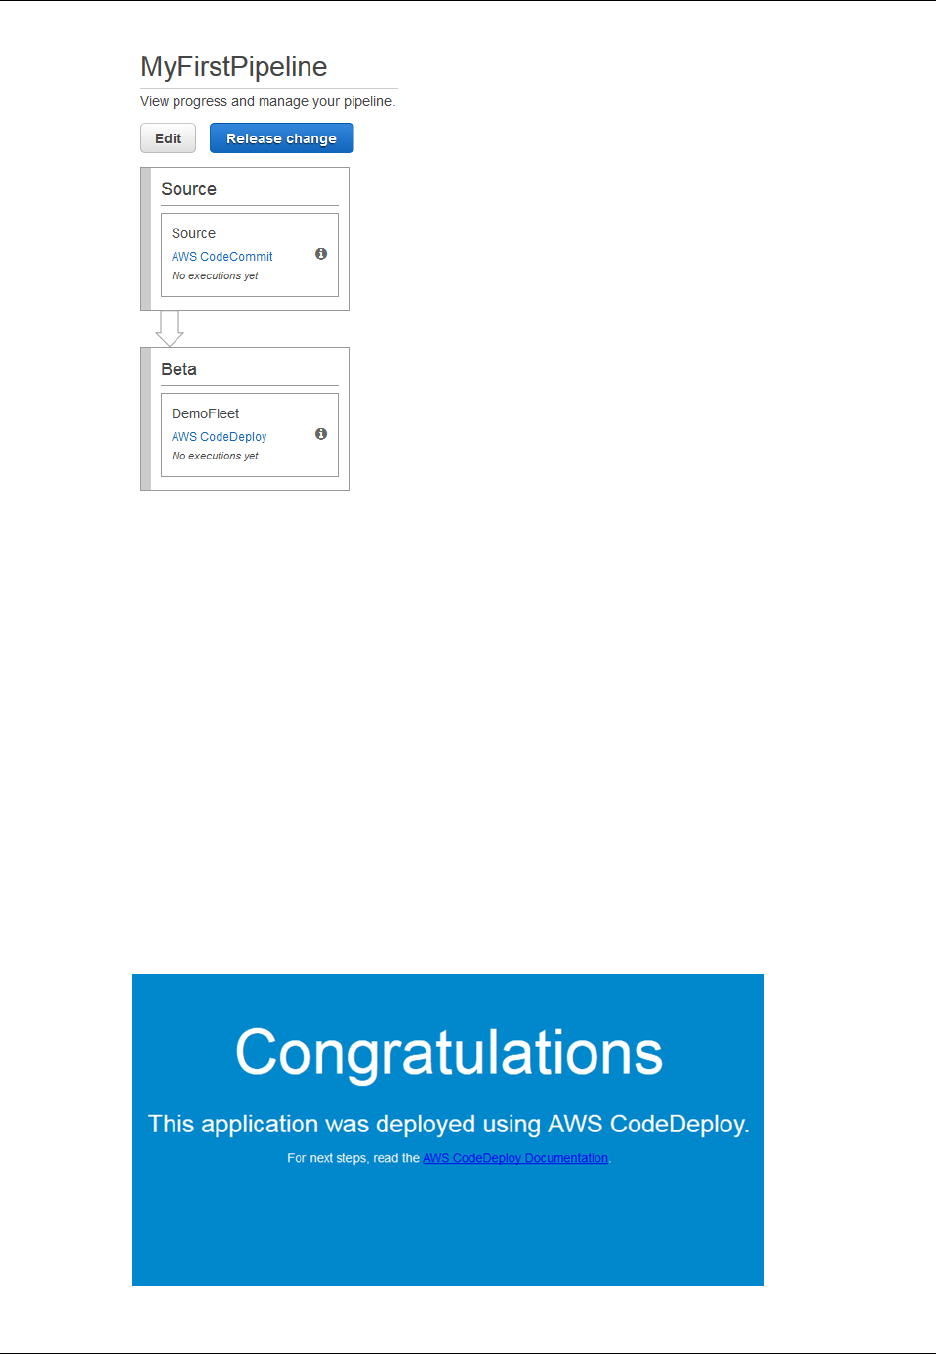
AWS CodePipeline User Guide
Create Your First Pipeline
Congratulations! You just created a simple pipeline in AWS CodePipeline. The pipeline has two stages:
a source stage named Source, which detects changes in the sample application stored in the AWS
CodeCommit repository and pulls those changes into the pipeline, and a Beta stage that deploys those
changes to the Amazon EC2 instance using AWS CodeDeploy. Next, you will verify the results.
To verify that your pipeline ran successfully
1. View the initial progress of the pipeline. The status of each stage will change from No executions
yet to In Progress, and then to either Succeeded or Failed. The pipeline should complete the
first run within a few minutes.
2. After the pipeline status displays Succeeded, in the status area for the Beta stage, choose
Details.
3. In the AWS CodeDeploy console, in Deployment Details, in Instance ID, choose the instance ID
of the successfully deployed instance.
4. On the Description tab, in Public DNS, copy the address, and then paste it into the address bar
of your web browser.
This is the sample application you downloaded and pushed to your AWS CodeCommit repository.
API Version 2015-07-09
43

AWS CodePipeline User Guide
Update Code in Your AWS CodeCommit Repository
For more information about stages, actions, and how pipelines work, see Concepts (p. 4).
Step 6: Modify Code in Your AWS CodeCommit
Repository
In this step, you will make changes to the HTML file that is part of the sample AWS CodeDeploy
application you deployed to your Amazon EC2 instance. When your pipeline runs again later in this
walkthrough, the changes you make will be visible at the http://PublicDNS URLs.
1. Change directories to your local repo:
(For Linux, OS X, or Unix) cd /tmp/my-demo-repo
(For Windows) cd c:\temp\my-demo-repo
2. Use a text editor to modify the index.html file:
(For Linux or Unix)gedit index.html
(For OS X)open –e index.html
(For Windows)notepad index.html
3. Revise the contents of the index.html file to change the background color and some of the text
on the web page, and then save the file.
<!DOCTYPE html>
<html>
<head>
<title>Updated Sample Deployment</title>
<style>
body {
color: #000000;
background-color: #CCFFCC;
font-family: Arial, sans-serif;
font-size:14px;
}
h1 {
font-size: 250%;
font-weight: normal;
margin-bottom: 0;
}
h2 {
font-size: 175%;
font-weight: normal;
margin-bottom: 0;
}
</style>
</head>
<body>
<div align="center"><h1>Updated Sample Deployment</h1></div>
<div align="center"><h2>This application was updated using AWS
CodePipeline, AWS CodeCommit, and AWS CodeDeploy.</h2></div>
<div align="center">
<p>Learn more:</p>
<p><a href="http://docs.aws.amazon.com/codepipeline/latest/
userguide/">AWS CodePipeline User Guide</a></p>
API Version 2015-07-09
44
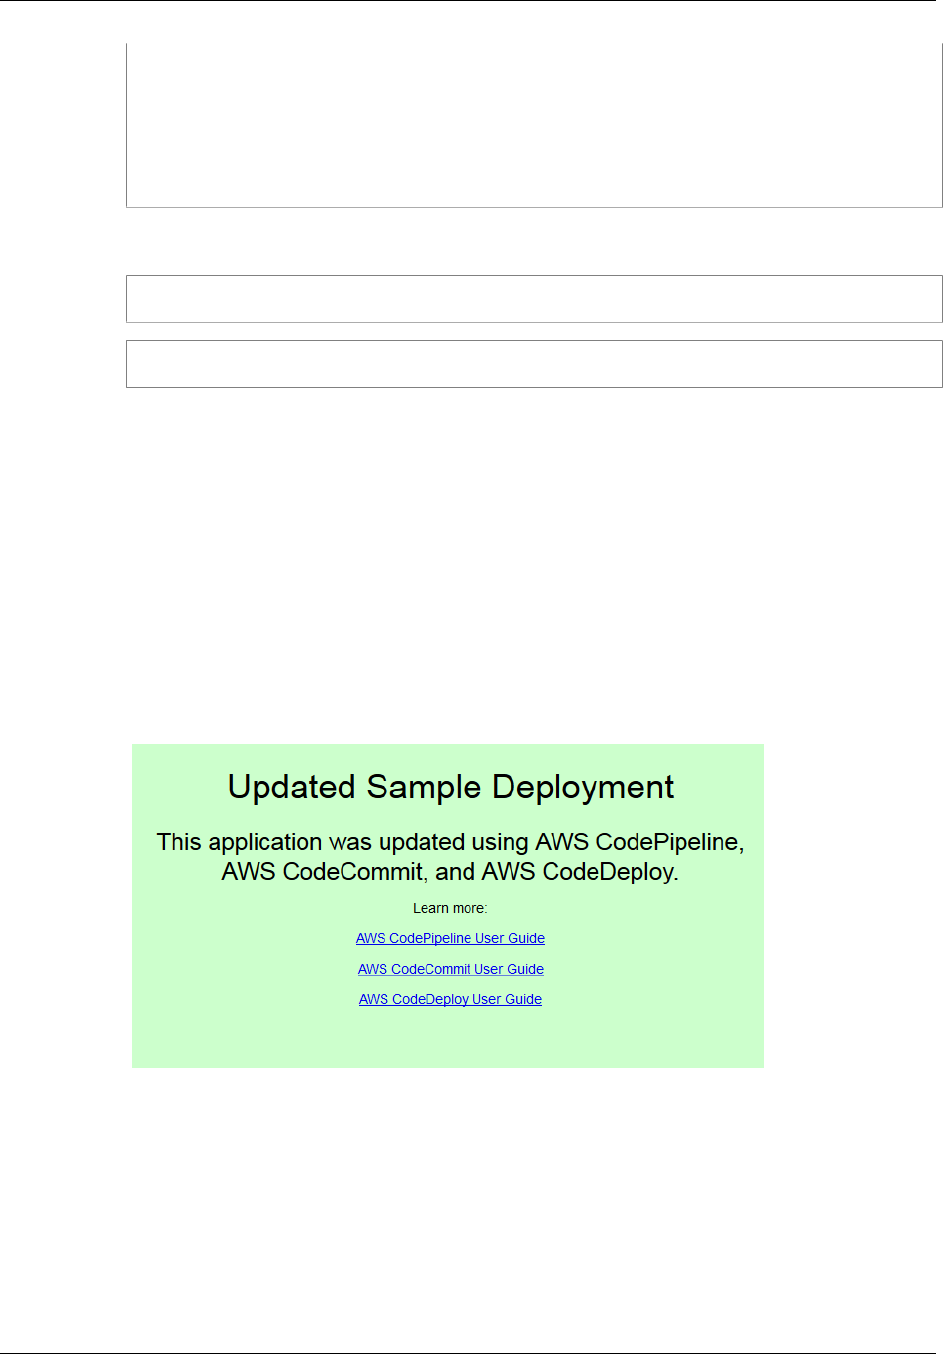
AWS CodePipeline User Guide
Optional Stage Management Tasks
<p><a href="http://docs.aws.amazon.com/codecommit/latest/
userguide/">AWS CodeCommit User Guide</a></p>
<p><a href="http://docs.aws.amazon.com/codedeploy/latest/
userguide/">AWS CodeDeploy User Guide</a></p>
</div>
</body>
</html>
4. Commit and push your changes to your AWS CodeCommit repository by running the following
commands, one at a time:
git commit -am "Updated sample application files"
git push
Your pipeline is configured to run whenever code changes are made to your AWS CodeCommit
repository.
To verify your pipeline ran successfully
1. View the initial progress of the pipeline. The status of each stage will change from No executions
yet to In Progress, and then to either Succeeded or Failed. The pipeline should complete within
a few minutes.
2. After the action status displays Succeeded, in the status area for the Beta stage, choose Details.
3. In the Deployment Details section, in Instance ID, choose the instance ID of the instance.
4. On the Description tab, in Public DNS, copy the address, and then paste it into the address bar
of your web browser.
The updated web page will be displayed:
For more information about stages, actions, and how pipelines work, see Concepts (p. 4).
Step 7: Optional Stage Management Tasks
If you want to gain more experience working with stages before you end the walkthrough, you can
follow two additional procedures in the Simple Pipeline Walkthrough (Amazon S3 Bucket) (p. 21).
•Add Another Stage (p. 28)
•Disable and Enable Transitions Between Stages in AWS CodePipeline (p. 33)
API Version 2015-07-09
45

AWS CodePipeline User Guide
Clean Up Resources
Note
In step 4 of the second procedure, instead of uploading your sample to an Amazon S3
bucket again, as described, make a change to the sample app in your local repo and push it
to your AWS CodeCommit repository.
Step 8: Clean Up Resources
You can use some of the resources you created in this walkthrough for the next tutorial, Four-Stage
Pipeline Tutorial (p. 46). For example, you can reuse the AWS CodeDeploy application and
deployment. However, after you complete this and any other tutorials, you should delete the pipeline
and the resources it uses, so that you will not be charged for the continued use of those resources.
First, delete the pipeline, then the AWS CodeDeploy application and its associated Amazon EC2
instance, and finally, the AWS CodeCommit repository.
To clean up the resources used in this tutorial
1. To clean up your AWS CodePipeline resources, follow the instructions in Delete a Pipeline in AWS
CodePipeline (p. 83).
2. To clean up your AWS CodeDeploy resources, follow the instructions in Clean Up Deployment
Walkthrough Resources.
3. To delete the AWS CodeCommit repository, follow the instructions in Delete an AWS CodeCommit
Repository.
Getting Started by Creating a Four-Stage
Pipeline
Now that you've created your first pipeline in Simple Pipeline Walkthrough (Amazon S3
Bucket) (p. 21) or Simple Pipeline Walkthrough (AWS CodeCommit Repository) (p. 35), you
can start creating more complex pipelines. This tutorial will walk you through the creation of a four-
stage pipeline that uses a GitHub repository for your source, a Jenkins build server to build the project,
and an AWS CodeDeploy application to deploy the built code to a staging server. After the pipeline is
created, you will edit it to add a stage with a test action to test the code, also using Jenkins.
Before you can create this pipeline, you must configure the required resources. For example, if you
want to use a GitHub repository for your source code, you must create the repository before you
can add it to a pipeline. As part of setting up, this tutorial walks you through setting up Jenkins on an
Amazon EC2 instance for demonstration purposes.
Before you begin this tutorial, you should have already completed the prerequisites (p. 18).
Topics
•Step 1: Set Up Prerequisites (p. 46)
•Step 2: Create a Pipeline in AWS CodePipeline (p. 49)
•Step 3: Add Another Stage to Your Pipeline (p. 50)
•Step 4: Clean Up Resources (p. 53)
Step 1: Set Up Prerequisites
To integrate with Jenkins, AWS CodePipeline requires you to install the AWS CodePipeline Plugin for
Jenkins on any instance of Jenkins you want to use with AWS CodePipeline. You should also configure
API Version 2015-07-09
46

AWS CodePipeline User Guide
Set Up Prerequisites
a dedicated IAM user to use for permissions between your Jenkins project and AWS CodePipeline.
The easiest way to integrate Jenkins and AWS CodePipeline is to install Jenkins on an Amazon EC2
instance that uses an IAM instance role that you create for Jenkins integration. In order for links in the
pipeline for Jenkins actions to successfully connect, you must configure proxy and firewall settings on
the server or Amazon EC2 instance to allow inbound connections to the port used by your Jenkins
project. Make sure you have configured Jenkins to authenticate users and enforce access control
before you allow connections on those ports (for example, 443 and 8443 if you have secured Jenkins
to only use HTTPS connections, or 80 and 8080 if you allow HTTP connections). For more information,
see Securing Jenkins.
Note
This tutorial uses a code sample and configures build steps that convert the sample from
Haml to HTML. You can download the open-source sample code from the GitHub repository
by following the steps in this topic. You will need the entire sample in your GitHub repository,
not just the .zip file.
This tutorial also assumes that:
• You are familiar with installing and administering Jenkins and creating Jenkins projects.
• You have installed Rake and the Haml gem for Ruby on the same computer or instance that
hosts your Jenkins project.
• You have set the required system environment variables so that Rake commands can be
run from the terminal or command line (for example, on Windows systems, modifying the
PATH variable to include the directory where you installed Rake).
Topics
•Copy or Clone the Sample into a GitHub Repository (p. 47)
•Create an IAM Role to Use for Jenkins Integration (p. 47)
•Install and Configure Jenkins and the AWS CodePipeline Plugin for Jenkins (p. 48)
Copy or Clone the Sample into a GitHub Repository
Clone the sample and push to a GitHub repository
1. Download the sample code from the GitHub repository, or clone the repositories to your local
computer. There are two sample packages:
• If you will be deploying your sample to Linux, OS X, or Unix instances, choose aws-
codepipeline-jenkins-aws-codedeploy_linux.zip.
• If you will be deploying your sample to Windows, choose AWSCodePipeline-Jenkins-
AWSCodeDeploy_Windows.zip.
2. From the repository, choose Fork to clone the sample repo into a repo in your Github account. For
more information, see the GitHub documentation.
Create an IAM Role to Use for Jenkins Integration
As a best practice, consider launching an Amazon EC2 instance to host your Jenkins server and using
an IAM role to grant the instance the required permissions for interacting with AWS CodePipeline.
1. Sign in to the Identity and Access Management (IAM) console at https://console.aws.amazon.com/
iam/.
2. In the IAM console, in the navigation pane, choose Roles, and then choose Create New Role.
3. On the Set Role Name page, type the name of the role you will create specifically for Jenkins
integration (for example JenkinsAccess), and then choose Next Step. On the Select Role Type
API Version 2015-07-09
47

AWS CodePipeline User Guide
Set Up Prerequisites
page, choose the Select button next to Amazon EC2, and then choose Next Step. On the Attach
Policy page, select the AWSCodePipelineCustomActionAccess managed policy, and then
choose Next Step. Review the role information, and then choose Create Role.
When you create the Amazon EC2 instance where you will install Jenkins, in Step 3: Configure
Instance Details, make sure you choose the instance role (for example, JenkinsAccess).
For more information about instance roles and Amazon EC2, see IAM Roles for Amazon EC2, Using
IAM Roles to Grant Permissions to Applications Running on Amazon EC2 Instances, and Creating a
Role to Delegate Permissions to an AWS Service.
Install and Configure Jenkins and the AWS CodePipeline
Plugin for Jenkins
To install Jenkins and the AWS CodePipeline Plugin for Jenkins
1. Create an Amazon EC2 instance where you will install Jenkins, and in Step 3: Configure
Instance Details, make sure you choose the instance role you created (for example,
JenkinsAccess). For more information about creating Amazon EC2 instances, see Launch an
Amazon EC2 Instance.
Tip
If you already have Jenkins resources you want to use, you can do so, but you must
create a special IAM user, apply the AWSCodePipelineCustomActionAccess
managed policy to that user, and then configure and use the access credentials
for that user on your Jenkins resource. If you want to use the Jenkins UI to supply
the credentials, configure Jenkins to only allow HTTPS. For more information, see
Troubleshooting (p. 134).
2. Install Jenkins on the Amazon EC2 instance. For more information, see the Jenkins
documentation for installing Jenkins and starting and accessing Jenkins, as well as Details of
integration with Jenkins (p. 13).
3. Launch Jenkins, and on the home page, choose Manage Jenkins.
4. On the Manage Jenkins page, choose Manage Plugins.
5. Choose the Available tab, and in the Filter search box, type AWS CodePipeline. Choose AWS
CodePipeline Plugin for Jenkins from the list and choose Download now and install after
restart.
6. On the Installing Plugins/Upgrades page, select Restart Jenkins when installation is
complete and no jobs are running.
7. Choose Back to Dashboard.
8. On the main page, choose New Item.
9. In Item Name, type a name for the Jenkins project (for example, MyDemoProject). Choose
Freestyle project, and then choose OK.
Note
Make sure the name for your project meets the requirements for AWS CodePipeline. For
more information, see Limits (p. 166).
10. On the configuration page for the project, select the Execute concurrent builds if necessary
check box. In Source Code Management, choose AWS CodePipeline. If you have installed
Jenkins on an Amazon EC2 instance and configured the AWS CLI with the profile for the IAM user
you created for integration between AWS CodePipeline and Jenkins, leave all of the other fields
empty.
11. Choose Advanced, and in Provider, type a name for the provider of the action as it will appear in
AWS CodePipeline (for example, MyJenkinsProviderName). Make sure this name is unique and
easy to remember. You will use it when you add a build action to your pipeline later in this tutorial,
and again when you add a test action.
API Version 2015-07-09
48

AWS CodePipeline User Guide
Create a Pipeline
Note
This action name must meet the naming requirements for actions in AWS CodePipeline.
For more information, see Limits (p. 166).
12. In Build Triggers, clear any check boxes, and then select Poll SCM. In Schedule, type five
asterisks separated by spaces, as follows:
* * * * *
This polls AWS CodePipeline every minute.
13. In Build, choose Add build step. Choose Execute shell (Linux, OS X, or Unix) or Execute batch
command (Windows), and then type the following:
rake
Note
Make sure your environment is configured with the variables and settings required to run
rake; otherwise, the build will fail.
14. Choose Add post-build action, and then choose AWS CodePipeline Publisher. Choose Add,
and in Build Output Locations, leave the location blank. This configuration is the default. It will
create a compressed file at the end of the build process.
15. Choose Save to save your Jenkins project.
Step 2: Create a Pipeline in AWS CodePipeline
In this part of the tutorial, you will create the pipeline using the Create Pipeline wizard.
To create an AWS CodePipeline automated release process
1. Sign in to the AWS Management Console and open the AWS CodePipeline console at http://
console.aws.amazon.com/codepipeline.
2. If necessary, use the region selector to change the region to the same region where your pipeline
resources are located. For example, if you created resources for the previous tutorial in us-east-1,
make sure the region selector is set to US East (N. Virginia).
For more information about the regions and endpoints available for AWS CodePipeline, see
Regions and Endpoints.
3. On the introductory page, choose Get started.
If you see the Welcome page, choose Create pipeline.
4. In Step 1: Name, in Pipeline name, type MySecondPipeline, and then choose Next step.
Note
If you choose another name for your pipeline, be sure to use it instead of
MySecondPipeline for the rest of this tutorial. After you create a pipeline, you cannot
change its name. Pipeline names are subject to some limitations. For more information,
see Limits (p. 166).
5. In Step 2: Source, in Source provider, choose GitHub, and then choose Connect to GitHub.
This will open a new browser window that will connect you to GitHub. If prompted to sign in,
provide your GitHub credentials.
Important
Do not provide your AWS credentials on the GitHub website.
API Version 2015-07-09
49

AWS CodePipeline User Guide
Add More Stages
After you have connected to GitHub, choose the repository and branch where you pushed the
sample you want to use for this tutorial (aws-codepipeline-jenkins-aws-codedeploy_linux.zip or
AWSCodePipeline-Jenkins-AWSCodeDeploy_Windows.zip), and then choose Next step.
Tip
There is a limit to the number of OAuth tokens you can use in GitHub for a particular
application, such as AWS CodePipeline. If you plan on creating multiple pipelines or
GitHub source actions, you can configure a personal access token, and then use that
OAuth token for all of your GitHub actions. For more information, see To configure a
pipeline to use a personal access token from GitHub (p. 136).
6. In Step 3: Build, choose Add Jenkins. In Provider name, type the name of the action you
provided in the AWS CodePipeline Plugin for Jenkins (for example MyJenkinsProviderName).
This name must exactly match the name in the AWS CodePipeline Plugin for Jenkins. In Server
URL, type the URL of the Amazon EC2 instance where Jenkins is installed. In Project name, type
the name of the project you created in Jenkins, such as MyDemoProject, and then choose Next
step.
7. In Step 4: Beta, reuse the AWS CodeDeploy application and deployment group you created in
Simple Pipeline Walkthrough (Amazon S3 Bucket) (p. 21). In Deployment provider, choose
AWS CodeDeploy. In Application name, type CodePipelineDemoApplication, or choose the
refresh button, and then choose the application name from the list. In Deployment group, type
CodePipelineDemoFleet, or choose it from the list, and then choose Next step.
Tip
You can use your own AWS CodeDeploy resources or create new ones, but you might
incur additional costs.
8. In Step 5: Service Role, from Role name, choose the service role you created for AWS
CodePipeline (for example, AWS-CodePipeline-Service), and then choose Next step.
Note
Service role creation is only required the first time you create a pipeline in AWS
CodePipeline. If you followed the steps in one of the simple pipeline walkthroughs, you
already created this service role and will be able to choose it from the drop-down list.
Because the drop-down list will display all IAM service roles associated with your account,
if you chose a name different from the default, choose that name instead. If you have not
yet created a service role, choose Create role.
If you are using an AWS CodeCommit repository instead of a GitHub repository, and
are using a service role that was created before April 18, 2016, make sure it includes
the permissions required to access AWS CodeCommit. For more information, see Add
Permissions for Other AWS Services (p. 146).
9. In Step 6: Review, review the information, and then choose Create pipeline.
10. The pipeline automatically starts and runs the sample through the pipeline. You can view progress
and success and failure messages as the pipeline builds the Haml sample to HTML and deploys it
a web page to each of the Amazon EC2 instances in the AWS CodeDeploy deployment.
Step 3: Add Another Stage to Your Pipeline
Now you will add a test stage and then a test action to that stage that uses the Jenkins test included
in the sample to determine whether the web page has any content. This test is for demonstration
purposes only.
Tip
If you did not want to add another stage to your pipeline, you could add a test action to the
Beta stage of the pipeline, before or after the deployment action.
API Version 2015-07-09
50

AWS CodePipeline User Guide
Add More Stages
Add a Test Stage to Your Pipeline
Topics
•Look Up the IP Address of an Instance (p. 51)
•Create a Jenkins project for Testing the Deployment (p. 51)
•Create a Fourth Stage (p. 52)
Look Up the IP Address of an Instance
To verify the IP address of an instance where you deployed your code
1. After Succeeded is displayed for the pipeline status, in the status area for the Beta stage, choose
Details.
2. In the Deployment Details section, in Instance ID, choose the instance ID of one of the
successfully deployed instances.
3. Copy the IP address of the instance (for example, 192.168.0.4). You will use this IP address in
your Jenkins test.
Create a Jenkins project for Testing the Deployment
To create the Jenkins project
1. On the instance where you installed Jenkins, open Jenkins and from the main page, choose New
Item.
2. In Item Name, type a name for the Jenkins project (for example, MyTestProject). Choose
Freestyle project, and then choose OK.
Note
Make sure the name for your project meets the AWS CodePipeline requirements. For
more information, see Limits (p. 166).
3. On the configuration page for the project, select the Execute concurrent builds if necessary
check box. In Source Code Management, choose AWS CodePipeline. If you have installed
Jenkins on an Amazon EC2 instance and configured the AWS CLI with the profile for the IAM
user you created for integration between AWS CodePipeline and Jenkins, leave all the other fields
empty.
Important
If you are configuring a Jenkins project and it is not installed on an Amazon EC2 instance,
or it is installed on an Amazon EC2 instance that is running a Windows operating system,
complete the fields as required by your proxy host and port settings, and provide the
credentials of the IAM user you configured for integration between Jenkins and AWS
CodePipeline.
4. Choose Advanced, and in Category, choose Test.
5. In Provider, type the same name you used for the build project (for example,
MyJenkinsProviderName). You will use this name when you add the test action to your pipeline
later in this tutorial.
Note
This name must meet the AWS CodePipeline naming requirements for actions. For more
information, see Limits (p. 166).
6. In Build Triggers, clear any check boxes, and then select Poll SCM. In Schedule, type five
asterisks separated by spaces, as follows:
API Version 2015-07-09
51
AWS CodePipeline User Guide
Add More Stages
* * * * *
This polls AWS CodePipeline every minute.
7. In Build, choose Add build step. If you are deploying to Linux, OS X, or Unix, choose Execute
shell , and then type the following, where the IP address is the address of the Amazon EC2
instance you copied earlier:
TEST_IP_ADDRESS=192.168.0.4 rake test
If you are deploying to Windows, choose Execute batch command, and then type the following,
where the IP address is the address of the Amazon EC2 instance you copied earlier:
set TEST_IP_ADDRESS=192.168.0.4 rake test
Tip
The test assumes a default port of 80. If you want to specify a different port, add a test
port statement, as follows:
TEST_IP_ADDRESS=192.168.0.4 TEST_PORT=8000 rake test
8. Choose Add post-build action, and then choose AWS CodePipeline Publisher. Do not choose
Add.
9. Choose Save to save your Jenkins project.
Create a Fourth Stage
To add a stage to your pipeline that includes the Jenkins test action
1. Sign in to the AWS Management Console and open the AWS CodePipeline console at http://
console.aws.amazon.com/codepipeline.
2. In Name, choose the name of the pipeline you created, MySecondPipeline.
3. On the pipeline details page, choose Edit.
4. On the Edit page, choose + Stage to add a stage immediately after the Beta stage.
5. In the name field for the new stage, type a name (for example, Testing), and then choose +
Action.
6. In the Action category drop-down list, choose Test. In Action name, type MyJenkinsTest-
Action. In Test provider, choose the provider name you specified in Jenkins (for example,
MyJenkinsProviderName). In Project name, type the name of the project you created in
Jenkins (for example, MyTestProject). In Input artifacts, choose the artifact from the Jenkins
build whose default name is MyBuiltApp, and then choose Add action.
For more information about input and output artifacts and the structure of pipelines, see Pipeline
Structure Reference (p. 158).
7. On the Edit page, choose Save pipeline changes. In the Save pipeline changes dialog box,
choose Save and continue.
8. Although the new stage has been added to your pipeline, a status of No executions yet is
displayed for that stage because no changes have triggered another run of the pipeline. To run the
sample through the revised pipeline, on the pipeline details page, choose Release change.
API Version 2015-07-09
52

AWS CodePipeline User Guide
Clean Up Resources
The pipeline view shows the stages and actions in your pipeline and the state of the revision
running through those four stages. The time it takes for the pipeline to run through all stages will
depend on the size of the artifacts, the complexity of your build and test actions, and other factors.
Step 4: Clean Up Resources
After you complete this tutorial, you should delete the pipeline and the resources it uses so you
will not be charged for continued use of those resources. If you do not intend to keep using AWS
CodePipeline, delete the pipeline, then the AWS CodeDeploy application and its associated Amazon
EC2 instances, and finally, the Amazon S3 bucket used to store artifacts. You should also consider
whether to delete other resources, such as the GitHub repository, if you do not intend to keep using
them.
To clean up the resources used in this tutorial
1. Open a terminal session (Linux, OS X, or Unix) or command prompt (Windows) and run the
delete-pipeline command to delete the pipeline you created. For MySecondPipeline, you would
type the following command:
aws codepipeline delete-pipeline --name "MySecondPipeline"
This command returns nothing.
2. To clean up your AWS CodeDeploy resources, follow the instructions in Cleaning Up.
3. To clean up your instance resources, delete the Amazon EC2 instance where you installed
Jenkins. For more information, see Clean Up Your Instance and Volume.
4. If you do not intend to create more pipelines or use AWS CodePipeline again, delete the Amazon
S3 bucket used to store artifacts for your pipeline. To delete the bucket, follow the instructions in
Deleting a Bucket. For more information about this bucket, see Concepts (p. 5).
5. If you do not intend to use the other resources for this pipeline again, consider deleting them by
following the guidance for that particular resource. For example, if you want to delete the GitHub
repository, follow the instructions in Deleting a repository on the GitHub website.
API Version 2015-07-09
53

AWS CodePipeline User Guide
Create a Pipeline (Console)
Create a Pipeline in AWS
CodePipeline
To define an automated release process, you create a pipeline, which is a workflow construct that
describes how software changes go through a release process, and is composed of a combination of
stages and actions that you configure.
Note
When you add stages for Build, Deploy, Test, or Invoke, in addition to the default options
provided with AWS CodePipeline, you can choose custom actions that you have already
created for use with your pipelines. Custom actions can be used for tasks such as running
an internally developed build process or a test suite. Version identifiers are included to help
you distinguish among different versions of a custom action in the provider lists. For more
information, see Create a Custom Action for a Pipeline (p. 95).
Before you can create a pipeline, you must first complete the steps in Setting Up (p. 18).
For more information about pipelines, see Concepts (p. 4), Getting Started (p. 21), and, if you want
to create a pipeline using the AWS CLI, Pipeline Structure Reference (p. 158). To view a list of
pipelines, see View a Pipeline (p. 88).
Topics
•Create a Pipeline (Console) (p. 54)
•Create a Pipeline (CLI) (p. 57)
Create a Pipeline (Console)
To create a pipeline in the console, you'll need to provide the source file location and information about
the providers you will use for your actions.
Pipelines must contain at least two stages. When you use the console to create a pipeline, in addition
to a Source stage, you must include a Build stage, a Beta (deployment) stage, or both. You can then
edit the pipeline to add more stages.
API Version 2015-07-09
54

AWS CodePipeline User Guide
Create a Pipeline (Console)
To create a pipeline
1. Sign in to the AWS Management Console and open the AWS CodePipeline console at http://
console.aws.amazon.com/codepipeline.
2. On the Welcome page, choose Create pipeline.
If this is your first time using AWS CodePipeline, an introductory page appears instead of
Welcome. Choose Get Started Now.
3. On the Step 1: Name page, in the Pipeline name box, type the name for your pipeline, and then
choose Next step.
Within a single AWS account, each pipeline you create in a region must have a unique name.
Names can be reused for pipelines in different regions.
Note
After you create a pipeline, you cannot change its name. For information about other
limitations, see Limits (p. 166).
4. On the Step 2: Source page, in the Source provider drop-down list, choose the type of repository
where your source code is stored and specify its required options:
•GitHub: Choose Connect to GitHub. If prompted to sign in, provide your GitHub credentials.
Important
Do not provide your AWS credentials.
If this is your first time connecting to GitHub from AWS CodePipeline, you will be asked to
authorize application access to your account. Review the permissions required for integration,
and then, if you want to continue, choose Authorize application. For more information about
how AWS CodePipeline integrates with GitHub, see Integration with Partner Products and
Services (p. 11).
Tip
There is a limit to the number of OAuth tokens you can use in GitHub for a particular
application, such as AWS CodePipeline. If you plan on creating multiple pipelines or
GitHub source actions, you can configure a personal access token, and then use that
OAuth token for all of your GitHub actions. For more information, see To configure a
pipeline to use a personal access token from GitHub (p. 136).
On the Source page in the Create Pipeline wizard, from the Repository drop-down list, choose
the GitHub repository you want to use as the source location for your pipeline. In Branch, from
the drop-down list, choose the branch you want to use, and then choose Next step.
•Amazon S3: In Amazon S3 location, provide the Amazon S3 bucket name and path to the
object in a bucket with versioning enabled, and then choose Next step. The format of the bucket
name and path will look something like this:
s3://bucketName/folderName/objectName
•AWS CodeCommit: In Repository name, choose the name of the AWS CodeCommit
repository you want to use as the source location for your pipeline. In Branch name, from the
drop-down list, choose the branch you want to use, and then choose Next step.
Note
The object and file type must be compatible with the deployment system you plan to use,
for example Elastic Beanstalk or AWS CodeDeploy. Example supported file types might
API Version 2015-07-09
55

AWS CodePipeline User Guide
Create a Pipeline (Console)
include .zip, .tar, and .tgz files. For more information about the supported container types
for Elastic Beanstalk, see Customizing and Configuring Elastic Beanstalk Environments
and Supported Platforms. For more information about deploying revisions with AWS
CodeDeploy, see Uploading Your Application Revision and Prepare a Revision.
5. On the Step 3: Build page, do one of the following, and then choose Next step:
• Choose the provider of build services that you want to use, either a default provider or custom
action, and provide the configuration details for that provider.
Tip
The steps for adding a build provider vary by provider. For an example of how to add
Jenkins as a build provider, see Four-Stage Pipeline Tutorial (p. 46).
• Choose No Build to skip the configuration of a build stage.
6. On the Step 4: Beta page, do one of the following, and then choose Next step:
• Choose one of the following default providers from the Deployment provider drop-down list:
•AWS CodeDeploy: Type or choose the name of an existing AWS CodeDeploy application in
Application name and the name of a deployment group for that application in Deployment
group, and then choose Next step. Alternatively, you can create an application, deployment
group, or both by choosing those links in AWS CodeDeploy.
•AWS Elastic Beanstalk: Type or choose the name of an existing Elastic Beanstalk
application in Application name and an environment for that application in Environment
name, and then choose Next step. Alternatively, you can create an application, environment,
or both by choosing those links in Elastic Beanstalk.
•AWS OpsWorks: Type or choose the name of the stack you want to use in Stack and the
layer that your target instances belong to in Layer. In App, choose the application that you
want to update and deploy. If you need to create an app, choose create a new one in AWS
OpsWorks.
For information about adding an application to a stack and layer in AWS OpsWorks, see
Adding Apps in the AWS OpsWorks User Guide.
For an end-to-end example of how to use a simple pipeline in AWS CodePipeline as the
source for code that you run on AWS OpsWorks layers, see Using AWS CodePipeline with
AWS OpsWorks.
Tip
After a pipeline is created successfully, you can edit it to add more deployment stages
or actions to a deployment stage.
• Choose a custom action that you have created for a deployment provider.
7. On the Step 5: Service Role page, do one of the following, and then choose Next step:
• In the Service Role, drop-down list, choose an IAM service role you have set up for AWS
CodePipeline.
API Version 2015-07-09
56

AWS CodePipeline User Guide
Create a Pipeline (CLI)
• If you do not have a service role, choose Create role, and then on the IAM console page that
describes the role that will be created for you, choose Allow. On the Step 5: Service Role
page, AWS-CodePipeline-Service will appear in the drop-down box.
Note
If your service role was created before April 18, 2016 and you chose AWS CodeCommit
for your source repository, or before June 2, 2016 and you chose AWS OpsWorks as
your deployment provider, you need to update the permissions specified for your service
role. For information, see Add Permissions for Other AWS Services (p. 146).
For more information about the service role and its policy statement, see Edit a Policy for an IAM
Service Role (p. 144).
8. On the Step 6: Review page, review your pipeline configuration, and then choose Create pipeline
to create the pipeline or Previous to go back and edit your choices. To exit the wizard without
creating a pipeline, choose Cancel.
Now that you've created your pipeline, you can view it in the console. The pipeline will start to run
automatically after you create it. For more information, see View a Pipeline (p. 88). You can also
make changes to the pipeline. For more information, see Edit a Pipeline (p. 60).
Create a Pipeline (CLI)
To use the AWS CLI to create a pipeline, you create a JSON file to define the pipeline structure, and
then run the create-pipeline command with the --cli-input-json parameter.
The simplest way to create the JSON file is to start with an existing pipeline. You can use the
get-pipeline command to get a copy of the JSON structure of that pipeline, and then modify that
structure in a plain-text editor. For more information about pipeline structure, see Pipeline Structure
Reference (p. 158) and create-pipeline in the AWS CodePipeline API Reference.
Tip
If you don’t already have a pipeline, you can use the wizard in the AWS CodePipeline console
to create a pipeline, and then use that JSON structure as the basis for your pipeline.
You will need the ARN of the service role you created for AWS CodePipeline in Setting Up (p. 18) and
the name of an Amazon S3 bucket where artifacts for the pipeline will be stored. This bucket must be in
the same region as the pipeline. You will use both when you run the create-pipeline command. Unlike
the console, the create-pipeline command in the AWS CLI cannot create an Amazon S3 bucket for
storing artifacts. The bucket must already exist.
Important
You cannot use the AWS CLI to create a pipeline that includes partner actions. To create a
pipeline that includes partner actions, use the AWS CodePipeline console.
Topics
•Create the JSON file (p. 57)
•Run the create-pipeline Command (p. 59)
Create the JSON file
To create a JSON file, use the get-pipeline command to copy the structure of an existing pipeline to a
file, edit it, and then call that file when running the create-pipeline command.
API Version 2015-07-09
57

AWS CodePipeline User Guide
Create the JSON file
To create the JSON file
1. At a terminal (Linux, OS X, or Unix) or command prompt (Windows), run the get-pipeline
command on a pipeline, and then copy the output of the command to a JSON file. For example, for
a pipeline named MyFirstPipeline, you would type something similar to the following:
aws codepipeline get-pipeline --name MyFirstPipeline >pipeline.json
The output of the command is sent to the pipeline.json file.
2. Open the file in a plain-text editor and edit the values to reflect the structure you want to create.
At a minimum, you must change the name of the pipeline. You should also consider whether you
want to change the Amazon S3 bucket where artifacts for this pipeline are stored; the source
location for your code; the deployment provider; how you want your code deployed; and other
details.
The following two-stage sample pipeline structure highlights the values you should consider
changing for your pipeline. Your pipeline will likely contain more than two stages:
{
"pipeline": {
"roleArn": "arn:aws:iam::80398EXAMPLE::role/AWS-CodePipeline-
Service",
"stages": [
{
"name": "Source",
"actions": [
{
"inputArtifacts": [],
"name": "Source",
"actionTypeId": {
"category": "Source",
"owner": "AWS",
"version": "1",
"provider": "S3"
},
"outputArtifacts": [
{
"name": "MyApp"
}
],
"configuration": {
"S3Bucket": "awscodepipeline-demobucket-
example-date",
"S3ObjectKey":
"ExampleCodePipelineSampleBundle.zip"
},
"runOrder": 1
}
]
},
{
"name": "Beta",
"actions": [
{
"inputArtifacts": [
{
"name": "MyApp"
API Version 2015-07-09
58

AWS CodePipeline User Guide
Run the create-pipeline Command
}
],
"name": "Deploy-CodeDeploy-Application",
"actionTypeId": {
"category": "Deploy",
"owner": "AWS",
"version": "1",
"provider": "CodeDeploy"
},
"outputArtifacts": [],
"configuration": {
"ApplicationName":
"CodePipelineDemoApplication",
"DeploymentGroupName": "CodePipelineDemoFleet"
},
"runOrder": 1
}
]
}
],
"artifactStore": {
"type": "S3",
"location": "codepipeline-us-east-1-1234567890"
},
"name": "MyPipelineName",
"version": 1
}
}
3. When you are satisfied with its structure, save your file as with a name like pipeline.json.
Run the create-pipeline Command
After you have a JSON file that contains the structure of your pipeline, call that file when you run the
create-pipeline command.
To create a pipeline
1. Run the create-pipeline command and use the --cli-input-json parameter to specify the
JSON file you created previously.
To create a pipeline named MySecondPipeline with a JSON file named pipeline.json that
includes the name "MySecondPipeline" as the value for name in the JSON, your command
would look similar to the following:
aws codepipeline create-pipeline --cli-input-json file://pipeline.json
This command returns the structure of the entire pipeline you created.
2. To view the pipeline you just created, either open the AWS CodePipeline console and choose it
from the list of pipelines, or use the get-pipeline-state command. For more information, see View
a Pipeline (p. 88).
API Version 2015-07-09
59

AWS CodePipeline User Guide
Edit a Pipeline (Console)
Edit a Pipeline in AWS
CodePipeline
A pipeline describes the release process you want AWS CodePipeline to follow, including the stages
and actions that must be completed. You can edit a pipeline to add or remove these elements.
However, unlike creating a pipeline, editing a pipeline does not rerun the most recent revision through
the pipeline. If you want to run the most recent revision through a pipeline you've just edited, you
must manually rerun it. Otherwise, the edited pipeline will run the next time you make a change to a
source location configured in the source stage of the pipeline. For information, see Manually Rerun a
Pipeline (p. 105).
Topics
•Edit a Pipeline (Console) (p. 60)
•Edit a Pipeline (AWS CLI) (p. 62)
Edit a Pipeline (Console)
You can use the AWS CodePipeline console to add, edit, or remove stages in a pipeline, as well as to
add, edit, or remove actions in a stage.
To edit a pipeline in the AWS CodePipeline console
1. Sign in to the AWS Management Console and open the AWS CodePipeline console at http://
console.aws.amazon.com/codepipeline.
The names of all pipelines associated with your AWS account are displayed.
2. In Name, choose the name of the pipeline you want to edit. This opens a detailed view of the
pipeline, including the state of each of the actions in each stage of the pipeline.
3. On the pipeline details page, choose Edit. This opens the editing page for the pipeline.
4. On the Edit page, do one of the following:
API Version 2015-07-09
60

AWS CodePipeline User Guide
Edit a Pipeline (Console)
•
To edit a stage, choose the edit icon ( ) on that stage. The stage expands and displays add
action icons ( ) in serial and parallel with existing actions. You can also edit actions in
this view by choosing the edit icon for those actions. To delete an action, choose the delete icon
( ) on that action.
• To edit an action, choose the edit icon for that action, and then modify the values you want to
change on the Edit action panel. Items marked with an asterisk (*) are required.
• To add a stage, choose + Stage at the point in the pipeline where you want to add a stage.
Provide a name for the stage, and then add at least one action to it. Items marked with an
asterisk (*) are required.
• To delete a stage, choose the delete icon on that stage. The stage and all of its actions will be
deleted.
For example, if you wanted to add an action to an existing stage in a pipeline:
1.
In the stage where you want to add your action, choose the edit icon ( ), and then add your
action by choosing + Action.
Tip
To add an action that will run in parallel with another action, choose the add action icon
next to that action. To run your action before another action, choose the add action
icon above that action. To run your action after another action in that stage, choose the
add action icon under that action.
2. The Add action panel opens. In Action category, choose the category of your action, such
as build or deploy. In the system drop-down list, choose the system, and then provide all the
required details for the action configuration, such as a name for the action, a provider, and
the input or output artifact, depending on the action type. Items marked with an asterisk (*)
are required. For more information about the requirements for actions in AWS CodePipeline,
including names for input and output artifacts and how they are used, see Action Structure
Requirements in AWS CodePipeline (p. 159).
Tip
Some action providers, such as GitHub, require you to connect to the provider's
website before you can complete the configuration of the action. When connecting to a
provider's website, make sure you use the credentials for that website. Do not use your
AWS credentials.
3. When you have finished configuring your action, choose Add action.
Note
You cannot rename an action or a stage in the console view. You can add a new stage
or action with the name you want to change, and then delete the old one. Make sure you
have added all the actions you want in that stage before you delete the old one.
5. When you have finished editing your pipeline, choose Save pipeline changes to return to the
summary page.
Important
After you save your changes, you cannot undo them. You must re-edit the pipeline. In
addition, if a revision is running through your pipeline when you save your changes, it
will not complete the run. If you want a specific commit or change to run through the
API Version 2015-07-09
61

AWS CodePipeline User Guide
Edit a Pipeline (AWS CLI)
edited pipeline, you must manually rerun the change through the pipeline after saving
your changes. Otherwise, the next commit or change will run automatically through the
pipeline.
6. To test your action, choose Release change to process that commit through the pipeline, commit
a change to the source specified in the source stage of the pipeline, or follow the steps in Manually
Rerun a Pipeline (p. 105) to manually release a change using the AWS CLI.
Edit a Pipeline (AWS CLI)
You can use the update-pipeline command to edit a pipeline.
Important
While you can edit pipelines that include partner actions using the AWS CLI, you must not
manually edit the JSON of a partner action itself. If you do so, the partner action will likely fail
after you update the pipeline.
To edit a pipeline in the AWS CLI
1. Open a terminal session (Linux, OS X, or Unix) or command prompt (Windows) and run the get-
pipeline command to copy the pipeline structure into a JSON file. For example, for a pipeline
named MyFirstPipeline, you would type the following command:
aws codepipeline get-pipeline --name MyFirstPipeline >pipeline.json
This command returns nothing, but the file you created should appear in the directory where you
ran the command.
2. Open the JSON file in any plain-text editor and modify the structure of the file to reflect the
changes you want to make to the pipeline. For example, you can add or remove stages, or add
another action to an existing stage.
Note
Some edits, such as moving an action from one stage to another stage, will delete the
last known state history for the action. In addition, if a pipeline contains one or more
secret parameters, such as an OAuth token for an action, that token will be masked by
a series of asterisks (****). These secret parameters will be left unchanged unless you
edit that portion of the pipeline (for example, if you change the name of the action that
includes the OAuth token or the name of the stage that contains an action that uses an
OAuth token). If you make a change that affects an action that includes an OAuth token,
you must include the value of the token in the edited JSON. For more information, see
Pipeline Structure Reference (p. 158).
The following example shows how you would add another deployment stage in the pipeline.json
file. This stage will run after the first deployment stage named Beta.
Note
This is just a portion of the file, not the entire structure. For more information, see Pipeline
Structure Reference (p. 158).
,
{
"name": "Beta",
"actions": [
{
"inputArtifacts": [
{
"name": "MyApp"
}
API Version 2015-07-09
62

AWS CodePipeline User Guide
Edit a Pipeline (AWS CLI)
],
"name": "Deploy-CodeDeploy-Application",
"actionTypeId": {
"category": "Deploy",
"owner": "AWS",
"version": "1",
"provider": "CodeDeploy"
},
"outputArtifacts": [],
"configuration": {
"ApplicationName":
"CodePipelineDemoApplication",
"DeploymentGroupName": "CodePipelineDemoFleet"
},
"runOrder": 1
}
]
},
{
"name": "Production",
"actions": [
{
"inputArtifacts": [
{
"name": "MyApp"
}
],
"name": "Deploy-Second-Deployment",
"actionTypeId": {
"category": "Deploy",
"owner": "AWS",
"version": "1",
"provider": "CodeDeploy"
},
"outputArtifacts": [],
"configuration": {
"ApplicationName": "CodePipelineDemoApplication",
"DeploymentGroupName":
"CodePipelineProductionFleet"
},
"runOrder": 1
}
]
}
]
}
The following example shows how you would add a source stage that uses a GitHub repository as
its source action. For more information about how AWS CodePipeline integrates with GitHub, see
Integration with Partner Products and Services (p. 11).
Note
This is just a portion of the file, not the entire structure. For more information, see Pipeline
Structure Reference (p. 158).
{
"name": "Source",
"actions": [
API Version 2015-07-09
63

AWS CodePipeline User Guide
Edit a Pipeline (AWS CLI)
{
"inputArtifacts": [],
"name": "Source",
"actionTypeId": {
"category": "Source",
"owner": "ThirdParty",
"version": "1",
"provider": "GitHub"
},
"outputArtifacts": [
{
"name": "MyApp"
}
],
"configuration": {
"Owner": "MyGitHubAccountName",
"Repo": "MyGitHubRepositoryName",
"Branch": "master",
"OAuthToken": "****"
},
"runOrder": 1
}
]
},
You must supply a value for OAuthToken to access the GitHub repository. You can use a
personal access token for this value. To create a personal access token in GitHub, go to Settings,
choose Personal access tokens, and then choose the generate a personal access token link.
On the New personal access token page, provide a description in Token description. Select
the admin:repo_hook and repo check boxes and clear any other check boxes, and then choose
Generate token. Copy the personal access token and store it in a safe place because this is the
only time you will be able to access it. Paste that token as the value for OAuthToken.
Tip
For information about adding an approval action to a pipeline using the CLI, see Add a
Manual Approval Action (p. 69).
3. To apply your changes, run the update-pipeline command, specifying the name of the pipeline
and the pipeline JSON file, similar to the following:
aws codepipeline update-pipeline --cli-input-json file://pipeline.json
This command returns the entire structure of the edited pipeline.
Note
The update-pipeline command stops the pipeline. If a revision is being run through the
pipeline when you run the update-pipeline command, that run will be stopped. You must
manually start the pipeline to run that revision through the updated pipeline.
4. Open the AWS CodePipeline console and choose the pipeline you just edited from the list.
The pipeline shows your changes. The next time you make a change to the source location, the
pipeline will run that revision through the revised structure of the pipeline.
5. To manually run the last revision through the revised structure of the pipeline, run the start-
pipeline-execution command. For more information, see Manually Rerun a Pipeline (p. 105).
For more information about the structure of a pipeline and expected values, see Pipeline Structure
Reference (p. 158) and AWS CodePipeline API Reference.
API Version 2015-07-09
64

AWS CodePipeline User Guide
Configuration Options for Manual Approval Actions
Managing Approval Actions in
AWS CodePipeline
In AWS CodePipeline, you can add an approval action to a stage in a pipeline at the point where
you want the pipeline execution to stop so that someone with the required AWS Identity and Access
Management permissions can approve or reject the action.
If the action is approved, the pipeline execution resumes. If the action is rejected—or if no one
approves or rejects the action within seven days of the pipeline reaching the action and stopping—the
result is the same as an action failing, and the pipeline execution does not continue.
You might use manual approvals for a variety of purposes:
• You want someone to perform a code review or change management review before a revision is
allowed into the next stage of a pipeline.
• You want someone to perform manual quality assurance testing on the latest version of an
application, or to confirm the integrity of a build artifact, before it is released.
• You want someone to review new or updated text before it is published to a company website.
Configuration Options for Manual Approval
Actions in AWS CodePipeline
AWS CodePipeline provides three configuration options you can use to tell approvers about the
approval action.
Publish Approval Notifications You can configure an approval action to publish a message to an
Amazon Simple Notification Service topic when the pipeline stops at the action. Amazon SNS delivers
the message to every endpoint subscribed to the topic. You must use a topic created in the same AWS
region as the pipeline that will include the approval action. When you create a topic, we recommend
you give it a name that will identify its purpose, in formats such as MyFirstPipeline-us-east-1-
approval.
When you publish approval notifications to Amazon SNS topics, you can choose from formats such as
email or SMS recipients, SQS queues, HTTP/HTTPS endpoints, or AWS Lambda functions you invoke
using Amazon SNS. For information about Amazon SNS topic notifications, see the following topics:
•What Is Amazon Simple Notification Service?
•Create a Topic in Amazon SNS
API Version 2015-07-09
65

AWS CodePipeline User Guide
Prerequisites and Process for Approval Actions
•Sending Amazon SNS Messages to Amazon SQS Queues
•Subscribing a Queue to an Amazon SNS Topic
•Sending Amazon SNS Messages to HTTP/HTTPS Endpoints
•Invoking Lambda Functions Using Amazon SNS Notifications
For a look at the structure of the JSON data generated for an approval action notification, see JSON
Data Format for Manual Approval Notifications in AWS CodePipeline (p. 75).
Specify a URL for Review As part of the configuration of the approval action, you can specify a URL
to be reviewed. The URL might be a link to a Web application you want approvers to test or a page
with more information about your approval request. The URL is included in the notification that is
published to the Amazon SNS topic. Approvers can use the console or AWS CLI to view it.
Enter Comments for Approvers When you create an approval action, you can also add comments
that will be displayed to those who receive the notifications or those who view the action in the console
or CLI response.
No Configuration Options You can also choose not to configure any of these three options. You may
not need them if, for example, you will directly notify someone that the action is ready for their review,
or you simply want the pipeline to stop until you decide to approve the action yourself.
Setup and Workflow Overview for Approval
Actions in AWS CodePipeline
The following is an overview for setting up and using manual approvals.
1. You grant the IAM permissions required for approving or rejecting approval actions to one or more
IAM users in your organization.
2. (Optional) If you are using Amazon SNS notifications, you ensure that the service role you use in
your AWS CodePipeline operations has permission to access Amazon SNS resources.
3. (Optional) If you are using Amazon SNS notifications, you create an Amazon SNS topic and add
one or more subscribers or endpoints to it.
4. When you use the AWS CLI to create the pipeline or after you have used the CLI or console to
create the pipeline, you add an approval action to a stage in the pipeline.
If you are using notifications, you include the Amazon Resource Name (ARN) of the
Amazon SNS topic in the configuration of the action. (An ARN is a unique identifier for an
Amazon resource. ARNs for Amazon SNS topics are structured like arn:aws:sns:us-
east-1:80398EXAMPLE:MyApprovalTopic. For more information, see Amazon Resource
Names (ARNs) and AWS Service Namespaces in the Amazon Web Services General Reference.)
5. The pipeline stops when it reaches the approval action. If an Amazon SNS topic ARN was included
in the configuration of the action, a notification is published to the Amazon SNS topic, and a
message is delivered to any subscribers to the topic or subscribed endpoints, with a link to review
the approval action in the console.
API Version 2015-07-09
66

AWS CodePipeline User Guide
Grant Approval Permissions to
an IAM User in AWS CodePipeline
6. An approver examines the target URL and reviews comments, if any.
7. Using the console, CLI, or SDK, the approver provides a summary comment and submits a
response:
• Approved: The pipeline execution resumes.
• Rejected: The stage status is changed to "Failed" and the pipeline execution does not resume.
If no response is submitted within seven days, the action is marked as "Failed."
Topics
•Grant Approval Permissions to an IAM User in AWS CodePipeline (p. 67)
•Grant Amazon SNS Permissions to a Service Role (p. 69)
•Add a Manual Approval Action (p. 69)
•Approve or Reject an Approval Action (p. 73)
•JSON Data Format for Manual Approval Notifications (p. 75)
Grant Approval Permissions to an IAM User in
AWS CodePipeline
Before IAM users in your organization can approve or reject approval actions, they must be
granted permissions to access pipelines and to update the status of approval actions. You can
grant permission to access all pipelines and approval actions in your account by attaching the
AWSCodePipelineApproverAccess managed policy to an IAM user, role, or group; or you can to
grant limited permissions by specifying the individual resources that can be accessed by an IAM user,
role, or group.
Note
The permissions described in this topic grant very limited access. To enable a user, role, or
group to do more than approve or reject approval actions, you can attach other managed
policies. For information about the managed policies available for AWS CodePipeline, see
Access Permissions Reference (p. 139).
Grant Approval Permission to All Pipelines and
Approval Actions
1. Sign in to the Identity and Access Management (IAM) console at https://console.aws.amazon.com/
iam/.
2. In the navigation pane, choose Groups, Roles, or Users.
3. Choose the group, role or IAM user to grant permissions to.
4. Choose the Permissions tab.
5. In the Managed Policies area, choose Attach Policy.
6. Select the AWSCodePipelineApproverAccess managed policy, and then choose Attach
Policy.
API Version 2015-07-09
67

AWS CodePipeline User Guide
Specify Approval Permission for
Specific Pipelines and Approval Actions
Specify Approval Permission for Specific
Pipelines and Approval Actions
1. Sign in to the Identity and Access Management (IAM) console at https://console.aws.amazon.com/
iam/.
Important
Make sure you are signed in to the AWS Management Console with the same account
information you used in Setting Up (p. 18).
2. In the navigation pane, choose Groups or Users, as appropriate.
3. Browse to and choose the user or group you want to change.
4. On the summary page, choose the Permissions tab, and expand the Inline Policies section.
5. Do one of the following:
• If you chose Groups, now choose Create Group Policy. If you chose Users, now choose
Create User Policy.
• If no inline policies have been created yet, choose click here.
6. Choose Custom Policy, and then choose Select.
7. Type a name for this policy in Policy Name.
8. Specify the individual resources an IAM user can access. For example, the following policy
grants users the authority to approve or reject only the action named MyApprovalAction in the
MyFirstPipeline pipeline in the US East (N. Virginia) Region (us-east-1):
{
"Version": "2012-10-17",
"Statement": [
{
"Action": [
"codepipeline:GetPipeline",
"codepipeline:GetPipelineState",
"codepipeline:ListPipelines"
],
"Effect": "Allow",
"Resource": "arn:aws:codepipeline:us-
east-1:80398EXAMPLE:MyFirstPipeline"
},
{
"Action": [
"codepipeline:PutApprovalResult"
],
"Effect": "Allow",
"Resource": "arn:aws:codepipeline:us-
east-1:80398EXAMPLE:MyFirstPipeline/MyApprovalStage/MyApprovalAction"
}
]
}
Note
The codepipeline:ListPipelines permission is required only if IAM users need to
access the AWS CodePipeline dashboard to view this list of pipelines. If console access
is not required, you can omit codepipeline:ListPipelines.
9. Choose Validate Policy. Correct any errors displayed in a red box at the top of the page.
10. When you are satisfied with the policy, choose Apply Policy.
API Version 2015-07-09
68

AWS CodePipeline User Guide
Grant Amazon SNS Permissions to a Service Role
Grant Amazon SNS Permissions to an AWS
CodePipeline Service Role
If you plan to use Amazon SNS to publish notifications to topics when approval actions require review,
the service role you use in your AWS CodePipeline operations must be granted permission to access
the Amazon SNS resources. You can use the IAM console to add this permission to your service role.
1. Sign in to the Identity and Access Management (IAM) console at https://console.aws.amazon.com/
iam/.
Important
Make sure you are signed in to the AWS Management Console with the same account
information you used in Setting Up (p. 18).
2. In the IAM console, in the navigation pane, choose Roles.
3. Choose the name of the service role you use in your AWS CodePipeline operations.
4. On the Permissions tab, in the Inline Policies area, choose Create Role Policy.
–or–
If the Create Role Policy button is not available, expand the Inline Policies area, and then
choose click here.
5. On the Set Permissions page, choose Custom Policy, and then choose Select.
6. On the Review Policy page, in the Policy Name field, type a name to identify this policy, such as
SNSPublish.
7. Paste the following into the Policy Document field:
{
"Version": "2012-10-17",
"Statement": [
{
"Effect": "Allow",
"Action": "sns:Publish",
"Resource": "*"
}
]
}
8. Choose Apply Policy.
Add a Manual Approval Action to a Pipeline in
AWS CodePipeline
You can add an approval action to a stage in an AWS CodePipeline pipeline at the point where you
want the pipeline to stop so someone can manually approve or reject the action.
Note
Approval actions can't be added to Source stages. Source stages can contain only source
actions.
If you want to use Amazon SNS to send notifications when an approval action is ready for review, you
must first complete the following prerequisites:
API Version 2015-07-09
69

AWS CodePipeline User Guide
Add a Manual Approval Action to an
AWS CodePipeline Pipeline (Console)
• Grant permission to your AWS CodePipeline service role to access Amazon SNS resources. For
information, see Grant Amazon SNS Permissions to an AWS CodePipeline Service Role (p. 69).
• Grant permission to one or more IAM users in your organization to update the status of an
approval action. For information, see Grant Approval Permissions to an IAM User in AWS
CodePipeline (p. 67).
Add a Manual Approval Action to an AWS
CodePipeline Pipeline (Console)
You can use the AWS CodePipeline console to add an approval action to an existing AWS
CodePipeline pipeline. You must use the AWS CLI if you want to add approval actions when you
create a new pipeline.
1. Open the AWS CodePipeline console at https://console.aws.amazon.com/codepipeline/.
2. In Name, choose the pipeline.
3. On the pipeline details page, choose Edit.
4. If you want to add an approval action to a new stage, choose + Stage at the point in the pipeline
where you want to add an approval request, and type a name for the stage.
If you want to add an approval action to an existing stage, choose the edit icon ( ) on that
stage.
5.
Choose the action icon ( ).
6. On the Add action page, do the following:
1. In Action category, choose Approval.
2. In Action name, type a name to identify the action.
3. In Approval type, choose Manual approval.
4. (Optional) In SNS topic ARN, choose the name of the topic you will use to send notifications for
the approval action.
5. (Optional) In URL for review, enter the URL of the page or application you want the approver
to examine. Approvers can access this URL through a link included in the console view of the
pipeline.
6. (Optional) In Comments, type any additional information you want to share with the reviewer.
Your completed page might look similar to the following:
API Version 2015-07-09
70
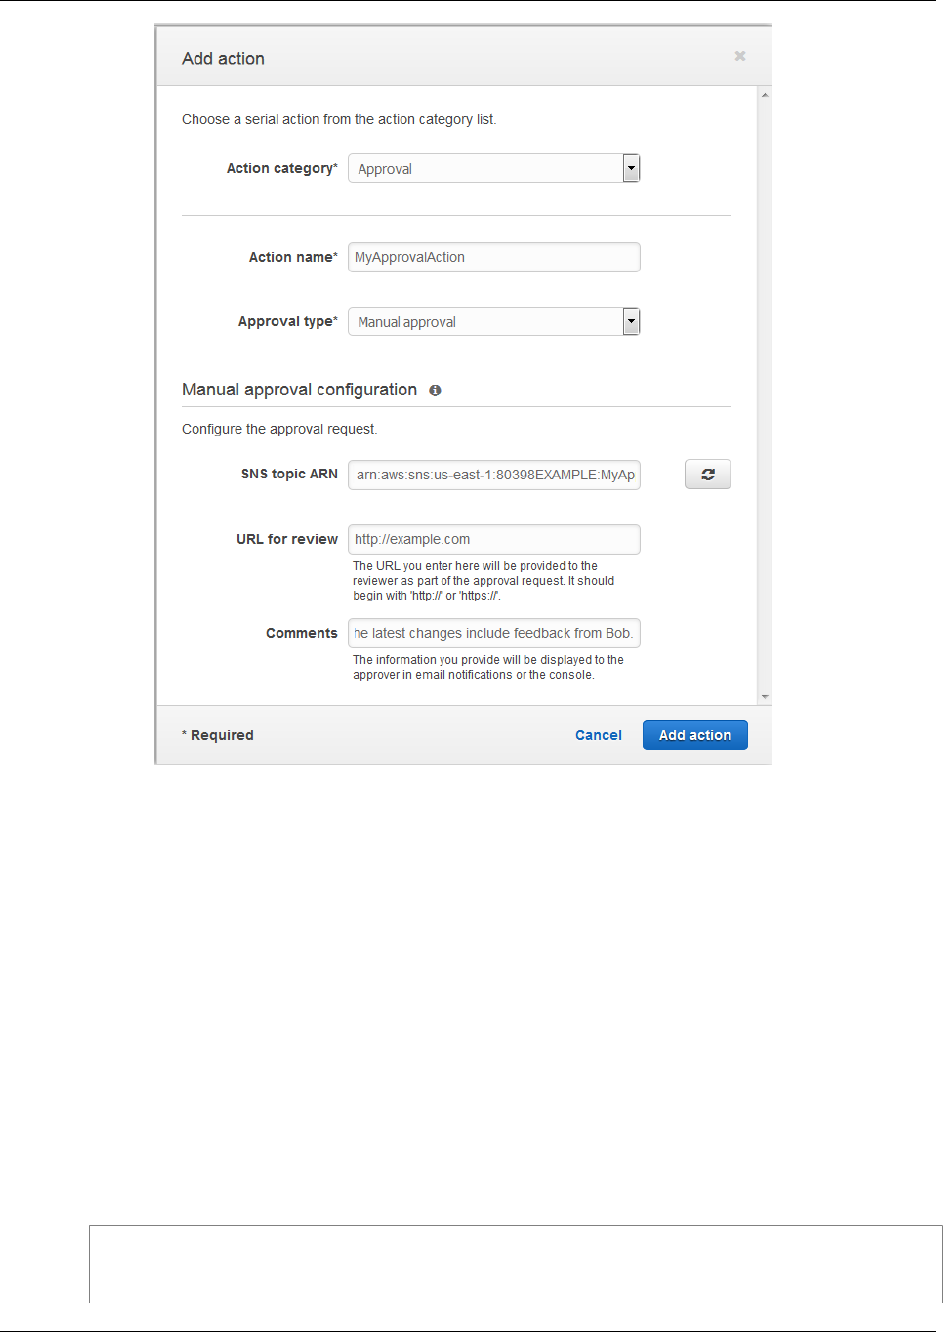
AWS CodePipeline User Guide
Add a Manual Approval Action to
an AWS CodePipeline Pipeline (CLI)
7. Choose Add action.
Add a Manual Approval Action to an AWS
CodePipeline Pipeline (CLI)
You can use the CLI to add an approval action to an existing pipeline or when you create a pipeline.
You do this by including an approval action, with the Manual approval approval type, in a stage you are
creating or editing.
For more information about creating and editing pipelines, see Create a Pipeline (p. 54) and Edit a
Pipeline (p. 60).
To add a stage to a pipeline that includes only an approval action, you would include something similar
to the following example when you create or update the pipeline.
Note
The configuration section is optional. This is just a portion, not the entire structure, of the
file. For more information, see Pipeline Structure Reference (p. 158).
{
"name": "MyApprovalStage",
"actions": [
API Version 2015-07-09
71

AWS CodePipeline User Guide
Add a Manual Approval Action to
an AWS CodePipeline Pipeline (CLI)
{
"name": "MyApprovalAction",
"actionTypeId": {
"category": "Approval",
"owner": "AWS",
"version": "1",
"provider": "Manual"
},
"inputArtifacts": [],
"outputArtifacts": [],
"configuration": {
"NotificationArn": "arn:aws:sns:us-
east-1:80398EXAMPLE:MyApprovalTopic",
"ExternalEntityLink": "http://example.com",
"CustomData": "The latest changes include feedback from
Bob."},
"runOrder": 1
}
]
}
If the approval action is in a stage with other actions, the section of your JSON file that contains the
stage might look similar instead to the following example.
Note
The configuration section is optional. This is just a portion, not the entire structure, of the
file. For more information, see Pipeline Structure Reference (p. 158).
,
{
"name": "Production",
"actions": [
{
"inputArtifacts": [],
"name": "MyApprovalStage",
"actionTypeId": {
"category": "Approval",
"owner": "AWS",
"version": "1",
"provider": "Manual"
},
"outputArtifacts": [],
"configuration": {
"NotificationArn": "arn:aws:sns:us-
east-1:80398EXAMPLE:MyApprovalTopic",
"ExternalEntityLink": "http://example.com",
"CustomData": "The latest changes include feedback from Bob."
},
"runOrder": 1
},
{
"inputArtifacts": [
{
"name": "MyApp"
}
],
"name": "MyDeploymentStage",
"actionTypeId": {
"category": "Deploy",
API Version 2015-07-09
72
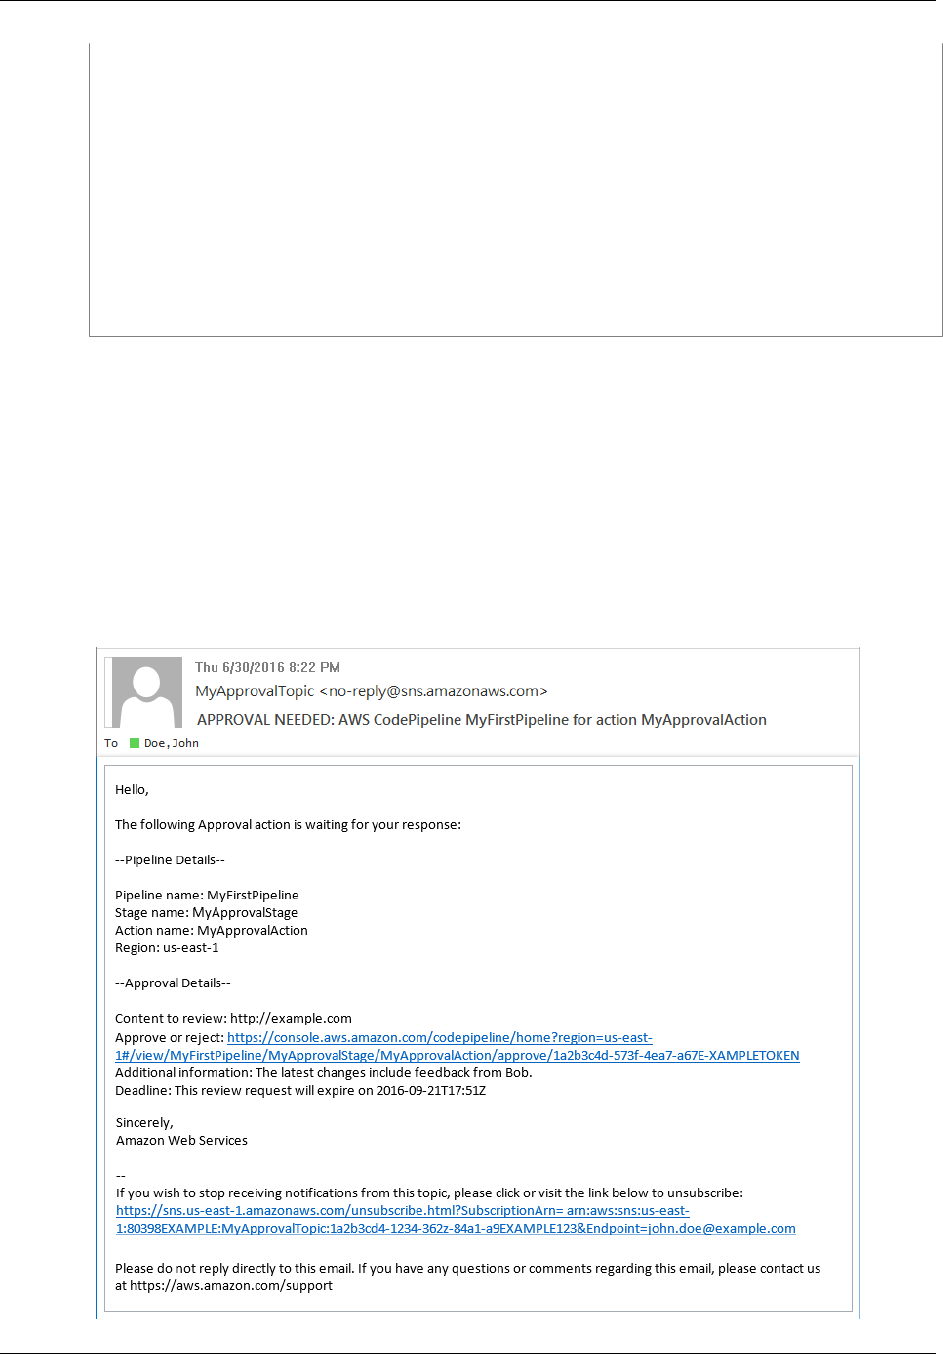
AWS CodePipeline User Guide
Approve or Reject an Approval Action
"owner": "AWS",
"version": "1",
"provider": "CodeDeploy"
},
"outputArtifacts": [],
"configuration": {
"ApplicationName": "MyDemoApplication",
"DeploymentGroupName": "MyProductionFleet"
},
"runOrder": 2
}
]
}
Approve or Reject an Approval Action in AWS
CodePipeline
When a pipeline includes an approval action, the pipeline execution stops at the point where the action
has been added. The pipeline won't resume unless someone manually approves the action. If an
approver rejects the action, or if no approval response is received within seven days of the pipeline
stopping for the approval action, the pipeline status becomes "Failed."
If the person who added the approval action to the pipeline configured notifications, you might receive
an email that looks similar to the following:
API Version 2015-07-09
73

AWS CodePipeline User Guide
Approve or Reject an Approval Action (Console)
Approve or Reject an Approval Action (Console)
If you receive a notification that includes a direct link to an approval action, choose the Approve or
reject link, sign in to the console if necessary, and then continue with step 7 below. Otherwise, use all
the following steps.
1. Open the AWS CodePipeline console at https://console.aws.amazon.com/codepipeline/.
2. On the All Pipelines page, choose the name of the pipeline.
3. Locate the stage with the approval action.
4. Hover over the information icon to view the comments and URL, if any. The information pop-up
message will also display the URL of content for you to review, if one was included.
5. If a URL was provided, choose the Manual approval link in the action to open the target Web
page, and then review the content.
6. Return to the pipeline details view, and then choose the Review button.
7. In the Approve or reject the revision window, type comments related to your review, such as
why you are approving or rejecting the action, and then choose the Approve or Reject button.
Approve or Reject an Approval Request (CLI)
To use the CLI to respond to an approval action, you must first use the get-pipeline-state command to
retrieve the token associated with latest execution of the approval action.
1. At a terminal (Linux, OS X, or Unix) or command prompt (Windows), run the get-pipeline-state
command on the pipeline that contains the approval action. For example, for a pipeline named
MyFirstPipeline, you would type the following:
aws codepipeline get-pipeline-state --name MyFirstPipeline
2. In the response to the command, locate the token value, which appears in latestExecution in
the actionStates section for the approval action. For example:
{
"created": 1467929497.204,
"pipelineName": "MyFirstPipeline",
"pipelineVersion": 1,
"stageStates": [
{
"actionStates": [
{
"actionName": "MyApprovalAction",
"currentRevision": {
"created": 1467929497.204,
"revisionChangeId":
"CEM7d6Tp7zfelUSLCPPwo234xEXAMPLE",
"revisionId": "HYGp7zmwbCPPwo23xCMdTeqIlEXAMPLE"
},
"latestExecution": {
"lastUpdatedBy": "arn:aws:iam::123456789012:user/
Bob",
"summary": "The new design needs to be reviewed
before release.",
"token": "1a2b3c4d-573f-4ea7-a67E-XAMPLETOKEN"
}
}
API Version 2015-07-09
74

AWS CodePipeline User Guide
JSON Data Format for Manual Approval Notifications
//More content might appear here
}
3. In a plain-text editor, create a file where you will record the following, in JSON format:
• The name of the pipeline that contains the approval action.
• The name of the stage that contains the approval action.
• The name of the approval action.
• The token value you collected in the previous step.
• Your response to the action, either Approved or Rejected. (The response must be capitalized.)
• Your summary comments.
For the preceding MyFirstPipeline example, your file would look something like this:
{
"pipelineName": "MyFirstPipeline",
"stageName": "MyApprovalStage",
"actionName": "MyApprovalAction",
"token": "1a2b3c4d-573f-4ea7-a67E-XAMPLETOKEN",
"result": {
"status": "Approved",
"summary": "The new design looks good. Ready to release to customers."
}
}
4. Save the file with a name like approvalstage-approved.json.
5. Run the put-approval-result command, specifying the name of the approval JSON file, similar to
the following
aws codepipeline put-approval-result --cli-input-json
file://approvalstage-approved.json
JSON Data Format for Manual Approval
Notifications in AWS CodePipeline
For approval actions that use Amazon SNS notifications, JSON data about the action is created and
published to Amazon SNS when the pipeline stops. You can use the JSON output to send messages
to Amazon SQS queues or invoke functions in AWS Lambda.
Note
This guide does not address how to configure notifications using JSON. For information about
using Amazon SNS to send messages to Amazon SQS queues, see Sending Amazon SNS
Messages to Amazon SQS Queues. For information about using Amazon SNS to invoke a
Lambda function, see Invoking Lambda Functions Using Amazon SNS Notifications.
The following example shows the structure of the JSON output available with AWS CodePipeline
approvals.
{
"region": "us-east-1",
"consoleLink": "https://console.aws.amazon.com/codepipeline/home?
region=us-east-1#/view/MyFirstPipeline",
API Version 2015-07-09
75

AWS CodePipeline User Guide
JSON Data Format for Manual Approval Notifications
"approval": {
"pipelineName": "MyFirstPipeline",
"stageName": "MyApprovalStage",
"actionName": "MyApprovalAction",
"token": "1a2b3c4d-573f-4ea7-a67E-XAMPLETOKEN",
"expires": "2016-07-07T20:22Z",
"externalEntityLink": "http://example.com",
"approvalReviewLink": "https://console.aws.amazon.com/codepipeline/
home?region=us-east-1#/view/MyFirstPipeline/MyApprovalStage/MyApprovalAction/
approve/1a2b3c4d-573f-4ea7-a67E-XAMPLETOKEN",
"customData": "Review the latest changes and approve or reject within
seven days."
}
}
API Version 2015-07-09
76
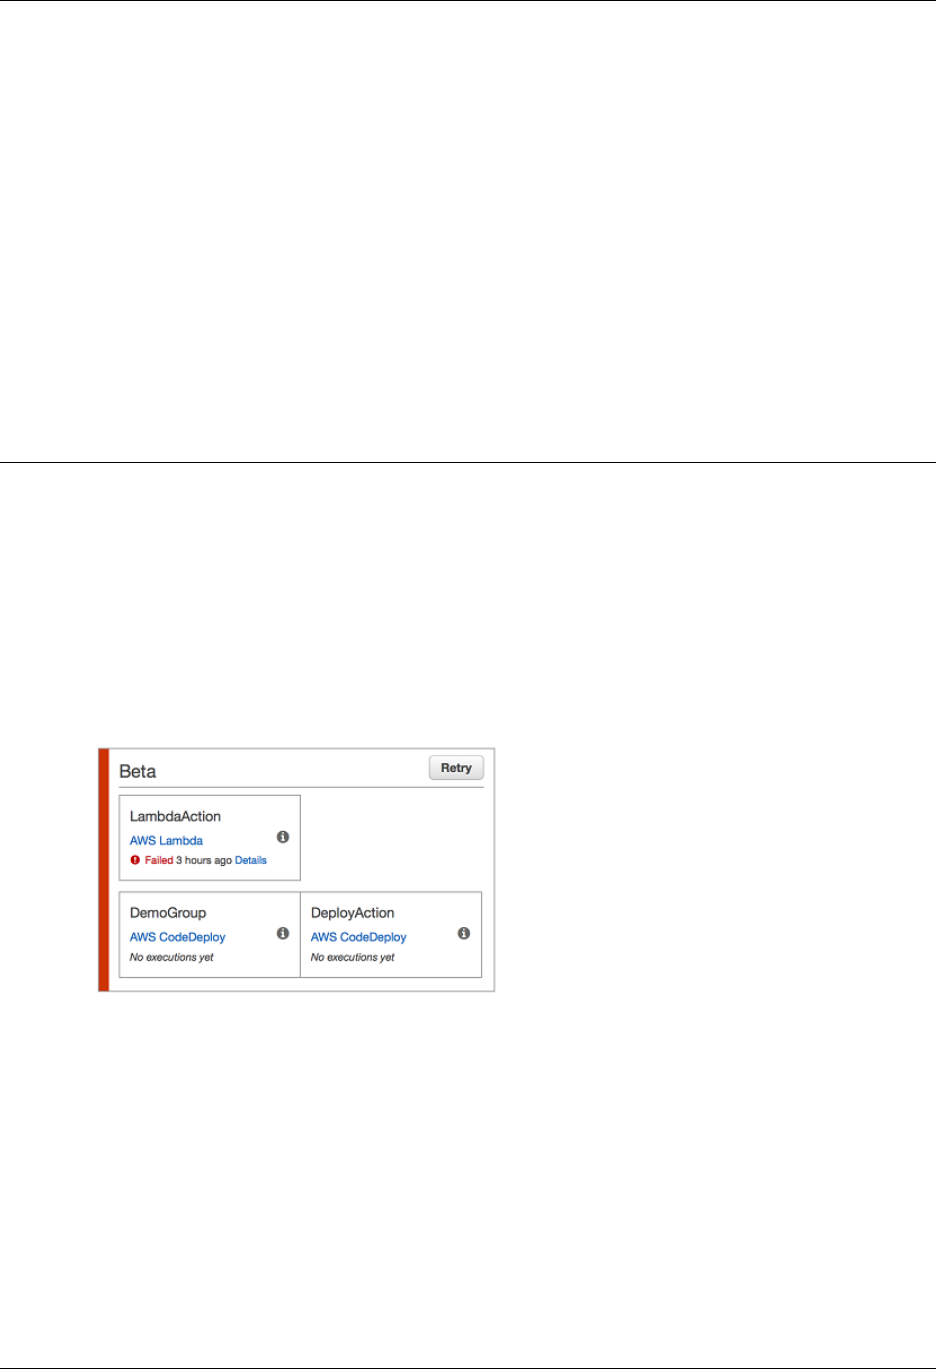
AWS CodePipeline User Guide
Retry Failed Actions in AWS
CodePipeline
In AWS CodePipeline, an action is a task performed on an artifact in a stage. If an action or a set of
parallel actions is not completed successfully, the pipeline stops running.
You can retry the latest failed actions in a stage without having to run a pipeline again from the
beginning. If you are using the console to view a pipeline, a Retry button will appear on the stage
where the failed actions can be retried.
If you are using the AWS CLI, you can use the get-pipeline-state command to determine whether any
actions have failed.
Note
In the following cases, you may not be able to retry actions:
• The overall pipeline structure changed after an action failed.
• One or more actions in the stage are still in progress.
• Another retry attempt in the stage is already in progress.
Topics
•Retry Failed Actions (Console) (p. 78)
•Retry Failed Actions (CLI) (p. 78)
API Version 2015-07-09
77

AWS CodePipeline User Guide
Retry Failed Actions (Console)
Retry Failed Actions (Console)
1. Sign in to the AWS Management Console and open the AWS CodePipeline console at http://
console.aws.amazon.com/codepipeline.
The names of all pipelines associated with your AWS account are displayed.
2. In Name, choose the name of the pipeline.
3. Locate the stage with the failed action, and then choose Retry.
Tip
To identify which actions in the stage can be retried, hover over the Retry button.
If all retried actions in the stage are completed successfully, the pipeline continues to run.
Retry Failed Actions (CLI)
To use the AWS CLI to retry failed actions, you first create a JSON file that identifies the pipeline, the
stage that contains the failed actions, and the latest pipeline execution in that stage. You then run the
retry-stage-execution command with the --cli-input-json parameter. To retrieve the details you
need for the JSON file, it's easiest to use the get-pipeline-state command.
1. At a terminal (Linux, OS X, or Unix) or command prompt (Windows), run the get-pipeline-state
command on a pipeline. For example, for a pipeline named MyFirstPipeline, you would type
something similar to the following:
aws codepipeline get-pipeline-state --name MyFirstPipeline
The response to the command includes pipeline state information for each stage. In the following
example, the response indicates that one or more actions failed in the Beta stage:
{
"updated": 1427245911.525,
"created": 1427245911.525,
"pipelineVersion": 1,
"pipelineName": "MyFirstPipeline",
"stageStates": [
{
"actionStates": [...],
"stageName": "Source",
"latestExecution": {
"pipelineExecutionId": "9811f7cb-7cf7-SUCCESS",
"status": "Succeeded"
}
},
{
"actionStates": [...],
"stageName": "Beta",
"latestExecution": {
"pipelineExecutionId": "3137f7cb-7cf7-EXAMPLE",
"status": "Failed"
}
}
]
API Version 2015-07-09
78
AWS CodePipeline User Guide
Retry Failed Actions (CLI)
}
2. In a plain-text editor, create a file where you will record the following, in JSON format:
• The name of the pipeline that contains the failed actions
• The name of the stage that contains the failed actions
• The ID of the latest pipeline execution in the stage
• The retry mode. (Currently, the only supported value is FAILED_ACTIONS)
For the preceding MyFirstPipeline example, your file would look something like this:
{
"pipelineName": "MyFirstPipeline",
"stageName": "Beta",
"pipelineExecutionId": "3137f7cb-7cf7-EXAMPLE",
"retryMode": "FAILED_ACTIONS"
}
3. Save the file with a name like retry-failed-actions.json.
4. Call the file you created when you run the retry-stage-execution command. For example:
aws codepipeline retry-stage-execution --cli-input-json file://retry-
failed-actions.json
5. To view the results of the retry attempt, either open the AWS CodePipeline console and choose
the pipeline that contains the actions that failed, or use the get-pipeline-state command again.
For more information, see View a Pipeline (p. 88).
API Version 2015-07-09
79

AWS CodePipeline User Guide
Disable or Enable Transitions (Console)
Disable or Enable Transitions in
AWS CodePipeline
Transitions are links between stages in a pipeline that can be disabled or enabled. They are enabled
by default. When you re-enable a disabled transition, the latest revision will run through the remaining
stages of the pipeline.
Tip
You can use an approval action to pause the run of a pipeline until it is manually approved to
continue. For more information, see Managing Approval Actions in Pipelines (p. 65).
Topics
•Disable or Enable Transitions (Console) (p. 80)
•Disable or Enable Transitions (CLI) (p. 82)
Disable or Enable Transitions (Console)
To disable or enable transitions in a pipeline
1. Sign in to the AWS Management Console and open the AWS CodePipeline console at http://
console.aws.amazon.com/codepipeline.
The names of all pipelines associated with your AWS account are displayed.
2. In Name, choose the name of the pipeline for which you want to enable or disable transitions. This
opens a detailed view of the pipeline, including the transitions between the stages of the pipeline.
3. Find the arrow after the last stage that you want to run, and then choose it. For example, in the
following example pipeline, if you want the actions in the Source stage to run, but not the actions
in the stage named Beta, you would choose the arrow between those two stages:
API Version 2015-07-09
80
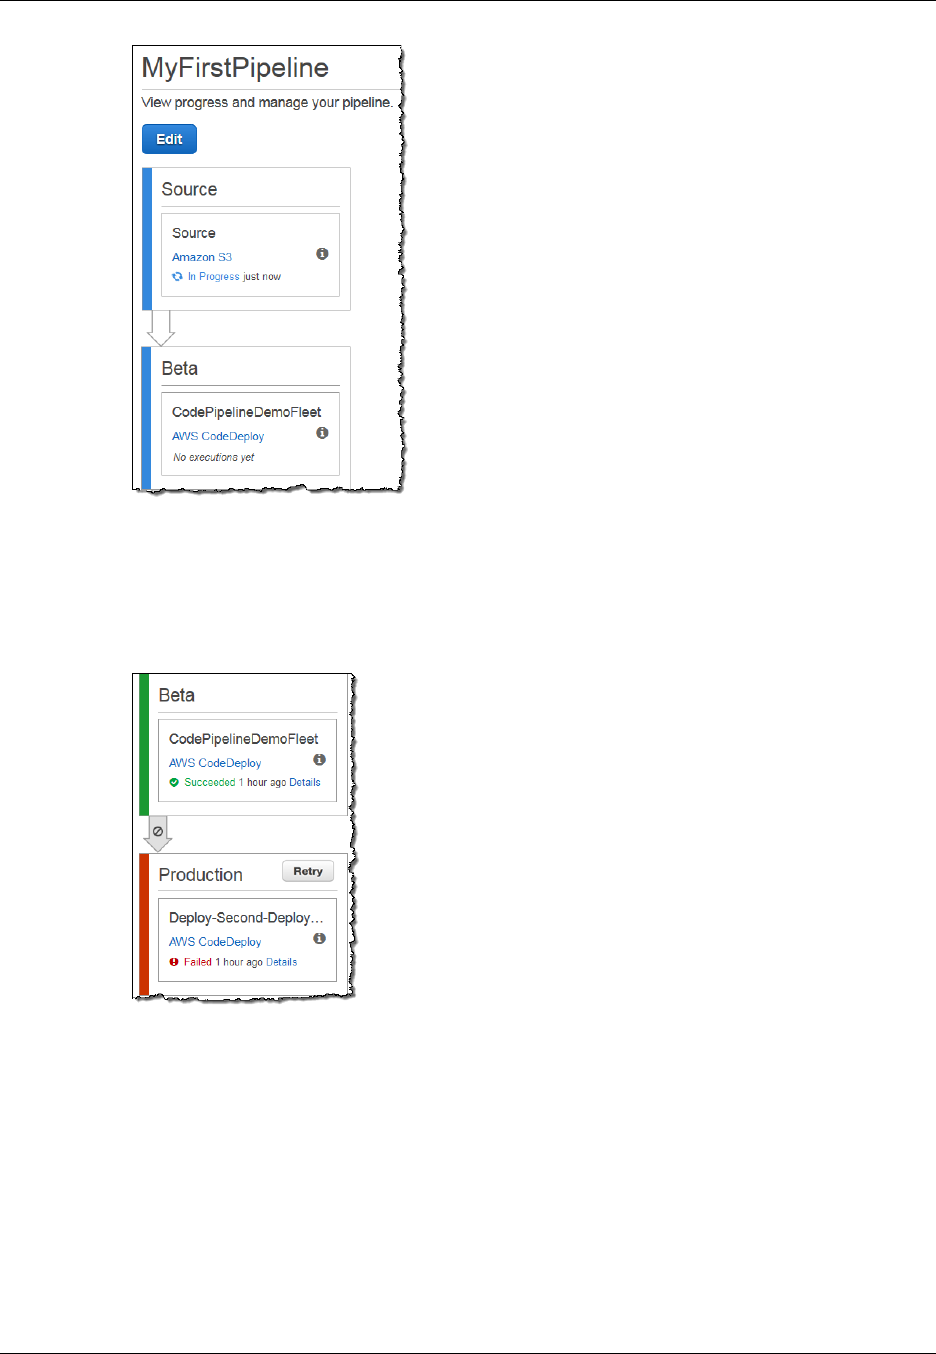
AWS CodePipeline User Guide
Disable or Enable Transitions (Console)
4. In the Disable Transition dialog box, type a reason for disabling the transition, and then choose
Disable.
The arrow changes to show that transitions are disabled between the stage preceding the arrow
and the stage following the arrow. Any revisions in the stages following the disabled transition will
continue to run through those stages, but any new revisions will not be run through the stages
after the disabled transition.
5. To enable transitions, choose the disabled transition arrow. In the Enable Transition dialog box,
choose Enable. The pipeline will immediately enable the transition between the two stages. If
any revisions have been run through the prior stages after the transition was disabled, in a few
moments, the pipeline will start running the latest revision through the stages after the formerly
disabled transition. The pipeline will run the revision through all remaining stages in the pipeline.
Note
It might take a few seconds for changes to appear in the AWS CodePipeline console after
you enable the transition.
API Version 2015-07-09
81

AWS CodePipeline User Guide
Disable or Enable Transitions (CLI)
Disable or Enable Transitions (CLI)
To disable a transition between stages by using the AWS CLI, run the disable-stage-transition
command. To enable a disabled transition, run the enable-stage-transition command.
To disable a transition
1. Open a terminal (Linux, OS X, or Unix) or command prompt (Windows) and use the AWS CLI
to run the disable-stage-transition command, specifying the name of the pipeline, the name of
the stage to which you want to disable transitions, the transition type, and the reason you are
disabling transitions to that stage. Unlike using the console, you must also specify whether you
are disabling transitions into the stage (inbound) or transitions out of the stage after all actions
complete (outbound).
For example, to disable the transition to a stage named Beta in a pipeline named
MyFirstPipeline, you would type a command similar to the following:
aws codepipeline disable-stage-transition --pipeline-name MyFirstPipeline
--stage-name Beta --transition-type Inbound --reason "My Reason"
The command returns nothing.
2. To verify the transition has been disabled, either view the pipeline in the AWS CodePipeline
console or run the get-pipeline-status command. For more information, see View a Pipeline
(Console) (p. 88) and View a Pipeline (CLI) (p. 90).
To enable a transition
1. Open a terminal (Linux, OS X, or Unix) or command prompt (Windows) and use the AWS CLI to
run the enable-stage-transition command, specifying the name of the pipeline, the name of the
stage to which you want to enable transitions, and the transition type.
For example, to enable the transition to a stage named Beta in a pipeline named
MyFirstPipeline, you would type a command similar to the following:
aws codepipeline enable-stage-transition --pipeline-name MyFirstPipeline
--stage-name Beta --transition-type Inbound
The command returns nothing.
2. To verify the transition has been disabled, either view the pipeline in the AWS CodePipeline
console or run the get-pipeline-status command. For more information, see View a Pipeline
(Console) (p. 88) and View a Pipeline (CLI) (p. 90).
API Version 2015-07-09
82

AWS CodePipeline User Guide
Delete a Pipeline (Console)
Delete a Pipeline in AWS
CodePipeline
You can always edit a pipeline to change its functionality, but you might decide you want to delete it
instead. You can delete a pipeline by using the AWS CodePipeline console or by using the AWS CLI
and delete-pipeline command.
Topics
•Delete a Pipeline (Console) (p. 83)
•Delete a Pipeline (CLI) (p. 83)
Delete a Pipeline (Console)
To delete a pipeline in the AWS CodePipeline console
1. Sign in to the AWS Management Console and open the AWS CodePipeline console at http://
console.aws.amazon.com/codepipeline.
2. The names of all pipelines associated with your AWS account are displayed, along with their
status.
3. In Name, choose the name of the pipeline you want to delete. This opens a detailed view of the
pipeline.
4. On the pipeline details page, choose Edit. This opens the editing page for the pipeline.
5. On the Edit page, choose Delete.
6. Type the name of the pipeline, and then choose Delete.
Important
This action cannot be undone.
Delete a Pipeline (CLI)
To manually delete a pipeline by using the AWS CLI, use the delete-pipeline command.
Important
Deleting a pipeline is irreversible. There is no confirmation dialog box. After the command is
run, the pipeline is deleted, but none of the resources used in the pipeline are deleted. This
API Version 2015-07-09
83

AWS CodePipeline User Guide
Delete a Pipeline (CLI)
makes it easier to create a new pipeline that uses those resources to automate the release of
your software.
To delete a pipeline by using the AWS CLI
1. Open a terminal (Linux, OS X, or Unix) or command prompt (Windows) and use the AWS CLI to
run the delete-pipeline command, specifying the name of the pipeline you want to delete. For
example, to delete a pipeline named MyFirstPipeline:
aws codepipeline delete-pipeline --name MyFirstPipeline
This command returns nothing.
2. Delete any resources no longer needed.
Tip
Deleting a pipeline does not delete the resources used in the pipeline, such as the AWS
CodeDeploy or Elastic Beanstalk application you used to deploy your code, or, if you
created your pipeline from the AWS CodePipeline console, the Amazon S3 bucket AWS
CodePipeline created to store the artifacts of your pipelines. Make sure that you delete
resources that are no longer required so that you will not be charged for them in the
future. For example, when you use the console to create a pipeline for the first time, AWS
CodePipeline creates one Amazon S3 bucket to store all artifacts for all of your pipelines.
If you have deleted all of your pipelines, follow the steps in Deleting a Bucket.
API Version 2015-07-09
84

AWS CodePipeline User Guide
Monitoring Pipelines with AWS
CodePipeline
Monitoring is an important part of maintaining the reliability, availability, and performance of AWS
CodePipeline and your AWS solutions. You should collect monitoring data from all of the parts of
your AWS solution so that you can more easily debug a multi-point failure if one occurs. Before you
start monitoring AWS CodePipeline, you should create a monitoring plan that includes answers to the
following questions:
• What are your monitoring goals?
• What resources will you monitor?
• How often will you monitor these resources?
• What monitoring tools are available for you to use?
• Who will perform the monitoring tasks?
• Who should be notified when something goes wrong?
Currently, you can keep track of your AWS CodePipeline pipelines and their components using the
following tools:
•AWS CloudTrail — Use CloudTrail to captures API calls made by or on behalf of AWS
CodePipeline in your AWS account and delivers the log files to an Amazon S3 bucket you specify.
You can choose to have CloudWatch publish Amazon Simple Notification Service notifications when
new log files are delivered if you want to take quick action upon log file delivery.
•Console and CLI — You can use the AWS CodePipeline console and CLI to view details about the
status of a pipeline or a particular pipeline execution.
Topics
•Logging API Calls with CloudTrail (p. 86)
•View a Pipeline (p. 88)
•View Current Source Revision Details in a Pipeline (p. 92)
API Version 2015-07-09
85

AWS CodePipeline User Guide
Logging API Calls with CloudTrail
Logging AWS CodePipeline API Calls with
AWS CloudTrail
AWS CodePipeline is integrated with CloudTrail, a service that captures API calls made by or on behalf
of AWS CodePipeline in your AWS account and delivers the log files to an Amazon S3 bucket you
specify. CloudTrail captures API calls from the AWS CodePipeline console, from AWS CodePipeline
commands through the AWS CLI, or from the AWS CodePipeline APIs. Using the information collected
by CloudTrail, you can determine which request was made to AWS CodePipeline, the source IP
address from which the request was made, who made the request, when it was made, and so on. To
learn more about CloudTrail, including how to configure and enable it, see the AWS CloudTrail User
Guide.
AWS CodePipeline Information in CloudTrail
When CloudTrail logging is enabled in your AWS account, API calls made to AWS CodePipeline are
tracked in log files. AWS CodePipeline records are written together with other AWS service records in
a log file. CloudTrail determines when to create and write to a new file based on a time period and file
size.
All of the AWS CodePipeline actions are logged and documented in the AWS CodePipeline API
Reference and the AWS CodePipeline Command Line Reference. For example, calls to create, delete,
and edit pipelines and create custom actions generate entries in CloudTrail log files.
Every log entry contains information about who generated the request. The user identity information
in the log helps you determine whether the request was made with root or IAM user credentials, with
temporary security credentials for a role or federated user, or by another AWS service. For more
information, see the userIdentity field in the CloudTrail Event Reference.
You can store your log files in your bucket for as long as you want, but you can also define Amazon
S3 lifecycle rules to archive or delete log files automatically. By default, your log files are encrypted by
using Amazon S3 server-side encryption (SSE).
You can choose to have CloudTrail publish Amazon SNS notifications when new log files are delivered
if you want to take quick action upon log file delivery. For more information, see Configuring Amazon
SNS Notifications.
You can also aggregate AWS CodePipeline log files from multiple AWS regions and multiple AWS
accounts into a single Amazon S3 bucket. For more information, see Aggregating CloudTrail Log Files
to a Single Amazon S3 Bucket.
Understanding AWS CodePipeline Log File
Entries
CloudTrail log files can contain one or more log entries where each entry is made up of multiple JSON-
formatted events. A log entry represents a single request from any source and includes information
about the requested action, any parameters, the date and time of the action, and so on. The log entries
are not guaranteed to be in any particular order (that is, they are not an ordered stack trace of the
public API calls).
The following example shows a CloudTrail log entry for an update pipeline event, where a pipeline
named MyFirstPipeline has been edited by the user named JaneDoe-CodePipeline with the account
ID 80398EXAMPLE. The user changed the name of the source stage of a pipeline from Source to
MySourceStage. Because both the requestParameters and the responseElements elements
in the CloudTrail log contain the entire structure of the edited pipeline, those elements have been
abbreviated in the following example. Emphasis has been added to the requestParameters portion
of the pipeline where the change occurred, the previous version number of the pipeline, and the
API Version 2015-07-09
86

AWS CodePipeline User Guide
Understanding AWS CodePipeline Log File Entries
responseElements portion, which shows the version number incremented by 1. Edited portions are
marked with ellipses (...) to illustrate where more data appears in a real log entry.
{
"eventVersion":"1.03",
"userIdentity": {
"type":"IAMUser",
"principalId":"AKIAI44QH8DHBEXAMPLE",
"arn":"arn:aws:iam::80398EXAMPLE:user/JaneDoe-CodePipeline",
"accountId":"80398EXAMPLE",
"accessKeyId":"AKIAIOSFODNN7EXAMPLE",
"userName":"JaneDoe-CodePipeline",
"sessionContext": {
"attributes":{
"mfaAuthenticated":"false",
"creationDate":"2015-06-17T14:44:03Z"
}
},
"invokedBy":"signin.amazonaws.com"},
"eventTime":"2015-06-17T19:12:20Z",
"eventSource":"codepipeline.amazonaws.com",
"eventName":"UpdatePipeline",
"awsRegion":"us-east-1",
"sourceIPAddress":"192.0.2.64",
"userAgent":"signin.amazonaws.com",
"requestParameters":{
"pipeline":{
"version":1,
"roleArn":"arn:aws:iam::80398EXAMPLE:role/AWS-CodePipeline-Service",
"name":"MyFirstPipeline",
"stages":[
{
"actions":[
{
"name":"MySourceStage",
"actionType":{
"owner":"AWS",
"version":"1",
"category":"Source",
"provider":"S3"
},
"inputArtifacts":[],
"outputArtifacts":[
{"name":"MyApp"}
],
"runOrder":1,
"configuration":{
"S3Bucket":"awscodepipeline-demobucket-example-date",
"S3ObjectKey":"sampleapp_linux.zip"
}
}
],
"name":"Source"
},
(...)
},
"responseElements":{
"pipeline":{
"version":2,
API Version 2015-07-09
87

AWS CodePipeline User Guide
View a Pipeline
(...)
},
"requestID":"2c4af5c9-7ce8-EXAMPLE",
"eventID":""c53dbd42-This-Is-An-Example"",
"eventType":"AwsApiCall",
"recipientAccountId":"80398EXAMPLE"
}
]
}
View Pipelines in AWS CodePipeline
You can use the AWS CodePipeline console or the AWS CLI to view details about pipelines associated
with your AWS account.
Topics
•View a Pipeline (Console) (p. 88)
•View a Pipeline (CLI) (p. 90)
View a Pipeline (Console)
You can use the AWS CodePipeline console to view a list of all of the pipelines in your account.
You can also view details for each pipeline, including when actions last ran in the pipeline, whether
a transition between stages is enabled or disabled, whether any actions have failed, and other
information.
Note
After an hour, the detailed view of a pipeline will stop refreshing automatically in your browser.
To view current information, refresh the page.
To view a pipeline
1. Sign in to the AWS Management Console and open the AWS CodePipeline console at http://
console.aws.amazon.com/codepipeline.
The names of all pipelines associated with your AWS account will be displayed.
2. To see details for a single pipeline, in Name, choose the name of the pipeline. This opens a
detailed view of the pipeline, including the state of each action in each stage and the state of the
transitions.
Note
It might take a few seconds for changes to appear in the AWS CodePipeline console.
API Version 2015-07-09
88

AWS CodePipeline User Guide
View a Pipeline (Console)
The graphical view displays the following information for each stage:
• The name of the stage.
• Every action configured for the stage.
• The state of transitions between stages (enabled or disabled), as indicated by the state of the
arrow between stages. An enabled transition is indicated by a plain arrow; a disabled transition
is indicated by a gray arrow and icon.
The graphical view also displays the following information about actions in each stage:
• The name of the action.
• The provider of the action, such as AWS CodeDeploy.
• When the action was last run.
• Whether the action succeeded or failed.
• Links to other details about the last run of the action, where available.
• Details about the source revisions that are running through the latest pipeline execution in the
stage or, for AWS CodeDeploy deployments, the latest source revisions that were deployed to
target instances.
3. To see the configuration details for a particular action in a stage of a pipeline, choose or hover
over the information icon next to that action.
4. To view the details of the provider of the action, choose the name of the provider. This will open
the AWS console page for that provider. For example, in the preceding example pipeline, choosing
AWS CodeDeploy in either the Beta or Production stages will open the AWS CodeDeploy console
page for the deployment group configured for that stage.
5. To see the progress details for a particular action in a stage, choose Details when it is displayed
next to an action in progress (indicated by an In Progress message). If the action is in progress,
you will see the incremental progress and the steps or actions as they occur.
Note
Details are available for source actions involving GitHub repositories, but not those
involving Amazon S3 buckets or AWS CodeCommit repositories.
6. To approve or reject actions that have been configured for manual approval, choose Review.
7. To retry actions in a stage that were not completed successfully, choose Retry.
8. To get more information about errors or failures for a completed action in a stage, choose
Details. You will see details from the last time the action ran, including the results of that action,
Succeeded or Failed.
9. To view details about source artifacts (output artifact that originated in the first stage of a pipeline)
that are used the latest pipeline execution for a stage, click in the details information area at
API Version 2015-07-09
89
AWS CodePipeline User Guide
View a Pipeline (CLI)
the bottom of the stage. You can view details about identifiers, such as commit IDs, check-in
comments, and the time since the artifact was created or updated. For more information, see View
Current Source Revision Details in a Pipeline (p. 92).
View a Pipeline (CLI)
You can run the list-pipelines command to view a summary of all of the pipelines associated with your
AWS account or the get-pipeline command to review details of a single pipeline, respectively.
Note
For information about using the CLI to view details about the source revisions used in the
latest pipeline execution for a stage, see View Current Source Revision Details in a Pipeline
(CLI) (p. 93).
To view a pipeline
1. Open a terminal (Linux, OS X, or Unix) or command prompt (Windows) and use the AWS CLI to
run the list-pipelines command, as follows:
aws codepipeline list-pipelines
This command returns a list of all of the pipelines associated with your AWS account.
2. To view details about a pipeline, run the get-pipeline command, specifying the unique name of
the pipeline. For example, to view details about a pipeline named MyFirstPipeline, you would
type the following:
aws codepipeline get-pipeline --name MyFirstPipeline
This command returns the structure of the pipeline.
3. To view details about the current state of a pipeline, run the get-pipeline-state command,
specifying the unique name of the pipeline. For example, to view details about the current state of
a pipeline named MyFirstPipeline, you would type the following:
aws codepipeline get-pipeline-state --name MyFirstPipeline
This command returns the current status of all stages of the pipeline and the status of the actions
within those stages.
The following example shows the returned data for a three-stage pipeline named
MyFirstPipeline, where the first two stages and actions show success, the third shows failure,
and the transition between the second and third stages is disabled:
{
"updated": 1427245911.5250001,
"created": 1427245911.5250001,
"pipelineVersion": 1,
"pipelineName": "MyFirstPipeline",
"stageStates": [
{
"actionStates": [
{
"actionName": "Source",
"entityUrl": "https://console.aws.amazon.com/s3/home?
#",
API Version 2015-07-09
90

AWS CodePipeline User Guide
View a Pipeline (CLI)
"latestExecution": {
"status": "Succeeded",
"lastStatusChange": 1427298837.7679999
}
}
],
"stageName": "Source"
},
{
"actionStates": [
{
"actionName": "Deploy-CodeDeploy-Application",
"entityUrl": "https://console.aws.amazon.com/
codedeploy/home?#",
"latestExecution": {
"status": "Succeeded",
"lastStatusChange": 1427298939.4560001,
"externalExecutionUrl": "https://
console.aws.amazon.com/?#",
"externalExecutionId": ""c53dbd42-This-Is-An-
Example"",
"summary": "Deployment Succeeded"
}
}
],
"inboundTransitionState": {
"enabled": true
},
"stageName": "Beta"
},
{
"actionStates": [
{
"actionName": "Deploy-Second-Deployment",
"entityUrl": "https://console.aws.amazon.com/
codedeploy/home?#",
"latestExecution": {
"status": "Failed",
"errorDetails": {
"message": "Deployment Group is already
deploying deployment ...",
"code": "JobFailed"
},
"lastStatusChange": 1427246155.648,
}
}
],
"inboundTransitionState": {
"disabledReason": "Disabled while I investigate the
failure",
"enabled": false,
"lastChangedAt": 1427246517.8469999,
"lastChangedBy": "arn:aws:iam::80398EXAMPLE:user/
CodePipelineUser"
},
"stageName": "Production"
}
API Version 2015-07-09
91
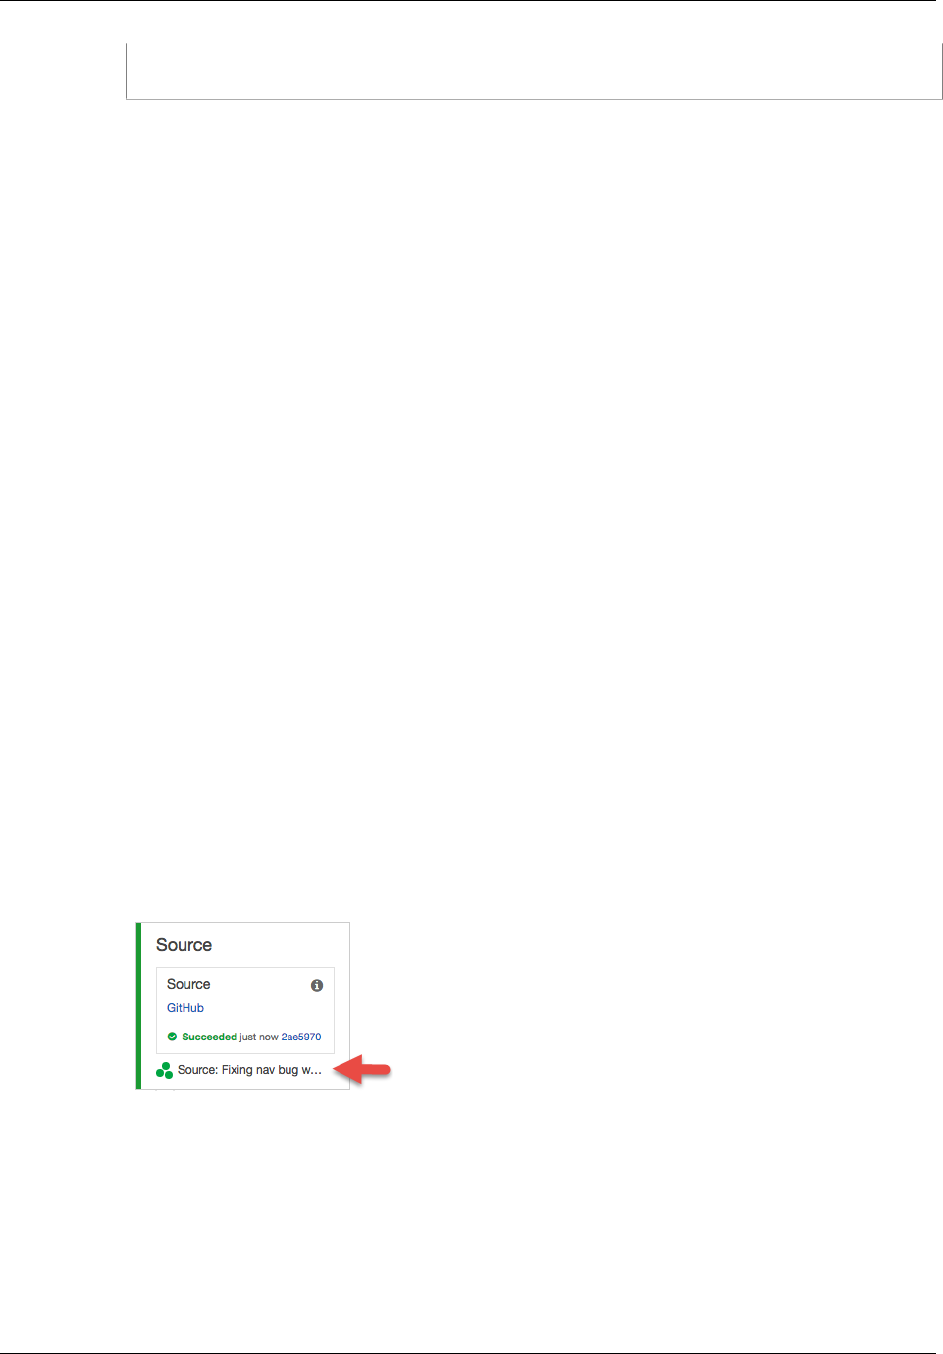
AWS CodePipeline User Guide
View Current Source Revision Details in a Pipeline
]
}
View Current Source Revision Details in a
Pipeline in AWS CodePipeline
You can use the AWS CodePipeline console or the AWS CLI to view details about source artifacts
(output artifact that originated in the first stage of a pipeline) that are used in an execution of a pipeline.
The details include identifiers, such as commit IDs, check-in comments, time since the artifact was
created or updated and, when you use the CLI, version numbers of build actions. For some revision
types, you can view and open the URL of the commit for the artifact version.
Topics
•View Current Source Revision Details in a Pipeline (Console) (p. 92)
•View Current Source Revision Details in a Pipeline (CLI) (p. 93)
View Current Source Revision Details in a
Pipeline (Console)
You can use the AWS CodePipeline console to view information about the most recent source
revisions that were included in a pipeline execution.
To view source revisions in a pipeline
1. Sign in to the AWS Management Console and open the AWS CodePipeline console at http://
console.aws.amazon.com/codepipeline.
The names of all pipelines associated with your AWS account will be displayed.
2. Choose the name of the pipeline for which you want to view source revision details.
3. Locate an action for which you want to view source revision details, and then find the revision
information at the bottom of its stage:
4. Click in the details area to view more information about the artifact, including the length of time
since the artifact was committed. With the exception of artifacts stored in Amazon S3 buckets,
identifiers such as commit IDs in this information detail view are linked to source information pages
for the artifacts.
API Version 2015-07-09
92

AWS CodePipeline User Guide
View Current Source Revision
Details in a Pipeline (CLI)
View Current Source Revision Details in a
Pipeline (CLI)
You can run the get-pipeline-execution command to view information about the most recent source
revisions that were included in a pipeline execution. After you first run the get-pipeline-state command
to get details about all stages in a pipeline, you identify the execution ID that applies to a particular
stage for which you want source revision details, and then use that execution ID in the get-pipeline-
execution command. (Stages in a pipeline might have been last successfully completed during
different pipeline runs and can therefore have different execution IDs.)
In other words, if you want to view details about artifacts currently in the Beta stage, run the get-
pipeline-state command, identify the current execution ID of the Beta stage, and then run the get-
pipeline-execution command using that execution ID.
To view source revisions in a pipeline
1. Open a terminal (Linux, OS X, or Unix) or command prompt (Windows) and use the AWS CLI to
run the get-pipeline-state command. For a pipeline named MyFirstPipeline, you would type:
aws codepipeline get-pipeline-state --name MyFirstPipeline
This command returns the most recent state of a pipeline, including the latest pipeline execution ID
for each stage.
2. To view details about a pipeline execution, run the get-pipeline-execution command, specifying
the unique name of the pipeline and the pipeline execution ID of the particular execution for which
you want to view artifact details. For example, to view details about the execution of a pipeline
named MyFirstPipeline, with the execution ID 3137f7cb-7cf7-039j-s83l-d7eu3EXAMPLE, you
would type the following:
aws codepipeline get-pipeline-execution --pipeline-name MyFirstPipeline --
pipeline-execution-id 3137f7cb-7cf7-039j-s83l-d7eu3EXAMPLE
This command returns information about each source revision that is part of the pipeline execution
and identifying information about the pipeline. Only information about pipeline stages that were
included in that execution are included. There might be other stages in the pipeline that were not
part of that pipeline execution.
The following example shows the returned data for a portion of pipeline named
MyFirstPipeline, where an artifact named "MyApp" is stored in a GitHub repository:
3. {
"pipelineExecution": {
"artifactRevisions": [
API Version 2015-07-09
93

AWS CodePipeline User Guide
View Current Source Revision
Details in a Pipeline (CLI)
{
"created": 1427298837.7689769,
"name": "MyApp",
"revisionChangeIdentifier": "1427298921.3976923",
"revisionId": "7636d59f3c461cEXAMPLE8417dbc6371",
"revisionSummary": "Updating the application for feature
12-4820",
"revisionUrl": "https://api.github.com/repos/anycompany/
MyApp/git/commits/7636d59f3c461cEXAMPLE8417dbc6371"
}
//More revisions might be listed here
],
"pipelineExecutionId": "3137f7cb-7cf7-039j-s83l-d7eu3EXAMPLE",
"pipelineName": "MyFirstPipeline",
"pipelineVersion": 2,
"status": "Succeeded"
}
}
API Version 2015-07-09
94

AWS CodePipeline User Guide
Create a Custom Action for a Pipeline
Advanced Tasks in AWS
CodePipeline
After you are comfortable with the basic operations, you can get the most out of AWS CodePipeline by
completing the following advanced tasks.
Topics
•Create a Custom Action for a Pipeline (p. 95)
•Manually Rerun a Pipeline (p. 105)
•Create a Pipeline That Uses Resources from Another Account (p. 106)
•Integrate Lambda Functions into Pipelines (p. 116)
Create and Add a Custom Action in AWS
CodePipeline
AWS CodePipeline includes a number of actions that help you configure build, test, and deployment
resources for your automated release process. If your release process includes activities that are not
included in the default actions, such as an internally developed build process or a test suite, you can
create a custom action for that purpose and include it in your pipeline. You can use the AWS CLI to
create custom actions in pipelines associated with your AWS account.
Custom actions fall into the following categories:
• A build action that builds or transforms the items
• A deploy action that deploys items to one or more servers, websites, or repositories
• A test action that configures and runs automated tests
• An invoke action that runs functions
When you create a custom action, you must also create a job worker that will poll AWS CodePipeline
for job requests for this custom action, execute the job, and return the status result to AWS
CodePipeline. This job worker can be located on any computer or resource as long as it has access
to the public endpoint for AWS CodePipeline. To easily manage access and security, consider hosting
your job worker on an Amazon EC2 instance.
The following diagram shows a high-level view of a pipeline that includes a custom build action:
API Version 2015-07-09
95
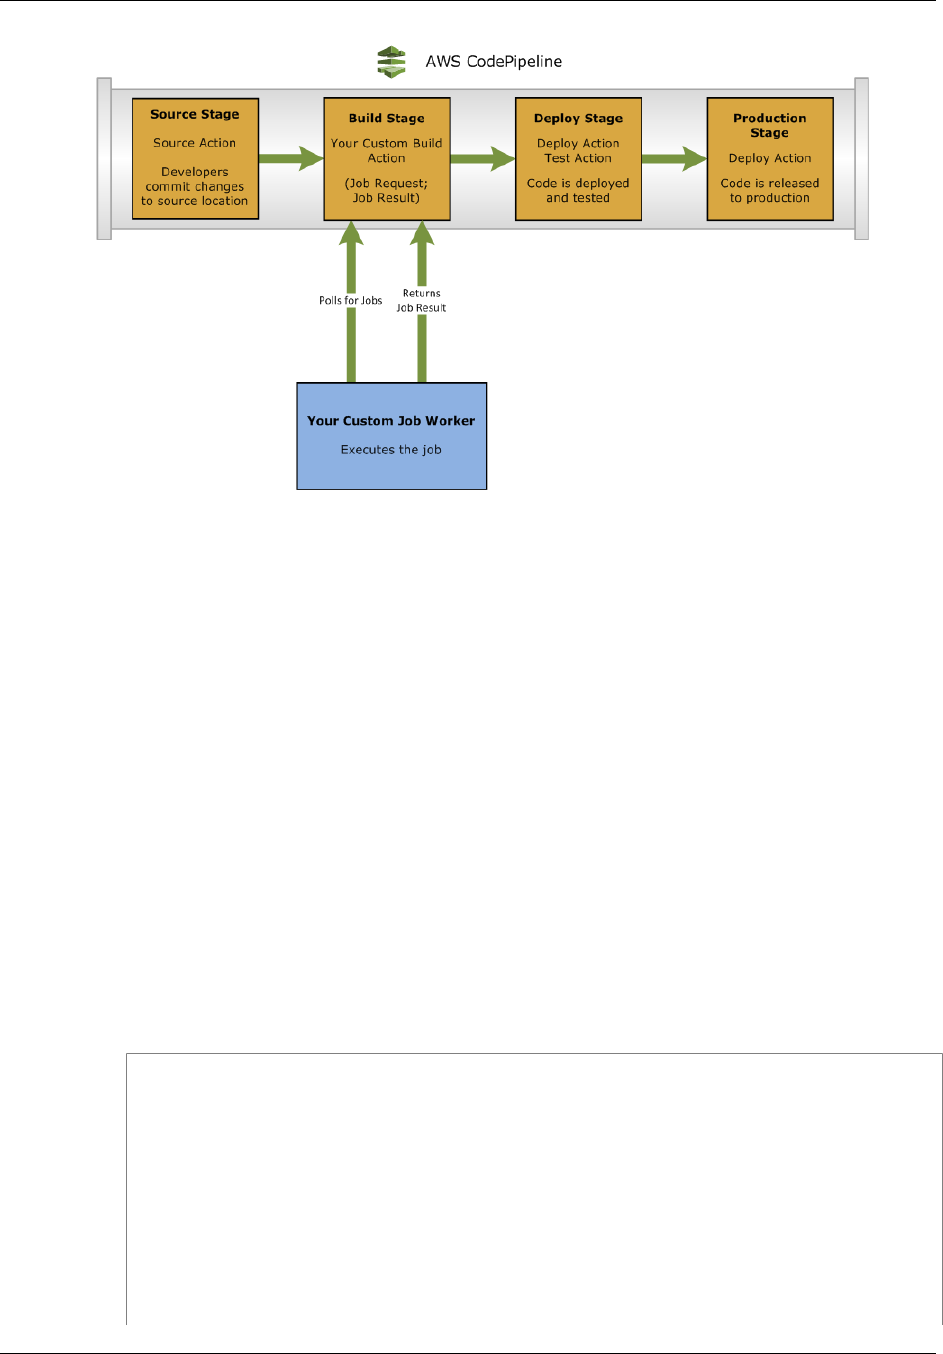
AWS CodePipeline User Guide
Create a Custom Action (CLI)
When a pipeline includes a custom action as part of a stage, the pipeline will create a job request. A
custom job worker detects that request and performs that job (in this example, a custom process using
third-party build software). When the action is complete, the job worker returns either a success result
or a failure result. If a success result is received, the pipeline will transition the revision and its artifacts
to the next action. If a failure is returned, the pipeline will not transition the revision to the next action in
the pipeline.
Note
These instructions assume that you have already completed the steps in Setting Up (p. 18).
Topics
•Create a Custom Action (CLI) (p. 96)
•Create a Job Worker for Your Custom Action (p. 99)
•Add a Custom Action to a Pipeline (p. 103)
Create a Custom Action (CLI)
Create a custom action with the AWS CLI
1. Open a text editor and create a JSON file for your custom action that includes the action category,
the action provider, and any settings required by your custom action. For example, to create a
custom build action that requires only one property, your JSON file might look like this:
{
"category": "Build",
"provider": "My-Build-Provider-Name",
"version": "1",
"settings": {
"entityUrlTemplate": "https://my-build-instance/job/
{Config:ProjectName}/",
"executionUrlTemplate": "https://my-build-instance/job/
{Config:ProjectName}/lastSuccessfulBuild/{ExternalExecutionId}/"
},
"configurationProperties": [{
"name": "ProjectName",
API Version 2015-07-09
96
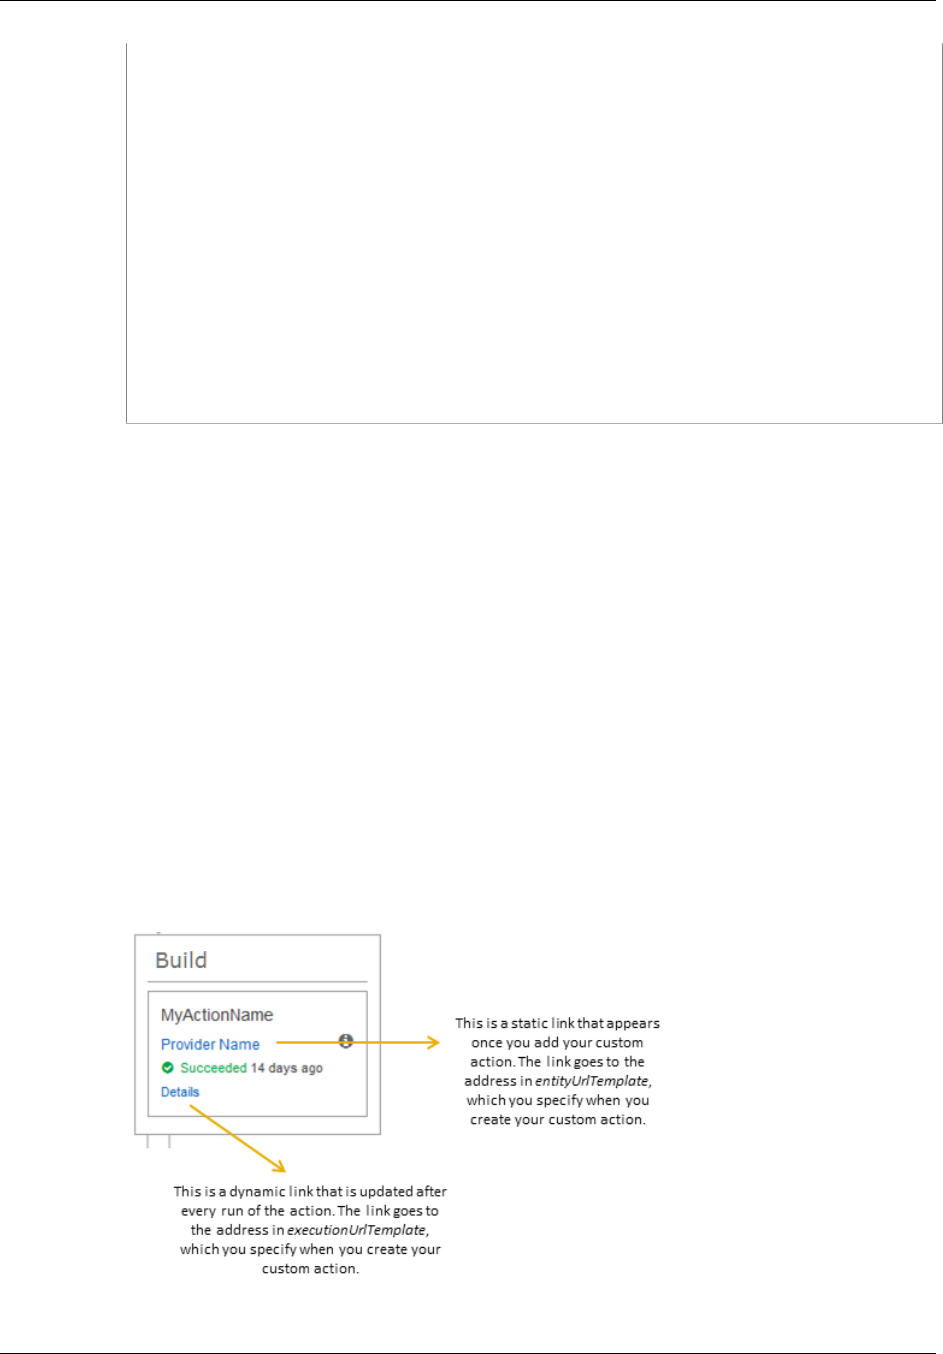
AWS CodePipeline User Guide
Create a Custom Action (CLI)
"required": true,
"key": true,
"secret": false,
"queryable": false,
"description": "The name of the build project must be provided
when this action is added to the pipeline.",
"type": "String"
}],
"inputArtifactDetails": {
"maximumCount": integer,
"minimumCount": integer
},
"outputArtifactDetails": {
"maximumCount": integer,
"minimumCount": integer
}
}
You'll notice that there are two properties included in the JSON file, entityUrlTemplate and
executionUrlTemplate. You can refer to a name in the configuration properties of the custom
action within the URL templates by following the format of {Config:name}, as long as the
configuration property is both required and not secret. For example, in the sample above, the
entityUrlTemplate value refers to the configuration property ProjectName.
•entityUrlTemplate: the static link that provides information about the service provider for
the action. In the example, the build system includes a static link to each build project. The link
format will vary, depending on your build provider (or, if you are creating a different action type,
such as test, other service provider). You must provide this link format so that when the custom
action is added, the user can choose this link to open a browser to a page on your website that
provides the specifics for the build project (or test environment).
•executionUrlTemplate: the dynamic link that will be updated with information about
the current or most recent run of the action. When your custom job worker updates
the status of a job (for example, success, failure, or in progress), it will also provide an
externalExecutionId that will be used to complete the link. This link can be used to provide
details about the run of an action.
For example, when you view the action in the pipeline, you see the following two links:
API Version 2015-07-09
97

AWS CodePipeline User Guide
Create a Custom Action (CLI)
For more information about these link types, as well as RevisionURLTemplate and
ThirdPartyURL, see ActionTypeSettings and CreateCustomActionType in the AWS
CodePipeline API Reference. For more information about action structure requirements and how
to create an action, see Pipeline Structure Reference (p. 158).
2. Save the JSON file and give it a name you can easily remember (for example,
MyCustomAction.json).
3. Open a terminal session (Linux, OS X, Unix) or command prompt (Windows) on a computer where
you have installed the AWS CLI.
4. Use the AWS CLI to run the aws codepipeline create-custom-action-type command, specifying
the name of the JSON file you just created.
For example, to create a build custom action:
aws codepipeline create-custom-action-type --cli-input-json
file://MyCustomAction.json
5. This command returns the entire structure of the custom action you created, as well as the
JobList action configuration property, which is added for you. When you add the custom action
to a pipeline, you can use JobList to specify which projects from the provider you can poll for
jobs. If you do not configure this, all available jobs will be returned when your custom job worker
polls for jobs.
For example, the preceding command might return a structure similar to the following:
{
"actionType": {
"inputArtifactDetails": {
"maximumCount": 1,
"minimumCount": 1
},
"actionConfigurationProperties": [
{
"secret": false,
"required": true,
"name": "ProjectName",
"key": true,
"description": "The name of the build project must be
provided when this action is added to the pipeline."
}
],
"outputArtifactDetails": {
"maximumCount": 0,
"minimumCount": 0
},
"id": {
"category": "Build",
"owner": "Custom",
"version": "1",
"provider": "My-Build-Provider-Name"
},
"settings": {
"entityUrlTemplate": "https://my-build-instance/job/
{Config:ProjectName}/",
"executionUrlTemplate": "https://my-build-instance/job/
mybuildjob/lastSuccessfulBuild/{ExternalExecutionId}/"
}
API Version 2015-07-09
98

AWS CodePipeline User Guide
Create a Job Worker for Your Custom Action
}
}
Create a Job Worker for Your Custom Action
Custom actions require a job worker that will poll AWS CodePipeline for job requests for the custom
action, execute the job, and return the status result to AWS CodePipeline. The job worker can
be located on any computer or resource as long as it has access to the public endpoint for AWS
CodePipeline.
There are many ways to design your job worker. The following sections provide some practical
guidance for developing your custom job worker for AWS CodePipeline.
Topics
•Choose and Configure a Permissions Management Strategy for Your Job Worker (p. 99)
•Develop a Job Worker for Your Custom Action (p. 100)
•Custom Job Worker Architecture and Examples (p. 102)
Choose and Configure a Permissions Management
Strategy for Your Job Worker
To develop a custom job worker for your custom action in AWS CodePipeline, you will need a strategy
for the integration of user and permission management.
The simplest strategy is to add the infrastructure you need for your custom job worker by creating
Amazon EC2 instances with an IAM instance role, which allow you to easily scale up the resources
you need for your integration. You can use the built-in integration with AWS to simplify the interaction
between your custom job worker and AWS CodePipeline.
To set up Amazon EC2 instances
1. Learn more about Amazon EC2 and determine whether it is the right choice for your integration.
For information, see Amazon EC2 - Virtual Server Hosting.
2. Get started creating your Amazon EC2 instances. For information, see Getting Started with
Amazon EC2 Linux Instances.
Another strategy to consider is using identity federation with IAM to integrate your existing identity
provider system and resources. This strategy is particularly useful if you already have a corporate
identity provider or are already configured to support users using web identity providers. Identity
federation allows you to grant secure access to AWS resources, including AWS CodePipeline, without
having to create or manage IAM users. You can leverage features and policies for password security
requirements and credential rotation. You can use sample applications as templates for your own
design.
To set up identity federation
1. Learn more about IAM identity federation. For information, see Manage Federation.
2. Review the examples in Scenarios for Granting Temporary Access to identify the scenario for
temporary access that best fits the needs of your custom action.
3. Review code examples of identity federation relevant to your infrastructure, such as:
•Identity Federation Sample Application for an Active Directory Use Case
API Version 2015-07-09
99

AWS CodePipeline User Guide
Create a Job Worker for Your Custom Action
•Mobile Application Identity Federation with Amazon Cognito
4. Get started configuring identity federation. For information, see Identity Providers and Federation
in IAM User Guide.
A third strategy to consider is to create an IAM user to use under your AWS account when running your
custom action and job worker.
To set up an IAM user
1. Learn more about IAM best practices and use cases in IAM Best Practices and Use Cases.
2. Get started creating IAM users by following the steps in Creating an IAM User in Your AWS
Account.
The following is an example policy you might create for use with your custom job worker. This policy is
meant as an example only and is provided as-is.
{
"Version": "2012-10-17",
"Statement": [
{
"Effect": "Allow",
"Action": [
"codepipeline:PollForJobs",
"codepipeline:AcknowledgeJob",
"codepipeline:GetJobDetails",
"codepipeline:PutJobSuccessResult",
"codepipeline:PutJobFailureResult"
],
"Resource": [
"arn:aws:codepipeline:us-east-1::actionType:custom/
Build/MyBuildProject/1/"
]
}
]
}
Tip
Consider using the AWSCodePipelineCustomActionAccess managed policy for the IAM
user.
Develop a Job Worker for Your Custom Action
After you've chosen your permissions management strategy, you should consider how your job worker
will interact with AWS CodePipeline. The following high-level diagram shows the workflow of a custom
action and job worker for a build process.
API Version 2015-07-09
100

AWS CodePipeline User Guide
Create a Job Worker for Your Custom Action
1. Your job worker polls AWS CodePipeline for jobs using PollForJobs.
2. When a pipeline is triggered by a change in its source stage (for example, when a developer
commits a change), the automated release process begins. The process continues until the stage
at which your custom action has been configured. When it reaches your action in this stage, AWS
CodePipeline queues a job. This job will appear if your job worker calls PollForJobs again to get
status. Take the job detail from PollForJobs and pass it back to your job worker.
3. The job worker calls AcknowledgeJob to send AWS CodePipeline a job acknowledgement. AWS
CodePipeline returns an acknowledgement that indicates the job worker should continue the job
(InProgress), or, if you have more than one job worker polling for jobs and another job worker has
already claimed the job, an InvalidNonceException error response will be returned. After the
InProgress acknowledgement, AWS CodePipeline waits for results to be returned.
4. The job worker initiates your custom action on the revision, and then your action runs. Along with
any other actions, your custom action returns a result to the job worker. In the example of a build
custom action, the action pulls artifacts from the Amazon S3 bucket, builds them, and pushes
successfully built artifacts back to the Amazon S3 bucket.
API Version 2015-07-09
101

AWS CodePipeline User Guide
Create a Job Worker for Your Custom Action
5. While the action is running, the job worker can call PutJobSuccessResult with a continuation
token (the serialization of the state of the job generated by the job worker, for example a build
identifer in JSON format, or an Amazon S3 object key), as well as the ExternalExecutionId
information that will be used to populate the link in executionUrlTemplate. This will update
the console view of the pipeline with a working link to specific action details while it is in progress.
Although not required, it is a best practice because it enables users to view the status of your
custom action while it runs.
Once PutJobSuccessResult is called, the job is considered complete. A new job is created in
AWS CodePipeline that includes the continuation token. This job will appear if your job worker
calls PollForJobs again. This new job can be used to check on the state of the action, and
either returns with a continuation token, or returns without a continuation token once the action is
complete.
Note
If your job worker performs all the work for a custom action, you should consider breaking
your job worker processing into at least two steps. The first step establishes the details
page for your action. Once you have created the details page, you can serialize the
state of the job worker and return it as a continuation token, subject to size limits (see
Limits (p. 166)). For example, you could write the state of the action into the string you
use as the continuation token. The second step (and subsequent steps) of your job worker
processing perform the actual work of the action. The final step returns success or failure to
AWS CodePipeline, with no continuation token on the final step.
For more information about using the continuation token, see the specifications for
PutJobSuccessResult in the AWS CodePipeline API Reference.
6. Once the custom action completes, the job worker returns the result of the custom action to AWS
CodePipeline by calling one of two APIs:
•PutJobSuccessResult without a continuation token, which indicates the custom action ran
successfully
•PutJobFailureResult, which indicates the custom action did not run successfully
Depending on the result, the pipeline will either continue on to the next action (success) or stop
(failure).
Custom Job Worker Architecture and Examples
After you have mapped out your high-level workflow, you can create your job worker. Although the
specifics of your custom action will ultimately determine what is needed for your job worker, most job
workers for custom actions include the following functionality:
• Polling for jobs from AWS CodePipeline using PollForJobs.
API Version 2015-07-09
102

AWS CodePipeline User Guide
Add a Custom Action to a Pipeline
• Acknowledging jobs and returning results to AWS CodePipeline using AcknowledgeJob,
PutJobSuccessResult, and PutJobFailureResult.
• Retrieving artifacts from and/or putting artifacts into the Amazon S3 bucket for the pipeline. To
download artifacts from the Amazon S3 bucket, you must create an Amazon S3 client that uses
signature version 4 signing (Sig V4). Sig V4 is required for SSE-KMS.
To upload artifacts to the Amazon S3 bucket, you must additionally configure the Amazon S3
PutObject request to use encryption. Currently only SSE-KMS is supported for encryption. In order
to know whether to use the default key or a customer-managed key to upload artifacts, your custom
job worker must look at the job data and check the encryption key property. If the encryption key
property is set, you should use that encryption key ID when configuring SSE-KMS. If the key is null,
you use the default master key. AWS CodePipeline uses the default Amazon S3 master key unless
otherwise configured.
The following sample shows how to create the KMS parameters in Java:
private static SSEAwsKeyManagementParams
createSSEAwsKeyManagementParams(final EncryptionKey encryptionKey) {
if (encryptionKey != null
&& encryptionKey.getId() != null
&&
EncryptionKeyType.KMS.toString().equals(encryptionKey.getType())) {
// Use a customer-managed encryption key
return new SSEAwsKeyManagementParams(encryptionKey.getId());
}
// Use the default master key
return new SSEAwsKeyManagementParams();
}
For more samples, see Specifying the AWS Key Management Service in Amazon S3 Using the
AWS SDKs. For more information about the Amazon S3 bucket for AWS CodePipeline, see
Concepts (p. 4).
A more complex example of a custom job worker is available on GitHub. This sample is open source
and provided as-is.
•Sample Job Worker for AWS CodePipeline: Download the sample from the GitHub repository.
Add a Custom Action to a Pipeline
After you have a job worker, you can add your custom action to a pipeline by creating a new one and
choosing it when you use the Create Pipeline wizard, by editing an existing pipeline and adding the
custom action, or by using the AWS CLI, the SDKs, or the APIs.
Note
You can create a pipeline in the Create Pipeline wizard that includes a custom action if it is a
build or deploy action. If your custom action is in the test category, you must add it by editing
an existing pipeline.
Topics
API Version 2015-07-09
103

AWS CodePipeline User Guide
Add a Custom Action to a Pipeline
•Add a Custom Action to a Pipeline (Console) (p. 104)
•Add a Custom Action to an Existing Pipeline (CLI) (p. 104)
Add a Custom Action to a Pipeline (Console)
To create a pipeline with your custom action by using the AWS CodePipeline console, follow the steps
in Create a Pipeline (p. 54) and choose your custom action from as many stages as you would like to
test. To add your custom action to an existing pipeline by using the AWS CodePipeline console, follow
the steps in Edit a Pipeline (p. 60) and add your custom action to one or more stages in the pipeline.
Add a Custom Action to an Existing Pipeline (CLI)
You can use the AWS CLI to add a custom action to an existing pipeline.
1. Open a terminal session (Linux, OS X, or Unix) or command prompt (Windows) and run the get-
pipeline command to copy the pipeline structure you want to edit into a JSON file. For example,
for a pipeline named MyFirstPipeline, you would type the following command:
aws codepipeline get-pipeline --name MyFirstPipeline >pipeline.json
This command returns nothing, but the file you created should appear in the directory where you
ran the command.
2. Open the JSON file in any text editor and modify the structure of the file to add your custom action
to an existing stage.
Tip
If you want your action to run in parallel with another action in that stage, make sure you
assign it the same runOrder value as that action.
For example, to modify the structure of a pipeline to add a stage named Build and to add a
build custom action to that stage, you might modify the JSON to add the Build stage before a
deployment stage as follows:
,
{
"name": "MyBuildStage",
"actions": [
{
"inputArtifacts": [
{
"name": "MyApp"
}
],
"name": "MyBuildCustomAction",
"actionTypeId": {
"category": "Build",
"owner": "Custom",
"version": "1",
"provider": "My-Build-Provider-Name"
},
"outputArtifacts": [
{
"name": "MyBuiltApp"
}
],
"configuration": {
API Version 2015-07-09
104

AWS CodePipeline User Guide
Manually Rerun a Pipeline
"ProjectName": "MyBuildProject"
},
"runOrder": 1
}
]
},
{
"name": "DeployToBeta",
"actions": [
{
"inputArtifacts": [
{
"name": "MyBuiltApp"
}
],
"name": "Deploy-CodeDeploy-Application",
"actionTypeId": {
"category": "Deploy",
"owner": "AWS",
"version": "1",
"provider": "CodeDeploy"
},
"outputArtifacts": [],
"configuration": {
"ApplicationName":
"CodePipelineDemoApplication",
"DeploymentGroupName": "CodePipelineDemoFleet"
},
"runOrder": 1
}
]
}
]
}
3. To apply your changes, run the update-pipeline command, specifying the name of the pipeline
and the pipeline JSON file, similar to the following:
aws codepipeline update-pipeline --cli-input-json file://pipeline.json
This command returns the entire structure of the edited pipeline.
4. Open the AWS CodePipeline console and choose the name of the pipeline you just edited.
The pipeline shows your changes. The next time you make a change to the source location, the
pipeline will run that revision through the revised structure of the pipeline.
Manually Release a Change to a Pipeline in
AWS CodePipeline
By default, a pipeline runs automatically any time a change is made in the source repository. However,
you might want to rerun the most recent revision through the pipeline a second time. You can use the
AWS CodePipeline console or the AWS CLI and start-pipeline-execution command to manually rerun
the most recent revision through your pipeline.
Topics
API Version 2015-07-09
105
AWS CodePipeline User Guide
Manually Rerun a Revision
Through a Pipeline (Console)
•Manually Rerun a Revision Through a Pipeline (Console) (p. 106)
•Manually Start a Pipeline ( CLI) (p. 106)
Manually Rerun a Revision Through a Pipeline
(Console)
To manually rerun the most recent revision through a pipeline using the console
1. Sign in to the AWS Management Console and open the AWS CodePipeline console at http://
console.aws.amazon.com/codepipeline.
2. In Name, choose the name of the pipeline you want to rerun. This opens a detailed view of the
pipeline, including the state of each of the actions in each stage of the pipeline.
3. On the pipeline details page, choose Release change. This will run the most recent revision
available in each source location specified in a source action through the pipeline.
Manually Start a Pipeline ( CLI)
To manually start running your pipeline using the AWS CLI, use the start-pipeline-execution
command.
To run the most recent version of an artifact through a pipeline using the AWS CLI
1. Open a terminal (Linux, OS X, or Unix) or command prompt (Windows) and use the AWS CLI
to run the start-pipeline-execution command, specifying the name of the pipeline you want to
manually run. For example, to manually start running the last change through a pipeline named
MyFirstPipeline:
aws codepipeline start-pipeline-execution --name MyFirstPipeline
2. View the returned object to verify success. This command returns an ExecutionID object, similar to
the following:
{
"pipelineExecutionId": "c53dbd42-This-Is-An-Example"
}
Tip
After you have started running the pipeline, you can either view the pipeline in the
AWS CodePipeline console or run the get-pipeline-status command to monitor its
progress. For more information, see View a Pipeline (Console) (p. 88) and View a
Pipeline (CLI) (p. 90).
Create a Pipeline in AWS CodePipeline That
Uses Resources from Another AWS Account
You might want to create a pipeline that uses resources created or managed by another AWS
account. For example, you might want to use one account for your pipeline and another for your AWS
CodeDeploy resources. To do so, you must create a AWS Key Management Service (AWS KMS)
key to use, add the key to the pipeline, and set up account policies and roles to enable cross-account
access.
API Version 2015-07-09
106

AWS CodePipeline User Guide
Prerequisite: Create an AWS KMS Encryption Key
Note
Source actions cannot use Amazon S3 buckets from other AWS accounts.
In this walkthrough and its examples, AccountA is the account originally used to create the pipeline. It
has access to the Amazon S3 bucket used to store pipeline artifacts and the service role used by AWS
CodePipeline. AccountB is the account originally used to create the AWS CodeDeploy application,
deployment group, and service role used by AWS CodeDeploy.
For AccountA to edit a pipeline to use the AWS CodeDeploy application created by AccountB,
AccountA must:
• Request the ARN or account ID of AccountB (in this walkthrough, the AccountB ID is
012ID_ACCOUNT_B).
• Create or use an AWS KMS customer-managed key in the region for the pipeline, and grant
permissions to use that key to the service role (AWS-CodePipeline-Service) and AccountB.
• Create an Amazon S3 bucket policy that grants AccountB access to the Amazon S3 bucket (for
example, codepipeline-us-east-1-1234567890).
• Create a policy that allows AccountA to assume a role configured by AccountB, and attach that
policy to the service role (AWS-CodePipeline-Service).
• Edit the pipeline to use the customer-managed AWS KMS key instead of the default key.
For AccountB to allow access to its resources to a pipeline created in AccountA, AccountB must:
• Request the ARN or account ID of AccountA (in this walkthrough, the AccountA ID is
012ID_ACCOUNT_A).
• Create a policy applied to the Amazon EC2 instance role configured for AWS CodeDeploy that
allows access to the Amazon S3 bucket (codepipeline-us-east-1-1234567890).
• Create a policy applied to the Amazon EC2 instance role configured for AWS CodeDeploy that
allows access to the AWS KMS customer-managed key used to encrypt the pipeline artifacts in
AccountA.
• Configure and attach an IAM role (CrossAccount_Role) with a trust relationship policy that allows
AccountA to assume the role.
• Create a policy that allows access to the deployment resources required by the pipeline and attach it
to CrossAccount_Role.
• Create a policy that allows access to the Amazon S3 bucket (codepipeline-us-
east-1-1234567890) and attach it to CrossAccount_Role.
Topics
•Prerequisite: Create an AWS KMS Encryption Key (p. 107)
•Step 1: Set Up Account Policies and Roles (p. 108)
•Step 2: Edit the Pipeline (p. 114)
Prerequisite: Create an AWS KMS Encryption
Key
Customer-managed keys are specific to a region, as are all AWS KMS keys. You must create your
customer-managed AWS KMS key in the same region where the pipeline was created (for example,
us-east-1).
Tip
For more information about the regions and endpoints available for AWS CodePipeline, see
Regions and Endpoints.
API Version 2015-07-09
107

AWS CodePipeline User Guide
Step 1: Set Up Account Policies and Roles
To create a customer-managed key in AWS KMS
1. Sign in to the AWS Management Console with AccountA and open the IAM console at https://
console.aws.amazon.com/iam/.
2. In Dashboard, choose Encryption Keys.
3. In Encryption Keys, in Filter, make sure the region selected is the same as the region where the
pipeline was created, and then choose Create Key.
For example, if the pipeline was created in us-east-1, make sure the filter is set to US East (N.
Virginia).
4. In Alias, type an alias to use for this key (for example, PipelineName-Key). Optionally, provide a
description for this key, and then choose Next Step.
5. In Define Key Administrators, choose your IAM user and any other users or groups you want to
act as administrators for this key, and then choose Next Step.
6. In Define Key Usage Permissions, under This Account, select the name of the service role for
the pipeline (for example, AWS-CodePipeline-Service). Under External Accounts, choose Add
an External Account. Type the account ID for AccountB to complete the ARN, and then choose
Next Step.
7. In Preview Key Policy, review the policy, and then choose Finish.
8. From the list of keys, choose the alias of your key
and copy its ARN (for example, arn:aws:kms:us-
east-1:012ID_ACCOUNT_A:key/2222222-3333333-4444-556677EXAMPLE). You will need
this when you edit your pipeline and configure policies.
Step 1: Set Up Account Policies and Roles
Once you have created the AWS KMS key, you must create and attach policies that will enable the
cross-account access. This requires actions from both AccountA and AccountB.
Topics
•Configure Policies and Roles in the Account That Will Create the Pipeline (AccountA) (p. 108)
•Configure Policies and Roles in the Account That Owns the AWS Resource (AccountB) (p. 110)
Configure Policies and Roles in the Account That Will
Create the Pipeline (AccountA)
To create a pipeline that uses AWS CodeDeploy resources associated with another AWS account,
AccountA must configure policies for both the Amazon S3 bucket used to store artifacts and the
service role for AWS CodePipeline.
To create a policy for the Amazon S3 bucket that grants access to AccountB (console)
1. Sign in to the AWS Management Console with AccountA and open the Amazon S3 console at
https://console.aws.amazon.com/s3/.
2. In the list of Amazon S3 buckets, choose the Amazon S3 bucket where artifacts for your
pipelines are stored. This bucket is named codepipeline-region-1234567EXAMPLE, where
region is the AWS region in which you created the pipeline and 1234567EXAMPLE is a ten-
digit random number that ensures the bucket name is unique (for example, codepipeline-us-
east-1-1234567890).
3. On the detail page for the Amazon S3 bucket, choose Properties.
4. In the properties pane, expand Permissions, and then choose Add bucket policy.
API Version 2015-07-09
108

AWS CodePipeline User Guide
Step 1: Set Up Account Policies and Roles
Tip
If a policy is already attached to your Amazon S3 bucket, choose Edit bucket policy.
You can then add the statements in the following example to the existing policy. To add a
new policy, choose the link, and follow the instructions in the AWS Policy Generator. For
more information, see Overview of IAM Policies.
5. In the Bucket Policy Editor window, type the following policy. This will allow AccountB access to
the pipeline artifacts, and will give AccountB the ability to add output artifacts if an action, such as
a custom source or build action, creates them.
In the following example, the ARN is for AccountB is 012ID_ACCOUNT_B. The ARN for the
Amazon S3 bucket is codepipeline-us-east-1-1234567890. Replace these ARNs with the
ARN for the account you want to allow access and the ARN for the Amazon S3 bucket:
{
"Version": "2012-10-17",
"Id": "SSEAndSSLPolicy",
"Statement": [
{
"Sid": "DenyUnEncryptedObjectUploads",
"Effect": "Deny",
"Principal": "*",
"Action": "s3:PutObject",
"Resource": "arn:aws:s3:::codepipeline-us-east-1-1234567890/*",
"Condition": {
"StringNotEquals": {
"s3:x-amz-server-side-encryption": "aws:kms"
}
}
},
{
"Sid": "DenyInsecureConnections",
"Effect": "Deny",
"Principal": "*",
"Action": "s3:*",
"Resource": "arn:aws:s3:::codepipeline-us-east-1-1234567890/*",
"Condition": {
"Bool": {
"aws:SecureTransport": false
}
}
},
{
"Sid": "",
"Effect": "Allow",
"Principal": {
"AWS": "arn:aws:iam::012ID_ACCOUNT_B:root"
},
"Action": [
"s3:Get*",
"s3:Put*"
],
"Resource": "arn:aws:s3:::codepipeline-us-east-1-1234567890/*"
},
{
"Sid": "",
"Effect": "Allow",
"Principal": {
"AWS": "arn:aws:iam::012ID_ACCOUNT_B:root"
API Version 2015-07-09
109

AWS CodePipeline User Guide
Step 1: Set Up Account Policies and Roles
},
"Action": "s3:ListBucket",
"Resource": "arn:aws:s3:::codepipeline-us-east-1-1234567890"
}
]
}
6. Choose Save, and then close the policy editor.
7. Choose Save to save the permissions for the Amazon S3 bucket.
To create a policy for the service role for AWS CodePipeline (console)
1. Sign in to the AWS Management Console with AccountA and open the IAM console at https://
console.aws.amazon.com/iam/.
2. In Dashboard, choose Roles.
3. In the list of roles, under Role Name, choose the name of the service role for AWS CodePipeline.
By default, this is AWS-CodePipeline-Service. If you used a different name for your service role,
be sure to choose it from the list.
4. On the Summary page, expand Permissions, and in Inline Policies, choose Create Role
Policy.
Note
If you have not previously created any role policies, Create Role Policy will not appear.
Choose the link to create a new policy instead.
5. In Set Permissions, choose Custom Policy, and then choose Select.
6. On the Review Policy page, type a name for the policy in Policy Name. In Policy Document,
type the following policy to allow AccountB to assume the role. In the following example,
012ID_ACCOUNT_B is the ARN for AccountB:
{
"Version": "2012-10-17",
"Statement": {
"Effect": "Allow",
"Action": "sts:AssumeRole",
"Resource": [
"arn:aws:iam::012ID_ACCOUNT_B:role/*"
]
}
}
7. Choose Validate Policy.
8. After the policy is validated, choose Apply Policy.
Configure Policies and Roles in the Account That Owns
the AWS Resource (AccountB)
When you create an application, deployment, and deployment group in AWS CodeDeploy, you also
create an Amazon EC2 instance role. (This role is created for you if you use the Run Deployment
Walkthrough wizard, but you can also create it manually.) For a pipeline created in AccountA to use
AWS CodeDeploy resources created in AccountB, you must:
Note
These policies are specific to setting up AWS CodeDeploy resources to be used in a pipeline
created using a different AWS account. Other AWS resources will require policies specific to
their resource requirements.
API Version 2015-07-09
110

AWS CodePipeline User Guide
Step 1: Set Up Account Policies and Roles
• Configure a policy for the instance role that allows it to access the Amazon S3 bucket where pipeline
artifacts are stored.
• Create a second role in AccountB configured for cross-account access.
This second role must not only have access to the Amazon S3 bucket in AccountA, it must also
contain a policy that allows access to the AWS CodeDeploy resources and a trust relationship policy
that allows AccountA to assume the role.
To create a policy for the Amazon EC2 instance role configured for AWS CodeDeploy
(console)
1. Sign in to the AWS Management Console with AccountB and open the IAM console at https://
console.aws.amazon.com/iam/.
2. In Dashboard, choose Roles.
3. In the list of roles, under Role Name, choose the name of the service role used as the Amazon
EC2 instance role for the AWS CodeDeploy application. This role name can vary, and more than
one instance role can be used by a deployment group. For more information, see Create an IAM
Instance Profile for your Amazon EC2 Instances.
4. On the Summary page, expand Permissions, and in Inline Policies, choose Create Role
Policy.
5. In Set Permissions, choose Custom Policy, and then choose Select.
6. On the Review Policy page, type a name for the policy in Policy Name. In Policy Document,
type the following policy to grant access to the Amazon S3 bucket used by AccountA to store
artifacts for pipelines (in this example, codepipeline-us-east-1-1234567890):
{
"Version": "2012-10-17",
"Statement": [
{
"Effect": "Allow",
"Action": [
"s3:Get*"
],
"Resource": [
"arn:aws:s3:::codepipeline-us-east-1-1234567890/*"
]
},
{
"Effect": "Allow",
"Action": [
"s3:ListBucket"
],
"Resource": [
"arn:aws:s3:::codepipeline-us-east-1-1234567890"
]
}
]
}
7. Choose Validate Policy.
8. After the policy is validated, choose Apply Policy.
9. Create a second policy for AWS KMS where arn:aws:kms:us-
east-1:012ID_ACCOUNT_A:key/2222222-3333333-4444-556677EXAMPLE is the ARN of the
customer-managed key created in AccountA and configured to allow AccountB to use it:
API Version 2015-07-09
111

AWS CodePipeline User Guide
Step 1: Set Up Account Policies and Roles
{
"Version": "2012-10-17",
"Statement": [
{
"Effect": "Allow",
"Action": [
"kms:DescribeKey",
"kms:GenerateDataKey*",
"kms:Encrypt",
"kms:ReEncrypt*",
"kms:Decrypt"
],
"Resource": [
"arn:aws:kms:us-
east-1:012ID_ACCOUNT_A:key/2222222-3333333-4444-556677EXAMPLE"
]
}
]
}
Important
You must use the account ID of AccountA in this policy as part of the resource ARN for
the AWS KMS key, as shown here, or the policy will not work.
10. Choose Validate Policy.
11. After the policy is validated, choose Apply Policy.
Now create an IAM role to use for cross-account access, and configure it so that AccountA can
assume the role. This role must contain policies that allow access to the AWS CodeDeploy resources
and the Amazon S3 bucket used to store artifacts in AccountA.
To configure the cross-account role in IAM
1. Sign in to the AWS Management Console with AccountB and open the IAM console at https://
console.aws.amazon.com/iam/.
2. In Dashboard, choose Roles, and then choose Create New Role.
3. On the Set New Role page, type a name for this role in Role Name (for example,
CrossAccount_Role). You can name this role anything you want as long as it follows the naming
conventions in IAM. Consider giving the role a name that clearly states its purpose.
4. On the Select Role Type page, choose Role for Cross-Account Access. Next to Provide
access between AWS accounts you own, choose Select.
5. Type the AWS account ID for the account that will create the pipeline in AWS CodePipeline
(AccountA), and then choose Next Step.
Note
This step creates the trust relationship policy between AccountB and AccountA.
6. In Attach Policy, choose AmazonS3ReadOnlyAccess, and then choose Next Step.
Note
This is not the policy you will use. You must choose a policy to complete the wizard.
7. On the Review page, choose Create Role.
8. From the list of roles, choose the policy you just created (for example, CrossAccount_Role) to
open the Summary page for that role.
9. Expand Permissions, and then expand Inline Policies. Choose the link to create an inline policy.
10. In Set Permissions, choose Custom Policy, and then choose Select.
API Version 2015-07-09
112

AWS CodePipeline User Guide
Step 1: Set Up Account Policies and Roles
11. On the Review Policy page, type a name for the policy in Policy Name. In Policy Document,
type the following policy to allow access to AWS CodeDeploy resources:
{
"Version": "2012-10-17",
"Statement": [
{
"Effect": "Allow",
"Action": [
"codedeploy:CreateDeployment",
"codedeploy:GetDeployment",
"codedeploy:GetDeploymentConfig",
"codedeploy:GetApplicationRevision",
"codedeploy:RegisterApplicationRevision"
],
"Resource": "*"
}
]
}
12. Choose Validate Policy.
13. After the policy is validated, choose Apply Policy.
14. In Inline Policies, choose Create Role Policy.
15. In Set Permissions, choose Custom Policy, and then choose Select.
16. On the Review Policy page, type a name for the policy in Policy Name. In Policy Document,
type the following policy to allow this role to retrieve input artifacts from, and put output artifacts
into, the Amazon S3 bucket in AccountA:
{
"Version": "2012-10-17",
"Statement": [
{
"Effect": "Allow",
"Action": [
"s3:GetObject*",
"s3:PutObject",
"s3:PutObjectAcl",
"codecommit:ListBranches",
"codecommit:ListRepositories"
],
"Resource": [
"arn:aws:s3:::codepipeline-us-east-1-1234567890/*"
]
}
]
}
17. Choose Validate Policy.
18. When the policy is validated, choose Apply Policy.
19. In Managed Policies, find AmazonS3ReadOnlyAccess in the list of policies under Policy Name,
and choose Detach Policy. When prompted, choose Detach.
API Version 2015-07-09
113

AWS CodePipeline User Guide
Step 2: Edit the Pipeline
Step 2: Edit the Pipeline
You cannot use the AWS CodePipeline console to create or edit a pipeline that uses resources
associated with another AWS account. However, you can use the console to create the general
structure of the pipeline, and then use the AWS CLI to edit the pipeline and add those resources.
Alternatively, you can use the structure of an existing pipeline and manually add the resources to it.
To add the resources associated with another AWS account (AWS CLI)
1. At a terminal (Linux, OS X, or Unix) or command prompt (Windows), run the get-pipeline
command on the pipeline to which you want to add resources. Copy the command output to a
JSON file. For example, for a pipeline named MyFirstPipeline, you would type something similar to
the following:
aws codepipeline get-pipeline --name MyFirstPipeline >pipeline.json
The output is sent to the pipeline.json file.
2. Open the JSON file in any plain-text editor. After "type": "S3" in the artifact store, add the KMS
encryptionKey, ID, and type information where codepipeline-us-east-1-1234567890 is the
name of the Amazon S3 bucket used to store artifacts for the pipeline and arn:aws:kms:us-
east-1:012ID_ACCOUNT_A:key/2222222-3333333-4444-556677EXAMPLE is the ARN of the
customer-managed key you just created:
{
"artifactStore”: {
"location": "codepipeline-us-east-1-1234567890",
"type": "S3",
"encryptionKey": {
"id": "arn:aws:kms:us-
east-1:012ID_ACCOUNT_A:key/2222222-3333333-4444-556677EXAMPLE",
"type": "KMS"
}
},
3. Add a deploy action in a stage to use the AWS CodeDeploy resources associated with AccountB,
including the roleArn values for the cross-account role you created (CrossAccount_Role).
The following example shows JSON that adds a deploy action named ExternalDeploy. It uses
the AWS CodeDeploy resources created in AccountB in a stage named Beta. In the following
example, the ARN for AccountB is 012ID_ACCOUNT_B:
,
{
"name": "Beta",
"actions": [
{
"inputArtifacts": [
{
"name": "MyApp"
}
],
"name": "ExternalDeploy",
"actionTypeId": {
"category": "Deploy",
"owner": "AWS",
"version": "1",
API Version 2015-07-09
114

AWS CodePipeline User Guide
Step 2: Edit the Pipeline
"provider": "CodeDeploy"
},
"outputArtifacts": [],
"configuration": {
"ApplicationName": "AccountBApplicationName",
"DeploymentGroupName":
"AccountBApplicationGroupName"
},
"runOrder": 1,
"roleArn":
"arn:aws:iam::012ID_ACCOUNT_B:role/CrossAccount_Role"
}
]
}
Note
This is not the JSON for the entire pipeline, just the structure for the action in a stage.
4. Save the file.
5. To apply your changes, run the update-pipeline command, specifying the name of the pipeline
and the pipeline JSON file, similar to the following:
aws codepipeline update-pipeline --cli-input-json file://pipeline.json
This command returns the entire structure of the edited pipeline.
To test the pipeline that uses resources associated with another AWS account
1. At a terminal (Linux, OS X, or Unix) or command prompt (Windows), run the start-pipeline-
execution command, specifying the name of the pipeline, similar to the following:
aws codepipeline start-pipeline-execution --name MyFirstPipeline
For more information, see Manually Rerun a Pipeline (p. 105).
2. Sign in to the AWS Management Console with AccountA and open the AWS CodePipeline
console at http://console.aws.amazon.com/codepipeline.
The names of all pipelines associated with your AWS account are displayed.
3. In Name, choose the name of the pipeline you just edited. This opens a detailed view of the
pipeline, including the state of each action in each stage of the pipeline.
4. Watch the progress through the pipeline. Wait for a success message on the action that uses the
resource associated with another AWS account.
Note
You will receive an error if you try to view details for the action while signed in with
AccountA. Sign out, and then sign in with AccountB to view the deployment details in
AWS CodeDeploy.
API Version 2015-07-09
115

AWS CodePipeline User Guide
Integrate Lambda Functions into Pipelines
Integrate AWS Lambda Functions into
Pipelines in AWS CodePipeline
AWS Lambda is a compute service that lets you run code without provisioning or managing servers.
You can create Lambda functions and add them as actions in your pipelines. Because Lambda allows
you to write functions to perform almost any task, you can customize the way your pipeline works.
Note
Creating and running Lambda functions might result in charges to your AWS account. For
more information, see Pricing.
The following are some ways Lambda functions can be used in pipelines:
• To roll out changes to your environment by applying or updating an AWS CloudFormation template.
• To create resources on demand in one stage of a pipeline using AWS CloudFormation and delete
them in another stage.
• To deploy application versions with zero downtime in AWS Elastic Beanstalk with a Lambda function
that swaps CNAME values.
• To deploy to Amazon ECS Docker instances.
• To back up resources before building or deploying by creating an AMI snapshot.
• To add integration with third-party products to your pipeline, such as posting messages to an IRC
client.
This topic assumes you are familiar with AWS CodePipeline and AWS Lambda and know how to
create pipelines, functions, and the IAM polices and roles on which they depend. In this topic, we will
walk through the steps for:
• Creating a Lambda function that tests whether a web page was deployed successfully.
• Configuring the AWS CodePipeline and Lambda execution roles and the permissions required to run
the function as part of the pipeline.
• Editing a pipeline to add the Lambda function as an action.
• Testing the action by manually releasing a change.
This topic includes sample functions to demonstrate the flexibility of working with Lambda functions in
AWS CodePipeline:
•Basic Lambda function (p. 118)
• Creating a basic Lambda function to use with AWS CodePipeline.
• Returning success or failure results to AWS CodePipeline in the Details link for the action.
•A Sample Python Function That Uses an AWS CloudFormation Template (p. 125)
• Using JSON-encoded user parameters to pass multiple configuration values to the function
(get_user_params).
• Interacting with .zip artifacts in an artifact bucket (get_template).
• Using a continuation token to monitor a long-running asynchronous process
(continue_job_later). This will allow the action to continue and the function to succeed even if
it exceeds a five-minute runtime (a limitation in Lambda).
Each sample function includes information about the permissions you must add to the role. For
information about limits in AWS Lambda, see Limits in the AWS Lambda Developer Guide.
API Version 2015-07-09
116

AWS CodePipeline User Guide
Step 1: Create a Pipeline
Important
The sample code, roles, and polices included in this topic are meant as examples only, and
are provided as-is.
Topics
•Step 1: Create a Pipeline (p. 117)
•Step 2: Create the Lambda Function (p. 117)
•Step 3: Add the Lambda Function to a Pipeline in the AWS CodePipeline Console (p. 121)
•Step 4: Test the Pipeline with the Lambda function (p. 122)
•Step 5: Next Steps (p. 123)
•Example JSON Event (p. 123)
•Additional Sample Functions (p. 124)
Step 1: Create a Pipeline
In this step, you will create a pipeline to which you will later add the Lambda function. This is the same
pipeline you created in Getting Started (p. 21). If that pipeline is still configured for your account and is
in the same region where you will create the Lambda function, you can skip this step.
Important
You must create the pipeline and all of its resources in the same region where you will create
the Lambda function.
To create the pipeline
1. Follow the first three steps in Simple Pipeline Walkthrough (Amazon S3 Bucket) (p. 21) to create
an Amazon S3 bucket, AWS CodeDeploy resources, and a two-stage pipeline. Choose the
Amazon Linux option for your instance types. You can use any name you want for the pipeline, but
the steps in this topic use MyLambdaTestPipeline.
2. On the status page for your pipeline, in the AWS CodeDeploy action, choose Details. On the
deployment details page for the deployment group, choose an instance ID from the list.
3. In the Amazon EC2 console, on the Description tab for the instance, copy the IP address in
Public IP (for example, 192.0.2.4). You will use this address as the target of the function in
AWS Lambda.
Note
The default service role for AWS CodePipeline, AWS-CodePipeline-Service, includes
the Lambda permissions required to invoke the function, so you do not have to create
an additional invocation policy or role. However, if you have modified the default
service role or selected a different one, make sure the policy for the role allows the
lambda:InvokeFunction and lambda:ListFunctions permissions. Otherwise, pipelines
that include Lambda actions will fail.
Step 2: Create the Lambda Function
In this step, you will create a Lambda function that makes an HTTP request and checks for a line of
text on a web page. As part of this step, you must also create an IAM policy and Lambda execution
role. For more information about Lambda, execution roles and why this is required, see Permissions
Model in the AWS Lambda Developer Guide.
To create the execution role
1. Sign in to the Identity and Access Management (IAM) console at https://console.aws.amazon.com/
iam/.
API Version 2015-07-09
117

AWS CodePipeline User Guide
Step 2: Create the Lambda Function
2. Choose Policies, and then choose Create Policy.
3. On the Create Policy page, choose the Select button next to Create Your Own Policy.
4. On the Review Policy page, in Policy Name, type a name for the policy (for example,
CodePipelineLambdaExecPolicy). In Description, type Enables Lambda to execute
code. In Policy Document, copy and paste the following policy into the policy box, and then
choose Validate Policy.
{
"Version": "2012-10-17",
"Statement": [
{
"Action": [
"logs:*"
],
"Effect": "Allow",
"Resource": "arn:aws:logs:*:*:*"
},
{
"Action": [
"codepipeline:PutJobSuccessResult",
"codepipeline:PutJobFailureResult"
],
"Effect": "Allow",
"Resource": "*"
}
]
}
After the policy is validated, choose Create Policy.
Note
These are the minimum permissions required for a Lambda function to interoperate with
AWS CodePipeline and Amazon CloudWatch. If you want to expand this policy to allow
functions that interact with other AWS resources, you should modify this policy to allow
the actions required by those Lambda functions.
5. On the policy dashboard page, choose Roles, and then choose Create New Role.
6. On the Set Role Name page, type a name for the role (for example,
CodePipelineLambdaExecRole), and then choose Next Step.
7. On the Select Role Type page, in the list of roles under AWS Service Roles, choose the Select
button next to AWS Lambda.
8. On the Attach Policy page, select the check box next to CodePipelineLambdaExecPolicy, and
then choose Next Step.
9. On the Review page, choose Create Role.
To create the sample Lambda function to use with AWS CodePipeline
1. Sign in to the AWS Management Console and open the AWS Lambda console at https://
console.aws.amazon.com/lambda/.
2. On the Lambda: Function list page, choose Create a Lambda function.
Tip
If you see a Welcome page instead of the Lambda: Function list page, choose Get
Started Now.
3. On the Select blueprint page, choose Skip.
API Version 2015-07-09
118

AWS CodePipeline User Guide
Step 2: Create the Lambda Function
4. On the Configure function page, in Name, type a name for your Lambda function (for example,
MyLambdaFunctionForAWSCodePipeline). Optionally, in Description, type a description for
the function (for example, A sample test to check whether the website responds
with a 200 (OK) and contains a specific word on the page). In the Runtime list,
choose Node.js, and then copy the following code into the Lambda function code box:
Note
The event object, under the CodePipeline.job key, contains the job details. For a full
example of the JSON event AWS CodePipeline returns to Lambda, see Example JSON
Event (p. 123).
var assert = require('assert');
var AWS = require('aws-sdk');
var http = require('http');
exports.handler = function(event, context) {
var codepipeline = new AWS.CodePipeline();
// Retrieve the Job ID from the Lambda action
var jobId = event["CodePipeline.job"].id;
// Retrieve the value of UserParameters from the Lambda action
configuration in AWS CodePipeline, in this case a URL which will be
// health checked by this function.
var url =
event["CodePipeline.job"].data.actionConfiguration.configuration.UserParameters;
// Notify AWS CodePipeline of a successful job
var putJobSuccess = function(message) {
var params = {
jobId: jobId
};
codepipeline.putJobSuccessResult(params, function(err, data) {
if(err) {
context.fail(err);
} else {
context.succeed(message);
}
});
};
// Notify AWS CodePipeline of a failed job
var putJobFailure = function(message) {
var params = {
jobId: jobId,
failureDetails: {
message: JSON.stringify(message),
type: 'JobFailed',
externalExecutionId: context.invokeid
}
};
codepipeline.putJobFailureResult(params, function(err, data) {
context.fail(message);
});
};
// Validate the URL passed in UserParameters
if(!url || url.indexOf('http://') === -1) {
API Version 2015-07-09
119

AWS CodePipeline User Guide
Step 2: Create the Lambda Function
putJobFailure('The UserParameters field must contain a valid URL
address to test, including http:// or https://');
return;
}
// Helper function to make a HTTP GET request to the page.
// The helper will test the response and succeed or fail the job
accordingly
var getPage = function(url, callback) {
var pageObject = {
body: '',
statusCode: 0,
contains: function(search) {
return this.body.indexOf(search) > -1;
}
};
http.get(url, function(response) {
pageObject.body = '';
pageObject.statusCode = response.statusCode;
response.on('data', function (chunk) {
pageObject.body += chunk;
});
response.on('end', function () {
callback(pageObject);
});
response.resume();
}).on('error', function(error) {
// Fail the job if our request failed
putJobFailure(error);
});
};
getPage(url, function(returnedPage) {
try {
// Check if the HTTP response has a 200 status
assert(returnedPage.statusCode === 200);
// Check if the page contains the text "Congratulations"
// You can change this to check for different text, or add
other tests as required
assert(returnedPage.contains('Congratulations'));
// Succeed the job
putJobSuccess("Tests passed.");
} catch (ex) {
// If any of the assertions failed then fail the job
putJobFailure(ex);
}
});
};
5. Leave the value of Handler name at the default value, but change Role to
CodePipelineLambdaExecRole.
6. In Advanced settings, for Timeout (s), type 20.
7. After you have finished configuring these details, choose Next.
8. On the Review page, choose Create function.
API Version 2015-07-09
120

AWS CodePipeline User Guide
Step 3: Add the Lambda Function to a
Pipeline in the AWS CodePipeline Console
Step 3: Add the Lambda Function to a Pipeline in
the AWS CodePipeline Console
In this step, you will add a new stage to your pipeline, and then add an action—a Lambda action that
calls your function— to that stage.
To add a stage
1. Sign in to the AWS Management Console and open the AWS CodePipeline console at http://
console.aws.amazon.com/codepipeline.
2. On the Welcome page, choose the pipeline you created from the list of pipelines.
3. On the pipeline view page, choose Edit.
4. On the Edit page, choose the option to add a stage after the deployment stage with the AWS
CodeDeploy action. Type a name for the stage (for example, LambdaStage), and then choose the
option to add an action to the stage.
Note
You can also choose to add your Lambda action to an existing stage. For demonstration
purposes, we are adding the Lambda function as the only action in a stage to allow you to
easily view its progress as artifacts progress through a pipeline.
5. In the Add action panel, in Action category, choose Invoke. In Invoke actions, in Action name,
type a name for your Lambda action (for example, MyLambdaAction). In Provider, choose AWS
Lambda. In Function name, choose or type the name of your Lambda function (for example,
MyLambdaFunctionForAWSCodePipeline). In User parameters, specify the IP address for the
Amazon EC2 instance you copied earlier (for example, http://192.0.2.4), and then choose
Add action.
API Version 2015-07-09
121
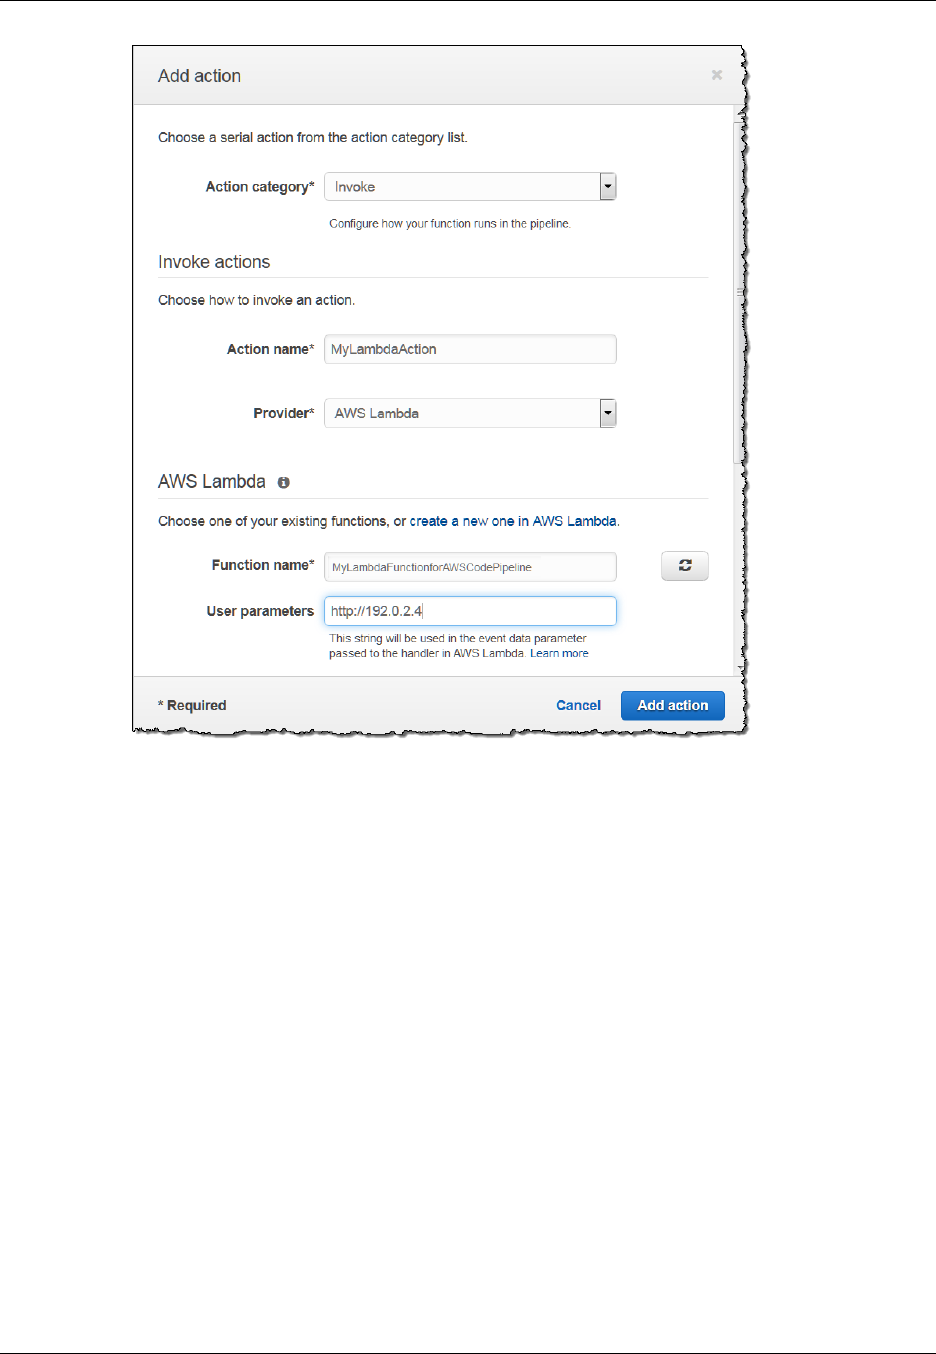
AWS CodePipeline User Guide
Step 4: Test the Pipeline with the Lambda function
Note
This topic uses an IP address, but in a real-world scenario, you could provide your
registered website name instead (for example, http://www.example.com). For more
information about event data and handlers in AWS Lambda, see Programming Model in
the AWS Lambda Developer Guide.
6. On the Edit page, choose Save pipeline changes.
Step 4: Test the Pipeline with the Lambda
function
To test the function, release the most recent change through the pipeline.
To use the console to run the most recent version of an artifact through a pipeline
1. On the pipeline details page, choose Release change. This will run the most recent revision
available in each source location specified in a source action through the pipeline.
2. When the Lambda action is complete, choose the Details link to view the log stream for the
function in Amazon CloudWatch, including the billed duration of the event. If the function failed, the
CloudWatch log will provide information about the cause.
API Version 2015-07-09
122

AWS CodePipeline User Guide
Step 5: Next Steps
Step 5: Next Steps
Now that you've successfully created a Lambda function and added it as an action in a pipeline, you
can try the following:
• Add more Lambda actions to your stage to check other web pages.
• Modify the Lambda function to check for a different text string.
•Explore Lambda functions and create and add your own Lambda functions to pipelines.
After you have finished experimenting with the Lambda function, consider removing it from your
pipeline, deleting it from AWS Lambda, and deleting the role from IAM in order to avoid possible
charges. For more information, see Edit a Pipeline (p. 60), Delete a Pipeline (p. 83), and Deleting
Roles or Instance Profiles.
Example JSON Event
The following example shows a sample JSON event sent to Lambda by AWS CodePipeline. You can
use a JSON file to test your function manually in the Lambda console. The job details differ from the
standard documented in the GetJobDetails API only in that the specific action configuration details for
a Lambda action, FunctionName and UserParameters, are supplied as part of the response. The
values in red italic text are examples or explanations, not real values.
{
"CodePipeline.job": {
"id": "11111111-abcd-1111-abcd-111111abcdef",
"accountId": "111111111111",
"data": {
"actionConfiguration": {
"configuration": {
API Version 2015-07-09
123

AWS CodePipeline User Guide
Additional Sample Functions
"FunctionName": "MyLambdaFunctionForAWSCodePipeline",
"UserParameters": "some-input-such-as-a-URL"
}
},
"inputArtifacts": [
{
"location": {
"s3Location": {
"bucketName": "the name of the bucket configured
as the pipeline artifact store in Amazon S3, for example codepipeline-us-
east-1-1234567890",
"objectKey": "the name of the application, for
example CodePipelineDemoApplication.zip"
},
"type": "S3"
},
"revision": null,
"name": "ArtifactName"
}
],
"outputArtifacts": [],
"artifactCredentials": {
"secretAccessKey": "wJalrXUtnFEMI/K7MDENG/
bPxRfiCYEXAMPLEKEY",
"sessionToken": "MIICiTCCAfICCQD6m7oRw0uXOjANBgkqhkiG9w
0BAQUFADCBiDELMAkGA1UEBhMCVVMxCzAJBgNVBAgTAldBMRAwDgYDVQQHEwdTZ
WF0dGxlMQ8wDQYDVQQKEwZBbWF6b24xFDASBgNVBAsTC0lBTSBDb25zb2xlMRIw
EAYDVQQDEwlUZXN0Q2lsYWMxHzAdBgkqhkiG9w0BCQEWEG5vb25lQGFtYXpvbi5
jb20wHhcNMTEwNDI1MjA0NTIxWhcNMTIwNDI0MjA0NTIxWjCBiDELMAkGA1UEBh
MCVVMxCzAJBgNVBAgTAldBMRAwDgYDVQQHEwdTZWF0dGxlMQ8wDQYDVQQKEwZBb
WF6b24xFDASBgNVBAsTC0lBTSBDb25zb2xlMRIwEAYDVQQDEwlUZXN0Q2lsYWMx
HzAdBgkqhkiG9w0BCQEWEG5vb25lQGFtYXpvbi5jb20wgZ8wDQYJKoZIhvcNAQE
BBQADgY0AMIGJAoGBAMaK0dn+a4GmWIWJ21uUSfwfEvySWtC2XADZ4nB+BLYgVI
k60CpiwsZ3G93vUEIO3IyNoH/f0wYK8m9TrDHudUZg3qX4waLG5M43q7Wgc/MbQ
ITxOUSQv7c7ugFFDzQGBzZswY6786m86gpEIbb3OhjZnzcvQAaRHhdlQWIMm2nr
AgMBAAEwDQYJKoZIhvcNAQEFBQADgYEAtCu4nUhVVxYUntneD9+h8Mg9q6q+auN
KyExzyLwaxlAoo7TJHidbtS4J5iNmZgXL0FkbFFBjvSfpJIlJ00zbhNYS5f6Guo
EDmFJl0ZxBHjJnyp378OD8uTs7fLvjx79LjSTbNYiytVbZPQUQ5Yaxu2jXnimvw
3rrszlaEXAMPLE=",
"accessKeyId": "AKIAIOSFODNN7EXAMPLE"
},
"continuationToken": "A continuation token if continuing job"
}
}
}
Additional Sample Functions
The following sample Lambda functions demonstrate additional functionality you can leverage for your
pipelines in AWS CodePipeline. To use these functions, you might have to make modifications to the
policy for the Lambda execution role, as noted in the introduction for each sample.
Topics
•A Sample Python Function That Uses an AWS CloudFormation Template (p. 125)
API Version 2015-07-09
124

AWS CodePipeline User Guide
Additional Sample Functions
A Sample Python Function That Uses an AWS
CloudFormation Template
The following sample shows a function that creates or updates a stack based on a supplied AWS
CloudFormation template. The template creates an Amazon S3 bucket. It is for demonstration
purposes only, to minimize costs. Ideally, you should delete the stack before you upload anything to
the bucket. If you upload files to the bucket, you will not be able to delete the bucket when you delete
the stack. You will have to manually delete everything in the bucket before you can delete the bucket
itself.
This Python sample assumes you have a pipeline that uses an Amazon S3 bucket as a source action,
or that you have access to a versioned Amazon S3 bucket you can use with the pipeline. You will
create the AWS CloudFormation template, compress it, and upload it to that bucket as a .zip file. You
must then add a source action to your pipeline that retrieves this .zip file from the bucket.
This sample demonstrates:
• The use of JSON-encoded user parameters to pass multiple configuration values to the function
(get_user_params).
• The interaction with .zip artifacts in an artifact bucket (get_template).
• The use of a continuation token to monitor a long-running asynchronous process
(continue_job_later). This will allow the action to continue and the function to succeed even if it
exceeds a five-minute runtime (a limitation in Lambda).
To use this sample Lambda function, the policy for the Lambda execution role must have Allow
permissions in AWS CloudFormation, Amazon S3, and AWS CodePipeline, as shown in this sample
policy:
{
"Version": "2012-10-17",
"Statement": [
{
"Action": [
"logs:*"
],
"Effect": "Allow",
"Resource": "arn:aws:logs:*:*:*"
},
{
"Action": [
"codepipeline:PutJobSuccessResult",
"codepipeline:PutJobFailureResult"
],
"Effect": "Allow",
"Resource": "*"
},
{
"Action": [
"cloudformation:DescribeStacks",
"cloudformation:CreateStack",
"cloudformation:UpdateStack"
],
"Effect": "Allow",
"Resource": "*"
},
{
"Action": [
API Version 2015-07-09
125

AWS CodePipeline User Guide
Additional Sample Functions
"s3:*"
],
"Effect": "Allow",
"Resource": "*"
}
]
}
To create the AWS CloudFormation template, open any plain-text editor and copy and paste the
following code:
{
"AWSTemplateFormatVersion" : "2010-09-09",
"Description" : "AWS CloudFormation template which creates an S3 bucket",
"Resources" : {
"MySampleBucket" : {
"Type" : "AWS::S3::Bucket",
"Properties" : {
}
}
},
"Outputs" : {
"BucketName" : {
"Value" : { "Ref" : "MySampleBucket" },
"Description" : "The name of the S3 bucket"
}
}
}
Save this as a JSON file with the name template.json in a directory named template-package.
Create a compressed (.zip) file of this directory and file named template-package.zip, and upload
the compressed file to a versioned Amazon S3 bucket. If you already have a bucket configured for your
pipeline, you can use it. Next, edit your pipeline to add a source action that retrieves the .zip file. Name
the output for this action MyTemplate. For more information, see Edit a Pipeline (p. 60).
Note
The sample Lambda function expects these file names and compressed structure. However,
you can substitute your own AWS CloudFormation template for this sample. If you choose
to use your own template, make sure you modify the policy for the Lambda execution role to
allow any additional functionality required by your AWS CloudFormation template.
To add the following code as a function in Lambda
1. Open the Lambda console and choose Create a Lambda function.
2. On the Select blueprint page, choose Skip.
3. On the Configure function page, in Name, type a name for your Lambda function. Optionally, in
Description, type a description for the function.
4. In the Runtime list, choose Python 2.7.
5. Leave the value of Handler name at the default value, but change Role to your Lambda execution
role (for example, CodePipelineLambdaExecRole).
6. In Advanced settings, for Timeout (s), replace the default of 3 seconds with 20.
7. Copy the following code into the Lambda function code code box:
from __future__ import print_function
from boto3.session import Session
import json
API Version 2015-07-09
126

AWS CodePipeline User Guide
Additional Sample Functions
import urllib
import boto3
import zipfile
import tempfile
import botocore
import traceback
print('Loading function')
cf = boto3.client('cloudformation')
code_pipeline = boto3.client('codepipeline')
def find_artifact(artifacts, name):
"""Finds the artifact 'name' among the 'artifacts'
Args:
artifacts: The list of artifacts available to the function
name: The artifact we wish to use
Returns:
The artifact dictionary found
Raises:
Exception: If no matching artifact is found
"""
for artifact in artifacts:
if artifact['name'] == name:
return artifact
raise Exception('Input artifact named "{0}" not found in
event'.format(name))
def get_template(s3, artifact, file_in_zip):
"""Gets the template artifact
Downloads the artifact from the S3 artifact store to a temporary file
then extracts the zip and returns the file containing the
CloudFormation
template.
Args:
artifact: The artifact to download
file_in_zip: The path to the file within the zip containing the
template
Returns:
The CloudFormation template as a string
Raises:
Exception: Any exception thrown while downloading the artifact or
unzipping it
"""
tmp_file = tempfile.NamedTemporaryFile()
bucket = artifact['location']['s3Location']['bucketName']
key = artifact['location']['s3Location']['objectKey']
with tempfile.NamedTemporaryFile() as tmp_file:
s3.download_file(bucket, key, tmp_file.name)
with zipfile.ZipFile(tmp_file.name, 'r') as zip:
API Version 2015-07-09
127

AWS CodePipeline User Guide
Additional Sample Functions
return zip.read(file_in_zip)
def update_stack(stack, template):
"""Start a CloudFormation stack update
Args:
stack: The stack to update
template: The template to apply
Returns:
True if an update was started, false if there were no changes
to the template since the last update.
Raises:
Exception: Any exception besides "No updates are to be performed."
"""
try:
cf.update_stack(StackName=stack, TemplateBody=template)
return True
except botocore.exceptions.ClientError as e:
if e.response['Error']['Message'] == 'No updates are to be
performed.':
return False
else:
raise Exception('Error updating CloudFormation stack
"{0}"'.format(stack), e)
def stack_exists(stack):
"""Check if a stack exists or not
Args:
stack: The stack to check
Returns:
True or False depending on whether the stack exists
Raises:
Any exceptions raised .describe_stacks() besides that
the stack doesn't exist.
"""
try:
cf.describe_stacks(StackName=stack)
return True
except botocore.exceptions.ClientError as e:
if "does not exist" in e.response['Error']['Message']:
return False
else:
raise e
def create_stack(stack, template):
"""Starts a new CloudFormation stack creation
Args:
stack: The stack to be created
template: The template for the stack to be created with
API Version 2015-07-09
128

AWS CodePipeline User Guide
Additional Sample Functions
Throws:
Exception: Any exception thrown by .create_stack()
"""
cf.create_stack(StackName=stack, TemplateBody=template)
def get_stack_status(stack):
"""Get the status of an existing CloudFormation stack
Args:
stack: The name of the stack to check
Returns:
The CloudFormation status string of the stack such as
CREATE_COMPLETE
Raises:
Exception: Any exception thrown by .describe_stacks()
"""
stack_description = cf.describe_stacks(StackName=stack)
return stack_description['Stacks'][0]['StackStatus']
def put_job_success(job, message):
"""Notify CodePipeline of a successful job
Args:
job: The CodePipeline job ID
message: A message to be logged relating to the job status
Raises:
Exception: Any exception thrown by .put_job_success_result()
"""
print('Putting job success')
print(message)
code_pipeline.put_job_success_result(jobId=job)
def put_job_failure(job, message):
"""Notify CodePipeline of a failed job
Args:
job: The CodePipeline job ID
message: A message to be logged relating to the job status
Raises:
Exception: Any exception thrown by .put_job_failure_result()
"""
print('Putting job failure')
print(message)
code_pipeline.put_job_failure_result(jobId=job,
failureDetails={'message': message, 'type': 'JobFailed'})
def continue_job_later(job, message):
"""Notify CodePipeline of a continuing job
This will cause CodePipeline to invoke the function again with the
supplied continuation token.
API Version 2015-07-09
129

AWS CodePipeline User Guide
Additional Sample Functions
Args:
job: The JobID
message: A message to be logged relating to the job status
continuation_token: The continuation token
Raises:
Exception: Any exception thrown by .put_job_success_result()
"""
# Use the continuation token to keep track of any job execution state
# This data will be available when a new job is scheduled to continue
the current execution
continuation_token = json.dumps({'previous_job_id': job})
print('Putting job continuation')
print(message)
code_pipeline.put_job_success_result(jobId=job,
continuationToken=continuation_token)
def start_update_or_create(job_id, stack, template):
"""Starts the stack update or create process
If the stack exists then update, otherwise create.
Args:
job_id: The ID of the CodePipeline job
stack: The stack to create or update
template: The template to create/update the stack with
"""
if stack_exists(stack):
status = get_stack_status(stack)
if status not in ['CREATE_COMPLETE', 'ROLLBACK_COMPLETE',
'UPDATE_COMPLETE']:
# If the CloudFormation stack is not in a state where
# it can be updated again then fail the job right away.
put_job_failure(job_id, 'Stack cannot be updated when status
is: ' + status)
return
were_updates = update_stack(stack, template)
if were_updates:
# If there were updates then continue the job so it can
monitor
# the progress of the update.
continue_job_later(job_id, 'Stack update started')
else:
# If there were no updates then succeed the job immediately
put_job_success(job_id, 'There were no stack updates')
else:
# If the stack doesn't already exist then create it instead
# of updating it.
create_stack(stack, template)
# Continue the job so the pipeline will wait for the
CloudFormation
# stack to be created.
API Version 2015-07-09
130

AWS CodePipeline User Guide
Additional Sample Functions
continue_job_later(job_id, 'Stack create started')
def check_stack_update_status(job_id, stack):
"""Monitor an already-running CloudFormation update/create
Succeeds, fails or continues the job depending on the stack status.
Args:
job_id: The CodePipeline job ID
stack: The stack to monitor
"""
status = get_stack_status(stack)
if status in ['UPDATE_COMPLETE', 'CREATE_COMPLETE']:
# If the update/create finished successfully then
# succeed the job and don't continue.
put_job_success(job_id, 'Stack update complete')
elif status in ['UPDATE_IN_PROGRESS', 'UPDATE_ROLLBACK_IN_PROGRESS',
'UPDATE_ROLLBACK_COMPLETE_CLEANUP_IN_PROGRESS', 'CREATE_IN_PROGRESS',
'ROLLBACK_IN_PROGRESS']:
# If the job isn't finished yet then continue it
continue_job_later(job_id, 'Stack update still in progress')
else:
# If the Stack is a state which isn't "in progress" or "complete"
# then the stack update/create has failed so end the job with
# a failed result.
put_job_failure(job_id, 'Update failed: ' + status)
def get_user_params(job_data):
"""Decodes the JSON user parameters and validates the required
properties.
Args:
job_data: The job data structure containing the UserParameters
string which should be a valid JSON structure
Returns:
The JSON parameters decoded as a dictionary.
Raises:
Exception: The JSON can't be decoded or a property is missing.
"""
try:
# Get the user parameters which contain the stack, artifact and
file settings
user_parameters = job_data['actionConfiguration']['configuration']
['UserParameters']
decoded_parameters = json.loads(user_parameters)
except Exception as e:
# We're expecting the user parameters to be encoded as JSON
# so we can pass multiple values. If the JSON can't be decoded
# then fail the job with a helpful message.
raise Exception('UserParameters could not be decoded as JSON')
if 'stack' not in decoded_parameters:
API Version 2015-07-09
131

AWS CodePipeline User Guide
Additional Sample Functions
# Validate that the stack is provided, otherwise fail the job
# with a helpful message.
raise Exception('Your UserParameters JSON must include the stack
name')
if 'artifact' not in decoded_parameters:
# Validate that the artifact name is provided, otherwise fail the
job
# with a helpful message.
raise Exception('Your UserParameters JSON must include the
artifact name')
if 'file' not in decoded_parameters:
# Validate that the template file is provided, otherwise fail the
job
# with a helpful message.
raise Exception('Your UserParameters JSON must include the
template file name')
return decoded_parameters
def setup_s3_client(job_data):
"""Creates an S3 client
Uses the credentials passed in the event by CodePipeline. These
credentials can be used to access the artifact bucket.
Args:
job_data: The job data structure
Returns:
An S3 client with the appropriate credentials
"""
key_id = job_data['artifactCredentials']['accessKeyId']
key_secret = job_data['artifactCredentials']['secretAccessKey']
session_token = job_data['artifactCredentials']['sessionToken']
session = Session(aws_access_key_id=key_id,
aws_secret_access_key=key_secret,
aws_session_token=session_token)
return session.client('s3',
config=botocore.client.Config(signature_version='s3v4'))
def lambda_handler(event, context):
"""The Lambda function handler
If a continuing job then checks the CloudFormation stack status
and updates the job accordingly.
If a new job then kick of an update or creation of the target
CloudFormation stack.
Args:
event: The event passed by Lambda
context: The context passed by Lambda
"""
try:
API Version 2015-07-09
132

AWS CodePipeline User Guide
Additional Sample Functions
# Extract the Job ID
job_id = event['CodePipeline.job']['id']
# Extract the Job Data
job_data = event['CodePipeline.job']['data']
# Extract the params
params = get_user_params(job_data)
# Get the list of artifacts passed to the function
artifacts = job_data['inputArtifacts']
stack = params['stack']
artifact = params['artifact']
template_file = params['file']
if 'continuationToken' in job_data:
# If we're continuing then the create/update has already been
triggered
# we just need to check if it has finished.
check_stack_update_status(job_id, stack)
else:
# Get the artifact details
artifact_data = find_artifact(artifacts, artifact)
# Get S3 client to access artifact with
s3 = setup_s3_client(job_data)
# Get the JSON template file out of the artifact
template = get_template(s3, artifact_data, template_file)
# Kick off a stack update or create
start_update_or_create(job_id, stack, template)
except Exception as e:
# If any other exceptions which we didn't expect are raised
# then fail the job and log the exception message.
print('Function failed due to exception.')
print(e)
traceback.print_exc()
put_job_failure(job_id, 'Function exception: ' + str(e))
print('Function complete.')
return "Complete."
8. Save the function.
9. From the AWS CodePipeline console, edit the pipeline to add the function as an action in a stage
in your pipeline. In UserParameters, you must provide a JSON string including curly braces with
three parameters separated by commas: a stack name, the AWS CloudFormation template name
and path to the file, and the application name.
For example, to create a stack named MyTestStack, for a pipeline with the input artifact
MyTemplate, in UserParameters, you would type: {"stack":"MyTestStack","file":"template-
package/template.json", "artifact":"MyTemplate"}.
Note
Even though you have specified the input artifact in UserParameters, you must also
specify this input artifact for the action in Input artifacts.
10. Save your changes to the pipeline, and then manually release a change to test the action and
Lambda function.
API Version 2015-07-09
133

AWS CodePipeline User Guide
Pipeline Error: A pipeline configured with AWS Elastic
Beanstalk returns an error message: "Deployment
failed. The provided role does not have sufficient
permissions: Service:AmazonElasticLoadBalancing"
Troubleshooting AWS
CodePipeline
The following information might help you troubleshoot common issues in AWS CodePipeline.
Topics
•Pipeline Error: A pipeline configured with AWS Elastic Beanstalk returns an error
message: "Deployment failed. The provided role does not have sufficient permissions:
Service:AmazonElasticLoadBalancing" (p. 134)
•Pipeline Error: A source action returns the insufficient permissions message: "Could not access the
AWS CodeCommit repository repository-name. Make sure that the pipeline IAM role has sufficient
permissions to access the repository." (p. 135)
•Pipeline Error: A Jenkins build or test action runs for a long time and then fails due to lack of
credentials or permissions (p. 136)
•Pipeline Error: My GitHub source stage contains Git submodules, but AWS CodePipeline doesn't
initialize them (p. 136)
•Pipeline Error: I receive a pipeline error that includes the following message: "PermissionError:
Could not access the GitHub repository" (p. 136)
•Pipeline Error: A pipeline created in one AWS region using a bucket created in another AWS
region returns an "InternalError" with the code "JobFailed" (p. 137)
•Need Help with a Different Issue? (p. 138)
Pipeline Error: A pipeline configured with
AWS Elastic Beanstalk returns an error
message: "Deployment failed. The provided
role does not have sufficient permissions:
Service:AmazonElasticLoadBalancing"
Problem: The service role for AWS CodePipeline does not have sufficient permissions for AWS Elastic
Beanstalk, including, but not limited to, some operations in Elastic Load Balancing. The service role for
API Version 2015-07-09
134

AWS CodePipeline User Guide
Pipeline Error: A source action returns the insufficient
permissions message: "Could not access the
AWS CodeCommit repository repository-
name. Make sure that the pipeline IAM role has
sufficient permissions to access the repository."
AWS CodePipeline was updated on August 6, 2015 to address this issue. Customers who created their
service role before this date must modify the policy statement for their service role to add the required
permissions.
Possible fixes: The easiest solution is to copy the updated policy statement for service roles from
Review the Default AWS CodePipeline Service Role Policy (p. 144), edit your service role, and
overwrite the old policy statement with the current policy. This portion of the policy statement applies to
Elastic Beanstalk:
{
"Action": [
"elasticbeanstalk:*",
"ec2:*",
"elasticloadbalancing:*",
"autoscaling:*",
"cloudwatch:*",
"s3:*",
"sns:*",
"cloudformation:*",
"rds:*",
"sqs:*",
"ecs:*",
"iam:PassRole"
],
"Resource": "*",
"Effect": "Allow"
},
After you apply the edited policy, follow the steps in Manually Rerun a Pipeline (p. 105) to manually
rerun any pipelines that use Elastic Beanstalk.
Depending on your security needs, you can modify the permissions in other ways, too.
Pipeline Error: A source action returns the
insufficient permissions message: "Could
not access the AWS CodeCommit repository
repository-name. Make sure that the pipeline IAM
role has sufficient permissions to access the
repository."
Problem: The service role for AWS CodePipeline does not have sufficient permissions for AWS
CodeCommit and likely was created before support for using AWS CodeCommit repositories was
added on April 18, 2016. Customers who created their service role before this date must modify the
policy statement for their service role to add the required permissions.
Possible fixes: Add the required permissions for AWS CodeCommit to your AWS CodePipeline
service role's policy. For more information, see Add Permissions for Other AWS Services (p. 146).
API Version 2015-07-09
135

AWS CodePipeline User Guide
Pipeline Error: A Jenkins build or test
action runs for a long time and then fails
due to lack of credentials or permissions
Pipeline Error: A Jenkins build or test action
runs for a long time and then fails due to lack
of credentials or permissions
Problem: If the Jenkins server is installed on an Amazon EC2 instance, the instance might not have
been created with an instance role that has the permissions required for AWS CodePipeline. If you
are using an IAM user on a Jenkins server, an on-premises instance, or an Amazon EC2 instance
created without the required IAM role, the IAM user either does not have the required permissions, or
the Jenkins server cannot access those credentials through the profile configured on the server.
Possible fixes: Make sure that Amazon EC2 instance role or IAM user is configured with the
AWSCodePipelineCustomActionAccess managed policy or with the equivalent permissions. For
more information, see Access Permissions Reference (p. 139).
If you are using an IAM user, make sure the AWS profile configured on the instance uses the IAM
user configured with the correct permissions. You might have to provide the IAM user credentials you
configured for integration between Jenkins and AWS CodePipeline directly into the Jenkins UI. This is
not a recommended best practice. If you must do so, be sure the Jenkins server is secured and uses
HTTPS instead of HTTP.
Pipeline Error: My GitHub source stage
contains Git submodules, but AWS
CodePipeline doesn't initialize them
Problem: AWS CodePipeline does not support git submodules. AWS CodePipeline relies on the
archive link API from GitHub, which does not support submodules.
Possible fixes: Consider cloning the GitHub repository directly as part of a separate script. For
example, you could include a clone action in a Jenkins script.
Pipeline Error: I receive a pipeline error
that includes the following message:
"PermissionError: Could not access the
GitHub repository"
Problem: AWS CodePipeline uses OAuth tokens to integrate with GitHub. You might have revoked the
permissions of the OAuth token for AWS CodePipeline. Additionally, the number of tokens is limited
(see the GitHub documentation for details). If AWS CodePipeline reaches that limit, older tokens will
stop working, and actions in pipelines that rely upon that token will fail.
Possible fixes: Check to see if the permission for AWS CodePipeline has been revoked. Sign in to
GitHub, go to Settings, and choose OAuth applications. If you do not see AWS CodePipeline in the
list, open the AWS CodePipeline console, edit the pipeline, and choose Connect to GitHub to restore
the authorization.
API Version 2015-07-09
136
AWS CodePipeline User Guide
Pipeline Error: A pipeline created in one AWS region
using a bucket created in another AWS region
returns an "InternalError" with the code "JobFailed"
If AWS CodePipeline is present in the list of authorized applications for GitHub, you might have
exceeded the allowed number of tokens. To fix this issue, you can manually configure one OAuth token
as a personal access token, and then configure all pipelines in your AWS account to use that token.
To configure a pipeline to use a personal access token from GitHub
1. Sign in to your GitHub account and follow the instructions in the GitHub documentation for creating
a personal access token. Make sure the token is configured to have the following GitHub scopes:
admin:repo_hook and repo. Copy the token.
2. At a terminal (Linux, OS X, or Unix) or command prompt (Windows), run the get-pipeline
command on the pipeline where you want to change the OAuth token, and then copy the output of
the command to a JSON file. For example, for a pipeline named MyFirstPipeline, you would type
something similar to the following:
aws codepipeline get-pipeline --name MyFirstPipeline >pipeline.json
The output of the command is sent to the pipeline.json file.
3. Open the file in a plain-text editor and edit the value in the OAuthTokenField of your GitHub
action. Replace the asterisks (****) with the token you copied from GitHub. For example:
"configuration": {
"Owner": "MyGitHubUserName",
"Repo": "test-repo",
"Branch": "master",
"OAuthToken": "Replace the **** with your
personal access token"
},
4. Save the file, and then run the update-pipeline with the --cli-input-json parameter to
specify the JSON file you just edited. For example, to update a pipeline named MyFirstPipeline,
you would type something similar to the following:
aws codepipeline update-pipeline --cli-input-json file://pipeline.json
5. Repeat steps 2 through 4 for every pipeline that contains a GitHub action.
6. When you have finished updating your pipelines, delete the .json files used to update those
pipelines.
Pipeline Error: A pipeline created in one AWS
region using a bucket created in another AWS
region returns an "InternalError" with the code
"JobFailed"
Problem: The download of an artifact stored in an Amazon S3 bucket will fail if the pipeline and bucket
are created in different AWS regions.
Possible fixes: Make sure the Amazon S3 bucket where your artifact is stored is in the same AWS
region as the pipeline you have created.
API Version 2015-07-09
137

AWS CodePipeline User Guide
Need Help with a Different Issue?
Need Help with a Different Issue?
Try these other resources:
• Contact AWS Support.
• Ask a question in the AWS CodePipeline forum.
•Request a limit increase for an limit. For more information, see Limits (p. 166).
Note
It may take up to two weeks to process requests for a limit increase.
API Version 2015-07-09
138

AWS CodePipeline User Guide
AWS CodePipeline Access
Permissions Reference
By default, any pipeline you create in AWS CodePipeline is only accessible to your AWS account.
You can use IAM to allow or deny access to other IAM users, groups, or AWS accounts to your AWS
CodePipeline resources and perform certain actions against those resources. You might want to do
this, for example, if you want to give another user access to a pipeline to view its status. You can
also create service role policies for custom job workers, cross-account resources, and other access
requirements.
In the Getting Started (p. 21) instructions, you attached the AWSCodePipelineFullAccess managed
policy to an IAM user. That policy included a statement that looked similar to this:
{
"Statement": [
{
"Action": [
"codepipeline:*",
"iam:ListRoles",
"iam:PassRole",
"s3:CreateBucket",
"s3:GetBucketPolicy",
"s3:GetObject",
"s3:ListAllMyBuckets",
"s3:ListBucket",
"s3:PutBucketPolicy",
"codecommit:ListBranches",
"codecommit:ListRepositories",
"codedeploy:GetApplication",
"codedeploy:GetDeploymentGroup",
"codedeploy:ListApplications",
"codedeploy:ListDeploymentGroups",
"elasticbeanstalk:DescribeApplications",
"elasticbeanstalk:DescribeEnvironments",
"lambda:GetFunctionConfiguration",
"lambda:ListFunctions,
"opsworks:DescribeStacks",
"opsworks:DescribeApps",
"opsworks:DescribeLayers"
],
"Effect": "Allow",
API Version 2015-07-09
139

AWS CodePipeline User Guide
"Resource": "*"
}
],
"Version": "2012-10-17"
}
This statement allows the IAM user to perform all available actions in AWS CodePipeline with access
to all resources available to the AWS account. In practice, you might not want to give all users this
much access. For example, to grant an IAM user permission to view a pipeline and its status, but not
make any changes to the pipeline, you can apply the AWSCodePipelineReadOnlyAccess managed
policy to that user. That policy includes the following policy statement:
{
"Statement": [
{
"Action": [
"codepipeline:GetPipeline",
"codepipeline:GetPipelineState",
"codepipeline:ListActionTypes",
"codepipeline:ListPipelines",
"iam:ListRoles",
"s3:GetBucketPolicy",
"s3:GetObject",
"s3:ListAllMyBuckets",
"s3:ListBucket",
"codecommit:ListBranches",
"codecommit:ListRepositories",
"codedeploy:GetApplication",
"codedeploy:GetDeploymentGroup",
"codedeploy:ListApplications",
"codedeploy:ListDeploymentGroups",
"elasticbeanstalk:DescribeApplications",
"elasticbeanstalk:DescribeEnvironments",
"lambda:GetFunctionConfiguration",
"lambda:ListFunctions",
"opsworks:DescribeStacks",
"opsworks:DescribeApps",
"opsworks:DescribeLayers"
],
"Effect": "Allow",
"Resource": "*"
}
],
"Version": "2012-10-17"
}
In cases where you want to grant a user permission to approve or reject a manual approval action,
you can apply the AWSCodePipelineApproverAccess managed policy. The policy can be applied in
addition to other managed policies that you have applied to a user. This policy includes the following
policy statement:
{
"Version": "2012-10-17",
"Statement": [
{
"Action": [
"codepipeline:GetPipeline",
API Version 2015-07-09
140

AWS CodePipeline User Guide
Create a Customer Managed
Policy for AWS CodePipeline
"codepipeline:GetPipelineState",
"codepipeline:ListPipelines",
"codepipeline:PutApprovalResult"
],
"Effect": "Allow",
"Resource": "*"
}
]
}
When creating custom actions in AWS CodePipeline or integrating Jenkins resources for build or test
actions, create an IAM user and attach the AWSCodePipelineCustomActionAccess managed policy
to that user. That policy includes the following policy statement:
{
"Statement": [
{
"Action": [
"codepipeline:AcknowledgeJob",
"codepipeline:GetJobDetails",
"codepipeline:PollForJobs",
"codepipeline:PutJobFailureResult",
"codepipeline:PutJobSuccessResult"
],
"Effect": "Allow",
"Resource": "*"
}
],
"Version": "2012-10-17"
}
The following information shows how you can modify access to AWS CodePipeline resources to
specific operations, resources, users, or all of these. You can use managed policies or create your
IAM policies to control access to AWS CodePipeline and its resources. You can also configure cross-
account access to enable users in other AWS accounts access to specific pipelines or specific stages,
actions, or transitions within a pipeline.
Topics
•Create a Customer Managed Policy for AWS CodePipeline (p. 141)
•Create a Policy for an Amazon S3 Bucket to Use as the Artifact Store for AWS
CodePipeline (p. 142)
•Attach a Policy to an IAM User or Group (p. 143)
•Edit a Policy for an IAM Service Role (p. 144)
•Attach or Edit a Policy for Jenkins Integration with AWS CodePipeline (p. 148)
•Configure Cross-Account Access to a Pipeline (p. 148)
•Use AWS Resources Associated with Another Account in a Pipeline (p. 150)
•Operation and Resource Syntax (p. 153)
Create a Customer Managed Policy for AWS
CodePipeline
You can allow or deny access to multiple IAM users or AWS accounts by using the managed policies
for AWS CodePipeline as a template for a customer-managed policy and then attaching it to IAM
API Version 2015-07-09
141

AWS CodePipeline User Guide
Create a Policy for an Amazon S3 Bucket to
Use as the Artifact Store for AWS CodePipeline
users, AWS accounts, IAM roles, or combinations of all of these. To create a customer-managed policy
that allows access to actions and resources in AWS CodePipeline, do the following:
1. Sign in to the Identity and Access Management (IAM) console at https://console.aws.amazon.com/
iam/.
2. Choose Create Policy, and in the list of actions, find Copy an AWS Managed Policy and choose
Select.
3. On the Copy an AWS Managed Policy page, choose the AWS CodePipeline policy you want to
use as a template for your customer managed policy, and then choose Select.
4. On the Review Policy page, type a name for this policy in the Policy Name box. Type any
name that will be easy for you to remember. Optionally, provide a description for this policy in the
Description box.
5. In the Policy Document box, optionally modify the policy to suit your business needs (for
example, to apply to only one pipeline instead of all pipelines in your account), and then choose
Create Policy.
For example, to allow users with this policy full access to the pipeline named MyFirstPipeline
in the US East (N. Virginia) (us-east-1) region:
{
"Version": "2012-10-17",
"Statement": [
{
"Effect": "Allow",
"Action": [
"codepipeline:*"
],
"Resource": "arn:aws:codepipeline:us-
east-1:80398EXAMPLE:MyFirstPipeline"
}
]
}
Note
This policy provides permissions to AWS CodePipeline only. It does not provide
permissions to other AWS services that might be configured as actions in the pipeline,
such as AWS CodeDeploy or AWS Lambda. Unless the user has permissions to all of the
resources configured for the pipeline, the user might not be able to successfully edit the
pipeline.
For more information about the regions and endpoints available for AWS CodePipeline,
see Regions and Endpoints.
Create a Policy for an Amazon S3 Bucket
to Use as the Artifact Store for AWS
CodePipeline
You can use any versioned Amazon S3 bucket as the artifact store for AWS CodePipeline. If you use
the Create Pipeline wizard to create your first pipeline, this Amazon S3 bucket is created for you
automatically to ensure that all objects uploaded to the artifact store are encrypted and connections to
the bucket are secure. As a best practice, if you create your own Amazon S3 bucket, consider adding
the following policy or its elements to the bucket. In this policy, the ARN for the Amazon S3 bucket
API Version 2015-07-09
142

AWS CodePipeline User Guide
Attach a Policy to an IAM User or Group
is codepipeline-us-east-1-1234567890. Replace this ARN with the ARN for your Amazon S3
bucket:
{
"Version": "2012-10-17",
"Id": "SSEAndSSLPolicy",
"Statement": [
{
"Sid": "DenyUnEncryptedObjectUploads",
"Effect": "Deny",
"Principal": "*",
"Action": "s3:PutObject",
"Resource": "arn:aws:s3:::codepipeline-us-east-1-1234567890/*",
"Condition": {
"StringNotEquals": {
"s3:x-amz-server-side-encryption": "aws:kms"
}
}
},
{
"Sid": "DenyInsecureConnections",
"Effect": "Deny",
"Principal": "*",
"Action": "s3:*",
"Resource": "arn:aws:s3:::codepipeline-us-east-1-1234567890/*",
"Condition": {
"Bool": {
"aws:SecureTransport": false
}
}
}
]
}
Attach a Policy to an IAM User or Group
To attach a policy to an IAM user that allows the user access to certain actions and resources in AWS
CodePipeline, do the following:
1. Sign in to the Identity and Access Management (IAM) console at https://console.aws.amazon.com/
iam/.
2. In the navigation pane, choose Users or Groups, as appropriate.
3. Browse to and choose the user or group you want to change. The summary page opens.
4. Choose the Permissions tab and do one of the following:
• If you want to apply a managed policy, expand Managed Policies, and choose Attach Policy.
• If you want to create your own policy, expand Inline Policies, and choose the option to create
your own inline policy.
For more information about managed policies and inline policies, see Managed Policies and Inline
Policies.
API Version 2015-07-09
143

AWS CodePipeline User Guide
Edit a Policy for an IAM Service Role
Edit a Policy for an IAM Service Role
AWS CodePipeline uses a service role when processing revisions through the stages and actions in
a pipeline. That role is configured with one or more policies that control access to the AWS resources
used by the pipeline. You might want to attach additional policies to this role, edit the policy attached to
the role, or configure policies for other service roles in AWS. You might also want to attach a policy to a
role when configuring cross-account access to your pipeline.
Important
Modifying a policy statement or attaching another policy to the role can prevent your pipelines
from functioning. Be sure that you understand the implications before you modify the service
role for AWS CodePipeline in any way. Make sure you test your pipelines after making any
changes to the service role.
Topics
•Review the Default AWS CodePipeline Service Role Policy (p. 144)
•Add Permissions for Other AWS Services (p. 146)
•Remove Permissions for Unused AWS Services (p. 147)
Review the Default AWS CodePipeline Service
Role Policy
By default, the IAM service role for AWS CodePipeline, AWS-CodePipeline-Service, includes the
following policy statement:
{
"Statement": [
{
"Action": [
"s3:GetObject",
"s3:GetObjectVersion",
"s3:GetBucketVersioning"
],
"Resource": "*",
"Effect": "Allow"
},
{
"Action": [
"s3:PutObject"
],
"Resource": [
"arn:aws:s3:::codepipeline*",
"arn:aws:s3:::elasticbeanstalk*"
],
"Effect": "Allow"
},
{
"Action": [
"codecommit:GetBranch",
"codecommit:GetCommit",
"codecommit:UploadArchive",
"codecommit:GetUploadArchiveStatus",
"codecommit:CancelUploadArchive"
],
"Resource": "*",
API Version 2015-07-09
144

AWS CodePipeline User Guide
Review the Default AWS
CodePipeline Service Role Policy
"Effect": "Allow"
},
{
"Action": [
"opsworks:CreateDeployment",
"opsworks:DescribeApps",
"opsworks:DescribeCommands",
"opsworks:DescribeDeployments",
"opsworks:DescribeInstances",
"opsworks:DescribeStacks",
"opsworks:UpdateApp",
"opsworks:UpdateStack"
],
"Resource": "*",
"Effect": "Allow"
},
{
"Action": [
"codedeploy:CreateDeployment",
"codedeploy:GetApplicationRevision",
"codedeploy:GetDeployment",
"codedeploy:GetDeploymentConfig",
"codedeploy:RegisterApplicationRevision"
],
"Resource": "*",
"Effect": "Allow"
},
{
"Action": [
"elasticbeanstalk:*",
"ec2:*",
"elasticloadbalancing:*",
"autoscaling:*",
"cloudwatch:*",
"s3:*",
"sns:*",
"cloudformation:*",
"rds:*",
"sqs:*",
"ecs:*",
"iam:PassRole"
],
"Resource": "*",
"Effect": "Allow"
},
{
"Action": [
"lambda:InvokeFunction",
"lambda:ListFunctions"
],
"Resource": "*",
"Effect": "Allow"
}
],
"Version": "2012-10-17"
}
API Version 2015-07-09
145

AWS CodePipeline User Guide
Add Permissions for Other AWS Services
Add Permissions for Other AWS Services
You must update your service role policy statement with permissions for an AWS service not already
included in the default service role policy statement before you can use it in your pipelines.
This is especially important if the service role you use for your pipelines was created before support
was added to AWS CodePipeline for an AWS service.
The following table shows when support was added for other AWS services.
AWS Service AWS CodePipeline Support Date
AWS CodeCommit April 18, 2016
AWS OpsWorks June 2, 2016
To add permissions for an additional supported service, follow these steps:
1. Sign in to the Identity and Access Management (IAM) console at https://console.aws.amazon.com/
iam/.
2. In the IAM console, in the navigation pane, choose Roles, and then choose your AWS-
CodePipeline-Service role from the list of roles.
3. On the Permissions tab, in Inline Policies, in the row for your service role policy, choose Edit
Policy.
Tip
Your service role has a name in a format similar to oneClick_AWS-
CodePipeline-1111222233334.
4. Add the required permissions in the Policy Document box. For example, for AWS CodeCommit
support, add the following to your policy statement:
{
"Action": [
"codecommit:GetBranch",
"codecommit:GetCommit",
"codecommit:UploadArchive",
"codecommit:GetUploadArchiveStatus",
"codecommit:CancelUploadArchive"
],
"Resource": "*",
"Effect": "Allow"
},
For AWS OpsWorks support, add the following to your policy statement:
{
"Action": [
"opsworks:CreateDeployment",
"opsworks:DescribeApps",
"opsworks:DescribeCommands",
"opsworks:DescribeDeployments",
"opsworks:DescribeInstances",
"opsworks:DescribeStacks",
"opsworks:UpdateApp",
API Version 2015-07-09
146

AWS CodePipeline User Guide
Remove Permissions for Unused AWS Services
"opsworks:UpdateStack"
],
"Resource": "*"
"Effect": "Allow",
},
5. Choose Validate Policy to ensure the policy contains no errors. When the policy is error-free,
choose Apply Policy.
Remove Permissions for Unused AWS Services
You can edit the service role statement to remove access to resources you do not use. For example,
if none of your pipelines include Elastic Beanstalk, you could edit the policy statement to remove the
section that grants Elastic Beanstalk resources. For example, you could remove the following section
from the policy statement:
{
"Action": [
"elasticbeanstalk:*",
"ec2:*",
"elasticloadbalancing:*",
"autoscaling:*",
"cloudwatch:*",
"s3:*",
"sns:*",
"cloudformation:*",
"rds:*",
"sqs:*",
"ecs:*",
"iam:PassRole"
],
"Resource": "*",
"Effect": "Allow"
},
Similarly, if none of your pipelines includes AWS CodeDeploy, you can edit the policy statement to
remove the section that grants AWS CodeDeploy resources:
{
"Action": [
"codedeploy:CreateDeployment",
"codedeploy:GetApplicationRevision",
"codedeploy:GetDeployment",
"codedeploy:GetDeploymentConfig",
"codedeploy:RegisterApplicationRevision"
],
"Resource": "*",
"Effect": "Allow"
},
For more information about IAM roles, see IAM Roles.
API Version 2015-07-09
147

AWS CodePipeline User Guide
Attach or Edit a Policy for Jenkins
Integration with AWS CodePipeline
Attach or Edit a Policy for Jenkins Integration
with AWS CodePipeline
If you configure a pipeline to use Jenkins for build or test, create a separate IAM user
for that integration and attach an IAM policy that has the minimum permissions required
for integration between Jenkins and AWS CodePipeline. This policy is the same as the
AWSCodePipelineCustomActionAccess managed policy. The following example shows a policy to
attach to an IAM user that will be used for Jenkins integration:
{
"Statement": [
{
"Action": [
"codepipeline:AcknowledgeJob",
"codepipeline:GetJobDetails",
"codepipeline:PollForJobs",
"codepipeline:PutJobFailureResult",
"codepipeline:PutJobSuccessResult"
],
"Effect": "Allow",
"Resource": "*"
}
],
"Version": "2012-10-17"
}
Configure Cross-Account Access to a Pipeline
You can configure access to pipelines for users and groups in another AWS account. The
recommended way of doing so is to create a role in the account where the pipeline was created that
allows users from the other AWS account to assume that role and access the pipeline. For more
information, see Walkthrough: Cross-Account Access Using Roles.
The following example shows a policy in the 80398EXAMPLE account that allows users to view,
but not change, the pipeline named MyFirstPipeline in the AWS CodePipeline console. This
policy is based on the AWSCodePipelineReadOnlyAccess managed policy, but because it is
specific to the MyFirstPipeline pipeline, it cannot use the managed policy directly. If you do not
want to restrict the policy to a specific pipeline, strongly consider using one of the managed policies
created and maintained by AWS CodePipeline. For more information, see Working with Managed
Policies. You must attach this policy to an IAM role you create for access, for example a role named
CrossAccountPipelineViewers:
{
"Statement": [
{
"Action": [
"codepipeline:GetPipeline",
"codepipeline:GetPipelineState",
"codepipeline:ListActionTypes",
"codepipeline:ListPipelines",
"iam:ListRoles",
"s3:GetBucketPolicy",
"s3:GetObject",
API Version 2015-07-09
148

AWS CodePipeline User Guide
Configure Cross-Account Access to a Pipeline
"s3:ListAllMyBuckets",
"s3:ListBucket",
"codecommit:ListBranches",
"codecommit:ListRepositories",
"codedeploy:GetApplication",
"codedeploy:GetDeploymentGroup",
"codedeploy:ListApplications",
"codedeploy:ListDeploymentGroups",
"elasticbeanstalk:DescribeApplications",
"elasticbeanstalk:DescribeEnvironments",
"lambda:GetFunctionConfiguration",
"lambda:ListFunctions",
"opsworks:CreateDeployment",
"opsworks:DescribeApps",
"opsworks:DescribeCommands",
"opsworks:DescribeDeployments",
"opsworks:DescribeInstances",
"opsworks:DescribeStacks",
"opsworks:UpdateApp",
"opsworks:UpdateStack"
],
"Resource": "*",
"Effect": "Allow"
}
],
"Version": "2012-10-17"
}
Once you create this policy, create the IAM role in the 80398EXAMPLE account and attach the policy
to that role. In the role's trust relationships, you must add the AWS account that will assume this role.
The following example shows a policy that allows users from the 111111111111 AWS account to
assume roles defined in the 80398EXAMPLE account:
{
"Version": "2012-10-17",
"Statement": [
{
"Effect": "Allow",
"Principal": {
"AWS": "arn:aws:iam::111111111111:root"
},
"Action": "sts:AssumeRole"
}
]
}
The following example shows a policy created in the 111111111111 AWS account that allows users to
assume the role named CrossAccountPipelineViewers in the 80398EXAMPLE account:
{
"Version": "2012-10-17",
"Statement": [
{
"Effect": "Allow",
"Action": "sts:AssumeRole",
"Resource":
"arn:aws:iam::80398EXAMPLE:role/CrossAccountPipelineViewers"
API Version 2015-07-09
149

AWS CodePipeline User Guide
Use AWS Resources Associated
with Another Account in a Pipeline
}
]
}
Use AWS Resources Associated with Another
Account in a Pipeline
You can configure policies that allow a user to create a pipeline that uses resources in another AWS
account. This requires configuring policies and roles in both the account that will create the pipeline
(AccountA) and the account that created the resources to be used in the pipeline (AccountB). You
must also create a customer-managed key in AWS Key Management Service to use for cross-account
access. For more information and step-by-step examples, see Create a Pipeline That Uses Resources
from Another Account (p. 106) and Encryption (p. 164).
The following example shows a policy configured by AccountA for an Amazon S3 bucket used to
store pipeline artifacts that grants access to AccountB (where the ARN for AccountB. In the following
example, the ARN is for AccountB is 012ID_ACCOUNT_B. The ARN for the Amazon S3 bucket is
codepipeline-us-east-1-1234567890. Replace these ARNs with the ARN for the account you
want to allow access and for the Amazon S3 bucket:
{
"Version": "2012-10-17",
"Id": "SSEAndSSLPolicy",
"Statement": [
{
"Sid": "DenyUnEncryptedObjectUploads",
"Effect": "Deny",
"Principal": "*",
"Action": "s3:PutObject",
"Resource": "arn:aws:s3:::codepipeline-us-east-1-1234567890/*",
"Condition": {
"StringNotEquals": {
"s3:x-amz-server-side-encryption": "aws:kms"
}
}
},
{
"Sid": "DenyInsecureConnections",
"Effect": "Deny",
"Principal": "*",
"Action": "s3:*",
"Resource": "arn:aws:s3:::codepipeline-us-east-1-1234567890/*",
"Condition": {
"Bool": {
"aws:SecureTransport": false
}
}
},
{
"Sid": "",
"Effect": "Allow",
"Principal": {
"AWS": "arn:aws:iam::012ID_ACCOUNT_B:root"
},
"Action": [
API Version 2015-07-09
150

AWS CodePipeline User Guide
Use AWS Resources Associated
with Another Account in a Pipeline
"s3:Get*",
"s3:Put*"
],
"Resource": "arn:aws:s3:::codepipeline-us-east-1-1234567890/*"
},
{
"Sid": "",
"Effect": "Allow",
"Principal": {
"AWS": "arn:aws:iam::012ID_ACCOUNT_B:root"
},
"Action": "s3:ListBucket",
"Resource": "arn:aws:s3:::codepipeline-us-east-1-1234567890"
}
]
}
The following example shows a policy configured by AccountA that allows AccountB to assume a
role. This policy must be applied to the service role for AWS CodePipeline (AWS-CodePipeline-
Service). For more information about how to apply policies to roles in IAM, see Modifying a Role. In
the following example, 012ID_ACCOUNT_B is the ARN for AccountB:
{
"Version": "2012-10-17",
"Statement": {
"Effect": "Allow",
"Action": "sts:AssumeRole",
"Resource": [
"arn:aws:iam::012ID_ACCOUNT_B:role/*"
]
}
}
The following example shows a policy configured by AccountB and applied to the Amazon EC2
instance role for AWS CodeDeploy. This policy grants access to the Amazon S3 bucket used by
AccountA to store pipeline artifacts (codepipeline-us-east-1-1234567890):
{
"Version": "2012-10-17",
"Statement": [
{
"Effect": "Allow",
"Action": [
"s3:Get*"
],
"Resource": [
"arn:aws:s3:::codepipeline-us-east-1-1234567890/*"
]
},
{
"Effect": "Allow",
"Action": [
"s3:ListBucket"
],
"Resource": [
"arn:aws:s3:::codepipeline-us-east-1-1234567890"
]
API Version 2015-07-09
151

AWS CodePipeline User Guide
Use AWS Resources Associated
with Another Account in a Pipeline
}
]
}
The following example shows a policy for AWS KMS where arn:aws:kms:us-
east-1:012ID_ACCOUNT_A:key/2222222-3333333-4444-556677EXAMPLE is the ARN of the
customer-managed key created in AccountA and configured to allow AccountB to use it:
{
"Version": "2012-10-17",
"Statement": [
{
"Effect": "Allow",
"Action": [
"kms:DescribeKey",
"kms:GenerateDataKey*",
"kms:Encrypt",
"kms:ReEncrypt*",
"kms:Decrypt"
],
"Resource": [
"arn:aws:kms:us-
east-1:012ID_ACCOUNT_A:key/2222222-3333333-4444-556677EXAMPLE"
]
}
]
}
The following example shows an inline policy for an IAM role (CrossAccount_Role) created by
AccountB that allows access to AWS CodeDeploy actions required by the pipeline in AccountA.
{
"Version": "2012-10-17",
"Statement": [
{
"Effect": "Allow",
"Action": [
"codedeploy:CreateDeployment",
"codedeploy:GetDeployment",
"codedeploy:GetDeploymentConfig",
"codedeploy:GetApplicationRevision",
"codedeploy:RegisterApplicationRevision"
],
"Resource": "*"
}
]
}
The following example shows an inline policy for an IAM role (CrossAccount_Role) created by
AccountB that allows access to the Amazon S3 bucket in order to download input artifacts and upload
output artifacts:
{
"Version": "2012-10-17",
"Statement": [
{
API Version 2015-07-09
152

AWS CodePipeline User Guide
Operation and Resource Syntax
"Effect": "Allow",
"Action": [
"s3:GetObject*",
"s3:PutObject",
"s3:PutObjectAcl"
],
"Resource": [
"arn:aws:s3:::codepipeline-us-east-1-1234567890/*"
]
}
]
}
For more information about how to edit a pipeline for cross-account access to resources after you have
created the necessary policies, roles, and AWS Key Management Service customer-managed key, see
Step 2: Edit the Pipeline (p. 114).
Operation and Resource Syntax
The following sections describe the format for specifying operations and resources in AWS
CodePipeline.
Operations follow this general format:
codepipeline:operation
Where operation is an available AWS CodePipeline operation, such as GetPipeline or
DisableStageTransition. To allow an operation, use the "Effect" : "Allow" clause. To deny
an operation explicitly, use the "Effect" : "Deny" clause. By default, all operations are denied,
unless specified otherwise in any other attached policy.
Resources follow this general format:
arn:aws:codepipeline:region:account:resource-specifier
Where region is a target region (such as us-east-1), account is the AWS account ID, and
resource-specifier is the pipeline name. Wildcard (*) characters can be used to specify a partial
pipeline name.
For example, the following specifies the AWS CodePipeline pipeline named MyFirstPipeline
registered to the AWS account 80398EXAMPLE in the region us-east-1:
arn:aws:codepipeline:us-east-1:80398EXAMPLE:MyFirstPipeline
While the following example specifies any AWS CodePipeline pipeline that begins with the name My
registered to the AWS account 80398EXAMPLE in the region us-east-1:
arn:aws:codepipeline:us-east-1:80398EXAMPLE:My*
Resource specifiers can be further defined to apply to a specific stage in a pipeline or even a specific
action within a stage:
arn:aws:codepipeline:region:account:PipelineName/StageName/ActionName
API Version 2015-07-09
153

AWS CodePipeline User Guide
Pipelines
The following example of a resource specifier is scoped to the custom action named
Example.com_Test_Action in the stage named Test in the pipeline named MyFirstPipeline
registered to the AWS account 80398EXAMPLE in the region us-east-1 :
arn:aws:codepipeline:us-
east-1:80398EXAMPLE:MyFirstPipeline/Test/Example.com_Test_Action
Topics
•Pipelines (p. 154)
•Stages (p. 154)
•Actions (p. 155)
•Jobs (p. 156)
Pipelines
Allowed operations include:
•CreatePipeline, to create a uniquely named pipeline.
•DeletePipeline, to delete a specified pipeline.
•GetPipeline, to retrieve information about a pipeline structure.
•GetPipelineState, to retrieve information about the current state of the stages and actions of a
pipeline.
•ListPipelines, to get a summary of all the pipelines associated with your AWS account.
•StartPipelineExecution, to run the most recent revision through the pipeline.
•UpdatePipeline, to update a pipeline with changes to the structure of the pipeline.
The following example allows the specified user to get the state of the pipeline named
MyFirstPipeline:
{
"Version": "2012-10-17",
"Statement": [
{
"Effect": "Allow",
"Action": [
"codepipeline:GetPipelineState"
],
"Resource": "arn:aws:codepipeline:us-
east-1:80398EXAMPLE:MyFirstPipeline"
}
]
}
Stages
Allowed operations include:
•DisableStageTransition, to prevent revisions from transitioning to the next stage in a pipeline.
•EnableStageTransition, to enable revisions to transition to the next stage in a pipeline.
•RetryStageExecution, to retry an action or set of parallel actions in a stage that did not complete
successfully.
API Version 2015-07-09
154

AWS CodePipeline User Guide
Actions
The following example allows the specified user to disable and enable transitions between all stages in
the pipeline named MyFirstPipeline:
{
"Version": "2012-10-17",
"Statement": [
{
"Effect": "Allow",
"Action": [
"codepipeline:DisableStageTransition",
"codepipeline:EnableStageTransition"
],
"Resource": "arn:aws:codepipeline:us-
east-1:80398EXAMPLE:MyFirstPipeline/*"
}
]
}
To allow the user to disable and enable transitions for a single stage in a pipeline, you must specify the
stage. For example, to allow the user to enable and disable transitions for a stage named Beta in a
pipeline named MyFirstPipeline:
"Resource": "arn:aws:codepipeline:us-
east-1:80398EXAMPLE:MyFirstPipeline/Beta"
Actions
In AWS CodePipeline, Actions refer specifically to actions configured within a specific stage of a
pipeline. They are categorized in two ways: by type of action (for example, source, build, or deploy)
and by the owner of the action, which includes the actions you create (Custom) as well as those
provided by AWS CodePipeline (AWS) and those provided by partners who have integrated with AWS
CodePipeline (ThirdParty). Allowed operations include:
•CreateCustomActionType, to create a custom action you can use in the pipelines associated with
your AWS account.
•DeleteCustomActionType, to delete a custom action.
•ListActionTypes, to retrieve a summary of all the action types available for pipelines in your
account.
•PutActionRevision, to edit actions within a pipeline.
•PutApprovalResult, to approve or reject a manual approval action.
The following example allows the specified user to get a list of all available action types available for
pipelines in the us-east-1 region:
{
"Version": "2012-10-17",
"Statement": [
{
"Effect": "Allow",
"Action": [
"codepipeline:ListActionTypes"
],
"Resource": "arn:aws:codepipeline:us-
east-1:80398EXAMPLE:actiontype:*"
API Version 2015-07-09
155

AWS CodePipeline User Guide
Jobs
}
]
}
The following example allows the specified user to revise all actions for a stage named Beta in a
pipeline named MyFirstPipeline:
{
"Version": "2012-10-17",
"Statement": [
{
"Effect": "Allow",
"Action": [
"codepipeline:PutActionRevision"
],
"Resource": "arn:aws:codepipeline:us-
east-1:80398EXAMPLE:MyFirstPipeline/Beta/*"
}
]
}
Jobs
Allowed operation:
•PollForJobs, to determine whether there are any jobs for the custom action to act upon.
Note
The job worker for a custom action might be configured under a different AWS account or
require a specific IAM role in order to function.
The following example allows the specified account to poll for jobs for the custom action named
TestProvider, which is a Test action type in its first version, across all pipelines:
{
"Version": "2012-10-17",
"Statement": [
{
"Effect": "Allow",
"Action": [
"codepipeline:PollForJobs"
],
"Resource": [
"arn:aws:codepipeline:us-
east-1:80398EXAMPLE:actiontype:Custom/Test/TestProvider/1"
]
}
]
}
For more information about action types and action structures, see Action Structure Requirements in
AWS CodePipeline (p. 159).
API Version 2015-07-09
156
AWS CodePipeline User Guide
AWS CodePipeline Command
Line Reference
Use this reference when working with the AWS CodePipeline commands and as a supplement to
information documented in the AWS CLI User Guide and the AWS CLI Reference.
Before you use the AWS CLI, make sure you complete the prerequisites in Setting Up (p. 18).
To view a list of all available AWS CodePipeline commands, run the following command:
aws codepipeline help
To view information about a specific AWS CodePipeline command, run the following command, where
command-name is the name of one of the commands listed below (for example, create-pipeline):
aws codepipeline command-name help
To begin learning how to use the commands in the AWS CodePipeline extension to the AWS CLI, go
to one or more of the following sections:
•Create a Custom Action (CLI) (p. 96)
•Create a Pipeline (CLI) (p. 57)
•Delete a Pipeline (CLI) (p. 83)
•Disable or Enable Transitions (CLI) (p. 82)
•View a Pipeline (CLI) (p. 90)
•Retry Failed Actions (CLI) (p. 78)
•Manually Start a Pipeline ( CLI) (p. 106)
•Edit a Pipeline (AWS CLI) (p. 62)
You can also view examples of how to use most of these commands in Getting Started (p. 21).
API Version 2015-07-09
157

AWS CodePipeline User Guide
Pipeline and Stage Structure
Requirements in AWS CodePipeline
AWS CodePipeline Pipeline
Structure Reference
By default, any pipeline you successfully create in AWS CodePipeline will have a valid structure.
However, if you manually create or edit a JSON file to create a pipeline or update a pipeline from the
AWS CLI, you might inadvertently create a structure that is not valid. The following reference can help
you better understand the requirements for your pipeline structure and how to troubleshoot issues.
Refer also to the constraints documented in Limits (p. 166), which apply to all pipelines.
Topics
•Pipeline and Stage Structure Requirements in AWS CodePipeline (p. 158)
•Action Structure Requirements in AWS CodePipeline (p. 159)
Pipeline and Stage Structure Requirements in
AWS CodePipeline
A two-stage pipeline has the following basic structure:
{
"roleArn": "An IAM ARN for a service role, such as
arn:aws:iam::80398EXAMPLE:role/AWS-CodePipeline-Service",
"stages": [
{
"name": "SourceStageName",
"actions": [
... See Action Structure Requirements in AWS
CodePipeline (p. 159) ...
]
},
API Version 2015-07-09
158

AWS CodePipeline User Guide
Action Structure Requirements in AWS CodePipeline
{
"name": "NextStageName",
"actions": [
... See Action Structure Requirements in AWS
CodePipeline (p. 159) ...
]
}
],
"artifactStore": {
"type": "S3",
"location": "The name of the Amazon S3 bucket automatically
generated for you the first time you create a pipeline
using the console, such as codepipeline-us-east-1-1234567890, or
any Amazon S3 bucket you provision for this purpose"
},
"name": "YourPipelineName",
"version": 1
}
}
The pipeline structure has the following requirements:
• A pipeline must contain at least two stages.
• The first stage of a pipeline must contain at least one source action, and can only contain source
actions.
• Only the first stage of a pipeline may contain source actions.
• At least one stage in each pipeline must contain an action that is not a source action.
• All stage names within a pipeline must be unique.
• Stage names cannot be edited within the AWS CodePipeline console. If you edit a stage name by
using the AWS CLI, and the stage contains an action with one or more secret parameters (such as
an OAuth token), the value of those secret parameters will not be preserved. You must manually
type the value of the parameters (which are masked by four asterisks in the JSON returned by the
AWS CLI) and include them in the JSON structure.
The version number of a pipeline is automatically generated and updated every time you update the
pipeline.
Action Structure Requirements in AWS
CodePipeline
An action has the following high-level structure:
[
{
"inputArtifacts": [
An input artifact structure, if supported for the
action category
],
"name": "ActionName",
"actionTypeId": {
"category": "An action category",
"owner": "AWS",
API Version 2015-07-09
159

AWS CodePipeline User Guide
Action Structure Requirements in AWS CodePipeline
"version": "1"
"provider": "A provider type for the action
category",
},
"outputArtifacts": [
An output artifact structure, if supported for the
action category
],
"configuration": {
Configuration details appropriate to the provider
type
},
"runOrder": A positive integer that indicates the run
order within the stage,
}
]
The action structure has the following requirements:
• All action names within a stage must be unique.
• The input artifact of an action must exactly match the output artifact declared in a preceding action.
For example, if a preceding action includes the following declaration:
"outputArtifacts": [
}
"MyApp"
}
],
and there are no other output artifacts, then the input artifact of a following action must be:
"inputArtifacts": [
{
"MyApp"
}
],
This is true for all actions, whether they are in the same stage or in following stages, but the input
artifact does not have to be the next action in strict sequence from the action that provided the output
artifact. Actions in parallel can declare different output artifact bundles, which are in turn consumed
by different following actions.
The following illustration provides an example of input and output artifacts in actions in a pipeline:
API Version 2015-07-09
160
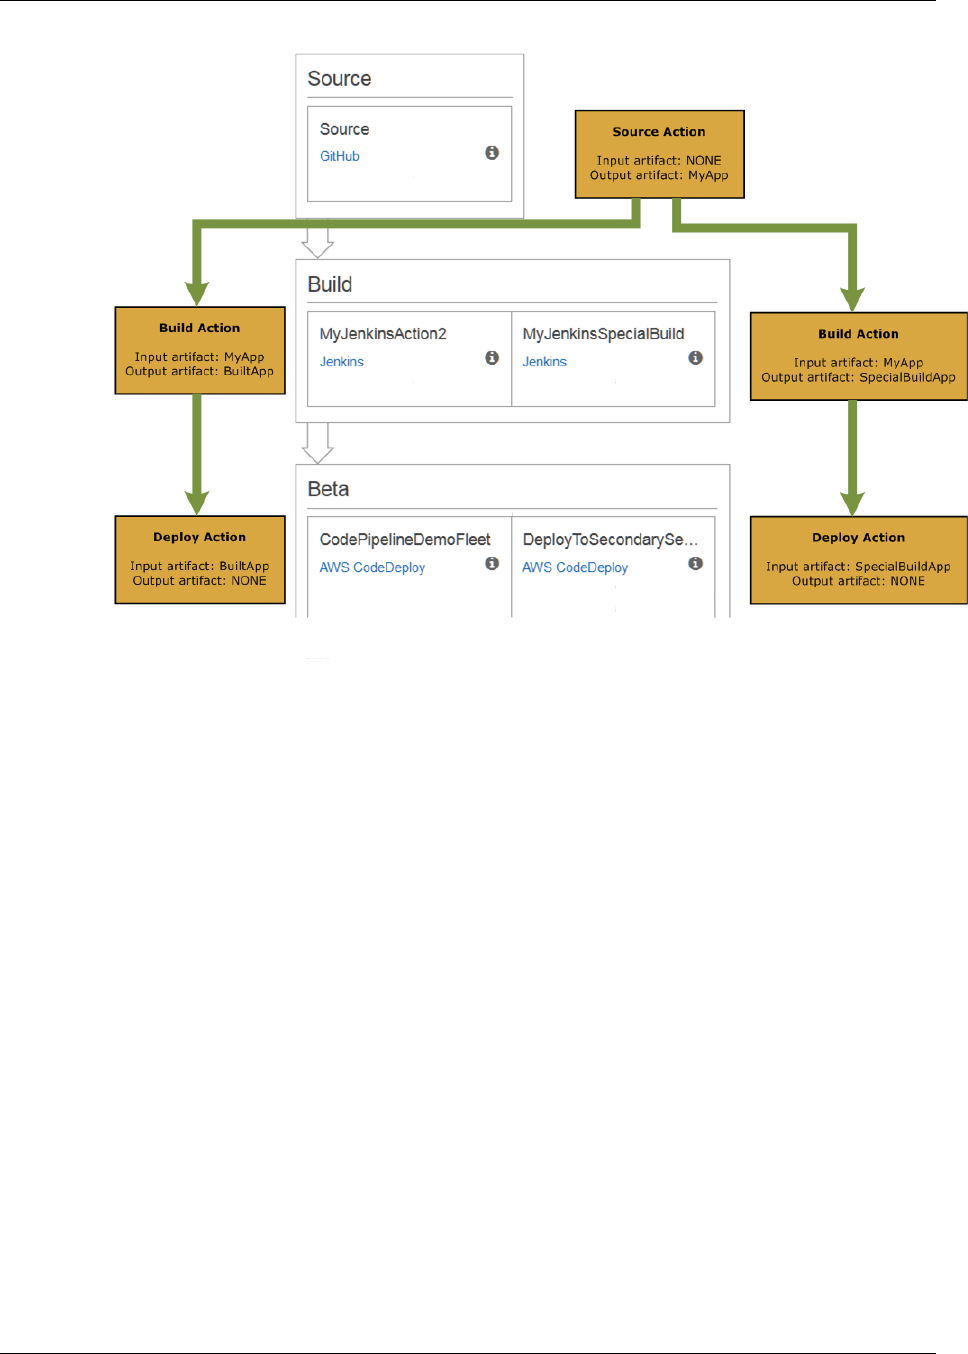
AWS CodePipeline User Guide
Action Structure Requirements in AWS CodePipeline
• Output artifact names must be unique within a pipeline. For example, a pipeline can include one
action that has an output artifact named "MyApp" and another action that has an output artifact
named "MyBuiltApp". However, a pipeline cannot include two actions that both have an output
artifact named "MyApp".
• If an action contains a parameter whose value is secret, such as the OAuth token for a GitHub
source action, the value of that parameter is masked in the JSON by a series of four asterisks
(****). The actual value is stored, and as long as you do not edit that value, or change the name of
the action or the name of the stage where that action runs, you do not have to supply that value
when editing the JSON using the AWS CLI or AWS CodePipeline API. However, if you do change
the name of the action, or the name of the stage in which the action runs, the value of any secret
parameters will be lost. You must manually type the values for any secret parameters in the JSON,
or the action will fail the next time the pipeline runs.
• For all currently supported action types, the only valid version string is "1".
• For all currently supported action types, the only valid owner string is "AWS", "ThirdParty", or
"Custom". For more information, see the AWS CodePipeline API Reference.
• The default runOrder value for an action is 1. The value must be a positive integer (natural
number). You cannot use fractions, decimals, negative numbers, or zero. To specify a serial
sequence of actions, use the smallest number for the first action and larger numbers for each of the
API Version 2015-07-09
161

AWS CodePipeline User Guide
Action Structure Requirements in AWS CodePipeline
rest of the actions in sequence. To specify parallel actions, use the same integer for each action you
want to run in parallel.
For example, if you want three actions to run in sequence in a stage, you would give the first action
the runOrder value of 1, the second action the runOrder value of 2, and the third the runOrder
value of 3. However, if you want the second and third actions to run in parallel, you would give the
first action the runOrder value of 1 and both the second and third actions the runOrder value of 2.
Note
The numbering of serial actions do not have to be in strict sequence. For example, if you
have three actions in a sequence and decide to remove the second action, you do not need
to renumber the runOrder value of the third action. Because the runOrder value of that
action (3) is higher than the runOrder value of the first action (1), it will run serially after the
first action in the stage.
• Depending on the action type, you can have the following number of input and output artifacts:
Action Type Constraints for Artifacts
Owner Type of Action Provider Valid Number of
Input Artifacts Valid Number of
Output Artifacts
AWS Source Amazon S3 0 1
AWS Source AWS
CodeCommit 0 1
ThirdParty Source GitHub 0 1
AWS Approval Manual 0 0
AWS Deploy AWS
CodeDeploy 1 0
AWS Deploy AWS Elastic
Beanstalk 1 0
AWS Deploy AWS OpsWorks 1 0
AWS Invoke AWS Lambda 0 to 5 0 to 5
Custom Build Jenkins 0 to 5 0 to 5
Custom Test Jenkins 0 to 5 0 to 5
Custom Any supported
category As specified in
the custom action 0 to 5 0 to 5
• Valid action categories include values similar to the following:
• Source
• Build
• Approval
• Deploy
• Test
• Invoke
For a full list of valid action types, see the AWS CodePipeline API Reference.
API Version 2015-07-09
162

AWS CodePipeline User Guide
Action Structure Requirements in AWS CodePipeline
• Valid provider types for an action category depend on the category. For example, for a source action
type, a valid provider type is:
S3
For a full list of valid provider types, see the AWS CodePipeline API Reference.
• Every action must have a valid action configuration, which depends on the provider type for that
action. The following table lists the required action configuration elements for each valid provider
type:
Action Configuration Properties for Provider Types
Name of
Provider Provider
Name in
Action Type
First
Required
Property
Second
Required
Property
Third
Required
Property
Fourth
Required
Property
Amazon S3 S3 S3Bucket S3ObjectKey none none
AWS
CodeCommit
CodeCommit RepositoryNameBranchName none none
GitHub GitHub Owner Repo Branch OAuthToken
AWS
CodeDeploy
CodeDeploy ApplicationNameDeploymentGroupNamenone none
AWS Elastic
Beanstalk
ElasticBeanstalkApplicationNameEnvironmentNamenone none
AWS Lambda Lambda FunctionName UserParameters¹none none
AWS
OpsWorks
OpsWorks Stack Layer¹App none
Jenkins as configured
in the AWS
CodePipeline
Plugin for
Jenkins
ProjectName none none none
¹ Optional.
The following example shows a valid action configuration for a source action that uses Amazon S3:
"configuration": {
"S3Bucket": "awscodepipeline-demobucket-example-date",
"S3ObjectKey": "CodePipelineDemoApplication.zip",
}
API Version 2015-07-09
163

AWS CodePipeline User Guide
Encryption for Artifacts
Stored in Amazon S3 for AWS
CodePipeline
When you use the Create Pipeline wizard to create your first pipeline, an Amazon S3 bucket is created
for you in the same region you created the pipeline. The bucket is used to store pipeline artifacts.
When a pipeline runs, artifacts are put into and retrieved from the Amazon S3 bucket. By default, AWS
CodePipeline uses server-side encryption with the Amazon S3-managed keys (SSE-S3) using the
default key for Amazon S3 (the aws/s3 key). This key is created and stored in your AWS account.
When artifacts are retrieved from the Amazon S3 bucket, AWS CodePipeline uses the same SSE-S3
process to decrypt the artifact. For more information about server-side encryption and AWS KMS, see
Protecting Data Using Server-Side Encryption.
You can choose to use your own customer-managed key instead of the default Amazon S3 key. Some
reasons for doing so include:
• You want to rotate the key on a schedule to meet business or security requirements for your
organization.
• You want to create a pipeline that uses resources associated with another AWS account. This
requires the use of a customer-managed key. For more information, see Create a Pipeline That Uses
Resources from Another Account (p. 106).
To view information about a AWS KMS key, do the following:
1. Sign in to the Identity and Access Management (IAM) console at https://console.aws.amazon.com/
iam/.
2. In the service navigation pane, choose Encryption Keys. (If a welcome page appears, choose
Get Started Now.)
3. In Filter, choose the region for your pipeline. For example, if the pipeline was created in us-
east-1, make sure the filter is set to US East (N. Virginia).
For more information about the regions and endpoints available for AWS CodePipeline, see
Regions and Endpoints.
4. In the list of encryption keys, choose the key with the alias used for your pipeline (by default, aws/
s3). Basic information about the key will be displayed.
API Version 2015-07-09
164

AWS CodePipeline User Guide
If you are using the default Amazon S3 key, you cannot change or delete this AWS-managed key. If
you are using a customer-managed key in AWS KMS to encrypt or decrypt artifacts in the Amazon S3
bucket, you can change or rotate this key as necessary.
For more information about AWS KMS, see the AWS Key Management Service Developer Guide.
API Version 2015-07-09
165

AWS CodePipeline User Guide
Limits in AWS CodePipeline
The following table lists current limits in AWS CodePipeline. Structural requirements are discussed
in Pipeline Structure Reference (p. 158). For information about limits that can be changed, see AWS
Service Limits.
Number of pipelines per AWS account Maximum of 20
Number of stages in a pipeline Minimum of 2, maximum of 10
Number of actions in a stage Minimum of 1, maximum of 20
Number of custom actions per AWS account Maximum of 20
Number of parallel actions in a stage Maximum of 5
Number of sequential actions in a stage Maximum of 5
Number of revisions running across all pipelines Maximum of 20
Number of times an action can be run per month Maximum of 1,000 per calendar month
Regions where you can create a pipeline US East (N. Virginia) (us-east-1)
US West (Oregon) (us-west-2)
EU (Ireland) (eu-west-1)
Size of artifacts in a source stage For artifacts stored in Amazon Simple Storage
Service (Amazon S3) buckets, maximum size is
2 GB.
For artifacts stored in AWS CodeCommit
or GitHub repositories, maximum size is
approximately 1 GB.
Exception: If you are using AWS Elastic
Beanstalk to deploy applications, the maximum
artifact size is always 512 MB.
Uniqueness of names Pipeline names must be unique within a user's
AWS account.
Stage names must be unique within a pipeline.
Action names must be unique within a stage.
API Version 2015-07-09
166

AWS CodePipeline User Guide
Characters allowed in pipeline name Pipeline names cannot exceed 100 characters.
Allowed characters include:
The letter characters a through z, inclusive.
The letter characters A through Z, inclusive.
The number characters 0 through 9, inclusive.
The special characters . (period), @ (at sign), -
(minus sign), and _ (underscore).
Any other characters, such as spaces, are not
allowed.
Characters allowed in stage name Stage names cannot exceed 100 characters.
Allowed characters include:
The letter characters a through z, inclusive.
The letter characters A through Z, inclusive.
The number characters 0 through 9, inclusive.
The special characters . (period), @ (at sign), -
(minus sign), and _ (underscore).
Any other characters, such as spaces, are not
allowed.
Characters allowed in action name Action names cannot exceed 100 characters.
Allowed characters include:
The letter characters a through z, inclusive.
The letter characters A through Z, inclusive.
The number characters 0 through 9, inclusive.
The special characters . (period), @ (at sign), -
(minus sign), and _ (underscore).
Any other characters, such as spaces, are not
allowed.
Characters allowed in action types Action type names cannot exceed 25 characters.
Allowed characters include:
The letter characters a through z, inclusive.
The letter characters A through Z, inclusive.
The number characters 0 through 9, inclusive.
The special characters . (period), @ (at sign), -
(minus sign), and _ (underscore).
Any other characters, such as spaces, are not
allowed.
API Version 2015-07-09
167

AWS CodePipeline User Guide
Characters allowed in partner action names Partner action names must follow the same
naming conventions and restrictions as other
action names in AWS CodePipeline. Specifically,
they cannot exceed 100 characters, and the
following characters are allowed:
The letter characters a through z, inclusive.
The letter characters A through Z, inclusive.
The number characters 0 through 9, inclusive.
The special characters . (period), @ (at sign), -
(minus sign), and _ (underscore).
Any other characters, such as spaces, are not
allowed.
API Version 2015-07-09
168

AWS CodePipeline User Guide
AWS CodePipeline User Guide
Document History
The following table describes the important changes to the documentation since the last release of the
AWS CodePipeline User Guide.
•API version: 2015-07-09
•Latest documentation update: 2016-09-22
Change Description Date
Changed
Updated topic Create a Pipeline (p. 54) has been updated to reflect support
for displaying version identifiers of custom actions in the
Source provider and Build provider lists.
September
22, 2016
Updated topic The Managing Approval Actions in Pipelines (p. 65) section
has been updated to reflect an enhancement that lets
Approval action reviewers open the Approve or reject the
revision form directly from an email notification.
September
14, 2016
New and updated
topics A new topic, View Current Source Revision Details in a
Pipeline (p. 92), describes how to view details about code
changes currently flowing through your software release
pipeline. Quick access to this information information can
be useful when reviewing manual approval actions or
troubleshooting failures in your pipeline.
A new section, Monitoring Pipelines (p. 85), provides a
central location for all topics related to monitoring the status
and progress of your pipelines.
September
08, 2016
New and updated
topics A new section, Managing Approval Actions in
Pipelines (p. 65), provides information about configuring
and using manual approval actions in pipelines. Topics
in this section provide conceptual information about the
approval process; instructions for setting up required IAM
permissions, creating approval actions, and approving or
rejecting approval actions; and samples of the JSON data
generated when an approval action is reached in a pipeline.
July 06, 2016
API Version 2015-07-09
169

AWS CodePipeline User Guide
Change Description Date
Changed
New region AWS CodePipeline is now available in EU (Ireland). The
Limits (p. 166) topic and Regions and Endpoints topic have
been updated.
June 23, 2016
New topic A new topic, Retry Failed Actions (p. 77), has been added
to describe how to retry a failed action or a group of parallel
failed actions in stage.
June 22, 2016
Updated topics A number of topics, including Create a Pipeline (p. 54),
Access Permissions Reference (p. 139), Pipeline Structure
Reference (p. 158), and Integration with Other AWS
Services (p. 9), have been updated to reflect support for
configuring a pipeline to deploy code in conjunction with
custom Chef cookbooks and applications created in AWS
OpsWorks. AWS CodePipeline support for AWS OpsWorks
is currently available in the US East (N. Virginia) Region (us-
east-1) only.
June 2, 2016
New and updated
topics A new topic, Simple Pipeline Walkthrough (AWS
CodeCommit Repository) (p. 35), has been added. This
topic provides a sample walkthrough showing how to
use an AWS CodeCommit repository and branch as
the source location for a source action in a pipeline.
Several other topics have been updated to reflect this
integration with AWS CodeCommit, including Access
Permissions Reference (p. 139), Product and Service
Integrations (p. 9), Four-Stage Pipeline Tutorial (p. 46), and
Troubleshooting (p. 134).
April 18, 2016
New topic A new topic, Integrate Lambda Functions into
Pipelines (p. 116), has been added. This topic contains
sample AWS Lambda functions and steps for adding
Lambda functions to pipelines.
January 27,
2016
Updated topic A new section has been added to Access Permissions
Reference (p. 139), Create a Policy for an Amazon
S3 Bucket to Use as the Artifact Store for AWS
CodePipeline (p. 142).
January 22,
2016
New topic A new topic, Product and Service Integrations (p. 9), has
been added. Information about integrations with partners
and other AWS services has been moved to this topic. Links
to blogs and videos have also been added.
December 17,
2015
Updated topic Details of integration with Solano CI (p. 14) have been
added to Integration with Other AWS Services (p. 9).November 17,
2015
Updated topic The AWS CodePipeline Plugin for Jenkins is now available
through the Jenkins Plugin Manager as part of the library of
plugins for Jenkins. The steps for installing the plugin have
been updated in Four-Stage Pipeline Tutorial (p. 46).
November 9,
2015
New region AWS CodePipeline is now available in US West (Oregon).
The Limits (p. 166) topic has been updated. Links have been
added to Regions and Endpoints.
October 22,
2015
API Version 2015-07-09
170

AWS CodePipeline User Guide
Change Description Date
Changed
New topic Two new topics,Encryption (p. 164) and Create a Pipeline
That Uses Resources from Another Account (p. 106), have
been added. A new section has been added to Access
Permissions Reference (p. 139), Use AWS Resources
Associated with Another Account in a Pipeline (p. 150).
August 25,
2015
Updated topic The Create a Custom Action for a Pipeline (p. 95) topic has
been updated to reflect changes in the structure, including
inputArtifactDetails and outputArtifactDetails.
August 17,
2015
Updated topic The Troubleshooting (p. 134) topic has been updated with
revised steps for troubleshooting problems with the service
role and Elastic Beanstalk.
August 11,
2015
Updated topic The Access Permissions Reference (p. 139) topic has been
updated with the latest changes to the service role for AWS
CodePipeline (p. 144).
August 6,
2015
New topic A Troubleshooting (p. 134) topic has been added. Updated
steps have been added for IAM roles and Jenkins in Four-
Stage Pipeline Tutorial (p. 46).
July 24, 2015
Topic update Updated steps have been added for downloading the
sample files in Simple Pipeline Walkthrough (Amazon S3
Bucket) (p. 21) and Four-Stage Pipeline Tutorial (p. 46).
July 22, 2015
Topic update A temporary workaround for download issues with the
sample files was added in Simple Pipeline Walkthrough
(Amazon S3 Bucket) (p. 21).
July 17, 2015
Topic update A link was added in Limits (p. 166) to point to information
about which limits can be changed. July 15, 2015
Topic update The managed policies section in Access Permissions
Reference (p. 139) was updated. July 10, 2015
Initial Public Release This is the initial public release of the AWS CodePipeline
User Guide. July 9, 2015
API Version 2015-07-09
171

