AWS Elastic Beanstalk Developer Guide
User Manual:
Open the PDF directly: View PDF ![]() .
.
Page Count: 1150 [warning: Documents this large are best viewed by clicking the View PDF Link!]
- AWS Elastic Beanstalk
- Table of Contents
- What Is AWS Elastic Beanstalk?
- Getting Started Using Elastic Beanstalk
- AWS Elastic Beanstalk Concepts
- Service Roles, Instance Profiles, and User Policies
- Elastic Beanstalk Platforms
- Tutorials and Samples
- Managing and Configuring AWS Elastic Beanstalk Applications
- Managing Environments
- The AWS Elastic Beanstalk Environment Management Console
- Creating an AWS Elastic Beanstalk Environment
- The Create New Environment Wizard
- Clone an Environment
- Terminate an Environment
- Creating Elastic Beanstalk Environments with the AWS CLI
- Creating Elastic Beanstalk Environments with the API
- Constructing a Launch Now URL
- Creating and Updating Groups of AWS Elastic Beanstalk Environments
- Deploying Applications to AWS Elastic Beanstalk Environments
- Configuration Changes
- Updating Your Elastic Beanstalk Environment's Platform Version
- Canceling Environment Configuration Updates and Application Deployments
- Rebuilding AWS Elastic Beanstalk Environments
- Environment Types
- Worker Environments
- Creating Links Between AWS Elastic Beanstalk Environments
- AWS Elastic Beanstalk Environment Configuration
- Your AWS Elastic Beanstalk Environment's Auto Scaling Group
- Your AWS Elastic Beanstalk Environment's Load Balancer
- Adding a Database to Your Elastic Beanstalk Environment
- Environment Properties and Other Software Settings
- Configuring AWS X-Ray Debugging
- Elastic Beanstalk Environment Notifications with Amazon Simple Notification Service
- Streaming Logs to Amazon CloudWatch
- Configuring VPC with Elastic Beanstalk
- Your Elastic Beanstalk Environment's Domain Name
- Updating Tags in an Elastic Beanstalk Environment
- Advanced AWS Elastic Beanstalk Environment Configuration
- Configuration Options
- Precedence
- Recommended Values
- Setting Configuration Options Before Environment Creation
- Setting Configuration Options During Environment Creation
- Setting Configuration Options After Environment Creation
- General Options for All Environments
- aws:autoscaling:asg
- aws:autoscaling:launchconfiguration
- aws:autoscaling:scheduledaction
- aws:autoscaling:trigger
- aws:autoscaling:updatepolicy:rollingupdate
- aws:ec2:vpc
- aws:elasticbeanstalk:application
- aws:elasticbeanstalk:application:environment
- aws:elasticbeanstalk:cloudwatch:logs
- aws:elasticbeanstalk:command
- aws:elasticbeanstalk:environment
- aws:elasticbeanstalk:environment:process:default
- aws:elasticbeanstalk:environment:process:process_name
- aws:elasticbeanstalk:healthreporting:system
- aws:elasticbeanstalk:hostmanager
- aws:elasticbeanstalk:managedactions
- aws:elasticbeanstalk:managedactions:platformupdate
- aws:elasticbeanstalk:monitoring
- aws:elasticbeanstalk:sns:topics
- aws:elasticbeanstalk:sqsd
- aws:elb:healthcheck
- aws:elb:loadbalancer
- aws:elb:listener
- aws:elb:listener:listener_port
- aws:elb:policies
- aws:elb:policies:policy_name
- aws:elbv2:listener:default
- aws:elbv2:listener:listener_port
- aws:elbv2:listenerrule:rule_name
- aws:elbv2:loadbalancer
- aws:rds:dbinstance
- Platform Specific Options
- Custom Options
- Advanced Environment Customization with Configuration Files (.ebextensions)
- Option Settings
- Customizing Software on Linux Servers
- Customizing Software on Windows Servers
- Adding and Customizing Elastic Beanstalk Environment Resources
- Using Elastic Beanstalk Saved Configurations
- Environment Manifest (env.yaml)
- Creating a Custom Amazon Machine Image (AMI)
- Configuring HTTPS for your Elastic Beanstalk Environment
- Create and Sign an X509 Certificate
- Upload a Certificate to IAM
- Configuring Your Elastic Beanstalk Environment's Load Balancer to Terminate HTTPS
- Configuring Your Application to Terminate HTTPS Connections at the Instance
- Terminating HTTPS on EC2 Instances Running Docker
- Terminating HTTPS on EC2 Instances Running Go
- Terminating HTTPS on EC2 Instances Running Java SE
- Terminating HTTPS on EC2 Instances Running Node.js
- Terminating HTTPS on EC2 Instances Running PHP
- Terminating HTTPS on EC2 Instances Running Python
- Terminating HTTPS on EC2 Instances Running Ruby
- Terminating HTTPS on EC2 Instances Running Tomcat
- Terminating HTTPS on EC2 Instances Running .NET
- Configuring End-to-End Encryption in a Load Balanced Elastic Beanstalk Environment
- Configuring Your Environment's Load Balancer for TCP Passthrough
- Storing Private Keys Securely in Amazon S3
- Configuration Options
- Monitoring an Environment
- Monitoring Environment Health in the AWS Management Console
- Basic Health Reporting
- Enhanced Health Reporting and Monitoring
- The Elastic Beanstalk Health Agent
- Factors in Determining Instance and Environment Health
- Enhanced Health Roles
- Enhanced Health Events
- Enhanced Health Reporting Behavior During Updates, Deployments, and Scaling
- Enabling AWS Elastic Beanstalk Enhanced Health Reporting
- Enhanced Health Monitoring with the Environment Management Console
- Health Colors and Statuses
- Instance Metrics
- Publishing Amazon CloudWatch Custom Metrics for an Environment
- Using Enhanced Health Reporting with the AWS Elastic Beanstalk API
- Enhanced Health Log Format
- Notifications and Troubleshooting
- Manage Alarms
- Viewing an Elastic Beanstalk Environment's Event Stream
- Listing and Connecting to Server Instances
- Viewing Logs from Your Elastic Beanstalk Environment's Amazon EC2 Instances
- Using Elastic Beanstalk with Other AWS Services
- Architectural Overview
- Using Elastic Beanstalk with Amazon CloudFront
- Logging Elastic Beanstalk API Calls with AWS CloudTrail
- Using Elastic Beanstalk with Amazon CloudWatch
- Using Elastic Beanstalk with Amazon CloudWatch Logs
- Using Elastic Beanstalk with DynamoDB
- Using Elastic Beanstalk with Amazon ElastiCache
- Using Elastic Beanstalk with Amazon Elastic File System
- Using Elastic Beanstalk with AWS Identity and Access Management
- Managing Elastic Beanstalk Instance Profiles
- Managing Elastic Beanstalk Service Roles
- Verifying the Default Service Role's Permissions
- Updating an Out-of-Date Default Service Role
- Adding Permissions to the Default Service Role
- Creating a Service Role
- Using Service-Linked Roles for Elastic Beanstalk
- Controlling Access to Elastic Beanstalk
- Amazon Resource Name Format for Elastic Beanstalk
- Resources and Conditions for Elastic Beanstalk Actions
- Example Policies Based on Managed Policies
- Example Policies Based on Resource Permissions
- Using Elastic Beanstalk with Amazon Relational Database Service
- Using Elastic Beanstalk with Amazon Simple Storage Service
- Using Elastic Beanstalk with Amazon Virtual Private Cloud
- What VPC Configurations Do I Need?
- Example: Launching a Single-Instance Environment without Any Associated Private Resources in a VPC
- Example: Launching a Load-Balancing, Autoscaling Environment with Public and Private Resources in a VPC
- Example: Launching an Elastic Beanstalk Application in a VPC with Bastion Hosts
- Example: Launching an Elastic Beanstalk in a VPC with Amazon RDS
- Example: Launching a Load-Balancing, Autoscaling Environment with Public Instances in a VPC
- Configuring your development environment for use with AWS Elastic Beanstalk
- The Elastic Beanstalk Command Line Interface (EB CLI)
- Install the Elastic Beanstalk Command Line Interface (EB CLI)
- Configure the EB CLI
- Managing Elastic Beanstalk Environments with the EB CLI
- Using the EB CLI with AWS CodeBuild
- Using the EB CLI with Git
- Using the EB CLI with AWS CodeCommit
- Using the EB CLI to Monitor Environment Health
- Managing Multiple AWS Elastic Beanstalk Environments as a Group with the EB CLI
- Troubleshooting issues with the EB CLI
- EB CLI Command Reference
- EB CLI 2.6 (Deprecated)
- Elastic Beanstalk API Command Line Interface (deprecated)
- Converting Elastic Beanstalk API CLI Scripts
- Getting Set Up
- Common Options
- Operations
- elastic-beanstalk-check-dns-availability
- elastic-beanstalk-create-application
- elastic-beanstalk-create-application-version
- elastic-beanstalk-create-configuration-template
- elastic-beanstalk-create-environment
- elastic-beanstalk-create-storage-location
- elastic-beanstalk-delete-application
- elastic-beanstalk-delete-application-version
- elastic-beanstalk-delete-configuration-template
- elastic-beanstalk-delete-environment-configuration
- elastic-beanstalk-describe-application-versions
- elastic-beanstalk-describe-applications
- elastic-beanstalk-describe-configuration-options
- elastic-beanstalk-describe-configuration-settings
- elastic-beanstalk-describe-environment-resources
- elastic-beanstalk-describe-environments
- elastic-beanstalk-describe-events
- elastic-beanstalk-list-available-solution-stacks
- elastic-beanstalk-rebuild-environment
- elastic-beanstalk-request-environment-info
- elastic-beanstalk-restart-app-server
- elastic-beanstalk-retrieve-environment-info
- elastic-beanstalk-swap-environment-cnames
- elastic-beanstalk-terminate-environment
- elastic-beanstalk-update-application
- elastic-beanstalk-update-application-version
- elastic-beanstalk-update-configuration-template
- elastic-beanstalk-update-environment
- elastic-beanstalk-validate-configuration-settings
- Deploying Elastic Beanstalk Applications from Docker Containers
- Docker Platform Configurations
- Single Container Docker Environments
- Multicontainer Docker Environments
- Multicontainer Docker Platform
- Dockerrun.aws.json File
- Docker Images
- Container Instance Role
- Amazon ECS Resources Created by Elastic Beanstalk
- Using Multiple Elastic Load Balancing Listeners
- Failed Container Deployments
- Multicontainer Docker Configuration
- Multicontainer Docker Environments with the AWS Management Console
- Preconfigured Docker Containers
- Configuring Docker Environments
- Running a Docker Environment Locally with the EB CLI
- Deploying Go Applications to Elastic Beanstalk Applications
- Creating and Deploying Java Applications on AWS Elastic Beanstalk
- Getting Started with Java on Elastic Beanstalk
- Setting Up your Java Development Environment
- Using the AWS Elastic Beanstalk Tomcat Platform
- Using the AWS Elastic Beanstalk Java SE Platform
- Adding an Amazon RDS DB Instance to Your Java Application Environment
- Using the AWS Toolkit for Eclipse
- Importing Existing Environments into Eclipse
- Managing Elastic Beanstalk Application Environments
- Changing Environment Configuration Settings
- Changing Environment Type
- Configuring EC2 Server Instances Using AWS Toolkit for Eclipse
- Configuring Elastic Load Balancing Using AWS Toolkit for Eclipse
- Configuring Auto Scaling Using AWS Toolkit for Eclipse
- Configuring Notifications Using AWS Toolkit for Eclipse
- Configuring Java Containers Using AWS Toolkit for Eclipse
- Setting System Properties with AWS Toolkit for Eclipse
- Managing Multiple AWS Accounts
- Viewing Events
- Listing and Connecting to Server Instances
- Terminating an Environment
- Resources
- Creating and Deploying Elastic Beanstalk Applications in .NET Using AWS Toolkit for Visual Studio
- Getting Started with .NET on Elastic Beanstalk
- Setting Up your .NET Development Environment
- Using the AWS Elastic Beanstalk .NET Platform
- Tutorial: How to Deploy a .NET Sample Application Using AWS Elastic Beanstalk
- Deploying an ASP.NET Core Application with AWS Elastic Beanstalk
- Adding an Amazon RDS DB Instance to Your .NET Application Environment
- The AWS Toolkit for Visual Studio
- Test Locally
- Create an Elastic Beanstalk Environment
- Terminating an Environment
- Deploying to Your Environment
- Managing Your Elastic Beanstalk Application Environments
- Changing Environment Configurations Settings
- Configuring EC2 Server Instances Using the AWS Toolkit for Visual Studio
- Configuring Elastic Load Balancing Using the AWS Toolkit for Visual Studio
- Configuring Auto Scaling Using the AWS Toolkit for Visual Studio
- Configuring Notifications Using AWS Toolkit for Visual Studio
- Configuring .NET Containers Using the AWS Toolkit for Visual Studio
- Managing Accounts
- Listing and Connecting to Server Instances
- Monitoring Application Health
- Deploying Elastic Beanstalk Applications in .NET Using the Deployment Tool
- Resources
- Deploying Node.js Applications to AWS Elastic Beanstalk
- Getting Started with Node.js on Elastic Beanstalk
- Setting Up your Node.js Development Environment
- Using the AWS Elastic Beanstalk Node.js Platform
- Deploying an Express Application to Elastic Beanstalk
- Deploying a Node.js Application with DynamoDB to Elastic Beanstalk
- Deploying a Geddy Application with Clustering to Elastic Beanstalk
- Adding an Amazon RDS DB Instance to your Node.js Application Environment
- Resources
- Creating and Deploying PHP Applications on AWS Elastic Beanstalk
- Using the AWS Elastic Beanstalk PHP Platform
- Deploying a Laravel Application to Elastic Beanstalk
- Deploying a CakePHP Application to Elastic Beanstalk
- Deploying a Symfony2 Application to Elastic Beanstalk
- Deploying a High-Availability PHP Application with an External Amazon RDS Database to Elastic Beanstalk
- Deploying a High-Availability WordPress Website with an External Amazon RDS Database to Elastic Beanstalk
- Deploying a High-Availability Drupal Website with an External Amazon RDS Database to Elastic Beanstalk
- Adding an Amazon RDS DB Instance to Your PHP Application Environment
- Resources
- Working with Python
- Setting Up Your Python Development Environment
- Using the AWS Elastic Beanstalk Python Platform
- Deploying a Flask Application to AWS Elastic Beanstalk
- Deploying a Django Application to Elastic Beanstalk
- Adding an Amazon RDS DB Instance to Your Python Application Environment
- Python Tools and Resources
- Deploying Elastic Beanstalk Applications in Ruby Using EB CLI and Git
- Using the AWS Elastic Beanstalk Ruby Platform
- Deploying a Rails Application to Elastic Beanstalk
- Deploying a Sinatra Application to AWS Elastic Beanstalk
- Adding an Amazon RDS DB Instance to Your Ruby Application Environment
- Tools
- Resources
- Troubleshooting
- Elastic Beanstalk Resources
- Platform History
- Packer Platform History
- Single Container Docker Platform History
- Multicontainer Docker Platform History
- Docker Platform Earlier History
- Preconfigured Docker Platform History
- Go Platform History
- Tomcat Platform History
- Java SE Platform History
- .NET on Windows Server with IIS Platform History
- November 20, 2017 – December 18, 2017
- August 28, 2017 – November 19, 2017
- July 24, 2017 – Aug 27, 2017
- July 17, 2017 – July 23, 2017
- June 26, 2017 – July 16, 2017
- May 16, 2017 – July 16, 2017
- May 4, 2017 – May 15, 2017
- April 4, 2017 – May 3, 2017
- January 16, 2017 – Apr 3, 2017
- December 18, 2016 – January 15, 2017
- November 16, 2016 – December 18, 2016
- October 21, 2016 – November 16, 2016
- September 26, 2016 – October 21, 2016
- August 23, 2016 – September 26, 2016
- June 21, 2016 – August 23, 2016
- May 25, 2016 – June 21, 2016
- April 25, 2016 – May 25, 2016
- March 23, 2016 – April 25, 2016
- February 29, 2016 – March 23, 2016
- January 28, 2016 – February 29, 2016
- December 15, 2015 – January 28, 2016
- October 21, 2015 – December 15, 2015
- September 14, 2015 – October 21, 2015
- August 20, 2015 – September 14, 2015
- July 21, 2015 – August 20, 2015
- June 12, 2015 – July 21, 2015
- April 16, 2015 – June 12, 2015
- August 6, 2014 – April 16, 2015
- Prior to August 6, 2014
- Node.js Platform History
- PHP Platform History
- Python Platform History
- Ruby Platform History

AWS Elastic Beanstalk
Developer Guide
API Version 2010-12-01

AWS Elastic Beanstalk Developer Guide
AWS Elastic Beanstalk: Developer Guide
Copyright © 2018 Amazon Web Services, Inc. and/or its affiliates. All rights reserved.
Amazon's trademarks and trade dress may not be used in connection with any product or service that is not Amazon's, in any manner
that is likely to cause confusion among customers, or in any manner that disparages or discredits Amazon. All other trademarks not
owned by Amazon are the property of their respective owners, who may or may not be affiliated with, connected to, or sponsored by
Amazon.

AWS Elastic Beanstalk Developer Guide
Table of Contents
What Is AWS Elastic Beanstalk? ............................................................................................................ 1
Storage ..................................................................................................................................... 2
Pricing ...................................................................................................................................... 2
Community ............................................................................................................................... 2
Where to Go Next ...................................................................................................................... 2
Getting Started .................................................................................................................................. 3
Step 1: Sign up for the Service .................................................................................................... 3
Step 2: Create an Application ...................................................................................................... 3
Step 3: View Information About Your Environment ......................................................................... 6
Step 4: Deploy a New Application Version ..................................................................................... 7
Step 5: Change Configuration ...................................................................................................... 9
Step 6: Clean Up ...................................................................................................................... 10
Where to Go Next .................................................................................................................... 11
The EB CLI ...................................................................................................................... 11
AWS SDK for Java ............................................................................................................ 11
AWS Toolkit for Eclipse ..................................................................................................... 12
AWS SDK for .NET ............................................................................................................ 12
AWS Toolkit for Visual Studio ............................................................................................ 12
AWS SDK for Node.js ........................................................................................................ 12
AWS SDK for PHP ............................................................................................................ 12
Boto (AWS SDK for Python) ............................................................................................... 13
AWS SDK for Ruby ........................................................................................................... 13
Concepts ......................................................................................................................................... 14
Application .............................................................................................................................. 14
Application Version ................................................................................................................... 14
Environment ............................................................................................................................ 14
Environment Tier ...................................................................................................................... 14
Environment Configuration ........................................................................................................ 14
Configuration Template ............................................................................................................. 15
Web Server Environments ......................................................................................................... 15
Worker Environments ................................................................................................................ 16
Design Considerations ............................................................................................................... 17
Scalability ........................................................................................................................ 17
Security ........................................................................................................................... 18
Persistent Storage ............................................................................................................ 18
Fault Tolerance ................................................................................................................ 19
Content Delivery .............................................................................................................. 19
Software Updates and Patching ......................................................................................... 19
Connectivity ..................................................................................................................... 19
Permissions ..................................................................................................................................... 21
Service Role ............................................................................................................................. 21
Instance Profile ........................................................................................................................ 22
User Policy .............................................................................................................................. 24
Elastic Beanstalk Platforms ................................................................................................................ 26
Supported Platforms ................................................................................................................ 26
Packer Builder .................................................................................................................. 27
Single Container Docker .................................................................................................... 27
Multicontainer Docker ....................................................................................................... 27
Preconfigured Docker ........................................................................................................ 28
Go .................................................................................................................................. 29
Java SE ........................................................................................................................... 29
Java with Tomcat ............................................................................................................. 30
.NET on Windows Server with IIS ....................................................................................... 30
Node.js ............................................................................................................................ 32
API Version 2010-12-01
iii

AWS Elastic Beanstalk Developer Guide
PHP ................................................................................................................................ 33
Python ............................................................................................................................ 34
Ruby ............................................................................................................................... 34
Custom Platforms .................................................................................................................... 36
Creating a Custom Platform .............................................................................................. 37
Using a Sample Custom Platform ....................................................................................... 38
Platform Definition Archive Contents .................................................................................. 41
Platform Hooks ................................................................................................................ 42
Platform Scripts ............................................................................................................... 42
Packer Instance Cleanup .................................................................................................... 43
Platform.yaml Format ....................................................................................................... 43
Tutorials and Samples ....................................................................................................................... 47
Managing Applications ...................................................................................................................... 49
Application Management Console ............................................................................................... 49
Managing Application Versions ................................................................................................... 53
Version Lifecycle ...................................................................................................................... 56
Setting the Application Lifecycle Settings in the Console ....................................................... 57
Create a Source Bundle ............................................................................................................. 58
Creating a Source Bundle from the Command Line ............................................................... 58
Creating a Source Bundle with Git ...................................................................................... 59
Zipping Files in Mac OS X Finder or Windows Explorer .......................................................... 59
Creating a Source Bundle for a .NET Application ................................................................... 63
Testing Your Source Bundle ............................................................................................... 64
Managing Environments .................................................................................................................... 65
The Environment Management Console ...................................................................................... 65
Environment Dashboard .................................................................................................... 67
Environment Management Actions ..................................................................................... 68
Configuration ................................................................................................................... 70
Logs ............................................................................................................................... 71
Health ............................................................................................................................. 71
Monitoring ....................................................................................................................... 72
Alarms ............................................................................................................................ 73
Managed Updates ............................................................................................................ 74
Events ............................................................................................................................. 74
Tags ................................................................................................................................ 75
Creating Environments .............................................................................................................. 76
The Create New Environment Wizard .................................................................................. 78
Clone an Environment ..................................................................................................... 110
Terminate an Environment ............................................................................................... 114
With the AWS CLI ........................................................................................................... 116
With the API .................................................................................................................. 117
Launch Now URL ............................................................................................................ 119
Compose Environments ................................................................................................... 122
Deployments .......................................................................................................................... 124
Deployment Options ....................................................................................................... 125
Blue/Green Deployments ................................................................................................. 129
Deploying a New Application Version ................................................................................ 132
Redeploying a Previous Version ........................................................................................ 133
Configuration Changes ............................................................................................................ 133
Rolling Updates .............................................................................................................. 134
Immutable Updates ........................................................................................................ 138
Tag an Environment ........................................................................................................ 140
Platform Updates ................................................................................................................... 143
Managed Updates ........................................................................................................... 145
Upgrade a Legacy Environment ........................................................................................ 149
Cancel an Update ................................................................................................................... 151
Rebuild an Environment .......................................................................................................... 152
API Version 2010-12-01
iv

AWS Elastic Beanstalk Developer Guide
Rebuilding a Running Environment ................................................................................... 152
Rebuilding a Terminated Environment ............................................................................... 153
Environment Types ................................................................................................................. 154
Load-balancing, Autoscaling Environment .......................................................................... 154
Single-instance Environment ............................................................................................ 155
Changing Environment Type ............................................................................................ 155
Worker Environments .............................................................................................................. 156
The Worker Environment SQS Daemon ............................................................................. 158
Dead Letter Queues ........................................................................................................ 159
Periodic Tasks ................................................................................................................ 159
Use Amazon CloudWatch for Auto Scaling in Worker Environment Tiers ................................. 160
Configuring Worker Environments .................................................................................... 160
Environment Links .................................................................................................................. 162
Environment Configuration .............................................................................................................. 164
Auto Scaling Group ................................................................................................................. 165
Configuring Your Environment's Auto Scaling Group ........................................................... 165
The aws:autoscaling:asg Namespace ................................................................................. 167
EC2 Instances ................................................................................................................. 167
Triggers ......................................................................................................................... 170
Scheduled Actions .......................................................................................................... 172
Health Check Setting ...................................................................................................... 175
Load Balancer ........................................................................................................................ 176
Configuring a Classic Load Balancer .................................................................................. 176
Load Balancer Configuration Namespaces .......................................................................... 180
Application Load Balancer ............................................................................................... 181
Network Load Balancer ................................................................................................... 184
Configuring Access Logs .................................................................................................. 186
Database ............................................................................................................................... 186
Adding an Amazon RDS DB Instance to Your Environment ................................................... 187
Connecting to the database ............................................................................................. 188
Configuring an Integrated RDS DB Instance ....................................................................... 188
Software Settings ................................................................................................................... 189
Configuring Environment Properties ................................................................................. 190
Software Setting Namespaces .......................................................................................... 191
Accessing Environment Properties ..................................................................................... 192
Debugging ............................................................................................................................. 192
Configuring Debugging ................................................................................................... 194
The aws:elasticbeanstalk:xray Namespace .......................................................................... 194
Notifications .......................................................................................................................... 195
Configuring Notifications ................................................................................................. 195
The aws:elasticbeanstalk:sns:topics Namespace .................................................................. 196
Log Streaming ....................................................................................................................... 197
Configuring Log Streaming .............................................................................................. 197
The aws:elasticbeanstalk:cloudwatch:logs Namespace ......................................................... 198
VPC ...................................................................................................................................... 198
Domain Name ........................................................................................................................ 199
Updating tags ........................................................................................................................ 201
Advanced Configuration .................................................................................................................. 202
Configuration Options ............................................................................................................. 202
Precedence .................................................................................................................... 203
Recommended Values ..................................................................................................... 203
Before Environment Creation ........................................................................................... 205
During Creation .............................................................................................................. 209
After Creation ................................................................................................................ 213
General Options ............................................................................................................. 220
Platform Specific Options ................................................................................................ 248
Custom Options ............................................................................................................. 255
API Version 2010-12-01
v

AWS Elastic Beanstalk Developer Guide
.ebextensions ......................................................................................................................... 256
Option Settings .............................................................................................................. 257
Linux Server ................................................................................................................... 258
Windows Server ............................................................................................................. 269
Custom Resources ........................................................................................................... 275
Saved Configurations .............................................................................................................. 293
env.yaml ............................................................................................................................. 296
Custom Image ........................................................................................................................ 297
HTTPS ................................................................................................................................... 299
Create a Certificate ......................................................................................................... 300
Upload a Certificate ........................................................................................................ 302
Terminate at the Load Balancer ........................................................................................ 302
Terminate at the Instance ................................................................................................ 304
End-to-End Encryption .................................................................................................... 324
TCP Passthrough ............................................................................................................ 326
Store Keys Securely ........................................................................................................ 327
Monitoring an Environment ............................................................................................................. 329
Monitoring Console ................................................................................................................. 329
Overview ....................................................................................................................... 329
Monitoring Graphs .......................................................................................................... 330
Customizing the Monitoring Console ................................................................................. 331
Basic Health Reporting ............................................................................................................ 333
Health Colors ................................................................................................................. 333
Elastic Load Balancing Health Check ................................................................................. 334
Single Instance Environment Health Check ........................................................................ 334
Additional Checks ........................................................................................................... 334
Amazon CloudWatch Metrics ............................................................................................ 335
Enhanced Health Reporting and Monitoring ............................................................................... 336
The Elastic Beanstalk Health Agent ................................................................................... 337
Factors in Determining Instance and Environment Health .................................................... 338
Enhanced Health Roles .................................................................................................... 340
Enhanced Health Events .................................................................................................. 340
Enhanced Health Reporting Behavior During Updates, Deployments, and Scaling .................... 341
Enable Enhanced Health .................................................................................................. 341
Health Console ............................................................................................................... 344
Health Colors and Statuses .............................................................................................. 349
Instance Metrics ............................................................................................................. 351
CloudWatch ................................................................................................................... 352
API Users ....................................................................................................................... 357
Enhanced Health Log Format ........................................................................................... 359
Notifications and Troubleshooting .................................................................................... 361
Manage Alarms ...................................................................................................................... 362
View Events ........................................................................................................................... 365
Monitor Instances ................................................................................................................... 367
View Instance Logs ................................................................................................................. 369
Log Location on-Instance ................................................................................................ 371
Log Location in S3 ......................................................................................................... 371
Log Rotation Settings on Linux ........................................................................................ 372
Extending the Default Log Task Configuration .................................................................... 372
Amazon CloudWatch Logs ............................................................................................... 374
Integrating AWS Services ................................................................................................................. 376
Architectural Overview ............................................................................................................ 376
CloudFront ............................................................................................................................. 377
CloudTrail .............................................................................................................................. 377
Elastic Beanstalk Information in CloudTrail History ............................................................. 377
Elastic Beanstalk Information in CloudTrail Logging ............................................................ 377
Understanding Elastic Beanstalk Log File Entries ................................................................ 378
API Version 2010-12-01
vi

AWS Elastic Beanstalk Developer Guide
CloudWatch ........................................................................................................................... 379
CloudWatch Logs .................................................................................................................... 379
Streaming CloudWatch Logs ............................................................................................ 381
Setting Up CloudWatch Logs Integration with Configuration Files ......................................... 384
Troubleshooting CloudWatch Logs Integration ................................................................... 385
DynamoDB ............................................................................................................................. 386
ElastiCache ............................................................................................................................ 386
Amazon EFS ........................................................................................................................... 387
Configuration Files .......................................................................................................... 387
Encrypted File Systems ................................................................................................... 388
Sample Applications ....................................................................................................... 388
IAM ....................................................................................................................................... 388
Instance Profiles ............................................................................................................. 388
Service Roles .................................................................................................................. 393
User Policies .................................................................................................................. 403
ARN Format ................................................................................................................... 407
Resources and Conditions ................................................................................................ 408
Example Policies ............................................................................................................. 430
Example Policies Based on Resource Permissions ................................................................ 432
Amazon RDS .......................................................................................................................... 439
Launching and Connecting to an External RDS Instance in a Default VPC ................................ 440
Launching and Connecting to an External RDS Instance in EC2 Classic ................................... 444
Storing the Connection String in Amazon S3 ..................................................................... 449
Amazon S3 ............................................................................................................................ 451
Amazon VPC .......................................................................................................................... 451
What VPC Configurations Do I Need? ................................................................................ 452
Single-Instance Environment in a VPC ............................................................................... 453
Load-Balancing Environment with Private Instances ............................................................ 458
Bastion Hosts ................................................................................................................. 462
Amazon RDS .................................................................................................................. 466
Load-Balancing Environment with Public Instances ............................................................. 472
Your Local Development Environment ............................................................................................... 477
Creating a Project Folder ......................................................................................................... 477
Setting Up Source Control ....................................................................................................... 477
Configuring a Remote Repository ............................................................................................. 478
Installing the EB CLI ............................................................................................................... 478
Installing the AWS CLI ............................................................................................................. 478
The EB CLI ..................................................................................................................................... 480
Install the EB CLI .................................................................................................................... 481
Linux ............................................................................................................................. 482
Windows ....................................................................................................................... 485
macOS .......................................................................................................................... 486
Virtualenv ...................................................................................................................... 488
Configure the EB CLI ............................................................................................................... 489
Ignoring files with .ebignore ............................................................................................ 491
Using Named Profiles ...................................................................................................... 491
Deploying an Artifact Instead of the Project Folder ............................................................. 491
Configuration Settings and Precedence ............................................................................. 492
Instance Metadata .......................................................................................................... 492
EB CLI Basics .......................................................................................................................... 492
eb create ....................................................................................................................... 493
eb status ....................................................................................................................... 493
eb health ....................................................................................................................... 494
eb events ...................................................................................................................... 494
eb logs .......................................................................................................................... 495
eb open ........................................................................................................................ 495
eb deploy ...................................................................................................................... 495
API Version 2010-12-01
vii

AWS Elastic Beanstalk Developer Guide
eb config ....................................................................................................................... 496
eb terminate .................................................................................................................. 496
AWS CodeBuild ...................................................................................................................... 497
Creating an Application ................................................................................................... 497
Using the EB CLI with Git ........................................................................................................ 497
Associating Elastic Beanstalk environments with Git branches .............................................. 497
Deploying changes .......................................................................................................... 498
Using Git submodules ..................................................................................................... 498
Assigning Git tags to your application version .................................................................... 499
AWS CodeCommit .................................................................................................................. 499
Prerequisites .................................................................................................................. 499
Creating an AWS CodeCommit Repository with the EB CLI ................................................... 500
Deploying from Your AWS CodeCommit Repository ............................................................ 500
Configuring Additional Branches and Environments ............................................................ 501
Using an Existing AWS CodeCommit Repository ................................................................. 502
Monitoring Health .................................................................................................................. 503
Reading the Output ........................................................................................................ 505
Interactive Health View ................................................................................................... 506
Interactive Health View Options ....................................................................................... 507
Composing Environments ........................................................................................................ 508
Troubleshooting ..................................................................................................................... 509
Troubleshooting deployments .......................................................................................... 509
EB CLI Commands .................................................................................................................. 511
eb abort ..................................................................................................................... 512
eb appversion ........................................................................................................... 513
eb clone ..................................................................................................................... 515
eb codesource ........................................................................................................... 517
eb config ................................................................................................................... 518
eb console ................................................................................................................. 520
eb create ................................................................................................................... 521
eb deploy ................................................................................................................... 527
eb events ................................................................................................................... 529
eb health ................................................................................................................... 530
eb init ...................................................................................................................... 532
eb labs ...................................................................................................................... 534
eb list ...................................................................................................................... 535
eb local ..................................................................................................................... 536
eb logs ...................................................................................................................... 538
eb open ...................................................................................................................... 539
eb platform ............................................................................................................... 540
eb printenv ............................................................................................................... 546
eb restore ................................................................................................................. 547
eb scale ..................................................................................................................... 548
eb setenv ................................................................................................................... 548
eb ssh ........................................................................................................................ 549
eb status ................................................................................................................... 551
eb swap ...................................................................................................................... 552
eb tags ...................................................................................................................... 553
eb terminate ............................................................................................................. 555
eb upgrade ................................................................................................................. 556
eb use ........................................................................................................................ 557
Common Options ........................................................................................................... 558
EB CLI 2.6 (Deprecated) ........................................................................................................... 558
Differences from Version 3 of EB CLI ................................................................................. 559
Migrating to EB CLI 3 and AWS CodeCommit ..................................................................... 559
Getting Started with Eb .................................................................................................. 560
Deploying a Branch to an Environment ............................................................................. 565
API Version 2010-12-01
viii

AWS Elastic Beanstalk Developer Guide
Eb Common Options ....................................................................................................... 567
EB CLI 2 Commands ....................................................................................................... 567
EB API CLI (deprecated) ........................................................................................................... 585
Converting Elastic Beanstalk API CLI Scripts ....................................................................... 585
Getting Set Up ............................................................................................................... 587
Common Options ........................................................................................................... 589
Operations ..................................................................................................................... 590
Working with Docker ...................................................................................................................... 632
Docker Platform Configurations ............................................................................................... 632
Single Container Docker .................................................................................................. 632
Multicontainer Docker ..................................................................................................... 632
Preconfigured Docker Containers ...................................................................................... 633
Single Container Docker .......................................................................................................... 633
Sample PHP Application .................................................................................................. 634
Sample Python Application .............................................................................................. 634
Sample Dockerfile Application .......................................................................................... 634
Single Container Docker Configuration .............................................................................. 634
Multicontainer Docker ............................................................................................................. 638
Multicontainer Docker Platform ........................................................................................ 639
Dockerrun.aws.json File ................................................................................................... 639
Docker Images ............................................................................................................... 640
Container Instance Role ................................................................................................... 640
Amazon ECS Resources Created by Elastic Beanstalk ........................................................... 641
Using Multiple Elastic Load Balancing Listeners .................................................................. 641
Failed Container Deployments .......................................................................................... 642
Multicontainer Docker Configuration ................................................................................. 642
Tutorial - Multicontainer Docker ....................................................................................... 646
Preconfigured Containers ......................................................................................................... 652
Getting Started with Preconfigured Docker Containers ........................................................ 652
Example: Customize and Configure Preconfigured Docker Platforms ...................................... 654
Environment Configuration ...................................................................................................... 655
Docker Images ............................................................................................................... 656
Configuring Additional Storage Volumes ........................................................................... 658
Reclaiming Docker Storage Space ..................................................................................... 659
Running Containers Locally ...................................................................................................... 659
Prerequisites for Running Docker Applications Locally ......................................................... 659
Preparing a Docker Application for Use with the EB CLI ....................................................... 660
Running a Docker Application Locally ................................................................................ 660
Cleaning Up After Running a Docker Application Locally ...................................................... 662
Working with Go ............................................................................................................................ 664
The Go Platform .................................................................................................................... 664
Configuring Your Go Environment .................................................................................... 665
The aws:elasticbeanstalk:container:golang:staticfiles Namespace ........................................... 665
Procfile .......................................................................................................................... 666
Buildfile ......................................................................................................................... 667
Proxy Configuration ........................................................................................................ 667
The Docker-based Go Platform ................................................................................................ 668
Set Up Your Local Development Environment .................................................................... 668
Develop and Test Locally Using Docker ............................................................................. 668
Deploy to Elastic Beanstalk .............................................................................................. 669
Working with Java .......................................................................................................................... 671
Getting Started ...................................................................................................................... 671
Launching an Environment with a Sample Java Application .................................................. 672
Next Steps ..................................................................................................................... 676
Development Environment ...................................................................................................... 676
Installing the Java Development Kit .................................................................................. 677
Installing a Web Container ............................................................................................... 677
API Version 2010-12-01
ix

AWS Elastic Beanstalk Developer Guide
Downloading Libraries ..................................................................................................... 677
Installing the AWS SDK for Java ....................................................................................... 677
Installing an IDE or Text Editor ......................................................................................... 677
Installing the AWS Toolkit for Eclipse ................................................................................ 678
The Tomcat Platform .............................................................................................................. 678
Configuring Your Tomcat Environment .............................................................................. 678
Tomcat Configuration Namespaces ................................................................................... 680
Bundling WAR Files ......................................................................................................... 681
Structuring your Project Folder ........................................................................................ 681
Proxy Configuration ........................................................................................................ 684
The Java SE Platform .............................................................................................................. 686
Configuring Your Java SE Environment .............................................................................. 687
The aws:elasticbeanstalk:container:java:staticfiles Namespace ............................................... 687
Procfile .......................................................................................................................... 688
Buildfile ......................................................................................................................... 689
Proxy Configuration ........................................................................................................ 689
Adding a Database ................................................................................................................. 690
Downloading the JDBC Driver .......................................................................................... 691
Connecting to a Database (Java SE Platforms) .................................................................... 692
Connecting to a Database (Tomcat Platforms) .................................................................... 692
Troubleshooting Database Connections ............................................................................. 694
Eclipse Toolkit ........................................................................................................................ 696
Importing Existing Environments into Eclipse ..................................................................... 696
Managing Environments .................................................................................................. 696
Managing Multiple AWS Accounts ..................................................................................... 706
Viewing Events ............................................................................................................... 707
Listing and Connecting to Server Instances ........................................................................ 708
Terminating an Environment ............................................................................................ 709
Resources .............................................................................................................................. 709
Working with .NET .......................................................................................................................... 710
Getting Started ...................................................................................................................... 710
Launching an Environment with a Sample .NET Application .................................................. 711
Next Steps ..................................................................................................................... 713
Development Environment ...................................................................................................... 713
Installing an IDE ............................................................................................................. 713
Installing the AWS Toolkit for Visual Studio ....................................................................... 713
The .NET Platform .................................................................................................................. 713
Configuring your .NET Environment in the AWS Management Console ................................... 714
The aws:elasticbeanstalk:container:dotnet:apppool Namespace ............................................. 715
Migrating to v1 Elastic Beanstalk Windows Server Platforms ................................................ 715
Deployment Manifest ...................................................................................................... 716
Tutorial - ASP.NET MVC5 ......................................................................................................... 720
Create the Environment .................................................................................................. 720
Publish Your Application to Elastic Beanstalk ..................................................................... 726
Clean Up Your AWS Resources ......................................................................................... 733
Tutorial - .NET Core ................................................................................................................ 734
Prerequisites .................................................................................................................. 734
Generate a .NET Core Project ........................................................................................... 735
Launch an Elastic Beanstalk Environment .......................................................................... 736
Update the Source Code .................................................................................................. 736
Deploy Your Application .................................................................................................. 739
Clean Up ....................................................................................................................... 741
Next Steps ..................................................................................................................... 741
Adding a Database ................................................................................................................. 742
Adding a DB Instance to Your Environment ........................................................................ 742
Downloading a Driver ..................................................................................................... 743
Connecting to a Database ............................................................................................... 743
API Version 2010-12-01
x

AWS Elastic Beanstalk Developer Guide
The AWS Toolkit for Visual Studio ............................................................................................ 744
Test Locally .................................................................................................................... 745
Create an Elastic Beanstalk Environment ........................................................................... 745
Terminating an Environment ............................................................................................ 754
Deploy .......................................................................................................................... 754
Managing Environments .................................................................................................. 757
Managing Accounts ......................................................................................................... 766
Debug ........................................................................................................................... 767
Monitor ......................................................................................................................... 768
Deployment Tool ............................................................................................................ 769
Resources .............................................................................................................................. 770
Working with Node.js ...................................................................................................................... 772
Getting Started ...................................................................................................................... 772
Launching an Environment with a Sample Node.js Application .............................................. 772
Next Steps ..................................................................................................................... 775
Development Environment ...................................................................................................... 775
Installing Node.js ............................................................................................................ 775
Installing npm ................................................................................................................ 775
Installing the AWS SDK for Node.js ................................................................................... 776
Installing Express ............................................................................................................ 776
Installing Geddy ............................................................................................................. 776
The Node.js Platform .............................................................................................................. 777
Configuring Your Node.js Environment .............................................................................. 778
Node.js Configuration Namespaces ................................................................................... 779
Installing Packages with a Package.json File ....................................................................... 779
Locking Dependencies with npm shrinkwrap ...................................................................... 780
Configuring the Proxy Server ........................................................................................... 780
Tutorial - Express .................................................................................................................... 782
Prerequisites .................................................................................................................. 782
Install Express and Generate a Project ............................................................................... 782
Create an Elastic Beanstalk Environment ........................................................................... 783
Update the Application ................................................................................................... 784
Clean Up ....................................................................................................................... 786
Tutorial - Node.js w/ DynamoDB .............................................................................................. 786
Prerequisites .................................................................................................................. 787
Launch an Elastic Beanstalk Environment .......................................................................... 787
Add Permissions to Your Environment's Instances ............................................................... 788
Deploy the Sample Application ........................................................................................ 789
Create a DynamoDB Table ............................................................................................... 791
Update the Application's Configuration Files ...................................................................... 791
Configure Your Environment for High Availability ............................................................... 794
Clean Up ....................................................................................................................... 794
Next Steps ..................................................................................................................... 795
Tutorial - Geddy with Clustering ............................................................................................... 795
Step 1: Set Up Your Git Repository ................................................................................... 795
Step 2: Set Up Your Geddy Development Environment ........................................................ 795
Step 3: Configure Elastic Beanstalk ................................................................................... 796
Step 5: View the Application ............................................................................................ 798
Step 6: Update the Application ........................................................................................ 798
Step 7: Clean Up ............................................................................................................ 805
Adding a Database ................................................................................................................. 805
Adding a DB Instance to Your Environment ........................................................................ 805
Downloading a Driver ..................................................................................................... 806
Connecting to a Database ............................................................................................... 807
Resources .............................................................................................................................. 807
Working with PHP .......................................................................................................................... 808
The PHP Platform .................................................................................................................. 808
API Version 2010-12-01
xi

AWS Elastic Beanstalk Developer Guide
Configuring your PHP Environment ................................................................................... 809
The aws:elasticbeanstalk:container:php:phpini Namespace ................................................... 810
Composer File ................................................................................................................ 810
Update Composer ........................................................................................................... 811
Extending php.ini ........................................................................................................... 811
Tutorial - Laravel 5.2 .............................................................................................................. 811
Prerequisites .................................................................................................................. 812
Install Composer ............................................................................................................ 812
Install Laravel and Generate a Website .............................................................................. 813
Create an Elastic Beanstalk Environment and Deploy Your Application ................................... 813
Add a Database to Your Environment ................................................................................ 815
Clean Up ....................................................................................................................... 817
Next Steps ..................................................................................................................... 818
Tutorial - CakePHP 3.2 ............................................................................................................ 818
Prerequisites .................................................................................................................. 819
Install Composer ............................................................................................................ 819
Install CakePHP and Generate a Website ........................................................................... 820
Create an Elastic Beanstalk Environment and Deploy Your Application ................................... 820
Add a Database to Your Environment ................................................................................ 823
Clean Up ....................................................................................................................... 824
Next Steps ..................................................................................................................... 825
Tutorial - Symfony2 ................................................................................................................ 825
Set Up Your Symfony2 Development Environment .............................................................. 826
Configure Elastic Beanstalk .............................................................................................. 827
View the Application ....................................................................................................... 828
Update the Application ................................................................................................... 829
Clean Up ....................................................................................................................... 829
Tutorial - HA Production ......................................................................................................... 829
Prerequisites .................................................................................................................. 830
Launch a DB Instance in Amazon RDS ............................................................................... 830
Launch an Elastic Beanstalk Environment .......................................................................... 832
Configure Security Groups, Environment Properties, and Scaling ........................................... 833
Deploy the Sample Application ........................................................................................ 834
Clean Up ....................................................................................................................... 836
Next Steps ..................................................................................................................... 837
Tutorial - HA WordPress .......................................................................................................... 837
Launch a DB Instance in Amazon RDS ............................................................................... 838
Download WordPress ...................................................................................................... 840
Launch an Elastic Beanstalk Environment .......................................................................... 841
Configure Security Groups and Environment Properties ....................................................... 842
Install WordPress ............................................................................................................ 843
Updating keys and salts .................................................................................................. 843
Update the Environment ................................................................................................. 844
Configure Autoscaling ..................................................................................................... 845
Review .......................................................................................................................... 845
Clean Up ....................................................................................................................... 846
Next Steps ..................................................................................................................... 846
Tutorial - HA Drupal ............................................................................................................... 847
Launch a DB Instance in Amazon RDS ............................................................................... 847
Download Drupal ............................................................................................................ 850
Launch an Elastic Beanstalk Environment .......................................................................... 851
Configure Security Groups and Environment Properties ....................................................... 851
Install Drupal ................................................................................................................. 853
Update the Environment ................................................................................................. 854
Configure Autoscaling ..................................................................................................... 854
Review .......................................................................................................................... 855
Clean Up ....................................................................................................................... 855
API Version 2010-12-01
xii

AWS Elastic Beanstalk Developer Guide
Next Steps ..................................................................................................................... 856
Adding a Database ................................................................................................................. 856
Adding a DB Instance to Your Environment ........................................................................ 857
Downloading a Driver ..................................................................................................... 858
Connecting to a Database with a PDO or MySQLi ............................................................... 858
Resources .............................................................................................................................. 859
Working with Python ...................................................................................................................... 860
Development Environment ...................................................................................................... 860
Common Prerequisites .................................................................................................... 860
Setting up a virtual Python environment ........................................................................... 861
Configuring a Python project for Elastic Beanstalk .............................................................. 861
The Python Platform .............................................................................................................. 862
Configuring Your Python Environment .............................................................................. 862
Python Configuration Namespaces .................................................................................... 863
Requirements File ........................................................................................................... 864
Tutorial - Flask 0.10 ................................................................................................................ 865
Prerequisites .................................................................................................................. 865
Set Up a Python Virtual Environment with Flask ................................................................. 865
Create a Flask Application ............................................................................................... 866
Configure Your Flask Application for Elastic Beanstalk ......................................................... 868
Deploy Your Site With the EB CLI ..................................................................................... 868
Clean Up and Next Steps ................................................................................................. 870
Tutorial - Django 1.9 ............................................................................................................... 870
Prerequisites .................................................................................................................. 871
Set Up a Python Virtual Environment with Django .............................................................. 871
Create a Django Project ................................................................................................... 872
Configure Your Django Application for Elastic Beanstalk ...................................................... 874
Deploy Your Site With the EB CLI ..................................................................................... 875
Updating Your Application ............................................................................................... 877
Clean Up and Next Steps ................................................................................................. 880
Adding a Database ................................................................................................................. 881
Adding a DB Instance to Your Environment ........................................................................ 881
Downloading a Driver ..................................................................................................... 882
Connecting to a Database ............................................................................................... 883
Tools and Resources ................................................................................................................ 883
Working with Ruby ......................................................................................................................... 884
The Ruby Platform ................................................................................................................. 884
Configuring Your Ruby Environment ................................................................................. 885
Ruby Configuration Namespaces ....................................................................................... 886
Installing Packages with a Gemfile .................................................................................... 886
Tutorial - Rails 4.1 .................................................................................................................. 886
Rails Development Environment Setup .............................................................................. 887
Install the EB CLI ............................................................................................................ 888
Set Up Your Git Repository .............................................................................................. 889
Configure the EB CLI ....................................................................................................... 889
Create a Service Role and Instance Profile ......................................................................... 890
Update the Gemfile ........................................................................................................ 890
Deploy the Project .......................................................................................................... 890
Update the Application ................................................................................................... 893
Clean Up ....................................................................................................................... 894
Tutorial - Sinatra .................................................................................................................... 894
Prerequisites .................................................................................................................. 894
Step 1: Set Up Your Project ............................................................................................. 895
Step 2: Create an Application ........................................................................................... 896
Step 3: Create an Environment ......................................................................................... 897
Step 4: Deploy a Simple Sinatra Application ...................................................................... 898
Step 5: Clean Up ............................................................................................................ 899
API Version 2010-12-01
xiii

AWS Elastic Beanstalk Developer Guide
Related Resources ........................................................................................................... 899
Adding a Database ................................................................................................................. 900
Adding a DB Instance to Your Environment ........................................................................ 900
Downloading an Adapter ................................................................................................. 901
Connecting to a Database ............................................................................................... 901
Tools ..................................................................................................................................... 902
AWS SDK for Ruby ......................................................................................................... 902
Git Deployment Via EB CLI .............................................................................................. 902
Resources .............................................................................................................................. 902
Troubleshooting ............................................................................................................................. 903
Connectivity ........................................................................................................................... 903
Environment Creation ............................................................................................................. 904
Deployments .......................................................................................................................... 904
Health ................................................................................................................................... 904
Configuration ......................................................................................................................... 905
Docker .................................................................................................................................. 905
FAQ ...................................................................................................................................... 906
Resources ...................................................................................................................................... 907
Sample Applications ............................................................................................................... 907
Platform History ............................................................................................................................. 909
Packer ................................................................................................................................... 909
Single Container Docker .......................................................................................................... 912
Multicontainer Docker ............................................................................................................. 913
Docker .................................................................................................................................. 914
Preconfigured Docker .............................................................................................................. 929
Go ........................................................................................................................................ 962
Tomcat .................................................................................................................................. 967
Java SE ................................................................................................................................. 990
.NET on Windows Server ......................................................................................................... 997
November 20, 2017 – December 18, 2017 ......................................................................... 998
August 28, 2017 – November 19, 2017 ............................................................................. 999
July 24, 2017 – Aug 27, 2017 ........................................................................................ 1001
July 17, 2017 – July 23, 2017 ........................................................................................ 1003
June 26, 2017 – July 16, 2017 ....................................................................................... 1004
May 16, 2017 – July 16, 2017 ........................................................................................ 1005
May 4, 2017 – May 15, 2017 .......................................................................................... 1006
April 4, 2017 – May 3, 2017 ........................................................................................... 1008
January 16, 2017 – Apr 3, 2017 ..................................................................................... 1009
December 18, 2016 – January 15, 2017 ........................................................................... 1011
November 16, 2016 – December 18, 2016 ....................................................................... 1012
October 21, 2016 – November 16, 2016 .......................................................................... 1014
September 26, 2016 – October 21, 2016 ......................................................................... 1015
August 23, 2016 – September 26, 2016 .......................................................................... 1016
June 21, 2016 – August 23, 2016 ................................................................................... 1018
May 25, 2016 – June 21, 2016 ....................................................................................... 1019
April 25, 2016 – May 25, 2016 ....................................................................................... 1020
March 23, 2016 – April 25, 2016 .................................................................................... 1021
February 29, 2016 – March 23, 2016 ............................................................................... 1022
January 28, 2016 – February 29, 2016 ............................................................................ 1024
December 15, 2015 – January 28, 2016 ........................................................................... 1025
October 21, 2015 – December 15, 2015 .......................................................................... 1025
September 14, 2015 – October 21, 2015 ......................................................................... 1026
August 20, 2015 – September 14, 2015 .......................................................................... 1027
July 21, 2015 – August 20, 2015 .................................................................................... 1028
June 12, 2015 – July 21, 2015 ....................................................................................... 1028
April 16, 2015 – June 12, 2015 ...................................................................................... 1029
August 6, 2014 – April 16, 2015 ..................................................................................... 1029
API Version 2010-12-01
xiv

AWS Elastic Beanstalk Developer Guide
Prior to August 6, 2014 ................................................................................................. 1030
Node.js ................................................................................................................................ 1030
PHP .................................................................................................................................... 1045
Python ................................................................................................................................ 1067
Ruby ................................................................................................................................... 1085
API Version 2010-12-01
xv

AWS Elastic Beanstalk Developer Guide
What Is AWS Elastic Beanstalk?
Amazon Web Services (AWS) comprises dozens of services, each of which exposes an area of
functionality. While the variety of services offers flexibility for how you want to manage your AWS
infrastructure, it can be challenging to figure out which services to use and how to provision them.
With Elastic Beanstalk, you can quickly deploy and manage applications in the AWS Cloud without
worrying about the infrastructure that runs those applications. AWS Elastic Beanstalk reduces
management complexity without restricting choice or control. You simply upload your application, and
Elastic Beanstalk automatically handles the details of capacity provisioning, load balancing, scaling,
and application health monitoring. Elastic Beanstalk uses highly reliable and scalable services that are
available in the AWS Free Usage Tier.
Elastic Beanstalk supports applications developed in Java, PHP, .NET, Node.js, Python, and Ruby, as well
as different container types for each language. A container defines the infrastructure and software stack
to be used for a given environment. When you deploy your application, Elastic Beanstalk provisions one
or more AWS resources, such as Amazon EC2 instances. The software stack that runs on your Amazon
EC2 instances depends on the container type. For example, Elastic Beanstalk supports two container
types for Node.js: a 32-bit Amazon Linux image and a 64-bit Amazon Linux image. Each runs a software
stack tailored to hosting a Node.js application. You can interact with Elastic Beanstalk by using the AWS
Management Console, the AWS Command Line Interface (AWS CLI), or eb, a high-level CLI designed
specifically for Elastic Beanstalk.
To learn more about the AWS Free Usage Tier and how to deploy a sample web application in it using
AWS Elastic Beanstalk, go to Getting Started with AWS: Deploying a Web Application.
You can also perform most deployment tasks, such as changing the size of your fleet of Amazon EC2
instances or monitoring your application, directly from the Elastic Beanstalk web interface (console).
To use Elastic Beanstalk, you create an application, upload an application version in the form of an
application source bundle (for example, a Java .war file) to Elastic Beanstalk, and then provide some
information about the application. Elastic Beanstalk automatically launches an environment and creates
and configures the AWS resources needed to run your code. After your environment is launched, you can
then manage your environment and deploy new application versions. The following diagram illustrates
the workflow of Elastic Beanstalk.
After you create and deploy your application, information about the application—including metrics,
events, and environment status—is available through the AWS Management Console, APIs, or Command
Line Interfaces, including the unified AWS CLI. For step-by-step instructions on how to create, deploy,
and manage your application using the AWS Management Console, go to Getting Started Using Elastic
Beanstalk (p. 3). To learn more about an Elastic Beanstalk application and its components, see AWS
Elastic Beanstalk Concepts (p. 14).
Elastic Beanstalk provides developers and systems administrators an easy, fast way to deploy and
manage their applications without having to worry about AWS infrastructure. If you already know the
AWS resources you want to use and how they work, you might prefer AWS CloudFormation to create
your AWS resources by creating a template. You can then use this template to launch new AWS resources
API Version 2010-12-01
1

AWS Elastic Beanstalk Developer Guide
Storage
in the exact same way without having to recustomize your AWS resources. Once your resources are
deployed, you can modify and update the AWS resources in a controlled and predictable way, providing
the same sort of version control over your AWS infrastructure that you exercise over your software. For
more information about AWS CloudFormation, go to AWS CloudFormation Getting Started Guide.
Storage
Elastic Beanstalk does not restrict your choice of persistent storage and database service options. For
more information on AWS storage options, go to Storage Options in the AWS Cloud.
Pricing
There is no additional charge for Elastic Beanstalk. You pay only for the underlying AWS resources that
your application consumes. For details about pricing, see the Elastic Beanstalk service detail page.
Community
Customers have built a wide variety of products, services, and applications on top of AWS. Whether
you are searching for ideas about what to build, looking for examples, or just want to explore, you
can find many solutions at the AWS Customer App Catalog. You can browse by audience, services, and
technology. We also invite you to share applications you build with the community. Developer resources
produced by the AWS community are at http://aws.amazon.com/resources/.
Where to Go Next
This guide contains conceptual information about the Elastic Beanstalk web service, as well as
information about how to use the service to deploy web applications. Separate sections describe how to
use the AWS Management console, command line interface (CLI) tools, and API to deploy and manage
your Elastic Beanstalk environments. This guide also documents how Elastic Beanstalk is integrated with
other services provided by Amazon Web Services.
We recommend that you first read Getting Started Using Elastic Beanstalk (p. 3) to learn how to start
using Elastic Beanstalk. Getting Started steps you through creating, viewing, and updating your Elastic
Beanstalk application, as well as editing and terminating your Elastic Beanstalk environment. Getting
Started also describes different ways you can access Elastic Beanstalk. We also recommend that you
familiarize yourself with Elastic Beanstalk concepts and terminology by reading AWS Elastic Beanstalk
Concepts (p. 14).
API Version 2010-12-01
2

AWS Elastic Beanstalk Developer Guide
Step 1: Sign up for the Service
Getting Started Using Elastic
Beanstalk
The following tasks will help you get started with Elastic Beanstalk to create, view, deploy, and update
your application as well as edit and terminate your environment. You'll use the AWS Management
Console, a point-and-click web-based interface, to complete these tasks.
Sections
•Step 1: Sign up for the Service (p. 3)
•Step 2: Create an Application (p. 3)
•Step 3: View Information About Your Environment (p. 6)
•Step 4: Deploy a New Application Version (p. 7)
•Step 5: Change Configuration (p. 9)
•Step 6: Clean Up (p. 10)
•Where to Go Next (p. 11)
Step 1: Sign up for the Service
If you're not already an AWS customer, you'll need to sign up. Signing up allows you to access Elastic
Beanstalk and other AWS services that you will need, such as Amazon Elastic Compute Cloud (Amazon
EC2), Amazon Simple Storage Service (Amazon S3), and Amazon Simple Notification Service (Amazon
SNS).
To sign up for an AWS account
1. Open the Elastic Beanstalk console.
2. Follow the instructions shown.
Step 2: Create an Application
Next, you will create and deploy a sample application. For this step, you use a sample application that is
already prepared.
Elastic Beanstalk is free to use, but the AWS resources that it provides will be live (and not running in a
sandbox). You will incur the standard usage fees for these resources until you terminate them in the last
task in this tutorial. The total charges will be minimal (typically less than a dollar). For information on
how you might minimize any charges, go to http://aws.amazon.com/free/.
To create a sample application
1. Open the Elastic Beanstalk Management Console with this preconfigured link: https://
console.aws.amazon.com/elasticbeanstalk/home#/newApplication?applicationName=getting-
started&environmentType=LoadBalanced
2. Choose a platform and then choose Review and launch.
API Version 2010-12-01
3
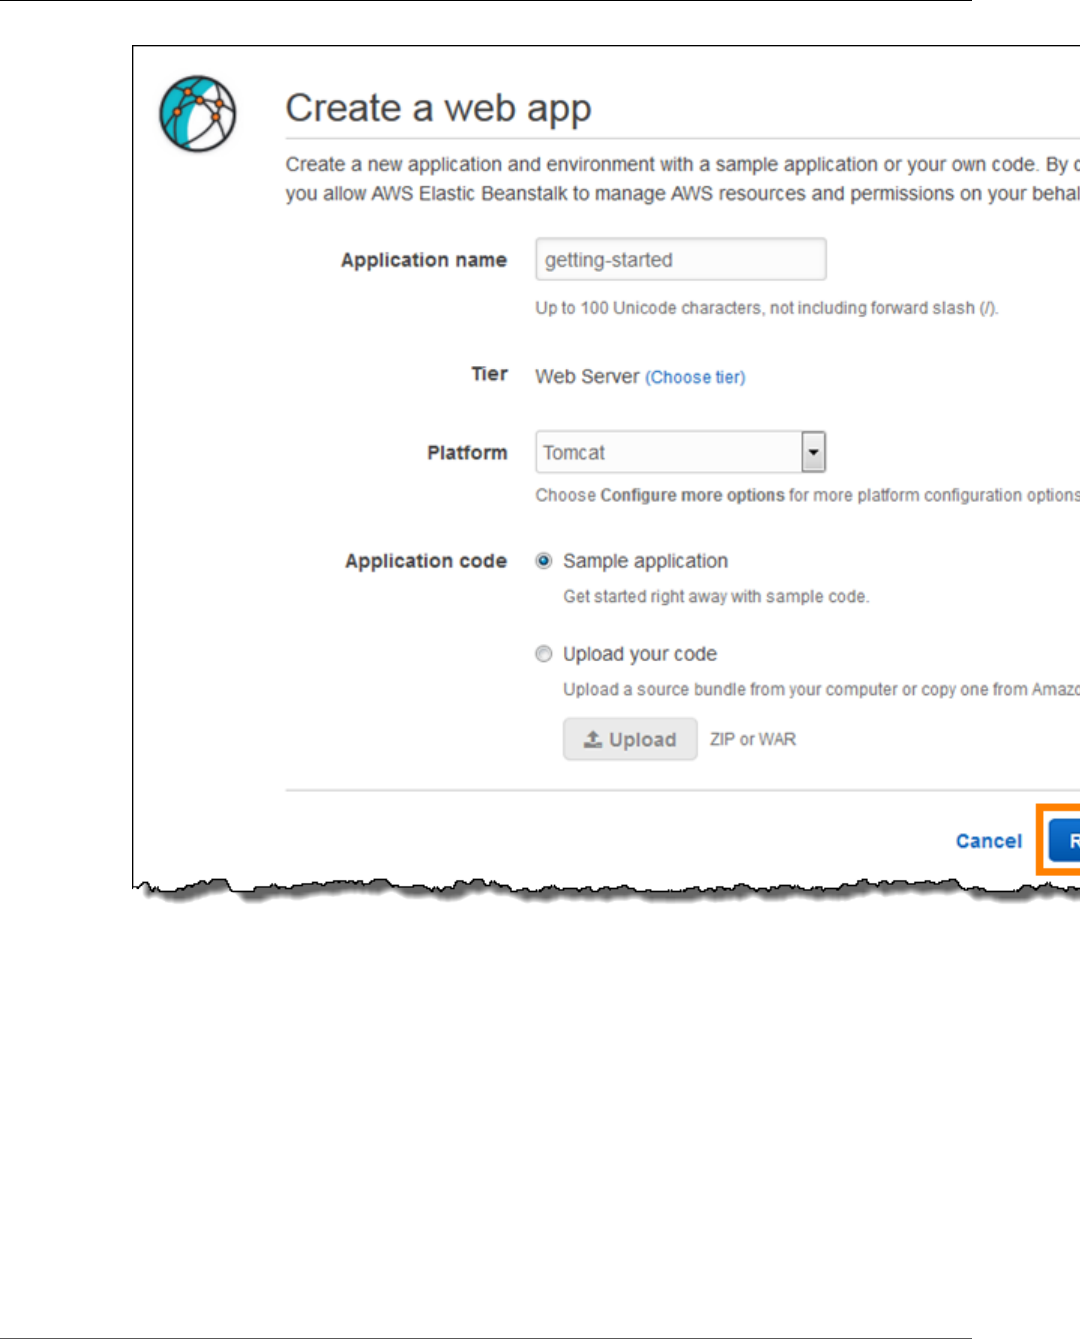
AWS Elastic Beanstalk Developer Guide
Step 2: Create an Application
3. Review the available settings and choose Create app.
To run a sample application on AWS resources, Elastic Beanstalk takes the following actions, which takes
about 5 minutes to complete:
• Creates an Elastic Beanstalk application named getting-started.
• Launches an environment named Custom-env with the following AWS resources:
•EC2 instance – An Amazon Elastic Compute Cloud (Amazon EC2) virtual machine configured to run
web apps on the platform that you choose.
Each platform runs a different set of software, configuration files, and scripts to support a specific
language version, framework, web container, or combination thereof. Most platforms use either
Apache or nginx as a reverse proxy that sits in front of your web app, forwards requests to it, serves
static assets, and generates access and error logs.
API Version 2010-12-01
4
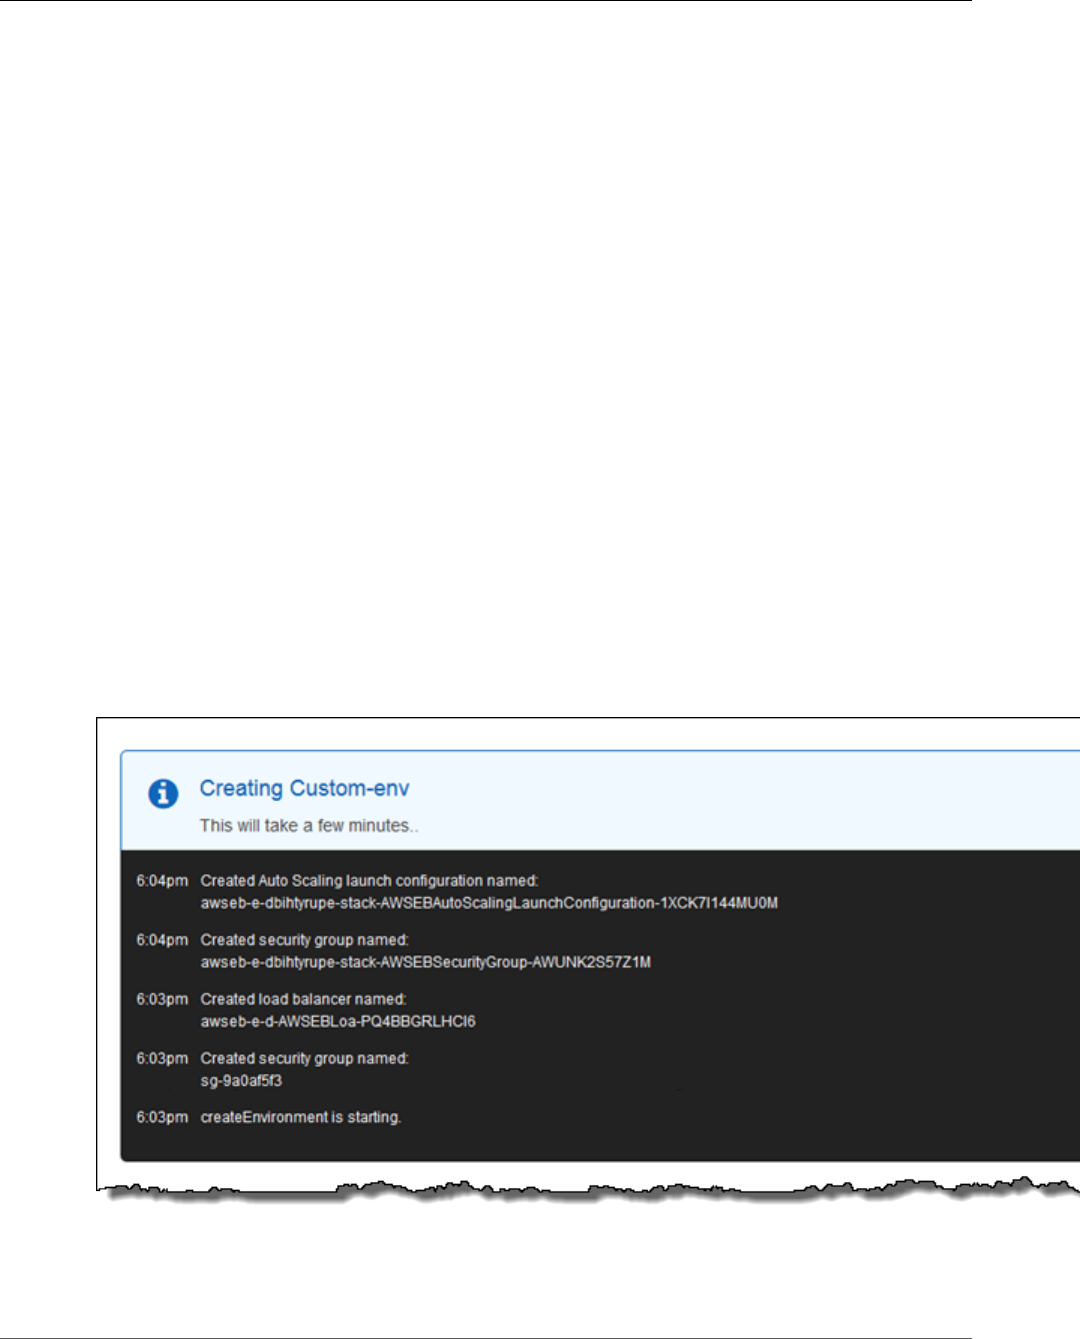
AWS Elastic Beanstalk Developer Guide
Step 2: Create an Application
•Instance security group – An Amazon EC2 security group configured to allow ingress on port 80.
This resource lets HTTP traffic from the load balancer reach the EC2 instance running your web app.
By default, traffic is not allowed on other ports.
•Load balancer – An Elastic Load Balancing load balancer configured to distribute requests to
the instances running your application. A load balancer also eliminates the need to expose your
instances directly to the Internet.
•Load balancer security group – An Amazon EC2 security group configured to allow ingress on port
80. This resource lets HTTP traffic from the Internet reach the load balancer. By default, traffic is not
allowed on other ports.
•Auto Scaling group – An Auto Scaling group configured to replace an instance if it is terminated or
becomes unavailable.
•Amazon S3 bucket – A storage location for your source code, logs, and other artifacts that are
created when you use Elastic Beanstalk.
•Amazon CloudWatch alarms – Two CloudWatch alarms that monitor the load on the instances in
your environment and are triggered if the load is too high or too low. When an alarm is triggered,
your Auto Scaling group scales up or down in response.
•AWS CloudFormation stack – Elastic Beanstalk uses AWS CloudFormation to launch the resources
in your environment and propagate configuration changes. The resources are defined in a template
that you can view in the AWS CloudFormation console.
•Domain name – A domain name that routes to your web app in the form
subdomain.region.elasticbeanstalk.com.
• Creates a new application version named Sample Application, which refers to the default Elastic
Beanstalk sample application file.
• Deploys the sample application code to Custom-env.
During the environment creation process, the console tracks its progress and displays events:
When all of the resources finish launching and the EC2 instances running the application pass health
checks, the environment's health changes to Ok and the website becomes ready to use.
API Version 2010-12-01
5

AWS Elastic Beanstalk Developer Guide
Step 3: View Information About Your Environment
Step 3: View Information About Your Environment
After you create the Elastic Beanstalk application, you can view information about the application you
deployed and its provisioned resources by going to the environment dashboard in the AWS Management
Console. The dashboard shows the health of your application's environment, the running version, and
the environment configuration.
While Elastic Beanstalk creates your AWS resources and launches your application, the environment
will be in a Pending state. Status messages about launch events are displayed in the environment's
dashboard.
If you are not currently viewing the Dashboard, return to it now:
To view the dashboard
1. Open the Elastic Beanstalk console.
2. Choose Custom-env
The dashboard shows a subset of useful information about your environment, including its current
health status, the name of the currently deployed application version, its five most recent events, and
the platform configuration on which the application runs.
API Version 2010-12-01
6
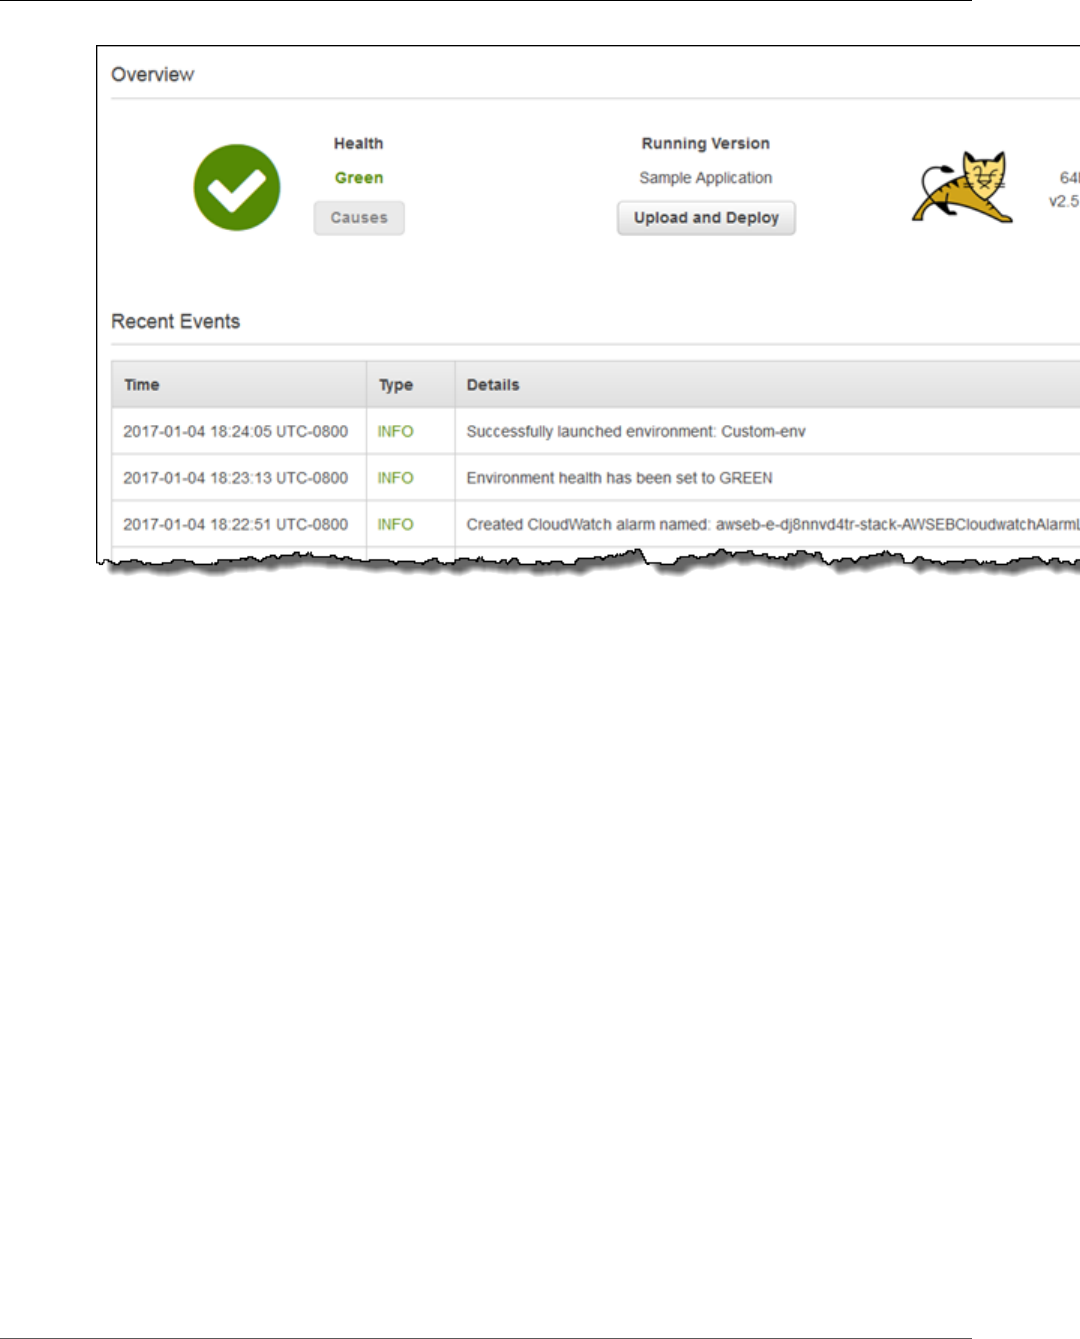
AWS Elastic Beanstalk Developer Guide
Step 4: Deploy a New Application Version
On the left hand side of the console is a navigation bar that links to other pages, which contain more
detailed information about your environment and provide access to additional features. Explore the
following pages to see the current state of your environment:
• The Configuration page shows the resources provisioned for this environment, such as Amazon
EC2 instances that host your application. This page also lets you configure some of the provisioned
resources.
• The Health page shows the status and detailed health information about the EC2 instances running
your application.
• The Monitoring page shows the statistics for the environment, such as average latency and CPU
utilization. This page also lets you create alarms for the metrics that you are monitoring.
• The Events page shows any informational or error messages from services that this environment is
using.
Step 4: Deploy a New Application Version
You can deploy a new version of your application at any time, as long as no other update operations are
currently in-progress on your environment.
The application version you are running now is labeled Sample Application.
To update your application version
1. Download one of the following sample applications that match the configuration for your
environment:
•Single Container Docker – docker-singlecontainer-v1.zip
•Multicontainer Docker – docker-multicontainer-v2.zip
•Preconfigured Docker (Glassfish) – docker-glassfish-v1.zip
API Version 2010-12-01
7
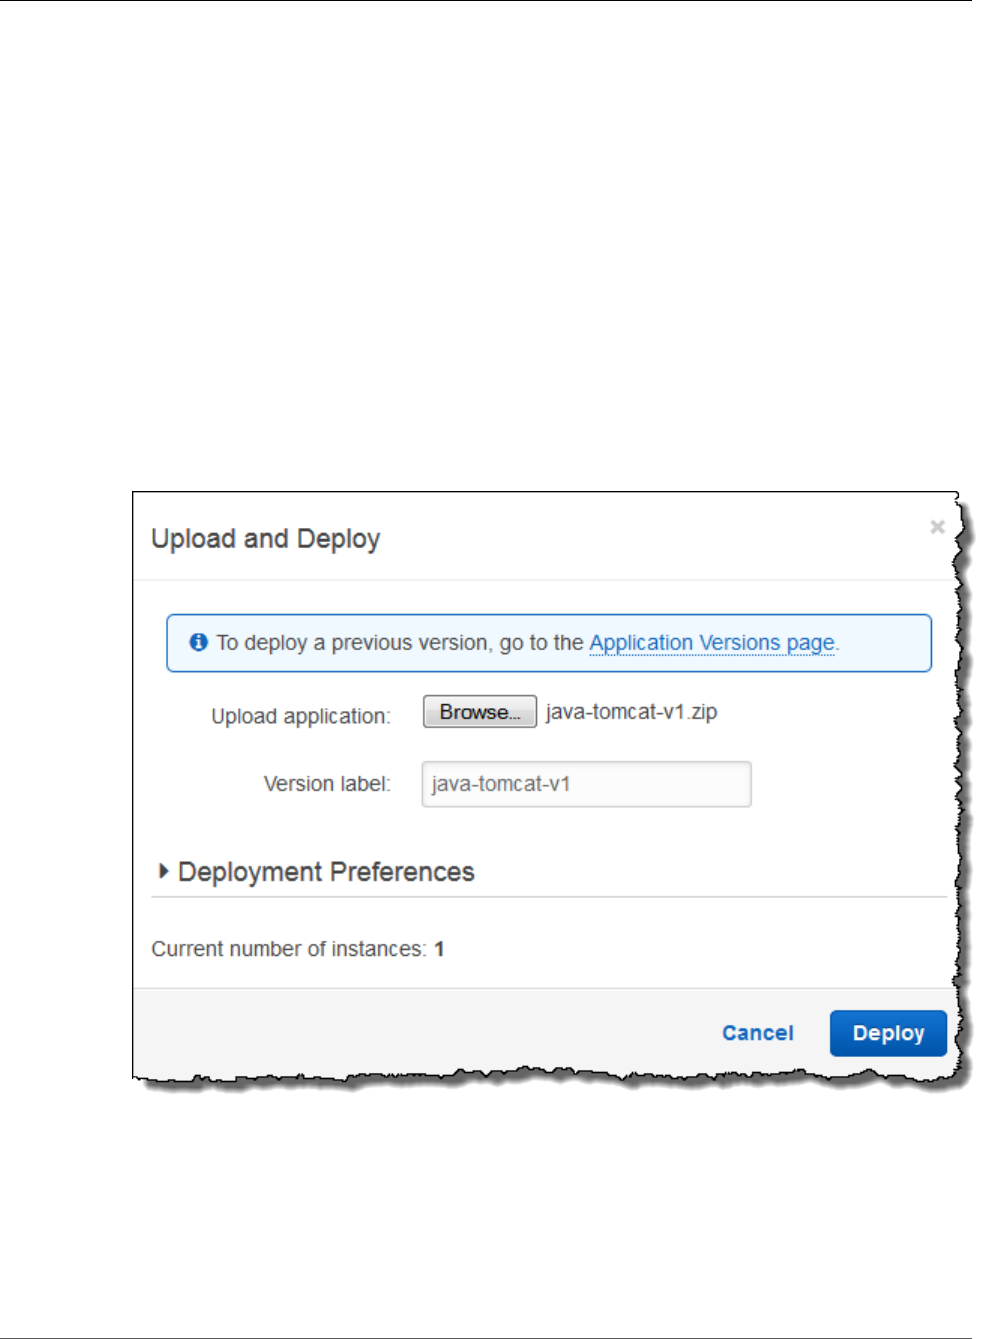
AWS Elastic Beanstalk Developer Guide
Step 4: Deploy a New Application Version
•Preconfigured Docker (Python 3) – docker-python-v1.zip
•Preconfigured Docker (Go) – docker-golang-v1.zip
•Go – go-v1.zip
•Java SE – java-se-jetty-gradle-v3.zip
•Tomcat – java-tomcat-v3.zip
•.NET – dotnet-asp-v1.zip
•Node.js – nodejs-v1.zip
•PHP – php-v1.zip
•Python – python-v1.zip
•Ruby (Passenger Standalone) – ruby-passenger-v2.zip
•Ruby (Puma) – ruby-puma-v2.zip
2. Open the Elastic Beanstalk console.
3. From the Elastic Beanstalk applications page, choose My First Elastic Beanstalk Application and
then choose Custom-env.
4. In the Overview section, choose Upload and Deploy.
5. Choose Browse and upload the sample source bundle that you downloaded.
6. The console automatically fills in the Version label based on the name of the archive that you
uploaded. For future deployments, you will need to type a unique version label if you use a source
bundle with the same name.
7. Choose Deploy.
Elastic Beanstalk now deploys your file to your Amazon EC2 instances. You can view the status of
your deployment on the environment's dashboard. The Environment Health status turns grey while
the application version is updated. When the deployment is complete, Elastic Beanstalk performs an
API Version 2010-12-01
8
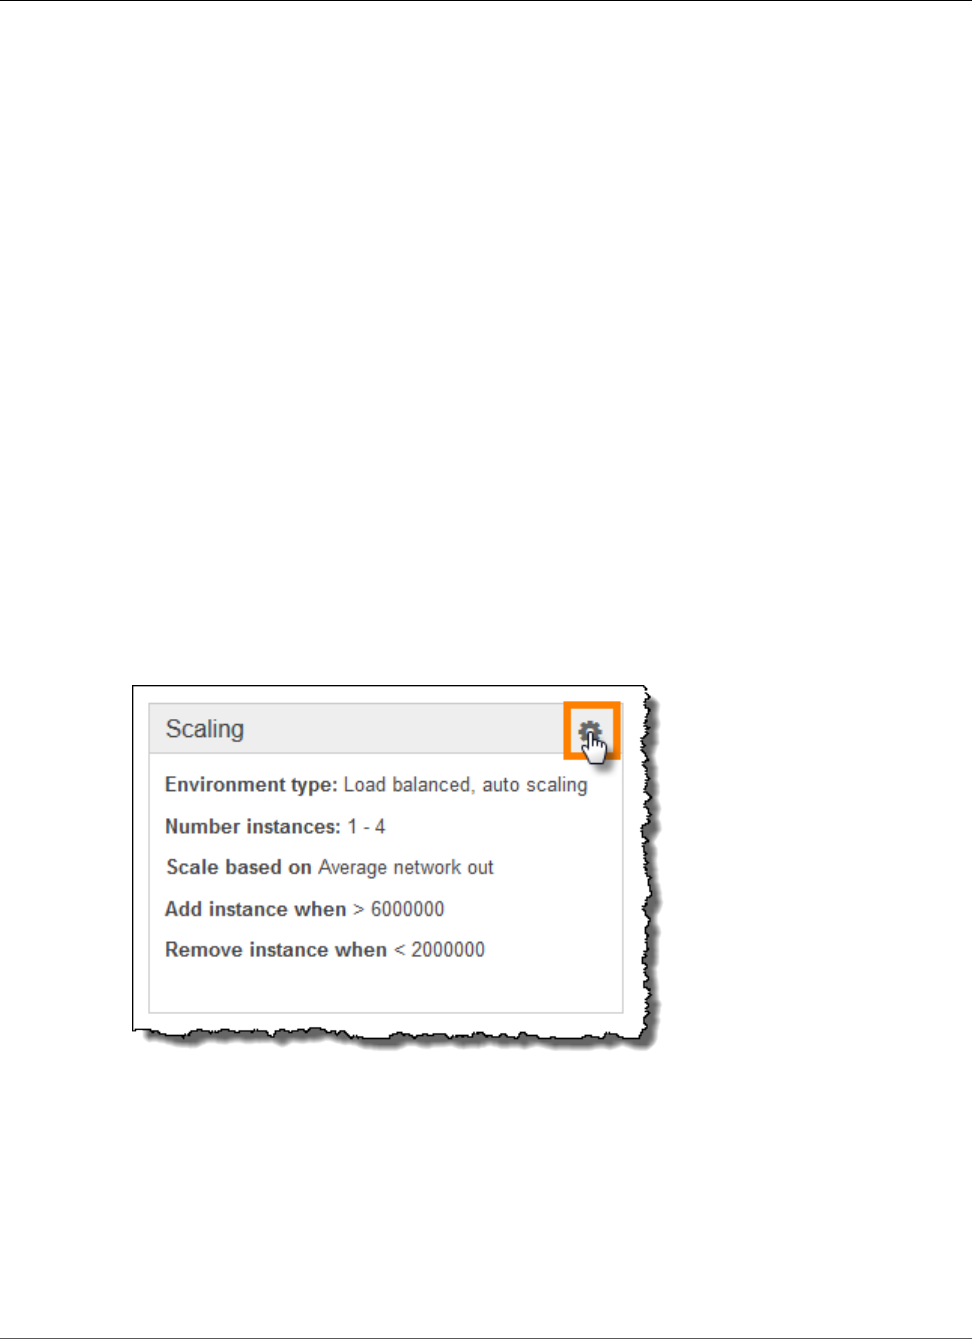
AWS Elastic Beanstalk Developer Guide
Step 5: Change Configuration
application health check. The status returns to green when the application responds to the health check.
The environment dashboard will show the new Running Version as Sample Application Second Version
(or whatever you provided as the Version label.
Your new application version is also uploaded and added to the table of application versions. To view
the table of application versions, choose My First Elastic Beanstalk Application and then choose
Application Versions.
Step 5: Change Configuration
You can customize your environment to better suit your application. For example, if you have a compute-
intensive application, you can change the type of Amazon EC2 instance that is running your application.
Some configuration changes are simple and happen quickly. Some changes require Elastic Beanstalk to
delete and recreate AWS resources, which can take several minutes. Elastic Beanstalk will warn you about
possible application downtime when changing configuration settings.
In this task, you change the minimum instance settings for your Auto Scaling group from one to two and
then verify that the change occurred. After the new instance gets created, it will become associated with
your load balancer.
To change your environment configuration
1. Open the Elastic Beanstalk console.
2. Navigate to the management page (p. 65) for your environment.
3. Choose Configuration.
4. Choose Scaling.
5. In the Auto Scaling section, change Minimum Instance Count from 1 to 2. This increases the
minimum number of Auto Scaling instances deployed in Amazon EC2.
6. At the bottom of the page, choose Apply.
The environment update might take a few minutes. When the environment is ready, you can go to the
next task to verify your changes.
To verify changes to load balancers
1. In the navigation pane, choose Events.
API Version 2010-12-01
9
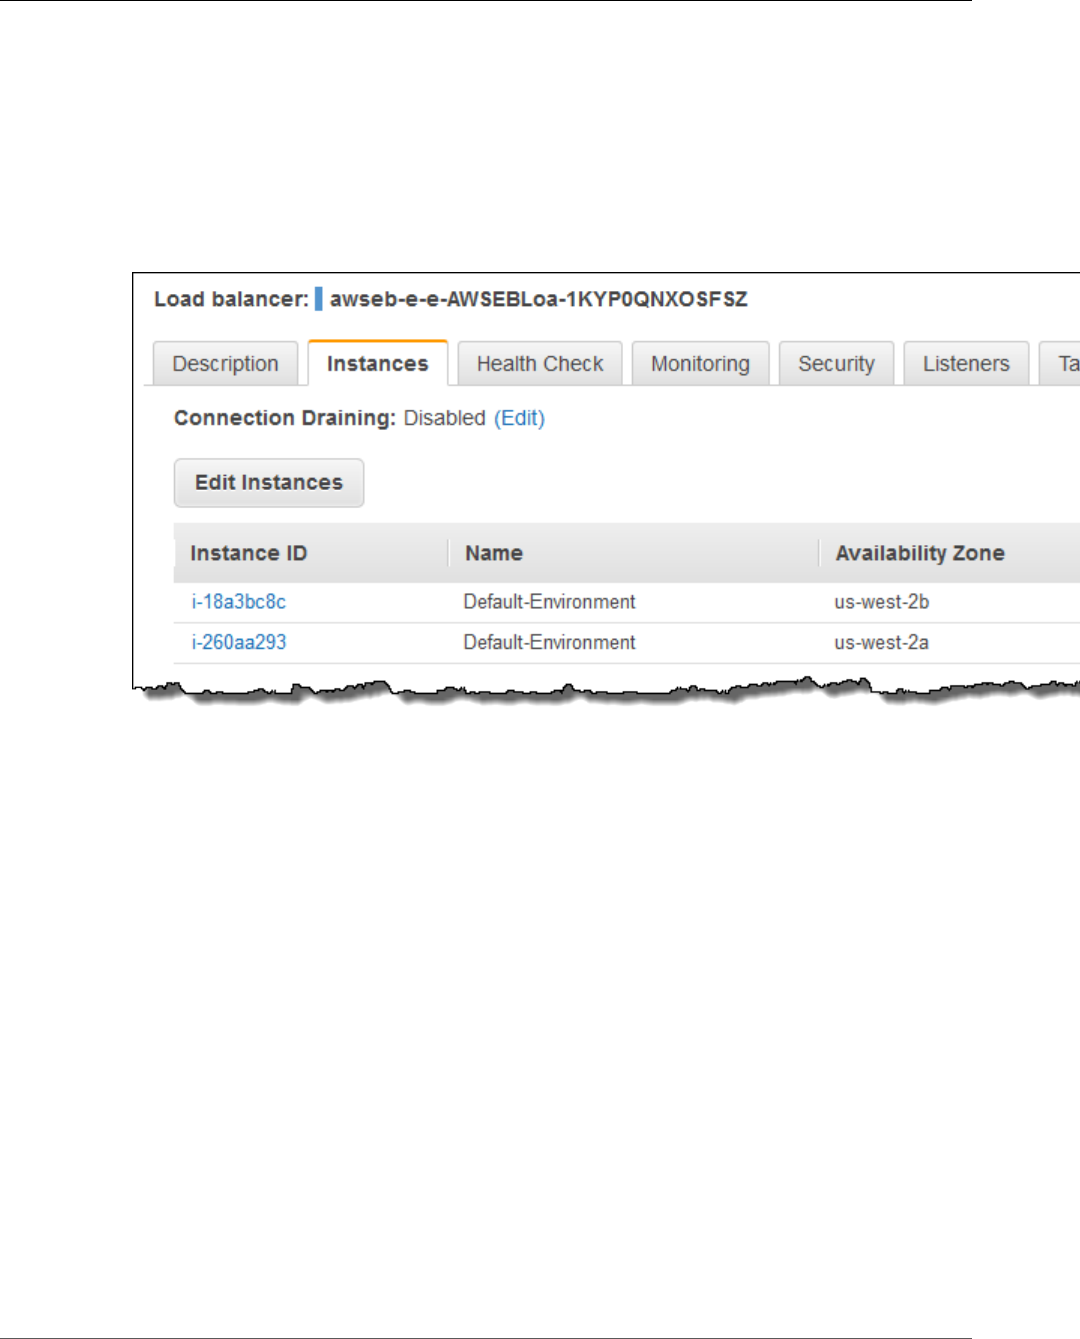
AWS Elastic Beanstalk Developer Guide
Step 6: Clean Up
You will see the event Successfully deployed new configuration to environment in the events list.
This confirms that the Auto Scaling minimum instance count has been set to 2. A second instance is
launched automatically.
2. Open the Amazon EC2 console at https://console.aws.amazon.com/ec2/.
3. In the navigation pane, under LOAD BALANCING, click Load Balancers.
4. Repeat the next two steps until you identify the load balancer with the desired instance name.
5. Choose a load balancer in the list of load balancers.
6. Choose the Instances tab in the Load Balancer: <load balancer name> pane, and then look at the
Name in the Instances table.
The information shows that two instances are associated with this load balancer, corresponding to
the increase in EC2 instances.
Step 6: Clean Up
Congratulations! You have successfully deployed a sample application to the cloud, uploaded a new
version, and modified its configuration to add a second Auto Scaling instance. To make sure you are
not charged for any services you don't need, delete any unwanted applications and environments from
Elastic Beanstalk and AWS services.
To completely delete the application
1. Delete all application versions.
a. Open the Elastic Beanstalk console.
b. From the Elastic Beanstalk applications page, choose Custom-env in the My First Elastic
Beanstalk Application application.
c. Choose Upload and Deploy.
d. When prompted for an application, choose Application Versions page.
e. On the Application Versions page, select all application versions that you want to delete, and
then choose Delete.
f. Confirm the versions that you are deleting, and then click Delete.
API Version 2010-12-01
10

AWS Elastic Beanstalk Developer Guide
Where to Go Next
g. Choose Done.
2. Terminate the environment.
a. Go back to the environment dashboard by clicking My First Elastic Beanstalk Application and
then Custom-env.
b. Choose Actions and then choose Terminate Environment.
c. Confirm that you are terminating Custom-env and then choose Terminate.
3. Delete the My First Elastic Beanstalk Application Elastic Beanstalk application.
a. Choose Elastic Beanstalk at the upper left to return to the main dashboard.
b. From the Elastic Beanstalk applications page, choose Actions for the My First Elastic Beanstalk
Application application and then choose Delete Application.
c. Confirm that you want to delete this Elastic Beanstalk application by clicking Delete.
Where to Go Next
Now that you have learned about Elastic Beanstalk and how to access it, we recommend that you
read AWS Elastic Beanstalk Concepts (p. 14) This topic provides information about the Elastic
Beanstalk components, the architecture, and important design considerations for your Elastic Beanstalk
application.
In addition to the AWS Management Console, you can also use the following tools to create and manage
Elastic Beanstalk environments:
Sections
•The EB CLI (p. 11)
•AWS SDK for Java (p. 11)
•AWS Toolkit for Eclipse (p. 12)
•AWS SDK for .NET (p. 12)
•AWS Toolkit for Visual Studio (p. 12)
•AWS SDK for Node.js (p. 12)
•AWS SDK for PHP (p. 12)
•Boto (AWS SDK for Python) (p. 13)
•AWS SDK for Ruby (p. 13)
The EB CLI
The EB CLI is a command line tool for creating and managing environments. See The Elastic Beanstalk
Command Line Interface (EB CLI) (p. 480) for details.
AWS SDK for Java
The AWS SDK for Java provides a Java API you can use to build applications that use AWS infrastructure
services. With the AWS SDK for Java, you can get started in minutes with a single, downloadable package
that includes the AWS Java library, code samples, and documentation.
The AWS SDK for Java requires J2SE Development Kit 5.0 or later. You can download the latest Java
software from http://developers.sun.com/downloads/. The SDK also requires Apache Commons (Codec,
HTTPClient, and Logging), and Saxon-HE third-party packages, which are included in the third-party
directory of the SDK.
API Version 2010-12-01
11

AWS Elastic Beanstalk Developer Guide
AWS Toolkit for Eclipse
For more information on using the AWS SDK for Java, go to the AWS SDK for Java.
AWS Toolkit for Eclipse
With the AWS Toolkit for Eclipse plug-in, you can create new AWS Java web projects that are
preconfigured with the AWS SDK for Java, and then deploy the web applications to Elastic Beanstalk. The
Elastic Beanstalk plug-in builds on top of the Eclipse Web Tools Platform (WTP). The toolkit provides a
Travel Log sample web application template that demonstrates the use of Amazon S3 and Amazon SNS.
To ensure you have all the WTP dependencies, we recommend that you start with the Java EE
distribution of Eclipse, which you can download from http://eclipse.org/downloads/.
For more information on using the Elastic Beanstalk plug-in for Eclipse, go to the AWS Toolkit for Eclipse
web page. To get started creating your Elastic Beanstalk application using Eclipse, see Creating and
Deploying Java Applications on AWS Elastic Beanstalk (p. 671).
AWS SDK for .NET
The AWS SDK for .NET enables you to build applications that use AWS infrastructure services. With the
AWS SDK for .NET, you can get started in minutes with a single, downloadable package that includes the
AWS .NET library, code samples, and documentation.
The AWS SDK for .NET requires .NET Framework 2.0 or later. It will work with any of the following Visual
Studio editions:
•Microsoft Visual Studio Professional Edition 2010 and 2012 (recommended)
•Microsoft Visual C# 2008 Express Edition
•Microsoft Visual Web Developer 2008 Express Edition
For more information on using the AWS SDK for .NET, go to the AWS SDK for .NET web page.
AWS Toolkit for Visual Studio
With the AWS Toolkit for Visual Studio plug-in, you can deploy an existing .NET application to Elastic
Beanstalk. You can also create new projects using the AWS templates that are preconfigured with the
AWS SDK for .NET. For prerequisite and installation information, go to AWS Toolkit for Visual Studio. To
get started creating your Elastic Beanstalk application using Visual Studio, see Creating and Deploying
Elastic Beanstalk Applications in .NET Using AWS Toolkit for Visual Studio (p. 710).
AWS SDK for Node.js
The AWS SDK for Node.js enables you to build applications on top of AWS infrastructure services. With
the AWS SDK for Node.js, you can get started in minutes with a single, downloadable package that
includes the AWS Node.js library, code samples, and documentation.
For more information on using the AWS SDK for Node.js, go to the AWS SDK for Node.js (Developer
Preview) web page.
AWS SDK for PHP
The AWS SDK for PHP enables you to build applications on top of AWS infrastructure services. With the
AWS SDK for PHP, you can get started in minutes with a single, downloadable package that includes the
AWS PHP library, code samples, and documentation.
API Version 2010-12-01
12

AWS Elastic Beanstalk Developer Guide
Boto (AWS SDK for Python)
The AWS SDK for PHP requires PHP 5.2 or later.
For more information on using the AWS SDK for PHP, go to the AWS SDK for PHP web page.
Boto (AWS SDK for Python)
With Boto, you can get started in minutes with a single, downloadable package complete with the AWS
Python library, code samples, and documentation. You can build Python applications on top of APIs that
take the complexity out of coding directly against web services interfaces. The all-in-one library provides
Python developer-friendly APIs that hide much of the lower-level tasks associated with programming
for the AWS cloud, including authentication, request retries, and error handling. Practical examples are
provided in Python for how to use the libraries to build applications. For information about Boto, sample
code, documentation, tools, and additional resources, go to http://aws.amazon.com/python/.
AWS SDK for Ruby
You can get started in minutes with a single, downloadable package complete with the AWS Ruby
library, code samples, and documentation. You can build Ruby applications on top of APIs that take the
complexity out of coding directly against web services interfaces. The all-in-one library provides Ruby
developer-friendly APIs that hide much of the lower-level tasks associated with programming for the
AWS cloud, including authentication, request retries, and error handling. Practical examples are provided
in Ruby for how to use the libraries to build applications. For information about the SDK, sample code,
documentation, tools, and additional resources, go to http://aws.amazon.com/ruby/.
API Version 2010-12-01
13

AWS Elastic Beanstalk Developer Guide
Application
AWS Elastic Beanstalk Concepts
AWS Elastic Beanstalk lets you manage all of the resources that run your application as environments.
Let's take a closer look at what these terms mean.
Application
An Elastic Beanstalk application is a logical collection of Elastic Beanstalk components, including
environments, versions, and environment configurations. In Elastic Beanstalk an application is
conceptually similar to a folder.
Application Version
In Elastic Beanstalk, an application version refers to a specific, labeled iteration of deployable code for
a web application. An application version points to an Amazon Simple Storage Service (Amazon S3)
object that contains the deployable code such as a Java WAR file. An application version is part of an
application. Applications can have many versions and each application version is unique. In a running
environment, you can deploy any application version you already uploaded to the application or you
can upload and immediately deploy a new application version. You might upload multiple application
versions to test differences between one version of your web application and another.
Environment
An environment is a version that is deployed onto AWS resources. Each environment runs only a single
application version at a time, however you can run the same version or different versions in many
environments at the same time. When you create an environment, Elastic Beanstalk provisions the
resources needed to run the application version you specified.
Environment Tier
When you launch an Elastic Beanstalk environment, you first choose an environment tier. The
environment tier that you choose determines whether Elastic Beanstalk provisions resources to
support an application that handles HTTP requests or an application that pulls tasks from a queue. An
application that serves HTTP requests runs in a web server environment (p. 15). An environment that
pulls tasks from an Amazon Simple Queue Service queue runs in a worker environment (p. 16).
Environment Configuration
An environment configuration identifies a collection of parameters and settings that define how an
environment and its associated resources behave. When you update an environment’s configuration
API Version 2010-12-01
14
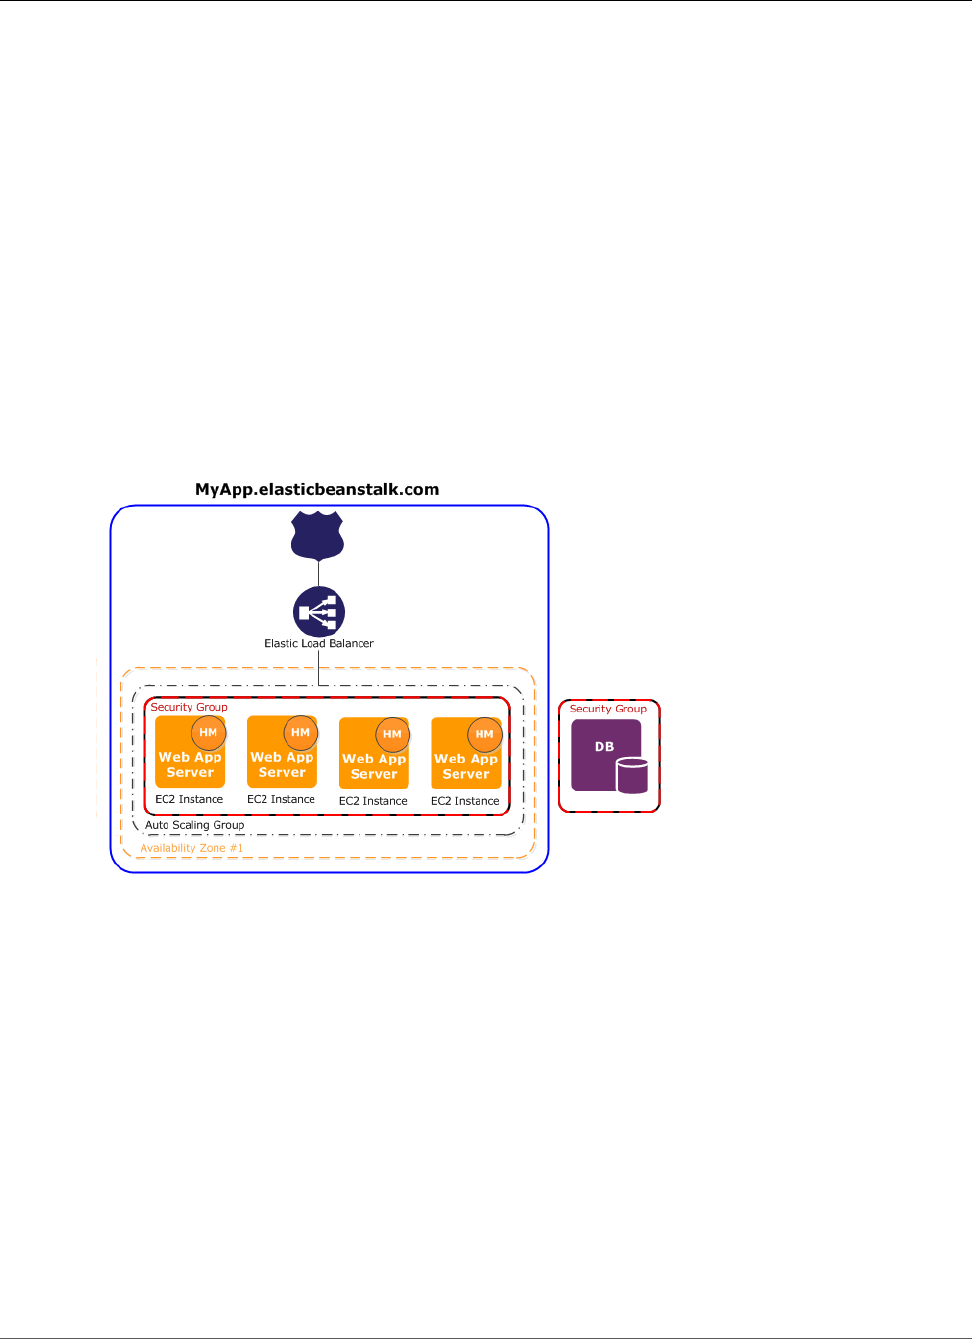
AWS Elastic Beanstalk Developer Guide
Configuration Template
settings, Elastic Beanstalk automatically applies the changes to existing resources or deletes and deploys
new resources (depending on the type of change).
Configuration Template
A configuration template is a starting point for creating unique environment configurations.
Configuration templates can be created or modified by using the Elastic Beanstalk command line utilities
or API.
Web Server Environments
This following diagram illustrates an example Elastic Beanstalk architecture for a web server
environment tier and shows how the components in that type of environment tier work together. The
remainder of this section discusses all the components in more detail.
The environment is the heart of the application. In the diagram, the environment is delineated by the
solid blue line. When you create an environment, Elastic Beanstalk provisions the resources required to
run your application. AWS resources created for an environment include one elastic load balancer (ELB in
the diagram), an Auto Scaling group, and one or more Amazon EC2 instances.
Every environment has a CNAME (URL) that points to a load balancer. The environment has a URL
such as myapp.us-west-2.elasticbeanstalk.com. This URL is aliased in Amazon Route 53 to an
Elastic Load Balancing URL—something like abcdef-123456.us-west-2.elb.amazonaws.com—
by using a CNAME record. Amazon Route 53 is a highly available and scalable Domain Name System
(DNS) web service. It provides secure and reliable routing to your infrastructure. Your domain name that
you registered with your DNS provider will forward requests to the CNAME. The load balancer sits in
front of the Amazon EC2 instances, which are part of an Auto Scaling group. (The Auto Scaling group is
delineated in the diagram by a broken black line.) Auto Scaling automatically starts additional Amazon
EC2 instances to accommodate increasing load on your application. If the load on your application
decreases, Auto Scaling stops instances, but always leaves at least one instance running.
The software stack running on the Amazon EC2 instances is dependent on the container type. A container
type defines the infrastructure topology and software stack to be used for that environment. For
API Version 2010-12-01
15

AWS Elastic Beanstalk Developer Guide
Worker Environments
example, an Elastic Beanstalk environment with an Apache Tomcat container uses the Amazon Linux
operating system, Apache web server, and Apache Tomcat software. For a list of supported container
types, see Elastic Beanstalk Supported Platforms (p. 26). Each Amazon EC2 server instance that runs
your application uses one of these container types. In addition, a software component called the host
manager (HM) runs on each Amazon EC2 server instance. (In the diagram, the HM is an orange circle in
each EC2 instance.) The host manager is responsible for:
• Deploying the application
• Aggregating events and metrics for retrieval via the console, the API, or the command line
• Generating instance-level events
• Monitoring the application log files for critical errors
• Monitoring the application server
• Patching instance components
• Rotating your application's log files and publishing them to Amazon S3
The host manager reports metrics, errors and events, and server instance status, which are available via
the AWS Management Console, APIs, and CLIs.
The Amazon EC2 instances shown in the diagram are part of one security group. A security group defines
the firewall rules for your instances. By default, Elastic Beanstalk defines a security group, which allows
everyone to connect using port 80 (HTTP). You can define more than one security group. For instance,
you can define a security group for your database server. For more information about Amazon EC2
security groups and how to configure them for your Elastic Beanstalk application, see the Security
Groups (p. 168).
Worker Environments
AWS resources created for a worker environment tier include an Auto Scaling group, one or more
Amazon EC2 instances, and an IAM role. For the worker environment tier, Elastic Beanstalk also creates
and provisions an Amazon SQS queue if you don’t already have one. When you launch a worker
environment tier, Elastic Beanstalk installs the necessary support files for your programming language
of choice and a daemon on each EC2 instance in the Auto Scaling group. The daemon is responsible for
pulling requests from an Amazon SQS queue and then sending the data to the web application running
in the worker environment tier that will process those messages. If you have multiple instances in your
worker environment tier, each instance has its own daemon, but they all read from the same Amazon
SQS queue.
The following diagram shows the different components and their interactions across environments and
AWS services.
API Version 2010-12-01
16
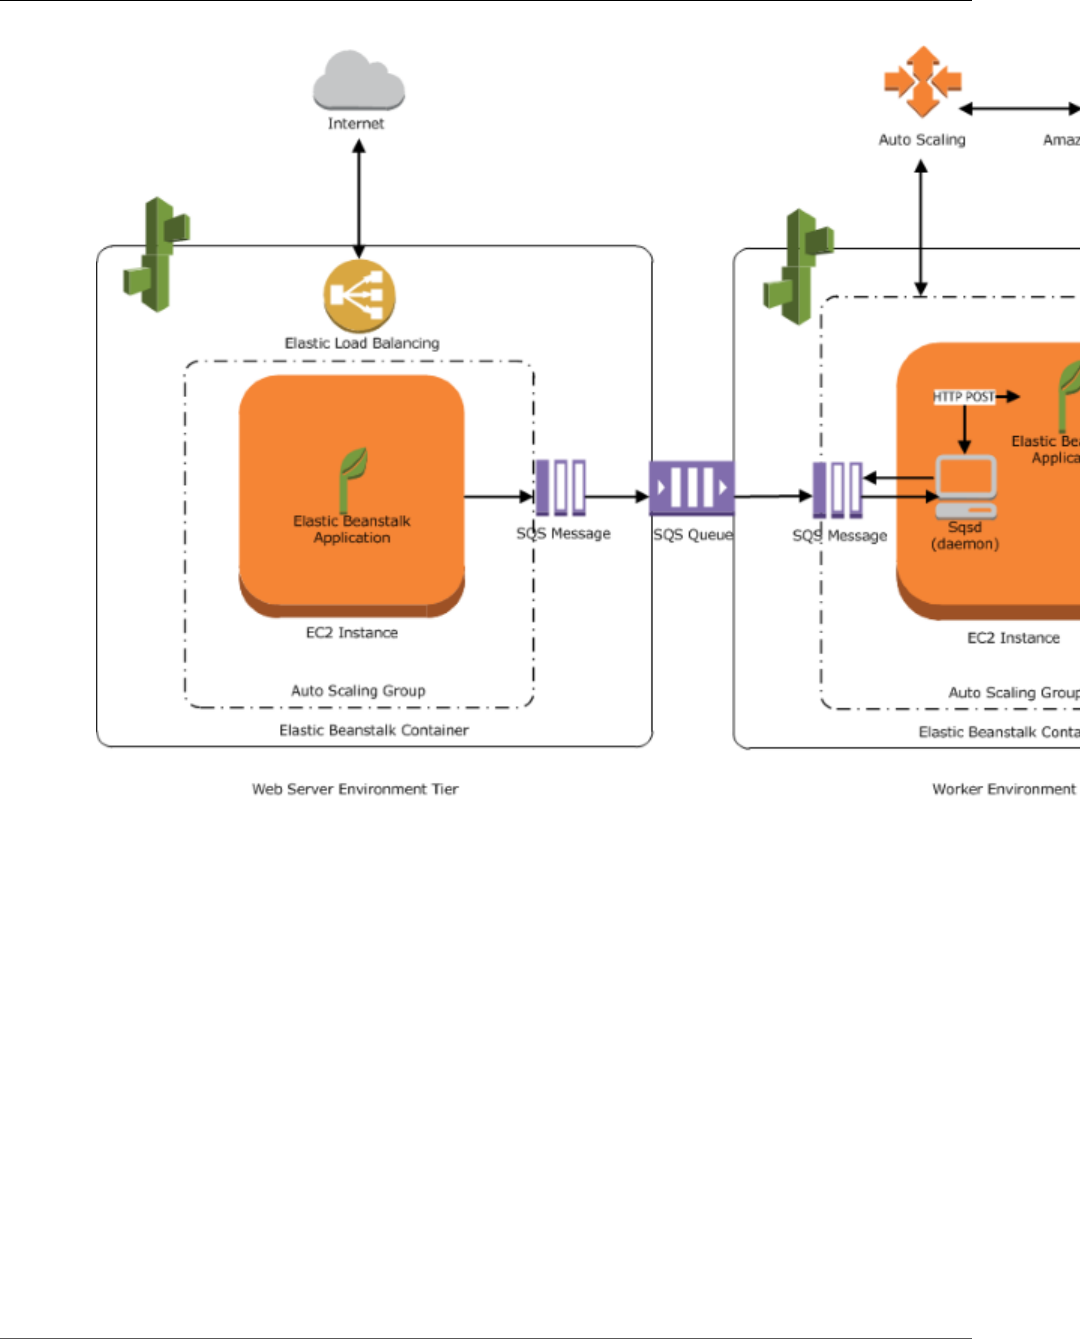
AWS Elastic Beanstalk Developer Guide
Design Considerations
Amazon CloudWatch is used for alarms and health monitoring. For more information, go to Basic Health
Reporting (p. 333).
For details about how the worker environment tier works, see Worker Environments (p. 156).
Design Considerations
Because applications deployed using Elastic Beanstalk run on Amazon cloud resources, you should keep
several things in mind when designing your application: scalability, security, persistent storage, fault
tolerance, content delivery, software updates and patching, and connectivity. For a comprehensive list
of technical AWS whitepapers, covering topics such as architecture, security and economics, go to AWS
Cloud Computing Whitepapers.
Scalability
When you're operating in a physical hardware environment, as opposed to a cloud environment, you
can approach scalability two ways—you can scale up (vertical scaling) or scale out (horizontal scaling).
The scale-up approach requires an investment in powerful hardware as the demands on the business
increase, whereas the scale-out approach requires following a distributed model of investment, so
hardware and application acquisitions are more targeted, data sets are federated, and design is service-
API Version 2010-12-01
17

AWS Elastic Beanstalk Developer Guide
Security
oriented. The scale-up approach could become very expensive, and there's still the risk that demand
could outgrow capacity. Although the scale-out approach is usually more effective, it requires predicting
the demand at regular intervals and deploying infrastructure in chunks to meet demand. This approach
often leads to unused capacity and requires careful monitoring.
By moving to the cloud you can bring the use of your infrastructure into close alignment with demand
by leveraging the elasticity of the cloud. Elasticity is the streamlining of resource acquisition and release,
so that your infrastructure can rapidly scale in and scale out as demand fluctuates. To implement
elasticity, configure your Auto Scaling settings to scale up or down based on metrics from the resources
in your environment (utilization of the servers or network I/O, for instance). You can use Auto Scaling to
automatically add compute capacity when usage rises and remove it when usage drops. Publish system
metrics (CPU, memory, disk I/O, network I/O) to Amazon CloudWatch and configure alarms to trigger
Auto Scaling actions or send notifications. For more instructions on configuring Auto Scaling, see Your
AWS Elastic Beanstalk Environment's Auto Scaling Group (p. 165).
Elastic Beanstalk applications should also be as stateless as possible, using loosely coupled, fault-
tolerant components that can be scaled out as needed. For more information about designing scalable
application architectures for AWS, read the Architecting for the Cloud: Best Practices whitepaper.
Security
Security on AWS is a shared responsibility. AWS protects the physical resources in your environment and
ensure that the cloud is a safe place for you to run applications. You are responsible for the security of
data coming in and out of your Elastic Beanstalk environment and the security of your application.
Configure SSL to protect information from your clients. You will need a certificate from an external
certification authority such as VeriSign or Entrust. The public key included in the certificate authenticates
your server to the browser and serves as the basis for creating the shared session key used to encrypt the
data in both directions. For instructions on creating, uploading, and assigning an SSL certificate to your
environment, see Configuring HTTPS for your Elastic Beanstalk Environment (p. 299).
When you configure an SSL certificate for your environment, data is encrypted between the client and
your environment's Elastic Load Balancing load balancer. By default, encryption is terminated at the load
balancer and traffic between the load balancer and Amazon EC2 instances is unencrypted.
Persistent Storage
Elastic Beanstalk applications run on Amazon EC2 instances that have no persistent local storage. When
the Amazon EC2 instances terminate, the local file system is not saved, and new Amazon EC2 instances
start with a default file system. You should design your application to store data in a persistent data
source. Amazon Web Services offers a number of persistent storage services that you can leverage for
your application. The following table lists them.
Storage service Service documentation Elastic Beanstalk integration
Amazon S3 Amazon Simple Storage Service
Documentation
Using Elastic Beanstalk with Amazon
Simple Storage Service (p. 451)
Amazon Elastic File System Amazon Elastic File System
Documentation
Using Elastic Beanstalk with Amazon
Elastic File System (p. 387)
Amazon Elastic Block Store Amazon Elastic Block Store
Feature Guide: Elastic Block Store
Amazon DynamoDB Amazon DynamoDB
Documentation
Using Elastic Beanstalk with
DynamoDB (p. 386)
API Version 2010-12-01
18

AWS Elastic Beanstalk Developer Guide
Fault Tolerance
Storage service Service documentation Elastic Beanstalk integration
Amazon Relational
Database Service (RDS)
Amazon Relational Database
Service Documentation
Using Elastic Beanstalk with
Amazon Relational Database
Service (p. 439)
Fault Tolerance
As a rule of thumb, you should be a pessimist when designing architecture for the cloud. Always design,
implement, and deploy for automated recovery from failure. Use multiple Availability Zones for your
Amazon EC2 instances and for Amazon RDS. Availability Zones are conceptually like logical data centers.
Use Amazon CloudWatch to get more visibility into the health of your Elastic Beanstalk application and
take appropriate actions in case of hardware failure or performance degradation. Configure your Auto
Scaling settings to maintain your fleet of Amazon EC2 instances at a fixed size so that unhealthy Amazon
EC2 instances are replaced by new ones. If you are using Amazon RDS, then set the retention period for
backups, so that Amazon RDS can perform automated backups.
Content Delivery
When users connect to your website, their requests may be routed through a number of individual
networks. As a result users may experience poor performance due to high latency. Amazon CloudFront
can help ameliorate latency issues by distributing your web content (such as images, video, and so on)
across a network of edge locations around the world. End users are routed to the nearest edge location,
so content is delivered with the best possible performance. CloudFront works seamlessly with Amazon
S3, which durably stores the original, definitive versions of your files. For more information about
Amazon CloudFront, see http://aws.amazon.com/cloudfront.
Software Updates and Patching
Elastic Beanstalk periodically updates its platform configurations with new software and patches. Elastic
Beanstalk does not upgrade running environments to new configuration versions automatically, but
you can initiate a platform upgrade (p. 143) to update your running environment in place. Platform
upgrades use rolling updates (p. 134) to keep your application available by applying changes in
batches.
Connectivity
Elastic Beanstalk needs to be able to connect to the instances in your environment to complete
deployments. When you deploy an Elastic Beanstalk application inside an Amazon VPC, the configuration
required to enable connectivity depends on the type of Amazon VPC environment you create:
• For single-instance environments, no additional configuration is required because Elastic Beanstalk
assigns each Amazon EC2 instance a public Elastic IP address that enables the instance to
communicate directly with the Internet.
• For load-balancing, autoscaling environments in an Amazon VPC with both public and private subnets,
you must do the following:
• Create a load balancer in the public subnet to route inbound traffic from the Internet to the Amazon
EC2 instances.
• Create a network address translation (NAT) device to route outbound traffic from the Amazon EC2
instances to the Internet.
• Create inbound and outbound routing rules for the Amazon EC2 instances inside the private subnet.
• If using a NAT instance, configure the security groups for the NAT instance and Amazon EC2
instances to enable Internet communication.
API Version 2010-12-01
19

AWS Elastic Beanstalk Developer Guide
Connectivity
• For a load-balancing, autoscaling environment in an Amazon VPC that has one public subnet, no
additional configuration is required because the Amazon EC2 instances are configured with a public IP
address that enables the instances to communicate with the Internet.
For more information about using Elastic Beanstalk with Amazon VPC, see Using Elastic Beanstalk with
Amazon Virtual Private Cloud (p. 451).
API Version 2010-12-01
20

AWS Elastic Beanstalk Developer Guide
Service Role
Service Roles, Instance Profiles, and
User Policies
When you create an environment, AWS Elastic Beanstalk prompts you to provide two AWS Identity
and Access Management (IAM) roles: a service role and an instance profile. The service role (p. 21) is
assumed by Elastic Beanstalk to use other AWS services on your behalf. The instance profile (p. 22) is
applied to the instances in your environment and allows them to upload logs to Amazon S3 and perform
other tasks that vary depending on the environment type and platform.
The best way to get a properly configured service role and instance profile is to create an environment
running a sample application (p. 76) in the Elastic Beanstalk console or by using the Elastic Beanstalk
Command Line Interface (EB CLI). When you create an environment, the clients create the required roles
and assign them managed policies (p. 403) that include all of the necessary permissions.
In addition to the two roles that you assign to your environment, you can also create user
policies (p. 24) and apply them to IAM users and groups in your account to allow users to create and
manage Elastic Beanstalk applications and environments. Elastic Beanstalk provides managed policies for
full access and read-only access.
You can create your own instance profiles and user policies for advanced scenarios. If your instances need
to access services that are not included in the default policies, you can add additional policies to the
default or create a new one. You can also create more restrictive user policies if the managed policy is
too permissive. See the AWS Identity and Access Management User Guide for in-depth coverage of AWS
permissions.
Topics
•Elastic Beanstalk Service Role (p. 21)
•Elastic Beanstalk Instance Profile (p. 22)
•Elastic Beanstalk User Policy (p. 24)
Elastic Beanstalk Service Role
A service role is the IAM role that Elastic Beanstalk assumes when calling other services on your behalf.
For example, Elastic Beanstalk uses the service role that you specify when creating an Elastic Beanstalk
environment when it calls Amazon Elastic Compute Cloud (Amazon EC2), Elastic Load Balancing, and
Auto Scaling APIs to gather information about the health of its AWS resources for enhanced health
monitoring (p. 336).
The AWSElasticBeanstalkEnhancedHealth managed policy contains all of the permissions that
Elastic Beanstalk needs to monitor environment health:
{
"Version": "2012-10-17",
"Statement": [
{
"Effect": "Allow",
API Version 2010-12-01
21

AWS Elastic Beanstalk Developer Guide
Instance Profile
"Action": [
"elasticloadbalancing:DescribeInstanceHealth",
"elasticloadbalancing:DescribeLoadBalancers",
"elasticloadbalancing:DescribeTargetHealth",
"ec2:DescribeInstances",
"ec2:DescribeInstanceStatus",
"ec2:GetConsoleOutput",
"ec2:AssociateAddress",
"ec2:DescribeAddresses",
"ec2:DescribeSecurityGroups",
"sqs:GetQueueAttributes",
"sqs:GetQueueUrl",
"autoscaling:DescribeAutoScalingGroups",
"autoscaling:DescribeAutoScalingInstances",
"autoscaling:DescribeScalingActivities",
"autoscaling:DescribeNotificationConfigurations"
],
"Resource": [
"*"
]
}
]
}
This policy also includes Amazon SQS actions to allow Elastic Beanstalk to monitor queue activity for
worker environments.
When you create an environment using the Elastic Beanstalk console, Elastic Beanstalk prompts you
to create a service role named aws-elasticbeanstalk-service-role with the default set of
permissions and a trust policy that allows Elastic Beanstalk to assume the service role. If you enable
managed platform updates (p. 145), Elastic Beanstalk attaches another policy with permissions that
enable that feature.
Similarly, when you create an envitonment using the the section called “eb create” (p. 521)
command of the Elastic Beanstalk Command Line Interface (EB CLI) and don't specify a service
role through the --service-role option, Elastic Beanstalk creates the default service role aws-
elasticbeanstalk-service-role. If the default service role already exists, Elastic Beanstalk uses it
for the new environment.
When you create an environment by using the CreateEnvironment action of the Elastic Beanstalk API,
and don't specify a service role, Elastic Beanstalk creates a service-linked role. This is a unique type of
service role that is predefined by Elastic Beanstalk to include all the permissions that the service requires
to call other AWS services on your behalf. The service-linked role is associated with your account. Elastic
Beanstalk creates it once, then reuses it when creating additional environments. You can also use IAM
to create your account's service-linked role in advance. When your account has a service-linked role, you
can use it to create an environment by using the Elastic Beanstalk API, the Elastic Beanstalk console, or
the EB CLI. For details about using service-linked roles with Elastic Beanstalk environments, see Using
Service-Linked Roles for Elastic Beanstalk (p. 397).
For more information about service roles, see Managing Elastic Beanstalk Service Roles (p. 393).
Elastic Beanstalk Instance Profile
An instance profile is an IAM role that is applied to instances launched in your Elastic Beanstalk
environment. When creating an Elastic Beanstalk environment, you specify the instance profile that is
used when your instances:
• Write logs to Amazon Simple Storage Service
API Version 2010-12-01
22

AWS Elastic Beanstalk Developer Guide
Instance Profile
• In AWS X-Ray integrated environments (p. 192), upload debugging data to X-Ray
• In multicontainer Docker environments, coordinate container deployments with Amazon Elastic
Container Service
• In worker environments, read from an Amazon Simple Queue Service (Amazon SQS) queue
• In worker environments, perform leader election with Amazon DynamoDB
• In worker environments, publish instance health metrics to Amazon CloudWatch
The AWSElasticBeanstalkWebTier managed policy contains statements that allow instances in your
environment to upload logs to Amazon S3 and send debugging information to X-Ray:
{
"Version": "2012-10-17",
"Statement": [
{
"Sid": "BucketAccess",
"Action": [
"s3:Get*",
"s3:List*",
"s3:PutObject"
],
"Effect": "Allow",
"Resource": [
"arn:aws:s3:::elasticbeanstalk-*",
"arn:aws:s3:::elasticbeanstalk-*/*"
]
},
{
"Sid": "XRayAccess",
"Action": [
"xray:PutTraceSegments",
"xray:PutTelemetryRecords"
],
"Effect": "Allow",
"Resource": "*"
},
{
"Sid": "CloudWatchLogsAccess",
"Action": [
"logs:PutLogEvents",
"logs:CreateLogStream",
"logs:DescribeLogStreams",
"logs:DescribeLogGroups"
],
"Effect": "Allow",
"Resource": [
"arn:aws:logs:*:*:log-group:/aws/elasticbeanstalk*"
]
}
]
}
Elastic Beanstalk also provides managed policies named AWSElasticBeanstalkWorkerTier and
AWSElasticBeanstalkMulticontainerDocker for the other use cases. Elastic Beanstalk attaches all
of these policies to the default instance profile, aws-elasticbeanstalk-ec2-role, when you create
an environment with the console or EB CLI.
If your web application requires access to any other AWS services, add statements or managed policies to
the instance profile that allow access to those services.
For more information about instance profiles, see Managing Elastic Beanstalk Instance Profiles (p. 388).
API Version 2010-12-01
23

AWS Elastic Beanstalk Developer Guide
User Policy
Elastic Beanstalk User Policy
Create IAM users for each person who uses Elastic Beanstalk to avoid using your root account or sharing
credentials. For increased security, only grant these users permission to access services and features that
they need.
Elastic Beanstalk requires permissions not only for its own API actions, but for several other AWS
services as well. Elastic Beanstalk uses user permissions to launch all of the resources in an environment,
including EC2 instances, an Elastic Load Balancing load balancer, and an Auto Scaling group. Elastic
Beanstalk also uses user permissions to save logs and templates to Amazon S3, send notifications to
Amazon SNS, assign instance profiles, and publish metrics to CloudWatch. Elastic Beanstalk requires AWS
CloudFormation permissions to orchestrate resource deployments and updates. It also requires Amazon
RDS permissions to create databases when needed, and Amazon SQS permissions to create queues for
worker environments.
The following policy allows access to the actions used to create and manage Elastic Beanstalk
environments. This policy is available in the IAM console as a managed policy named
AWSElasticBeanstalkFullAccess. You can apply the managed policy to an IAM user or group to
grant permission to use Elastic Beanstalk, or create your own policy that excludes permissions that are
not needed by your users.
{
"Version": "2012-10-17",
"Statement": [
{
"Effect": "Allow",
"Action": [
"elasticbeanstalk:*",
"ec2:*",
"ecs:*",
"ecr:*",
"elasticloadbalancing:*",
"autoscaling:*",
"cloudwatch:*",
"s3:*",
"sns:*",
"cloudformation:*",
"dynamodb:*",
"rds:*",
"sqs:*",
"logs:*",
"iam:GetPolicyVersion",
"iam:GetRole",
"iam:PassRole",
"iam:ListRolePolicies",
"iam:ListAttachedRolePolicies",
"iam:ListInstanceProfiles",
"iam:ListRoles",
"iam:ListServerCertificates",
"acm:DescribeCertificate",
"acm:ListCertificates",
"codebuild:CreateProject",
"codebuild:DeleteProject",
"codebuild:BatchGetBuilds",
"codebuild:StartBuild"
],
"Resource": "*"
},
{
"Effect": "Allow",
"Action": [
"iam:AddRoleToInstanceProfile",
API Version 2010-12-01
24

AWS Elastic Beanstalk Developer Guide
User Policy
"iam:CreateInstanceProfile",
"iam:CreateRole"
],
"Resource": [
"arn:aws:iam::*:role/aws-elasticbeanstalk*",
"arn:aws:iam::*:instance-profile/aws-elasticbeanstalk*"
]
},
{
"Effect": "Allow",
"Action": [
"iam:AttachRolePolicy"
],
"Resource": "*",
"Condition": {
"StringLike": {
"iam:PolicyArn": [
"arn:aws:iam::aws:policy/AWSElasticBeanstalk*",
"arn:aws:iam::aws:policy/service-role/AWSElasticBeanstalk*"
]
}
}
}
]
}
Elastic Beanstalk also provides a read-only managed policy named
AWSElasticBeanstalkReadOnlyAccess. This policy allows a user to view, but not modify or create,
Elastic Beanstalk environments.
For more information about user policies, see Controlling Access to Elastic Beanstalk (p. 403).
API Version 2010-12-01
25

AWS Elastic Beanstalk Developer Guide
Supported Platforms
Elastic Beanstalk Platforms
Topics
•Elastic Beanstalk Supported Platforms (p. 26)
•Custom Platforms (p. 36)
Elastic Beanstalk provides platforms for programming languages (Java, PHP, Python, Ruby, Go), web
containers (Tomcat, Passenger, Puma), and Docker containers, with multiple configurations of each.
Elastic Beanstalk also supports custom platforms that can be based on an AMI that you create and can
include further customizations.
Elastic Beanstalk Supported Platforms
AWS Elastic Beanstalk provides platforms for programming languages (Java, PHP, Python, Ruby, Go), web
containers (Tomcat, Passenger, Puma) and Docker containers, with multiple configurations of each.
Elastic Beanstalk provisions the resources needed to run your application, including one or more Amazon
EC2 instances. The software stack running on the Amazon EC2 instances depends on the configuration.
In a configuration name, the version number refers to the version of the platform configuration.
You can use the solution stack name listed under the configuration name to launch an environment with
the EB CLI (p. 480), Elastic Beanstalk API, or AWS CLI. You can also retrieve solution stack names from
the service with the ListAvailableSolutionStacks API (aws elasticbeanstalk list-available-solution-stacks in
the AWS CLI). This operation returns all of the solution stacks that you can use to create an environment.
Note
You can use solution stacks for the latest platform configurations (the current versions listed on
this page) to create an environment.
In addition, a platform configuration that you used to launch or update an environment remains
available (to the account in use, in the region used) even after it's no longer current, as long as
the environment is active, and up to 30 days after its termination.
All current Linux-based platform configurations run on Amazon Linux 2017.09 (64-bit). You can
customize and configure the software that your application depends on in your Linux platform. Learn
more at Customizing Software on Linux Servers (p. 258). Detailed release notes are available for recent
releases at aws.amazon.com/releasenotes.
Platforms
•Packer Builder (p. 27)
•Single Container Docker (p. 27)
•Multicontainer Docker (p. 27)
•Preconfigured Docker (p. 28)
•Go (p. 29)
•Java SE (p. 29)
•Java with Tomcat (p. 30)
API Version 2010-12-01
26

AWS Elastic Beanstalk Developer Guide
Packer Builder
•.NET on Windows Server with IIS (p. 30)
•Node.js (p. 32)
•PHP (p. 33)
•Python (p. 34)
•Ruby (p. 34)
Packer Builder
Packer is an open-source tool for creating machine images for many platforms, including AMIs for use
with Amazon EC2.
Configuration and Solution
Stack Name
AMI Packer Version
Elastic Beanstalk Packer Builder
version 2.4.1
64bit Amazon Linux 2017.09
v2.4.1 running Packer 1.0.3
2017.09.1 1.0.3
For information on previous configurations, see Packer Platform History (p. 909).
Single Container Docker
Docker is a container platform that allows you to define your own software stack and store it in an image
that can be downloaded from a remote repository. Use the Single Container Docker platform if you
only need to run a single Docker container on each instance in your environment. The single container
configuration includes an nginx proxy server.
See Deploying Elastic Beanstalk Applications from Docker Containers (p. 632) for more information
about the Docker platform.
Configuration and Solution
Stack Name
AMI Docker Version Proxy Server
Single Container Docker 17.06
version 2.8.1
64bit Amazon Linux 2017.09
v2.8.1 running Docker 17.06.2-ce
2017.09.1 17.06.2-ce nginx 1.12.1
For information on previous configurations, see Single Container Docker Platform History (p. 912).
Multicontainer Docker
Docker is a container platform that allows you to define your own software stack and store it in an image
that can be downloaded from a remote repository. Use the Multicontainer Docker platform if you need
to run multiple containers on each instance. The Multicontainer Docker platform does not include a
proxy server.
API Version 2010-12-01
27

AWS Elastic Beanstalk Developer Guide
Preconfigured Docker
Note
Elastic Beanstalk uses Amazon Elastic Container Service (Amazon ECS) to coordinate container
deployments to multicontainer Docker environments. Some regions don't offer Amazon ECS.
Multicontainer Docker isn't supported in these regions.
For information about the AWS services offered in each region, see Region Table.
See Deploying Elastic Beanstalk Applications from Docker Containers (p. 632) for more information
about the Docker platform.
Configuration and Solution
Stack Name
AMI Docker Version ECS Agent
Multicontainer Docker 17.06
version 2.8.1
64bit Amazon Linux 2017.09
v2.8.1 running Multi-container
Docker 17.06.2-ce (Generic)
2017.09.1 17.06.2-ce 1.16.0
For information on previous configurations, see Multicontainer Docker Platform History (p. 913).
Preconfigured Docker
Preconfigured Docker platform configurations use Docker, but do not let you provide your own Docker
images. The preconfigured containers provide application frameworks that are not available on other
platforms, such as Glassfish. They also provide support for Go applications prior to the release of the
full-fledged Go platform.
Configuration and
Solution Stack Name
AMI PlatformContainer
OS
LanguageProxy
Server
Application
Server
Docker Image
Glassfish 4.1 (Docker)
version 2.8.1
64bit Debian jessie
v2.8.1 running
GlassFish 4.1 Java
8 (Preconfigured -
Docker)
2017.09.1Docker
17.06.2-
ce
Debian
Jessie
Java
8
nginx
1.12.1
Glassfish
4.1
amazon/aws-eb-
glassfish:4.1-jdk8-
onbuild-3.5.1
Glassfish 4.0 (Docker)
version 2.8.1
64bit Debian jessie
v2.8.1 running
GlassFish 4.0 Java
7 (Preconfigured -
Docker)
2017.09.1Docker
17.06.2-
ce
Debian
Jessie
Java
7
nginx
1.12.1
Glassfish
4.0
amazon/aws-eb-
glassfish:4.0-jdk7-
onbuild-3.5.1
Go 1.4 (Docker)
version 2.8.1
64bit Debian jessie
v2.8.1 running Go
1.4 (Preconfigured -
Docker)
2017.09.1Docker
17.06.2-
ce
Debian
Jessie
Go
1.4.2
nginx
1.12.1
none golang:1.4.2-onbuild
API Version 2010-12-01
28

AWS Elastic Beanstalk Developer Guide
Go
Configuration and
Solution Stack Name
AMI PlatformContainer
OS
LanguageProxy
Server
Application
Server
Docker Image
Go 1.3 (Docker)
version 2.8.1
64bit Debian jessie
v2.8.1 running Go
1.3 (Preconfigured -
Docker)
2017.09.1Docker
17.06.2-
ce
Debian
Jessie
Go
1.3.3
nginx
1.12.1
none golang:1.3.3-onbuild
Python 3.4 with
uWSGI 2 (Docker)
version 2.8.1
64bit Debian jessie
v2.8.1 running Python
3.4 (Preconfigured -
Docker)
2017.09.1Docker
17.06.2-
ce
Debian
Jessie
Python
3.4
nginx
1.12.1
uWSGI
2.0.8
amazon/aws-
eb-python:3.4.2-
onbuild-3.5.1
For information on previous configurations, see Preconfigured Docker Platform History (p. 929).
Go
Elastic Beanstalk supports the following Go configurations.
Configuration and Solution Stack
Name
AMI Language Proxy Server
Go 1.9 version 2.7.2
64bit Amazon Linux 2017.09
v2.7.2 running Go 1.9
2017.09.1 Go 1.9.1 nginx 1.12.1
For information on previous configurations, see Go Platform History (p. 962).
Java SE
Elastic Beanstalk supports the following Java SE configurations.
Configuration and Solution
Stack Name
AMI Language Tools AWS
X‑Ray
Proxy Server
Java 8 version 2.6.1
64bit Amazon Linux 2017.09
v2.6.1 running Java 8
2017.09.1Java
1.8.0_151
Ant 1.9.6, Gradle
2.7, Maven 3.3.3
2.0.0 nginx 1.12.1
Java 7 version 2.6.1
64bit Amazon Linux 2017.09
v2.6.1 running Java 7
2017.09.1Java
1.7.0_151
Ant 1.9.6, Gradle
2.7, Maven 3.3.3
2.0.0 nginx 1.12.1
For information on previous configurations, see Java SE Platform History (p. 990).
API Version 2010-12-01
29

AWS Elastic Beanstalk Developer Guide
Java with Tomcat
Java with Tomcat
Elastic Beanstalk supports the following Tomcat configurations.
Configuration and
Solution Stack Name
AMI Language AWS X‑Ray Application
Server
Proxy Server
Java 8 with Tomcat
8 version 2.7.2
64bit Amazon Linux
2017.09 v2.7.2
running Tomcat 8
Java 8
2017.09.1Java 1.8.0_151 2.0.0 Tomcat 8.0.47 Apache 2.2.34
Java 7 with Tomcat
7 version 2.7.2
64bit Amazon Linux
2017.09 v2.7.2
running Tomcat 7
Java 7
2017.09.1Java 1.7.0_151 2.0.0 Tomcat 7.0.82 Apache 2.2.34
Java 6 with Tomcat
7 version 2.7.2
64bit Amazon Linux
2017.09 v2.7.2
running Tomcat 7
Java 6
2017.09.1Java 1.6.0_41 2.0.0 Tomcat 7.0.82 Apache 2.2.34
For information on previous configurations, see Tomcat Platform History (p. 967).
.NET on Windows Server with IIS
You can get started in minutes using the AWS Toolkit for Visual Studio. The toolkit includes the AWS
libraries, project templates, code samples, and documentation. The AWS SDK for .NET supports the
development of applications using .NET Framework 2.0 or later.
Note
This platform does not support worker environments, enhanced health reporting, managed
updates, bundle logs, immutable updates, or log streaming.
To learn how to get started deploying a .NET application using the AWS Toolkit for Visual Studio,
see Creating and Deploying Elastic Beanstalk Applications in .NET Using AWS Toolkit for Visual
Studio (p. 710).
For information about the latest security updates, see Microsoft Security Bulletin Summary for 2017.
For information on previous configurations, see .NET on Windows Server with IIS Platform
History (p. 997).
Note
To use the C5 instance type family, choose Windows Server 2012 R2 or newer.
Elastic Beanstalk supports the following .NET configurations.
API Version 2010-12-01
30

AWS Elastic Beanstalk Developer Guide
.NET on Windows Server with IIS
Configuration basics
Configuration Solution Stack Name Framework Proxy
Server
Windows Server 2016 with
IIS 10.0 version 1.2.0
64bit Windows Server 2016
v1.2.0 running IIS 10.0
.NET Core 2.0, supports 2.0.x,
1.1.x, 1.0.x
.NET Framework 4.7,
supports 4.x, 2.0, 1.x
IIS 10.0
Windows Server Core 2016
with IIS 10.0 version 1.2.0
64bit Windows Server Core
2016 v1.2.0 running IIS 10.0
.NET Core 2.0, supports 2.0.x,
1.1.x, 1.0.x
.NET Framework 4.7,
supports 4.x, 2.0, 1.x
IIS 10.0
Windows Server 2012 R2
with IIS 8.5 version 1.2.0
64bit Windows Server 2012
R2 v1.2.0 running IIS 8.5
.NET Core 2.0, supports 2.0.x,
1.1.x, 1.0.x
.NET Framework 4.7,
supports 4.x, 2.0, 1.x
IIS 8.5
Windows Server 2012 R2
Server Core with IIS 8.5
version 1.2.0
64bit Windows Server Core
2012 R2 v1.2.0 running IIS
8.5
.NET Core 2.0, supports 2.0.x,
1.1.x, 1.0.x
.NET Framework 4.7,
supports 4.x, 2.0, 1.x
IIS 8.5
Windows Server 2012 with
IIS 8 version 1.2.0
64bit Windows Server 2012
v1.2.0 running IIS 8
.NET Core 2.0, supports 2.0.x,
1.1.x, 1.0.x
.NET Framework 4.7,
supports 4.x, 2.0, 1.x
IIS 8
Windows Server 2008 R2
with IIS 7.5 version 1.2.0
64bit Windows Server 2008
R2 v1.2.0 running IIS 7.5
.NET Core 2.0, supports 2.0.x,
1.1.x, 1.0.x
.NET Framework 4.7,
supports 4.x, 2.0, 1.x
IIS 7.5
Windows Server 2012 R2
with IIS 8.5
64bit Windows Server 2012
R2 running IIS 8.5
.NET Framework 4.7,
supports 4.x, 2.0, 1.x
IIS 8.5
Windows Server 2012 R2
Server Core with IIS 8.5
64bit Windows Server Core
2012 R2 running IIS 8.5
.NET Framework 4.7,
supports 4.x, 2.0, 1.x
IIS 8.5
Windows Server 2012 with
IIS 8
64bit Windows Server 2012
running IIS 8
.NET Framework 4.7,
supports 4.x, 2.0, 1.x
IIS 8
Windows Server 2008 R2
with IIS 7.5
64bit Windows Server 2008
R2 running IIS 7.5
.NET Framework 4.7,
supports 4.x, 2.0, 1.x
IIS 7.5
API Version 2010-12-01
31

AWS Elastic Beanstalk Developer Guide
Node.js
More details
Configuration AMI
version
AWS SDK
for .NET
EC2Config SSM
Agent
Web
Deploy
AWS
X‑Ray
Windows Server 2016 with
IIS 10.0 version 1.2.0
2017.11.29 3.15.244.0 SSM only 2.2.64.0 3.6 1.0.0
Windows Server Core 2016
with IIS 10.0 version 1.2.0
2017.11.29 3.15.244.0 SSM only 2.2.64.0 3.6 1.0.0
Windows Server 2012 R2
with IIS 8.5 version 1.2.0
2017.11.29 3.15.244.0 4.9.2188.0 2.2.64.0 3.6 1.0.0
Windows Server 2012 R2
Server Core with IIS 8.5
version 1.2.0
2017.11.29 3.15.244.0 4.9.2188.0 2.2.64.0 3.6 1.0.0
Windows Server 2012 with
IIS 8 version 1.2.0
2017.11.29 3.15.244.0 4.9.2188.0 2.2.64.0 3.6 1.0.0
Windows Server 2008 R2
with IIS 7.5 version 1.2.0
2017.11.29 3.15.244.0 4.9.2188.0 2.2.64.0 3.6 1.0.0
Windows Server 2012 R2
with IIS 8.5
2017.11.29 3.15.244.0 4.9.2188.0 2.2.64.0 3.6 1.0.0
Windows Server 2012 R2
Server Core with IIS 8.5
2017.11.29 3.15.244.0 4.9.2188.0 2.2.64.0 3.6 1.0.0
Windows Server 2012 with
IIS 8
2017.11.29 3.15.244.0 4.9.2188.0 2.2.64.0 3.6 1.0.0
Windows Server 2008 R2
with IIS 7.5
2017.11.29 3.15.244.0 4.9.2188.0 2.2.64.0 3.6 1.0.0
Node.js
The Node.js platform includes a few Node.js versions in a single configuration. The
following table lists them. The default version applies when the NodeVersion option in the
aws:elasticbeanstalk:container:nodejs namespace isn't set. See Node.js Platform
Options (p. 251) for details.
Each Node.js version includes a respective version of npm (the Node.js package manager). The table lists
npm versions in parentheses.
Elastic Beanstalk supports the following Node.js configurations.
Configuration and
Solution Stack Name
AMI Node.js version (npm version) Proxy Server Git AWS
X‑Ray
Node.js version 4.4.1
64bit Amazon Linux
2017.09 v4.4.1
running Node.js
2017.09.18.9.3 (5.5.1), 8.8.1 (5.4.2),
7.10.1 (4.2.0), 6.12.2 (3.10.10),
6.11.5 (3.10.10), 5.12.0 (3.8.6),
4.8.7 (2.15.11), 4.8.5 (2.15.11)
nginx 1.12.1,
Apache 2.4.27
2.13.6 2.0.0
API Version 2010-12-01
32

AWS Elastic Beanstalk Developer Guide
PHP
Configuration and
Solution Stack Name
AMI Node.js version (npm version) Proxy Server Git AWS
X‑Ray
Default platform: 6.11.5
For information on previous configurations, see Node.js Platform History (p. 1030).
Note
When support for the version of Node.js that you are using is removed from the platform
configuration, you must change or remove the version setting prior to doing a platform
upgrade (p. 143). This may occur when a security vulnerability is identified for one or more
versions of Node.js
When this occurs, attempting to upgrade to a new version of the platform that does not support
the configured NodeVersion (p. 251) will fail. To avoid needing to create a new environment,
change the NodeVersion configuration option to a version that is supported by both the old
configuration version and the new one, or remove the option setting (p. 213), and then
perform the platform upgrade.
PHP
Elastic Beanstalk supports the following PHP configurations.
Configuration and
Solution Stack Name
AMI Language Composer Proxy Server
PHP 7.1 version 2.6.1
64bit Amazon Linux
2017.09 v2.6.1 running
PHP 7.1
2017.09.1 PHP 7.1.11 1.4.2 Apache 2.4.27
PHP 7.0 version 2.6.1
64bit Amazon Linux
2017.09 v2.6.1 running
PHP 7.0
2017.09.1 PHP 7.0.25 1.4.2 Apache 2.4.27
PHP 5.6 version 2.6.1
64bit Amazon Linux
2017.09 v2.6.1 running
PHP 5.6
2017.09.1 PHP 5.6.32 1.4.2 Apache 2.4.27
PHP 5.5 version 2.6.1
64bit Amazon Linux
2017.09 v2.6.1 running
PHP 5.5
2017.09.1 PHP 5.5.38 1.4.2 Apache 2.4.27
PHP 5.4 version 2.6.1
64bit Amazon Linux
2017.09 v2.6.1 running
PHP 5.4
2017.09.1 PHP 5.4.45 1.4.2 Apache 2.4.27
For information on previous configurations, see PHP Platform History (p. 1045).
API Version 2010-12-01
33

AWS Elastic Beanstalk Developer Guide
Python
Python
Elastic Beanstalk supports the following Python configurations.
Configuration
and Solution
Stack Name
AMI Language Package
Manager
Packager meld3 AWS
X‑Ray
Proxy
Server
Python 3.6
version 2.6.1
64bit Amazon
Linux 2017.09
v2.6.1 running
Python 3.6
2017.09.1Python 3.6.2 pip 9.0.1 setuptools
28.8.0
meld3
1.0.2
2.0.0 Apache
2.4.27
with
mod_wsgi
3.5
Python 3.4
version 2.6.1
64bit Amazon
Linux 2017.09
v2.6.1 running
Python 3.4
2017.09.1Python 3.4.3 pip 9.0.1 setuptools
28.8.0
meld3
1.0.2
2.0.0 Apache
2.4.27
with
mod_wsgi
3.5
Python 2.7
version 2.6.1
64bit Amazon
Linux 2017.09
v2.6.1 running
Python 2.7
2017.09.1Python 2.7.12 pip 9.0.1 setuptools
28.8.0
meld3
1.0.2
2.0.0 Apache
2.4.27
with
mod_wsgi
3.5
Python 2.6
version 2.6.1
64bit Amazon
Linux 2017.09
v2.6.1 running
Python 2.6
2017.09.1Python 2.6.9 pip 9.0.1 setuptools
28.8.0
meld3
1.0.2
2.0.0 Apache
2.4.27
with
mod_wsgi
3.5
For information on previous configurations, see Python Platform History (p. 1067).
Ruby
Elastic Beanstalk supports the following Ruby configurations.
Configuration and
Solution Stack
Name
AMI Language Package
Manager
Application Server Proxy
Server
Ruby 2.4 with
Puma version 2.6.2
64bit Amazon Linux
2017.09 v2.6.2
2017.09.1Ruby
2.4.3-p205
RubyGems
2.7.3
Puma 2.16.0 nginx
1.12.1
API Version 2010-12-01
34

AWS Elastic Beanstalk Developer Guide
Ruby
Configuration and
Solution Stack
Name
AMI Language Package
Manager
Application Server Proxy
Server
running Ruby 2.4
(Puma)
Ruby 2.4 with
Passenger version
2.6.2
64bit Amazon
Linux 2017.09
v2.6.2 running
Ruby 2.4 (Passenger
Standalone)
2017.09.1Ruby
2.4.3-p205
RubyGems
2.7.3
Passenger 4.0.60 nginx
1.12.1
Ruby 2.3 with
Puma version 2.6.2
64bit Amazon Linux
2017.09 v2.6.2
running Ruby 2.3
(Puma)
2017.09.1Ruby
2.3.6-p384
RubyGems
2.7.3
Puma 2.16.0 nginx
1.12.1
Ruby 2.3 with
Passenger version
2.6.2
64bit Amazon
Linux 2017.09
v2.6.2 running
Ruby 2.3 (Passenger
Standalone)
2017.09.1Ruby
2.3.6-p384
RubyGems
2.7.3
Passenger 4.0.60 nginx
1.12.1
Ruby 2.2 with
Puma version 2.6.2
64bit Amazon Linux
2017.09 v2.6.2
running Ruby 2.2
(Puma)
2017.09.1Ruby
2.2.9-p480
RubyGems
2.7.3
Puma 2.16.0 nginx
1.12.1
Ruby 2.2 with
Passenger version
2.6.2
64bit Amazon
Linux 2017.09
v2.6.2 running
Ruby 2.2 (Passenger
Standalone)
2017.09.1Ruby
2.2.9-p480
RubyGems
2.7.3
Passenger 4.0.60 nginx
1.12.1
API Version 2010-12-01
35

AWS Elastic Beanstalk Developer Guide
Custom Platforms
Configuration and
Solution Stack
Name
AMI Language Package
Manager
Application Server Proxy
Server
Ruby 2.1 with
Puma version 2.6.2
64bit Amazon Linux
2017.09 v2.6.2
running Ruby 2.1
(Puma)
2017.09.1Ruby
2.1.10-
p492
RubyGems
2.6.13
Puma 2.16.0 nginx
1.12.1
Ruby 2.1 with
Passenger version
2.6.2
64bit Amazon
Linux 2017.09
v2.6.2 running
Ruby 2.1 (Passenger
Standalone)
2017.09.1Ruby
2.1.10-
p492
RubyGems
2.6.13
Passenger 4.0.60 nginx
1.12.1
Ruby 2.0 with
Puma version 2.6.2
64bit Amazon Linux
2017.09 v2.6.2
running Ruby 2.0
(Puma)
2017.09.1Ruby
2.0.0-p648
RubyGems
2.6.13
Puma 2.16.0 nginx
1.12.1
Ruby 2.0 with
Passenger version
2.6.2
64bit Amazon
Linux 2017.09
v2.6.2 running
Ruby 2.0 (Passenger
Standalone)
2017.09.1Ruby
2.0.0-p648
RubyGems
2.6.13
Passenger 4.0.60 nginx
1.12.1
Ruby 1.9 with
Passenger version
2.6.2
64bit Amazon Linux
2017.09 v2.6.2
running Ruby 1.9.3
2017.09.1Ruby
1.9.3-p551
RubyGems
2.6.13
Passenger 4.0.60 nginx
1.12.1
For information on previous configurations, see Ruby Platform History (p. 1085).
Custom Platforms
Elastic Beanstalk supports custom platforms. A custom platform is a more advanced customization than
a Custom Image (p. 297) in several ways. A custom platform lets you develop an entire new platform
from scratch, customizing the operating system, additional software, and scripts that Elastic Beanstalk
runs on platform instances. This flexibility allows you to build a platform for an application that uses a
API Version 2010-12-01
36

AWS Elastic Beanstalk Developer Guide
Creating a Custom Platform
language or other infrastructure software, for which Elastic Beanstalk doesn't provide a platform out
of the box. Compare that to custom images, where you modify an AMI for use with an existing Elastic
Beanstalk platform, and Elastic Beanstalk still provides the platform scripts and controls the platform's
software stack. In addition, with custom platforms you use an automated, scripted way to create and
maintain your customization, whereas with custom images you make the changes manually over a
running instance.
To create a custom platform, you build an Amazon Machine Image (AMI) from one of the supported
operating systems—Ubuntu, RHEL, or Amazon Linux (see the flavor entry in Platform.yaml File
Format (p. 43) for the exact version numbers) and add further customizations. You create your own
Elastic Beanstalk platform using Packer, which is an open-source tool for creating machine images for
many platforms, including AMIs for use with Amazon EC2. An Elastic Beanstalk platform comprises an
AMI configured to run a set of software that supports an application, and metadata that can include
custom configuration options and default configuration option settings.
Elastic Beanstalk manages Packer as a separate built-in platform, and you don't need to worry about
Packer configuration and versions.
You create a platform by providing Elastic Beanstalk with a Packer template, and the scripts and files
that the template invokes to build an AMI. These components are packaged with a platform definition
file (p. 37), which specifies the template and metadata, into a ZIP archive called a platform definition
archive (p. 41).
When you create a custom platform, you launch a single instance environment without an Elastic IP that
runs Packer. Packer then launches another instance to build an image. You can reuse this environment for
multiple platforms and multiple versions of each platform.
Note
Custom platforms are region-specific. If you use Elastic Beanstalk in multiple regions, you must
create your platforms separately in each region.
In certain circumstances, instances launched by Packer are not cleaned up and have to be
manually terminated. To learn how to manually clean up these instances, see ??? (p. 43).
Users in your account can use your custom platforms by specifying a platform ARN (p. 407) during
environment creation. These ARNs are returned by the eb platform create command that you used
to create the custom platform.
Each time you build your custom platform, Elastic Beanstalk creates a new platform version. Users can
specify a platform by name to get only the latest version of the platform, or include a version number to
get a specific version.
For example, to deploy the latest version of the custom platform with the ARN MyCustomPlatformARN,
which could be version 3.0, your EB CLI command line would look like:
eb create -p MyCustomPlatformARN
To deploy version 2.1 your EB CLI command line would look like:
eb create -p MyCustomPlatformARN --version 2.1
Creating a Custom Platform
To create a custom platform, the root of your application must include a platform definition file,
platform.yaml, which defines the type of builder used to create the custom platform. The format
of this file is described in the Platform.yaml File Format (p. 43) topic. You can create your custom
platform from scratch, or use one of the sample custom platforms (p. 38) as a starting point.
API Version 2010-12-01
37

AWS Elastic Beanstalk Developer Guide
Using a Sample Custom Platform
Using a Sample Custom Platform
One alternative to rolling your own custom platform is to use one of the platform definition archive
samples to bootstrap your custom platform.
Note
Do not use an unmodified sample custom platform in production. The goal of the samples is
to illustrate some of the functionality available for a custom platform, but they have not been
hardened for production use.
NodePlatform_Ubuntu.zip
This custom platform is based on Ubuntu 16.04 and supports Node.js 4.4.4. We'll use this custom
platform for the examples in this section.
NodePlatform_RHEL.zip
This custom platform is based on RHEL 7.2 and supports Node.js 4.4.4.
NodePlatform_AmazonLinux.zip
This custom platform is based on Amazon Linux 2016.09.1 and supports Node.js 4.4.4.
TomcatPlatform_Ubuntu.zip
This custom platform is based on Ubuntu 16.04 and supports Tomcat 7/Java 8.
CustomPlatform_NodeSampleApp.zip
A Node.js sample that uses express and ejs to display a static web page
CustomPlatform_TomcatSampleApp.zip
A Tomcat sample that displays a static web page when deployed
Download the sample platform definition archive: NodePlatform_Ubuntu.zip. This file contains a
platform definition file, Packer template, scripts that Packer runs during image creation, and scripts and
configuration files that Packer copies onto the builder instance during platform creation.
Example NodePlatform_Ubuntu.zip
|-- builder Contains files used by Packer to create the custom platform
|-- custom_platform.json Packer template
|-- platform.yaml Platform definition file
|-- ReadMe.txt Briefly describes the sample
The platform definition file, platform.yaml, tells Elastic Beanstalk the name of the Packer template,
custom_platform.json.
version: "1.0"
provisioner:
type: packer
template: custom_platform.json
flavor: ubuntu1604
The Packer template tells Packer how to build the AMIs for the platform, using an Ubuntu AMI as a base
for the platform image for HVM instance types. The provisioners section tells Packer to copy all
files in the builder folder within the archive to the instance, and to run the builder.sh script on the
instance. When the scripts complete, Packer creates an image from the modified instance.
Elastic Beanstalk creates three environment variables that can be used to tag AMIs in Packer:
API Version 2010-12-01
38

AWS Elastic Beanstalk Developer Guide
Using a Sample Custom Platform
AWS_EB_PLATFORM_ARN
The ARN of the custom platform.
AWS_EB_PLATFORM_NAME
The name of the custom platform.
AWS_EB_PLATFORM_VERSION
The version of the custom platform.
The sample custom_platform.json file uses these values to define the following values that it uses in
the scripts:
•platform_name, which is set by platform.yaml
•platform_version, which is set by platform.yaml
•platform_arn, which is set by the main build script, builder.sh, which is shown at the end of the
sample custom_platform.json file.
Example custom_platform.json
{
"variables": {
"platform_name": "{{env `AWS_EB_PLATFORM_NAME`}}",
"platform_version": "{{env `AWS_EB_PLATFORM_VERSION`}}",
"platform_arn": "{{env `AWS_EB_PLATFORM_ARN`}}"
},
...,
"provisioners": [
{...},
{
"type": "shell",
"execute_command": "chmod +x {{ .Path }}; {{ .Vars }} sudo {{ .Path }}",
"scripts": [
"builder/builder.sh"
]
}
]
}
The scripts and other files that you include in your platform definition archive will vary greatly
depending on the modifications that you want to make to the instance. The sample platform includes
the following scripts:
•00-sync-apt.sh – Commented out: apt -y update. We commented out the command because
it prompts the user for input, which breaks the automated package update. This might be an Ubuntu
issue. However, running apt -y update is still recommended as best practice. For this reason, we left
the command in the sample script for reference.
•01-install-nginx.sh – Installs nginx.
•02-setup-platform.sh – Installs wget, tree, and git. Copies hooks and logging
configurations (p. 369) to the instance, and creates the following directories:
•/etc/SampleNodePlatform – Where the container configuration file is uploaded during
deployment.
•/opt/elasticbeanstalk/deploy/appsource/ – Where the 00-unzip.sh script uploads
application source code during deployment (see the Platform Scripts (p. 42) section for
information about this script).
•/var/app/staging/ – Where application source code is processed during deployment.
API Version 2010-12-01
39

AWS Elastic Beanstalk Developer Guide
Using a Sample Custom Platform
•/var/app/current/ – Where application source code runs after processing.
•/var/log/nginx/healthd/ – Where the enhanced health agent (p. 337) writes logs.
•/var/nodejs – Where the Node.js files are uploaded during deployment.
Use the EB CLI to create your first custom platform with the sample platform definition archive.
To create a custom platform
1. Install the EB CLI (p. 481).
2. Create a directory in which you will extract the sample custom platform.
~$ mkdir ~/custom-platform
3. Extract NodePlatform_Ubuntu.zip to the directory.
~$ cd ~/custom-platform
~/custom-platform$ unzip ~/NodePlatform_Ubuntu.zip
4. Run eb platform init (p. 543) and follow the prompts to initialize a platform repository.
Note
You can shorten eb platform to ebp.
Windows PowerShell uses ebp as a command alias. If you're running the EB CLI in Windows
PowerShell, use the long form of this command — eb platform.
~/custom-platform$ ebp init
This command also creates the directory .elasticbeanstalk in the current directory and adds
the configuration file config.yml to the directory. Don't change or delete this file, because Elastic
Beanstalk relies on it when creating the custom platform.
By default, ebp init uses the name of the current folder as the name of the custom platform,
which would be custom-platform in this example.
5. Run eb platform create (p. 541) to launch a Packer environment and get the ARN of the
custom platform. You'll need this value later when you create an environment from the custom
platform.
~/custom-platform$ ebp create
...
By default, Elastic Beanstalk creates the instance profile aws-elasticbeanstalk-custom-
platform-ec2-role for custom platforms. If, instead, you want to use an existing instance profile,
add the option -ip INSTANCE_PROFILE to the eb platform create (p. 541) command.
Note
Packer will fail to create a custom platform if you use the Elastic Beanstalk default instance
profile aws-elasticbeanstalk-ec2-role.
The EB CLI shows event output of the Packer environment until the build is complete. You can exit
the event view by pressing Ctrl-C.
6. You can check the logs for errors using the eb platform logs (p. 544) command.
~/custom-platform$ ebp logs
...
7. You can check on the process later with eb platform events (p. 542).
API Version 2010-12-01
40

AWS Elastic Beanstalk Developer Guide
Platform Definition Archive Contents
~/custom-platform$ ebp events
...
8. Check the status of your platform with eb platform status (p. 544).
~/custom-platform$ ebp status
...
When the operation completes, you have a platform that you can use to launch an Elastic Beanstalk
environment.
You can use the custom platform when creating a new environment from the console. Learn more at The
Create New Environment Wizard (p. 78).
To launch an environment on your custom platform
1. Create a new directory for your application.
~$ mkdir custom-platform-app
~$ cd ~/custom-platform-app
2. Initialize an application repository.
~/custom-platform-app$ eb init
...
3. Download the sample application NodeSampleApp.zip.
4. Unzip the sample application.
~/custom-platform-app$ unzip ~/NodeSampleApp.zip
5. Run eb create -p CUSTOM-PLATFORM-ARN, where CUSTOM-PLATFORM-ARN is the ARN returned
by an eb platform create command, to launch an environment running your custom platform.
~/custom-platform-app$ eb create -p CUSTOM-PLATFORM-ARN
...
Platform Definition Archive Contents
A platform definition archive is the platform equivalent of an application source bundle (p. 58). The
platform definition archive is a ZIP file that contains a platform definition file, a Packer template, and the
scripts and files used by the Packer template to create your platform.
Note
When you use the EB CLI to create a custom platform, the EB CLI creates a platform definition
archive from the files and folders in your platform repository, so you don't need to create the
archive manually.
The platform definition file is a YAML-formatted file that must be named platform.yaml and be in the
root of your platform definition archive. See Creating a Custom Platform (p. 37) for a list of required
and optional keys supported in a platform definition file.
You don't need to name the Packer template in a specific way, but the name of the file must match the
provisioner template specified in the platform definition file. See the official Packer documentation for
instructions on creating Packer templates.
API Version 2010-12-01
41

AWS Elastic Beanstalk Developer Guide
Platform Hooks
The other files in your platform definition archive are scripts and files used by the template to customize
an instance before creating an AMI.
Platform Hooks
Elastic Beanstalk uses a standardized directory structure for hooks, which are scripts that are run during
lifecycle events and in response to management operations: when instances in your environment are
launched, or when a user initiates a deployment or uses the restart application server feature.
Hooks are organized into the following folders:
•appdeploy — Scripts run during an application deployment. Elastic Beanstalk performs an
application deployment when new instances are launched and when a client initiates a new version
deployment.
•configdeploy — Scripts run when a client performs a configuration update that affects the software
configuration on-instance, for example, by setting environment properties or enabling log rotation to
Amazon S3.
•restartappserver — Scripts run when a client performs a restart app server operation.
•preinit — Scripts run during instance bootstrapping.
•postinit — Scripts run after instance bootstrapping.
The appdeploy, configdeploy, and restartappserver folders contain pre, enact, and post
subfolders. In each phase of an operation, all scripts in the pre folder are run in alphabetical order, then
the enact folder, then the post folder.
When an instance is launched, Elastic Beanstalk runs preinit, appdeploy, and postinit, in
this order. On subsequent deployments to running instances, Elastic Beanstalk runs appdeploy
hooks. configdeploy hooks are run when a user updates instance software configuration settings.
restartappserver hooks are run only when the user initiates an application server restart.
When your scripts encounter errors, they can exit with a non-zero status and write to stderr to fail
the operation. The message that you write to stderr will appear in the event that is output when
the operation fails. Elastic Beanstalk also captures this information in the log file /var/log/eb-
activity.log If you don't want to fail the operation, return 0. Messages that you write to stderr
or stdout appear in the deployment logs (p. 369), but won't appear in the event stream unless the
operation fails.
Platform Scripts
Elastic Beanstalk installs the shell script get-config that you can use to get environment variables and
other information in hooks that run on-instance in environments launched with your custom platform.
This tool is available at /opt/elasticbeanstalk/bin/get-config and can be used in the following
ways:
•get-config optionsettings – Returns a JSON object listing the configuration options set on the
environment, organized by namespace.
$ /opt/elasticbeanstalk/bin/get-config optionsettings
{"aws:elasticbeanstalk:container:php:phpini":
{"memory_limit":"256M","max_execution_time":"60","display_errors":"Off","composer_options":"","allow_url_fopen":"On","zlib_output_compression":"Off","document_root":""},"aws:elasticbeanstalk:hostmanager":
{"LogPublicationControl":"false"},"aws:elasticbeanstalk:application:environment":
{"TESTPROPERTY":"testvalue"}}
•get-config environment – Returns a JSON object containing a list of environment properties,
including both user-configured properties and those provided by Elastic Beanstalk.
API Version 2010-12-01
42

AWS Elastic Beanstalk Developer Guide
Packer Instance Cleanup
$ /opt/elasticbeanstalk/bin/get-config environment
{"TESTPROPERTY":"testvalue","RDS_PORT":"3306","RDS_HOSTNAME":"anj9aw1b0tbj6b.cijbpanmxz5u.us-
west-2.rds.amazonaws.com","RDS_USERNAME":"testusername","RDS_DB_NAME":"ebdb","RDS_PASSWORD":"testpassword1923851"}
For example, Elastic Beanstalk provides environment properties for connecting to an integrated
RDS DB instance (RDS_HOSTNAME, etc.). These properties appear in the output of get-config
environment but not in the output of get-config optionsettings, because they are not set by
the user.
You can test the previous commands by using SSH to connect to an instance in an Elastic Beanstalk
environment running a Linux-based platform.
See the following files in the sample platform definition archive (p. 38) for an example of get-
config usage:
•builder/platform-uploads/opt/elasticbeanstalk/hooks/configdeploy/enact/02-
gen-envvars.sh – Gets environment properties.
•builder/platform-uploads/opt/SampleNodePlatform/bin/createPM2ProcessFile.js –
Parses the output.
Elastic Beanstalk installs the shell script download-source-bundle that you can use to download
your application source code during the deployment of your custom platform. This tool is available at
/opt/elasticbeanstalk/bin/download-source-bundle. See the sample script 00-unzip.sh,
which is in the appdeploy/pre folder, for an example of how to use download-source-bundle
to download application source code to the /opt/elasticbeanstalk/deploy/appsource folder
during deployment.
Packer Instance Cleanup
In certain circumstances, such as killing the Packer builder process before it has finished, instances
launched by Packer are not cleaned up. These instances are not part of the Elastic Beanstalk environment
and can only be viewed and terminated using the Amazon EC2 service.
To manually clean up these instances
1. Open the https://console.aws.amazon.com/ec2/
2. Make sure you are in the same region in which you created the instance with Packer.
3. Under Resources select N Running Instances, where N indicates the number of running instances.
4. Click in the query text box.
5. Select the Name tag.
6. Type packer.
The query should look like: tag:Name: packer
7. Select any instances that match the query.
8. If the Instance State is running, select Actions, Instance State, Stop, then Actions, Instance State,
Terminate.
Platform.yaml File Format
This file has the following format:
API Version 2010-12-01
43

AWS Elastic Beanstalk Developer Guide
Platform.yaml Format
version: "version-number"
provisioner:
type: provisioner-type
template: provisioner-template
flavor: provisioner-flavor
metadata:
maintainer: metadata-maintainer
description: metadata-description
operating_system_name: metadata-operating_system_name
operating_system_version: metadata-operating_system_version
programming_language_name: metadata-programming_language_name
programming_language_version: metadata-programming_language_version
framework_name: metadata-framework_name
framework_version: metadata-framework_version
option_definitions:
- namespace: option-def-namespace
option_name: option-def-option_name
description: option-def-description
default_value: option-def-default_value
option_settings:
- namespace: "option-setting-namespace"
option_name: "option-setting-option_name"
value: "option-setting-value"
Where:
version-number
Required. The version of the YAML definition. Must be 1.0.
provisioner-type
Required. The type of builder used to create the custom platform. Must be packer.
provisioner-template
Required. The JSON file containing the settings for provisioner-type.
provisioner-flavor
Optional. The base operating system used for the AMI. One of:
amazon (default)
Amazon Linux. If not specified, the latest version of Amazon Linux when the platform is created.
ubuntu1604
Ubuntu 16.04 LTS
rhel7
RHEL 7
rhel6
RHEL 6
metadata-maintainer
Optional. Contact information for the person who owns the platform (100 characters).
metadata-description
Optional. Description of the platform (2000 characters).
API Version 2010-12-01
44

AWS Elastic Beanstalk Developer Guide
Platform.yaml Format
metadata-operating_system_name
Optional. Name of the platform's operating system (50 characters). This value is available when
filtering the output for the ListPlatformVersions API.
metadata-operating_system_version
Optional. Version of the platform's operating system (20 characters).
metadata-programming_language_name
Optional. Programming language supported by the platform (50 characters)
metadata-programming_language_version
Optional. Version of the platform's language (20 characters).
metadata-framework_name
Optional. Name of the web framework used by the platform (50 characters).
metadata-framework_version
Optional. Version of the platform's web framework (20 characters).
option-def-namespace
Optional. A namespace under aws:elasticbeanstalk:container:custom (100 characters)
option-def-option_name
Optional. The option's name (100 characters). You can define up to 50 custom configuration options
that the platform provides to users.
option-def-description
Optional. Description of the option (1024 characters).
option-def-default_value
Optional. Default value used when the user doesn't specify one.
The following example creates the option NPM_START:
options_definitions:
- namespace: "aws:elasticbeanstalk:container:custom:application"
option_name: "NPM_START"
description: "Default application startup command"
default_value: "node application.js"
option-setting-namespace
Optional. Namespace of the option.
option-setting-option_name
Optional. Name of the option. You can specify up to 50 options provided by Elastic
Beanstalk (p. 220).
option-setting-value
Optional. Value used when the user doesn't specify one.
The following example creates the option TEST.
option_settings:
- namespace: "aws:elasticbeanstalk:application:environment"
option_name: "TEST"
API Version 2010-12-01
45

AWS Elastic Beanstalk Developer Guide
Platform.yaml Format
value: "This is a test"
API Version 2010-12-01
46

AWS Elastic Beanstalk Developer Guide
Tutorials and Samples
Language and framework specific tutorials are spread throughout the AWS Elastic Beanstalk Developer
Guide. New and updated tutorials are added to this list as they are published. The most recent updates
are shown first.
These tutorials are targeted at intermediate users and may not contain instructions for basic steps such
as signing up for AWS. If this is your first time using AWS or Elastic Beanstalk, check out the Getting
Started walkthrough (p. 3) to get your first Elastic Beanstalk environment up and running.
•PHP and Drupal HA Configuration - Deploying a High-Availability Drupal Website with an External
Amazon RDS Database to Elastic Beanstalk (p. 847)
•PHP and WordPress HA Configuration - Deploying a High-Availability WordPress Website with an
External Amazon RDS Database to Elastic Beanstalk (p. 837)
•Node.js with DynamoDB HA Configuration - Deploying a Node.js Application with DynamoDB to
Elastic Beanstalk (p. 786)
•ASP.NET Core - Deploying an ASP.NET Core Application with AWS Elastic Beanstalk (p. 734)
•PHP 5.6 and MySQL HA Configuration - Deploying a High-Availability PHP Application with an
External Amazon RDS Database to Elastic Beanstalk (p. 829)
•PHP 5.6 and Laravel 5.2 - Deploying a Laravel Application to Elastic Beanstalk (p. 811)
•PHP 5.6 and CakePHP 3.2 - Deploying a CakePHP Application to Elastic Beanstalk (p. 818)
•Python and Flask 0.10 - Deploying a Flask Application to AWS Elastic Beanstalk (p. 865)
•Python and Django 1.9 - Deploying a Django Application to Elastic Beanstalk (p. 870)
•Node.js and Express 4 - Deploying an Express Application to Elastic Beanstalk (p. 782)
•Docker, PHP and nginx - Multicontainer Docker Environments with the AWS Management
Console (p. 646)
•Ruby on Rails - Deploying a Rails Application to Elastic Beanstalk (p. 886)
•Ruby and Sinatra - Deploying a Sinatra Application to AWS Elastic Beanstalk (p. 894)
•.NET Framework (IIS and ASP.NET) - Tutorial: How to Deploy a .NET Sample Application Using AWS
Elastic Beanstalk (p. 720)
You can download the sample applications used by Elastic Beanstalk when you create an environment
without providing a source bundle with the following links:
•Single Container Docker – docker-singlecontainer-v1.zip
•Multicontainer Docker – docker-multicontainer-v2.zip
•Preconfigured Docker (Glassfish) – docker-glassfish-v1.zip
•Preconfigured Docker (Python 3) – docker-python-v1.zip
•Preconfigured Docker (Go) – docker-golang-v1.zip
•Go – go-v1.zip
•Java SE – java-se-jetty-gradle-v3.zip
•Tomcat – java-tomcat-v3.zip
•.NET – dotnet-asp-v1.zip
•Node.js – nodejs-v1.zip
•PHP – php-v1.zip
•Python – python-v1.zip
•Ruby (Passenger Standalone) – ruby-passenger-v2.zip
API Version 2010-12-01
47

AWS Elastic Beanstalk Developer Guide
•Ruby (Puma) – ruby-puma-v2.zip
More involved sample applications that show the use of additional web frameworks, libraries and tools
are available as open source projects on GitHub:
•Load Balanced WordPress (tutorial (p. 837)) – Configuration files for installing WordPress securely
and running it in a load balanced AWS Elastic Beanstalk environment.
•Load Balanced Drupal (tutorial (p. 847)) – Configuration files and instructions for installing Drupal
securely and running it in a load balanced AWS Elastic Beanstalk environment.
•Scorekeep - RESTful web API that uses the Spring framework and the AWS SDK for Java to provide an
interface for creating and managing users, sessions, and games. The API is bundled with an Angular
1.5 web app that consumes the API over HTTP. Includes branches that show integration with Amazon
Cognito, AWS X-Ray, and Amazon Relational Database Service.
The application uses features of the Java SE platform to download dependencies and build on-
instance, minimizing the size of the souce bundle. The application also includes nginx configuration
files that override the default configuration to serve the frontend web app statically on port 80
through the proxy, and route requests to paths under /api to the API running on localhost:5000.
•Does it Have Snakes? - Tomcat application that shows the use of RDS in a Java EE web application
in AWS Elastic Beanstalk. The project shows the use of Servlets, JSPs, Simple Tag Support, Tag Files,
JDBC, SQL, Log4J, Bootstrap, Jackson, and Elastic Beanstalk configuration files.
•Locust Load Generator - This project shows the use of Java SE platform features to install and run
Locust, a load generating tool written in Python. The project includes configuration files that install
and configure Locust, a build script that configures a DynamoDB table, and a Procfile that runs Locust.
•Share Your Thoughts (tutorial (p. 829)) - PHP application that shows the use of MySQL on Amazon
RDS, Composer, and configuration files.
•A New Startup (tutorial (p. 786)) - Node.js sample application that shows the use of DynamoDB, the
AWS SDK for JavaScript in Node.js, npm package management, and configuration files.
API Version 2010-12-01
48

AWS Elastic Beanstalk Developer Guide
Application Management Console
Managing and Configuring AWS
Elastic Beanstalk Applications
The first step in using Elastic Beanstalk is to create an application, which represents your web application
in AWS. In Elastic Beanstalk an application serves as a container for the environments that run your web
app, and versions of your web app's source code, saved configurations, logs and other artifacts that you
create while using Elastic Beanstalk.
To create a new application
1. Open the Elastic Beanstalk console.
2. Choose Create New Application.
3. Enter the name of the application and, optionally, a description. Then click Next.
After creating a new application, the console prompts you to create an environment for it. For
detailed information about all of the options available, see Creating an AWS Elastic Beanstalk
Environment (p. 76).
If you have no further need for an application, you can delete it.
Warning
Deleting an application terminates all associated environments and deletes all application
versions and saved configurations that belong to the application.
To delete an application
1. Open the Elastic Beanstalk console.
2. Choose Actions next to the application that you want to delete.
3. Choose Delete Application
Topics
•The AWS Elastic Beanstalk Application Management Console (p. 49)
•Managing Application Versions (p. 53)
•Configuring Application Version Lifecycle Settings (p. 56)
•Create an Application Source Bundle (p. 58)
The AWS Elastic Beanstalk Application
Management Console
You can use the AWS Management Console to manage applications, application versions, and saved
configurations.
API Version 2010-12-01
49

AWS Elastic Beanstalk Developer Guide
Application Management Console
To access the application management console
1. Open the Elastic Beanstalk console.
2. The console displays a list of all environments running in the current region, sorted by application.
Choose an application name to view the management console for that application.
Note
If you have a large number of applications, use the search bar in the upper right corner to
filter the list of applications.
The Environments page shows an overview of all environments associated with the application.
API Version 2010-12-01
50
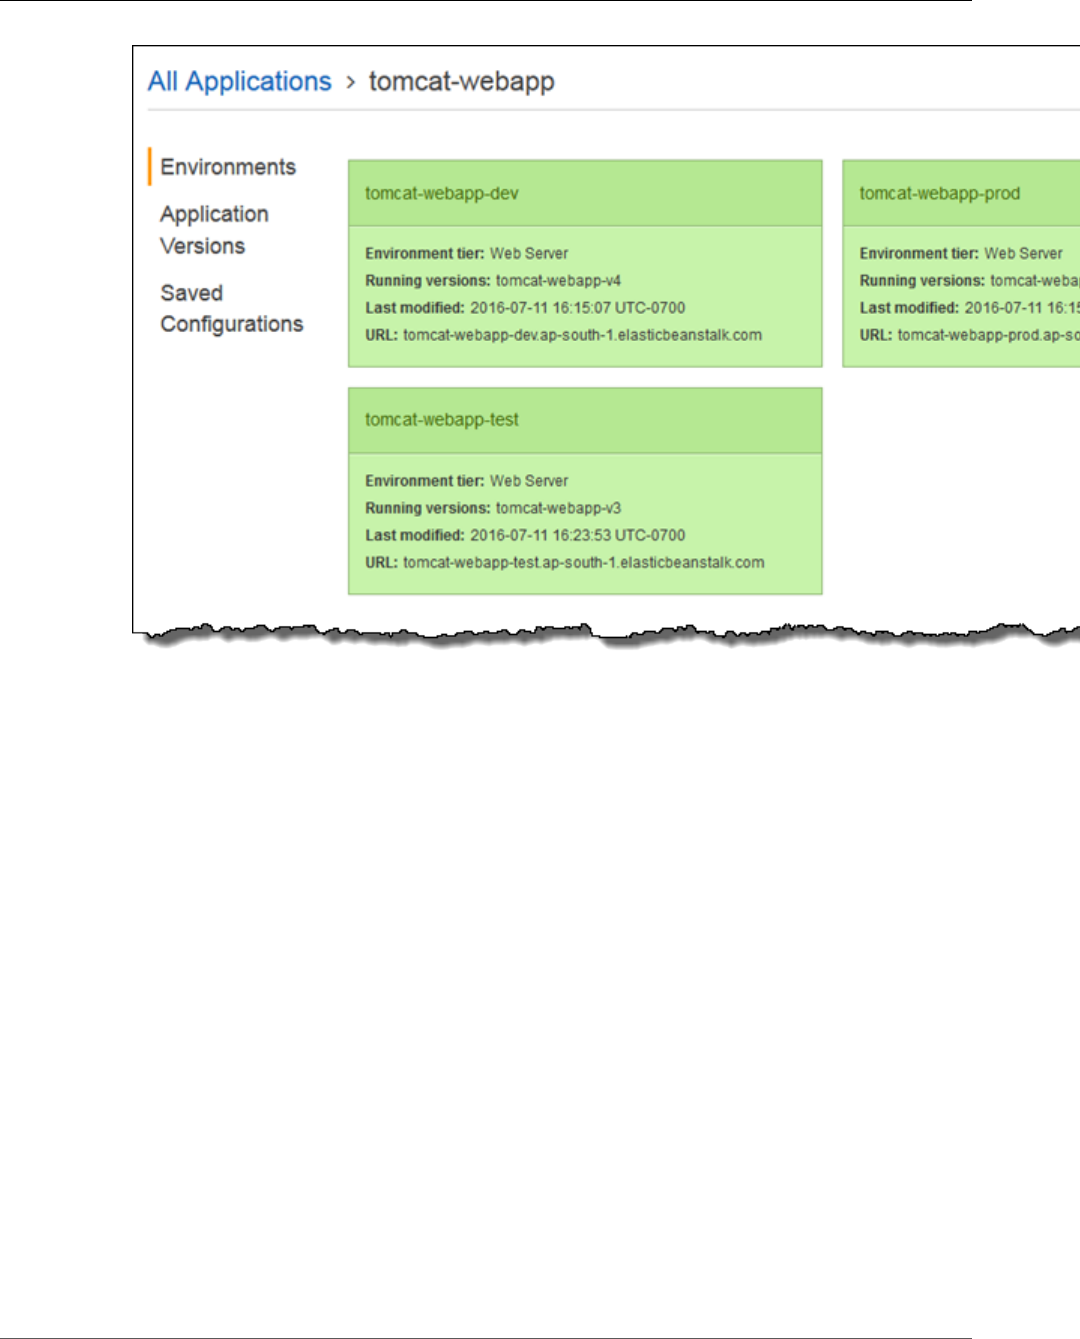
AWS Elastic Beanstalk Developer Guide
Application Management Console
3. Choose an environment by name to go to the environment management console (p. 65) for that
environment to configure, monitor, or manage it.
Choose Application Versions to view a list of application versions for your application:
API Version 2010-12-01
51
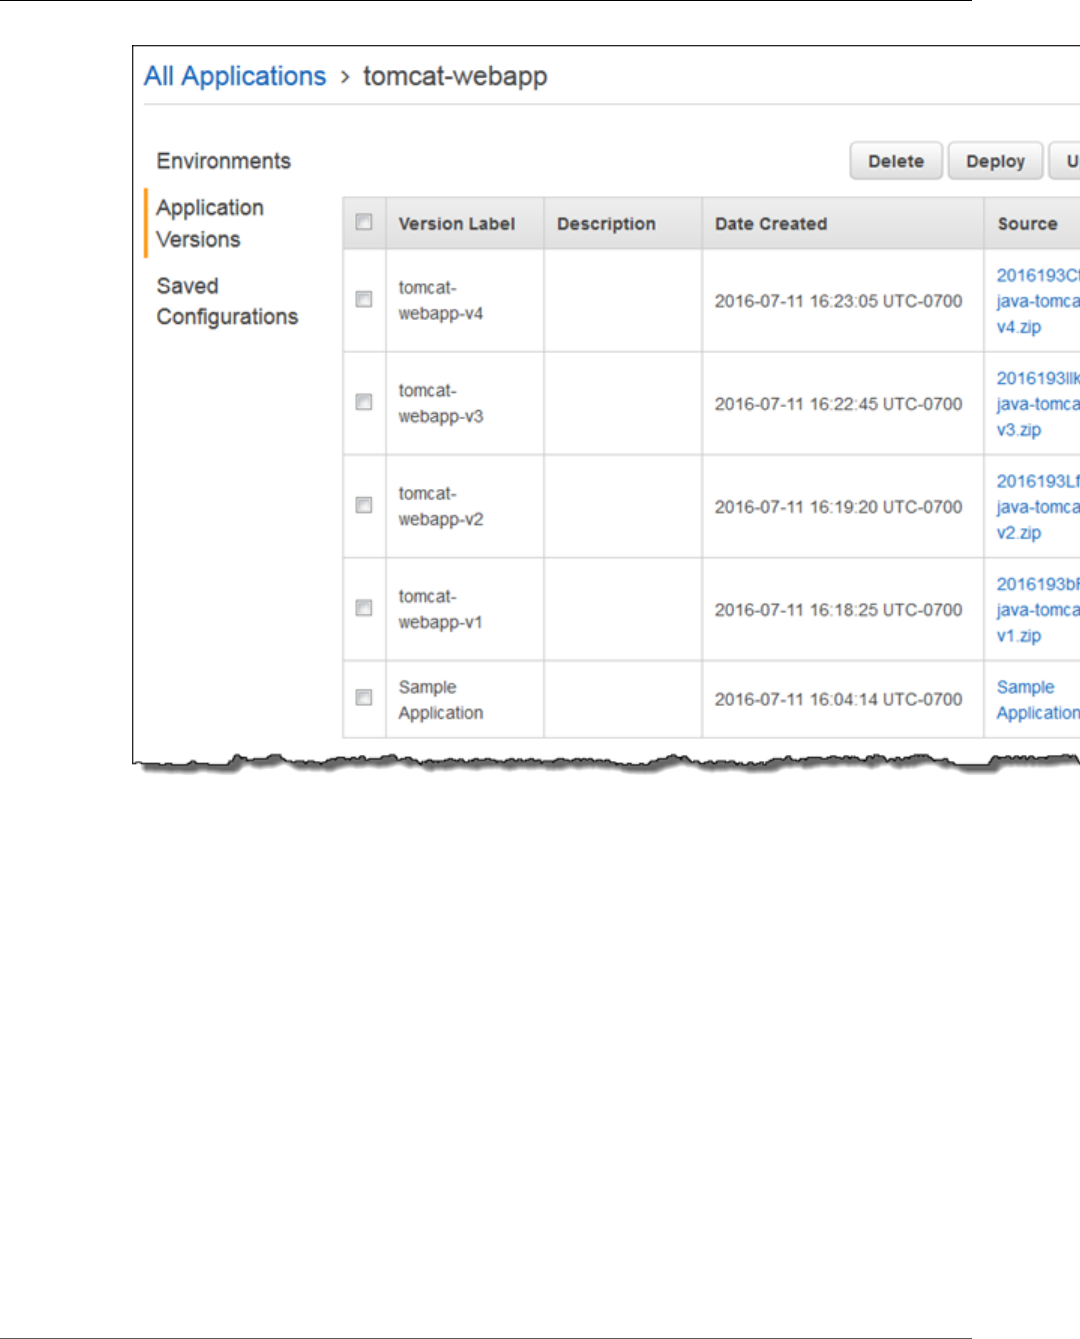
AWS Elastic Beanstalk Developer Guide
Application Management Console
Here you can upload new versions, deploy an existing version to any of the application's
environments, or delete old versions. See Managing Application Versions (p. 53) for more
information about the options on this page.
4. Choose Saved Configurations to view a list of configurations saved from running environments. A
saved configuration is a collection of settings that you can use to restore an environment's settings
to a previous state or create a new environment with the same settings.
API Version 2010-12-01
52
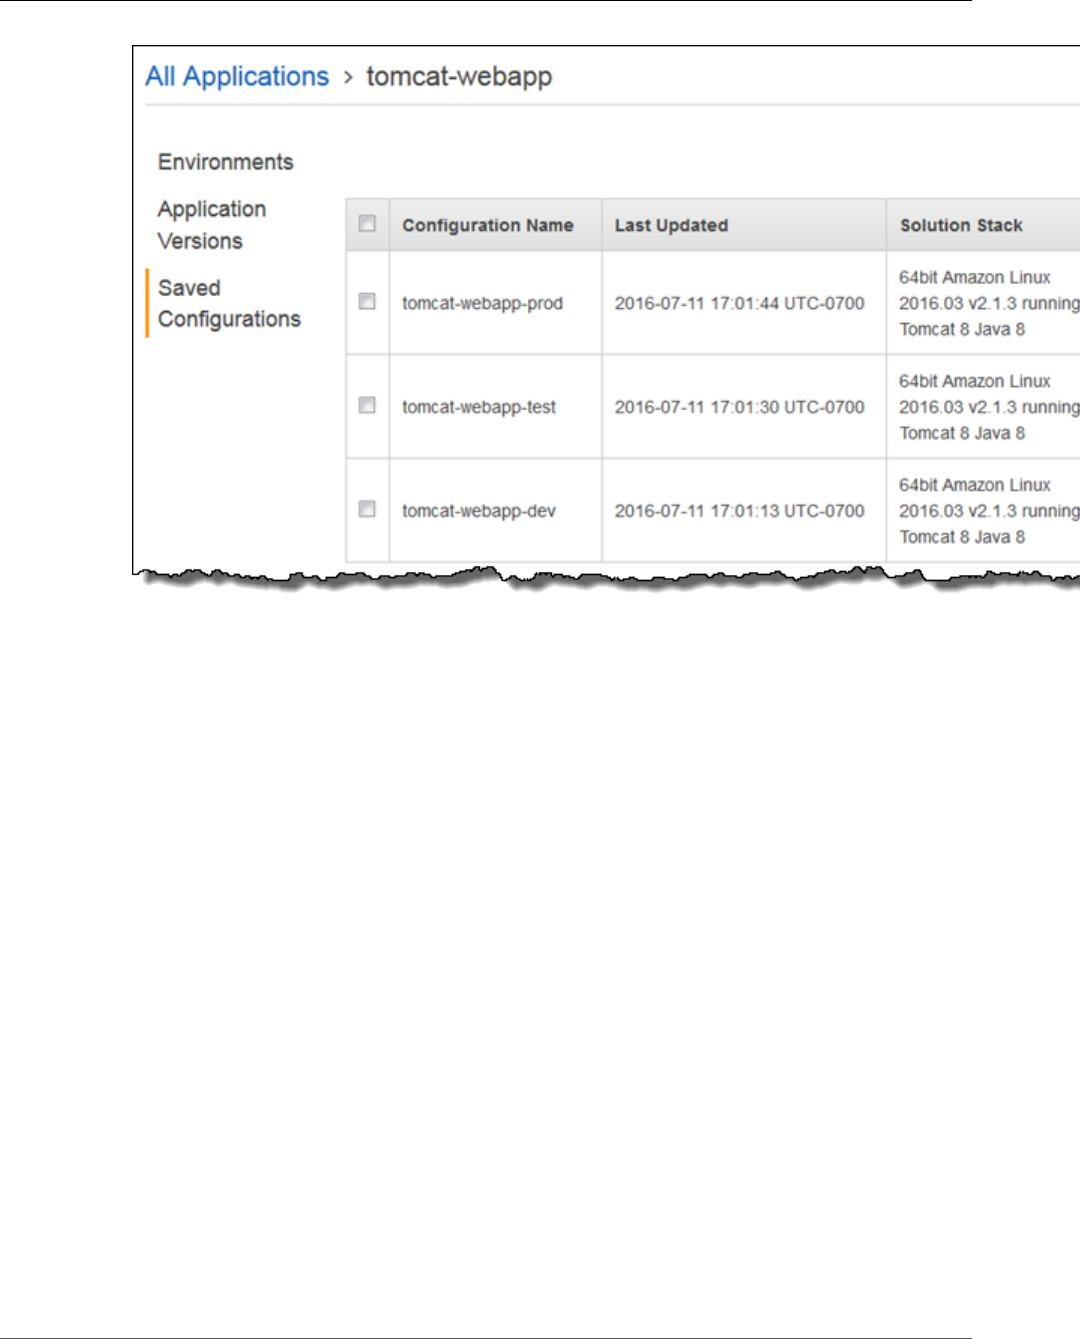
AWS Elastic Beanstalk Developer Guide
Managing Application Versions
See Using Elastic Beanstalk Saved Configurations (p. 293) for more information.
Managing Application Versions
Elastic Beanstalk creates an application version whenever you upload source code. This usually occurs
when you create a new environment or upload and deploy code using the environment management
console (p. 65) or EB CLI (p. 480). You can also upload a source bundle without deploying it from the
application management console (p. 49).
To create a new application version
1. Open the Elastic Beanstalk console.
2. Choose an application.
3. In the navigation pane, choose Application Versions.
4. Choose Upload.
API Version 2010-12-01
53
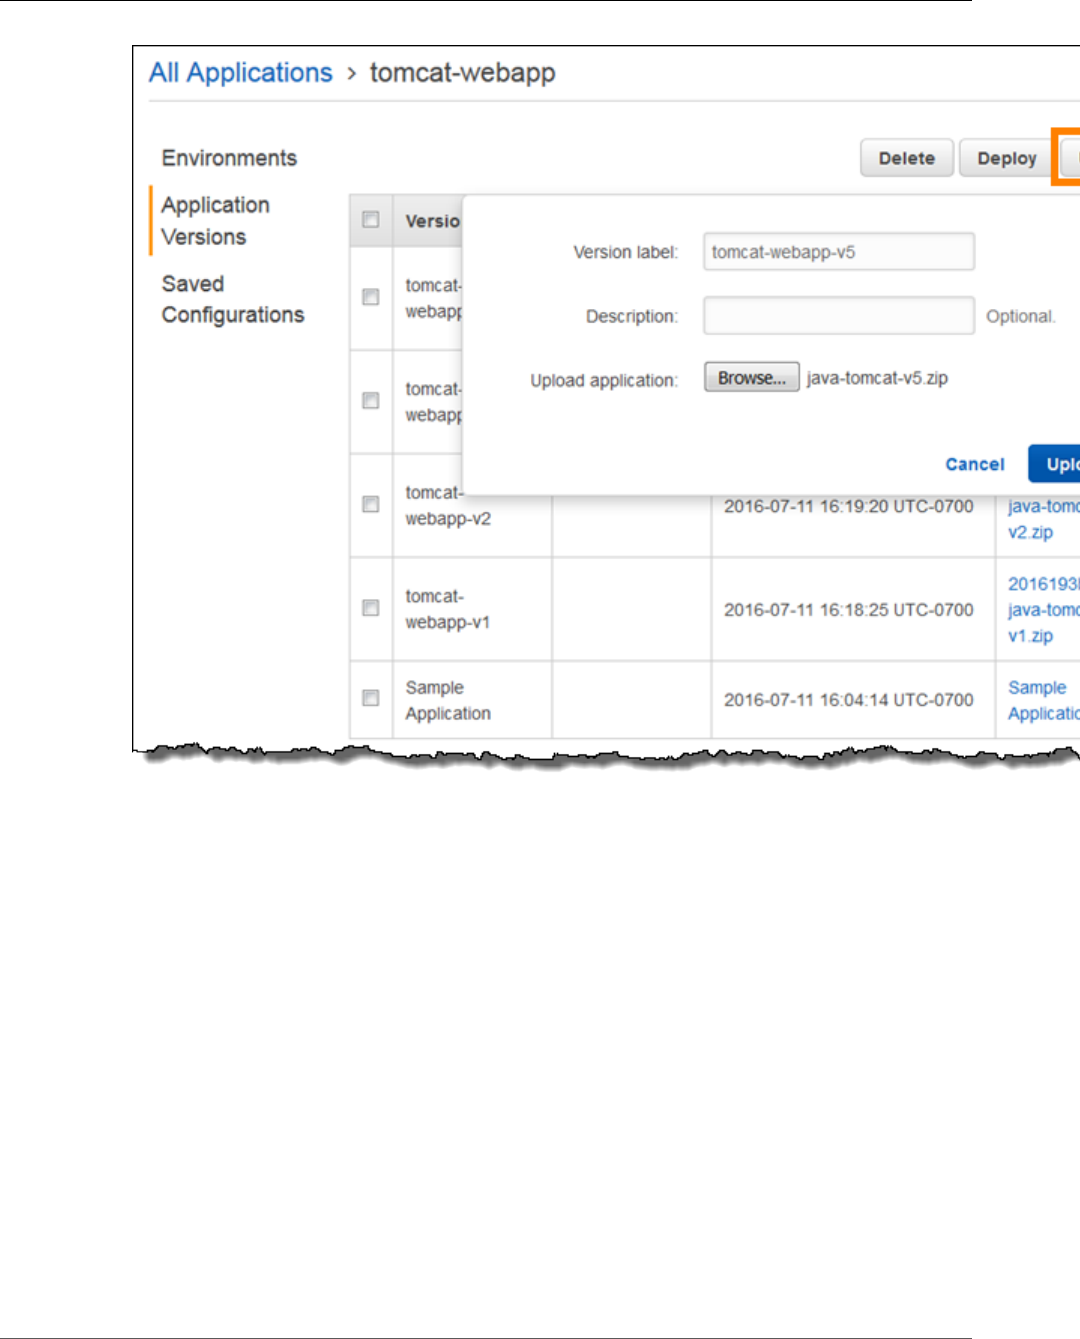
AWS Elastic Beanstalk Developer Guide
Managing Application Versions
5. Enter a label for this version in the Version label field.
6. (Optional) Enter a brief description for this version in the Description field.
7. Choose Browse to specify the location of the source bundle (p. 58).
Note
The file size limit is 512 MB.
8. Choose Upload.
The file you specified is associated with your application. You can deploy the application version to a new
or existing environment.
Over time, your application can accumulate a large number of application versions. To save storage space
and avoid hitting the application version limit, you can configure Elastic Beanstalk to delete old versions
automatically.
Note
Deleting an application version does not have any affect on environments currently running that
version.
To delete an application version
1. Open the Elastic Beanstalk console.
2. Choose an application.
API Version 2010-12-01
54

AWS Elastic Beanstalk Developer Guide
Managing Application Versions
3. In the navigation pane, choose Application versions.
4. In the list of application versions, select the check box next to the application version that you want
to delete, and then click Delete.
5. (Optional) To leave the application source bundle for this application version in your Amazon S3
bucket, uncheck Delete versions from Amazon S3.
API Version 2010-12-01
55
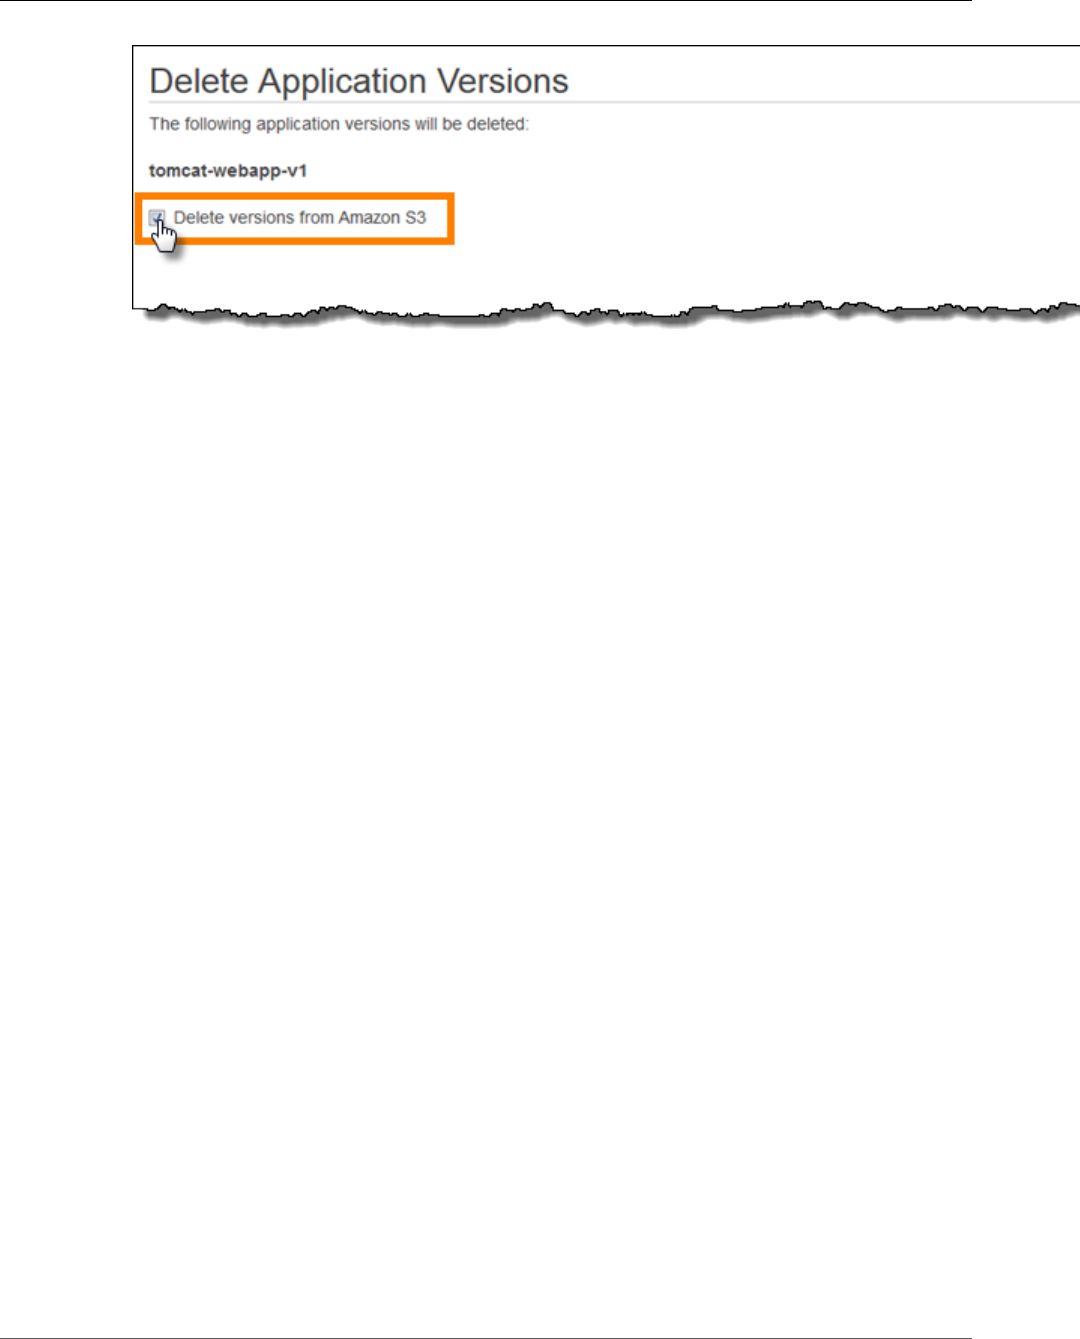
AWS Elastic Beanstalk Developer Guide
Version Lifecycle
6. Choose Apply.
Lifecycle settings are applied when you create new application versions. For example, if you configure
a maximum of 25 application versions, Elastic Beanstalk deletes the oldest version when you upload a
26th version. If you set a maximum age of 90 days, any versions more than 90 days old are deleted when
you upload a new version.
If you don't choose to delete the source bundle from Amazon S3, Elastic Beanstalk deletes the version
from it's records, but the source bundle is left if your Elastic Beanstalk storage bucket (p. 451). The
application version limit only applies to versions Elastic Beanstalk tracks, so you can delete versions to
stay within the limit, but retain all source bundles in Amazon S3 if needed.
Configuring Application Version Lifecycle Settings
Each time you upload a new version of your application with the Elastic Beanstalk console or the EB CLI,
Elastic Beanstalk creates an application version (p. 53). If you don't delete versions that you no longer
use, you will eventually reach the application version limit and be unable to create new versions of that
application.
You can avoid hitting the limit by applying an application version lifecycle policy to your applications. A
lifecycle policy tells Elastic Beanstalk to delete application versions that are old, or to delete application
versions when the total number of versions for an application exceeds a specified number.
Elastic Beanstalk applies an application's lifecycle policy each time you create a new application version,
and deletes up to 100 versions each time the lifecycle policy is applied. Elastic Beanstalk deletes old
versions before creating the new version, and does not count the new version towards the maximum
number of versions defined in the policy.
Elastic Beanstalk does not delete application versions that are currently being used by an environment,
or application versions deployed to environments that were terminated less than ten weeks before the
policy was triggered.
The application version limit applies across all applications in a region. If you have several applications,
configure each application with a lifecycle policy appropriate to avoid reaching the limit. Elastic
Beanstalk only applies the policy if the application version creation succeeds, so if you have already
reached the limit, you must delete some versions manually prior to creating a new version.
By default, Elastic Beanstalk leaves the application version's source bundle (p. 58) in Amazon S3 to
prevent loss of data. You can delete the source bundle to save space.
You can set the lifecycle settings through the Elastic Beanstalk CLI and APIs. See eb
appversion (p. 513), CreateApplication (using the ResourceLifecycleConfig parameter), and
UpdateApplicationResourceLifecycle for details.
API Version 2010-12-01
56
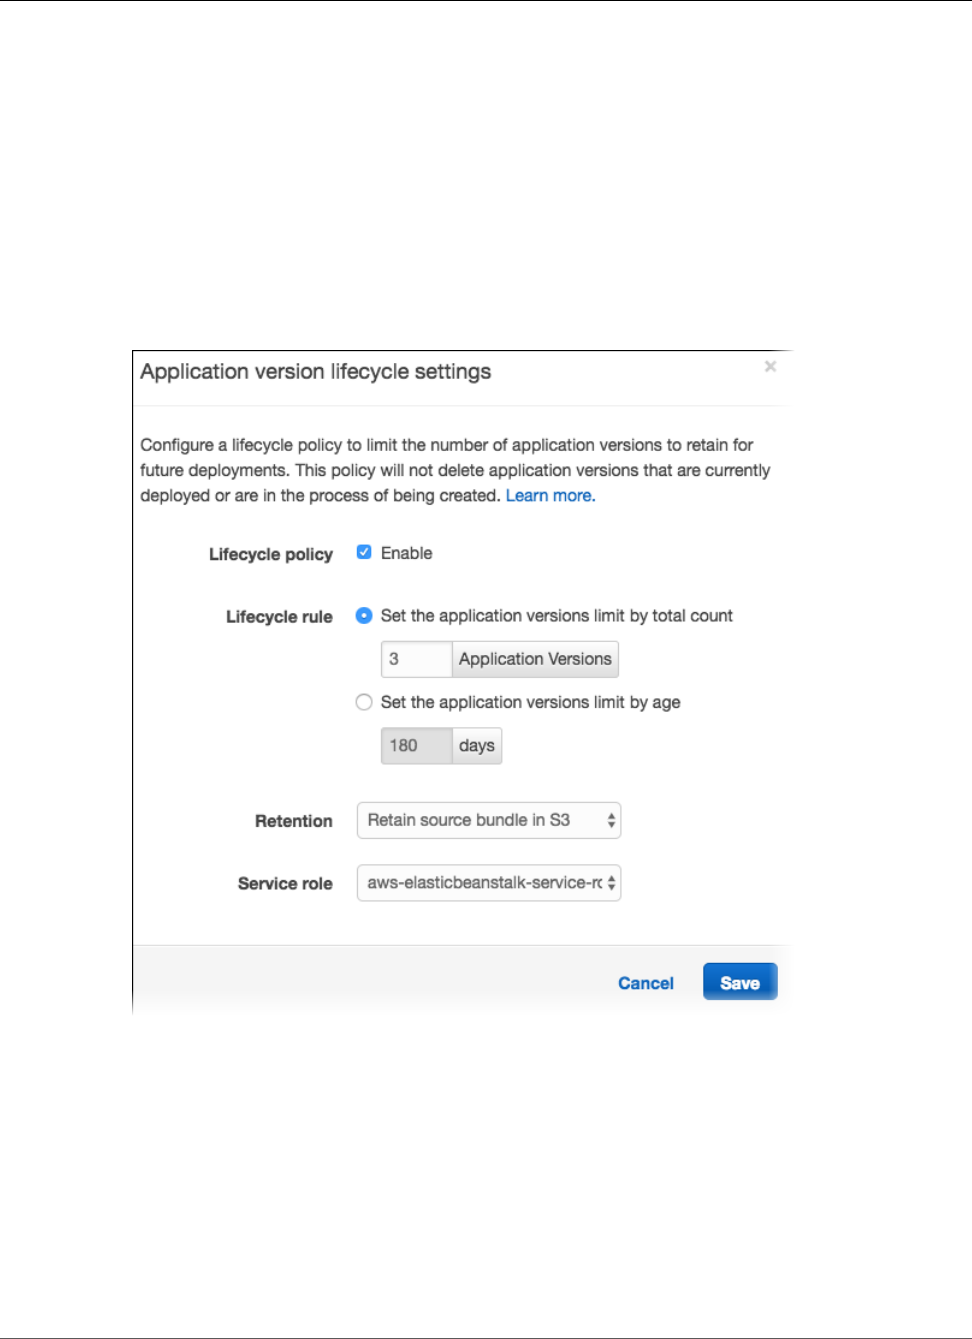
AWS Elastic Beanstalk Developer Guide
Setting the Application Lifecycle Settings in the Console
Setting the Application Lifecycle Settings in the
Console
You can specify the lifecycle settings in the console.
To specify your application lifecycle settings.
1. Open the Elastic Beanstalk console.
2. Choose an application.
3. In the navigation pane, select Application versions.
4. Select Settings.
5. Select Enable for Lifecycle policy to enable lifecycle settings.
6. Select either Set the application versions limit by total count or Set the application versions limit
by age.
7. If you selected Set the application versions limit by total count, enter a value from 1 to 1000
for Application Versions to specify the maximum number of application versions to keep before
deleting old versions.
8. If you selected Set the application versions limit by age, specify the maximum age, in days from 1
to 180, of application versions to keep.
9. For Retention, specify whether to delete the source bundle from S3 when the application version is
deleted.
10. For Service role, specify the role under which the application version is deleted.
API Version 2010-12-01
57

AWS Elastic Beanstalk Developer Guide
Create a Source Bundle
11. Select Save to save your application lifecycle settings.
Create an Application Source Bundle
When you use the AWS Elastic Beanstalk console to deploy a new application or an application version,
you'll need to upload a source bundle. Your source bundle must meet the following requirements:
• Consist of a single ZIP file or WAR file (you can include multiple WAR files inside your ZIP file)
• Not exceed 512 MB
• Not include a parent folder or top-level directory (subdirectories are fine)
If you want to deploy a worker application that processes periodic background tasks, your application
source bundle must also include a cron.yaml file. For more information, see Periodic Tasks (p. 159).
If you are deploying your application with the Elastic Beanstalk Command Line Interface (EB CLI), the
AWS Toolkit for Eclipse, or the AWS Toolkit for Visual Studio, the ZIP or WAR file will automatically
be structured correctly. For more information, see The Elastic Beanstalk Command Line Interface (EB
CLI) (p. 480), Creating and Deploying Java Applications on AWS Elastic Beanstalk (p. 671), and The
AWS Toolkit for Visual Studio (p. 744).
Sections
•Creating a Source Bundle from the Command Line (p. 58)
•Creating a Source Bundle with Git (p. 59)
•Zipping Files in Mac OS X Finder or Windows Explorer (p. 59)
•Creating a Source Bundle for a .NET Application (p. 63)
•Testing Your Source Bundle (p. 64)
Creating a Source Bundle from the Command Line
Create a source bundle using the zip command. To include hidden files and folders, use a pattern like
the following.
~/myapp$ zip ../myapp.zip -r * .[^.]*
adding: app.js (deflated 63%)
adding: index.js (deflated 44%)
adding: manual.js (deflated 64%)
adding: package.json (deflated 40%)
adding: restify.js (deflated 85%)
adding: .ebextensions/ (stored 0%)
adding: .ebextensions/xray.config (stored 0%)
This ensures that Elastic Beanstalk configuration files (p. 256) and other files and folders that start with
a period are included in the archive.
For Tomcat web applications, use jar to create a web archive.
~/myapp$ jar -cvf myapp.war .
The above commands include hidden files that may increase your source bundle size unnecessarily. For
more control, use a more detailed file pattern, or create your source bundle with Git (p. 59).
API Version 2010-12-01
58

AWS Elastic Beanstalk Developer Guide
Creating a Source Bundle with Git
Creating a Source Bundle with Git
If you're using Git to manage your application source code, use the git archive command to create
your source bundle.
$ git archive -v -o myapp.zip --format=zip HEAD
git archive only includes files that are stored in git, and excludes ignored files and git files. This helps
keep your source bundle as small as possible. For more information, go to the git-archive manual page.
Zipping Files in Mac OS X Finder or Windows Explorer
When you create a ZIP file in Mac OS X Finder or Windows Explorer, make sure you zip the files and
subfolders themselves, rather than zipping the parent folder.
Note
The graphical user interface (GUI) on Mac OS X and Linux-based operating systems does not
display files and folders with names that begin with a period (.). Use the command line instead
of the GUI to compress your application if the ZIP file must include a hidden folder, such as
.ebextensions. For command line procedures to create a ZIP file on Mac OS X or a Linux-
based operating system, see Creating a Source Bundle from the Command Line (p. 58).
Example
Suppose you have a Python project folder labeled myapp, which includes the following files and
subfolders:
myapplication.py
README.md
static/
static/css
static/css/styles.css
static/img
static/img/favicon.ico
static/img/logo.png
templates/
templates/base.html
templates/index.html
As noted in the list of requirements above, your source bundle must be compressed without a parent
folder, so that its decompressed structure does not include an extra top-level directory. In this example,
no myapp folder should be created when the files are decompressed (or, at the command line, no myapp
segment should be added to the file paths).
This sample file structure is used throughout this topic to illustrate how to zip files.
To zip files in Mac OS X Finder
1. Open your top-level project folder and select all the files and subfolders within it. Do not select the
top-level folder itself.
API Version 2010-12-01
59
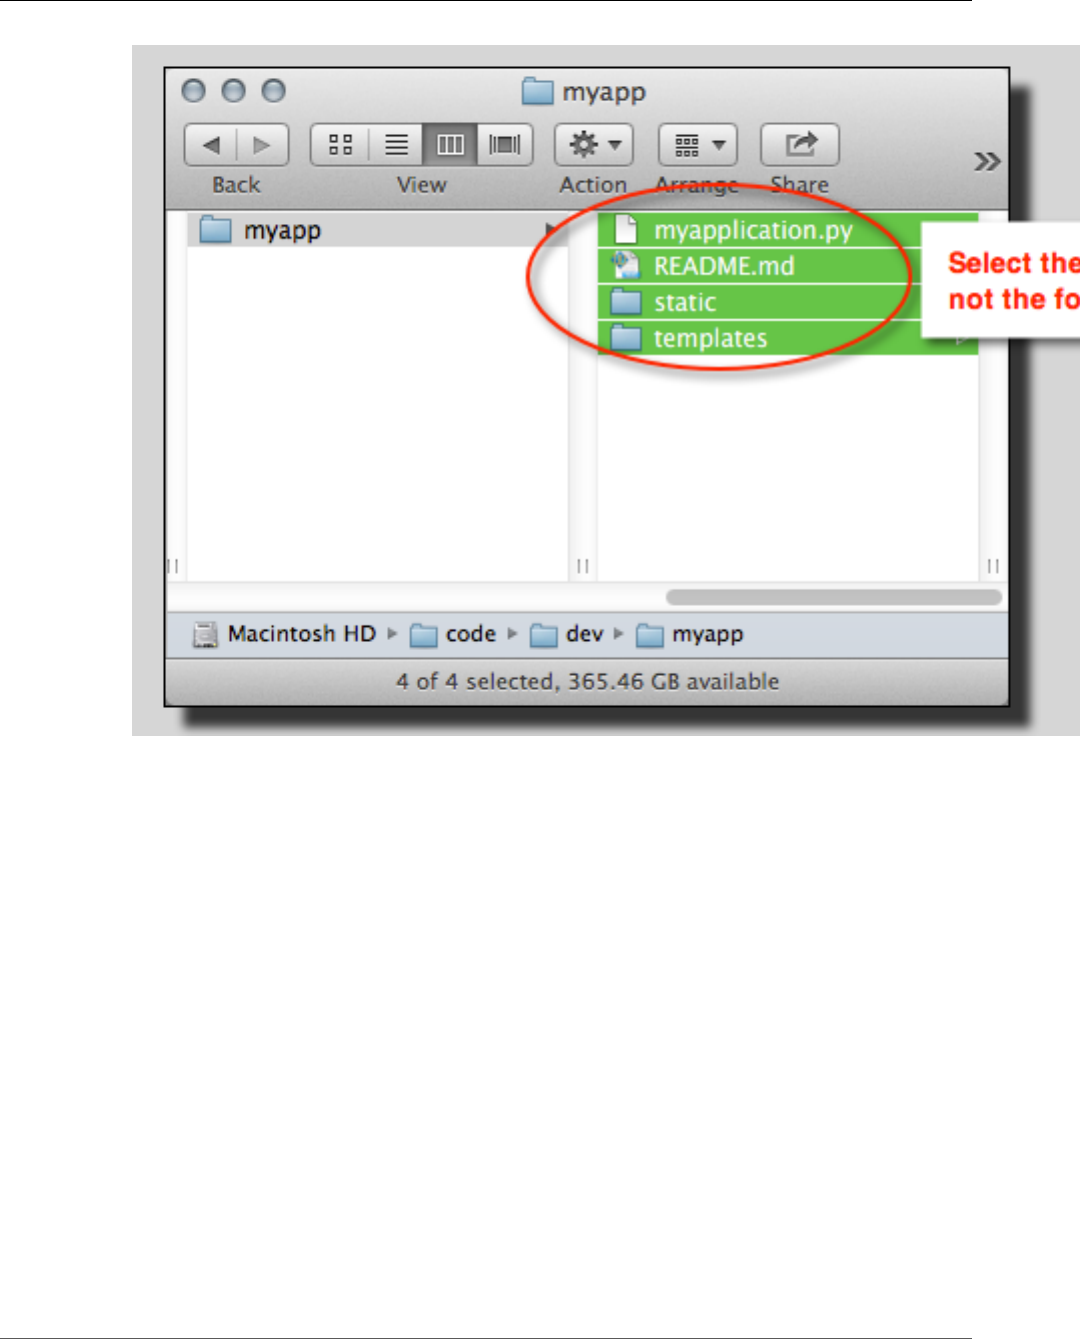
AWS Elastic Beanstalk Developer Guide
Zipping Files in Mac OS X Finder or Windows Explorer
2. Right-click the selected files, and then choose Compress X items, where X is the number of files and
subfolders you've selected.
API Version 2010-12-01
60
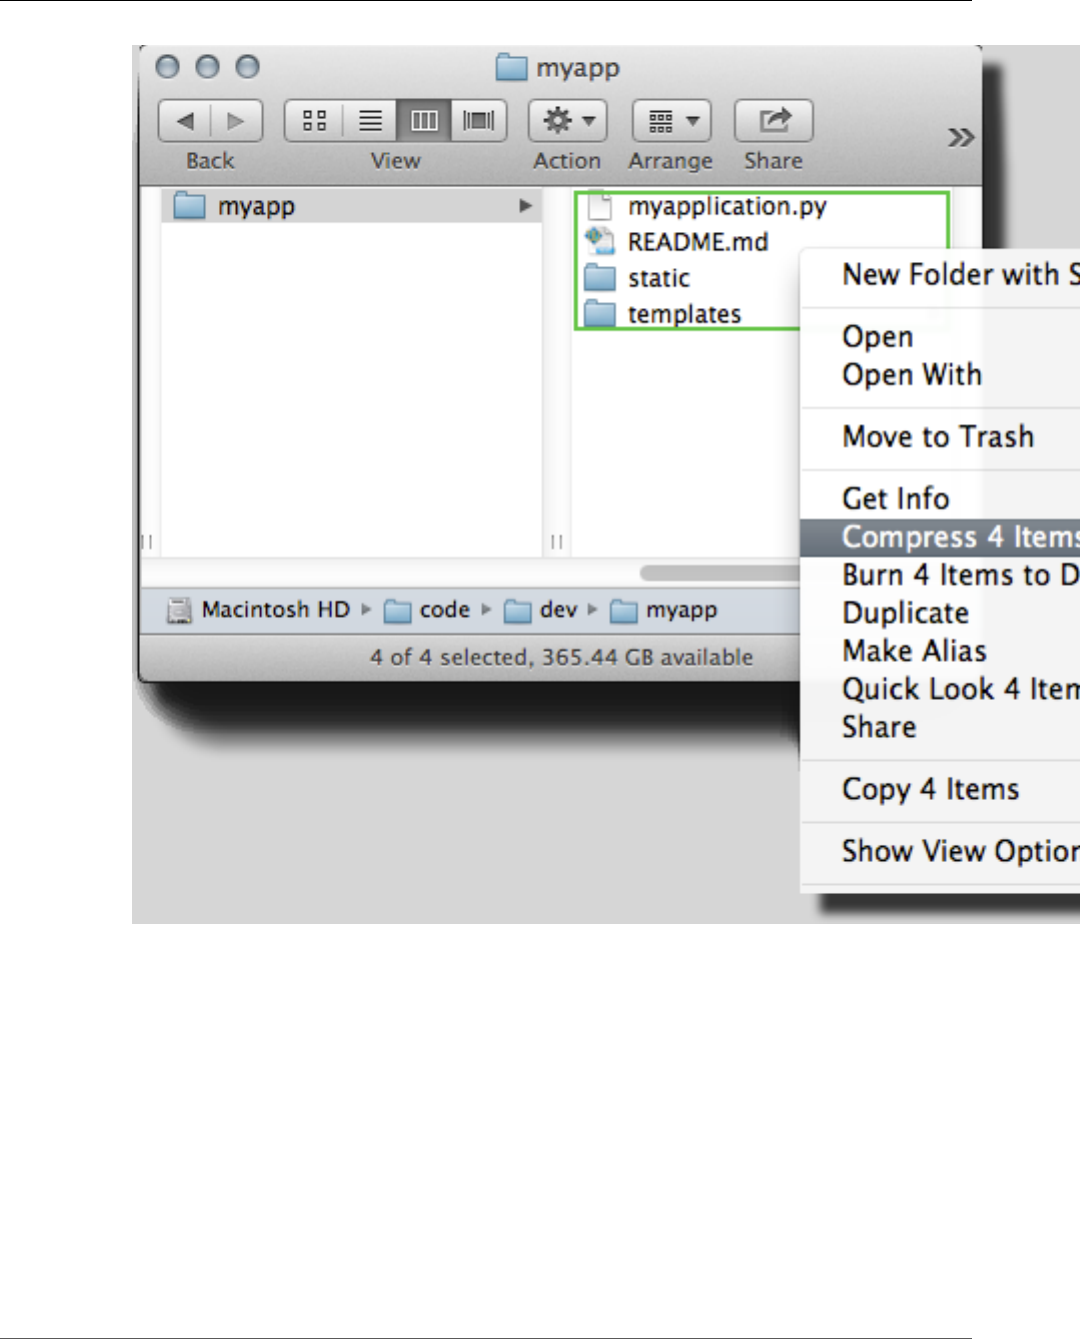
AWS Elastic Beanstalk Developer Guide
Zipping Files in Mac OS X Finder or Windows Explorer
To zip files in Windows Explorer
1. Open your top-level project folder and select all the files and subfolders within it. Do not select the
top-level folder itself.
API Version 2010-12-01
61
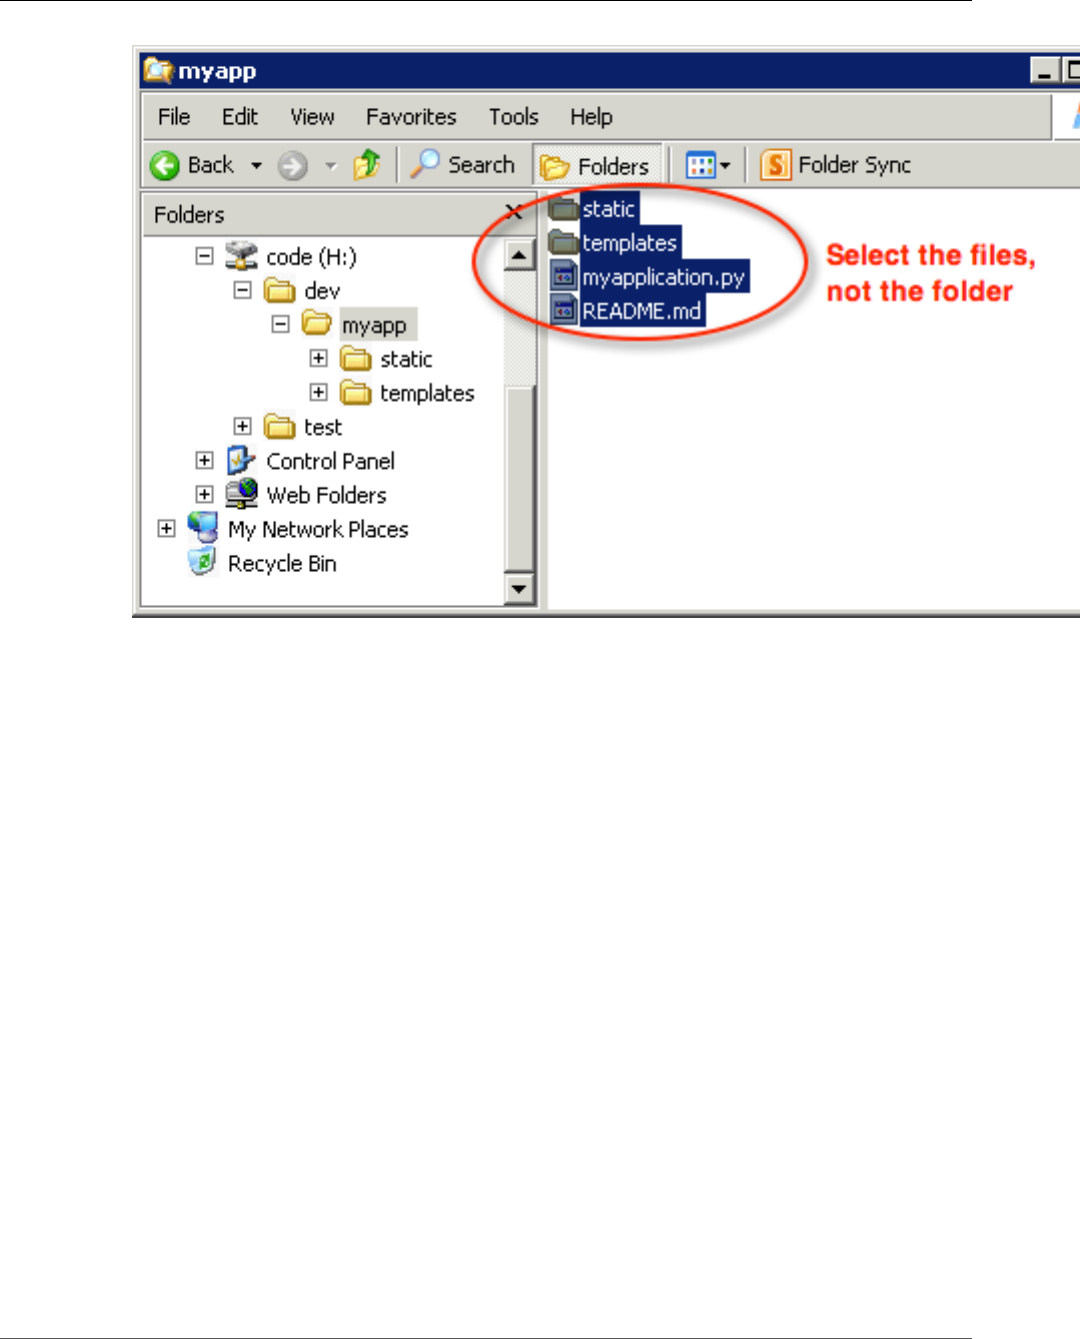
AWS Elastic Beanstalk Developer Guide
Zipping Files in Mac OS X Finder or Windows Explorer
2. Right-click the selected files, choose Send to, and then choose Compressed (zipped) folder.
API Version 2010-12-01
62
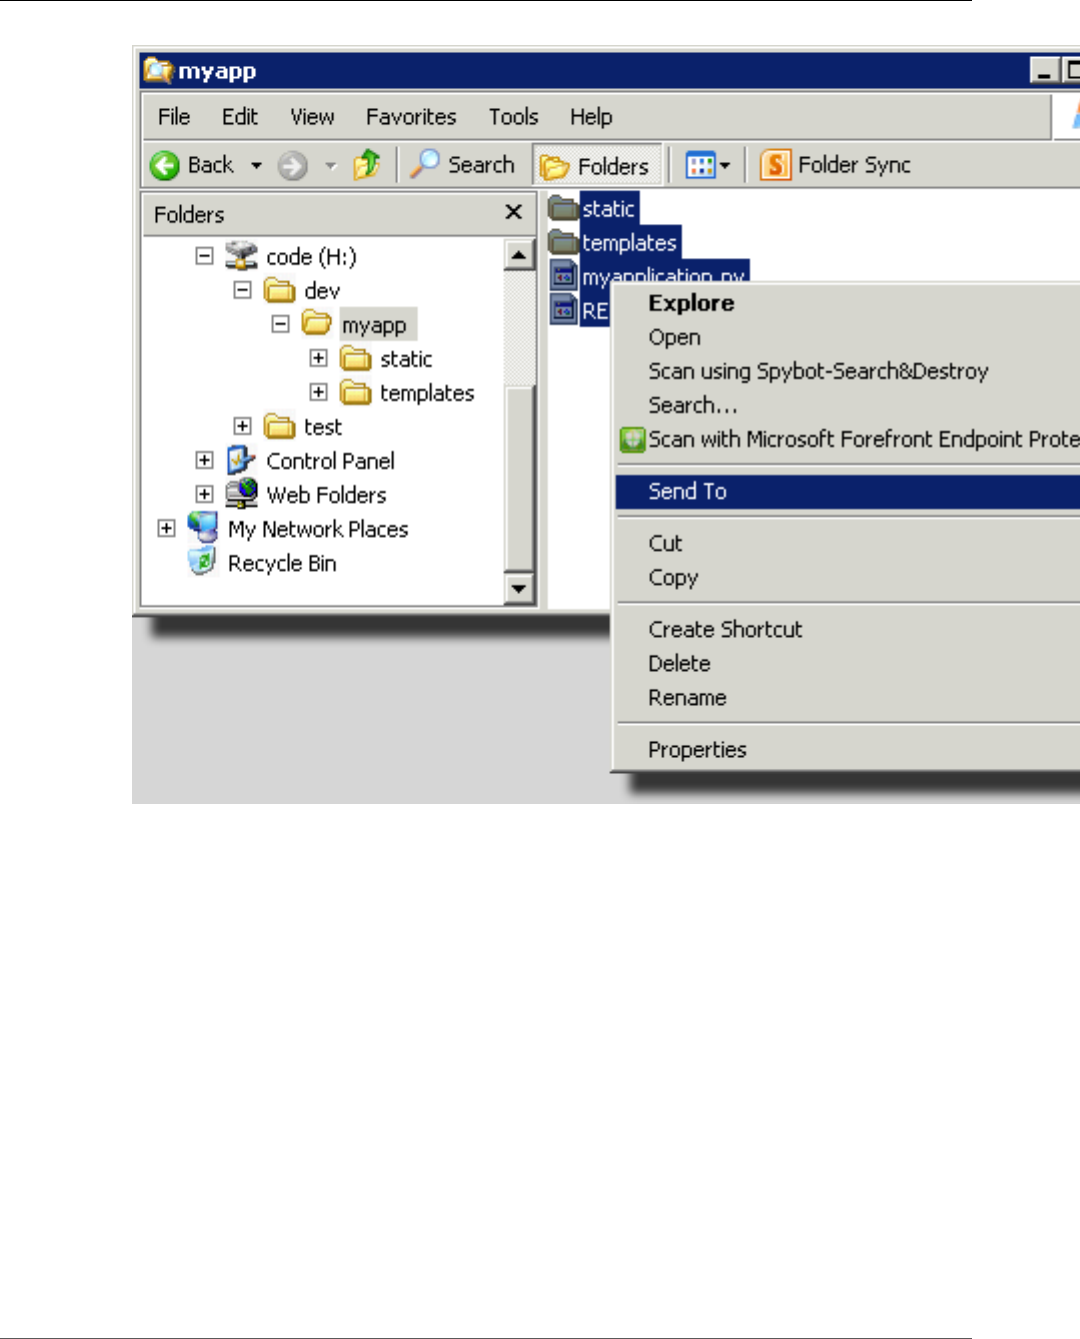
AWS Elastic Beanstalk Developer Guide
Creating a Source Bundle for a .NET Application
Creating a Source Bundle for a .NET Application
If you use Visual Studio, you can use the deployment tool included in the AWS Toolkit for Visual Studio
to deploy your .NET application to Elastic Beanstalk. For more information, see Deploying Elastic
Beanstalk Applications in .NET Using the Deployment Tool (p. 769).
If you need to manually create a source bundle for your .NET application, you cannot simply create a
ZIP file that contains the project directory. You must create a web deployment package for your project
that is suitable for deployment to Elastic Beanstalk. There are several methods you can use to create a
deployment package:
• Create the deployment package using the Publish Web wizard in Visual Studio. For more information,
go to How to: Create a Web Deployment Package in Visual Studio.
Important
When creating the web deployment package, you must start the Site name with Default
Web Site.
• It you have a .NET project, you can create the deployment package using the msbuild command as
shown in the following example.
API Version 2010-12-01
63

AWS Elastic Beanstalk Developer Guide
Testing Your Source Bundle
Important
The DeployIisAppPath parameter must begin with Default Web Site.
C:/> msbuild <web_app>.csproj /t:Package /p:DeployIisAppPath="Default Web Site"
• If you have a website project, you can use the IIS Web Deploy tool to create the deployment package.
For more information, go to Packaging and Restoring a Web site.
Important
The apphostconfig parameter must begin with Default Web Site.
If you are deploying multiple applications or an ASP.NET Core application, put your .ebextensions
folder in the root of the source bundle, side by side with the application bundles and manifest file:
~/workspace/source-bundle/
|-- .ebextensions
| |-- environmentvariables.config
| `-- healthcheckurl.config
|-- AspNetCore101HelloWorld.zip
|-- AspNetCoreHelloWorld.zip
|-- aws-windows-deployment-manifest.json
`-- VS2015AspNetWebApiApp.zip
Testing Your Source Bundle
You may want to test your source bundle locally before you upload it to Elastic Beanstalk. Because
Elastic Beanstalk essentially uses the command line to extract the files, it's best to do your tests from the
command line rather than with a GUI tool.
To test the file extraction in Mac OS X or Linux
1. Open a terminal window (Mac OS X) or connect to the Linux server. Navigate to the directory that
contains your source bundle.
2. Using the unzip or tar xf command, decompress the archive.
3. Ensure that the decompressed files appear in the same folder as the archive itself, rather than in a
new top-level folder or directory.
Note
If you use Mac OS X Finder to decompress the archive, a new top-level folder will be
created, no matter how you structured the archive itself. For best results, use the command
line.
To test the file extraction in Windows
1. Download or install a program that allows you to extract compressed files via the command line. For
example, you can download the free unzip.exe program from http://stahlforce.com/dev/index.php?
tool=zipunzip.
2. If necessary, copy the executable file to the directory that contains your source bundle. If you've
installed a system-wide tool, you can skip this step.
3. Using the appropriate command, decompress the archive. If you downloaded unzip.exe using the
link in step 1, the command is unzip <archive-name>.
4. Ensure that the decompressed files appear in the same folder as the archive itself, rather than in a
new top-level folder or directory.
API Version 2010-12-01
64

AWS Elastic Beanstalk Developer Guide
The Environment Management Console
Managing Environments
AWS Elastic Beanstalk makes it easy to create new environments for your application. You can create
and manage separate environments for development, testing, and production use, and you can deploy
any version (p. 124) of your application to any environment. Environments can be long-running or
temporary. When you terminate an environment, you can save its configuration to recreate it later.
As you develop your application, you will deploy it often, possibly to several different environments for
different purposes. Elastic Beanstalk lets you configure how deployments are performed (p. 125). You
can deploy to all of the instances in your environment simultaneously, or split a deployment into batches
with rolling deployments.
Configuration changes (p. 133) are processed separately from deployments, and have their own
scope. For example, if you change the type of the EC2 instances running your application, all of the
instances must be replaced. On the other hand, if you modify the configuration of the environment's
load balancer, that change can be made in-place without interrupting service or lowering capacity. You
can also apply configuration changes that modify the instances in your environment in batches with
rolling configuration updates (p. 134).
Note
Modify the resources in your environment only by using Elastic Beanstalk. If you modify
resources using another service's console, CLI commands, or SDKs, Elastic Beanstalk won't
be able to accurately monitor the state of those resources, and you won't be able to save the
configuration or reliably recreate the environment. Out-of band-changes can also cause issues
when terminating an environment.
When you launch an environment, you choose a platform configuration. We update platform
configurations periodically to provide performance improvements and new features. You can update
your environment to the latest platform configuration (p. 143) at any time.
As your application grows in complexity, you can split it into multiple components, each running in a
separate environment. For long-running workloads, you can launch worker environments (p. 156) that
process jobs from an Amazon Simple Queue Service (Amazon SQS) queue.
Topics
•The AWS Elastic Beanstalk Environment Management Console (p. 65)
•Creating an AWS Elastic Beanstalk Environment (p. 76)
•Deploying Applications to AWS Elastic Beanstalk Environments (p. 124)
•Configuration Changes (p. 133)
•Updating Your Elastic Beanstalk Environment's Platform Version (p. 143)
•Canceling Environment Configuration Updates and Application Deployments (p. 151)
•Rebuilding AWS Elastic Beanstalk Environments (p. 152)
•Environment Types (p. 154)
•Worker Environments (p. 156)
•Creating Links Between AWS Elastic Beanstalk Environments (p. 162)
The AWS Elastic Beanstalk Environment
Management Console
The AWS Management Console provides a management page for each of your AWS Elastic Beanstalk
environments. From this page, you can manage your environment's configuration and perform common
API Version 2010-12-01
65
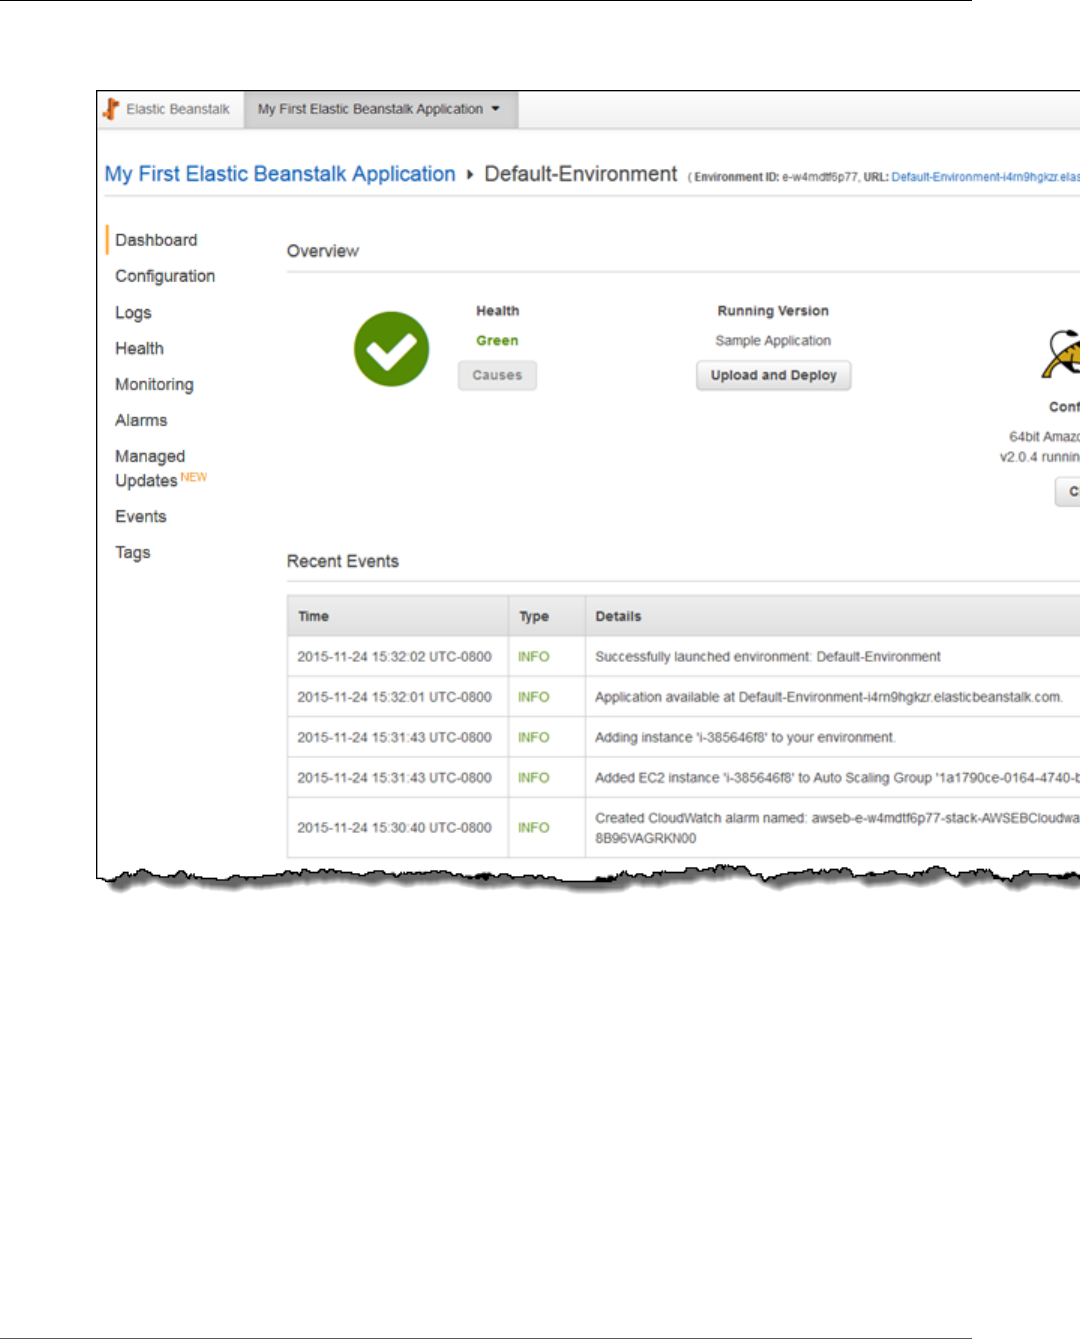
AWS Elastic Beanstalk Developer Guide
The Environment Management Console
actions including restarting the web servers running in your environment, cloning the environment, or
rebuilding it from scratch.
Topics
•Environment Dashboard (p. 67)
•Environment Management Actions (p. 68)
•Configuration (p. 70)
•Logs (p. 71)
•Health (p. 71)
•Monitoring (p. 72)
•Alarms (p. 73)
•Managed Updates (p. 74)
•Events (p. 74)
•Tags (p. 75)
API Version 2010-12-01
66

AWS Elastic Beanstalk Developer Guide
Environment Dashboard
To access the environment management console, open the Elastic Beanstalk console in your region and
click on the name of a running environment. Environments are shown in color coded tiles under their
associated application. The color (green, grey or red) indicates the health of the environment.
At the top of the environment console, the name of the application is shown, followed by the name of
the environment and the public DNS name of the running application.
Environment Dashboard
The main view of the environment management console is the Dashboard.
Within the environment management dashboard is an overview, which shows the environment's health,
the application version, and information about the in-use platform, and a list of recent events generated
by the environment.
Click Refresh to update the information shown. The overview contains the following information and
options.
Health
The overall health of the environment. With Enhanced Health Reporting and Monitoring (p. 336)
enabled, the environment status is shown with a Causes button you can click to view more information
about the current status.
For Basic Health Reporting (p. 333) environments, a link to the Monitoring Console (p. 329) is shown.
Running Version
The name of the application version running on your environment. Click Upload and Deploy to upload a
source bundle (p. 58) and deploy it to your environment. This option creates a new application version.
Configuration
Shows the architecture, OS version, and platform running on your environment. Click Change to select
a different configuration. This option is only available if another compatible version of the platform
is available. To be considered compatible, the architecture, OS name, and platform name must be the
same.
Updating the platform version using this option replaces instances running in your environment with
new instances.
API Version 2010-12-01
67
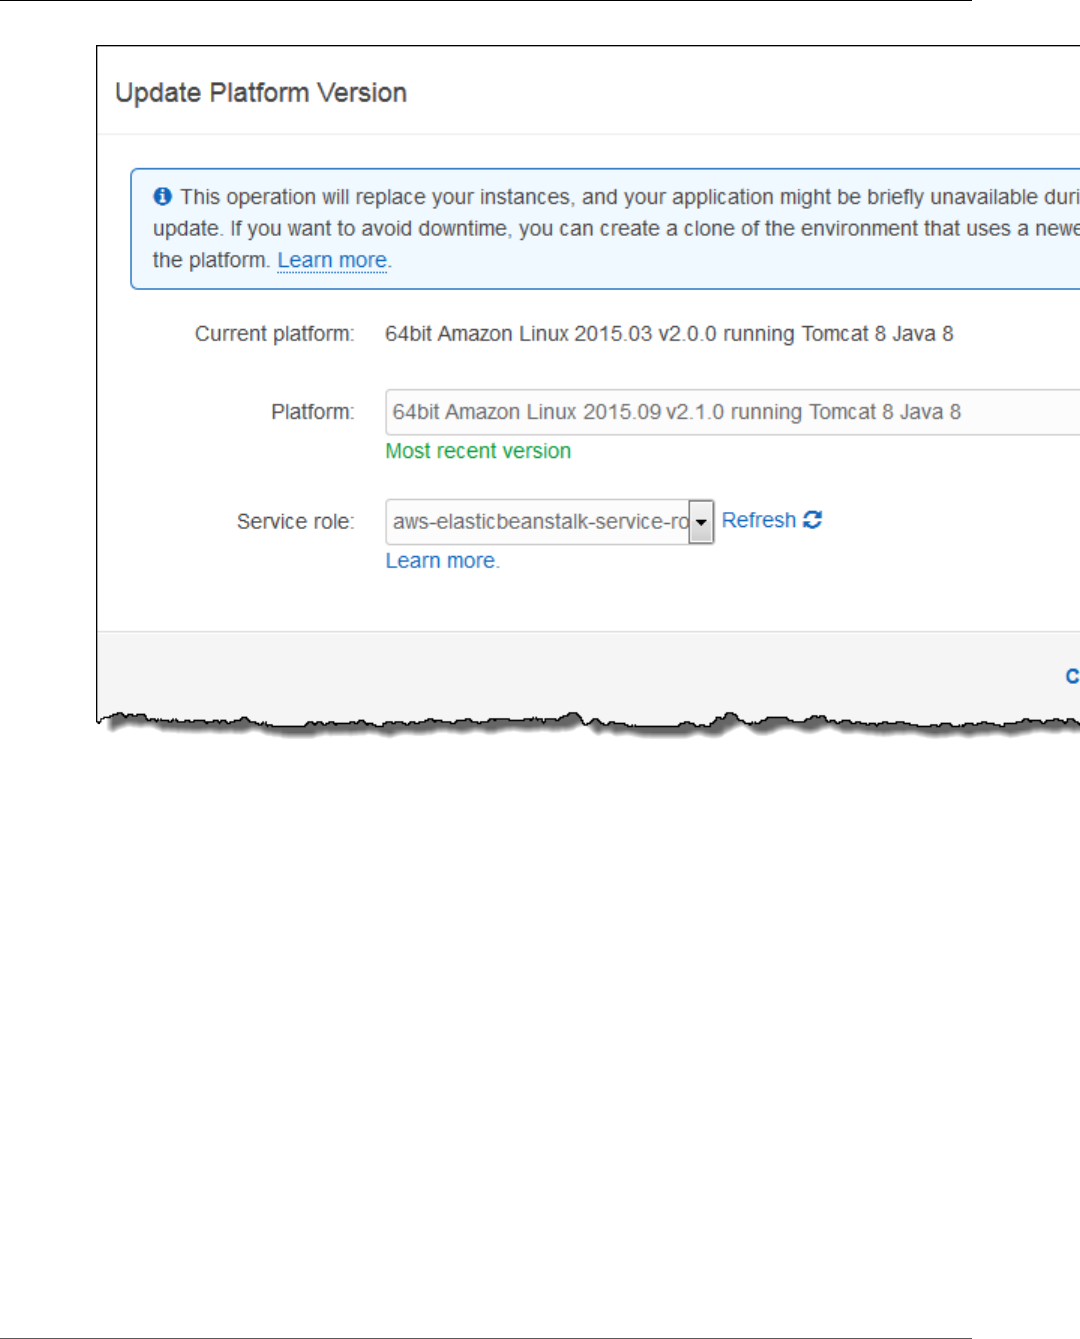
AWS Elastic Beanstalk Developer Guide
Environment Management Actions
Note
When you first use Beanstalk, only the latest version of each platform is available for use. The
Change first becomes available when a new version of the operating system or platform is
released. After upgrading, you have the option to change back to the previous version.
Recent Events
The Recent Events section of the environment management dashboard shows the most recent events
emitted by your environment. This list is updated in real time when your environment is being updated.
Click Show All to open the Events menu.
Environment Management Actions
The environment management console contains an Actions drop down menu that you can use to
perform common operations on your environment. This menu is shown on the right side of the
environment header under the Create New Environment option.
Note
Some actions are only available under certain conditions, and will be greyed out unless these
conditions are met.
API Version 2010-12-01
68

AWS Elastic Beanstalk Developer Guide
Environment Management Actions
Load Configuration
Load a previously saved configuration. Configurations are saved to your application and can be loaded by
any associated environment. If you've made changes to your environment's configuration, you can load
a saved configuration to undo those changes. You can also load a configuration that you saved from a
different environment running the same application to propagate configuration changes between them.
Save Configuration
Save the current configuration of your environment to your application. Prior to making changes to your
environment's configuration, save the current configuration so that you can roll back later if needed. You
can also apply a saved configuration when you launch a new environment.
Swap Environment URLs
Swap the CNAME of the current environment with a new environment. After a CNAME swap, all traffic
to the application using the environment URL will go to the new environment. When you are ready to
deploy a new version of your application, you can launch a separate environment under the new version.
When the new environment is ready to start taking requests, perform a CNAME swap to start routing
traffic to the new environment with no interruption of service. For more information see Blue/Green
Deployments with AWS Elastic Beanstalk (p. 129).
Clone Environment
Launch a new environment with the same configuration as your currently running environment.
Clone with Latest Platform
Clone your current environment with the latest version of the in-use application platform. This option is
only available when a newer version of the current environment's platform is available for use.
Abort Current Operation
Stop an in progress environment update. Aborting an operation can cause some of the instances in your
environment to be in a different state than others, depending on how far the operation progressed. This
option is only available when your environment is being updated.
Restart App Server(s)
Restart the web server running on your environment's instances. This option does not terminate or
restart any AWS resources. If your environment is acting strangely in response to some bad requests,
restarting the application server may restore functionality temporarily while you troubleshoot the root
cause.
Rebuild Environment
Terminate all resources in the running environment and build a new environment with the same settings.
This operation takes several minutes, equivalent to deploying a new environment from scratch. Any
RDS instances running in your environment's data tier are deleted during a rebuild. If you need the data,
create a snapshot. You can create a snapshot manually in the RDS console or configure your data tier's
Deletion Policy to create a snapshot automatically prior to deleting the instance (this is the default
setting when you create a data tier).
Terminate Environment
Terminate all resources in the running environment, and remove the environment from the application.
If you have an RDS instance running in a data tier and need to retain the data, ensure that a snapshot
API Version 2010-12-01
69
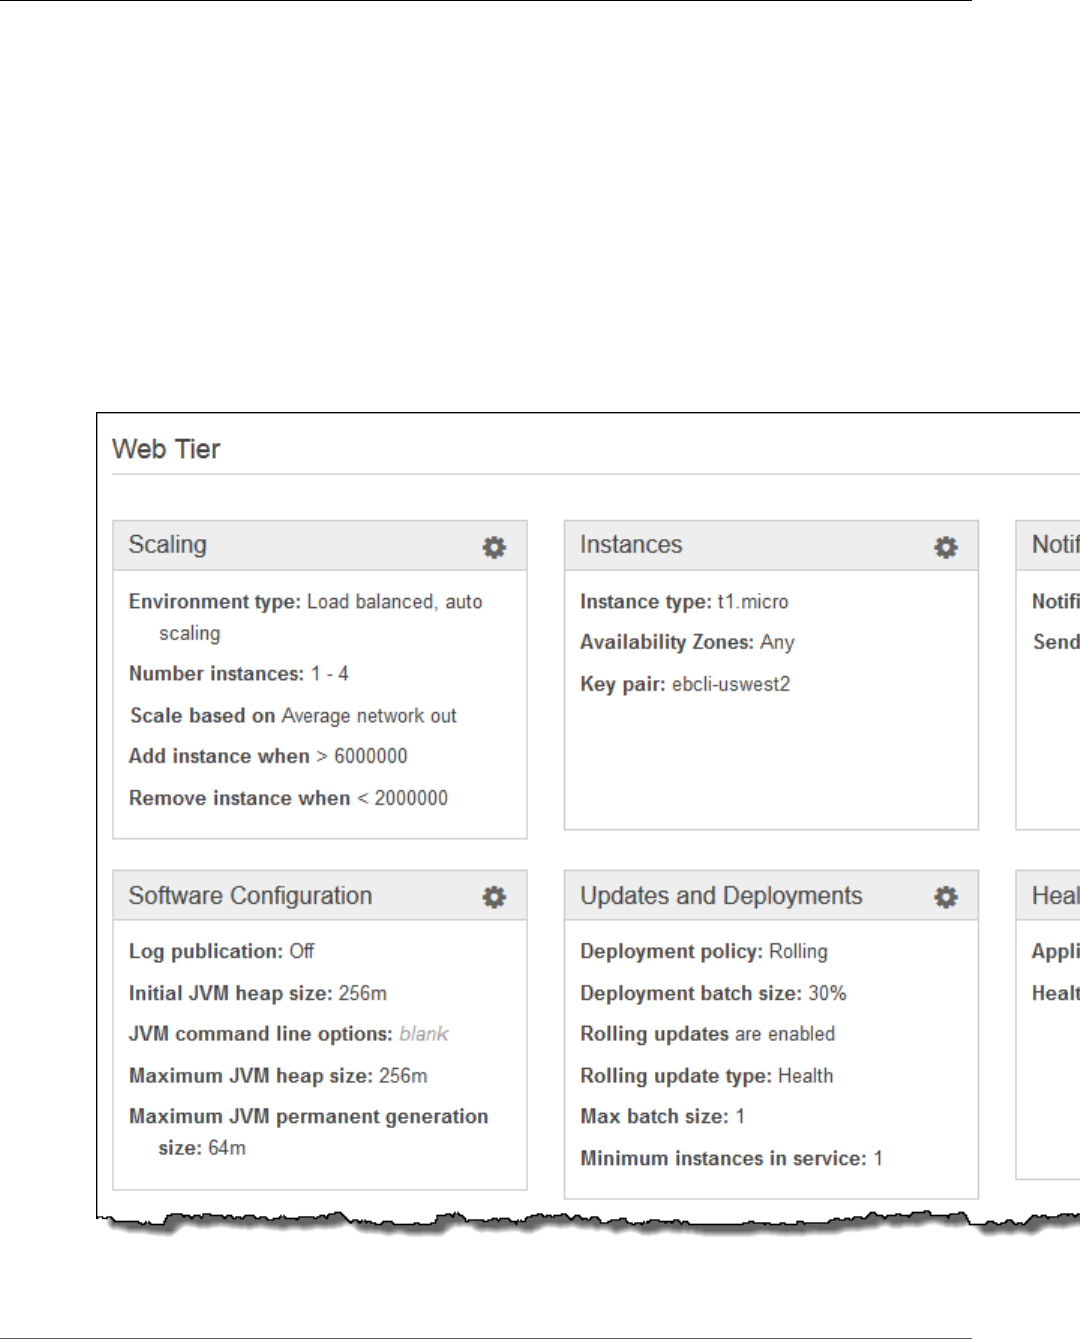
AWS Elastic Beanstalk Developer Guide
Configuration
is taken prior to terminating your environment. You can create a snapshot manually in the RDS console
or configure your data tier's Deletion Policy to create a snapshot automatically prior to deleting the
instance (this is the default setting when you create a data tier).
Restore Environment
If the environment has been terminated in the last hour, you can restore it from this page. After an hour,
you can restore it from the application overview page (p. 153).
Configuration
The Configuration page shows the current configuration of your environment and its resources,
including EC2 instances, load balancer, notifications and health monitoring settings. Use the settings
on this page to customize the behavior of your environment during deployments, enable additional
features, and modify the instance type and other settings that you chose during environment creation.
For more information, see AWS Elastic Beanstalk Environment Configuration (p. 164).
API Version 2010-12-01
70
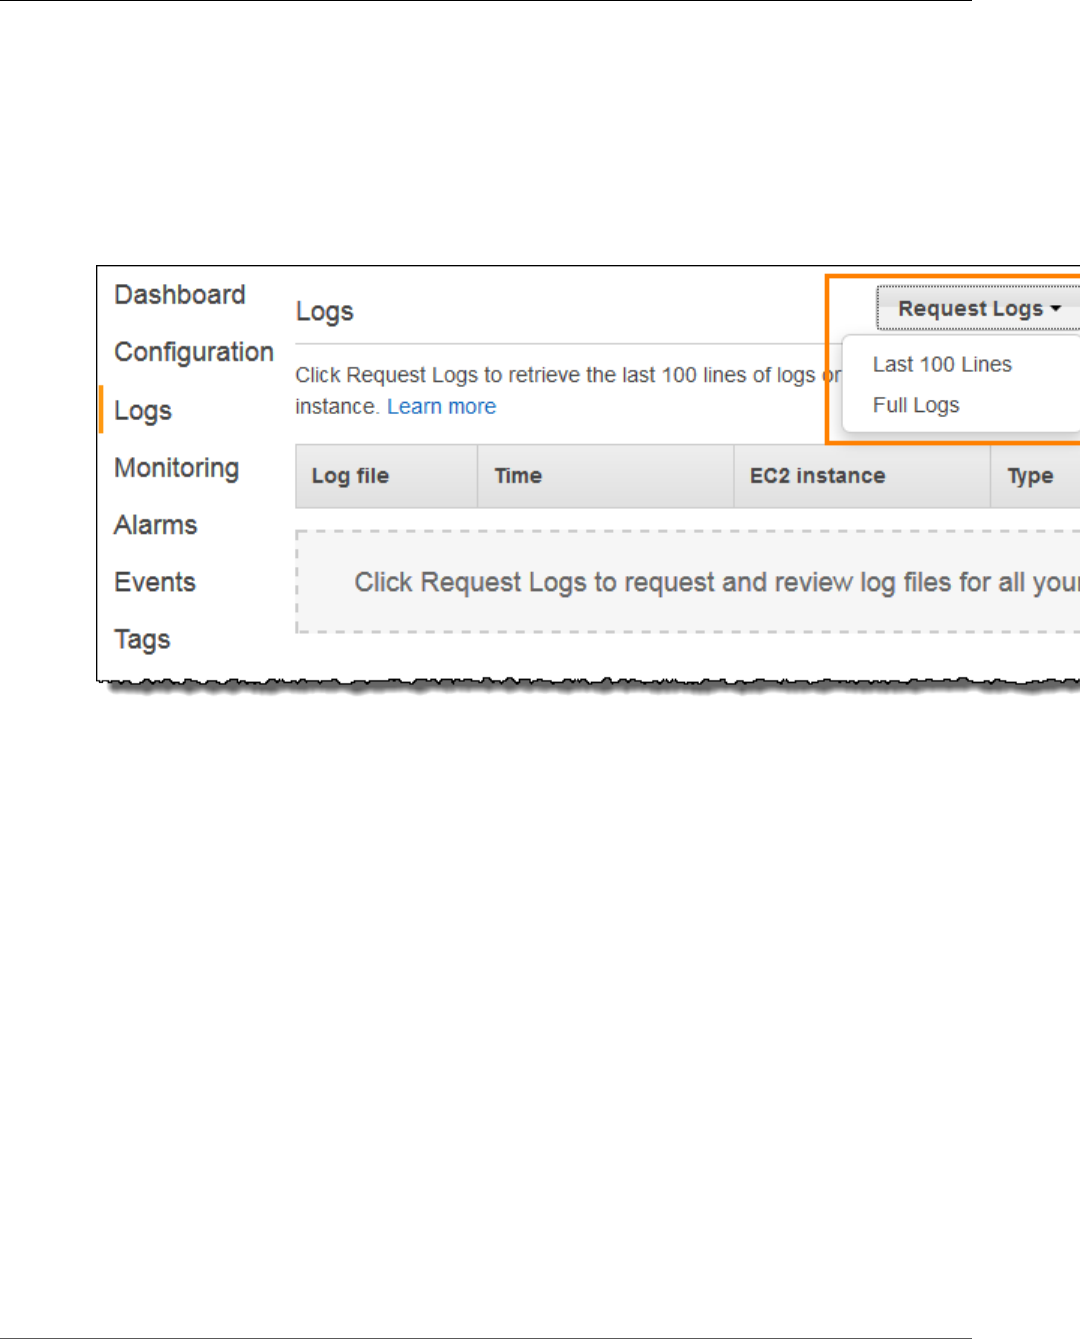
AWS Elastic Beanstalk Developer Guide
Logs
Logs
The Logs page lets you retrieve logs from the EC2 instances in your environment. When you request logs,
Elastic Beanstalk sends a command to the instances, which then upload logs to your Elastic Beanstalk
storage bucket in Amazon S3. When you request logs on this page, Elastic Beanstalk automatically
deletes them from Amazon S3 after 15 minutes.
You can also configure your environment's instances to upload logs to Amazon S3 for permanent storage
after they have been rotated locally.
For more information, see Viewing Logs from Your Elastic Beanstalk Environment's Amazon EC2
Instances (p. 369).
Health
The Health page shows live health information about every instance in your environment, if enhanced
health monitoring is enabled. Enhanced health monitoring allows Elastic Beanstalk to closely monitor
the resources in your environment so that it can assess the health of your application more accurately.
When enhanced health monitoring is enabled, this page shows information about the requests served
by the instances in your environment and metrics from the operating system including latency, load and
CPU utilization.
API Version 2010-12-01
71
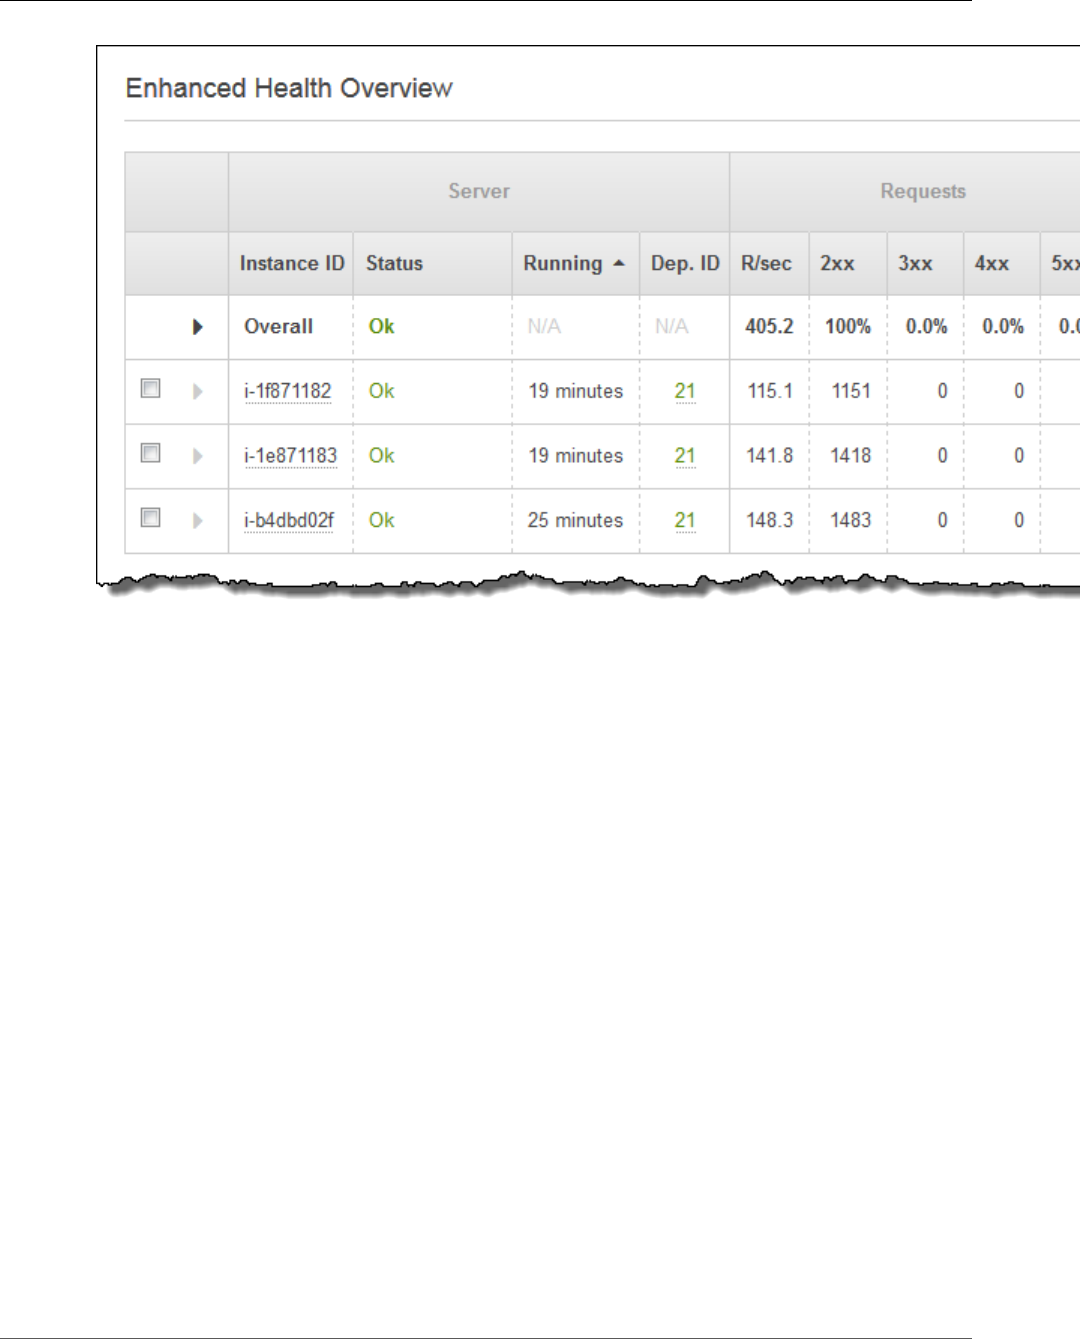
AWS Elastic Beanstalk Developer Guide
Monitoring
For more information, see Enhanced Health Reporting and Monitoring (p. 336).
Monitoring
The Monitoring page shows an overview of health information for your environment, including the
default set of metrics provided by Elastic Load Balancing and Amazon EC2, and graphs that show how
the environment's health has changed over time. You can use the options on this page to configure
additional graphs for resource specific metrics, and add alarms for any metric supported by the in-use
health reporting system.
API Version 2010-12-01
72

AWS Elastic Beanstalk Developer Guide
Alarms
For more information, see Monitoring Environment Health in the AWS Management Console (p. 329).
Alarms
The Alarms page shows information about any alarms that you have configured for your environment.
You can use the options on this page to modify or delete alarms.
API Version 2010-12-01
73
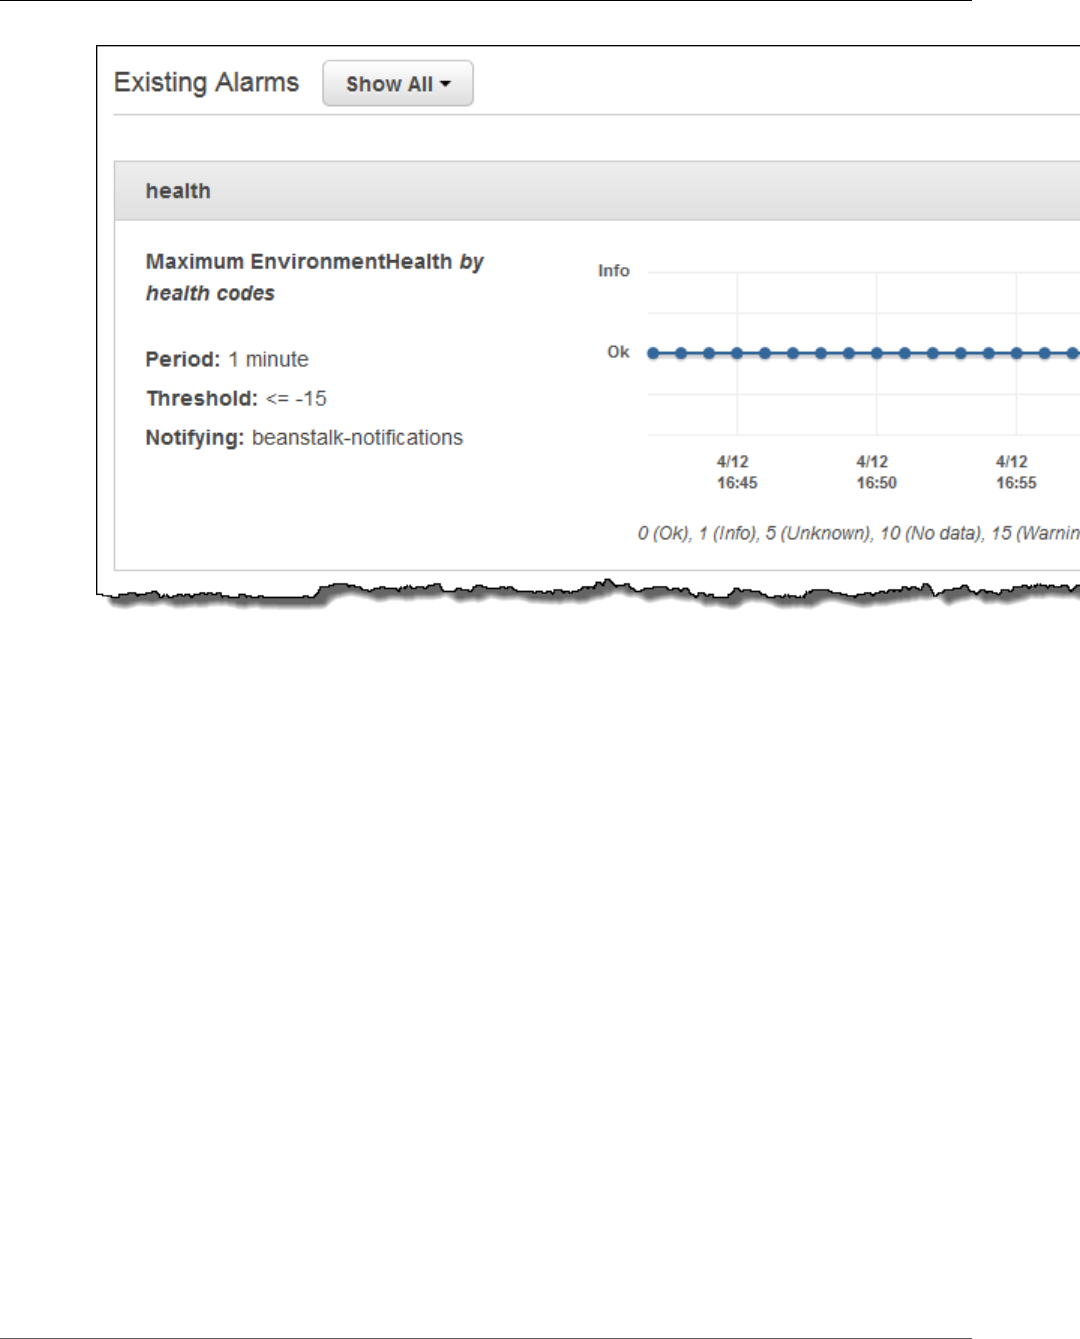
AWS Elastic Beanstalk Developer Guide
Managed Updates
For more information, see Manage Alarms (p. 362).
Managed Updates
The Managed Updates shows information about upcoming and completed managed platform updates
and instance replacement. These features let you configure your environment to update to the latest
platform version automatically during a weekly maintenance window that you choose.
In between platform releases, you can choose to have your environment replace all of its EC2 instances
during the maintenance window. This can help alleviate issues that occur when your application runs for
extended periods of time.
For more information, see Managed Platform Updates (p. 145).
Events
The Events page shows the event stream for your environment. Elastic Beanstalk outputs event
messages whenever you interact with the environment, and when any of your environment's resources
are created or modified as a result.
API Version 2010-12-01
74
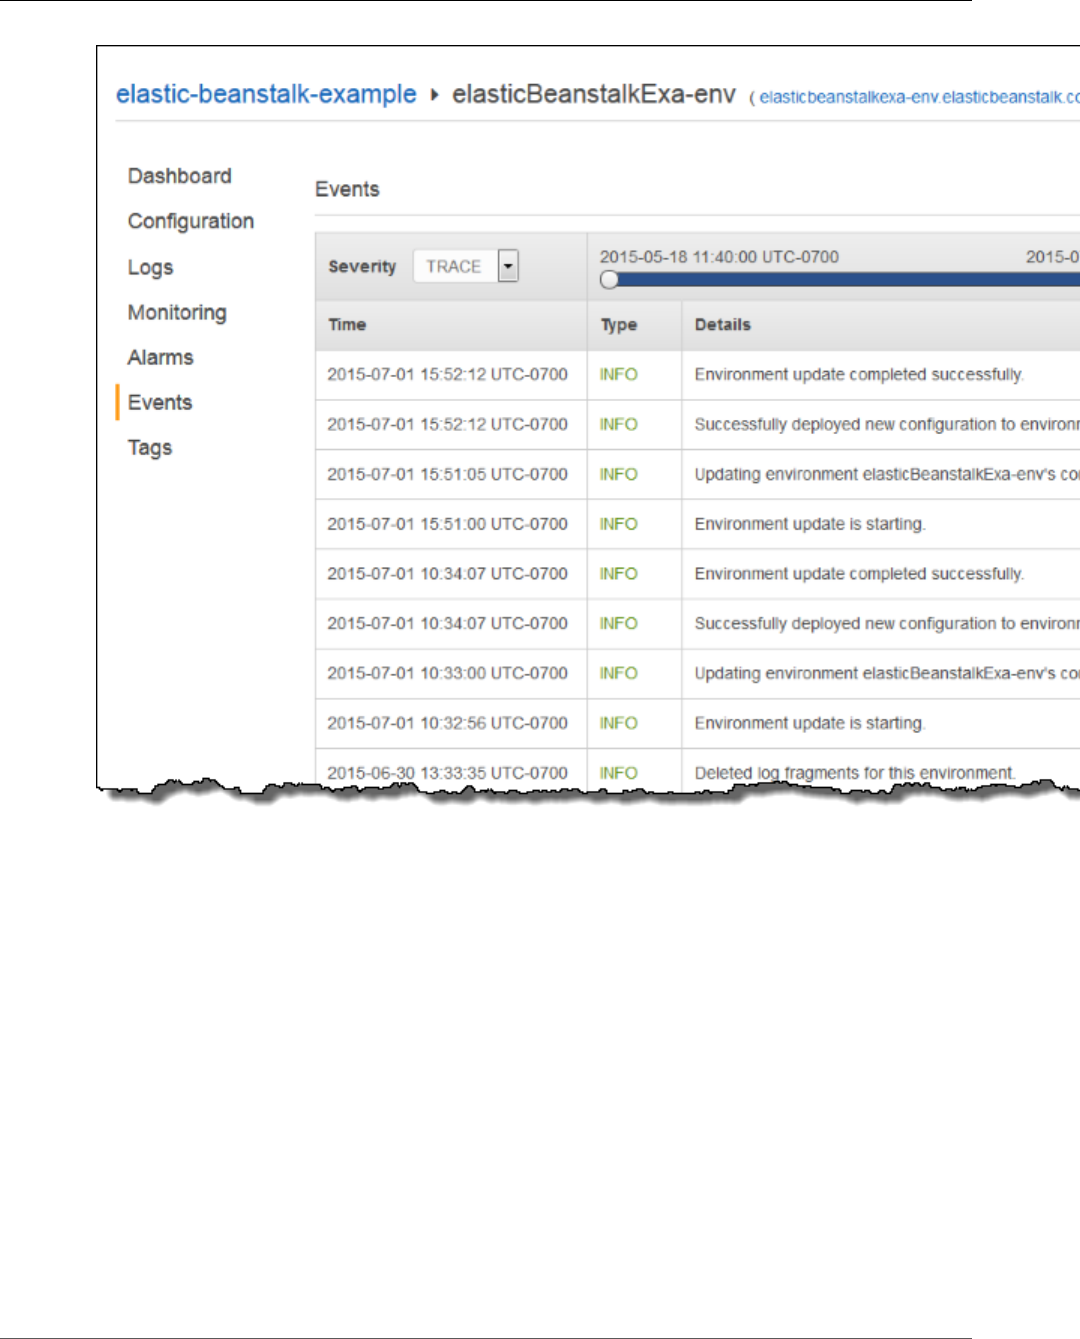
AWS Elastic Beanstalk Developer Guide
Tags
For more information, see Viewing an Elastic Beanstalk Environment's Event Stream (p. 365).
Tags
The Tags page shows the tags that you applied to the environment when you created it. These tags are
applied to every resource that Elastic Beanstalk creates to support your application.
API Version 2010-12-01
75
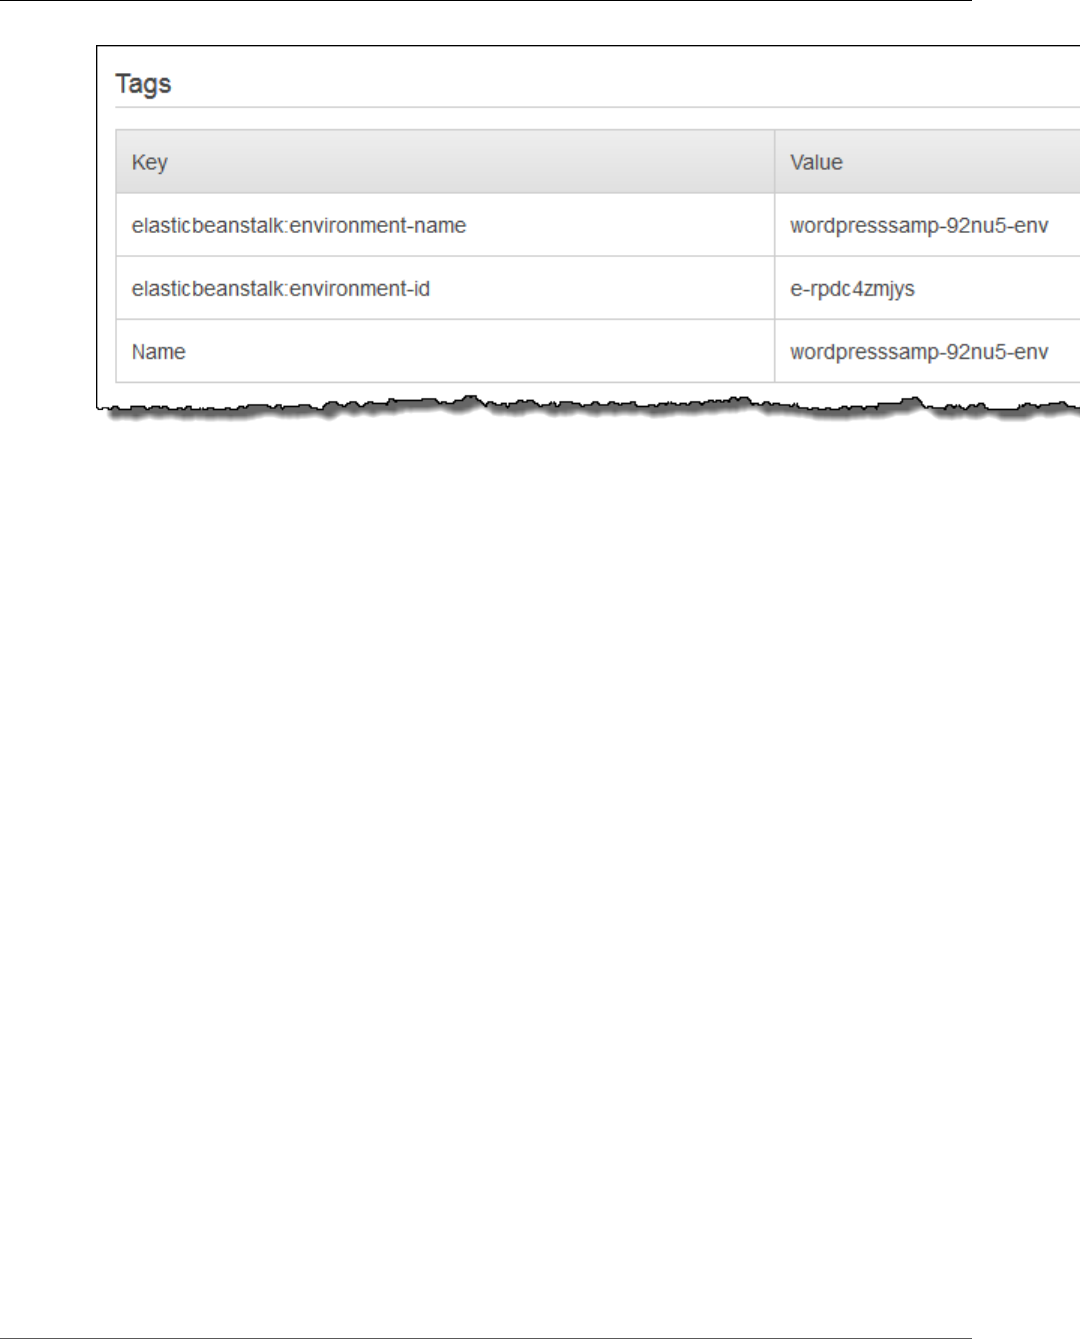
AWS Elastic Beanstalk Developer Guide
Creating Environments
For more information, see Tagging Resources in Your Elastic Beanstalk Environment (p. 140).
Creating an AWS Elastic Beanstalk Environment
You can deploy multiple environments when you need to run multiple versions of an application. For
example, you might have development, integration, and production environments.
Note
For instructions on creating and managing environments with the EB CLI, see Managing Elastic
Beanstalk Environments with the EB CLI (p. 492).
The Create New Environment wizard in the AWS Management Console guides you through the creation
of an environment step by step, with a bevy of options for configuring the resources that Elastic
Beanstalk deploys on your behalf. If you are just getting started, you can use the default values for many
of these options without issue.
Note
Creating an environment requires the permissions in the Elastic Beanstalk full access managed
policy. See Elastic Beanstalk User Policy (p. 24) for details.
Follow this procedure to launch a new environment running the default application. These steps
are simplified to get your environment up and running quickly. See The Create New Environment
Wizard (p. 78) for more detailed instructions with descriptions of all of the available options.
To launch an environment with a sample application (console)
1. Open the Elastic Beanstalk console.
2. Choose an application or create a new one (p. 49).
3. In the upper right corner, choose Create New Environment from the Actions menu.
API Version 2010-12-01
76

AWS Elastic Beanstalk Developer Guide
Creating Environments
4. Choose between Web server and Worker environment tiers (p. 14). You cannot change an
environment's tier after creation.
Note
The .NET on Windows Server platform (p. 710) doesn't support the worker environment
tier.
5. For Platform, choose the platform that matches the language used by your application.
API Version 2010-12-01
77

AWS Elastic Beanstalk Developer Guide
The Create New Environment Wizard
Note
Elastic Beanstalk supports multiple configurations (p. 26) for most platforms listed. By
default, the console selects the latest version of the language, web container or framework
supported by Elastic Beanstalk (p. 26). If your application requires an older version, choose
Configure more options below.
6. For App code, choose Sample application.
7. If you would like to further customize your environment, choose Configure more options. The
following options can only be set during environment creation:
• Environment name
• Domain name
• Platform configuration
• VPC
• Tier
The following settings can be changed after environment creation, but require new instances or
other resources to be provisioned and can take a long time to apply:
• Instance type, root volume, key pair, and IAM role
• Internal RDS database
• Load balancer
For details on all available settings, see The Create New Environment Wizard (p. 78).
8. Choose Create environment.
While Elastic Beanstalk creates your environment, you are redirected to the The AWS Elastic Beanstalk
Environment Management Console (p. 65). Once the environment health turns green, click on the
URL next to the environment name to view the running application. This URL is generally accessible
from the Internet unless you configure your environment to use a custom VPC with an internal load
balancer (p. 97).
Topics
•The Create New Environment Wizard (p. 78)
•Clone an Environment (p. 110)
•Terminate an Environment (p. 114)
•Creating Elastic Beanstalk Environments with the AWS CLI (p. 116)
•Creating Elastic Beanstalk Environments with the API (p. 117)
•Constructing a Launch Now URL (p. 119)
•Creating and Updating Groups of AWS Elastic Beanstalk Environments (p. 122)
The Create New Environment Wizard
This topic provides more information about pages in the Create New Environment wizard. For basic
instructions, see Creating an AWS Elastic Beanstalk Environment (p. 76).
Topics
•Create a new environment (p. 79)
•Configuration presets (p. 82)
•Environment settings (p. 83)
API Version 2010-12-01
78

AWS Elastic Beanstalk Developer Guide
The Create New Environment Wizard
•Software settings (p. 85)
•Instances (p. 86)
•Capacity (p. 87)
•Load Balancer (p. 89)
•Deployment Settings (p. 91)
•Security (p. 94)
•Monitoring (p. 95)
•Notifications (p. 96)
•Network (p. 97)
•Database (p. 99)
•Worker Details (p. 100)
•The Old New Environment Wizard (p. 101)
Create a new environment
You can use the sample application, upload your own application, or specify the URL for the Amazon S3
bucket that contains your application code.
Choose Create environment to launch an environment right away with a default environment name,
automatically generated domain, and recommended settings. To configure more options before you
launch, choose Configure more options. You can also launch a new environment based on a custom
platform by selecting Custom platform, as shown in the following screenshot. If there are no custom
platforms available, this option is greyed out.
You can create a new environment from two types of platforms:
•Supported platforms (p. 79)
•Custom platforms (p. 80)
Create new environment from supported platform
In most cases you will use an Elastic Beanstalk supported platform for your new environment. When the
new environment wizard starts, it selects the Preconfigured platform option by default, as shown in the
following screenshot.
API Version 2010-12-01
79
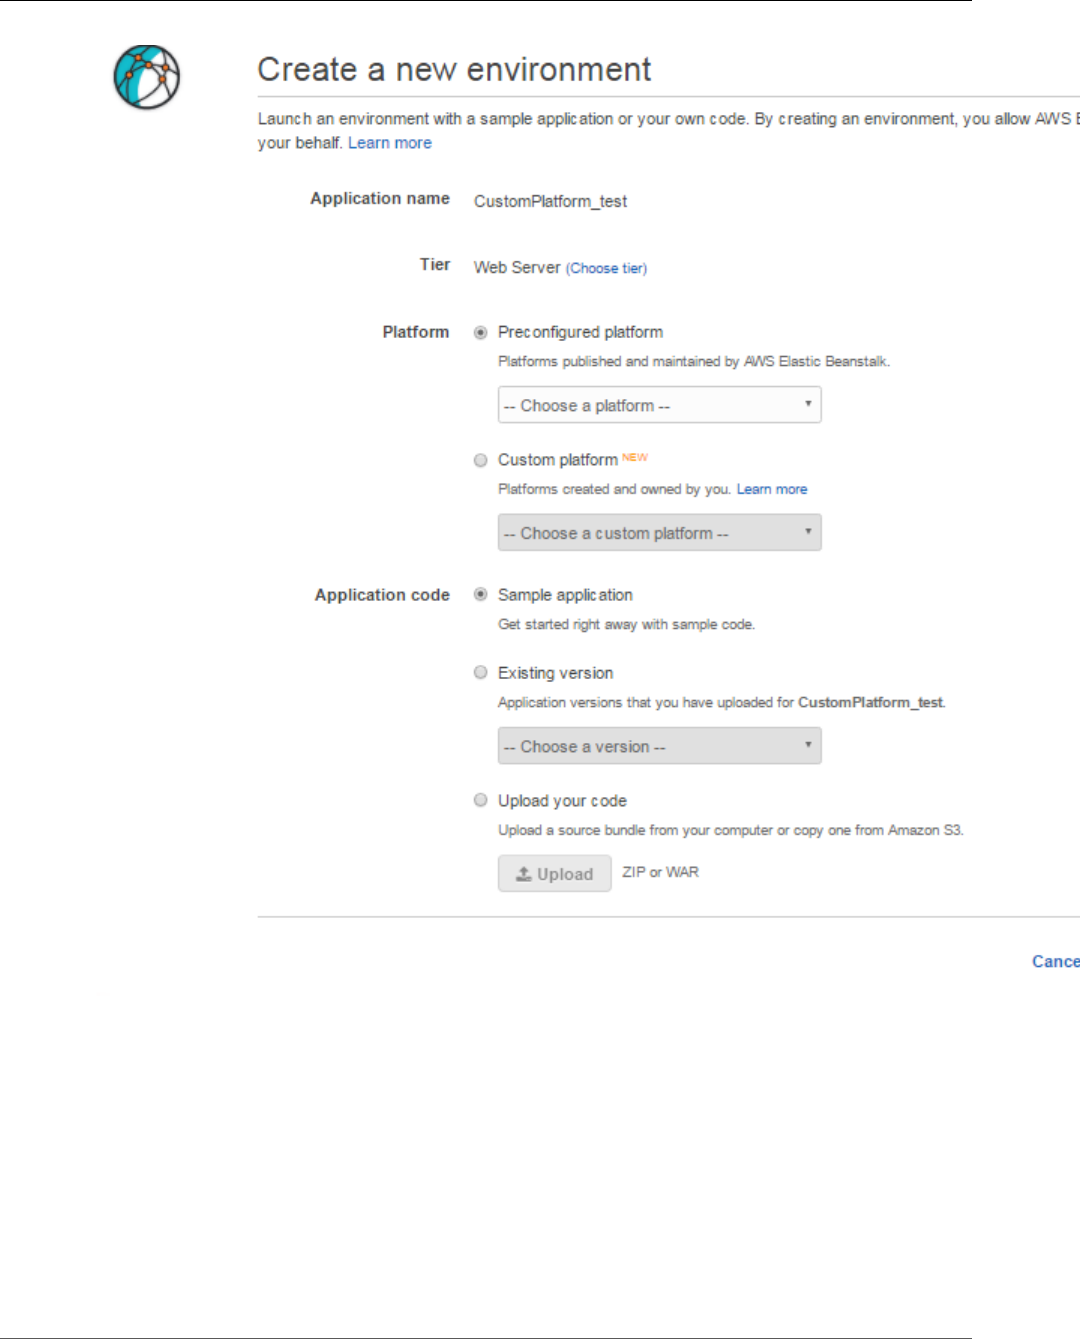
AWS Elastic Beanstalk Developer Guide
The Create New Environment Wizard
Scroll through the list, select the supported platform to base your environment on, and select Create
environment.
Create new environment from a custom platform
If an off-the-shelf platform does not suit your needs, you can create a new environment from a custom
platform. When the new environment wizard starts, select the Custom platform option, as shown in the
following screenshot.
API Version 2010-12-01
80
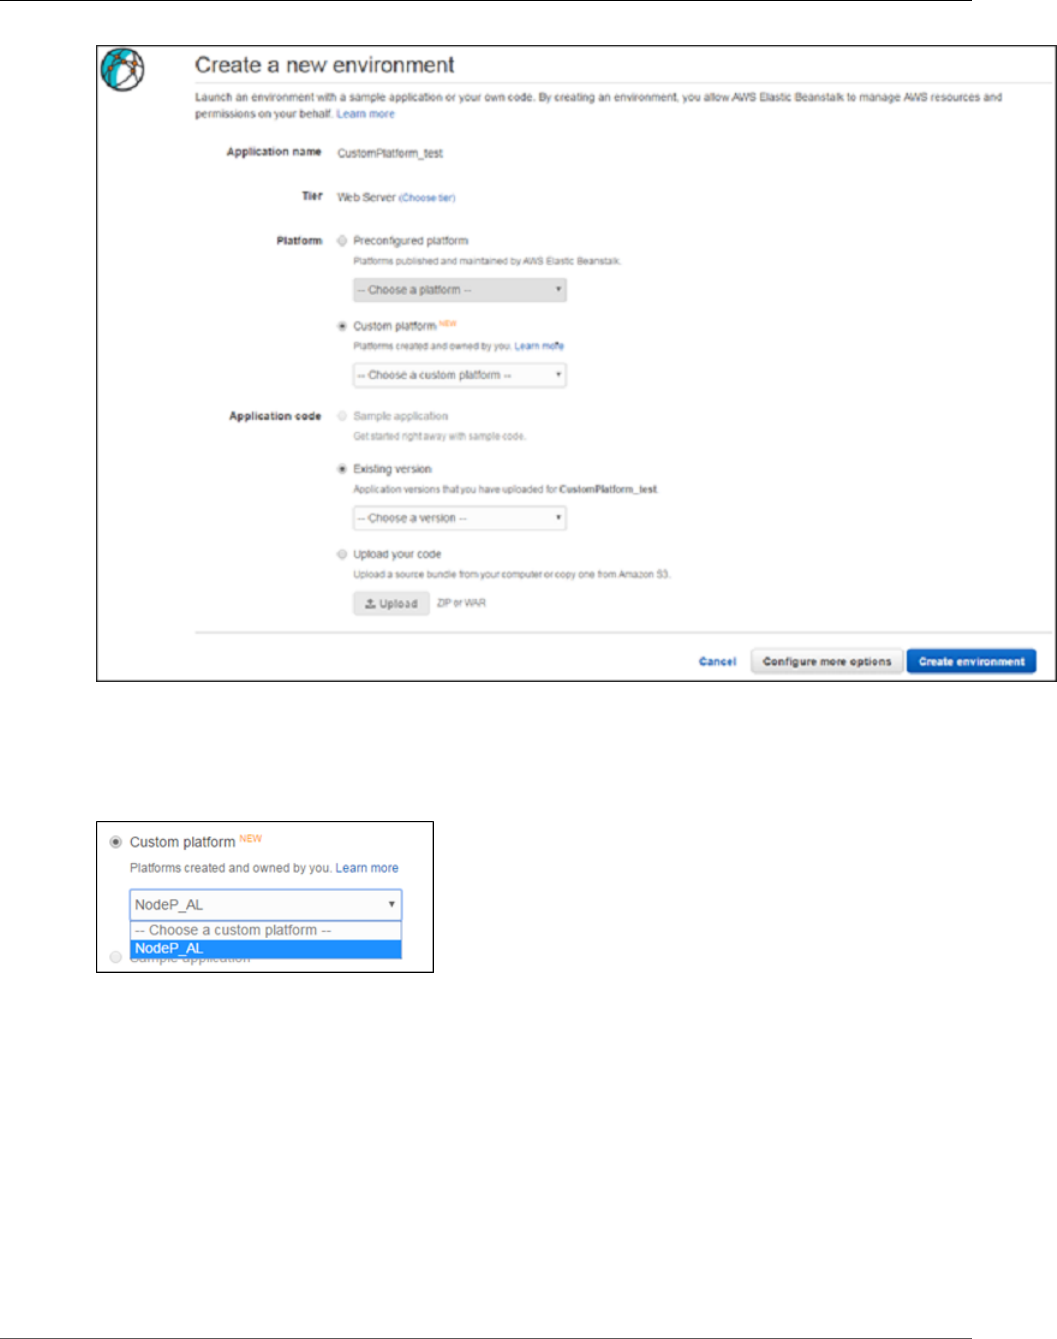
AWS Elastic Beanstalk Developer Guide
The Create New Environment Wizard
Note
Depending on the platform configuration you selected, you can upload your application in a ZIP
source bundle (p. 58), a WAR file (p. 678), or a plaintext Docker configuration (p. 633). The
file size limit is 512 MB. If you select Custom platform, the console pops up a window like the
following in which you can specify the custom platform setting.
Once you've selected the platform from which the new environment is created, you can also change the
platform version. Select Configure more options and then Change platform configuration. When the
Change a platform version window appears, select the version to use for your new environment and
select Save.
API Version 2010-12-01
81
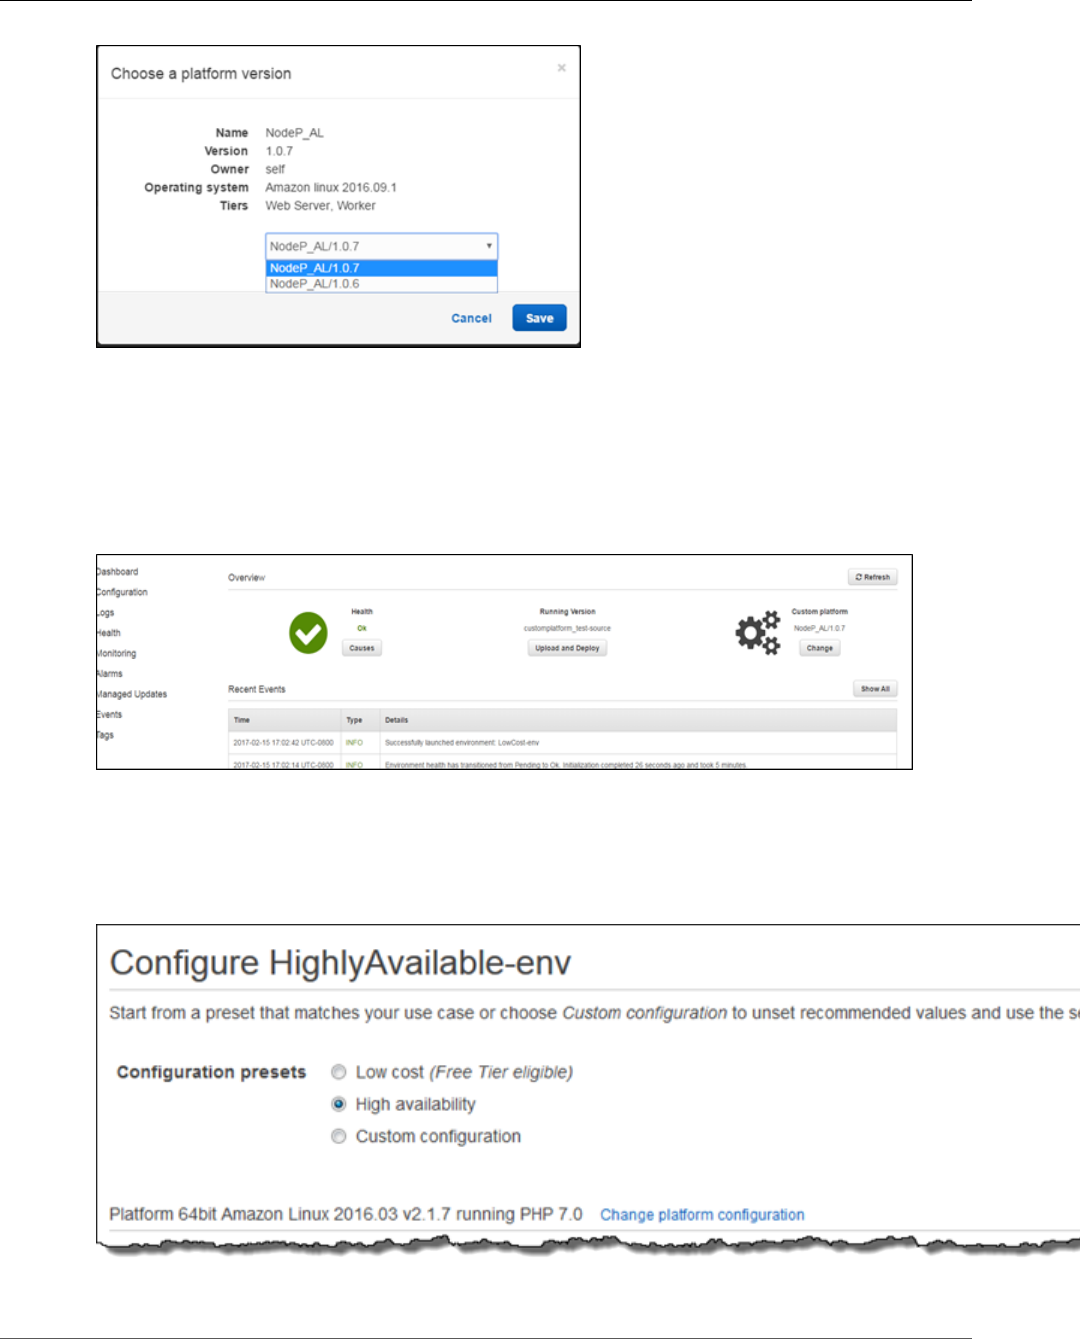
AWS Elastic Beanstalk Developer Guide
The Create New Environment Wizard
Now that you have selected the platform to use, the next step is to load your application code. If you
already have code deployed to Elastic Beanstalk, select Existing version and your application in the
Application code section.
If you want to upload new code, select Upload your code, Upload and follow the on-screen instructions.
Once you've loaded your application code into the environment, select Create environement to create
your new environment.
Configuration presets
Elastic Beanstalk provides configuration presets for low-cost development and high availability
use cases. Each preset includes a default environment name and recommended values for several
configuration options (p. 202).
API Version 2010-12-01
82

AWS Elastic Beanstalk Developer Guide
The Create New Environment Wizard
The high availability preset includes a load balancer; the low cost preset does not. Choose this option if
you want a load-balanced environment that can run multiple instances for high availability and scale in
response to load.
The third preset, Custom configuration, removes all recommended values except role settings and
uses the API defaults. Choose this option if you are deploying a source bundle with configuration
files (p. 256) that set configuration options. Custom configuration is also selected automatically if you
modify either the low cost or high availability configuration presets.
Environment settings
Set the name and subdomain, and create a description for your environment. Be aware that once you
specify the environment settings, you cannot change them later.
API Version 2010-12-01
83
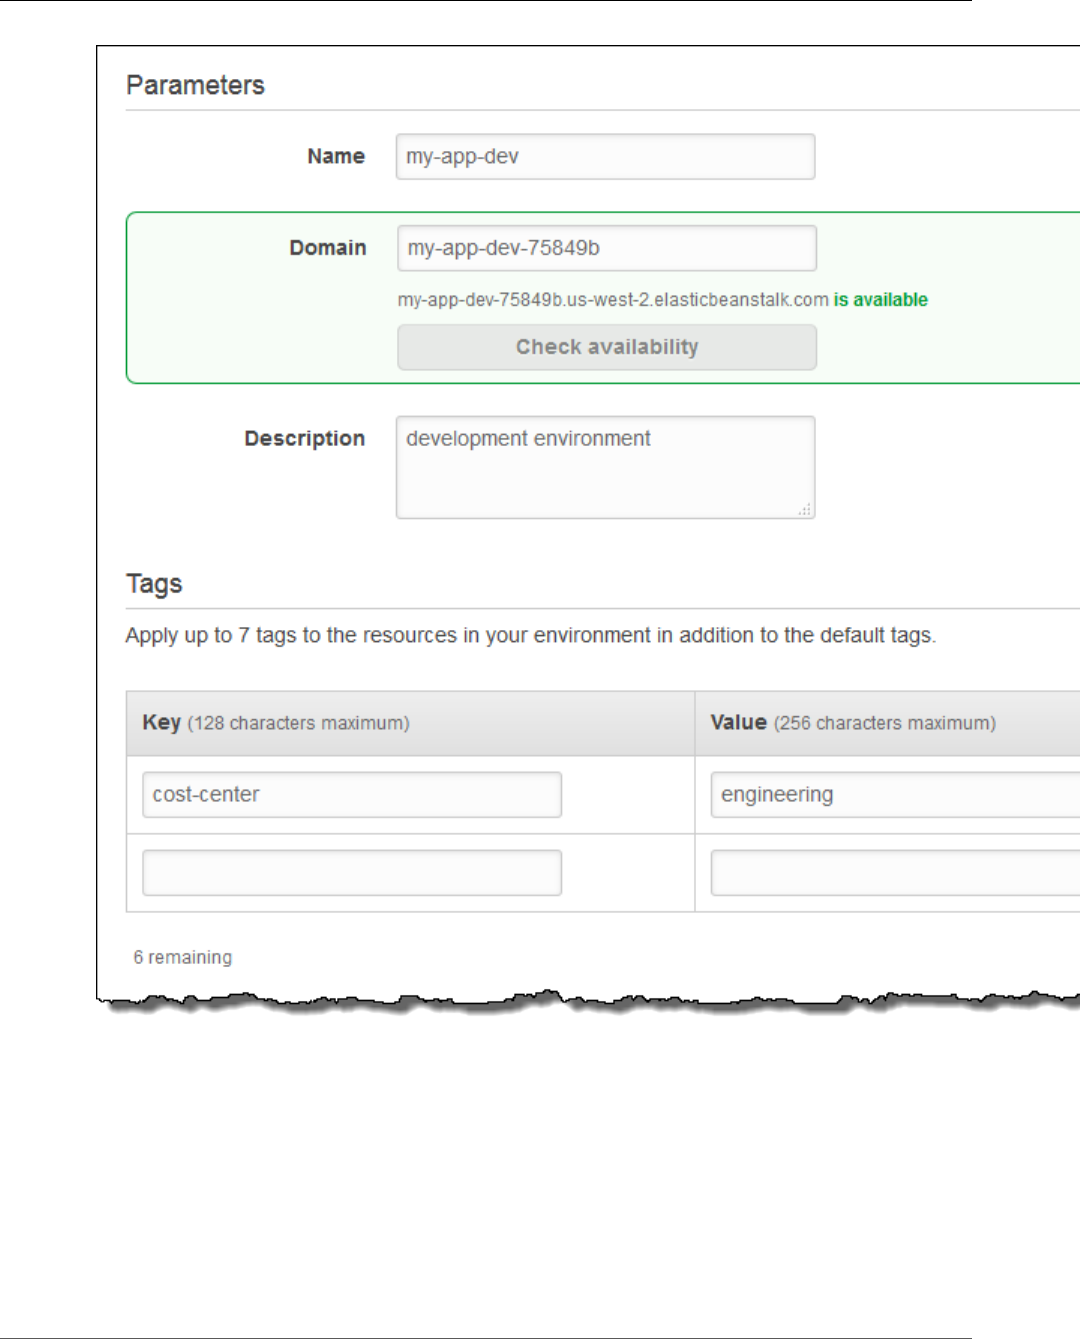
AWS Elastic Beanstalk Developer Guide
The Create New Environment Wizard
•Name – Enter a name for the environment.
•Domain – (web server environments) Enter a unique URL for your environment. Although the
environment URL is populated with the environment name, you can enter a different name for the
URL. Elastic Beanstalk uses this name to create a unique CNAME for the environment. To check
whether the URL you want is available, click Check Availability.
•Description – Enter a description for this environment.
•Tags – Add tags to the resources in your environment. Restrictions on tag keys and tag values include
the following:
• Keys and values can contain any alphabetic character in any language, any numeric character, white
space, invisible separator, and the following symbols: _ . : / = + \ - @
API Version 2010-12-01
84
AWS Elastic Beanstalk Developer Guide
The Create New Environment Wizard
• Keys and values are case-sensitive
• Values cannot match the environment name
• Values cannot include aws: or elasticbeanstalk:
For more information about using tags, see Tagging Your Amazon EC2 Resources in the Amazon EC2
User Guide for Linux Instances.
Software settings
Configure the instances in your environment to upload rotated logs to Amazon S3, run the AWS X-Ray
daemon for debugging, and set environment properties to pass information to your application. More
platform-specific settings are available on the Configuration page after you create your environment.
•X-Ray Daemon – Run the AWS X-Ray daemon (p. 192) for debugging.
•Application logs – Enable Log storage to upload rotated logs from the instances in your environment
to your Elastic Beanstalk storage bucket in Amazon S3.
•Environment variables – Set environment properties (p. 189) that are passed to the application on-
instance as environment variables.
API Version 2010-12-01
85
AWS Elastic Beanstalk Developer Guide
The Create New Environment Wizard
The way that properties are passed to applications varies by platform. In general, properties are not
visible if you connect to an instance and run env.
Instances
Configure the Amazon EC2 instances that serve requests in your environment.
•Instance type – Select a server with the characteristics (including memory size and CPU power) that
are most appropriate to your application.
For more information about the Amazon EC2 instance types available for your Elastic Beanstalk
environment, see Instance Families and Types in the Amazon EC2 User Guide for Linux Instances.
•AMI ID – If you have created a custom AMI (p. 297), specify the AMI ID to use on your instances.
•Root volume – Specify the type, size, and input/output operations per second (IOPS) for your root
volume.
•Root volume type – From the list of storage volumes types provided by Amazon EBS, choose the
type to attach to the Amazon EC2 instances in your Elastic Beanstalk environment. Select the
volume type that meets your performance and price requirements. For more information, see
Amazon EBS Volume Types and Amazon EBS Product Details.
•Size – Set the size of your storage volume. The size for magnetic volumes can be between 8 GiB and
1024 GiB; SSD volumes can be between 10 GiB and 16,384 GiB. If you choose Provisioned IOPS
(SSD) as the root volume type for your instances, you must specify the value you want for root
API Version 2010-12-01
86
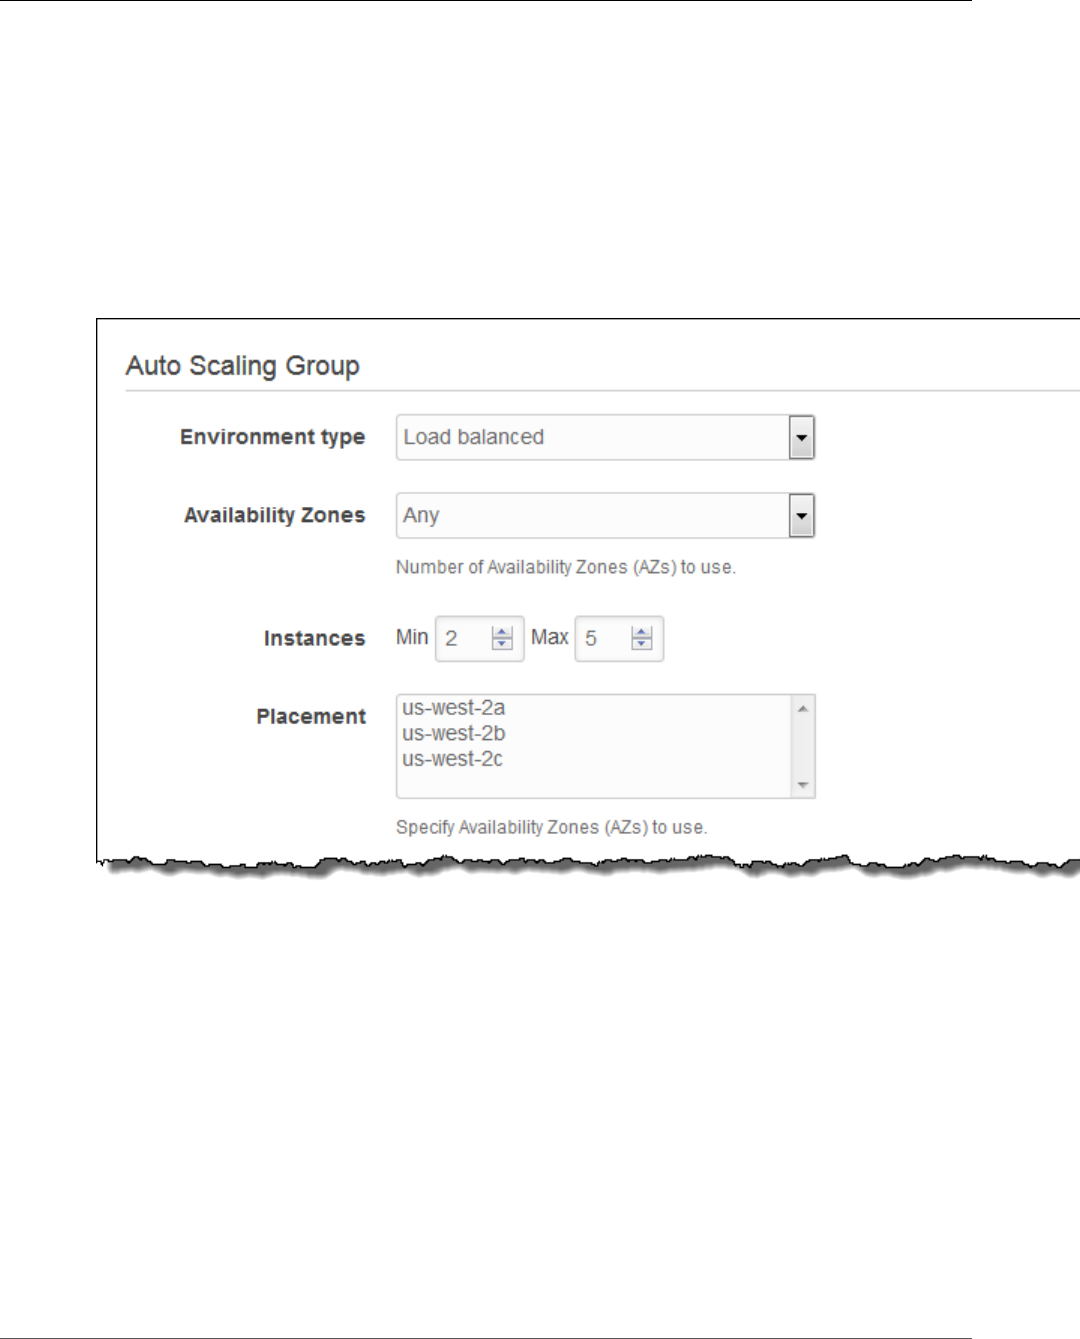
AWS Elastic Beanstalk Developer Guide
The Create New Environment Wizard
volume size. For other root volumes, if you do not specify your own value, Elastic Beanstalk uses the
default volume size for that storage volume type.
•IOPS – Specify the input/output operations per second that you want. If you selected Provisioned
IOPS (SSD) as your root volume type, you must specify the IOPS. The minimum is 100 and the
maximum is 4,000. The maximum ratio of IOPS to your volume size is 30 to 1. For example, a
volume with 3,000 IOPS must be at least 100 GiB.
Capacity
Configure the compute capacity of your environment and Auto Scaling Group settings to optimize the
number of instances you're using.
•Environment type – Choose Load balanced to run the Amazon EC2 instances in your environment
behind a load balancer, or Single instance to run one instance without a load balancer.
Warning
A single-instance environment isn't production-ready. If the instance becomes unstable
during deployment, or Elastic Beanstalk terminates and restarts the instance during a
configuration update, your application may be unavailable for a period of time. Use single-
instance environments for development, testing, or staging. Use load-balanced environments
for production.
•Availability Zones – Restrict the number of Availability Zones to use for instances.
•Instances – Set the minimum and maximum number of instances to run.
•Placement – Choose AZs that must have instances at all times. If you assign Availability Zones here,
the minimum number of instances must be at least the number of Availability Zones that you choose.
A load balanced environment can run multiple instances for high availability and prevent downtime
during configuration updates and deployments. In a load balanced environment, the domain name maps
to the load balancer. In a single instance environment, it maps to an elastic IP address on the instance.
API Version 2010-12-01
87
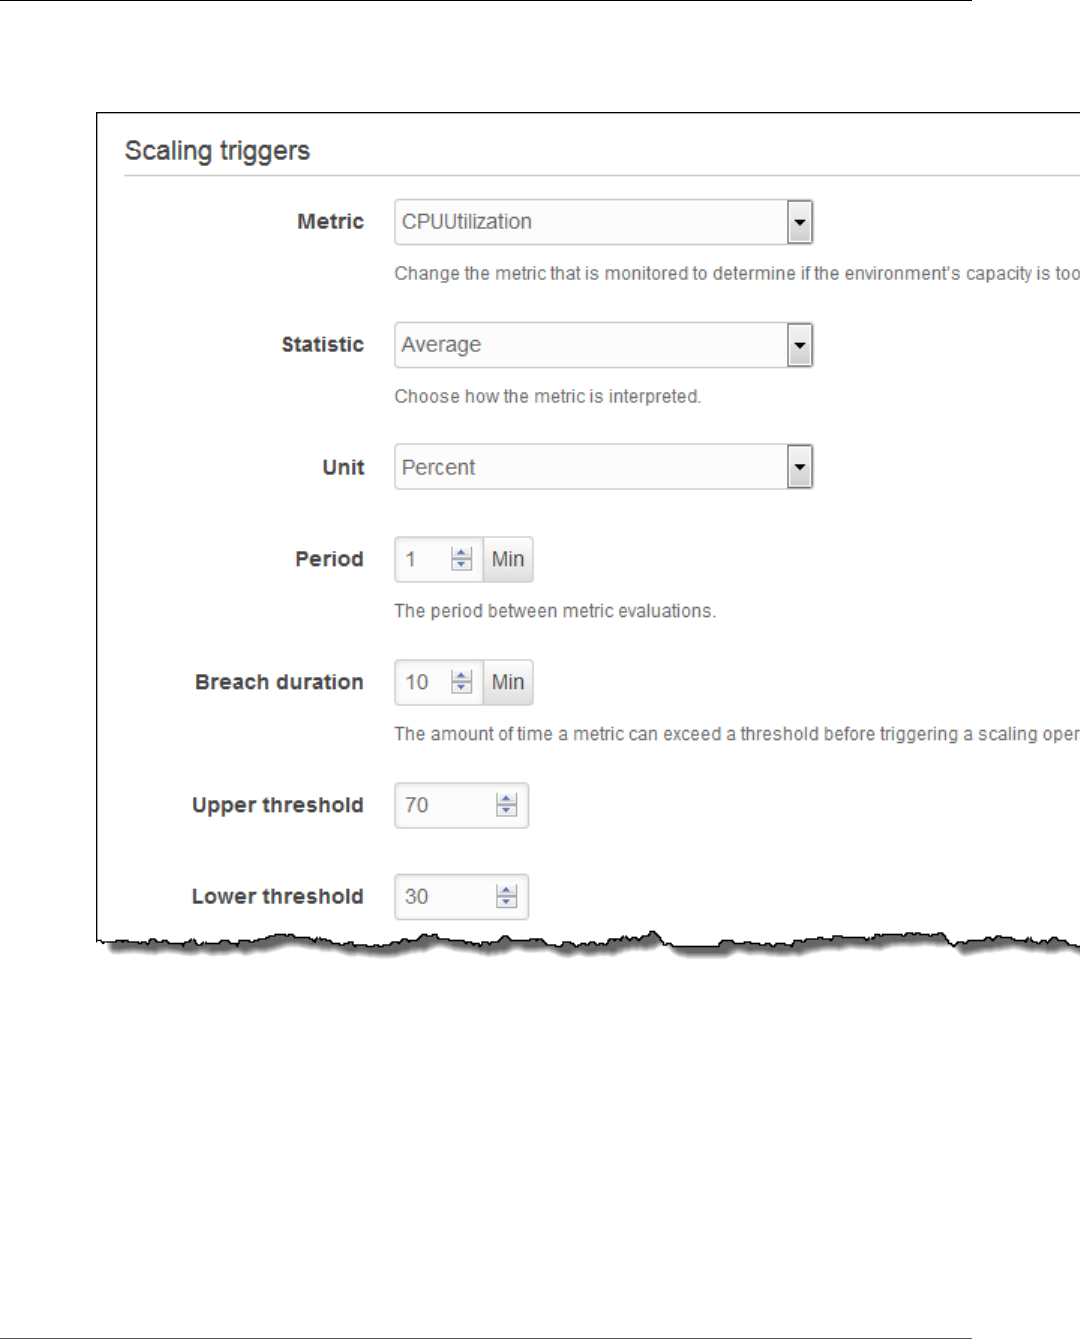
AWS Elastic Beanstalk Developer Guide
The Create New Environment Wizard
A scaling trigger is an Amazon CloudWatch alarm that lets Auto Scaling know when to scale the number
of instances in your environment. Your environment includes two triggers by default, a high trigger to
scale up, and a low trigger to scale down.
•Metric – Choose the metric that the alarm monitors to identify times when you have too few or too
many running instances for the amount of traffic that your application receives.
•Statistic – Choose how to interpret the metric. Metrics can be measured as an average across all
instances, the maximum or minimum value seen, or a sum value from the numbers submitted by all
instances.
•Unit – Specify the unit of measurement for the values of upper and lower thresholds.
•Period – Specify the amount of time between each metric evaluation.
•Breach duration – Specifiy the amount of time that a metric can meet or exceed a threshold before
triggering the alarm. This value must be a multiple of the value for Period. For example, with a period
of 1 minute and a breach duration of 10 minutes, the threshold must be exceeded on 10 consecutive
evaluations to trigger a scaling operation
•Upper threshold – Specify the minimum value that a statistic can match to be considered in breach.
API Version 2010-12-01
88

AWS Elastic Beanstalk Developer Guide
The Create New Environment Wizard
•Lower threshold – Specify the maximum value that a statistic can match to be considered in breach.
For more information on CloudWatch metrics and alarms, see Amazon CloudWatch Concepts in the
Amazon CloudWatch User Guide.
Load Balancer
Your environment's load balancer is the entry point for all traffic headed for your application. Elastic
Beanstalk supports several types of load balancer. When you create an environment using the Elastic
Beanstalk console, a Classic Load Balancer is created for your environment. For more details about load
balancer types, see Your AWS Elastic Beanstalk Environment's Load Balancer (p. 176).
By default, the load balancer serves HTTP traffic on port 80. You can also configure a secure listener to
accept secure connections using HTTPS. If you use HTTPS to provide secure connections on port 443, you
can disable the default listener to require users to connect securely.
API Version 2010-12-01
89
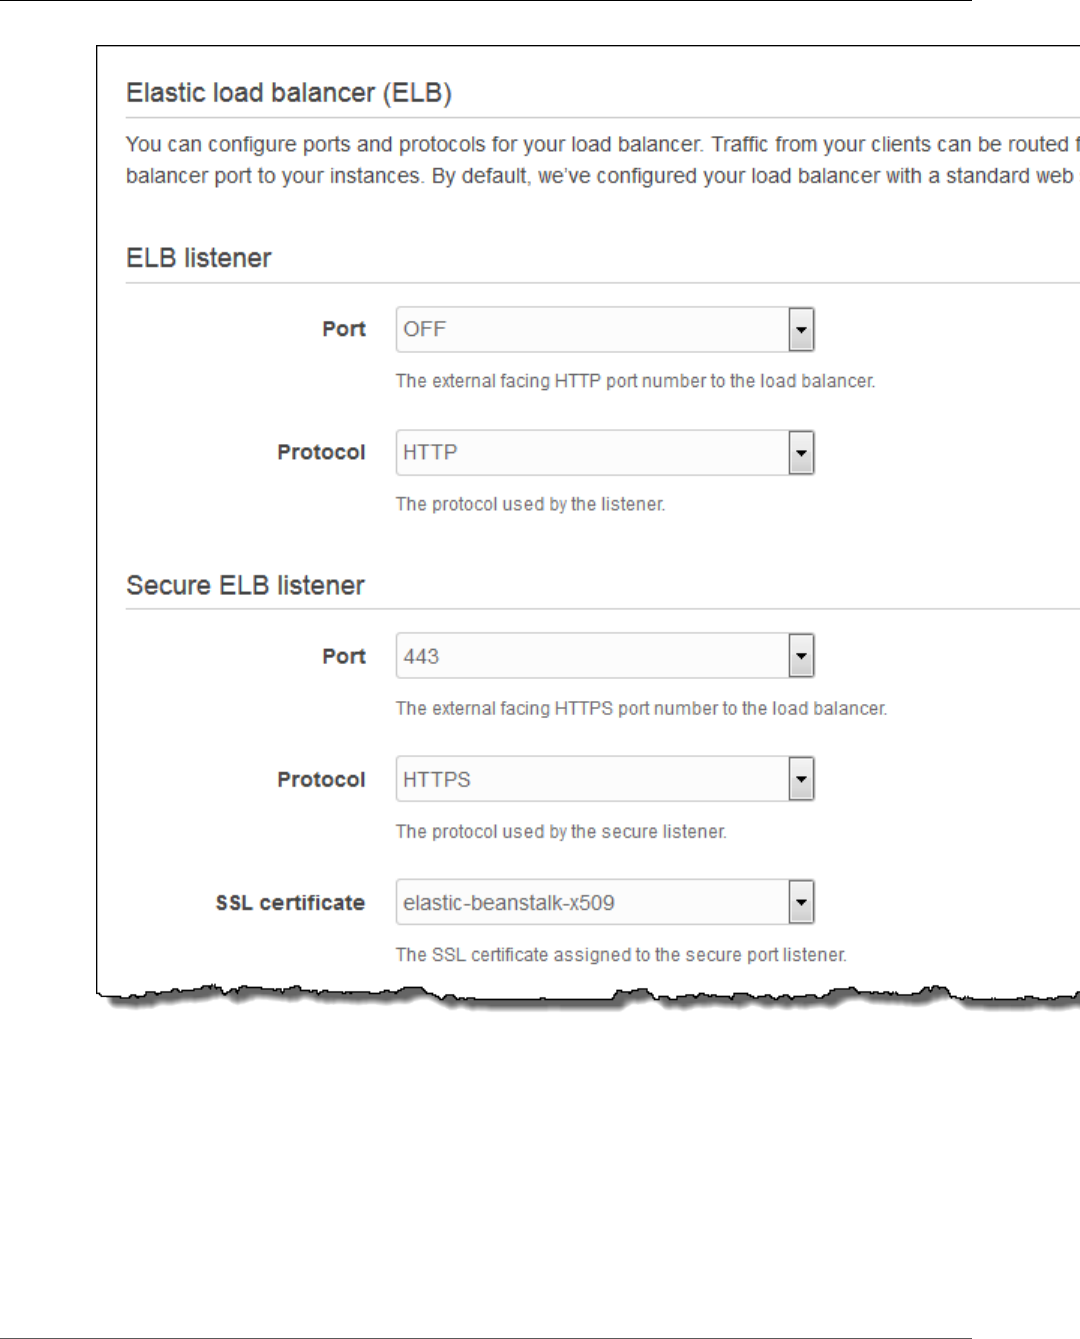
AWS Elastic Beanstalk Developer Guide
The Create New Environment Wizard
•ELB listener – The default listener on the load balancer serves HTTP traffic from the Internet or, for an
internal application, networks connected to your VPC.
•Secure ELB listener – The secure listener terminates HTTPS connections using a TLS/SSL certificate
and passes the decrypted traffic to your instances. You can upload certificates with IAM (p. 302), or
create a new certificate with AWS Certificate Managerfor a domain that you own.
Use the remaining options to enable cross-zone load balancing and connection draining.
API Version 2010-12-01
90
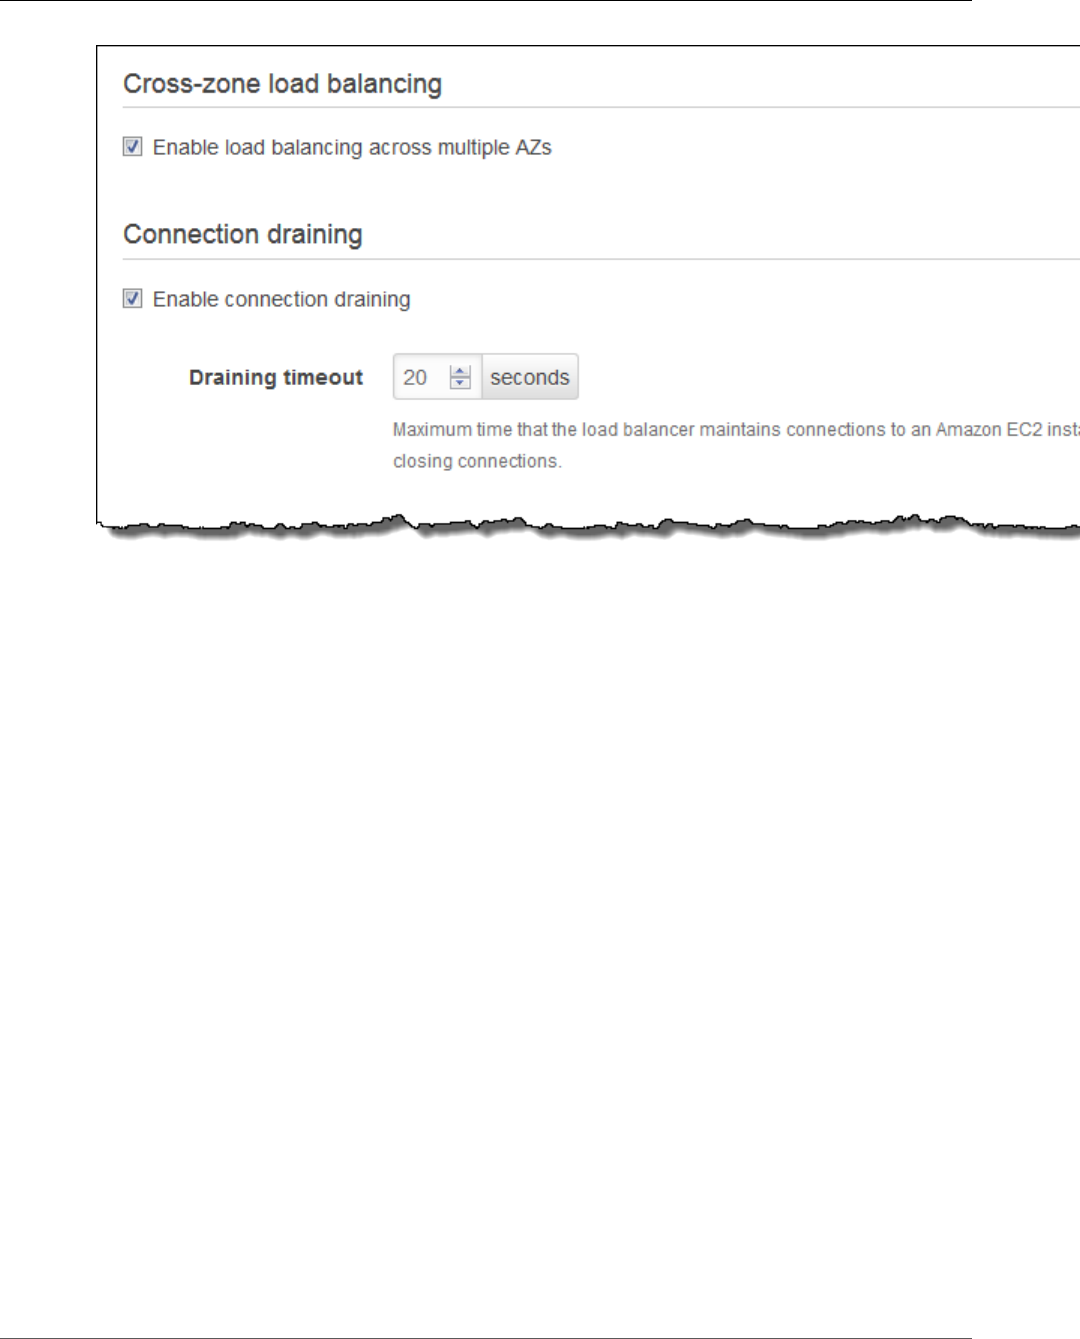
AWS Elastic Beanstalk Developer Guide
The Create New Environment Wizard
•Cross-zone load balancing – Ensures traffic is balanced correctly when the number of instances in
each availability zone is not uniform, and prevents issues due to DNS caching on clients.
•Connection draining – Allows time for active connections to complete before deregistering an
instance from the load balancer during scaling operations, updates, and deployments.
You can use configuration files (p. 256) to configure more load balancer options, including advanced
listener configuration, TCP passthrough, application load balancing, and backend authentication. See
Your AWS Elastic Beanstalk Environment's Load Balancer (p. 176) and Configuring HTTPS for your
Elastic Beanstalk Environment (p. 299) for more information.
Deployment Settings
For single-instance environments, choose a Deployment policy to configure how to deploy new
application versions and changes to the software configuration for instances. All at once completes
deployments as quickly as possible, but can result in downtime. Immutable deployments ensure the
new instance passes health checks before switching over to the new version; otherwise the old version
remains untouched. See Deployment Policies and Settings (p. 125) for more information.
For load-balanced environments, choose a Deployment policy to configure how to deploy new
application versions and changes to the software configuration for instances. All at once completes
deployments as quickly as possible, but can result in downtime. Rolling deployments ensure that
some instances remain in service during the entire deployment process. See Deployment Policies and
Settings (p. 125) for more information.
API Version 2010-12-01
91
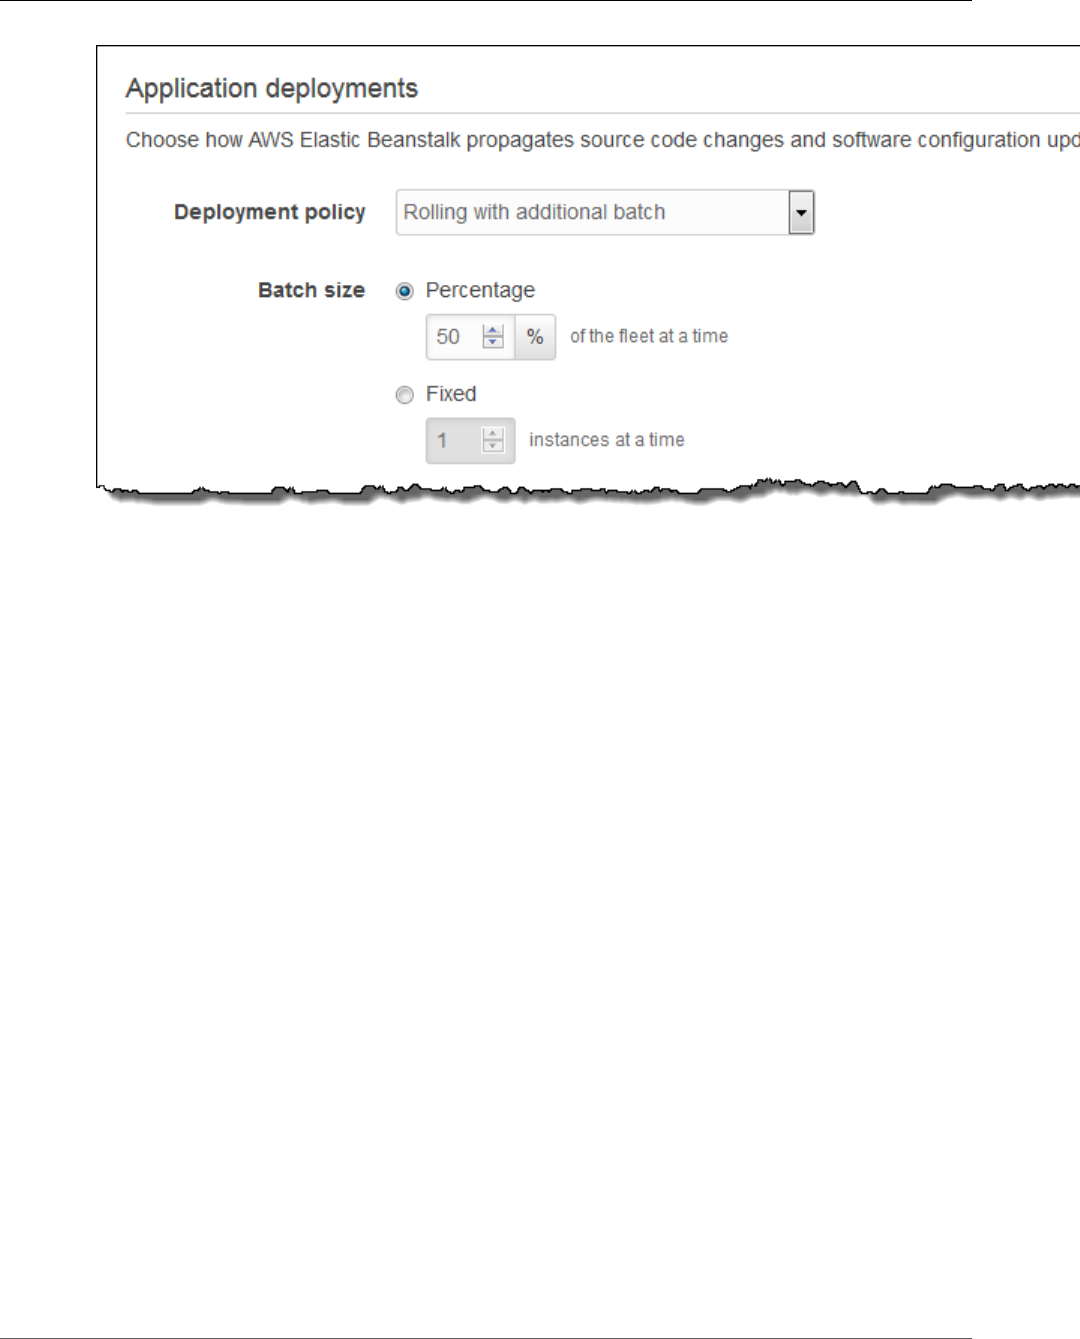
AWS Elastic Beanstalk Developer Guide
The Create New Environment Wizard
•Deployment policy – Rolling deployments take one batch of instances out of service at a time to
deploy a new version. Rolling with additional batch launches a new batch first to ensure that capacity
is not affected during the deployment. Immutable performs an immutable update (p. 138) when you
deploy.
•Batch size – The number or percentage of instances to update in each batch.
Rolling updates (p. 134) occur when you change instance launch configuration settings or VPC settings,
which require terminating and replacing the instances in your environment. Other configuration
changes are made in place without affecting capacity. For more information, see Configuration
Changes (p. 133).
API Version 2010-12-01
92
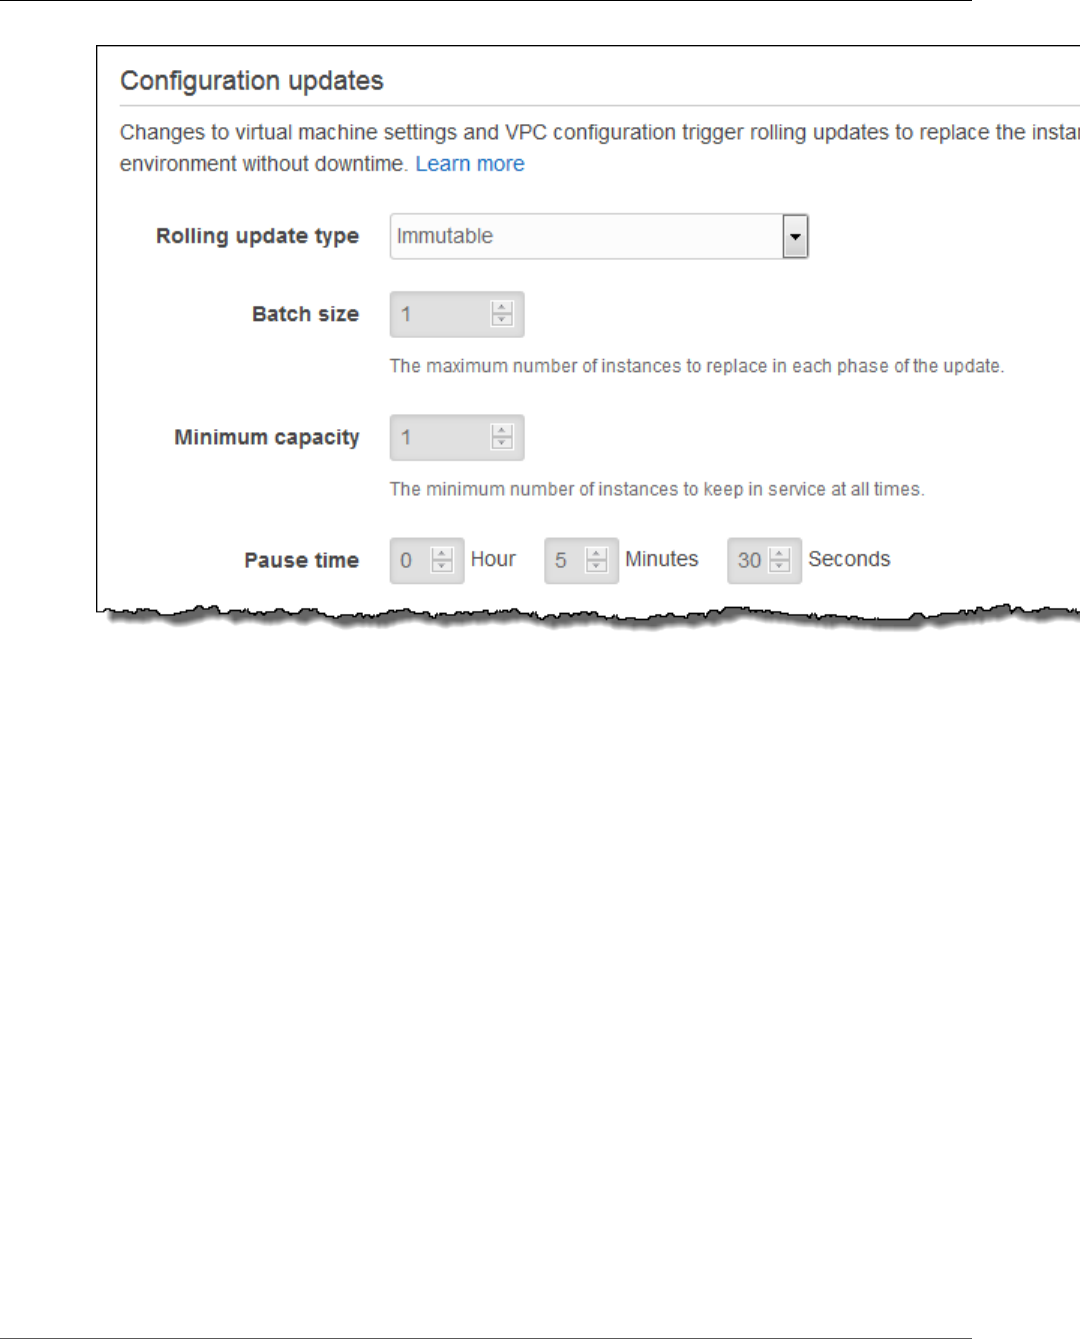
AWS Elastic Beanstalk Developer Guide
The Create New Environment Wizard
•Rolling update type – Time based, where AWS CloudFormation waits for the specified amount of
time after new instances are registered before moving on to the next batch, or health based, where
AWS CloudFormation waits for instances to pass health checks. Immutable performs an immutable
update (p. 138) when a configuration change would normally trigger a rolling update.
•Batch size – The number of instances to replace in each batch.
•Minimum capacity – The minimum number of instances to keep in service at any given time.
•Pause time – For time-based rolling updates, the amount of time to wait for new instances to come up
to speed after they are registered to the load balancer.
The remaining options customize health checks and timeouts.
API Version 2010-12-01
93
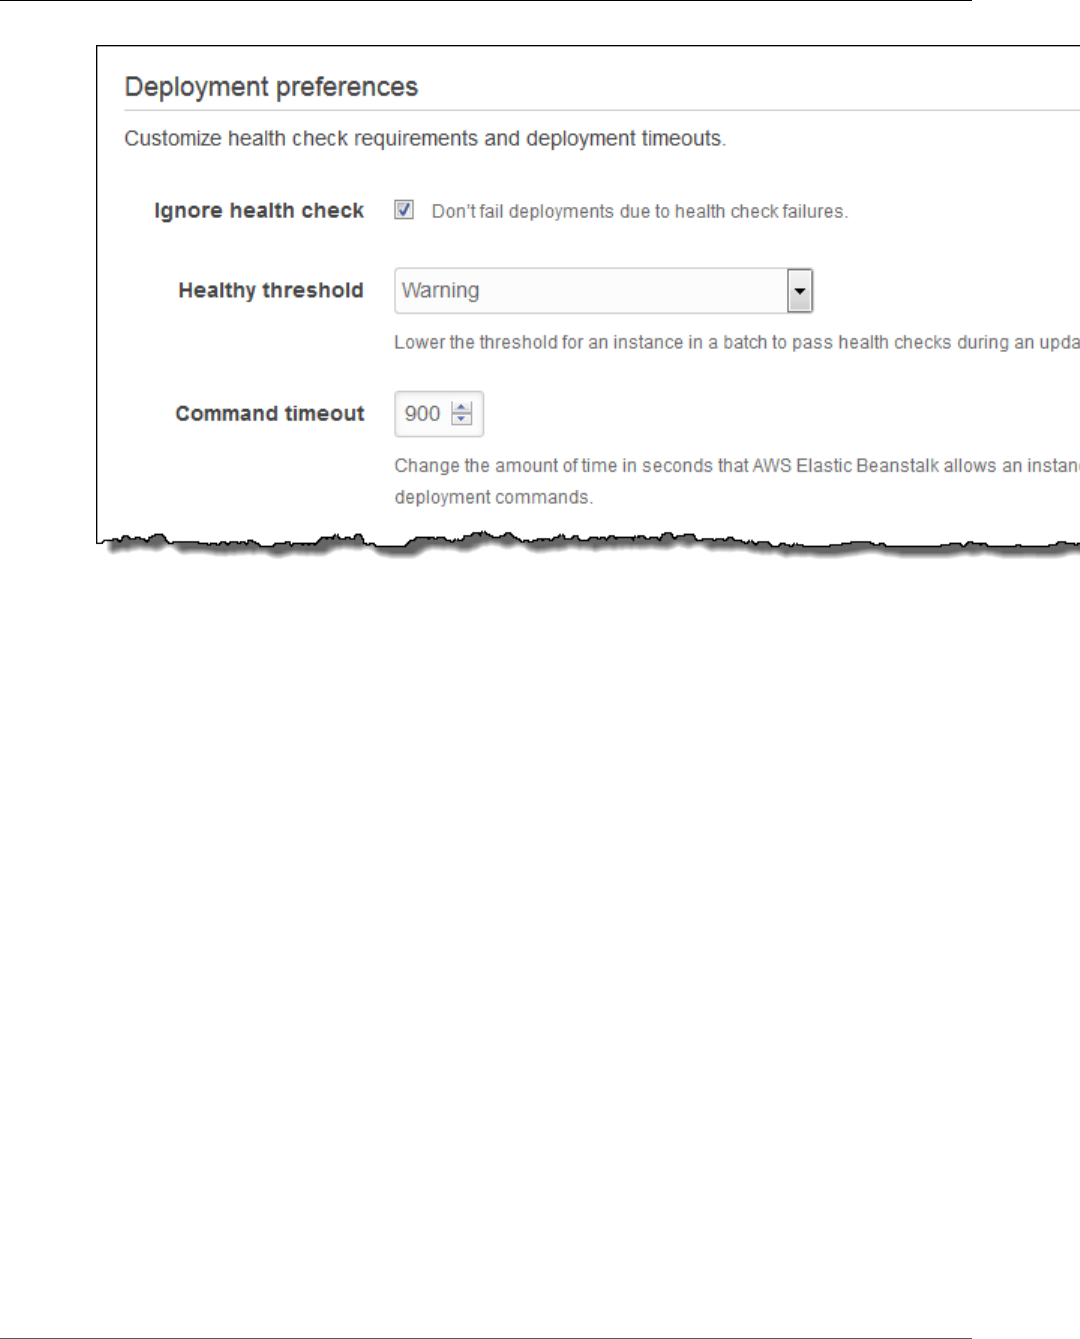
AWS Elastic Beanstalk Developer Guide
The Create New Environment Wizard
•Ignore health check – Prevents a deployment from rolling back when a batch fails to become healthy
within the Command timeout.
•Healthy threshold – Lowers the threshold at which an instance is considered healthy during rolling
deployments, rolling updates, and immutable updates.
•Command timeout – The number of seconds to wait for an instance to become healthy before
canceling the deployment or, if Ignore health check is set, to continue to the next batch.
Security
Choose an Amazon EC2 key pair to enable SSH or RDP access to the instances in your environment. If you
have created a custom service role and instance profile, select them from the drop-down lists. If not, use
the default roles, aws-elasticbeanstalk-service-role and aws-elasticbeanstalk-ec2-role.
API Version 2010-12-01
94
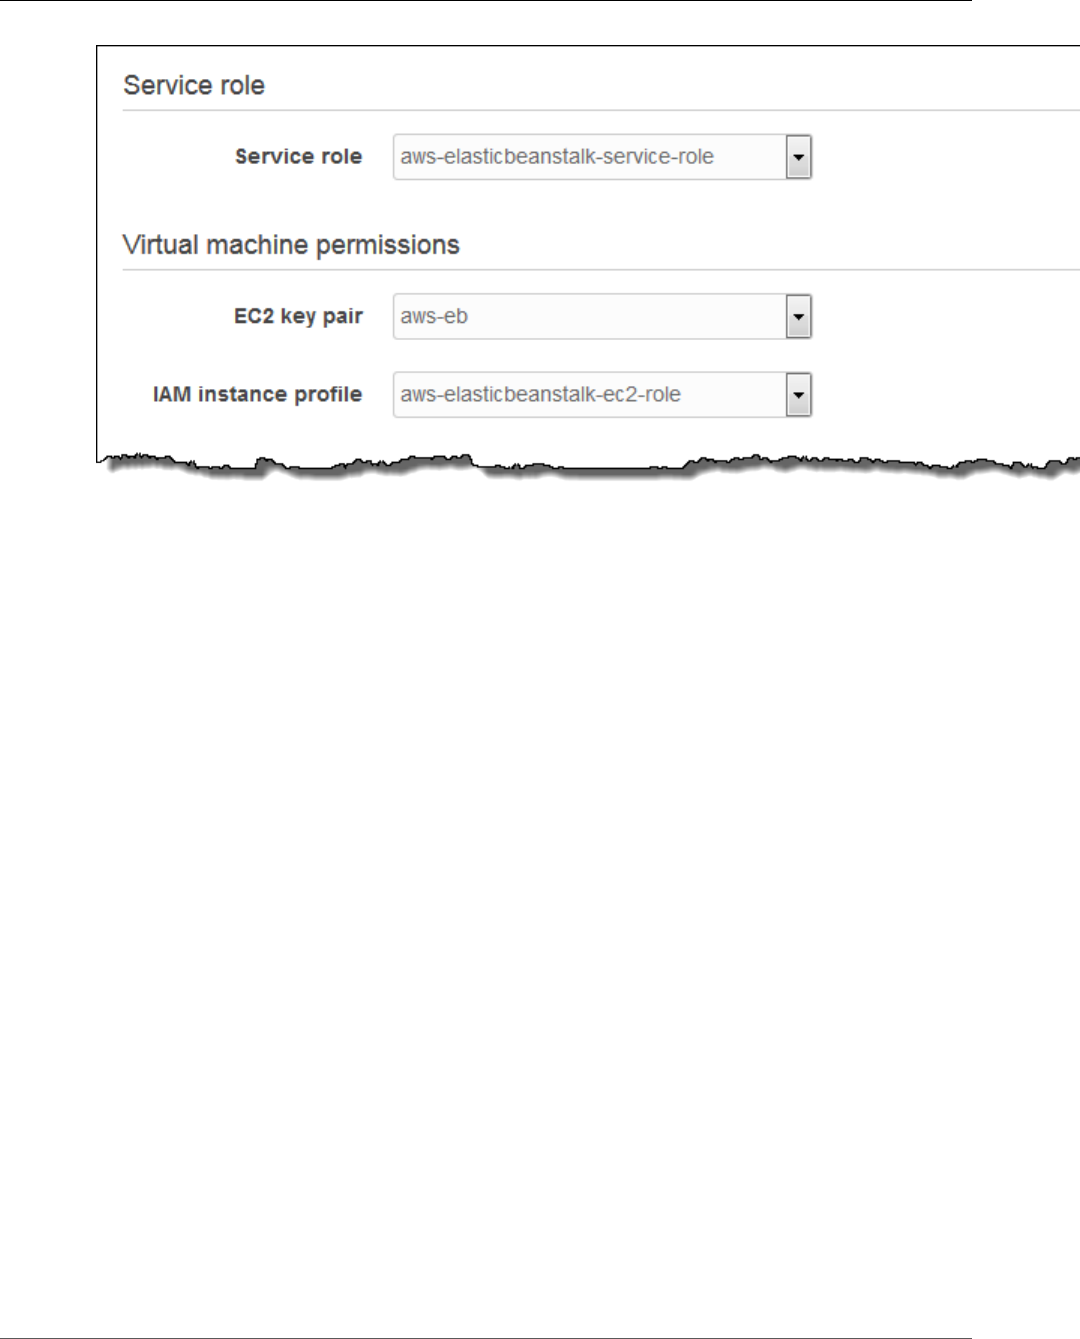
AWS Elastic Beanstalk Developer Guide
The Create New Environment Wizard
•Service role – A service role (p. 21) grants Elastic Beanstalk permission to monitor the resources in
your environment.
•EC2 key pair – Assign an SSH key to the instances in your environment to allow you to connect
to them remotely for debugging. For more information about Amazon EC2 key pairs, see Using
Credentials in the Amazon EC2 User Guide for Linux Instances.
•IAM instance profile – An instance profile (p. 22) grants the Amazon EC2 instances in your
environment permissions to access AWS resources.
The Elastic Beanstalk console looks for an instance profile named aws-elasticbeanstalk-ec2-role
and a service role named aws-elasticbeanstalk-service-role. If you don't have these roles,
the console creates them for you. For more information, see Service Roles, Instance Profiles, and User
Policies (p. 21).
Monitoring
For load-balanced environments, Health check path tells the load balancer where to send requests for
health checks.
API Version 2010-12-01
95
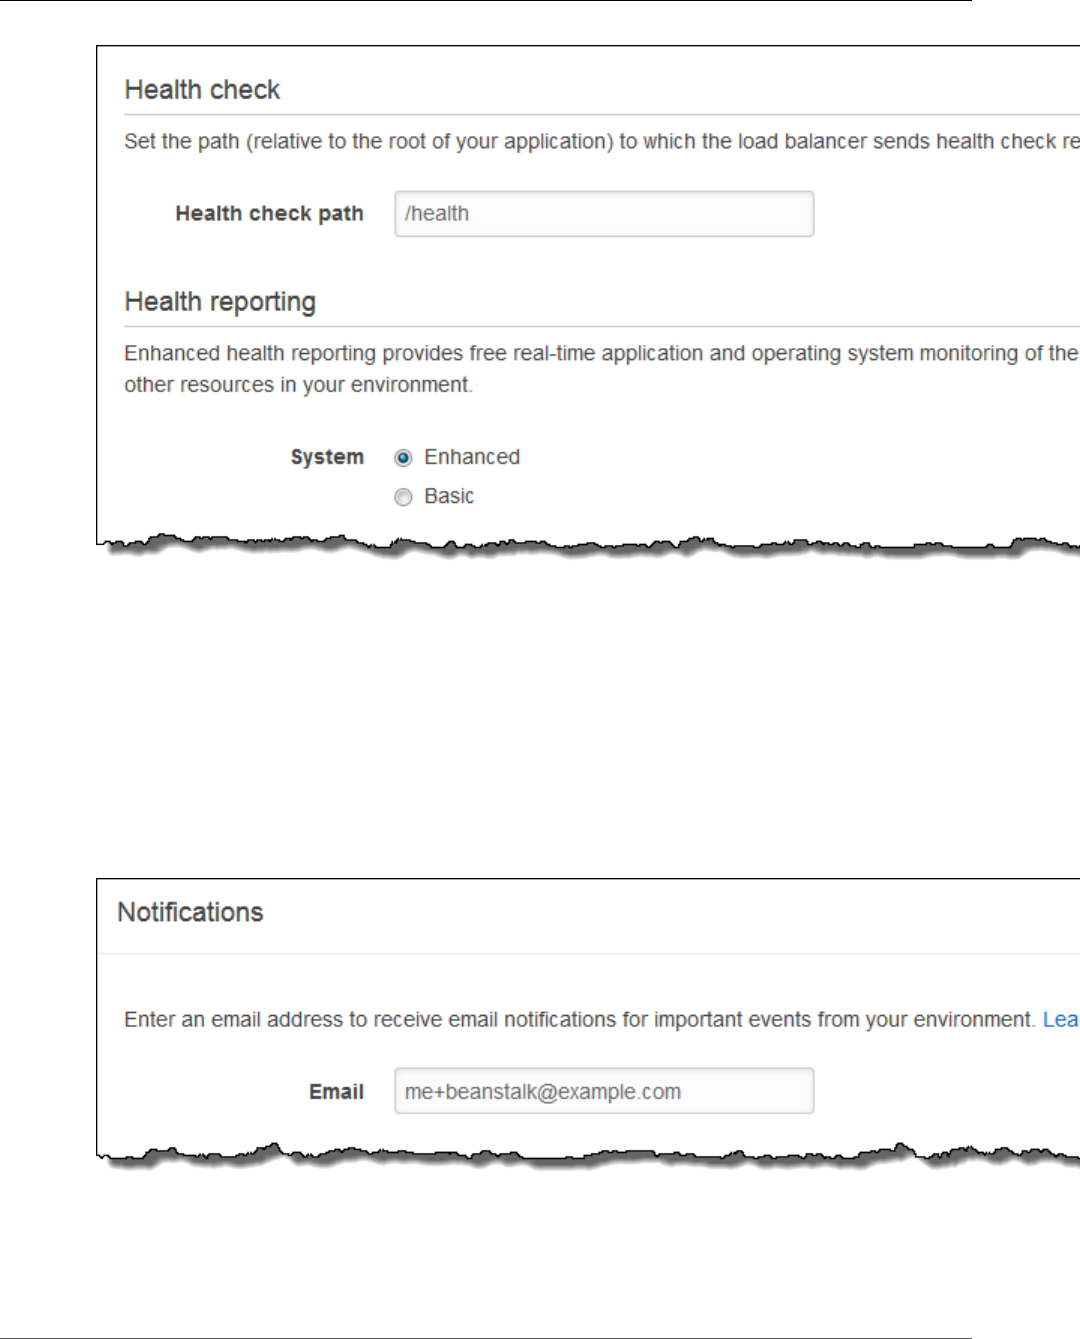
AWS Elastic Beanstalk Developer Guide
The Create New Environment Wizard
•Health check path – The path to send health check requests to. If not set, the load balancer attempts
to make a TCP connection on port 80 to verify health. Set to a path starting with / to send an HTTP
GET request to that path. You can also include a protocol (HTTP, HTTPS, TCP, or SSL) and port before
the path to check HTTPS connectivity or use a non-default port. For example, HTTPS:443/health.
•Health reporting system – Enhanced health reporting (p. 336) provides additional health
information about the resources in your environment at no additional charge.
Notifications
Specify an email address to receive email notifications (p. 195) for important events from your
environment.
•Email – An email address for notifications.
API Version 2010-12-01
96
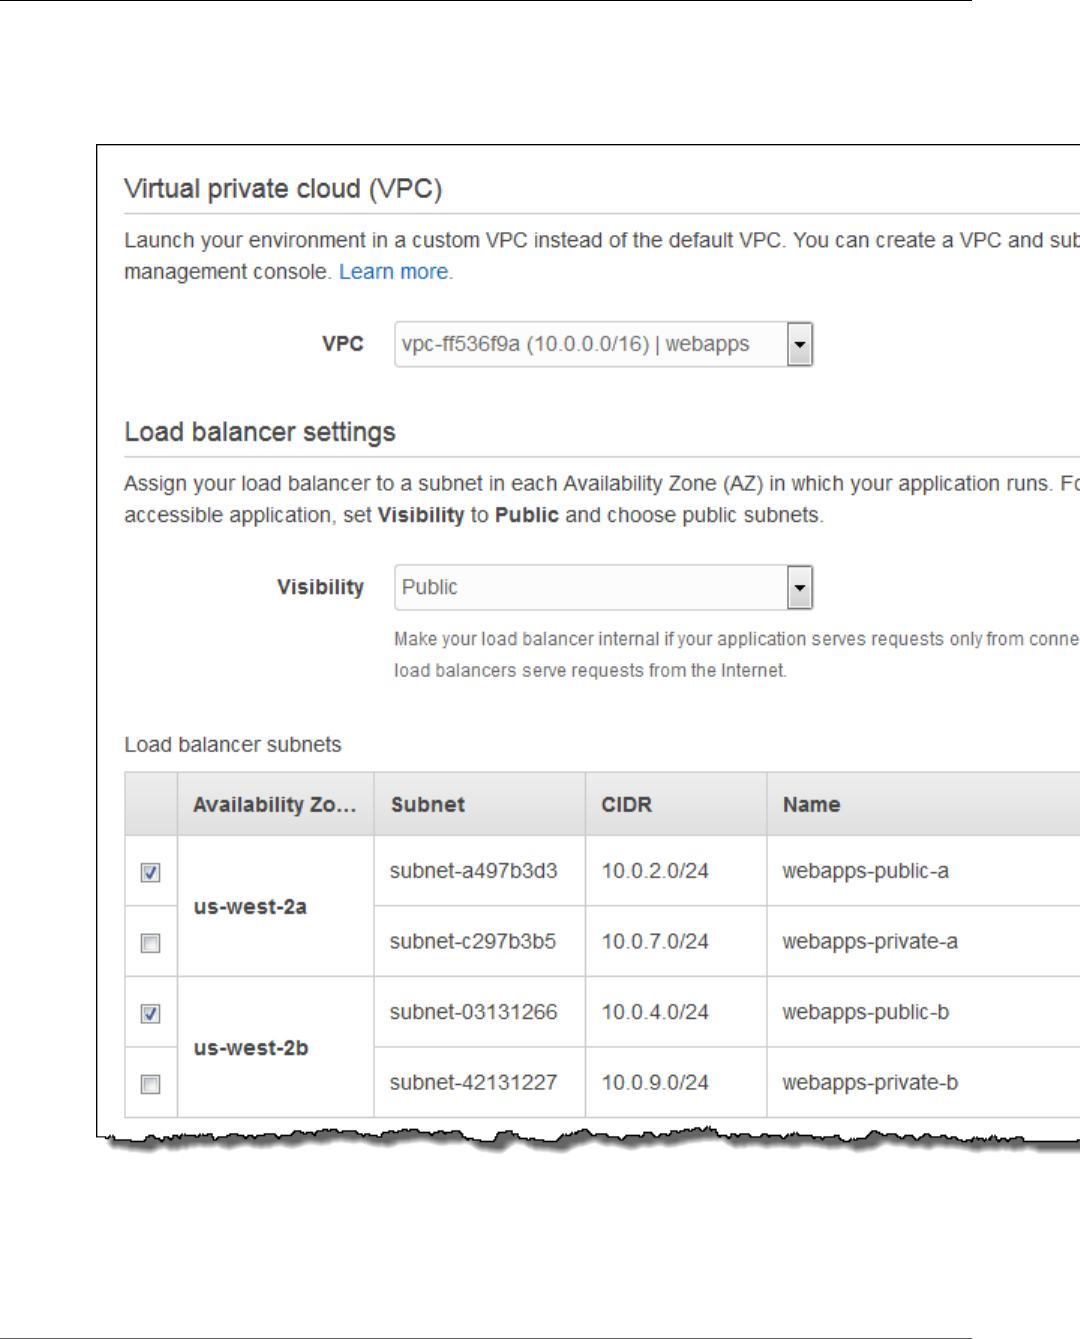
AWS Elastic Beanstalk Developer Guide
The Create New Environment Wizard
Network
If you have created a custom VPC (p. 198), use these settings to configure your environment to use it. If
you do not choose a VPC, Elastic Beanstalk uses the default VPC and subnets.
•VPC – The VPC in which to launch your environment's resources.
•Load balancer visibility – Makes your load balancer internal to prevent connections from the Internet.
This option is for applications that serve traffic only from networks connected to the VPC.
•Load balancer subnets – Choose public subnets for your load balancer if your site serves traffic from
the Internet.
API Version 2010-12-01
97
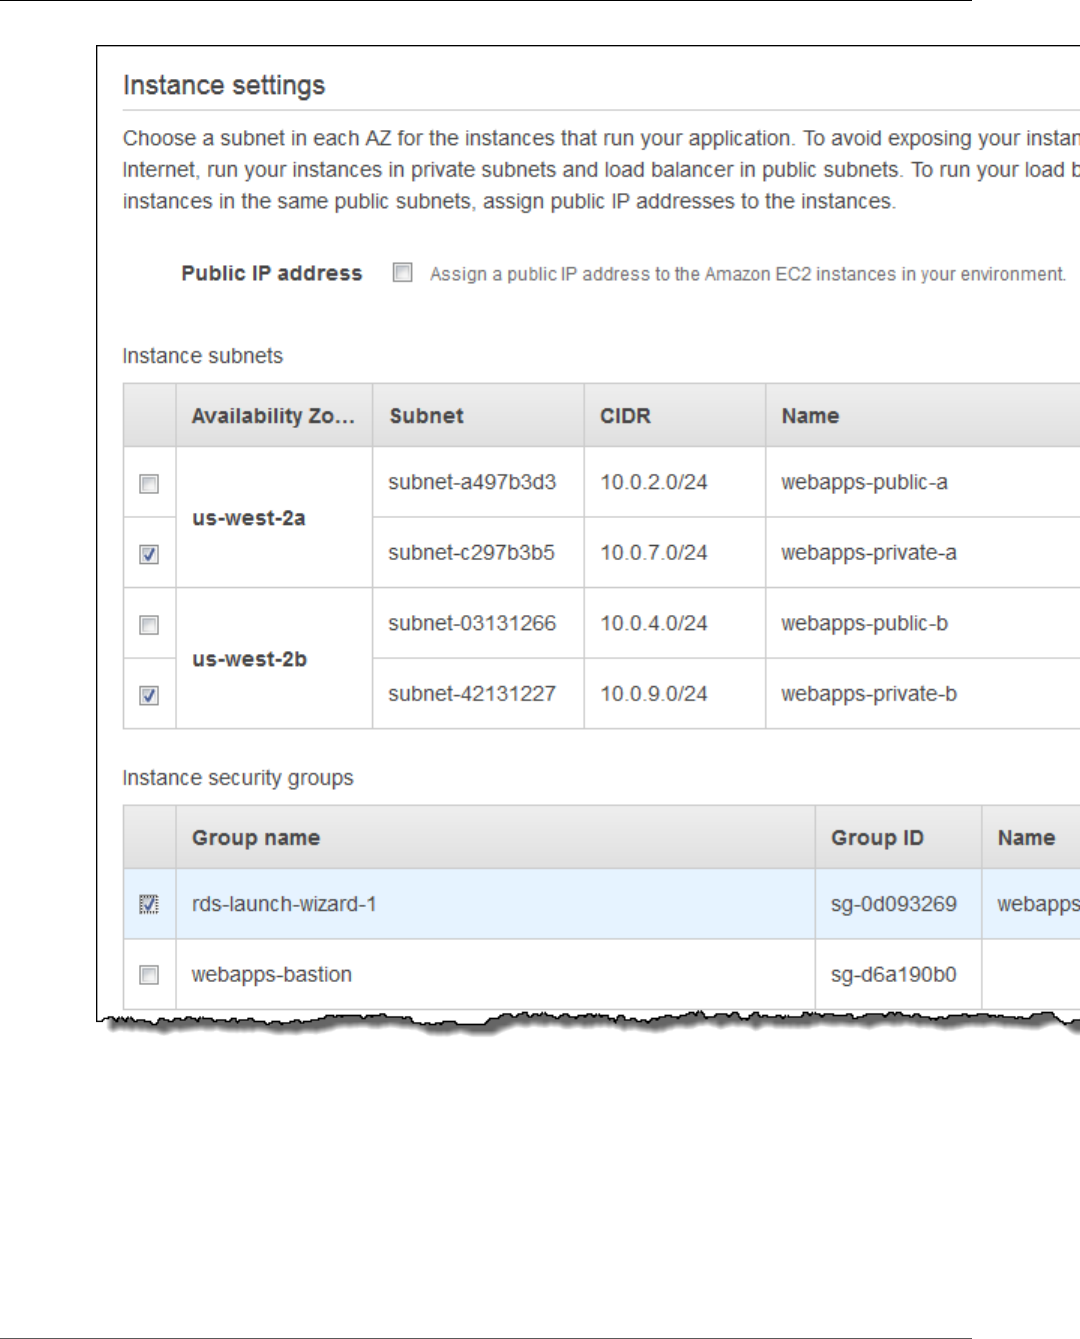
AWS Elastic Beanstalk Developer Guide
The Create New Environment Wizard
•Public IP address – Choose this option if you run your instances and load balancer in the same public
subnets.
•Instance subnets – Choose private subnets for your instances.
•Instance security groups – Choose security groups to assign to your instances, in addition to standard
security groups that Elastic Beanstalk creates.
For more information about Amazon VPC, see Amazon Virtual Private Cloud (Amazon VPC).
API Version 2010-12-01
98
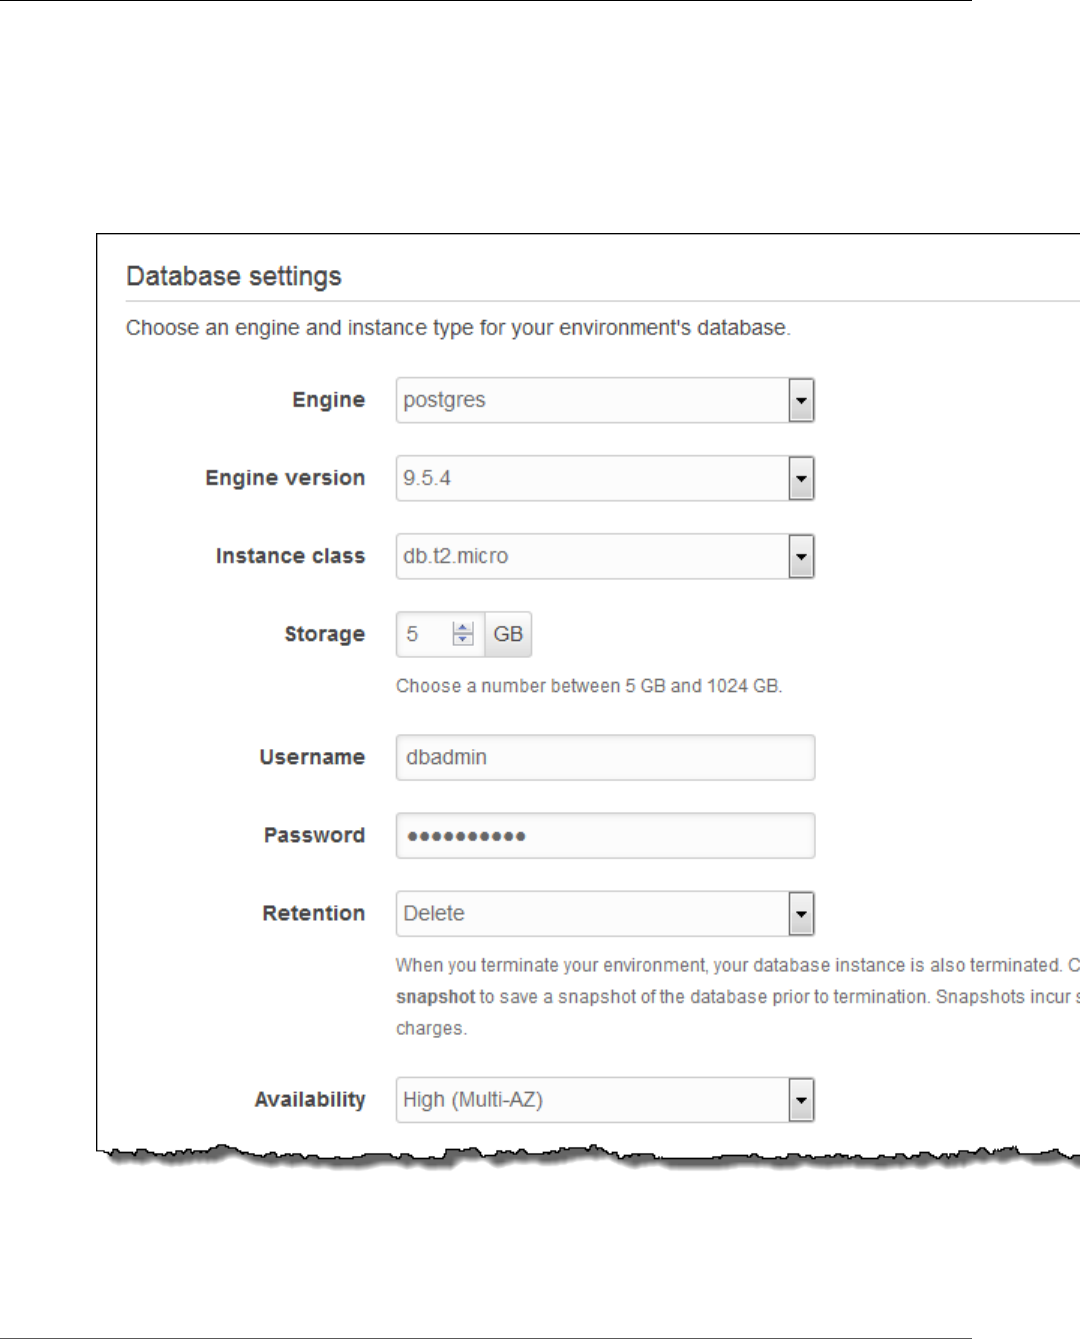
AWS Elastic Beanstalk Developer Guide
The Create New Environment Wizard
Database
Add an Amazon RDS SQL database to your environment for development and testing. Elastic Beanstalk
provides connection information to your instances by setting environment properties for the database
hostname, username, password, table name, and port. When you add a database to your environment,
its lifecycle is tied to your environment lifecycle.
For production environments, you can configure your instances to connect to an external database.
•Engine – Choose the database engine used by your application.
•Engine version – Choose the version of the database engine.
•Instance class – Choose a database instance class. For information about the DB instance classes, see
http://aws.amazon.com/rds/.
API Version 2010-12-01
99
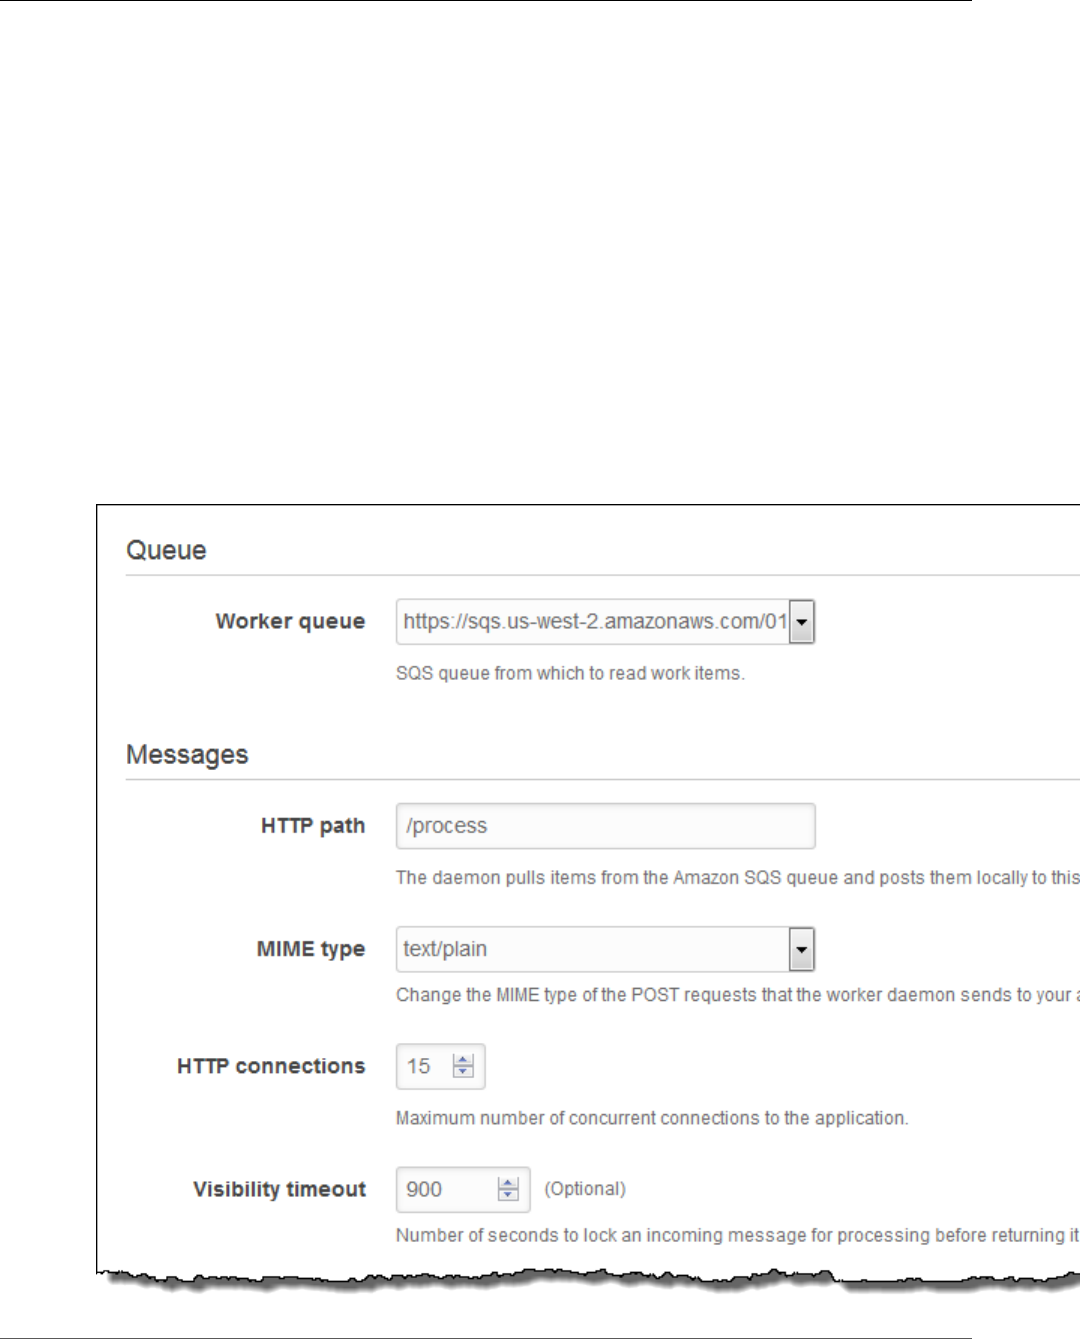
AWS Elastic Beanstalk Developer Guide
The Create New Environment Wizard
•Storage – Specifiy the amount of storage space, in gigabytes, to allocate for your database. For
information about storage allocation, see Features.
•Username – The username for the database administrator. Username requirements vary per database
engine.
•Password – The password for the database administrator. Password requirements vary per database
engine.
•Retention – You can use a snapshot to restore data by launching a new DB instance. Choose Create
snapshot to save a snapshot of the database automatically when you terminate your environment.
•Availability – Choose High (Multi-AZ) to run a second DB instance in a different Availability Zone for
high availability.
For more information about Amazon RDS, see Amazon Relational Database Service (Amazon RDS).
Worker Details
(worker environments) You can create an Amazon SQS queue for your worker application or pull work
items from an existing queue. The worker daemon on the instances in your environment pulls an item
from the queue and relays it in the body of a POST request to a local HTTP path relative to the local
host.
API Version 2010-12-01
100
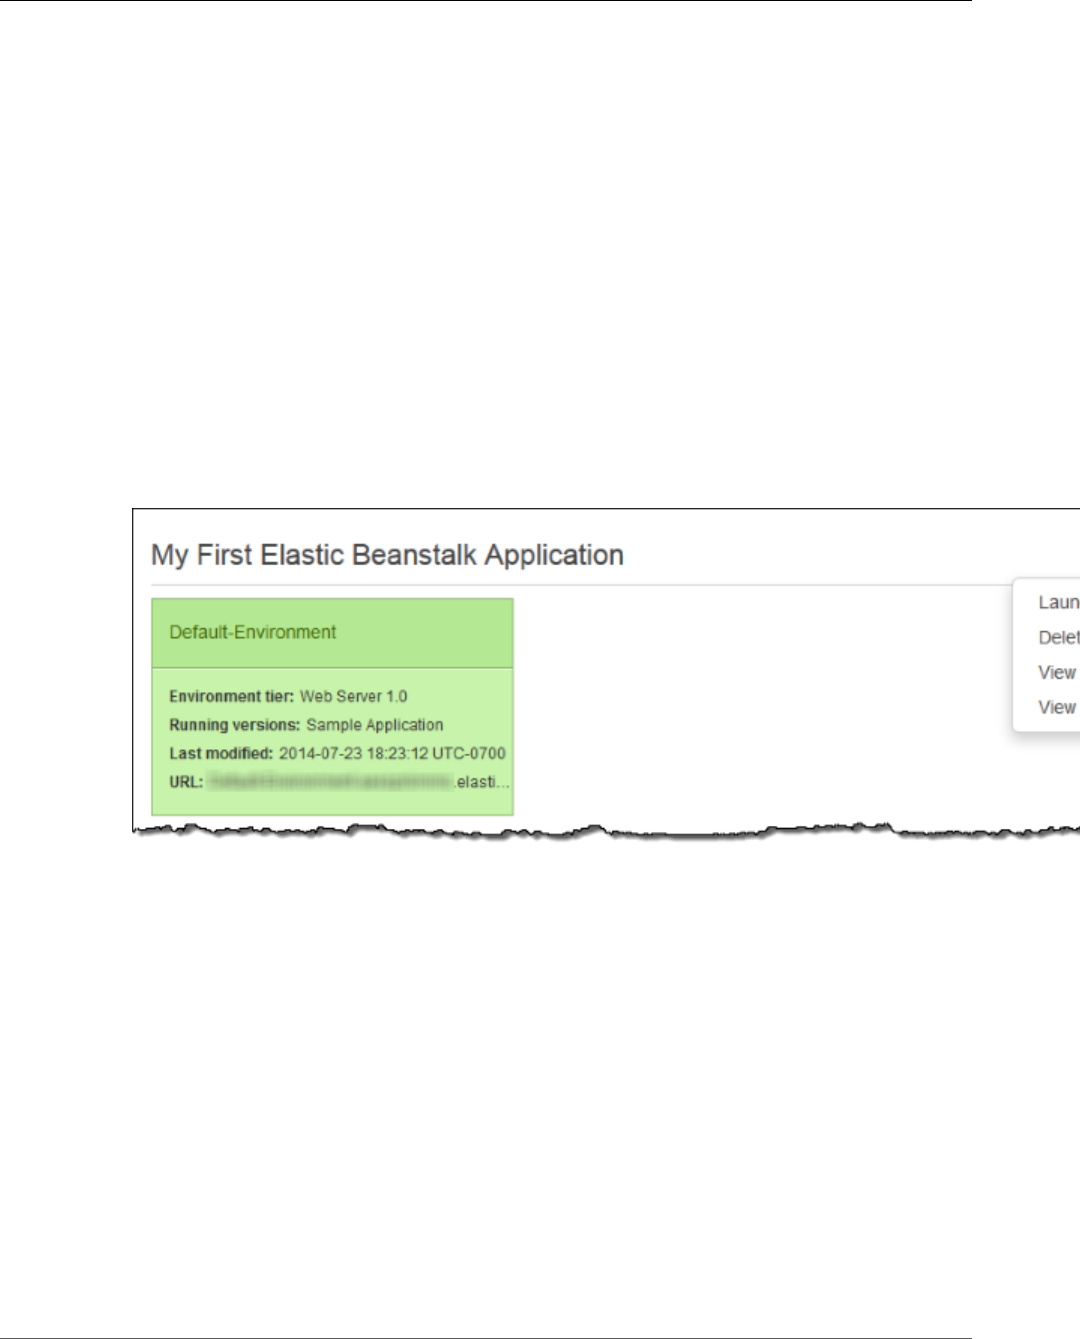
AWS Elastic Beanstalk Developer Guide
The Create New Environment Wizard
•Worker queue – Choose the queue from which the worker environment tier reads messages that it will
process. If you do not provide a value, then Elastic Beanstalk automatically creates one for you.
•HTTP path – Specifiy the relative path on the local host to which messages from the queue are
forwarded in the form of HTTP POST requests.
•MIME type – Choose The MIME type of the message sent in the HTTP POST request.
•HTTP connections – The maximum number of concurrent connections to the application. Set this to
the number of processes or thread messages that your application can process in parallel.
•Visibility timeout – The amount of time that an incoming message is locked for processing before
being returned to the queue. Set this to the potentially longest amount of time that might be required
to process a message.
The Old New Environment Wizard
To launch a new environment
1. Open the Elastic Beanstalk console.
2. From the Elastic Beanstalk console applications page, choose Actions for the application in which
you want to launch a new environment.
3. Choose Launch New Environment.
4. Follow the instructions shown to launch an environment.
See the following sections for details on each page of the wizard.
Pages
•New Environment (p. 102)
•Environment Type (p. 102)
•Application Version (p. 102)
•Environment Info (p. 102)
•Additional Resources (p. 103)
•Configuration Details (p. 103)
•Environment Tags (p. 105)
•Worker Details (p. 106)
•RDS Configuration (p. 107)
•VPC Configuration (p. 108)
API Version 2010-12-01
101

AWS Elastic Beanstalk Developer Guide
The Create New Environment Wizard
•Permissions (p. 110)
•Review Information (p. 110)
New Environment
On the New Environment page, select an environment tier. The environment tier setting specifies
whether you want a Web Server or Worker environment. For more information, see Environment
Tier (p. 14).
Note
After you launch an environment, you cannot change the environment tier. If your application
requires a different environment tier, you must launch a new environment.
Environment Type
On the Environment Type page, select a platform and environment type, and then choose Next.
• The Predefined configuration setting specifies the platform and version that is used for the
environment. For more information, see Elastic Beanstalk Supported Platforms (p. 26).
Note
After you launch an environment with a specific configuration, you cannot change the
configuration. If your application requires a different configuration, you must launch a new
environment.
• The Saved configuration setting lists all environment configurations that you previously saved for this
application, if any. If you have no saved configurations for this application, Elastic Beanstalk does not
display this option in the console.
• The Environment type specifies whether the environment is load balancing and automatically scaling
or is only a single Amazon EC2 instance. For more information, see Environment Types (p. 154).
Application Version
On the Application Version page, you can use the sample application, upload your own, or specify the
URL for the Amazon S3 bucket that contains your application code.
Note
Depending on the platform configuration you selected, you can upload your application in
a ZIP source bundle (p. 58), a WAR file, or a plaintext Docker configuration. You can include
multiple WAR files inside a ZIP file to deploy multiple Tomcat applications to each instance in
your environment. The file size limit is 512 MB.
For load-balancing, automatically scaling environments, choose a Deployment policy to configure how
new application versions and changes to software configurations for instances are deployed. All at once
completes deployments as quickly as possible, but can result in downtime. Rolling deployments ensure
that some instances remain in service during the entire deployment process. The Healthy threshold
option lets you lower the minimum status at which instances can pass health checks during rolling
deployments and configuration updates. See Deployment Policies and Settings (p. 125) for more
information.
Environment Info
On the Environment Information page, enter the details of your environment and choose Next.
• Enter a name for the environment.
• (Web server environments) Enter a unique environment URL. Although the environment URL is
populated with the environment name, you can enter a different name for the URL. Elastic Beanstalk
API Version 2010-12-01
102

AWS Elastic Beanstalk Developer Guide
The Create New Environment Wizard
uses this name to create a unique CNAME for the environment. You can check the availability of the
URL by clicking Check Availability.
• (Optional) Enter a description for this environment.
Additional Resources
(Optional) On the Additional Resources page, select more resources for the environment, and then
choose Next. Note the following:
• If you want to add an Amazon RDS DB to the environment, select Create an RDS Database with this
environment. For more information about Amazon RDS, see Amazon Relational Database Service
(Amazon RDS).
• To create your environment in a custom VPC, select Create this environment inside a VPC. For more
information about Amazon VPC, see Amazon Virtual Private Cloud (Amazon VPC).
Configuration Details
Set configuration details for the environment, and then choose Next.
API Version 2010-12-01
103
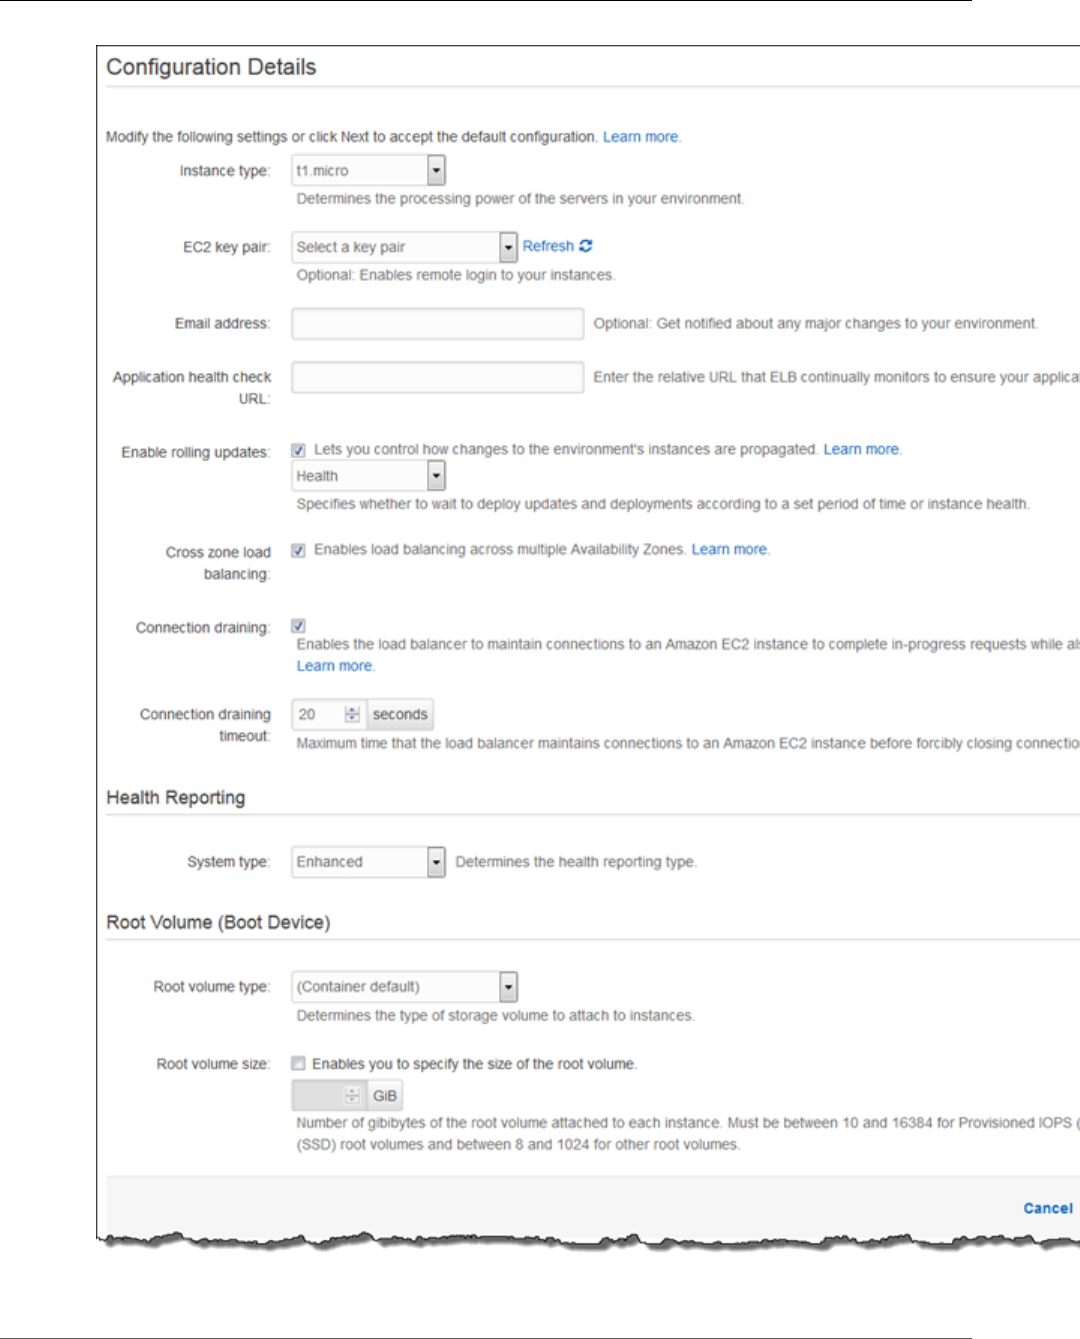
AWS Elastic Beanstalk Developer Guide
The Create New Environment Wizard
API Version 2010-12-01
104

AWS Elastic Beanstalk Developer Guide
The Create New Environment Wizard
•Instance type displays the instance types available to your Elastic Beanstalk environment. Select a
server with the characteristics (including memory size and CPU power) that are most appropriate to
your application.
Note
Elastic Beanstalk is free, but the AWS resources that it provisions might not be. For
information on Amazon EC2 usage fees, see Amazon EC2 Pricing.
For more information about the Amazon EC2 instance types that are available for your Elastic
Beanstalk environment, see Instance Families and Types in the Amazon EC2 User Guide for Linux
Instances.
• Select an EC2 key pair to enable SSH or RDP access to the instances in your environment. For more
information about Amazon EC2 key pairs, see Using Credentials in the Amazon EC2 User Guide for
Linux Instances.
• Specify an Email address to receive notifications about important events emitted by your
environment. For more information, see Elastic Beanstalk Environment Notifications with Amazon
Simple Notification Service (p. 195).
• For load-balancing, automatically scaling environments, Application health check URL, Cross-
zone load balancing, Connection draining, and Connection draining timeout let you configure the
load balancer's behavior. For more information, see Your AWS Elastic Beanstalk Environment's Load
Balancer (p. 176).
•Rolling updates type provides options for managing how instances are replaced when you change
settings on the AutoScaling group or VPC. For more information, see Elastic Beanstalk Rolling
Environment Configuration Updates (p. 134).
•Root volume type displays the types of storage volumes provided by Amazon EBS that you can attach
to Amazon EC2 instances in your Elastic Beanstalk environment. Select the volume type that meets
your performance and price requirements. For more information, see Amazon EBS Volume Types and
Amazon EBS Product Details. The size of magnetic volumes can be between 8 GiB and 1,024 GiB, and
SSD volumes can be between 10 GiB and 16,384 GiB.
• With Root volume size, you can specify the size of the storage volume that you selected. You must
specify the root volume size you want if you choose Provisioned IOPS (SSD) as the root volume type
that your instances will use. For other root volumes, if you do not specify your own value, Elastic
Beanstalk uses the default volume size for the storage volume type.
• If you selected Provisioned IOPS (SSD) as your root volume type, you must specify the input/output
operations per second (IOPS) that you want. The minimum is 100 and the maximum is 4,000. The
maximum ratio of IOPS to your volume size is 30 to 1. For example, a volume with 3,000 IOPS must be
at least 100 GiB.
Environment Tags
(Optional) On the Environment Tags page, create tags for the environment, and then choose Next.
Restrictions on tag keys and tag values include the following:
• Keys and values can contain any alphabetic character in any language, any numeric character, white
space, invisible separator, and the following symbols: _ . : / = + \ - @
• Keys and values are case-sensitive
• Values cannot match the environment name
• Values cannot include either aws: or elasticbeanstalk:
For more information about using tags, see Tagging Your Amazon EC2 Resources in the Amazon EC2 User
Guide for Linux Instances.
API Version 2010-12-01
105
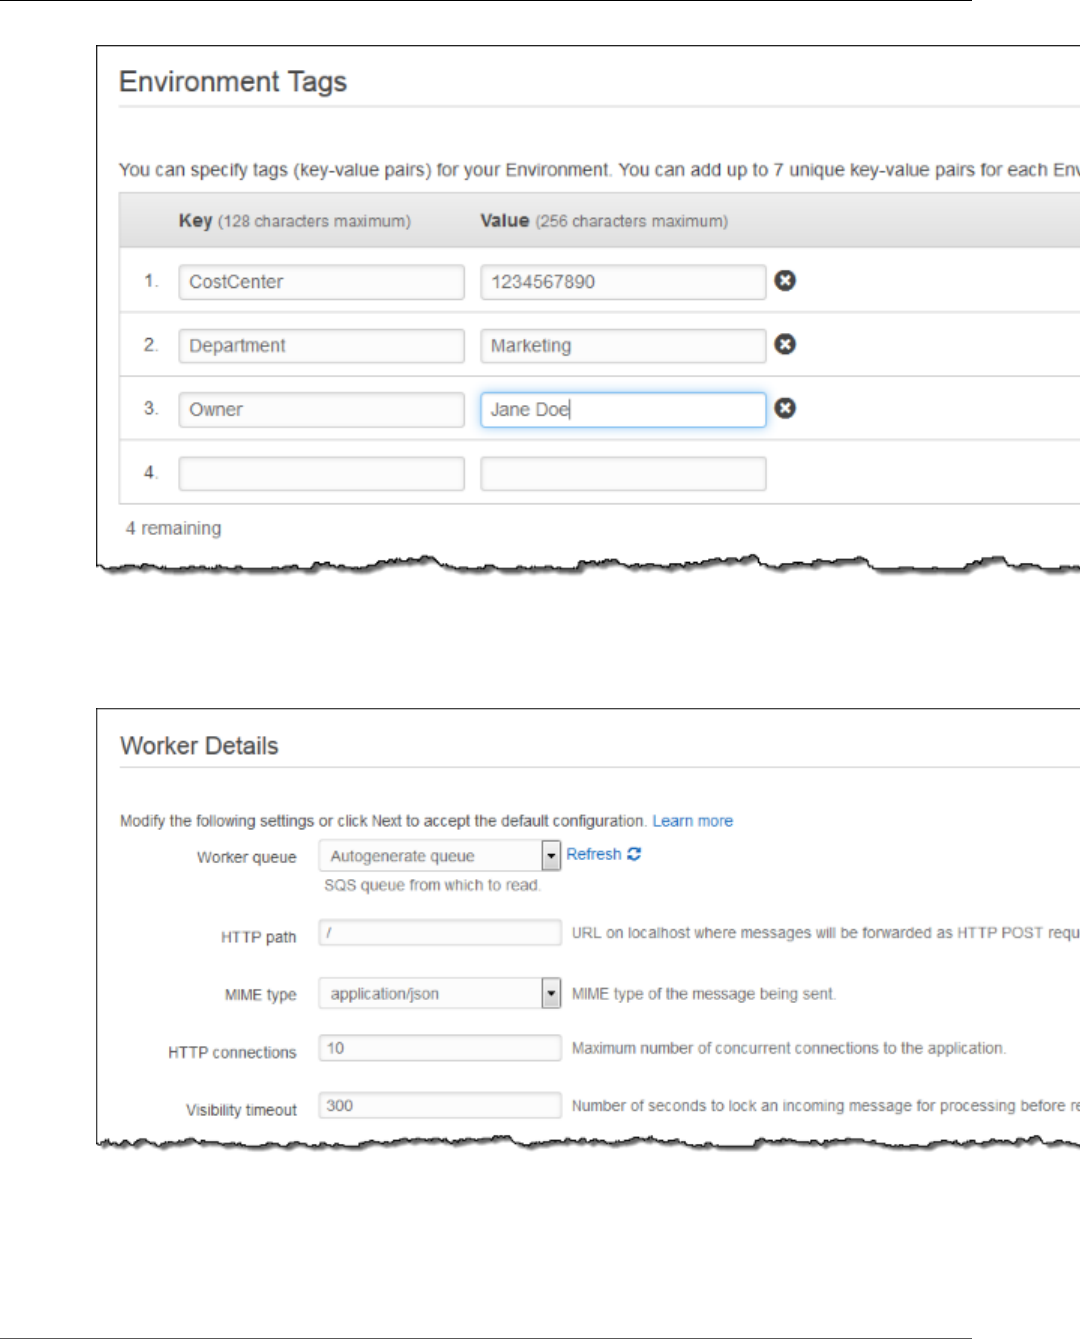
AWS Elastic Beanstalk Developer Guide
The Create New Environment Wizard
Worker Details
(worker environments) On the Worker Details page, set the following preliminary worker environment
tier details. Then, choose Next.
•Worker queue specifies the queue from which the worker environment tier reads messages that it will
process. If you do not provide a value, then Elastic Beanstalk automatically creates one for you.
•HTTP path specifies the relative path on the local host to which messages from the queue are
forwarded in the form of HTTP POST requests.
•MIME type specifies the MIME type of the message sent in the HTTP POST request.
API Version 2010-12-01
106
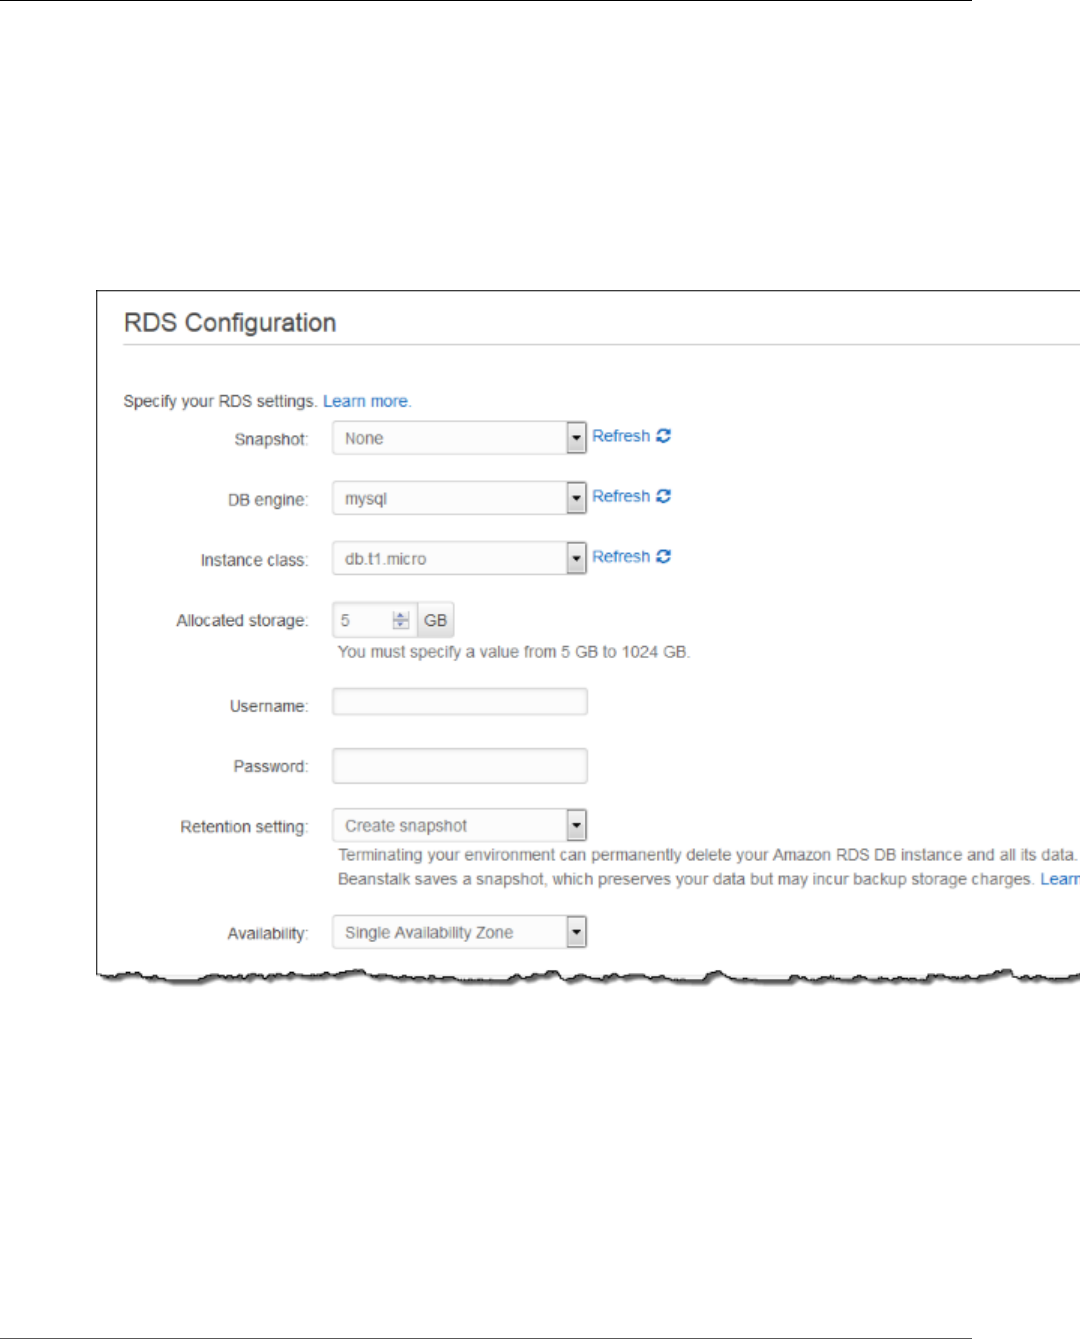
AWS Elastic Beanstalk Developer Guide
The Create New Environment Wizard
•HTTP connections specifies the maximum number of concurrent connections to the application. Set
this to the number of process or thread messages your application can process in parallel.
•Visibility timeout specifies how long an incoming message is locked for processing before being
returned to the queue. Set this to the potentially longest amount of time that might be required to
process a message.
RDS Configuration
If you chose to associate an Amazon RDS DB earlier in the environment configuration process, on the
RDS Configuration page, set the Amazon RDS configuration settings, and then choose Next.
• (Optional) For Snapshot, select whether to create an Amazon RDS DB from an existing snapshot.
• (Optional) For DB engine, select a database engine.
• (Optional) For Instance Class, select a database instance class. For information about the DB instance
classes, see http://aws.amazon.com/rds/.
• For Allocated Storage, type the space needed for your database. You can allocate between 5 GB and
1024 GB. You cannot update the allocated storage for a database to a lower amount after you set it. In
some cases, allocating a larger amount of storage for your DB instance than the size of your database
can improve IO performance. For information about storage allocation, see Features.
• For Master Username, type a name using alphanumeric characters to use to log in to your DB instance
with all database privileges.
• For Master Password, type a password containing 8–16 printable ASCII characters (excluding /, \, and
@).
API Version 2010-12-01
107

AWS Elastic Beanstalk Developer Guide
The Create New Environment Wizard
• For Deletion Policy, select Create snapshot to create a snapshot that you can use later to create
another Amazon RDS database. Select Delete to delete the DB instance when you terminate the
environment. If you select Delete, you lose your DB instance and all the data in it when you terminate
the Elastic Beanstalk instance associated with it. By default, Elastic Beanstalk creates and saves a
snapshot. You can use a snapshot to restore data to use in a new environment, but cannot otherwise
recover lost data.
Note
You may incur charges for storing database snapshots. For more information, see the "Backup
Storage" section of Amazon RDS Pricing.
• For Availability, select one of the following:
• To configure your database in one Availability Zone, select Single Availability Zone. A database
instance launched in one Availability Zone does not have protection from the failure of a single
location.
• To configure your database across multiple Availability Zones, select Multiple Availability Zones.
Running your database instance in multiple Availability Zones helps safeguard your data in the
unlikely event of a database instance component failure or service health disruption in one
Availability Zone.
VPC Configuration
If you chose to create an environment inside a VPC earlier in the environment creation process, set the
VPC configuration settings, and then choose Next.
API Version 2010-12-01
108
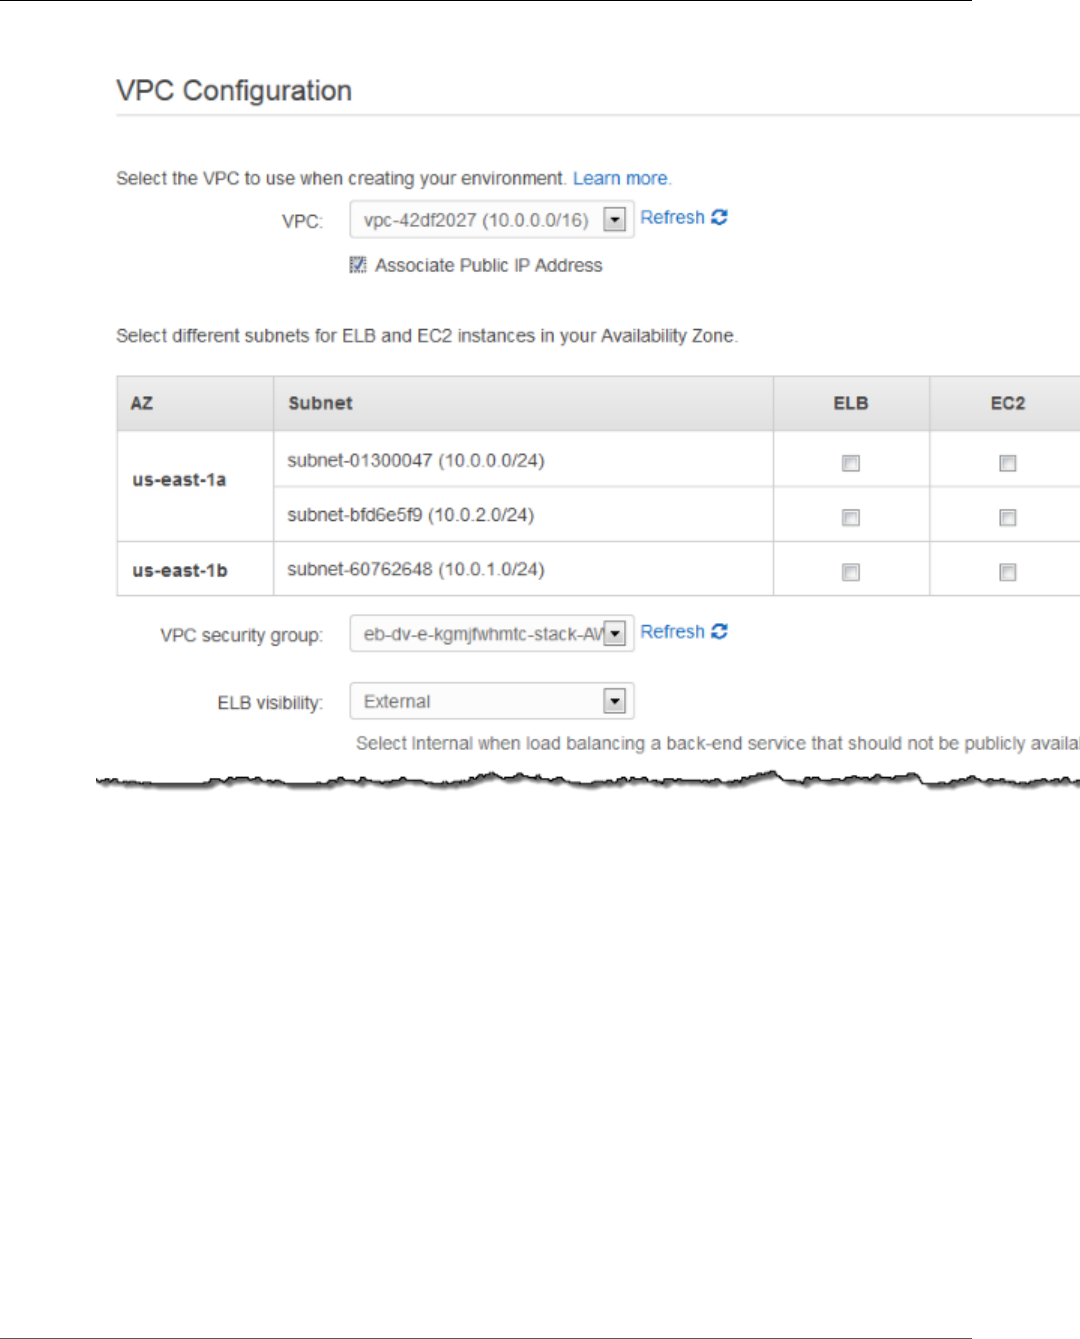
AWS Elastic Beanstalk Developer Guide
The Create New Environment Wizard
• Select the VPC ID of the VPC in which you want to launch your environment.
Note
If you do not see the VPC information, then you have not created a VPC in the same region
in which you are launching your environment. To learn how to create a VPC, see Using Elastic
Beanstalk with Amazon Virtual Private Cloud (p. 451).
• For a load-balancing, automatically scaling environment, select the subnets for the Elastic Load
Balancing load balancer and the Amazon EC2 instances. If you created a single public subnet, select
the Associate Public IP Address check box, and then select the check boxes for the load balancer
and the Amazon EC2 instances. If you created public and private subnets, be sure the load balancer
(public subnet) and the Amazon EC2 instances (private subnet) are associated with the correct
subnet. By default, Amazon VPC creates a default public subnet using 10.0.0.0/24 and a private
subnet using 10.0.1.0/24. You can view your existing subnets in the Amazon VPC console at https://
console.aws.amazon.com/vpc/.
• For a single-instance environment, select a public subnet for the Amazon EC2 instance. By default,
Amazon VPC creates a default public subnet using 10.0.0.0/24. You can view your existing subnets in
the Amazon VPC console at https://console.aws.amazon.com/vpc/.
• If you are using Amazon RDS, you must select at least two subnets in different Availability Zones. To
learn how to create subnets for your VPC, see Task 1: Create the VPC and Subnets in the Amazon VPC
User Guide.
API Version 2010-12-01
109

AWS Elastic Beanstalk Developer Guide
Clone an Environment
• If your VPC configuration uses a NAT device, select the security group you created for your instances.
For more information, see Create a Security Group for Your Instances (p. 459). If you do not have a
NAT device or if you did not create a security group, you can use the default security group.
• For a load-balancing, automatically scaling environment, select whether you want to make the load
balancer external or internal. If you do not want your load balancer to be available to the Internet,
select Internal.
Permissions
For Permissions window, select an instance profile (p. 22) and service role (p. 21). An instance profile
grants the Amazon EC2 instances in your environment permissions to access AWS resources. A service
role grants Elastic Beanstalk permission to monitor the resources in your environment. For more
information, see Service Roles, Instance Profiles, and User Policies (p. 21).)
If you've created a custom instance profile and service role, select them from the drop-down menus. If
not, choose Next to use the default roles.
The Elastic Beanstalk console looks for an instance profile named aws-elasticbeanstalk-ec2-role
and a service role named aws-elasticbeanstalk-service-role. If you don't have these roles, the
console creates them for you.
Review Information
On the Review Information page, review your application and environment information, and then
choose Launch.
Elastic Beanstalk launches your application in a new environment. It can take several minutes for the new
environment to start while Elastic Beanstalk is provisioning AWS resources. You can view the status of
your deployment on the environment's dashboard. While Elastic Beanstalk creates your AWS resources
and launches your application, the environment displays a gray state. Status messages about launch
events appear in the environment's dashboard. When the deployment is complete, Elastic Beanstalk
performs an application health check. The environment status becomes green when the application
responds to the health check.
Clone an Environment
You can use an existing environment as the basis for a new environment by creating a clone of the
existing environment. For example, you might want to create a clone so that you can use a newer version
of the solution stack used by the original environment's platform. Elastic Beanstalk configures the
clone with the same environment settings used by the original environment. By cloning an existing
environment instead of creating a new environment, you do not have to manually configure option
settings, environment variables, and other settings. Elastic Beanstalk also creates a copy of any AWS
resource associated with the original environment. However, during the cloning process, Elastic Beanstalk
does not copy data from Amazon RDS to the clone. After you have created the clone environment, you
can modify environment configuration settings as needed.
Note
Elastic Beanstalk does not include any unmanaged changes to resources in the clone. Changes
to AWS resources that you make using tools other than the Elastic Beanstalk management
console, command-line tools, or API are considered unmanaged changes.
AWS Management Console
To clone an environment
1. Open the Elastic Beanstalk console.
API Version 2010-12-01
110
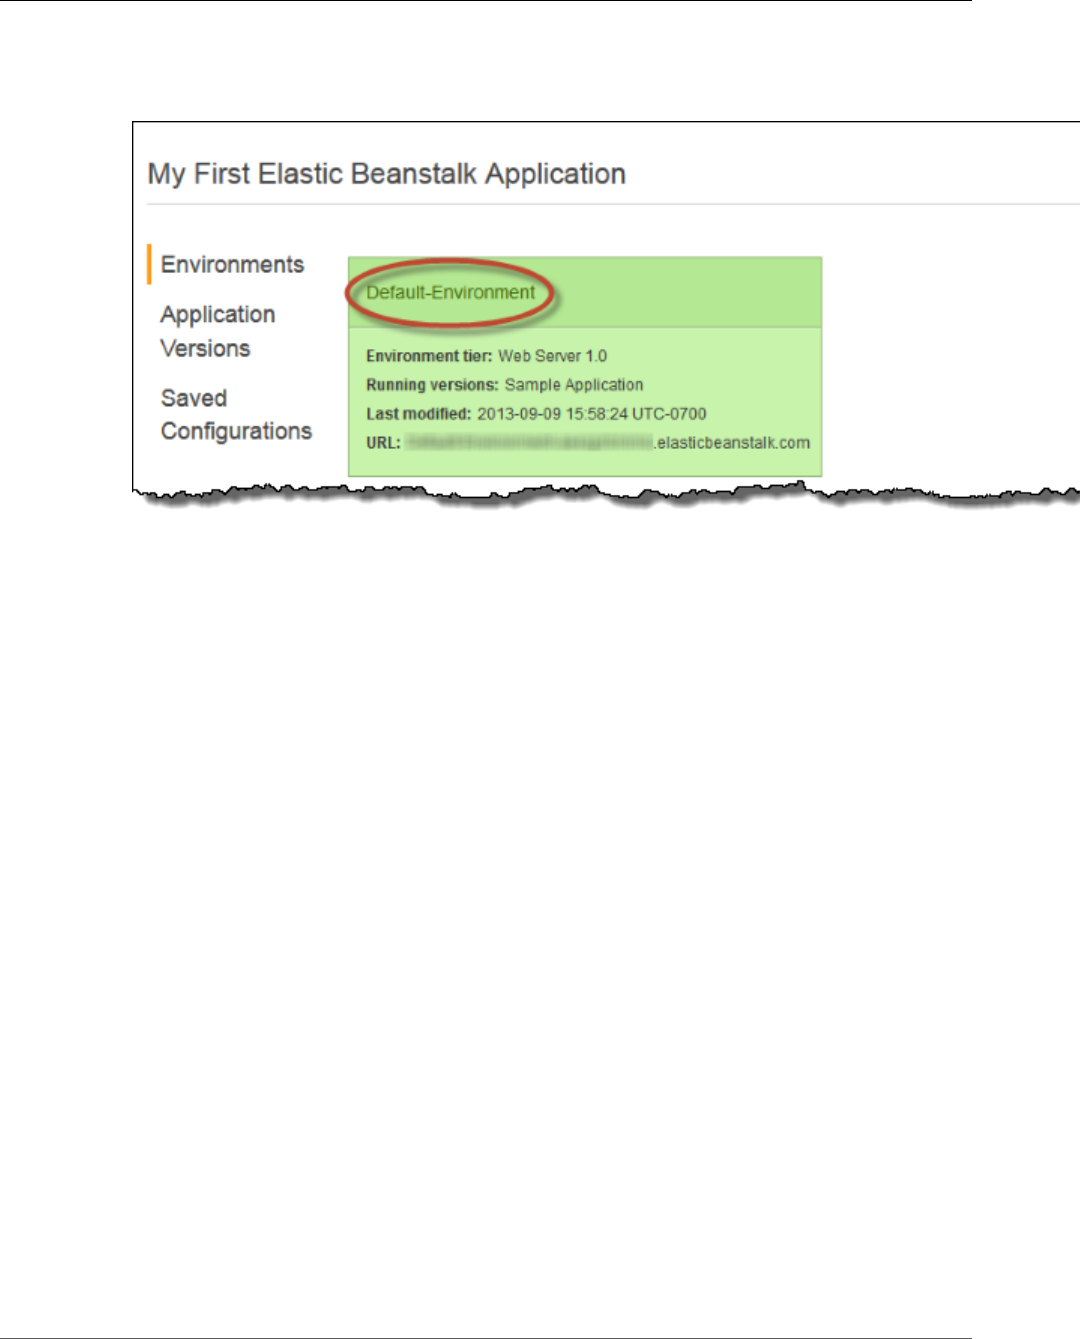
AWS Elastic Beanstalk Developer Guide
Clone an Environment
2. From the region list, select the region that includes the environment that you want to work with.
3. On the Elastic Beanstalk console applications page, click the name of the application, and then the
name of the environment that you want to clone.
4. On the environment dashboard, click Actions, and then do one of the following:
• Click Clone Environment if you want to clone the environment without any changes to the
solution stack version.
• Click Clone with Latest Platform if you want to clone the environment, but with a newer version
of the original environment's solution stack.
API Version 2010-12-01
111
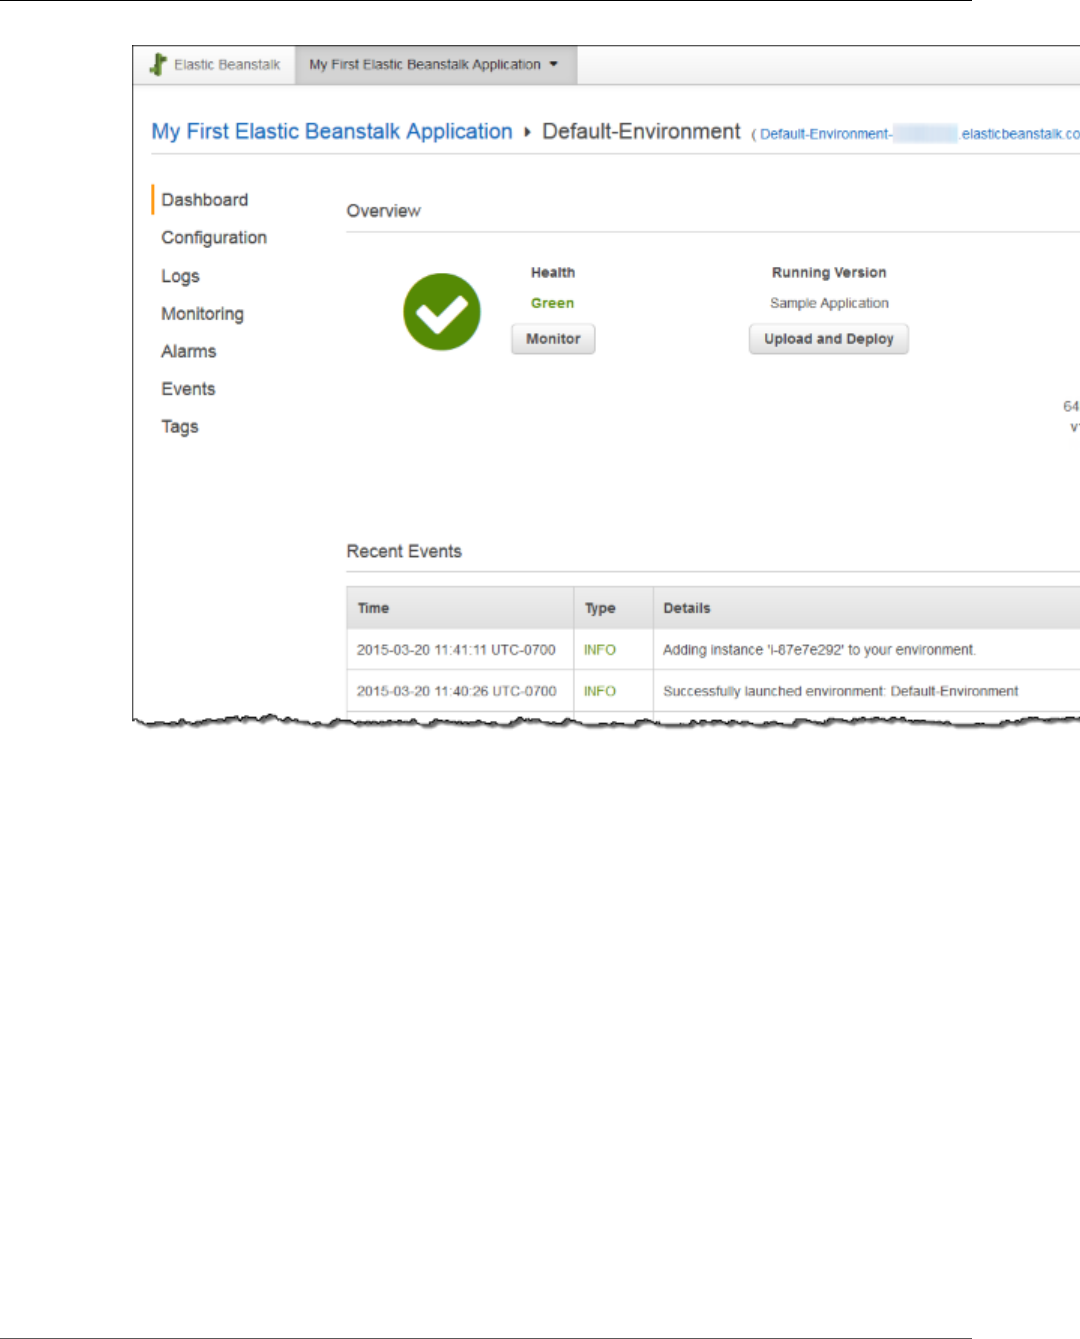
AWS Elastic Beanstalk Developer Guide
Clone an Environment
5. On the Clone Environment page, review the information in the Original Environment section to
verify that you chose the environment from which you want to create a clone.
6. In the New Environment section, you can optionally change the Environment name, Environment
URL, Description, and Platform values that Elastic Beanstalk automatically set based on the original
environment.
Note
For Platform, only solution stacks with the same language and web server configuration
are shown. If a newer version of the solution stack used with the original environment
is available, you will be prompted to update, but you cannot choose a different stack,
even if it is for a different version of the same language. For more information, see Elastic
Beanstalk Supported Platforms (p. 26).
API Version 2010-12-01
112
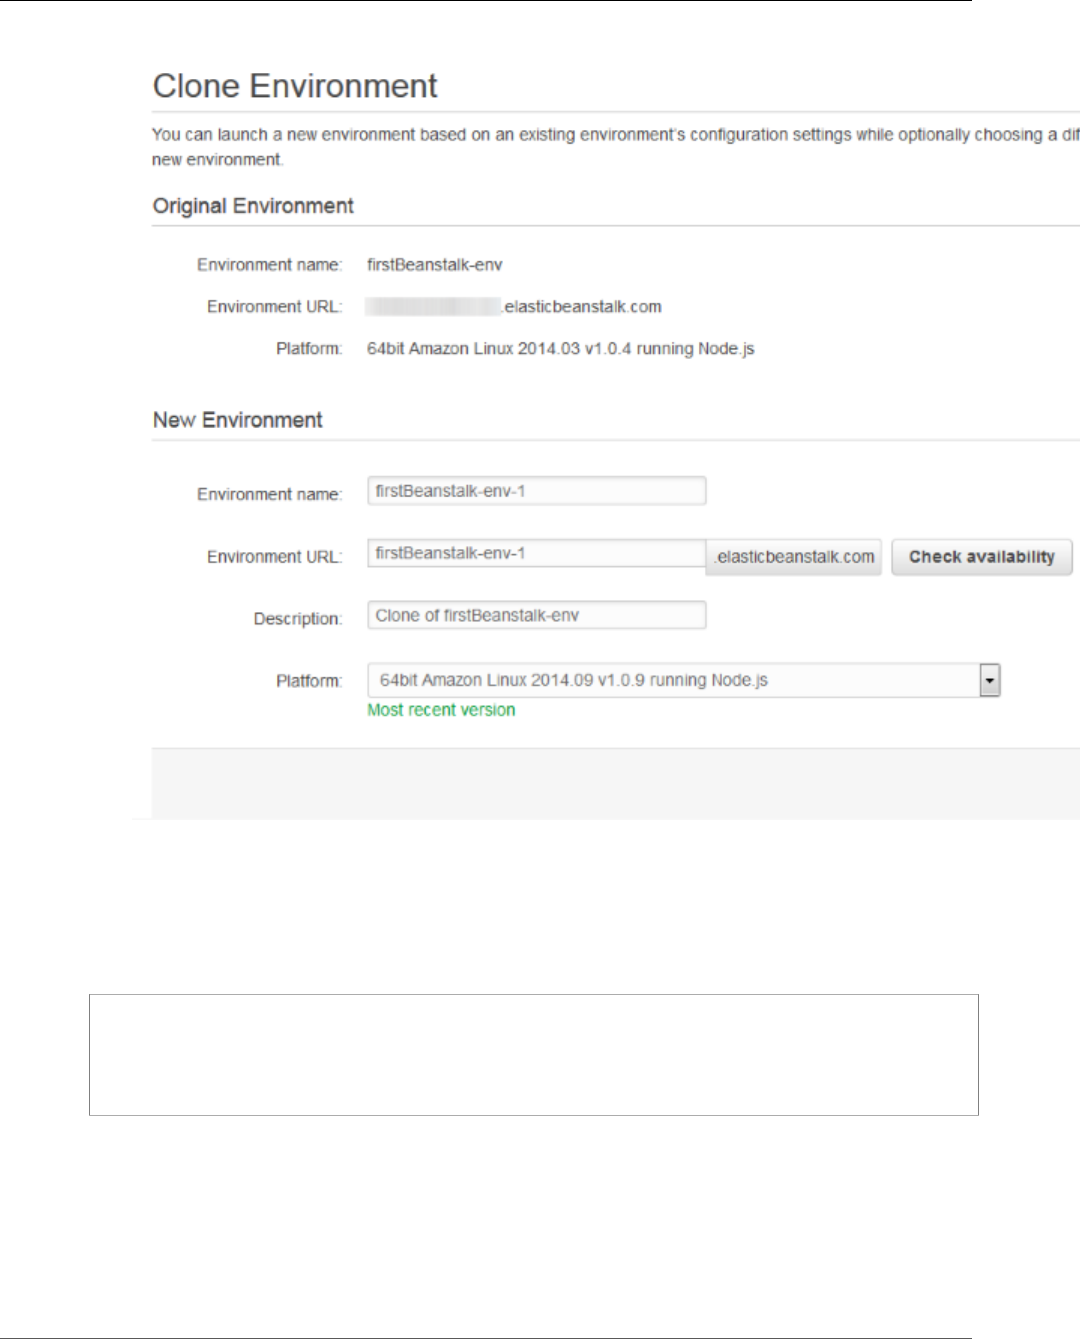
AWS Elastic Beanstalk Developer Guide
Clone an Environment
7. When you are ready, click Clone.
Elastic Beanstalk Command Line Interface (EB CLI)
Use the eb clone command to clone a running environment:
~/workspace/my-app$ eb clone my-env1
Enter name for Environment Clone
(default is my-env1-clone): my-env2
Enter DNS CNAME prefix
(default is my-env1-clone): my-env2
You can specify the name of the source environment in the clone command, or leave it out to clone the
default environment for the current project folder. The EB CLI prompts you to enter a name and DNS
prefix for the new environment.
By default, eb clone creates the new environment with the latest available version of the source
environment's platform. To force the EB CLI to use the same version, even if there is a newer version
available, use the --exact option:
API Version 2010-12-01
113
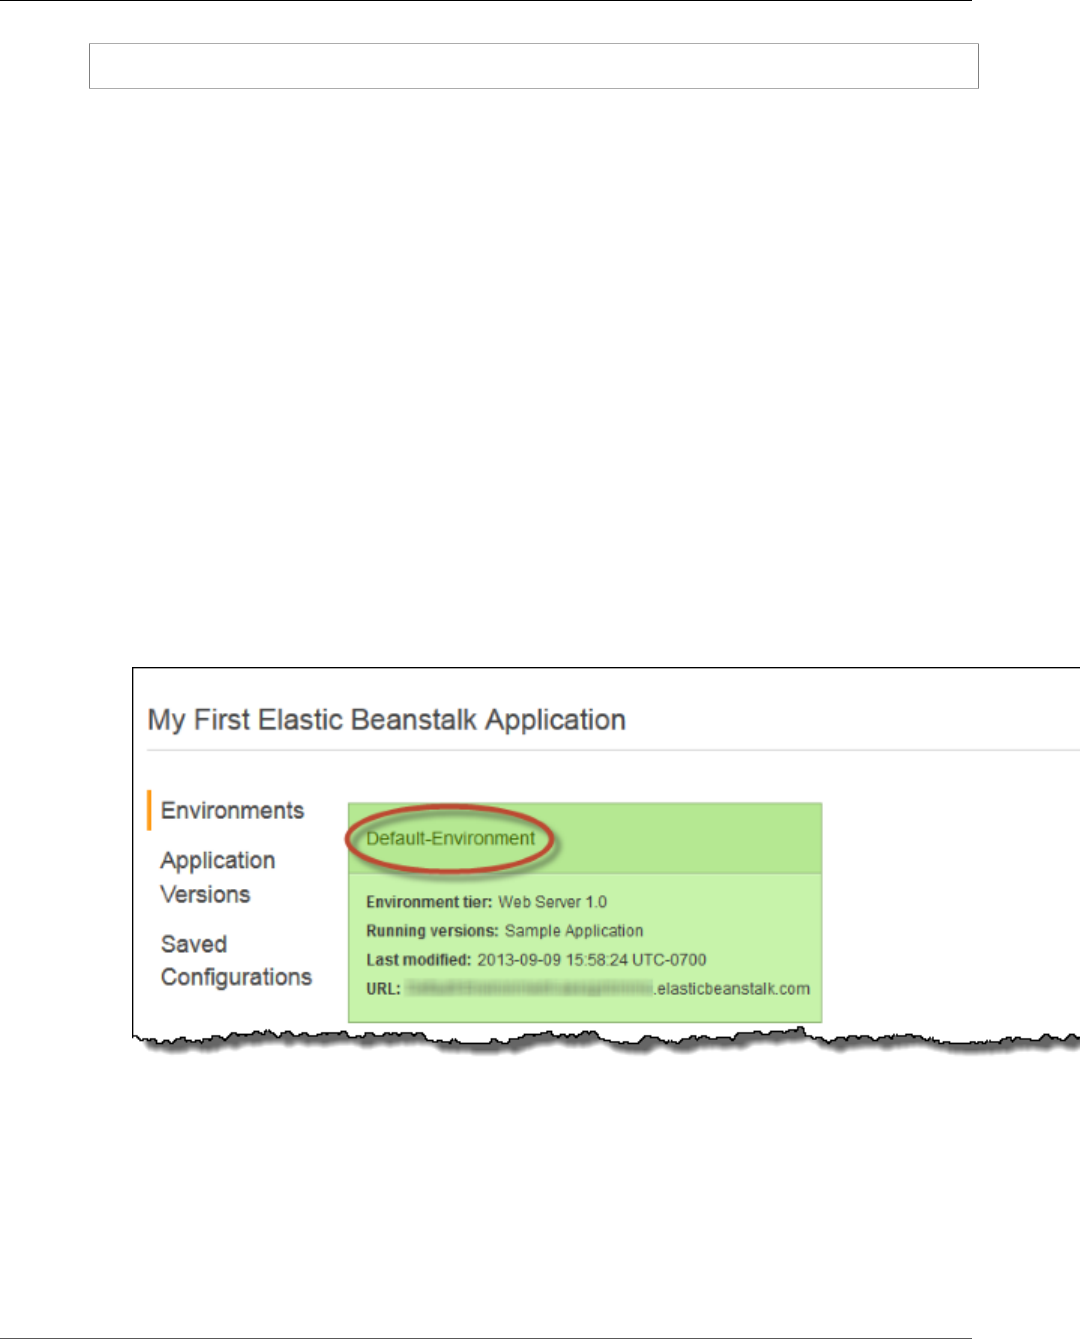
AWS Elastic Beanstalk Developer Guide
Terminate an Environment
~/workspace/my-app$ eb clone --exact
For more information about this command, see eb clone (p. 515).
Terminate an Environment
You can terminate a running environment using the AWS Management Console to avoid incurring
charges for unused AWS resources. For more information about terminating an environment using the
AWS Toolkit for Eclipse, see Terminating an Environment (p. 709).
Note
You can always launch a new environment using the same version later. If you have data from
an environment that you would like to preserve, create a snapshot of your current database
instance before you terminate the environment. You can later use it as the basis for new DB
instance when you create a new environment. For more information, see Creating a DB Snapshot
in the Amazon Relational Database Service User Guide.
AWS Management Console
To terminate an environment
1. Open the Elastic Beanstalk console.
2. From the region list, select the region that includes the environment that want to terminate.
3. From the Elastic Beanstalk console applications page, click the name of the environment that you
want to terminate.
4. Click Actions and the select Terminate Environment.
API Version 2010-12-01
114

AWS Elastic Beanstalk Developer Guide
Terminate an Environment
5. Confirm that you are terminating the correct environment and then click Terminate.
Note
When you terminate your environment, the CNAME associated with the terminated
environment becomes available for anyone to use.
It will take a few minutes for Elastic Beanstalk to terminate the AWS resources running in the
environment.
CLI
To terminate an environment
•$ aws elasticbeanstalk terminate-environment --environment-name my-env
API
To terminate an environment
• Call TerminateEnvironment with the following parameter:
•EnvironmentName = SampleAppEnv
API Version 2010-12-01
115

AWS Elastic Beanstalk Developer Guide
With the AWS CLI
Example
https://elasticbeanstalk.us-west-2.amazon.com/?EnvironmentName=SampleAppEnv
&Operation=TerminateEnvironment
&AuthParams
Creating Elastic Beanstalk Environments with the
AWS CLI
To create an environment with the AWS CLI
1. Check if the CNAME for the environment is available.
$ aws elasticbeanstalk check-dns-availability --cname-prefix my-cname
{
"Available": true,
"FullyQualifiedCNAME": "my-cname.elasticbeanstalk.com"
}
2. Make sure your application version exists.
$ aws elasticbeanstalk describe-application-versions --application-name my-app --
version-label v1
3. Create a configuration template for the application.
$ aws elasticbeanstalk create-configuration-template --application-name my-app --
template-name v1 --solution-stack-name "64bit Amazon Linux 2015.03 v2.0.0 running Ruby
2.2 (Passenger Standalone)"
4. Create environment.
$ aws elasticbeanstalk create-environment --cname-prefix my-cname --application-
name my-app --template-name v1 --version-label v1 --environment-name v1clone --option-
settings file://options.txt
Option Settings are defined in the options.txt file:
[
{
"Namespace": "aws:autoscaling:launchconfiguration",
"OptionName": "IamInstanceProfile",
"Value": "aws-elasticbeanstalk-ec2-role"
}
]
The above option setting defines the IAM instance profile. You can specify the ARN or the profile
name.
5. Determine if the new environment is Green and Ready.
$ aws elasticbeanstalk describe-environments --environment-names my-env
API Version 2010-12-01
116

AWS Elastic Beanstalk Developer Guide
With the API
If the new environment does not come up Green and Ready, you should decide if you want to retry
the operation or leave the environment in its current state for investigation. Make sure to terminate
the environment after you are finished, and clean up any unused resources.
Note
You can adjust the timeout period if the environment doesn't launch in a reasonable time.
Creating Elastic Beanstalk Environments with the API
To launch a new environment
1. Call CheckDNSAvailability with the following parameter:
•CNAMEPrefix = SampleApp
Example
https://elasticbeanstalk.®ion_console_default;.amazon.com/?
CNAMEPrefix=sampleapplication
&Operation=CheckDNSAvailability
&AuthParams
2. Call DescribeApplicationVersions with the following parameters:
•ApplicationName = SampleApp
•VersionLabel = Version2
Example
https://elasticbeanstalk.®ion_console_default;.amazon.com/?ApplicationName=SampleApp
&VersionLabel=Version2
&Operation=DescribeApplicationVersions
&AuthParams
3. Call CreateConfigurationTemplate with the following parameters:
•ApplicationName = SampleApp
•TemplateName = MyConfigTemplate
•SolutionStackName = 64bit%20Amazon%20Linux%202015.03%20v2.0.0%20running
%20Ruby%202.2%20(Passenger%20Standalone)
Example
https://elasticbeanstalk.®ion_console_default;.amazon.com/?ApplicationName=SampleApp
&TemplateName=MyConfigTemplate
&Operation=CreateConfigurationTemplate
&SolutionStackName=64bit%20Amazon%20Linux%202015.03%20v2.0.0%20running%20Ruby
%202.2%20(Passenger%20Standalone)
&AuthParams
4. Call CreateEnvironment with one of the following sets of parameters.
a. Use the following for a web server environment tier:
API Version 2010-12-01
117

AWS Elastic Beanstalk Developer Guide
With the API
•EnvironmentName = SampleAppEnv2
•VersionLabel = Version2
•Description = description
•TemplateName = MyConfigTemplate
•ApplicationName = SampleApp
•CNAMEPrefix = sampleapplication
•OptionSettings.member.1.Namespace = aws:autoscaling:launchconfiguration
•OptionSettings.member.1.OptionName = IamInstanceProfile
•OptionSettings.member.1.Value = ElasticBeanstalkProfile
Example
https://elasticbeanstalk.®ion_console_default;.amazon.com/?
ApplicationName=SampleApp
&VersionLabel=Version2
&EnvironmentName=SampleAppEnv2
&TemplateName=MyConfigTemplate
&CNAMEPrefix=sampleapplication
&Description=description
&Operation=CreateEnvironment
&OptionSettings.member.1.Namespace=aws%3Aautoscaling%3Alaunchconfiguration
&OptionSettings.member.1.OptionName=IamInstanceProfile
&OptionSettings.member.1.Value=ElasticBeanstalkProfile
&AuthParams
b. Use the following for a worker environment tier:
•EnvironmentName = SampleAppEnv2
•VersionLabel = Version2
•Description = description
•TemplateName = MyConfigTemplate
•ApplicationName = SampleApp
•Tier = Worker
•OptionSettings.member.1.Namespace = aws:autoscaling:launchconfiguration
•OptionSettings.member.1.OptionName = IamInstanceProfile
•OptionSettings.member.1.Value = ElasticBeanstalkProfile
•OptionSettings.member.2.Namespace = aws:elasticbeanstalk:sqsd
•OptionSettings.member.2.OptionName = WorkerQueueURL
•OptionSettings.member.2.Value = sqsd.elasticbeanstalk.us-
east-2.amazon.com
•OptionSettings.member.3.Namespace = aws:elasticbeanstalk:sqsd
•OptionSettings.member.3.OptionName = HttpPath
•OptionSettings.member.3.Value = /
•OptionSettings.member.4.Namespace = aws:elasticbeanstalk:sqsd
•OptionSettings.member.4.OptionName = MimeType
•OptionSettings.member.4.Value = application/json
•OptionSettings.member.5.Namespace = aws:elasticbeanstalk:sqsd
•OptionSettings.member.5.OptionName = HttpConnections
•OptionSettings.member.5.Value = 75
•OptionSettings.member.6.Namespace = aws:elasticbeanstalk:sqsd
API Version 2010-12-01
118

AWS Elastic Beanstalk Developer Guide
Launch Now URL
•OptionSettings.member.6.OptionName = ConnectTimeout
•OptionSettings.member.6.Value = 10
•OptionSettings.member.7.Namespace = aws:elasticbeanstalk:sqsd
•OptionSettings.member.7.OptionName = InactivityTimeout
•OptionSettings.member.7.Value = 10
•OptionSettings.member.8.Namespace = aws:elasticbeanstalk:sqsd
•OptionSettings.member.8.OptionName = VisibilityTimeout
•OptionSettings.member.8.Value = 60
•OptionSettings.member.9.Namespace = aws:elasticbeanstalk:sqsd
•OptionSettings.member.9.OptionName = RetentionPeriod
•OptionSettings.member.9.Value = 345600
Example
https://elasticbeanstalk.®ion_console_default;.amazon.com/?
ApplicationName=SampleApp
&VersionLabel=Version2
&EnvironmentName=SampleAppEnv2
&TemplateName=MyConfigTemplate
&Description=description
&Tier=Worker
&Operation=CreateEnvironment
&OptionSettings.member.1.Namespace=aws%3Aautoscaling%3Alaunchconfiguration
&OptionSettings.member.1.OptionName=IamInstanceProfile
&OptionSettings.member.1.Value=ElasticBeanstalkProfile
&OptionSettings.member.2.Namespace=aws%3Aelasticbeanstalk%3Asqsd
&OptionSettings.member.2.OptionName=WorkerQueueURL
&OptionSettings.member.2.Value=sqsd.elasticbeanstalk.®ion_console_default;.amazon.com
&OptionSettings.member.3.Namespace=aws%3elasticbeanstalk%3sqsd
&OptionSettings.member.3.OptionName=HttpPath
&OptionSettings.member.3.Value=%2F
&OptionSettings.member.4.Namespace=aws%3Aelasticbeanstalk%3Asqsd
&OptionSettings.member.4.OptionName=MimeType
&OptionSettings.member.4.Value=application%2Fjson
&OptionSettings.member.5.Namespace=aws%3Aelasticbeanstalk%3Asqsd
&OptionSettings.member.5.OptionName=HttpConnections
&OptionSettings.member.5.Value=75
&OptionSettings.member.6.Namespace=aws%3Aelasticbeanstalk%3Asqsd
&OptionSettings.member.6.OptionName=ConnectTimeout
&OptionSettings.member.6.Value=10
&OptionSettings.member.7.Namespace=aws%3Aelasticbeanstalk%3Asqsd
&OptionSettings.member.7.OptionName=InactivityTimeout
&OptionSettings.member.7.Value=10
&OptionSettings.member.8.Namespace=aws%3Aelasticbeanstalk%3Asqsd
&OptionSettings.member.8.OptionName=VisibilityTimeout
&OptionSettings.member.8.Value=60
&OptionSettings.member.9.Namespace=aws%3Aelasticbeanstalk%3Asqsd
&OptionSettings.member.9.OptionName=RetentionPeriod
&OptionSettings.member.9.Value=345600
&AuthParams
Constructing a Launch Now URL
You can construct a custom uniform resource locator (URL) so that anyone can quickly deploy and
run a predetermined web application in Elastic Beanstalk. This URL is called a Launch Now URL. You
might need a Launch Now URL, for example, to demonstrate a web application that is built to run on
API Version 2010-12-01
119

AWS Elastic Beanstalk Developer Guide
Launch Now URL
Elastic Beanstalk. With Launch Now URL, you can use parameters to add the required information to the
Create Application wizard in advance. When you do, anyone can use the URL link to launch an Elastic
Beanstalk environment with your web application source in just a few clicks. This means users don't need
to manually upload or specify the location of the application source bundle or provide any additional
input to the wizard.
A Launch Now URL gives Elastic Beanstalk the minimum information required to create an application:
the application name, solution stack, instance type, and environment type. Elastic Beanstalk uses default
values for other configuration details that are not explicitly specified in your custom Launch Now URL.
A Launch Now URL uses standard URL syntax. For more information, see RFC 3986 - Uniform Resource
Identifier (URI): Generic Syntax.
URL Parameters
The URL must contain the following parameters, which are case-sensitive:
•region – Specify an AWS region. For a list of regions supported by Elastic Beanstalk, see AWS Elastic
Beanstalk in the Amazon Web Services General Reference.
•applicationName – Specify the name of your application. Elastic Beanstalk displays the application
name in the AWS Management Console to distinguish it from other applications. By default, the
application name also forms the basis of the environment name and environment URL.
•solutionStackName – Specify the platform and version that will be used for the environment. For
more information, see Elastic Beanstalk Supported Platforms (p. 26).
A Launch Now URL can optionally contain the following parameters. If you do not include the optional
parameters in your Launch Now URL, Elastic Beanstalk uses default values to create and run your
application. When you do not include the sourceBundleUrl parameter, Elastic Beanstalk uses the default
sample application for the specified solutionStackName.
•sourceBundleUrl – Specify the location of your web application source bundle in URL format. For
example, if you uploaded your source bundle to an Amazon Simple Storage Service bucket, you might
specify the value of the sourceBundleUrl parameter as http://s3.amazonaws.com/mybucket/
myobject.
Note
You can specify the value of the sourceBundleUrl parameter as an HTTP URL, but the user's
web browser will convert characters as needed by applying HTML URL encoding.
•environmentType – Specify whether the environment is load balancing and autoscaling or just
a single instance. For more information, see Environment Types (p. 154). You can specify either
LoadBalancing or SingleInstance as the parameter value.
•tierName – Specify whether the environment supports a web application that processes web
requests or a web application that runs background jobs. For more information, see Worker
Environments (p. 156). You can specify either WebServer or Worker,
•instanceType – Specify a server with the characteristics (including memory size and CPU power) that
are most appropriate to your application. To see the instance types that are available in your Elastic
Beanstalk region, see InstanceType (p. 222) in the topic Configuration Options (p. 202). To see the
detailed specifications for each Amazon EC2 instance type, see Instance Types.
•withVpc – Specify whether to create the environment in an Amazon VPC. You can specify either true
or false. For more information about using Elastic Beanstalk with Amazon VPC, see Using Elastic
Beanstalk with Amazon Virtual Private Cloud (p. 451).
•withRds – Specify whether to create an Amazon RDS database instance with this environment. For
more information, see Using Elastic Beanstalk with Amazon Relational Database Service (p. 439). You
can specify either true or false.
API Version 2010-12-01
120
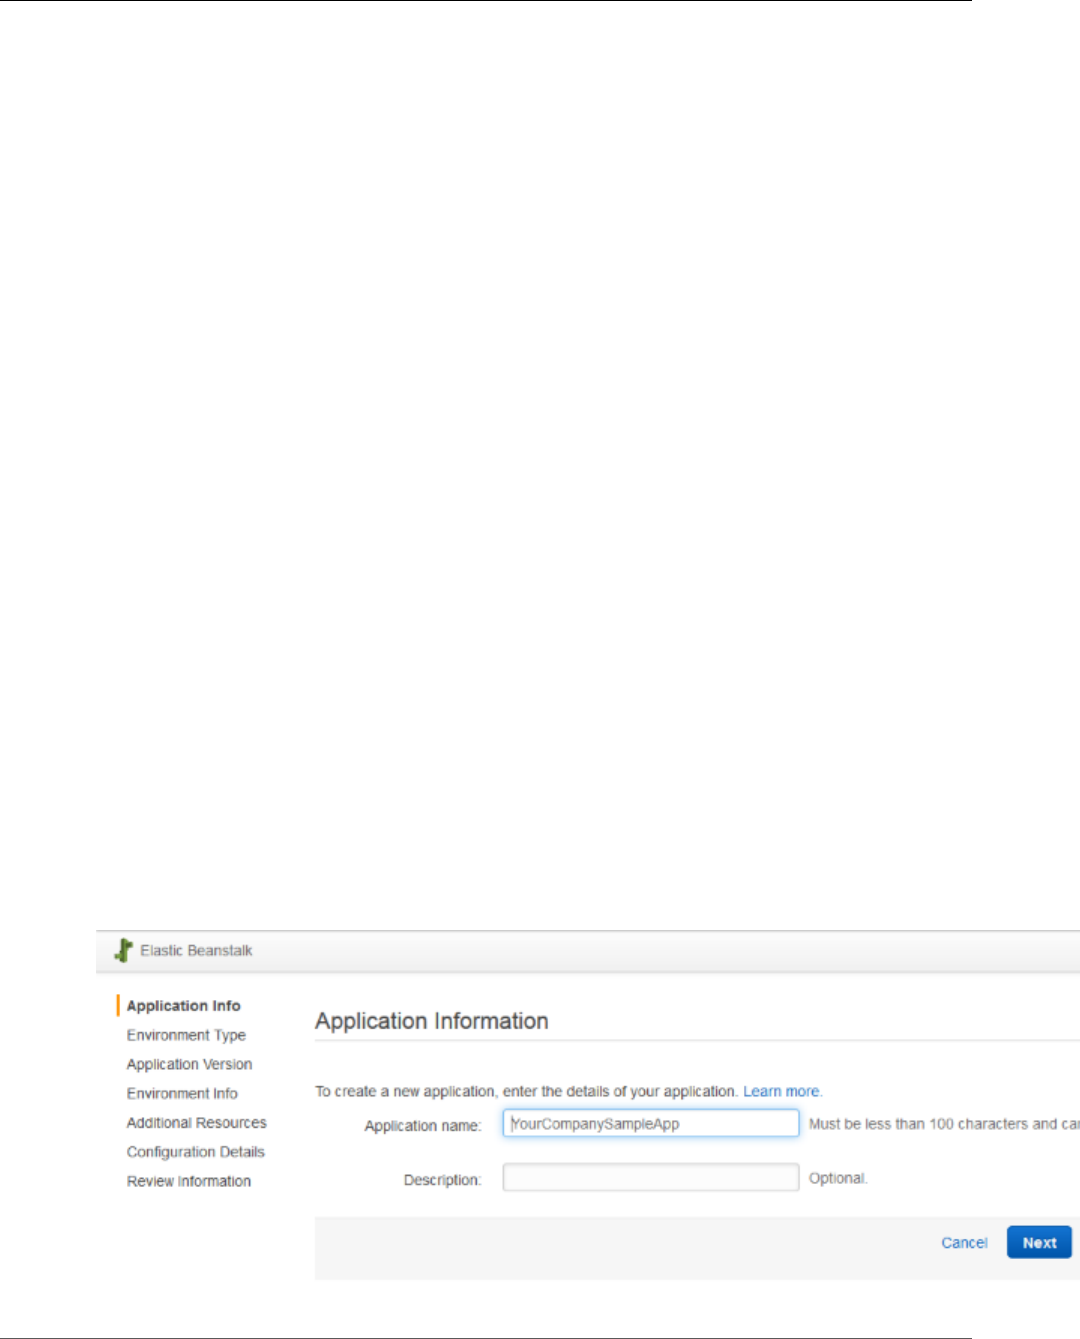
AWS Elastic Beanstalk Developer Guide
Launch Now URL
•rdsDBEngine – Specify the database engine that you want to use for your Amazon EC2 instances
in this environment. You can specify mysql, oracle-sel, sqlserver-ex, sqlserver-web, or
sqlserver-se. The default value is mysql.
•rdsDBAllocatedStorage – Specify the allocated database storage size in gigabytes. You can specify the
following values:
•MySQL – 5 to 1024. The default is 5.
•Oracle – 10 to 1024. The default is 10.
•Microsoft SQL Server Express Edition – 30.
•Microsoft SQL Server Web Edition – 30.
•Microsoft SQL Server Standard Edition – 200.
•rdsDBInstanceClass – Specify the database instance type. The default value is db.t2.micro
(db.m1.large for an environment not running in an Amazon VPC). For a list of database instance
classes supported by Amazon RDS, see DB Instance Class in the Amazon Relational Database Service
User Guide.
•rdsMultiAZDatabase – Specify whether Elastic Beanstalk needs to create the database instance
across multiple Availability Zones. You can specify either true or false. For more information about
multiple Availability Zone deployments with Amazon RDS, go to Regions and Availability Zones in the
Amazon Relational Database Service User Guide.
•rdsDBDeletionPolicy – Specify whether to delete or snapshot the database instance on environment
termination. You can specify either Delete or Snapshot.
Example
The following is an example Launch Now URL. After you construct your own, you can give it to your
users. For example, you might want to embed the URL on a web page or in training materials. When
users create an application using the Launch Now URL, the Elastic Beanstalk Create an Application wizard
requires no additional input.
https://console.aws.amazon.com/elasticbeanstalk/?region=us-west-2#/
newApplication?
applicationName=YourCompanySampleApp&solutionStackName=PHP&sourceBundleUrl=http://
s3.amazonaws.com/mybucket/
myobject&environmentType=SingleInstance&tierName=WebServer&instanceType=m1.small&withVpc=true&withRds=true&rdsDBEngine=postgres&rdsDBAllocatedStorage=6&rdsDBInstanceClass=db.m1.small&rdsMultiAZDatabase=true&rdsDBDeletionPolicy=Snapshot.
When users click a Launch Now URL, Elastic Beanstalk displays a page similar to the following.
API Version 2010-12-01
121

AWS Elastic Beanstalk Developer Guide
Compose Environments
To use the Launch Now URL
1. Click the Launch Now URL.
2. When the Elastic Beanstalk console opens, on the Application Info page, click Review and Launch
to view the settings Elastic Beanstalk will use to create the application and launch the environment
in which the application runs.
3. On the Review page, click Launch to create the application.
Creating and Updating Groups of AWS Elastic
Beanstalk Environments
With AWS Elastic Beanstalk's (Elastic Beanstalk's) Compose Environments API, you can create and
update groups of Elastic Beanstalk environments within a single application. Each environment in
the group can run a separate component of a service-oriented architecture application. The Compose
Environments API takes a list of application versions and an optional group name. Elastic Beanstalk
creates an environment for each application version, or, if the environments already exist, deploys the
application versions to them.
Create links between Elastic Beanstalk environments to designate one environment as a dependency
of another. When you create a group of environments with the Compose Environments API,
Elastic Beanstalk creates dependent environments only after their dependencies are up and running.
For more information on environment links, see Creating Links Between AWS Elastic Beanstalk
Environments (p. 162).
The Compose Environments API uses an environment manifest (p. 296) to store configuration
details that are shared by groups of environments. Each component application must have an env.yaml
configuration file in its application source bundle that specifies the parameters used to create its
environment.
Compose Environments requires the EnvironmentName and SolutionStack to be specified in the
environment manifest for each component application.
You can use the Compose Environments API with the Elastic Beanstalk command line interface (EB
CLI), the AWS CLI, or an SDK. See Managing Multiple AWS Elastic Beanstalk Environments as a Group
with the EB CLI (p. 508) for EB CLI instructions.
Using the Compose Environments API
For example, you could make an application named Media Library that lets users upload and manage
images and videos stored in Amazon Simple Storage Service (Amazon S3). The application has a front-
end environment, front, that runs a web application that lets users upload and download individual
files, view their library, and initiate batch processing jobs.
Instead of processing the jobs directly, the front-end application adds jobs to an Amazon SQS queue. The
second environment, worker, pulls jobs from the queue and processes them. worker uses a G2 instance
type that has a high-performance GPU, while front can run on a more cost-effective generic instance
type.
You would organize the project folder, Media Library, into separate directories for each component,
with each directory containing an environment definition file (env.yaml) with the source code for each:
~/workspace/media-library
|-- front
| `-- env.yaml
API Version 2010-12-01
122

AWS Elastic Beanstalk Developer Guide
Compose Environments
`-- worker
`-- env.yaml
The following listings show the env.yaml file for each component application.
~/workspace/media-library/front/env.yaml
EnvironmentName: front+
EnvironmentLinks:
"WORKERQUEUE" : "worker+"
AWSConfigurationTemplateVersion: 1.1.0.0
EnvironmentTier:
Name: WebServer
Type: Standard
SolutionStack: 64bit Amazon Linux 2015.09 v2.0.4 running Java 8
OptionSettings:
aws:autoscaling:launchconfiguration:
InstanceType: m4.large
~/workspace/media-library/worker/env.yaml
EnvironmentName: worker+
AWSConfigurationTemplateVersion: 1.1.0.0
EnvironmentTier:
Name: Worker
Type: SQS/HTTP
SolutionStack: 64bit Amazon Linux 2015.09 v2.0.4 running Java 8
OptionSettings:
aws:autoscaling:launchconfiguration:
InstanceType: g2.2xlarge
After creating an application version (p. 53) for the front-end (front-v1) and worker (worker-v1)
application components, you call the Compose Environments API with the version names. In this
example, we use the AWS CLI to call the API.
# Create application versions for each component:
~$ aws elasticbeanstalk create-application-version --application-name media-library --
version-label front-v1 --source-bundle S3Bucket="my-bucket",S3Key="front-v1.zip"
{
"ApplicationVersion": {
"ApplicationName": "media-library",
"VersionLabel": "front-v1",
"Description": "",
"DateCreated": "2015-11-03T23:01:25.412Z",
"DateUpdated": "2015-11-03T23:01:25.412Z",
"SourceBundle": {
"S3Bucket": "my-bucket",
"S3Key": "front-v1.zip"
}
}
}
~$ aws elasticbeanstalk create-application-version --application-name media-library --
version-label worker-v1 --source-bundle S3Bucket="my-bucket",S3Key="worker-v1.zip"
{
"ApplicationVersion": {
"ApplicationName": "media-library",
"VersionLabel": "worker-v1",
"Description": "",
"DateCreated": "2015-11-03T23:01:48.151Z",
"DateUpdated": "2015-11-03T23:01:48.151Z",
"SourceBundle": {
API Version 2010-12-01
123

AWS Elastic Beanstalk Developer Guide
Deployments
"S3Bucket": "my-bucket",
"S3Key": "worker-v1.zip"
}
}
}
# Create environments:
~$ aws elasticbeanstalk compose-environments --application-name media-library --group-name
dev --version-labels front-v1 worker-v1
The third call creates two environments, front-dev and worker-dev. The API creates the names of the
environments by concatenating the EnvironmentName specified in the env.yaml file with the group
name option specified in the Compose Environments call, separated by a hyphen. The total length of
these two options and the hyphen must not exceed the maximum allowed environment name length of
23 characters.
The application running in the front-dev environment can access the name of the Amazon SQS queue
attached to the worker-dev environment by reading the WORKERQUEUE variable. For more information
on environment links, see Creating Links Between AWS Elastic Beanstalk Environments (p. 162).
Deploying Applications to AWS Elastic Beanstalk
Environments
You can use the AWS Management Console to upload an updated source bundle (p. 58) and deploy it to
your AWS Elastic Beanstalk environment, or redeploy a previously uploaded version.
Deploying a new version of your application to an environment is typically a fairly quick process. The
new source bundle is deployed to an instance and extracted, and then the web container or application
server picks up the new version and restarts if necessary. During deployment, your application might still
become unavailable to users for a few seconds. You can prevent this by configuring your environment to
use rolling deployments (p. 125) to deploy the new version to instances in batches.
Each deployment is identified by a deployment ID. Deployment IDs start at one and increment by one
with each deployment and instance configuration change. Elastic Beanstalk displays the deployment ID
in both the health console (p. 344) and the EB CLI (p. 503) when it reports instance health status if
you have enabled enhanced health reporting (p. 336). The deployment ID can help you determine the
state of your environment when a rolling update fails.
If you need to ensure that your application source is always deployed to new instances, instead of
updating existing instances, you can configure your environment to use immutable updates (p. 138) for
deployments. In an immutable update, a second AutoScaling group is launched in your environment and
the new version serves traffic alongside the old version until the new instance pass health checks.
Supported Deployment Policies
Deployment Policy Load Balanced
Environments
Single Instance
Environments
Windows Server
Environments
All at Once ✓✓✓
Rolling ✓ ☓ ✓
Rolling with an
Additional Batch
✓ ☓ ☓
Immutable ✓✓☓
API Version 2010-12-01
124

AWS Elastic Beanstalk Developer Guide
Deployment Options
To configure deployments
1. Open the Elastic Beanstalk console.
2. Navigate to the management page (p. 65) for your environment.
3. Choose Configuration.
4. Choose Updates and Deployments.
5. In the Application Deployments section, choose a Deployment policy (p. 125) and batch settings.
6. Choose Apply.
For deployments that are dependent on resource configuration changes or a new version that can't
run alongside the old version, you can launch a new environment with the new version and perform a
CNAME swap for a blue/green deployment (p. 129).
The following table compares deployment methods:
Deployment Methods
MethodImpact of Failed Deployment Deploy Time Zero
Downtime
No
DNS
Change
Rollback
Process
Code
Deployed
To
All
at
once
Downtime ☓ ✓ Re-
deploy
Existing
instances
RollingSingle batch out of service. Any successful
batches prior to failure running new
application version.
†✓✓Re-
deploy
Existing
instances
Rolling
with
additional
batch
Minimal if first batch fails, otherwise similar
to Rolling.†✓✓Re-
deploy
New
&
existing
instances
ImmutableMinimal ✓✓Re-
deploy
New
instances
Blue/
green
Minimal ✓ ☓ Swap
URL
New
instances
† Varies depending on batch size.
If you deploy often, consider using the Elastic Beanstalk Command Line Interface (p. 480) to manage
your environments. The EB CLI creates a repository alongside your source code and can create a source
bundle, upload it to Elastic Beanstalk, and deploy with a single command.
Deployment Policies and Settings
AWS Elastic Beanstalk provides several options for how deployments (p. 124) are processed, including
deployment policies (All at once, Rolling, Rolling with additional batch, and Immutable) and options
that let you configure batch size and health check behavior during deployments. By default, your
environment uses rolling deployments if you created it with the console or EB CLI, or all at once
deployments if you created it with a different client (API, SDK or AWS CLI).
With rolling deployments, AWS Elastic Beanstalk splits the environment's EC2 instances into batches and
deploys the new version of the application to one batch at a time, leaving the rest of the instances in the
API Version 2010-12-01
125

AWS Elastic Beanstalk Developer Guide
Deployment Options
environment running the old version of the application. During a rolling deployment, some instances
serve requests with the old version of the application, while instances in completed batches serve other
requests with the new version.
If you need to maintain full capacity during deployments, you can configure your environment to launch
a new batch of instances prior to taking any instances out of service. This option is called a rolling
deployment with an additional batch. When the deployment completes, Elastic Beanstalk terminates
the additional batch of instances.
Immutable deployments perform an immutable update (p. 138) to launch a full set of new instances
running the new version of the application in a separate Auto Scaling group alongside the instances
running the old version. Immutable deployments can prevent issues caused by partially completed
rolling deployments. If the new instances don't pass health checks, Elastic Beanstalk terminates them,
leaving the original instances untouched.
If your application doesn't pass all health checks, but still operates correctly at a lower health status,
you can allow instances to pass health checks with a lower status, such as Warning, by modifying the
Healthy threshold option. If your deployments fail because they don't pass health checks and you need
to force an update regardless of health status, specify the Ignore health check option.
When you specify a batch size for rolling updates, Elastic Beanstalk also uses that value for rolling
application restarts. Use rolling restarts when you need to restart the proxy and application servers
running on your environment's instances without downtime.
Configuring Application Deployments
In the environment management console (p. 65), enable and configure batched application version
deployments by editing Updates and Deployments on the environment's Configuration page.
To configure deployments (console)
1. Open the Elastic Beanstalk console.
2. Navigate to the management page (p. 65) for your environment.
3. Choose Configuration.
4. In the Updates and Deployments section, choose .
5. In the Application Deployments section, choose a Deployment policy, batch settings and health
check options.
6. Choose Apply.
The Application Deployments section of the Updates and Deployments page has the following options
for rolling updates:
•Deployment policy – Choose from the following deployment options:
•All at once – Deploy the new version to all instances simultaneously. All instances in your
environment are out of service for a short time while the deployment occurs.
•Rolling – Deploy the new version in batches. Each batch is taken out of service during the
deployment phase, reducing your environment's capacity by the number of instances in a batch.
•Rolling with additional batch – Deploy the new version in batches, but first launch a new batch of
instances to ensure full capacity during the deployment process.
•Immutable – Deploy the new version to a fresh group of instances by performing an immutable
update (p. 138).
•Batch type – Whether you want to allocate a percentage of the total number of EC2 instances in the
Auto Scaling group or a fixed number to a batch of instances.
•Batch size – The number or percentage of instances to deploy in each batch, up to 100 percent or the
maximum instance count in your environment's Auto Scaling configuration.
API Version 2010-12-01
126
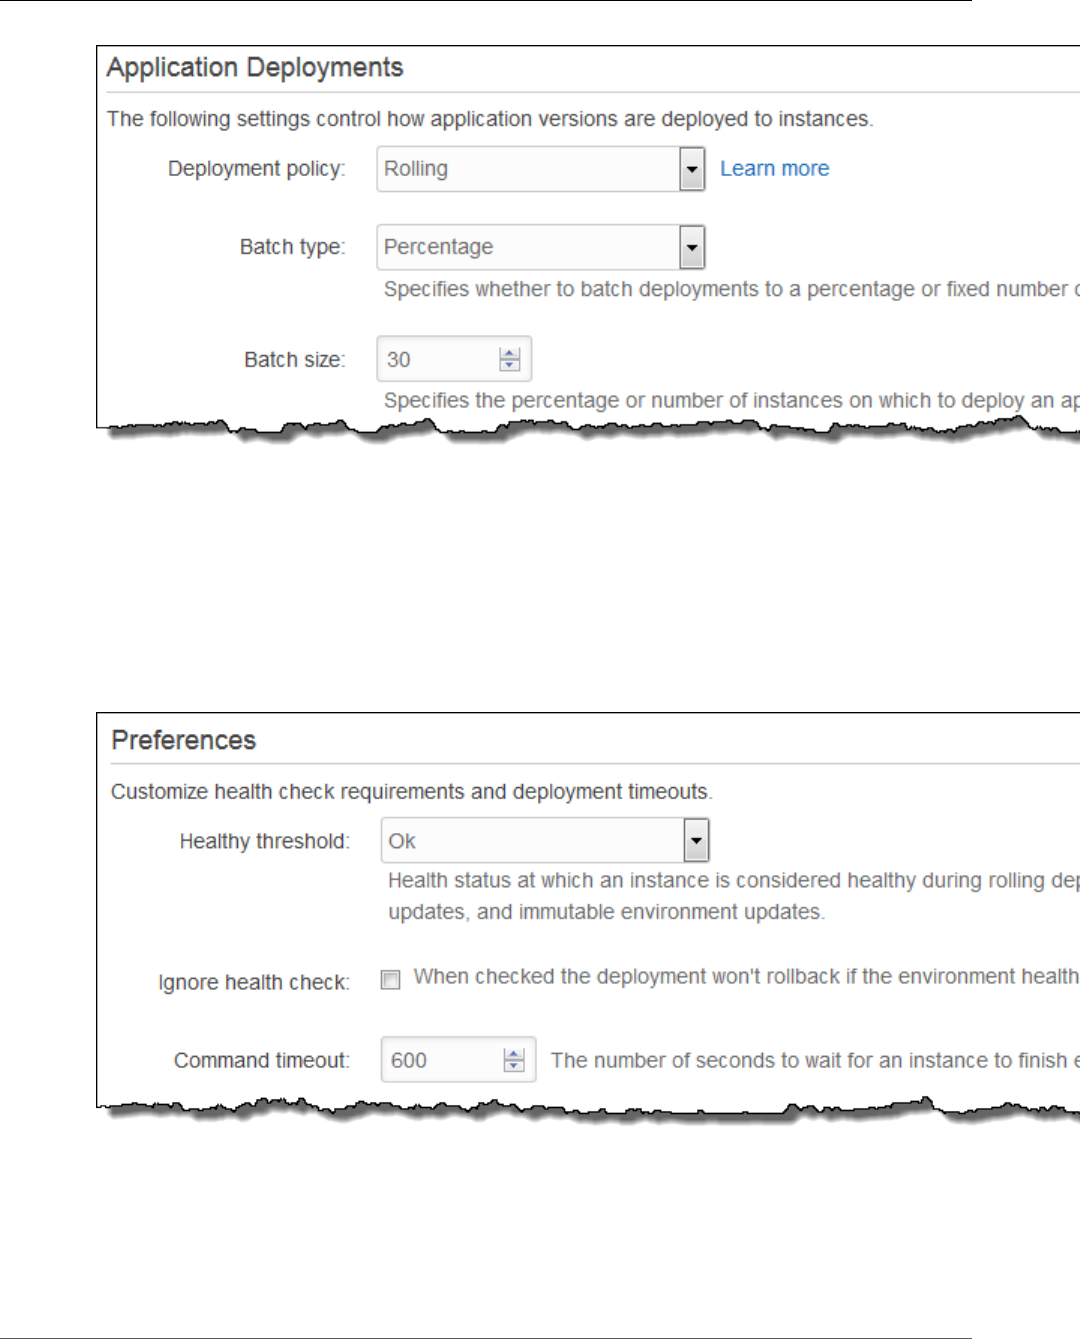
AWS Elastic Beanstalk Developer Guide
Deployment Options
The Preferences section contains options related to health checks.
•Healthy threshold – Lowers the threshold at which an instance is considered healthy during rolling
deployments, rolling updates and immutable updates.
•Ignore health check – Prevents a deployment from rolling back when a batch fails to become healthy
within the Command timeout.
•Command timeout – The number of seconds to wait for an instance to become healthy before
cancelling the deployment or, if Ignore health check is set, to continue to the next batch.
How Rolling Deployments Work
When processing a batch, Elastic Beanstalk detaches all instances in the batch from the load balancer,
deploys the new application version, and then reattaches the instances. If you have connection
draining (p. 179) enabled, Elastic Beanstalk drains existing connections from the EC2 instances in each
batch before beginning the deployment.
API Version 2010-12-01
127

AWS Elastic Beanstalk Developer Guide
Deployment Options
After reattaching the instances in a batch to the load balancer, Elastic Load Balancing waits until they
pass a minimum number of Elastic Load Balancing health checks (the Healthy check count threshold
value), and then starts routing traffic to them. If no health check URL (p. 179) is configured, this can
happen very quickly, because an instance will pass the health check as soon as it can accept a TCP
connection. If a health check URL is configured, the load balancer doesn't route traffic to the updated
instances until they return a 200 OK status code in response to an HTTP GET request to the health
check URL.
Elastic Beanstalk waits until all instances in a batch are healthy before moving on to the next batch.
With basic health reporting (p. 333), instance health depends on the Elastic Load Balancing health
check status. When all instances in the batch pass enough health checks to be considered healthy by
Elastic Load Balancing, the batch is complete. If enhanced health reporting (p. 336) is enabled, Elastic
Beanstalk considers several other factors, including the result of incoming requests. With enhanced
health reporting, all instances must pass 12 consecutive health checks with an OK status (p. 350)
within 2 minutes for web server environments, and 18 health checks within three minutes for worker
environments.
If a batch of instances does not become healthy within the command timeout (p. 126), the deployment
fails. After a failed deployment, check the health of the instances in your environment (p. 344) for
information about the cause of the failure, and perform another deployment with a fixed or known good
version of your application to roll back.
If a deployment fails after one or more batches completed successfully, the completed batches run
the new version of your application while any pending batches continue to run the old version. You
can identify the version running on the instances in your environment on the health page (p. 345)
in the console. This page displays the deployment ID of the most recent deployment that executed
on each instance in your environment. If you terminate instances from the failed deployment, Elastic
Beanstalk replaces them with instances running the application version from the most recent successful
deployment.
The aws:elasticbeanstalk:command Namespace
You can also use the configuration options (p. 202) in the
aws:elasticbeanstalk:command (p. 230) namespace to configure rolling deployments.
Use the DeploymentPolicy option to set the deployment type. The following values are supported:
•AllAtOnce disables rolling deployments and always deploy to all instances simultaneously.
•Rolling enables standard rolling deployments.
•RollingWithAdditionalBatch launches an extra batch of instances prior to starting the
deployment to maintain full capacity.
•Immutable performs an immutable update (p. 138) for every deployment.
When you enable rolling deployments, set the BatchSize and BatchSizeType options to configure
the size of each batch. For example, to deploy 25% of all instances in each batch, specify the following
options and values:
Example .ebextensions/rolling-updates.config
option_settings:
aws:elasticbeanstalk:command:
DeploymentPolicy: Rolling
BatchSizeType: Percentage
BatchSize: 25
API Version 2010-12-01
128

AWS Elastic Beanstalk Developer Guide
Blue/Green Deployments
To deploy to five instances in each batch regardless of the number of instances running, and to bring
up an extra batch of five instances running the new version prior to pulling any instances out of service,
specify the following options and values:
Example .ebextensions/rolling-additionalbatch.config
option_settings:
aws:elasticbeanstalk:command:
DeploymentPolicy: RollingWithAdditionalBatch
BatchSizeType: Fixed
BatchSize: 5
To perform an immutable update for each deployment with a health check threshold of Warning, and
proceed with the deployment even if instances in a batch don't pass health checks within a timeout of 15
minutes, specify the following options and values:
Example .ebextensions/immutable-ignorehealth.config
option_settings:
aws:elasticbeanstalk:command:
DeploymentPolicy: Immutable
HealthCheckSuccessThreshold: Warning
IgnoreHealthCheck: true
Timeout: "900"
EB CLI and Elastic Beanstalk console apply recommended values for the preceding options.
These settings must be removed if you want to use configuration files to configure the same. See
Recommended Values (p. 203) for details.
Blue/Green Deployments with AWS Elastic Beanstalk
Because Elastic Beanstalk performs an in-place update when you update your application versions,
your application may become unavailable to users for a short period of time. It is possible to avoid this
downtime by performing a blue/green deployment, where you deploy the new version to a separate
environment, and then swap CNAMEs of the two environments to redirect traffic to the new version
instantly.
Blue/green deployments require that your environment runs independently of your production database,
if your application uses one. If your environment has an Amazon RDS DB instance attached to it, the
data will not transfer over to your second environment, and will be lost if you terminate the original
environment.
For details on configuring your application to connect to an external (not managed by Elastic Beanstalk)
Amazon RDS instance, see Using Elastic Beanstalk with Amazon Relational Database Service (p. 439).
To perform a blue/green deployment
1. Open the Elastic Beanstalk console.
2. Clone your current environment (p. 110), or launch a new environment running the desired
configuration.
3. Deploy the new application version (p. 132) to the new environment.
4. Test the new version on the new environment.
5. From the new environment's dashboard, choose Actions and then choose Swap Environment URLs.
API Version 2010-12-01
129
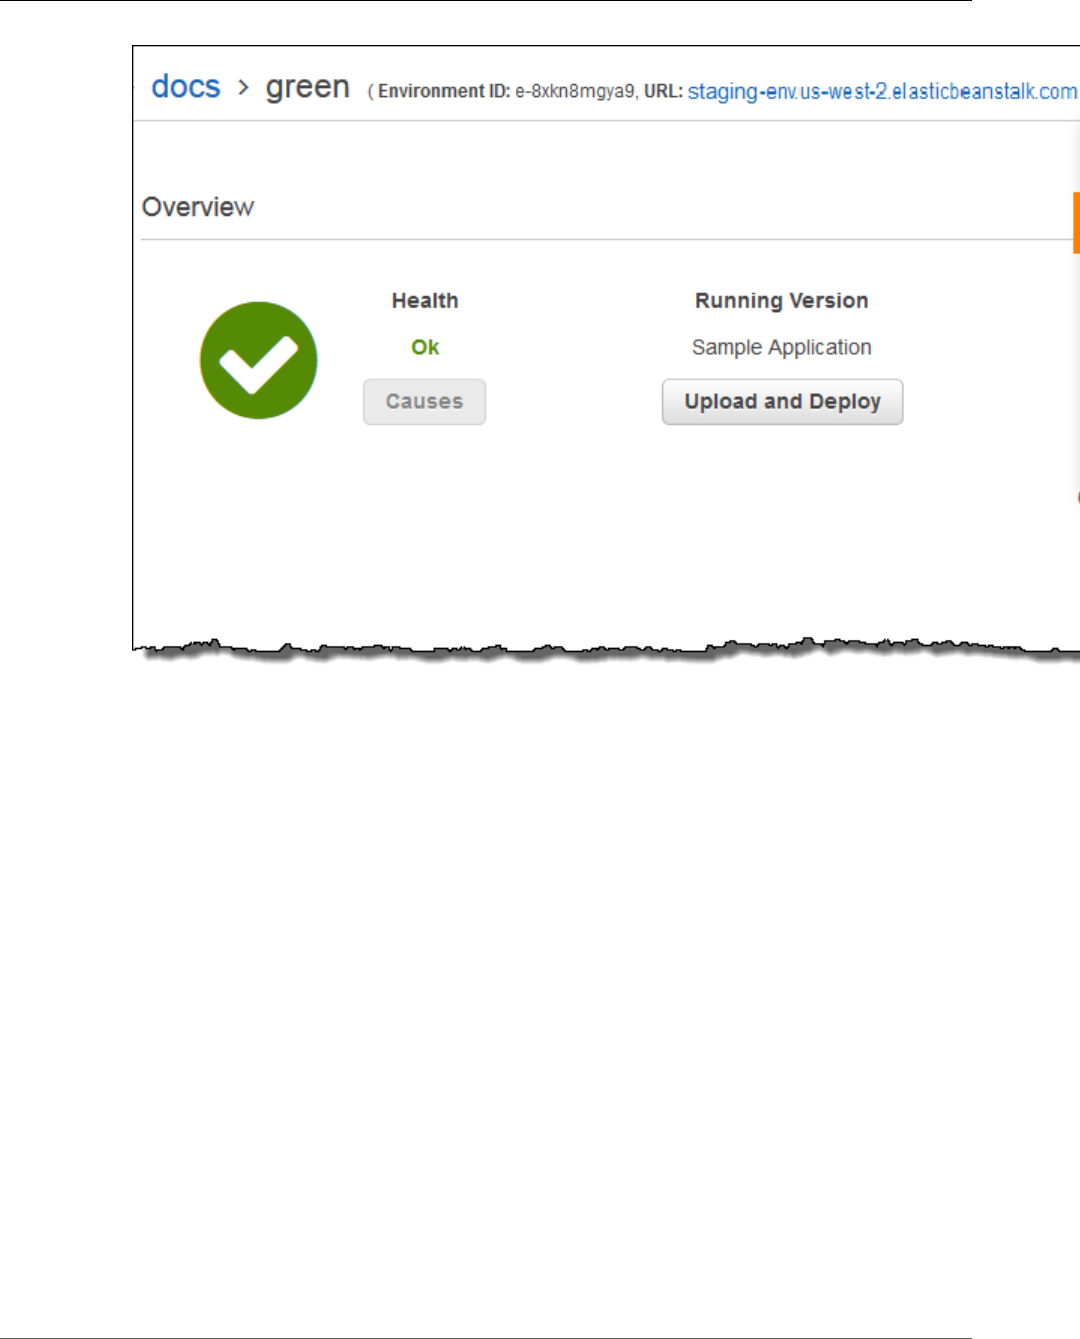
AWS Elastic Beanstalk Developer Guide
Blue/Green Deployments
6. From the Environment name drop-down list, select the current environment.
API Version 2010-12-01
130
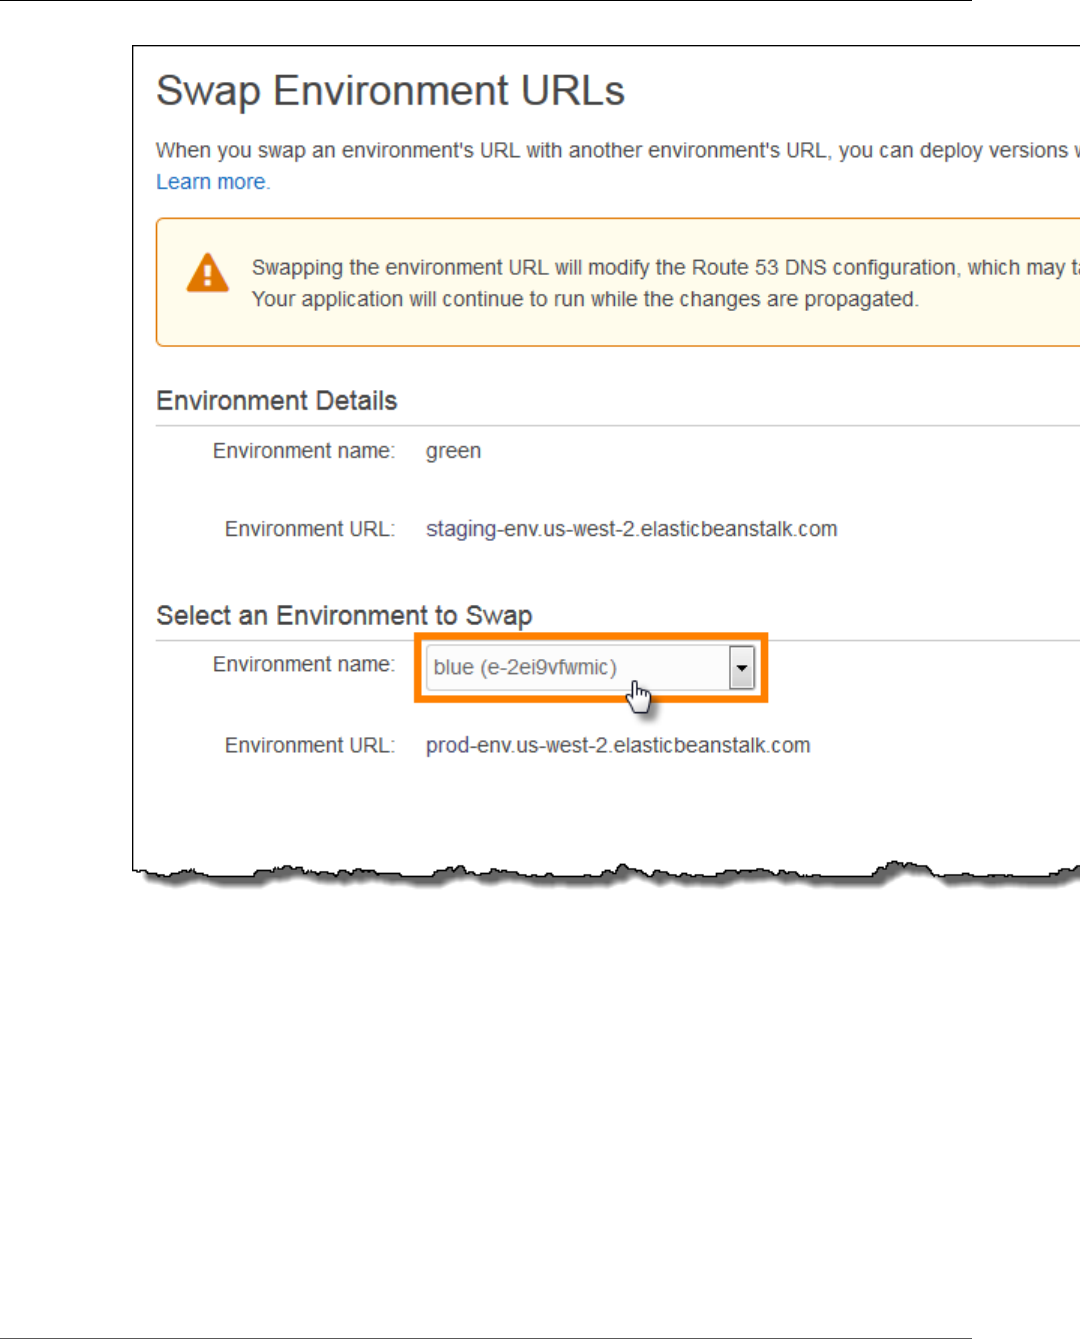
AWS Elastic Beanstalk Developer Guide
Blue/Green Deployments
7. Choose Swap.
8. Elastic Beanstalk swaps the CNAME records of the old and new environment, redirecting traffic from
the old version to the new version and vice-versa.
API Version 2010-12-01
131
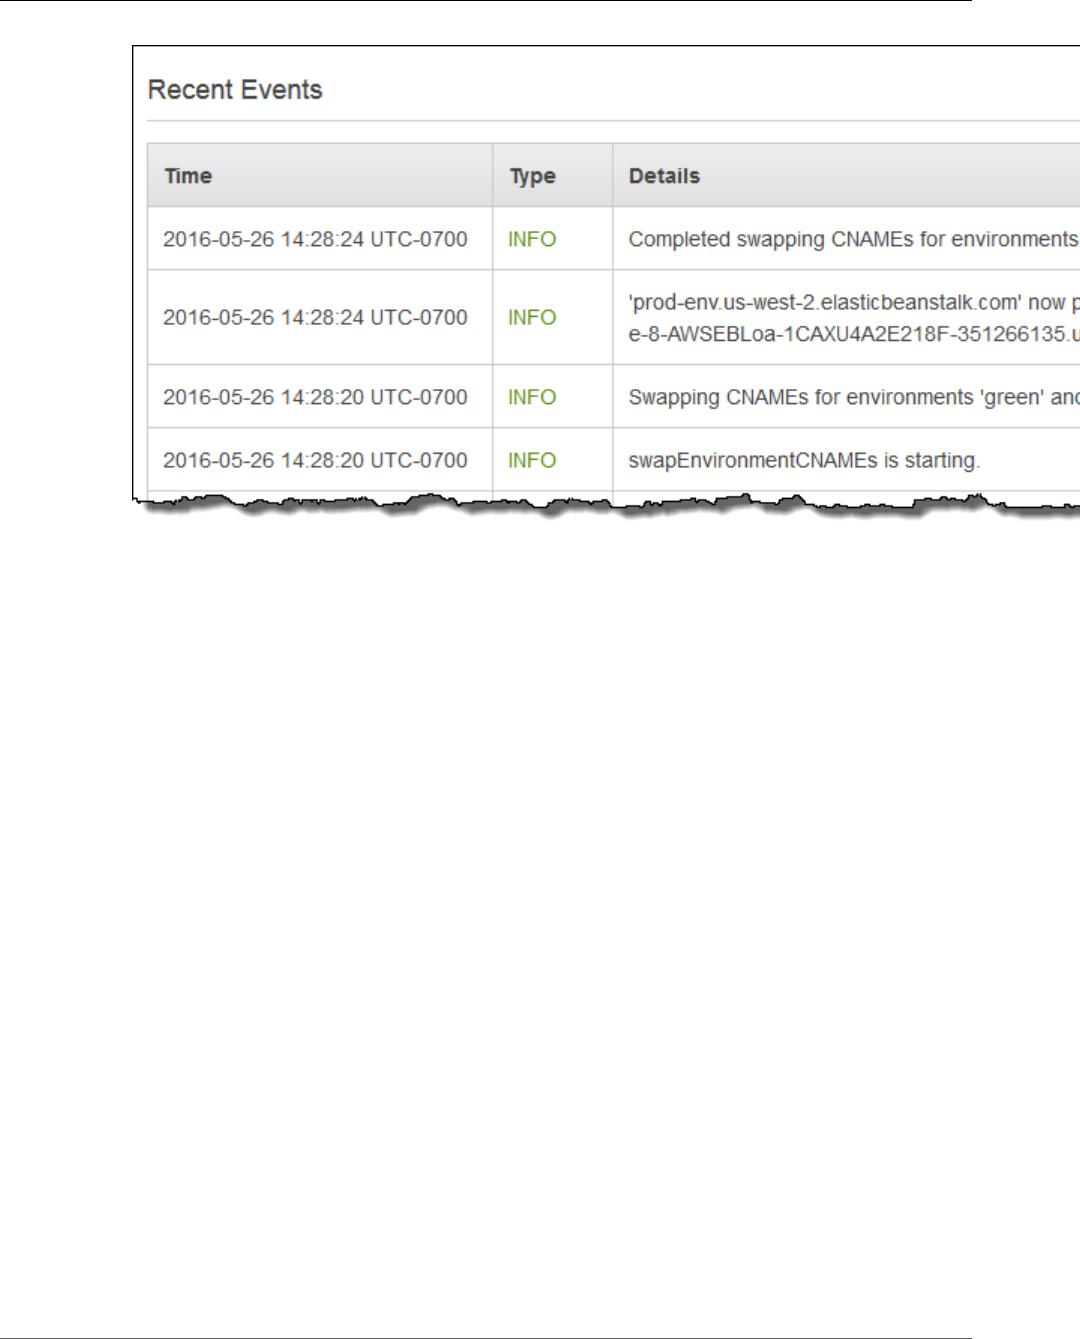
AWS Elastic Beanstalk Developer Guide
Deploying a New Application Version
After Elastic Beanstalk completes the swap operation, verify that the new environment responds when
you try to connect to the old environment URL. However, do not terminate your old environment until
the DNS changes have been propagated and your old DNS records expire. DNS servers do not necessarily
clear old records from their cache based on the time to live (TTL) you set on your DNS records.
Deploying a New Application Version
You can perform deployments from your environment's dashboard.
To deploy a new application version to an Elastic Beanstalk environment
1. Open the Elastic Beanstalk console.
2. Navigate to the management page (p. 65) for your environment.
3. Choose Upload and Deploy,
4. Choose Browse to select the application source bundle for the application version you want to
deploy.
API Version 2010-12-01
132
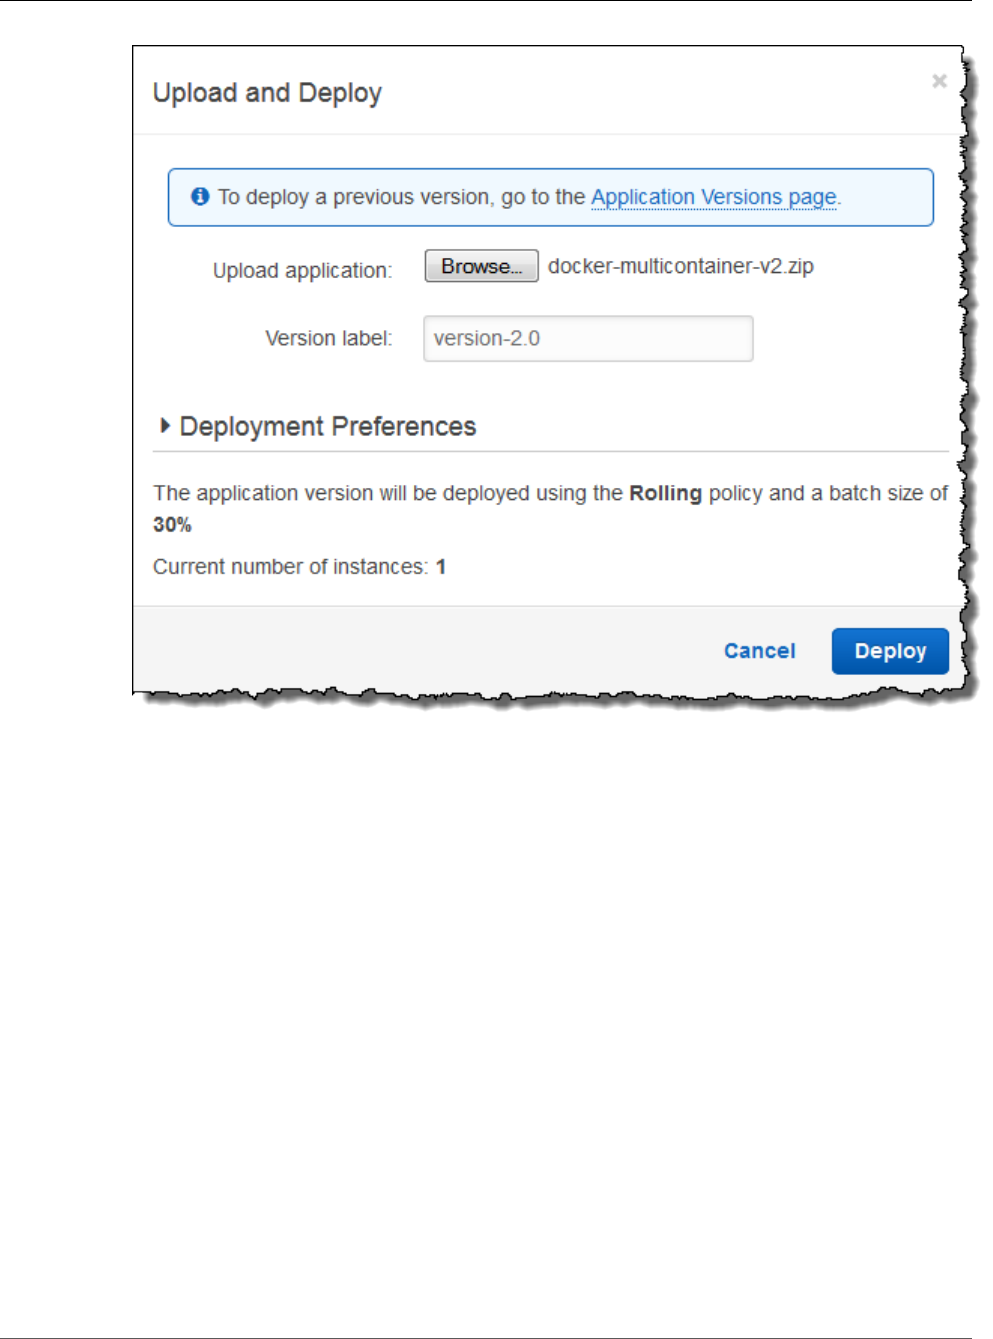
AWS Elastic Beanstalk Developer Guide
Redeploying a Previous Version
5. For Version label, type a unique version label to represent the new application version.
6. Choose Deploy.
Redeploying a Previous Version
You can also deploy a previously uploaded version of your application to any of its environments from
the application versions page.
To deploy an existing application version to an existing environment
1. Open the Elastic Beanstalk console.
2. Choose Actions next to the application name and then choose View application versions.
3. Select the application version that you want to deploy, and then click Deploy.
4. Choose an environment and then choose Deploy.
Configuration Changes
When you modify configuration option settings in the Configuration section of the environment
management console (p. 65), AWS Elastic Beanstalk propagates the change to all affected resources.
These resources include the load balancer that distributes traffic to the EC2 instances running your
application, the Auto Scaling group that manages those instances, and the EC2 instances themselves.
API Version 2010-12-01
133

AWS Elastic Beanstalk Developer Guide
Rolling Updates
Many configuration changes can be applied to a running environment without replacing existing
instances. For example, setting a health check URL (p. 179) triggers an environment update to
modify the load balancer settings, but doesn't cause any downtime because the instances running your
application continue serving requests while the update is propagated.
Configuration changes that modify the launch configuration (p. 221) or VPC settings (p. 229) require
terminating all instances in your environment and replacing them. For example, when you change
the instance type or SSH key setting for your environment the environment must be terminated and
replaced. To prevent downtime during these processes, Elastic Beanstalk applies these configuration
changes in batches, keeping a minimum number of instances running and serving traffic at all times. This
process is called a rolling update (p. 134).
Immutable updates (p. 138) are an alternative to rolling updates where a temporary Auto Scaling
group is launched outside of your environment with a separate set of instances running on the new
configuration, which are placed behind your environment's load balancer. Old and new instances both
serve traffic until the new instances pass health checks, at which time the new instances are moved into
your environment's Auto Scaling group and the temporary group and old instances are terminated.
Supported Update Types
Rolling Update Setting Load Balanced
Environments
Single Instance
Environments
Windows Server
Environments
Disabled ✓✓✓
Rolling Based on Health ✓ ☓ ✓
Rolling Based on Time ✓ ☓ ✓
Immutable ✓✓☓
Topics
•Elastic Beanstalk Rolling Environment Configuration Updates (p. 134)
•Immutable Environment Updates (p. 138)
•Tagging Resources in Your Elastic Beanstalk Environment (p. 140)
Elastic Beanstalk Rolling Environment Configuration
Updates
When a configuration change requires instances to be replaced (p. 133), Elastic Beanstalk can perform
the update in batches to avoid downtime while the change is propagated. During a rolling update,
capacity is only reduced by the size of a single batch, which you can configure. Elastic Beanstalk takes
one batch of instances out of service, terminates them, and then launches a batch with the new
configuration. After the new batch starts serving requests, Elastic Beanstalk moves on to the next batch.
Rolling configuration update batches can be processed periodically (time-based), with a delay between
each batch, or based on health. For time-based rolling updates, you can configure the amount of time
that Elastic Beanstalk waits after completing the launch of a batch of instances before moving on to the
next batch. This pause time allows your application to bootstrap and start serving requests.
With health-based rolling updates, Elastic Beanstalk waits until instances in a batch pass health checks
before moving on to the next batch. The health of an instance is determined by the health reporting
system, which can be basic or enhanced. With basic health (p. 333), a batch is considered healthy as
soon as all instances in it pass ELB health checks.
API Version 2010-12-01
134

AWS Elastic Beanstalk Developer Guide
Rolling Updates
With enhanced health reporting (p. 336), all of the instances in a batch must pass multiple consecutive
health checks before Elastic Beanstalk will move on to the next batch. In addition to ELB health
checks, which only check your instances, enhanced health monitors application logs and the state of
your environment's other resources. In a web server environment with enhanced health, all instances
must pass 12 health checks over the course of two minutes (18 checks over three minutes for worker
environments). If any instance fails one health check, the count resets.
If a batch does not become healthy within the rolling update timeout (default is 30 minutes), the
update is cancelled. Rolling update timeout is a configuration option (p. 202) that is available
in the aws:autoscaling:updatepolicy:rollingupdate (p. 137) namespace. If your
application does not pass health checks with Ok status but is stable at a different level, you can
set the HealthCheckSuccessThreshold option in the aws:elasticbeanstalk:command
namespace (p. 230) to change the level at which Elastic Beanstalk considers an instance to be healthy.
If the rolling update process fails, Elastic Beanstalk starts another rolling update to rollback to the
previous configuration. A rolling update can fail due to failed health checks or if launching new instances
causes you to exceed the limits on your account. If you hit a limit on the number of EC2 instances, for
example, the rolling update can fail when it attempts to provision a batch of new instances. In this case,
the rollback fails as well.
A failed rollback ends the update process and leaves your environment in an unhealthy state.
Unprocessed batches are still running instances with the old configuration, while any batches that
completed successfully have the new configuration. To fix an environment after a failed rollback, first
resolve the underlying issue that caused the update to fail, and then initiate another environment
update.
An alternative method is to deploy the new version of your application to a different environment and
then perform a CNAME swap to redirect traffic with zero downtime. See Blue/Green Deployments with
AWS Elastic Beanstalk (p. 129) for more information.
Rolling Updates vs Rolling Deployments
Rolling updates occur when you change settings that require new EC2 instances to be provisioned for
your environment. This includes changes to the Auto Scaling group configuration such as instance
type and key pair settings, and changes to VPC settings. In a rolling update, each batch of instances is
terminated prior to a new batch being provisioned to replace it.
Rolling deployments (p. 125) occur whenever you deploy your application and can typically be
performed without replacing instances in your environment. Elastic Beanstalk takes each batch out of
service, deploys the new application version, and then places it back in service.
The exception to this is if you change settings that require instance replacement at the same time you
deploy a new application version. For example, if you change the key name (p. 221) settings in a
configuration file (p. 256) in your source bundle and deploy it to your environment, you trigger a rolling
update. Instead of deploying your new application version to each batch of existing instances, a new
batch of instances is provisioned with the new configuration. A separate deployment does not occur in
this case because the new instances are brought up with the new application version.
Any time that new instances are provisioned as part of an environment update, there is a deployment
phase where your application's source code is deployed to the new instances and any configuration
settings that modify the operating system or software on the instances are applied. Deployment health
check settings (p. 126) (Ignore health check, Healthy threshold and Command timeout) also apply to
health based rolling updates and immutable updates during the deployment phase.
Configuring Rolling Updates
You can enable and configure rolling updates in the Elastic Beanstalk Management Console.
API Version 2010-12-01
135
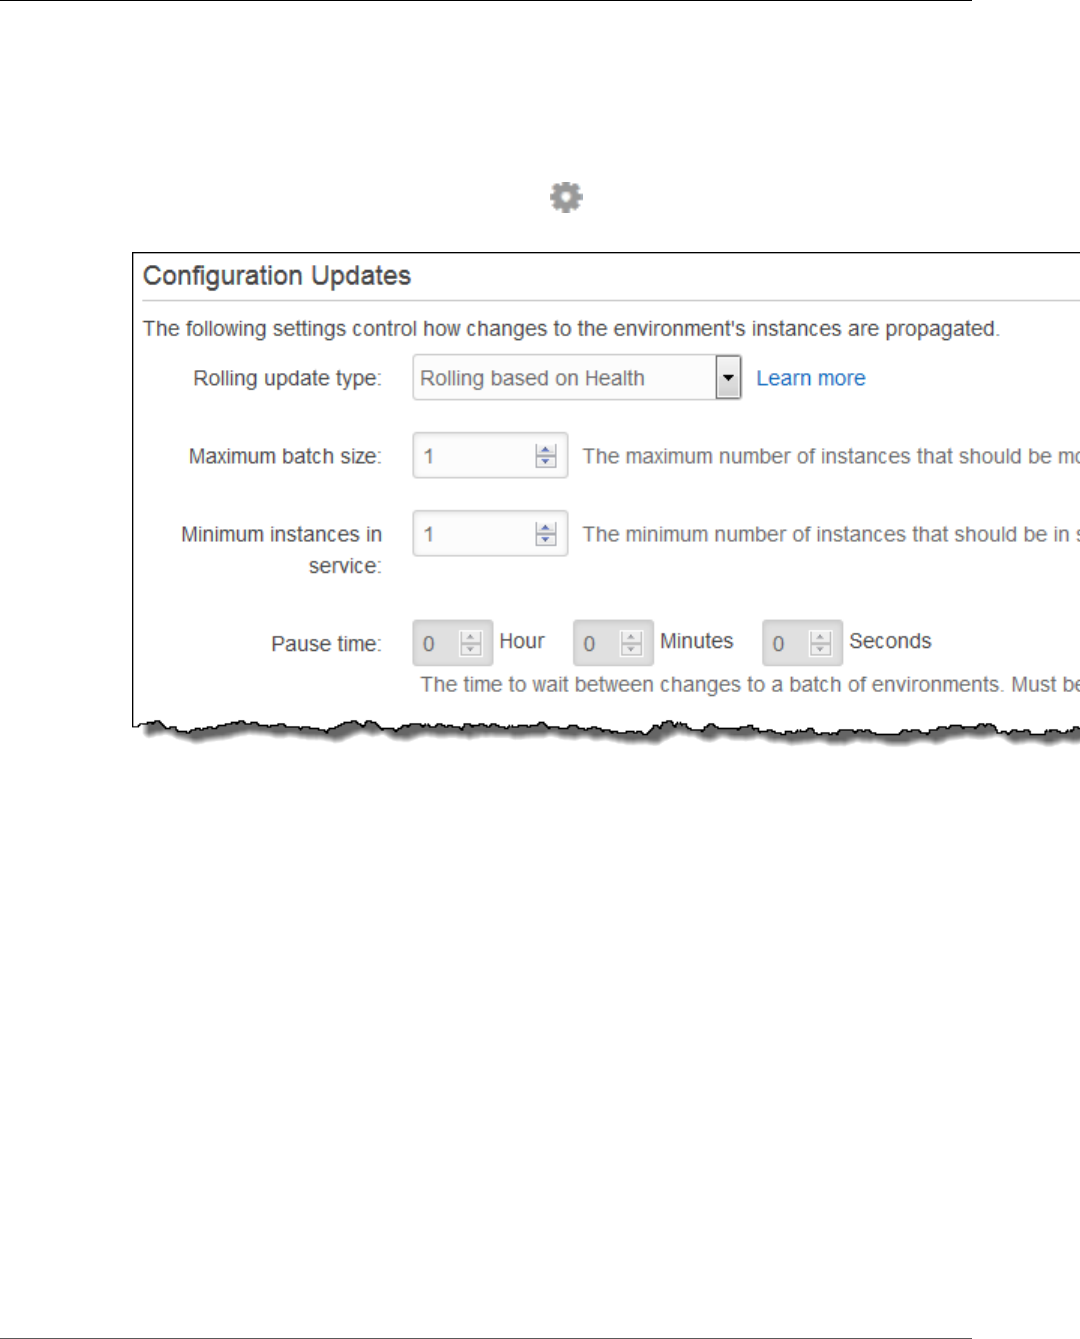
AWS Elastic Beanstalk Developer Guide
Rolling Updates
To enable rolling updates
1. Open the Elastic Beanstalk console.
2. Navigate to the management page (p. 65) for your environment.
3. Choose Configuration.
4. In the Updates and Deployments section, choose .
5. In the Configuration Updates section, select Rolling configuration updates.
6. Choose an Update type and batch settings.
7. Choose Apply.
The Configuration Updates section of the Updates and Deployments page has the following options for
rolling updates:
•Update type – Choose from the following options: Elastic Beanstalk waits after it finishes updating
a batch of instances before moving on to the next batch, to allow those instances to finish
bootstrapping and start serving traffic.
•Rolling based on Health – Wait until instances in the current batch are healthy before placing
instances in service and starting the next batch.
•Rolling based on Time – Specify an amount of time to wait between launching new instances and
placing them in service before starting the next batch.
•Immutable – Apply the configuration change to a fresh group of instances by performing an
immutable update (p. 138).
•Maximum batch size – The number of instances to replace in each batch, between 1 and 10000. By
default, this value is one-third of the minimum size of the autoscaling group, rounded up.
•Minimum instances in service – The minimum number of instances to keep running while other
instances are being updated, between 0 and 9999. The default value is either the minimum size of the
autoscaling group or one less than the maximum size of the autoscaling group, whichever number is
lower.
API Version 2010-12-01
136

AWS Elastic Beanstalk Developer Guide
Rolling Updates
•Pause time (time-based only) – The amount of time to wait after a batch is updated before moving on
to the next batch, to allow your application to start receiving traffic. Between 0 seconds to 1 hour.
The aws:autoscaling:updatepolicy:rollingupdate namespace
You can also use the configuration options (p. 202) in the
aws:autoscaling:updatepolicy:rollingupdate (p. 227) namespace to configure rolling
updates.
Use the RollingUpdateEnabled option to enable rolling updates, and RollingUpdateType to
choose the update type. The following values are supported for RollingUpdateType:
•Health .– Wait until instances in the current batch are healthy before placing instances in service and
starting the next batch.
•Time – Specify an amount of time to wait between launching new instances and placing them in
service before starting the next batch.
•Immutable – Apply the configuration change to a fresh group of instances by performing an
immutable update (p. 138).
When you enable rolling updates, set the MaxBatchSize and MinInstancesInService options
to configure the size of each batch. For time-based and health-based rolling updates, you can also
configure a PauseTime and Timeout, respectively.
For example, to launch up to five instances at a time, while maintaining at least two instances in service,
and wait five minutes and 30 seconds between batches, specify the following options and values:
Example .ebextensions/timebased.config
option_settings:
aws:autoscaling:updatepolicy:rollingupdate:
RollingUpdateEnabled: true
MaxBatchSize: 5
MinInstancesInService: 2
RollingUpdateType: Time
PauseTime: PT5M30S
To enable health based rolling updates, with a 45 minute timeout for each batch, specify the following
options and values:
Example .ebextensions/healthbased.config
option_settings:
aws:autoscaling:updatepolicy:rollingupdate:
RollingUpdateEnabled: true
MaxBatchSize: 5
MinInstancesInService: 2
RollingUpdateType: Health
Timeout: PT45M
Timeout and PauseTime values must be specified in ISO8601 duration: PT#H#M#S, where each # is the
number of hours, minutes, and/or seconds, respectively.
EB CLI and Elastic Beanstalk console apply recommended values for the preceding options.
These settings must be removed if you want to use configuration files to configure the same. See
Recommended Values (p. 203) for details.
API Version 2010-12-01
137

AWS Elastic Beanstalk Developer Guide
Immutable Updates
Immutable Environment Updates
Immutable environment updates are an alternative to rolling updates (p. 134) that ensure that
configuration changes that require replacing instances are applied efficiently and safely. If an immutable
environment update fails, the rollback process requires only terminating an Auto Scaling group. A failed
rolling update, on the other hand, requires performing an additional rolling update to roll back the
changes.
To perform an immutable environment update, Elastic Beanstalk creates a second, temporary Auto
Scaling group behind your environment's load balancer to contain the new instances. First, Elastic
Beanstalk launches a single instance with the new configuration in the new group. This instance serves
traffic alongside all of the instances in the original Auto Scaling group that are running the previous
configuration.
When the first instance passes health checks, Elastic Beanstalk launches additional instances with the
new configuration, matching the number of instances running in the original Auto Scaling group. When
all of the new instances pass health checks, Elastic Beanstalk transfers them to the original Auto Scaling
group, and terminates the temporary Auto Scaling group and old instances.
Note
During an immutable environment update, the capacity of your environment doubles for a short
time when the instances in the new Auto Scaling group start serving requests and before the
original Auto Scaling group's instances are terminated. If your environment has many instances,
or instances with a low on-demand limit, ensure that you have enough capacity to perform an
immutable environment update. If you are near the limit, consider using rolling updates instead.
Immutable updates require enhanced health reporting (p. 336) to evaluate your environment's health
during the update. Enhanced health reporting combines standard load balancer health checks with
instance monitoring to ensure that the instances running the new configuration are serving requests
successfully (p. 338).
You can also use immutable updates to deploy new versions of your application, as an alternative to
rolling deployments. When you configure Elastic Beanstalk to use immutable updates for application
deployments (p. 125), it replaces all instances in your environment every time you deploy a new version
of your application. If an immutable application deployment fails, Elastic Beanstalk reverts the changes
immediately by terminating the new Auto Scaling group. This can prevent partial fleet deployments,
which can occur when a rolling deployment fails after some batches have already completed.
If an immutable update fails, the new instances upload bundle logs (p. 369) to Amazon S3 before
Elastic Beanstalk terminates them. Elastic Beanstalk leaves logs from a failed immutable update in
Amazon S3 for one hour before deleting them, instead of the standard 15 minutes for bundle and tail
logs.
Note
If you use immutable updates for application version deployments, but not for configuration,
you might encounter an error if you attempt to deploy an application version that contains
configuration changes that would normally trigger a rolling update (for example, that change
instance type). To avoid this, make the configuration change in a separate update, or configure
immutable updates for both deployments and configuration changes.
You can't perform an immutable update in concert with resource configuration changes. For example,
you can't change settings that require instance replacement (p. 133) while also updating other settings,
or perform an immutable deployment with configuration files that change configuration settings or
additional resources in your source code. If you attempt to change resource settings (for example, load
balancer settings) and concurrently perform an immutable update, Elastic Beanstalk returns an error.
If your resource configuration changes aren't dependent on your source code change or on
instance configuration, perform them in two updates. If they are dependent, perform a blue/green
deployment (p. 129) instead.
API Version 2010-12-01
138
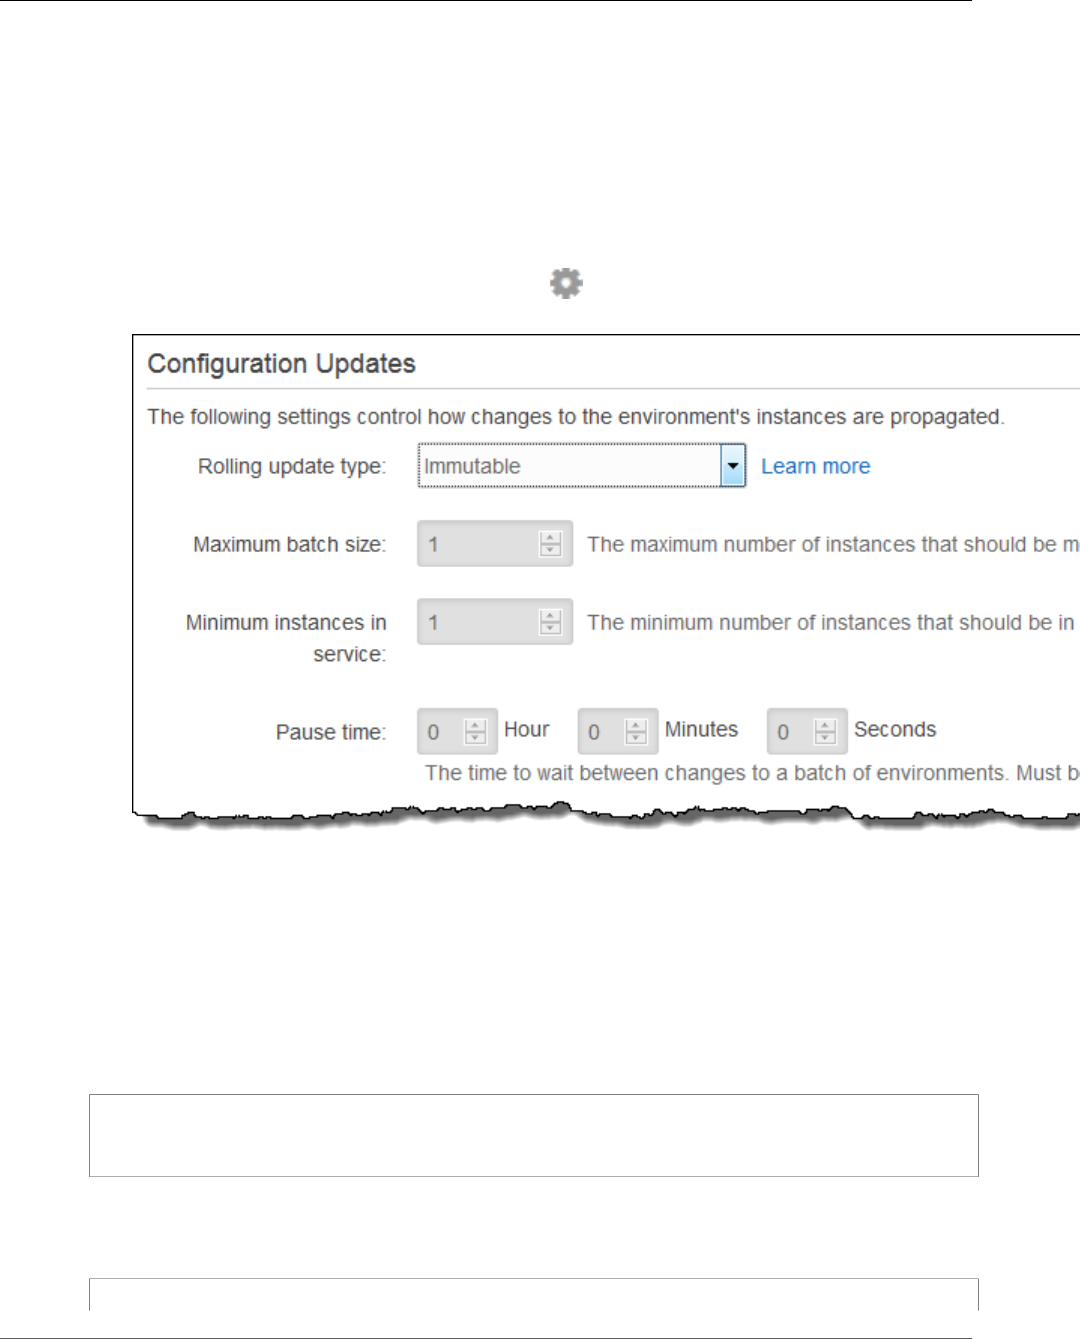
AWS Elastic Beanstalk Developer Guide
Immutable Updates
Configuring Immutable Updates
You can enable and configure immutable updates in the Elastic Beanstalk Management Console.
To enable immutable updates (console)
1. Open the Elastic Beanstalk console.
2. Navigate to the management page (p. 65) for your environment.
3. Choose Configuration.
4. In the Updates and Deployments section, choose .
5. In the Configuration Updates section, set Rolling update type to Immutable.
6. Choose Apply.
The aws:autoscaling:updatepolicy:rollingupdate namespace
You can also use the options in the aws:autoscaling:updatepolicy:rollingupdate namespace
to configure immutable updates. The following example configuration file (p. 256) enables immutable
updates for configuration changes:
Example .ebextensions/immutable-updates.config
option_settings:
aws:autoscaling:updatepolicy:rollingupdate:
RollingUpdateType: Immutable
The following example enables immutable updates for both configuration changes and deployments:
Example .ebextensions/immutable-all.config
option_settings:
API Version 2010-12-01
139

AWS Elastic Beanstalk Developer Guide
Tag an Environment
aws:autoscaling:updatepolicy:rollingupdate:
RollingUpdateType: Immutable
aws:elasticbeanstalk:command:
DeploymentPolicy: Immutable
EB CLI and Elastic Beanstalk console apply recommended values for the preceding options.
These settings must be removed if you want to use configuration files to configure the same. See
Recommended Values (p. 203) for details.
Tagging Resources in Your Elastic Beanstalk
Environment
Introduction to Environment Tagging
AWS Elastic Beanstalk provides support for specifying tags to apply to resources in your environment.
Tags are key-value pairs. They help you identify environments in cost allocation reports. This is especially
useful if you manage many environments. You can also use tags to manage permissions at the resource
level.
By default, Elastic Beanstalk applies three tags:
•elasticbeanstalk:environment-name is the name of the environment.
elasticbeanstalk:environment-id is the environment ID.
•elasticbeanstalk:environment-id is the environment ID.
•Name is also the name of the environment. Name is used in the Amazon EC2 dashboard to identify and
sort resources.
You can't edit these default tags.
You can specify tags when you create the Elastic Beanstalk environment. In an existing environment, you
can add or remove tags, and you can update the values of existing tags. In addition to the default tags,
you can add up to 47 additional tags to each environment.
Constraints
• Keys and values can contain letters, numbers, white space, and the following symbols: _ . : / = + - @
• Keys can contain up to 128 characters. Values can contain up to 256 characters.
• Keys are case-sensitive.
• Keys cannot begin with aws: or elasticbeanstalk:.
• Values cannot match the environment name.
You can use cost allocation reports to track your usage of AWS resources. The reports include both
tagged and untagged resources, but they aggregate costs according to tags. For information about how
cost allocation reports use tags, see Use Cost Allocation Tags for Custom Billing Reports in the AWS
Billing and Cost Management User Guide.
Adding Tags During Environment Creation
When you use the AWS Management Console to create an environment, you can specify tag keys and
values on the Tags page of the Create New Environment wizard (p. 78), as shown.
API Version 2010-12-01
140
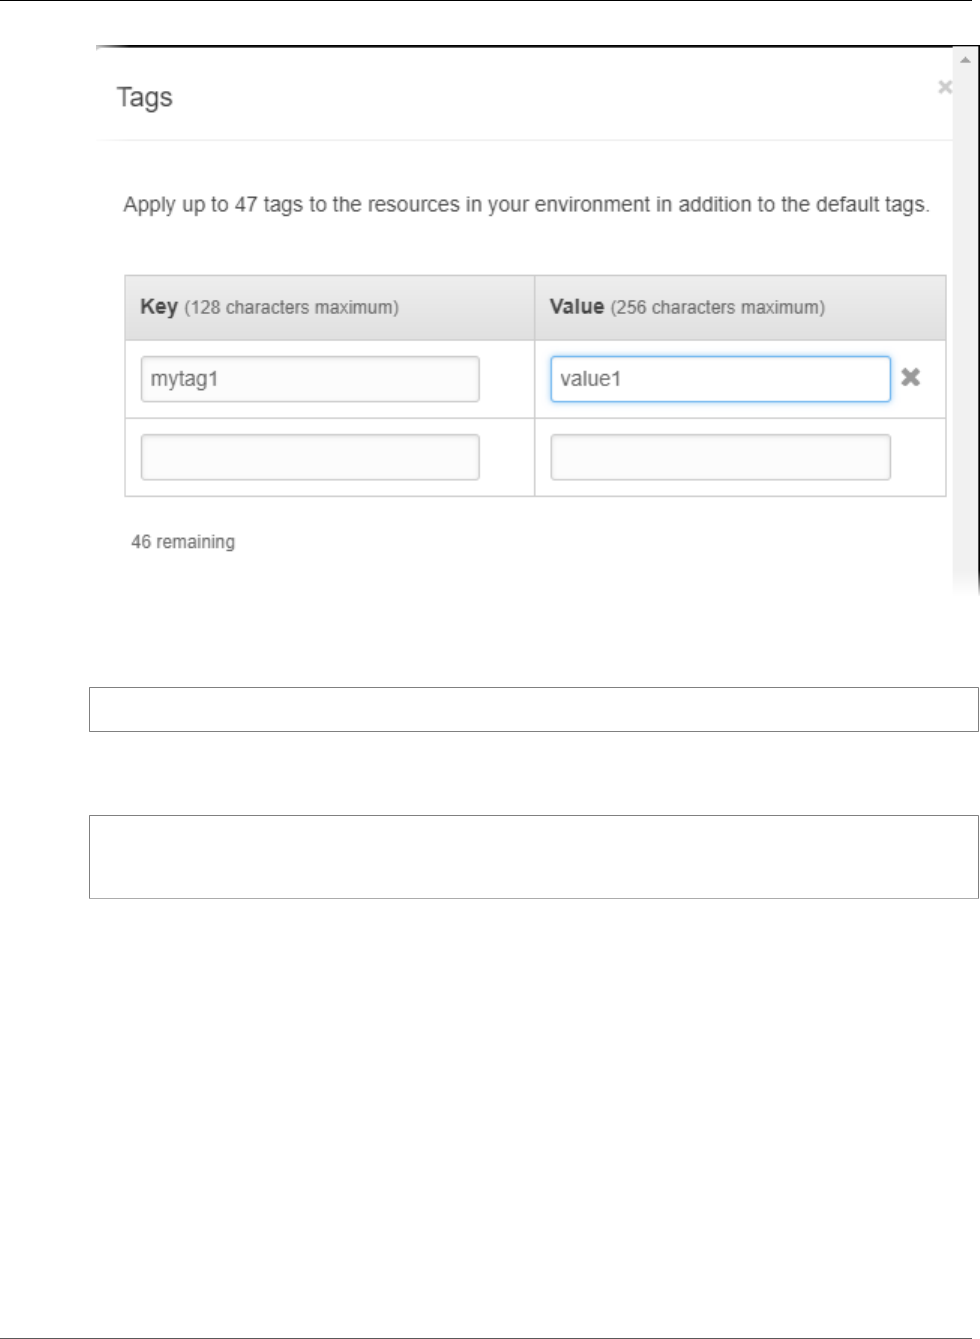
AWS Elastic Beanstalk Developer Guide
Tag an Environment
If you use the EB CLI to create environments, use the --tags option with eb create (p. 521) to add
tags.
~/workspace/my-app$ eb create --tags mytag1=value1,mytag2=value2
With the AWS CLI or other API-based clients, use the --tags parameter on the create-environment
command.
$ aws elasticbeanstalk create-environment --tags Key=mytag1,Value=value1
Key=mytag2,Value=value2 --application-name my-app --environment-name my-env --cname-prefix
my-app --version-label v1 --template-name my-saved-config
Saved configurations (p. 206) include user-defined tags. When you apply a saved configuration that
contains tags during environment creation, those tags are applied to the new environment, as long as
you don't specify any new tags. If you add tags to an environment using one of the preceding methods,
any tags defined in the saved configuration are discarded.
Managing Tags of an Existing Environment
You can add, update, and delete tags in an existing Elastic Beanstalk environment. Elastic Beanstalk
applies the changes to your environment's resources.
You can't edit the default tags that Elastic Beanstalk applies to your environment. For details about these
default tags, see ??? (p. 140).
To manage an environment's tags in the AWS Management Console
1. Navigate to the environment management console (p. 65) for your environment.
2. In the side navigation pane, choose Tags.
API Version 2010-12-01
141
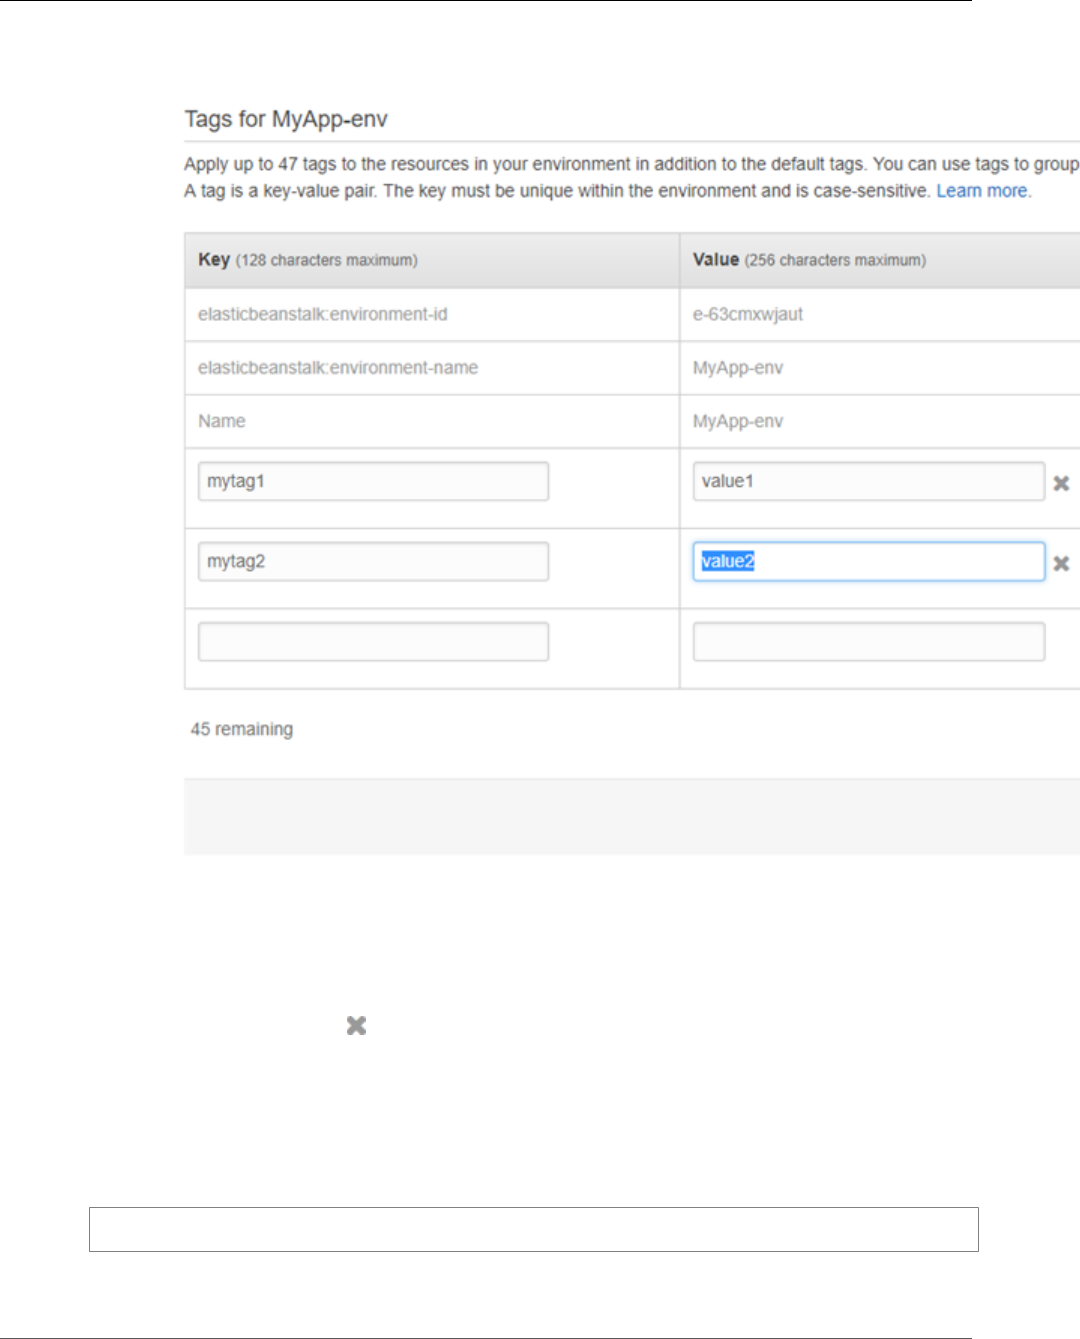
AWS Elastic Beanstalk Developer Guide
Tag an Environment
The tag management page shows the list of tags that currently exist in the environment.
3. Add, update, or delete tags.
• To add a tag, type it into the empty boxes at the bottom of the list.
• To update a tag's key or value, edit the respective box in the tag's row.
•To delete a tag, choose next to the tag's value box.
4. Choose Apply.
If you use the EB CLI to update environments, use eb tags (p. 553) to add, update, delete, or list
tags.
For example, the following command lists the tags in your default environment.
~/workspace/my-app$ eb tags --list
The following command updates the tag mytag1 and deletes the tag mytag2.
API Version 2010-12-01
142

AWS Elastic Beanstalk Developer Guide
Platform Updates
~/workspace/my-app$ eb tags --update mytag1=newvalue --delete mytag2
For a complete list of options and more examples, see eb tags (p. 553).
With the AWS CLI or other API-based clients, use the list-tags-for-resource command to list the
tags of an environment.
$ aws elasticbeanstalk list-tags-for-resource --resource-arn "arn:aws:elasticbeanstalk:us-
east-2:my-account-id:environment/my-app/my-env"
Use the update-tags-for-resource command to add, update, or delete tags in an environment.
$ aws elasticbeanstalk update-tags-for-resource --tags-to-add
Key=mytag1,Value=newvalue --tags-to-remove mytag2 --resource-arn
"arn:aws:elasticbeanstalk:us-east-2:my-account-id:environment/my-app/my-env"
Note
To use these two commands with an Elastic Beanstalk environment, you need the environment's
ARN. You can retrieve the ARN by using the following command.
aws elasticbeanstalk describe-environments
Specify both tags to add and tags to update in the --tags-to-add parameter of update-
tags-for-resource. A nonexisting tag is added, and an existing tag's value is updated.
Updating Your Elastic Beanstalk Environment's
Platform Version
Elastic Beanstalk regularly releases updates for the Linux and Windows Server based platforms (p. 26)
that run applications on an Elastic Beanstalk environment. A platform consists of a software component
(an AMI running a specific version of an OS, tools, and Elastic Beanstalk-specific scripts), and a
configuration component (the default settings (p. 202) applied to environments created with the
platform). New platform versions provide updates to existing software components and support for new
features and configuration options.
For platforms which support multiple incompatible major versions of the included web container,
programming language, or framework, a separate configuration of the platform is provided for each. For
example, the Java with Tomcat (p. 678) platform supports separate configurations for Tomcat 7 and
Tomcat 8. Each configuration of a platform is versioned separately, but updates are generally released
for all configurations of a given platform at the same time.
When a new version of your environment's platform configuration is available, Elastic Beanstalk shows a
message in the environment management console (p. 65) and makes the Change button available. If
you've previously created an environment using an older version of the same configuration, or upgraded
your environment from an older configuration, you can also use the Change button to revert to a
previous configuration version.
To update your environment's platform
1. Navigate to the management page (p. 65) for your environment.
2. In the Overview section, under Configuration, click Change.
API Version 2010-12-01
143
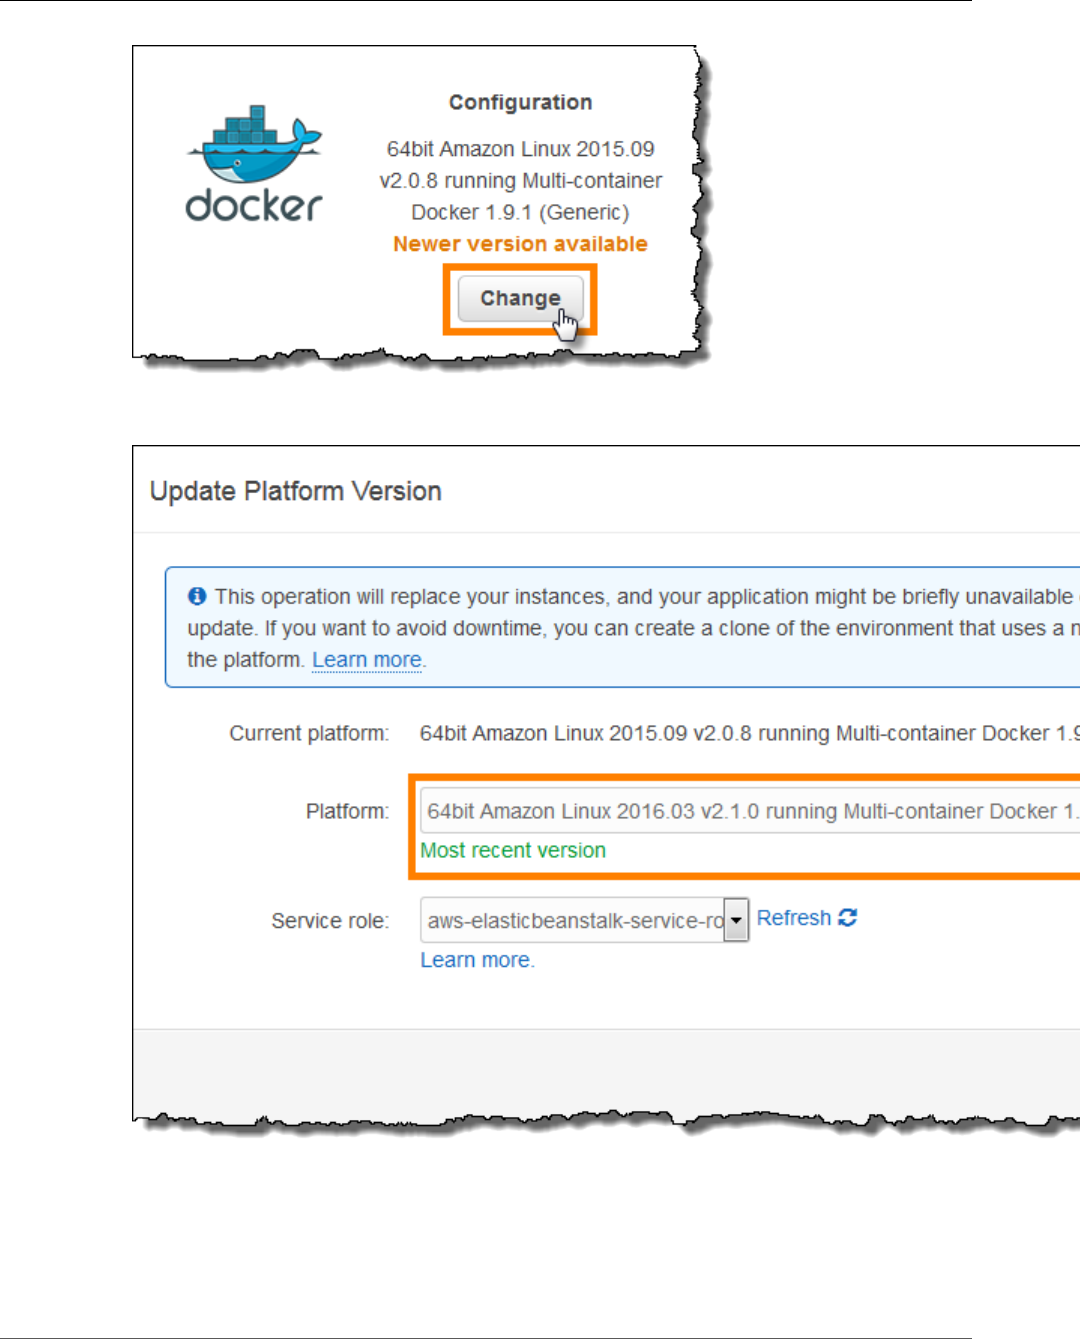
AWS Elastic Beanstalk Developer Guide
Platform Updates
3. Choose a Platform Version. The newest platform version is selected automatically, but you can
update to any version that you have used in the past if you choose.
4. Choose Save.
Configurations are specific to major language and tool versions. When a configuration is updated, the
language and tools will not change major versions. For example, Java 7 with Tomcat 7 and Java 8 with
Tomcat 8 are two different configurations of the Java with Tomcat platform. You cannot perform a
API Version 2010-12-01
144

AWS Elastic Beanstalk Developer Guide
Managed Updates
platform update between configurations, only between versions of the same configuration, such as Java
8 with Tomcat 8 version 1.4.5 and Java 8 with Tomcat 8 version 2.0.0.
Linux-based Elastic Beanstalk platforms are semantically versioned with three numbers, major, minor,
and patch. For example, Java 8 with Tomcat 8 version 2.1.0 has a major version of 2, a minor version of
1, and a patch version of 0. Major versions are only used for backwards incompatible changes. Minor
versions add support for new Elastic Beanstalk features, and patch versions fix bugs, update OS and
software components, and provide access to updated packages in the Amazon Linux yum repository.
You can configure your environment to apply minor and patch version updates automatically during
a configurable weekly maintenance window with Managed Platform Updates (p. 145). Elastic
Beanstalk applies managed updates with no downtime or reduction in capacity, and cancels the update
immediately if instances running your application on the new version fail health checks.
Windows Server-based platforms are not semantically versioned and do not support managed platform
updates. You can only launch the latest version of each Windows Server platform configuration and
cannot roll back after an upgrade.
Managed Platform Updates
Elastic Beanstalk regularly releases platform updates (p. 143) to provide fixes, software updates and
new features. With managed platform updates, you can configure your environment to automatically
upgrade to the latest version of a platform during a scheduled maintenance window (p. 147). Your
application remains in service during the update process with no reduction in capacity. Managed updates
are available on both single-instance and load-balanced environments.
Note
This feature is not available for the .NET on Windows Server platform.
You can configure your environment to automatically apply patch version updates (p. 147), or both
patch and minor version updates. Managed platform updates don't support major version updates,
which may introduce changes that are backwards incompatible.
When you enable managed platform updates, you can also configure AWS Elastic Beanstalk to replace all
instances in your environment during the maintenance window, even if a platform update isn't available.
Replacing all instances in your environment is helpful if your application encounters bugs or memory
issues when running for a long period.
Use the Elastic Beanstalk environment management console to enable managed platform updates.
To enable managed platform updates
1. Open the Elastic Beanstalk console.
2. Navigate to the management page (p. 65) for your environment.
3. Choose Configuration.
4. Choose Managed Updates.
API Version 2010-12-01
145
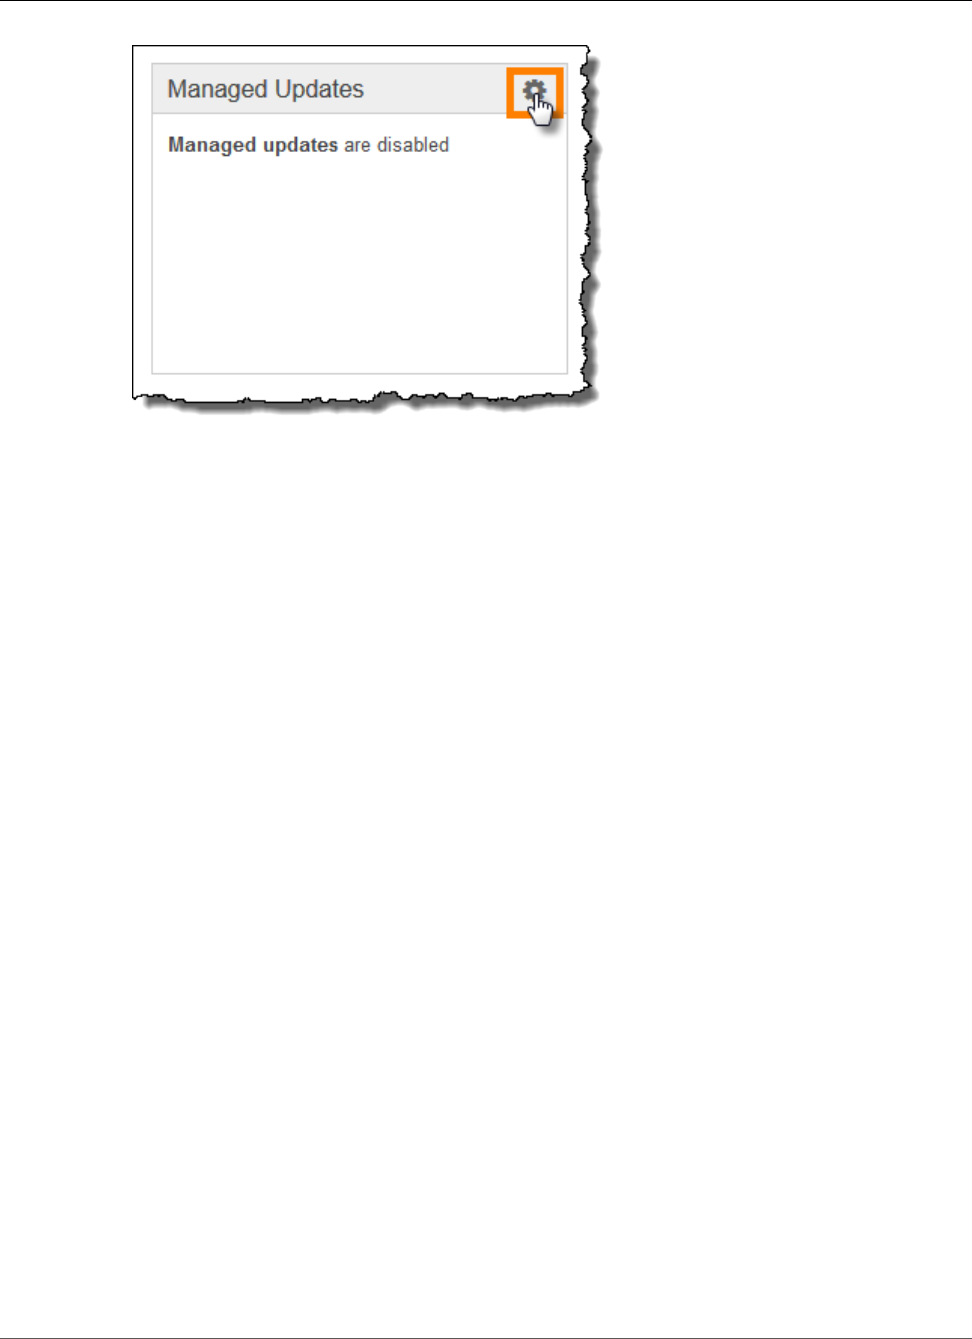
AWS Elastic Beanstalk Developer Guide
Managed Updates
5. Select Enable managed updates.
6. Choose a maintenance window and then choose Update level.
7. (optional) Select Instance replacement to enable weekly instance replacement.
8. Choose Apply.
Managed platform updates depend on enhanced health reporting (p. 336) to determine that your
application is healthy enough to consider the platform update successful. See Enabling AWS Elastic
Beanstalk Enhanced Health Reporting (p. 341) for instructions.
Sections
•Permissions Required to Perform Managed Platform Updates (p. 146)
•The Managed Update Maintenance Window (p. 147)
•Minor and Patch Version Updates (p. 147)
•Immutable Environment Updates (p. 147)
•Managing Managed Updates (p. 147)
•Managed Action Option Namespaces (p. 149)
Permissions Required to Perform Managed Platform Updates
Elastic Beanstalk needs permission to initiate a platform update on your behalf. When you use the
default service role (p. 21) for your environment, the console adds the required permissions when you
enable managed platform updates. If you aren't using the default service role, or you're managing your
environments with a different client, add the AWSElasticBeanstalkService (p. 396) managed
policy to your service role.
If you're using a service-linked role (p. 397) for your environment, you can't enable managed platform
updates. The service-linked role doesn't have the required permissions. Select a different role, and make
sure it has the AWSElasticBeanstalkService (p. 396) managed policy.
Note
If you use configuration files (p. 256) to extend your environment to include additional
resources, you might need to add additional permissions to your environment's service role.
Typically you need to add additional permissions when you reference these resources by name in
other sections or files.
If an update fails, you can find the reason for the failure on the Managed Updates (p. 147) page.
API Version 2010-12-01
146

AWS Elastic Beanstalk Developer Guide
Managed Updates
The Managed Update Maintenance Window
When AWS releases a new version of your environment's platform configuration, Elastic Beanstalk
schedules a managed platform update during the next weekly maintenance window. Maintenance
windows are two hours long. Elastic Beanstalk starts a scheduled update during the maintenance
window, but the update might not complete until after the windows ends.
Minor and Patch Version Updates
You can enable managed platform updates to apply patch version updates only, or for both minor and
patch version updates. Patch version updates provide bug fixes and performance improvements, and
can include minor configuration changes to the on-instance software, scripts, and configuration options.
Minor version updates provide support for new Elastic Beanstalk features. You can't apply major version
updates, which might make changes that are backwards incompatible, with managed platform updates.
In a platform version number, the second number is the minor update version, and the third number is
the patch version. For example, a version 2.0.7 platform version has a minor version of 0 and a patch
version of 7.
Immutable Environment Updates
Managed platform updates perform immutable environment updates (p. 138) to upgrade your
environment to a new platform version. Immutable updates update your environment without taking
any instances out of service or modifying your environment, prior to confirming that instances running
the new configuration pass health checks.
In an immutable update, Elastic Beanstalk deploys as many instances as are currently running with the
new platform version. The new instances begin to take requests alongside those running the old version.
If the new set of instances passes all health checks, Elastic Beanstalk terminates the old set of instances,
leaving only instances with the new configuration.
Managed platform updates always perform immutable updates, even when you apply them outside
of the maintenance window. If you change the platform configuration from the Dashboard, Elastic
Beanstalk applies the update policy that you've chosen for configuration updates.
Managing Managed Updates
The Elastic Beanstalk environment management console shows detailed information about managed
updates on the Managed Updates page.
To view information about managed updates (console)
1. Open the Elastic Beanstalk console.
2. Navigate to the management page (p. 65) for your environment.
3. Choose Managed Updates.
The Managed Updates Overview section provides information about scheduled and pending managed
updates. The History section lists successful updates and failed attempts.
You can choose to apply a scheduled update immediately, instead of waiting until the maintenance
window.
To apply a managed platform update immediately (console)
1. Open the Elastic Beanstalk console.
API Version 2010-12-01
147
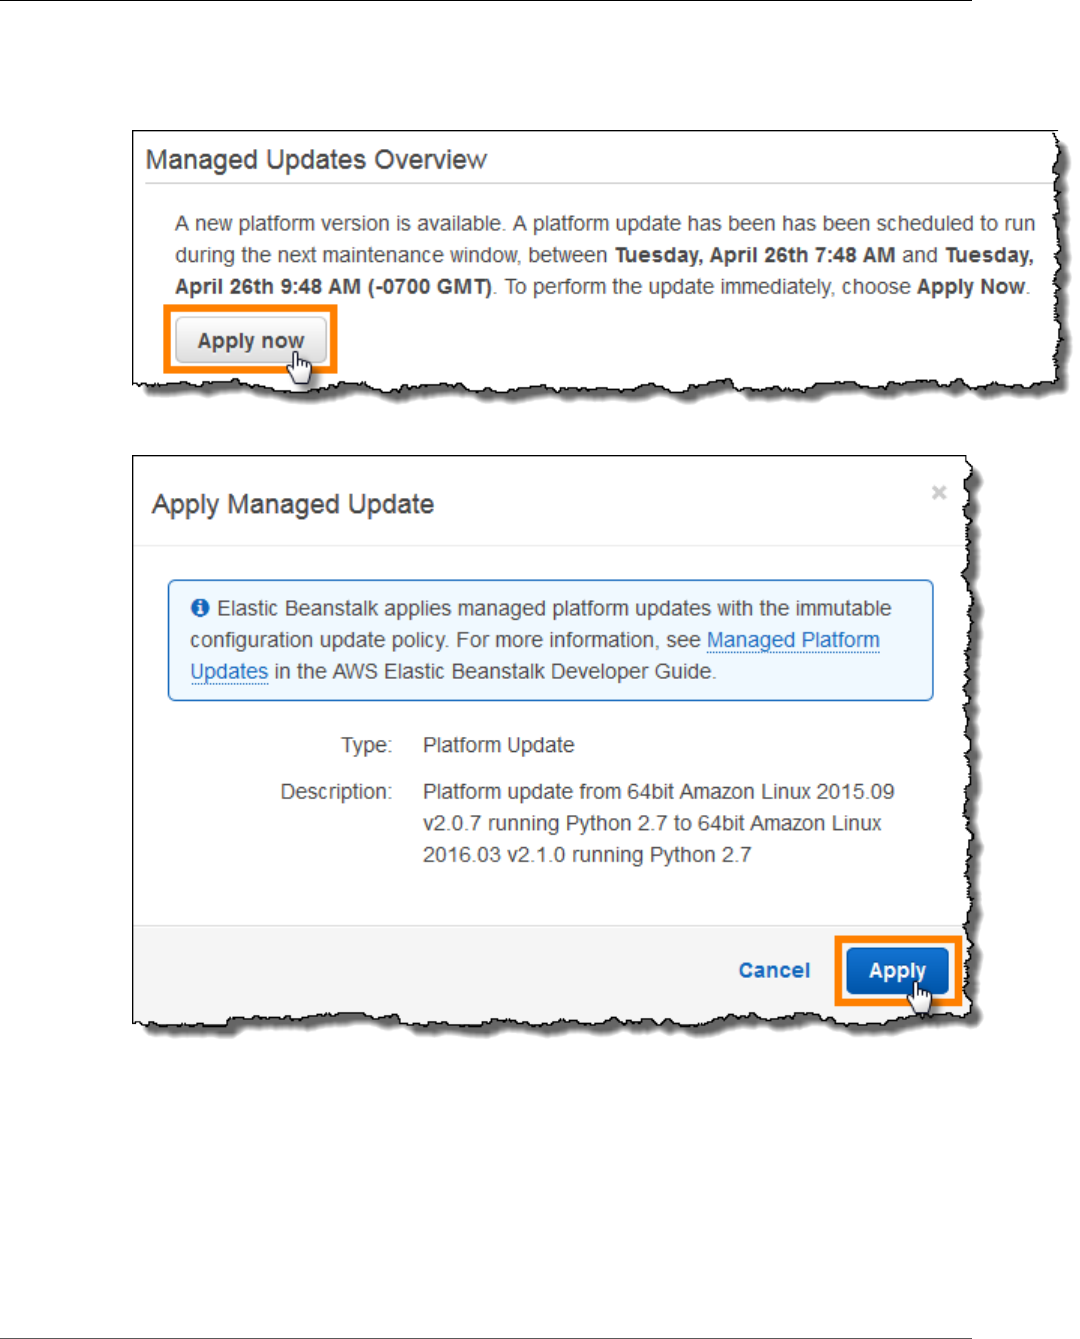
AWS Elastic Beanstalk Developer Guide
Managed Updates
2. Navigate to the management page (p. 65) for your environment.
3. Choose Managed Updates.
4. Choose Apply now.
5. Choose Apply.
When you apply a managed platform update outside of the maintenance window, Elastic Beanstalk
performs an immutable update. If you update the environment's platform from the Dashboard (p. 67),
or by using a different client, Elastic Beanstalk uses the update type that you have selected for
configuration changes (p. 133).
If you don't have a managed update scheduled, your environment may already be running the latest
version. Other reasons for not having an update scheduled include:
• a minor version (p. 147) update is available, but your environment is configured to automatically
apply only patch version updates.
API Version 2010-12-01
148

AWS Elastic Beanstalk Developer Guide
Upgrade a Legacy Environment
• your environment hasn't been scanned since the update was released. Elastic Beanstalk typically
checks for updates every hour.
• an update is pending or already in progress.
When your maintenance window starts or when you choose Apply now, scheduled updates goes into
pending status prior to execution.
Managed Action Option Namespaces
You can use configuration options (p. 202) in the
aws:elasticbeanstalk:managedactions (p. 236) and
aws:elasticbeanstalk:managedactions:platformupdate (p. 236) namespaces to enable and
configure managed platform updates.
The ManagedActionsEnabled option turns on managed platform updates. Set this option to true to
enable managed platform updates, and use the other options to configure update behavior.
Use PreferredStartTime to configure the beginning of the weekly maintenance window in
day:hour:minute format.
Set UpdateLevel to minor or patch to apply both minor and patch version updates, or just patch
version updates, respectively.
When managed platform updates are enabled, you can enable instance replacement by setting the
InstanceRefreshEnabled option to true. When this setting is enabled, Elastic Beanstalk runs an
immutable update on your environment every week, regardless of whether there is a new platform
version available.
The following example configuration file (p. 256) enables managed platform updates for patch version
updates with a maintenance window starting at 10:00 AM UTC each Tuesday:
Example .ebextensions/managed-platform-update.config
option_settings:
aws:elasticbeanstalk:managedactions:
ManagedActionsEnabled: true
PreferredStartTime: "Tue:10:00"
aws:elasticbeanstalk:managedactions:platformupdate:
UpdateLevel: patch
InstanceRefreshEnabled: true
Migrating Your Application from a Legacy Container
Type
If you have deployed an Elastic Beanstalk application that uses a legacy container type, you should
migrate your application to a new environment using a non-legacy container type so that you can
get access to new features. If you are unsure whether you are running your application using a legacy
container type, you can check in the Elastic Beanstalk console. For instructions, see To check if you are
using a legacy container type (p. 150).
What new features are legacy containers missing?
Legacy platforms do not support the following features:
• Configuration files, as described in the Advanced Environment Customization with Configuration Files
(.ebextensions) (p. 256) topic
API Version 2010-12-01
149
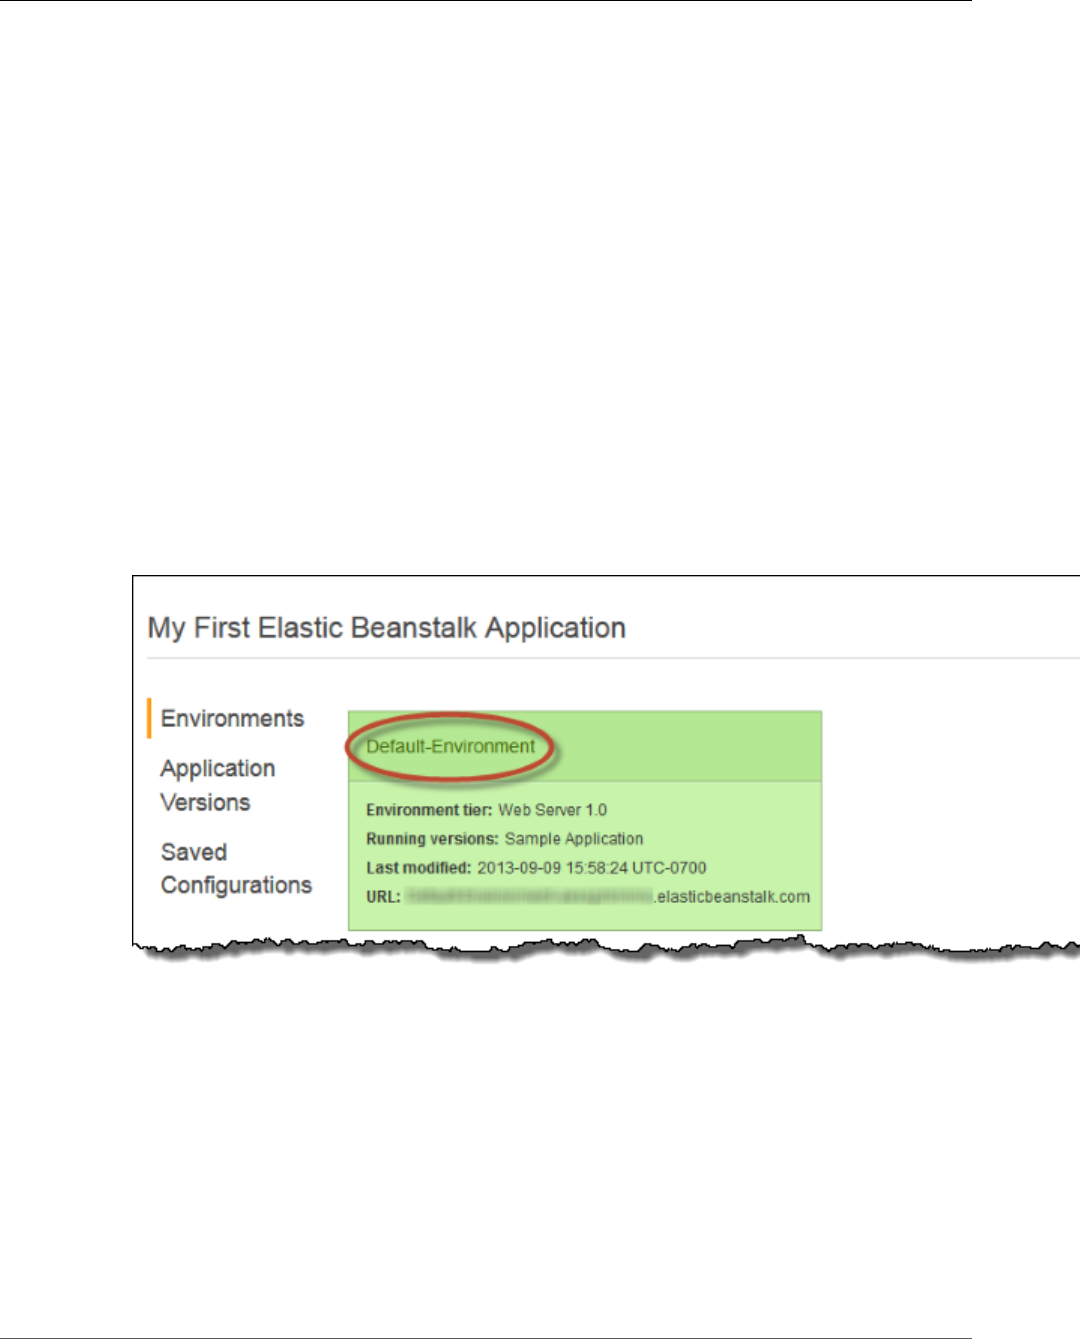
AWS Elastic Beanstalk Developer Guide
Upgrade a Legacy Environment
• ELB health checks, as described in the Basic Health Reporting (p. 333) topic
• Instance Profiles, as described in the Managing Elastic Beanstalk Instance Profiles (p. 388) topic
• VPCs, as described in the Using Elastic Beanstalk with Amazon Virtual Private Cloud (p. 451) topic
• Data Tiers, as described in the Adding a Database to Your Elastic Beanstalk Environment (p. 186)
topic
• Worker Tiers, as described in the Worker Environments (p. 16) topic
• Single Instance Environments, as described in the Environment Types (p. 154) topic
• Tags, as described in the Tagging Resources in Your Elastic Beanstalk Environment (p. 140) topic
• Rolling Updates, as described in the Elastic Beanstalk Rolling Environment Configuration
Updates (p. 134) topic
Why are some container types marked legacy?
Some older platform configurations do not support the latest Elastic Beanstalk features. These
configurations are marked (legacy) on the environment configuration page in the AWS Management
Console.
To check if you are using a legacy container type
1. Open the Elastic Beanstalk console.
2. From the Elastic Beanstalk console applications page, click the environment that you want to verify.
3. In the Overview section of the environment dashboard, view the Configuration name.
Your application is using a legacy container type if you see (legacy) next to the configuration.
To migrate your application
1. Deploy your application to a new environment. For instructions, go to Creating an AWS Elastic
Beanstalk Environment (p. 76).
2. If you have an Amazon RDS DB Instance, update your database security group to allow access to
your EC2 security group for your new environment. For instructions on how to find the name of your
EC2 security group using the AWS Management Console, see Security Groups (p. 168). For more
information about configuring your EC2 security group, go to the "Authorizing Network Access to an
Amazon EC2 Security Group" section of Working with DB Security Groups in the Amazon Relational
Database Service User Guide.
API Version 2010-12-01
150

AWS Elastic Beanstalk Developer Guide
Cancel an Update
3. Swap your environment URL. For instructions, go to Blue/Green Deployments with AWS Elastic
Beanstalk (p. 129).
4. Terminate your old environment. For instructions, go to Terminate an Environment (p. 114).
Note
If you use AWS Identity and Access Management (IAM) then you will need to update your
policies to include AWS CloudFormation and Amazon RDS (if applicable). For more information,
see Using Elastic Beanstalk with AWS Identity and Access Management (p. 388).
Canceling Environment Configuration Updates and
Application Deployments
You can cancel in-progress updates that are triggered by environment configuration changes. You can
also cancel the deployment of a new application version in progress. For example, you might want
to cancel an update if you decide you want to continue using the existing environment configuration
instead of applying new environment configuration settings. Or, you might realize that the new
application version that you are deploying has problems that will cause it to not start or not run
properly. By canceling an environment update or application version update, you can avoid waiting until
the update or deployment process is done before you begin a new attempt to update the environment or
application version.
Note
During the cleanup phase in which old resources that are no longer needed are removed, after
the last batch of instances has been updated, you can no longer cancel the update.
Elastic Beanstalk performs the rollback the same way that it performed the last successful update. For
example, if you have time-based rolling updates enabled in your environment, then Elastic Beanstalk
will wait the specified pause time between rolling back changes on one batch of instances before rolling
back changes on the next batch. Or, if you recently turned on rolling updates, but the last time you
successfully updated your environment configuration settings was without rolling updates, Elastic
Beanstalk will perform the rollback on all instances simultaneously.
You cannot stop Elastic Beanstalk from rolling back to the previous environment configuration once
it begins to cancel the update. The rollback process continues until all instances in the environment
have the previous environment configuration or until the rollback process fails. For application version
deployments, canceling the deployment simply stops the deployment; some instances will have the new
application version and others will continue to run the existing application version. You can deploy the
same or another application version later.
For more information about rolling updates, see Elastic Beanstalk Rolling Environment Configuration
Updates (p. 134). For more information about batched application version deployments, see
Deployment Policies and Settings (p. 125).
To cancel an update
• On the environment dashboard, click Actions, and then click Abort Current Operation.
API Version 2010-12-01
151
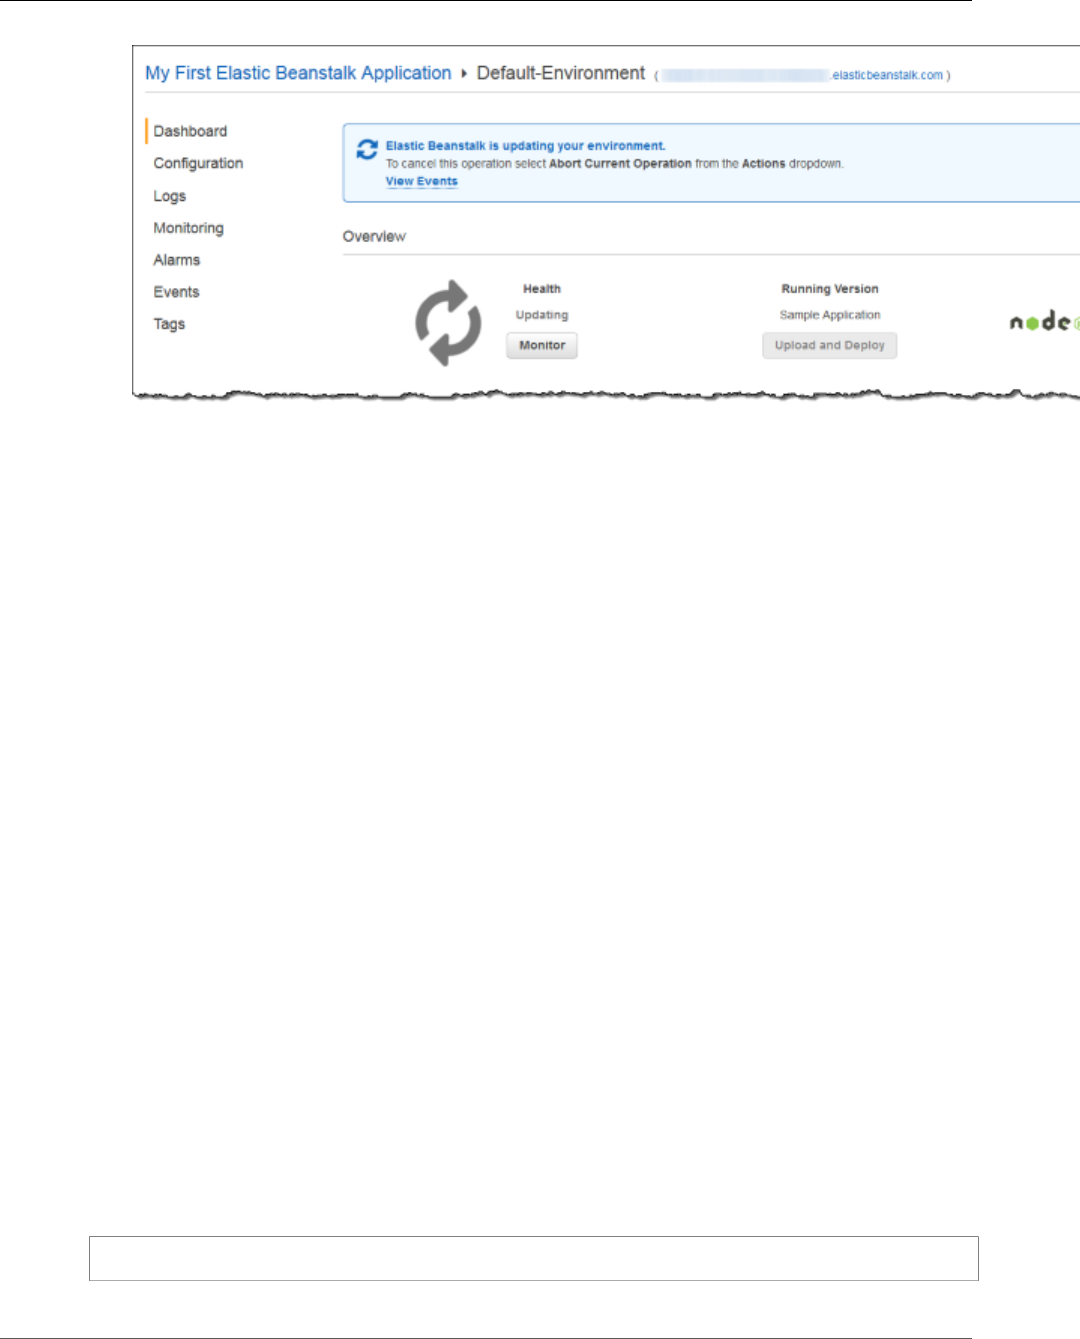
AWS Elastic Beanstalk Developer Guide
Rebuild an Environment
Rebuilding AWS Elastic Beanstalk Environments
Your Elastic Beanstalk environment can become unusable if you don't use Elastic Beanstalk functionality
to modify or terminate the environment's underlying AWS resources. If this happens, you can rebuild the
environment to attempt to restore it to a working state. Rebuilding an environment terminates all of its
resources and replaces them with new resources with the same configuration.
You can also rebuild terminated environments within six weeks (42 days) of their termination. When
you rebuild, Elastic Beanstalk attempts to create a new environment with the same name, ID, and
configuration.
Rebuilding a Running Environment
You can rebuild an environment through the Elastic Beanstalk console or by using the
RebuildEnvironment API.
To rebuild a running environment (console)
1. Open the Elastic Beanstalk console.
2. Navigate to the management page (p. 65) for your environment.
3. Choose Actions, and then choose Rebuild environment.
4. Choose Rebuild.
Rebuilding a running environment creates new resources that have the same configuration as the old
resources; however, the resource IDs are different, and any data on the old resources is not restored. For
example, rebuilding an environment with an Amazon RDS database instance creates a new database with
the same configuration, but does not apply a snapshot to the new database.
To rebuild a running environment with the Elastic Beanstalk API, use the RebuildEnvironment action
with the AWS CLI or the AWS SDK.
$ aws elasticbeanstalk rebuild-environment --environment-id e-vdnftxubwq
API Version 2010-12-01
152
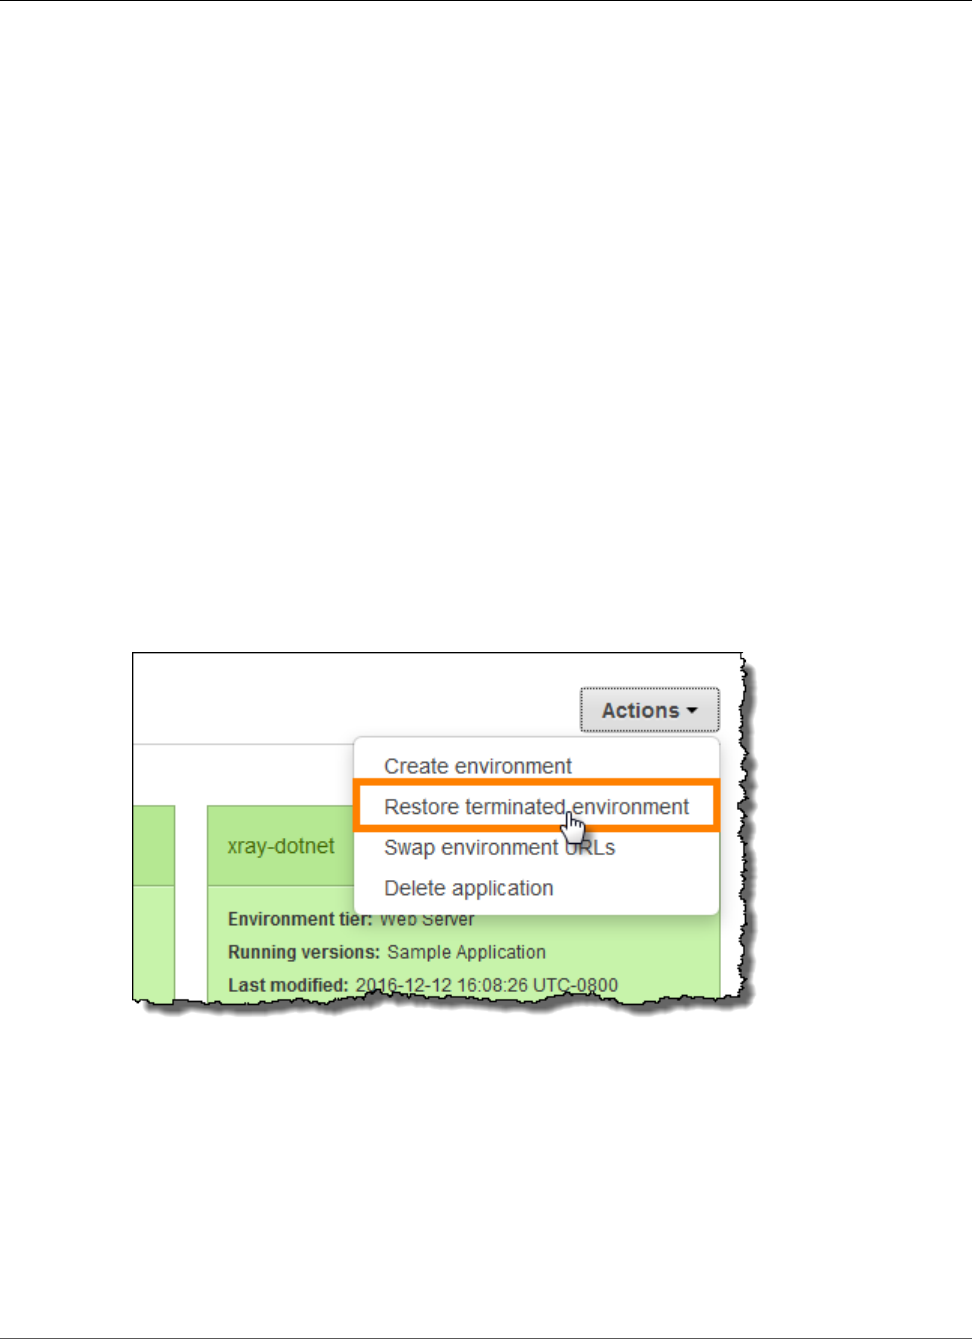
AWS Elastic Beanstalk Developer Guide
Rebuilding a Terminated Environment
Rebuilding a Terminated Environment
You can rebuild and restore a terminated environment by using the Elastic Beanstalk console, the EB CLI,
or the RebuildEnvironment API.
Note
Unless you are using your own custom domain name with your terminated environment, the
environment uses a subdomain of elasticbeanstalk.com. These subdomains are shared within
an Elastic Beanstalk region. Therefore, they can be used by any environment created by any
customer in the same region. While your environment was terminated, another environment
could use its subdomain. In this case, the rebuild would fail.
You can avoid this issue by using a custom domain. See Your Elastic Beanstalk Environment's
Domain Name (p. 199) for details.
Recently terminated environments appear in the application overview for up to an hour. During this time,
you can view events for the environment in its dashboard (p. 65), and use the Restore environment
action (p. 68) to rebuild it.
To rebuild an environment that is no longer visible, use the Restore terminated environment option
from the application page.
To rebuild a terminated environment (console)
1. Open the Elastic Beanstalk console.
2. Choose your application.
3. Choose Actions, and then choose Restore terminated environment.
4. Choose a terminated environment.
5. Choose Restore.
API Version 2010-12-01
153
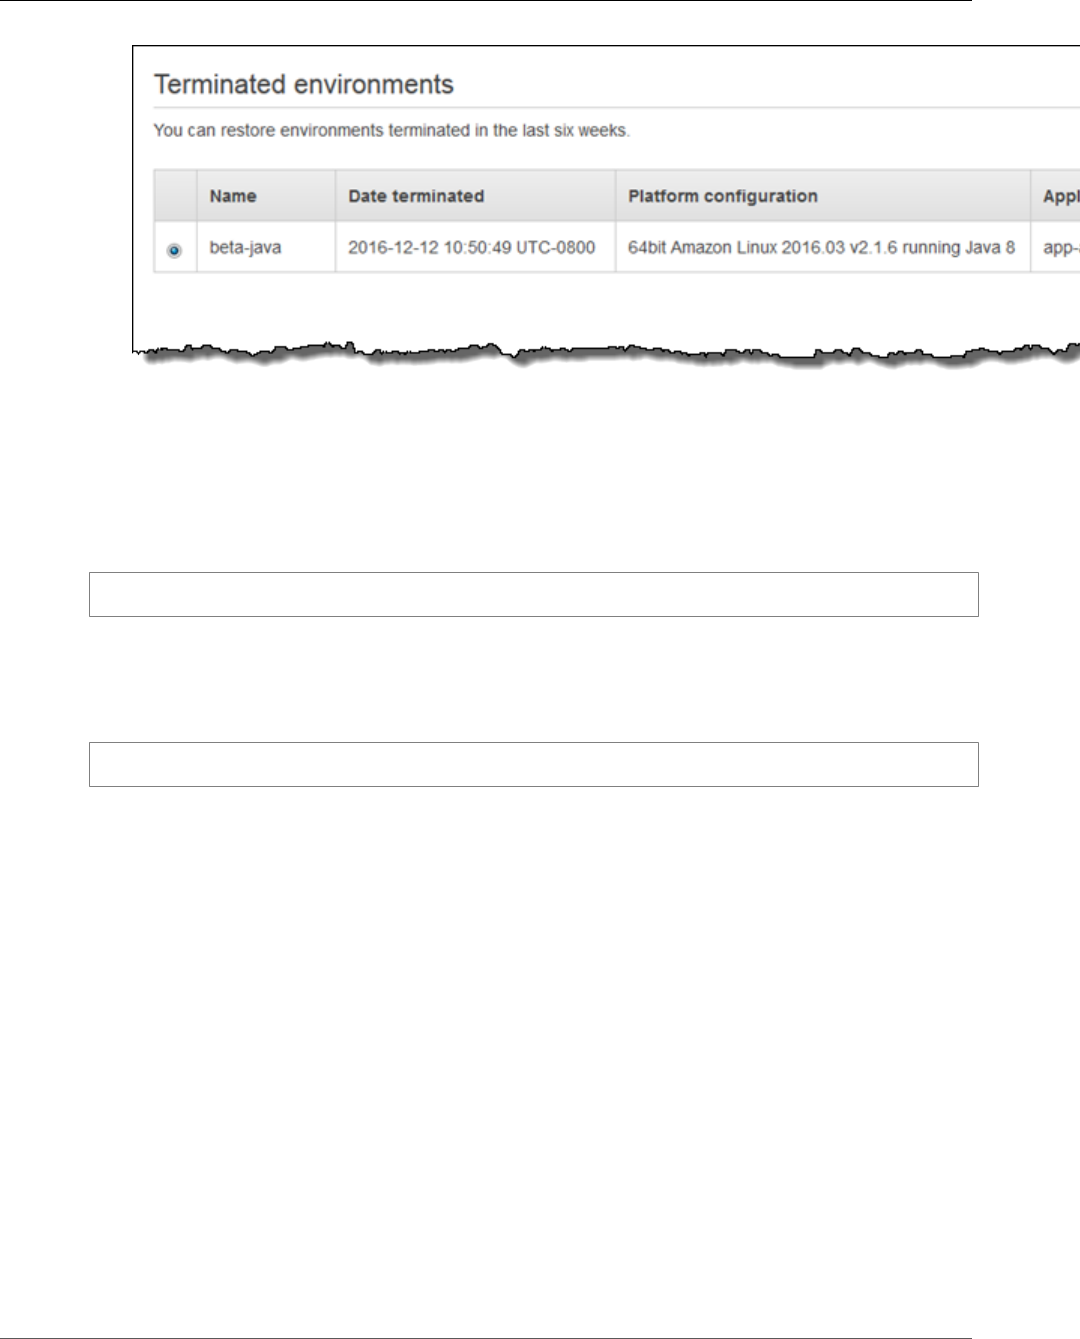
AWS Elastic Beanstalk Developer Guide
Environment Types
Elastic Beanstalk attempts to create a new environment with the same name, ID, and configuration. If an
environment with the same name or URL exists when you attempt to rebuild, the rebuild fails. Deleting
the application version that was deployed to the environment will also cause the rebuild to fail.
If you use the EB CLI to manage your environment, use the eb restore command to rebuild a
terminated environment.
$ eb restore e-vdnftxubwq
See eb restore (p. 547) for more information.
To rebuild a terminated environment with the Elastic Beanstalk API, use the RebuildEnvironment
action with the AWS CLI or the AWS SDK.
$ aws elasticbeanstalk rebuild-environment --environment-id e-vdnftxubwq
Environment Types
In Elastic Beanstalk, you can create a load-balancing, autoscaling environment or a single-instance
environment. The type of environment that you require depends on the application that you deploy. For
example, you can develop and test an application in a single-instance environment to save costs and
then upgrade that environment to a load-balancing, autoscaling environment when the application is
ready for production.
Note
A worker environment tier for a web application that processes background tasks does not
include a load balancer. However, a worker environment does effectively scale out by adding
instances to the autoscaling group to process data from the Amazon SQS queue when the load
necessitates it.
Load-balancing, Autoscaling Environment
A load-balancing and autoscaling environment uses the Elastic Load Balancing and Auto Scaling services
to provision the Amazon EC2 instances that are required for your deployed application. Auto Scaling
automatically starts additional instances to accommodate increasing load on your application. If the load
on your application decreases, Auto Scaling stops instances but always leaves your specified minimum
API Version 2010-12-01
154
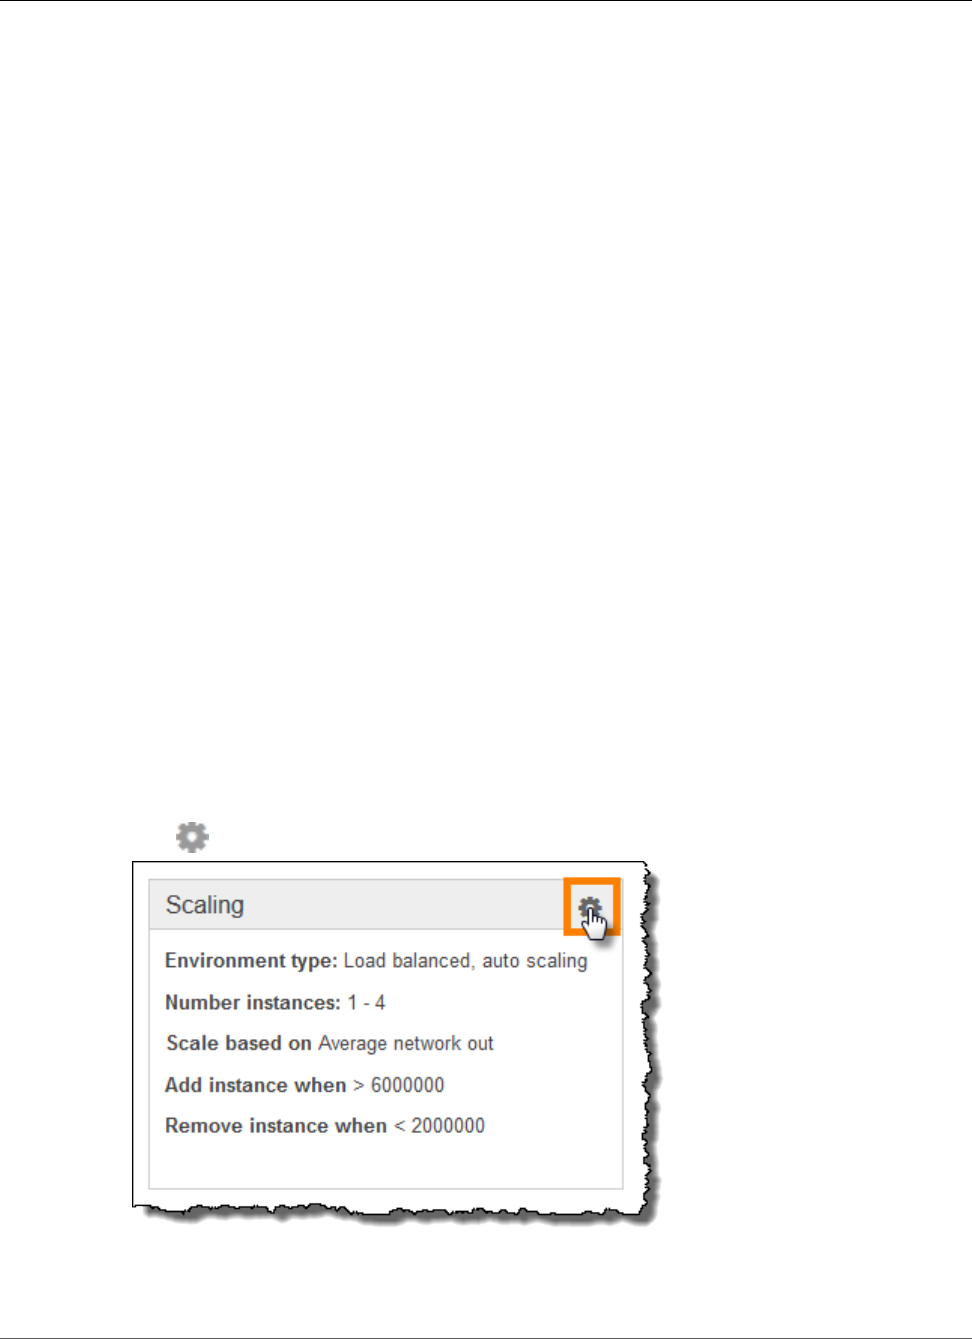
AWS Elastic Beanstalk Developer Guide
Single-instance Environment
number of instances running. If your application requires scalability with the option of running in
multiple Availability Zones, use a load-balancing, autoscaling environment. If you're not sure which
environment type to select, you can pick one, and if required, switch the environment type later.
Single-instance Environment
A single-instance environment contains one Amazon EC2 instance with an Elastic IP address. A single-
instance environment doesn't have a load balancer, which can help you reduce costs compared to a load-
balancing, autoscaling environment. Although a single-instance environment does use the Auto Scaling
service, settings for the minimum number of instances, maximum number of instances, and desired
capacity are all set to 1. Consequently, new instances are not started to accommodate increasing load on
your application.
Use a single-instance environment if you expect your production application to have low traffic or if
you are doing remote development. If you're not sure which environment type to select, you can pick
one, and, if required, you can switch the environment type later. For more information, see Changing
Environment Type (p. 155).
Changing Environment Type
You can change your environment type to a single-instance or load-balancing, autoscaling environment
by editing your environment's configuration. In some cases, you might want to change your environment
type from one type to another. For example, let's say that you developed and tested an application in a
single-instance environment in order to save costs. When your application is ready for production, you
can change the environment type to a load-balancing, autoscaling environment so that it can scale to
meet the demands of your customers.
To change an environment's type
1. Open the Elastic Beanstalk console.
2. Navigate to the management page (p. 65) for your environment.
3. Choose Configuration.
4. Click for the Scaling settings.
5. In the Environment Type section, select the type of environment that you want.
API Version 2010-12-01
155
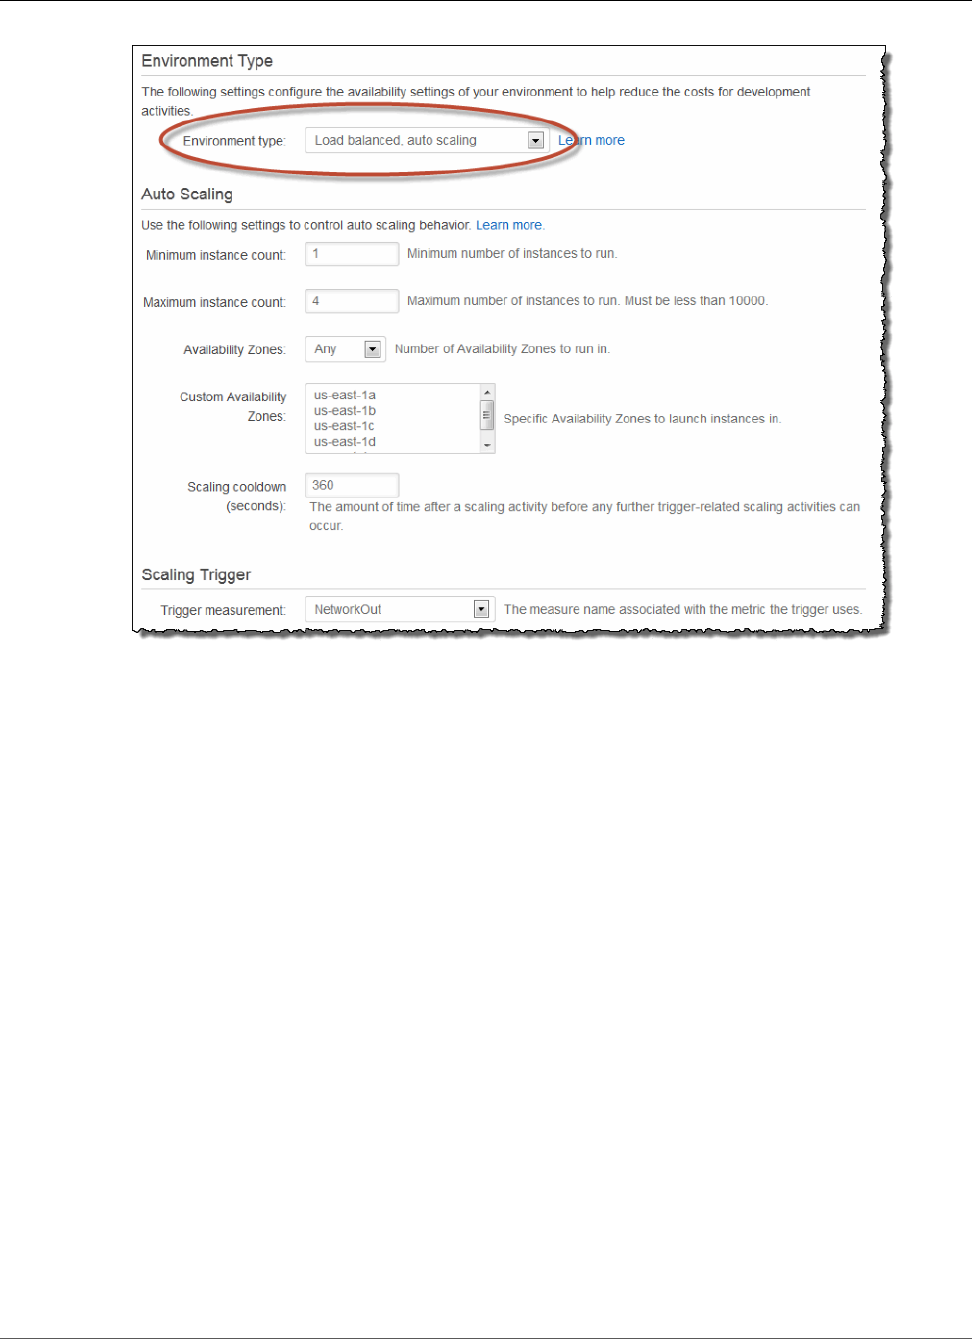
AWS Elastic Beanstalk Developer Guide
Worker Environments
6. If your environment is in a VPC, select subnets to place ELB and EC2 instances in. Each availability
zone that your application runs in must have both. See Using Elastic Beanstalk with Amazon Virtual
Private Cloud (p. 451) for details.
7. Click Save.
Note that it can take several minutes for the environment to update while Elastic Beanstalk
provisions AWS resources.
Worker Environments
If your application performs operations or workflows that take a long time to complete, you can offload
those tasks to a dedicated worker environment. Decoupling your web application front-end from a
process that performs blocking operations is a common way to ensure that your application stays
responsive under load.
A long running task is anything that substantially increases the time it takes to complete a request, such
as processing images or videos, sending email, or generating a ZIP archive. These operations may only
take a second or two to complete, but a delay of a few seconds is a lot for a web request that would
otherwise complete in less than 500ms.
One option is to spawn a worker process locally, return success, and process the task asynchronously.
This works, as long as your instance can keep up with all of the tasks sent to it. Under high load,
however, an instance can become overwhelmed with background tasks and become unresponsive to
higher priority requests. If individual users can generate multiple tasks, the increase in load might not
correspond to an increase in users, making it hard to scale out your web server tier effectively.
To avoid running long-running tasks locally, you can use the AWS SDK for your programming language
to send them to an Amazon Simple Queue Service queue, and run the process that performs them on a
API Version 2010-12-01
156

AWS Elastic Beanstalk Developer Guide
Worker Environments
separate set of instances. The worker instances only take items from the queue when they have capacity
to run them, preventing them from becoming overwhelmed.
Elastic Beanstalk simplifies this process by managing the Amazon SQS queue and running a daemon
process (p. 158) on each instance that reads from the queue for you. When the daemon pulls an item
from the queue, it sends an HTTP POST request locally to http://localhost/ with the contents of
the queue message in the body. All that your application needs to do is perform the long-running task in
response to the POST. You can configure the daemon (p. 160) to post to a different path, use a MIME
type other than application/JSON, connect to an existing queue, or customize connections, timeouts,
and retries.
With periodic tasks (p. 159), you can also configure the worker daemon to queue messages based on
a cron schedule. Each periodic tasks can POST to a different path. Enable periodic tasks by including a
YAML file in your source code that defines the schedule and path for each task.
Note
The .NET on Windows Server platform (p. 710) doesn't support worker environments.
Sections
•The Worker Environment SQS Daemon (p. 158)
API Version 2010-12-01
157

AWS Elastic Beanstalk Developer Guide
The Worker Environment SQS Daemon
•Dead Letter Queues (p. 159)
•Periodic Tasks (p. 159)
•Use Amazon CloudWatch for Auto Scaling in Worker Environment Tiers (p. 160)
•Configuring Worker Environments (p. 160)
The Worker Environment SQS Daemon
Worker environments run a daemon process provided by Elastic Beanstalk. This daemon is updated
regularly to add features and fix bugs. To get the latest version of the daemon, update to the latest
platform version (p. 26).
Feature Release Date Description
Enhanced Health
Reporting (p. 336)
August 11, 2015 Monitor environment health
with more detail and accuracy.
Periodic Tasks (p. 159) February 17, 2015 Run cron jobs that you configure
in a cron.yaml file in your
application source code.
Dead Letter Queues (p. 159) May 27, 2014 Send failed jobs to a dead letter
queue for troubleshooting.
Changed the default visibility
timeout from 30 seconds to 300
seconds.
When the application in the worker environment returns a 200 OK response to acknowledge that it has
received and successfully processed the request, the daemon sends a DeleteMessage call to the SQS
queue so that the message will be deleted from the queue. If the application returns any response other
than 200 OK, then Elastic Beanstalk waits to put the message back in the queue after the configured
ErrorVisibilityTimeout period. If there is no response, then Elastic Beanstalk waits to put the
message back in the queue after the InactivityTimeout period so that the message is available for
another attempt at processing.
Note
The properties of Amazon SQS queues (message order, at-least-once delivery, and message
sampling) can affect how you design a web application for a worker environment. For more
information, see Properties of Distributed Queues in the Amazon Simple Queue Service
Developer Guide.
SQS automatically deletes messages that have been in a queue for longer than the configured
RetentionPeriod.
The daemon sets the following HTTP headers:
HTTP Headers
Name Value
User-Agent aws-sqsd
aws-sqsd/1.11
API Version 2010-12-01
158

AWS Elastic Beanstalk Developer Guide
Dead Letter Queues
HTTP Headers
X-Aws-Sqsd-Msgid SQS message ID, used to detect message storms (an unusually high number
of new messages)
X-Aws-Sqsd-Queue Name of the SQS queue
X-Aws-Sqsd-First-
Received-At
UTC time, in ISO 8601 format, when the message was first received.
X-Aws-Sqsd-Receive-
Count
SQS message receive count
X-Aws-Sqsd-
Attr-message-
attribute-name
Custom message attributes assigned to the message being processed. The
message-attribute-name is the actual message attribute name. All string
and number message attributes are added to the header, Binary attributes are
discarded and not included in the header.
Content-Type Mime type configuration; by default, application/json
Dead Letter Queues
Elastic Beanstalk worker environments support Amazon Simple Queue Service (SQS) dead letter queues.
A dead letter queue is a queue where other (source) queues can send messages that for some reason
could not be successfully processed. A primary benefit of using a dead letter queue is the ability to
sideline and isolate the unsuccessfully processed messages. You can then analyze any messages sent to
the dead letter queue to try to determine why they were not successfully processed.
A dead letter queue is enabled by default for a worker environment if you specify an autogenerated
Amazon SQS queue at the time you create your worker environment tier. If you choose an existing SQS
queue for your worker environment, you must use SQS to configure a dead letter queue independently.
For information about how to use SQS to configure a dead letter queue, see Using Amazon SQS Dead
Letter Queues.
You cannot disable dead letter queues. Messages that cannot be delivered will always eventually be sent
to a dead letter queue. You can, however, effectively disable this feature by setting the MaxRetries
option to the maximum valid value of 100.
Note
The Elastic Beanstalk MaxRetries option is equivalent to the SQS MaxReceiveCount
option. If your worker environment does not use an autogenerated SQS queue, use the
MaxReceiveCount option in SQS to effectively disable your dead letter queue. For more
information, see Using Amazon SQS Dead Letter Queues.
For more information about the lifecycle of an SQS message, go to Message Lifecycle.
Periodic Tasks
You can define periodic tasks in a file named cron.yaml in your source bundle to add jobs to your
worker environment's queue automatically at a regular interval.
For example, the following cron.yaml file creates two periodic tasks, one that runs every 12 hours and
a second that runs at 11pm UTC every day:
Example cron.yaml
version: 1
cron:
API Version 2010-12-01
159

AWS Elastic Beanstalk Developer Guide
Use Amazon CloudWatch for Auto
Scaling in Worker Environment Tiers
- name: "backup-job"
url: "/backup"
schedule: "0 */12 * * *"
- name: "audit"
url: "/audit"
schedule: "0 23 * * *"
The name must be unique for each task. The URL is the path to which the POST request is sent to trigger
the job. The schedule is a CRON expression that determines when the task runs.
When a task runs, the daemon posts a message to the environment's SQS queue with a header indicating
the job that needs to be performed. Any instance in the environment can pick up the message and
process the job.
Elastic Beanstalk uses leader election to determine which instance in your worker environment queues
the periodic task. Each instance attempts to become leader by writing to a DynamoDB table. The first
instance that succeeds is the leader, and must continue to write to the table to maintain leader status. If
the leader goes out of service, another instance quickly takes its place.
For periodic tasks, the worker daemon sets the following additional headers:
HTTP Headers
Name Value
X-Aws-Sqsd-Taskname For periodic tasks, the name of the task to perform.
X-Aws-Sqsd-
Scheduled-At
Time at which the periodic task was scheduled
X-Aws-Sqsd-Sender-Id AWS account number of the sender of the message
Use Amazon CloudWatch for Auto Scaling in Worker
Environment Tiers
Together, Auto Scaling and CloudWatch monitor the CPU utilization of the running instances in the
worker environment. How you configure the autoscaling limit for CPU capacity determines how many
instances the autoscaling group runs to appropriately manage the throughput of messages in the SQS
queue. Each EC2 instance publishes its CPU utilization metrics to CloudWatch. Auto Scaling retrieves
from CloudWatch the average CPU usage across all instances in the worker environment. You configure
the upper and lower threshold as well as how many instances to add or terminate according to CPU
capacity. When Auto Scaling detects that you have reached the specified upper threshold on CPU
capacity, Elastic Beanstalk creates new instances in the worker environment. The instances are deleted
when the CPU load drops back below the threshold.
Note
Messages that have not been processed at the time an instance is terminated are returned to the
queue where they can be processed by another daemon on an instance that is still running.
You can also set other CloudWatch alarms, as needed, by using the AWS Management Console, CLI, or
the options file. For more information, go to Using Elastic Beanstalk with Amazon CloudWatch (p. 379)
and Use Auto Scaling Policies and Amazon CloudWatch Alarms for Dynamic Scaling.
Configuring Worker Environments
You can manage a worker environment's configuration by editing Worker Configuration on the
Configuration page in the environment management console (p. 65).
API Version 2010-12-01
160
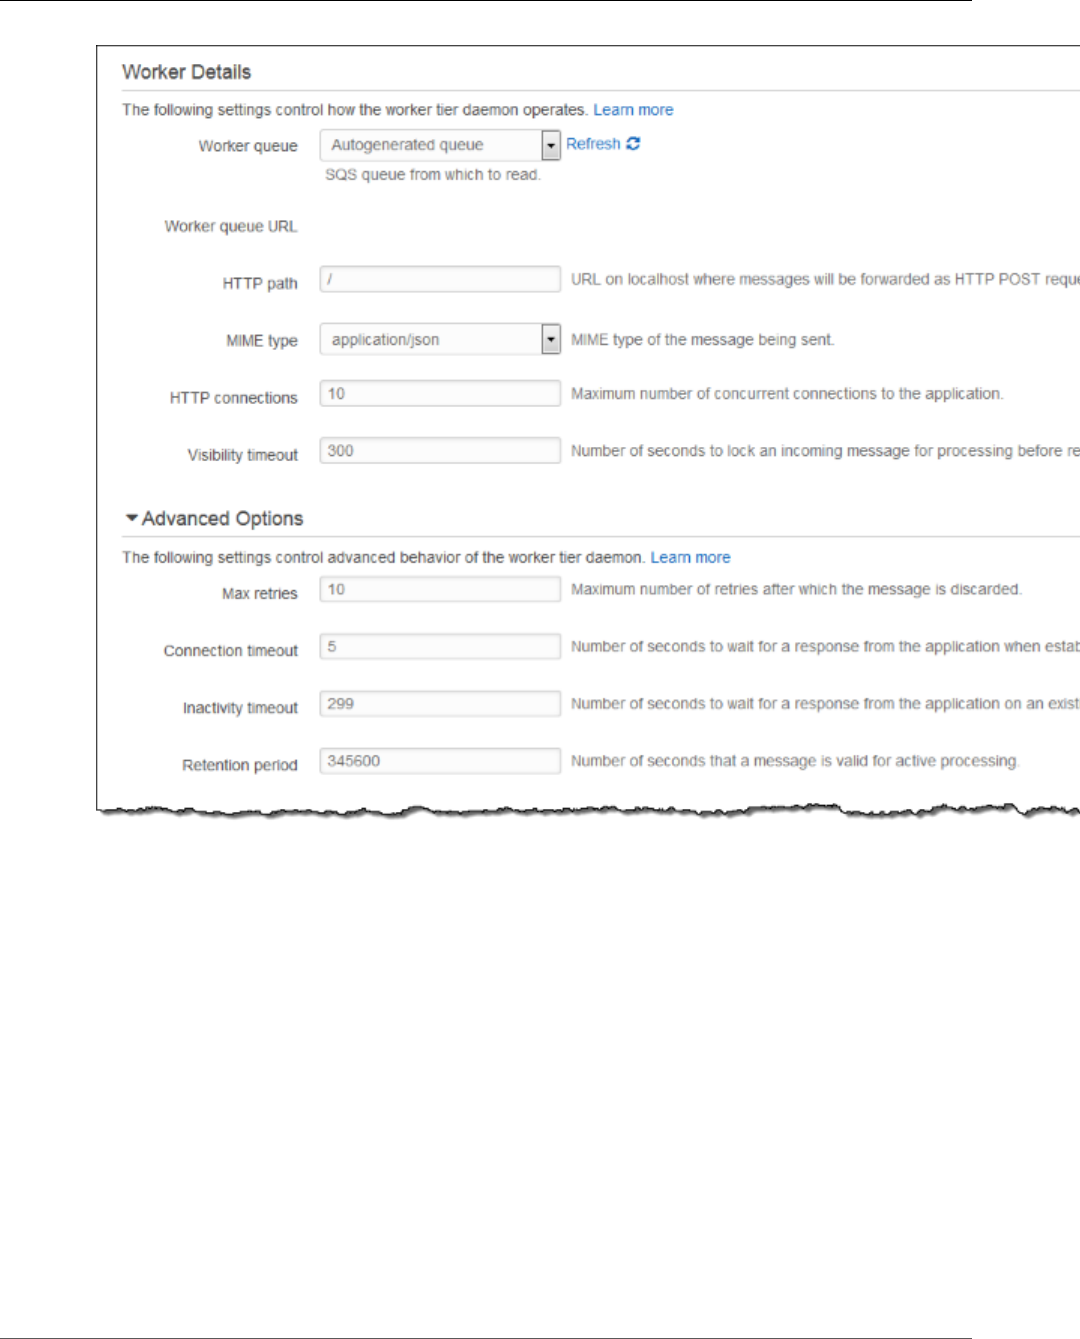
AWS Elastic Beanstalk Developer Guide
Configuring Worker Environments
To configure the worker daemon
1. Open the Elastic Beanstalk console.
2. Navigate to the management page (p. 65) for your environment.
3. Choose Configuration.
4. Choose Worker Configuration.
The Worker Details page has the following options:
•Worker queue – Specify the Amazon SQS queue from which the daemon reads. You can choose an
existing queue, if you have one. If you choose Autogenerated queue, Elastic Beanstalk creates a new
Amazon SQS queue and a corresponding Worker queue URL.
•Worker queue URL – If you choose an existing Worker queue, then this setting displays the URL
associated with that Amazon SQS queue.
•HTTP path – Specify the relative path to the application that will receive the data from the Amazon
SQS queue. The data is inserted into the message body of an HTTP POST message. The default value is
/.
API Version 2010-12-01
161

AWS Elastic Beanstalk Developer Guide
Environment Links
•MIME type – Indicate the MIME type that the HTTP POST message uses. The default value is
application/json. However, any value is valid because you can create and then specify your own
MIME type.
•Max retries – Specify the maximum number of times Elastic Beanstalk attempts to send the message
to the Amazon SQS queue before moving the message to the dead letter queue. The default value is
10. You can specify a value between 1 and 1000.
•HTTP connections – Specify the maximum number of concurrent connections that the daemon can
make to any application(s) within an Amazon EC2 instance. The default is 50. You can specify a value
between 1 and 100.
•Connection timeout – Indicate the amount of time, in seconds, to wait for successful connections to
an application. The default value is 5. You can specify a value between 1 and 60 seconds.
•Inactivity timeout – Indicate the amount of time, in seconds, to wait for a response on an existing
connection to an application. The default value is 180. You can specify a value between 1 and 36000
seconds.
•Visibility timeout – Indicate the amount of time, in seconds, an incoming message from the Amazon
SQS queue is locked for processing. After the configured amount of time has passed, the message is
again made visible in the queue for another daemon to read. Choose a value that is longer than you
expect your application requires to process messages, up to 43200 seconds.
•Error visibility timeout – Indicate the amount of time, in seconds, that elapses before Elastic
Beanstalk returns a message to the Amazon SQS queue after an attempt to process it fails with an
explicit error. You can specify a value between 0 and 43200.
•Retention period – Indicate the amount of time, in seconds, a message is valid and will be actively
processed. The default value is 345600. You can specify a value between 60 and 1209600.
If you use an existing Amazon SQS queue, the settings that you configure when you create a worker
environment can conflict with settings you configured directly in Amazon SQS. For example, if
you configure a worker environment with a RetentionPeriod value that is higher than the
MessageRetentionPeriod value you set in Amazon SQS, then Amazon SQS will delete the message
when it exceeds the MessageRetentionPeriod.
Conversely, if the RetentionPeriod value you configure in the worker environment settings is lower
than the MessageRetentionPeriod value you set in Amazon SQS, then the daemon will delete the
message before Amazon SQS can. For VisibilityTimeout, the value that you configure for the
daemon in the worker environment settings overrides the Amazon SQS VisibilityTimeout setting.
Ensure that messages are deleted appropriately by comparing your Elastic Beanstalk settings to your
Amazon SQS settings.
Creating Links Between AWS Elastic Beanstalk
Environments
As your application grows in size and complexity, you may want to split it into components that
have different development and operational lifecycles. This allows you to manage and scale each
component independently providing you with greater agility. One of the challenges of this approach is
the requirement for sharing connection information between components. This can be solved with AWS
Elastic Beanstalk environment links.
Note
Elastic Beanstalk currently supports environment links for all platforms except Multicontainer
Docker.
With environment links, you can specify the connections between your application’s component
environments as named references. When you create an environment that defines a link, Elastic
API Version 2010-12-01
162

AWS Elastic Beanstalk Developer Guide
Environment Links
Beanstalk sets an environment variable with the same name as the link. The value of the variable is the
endpoint that you can use to connect to the other component, which can be a web server or worker
environment.
For example, if your application consists of a frontend that collects email addresses and a worker that
sends a welcome email to the email addresses collected by the frontend, you can create a link to the
worker in your frontend and have the frontend automatically discover the endpoint (queue URL) for your
worker.
Define links to other environments in an environment manifest (p. 296), a YAML formatted file
named env.yaml in the root of your application source. The following manifest defines a link to an
environment named worker:
~/workspace/my-app/frontend/env.yaml
AWSConfigurationTemplateVersion: 1.1.0.0
EnvironmentLinks:
"WORKERQUEUE": "worker"
When you create an environment with an application version that includes the above environment
manifest, Elastic Beanstalk looks for an environment named worker that belongs to the same
application. If that environment exists, Elastic Beanstalk creates an environment property named
WORKERQUEUE. The value of WORKERQUEUE is the Amazon SQS queue URL. The frontend application can
read this property in the same manner as an environment variable. See Using Elastic Beanstalk Saved
Configurations (p. 293) for details.
To use environment links, add an environment manifest to your application source and upload it with
the EB CLI, AWS CLI or an SDK. If you use the AWS CLI or an SDK, set the process flag when you call
CreateApplicationVersion:
$ aws elasticbeanstalk create-application-version --process --application-name my-app --
version-label frontend-v1 --source-bundle S3Bucket="my-bucket",S3Key="front-v1.zip"
This option tells Elastic Beanstalk to validate the environment manifest and configuration files in your
source bundle when you create the application version. The EB CLI sets this flag automatically when you
have an environment manifest in your project directory.
Create your environments normally using any client. When you need to terminate environments,
terminate the environment with the link first. If an environment is linked to by another environment,
Elastic Beanstalk will prevent the linked environment from being terminated. To override this protection,
use the ForceTerminate flag. This parameter is available in the AWS CLI as --force-terminate:
$ aws elasticbeanstalk terminate-environment --force-terminate --environment-name worker
API Version 2010-12-01
163

AWS Elastic Beanstalk Developer Guide
AWS Elastic Beanstalk Environment
Configuration
Elastic Beanstalk provides a wide range of options for customizing the resources in your environment,
Elastic Beanstalk's behavior, and platform settings. When you create a web server environment, Elastic
Beanstalk creates several resources to support the operation of your application.
•EC2 instance – An Amazon Elastic Compute Cloud (Amazon EC2) virtual machine configured to run
web apps on the platform that you choose.
Each platform runs a different set of software, configuration files, and scripts to support a specific
language version, framework, web container, or combination thereof. Most platforms use either
Apache or nginx as a reverse proxy that sits in front of your web app, forwards requests to it, serves
static assets, and generates access and error logs.
•Instance security group – An Amazon EC2 security group configured to allow ingress on port 80. This
resource lets HTTP traffic from the load balancer reach the EC2 instance running your web app. By
default, traffic is not allowed on other ports.
•Load balancer – An Elastic Load Balancing load balancer configured to distribute requests to the
instances running your application. A load balancer also eliminates the need to expose your instances
directly to the Internet.
•Load balancer security group – An Amazon EC2 security group configured to allow ingress on port
80. This resource lets HTTP traffic from the Internet reach the load balancer. By default, traffic is not
allowed on other ports.
•Auto Scaling group – An Auto Scaling group configured to replace an instance if it is terminated or
becomes unavailable.
•Amazon S3 bucket – A storage location for your source code, logs, and other artifacts that are created
when you use Elastic Beanstalk.
•Amazon CloudWatch alarms – Two CloudWatch alarms that monitor the load on the instances in your
environment and are triggered if the load is too high or too low. When an alarm is triggered, your Auto
Scaling group scales up or down in response.
•AWS CloudFormation stack – Elastic Beanstalk uses AWS CloudFormation to launch the resources in
your environment and propagate configuration changes. The resources are defined in a template that
you can view in the AWS CloudFormation console.
•Domain name – A domain name that routes to your web app in the form
subdomain.region.elasticbeanstalk.com.
This topic focuses on the resource configuration options available in the Elastic Beanstalk console. The
following topics show how to configure your environment in the console, and describe the underlying
namespaces that correspond to the console options for use with configuration files or API configuration
options. You can learn more about advanced configuration methods in the next chapter (p. 202).
Topics
•Your AWS Elastic Beanstalk Environment's Auto Scaling Group (p. 165)
•Your AWS Elastic Beanstalk Environment's Load Balancer (p. 176)
•Adding a Database to Your Elastic Beanstalk Environment (p. 186)
API Version 2010-12-01
164

AWS Elastic Beanstalk Developer Guide
Auto Scaling Group
•Environment Properties and Other Software Settings (p. 189)
•Configuring AWS X-Ray Debugging (p. 192)
•Elastic Beanstalk Environment Notifications with Amazon Simple Notification Service (p. 195)
•Streaming Logs to Amazon CloudWatch (p. 197)
•Configuring VPC with Elastic Beanstalk (p. 198)
•Your Elastic Beanstalk Environment's Domain Name (p. 199)
•Updating Tags in an Elastic Beanstalk Environment (p. 201)
Your AWS Elastic Beanstalk Environment's Auto
Scaling Group
Your Elastic Beanstalk includes an Auto Scaling group that manages the Amazon EC2 instances in your
environment. In a single-instance environment, the Auto Scaling group ensures that there is always one
instance running. In a load balanced environment, you configure the group with a range of instances to
run, and Auto Scaling adds or removes instances as-needed based on load.
The Auto Scaling group also manages the launch configuration for the instances in your environment.
You can modify the launch configuration (p. 167) to change the instance type, key pair, Amazon Elastic
Block Store storage, and other settings that can only be configured when you launch an instance.
The Auto Scaling group uses two Amazon CloudWatch alarms to trigger scaling operations. The default
triggers scale when the average outbound network traffic from each instance is higher than 6 MiB or
lower than 2 MiB over a period of 5 minutes. To use Auto Scaling effectively, configure triggers (p. 170)
that are appropriate for your application, instance type, and service requirements. You can scale based
on several statistics including latency, disk I/O, CPU utilization, and request count.
To optimize your environment's use of Amazon EC2 instances through predictable periods of peak
traffic, configure your Auto Scaling group to change its instance count on a schedule (p. 172). You can
schedule changes to your group's configuration that recur daily or weekly, or schedule one-time changes
to prepare for marketing events that will drive a lot of traffic to your site.
Auto Scaling monitors the health of each Amazon EC2 instance that it launches. If any instance
terminates unexpectedly, Auto Scaling detects the termination and launches a replacement instance. To
configure the group to use the load balancer's health check mechanism, see Auto Scaling Health Check
Setting (p. 175).
Configuring Your Environment's Auto Scaling Group
You can configure how Auto Scaling works by editing Scaling on the environment's Configuration page
in the environment management console (p. 65).
To configure scheduled actions in the Elastic Beanstalk console
1. Open the Elastic Beanstalk console.
2. Navigate to the management page (p. 65) for your environment.
3. Choose Configuration.
4. Choose Scaling.
5. Expand the Auto Scaling section.
API Version 2010-12-01
165
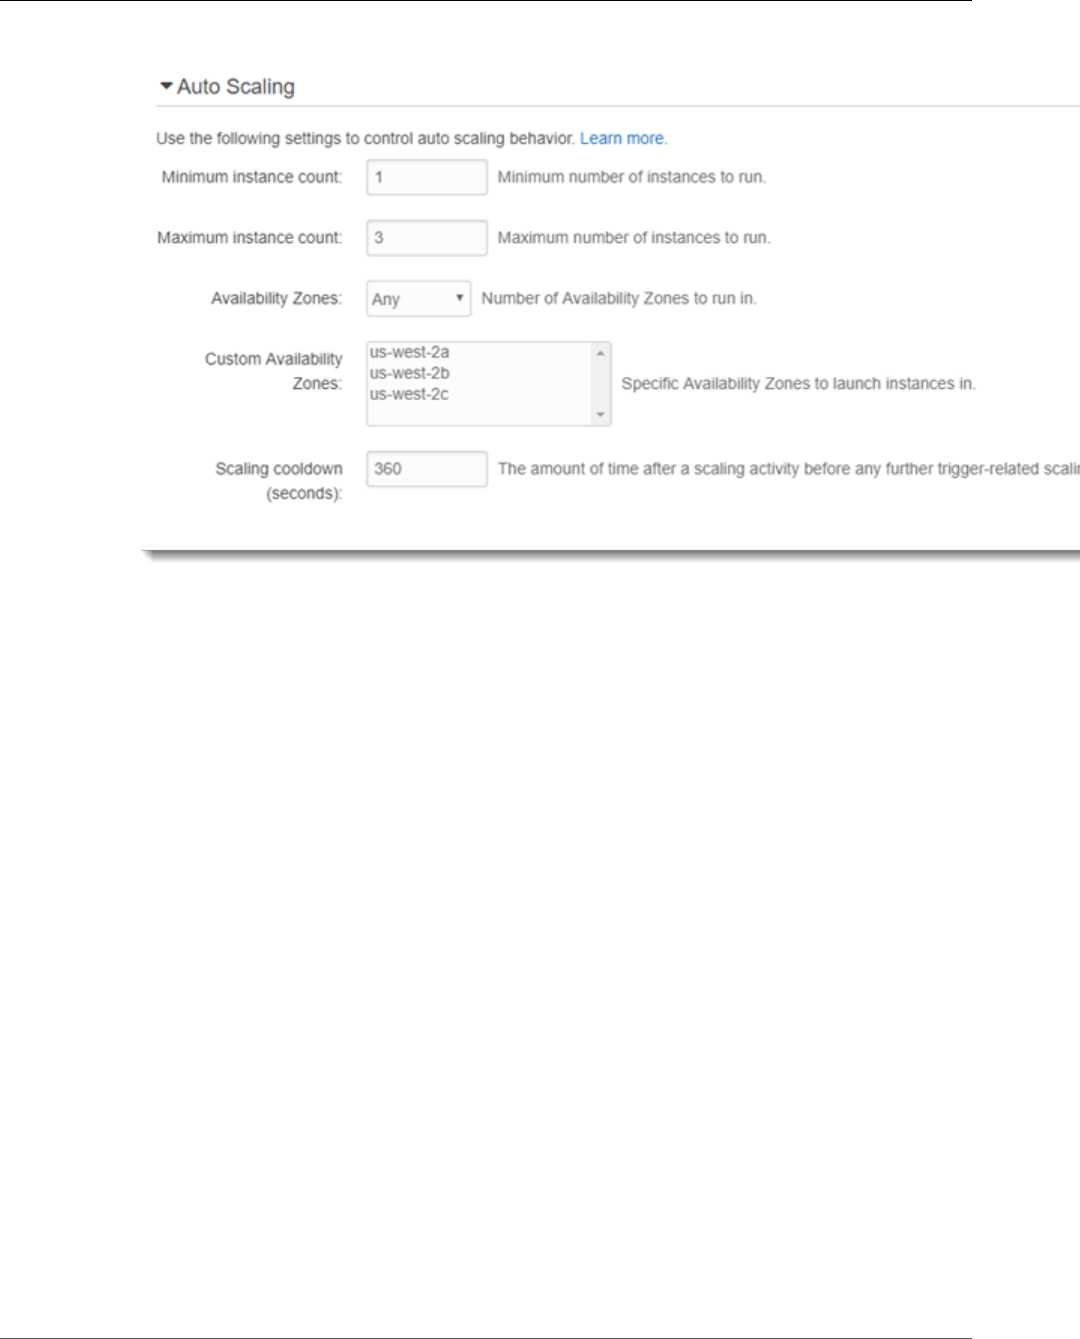
AWS Elastic Beanstalk Developer Guide
Configuring Your Environment's Auto Scaling Group
6. Configure the following settings.
Auto Scaling Group Settings
•Minimum instance count – The minimum number of EC2 instances that the group should contain
at any time. The group starts with the minimum count and adds instances when the scale-up
trigger condition is met.
•Maximum instance count – The maximum number of EC2 instances that the group should contain
at any time.
Note
If you use rolling updates, make sure that the maximum instance count is higher than the
Minimum instances in service setting (p. 135) for rolling updates.
•Availability Zones – Choose the number of availability zones to spread your environment's
instances across. By default, the Auto Scaling group launches instances evenly across all usable
zones. To concentrate your instances in fewer zones, choose the number of zones to use. For
production environments, use at least two zones to ensure that your application is available in
case one Availability Zone goes out.
•Custom Availability Zones (optional) – Choose the Availability Zones to use. Use this setting if
your instances need to connect to resources in specific zones, or if you have purchased reserved
instances, which are zone-specific. If you also set the number of zones, you must choose at least
that many custom zones.
If you launch your environment in a custom VPC, you cannot configure this option. In a custom
VPC, you choose Availability Zones for the subnets that you assign to your environment.
•Scaling cooldown (seconds) – The amount of time to wait for instances to launch or terminate
after scaling, before continuing to evaluate triggers. For more information, see Auto Scaling
Cooldowns.
7. Choose Apply.
API Version 2010-12-01
166
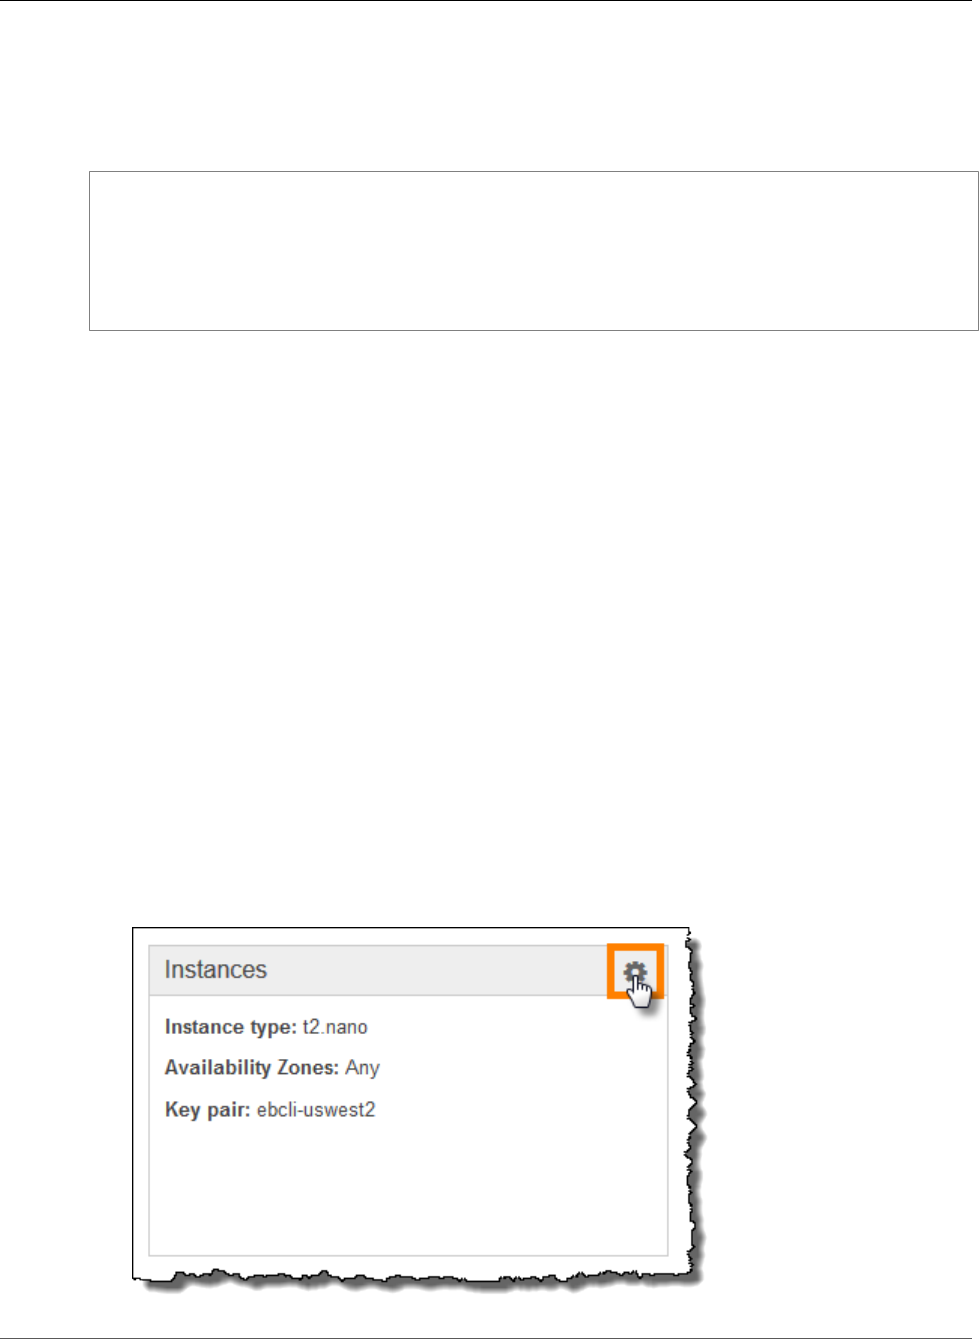
AWS Elastic Beanstalk Developer Guide
The aws:autoscaling:asg Namespace
The aws:autoscaling:asg Namespace
Elastic Beanstalk provides configuration options (p. 202) for Auto Scaling settings in the
aws:autoscaling:asg (p. 221) namespace.
option_settings:
aws:autoscaling:asg:
Availability Zones: Any
Cooldown: '720'
Custom Availability Zones: 'us-west-2a,us-west-2b'
MaxSize: '4'
MinSize: '2'
EC2 Instance Launch Configuration
The Auto Scaling Group in your environment manages the EC2 instances that run your application.
Changes to the Auto Scaling Group's launch configuration require replacement of all instances (p. 133)
and will trigger a rolling update (p. 134) or immutable update (p. 138), depending on which one is
configured.
Sections
•Configuring Your Environment's EC2 Instances (p. 165)
•The aws:autoscaling:launchconfiguration Namespace (p. 167)
Configuring Your Environment's EC2 Instances
You can modify your Elastic Beanstalk environment's Auto Scaling Group configuration in the Elastic
Beanstalk console.
To configure EC2 Instances in the Elastic Beanstalk console
1. Open the Elastic Beanstalk console.
2. Navigate to the management page (p. 65) for your environment.
3. Choose Configuration.
4. Choose Instances.
API Version 2010-12-01
167

AWS Elastic Beanstalk Developer Guide
EC2 Instances
The following settings are available:
Options
•Instance Type (p. 168)
•Security Groups (p. 168)
•EC2 Key Pair (p. 168)
•Instance Profile (p. 169)
•Monitoring Interval (p. 169)
•Custom AMI ID (p. 169)
•Root Volume (Boot Device) (p. 169)
Instance Type
The Instance type setting determines the type of EC2 instance launched to run your application. Choose
an instance that is powerful enough to run your application under load, but not so powerful that it is idle
most of the time. For development purposes, the t2 family of instances provides a moderate amount of
power with the ability to burst for short periods of time.
For large scale, high availability applications, use a pool of instances to ensure that capacity is not
greatly affected if any single instance goes down. Start with an instance type that allows you to run five
instances under moderate load during normal hours. If any instance fails, the rest of the instances can
absorb the rest of the traffic. The capacity buffer also allows time for the environment to scale up as
traffic begins to rise during peak hours.
For more information about EC2 instance families and types, see Instance Types in the Amazon Elastic
Compute Cloud User Guide.
Security Groups
The security groups attached to your instances determine which traffic is allowed to reach the instances
(ingress), and which traffic is allowed to leave the instances (egress). Elastic Beanstalk creates a security
group that allows traffic from the load balancer on the standard ports for HTTP (80) and HTTPS (443).
You can specify additional security groups that you have created to allow traffic on other ports or from
other sources. For example, you can create a security group for SSH access that allows ingress on port 22
from a restricted IP address range or, for additional security, from a bastion host to which only you have
access.
Note
To allow traffic between environment A's instances and environment B's instances, you can add
a rule to the security group that Elastic Beanstalk attached to environment B, and specify the
security group that Elastic Beanstalk attached to environment A. This allows ingress from, or
egress to, environment A's instances. However, doing so creates a dependency between the two
security groups. If you later try to terminate environment A, Elastic Beanstalk will not be able to
delete the environment's security group, because environment B's security group is dependent
on it.
A safer approach would be to create a separate security group, attach it to environment A, and
specify it in a rule of environment B's security group.
For more information on Amazon EC2 security groups, see Amazon EC2 Security Groups in the Amazon
Elastic Compute Cloud User Guide.
EC2 Key Pair
You can securely log in to the Amazon EC2 instances provisioned for your Elastic Beanstalk application
with an Amazon EC2 key pair. For instructions on creating a key pair for Amazon EC2, see the Amazon
Elastic Compute Cloud Getting Started Guide.
API Version 2010-12-01
168

AWS Elastic Beanstalk Developer Guide
EC2 Instances
Choose an EC2 key pair from the drop down menu to assign it to your environment's instances. When
you assign a key pair, the public key is stored on the instance to authenticate the private key, which you
store locally. The private key is never stored in AWS.
For more information on connecting to Amazon EC2 instances, see Connect to Your Instance and
Connecting to Linux/UNIX Instances from Windows using PuTTY in the Amazon Elastic Compute Cloud
User Guide.
Instance Profile
An instance profile (p. 22) is an IAM role that is applied to instances launched in your Elastic Beanstalk
environment. EC2 instances assume the instance profile role to sign requests to AWS and access APIs, for
example, to upload logs to Amazon S3.
The first time you create an environment in the AWS Management Console, Elastic Beanstalk prompts
you to create an instance profile with a default set of permissions. You can add permissions to this profile
to provide your instances access to other AWS services. For details, see Managing Elastic Beanstalk
Instance Profiles (p. 388)
Monitoring Interval
By default, the instances in your environment publish basic health metrics (p. 333) to CloudWatch at 5
minute intervals at no additional cost.
For more detailed reporting, you can set the Monitoring interval to 1 minute to increase the frequency
with which the resources in your environment publish basic health metrics (p. 335) to CloudWatch.
Amazon CloudWatch service charges apply for one-minute interval metrics. See Amazon CloudWatch for
more information.
Custom AMI ID
The Amazon Machine Image (AMI) is the Amazon Linux or Windows Server machine image that AWS
Elastic Beanstalk uses to launch EC2 instances in your environment. Elastic Beanstalk provides machine
images that contain the tools and resources required to run your application.
Elastic Beanstalk selects a default AMI for your environment based on the region, platform, and instance
type that you choose. If you have created a custom AMI (p. 297), replace the default AMI ID with yours.
Root Volume (Boot Device)
Each instance in your environment is configured with a root volume. The root volume is the Amazon
EBS block device attached to the instance to store the operating system, libraries, scripts, and your
application source code. By default, all platforms use general purpose SSD block devices for storage.
You can modify Root volume type to use use magnetic storage or provisioned IOPS SSD volume types,
and increase the volume size if needed. For provisioned IOPS volumes, you must also select the number
of IOPS to provision. Select the volume type that meets your performance and price requirements.
For more information, see Amazon EBS Volume Types and Amazon EBS Product Details.
The aws:autoscaling:launchconfiguration Namespace
You can use the configuration options (p. 202) in the
aws:autoscaling:launchconfiguration (p. 221) namespace to configure your Auto Scaling
Group, including additional options that are not available in the console.
The following configuration file (p. 256) configures the basic options shown above an an additional
option, BlockDeviceMappings, which isn't available in the console.
API Version 2010-12-01
169

AWS Elastic Beanstalk Developer Guide
Triggers
option_settings:
aws:autoscaling:launchconfiguration:
InstanceType: m1.small
SecurityGroups: my-securitygroup
EC2KeyName: my-keypair
MonitoringInterval: "1 minute"
ImageId: "ami-cbab67a2"
IamInstanceProfile: "ElasticBeanstalkProfile"
BlockDeviceMappings: "/dev/sdj=:100,/dev/sdh=snap-51eef269,/dev/sdb=ephemeral0"
BlockDeviceMappings lets you configure additional block devices for your instances. For more
information about block device mappings, see Block Device Mapping in the Amazon Elastic Cloud
Computer User Guide.
EB CLI and Elastic Beanstalk console apply recommended values for the preceding options.
These settings must be removed if you want to use configuration files to configure the same. See
Recommended Values (p. 203) for details.
Auto Scaling Triggers
The Auto Scaling group in your Elastic Beanstalk environment uses two Amazon CloudWatch alarms
to trigger scaling operations. The default triggers scale when the average outbound network traffic
from each instance is higher than 6 MiB or lower than 2 MiB over a period of 5 minutes. To use Auto
Scaling effectively, configure triggers that are appropriate for your application, instance type, and service
requirements. You can scale based on several statistics including latency, disk I/O, CPU utilization, and
request count.
Configuring Auto Scaling Triggers
You can configure the triggers that adjust the number of instances in your environment's Auto Scaling
group in the Elastic Beanstalk console.
To configure triggers in the Elastic Beanstalk console
1. Open the Elastic Beanstalk console.
2. Navigate to the management page (p. 65) for your environment.
3. Choose Configuration.
4. Choose Scaling.
5. Expand the Scaling Trigger section.
API Version 2010-12-01
170
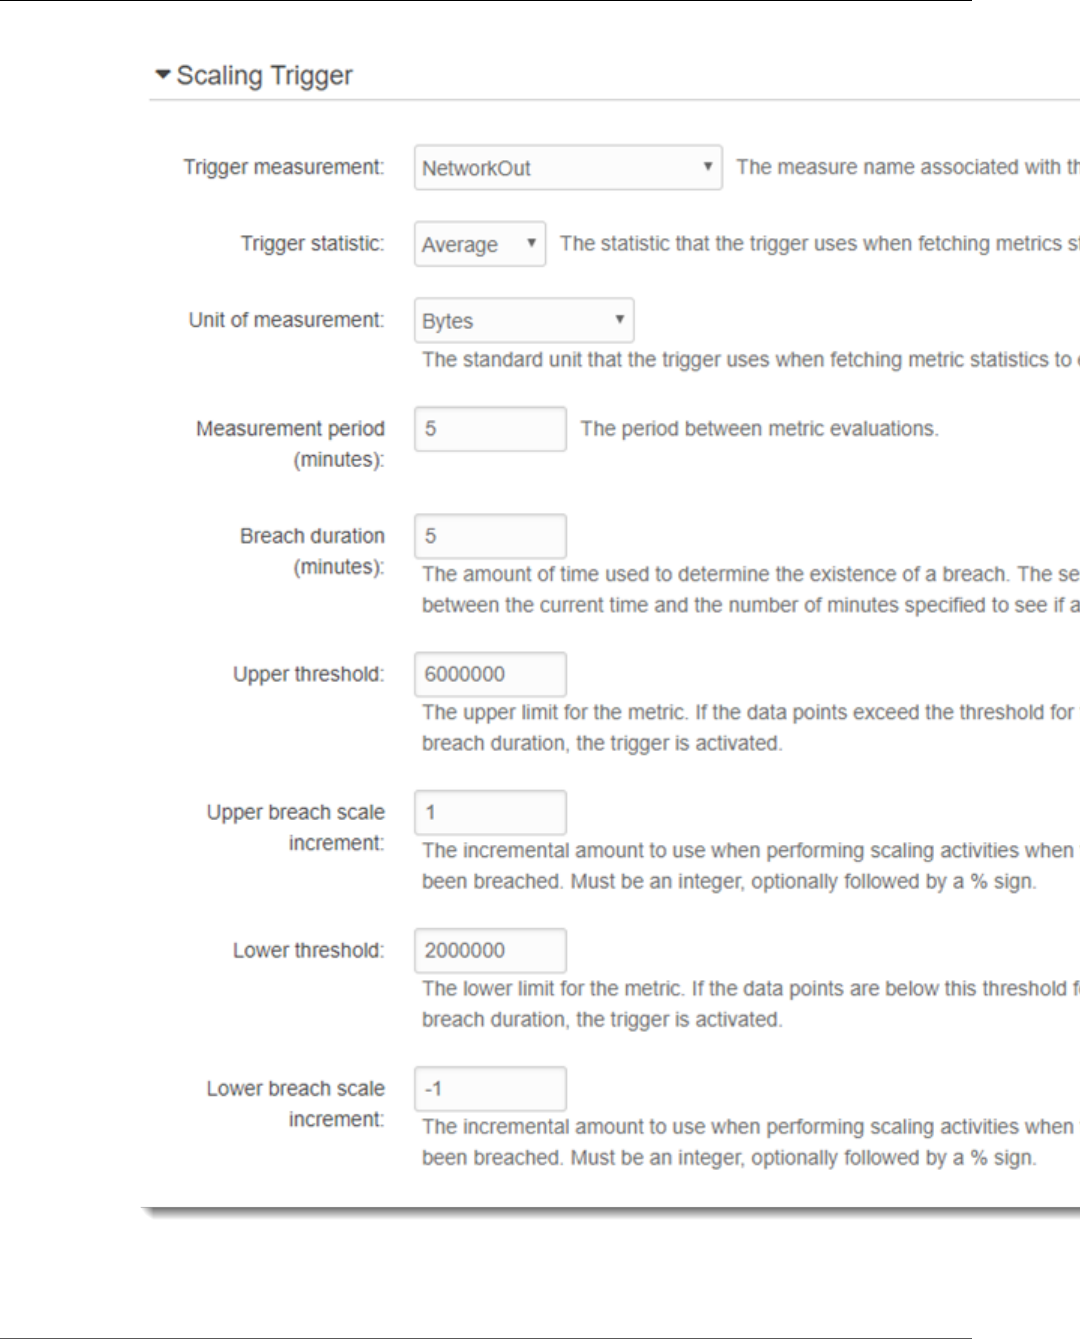
AWS Elastic Beanstalk Developer Guide
Triggers
6. Configure the following options.
•Trigger measurement – Metric used for your Auto Scaling trigger.
API Version 2010-12-01
171

AWS Elastic Beanstalk Developer Guide
Scheduled Actions
•Trigger statistic – Statistic the trigger should use, such as Average.
•Unit of measurement – Unit for the trigger measurement, such as Bytes.
•Measurement period – Specifies how frequently Amazon CloudWatch measures the metrics for
your trigger.
•Breach duration – Amount of time, in minutes, a metric can be beyond outside of the upper and
lower thresholds before the trigger fires.
•Upper threshold – If the measurement is higher than this number for the breach duration, a
trigger is fired.
•Upper breach scale increment – How many Amazon EC2 instances to add when performing a
scaling activity.
•Lower threshold – If the measurement falls below this number for the breach duration, a trigger
is fired.
•Lower breach scale increment – How many Amazon EC2 instances to remove when performing a
scaling activity.
7. Choose Apply.
The aws:autoscaling:trigger Namespace
Elastic Beanstalk provides configuration options (p. 202) for Auto Scaling settings in the
aws:autoscaling:trigger (p. 226) namespace. Settings in this namespace are organized by the
resource that they apply to.
option_settings:
AWSEBAutoScalingScaleDownPolicy.aws:autoscaling:trigger:
LowerBreachScaleIncrement: '-1'
AWSEBAutoScalingScaleUpPolicy.aws:autoscaling:trigger:
UpperBreachScaleIncrement: '1'
AWSEBCloudwatchAlarmHigh.aws:autoscaling:trigger:
UpperThreshold: '6000000'
AWSEBCloudwatchAlarmLow.aws:autoscaling:trigger:
BreachDuration: '5'
EvaluationPeriods: '1'
LowerThreshold: '2000000'
MeasureName: NetworkOut
Period: '5'
Statistic: Average
Unit: Bytes
Scheduled Auto Scaling Actions
To optimize your environment's use of Amazon EC2 instances through predictable periods of peak traffic,
configure your Auto Scaling group to change its instance count on a schedule. You can configure your
environment with a recurring action to scale up each day in the morning, and scale down at night when
traffic is low. If you have a marketing event that will drive traffic to your site for a limited period of time,
you can schedule a one time event to scale up when it starts, and another to scale down when it ends.
You can define up to 120 active scheduled actions per environment. Elastic Beanstalk also retains up to
150 expired scheduled actions, which you can re-use by updating their settings.
Configuring Scheduled Actions
You can create scheduled actions for your environment's Auto Scaling group in the Elastic Beanstalk
console.
API Version 2010-12-01
172
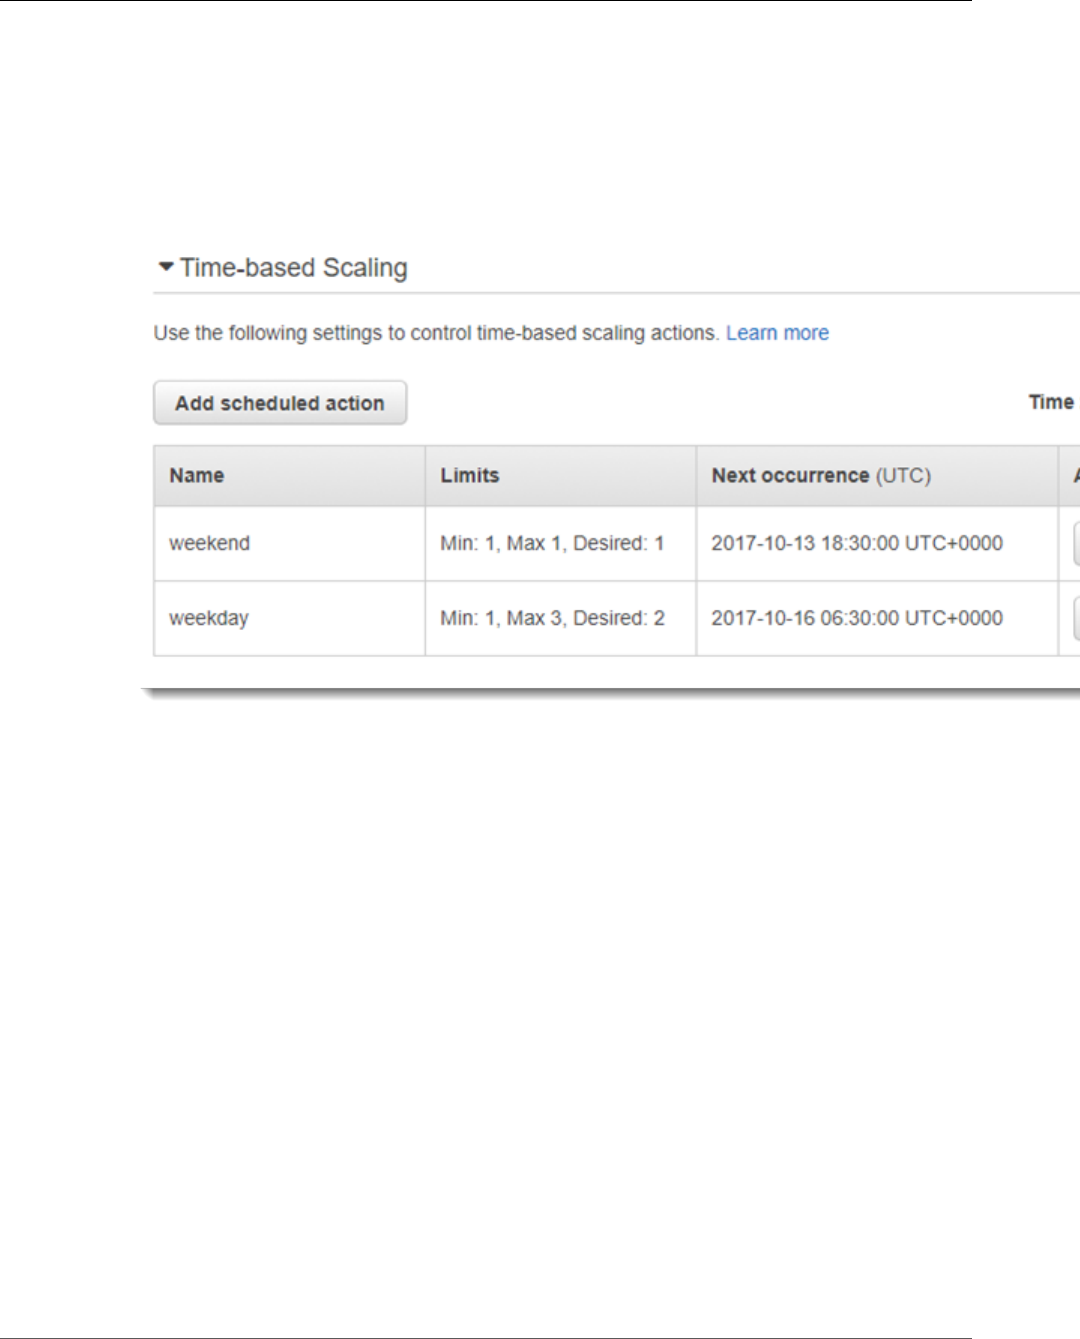
AWS Elastic Beanstalk Developer Guide
Scheduled Actions
To configure scheduled actions in the Elastic Beanstalk console
1. Open the Elastic Beanstalk console.
2. Navigate to the management page (p. 65) for your environment.
3. Choose Configuration.
4. Choose Scaling.
5. Expand the Time-based Scaling section.
6. Choose Add scheduled action.
7. Fill in the form and choose Add.
Scheduled Action Settings
•Name – Specify a unique name with up to 255 alphanumeric characters with no spaces.
•Instances – Choose the minimum and maximum instance count to apply to the Auto Scaling
group.
•Desired capacity (optional) – Set the initial desired capacity for the Auto Scaling group. After the
scheduled action is applied, triggers will adjust the desired capacity based on their settings.
•Occurrence – Choose Recurrent to repeat the scaling action on a schedule.
•Start time – For one-time actions, choose the date and time to run the action. For recurrent
actions, choose when to activate the action.
•Recurrence – Use a Cron expression to specify the frequency with which you want the scheduled
action to occur. For example, 30 6 * * 2 runs the action every Tuesday at 6:30 AM UTC.
•End time (optional) – For recurrent actions, choose when to deactivate the action. If you don't
specify an EndTime, the action recurs according to the Recurrence expression.
When a scheduled action ends, the Auto Scaling does not automatically go back to its previous
settings. Configure a second scheduled action to return to the original settings as needed.
8. Choose Apply.
API Version 2010-12-01
173

AWS Elastic Beanstalk Developer Guide
Scheduled Actions
The aws:autoscaling:scheduledaction Namespace
If you need to configure a large number of scheduled actions, you can use configuration files (p. 256) or
the Elastic Beanstalk API (p. 219) to apply the configuration option changes from a YAML or JSON file.
These methods also let you access the Suspend option (p. 225) to temporarily deactivate a recurrent
scheduled action.
Note
When working with scheduled action configuration options outside of the console, use ISO 8601
time format to specify start and end times in UTC. For example, 2015-04-28T04:07:02Z. For
more information about ISO 8601 time format, go to Date and Time Formats. The dates must
be unique across all scheduled actions.
Elastic Beanstalk provides configuration options for scheduled action settings in the
aws:autoscaling:scheduledaction (p. 225) namespace. Use the resource_name field to specify
the name of the scheduled action.
Example scheduled-scale-up-specific-time.config
This configuration file instructs Elastic Beanstalk to scale out from five instances to 10 instances at
2015-12-12T00:00:00Z.
option_settings:
- namespace: aws:autoscaling:scheduledaction
resource_name: ScheduledScaleUpSpecificTime
option_name: MinSize
value: '5'
- namespace: aws:autoscaling:scheduledaction
resource_name: ScheduledScaleUpSpecificTime
option_name: MaxSize
value: '10'
- namespace: aws:autoscaling:scheduledaction
resource_name: ScheduledScaleUpSpecificTime
option_name: DesiredCapacity
value: '5'
- namespace: aws:autoscaling:scheduledaction
resource_name: ScheduledScaleUpSpecificTime
option_name: StartTime
value: '2015-12-12T00:00:00Z'
Example scheduled-scale-up-specific-time.config
To use the shorthand syntax with the EB CLI or configuration files, prepend the resource name to the
namespace.
option_settings:
ScheduledScaleUpSpecificTime.aws:autoscaling:scheduledaction:
MinSize: '5'
MaxSize: '10'
DesiredCapacity: '5'
StartTime: '2015-12-12T00:00:00Z'
Example scheduled-scale-down-specific-time.config
This configuration file instructs Elastic Beanstalk to scale in at 2015-12-12T07:00:00Z.
option_settings:
ScheduledScaleDownSpecificTime.aws:autoscaling:scheduledaction:
MinSize: '1'
API Version 2010-12-01
174

AWS Elastic Beanstalk Developer Guide
Health Check Setting
MaxSize: '1'
DesiredCapacity: '4'
StartTime: '2015-12-12T07:00:00Z'
Example scheduled-periodic-scale-up.config
This configuration file instructs Elastic Beanstalk to scale out every day at 9AM. The action is scheduled
to begin May 14, 2015 and end January 12, 2016.
option_settings:
ScheduledPeriodicScaleUp.aws:autoscaling:scheduledaction:
MinSize: '5'
MaxSize: '10'
DesiredCapacity: '5'
StartTime: '2015-05-14T07:00:00Z'
EndTime: '2016-01-12T07:00:00Z'
Recurrence: 0 9 * * *
Example scheduled-weekend-scale-down.config
This configuration file instructs Elastic Beanstalk to scale in every Friday at 6PM. If you know that your
application doesn’t receive as much traffic over the weekend, you can create a similar scheduled action.
option_settings:
ScheduledWeekendScaleDown.aws:autoscaling:scheduledaction:
MinSize: '1'
MaxSize: '4'
DesiredCapacity: '1'
StartTime: '2015-12-12T07:00:00Z'
EndTime: '2016-01-12T07:00:00Z'
Recurrence: 0 18 * * 5
Auto Scaling Health Check Setting
Auto Scaling monitors the health of each Amazon EC2 instance that it launches. If any instance
terminates unexpectedly, Auto Scaling detects the termination and launches a replacement instance. By
default, the Auto Scaling created for your environment uses Amazon EC2 status checks. If an instance in
your environment fails an EC2 status check, it is taken down and replaced by Auto Scaling.
EC2 status checks only cover an instance's health, not the health of your application, server, or any
Docker containers running on the instance. If your application crashes, but the instance that it runs on
is still healthy, it may be kicked out of the load balancer, but it won't be replaced automatically by Auto
Scaling. The default behavior is good for troubleshooting; if Auto Scaling replaced the instance as soon
as the application crashed, you may not realize that anything went wrong, even if it crashed quickly after
starting up.
If you would like Auto Scaling to replace instances whose application has stopped responding, you
can configure the Auto Scaling group to use Elastic Load Balancing health checks with a configuration
file (p. 256). This configuration file tells the group to use the load balancer's health checks to determine
an instance's health, instead of the EC2 status check.
Example .ebextensions/autoscaling.config
Resources:
AWSEBAutoScalingGroup:
Type: "AWS::AutoScaling::AutoScalingGroup"
Properties:
HealthCheckType: ELB
API Version 2010-12-01
175

AWS Elastic Beanstalk Developer Guide
Load Balancer
HealthCheckGracePeriod: 300
By default, the Elastic Load Balancing health check is configured to attempt a TCP connection to
your instance over port 80. This confirms that the web server running on the instance is accepting
connections, but you may want to customize the load balancer health check (p. 176) to make sure that
your application is in a good state, not just the web server. The grace period setting sets the number
of seconds that an instance can fail the health check without being terminated and replaced. Instances
may recover after being kicked out of the load balancer, so give the instance an amount of time that is
appropriate for your application.
Your AWS Elastic Beanstalk Environment's Load
Balancer
If you've enabled load balancing (p. 155), your environment is equipped with an Elastic Load Balancing
load balancer to distribute traffic among the instances in your environment.
Note
The Elastic Beanstalk Environment Management Console only supports creating and managing
an Elastic Beanstalk environment with a Classic Load Balancer. For other options, see Application
Load Balancer (p. 181) and Network Load Balancer (p. 184).
By default, your load balancer is configured to listen for HTTP traffic on port 80 and forward it to
instances on the same port. To support secure connections, you can configure your load balancer with a
listener on port 443 and a TLS certificate.
Elastic Load Balancing uses a health check to determine whether the EC2 instances running your
application are healthy. The health check determines an instance's health status by making a request to
a specified URL at a set interval. If the URL returns an error message, or fails to return within a specified
timeout period, the health check fails.
If your application performs better by serving multiple requests from the same client on a single server,
you can configure your load balancer to use sticky sessions. With sticky sessions, the load balancer adds
a cookie to HTTP responses that identifies the EC2 instance that served the request. When a subsequent
request is received from the same client, the load balancer uses the cookie to send the request to the
same instance.
When an instance is removed from the load balancer because it has become unhealthy or the
environment is scaling down, connection draining gives the instance time to complete requests prior to
closing the connection between the instance and the load balancer. You can change the amount of time
given to instances to send a response, or disable connection draining completely.
Note
Connection draining is enabled by default when you create an environment with the console or
EB CLI. For other clients, you must enable it with configuration options (p. 180).
Advanced load balancer settings are available through configuration options (p. 180) that you can set
with configuration files in your source code or directly on an environment by using the Elastic Beanstalk
API. You can use these options to configure listeners on arbitrary ports, modify additional sticky session
settings, and configure the load balancer to connect to EC2 instances securely. You can also configure a
load balancer to upload access logs (p. 186) to Amazon S3.
Configuring a Classic Load Balancer
You can use the Elastic Beanstalk console to configure a classic load balancer's ports, HTTPS certificate,
and other settings.
API Version 2010-12-01
176
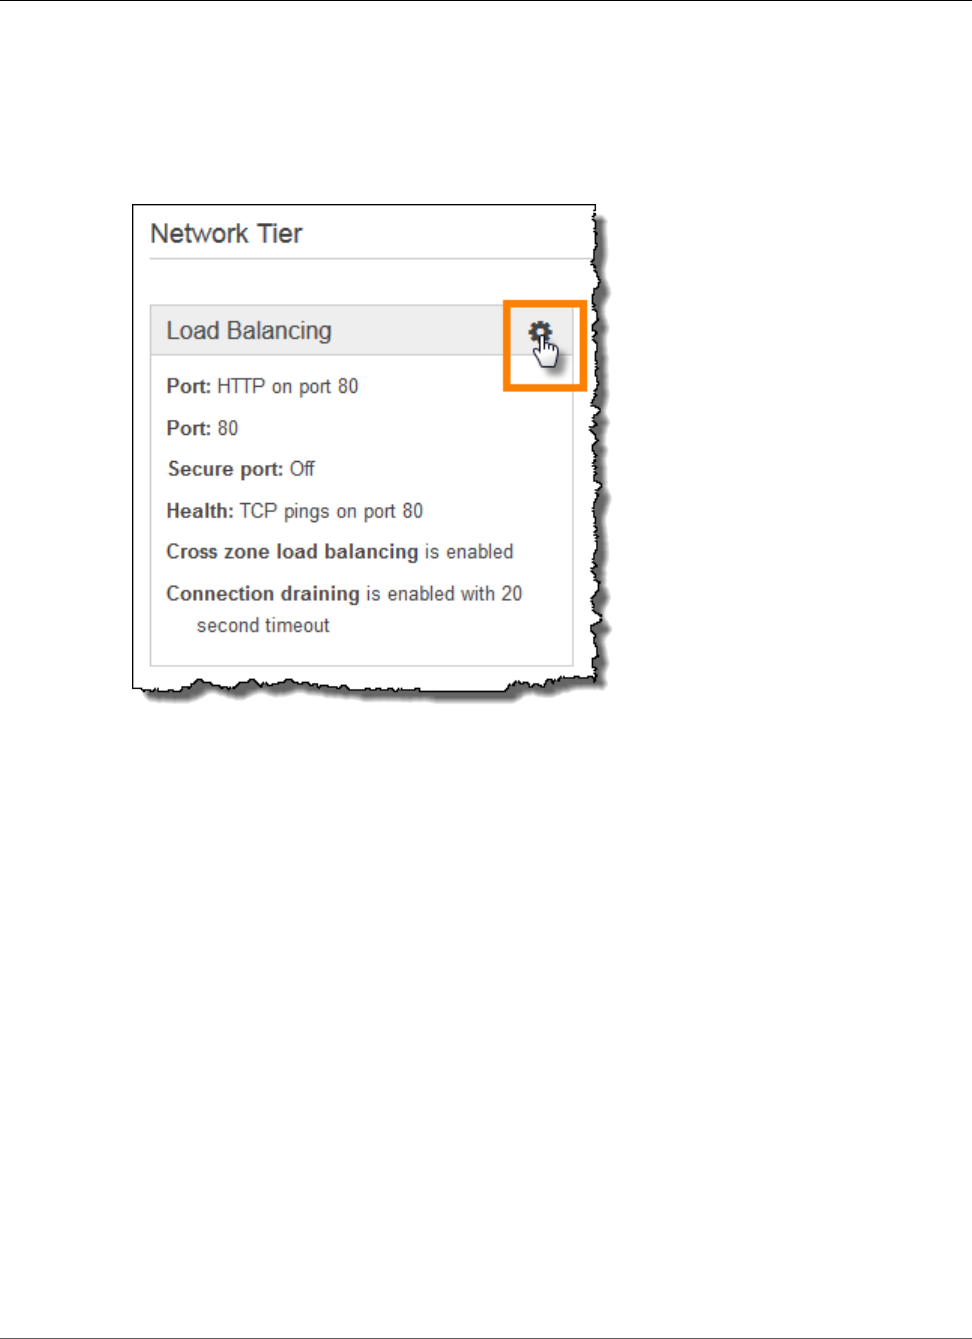
AWS Elastic Beanstalk Developer Guide
Configuring a Classic Load Balancer
To configure a load balancer in the Elastic Beanstalk console
1. Open the Elastic Beanstalk console.
2. Navigate to the management page (p. 65) for your environment.
3. Choose Configuration.
4. Choose Load Balancing.
The following settings are available:
Sections
•Ports and Cross-Zone Load Balancing (p. 177)
•Connection Draining (p. 179)
•Sessions (p. 179)
•Health Check (p. 179)
Ports and Cross-Zone Load Balancing
The basic settings for your load balancer let you configure the standard listener on port 80, a secure
listener on port 443 or port 8443, cross-zone load balancing.
API Version 2010-12-01
177
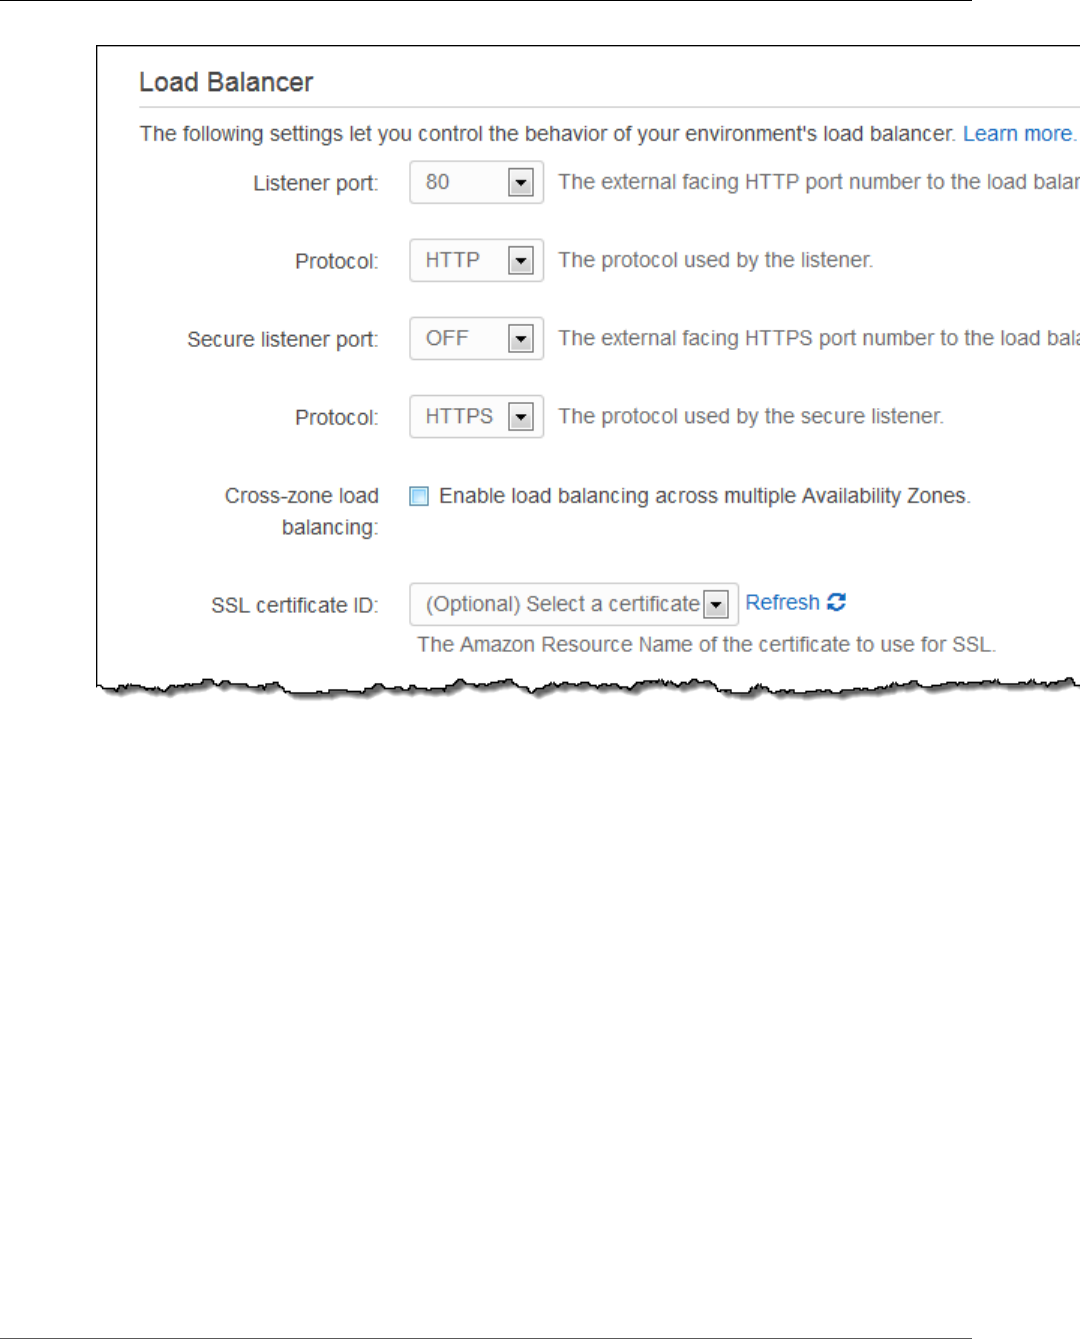
AWS Elastic Beanstalk Developer Guide
Configuring a Classic Load Balancer
You can change the listener protocol from HTTP to TCP if you want the load balancer to forward
requests as-is. This prevents the load balancer from rewriting headers (including X-Forwarded-For)
and does not work with sticky sessions.
For HTTPS, you can add a secure listener with the secure listener port and protocol options. You must
also select a certificate to use to decrypt the connections. You can also disable the standard listener if
you only want to accept secure connections.
To turn on the secure listener port
1. Create and upload a certificate and key to AWS Identity and Access Management (IAM).
For more information about creating and uploading certificates, see the Managing Server
Certificates section of Using AWS Identity and Access Management.
2. Open the Elastic Beanstalk console.
3. Navigate to the management page (p. 65) for your environment.
4. Choose Configuration.
5. Specify the secure listener port by selecting a port from the Secure Listener Port list.
6. For SSL Certificate ID, choose the ARN of your SSL certificate. For example,
arn:aws:iam::123456789012:server-certificate/abc/certs/build).
7. (Optional) Set Listener port to OFF to disable the standard listener.
8. Choose Apply.
API Version 2010-12-01
178
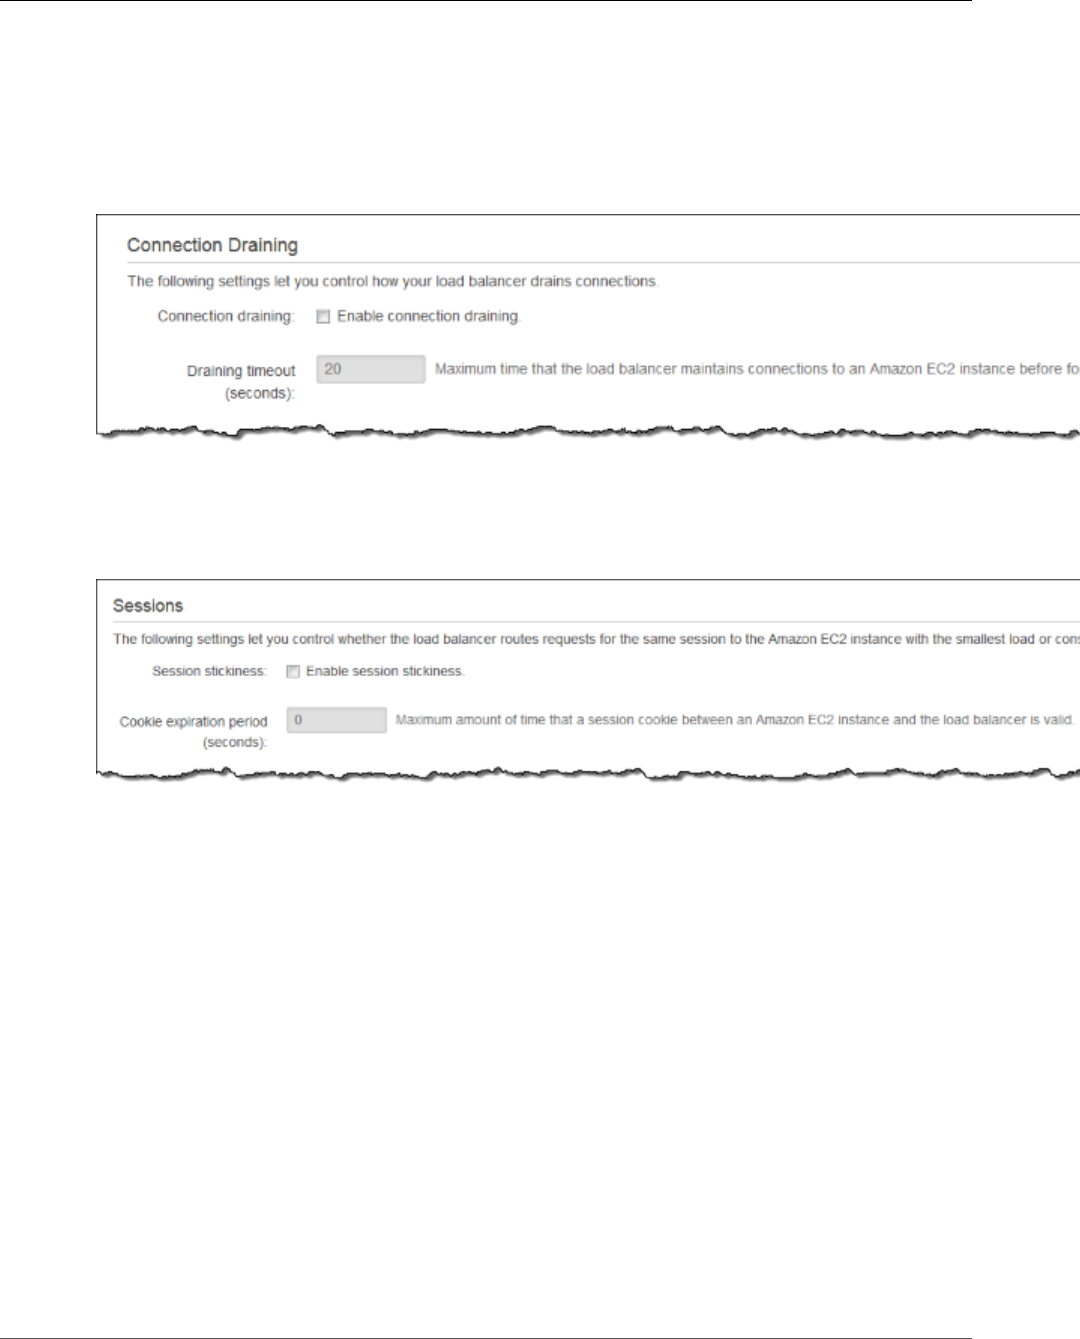
AWS Elastic Beanstalk Developer Guide
Configuring a Classic Load Balancer
For more detail on configuring HTTPS and working with certificates, see Configuring HTTPS for your
Elastic Beanstalk Environment (p. 299).
Connection Draining
Use these settings to turn connection draining on or off and set the Draining timeout to anything up to
3600 seconds.
Sessions
Use these settings to enable session sticking and configure the length of a session up to a maximum of
1000000 seconds.
Health Check
Specify an Application health check URL to configure the load balancer to make an HTTP GET request
to a specific route. For example, type / to send requests to the application root, or /health to send
requests to a resource at /health. If you don't configure a health check URL, the load balancer attempts
to establish a TCP connection with the instance.
Note
Configuring a health check URL does not affect the health check behavior of an environment's
Auto Scaling group. Instances that fail an Elastic Load Balancing health check will not
automatically be replaced by Auto Scaling unless you configure Auto Scaling to do so manually.
See Auto Scaling Health Check Setting (p. 175) for details.
API Version 2010-12-01
179
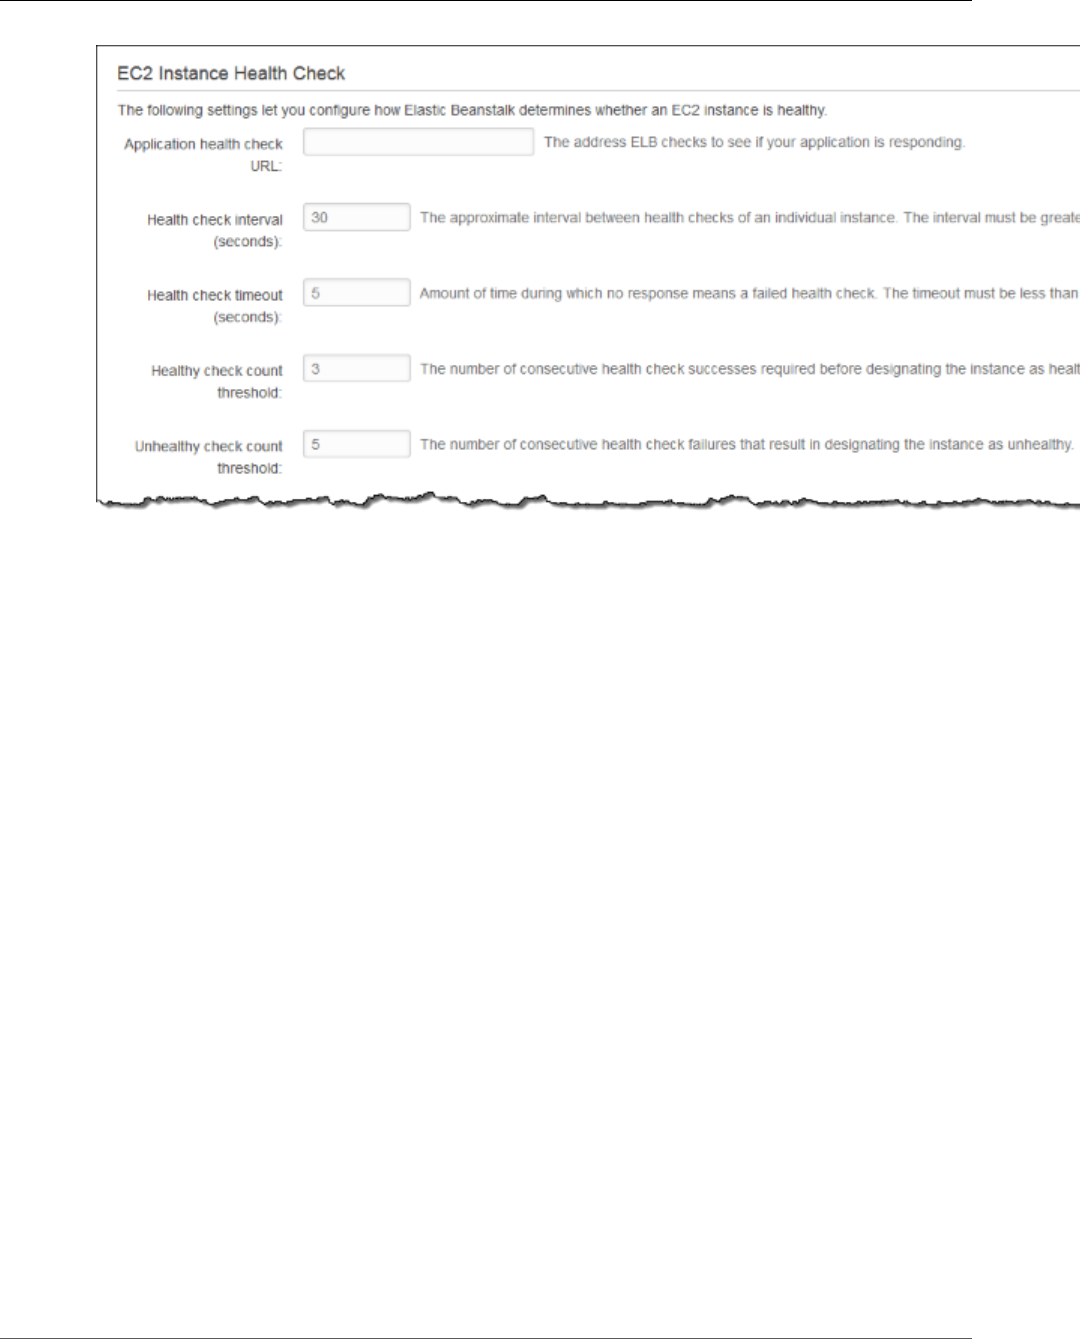
AWS Elastic Beanstalk Developer Guide
Load Balancer Configuration Namespaces
The remaining options let you customize the number of seconds between each health check (Health
check interval), the number of seconds to wait for the health check to return (Health check timeout),
and the number of health checks that must pass (Healthy check count threshold) or fail (Unhealthy
check count threshold) before Elastic Load Balancing marks an instance as healthy or unhealthy.
For more information on health checks and how they influence your environment's overall health, see
Basic Health Reporting (p. 333).
Load Balancer Configuration Namespaces
Elastic Beanstalk provides additional configuration options (p. 202) in the following namespaces that
allow you to further customize the load balancer in your environment:
•aws:elb:healthcheck (p. 239) – Configure the thresholds, check interval and timeout for ELB
health checks.
•aws:elasticbeanstalk:application (p. 229) – Configure the health check URL.
•aws:elb:loadbalancer (p. 239) – Enable cross-zone load balancing. Assign security groups to the
load balancer and override the default security group that Elastic Beanstalk creates. This namespace
also includes deprecated options for configuring the standard and secure listeners that have been
replaced by options in the the aws:elb:listener namespace.
•aws:elb:listener (p. 240) – Configure the default listener on port 80, a secure listener on 443, or
additional listeners for any protocol on any port.
•aws:elb:policies (p. 242) – Configure additional settings for your load balancer. You can use
options in this namespace to configure listeners on arbitrary ports, modify additional sticky session
settings, and configure the load balancer to connect to EC2 instances securely.
aws:elb:listener
You can use aws:elb:listener namespaces to configure additional listeners on your load balancer. If
you specify aws:elb:listener as the namespace, settings apply to the default listener on port 80. If
you specify a port (for example, aws:elb:listener:443), a listener is configured on that port.
API Version 2010-12-01
180

AWS Elastic Beanstalk Developer Guide
Application Load Balancer
The following example configuration file creates an HTTPS listener on port 443, assigns a certificate
that the load balancer uses to terminate the secure connection, and disables the default listener on port
80. The load balancer forwards the decrypted requests to the EC2 instances in your environment on
HTTP:80.
Example .ebextensions/loadbalancer-terminatehttps.config
option_settings:
aws:elb:listener:443:
ListenerProtocol: HTTPS
SSLCertificateId: arn:aws:iam::123456789012:server-certificate/elastic-beanstalk-x509
InstancePort: 80
InstanceProtocol: HTTP
aws:elb:listener:80:
ListenerEnabled: false
EB CLI and Elastic Beanstalk console apply recommended values for the preceding options.
These settings must be removed if you want to use configuration files to configure the same. See
Recommended Values (p. 203) for details.
Configuring an Application Load Balancer
If you've enabled load balancing (p. 155), your environment is equipped with an Elastic Load Balancing
load balancer to distribute traffic among the instances in your environment. Elastic Beanstalk supports
a few Elastic Load Balancing types. See Elastic Load Balancing User Guide to learn about them. This
topic describes the configuration of an Application Load Balancer. To learn how to configure other load
balancer types, see Classic Load Balancer (p. 176) and Network Load Balancer (p. 184).
Introduction
An Application Load Balancer inspects traffic to identify the request's path so that it can direct requests
for different paths to different destinations.
By default, an Application Load Balancer performs the same function as a Classic Load Balancer.
The default listener accepts HTTP requests on port 80 and distributes them to the instances in your
environment. You can add a secure listener on port 443 with a certificate to decrypt HTTPS traffic,
configure health check behavior, and push access logs from the load balancer to an Amazon Simple
Storage Service (Amazon S3) bucket.
Note
Unlike a Classic Load Balancer, an Application Load Balancer cannot have non-HTTP TCP or
SSL/TLS listeners, and cannot use backend authentication to authenticate HTTPS connections
between the load balancer and backend instances.
In an AWS Elastic Beanstalk environment, you can use an Application Load Balancer to direct traffic for
certain paths to a different port on your web server instances. With a Classic Load Balancer, all traffic to
a listener is routed to a single port on the backend instances. With an Application Load Balancer, you can
configure multiple rules on the listener to route requests to certain paths to different backend ports.
For example, you could run a login process separate from your main application. While your main
application accepts the majority of requests and listens on port 80, your login process listens on port
5000 and accepts requests to the /login path. With an Application Load Balancer, you can configure a
single listener with two rules to route traffic to either port 80 or port 5000, depending on the path in the
request. One rule routes traffic to /login to port 5000, while the default rule routes all other traffic to
port 80.
An Application Load Balancer rule maps a request to a target group. In Elastic Beanstalk, a target group
is represented by a process, which you can configure with a protocol, port, and health check settings. The
API Version 2010-12-01
181

AWS Elastic Beanstalk Developer Guide
Application Load Balancer
process represents the process running on the instances in your environment. The default process is a
listener on port 80 of the reverse proxy (nginx or Apache) that runs in front of your application.
Note
Outside of Elastic Beanstalk, a target group maps to a group of instances, and a listener can use
rules and target groups to route traffic to different instances based on the path. Within Elastic
Beanstalk, all of your instances in your environment are identical, so the distinction is made
between processes listening on different ports.
A Classic Load Balancer uses a single health check path for the entire environment. With an Application
Load Balancer, each process has a separate health check path that is monitored by the load balancer and
Elastic Beanstalk enhanced health monitoring.
To use an Application Load Balancer, your environment must be in a default or
custom VPC, and must have a service role with the standard set of permissions. If
you have an older service role, you may need to update the permissions (p. 392)
on it to include elasticloadbalancing:DescribeTargetHealth and
elasticloadbalancing:DescribeLoadBalancers. For more information about Application Load
Balancers, see the User Guide for Application Load Balancers.
Note
The Application Load Balancer health check does not take into account the Elastic Beanstalk
health check path. Instead, it uses the path provided in the .ebextensions like the one in the
example .ebextensions/alb-default-process.config (p. 183).
Getting Started
Note
You can set the load balancer type only during environment creation using the EB CLI, the
Elastic Beanstalk APIs, or .ebextensions, such as the one in the example .ebextensions/
application-load-balancer.config (p. 183). The console does not support this functionality.
The EB CLI prompts you to choose a load balancer type when you run eb create:
$ eb create
Enter Environment Name
(default is my-app): test-env
Enter DNS CNAME prefix
(default is my-app): test-env-DLW24ED23SF
Select a load balancer type
1) classic
2) application
3) network
(default is 1): 2
You can also specify a load balancer type with the --elb-type option:
$ eb create test-env --elb-type application
Application Load Balancer Namespaces
Settings related to Application Load Balancers are found across the following namespaces:
•aws:elasticbeanstalk:environment (p. 231) – Choose the load balancer type for the
environment. The value for an Application Load Balancer is application.
•aws:elbv2:loadbalancer (p. 245) – Configure access logs and other settings that apply to the
Application Load Balancer as a whole.
•aws:elbv2:listener (p. 244) – Configure listeners on the Application Load Balancer. These
settings map to the settings in aws:elb:listener for Classic Load Balancers.
API Version 2010-12-01
182

AWS Elastic Beanstalk Developer Guide
Application Load Balancer
•aws:elbv2:listenerrule (p. 245) – Configure rules that route traffic to different processes,
depending on the request path. Rules are unique to Application Load Balancers.
•aws:elasticbeanstalk:environment:process (p. 232) – Configure health checks and
specify the port and protocol for the processes that run on your environment's instances. The port
and protocol settings map to the instance port and instance protocol settings in aws:elb:listener
for a listener on a Classic Load Balancer. Health check settings map to the settings in the
aws:elb:healthcheck and aws:elasticbeanstalk:application namespaces.
Example .ebextensions/application-load-balancer.config
To get started with an Application Load Balancer, use a configuration file (p. 256) to set the load
balancer type to application:
option_settings:
aws:elasticbeanstalk:environment:
LoadBalancerType: application
Note
You can only set the load balancer type during environment creation.
Example .ebextensions/alb-access-logs.config
The following configuration file enables access log uploads for an environment with an Application Load
Balancer:
option_settings:
aws:elbv2:loadbalancer:
AccessLogsS3Bucket: my-bucket
AccessLogsS3Enabled: 'true'
AccessLogsS3Prefix: beanstalk-alb
Example .ebextensions/alb-default-process.config
The following configuration file modifies health check and stickiness settings on the default process:
option_settings:
aws:elasticbeanstalk:environment:process:default:
DeregistrationDelay: '20'
HealthCheckInterval: '15'
HealthCheckPath: /
HealthCheckTimeout: '5'
HealthyThresholdCount: '3'
UnhealthyThresholdCount: '5'
Port: '80'
Protocol: HTTP
StickinessEnabled: 'true'
StickinessLBCookieDuration: '43200'
Example .ebextensions/alb-secure-listener.config
The following configuration file adds a secure listener and a matching process on port 443:
option_settings:
aws:elbv2:listener:443:
DefaultProcess: https
ListenerEnabled: 'true'
Protocol: HTTPS
SSLCertificateArns: arn:aws:acm:us-east-2:0123456789012:certificate/21324896-0fa4-412b-
bf6f-f362d6eb6dd7
API Version 2010-12-01
183

AWS Elastic Beanstalk Developer Guide
Network Load Balancer
aws:elasticbeanstalk:environment:process:https:
Port: '443'
Protocol: HTTPS
Example .ebextensions/alb-admin-rule.config
The following configuration file adds a secure listener with a rule that routes traffic with a request path
of /admin to a process named admin that listens on port 4443:
option_settings:
aws:elbv2:listener:443:
DefaultProcess: https
ListenerEnabled: 'true'
Protocol: HTTPS
Rules: admin
SSLCertificateArns: arn:aws:acm:us-east-2:0123456789012:certificate/21324896-0fa4-412b-
bf6f-f362d6eb6dd7
aws:elasticbeanstalk:environment:process:admin:
HealthCheckPath: /admin
Port: '4443'
Protocol: HTTPS
aws:elbv2:listenerrule:admin:
PathPatterns: /admin/*
Priority: 1
Process: admin
Configuring a Network Load Balancer
If you've enabled load balancing (p. 155), your environment is equipped with an Elastic Load Balancing
load balancer to distribute traffic among the instances in your environment. Elastic Beanstalk supports
a few Elastic Load Balancing types. See the Elastic Load Balancing User Guide to learn about them. This
topic describes the configuration of a Network Load Balancer. To learn how to configure other load
balancer types, see Classic Load Balancer (p. 176) and Application Load Balancer (p. 181).
Introduction
With a Network Load Balancer, the default listener accepts TCP requests on port 80 and distributes them
to the instances in your environment. You can configure health check behavior, push access logs from the
load balancer to an Amazon Simple Storage Service (Amazon S3) bucket, configure the listener port, or
add a listener on another port.
Note
Unlike a Classic Load Balancer or an Application Load Balancer, a Network Load Balancer cannot
have HTTP or HTTPS listeners. It only supports TCP listeners. Web traffic in both HTTP and
HTTPS protocols at layer 7 uses the TCP protocol at layer 4, so a Network Load Balancer listens
to all web traffic on configured TCP ports. For secure HTTPS traffic that travels on a different
port (typically 443), you can configure a separate listener for this port and direct the traffic to a
different target process.
A Network Load Balancer supports active health checks. These checks are based on messages to
configured health check paths, similarly to the other load balancer types. In addition, a Network Load
Balancer supports passive health checks. It automatically detects faulty backend instances and routes
traffic only to healthy instances.
Getting Started
Note
You can set the load balancer type only during environment creation using the EB CLI, the
Elastic Beanstalk APIs, or .ebextensions, such as the one in the example .ebextensions/
network-load-balancer.config (p. 185). The console does not support this functionality.
API Version 2010-12-01
184

AWS Elastic Beanstalk Developer Guide
Network Load Balancer
The EB CLI prompts you to choose a load balancer type when you run eb create:
$ eb create
Enter Environment Name
(default is my-app): test-env
Enter DNS CNAME prefix
(default is my-app): test-env-DLW24ED23SF
Select a load balancer type
1) classic
2) application
3) network
(default is 1): 3
You can also specify a load balancer type with the --elb-type option:
$ eb create test-env --elb-type network
Network Load Balancer Namespaces
Settings related to Network Load Balancers are found across the following namespaces:
•aws:elasticbeanstalk:environment (p. 231) – Choose the load balancer type for the
environment. The value for a Network Load Balancer is network.
•aws:elbv2:loadbalancer (p. 245) – Configure access logs and other settings that apply to the
Network Load Balancer as a whole.
Note
The ManagedSecurityGroup and SecurityGroups settings in this namespace don't apply
to a Network Load Balancer.
•aws:elbv2:listener (p. 244) – Configure listeners on the Network Load Balancer. These
settings map to the settings in aws:elb:listener for Classic Load Balancers.
•aws:elasticbeanstalk:environment:process (p. 232) – Configure health checks and
specify the port and protocol for the processes that run on your environment's instances. The port
and protocol settings map to the instance port and instance protocol settings in aws:elb:listener
for a listener on a Classic Load Balancer. Health check settings map to the settings in the
aws:elb:healthcheck and aws:elasticbeanstalk:application namespaces.
Example .ebextensions/network-load-balancer.config
To get started with a Network Load Balancer, use a configuration file (p. 256) to set the load balancer
type to network:
option_settings:
aws:elasticbeanstalk:environment:
LoadBalancerType: network
Note
You can only set the load balancer type during environment creation.
Example .ebextensions/nlb-default-process.config
The following configuration file modifies health check settings on the default process:
option_settings:
API Version 2010-12-01
185

AWS Elastic Beanstalk Developer Guide
Configuring Access Logs
aws:elasticbeanstalk:environment:process:default:
DeregistrationDelay: '20'
HealthCheckInterval: '10'
HealthyThresholdCount: '5'
UnhealthyThresholdCount: '5'
Port: '80'
Protocol: TCP
Example .ebextensions/nlb-secure-listener.config
The following configuration file adds a listener for secure traffic on port 443 and a matching target
process that listens to port 443:
option_settings:
aws:elbv2:listener:443:
DefaultProcess: https
ListenerEnabled: 'true'
aws:elasticbeanstalk:environment:process:https:
Port: '443'
Note
The DefaultProcess option is named this way because of Application Load Balancers, which
can have non-default listeners on the same port for traffic to specific paths (see Application
Load Balancer (p. 181) for details). For a Network Load Balancer the option specifies the only
target process for this listener.
In this example, we named the process https because it listens to secure (HTTPS) traffic. The
listener sends traffic to the process on the designated port using the TCP protocol, because
a Network Load Balancer only works with TCP. This is OK, because HTTP and HTTPS network
traffic is implemented on top of TCP.
Configuring Access Logs
You can use configuration files (p. 256) to configure your environment's load balancer to upload access
logs to an Amazon S3 bucket. See the following example configuration files on GitHub for instructions:
•loadbalancer-accesslogs-existingbucket.config – Configure the load balancer to upload
access logs to an existing Amazon S3 bucket.
•loadbalancer-accesslogs-newbucket.config – Configure the load balancer to upload access
logs to a new bucket.
Adding a Database to Your Elastic Beanstalk
Environment
Elastic Beanstalk provides integration with Amazon RDS to help you add a database instance to your
Elastic Beanstalk environment. You can use Elastic Beanstalk to add a MySQL, PostgreSQL, Oracle,
or SQL Server database to your environment during or after environment creation. When you add a
database instance to your environment, Elastic Beanstalk provides connection information to your
application by setting environment properties for the database hostname, port, username, password,
and database name.
A database instance that is part of your environment is tied to the lifecycle of your environment,
and cannot be removed from your environment once added. If you terminate the environment, the
database instance is terminated as well. You can configure Elastic Beanstalk to save a snapshot of the
database when you terminate your environment, and restore a database from a snapshot when you
API Version 2010-12-01
186
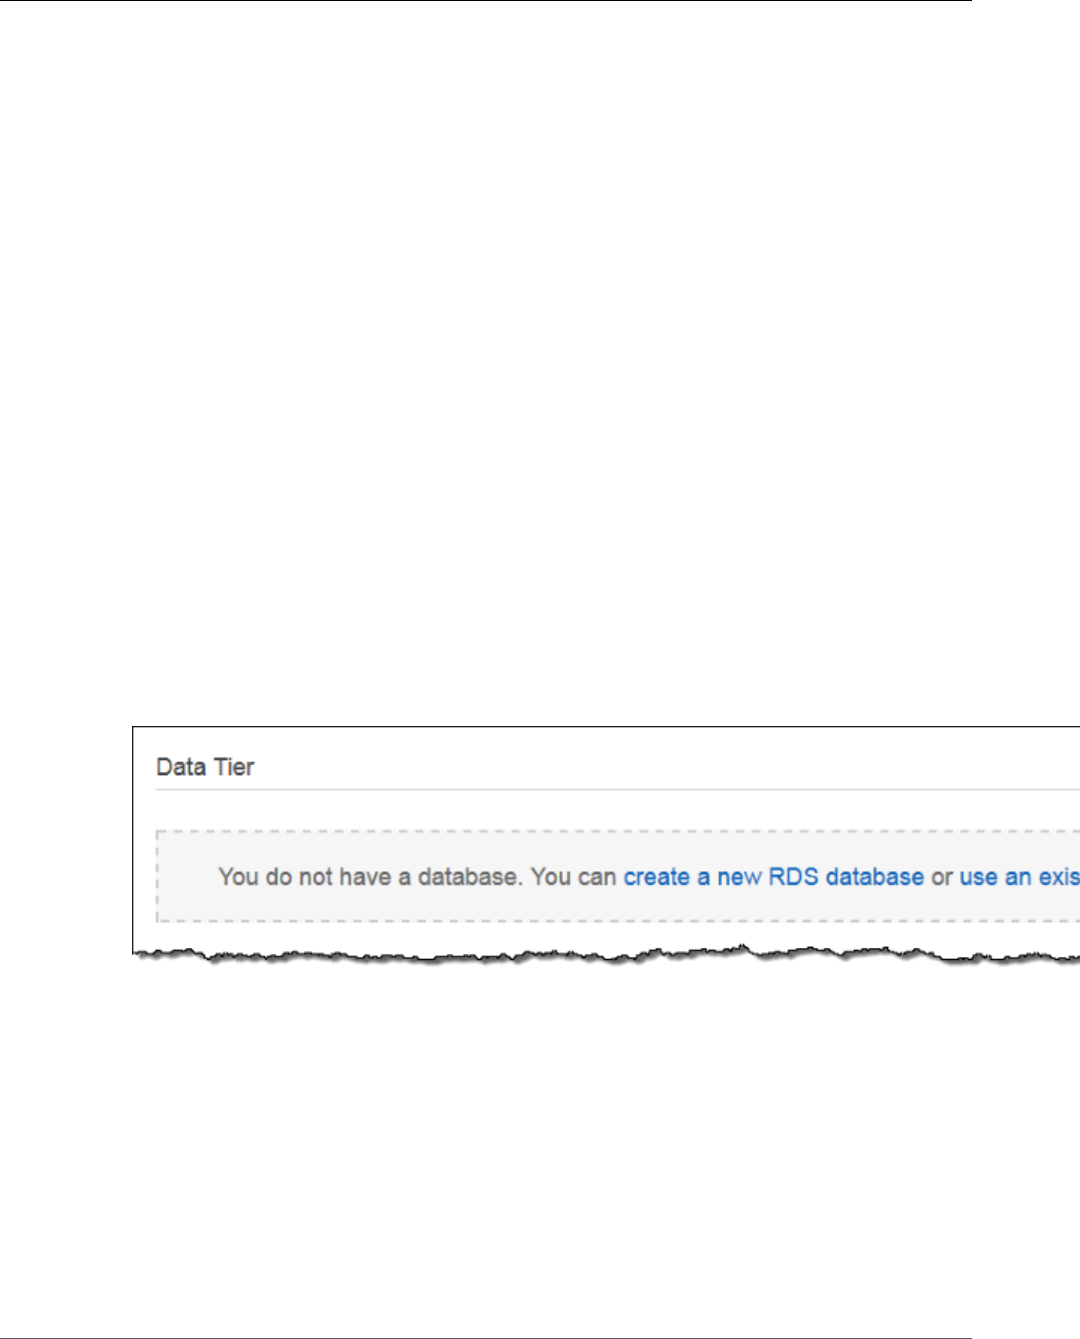
AWS Elastic Beanstalk Developer Guide
Adding an Amazon RDS DB Instance to Your Environment
add a DB instance to an environment. You may incur charges for storing database snapshots. For more
information, see the Backup Storage section of Amazon RDS Pricing.
For a production environment, you may want to launch a database instance outside of your
environment (p. 439) and configure your application to connect to it outside of the functionality
provided by Elastic Beanstalk. Using a database instance external to your environment requires
additional security group and connection string configuration, but it also lets you connect to the
database from multiple environments, use database types not supported with integrated databases,
perform blue/green deployments, and tear down your environment without affecting the database
instance.
Sections
•Adding an Amazon RDS DB Instance to Your Environment (p. 187)
•Connecting to the database (p. 188)
•Configuring an Integrated RDS DB Instance (p. 188)
Adding an Amazon RDS DB Instance to Your
Environment
You can add a DB instance to your environment in the Elastic Beanstalk console.
To add a DB instance to your environment
1. Open the Elastic Beanstalk console.
2. Navigate to the management page (p. 65) for your environment.
3. Choose Configuration.
4. Under Data Tier, choose Create a new RDS database.
5. Choose a DB engine, enter a user name and password, and then choose Apply.
You can configure the following options:
•DB engine – Choose a database engine.
•Instance Class – Choose the DB instance class. For information about the DB instance classes, see
http://aws.amazon.com/rds/.
•Allocated Storage – Choose the amount of storage to provision for your database. You can increase
allocated storage later, but you cannot decrease it. For information about storage allocation, see
Features.
•Master Username – Type a username using alphanumeric characters.
•Master Password – Type a password containing 8 to 16 printable ASCII characters (excluding /, \, and
@).
API Version 2010-12-01
187

AWS Elastic Beanstalk Developer Guide
Connecting to the database
•Deletion Policy – Choose Create snapshot to create a snapshot of the database when you terminate
your environment.
•Snapshot – To restore a database from an existing snapshot, choose a snapshot.
•Availability – Choose Multiple Availability Zones to run a warm backup in a second AZ for high
availability.
Adding a DB instance takes about 10 minutes. When the environment update is complete, the DB
instance's hostname and other connection information are available to your application through the
following environment properties:
•RDS_HOSTNAME – The hostname of the DB instance.
Amazon RDS console label – Endpoint is the hostname.
•RDS_PORT – The port on which the DB instance accepts connections. The default value varies between
DB engines.
Amazon RDS console label – Port
•RDS_DB_NAME – The database name, ebdb.
Amazon RDS console label – DB Name
•RDS_USERNAME – The user name that you configured for your database.
Amazon RDS console label – Username
•RDS_PASSWORD – The password that you configured for your database.
Connecting to the database
Use the connectivity information to connect to your DB from inside your application through
environment variables. For more information about using Amazon RDS with your applications, see the
following topics.
• Java SE – Connecting to a Database (Java SE Platforms) (p. 692)
• Java with Tomcat – Connecting to a Database (Tomcat Platforms) (p. 692)
• Node.js – Connecting to a Database (p. 807)
• .NET – Connecting to a Database (p. 743)
• PHP – Connecting to a Database with a PDO or MySQLi (p. 858)
• Python – Connecting to a Database (p. 883)
• Ruby – Connecting to a Database (p. 901)
Configuring an Integrated RDS DB Instance
You can view and modify configuration settings for your DB instance in the Data Tier section on the
environment's Configuration page in the environment management console (p. 65).
To configure your environment's DB instance in the Elastic Beanstalk console
1. Open the Elastic Beanstalk console.
2. Navigate to the management page (p. 65) for your environment.
3. Choose Configuration.
4. Under Data Tier, choose RDS.
API Version 2010-12-01
188
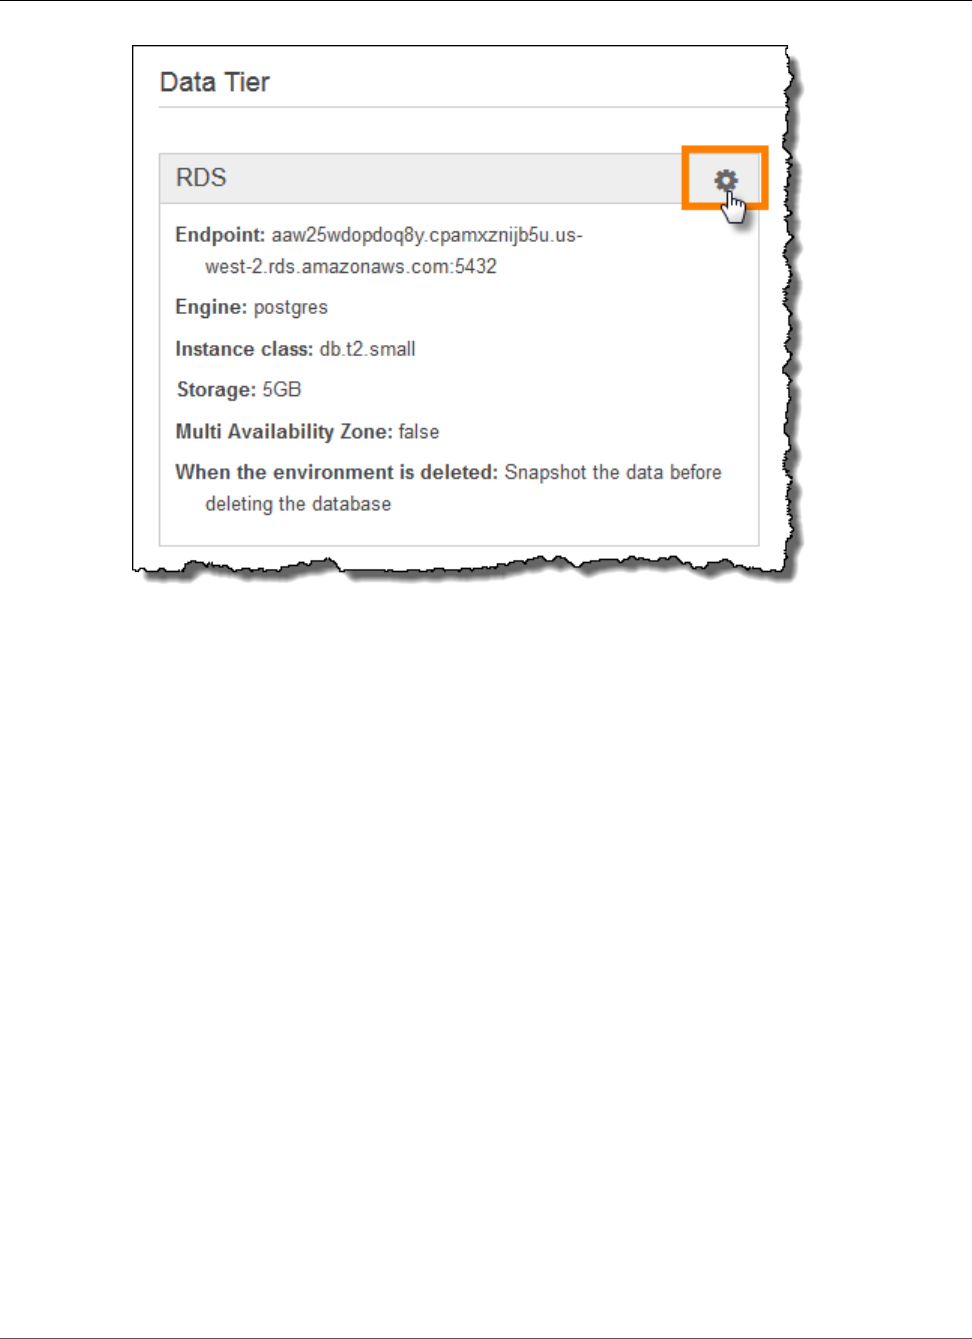
AWS Elastic Beanstalk Developer Guide
Software Settings
You can modify the Master Password, Allocated Storage, Instance Class, Deletion Policy, and
Availability after database creation. Changing the instance class requires Elastic Beanstalk to reprovision
the DB instance.
Do not modify settings on the DB instance outside of the functionality provided by Elastic Beanstalk (for
example, in the Amazon RDS console).
Environment Properties and Other Software
Settings
You can use environment properties to pass secrets, endpoints, debug settings, and other information
to your application. Environment properties help you run your application in multiple environments for
different purposes, such as development, testing, staging, and production.
Environment Variables
In most cases, environment properties are passed to your application as environment variables,
but the behavior is platform dependent. For example, the Java SE platform (p. 686)
sets environment variables that you retrieve with System.getenv, while the Tomcat
platform (p. 678) sets Java system properties that you retrieve with System.getProperty.
In addition to the standard set of options available for all environments, most Elastic Beanstalk
platforms let you set language-specific or framework-specific settings. These can take the following
forms.
Platform-Specific Settings
•Preset environment properties – The Ruby platform uses environment properties for framework
settings like RACK_ENV and BUNDLE_WITHOUT.
API Version 2010-12-01
189

AWS Elastic Beanstalk Developer Guide
Configuring Environment Properties
•Placeholder environment properties – The Tomcat platform defines an environment property named
JDBC_CONNECTION_STRING that is not set to any value. This type of setting was more common on
older platform versions.
•Configuration options – Most platforms define configuration options (p. 202) in
platform-specific or shared namespaces like aws:elasticbeanstalk:xray or
aws:elasticbeanstalk:container:python.
For information about platform-specific options, see the platform topic for your language or framework:
• Go – Using the AWS Elastic Beanstalk Go Platform (p. 664)
• Java SE – Using the AWS Elastic Beanstalk Java SE Platform (p. 686)
• Tomcat – Using the AWS Elastic Beanstalk Tomcat Platform (p. 678)
• .NET – Using the AWS Elastic Beanstalk .NET Platform (p. 713)
• Node.js – Using the AWS Elastic Beanstalk Node.js Platform (p. 777)
• PHP – Using the AWS Elastic Beanstalk PHP Platform (p. 808)
• Python – Using the AWS Elastic Beanstalk Python Platform (p. 862)
• Ruby – Using the AWS Elastic Beanstalk Ruby Platform (p. 884)
Also, when you add a database to your environment (p. 186), Elastic Beanstalk sets environment
properties such as RDS_HOSTNAME that you can read in your application code to construct a connection
object or string.
Configuring Environment Properties
Environment properties appear in the console under Software Configuration.
To configure environment properties in the Elastic Beanstalk console
1. Open the Elastic Beanstalk console.
2. Navigate to the management page (p. 65) for your environment.
3. Choose Configuration.
4. In theSoftware Configurationsection, choose the settings icon ( ).
5. Under Environment Properties, enter key-value pairs.
6. Choose Apply.
Environment Property Limits
•Keys can contain any alphanumeric characters and the following symbols: _, ., :, /, +, \, -, @
The symbols listed are valid for environment property keys, but may not be valid for environment
variable names on your environment's platform. For compatibility with all platforms, limit
environment properties to the following pattern: [A-Z_][A-Z0-9_]*
•Values can contain any alphanumeric characters, white space, and the following symbols: _, ., :, /, =,
+, \, -, @, '*, "*
*Single and double quotation marks in values must be escaped.
•Keys can contain up to 128 characters. Values can contain up to 256 characters.
•Keys and values are case sensitive.
• The combined size of all environment properties cannot exceed 4,096 bytes when stored as strings
with the format key=value.
API Version 2010-12-01
190

AWS Elastic Beanstalk Developer Guide
Software Setting Namespaces
Software Setting Namespaces
You can use a configuration file (p. 256) to set configuration options and perform other instance
configuration tasks during deployments. Configuration options can be defined by the Elastic Beanstalk
service or the platform that you use and are organized into namespaces.
You can use Elastic Beanstalk configuration files (p. 256) to set environment
properties and configuration options in your source code. Use the
aws:elasticbeanstalk:application:environment namespace (p. 230) to define environment
properties.
Example .ebextensions/options.config
option_settings:
aws:elasticbeanstalk:application:environment:
API_ENDPOINT: www.example.com/api
If you use configuration files or AWS CloudFormation templates to create custom resources (p. 275),
you can use an AWS CloudFormation function to get information about the resource and assign it to
an environment property dynamically during deployment. The following example from the the elastic-
beanstalk-docs GitHub repository uses the Ref function (p. 279) to get the ARN of an Amazon SNS
topic that it creates, and assigns it to an environment property named NOTIFICATION_TOPIC.
Example .ebextensions/sns-topic.config
Resources:
NotificationTopic:
Type: AWS::SNS::Topic
option_settings:
aws:elasticbeanstalk:application:environment:
NOTIFICATION_TOPIC: '`{"Ref" : "NotificationTopic"}`'
You can also use this feature to propagate information from AWS CloudFormation pseudo parameters.
This example gets the current region and assigns it to a property named AWS_REGION.
Example .ebextensions/env-regionname.config
option_settings:
aws:elasticbeanstalk:application:environment:
AWS_REGION: '`{"Ref" : "AWS::Region"}`'
Most Elastic Beanstalk platforms define additional namespaces with options for configuring software
that runs on the instance, such as the reverse proxy that relays requests to your application. For more
information about the namespaces available for your platform, see one of the following sections:
• Go – The aws:elasticbeanstalk:container:golang:staticfiles Namespace (p. 665)
• Java SE – The aws:elasticbeanstalk:container:java:staticfiles Namespace (p. 687)
• Tomcat – Tomcat Configuration Namespaces (p. 680)
• .NET – The aws:elasticbeanstalk:container:dotnet:apppool Namespace (p. 715)
• Node.js – Node.js Configuration Namespaces (p. 779)
• PHP – The aws:elasticbeanstalk:container:php:phpini Namespace (p. 810)
• Python – Python Configuration Namespaces (p. 863)
• Ruby – Ruby Configuration Namespaces (p. 886)
API Version 2010-12-01
191

AWS Elastic Beanstalk Developer Guide
Accessing Environment Properties
Elastic Beanstalk provides many configuration options for customizing your environment. In addition to
configuration files, you can also set configuration options using the console, saved configurations, the EB
CLI, or the AWS CLI. See Configuration Options (p. 202) for more information.
Accessing Environment Properties
In most cases, you access environment properties in your application code like an environment variable.
In general, however, environment properties are passed only to the application and can't be viewed by
connecting an instance in your environment and running env.
•Go (p. 665) – os.Getenv
endpoint := os.Getenv("API_ENDPOINT")
•Java SE (p. 687) – System.getenv
String endpoint = System.getenv("API_ENDPOINT");
•Tomcat (p. 679) – System.getProperty
String endpoint = System.getProperty("API_ENDPOINT");
•.NET (p. 714) – appConfig
NameValueCollection appConfig = ConfigurationManager.AppSettings;
string endpoint = appConfig["API_ENDPOINT"];
•Node.js (p. 779) – process.env
var endpoint = process.env.API_ENDPOINT
•PHP (p. 809) – $_SERVER
$endpoint = $_SERVER['API_ENDPOINT'];
•Python (p. 863) – os.environ
import os
endpoint = os.environ['API_ENDPOINT']
•Ruby (p. 885) – ENV
endpoint = ENV['API_ENDPOINT']
Outside of application code, such as in a script that runs during deployment, you can access environment
properties with the get-config platform script (p. 42). See the elastic-beanstalk-docs GitHub
repository for example configurations that use get-config.
Configuring AWS X-Ray Debugging
You can use the AWS Elastic Beanstalk console or a configuration file to run the AWS X-Ray daemon on
the instances in your environment. AWS X-Ray is an AWS service that gathers data about the requests
API Version 2010-12-01
192
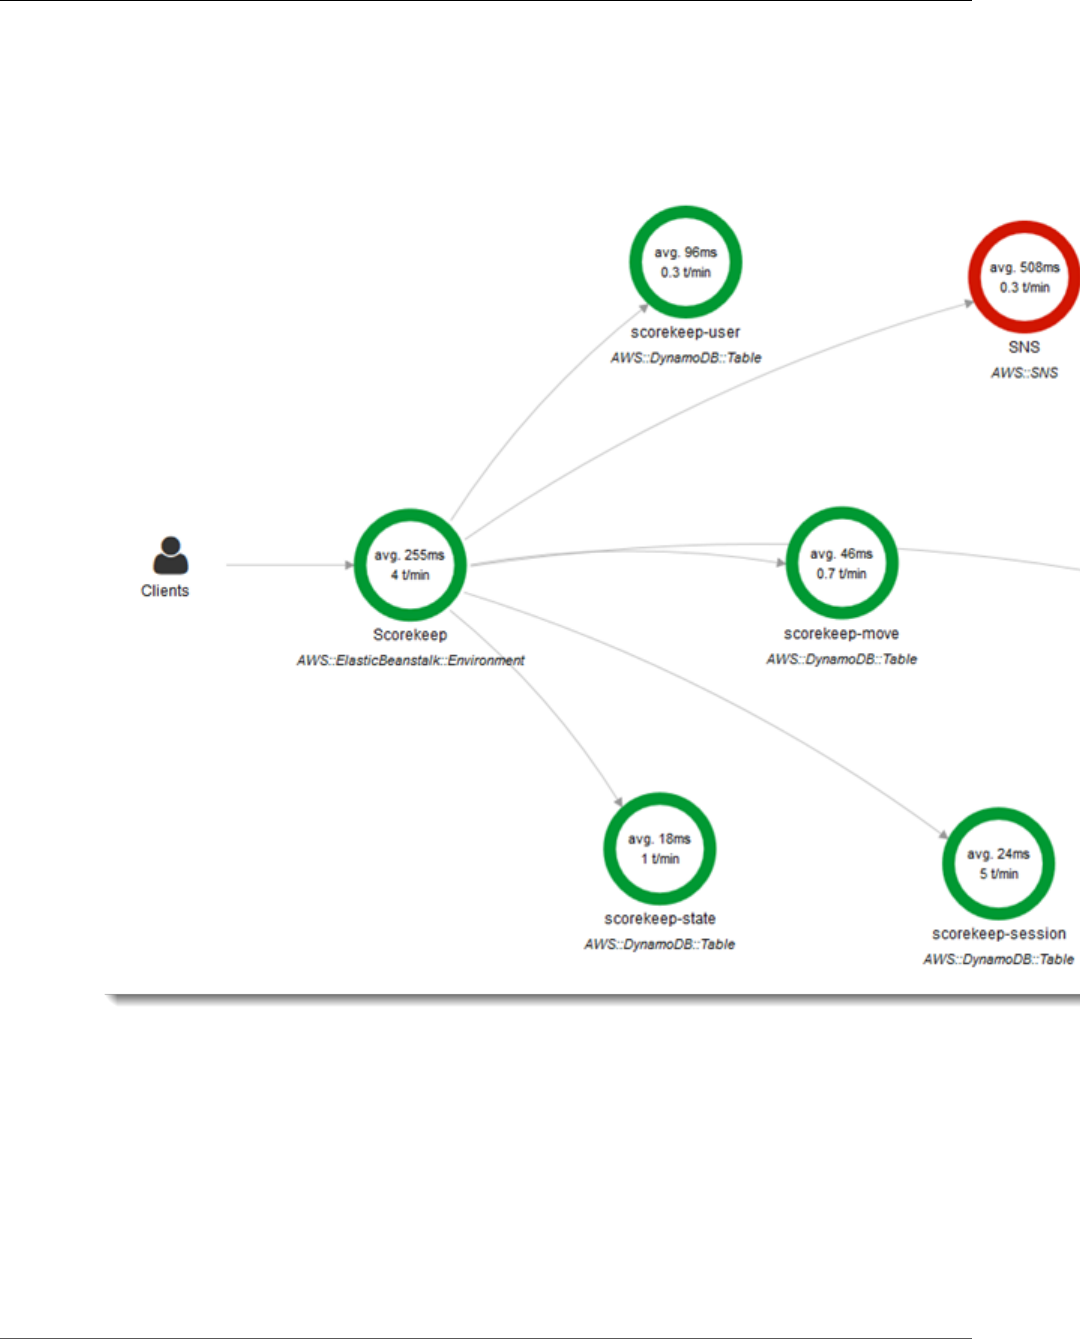
AWS Elastic Beanstalk Developer Guide
Debugging
that your application serves, and uses it to construct a service map that you can use to identify issues
with your application and opportunities for optimization.
Note
Some regions don't offer AWS X-Ray. If you create an environment in one of these regions, you
can't run the AWS X-Ray daemon on the instances in your environment.
For information about the AWS services offered in each region, see Region Table.
AWS X-Ray provides an SDK that you can use to instrument your application code, and a daemon
application that relays debugging information from the SDK to the X-Ray API.
Supported platforms
You can use the AWS X-Ray SDK with the following Elastic Beanstalk platform configurations:
•Java 8 - version 2.3.0 and later
•Java 8 with Tomcat 8 - version 2.4.0 and later
•Node.js - version 3.2.0 and later
•Python - version 2.5.0 and later
API Version 2010-12-01
193

AWS Elastic Beanstalk Developer Guide
Configuring Debugging
•Windows Server - all configurations starting December 9th, 2016
On supported platforms, you can use a configuration option to run the X-Ray daemon on the instances
in your environment. You can enable the daemon in the console (p. 194) or by using a configuration
file (p. 194).
Note
To be able to upload data to X-Ray, the X-Ray daemon requires IAM permissions in the
AWSXrayWriteOnlyAccess managed policy. These permissions are included in the Elastic
Beanstalk instance profile (p. 22). If you don't use the default instance profile, see Giving the
Daemon Permission to Send Data to X-Ray.
Debugging with AWS X-Ray requires the use of the AWS X-Ray SDK. See the AWS X-Ray Developer Guide
for instructions and sample applications.
If you use a platform configuration that doesn't include the daemon, you can still run it with a script in
a configuration file. For more information, see Downloading and Running the X-Ray Daemon Manually
(Advanced) in the AWS X-Ray Developer Guide.
Sections
•Configuring Debugging (p. 194)
•The aws:elasticbeanstalk:xray Namespace (p. 194)
Configuring Debugging
You can enable the AWS X-Ray daemon on a running environment in the Elastic Beanstalk console.
To enable debugging in the Elastic Beanstalk console
1. Open the Elastic Beanstalk console.
2. Navigate to the management page (p. 65) for your environment.
3. Choose Configuration.
4. In theSoftware Configurationsection, choose the settings icon ( ).
5. For X-Ray Daemon, choose Enabled.
6. Choose Apply.
You can also enable this option during environment creation. For more information, see The Create New
Environment Wizard (p. 78).
The aws:elasticbeanstalk:xray Namespace
You can use the XRayEnabled option in the aws:elasticbeanstalk:xray namespace to enable
debugging.
To enable debugging automatically when you deploy your application, set the option in a configuration
file (p. 256) in your source code, as follows.
Example .ebextensions/debugging.config
option_settings:
aws:elasticbeanstalk:xray:
XRayEnabled: true
API Version 2010-12-01
194
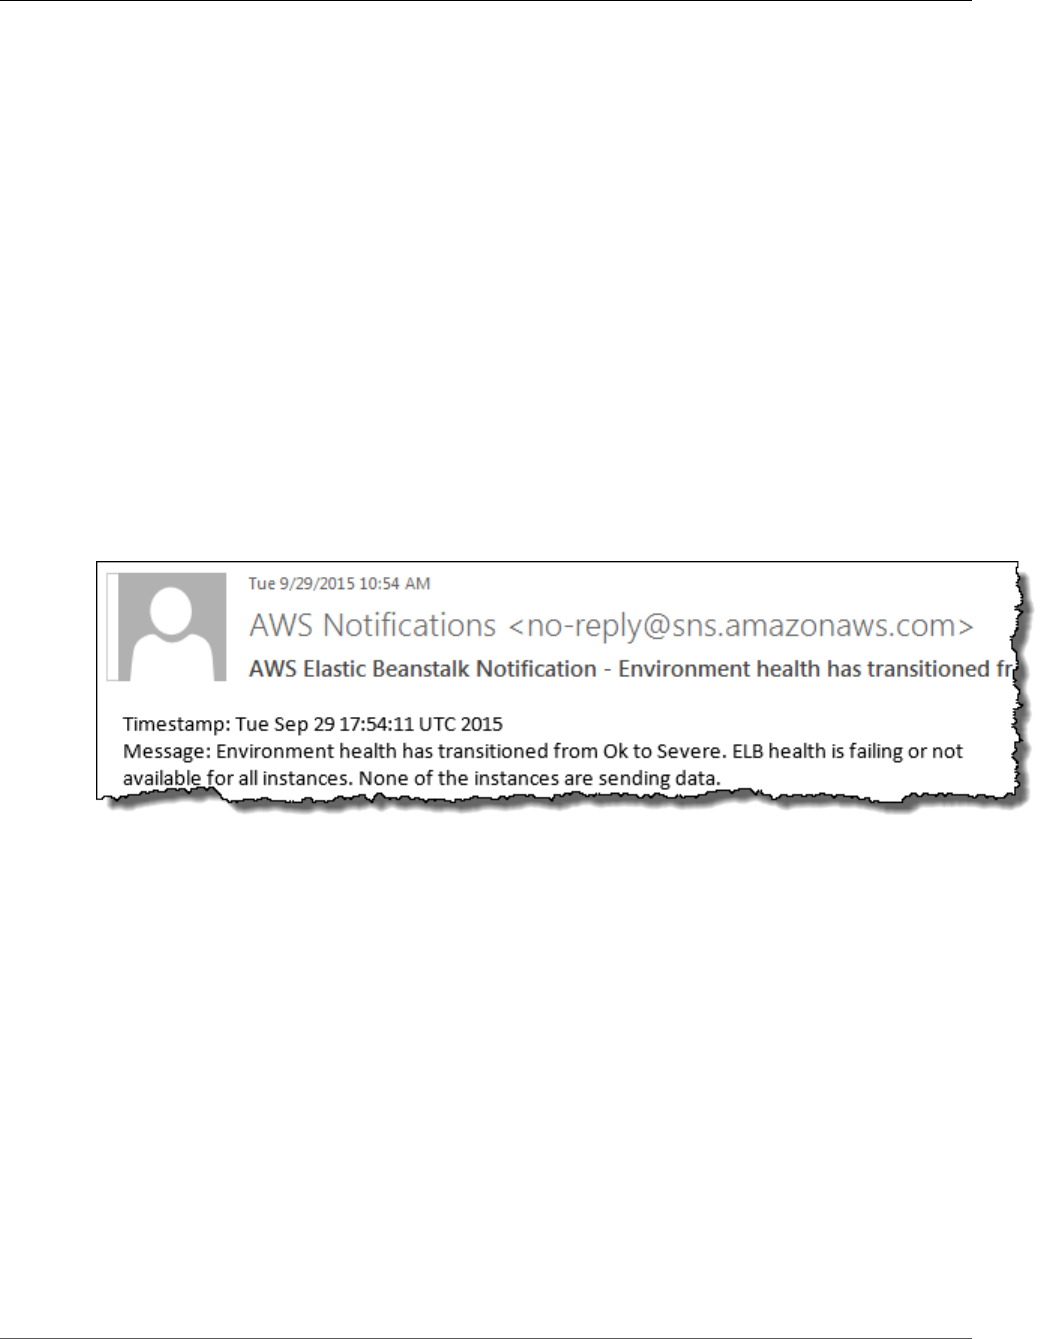
AWS Elastic Beanstalk Developer Guide
Notifications
Elastic Beanstalk Environment Notifications with
Amazon Simple Notification Service
You can configure your AWS Elastic Beanstalk environment to use Amazon Simple Notification Service
to notify you of important events affecting your application. Specify an email address during or after
environment creation to receive emails from AWS when an error occurs or your environment's health
changes.
Note
Elastic Beanstalk uses Amazon Simple Notification Service for notifications. For details on
Amazon SNS pricing, see https://aws.amazon.com/sns/pricing/.
When you configure notifications for your environment, Elastic Beanstalk creates an Amazon SNS topic
for your environment. To send messages to an Amazon SNS topic, Elastic Beanstalk must have the
required permissions. Elastic Beanstalk automatically attaches the required permissions to the topic's
policy.
When a notable event (p. 365) occurs, Elastic Beanstalk sends a message to the topic. Amazon SNS
relays messages it receives to the topic's subscribers. Notable events include environment creation
errors and all changes in environment and instance health (p. 336). Events for Auto Scaling operations
(adding and removing instances from the environment) and other informational events do not trigger
notifications.
The Elastic Beanstalk console lets you enter an email address during or after environment creation to
create an Amazon SNS topic and subscribe to it. Elastic Beanstalk manages the lifecycle of the topic, and
deletes it when your environment is terminated or you remove your email address in the environment
management console (p. 65).
The aws:elasticbeanstalk:sns:topics configuration option namespace provides options for
configuring an Amazon SNS topic in configuration files, or by using a CLI or SDK. These methods let you
configure the type of subscriber as well as the endpoint, so that the subscriber can be an Amazon SQS
queue or HTTP URL.
Amazon SNS notifications can only be turned on or off. Depending on the size and composition of
your environment, the frequency of notifications sent to the topic can be high. For notifications that
are only sent under specific circumstances, you can configure your environment to publish custom
metrics (p. 352) and set Amazon CloudWatch alarms (p. 362) to notify you when those metrics reach
an unhealthy threshold.
Configuring Notifications
The Elastic Beanstalk console lets you enter an email address to create an SNS topic for your
environment.
API Version 2010-12-01
195
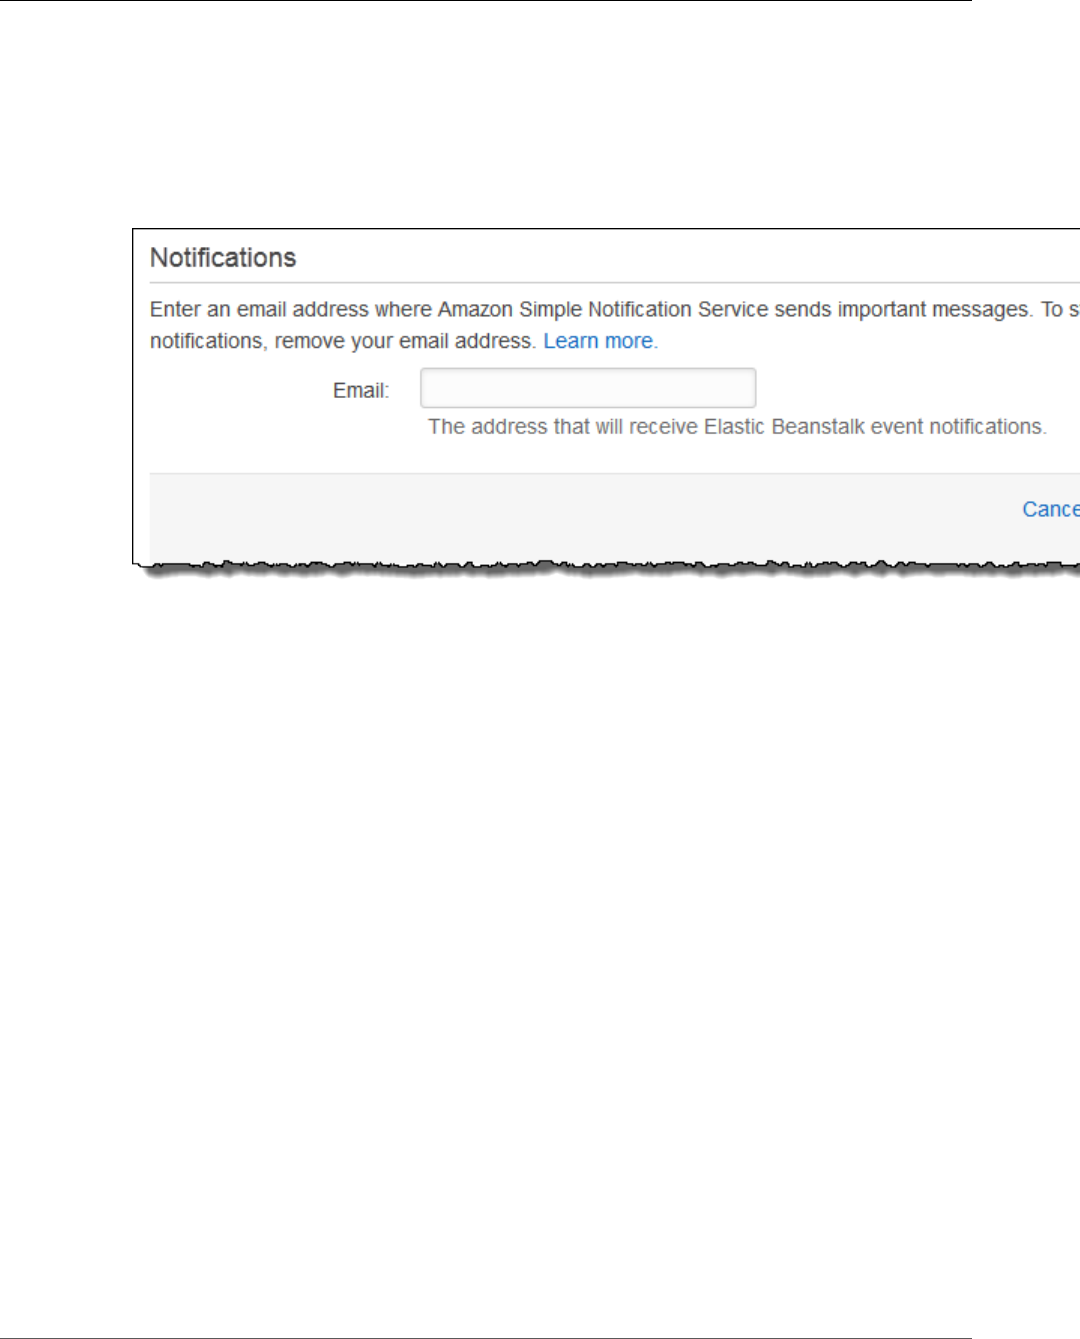
AWS Elastic Beanstalk Developer Guide
The aws:elasticbeanstalk:sns:topics Namespace
To configure notifications in the Elastic Beanstalk console
1. Open the Elastic Beanstalk console.
2. Navigate to the management page (p. 65) for your environment.
3. Choose Configuration.
4. Choose Notifications.
5. Enter an email address.
6. Choose Save.
When you enter an email address for notifications, Elastic Beanstalk creates an Amazon SNS topic for
your environment and adds a subscription. Amazon SNS sends an email to the subscribed address to
confirm the subscription. You must click on the link in the confirmation email to activate the subscription
and receive notifications.
The aws:elasticbeanstalk:sns:topics Namespace
Use the options in the aws:elasticbeanstalk:sns:topics namespace (p. 237) to configure Amazon SNS
notifications for your environment. These options can be set by using configuration files (p. 256), a CLI
or an SDK.
Notification Endpoint – Email address, Amazon SQS queue, or URL to send notifications to. Setting
this option creates an SQS queue and a subscription for the specified endpoint. If the endpoint is not
an email address, you must set the Notification Protocol option as well. SNS validates the value
of Notification Endpoint based on the value of Notification Protocol. Setting this option
multiple times creates additional subscriptions to the topic. Removing this option deletes the topic.
Notification Protocol – The protocol used to send notifications to the Notification Endpoint.
This option defaults to email. Set this option to email-json to send JSON formatted emails, http or
https to post JSON formatted notifications to an HTTP endpoint, or sqs to send notifications to an SQS
queue.
Note
AWS Lambda notifications are not supported.
Notification Topic ARN – After setting a notification endpoint for your environment, read this
setting to get the ARN of the SNS topic. You can also set this option to use an existing SNS topic for
notifications. A topic that you attach to your environment by using this option is not deleted when you
change this option or terminate the environment.
API Version 2010-12-01
196

AWS Elastic Beanstalk Developer Guide
Log Streaming
Note
When you specify an existing SNS topic, be sure the topic has the required permissions. The
following policy allows Elastic Beanstalk to send messages to the topic.
{
"Version": "2012-10-17",
"Statement": [{
"Sid": "AWSElasticBeanstalkSNSPublishStatement-20170914",
"Effect": "Allow",
"Principal": {
"Service": "elasticbeanstalk.amazonaws.com"
},
"Action": "sns:Publish",
"Resource": "arn:aws:sns:region:topic-owner-account-id:topic-name"
}]
}
To update an Amazon SNS topic policy
1. Open the Amazon SNS console at https://console.aws.amazon.com/sns/v2/home.
2. Choose Topics, and then choose the topic with the policy you want to update.
3. Choose Other topic actions, and then choose Edit topic policy.
4. Choose Advanced view, and then add the statement specified in this section, using the
appropriate values for the region, account ID, and topic name. Specify a policy statement
Sid that is unique within the topic's policy. For example, you can use today's date as part of
the name.
5. Choose Update policy.
Notification Topic Name – Set this option to customize the name of the Amazon SNS topic used
for environment notifications. If a topic with the same name already exists, Elastic Beanstalk attaches
that topic to the environment.
Warning
If you attach an existing SNS topic to an environment with Notification Topic Name,
Elastic Beanstalk will delete the topic if you terminate the environment or change this setting.
Changing this option also changes the Notification Topic ARN. If a topic is already attached to the
environment, Elastic Beanstalk deletes the old topic, and then creates a new topic and subscription.
The EB CLI and Elastic Beanstalk console apply recommended values for the preceding options.
These settings must be removed if you want to use configuration files to configure the same. See
Recommended Values (p. 203) for details.
Streaming Logs to Amazon CloudWatch
You can configure your AWS Elastic Beanstalk environment to stream Amazon CloudWatch logs from the
Amazon EC2 instances that run your application.
When you configure CloudWatch logs, Elastic Beanstalk creates CloudWatch log groups for proxy and
deployment logs on the Amazon EC2 instances and transfers these log files to CloudWatch logs in real
time.
Configuring Log Streaming
You can enable log streaming in the Elastic Beanstalk console.
API Version 2010-12-01
197
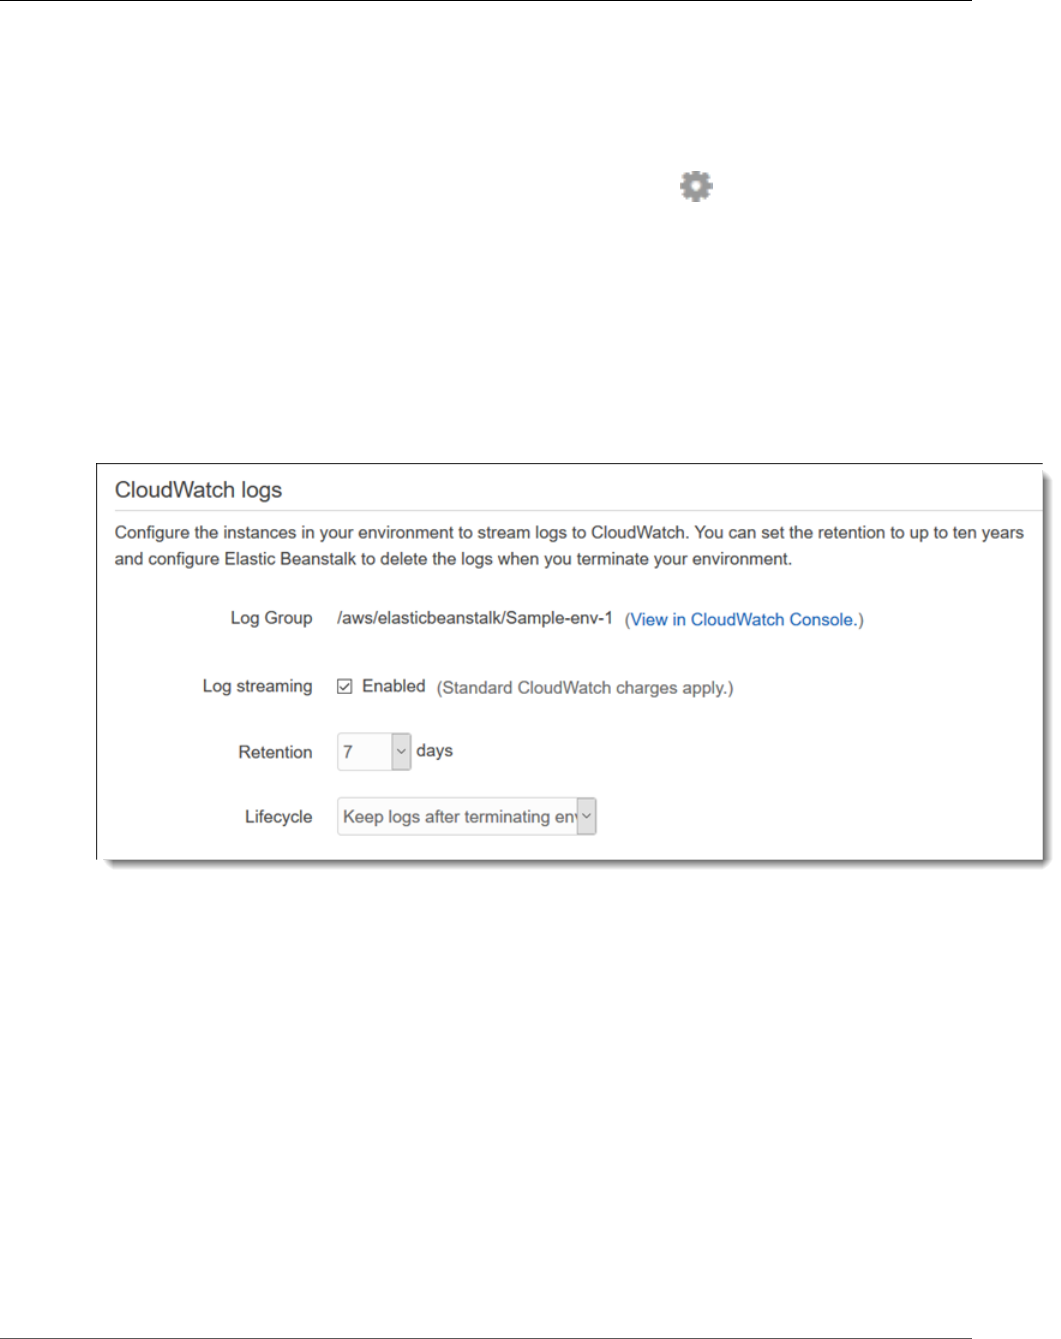
AWS Elastic Beanstalk Developer Guide
The aws:elasticbeanstalk:cloudwatch:logs Namespace
To configure log streaming in the Elastic Beanstalk console
1. Open the Elastic Beanstalk console.
2. Navigate to the management page (p. 65) for your environment.
3. Choose Configuration.
4. In theSoftware Configurationsection, choose the settings icon ( ).
5. Under CloudWatch logs, configure the following settings.
•Log streaming – Check to enable log streaming.
•Retention – The number of days to retain logs in CloudWatch
•Lifecycle – Set to Delete logs upon termination to delete logs from CloudWatch immediately if
the environment is terminated, instead of waiting for them to expire.
6. Choose Apply.
After you enable log streaming, you can return to the configuration page to find a link to log group in
the CloudWatch console.
The aws:elasticbeanstalk:cloudwatch:logs Namespace
Use the options in the aws:elasticbeanstalk:cloudwatch:logs (p. 230) namespace to configure
CloudWatch logs. These options can be set by using configuration files, a CLI or an SDK.
•StreamLogs – Set this option to true to create groups in CloudWatch logs for proxy and deployment
logs, and stream logs from each instance in your environment.
•DeleteOnTerminate – Set this option to true to delete the log groups when the environment is
terminated. If false, the logs are kept RetentionInDays days.
•RetentionInDays – Set this option to the number of days to keep log events before they expire.
Configuring VPC with Elastic Beanstalk
Amazon Virtual Private Cloud (Amazon VPC) enables you to define a virtual network in your own isolated
section within the Amazon Web Services (AWS) cloud, known as a virtual private cloud (VPC). Using VPC,
you can deploy a new class of web applications on Elastic Beanstalk, including internal web applications
API Version 2010-12-01
198
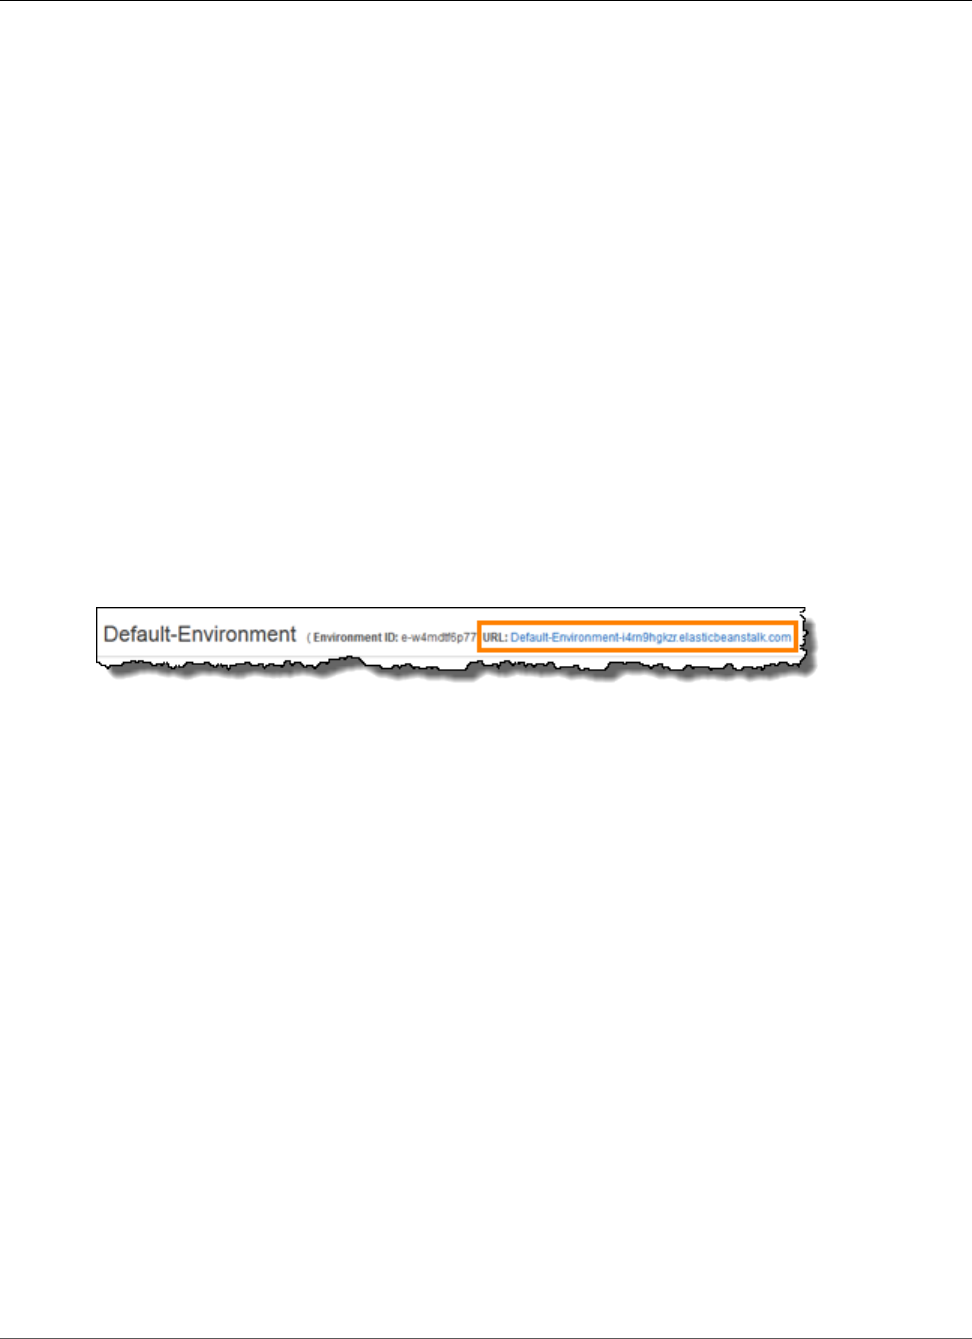
AWS Elastic Beanstalk Developer Guide
Domain Name
(such as your recruiting application), web applications that connect to an on-premise database (using
a VPN connection), as well as private web service back ends. Elastic Beanstalk launches your AWS
resources, such as instances, into your VPC. Your VPC closely resembles a traditional network, with
the benefits of using AWS's scalable infrastructure. You have complete control over your VPC; you can
select the IP address range, create subnets, and configure routes and network gateways. To protect the
resources in each subnet, you can use multiple layers of security, including security groups and network
access control lists. For more information about Amazon VPC, go to the Amazon VPC User Guide.
You can view your environment's VPC configuration by viewing the VPC settings on the environment's
Configuration page. If you do not see the VPC settings on the Configuration page, your current
environment is not inside a VPC either because you are using a legacy container or you created the
Elastic Beanstalk environment outside a VPC. To learn how to migrate to a nonlegacy container to
use Amazon VPC with Elastic Beanstalk, see Migrating Your Application from a Legacy Container
Type (p. 149). To learn how to create your VPC and launch your Elastic Beanstalk environment inside your
VPC, see Using Elastic Beanstalk with Amazon Virtual Private Cloud (p. 451).
Your Elastic Beanstalk Environment's Domain
Name
Your environment is available to users at a subdomain of elasticbeanstalk.com. When you create an
environment (p. 76), you can choose a unique subdomain that represents your application. To route users
to your environment Elastic Beanstalk registers a CNAME record that points to your environment's load
balancer. You can see the current value of the CNAME in the Environment Dashboard (p. 67):
You can change the CNAME on your environment by swapping it with the CNAME of another
environment. For instructions, see Blue/Green Deployments with AWS Elastic Beanstalk (p. 129).
If you own a domain name, you can use Route53 to resolve it to your environment. You can purchase a
domain name with Amazon Route53, or use one that you purchase from another provider. To purchase a
domain name with Route53, see Registering a New Domain in the Route53 Developer Guide.
To use a custom domain name, first create a hosted zone for your domain. A hosted zone contains the
name server and start of authority (SOA) records that specify the DNS hosts that will resolve requests for
your domain name.
To create a hosted zone in Route53
1. Open the Route53 management console.
2. Choose Hosted Zones.
3. Choose Create Hosted Zone.
4. For Domain Name, type the domain name that you own. For example: example.com.
5. Choose Create.
Next, add a record to the hosted zone that resolves your domain name to your environment. When
an Route53 DNS server receives a name request for your custom domain name, it resolves to the
elasticbeanstalk.com subdomain, which resolves to the public DNS name of your Elastic Load Balancing
load balancer, which relays requests to the instances in your environment.
Note
In a single-instance environment, the elasticbeanstalk.com subdomain resolves to an Elastic IP
address attached to the instance running your application.
API Version 2010-12-01
199

AWS Elastic Beanstalk Developer Guide
Domain Name
If your environment has a regionalized subdomain, you can use an Route53 alias resource record set to
save money on name resolution. The domain name for an environment with a regionalized subdomain
includes the region; for example, my-environment.us-west-2.elasticbeanstalk.com.
To add an alias resource record set in Route53
1. Open the Route53 management console.
2. Choose Hosted Zones.
3. Choose your hosted zone's name.
4. Choose Create Record Set.
5. For Name, type the subdomain that will redirect to your Elastic Beanstalk application. For example:
www.
6. For Type, choose A - IPv4 address.
7. For Alias, choose yes
8. For Alias Target, choose the domain name of your Elastic Beanstalk environment.
9. Choose Save Record Set.
If your environment does not have a regionalized subdomain, create a CNAME record instead.
To add a CNAME record in Route53
1. Open the Route53 management console.
2. Choose Hosted Zones.
3. Choose your hosted zone's name.
4. Choose Create Record Set.
5. For Name, type the subdomain that will redirect to your Elastic Beanstalk application. For example:
www.
6. For Type, choose CNAME - Canonical Name.
7. For Value, type the domain name of your Elastic Beanstalk environment. For example:
example.elasticbeanstalk.com.
8. Choose Save Record Set.
DNS records take up to 24 hours to propagate worldwide.
If you registered a domain name with another provider, register the name servers in your Route53
hosted zone in the domain configuration. When your provider receives DNS requests for your domain
name, it will forward them to Route53's name servers to resolve the domain name to an IP address.
Look for a setting called Nameservers or check your provider's documentation.
The Route53 console displays the list of name servers for your hosted zone in an NS record on the
Hosted Zones page:
API Version 2010-12-01
200

AWS Elastic Beanstalk Developer Guide
Updating tags
If you have multiple environments running your application, you can use the Elastic Beanstalk console to
swap two environments' domain names. This allows you to deploy a new version of your application to a
standby environment, test it, and then swap domains with the production environment.
When you perform a CNAME swap, users are directed to the new version of your application with zero
downtime. This is known as a blue/green deployment.
To swap environment CNAMEs
1. Open the Elastic Beanstalk console.
2. Choose either environment to open the Environment Dashboard.
3. Choose Actions, and then choose Swap Environment URLs.
4. Select the other environment.
5. Choose Swap.
Updating Tags in an Elastic Beanstalk Environment
Your AWS Elastic Beanstalk environment has a list of tags that it applies to the environment's resources.
Tags are key-value pairs. You can use tags to identify and group environments for various purposes.
You can specify tags for your environment when you create it. You can also edit your tag list later in an
existing environment.
For details about specifying and editing environment tags, see ??? (p. 140).
API Version 2010-12-01
201

AWS Elastic Beanstalk Developer Guide
Configuration Options
Advanced AWS Elastic Beanstalk
Environment Configuration
When you create an AWS Elastic Beanstalk environment, Elastic Beanstalk provisions and configures
all of the AWS resources required to run and support your application. In addition to configuring your
environment's metadata and update behavior, you can customize these resources by providing values for
configuration options (p. 202). For example, you may want to add an Amazon SQS queue and an alarm
on queue depth, or you might want to add an Amazon ElastiCache cluster.
Most of the configuration options have default values that are applied automatically by Elastic
Beanstalk. You can override these defaults with configuration files, saved configurations, command line
options, or by directly calling the Elastic Beanstalk API. The EB CLI and Elastic Beanstalk console also
apply recommended values for some options.
You can easily customize your environment at the same time that you deploy your application version by
including a configuration file with your source bundle. When customizing the software on your instance,
it is more advantageous to use a configuration file than to create a custom AMI because you do not need
to maintain a set of AMIs.
When deploying your applications, you may want to customize and configure the software that your
application depends on. These files could be either dependencies required by the application—for
example, additional packages from the yum repository—or they could be configuration files such as a
replacement for httpd.conf to override specific settings that are defaulted by AWS Elastic Beanstalk.
Topics
•Configuration Options (p. 202)
•Advanced Environment Customization with Configuration Files (.ebextensions) (p. 256)
•Using Elastic Beanstalk Saved Configurations (p. 293)
•Environment Manifest (env.yaml) (p. 296)
•Creating a Custom Amazon Machine Image (AMI) (p. 297)
•Configuring HTTPS for your Elastic Beanstalk Environment (p. 299)
Configuration Options
Elastic Beanstalk defines a large number of configuration options that you can use to configure your
environment's behavior and the resources that it contains. Configuration options are organized into
namespaces like aws:autoscaling:asg, which defines options for an environment's Auto Scaling
group.
The Elastic Beanstalk console and EB CLI set configuration options when you create an environment,
including options that you set explicitly, and recommended values (p. 203) defined by the client. You
can also set configuration options in saved configurations and configuration files. If the same option is
set in multiple locations, the value used is determined by the order of precedence (p. 203).
Configuration option settings can be composed in text format and saved prior to environment creation,
applied during environment creation using any supported client, and added, modified or removed
API Version 2010-12-01
202

AWS Elastic Beanstalk Developer Guide
Precedence
after environment creation. For a detailed breakdown of all of the available methods for working with
configuration options at each of these three stages, read the following topics:
•Setting Configuration Options Before Environment Creation (p. 205)
•Setting Configuration Options During Environment Creation (p. 209)
•Setting Configuration Options After Environment Creation (p. 213)
For a complete list of namespaces and options, including default and supported values for each, see
General Options for All Environments (p. 220) and Platform Specific Options (p. 248).
Precedence
During environment creation, configuration options are applied from multiple sources with the following
precedence, from highest to lowest:
•Settings applied directly to the environment – Settings specified during a create environment
or update environment operation on the Elastic Beanstalk API by any client, including the AWS
Management Console, EB CLI, AWS CLI, and SDKs. The AWS Management Console and EB CLI also
apply recommended values (p. 203) for some options that apply at this level unless overridden.
•Saved Configurations – Settings for any options that are not applied directly to the environment are
loaded from a saved configuration, if specified.
•Configuration Files (.ebextensions) – Settings for any options that are not applied directly to the
environment, and also not specified in a saved configuration, are loaded from configuration files in the
.ebextensions folder at the root of the application source bundle.
Configuration files are executed in alphabetical order. For example, .ebextensions/01run.config
is executed before .ebextensions/02do.config.
•Default Values – If a configuration option has a default value, it only applies when the option is not
set at any of the above levels.
If the same configuration option is defined in more than one location, the setting with the highest
precedence is applied. When a setting is applied from a saved configuration or settings applied directly
to the environment, the setting is stored as part of the environment's configuration. These settings can
be removed with the AWS CLI (p. 219) or with the EB CLI (p. 217).
Settings in configuration files are not applied directly to the environment and cannot be removed
without modifying the configuration files and deploying a new application version. If a setting applied
with one of the other methods is removed, the same setting will be loaded from configuration files in the
source bundle.
For example, say you set the minimum number of instances in your environment to 5 during
environment creation, using either the AWS Management Console, a command line option, or a saved
configuration. The source bundle for your application also includes a configuration file that sets the
minimum number of instances to 2.
When you create the environment, Elastic Beanstalk sets the MinSize option in the
aws:autoscaling:asg namespace to 5. If you then remove the option from the environment
configuration, the value in the configuration file is loaded, and the minimum number of instances is set
to 2. If you then remove the configuration file from the source bundle and redeploy, Elastic Beanstalk
uses the default setting of 1.
Recommended Values
The Elastic Beanstalk Command Line Interface (EB CLI) and Elastic Beanstalk console provide
recommended values for some configuration options. These values can be different from the default
API Version 2010-12-01
203

AWS Elastic Beanstalk Developer Guide
Recommended Values
values and are set at the API level when your environment is created. Recommended values allow Elastic
Beanstalk to improve the default environment configuration without making backwards incompatible
changes to the API.
For example, both the EB CLI and Elastic Beanstalk console set the configuration option for EC2
instance type (InstanceType in the aws:autoscaling:launchconfiguration namespace).
Each client provides a different way of overriding the default setting. In the console you can choose
a different instance type from a drop down menu on the Configuration Details page of the Create
New Environment wizard. With the EB CLI, you can use the --instance_type parameter for eb
create (p. 521).
Because the recommended values are set at the API level, they will override values for the same options
that you set in configuration files or saved configurations. The following options are set:
Elastic Beanstalk console
• Namespace: aws:autoscaling:launchconfiguration
Option Names: IamInstanceProfile, EC2KeyName, InstanceType
• Namespace: aws:autoscaling:updatepolicy:rollingupdate
Option Names: RollingUpdateType and RollingUpdateEnabled
• Namespace: aws:elasticbeanstalk:application
Option Name: Application Healthcheck URL
• Namespace: aws:elasticbeanstalk:command
Option Name: DeploymentPolicy, BatchSize and BatchSizeType
• Namespace: aws:elasticbeanstalk:environment
Option Name: ServiceRole
• Namespace: aws:elasticbeanstalk:healthreporting:system
Option Name: SystemType and HealthCheckSuccessThreshold
• Namespace: aws:elasticbeanstalk:sns:topics
Option Name: Notification Endpoint
• Namespace: aws:elasticbeanstalk:sqsd
Option Name: HttpConnections
• Namespace: aws:elb:loadbalancer
Option Name: CrossZone
• Namespace: aws:elb:policies
Option Names: ConnectionDrainingTimeout and ConnectionDrainingEnabled
EB CLI
• Namespace: aws:autoscaling:launchconfiguration
Option Names: IamInstanceProfile, InstanceType
• Namespace: aws:autoscaling:updatepolicy:rollingupdate
Option Names: RollingUpdateType and RollingUpdateEnabled
API Version 2010-12-01
204

AWS Elastic Beanstalk Developer Guide
Before Environment Creation
• Namespace: aws:elasticbeanstalk:command
Option Name: BatchSize and BatchSizeType
• Namespace: aws:elasticbeanstalk:environment
Option Name: ServiceRole
• Namespace: aws:elasticbeanstalk:healthreporting:system
Option Name: SystemType
• Namespace: aws:elb:loadbalancer
Option Name: CrossZone
• Namespace: aws:elb:policies
Option Names: ConnectionDrainingEnabled
If you use the Elastic Beanstalk console or EB CLI to create environments, and you want to set these
options using configuration files or saved configurations, you can remove the options settings with the
AWS CLI (p. 219) or EB CLI (p. 217) after the environment is created.
Setting Configuration Options Before Environment
Creation
AWS Elastic Beanstalk supports a large number of configuration options (p. 202) that let you modify
the settings that are applied to resources in your environment. Several of these options have default
values that can be overridden to customize your environment. Other options can be configured to enable
additional features.
Elastic Beanstalk supports two methods of saving configuration option settings. Configuration files
in YAML or JSON format can be included in your application's source code in a directory named
.ebextensions and deployed as part of your application source bundle. You create and manage
configuration files locally.
Saved configurations are templates that you create from a running environment or JSON options file
and store in Elastic Beanstalk. Existing saved configurations can also be extended to create a new
configuration.
Note
Settings defined in configuration files and saved configurations have lower precedence than
settings configured during or after environment creation, including recommended values
applied by the Elastic Beanstalk console and EB CLI (p. 480). See Precedence (p. 203) for
details.
Options can also be specified in a JSON document and provided directly to Elastic Beanstalk when
you create or update an environment with the EB CLI or AWS CLI. Options provided directly to Elastic
Beanstalk in this manner override all other methods.
For a full list of available options, see Configuration Options (p. 202).
Methods
•Configuration Files (.ebextensions) (p. 206)
•Saved Configurations (p. 206)
•JSON Document (p. 208)
•EB CLI Configuration (p. 208)
API Version 2010-12-01
205

AWS Elastic Beanstalk Developer Guide
Before Environment Creation
Configuration Files (.ebextensions)
Use .ebextensions to configure options that are required to make your application work, and provide
default values for other options that can be overridden at a higher level of precedence (p. 203).
Options specified in .ebextensions have the lowest level of precedence and are overridden by settings
at any other level.
To use configuration files, create a folder named .ebextensions at the top level of your project's
source code. Add a file with the extension .config and specify options in the following manner:
option_settings:
- namespace: namespace
option_name: option name
value: option value
- namespace: namespace
option_name: option name
value: option value
For example, the following configuration file sets the application's health check url to /health:
healthcheckurl.config
option_settings:
- namespace: aws:elasticbeanstalk:application
option_name: Application Healthcheck URL
value: /health
In JSON:
{
"option_settings" :
[
{
"namespace" : "aws:elasticbeanstalk:application",
"option_name" : "Application Healthcheck URL",
"value" : "/health"
}
]
}
This configures the Elastic Load Balancing load balancer in your Elastic Beanstalk environment to make
an HTTP request to the path /health to each EC2 instance to determine if it is healthy or not.
Note
YAML relies on consistent indentation. Match the indentation level when replacing content in an
example configuration file and make sure that your text editor uses spaces, not tab characters,
to indent.
Include the .ebextensions directory in your Application Source Bundle (p. 58) and deploy it to a new
or existing Elastic Beanstalk environment.
Configuration files support several sections in addition to option_settings for customizing the
software and files that run on the servers in your environment. For more information, see Customizing
Software on Linux Servers (p. 258) and Customizing Software on Windows Servers (p. 269).
Saved Configurations
Create a saved configuration to save settings that you have applied to an existing environment during
or after environment creation by using the AWS Management Console, EB CLI, or AWS CLI. Saved
API Version 2010-12-01
206

AWS Elastic Beanstalk Developer Guide
Before Environment Creation
configurations belong to an application and can be applied to new or existing environments for that
application.
Clients
•Elastic Beanstalk Console (p. 207)
•EB CLI (p. 207)
•AWS CLI (p. 207)
Elastic Beanstalk Console
To create a saved configuration (Elastic Beanstalk console)
1. Open the Elastic Beanstalk console.
2. Navigate to the management page (p. 65) for your environment.
3. Click Actions and then click Save Configuration.
4. Enter a configuration name and description and then click Save.
Saved configurations are stored in the Elastic Beanstalk S3 bucket in a folder named after your
application. For example, configurations for an application named my-app in the us-west-2
region for account number 0123456789012 can be found at s3://elasticbeanstalk-us-
west-2-0123456789012/resources/templates/my-app.
EB CLI
The EB CLI (p. 480) also provides subcommands for interacting with saved configurations under eb
config (p. 518):
To create a saved configuration (EB CLI)
1. Save the attached environment's current configuration:
~/project$ eb config save --cfg my-app-v1
The EB CLI saves the configuration to ~/project/.elasticbeanstalk/saved_configs/my-
app-v1.cfg.yml
2. Modify the saved configuration locally if needed.
3. Upload the saved configuration to S3:
~/project$ eb config put my-app-v1
AWS CLI
Create a saved configuration from a running environment with aws elasticbeanstalk create-
configuration-template
To create a saved configuration (AWS CLI)
1. Identify your Elastic Beanstalk environment's environment ID with describe-environments:
$ aws elasticbeanstalk describe-environments --environment-name my-env
{
API Version 2010-12-01
207

AWS Elastic Beanstalk Developer Guide
Before Environment Creation
"Environments": [
{
"ApplicationName": "my-env",
"EnvironmentName": "my-env",
"VersionLabel": "89df",
"Status": "Ready",
"Description": "Environment created from the EB CLI using \"eb create\"",
"EnvironmentId": "e-vcghmm2zwk",
"EndpointURL": "awseb-e-v-AWSEBLoa-1JUM8159RA11M-43V6ZI1194.us-
west-2.elb.amazonaws.com",
"SolutionStackName": "64bit Amazon Linux 2015.03 v2.0.2 running Multi-
container Docker 1.7.1 (Generic)",
"CNAME": "my-env-nfptuqaper.elasticbeanstalk.com",
"Health": "Green",
"AbortableOperationInProgress": false,
"Tier": {
"Version": " ",
"Type": "Standard",
"Name": "WebServer"
},
"HealthStatus": "Ok",
"DateUpdated": "2015-10-01T00:24:04.045Z",
"DateCreated": "2015-09-30T23:27:55.768Z"
}
]
}
2. Save the environment's current configuration with create-configuration-template:
$ aws elasticbeanstalk create-configuration-template --environment-id e-vcghmm2zwk --
application-name my-app --template-name v1
Elastic Beanstalk saves the configuration to your Elastic Beanstalk bucket in Amazon S3.
JSON Document
If you use the AWS CLI to create and update environments, you can also provide configuration options
in JSON format. A library of configuration files in JSON is useful if you use the AWS CLI to create and
manage environments.
For example, the following JSON document sets the application's health check url to /health:
~/ebconfigs/healthcheckurl.json
[
{
"Namespace": "aws:elasticbeanstalk:application",
"OptionName": "Application Healthcheck URL",
"Value": "/health"
}
]
EB CLI Configuration
In addition to supporting saved configurations and direct environment configuration with eb config
commands, the EB CLI has a configuration file with an option named default_ec2_keyname
that you can use to specify an Amazon EC2 key pair for SSH access to the instances in your
environment. The EB CLI uses this option to set the EC2KeyName configuration option in the
aws:autoscaling:launchconfiguration namespace.
API Version 2010-12-01
208

AWS Elastic Beanstalk Developer Guide
During Creation
~/workspace/my-app/.elasticbeanstalk/config.yml
branch-defaults:
master:
environment: my-env
develop:
environment: my-env-dev
deploy:
artifact: ROOT.war
global:
application_name: my-app
default_ec2_keyname: my-keypair
default_platform: Tomcat 8 Java 8
default_region: us-west-2
profile: null
sc: git
Setting Configuration Options During Environment
Creation
When you create an AWS Elastic Beanstalk environment by using the AWS Management Console, EB
CLI, AWS CLI, an SDK, or the Elastic Beanstalk API, you can provide values for configuration options to
customize your environment and the AWS resources that are launched within it.
For anything other than a one-off configuration change, you can store configuration files (p. 205)
locally, in your source bundle, or in Amazon S3.
This topic includes procedures for all of the methods of setting configuration options during
environment creation.
Clients
•In the AWS Management Console (p. 209)
•With the EB CLI (p. 210)
•With the AWS CLI (p. 212)
In the AWS Management Console
When you create an Elastic Beanstalk environment in the AWS Management Console, you can provide
configuration options using configuration files, saved configurations, and forms in the Create New
Environment wizard.
Methods
•Using Configuration Files (.ebextensions) (p. 209)
•Using a Saved Configuration (p. 210)
•Using the New Environment Wizard (p. 210)
Using Configuration Files (.ebextensions)
Include .config files in your application source bundle (p. 58) in a folder named .ebextensions.
~/workspace/my-app-v1.zip
|-- .ebextensions
| |-- environmentvariables.config
| `-- healthcheckurl.config
API Version 2010-12-01
209

AWS Elastic Beanstalk Developer Guide
During Creation
|-- index.php
`-- styles.css
Upload the source bundle to Elastic Beanstalk normally during environment creation (p. 76).
The Elastic Beanstalk console applies recommended values (p. 203) for some configuration options and
has form fields for others. Options configured by the Elastic Beanstalk console are applied directly to the
environment and override settings in configuration files.
Using a Saved Configuration
When you create a new environment using the Elastic Beanstalk console, one of the first steps is to
choose a configuration. The configuration can be a Predefined configuration (p. 26), typically the latest
version of a platform such as PHP or Tomcat, or it can be a Saved configuration.
To apply a saved configuration during environment creation (AWS Management Console)
1. Open the Elastic Beanstalk console.
2. Choose an application.
3. Choose Saved Configurations.
4. Choose a saved configuration and then choose Launch environment.
5. Proceed through the wizard to create your environment.
Saved configurations are application specific. See Saved Configurations (p. 206) for details on creating
saved configurations.
Using the New Environment Wizard
Most of the standard configuration options are presented on the Configuration Details and Permissions
pages of the wizard. If you create an Amazon RDS database or configure a VPC for your environment,
additional configuration options are available on the pages for those resources.
To set configuration options during environment creation (AWS Management Console)
1. Open the Elastic Beanstalk console.
2. Choose or create (p. 49) an application.
3. Choose Create New Environment.
4. Proceed through the wizard to the Configuration Details page.
5. Fill in the fields on this page to set the corresponding configuration options.
6. Proceed through the wizard to create your environment.
Any options that you set in the new environment wizard are set directly on the environment and override
any option settings in saved configurations or configuration files (.ebextensions) that you apply. You
can remove settings after the environment is created using the EB CLI (p. 215) or AWS CLI (p. 218) to
allow the settings in saved configurations or configuration files to surface.
With the EB CLI
Methods
•Using Configuration Files (.ebextensions) (p. 211)
•Using Saved Configurations (p. 211)
•Using Command Line Options (p. 211)
API Version 2010-12-01
210

AWS Elastic Beanstalk Developer Guide
During Creation
Using Configuration Files (.ebextensions)
Include .config files in your project folder under .ebextensions to deploy them with your
application code.
~/workspace/my-app/
|-- .ebextensions
| |-- environmentvariables.config
| `-- healthcheckurl.config
|-- .elasticbeanstalk
| `-- config.yml
|-- index.php
`-- styles.css
Create your environment and deploy your source code to it with eb create:
~/workspace/my-app$ eb create my-env
Using Saved Configurations
To apply a saved configuration when you create an environment with eb create (p. 521), use the --
cfg option:
~/workspace/my-app$ eb create --cfg savedconfig
The saved configuration can be stored in your project folder or in your Elastic Beanstalk storage location
on Amazon S3. In the above example, the EB CLI first looks for a saved configuration file named
savedconfig.cfg.yml in the folder .elasticbeanstalk/saved_configs/. Do not include the file
extensions (.cfg.yml) when applying a saved configuration with --cfg.
~/workspace/my-app/
|-- .ebextensions
| `-- healthcheckurl.config
|-- .elasticbeanstalk
| |-- saved_configs
| | `-- savedconfig.cfg.yml
| `-- config.yml
|-- index.php
`-- styles.css
If the EB CLI does not find the configuration locally, it looks in the Elastic Beanstalk storage location
in Amazon S3. For details on creating, editing and uploading saved configurations, see Saved
Configurations (p. 206).
Using Command Line Options
The EB CLI eb create command has several options (p. 521) that you can use to set configuration
options during environment creation. These options can be used to add an RDS database to your
environment, configure a VPC, or override recommended values (p. 203).
For example, the EB CLI will use the t2.micro instance type by default. To choose a different instance
type, use the --instance_type option:
$ eb create my-env --instance_type t2.medium
To create an Amazon RDS database instance and attach it to your environment, use the --database
options:
API Version 2010-12-01
211

AWS Elastic Beanstalk Developer Guide
During Creation
$ eb create --database.engine postgres --database.username dbuser
If you leave out the environment name, database password or any other parameters that are required to
create your environment, the EB CLI prompts you to enter them.
See eb create (p. 521) for a full list of available options and usage examples.
With the AWS CLI
When you use the create-environment command to create an Elastic Beanstalk environment with
the AWS CLI, the AWS CLI does not apply any recommended values (p. 203). All configuration options
defined in configuration files in the source bundle that you specify
Methods
•Using Configuration Files (.ebextensions) (p. 212)
•Using a Saved Configuration (p. 213)
•Using Command Line Options (p. 213)
Using Configuration Files (.ebextensions)
To apply configuration files to an environment that you create with the AWS CLI, include them in the
application source bundle that you upload to Amazon S3.
~/workspace/my-app-v1.zip
|-- .ebextensions
| |-- environmentvariables.config
| `-- healthcheckurl.config
|-- index.php
`-- styles.css
To upload an application source bundle and create an environment with the AWS CLI
1. If you don't already have an Elastic Beanstalk bucket in Amazon S3, create one with create-
storage-location:
$ aws elasticbeanstalk create-storage-location
{
"S3Bucket": "elasticbeanstalk-us-west-2-0123456789012"
}
2. Upload your application source bundle to Amazon S3:
$ aws s3 cp sourcebundle.zip s3://elasticbeanstalk-us-west-2-0123456789012/my-app/
sourcebundle.zip
3. Create the application version:
$ aws elasticbeanstalk create-application-version --application-name my-app --
version-label v1 --description MyAppv1 --source-bundle S3Bucket="elasticbeanstalk-us-
west-2-0123456789012",S3Key="my-app/sourcebundle.zip" --auto-create-application
4. Create the environment:
$ aws elasticbeanstalk create-environment --application-name my-app --environment-name
my-env --version-label v1 --solution-stack-name "64bit Amazon Linux 2015.03 v2.0.0
running Tomcat 8 Java 8"
API Version 2010-12-01
212

AWS Elastic Beanstalk Developer Guide
After Creation
Using a Saved Configuration
To apply a saved configuration to an environment during creation, use the --template-name
parameter:
$ aws elasticbeanstalk create-environment --application-name my-app --environment-name my-
env --template-name savedconfig --version-label v1
When you specify a saved configuration, do not also specify a solution stack name. Saved configurations
already specify a solution stack and Elastic Beanstalk will return an error if you try to use both options.
Using Command Line Options
Use the --option-settings parameter to specify configuration options in JSON format:
$ aws elasticbeanstalk create-environment --application-name my-app --environment-name my-
env --version-label v1 --template-name savedconfig --option-settings '[
{
"Namespace": "aws:elasticbeanstalk:application",
"OptionName": "Application Healthcheck URL",
"Value": "/health"
}
]
To load the JSON from a file, use the file:// prefix:
$ aws elasticbeanstalk create-environment --application-name my-app --environment-
name my-env --version-label v1 --template-name savedconfig --option-settings file://
healthcheckurl.json
Elastic Beanstalk applies option settings that you specify with the --option-settings option directly
to your environment. If the same options are specified in a saved configuration or configuration file, --
option-settings overrides those values.
Setting Configuration Options After Environment
Creation
You can modify the option settings on a running environment by applying saved configurations,
uploading a new source bundle with configuration files (.ebextensions), or a JSON document. The EB
CLI and Elastic Beanstalk console also have client specific functionality for setting and updating options
configuration options.
When you set or change a configuration option, you may trigger a full environment
update, depending on the severity of the change. For example, changes to options in the
aws:autoscaling:launchconfiguration (p. 221), such as InstanceType, require that the EC2
instances in your environment must be reprovisioned. This will trigger a rolling update (p. 134). Other
configuration changes can be applied without any interruption or reprovisioning.
You can remove option settings from an environment with EB CLI or AWS CLI commands. Removing an
option that has been set directly on an environment at an API level allows settings in configuration files,
which are otherwise masked by settings applied directly to an environment, to surface and take effect.
Settings in saved configurations and configuration files can be overridden by setting the same option
directly on the environment with one of the other configuration methods, but can only be removed
completely by applying an updated saved configuration or configuration file. When an option is not set
API Version 2010-12-01
213
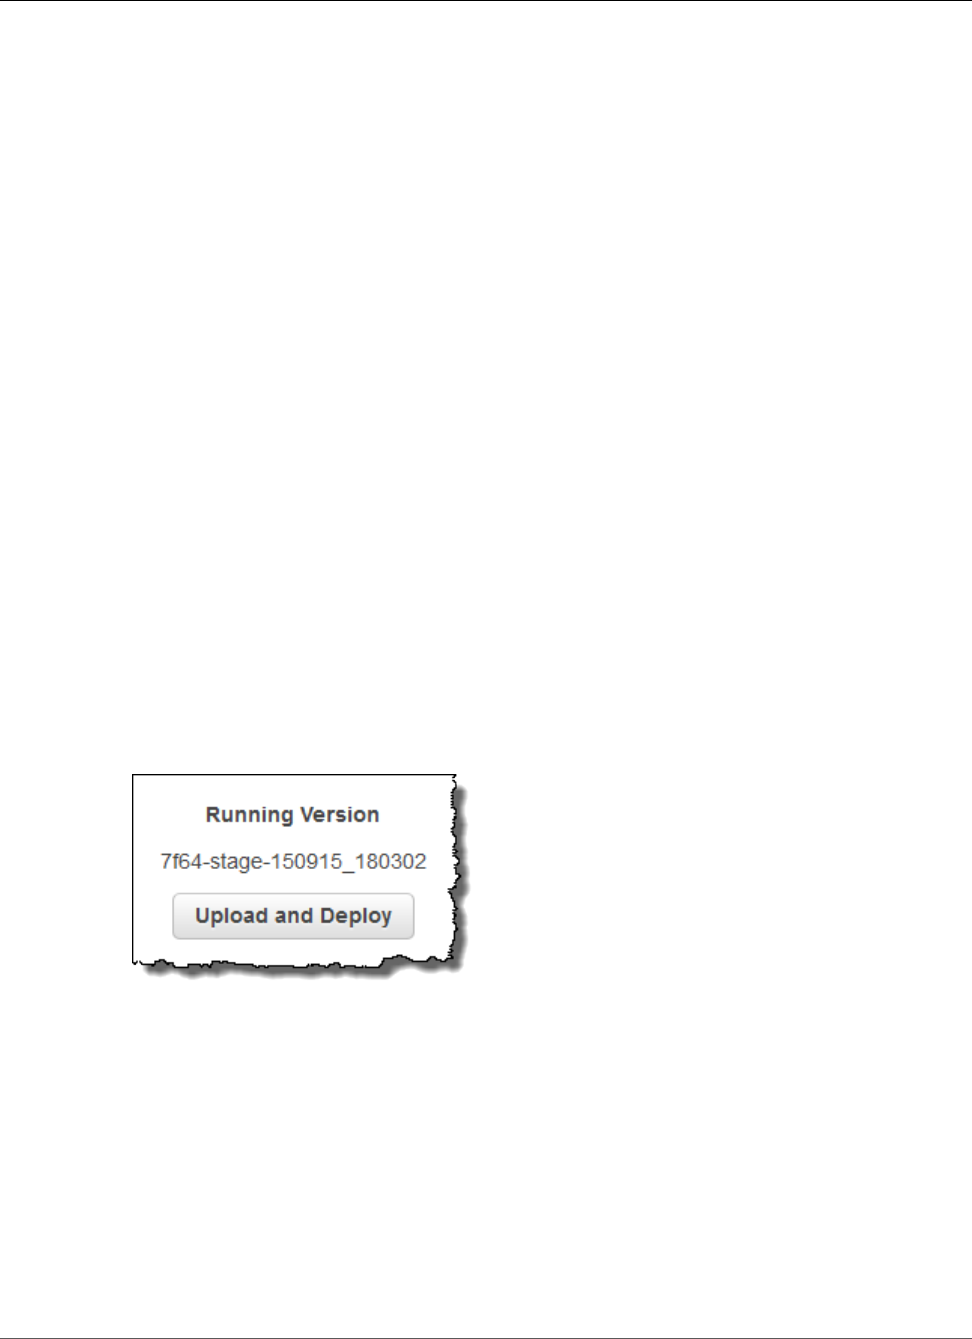
AWS Elastic Beanstalk Developer Guide
After Creation
in a saved configuration, configuration file, or directly on an environment, the default value applies, if
there is one. See Precedence (p. 203) for details.
Clients
•The Elastic Beanstalk console (p. 214)
•The EB CLI (p. 215)
•The AWS CLI (p. 218)
The Elastic Beanstalk console
You can update configuration option settings in the AWS Management Console by deploying an
application source bundle that contains configuration files, applying a saved configuration, or modifying
the environment directly with the Configuration page in the environment management console.
Methods
•Using Configuration Files (.ebextensions) (p. 214)
•Using a Saved Configuration (p. 214)
•Using the Environment Management Console (p. 215)
Using Configuration Files (.ebextensions)
Update configuration files in your source directory, create a new source bundle, and deploy the new
version to your Elastic Beanstalk environment to apply the changes.
To deploy an updated source bundle to your environment (Elastic Beanstalk console)
1. Open the Elastic Beanstalk console.
2. Navigate to the management page (p. 65) for your environment.
3. Choose Upload and Deploy
4. Choose Browse and open the application source bundle.
5. Choose Deploy.
Changes made to configuration files will not override option settings in saved configurations or settings
applied directly to the environment at the API level. See Precedence (p. 203) for details.
Using a Saved Configuration
Apply a saved configuration to a running environment to apply option settings that it defines.
To apply a saved configuration to a running environment (Elastic Beanstalk console)
1. Open the Elastic Beanstalk console.
API Version 2010-12-01
214

AWS Elastic Beanstalk Developer Guide
After Creation
2. Choose the name of your application.
3. Choose Saved Configurations.
4. Select the saved configuration and then choose Load.
5. Select an environment and then choose Load.
Settings defined in a saved configuration override settings in configuration files, and are overridden by
settings configured using the environment management console.
See Saved Configurations (p. 206) for details on creating saved configurations.
Using the Environment Management Console
The Elastic Beanstalk console presents several configuration options on the Configuration page for each
environment.
Changing configuration options on a running environment (Elastic Beanstalk console)
1. Open the Elastic Beanstalk console.
2. Navigate to the management page (p. 65) for your environment.
3. Choose Configuration
4. In the section that contains the option that you want to modify, choose .
5. Modify settings and choose Apply.
Changes made to configuration options in the environment management console are applied directly to
the environment, overriding settings for the same options in configuration files or saved configurations.
See Precedence (p. 203) for details.
The EB CLI
You can update configuration option settings with the EB CLI by deploying source code that contains
configuration files, applying settings from a saved configuration, or modifying the environment
configuration directly with the eb config command.
Methods
•Using Configuration Files (.ebextensions) (p. 215)
•Using a Saved Configuration (p. 216)
•Using eb config (p. 216)
•Using eb setenv (p. 217)
Using Configuration Files (.ebextensions)
Include .config files in your project folder under .ebextensions to deploy them with your
application code.
~/workspace/my-app/
|-- .ebextensions
| |-- environmentvariables.config
| `-- healthcheckurl.config
|-- .elasticbeanstalk
| `-- config.yml
|-- index.php
API Version 2010-12-01
215

AWS Elastic Beanstalk Developer Guide
After Creation
`-- styles.css
Deploy your source code with eb deploy:
~/workspace/my-app$ eb deploy
Using a Saved Configuration
You can use the eb config command to apply a saved configuration to a running environment. Use the
--cfg option with the name of the saved configuration to apply its settings to your environment:
$ eb config --cfg v1
In this example, v1 is the name of a previously created saved configuration file (p. 206).
Settings applied to an environment with this command override settings that were applied during
environment creation, and settings defined in configuration files in your application source bundle.
Using eb config
The EB CLI's eb config command lets you set and remove option settings directly on an environment
by using a text editor.
When you run eb config, the EB CLI shows settings applied to your environment from all sources,
including configuration files, saved configurations, recommended values, options set directly on the
environment, and API defaults.
Note
eb config does not show environment properties. To set environment properties that you can
read from within your application, use eb setenv (p. 217)
The following example shows settings applied in the aws:autoscaling:launchconfiguration
namespace, including two recommended values (for IamInstanceProfile and InstanceType
applied by the EB CLI during environment creation, an option set directly on the environment during
creation based on repository configuration (EC2KeyName), and API defaults for the other values.
ApplicationName: tomcat
DateUpdated: 2015-09-30 22:51:07+00:00
EnvironmentName: tomcat
SolutionStackName: 64bit Amazon Linux 2015.03 v2.0.1 running Tomcat 8 Java 8
settings:
...
aws:autoscaling:launchconfiguration:
BlockDeviceMappings: null
EC2KeyName: my-key
IamInstanceProfile: aws-elasticbeanstalk-ec2-role
ImageId: ami-538a9563
InstanceType: t2.micro
...
To set or change configuration options with eb config
1. Run eb config to view your environment's configuration.
~/workspace/my-app/$ eb config
2. Change any of the setting values using the default text editor
API Version 2010-12-01
216

AWS Elastic Beanstalk Developer Guide
After Creation
aws:autoscaling:launchconfiguration:
BlockDeviceMappings: null
EC2KeyName: my-key
IamInstanceProfile: aws-elasticbeanstalk-ec2-role
ImageId: ami-538a9563
InstanceType: t2.medium
3. Save the temporary configuration file and exit.
4. The EB CLI updates your environment configuration.
Setting configuration options with eb config overrides settings from all other sources.
You can also remove options from your environment with eb config.
To remove configuration options (EB CLI)
1. Run eb config to view your environment's configuration.
~/workspace/my-app/$ eb config
2. Replace any value shown with the string null. You can also delete the entire line containing the
option that you want to remove.
aws:autoscaling:launchconfiguration:
BlockDeviceMappings: null
EC2KeyName: my-key
IamInstanceProfile: aws-elasticbeanstalk-ec2-role
ImageId: ami-538a9563
InstanceType: null
3. Save the temporary configuration file and exit.
4. The EB CLI updates your environment configuration.
Removing options from your environment with eb config allows settings for the same options to
surface from configuration files in your application source bundle. See Precedence (p. 203) for details.
Using eb setenv
To set environment properties with the EB CLI, use eb setenv:
~/workspace/my-app/$ eb setenv ENVVAR=TEST
INFO: Environment update is starting.
INFO: Updating environment my-env's configuration settings.
INFO: Environment health has transitioned from Ok to Info. Command is executing on all
instances.
INFO: Successfully deployed new configuration to environment.
This command sets environment properties in the
aws:elasticbeanstalk:application:environment namespace (p. 230). Environment properties
set with eb setenv are available to your application after a short update process.
View environment properties set on your environment with eb printenv:
~/workspace/my-app/$ eb printenv
Environment Variables:
API Version 2010-12-01
217

AWS Elastic Beanstalk Developer Guide
After Creation
ENVVAR = TEST
The AWS CLI
You can update configuration option settings with the AWS CLI by deploying a source bundle that
contains configuration files, applying a remotely stored saved configuration, or modifying the
environment directly with the aws elasticbeanstalk update-environment command.
Methods
•Using Configuration Files (.ebextensions) (p. 218)
•Using a Saved Configuration (p. 218)
•Using Command Line Options (p. 219)
Using Configuration Files (.ebextensions)
To apply configuration files to a running environment with the AWS CLI, include them in the application
source bundle that you upload to Amazon S3.
~/workspace/my-app-v1.zip
|-- .ebextensions
| |-- environmentvariables.config
| `-- healthcheckurl.config
|-- index.php
`-- styles.css
To upload an application source bundle and apply it to a running environment (AWS CLI)
1. If you don't already have an Elastic Beanstalk bucket in Amazon S3, create one with create-
storage-location:
$ aws elasticbeanstalk create-storage-location
{
"S3Bucket": "elasticbeanstalk-us-west-2-0123456789012"
}
2. Upload your application source bundle to Amazon S3:
$ aws s3 cp sourcebundlev2.zip s3://elasticbeanstalk-us-west-2-0123456789012/my-app/
sourcebundlev2.zip
3. Create the application version:
$ aws elasticbeanstalk create-application-version --application-name my-app --
version-label v2 --description MyAppv2 --source-bundle S3Bucket="elasticbeanstalk-us-
west-2-0123456789012",S3Key="my-app/sourcebundlev2.zip"
4. Update the environment:
$ aws elasticbeanstalk update-environment --environment-name my-env --version-label v2
Using a Saved Configuration
You can apply a saved configuration to a running environment with the --template-name option on
the aws elasticbeanstalk update-environment command.
API Version 2010-12-01
218

AWS Elastic Beanstalk Developer Guide
After Creation
The saved configuration must be in your Elastic Beanstalk bucket in a path named after your application
under resources/templates. For example, the v1 template for the my-app application in the
us-west-2 region for account 0123456789012 is located at s3://elasticbeanstalk-us-
west-2-0123456789012/resources/templates/my-app/v1
To apply a saved configuration to a running environment (AWS CLI)
• Specify saved configuration in an update-environment call with the --template-name option.
$ aws elasticbeanstalk update-environment --environment-name my-env --template-name v1
Elastic Beanstalk places saved configurations in this location when you create them with aws
elasticbeanstalk create-configuration-template. You can also modify saved configurations
locally and place them in this location yourself.
Using Command Line Options
To change configuration options with a JSON document (AWS CLI)
1. Define your option settings in JSON format in a local file.
2. Run update-environment with the --option-settings option:
$ aws elasticbeanstalk update-environment --environment-name my-env --option-settings
file://~/ebconfigs/as-zero.json
In this example, as-zero.json defines options that configures the environment with a minimum and
maximum of zero instances. This stops the instances in the environment without terminating it:
~/ebconfigs/as-zero.json
[
{
"Namespace": "aws:autoscaling:asg",
"OptionName": "MinSize",
"Value": "0"
},
{
"Namespace": "aws:autoscaling:asg",
"OptionName": "MaxSize",
"Value": "0"
},
{
"Namespace": "aws:autoscaling:updatepolicy:rollingupdate",
"OptionName": "RollingUpdateEnabled",
"Value": "false"
}
]
Note
Setting configuration options with update-environment overrides settings from all other
sources.
You can also remove options from your environment with update-environment.
To remove configuration options (AWS CLI)
• Run update-environment command with the --settings-to-remove option:
API Version 2010-12-01
219

AWS Elastic Beanstalk Developer Guide
General Options
$ aws elasticbeanstalk update-environment --environment-name my-env --options-to-remove
Namespace=aws:autoscaling:launchconfiguration,OptionName=InstanceType
Removing options from your environment with update-environment allows settings for the
same options to surface from configuration files in your application source bundle. If an option
is not configured using any of these methods, the API default value applies, if one exists. See
Precedence (p. 203) for details.
General Options for All Environments
Namespaces
•aws:autoscaling:asg (p. 221)
•aws:autoscaling:launchconfiguration (p. 221)
•aws:autoscaling:scheduledaction (p. 225)
•aws:autoscaling:trigger (p. 226)
•aws:autoscaling:updatepolicy:rollingupdate (p. 227)
•aws:ec2:vpc (p. 229)
•aws:elasticbeanstalk:application (p. 229)
•aws:elasticbeanstalk:application:environment (p. 230)
•aws:elasticbeanstalk:cloudwatch:logs (p. 230)
•aws:elasticbeanstalk:command (p. 230)
•aws:elasticbeanstalk:environment (p. 231)
•aws:elasticbeanstalk:environment:process:default (p. 232)
•aws:elasticbeanstalk:environment:process:process_name (p. 234)
•aws:elasticbeanstalk:healthreporting:system (p. 235)
•aws:elasticbeanstalk:hostmanager (p. 236)
•aws:elasticbeanstalk:managedactions (p. 236)
•aws:elasticbeanstalk:managedactions:platformupdate (p. 236)
•aws:elasticbeanstalk:monitoring (p. 237)
•aws:elasticbeanstalk:sns:topics (p. 237)
•aws:elasticbeanstalk:sqsd (p. 238)
•aws:elb:healthcheck (p. 239)
•aws:elb:loadbalancer (p. 239)
•aws:elb:listener (p. 240)
•aws:elb:listener:listener_port (p. 241)
•aws:elb:policies (p. 242)
•aws:elb:policies:policy_name (p. 242)
•aws:elbv2:listener:default (p. 244)
•aws:elbv2:listener:listener_port (p. 244)
•aws:elbv2:listenerrule:rule_name (p. 245)
•aws:elbv2:loadbalancer (p. 245)
•aws:rds:dbinstance (p. 246)
API Version 2010-12-01
220

AWS Elastic Beanstalk Developer Guide
General Options
aws:autoscaling:asg
Configure your environment's Auto Scaling group.
Namespace: aws:autoscaling:asg
Name Description Default Valid Values
Availability
Zones
Availability Zones (AZs) are distinct
locations within a region that are
engineered to be isolated from failures in
other AZs and provide inexpensive, low-
latency network connectivity to other AZs
in the same region. Choose the number
of AZs for your instances.
Any Any
Any 1
Any 2
Any 3
Cooldown Cooldown periods help to prevent Auto
Scaling from initiating additional scaling
activities before the effects of previous
activities are visible.
360 0 to 10000
Custom
Availability
Zones
Define the AZs for your instances. None us-east-1a
us-east-1b
us-east-1c
us-east-1d
us-east-1e
eu-central-1
MinSize Minimum number of instances you want
in your Auto Scaling group.
1 1 to 10000
MaxSize Maximum number of instances you want
in your Auto Scaling group.
4 1 to 10000
aws:autoscaling:launchconfiguration
Configure your environment's EC2 instances.
Namespace: aws:autoscaling:launchconfiguration
Name Description Default Valid Values
EC2KeyName A key pair enables you to securely log
into your EC2 instance.
None
IamInstanceProfileAn instance profile enables AWS Identity
and Access Management (IAM) users
and AWS services to access temporary
security credentials to make AWS API
calls. Specify the profile name or the
ARN.
Example: ElasticBeanstalkProfile
None
API Version 2010-12-01
221

AWS Elastic Beanstalk Developer Guide
General Options
Name Description Default Valid Values
Example:
arn:aws:iam::123456789012:instance-
profile/ElasticBeanstalkProfile
ImageId You can override the default Amazon
Machine Image (AMI) by specifying your
own custom AMI ID.
Example: ami-cbab67a2
None
InstanceType
The instance type used to run your
application in an Elastic Beanstalk
environment.
The instance types available
depend on platform, solution stack
(configuration) and region. To get
a list of available instance types for
your solution stack of choice, use the
DescribeConfigurationOptions action in
the API, describe-configuration-options
command in the AWS CLI.
For example, the following command lists
the available instance types for version
1.4.3 of the PHP 5.6 stack in the current
region:
$ aws elasticbeanstalk describe-
configuration-options --options
Namespace=aws:autoscaling:launchconfiguration,OptionName=InstanceType
--solution-stack-name "64bit
Amazon Linux 2015.03 v1.4.3
running PHP 5.6"
t1.micro
MonitoringIntervalInterval at which you want Amazon
CloudWatch metrics returned.
5 minute 1 minute
5 minute
SecurityGroups Lists the Amazon EC2 security groups to
assign to the EC2 instances in the Auto
Scaling group in order to define firewall
rules for the instances.
You can provide a single string of comma-
separated values that contain the name
of existing Amazon EC2 security groups
or references to AWS::EC2::SecurityGroup
resources created in the template. If you
use Amazon VPC with Elastic Beanstalk so
that your instances are launched within
a virtual private cloud (VPC), specify
security group IDs instead of a security
group name.
elasticbeanstalk-
default
API Version 2010-12-01
222

AWS Elastic Beanstalk Developer Guide
General Options
Name Description Default Valid Values
SSHSourceRestriction
Used to lock down SSH access to an
environment. For instance, you can lock
down SSH access to the EC2 instances so
that only a bastion host can access the
instances in the private subnet.
This string takes the following form:
protocol, fromPort, toPort,
source_restriction
protocol
The protocol for the ingress rule.
fromPort
The starting port number.
toPort
The ending port number.
source_restriction
The CIDR range or the name of
a security group to allow traffic
from. To specify a security group
from another account (EC2-Classic
only, must be in the same region),
include the account ID prior to
the security group name (e.g.,
other_account_id/
security_group_name).
Example: tcp, 22, 22,
54.240.196.185/32
Example: tcp, 22, 22, my-
security-group
Example (EC2-Classic): tcp, 22, 22,
0123456789012/their-security-
group
None
API Version 2010-12-01
223

AWS Elastic Beanstalk Developer Guide
General Options
Name Description Default Valid Values
BlockDeviceMappingsAttach additional Amazon EBS volumes
or instance store volumes on all of the
instances in the autoscaling group.
When you map instance store volumes
you only map the device name to a
volume name; when you map Amazon
EBS volumes, you can specify the
following fields, separated by a colon:
• snapshot ID
• size, in GB
• delete on terminate (true or false)
• storage type (gp2, standard, st1,
sc1, or io1)
• IOPS (only for io1 volumes).
The following example attaches three
Amazon EBS volumes, one blank 100GB
gp2 volume and one snapshot, one blank
20GB io1 volume with 2000 provisioned
IOPS, and an instance store volume
ephemeral0. Multiple instance store
volumes can be attached if the instance
type supports it.
/dev/sdj=:100:true:gp2,/
dev/sdh=snap-51eef269,/dev/
sdi=:20:true:io1:2000,/dev/
sdb=ephemeral0
None
RootVolumeTypeVolume type (magnetic, general purpose
SSD or privisioned IOPS SSD) to use for
the root Amazon EBS volume attached to
your environment's EC2 instances.
Varies per platform. standard for
magnetic storage
gp2 for general
purpose SSD
io1 for
provisioned IOPS
SSD
RootVolumeSizeStorage capacity of the root Amazon EBS
volume in whole GB.
Required if you set RootVolumeType to
provisioned IOPS SSD.
For example, "64".
Varies per platform
for magnetic storage
and general purpose
SSD. None for
provisioned IOPS SSD.
10 to 16384
GB for general
purpose and
provisioned IOPS
SSD.
8 to 1024 GB for
magnetic.
API Version 2010-12-01
224

AWS Elastic Beanstalk Developer Guide
General Options
Name Description Default Valid Values
RootVolumeIOPSDesired input/output operations per
second (IOPS) for a provisioned IOPS SSD
root volume.
The maximum ratio of IOPS to volume
size is 30 to 1. For example, a volume
with 3000 IOPS must be at least 100 GB.
None 100 to 20000
aws:autoscaling:scheduledaction
Configure scheduled actions (p. 172) for your environment's Auto Scaling group. For each action, specify
a resource_name in addition to the option name, namespace, and value for each setting. See The
aws:autoscaling:scheduledaction Namespace (p. 174) for examples.
Namespace: aws:autoscaling:scheduledaction
Name Description Default Valid Values
StartTime For one-time actions, choose the date
and time to run the action. For recurrent
actions, choose when to activate the
action.
None A ISO-8601
timestamp unique
across all scheduled
scaling actions.
EndTime A date and time in the future (in the
UTC/GMT time zone) when you want
the scheduled scaling action to stop
repeating. If you don't specify an
EndTime, the action recurs according to
the Recurrence expression.
Example: 2015-04-28T04:07:2Z
When a scheduled action ends, the Auto
Scaling does not automatically go back
to its previous settings. Configure a
second scheduled action to return to the
original settings as needed.
None A ISO-8601
timestamp unique
across all scheduled
scaling actions.
MaxSize The maximum instance count to apply
when the action runs.
None 0 to 10000
MinSize The minimum instance count to apply
when the action runs.
None 0 to 10000
DesiredCapacity Set the initial desired capacity for the
Auto Scaling group. After the scheduled
action is applied, triggers will adjust the
desired capacity based on their settings.
None 1 to 10000
Recurrence The frequency with which you want the
scheduled action to occur. If you do not
specify a recurrence, then the scaling
action will occur only once, as specified
by the StartTime.
None A Cron expression.
API Version 2010-12-01
225

AWS Elastic Beanstalk Developer Guide
General Options
Name Description Default Valid Values
Suspend Set to true to deactivate a recurrent
scheduled action temporarily.
false true
false
aws:autoscaling:trigger
Configure scaling triggers for your environment's Auto Scaling group.
Namespace: aws:autoscaling:trigger
Name Description Default Valid Values
BreachDuration Amount of time, in minutes, a metric
can be beyond its defined limit (as
specified in the UpperThreshold and
LowerThreshold) before the trigger
fires.
5 1 to 600
LowerBreachScaleIncrementHow many Amazon EC2 instances to
remove when performing a scaling
activity.
-1
LowerThreshold If the measurement falls below this
number for the breach duration, a
trigger is fired.
2000000 0 to 20000000
MeasureName Metric used for your Auto Scaling
trigger.
NetworkOut CPUUtilization
NetworkIn
NetworkOut
DiskWriteOps
DiskReadBytes
DiskReadOps
DiskWriteBytes
Latency
RequestCount
HealthyHostCount
UnhealthyHostCount
Period Specifies how frequently Amazon
CloudWatch measures the metrics for
your trigger.
5
Statistic Statistic the trigger should use, such as
Average.
Average Minimum
Maximum
Sum
API Version 2010-12-01
226

AWS Elastic Beanstalk Developer Guide
General Options
Name Description Default Valid Values
Average
Unit Unit for the trigger measurement, such
as Bytes.
Bytes Seconds
Percent
Bytes
Bits
Count
Bytes/Second
Bits/Second
Count/Second
None
UpperBreachScaleIncrementHow many Amazon EC2 instances to add
when performing a scaling activity.
1
UpperThreshold If the measurement is higher than this
number for the breach duration, a
trigger is fired.
6000000 0 to 20000000
aws:autoscaling:updatepolicy:rollingupdate
Configure rolling updates your environment's Auto Scaling group.
Namespace: aws:autoscaling:updatepolicy:rollingupdate
Name Description Default Valid Values
MaxBatchSize The number of
instances included
in each batch of the
rolling update.
One-third of the
minimum size of
the autoscaling
group, rounded to
the next highest
integer.
1 to 10000
MinInstancesInService The minimum number
of instances that must
be in service within
the autoscaling group
while other instances
are terminated.
The minimum size
of the AutoScaling
group or one
less than the
maximum size of
the autoscaling
group, whichever is
lower.
0 to 9999
RollingUpdateEnabled If true, enables
rolling updates for
an environment.
Rolling updates are
useful when you
need to make small,
false true
false
API Version 2010-12-01
227

AWS Elastic Beanstalk Developer Guide
General Options
Name Description Default Valid Values
frequent updates to
your Elastic Beanstalk
software application
and you want to avoid
application downtime.
Setting this value to
true automatically
enables the
MaxBatchSize,
MinInstancesInService,
and PauseTime
options. Setting any
of those options also
automatically sets the
RollingUpdateEnabled
option value to true.
Setting this option to
false disables rolling
updates.
RollingUpdateType Time-based rolling
updates apply a
PauseTime between
batches. Health-based
rolling updates wait for
new instances to pass
health checks before
moving on to the next
batch. Immutable
updates (p. 138) launch
a full set of instances
in a new AutoScaling
group.
Time Time
Health
Immutable
PauseTime The amount of time the
Elastic Beanstalk service
will wait after it has
completed updates to
one batch of instances
before it continues on
to the next batch.
Automatically
computed based on
instance type and
container.
PT0S* (0 seconds) to
PT1H (1 hour)
Timeout Maximum amount of
time to wait for all
instances in a batch of
instances to pass health
checks before canceling
the update.
PT30M (30 minutes) PT5M* (5 minutes) to
PT1H (1 hour)
*ISO8601 duration
format: PT#H#M#S
where each # is the
number of hours,
minutes, and/or
seconds, respectively.
API Version 2010-12-01
228

AWS Elastic Beanstalk Developer Guide
General Options
aws:ec2:vpc
Configure your environment to launch resources in a custom VPC. If you don't configure settings in this
namespace, Elastic Beanstalk launches resources in the default VPC.
Namespace: aws:ec2:vpc
Name Description Default Valid
Values
VPCId The ID for your VPC. None
Subnets The IDs of the Auto Scaling group subnet or subnets. If
you have multiple subnets, specify the value as a single
comma-delimited string of subnet IDs (for example,
"subnet-11111111,subnet-22222222").
None
ELBSubnets The IDs of the subnet or subnets for the elastic load
balancer. If you have multiple subnets, specify the value
as a single comma-delimited string of subnet IDs (for
example, "subnet-11111111,subnet-22222222").
None
ELBScheme Specify internal if you want to create an internal
load balancer in your VPC so that your Elastic Beanstalk
application cannot be accessed from outside your VPC.
None internal
DBSubnets Contains the IDs of the database subnets. This is
only used if you want to add an Amazon RDS DB
Instance as part of your application. If you have
multiple subnets, specify the value as a single
comma-delimited string of subnet IDs (for example,
"subnet-11111111,subnet-22222222").
None
AssociatePublicIpAddressSpecifies whether to launch instances with public IP
addresses in your VPC. Instances with public IP addresses
do not require a NAT device to communicate with the
Internet. You must set the value to true if you want to
include your load balancer and instances in a single public
subnet.
None true
false
aws:elasticbeanstalk:application
Configure a health check path for your application.
Namespace: aws:elasticbeanstalk:application
Name Description Default Valid Values
Application
Healthcheck URL
The path to which to send health check
requests. If not set, the load balancer
attempts to make a TCP connection
on port 80 to verify health. Set to a
path starting with / to send an HTTP
GET request to that path. You can also
include a protocol (HTTP, HTTPS, TCP, or
SSL) and port prior to the path to check
None / (HTTP GET to root path)
/health
HTTPS:443/
HTTPS:443/health
etc
API Version 2010-12-01
229

AWS Elastic Beanstalk Developer Guide
General Options
Name Description Default Valid Values
HTTPS connectivity or use a non-default
port.
EB CLI and Elastic Beanstalk console apply recommended values for the preceding options.
These settings must be removed if you want to use configuration files to configure the same. See
Recommended Values (p. 203) for details.
aws:elasticbeanstalk:application:environment
Configure environment properties for your application.
Namespace: aws:elasticbeanstalk:application:environment
Name Description Default Valid Values
Any environment
variable name.
Pass in key-value pairs. None Any environment
variable value.
See Environment Properties and Other Software Settings (p. 189) for more information.
aws:elasticbeanstalk:cloudwatch:logs
Configure log streaming for your application.
Namespace: aws:elasticbeanstalk:cloudwatch:logs
Name Description Default Valid
Values
StreamLogs Whether to create groups in CloudWatch logs for proxy
and deployment logs, and stream logs from each instance
in your environment.
false true
false
DeleteOnTerminateWhether to delete the log groups when the
environment is terminated. If false, the logs are kept
RetentionDays days.
false true
false
RetentionInDaysThe number of days to keep log events before they expire. 7 1, 3, 5,
7, 14,
30, 60,
90, 120,
150, 180,
365, 400,
545, 731,
1827,
3653
aws:elasticbeanstalk:command
Configure rolling deployments for your application code.
API Version 2010-12-01
230

AWS Elastic Beanstalk Developer Guide
General Options
Namespace: aws:elasticbeanstalk:command
Name Description Default Valid
Values
DeploymentPolicy Choose a deployment policy (p. 125) for
application version deployments.
AllAtOnce AllAtOnce
Rolling
RollingWithAdditionalBatch
Immutable
Timeout Number of seconds to wait for an
instance to complete executing
commands.
"600" "1" to
"3600"
BatchSizeType The type of number that is specified in
BatchSize.
Percentage Percentage
Fixed
BatchSize Percentage or fixed number of Amazon
EC2 instances in the Auto Scaling group
on which to simultaneously perform
deployments. Valid values vary per
BatchSizeType setting.
100 1 to 100
(Percentage).
1 to
aws:autoscaling:asg::MaxSize (p. 221)
(Fixed)
IgnoreHealthCheck Do not cancel a deployment due to failed
health checks.
false true
false
HealthCheckSuccessThreshold Lower the threshold for instances to pass
health checks.
Ok Ok
Warning
Degraded
Severe
aws:elasticbeanstalk:environment
Configure your environment's architecture and service role.
Namespace: aws:elasticbeanstalk:environment
Name Description Default Valid Values
EnvironmentType Set to SingleInstance to launch one EC2
instance with no load balancer.
LoadBalanced SingleInstance
LoadBalanced
ServiceRole The name of an IAM role that Elastic Beanstalk
uses to manage resources for the environment.
For example, aws-elasticbeanstalk-
service-role.
None Any role name.
LoadBalancerType The type of load balancer for your
environment.
classic classic
API Version 2010-12-01
231

AWS Elastic Beanstalk Developer Guide
General Options
Name Description Default Valid Values
application
network
aws:elasticbeanstalk:environment:process:default
Configure your environment's default process.
Namespace: aws:elasticbeanstalk:environment:process:default
Name Description Default Valid Values
DeregistrationDelay Time, in seconds, to
wait for active requests
to complete before
deregistering.
20 0 to 3600
HealthCheckInterval The interval, in seconds,
at which Elastic Load
Balancing will check
the health of your
application's Amazon
EC2 instances.
With classic or
application load
balancer: 15
With network load
balancer: 30
With classic or
application load
balancer: 5 to 300
With network load
balancer: 10, 30
HealthCheckPath Path to which to send
HTTP requests for
health checks.
/A routable path.
HealthCheckTimeout Time, in seconds, to
wait for a response
during a health check.
This option is
only applicable to
environments with a
classic load balancer
or an application load
balancer.
5 1 to 60
HealthyThresholdCount Consecutive successful
requests before Elastic
Load Balancing changes
the instance health
status.
With classic or
application load
balancer: 3
With network load
balancer: 5
2 to 10
MatcherHTTPCode HTTP code that
indicates that an
instance is healthy.
This option is
only applicable to
environments with a
classic load balancer
or an application load
balancer.
200 200 to 499
API Version 2010-12-01
232

AWS Elastic Beanstalk Developer Guide
General Options
Name Description Default Valid Values
Port Port on which the
process listens.
80 1 to 65535
Protocol Protocol that the
process uses.
With an application
load balancer, you can
only set this option to
HTTP or HTTPS.
With a network load
balancer, you can only
set this option to TCP.
With classic or
application load
balancer: HTTP
With network load
balancer: TCP
TCP
HTTP
HTTPS
StickinessEnabled Set to true to enable
sticky sessions.
This option is
only applicable to
environments with a
classic load balancer
or an application load
balancer.
'false' 'false'
'true'
StickinessLBCookieDurationLifetime, in seconds,
of the sticky session
cookie.
This option is
only applicable to
environments with a
classic load balancer
or an application load
balancer.
86400 1 to 604800
StickinessType Set to lb_cookie to
use cookies for sticky
sessions.
This option is
only applicable to
environments with a
classic load balancer
or an application load
balancer.
lb_cookie lb_cookie
UnhealthyThresholdCountConsecutive
unsuccessful requests
before Elastic Load
Balancing changes the
instance health status.
5 2 to 10
API Version 2010-12-01
233

AWS Elastic Beanstalk Developer Guide
General Options
aws:elasticbeanstalk:environment:process:process_name
Configure additional processes for your environment.
Namespace: aws:elasticbeanstalk:environment:process:process_name
Name Description Default Valid Values
DeregistrationDelay Time, in seconds, to
wait for active requests
to complete before
deregistering.
20 0 to 3600
HealthCheckInterval The interval, in seconds,
at which Elastic Load
Balancing will check
the health of your
application's Amazon
EC2 instances.
With classic or
application load
balancer: 15
With network load
balancer: 30
With classic or
application load
balancer: 5 to 300
With network load
balancer: 10, 30
HealthCheckPath Path to which to send
HTTP requests for
health checks.
/A routable path.
HealthCheckTimeout Time, in seconds, to
wait for a response
during a health check.
This option is
only applicable to
environments with a
classic load balancer
or an application load
balancer.
5 1 to 60
HealthyThresholdCount Consecutive successful
requests before Elastic
Load Balancing changes
the instance health
status.
With classic or
application load
balancer: 3
With network load
balancer: 5
2 to 10
MatcherHTTPCode HTTP code that
indicates that an
instance is healthy.
This option is
only applicable to
environments with a
classic load balancer
or an application load
balancer.
200 200 to 499
Port Port on which the
process listens.
80 1 to 65535
Protocol Protocol that the
process uses.
With classic or
application load
balancer: HTTP
TCP
HTTP
API Version 2010-12-01
234

AWS Elastic Beanstalk Developer Guide
General Options
Name Description Default Valid Values
With an application
load balancer, you can
only set this option to
HTTP or HTTPS.
With a network load
balancer, you can only
set this option to TCP.
With network load
balancer: TCP
HTTPS
StickinessEnabled Set to true to enable
sticky sessions.
This option is
only applicable to
environments with a
classic load balancer
or an application load
balancer.
'false' 'false'
'true'
StickinessLBCookieDurationLifetime, in seconds,
of the sticky session
cookie.
This option is
only applicable to
environments with a
classic load balancer
or an application load
balancer.
86400 1 to 604800
StickinessType Set to lb_cookie to
use cookies for sticky
sessions.
This option is
only applicable to
environments with a
classic load balancer
or an application load
balancer.
lb_cookie lb_cookie
UnhealthyThresholdCountConsecutive
unsuccessful requests
before Elastic Load
Balancing changes the
instance health status.
5 2 to 10
aws:elasticbeanstalk:healthreporting:system
Configure enhanced health reporting for your environment.
API Version 2010-12-01
235

AWS Elastic Beanstalk Developer Guide
General Options
Namespace: aws:elasticbeanstalk:healthreporting:system
Name Description Default Valid Values
SystemType Health reporting system (basic (p. 333) or
enhanced (p. 336)). Enhanced health reporting
requires a service role (p. 21) and a version 2
platform configuration (p. 26).
basic basic
enhanced
ConfigDocument A JSON document describing the environment and
instance metrics to publish to CloudWatch.
None
aws:elasticbeanstalk:hostmanager
Configure the EC2 instances in your environment to upload rotated logs to Amazon S3.
Namespace: aws:elasticbeanstalk:hostmanager
Name Description Default Valid Values
LogPublicationControlCopy the log files for your application's Amazon
EC2 instances to the Amazon S3 bucket associated
with your application.
false true
false
aws:elasticbeanstalk:managedactions
Configure managed platform updates for your environment.
Namespace: aws:elasticbeanstalk:managedactions
Name Description Default Valid Values
ManagedActionsEnabled Enable managed platform
updates (p. 149).
When you set this to true,
you must also specify a
PreferredStartTime and
UpdateLevel (p. 236).
true true
false
PreferredStartTime Configure a maintenance window
for managed actions in UTC.
For example, "Tue:10:00".
None Day and time in
day:hour:minute
format.
aws:elasticbeanstalk:managedactions:platformupdate
Configure managed platform updates for your environment.
API Version 2010-12-01
236

AWS Elastic Beanstalk Developer Guide
General Options
Namespace: aws:elasticbeanstalk:managedactions:platformupdate
Name Description Default Valid Values
UpdateLevel The highest level of update to
apply with managed platform
updates. Platforms are versioned
major.minor.patch. For
example, 2.0.8 has a major
version of 2, a minor version of 0,
and a patch version of 8.
None patch for
patch version
updates only.
minor for both
minor and
patch version
updates.
InstanceRefreshEnabled Enable weekly instance
replacement.
Requires
ManagedActionsEnabled to be
set to true.
false true
false
aws:elasticbeanstalk:monitoring
Configure your environment to terminate EC2 instances that fail health checks.
Namespace: aws:elasticbeanstalk:monitoring
Name Description Default Valid Values
Automatically Terminate
Unhealthy Instances
Terminate an instance if it fails
health checks.
true true
false
aws:elasticbeanstalk:sns:topics
Configure notifications for your environment.
Namespace: aws:elasticbeanstalk:sns:topics
Name Description Default Valid Values
Notification
Endpoint
Endpoint where you want to be
notified of important events
affecting your application.
None
Notification
Protocol
Protocol used to send notifications to
your endpoint.
email http
https
email
email-json
sqs
Notification
Topic ARN
Amazon Resource Name for the topic
you subscribed to.
None
API Version 2010-12-01
237

AWS Elastic Beanstalk Developer Guide
General Options
Name Description Default Valid Values
Notification
Topic Name
Name of the topic you subscribed to. None
aws:elasticbeanstalk:sqsd
Configure the Amazon SQS queue for a worker environment.
Namespace: aws:elasticbeanstalk:sqsd
Name Description Default Valid Values
WorkerQueueURL The URL of the queue from which the
daemon in the worker environment
tier reads messages
automatically
generated
If you don't specify a value,
then Elastic Beanstalk
automatically creates a
queue.
HttpPath The relative path to the application
to which HTTP POST messages are
sent
/
MimeType The MIME type of the message sent
in the HTTP POST request
application/
json
application/json
application/x-www-
form-urlencoded
application/xml
text/plain
Custom MIME type.
HttpConnections The maximum number of concurrent
connections to any application(s)
within an Amazon EC2 instance
50 1 to 100
ConnectTimeout The amount of time, in seconds, to
wait for successful connections to an
application
5 1 to 60
InactivityTimeout The amount of time, in seconds, to
wait for a response on an existing
connection to an application
The message is reprocessed until
the daemon receives a 200 OK
response from the application in
the worker environment tier or the
RetentionPeriod expires.
299 1 to 36000
VisibilityTimeout The amount of time, in seconds, an
incoming message from the Amazon
SQS queue is locked for processing.
After the configured amount of time
has passed, then the message is
again made visible in the queue for
any other daemon to read.
300 0 to 43200
API Version 2010-12-01
238

AWS Elastic Beanstalk Developer Guide
General Options
Name Description Default Valid Values
ErrorVisibilityTimeoutThe amount of time, in seconds,
that elapses before Elastic Beanstalk
returns a message to the Amazon
SQS queue after a processing
attempt fails with an explicit error.
2 seconds 0 to 43200 seconds
RetentionPeriod The amount of time, in seconds, a
message is valid and will be actively
processed
345600 60 to 1209600
MaxRetries The maximum number of attempts
that Elastic Beanstalk attempts
to send the message to the web
application that will process it before
moving the message to the dead
letter queue.
10 1 to 100
aws:elb:healthcheck
Configure healthchecks for a classic load balancer.
Namespace: aws:elb:healthcheck
Name Description Default Valid
Values
HealthyThreshold Consecutive successful requests before Elastic Load
Balancing changes the instance health status.
3 2 to 10
Interval The interval at which Elastic Load Balancing will check the
health of your application's Amazon EC2 instances.
10 5 to 300
Timeout Number of seconds Elastic Load Balancing will wait for a
response before it considers the instance nonresponsive.
5 2 to 60
UnhealthyThresholdConsecutive unsuccessful requests before Elastic Load
Balancing changes the instance health status.
5 2 to 10
(deprecated)
Target
Destination on backend instance to which to send health
checks. Use Application Healthcheck URL in the
aws:elasticbeanstalk:application (p. 229)
namespace instead.
TCP:80 Target in
the format
PROTOCOL:PORT/
PATH
aws:elb:loadbalancer
Configure your environment's classic load balancer.
Several of the options in this namespace have been deprecated in favor of listener-specific options in the
aws:elb:listener (p. 240) namespace. The deprecated options only let you configure two listeners (one
secure and one unsecure) on standard ports.
API Version 2010-12-01
239

AWS Elastic Beanstalk Developer Guide
General Options
Namespace: aws:elb:loadbalancer
Name Description Default Valid Values
CrossZone Configure the load balancer to route traffic
evenly across all instances in all Availability
Zones rather than only within each zone.
false true
false
SecurityGroups Assign one or more security groups that you
created to the load balancer.
None One or more
security
group IDs.
ManagedSecurityGroup Assign an existing security group to your
environment’s load balancer, instead of
creating a new one. To use this setting,
update the SecurityGroups setting in this
namespace to include your security group’s ID,
and remove the automatically created security
group’s ID, if one exists.
To allow traffic from the load balancer to your
environment’s EC2 instances, Elastic Beanstalk
adds a rule to the instances’ security group
that allows inbound traffic from the managed
security group.
None A security
group ID.
(deprecated)
LoadBalancerHTTPPort
Port to listen on for the unsecure listener. 80 OFF
80
(deprecated)
LoadBalancerPortProtocol
Protocol to use on the unsecure listener. HTTP HTTP
TCP
(deprecated)
LoadBalancerHTTPSPort
Port to listen on for the secure listener. OFF OFF
443
8443
(deprecated)
LoadBalancerSSLPortProtocol
Protocol to use on the secure listener. HTTPS HTTPS
SSL
(deprecated)
SSLCertificateId
ARN of an SSL certificate to bind to the secure
listener.
None
aws:elb:listener
Configure the default listener (port 80) on a classic load balancer.
Namespace: aws:elb:listener
Name Description Default Valid Values
ListenerProtocol The protocol used by the listener. HTTP HTTP TCP
InstancePort The port that this listener uses to
communicate with the EC2 instances.
The same as
listener_port.
1 to 65535
API Version 2010-12-01
240

AWS Elastic Beanstalk Developer Guide
General Options
Name Description Default Valid Values
InstanceProtocol The protocol that this listener uses to
communicate with the EC2 instances.
HTTP when
ListenerProtocol
is HTTP
TCP when
ListenerProtocol
is TCP
HTTP or
HTTPS when
ListenerProtocol
is HTTP or
HTTPS
TCP or
SSL when
ListenerProtocol
is TCP or SSL
PolicyNames A comma-separated list of policy names to
apply to the port for this listener. We suggest
that you use the LoadBalancerPorts option
of the aws:elb:policies (p. 242) namespace
instead.
None
ListenerEnabled Specifies whether this listener is enabled. If
you specify false, the listener is not included
in the load balancer.
true true
false
aws:elb:listener:listener_port
Configure additional listeners on a classic load balancer.
Namespace: aws:elb:listener:listener_port
Name Description Default Valid Values
ListenerProtocol The protocol used by the listener. HTTP HTTP HTTPS
TCP SSL
InstancePort The port that this listener uses to
communicate with the EC2 instances.
The same as
listener_port.
1 to 65535
InstanceProtocol The protocol that this listener uses to
communicate with the EC2 instances.
HTTP when
ListenerProtocol
is HTTP or
HTTPS
TCP when
ListenerProtocol
is TCP or
SSL
HTTP or
HTTPS when
ListenerProtocol
is HTTP or
HTTPS
TCP or
SSL when
ListenerProtocol
is TCP or SSL
PolicyNames A comma-separated list of policy names to
apply to the port for this listener. We suggest
that you use the LoadBalancerPorts option
of the aws:elb:policies (p. 242) namespace
instead.
None
SSLCertificateId ARN of an SSL certificate to bind to the
listener.
None
API Version 2010-12-01
241

AWS Elastic Beanstalk Developer Guide
General Options
Name Description Default Valid Values
ListenerEnabled Specifies whether this listener is enabled. If
you specify false, the listener is not included
in the load balancer.
true if
any other
option is
set. false
otherwise.
true false
aws:elb:policies
Modify the default stickiness and global load balancer policies for a classic load balancer.
Namespace: aws:elb:policies
Name Description Default Valid Values
ConnectionDrainingEnabledSpecifies whether the load balancer
maintains existing connections to instances
that have become unhealthy or deregistered
to complete in-progress requests.
false true
false
ConnectionDrainingTimeoutThe maximum number of seconds that the
load balancer maintains existing connections
to an instance during connection draining
before forcibly closing the connections.
20 1 to 3600
ConnectionSettingIdleTimeoutNumber of seconds that the load balancer
waits for any data to be sent or received over
the connection. If no data has been sent or
received after this time period elapses, the
load balancer closes the connection.
60 1 to 3600
LoadBalancerPorts A comma-separated list of the listener
ports that the default policy (AWSEB-ELB-
StickinessPolicy) applies to.
None You can use
:all to indicate
all listener ports
Stickiness Cookie
Expiration
The amount of time, in seconds, that each
cookie is valid. Uses the default policy
(AWSEB-ELB-StickinessPolicy) .
0 0 to 1000000
Stickiness Policy Binds a user's session to a specific server
instance so that all requests coming from
the user during the session are sent to the
same server instance. Uses the default policy
(AWSEB-ELB-StickinessPolicy) .
false true false
aws:elb:policies:policy_name
Create additional load balancer policies for a classic load balancer.
Namespace: aws:elb:policies:policy_name
Name Description Default Valid Values
CookieName The name of the application-generated
cookie that controls the session lifetimes of a
None
API Version 2010-12-01
242

AWS Elastic Beanstalk Developer Guide
General Options
Name Description Default Valid Values
AppCookieStickinessPolicyType policy.
This policy can be associated only with HTTP/
HTTPS listeners.
InstancePorts A comma-separated list of the instance ports
that this policy applies to.
None A list of ports,
or :all
LoadBalancerPorts A comma-separated list of the listener ports
that this policy applies to.
None A list of ports,
or :all
ProxyProtocol For a ProxyProtocolPolicyType policy,
specifies whether to include the IP address
and port of the originating request for TCP
messages. This policy can be associated only
with TCP/SSL listeners.
None true false
PublicKey The contents of a public key for a
PublicKeyPolicyType policy to
use when authenticating the back-
end server or servers. This policy
cannot be applied directly to back-end
servers or listeners; it must be part of a
BackendServerAuthenticationPolicyType
policy.
None
PublicKeyPolicyNames A comma-separated list
of policy names (from the
PublicKeyPolicyType policies) for a
BackendServerAuthenticationPolicyType
policy that controls authentication to a back-
end server or servers. This policy can be
associated only with back-end servers that
are using HTTPS/SSL.
None
SSLProtocols A comma-separated list of SSL
protocols to be enabled for a
SSLNegotiationPolicyType policy that
defines the ciphers and protocols that will be
accepted by the load balancer. This policy can
be associated only with HTTPS/SSL listeners.
None
SSLReferencePolicy The name of a predefined security
policy that adheres to AWS security best
practices and that you want to enable for a
SSLNegotiationPolicyType policy that
defines the ciphers and protocols that will be
accepted by the load balancer. This policy can
be associated only with HTTPS/SSL listeners.
None
Stickiness Cookie
Expiration
The amount of time, in seconds, that each
cookie is valid.
0 0 to 1000000
Stickiness Policy Binds a user's session to a specific server
instance so that all requests coming from the
user during the session are sent to the same
server instance.
false true false
API Version 2010-12-01
243

AWS Elastic Beanstalk Developer Guide
General Options
aws:elbv2:listener:default
Configure the default listener (port 80) on an application load balancer or a network load balancer.
Namespace: aws:elbv2:listener:default
Name Description Default Valid Values
DefaultProcess Name of the
process (p. 232) to
which to forward traffic
when no rules match.
default A process name.
ListenerEnabled Set to false to disable
the listener. You can use
this option to disable
the default listener on
port 80.
true true
false
Rules List of rules (p. 245)
to apply to the listener
This option is
only applicable to
environments with
an application load
balancer.
None Comma separated list
of rule names.
aws:elbv2:listener:listener_port
Configure additional listeners on an application load balancer or a network load balancer.
Namespace: aws:elbv2:listener:listener_port
Name Description Default Valid Values
DefaultProcess Name of the
process (p. 232) where
traffic is forwarded
when no rules match.
default A process name.
ListenerEnabled Set to false to disable
the listener. You can use
this option to disable
the default listener on
port 80.
true true
false
Protocol Protocol of traffic to
process.
With application load
balancer: HTTP
With network load
balancer: TCP
With application load
balancer: HTTP, HTTPS
With network load
balancer: TCP
Rules List of rules (p. 245)
to apply to the listener
This option is
only applicable to
None Comma separated list
of rule names.
API Version 2010-12-01
244

AWS Elastic Beanstalk Developer Guide
General Options
Name Description Default Valid Values
environments with
an application load
balancer.
SSLCertificateArns The ARN of the SSL
certificate to bind to
the listener.
This option is
only applicable to
environments with
an application load
balancer.
None The ARN of a certificate
stored in IAM or ACM.
SSLPolicy Specify a security policy
to apply to the listener.
This option is
only applicable to
environments with
an application load
balancer.
None (ELB default) The name of a load
balancer security policy.
aws:elbv2:listenerrule:rule_name
Add listener rules to an application load balancer.
Note
This namespace isn't applicable to environments with a network load balancer.
Namespace: aws:elbv2:listenerrule:rule_name
Name Description Default Valid Values
PathPatternsList of path patterns to match. For example, /
img/*.
This option is only applicable to environments
with an application load balancer.
None
Priority Precedence of this rule when multiple rules
match. The lower number takes precedence. No
two rules can have the same priority.
1 1 to 1000
Process Name of the process (p. 232) to which to
forward traffic when this rule matches the
request.
default A process name.
aws:elbv2:loadbalancer
Configure an application load balancer.
Note
This namespace isn't applicable to environments with a network load balancer.
API Version 2010-12-01
245

AWS Elastic Beanstalk Developer Guide
General Options
Namespace: aws:elbv2:loadbalancer
Name Description Default Valid Values
AccessLogsS3Bucket Amazon S3 bucket in which to store
access logs. The bucket must be in the
same region as the environment and
allow the load balancer write access.
None A bucket name.
AccessLogsS3Enabled Enable access log storage. false true
false
AccessLogsS3Prefix Prefix to prepend to access log names.
By default, the load balancer uploads
logs to a directory names AWSLogs in
the bucket you specify. Specify a prefix
to place the AWSLogs directory inside
another directory.
None
IdleTimeout Time to wait for a request to complete
before closing connections to client and
instance.
None 1 to 3600
ManagedSecurityGroup Assign an existing security group to
your environment’s load balancer,
instead of creating a new one.
To use this setting, update the
SecurityGroups setting in
this namespace to include your
security group’s ID, and remove the
automatically created security group’s
ID, if one exists.
To allow traffic from the load balancer
to your environment’s EC2 instances,
Elastic Beanstalk adds a rule to the
instances’ security group that allows
inbound traffic from the managed
security group.
The
security
group
that
Elastic
Beanstalks
creates
for your
load
balancer.
A security group ID.
SecurityGroups List of security groups to attach to the
load balancer.
The
security
group
that
Elastic
Beanstalks
creates
for your
load
balancer.
Comma separated list
of security group IDs.
aws:rds:dbinstance
Configure an attached Amazon RDS DB instance.
API Version 2010-12-01
246

AWS Elastic Beanstalk Developer Guide
General Options
Namespace: aws:rds:dbinstance
Name Description Default Valid Values
DBAllocatedStorageThe allocated database storage size, specified
in gigabytes.
MySQL: 5
Oracle: 10
sqlserver-se:
200
sqlserver-ex: 30
sqlserver-web:
30
MySQL: 5-1024
Oracle: 10-1024
sqlserver: cannot
be modified
DBDeletionPolicyDecides whether to delete or snapshot the DB
instance on environment termination.
Warning
Deleting a DB instance results in
permanent data loss.
Delete Delete
Snapshot
DBEngine The name of the database engine to use for
this instance.
mysql mysql
oracle-se1
oracle-se
oracle-ee
sqlserver-ee
sqlserver-ex
sqlserver-web
sqlserver-se
postgres
DBEngineVersionThe version number of the database engine. 5.5
DBInstanceClass The database instance type. db.t2.micro
(db.m1.large
for an
environment
not running
in an Amazon
VPC)
Go to DB Instance
Class in the
Amazon Relational
Database Service
User Guide.
DBPassword The name of master user password for the
database instance.
None
DBSnapshotIdentifierThe identifier for the DB snapshot to restore
from.
None
DBUser The name of master user for the DB Instance. ebroot
MultiAZDatabaseSpecifies whether a database instance Multi-
AZ deployment needs to be created. For more
false true
API Version 2010-12-01
247

AWS Elastic Beanstalk Developer Guide
Platform Specific Options
Name Description Default Valid Values
information about Multi-AZ deployments
with Amazon Relational Database Service
(RDS), go to Regions and Availability Zones in
the Amazon Relational Database Service User
Guide.
false
Platform Specific Options
Platforms
•Docker Platform Options (p. 248)
•Go Platform Options (p. 248)
•Java SE Platform Options (p. 249)
•Java with Tomcat Platform Options (p. 249)
•.NET Platform Options (p. 251)
•Node.js Platform Options (p. 251)
•PHP Platform Options (p. 253)
•Python Platform Options (p. 253)
•Ruby Platform Options (p. 254)
Docker Platform Options
The following Docker-specific configuration options apply to the Sinlge Container and Preconfigured
Docker platforms.
Note
These configuration options do not apply to the Multicontainer Docker platform.
Namespace: aws:elasticbeanstalk:environment:proxy
Name Description Default Valid Values
ProxyServer Specifies which web server should be used as a
proxy.
nginx nginx
none
Go Platform Options
You can use the following namespace to configure the proxy server to serve static files. When a the proxy
server receives a request for a file under the specified path, it serves the file directly instead of routing
the request to your application. This reduces the number of requests that your application has to process.
Map a path served by the proxy server to a folder in your source code that contains static assets. Each
option that you define in this namespace maps a different path.
Namespace: aws:elasticbeanstalk:container:golang:staticfiles
Name Value
Path where the proxy server will serve the files. Name of the folder containing the files.
API Version 2010-12-01
248

AWS Elastic Beanstalk Developer Guide
Platform Specific Options
Name Value
Example: /images to serve files at
subdomain.eleasticbeanstalk.com/
images.
Example: staticimages to serve files from a
folder named staticimages at the top level of
your source bundle.
Java SE Platform Options
You can use the following namespace to configure the proxy server to serve static files. When a the proxy
server receives a request for a file under the specified path, it serves the file directly instead of routing
the request to your application. This reduces the number of requests that your application has to process.
Map a path served by the proxy server to a folder in your source code that contains static assets. Each
option that you define in this namespace maps a different path.
Namespace: aws:elasticbeanstalk:container:java:staticfiles
Name Value
Path where the proxy server will serve the files.
Example: /images to serve files at
subdomain.eleasticbeanstalk.com/
images.
Name of the folder containing the files.
Example: staticimages to serve files from a
folder named staticimages at the top level of
your source bundle.
Run the AWS X-Ray daemon to relay trace information from your X-Ray integrated (p. 192) Java 8
application.
Namespace: aws:elasticbeanstalk:xray
Name Description Default Valid Values
XRayEnabled Set to true to run the AWS X-Ray daemon
on the instances in your environment.
false true
false
Java with Tomcat Platform Options
Namespace: aws:elasticbeanstalk:application:environment
Name Description Default Valid
Values
JDBC_CONNECTION_STRINGThe connection string to an external database. n/a n/a
See Environment Properties and Other Software Settings (p. 189) for more information.
Namespace: aws:elasticbeanstalk:container:tomcat:jvmoptions
Name Description Default Valid
Values
JVM Options Pass command-line options to the JVM at
startup.
n/a n/a
API Version 2010-12-01
249

AWS Elastic Beanstalk Developer Guide
Platform Specific Options
Name Description Default Valid
Values
Xmx Maximum JVM heap sizes. 256m n/a
XX:MaxPermSize Section of the JVM heap that is used to store
class definitions and associated metadata.
64m n/a
Xms Initial JVM heap sizes. 256m n/a
optionName Specify arbitrary JVM options in addition to the
those defined by the Tomcat platform.
n/a n/a
Namespace: aws:elasticbeanstalk:environment:proxy
Name Description Default Valid Values
GzipCompressionSet to false to disable response compression. true true
false
ProxyServer Set to nginx to use nginx as a proxy instead of
Apache 2.2.
apache apache
nginx
You can use the following namespace to configure the proxy server to serve static files. When a the proxy
server receives a request for a file under the specified path, it serves the file directly instead of routing
the request to your application. This reduces the number of requests that your application has to process.
Map a path served by the proxy server to a folder in your source code that contains static assets. Each
option that you define in this namespace maps a different path.
Namespace: aws:elasticbeanstalk:environment:proxy:staticfiles
Name Value
Path where the proxy server will serve the files.
Example: /images to serve files at
subdomain.eleasticbeanstalk.com/
images.
Name of the folder containing the files.
Example: staticimages to serve files from a
folder named staticimages at the top level of
your source bundle.
Run the AWS X-Ray daemon to relay trace information from your X-Ray integrated (p. 192) Tomcat 8
application.
Namespace: aws:elasticbeanstalk:xray
Name Description Default Valid Values
XRayEnabled Set to true to run the AWS X-Ray daemon
on the instances in your environment.
false true
false
API Version 2010-12-01
250

AWS Elastic Beanstalk Developer Guide
Platform Specific Options
.NET Platform Options
Namespace: aws:elasticbeanstalk:container:dotnet:apppool
Name Description Default Valid Values
Target Runtime Choose the version of .NET Framework for your
application.
4.0 2.0
4.0
Enable 32-bit
Applications
Set to True to run 32-bit applications. False True
False
Run the AWS X-Ray daemon to relay trace information from your X-Ray integrated (p. 192) .NET
application.
Namespace: aws:elasticbeanstalk:xray
Name Description Default Valid Values
XRayEnabled Set to true to run the AWS X-Ray daemon
on the instances in your environment.
false true
false
Node.js Platform Options
Namespace: aws:elasticbeanstalk:container:nodejs
Name Description Default Valid Values
NodeCommandCommand used to start the Node.js
application. If an empty string is specified,
app.js is used, then server.js, then npm
start in that order.
"" n/a
NodeVersion Version of Node.js. For example, 4.4.6
Supported Node.js versions vary between
versions of the Node.js platform configuration.
See Node.js (p. 32) on the supported platforms
page for a list of the currently supported
versions.
Note
When support for the version of
Node.js that you are using is removed
from the platform configuration, you
must change or remove the version
setting prior to doing a platform
upgrade (p. 143). This may occur when
a security vulnerability is identified for
one or more versions of Node.js
When this occurs, attempting to
upgrade to a new version of the
platform that does not support the
varies varies
API Version 2010-12-01
251

AWS Elastic Beanstalk Developer Guide
Platform Specific Options
Name Description Default Valid Values
configured NodeVersion (p. 251)
fails. To avoid needing to create
a new environment, change the
NodeVersion configuration option to
a version that is supported by both
the old configuration version and
the new one, or remove the option
setting (p. 213), and then perform
the platform upgrade.
GzipCompressionSpecifies if gzip compression is enabled.
If ProxyServer is set to none, then gzip
compression is disabled.
false true
false
ProxyServer Specifies which web server should be used to
proxy connections to Node.js. If ProxyServer is
set to none, then static file mappings doesn't
take affect and gzip compression is disabled.
nginx apache
nginx
none
You can use the following namespace to configure the proxy server to serve static files. When a the proxy
server receives a request for a file under the specified path, it serves the file directly instead of routing
the request to your application. This reduces the number of requests that your application has to process.
Map a path served by the proxy server to a folder in your source code that contains static assets. Each
option that you define in this namespace maps a different path.
Note
Static file settings do not apply if
aws:elasticbeanstalk:container:nodejs::ProxyFiles is set to none.
Namespace: aws:elasticbeanstalk:container:nodejs:staticfiles
Name Value
Path where the proxy server will serve the files.
Example: /images to serve files at
subdomain.eleasticbeanstalk.com/
images.
Name of the folder containing the files.
Example: staticimages to serve files from a
folder named staticimages at the top level of
your source bundle.
Run the AWS X-Ray daemon to relay trace information from your X-Ray integrated (p. 192) Node.js
application.
Namespace: aws:elasticbeanstalk:xray
Name Description Default Valid Values
XRayEnabled Set to true to run the AWS X-Ray daemon
on the instances in your environment.
false true
false
API Version 2010-12-01
252

AWS Elastic Beanstalk Developer Guide
Platform Specific Options
PHP Platform Options
Namespace: aws:elasticbeanstalk:container:php:phpini
Name Description Default Valid Values
document_root (p. 808)Specify the child directory of your project
that is treated as the public-facing web root.
/A blank string is treated
as /, or specify a string
starting with /
memory_limit (p. 808)Amount of memory allocated to the PHP
environment.
256M n/a
zlib.output_compression (p. 808)Specifies whether or not PHP should use
compression for output.
Off On
Off
allow_url_fopen (p. 808)Specifies if PHP's file functions are allowed
to retrieve data from remote locations, such
as websites or FTP servers.
On On
Off
display_errors (p. 808)Specifies if error messages should be part of
the output.
Off On
Off
max_execution_time (p. 808)Sets the maximum time, in seconds, a script
is allowed to run before it is terminated by
the environment.
60 0 to
9223372036854775807
(PHP_INT_MAX)
composer_options (p. 808)Sets custom options to use when installing
dependencies using Composer through
composer.phar install. For more information
including available options, go to http://
getcomposer.org/doc/03-cli.md#install.
n/a n/a
Python Platform Options
Namespace: aws:elasticbeanstalk:application:environment
Name Description Default Valid Values
DJANGO_SETTINGS_MODULESpecifies which settings file to use. n/a n/a
See Environment Properties and Other Software Settings (p. 189) for more information.
Namespace: aws:elasticbeanstalk:container:python
Name Description Default Valid
Values
WSGIPath The file that contains the WSGI application. This file must
have an application callable.
application.pyn/a
NumProcesses The number of daemon processes that should be started
for the process group when running WSGI applications.
1n/a
API Version 2010-12-01
253

AWS Elastic Beanstalk Developer Guide
Platform Specific Options
Name Description Default Valid
Values
NumThreads The number of threads to be created to handle requests
in each daemon process within the process group when
running WSGI applications.
15 n/a
You can use the following namespace to configure the proxy server to serve static files. When a the proxy
server receives a request for a file under the specified path, it serves the file directly instead of routing
the request to your application. This reduces the number of requests that your application has to process.
Map a path served by the proxy server to a folder in your source code that contains static assets. Each
option that you define in this namespace maps a different path.
Namespace: aws:elasticbeanstalk:container:python:staticfiles
Name Value
Path where the proxy server will serve the files.
Example: /images to serve files at
subdomain.eleasticbeanstalk.com/
images.
Name of the folder containing the files.
Example: staticimages to serve files from a
folder named staticimages at the top level of
your source bundle.
Run the AWS X-Ray daemon to relay trace information from your X-Ray integrated (p. 192) Python
application.
Namespace: aws:elasticbeanstalk:xray
Name Description Default Valid Values
XRayEnabled Set to true to run the AWS X-Ray daemon
on the instances in your environment.
false true
false
Ruby Platform Options
Namespace: aws:elasticbeanstalk:application:environment
Name Description Default Valid
Values
RAILS_SKIP_MIGRATIONS Specifies whether to run `rake
db:migrate` on behalf of the users'
applications; or whether it should be
skipped. This is only applicable to Rails 3
applications.
false true
false
RAILS_SKIP_ASSET_COMPILATIONSpecifies whether the container should
run `rake assets:precompile` on
behalf of the users' applications; or whether
it should be skipped. This is also only
applicable to Rails 3 applications.
false true
false
API Version 2010-12-01
254

AWS Elastic Beanstalk Developer Guide
Custom Options
Name Description Default Valid
Values
BUNDLE_WITHOUT A colon (:) separated list of groups to
ignore when installing dependencies from a
Gemfile.
test:developmentn/a
RACK_ENV Specifies what environment stage an
application can be run in. Examples
of common environments include
development, production, test.
production n/a
See Environment Properties and Other Software Settings (p. 189) for more information.
Custom Options
Use the aws:elasticbeanstalk:customoption namespace to define options and values that can
be read in Resources blocks in other configuration files. Use custom options to collect user specified
settings in a single configuration file.
For example, you may have a complex configuration file that defines a resource that can be configured
by the user launching the environment. If you use Fn::GetOptionSetting to retrieve the value of a
custom option, you can put the definition of that option in a different configuration file, where it is more
easily discovered and modified by the user.
Also, because they are configuration options, custom options can be set at the API level to override
values set in a configuration file. See Precedence (p. 203) for more information.
Custom options are defined like any other option:
option_settings:
aws:elasticbeanstalk:customoption:
option name: option value
For example, the following configuration file creates an option named ELBAlarmEmail and sets the
value to someone@example.com:
option_settings:
aws:elasticbeanstalk:customoption:
ELBAlarmEmail: someone@example.com
Elsewhere, a configuration file defines an SNS topic that reads the option with Fn::GetOptionSetting
to populate the value of the Endpoint attribute:
Resources:
MySNSTopic:
Type: AWS::SNS::Topic
Properties:
Subscription:
- Endpoint:
Fn::GetOptionSetting:
OptionName: ELBAlarmEmail
DefaultValue: nobody@example.com
Protocol: email
You can find more example snippets using Fn::GetOptionSetting at Adding and Customizing Elastic
Beanstalk Environment Resources (p. 275).
API Version 2010-12-01
255

AWS Elastic Beanstalk Developer Guide
.ebextensions
Advanced Environment Customization with
Configuration Files (.ebextensions)
You can add AWS Elastic Beanstalk configuration files (.ebextensions) to your web application's
source code to configure your environment and customize the AWS resources that it contains.
Configuration files are YAML formatted documents with a .config file extension that you place in a
folder named .ebextensions and deploy in your application source bundle.
Tip
When you are developing or testing new configuration files, launch a clean environment running
the default application and deploy to that. Poorly formatted configuration files will cause a new
environment launch to fail unrecoverably.
The option_settings section of a configuration file defines values for configuration options (p. 202).
Configuration options let you configure your Elastic Beanstalk environment, the AWS resources in it,
and the software that runs your application. Configuration files are only one of several ways to set
configuration options.
The Resources section (p. 275) lets you further customize the resources in your application's
environment, and define additional AWS resources beyond the functionality provided by configuration
options. You can add and configure any resources supported by AWS CloudFormation, which Elastic
Beanstalk uses to create environments.
The other sections of a configuration file (packages, sources, files, users, groups, commands,
container_commands, and services) let you configure the EC2 instances that are launched in your
environment. Whenever a server is launched in your environment, Elastic Beanstalk runs the operations
defined in these sections to prepare the operating system and storage system for your application.
Requirements
•Location – Place all of your configuration files in a single folder, named .ebextensions, in the
root of your source bundle. Folders starting with a dot can be hidden by file browsers, so make sure
that the folder is added when you create your source bundle. See Create an Application Source
Bundle (p. 58) for instructions.
•Naming – Configuration files must have the .config file extension.
•Formatting – Configuration files must conform to YAML formatting requirements. Always use spaces
to indent and don't use the same key twice in the same file.
Warning
If you use a key (for example, option_settings) twice in the same configuration file, one of
the sections will be dropped. Combine duplicate sections into a single section, or place them
in separate configuration files.
For more information about YAML, see YAML Ain't Markup Language (YAML™) Version 1.1.
The process for deploying varies slightly depending on the client that you use to manage your
environments. See the following sections for details:
•Elastic Beanstalk Console (p. 209)
•EB CLI (p. 211)
•AWS CLI (p. 212)
Topics
•Option Settings (p. 257)
API Version 2010-12-01
256

AWS Elastic Beanstalk Developer Guide
Option Settings
•Customizing Software on Linux Servers (p. 258)
•Customizing Software on Windows Servers (p. 269)
•Adding and Customizing Elastic Beanstalk Environment Resources (p. 275)
Option Settings
You can use the option_settings key to modify the Elastic Beanstalk configuration and define
variables that can be retrieved from your application using environment variables. Some namespaces
allow you to extend the number of parameters, and specify the parameter names. For a list of
namespaces and configuration options, see Configuration Options (p. 202).
Option settings can also be applied directly to an environment during environment creation or an
environment update. Settings applied directly to the environment override the settings for the same
options in configuration files. If you remove settings from an environment's configuration, settings in
configuration files will take effect. See Precedence (p. 203) for details.
Syntax
The standard syntax for option settings is an array of objects, each having a namespace, option_name
and value key.
option_settings:
- namespace: namespace
option_name: option name
value: option value
- namespace: namespace
option_name: option name
value: option value
The namespace key is optional. If you do not specify a namespace, the default used is
aws:elasticbeanstalk:application:environment:
option_settings:
- option_name: option name
value: option value
- option_name: option name
value: option value
Elastic Beanstalk also supports a shorthand syntax for option settings that lets you specify options as
key-value pairs underneath the namespace:
option_settings:
namespace:
option name: option value
Examples
The following examples set a Tomcat platform-specific option in the
aws:elasticbeanstalk:container:tomcat:jvmoptions namespace and an environment
property named MYPARAMETER. In standard YAML format:
Example .ebextensions/options.config
option_settings:
API Version 2010-12-01
257

AWS Elastic Beanstalk Developer Guide
Linux Server
- namespace: aws:elasticbeanstalk:container:tomcat:jvmoptions
option_name: Xmx
value: 256m
- option_name: MYPARAMETER
value: parametervalue
In shorthand format:
Example .ebextensions/options.config
option_settings:
aws:elasticbeanstalk:container:tomcat:jvmoptions:
Xmx: 256m
aws:elasticbeanstalk:application:environment:
MYPARAMETER: parametervalue
In JSON:
Example .ebextensions/options.config
{
"option_settings": [
{
"namespace": "aws:elasticbeanstalk:container:tomcat:jvmoptions",
"option_name": "Xmx",
"value": "256m"
},
{
"option_name": "MYPARAMETER",
"value": "parametervalue"
}
]
}
Customizing Software on Linux Servers
You may want to customize and configure the software that your application depends on. These files
could be either dependencies required by the application—for example, additional packages from the
yum repository—or they could be configuration files such as a replacement for httpd.conf to override
specific settings that are defaulted by Elastic Beanstalk.
Note
YAML relies on consistent indentation. Match the indentation level when replacing content in an
example configuration file and make sure that your text editor uses spaces, not tab characters,
to indent.
This section describes the type of information you can include in a configuration file to customize
the software on your EC2 instances running Linux. For general information about customizing
and configuring your Elastic Beanstalk environments, see AWS Elastic Beanstalk Environment
Configuration (p. 164). For information about customizing software on your EC2 instances running
Windows, see Customizing Software on Windows Servers (p. 269).
Configuration files support the following keys that affect the Linux server your application runs on.
Keys
•Packages (p. 259)
•Groups (p. 260)
API Version 2010-12-01
258

AWS Elastic Beanstalk Developer Guide
Linux Server
•Users (p. 260)
•Sources (p. 261)
•Files (p. 261)
•Commands (p. 263)
•Services (p. 264)
•Container Commands (p. 265)
•Example: Using Custom Amazon CloudWatch Metrics (p. 266)
Keys are processed in the order that they are listed above.
Packages
You can use the packages key to download and install prepackaged applications and components.
Syntax
packages:
name of package manager:
package name: version
Supported Package Formats
Elastic Beanstalk currently supports the following package managers: yum, rubygems, python, and rpm.
Packages are processed in the following order: rpm, yum, and then rubygems and python. There is no
ordering between rubygems and python, and packages within each package manager are not guaranteed
to be installed in any order. Use a package manager supported by your operating system.
Note
Elastic Beanstalk supports two underlying package managers for Python, pip and easy_install.
However, in the syntax of the configuration file, you must specify the package manager name
as python. When you use a configuration file to specify a Python package manager, Elastic
Beanstalk uses Python 2.7. If your application relies on a different version of Python, you
can specify the packages to install in a requirements.txt file. For more information, see
Requirements File (p. 864).
Specifying Versions
Within each package manager, each package is specified as a package name and a list of versions. The
version can be a string, a list of versions, or an empty string or list. An empty string or list indicates that
you want the latest version. For rpm manager, the version is specified as a path to a file on disk or a URL.
Relative paths are not supported.
If you specify a version of a package, Elastic Beanstalk attempts to install that version even if a newer
version of the package is already installed on the instance. If a newer version is already installed, the
deployment fails. Some package managers support multiple versions, but others may not. Please check
the documentation for your package manager for more information. If you do not specify a version and
a version of the package is already installed, Elastic Beanstalk does not install a new version—it assumes
that you want to keep and use the existing version.
Example Snippet
The following snippet specifies a version URL for rpm, requests the latest version from yum, and version
0.10.2 of chef from rubygems.
API Version 2010-12-01
259

AWS Elastic Beanstalk Developer Guide
Linux Server
packages:
yum:
libmemcached: []
ruby-devel: []
gcc: []
rpm:
epel: http://download.fedoraproject.org/pub/epel/5/i386/epel-release-5-4.noarch.rpm
rubygems:
chef: '0.10.2'
Groups
You can use the groups key to create Linux/UNIX groups and to assign group IDs. To create a group, add
a new key-value pair that maps a new group name to an optional group ID. The groups key can contain
one or more group names. The following table lists the available keys.
Syntax
groups:
name of group: {}
name of group:
gid: "group id"
Options
gid
A group ID number.
If a group ID is specified, and the group already exists by name, the group creation will fail. If
another group has the specified group ID, the operating system may reject the group creation.
Example Snippet
The following snippet specifies a group named groupOne without assigning a group ID and a group
named groupTwo that specified a group ID value of 45.
groups:
groupOne: {}
groupTwo:
gid: "45"
Users
You can use the users key to create Linux/UNIX users on the EC2 instance.
Syntax
users:
name of user:
groups:
- name of group
uid: "id of the user"
homeDir: "user's home directory"
API Version 2010-12-01
260

AWS Elastic Beanstalk Developer Guide
Linux Server
Options
uid
A user ID. The creation process fails if the user name exists with a different user ID. If the user ID is
already assigned to an existing user, the operating system may reject the creation request.
groups
A list of group names. The user is added to each group in the list.
homeDir
The user's home directory.
Users are created as noninteractive system users with a shell of /sbin/nologin. This is by design and
cannot be modified.
Example Snippet
users:
myuser:
groups:
- group1
- group2
uid: "50"
homeDir: "/tmp"
Sources
You can use the sources key to download an archive file from a public URL and unpack it in a target
directory on the EC2 instance.
Syntax
sources:
target directory: location of archive file
Supported Formats
Supported formats are tar, tar+gzip, tar+bz2, and zip. You can reference external locations such
as Amazon Simple Storage Service (Amazon S3) (e.g., http://s3.amazonaws.com/mybucket/
myobject) as long as the URL is publicly accessible.
Example Snippet
The following example downloads a public .zip file from an Amazon S3 bucket and unpacks it into /etc/
myapp:
sources:
/etc/myapp: http://s3.amazonaws.com/mybucket/myobject
Files
You can use the files key to create files on the EC2 instance. The content can be either inline in the
configuration file, or the content can be pulled from a URL. The files are written to disk in lexicographic
order.
API Version 2010-12-01
261

AWS Elastic Beanstalk Developer Guide
Linux Server
You can use the files key to download private files from Amazon S3 by providing an instance profile
for authorization.
Syntax
files:
"target file location on disk":
mode: "six-digit octal value"
owner: name of owning user for file
group: name of owning group for file
source: URL
authentication: authentication name:
"target file location on disk":
mode: "six-digit octal value"
owner: name of owning user for file
group: name of owning group for file
content: |
this is my content
encoding: encoding format
authentication: authentication name:
Options
content
String content to add to the file. Specify either content or source, but not both.
source
URL of a file to download. Specify either content or source, but not both.
encoding
The encoding format of the string specified with the content option.
Valid values: plain | base64
group
Linux group that owns the file.
owner
Linux user that owns the file.
mode
A six-digit octal value representing the mode for this file (e.g, 000444). The first three digits are used
for symlinks and the last three digits are used for setting permissions on the file.
authentication
The name of a AWS CloudFormation authentication method to use. You can add authentication
methods to the autoscaling group metadata with the Resources key. See below for an example.
Example Snippet
files:
"/home/ec2-user/myfile" :
mode: "000755"
owner: root
group: root
source: http://foo.bar/myfile
API Version 2010-12-01
262

AWS Elastic Beanstalk Developer Guide
Linux Server
"/home/ec2-user/myfile2" :
mode: "000755"
owner: root
group: root
content: |
# this is my file
# with content
Example using a symlink. This creates a link /tmp/myfile2.txt that points at the existing file /tmp/
myfile1.txt.
files:
"/tmp/myfile2.txt" :
mode: "120400"
content: "/tmp/myfile1.txt"
The following example uses the Resources key to add an authentication method named S3Auth and uses
it to download a private file from an Amazon S3 bucket:
Resources:
AWSEBAutoScalingGroup:
Metadata:
AWS::CloudFormation::Authentication:
S3Auth:
type: "s3"
buckets: ["elasticbeanstalk-us-west-2-123456789012"]
roleName:
"Fn::GetOptionSetting":
Namespace: "aws:autoscaling:launchconfiguration"
OptionName: "IamInstanceProfile"
DefaultValue: "aws-elasticbeanstalk-ec2-role"
files:
"/tmp/data.json" :
mode: "000755"
owner: root
group: root
authentication: "S3Auth"
source: https://s3-us-west-2.amazonaws.com/elasticbeanstalk-us-west-2-123456789012/
data.json
Commands
You can use the commands key to execute commands on the EC2 instance. The commands are processed
in alphabetical order by name, and they run before the application and web server are set up and the
application version file is extracted.
The specified commands run as the root user. By default, commands run in the root directory. To run
commands from another directory, use the cwd option.
Syntax
commands:
command name:
command: command to run
cwd: working directory
env:
variable name: variable value
test: conditions for command
ignoreErrors: true
API Version 2010-12-01
263

AWS Elastic Beanstalk Developer Guide
Linux Server
Options
command
Either an array or a string specifying the command to run. If you use an array, you do not need to
escape space characters or enclose command parameters in quotes.
env
(Optional) Sets environment variables for the command. This property overwrites, rather than
appends, the existing environment.
cwd
(Optional) The working directory. If not specified, commands run from the root directory (/).
test
(Optional) A command that must return the value true (exit code 0) in order for Elastic Beanstalk to
process the command, such as a shell script, contained in the command key.
ignoreErrors
(Optional) A boolean value that determines if other commands should run if the command
contained in the command key fails (returns a nonzero value). Set this value to true if you want to
continue running commands even if the command fails. Set it to false if you want to stop running
commands if the command fails. The default value is false.
Example Snippet
The following example snippet runs a python script.
commands:
python_install:
command: myscript.py
cwd: /home/ec2-user
env:
myvarname: myvarvalue
test: "[ -x /usr/bin/python ]"
Services
You can use the services key to define which services should be started or stopped when the instance
is launched. The services key also allows you to specify dependencies on sources, packages, and
files so that if a restart is needed due to files being installed, Elastic Beanstalk takes care of the service
restart.
Syntax
services:
sysvinit:
name of service:
enabled: "true"
ensureRunning: "true"
files:
- "file name"
sources:
- "directory"
packages:
name of package manager:
"package name[: version]"
commands:
API Version 2010-12-01
264

AWS Elastic Beanstalk Developer Guide
Linux Server
- "name of command"
Options
ensureRunning
Set to true to ensure that the service is running after Elastic Beanstalk finishes.
Set to false to ensure that the service is not running after Elastic Beanstalk finishes.
Omit this key to make no changes to the service state.
enabled
Set to true to ensure that the service is started automatically upon boot.
Set to false to ensure that the service is not started automatically upon boot.
Omit this key to make no changes to this property.
files
A list of files. If Elastic Beanstalk changes one directly via the files block, the service is restarted.
sources
A list of directories. If Elastic Beanstalk expands an archive into one of these directories, the service
is restarted.
packages
A map of the package manager to a list of package names. If Elastic Beanstalk installs or updates
one of these packages, the service is restarted.
commands
A list of command names. If Elastic Beanstalk runs the specified command, the service is restarted.
Example Snippet
The following is an example snippet:
services:
sysvinit:
myservice:
enabled: true
ensureRunning: true
Container Commands
You can use the container_commands key to execute commands that affect your application
source code. Container commands run after the application and web server have been set up and the
application version archive has been extracted, but before the application version is deployed. Non-
container commands and other customization operations are performed prior to the application source
code being extracted.
Container commands are run from the staging directory, where your source code is extracted prior to
being deployed to the application server. Any changes you make to your source code in the staging
directory with a container command will be included when the source is deployed to its final location.
You can use leader_only to only run the command on a single instance, or configure a test to
only run the command when a test command evaluates to true. Leader-only container commands
are only executed during environment creation and deployments, while other commands and server
customization operations are performed every time an instance is provisioned or updated. Leader-only
API Version 2010-12-01
265

AWS Elastic Beanstalk Developer Guide
Linux Server
container commands are not executed due to launch configuration changes, such as a change in the AMI
Id or instance type.
Syntax
container_commands:
name of container_command:
command: "command to run"
leader_only: true
name of container_command:
command: "command to run"
Options
command
A string or array of strings to run.
env
(Optional) Set environment variables prior to running the command, overriding any existing value.
cwd
(Optional) The working directory. By default, this is the staging directory of the unzipped
application.
leader_only
(Optional) Only run the command on a single instance chosen by Elastic Beanstalk. Leader-only
container commands are run before other container commands. A command can be leader-only or
have a test, but not both (leader_only takes precedence).
test
(Optional) Run a test command that must return the true in order to run the container command. A
command can be leader-only or have a test, but not both (leader_only takes precedence).
ignoreErrors
(Optional) Do not fail deployments if the container command returns a value other than 0 (success).
Set to true to enable.
Example Snippet
The following is an example snippet.
container_commands:
collectstatic:
command: "django-admin.py collectstatic --noinput"
01syncdb:
command: "django-admin.py syncdb --noinput"
leader_only: true
02migrate:
command: "django-admin.py migrate"
leader_only: true
99customize:
command: "scripts/customize.sh"
Example: Using Custom Amazon CloudWatch Metrics
Amazon CloudWatch is a web service that enables you to monitor, manage, and publish various metrics,
as well as configure alarm actions based on data from metrics. You can define custom metrics for
API Version 2010-12-01
266

AWS Elastic Beanstalk Developer Guide
Linux Server
your own use, and Elastic Beanstalk will push those metrics to Amazon CloudWatch. Once Amazon
CloudWatch contains your custom metrics, you can view those in the Amazon CloudWatch console.
The Amazon CloudWatch Monitoring Scripts for Linux are available to demonstrate how to produce
and consume Amazon CloudWatch custom metrics. The scripts comprise a fully functional example that
reports memory, swap, and disk space utilization metrics for an Amazon Elastic Compute Cloud (Amazon
EC2) Linux instance. For more information about the Amazon CloudWatch Monitoring Scripts, go to
Amazon CloudWatch Monitoring Scripts for Linux in the Amazon CloudWatch Developer Guide.
Note
Elastic Beanstalk Enhanced Health Reporting (p. 336) has native support for publishing a wide
range of instance and environment metrics to CloudWatch. See Publishing Amazon CloudWatch
Custom Metrics for an Environment (p. 352) for details.
Topics
•.ebextensions Configuration File (p. 267)
•Permissions (p. 268)
•Viewing Metrics in the CloudWatch Console (p. 268)
.ebextensions Configuration File
This example uses commands and option settings in an .ebextensions configuration file to download,
install, and run monitoring scripts provided by Amazon CloudWatch.
To use this sample, save it to a file named cloudwatch.config in a directory named .ebextensions
at the top level of your project directory, then deploy your application using the AWS Management
Console (include the .ebextensions directory in your source bundle (p. 58)) or the EB CLI (p. 480).
For more information about configuration files, see Advanced Environment Customization with
Configuration Files (.ebextensions) (p. 256).
.ebextensions/cloudwatch.config
packages:
yum:
perl-DateTime: []
perl-Sys-Syslog: []
perl-LWP-Protocol-https: []
perl-Switch: []
perl-URI: []
perl-Bundle-LWP: []
sources:
/opt/cloudwatch: http://aws-cloudwatch.s3.amazonaws.com/downloads/
CloudWatchMonitoringScripts-1.2.1.zip
container_commands:
01-setupcron:
command: |
echo '*/5 * * * * root perl /opt/cloudwatch/aws-scripts-mon/mon-put-instance-data.pl
`{"Fn::GetOptionSetting" : { "OptionName" : "CloudWatchMetrics", "DefaultValue" : "--mem-
util --disk-space-util --disk-path=/" }}` >> /var/log/cwpump.log 2>&1' > /etc/cron.d/cwpump
02-changeperm:
command: chmod 644 /etc/cron.d/cwpump
03-changeperm:
command: chmod u+x /opt/cloudwatch/aws-scripts-mon/mon-put-instance-data.pl
option_settings:
"aws:autoscaling:launchconfiguration" :
API Version 2010-12-01
267

AWS Elastic Beanstalk Developer Guide
Linux Server
IamInstanceProfile : "aws-elasticbeanstalk-ec2-role"
"aws:elasticbeanstalk:customoption" :
CloudWatchMetrics : "--mem-util --mem-used --mem-avail --disk-space-util --disk-space-
used --disk-space-avail --disk-path=/ --auto-scaling"
After you verify the configuration file works, you can conserve disk usage by changing the command
redirect from a log file (>> /var/log/cwpump.log 2>&1') to /dev/null (> /dev/null).
Permissions
In order to publish custom Amazon CloudWatch metrics, the instances in your environment need
permission to use CloudWatch. You can grant permissions to your environment's instances by adding
them to the environment's instance profile (p. 22). You can add permissions to the instance profile before
or after deploying your application.
To grant permissions to publish CloudWatch metrics
1. Open the IAM console at https://console.aws.amazon.com/iam/.
2. In the navigation pane, choose Roles.
3. Choose your environment's instance profile role. By default, when you create an environment with
the AWS Management Console or EB CLI (p. 480), this is aws-elasticbeanstalk-ec2-role.
4. Choose the Permissions tab.
5. Under Inline Policies, in the Permissions section, choose Create Role Policy.
6. Choose Custom Policy, and then choose Select.
7. Complete the following fields, and then choose Apply Policy:
Policy Name
The name of the policy.
Policy Document
Copy and paste the following text into the policy document:
{
"Version": "2012-10-17",
"Statement": [
{
"Action": [
"cloudwatch:PutMetricData",
"ec2:DescribeTags"
],
"Effect": "Allow",
"Resource": [
"*"
]
}
]
}
For more information about managing policies, see Working with Policies in the IAM User Guide.
Viewing Metrics in the CloudWatch Console
After deploying the CloudWatch configuration file to your environment, check the Amazon CloudWatch
console to view your metrics. Custom metrics will have the prefix Linux System.
API Version 2010-12-01
268
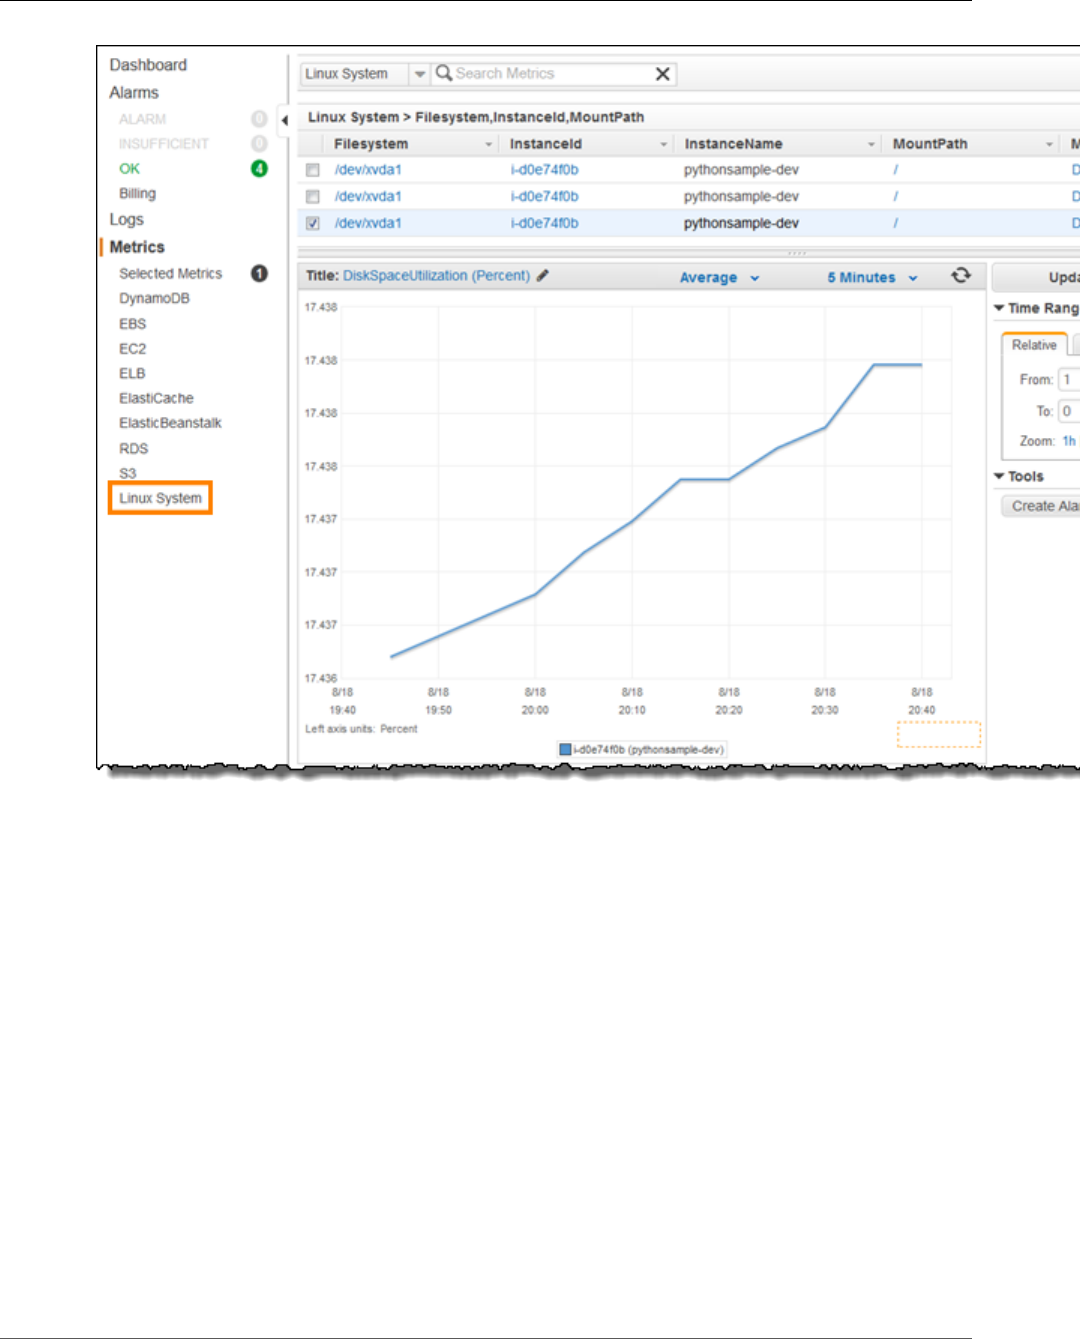
AWS Elastic Beanstalk Developer Guide
Windows Server
Customizing Software on Windows Servers
You may want to customize and configure the software that your application depends on. These files
could be either dependencies required by the application—for example, additional packages or services
that need to be run. For general information on customizing and configuring your Elastic Beanstalk
environments, see AWS Elastic Beanstalk Environment Configuration (p. 164).
Note
YAML relies on consistent indentation. Match the indentation level when replacing content in an
example configuration file and make sure that your text editor uses spaces, not tab characters,
to indent.
Configuration files support the following keys that affect the Windows server on which your application
runs.
Keys are processed in the following order.
Note
Older (non-versioned) versions of .NET platform configurations do not process configuration
files in the correct order. Learn more at Migrating to v1 Elastic Beanstalk Windows Server
Platforms (p. 715).
Keys
API Version 2010-12-01
269

AWS Elastic Beanstalk Developer Guide
Windows Server
•Packages (p. 270)
•Sources (p. 270)
•Files (p. 271)
•Commands (p. 272)
•Services (p. 273)
•Container Commands (p. 274)
Packages
Use the packages key to download and install prepackaged applications and components.
Syntax
packages:
name of package manager:
package name: version
Supported Package Formats
Elastic Beanstalk supports MSI packages.
Specifying Versions
Packages are specified as a package name and a URL to the software.
Elastic Beanstalk invokes the package manager associated with your configuration to install the package
you specify, even if a newer version of the package is already installed on the instance. Some package
managers allow you to install an older version; some do not. It is your responsibility to ensure that if you
attempt to install an earlier version of a package, your package manager supports that feature. If you
specify the same version of a package that is already installed, the deployment fails.
Example
The following example specifies a URL to download mysql.
packages:
msi:
mysql: http://dev.mysql.com/get/Downloads/Connector-Net/mysql-connector-net-6.6.5.msi/
from/http://cdn.mysql.com/
Sources
Use the sources key to download an archive file from a public URL and unpack it in a target directory
on the EC2 instance.
Syntax
sources:
target directory: location of archive file
Supported Formats
Elastic Beanstalk currently supports .zip format. You can reference external locations such as Amazon
Simple Storage Service (Amazon S3) (e.g., http://s3.amazonaws.com/mybucket/myobject) as long
as the URL is publically accessible.
API Version 2010-12-01
270

AWS Elastic Beanstalk Developer Guide
Windows Server
Example
The following example downloads a public .zip file from an Amazon S3 bucket and unpacks it into c:/
myproject/myapp.
sources:
"c:/myproject/myapp": http://s3.amazonaws.com/mybucket/myobject.zip
Files
Use the files key to create files on the EC2 instance. The content can be either inline in the
configuration file, or from a URL. The files are written to disk in lexicographic order. To download private
files from Amazon S3, provide an instance profile for authorization.
Syntax
files:
"target file location on disk":
source: URL
authentication: authentication name:
"target file location on disk":
content: |
this is my content
encoding: encoding format
Options
content
(Optional) A string.
source
(Optional) The URL from which the file is loaded. This option cannot be specified with the content
key.
encoding
(Optional) The encoding format. This option is only used for a provided content key value. The
default value is plain.
Valid values: plain | base64
authentication
(Optional) The name of a AWS CloudFormation authentication method to use. You can add
authentication methods to the autoscaling group metadata with the Resources key.
Example
files:
"c:\\targetdirectory\\targetfile.txt":
source: http://foo.bar/myfile
"c:/targetdirectory/targetfile.txt":
content: |
# this is my file
# with content
API Version 2010-12-01
271

AWS Elastic Beanstalk Developer Guide
Windows Server
Note
If you use a backslash (\) in your file path, you must precede that with another backslash (the
escape character) as shown in the previous example.
Commands
Use the commands key to execute commands on the EC2 instance. The commands are processed in
alphabetical order by name, and they run before the application and web server are set up and the
application version file is extracted.
The specified commands run as the Administrator user.
Syntax
commands:
command name:
command: command to run
Options
command
Either an array or a string specifying the command to run. If you use an array, you do not need to
escape space characters or enclose command parameters in quotes.
cwd
(Optional) The working directory. By default, Elastic Beanstalk attempts to find the directory
location of your project. If not found, it uses c:\Windows\System32 as the default.
env
(Optional) Sets environment variables for the command. This property overwrites, rather than
appends, the existing environment.
ignoreErrors
(Optional) A boolean value that determines if other commands should run if the command
contained in the command key fails (returns a nonzero value). Set this value to true if you want to
continue running commands even if the command fails. Set it to false if you want to stop running
commands if the command fails. The default value is false.
test
(Optional) A command that must return the value true (exit code 0) in order for Elastic Beanstalk to
process the command contained in the command key.
waitAfterCompletion
(Optional) Seconds to wait after the command completes before running the next command. If
the system requires a reboot after the command completes, the system reboots after the specified
number of seconds elapses. If the system reboots as a result of a command, Elastic Beanstalk will
recover to the point after the command in the configuration file. The default value is 60 seconds.
You can also specify forever, but the system must reboot before you can run another command.
Example
The following example saves the output of the set command to the specified file. If there is a
subsequent command, Elastic Beanstalk runs that command immediately after this command completes.
If this command requires a reboot, Elastic Beanstalk reboots the instance immediately after the
command completes.
API Version 2010-12-01
272

AWS Elastic Beanstalk Developer Guide
Windows Server
commands:
test:
command: set > c:\\myapp\\set.txt
waitAfterCompletion: 0
Services
Use the services key to define which services should be started or stopped when the instance is
launched. The services key also enables you to specify dependencies on sources, packages, and files so
that if a restart is needed due to files being installed, Elastic Beanstalk takes care of the service restart.
Syntax
services:
windows:
name of service:
files:
- "file name"
sources:
- "directory"
packages:
name of package manager:
"package name[: version]"
commands:
- "name of command"
Options
ensureRunning
(Optional) Set to true to ensure that the service is running after Elastic Beanstalk finishes.
Set to false to ensure that the service is not running after Elastic Beanstalk finishes.
Omit this key to make no changes to the service state.
enabled
(Optional) Set to true to ensure that the service is started automatically upon boot.
Set to false to ensure that the service is not started automatically upon boot.
Omit this key to make no changes to this property.
files
A list of files. If Elastic Beanstalk changes one directly via the files block, the service is restarted.
sources
A list of directories. If Elastic Beanstalk expands an archive into one of these directories, the service
is restarted.
packages
A map of the package manager to a list of package names. If Elastic Beanstalk installs or updates
one of these packages, the service is restarted.
commands
A list of command names. If Elastic Beanstalk runs the specified command, the service is restarted.
API Version 2010-12-01
273

AWS Elastic Beanstalk Developer Guide
Windows Server
Example
services:
windows:
myservice:
enabled: true
ensureRunning: true
Container Commands
Use the container_commands key to execute commands that affect your application source code.
Container commands run after the application and web server have been set up and the application
version archive has been extracted, but before the application version is deployed. Non-container
commands and other customization operations are performed prior to the application source code being
extracted.
Container commands are run from the staging directory, where your source code is extracted prior to
being deployed to the application server. Any changes you make to your source code in the staging
directory with a container command will be included when the source is deployed to its final location.
Use the leader_only option to only run the command on a single instance, or configure a test to
only run the command when a test command evaluates to true. Leader-only container commands
are only executed during environment creation and deployments, while other commands and server
customization operations are performed every time an instance is provisioned or updated. Leader-only
container commands are not executed due to launch configuration changes, such as a change in the AMI
Id or instance type.
Syntax
container_commands:
name of container_command:
command: command to run
Options
command
A string or array of strings to run.
env
(Optional) Set environment variables prior to running the command, overriding any existing value.
cwd
(Optional) The working directory. By default, this is the staging directory of the unzipped
application.
leader_only
(Optional) Only run the command on a single instance chosen by Elastic Beanstalk. Leader-only
container commands are run before other container commands. A command can be leader-only or
have a test, but not both (leader_only takes precedence).
test
(Optional) Run a test command that must return the true in order to run the container command. A
command can be leader-only or have a test, but not both (leader_only takes precedence).
ignoreErrors
(Optional) Do not fail deployments if the container command returns a value other than 0 (success).
Set to true to enable.
API Version 2010-12-01
274

AWS Elastic Beanstalk Developer Guide
Custom Resources
waitAfterCompletion
(Optional) Seconds to wait after the command completes before running the next command. If
the system requires a reboot after the command completes, the system reboots after the specified
number of seconds elapses. If the system reboots as a result of a command, Elastic Beanstalk will
recover to the point after the command in the configuration file. The default value is 60 seconds.
You can also specify forever, but the system must reboot before you can run another command.
Example
The following example saves the output of the set command to the specified file. Elastic Beanstalk runs
the command on one instance, and reboots the instance immediately after the command completes.
container_commands:
foo:
command: set > c:\\myapp\\set.txt
leader_only: true
waitAfterCompletion: 0
Adding and Customizing Elastic Beanstalk
Environment Resources
You may also want to customize your environment resources that are part of your Elastic Beanstalk
environment. For example, you may want to add an Amazon SQS queue and an alarm on queue depth,
or you might want to add an Amazon ElastiCache cluster. You can easily customize your environment at
the same time that you deploy your application version by including a configuration file with your source
bundle.
You can use the Resources key in a configuration file (p. 256) to create and customize AWS resources
in your environment. Resources defined in configuration files are added to the AWS CloudFormation
template used to launch your environment. All AWS CloudFormation resources types are supported.
For example, the following configuration file adds an Auto Scaling lifecycle hook to the default Auto
Scaling group created by Elastic Beanstalk:
~/my-app/.ebextensions/as-hook.config
Resources:
hookrole:
Type: AWS::IAM::Role
Properties:
AssumeRolePolicyDocument: {
"Version" : "2012-10-17",
"Statement": [ {
"Effect": "Allow",
"Principal": {
"Service": [ "autoscaling.amazonaws.com" ]
},
"Action": [ "sts:AssumeRole" ]
} ]
}
Policies: [ {
"PolicyName": "SNS",
"PolicyDocument": {
"Version": "2012-10-17",
"Statement": [{
"Effect": "Allow",
"Resource": "*",
API Version 2010-12-01
275

AWS Elastic Beanstalk Developer Guide
Custom Resources
"Action": [
"sqs:SendMessage",
"sqs:GetQueueUrl",
"sns:Publish"
]
}
]
}
} ]
hooktopic:
Type: AWS::SNS::Topic
Properties:
Subscription:
- Endpoint: "my-email@example.com"
Protocol: email
lifecyclehook:
Type: AWS::AutoScaling::LifecycleHook
Properties:
AutoScalingGroupName: { "Ref" : "AWSEBAutoScalingGroup" }
LifecycleTransition: autoscaling:EC2_INSTANCE_TERMINATING
NotificationTargetARN: { "Ref" : "hooktopic" }
RoleARN: { "Fn::GetAtt" : [ "hookrole", "Arn"] }
This example defines three resources, hookrole, hooktopic and lifecyclehook. The first two
resources are an IAM role, which grants Auto Scaling permission to publish messages to Amazon SNS,
and an SNS topic, which relays messages from the Auto Scaling group to an email address. Elastic
Beanstalk creates these resources with the specified properties and types.
The final resource, lifecyclehook, is the lifecycle hook itself:
lifecyclehook:
Type: AWS::AutoScaling::LifecycleHook
Properties:
AutoScalingGroupName: { "Ref" : "AWSEBAutoScalingGroup" }
LifecycleTransition: autoscaling:EC2_INSTANCE_TERMINATING
NotificationTargetARN: { "Ref" : "hooktopic" }
RoleARN: { "Fn::GetAtt" : [ "hookrole", "Arn"] }
The lifecycle hook definition uses two functions (p. 279) to populate values for the hook's properties.
{ "Ref" : "AWSEBAutoScalingGroup" } retrieves the name of the Auto Scaling group created
by Elastic Beanstalk for the environment. AWSEBAutoScalingGroup is one of the standard resource
names (p. 276) provided by Elastic Beanstalk.
For AWS::IAM::Role, Ref only returns the name of the role, not the ARN. To get the ARN for the
RoleARN parameter, you use another intrinsic function, Fn::GetAtt instead, which can get any
attribute from a resource. RoleARN: { "Fn::GetAtt" : [ "hookrole", "Arn"] } gets the Arn
attribute from the hookrole resource.
{ "Ref" : "hooktopic" } gets the ARN of the Amazon SNS topic created earlier in the configuration
file. The value returned by Ref varies per resource type and can be found in the AWS CloudFormation
User Guide topic for the AWS::SNS::Topic resource type.
Modifying the Resources that Elastic Beanstalk Creates for your
Environment
The resources that Elastic Beanstalk creates for your environment have names. You can use these names
to get information about the resources with a function (p. 279), or modify properties on the resources
to customize their behavior.
Web server environments have the following resources.
API Version 2010-12-01
276

AWS Elastic Beanstalk Developer Guide
Custom Resources
Web server environments
•AWSEBAutoScalingGroup (AWS::AutoScaling::AutoScalingGroup) – The Auto Scaling group attached
to your environment.
•AWSEBAutoScalingLaunchConfiguration (AWS::AutoScaling::LaunchConfiguration) – The launch
configuration attached to your environment's Auto Scaling group.
•AWSEBEnvironmentName (AWS::ElasticBeanstalk::Environment) – Your environment.
•AWSEBSecurityGroup (AWS::EC2::SecurityGroup) – The security group attached to your Auto Scaling
group.
•AWSEBRDSDatabase (AWS::RDS::DBInstance) – The Amazon RDS DB instance attached to your
environment (if applicable).
In a load balanced environment, you can access additional resources related to the load balancer. Classic
load balancers have a resource for the load balancer and one for the security group attached to it.
Application and network load balancers have additional resources for the load balancer's default listener,
listener rule, and target group.
Load balanced environments
•AWSEBLoadBalancer (AWS::ElasticLoadBalancing::LoadBalancer) – Your environment's classic load
balancer.
•AWSEBV2LoadBalancer (AWS::ElasticLoadBalancingV2::LoadBalancer) – Your environment's
application or network load balancer.
•AWSEBLoadBalancerSecurityGroup (AWS::EC2::SecurityGroup) – In a custom VPC only, the name
of the security group that Elastic Beanstalk creates for the load balancer. In a default VPC or EC2
classic, Elastic Load Balancing assigns a default security group to the load balancer.
•AWSEBV2LoadBalancerListener (AWS::ElasticLoadBalancingV2::Listener) – A listener that allows
the load balancer to check for connection requests and forward them to one or more target groups.
•AWSEBV2LoadBalancerListenerRule (AWS::ElasticLoadBalancingV2::ListenerRule) – Defines which
requests an Elastic Load Balancing listener takes action on and the action that it takes.
•AWSEBV2LoadBalancerTargetGroup (AWS::ElasticLoadBalancingV2::TargetGroup) – An Elastic Load
Balancing target group that routes requests to one or more registered targets, such as Amazon EC2
instances.
Worker environments have resources for the SQS queue that buffers incoming requests, and a Amazon
DynamoDB table that the instances use for leader election.
Worker environments
•AWSEBWorkerQueue (AWS::SQS::Queue) – The Amazon SQS queue from which the daemon pulls
requests that need to be processed.
•AWSEBWorkerDeadLetterQueue (AWS::SQS::Queue) – The Amazon SQS queue that stores messages
that cannot be delivered or otherwise were not successfully processed by the daemon.
•AWSEBWorkerCronLeaderRegistry (AWS::DynamoDB::Table) – The Amazon DynamoDB table that is
the internal registry used by the daemon for periodic tasks.
Other AWS CloudFormation Template Keys
We've already introduced configuration file keys from AWS CloudFormation such as Resources, files,
and packages. Elastic Beanstalk adds the contents of configurations files to the AWS CloudFormation
template that supports your environment, so you can use other AWS CloudFormation sections to
perform advanced tasks in your configuration files.
API Version 2010-12-01
277

AWS Elastic Beanstalk Developer Guide
Custom Resources
Keys
•Parameters (p. 278)
•Outputs (p. 278)
•Mappings (p. 279)
Parameters
Parameters are an alternative Elastic Beanstalk's own custom options (p. 255) that you can use to
define values that you use in other places in your configuration files. Like custom options, you can
use parameters to gather user configurable values in one place. Unlike custom options, you can not
use Elastic Beanstalk's API to set parameter values, and the number of parameters you can define in a
template is limited by AWS CloudFormation.
One reason you might want to use parameters is to make your configuration files double as AWS
CloudFormation templates. If you use parameters instead of custom options, you can use the
configuration file to create the same resource in AWS CloudFormation as its own stack. For example, you
could have a configuration file that adds an Amazon EFS file system to your environment for testing, and
then use the same file to create an independent file system that isn't tied to your environment's lifecycle
for production use.
The following example shows the use of parameters to gather user-configurable values at the top of a
configuration file.
Example loadbalancer-accesslogs-existingbucket.config – Parameters
Parameters:
bucket:
Type: String
Description: "Name of the Amazon S3 bucket in which to store load balancer logs"
Default: "my-bucket"
bucketprefix:
Type: String
Description: "Optional prefix. Can't start or end with a /, or contain the word
AWSLogs"
Default: ""
Outputs
You can use an Outputs block to export information about created resources to AWS CloudFormation.
You can then use the Fn::ImportValue function to pull the value into a AWS CloudFormation
template outside of Elastic Beanstalk.
The following example creates an Amazon SNS topic and exports its ARN to AWS CloudFormation with
the name NotificationTopicArn.
Example sns-topic.config
Resources:
NotificationTopic:
Type: AWS::SNS::Topic
Outputs:
NotificationTopicArn:
Description: Notification topic ARN
Value: { "Ref" : "NotificationTopic" }
Export:
Name: NotificationTopicArn
API Version 2010-12-01
278

AWS Elastic Beanstalk Developer Guide
Custom Resources
In a configuration file for a different environment, or a AWS CloudFormation template outside of Elastic
Beanstalk, you can use the Fn::ImportValue function to get the exported ARN. This example assigns
the exported value to an environment property named TOPIC_ARN.
Example env.config
option_settings:
aws:elasticbeanstalk:application:environment:
TOPIC_ARN: '`{ "Fn::ImportValue" : "NotificationTopicArn" }`'
Mappings
You can use a mapping to store key-value pairs organized by namespace. A mapping can help you
organize values that you use throughout your configs, or change a parameter value depending on
another value. For example, the following configuration sets the value of an account ID parameter based
on the current region.
Example loadbalancer-accesslogs-newbucket.config – mappings
Mappings:
Region2ELBAccountId:
us-east-1:
AccountId: "127311923021"
us-west-2:
AccountId: "797873946194"
us-west-1:
AccountId: "027434742980"
eu-west-1:
AccountId: "156460612806"
...
Principal:
AWS:
? "Fn::FindInMap"
:
- Region2ELBAccountId
-
Ref: "AWS::Region"
- AccountId
Functions
You can use functions in your configuration files to populate values for resource properties with
information from other resources or from Elastic Beanstalk configuration option settings. Elastic
Beanstalk supports AWS CloudFormation functions (Ref, Fn::GetAtt, Fn::Join), and one Elastic
Beanstalk-specific function, Fn::GetOptionSetting.
Functions
•Ref (p. 279)
•Fn::GetAtt (p. 280)
•Fn::Join (p. 280)
•Fn::GetOptionSetting (p. 280)
Ref
Use Refto retrieve the default string representation of an AWS resource. The value returned by
Refdepends on the resource type, and sometimes depends on other factors as well. For example, a
API Version 2010-12-01
279

AWS Elastic Beanstalk Developer Guide
Custom Resources
security group (AWS::EC2::SecurityGroup) returns either the name or ID of the security group, depending
on if the security group is in a default VPC, EC2 classic, or a custom VPC.
{ "Ref" : "resource name" }
Note
For details on each resource type, including the return value(s) of Ref, see AWS Resource Types
Reference in the AWS CloudFormation User Guide.
From the sample Auto Scaling lifecycle hook (p. 275):
Resources:
lifecyclehook:
Type: AWS::AutoScaling::LifecycleHook
Properties:
AutoScalingGroupName: { "Ref" : "AWSEBAutoScalingGroup" }
You can also use Ref to retrieve the value of a AWS CloudFormation parameter defined elsewhere in the
same file or in a different configuration file.
Fn::GetAtt
Use Fn::GetAtt to retrieve the value of an attribute on an AWS resource.
{ "Fn::GetAtt" : [ "resource name", "attribute name"] }
From the sample Auto Scaling lifecycle hook (p. 275):
Resources:
lifecyclehook:
Type: AWS::AutoScaling::LifecycleHook
Properties:
RoleARN: { "Fn::GetAtt" : [ "hookrole", "Arn"] }
See Fn::GetAtt for more information.
Fn::Join
Use Fn::Join to combine strings with a delimiter. The strings can be hard-coded or use the output from
Fn::GetAtt or Ref.
{ "Fn::Join" : [ "delimiter", [ "string1", "string2" ] ] }
See Fn::Join fore more information.
Fn::GetOptionSetting
Use Fn::GetOptionSetting to retrieve the value of a configuration option (p. 202) setting applied
to the environment.
"Fn::GetOptionSetting":
Namespace: "namespace"
OptionName: "option name"
DefaultValue: "default value"
From the storing private keys (p. 327) example:
API Version 2010-12-01
280

AWS Elastic Beanstalk Developer Guide
Custom Resources
Resources:
AWSEBAutoScalingGroup:
Metadata:
AWS::CloudFormation::Authentication:
S3Auth:
type: "s3"
buckets: ["elasticbeanstalk-us-west-2-123456789012"]
roleName:
"Fn::GetOptionSetting":
Namespace: "aws:autoscaling:launchconfiguration"
OptionName: "IamInstanceProfile"
DefaultValue: "aws-elasticbeanstalk-ec2-role"
Example Snippets
The following is a list of example configuration files that you can use to customize your Elastic Beanstalk
environments:
•DynamoDB, CloudWatch, and SNS
•Elastic Load Balancing and CloudWatch
•ElastiCache
•RDS and CloudWatch
•SQS, SNS, and CloudWatch
Example Snippets: ElastiCache
The following samples add an Amazon ElastiCache cluster to EC2-Classic and EC2-VPC (both default and
custom VPC) platforms. For more information about these platforms and how you can determine which
ones EC2 supports for your region and your AWS account, see http://docs.aws.amazon.com/AWSEC2/
latest/UserGuide/ec2-supported-platforms.html. Then refer to the section in this topic that applies to
your platform.
•EC2-Classic Platforms (p. 281)
•EC2-VPC (Default) (p. 283)
•EC2-VPC (Custom) (p. 285)
EC2-Classic Platforms
This sample adds an Amazon ElastiCache cluster to an environment with instances launched into the
EC2-Classic platform. All of the properties that are listed in this example are the minimum required
properties that must be set for each resource type. You can download the example at ElastiCache
Example.
Note
This example creates AWS resources, which you may be charged for. For more information about
AWS pricing, go to http://aws.amazon.com/pricing/. Some services are part of the AWS Free
Usage Tier. If you are a new customer, you may test drive these services for free. Go to http://
aws.amazon.com/free/ for more information.
To use this example, do the following:
1. Create an .ebextensions directory in the top-level directory of your source bundle.
2. Create two configuration files with the .config extension and place them in your .ebextensions
directory. One configuration file defines the resources, and the other configuration file defines the
options.
API Version 2010-12-01
281

AWS Elastic Beanstalk Developer Guide
Custom Resources
3. Deploy your application to Elastic Beanstalk.
YAML relies on consistent indentation. Match the indentation level when replacing content in an
example configuration file and make sure that your text editor uses spaces, not tab characters, to
indent.
Create a configuration file (e.g., elasticache.config) that defines the resources. In this example,
we create the ElastiCache cluster by specifying the name of the ElastiCache cluster resource
(MyElastiCache), declaring its type, and then configuring the properties for the cluster. The example
references the name of the ElastiCache security group resource that gets created and defined in this
configuration file. Next, we create an ElastiCache security group. We define the name for this resource,
declare its type, and add a description for the security group. Finally, we set the ingress rules for the
ElastiCache security group to allow access only from instances inside the ElastiCache security group
(MyCacheSecurityGroup) and the Elastic Beanstalk security group (AWSEBSecurityGroup). The
parameter name, AWSEBSecurityGroup, is a fixed resource name provided by Elastic Beanstalk. You
must add AWSEBSecurityGroup to your ElastiCache security group ingress rules in order for your
Elastic Beanstalk application to connect to the instances in your ElastiCache cluster.
#This sample requires you to create a separate configuration file that defines the custom
option settings for CacheCluster properties.
Resources:
MyElastiCache:
Type: AWS::ElastiCache::CacheCluster
Properties:
CacheNodeType:
Fn::GetOptionSetting:
OptionName : CacheNodeType
DefaultValue: cache.m1.small
NumCacheNodes:
Fn::GetOptionSetting:
OptionName : NumCacheNodes
DefaultValue: 1
Engine:
Fn::GetOptionSetting:
OptionName : Engine
DefaultValue: memcached
CacheSecurityGroupNames:
- Ref: MyCacheSecurityGroup
MyCacheSecurityGroup:
Type: AWS::ElastiCache::SecurityGroup
Properties:
Description: "Lock cache down to webserver access only"
MyCacheSecurityGroupIngress:
Type: AWS::ElastiCache::SecurityGroupIngress
Properties:
CacheSecurityGroupName:
Ref: MyCacheSecurityGroup
EC2SecurityGroupName:
Ref: AWSEBSecurityGroup
For more information about the resources used in this example configuration file, see the following
references:
•AWS::ElastiCache::CacheCluster
•AWS::ElastiCache::SecurityGroup
•AWS::ElastiCache:SecurityGroupIngress
Create a separate configuration file called options.config and define the custom option settings.
API Version 2010-12-01
282

AWS Elastic Beanstalk Developer Guide
Custom Resources
option_settings:
"aws:elasticbeanstalk:customoption":
CacheNodeType : cache.m1.small
NumCacheNodes : 1
Engine : memcached
These lines tell Elastic Beanstalk to get the values for the CacheNodeType, NumCacheNodes,
and Engine properties from the CacheNodeType, NumCacheNodes, and Engine values in a
config file (options.config in our example) that contains an option_settings section with an
aws:elasticbeanstalk:customoption section that contains a name-value pair that contains the actual
value to use. In the example above, this means cache.m1.small, 1, and memcached would be used for the
values. For more information about Fn::GetOptionSetting, see Functions (p. 279).
EC2-VPC (Default)
This sample adds an Amazon ElastiCache cluster to an environment with instances launched into the
EC2-VPC platform. Specifically, the information in this section applies to a scenario where EC2 launches
instances into the default VPC. All of the properties in this example are the minimum required properties
that must be set for each resource type. For more information about default VPCs, see Your Default VPC
and Subnets.
Note
This example creates AWS resources, which you may be charged for. For more information about
AWS pricing, go to http://aws.amazon.com/pricing/. Some services are part of the AWS Free
Usage Tier. If you are a new customer, you may test drive these services for free. Go to http://
aws.amazon.com/free/ for more information.
To use this example, do the following:
1. Create an .ebextensions directory in the top-level directory of your source bundle.
2. Create two configuration files with the .config extension and place them in your .ebextensions
directory. One configuration file defines the resources, and the other configuration file defines the
options.
3. Deploy your application to Elastic Beanstalk.
YAML relies on consistent indentation. Match the indentation level when replacing content in an
example configuration file and make sure that your text editor uses spaces, not tab characters, to
indent.
Now name the resources configuration file elasticache.config. To create the ElastiCache cluster,
this example specifies the name of the ElastiCache cluster resource (MyElastiCache), declares its type,
and then configures the properties for the cluster. The example references the ID of the security group
resource that we create and define in this configuration file.
Next, we create an EC2 security group. We define the name for this resource, declare its type, add
a description, and set the ingress rules for the security group to allow access only from instances
inside the Elastic Beanstalk security group (AWSEBSecurityGroup). (The parameter name,
AWSEBSecurityGroup, is a fixed resource name provided by Elastic Beanstalk. You must add
AWSEBSecurityGroup to your ElastiCache security group ingress rules in order for your Elastic
Beanstalk application to connect to the instances in your ElastiCache cluster.)
The ingress rules for the EC2 security group also define the IP protocol and port numbers on which the
cache nodes can accept connections. For Redis, the default port number is 6379.
#This sample requires you to create a separate configuration file that defines the custom
option settings for CacheCluster properties.
API Version 2010-12-01
283

AWS Elastic Beanstalk Developer Guide
Custom Resources
Resources:
MyCacheSecurityGroup:
Type: "AWS::EC2::SecurityGroup"
Properties:
GroupDescription: "Lock cache down to webserver access only"
SecurityGroupIngress :
- IpProtocol : "tcp"
FromPort :
Fn::GetOptionSetting:
OptionName : "CachePort"
DefaultValue: "6379"
ToPort :
Fn::GetOptionSetting:
OptionName : "CachePort"
DefaultValue: "6379"
SourceSecurityGroupName:
Ref: "AWSEBSecurityGroup"
MyElastiCache:
Type: "AWS::ElastiCache::CacheCluster"
Properties:
CacheNodeType:
Fn::GetOptionSetting:
OptionName : "CacheNodeType"
DefaultValue : "cache.t1.micro"
NumCacheNodes:
Fn::GetOptionSetting:
OptionName : "NumCacheNodes"
DefaultValue : "1"
Engine:
Fn::GetOptionSetting:
OptionName : "Engine"
DefaultValue : "redis"
VpcSecurityGroupIds:
-
Fn::GetAtt:
- MyCacheSecurityGroup
- GroupId
Outputs:
ElastiCache:
Description : "ID of ElastiCache Cache Cluster with Redis Engine"
Value :
Ref : "MyElastiCache"
For more information about the resources used in this example configuration file, see the following
references:
•AWS::ElastiCache::CacheCluster
•AWS::EC2::SecurityGroup
Next, name the options configuration file options.config and define the custom option settings.
option_settings:
"aws:elasticbeanstalk:customoption":
CacheNodeType : cache.t1.micro
NumCacheNodes : 1
Engine : redis
CachePort : 6379
These lines tell Elastic Beanstalk to get the values for the CacheNodeType, NumCacheNodes,
Engine, and CachePort properties from the CacheNodeType, NumCacheNodes, Engine,
and CachePort values in a config file (options.config in our example). That file includes an
API Version 2010-12-01
284

AWS Elastic Beanstalk Developer Guide
Custom Resources
aws:elasticbeanstalk:customoption section (under option_settings) that contains name-
value pairs with the actual values to use. In the preceding example, cache.t1.micro, 1, redis,
and 6379 would be used for the values. For more information about Fn::GetOptionSetting, see
Functions (p. 279).
EC2-VPC (Custom)
If you create a custom VPC on the EC2-VPC platform and specify it as the VPC into which EC2 launches
instances, the process of adding an Amazon ElastiCache cluster to your environment differs from that of
a default VPC. The main difference is that you must create a subnet group for the ElastiCache cluster. All
of the properties in this example are the minimum required properties that must be set for each resource
type.
Note
This example creates AWS resources, which you may be charged for. For more information about
AWS pricing, go to http://aws.amazon.com/pricing/. Some services are part of the AWS Free
Usage Tier. If you are a new customer, you may test drive these services for free. Go to http://
aws.amazon.com/free/ for more information.
To use this example, do the following:
1. Create an .ebextensions directory in the top-level directory of your source bundle.
2. Create two configuration files with the .config extension and place them in your .ebextensions
directory. One configuration file defines the resources, and the other configuration file defines the
options.
3. Deploy your application to Elastic Beanstalk.
YAML relies on consistent indentation. Match the indentation level when replacing content in an
example configuration file and make sure that your text editor uses spaces, not tab characters, to
indent.
Now name the resources configuration file elasticache.config. To create the ElastiCache cluster, this
example specifies the name of the ElastiCache cluster resource (MyElastiCache), declares its type, and
then configures the properties for the cluster. The properties in the example reference the name of the
subnet group for the ElastiCache cluster as well as the ID of security group resource that we create and
define in this configuration file.
Next, we create an EC2 security group. We define the name for this resource, declare its type, add
a description, the VPC ID, and set the ingress rules for the security group to allow access only from
instances inside the Elastic Beanstalk security group (AWSEBSecurityGroup). (The parameter
name, AWSEBSecurityGroup, is a fixed resource name provided by Elastic Beanstalk. You must
add AWSEBSecurityGroup to your ElastiCache security group ingress rules in order for your Elastic
Beanstalk application to connect to the instances in your ElastiCache cluster.)
The ingress rules for the EC2 security group also define the IP protocol and port numbers on which the
cache nodes can accept connections. For Redis, the default port number is 6379. Finally, this example
creates a subnet group for the ElastiCache cluster. We define the name for this resource, declare its type,
and add a description and ID of the subnet in the subnet group.
Note
We recommend that you use private subnets for the ElastiCache cluster. For more information
about a VPC with a private subnet, see http://docs.aws.amazon.com/AmazonVPC/latest/
UserGuide/VPC_Scenario2.html.
#This sample requires you to create a separate configuration file that defines the custom
option settings for CacheCluster properties.
Resources:
API Version 2010-12-01
285

AWS Elastic Beanstalk Developer Guide
Custom Resources
MyElastiCache:
Type: "AWS::ElastiCache::CacheCluster"
Properties:
CacheNodeType:
Fn::GetOptionSetting:
OptionName : "CacheNodeType"
DefaultValue : "cache.t1.micro"
NumCacheNodes:
Fn::GetOptionSetting:
OptionName : "NumCacheNodes"
DefaultValue : "1"
Engine:
Fn::GetOptionSetting:
OptionName : "Engine"
DefaultValue : "redis"
CacheSubnetGroupName:
Ref: "MyCacheSubnets"
VpcSecurityGroupIds:
- Ref: "MyCacheSecurityGroup"
MyCacheSecurityGroup:
Type: "AWS::EC2::SecurityGroup"
Properties:
GroupDescription: "Lock cache down to webserver access only"
VpcId:
Fn::GetOptionSetting:
OptionName : "VpcId"
SecurityGroupIngress :
- IpProtocol : "tcp"
FromPort :
Fn::GetOptionSetting:
OptionName : "CachePort"
DefaultValue: "6379"
ToPort :
Fn::GetOptionSetting:
OptionName : "CachePort"
DefaultValue: "6379"
SourceSecurityGroupId:
Ref: "AWSEBSecurityGroup"
MyCacheSubnets:
Type: "AWS::ElastiCache::SubnetGroup"
Properties:
Description: "Subnets for ElastiCache"
SubnetIds:
Fn::GetOptionSetting:
OptionName : "CacheSubnets"
Outputs:
ElastiCache:
Description : "ID of ElastiCache Cache Cluster with Redis Engine"
Value :
Ref : "MyElastiCache"
For more information about the resources used in this example configuration file, see the following
references:
•AWS::ElastiCache::CacheCluster
•AWS::EC2::SecurityGroup
•AWS::ElastiCache::SubnetGroup
Next, name the options configuration file options.config and define the custom option settings.
Note
In the following example, replace the example CacheSubnets and VpcId values with your own
subnets and VPC.
API Version 2010-12-01
286

AWS Elastic Beanstalk Developer Guide
Custom Resources
option_settings:
"aws:elasticbeanstalk:customoption":
CacheNodeType : cache.t1.micro
NumCacheNodes : 1
Engine : redis
CachePort : 6379
CacheSubnets:
- subnet-1a1a1a1a
- subnet-2b2b2b2b
- subnet-3c3c3c3c
VpcId: vpc-4d4d4d4d
These lines tell Elastic Beanstalk to get the values for the CacheNodeType, NumCacheNodes, Engine,
CachePort, CacheSubnets, and VpcId properties from the CacheNodeType, NumCacheNodes,
Engine, CachePort, CacheSubnets, and VpcId values in a config file (options.config in
our example). That file includes an aws:elasticbeanstalk:customoption section (under
option_settings) that contains name-value pairs with sample values. In the example above,
cache.t1.micro, 1, redis, 6379, subnet-1a1a1a1a, subnet-2b2b2b2b, subnet-3c3c3c3c, and
vpc-4d4d4d4d would be used for the values. For more information about Fn::GetOptionSetting,
see Functions (p. 279).
Example Snippet: SQS, CloudWatch, and SNS
This example adds an Amazon SQS queue and an alarm on queue depth to the environment. The
properties that you see in this example are the minimum required properties that you must set for each
of these resources. You can download the example at SQS, SNS, and CloudWatch.
Note
This example creates AWS resources, which you may be charged for. For more information about
AWS pricing, go to http://aws.amazon.com/pricing/. Some services are part of the AWS Free
Usage Tier. If you are a new customer, you may test drive these services for free. Go to http://
aws.amazon.com/free/ for more information.
To use this example, do the following:
1. Create an .ebextensions directory in the top-level directory of your source bundle.
2. Create two configuration files with the .config extension and place them in your .ebextensions
directory. One configuration file defines the resources, and the other configuration file defines the
options.
3. Deploy your application to Elastic Beanstalk.
YAML relies on consistent indentation. Match the indentation level when replacing content in an
example configuration file and make sure that your text editor uses spaces, not tab characters, to
indent.
Create a configuration file (e.g., sqs.config) that defines the resources. In this example, we create an SQS
queue and define the VisbilityTimeout property in the MySQSQueue resource. Next, we create an
SNS Topic and specify that email gets sent to someone@example.com when the alarm is fired. Finally,
we create a CloudWatch alarm if the queue grows beyond 10 messages. In the Dimensions property,
we specify the name of the dimension and the value representing the dimension measurement. We use
Fn::GetAtt to return the value of QueueName from MySQSQueue.
#This sample requires you to create a separate configuration file to define the custom
options for the SNS topic and SQS queue.
Resources:
MySQSQueue:
Type: AWS::SQS::Queue
Properties:
API Version 2010-12-01
287

AWS Elastic Beanstalk Developer Guide
Custom Resources
VisibilityTimeout:
Fn::GetOptionSetting:
OptionName: VisibilityTimeout
DefaultValue: 30
AlarmTopic:
Type: AWS::SNS::Topic
Properties:
Subscription:
- Endpoint:
Fn::GetOptionSetting:
OptionName: AlarmEmail
DefaultValue: "nobody@amazon.com"
Protocol: email
QueueDepthAlarm:
Type: AWS::CloudWatch::Alarm
Properties:
AlarmDescription: "Alarm if queue depth grows beyond 10 messages"
Namespace: "AWS/SQS"
MetricName: ApproximateNumberOfMessagesVisible
Dimensions:
- Name: QueueName
Value : { "Fn::GetAtt" : [ "MySQSQueue", "QueueName"] }
Statistic: Sum
Period: 300
EvaluationPeriods: 1
Threshold: 10
ComparisonOperator: GreaterThanThreshold
AlarmActions:
- Ref: AlarmTopic
InsufficientDataActions:
- Ref: AlarmTopic
Outputs :
QueueURL:
Description : "URL of newly created SQS Queue"
Value : { Ref : "MySQSQueue" }
QueueARN :
Description : "ARN of newly created SQS Queue"
Value : { "Fn::GetAtt" : [ "MySQSQueue", "Arn"]}
QueueName :
Description : "Name newly created SQS Queue"
Value : { "Fn::GetAtt" : [ "MySQSQueue", "QueueName"]}
For more information about the resources used in this example configuration file, see the following
references:
•AWS::SQS::Queue
•AWS::SNS::Topic
•AWS::CloudWatch::Alarm
Create a separate configuration file called options.config and define the custom option settings.
option_settings:
"aws:elasticbeanstalk:customoption":
VisibilityTimeout : 30
AlarmEmail : "nobody@example.com"
These lines tell Elastic Beanstalk to get the values for the VisibilityTimeout and Subscription Endpoint
properties from the VisibilityTimeout and Subscription Endpoint values in a config file (options.config
in our example) that contains an option_settings section with an aws:elasticbeanstalk:customoption
section that contains a name-value pair that contains the actual value to use. In the example above,
API Version 2010-12-01
288

AWS Elastic Beanstalk Developer Guide
Custom Resources
this means 30 and "nobody@amazon.com" would be used for the values. For more information about
Fn::GetOptionSetting, see Functions (p. 279)
Example: DynamoDB, CloudWatch, and SNS
This configuration file sets up the DynamoDB table as a session handler for a PHP-based application
using the AWS SDK for PHP 2. To use this example, you must have an IAM instance profile, which is
added to the instances in your environment and used to access the DynamoDB table.
You can download the sample that we'll use in this step at DynamoDB Session Support Example. The
sample contains the following files:
• The sample application, index.php
• A configuration file, dynamodb.config, to create and configure a DynamoDB table and other AWS
resources as well as install software on the EC2 instances that host the application in an Elastic
Beanstalk environment
• An configuration file, options.config, that overrides the defaults in dynamodb.config with
specific settings for this particular installation
index.php
<?php
// Include the SDK using the Composer autoloader
require '../vendor/autoload.php';
use Aws\DynamoDb\DynamoDbClient;
// Grab the session table name and region from the configuration file
list($tableName, $region) = file(__DIR__ . '/../sessiontable');
$tableName = rtrim($tableName);
$region = rtrim($region);
// Create a DynamoDB client and register the table as the session handler
$dynamodb = DynamoDbClient::factory(array('region' => $region));
$handler = $dynamodb->registerSessionHandler(array('table_name' => $tableName, 'hash_key'
=> 'username'));
// Grab the instance ID so we can display the EC2 instance that services the request
$instanceId = file_get_contents("http://169.254.169.254/latest/meta-data/instance-id");
?>
<h1>Elastic Beanstalk PHP Sessions Sample</h1>
<p>This sample application shows the integration of the Elastic Beanstalk PHP
container and the session support for DynamoDB from the AWS SDK for PHP 2.
Using DynamoDB session support, the application can be scaled out across
multiple web servers. For more details, see the
<a href="http://aws.amazon.com/php/">PHP Developer Center</a>.</p>
<form id="SimpleForm" name="SimpleForm" method="post" action="index.php">
<?php
echo 'Request serviced from instance ' . $instanceId . '<br/>';
echo '<br/>';
if (isset($_POST['continue'])) {
session_start();
$_SESSION['visits'] = $_SESSION['visits'] + 1;
echo 'Welcome back ' . $_SESSION['username'] . '<br/>';
echo 'This is visit number ' . $_SESSION['visits'] . '<br/>';
session_write_close();
echo '<br/>';
echo '<input type="Submit" value="Refresh" name="continue" id="continue"/>';
API Version 2010-12-01
289

AWS Elastic Beanstalk Developer Guide
Custom Resources
echo '<input type="Submit" value="Delete Session" name="killsession" id="killsession"/>';
} elseif (isset($_POST['killsession'])) {
session_start();
echo 'Goodbye ' . $_SESSION['username'] . '<br/>';
session_destroy();
echo 'Username: <input type="text" name="username" id="username" size="30"/><br/>';
echo '<br/>';
echo '<input type="Submit" value="New Session" name="newsession" id="newsession"/>';
} elseif (isset($_POST['newsession'])) {
session_start();
$_SESSION['username'] = $_POST['username'];
$_SESSION['visits'] = 1;
echo 'Welcome to a new session ' . $_SESSION['username'] . '<br/>';
session_write_close();
echo '<br/>';
echo '<input type="Submit" value="Refresh" name="continue" id="continue"/>';
echo '<input type="Submit" value="Delete Session" name="killsession" id="killsession"/>';
} else {
echo 'To get started, enter a username.<br/>';
echo '<br/>';
echo 'Username: <input type="text" name="username" id="username" size="30"/><br/>';
echo '<input type="Submit" value="New Session" name="newsession" id="newsession"/>';
}
?>
</form>
.ebextensions/dynamodb.config
Resources:
SessionTable:
Type: AWS::DynamoDB::Table
Properties:
KeySchema:
HashKeyElement:
AttributeName:
Fn::GetOptionSetting:
OptionName : SessionHashKeyName
DefaultValue: "username"
AttributeType:
Fn::GetOptionSetting:
OptionName : SessionHashKeyType
DefaultValue: "S"
ProvisionedThroughput:
ReadCapacityUnits:
Fn::GetOptionSetting:
OptionName : SessionReadCapacityUnits
DefaultValue: 1
WriteCapacityUnits:
Fn::GetOptionSetting:
OptionName : SessionWriteCapacityUnits
DefaultValue: 1
SessionWriteCapacityUnitsLimit:
Type: AWS::CloudWatch::Alarm
Properties:
AlarmDescription: { "Fn::Join" : ["", [{ "Ref" : "AWSEBEnvironmentName" }, " write
capacity limit on the session table." ]]}
Namespace: "AWS/DynamoDB"
MetricName: ConsumedWriteCapacityUnits
Dimensions:
- Name: TableName
Value: { "Ref" : "SessionTable" }
Statistic: Sum
Period: 300
EvaluationPeriods: 12
API Version 2010-12-01
290

AWS Elastic Beanstalk Developer Guide
Custom Resources
Threshold:
Fn::GetOptionSetting:
OptionName : SessionWriteCapacityUnitsAlarmThreshold
DefaultValue: 240
ComparisonOperator: GreaterThanThreshold
AlarmActions:
- Ref: SessionAlarmTopic
InsufficientDataActions:
- Ref: SessionAlarmTopic
SessionReadCapacityUnitsLimit:
Type: AWS::CloudWatch::Alarm
Properties:
AlarmDescription: { "Fn::Join" : ["", [{ "Ref" : "AWSEBEnvironmentName" }, " read
capacity limit on the session table." ]]}
Namespace: "AWS/DynamoDB"
MetricName: ConsumedReadCapacityUnits
Dimensions:
- Name: TableName
Value: { "Ref" : "SessionTable" }
Statistic: Sum
Period: 300
EvaluationPeriods: 12
Threshold:
Fn::GetOptionSetting:
OptionName : SessionReadCapacityUnitsAlarmThreshold
DefaultValue: 240
ComparisonOperator: GreaterThanThreshold
AlarmActions:
- Ref: SessionAlarmTopic
InsufficientDataActions:
- Ref: SessionAlarmTopic
SessionThrottledRequestsAlarm:
Type: AWS::CloudWatch::Alarm
Properties:
AlarmDescription: { "Fn::Join" : ["", [{ "Ref" : "AWSEBEnvironmentName" }, ":
requests are being throttled." ]]}
Namespace: AWS/DynamoDB
MetricName: ThrottledRequests
Dimensions:
- Name: TableName
Value: { "Ref" : "SessionTable" }
Statistic: Sum
Period: 300
EvaluationPeriods: 1
Threshold:
Fn::GetOptionSetting:
OptionName: SessionThrottledRequestsThreshold
DefaultValue: 1
ComparisonOperator: GreaterThanThreshold
AlarmActions:
- Ref: SessionAlarmTopic
InsufficientDataActions:
- Ref: SessionAlarmTopic
SessionAlarmTopic:
Type: AWS::SNS::Topic
Properties:
Subscription:
- Endpoint:
Fn::GetOptionSetting:
OptionName: SessionAlarmEmail
DefaultValue: "nobody@amazon.com"
Protocol: email
API Version 2010-12-01
291

AWS Elastic Beanstalk Developer Guide
Custom Resources
files:
"/var/app/sessiontable":
mode: "000444"
content: |
`{"Ref" : "SessionTable"}`
`{"Ref" : "AWS::Region"}`
"/var/app/composer.json":
mode: "000744"
content:
{
"require": {
"aws/aws-sdk-php": "*"
}
}
container_commands:
"1-install-composer":
command: "cd /var/app; curl -s http://getcomposer.org/installer | php"
"2-install-dependencies":
command: "cd /var/app; php composer.phar install"
"3-cleanup-composer":
command: "rm -Rf /var/app/composer.*"
In the sample configuration file, we first create the DynamoDB table and configure the primary key
structure for the table and the capacity units to allocate sufficient resources to provide the requested
throughput. Next, we create CloudWatch alarms for WriteCapacity and ReadCapacity. We create an
SNS topic that sends email to "nobody@amazon.com" if the alarm thresholds are breached.
After we create and configure our AWS resources for our environment, we need to customize the EC2
instances. We use the files key to pass the details of the DynamoDB table to the EC2 instances in our
environment as well as add a "require" in the composer.json file for the AWS SDK for PHP 2. Finally,
we run container commands to install composer, the required dependencies, and then remove the
installer.
.ebextensions/options.config
option_settings:
"aws:elasticbeanstalk:customoption":
SessionHashKeyName : username
SessionHashKeyType : S
SessionReadCapacityUnits : 1
SessionReadCapacityUnitsAlarmThreshold : 240
SessionWriteCapacityUnits : 1
SessionWriteCapacityUnitsAlarmThreshold : 240
SessionThrottledRequestsThreshold : 1
SessionAlarmEmail : me@example.com
Replace the SessionAlarmEmail value with the email where you want alarm notifications sent. The
options.config file contains the values used for some of the variables defined in dynamodb.config.
For example, dynamodb.config contains the following lines:
Subscription:
- Endpoint:
Fn::GetOptionSetting:
OptionName: SessionAlarmEmail
DefaultValue: "nobody@amazon.com"
These lines that tell Elastic Beanstalk to get the value for the Endpoint property from the
SessionAlarmEmail value in a config file (options.config in our sample application) that contains an
option_settings section with an aws:elasticbeanstalk:customoption section that contains a name-value
API Version 2010-12-01
292
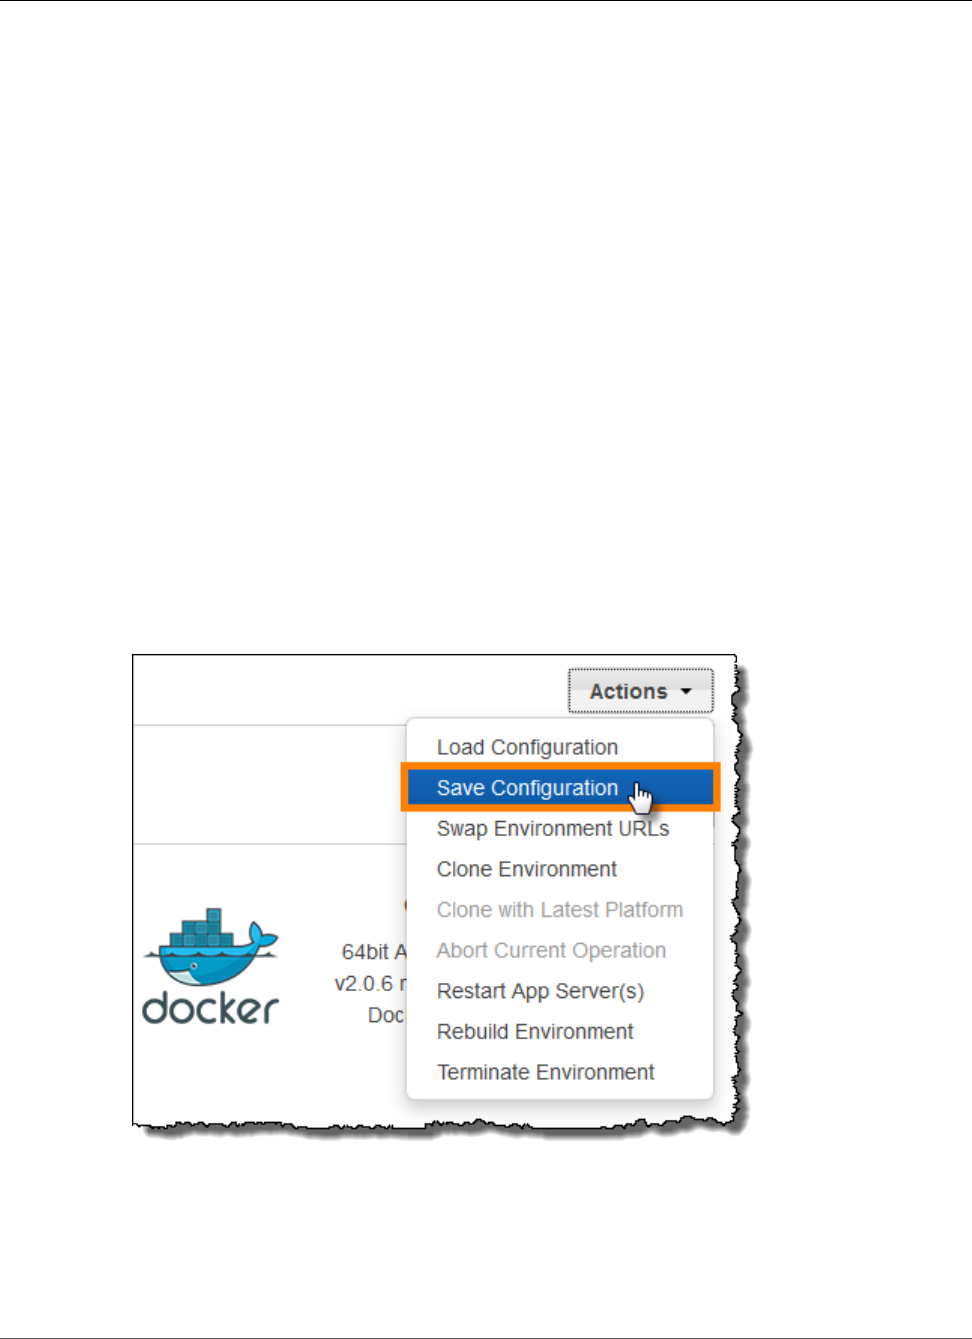
AWS Elastic Beanstalk Developer Guide
Saved Configurations
pair that contains the actual value to use. In the example above, this means SessionAlarmEmail would
be assigned the value nobody@amazon.com.
For more information about the CloudFormation resources used in this example, see the following
references:
•AWS::DynamoDB::Table
•AWS::CloudWatch::Alarm
•AWS::SNS::Topic
Using Elastic Beanstalk Saved Configurations
You can save your environment's configuration as an object in Amazon S3 that can be applied to other
environments during environment creation, or applied to a running environment. Saved configurations
are YAML formatted templates that define an environment's platform configuration (p. 26), tier (p. 14),
configuration option (p. 202) settings, and tags.
Create a saved configuration from the current state of your environment in the Elastic Beanstalk
Management Console:
To save an environment's configuration
1. Open the Elastic Beanstalk console.
2. Navigate to the management page (p. 65) for your environment.
3. Choose Actions and then choose Save Configuration.
4. Type a configuration name and description and then choose Save.
The saved configuration includes any settings that you have applied to the environment with the console
or any other client that uses the Elastic Beanstalk API. You can then apply the saved configuration to
your environment at a later date to restore it to its previous state, or apply it to a new environment
during environment creation (p. 78).
API Version 2010-12-01
293

AWS Elastic Beanstalk Developer Guide
Saved Configurations
You can download a configuration using the EB CLI the section called “eb config” (p. 518) command,
as shown in the following example, NAME is the name of your saved configuration.
eb config get NAME
To apply a saved configuration during environment creation (AWS Management Console)
1. Open the Elastic Beanstalk console.
2. Choose an application.
3. Choose Saved Configurations.
4. Choose a saved configuration and then choose Launch environment.
5. Proceed through the wizard to create your environment.
Saved configurations do not include settings applied with configuration files (p. 256) in your
application's source code. If the same setting is applied in both a configuration file and saved
configuration, the setting in the saved configuration takes precedence. Likewise, options specified in
the AWS Management Console override options in saved configurations. For more information, see
Precedence (p. 203).
Saved configurations are stored in the Elastic Beanstalk S3 bucket in a folder named after your
application. For example, configurations for an application named my-app in the us-west-2
region for account number 0123456789012 can be found at s3://elasticbeanstalk-us-
west-2-0123456789012/resources/templates/my-app/.
View the contents of a saved configuration by opening it in a text editor. The following example
configuration shows the configuration of a web server environment launched with the Elastic Beanstalk
Management Console:
EnvironmentConfigurationMetadata:
Description: Saved configuration from a multicontainer Docker environment created with
the Elastic Beanstalk Management Console
DateCreated: '1452824453000'
DateModified: '1452824453000'
SolutionStack: 64bit Amazon Linux 2015.09 v2.0.6 running Multi-container Docker 1.7.1
(Generic)
OptionSettings:
aws:elasticbeanstalk:command:
BatchSize: '30'
BatchSizeType: Percentage
aws:elasticbeanstalk:sns:topics:
Notification Endpoint: me@example.com
aws:elb:policies:
ConnectionDrainingEnabled: true
ConnectionDrainingTimeout: '20'
aws:elb:loadbalancer:
CrossZone: true
aws:elasticbeanstalk:environment:
ServiceRole: aws-elasticbeanstalk-service-role
aws:elasticbeanstalk:application:
Application Healthcheck URL: /
aws:elasticbeanstalk:healthreporting:system:
SystemType: enhanced
aws:autoscaling:launchconfiguration:
IamInstanceProfile: aws-elasticbeanstalk-ec2-role
InstanceType: t2.micro
EC2KeyName: workstation-uswest2
aws:autoscaling:updatepolicy:rollingupdate:
RollingUpdateType: Health
RollingUpdateEnabled: true
API Version 2010-12-01
294

AWS Elastic Beanstalk Developer Guide
Saved Configurations
EnvironmentTier:
Type: Standard
Name: WebServer
AWSConfigurationTemplateVersion: 1.1.0.0
Tags:
Cost Center: WebApp Dev
You can modify the contents of a saved configuration and save it in the same location in Amazon S3. Any
properly formatted saved configuration stored in the right location can be applied to an environment
with the Elastic Beanstalk Management Console.
The following keys are supported:
•AWSConfigurationTemplateVersion (required) – The configuration template version (1.1.0.0).
AWSConfigurationTemplateVersion: 1.1.0.0
•SolutionStack – The full name of the solution stack (p. 26) used to create the environment:
SolutionStack: 64bit Amazon Linux 2015.09 v2.0.6 running Multi-container Docker 1.7.1
(Generic)
•OptionSettings – Configuration option (p. 202) settings to apply to the environment. For example,
the following entry sets the instance type to t2.micro:
OptionSettings:
aws:autoscaling:launchconfiguration:
InstanceType: t2.micro
•Tags – Up to 47 tags to apply to resources created within the environment.
Tags:
Cost Center: WebApp Dev
•EnvironmentTier – The type of environment to create. For a web server environment, you can exclude
this section (web server is the default). For a worker environment, use the following:
EnvironmentTier:
Name: Worker
Type: SQS/HTTP
•CName – The CNAME for the environment. Include a + character at the end of the name to enable
groups:
CName: front-A08G28LG+
•EnvironmentName – The name of the environment to create. Include a + character at the end of the
name to enable groups:
EnvironmentName: front+
With groups enabled, you must specify a group name when you create the environments. Elastic
Beanstalk appends the group name to the environment name with a hyphen. For example, with the
environment name front+ and the group name dev, Elastic Beanstalk will create the environment
with the name front-dev.
•EnvironmentLinks – A map of variable names and environment names of dependencies. The following
example makes the worker+ environment a dependency and tells Elastic Beanstalk to save the link
information to a variable named WORKERQUEUE.
API Version 2010-12-01
295

AWS Elastic Beanstalk Developer Guide
env.yaml
EnvironmentLinks:
"WORKERQUEUE" : "worker+"
The value of the link variable varies depending on the type of the linked environment. For a web server
environment, the link is the environment's CNAME. For a worker environment, the link is the name of
the environment's Amazon SQS queue.
The CName, EnvironmentName and EnvironmentLinks keys can be used to create environment
groups (p. 122) and links to other environments (p. 162). These features are currently supported when
using the EB CLI, AWS CLI or an SDK. When using these features, you can include the saved configuration
in your source code as an environment manifest (p. 296) instead of referencing a saved configuration
stored in Amazon S3. See the corresponding topics for more information.
See the following topics for alternate methods of creating and applying saved configurations:
•Setting Configuration Options Before Environment Creation (p. 205)
•Setting Configuration Options During Environment Creation (p. 209)
•Setting Configuration Options After Environment Creation (p. 213)
Environment Manifest (env.yaml)
You can include a YAML formatted environment manifest in the root of your application source bundle
to configure the environment name, solution stack and environment links (p. 162) to use when creating
your environment. An environment manifest uses the same format as Saved Configurations (p. 293).
This file format includes support for environment groups. To use groups, specify the environment name
in the manifest with a + symbol at the end. When you create or update the environment, specify the
group name with --group-name (AWS CLI) or --env-group-suffix (EB CLI). For more information on
groups, see Creating and Updating Groups of AWS Elastic Beanstalk Environments (p. 122).
The following example manifest defines an web server environment with a link to a worker environment
component that it is dependent upon. The manifest uses groups to allow creating multiple environments
with the same source bundle:
~/myapp/frontend/env.yaml
AWSConfigurationTemplateVersion: 1.1.0.0
SolutionStack: 64bit Amazon Linux 2015.09 v2.0.6 running Multi-container Docker 1.7.1
(Generic)
OptionSettings:
aws:elasticbeanstalk:command:
BatchSize: '30'
BatchSizeType: Percentage
aws:elasticbeanstalk:sns:topics:
Notification Endpoint: me@example.com
aws:elb:policies:
ConnectionDrainingEnabled: true
ConnectionDrainingTimeout: '20'
aws:elb:loadbalancer:
CrossZone: true
aws:elasticbeanstalk:environment:
ServiceRole: aws-elasticbeanstalk-service-role
aws:elasticbeanstalk:application:
Application Healthcheck URL: /
aws:elasticbeanstalk:healthreporting:system:
SystemType: enhanced
API Version 2010-12-01
296

AWS Elastic Beanstalk Developer Guide
Custom Image
aws:autoscaling:launchconfiguration:
IamInstanceProfile: aws-elasticbeanstalk-ec2-role
InstanceType: t2.micro
EC2KeyName: workstation-uswest2
aws:autoscaling:updatepolicy:rollingupdate:
RollingUpdateType: Health
RollingUpdateEnabled: true
Tags:
Cost Center: WebApp Dev
CName: front-A08G28LG+
EnvironmentName: front+
EnvironmentLinks:
"WORKERQUEUE" : "worker+"
For more information on the saved configuration format and supported keys, see Using Elastic Beanstalk
Saved Configurations (p. 293)
Creating a Custom Amazon Machine Image (AMI)
When you create an AWS Elastic Beanstalk environment, you can specify an Amazon Machine Image
(AMI) to use instead of the standard Elastic Beanstalk AMI included in your platform configuration's
solution stack. A custom AMI can improve provisioning times when instances are launched in your
environment if you need to install a lot of software that isn't included in the standard AMIs.
Using configuration files (p. 256) is great for configuring and customizing your environment quickly
and consistently. Applying configurations, however, can start to take a long time during environment
creation and updates. If you do a lot of server configuration in configuration files, you can reduce this
time by making a custom AMI that already has the software and configuration that you need.
A custom AMI also allows you to make changes to low level components, such as the Linux kernel, that
are difficult to implement or take a long time to apply in configuration files. To create a custom AMI,
launch an Elastic Beanstalk platform AMI in Amazon EC2, customize the software and configuration to
your needs, and then stop the instance and save an AMI from it.
To identify the base Elastic Beanstalk AMI
1. Open the Elastic Beanstalk console.
2. Create an Elastic Beanstalk environment running your application. For more information on how to
launch an Elastic Beanstalk application, go to the Getting Started Using Elastic Beanstalk (p. 3).
3. Navigate to the management page (p. 65) for your environment.
4. Choose Configuration
5. Next to Instances, choose .
6. Note the value in the Custom AMI ID box.
7. Terminate the environment.
The value in the Custom AMI ID field is the stock Elastic Beanstalk AMI for the platform version, EC2
instance architecture and region in which you created your environment. If you need to create AMIs for
multiple platforms, architectures or regions, repeat this process to identify the correct base AMI for each
combination.
Note
Do not create an AMI from an instance that has been launched in an Elastic Beanstalk
environment. Elastic Beanstalk makes changes to instances during provisioning that can cause
issues in the saved AMI. Saving an image from an instance in an Elastic Beanstalk environment
will also bake in the version of your application that was deployed to the instance.
API Version 2010-12-01
297

AWS Elastic Beanstalk Developer Guide
Custom Image
It is also possible to create a custom AMI from a community AMI that was not published by Elastic
Beanstalk. You can use the latest Amazon Linux AMI as a starting point. When you launch an
environment with a non-Beanstalk Linux AMI, Elastic Beanstalk attempts to install platform software
(language, framework, proxy server, etc.) and additional components to support features such as
Enhanced Health Reporting (p. 336).
Note
Non-Beanstalk AMIs are not supported for Elastic Beanstalk Windows Server platforms.
Although you can use a non-Beanstalk AMI with Elastic Beanstalk, the increase in provisioning time that
results from Elastic Beanstalk installing missing components can reduce or eliminate the benefits of
creating a custom AMI in the first place. Other Linux distributions may work with some troubleshooting
but are not officially supported. If your application requires a specific Linux distribution, one alternative
is to create a Docker image and run it on Elastic Beanstalk's single container Docker platform (p. 633) or
multicontainer Docker platform (p. 638).
To create a custom AMI
1. Open the Amazon EC2 console at https://console.aws.amazon.com/ec2/.
2. Choose Launch Instance.
3. Choose Community AMIs
4. Enter the AMI ID of the Elastic Beanstalk or Amazon Linux AMI that you will customize to create a
custom AMI and press Enter.
5. Choose Select to select the AMI.
6. Select an instance type and choose Next: Configure Instance Details.
7. (Linux platforms) Expand the Advanced Details section and paste the following text in the User
Data field:
#cloud-config
repo_releasever: repository version number
repo_upgrade: none
The repository version number is the year and month version in the AMI name. For example, AMIs
based on the March 2015 release of Amazon Linux have a repository version number 2015.03. For
Elastic Beanstalk image, this matches the date shown in the solution stack name for your platform
configuration (p. 26).
Note
These settings configure the lock-on-launch feature, which causes the AMI to use a fixed,
specific repository version when it launches, and disables the automatic installation of
security updates. Both are required to use a custom AMI with Elastic Beanstalk.
8. Proceed through the wizard to launch the EC2 instance. When prompted, select an key pair that you
have access to so that you can connect to the instance for the next steps.
9. Connect to the instance with SSH or RDP.
10. Perform any desired customizations.
11. (Windows platforms) Run the EC2Config service Sysprep. For information about EC2Config, go to
Configuring a Windows Instance Using the EC2Config Service. Ensure that Sysprep is configured to
generate a random password that can be retrieved from the AWS Management Console.
12. In the Amazon EC2 console, stop the EC2 instance and then choose Create Image (EBS AMI) from
the Instance Actions menu.
13. To avoid incurring additional AWS charges, terminate the EC2 instance.
14. To use your custom AMI, specify your custom AMI ID in the Custom AMI ID field in Instances section
of the Configuration page of the Elastic Beanstalk Environment Management Console. Existing
instances will be replaced with new instances launched from the new custom AMI.
API Version 2010-12-01
298

AWS Elastic Beanstalk Developer Guide
HTTPS
When you create a new environment with the custom AMI, you should use the same platform
configuration that you used as a base to create the AMI. If you later apply a platform update (p. 143) to
an environment using a custom AMI, Elastic Beanstalk attempts to apply the library and configuration
updates during the bootstrapping process.
Configuring HTTPS for your Elastic Beanstalk
Environment
If you've purchased and configured a custom domain name (p. 199) for your Elastic Beanstalk
environment, you can use HTTPS to allow users to connect to your web site securely. If you don't own
a domain name, you can still use HTTPS with a self-signed certificate for development and testing
purposes. HTTPS is a must for any application that transmits user data or login information.
The simplest way to use HTTPS with an Elastic Beanstalk environment is to assign a server certificate to
your environment's load balancer (p. 302). When you configure your load balancer to terminate HTTPS,
the connection between the client and the load balancer is secure. Backend connections between the
load balancer and EC2 instances use HTTP, so no additional configuration of the instances is required.
Note
With AWS Certificate Manager (ACM), you can create a trusted certificate for your domain
names for free. ACM certificates can only be used with AWS load balancers and CloudFront
distributions.
To use an ACM certificate with Elastic Beanstalk, see Configuring Your Elastic Beanstalk
Environment's Load Balancer to Terminate HTTPS (p. 302)
If you run your application in a single instance environment, or need to secure the connection all the
way to the EC2 instances behind the load balancer, you can configure the proxy server that runs on the
instance to terminate HTTPS (p. 304). Configuring your instances to terminate HTTPS connections
requires the use of configuration files (p. 256) to modify the software running on the instances, and to
modify security groups to allow secure connections.
For end-to-end HTTPS in a load balanced environment, you can combine instance and load balancer
termination (p. 324) to encrypt both connections. By default, if you configure the load balancer to
forward traffic using HTTPS, it will trust any certificate presented to it by the backend instances. For
maximum security, you can attach policies to the load balancer that prevent it from connecting to
instances that don't present a public certificate that it trusts.
Note
You can also configure the load balancer to relay HTTPS traffic without decrypting it (p. 326).
The down side to this method is that the load balancer cannot see the requests and thus cannot
optimize routing or report response metrics.
If ACM is not available in your region, you can purchase a trusted certificate from a third party. A third
party certificate can be used to decrypt HTTPS traffic at your load balancer, on the backend instances, or
both.
For development and testing, you can create and sign a certificate (p. 300) yourself with open source
tools. Self-signed certificates are free and easy to create, but cannot be used for front-end decryption
on public sites. If you attempt to use a self-signed certificate for an HTTPS connection with a client, the
user's browser will show an error indicating that your web site is unsafe. You can, however, use a self
signed certificate to secure backend connections without issue.
You can upload a third party or self signed certificate and private key (p. 302) to AWS Identity and
Access Management (IAM) by using the AWS CLI. Certificates stored in IAM can be used with load
balancers and CloudFront distributions.
API Version 2010-12-01
299

AWS Elastic Beanstalk Developer Guide
Create a Certificate
Note
The Does it have Snakes? sample application on GitHub includes configuration files and
instructions for each method of configuring HTTPS with a Tomcat web application. See the
readme file and HTTPS instructions for details.
Topics
•Create and Sign an X509 Certificate (p. 300)
•Upload a Certificate to IAM (p. 302)
•Configuring Your Elastic Beanstalk Environment's Load Balancer to Terminate HTTPS (p. 302)
•Configuring Your Application to Terminate HTTPS Connections at the Instance (p. 304)
•Configuring End-to-End Encryption in a Load Balanced Elastic Beanstalk Environment (p. 324)
•Configuring Your Environment's Load Balancer for TCP Passthrough (p. 326)
•Storing Private Keys Securely in Amazon S3 (p. 327)
Create and Sign an X509 Certificate
You can create an X509 certificate for your application with OpenSSL. OpenSSL is a standard, open
source library that supports a wide range of cryptographic functions, including the creation and signing
of x509 certificates. For more information about OpenSSL, visit www.openssl.org.
Note
You only need to create a certificate locally if you want to use HTTPS in a single instance
environment (p. 304) or re-encrypt on the backend (p. 324) with a self-signed certificate.
If you own a domain name, you can create a certificate in AWS and use it with a load balanced
environment for free by using AWS Certificate Manager (ACM). See Request a Certificate in the
AWS Certificate Manager User Guide for instructions.
Run openssl version at the command line to see if you already have OpenSSL installed. If you don't,
you can build and install the source code using the instructions at the public GitHub repository, or use
your favorite package manager. OpenSSL is also installed on Elastic Beanstalk's Linux images, so a quick
alternative is to connect to an EC2 instance in a running environment by using the EB CLI (p. 480)'s eb
ssh command:
~/eb$ eb ssh
[ec2-user@ip-255-55-55-255 ~]$ openssl version
OpenSSL 1.0.1k-fips 8 Jan 2015
You need to create an RSA private key to create your certificate signing request (CSR). To create your
private key, use the openssl genrsa command:
[ec2-user@ip-255-55-55-255 ~]$ openssl genrsa 2048 > privatekey.pem
Generating RSA private key, 2048 bit long modulus
.................................................................................................................................
+++
...............+++
e is 65537 (0x10001)
privatekey.pem
The name of the file where you want to save the private key. Normally, the openssl genrsa
command prints the private key contents to the screen, but this command pipes the output to a file.
Choose any file name, and store the file in a secure place so that you can retrieve it later. If you lose
your private key, you won't be able to use your certificate.
API Version 2010-12-01
300

AWS Elastic Beanstalk Developer Guide
Create a Certificate
A CSR is a file you send to a certificate authority (CA) to apply for a digital server certificate. To create a
CSR, use the openssl req command:
$ openssl req -new -key privatekey.pem -out csr.pem
You are about to be asked to enter information that will be incorporated
into your certificate request.
What you are about to enter is what is called a Distinguished Name or a DN.
There are quite a few fields but you can leave some blank
For some fields there will be a default value,
If you enter '.', the field will be left blank.
Enter the information requested and press Enter. The following table describes and shows examples for
each field:
Name Description Example
Country Name The two-letter ISO abbreviation for your
country.
US = United States
State or Province The name of the state or province where your
organization is located. You cannot abbreviate
this name.
Washington
Locality Name The name of the city where your organization is
located.
Seattle
Organization Name The full legal name of your organization. Do not
abbreviate your organization name.
Example Corporation
Organizational Unit Optional, for additional organization
information.
Marketing
Common Name The fully qualified domain name for your web
site. This must match the domain name that
users see when they visit your site, otherwise
certificate errors will be shown.
www.example.com
Email address The site administrator's email address. someone@example.com
You can submit the signing request to a third party for signing, or sign it yourself for development and
testing. Self-signed certificates can also be used for backend HTTPS between a load balancer and EC2
instances.
To sign the certificate, use the openssl x509 command. The following example uses the private key from
the previous step (privatekey.pem) and the signing request (csr.pem) to create a public certificate
named server.crt that is valid for 365 days :
$ openssl x509 -req -days 365 -in csr.pem -signkey privatekey.pem -out server.crt
Signature ok
subject=/C=us/ST=washington/L=seattle/O=example corporation/OU=marketing/
CN=www.example.com/emailAddress=someone@example.com
Getting Private key
Keep the private key and public certificate for later use. You can discard the signing request. Always store
the private key in a secure location (p. 327) and avoid adding it to your source code.
To use the certificate with the Windows Server platform, you must convert it to a PFX format. Use the
following command to create a PFX certificate from the private key and public certificate files:
API Version 2010-12-01
301

AWS Elastic Beanstalk Developer Guide
Upload a Certificate
$ openssl pkcs12 -export -out example.com.pfx -inkey privatekey.pem -in public.crt
Enter Export Password: password
Verifying - Enter Export Password: password
Now that you have a certificate, you can upload it to IAM (p. 302) for use with a load balancer, or
configure the instances in your environment to terminate HTTPS (p. 304).
Upload a Certificate to IAM
To use your certificate with your Elastic Beanstalk environment's load balancer, upload the certificate and
private key to AWS Identity and Access Management (IAM). You can use a certificate stored in IAM with
Elastic Load Balancing load balancers and CloudFront distributions.
You can use the AWS Command Line Interface (p. 478) (AWS CLI) to upload your certificate. The
following command uploads a self-signed certificate named https-cert.crt with a private key named
private-key.pem:
$ aws iam upload-server-certificate --server-certificate-name elastic-beanstalk-x509 --
certificate-body file://https-cert.crt --private-key file://private-key.pem
{
"ServerCertificateMetadata": {
"ServerCertificateId": "AS5YBEIONO2Q7CAIHKNGC",
"ServerCertificateName": "elastic-beanstalk-x509",
"Expiration": "2017-01-31T23:06:22Z",
"Path": "/",
"Arn": "arn:aws:iam::123456789012:server-certificate/elastic-beanstalk-x509",
"UploadDate": "2016-02-01T23:10:34.167Z"
}
}
The file:// prefix tells the AWS CLI to load the contents of a file in the current directory. elastic-
beanstalk-x509 specifies the name to call the certificate in IAM.
If you purchased a certificate from a certificate authority and received a certificate chain file, upload that
as well by including the --certificate-chain option:
$ aws iam upload-server-certificate --server-certificate-name elastic-beanstalk-x509 --
certificate-chain file://certificate-chain.pem --certificate-body file://https-cert.crt --
private-key file://private-key.pem
Make note of the Amazon Resource Name (ARN) for your certificate. You will use it when you update
your load balancer configuration settings to use HTTPS.
To see sample certificates that are valid with IAM, go to Sample Certificates in the AWS Identity and
Access Management Using IAM User Guide.
Configuring Your Elastic Beanstalk Environment's
Load Balancer to Terminate HTTPS
To update your Elastic Beanstalk environment to use HTTPS, you need to configure an HTTPS listener for
the load balancer in your environment.
You can use the Elastic Beanstalk Management Console to configure a secure listener and assign the
certificate.
To assign a certificate to your environment's load balancer (AWS Management Console)
1. Open the Elastic Beanstalk console.
API Version 2010-12-01
302

AWS Elastic Beanstalk Developer Guide
Terminate at the Load Balancer
2. Navigate to the management page (p. 65) for your environment.
3. Choose Configuration.
4. In the Network Tier section, choose the gear icon next to Load Balancing.
Note
If the Network Tier section is not shown, your environment does not have a load
balancer (p. 155).
5. In the Load Balancer section, choose your certificate from the SSL certificate ID drop down menu.
Configuring a Secure Listener with a Configuration File
You can configure a secure listener on your load balancer with a configuration file (p. 256) like the
following:
Example .ebextensions/securelistener.config
option_settings:
aws:elb:listener:443:
SSLCertificateId: arn:aws:acm:us-east-2:1234567890123:certificate/
####################################
ListenerProtocol: HTTPS
InstancePort: 80
Replace the highlighted text with the ARN of your certificate. The certificate can be one that you created
in ACM or one that you uploaded to IAM with the AWS CLI.
The above example uses options in the aws:elb:listener namespace to configure an HTTPS listener
on port 443 with the specified certificate, and forward the decrypted traffic to the instances in your
environment on port 80.
For more information on load balancer configuration options, see Load Balancer Configuration
Namespaces (p. 180).
Security Group Configuration
If you configure your load balancer to forward traffic to an instance port other than port 80, you must
add a rule to your security group that allows inbound traffic over the instance port from your load
balancer. If you create your environment in a custom VPC, Elastic Beanstalk adds this rule for you.
You add this rule by adding a Resources key to a configuration file (p. 256) in the .ebextensions
directory for your application.
The following example configuration file adds an ingress rule to the AWSEBSecurityGroup security
group allows traffic on port 1000 from the load balancer's security group.
Example .ebextensions/sg-ingressfromlb.config
Resources:
sslSecurityGroupIngress:
Type: AWS::EC2::SecurityGroupIngress
Properties:
GroupId: {"Fn::GetAtt" : ["AWSEBSecurityGroup", "GroupId"]}
IpProtocol: tcp
ToPort: 1000
FromPort: 1000
SourceSecurityGroupName: {"Fn::GetAtt" : ["AWSEBLoadBalancer" ,
"SourceSecurityGroup.GroupName"]}
API Version 2010-12-01
303

AWS Elastic Beanstalk Developer Guide
Terminate at the Instance
Configuring Your Application to Terminate HTTPS
Connections at the Instance
You can use configuration files (p. 256) to configure the proxy server that passes traffic to your
application to terminate HTTPS connections. This is useful if you want to use HTTPS with a single
instance environment, or if you configure your load balancer to pass traffic through without decrypting
it.
To enable HTTPS, you must allow incoming traffic on port 443 to the EC2 instance that your Elastic
Beanstalk application is running on. You do this by using the Resources key in the configuration file to
add a rule for port 443 to the ingress rules for the AWSEBSecurityGroup security group.
The following snippet adds an ingress rule to the AWSEBSecurityGroup security group that opens port
443 to all traffic for a single instance environment:
.ebextensions/https-instance-securitygroup.config
Resources:
sslSecurityGroupIngress:
Type: AWS::EC2::SecurityGroupIngress
Properties:
GroupId: {"Fn::GetAtt" : ["AWSEBSecurityGroup", "GroupId"]}
IpProtocol: tcp
ToPort: 443
FromPort: 443
CidrIp: 0.0.0.0/0
In a load balanced environment in a default VPC, you can modify this policy to only accept traffic
from the load balancer. See Configuring End-to-End Encryption in a Load Balanced Elastic Beanstalk
Environment (p. 324) for an example.
Platforms
•Terminating HTTPS on EC2 Instances Running Docker (p. 304)
•Terminating HTTPS on EC2 Instances Running Go (p. 306)
•Terminating HTTPS on EC2 Instances Running Java SE (p. 308)
•Terminating HTTPS on EC2 Instances Running Node.js (p. 310)
•Terminating HTTPS on EC2 Instances Running PHP (p. 312)
•Terminating HTTPS on EC2 Instances Running Python (p. 314)
•Terminating HTTPS on EC2 Instances Running Ruby (p. 316)
•Terminating HTTPS on EC2 Instances Running Tomcat (p. 320)
•Terminating HTTPS on EC2 Instances Running .NET (p. 322)
Terminating HTTPS on EC2 Instances Running Docker
For Docker containers, you use a configuration file (p. 256) to enable HTTPS.
Add the following snippet to your configuration file, replacing the certificate and private key material as
instructed, and save it in your source bundle's .ebextensions directory. The configuration file performs
the following tasks:
• The files key creates the following files on the instance:
/etc/nginx/conf.d/https.conf
Configures the nginx server. This file is loaded when the nginx service starts.
API Version 2010-12-01
304

AWS Elastic Beanstalk Developer Guide
Terminate at the Instance
/etc/pki/tls/certs/server.crt
Creates the certificate file on the instance. Replace certificate file contents with the
contents of your certificate.
Note
YAML relies on consistent indentation. Match the indentation level when replacing
content in an example configuration file and make sure that your text editor uses spaces,
not tab characters, to indent.
If you have intermediate certificates, include them in server.crt after your site certificate:
-----BEGIN CERTIFICATE-----
certificate file contents
-----END CERTIFICATE-----
-----BEGIN CERTIFICATE-----
first intermediate certificate
-----END CERTIFICATE-----
-----BEGIN CERTIFICATE-----
second intermediate certificate
-----END CERTIFICATE-----
/etc/pki/tls/certs/server.key
Creates the private key file on the instance. Replace private key contents with the contents
of the private key used to create the certificate request or self-signed certificate.
Example .ebextensions/https-instance.config
files:
/etc/nginx/conf.d/https.conf:
mode: "000644"
owner: root
group: root
content: |
# HTTPS Server
server {
listen 443;
server_name localhost;
ssl on;
ssl_certificate /etc/pki/tls/certs/server.crt;
ssl_certificate_key /etc/pki/tls/certs/server.key;
ssl_session_timeout 5m;
ssl_protocols TLSv1 TLSv1.1 TLSv1.2;
ssl_prefer_server_ciphers on;
location / {
proxy_pass http://docker;
proxy_http_version 1.1;
proxy_set_header Connection "";
proxy_set_header Host $host;
proxy_set_header X-Real-IP $remote_addr;
proxy_set_header X-Forwarded-For $proxy_add_x_forwarded_for;
proxy_set_header X-Forwarded-Proto https;
}
}
API Version 2010-12-01
305

AWS Elastic Beanstalk Developer Guide
Terminate at the Instance
/etc/pki/tls/certs/server.crt:
mode: "000400"
owner: root
group: root
content: |
-----BEGIN CERTIFICATE-----
certificate file contents
-----END CERTIFICATE-----
/etc/pki/tls/certs/server.key:
mode: "000400"
owner: root
group: root
content: |
-----BEGIN RSA PRIVATE KEY-----
private key contents # See note below.
-----END RSA PRIVATE KEY-----
Note
Avoid commiting a configuration file that contains your private key to source control. After you
have tested the configuration and confirmed that it works, store your private key in Amazon S3
and modify the configuration to download it during deployment. For instructions, see Storing
Private Keys Securely in Amazon S3 (p. 327).
In a single instance environment, you must also modify the instance's security group to allow traffic on
port 443. The following configuration file retrieves the security group's ID using an AWS CloudFormation
function (p. 279) and adds a rule to it:
Example .ebextensions/https-instance-single.config
Resources:
sslSecurityGroupIngress:
Type: AWS::EC2::SecurityGroupIngress
Properties:
GroupId: {"Fn::GetAtt" : ["AWSEBSecurityGroup", "GroupId"]}
IpProtocol: tcp
ToPort: 443
FromPort: 443
CidrIp: 0.0.0.0/0
For a load balanced environment, you configure the load balancer to either pass secure traffic through
untouched (p. 326), or decrypt and re-encrypt (p. 324) for end-to-end encryption.
Terminating HTTPS on EC2 Instances Running Go
For Go container types, you enable HTTPS with a configuration file (p. 256) and an nginx configuration
file that configures the nginx server to use HTTPS.
Add the following snippet to your configuration file, replacing the certificate and private key
placeholders as instructed, and save it in your source bundle's .ebextensions directory. The
configuration file performs the following tasks:
• The Resources key enables port 443 on the security group used by your environment's instance.
• The files key creates the following files on the instance:
/etc/pki/tls/certs/server.crt
Creates the certificate file on the instance. Replace certificate file contents with the
contents of your certificate.
API Version 2010-12-01
306

AWS Elastic Beanstalk Developer Guide
Terminate at the Instance
Note
YAML relies on consistent indentation. Match the indentation level when replacing
content in an example configuration file and make sure that your text editor uses spaces,
not tab characters, to indent.
If you have intermediate certificates, include them in server.crt after your site certificate:
-----BEGIN CERTIFICATE-----
certificate file contents
-----END CERTIFICATE-----
-----BEGIN CERTIFICATE-----
first intermediate certificate
-----END CERTIFICATE-----
-----BEGIN CERTIFICATE-----
second intermediate certificate
-----END CERTIFICATE-----
/etc/pki/tls/certs/server.key
Creates the private key file on the instance. Replace private key contents with the contents
of the private key used to create the certificate request or self-signed certificate.
• The container_commands key restarts the nginx server after everything is configured so that the
server loads the nginx configuration file.
Example .ebextensions/https-instance.config
files:
/etc/pki/tls/certs/server.crt:
content: |
-----BEGIN CERTIFICATE-----
certificate file contents
-----END CERTIFICATE-----
/etc/pki/tls/certs/server.key:
content: |
-----BEGIN RSA PRIVATE KEY-----
private key contents # See note below.
-----END RSA PRIVATE KEY-----
container_commands:
01restart_nginx:
command: "service nginx restart"
Note
Avoid commiting a configuration file that contains your private key to source control. After you
have tested the configuration and confirmed that it works, store your private key in Amazon S3
and modify the configuration to download it during deployment. For instructions, see Storing
Private Keys Securely in Amazon S3 (p. 327).
Place the following in a file with the .conf extension in the .ebextensions/nginx/conf.d/
directory of your source bundle (e.g., .ebextensions/nginx/conf.d/https.conf). Replace
app_port with the port number that your application listens on. This example configures the nginx
server to listen on port 443 using SSL. For more information about these configuration files on the Go
platform, see Configuring the Reverse Proxy (p. 667).
Example .ebextensions/nginx/conf.d/https.conf
# HTTPS server
API Version 2010-12-01
307

AWS Elastic Beanstalk Developer Guide
Terminate at the Instance
server {
listen 443;
server_name localhost;
ssl on;
ssl_certificate /etc/pki/tls/certs/server.crt;
ssl_certificate_key /etc/pki/tls/certs/server.key;
ssl_session_timeout 5m;
ssl_protocols TLSv1 TLSv1.1 TLSv1.2;
ssl_prefer_server_ciphers on;
location / {
proxy_pass http://localhost:app_port;
proxy_set_header Connection "";
proxy_http_version 1.1;
proxy_set_header Host $host;
proxy_set_header X-Real-IP $remote_addr;
proxy_set_header X-Forwarded-For $proxy_add_x_forwarded_for;
proxy_set_header X-Forwarded-Proto https;
}
}
In a single instance environment, you must also modify the instance's security group to allow traffic on
port 443. The following configuration file retrieves the security group's ID using an AWS CloudFormation
function (p. 279) and adds a rule to it:
Example .ebextensions/https-instance-single.config
Resources:
sslSecurityGroupIngress:
Type: AWS::EC2::SecurityGroupIngress
Properties:
GroupId: {"Fn::GetAtt" : ["AWSEBSecurityGroup", "GroupId"]}
IpProtocol: tcp
ToPort: 443
FromPort: 443
CidrIp: 0.0.0.0/0
For a load balanced environment, you configure the load balancer to either pass secure traffic through
untouched (p. 326), or decrypt and re-encrypt (p. 324) for end-to-end encryption.
Terminating HTTPS on EC2 Instances Running Java SE
For Java SE container types, you enable HTTPS with an .ebextensions configuration file (p. 256), and an
nginx configuration file that configures the nginx server to use HTTPS.
Add the following snippet to your configuration file, replacing the certificate and private key
placeholders as instructed, and save it in the .ebextensions directory. The configuration file performs
the following tasks:
• The files key creates the following files on the instance:
/etc/pki/tls/certs/server.crt
Creates the certificate file on the instance. Replace certificate file contents with the
contents of your certificate.
Note
YAML relies on consistent indentation. Match the indentation level when replacing
content in an example configuration file and make sure that your text editor uses spaces,
not tab characters, to indent.
API Version 2010-12-01
308

AWS Elastic Beanstalk Developer Guide
Terminate at the Instance
If you have intermediate certificates, include them in server.crt after your site certificate:
-----BEGIN CERTIFICATE-----
certificate file contents
-----END CERTIFICATE-----
-----BEGIN CERTIFICATE-----
first intermediate certificate
-----END CERTIFICATE-----
-----BEGIN CERTIFICATE-----
second intermediate certificate
-----END CERTIFICATE-----
/etc/pki/tls/certs/server.key
Creates the private key file on the instance. Replace private key contents with the contents
of the private key used to create the certificate request or self-signed certificate.
• The container_commands key restarts the nginx server after everything is configured so that the
server loads the nginx configuration file.
Example .ebextensions/https-instance.config
files:
/etc/pki/tls/certs/server.crt:
content: |
-----BEGIN CERTIFICATE-----
certificate file contents
-----END CERTIFICATE-----
/etc/pki/tls/certs/server.key:
content: |
-----BEGIN RSA PRIVATE KEY-----
private key contents # See note below.
-----END RSA PRIVATE KEY-----
container_commands:
01restart_nginx:
command: "service nginx restart"
Note
Avoid commiting a configuration file that contains your private key to source control. After you
have tested the configuration and confirmed that it works, store your private key in Amazon S3
and modify the configuration to download it during deployment. For instructions, see Storing
Private Keys Securely in Amazon S3 (p. 327).
Place the following in a file with the .conf extension in the .ebextensions/nginx/conf.d/
directory of your source bundle (e.g., .ebextensions/nginx/conf.d/https.conf). Replace
app_port with the port number that your application listens on. This example configures the nginx
server to listen on port 443 using SSL. For more information about these configuration files on the Java
SE platform, see Configuring the Reverse Proxy (p. 689).
Example ebextensions/nginx/conf.d/https.conf
# HTTPS server
server {
listen 443;
server_name localhost;
ssl on;
API Version 2010-12-01
309

AWS Elastic Beanstalk Developer Guide
Terminate at the Instance
ssl_certificate /etc/pki/tls/certs/server.crt;
ssl_certificate_key /etc/pki/tls/certs/server.key;
ssl_session_timeout 5m;
ssl_protocols TLSv1 TLSv1.1 TLSv1.2;
ssl_prefer_server_ciphers on;
location / {
proxy_pass http://localhost:app_port;
proxy_set_header Connection "";
proxy_http_version 1.1;
proxy_set_header Host $host;
proxy_set_header X-Real-IP $remote_addr;
proxy_set_header X-Forwarded-For $proxy_add_x_forwarded_for;
proxy_set_header X-Forwarded-Proto https;
}
}
In a single instance environment, you must also modify the instance's security group to allow traffic on
port 443. The following configuration file retrieves the security group's ID using an AWS CloudFormation
function (p. 279) and adds a rule to it:
Example .ebextensions/https-instance-single.config
Resources:
sslSecurityGroupIngress:
Type: AWS::EC2::SecurityGroupIngress
Properties:
GroupId: {"Fn::GetAtt" : ["AWSEBSecurityGroup", "GroupId"]}
IpProtocol: tcp
ToPort: 443
FromPort: 443
CidrIp: 0.0.0.0/0
For a load balanced environment, you configure the load balancer to either pass secure traffic through
untouched (p. 326), or decrypt and re-encrypt (p. 324) for end-to-end encryption.
Terminating HTTPS on EC2 Instances Running Node.js
The following example configuration file extends the default nginx configuration (p. 780) to listen on
port 443 and terminate SSL/TLS connections with a public certificate and private key.
Example .ebextensions/https-instance.config
files:
/etc/nginx/conf.d/https.conf:
mode: "000644"
owner: root
group: root
content: |
# HTTPS server
server {
listen 443;
server_name localhost;
ssl on;
ssl_certificate /etc/pki/tls/certs/server.crt;
ssl_certificate_key /etc/pki/tls/certs/server.key;
ssl_session_timeout 5m;
API Version 2010-12-01
310

AWS Elastic Beanstalk Developer Guide
Terminate at the Instance
ssl_protocols TLSv1 TLSv1.1 TLSv1.2;
ssl_prefer_server_ciphers on;
location / {
proxy_pass http://nodejs;
proxy_set_header Connection "";
proxy_http_version 1.1;
proxy_set_header Host $host;
proxy_set_header X-Real-IP $remote_addr;
proxy_set_header X-Forwarded-For $proxy_add_x_forwarded_for;
proxy_set_header X-Forwarded-Proto https;
}
}
/etc/pki/tls/certs/server.crt:
mode: "000400"
owner: root
group: root
content: |
-----BEGIN CERTIFICATE-----
certificate file contents
-----END CERTIFICATE-----
/etc/pki/tls/certs/server.key:
mode: "000400"
owner: root
group: root
content: |
-----BEGIN RSA PRIVATE KEY-----
private key contents # See note below.
-----END RSA PRIVATE KEY-----
The files key creates the following files on the instance:
/etc/nginx/conf.d/https.conf
Configures the nginx server. This file is loaded when the nginx service starts.
/etc/pki/tls/certs/server.crt
Creates the certificate file on the instance. Replace certificate file contents with the
contents of your certificate.
Note
YAML relies on consistent indentation. Match the indentation level when replacing content
in an example configuration file and make sure that your text editor uses spaces, not tab
characters, to indent.
If you have intermediate certificates, include them in server.crt after your site certificate:
-----BEGIN CERTIFICATE-----
certificate file contents
-----END CERTIFICATE-----
-----BEGIN CERTIFICATE-----
first intermediate certificate
-----END CERTIFICATE-----
-----BEGIN CERTIFICATE-----
second intermediate certificate
-----END CERTIFICATE-----
/etc/pki/tls/certs/server.key
Creates the private key file on the instance. Replace private key contents with the contents of
the private key used to create the certificate request or self-signed certificate.
API Version 2010-12-01
311

AWS Elastic Beanstalk Developer Guide
Terminate at the Instance
Note
Avoid commiting a configuration file that contains your private key to source control. After you
have tested the configuration and confirmed that it works, store your private key in Amazon S3
and modify the configuration to download it during deployment. For instructions, see Storing
Private Keys Securely in Amazon S3 (p. 327).
In a single instance environment, you must also modify the instance's security group to allow traffic on
port 443. The following configuration file retrieves the security group's ID using an AWS CloudFormation
function (p. 279) and adds a rule to it:
Example .ebextensions/https-instance-single.config
Resources:
sslSecurityGroupIngress:
Type: AWS::EC2::SecurityGroupIngress
Properties:
GroupId: {"Fn::GetAtt" : ["AWSEBSecurityGroup", "GroupId"]}
IpProtocol: tcp
ToPort: 443
FromPort: 443
CidrIp: 0.0.0.0/0
For a load balanced environment, you configure the load balancer to either pass secure traffic through
untouched (p. 326), or decrypt and re-encrypt (p. 324) for end-to-end encryption.
Terminating HTTPS on EC2 Instances Running PHP
For PHP container types, you use a configuration file (p. 256) to enable the Apache HTTP Server to use
HTTPS.
Add the following snippet to your configuration file, replacing the certificate and private key material as
instructed, and save it in your source bundle's .ebextensions directory.
The configuration file performs the following tasks:
• The packages key uses yum to install mod24_ssl.
• The files key creates the following files on the instance:
/etc/httpd/conf.d/ssl.conf
Configures the Apache server. This file loads when the Apache service starts.
/etc/pki/tls/certs/server.crt
Creates the certificate file on the instance. Replace certificate file contents with the
contents of your certificate.
Note
YAML relies on consistent indentation. Match the indentation level when replacing
content in an example configuration file and make sure that your text editor uses spaces,
not tab characters, to indent.
If you have intermediate certificates, include them in server.crt after your site certificate:
-----BEGIN CERTIFICATE-----
certificate file contents
-----END CERTIFICATE-----
-----BEGIN CERTIFICATE-----
first intermediate certificate
-----END CERTIFICATE-----
-----BEGIN CERTIFICATE-----
API Version 2010-12-01
312

AWS Elastic Beanstalk Developer Guide
Terminate at the Instance
second intermediate certificate
-----END CERTIFICATE-----
/etc/pki/tls/certs/server.key
Creates the private key file on the instance. Replace private key contents with the contents
of the private key used to create the certificate request or self-signed certificate.
Example .ebextensions/https-instance.config
packages:
yum:
mod24_ssl : []
files:
/etc/httpd/conf.d/ssl.conf:
mode: "000644"
owner: root
group: root
content: |
LoadModule ssl_module modules/mod_ssl.so
Listen 443
<VirtualHost *:443>
<Proxy *>
Order deny,allow
Allow from all
</Proxy>
SSLEngine on
SSLCertificateFile "/etc/pki/tls/certs/server.crt"
SSLCertificateKeyFile "/etc/pki/tls/certs/server.key"
SSLCipherSuite EECDH+AESGCM:EDH+AESGCM:AES256+EECDH:AES256+EDH
SSLProtocol All -SSLv2 -SSLv3
SSLHonorCipherOrder On
SSLSessionTickets Off
Header always set Strict-Transport-Security "max-age=63072000; includeSubdomains;
preload"
Header always set X-Frame-Options DENY
Header always set X-Content-Type-Options nosniff
ProxyPass / http://localhost:80/ retry=0
ProxyPassReverse / http://localhost:80/
ProxyPreserveHost on
RequestHeader set X-Forwarded-Proto "https" early
</VirtualHost>
/etc/pki/tls/certs/server.crt:
mode: "000400"
owner: root
group: root
content: |
-----BEGIN CERTIFICATE-----
certificate file contents
-----END CERTIFICATE-----
/etc/pki/tls/certs/server.key:
mode: "000400"
owner: root
group: root
content: |
-----BEGIN RSA PRIVATE KEY-----
API Version 2010-12-01
313

AWS Elastic Beanstalk Developer Guide
Terminate at the Instance
private key contents # See note below.
-----END RSA PRIVATE KEY-----
Note
Avoid commiting a configuration file that contains your private key to source control. After you
have tested the configuration and confirmed that it works, store your private key in Amazon S3
and modify the configuration to download it during deployment. For instructions, see Storing
Private Keys Securely in Amazon S3 (p. 327).
In a single instance environment, you must also modify the instance's security group to allow traffic on
port 443. The following configuration file retrieves the security group's ID using an AWS CloudFormation
function (p. 279) and adds a rule to it:
Example .ebextensions/https-instance-single.config
Resources:
sslSecurityGroupIngress:
Type: AWS::EC2::SecurityGroupIngress
Properties:
GroupId: {"Fn::GetAtt" : ["AWSEBSecurityGroup", "GroupId"]}
IpProtocol: tcp
ToPort: 443
FromPort: 443
CidrIp: 0.0.0.0/0
For a load balanced environment, you configure the load balancer to either pass secure traffic through
untouched (p. 326), or decrypt and re-encrypt (p. 324) for end-to-end encryption.
Terminating HTTPS on EC2 Instances Running Python
For Python container types using Apache HTTP Server with the Web Server Gateway Interface (WSGI),
you use a configuration file (p. 256) to enable the Apache HTTP Server to use HTTPS.
Add the following snippet to your configuration file (p. 256), replacing the certificate and private key
material as instructed, and save it in your source bundle's .ebextensions directory. The configuration
file performs the following tasks:
• The packages key uses yum to install mod24_ssl.
• The files key creates the following files on the instance:
/etc/httpd/conf.d/ssl.conf
Configures the Apache server. Replace python site-packages directories with the Python
site-packages directories in your environment, separating each directory with a colon (:). The
Python site-packages directories vary depending on your environment.
Python 2.7
•/opt/python/run/venv/lib/python2.7/site-packages
•/opt/python/run/venv/lib64/python2.7/site-packages
Python 3.4
•/opt/python/run/venv/lib/python3.4/site-packages
•/opt/python/run/venv/lib64/python3.4/site-packages
Depending on your application requirements, you may also need to add other directories to the
python-path parameter.
/etc/pki/tls/certs/server.crt
Creates the certificate file on the instance. Replace certificate file contents with the
contents of your certificate.
API Version 2010-12-01
314

AWS Elastic Beanstalk Developer Guide
Terminate at the Instance
Note
YAML relies on consistent indentation. Match the indentation level when replacing
content in an example configuration file and make sure that your text editor uses spaces,
not tab characters, to indent.
If you have intermediate certificates, include them in server.crt after your site certificate:
-----BEGIN CERTIFICATE-----
certificate file contents
-----END CERTIFICATE-----
-----BEGIN CERTIFICATE-----
first intermediate certificate
-----END CERTIFICATE-----
-----BEGIN CERTIFICATE-----
second intermediate certificate
-----END CERTIFICATE-----
/etc/pki/tls/certs/server.key
Creates the private key file on the instance. Replace private key contents with the contents
of the private key used to create the certificate request or self-signed certificate.
• The container_commands key stops the httpd service after everything has been configured so that
the service uses the new https.conf file and certificate.
• If your application is not named application.py, replace the highlighted text in the value for
WSGIScriptAlias with the local path to your application. For example, a django application's may
be at django/wsgi.py. The location should match the value of the WSGIPath option that you set for
your environment.
Example .ebextensions/https-instance.config
packages:
yum:
mod24_ssl : []
files:
/etc/httpd/conf.d/ssl.conf:
mode: "000644"
owner: root
group: root
content: |
LoadModule wsgi_module modules/mod_wsgi.so
WSGIPythonHome /opt/python/run/baselinenv
WSGISocketPrefix run/wsgi
WSGIRestrictEmbedded On
Listen 443
<VirtualHost *:443>
SSLEngine on
SSLCertificateFile "/etc/pki/tls/certs/server.crt"
SSLCertificateKeyFile "/etc/pki/tls/certs/server.key"
Alias /static/ /opt/python/current/app/static/
<Directory /opt/python/current/app/static>
Order allow,deny
Allow from all
</Directory>
WSGIScriptAlias / /opt/python/current/app/application.py
<Directory /opt/python/current/app>
Require all granted
API Version 2010-12-01
315

AWS Elastic Beanstalk Developer Guide
Terminate at the Instance
</Directory>
WSGIDaemonProcess wsgi-ssl processes=1 threads=15 display-name=%{GROUP} \
python-path=/opt/python/current/app:<python site-packages directories> \
home=/opt/python/current/app \
user=wsgi \
group=wsgi
WSGIProcessGroup wsgi-ssl
</VirtualHost>
/etc/pki/tls/certs/server.crt:
mode: "000400"
owner: root
group: root
content: |
-----BEGIN CERTIFICATE-----
certificate file contents
-----END CERTIFICATE-----
/etc/pki/tls/certs/server.key:
mode: "000400"
owner: root
group: root
content: |
-----BEGIN RSA PRIVATE KEY-----
private key contents # See note below.
-----END RSA PRIVATE KEY-----
container_commands:
01killhttpd:
command: "killall httpd"
02waitforhttpddeath:
command: "sleep 3"
Note
Avoid commiting a configuration file that contains your private key to source control. After you
have tested the configuration and confirmed that it works, store your private key in Amazon S3
and modify the configuration to download it during deployment. For instructions, see Storing
Private Keys Securely in Amazon S3 (p. 327).
In a single instance environment, you must also modify the instance's security group to allow traffic on
port 443. The following configuration file retrieves the security group's ID using an AWS CloudFormation
function (p. 279) and adds a rule to it:
Example .ebextensions/https-instance-single.config
Resources:
sslSecurityGroupIngress:
Type: AWS::EC2::SecurityGroupIngress
Properties:
GroupId: {"Fn::GetAtt" : ["AWSEBSecurityGroup", "GroupId"]}
IpProtocol: tcp
ToPort: 443
FromPort: 443
CidrIp: 0.0.0.0/0
For a load balanced environment, you configure the load balancer to either pass secure traffic through
untouched (p. 326), or decrypt and re-encrypt (p. 324) for end-to-end encryption.
Terminating HTTPS on EC2 Instances Running Ruby
For Ruby container types, the way you enable HTTPS depends on the type of application server used.
API Version 2010-12-01
316

AWS Elastic Beanstalk Developer Guide
Terminate at the Instance
Topics
•Configure HTTPS for Ruby with Puma (p. 317)
•Configure HTTPS for Ruby with Passenger (p. 319)
Configure HTTPS for Ruby with Puma
For Ruby container types that use Puma as the application server, you use a configuration file (p. 256)
to enable HTTPS.
Add the following snippet to your configuration file, replacing the certificate and private key material as
instructed, and save it in your source bundle's .ebextensions directory. The configuration file performs
the following tasks:
• The files key creates the following files on the instance:
/etc/nginx/conf.d/https.conf
Configures the nginx server. This file is loaded when the nginx service starts.
/etc/pki/tls/certs/server.crt
Creates the certificate file on the instance. Replace certificate file contents with the
contents of your certificate.
Note
YAML relies on consistent indentation. Match the indentation level when replacing
content in an example configuration file and make sure that your text editor uses spaces,
not tab characters, to indent.
If you have intermediate certificates, include them in server.crt after your site certificate:
-----BEGIN CERTIFICATE-----
certificate file contents
-----END CERTIFICATE-----
-----BEGIN CERTIFICATE-----
first intermediate certificate
-----END CERTIFICATE-----
-----BEGIN CERTIFICATE-----
second intermediate certificate
-----END CERTIFICATE-----
/etc/pki/tls/certs/server.key
Creates the private key file on the instance. Replace private key contents with the contents
of the private key used to create the certificate request or self-signed certificate.
• The container_commands key restarts the nginx server after everything is configured so that the
server uses the new https.conf file.
Example .ebextensions/https-instance.config
files:
/etc/nginx/conf.d/https.conf:
content: |
# HTTPS server
server {
listen 443;
server_name localhost;
API Version 2010-12-01
317

AWS Elastic Beanstalk Developer Guide
Terminate at the Instance
ssl on;
ssl_certificate /etc/pki/tls/certs/server.crt;
ssl_certificate_key /etc/pki/tls/certs/server.key;
ssl_session_timeout 5m;
ssl_protocols TLSv1 TLSv1.1 TLSv1.2;
ssl_prefer_server_ciphers on;
location / {
proxy_pass http://my_app;
proxy_set_header Host $host;
proxy_set_header X-Forwarded-For $proxy_add_x_forwarded_for;
proxy_set_header X-Forwarded-Proto https;
}
location /assets {
alias /var/app/current/public/assets;
gzip_static on;
gzip on;
expires max;
add_header Cache-Control public;
}
location /public {
alias /var/app/current/public;
gzip_static on;
gzip on;
expires max;
add_header Cache-Control public;
}
}
/etc/pki/tls/certs/server.crt:
content: |
-----BEGIN CERTIFICATE-----
certificate file contents
-----END CERTIFICATE-----
/etc/pki/tls/certs/server.key:
content: |
-----BEGIN RSA PRIVATE KEY-----
private key contents # See note below.
-----END RSA PRIVATE KEY-----
container_commands:
01restart_nginx:
command: "service nginx restart"
Note
Avoid commiting a configuration file that contains your private key to source control. After you
have tested the configuration and confirmed that it works, store your private key in Amazon S3
and modify the configuration to download it during deployment. For instructions, see Storing
Private Keys Securely in Amazon S3 (p. 327).
In a single instance environment, you must also modify the instance's security group to allow traffic on
port 443. The following configuration file retrieves the security group's ID using an AWS CloudFormation
function (p. 279) and adds a rule to it:
Example .ebextensions/https-instance-single.config
Resources:
sslSecurityGroupIngress:
API Version 2010-12-01
318

AWS Elastic Beanstalk Developer Guide
Terminate at the Instance
Type: AWS::EC2::SecurityGroupIngress
Properties:
GroupId: {"Fn::GetAtt" : ["AWSEBSecurityGroup", "GroupId"]}
IpProtocol: tcp
ToPort: 443
FromPort: 443
CidrIp: 0.0.0.0/0
For a load balanced environment, you configure the load balancer to either pass secure traffic through
untouched (p. 326), or decrypt and re-encrypt (p. 324) for end-to-end encryption.
Configure HTTPS for Ruby with Passenger
For Ruby container types that use Passenger as the application server, you use both a configuration file
and a JSON file to enable HTTPS.
To configure HTTPS for Ruby with Passenger
1. Add the following snippet to your configuration file, replacing the certificate and private key
material as instructed, and save it in your source bundle's .ebextensions directory. The
configuration file performs the following tasks:
• The files key creates the following files on the instance:
/etc/pki/tls/certs/server.crt
Creates the certificate file on the instance. Replace certificate file contents with the
contents of your certificate.
Note
YAML relies on consistent indentation. Match the indentation level when replacing
content in an example configuration file and make sure that your text editor uses
spaces, not tab characters, to indent.
If you have intermediate certificates, include them in server.crt after your site certificate:
-----BEGIN CERTIFICATE-----
certificate file contents
-----END CERTIFICATE-----
-----BEGIN CERTIFICATE-----
first intermediate certificate
-----END CERTIFICATE-----
-----BEGIN CERTIFICATE-----
second intermediate certificate
-----END CERTIFICATE-----
/etc/pki/tls/certs/server.key
Creates the private key file on the instance. Replace private key contents with the
contents of the private key used to create the certificate request or self-signed certificate.
Example .ebextensions Snippet for Configuring HTTPS for Ruby with Passenger
files:
/etc/pki/tls/certs/server.crt:
content: |
-----BEGIN CERTIFICATE-----
certificate file contents
-----END CERTIFICATE-----
API Version 2010-12-01
319

AWS Elastic Beanstalk Developer Guide
Terminate at the Instance
/etc/pki/tls/certs/server.key:
content: |
-----BEGIN RSA PRIVATE KEY-----
private key contents # See note below.
-----END RSA PRIVATE KEY-----
Note
Avoid commiting a configuration file that contains your private key to source control.
After you have tested the configuration and confirmed that it works, store your private
key in Amazon S3 and modify the configuration to download it during deployment. For
instructions, see Storing Private Keys Securely in Amazon S3 (p. 327).
2. Create a text file and add the following JSON to the file. Save it in your source bundle's root
directory with the name passenger-standalone.json. This JSON file configures Passenger to
use HTTPS.
Important
This JSON file must not contain a byte order mark (BOM). If it does, the Passenger JSON
library will not read the file correctly and the Passenger service will not start.
Example passenger-standalone.json
{
"ssl" : true,
"ssl_port" : 443,
"ssl_certificate" : "/etc/pki/tls/certs/server.crt",
"ssl_certificate_key" : "/etc/pki/tls/certs/server.key"
}
In a single instance environment, you must also modify the instance's security group to allow traffic on
port 443. The following configuration file retrieves the security group's ID using an AWS CloudFormation
function (p. 279) and adds a rule to it:
Example .ebextensions/https-instance-single.config
Resources:
sslSecurityGroupIngress:
Type: AWS::EC2::SecurityGroupIngress
Properties:
GroupId: {"Fn::GetAtt" : ["AWSEBSecurityGroup", "GroupId"]}
IpProtocol: tcp
ToPort: 443
FromPort: 443
CidrIp: 0.0.0.0/0
For a load balanced environment, you configure the load balancer to either pass secure traffic through
untouched (p. 326), or decrypt and re-encrypt (p. 324) for end-to-end encryption.
Terminating HTTPS on EC2 Instances Running Tomcat
For Tomcat container types, you use a configuration file (p. 256) to enable the Apache HTTP Server to
use HTTPS when acting as the reverse proxy for Tomcat.
Add the following snippet to your configuration file, replacing the certificate and private key material as
instructed, and save it in your source bundle's .ebextensions directory. The configuration file performs
the following tasks:
• The packages key uses yum to install mod_ssl.
API Version 2010-12-01
320

AWS Elastic Beanstalk Developer Guide
Terminate at the Instance
• The files key creates the following files on the instance:
/etc/pki/tls/certs/server.crt
Creates the certificate file on the instance. Replace certificate file contents with the
contents of your certificate.
Note
YAML relies on consistent indentation. Match the indentation level when replacing
content in an example configuration file and make sure that your text editor uses spaces,
not tab characters, to indent.
/etc/pki/tls/certs/server.key
Creates the private key file on the instance. Replace private key contents with the contents
of the private key used to create the certificate request or self-signed certificate.
• The container_commands key stops the httpd service after everything has been configured so that
the service uses the new https.conf file and certificate.
Example .ebextensions/https-instance.config
packages:
yum:
mod_ssl : []
files:
/etc/pki/tls/certs/server.crt:
mode: "000400"
owner: root
group: root
content: |
-----BEGIN CERTIFICATE-----
certificate file contents
-----END CERTIFICATE-----
/etc/pki/tls/certs/server.key:
mode: "000400"
owner: root
group: root
content: |
-----BEGIN RSA PRIVATE KEY-----
private key contents # See note below.
-----END RSA PRIVATE KEY-----
container_commands:
killhttpd:
command: "killall httpd"
waitforhttpddeath:
command: "sleep 3"
Your certificate vendor may include intermediate certificates that you can install for better compatibility
with mobile clients. Configure Apache with an intermediate certificate authority (CA) bundle by adding
the following to your SSL configuration file (see Extending the Default Apache Configuration (p. 684)
for the location):
• In the ssl.conf file contents, specify the chain file:
SSLCertificateKeyFile "/etc/pki/tls/certs/server.key"
SSLCertificateChainFile "/etc/pki/tls/certs/gd_bundle.crt"
SSLCipherSuite EECDH+AESGCM:EDH+AESGCM:AES256+EECDH:AES256+EDH
• Add a new entry to the files key with the contents of the intermediate certificates:
API Version 2010-12-01
321

AWS Elastic Beanstalk Developer Guide
Terminate at the Instance
files:
/etc/pki/tls/certs/gd_bundle.crt:
mode: "000400"
owner: root
group: root
content: |
-----BEGIN CERTIFICATE-----
First intermediate certificate
-----END CERTIFICATE-----
-----BEGIN CERTIFICATE-----
Second intermediate certificate
-----END CERTIFICATE-----
Note
Avoid commiting a configuration file that contains your private key to source control. After you
have tested the configuration and confirmed that it works, store your private key in Amazon S3
and modify the configuration to download it during deployment. For instructions, see Storing
Private Keys Securely in Amazon S3 (p. 327).
In a single instance environment, you must also modify the instance's security group to allow traffic on
port 443. The following configuration file retrieves the security group's ID using an AWS CloudFormation
function (p. 279) and adds a rule to it:
Example .ebextensions/https-instance-single.config
Resources:
sslSecurityGroupIngress:
Type: AWS::EC2::SecurityGroupIngress
Properties:
GroupId: {"Fn::GetAtt" : ["AWSEBSecurityGroup", "GroupId"]}
IpProtocol: tcp
ToPort: 443
FromPort: 443
CidrIp: 0.0.0.0/0
For a load balanced environment, you configure the load balancer to either pass secure traffic through
untouched (p. 326), or decrypt and re-encrypt (p. 324) for end-to-end encryption.
Terminating HTTPS on EC2 Instances Running .NET
The following configuration file (p. 256) creates and runs a Windows PowerShell script that performs
the following tasks:
• Checks for an existing HTTPS certificate binding to port 443
• Gets the PFX certificate (p. 300) and password from an Amazon S3 bucket
Don't forget to to add an AmazonS3ReadOnlyAccess policy to the aws-elasticbeanstalk-
service-role to access the SSL certificate and password files on the Amazon S3 bucket.
• Installs the certificate
• Binds the certificate to port 443
See the comment above the Remove-WebBinding command if you want to remove the HTTP
endpoint (port 80).
API Version 2010-12-01
322

AWS Elastic Beanstalk Developer Guide
Terminate at the Instance
Example .ebextensions/https-instance-dotnet.config
files:
"C:\\certs\\install-cert.ps1":
content: |
import-module webadministration
## Settings - replace the following values with your own
$bucket = "my-bucket" ## S3 bucket name
$certkey = "example.com.pfx" ## S3 object key for your PFX certificate
$pwdkey = "password.txt" ## S3 object key for a text file containing the
certificate's password
##
# Set variables
$certfile = "C:\cert.pfx"
$pwdfile = "C:\certs\pwdcontent"
Read-S3Object -BucketName $bucket -Key $pwdkey -File $pwdfile
$pwd = Get-Content $pwdfile -Raw
# Cleanup existing binding
if ( Get-WebBinding "Default Web Site" -Port 443 ) {
Echo "Removing WebBinding"
Remove-WebBinding -Name "Default Web Site" -BindingInformation *:443:
}
if ( Get-Item -path IIS:\SslBindings\0.0.0.0!443 ) {
Echo "Deregistering WebBinding from IIS"
Remove-Item -path IIS:\SslBindings\0.0.0.0!443
}
# Download certificate from S3
Read-S3Object -BucketName $bucket -Key $certkey -File $certfile
# Install certificate
Echo "Installing cert..."
$securepwd = ConvertTo-SecureString -String $pwd -Force -AsPlainText
$cert = Import-PfxCertificate -FilePath $certfile cert:\localMachine\my -Password
$securepwd
# Create site binding
Echo "Creating and registering WebBinding"
New-WebBinding -Name "Default Web Site" -IP "*" -Port 443 -Protocol https
New-Item -path IIS:\SslBindings\0.0.0.0!443 -value $cert -Force
## (optional) Remove the HTTP binding - uncomment the following line to unbind port
80
# Remove-WebBinding -Name "Default Web Site" -BindingInformation *:80:
##
# Update firewall
netsh advfirewall firewall add rule name="Open port 443" protocol=TCP localport=443
action=allow dir=OUT
commands:
00_install_ssl:
command: powershell -NoProfile -ExecutionPolicy Bypass -file C:\\certs\\install-
cert.ps1
In a single instance environment, you must also modify the instance's security group to allow traffic on
port 443. The following configuration file retrieves the security group's ID using an AWS CloudFormation
function (p. 279) and adds a rule to it:
Example .ebextensions/https-instance-single.config
Resources:
API Version 2010-12-01
323

AWS Elastic Beanstalk Developer Guide
End-to-End Encryption
sslSecurityGroupIngress:
Type: AWS::EC2::SecurityGroupIngress
Properties:
GroupId: {"Fn::GetAtt" : ["AWSEBSecurityGroup", "GroupId"]}
IpProtocol: tcp
ToPort: 443
FromPort: 443
CidrIp: 0.0.0.0/0
For a load balanced environment, you configure the load balancer to either pass secure traffic through
untouched (p. 326), or decrypt and re-encrypt (p. 324) for end-to-end encryption.
Configuring End-to-End Encryption in a Load
Balanced Elastic Beanstalk Environment
Terminating secure connections at the load balancer and using HTTP on the backend may be sufficient
for your application. Network traffic between AWS resources cannot be listened to by instances that are
not part of the connection, even if they are running under the same account.
However, if you are developing an application that needs to comply with strict external regulations, you
may be required to secure all network connections. You can use configuration files (p. 256) to make
your Elastic Beanstalk environment's load balancer connect to backend instances securely to meet these
requirements.
First add a secure listener to your load balancer (p. 302), if you haven't already:
.ebextensions/https-lbterminate.config
option_settings:
aws:elb:listener:443:
SSLCertificateId: arn:aws:acm:us-east-2:#############:certificate/
####################################
ListenerProtocol: HTTPS
You must also configure the instances in your environment to listen on the secure port and terminate
HTTPS connections. The configuration varies per platform. See Configuring Your Application to
Terminate HTTPS Connections at the Instance (p. 304) for instructions. You can use a self-signed
certificate (p. 300) for the EC2 instances without issue.
Next, configure the listener to forward traffic using HTTPS on the secure port used by your application.
You can also change the default health check to use this port and protocol to ensure that the load
balancer is able to connect securely. The following configuration file does both:
.ebextensions/https-reencrypt.config
option_settings:
aws:elb:listener:443:
InstancePort: 443
InstanceProtocol: HTTPS
aws:elasticbeanstalk:application:
Application Healthcheck URL: HTTPS:443/
Note
EB CLI and Elastic Beanstalk console apply recommended values for the preceding options.
These settings must be removed if you want to use configuration files to configure the same.
See Recommended Values (p. 203) for details.
API Version 2010-12-01
324

AWS Elastic Beanstalk Developer Guide
End-to-End Encryption
The next part is a bit more complex. You need to modify the load balancer's security group to allow
traffic, but depending on whether you launch your environment in the default VPC or a custom VPC,
the load balancer's security group will vary. In a default VPC, Elastic Load Balancing provides a default
security group that can be used by all load balancers. In a VPC that you create, Elastic Beanstalk creates a
security group for the load balancer to use.
To support both scenarios, you can create a security group and tell Elastic Beanstalk to use that. The
following configuration file creates a security group and attaches it to the load balancer:
.ebextensions/https-lbsecuritygroup.config
option_settings:
# Use the custom security group for the load balancer
aws:elb:loadbalancer:
SecurityGroups: '`{ "Ref" : "loadbalancersg" }`'
ManagedSecurityGroup: '`{ "Ref" : "loadbalancersg" }`'
Resources:
loadbalancersg:
Type: AWS::EC2::SecurityGroup
Properties:
GroupDescription: load balancer security group
VpcId: vpc-########
SecurityGroupIngress:
- IpProtocol: tcp
FromPort: 443
ToPort: 443
CidrIp: 0.0.0.0/0
- IpProtocol: tcp
FromPort: 80
ToPort: 80
CidrIp: 0.0.0.0/0
SecurityGroupEgress:
- IpProtocol: tcp
FromPort: 80
ToPort: 80
CidrIp: 0.0.0.0/0
Replace the highlighted text with your default or custom VPC ID. The above example includes ingress
and egress over port 80 to allow HTTP connections. You can remove those properties if you only want to
allow secure connections.
Finally, add ingress and egress rules that allow communication over 443 between the load balancer's
security group and the instances' security group:
.ebextensions/https-backendsecurity.config
Resources:
# Add 443-inbound to instance security group (AWSEBSecurityGroup)
httpsFromLoadBalancerSG:
Type: AWS::EC2::SecurityGroupIngress
Properties:
GroupId: {"Fn::GetAtt" : ["AWSEBSecurityGroup", "GroupId"]}
IpProtocol: tcp
ToPort: 443
FromPort: 443
SourceSecurityGroupId: {"Fn::GetAtt" : ["loadbalancersg", "GroupId"]}
# Add 443-outbound to load balancer security group (loadbalancersg)
httpsToBackendInstances:
Type: AWS::EC2::SecurityGroupEgress
Properties:
GroupId: {"Fn::GetAtt" : ["loadbalancersg", "GroupId"]}
IpProtocol: tcp
API Version 2010-12-01
325

AWS Elastic Beanstalk Developer Guide
TCP Passthrough
ToPort: 443
FromPort: 443
DestinationSecurityGroupId: {"Fn::GetAtt" : ["AWSEBSecurityGroup", "GroupId"]}
Doing this separately from security group creation allows you to restrict the source and destination
security groups without creating a circular dependency.
With all of the above pieces in place, the load balancer connects to your backend instances securely
Using HTTPS. The load balancer doesn't care if your instance's certificate is self-signed or issued by a
trusted certificate authority, and will accept any certificate presented to it.
You can change this by adding policies to the load balancer that tell it only to trust a specific certificate.
The following configuration file creates two policies. One policy specifies a public certificate, and the
other tells the load balancer to only trust that certificate for connections to instance port 443:
.ebextensions/https-backendauth.config
option_settings:
# Backend Encryption Policy
aws:elb:policies:backendencryption:
PublicKeyPolicyNames: backendkey
InstancePorts: 443
# Public Key Policy
aws:elb:policies:backendkey:
PublicKey: |
-----BEGIN CERTIFICATE-----
################################################################
################################################################
################################################################
################################################################
################################################
-----END CERTIFICATE-----
Replace the highlighted text with the contents of your EC2 instance's public certificate.
Configuring Your Environment's Load Balancer for
TCP Passthrough
If you don't want the load balancer in your AWS Elastic Beanstalk environment to decrypt HTTPS traffic,
you can configure the secure listener to relay requests to backend instances as-is.
First configure your environment's EC2 instances to terminate HTTPS (p. 304). Test the configuration on
a single instance environment to make sure everything works before adding a load balancer to the mix.
Add a configuration file (p. 256) to your project to configure a listener on port 443 that passes TCP
packets as-is to port 443 on backend instances:
.ebextensions/https-lb-passthrough.config
option_settings:
aws:elb:listener:443:
ListenerProtocol: TCP
InstancePort: 443
InstanceProtocol: TCP
In a default VPC, you also need to add a rule to the instances' security group to allow inbound traffic on
443 from the load balancer:
.ebextensions/https-instance-securitygroup.config
API Version 2010-12-01
326

AWS Elastic Beanstalk Developer Guide
Store Keys Securely
Resources:
443inboundfromloadbalancer:
Type: AWS::EC2::SecurityGroupIngress
Properties:
GroupId: {"Fn::GetAtt" : ["AWSEBSecurityGroup", "GroupId"]}
IpProtocol: tcp
ToPort: 443
FromPort: 443
SourceSecurityGroupName: { "Fn::GetAtt": ["AWSEBLoadBalancer",
"SourceSecurityGroup.GroupName"] }
In a custom VPC, Elastic Beanstalk updates the security group configuration for you.
Storing Private Keys Securely in Amazon S3
The private key that you use to sign your public certificate is private and should not be commited to
source code. You can avoid storing private keys in configuration files by uploading them to Amazon S3,
and configuring Elastic Beanstalk to download the file from Amazon S3 during application deployment.
The following example shows the Resources (p. 275) and files (p. 261) sections of a configuration
file (p. 256) downloads a private key file from an Amazon S3 bucket.
Example .ebextensions/privatekey.config
Resources:
AWSEBAutoScalingGroup:
Metadata:
AWS::CloudFormation::Authentication:
S3Auth:
type: "s3"
buckets: ["elasticbeanstalk-us-west-2-123456789012"]
roleName:
"Fn::GetOptionSetting":
Namespace: "aws:autoscaling:launchconfiguration"
OptionName: "IamInstanceProfile"
DefaultValue: "aws-elasticbeanstalk-ec2-role"
files:
# Private key
/etc/pki/tls/certs/server.key:
mode: "000400"
owner: root
group: root
authentication: "S3Auth"
source: https://s3-us-west-2.amazonaws.com/elasticbeanstalk-us-west-2-123456789012/
server.key
Replace the bucket name and URL in the example with your own. The first entry in this file adds an
authentication method named S3Auth to the environment's Auto Scaling group's metadata. If you
have configured a custom instance profile (p. 22) for your environment, that will be used, otherwise
the default value of aws-elasticbeanstalk-ec2-role is applied. The default instance profile
has permission to read from the Elastic Beanstalk storage bucket. If you use a different bucket, add
permissions to the instance profile (p. 392).
The second entry uses the S3Auth authentication method to download the private key from the
specified URL and save it to /etc/pki/tls/certs/server.key. The proxy server can then read the
private key from this location to terminate HTTPS connections at the instance (p. 304).
The instance profile assigned to your environment's EC2 instances must have permission to read the key
object from the specified bucket. Verify that the instance profile has permission (p. 391) to read the
object in IAM, and that the permissions on the bucket and object do not prohibit the instance profile.
API Version 2010-12-01
327

AWS Elastic Beanstalk Developer Guide
Store Keys Securely
To view a bucket's permissions
1. Open the Amazon S3 Management Console.
2. Choose a bucket.
3. Choose Properties and then choose Permissions.
4. Verify that your account is a grantee on the bucket with read permission.
5. If a bucket policy is attached, the Edit bucket policy. Choose Edit bucket policy to view the
permissions assigned to the bucket.
API Version 2010-12-01
328

AWS Elastic Beanstalk Developer Guide
Monitoring Console
Monitoring an Environment
When you are running a production website, it is important to know that your application is available
and responding to requests. To assist with monitoring your application’s responsiveness, Elastic
Beanstalk provides features that monitor statistics about your application and create alerts that trigger
when thresholds are exceeded.
Topics
•Monitoring Environment Health in the AWS Management Console (p. 329)
•Basic Health Reporting (p. 333)
•Enhanced Health Reporting and Monitoring (p. 336)
•Manage Alarms (p. 362)
•Viewing an Elastic Beanstalk Environment's Event Stream (p. 365)
•Listing and Connecting to Server Instances (p. 367)
•Viewing Logs from Your Elastic Beanstalk Environment's Amazon EC2 Instances (p. 369)
Monitoring Environment Health in the AWS
Management Console
You can access operational information about your application from the AWS Management Console at
http://console.aws.amazon.com/elasticbeanstalk.
The AWS Management Console displays your environment's status and application health at a glance.
In the Elastic Beanstalk console applications page, each environment is color-coded to indicate an
environment's status.
To monitor an environment in the AWS Management Console
1. Navigate to the Environment Management Console (p. 65) for your environment
2. In the left navigation, click Monitoring.
The Monitoring page shows you overall statistics about your environment, such as CPU utilization
and average latency. In addition to the overall statistics, you can view monitoring graphs that show
resource usage over time. You can click any of the graphs to view more detailed information.
Note
By default, only basic CloudWatch metrics are enabled, which return data in five-minute
periods. You can enable more granular one-minute CloudWatch metrics by editing your
environment's configuration settings.
Overview
An overview of the environment's health is shown near the top of the screen.
API Version 2010-12-01
329
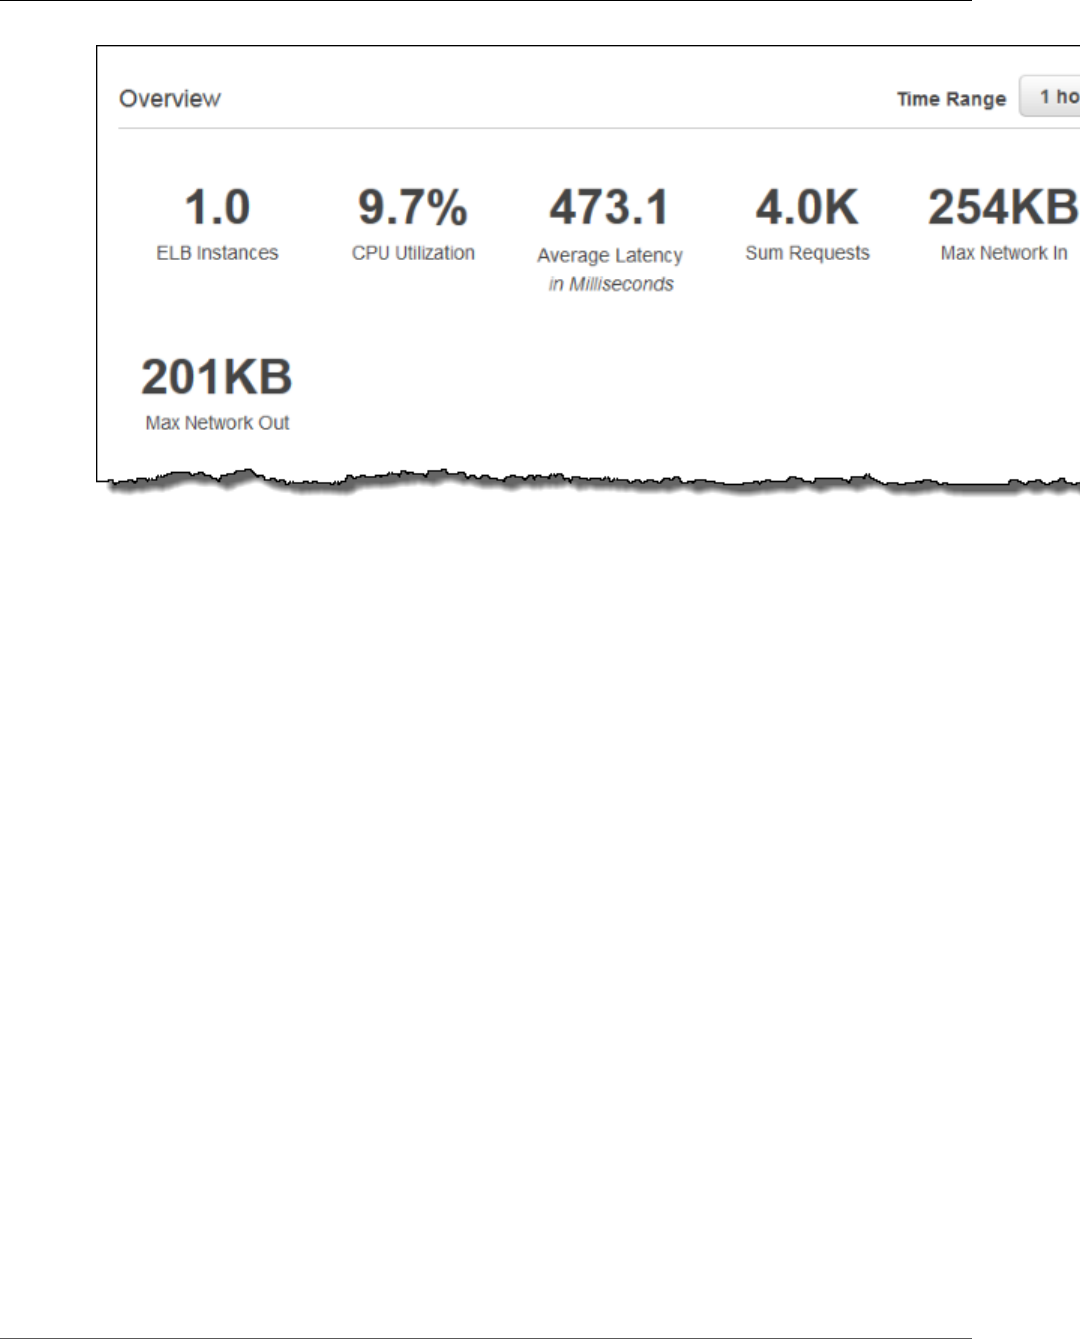
AWS Elastic Beanstalk Developer Guide
Monitoring Graphs
The overview panel shows a customizable summary of the activity in your environment over the last
hour. Click the Time Range drop-down and select a different length of time to view information for a
time period of five minutes to one day.
Monitoring Graphs
Below the overview are graphs that show data about overall environment health over the last twelve
hours. Click the Time Range drop-down and select a different length of time to view information for a
time period of three hours and two weeks.
API Version 2010-12-01
330
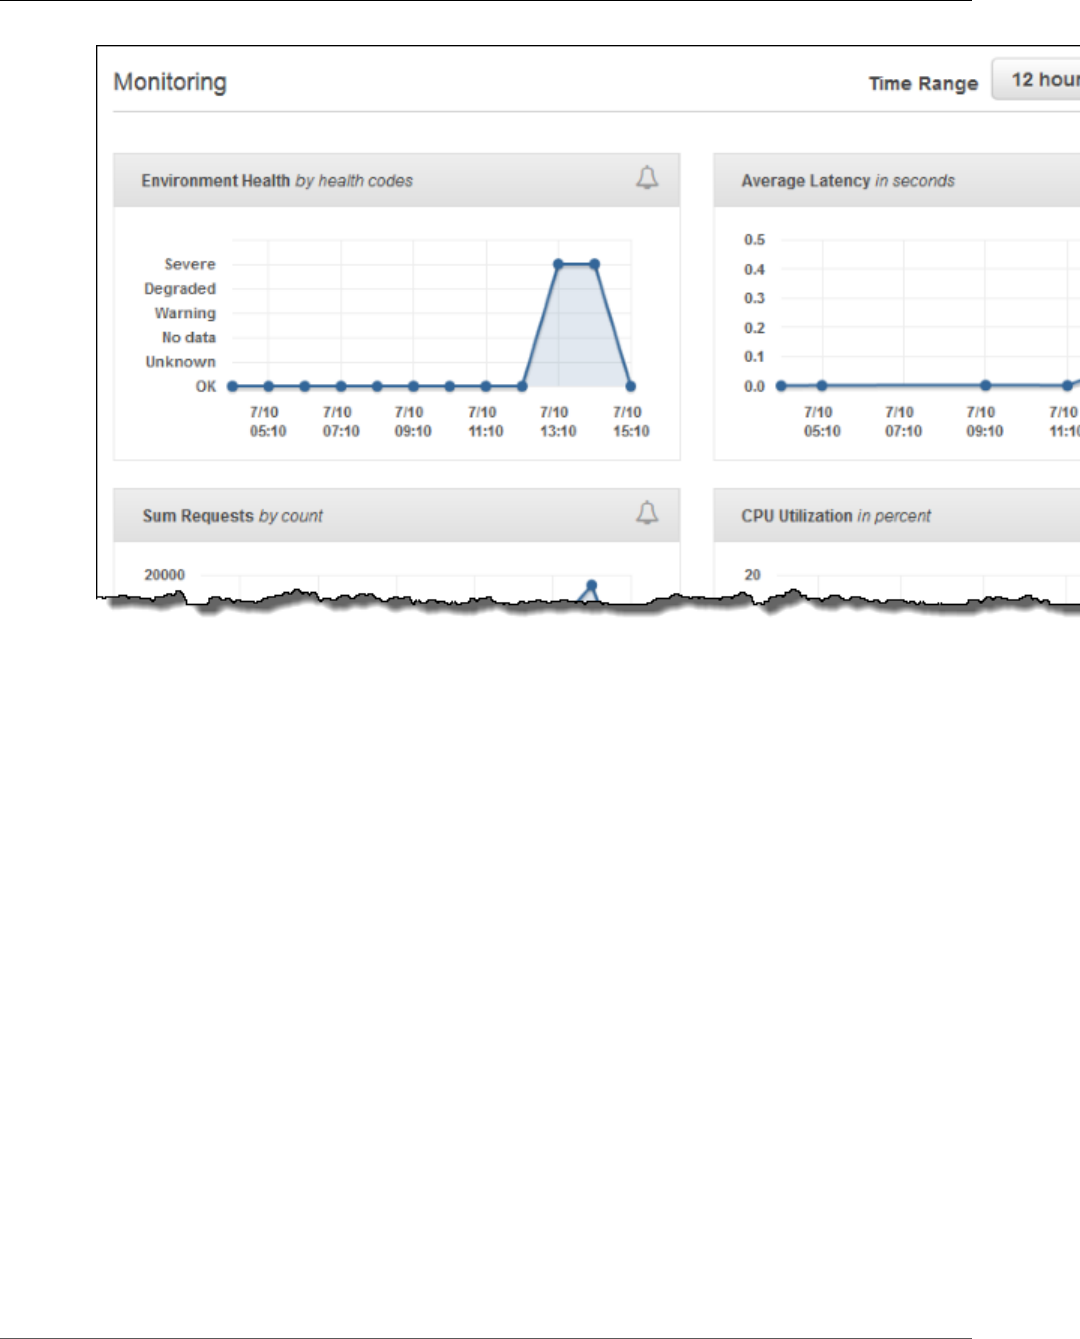
AWS Elastic Beanstalk Developer Guide
Customizing the Monitoring Console
Customizing the Monitoring Console
Click Edit next to either monitoring section to customize the information shown.
API Version 2010-12-01
331

AWS Elastic Beanstalk Developer Guide
Customizing the Monitoring Console
To remove any of the existing items, click the in the top right corner.
To add an overview or graph
1. Click Edit in the Overview or Monitoring section.
2. Select a Resource. The supported resources are your environment's Auto Scaling group, Elastic Load
Balancing load balancer, and the environment itself.
3. Select a CloudWatch metric for the resource. See Publishing Amazon CloudWatch Custom Metrics
for an Environment (p. 352) for a full list of supported metrics.
4. Select a Statistic. The default statistic is the average value of the selected cloudwatch metric during
the time range (overview) or between plot points (graph).
5. Enter a Description. The description is the label for the item shown in the monitoring console.
6. Click Add.
7. Repeat the previous steps to add more items or click Save to finish modifying the panel.
For more information about metrics and dimensions for each resource, see Amazon CloudWatch Metrics,
Namespaces, and Dimensions Reference in the Amazon CloudWatch User Guide.
Elastic Load Balancing and Amazon EC2 metrics are enabled for all environments.
API Version 2010-12-01
332

AWS Elastic Beanstalk Developer Guide
Basic Health Reporting
With enhanced health (p. 336), the EnvironmentHealth metric is enabled and a graph is added to
the monitoring console automatically. Additional metrics become available for use in the monitoring
console when you enabled them in the environment configuration. Enhanced health also adds the Health
page (p. 345) to the management console.
Note
When you enable additional CloudWatch metrics for your environment, it takes a few minutes
for them to start being reported and appear in the list of metrics that you use to add graphs and
overview stats.
See Publishing Amazon CloudWatch Custom Metrics for an Environment (p. 352) for a list of available
enhanced health metrics.
Basic Health Reporting
AWS Elastic Beanstalk uses information from multiple sources to determine if your environment is
available and processing requests from the Internet. An environment's health is represented by one
of four colors, which is displayed in the environment dashboard (p. 65), and is also available from the
DescribeEnvironments API and by calling eb status with the EB CLI (p. 480).
Prior to version 2 Linux platform configurations, the only health reporting system was basic health.
The basic health reporting system provides information about the health of instances in an Elastic
Beanstalk environment based on health checks performed by Elastic Load Balancing for load balanced
environments or Amazon Elastic Compute Cloud for single instance environments.
In addition to checking the health of your EC2 instances, Elastic Beanstalk also monitors the other
resources in your environment and reports missing or incorrectly configured resources that can cause
your environment to become unavailable to users.
Metrics gathered by the resources in your environment is published to Amazon CloudWatch in five
minute intervals. This includes operating system metrics from EC2, request metrics from Elastic Load
Balancing. You can view graphs based on these CloudWatch metrics on the Monitoring page (p. 329)
of the environment console. For basic health, these metrics are not used to determine an environment's
health.
Topics
•Health Colors (p. 333)
•Elastic Load Balancing Health Check (p. 334)
•Single Instance Environment Health Check (p. 334)
•Additional Checks (p. 334)
•Amazon CloudWatch Metrics (p. 335)
Health Colors
Elastic Beanstalk reports the health of a web server environment depending on how the application
running in it responds to the health check. Elastic Beanstalk uses one of four colors to describe status, as
shown in the following table:
Color Description
Grey Your environment is being updated.
Green Your environment has passed the most recent health check. At least one
instance in your environment is available and taking requests.
API Version 2010-12-01
333

AWS Elastic Beanstalk Developer Guide
Elastic Load Balancing Health Check
Color Description
Yellow Your environment has failed one or more health checks. Some requests to
your environment are failing.
Red Your environment has failed three or more health checks, or an environment
resource has become unavailable. Requests are consistently failing.
These descriptions only apply to environments using basic health reporting. See Health Colors and
Statuses (p. 349) for details related to enhanced health.
Elastic Load Balancing Health Check
In a load balanced environment, Elastic Load Balancing sends a request to each instance in an
environment every 30 seconds to confirm that instances are healthy. By default, the load balancer is
configured to open a TCP connection on port 80. If the instance acknowledges the connection, it is
considered healthy.
You can choose to override this setting by specifying an existing resource in your application. If you
specify a path, such as /health, the health check URL is set to http:80/health. The health check
URL should be set to a path that is always served by your application. If it is set to a static page that is
served or cached by the web server in front of your application, health checks will not reveal issues with
the application server or web container. For instructions on modifying your health check URL, see Health
Check (p. 179).
If a health check URL is configured, Elastic Load Balancing expects a GET request that it sends to return
a response of 200 OK. The application fails the health check if it fails to respond within 5 seconds or
if it responds with any other HTTP status code. After 5 consecutive health check failures, Elastic Load
Balancing takes the instance out of service.
For more information about Elastic Load Balancing health checks, see Health Check in the Elastic Load
Balancing User Guide.
Note
Configuring a health check URL does not change the health check behavior of an environment's
Auto Scaling group. An unhealthy instance is removed from the load balancer, but is not
automatically replaced by Auto Scaling unless you configure Auto Scaling to use the Elastic
Load Balancing health check as a basis for replacing instances. To configure Auto Scaling to
replace instances that fail an Elastic Load Balancing health check, see Auto Scaling Health Check
Setting (p. 175).
Single Instance Environment Health Check
In a single instance environment, Elastic Beanstalk determines the instance's health by monitoring its
Amazon EC2 instance status. Elastic Load Balancing health settings, including HTTP health check URLs,
cannot be used in a single instance environment.
For more information on Amazon EC2 instance status checks, see Monitoring Instances with Status
Checks in the Amazon EC2 User Guide for Linux Instances.
Additional Checks
In addition to Elastic Load Balancing health checks, Elastic Beanstalk monitors resources in your
environment and changes health status to red if they fail to deploy, are not configured correctly, or
become unavailable. These checks confirm that:
API Version 2010-12-01
334

AWS Elastic Beanstalk Developer Guide
Amazon CloudWatch Metrics
• The environment's Auto Scaling group is available and has a minimum of at least one instance.
• The environment's security group is available and is configured to allow incoming traffic on port 80.
• The environment CNAME exists and is pointing to the right load balancer.
• In a worker environment, the Amazon Simple Queue Service (Amazon SQS) queue is being polled at
least once every three minutes.
Amazon CloudWatch Metrics
With basic health reporting, the Elastic Beanstalk service does not publish any metrics to Amazon
CloudWatch. The CloudWatch metrics used to produce graphs on the Monitoring page (p. 329) of the
environment console are published by the resources in your environment.
For example, EC2 publishes the following metrics for the instances in your environment's Auto Scaling
group:
CPUUtilization
Percentage of compute units currently in use.
DiskReadBytes, DiskReadOps, DiskWriteBytes, DiskWriteOps
Number of bytes read and written, and number of read and write operations.
NetworkIn, NetworkOut
Number of bytes sent and received.
Elastic Load Balancing publishes the following metrics for your environment's load balancer:
BackendConnectionErrors
Number of connection failures between the load balancer and environment instances.
HTTPCode_Backend_2XX, HTTPCode_Backend_4XX
Number of successful (2XX) and client error (4XX) response codes generated by instances in your
environment.
Latency
Number of seconds between when the load balancer relays a request to an instance and when the
response is received.
RequestCount
Number of completed requests.
These lists are not comprehensive. For a full list of metrics that can be reported for these resources, see
the following topics in the Amazon CloudWatch Developer Guide:
Metrics
Namespace Topic
AWS::ElasticLoadBalancing::LoadBalancer Elastic Load Balancing Metrics and Resources
AWS::AutoScaling::AutoScalingGroup Amazon Elastic Compute Cloud Metrics and
Resources
AWS::SQS::Queue Amazon SQS Metrics and Resources
API Version 2010-12-01
335

AWS Elastic Beanstalk Developer Guide
Enhanced Health Reporting and Monitoring
Namespace Topic
AWS::RDS::DBInstance Amazon RDS Dimensions and Metrics
Worker Environment Health Metric
For worker environments only, the SQS daemon publishes a custom metric for environment health to
CloudWatch, where a value of 1 is Green. You can review the CloudWatch health metric data in your
account using the ElasticBeanstalk/SQSD namespace. The metric dimension is EnvironmentName,
and the metric name is Health. All instances publish their metrics to the same namespace.
To enable the daemon to publish metrics, the environment's instance profile must have permission to
call cloudwatch:PutMetricData. This permission is included in the default instance profile. For more
information, see Managing Elastic Beanstalk Instance Profiles (p. 388).
Enhanced Health Reporting and Monitoring
Enhanced health reporting is a feature that you can enable on your environment to allow AWS Elastic
Beanstalk to gather additional information about resources in your environment. Elastic Beanstalk
analyzes the information gathered to provide a better picture of overall environment health and aid in
the identification of issues that can cause your application to become unavailable.
In addition to changes in how health color works, enhanced health adds a status descriptor that provides
an indicator of the severity of issues observed when an environment is yellow or red. When more
information is available about the current status, you can choose the Causes button to view detailed
health information on the health page (p. 344).
To provide detailed health information about the EC2 instances running in your environment, Elastic
Beanstalk includes a health agent (p. 337) in the Amazon Machine Image (AMI) for each platform
API Version 2010-12-01
336

AWS Elastic Beanstalk Developer Guide
The Elastic Beanstalk Health Agent
configuration that supports enhanced health. The health agent monitors web server logs and system
metrics and relays them to the Elastic Beanstalk service. Elastic Beanstalk analyzes these metrics along
with data from Elastic Load Balancing and Auto Scaling to provide an overall picture of an environment's
health.
In addition to collecting and presenting information about your environment's resources, Elastic
Beanstalk monitors the resources in your environment for several error conditions and provides
notifications to help you avoid failures and resolve configuration issues. Factors that influence your
environment's health (p. 338) include the results of each request served by your application, metrics
from your instances' operating system, and the status of the most recent deployment.
You can view health status in real time by using the environment dashboard (p. 344) in the AWS
Management Console or the eb health (p. 503) command in the Elastic Beanstalk command line
interface (p. 480) (EB CLI). To record and track environment and instance health over time, you can
configure your environment to publish the information gathered by Elastic Beanstalk for enhanced
health reporting to Amazon CloudWatch as custom metrics. CloudWatch charges for custom metrics
apply to all metrics other than EnvironmentHealth, which is free of charge.
Enhanced health reporting requires a version 2 or newer platform configuration (p. 26) and is supported
by all platforms except Windows Server with IIS. In order to monitor resources and publish metrics, your
environment must have both an instance profile and service (p. 336) role. The Multicontainer Docker
configuration does not include a web server by default but can be used with enhanced health reporting if
you configure your web server to provide logs in the proper format (p. 359).
The first time you create an environment with a version 2 platform configuration in the AWS
Management Console, Elastic Beanstalk prompts you to create the required roles and enables enhanced
health reporting by default. Continue reading for details on how enhanced health reporting works, or
go to Enabling AWS Elastic Beanstalk Enhanced Health Reporting (p. 341) to get started using it right
away.
Topics
•The Elastic Beanstalk Health Agent (p. 337)
•Factors in Determining Instance and Environment Health (p. 338)
•Enhanced Health Roles (p. 340)
•Enhanced Health Events (p. 340)
•Enhanced Health Reporting Behavior During Updates, Deployments, and Scaling (p. 341)
•Enabling AWS Elastic Beanstalk Enhanced Health Reporting (p. 341)
•Enhanced Health Monitoring with the Environment Management Console (p. 344)
•Health Colors and Statuses (p. 349)
•Instance Metrics (p. 351)
•Publishing Amazon CloudWatch Custom Metrics for an Environment (p. 352)
•Using Enhanced Health Reporting with the AWS Elastic Beanstalk API (p. 357)
•Enhanced Health Log Format (p. 359)
•Notifications and Troubleshooting (p. 361)
The Elastic Beanstalk Health Agent
The Elastic Beanstalk health agent is a daemon process that runs on each EC2 instance in your
environment, monitoring operating system and application-level health metrics and reporting issues to
Elastic Beanstalk. The health agent is included in all Linux platform solution stacks starting with version
2.0 of each configuration.
The health agent reports similar metrics to those published to CloudWatch (p. 335) by Auto Scaling
and Elastic Load Balancing as part of basic health reporting (p. 333), including CPU load, HTTP codes,
API Version 2010-12-01
337

AWS Elastic Beanstalk Developer Guide
Factors in Determining Instance and Environment Health
and latency. The health agent, however, reports directly to Elastic Beanstalk, with greater granularity and
frequency than basic health reporting.
For basic health, these metrics are published every five minutes and can be monitored with graphs in the
environment management console. With enhanced health, the Elastic Beanstalk health agent reports
metrics to Elastic Beanstalk every ten seconds. Elastic Beanstalk uses the metrics provided by the health
agent to determine the health status of each instance in the environment, and, combined with other
factors (p. 338), to determine the overall health of the environment.
The overall health of the environment can be viewed in real-time in the environment dashboard and
is published to CloudWatch by Elastic Beanstalk every sixty seconds. Detailed metrics reported by the
health agent can be viewed in real time with the eb health (p. 503) command in the EB CLI (p. 480).
For an additional charge, you can choose to publish individual instance and environment level metrics to
CloudWatch every sixty seconds. Metrics published to CloudWatch can then be used to create monitoring
graphs (p. 331) in the environment management console (p. 65).
Enhanced health reporting only incurs a charge if you choose to publish enhanced health metrics to
CloudWatch. When you use enhanced health, you still get the basic health metrics published for free,
even if you don't choose to publish enhanced health metrics.
See Instance Metrics (p. 351) for details on the metrics reported by the health agent. For details on
publishing enhanced health metrics to CloudWatch, see Publishing Amazon CloudWatch Custom Metrics
for an Environment (p. 352).
Factors in Determining Instance and Environment
Health
In addition to the basic health reporting system checks, including Elastic Load Balancing Health
Check (p. 334) and resource monitoring (p. 334), Elastic Beanstalk enhanced health reporting gathers
additional data about the state of the instances in your environment, including operating system metrics,
server logs, and the state of ongoing environment operations such as deployments and updates. The
Elastic Beanstalk health reporting service combines information from all available sources and analyzes it
to determine the overall health of the environment.
Operations and Commands
When you perform an operation on your environment, such as deploying a new version of an application,
Elastic Beanstalk makes several changes that cause the health status of the environment to change.
For example, when you deploy a new version of an application to an environment that is running
multiple instances, you might see messages similar to the following as you monitor the environment's
health with the EB CLI (p. 503):
id status cause
Overall Info Command is executing on 3 out of 5 instances
i-bb65c145 Pending 91 % of CPU is in use. 24 % in I/O wait
Performing application deployment (running for 31 seconds)
i-ba65c144 Pending Performing initialization (running for 12 seconds)
i-f6a2d525 Ok Application deployment completed 23 seconds ago and took 26
seconds
i-e8a2d53b Pending 94 % of CPU is in use. 52 % in I/O wait
Performing application deployment (running for 33 seconds)
i-e81cca40 Ok
In this example, the overall status of the environment is Ok and the cause of this status is that the
Command is executing on 3 out of 5 instances. Three of the instances in the environment have the status
Pending, indicating that an operation is in progress.
API Version 2010-12-01
338

AWS Elastic Beanstalk Developer Guide
Factors in Determining Instance and Environment Health
When an operation completes, Elastic Beanstalk reports additional information about the operation. For
the example, Elastic Beanstalk displays the following information about an instance that has already
been updated with the new version of the application:
i-f6a2d525 Ok Application deployment completed 23 seconds ago and took 26
seconds
Instance health information also includes details about the most recent deployment to each instance
in your environment. Each instance reports a deployment ID and status. The deployment ID is an
integer that increases by one each time you deploy a new version of your application or change settings
for on-instance configuration options such as environment variables. You can use the deployment
information to identify instances that are running the wrong version of your application after a failed
rolling deployment (p. 125).
In the cause column, Elastic Beanstalk includes informational messages about successful operations
and other healthy states across multiple health checks, but they do not persist indefinitely. Causes for
unhealthy environment statuses persist until the environment returns to a healthy status.
Command Timeout
Elastic Beanstalk applies a command timeout from the time an operation begins to allow an instance
to transition into a healthy state. This command timeout is set in your environment's update and
deployment configuration (in the aws:elasticbeanstalk:command (p. 230) namespace) and defaults to 10
minutes.
During rolling updates, Elastic Beanstalk applies a separate timeout to each batch in the
operation. This timeout is set as part of the environment's rolling update configuration (in the
aws:autoscaling:updatepolicy:rollingupdate (p. 227) namespace). If all instances in the batch are healthy
within the command timeout, the operation continues to the next batch. If not, the operation fails.
Note
If your application does not pass health checks with Ok status but is stable at a
different level, you can set the HealthCheckSuccessThreshold option in the
aws:elasticbeanstalk:command namespace (p. 230) to change the level at which Elastic
Beanstalk considers an instance to be healthy.
For a web server environment to be considered healthy, each instance in the environment or batch must
pass 12 consecutive health checks over the course of two minutes. For worker tier, each instance must
pass 18 health checks. Prior to command timeout, Elastic Beanstalk does not lower an environment's
health status when health checks fail. As long as the instances in the environment and become healthy
within the command timeout, the operation succeeds.
HTTP Requests
When no operation is in progress on an environment, the primary source of information about instance
and environment health is the web server logs for each instance. To determine the health of an instance
and the overall health of the environment, Elastic Beanstalk considers the number of requests, the result
of each request, and the speed at which each request was resolved.
If you use Multicontainer Docker, which does not include a web server, or disable the web server (nginx or
Apache) that is included in other Elastic Beanstalk platforms, additional configuration is required to get
the Elastic Beanstalk health agent (p. 337) logs in the format that it needs to relay health information
to the Elastic Beanstalk service. See Enhanced Health Log Format (p. 359) for details.
Operating System Metrics
Elastic Beanstalk monitors operating system metrics reported by the health agent to identify instances
that are consistently low on system resources.
API Version 2010-12-01
339
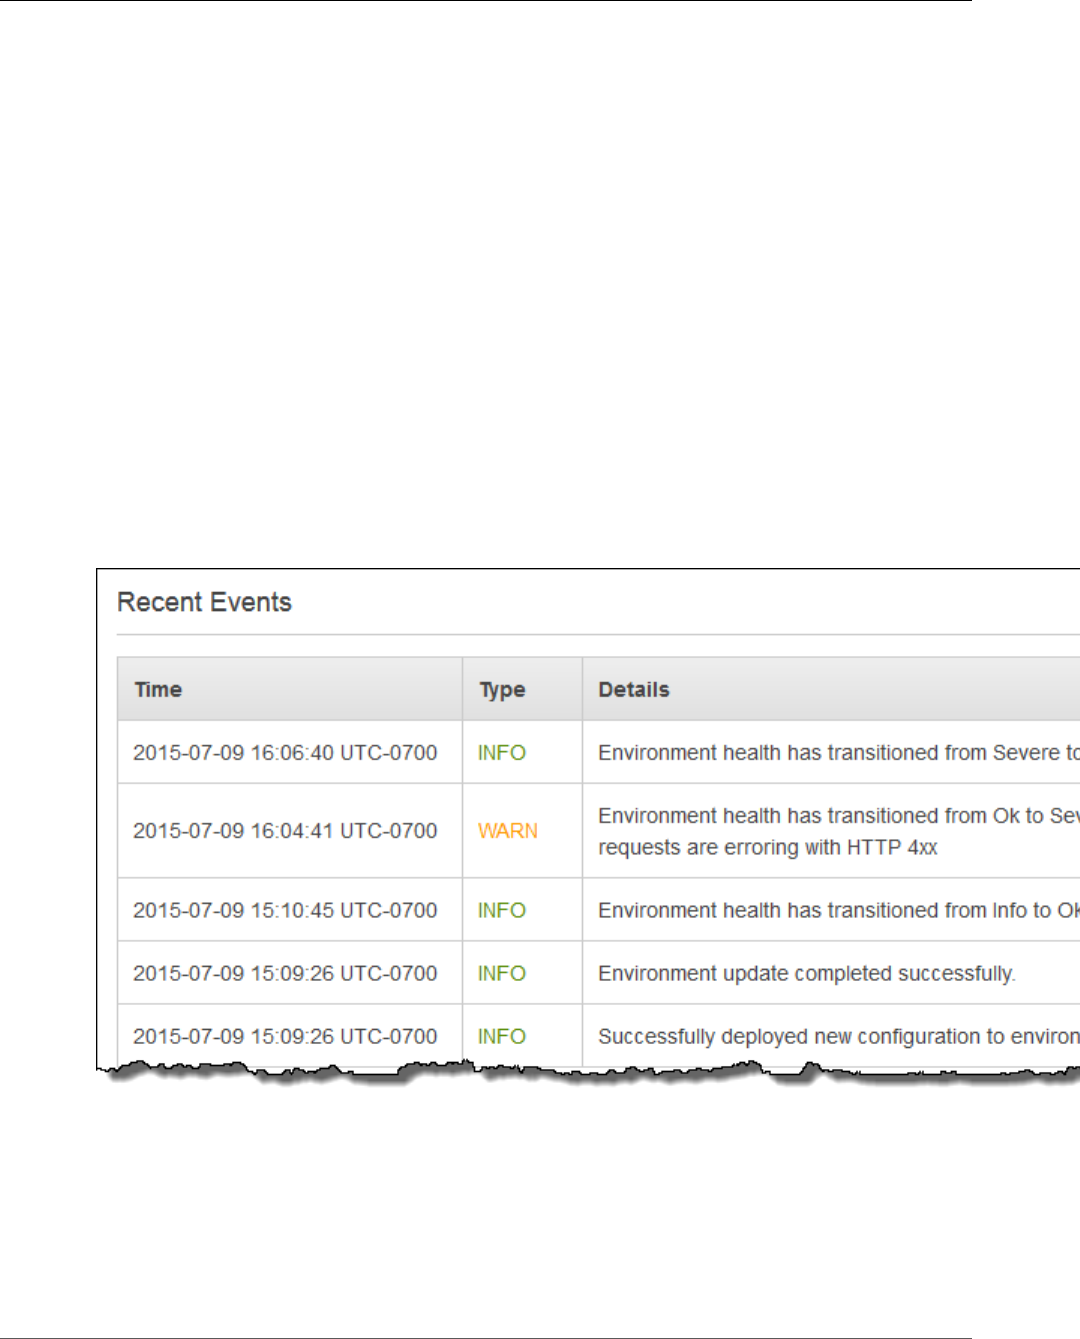
AWS Elastic Beanstalk Developer Guide
Enhanced Health Roles
See Instance Metrics (p. 351) for details on the metrics reported by the health agent.
Enhanced Health Roles
Enhanced health reporting requires two roles—a service role for Elastic Beanstalk and an instance profile
for the environment. The service role allows Elastic Beanstalk to interact with other AWS services on
your behalf in order to gather information about the resources in your environment. The instance profile
allows the instances in your environment to write logs to Amazon S3.
When you create an Elastic Beanstalk environment in the AWS Management Console, the console
prompts you to create an instance profile and service role with appropriate permissions. The EB CLI also
assists you in creating these roles when you call eb create to create an environment.
If you use the API, an SDK, or the AWS CLI to create environments, you must create these roles
beforehand and specify them during environment creation to use enhanced health. For instructions
on creating appropriate roles for your environments, see Service Roles, Instance Profiles, and User
Policies (p. 21).
Enhanced Health Events
The enhanced health system generates events when an environment transitions between states. The
following example shows events output by an environment transitioning between Info, OK and Severe
states:
When transitioning to a worse state, Elastic Beanstalk includes a message indicating the cause in the
event.
Not all changes in status at an instance level will cause Elastic Beanstalk to emit an event. To prevent
false alarms, Elastic Beanstalk only generates a health related event if an issue persists across multiple
checks.
Real time environment level health information, including status, color and cause, is available in the
environment dashboard (p. 67) and the EB CLI (p. 480). By attaching the EB CLI to your environment
API Version 2010-12-01
340

AWS Elastic Beanstalk Developer Guide
Enhanced Health Reporting Behavior
During Updates, Deployments, and Scaling
and running the eb health (p. 503) command, you can also view real time statuses from each of the
instances in your environment.
Enhanced Health Reporting Behavior During Updates,
Deployments, and Scaling
Enabling enhanced health reporting can affect how your environment behaves during configuration
updates and deployments. Elastic Beanstalk won't complete a batch of updates until all of the instances
pass health checks consistently, and since enhanced health reporting applies a higher standard for health
and monitors more factors, instances that pass basic health reporting's ELB health check (p. 334)
won't necessarily pass muster with enhanced health reporting. See the topics on rolling configuration
updates (p. 134) and rolling deployments (p. 125) for details on how health checks affect the update
process.
Enhanced health reporting can also highlight the need to set a proper health check URL (p. 179) for
Elastic Load Balancing. When your environment scales up to meet demand, new instances will start
taking requests as soon as they pass enough ELB health checks. If a health check URL is not configured,
this can be as little as 20 seconds after a new instance is able to accept a TCP connection.
If your application hasn't finished starting up by the time the load balancer declares it healthy enough
to receive traffic, you will see a flood of failed requests, and your environment will start to fail health
checks. A health check URL that hits a path served by your application can prevent this issue; ELB health
checks won't pass until a GET request to the health check URL returns a 200 status code.
Enabling AWS Elastic Beanstalk Enhanced Health
Reporting
New environments created with the latest platform versions (p. 26) include the AWS Elastic Beanstalk
health agent (p. 337), which supports enhanced health reporting. If you create your environment in the
AWS Management Console or with the EB CLI, enhanced health is enabled by default. You can also set
your health reporting preference in your application's source code using configuration files (p. 256).
Enhanced health reporting requires an instance profile (p. 22) and service role (p. 21) with the
standard set of permissions. When you create an environment in the Elastic Beanstalk Management
Console, Elastic Beanstalk creates the required roles automatically. See Getting Started Using Elastic
Beanstalk (p. 3) for instructions on creating your first environment.
Topics
•Enabling Enhanced Health Reporting with the AWS Management Console (p. 341)
•Enabling Enhanced Health Reporting with the EB CLI (p. 343)
•Enabling Enhanced Health Reporting with a Configuration File (p. 344)
Enabling Enhanced Health Reporting with the AWS
Management Console
To enable enhanced health reporting in a running environment with the AWS Management
Console
1. Navigate to the management page (p. 65) for your environment.
2. Choose Configuration.
3. On the Health panel under Web Tier, choose .
API Version 2010-12-01
341
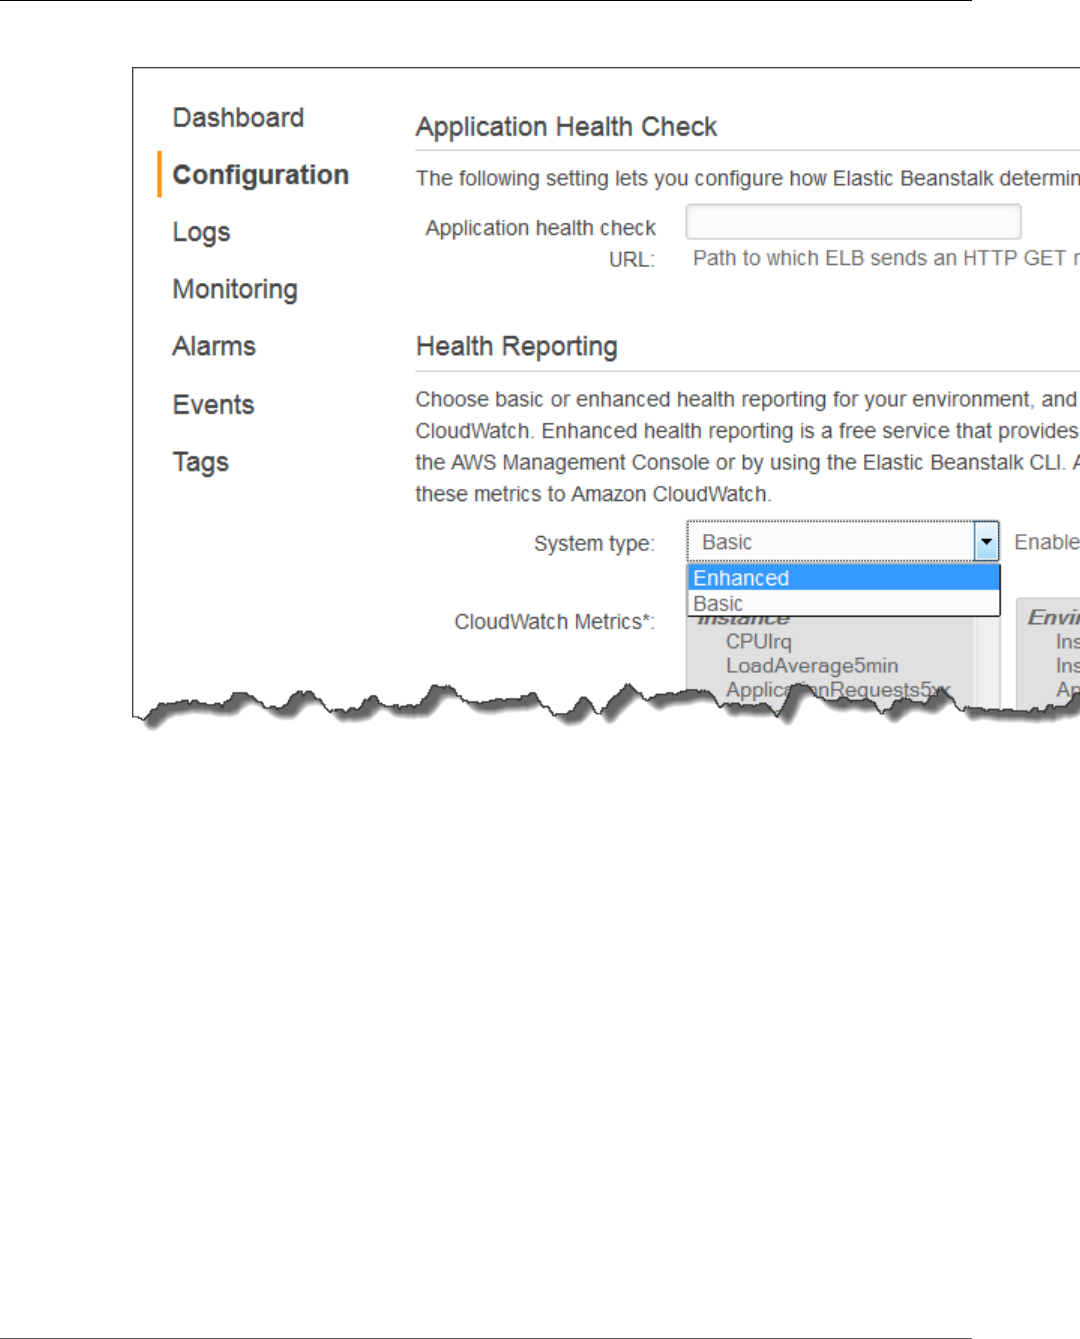
AWS Elastic Beanstalk Developer Guide
Enable Enhanced Health
4. Under Health Reporting, for System type, choose Enhanced.
Note
The options for enhanced health reporting do not appear if you are using an unsupported
platform or version (p. 336).
5. Choose Apply.
The Elastic Beanstalk console defaults to enhanced health reporting when you create a new environment
with a version 2 platform configuration. You can disable enhanced health reporting by changing the
health reporting option during environment creation.
To disable enhanced health reporting when creating an environment using the AWS
Management Console
1. Open the Elastic Beanstalk console.
2. Create an application (p. 49) or select an existing one.
3. Create an environment (p. 76). On the Configuration Details page, choose Basic for the health
reporting type under Health Reporting.
API Version 2010-12-01
342
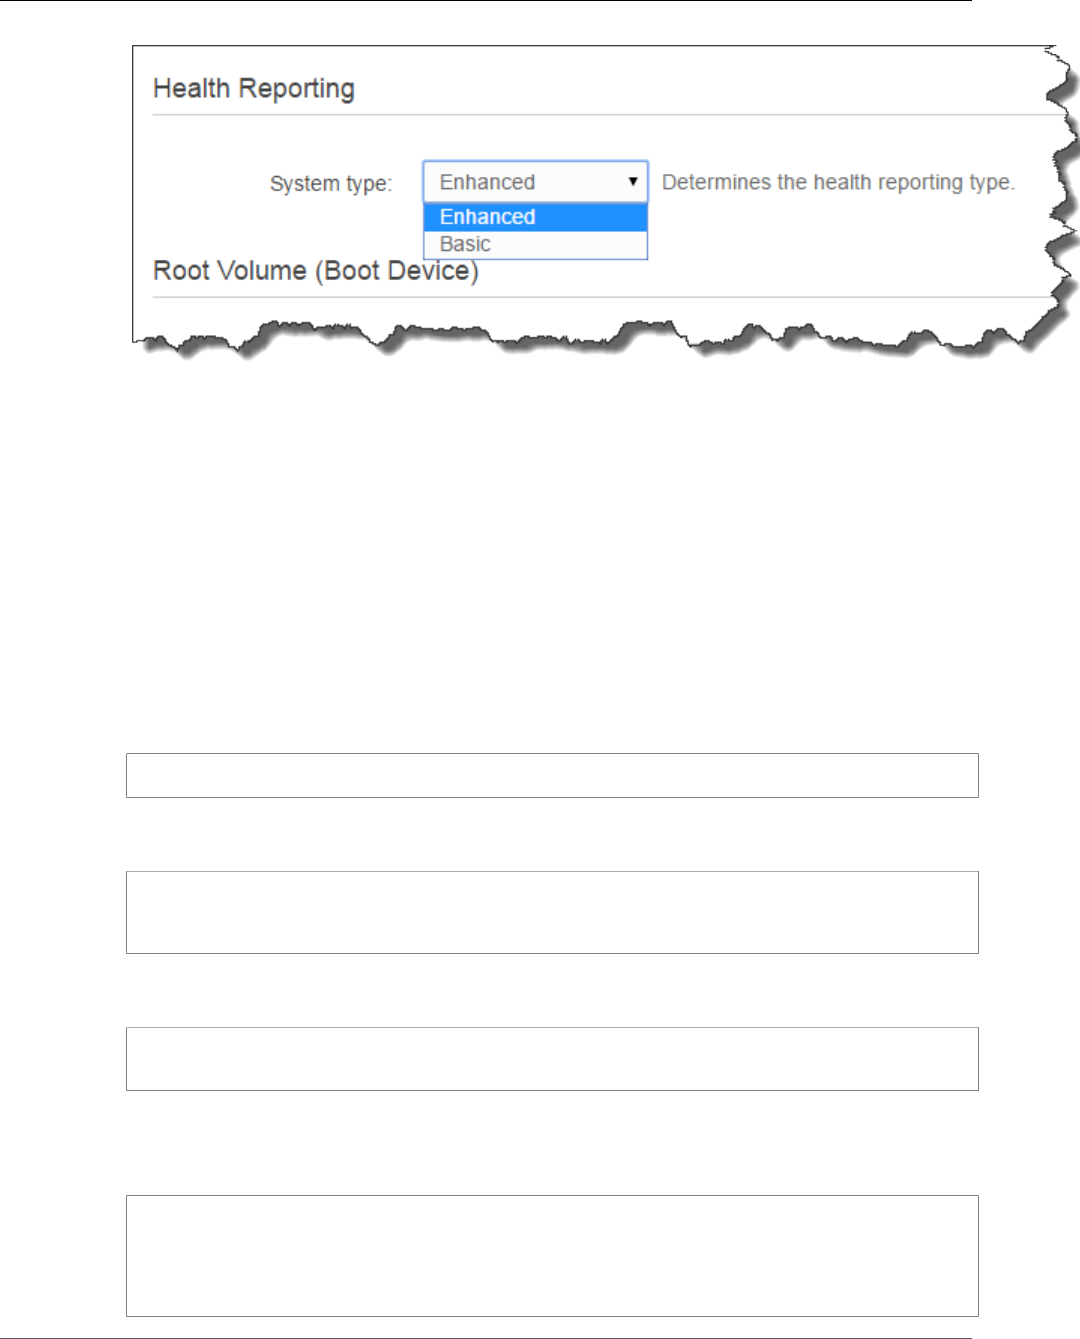
AWS Elastic Beanstalk Developer Guide
Enable Enhanced Health
Enabling Enhanced Health Reporting with the EB CLI
When you create a new environment with the eb create command, the EB CLI enables enhanced
health reporting by default and applies the default instance profile and service role.
You can specify a different service role by name with the --service-role option.
If you have an environment running with basic health reporting on a version 2 platform configuration
and want to switch to enhanced health, follow these steps:
To enable enhanced health on a running environment using the EB CLI (p. 480)
1. Use the eb config command to open the configuration file in the default text editor:
~/project$ eb config
2. Locate the aws:elasticbeanstalk:environment namespace in the settings section. Ensure that
the value of ServiceRole is not null and that it matches the name of your service role (p. 21).
aws:elasticbeanstalk:environment:
EnvironmentType: LoadBalanced
ServiceRole: aws-elasticbeanstalk-service-role
3. Under the aws:elasticbeanstalk:healthreporting:system: namespace, change the value
of SystemType to enhanced.
aws:elasticbeanstalk:healthreporting:system:
SystemType: enhanced
4. Save the configuration file and close the text editor.
5. The EB CLI starts an environment update to apply your configuration changes. Wait for the
operation to complete or press Ctrl-C to exit safely.
~/project$ eb config
Printing Status:
INFO: Environment update is starting.
INFO: Health reporting type changed to ENHANCED.
INFO: Updating environment no-role-test's configuration settings.
API Version 2010-12-01
343

AWS Elastic Beanstalk Developer Guide
Health Console
Enabling Enhanced Health Reporting with a Configuration File
You can enable enhanced health reporting by including a configuration file (p. 256) in your source
bundle. The following example shows a configuration file that enables enhanced health reporting and
assigns the default service and instance profile to the environment:
Example .ebextensions/enhanced-health.config
option_settings:
aws:elasticbeanstalk:healthreporting:system:
SystemType: enhanced
aws:autoscaling:launchconfiguration:
IamInstanceProfile: aws-elasticbeanstalk-ec2-role
aws:elasticbeanstalk:environment:
ServiceRole: aws-elasticbeanstalk-service-role
If you created your own instance profile or service role, replace the highlighted text with the names of
those roles.
Enhanced Health Monitoring with the Environment
Management Console
When you have enabled enhanced health reporting in AWS Elastic Beanstalk, you can monitor
environment health in the environment management console (p. 65).
Topics
•Environment Dashboard (p. 344)
•Environment Health Page (p. 345)
•Monitoring Page (p. 349)
Environment Dashboard
The environment dashboard (p. 67) displays the health status (p. 349) of the environment and lists
events that provide information about recent changes in health status.
To view the environment dashboard
1. Open the Elastic Beanstalk console.
2. Navigate to the management page (p. 65) for your environment.
For detailed information about the current environment's health, open the Health page by choosing
Causes.
API Version 2010-12-01
344
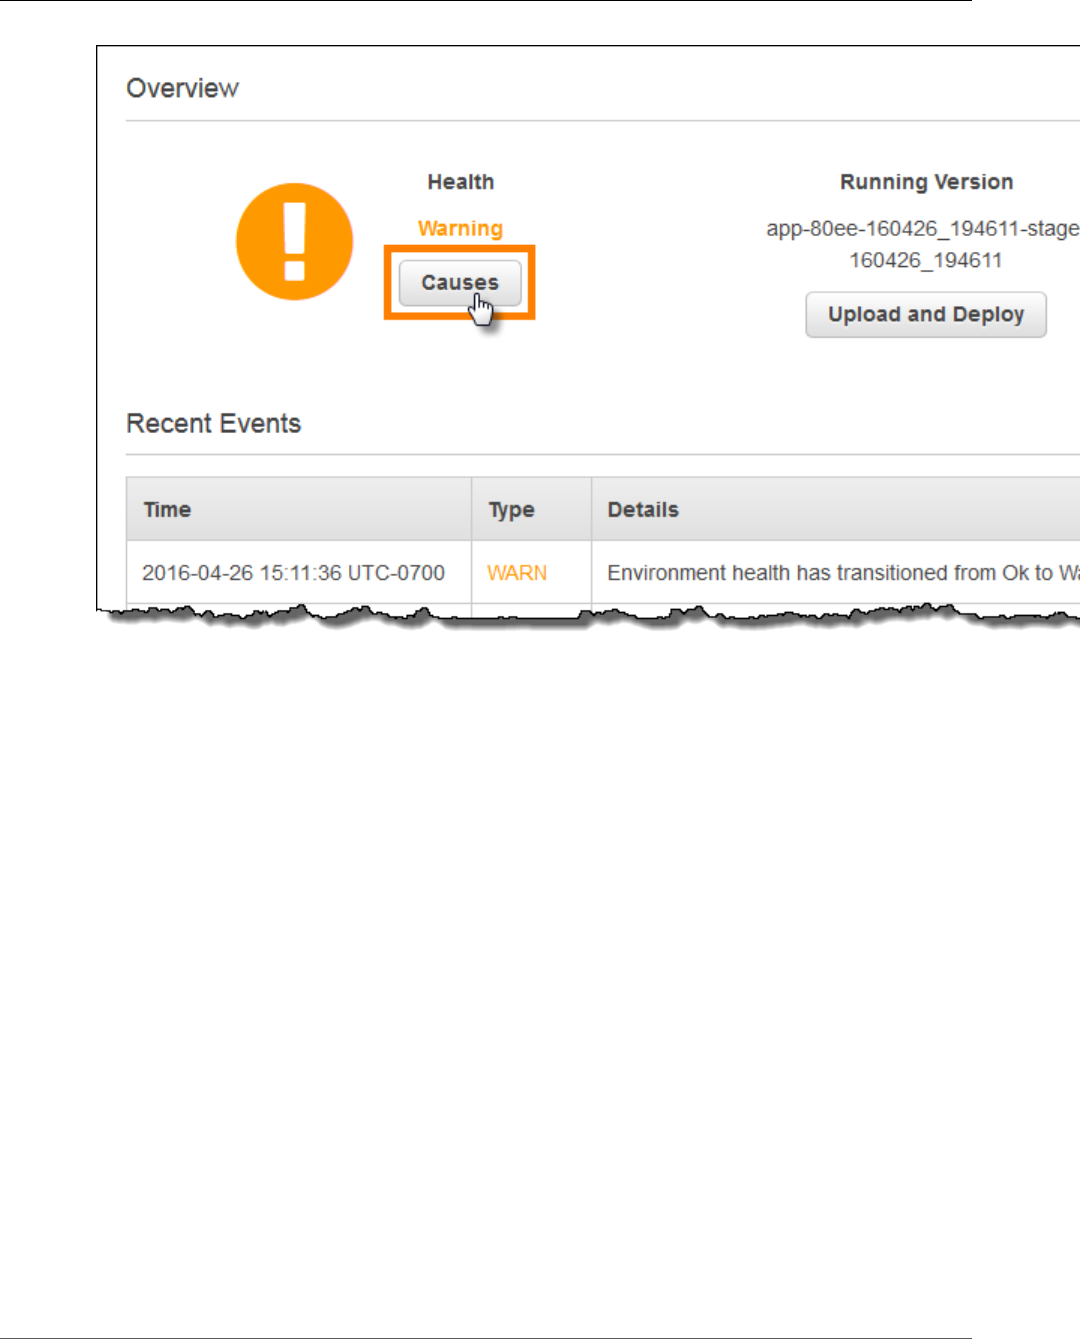
AWS Elastic Beanstalk Developer Guide
Health Console
Environment Health Page
The Health page displays health status, metrics and causes for the environment and for each EC2
instance in the environment.
Note
Elastic Beanstalk displays the Health page only if you have enabled enhanced health
monitoring (p. 341) for the environment.
API Version 2010-12-01
345
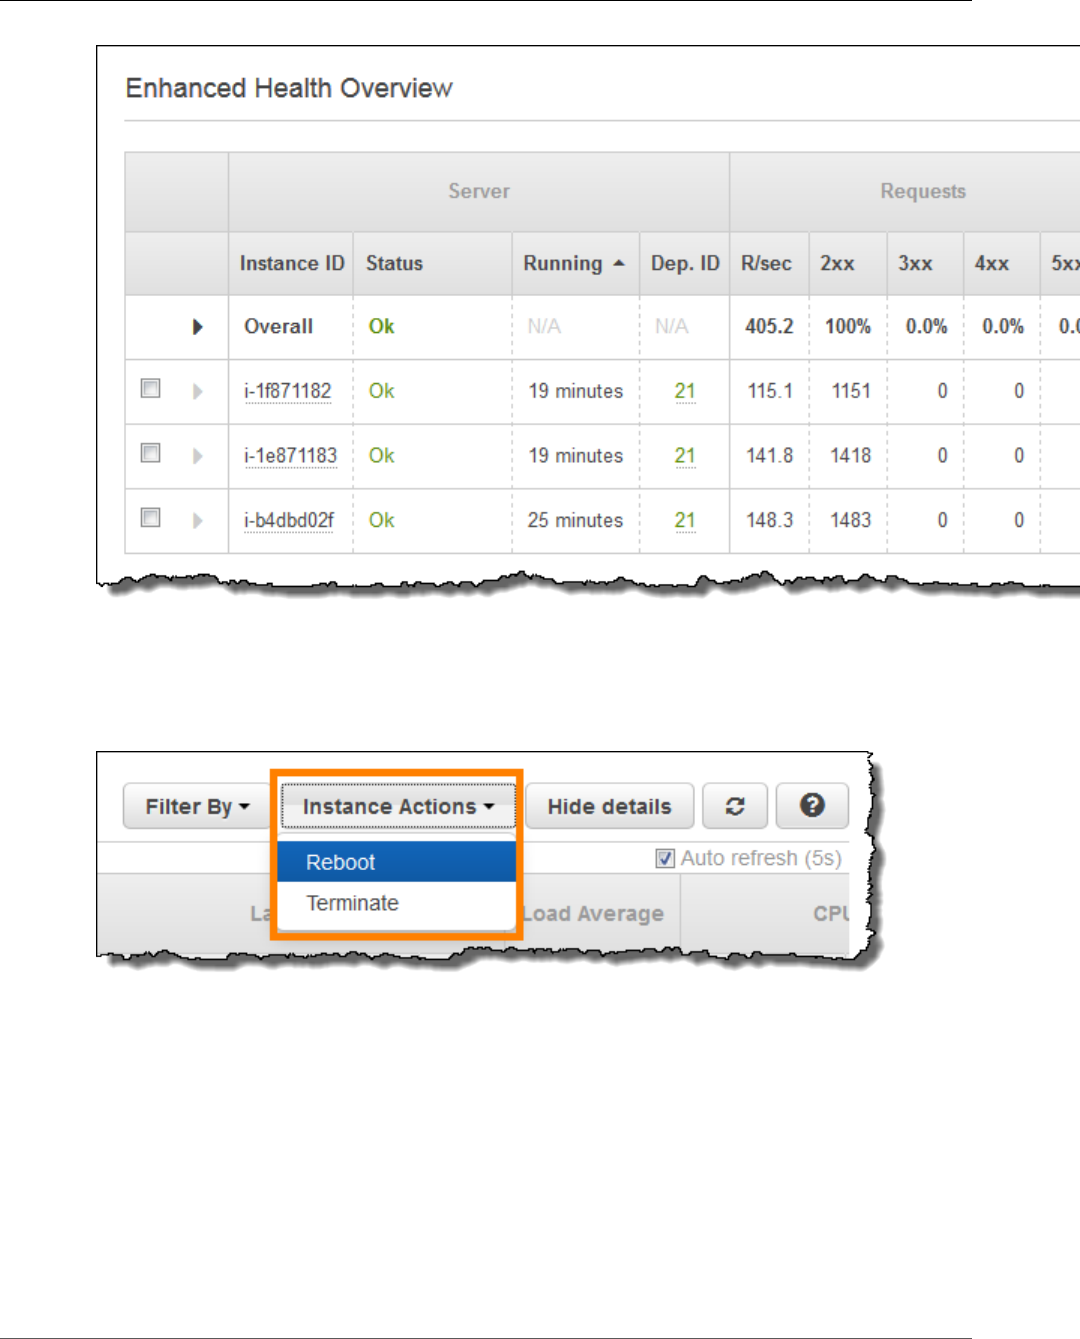
AWS Elastic Beanstalk Developer Guide
Health Console
To display only instances that have a particular status, chooseFilter By, and then choose a
status (p. 349).
To reboot or terminate an unhealthy instance, choose Instance Actions, and then choose Reboot or
Terminate.
To hide detailed information about the environment and instances' health, choose Hide Details. To show
or hide the details for a single instance, use the arrow at the beginning of the row:
API Version 2010-12-01
346
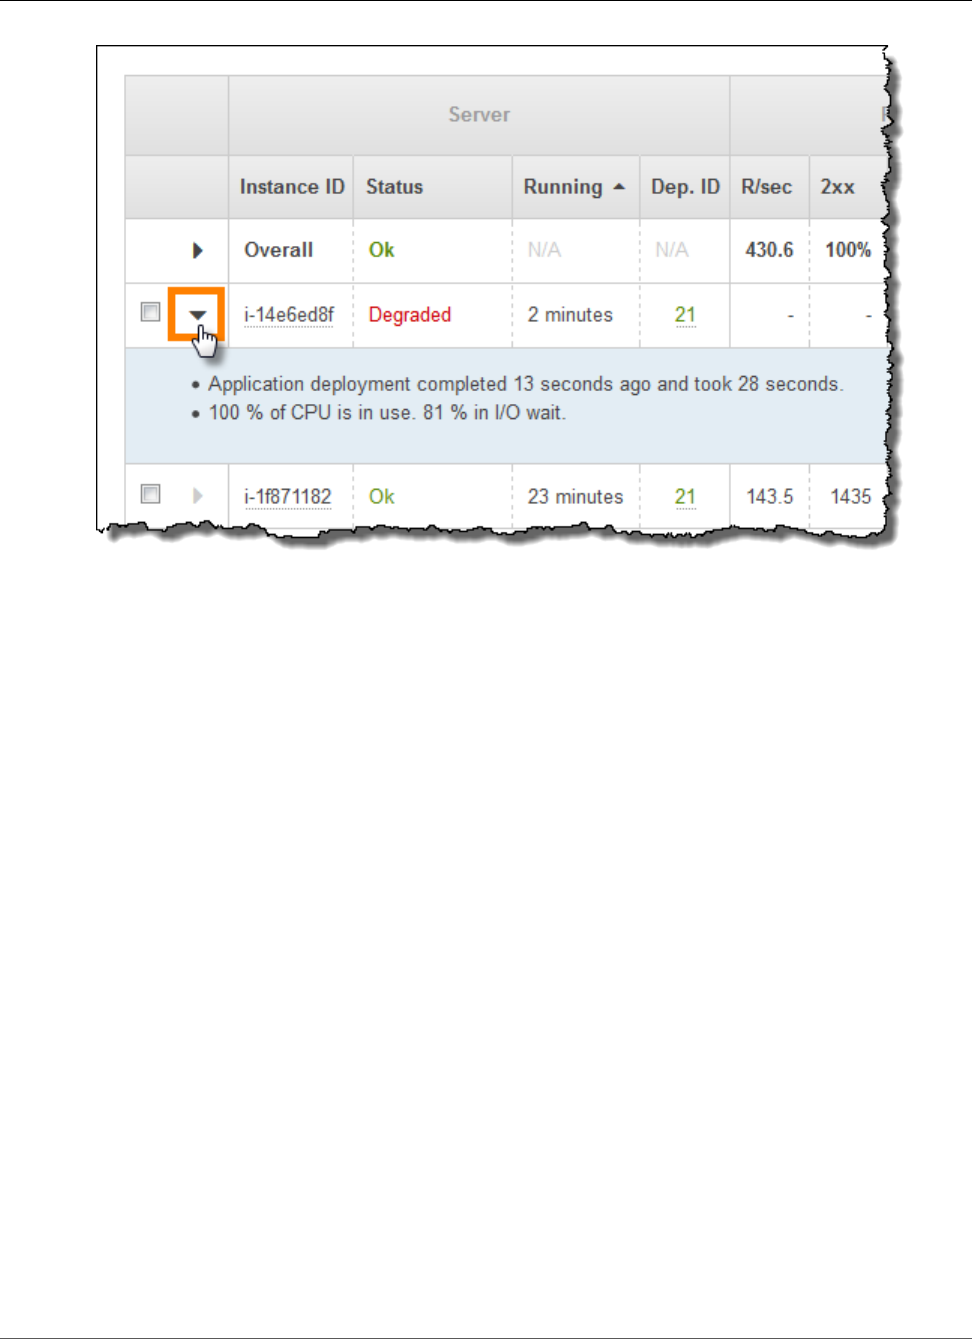
AWS Elastic Beanstalk Developer Guide
Health Console
Elastic Beanstalk updates the Health page every ten seconds. It reports information about environment
health for five categories.
The first category, Server, displays information about each of the EC2 instances in the environment,
including the instance's ID and status (p. 349), the amount of time since the instance was launched, and
the ID of the most recent deployment executed on the instance.
For more information about an instance, including its Availability Zone and instance type, pause on its
Instance ID:
API Version 2010-12-01
347

AWS Elastic Beanstalk Developer Guide
Health Console
For information about the last deployment (p. 124) to the instance, pause on the Deployment ID:
Deployment information includes the following:
•Deployment ID—The unique identifier for the deployment (p. 124). Deployment IDs starts at 1 and
increase by one each time you deploy a new application version or change configuration settings that
affect the software or operating system running on the instances in your environment.
API Version 2010-12-01
348
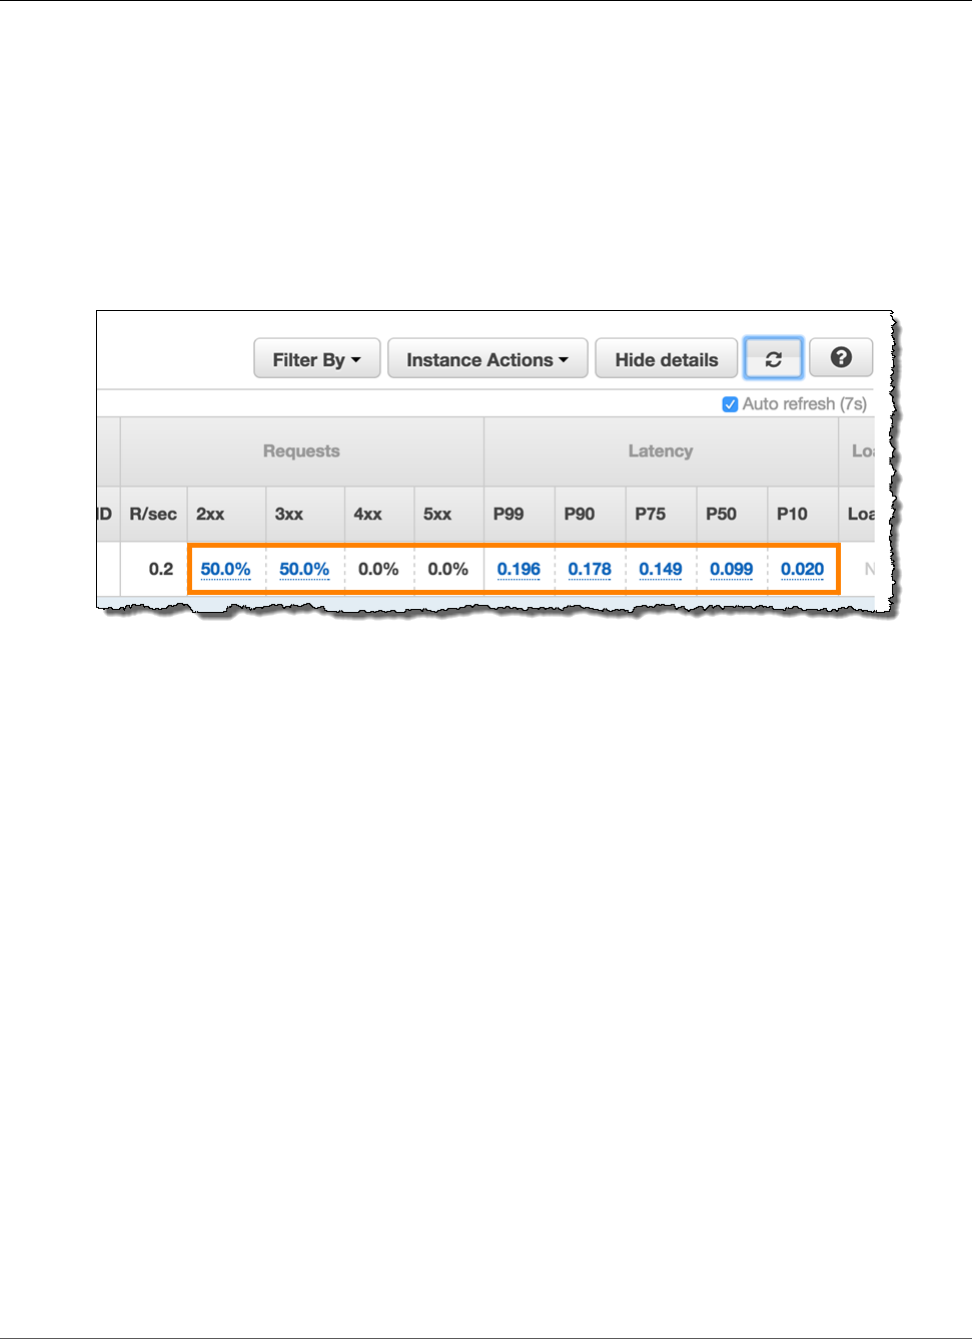
AWS Elastic Beanstalk Developer Guide
Health Colors and Statuses
•Version—The version label of the application source code used in the deployment.
•Status—The status of the deployment, which can be In Progress, Deployed, or Failed.
•Time— For in-progress deployments, the time that the deployment started. For completed
deployments, the time that the deployment ended.
The other categories provide detailed information about the results and latency of requests served by
each instance, and load and CPU utilization information for each instance. For details on these metrics,
see Instance Metrics (p. 351).
If you enable X-Ray integration (p. 192) on your environment and instrument your application with the
AWS X-Ray SDK, the Health page adds links to the AWS X-Ray console in the overview row.
Choose a link to view traces related to the highlighted statistic in the AWS X-Ray console.
Monitoring Page
The Monitoring page displays summary statistics and graphs for the custom Amazon CloudWatch metrics
generated by the enhanced health reporting system. See Monitoring Environment Health in the AWS
Management Console (p. 329) for instructions on adding graphs and statistics to this page.
Health Colors and Statuses
Enhanced health reporting represents instance and overall environment health with four colors, similar
to basic health reporting (p. 333). Enhanced health reporting also provides seven health statuses,
single word descriptors that provide a better indication of the state of your environment.
Instance Status and Environment Status
Every time Elastic Beanstalk runs a health check on your environment, enhanced health reporting checks
the health of each instance in your environment by analyzing all of the data (p. 338) available. If any of
the lower-level checks fails, Elastic Beanstalk downgrades the health of the instance.
Elastic Beanstalk displays the health information for the overall environment (color, status, and cause)
in the environment management console (p. 65). This information is also available in the EB CLI. Health
status and cause messages for individual instances are updated every ten seconds and are available from
the EB CLI (p. 480) when you view health status with eb health (p. 503).
Elastic Beanstalk uses changes in instance health to evaluate environment health, but does not
immediately change environment health status. When an instance fails health checks at least three times
in any one-minute period, Elastic Beanstalk may downgrade the health of the environment. Depending
on the number of instances in the environment and the issue identified, one unhealthy instance may
API Version 2010-12-01
349

AWS Elastic Beanstalk Developer Guide
Health Colors and Statuses
cause Elastic Beanstalk to display an informational message or to change the environment's health status
from green (OK) to yellow (Warning) or red (Degraded or Severe).
OK (Green)
An instance is passing health checks and the health agent is not reporting any problems.
Most instances in the environment are passing health checks and the health agent is not reporting major
issues.
An instance is passing health checks and is completing requests normally.
Example: Your environment was recently deployed and is taking requests normally. Five percent of
requests are returning 400 series errors. Deployment completed normally on each instance.
Message (Instance): Application deployment completed 23 seconds ago and took 26 seconds.
Warning (Yellow)
The health agent is reporting a moderate number of request failures or other issues for an instance or
environment.
An operation in progress on an instance and is taking a very long time.
Example: One instance in the environment has a status of Severe.
Message (Environment): Impaired services on 1 out of 5 instances
Degraded (Red)
The health agent is reporting a high number of request failures or other issues for an instance or
environment.
Example: Environment is in the process of scaling up to 5 instances.
Message (Environment): 4 active instances is below Auto Scaling group minimum size 5
Severe (Red)
The health agent is reporting a very high number of request failures or other issues for an instance or
environment.
Example: Elastic Beanstalk is unable to contact the load balancer to get instance health.
Message (Environment): ELB health is failing or not available for all instances. None of the instances are
sending data. Unable to assume role "arn:aws:iam::0123456789012:role/aws-elasticbeanstalk-service-
role". Verify that the role exists and is configured correctly.
Message (Instances): Instance ELB health has not been available for 37 minutes. No data. Last seen 37
minutes ago.
Info (Green)
An operation is in progress on an instance.
An operation is in progress on several instances in an environment.
Example: A new application version is being deployed to running instances.
Message (Environment): Command is executing on 3 out of 5 instances
Message (Instance): Performing application deployment (running for 3 seconds)
API Version 2010-12-01
350

AWS Elastic Beanstalk Developer Guide
Instance Metrics
Pending (Grey)
An operation is in progress on an instance within the command timeout (p. 339).
Example: You have recently created the environment and instances are being bootstrapped.
Message: Performing initialization (running for 12 seconds)
Unknown (Grey)
Elastic Beanstalk and the health agent are reporting an insufficient amount of data on an instance.
Example: No data is being received.
Instance Metrics
Instance metrics provide information about the health of instances in your environment. The AWS Elastic
Beanstalk Elastic Beanstalk health agent (p. 337) gathers and relays metrics about instances to Elastic
Beanstalk, which analyzes the metrics to determine the health of the instances in your environments.
The Elastic Beanstalk health agent gathers metrics about instances from web server logs and the
operating system. Web server logs provide information about incoming HTTP requests: how many
requests came in, how many resulted in errors, and how long they took to resolve. The operating system
provides snapshot information about the state of the instances' resources: the CPU load and distribution
of time spent on each process type. These metrics are a subset of the information that you would see if
you ran top on a Linux server.
The health agent gathers web server and operating system metrics and relays them to Elastic Beanstalk
every ten seconds. Elastic Beanstalk analyzes the data and uses the results to update the health status
for each instance and the environment.
Web Server Metrics
The Elastic Beanstalk health agent reads web server metrics from logs generated by the web container
or server that processes requests on each instance in your environment. Elastic Beanstalk platforms are
configured to generate two logs: one in human readable format and one in machine readable format.
The health agent relays machine-readable logs to Elastic Beanstalk every ten seconds.
For more information on the log format used by Elastic Beanstalk, see Enhanced Health Log
Format (p. 359).
Web Server Metrics
RequestCount
Number of requests handled by the web server per second over the last 10 seconds. Shown as an
average r/sec (requests per second) in the EB CLI and Environment Health Page (p. 345)
Status2xx, Status3xx, Status4xx, Status5xx
Number of requests that resulted in each type of status code over the last 10 seconds. For example,
successful requests return a 200 OK, redirects are a 301, and a 404 is returned if the URL entered
does not match any resources in the application.
The EB CLI and Environment Health Page (p. 345) show these metrics both as a raw number of
requests for instances, and as a percentage of overall requests for environments.
p99.9, p99, p95, p90, p85, p75, p50, p10
Average latency for the slowest x percent of requests over the last 10 seconds, where x is the
difference between the number and 100. For example, p99 indicates the latency for the slowest 1%
of requests over the last 10 seconds.
API Version 2010-12-01
351

AWS Elastic Beanstalk Developer Guide
CloudWatch
Operating System Metrics
The Elastic Beanstalk health agent reports the following operating system metrics. Elastic Beanstalk uses
these metrics to identify instances that are under sustained heavy load:
Operating System Metrics
Running
The amount of time that has passed since the instance was launched.
Load 1, Load 5
Load average in the last 1-minute and 5-minute periods. Shown as a decimal value indicating the
average number of processes running during that time. If the number shown is higher than the
number of vCPUs (threads) available, then the remainder is the average number of processes that
were waiting.
For example, if your instance type has 4 vCPUs, and the load is 4.5, there was an average of .5
processes in wait during that time period, equivalent to one process was waiting 50 percent of the
time.
User %, Nice %, System %, Idle %, I/O Wait %
Percentage of time that the CPU has spent in each state over the last 10 seconds.
Publishing Amazon CloudWatch Custom Metrics for
an Environment
You can publish the data gathered by AWS Elastic Beanstalk enhanced health reporting to Amazon
CloudWatch as custom metrics. Publishing metrics to CloudWatch lets you monitor changes in
application performance over time and identify potential issues by tracking how resource usage and
request latency scale with load.
By publishing metrics to CloudWatch you also make them available for use with monitoring
graphs (p. 330) and alarms (p. 362). One free metric, EnvironmentHealth is enabled automatically
when you use enhanced health reporting. Custom metrics other than EnvironmentHealth incur standard
CloudWatch charges.
To publish CloudWatch custom metrics for an environment, you must first enable enhanced health
reporting on the environment. See Enabling AWS Elastic Beanstalk Enhanced Health Reporting (p. 341)
for instructions.
Topics
•Enhanced Health Reporting Metrics (p. 352)
•Configuring CloudWatch Metrics in the AWS Management Console (p. 354)
•Configuring CloudWatch Custom Metrics with the EB CLI (p. 354)
•Providing Custom Metric Config Documents (p. 355)
Enhanced Health Reporting Metrics
When you enabled enhanced health reporting in your environment, the enhanced health reporting
system automatically publishes one CloudWatch custom metric, EnvironmentHealth. To publish
additional metrics to CloudWatch, configure your environment with the metrics that you want to publish
using the AWS Management Console (p. 354), the EB CLI (p. 354), or .ebextensions (p. 202).
API Version 2010-12-01
352

AWS Elastic Beanstalk Developer Guide
CloudWatch
EnvironmentHealth
Environment only. This is the only CloudWatch metric that is published by the enhanced health
system unless you configure additional metrics. Environment health is represented by one of seven
statuses (p. 349). In the CloudWatch console, these statuses map to the following values:
• 0 – OK
• 1 – Info
• 5 – Unknown
• 10 – No data
• 15 – Warning
• 20 – Degraded
• 25 – Severe
InstancesSevere, InstancesDegraded, InstancesWarning, InstancesInfo, InstancesOk,
InstancesPending, InstancesUnknown, InstancesNoData
Environment only. These metrics indicate the number of instances in the environment with each
health status. InstancesNoData indicates the number of instances for which no data is being
received for (if any).
ApplicationRequestsTotal, ApplicationRequests5xx, ApplicationRequests4xx,
ApplicationRequests3xx, ApplicationRequests2xx
Instance and environment. Indicates the total number of requests completed by the instance or
environment, and the number of requests that completed with each status code category.
ApplicationLatencyP10, ApplicationLatencyP50, ApplicationLatencyP75,
ApplicationLatencyP85, ApplicationLatencyP90, ApplicationLatencyP95,
ApplicationLatencyP99, ApplicationLatencyP99.9
Instance and environment. Indicates the average amount of time, in seconds, it takes to complete
the fastest x percent of requests.
LoadAverage1min
Instance only. The average CPU load of the instance over the last minute.
InstanceHealth
Instance only. Indicates the current health status of the instance. Instance health is represented by
one of seven statuses (p. 349). In the CloudWatch console, these statuses map to the following
values:
• 0 – OK
• 1 – Info
• 5 – Unknown
• 10 – No data
• 15 – Warning
• 20 – Degraded
• 25 – Severe
RootFilesystemUtil
Instance only. Indicates the percentage of disk space in use.
CPUIrq, CPUUser, CPUIdle, CPUSystem, CPUSoftirq, CPUIowait, CPUNice
Instance only. Indicates the percentage of time that the CPU has spent in each state over the last
minute.
API Version 2010-12-01
353

AWS Elastic Beanstalk Developer Guide
CloudWatch
Configuring CloudWatch Metrics in the AWS Management
Console
Use the AWS Management Console to configure your environment to publish enhanced health reporting
metrics to CloudWatch and make them available for use with monitoring graphs and alarms.
To configure CloudWatch custom metrics in the AWS Management Console
1. Open the Elastic Beanstalk console.
2. Navigate to the management page (p. 65) for your environment.
3. Choose Configuration.
4. On the Health panel, under Web Tier, choose (edit).
5. Under Health Reporting, select the instance and environment metrics that you want to publish to
CloudWatch. To select multiple metrics, hold the Ctrl key while choosing.
Enabling CloudWatch custom metrics adds them to the list of metrics available in the Monitoring
Console (p. 329).
Configuring CloudWatch Custom Metrics with the EB CLI
You can use the EB CLI to configure custom metrics by saving your environment's configuration locally,
adding an entry that defines the metrics to publish, and then uploading the configuration to Elastic
Beanstalk. The saved configuration can be applied to an environment during or after creation.
To configure CloudWatch custom metrics with the EB CLI and saved configurations
1. Initialize your project folder with eb init (p. 489).
2. Create an environment by running the eb create (p. 492) command.
3. Save a configuration template locally by running the eb config save command. The following
example uses the --cfg option to specify the name of the configuration.
$ eb config save --cfg 01-base-state
Configuration saved at: ~/project/.elasticbeanstalk/saved_configs/01-base-state.cfg.yml
4. Open the saved configuration file in a text editor.
5. Under OptionSettings > aws:elasticbeanstalk:healthreporting:system:, add
a ConfigDocument key to enable each of the CloudWatch metrics that you want to enable.
For example, the following ConfigDocument publishes ApplicationRequests5xx and
ApplicationRequests4xx metrics at the environment level, and ApplicationRequestsTotal
metrics at the instance level:
OptionSettings:
...
aws:elasticbeanstalk:healthreporting:system:
ConfigDocument:
CloudWatchMetrics:
Environment
ApplicationRequests5xx: 60
ApplicationRequests4xx: 60
Instance:
ApplicationRequestsTotal: 60
Version: 1
SystemType: enhanced
API Version 2010-12-01
354

AWS Elastic Beanstalk Developer Guide
CloudWatch
...
Note
In the example, 60 indicates the number of seconds between measurements. This is the
only currently supported value.
6. Save the configuration file and close the text editor. In this example, the updated configuration
file is saved with a different name (02-cloudwatch-enabled.cfg.yml) than the downloaded
configuration file. This will create a separate saved configuration when the file is uploaded. You can
use the same name as the downloaded file to overwrite the existing configuration without creating a
new one.
7. Upload the updated configuration file to Elastic Beanstalk with the eb config put command:
$ eb config put 02-cloudwatch-enabled
When using the eb config get and put commands with saved configurations, do not include the
file extension..
8. Apply the saved configuration to your running environment:
$ eb config --cfg 02-cloudwatch-enabled
The --cfg option specifies a named configuration file that is applied to the environment. The
configuration can be saved locally or in Elastic Beanstalk. If a configuration file with the specified
name exists in both locations, the EB CLI uses the local file.
Providing Custom Metric Config Documents
The config document for Amazon CloudWatch custom metrics is a JSON document that lists the metrics
to publish at an environment and instance level. The following example shows a config document that
enables all available custom metrics:
{
"CloudWatchMetrics": {
"Environment": {
"ApplicationLatencyP99.9": 60,
"InstancesSevere": 60,
"ApplicationLatencyP90": 60,
"ApplicationLatencyP99": 60,
"ApplicationLatencyP95": 60,
"InstancesUnknown": 60,
"ApplicationLatencyP85": 60,
"InstancesInfo": 60,
"ApplicationRequests2xx": 60,
"InstancesDegraded": 60,
"InstancesWarning": 60,
"ApplicationLatencyP50": 60,
"ApplicationRequestsTotal": 60,
"InstancesNoData": 60,
"InstancesPending": 60,
"ApplicationLatencyP10": 60,
"ApplicationRequests5xx": 60,
"ApplicationLatencyP75": 60,
"InstancesOk": 60,
"ApplicationRequests3xx": 60,
"ApplicationRequests4xx": 60
},
"Instance": {
API Version 2010-12-01
355

AWS Elastic Beanstalk Developer Guide
CloudWatch
"ApplicationLatencyP99.9": 60,
"ApplicationLatencyP90": 60,
"ApplicationLatencyP99": 60,
"ApplicationLatencyP95": 60,
"ApplicationLatencyP85": 60,
"CPUUser": 60,
"ApplicationRequests2xx": 60,
"CPUIdle": 60,
"ApplicationLatencyP50": 60,
"ApplicationRequestsTotal": 60,
"RootFilesystemUtil": 60,
"LoadAverage1min": 60,
"CPUIrq": 60,
"CPUNice": 60,
"CPUIowait": 60,
"ApplicationLatencyP10": 60,
"LoadAverage5min": 60,
"ApplicationRequests5xx": 60,
"ApplicationLatencyP75": 60,
"CPUSystem": 60,
"ApplicationRequests3xx": 60,
"ApplicationRequests4xx": 60,
"InstanceHealth": 60,
"CPUSoftirq": 60
}
},
"Version": 1
}
For the AWS CLI, you pass the document as a value for the Value key in an option settings argument,
which itself is a JSON object. In this case, quotes in the embedded document must be escaped:
$ aws elasticbeanstalk validate-configuration-settings --application-name my-app --
environment-name my-env --option-settings '[
{
"Namespace": "aws:elasticbeanstalk:healthreporting:system",
"OptionName": "ConfigDocument",
"Value": "{\"CloudWatchMetrics\": {\"Environment\": {\"ApplicationLatencyP99.9\":
60,\"InstancesSevere\": 60,\"ApplicationLatencyP90\": 60,\"ApplicationLatencyP99\":
60,\"ApplicationLatencyP95\": 60,\"InstancesUnknown\": 60,\"ApplicationLatencyP85\":
60,\"InstancesInfo\": 60,\"ApplicationRequests2xx\": 60,\"InstancesDegraded\": 60,
\"InstancesWarning\": 60,\"ApplicationLatencyP50\": 60,\"ApplicationRequestsTotal
\": 60,\"InstancesNoData\": 60,\"InstancesPending\": 60,\"ApplicationLatencyP10\":
60,\"ApplicationRequests5xx\": 60,\"ApplicationLatencyP75\": 60,\"InstancesOk\":
60,\"ApplicationRequests3xx\": 60,\"ApplicationRequests4xx\": 60},\"Instance\":
{\"ApplicationLatencyP99.9\": 60,\"ApplicationLatencyP90\": 60,\"ApplicationLatencyP99\":
60,\"ApplicationLatencyP95\": 60,\"ApplicationLatencyP85\": 60,\"CPUUser\": 60,
\"ApplicationRequests2xx\": 60,\"CPUIdle\": 60,\"ApplicationLatencyP50\": 60,
\"ApplicationRequestsTotal\": 60,\"RootFilesystemUtil\": 60,\"LoadAverage1min\":
60,\"CPUIrq\": 60,\"CPUNice\": 60,\"CPUIowait\": 60,\"ApplicationLatencyP10\": 60,
\"LoadAverage5min\": 60,\"ApplicationRequests5xx\": 60,\"ApplicationLatencyP75\":
60,\"CPUSystem\": 60,\"ApplicationRequests3xx\": 60,\"ApplicationRequests4xx\": 60,
\"InstanceHealth\": 60,\"CPUSoftirq\": 60}},\"Version\": 1}"}
]'
For an .ebextensions configuration file in YAML, you can provide the JSON document as is:
option_settings:
- namespace: aws:elasticbeanstalk:healthreporting:system
option_name: ConfigDocument
value: {
"CloudWatchMetrics": {
"Environment": {
API Version 2010-12-01
356

AWS Elastic Beanstalk Developer Guide
API Users
"ApplicationLatencyP99.9": 60,
"InstancesSevere": 60,
"ApplicationLatencyP90": 60,
"ApplicationLatencyP99": 60,
"ApplicationLatencyP95": 60,
"InstancesUnknown": 60,
"ApplicationLatencyP85": 60,
"InstancesInfo": 60,
"ApplicationRequests2xx": 60,
"InstancesDegraded": 60,
"InstancesWarning": 60,
"ApplicationLatencyP50": 60,
"ApplicationRequestsTotal": 60,
"InstancesNoData": 60,
"InstancesPending": 60,
"ApplicationLatencyP10": 60,
"ApplicationRequests5xx": 60,
"ApplicationLatencyP75": 60,
"InstancesOk": 60,
"ApplicationRequests3xx": 60,
"ApplicationRequests4xx": 60
},
"Instance": {
"ApplicationLatencyP99.9": 60,
"ApplicationLatencyP90": 60,
"ApplicationLatencyP99": 60,
"ApplicationLatencyP95": 60,
"ApplicationLatencyP85": 60,
"CPUUser": 60,
"ApplicationRequests2xx": 60,
"CPUIdle": 60,
"ApplicationLatencyP50": 60,
"ApplicationRequestsTotal": 60,
"RootFilesystemUtil": 60,
"LoadAverage1min": 60,
"CPUIrq": 60,
"CPUNice": 60,
"CPUIowait": 60,
"ApplicationLatencyP10": 60,
"LoadAverage5min": 60,
"ApplicationRequests5xx": 60,
"ApplicationLatencyP75": 60,
"CPUSystem": 60,
"ApplicationRequests3xx": 60,
"ApplicationRequests4xx": 60,
"InstanceHealth": 60,
"CPUSoftirq": 60
}
},
"Version": 1
}
Using Enhanced Health Reporting with the AWS
Elastic Beanstalk API
Because AWS Elastic Beanstalk enhanced health reporting has role and solution stack requirements, you
must update scripts and code that you used prior to the release of enhanced health reporting before
you can use it. To maintain backward compatibility, enhanced health reporting is not enabled by default
when you create an environment using the Elastic Beanstalk API.
You configure enhanced health reporting by setting the service role, the instance profile, and Amazon
CloudWatch configuration options for your environment. You can do this in three ways: by setting the
API Version 2010-12-01
357

AWS Elastic Beanstalk Developer Guide
API Users
configuration options in the .ebextensions folder, with saved configurations, or by configuring them
directly in the create-environment call's option-settings parameter.
To use the API, SDKs, or AWS command line interface (CLI) to create an environment that supports
enhanced health, you must:
• Create a service role and instance profile with the appropriate permissions (p. 21)
• Create a new environment with a solution stack for a new version of the platform configuration (p. 26)
• Set the health system type, instance profile, and service role configuration options (p. 202)
Use the following configuration options in the aws:elasticbeanstalk:healthreporting:system,
aws:autoscaling:launchconfiguration, and aws:elasticbeanstalk:environment
namespaces to configure your environment for enhanced health reporting.
Enhanced Health Configuration Options
SystemType
Namespace: aws:elasticbeanstalk:healthreporting:system
To enable enhanced health reporting, set to enhanced.
IamInstanceProfile
Namespace: aws:autoscaling:launchconfiguration
Set to the name of an instance profile configured for use with Elastic Beanstalk.
ServiceRole
Namespace: aws:elasticbeanstalk:environment
Set to the name of a service role configured for use with Elastic Beanstalk.
ConfigDocument (optional)
Namespace: aws:elasticbeanstalk:healthreporting:system
A JSON document that defines the and instance and environment metrics to publish to CloudWatch. For
example:
{
"CloudWatchMetrics":
{
"Environment":
{
"ApplicationLatencyP99.9":60,
"InstancesSevere":60
}
"Instance":
{
"ApplicationLatencyP85":60,
"CPUUser": 60
}
}
"Version":1
}
API Version 2010-12-01
358

AWS Elastic Beanstalk Developer Guide
Enhanced Health Log Format
Note
Config documents may require special formatting, such as escaping quotes, depending
on how you provide them to Elastic Beanstalk. See Providing Custom Metric Config
Documents (p. 355) for examples.
Enhanced Health Log Format
AWS Elastic Beanstalk platforms use a custom web server log format to efficiently relay information
about HTTP requests to the enhanced health reporting system, which analyzes the logs, identifies issues,
and sets the instance and environment health accordingly. If you disable the web server proxy on your
environment and serve requests directly from the web container, you can still make full use of enhanced
health reporting by configuring your server to output logs in the location and format that the Elastic
Beanstalk health agent (p. 337) uses.
Web Server Log Configuration
Elastic Beanstalk platforms are configured to output two logs with information about HTTP requests.
The first is in verbose format and provides detailed information about the request, including the
requester's user agent information and a human-readable timestamp.
/var/log/nginx/access.log
The following example is from an nginx proxy running on a Ruby web server environment, but the
format is similar for Apache:
172.31.24.3 - - [23/Jul/2015:00:21:20 +0000] "GET / HTTP/1.1" 200 11 "-" "curl/7.22.0
(x86_64-pc-linux-gnu) libcurl/7.22.0 OpenSSL/1.0.1 zlib/1.2.3.4 libidn/1.23 librtmp/2.3"
"177.72.242.17"
172.31.24.3 - - [23/Jul/2015:00:21:21 +0000] "GET / HTTP/1.1" 200 11 "-" "curl/7.22.0
(x86_64-pc-linux-gnu) libcurl/7.22.0 OpenSSL/1.0.1 zlib/1.2.3.4 libidn/1.23 librtmp/2.3"
"177.72.242.17"
172.31.24.3 - - [23/Jul/2015:00:21:22 +0000] "GET / HTTP/1.1" 200 11 "-" "curl/7.22.0
(x86_64-pc-linux-gnu) libcurl/7.22.0 OpenSSL/1.0.1 zlib/1.2.3.4 libidn/1.23 librtmp/2.3"
"177.72.242.17"
172.31.24.3 - - [23/Jul/2015:00:21:22 +0000] "GET / HTTP/1.1" 200 11 "-" "curl/7.22.0
(x86_64-pc-linux-gnu) libcurl/7.22.0 OpenSSL/1.0.1 zlib/1.2.3.4 libidn/1.23 librtmp/2.3"
"177.72.242.17"
172.31.24.3 - - [23/Jul/2015:00:21:22 +0000] "GET / HTTP/1.1" 200 11 "-" "curl/7.22.0
(x86_64-pc-linux-gnu) libcurl/7.22.0 OpenSSL/1.0.1 zlib/1.2.3.4 libidn/1.23 librtmp/2.3"
"177.72.242.17"
The second log is in terse format. It includes information relevant only to enhanced health reporting.
This log is output to a subfolder named healthd and rotates hourly. Old logs are deleted immediately
after rotating out.
/var/log/nginx/healthd/application.log.2015-07-23-00
The following example shows a log in the machine-readable format.
1437609879.311"/"200"0.083"0.083"177.72.242.17
1437609879.874"/"200"0.347"0.347"177.72.242.17
1437609880.006"/bad/path"404"0.001"0.001"177.72.242.17
1437609880.058"/"200"0.530"0.530"177.72.242.17
1437609880.928"/bad/path"404"0.001"0.001"177.72.242.17
The enhanced health log format includes the following information:
• The time of the request, in Unix time.
API Version 2010-12-01
359

AWS Elastic Beanstalk Developer Guide
Enhanced Health Log Format
• The path of the request.
• The HTTP status code for the result.
• The request time.
• The upstream time.
• The X-Forwarded-For HTTP header.
For nginx proxies, times are printed in floating-point seconds, with three decimal places. For Apache,
whole milliseconds are used.
Note
If you see a warning similar to the following in a log file, where DATE-TIME is a date and time,
and you are using a custom proxy, such as in a multi-container Docker environment. you must
use an .ebextension to configure your environment so that healthd can read your log files:
W, [DATE-TIME #1922] WARN -- : log file "/var/log/nginx/healthd/
application.log.DATE-TIME" does not exist
You can start with the .ebextension in the Multicontainer Docker sample.
/etc/nginx/conf.d/webapp_healthd.conf
The following example shows the log configuration for nginx with the healthd log format highlighted:
upstream my_app {
server unix:///var/run/puma/my_app.sock;
}
log_format healthd '$msec"$uri"'
'$status"$request_time"$upstream_response_time"'
'$http_x_forwarded_for';
server {
listen 80;
server_name _ localhost; # need to listen to localhost for worker tier
if ($time_iso8601 ~ "^(\d{4})-(\d{2})-(\d{2})T(\d{2})") {
set $year $1;
set $month $2;
set $day $3;
set $hour $4;
}
access_log /var/log/nginx/access.log main;
access_log /var/log/nginx/healthd/application.log.$year-$month-$day-$hour healthd;
location / {
proxy_pass http://my_app; # match the name of upstream directive which is defined above
proxy_set_header Host $host;
proxy_set_header X-Forwarded-For $proxy_add_x_forwarded_for;
}
location /assets {
alias /var/app/current/public/assets;
gzip_static on;
gzip on;
expires max;
add_header Cache-Control public;
}
location /public {
alias /var/app/current/public;
API Version 2010-12-01
360

AWS Elastic Beanstalk Developer Guide
Notifications and Troubleshooting
gzip_static on;
gzip on;
expires max;
add_header Cache-Control public;
}
}
Generating Logs for Enhanced Health Reporting
To provide logs to the health agent, you must do the following:
• Output logs in the correct format, as shown in the previous section
• Output logs to /var/log/nginx/healthd/
• Name logs using the following format: application.log.$year-$month-$day-$hour
• Rotate logs once per hour
• Do not truncate logs
Notifications and Troubleshooting
This page lists example cause messages for common issues and links to more information. Cause
messages appear in the environment dashboard (p. 329) and are recorded in events (p. 365) when
health issues persist across several checks.
Deployments
Elastic Beanstalk monitors your environment for consistency following deployments. If a rolling
deployment fails, the version of your application running on the instances in your environment may vary.
This can occur if a deployment succeeds on one or more batches but fails prior to all batches completing.
Incorrect application version found on 2 out of 5 instances. Expected version "v1" (deployment 1).
Incorrect application version on environment instances. Expected version "v1" (deployment 1).
The expected application version is not running on some or all instances in an environment.
Incorrect application version "v2" (deployment 2). Expected version "v1" (deployment 1).
The application deployed to an instance differs from the expected version. If a deployment fails, the
expected version is reset to the version from the most recent successful deployment. In the above
example, the first deployment (version "v1") succeeded, but the second deployment (version "v2") failed.
Any instances running "v2" are considered unhealthy.
To solve this issue, start another deployment. You can redeploy a previous version (p. 124) that you know
works, or configure your environment to ignore health checks (p. 126) during deployment and redeploy
the new version to force the deployment to complete.
You can also identify and terminate the instances that are running the wrong application version. Elastic
Beanstalk will launch instances with the correct version to replace any instances that you terminate.
Use the EB CLI health command (p. 503) to identify instances that are running the wrong application
version.
Application Server
15% of requests are erroring with HTTP 4xx
20% of the requests to the ELB are erroring with HTTP 4xx.
API Version 2010-12-01
361

AWS Elastic Beanstalk Developer Guide
Manage Alarms
A high percentage of HTTP requests to an instance or environment are failing with 4xx errors.
A 400 series status code indicates that the user made a bad request, such as requesting a page that
doesn't exist (404 File Not Found) or that the user doesn't have access to (403 Forbidden). A low number
of 404s is not unusual but a large number could mean that there are internal or external links to
unavailable pages. These issues can be resolved by fixing bad internal links and adding redirects for bad
external links.
5% of the requests are failing with HTTP 5xx
3% of the requests to the ELB are failing with HTTP 5xx.
A high percentage of HTTP requests to an instance or environment are failing with 500 series status
codes.
A 500 series status code indicates that the application server encountered an internal error. These issues
indicate that there is an error in your application code and should be identified and fixed quickly.
95% of CPU is in use
On an instance, the health agent is reporting an extremely high percentage of CPU usage and sets the
instance health to Warning or Degraded.
Scale your environment to take load off of instances.
Worker Instance
20 messages waiting in the queue (25 seconds ago)
Requests are being added to your worker environment's queue faster than they can be processed. Scale
your environment to increase capacity.
5 messages in Dead Letter Queue (15 seconds ago)
Worker requests are failing repeatedly and being added to the Dead Letter Queue (p. 159). Check the
requests in the dead letter queue to see why they are failing.
Other Resources
4 active instances is below Auto Scaling group minimum size 5
The number of instances running in your environment is fewer than the minimum configured for the
Auto Scaling group.
Auto Scaling group (groupname) notifications have been deleted or modified
The notifications configured for your Auto Scaling group have been modified outside of Elastic
Beanstalk.
Manage Alarms
You can create alarms for metrics that you are monitoring by using the AWS Management Console.
Alarms help you monitor changes to your environment so that you can easily identify and mitigate
problems before they occur. For example, you can set an alarm that notifies you when CPU utilization in
an environment exceeds a certain threshold, ensuring that you are notified before a potential problem
occurs. For more information, see Using Elastic Beanstalk with Amazon CloudWatch (p. 379).
API Version 2010-12-01
362
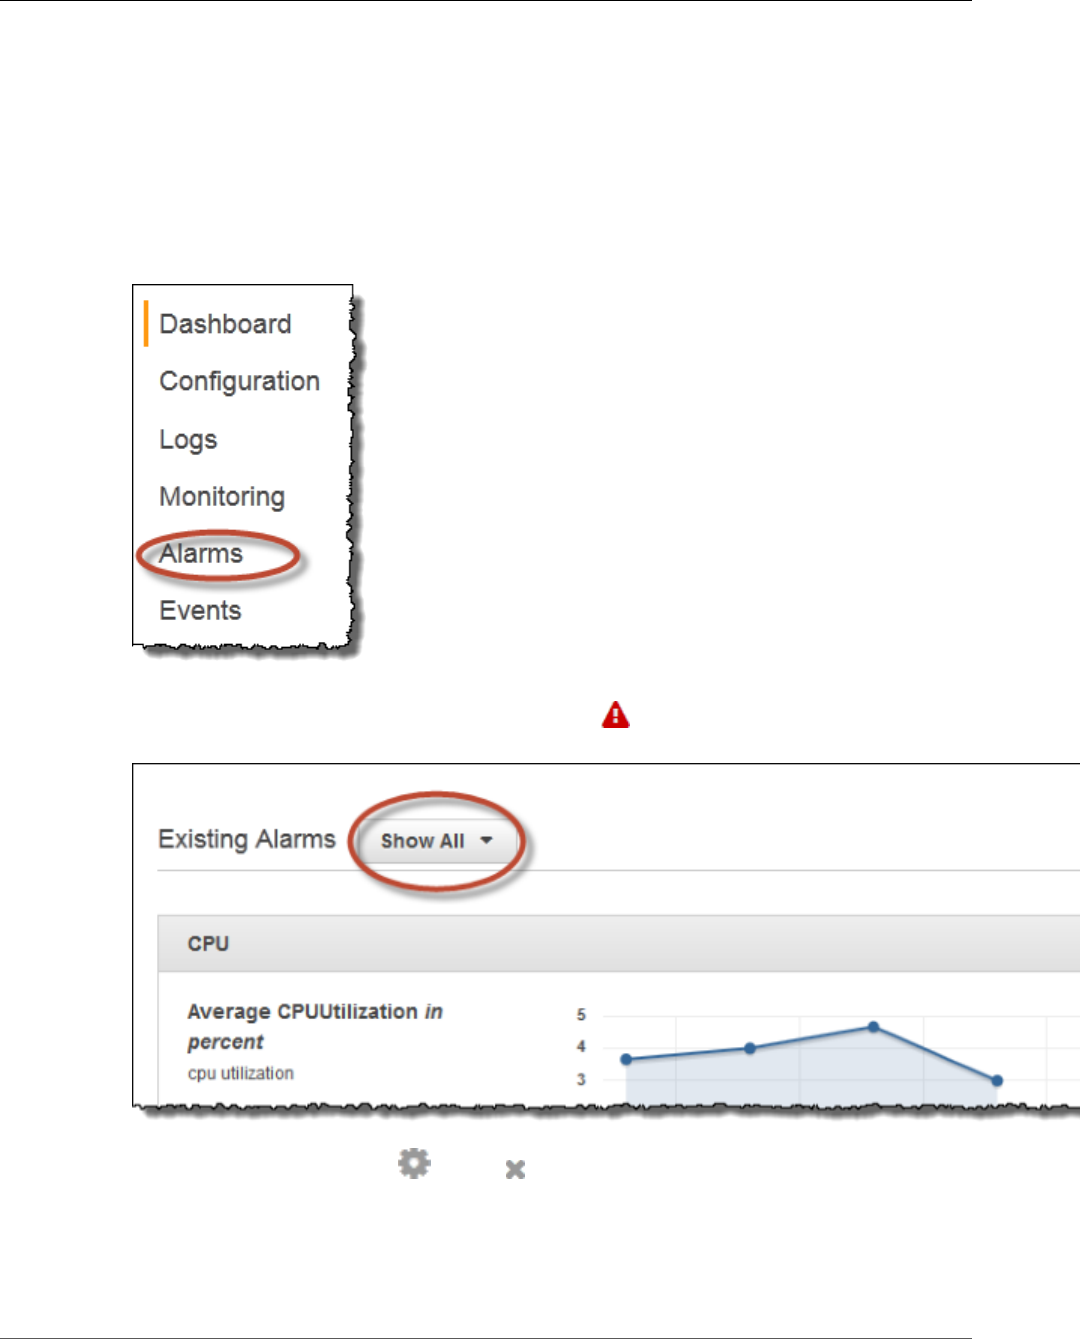
AWS Elastic Beanstalk Developer Guide
Manage Alarms
Note
Elastic Beanstalk uses CloudWatch for monitoring and alarms, meaning CloudWatch costs are
applied to your AWS account for any alarms that you use.
For more information about monitoring specific metrics, see Basic Health Reporting (p. 333).
To check the state of your alarms
1. From the Elastic Beanstalk console applications page, click the environment name that you want to
manage alarms for.
2. From the navigation menu, click Alarms to see a list of alarms.
If any alarms is in the alarm state, they are flagged with (warning).
3. To filter alarms, click the drop-down filter and select the filter that you want.
4. To edit or delete an alarm, click (edit) or (delete).
To create an alarm
1. From the Elastic Beanstalk console applications page, click the environment name that you want to
add alarms to.
API Version 2010-12-01
363
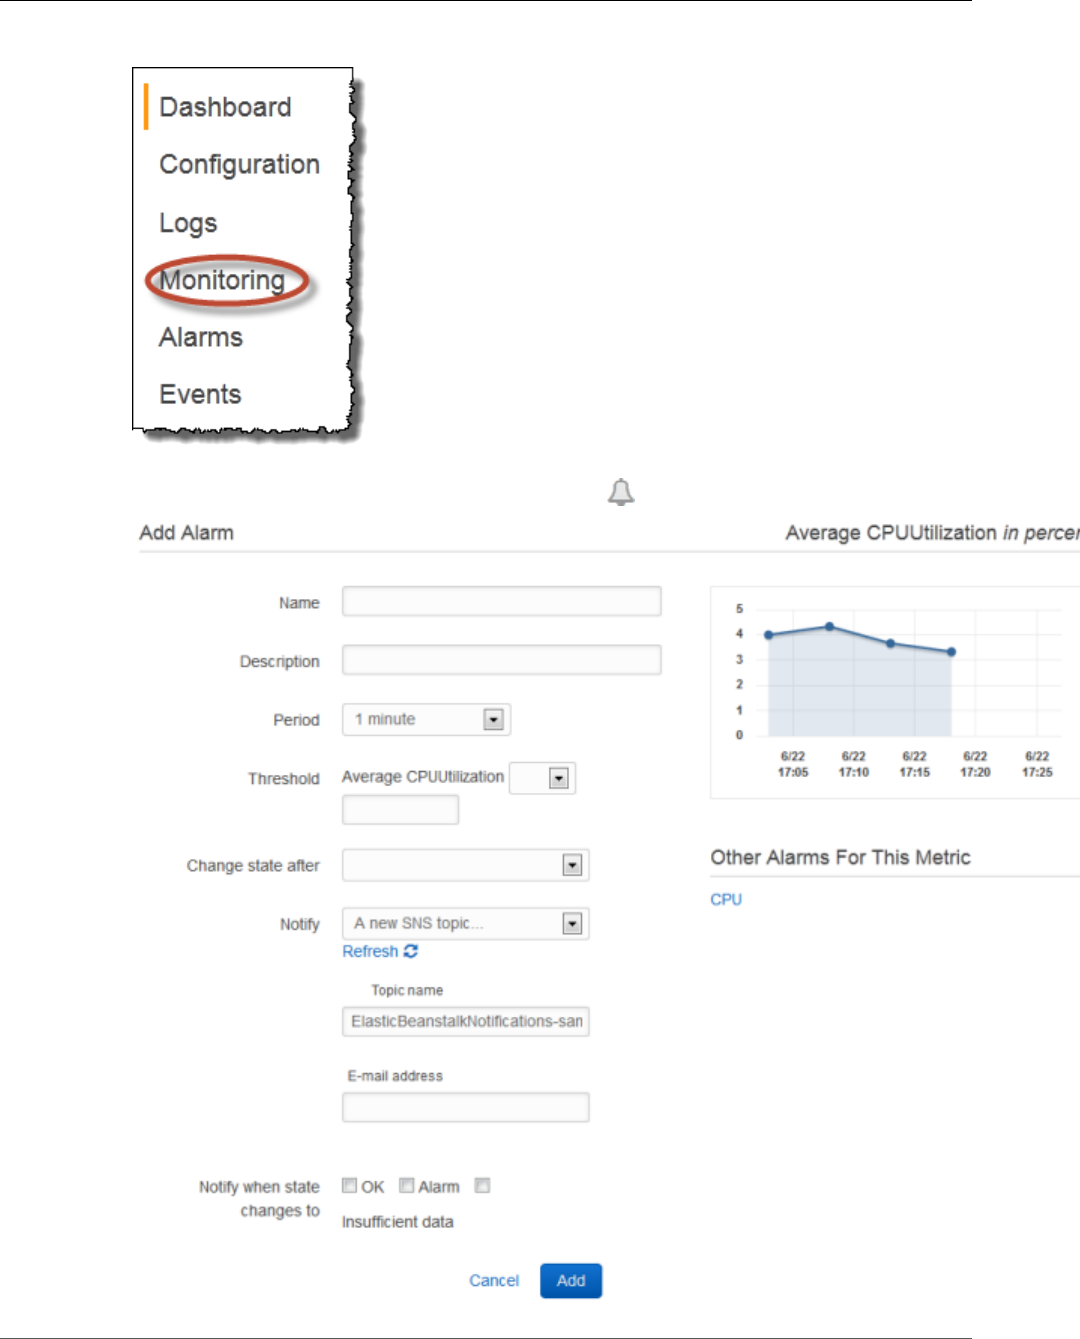
AWS Elastic Beanstalk Developer Guide
Manage Alarms
2. From the navigation menu, click Monitoring.
3. For the metric that you want to create an alarm for, click . You are directed to the Alarms page.
API Version 2010-12-01
364

AWS Elastic Beanstalk Developer Guide
View Events
4. Enter details about the alarm:
•Name: A name for this alarm.
•Description (optional): A short description of what this alarm is.
•Period: The time interval between readings.
•Threshold: Describes the behavior and value that the metric must exceed in order to trigger an
alarm.
•Change state after: The amount a time after a threshold has been exceed that triggers a change
in state of the alarm.
•Notify: The Amazon SNS topic that is notified when an alarm changes state.
•Notify when state changes to:
•OK: The metric is within the defined threshold.
•Alarm: The metric exceeded the defined threshold.
•Insufficient data: The alarm has just started, the metric is not available, or not enough data is
available for the metric to determine the alarm state.
5. Click Add. The environment status changes to gray while the environment updates. You can view the
alarm that you created by going to the Alarms page.
Viewing an Elastic Beanstalk Environment's Event
Stream
You can use the AWS Management Console to access events and notifications associated with your
application.
To view events
1. Navigate to the management page (p. 65) for your environment.
2. From the navigation menu, click Events.
API Version 2010-12-01
365
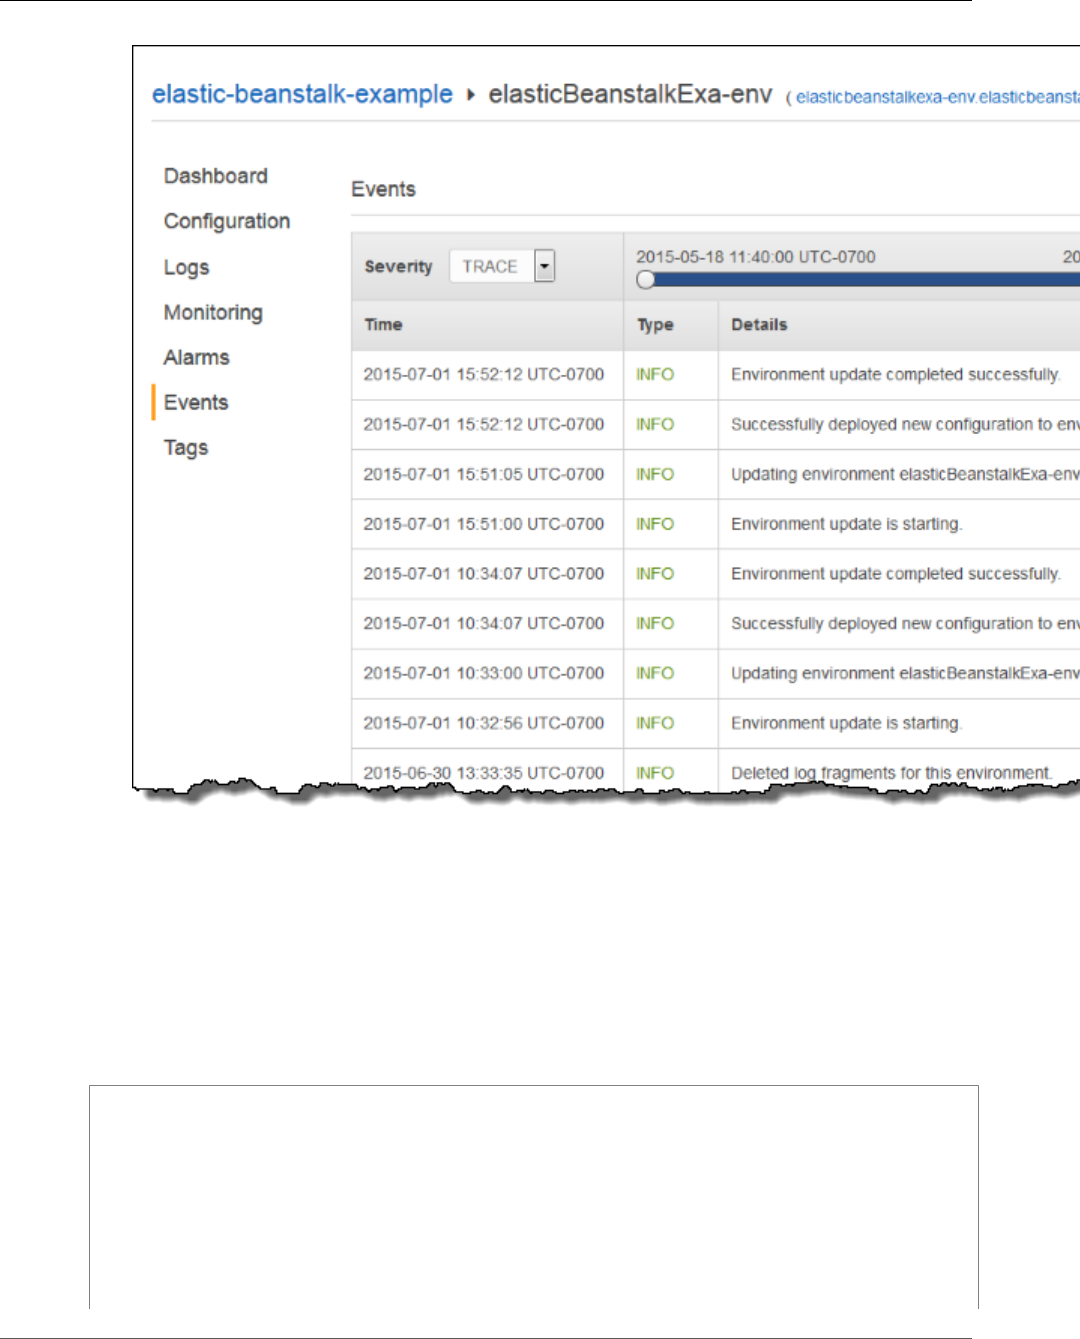
AWS Elastic Beanstalk Developer Guide
View Events
The Events page shows you a list of all events that have been recorded for the environment and
application version. You can filter on the type of events by using the Severity drop-down list. You
can also filter when the events occurred by using the time slider.
The EB CLI (p. 480) and AWS CLI both provide commands for retrieving events. If you are managing
your environment using the EB CLI, use eb events (p. 529) to print a list of events. This command also
has a --follow option that continues to show new events until you press Ctrl-C to stop output.
To pull events using the AWS CLI, use the describe-events command and specify the environment by
name or ID:
$ aws elasticbeanstalk describe-events --environment-id e-gbjzqccra3
{
"Events": [
{
"ApplicationName": "elastic-beanstalk-example",
"EnvironmentName": "elasticBeanstalkExa-env",
"Severity": "INFO",
"RequestId": "a4c7bfd6-2043-11e5-91e2-9114455c358a",
"Message": "Environment update completed successfully.",
"EventDate": "2015-07-01T22:52:12.639Z"
},
API Version 2010-12-01
366

AWS Elastic Beanstalk Developer Guide
Monitor Instances
...
For more information on the command line tools, see Tools (p. 480).
Listing and Connecting to Server Instances
You can view a list of Amazon EC2 instances running your Elastic Beanstalk application environment
through the AWS Management Console. You can connect to the instances using any SSH client. For
more information about listing and connecting to Server Instances using the AWS Toolkit for Eclipse, see
Listing and Connecting to Server Instances (p. 708). You can connect to the instances running Windows
using Remote Desktop. For more information about listing and connecting to Server Instances using the
AWS Toolkit for Visual Studio, see Listing and Connecting to Server Instances (p. 767).
Important
You must create an Amazon EC2 key pair and configure your Elastic Beanstalk–provisioned
Amazon EC2 instances to use the Amazon EC2 key pair before you can access your Elastic
Beanstalk–provisioned Amazon EC2 instances. You can set up your Amazon EC2 key pairs using
the AWS Management Console. For instructions on creating a key pair for Amazon EC2, go to the
Amazon EC2 Getting Started Guide. For more information on how to configure your Amazon EC2
instances to use an Amazon EC2 key pair, see EC2 Key Pair (p. 168).
Elastic Beanstalk does not enable remote connections to EC2 instances in a Windows container
by default except for legacy Windows containers. (Beanstalk configures EC2 instances in legacy
Windows containers to use port 3389 for RDP connections.) You can enable remote connections
to your EC2 instances running Windows by adding a rule to a security group that authorizes
inbound traffic to the instances. We strongly recommend that you remove the rule when
you end your remote connection. You can add the rule again the next time you need to log
in remotely. For more information, see Adding a Rule for Inbound RDP Traffic to a Windows
Instance and Connect to Your Windows Instance in the Amazon Elastic Compute Cloud User
Guide for Microsoft Windows.
To view and connect to Amazon EC2 instances for an environment
1. Open the Amazon EC2 console at https://console.aws.amazon.com/ec2/.
2. In the navigation (left) pane of the console, click Load Balancers.
API Version 2010-12-01
367
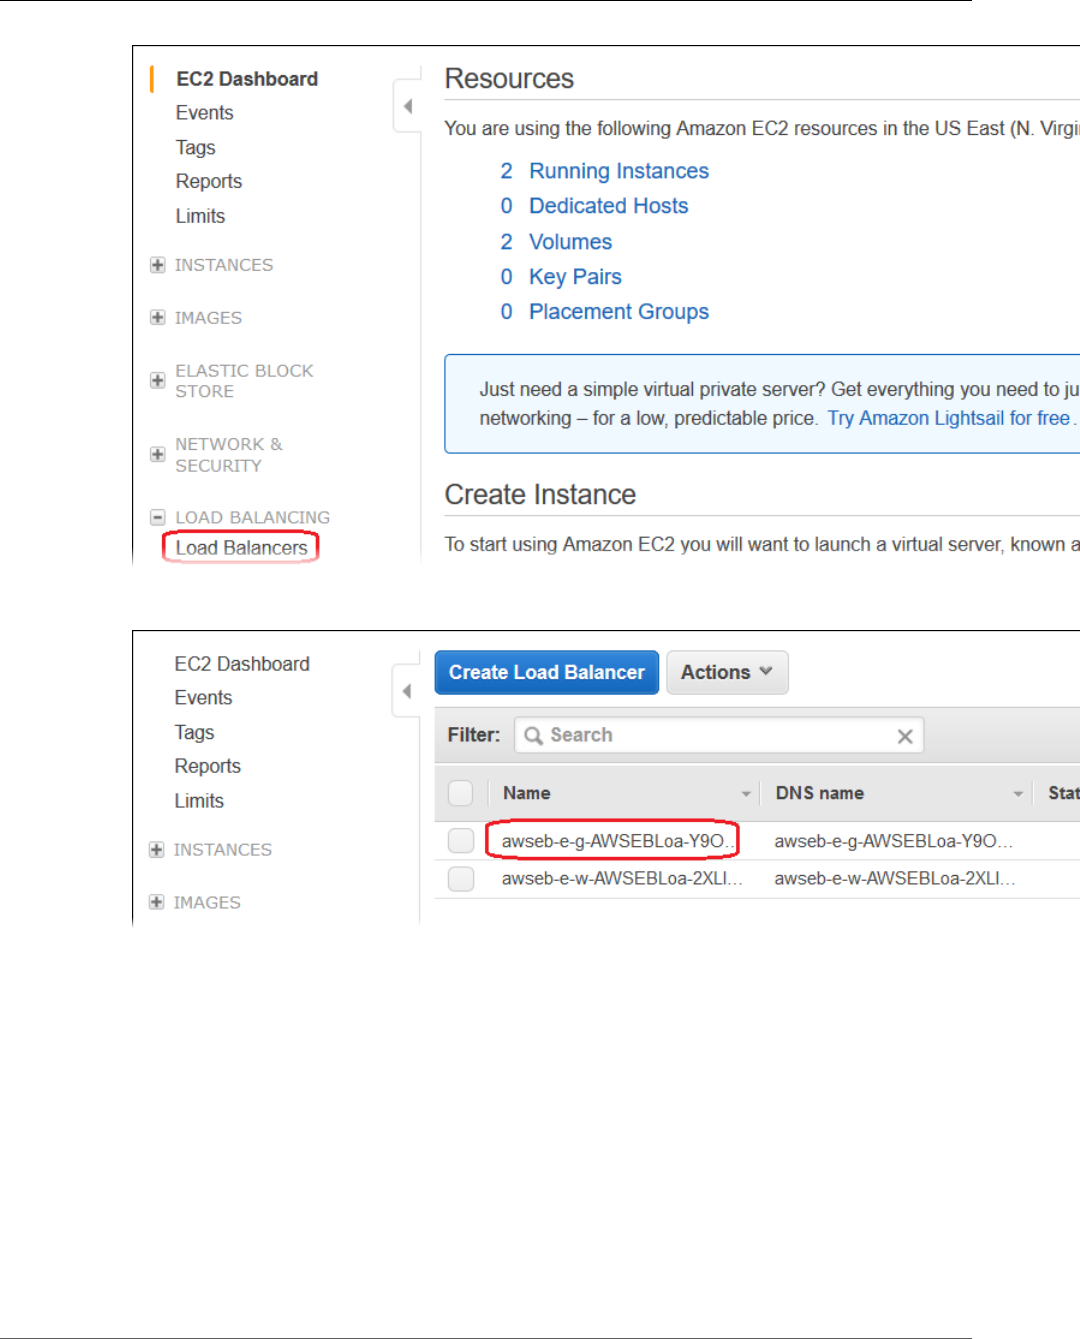
AWS Elastic Beanstalk Developer Guide
Monitor Instances
3. Load balancers created by Elastic Beanstalk will have a awseb in the name. Find the load balancer
for your environment and click it.
4. Click the Instances tab in the bottom pane of the console window.
API Version 2010-12-01
368
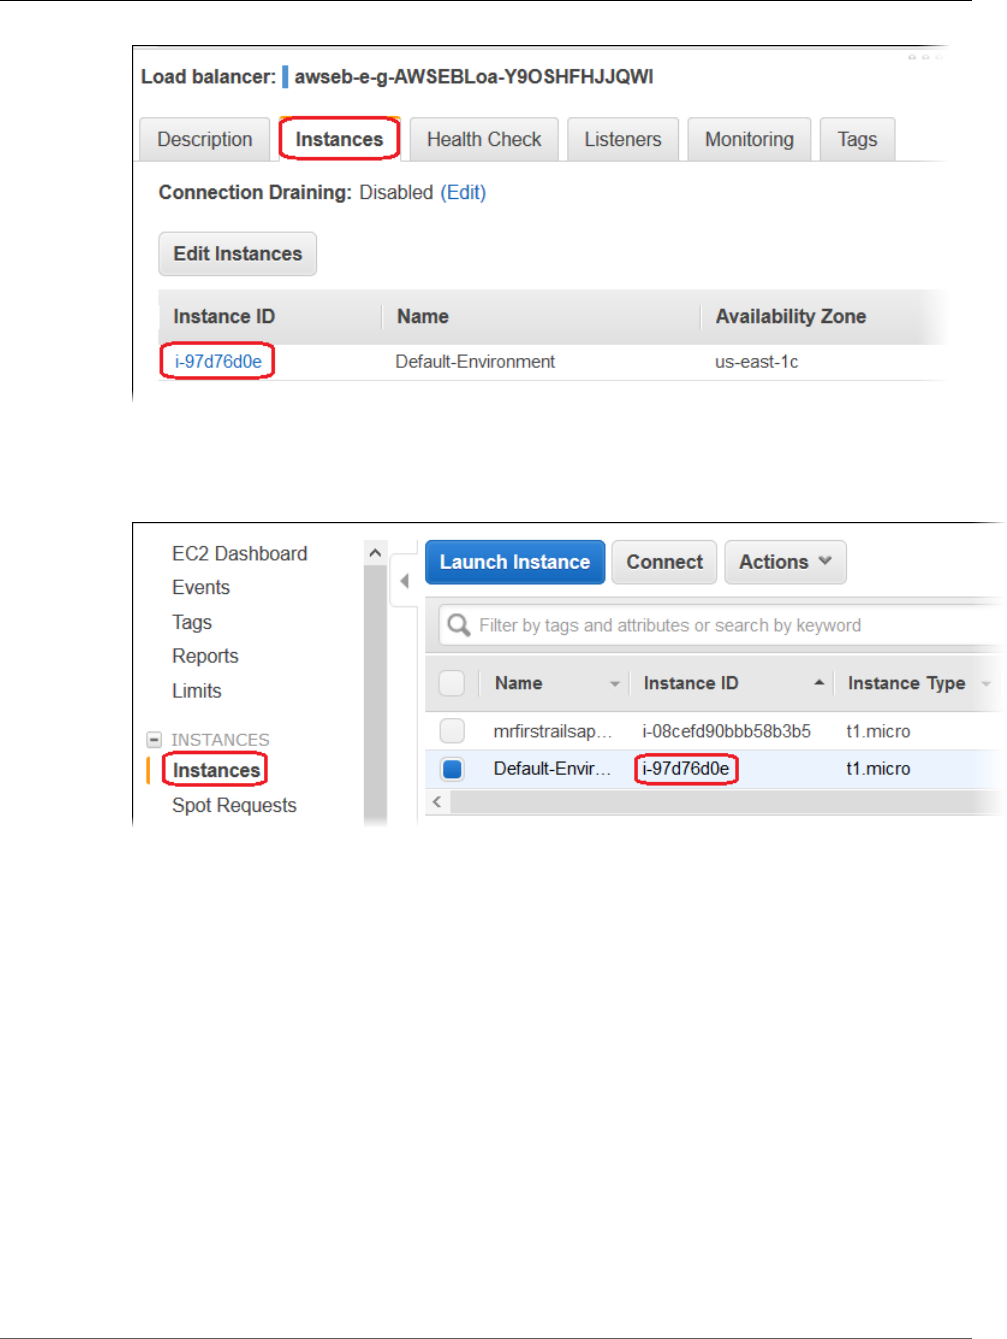
AWS Elastic Beanstalk Developer Guide
View Instance Logs
A list of the instances that the load balancer for your Elastic Beanstalk environment uses is
displayed. Make a note of an instance ID that you want to connect to.
5. Click the Instances link in the left side of the Amazon EC2 console, and find your instance ID in the
list.
6. Right-click the instance ID for the Amazon EC2 instance running in your environment's load balancer,
and then select Connect from the context menu.
7. Make a note of the instance's public DNS address on the Description tab.
8. To connect to an instance running Linux, use the SSH client of your choice to connect to your
instance and type ssh -i .ec2/mykeypair.pem ec2-user@<public-DNS-of-the-instance> . For
instructions on how to connect to an instance running Windows, see Connect to your Windows
Instance in the Amazon Elastic Compute Cloud Microsoft Windows Guide.
For more information on connecting to an Amazon EC2 instance, see the Amazon Elastic Compute Cloud
Getting Started Guide.
Viewing Logs from Your Elastic Beanstalk
Environment's Amazon EC2 Instances
The EC2 instances in your Elastic Beanstalk environment generate logs that you can view to troubleshoot
issues with your application or configuration files. Logs created by the web server, application server,
Elastic Beanstalk platform scripts, and AWS CloudFormation are stored locally on individual instances,
API Version 2010-12-01
369
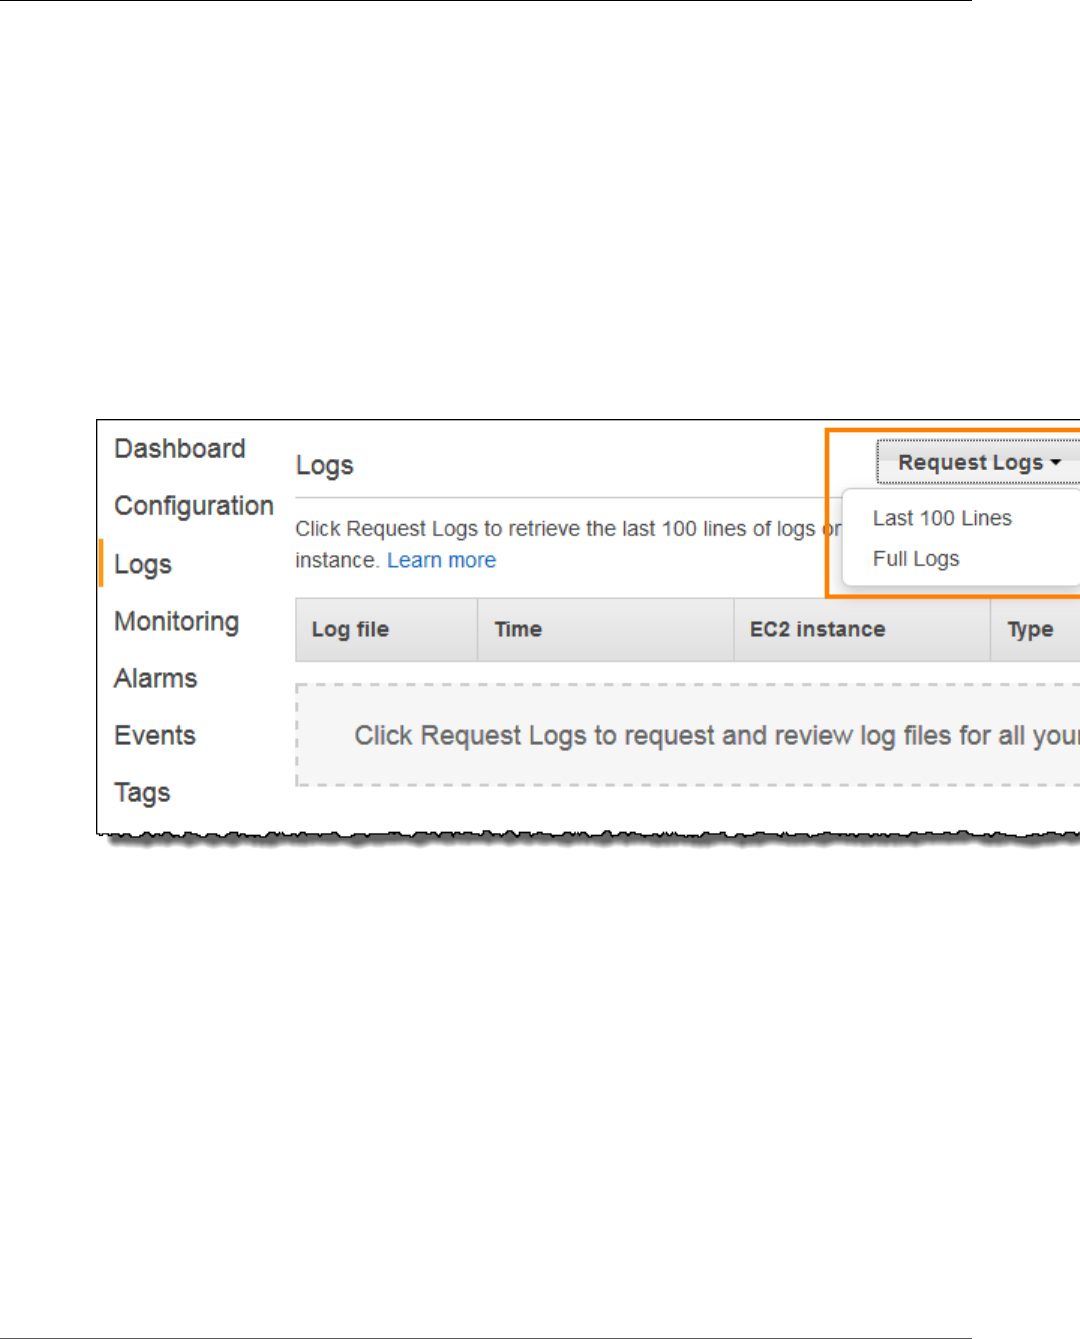
AWS Elastic Beanstalk Developer Guide
View Instance Logs
and can be easily retrieved with the environment management console or the EB CLI. You can also
configure your environment to stream logs to Amazon CloudWatch Logs in real time.
Tail logs are the last 100 lines of the most commonly used log files – Elastic Beanstalk operational logs
and logs from the web server and/or application server. When you request tail logs in the environment
management console or with eb logs, an instance in your environment concatenates the most recent
log entries into a single text file and uploads it to Amazon S3.
Bundle logs are full logs for a wider range of log files, including logs from yum and cron and several logs
from AWS CloudFormation. When you request bundle logs, an instance in your environment packages
the full log files into a ZIP archive and uploads it to Amazon S3.
Note
Elastic Beanstalk Windows Server platforms do not support bundle logs.
To retrieve logs in the environment management console (p. 65), navigate to Logs, choose Request Logs,
and then choose the type of logs to retrieve. To get tail logs, choose Last 100 Lines. To get bundle logs,
choose Full Logs.
When Elastic Beanstalk finishes retrieving your logs, choose Download.
Tail and bundle logs are removed from Amazon S3 15 minutes after they are created. To persist logs,
you can configure your environment to publish logs to Amazon S3 automatically after they have been
rotated.
To enable log rotation to Amazon S3, navigate to the Software Configuration section of the
Configuration page (p. 215) in the environment management console. Under Log Options, select Enable
log file rotation to Amazon S3 and then choose Apply. Instances in your environment will attempt to
upload logs that have been rotated once per hour.
To upload rotated logs to Amazon S3, the instances in your environment must have an instance
profile (p. 22) with permission to write to your Elastic Beanstalk Amazon S3 bucket. These permissions
are included in the default instance profile that Elastic Beanstalk prompts you to create when you launch
an environment in the Elastic Beanstalk console for the first time.
If your application generates logs in a location that is not part of the default configuration for
your environment's platform, you can extend the default configuration by using configuration files
(.ebextensions (p. 256)). You can add your application's log files to tail logs, bundle logs, or log
rotation.
API Version 2010-12-01
370

AWS Elastic Beanstalk Developer Guide
Log Location on-Instance
For real time log streaming and long term storage, configure your environment to stream logs to
Amazon CloudWatch Logs (p. 374).
Sections
•Log Location on-Instance (p. 371)
•Log Location in S3 (p. 371)
•Log Rotation Settings on Linux (p. 372)
•Extending the Default Log Task Configuration (p. 372)
•Amazon CloudWatch Logs (p. 374)
Log Location on-Instance
Logs are stored in standard locations on the EC2 instances in your environment. Elastic Beanstalk
generates the following logs:
Linux
•/var/log/eb-activity.log
•/var/log/eb-commandprocessor.log
•/var/log/eb-version-deployment.log
Windows Server
•C:\Program Files\Amazon\ElasticBeanstalk\logs\
These logs contain messages about deployment activities including messages related to configuration
files (.ebextensions (p. 256)).
Each application and web server stores logs in its own folder:
•Apache – /var/log/httpd/
•IIS – C:\inetpub\wwwroot\
•Node.js – /var/log/nodejs/
•nginx – /var/log/nginx/
•Passenger – /var/app/support/logs/
•Puma – /var/log/puma/
•Python – /opt/python/log/
•Tomcat – /var/log/tomcat8/
Log Location in S3
When you request tail or bundle logs from your environment, or instances upload rotated
logs, they are stored in your Elastic Beanstalk bucket in Amazon S3. Elastic Beanstalk creates a
bucket named elasticbeanstalk-region-account-id for each region in which you create
environments. Within this bucket, logs are stored under the path resources/environments/
logs/logtype/environment-id/instance-id.
For example, logs from instance i-0a1fd158, in Elastic Beanstalk environment e-mpcwnwheky in
region us-west-2 in account 0123456789012, are stored in the following locations:
•Tail Logs –
API Version 2010-12-01
371

AWS Elastic Beanstalk Developer Guide
Log Rotation Settings on Linux
s3://elasticbeanstalk-us-west-2-0123456789012/resources/environments/logs/
tail/e-mpcwnwheky/i-0a1fd158
•Bundle Logs –
s3://elasticbeanstalk-us-west-2-0123456789012/resources/environments/logs/
bundle/e-mpcwnwheky/i-0a1fd158
•Rotated Logs –
s3://elasticbeanstalk-us-west-2-0123456789012/resources/environments/logs/
publish/e-mpcwnwheky/i-0a1fd158
Note
You can find your environment ID in the environment management console (p. 65).
Elastic Beanstalk deletes tail and bundle logs from Amazon S3 automatically 15 minutes after they are
created. Rotated logs persist until you delete them or move them to Amazon Glacier.
Log Rotation Settings on Linux
On Linux platforms, Elastic Beanstalk uses logrotate to rotate logs periodically. After a log is rotated
locally, the log rotation task picks it up and uploads it to Amazon S3, if configured. Logs that are rotated
locally do not appear in tail or bundle logs by default.
You can find Elastic Beanstalk configuration files for logrotate in /etc/
logrotate.elasticbeanstalk.hourly/. The specific rotation settings are platform-specific and
might change in future versions of the platform. For more information on the available settings and
example configurations, run man logrotate.
The configuration files are invoked by cron jobs in /etc/cron.hourly/. For more information on cron,
run man cron.
Extending the Default Log Task Configuration
Elastic Beanstalk uses files in subfolders of /opt/elasticbeanstalk/tasks (Linux) or C:\Program
Files\Amazon\ElasticBeanstalk\config (Windows Server) on the EC2 instance to configure tasks
for tail logs, bundle logs and log rotation.
On Linux:
•Tail Logs –
/opt/elasticbeanstalk/tasks/taillogs.d/
•Bundle Logs –
/opt/elasticbeanstalk/tasks/bundlelogs.d/
•Rotated Logs –
/opt/elasticbeanstalk/tasks/publishlogs.d/
On Windows Server:
•Tail Logs –
c:\Program Files\Amazon\ElasticBeanstalk\config\taillogs.d\
API Version 2010-12-01
372

AWS Elastic Beanstalk Developer Guide
Extending the Default Log Task Configuration
•Rotated Logs –
c:\Program Files\Amazon\ElasticBeanstalk\config\publogs.d\
For example, the file eb-activity.conf on Linux adds two log files to the tail logs task:
/opt/elasticbeanstalk/tasks/taillogs.d/eb-activity.conf
/var/log/eb-commandprocessor.log
/var/log/eb-activity.log
You can use environment configuration files (.ebextensions (p. 256)) to add your own .conf files
to these folders. A .conf file lists log files specific to your application, which Elastic Beanstalk adds to
the log file tasks.
Use the files (p. 261) section to add configuration files to the tasks that you want to modify. For
example, the following configuration file adds a config to each instance in your environment that adds /
var/log/cloud-init.log to tail logs:
files:
"/opt/elasticbeanstalk/tasks/taillogs.d/cloud-init.conf" :
mode: "000755"
owner: root
group: root
content: |
/var/log/cloud-init.log
Add this text to a file with the .config extension to your source bundle under a folder named
.ebextensions:
~/workspace/my-app
|-- .ebextensions
| `-- tail-logs.config
|-- index.php
`-- styles.css
On Linux platforms, you can also use wildcards in log task configurations. This configuration file adds all
files with the .log extension from the log folder in the application root to bundle logs:
files:
"/opt/elasticbeanstalk/tasks/bundlelogs.d/applogs.conf" :
mode: "000755"
owner: root
group: root
content: |
/var/app/current/log/*.log
Note
Log task configurations don't support wildcards on Windows platforms.
For more information on using configuration files, see Advanced Environment Customization with
Configuration Files (.ebextensions) (p. 256).
Much like extending tail logs and bundle logs, you can extend log rotation using a configuration file.
Whenever Elastic Beanstalk rotates its own logs and uploads them to Amazon S3, it also rotates and
uploads your additional logs. Log rotation extension behaves differently depending on the platform's
operating system. The following sub-sections describe the two cases.
API Version 2010-12-01
373
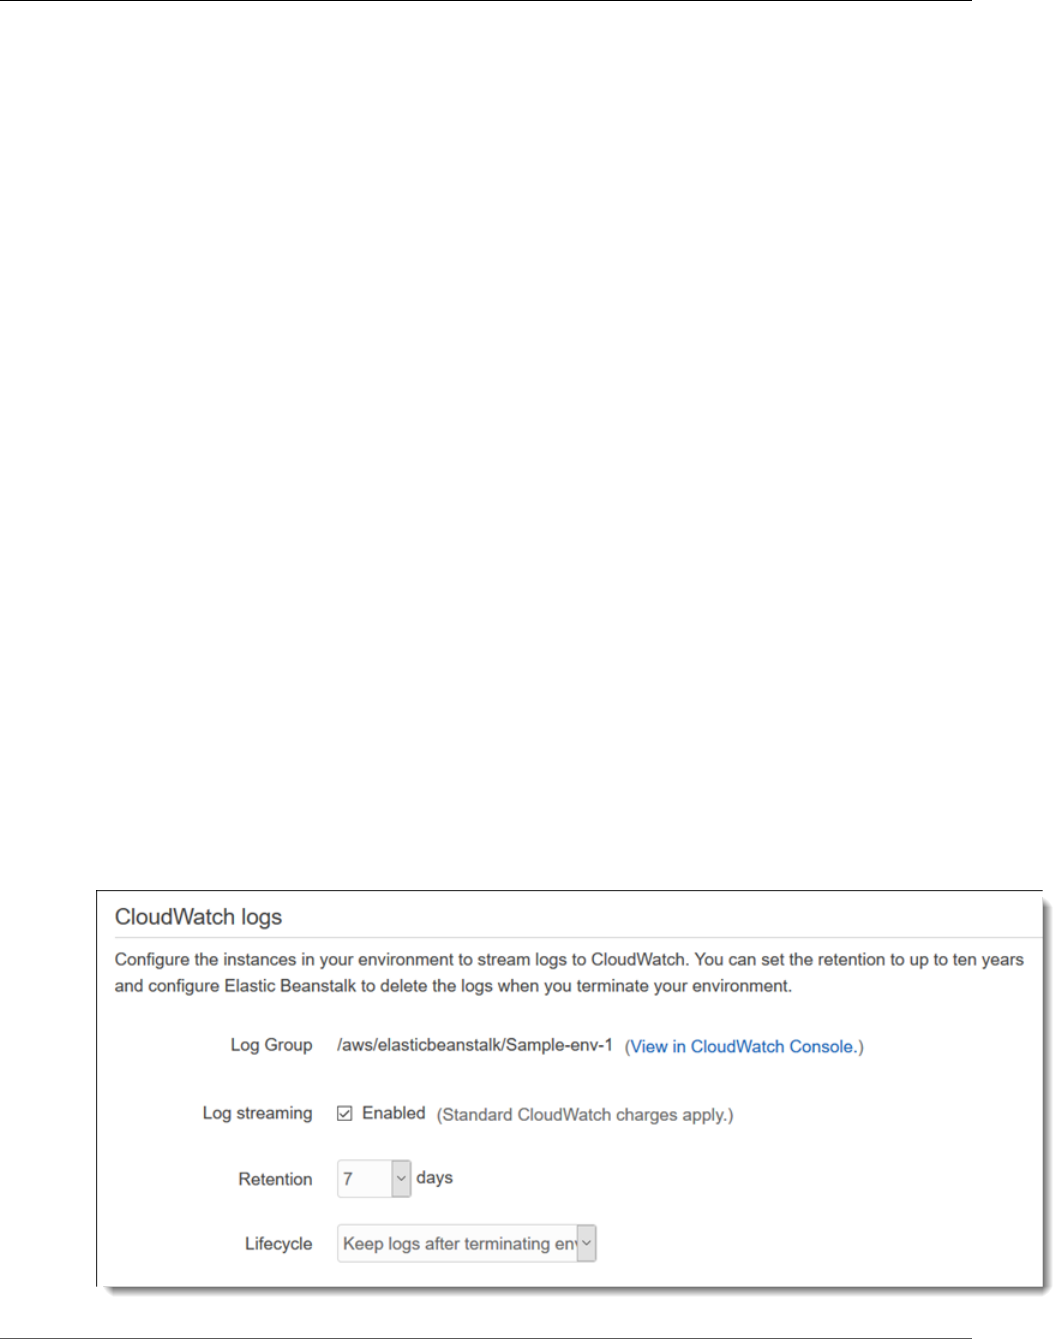
AWS Elastic Beanstalk Developer Guide
Amazon CloudWatch Logs
Extending Log Rotation on Linux
As explained in Log Rotation Settings on Linux (p. 372), Elastic Beanstalk uses logrotate to rotate
logs on Linux platforms. When you configure your application's log files for log rotation, the application
doesn't need to create copies of log files. Elastic Beanstalk configures logrotate to make a copy of your
application's log files for each rotation. Therefore, the application must keep log files unlocked when it
isn't actively writing to them.
Extending Log Rotation on Windows Server
On Windows Server, when you configure your application's log files for log rotation, the application must
rotate the log files periodically. Elastic Beanstalk looks for files with names starting with the pattern
you configured, and picks them up for uploading to Amazon S3. In addition, periods in the file name are
ignored, and Elastic Beanstalk considers the name up to the period to be the base log file name.
Elastic Beanstalk uploads all versions of a base log file except for the newest one, because it considers
that one to be the active application log file, which can potentially be locked. Your application may,
therefore, keep the active log file locked between rotations.
For example: your application writes to a log file named my_log.log, and you specify this name in your
.conf file. The application periodically rotates the file. During Elastic Beanstalk's rotation cycle, it finds
the following files in the log file's folder: my_log.log, my_log.0800.log, my_log.0830.log. Elastic
Beanstalk considers all of them to be versions of the base name my_log. The file my_log.log has the
latest modification time, so Elastic Beanstalk uploads only the other two files, my_log.0800.log and
my_log.0830.log.
Amazon CloudWatch Logs
You can configure your environment to stream logs to Amazon CloudWatch Logs in the AWS
Management Console or with configuration options (p. 202). With CloudWatch Logs, each instance in
your environment streams logs to log groups that you can configure to be retained for weeks or years,
even after your environment is terminated.
The set of logs streamed varies per environment but always includes eb-activity.log and access logs from
the nginx or Apache proxy server that runs in front of your application.
You can configure log streaming in the AWS Management Console during environment creation on the
Software settings page (p. 85), as shown in the following screen shot, which saves logs up to 60 days,
even when the environment has terminated.
API Version 2010-12-01
374

AWS Elastic Beanstalk Developer Guide
Amazon CloudWatch Logs
The following configuration file (p. 256) enables log streaming with 180 days retention, even if the
environment is terminated:
Example .ebextensions/log-streaming.config
option_settings:
aws:elasticbeanstalk:cloudwatch:logs:
StreamLogs: true
DeleteOnTerminate: false
RetentionInDays: 180
API Version 2010-12-01
375

AWS Elastic Beanstalk Developer Guide
Architectural Overview
Using Elastic Beanstalk with Other
AWS Services
The topics in this chapter discusses the integration of Elastic Beanstalk with resources from other AWS
services that are not managed by Elastic Beanstalk as part of your environment.
Topics
•Architectural Overview (p. 376)
•Using Elastic Beanstalk with Amazon CloudFront (p. 377)
•Logging Elastic Beanstalk API Calls with AWS CloudTrail (p. 377)
•Using Elastic Beanstalk with Amazon CloudWatch (p. 379)
•Using Elastic Beanstalk with Amazon CloudWatch Logs (p. 379)
•Using Elastic Beanstalk with DynamoDB (p. 386)
•Using Elastic Beanstalk with Amazon ElastiCache (p. 386)
•Using Elastic Beanstalk with Amazon Elastic File System (p. 387)
•Using Elastic Beanstalk with AWS Identity and Access Management (p. 388)
•Using Elastic Beanstalk with Amazon Relational Database Service (p. 439)
•Using Elastic Beanstalk with Amazon Simple Storage Service (p. 451)
•Using Elastic Beanstalk with Amazon Virtual Private Cloud (p. 451)
Architectural Overview
The following diagram illustrates an example architecture of Elastic Beanstalk across multiple Availability
Zones working with other AWS products such as Amazon CloudFront, Amazon Simple Storage Service
(Amazon S3), and Amazon Relational Database Service (Amazon RDS).
API Version 2010-12-01
376

AWS Elastic Beanstalk Developer Guide
CloudFront
To plan for fault-tolerance, it is advisable to have N+1 Amazon EC2 instances and spread your instances
across multiple Availability Zones. In the unlikely case that one Availability Zone goes down, you will still
have your other Amazon EC2 instances running in another Availability Zone. You can adjust Auto Scaling
to allow for a minimum number of instances as well as multiple Availability Zones. For instructions on
how to do this, see Your AWS Elastic Beanstalk Environment's Auto Scaling Group (p. 165). For more
information about building fault-tolerant applications, go to Building Fault-Tolerant Applications on
AWS.
The following sections discuss in more detail integration with Amazon CloudFront, Amazon CloudWatch,
Amazon DynamoDB Amazon ElastiCache, Amazon RDS, Amazon Route53, Amazon Simple Storage
Service, Amazon VPC , and IAM.
Using Elastic Beanstalk with Amazon CloudFront
Amazon CloudFront is a web service that speeds up distribution of your static and dynamic web content,
for example, .html, .css, .php, image, and media files, to end users. CloudFront delivers your content
through a worldwide network of edge locations. When an end user requests content that you're serving
with CloudFront, the user is routed to the edge location that provides the lowest latency, so content is
delivered with the best possible performance. If the content is already in that edge location, CloudFront
delivers it immediately. If the content is not currently in that edge location, CloudFront retrieves it from
an Amazon S3 bucket or an HTTP server (for example, a web server) that you have identified as the
source for the definitive version of your content.
After you have created and deployed your Elastic Beanstalk application you can sign up for CloudFront
and start using CloudFront to distribute your content. Learn more about CloudFront from the Amazon
CloudFront Developer Guide.
Logging Elastic Beanstalk API Calls with AWS
CloudTrail
Elastic Beanstalk is integrated with CloudTrail, a service that captures all of the Elastic BeanstalkAPI calls
and delivers the log files to an Amazon S3 bucket that you specify. CloudTrail captures API calls from the
Elastic Beanstalk console or from your code to the Elastic Beanstalk APIs. Using the information collected
by CloudTrail, you can determine the request that was made to Elastic Beanstalk, the source IP address
from which the request was made, who made the request, when it was made, and so on.
To learn more about CloudTrail, including how to configure and enable it, see the AWS CloudTrail User
Guide.
Elastic Beanstalk Information in CloudTrail History
The CloudTrail API activity history feature lets you look up and filter events captured by CloudTrail. You
can look up events related to the creation, modification, or deletion of resources in your AWS account
on a per-region basis. Events can be looked up by using the CloudTrail console, or programmatically by
using the AWS SDKs or AWS CLI (lookup-events).
For a list of supported actions, see AWS Elastic Beanstalk APIs in the CloudTrail User Guide.
Elastic Beanstalk Information in CloudTrail Logging
When CloudTrail logging is enabled in your AWS account, API calls made to Elastic Beanstalk actions
are tracked in CloudTrail log files, where they are written with other AWS service records. CloudTrail
determines when to create and write to a new file based on a time period and file size.
API Version 2010-12-01
377

AWS Elastic Beanstalk Developer Guide
Understanding Elastic Beanstalk Log File Entries
All Elastic Beanstalk actions are logged by CloudTrail and are documented in the Elastic
Beanstalk API Reference. For example, calls to the CreateEnvironment, UpdateEnvironment and
TerminateEnvironment sections generate entries in the CloudTrail log files.
Every log entry contains information about who generated the request. The user identity information in
the log entry helps you determine the following:
• Whether the request was made with root or IAM user credentials
• Whether the request was made with temporary security credentials for a role or federated user
• Whether the request was made by another AWS service
For more information, see the CloudTrail userIdentity Element.
You can store your log files in your Amazon S3 bucket for as long as you want, but you can also define
Amazon S3 lifecycle rules to archive or delete log files automatically. By default, your log files are
encrypted with Amazon S3 server-side encryption (SSE).
If you want to be notified upon log file delivery, you can configure CloudTrail to publish Amazon SNS
notifications when new log files are delivered. For more information, see Configuring Amazon SNS
Notifications for CloudTrail.
You can also aggregate Elastic Beanstalk log files from multiple AWS regions and multiple AWS accounts
into a single Amazon S3 bucket.
For more information, see Receiving CloudTrail Log Files from Multiple Regions and Receiving CloudTrail
Log Files from Multiple Accounts.
Understanding Elastic Beanstalk Log File Entries
CloudTrail log files can contain one or more log entries. Each entry lists multiple JSON-formatted events.
A log entry represents a single request from any source and includes information about the requested
action, the date and time of the action, request parameters, and so on. Log entries are not an ordered
stack trace of the public API calls, so they do not appear in any specific order.
The following example shows a CloudTrail log entry that demonstrates the UpdateEnvironment action
called by an IAM user named intern.
{
"Records": [{
"eventVersion": "1.03",
"userIdentity": {
"type": "IAMUser",
"principalId": "AIXDAYQEXAMPLEUMLYNGL",
"arn": "arn:aws:iam::123456789012:user/intern",
"accountId": "123456789012",
"accessKeyId": "ASXIAGXEXAMPLEQULKNXV",
"userName": "intern",
"sessionContext": {
"attributes": {
"mfaAuthenticated": "false",
"creationDate": "2016-04-22T00:23:24Z"
}
},
"invokedBy": "signin.amazonaws.com"
},
"eventTime": "2016-04-22T00:24:14Z",
"eventSource": "elasticbeanstalk.amazonaws.com",
"eventName": "UpdateEnvironment",
API Version 2010-12-01
378

AWS Elastic Beanstalk Developer Guide
CloudWatch
"awsRegion": "us-west-2",
"sourceIPAddress": "255.255.255.54",
"userAgent": "signin.amazonaws.com",
"requestParameters": {
"optionSettings": []
},
"responseElements": null,
"requestID": "84ae9ecf-0280-17ce-8612-705c7b132321",
"eventID": "e48b6a08-c6be-4a22-99e1-c53139cbfb18",
"eventType": "AwsApiCall",
"recipientAccountId": "123456789012"
}]
}
Using Elastic Beanstalk with Amazon CloudWatch
Amazon CloudWatch enables you to monitor, manage, and publish various metrics, as well as configure
alarm actions based on data from metrics. Amazon CloudWatch monitoring enables you to collect,
analyze, and view system and application metrics so that you can make operational and business
decisions more quickly and with greater confidence. You can use Amazon CloudWatch to collect metrics
about your Amazon Web Services (AWS) resources—such as the performance of your Amazon EC2
instances. You can also publish your own metrics directly to Amazon CloudWatch. Amazon CloudWatch
alarms help you implement decisions more easily by enabling you to send notifications or automatically
make changes to the resources you are monitoring, based on rules that you define. For example, you can
create alarms that initiate Auto Scaling and Amazon Simple Notification Service (Amazon SNS) actions
on your behalf. Elastic Beanstalk automatically uses Amazon CloudWatch to help you monitor your
application and environment status. You can navigate to the Amazon CloudWatch console to see your
dashboard and get an overview of all of your resources as well as your alarms. You can also choose to
view more metrics or add custom metrics. For more information about Amazon CloudWatch, go to the
Amazon CloudWatch Developer Guide. For an example of how to use Amazon CloudWatch with Elastic
Beanstalk, see Example: Using Custom Amazon CloudWatch Metrics (p. 266).
Using Elastic Beanstalk with Amazon CloudWatch
Logs
With CloudWatch Logs, you can monitor and archive your Elastic Beanstalk application, system, and
custom log files. Furthermore, you can configure alarms that make it easier for you to take actions
in response to specific log stream events that your metric filters extract. The CloudWatch Logs agent
installed on each Amazon EC2 in your environment publishes metric data points to the CloudWatch
service for each log group you configure. Each log group applies its own filter patterns to determine
what log stream events to send to CloudWatch as data points. Log streams that belong to the same
log group share the same retention, monitoring, and access control settings. You can configure
Elastic Beanstalk to automatically stream logs to the CloudWatch service, as described in Streaming
CloudWatch Logs (p. 381). For more information about CloudWatch Logs, including terminology and
concepts, go to Monitoring System, Application, and Custom Log Files.
The following figure displays graphs on the Monitoring page for an environment that is configured
with CloudWatch Logs integration. The example metrics in this environment are named CWLHttp4xx
and CWLHttp5xx. In the image, the CWLHttp4xx metric has triggered an alarm according to conditions
specified in the configuration files.
API Version 2010-12-01
379
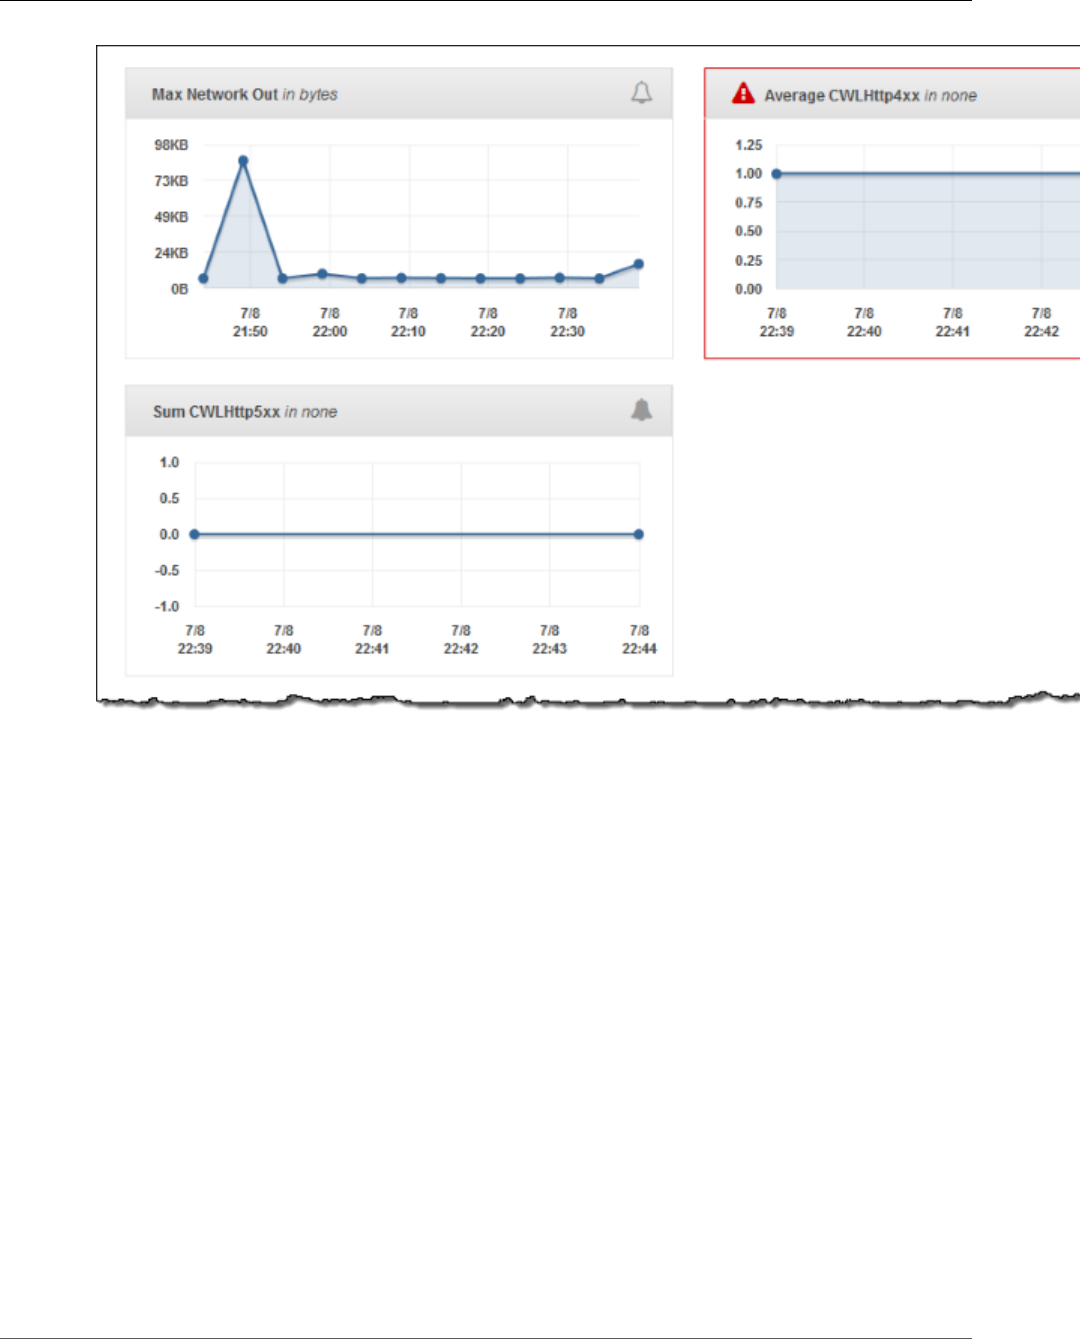
AWS Elastic Beanstalk Developer Guide
CloudWatch Logs
The following figure displays graphs on the Alarms page for the example alarms named
AWSEBCWLHttp4xxPercentAlarm and AWSEBCWLHttp5xxCountAlarm that correspond to the
CWLHttp4xx and CWLHttp5xx metrics, respectively.
API Version 2010-12-01
380
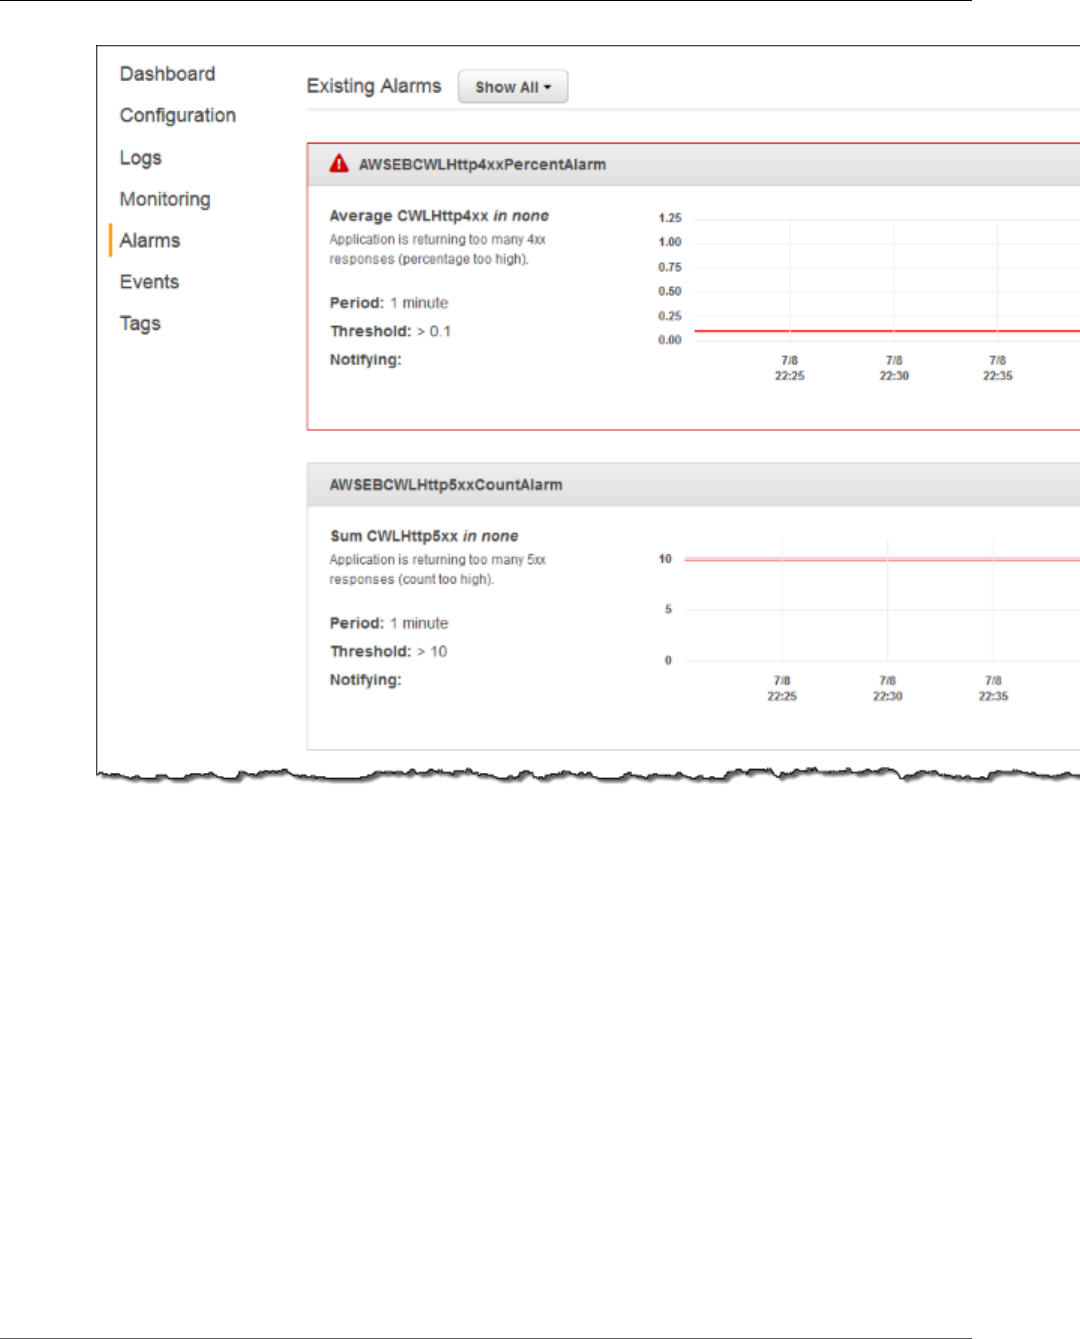
AWS Elastic Beanstalk Developer Guide
Streaming CloudWatch Logs
Streaming CloudWatch Logs
Since Elastic Beanstalk can spin up Amazon EC2 instances on demand (provided you have enabled
that feature), Elastic Beanstalk provides another option so that you can stream log entries from those
Amazon EC2 instances to CloudWatch. To enable this feature, select Enabled for Log streaming, set
Retention to the number of days to save the logs, and select the Lifecycle setting for whether the logs
are saved after the instance is terminated, as shown in the following figure, which saves the logs for 7
days and keeps the logs after terminating the instance. You can also enable these settings using the eb
logs (p. 538) command. Note that this feature is only available in platform configurations since this
release.
Note also that once you enable CloudWatch logs, you'll see the View in CloudWatch Console link. Click
that link to see your CloudWatch logs in the CloudWatch console.
API Version 2010-12-01
381
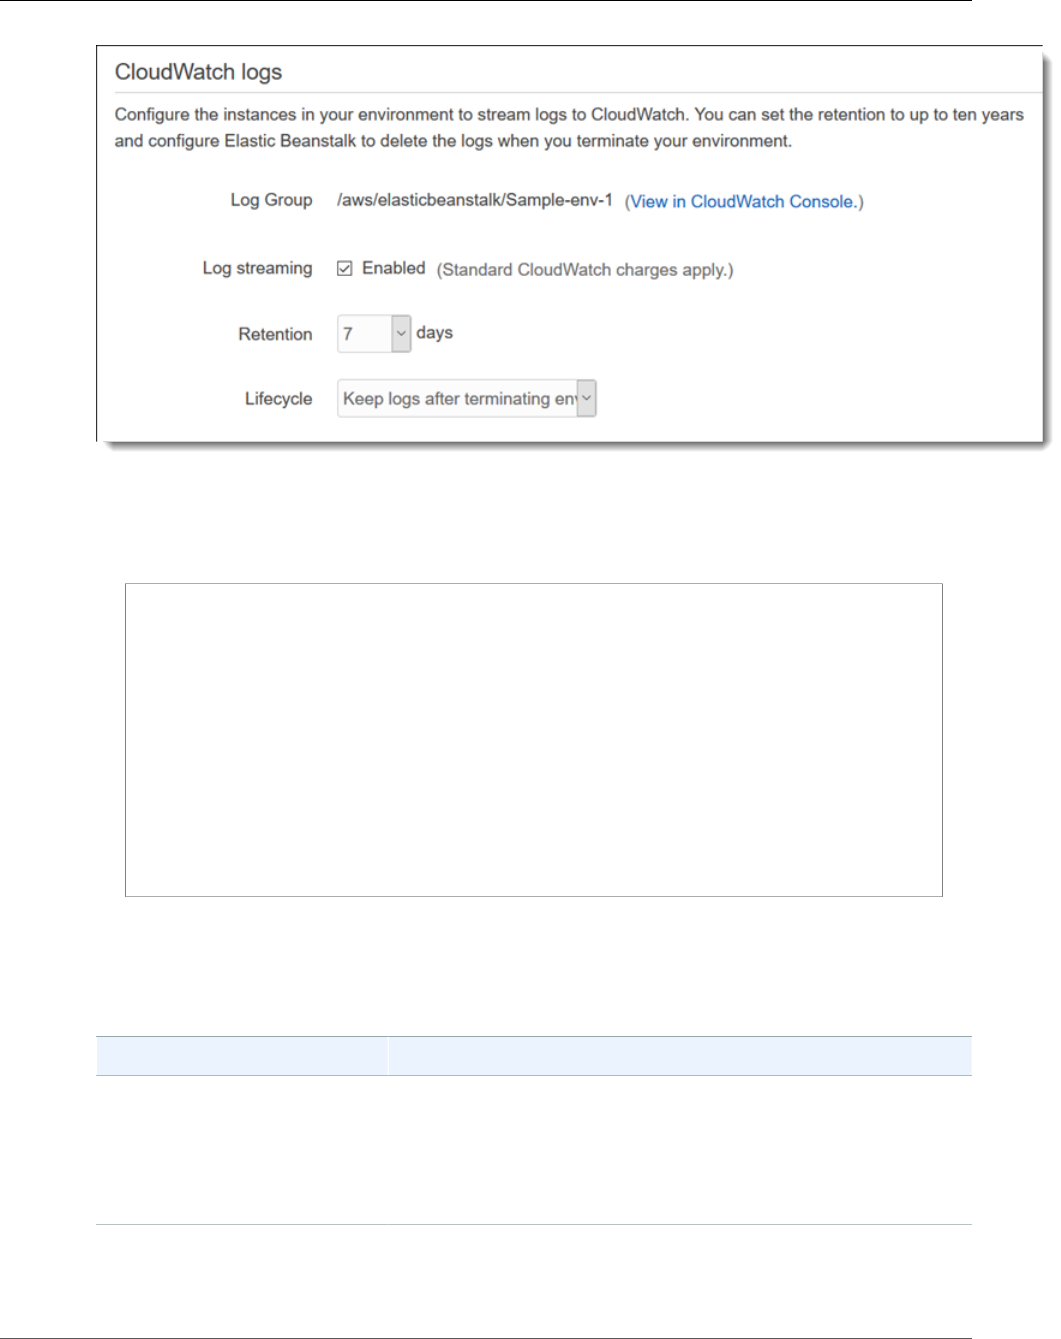
AWS Elastic Beanstalk Developer Guide
Streaming CloudWatch Logs
Note
If you do not have the AWSElasticBeanstalkWebTier or AWSElasticBeanstalkWorkerTier Elastic
Beanstalk managed policy in your Elastic Beanstalk instance profile (p. 22), you must add the
following to your profile to enable this feature.
{
"Version": "2012-10-17",
"Statement": [
{
"Effect": "Allow",
"Action": [
"logs:PutLogEvents",
"logs:CreateLogStream"
],
"Resource": [
"arn:aws:logs:*:*:log-group:/aws/elasticbeanstalk*"
]
}
]
}
Elastic Beanstalk installs a CloudWatch log agent with the default configuration settings on each
instance it creates. Learn more at CloudWatch Logs Agent Reference.
Different platforms stream different logs. The following table lists the logs, by platform.
Platform Logs
Docker • /var/log/eb-activity.log
• /var/log/nginx/error.log
• /var/log/docker-events.log
• /var/log/docker
• /var/log/nginx/access.log
Multi-Docker(generic) • /var/log/eb-activity.log
• /var/log/ecs/ecs-init.log
• /var/log/eb-ecs-mgr.log
API Version 2010-12-01
382

AWS Elastic Beanstalk Developer Guide
Streaming CloudWatch Logs
Platform Logs
• /var/log/ecs/ecs-agent.log
• /var/log/docker-events.log
Glass fish
(Preconfigured docker)
• /var/log/eb-activity.log
• /var/log/nginx/error.log
• /var/log/docker-events.log
• /var/log/docker
• /var/log/nginx/access.log
Go (Preconfigured
docker)
• /var/log/eb-activity.log
• /var/log/nginx/error.log
• /var/log/docker-events.log
• /var/log/docker
• /var/log/nginx/access.log
Python (Preconfigured
docker)
• /var/log/eb-activity.log
• /var/log/nginx/error.log
• /var/log/docker-events.log
• /var/log/docker
• /var/log/nginx/access.log
Go • /var/log/eb-activity.log
• /var/log/nginx/error.log
• /var/log/nginx/access.log
Java • /var/log/eb-activity.log
• /var/log/nginx/access.log
• /var/log/nginx/error.log
• /var/log/web-1.error.log
• /var/log/web-1.log
Tomcat • /var/log/eb-activity.log
• /var/log/httpd/error_log
• /var/log/httpd/access_log
• /var/log/nginx/error_log
• /var/log/nginx/access_log
.NET on Windows Server • C:\Program Files\Amazon\ElasticBeanstalk\logs
\AWSDeployment.log
• C:\Program Files\Amazon\ElasticBeanstalk\logs\Hooks.log
• C:\inetpub\logs\LogFiles (the entire directory)
Node.js • /var/log/eb-activity.log
• /var/log/nodejs/nodejs.log
• /var/log/nginx/error.log
• /var/log/nginx/access.log
• /var/log/httpd/error.log
• /var/log/httpd/access.log
API Version 2010-12-01
383

AWS Elastic Beanstalk Developer Guide
Setting Up CloudWatch Logs
Integration with Configuration Files
Platform Logs
Php • /var/log/eb-activity.log
• /var/log/httpd/error_log
• /var/log/httpd/access_log
Python • /var/log/eb-activity.log
• /var/log/httpd/error_log
• /var/log/httpd/access_log
• /opt/python/log/supervisord.log
Ruby (Puma) • /var/log/eb-activity.log
• /var/log/nginx/error.log
• /var/log/puma/puma.log
• /var/log/nginx/access.log
Ruby (passenger) • /var/log/eb-activity.log
• /var/app/support/logs/passenger.log
• /var/app/support/logs/access.log
• /var/app/support/logs/error.log
You can also enable CloudWatch logs using the eb logs --cloudwatch enable (p. 538) command.
Setting Up CloudWatch Logs Integration with
Configuration Files
When you create or update an environment, you can use the sample configuration files in the following
list to set up and configure integration with CloudWatch Logs. You can include the .zip file that
contains following configuration files or the extracted configuration files in the .ebextensions
directory at the top level of your application source bundle. Use the appropriate files for the web
server for your platform. For more information about the web server used by each platform, see Elastic
Beanstalk Supported Platforms (p. 26).
Before you can configure integration with CloudWatch Logs using configuration files, you must set up
IAM permissions to use with the CloudWatch Logs agent. You can attach the following custom policy to
the instance profile (p. 22) that you assign to your environment:
{
"Version": "2012-10-17",
"Statement": [
{
"Effect": "Allow",
"Action": [
"logs:CreateLogGroup",
"logs:CreateLogStream",
"logs:GetLogEvents",
"logs:PutLogEvents",
"logs:DescribeLogGroups",
"logs:DescribeLogStreams",
"logs:PutRetentionPolicy"
],
"Resource": [
"arn:aws:logs:us-west-2:*:*"
]
}
API Version 2010-12-01
384

AWS Elastic Beanstalk Developer Guide
Troubleshooting CloudWatch Logs Integration
]
}
Replace the region in the above policy with the region in which you launch your environment.
You can download the configuration files at the following locations:
•Tomcat (Java) configuration files
•Apache (PHP and Python) configuration files
•nginx (Go, Ruby, Node.js, and Docker) configuration files
Each .zip file contains the following configuration files:
•cwl-setup.config – This file installs the CloudWatch Logs agent on each Amazon EC2 instance
in your environment and then configures the agent. This file also creates the general.conf file
when Elastic Beanstalk launches the instance. You can use the cwl-setup.config file without any
modifications.
If you prefer, you can manually set up the CloudWatch Logs agent on a new instance as explained in
either Quick Start: Install and Configure the CloudWatch Logs Agent on a New EC2 Instance (for new
instances) or Quick Start: Install and Configure the CloudWatch Logs Agent on an Existing EC2 Instance
(for existing instances) in the Amazon CloudWatch Developer Guide.
•cwl-webrequest-metrics.config – This file specifies which logs the CloudWatch Logs agent
monitors. The file also specifies the metric filters the CloudWatch Logs agent applies to each log that it
monitors. Metric filters include filter patterns that map to the space-delimited entries in your log files.
(If you have custom logs, update or replace the example filter patterns in this example configuration
file as needed.)
Metric filters also include metric transformations that specify what metric name and value to use when
the CloudWatch Logs agent sends metric data points to the CloudWatch service. The CloudWatch Logs
agent sends metric data points based on whether any entries in the web server access log file match
the filter patterns.
Finally, the configuration file also includes an alarm action to send a message to an Amazon Simple
Notification Service topic, if you created one for your environment, when the alarm conditions
specified in the cwl-setup.config file are met. For more information about filter patterns, see Filter
and Pattern Syntax in the Amazon CloudWatch Developer Guide. For more information about Amazon
SNS, go to the Amazon Simple Notification Service Developer Guide. For more information about
managing alarms from the Elastic Beanstalk management console, see Manage Alarms (p. 362).
Note
CloudWatch costs are applied to your AWS account for any alarms that you use.
•eb-logs.config – This file sets up the CloudWatch Logs log files for the CloudWatch Logs agent.
This configuration file also ensures that log files are copied to Amazon S3 as part of log rotation. You
can use this file without any modifications.
Troubleshooting CloudWatch Logs Integration
If Elastic Beanstalk cannot launch your environment when you try to integrate Elastic Beanstalk with
CloudWatch Logs, you can investigate the following common issues:
• Your IAM role lacks the required IAM permissions.
• You attempted to launch an environment in a region where CloudWatch Logs is not supported.
• Access logs do not exist at the path specified in the cwl-webrequest-metrics.config file (/var/
log/httpd/elasticbeanstalk-access_log).
API Version 2010-12-01
385

AWS Elastic Beanstalk Developer Guide
DynamoDB
Using Elastic Beanstalk with DynamoDB
DynamoDB is a fully managed NoSQL database service that provides fast and predictable performance
with seamless scalability. If you are a developer, you can use DynamoDB to create a database table
that can store and retrieve any amount of data, and serve any level of request traffic. DynamoDB
automatically spreads the data and traffic for the table over a sufficient number of servers to handle the
request capacity specified by the customer and the amount of data stored, while maintaining consistent
and fast performance. All data items are stored on Solid State Disks (SSDs) and are automatically
replicated across multiple Availability Zones in a Region to provide built-in high availability and data
durability.
If you use periodic tasks (p. 159) in a worker environment, Elastic Beanstalk creates a DynamoDB
table and uses it to perform leader election and store information about the task. Each instance in the
environment attempts to write to the table every few seconds to become leader and perform the task
when scheduled.
You can use configuration files (p. 256) to create a DynamoDB table for your application. See eb-node-
express-sample on GitHub for a sample Node.js application that creates a table with a configuration file
and connects to it with the AWS SDK for Node.js. For an example walkthrough using DynamoDB with
PHP, see Example: DynamoDB, CloudWatch, and SNS (p. 289). For an example that uses the AWS SDK for
Java, see Manage Tomcat Session State with DynamoDB in the AWS SDK for Java documentation.
For more information about DynamoDB, go to the DynamoDB Developer Guide.
Using Elastic Beanstalk with Amazon ElastiCache
Amazon ElastiCache is a web service that makes it easy to set up, manage, and scale distributed
in-memory cache environments in the cloud. It provides a high performance, resizable, and cost-
effective in-memory cache, while removing the complexity associated with deploying and managing a
distributed cache environment. Amazon ElastiCache is protocol-compliant with Memcached, so the code,
applications, and most popular tools that you use today with your existing Memcached environments will
work seamlessly with the service. For more information about Amazon ElastiCache, go to the Amazon
ElastiCache product page.
To use Elastic Beanstalk with Amazon ElastiCache
1. Create an ElastiCache cluster. For instructions on how to create an ElastiCache cluster, go to Create a
Cache Cluster in the Amazon ElastiCache Getting Started Guide.
2. Configure your Amazon ElastiCache Security Group to allow access from the Amazon EC2 security
group used by your Elastic Beanstalk application. For instructions on how to find the name of your
EC2 security group using the AWS Management Console, see Security Groups (p. 168). For more
information, go to Authorize Access in the Amazon ElastiCache Getting Started Guide.
If you are using a non-legacy container, you can also use configuration files to customize your Elastic
Beanstalk environment to use Amazon ElastiCache. For information on supported container types
and customizing your environment, see AWS Elastic Beanstalk Environment Configuration (p. 164).
For an example snippet using Amazon ElastiCache with Elastic Beanstalk, see Example Snippets:
ElastiCache (p. 281).
API Version 2010-12-01
386

AWS Elastic Beanstalk Developer Guide
Amazon EFS
Using Elastic Beanstalk with Amazon Elastic File
System
With Amazon Elastic File System, you can create network file systems that can be mounted by instances
across multiple Availability Zones. An Amazon EFS file system is an AWS resource that uses security
groups to control access over the network in your default or custom VPC.
In an Elastic Beanstalk environment, you can use Amazon EFS to create a shared directory that stores
files uploaded or modified by users of your application. Your application can treat a mounted Amazon
EFS volume like local storage, so you don't have to change your application code to scale up to multiple
instances.
For more information about Amazon EFS, see the Amazon Elastic File System User Guide.
Sections
•Configuration Files (p. 387)
•Encrypted File Systems (p. 388)
•Sample Applications (p. 388)
Configuration Files
Elastic Beanstalk provides configuration files (p. 256) that you can use to create and mount Amazon EFS
file systems. You can create an Amazon EFS volume as part of your environment, or mount an Amazon
EFS volume that you created independently of Elastic Beanstalk.
•storage-efs-createfilesystem.config – Uses the Resources key to create a new file system and mount
points in Amazon EFS. All instances in your environment can connect to the same file system for
shared, scalable storage. Use storage-efs-mountfilesystem.config to mount the file system on
each instance.
Internal Resources
Any resources that you create with configuration files are tied to the lifecycle of your
environment and will be lost if you terminate your environment or remove the configuration
file.
•storage-efs-mountfilesystem.config – Mount an Amazon EFS file system to a local path on the
instances in your environment. You can create the volume as part of the environment with storage-
efs-createfilesystem.config, or external to your environment by using the Amazon EFS
console, AWS CLI, or AWS SDK.
To use the configuration files, start by creating your Amazon EFS file system with storage-efs-
createfilesystem.config. Follow the instructions in the configuration file and add it to the
.ebextensions directory in your source code to create the file system in your VPC.
Deploy your updated source code to your Elastic Beanstalk environment to confirm that the file system
is created successfully. Then, add the storage-efs-mountfilesystem.config to mount the file
system to the instances in your environment. Doing this in two separate deployments ensures that if the
mount operation fails, the file system is left intact. If you do both in the same deployment, an issue with
either step will cause the file system to terminate when the deployment fails.
API Version 2010-12-01
387

AWS Elastic Beanstalk Developer Guide
Encrypted File Systems
Encrypted File Systems
Amazon EFS supports encrypted file systems. The storage-efs-createfilesystem.config
configuration file discussed in this topic defines two custom options that you can use to create an
Amazon EFS encrypted file system. For details, follow the instructions in the configuration file.
Sample Applications
Elastic Beanstalk also provides sample applications that use Amazon EFS for shared storage. The two
projects are configuration files that you can use with a standard WordPress or Drupal installer to run
a blog or other content management system in a load-balanced environment. When a user uploads a
photo or other media, it is stored on an Amazon EFS file system, avoiding the need to use a plugin to
store uploaded files in Amazon S3.
•Load Balanced WordPress – Configuration files for installing WordPress securely and running it in a
load-balanced AWS Elastic Beanstalk environment.
•Load Balanced Drupal – Configuration files and instructions for installing Drupal securely and running
it in a load-balanced AWS Elastic Beanstalk environment.
Using Elastic Beanstalk with AWS Identity and
Access Management
AWS Identity and Access Management (IAM) helps you securely control access to your AWS resources.
This section includes reference materials for working with IAM policies, instance profiles, and service
roles.
For an overview of permissions, see Service Roles, Instance Profiles, and User Policies (p. 21). For most
environments, the service role and instance profile that the AWS Management Console prompts you to
create when you launch your first environment have all of the permissions that you need. Likewise, the
managed policies (p. 403) provided by Elastic Beanstalk for full access and read-only access contain all
of the user permissions required for daily use.
The IAM User Guide provides in-depth coverage of AWS permissions.
Topics
•Managing Elastic Beanstalk Instance Profiles (p. 388)
•Managing Elastic Beanstalk Service Roles (p. 393)
•Controlling Access to Elastic Beanstalk (p. 403)
•Amazon Resource Name Format for Elastic Beanstalk (p. 407)
•Resources and Conditions for Elastic Beanstalk Actions (p. 408)
•Example Policies Based on Managed Policies (p. 430)
•Example Policies Based on Resource Permissions (p. 432)
Managing Elastic Beanstalk Instance Profiles
An instance profile is a container for an AWS Identity and Access Management (IAM) role that you
can use to pass role information to an EC2 instance when the instance starts. When you launch an
environment in the AWS Elastic Beanstalk environment management console, the console creates a
API Version 2010-12-01
388

AWS Elastic Beanstalk Developer Guide
Instance Profiles
default instance profile, called aws-elasticbeanstalk-ec2-role, and assigns managed policies with
default permissions to it.
Elastic Beanstalk provides three managed policies: one for the web server tier, one for the worker tier,
and one with additional permissions required for multicontainer Docker environments. The console
assigns all of these policies to the role attached to the default instance profile. The policies follow.
Managed Instance Profile Policies
•AWSElasticBeanstalkWebTier – Grants permissions for the application to upload logs to Amazon S3
and debugging information to AWS X-Ray.
{
"Version": "2012-10-17",
"Statement": [
{
"Sid": "BucketAccess",
"Action": [
"s3:Get*",
"s3:List*",
"s3:PutObject"
],
"Effect": "Allow",
"Resource": [
"arn:aws:s3:::elasticbeanstalk-*",
"arn:aws:s3:::elasticbeanstalk-*/*"
]
},
{
"Sid": "XRayAccess",
"Action": [
"xray:PutTraceSegments",
"xray:PutTelemetryRecords"
],
"Effect": "Allow",
"Resource": "*"
},
{
"Sid": "CloudWatchLogsAccess",
"Action": [
"logs:PutLogEvents",
"logs:CreateLogStream",
"logs:DescribeLogStreams",
"logs:DescribeLogGroups"
],
"Effect": "Allow",
"Resource": [
"arn:aws:logs:*:*:log-group:/aws/elasticbeanstalk*"
]
}
]
}
•AWSElasticBeanstalkWorkerTier – Grants permissions for log uploads, debugging, metric publication,
and worker instance tasks, including queue management, leader election, and periodic tasks.
{
"Version": "2012-10-17",
"Statement": [
{
"Sid": "MetricsAccess",
"Action": [
"cloudwatch:PutMetricData"
API Version 2010-12-01
389

AWS Elastic Beanstalk Developer Guide
Instance Profiles
],
"Effect": "Allow",
"Resource": "*"
},
{
"Sid": "XRayAccess",
"Action":[
"xray:PutTraceSegments",
"xray:PutTelemetryRecords"
],
"Effect": "Allow",
"Resource": "*"
},
{
"Sid": "QueueAccess",
"Action": [
"sqs:ChangeMessageVisibility",
"sqs:DeleteMessage",
"sqs:ReceiveMessage",
"sqs:SendMessage"
],
"Effect": "Allow",
"Resource": "*"
},
{
"Sid": "BucketAccess",
"Action": [
"s3:Get*",
"s3:List*",
"s3:PutObject"
],
"Effect": "Allow",
"Resource": [
"arn:aws:s3:::elasticbeanstalk-*",
"arn:aws:s3:::elasticbeanstalk-*/*"
]
},
{
"Sid": "DynamoPeriodicTasks",
"Action": [
"dynamodb:BatchGetItem",
"dynamodb:BatchWriteItem",
"dynamodb:DeleteItem",
"dynamodb:GetItem",
"dynamodb:PutItem",
"dynamodb:Query",
"dynamodb:Scan",
"dynamodb:UpdateItem"
],
"Effect": "Allow",
"Resource": [
"arn:aws:dynamodb:*:*:table/*-stack-AWSEBWorkerCronLeaderRegistry*"
]
}
]
}
•AWSElasticBeanstalkMulticontainerDocker – Grants permissions for the Amazon Elastic Container
Service to coordinate cluster tasks.
{
"Version": "2012-10-17",
"Statement": [
{
"Sid": "ECSAccess",
API Version 2010-12-01
390

AWS Elastic Beanstalk Developer Guide
Instance Profiles
"Effect": "Allow",
"Action": [
"ecs:Poll",
"ecs:StartTask",
"ecs:StopTask",
"ecs:DiscoverPollEndpoint",
"ecs:StartTelemetrySession",
"ecs:RegisterContainerInstance",
"ecs:DeregisterContainerInstance",
"ecs:DescribeContainerInstances",
"ecs:Submit*"
],
"Resource": "*"
}
]
}
To allow the EC2 instances in your environment to assume the aws-elasticbeanstalk-ec2-role
role, the instance profile specifies Amazon EC2 as a trusted entity in the trust relationship policy:
{
"Version": "2008-10-17",
"Statement": [
{
"Effect": "Allow",
"Principal": {
"Service": "ec2.amazonaws.com"
},
"Action": "sts:AssumeRole"
}
]
}
To customize permissions, you can either add policies to the role attached to the default instance profile,
or create your own instance profile with a restricted set of permissions.
Sections
•Verifying the Permissions Assigned to the Default Instance Profile (p. 391)
•Updating an Out-of-Date Default Instance Profile (p. 392)
•Adding Permissions to the Default Instance Profile (p. 392)
•Creating an Instance Profile (p. 392)
Verifying the Permissions Assigned to the Default Instance
Profile
The permissions assigned to your default instance profile can vary depending on when it was created,
the last time you launched an environment, and which client you used. You can verify the permissions on
the default instance profile in the IAM console.
To verify the default instance profile's permissions
1. Open the Roles page in the IAM console.
2. Choose aws-elasticbeanstalk-ec2-role.
3. Choose the Permissions tab and review the Managed Policies and Inline Policies sections to see the
policies attached to the role.
4. To see the permissions that a policy grants, choose Show Policy next to the policy.
API Version 2010-12-01
391

AWS Elastic Beanstalk Developer Guide
Instance Profiles
Updating an Out-of-Date Default Instance Profile
If the default instance profile lacks the required permissions, you can update it by creating a new
environment (p. 76) in the Elastic Beanstalk environment management console.
Alternatively, you can add the managed policies to the role attached to the default instance profile
manually.
To add managed policies to the role attached to the default instance profile
1. Open the Roles page in the IAM console.
2. Choose aws-elasticbeanstalk-ec2-role.
3. On the Permissions tab, under Managed Policies, choose Attach Policy.
4. Type AWSElasticBeanstalk to filter the policies.
5. Select the following policies, and then choose Attach Policies:
•AWSElasticBeanstalkWebTier
•AWSElasticBeanstalkWorkerTier
•AWSElasticBeanstalkMulticontainerDocker
Adding Permissions to the Default Instance Profile
If your application accesses AWS APIs or resources to which permissions aren't granted in the default
instance profile, add policies that grant permissions in the IAM console.
To add policies to the role attached to the default instance profile
1. Open the Roles page in the IAM console.
2. Choose aws-elasticbeanstalk-ec2-role.
3. On the Permissions tab, under Managed Policies, choose Attach Policy.
4. Select the managed policy for the additional services that your application uses. For example,
AmazonS3FullAccess or AmazonDynamoDBFullAccess.
5. Choose Attach Policies.
Creating an Instance Profile
An instance profile is a wrapper around a standard IAM role that allows an EC2 instance to assume the
role. You can create additional instance profiles to customize permissions for different applications or
to create an instance profile that doesn't grant permissions for worker tier or multicontainer Docker
environments if you don't use those features.
To create an instance profile
1. Open the Roles page in the IAM console.
2. Choose Create New Role.
3. Type a name, and then choose Next Step.
4. Under AWS Service Roles, choose Amazon EC2.
5. Attach the appropriate managed policies provided by Elastic Beanstalk and any additional policies
that provide permissions that your application needs.
6. Choose Next Step.
7. Choose Create Role.
API Version 2010-12-01
392

AWS Elastic Beanstalk Developer Guide
Service Roles
Managing Elastic Beanstalk Service Roles
When you launch an environment in the AWS Elastic Beanstalk environment management console, the
console creates a default service role, called aws-elasticbeanstalk-service-role, and attaches
managed policies with default permissions to it.
Elastic Beanstalk provides a managed policy for enhanced health monitoring (p. 336), and one with
additional permissions required for managed platform updates (p. 145). The console assigns both of
these policies to the default service role. The managed service role policies follow.
Managed Service Role Policies
•AWSElasticBeanstalkEnhancedHealth – Grants permissions for Elastic Beanstalk to monitor instance
and environment health.
{
"Version": "2012-10-17",
"Statement": [
{
"Effect": "Allow",
"Action": [
"elasticloadbalancing:DescribeInstanceHealth",
"elasticloadbalancing:DescribeLoadBalancers",
"elasticloadbalancing:DescribeTargetHealth",
"ec2:DescribeInstances",
"ec2:DescribeInstanceStatus",
"ec2:GetConsoleOutput",
"ec2:AssociateAddress",
"ec2:DescribeAddresses",
"ec2:DescribeSecurityGroups",
"sqs:GetQueueAttributes",
"sqs:GetQueueUrl",
"autoscaling:DescribeAutoScalingGroups",
"autoscaling:DescribeAutoScalingInstances",
"autoscaling:DescribeScalingActivities",
"autoscaling:DescribeNotificationConfigurations"
],
"Resource": [
"*"
]
}
]
}
•AWSElasticBeanstalkService – Grants permissions for Elastic Beanstalk to update environments on
your behalf to perform managed updates.
{
"Version": "2012-10-17",
"Statement": [
{
"Sid": "AllowCloudformationOperationsOnElasticBeanstalkStacks",
"Effect": "Allow",
"Action": [
"cloudformation:*"
],
"Resource": [
"arn:aws:cloudformation:*:*:stack/awseb-*",
"arn:aws:cloudformation:*:*:stack/eb-*"
]
},
{
API Version 2010-12-01
393

AWS Elastic Beanstalk Developer Guide
Service Roles
"Sid": "AllowS3OperationsOnElasticBeanstalkBuckets",
"Effect": "Allow",
"Action": [
"s3:*"
],
"Resource": [
"arn:aws:s3:::elasticbeanstalk-*",
"arn:aws:s3:::elasticbeanstalk-*/*"
]
},
{
"Sid": "AllowOperations",
"Effect": "Allow",
"Action": [
"autoscaling:AttachInstances",
"autoscaling:CreateAutoScalingGroup",
"autoscaling:CreateLaunchConfiguration",
"autoscaling:DeleteLaunchConfiguration",
"autoscaling:DeleteAutoScalingGroup",
"autoscaling:DeleteScheduledAction",
"autoscaling:DescribeAccountLimits",
"autoscaling:DescribeAutoScalingGroups",
"autoscaling:DescribeAutoScalingInstances",
"autoscaling:DescribeLaunchConfigurations",
"autoscaling:DescribeLoadBalancers",
"autoscaling:DescribeNotificationConfigurations",
"autoscaling:DescribeScalingActivities",
"autoscaling:DescribeScheduledActions",
"autoscaling:DetachInstances",
"autoscaling:PutScheduledUpdateGroupAction",
"autoscaling:ResumeProcesses",
"autoscaling:SetDesiredCapacity",
"autoscaling:SuspendProcesses",
"autoscaling:TerminateInstanceInAutoScalingGroup",
"autoscaling:UpdateAutoScalingGroup",
"cloudwatch:PutMetricAlarm",
"ec2:AuthorizeSecurityGroupEgress",
"ec2:AuthorizeSecurityGroupIngress",
"ec2:CreateSecurityGroup",
"ec2:DeleteSecurityGroup",
"ec2:DescribeAccountAttributes",
"ec2:DescribeImages",
"ec2:DescribeInstances",
"ec2:DescribeKeyPairs",
"ec2:DescribeSecurityGroups",
"ec2:DescribeSubnets",
"ec2:DescribeVpcs",
"ec2:RevokeSecurityGroupEgress",
"ec2:RevokeSecurityGroupIngress",
"ec2:TerminateInstances",
"ecs:CreateCluster",
"ecs:DeleteCluster",
"ecs:DescribeClusters",
"ecs:RegisterTaskDefinition",
"elasticbeanstalk:*",
"elasticloadbalancing:ApplySecurityGroupsToLoadBalancer",
"elasticloadbalancing:ConfigureHealthCheck",
"elasticloadbalancing:CreateLoadBalancer",
"elasticloadbalancing:DeleteLoadBalancer",
"elasticloadbalancing:DeregisterInstancesFromLoadBalancer",
"elasticloadbalancing:DescribeInstanceHealth",
"elasticloadbalancing:DescribeLoadBalancers",
"elasticloadbalancing:DescribeTargetHealth",
"elasticloadbalancing:RegisterInstancesWithLoadBalancer",
"iam:ListRoles",
"iam:PassRole",
API Version 2010-12-01
394

AWS Elastic Beanstalk Developer Guide
Service Roles
"logs:CreateLogGroup",
"logs:PutRetentionPolicy",
"rds:DescribeDBInstances",
"rds:DescribeOrderableDBInstanceOptions",
"s3:CopyObject",
"s3:GetObject",
"s3:GetObjectAcl",
"s3:GetObjectMetadata",
"s3:ListBucket",
"s3:listBuckets",
"s3:ListObjects",
"sns:CreateTopic",
"sns:GetTopicAttributes",
"sns:ListSubscriptionsByTopic",
"sns:Subscribe",
"sqs:GetQueueAttributes",
"sqs:GetQueueUrl"
],
"Resource": [
"*"
]
}
]
}
To allow Elastic Beanstalk to assume the aws-elasticbeanstalk-service-role role, the service
role specifies Elastic Beanstalk as a trusted entity in the trust relationship policy:
{
"Version": "2012-10-17",
"Statement": [
{
"Sid": "",
"Effect": "Allow",
"Principal": {
"Service": "elasticbeanstalk.amazonaws.com"
},
"Action": "sts:AssumeRole",
"Condition": {
"StringEquals": {
"sts:ExternalId": "elasticbeanstalk"
}
}
}
]
}
When you launch an envitonment using the the section called “eb create” (p. 521) command of
the Elastic Beanstalk Command Line Interface (EB CLI) and don't specify a service role through the --
service-role option, Elastic Beanstalk creates the default service role aws-elasticbeanstalk-
service-role. If the default service role already exists, Elastic Beanstalk uses it for the new
environment.
If you use the CreateEnvironment action of the Elastic Beanstalk API to create an
environment, specify a service role with the ServiceRole configuration option in the
aws:elasticbeanstalk:environment namespace. See Using Enhanced Health Reporting with the
AWS Elastic Beanstalk API (p. 357) for details on using enhanced health monitoring with the Elastic
Beanstalk API.
When you create an environment by using the Elastic Beanstalk API, and don't specify a service role,
Elastic Beanstalk creates a service-linked role. This is a unique type of service role that is predefined by
API Version 2010-12-01
395

AWS Elastic Beanstalk Developer Guide
Service Roles
Elastic Beanstalk to include all the permissions that the service requires to call other AWS services on
your behalf. The service-linked role is associated with your account. Elastic Beanstalk creates it once,
then reuses it when creating additional environments. You can also use IAM to create your account's
service-linked role in advance. When your account has a service-linked role, you can use it to create an
environment by using the Elastic Beanstalk API, the Elastic Beanstalk console, or the EB CLI. For details
about using service-linked roles with Elastic Beanstalk environments, see Using Service-Linked Roles for
Elastic Beanstalk (p. 397).
Sections
•Verifying the Default Service Role's Permissions (p. 396)
•Updating an Out-of-Date Default Service Role (p. 396)
•Adding Permissions to the Default Service Role (p. 396)
•Creating a Service Role (p. 397)
•Using Service-Linked Roles for Elastic Beanstalk (p. 397)
Verifying the Default Service Role's Permissions
The permissions granted by your default service role can vary depending on when it was created, the last
time you launched an environment, and which client you used. You can verify the permissions granted by
the default service role in the IAM console.
To verify the default service role's permissions
1. Open the Roles page in the IAM console.
2. Choose aws-elasticbeanstalk-service-role.
3. On the Permissions tab, in the Managed Policies and Inline Policies sections, review the list of
policies attached to the role.
4. To view the permissions that a policy grants, choose Show Policy next to the policy.
Updating an Out-of-Date Default Service Role
If the default service role lacks the required permissions, you can update it by creating a new
environment (p. 76) in the Elastic Beanstalk environment management console.
Alternatively, you can add the managed policies to the default service role manually.
To add managed policies to the default service role
1. Open the Roles page in the IAM console.
2. Choose aws-elasticbeanstalk-service-role.
3. On the Permissions tab, under Managed Policies, choose Attach Policy.
4. Type AWSElasticBeanstalk to filter the policies.
5. Select the following policies, and then choose Attach Policies:
•AWSElasticBeanstalkEnhancedHealth
•AWSElasticBeanstalkService
Adding Permissions to the Default Service Role
If your application includes configuration files that refer to AWS resources for which permissions aren't
included in the default service role, Elastic Beanstalk might need additional permissions to resolve these
references when it processes the configuration files during a managed update. If permissions are missing,
API Version 2010-12-01
396

AWS Elastic Beanstalk Developer Guide
Service Roles
the update fails and Elastic Beanstalk returns a message indicating which permission it needs. Add
permissions for additional services to the default service role in the IAM console.
To add additional policies to the default service role
1. Open the Roles page in the IAM console.
2. Choose aws-elasticbeanstalk-service-role.
3. On the Permissions tab, under Managed Policies, choose Attach Policy.
4. Select the managed policy for the additional services that your application uses. For example,
AmazonAPIGatewayAdministrator or AmazonElasticFileSystemFullAccess.
5. Choose Attach Policies.
Creating a Service Role
If you can't use the default service role, create a service role.
To create a service role
1. Open the Roles page in the IAM console.
2. Choose Create New Role.
3. Type a name, and then choose Next Step.
4. Under AWS Service Roles, choose AWS Elastic Beanstalk.
5. Attach the AWSElasticBeanstalkService and AWSElasticBeanstalkEnhancedHealth
managed policies and any additional policies that provide permissions that your application needs.
6. Choose Next Step.
7. Choose Create Role.
You can apply your custom service role when you create an environment in the environment creation
wizard (p. 78) or with the --service-role option on the eb create (p. 521) command.
Using Service-Linked Roles for Elastic Beanstalk
AWS Elastic Beanstalk can use AWS Identity and Access Management (IAM) service-linked roles. A
service-linked role is a unique type of IAM role that is linked directly to Elastic Beanstalk. Service-linked
roles are predefined by Elastic Beanstalk and include all the permissions that the service requires to
call other AWS services on your behalf. Elastic Beanstalk uses a service-linked role when you create an
environment and don't explicitly specify a service role for it.
A service-linked role makes setting up Elastic Beanstalk easier because you don’t have to manually add
the necessary permissions. Elastic Beanstalk defines the permissions of its service-linked roles, and
unless defined otherwise, only Elastic Beanstalk can assume its roles. The defined permissions include
the trust policy and the permissions policy, and that permissions policy cannot be attached to any other
IAM entity.
You can delete the roles only after first deleting their related resources. This protects your Elastic
Beanstalk resources because you can't inadvertently remove permission to access the resources.
For information about other services that support service-linked roles, see AWS Services That Work with
IAM and look for the services that have Yes in the Service-Linked Role column. Choose a Yes with a link
to view the service-linked role documentation for that service.
Service-Linked Role Permissions for Elastic Beanstalk
Elastic Beanstalk uses the service-linked role named AWSServiceRoleForElasticBeanstalk. Elastic
Beanstalk uses this service-linked role to call other AWS services on your behalf.
API Version 2010-12-01
397

AWS Elastic Beanstalk Developer Guide
Service Roles
The AWSServiceRoleForElasticBeanstalk service-linked role trusts the
elasticbeanstalk.amazonaws.com service to assume the role.
The permissions policy of the AWSServiceRoleForElasticBeanstalk service-linked role contains all of the
permissions that Elastic Beanstalk needs to complete actions on your behalf:
{
"Version": "2012-10-17",
"Statement": [
{
"Sid": "AllowPassRoleToElasticBeanstalk",
"Effect": "Allow",
"Action": [
"iam:PassRole"
],
"Resource": "*",
"Condition": {
"StringLikeIfExists": {
"iam:PassedToService": "elasticbeanstalk.amazonaws.com"
}
}
},
{
"Sid": "AllowCloudformationOperationsOnElasticBeanstalkStacks",
"Effect": "Allow",
"Action": [
"cloudformation:*"
],
"Resource": [
"arn:aws:cloudformation:*:*:stack/awseb-*",
"arn:aws:cloudformation:*:*:stack/eb-*"
]
},
{
"Sid": "AllowDeleteCloudwatchLogGroups",
"Effect": "Allow",
"Action": [
"logs:DeleteLogGroup"
],
"Resource": [
"arn:aws:logs:*:*:log-group:/aws/elasticbeanstalk*"
]
},
{
"Sid": "AllowS3OperationsOnElasticBeanstalkBuckets",
"Effect": "Allow",
"Action": [
"s3:*"
],
"Resource": [
"arn:aws:s3:::elasticbeanstalk-*",
"arn:aws:s3:::elasticbeanstalk-*/*"
]
},
{
"Sid": "AllowOperations",
"Effect": "Allow",
"Action": [
"autoscaling:AttachInstances",
"autoscaling:CreateAutoScalingGroup",
"autoscaling:CreateLaunchConfiguration",
"autoscaling:DeleteLaunchConfiguration",
"autoscaling:DeleteAutoScalingGroup",
"autoscaling:DeleteScheduledAction",
"autoscaling:DescribeAccountLimits",
API Version 2010-12-01
398

AWS Elastic Beanstalk Developer Guide
Service Roles
"autoscaling:DescribeAutoScalingGroups",
"autoscaling:DescribeAutoScalingInstances",
"autoscaling:DescribeLaunchConfigurations",
"autoscaling:DescribeLoadBalancers",
"autoscaling:DescribeNotificationConfigurations",
"autoscaling:DescribeScalingActivities",
"autoscaling:DescribeScheduledActions",
"autoscaling:DetachInstances",
"autoscaling:PutScheduledUpdateGroupAction",
"autoscaling:ResumeProcesses",
"autoscaling:SetDesiredCapacity",
"autoscaling:SuspendProcesses",
"autoscaling:TerminateInstanceInAutoScalingGroup",
"autoscaling:UpdateAutoScalingGroup",
"cloudwatch:PutMetricAlarm",
"ec2:AssociateAddress",
"ec2:AllocateAddress",
"ec2:AuthorizeSecurityGroupEgress",
"ec2:AuthorizeSecurityGroupIngress",
"ec2:CreateSecurityGroup",
"ec2:DeleteSecurityGroup",
"ec2:DescribeAccountAttributes",
"ec2:DescribeAddresses",
"ec2:DescribeImages",
"ec2:DescribeInstances",
"ec2:DescribeKeyPairs",
"ec2:DescribeSecurityGroups",
"ec2:DescribeSubnets",
"ec2:DescribeVpcs",
"ec2:DisassociateAddress",
"ec2:ReleaseAddress",
"ec2:RevokeSecurityGroupEgress",
"ec2:RevokeSecurityGroupIngress",
"ec2:TerminateInstances",
"ecs:CreateCluster",
"ecs:DeleteCluster",
"ecs:DescribeClusters",
"ecs:RegisterTaskDefinition",
"elasticbeanstalk:*",
"elasticloadbalancing:ApplySecurityGroupsToLoadBalancer",
"elasticloadbalancing:ConfigureHealthCheck",
"elasticloadbalancing:CreateLoadBalancer",
"elasticloadbalancing:DeleteLoadBalancer",
"elasticloadbalancing:DeregisterInstancesFromLoadBalancer",
"elasticloadbalancing:DescribeInstanceHealth",
"elasticloadbalancing:DescribeLoadBalancers",
"elasticloadbalancing:DescribeTargetHealth",
"elasticloadbalancing:RegisterInstancesWithLoadBalancer",
"elasticloadbalancing:DescribeTargetGroups",
"elasticloadbalancing:RegisterTargets",
"elasticloadbalancing:DeregisterTargets",
"iam:ListRoles",
"logs:CreateLogGroup",
"logs:PutRetentionPolicy",
"rds:DescribeDBInstances",
"rds:DescribeOrderableDBInstanceOptions",
"rds:DescribeDBEngineVersions",
"sns:ListTopics",
"sns:GetTopicAttributes",
"sns:ListSubscriptionsByTopic",
"sqs:GetQueueAttributes",
"sqs:GetQueueUrl",
"codebuild:CreateProject",
"codebuild:DeleteProject",
"codebuild:BatchGetBuilds",
"codebuild:StartBuild"
API Version 2010-12-01
399

AWS Elastic Beanstalk Developer Guide
Service Roles
],
"Resource": [
"*"
]
}
]
}
You must configure permissions to allow an IAM entity (such as a user, group, or role) to create, edit, or
delete a service-linked role.
To allow an IAM entity to create the AWSServiceRoleForElasticBeanstalk service-linked role
Add the following statement to the permissions policy for the IAM entity that needs to create the
service-linked role:
{
"Effect": "Allow",
"Action": [
"iam:CreateServiceLinkedRole",
"iam:PutRolePolicy"
],
"Resource": "arn:aws:iam::*:role/aws-service-role/elasticbeanstalk.amazonaws.com/
AWSServiceRoleForElasticBeanstalk*",
"Condition": {"StringLike": {"iam:AWSServiceName": "elasticbeanstalk.amazonaws.com"}}
}
To allow an IAM entity to edit the description of the AWSServiceRoleForElasticBeanstalk service-
linked role
Add the following statement to the permissions policy for the IAM entity that needs to edit the
description of a service-linked role:
{
"Effect": "Allow",
"Action": [
"iam:UpdateRoleDescription"
],
"Resource": "arn:aws:iam::*:role/aws-service-role/elasticbeanstalk.amazonaws.com/
AWSServiceRoleForElasticBeanstalk*",
"Condition": {"StringLike": {"iam:AWSServiceName": "elasticbeanstalk.amazonaws.com"}}
}
To allow an IAM entity to delete the AWSServiceRoleForElasticBeanstalk service-linked role
Add the following statement to the permissions policy for the IAM entity that needs to delete a service-
linked role:
{
"Effect": "Allow",
"Action": [
"iam:DeleteServiceLinkedRole",
"iam:GetServiceLinkedRoleDeletionStatus"
],
"Resource": "arn:aws:iam::*:role/aws-service-role/elasticbeanstalk.amazonaws.com/
AWSServiceRoleForElasticBeanstalk*",
"Condition": {"StringLike": {"iam:AWSServiceName": "elasticbeanstalk.amazonaws.com"}}
}
Alternatively, you can use an AWS managed policy to provide full access (p. 403) to Elastic Beanstalk.
API Version 2010-12-01
400

AWS Elastic Beanstalk Developer Guide
Service Roles
Creating a Service-Linked Role for Elastic Beanstalk
You don't need to manually create the AWSServiceRoleForElasticBeanstalk role. When you create an
Elastic Beanstalk environment using the Elastic Beanstalk API and don't specify a service role, Elastic
Beanstalk creates the service-linked role for you.
You can also use the IAM console, the AWS CLI, or the IAM API to create a service-linked role using the
Elastic Beanstalk use case. For more information, see Creating a Service-Linked Role in the IAM User
Guide.
Important
If you were using the Elastic Beanstalk service before September 27, 2017,
when it began supporting service-linked roles, Elastic Beanstalk created the
AWSServiceRoleForElasticBeanstalk role in your account. To learn more, see A New Role
Appeared in My IAM Account.
Editing a Service-Linked Role for Elastic Beanstalk
Elastic Beanstalk does not allow you to edit the AWSServiceRoleForElasticBeanstalk service-linked role.
After you create a service-linked role, you cannot change the name of the role because various entities
might reference the role. However, you can edit the description of the role using IAM.
Editing a Service-Linked Role Description (IAM Console)
You can use the IAM console to edit the description of a service-linked role.
To edit the description of a service-linked role (console)
1. In the navigation pane of the IAM console, choose Roles.
2. Choose the name of the role to modify.
3. To the far right of Role description, choose Edit.
4. Type a new description in the box, and then choose Save.
Editing a Service-Linked Role Description (IAM CLI)
You can use IAM commands from the AWS Command Line Interface to edit the description of a service-
linked role.
To change the description of a service-linked role (CLI)
1. (Optional) To view the current description for a role, use the following commands:
$ aws iam get-role --role-name role-name
Use the role name, not the ARN, to refer to roles with the CLI commands. For example, if a role
has the following ARN: arn:aws:iam::123456789012:role/myrole, you refer to the role as
myrole.
2. To update a service-linked role's description, use one of the following commands:
$ aws iam update-role-description --role-name role-name --description description
Editing a Service-Linked Role Description (IAM API)
You can use the IAM API to edit the description of a service-linked role.
API Version 2010-12-01
401

AWS Elastic Beanstalk Developer Guide
Service Roles
To change the description of a service-linked role (API)
1. (Optional) To view the current description for a role, use the following command:
IAM API: GetRole
2. To update a role's description, use the following command:
IAM API: UpdateRoleDescription
Deleting a Service-Linked Role for Elastic Beanstalk
If you no longer need to use a feature or service that requires a service-linked role, we recommend
that you delete that role. That way you don’t have an unused entity that is not actively monitored or
maintained. However, you must clean up your service-linked role before you can delete it.
Cleaning up a Service-Linked Role
Before you can use IAM to delete a service-linked role, you must first confirm that the role has no active
sessions and remove any resources used by the role.
To check whether the service-linked role has an active session in the IAM console
1. Sign in to the AWS Management Console and open the IAM console at https://
console.aws.amazon.com/iam/.
2. In the navigation pane of the IAM console, choose Roles. Then choose the name (not the check box)
of the AWSServiceRoleForElasticBeanstalk role.
3. On the Summary page for the selected role, choose the Access Advisor tab.
4. On the Access Advisor tab, review recent activity for the service-linked role.
Note
If you are unsure whether Elastic Beanstalk is using the AWSServiceRoleForElasticBeanstalk
role, you can try to delete the role. If the service is using the role, the deletion fails and you
can view the regions where the role is being used. If the role is being used, you must wait
for the session to end before you can delete the role. You cannot revoke the session for a
service-linked role.
When you find out which Elastic Beanstalk environments are using the
AWSServiceRoleForElasticBeanstalk role, you can terminate them, and then delete the role.
To terminate an Elastic Beanstalk environment (console)
1. Open the Elastic Beanstalk console.
2. Navigate to the management page (p. 65) for your environment.
3. Choose Actions, and then choose Terminate Environment.
4. In the Confirm Termination dialog box, type the environment name, and then choose Terminate.
See eb terminate (p. 555) for details about terminating an Elastic Beanstalk environment using the
EB CLI.
See TerminateEnvironment for details about terminating an Elastic Beanstalk environment using the API.
Deleting a Service-Linked Role
You can use the IAM console, the AWS CLI, or the IAM API to delete a service-linked role. For more
information, see Deleting a Service-Linked Role in the IAM User Guide.
API Version 2010-12-01
402

AWS Elastic Beanstalk Developer Guide
User Policies
Controlling Access to Elastic Beanstalk
AWS Elastic Beanstalk provides two managed policies that enable you to assign full access or read-
only access to all Elastic Beanstalk resources. You can attach the policies to AWS Identity and Access
Management (IAM) users or groups.
Managed User Policies
•AWSElasticBeanstalkFullAccess – Allows the user to create, modify, and delete Elastic Beanstalk
applications, application versions, configuration settings, environments, and their underlying
resources.
{
"Version": "2012-10-17",
"Statement": [
{
"Effect": "Allow",
"Action": [
"elasticbeanstalk:*",
"ec2:*",
"ecs:*",
"ecr:*",
"elasticloadbalancing:*",
"autoscaling:*",
"cloudwatch:*",
"s3:*",
"sns:*",
"cloudformation:*",
"dynamodb:*",
"rds:*",
"sqs:*",
"iam:GetPolicyVersion",
"iam:GetRole",
"iam:PassRole",
"iam:ListRolePolicies",
"iam:ListAttachedRolePolicies",
"iam:ListInstanceProfiles",
"iam:ListRoles",
"iam:ListServerCertificates",
"acm:DescribeCertificate",
"acm:ListCertificates",
"codebuild:CreateProject",
"codebuild:DeleteProject",
"codebuild:BatchGetBuilds",
"codebuild:StartBuild"
],
"Resource": "*"
},
{
"Effect": "Allow",
"Action": [
"iam:AddRoleToInstanceProfile",
"iam:CreateInstanceProfile",
"iam:CreateRole"
],
"Resource": [
"arn:aws:iam::*:role/aws-elasticbeanstalk*",
"arn:aws:iam::*:instance-profile/aws-elasticbeanstalk*"
]
},
{
"Effect": "Allow",
"Action": [
API Version 2010-12-01
403

AWS Elastic Beanstalk Developer Guide
User Policies
"iam:AttachRolePolicy"
],
"Resource": "*",
"Condition": {
"StringLike": {
"iam:PolicyArn": [
"arn:aws:iam::aws:policy/AWSElasticBeanstalk*",
"arn:aws:iam::aws:policy/service-role/AWSElasticBeanstalk*"
]
}
}
}
]
}
•AWSElasticBeanstalkReadOnlyAccess – Allows the user to view applications and environments, but
not to perform operations on them. It provides read-only access to all Elastic Beanstalk resources. Note
that read-only access does not enable actions such as downloading Elastic Beanstalk logs so that you
can read them. See the example at the end of this topic for information on how to enable read-only
access to Elastic Beanstalk logs.
{
"Version": "2012-10-17",
"Statement": [
{
"Effect": "Allow",
"Action": [
"elasticbeanstalk:Check*",
"elasticbeanstalk:Describe*",
"elasticbeanstalk:List*",
"elasticbeanstalk:RequestEnvironmentInfo",
"elasticbeanstalk:RetrieveEnvironmentInfo",
"ec2:Describe*",
"elasticloadbalancing:Describe*",
"autoscaling:Describe*",
"cloudwatch:Describe*",
"cloudwatch:List*",
"cloudwatch:Get*",
"s3:Get*",
"s3:List*",
"sns:Get*",
"sns:List*",
"cloudformation:Describe*",
"cloudformation:Get*",
"cloudformation:List*",
"cloudformation:Validate*",
"cloudformation:Estimate*",
"rds:Describe*",
"sqs:Get*",
"sqs:List*"
],
"Resource": "*"
}
]
}
Controlling Access with Managed Policies
You can use managed policies to grant full access or read-only access to Elastic Beanstalk. Elastic
Beanstalk updates these policies automatically when additional permissions are required to access new
features.
API Version 2010-12-01
404

AWS Elastic Beanstalk Developer Guide
User Policies
To apply a managed policy to an IAM user
1. Open the Users page in the IAM console.
2. In the navigation pane, choose Permissions.
3. Choose Attach Policy.
4. Type AWSElasticBeanstalk to filter the policies.
5. Select AWSElasticBeanstalkReadOnlyAccess or AWSElasticBeanstalkFullAccess, and then choose
Attach Policy.
Creating a Custom User Policy
You can create your own IAM policy to allow or deny specific Elastic Beanstalk API actions on specific
Elastic Beanstalk resources. For more information about attaching a policy to a user or group, see
Working with Policies in Using AWS Identity and Access Management.
An IAM policy contains policy statements that describe the permissions that you want to grant. When
you create a policy statement for Elastic Beanstalk, you need to understand how to use the following
four parts of a policy statement:
•Effect specifies whether to allow or deny the actions in the statement.
•Action specifies the API operations that you want to control. For example, use
elasticbeanstalk:CreateEnvironment to specify the CreateEnvironment operation. Certain
operations, such as creating an environment, require additional permissions to perform those actions.
For more information, see Resources and Conditions for Elastic Beanstalk Actions (p. 408).
Note
To use the UpdateTagsForResource API operation, specify one of the following two virtual
actions (or both) instead of the API operation name:
elasticbeanstalk:AddTags
Controls permission to call UpdateTagsForResource and pass a list of tags to add in
the TagsToAdd parameter.
elasticbeanstalk:RemoveTags
Controls permission to call UpdateTagsForResource and pass a list of tag keys to
remove in the TagsToRemove parameter.
•Resource specifies the resources that you want to control access to. To specify Elastic Beanstalk
resources, list the Amazon Resource Name (p. 407) (ARN) of each resource.
• (optional) Condition specifies restrictions on the permission granted in the statement. For more
information, see Resources and Conditions for Elastic Beanstalk Actions (p. 408).
The following example policy contains three statements that enable a user who has this policy to call the
CreateEnvironment action to create an environment whose name begins with Test with the specified
application and application version.
{
"Version": "2012-10-17",
"Statement": [
{
"Sid":"CreateEnvironmentPerm",
"Action": [
"elasticbeanstalk:CreateEnvironment"
],
"Effect": "Allow",
API Version 2010-12-01
405

AWS Elastic Beanstalk Developer Guide
User Policies
"Resource": [
"arn:aws:elasticbeanstalk:us-east-2:123456789012:environment/My First Elastic
Beanstalk Application/Test*"
],
"Condition": {
"StringEquals": {
"elasticbeanstalk:InApplication": ["arn:aws:elasticbeanstalk:us-
east-2:123456789012:application/My First Elastic Beanstalk Application"],
"elasticbeanstalk:FromApplicationVersion": ["arn:aws:elasticbeanstalk:us-
east-2:123456789012:applicationversion/My First Elastic Beanstalk Application/First
Release"]
}
}
},
{
"Sid":"AllNonResourceCalls",
"Action":[
"elasticbeanstalk:CheckDNSAvailability",
"elasticbeanstalk:CreateStorageLocation"
],
"Effect":"Allow",
"Resource":[
"*"
]
}
]
}
The above policy shows how to grant limited access to Elastic Beanstalk operations. In order to actually
launch an environment, the user must have permission to create the AWS resources that power the
environment as well. For example, the following policy grants access to the default set of resources for a
web server environment:
{
"Version": "2012-10-17",
"Statement": [
{
"Effect": "Allow",
"Action": [
"ec2:*",
"ecs:*",
"elasticloadbalancing:*",
"autoscaling:*",
"cloudwatch:*",
"s3:*",
"sns:*",
"cloudformation:*",
"sqs:*"
],
"Resource": "*"
}
]
}
Note that while you can restrict how a user interacts with Elastic Beanstalk APIs, there is not currently an
effective way to prevent users who have permission to create the necessary underlying resources from
creating other resources in Amazon EC2 and other services.
Enabling Read-Only Access to Elastic Beanstalk Logs
The following example policy contains two statements that enable a user who has this policy to view and
pull Elastic Beanstalk logs.
API Version 2010-12-01
406

AWS Elastic Beanstalk Developer Guide
ARN Format
{
"Version": "2012-10-17",
"Statement": [
{
"Sid": "Stmt1491295324000",
"Effect": "Allow",
"Action": [
"s3:PutObjectAcl"
],
"Resource": [
"arn:aws:s3:::elasticbeanstalk-*/*"
]
},
{
"Sid": "Stmt1491295472000",
"Effect": "Allow",
"Action": [
"s3:PutObjectAcl"
],
"Resource": [
"arn:aws:s3:::elasticbeanstalk-*"
]
}
]
}
Amazon Resource Name Format for Elastic Beanstalk
You specify a resource for an IAM policy using that resource's Amazon Resource Name (ARN). For Elastic
Beanstalk, the ARN has the following format.
arn:aws:elasticbeanstalk:region:accountid:resourcetype/resourcepath
Where:
•region is the region the resource resides in (for example, us-west-2).
•accountid is the AWS account ID, with no hyphens (for example, 123456789012)
•resourcetype identifies the type of the Elastic Beanstalk resource—for example, environment. See
the table below for a list of all Elastic Beanstalk resource types.
•resourcepath is the portion that identifies the specific resource. An Elastic Beanstalk resource has
a path that uniquely identifies that resource. See the table below for the format of the resource path
for each resource type. For example, an environment is always associated with an application. The
resource path for the environment myEnvironment in the application myApp would look like this:
myApp/myEnvironment
Elastic Beanstalk has several types of resources you can specify in a policy. The following table shows the
ARN format for each resource type and an example.
Resource Type Format for ARN
application arn:aws:elasticbeanstalk:region:accountid:application/
applicationname
Example: arn:aws:elasticbeanstalk:us-
west-2:123456789012:application/My App
API Version 2010-12-01
407

AWS Elastic Beanstalk Developer Guide
Resources and Conditions
Resource Type Format for ARN
applicationversionarn:aws:elasticbeanstalk:region:accountid:applicationversion/
applicationname/versionlabel
Example: arn:aws:elasticbeanstalk:us-
west-2:123456789012:applicationversion/My App/My Version
configurationtemplatearn:aws:elasticbeanstalk:region:accountid:configurationtemplate/
applicationname/templatename
Example: arn:aws:elasticbeanstalk:us-
west-2:123456789012:configurationtemplate/My App/My Template
environment arn:aws:elasticbeanstalk:region:accountid:environment/
applicationname/environmentname
Example: arn:aws:elasticbeanstalk:us-
west-2:123456789012:environment/My App/MyEnvironment
platform arn:aws:elasticbeanstalk:REGION:ACCOUNT_ID:platform/
PLATFORM_NAME/PLATFORM_VERSION
Example: arn:aws:elasticbeanstalk:us-west-2:123456789:platform/
MyPlatform/1.0
solutionstack arn:aws:elasticbeanstalk:region::solutionstack/solutionstackname
Example: arn:aws:elasticbeanstalk:us-west-2::solutionstack/32bit
Amazon Linux running Tomcat 7
An environment, application version, and configuration template are always contained within a specific
application. You'll notice that these resources all have an application name in their resource path so that
they are uniquely identified by their resource name and the containing application. Although solution
stacks are used by configuration templates and environments, solution stacks are not specific to an
application or AWS account and do not have the application or AWS account in their ARNs.
Resources and Conditions for Elastic Beanstalk
Actions
This section describes the resources and conditions that you can use in policy statements to grant
permissions that allow specific Elastic Beanstalk actions to be performed on specific Elastic Beanstalk
resources.
Conditions enable you to specify permissions to resources that the action needs to complete. For
example, when you can call the CreateEnvironment action, you must also specify the application
version to deploy as well as the application that contains that application name. When you set
permissions for the CreateEnvironment action, you specify the application and application version
that you want the action to act upon by using the InApplication and FromApplicationVersion
conditions.
In addition, you can specify the environment configuration with a solution stack (FromSolutionStack)
or a configuration template (FromConfigurationTemplate). The following policy statement
allows the CreateEnvironment action to create an environment with the name myenv (specified by
Resource) in the application My App (specified by the InApplication condition) using the application
version My Version (FromApplicationVersion) with a 32bit Amazon Linux running Tomcat
7 configuration (FromSolutionStack):
API Version 2010-12-01
408

AWS Elastic Beanstalk Developer Guide
Resources and Conditions
{
"Version": "2012-10-17",
"Statement": [
{
"Action": [
"elasticbeanstalk:CreateEnvironment"
],
"Effect": "Allow",
"Resource": [
"arn:aws:elasticbeanstalk:us-west-2:123456789012:environment/My App/myenv"
],
"Condition": {
"StringEquals": {
"elasticbeanstalk:InApplication": ["arn:aws:elasticbeanstalk:us-
west-2:123456789012:application/My App"],
"elasticbeanstalk:FromApplicationVersion": ["arn:aws:elasticbeanstalk:us-
west-2:123456789012:applicationversion/My App/My Version"],
"elasticbeanstalk:FromSolutionStack": ["arn:aws:elasticbeanstalk:us-
west-2::solutionstack/32bit Amazon Linux running Tomcat 7"]
}
}
}
]
}
Sections
•Policy Information for Elastic Beanstalk Actions (p. 409)
•Condition Keys for Elastic Beanstalk Actions (p. 427)
Policy Information for Elastic Beanstalk Actions
The following table lists all Elastic Beanstalk actions, the resource that each action acts upon, and the
additional contextual information that can be provided using conditions.
Policy information for Elastic Beanstalk actions, including resources, conditions, examples,
and dependencies
Resource Conditions Example Statement
Action: AbortEnvironmentUpdate
application
environment
N/A The following policy allows a user to abort environment
update operations on environments in an application
named My App.
{
"Version": "2012-10-17",
"Statement": [
{
"Action": [
"elasticbeanstalk:AbortEnvironmentUpdate"
],
"Effect": "Allow",
"Resource": [
"arn:aws:elasticbeanstalk:us-
west-2:123456789012:application/My App"
]
}
]
API Version 2010-12-01
409

AWS Elastic Beanstalk Developer Guide
Resources and Conditions
Resource Conditions Example Statement
}
Action: CheckDNSAvailability
"*" N/A {
"Version": "2012-10-17",
"Statement": [
{
"Action": [
"elasticbeanstalk:CheckDNSAvailability"
],
"Effect": "Allow",
"Resource": "*"
}
]
}
Action: ComposeEnvironments
application N/A The following policy allows a user to compose
environments that belong to an application named My
App.
{
"Version": "2012-10-17",
"Statement": [
{
"Action": [
"elasticbeanstalk:ComposeEnvironments"
],
"Effect": "Allow",
"Resource": [
"arn:aws:elasticbeanstalk:us-
west-2:123456789012:environment/My App"
]
}
]
}
Action: CreateApplication
API Version 2010-12-01
410

AWS Elastic Beanstalk Developer Guide
Resources and Conditions
Resource Conditions Example Statement
application N/A This example allows the CreateApplication action to
create applications whose names begin with DivA:
{
"Version": "2012-10-17",
"Statement": [
{
"Action": [
"elasticbeanstalk:CreateApplication"
],
"Effect": "Allow",
"Resource": [
"arn:aws:elasticbeanstalk:us-
west-2:123456789012:application/DivA*"
]
}
]
}
Action: CreateApplicationVersion
applicationversionInApplication This example allows the CreateApplicationVersion
action to create application versions with any name (*) in
the application My App:
{
"Version": "2012-10-17",
"Statement": [
{
"Action": [
"elasticbeanstalk:CreateApplicationVersion"
],
"Effect": "Allow",
"Resource": [
"arn:aws:elasticbeanstalk:us-
west-2:123456789012:applicationversion/My App/*"
],
"Condition": {
"StringEquals": {
"elasticbeanstalk:InApplication":
["arn:aws:elasticbeanstalk:us-
west-2:123456789012:application/My App"]
}
}
}
]
}
Action: CreateConfigurationTemplate
API Version 2010-12-01
411

AWS Elastic Beanstalk Developer Guide
Resources and Conditions
Resource Conditions Example Statement
configurationtemplateInApplication
FromApplication
FromApplicationVersion
FromConfigurationTemplate
FromEnvironment
FromSolutionStack
The following policy allows the
CreateConfigurationTemplate action to create
configuration templates whose name begins with My
Template (My Template*) in the application My App:
{
"Version": "2012-10-17",
"Statement": [
{
"Action": [
"elasticbeanstalk:CreateConfigurationTemplate"
],
"Effect": "Allow",
"Resource": [
"arn:aws:elasticbeanstalk:us-
west-2:123456789012:configurationtemplate/My App/
My Template*"
],
"Condition": {
"StringEquals": {
"elasticbeanstalk:InApplication":
["arn:aws:elasticbeanstalk:us-
west-2:123456789012:application/My App"],
"elasticbeanstalk:FromSolutionStack":
["arn:aws:elasticbeanstalk:us-
west-2::solutionstack/32bit Amazon Linux running
Tomcat 7"]
}
}
}
]
}
Action: CreateEnvironment
API Version 2010-12-01
412

AWS Elastic Beanstalk Developer Guide
Resources and Conditions
Resource Conditions Example Statement
environment InApplication
FromApplicationVersion
FromConfigurationTemplate
FromSolutionStack
The following policy allows the CreateEnvironment
action to create an environment whose name is myenv
in the application My App and using the solution stack
32bit Amazon Linux running Tomcat 7:
{
"Version": "2012-10-17",
"Statement": [
{
"Action": [
"elasticbeanstalk:CreateEnvironment"
],
"Effect": "Allow",
"Resource": [
"arn:aws:elasticbeanstalk:us-
west-2:123456789012:environment/My App/myenv"
],
"Condition": {
"StringEquals": {
"elasticbeanstalk:InApplication":
["arn:aws:elasticbeanstalk:us-
west-2:123456789012:application/My App"],
"elasticbeanstalk:FromApplicationVersion":
["arn:aws:elasticbeanstalk:us-
west-2:123456789012:applicationversion/My App/My
Version"],
"elasticbeanstalk:FromSolutionStack":
["arn:aws:elasticbeanstalk:us-
west-2::solutionstack/32bit Amazon Linux running
Tomcat 7"]
}
}
}
]
}
Action: CreateStorageLocation
"*" N/A {
"Version": "2012-10-17",
"Statement": [
{
"Action": [
"elasticbeanstalk:CreateStorageLocation"
],
"Effect": "Allow",
"Resource": "*"
}
]
}
Action: DeleteApplication
API Version 2010-12-01
413

AWS Elastic Beanstalk Developer Guide
Resources and Conditions
Resource Conditions Example Statement
application N/A The following policy allows the DeleteApplication
action to delete the application My App:
{
"Version": "2012-10-17",
"Statement": [
{
"Action": [
"elasticbeanstalk:DeleteApplication"
],
"Effect": "Allow",
"Resource": [
"arn:aws:elasticbeanstalk:us-
west-2:123456789012:application/My App"
]
}
]
}
Action: DeleteApplicationVersion
applicationversionInApplication The following policy allows the
DeleteApplicationVersion action to delete an
application version whose name is My Version in the
application My App:
{
"Version": "2012-10-17",
"Statement": [
{
"Action": [
"elasticbeanstalk:DeleteApplicationVersion"
],
"Effect": "Allow",
"Resource": [
"arn:aws:elasticbeanstalk:us-
west-2:123456789012:applicationversion/My App/My
Version"
],
"Condition": {
"StringEquals": {
"elasticbeanstalk:InApplication":
["arn:aws:elasticbeanstalk:us-
west-2:123456789012:application/My App"]
}
}
}
]
}
Action: DeleteConfigurationTemplate
API Version 2010-12-01
414

AWS Elastic Beanstalk Developer Guide
Resources and Conditions
Resource Conditions Example Statement
configurationtemplateInApplication
(Optional)
The following policy allows the
DeleteConfigurationTemplate action to delete a
configuration template whose name is My Template in
the application My App. Specifying the application name
as a condition is optional.
{
"Version": "2012-10-17",
"Statement": [
{
"Action": [
"elasticbeanstalk:DeleteConfigurationTemplate"
],
"Effect": "Allow",
"Resource": [
"arn:aws:elasticbeanstalk:us-
west-2:123456789012:configurationtemplate/My App/
My Template"
]
}
]
}
Action: DeleteEnvironmentConfiguration
environment InApplication
(Optional)
The following policy allows the
DeleteEnvironmentConfiguration action to delete
a draft configuration for the environment myenv in the
application My App. Specifying the application name as a
condition is optional.
{
"Version": "2012-10-17",
"Statement": [
{
"Action": [
"elasticbeanstalk:DeleteEnvironmentConfiguration"
],
"Effect": "Allow",
"Resource": [
"arn:aws:elasticbeanstalk:us-
west-2:123456789012:environment/My App/myenv"
]
}
]
}
Action: DescribeApplications
API Version 2010-12-01
415

AWS Elastic Beanstalk Developer Guide
Resources and Conditions
Resource Conditions Example Statement
application N/A The following policy allows the
DescribeApplications action to describe the
application My App.
{
"Version": "2012-10-17",
"Statement": [
{
"Action": [
"elasticbeanstalk:DescribeApplications"
],
"Effect": "Allow",
"Resource": [
"arn:aws:elasticbeanstalk:us-
west-2:123456789012:application/My App"
]
}
]
}
Action: DescribeApplicationVersions
applicationversionInApplication
(Optional)
The following policy allows the
DescribeApplicationVersions action to describe
the application version My Version in the application
My App. Specifying the application name as a condition is
optional.
{
"Version": "2012-10-17",
"Statement": [
{
"Action": [
"elasticbeanstalk:DescribeApplicationVersions"
],
"Effect": "Allow",
"Resource": [
"arn:aws:elasticbeanstalk:us-
west-2:123456789012:applicationversion/My App/My
Version"
]
}
]
}
Action: DescribeConfigurationOptions
API Version 2010-12-01
416

AWS Elastic Beanstalk Developer Guide
Resources and Conditions
Resource Conditions Example Statement
environment
configurationtemplate
solutionstack
InApplication
(Optional)
The following policy allows the
DescribeConfigurationOptions action to describe
the configuration options for the environment myenv in
the application My App. Specifying the application name
as a condition is optional.
{
"Version": "2012-10-17",
"Statement": [
{
"Action":
"elasticbeanstalk:DescribeConfigurationOptions",
"Effect": "Allow",
"Resource": [
"arn:aws:elasticbeanstalk:us-
west-2:123456789012:environment/My App/myenv"
]
}
]
}
Action: DescribeConfigurationSettings
environment,
configurationtemplate
InApplication
(Optional)
The following policy allows the
DescribeConfigurationSettings action to describe
the configuration settings for the environment myenv in
the application My App. Specifying the application name
as a condition is optional.
{
"Version": "2012-10-17",
"Statement": [
{
"Action":
"elasticbeanstalk:DescribeConfigurationSettings",
"Effect": "Allow",
"Resource": [
"arn:aws:elasticbeanstalk:us-
west-2:123456789012:environment/My App/myenv"
]
}
]
}
Action: DescribeEnvironmentHealth
API Version 2010-12-01
417

AWS Elastic Beanstalk Developer Guide
Resources and Conditions
Resource Conditions Example Statement
environment N/A The following policy allows use of
DescribeEnvironmentHealth to retrieve health
information for an environment named myenv.
{
"Version": "2012-10-17",
"Statement": [
{
"Action":
"elasticbeanstalk:DescribeEnvironmentHealth",
"Effect": "Allow",
"Resource": [
"arn:aws:elasticbeanstalk:us-
west-2:123456789012:environment/My App/myenv"
]
}
]
}
Action: DescribeEnvironmentResources
environment InApplication
(Optional)
The following policy allows the
DescribeEnvironmentResources action to return
list of AWS resources for the environment myenv in the
application My App. Specifying the application name as a
condition is optional.
{
"Version": "2012-10-17",
"Statement": [
{
"Action":
"elasticbeanstalk:DescribeEnvironmentResources",
"Effect": "Allow",
"Resource": [
"arn:aws:elasticbeanstalk:us-
west-2:123456789012:environment/My App/myenv"
]
}
]
}
Action: DescribeEnvironments
API Version 2010-12-01
418

AWS Elastic Beanstalk Developer Guide
Resources and Conditions
Resource Conditions Example Statement
environment InApplication
(Optional)
The following policy allows the
DescribeEnvironments action to describe the
environments myenv and myotherenv in the application
My App. Specifying the application name as a condition is
optional.
{
"Version": "2012-10-17",
"Statement": [
{
"Action":
"elasticbeanstalk:DescribeEnvironments",
"Effect": "Allow",
"Resource": [
"arn:aws:elasticbeanstalk:us-
west-2:123456789012:environment/My App/myenv",
"arn:aws:elasticbeanstalk:us-
west-2:123456789012:environment/My App2/
myotherenv"
]
}
]
}
Action: DescribeEvents
application
applicationversion
configurationtemplate
environment
InApplication The following policy allows the DescribeEvents action
to list event descriptions for the environment myenv and
the application version My Version in the application My
App.
{
"Version": "2012-10-17",
"Statement": [
{
"Action": "elasticbeanstalk:DescribeEvents",
"Effect": "Allow",
"Resource": [
"arn:aws:elasticbeanstalk:us-
west-2:123456789012:environment/My App/myenv",
"arn:aws:elasticbeanstalk:us-
west-2:123456789012:applicationversion/My App/My
Version"
],
"Condition": {
"StringEquals": {
"elasticbeanstalk:InApplication":
["arn:aws:elasticbeanstalk:us-
west-2:123456789012:application/My App"]
}
}
}
]
}
Action: DescribeInstancesHealth
API Version 2010-12-01
419

AWS Elastic Beanstalk Developer Guide
Resources and Conditions
Resource Conditions Example Statement
environment N/A The following policy allows use of
DescribeInstancesHealth to retrieve health
information for instances in an environment named
myenv.
{
"Version": "2012-10-17",
"Statement": [
{
"Action":
"elasticbeanstalk:DescribeInstancesHealth",
"Effect": "Allow",
"Resource": [
"arn:aws:elasticbeanstalk:us-
west-2:123456789012:environment/My App/myenv"
]
}
]
}
Action: ListAvailableSolutionStacks
solutionstack N/A The following policy allows the
ListAvailableSolutionStacks action to return only
the solution stack 32bit Amazon Linux running
Tomcat 7.
{
"Version": "2012-10-17",
"Statement": [
{
"Action": [
"elasticbeanstalk:ListAvailableSolutionStacks"
],
"Effect": "Allow",
"Resource": "arn:aws:elasticbeanstalk:us-
west-2::solutionstack/32bit Amazon Linux running
Tomcat 7"
}
]
}
Action: RebuildEnvironment
API Version 2010-12-01
420

AWS Elastic Beanstalk Developer Guide
Resources and Conditions
Resource Conditions Example Statement
environment InApplication The following policy allows the RebuildEnvironment
action to rebuild the environment myenv in the
application My App.
{
"Version": "2012-10-17",
"Statement": [
{
"Action": [
"elasticbeanstalk:RebuildEnvironment"
],
"Effect": "Allow",
"Resource": [
"arn:aws:elasticbeanstalk:us-
west-2:123456789012:environment/My App/myenv"
],
"Condition": {
"StringEquals": {
"elasticbeanstalk:InApplication":
["arn:aws:elasticbeanstalk:us-
west-2:123456789012:application/My App"]
}
}
}
]
}
Action: RequestEnvironmentInfo
environment InApplication The following policy allows the
RequestEnvironmentInfo action to compile
information about the environment myenv in the
application My App.
{
"Version": "2012-10-17",
"Statement": [
{
"Action": [
"elasticbeanstalk:RequestEnvironmentInfo"
],
"Effect": "Allow",
"Resource": [
"arn:aws:elasticbeanstalk:us-
west-2:123456789012:environment/My App/myenv"
],
"Condition": {
"StringEquals": {
"elasticbeanstalk:InApplication":
["arn:aws:elasticbeanstalk:us-
west-2:123456789012:application/My App"]
}
}
}
]
}
Action: RestartAppServer
API Version 2010-12-01
421

AWS Elastic Beanstalk Developer Guide
Resources and Conditions
Resource Conditions Example Statement
environment InApplication The following policy allows the RestartAppServer
action to restart the application container server for the
environment myenv in the application My App.
{
"Version": "2012-10-17",
"Statement": [
{
"Action": [
"elasticbeanstalk:RestartAppServer"
],
"Effect": "Allow",
"Resource": [
"arn:aws:elasticbeanstalk:us-
west-2:123456789012:environment/My App/myenv"
],
"Condition": {
"StringEquals": {
"elasticbeanstalk:InApplication":
["arn:aws:elasticbeanstalk:us-
west-2:123456789012:application/My App"]
}
}
}
]
}
Action: RetrieveEnvironmentInfo
environment InApplication The following policy allows the
RetrieveEnvironmentInfo action to retrieve the
compiled information for the environment myenv in the
application My App.
{
"Version": "2012-10-17",
"Statement": [
{
"Action": [
"elasticbeanstalk:RetrieveEnvironmentInfo"
],
"Effect": "Allow",
"Resource": [
"arn:aws:elasticbeanstalk:us-
west-2:123456789012:environment/My App/myenv"
],
"Condition": {
"StringEquals": {
"elasticbeanstalk:InApplication":
["arn:aws:elasticbeanstalk:us-
west-2:123456789012:application/My App"]
}
}
}
]
}
Action: SwapEnvironmentCNAMEs
API Version 2010-12-01
422

AWS Elastic Beanstalk Developer Guide
Resources and Conditions
Resource Conditions Example Statement
environment InApplication
(Optional)
FromEnvironment
(Optional)
The following policy allows the
SwapEnvironmentCNAMEs action to swap the CNAMEs
for the environments mysrcenv and mydestenv.
{
"Version": "2012-10-17",
"Statement": [
{
"Action": [
"elasticbeanstalk:SwapEnvironmentCNAMEs"
],
"Effect": "Allow",
"Resource": [
"arn:aws:elasticbeanstalk:us-
west-2:123456789012:environment/My App/mysrcenv",
"arn:aws:elasticbeanstalk:us-
west-2:123456789012:environment/My App/mydestenv"
]
}
]
}
Action: TerminateEnvironment
environment InApplication The following policy allows the
TerminateEnvironment action to terminate the
environment myenv in the application My App.
{
"Version": "2012-10-17",
"Statement": [
{
"Action": [
"elasticbeanstalk:TerminateEnvironment"
],
"Effect": "Allow",
"Resource": [
"arn:aws:elasticbeanstalk:us-
west-2:123456789012:environment/My App/myenv"
],
"Condition": {
"StringEquals": {
"elasticbeanstalk:InApplication":
["arn:aws:elasticbeanstalk:us-
west-2:123456789012:application/My App"]
}
}
}
]
}
Action: UpdateApplication
API Version 2010-12-01
423

AWS Elastic Beanstalk Developer Guide
Resources and Conditions
Resource Conditions Example Statement
application N/A The following policy allows the UpdateApplication
action to update properties of the application My App.
{
"Version": "2012-10-17",
"Statement": [
{
"Action": [
"elasticbeanstalk:UpdateApplication"
],
"Effect": "Allow",
"Resource": [
"arn:aws:elasticbeanstalk:us-
west-2:123456789012:application/My App"
]
}
]
}
Action: UpdateApplicationVersion
applicationversionInApplication The following policy allows the
UpdateApplicationVersion action to update the
properties of the application version My Version in the
application My App.
{
"Version": "2012-10-17",
"Statement": [
{
"Action": [
"elasticbeanstalk:UpdateApplicationVersion"
],
"Effect": "Allow",
"Resource": [
"arn:aws:elasticbeanstalk:us-
west-2:123456789012:applicationversion/My App/My
Version"
],
"Condition": {
"StringEquals": {
"elasticbeanstalk:InApplication":
["arn:aws:elasticbeanstalk:us-
west-2:123456789012:application/My App"]
}
}
}
]
}
Action: UpdateConfigurationTemplate
API Version 2010-12-01
424

AWS Elastic Beanstalk Developer Guide
Resources and Conditions
Resource Conditions Example Statement
configurationtemplateInApplication The following policy allows the
UpdateConfigurationTemplate action to update the
properties or options of the configuration template My
Template in the application My App.
{
"Version": "2012-10-17",
"Statement": [
{
"Action": [
"elasticbeanstalk:UpdateConfigurationTemplate"
],
"Effect": "Allow",
"Resource": [
"arn:aws:elasticbeanstalk:us-
west-2:123456789012:configurationtemplate/My App/
My Template"
],
"Condition": {
"StringEquals": {
"elasticbeanstalk:InApplication":
["arn:aws:elasticbeanstalk:us-
west-2:123456789012:application/My App"]
}
}
}
]
}
Action: UpdateEnvironment
API Version 2010-12-01
425

AWS Elastic Beanstalk Developer Guide
Resources and Conditions
Resource Conditions Example Statement
environment InApplication
FromApplicationVersion
FromConfigurationTemplate
The following policy allows the UpdateEnvironment
action to update the environment myenv in the
application My App by deploying the application version
My Version.
{
"Version": "2012-10-17",
"Statement": [
{
"Action": [
"elasticbeanstalk:UpdateEnvironment"
],
"Effect": "Allow",
"Resource": [
"arn:aws:elasticbeanstalk:us-
west-2:123456789012:environment/My App/myenv"
],
"Condition": {
"StringEquals": {
"elasticbeanstalk:InApplication":
["arn:aws:elasticbeanstalk:us-
west-2:123456789012:application/My App"],
"elasticbeanstalk:FromApplicationVersion":
["arn:aws:elasticbeanstalk:us-
west-2:123456789012:applicationversion/My App/My
Version"]
}
}
}
]
}
Action: ValidateConfigurationSettings
API Version 2010-12-01
426

AWS Elastic Beanstalk Developer Guide
Resources and Conditions
Resource Conditions Example Statement
template
environment
InApplication The following policy allows the
ValidateConfigurationSettings action to validates
configuration settings against the environment myenv in
the application My App.
{
"Version": "2012-10-17",
"Statement": [
{
"Action": [
"elasticbeanstalk:ValidateConfigurationSettings"
],
"Effect": "Allow",
"Resource": [
"arn:aws:elasticbeanstalk:us-
west-2:123456789012:environment/My App/myenv"
],
"Condition": {
"StringEquals": {
"elasticbeanstalk:InApplication":
["arn:aws:elasticbeanstalk:us-
west-2:123456789012:application/My App"]
}
}
}
]
}
Condition Keys for Elastic Beanstalk Actions
Keys enable you to specify conditions that express dependencies, restrict permissions, or specify
constraints on the input parameters for an action. Elastic Beanstalk supports the following keys.
InApplication
Specifies the application that contains the resource that the action operates on.
The following example allows the UpdateApplicationVersion action to update the properties
of the application version My Version. The InApplication condition specifies My App as the
container for My Version.
{
"Version": "2012-10-17",
"Statement": [
{
"Action": [
"elasticbeanstalk:UpdateApplicationVersion"
],
"Effect": "Allow",
"Resource": [
"arn:aws:elasticbeanstalk:us-west-2:123456789012:applicationversion/My App/My
Version"
],
"Condition": {
"StringEquals": {
"elasticbeanstalk:InApplication": ["arn:aws:elasticbeanstalk:us-
west-2:123456789012:application/My App"]
API Version 2010-12-01
427

AWS Elastic Beanstalk Developer Guide
Resources and Conditions
}
}
}
]
}
FromApplicationVersion
Specifies an application version as a dependency or a constraint on an input parameter.
The following example allows the UpdateEnvironment action to update the environment myenv in
the application My App. The FromApplicationVersion condition constrains the VersionLabel
parameter to allow only the application version My Version to update the environment.
{
"Version": "2012-10-17",
"Statement": [
{
"Action": [
"elasticbeanstalk:UpdateEnvironment"
],
"Effect": "Allow",
"Resource": [
"arn:aws:elasticbeanstalk:us-west-2:123456789012:environment/My App/myenv"
],
"Condition": {
"StringEquals": {
"elasticbeanstalk:InApplication": ["arn:aws:elasticbeanstalk:us-
west-2:123456789012:application/My App"],
"elasticbeanstalk:FromApplicationVersion": ["arn:aws:elasticbeanstalk:us-
west-2:123456789012:applicationversion/My App/My Version"]
}
}
}
]
}
FromConfigurationTemplate
Specifies a configuration template as a dependency or a constraint on an input parameter.
The following example allows the UpdateEnvironment action to update the environment
myenv in the application My App. The FromConfigurationTemplate condition constrains the
TemplateName parameter to allow only the configuration template My Template to update the
environment.
{
"Version": "2012-10-17",
"Statement": [
{
"Action": [
"elasticbeanstalk:UpdateEnvironment"
],
"Effect": "Allow",
"Resource": [
"arn:aws:elasticbeanstalk:us-west-2:123456789012:environment/My App/myenv"
],
"Condition": {
"StringEquals": {
"elasticbeanstalk:InApplication": ["arn:aws:elasticbeanstalk:us-
west-2:123456789012:application/My App"],
"elasticbeanstalk:FromConfigurationTemplate": ["arn:aws:elasticbeanstalk:us-
west-2:123456789012:configurationtemplate/My App/My Template"]
API Version 2010-12-01
428

AWS Elastic Beanstalk Developer Guide
Resources and Conditions
}
}
}
]
}
FromEnvironment
Specifies an environment as a dependency or a constraint on an input parameter.
The following example allows the SwapEnvironmentCNAMEs action to swap the CNAMEs in
My App for all environments whose names begin with mysrcenv and mydestenv but not those
environments whose names begin with mysrcenvPROD* and mydestenvPROD*.
{
"Version": "2012-10-17",
"Statement": [
{
"Action": [
"elasticbeanstalk:SwapEnvironmentCNAMEs"
],
"Effect": "Allow",
"Resource": [
"arn:aws:elasticbeanstalk:us-west-2:123456789012:environment/My App/mysrcenv*",
"arn:aws:elasticbeanstalk:us-west-2:123456789012:environment/My App/mydestenv*"
],
"Condition": {
"StringNotLike": {
"elasticbeanstalk:FromEnvironment": ["arn:aws:elasticbeanstalk:us-
west-2:123456789012:environment/My App/mysrcenvPROD*"],
"elasticbeanstalk:FromEnvironment": ["arn:aws:elasticbeanstalk:us-
west-2:123456789012:environment/My App/mydestenvPROD*"
]
}
}
}
]
}
FromSolutionStack
Specifies a solution stack as a dependency or a constraint on an input parameter.
The following policy allows the CreateConfigurationTemplate action to create configuration
templates whose name begins with My Template (My Template*) in the application My App.
The FromSolutionStack condition constrains the solutionstack parameter to allow only the
solution stack 32bit Amazon Linux running Tomcat 7 as the input value for that parameter.
{
"Version": "2012-10-17",
"Statement": [
{
"Action": [
"elasticbeanstalk:CreateConfigurationTemplate"
],
"Effect": "Allow",
"Resource": [
"arn:aws:elasticbeanstalk:us-west-2:123456789012:configurationtemplate/My App/
My Template*"
],
"Condition": {
"StringEquals": {
API Version 2010-12-01
429

AWS Elastic Beanstalk Developer Guide
Example Policies
"elasticbeanstalk:InApplication": ["arn:aws:elasticbeanstalk:us-
west-2:123456789012:application/My App"],
"elasticbeanstalk:FromSolutionStack": ["arn:aws:elasticbeanstalk:us-
west-2::solutionstack/32bit Amazon Linux running Tomcat 7"]
}
}
}
]
}
Example Policies Based on Managed Policies
This section demonstrates how to control user access to AWS Elastic Beanstalk and includes example
policies that provide the required access for common scenarios. These policies are derived from the
Elastic Beanstalk managed policies. For information about attaching managed policies to users and
groups, see Controlling Access to Elastic Beanstalk (p. 403).
In this scenario, Example Corp. is a software company with three teams responsible for the company
website: administrators who manage the infrastructure, developers who build the software for the
website, and a QA team that tests the website. To help manage permissions to their Elastic Beanstalk
resources, Example Corp. creates three groups to which members of each respective team belong:
Admins, Developers, and Testers. Example Corp. wants the Admins group to have full access to all
applications, environments, and their underlying resources so that they can create, troubleshoot, and
delete all Elastic Beanstalk assets. Developers require permissions to view all Elastic Beanstalk assets and
to create and deploy application versions. Developers should not be able to create new applications or
environments or terminate running environments. Testers need to view all Elastic Beanstalk resources to
monitor and test applications. The Testers should not be able to make changes to any Elastic Beanstalk
resources.
The following example policies provide the required permissions for each group.
Example 1: Allow the Admins group to use all Elastic Beanstalk and related service APIs
The following policy gives users permissions for all actions required to use Elastic Beanstalk. This policy
also allows Elastic Beanstalk to provision and manage resources on your behalf in the following services.
Elastic Beanstalk relies on these additional services to provision underlying resources when creating an
environment.
• Amazon Elastic Compute Cloud
• Elastic Load Balancing
• Auto Scaling
• Amazon CloudWatch
• Amazon Simple Storage Service
• Amazon Simple Notification Service
• Amazon Relational Database Service
• AWS CloudFormation
Note that this policy is an example. It gives a broad set of permissions to the AWS services that Elastic
Beanstalk uses to manage applications and environments. For example, ec2:* allows an AWS Identity
and Access Management (IAM) user to perform any action on any Amazon EC2 resource in the AWS
account. These permissions are not limited to the resources that you use with Elastic Beanstalk. As a best
practice, you should grant individuals only the permissions they need to perform their duties.
{
API Version 2010-12-01
430

AWS Elastic Beanstalk Developer Guide
Example Policies
"Version" : "2012-10-17",
"Statement" : [
{
"Effect" : "Allow",
"Action" : [
"elasticbeanstalk:*",
"ec2:*",
"elasticloadbalancing:*",
"autoscaling:*",
"cloudwatch:*",
"s3:*",
"sns:*",
"rds:*",
"cloudformation:*"
],
"Resource" : "*"
}
]
}
Example 2: Allow the Developers group to perform all actions except highly privileged
operations, such as creating applications and environments
The following policy denies permission to create applications and environments, but allows all other
Elastic Beanstalk actions.
Note that this policy is an example. It gives a broad set of permissions to the AWS products that Elastic
Beanstalk uses to manage applications and environments. For example, ec2:* allows an IAM user to
perform any action on any Amazon EC2 resource in the AWS account. These permissions are not limited
to the resources that you use with Elastic Beanstalk. As a best practice, you should grant individuals only
the permissions they need to perform their duties.
{
"Version" : "2012-10-17",
"Statement" : [
{
"Action" : [
"elasticbeanstalk:CreateApplication",
"elasticbeanstalk:CreateEnvironment",
"elasticbeanstalk:DeleteApplication",
"elasticbeanstalk:RebuildEnvironment",
"elasticbeanstalk:SwapEnvironmentCNAMEs",
"elasticbeanstalk:TerminateEnvironment"],
"Effect" : "Deny",
"Resource" : "*"
},
{
"Action" : [
"elasticbeanstalk:*",
"ec2:*",
"elasticloadbalancing:*",
"autoscaling:*",
"cloudwatch:*",
"s3:*",
"sns:*",
"rds:*",
"cloudformation:*"],
"Effect" : "Allow",
"Resource" : "*"
}
]
}
API Version 2010-12-01
431

AWS Elastic Beanstalk Developer Guide
Example Policies Based on Resource Permissions
Example 3: Allow the Testers group to view all Elastic Beanstalk assets, but not to perform
any actions
The following policy allows read-only access to all applications, application versions, events, and
environments.
{
"Version" : "2012-10-17",
"Statement" : [
{
"Effect" : "Allow",
"Action" : [
"elasticbeanstalk:Check*",
"elasticbeanstalk:Describe*",
"elasticbeanstalk:List*",
"elasticbeanstalk:RequestEnvironmentInfo",
"elasticbeanstalk:RetrieveEnvironmentInfo",
"ec2:Describe*",
"elasticloadbalancing:Describe*",
"autoscaling:Describe*",
"cloudwatch:Describe*",
"cloudwatch:List*",
"cloudwatch:Get*",
"s3:Get*",
"s3:List*",
"sns:Get*",
"sns:List*",
"rds:Describe*",
"cloudformation:Describe*",
"cloudformation:Get*",
"cloudformation:List*",
"cloudformation:Validate*",
"cloudformation:Estimate*"
],
"Resource" : "*"
}
]
}
Example Policies Based on Resource Permissions
This section walks through a use case for controlling user permissions for Elastic Beanstalk actions
that access specific Elastic Beanstalk resources. We'll walk through the sample policies that support
the use case. For more information policies on Elastic Beanstalk resources, see Creating a Custom User
Policy (p. 405). For information about attaching policies to users and groups, go to Managing IAM
Policies in Using AWS Identity and Access Management.
In our use case, Example Corp. is a small consulting firm developing applications for two different
customers. John is the development manager overseeing the development of the two Elastic Beanstalk
applications, app1 and app2. John does development and some testing on the two applications, and only
he can update the production environment for the two applications. These are the permissions that he
needs for app1 and app2:
• View application, application versions, environments, and configuration templates
• Create application versions and deploy them to the staging environment
• Update the production environment
• Create and terminate environments
API Version 2010-12-01
432

AWS Elastic Beanstalk Developer Guide
Example Policies Based on Resource Permissions
Jill is a tester who needs access to view the following resources in order to monitor and test the two
applications: applications, application versions, environments, and configuration templates. However, she
should not be able to make changes to any Elastic Beanstalk resources.
Jack is the developer for app1 who needs access to view all resources for app1 and also needs to create
application versions for app1 and deploy them to the staging environment.
Joe is the administrator of the AWS account for Example Corp. He has created IAM users for John, Jill,
and Jack and attaches the following policies to those users to grant the appropriate permissions to the
app1 and app2 applications.
Example 1: Policies that allow John to perform his development, test, and deployment
actions on app1 and app2
We have broken down John's policy into three separate policies so that they are easier to read and
manage. Together, they give John the permissions he needs to perform the Elastic Beanstalk actions on
the two applications.
The first policy specifies actions for Auto Scaling, Amazon S3, Amazon EC2, CloudWatch, Amazon
SNS, Elastic Load Balancing, Amazon RDS, and AWS CloudFormation. Elastic Beanstalk relies on these
additional services to provision underlying resources when creating an environment.
Note that this policy is an example. It gives a broad set of permissions to the AWS products that Elastic
Beanstalk uses to manage applications and environments. For example, ec2:* allows an IAM user to
perform any action on any Amazon EC2 resource in the AWS account. These permissions are not limited
to the resources that you use with Elastic Beanstalk. As a best practice, you should grant individuals only
the permissions they need to perform their duties.
{
"Version": "2012-10-17",
"Statement":[
{
"Effect":"Allow",
"Action":[
"ec2:*",
"ecs:*",
"ecr:*",
"elasticloadbalancing:*",
"autoscaling:*",
"cloudwatch:*",
"s3:*",
"sns:*",
"cloudformation:*",
"dynamodb:*",
"rds:*",
"sqs:*",
"logs:*",
"iam:GetPolicyVersion",
"iam:GetRole",
"iam:PassRole",
"iam:ListRolePolicies",
"iam:ListAttachedRolePolicies",
"iam:ListInstanceProfiles",
"iam:ListRoles",
"iam:ListServerCertificates",
"acm:DescribeCertificate",
"acm:ListCertificates",
"codebuild:CreateProject",
"codebuild:DeleteProject",
"codebuild:BatchGetBuilds",
"codebuild:StartBuild"
API Version 2010-12-01
433

AWS Elastic Beanstalk Developer Guide
Example Policies Based on Resource Permissions
],
"Resource":"*"
}
]
}
The second policy specifies the Elastic Beanstalk actions that John is allowed to perform on
the app1 and app2 resources. The AllCallsInApplications statement allows all Elastic
Beanstalk actions ("elasticbeanstalk:*") performed on all resources within app1 and app2
(for example, elasticbeanstalk:CreateEnvironment). The AllCallsOnApplications
statement allows all Elastic Beanstalk actions ("elasticbeanstalk:*") on the app1 and
app2 application resources (for example, elasticbeanstalk:DescribeApplications,
elasticbeanstalk:UpdateApplication, etc.). The AllCallsOnSolutionStacks statement
allows all Elastic Beanstalk actions ("elasticbeanstalk:*") for solution stack resources (for example,
elasticbeanstalk:ListAvailableSolutionStacks).
{
"Version": "2012-10-17",
"Statement":[
{
"Sid":"AllCallsInApplications",
"Action":[
"elasticbeanstalk:*"
],
"Effect":"Allow",
"Resource":[
"*"
],
"Condition":{
"StringEquals":{
"elasticbeanstalk:InApplication":[
"arn:aws:elasticbeanstalk:us-west-2:123456789012:application/app1",
"arn:aws:elasticbeanstalk:us-west-2:123456789012:application/app2"
]
}
}
},
{
"Sid":"AllCallsOnApplications",
"Action":[
"elasticbeanstalk:*"
],
"Effect":"Allow",
"Resource":[
"arn:aws:elasticbeanstalk:us-west-2:123456789012:application/app1",
"arn:aws:elasticbeanstalk:us-west-2:123456789012:application/app2"
]
},
{
"Sid":"AllCallsOnSolutionStacks",
"Action":[
"elasticbeanstalk:*"
],
"Effect":"Allow",
"Resource":[
"arn:aws:elasticbeanstalk:us-west-2::solutionstack/*"
]
}
]
}
The third policy specifies the Elastic Beanstalk actions that the second policy needs permissions
to in order to complete those Elastic Beanstalk actions. The AllNonResourceCalls
API Version 2010-12-01
434

AWS Elastic Beanstalk Developer Guide
Example Policies Based on Resource Permissions
statement allows the elasticbeanstalk:CheckDNSAvailability action, which is
required to call elasticbeanstalk:CreateEnvironment and other actions. It also
allows the elasticbeanstalk:CreateStorageLocation action, which is required for
elasticbeanstalk:CreateApplication, elasticbeanstalk:CreateEnvironment, and other
actions.
{
"Version": "2012-10-17",
"Statement":[
{
"Sid":"AllNonResourceCalls",
"Action":[
"elasticbeanstalk:CheckDNSAvailability",
"elasticbeanstalk:CreateStorageLocation"
],
"Effect":"Allow",
"Resource":[
"*"
]
}
]
}
Example 2: Policies that allow Jill to test and monitor app1 and app2
We have broken down Jill's policy into three separate policies so that they are easier to read and manage.
Together, they give Jill the permissions she needs to perform the Elastic Beanstalk actions on the two
applications.
The first policy specifies Describe*, List*, and Get* actions on Auto Scaling, Amazon S3, Amazon
EC2, CloudWatch, Amazon SNS, Elastic Load Balancing, Amazon RDS, and AWS CloudFormation (for non-
legacy container types) so that the Elastic Beanstalk actions are able to retrieve the relevant information
about the underlying resources of the app1 and app2 applications.
{
"Version": "2012-10-17",
"Statement":[
{
"Effect":"Allow",
"Action":[
"ec2:Describe*",
"elasticloadbalancing:Describe*",
"autoscaling:Describe*",
"cloudwatch:Describe*",
"cloudwatch:List*",
"cloudwatch:Get*",
"s3:Get*",
"s3:List*",
"sns:Get*",
"sns:List*",
"rds:Describe*",
"cloudformation:Describe*",
"cloudformation:Get*",
"cloudformation:List*",
"cloudformation:Validate*",
"cloudformation:Estimate*"
],
"Resource":"*"
}
]
}
API Version 2010-12-01
435

AWS Elastic Beanstalk Developer Guide
Example Policies Based on Resource Permissions
The second policy specifies the Elastic Beanstalk actions that Jill is allowed to perform on the app1 and
app2 resources. The AllReadCallsInApplications statement allows her to call the Describe*
actions and the environment info actions. The AllReadCallsOnApplications statement allows her
to call the DescribeApplications and DescribeEvents actions on the app1 and app2 application
resources. The AllReadCallsOnSolutionStacks statement allows viewing actions that involve
solution stack resources (ListAvailableSolutionStacks, DescribeConfigurationOptions, and
ValidateConfigurationSettings).
{
"Version": "2012-10-17",
"Statement":[
{
"Sid":"AllReadCallsInApplications",
"Action":[
"elasticbeanstalk:Describe*",
"elasticbeanstalk:RequestEnvironmentInfo",
"elasticbeanstalk:RetrieveEnvironmentInfo"
],
"Effect":"Allow",
"Resource":[
"*"
],
"Condition":{
"StringEquals":{
"elasticbeanstalk:InApplication":[
"arn:aws:elasticbeanstalk:us-west-2:123456789012:application/app1",
"arn:aws:elasticbeanstalk:us-west-2:123456789012:application/app2"
]
}
}
},
{
"Sid":"AllReadCallsOnApplications",
"Action":[
"elasticbeanstalk:DescribeApplications",
"elasticbeanstalk:DescribeEvents"
],
"Effect":"Allow",
"Resource":[
"arn:aws:elasticbeanstalk:us-west-2:123456789012:application/app1",
"arn:aws:elasticbeanstalk:us-west-2:123456789012:application/app2"
]
},
{
"Sid":"AllReadCallsOnSolutionStacks",
"Action":[
"elasticbeanstalk:ListAvailableSolutionStacks",
"elasticbeanstalk:DescribeConfigurationOptions",
"elasticbeanstalk:ValidateConfigurationSettings"
],
"Effect":"Allow",
"Resource":[
"arn:aws:elasticbeanstalk:us-west-2::solutionstack/*"
]
}
]
}
The third policy specifies the Elastic Beanstalk actions that the second policy needs permissions to in
order to complete those Elastic Beanstalk actions. The AllNonResourceCalls statement allows the
elasticbeanstalk:CheckDNSAvailability action, which is required for some viewing actions.
{
API Version 2010-12-01
436

AWS Elastic Beanstalk Developer Guide
Example Policies Based on Resource Permissions
"Version": "2012-10-17",
"Statement":[
{
"Sid":"AllNonResourceCalls",
"Action":[
"elasticbeanstalk:CheckDNSAvailability"
],
"Effect":"Allow",
"Resource":[
"*"
]
}
]
}
Example 3: Policies that allow Jack to access app1 to test, monitor, create application
versions, and deploy to the staging environment
We have broken down Jack's policy into three separate policies so that they are easier to read and
manage. Together, they give Jack the permissions he needs to perform the Elastic Beanstalk actions on
the app1 resource.
The first policy specifies the actions on Auto Scaling, Amazon S3, Amazon EC2, CloudWatch, Amazon
SNS, Elastic Load Balancing, Amazon RDS, and AWS CloudFormation (for non-legacy container types) so
that the Elastic Beanstalk actions are able to view and work with the underlying resources of app1. For a
list of supported non-legacy container types, see Why are some container types marked legacy? (p. 150).
Note that this policy is an example. It gives a broad set of permissions to the AWS products that Elastic
Beanstalk uses to manage applications and environments. For example, ec2:* allows an IAM user to
perform any action on any Amazon EC2 resource in the AWS account. These permissions are not limited
to the resources that you use with Elastic Beanstalk. As a best practice, you should grant individuals only
the permissions they need to perform their duties.
{
"Version": "2012-10-17",
"Statement":[
{
"Effect":"Allow",
"Action":[
"ec2:*",
"elasticloadbalancing:*",
"autoscaling:*",
"cloudwatch:*",
"s3:*",
"sns:*",
"rds:*",
"cloudformation:*"
],
"Resource":"*"
}
]
}
The second policy specifies the Elastic Beanstalk actions that Jack is allowed to perform on the app1
resource.
{
"Version": "2012-10-17",
"Statement":[
{
"Sid":"AllReadCallsAndAllVersionCallsInApplications",
API Version 2010-12-01
437

AWS Elastic Beanstalk Developer Guide
Example Policies Based on Resource Permissions
"Action":[
"elasticbeanstalk:Describe*",
"elasticbeanstalk:RequestEnvironmentInfo",
"elasticbeanstalk:RetrieveEnvironmentInfo",
"elasticbeanstalk:CreateApplicationVersion",
"elasticbeanstalk:DeleteApplicationVersion",
"elasticbeanstalk:UpdateApplicationVersion"
],
"Effect":"Allow",
"Resource":[
"*"
],
"Condition":{
"StringEquals":{
"elasticbeanstalk:InApplication":[
"arn:aws:elasticbeanstalk:us-west-2:123456789012:application/app1"
]
}
}
},
{
"Sid":"AllReadCallsOnApplications",
"Action":[
"elasticbeanstalk:DescribeApplications",
"elasticbeanstalk:DescribeEvents"
],
"Effect":"Allow",
"Resource":[
"arn:aws:elasticbeanstalk:us-west-2:123456789012:application/app1"
]
},
{
"Sid":"UpdateEnvironmentInApplications",
"Action":[
"elasticbeanstalk:UpdateEnvironment"
],
"Effect":"Allow",
"Resource":[
"arn:aws:elasticbeanstalk:us-west-2:123456789012:environment/app1/app1-
staging*"
],
"Condition":{
"StringEquals":{
"elasticbeanstalk:InApplication":[
"arn:aws:elasticbeanstalk:us-west-2:123456789012:application/app1"
]
},
"StringLike":{
"elasticbeanstalk:FromApplicationVersion":[
"arn:aws:elasticbeanstalk:us-west-2:123456789012:applicationversion/app1/
*"
]
}
}
},
{
"Sid":"AllReadCallsOnSolutionStacks",
"Action":[
"elasticbeanstalk:ListAvailableSolutionStacks",
"elasticbeanstalk:DescribeConfigurationOptions",
"elasticbeanstalk:ValidateConfigurationSettings"
],
"Effect":"Allow",
"Resource":[
"arn:aws:elasticbeanstalk:us-west-2::solutionstack/*"
]
API Version 2010-12-01
438

AWS Elastic Beanstalk Developer Guide
Amazon RDS
}
]
}
The third policy specifies the Elastic Beanstalk actions that the second policy needs permissions
to in order to complete those Elastic Beanstalk actions. The AllNonResourceCalls
statement allows the elasticbeanstalk:CheckDNSAvailability action, which is
required to call elasticbeanstalk:CreateEnvironment and other actions. It also
allows the elasticbeanstalk:CreateStorageLocation action, which is required for
elasticbeanstalk:CreateEnvironment, and other actions.
{
"Version": "2012-10-17",
"Statement":[
{
"Sid":"AllNonResourceCalls",
"Action":[
"elasticbeanstalk:CheckDNSAvailability",
"elasticbeanstalk:CreateStorageLocation"
],
"Effect":"Allow",
"Resource":[
"*"
]
}
]
}
Using Elastic Beanstalk with Amazon Relational
Database Service
Elastic Beanstalk provides support for running Amazon RDS instances in your Elastic Beanstalk
environment (p. 186). This works great for development and testing environments, but is not ideal for
a production environment because it ties the lifecycle of the database instance to the lifecycle of your
application's environment.
Note
If you haven't used a DB instance with your application before, try adding one to a test
environment with the Elastic Beanstalk console first. This lets you verify that your application
is able to read environment properties, construct a connection string, and connect to a DB
instance prior to adding VPCs and security group configuration to the mix. See Adding a
Database to Your Elastic Beanstalk Environment (p. 186) for details.
To decouple your database instance from your environment, you can run a database instance in Amazon
Relational Database Service and configure your application to connect to it on launch. This allows you to
connect multiple environments to a database, terminate an environment without affecting the database,
and perform seamless updates with blue-green deployments.
To allow the EC2 instances in your environment to connect to an outside database, you can configure the
environment's Auto Scaling group with an additional security group. The security group that you attach
to your environment can be the same one that is attached to your database instance, or a separate
security group from which the database's security group allows ingress.
Note
It is possible to connect your environment to a database by adding a rule to your database's
security group that allows ingress from the autogenerated security group that Elastic
API Version 2010-12-01
439

AWS Elastic Beanstalk Developer Guide
Launching and Connecting to an
External RDS Instance in a Default VPC
Beanstalk attaches to your environment's Auto Scaling group. However, doing so creates a
dependency between the two security groups. Subsequently, when you attempt to terminate
the environment, Elastic Beanstalk will be unable to delete the environment's security group
because the database's security group is dependent on it.
After launching your database instance and configuring security groups, you can pass the connection
information (endpoint, password, etc.) to your application by using environment properties, the same
mechanism that Elastic Beanstalk uses when you run a database instance in your environment.
For additional security, you can store your connection information in Amazon S3, and configure Elastic
Beanstalk to retrieve it during deployment. With configuration files (.ebextensions) (p. 256), you can
configure the instances in your environment to securely retrieve files from Amazon S3 when you deploy
your application.
Topics
•Launching and Connecting to an External RDS Instance in a Default VPC (p. 440)
•Launching and Connecting to an External RDS Instance in EC2 Classic (p. 444)
•Storing the Connection String in Amazon S3 (p. 449)
Launching and Connecting to an External RDS
Instance in a Default VPC
To use an external database with a application running in Elastic Beanstalk, first launch a DB instance
with Amazon RDS. Any instance that you launch with Amazon RDS is completely independent of Elastic
Beanstalk and your Elastic Beanstalk environments, and is not dependent on Elastic Beanstalk for
configuration. This means that you can use any DB engine and instance type supported by Amazon RDS,
even those not used by Elastic Beanstalk.
The following procedures describe the process for a default VPC. The process is the same if you are using
a custom VPC. The only additional requirements are that your environment and DB instance are in the
same subnet, or in subnets that are allowed to communicate with each other. See Using Elastic Beanstalk
with Amazon Virtual Private Cloud (p. 451) for details on configuring a custom VPC for use with Elastic
Beanstalk.
To launch an RDS DB instance in a default VPC
1. Open the RDS console.
2. Choose Instances in the navigation pane.
3. Choose Launch DB Instance.
4. Choose a DB Engine and preset configuration.
5. Under Specify DB Details, choose a DB Instance Class. For high availability, set Multi-AZ
Deployment to Yes.
6. Under Settings, enter values for DB Instance Identifier, Master Username, and Master Password
(and Confirm Password). Note the values that you entered for later.
7. Choose Next.
8. For Network and Security settings, choose the following:
•VPC – Default VPC
•Subnet Group – default
•Publicly Accessible – No
•Availability Zone – No Preference
API Version 2010-12-01
440
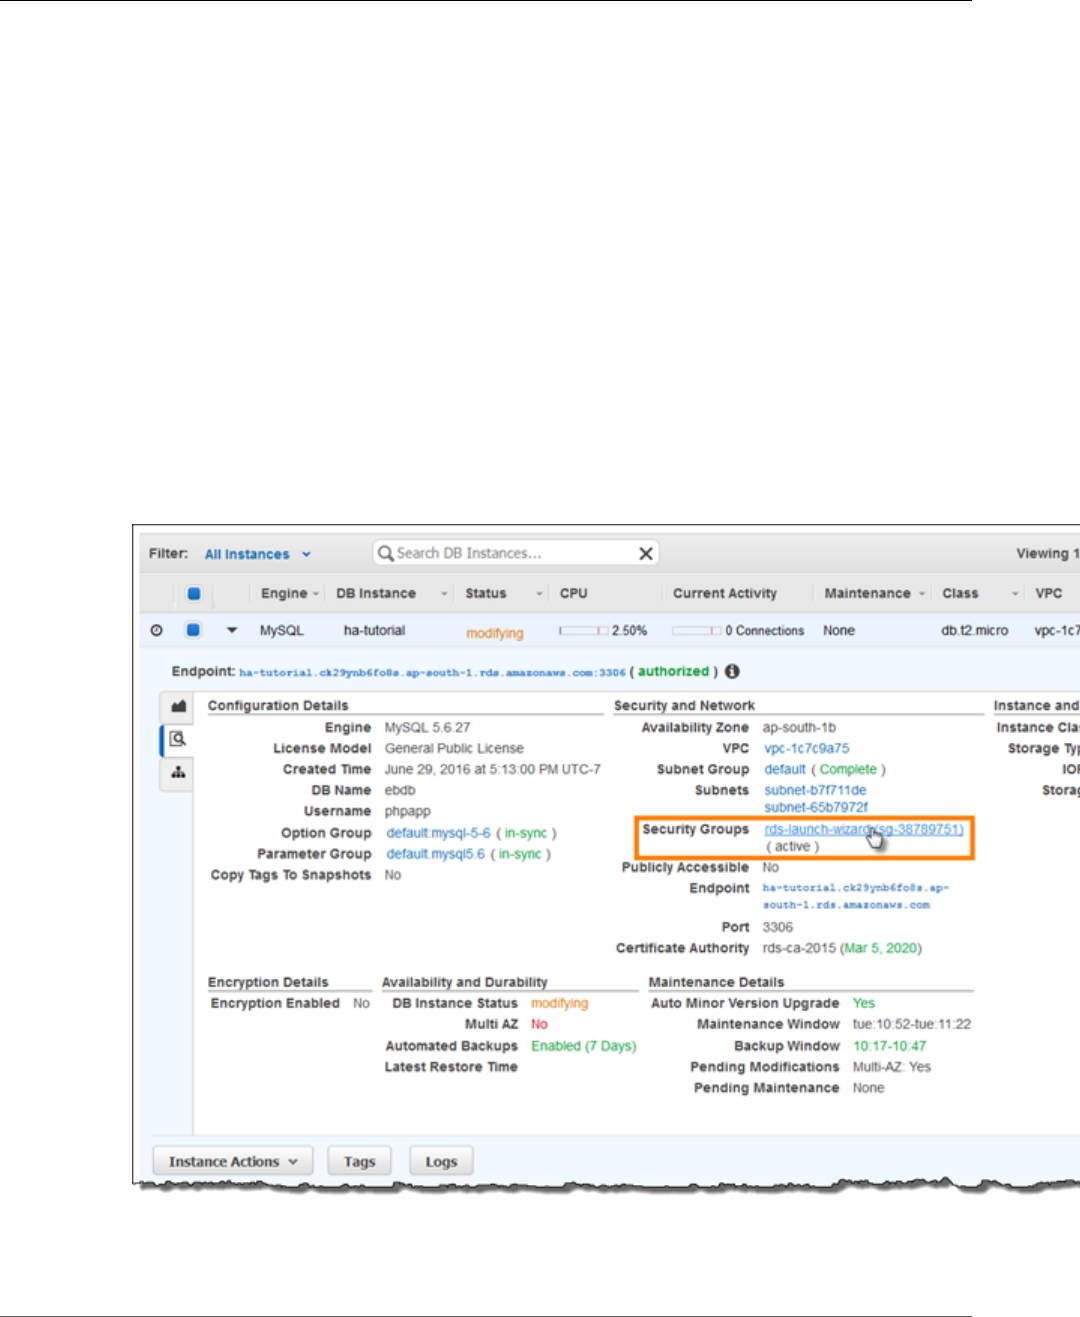
AWS Elastic Beanstalk Developer Guide
Launching and Connecting to an
External RDS Instance in a Default VPC
•VPC Security Groups – Default VPC Security Group
9. For Database Name, type ebdb, and verify the default settings for the remaining options. Note the
values of the following options:
•Database Name
•Database Port
10. Choose Launch DB Instance.
Next, modify the security group attached to your DB instance to allow inbound traffic on the appropriate
port. This is the same security group that you will attach to your Elastic Beanstalk environment later, so
the rule that you add will grant ingress permission to other resources in the same security group.
To modify the ingress rules on your RDS instance's security group
1. Open the Amazon RDS console.
2. Choose Instances.
3. Choose the arrow next to the entry for your DB instance to expand the view.
4. Choose the Details tab.
5. In the Security and Network section, the security group associated with the DB instance is shown.
Open the link to view the security group in the Amazon EC2 console.
Note
While you have the Details tab open, note the Endpoint and security group name shown on
this page for use later.
API Version 2010-12-01
441
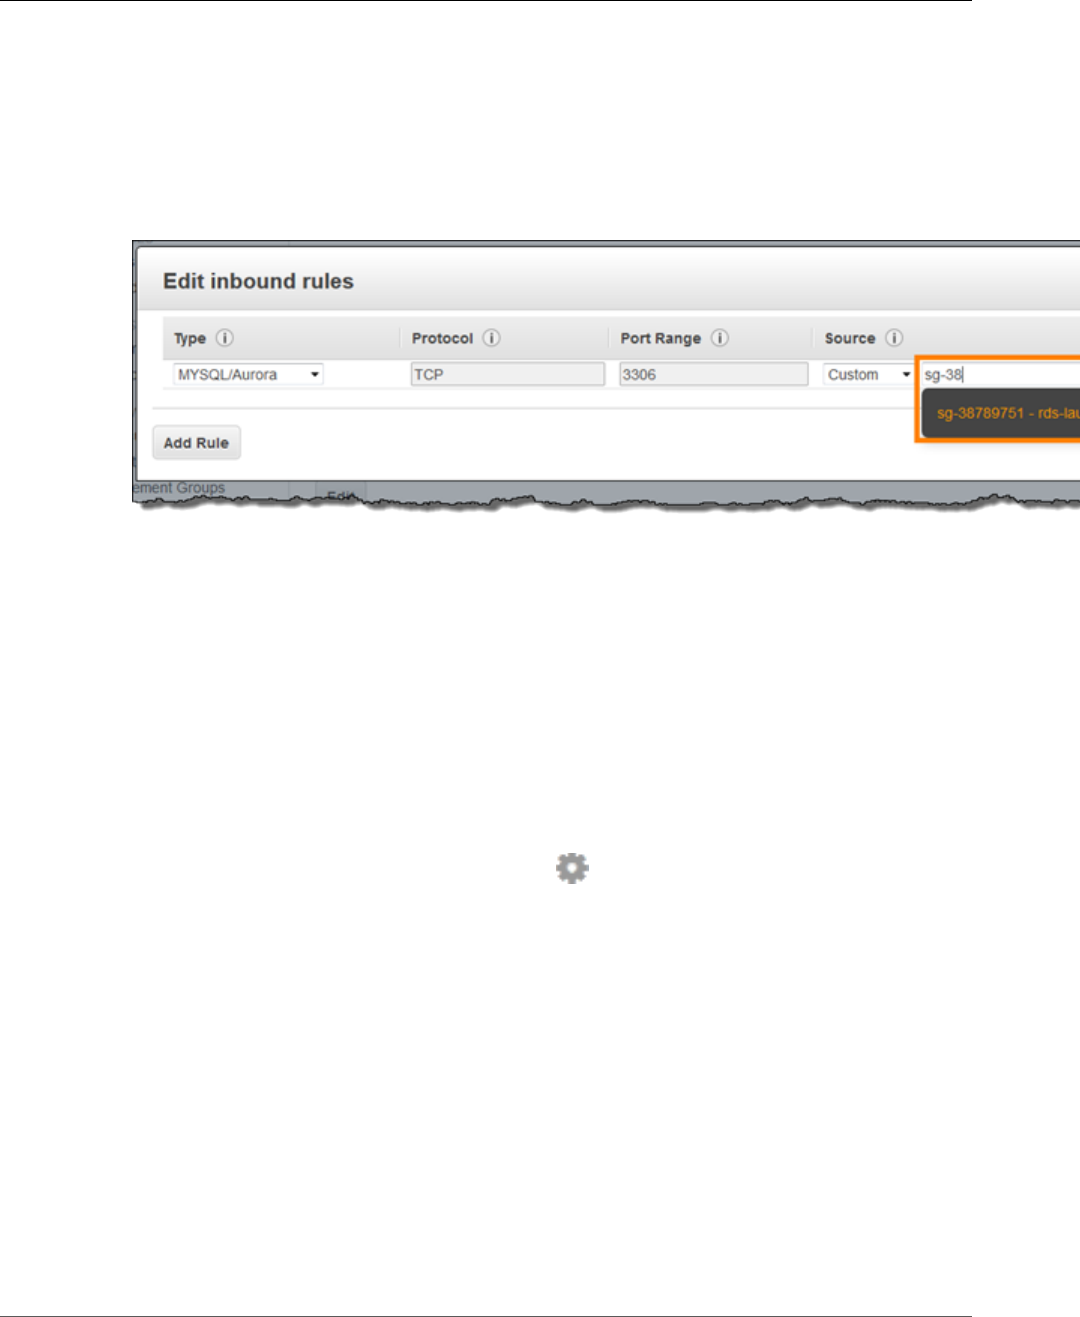
AWS Elastic Beanstalk Developer Guide
Launching and Connecting to an
External RDS Instance in a Default VPC
The security group name is the first value of the link shown in Security Groups, before the
parentheses. The second value, in parentheses, is the security group ID.
6. In the security group details, choose the Inbound tab.
7. Choose Edit.
8. Choose Add Rule.
9. For Type, choose the DB engine that your application uses.
10. For Source, choose Custom, and then type the group ID of the security group. This allows resources
in the security group to receive traffic on the database port from other resources in the same group.
11. Choose Save.
Next, add the DB instance's security group to your running environment. This procedure causes Elastic
Beanstalk to reprovision all instances in your environment with the additional security group attached.
Note
In a custom VPC, use the security group's group ID instead of its group name.
To add a security group to your environment
1. Open the Elastic Beanstalk console.
2. Navigate to the management page (p. 65) for your environment.
3. Choose Configuration.
4. In theInstancessection, choose the settings icon ( ).
5. For EC2 security groups, type a comma after the name of the autogenerated security group
followed by the name of the RDS DB instance's security group. It is the name you noted while
configuring the security group earlier.
6. Choose Apply.
7. Read the warning, and then choose Save.
Next, pass the connection information to your environment by using environment properties. When you
add a DB instance to your environment (p. 186) with the Elastic Beanstalk console, Elastic Beanstalk uses
environment properties like RDS_HOSTNAME to pass connection information to your application. You
can use the same properties, which will let you use the same application code with both integrated DB
instances and external DB instances, or choose your own property name(s).
To configure environment properties for an Amazon RDS DB instance
1. Open the Elastic Beanstalk console.
2. Navigate to the management page (p. 65) for your environment.
API Version 2010-12-01
442
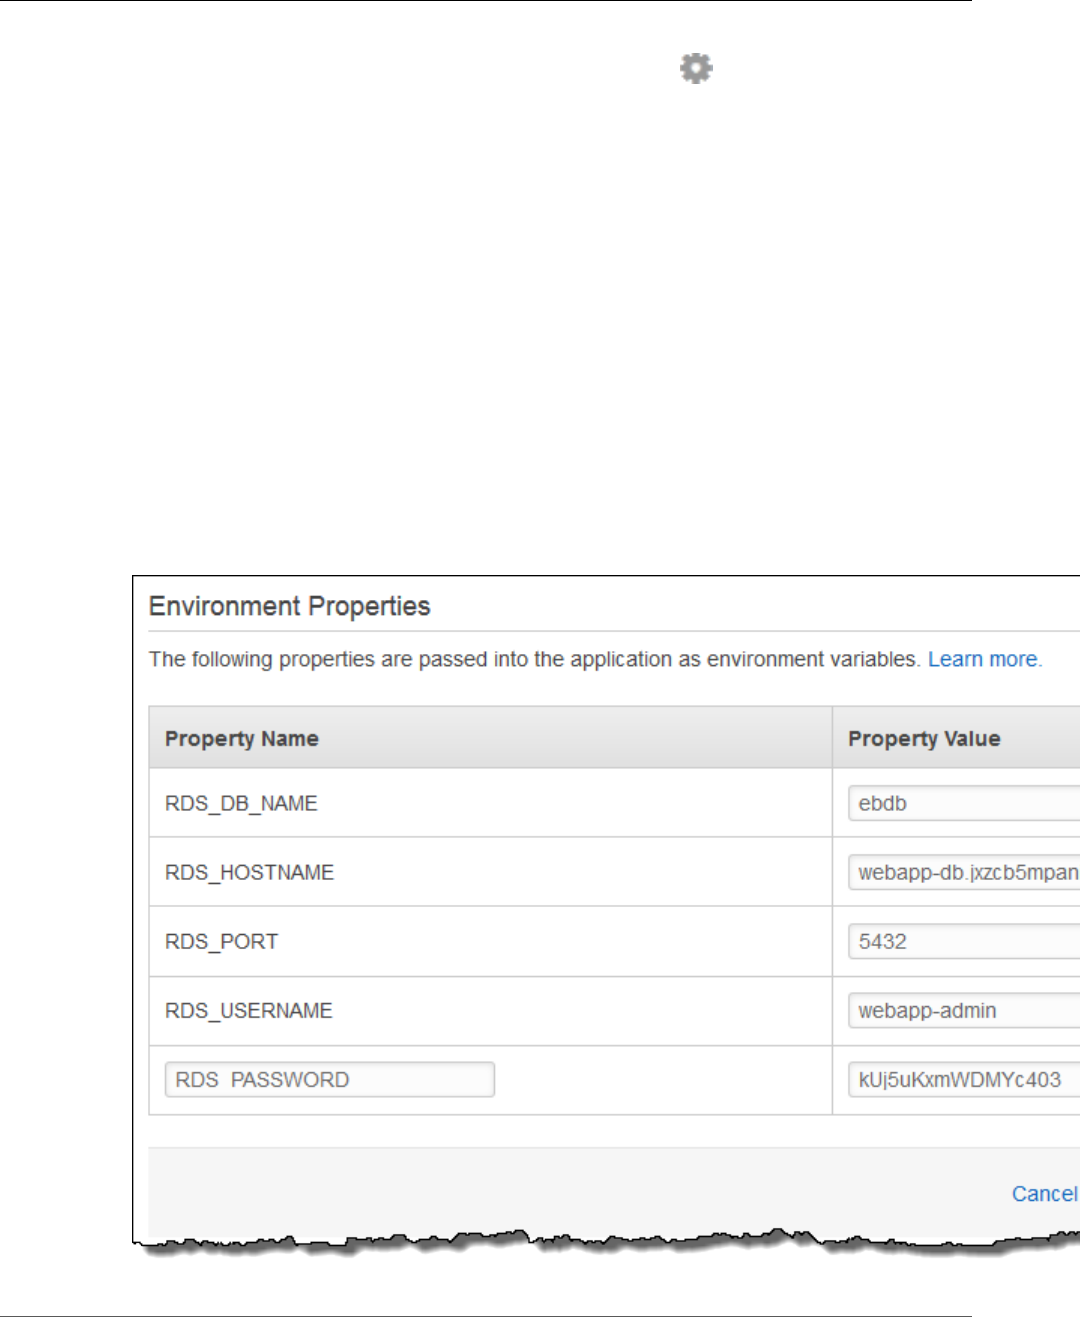
AWS Elastic Beanstalk Developer Guide
Launching and Connecting to an
External RDS Instance in a Default VPC
3. Choose Configuration.
4. In theSoftware Configurationsection, choose the settings icon ( ).
5. In the Environment Properties section, define the variables that your application reads to construct
a connection string. For compatibility with environments that have an integrated RDS DB instance,
use the following:
•RDS_HOSTNAME – The hostname of the DB instance.
Amazon RDS console label – Endpoint is the hostname.
•RDS_PORT – The port on which the DB instance accepts connections. The default value varies
between DB engines.
Amazon RDS console label – Port
•RDS_DB_NAME – The database name, ebdb.
Amazon RDS console label – DB Name
•RDS_USERNAME – The user name that you configured for your database.
Amazon RDS console label – Username
•RDS_PASSWORD – The password that you configured for your database.
Choose the plus symbol (+) to add additional properties.
6. Choose Apply.
API Version 2010-12-01
443

AWS Elastic Beanstalk Developer Guide
Launching and Connecting to an
External RDS Instance in EC2 Classic
If you haven't programmed your application to read environment properties and construct a connection
string yet, see the following language-specific topics for instructions:
• Java SE – Connecting to a Database (Java SE Platforms) (p. 692)
• Java with Tomcat – Connecting to a Database (Tomcat Platforms) (p. 692)
• Node.js – Connecting to a Database (p. 807)
• .NET – Connecting to a Database (p. 743)
• PHP – Connecting to a Database with a PDO or MySQLi (p. 858)
• Python – Connecting to a Database (p. 883)
• Ruby – Connecting to a Database (p. 901)
Finally, depending on when your application reads environment variables, you may need to restart the
application server on the instances in your environment.
To restart your environment's app servers
1. Open the Elastic Beanstalk console.
2. Navigate to the management page (p. 65) for your environment.
3. Choose Actions and then choose Restart App Server(s).
Launching and Connecting to an External RDS
Instance in EC2 Classic
If you use EC2 Classic (no VPC) with Elastic Beanstalk, the procedure changes slightly due to differences
in how security groups work. In EC2 Classic, DB instances cannot use EC2 security groups, so they get a
DB security group that only works with Amazon RDS.
You can add rules to a DB security group that allows ingress from EC2 security groups, but you cannot
attach a DB security group to your environment's Auto Scaling group. To avoid creating a dependency
between the DB security group and your environment, you must create a third security group in Amazon
EC2, grant it ingress from the DB security group, and then assign it to the Auto Scaling group in your
Elastic Beanstalk environment.
To launch an RDS instance in EC2 Classic (no VPC)
1. Open the RDS management console.
2. Choose Launch a DB Instance.
3. Proceed through the wizard until you reach the Advanced Settings page. Note the values that you
enter for the following options:
•Master Username
•Master Password
4. For Network and Security settings, choose the following:
•VPC – Not in VPC. If this option is not available, your account may not support EC2-Classic, or
you may have chosen an instance type that is only available in VPC.
•Availability Zone – No Preference
•DB Security Group(s) – Create new Security Group
5. Configure the remaining options and choose Launch DB Instance. Note the values that you enter for
the following options:
API Version 2010-12-01
444

AWS Elastic Beanstalk Developer Guide
Launching and Connecting to an
External RDS Instance in EC2 Classic
•Database Name
•Database Port
In EC2-classic, your DB instance will have a DB security group instead of a VPC security group. You cannot
attach a DB security group to your Elastic Beanstalk environment, so you need to create a new security
group that you can authorize to access the DB instance and attach to your environment. We will refer to
this as a bridge security group and name it webapp-bridge.
To create a bridge security group
1. Open the Amazon EC2 console
2. Choose Security Groups under Network & Security in the navigation sidebar.
3. Choose Create Security Group.
4. For Security group name, type webapp-bridge.
5. For Description, type Provide access to DB instance from Elastic Beanstalk
environment instances.
6. For VPC, select No VPC.
7. Choose Create
Next, modify the security group attached to your DB instance to allow inbound traffic from the bridge
security group.
To modify the ingress rules on your RDS instance's security group
1. Open the Amazon RDS console.
2. Choose Instances.
3. Choose the arrow next to the entry for your DB instance to expand the view.
4. Choose the Details tab.
5. In the Security and Network section, the security group associated with the DB instance is shown.
Open the link to view the security group in the Amazon EC2 console.
API Version 2010-12-01
445

AWS Elastic Beanstalk Developer Guide
Launching and Connecting to an
External RDS Instance in EC2 Classic
6. In the security group details, set Connection Type to EC2 Security Group.
7. Set EC2 Security Group Name to the name of the bridge security group that you created.
8. Choose Authorize.
Next, add the bridge security group to your running environment. This procedure requires all instances in
your environment to be reprovisioned with the additional security group attached.
To add a security group to your environment
1. Open the Elastic Beanstalk console.
2. Navigate to the management page (p. 65) for your environment.
3. Choose Configuration.
4. Choose Instances.
5. For EC2 security groups, type a comma after the name of the autogenerated security group
followed by the name of the bridge security group that you created.
6. Choose Apply
7. Read the warning and then choose Save.
API Version 2010-12-01
446

AWS Elastic Beanstalk Developer Guide
Launching and Connecting to an
External RDS Instance in EC2 Classic
Next, pass the connection information to your environment by using environment properties. When you
add a DB instance to your environment (p. 186) with the Elastic Beanstalk console, Elastic Beanstalk uses
environment properties like RDS_HOSTNAME to pass connection information to your application. You
can use the same properties, which will let you use the same application code with both integrated DB
instances and external DB instances, or choose your own property name(s).
To configure environment properties
1. Open the Elastic Beanstalk console.
2. Navigate to the management page (p. 65) for your environment.
3. Choose Configuration.
4. In theSoftware Configurationsection, choose the settings icon ( ).
5. In the Environment Properties section, define the variables that your application reads to construct
a connection string. For compatibility with environments that have an integrated RDS instance, use
the following:
•RDS_DB_NAME – The DB Name shown in the Amazon RDS console.
•RDS_USERNAME – The Master Username that you enter when you add the database to your
environment.
•RDS_PASSWORD – The Master Password that you enter when you add the database to your
environment.
•RDS_HOSTNAME – The Endpoint of the DB instance shown in the Amazon RDS console.
•RDS_PORT – The Port shown in the Amazon RDS console.
Choose the plus symbol to add additional properties:
API Version 2010-12-01
447
AWS Elastic Beanstalk Developer Guide
Launching and Connecting to an
External RDS Instance in EC2 Classic
6. Choose Apply
If you haven't programmed your application to read environment properties and construct a connection
string yet, see the following language-specific topics for instructions:
• Java SE – Connecting to a Database (Java SE Platforms) (p. 692)
• Java with Tomcat – Connecting to a Database (Tomcat Platforms) (p. 692)
• Node.js – Connecting to a Database (p. 807)
• .NET – Connecting to a Database (p. 743)
• PHP – Connecting to a Database with a PDO or MySQLi (p. 858)
• Python – Connecting to a Database (p. 883)
• Ruby – Connecting to a Database (p. 901)
Finally, depending on when your application reads environment variables, you may need to restart the
application server on the instances in your environment.
To restart your environment's app servers
1. Open the Elastic Beanstalk console.
2. Navigate to the management page (p. 65) for your environment.
3. Choose Actions and then choose Restart App Server(s).
API Version 2010-12-01
448

AWS Elastic Beanstalk Developer Guide
Storing the Connection String in Amazon S3
Storing the Connection String in Amazon S3
Providing connection information to your application with environment properties is a good way to
keep passwords out of your code, but it's not a perfect solution. Environment properties are discoverable
in the Environment Management Console (p. 65), and can be viewed by any user that has permission
to describe configuration settings on your environment. Depending on the platform, environment
properties may also appear in instance logs (p. 369).
You can lock down your connection information by storing it in an Amazon S3 bucket that you control.
The basic steps are as follows:
• Upload a file that contains your connection string to an Amazon S3 bucket.
• Grant the EC2 instance profile permission to read the file.
• Configure your application to download the file during deployment.
• Read the file in your application code.
First, create a bucket to store the file that contains your connection string. For this example, we will use
a JSON file that has a single key and value. The value is a JDBC connection string for a PostgreSQL DB
instance in Amazon RDS:
beanstalk-database.json
{
"connection": "jdbc:postgresql://mydb.b5uacpxznijm.us-west-2.rds.amazonaws.com:5432/ebdb?
user=username&password=mypassword"
}
The highlighted portions of the URL correspond to the endpoint, port, DB name, username and password
for the database.
To create a bucket and upload a file
1. Open the Amazon S3 console.
2. Choose Create Bucket.
3. Type a Bucket Name and choose a Region.
4. Choose Create.
5. Open the bucket and choose Upload
6. Follow the prompts to upload the file.
By default, your account owns the file and has permission to manage it, but IAM users and roles do not
unless you grant them access explicitly. Grant the instances in your Elastic Beanstalk environment by
adding a policy to the instance profile (p. 22).
The default instance is named aws-elasticbeanstalk-ec2-role. If you are not sure what your
instance profile is called, you can find it on the Configuration page in Environment Management
Console (p. 167).
To add permissions to the instance profile
1. Open the IAM console.
2. Choose Roles.
3. Choose aws-elasticbeanstalk-ec2-role.
4. Under Inline Policies, choose Create Role Policy. Choose Custom Policy.
API Version 2010-12-01
449

AWS Elastic Beanstalk Developer Guide
Storing the Connection String in Amazon S3
5. Add a policy that allows the instance to retrieve the file:
{
"Version": "2012-10-17",
"Statement": [
{
"Sid": "database",
"Action": [
"s3:GetObject"
],
"Effect": "Allow",
"Resource": [
"arn:aws:s3:::my-secret-bucket-123456789012/beanstalk-database.json"
]
}
]
}
Replace the bucket and object names with the names of your bucket and object.
Next, add a configuration file (p. 256) to your source code that tells Elastic Beanstalk to download the
file from Amazon S3 during deployment:
~/my-app/.ebextensions/database.config
Resources:
AWSEBAutoScalingGroup:
Metadata:
AWS::CloudFormation::Authentication:
S3Auth:
type: "s3"
buckets: ["my-secret-bucket-123456789012"]
roleName: "aws-elasticbeanstalk-ec2-role"
files:
"/tmp/beanstalk-database.json" :
mode: "000644"
owner: root
group: root
authentication: "S3Auth"
source: https://s3-us-west-2.amazonaws.com/my-secret-bucket-123456789012/beanstalk-
database.json
This configuration file does two things. The Resources key adds an authentication method to your
environment's Auto Scaling group metadata that Elastic Beanstalk can use to access Amazon S3. The
files key tells Elastic Beanstalk to download the file from Amazon S3 and store it locally in /tmp/
during deployment.
Deploy your application with the configuration file in .ebextensions folder at the root of your
source code. If you configured permissions correctly, the deployment will succeed and the file will be
downloaded to all of the instances in your environment. If not, the deployment will fail.
Finally, add code to your application to read the JSON file and use the connection string to connect to
the database. See the following language-specific topics for more information:
• Java SE – Connecting to a Database (Java SE Platforms) (p. 692)
• Java with Tomcat – Connecting to a Database (Tomcat Platforms) (p. 692)
• Node.js – Connecting to a Database (p. 807)
• .NET – Connecting to a Database (p. 743)
API Version 2010-12-01
450

AWS Elastic Beanstalk Developer Guide
Amazon S3
• PHP – Connecting to a Database with a PDO or MySQLi (p. 858)
• Python – Connecting to a Database (p. 883)
• Ruby – Connecting to a Database (p. 901)
Using Elastic Beanstalk with Amazon Simple
Storage Service
Amazon Simple Storage Service (Amazon S3) provides highly durable, fault-tolerant data storage. Behind
the scenes, Amazon S3 stores objects redundantly on multiple devices across multiple facilities in a
region.
Elastic Beanstalk creates an Amazon S3 bucket named elasticbeanstalk-region-account-id for each
region in which you create environments. Elastic Beanstalk uses this bucket to store application versions,
logs, and other supporting files.
Elastic Beanstalk applies a bucket policy to buckets it creates to allow environments to write to the
bucket and prevent accidental deletion. If you need to delete a bucket that Elastic Beanstalk created,
first delete the bucket policy from the Permissions section of the bucket properties in the Amazon S3
Management Console.
To delete an Elastic Beanstalk storage bucket (console)
1. Open the Amazon S3 Management Console
2. Select the Elastic Beanstalk storage bucket.
3. Choose Properties.
4. Choose Permissions.
5. Choose Edit Bucket Policy.
6. Choose Delete.
7. Choose OK.
8. Choose Actions and then choose Delete Bucket.
9. Type the name of the bucket and then choose Delete.
Using Elastic Beanstalk with Amazon Virtual
Private Cloud
Amazon Virtual Private Cloud (Amazon VPC) enables you to define a virtual network in your own isolated
section within the Amazon Web Services (AWS) cloud, known as a virtual private cloud (VPC). Using VPC,
you can deploy a new class of web applications on Elastic Beanstalk, including internal web applications
(such as your recruiting application), web applications that connect to an on-premise database (using a
VPN connection), as well as private web service backends. Elastic Beanstalk launches your AWS resources,
such as instances, into your VPC. Your VPC closely resembles a traditional network, with the benefits
of using AWS's scalable infrastructure. You have complete control over your VPC; you can select the IP
address range, create subnets, and configure routes and network gateways. To protect the resources in
each subnet, you can use multiple layers of security, including security groups and network access control
lists. For more information about Amazon VPC, go to the Amazon VPC User Guide.
Note
Elastic Beanstalk does not currently support linux proxy settings (HTTP_PROXY, HTTPS_PROXY
and NO_PROXY) for configuring a web proxy. Instances in your environment must have access to
the Internet directly or through a NAT device.
API Version 2010-12-01
451

AWS Elastic Beanstalk Developer Guide
What VPC Configurations Do I Need?
Important
Instances in your Elastic Beanstalk environment use Network Time Protocol (NTP) to syncronize
the system clock. If instances are unable to communicate on UDP port 123, the clock may go
out of sync, causing issues with Elastic Beanstalk health reporting. Ensure that your VPC security
groups and network ACLs allow inbound and outbound UDP traffic on port 123 to avoid these
issues.
What VPC Configurations Do I Need?
When you use Amazon VPC with Elastic Beanstalk, you can launch Elastic Beanstalk resources, such as
Amazon EC2 instances, in a public or private subnet. The subnets that you require depend on your Elastic
Beanstalk application environment type and whether the resources you launch are public or private. The
following scenarios discuss sample VPC configurations that you might use for a particular environment.
Topics
•Single-instance environments (p. 452)
•Load-balancing, autoscaling environments (p. 452)
•Extend your own network into AWS (p. 453)
Single-instance environments
For single-instance environments, Elastic Beanstalk assigns an Elastic IP address (a static, public IP
address) to the instance so that it can communicate directly with the Internet. No additional network
interface, such as a network address translator (NAT), is required for a single-instance environment.
If you have a single-instance environment without any associated private resources, such as a back-end
Amazon RDS DB instance, create a VPC with one public subnet, and include the instance in that subnet.
For more information, see Example: Launching a Single-Instance Environment without Any Associated
Private Resources in a VPC (p. 453).
If you have resources that you don't want public, create a VPC with one public subnet and one private
subnet. Add all of your public resources, such as the single Amazon EC2 instance, in the public subnet,
and add private resources such as a back-end Amazon RDS DB instance in the private subnet. If you do
launch an Amazon RDS DB instance in a VPC, you must create at least two different private subnets that
are in different Availability Zones (an Amazon RDS requirement).
Load-balancing, autoscaling environments
For load-balancing, autoscaling environments, you can either create a public and private subnet for your
VPC, or use a single public subnet. In the case of a load-balancing, autoscaling environment, with both
a public and private subnet, Amazon EC2 instances in the private subnet require Internet connectivity.
Consider the following scenarios:
Scenarios
•You want your Amazon EC2 instances to have a private IP address (p. 452)
•You have resources that are private (p. 453)
•You don't have any private resources (p. 453)
•You require direct access to your Amazon EC2 instances in a private subnet (p. 453)
You want your Amazon EC2 instances to have a private IP address
Create a public and private subnet for your VPC in each Availability Zone (an Elastic Beanstalk
requirement). Then add your public resources, such as the load balancer and NAT, to the public subnet.
API Version 2010-12-01
452

AWS Elastic Beanstalk Developer Guide
Single-Instance Environment in a VPC
Elastic Beanstalk assigns them a unique Elastic IP addresses (a static, public IP address). Launch your
Amazon EC2 instances in the private subnet so that Elastic Beanstalk assigns them private IP addresses.
Without a public IP address, an Amazon EC2 instance can't directly communicate with the Internet.
Although Amazon EC2 instances in a private subnet can't send outbound traffic by default, neither can
they receive unsolicited inbound connections from the Internet.
To enable communication between the private subnet, and the public subnet and the Internet beyond
the public subnet, create routing rules that do the following:
• Route all inbound traffic to your Amazon EC2 instances through the load balancer.
• Route all outbound traffic from your Amazon EC2 instances through the NAT device.
You have resources that are private
If you have associated resources that are private, such as a back-end Amazon RDS DB instance, launch
the resources in private subnets.
Note
Amazon RDS requires at least two subnets, each in a separate Availability Zone. For more
information, see Example: Launching an Elastic Beanstalk in a VPC with Amazon RDS (p. 466).
You don't have any private resources
You can create a single public subnet for your VPC. If you want to use a single public subnet, you must
choose the Associate Public IP Address option to add the load balancer and your Amazon EC2 instances
to the public subnet. Elastic Beanstalk assigns a public IP address to each Amazon EC2 instance, and
eliminates the need for a NAT device to allow the instances to communicate with the Internet.
For more information, see Example: Launching a Load-Balancing, Autoscaling Environment with Public
and Private Resources in a VPC (p. 458).
You require direct access to your Amazon EC2 instances in a private subnet
If you require direct access to your Amazon EC2 instances in a private subnet (for example, if you want
to use SSH to sign in to an instance), create a bastion host in the public subnet that proxies requests
from the Internet. From the Internet, you can connect to your instances by using the bastion host.
For more information, see Example: Launching an Elastic Beanstalk Application in a VPC with Bastion
Hosts (p. 462).
Extend your own network into AWS
If you want to extend your own network into the cloud and also directly access the Internet from your
VPC, create a VPN gateway. For more information about creating a VPN Gateway, see Scenario 3: VPC
with Public and Private Subnets and Hardware VPN Access in the Amazon VPC User Guide.
Example: Launching a Single-Instance Environment
without Any Associated Private Resources in a VPC
You can deploy an Elastic Beanstalk application in a public subnet. Use this configuration if you just have
a single instance without any private resources that are associated with the instance, such as an Amazon
RDS DB instance that you don't want publicly accessible. Elastic Beanstalk assigns an Elastic IP address to
the instance so that it can access the Internet through the VPC Internet gateway.
API Version 2010-12-01
453
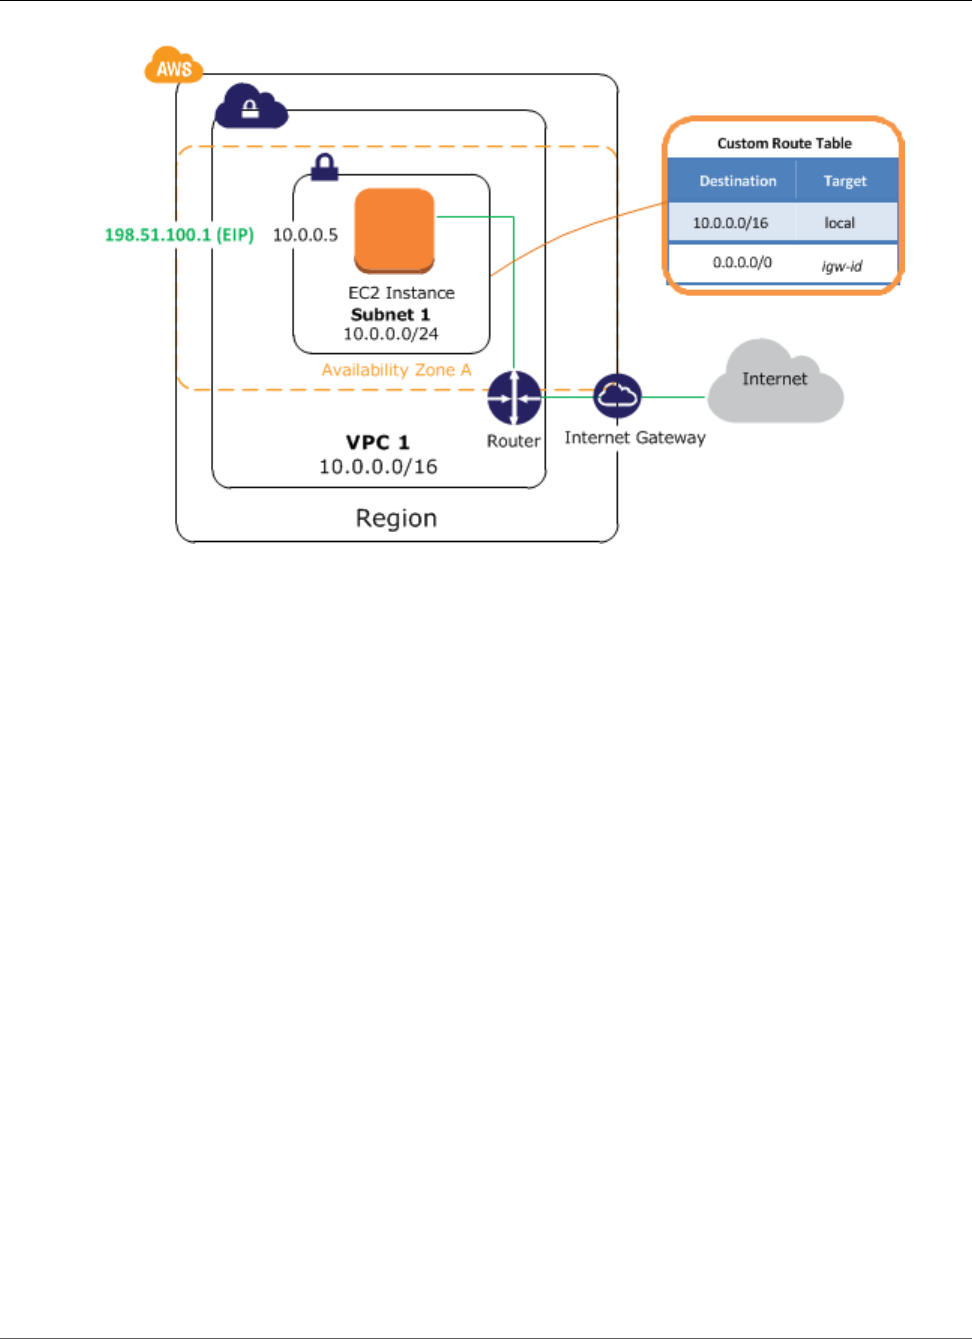
AWS Elastic Beanstalk Developer Guide
Single-Instance Environment in a VPC
To deploy a single-instance Elastic Beanstalk application inside a VPC, you need to complete the
following:
Topics
•Create a VPC with a Public Subnet (p. 454)
•Deploy to Elastic Beanstalk (p. 456)
Create a VPC with a Public Subnet
To create a VPC
1. Sign in to the AWS Management Console and open the Amazon VPC console at https://
console.aws.amazon.com/vpc/.
2. In the navigation pane, choose VPC Dashboard and then choose Start VPC Wizard.
3. Select VPC with a Single Public Subnet and then choose Select.
API Version 2010-12-01
454
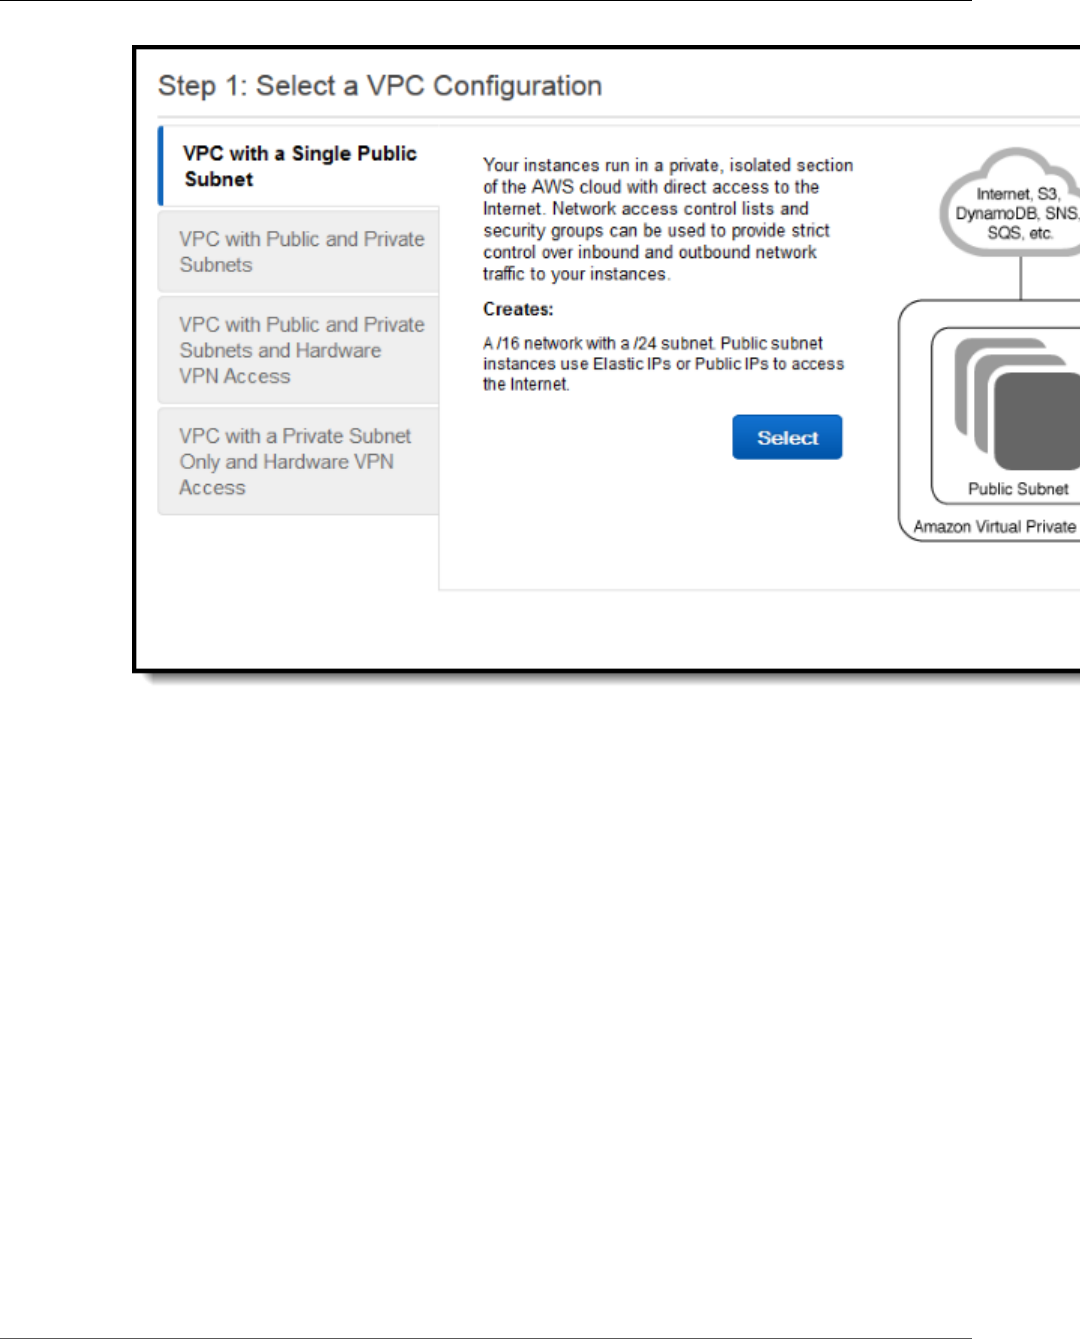
AWS Elastic Beanstalk Developer Guide
Single-Instance Environment in a VPC
A confirmation page shows the CIDR blocks used for the VPC and subnet. The page also shows the
subnet and the associated Availability Zone.
API Version 2010-12-01
455
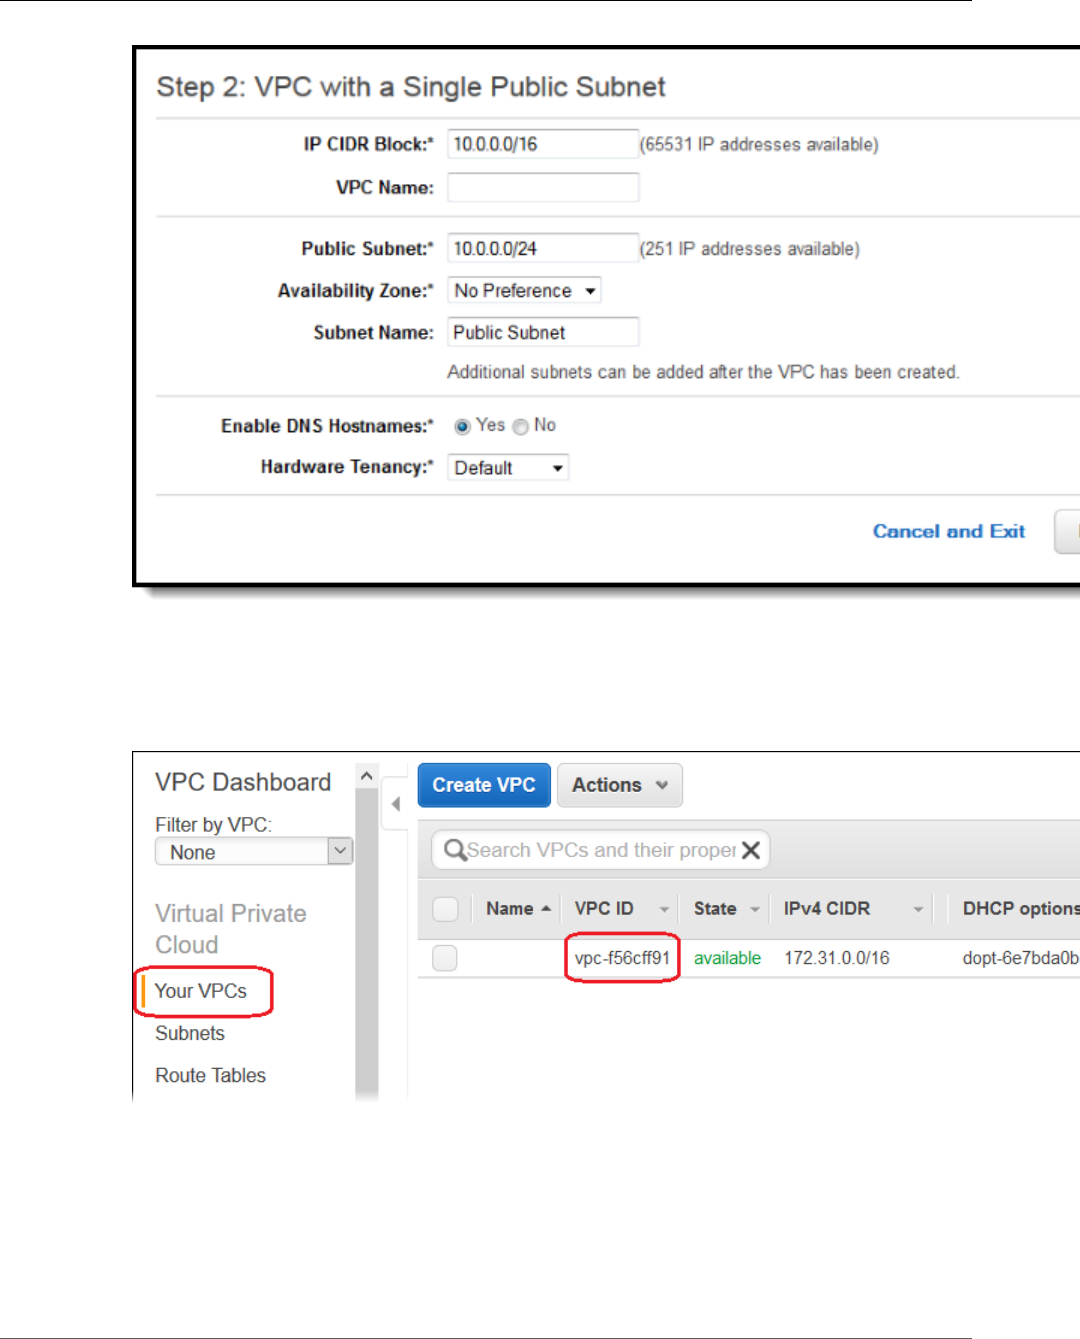
AWS Elastic Beanstalk Developer Guide
Single-Instance Environment in a VPC
4. Choose Create VPC.
AWS creates your VPC, subnet, Internet gateway, and route table. Choose OK to exit the wizard.
After AWS successfully creates the VPC, it assigns the VPC a VPC ID. You will need this for this for the
next step. To view your VPC ID, choose Your VPCs in the left pane of the Amazon VPC console.
Deploy to Elastic Beanstalk
After you set up your VPC, you can create your environment inside your VPC and deploy your application
to Elastic Beanstalk. You can do this using the Elastic Beanstalk console, or you can use the AWS toolkits,
AWS CLI, EB CLI, or Elastic Beanstalk API. If you use the Elastic Beanstalk console, you just need to upload
your .war or .zip file and select the VPC settings inside the wizard. Elastic Beanstalk then creates your
environment inside your VPC and deploys your application. Alternatively, you can use the AWS toolkits,
API Version 2010-12-01
456
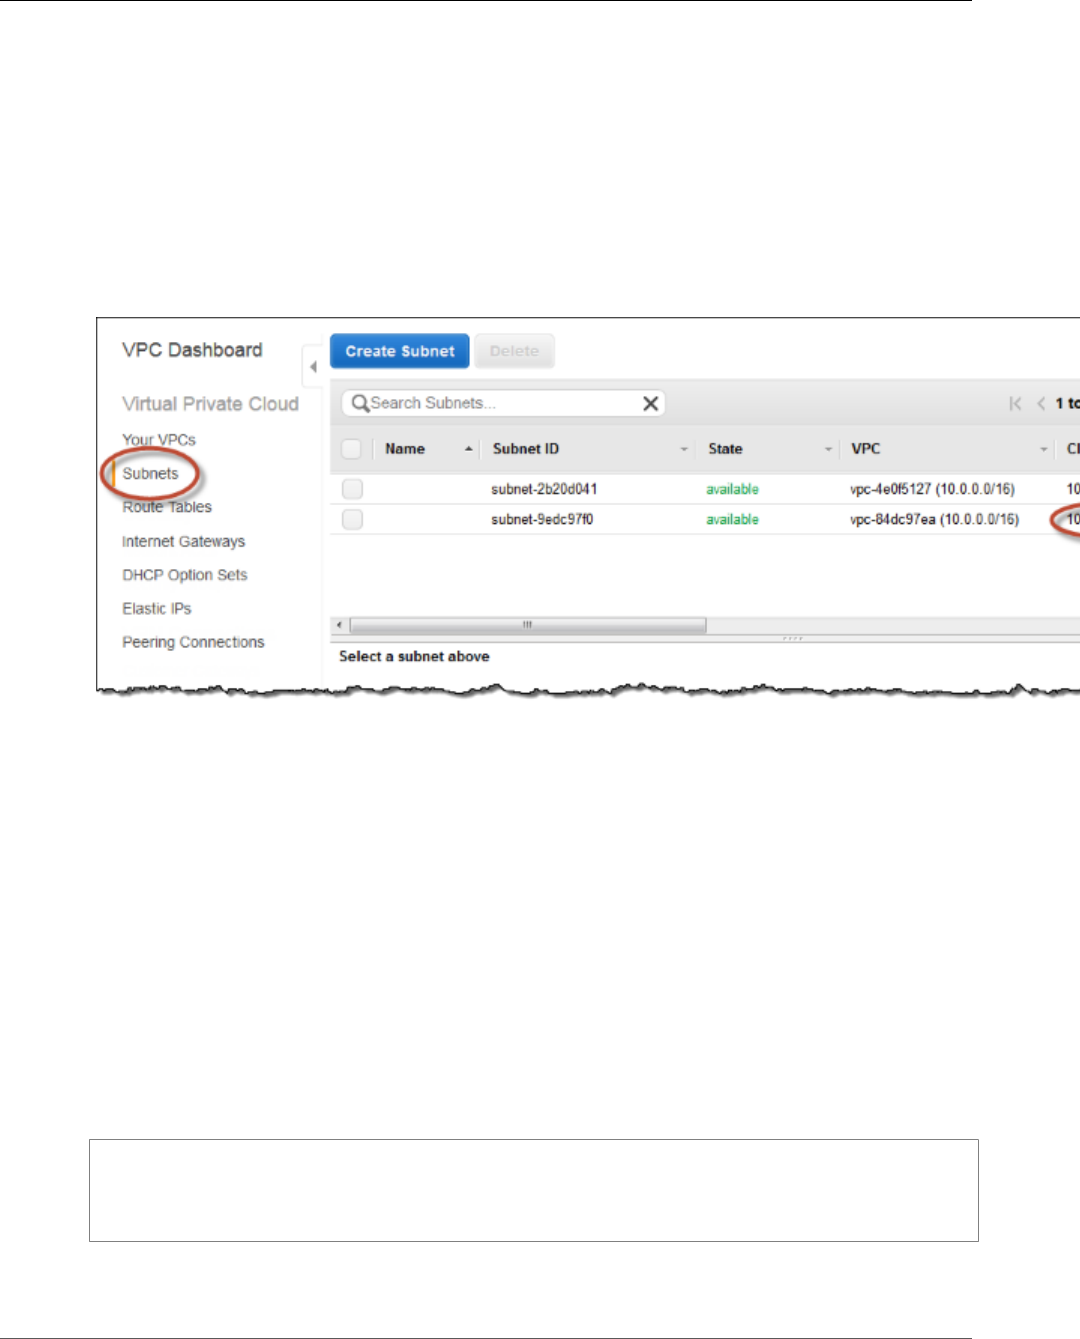
AWS Elastic Beanstalk Developer Guide
Single-Instance Environment in a VPC
AWS CLI, EB CLI, or Elastic Beanstalk API to deploy your application. To do this, you need to define
your VPC option settings in a configuration file and deploy this file with your source bundle. This topic
provides instructions for both methods.
Deploying with the Elastic Beanstalk Console
When you create an Elastic Beanstalk application or launch an environment, the Elastic Beanstalk console
walks you through creating your environment inside a VPC. For more information, see Managing and
Configuring AWS Elastic Beanstalk Applications (p. 49).
You'll need to select the VPC ID and subnet ID for your instance. By default, VPC creates a public subnet
using 10.0.0.0/24. You can view your subnet IDs by choosing Subnets in the Amazon VPC console.
Deploying with the AWS Toolkits, Eb, CLI, or API
When deploying your application to Elastic Beanstalk using the AWS toolkits, EB CLI, the AWS CLI, or API,
you can specify your VPC option settings in a file and deploy it with your source bundle. See Advanced
Environment Customization with Configuration Files (.ebextensions) (p. 256) for more information.
aws:ec2:vpc (p. 229) Namespace:
VPCId
The identifier of your VPC.
Subnets
The identifier(s) of the subnet(s) to launch the instances in.
You can specify multiple identifiers by separating them with a comma.
option_settings:
aws:ec2:vpc:
VPCId: "vpd_id"
Subnets: "instance_subnet, etc"
API Version 2010-12-01
457
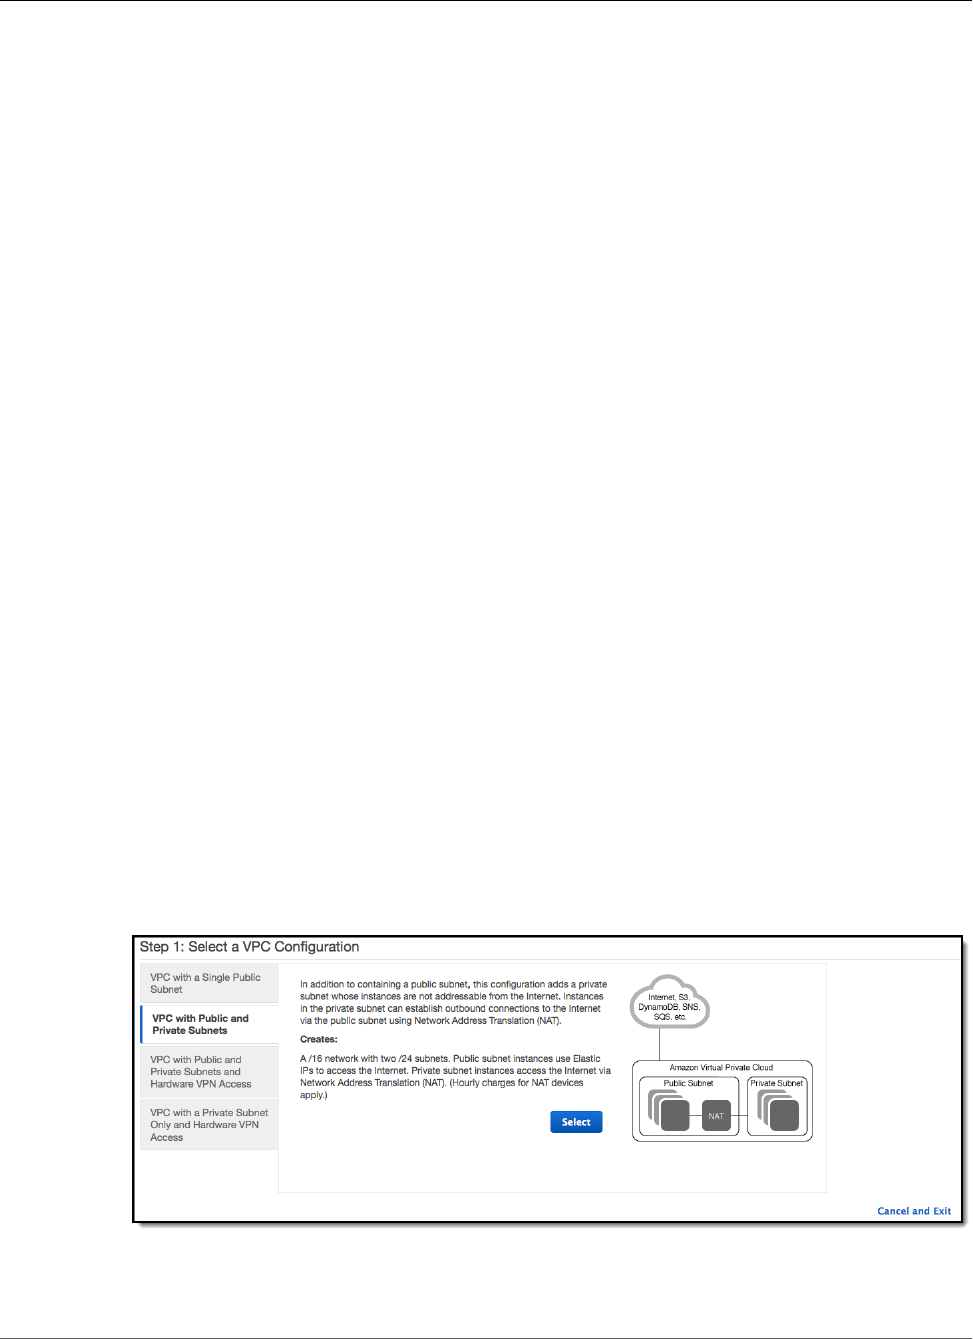
AWS Elastic Beanstalk Developer Guide
Load-Balancing Environment with Private Instances
Example: Launching a Load-Balancing, Autoscaling
Environment with Public and Private Resources in a
VPC
You can deploy an Elastic Beanstalk application in a load balancing, autoscaling environment in a VPC
that has both a public and private subnet. Use this configuration if you want Elastic Beanstalk to assign
private IP addresses to your Amazon EC2 instances. In this configuration, the Amazon EC2 instances in
the private subnet require a load balancer and a network address translation (NAT) gateway in the public
subnet. The load balancer routes inbound traffic from the Internet to the Amazon EC2 instances. You
need to create a NAT gateway to route outbound traffic from the Amazon EC2 instances to the Internet.
Your infrastructure will look similar to the following diagram.
Elastic Beanstalk and VPC Topology
Note
In this configuration, you cannot connect to your instances remotely because the instances
are located in a private subnet. If you need to be able to connect to your instances, and your
instances must be in a private subnet, you must implement a bastion host as described in
Example: Launching an Elastic Beanstalk Application in a VPC with Bastion Hosts (p. 462).
To deploy an Elastic Beanstalk application inside a VPC using a NAT gateway, you need to complete the
following:
Topics
•Create a VPC with a Public and Private Subnet (p. 458)
•Create a Security Group for Your Instances (p. 459)
•Deploy to Elastic Beanstalk (p. 460)
Create a VPC with a Public and Private Subnet
You can use the Amazon VPC console to create a VPC.
To create a VPC
1. Sign in to the Amazon VPC console.
2. In the navigation pane, choose VPC Dashboard. Then choose Start VPC Wizard.
3. Choose VPC with Public and Private Subnets and then choose Select.
4. Your Elastic Load Balancing load balancer and your Amazon EC2 instances must be in the same
Availability Zone so they can communicate with each other. Choose the same Availability Zone from
each Availability Zone list.
API Version 2010-12-01
458
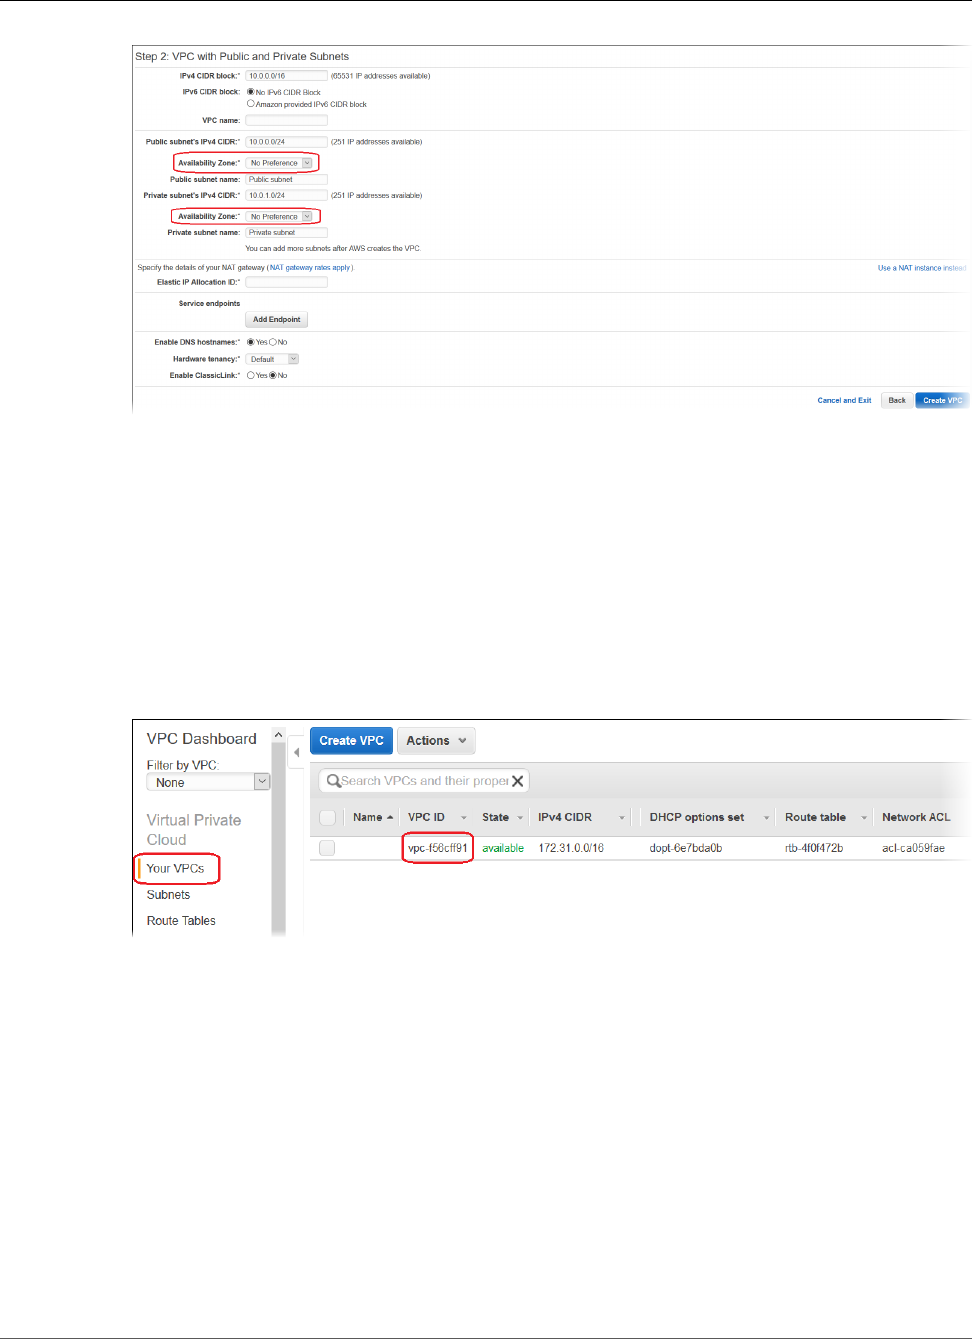
AWS Elastic Beanstalk Developer Guide
Load-Balancing Environment with Private Instances
5. Choose an Elastic IP address for your NAT gateway.
6. Choose Create VPC.
The wizard begins to create your VPC, subnets, and Internet gateway. It also updates the main route
table and creates a custom route table. Finally, the wizard creates a NAT gateway in the public
subnet.
Note
You can choose to launch a NAT instance in the public subnet instead of a NAT gateway. For
more information, see Scenario 2: VPC with Public and Private Subnets (NAT) in the Amazon
VPC User Guide.
7. After the VPC is successfully created, you get a VPC ID. You need this value for this for the next step.
To view your VPC ID, choose Your VPCs in the left pane of the Amazon VPC console.
Create a Security Group for Your Instances
You can optionally create a security group for your Elastic Beanstalk instances. You can add rules to the
security group to control inbound and outbound traffic for the instances associated with that security
group. To create a security group, perform the following procedure. You should give this security group
a meaningful name, such as Instance Group, that will allow you to easily identify the security group
later. For more information about security groups, see Security Groups for Your VPC in the Amazon VPC
User Guide.
To create a new security group
1. Open the Amazon VPC console at https://console.aws.amazon.com/vpc/.
2. In the navigation pane, choose Security Groups.
3. Choose Create Security Group.
API Version 2010-12-01
459

AWS Elastic Beanstalk Developer Guide
Load-Balancing Environment with Private Instances
4. In the Create Security Group dialog box, enter the following and choose Yes, Create.
Name tag (Optional)
Enter a name tag for the security group.
Group name
Enter the name of the security group.
Description
Enter a description for the security group.
VPC
Select your VPC.
The security group is created and appears on the Security Groups page. Notice that it has an ID (e.g.,
sg-xxxxxxxx). You might have to turn on the Group ID column by clicking Show/Hide in the top
right corner of the page.
Deploy to Elastic Beanstalk
After you set up your VPC, you can create your environment inside your VPC and deploy your application
to Elastic Beanstalk. You can do this using the Elastic Beanstalk console, or you can use the AWS toolkits,
AWS CLI, EB CLI, or Elastic Beanstalk API. If you use the Elastic Beanstalk console, you just need to upload
your .war or .zip file and select the VPC settings inside the wizard. Elastic Beanstalk then creates your
environment inside your VPC and deploys your application. Alternatively, you can use the AWS toolkits,
AWS CLI, EB CLI, or Elastic Beanstalk API to deploy your application. To do this, you need to define
your VPC option settings in a configuration file and deploy this file with your source bundle. This topic
provides instructions for both methods.
Topics
•Deploying with the Elastic Beanstalk Console (p. 460)
•Deploying with the AWS Toolkits, AWS CLI, EB CLI, or Elastic Beanstalk API (p. 461)
Deploying with the Elastic Beanstalk Console
The Elastic Beanstalk console walks you through creating your new environment inside your VPC. You
need to provide a .war file (for Java applications) or a .zip file (for all other applications). In the
VPC Configuration page of the Elastic Beanstalk environment wizard, you must make the following
selections:
VPC
Select your VPC
VPC security group
Select the instance security group you created above.
ELB visibility
Select External if your load balancer should be publicly available, or select Internal if the load
balancer should only be available within your VPC.
API Version 2010-12-01
460

AWS Elastic Beanstalk Developer Guide
Load-Balancing Environment with Private Instances
Select the subnets for your load balancer and EC2 instances. Make sure you select the public subnet for
the load balancer, and the private subnet for your Amazon EC2 instances. By default, the VPC creation
wizard creates the public subnet in 10.0.0.0/24 and the private subnet in 10.0.1.0/24.
You can view your subnet IDs by choosing Subnets in the Amazon VPC console.
Deploying with the AWS Toolkits, AWS CLI, EB CLI, or Elastic Beanstalk API
When deploying your application to Elastic Beanstalk using the AWS toolkits, EB CLI, the AWS CLI, or API,
you can specify your VPC option settings in a file and deploy it with your source bundle. See Advanced
Environment Customization with Configuration Files (.ebextensions) (p. 256) for more information.
When you create your configuration file with your option settings, you need to specify the following
configuration options:
aws:autoscaling:launchconfiguration (p. 221) Namespace:
EC2KeyName
The name of the Amazon EC2 key pair to apply to the instances.
InstanceType
The instance type used to run your application in the environment.
The instance types available depend on platform, solution stack (configuration) and
region. To get a list of available instance types for your solution stack of choice, use the
DescribeConfigurationOptions action in the API, describe-configuration-options command in the
AWS CLI.
SecurityGroups
The identifier(s) of the security group(s) to apply to the instances. In this example, this will be the
identifier of the security group you created in Create a Security Group for Your Instances (p. 459). If
you did not create a security group, you can use the default security group for your VPC.
You can specify multiple identifiers by separating them with a comma.
aws:ec2:vpc (p. 229) Namespace:
VPCId
The identifier of your VPC.
API Version 2010-12-01
461

AWS Elastic Beanstalk Developer Guide
Bastion Hosts
Subnets
The identifier(s) of the subnet(s) to launch the instances in. In this example, this is the ID of the
private subnet.
You can specify multiple identifiers by separating them with a comma.
ELBSubnets
The identifier(s) of the subnet(s) for the load balancer. In this example, this is the ID of the public
subnet.
You can specify multiple identifiers by separating them with a comma.
ELBScheme (Optional)
Specify internal if you want to create an internal load balancer inside your VPC so that your
Elastic Beanstalk application cannot be accessed from outside your VPC.
DBSubnets (Optional)
Contains the identifiers of the Amazon RDS DB subnets. This is only used if you want to add an
Amazon RDS DB Instance as part of your application. For an example, see Example: Launching an
Elastic Beanstalk in a VPC with Amazon RDS (p. 466).
Note
When using DBSubnets, you need to create additional subnets in your VPC to cover all the
Availability Zones in the region.
The following is an example of the option settings you could set when deploying your Elastic Beanstalk
application inside a VPC.
option_settings:
aws:autoscaling:launchconfiguration:
EC2KeyName: "ec2_key_name"
InstanceType: "instance_type"
SecurityGroups: "security_group_id, etc"
aws:ec2:vpc:
VPCId: "vpc_id"
Subnets: "instance_subnet, etc"
ELBSubnets: "elb_subnet, etc"
Example: Launching an Elastic Beanstalk Application
in a VPC with Bastion Hosts
If your Amazon EC2 instances are located inside a private subnet, you will not be able to connect to them
remotely. To connect to your instances, you can set up bastion servers in the public subnet to act as
proxies. For example, you can set up SSH port forwarders or RDP gateways in the public subnet to proxy
the traffic going to your database servers from your own network. This section provides an example
of how to create a VPC with a private and public subnet. The instances are located inside the private
subnet, and the bastion host, NAT gateway, and load balancer are located inside the public subnet. Your
infrastructure will look similar to the following diagram:
API Version 2010-12-01
462

AWS Elastic Beanstalk Developer Guide
Bastion Hosts
To deploy an Elastic Beanstalk application inside a VPC using a bastion host, you need to complete the
following:
Topics
•Create a VPC with a Public and Private Subnet (p. 464)
•Create and Configure the Bastion Host Security Group (p. 464)
•Update the Instance Security Group (p. 465)
•Create a Bastion Host (p. 466)
API Version 2010-12-01
463

AWS Elastic Beanstalk Developer Guide
Bastion Hosts
Create a VPC with a Public and Private Subnet
Complete all of the procedures in Example: Launching a Load-Balancing, Autoscaling Environment
with Public and Private Resources in a VPC (p. 458), including deployment of your application. When
deploying the application, you must specify an Amazon EC2 key pair for the instances so you can connect
to them remotely. For more information about how to specify the instance key pair, see EC2 Instance
Launch Configuration (p. 167).
Create and Configure the Bastion Host Security Group
Create a security group for the bastion host, and add rules that allow inbound SSH traffic from the
Internet, and outbound SSH traffic to the private subnet that contains the Amazon EC2 instances.
1. Create the bastion host security group.
To create a new security group
1. Open the Amazon VPC console at https://console.aws.amazon.com/vpc/.
2. In the navigation pane, choose Security Groups.
3. Choose Create Security Group.
4. In the Create Security Group dialog box, enter the following and choose Yes, Create.
Name tag (Optional)
Enter a name tag for the security group.
Group name
Enter the name of the security group.
Description
Enter a description for the security group.
VPC
Select your VPC.
The security group is created and appears on the Security Groups page. Notice that it has an ID
(e.g., sg-xxxxxxxx). You might have to turn on the Group ID column by clicking Show/Hide in
the top right corner of the page.
2. Configure the bastion host security group.
To update the security group for the bastion host
1. In the list of security groups, select the check box for the security group you just created for
your bastion host.
2. On the Inbound tab, choose Edit.
3. If needed, choose Add another rule.
4. If your bastion host is a Linux instance, under Type, select SSH.
If your bastion host is a Windows instance, under Type, select RDP.
5. Enter the desired source CIDR range in the Source field and choose Save.
API Version 2010-12-01
464
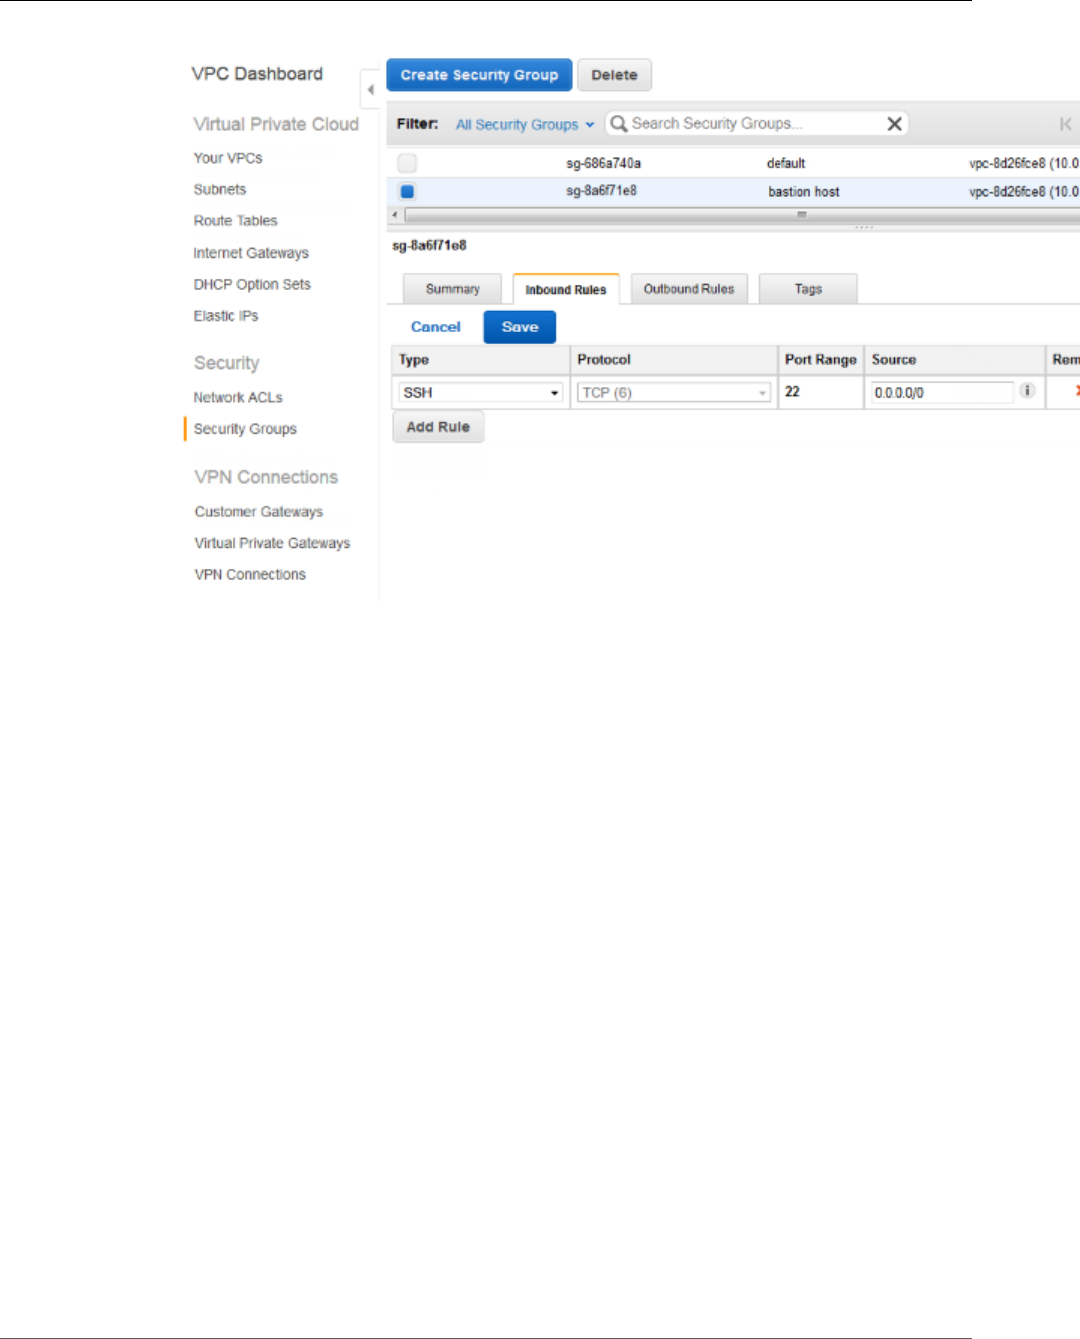
AWS Elastic Beanstalk Developer Guide
Bastion Hosts
Update the Instance Security Group
By default, the security group you created for your instances does not allow incoming traffic. While
Elastic Beanstalk will modify the default group for the instances to allow SSH traffic, you must modify
your custom instance security group to allow RDP traffic if your instances are Windows instances.
To update the instance security group for RDP
1. In the list of security groups, select the check box for the instance security group.
2. On the Inbound tab, choose Edit.
3. If needed, choose Add another rule.
4. Enter the following values, and choose Save.
Type
RDP
Protocol
TCP
Port Range
3389
Source
Enter the ID of the bastion host security group (e.g., sg-8a6f71e8) and choose Save.
API Version 2010-12-01
465

AWS Elastic Beanstalk Developer Guide
Amazon RDS
Create a Bastion Host
To create a bastion host, you launch an Amazon EC2 instance in your public subnet that will act as the
bastion host.
For more information about setting up a bastion host for Windows instances in the private subnet, see
Controlling Network Access to EC2 Instances Using a Bastion Server .
For more information about setting up a bastion host for Linux instances in the private subnet, see
Securely Connect to Linux Instances Running in a Private Amazon VPC .
Example: Launching an Elastic Beanstalk in a VPC
with Amazon RDS
This topic walks you through deploying an Elastic Beanstalk application with Amazon RDS in a VPC using
a NAT gateway. Your infrastructure will look similar to the following diagram:
API Version 2010-12-01
466
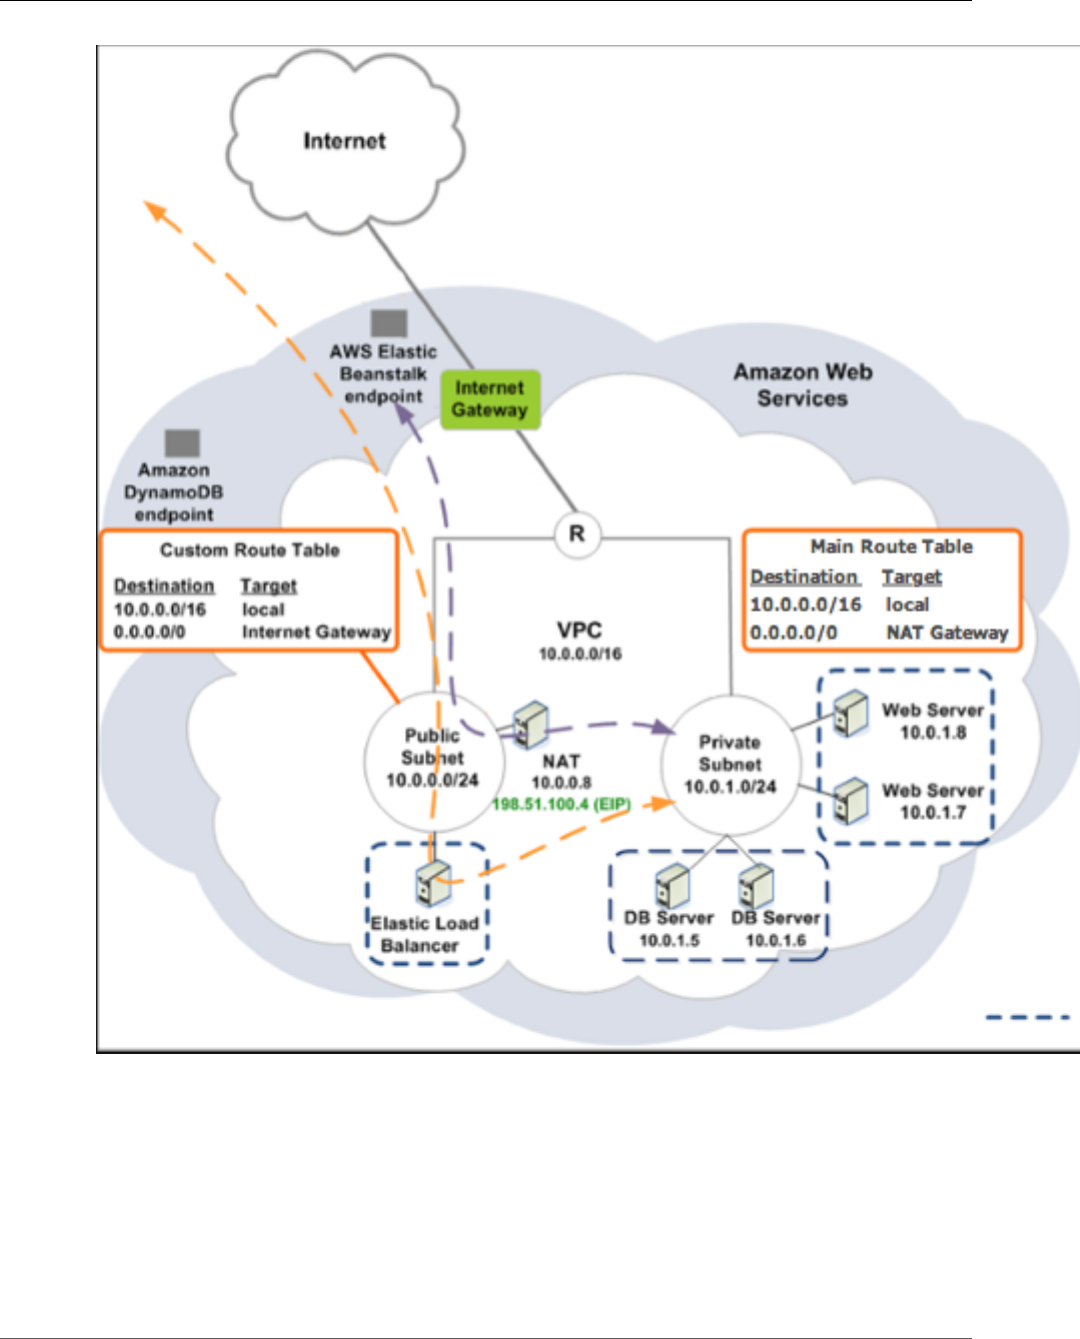
AWS Elastic Beanstalk Developer Guide
Amazon RDS
Note
If you haven't used a DB instance with your application before, try adding one to a test
environment (p. 186), and connecting to an external DB instance (p. 439) before adding VPC
configuration to the mix.
To deploy an Elastic Beanstalk application with Amazon RDS inside a VPC using a NAT gateway, you need
to complete the following:
Topics
•Create a VPC with a Public and Private Subnet (p. 468)
•Create a DB Subnet Group (p. 469)
API Version 2010-12-01
467

AWS Elastic Beanstalk Developer Guide
Amazon RDS
•Deploy to Elastic Beanstalk (p. 470)
Create a VPC with a Public and Private Subnet
You can use the Amazon VPC console to create a VPC.
To create a VPC
1. Sign in to the Amazon VPC console.
2. In the navigation pane, choose VPC Dashboard. Then choose Start VPC Wizard.
3. Choose VPC with Public and Private Subnets and then choose Select.
4. Your Elastic Load Balancing load balancer and your Amazon EC2 instances must be in the same
Availability Zone so they can communicate with each other. Choose the same Availability Zone from
each Availability Zone list.
5. Choose an Elastic IP address for your NAT gateway.
6. Choose Create VPC.
The wizard begins to create your VPC, subnets, and Internet gateway. It also updates the main route
table and creates a custom route table. Finally, the wizard creates a NAT gateway in the public
subnet.
Note
You can choose to launch a NAT instance in the public subnet instead of a NAT gateway. For
more information, see Scenario 2: VPC with Public and Private Subnets (NAT) in the Amazon
VPC User Guide.
API Version 2010-12-01
468
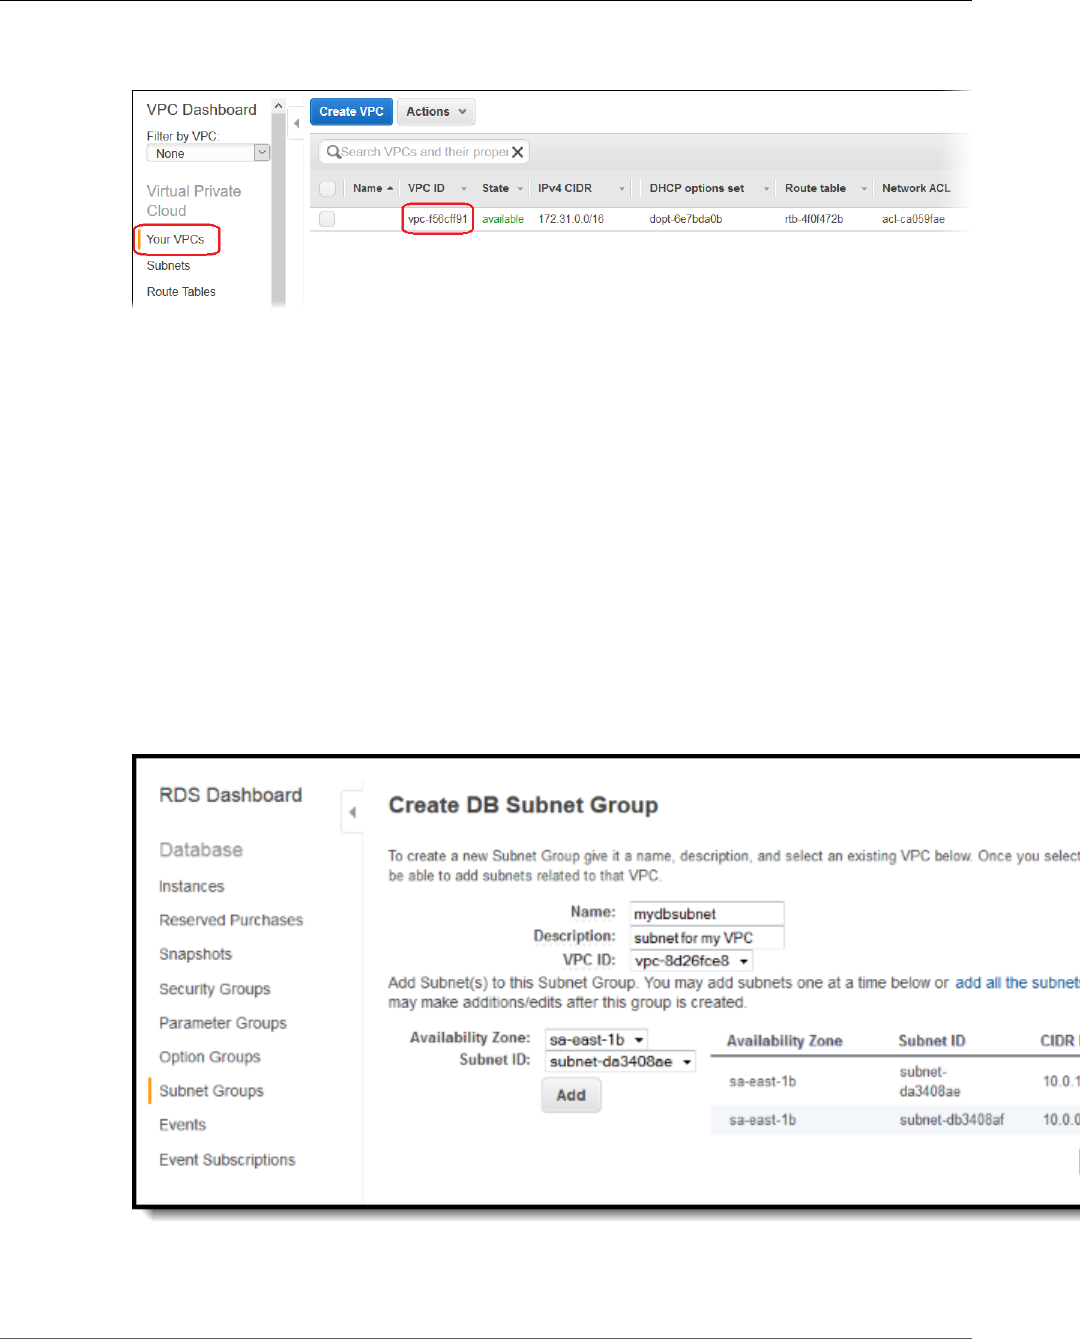
AWS Elastic Beanstalk Developer Guide
Amazon RDS
7. After the VPC is successfully created, you get a VPC ID. You need this value for this for the next step.
To view your VPC ID, choose Your VPCs in the left pane of the Amazon VPC console.
Create a DB Subnet Group
A DB Subnet Group for a VPC is a collection of subnets (typically private) that you may want to designate
for your back-end RDS DB Instances. Each DB Subnet Group should have at least one subnet for every
Availability Zone in a given region.
Create a DB subnet group
1. Open the Amazon RDS console at https://console.aws.amazon.com/rds/.
2. In the navigation pane, click Subnet Groups.
3. Click Create DB Subnet Group.
4. Click Name, and then type the name of your DB Subnet Group.
5. Click Description, and then describe your DB Subnet Group.
6. Next to VPC ID, select the ID of the VPC that you created.
7. Click the add all the subnets link in the Add Subnet(s) to this Subnet Group section.
8. When you are finished, click Yes, Create.
9. In the confirmation window, click Close.
API Version 2010-12-01
469
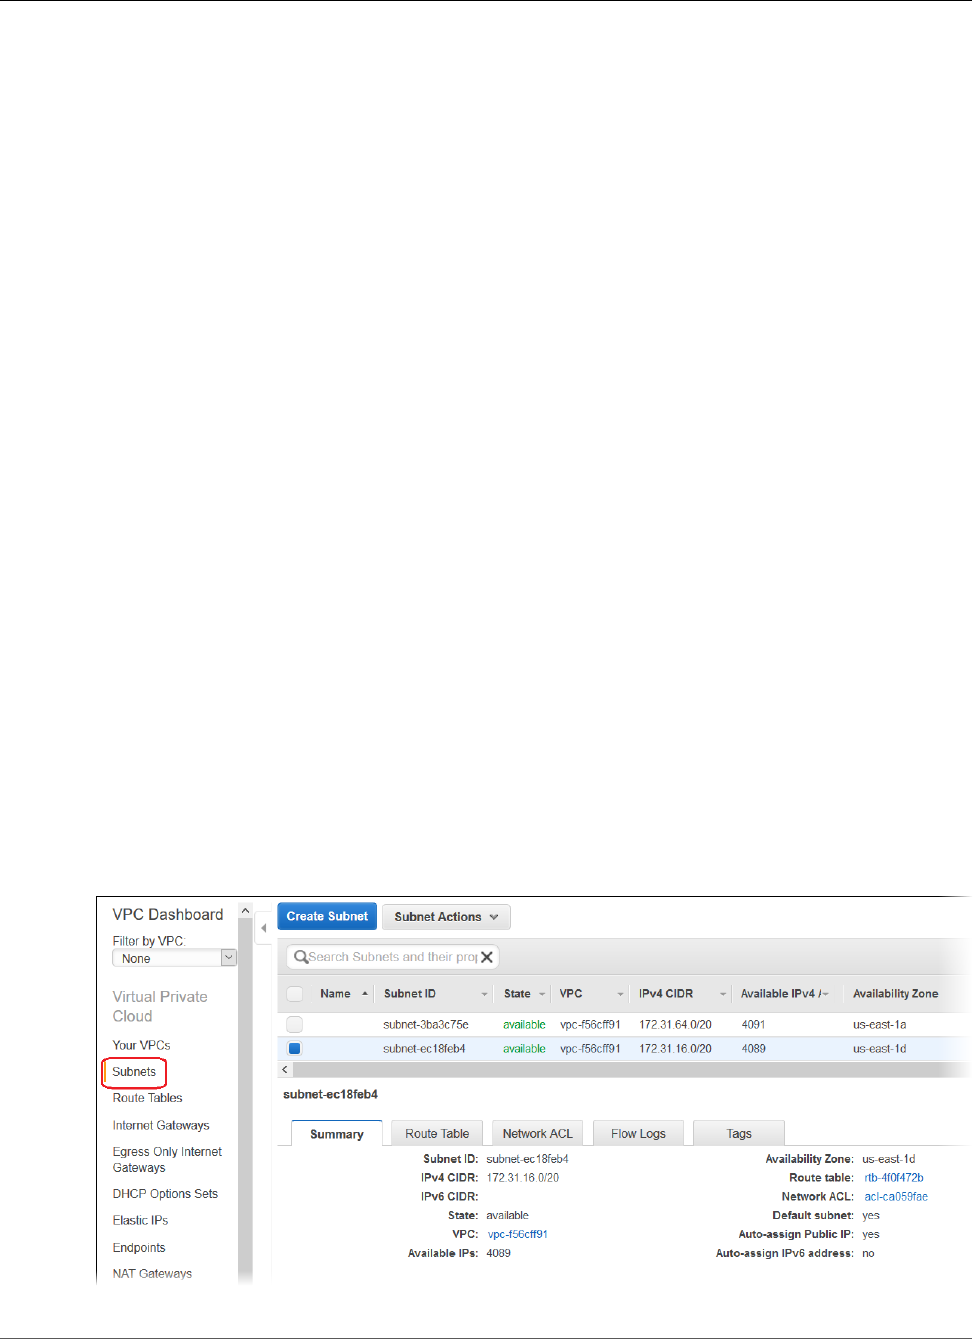
AWS Elastic Beanstalk Developer Guide
Amazon RDS
Your new DB Subnet Group appears in the DB Subnet Groups list of the RDS console. You can click it
to see details, such as all of the subnets associated with this group, in the details pane at the bottom
of the window.
Deploy to Elastic Beanstalk
After you set up your VPC, you can create your environment inside your VPC and deploy your application
to Elastic Beanstalk. You can do this using the Elastic Beanstalk console, or you can use the AWS toolkits,
AWS CLI, EB CLI, or Elastic Beanstalk API. If you use the Elastic Beanstalk console, you just need to upload
your .war or .zip file and select the VPC settings inside the wizard. Elastic Beanstalk then creates your
environment inside your VPC and deploys your application. Alternatively, you can use the AWS toolkits,
AWS CLI, EB CLI, or Elastic Beanstalk API to deploy your application. To do this, you need to define
your VPC option settings in a configuration file and deploy this file with your source bundle. This topic
provides instructions for both methods.
Deploying with the Elastic Beanstalk Console
The Elastic Beanstalk console walks you through creating your new environment inside your VPC. You
need to provide a .war file (for Java applications) or a .zip file (for all other applications). In the
VPC Configuration page of the Elastic Beanstalk environment wizard, you must make the following
selections:
VPC
Select your VPC
VPC security group
Select the instance security group you created above.
ELB visibility
Select External if your load balancer should be publicly available, or select Internal if the load
balancer should only be available within your VPC.
Select the subnets for your load balancer and EC2 instances. Make sure you select the public subnet for
the load balancer, and the private subnet for your Amazon EC2 instances. By default, the VPC creation
wizard creates the public subnet in 10.0.0.0/24 and the private subnet in 10.0.1.0/24.
You can view your subnet IDs by choosing Subnets in the Amazon VPC console.
API Version 2010-12-01
470

AWS Elastic Beanstalk Developer Guide
Amazon RDS
Deploying with the AWS Toolkits, Eb, CLI, or API
When deploying your application to Elastic Beanstalk using the AWS toolkits, EB CLI, the AWS CLI, or API,
you can specify your VPC option settings in a file and deploy it with your source bundle. See Advanced
Environment Customization with Configuration Files (.ebextensions) (p. 256) for more information.
When you update the option settings, you will need to specify at least the following:
•VPCId–Contains the ID of the VPC.
•Subnets–Contains the ID of the Auto Scaling group subnet. In this example, this is the ID of the private
subnet.
•ELBSubnets–Contains the ID of the subnet for the elastic load balancer. In this example, this is the ID
of the public subnet.
•SecurityGroups–Contains the ID of the security groups.
•DBSubnets–Contains the ID of the DB subnets.
Note
When using DBSubnets, you need to create additional subnets in your VPC to cover all the
Availability Zones in the region.
Optionally, you can also specify the following information:
•ELBScheme — Specify internal if you want to create an internal load balancer inside your VPC so
that your Elastic Beanstalk application cannot be accessed from outside your VPC.
The following is an example of the option settings you could use when deploying your Elastic Beanstalk
application inside a VPC. For more information about VPC option settings (including examples for how
to specify them, default values, and valid values), see the aws:ec2:vpc namespace table in Configuration
Options (p. 202).
option_settings:
- namespace: aws:autoscaling:launchconfiguration
option_name: EC2KeyName
value: ec2keypair
- namespace: aws:ec2:vpc
option_name: VPCId
value: vpc-170647c
- namespace: aws:ec2:vpc
option_name: Subnets
value: subnet-4f195024
- namespace: aws:ec2:vpc
option_name: ELBSubnets
value: subnet-fe064f95
- namespace: aws:ec2:vpc
option_name: DBSubnets
value: subnet-fg148g78
- namespace: aws:autoscaling:launchconfiguration
option_name: InstanceType
value: m1.small
- namespace: aws:autoscaling:launchconfiguration
option_name: SecurityGroups
value: sg-7f1ef110
API Version 2010-12-01
471
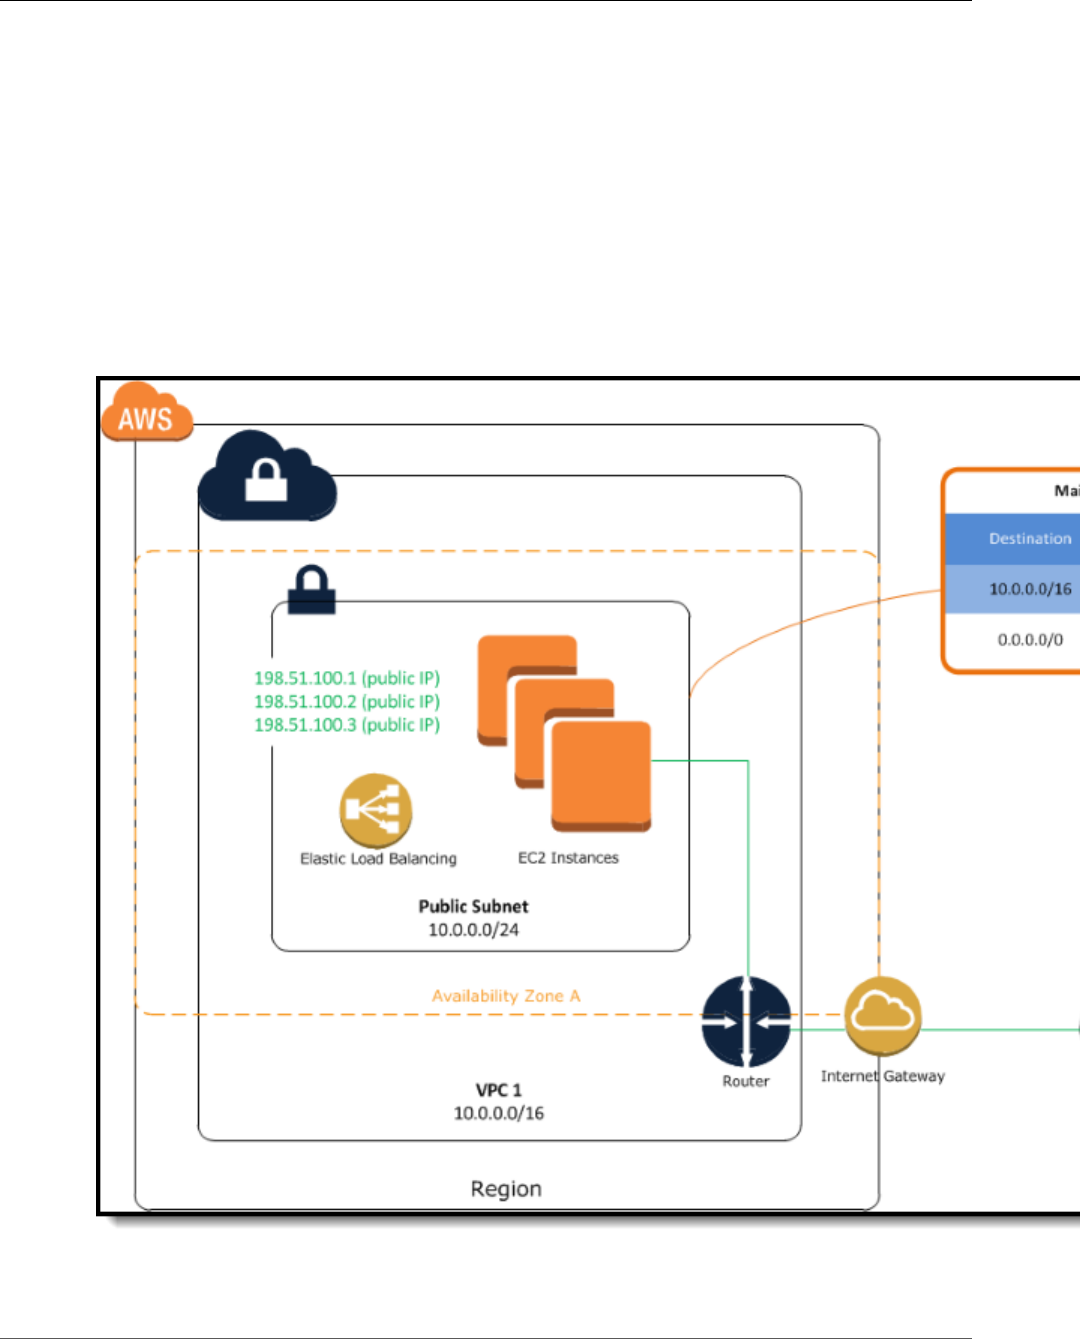
AWS Elastic Beanstalk Developer Guide
Load-Balancing Environment with Public Instances
Note
When using DBSubnets, make sure you have subnets in your VPC to cover all the Availability
Zones in the region.
Example: Launching a Load-Balancing, Autoscaling
Environment with Public Instances in a VPC
You can deploy an Elastic Beanstalk application in a load balancing, autoscaling environment in a single
public subnet. Use this configuration if you have a single public subnet without any private resources
associated with your Amazon EC2 instances. In this configuration, Elastic Beanstalk assigns public IP
addresses to the Amazon EC2 instances so that each can directly access the Internet through the VPC
Internet gateway. You do not need to create a network address translation (NAT) configuration in your
VPC.
To deploy an Elastic Beanstalk application in a load balancing, autoscaling environment in a single public
subnet, you need to complete the following:
API Version 2010-12-01
472
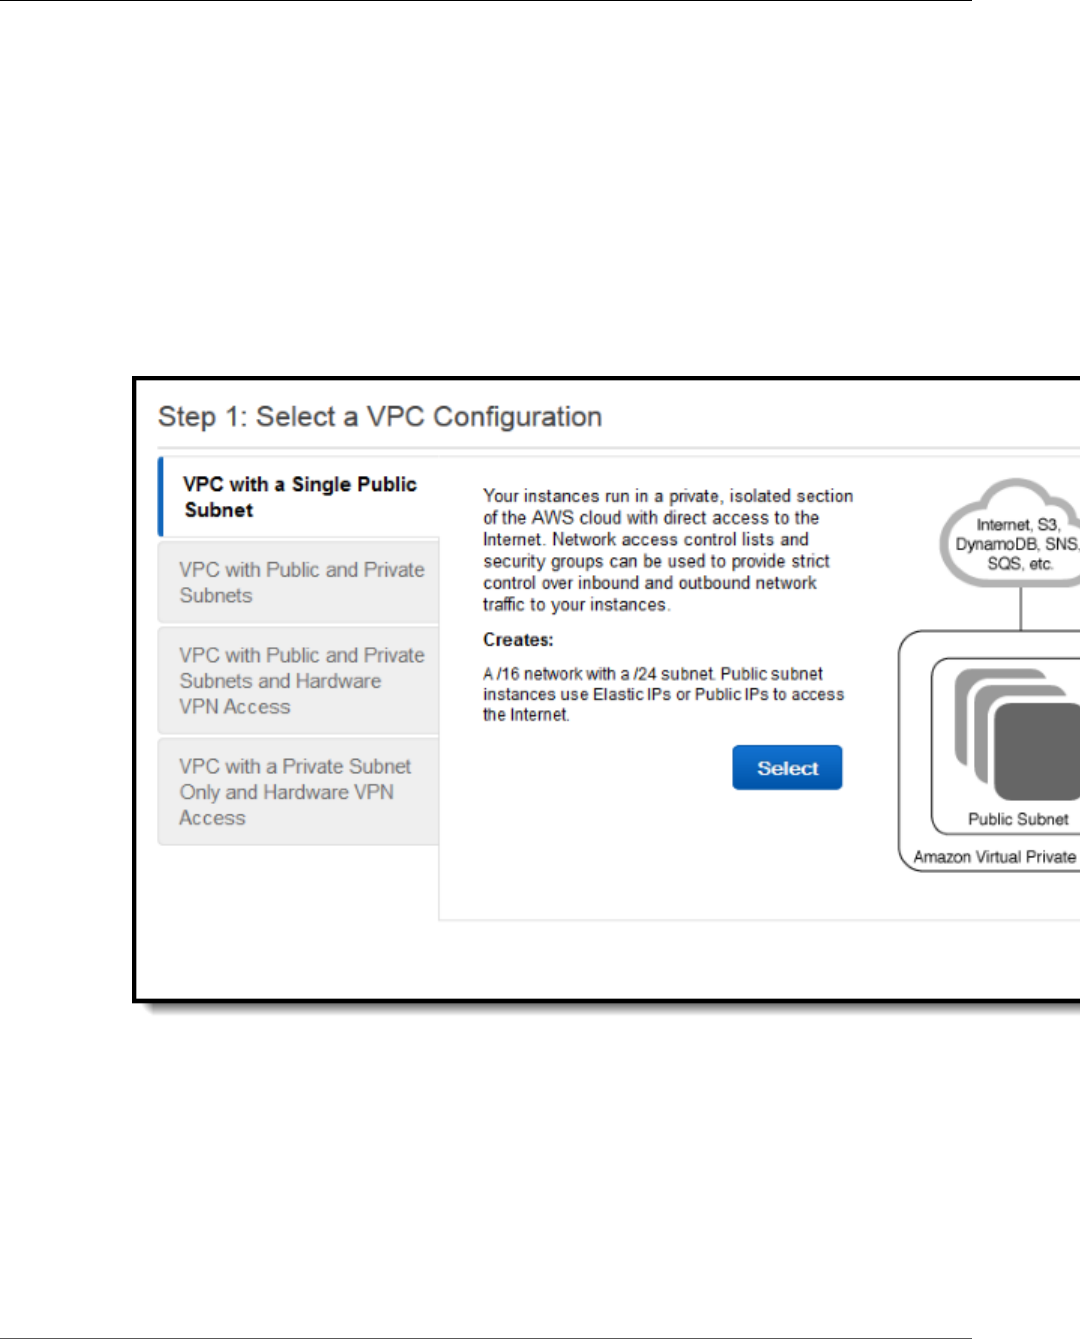
AWS Elastic Beanstalk Developer Guide
Load-Balancing Environment with Public Instances
Topics
•Create a VPC with a Public Subnet (p. 473)
•Deploy to Elastic Beanstalk (p. 474)
Create a VPC with a Public Subnet
To create a VPC
1. Sign in to the AWS Management Console and open the Amazon VPC console at https://
console.aws.amazon.com/vpc/.
2. In the navigation pane, choose VPC Dashboard and then choose Start VPC Wizard.
3. Select VPC with a Single Public Subnet and then choose Select.
A confirmation page shows the CIDR blocks used for the VPC and subnet. The page also shows the
subnet and the associated Availability Zone.
API Version 2010-12-01
473

AWS Elastic Beanstalk Developer Guide
Load-Balancing Environment with Public Instances
4. Choose Create VPC.
AWS creates your VPC, subnet, Internet gateway, and route table. Choose OK to exit the wizard.
After AWS successfully creates the VPC, it assigns the VPC a VPC ID. You will need this for this for the
next step. To view your VPC ID, choose Your VPCs in the left pane of the Amazon VPC console.
Deploy to Elastic Beanstalk
After you set up your VPC, you can create your environment inside your VPC and deploy your application
to Elastic Beanstalk. You can do this using the Elastic Beanstalk console, or you can use the AWS toolkits,
AWS CLI, EB CLI, or Elastic Beanstalk API. If you use the Elastic Beanstalk console, you just need to upload
your .war or .zip file and select the VPC settings inside the wizard. Elastic Beanstalk then creates your
environment inside your VPC and deploys your application. Alternatively, you can use the AWS toolkits,
API Version 2010-12-01
474
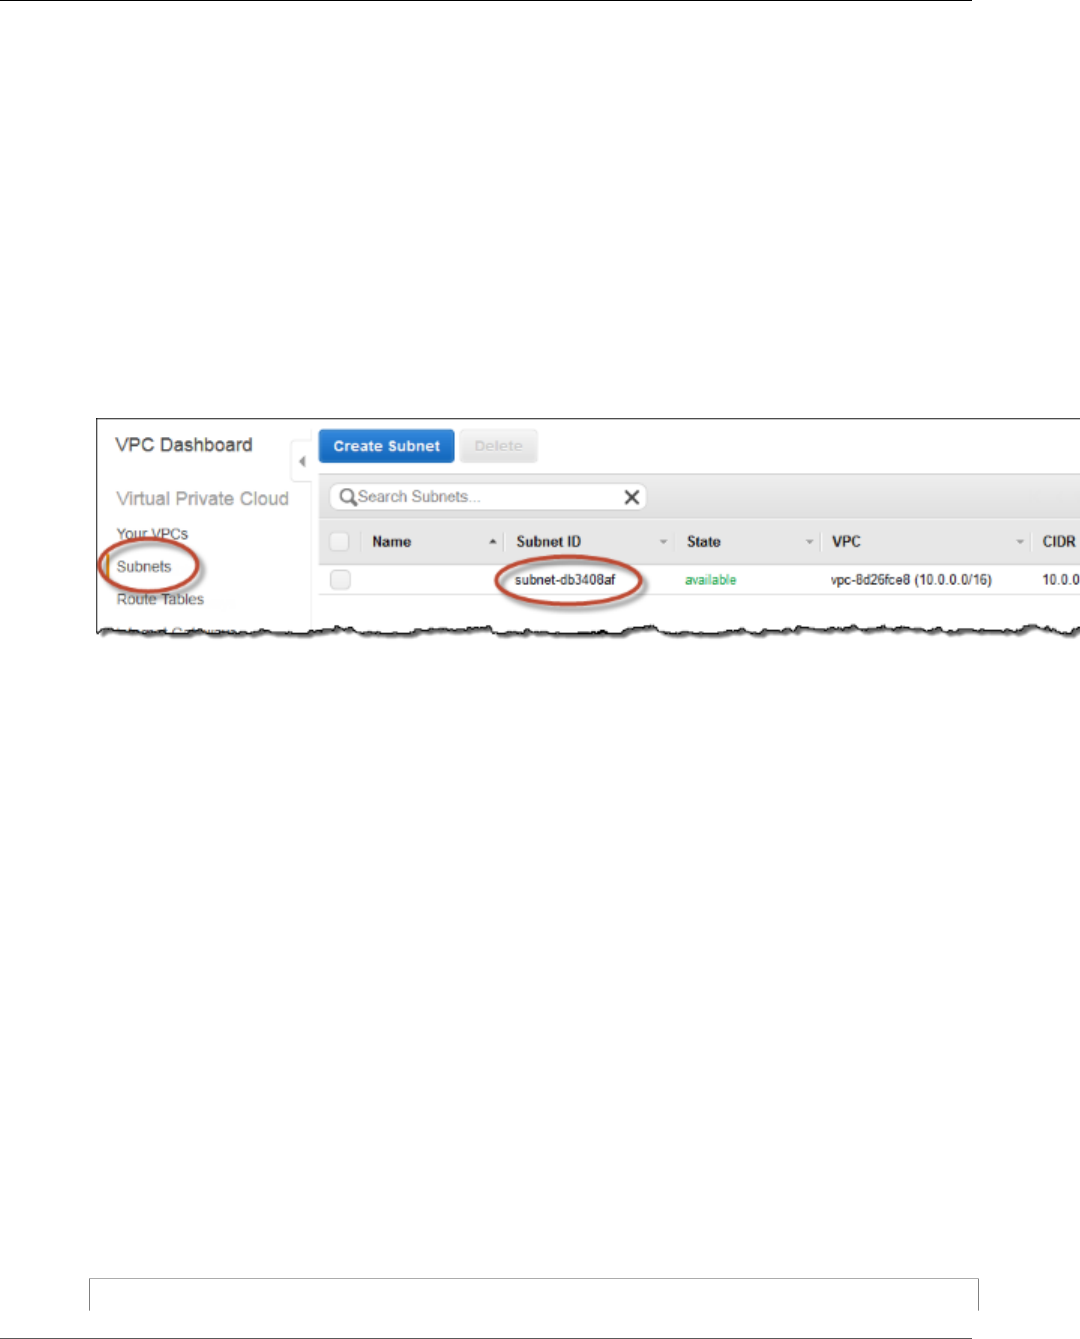
AWS Elastic Beanstalk Developer Guide
Load-Balancing Environment with Public Instances
AWS CLI, EB CLI, or Elastic Beanstalk API to deploy your application. To do this, you need to define
your VPC option settings in a configuration file and deploy this file with your source bundle. This topic
provides instructions for both methods.
Topics
•Deploying with the Elastic Beanstalk Console (p. 475)
•Deploying with the AWS Toolkits, AWS CLI, EB CLI, or Elastic Beanstalk API (p. 475)
Deploying with the Elastic Beanstalk Console
When you create an Elastic Beanstalk application or launch an environment, the Elastic Beanstalk console
walks you through creating your environment inside a VPC. For more information, see Managing and
Configuring AWS Elastic Beanstalk Applications (p. 49).
You'll need to select the VPC ID and subnet ID for your instance. By default, VPC creates a public subnet
using 10.0.0.0/24. You can view your subnet ID by clicking Subnets in the Amazon VPC console.
Deploying with the AWS Toolkits, AWS CLI, EB CLI, or Elastic Beanstalk API
When deploying your application to Elastic Beanstalk using the AWS toolkits, EB CLI, the AWS CLI, or API,
you can specify your VPC option settings in a file and deploy it with your source bundle. See Advanced
Environment Customization with Configuration Files (.ebextensions) (p. 256) for more information.
When you create your configuration file with your option settings, you need to specify the following
configuration options:
aws:ec2:vpc (p. 229) Namespace:
VPCId
The identifier of your VPC.
Subnets
The identifier(s) of the subnet(s) to launch the instances in.
You can specify multiple identifiers by separating them with a comma.
AssociatePublicIpAddress
Specifies whether to launch instances in your VPC with public IP addresses. Instances with public IP
addresses do not require a NAT device to communicate with the Internet. You must set the value to
true if you want to include your load balancer and instances in a single public subnet.
The following is an example of the option settings you could set when deploying your Elastic Beanstalk
application inside a VPC.
option_settings:
API Version 2010-12-01
475

AWS Elastic Beanstalk Developer Guide
Load-Balancing Environment with Public Instances
aws:ec2:vpc:
VPCId: "vpd_id"
Subnets: "instance_subnet, etc"
AssociatePublicIpAddress: "true"
API Version 2010-12-01
476

AWS Elastic Beanstalk Developer Guide
Creating a Project Folder
Configuring your development
environment for use with AWS
Elastic Beanstalk
Topics
•Creating a Project Folder (p. 477)
•Setting Up Source Control (p. 477)
•Configuring a Remote Repository (p. 478)
•Installing the EB CLI (p. 478)
•Installing the AWS CLI (p. 478)
Creating a Project Folder
Create a folder for your project. You can store the folder anywhere on your local disk as long as you have
permission to read from and write to it. Creating a folder in your user folder is acceptable. If you plan on
working on multiple applications, create your project folders inside another folder named something like
workspace or projects to keep everything organized:
workspace/
|-- my-first-app
`-- my-second-app
The contents of your project folder will vary depending on the web container or framework that your
application uses.
Note
Avoid folders and paths with single-quote (') or double-quote (") characters in the folder name
or any path element. Some Elastic Beanstalk commands fail when run within a folder with either
character in the name.
Setting Up Source Control
Set up source control to protect yourself from accidentally deleting files or code in your project folder,
and for a way to revert changes that break your project.
If you don't have a source control system, consider Git, a free and easy-to-use option, and it integrates
well with the Elastic Beanstalk Command Line Interface (CLI). Visit the Git homepage to install Git.
Follow the instructions on the Git website to install and configure Git, and then run git init in your
project folder to set up a local repository:
~/workspace/my-first-app$ git init
Initialized empty Git repository in /home/local/username/workspace/my-first-app/.git/
API Version 2010-12-01
477

AWS Elastic Beanstalk Developer Guide
Configuring a Remote Repository
As you add content to your project folder and update content, commit the changes to your Git
repository:
~/workspace/my-first-app$ git add default.jsp
~/workspace/my-first-app$ git commit -m "add default JSP"
Every time you commit, you create a snapshot of your project that you can restore later if anything goes
wrong. For much more information on Git commands and workflows, see the Git documentation.
Configuring a Remote Repository
What if your hard drive crashes, or you want to work on your project on a different computer? To back up
your source code online and access it from any computer, configure a remote repository to which you can
push your commits.
AWS CodeCommit lets you create a private repository in the AWS cloud, and is free in the AWS Free Tier
for up to five AWS Identity and Access Management (IAM) users in your account. For pricing details, see
AWS CodeCommit Pricing.
Visit the AWS CodeCommit User Guide for instructions on getting set up.
GitHub is another popular option for storing your project code online. It lets you create a public online
repository for free and also supports private repositories for a monthly charge. Sign up for GitHub at
github.com.
After you've created a remote repository for your project, attach it to your local repository with git
remote add:
~/workspace/my-first-app$ git remote add origin ssh://git-codecommit.us-
east-2.amazonaws.com/v1/repos/my-repo
Installing the EB CLI
Use the EB CLI (p. 480) to manage your Elastic Beanstalk environments and monitor health from the
command line. See Install the EB CLI (p. 481) for installation instructions.
By default, the EB CLI packages everything in your project folder and uploads it to Elastic Beanstalk as
a source bundle. When you use Git and the EB CLI together, you can prevent built class files from being
committed to source with .gitignore and prevent source files from being deployed with .ebignore.
You can also configure the EB CLI to deploy a build artifact (p. 491) (a WAR or ZIP file) instead of the
contents of your project folder.
Installing the AWS CLI
The AWS Command Line Interface (AWS CLI) is a unified client for AWS services that provides commands
for all public API operations. These commands are lower level than those provided by the EB CLI, so
it often takes more commands to do an operation with the AWS CLI. On the other hand, the AWS
CLI allows you to work with any application or environment running in your account without setting
up a repository on your local machine. Use the AWS CLI to create scripts that simplify or automate
operational tasks.
API Version 2010-12-01
478


AWS Elastic Beanstalk Developer Guide
The Elastic Beanstalk Command Line
Interface (EB CLI)
The EB CLI is a command line interface for Elastic Beanstalk that provides interactive commands that
simplify creating, updating and monitoring environments from a local repository. Use the EB CLI as part
of your everyday development and testing cycle as an alternative to the AWS Management Console.
Note
The current version of the EB CLI has a different base set of commands than versions prior to
version 3.0. See EB CLI 2.6 (Deprecated) (p. 558) if you use an older version.
Once you've installed the EB CLI and configured a repository, you can create environments with a single
command:
~/my-app$ eb create my-env
Previously, Elastic Beanstalk supported a separate CLI that provided direct access to API operations called
the Elastic Beanstalk API CLI (p. 585). This has been replaced with the AWS CLI (p. 478), which provides
the same functionality but for all AWS services' APIs.
With the AWS CLI you have direct access to the Elastic Beanstalk API. The AWS CLI is great for scripting,
but is not as easy to use from the command line because of the number of commands that you need to
run and the number of parameters on each command. For example, creating an environment requires a
series of commands:
~$ aws elasticbeanstalk check-dns-availability --cname-prefix my-cname
~$ aws elasticbeanstalk create-application-version --application-name my-application --
version-label v1 --source-bundle S3Bucket=my-bucket,S3Key=php-proxy-sample.zip
~$ aws elasticbeanstalk create-environment --cname-prefix my-cname --application-name my-
app --version-label v1 --environment-name my-env --solution-stack-name "64bit Amazon Linux
2015.03 v2.0.0 running Ruby 2.2 (Passenger Standalone)"
For information about installing the EB CLI, configuring a repository, and working with environments, see
the following topics:
Topics
•Install the Elastic Beanstalk Command Line Interface (EB CLI) (p. 481)
•Configure the EB CLI (p. 489)
•Managing Elastic Beanstalk Environments with the EB CLI (p. 492)
•Using the EB CLI with AWS CodeBuild (p. 497)
•Using the EB CLI with Git (p. 497)
•Using the EB CLI with AWS CodeCommit (p. 499)
•Using the EB CLI to Monitor Environment Health (p. 503)
•Managing Multiple AWS Elastic Beanstalk Environments as a Group with the EB CLI (p. 508)
•Troubleshooting issues with the EB CLI (p. 509)
•EB CLI Command Reference (p. 511)
•EB CLI 2.6 (Deprecated) (p. 558)
API Version 2010-12-01
480

AWS Elastic Beanstalk Developer Guide
Install the EB CLI
•Elastic Beanstalk API Command Line Interface (deprecated) (p. 585)
Install the Elastic Beanstalk Command Line
Interface (EB CLI)
The Elastic Beanstalk Command Line Interface (EB CLI) is a command line client that you can use to
create, configure, and manage Elastic Beanstalk environments. The EB CLI is developed in Python and
requires Python version 2.7, version 3.4, or newer.
Note
Amazon Linux comes with Python 2.7 and pip starting with version 2015.03.
The primary distribution method for the EB CLI on Linux, Windows, and macOS is pip, a package
manager for Python that provides an easy way to install, upgrade, and remove Python packages and
their dependencies. For macOS, you can also get the latest version of the EB CLI with Homebrew.
If you already have pip and a supported version of Python, you can install the EB CLI with the following
command:
$ pip install awsebcli --upgrade --user
The --upgrade option tells pip to upgrade any requirements that are already installed. The --user
option tells pip to install the program to a subdirectory of your user directory to avoid modifying
libraries used by your operating sytem.
Note
If you encounter issues when you attempt to install the EB CLI with pip, you can install the EB
CLI in a virtual environment (p. 488) to isolate the tool and its dependencies, or use a different
version of Python than you normally do.
After you install the EB CLI, add the path to the executable file to your PATH variable:
Linux – ~/.local/bin
macOS – ~/Library/Python/3.4/bin
To modify your PATH variable (Linux, macOS, or Unix)
1. Find your shell's profile script in your user folder. If you are not sure which shell you have, run echo
$SHELL.
$ ls -a ~
. .. .bash_logout .bash_profile .bashrc Desktop Documents Downloads
•Bash – .bash_profile, .profile, or .bash_login.
•Zsh – .zshrc
•Tcsh – .tcshrc, .cshrc or .login.
2. Add an export command to your profile script. The following example adds the path represented by
LOCAL_PATH to the current PATH variable.
export PATH=LOCAL_PATH:$PATH
3. Load the profile script described in the first step into your current session. The following example
loads the profile script represented by PROFILE_SCRIPT into your current session.
API Version 2010-12-01
481

AWS Elastic Beanstalk Developer Guide
Linux
$ source ~/PROFILE_SCRIPT
Windows – %USERPROFILE%\AppData\Roaming\Python\Scripts
Python 3.5 on Windows – %USERPROFILE%\AppData\Roaming\Python\Python3.5\Scripts
Python 3.6 on Windows – %USERPROFILE%\AppData\Roaming\Python\Python36\Scripts
To modify your PATH variable (Windows)
1. Press the Windows key and type environment variables.
2. Choose Edit environment variables for your account.
3. Choose PATH and then choose Edit.
4. Add paths to the Variable value field, separated by semicolons. For example: C:\existing
\path;C:\new\path
5. Choose OK twice to apply the new settings.
6. Close any running command prompts and re-open.
Verify that the EB CLI installed correctly by running eb --version.
$ eb --version
EB CLI 3.7.8 (Python 3.4.3)
The EB CLI is updated regularly to add functionality that supports the latest Elastic Beanstalk features.
To update to the latest version of the EB CLI, run the installation command again.
$ pip install awsebcli --upgrade --user
If you need to uninstall the EB CLI, use pip uninstall.
$ pip uninstall awsebcli
If you don't have Python and pip, use the procedure for your operating system:
Topics
•Install Python, pip, and the EB CLI on Linux (p. 482)
•Install Python, pip, and the EB CLI on Windows (p. 485)
•Install the EB CLI on macOS (p. 486)
•Install the EB CLI in a Virtual Environment (p. 488)
Install Python, pip, and the EB CLI on Linux
The EB CLI requires Python 2.7 or 3.4+. If your distribution did not come with Python, or came with an
older version, install Python before installing pip and the EB CLI.
To install Python 3.4 on Linux
1. Check to see if Python is already installed:
API Version 2010-12-01
482

AWS Elastic Beanstalk Developer Guide
Linux
$ python --version
Note
If your Linux distribution came with Python, you may need to install the Python developer
package in order to get the headers and libraries required to compile extensions and install
the EB CLI. Install the developer package (typically named python-dev or python-devel)
using your package manager.
2. If Python 2.7 or later is not installed, install Python 3.4 with your distribution's package manager.
The command and package name varies:
• On Debian derivatives such as Ubuntu, use APT:
$ sudo apt-get install python3.4
• On Red Hat and derivatives, use yum:
$ sudo yum install python34
• On SUSE and derivatives, use zypper:
$ sudo zypper install python3-3.4.1
3. Open a command prompt or shell and run the following command to verify that Python installed
correctly:
$ python3 --version
Python 3.4.3
Install pip by using the script provided by the Python Packaging Authority, and then install the EB CLI.
To install pip and the EB CLI
1. Download the installation script from pypa.io:
$ curl -O https://bootstrap.pypa.io/get-pip.py
The script downloads and installs the latest version of pip and another required package named
setuptools.
2. Run the script with Python:
$ python3 get-pip.py --user
Collecting pip
Downloading pip-8.1.2-py2.py3-none-any.whl (1.2MB)
Collecting setuptools
Downloading setuptools-26.1.1-py2.py3-none-any.whl (464kB)
Collecting wheel
Downloading wheel-0.29.0-py2.py3-none-any.whl (66kB)
Installing collected packages: pip, setuptools, wheel
Successfully installed pip setuptools wheel
Invoking version Python 3 directly by using the python3 command instead of python ensures that
pip is installed in the proper location, even if an older system version of Python is present on your
system.
3. Add the executable path to your PATH variable: ~/.local/bin
API Version 2010-12-01
483

AWS Elastic Beanstalk Developer Guide
Linux
To modify your PATH variable (Linux, macOS, or Unix)
1. Find your shell's profile script in your user folder. If you are not sure which shell you have, run
echo $SHELL.
$ ls -a ~
. .. .bash_logout .bash_profile .bashrc Desktop Documents Downloads
•Bash – .bash_profile, .profile, or .bash_login.
•Zsh – .zshrc
•Tcsh – .tcshrc, .cshrc or .login.
2. Add an export command to your profile script. The following example adds the path
represented by LOCAL_PATH to the current PATH variable.
export PATH=LOCAL_PATH:$PATH
3. Load the profile script described in the first step into your current session. The following
example loads the profile script represented by PROFILE_SCRIPT into your current session.
$ source ~/PROFILE_SCRIPT
4. Verify that pip is installed correctly.
$ pip --version
pip 8.1.2 from ~/.local/lib/python3.4/site-packages (python 3.4)
5. Finally, use pip to install the EB CLI.
$ pip install awsebcli --upgrade --user
Collecting awsebcli
Downloading awsebcli-3.7.8.tar.gz (176kB)
Collecting pyyaml>=3.11 (from awsebcli)
Downloading PyYAML-3.12.tar.gz (253kB)
Collecting botocore>=1.0.1 (from awsebcli)
Downloading botocore-1.4.53-py2.py3-none-any.whl (2.6MB)s
Collecting cement==2.8.2 (from awsebcli)
Downloading cement-2.8.2.tar.gz (165kB)
Collecting colorama==0.3.7 (from awsebcli)
Downloading colorama-0.3.7-py2.py3-none-any.whl
Collecting pathspec==0.3.4 (from awsebcli)
Downloading pathspec-0.3.4.tar.gz
Requirement already satisfied (use --upgrade to upgrade): setuptools>=20.0 in ./.local/
lib/python3.4/site-packages (from awsebcli)
Collecting docopt<0.7,>=0.6.1 (from awsebcli)
Downloading docopt-0.6.2.tar.gz
Collecting requests<=2.9.1,>=2.6.1 (from awsebcli)
Downloading requests-2.9.1-py2.py3-none-any.whl (501kB)
Collecting texttable<0.9,>=0.8.1 (from awsebcli)
Downloading texttable-0.8.4.tar.gz
Collecting websocket-client<1.0,>=0.11.0 (from awsebcli)
Downloading websocket_client-0.37.0.tar.gz (194kB)
Collecting docker-py<=1.7.2,>=1.1.0 (from awsebcli)
Downloading docker-py-1.7.2.tar.gz (68kB)
Collecting dockerpty<=0.4.1,>=0.3.2 (from awsebcli)
Downloading dockerpty-0.4.1.tar.gz
Collecting semantic_version==2.5.0 (from awsebcli)
Downloading semantic_version-2.5.0-py3-none-any.whl
Collecting blessed==1.9.5 (from awsebcli)
Downloading blessed-1.9.5-py2.py3-none-any.whl (77kB)
API Version 2010-12-01
484

AWS Elastic Beanstalk Developer Guide
Windows
Collecting docutils>=0.10 (from botocore>=1.0.1->awsebcli)
Downloading docutils-0.12-py3-none-any.whl (508kB)
Collecting python-dateutil<3.0.0,>=2.1 (from botocore>=1.0.1->awsebcli)
Downloading python_dateutil-2.5.3-py2.py3-none-any.whl (201kB)
Collecting jmespath<1.0.0,>=0.7.1 (from botocore>=1.0.1->awsebcli)
Downloading jmespath-0.9.0-py2.py3-none-any.whl
Collecting six (from websocket-client<1.0,>=0.11.0->awsebcli)
Downloading six-1.10.0-py2.py3-none-any.whl
Collecting wcwidth>=0.1.0 (from blessed==1.9.5->awsebcli)
Downloading wcwidth-0.1.7-py2.py3-none-any.whl
Building wheels for collected packages: awsebcli, pyyaml, cement, pathspec, docopt,
texttable, websocket-client, docker-py, dockerpty
Running setup.py bdist_wheel for awsebcli ... done
Running setup.py bdist_wheel for pyyaml ... done
Running setup.py bdist_wheel for cement ... done
Running setup.py bdist_wheel for pathspec ... done
Running setup.py bdist_wheel for docopt ... done
Running setup.py bdist_wheel for texttable ... done
Running setup.py bdist_wheel for websocket-client ... done
Running setup.py bdist_wheel for docker-py ... done
Running setup.py bdist_wheel for dockerpty ... done
Successfully built awsebcli pyyaml cement pathspec docopt texttable websocket-client
docker-py dockerpty
Installing collected packages: pyyaml, docutils, six, python-dateutil, jmespath,
botocore, cement, colorama, pathspec, docopt, requests, texttable, websocket-client,
docker-py, dockerpty, semantic-version, wcwidth, blessed, awsebcli
Successfully installed awsebcli-3.7.8 blessed-1.9.5 botocore-1.4.53 cement-2.8.2
colorama-0.3.7 docker-py-1.7.2 dockerpty-0.4.1 docopt-0.6.2 docutils-0.12
jmespath-0.9.0 pathspec-0.3.4 python-dateutil-2.5.3 pyyaml-3.12 requests-2.9.1
semantic-version-2.5.0 six-1.10.0 texttable-0.8.4 wcwidth-0.1.7 websocket-
client-0.37.0
6. Verify that the EB CLI installed correctly.
$ eb --version
EB CLI 3.7.8 (Python 3.4.3)
To upgrade to the latest version, run the installation command again:
$ pip install awsebcli --upgrade --user
Install Python, pip, and the EB CLI on Windows
The Python Software Foundation provides installers for Windows that include pip.
To install Python 3.6 and pip (Windows)
1. Download the Python 3.6 Windows x86-64 executable installer from the downloads page of
Python.org.
2. Run the installer.
3. Choose Add Python 3.6 to PATH.
4. Choose Install Now.
The installer installs Python in your user folder and adds its executable directories to your user path.
To install the AWS CLI with pip (Windows)
1. Open the Windows Command Processor from the Start menu.
API Version 2010-12-01
485

AWS Elastic Beanstalk Developer Guide
macOS
2. Verify that Python and pip are both installed correctly with the following commands:
C:\Windows\System32> python --version
Python 3.6.2
C:\Windows\System32> pip --version
pip 9.0.1 from c:\users\myname\appdata\local\programs\python\python36\lib\site-packages
(python 3.6)
3. Install the EB CLI using pip:
C:\Windows\System32> pip install awsebcli --upgrade --user
Collecting awsebcli
Downloading awsebcli-3.2.2.tar.gz (828kB)
Collecting pyyaml>=3.11 (from awsebcli)
Downloading PyYAML-3.11.tar.gz (248kB)
Collecting cement==2.4 (from awsebcli)
Downloading cement-2.4.0.tar.gz (129kB)
Collecting python-dateutil<3.0.0,>=2.1 (from awsebcli)
Downloading python_dateutil-2.4.2-py2.py3-none-any.whl (188kB)
Collecting jmespath>=0.6.1 (from awsebcli)
Downloading jmespath-0.6.2.tar.gz
Collecting six>=1.5 (from python-dateutil<3.0.0,>=2.1->awsebcli)
Downloading six-1.9.0-py2.py3-none-any.whl
Installing collected packages: six, jmespath, python-dateutil, cement, pyyaml, awsebcli
Running setup.py install for jmespath
Running setup.py install for cement
Running setup.py install for pyyaml
checking if libyaml is compilable
Microsoft Visual C++ 10.0 is required (Unable to find vcvarsall.bat).
skipping build_ext
Running setup.py install for awsebcli
Installing eb-script.py script to C:\Python34\Scripts
Installing eb.exe script to C:\Python34\Scripts
Installing eb.exe.manifest script to C:\Python34\Scripts
Successfully installed awsebcli-3.2.2 cement-2.4.0 jmespath-0.6.2 python-dateutil-2.4.2
pyyaml-3.11 six-1.9.0
4. Add the following to the PATH environment variable: %USERPROFILE%\AppData\roaming
\Python\Python36\scripts. The location may differ depending on whether you install Python
for one user or all users.
5. Restart a new command shell for the new PATH variable to take effect.
6. Verify that the EB CLI is installed correctly:
C:\Windows\System32> eb --version
EB CLI 3.2.2 (Python 3.4.3)
To upgrade to the latest version, run the installation command again:
C:\Windows\System32> pip install awsebcli --upgrade --user
Install the EB CLI on macOS
If you use the Homebrew package manager, you can install the EB CLI with the brew command. You can
also install Python and pip, and then use pip to install the EB CLI.
API Version 2010-12-01
486

AWS Elastic Beanstalk Developer Guide
macOS
Install the EB CLI with Homebrew
If you have Homebrew, you can use it to install the EB CLI. The latest version of the EB CLI is typically
available from Homebrew a couple of days after it appears in pip.
To install the EB CLI with Homebrew
1. Make sure you have the latest version of Homebrew
$ brew update
2. Run brew install awsebcli:
$ brew install awsebcli
3. Verify that the EB CLI is installed correctly:
$ eb --version
EB CLI 3.2.2 (Python 3.4.3)
Install Python, pip, and the EB CLI on macOS
You can install the latest version of Python and pip and then use them to install the EB CLI.
To install the EB CLI on macOS
1. Download and install Python 3.4 from the downloads page of Python.org.
2. Install pip with the script provided by the Python Packaging Authority.
$ curl -O https://bootstrap.pypa.io/get-pip.py
$ python3 get-pip.py --user
3. Use pip to install the EB CLI.
$ pip3 install awsebcli --upgrade --user
4. Add the path to the executable (~/Library/Python/3.4/bin) to your path variable:
To modify your PATH variable (Linux, macOS, or Unix)
1. Find your shell's profile script in your user folder. If you are not sure which shell you have, run
echo $SHELL.
$ ls -a ~
. .. .bash_logout .bash_profile .bashrc Desktop Documents Downloads
•Bash – .bash_profile, .profile, or .bash_login.
•Zsh – .zshrc
•Tcsh – .tcshrc, .cshrc or .login.
2. Add an export command to your profile script. The following example adds the path
represented by LOCAL_PATH to the current PATH variable.
export PATH=LOCAL_PATH:$PATH
API Version 2010-12-01
487

AWS Elastic Beanstalk Developer Guide
Virtualenv
3. Load the profile script described in the first step into your current session. The following
example loads the profile script represented by PROFILE_SCRIPT into your current session.
$ source ~/PROFILE_SCRIPT
5. Verify that the EB CLI is installed correctly.
$ eb --version
EB CLI 3.7.8 (Python 3.4.1)
To upgrade to the latest version, run the installation command again:
$ pip3 install awsebcli --upgrade --user
Install the EB CLI in a Virtual Environment
You can avoid requirement version conflicts with other pip packages by installing the EB CLI in a virtual
environment.
To install the EB CLI in a virtual environment
1. Install virtualenv with pip.
$ pip install --user virtualenv
2. Create a virtual environment.
$ virtualenv ~/eb-ve
You can use the -p option to use a Python executable other than the default.
$ virtualenv -p /usr/bin/python3.4 ~/eb-ve
3. Activate the virtual environment.
Linux, macOS, or Unix
$ source ~/eb-ve/bin/activate
Windows
$ %USERPROFILE%\eb-ve\Scripts\activate
4. Install the EB CLI.
(eb-ve)~$ pip install awsebcli --upgrade
5. Verify that the EB CLI is installed correctly.
$ eb --version
EB CLI 3.7.8 (Python 3.4.1)
API Version 2010-12-01
488

AWS Elastic Beanstalk Developer Guide
Configure the EB CLI
You can use the deactivate command to exit the virtual environment. Whenever you start a new
session, run the activation command again.
To upgrade to the latest version, run the installation command again:
(eb-ve)~$ pip install awsebcli --upgrade
Configure the EB CLI
After installing the EB CLI (p. 481), you are ready to configure your project folder with eb init.
Run eb init in your application's project directory to configure the EB CLI and your project.
The following example shows the configuration steps when running eb init for the first time in a
project folder named eb:
To initialize an EB CLI project
1. First, the EB CLI prompts you to select a region. Type the number that corresponds to the region that
you would like to use and press Enter.
~/eb $ eb init
Select a default region
1) us-east-1 : US East (N. Virginia)
2) us-west-1 : US West (N. California)
3) us-west-2 : US West (Oregon)
4) eu-west-1 : EU (Ireland)
5) eu-central-1 : EU (Frankfurt)
6) ap-south-1 : Asia Pacific (Mumbai)
7) ap-southeast-1 : Asia Pacific (Singapore)
8) ap-southeast-2 : Asia Pacific (Sydney)
9) ap-northeast-1 : Asia Pacific (Tokyo)
10) ap-northeast-2 : Asia Pacific (Seoul)
11) sa-east-1 : South America (Sao Paulo)
12) cn-north-1 : China (Beijing)
13) us-east-2 : US East (Columbus)
14) ca-central-1 : Canada (Central)
15) eu-west-2 : EU (London)
(default is 3): 3
2. Next, provide your access key and secret key so that the EB CLI can manage resources for you. Access
keys are created in the AWS Identity and Access Management management console. If you don't
have keys, see How Do I Get Security Credentials? in the Amazon Web Services General Reference.
You have not yet set up your credentials or your credentials are incorrect
You must provide your credentials.
(aws-access-id): AKIAJOUAASEXAMPLE
(aws-secret-key): 5ZRIrtTM4ciIAvd4EXAMPLEDtm+PiPSzpoK
3. An application in Elastic Beanstalk is a resource that contains a set of application versions (source),
environments, and saved configurations that are associated with a single web application. Each
time you deploy your source code to Elastic Beanstalk using the EB CLI, a new application version is
created and added to the list.
Select an application to use
1) [ Create new Application ]
(default is 1): 1
API Version 2010-12-01
489

AWS Elastic Beanstalk Developer Guide
Configure the EB CLI
4. The default application name is the name of the folder in which you run eb init. Enter any name
that describes your project.
Enter Application Name
(default is "eb"): eb
Application eb has been created.
5. Select a platform that matches the language or framework that your web application is developed
in. If you haven't started developing an application yet, choose a platform that you are interested
in. You will see how to launch a sample application shortly, and you can always change this setting
later.
Select a platform.
1) Node.js
2) PHP
3) Python
4) Ruby
5) Tomcat
6) IIS
7) Docker
8) Multi-container Docker
9) GlassFish
10) Go
11) Java
(default is 1): 1
6. Choose yes to assign an SSH key pair to the instances in your Elastic Beanstalk environment,
allowing you to connect directly to them for troubleshooting.
Do you want to set up SSH for your instances?
(y/n): y
7. Choose an existing key pair or create a new one. To use eb init to create a new key pair, you must
have ssh-keygen installed on your local machine and available from the command line. The CLI
registers the new key pair with Amazon EC2 for you and stores the private key locally in a folder
named .ssh in your user directory.
Select a keypair.
1) [ Create new KeyPair ]
(default is 1): 1
Your EB CLI installation is now configured and ready to use. See Managing Elastic Beanstalk
Environments with the EB CLI (p. 492) for instructions on creating and working with an Elastic
Beanstalk environment.
Advanced Configuration
•Ignoring files with .ebignore (p. 491)
•Using Named Profiles (p. 491)
•Deploying an Artifact Instead of the Project Folder (p. 491)
•Configuration Settings and Precedence (p. 492)
•Instance Metadata (p. 492)
API Version 2010-12-01
490

AWS Elastic Beanstalk Developer Guide
Ignoring files with .ebignore
Ignoring files with .ebignore
You can tell the EB CLI to ignore certain files in your project directory by adding the file .ebignore to
the directory. This file works like a .gitignore file. When you deploy your project directory to Elastic
Beanstalk and create a new application version, the EB CLI will not include files specified by .ebignore
in the source bundle that it creates.
If .ebignore isn't present, but .gitignore is, the EB CLI will ignore files specified in .gitignore. If
.ebignore is present, the EB CLI will not read .gitignore.
When .ebignore is present, the EB CLI doesn't use git commands to create your source bundle. This
means that EB CLI ignores files specified in .ebignore, and includes all other files. In particular, it
includes uncommitted source files.
Note
In Windows, adding .ebignore causes the EB CLI to follow symbolic links and include the
linked file when creating a source bundle. This is a known issue and will be fixed in a future
update.
Using Named Profiles
If you store your credentials as a named profile in a credentials or config file, you can use the --
profile (p. 558) option to explicitly specify a profile. For example, the following command creates a
new application using the user2 profile.
$ eb init --profile user2
You can also change the default profile by setting the AWS_EB_PROFILE environment variable. When
this variable is set, the EB CLI will read credentials from the specified profile instead of default or eb-
cli.
Linux, macOS, or Unix
$ export AWS_EB_PROFILE=user2
Windows
> set AWS_EB_PROFILE=user2
Deploying an Artifact Instead of the Project Folder
You can tell the EB CLI to deploy a ZIP or WAR file that you generate as part of a separate build process
by adding the following lines to .elasticbeanstalk/config.yml in your project folder.
deploy:
artifact: path/to/buildartifact.zip
If you configure the EB CLI in your Git repository (p. 497), and you don't commit the artifact to source,
use the --staged option to deploy the latest build:
~/eb$ eb deploy --staged
API Version 2010-12-01
491

AWS Elastic Beanstalk Developer Guide
Configuration Settings and Precedence
Configuration Settings and Precedence
The EB CLI uses a provider chain to look for AWS credentials in a number of different places, including
system or user environment variables and local AWS configuration files.
The AWS CLI looks for credentials and configuration settings in the following order:
1. Command Line Options – a named profile can be specified with --profile to override default
settings.
2. Environment Variables – AWS_ACCESS_KEY_ID and AWS_SECRET_ACCESS_KEY
3. The AWS credentials file – located at ~/.aws/credentials on Linux and OS X systems or at C:
\Users\USERNAME\.aws\credentials on Windows systems. This file can contain multiple named
profiles in addition to a default profile.
4. The AWS CLI configuration file – located at ~/.aws/config on Linux and OS X systems or C:
\Users\USERNAME\.aws\config on Windows systems. This file can contain a default profile,
named profiles, and AWS CLI specific configuration parameters for each.
5. Legacy EB CLI configuration file – located at ~/.elasticbeanstalk/config on Linux and OS X
systems or C:\Users\USERNAME\.elasticbeanstalk/config on Windows systems.
6. Instance profile credentials – these credentials can be used on EC2 instances with an assigned
instance role, and are delivered through the Amazon EC2 metadata service. The instance profile (p. 22)
must have permission to use Elastic Beanstalk.
If the credentials file contains a named profile with the name "eb-cli", the EB CLI will prefer that profile
over the default profile. If no profiles are found, or a profile is found but does not have permission to use
Elastic Beanstalk, the EB CLI prompts you to enter keys.
Instance Metadata
To use the EB CLI from an EC2 instance, create a role that has access to the resources needed and assign
that role to the instance when it is launched. Launch the instance and install the EB CLI with pip:
~$ sudo pip install awsebcli
pip comes pre-installed on Amazon Linux.
The EB CLI will read credentials from the instance metadata. For more information, see Granting
Applications that Run on Amazon EC2 Instances Access to AWS Resources in IAM User Guide.
Managing Elastic Beanstalk Environments with the
EB CLI
After installing the EB CLI (p. 481) and configuring your project directory (p. 489), you are ready to
create an Elastic Beanstalk environment using the EB CLI, deploy source and configuration updates, and
pull logs and events.
Note
Creating environments with the EB CLI requires a service role (p. 21). You can create a service
role by creating an environment in the Elastic Beanstalk console. If you don't have a service role,
the EB CLI attempts to create one when you run eb create.
The following examples use an empty project folder named eb that was initialized with the EB CLI for
use with a sample Docker application.
API Version 2010-12-01
492

AWS Elastic Beanstalk Developer Guide
eb create
Basic Commands
•eb create (p. 493)
•eb status (p. 493)
•eb health (p. 494)
•eb events (p. 494)
•eb logs (p. 495)
•eb open (p. 495)
•eb deploy (p. 495)
•eb config (p. 496)
•eb terminate (p. 496)
eb create
To create your first environment, run eb create (p. 521) and follow the prompts. If your project
directory has source code in it, the EB CLI will bundle it up and deploy it to your environment. Otherwise,
a sample application will be used.
~/eb$ eb create
Enter Environment Name
(default is eb-dev): eb-dev
Enter DNS CNAME prefix
(default is eb-dev): eb-dev
WARNING: The current directory does not contain any source code. Elastic Beanstalk is
launching the sample application instead.
Environment details for: elasticBeanstalkExa-env
Application name: elastic-beanstalk-example
Region: us-west-2
Deployed Version: Sample Application
Environment ID: e-j3pmc8tscn
Platform: 64bit Amazon Linux 2015.03 v1.4.3 running Docker 1.6.2
Tier: WebServer-Standard
CNAME: eb-dev.elasticbeanstalk.com
Updated: 2015-06-27 01:02:24.813000+00:00
Printing Status:
INFO: createEnvironment is starting.
-- Events -- (safe to Ctrl+C) Use "eb abort" to cancel the command.
Your environment can take several minutes to become ready. Press Ctrl-C to return to the command line
while the environment is created.
eb status
Run eb status to see the current status of your environment. When the status is ready, the sample
application is available at elasticbeanstalk.com and the environment is ready to be updated.
~/eb$ eb status
Environment details for: elasticBeanstalkExa-env
Application name: elastic-beanstalk-example
Region: us-west-2
Deployed Version: Sample Application
Environment ID: e-gbzqc3jcra
Platform: 64bit Amazon Linux 2015.03 v1.4.3 running Docker 1.6.2
Tier: WebServer-Standard
CNAME: elasticbeanstalkexa-env.elasticbeanstalk.com
Updated: 2015-06-30 01:47:45.589000+00:00
Status: Ready
API Version 2010-12-01
493

AWS Elastic Beanstalk Developer Guide
eb health
Health: Green
eb health
Use the eb health command to view health information (p. 336) about the instances in your
environment and the state of your environment overall. Use the --refresh option to view health in an
interactive view that updates every 10 seconds.
~/eb$ eb health
api Ok 2016-09-15 18:39:04
WebServer Java 8
total ok warning degraded severe info pending unknown
3 3 0 0 0 0 0 0
instance-id status cause health
Overall Ok
i-0ef05ec54918bf567 Ok
i-001880c1187493460 Ok
i-04703409d90d7c353 Ok
instance-id r/sec %2xx %3xx %4xx %5xx p99 p90 p75
p50 p10
Overall 8.6 100.0 0.0 0.0 0.0 0.083* 0.065 0.053
0.040 0.019
i-0ef05ec54918bf567 2.9 29 0 0 0 0.069* 0.066 0.057
0.050 0.023
i-001880c1187493460 2.9 29 0 0 0 0.087* 0.069 0.056
0.050 0.034
i-04703409d90d7c353 2.8 28 0 0 0 0.051* 0.027 0.024
0.021 0.015
instance-id type az running load 1 load 5 user% nice%
system% idle% iowait%
i-0ef05ec54918bf567 t2.micro 1c 23 mins 0.19 0.05 3.0 0.0
0.3 96.7 0.0
i-001880c1187493460 t2.micro 1a 23 mins 0.0 0.0 3.2 0.0
0.3 96.5 0.0
i-04703409d90d7c353 t2.micro 1b 1 day 0.0 0.0 3.6 0.0
0.2 96.2 0.0
instance-id status id version ago
deployments
i-0ef05ec54918bf567 Deployed 28 app-bc1b-160915_181041 20 mins
i-001880c1187493460 Deployed 28 app-bc1b-160915_181041 20 mins
i-04703409d90d7c353 Deployed 28 app-bc1b-160915_181041 27 mins
eb events
Use eb events to see a list of events output by Elastic Beanstalk.
~/eb$ eb events
2015-06-29 23:21:09 INFO createEnvironment is starting.
2015-06-29 23:21:10 INFO Using elasticbeanstalk-us-west-2-EXAMPLE as Amazon S3
storage bucket for environment data.
2015-06-29 23:21:23 INFO Created load balancer named: awseb-e-g-AWSEBLoa-EXAMPLE
2015-06-29 23:21:42 INFO Created security group named: awseb-e-gbzqc3jcra-stack-
AWSEBSecurityGroup-EXAMPLE
2015-06-29 23:21:45 INFO Created Auto Scaling launch configuration named: awseb-e-
gbzqc3jcra-stack-AWSEBAutoScalingLaunchConfiguration-EXAMPLE
...
API Version 2010-12-01
494

AWS Elastic Beanstalk Developer Guide
eb logs
eb logs
Use eb logs to pull logs from an instance in your environment. By default, eb logs pull logs from the
first instance launched and displays them in standard output. You can specify an instance ID with the --
instance option to get logs from a specific instance.
The --all option pulls logs from all instances and saves them to subdirectories under
.elasticbeanstalk/logs.
~/eb$ eb logs --all
Retrieving logs...
Logs were saved to /home/local/ANT/mwunderl/ebcli/environments/test/.elasticbeanstalk/
logs/150630_201410
Updated symlink at /home/local/ANT/mwunderl/ebcli/environments/test/.elasticbeanstalk/logs/
latest
eb open
To open your environment's website in a browser, use eb open:
~/eb$ eb open
In a windowed environment, your default browser will open in a new window. In a terminal environment,
a command line browser (e.g. w3m) will be used if available.
eb deploy
Once the environment is up and ready, you can update it using eb deploy.
This command works better with some source code to bundle up and deploy, so for this example we've
created a Dockerfile in the project directory with the following content:
~/eb/Dockerfile
FROM ubuntu:12.04
RUN apt-get update
RUN apt-get install -y nginx zip curl
RUN echo "daemon off;" >> /etc/nginx/nginx.conf
RUN curl -o /usr/share/nginx/www/master.zip -L https://codeload.github.com/
gabrielecirulli/2048/zip/master
RUN cd /usr/share/nginx/www/ && unzip master.zip && mv 2048-master/* . && rm -rf 2048-
master master.zip
EXPOSE 80
CMD ["/usr/sbin/nginx", "-c", "/etc/nginx/nginx.conf"]
This Dockerfile deploys an image of Ubuntu 12.04 and installs the game 2048. Run eb deploy to
upload the application to your environment:
~/eb$ eb deploy
Creating application version archive "app-150630_014338".
Uploading elastic-beanstalk-example/app-150630_014338.zip to S3. This may take a while.
API Version 2010-12-01
495

AWS Elastic Beanstalk Developer Guide
eb config
Upload Complete.
INFO: Environment update is starting.
-- Events -- (safe to Ctrl+C) Use "eb abort" to cancel the command.
When you run eb deploy, the EB CLI bundles up the contents of your project directory and deploys it to
your environment.
Note
If you have initialized a git repository in your project folder, the EB CLI will always deploy the
latest commit, even if you have pending changes. Commit your changes prior to running eb
deploy to deploy them to your environment.
eb config
Take a look at the configuration options available for your running environment with the eb config
command:
~/eb$ eb config
ApplicationName: elastic-beanstalk-example
DateUpdated: 2015-06-30 02:12:03+00:00
EnvironmentName: elasticBeanstalkExa-env
SolutionStackName: 64bit Amazon Linux 2015.03 v1.4.3 running Docker 1.6.2
settings:
AWSEBAutoScalingScaleDownPolicy.aws:autoscaling:trigger:
LowerBreachScaleIncrement: '-1'
AWSEBAutoScalingScaleUpPolicy.aws:autoscaling:trigger:
UpperBreachScaleIncrement: '1'
AWSEBCloudwatchAlarmHigh.aws:autoscaling:trigger:
UpperThreshold: '6000000'
...
This command populates a list of available configuration options in a text editor. Many of the options
shown have a null value, these are not set by default but can be modified to update the resources in
your environment. See Configuration Options (p. 202) for more information about these options.
eb terminate
If you are done using the environment for now, use eb terminate to terminate it.
~/eb$ eb terminate
The environment "eb-dev" and all associated instances will be terminated.
To confirm, type the environment name: eb-dev
INFO: terminateEnvironment is starting.
INFO: Deleted CloudWatch alarm named: awseb-e-jc8t3pmscn-stack-
AWSEBCloudwatchAlarmHigh-1XLMU7DNCBV6Y
INFO: Deleted CloudWatch alarm named: awseb-e-jc8t3pmscn-stack-
AWSEBCloudwatchAlarmLow-8IVI04W2SCXS
INFO: Deleted Auto Scaling group policy named: arn:aws:autoscaling:us-
west-2:210774411744:scalingPolicy:1753d43e-ae87-4df6-
a405-11d31f4c8f97:autoScalingGroupName/awseb-e-jc8t3pmscn-stack-
AWSEBAutoScalingGroup-90TTS2ZL4MXV:policyName/awseb-e-jc8t3pmscn-stack-
AWSEBAutoScalingScaleUpPolicy-A070H1BMUQAJ
INFO: Deleted Auto Scaling group policy named: arn:aws:autoscaling:us-
west-2:210774411744:scalingPolicy:1fd24ea4-3d6f-4373-
affc-4912012092ba:autoScalingGroupName/awseb-e-jc8t3pmscn-stack-
AWSEBAutoScalingGroup-90TTS2ZL4MXV:policyName/awseb-e-jc8t3pmscn-stack-
AWSEBAutoScalingScaleDownPolicy-LSWFUMZ46H1V
INFO: Waiting for EC2 instances to terminate. This may take a few minutes.
-- Events -- (safe to Ctrl+C)
API Version 2010-12-01
496

AWS Elastic Beanstalk Developer Guide
AWS CodeBuild
For a full list of available EB CLI commands, check out the EB CLI Command Reference (p. 511).
Using the EB CLI with AWS CodeBuild
You can use the EB CLI to build your application from your source code using AWS CodeBuild. With AWS
CodeBuild, you can compile your source code, run unit tests, and produce artifacts that are ready to
deploy.
Note
Some regions don't offer AWS CodeBuild. The integration between Elastic Beanstalk and AWS
CodeBuild doesn't work in these regions.
For information about the AWS services offered in each region, see Region Table.
Creating an Application
You can use the Elastic Beanstalk CLI to create an application that uses AWS CodeBuild to compile your
source code. If you run eb init in a folder with a buildspec.yml file, Elastic Beanstalk detects the
file and parses it to detect any Elastic Beanstalk settings. Elastic Beanstalk extends the format of the
buildspec.yml file to include the following additional settings, as described in eb init (p. 532).
Using the EB CLI with Git
The EB CLI provides integration with Git. This section provides an overview of how to use Git with the EB
CLI.
To install Git and initialize your Git repository
1. Download the most recent version of Git by going to http://git-scm.com
2. Initialize your Git repository by typing the following:
~/eb$ git init
EB CLI will now recognize that your application is set up with Git.
3. If you haven't already run eb init, do that now:
~/eb$ eb init
Associating Elastic Beanstalk environments with Git
branches
You can associate a different environment with each branch of your code. When you checkout a
branch, changes are deployed to the associated environment. For example, you can type the following
to associate your production environment with your master branch, and a separate development
environment with your development branch:
~/eb$ git checkout master
~/eb$ eb use prod
~/eb$ git checkout develop
API Version 2010-12-01
497

AWS Elastic Beanstalk Developer Guide
Deploying changes
~/eb$ eb use dev
Deploying changes
By default, the EB CLI deploys the latest commit in the current branch, using the commit ID and message
as the application version label and description, respectively. If you want to deploy to your environment
without committing, you can use the --staged option to deploy changes that have been added to the
staging area.
To deploy changes without committing
1. Add new and changed files to the staging area:
~/eb$ git add .
2. Deploy the staged changes with eb deploy:
~/eb$ eb deploy --staged
If you have configured the EB CLI to deploy an artifact (p. 491), and you don't commit the artifact to
your git repository, use the --staged option to deploy the latest build.
Using Git submodules
Some code projects benefit from having Git submodules — repositories within the top-level repository.
When you deploy your code using eb create or eb deploy, the EB CLI can include submodules in the
application version zip file and upload them with the rest of the code.
You can control the inclusion of submodules by using the include_git_submodules option in the
global section of the EB CLI configuration file, .elasticbeanstalk/config.yml in your project
folder.
To include submodules, set this option to true:
global:
include_git_submodules: true
When the include_git_submodules option is missing or set to false, EB CLI does not include
submodules in the uploaded zip file.
See Git Tools - Submodules for more details about Git submodules.
Default behavior
When you run eb init to configure your project, the EB CLI adds the
include_git_submodules option and sets it to true. This ensures that any submodules you
have in your project are included in your deployments.
The EB CLI did not always support including submodules. To avoid an accidental and undesirable
change to projects that had existed before we added submodule support, the EB CLI does not
include submodules when the include_git_submodules option is missing. If you have one
of these existing projects and you want to include submodules in your deployments, add the
option and set it to true as explained in this section.
CodeCommit behavior
Elastic Beanstalk's integration with AWS CodeCommit (p. 499) doesn't support submodules at
this time. If you enabled your environment to integrate with AWS CodeCommit, submodules are
not included in your deployments.
API Version 2010-12-01
498

AWS Elastic Beanstalk Developer Guide
Assigning Git tags to your application version
Assigning Git tags to your application version
You can use a Git tag as your version label to identify what application version is running in your
environment. For example, type the following:
~/eb$ git tag -a v1.0 -m "My version 1.0"
Using the EB CLI with AWS CodeCommit
You can use the EB CLI to deploy your application directly from your AWS CodeCommit repository.
With AWS CodeCommit, you can upload only your changes to the repository when you deploy, instead
of uploading your entire project. This can save you time and bandwidth if you have a large project or
limited Internet connectivity. The EB CLI pushes your local commits and uses them to create application
versions when you use eb create or eb deploy.
To deploy your changes, AWS CodeCommit integration requires you to commit changes first. However, as
you develop or debug, you might not want to push changes that you haven't confirmed are working. You
can avoid committing your changes by staging them and using eb deploy --staged (which performs
a standard deployment). Or commit your changes to a development or testing branch first, and merge to
your master branch only when your code is ready. With eb use, you can configure the EB CLI to deploy
to one environment from your development branch, and to a different environment from your master
branch.
Note
Some regions don't offer AWS CodeCommit. The integration between Elastic Beanstalk and AWS
CodeCommit doesn't work in these regions.
For information about the AWS services offered in each region, see Region Table.
Sections
•Prerequisites (p. 499)
•Creating an AWS CodeCommit Repository with the EB CLI (p. 500)
•Deploying from Your AWS CodeCommit Repository (p. 500)
•Configuring Additional Branches and Environments (p. 501)
•Using an Existing AWS CodeCommit Repository (p. 502)
Prerequisites
To use AWS CodeCommit with AWS Elastic Beanstalk, you need a local Git repository (either one you
have already or a new one you create) with at least one commit, permission to use AWS CodeCommit,
and an Elastic Beanstalk environment in a region that AWS CodeCommit supports. Your environment and
repository must be in the same region.
To initialize a Git repository
1. Run git init in your project folder.
~/my-app$ git init
2. Stage your project files with git add.
~/my-app$ git add .
3. Commit changes with git commit.
API Version 2010-12-01
499

AWS Elastic Beanstalk Developer Guide
Creating an AWS CodeCommit Repository with the EB CLI
~/my-app$ git commit -m "Elastic Beanstalk application"
Creating an AWS CodeCommit Repository with the
EB CLI
To get started with AWS CodeCommit, run eb init (p. 532). During repository configuration, the EB
CLI prompts you to use AWS CodeCommit to store your code and speed up deployments. Even if you
previously configured your project with eb init, you can run it again to configure AWS CodeCommit.
To create an AWS CodeCommit repository with the EB CLI
1. Run eb init in your project folder. During configuration, the EB CLI asks if you want to use AWS
CodeCommit to store your code and speed up deployments. If you previously configured your
project with eb init, you can still run it again to configure AWS CodeCommit. Type y at the
prompt to set up AWS CodeCommit.
~/my-app$ eb init
Note: Elastic Beanstalk now supports AWS CodeCommit; a fully-managed source control
service. To learn more, see Docs: https://aws.amazon.com/codecommit/
Do you wish to continue with CodeCommit? (y/n)(default is n): y
2. Choose Create new Repository.
Select a repository
1) my-repo
2) [ Create new Repository ]
(default is 2): 2
3. Type a repository name or press Enter to accept the default name.
Enter Repository Name
(default is "codecommit-origin"): my-app
Successfully created repository: my-app
4. Choose an existing branch for your commits, or use the EB CLI to create a new branch.
Enter Branch Name
***** Must have at least one commit to create a new branch with CodeCommit *****
(default is "master"): ENTER
Successfully created branch: master
Deploying from Your AWS CodeCommit Repository
When you configure AWS CodeCommit with your EB CLI repository, the EB CLI uses the contents of the
repository to create source bundles. When you run eb deploy or eb create, the EB CLI pushes new
commits and uses the HEAD revision of your branch to create the archive that it deploys to the EC2
instances in your environment.
To use AWS CodeCommit integration with the EB CLI
1. Create a new environment with eb create.
~/my-app$ eb create my-app-env
API Version 2010-12-01
500

AWS Elastic Beanstalk Developer Guide
Configuring Additional Branches and Environments
Starting environment deployment via CodeCommit
--- Waiting for application versions to be pre-processed ---
Finished processing application version app-ac1ea-161010_201918
Setting up default branch
Environment details for: my-app-env
Application name: my-app
Region: us-east-2
Deployed Version: app-ac1ea-161010_201918
Environment ID: e-pm5mvvkfnd
Platform: 64bit Amazon Linux 2016.03 v2.1.6 running Java 8
Tier: WebServer-Standard
CNAME: UNKNOWN
Updated: 2016-10-10 20:20:29.725000+00:00
Printing Status:
INFO: createEnvironment is starting.
...
The EB CLI uses the latest commit in the tracked branch to create the application version that is
deployed to the environment.
2. When you have new local commits, use eb deploy to push the commits and deploy to your
environment.
~/my-app$ eb deploy
Starting environment deployment via CodeCommit
INFO: Environment update is starting.
INFO: Deploying new version to instance(s).
INFO: New application version was deployed to running EC2 instances.
INFO: Environment update completed successfully.
3. To test changes before you commit them, use the --staged option to deploy changes that you
added to the staging area with git add.
~/my-app$ git add new-file
~/my-app$ eb deploy --staged
Deploying with the --staged option performs a standard deployment, bypassing AWS
CodeCommit.
Configuring Additional Branches and Environments
AWS CodeCommit configuration applies to a single branch. You can use eb use and eb codesource to
configure additional branches or modify the current branch's configuration.
To configure AWS CodeCommit integration with the EB CLI
1. To change the remote branch, use the eb use (p. 557) command's --source option.
~/my-app$ eb use test-env --source my-app/test
2. To create a new branch and environment, check out a new branch, push it to AWS CodeCommit,
create the environment, and then use eb use to connect the local branch, remote branch, and
environment.
~/my-app$ git checkout -b production
~/my-app$ git push --set-upstream production
~/my-app$ eb create production-env
~/my-app$ eb use --source my-app/production production-env
API Version 2010-12-01
501

AWS Elastic Beanstalk Developer Guide
Using an Existing AWS CodeCommit Repository
3. To configure AWS CodeCommit interactively, use eb codesource codecommit (p. 517).
~/my-app$ eb codesource codecommit
Current CodeCommit setup:
Repository: my-app
Branch: test
Do you wish to continue (y/n): y
Select a repository
1) my-repo
2) my-app
3) [ Create new Repository ]
(default is 2): 2
Select a branch
1) master
2) test
3) [ Create new Branch with local HEAD ]
(default is 1): 1
4. To disable AWS CodeCommit integration, use eb codesource local (p. 517).
~/my-app$ eb codesource local
Current CodeCommit setup:
Repository: my-app
Branch: master
Default set to use local sources
Using an Existing AWS CodeCommit Repository
If you already have an AWS CodeCommit repository and want to use it with Elastic Beanstalk, run eb
init at the root of your local Git repository.
To use an existing AWS CodeCommit repository with the EB CLI
1. Clone your AWS CodeCommit repository.
~$ git clone ssh://git-codecommit.us-east-2.amazonaws.com/v1/repos/my-app
2. Check out and push a branch to use for your Elastic Beanstalk environment.
~/my-app$ git checkout -b dev-env
~/my-app$ git push --set-upstream origin dev-env
3. Run eb init. Choose the same region, repository, and branch name that you are currently using.
~/my-app$ eb init
Select a default region
1) us-east-1 : US East (N. Virginia)
2) us-west-1 : US West (N. California)
3) us-west-2 : US West (Oregon)
4) eu-west-1 : EU (Ireland)
5) eu-central-1 : EU (Frankfurt)
6) ap-south-1 : Asia Pacific (Mumbai)
7) ap-southeast-1 : Asia Pacific (Singapore)
8) ap-southeast-2 : Asia Pacific (Sydney)
9) ap-northeast-1 : Asia Pacific (Tokyo)
10) ap-northeast-2 : Asia Pacific (Seoul)
11) sa-east-1 : South America (Sao Paulo)
API Version 2010-12-01
502

AWS Elastic Beanstalk Developer Guide
Monitoring Health
12) cn-north-1 : China (Beijing)
13) us-east-2 : US East (Columbus)
14) ca-central-1 : Canada (Central)
15) eu-west-2 : EU (London)
(default is 3): 1
...
Note: Elastic Beanstalk now supports AWS CodeCommit; a fully-managed source control
service. To learn more, see Docs: https://aws.amazon.com/codecommit/
Do you wish to continue with CodeCommit? (y/n)(default is n): y
Select a repository
1) my-app
2) [ Create new Repository ]
(default is 1): 1
Select a branch
1) master
2) dev-env
3) [ Create new Branch with local HEAD ]
(default is 2): 2
For more information about using eb init, see Configure the EB CLI (p. 489).
Using the EB CLI to Monitor Environment Health
The Elastic Beanstalk Command Line Interface (p. 480) (EB CLI) is a command line tool for managing
AWS Elastic Beanstalk environments. You also can use the EB CLI to monitor your environment's health in
real time and with more granularity than is currently available in the AWS Management Console
After installing (p. 481) and configuring (p. 489) the EB CLI, you can launch a new
environment (p. 492) and deploy your code to it with the eb create command. If you already have
an environment that you created in the AWS Management Console, you can attach the EB CLI to it by
running eb init in a project folder and following the prompts (the project folder can be empty).
Important
Ensure that you are using the latest version of the EB CLI by running pip install with the --
upgrade option:
$ sudo pip install --upgrade awsebcli
For complete EB CLI installation instructions, see Install the Elastic Beanstalk Command Line
Interface (EB CLI) (p. 481).
To use the EB CLI to monitor your environment's health, you must first configure a local project folder
by running eb init and following the prompts. For complete instructions, see Configure the EB
CLI (p. 489).
If you already have an environment running in Elastic Beanstalk and want to use the EB CLI to monitor its
health, attach it to use the existing environment by following these steps.
To attach the EB CLI to an existing environment
1. Open a command line terminal and navigate to your user folder.
2. Create and open a new folder for your environment.
3. Run the eb init command, and then choose the application and environment whose health you
want to monitor. If you have only one environment running the application you choose, the EB
CLI will select it automatically and you will not need to choose the environment, as shown in the
following example:
API Version 2010-12-01
503

AWS Elastic Beanstalk Developer Guide
Monitoring Health
~/project$ eb init
Select an application to use
1) elastic-beanstalk-example
2) [ Create new Application ]
(default is 2): 1
Select the default environment.
You can change this later by typing "eb use [environment_name]".
1) elasticBeanstalkEx2-env
2) elasticBeanstalkExa-env
(default is 1): 1
To monitor health by using the EB CLI
1. Open a command line and navigate to your project folder.
2. Run the eb health command to display the health status of the instances in your environment. In
this example, there are five instances running in the environment:
~/project $ eb health
elasticBeanstalkExa-env Ok
2015-07-08 23:13:20
WebServer
Ruby 2.1 (Puma)
total ok warning degraded severe info pending unknown
5 5 0 0 0 0 0 0
instance-id status cause
Overall Ok
i-d581497d Ok
i-d481497c Ok
i-136e00c0 Ok
i-126e00c1 Ok
i-8b2cf575 Ok
instance-id r/sec %2xx %3xx %4xx %5xx p99 p90 p75 p50
p10
Overall 671.8 100.0 0.0 0.0 0.0 0.003 0.002 0.001 0.001
0.000
i-d581497d 143.0 1430 0 0 0 0.003 0.002 0.001 0.001
0.000
i-d481497c 128.8 1288 0 0 0 0.003 0.002 0.001 0.001
0.000
i-136e00c0 125.4 1254 0 0 0 0.004 0.002 0.001 0.001
0.000
i-126e00c1 133.4 1334 0 0 0 0.003 0.002 0.001 0.001
0.000
i-8b2cf575 141.2 1412 0 0 0 0.003 0.002 0.001 0.001
0.000
instance-id type az running load 1 load 5 user% nice% system%
idle% iowait%
i-d581497d t2.micro 1a 12 mins 0.0 0.04 6.2 0.0 1.0
92.5 0.1
i-d481497c t2.micro 1a 12 mins 0.01 0.09 5.9 0.0 1.6
92.4 0.1
i-136e00c0 t2.micro 1b 12 mins 0.15 0.07 5.5 0.0 0.9
93.2 0.0
i-126e00c1 t2.micro 1b 12 mins 0.17 0.14 5.7 0.0 1.4
92.7 0.1
i-8b2cf575 t2.micro 1c 1 hour 0.19 0.08 6.5 0.0 1.2
92.1 0.1
API Version 2010-12-01
504

AWS Elastic Beanstalk Developer Guide
Reading the Output
instance-id status id version ago
deployments
i-d581497d Deployed 1 Sample Application 12 mins
i-d481497c Deployed 1 Sample Application 12 mins
i-136e00c0 Deployed 1 Sample Application 12 mins
i-126e00c1 Deployed 1 Sample Application 12 mins
i-8b2cf575 Deployed 1 Sample Application 1 hour
Reading the Output
The output displays the name of the environment, the environment's overall health, and the current date
at the top of the screen:
elasticBeanstalkExa-env Ok
2015-07-08 23:13:20
The next three lines display the type of environment ("WebServer" in this case), the configuration (Ruby
2.1 with Puma), and a breakdown of how many instances are in each of the seven states:
WebServer Ruby
2.1 (Puma)
total ok warning degraded severe info pending unknown
5 5 0 0 0 0 0 0
The rest of the output is split into four sections. The first displays the status and the cause of the status
for the environment overall, and then for each instance. The following example shows two instances in
the environment with a status of Info and a cause indicating that a deployment has started:
id status cause
Overall Ok
i-d581497d Info Performing application deployment (running for 3 seconds)
i-d481497c Info Performing application deployment (running for 3 seconds)
i-136e00c0 Ok
i-126e00c1 Ok
i-8b2cf575 Ok
For information about health statuses and colors, see Health Colors and Statuses (p. 349).
The requests section displays information from the web server logs on each instance. In this example,
each instance is taking requests normally and there are no errors:
id r/sec %2xx %3xx %4xx %5xx p99 p90 p75 p50
p10
Overall 13.7 100.0 0.0 0.0 0.0 1.403 0.970 0.710 0.413
0.079
i-d581497d 2.4 100.0 0.0 0.0 0.0 1.102* 0.865 0.601 0.413
0.091
i-d481497c 2.7 100.0 0.0 0.0 0.0 0.842* 0.788 0.480 0.305
0.062
i-136e00c0 4.1 100.0 0.0 0.0 0.0 1.520* 1.088 0.883 0.524
0.104
i-126e00c1 2.2 100.0 0.0 0.0 0.0 1.334* 0.791 0.760 0.344
0.197
i-8b2cf575 2.3 100.0 0.0 0.0 0.0 1.162* 0.867 0.698 0.477
0.076
The cpu section shows operating system metrics for each instance:
API Version 2010-12-01
505

AWS Elastic Beanstalk Developer Guide
Interactive Health View
instance-id type az running load 1 load 5 user% nice% system% idle
% iowait%
i-d581497d t2.micro 1a 12 mins 0.0 0.03 0.2 0.0 0.0
99.7 0.1
i-d481497c t2.micro 1a 12 mins 0.0 0.03 0.3 0.0 0.0
99.7 0.0
i-136e00c0 t2.micro 1b 12 mins 0.0 0.04 0.1 0.0 0.0
99.9 0.0
i-126e00c1 t2.micro 1b 12 mins 0.01 0.04 0.2 0.0 0.0
99.7 0.1
i-8b2cf575 t2.micro 1c 1 hour 0.0 0.01 0.2 0.0 0.1
99.6 0.1
For information about the server and operating system metrics shown, see Instance Metrics (p. 351).
The final section, deployments, shows the deployment status of each instance. If a rolling deployment
fails, you can use the deployment ID, status and version label shown to identify instances in your
environment that are running the wrong version.
instance-id status id version ago
deployments
i-d581497d Deployed 1 Sample Application 12 mins
i-d481497c Deployed 1 Sample Application 12 mins
i-136e00c0 Deployed 1 Sample Application 12 mins
i-126e00c1 Deployed 1 Sample Application 12 mins
i-8b2cf575 Deployed 1 Sample Application 1 hour
Interactive Health View
The eb health command displays a snapshot of your environment's health. To refresh the displayed
information every 10 seconds, use the --refresh option:
$ eb health --refresh
elasticBeanstalkExa-env Ok
2015-07-09 22:10:04 (1 secs)
WebServer
Ruby 2.1 (Puma)
total ok warning degraded severe info pending unknown
5 5 0 0 0 0 0 0
id status cause
Overall Ok
i-bb65c145 Ok Application deployment completed 35 seconds ago and took 26
seconds
i-ba65c144 Ok Application deployment completed 17 seconds ago and took 25
seconds
i-f6a2d525 Ok Application deployment completed 53 seconds ago and took 26
seconds
i-e8a2d53b Ok Application deployment completed 32 seconds ago and took 31
seconds
i-e81cca40 Ok
id r/sec %2xx %3xx %4xx %5xx p99 p90 p75 p50
p10
Overall 671.8 100.0 0.0 0.0 0.0 0.003 0.002 0.001 0.001
0.000
i-bb65c145 143.0 1430 0 0 0 0.003 0.002 0.001 0.001
0.000
i-ba65c144 128.8 1288 0 0 0 0.003 0.002 0.001 0.001
0.000
API Version 2010-12-01
506

AWS Elastic Beanstalk Developer Guide
Interactive Health View Options
i-f6a2d525 125.4 1254 0 0 0 0.004 0.002 0.001 0.001
0.000
i-e8a2d53b 133.4 1334 0 0 0 0.003 0.002 0.001 0.001
0.000
i-e81cca40 141.2 1412 0 0 0 0.003 0.002 0.001 0.001
0.000
instance-id type az running load 1 load 5 user% nice% system% idle
% iowait%
i-bb65c145 t2.micro 1a 12 mins 0.0 0.03 0.2 0.0 0.0
99.7 0.1
i-ba65c144 t2.micro 1a 12 mins 0.0 0.03 0.3 0.0 0.0
99.7 0.0
i-f6a2d525 t2.micro 1b 12 mins 0.0 0.04 0.1 0.0 0.0
99.9 0.0
i-e8a2d53b t2.micro 1b 12 mins 0.01 0.04 0.2 0.0 0.0
99.7 0.1
i-e81cca40 t2.micro 1c 1 hour 0.0 0.01 0.2 0.0 0.1
99.6 0.1
instance-id status id version ago
deployments
i-bb65c145 Deployed 1 Sample Application 12 mins
i-ba65c144 Deployed 1 Sample Application 12 mins
i-f6a2d525 Deployed 1 Sample Application 12 mins
i-e8a2d53b Deployed 1 Sample Application 12 mins
i-e81cca40 Deployed 1 Sample Application 1 hour
(Commands: Help,Quit, ▼ ▼ ▼ ▼)
This example shows an environment that has recently been scaled up from one to five instances. The
scaling operation succeeded, and all instances are now passing health checks and are ready to take
requests. In interactive mode, the health status updates every 10 seconds. In the upper right corner, a
timer ticks down to the next update.
In the lower left corner, the report displays a list of options. To exit interactive mode, press Q. To scroll,
press the arrow keys. To see a list of additional commands, press H.
Interactive Health View Options
When viewing environment health interactively, you can use keyboard keys to adjust the view and tell
Elastic Beanstalk to replace or reboot individual instances. To see a list of available commands while
viewing the health report in interactive mode, press H :
up,down,home,end Scroll vertically
left,right Scroll horizontally
F Freeze/unfreeze data
X Replace instance
B Reboot instance
<,> Move sort column left/right
-,+ Sort order descending/ascending
P Save health snapshot data file
Z Toggle color/mono mode
Views
1 All tables/split view
2 Status Table
3 Request Summary Table
4 CPU%/Load Table
H This help menu
API Version 2010-12-01
507

AWS Elastic Beanstalk Developer Guide
Composing Environments
Managing Multiple AWS Elastic Beanstalk
Environments as a Group with the EB CLI
You can use the EB CLI to create groups of environments, each running a separate component of a
service-oriented architecture application by using the Compose Environments API.
Organize your application components into the following folder structure:
~/project-name
|-- component-a
| `-- env.yaml
`-- component-b
`-- env.yaml
Each subfolder contains the source code for an independent component of an application that will run in
its own environment and an environment definition file named env.yaml. For details on the env.yaml
format, see Environment Manifest (env.yaml) (p. 296).
To use the Compose Environments API, first run eb init from the project folder, specifying each
component by the name of the folder that contains it with the --modules option:
~/workspace/project-name$ eb init --modules component-a component-b
The EB CLI prompts you to configure each component (p. 489), and then creates the
.elasticbeanstalk directory in each component folder. EB CLI doesn't create configuration files in
the parent directory.
~/project-name
|-- component-a
| |-- .elasticbeanstalk
| `-- env.yaml
`-- component-b
|-- .elasticbeanstalk
`-- env.yaml
Next, run the eb create command with a list of environments to create, one for each component:
~/workspace/project-name$ eb create --modules component-a component-b --env-group-
suffix group-name
This command creates an environment for each component. The names of the environments are created
by concatenating the EnvironmentName specified in the env.yaml file with the group name, separated
by a hyphen. The total length of these two options and the hyphen must not exceed the maximum
allowed environment name length of 23 characters.
To update the environment, use the eb deploy command:
~/workspace/project-name$ eb deploy --modules component-a component-b
You can update each component individually or you can update them as a group. Specify the
components that you want to update with the --modules option.
The EB CLI stores the group name that you used with eb create in the branch-defaults section of
the EB CLI configuration file under /.elasticbeanstalk/config.yml. To deploy your application to
a different group, use the --env-group-suffix option when you run eb deploy. If the group does
not already exist, the EB CLI will create a new group of environments:
API Version 2010-12-01
508

AWS Elastic Beanstalk Developer Guide
Troubleshooting
~/workspace/project-name$ eb deploy --modules component-a component-b --env-group-
suffix group-2-name
To terminate environments, run eb terminate in the folder for each module. By default, the EB CLI will
show an error if you try to terminate an environment that another running environment is dependent on.
Terminate the dependent environment first, or use the --ignore-links option to override the default
behavior:
~/workspace/project-name/component-b$ eb terminate --ignore-links
Troubleshooting issues with the EB CLI
This topic lists common error messages encountered when using the EB CLI and possible solutions. If you
encounter an error message not shown here, use the Feedback links to let us know about it.
ERROR: An error occurred while handling git command. Error code: 128 Error: fatal: Not a valid
object name HEAD
Cause: This error message is shown when you have initialized a Git repository but have not yet
commited. The EB CLI looks for the HEAD revision when your project folder contains a Git repository.
Solution: Add the files in your project folder to the staging area and commit:
~/my-app$ git add .
~/my-app$ git commit -m "First commit"
ERROR: This branch does not have a default environment. You must either specify an environment by
typing "eb status my-env-name" or set a default environment by typing "eb use my-env-name".
Cause: When you create a new branch in git, it is not attached to an Elastic Beanstalk environment by
default.
Solution: Run eb list to see a list of available environments. Then run eb use env-name to use one
of the available environments.
ERROR: 2.0+ Platforms require a service role. You can provide one with --service-role option
Cause: If you specify an environment name with eb create (for example, eb create my-env), the EB
CLI will not attempt to create a service role for you. If you don't have the default service role, the above
error is shown.
Solution: Run eb create without an environment name and follow the prompts to create the default
service role.
Troubleshooting deployments
If your Elastic Beanstalk deployment didn't go quite as smoothly as planned, you may get a 404 (if your
application failed to launch) or 500 (if your application fails during runtime) response, instead of seeing
your website. To troubleshoot many common issues, you can use the EB CLI to check the status of your
deployment, view its logs, gain access to your EC2 instance with SSH, or to open the AWS Management
Console page for your application environment.
To use the EB CLI to help troubleshoot your deployment
1. Run eb status to see the status of your current deployment and health of your EC2 hosts. For
example:
API Version 2010-12-01
509

AWS Elastic Beanstalk Developer Guide
Troubleshooting deployments
$ eb status --verbose
Environment details for: python_eb_app
Application name: python_eb_app
Region: us-west-2
Deployed Version: app-150206_035343
Environment ID: e-wa8u6rrmqy
Platform: 64bit Amazon Linux 2014.09 v1.1.0 running Python 2.7
Tier: WebServer-Standard-
CNAME: python_eb_app.elasticbeanstalk.com
Updated: 2015-02-06 12:00:08.557000+00:00
Status: Ready
Health: Green
Running instances: 1
i-8000528c: InService
Note
Using the --verbose switch provides information about the status of your running
instances. Without it, eb status will print only general information about your
environment.
2. Run eb health to view health information about your environment:
$ eb health --refresh
elasticBeanstalkExa-env Degraded
2016-03-28 23:13:20
WebServer
Ruby 2.1 (Puma)
total ok warning degraded severe info pending unknown
5 2 0 2 1 0 0 0
instance-id status cause
Overall Degraded Incorrect application version found on 3 out of 5 instances.
Expected version "Sample Application" (deployment 1).
i-d581497d Degraded Incorrect application version "v2" (deployment 2). Expected
version "Sample Application" (deployment 1).
i-d481497c Degraded Incorrect application version "v2" (deployment 2). Expected
version "Sample Application" (deployment 1).
i-136e00c0 Severe Instance ELB health has not been available for 5 minutes.
i-126e00c1 Ok
i-8b2cf575 Ok
instance-id r/sec %2xx %3xx %4xx %5xx p99 p90 p75 p50
p10
Overall 646.7 100.0 0.0 0.0 0.0 0.003 0.002 0.001 0.001
0.000
i-dac3f859 167.5 1675 0 0 0 0.003 0.002 0.001 0.001
0.000
i-05013a81 161.2 1612 0 0 0 0.003 0.002 0.001 0.001
0.000
i-04013a80 0.0 - - - - - - - -
-
i-3ab524a1 155.9 1559 0 0 0 0.003 0.002 0.001 0.001
0.000
i-bf300d3c 162.1 1621 0 0 0 0.003 0.002 0.001 0.001
0.000
instance-id type az running load 1 load 5 user% nice% system%
idle% iowait%
i-d581497d t2.micro 1a 25 mins 0.16 0.1 7.0 0.0 1.7
91.0 0.1
i-d481497c t2.micro 1a 25 mins 0.14 0.1 7.2 0.0 1.6
91.1 0.0
API Version 2010-12-01
510

AWS Elastic Beanstalk Developer Guide
EB CLI Commands
i-136e00c0 t2.micro 1b 25 mins 0.0 0.01 0.0 0.0 0.0
99.9 0.1
i-126e00c1 t2.micro 1b 25 mins 0.03 0.08 6.9 0.0 2.1
90.7 0.1
i-8b2cf575 t2.micro 1c 1 hour 0.05 0.41 6.9 0.0 2.0
90.9 0.0
instance-id status id version ago
deployments
i-d581497d Deployed 2 v2 9 mins
i-d481497c Deployed 2 v2 7 mins
i-136e00c0 Failed 2 v2 5 mins
i-126e00c1 Deployed 1 Sample Application 25 mins
i-8b2cf575 Deployed 1 Sample Application 1 hour
The above example shows an environment with five instances where the deployment of version
"v2" failed on the third instance. After a failed deployment, the expected version is reset to the last
version that succeeded, which in this case is "Sample Application" from the first deployment. See
Using the EB CLI to Monitor Environment Health (p. 503) for more information.
3. Run eb logs to download and view the logs associated with your application deployment.
$ eb logs
4. Run eb ssh to connect with the EC2 instance that's running your application and examine it
directly. On the instance, your deployed application can be found in the /opt/python/current/
app directory, and your Python environment will be found in /opt/python/run/venv/.
5. Run eb console to view your application environment on the AWS Management Console.
You can use the web interface to easily examine various aspects of your deployment, including
your application's configuration, status, events, logs. You can also download the current or past
application versions that you've deployed to the server.
EB CLI Command Reference
You can use the Elastic Beanstalk command line interface (EB CLI) to perform a variety of operations to
deploy and manage your Elastic Beanstalk applications and environments. The EB CLI integrates with Git
if you want to deploy application source code that is under Git source control. For more information, see
The Elastic Beanstalk Command Line Interface (EB CLI) (p. 480) and Using the EB CLI with Git (p. 497).
Commands
•eb abort (p. 512)
•eb appversion (p. 513)
•eb clone (p. 515)
•eb codesource (p. 517)
•eb config (p. 518)
•eb console (p. 520)
•eb create (p. 521)
•eb deploy (p. 527)
•eb events (p. 529)
•eb health (p. 530)
•eb init (p. 532)
•eb labs (p. 534)
•eb list (p. 535)
•eb local (p. 536)
API Version 2010-12-01
511

AWS Elastic Beanstalk Developer Guide
eb abort
•eb logs (p. 538)
•eb open (p. 539)
•eb platform (p. 540)
•eb printenv (p. 546)
•eb restore (p. 547)
•eb scale (p. 548)
•eb setenv (p. 548)
•eb ssh (p. 549)
•eb status (p. 551)
•eb swap (p. 552)
•eb tags (p. 553)
•eb terminate (p. 555)
•eb upgrade (p. 556)
•eb use (p. 557)
•Common Options (p. 558)
eb abort
Description
Cancels an upgrade when environment configuration changes to instances are still in progress.
Note
If you have more than two environments that are undergoing a update, you are prompted to
select the name of the environment for which you want to roll back changes.
Syntax
eb abort
eb abort environment_name
Options
Name Description
Common options (p. 558)
Output
The command shows a list of environments currently being updated and prompts you to choose the
update that you want to abort. If only one environment is currently being updated, you do not need to
specify the environment name. If successful, the command reverts environment configuration changes.
The rollback process continues until all instances in the environment have the previous environment
configuration or until the rollback process fails.
Example
The following example cancels the platform upgrade.
$ eb abort
API Version 2010-12-01
512

AWS Elastic Beanstalk Developer Guide
eb appversion
Aborting update to environment "tmp-dev".
<list of events>
eb appversion
Description
Manages your Elastic Beanstalk application versions, including deleting a version of the application or
creating the application version lifecycle policy. If you invoke the command without any options, it goes
into interactive mode (p. 513).
Use the --delete option to delete a version of the application.
Use the lifecycle option to display or create the application version lifecycle policy. Learn more at
Configuring Application Version Lifecycle Settings (p. 56)
Syntax
eb appversion
eb appversion [-d | --delete] version-label
eb appversion lifecycle [-p | --print]
Options
Name Description
-d version-label
or
--delete version-label
Delete version version-label of the application.
lifecycle Invoke the default editor to create a new application version
lifecycle policy. Use this policy to avoid hitting the limit to how
many application versions you can create.
lifecycle -p
or
lifecycle --print
Display the current application lifecycle policy.
Common options (p. 558)
Using the command interactively
The command without any arguments displays the versions of the application, from most recent to
oldest. See the Examples section for examples of what the screen looks like. Note the status line at the
bottom of the display. It displays context-sensitive information that you can use to guide you.
Press d to delete an application version, press l to manage the lifecycle policy for your application, or
press q to quit without making any changes.
Note
If the version is deployed to any environment, you cannot delete that version.
API Version 2010-12-01
513
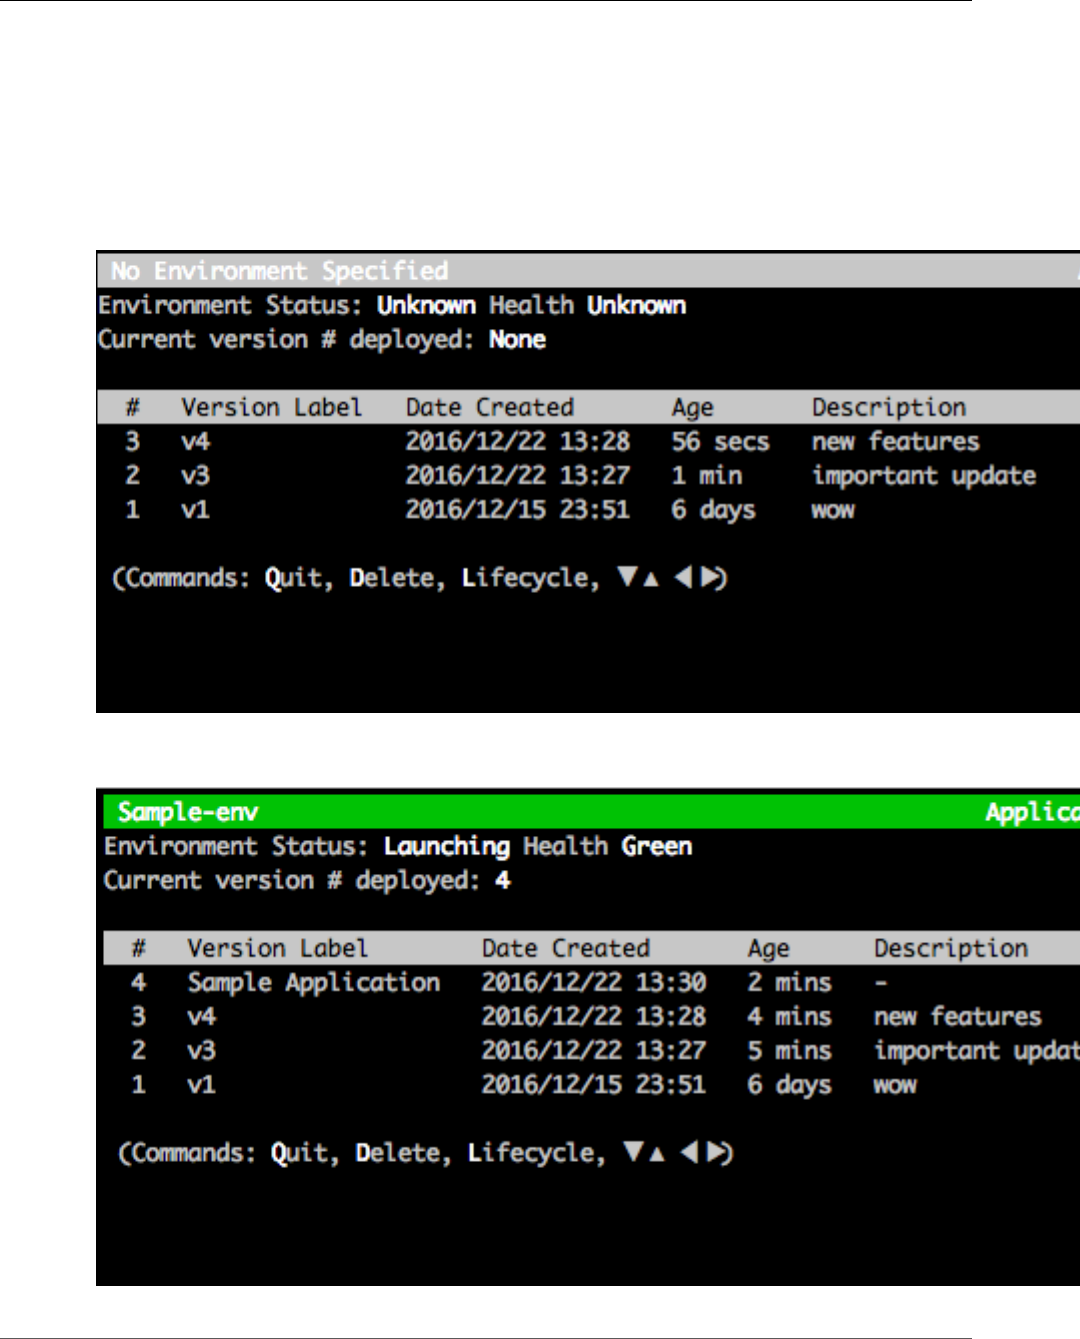
AWS Elastic Beanstalk Developer Guide
eb appversion
Output
The command with the --delete version-label option displays a message confirming that the
application version was deleted.
Examples
The following example shows the interactive window for an application with no deployments.
The following example shows the interactive window for an application with the fourth version, with
version label Sample Application, deployed.
API Version 2010-12-01
514

AWS Elastic Beanstalk Developer Guide
eb clone
The following example shows the output from an eb appversion lifecycle -p command, where
ACCOUNT-ID is the user's account ID:
Application details for: lifecycle
Region: sa-east-1
Description: Application created from the EB CLI using "eb init"
Date Created: 2016/12/20 02:48 UTC
Date Updated: 2016/12/20 02:48 UTC
Application Versions: ['Sample Application']
Resource Lifecycle Config(s):
VersionLifecycleConfig:
MaxCountRule:
DeleteSourceFromS3: False
Enabled: False
MaxCount: 200
MaxAgeRule:
DeleteSourceFromS3: False
Enabled: False
MaxAgeInDays: 180
ServiceRole: arn:aws:iam::ACCOUNT-ID:role/aws-elasticbeanstalk-service-role
eb clone
Description
Clones an environment to a new environment so that both have identical environment settings.
Note
By default, regardless of the solution stack version of the environment from which you create
the clone, the eb clone command creates the clone environment with the most recent solution
stack. You can suppress this by including the --exact option when you run the command.
Syntax
eb clone
eb clone environment_name
Options
Name Description
-n string
or
--clone_name string
Desired name for the cloned environment.
-c string
or
--cname string
Desired CNAME prefix for the cloned environment.
--envvars Environment properties in a comma-separated list with the format
name=value.
Type: String
API Version 2010-12-01
515

AWS Elastic Beanstalk Developer Guide
eb clone
Name Description
Constraints:
• Key-value pairs must be separated by commas.
• Keys and values can contain any alphabetic character in any
language, any numeric character, white space, invisible separator,
and the following symbols: _ . : / + \ - @
• Keys can contain up to 128 characters. Values can contain up to
256 characters.
• Keys and values are case sensitive.
• Values cannot match the environment name.
• Values cannot include either aws: or elasticbeanstalk:.
• The combined size of all environment properties cannot exceed
4096 bytes.
--exact Prevents Elastic Beanstalk from updating the solution stack version
for the new clone environment to the most recent version available
(for the original environment's platform).
--scale number The number of instances to run in the clone environment when it is
launched.
--tags name=value Tags (p. 140) for the resources in your environment in a comma-
separated list with the format name=value.
--timeout The number of minutes before the command times out.
Common options (p. 558)
Output
If successful, the command creates an environment that has the same settings as the original
environment or with modifications to the environment as specified by any eb clone options.
Example
The following example clones the specified environment.
$ eb clone
Enter name for Environment Clone
(default is tmp-dev-clone):
Enter DNS CNAME prefix
(default is tmp-dev-clone):
Environment details for: tmp-dev-clone
Application name: tmp
Region: us-west-2
Deployed Version: app-141029_144740
Environment ID: e-vjvrqnn5pv
Platform: 64bit Amazon Linux 2014.09 v1.0.9 running PHP 5.5
Tier: WebServer-Standard-1.0
CNAME: tmp-dev-clone.elasticbeanstalk.com
Updated: 2014-10-29 22:00:23.008000+00:00
Printing Status:
INFO: createEnvironment is starting.
INFO: Using elasticbeanstalk-us-west-2-888214631909 as Amazon S3 storage bucket for
environment data.
INFO: Created load balancer named: awseb-e-v-AWSEBLoa-4X0VL5UVQ353
API Version 2010-12-01
516

AWS Elastic Beanstalk Developer Guide
eb codesource
INFO: Created security group named: awseb-e-vjvrqnn5pv-stack-
AWSEBSecurityGroup-18AV9FGCH2HZM
INFO: Created Auto Scaling launch configuration named: awseb-e-vjvrqnn5pv-stack-
AWSEBAutoScalingLaunchConfiguration-FDUWRSZZ6L3Z
INFO: Waiting for EC2 instances to launch. This may take a few minutes.
INFO: Created Auto Scaling group named: awseb-e-vjvrqnn5pv-stack-
AWSEBAutoScalingGroup-69DN6PO5TISM
INFO: Created Auto Scaling group policy named: arn:aws:autoscaling:us-
west-2:11122223333:scalingPolicy:addb18d0-7088-402f-90ae-43be7c8d40cb:autoScalingGroupName/
awseb-e-vjvrqnn5pv-stack-AWSEBAutoScalingGroup-69DN6PO5TISM:policyName/awseb-e-vjvrqnn5pv-
stack-AWSEBAutoScalingScaleDownPolicy-I8GFGQ8T8MOV
INFO: Created Auto Scaling group policy named: arn:aws:autoscaling:us-
west-2:11122223333:scalingPolicy:fdcee817-e687-4fce-adc3-376995b3fef5:autoScalingGroupName/
awseb-e-vjvrqnn5pv-stack-AWSEBAutoScalingGroup-69DN6PO5TISM:policyName/awseb-e-vjvrqnn5pv-
stack-AWSEBAutoScalingScaleUpPolicy-1R312293DFY24
INFO: Created CloudWatch alarm named: awseb-e-vjvrqnn5pv-stack-
AWSEBCloudwatchAlarmLow-1M67HXZH1U9K3
INFO: Created CloudWatch alarm named: awseb-e-vjvrqnn5pv-stack-
AWSEBCloudwatchAlarmHigh-1K5CI7RVGV8ZJ
INFO: Added EC2 instance 'i-cf30e1c5' to Auto Scaling Group 'awseb-e-vjvrqnn5pv-stack-
AWSEBAutoScalingGroup-69DN6PO5TISM'.
INFO: Successfully launched environment: tmp-dev-clone
eb codesource
Description
Configures the EB CLI to deploy from an AWS CodeCommit repository (p. 499), or disables AWS
CodeCommit integration and uploads the source bundle from your local machine.
Note
Some regions don't offer AWS CodeCommit. The integration between Elastic Beanstalk and AWS
CodeCommit doesn't work in these regions.
For information about the AWS services offered in each region, see Region Table.
Syntax
eb codesource
eb codesource codecommit
eb codesource local
Options
Name Description
Common options (p. 558)
Output
eb codesource prompts you to choose between AWS CodeCommit integration and standard
deployments.
eb codesource codecommit initiates interactive repository configuration for AWS CodeCommit
integration.
API Version 2010-12-01
517

AWS Elastic Beanstalk Developer Guide
eb config
eb codesource local shows the original configuration and disables AWS CodeCommit integration.
Examples
Use eb codesource codecommit to configure AWS CodeCommit integration for the current branch.
~/my-app$ eb codesource codecommit
Select a repository
1) my-repo
2) my-app
3) [ Create new Repository ]
(default is 1): 1
Select a branch
1) master
2) test
3) [ Create new Branch with local HEAD ]
(default is 1): 1
Use eb codesource local to disable AWS CodeCommit integration for the current branch.
~/my-app$ eb codesource local
Current CodeCommit setup:
Repository: my-app
Branch: master
Default set to use local sources
eb config
Description
Changes the environment configuration settings. This command saves the environment configuration
settings as well as uploads, downloads, or lists saved configurations.
If the root directory contains a platform.yaml file specifying a custom platform, this command also
changes the builder configuration settings, based on the values set in platform.yaml.
Note
eb config does not show environment properties. To set environment properties that you can
read from within your application, use eb setenv (p. 217)
Syntax
eb config
eb config environment_name
The following describes the syntax for using the eb config command to work with saved
configurations. For examples, see the see the Examples (p. 519) section later in this topic.
•eb config delete filename – Deletes the named saved configuration.
•eb config get filename – Downloads the named saved configuration.
•eb config list – Lists the saved configurations that you have in Amazon S3.
•eb config put filename – Uploads the named saved configuration to an Amazon S3 bucket. The
filename must have the file extension .cfg.yml. To specify the file name without a path, you can
API Version 2010-12-01
518

AWS Elastic Beanstalk Developer Guide
eb config
save the file to the .elasticbeanstalk folder or to the .elasticbeanstalk/saved_configs/
folder before you run the command. Alternatively, you can specify the filename by providing the full
path.
•eb config save – Saves the environment configuration settings for the current running
environment to .elasticbeanstalk/saved_configs/ with the filename [configuration-
name].cfg.yml. By default, the EB CLI saves the configuration settings with a configuration-
name based on the environment name. You can specify a different configuration name by including the
--cfg option with your desired configuration name when you run the command.
Options
Name Description
--cfg config-name The name to use for a saved configuration (which you can
later specify to create or update an environment from a saved
configuration).
--timeout timeout The number of minutes before the command times out.
Common options (p. 558)
Output
If the command runs successfully with no parameters, the command displays your current option
settings in the text editor that you configured as the EDITOR environment variable. (If you have not
configured an EDITOR environment variable, then EB CLI displays your option settings in your computer's
default editor for YAML files.) When you save changes to the file and close the editor, the environment is
updated with the option settings in the file.
If the command runs successfully with the get parameter, the command displays the location of the
local copy that you downloaded.
If the command runs successfully with the save parameter, the command displays the location of the
saved file.
Examples
This section describes how to change the text editor that you use to view and edit your option settings
file.
For Linux/UNIX, the following example changes the editor to vim:
$ export EDITOR=vim
For Linux/UNIX,the following example changes the editor to what is installed at /usr/bin/kate.
$ export EDITOR=/usr/bin/kate
For Windows, the following example changes the editor to Notepad++.
> set EDITOR="C:\Program Files\Notepad++\Notepad++.exe
API Version 2010-12-01
519

AWS Elastic Beanstalk Developer Guide
eb console
This section provides examples for the eb config command when it is run with parameters.
The following example deletes the saved configuration named app-tmp.
$ eb config delete app-tmp
The following example downloads the saved configuration with the name app-tmp from your Amazon
S3 bucket.
$ eb config get app-tmp
The following example lists the names of saved configurations that are stored in your Amazon S3 bucket.
$ eb config list
The following example uploads the local copy of the saved configuration named app-tmp to your
Amazon S3 bucket.
$ eb config put app-tmp
The following example saves configuration settings from the current running environment. If you do not
provide a name to use for the saved configuration, then Elastic Beanstalk names the configuration file
according to the environment name. For example, an environment named tmp-dev would be called tmp-
dev.cfg.yml. Elastic Beanstalk saves the file to the folder /.elasticbeanstalk/saved_configs/.
$ eb config save
The following example shows how to use the --cfg option to save the configuration settings from the
environment tmp-dev to a file called v1-app-tmp.cfg.yml. Elastic Beanstalk saves the file to the
folder /.elasticbeanstalk/saved_configs/. If you do not specify an environment name, Elastic
Beanstalk saves configuration settings from the current running environment.
$ eb config save tmp-dev --cfg v1-app-tmp
eb console
Description
Opens a browser to display the environment configuration dashboard in the Elastic Beanstalk
Management Console.
If the root directory contains a platform.yaml file specifying a custom platform, this command also
displays the builder environment configuration, as specified in platform.yaml, in the Elastic Beanstalk
Management Console.
Syntax
eb console
eb console environment_name
API Version 2010-12-01
520

AWS Elastic Beanstalk Developer Guide
eb create
Options
Name Description
Common options (p. 558)
eb create
Description
Creates a new environment and deploys an application version to it.
Note
• To use eb create on a .NET application, you must create a deployment package as described
in Creating a Source Bundle for a .NET Application (p. 63), then set up the CLI configuration to
deploy the package as an artifact as described in Deploying an Artifact Instead of the Project
Folder (p. 491).
• Creating environments with the EB CLI requires a service role (p. 21). You can create a service
role by creating an environment in the Elastic Beanstalk console. If you don't have a service
role, the EB CLI attempts to create one when you run eb create.
You can deploy the application version from a few sources:
• By default: from the application source code in the local project directory.
• Using the --version option: from an application version that already exists in your application.
• When your project directory doesn't have application code, or when using the --sample option: from
a sample application, specific to your environment's platform.
Syntax
eb create
eb create environment-name
eb create environment-name-1 environment-name-2 (see Compose Environments (p. 508))
Environment names must be between 4 and 40 characters in length, and can only contain letters,
numbers, and hyphens. Environment names can't begin or end with a hyphen.
If you include an environment name in the command, the EB CLI doesn't prompt you to make any
selections or create a service role.
If you run the command without parameters, it runs in an interactive flow, and prompts you to enter or
select values for some settings. In this interactive flow, in case you are deploying a sample application,
the EB CLI also asks you if you want to download this sample application to your local project directory.
This enables you to use the EB CLI with the new environment later to run operations that require the
application's code, like eb deploy (p. 527).
Options
None of these options are required. If you run eb create without any options, the EB CLI prompts you
to enter or select a value for each setting.
API Version 2010-12-01
521

AWS Elastic Beanstalk Developer Guide
eb create
Name Description
-d
or
--branch_default
Set the environment as the default environment for the
current repository.
--cfg config-name Use platform settings from a saved configuration (p. 211) in
.elasticbeanstalk/saved_configs/ or your Amazon
S3 bucket. Specify the name of the file only, without the
.cfg.yml extension.
-c subdomain-name
or
--cname subdomain-name
The subdomain name to prefix the CNAME DNS entry that
routes to your website.
Type: String
Default: The environment name
-db
or
--database
Attaches a database to the environment. If you run eb
create with the --database option, but without the
--database.username and --database.password
options, EB CLI prompts you for the master database user
name and password.
-db.engine engine
or
--database.engine engine
The database engine type. If you run eb create with
this option, then EB CLI launches the environment with a
database attached even if you didn't run the command with
the --database option.
Type: String
Valid values: mysql, oracle-se1, postgres, sqlserver-
ex, sqlserver-web, sqlserver-se
-db.i instance_type
or
--database.instance
instance_type
The type of Amazon EC2 instance to use for the database. If
you run eb create with this option, then EB CLI launches
the environment with a database attached even if you didn't
run the command with the --database option.
Type: String
Valid values: See Option Values.
-db.pass password
or
--database.password password
The password for the database. If you run eb create with
this option, then EB CLI launches the environment with a
database attached even if you didn't run the command with
the --database option.
-db.size number_of_gigabytes
or
--database.size
number_of_gigabytes
The number of gigabytes (GB) to allocate for database
storage. If you run eb create with this option, then EB CLI
launches the environment with a database attached even if
you didn't run the command with the --database option.
Type: Number
Valid values:
API Version 2010-12-01
522

AWS Elastic Beanstalk Developer Guide
eb create
Name Description
•MySQL – 5 to 1024. The default is 5.
•Postgres – 5 to 1024. The default is 5.
•Oracle – 10 to 1024. The default is 10.
•Microsoft SQL Server Express Edition – 30.
•Microsoft SQL Server Web Edition – 30.
•Microsoft SQL Server Standard Edition – 200.
-db.user username
or
--database.username username
The user name for the database. If you run eb create with
this option, then EB CLI launches the environment with a
database attached even if you didn't run the command with
the --database option. If you run eb create with the --
database option, but without the --database.username
and --database.password options, then EB CLI prompts
you for the master database user name and password.
-db.version version
or
--database.version version
Allows you to specify the database engine version. If this
flag is present, the environment will launch with a database
with the specified version number, even if the --database
flag is not present.
--elb-type type The load balancer type (p. 176).
Type: String
Valid values: classic, application, network
Default: classic
--env-group-suffix groupname Group name to append to the environment name. Only for
use with Compose Environments (p. 508).
--envvars Environment properties (p. 189) in a comma-separated list
with the format name=value. See Configuring Environment
Properties (p. 190) for limits.
-ip profile_name
or
--instance_profile
profile_name
The instance profile with the IAM role with the temporary
security credentials that your application needs to access
AWS resources.
-i
or
--instance_type
The type of Amazon EC2 instance to use in the environment.
Valid values: See Option Values.
API Version 2010-12-01
523

AWS Elastic Beanstalk Developer Guide
eb create
Name Description
-k key_name
or
--keyname key_name
The name of the Amazon EC2 key pair to use with the Secure
Shell (SSH) client to securely log in to the Amazon EC2
instances running your Elastic Beanstalk application. If you
include this option with the eb create command, the value
you provide overwrites any key name that you might have
specified with eb init.
Valid values: An existing key name that is registered with
Amazon EC2
--modules component-a
component-b
List of component environments to create. Only for use with
Compose Environments (p. 508).
-p platform-configuration
or
--platform platform-
configuration
The platform configuration (p. 26) to use. You can specify
a platform, platform configuration, or solution stack name.
For example:
•php - the latest available PHP configuration
•php-5.5 - the latest PHP 5.5 configuration
•"64bit Amazon Linux 2016.03 v2.1.5 running
PHP 7.0" - PHP 7.0 version 2.1.5
Use eb platform list (p. 540) to get a list of available
configurations.
-pr
or
--process
Preprocess and validate the environment manifest and
configuration files in the source bundle. Validating
configuration files can identify issues prior to deploying the
application version to an environment.
-r region
or
--region region
The AWS Region in which you want to deploy the
application.
For the list of values you can specify for this option, see AWS
Elastic Beanstalk in the Regions and Endpoints topic in the
Amazon Web Services General Reference.
--sample Deploy the sample application to the new environment
instead of the code in your repository.
--scale number-of-instances Launch with the specified number of instances
--service-role servicerole Assign a non-default service role to the environment.
Note
Do not enter an ARN, just the role name. Elastic
Beanstalk prefixes the role name with the correct
values to create the resulting ARN internally.
API Version 2010-12-01
524

AWS Elastic Beanstalk Developer Guide
eb create
Name Description
--single Create the environment with a single Amazon EC2 instance
and without a load balancer.
Warning
A single-instance environment isn't production-
ready. If the instance becomes unstable during
deployment, or Elastic Beanstalk terminates and
restarts the instance during a configuration update,
your application may be unavailable for a period
of time. Use single-instance environments for
development, testing, or staging. Use load-balanced
environments for production.
--tagskey1=value1[,key2=value2...]Tag the resources in your environment. Tags are specified as
a comma-separated list of key=value pairs.
For valid values and more details, see Tag an
Environment (p. 140).
-t worker
or
--tier worker
Create a worker environment. Omit this option to create a
web server environment.
--timeout minutes Set number of minutes before the command times out.
--version version_label Specifies the application version that you want deployed to
the environment instead of the application source code in
the local project directory.
Type: String
Valid values: An existing application version label
--vpc Configure a VPC for your environment. When you include
this option, the EB CLI prompts you to enter all required
settings prior to launching the environment.
--vpc.dbsubnets
subnet1,subnet2
Specifies subnets for database instances in a VPC. Required
when --vpc.id is specified.
--vpc.ec2subnets
subnet1,subnet2
Specifies subnets for Amazon EC2 instances in a VPC.
Required when --vpc.id is specified.
--vpc.elbpublic Launches your Elastic Load Balancing load balancer in a
public subnet in your VPC.
--vpc.elbsubnets
subnet1,subnet2
Specifies subnets for the Elastic Load Balancing load
balancer in a VPC.
--vpc.id ID Launches your environment in the specified VPC.
--vpc.publicip Launches your Amazon EC2 instances in a public subnet in
your VPC.
--vpc.securitygroups
securitygroup1,securitygroup2
Specifies the security group ID or security group name.
Required when --vpc.id is specified.
API Version 2010-12-01
525

AWS Elastic Beanstalk Developer Guide
eb create
Name Description
Common options (p. 558)
Output
If successful, the command prompts you with questions and then returns the status of the create
operation. If there were problems during the launch, you can use the eb events (p. 529) operation to
get more details.
If you enabled AWS CodeBuild support in your application, eb create displays information from AWS
CodeBuild as your code is built. Learn more about AWS CodeBuild support in Elastic Beanstalk in the
Using the EB CLI with AWS CodeBuild (p. 497) topic.
Examples
The following example creates an environment in interactive mode.
$ eb create
Enter Environment Name
(default is tmp-dev): ENTER
Enter DNS CNAME prefix
(default is tmp-dev): ENTER
Select a load balancer type
1) classic
2) application
3) network
(default is 1): ENTER
Environment details for: tmp-dev
Application name: tmp
Region: us-east-2
Deployed Version: app-141029_145448
Environment ID: e-um3yfrzq22
Platform: 64bit Amazon Linux 2014.09 v1.0.9 running PHP 5.5
Tier: WebServer-Standard-1.0
CNAME: tmp-dev.elasticbeanstalk.com
Updated: 2014-10-29 21:54:51.063000+00:00
Printing Status:
...
The following example also creates an environment in interactive mode. In this example, your project
directory doesn't have application code. The command deploys a sample application and downloads it to
your local project directory.
$ eb create
Enter Environment Name
(default is tmp-dev): ENTER
Enter DNS CNAME prefix
(default is tmp-dev): ENTER
Select a load balancer type
1) classic
2) application
3) network
(default is 1): ENTER
NOTE: The current directory does not contain any source code. Elastic Beanstalk is
launching the sample application instead.
Do you want to download the sample application into the current directory?
(Y/n): ENTER
INFO: Downloading sample application to the current directory.
API Version 2010-12-01
526

AWS Elastic Beanstalk Developer Guide
eb deploy
INFO: Download complete.
Environment details for: tmp-dev
Application name: tmp
Region: us-east-2
Deployed Version: Sample Application
Environment ID: e-um3yfrzq22
Platform: 64bit Amazon Linux 2014.09 v1.0.9 running PHP 5.5
Tier: WebServer-Standard-1.0
CNAME: tmp-dev.elasticbeanstalk.com
Updated: 2017-11-08 21:54:51.063000+00:00
Printing Status:
...
The following command creates an environment without displaying any prompts.
$ eb create dev-env
Creating application version archive "app-160312_014028".
Uploading test/app-160312_014028.zip to S3. This may take a while.
Upload Complete.
Application test has been created.
Environment details for: dev-env
Application name: test
Region: us-east-2
Deployed Version: app-160312_014028
Environment ID: e-6fgpkjxyyi
Platform: 64bit Amazon Linux 2015.09 v2.0.8 running PHP 5.6
Tier: WebServer-Standard
CNAME: UNKNOWN
Updated: 2016-03-12 01:40:33.614000+00:00
Printing Status:
...
The following command creates an environment in a custom VPC.
$ eb create dev-vpc --vpc.id vpc-0ce8dd99 --vpc.elbsubnets subnet-b356d7c6,subnet-02f74b0c
--vpc.ec2subnets subnet-0bb7f0cd,subnet-3b6697c1 --vpc.securitygroup sg-70cff265
Creating application version archive "app-160312_014309".
Uploading test/app-160312_014309.zip to S3. This may take a while.
Upload Complete.
Environment details for: dev-vpc
Application name: test
Region: us-east-2
Deployed Version: app-160312_014309
Environment ID: e-pqkcip3mns
Platform: 64bit Amazon Linux 2015.09 v2.0.8 running Java 8
Tier: WebServer-Standard
CNAME: UNKNOWN
Updated: 2016-03-12 01:43:14.057000+00:00
Printing Status:
...
eb deploy
Description
Deploys the application source bundle from the initialized project directory to the running application.
If git is installed, EB CLI uses the git archive command to create a .zip file from the contents of the
most recent git commit command.
API Version 2010-12-01
527

AWS Elastic Beanstalk Developer Guide
eb deploy
However, when .ebignore is present in yout project directory, the EB CLI doesn't use git commands and
semantics to create your source bundle. This means that EB CLI ignores files specified in .ebignore, and
includes all other files. In particular, it includes uncommitted source files.
Note
You can configure the EB CLI to deploy an artifact from your build process instead of creating a
ZIP file of your project folder. See Deploying an Artifact Instead of the Project Folder (p. 491)
for details.
Syntax
eb deploy
eb deploy environment_name
Options
Name Description
-l version_label
or
--label version_label
Specify a label to use for the version that the EB CLI creates. If the
label has already been used, the EB CLI redeploys the previous
version with that label.
Type: String
--env-group-suffix
groupname
Group name to append to the environment name. Only for use
with Compose Environments (p. 508).
-m "version_description"
or
--message
"version_description"
The description for the application version, enclosed in double
quotation marks.
Type: String
--modules component-a
component-b
List of components to update. Only for use with Compose
Environments (p. 508).
-pr
or
--process
Preprocess and validate the environment manifest and
configuration files in the source bundle. Validating configuration
files can identify issues prior to deploying the application version
to an environment.
--source
codecommit/repository-
name/branch-name
AWS CodeCommit repository and branch. See Using the EB CLI
with AWS CodeCommit (p. 499).
--staged Deploy files staged in the git index instead of the HEAD commit.
--timeout minutes The number of minutes before the command times out.
--version version_label An existing application version to deploy.
Type: String
Common options (p. 558)
API Version 2010-12-01
528

AWS Elastic Beanstalk Developer Guide
eb events
Output
If successful, the command returns the status of the deploy operation.
If you enabled AWS CodeBuild support in your application, eb deploy displays information from AWS
CodeBuild as your code is built. Learn more about AWS CodeBuild support in Elastic Beanstalk in the
Using the EB CLI with AWS CodeBuild (p. 497) topic.
Example
The following example deploys the current application.
$ eb deploy
INFO: Environment update is starting.
INFO: Deploying new version to instance(s).
INFO: New application version was deployed to running EC2 instances.
INFO: Environment update completed successfully.
eb events
Description
Returns the most recent events for the environment.
If the root directory contains a platform.yaml file specifying a custom platform, this command also
returns the most recent evens for the builder environment.
Syntax
eb events
eb events environment_name
Options
Name Description
-f
or
--follow
Streams events. To cancel, press CTRL+C.
Output
If successful, the command returns recent events.
Example
The following example returns the most recent events.
API Version 2010-12-01
529

AWS Elastic Beanstalk Developer Guide
eb health
$ eb events
2014-10-29 21:55:39 INFO createEnvironment is starting.
2014-10-29 21:55:40 INFO Using elasticbeanstalk-us-west-2-169465803350 as Amazon S3
storage bucket for environment data.
2014-10-29 21:55:57 INFO Created load balancer named: awseb-e-r-AWSEBLoa-
NSKUOK5X6Z9J
2014-10-29 21:56:16 INFO Created security group named: awseb-e-rxgrhjr9bx-stack-
AWSEBSecurityGroup-1UUHU5LZ20ZY7
2014-10-29 21:56:20 INFO Created Auto Scaling launch configuration named:awseb-e-
rxgrhjr9bx-stack-AWSEBAutoScalingLaunchConfiguration-AG68JQHE9NWO
2014-10-29 21:57:18 INFO Waiting for EC2 instances to launch. This may take a few
minutes.
2014-10-29 21:57:18 INFO Created Auto Scaling group named: awseb-e-rxgrhjr9bx-stack-
AWSEBAutoScalingGroup-1TE320ZCJ9RPD
2014-10-29 21:57:22 INFO Created Auto Scaling group policy named:
arn:aws:autoscaling:us-west-2:11122223333:scalingPolicy:2cced9e6-859b-421a-
be63-8ab34771155a:autoScalingGroupName/awseb-e-rxgrhjr9bx-stack-
AWSEBAutoScalingGroup-1TE320ZCJ9RPD:policyName/awseb-e-rxgrhjr9bx-stack-
AWSEBAutoScalingScaleUpPolicy-1I2ZSNVU4APRY
2014-10-29 21:57:22 INFO Created Auto Scaling group policy named:
arn:aws:autoscaling:us-west-2:11122223333:scalingPolicy:1f08b863-
bf65-415a-b584-b7fa3a69a0d5:autoScalingGroupName/awseb-e-rxgrhjr9bx-stack-
AWSEBAutoScalingGroup-1TE320ZCJ9RPD:policyName/awseb-e-rxgrhjr9bx-stack-
AWSEBAutoScalingScaleDownPolicy-1E3G7PZKZPSOG
2014-10-29 21:57:25 INFO Created CloudWatch alarm named: awseb-e-rxgrhjr9bx-stack-
AWSEBCloudwatchAlarmLow-VF5EJ549FZBL
2014-10-29 21:57:25 INFO Created CloudWatch alarm named: awseb-e-rxgrhjr9bx-stack-
AWSEBCloudwatchAlarmHigh-LA9YEW3O6WJO
2014-10-29 21:58:50 INFO Added EC2 instance 'i-c7ee492d' to Auto ScalingGroup
'awseb-e-rxgrhjr9bx-stack-AWSEBAutoScalingGroup-1TE320ZCJ9RPD'.
2014-10-29 21:58:53 INFO Successfully launched environment: tmp-dev
2014-10-29 21:59:14 INFO Environment health has been set to GREEN
2014-10-29 21:59:43 INFO Adding instance 'i-c7ee492d' to your environment.
eb health
Description
Returns the most recent health for the environment.
If the root directory contains a platform.yaml file specifying a custom platform, this command also
returns the most recent health for the builder environment.
Syntax
eb health
eb health environment_name
Options
Name Description
-r
or
--refresh
Show health information interactively and update every ten
seconds as new information is reported.
API Version 2010-12-01
530

AWS Elastic Beanstalk Developer Guide
eb health
Name Description
--mono Don't display color in output.
Output
If successful, the command returns recent health.
Example
The following example returns the most recent health.
$ eb health
elasticBeanstalkExa-env Ok
2015-07-08 23:13:20
WebServer Ruby
2.1 (Puma)
total ok warning degraded severe info pending unknown
5 5 0 0 0 0 0 0
id status cause
Overall Ok
i-d581497d Ok
i-d481497c Ok
i-136e00c0 Ok
i-126e00c1 Ok
i-8b2cf575 Ok
id r/sec %2xx %3xx %4xx %5xx p99 p90 p75 p50
p10
Overall 0.0 - - - - - - - -
-
i-d581497d 0.0 - - - - - - - -
-
i-d481497c 0.0 - - - - - - - -
-
i-136e00c0 0.0 - - - - - - - -
-
i-126e00c1 0.0 - - - - - - - -
-
i-8b2cf575 0.0 - - - - - - - -
-
instance-id type az running load 1 load 5 user% nice% system% idle
% iowait%
i-d581497d t2.micro 1a 12 mins 0.0 0.03 0.2 0.0 0.0
99.7 0.1
i-d481497c t2.micro 1a 12 mins 0.0 0.03 0.3 0.0 0.0
99.7 0.0
i-136e00c0 t2.micro 1b 12 mins 0.0 0.04 0.1 0.0 0.0
99.9 0.0
i-126e00c1 t2.micro 1b 12 mins 0.01 0.04 0.2 0.0 0.0
99.7 0.1
i-8b2cf575 t2.micro 1c 1 hour 0.0 0.01 0.2 0.0 0.1
99.6 0.1
instance-id status id version ago
deployments
i-d581497d Deployed 1 Sample Application 12 mins
i-d481497c Deployed 1 Sample Application 12 mins
i-136e00c0 Deployed 1 Sample Application 12 mins
API Version 2010-12-01
531

AWS Elastic Beanstalk Developer Guide
eb init
i-126e00c1 Deployed 1 Sample Application 12 mins
i-8b2cf575 Deployed 1 Sample Application 1 hour
eb init
Description
Sets default values for Elastic Beanstalk applications created with EB CLI by prompting you with a series
of questions.
Note
The values you set with init apply only to the current directory and repository.
Syntax
eb init
eb init application-name
Options
If you run eb init without specifying any options, the EB CLI prompts you to enter a value for each
setting.
Note
To use eb init to create a new key pair, you must have ssh-keygen installed on your local
machine and available from the command line.
Name Description
-i
--interactive
Forces EB CLI to prompt you to provide a value for every eb init
command option.
Note
The init command prompts you to provide values for
eb init command options that do not have a (default)
value. After the first time you run the eb init command
in a directory, EB CLI might not prompt you about any
command options. Therefore, use the --interactive
option when you want to change a setting that you
previously set.
-k keyname
--keyname keyname
The name of the Amazon EC2 key pair to use with the Secure Shell
(SSH) client to securely log in to the Amazon EC2 instances running
your Elastic Beanstalk application.
--modules folder-1
folder-2
List of child directories to initialize. Only for use with Compose
Environments (p. 508).
-p platform-name
--platform platform-name
Specify the platform (p. 26) to skip interactive configuration. The
platform name can include a version if the platform supports
multiple configurations. If you do not specify a configuration
version, EB CLI uses the most recent configuration. Use eb
platform list to see a list of available platforms.
For example: php, PHP, php5.5, "PHP 5.5", node.js, "64bit
Amazon Linux 2014.03 v1.0.7 running PHP 5.5"
API Version 2010-12-01
532

AWS Elastic Beanstalk Developer Guide
eb init
Name Description
Note
When you specify this option, then EB CLI does not prompt
you for values for any other options. Instead, it assumes
default values for each option. You can specify options for
anything for which you do not want to use default values.
--source
codecommit/repository-
name/branch-name
AWS CodeCommit repository and branch. See Using the EB CLI with
AWS CodeCommit (p. 499).
Common options (p. 558)
AWS CodeBuild Support
If you run eb init in a folder that contains a buildspec.yml file, Elastic Beanstalk parses the file for an
eb_codebuild_settings entry with the following format:
eb_codebuild_settings:
CodeBuildServiceRole: role-name
ComputeType: size
Image: image
Timeout: minutes
CodeBuildServiceRole
The name (not ARN) of the IAM role for AWS CodeBuild. This value is required and if omitted any
subsequent eb create or eb deploy command fails.
ComputeType
The amount of resources for the Docker container. Valid values are BUILD_GENERAL1_SMALL,
BUILD_GENERAL1_MEDIUM, and BUILD_GENERAL1_LARGE.
Image
The name of the Docker Hub or Amazon ECR image that AWS CodeBuild creates for Elastic
Beanstalk. This value is optional and if omitted the eb init command prompts you for a platform
and other options. see Build Environment Reference for AWS CodeBuild for a list of images.
Timeout
The duration, in minutes, that the AWS CodeBuild build runs before timing out. This value is
optional. See Create a Build Project in AWS CodeBuild for the default value and range of values.
Note
Some regions don't offer AWS CodeBuild. The integration between Elastic Beanstalk and AWS
CodeBuild doesn't work in these regions.
For information about the AWS services offered in each region, see Region Table.
Learn more about AWS CodeBuild support in Elastic Beanstalk in the Using the EB CLI with AWS
CodeBuild (p. 497) topic.
Output
If successful, the command guides you through setting up a new Elastic Beanstalk application through a
series of prompts.
API Version 2010-12-01
533

AWS Elastic Beanstalk Developer Guide
eb labs
Example
The following example request initializes EB CLI and prompts you to enter information about your
application. Replace the red placeholder text with your own values.
$ eb init -i
Select a default region
1) us-east-1 : US East (N. Virginia)
2) us-west-1 : US West (N. California)
3) us-west-2 : US West (Oregon)
4) eu-west-1 : EU (Ireland)
5) eu-central-1 : EU (Frankfurt)
6) ap-south-1 : Asia Pacific (Mumbai)
7) ap-southeast-1 : Asia Pacific (Singapore)
8) ap-southeast-2 : Asia Pacific (Sydney)
9) ap-northeast-1 : Asia Pacific (Tokyo)
10) ap-northeast-2 : Asia Pacific (Seoul)
11) sa-east-1 : South America (Sao Paulo)
12) cn-north-1 : China (Beijing)
13) us-east-2 : US East (Columbus)
14) ca-central-1 : Canada (Central)
15) eu-west-2 : EU (London)
(default is 3): 3
Select an application to use
1) HelloWorldApp
2) NewApp
3) [ Create new Application ]
(default is 3): 3
Enter Application Name
(default is "tmp"):
Application tmp has been created.
It appears you are using PHP. Is this correct?
(y/n): y
Select a platform version.
1) PHP 5.5
2) PHP 5.4
3) PHP 5.3
(default is 1): 1
Do you want to set up SSH for your instances?
(y/n): y
Select a keypair.
1) aws-eb
2) [ Create new KeyPair ]
(default is 2): 1
eb labs
Description
Subcommands of eb labs support work-in-progress or experimental functionality. These commands
may be removed or reworked in future versions of the EB CLI and are not guaranteed to be forward
compatible.
For a list of available subcommands and descriptions, run eb labs --help.
API Version 2010-12-01
534

AWS Elastic Beanstalk Developer Guide
eb list
eb list
Description
Lists all environments in the current application or all environments in all applications, as specified by
the --all option.
If the root directory contains a platform.yaml file specifying a custom platform, this command also
lists the builder environments.
Syntax
eb list
Options
Name Description
-a
or
--all
Lists all environments from all applications.
-v
or
--verbose
Provides more detailed information about all environments,
including instances.
Common options (p. 558)
Output
If successful, the command returns a list of environment names in which your current environment is
marked with an asterisk (*).
Example 1
The following example lists your environments and indicates that tmp-dev is your default environment.
$ eb list
* tmp-dev
Example 2
The following example lists your environments with additional details.
$ eb list --verbose
Region: us-west-2
Application: tmp
Environments: 1
* tmp-dev : ['i-c7ee492d']
API Version 2010-12-01
535

AWS Elastic Beanstalk Developer Guide
eb local
eb local
Description
Use eb local run to run your application's containers locally in Docker. Check the application's
container status with eb local status. Open the application in a web browser with eb local open.
Retrieve the location of the application's logs with eb local logs.
eb local setenv and eb local printenv let you set and view environment variables that are
provided to the Docker containers that you run locally with eb local run.
You must run all eb local commands in the project directory of a Docker application that has been
initialized as an EB CLI repository by using eb init.
Note
Use eb local on a local computer running Linux. The command doesn't support Windows.
Syntax
eb local run
eb local status
eb local open
eb local logs
eb local setenv
eb local printenv
Options
eb local run
Name Description
--envvars
key1=value1,key2=value2
Sets environment variables that the EB CLI will pass to the local
Docker containers. In multicontainer environments, all variables are
passed to all containers.
--port hostport Maps a port on the host to the exposed port on the container. If
you don't specify this option, the EB CLI uses the same port on both
host and container.
This option works only with single container applications.
Common options (p. 558)
eb local status
eb local open
eb local logs
eb local setenv
eb local printenv
API Version 2010-12-01
536

AWS Elastic Beanstalk Developer Guide
eb local
Name Description
Common options (p. 558)
Output
eb local run
Status messages from Docker. Remains active as long as application is running. Press Ctrl-C to stop the
application.
eb local status
The status of each container used by the application, running or not.
eb local open
Opens the application in a web browser and exits.
eb local logs
The location of the logs generated in your project directory by applications running locally under eb
local run.
eb local setenv
None
eb local printenv
The name and values of environment variables set with eb local setenv.
Examples
eb local run
~/project$ eb local run
Creating elasticbeanstalk_phpapp_1...
Creating elasticbeanstalk_nginxproxy_1...
Attaching to elasticbeanstalk_phpapp_1, elasticbeanstalk_nginxproxy_1
phpapp_1 | [23-Apr-2015 23:24:25] NOTICE: fpm is running, pid 1
phpapp_1 | [23-Apr-2015 23:24:25] NOTICE: ready to handle connections
eb local status
View the status of your local containers:
~/project$ eb local status
Platform: 64bit Amazon Linux 2014.09 v1.2.1 running Multi-container Docker 1.3.3 (Generic)
Container name: elasticbeanstalk_nginxproxy_1
Container ip: 127.0.0.1
Container running: True
Exposed host port(s): 80
Full local URL(s): 127.0.0.1:80
Container name: elasticbeanstalk_phpapp_1
Container ip: 127.0.0.1
Container running: True
Exposed host port(s): None
API Version 2010-12-01
537

AWS Elastic Beanstalk Developer Guide
eb logs
Full local URL(s): None
eb local logs
View the log path for the current project:
~/project$ eb local logs
Elastic Beanstalk will write logs locally to /home/user/project/.elasticbeanstalk/logs/
local.
Logs were most recently created 3 minutes ago and written to /home/user/
project/.elasticbeanstalk/logs/local/150420_234011665784.
eb local setenv
Set environment variables for use with eb local run.
~/project$ eb local setenv PARAM1=value
Print environment variables set with eb local setenv.
~/project$ eb local printenv
Environment Variables:
PARAM1=value
eb logs
Description
Returns logs for the specified or default environment. Relevant logs vary by container type.
If the root directory contains a platform.yaml file specifying a custom platform, this command also
returns logs for the builder environment.
Syntax
eb logs
eb logs environment_name
Options
Name Description
-a
or
--all
Retrieves all logs and saves them to the .elasticbeanstalk/
logs directory.
-cw [enable | disable]
or
--cloudwatch [enable |
disable]
Enables or disables CloudWatch Logs. If no argument is supplied,
the logs are enabled.
API Version 2010-12-01
538

AWS Elastic Beanstalk Developer Guide
eb open
Name Description
-g log-group
or
--log-group log-group
Specifies the location where Elastic Beanstalk stores CloudWatch
Logs. CloudWatch Logs must be enabled for this option to take
effect.
If you enable CloudWatch Logs, but do not specify a location, the
default location is /aws/elasticbeanstalk/env-name/var/
log/eb-activity.log.
Elastic Beanstalk emits an error if the location does not exist.
--instance instance-id Retrieve logs for the specified instance only.
--stream Stream deployment logs that were set up with CloudWatch.
--zip Retrieves all logs, compresses them into a .zip file, and then saves
the file to the .elasticbeanstalk/logs directory.
Common options (p. 558)
Output
Shows the logs directly in the terminal by default (press q to close). --all and --zip options save the
logs locally and output the location of the file(s).
Example
$ eb logs --zip
Retrieving logs...
Logs were saved to /home/workspace/environment/.elasticbeanstalk/logs/150622_173444.zip
eb open
Description
Opens the public URL of your website in the default browser.
Syntax
eb open
eb open environment_name
Options
Name Description
Common options (p. 558)
Output
The command eb open does not have output. Instead, it opens the application in a browser window.
API Version 2010-12-01
539

AWS Elastic Beanstalk Developer Guide
eb platform
eb platform
Description
This command supports two different workspaces:
Platform (p. 540)
Use this workspace to manage custom platforms.
Environment (p. 544)
Use this workspace to select a default platform or show information about the current platform.
Note
Elastic Beanstalk provides the shortcut ebp for eb platform. The examples use this shortcut.
Windows PowerShell uses ebp as a command alias. If you're running the EB CLI in Windows
PowerShell, use the long form of this command — eb platform.
Using eb platform for custom platforms
Lists the versions of the current platform and enables you to manage custom platforms.
Syntax
eb platform create [version] [options]
eb platform delete [version] [options]
eb platform events [version] [options]
eb platform init [platform] [options]
eb platform list [options]
eb platform logs [version] [options]
eb platform status [version] [options]
eb platform use [platform] [options]
Options
Name Description
create [version]
[options]
Build a new version of the platform. Learn more (p. 541).
delete version [options]Delete a platform version. Learn more (p. 542).
events [version]
[options]
Display the events from a platform version. Learn more (p. 542).
init [platform]
[options]
Initialize a platform repository. Learn more (p. 543).
list [options]List the versions of the current platform. Learn more (p. 543).
logs [version] [options]Display logs from the builder environment for a platform version.
Learn more (p. 544).
API Version 2010-12-01
540

AWS Elastic Beanstalk Developer Guide
eb platform
Name Description
status [version]
[options]
Display the status of the a platform version. Learn more (p. 544).
use [platform] [options]Select a different platform from which new versions are built. Learn
more (p. 544).
Common options (p. 558)
Common Options
All ebp platform commands include the following common options.
Name Description
-h
OR
--help
Shows a help message and exits.
--debug Shows additional debugging output.
--quiet Suppresses all output.
-v
OR
--verbose
Shows additional output.
--profile PROFILE Uses the specified PROFILE from your credentials.
-r REGION
OR
--region REGION
Use the region REGION.
--no-verify-ssl Do not verify AWS SSL certificates.
ebp create
Builds a new version of the platform and returns the ARN for the new version. If there is no builder
environment running in the current region, this command launches one. The version and increment
options (-M, -m, and -p) are mutually exclusive.
Options
Name Description
version If version isn't specified, creates a new version based on the most-
recent platform with the patch version (N in n.n.N) incremented.
-M
OR
Increments the major version number (the N in N.n.n).
API Version 2010-12-01
541

AWS Elastic Beanstalk Developer Guide
eb platform
Name Description
--major-increment
-m
OR
--minor-increment
Increments the minor version number (the N in n.N.n).
-p
OR
--patch-incremeint
Increments the patch version number (the N in n.n.N).
-i INSTANCE_TYPE
OR
--instance-type
INSTANCE_TYPE
Use INSTANCE_TYPE as the instance type, such as t1.micro.
-ip INSTANCE_PROFILE
OR
--instance-profile
INSTANCE_PROFILE
Use INSTANCE_PROFILE as the instance profile when creating
AMIs for a custom platform.
If the -ip option isn't specified, creates the instance profile aws-
elasticbeanstalk-custom-platforme-ec2-role and uses it
for the custom platform.
--vpc.id VPC_ID The ID of the VPC in which Packer builds.
--vpc.subnets
VPC_SUBNETS
The VPC subnets in which Packer builds.
--vpc.publicip Associates public IPs to EC2 instances launched.
ebp delete
Delete a platform version. The version isn't deleted if an environment is using that version.
Options
Name Description
version The version to delete. This value is required.
--cleanup Remove all platform versions in the Failed state.
--all-platforms If --cleanup is specified, remove all platform versions in the
Failed state for all platforms.
--force Do not require confirmation when deleting a version.
ebp events
Display the events from a platform version. If version is specified, display the events from that version,
otherwise display the events from the current version.
API Version 2010-12-01
542

AWS Elastic Beanstalk Developer Guide
eb platform
Options
Name Description
version The version for which events are displayed. This value is required.
-f
OR
--follow
Continue to display events as they occur.
ebp init
Initialize a platform repository.
Options
Name Description
platform The name of the platform to initialize. This value is required, unless
-i (interactive mode) is enabled.
-i
OR
--interactive
Use interactive mode.
-k KEYNAME
OR
--keyname KEYNAME
The default EC2 key name.
You can run this command in a directory that has been previously initialized, although you cannot
change the workspace type if run in a directory that has been previously initialized.
To re-initialize with different options, use the -i option.
ebp list
List the versions of the platform associated with the workspace.
Options
Name Description
-a
OR
--all-platforms
Lists the versions of all of the platforms associated with your
account.
-s STATUS List only the platforms matching STATUS:
API Version 2010-12-01
543

AWS Elastic Beanstalk Developer Guide
eb platform
Name Description
OR
--status STATUS
• Ready
• Failed
• Deleting
• Creating
ebp logs
Display logs from the builder environment for a platform version.
Options
Name Description
version The version of the platform for which logs are displayed. If omitted,
display logs from the current version.
--stream Stream deployment logs that were set up with CloudWatch.
ebp status
Display the status of the a platform version.
Options
Name Description
version The version of the platform for which the status is retrieved. If
omitted, display the status of the current version.
ebp use
Select a different platform from which new versions are built.
Options
Name Description
platform Specifies platform sa the active version for this workspace. This
value is required.
Using eb platform for environments
Lists supported platforms and enables you to set the default platform and platform version to use when
you launch an environment. Use eb platform list to view a list of all supported platforms. Use eb
platform use to change the platform for your project. Use eb platform show to view your project's
selected platform.
Syntax
eb platform list
API Version 2010-12-01
544

AWS Elastic Beanstalk Developer Guide
eb platform
eb platform select
eb platform show
Options
Name Description
list List the version of the current platform.
select Select the default platform.
show Show information about the current platform.
Example 1
The following example lists the names of all of all of the container for all platforms that Elastic
Beanstalk supports.
$ ebp list
docker-1.5.0
glassfish-4.0-java-7-(preconfigured-docker)
glassfish-4.1-java-8-(preconfigured-docker)
go-1.3-(preconfigured-docker)
go-1.4-(preconfigured-docker)
iis-7.5
iis-8
iis-8.5
multi-container-docker-1.3.3-(generic)
node.js
php-5.3
php-5.4
php-5.5
python
python-2.7
python-3.4
python-3.4-(preconfigured-docker)
ruby-1.9.3
ruby-2.0-(passenger-standalone)
ruby-2.0-(puma)
ruby-2.1-(passenger-standalone)
ruby-2.1-(puma)
ruby-2.2-(passenger-standalone)
ruby-2.2-(puma)
tomcat-6
tomcat-7
tomcat-7-java-6
tomcat-7-java-7
tomcat-8-java-8
Example 2
The following example prompts you to choose from a list of platforms and the version that you want to
deploy for the specified platform.
$ ebp select
Select a platform.
1) PHP
API Version 2010-12-01
545

AWS Elastic Beanstalk Developer Guide
eb printenv
2) Node.js
3) IIS
4) Tomcat
5) Python
6) Ruby
7) Docker
8) Multi-container Docker
9) GlassFish
10) Go
(default is 1): 5
Select a platform version.
1) Python 2.7
2) Python
3) Python 3.4 (Preconfigured - Docker)
Example 3
The following example shows information about the current default platform.
$ ebp show
Current default platform: Python 2.7
New environments will be running: 64bit Amazon Linux 2014.09 v1.2.0 running Python 2.7
Platform info for environment "tmp-dev":
Current: 64bit Amazon Linux 2014.09 v1.2.0 running Python
Latest: 64bit Amazon Linux 2014.09 v1.2.0 running Python
eb printenv
Description
Prints all the environment properties in the command window.
Syntax
eb printenv
eb printenv environment_name
Options
Name Description
Common options (p. 558)
Output
If successful, the command returns the status of the printenv operation.
Example
The following example prints environment properties for the specified environment.
API Version 2010-12-01
546

AWS Elastic Beanstalk Developer Guide
eb restore
$ eb printenv
Environment Variables:
PARAM1 = Value1
eb restore
Description
Rebuilds a terminated environment, creating a new environment with the same name, ID, and
configuration. The environment name, domain name, and application version must be available for use
in order for the rebuild to succeed.
Syntax
eb restore
eb restore environment_id
Options
Name Description
Common options (p. 558)
Output
The EB CLI displays a list of terminated environments that are available to restore.
Example
$ eb restore
Select a terminated environment to restore
# Name ID Application Version Date Terminated Ago
3 gamma e-s7mimej8e9 app-77e3-161213_211138 2016/12/14 20:32 PST 13 mins
2 beta e-sj28uu2wia app-77e3-161213_211125 2016/12/14 20:32 PST 13 mins
1 alpha e-gia8mphu6q app-77e3-161213_211109 2016/12/14 16:21 PST 4 hours
(Commands: Quit, Restore, # #)
Selected environment alpha
Application: scorekeep
Description: Environment created from the EB CLI using "eb create"
CNAME: alpha.h23tbtbm92.us-east-2.elasticbeanstalk.com
Version: app-77e3-161213_211109
Platform: 64bit Amazon Linux 2016.03 v2.1.6 running Java 8
Terminated: 2016/12/14 16:21 PST
Restore this environment? [y/n]: y
INFO: restoreEnvironment is starting.
INFO: Created security group named: sg-e2443f72
...
API Version 2010-12-01
547

AWS Elastic Beanstalk Developer Guide
eb scale
eb scale
Description
Scales the environment to always run on a specified number of instances, setting both the minimum and
maximum number of instances to the specified number.
Syntax
eb scale scale
eb scale scale environment_name
Options
Name Description
--timeout The number of minutes before the command times out.
Common options (p. 558)
Output
If successful, the command updates the number of minimum and maximum instances to run to the
specified number.
Example
The following example sets the number of instances to 2.
$ eb scale 2
INFO: Environment update is starting.
INFO: Updating environment tmp-dev's configuration settings.
INFO: Added EC2 instance 'i-5fce3d53' to Auto Scaling Group 'awseb-e-2cpfjbra9a-stack-
AWSEBAutoScalingGroup-7AXY7U13ZQ6E'.
INFO: Successfully deployed new configuration to environment.
INFO: Environment update completed successfully.
eb setenv
Description
Sets environment properties (p. 189) for the default environment.
Syntax
eb setenv key=value
You can include as many properties as you want, but the total size of all properties cannot exceed
4096 bytes. You can delete a variable by leaving the value blank. See Configuring Environment
Properties (p. 190) for limits.
Note
If the value contains a special character, you must escape that character by preceeding it with a
\ character.
API Version 2010-12-01
548

AWS Elastic Beanstalk Developer Guide
eb ssh
Options
Name Description
--timeout The number of minutes before the command times out.
Common options (p. 558)
Output
If successful, the command displays that the environment update succeeded.
Example
The following example sets the environment variable ExampleVar.
$ eb setenv ExampleVar=ExampleValue
INFO: Environment update is starting.
INFO: Updating environment tmp-dev's configuration settings.
INFO: Successfully deployed new configuration to environment.
INFO: Environment update completed successfully.
The following command sets multiple environment properties. It adds the environment property named
foo and sets its value to bar, changes the value of the JDBC_CONNECTION_STRING property, and
deletes the PARAM4 and PARAM5 properties.
$ eb setenv foo=bar JDBC_CONNECTION_STRING=hello PARAM4= PARAM5=
eb ssh
Description
Note
This command does not work with environments running Windows Server instances.
Connect to a Linux Amazon EC2 instance in your environment using Secure Shell (SSH). If an
environment has multiple running instances, EB CLI prompts you to specify which instance you want to
connect to. To use this command, SSH must be installed on your local machine and available from the
command line. Private key files must be located in a folder named .ssh under your user directory, and
the EC2 instances in your environment must have public IP addresses.
If the root directory contains a platform.yaml file specifying a custom platform, this command also
connects to instances in the custom environment.
SSH Keys
If you have not previously configured SSH, you can use the EB CLI to create a key when running
eb init. If you have already run eb init, run it again with the --interactive option and
select Yes and Create New Keypair when prompted to set up SSH. Keys created during this
process will be stored in the proper folder by the EB CLI.
This command temporarily opens port 22 in your environment's security group for incoming traffic
from 0.0.0.0/0 (all IP addresses) if no rules for port 22 are already in place. If you have configured your
environment's security group to open port 22 to a restricted CIDR range for increased security, the EB CLI
will respect that setting and forgo any changes to the security group. To override this behavior and force
the EB CLI to open port 22 to all incoming traffic, use the --force option.
API Version 2010-12-01
549

AWS Elastic Beanstalk Developer Guide
eb ssh
See Security Groups (p. 168) for information on configuring your environment's security group.
Syntax
eb ssh
eb ssh environment_name
Options
Name Description
-i
or
--instance
Specifies the instance ID of the instance to which you connect. We
recommend that you use this option.
-n
or
--number
Specify the instance to connect to by number.
-o
or
--keep_open
Leave port 22 open on the security group after the SSH session
ends.
--command Execute a shell command on the specified instance instead of
starting an SSH session.
--custom Specify an SSH command to use instead of 'ssh -i keyfile'. Do not
include the remote user and hostname.
--setup Change the key pair assigned to the environment's instances
(requires instances to be replaced).
--force Open port 22 to incoming traffic from 0.0.0.0/0 in the
environment's security group, even if the security group is already
configured for SSH.
Use this option if your environment's security group is configured to
open port 22 to a restricted CIDR range that does not include the IP
address that you are trying to connect from.
Common options (p. 558)
Output
If successful, the command opens an SSH connection to the instance.
Example
The following example connects you to the specified environment.
API Version 2010-12-01
550

AWS Elastic Beanstalk Developer Guide
eb status
$ eb ssh
Select an instance to ssh into
1) i-96133799
2) i-5931e053
(default is 1): 1
INFO: Attempting to open port 22.
INFO: SSH port 22 open.
The authenticity of host '54.191.45.125 (54.191.45.125)' can't be established.
RSA key fingerprint is ee:69:62:df:90:f7:63:af:52:7c:80:60:1b:3b:51:a9.
Are you sure you want to continue connecting (yes/no)? yes
Warning: Permanently added '54.191.45.125' (RSA) to the list of known hosts.
__| __|_ )
_| ( / Amazon Linux AMI
___|\___|___|
https://aws.amazon.com/amazon-linux-ami/2014.09-release-notes/
No packages needed for security; 1 packages available
Run "sudo yum update" to apply all updates.
[ec2-user@ip-172-31-8-185 ~]$ ls
[ec2-user@ip-172-31-8-185 ~]$ exit
logout
Connection to 54.191.45.125 closed.
INFO: Closed port 22 on ec2 instance security group
eb status
Description
Provides information about the status of the environment.
If the root directory contains a platform.yaml file specifying a custom platform, this command also
provides information about the builder environment.
Syntax
eb status
eb status environment_name
Options
Name Description
-v
or
--verbose
Provides more information about individual instances, such as their
status with the Elastic Load Balancing load balancer.
Common options (p. 558)
Output
If successful, the command returns the following information about the environment:
API Version 2010-12-01
551

AWS Elastic Beanstalk Developer Guide
eb swap
• Environment name
• Application name
• Deployed application version
• Environment ID
• Platform
• Environment tier
• CNAME
• Time the environment was last updated
• Status
• Health
If you use verbose mode, EB CLI also provides you with the number of running Amazon EC2 instances.
Example
The following example shows the status for the environment tmp-dev.
$ eb status
Environment details for: tmp-dev
Application name: tmp
Region: us-west-2
Deployed Version: None
Environment ID: e-2cpfjbra9a
Platform: 64bit Amazon Linux 2014.09 v1.0.9 running PHP 5.5
Tier: WebServer-Standard-1.0
CNAME: tmp-dev.elasticbeanstalk.com
Updated: 2014-10-29 21:37:19.050000+00:00
Status: Launching
Health: Grey
eb swap
Description
Swaps the environment's CNAME with the CNAME of another environment (for example, to avoid
downtime when you update your application version).
Note
If you have more than two environments, you are prompted to select the name of the
environment that is currently using your desired CNAME from a list of environments. To
suppress this, you can specify the name of the environment to use by including the -n option
when you run the command.
Syntax
eb swap
eb swap environment_name
Note
The environment_name is the environment for which you want a different CNAME. If you don't
specify environment_name as a command line parameter when you run eb swap, EB CLI
updates the CNAME of the default environment.
API Version 2010-12-01
552

AWS Elastic Beanstalk Developer Guide
eb tags
Options
Name Description
-n
or
--destination_name
Specifies the name of the environment with which you want to
swap CNAMEs. If you run eb swap without this option, then EB CLI
prompts you to choose from a list of your environments.
Common options (p. 558)
Output
If successful, the command returns the status of the swap operation.
Examples
The following example swaps the environment tmp-dev with live-env.
$ eb swap
Select an environment to swap with.
1) staging-dev
2) live-env
(default is 1): 2
INFO: swapEnvironmentCNAMEs is starting.
INFO: Swapping CNAMEs for environments 'tmp-dev' and 'live-env'.
INFO: 'tmp-dev.elasticbeanstalk.com' now points to 'awseb-e-j-AWSEBLoa-
M7U21VXNLWHN-487871449.us-west-2.elb.amazonaws.com'.
INFO: Completed swapping CNAMEs for environments 'tmp-dev' and 'live-env'.
The following example swaps the environment tmp-dev with the environment live-env but does not
prompt you to enter or select a value for any settings.
$ eb swap tmp-dev --destination_name live-env
INFO: swapEnvironmentCNAMEs is starting.
INFO: Swapping CNAMEs for environments 'tmp-dev' and 'live-env'.
INFO: 'tmp-dev.elasticbeanstalk.com' now points to 'awseb-e-j-AWSEBLoa-
M7U21VXNLWHN-487871449.us-west-2.elb.amazonaws.com'.
INFO: Completed swapping CNAMEs for environments 'tmp-dev' and 'live-env'.
eb tags
Description
Add, delete, update, and list Elastic Beanstalk environment tags.
For details about environment tagging, see Tagging Resources in Your Elastic Beanstalk
Environment (p. 140).
Syntax
eb tags [environment-name] -l|--list
eb tags [environment-name] -a|--add key1=value1[,key2=value2 ...]
API Version 2010-12-01
553

AWS Elastic Beanstalk Developer Guide
eb tags
eb tags [environment-name] -u|--update key1=value1[,key2=value2 ...]
eb tags [environment-name] -d|--delete key1[,key2 ...]
You can combine the --add, --update, and --delete subcommand options in a single command. At
least one of them is required. You can't combined any of these three subcommand options with --list.
Environment names must be 4 to 40 characters in length, and can only contain letters, numbers, and
hyphens. Environment names can't begin or end with a hyphen.
Options
None of these options are required. If you run eb create without any options, you are prompted to
enter or select a value for each setting.
Name Description
-l
or
--list
List all tags that are currently applied to the environment.
-akey1=value1[,key2=value2...]
or
--addkey1=value1[,key2=value2...]
Apply new tags to the environment. Specify tags as a
comma-separated list of key=value pairs. You can't specify
keys of existing tags.
Valid values: See Tag an Environment (p. 140).
-ukey1=value1[,key2=value2...]
or
--updatekey1=value1[,key2=value2...]
Update the values of existing environment tags. Specify tags
as a comma-separated list of key=value pairs. You must
specify keys of existing tags.
Valid values: See Tag an Environment (p. 140).
-dkey1[,key2...]
or
--deletekey1[,key2...]
Delete existing environment tags. Specify tags as a comma-
separated list of keys. You must specify keys of existing tags.
Valid values: See Tag an Environment (p. 140).
-r region
or
--region region
The AWS Region in which your environment is running.
Default: the configured default region.
For the list of values you can specify for this option, see AWS
Elastic Beanstalk in Regions and Endpoints in the Amazon
Web Services General Reference.
Output
The --list subcommand option displays a list of the environments tags. The output shows both the
tags that Elastic Beanstalk applies by default and your custom tags.
$ eb tags --list
Showing tags for environment 'MyApp-env':
Key Value
API Version 2010-12-01
554

AWS Elastic Beanstalk Developer Guide
eb terminate
Name MyApp-env
elasticbeanstalk:environment-id e-63cmxwjaut
elasticbeanstalk:environment-name MyApp-env
mytag tagvalue
tag2 2nd value
The --add, --update, and --delete subcommand options, when successful, don't have any output.
You can add the --verbose option to see detailed output of the command's activity.
$ eb tags --verbose --update "mytag=tag value"
Updated Tags:
Key Value
mytag tag value
Examples
The following command adds a tag with the key tag1 and the value value1, and at the same time
deletes the tag tag2.
$ eb tags --add tag1=value1 --delete tag2
The following command fails because it tries to update a nonexisting tag.
$ eb tags --update tag3=newval
ERROR: Tags with the following keys can't be updated because they don't exist:
tag3
The following command fails because it tries to update and delete the same key.
$ eb tags --update mytag=newval --delete mytag
ERROR: A tag with the key 'mytag' is specified for both '--delete' and '--update'. Each tag
can be either deleted or updated in a single operation.
eb terminate
Description
Terminates the running environment so that you do not incur charges for unused AWS resources.
If the root directory contains a platform.yaml file specifying a custom platform, this command
terminates the running custom environment.
Note
You can always launch a new environment using the same version later. If you have data from
an environment that you would like to preserve, create a snapshot of your current database
instance before you terminate the environment. You can later use it as the basis for new DB
instance when you create a new environment. For more information, see Creating a DB Snapshot
in the Amazon Relational Database Service User Guide.
Syntax
eb terminate
eb terminate environment_name
API Version 2010-12-01
555

AWS Elastic Beanstalk Developer Guide
eb upgrade
Options
Name Description
--all Terminates the environment, application, and all resources.
--force Terminate the environment without prompting for confirmation.
--ignore-links Terminate the environment even if there are
dependent environments with links to it. See Compose
Environments (p. 508).
--timeout The number of minutes before the command times out.
Output
If successful, the command returns the status of the terminate operation.
Example
The following example request terminates the environment tmp-dev.
$ eb terminate
The environment "tmp-dev" and all associated instances will be terminated.
To confirm, type the environment name: tmp-dev
INFO: terminateEnvironment is starting.
INFO: Deleted CloudWatch alarm named: awseb-e-2cpfjbra9a-stack-
AWSEBCloudwatchAlarmHigh-16V08YOF2KQ7U
INFO: Deleted CloudWatch alarm named: awseb-e-2cpfjbra9a-stack-
AWSEBCloudwatchAlarmLow-6ZAWH9F20P7C
INFO: Deleted Auto Scaling group policy named: arn:aws:autoscaling:us-
west-2:11122223333:scalingPolicy:5d7d3e6b-d59b-47c5-b102-3e11fe3047be:autoScalingGroupName/
awseb-e-2cpfjbra9a-stack-AWSEBAutoScalingGroup-7AXY7U13ZQ6E:policyName/awseb-e-2cpfjbra9a-
stack-AWSEBAutoSca
lingScaleUpPolicy-1876U27JEC34J
INFO: Deleted Auto Scaling group policy named: arn:aws:autoscaling:us-
west-2:11122223333:scalingPolicy:29c6e7c7-7ac8-46fc-91f5-cfabb65b985b:autoScalingGroupName/
awseb-e-2cpfjbra9a-stack-AWSEBAutoScalingGroup-7AXY7U13ZQ6E:policyName/awseb-e-2cpfjbra9a-
stack-AWSEBAutoSca
lingScaleDownPolicy-SL4LHODMOMU
INFO: Waiting for EC2 instances to terminate. This may take a few minutes.
INFO: Deleted Auto Scaling group named: awseb-e-2cpfjbra9a-stack-
AWSEBAutoScalingGroup-7AXY7U13ZQ6E
INFO: Deleted Auto Scaling launch configuration named: awseb-e-2cpfjbra9a-stack-
AWSEBAutoScalingLaunchConfiguration-19UFHYGYWORZ
INFO: Deleted security group named: awseb-e-2cpfjbra9a-stack-AWSEBSecurityGroup-
XT4YYGFL7I99
INFO: Deleted load balancer named: awseb-e-2-AWSEBLoa-AK6RRYFQVV3S
INFO: Deleting SNS topic for environment tmp-dev.
INFO: terminateEnvironment completed successfully.
eb upgrade
Description
Upgrades the platform of your environment to the most recent version of the platform on which it is
currently running.
API Version 2010-12-01
556

AWS Elastic Beanstalk Developer Guide
eb use
If the root directory contains a platform.yaml file specifying a custom platform, this command
upgrades the environment to the most recent version of the custom platform on which it is currently
running.
Syntax
eb upgrade
eb upgrade environment_name
Options
Name Description
--force Upgrades without requiring you to confirm the environment name
before starting the upgrade process.
--noroll Updates all instances without using rolling updates to keep some
instances in service during the upgrade.
Common options (p. 558)
Output
The command shows an overview of the change and prompts you to confirm the upgrade by typing the
environment name. If successful, your environment is updated and then launched with the most recent
version of the platform.
Example
The following example upgrades the current platform version of the specified environment to the most
recently available platform version.
$ eb upgrade
Current platform: 64bit Amazon Linux 2014.09 v1.0.9 running Python 2.7
Latest platform: 64bit Amazon Linux 2014.09 v1.2.0 running Python 2.7
WARNING: This operation replaces your instances with minimal or zero downtime. You may
cancel the upgrade after it has started by typing "eb abort".
You can also change your platform version by typing "eb clone" and then "eb swap".
To continue, type the environment name:
eb use
Description
Sets the specified environment as the default environment.
When using Git, eb use sets the default environment for the current branch. Run this command once in
each branch that you want to deploy to Elastic Beanstalk.
Syntax
eb use environment_name
API Version 2010-12-01
557

AWS Elastic Beanstalk Developer Guide
Common Options
Options
Name Description
--source
codecommit/repository-
name/branch-name
AWS CodeCommit repository and branch. See Using the EB CLI with
AWS CodeCommit (p. 499).
-r region
--region region
Change the region in which you create environments.
Common options (p. 558)
Common Options
You can use the following options with all EB CLI commands.
Name Description
--debug Print information for debugging.
-h, --help Show the Help message.
Type: String
Default: None
--no-verify-ssl Skip SSL certificate verification. Use this option if you have issues
using the CLI with a proxy.
--profile Use a specific profile from your AWS credentials file.
--quiet Suppress all output from the command.
--region Use the specified region.
-v, --verbose Display verbose information.
EB CLI 2.6 (Deprecated)
Note
This version of EB CLI and its documentation have been replaced with version 3 (in this section,
EB CLI 3 represents version 3 and later of EB CLI). For information on the new version, see The
Elastic Beanstalk Command Line Interface (EB CLI) (p. 480).
This section describes how to set up EB CLI 2.6 and how to create a sample application using EB CLI 2.6.
This section also includes a command reference for Eb CLI 2.6.
Topics
•Differences from Version 3 of EB CLI (p. 559)
•Migrating to EB CLI 3 and AWS CodeCommit (p. 559)
•Getting Started with Eb (p. 560)
•Deploying a Git Branch to a Specific Environment (p. 565)
API Version 2010-12-01
558

AWS Elastic Beanstalk Developer Guide
Differences from Version 3 of EB CLI
•Eb Common Options (p. 567)
•EB CLI 2 Commands (p. 567)
Differences from Version 3 of EB CLI
EB is a command line interface (CLI) tool for Elastic Beanstalk that you can use to deploy applications
quickly and more easily. The latest version of EB was introduced by Elastic Beanstalk in EB CLI 3.
Although Elastic Beanstalk still supports EB 2.6 for customers who previously installed and continue
to use it, you should migrate to the latest version of EB CLI 3, as it can manage environments that you
launched using EB CLI 2.6 or earlier versions of EB CLI. EB CLI automatically retrieves settings from an
environment created using EB if the environment is running. Note that EB CLI 3 does not store option
settings locally, as in earlier versions.
EB CLI introduces the commands eb create, eb deploy, eb open, eb console, eb scale, eb
setenv, eb config, eb terminate, eb clone, eb list, eb use, eb printenv, and eb ssh. In EB
CLI 3.1 or later, you can also use the eb swap command. In EB CLI 3.2 only, you can use the eb abort,
eb platform, and eb upgrade commands. In addition to these new commands, EB CLI 3 commands
differ from EB CLI 2.6 commands in several cases:
•eb init – Use eb init to create an .elasticbeanstalk directory in an existing project directory
and create a new Elastic Beanstalk application for the project. Unlike with previous versions, EB CLI 3
and later versions do not prompt you to create an environment.
•eb start – EB CLI 3 does not include the command eb start. Use eb create to create an
environment.
•eb stop – EB CLI 3 does not include the command eb stop. Use eb terminate to completely
terminate an environment and clean up.
•eb push and git aws.push – EB CLI 3 does not include the commands eb push or git aws.push.
Use eb deploy to update your application code.
•eb update – EB CLI 3 does not include the command eb update. Use eb config to update an
environment.
•eb branch – EB CLI 3 does not include the command eb branch.
For more information about using EB CLI 3 commands to create and manage an application, see EB CLI
Command Reference (p. 511). For a command reference for EB 2.6, see EB CLI 2 Commands (p. 567).
For a walkthrough of how to deploy a sample application using EB CLI 3, see Managing Elastic Beanstalk
Environments with the EB CLI (p. 492). For a walkthrough of how to deploy a sample application using
eb 2.6, see Getting Started with Eb (p. 560). For a walkthrough of how to use EB 2.6 to map a Git
branch to a specific environment, see Deploying a Git Branch to a Specific Environment (p. 565).
Migrating to EB CLI 3 and AWS CodeCommit
Elastic Beanstalk has not only deprecated EB CLI 2.6, but is also removing some 2.6 functionality. The
most significant change from 2.6 is that EB CLI no longer natively supports incremental code updates (eb
push, git aws.push) or branching (eb branch). This section describes how to migrate from EB CLI 2.6
to the latest version of EB CLI and use AWS CodeCommit as your code repository.
If you have not done so already, create a code repository in AWS CodeCommit, as described in Migrate to
AWS CodeCommit.
Once you have installed (p. 481) and configured (p. 489) EB CLI, you have two opportunities to
associate your application with your AWS CodeCommit repository, including a specific branch.
• When executing eb init, such in the following example where myRepo is the name of your AWS
CodeCommit repository and myBranch is the branch in AWS CodeCommit.
API Version 2010-12-01
559

AWS Elastic Beanstalk Developer Guide
Getting Started with Eb
eb init --source codecommit/myRepo/myBranch
• When executing eb deploy, such in the following example where myRepo is the name of your AWS
CodeCommit repository and myBranch is the branch in AWS CodeCommit.
eb deploy --source codecommit/myRepo/myBranch
For further information, including how to deploy incremental code updates to an Elastic Beanstalk
environment without having to re-upload your entire project, see Using the EB CLI with AWS
CodeCommit (p. 499).
Getting Started with Eb
Note
This version of EB CLI and its documentation have been replaced with version 3 (in this section,
EB CLI 3 represents version 3 and later of EB CLI). For information on the new version, see The
Elastic Beanstalk Command Line Interface (EB CLI) (p. 480).
Eb is a command line interface (CLI) tool that asks you a series of questions and uses your answers to
deploy and manage Elastic Beanstalk applications. This section provides an end-to-end walkthrough
using eb to launch a sample application, view it, update it, and then delete it.
To complete this walkthrough, you will need to download the command line tools at the AWS
Sample Code & Libraries website. For a complete CLI reference for more advanced scenarios, see
Operations (p. 590), and see Getting Set Up (p. 587) for instructions on how to get set up.
Step 1: Initialize Your Git Repository
Eb is a command line interface that you can use with Git to deploy applications quickly and more easily.
Eb is available as part of the Elastic Beanstalk command line tools package. Follow the steps below to
install eb and initialize your Git repository.
To install eb, its prerequisite software, and initialize your Git repository
1. Install the following software onto your local computer:
a. Linux/Unix/Mac
• Download and unzip the Elastic Beanstalk command line tools package at the AWS Sample
Code & Libraries website.
• Git 1.6.6 or later. To download Git, go to http://git-scm.com/.
• Python 2.7 or 3.0.
b. Windows
• Download and unzip the Elastic Beanstalk command line tools package at the AWS Sample
Code & Libraries website.
• Git 1.6.6 or later. To download Git, go to http://git-scm.com/.
• PowerShell 2.0.
Note
Windows 7 and Windows Server 2008 R2 come with PowerShell 2.0. If you are
running an earlier version of Windows, you can download PowerShell 2.0. Visit
http://technet.microsoft.com/en-us/scriptcenter/dd742419.aspx for more details.
2. Initialize your Git repository.
API Version 2010-12-01
560

AWS Elastic Beanstalk Developer Guide
Getting Started with Eb
git init .
Step 2: Configure Elastic Beanstalk
Elastic Beanstalk needs the following information to deploy an application:
• AWS access key ID
• AWS secret key
• Service region
• Application name
• Environment name
• Solution stack
When you use the init command, Elastic Beanstalk will prompt you to enter this information. If a
default value or current setting is available, and you want to use it, press Enter.
Before you use eb, set your PATH to the location of eb. The following table shows an example for Linux/
UNIX and Windows.
In Linux and UNIX In Windows
$ export PATH=$PATH:<path to unzipped
eb CLI package>/eb/linux/python2.7/
If you are using Python 3.0, the path will include
python3 rather than python2.7.
C:\> set PATH=%PATH%;<path to unzipped
eb CLI package>\eb\windows\
To configure Elastic Beanstalk
Note
EB CLI stores your credentials in a file named credentials in a folder named .aws in your user
directory.
1. From the directory where you created your local repository, type the following command:
eb init
2. When you are prompted for the access key ID, type your access key ID. To get your access key ID, see
How Do I Get Security Credentials? in the AWS General Reference.
Enter your AWS Access Key ID (current value is "AKIAIOSFODNN7EXAMPLE"):
3. When you are prompted for the secret access key, type your secret access key. To get your secret
access key, see How Do I Get Security Credentials? in the AWS General Reference.
Enter your AWS Secret Access Key (current value is "wJalrXUtnFEMI/K7MDENG/
bPxRfiCYEXAMPLEKEY"):
4. When you are prompted for the Elastic Beanstalk region, type the number of the region. For
information about this product's regions, go to Regions and Endpoints in the Amazon Web Services
General Reference. For this example, we'll use US West (Oregon).
API Version 2010-12-01
561

AWS Elastic Beanstalk Developer Guide
Getting Started with Eb
5. When you are prompted for the Elastic Beanstalk application name, type the name of the
application. Elastic Beanstalk generates an application name based on the current directory name if
an application name has not been previously configured. In this example, we use HelloWorld.
Enter an AWS Elastic Beanstalk application name (auto-generated value is "windows"):
HelloWorld
Note
If you have a space in your application name, make sure you do not use quotation marks.
6. When you are prompted for the Elastic Beanstalk environment name, type the name of the
environment. Elastic Beanstalk automatically creates an environment name based on your
application name. If you want to accept the default, press Enter.
Enter an AWS Elastic Beanstalk environment name (current value is "HelloWorld-env"):
Note
If you have a space in your application name, make sure you do not have a space in your
environment name.
7. When you are prompted, choose an environment tier. For more information about environment tiers,
see Environment Tier (p. 14). For this example, we'll use 1.
Available environment tiers are:
1) WebServer::Standard::1.0
2) Worker::SQS/HTTP::1.0
8. When you are prompted for the solution stack, type the number of the solution stack you want. For
more information about solution stacks, see Elastic Beanstalk Supported Platforms (p. 26). For this
example, we'll use 64bit Amazon Linux running PHP 5.4.
9. When you are prompted, choose an environment type. For this example, use 2.
Available environment types are:
1) LoadBalanced
2) SingleInstance
10. When you are prompted to create an Amazon RDS DB instance, type y or n. For more information
about using Amazon RDS, see Using Elastic Beanstalk with Amazon Relational Database
Service (p. 439). For this example, we'll type y.
Create an Amazon RDS DB Instance? [y/n]:
11. When you are prompted to create the database from scratch or a snapshot, type your selection. For
this example, we'll use No snapshot.
12. When you are prompted to enter your RDS user master password, type your password containing 8
to 16 printable ASCII characters (excluding /, \, and @).
Enter an Amazon RDS DB master password:
Retype password to confirm:
13. When you are prompted to create a snapshot if you delete the Amazon RDS DB instance, type y or n.
For this example, we'll type n. If you type n, then your RDS DB instance will be deleted and your data
will be lost if you terminate your environment.
By default, eb sets the following default values for Amazon RDS.
API Version 2010-12-01
562

AWS Elastic Beanstalk Developer Guide
Getting Started with Eb
•Database engine — MySQL
•Default version: — 5.5
•Database name: — ebdb
•Allocated storage — 5GB
•Instance class — db.t2.micro (db.m1.large for an environment not running in an Amazon VPC)
•Deletion policy — delete
•Master username — ebroot
14. When you are prompted to enter your instance profile name, you can choose to create a default
instance profile or use an existing instance profile. Using an instance profile enables IAM users
and AWS services to gain access to temporary security credentials to make AWS API calls. Using
instance profiles prevents you from having to store long-term security credentials on the EC2
instance. For more information about instance profiles, see Service Roles, Instance Profiles, and User
Policies (p. 21). For this example, we'll use Create a default instance profile.
You should see a confirmation that your AWS Credential file was successfully updated.
After configuring Elastic Beanstalk, you are ready to deploy a sample application.
If you want to update your Elastic Beanstalk configuration, you can use the init command again. When
prompted, you can update your configuration options. If you want to keep any previous settings, press
the Enter key. If you want to update your Amazon RDS DB configuration settings, you can update your
optionsettings file in the .elasticbeanstalk directory, and then use the eb update command to
update your Elastic Beanstalk environment.
Note
You can set up multiple directories for use with eb—each with its own Elastic Beanstalk
configuration—by repeating the preceding two steps in each directory: first initialize a Git
repository, and then use init to configure eb.
Step 3: Create the Application
Next, you need to create and deploy a sample application. For this step, you use a sample application
that is already prepared. Elastic Beanstalk uses the configuration information you specified in the
previous step to do the following:
• Create an application using the application name you specified.
• Launch an environment using the environment name you specified that provisions the AWS resources
to host the application.
• Deploy the application into the newly created environment.
Use the start command to create and deploy a sample application.
To create the application
• From the directory where you created your local repository, type the following command:
eb start
It may take several minutes to complete this process. Elastic Beanstalk provides status updates
during the process. If at any time you want to stop polling for status updates, press Ctrl+C. When the
environment status is Green, Elastic Beanstalk outputs a URL for the application.
API Version 2010-12-01
563

AWS Elastic Beanstalk Developer Guide
Getting Started with Eb
Step 4: View the Application
In the previous step, you created an application and deployed it to Elastic Beanstalk. After the
environment is ready and its status is Green, Elastic Beanstalk provides a URL to view the application. In
this step, you can check the status of the environment to make sure it is set to Green and then copy and
paste the URL to view the application.
Use the status command to check the environment status, and then use the URL to view the
application.
To view the application
1. From the directory where you created your local repository, type the following command:
eb status --verbose
Elastic Beanstalk displays the environment status. If the environment is set to Green, Elastic
Beanstalk displays the URL for the application. If you attached an Amazon RDS DB instance to your
environment, your Amazon RDS DB information is displayed.
2. Copy and paste the URL into your web browser to view your application.
Step 5: Update the Application
After you have deployed a sample application, you can update the sample application with your own
application. In this step, we'll update the sample PHP application with a simple HelloWorld application.
To update the sample application
1. Create a simple PHP file that displays "Hello World" and name it index.php.
<html>
<head>
<title>PHP Test</title>
</head>
<body>
<?php echo '<p>Hello World</p>'; ?>
</body>
</html>
Next, add your new program to your local Git repository, and then commit your change.
git add index.php
git commit -m "initial check-in"
Note
For information about Git commands, go to Git - Fast Version Control System.
2. Deploy to Elastic Beanstalk.
eb push
3. View your updated application. Copy and paste the same URL in your web browser as you did in Step
4: View the Application (p. 564).
API Version 2010-12-01
564

AWS Elastic Beanstalk Developer Guide
Deploying a Branch to an Environment
Step 6: Clean Up
If you no longer want to run your application, you can clean up by terminating your environment and
deleting your application.
Use the stop command to terminate your environment and the delete command to delete your
application.
To terminate your environment and delete the application
1. From the directory where you created your local repository, type the following command:
eb stop
This process may take a few minutes. Elastic Beanstalk displays a message once the environment has
been successfully terminated.
Note
If you attached an Amazon RDS DB instance to your environment, your Amazon RDS DB
will be deleted, and you will lose your data. To save your data, create a snapshot before you
delete the application. For instructions on how to create a snapshot, go to Creating a DB
Snapshot in the Amazon Relational Database Service User Guide.
2. From the directory where you installed the command line interface, type the following command:
eb delete
Elastic Beanstalk displays a message once it has successfully deleted the application.
Deploying a Git Branch to a Specific Environment
Note
This version of EB CLI and its documentation have been replaced with version 3 (in this section,
EB CLI 3 represents version 3 and later of EB CLI). For information on the new version, see The
Elastic Beanstalk Command Line Interface (EB CLI) (p. 480).
Developers often use branching in a project to manage code intended for different target environments.
For example, you might have a test branch where you perform component or integration testing and a
prod branch where you manage the code for your live or production code. With version 2.3 and later of
the eb command line interface and AWS DevTools, you can use the eb init command to configure the
eb push command to push your current git branch to a specific Elastic Beanstalk environment.
To set up a Git branch to deploy to a specific environment
1. Make sure you have version 2.3 of the Elastic Beanstalk command line tools installed.
To check what version you have installed, use the following command:
eb --version
To download the command line tools, go to Elastic Beanstalk Command Line Tool page and follow
the instructions in the README.txt file in the .zip file.
2. From a command prompt, change directories to the location of the local repository containing the
code you want to deploy.
If you have not set up a Git repository, you need to create one to continue. For information about
how to use Git, see the Git documentation.
API Version 2010-12-01
565

AWS Elastic Beanstalk Developer Guide
Deploying a Branch to an Environment
3. Make sure that the current branch for your local repository is the one you want to map to an Elastic
Beanstalk environment.
To switch to a branch, you use the git checkout command. For example, you would use the
following command to switch to the prod branch.
git checkout prod
For more information about creating and managing branches in Git, see the Git documentation.
4. If you have not done so already, use the eb init command to configure eb to use Elastic Beanstalk
with a specific settings for credentials, application, region, environment, and solution stack. The
values set with eb init will be used as defaults for the environments that you create for your
branches. For detailed instructions, see Step 2: Configure Elastic Beanstalk (p. 561).
5. Use the eb branch command to map the current branch to a specific environment.
1. Type the following command.
eb branch
2. When prompted for an environment name, enter the name of the environment that you want to
map to the current branch.
The eb command will suggest a name in parentheses and you can accept that name by pressing
the Enter key or type the name that you want.
The current branch is "myotherbranch".
Enter an Elastic Beanstalk environment name (auto-generated value is "test-
myotherbranch-en"):
You'll notice that eb displays the current branch in your Git repository so you know which branch
you're working with. You can specify an existing environment or a new one. If you specify a new
one, you'll need to create it with the eb start command.
3. When prompted about using the settings from the default environment, type y unless you
explicitly don't want to use the optionsettings file from the default environment for the
environment for this branch.
Do you want to copy the settings from the default environment "main-env" for the new
branch? [y/n]: y
6. If you specified a new environment for your branch, use the eb start command to create and start
the environment.
When this command is successful, you're ready for the next step.
7. Use the eb push command to deploy the changes in the current branch to the environment that
you mapped to the branch.
API Version 2010-12-01
566

AWS Elastic Beanstalk Developer Guide
Eb Common Options
Eb Common Options
Note
This version of EB CLI and its documentation have been replaced with version 3 (in this section,
EB CLI 3 represents version 3 and later of EB CLI). For information on the new version, see The
Elastic Beanstalk Command Line Interface (EB CLI) (p. 480).
This section describes options common to all eb operations.
Name Description
-f, --force Skip the confirmation prompt.
- h, --help Show the Help message.
Type: String
Default: None
--verbose Display verbose information.
--version Show the program's version number and exit.
EB CLI 2 Commands
Note
This version of EB CLI and its documentation have been replaced with version 3 (in this section,
EB CLI 3 represents version 3 and later of EB CLI). For information on the new version, see The
Elastic Beanstalk Command Line Interface (EB CLI) (p. 480).
You can use the EB command line interface to perform a wide variety of operations.
Topics
•branch (p. 569)
•delete (p. 571)
•events (p. 572)
•init (p. 573)
•logs (p. 576)
•push (p. 577)
•start (p. 578)
•status (p. 580)
•stop (p. 582)
•update (p. 584)
Eb stores environment settings in the .elasticbeanstalk/optionsettings file for the repository.
It is designed to read only from local files. When you run eb start or eb update, Elastic Beanstalk
reads the .elasticbeanstalk/optionsettings file and provides its contents as parameters to the
CreateEnvironment or UpdateEnvironment API actions.
You can use a configuration file in an .ebextensions/*.conf directory to configure some of the
same settings that are in an .elasticbeanstalk/optionsettings file. However, the values
for the settings in .elasticbeanstalk/optionsettings will take precedence over anything in
.ebextensions/*.conf if the settings are configured in both. Additionally, any option setting that
API Version 2010-12-01
567

AWS Elastic Beanstalk Developer Guide
EB CLI 2 Commands
is specified using the API, including through eb, cannot later be changed in an environment using
.ebextensions configuration files.
When you run eb branch, Elastic Beanstalk will either add a section to the values in
.elasticbeanstalk/optionsettings or create a new one for a new environment. The command
does not affect any running environments.
To view your current settings, run eb status --verbose. You might also want to use eb in
conjunction with the Elastic Beanstalk console to get a complete picture of your applications and
environments.
API Version 2010-12-01
568

AWS Elastic Beanstalk Developer Guide
EB CLI 2 Commands
branch
Note
This version of EB CLI and its documentation have been replaced with version 3 (in this section,
EB CLI 3 represents version 3 and later of EB CLI). For information on the new version, see The
Elastic Beanstalk Command Line Interface (EB CLI) (p. 480).
Description
Maps a Git branch to a new or existing Elastic Beanstalk environment and configures the mapped
environment through a series of prompts. You must first create the Git branch. If no branches exist in the
Git repository, eb displays a message that prompts you to run the branch command. Eb then attempts
to start the application specified in the default settings in the optionsettings file.
To map a Git branch, first run git checkout <branch>, specifying the name of the Git branch you
want to map. Then run eb branch. If the branch has never been mapped to an Elastic Beanstalk
environment, you'll have the option to copy the most current environment settings to the new
environment.
Consider the following additional information about using branch:
• If you run eb init on an existing repository and change the application name, region, or solution
stack, the command resets all existing branch mappings. Run branch again to map each branch to an
environment.
• You can map different Git branches to the same Elastic Beanstalk environment but in most cases
maintain one-to-one relationships between branches and environments.
For a tutorial that describes how to use eb to deploy a Git branch to Elastic Beanstalk, see Deploying a
Git Branch to a Specific Environment (p. 565).
Syntax
eb branch
Options
Name Description Required
-e
or
--environment name ENVIRONMENT_NAME
The environment to which you want
to map the current Git branch. If
you do not use this option, you'll be
prompted to accept the autogenerated
environment name or enter a new one.
Type: String
Default: <Git-branch-name>-env
No
Common options For more information, see Eb Common
Options (p. 567).
No
Output
None
API Version 2010-12-01
569

AWS Elastic Beanstalk Developer Guide
EB CLI 2 Commands
Example
The following example maps the Git branch master to a new environment called MyApp-env-test, using
the same settings as a previously created environment called Myapp-env. Replace the red placeholder
text with your own values.
PROMPT> eb branch
The current branch is "master".
Enter an AWS Elastic Beanstalk environment name (auto-generated value is "MyApp-master-
env"): MyApp-env-test
Do you want to copy the settings from environment "MyApp-env" for the new branch? [y/n]: y
PROMPT> eb status
Environment "MyApp-env-test" is not running.
API Version 2010-12-01
570

AWS Elastic Beanstalk Developer Guide
EB CLI 2 Commands
delete
Note
This version of EB CLI and its documentation have been replaced with version 3 (in this section,
EB CLI 3 represents version 3 and later of EB CLI). For information on the new version, see The
Elastic Beanstalk Command Line Interface (EB CLI) (p. 480).
Description
Deletes the current application, or an application you specify, along with all associated environments,
versions, and configurations. For a tutorial that includes a description of how to use eb delete to
delete an application, see Getting Started with Eb (p. 560).
Note
The delete operation applies to an application and all of its environments. To stop only a
single environment rather than an entire application, use eb stop (p. 582).
Syntax
eb delete
Options
Name Description Required
-a
or
--application-name
APPLICATION_NAME
The application that you want to delete. If
you do not use this option, eb will delete
the application currently specified in
.elasticbeanstalk/optionsettings.
To verify your current settings, run eb init
(the current values will be displayed; press
Enter at each prompt to keep the current
value).
Type: String
Default: Current setting
No
Common options For more information, see Eb Common
Options (p. 567).
No
Output
If successful, the command returns confirmation that the application was deleted.
Example
The following example request deletes the specified application and all of its environments. Replace the
red placeholder text with your own values.
PROMPT> delete -a MyApp
Delete application? [y/n]: y
Deleted application "MyApp".
API Version 2010-12-01
571

AWS Elastic Beanstalk Developer Guide
EB CLI 2 Commands
events
Note
This version of EB CLI and its documentation have been replaced with version 3 (in this section,
EB CLI 3 represents version 3 and later of EB CLI). For information on the new version, see The
Elastic Beanstalk Command Line Interface (EB CLI) (p. 480).
Description
Returns the most recent events for the environment.
Syntax
eb events
Options
Name Description Required
[number] NUMBER The number of events to return. Valid values range from
1 to 1000.
Type: Integer
Default: 10
Yes
Output
If successful, the command returns the specified number of recent events.
Example
The following example returns the 15 most recent events.
PROMPT> eb events 15
2014-05-19 08:44:51 INFO terminateEnvironment completed successfully.
2014-05-19 08:44:50 INFO Deleting SNS topic for environment MyApp-test-env.
2014-05-19 08:44:38 INFO Deleted security group named: awseb-e-fEXAMPLEre-stack-
AWSEBSecurityGroup-1DEXAMPLEKI
2014-05-19 08:44:32 INFO Deleted RDS database named: aa1k8EXAMPLEdxl
2014-05-19 08:38:33 INFO Deleted EIP: xx.xx.xxx.xx
2014-05-19 08:37:04 INFO Waiting for EC2 instances to terminate. This may take a
few minutes.
2014-05-19 08:36:45 INFO terminateEnvironment is starting.
2014-05-19 08:27:54 INFO Adding instance 'i-fEXAMPLE7' to your environment.
2014-05-19 08:27:50 INFO Successfully launched environment: MyApp-test-env
2014-05-19 08:27:50 INFO Application available at MyApp-test-
envmEXAMPLEst.elasticbeanstalk.com.
2014-05-19 08:24:04 INFO Waiting for EC2 instances to launch. This may take a few
minutes.
2014-05-19 08:23:21 INFO Created RDS database named: aa1k8EXAMPLEdxl
2014-05-19 08:17:07 INFO Creating RDS database named: aa1k8EXAMPLEdxl. This may
take a few minutes.
2014-05-19 08:16:58 INFO Created security group named: awseb-e-fEXAMPLEre-stack-
AWSEBSecurityGroup-1D6HEXAMPLEKI
2014-05-19 08:16:54 INFO Created EIP: 50.18.181.66
API Version 2010-12-01
572

AWS Elastic Beanstalk Developer Guide
EB CLI 2 Commands
init
Note
This version of EB CLI and its documentation have been replaced with version 3 (in this section,
EB CLI 3 represents version 3 and later of EB CLI). For information on the new version, see The
Elastic Beanstalk Command Line Interface (EB CLI) (p. 480).
Description
Sets various default values for AWS Elastic Beanstalk environments created with eb, including your AWS
credentials and region. The values you set with init apply only to the current directory and repository.
You can override some defaults with operation options (for example, use -e or --environment-name
to target branch (p. 569) to a specific environment).
Note
Until you run the init command, the current running environment is unchanged. Each time you
run the init command, new settings get appended to the config file.
For a tutorial that shows you how to use eb init to deploy a sample application, see Getting Started
with Eb (p. 560).
Syntax
eb init
Options
None of these options are required. If you run eb init without any options, you will be prompted to
enter or select a value for each setting.
Name Description Required
-a
or
--application-name
APPLICATION_NAME
The application managed by the current repository.
Type: String
Default: None
No
--aws-credential-file
FILE_PATH_NAME
The file location where your AWS credentials are
saved. (You can use the environment variable
AWS_CREDENTIAL_FILE to set the file location.)
Type: String
Default: None
No
-e
or
--environment-name
ENVIRONMENT_NAME
The environment on which you want to perform
operations.
Type: String
Default: <application-name>-env
No
-I
or
--access-key-id
ACCESS_KEY_ID
Your AWS access key ID.
Type: String
Default: None
No
API Version 2010-12-01
573

AWS Elastic Beanstalk Developer Guide
EB CLI 2 Commands
Name Description Required
-S
or
--secret-key
SECRET_ACCESS_KEY
Your AWS secret access key.
Type: String
Default: None
No
-s
or
--solution-stack
SOLUTION_STACK_LABEL
The solution stack used as the application container
type. If you run eb init without this option, you will
be prompted to choose from a list of supported solution
stacks. Solution stack names change when AMIs are
updated.
Type: String
Default: None
No
Common options For more information, see Eb Common Options (p. 567). No
Output
If successful, the command guides you through setting up a new AWS Elastic Beanstalk application
through a series of prompts.
Example
The following example request initializes eb and prompts you to enter information about your
application. Replace the red placeholder text with your own values.
PROMPT> eb init
C:\>eb init
Enter your AWS Access Key ID (current value is "AKIAI*****5ZB7Q"):
Enter your AWS Secret Access Key (current value is "DHSAi*****xKPo6"):
Select an AWS Elastic Beanstalk service region (current value is "US East (Virginia)".
Available service regions are:
1) US East (Virginia)
2) US West (Oregon)
3) US West (North California)
4) EU West (Ireland)
5) Asia Pacific (Singapore)
6) Asia Pacific (Tokyo)
7) Asia Pacific (Sydney)
8) South America (Sao Paulo)
Select (1 to 8): 2
Enter an AWS Elastic Beanstalk application name (current value is "MyApp"): MyApp
Enter an AWS Elastic Beanstalk environment name (current value is "MyApp-env"): MyApp-env
Select a solution stack (current value is "64bit Amazon Linux running Python").
Available solution stacks are:
1) 32bit Amazon Linux running PHP 5.4
2) 64bit Amazon Linux running PHP 5.4
3) 32bit Amazon Linux running PHP 5.3
4) 64bit Amazon Linux running PHP 5.3
5) 32bit Amazon Linux running Node.js
6) 64bit Amazon Linux running Node.js
7) 64bit Windows Server 2008 R2 running IIS 7.5
8) 64bit Windows Server 2012 running IIS 8
9) 32bit Amazon Linux running Tomcat 7
10) 64bit Amazon Linux running Tomcat 7
API Version 2010-12-01
574

AWS Elastic Beanstalk Developer Guide
EB CLI 2 Commands
11) 32bit Amazon Linux running Tomcat 6
12) 64bit Amazon Linux running Tomcat 6
13) 32bit Amazon Linux running Python
14) 64bit Amazon Linux running Python
15) 32bit Amazon Linux running Ruby 1.8.7
16) 64bit Amazon Linux running Ruby 1.8.7
17) 32bit Amazon Linux running Ruby 1.9.3
18) 64bit Amazon Linux running Ruby 1.9.3
[...]
Select (1 to 70): 60
Select an environment type (current value is "LoadBalanced").
Available environment types are:
1) LoadBalanced
2) SingleInstance
Select (1 to 2): 1
Create an RDS DB Instance? [y/n] (current value is "Yes"): y
Create an RDS BD Instance from (current value is "[No snapshot]"):
1) [No snapshot]
2) [Other snapshot]
Select (1 to 2): 1
Enter an RDS DB master password (current value is "******"):
Retype password to confirm:
If you terminate your environment, your RDS DB Instance will be deleted and you will lose
your data.
Create snapshot? [y/n] (current value is "Yes"): y
Attach an instance profile (current value is "aws-elasticbeanstalk-ec2-role"):
1) [Create a default instance profile]
2) AppServer-AppServerInstanceProfile-TK2exampleHP
3) AppServer-AppServerInstanceProfile-1G2exampleK8
4) aws-opsworks-ec2-role
5) aws-elasticbeanstalk-ec2-role
6) [Other instance profile]
Select (1 to 6): 5
Updated AWS Credential file at "C:\Users\YourName\.elasticbeanstalk\aws_credential_file".
API Version 2010-12-01
575

AWS Elastic Beanstalk Developer Guide
EB CLI 2 Commands
logs
Note
This version of EB CLI and its documentation have been replaced with version 3 (in this section,
EB CLI 3 represents version 3 and later of EB CLI). For information on the new version, see The
Elastic Beanstalk Command Line Interface (EB CLI) (p. 480).
Description
Returns logs for the environment. Relevant logs vary by container type.
Syntax
eb logs
Options
Name Description Required
Common options For more information, see Eb Common Options (p. 567). No
Output
If successful, the command returns environment logs.
API Version 2010-12-01
576

AWS Elastic Beanstalk Developer Guide
EB CLI 2 Commands
push
Note
This version of EB CLI and its documentation have been replaced with version 3 (in this section,
EB CLI 3 represents version 3 and later of EB CLI). For information on the new version, see The
Elastic Beanstalk Command Line Interface (EB CLI) (p. 480).
Description
Deploys the current application to the AWS Elastic Beanstalk environment from the Git repository.
Note
• The eb push operation does not push to your remote repository, if any. Use a standard git
push or similar command to update your remote repository.
• The -e or --environment-name options are not not valid for eb push. To push to a
different environment from the current one (based on either the eb init default settings or
the Git branch that is currently checked out), run eb branch before running eb push.
Syntax
eb push
Options
Name Description Required
Common options For more information, see Eb Common Options (p. 567). No
Output
If successful, the command returns the status of the push operation.
Example
The following example deploys the current application.
PROMPT> eb push
Pushing to environment: MyApp-env
remote:
To https://AKIAXXXXXXXX5ZB7Q:2013092XXXXXXXXXXXXf502a780888b0a49899798aa6cbeaef690c0b
525d0f090c7338cbead589bf14f@git.elasticbeanstalk.us-west-2.amazonaws.com/v1/repos/417
0705XXXXXXXX23632303133/commitid/336264353663396262306463326563663763393EXAMPLExxxxx5
3165643137343939EXAMPLExx036/environment/417070536570743236323031332d6d6173EXAMPLEx65
2013-09-26 17:35:37 INFO Adding instance 'i-5EXAMPLE' to your environment.
2013-09-26 17:36:12 INFO Deploying new version to instance(s).
2013-09-26 17:36:20 INFO New application version was deployed to running EC2
instances.
2013-09-26 17:36:20 INFO Environment update completed successfully.
Update of environment "MyApp-env" has completed.
API Version 2010-12-01
577

AWS Elastic Beanstalk Developer Guide
EB CLI 2 Commands
start
Note
This version of EB CLI and its documentation have been replaced with version 3 (in this section,
EB CLI 3 represents version 3 and later of EB CLI). For information on the new version, see The
Elastic Beanstalk Command Line Interface (EB CLI) (p. 480).
Description
Creates and deploys the current application into the specified environment. For a tutorial that includes a
description of how to deploy a sample application using eb start, see Getting Started with Eb (p. 560).
Syntax
eb start
Options
Name Description Required
-e
or
--environment-name
ENVIRONMENT_NAME
The environment into which you want to create or start
the current application.
Type: String
Default: Current setting
No
Common options For more information, see Eb Common Options (p. 567). No
Output
If successful, the command returns the status of the start operation. If there were issues during the
launch, you can use the events (p. 572) operation to get more details.
Example 1
The following example starts the environment.
PROMPT> start
Starting application "MyApp".
Waiting for environment "MyApp-env" to launch.
2014-05-13 07:25:33 INFO createEnvironment is starting.
2014-05-13 07:25:39 INFO Using elasticbeanstalk-us-west-2-8EXAMPLE3 as Amazon
S3 storage bucket for environment data.
2014-05-13 07:26:07 INFO Created EIP: xx.xx.xxx.xx
2014-05-13 07:26:09 INFO Created security group named: awseb-e-vEXAMPLErp-stack-
AWSEBSecurityGroup-1GCEXAMPLEG0
2014-05-13 07:26:17 INFO Creating RDS database named: aavcEXAMPLE5y. This may
take a few minutes.
2014-05-13 07:32:36 INFO Created RDS database named: aavcEXAMPLE5y
2014-05-13 07:34:08 INFO Waiting for EC2 instances to launch. This may take a
few minutes.
2014-05-13 07:36:24 INFO Application available at MyApp-env-z4vsuuxh36.elastic
beanstalk.com.
2014-05-13 07:36:24 INFO Successfully launched environment: MyApp-env
Application is available at "MyApp-env-z4EXAMPLE6.elasticbeanstalk.com"
API Version 2010-12-01
578

AWS Elastic Beanstalk Developer Guide
EB CLI 2 Commands
Example 2
The following example starts the current application into an environment called MyApp-test-env.
PROMPT> start -e MyApp-test-env
Starting application "MyApp".
Waiting for environment "MyApp-test-env" to launch.
2014-05-13 07:25:33 INFO createEnvironment is starting.
2014-05-13 07:25:39 INFO Using elasticbeanstalk-us-west-2-8EXAMPLE3 as Amazon
S3 storage bucket for environment data.
2014-05-13 07:26:07 INFO Created EIP: xx.xx.xxx.xx
2014-05-13 07:26:09 INFO Created security group named: awseb-e-vEXAMPLErp-stack-
AWSEBSecurityGroup-1GCEXAMPLEG0
2014-05-13 07:26:17 INFO Creating RDS database named: aavcEXAMPLE5y. This may
take a few minutes.
2014-05-13 07:32:36 INFO Created RDS database named: aavcEXAMPLE5y
2014-05-13 07:34:08 INFO Waiting for EC2 instances to launch. This may take a
few minutes.
2014-05-13 07:36:24 INFO Application available at MyApp-test-envz4vsuuxh36.
elasticbeanstalk.com.
2014-05-13 07:36:24 INFO Successfully launched environment: MyApp-test-env
Application is available at "MyApp-test-env-z4EXAMPLE6.elasticbeanstalk.com"
API Version 2010-12-01
579

AWS Elastic Beanstalk Developer Guide
EB CLI 2 Commands
status
Note
This version of EB CLI and its documentation have been replaced with version 3 (in this section,
EB CLI 3 represents version 3 and later of EB CLI). For information on the new version, see The
Elastic Beanstalk Command Line Interface (EB CLI) (p. 480).
Description
Describes the status of the specified environment. For a tutorial that includes a description of how to
view an environment's status using eb status, see Getting Started with Eb (p. 560).
Syntax
eb status
Options
You might want to use the --verbose option with status.
Name Description Required
-e
or
--environment-name
ENVIRONMENT_NAME
The environment for which you want to display status.
Type: String
Default: Current setting
No
Common options For more information, see Eb Common Options (p. 567). No
Output
If successful, the command returns the status of the environment.
Example 1
The following example request returns the status of the environment.
PROMPT> eb status --verbose
Retrieving status of environment "MyNodeApp-env".
URL : MyNodeApp-env-tnEXAMPLEcf.elasticbeanstalk.com
Status : Ready
Health : Green
Environment Name: MyNodeApp-env
Environment ID : e-vmEXAMPLEp
Environment Tier: WebServer::Standard::1.0
Solution Stack : 64bit Amazon Linux 2014.02 running Node.js
Version Label : Sample Application
Date Created : 2014-05-14 07:25:35
Date Updated : 2014-05-14 07:36:24
Description :
RDS Database: AWSEBRDSDatabase | aavcEXAMPLEd5y.clak1.us-west-2.rds.amazon
aws.com:3306
Database Engine: mysql 5.6.37
Allocated Storage: 5
Instance Class: db.t2.micro
API Version 2010-12-01
580

AWS Elastic Beanstalk Developer Guide
EB CLI 2 Commands
Multi AZ: False
Master Username: ebroot
Creation Time: 2014-05-15 07:29:39
DB Instance Status: available
Example 2
The following example request returns the status of an application named MyNodeApp in an
environment called MyNodeApp-test-env.
PROMPT> eb status -e MyNodeApp-test-env -a MyNodeApp
Retrieving status of environment "MyNodeApp-test-env".
URL : MyNodeApp-test-env-tnEXAMPLEcf.elasticbeanstalk.com
Status : Ready
Health : Green
RDS Database: AWSEBRDSDatabase | aavcEXAMPLEd5y.clak1.us-west-2.rds.amazon
aws.com:3306
API Version 2010-12-01
581

AWS Elastic Beanstalk Developer Guide
EB CLI 2 Commands
stop
Note
This version of EB CLI and its documentation have been replaced with version 3 (in this section,
EB CLI 3 represents version 3 and later of EB CLI). For information on the new version, see The
Elastic Beanstalk Command Line Interface (EB CLI) (p. 480).
Description
Terminates the environment. For a tutorial that includes a description of how to terminate an
environment using eb stop, see Getting Started with Eb (p. 560).
Note
The stop operation applies to environments, not applications. To delete an application along
with its environments, use eb delete.
Syntax
eb stop
Options
Name Description Required
-e
or
--environment-name
ENVIRONMENT_NAME
The environment you want to terminate. The
environment must contain the current application; you
cannot specify an application other than the one in the
repository you're currently working in.
Type: String
Default: Current setting
No
Common options For more information, see Eb Common Options (p. 567). No
Output
If successful, the command returns the status of the stop operation.
Example1
The following example request terminates the environment.
PROMPT> eb stop
If you terminate your environment, your RDS DB Instance will be deleted and you will lose
your data.
Terminate environment? [y/n]: y
Stopping environment "MyApp-env". This may take a few minutes.
2014-05-13 07:18:10 INFO terminateEnvironment is starting.
2014-05-13 07:18:17 INFO Waiting for EC2 instances to terminate. This may take
a few minutes.
2014-05-13 07:19:43 INFO Deleted EIP: xxx.xxx.xxx.xx
2014-05-13 07:19:43 INFO Deleted security group named: awseb-e-zEXAMPLEng-stack-
AWSEBSecurityGroup-MEEXAMPLENHQ
2014-05-13 07:19:51 INFO Deleting SNS topic for environment MyApp-env.
2014-05-13 07:19:52 INFO terminateEnvironment completed successfully.
Stop of environment "MyApp-env" has completed.
API Version 2010-12-01
582

AWS Elastic Beanstalk Developer Guide
EB CLI 2 Commands
Example 2
The following example request terminates the environment named MyApp-test-env.
PROMPT> eb stop -e MyApp-test-env
If you terminate your environment, your RDS DB Instance will be deleted and you will lose
your data.
Terminate environment? [y/n]: y
Stopping environment "MyApp-test-env". This may take a few minutes.
2014-05-15 17:27:09 INFO terminateEnvironment is starting.
2014-05-15 17:27:16 INFO Waiting for EC2 instances to terminate. This
may take a few minutes.
2014-05-15 17:27:42 INFO Deleted EIP: xxx.xxx.xxx.xx
2014-05-15 17:27:42 INFO Deleted security group named: awseb-e-zEXAMPLEngstack-
AWSEBSecurityGroup-MEEXAMPLENHQ
2014-05-15 17:34:50 INFO Deleting SNS topic for environment MyApp-testenv.
2014-05-15 17:34:51 INFO terminateEnvironment completed successfully.
2013-05-15 17:29:55 INFO Deleted Auto Scaling group named: awseb-e-mqmp6mmcpk-stack-
AWSEBAutoScalingGroup-QALO012HZJVJ
2013-05-15 17:29:56 INFO Deleted Auto Scaling launch configuration named: awseb-e-
mqmp6mmcpk-stack-AWSEBAutoScalingLaunchConfiguration-1DBGPQ99YFX08
2013-05-15 17:34:11 INFO Deleted RDS database named: aauel5gap2gqb4
2013-05-15 17:34:16 INFO Deleted security group named: awseb-e-mqmp6mmcpk-stack-
AWSEBSecurityGroup-1LDYFT0256P0B
2013-05-15 17:34:17 INFO Deleted load balancer named: awseb-e-m-AWSEBLoa-
CT74SPXN541T
2013-05-15 17:34:29 INFO Deleting SNS topic for environment MyOtherApp-env.
2013-05-15 17:34:30 INFO terminateEnvironment completed successfully.
Stop of environment "MyApp-test-env" has completed.
API Version 2010-12-01
583

AWS Elastic Beanstalk Developer Guide
EB CLI 2 Commands
update
Note
This version of EB CLI and its documentation have been replaced with version 3 (in this section,
EB CLI 3 represents version 3 and later of EB CLI). For information on the new version, see The
Elastic Beanstalk Command Line Interface (EB CLI) (p. 480).
Description
Updates the specified environment by reading the .elasticbeanstalk/optionsettings. (Setting
values in .elasticbeanstalk/optionsettings take precedence over the values specified for the
same settings specified in .ebextensions/*.conf if the settings are configured in both places.) Use
this operation after making changes to your settings (for example, via init or branch).
Syntax
eb update
Options
Name Description Required
-e
or
--environment-name
ENVIRONMENT_NAME
The environment you want to update.
Type: String
Default: Current setting
No
Common options For more information, see Eb Common Options (p. 567). No
Output
If successful, the command returns the status of the update operation.
Example
The following example request updates the environment.
PROMPT> eb update
Update environment? [y/n]: y
Updating environment "MyApp-env". This may take a few minutes.
2014-05-15 17:10:34 INFO Updating environment MyApp-env's configuration
settings.
2014-05-15 17:11:12 INFO Successfully deployed new configuration to en
vironment.
2014-05-15 17:11:12 INFO Environment update completed successfully.
Update of environment "MyApp-env" has completed.
API Version 2010-12-01
584

AWS Elastic Beanstalk Developer Guide
EB API CLI (deprecated)
Elastic Beanstalk API Command Line Interface
(deprecated)
Note
This tool, the Elastic Beanstalk API CLI, and its documentation have been replaced with the AWS
CLI. See the AWS CLI User Guide to get started with the AWS CLI. Also try the EB CLI (p. 480) for
a simplified, higher level command line experience.
This section contains a reference for the old Elastic Beanstalk API command line interface. This tool's
functionality has been replaced by the AWS CLI, which provides API equivalent commands for all AWS
services. See Installing the AWS Command Line Interface to get started with the AWS CLI.
Topics
•Converting Elastic Beanstalk API CLI Scripts (p. 585)
•Getting Set Up (p. 587)
•Common Options (p. 589)
•Operations (p. 590)
Converting Elastic Beanstalk API CLI Scripts
Convert your old EB API CLI scripts to use the AWS CLI or Tools for Windows PowerShell to get access to
the latest Elastic Beanstalk APIs. The following table lists the Elastic Beanstalk API-based CLI commands
and their equivalent commands in the AWS CLI and Tools for Windows PowerShell.
Elastic Beanstalk API CLI AWS CLI AWS Tools for Windows
PowerShell
elastic-beanstalk-
check-dns-
availability (p. 590)
check-dns-availability Get-EBDNSAvailability
elastic-
beanstalk-create-
application (p. 591)
create-application New-EBApplication
elastic-beanstalk-
create-application-
version (p. 592)
create-application-version New-EBApplicationVersion
elastic-beanstalk-
create-configuration-
template (p. 594)
create-configuration-
template
New-
EBConfigurationTemplate
elastic-
beanstalk-create-
environment (p. 597)
create-environment New-EBEnvironment
elastic-beanstalk-
create-storage-
location (p. 601)
create-storage-location New-EBStorageLocation
elastic-
beanstalk-delete-
application (p. 601)
delete-application Remove-EBApplication
API Version 2010-12-01
585

AWS Elastic Beanstalk Developer Guide
Converting Elastic Beanstalk API CLI Scripts
Elastic Beanstalk API CLI AWS CLI AWS Tools for Windows
PowerShell
elastic-beanstalk-
delete-application-
version (p. 602)
delete-application-version Remove-
EBApplicationVersion
elastic-beanstalk-
delete-configuration-
template (p. 603)
delete-configuration-
template
Remove-
EBConfigurationTemplate
elastic-beanstalk-
delete-environment-
configuration (p. 604)
delete-environment-
configuration
Remove-
EBEnvironmentConfiguration
elastic-beanstalk-
describe-application-
versions (p. 605)
describe-application-
versions
Get-EBApplicationVersion
elastic-beanstalk-
describe-
applications (p. 606)
describe-applications Get-EBApplication
elastic-beanstalk-
describe-
configuration-
options (p. 607)
describe-configuration-
options
Get-EBConfigurationOption
elastic-beanstalk-
describe-
configuration-
settings (p. 608)
describe-configuration-
settings
Get-EBConfigurationSetting
elastic-beanstalk-
describe-environment-
resources (p. 610)
describe-environment-
resources
Get-EBEnvironmentResource
elastic-beanstalk-
describe-
environments (p. 611)
describe-environments Get-EBEnvironment
elastic-beanstalk-
describe-
events (p. 613)
describe-events Get-EBEvent
elastic-beanstalk-
list-available-
solution-
stacks (p. 615)
list-available-solution-
stacks
Get-
EBAvailableSolutionStack
elastic-
beanstalk-rebuild-
environment (p. 615)
rebuild-environment Start-EBEnvironmentRebuild
elastic-beanstalk-
request-environment-
info (p. 616)
request-environment-info Request-EBEnvironmentInfo
API Version 2010-12-01
586

AWS Elastic Beanstalk Developer Guide
Getting Set Up
Elastic Beanstalk API CLI AWS CLI AWS Tools for Windows
PowerShell
elastic-beanstalk-
restart-app-
server (p. 617)
restart-app-server Restart-EBAppServer
elastic-beanstalk-
retrieve-environment-
info (p. 618)
retrieve-environment-info Get-EBEnvironmentInfo
elastic-beanstalk-
swap-environment-
cnames (p. 619)
swap-environment-cnames Set-EBEnvironmentCNAME
elastic-beanstalk-
terminate-
environment (p. 620)
terminate-environment Stop-EBEnvironment
elastic-
beanstalk-update-
application (p. 622)
update-application Update-EBApplication
elastic-beanstalk-
update-application-
version (p. 623)
update-application-version Update-
EBApplicationVersion
elastic-beanstalk-
update-configuration-
template (p. 624)
update-configuration-
template
Update-
EBConfigurationTemplate
elastic-
beanstalk-update-
environment (p. 626)
update-environment Update-EBEnvironment
elastic-beanstalk-
validate-
configuration-
settings (p. 629)
validate-configuration-
settings
Test-
EBConfigurationSetting
Getting Set Up
Note
This tool, the Elastic Beanstalk API CLI, and its documentation have been replaced with the AWS
CLI. See the AWS CLI User Guide to get started with the AWS CLI. Also try the EB CLI (p. 480) for
a simplified, higher level command line experience.
Elastic Beanstalk provides a command line interface (CLI) to access Elastic Beanstalk functionality
without using the AWS Management Console or the APIs. This section describes the prerequisites for
running the CLI tools (or command line tools), where to get the tools, how to set up the tools and their
environment, and includes a series of common examples of tool usage.
Prerequisites
This document assumes you can work in a Linux/UNIX or Windows environment. The Elastic Beanstalk
command line interface also works correctly on Mac OS X (which resembles the Linux and UNIX
command environment), but no specific Mac OS X instructions are included in this guide.
API Version 2010-12-01
587

AWS Elastic Beanstalk Developer Guide
Getting Set Up
As a convention, all command line text is prefixed with a generic PROMPT> command line prompt.
The actual command line prompt on your machine is likely to be different. We also use $ to indicate
a Linux/UNIX-specific command and C:\> for a Windows-specific command. The example output
resulting from the command is shown immediately thereafter without any prefix.
The command line tools used in this guide require Ruby (version 1.8.7+ or 1.9.2+) and Python version 2.7
to run. To view and download Ruby clients for a range of platforms, including Linux/UNIX and Windows,
go to http://www.ruby-lang.org/en/. Python is available at python.org.
Note
If you are using Linux with a system version of Linux lower than 2.7, install Python 2.7 with your
distribution's package manager and then modify the eb script under eb/linux/python2.7/eb
to refer to the Python 2.7 executable:
#!/usr/bin/env python2.7
Additionally, you will need to install the boto module with pip:
$ sudo /usr/bin/easy_install-2.7 pip
$ sudo pip install boto
Getting the Command Line Tools
The command line tools are available as a .zip file on the AWS Sample Code & Libraries website. These
tools are written in Ruby, and include shell scripts for Windows 2000, Windows XP, Windows Vista,
Windows 7, Linux/UNIX, and Mac OS X. The .zip file is self-contained and no installation is required;
simply download the .zip file and unzip it to a directory on your local machine. You can find the tools in
the api directory.
Providing Credentials for the Command Line Interface
The command line interface requires the access key ID and secret access key. To get your access keys
(access key ID and secret access key), see How Do I Get Security Credentials? in the AWS General
Reference.
You need to create a file containing your access key ID and secret access key. The contents of the file
should look like this:
AWSAccessKeyId=Write your AWS access ID
AWSSecretKey=Write your AWS secret key
Important
On UNIX, limit permissions to the owner of the credential file:
$ chmod 600 <the file created above>
With the credentials file set up, you'll need to set the AWS_CREDENTIAL_FILE environment variable so
that the Elastic Beanstalk CLI tools can find your information.
To set the AWS_CREDENTIAL_FILE environment variable
• Set the environment variable using the following command:
API Version 2010-12-01
588

AWS Elastic Beanstalk Developer Guide
Common Options
On Linux and UNIX On Windows
$ export AWS_CREDENTIAL_FILE=<the
file created above>
C:\> set AWS_CREDENTIAL_FILE=<the
file created above>
Set the Service Endpoint URL
By default, the AWS Elastic Beanstalk uses the US East (N. Virginia) region (us-east-1) with the
elasticbeanstalk.us-east-1.amazonaws.com service endpoint URL. This section describes how to specify a
different region by setting the service endpoint URL. For information about this product's regions, go to
Regions and Endpoints in the Amazon Web Services General Reference.
To set the service endpoint URL
• Set the environment variable using the following command:
On Linux and UNIX On Windows
$ export
ELASTICBEANSTALK_URL=<service_endpoint>
C:\> set
ELASTICBEANSTALK_URL=<service_endpoint>
For example, on Linux, type the following to set your endpoint to us-west-2:
export ELASTICBEANSTALK_URL="https://elasticbeanstalk.us-west-2.amazonaws.com"
For example, on Windows, type the following to set your endpoint to us-west-2:
set ELASTICBEANSTALK_URL=https://elasticbeanstalk.us-west-2.amazonaws.com
Common Options
Note
This tool, the Elastic Beanstalk API CLI, and its documentation have been replaced with the AWS
CLI. See the AWS CLI User Guide to get started with the AWS CLI. Also try the EB CLI (p. 480) for
a simplified, higher level command line experience.
The command line operations accept the set of optional parameters described in the following table.
Option Description
--help
-h
Displays help text for the command. You can also use help
commandname. This option applies to eb and the original command line
interface.
Default: off
--show-json
-j
Displays the raw JSON response. This option applies only to the original
command line interface.
Default: off
API Version 2010-12-01
589

AWS Elastic Beanstalk Developer Guide
Operations
Operations
Note
This tool, the Elastic Beanstalk API CLI, and its documentation have been replaced with the AWS
CLI. See the AWS CLI User Guide to get started with the AWS CLI. Also try the EB CLI (p. 480) for
a simplified, higher level command line experience.
Commands
•elastic-beanstalk-check-dns-availability (p. 590)
•elastic-beanstalk-create-application (p. 591)
•elastic-beanstalk-create-application-version (p. 592)
•elastic-beanstalk-create-configuration-template (p. 594)
•elastic-beanstalk-create-environment (p. 597)
•elastic-beanstalk-create-storage-location (p. 601)
•elastic-beanstalk-delete-application (p. 601)
•elastic-beanstalk-delete-application-version (p. 602)
•elastic-beanstalk-delete-configuration-template (p. 603)
•elastic-beanstalk-delete-environment-configuration (p. 604)
•elastic-beanstalk-describe-application-versions (p. 605)
•elastic-beanstalk-describe-applications (p. 606)
•elastic-beanstalk-describe-configuration-options (p. 607)
•elastic-beanstalk-describe-configuration-settings (p. 608)
•elastic-beanstalk-describe-environment-resources (p. 610)
•elastic-beanstalk-describe-environments (p. 611)
•elastic-beanstalk-describe-events (p. 613)
•elastic-beanstalk-list-available-solution-stacks (p. 615)
•elastic-beanstalk-rebuild-environment (p. 615)
•elastic-beanstalk-request-environment-info (p. 616)
•elastic-beanstalk-restart-app-server (p. 617)
•elastic-beanstalk-retrieve-environment-info (p. 618)
•elastic-beanstalk-swap-environment-cnames (p. 619)
•elastic-beanstalk-terminate-environment (p. 620)
•elastic-beanstalk-update-application (p. 622)
•elastic-beanstalk-update-application-version (p. 623)
•elastic-beanstalk-update-configuration-template (p. 624)
•elastic-beanstalk-update-environment (p. 626)
•elastic-beanstalk-validate-configuration-settings (p. 629)
elastic-beanstalk-check-dns-availability
Description
Checks if the specified CNAME is available.
Syntax
elastic-beanstalk-check-dns-availability -c [CNAMEPrefix]
API Version 2010-12-01
590

AWS Elastic Beanstalk Developer Guide
Operations
Options
Name Description Required
-c
--cname-prefix CNAMEPrefix
The name of the CNAME to check.
Type: String
Default: None
Yes
Output
The command returns a table with the following information:
•Available—Shows true if the CNAME is available; otherwise, shows false.
•FullyQualifiedCNAME—Shows the fully qualified CNAME if it is available; otherwise shows N/A.
Examples
Checking to Availability of a CNAME
This example shows how to check to see if the CNAME prefix "myapp23" is available.
PROMPT> elastic-beanstalk-check-dns-availability -c myapp23
elastic-beanstalk-create-application
Description
Creates an application that has one configuration template named default and no application versions.
Note
The default configuration template is for a 32-bit version of the Amazon Linux operating
system running the Tomcat 6 application container.
Syntax
elastic-beanstalk-create-application -a [name] -d [desc]
Options
Name Description Required
-a
--application-name name
The name of the application.
Constraint: This name must be unique within your
account. If the specified name already exists, the
action returns an InvalidParameterValue
error.
Type: String
Default: None
Yes
API Version 2010-12-01
591

AWS Elastic Beanstalk Developer Guide
Operations
Name Description Required
-d
--description desc
The description of the application.
Type: String
Default: None
No
Output
The command returns a table with the following information:
•ApplicationName—The name of the application. If no application is found with this name, and
AutoCreateApplication is false, Elastic Beanstalk returns an InvalidParameterValue error.
•ConfigurationTemplates—A list of the configuration templates used to create the application.
•DateCreated—The date the application was created.
•DateUpdated—The date the application was last updated.
•Description—The description of the application.
•Versions—The versions of the application.
Examples
Creating an Application
This example shows how to create an application.
PROMPT> elastic-beanstalk-create-application -a MySampleApp -d "My description"
elastic-beanstalk-create-application-version
Description
Creates an application version for the specified application.
Note
Once you create an application version with a specified Amazon S3 bucket and key location, you
cannot change that Amazon S3 location. If you change the Amazon S3 location, you receive an
exception when you attempt to launch an environment from the application version.
Syntax
elastic-beanstalk-create-application-version -a [name] -l [label] -c -d [desc]
-s [location]
Options
Name Description Required
-a
--application-name name
The name of the application. If no
application is found with this name, and
AutoCreateApplication is false, Elastic
Beanstalk returns an InvalidParameterValue
error.
Yes
API Version 2010-12-01
592

AWS Elastic Beanstalk Developer Guide
Operations
Name Description Required
Type: String
Default: None
Length Constraints: Minimum value of 1.
Maximum value of 100.
-c
--auto-create
Determines how the system behaves if the
specified application for this version does not
already exist:
•true: Automatically creates the specified
application for this release if it does not already
exist.
•false: Throws an InvalidParameterValue
if the specified application for this release does
not already exist.
Type: Boolean
Valid Values: true | false
Default: false
No
-d
--description desc
The description of the version.
Type: String
Default: None
Length Constraints: Minimum value of 0.
Maximum value of 200.
No
-l
--version-label label
A label identifying this version.
Type: String
Default: None
Constraint: Must be unique per application. If an
application version already exists with this label
for the specified application, Elastic Beanstalk
returns an InvalidParameterValue error.
Length Constraints: Minimum value of 1.
Maximum value of 100.
Yes
API Version 2010-12-01
593

AWS Elastic Beanstalk Developer Guide
Operations
Name Description Required
-s
--source-location location
The name of the Amazon S3 bucket and key that
identify the location of the source bundle for this
version, in the format bucketname/key.
If data found at the Amazon S3 location
exceeds the maximum allowed source
bundle size, Elastic Beanstalk returns an
InvalidParameterCombination error.
Type: String
Default: If not specified, AWS Elastic Beanstalk
uses a sample application. If only partially
specified (for example, a bucket is provided but
not the key) or if no data is found at the Amazon
S3 location, AWS Elastic Beanstalk returns an
InvalidParameterCombination error.
No
Output
The command returns a table with the following information:
•ApplicationName—The name of the application.
•DateCreated—The date the application was created.
•DateUpdated—The date the application was last updated.
•Description—The description of the application.
•SourceBundle—The location where the source bundle is located for this version.
•VersionLabel—A label uniquely identifying the version for the associated application.
Examples
Creating a Version from a Source Location
This example shows create a version from a source location.
PROMPT> elastic-beanstalk-create-application-version -a MySampleApp -d "My version" -l
"TestVersion 1" -s amazonaws.com/sample.war
elastic-beanstalk-create-configuration-template
Description
Creates a configuration template. Templates are associated with a specific application and are used to
deploy different versions of the application with the same configuration settings.
Syntax
elastic-beanstalk-create-configuration-template -a [name] -t [name] -E [id] -d
[desc] -s [stack] -f [filename] -A [name] -T [name]
API Version 2010-12-01
594

AWS Elastic Beanstalk Developer Guide
Operations
Options
Name Description Required
-a
--application-name name
The name of the application to associate with
this configuration template. If no application is
found with this name, Elastic Beanstalk returns an
InvalidParameterValue error.
Type: String
Default: None
Yes
-t
--template-name name
The name of the configuration template.
If a configuration template already exists
with this name, Elastic Beanstalk returns an
InvalidParameterValue error.
Type: String
Default: None
Constraint: Must be unique for this application.
Length Constraints: Minimum value of 1.
Maximum value of 100.
Yes
-E
--environment-id id
The environment ID of the configuration
template.
Type: String
Default: None
No
-d
--description desc
The description of the configuration.
Type: String
Default: None
No
-s
--solution-stack stack
The name of the solution stack used by this
configuration. The solution stack specifies the
operating system, architecture, and application
server for a configuration template. It determines
the set of configuration options as well as the
possible and default values.
Use elastic-beanstalk-list-available-
solution-stacks to obtain a list of available
solution stacks.
A solution stack name or a source configuration
parameter must be specified; otherwise, Elastic
Beanstalk returns an InvalidParameterValue
error.
If a solution stack name is not specified and
the source configuration parameter is specified,
No
API Version 2010-12-01
595

AWS Elastic Beanstalk Developer Guide
Operations
Name Description Required
Elastic Beanstalk uses the same solution stack as
the source configuration template.
Type: String
Length Constraints: Minimum value of 0.
Maximum value of 100.
-f
--options-file filename
The name of a JSON file that contains a set of
key-value pairs defining configuration options
for the configuration template. The new values
override the values obtained from the solution
stack or the source configuration template.
Type: String
No
-A
--source-application-name
name
The name of the application to use as the source
for this configuration template.
Type: String
Default: None
No
-T
--source-template-name name
The name of the template to use as the source for
this configuration template.
Type: String
Default: None
No
Output
The command returns a table with the following information:
•ApplicationName—The name of the application associated with the configuration set.
•DateCreated—The date (in UTC time) when this configuration set was created.
•DateUpdated—The date (in UTC time) when this configuration set was last modified.
•DeploymentStatus—If this configuration set is associated with an environment, the deployment
status parameter indicates the deployment status of this configuration set:
•null: This configuration is not associated with a running environment.
•pending: This is a draft configuration that is not deployed to the associated environment but is in
the process of deploying.
•deployed: This is the configuration that is currently deployed to the associated running
environment.
•failed: This is a draft configuration that failed to successfully deploy.
•Description—The description of the configuration set.
•EnvironmentName—If not null, the name of the environment for this configuration set.
•OptionSettings—A list of configuration options and their values in this configuration set.
•SolutionStackName—The name of the solution stack this configuration set uses.
•TemplateNamel—If not null, the name of the configuration template for this configuration set.
API Version 2010-12-01
596

AWS Elastic Beanstalk Developer Guide
Operations
Examples
Creating a Basic Configuration Template
This example shows how to create a basic configuration template. For a list of configuration settings, see
Configuration Options (p. 202).
PROMPT> elastic-beanstalk-create-configuration-template -a MySampleApp -t myconfigtemplate
-E e-eup272zdrw
Related Operations
•elastic-beanstalk-describe-configuration-options (p. 607)
•elastic-beanstalk-describe-configuration-settings (p. 608)
•elastic-beanstalk-list-available-solution-stacks (p. 615)
elastic-beanstalk-create-environment
Description
Launches an environment for the specified application using the specified configuration.
Syntax
elastic-beanstalk-create-environment -a [name] -l [label] -e [name] [-t [name]
| -s [stack]] -c [prefix] -d [desc] -f[filename] -F [filename]
Options
Name Description Required
-a
--application-name name
The name of the application that contains the
version to be deployed. If no application is found
with this name, Elastic Beanstalk returns an
InvalidParameterValue error.
Type: String
Default: None
Length Constraints: Minimum value of 1.
Maximum value of 100.
Yes
-l
--version-label >label
The name of the application version to deploy.
If the specified application has no
associated application versions, Elastic
Beanstalk UpdateEnvironment returns an
InvalidParameterValue error.
Default: If not specified, Elastic Beanstalk
attempts to launch the the sample application in
the container.
Type: String
No
API Version 2010-12-01
597

AWS Elastic Beanstalk Developer Guide
Operations
Name Description Required
Default: None
Length Constraints: Minimum value of 1.
Maximum value of 100.
-e
--environment-name name
A unique name for the deployment environment.
Used in the application URL.
Constraint: Must be from 4 to 23 characters
in length. The name can contain only letters,
numbers, and hyphens. It cannot start or
end with a hyphen. This name must be
unique in your account. If the specified name
already exists, Elastic Beanstalk returns an
InvalidParameterValue.
Type: String
Default: If the CNAME parameter is not specified,
the environment name becomes part of the
CNAME, and therefore part of the visible URL for
your application.
Yes
-t
--template-name name
The name of the configuration template to use in
the deployment. If no configuration template is
found with this name, Elastic Beanstalk returns an
InvalidParameterValue error.
Conditional: You must specify either this
parameter or a solution stack name, but not both.
If you specify both, Elastic Beanstalk returns
an InvalidParameterValue error. If you do
not specify either, Elastic Beanstalk returns a
MissingRequiredParameter.
Type: String
Default: None
Constraint: Must be unique for this application.
Conditional
-s
--solution-stack stack
This is the alternative to specifying a
configuration name. If specified, Elastic Beanstalk
sets the configuration values to the default values
associated with the specified solution stack.
Condition: You must specify either this
or a TemplateName, but not both. If you
specify both, Elastic Beanstalk returns an
InvalidParameterCombination error. If you
do not specify either, Elastic Beanstalk returns
MissingRequiredParameter error.
Type: String
Default: None
Conditional
API Version 2010-12-01
598

AWS Elastic Beanstalk Developer Guide
Operations
Name Description Required
-c
--cname-prefix prefix
If specified, the environment attempts to use this
value as the prefix for the CNAME. If not specified,
the environment uses the environment name.
Type: String
Default: None
Length Constraints: Minimum value of 4.
Maximum value of 23.
No
-d
--description desc
The description of the environment.
Type: String
Default: None
No
-f
--options-file filename
The name of a JSON file that contains a set of
key-value pairs defining configuration options
for this new environment. These override the
values obtained from the solution stack or the
configuration template.
Type: String
No
-F
--options-to-remove-file
value
The name of a JSON file that contains
configuration options to remove from the
configuration set for this new environment.
Type: String
Default: None
No
Output
The command returns a table with the following information:
•ApplicationName—The name of the application associated with this environment.
•CNAME—The URL to the CNAME for this environment.
•DateCreated—The date the environment was created.
•DateUpdated—The date the environment was last updated.
•Description—The description of the environment.
•EndpointURL—The URL to the LoadBalancer for this environment.
•EnvironmentID—The ID of this environment.
•EnvironmentName—The name of this environment.
•Health—Describes the health status of the environment. Elastic Beanstalk indicates the failure levels
for a running environment:
•Red: Indicates the environment is not responsive. Occurs when three or more consecutive failures
occur for an environment.
•Yellow: Indicates that something is wrong. Occurs when two consecutive failures occur for an
environment.
•Green: Indicates the environment is healthy and fully functional.
API Version 2010-12-01
599

AWS Elastic Beanstalk Developer Guide
Operations
•Gray: Default health for a new environment. The environment is not fully launched and health
checks have not started or health checks are suspended during an UpdateEnvironment or
RestartEnvironmentrequest.
•Resources—A list of AWS resources used in this environment.
•SolutionStackName—The name of the solution stack deployed with this environment.
•Status—The current operational status of the environment:
•Launching: Environment is in the process of initial deployment.
•Updating: Environment is in the process of updating its configuration settings or application
version.
•Ready: Environment is available to have an action performed on it, such as update or terminate.
•Terminating: Environment is in the shut-down process.
•Terminated: Environment is not running.
•TemplateName—The name of the configuration template used to originally launch this environment.
•VersionLabel—The application version deployed in this environment.
Examples
Creating an Environment Using a Basic Configuration Template
This example shows how to create an environment using a basic configuration template as well as pass in
a file to edit configuration settings and a file to remove configuration settings. For a list of configuration
settings, see Configuration Options (p. 202).
$ elastic-beanstalk-create-environment -a MySampleApp -t myconfigtemplate -e MySampleAppEnv
-f options.txt -F options_remove.txt
options.txt
[
{
"Namespace": "aws:autoscaling:asg",
"OptionName": "MinSize",
"Value": "2"
},
{
"Namespace": "aws:autoscaling:asg",
"OptionName": "MaxSize",
"Value": "3"
}
]
options_remove.txt
[
{
"Namespace": "aws:elasticbeanstalk:sns:topics",
"OptionName": "PARAM4"
}
]
API Version 2010-12-01
600

AWS Elastic Beanstalk Developer Guide
Operations
elastic-beanstalk-create-storage-location
Description
Creates the Amazon S3 storage location for the account. This location is used to store user log files and
is used by the AWS Management Console to upload application versions. You do not need to create this
bucket in order to work with Elastic Beanstalk.
Syntax
elastic-beanstalk-create-storage-location
Examples
Creating the Storage Location
This example shows how to create a storage location.
PROMPT> elastic-beanstalk-create-storage-location
This command will output the name of the Amazon S3 bucket created.
elastic-beanstalk-delete-application
Description
Deletes the specified application along with all associated versions and configurations.
Note
You cannot delete an application that has a running environment.
Syntax
elastic-beanstalk-delete-application -a [name] -f
Options
Name Description Required
-a
--application-name name
The name of the application to delete.
Type: String
Default: None
Length Constraints: Minimum value of 1.
Maximum value of 100.
Yes
-f
--force-terminate-env
Determines if all running environments should be
deleted before deleting the application.
Type: Boolean
Valid Values: true | false
Default: false
No
API Version 2010-12-01
601

AWS Elastic Beanstalk Developer Guide
Operations
Output
The command returns the string Application deleted.
Examples
Deleting an Application
This example shows how to delete an application.
PROMPT> elastic-beanstalk-delete-application -a MySampleApp
elastic-beanstalk-delete-application-version
Description
Deletes the specified version from the specified application.
Note
You cannot delete an application version that is associated with a running environment.
Syntax
elastic-beanstalk-delete-application-version -a [name] -l [label] -d
Options
Name Description Required
-a
--application-name name
The name of the application to delete releases
from.
Type: String
Default: None
Yes
-l
--version-label
The label of the version to delete.
Type: String
Default: None
Length Constraints: Minimum value of 1.
Maximum value of 100.
Yes
-d
--delete-source-bundle
Indicates whether to delete the associated source
bundle from Amazon S3.
true: An attempt is made to delete the
associated Amazon S3 source bundle specified at
time of creation.
false: No action is taken on the Amazon S3
source bundle specified at time of creation.
Type: Boolean
Valid Values: true | false
No
API Version 2010-12-01
602

AWS Elastic Beanstalk Developer Guide
Operations
Name Description Required
Default: false
Output
The command returns the string Application version deleted.
Examples
Deleting an Application Version
This example shows how to delete an application version.
PROMPT> elastic-beanstalk-delete-application-version -a MySampleApp -l MyAppVersion
Deleting an Application Version and Amazon S3 Source Bundle
This example shows how to delete an application version.
PROMPT> elastic-beanstalk-delete-application-version -a MySampleApp -l MyAppVersion -d
elastic-beanstalk-delete-configuration-template
Description
Deletes the specified configuration template.
Note
When you launch an environment using a configuration template, the environment gets a copy
of the template. You can delete or modify the environment's copy of the template without
affecting the running environment.
Syntax
elastic-beanstalk-delete-configuration-template -a [name] -t [name]
Options
Name Description Required
-a
--application-name name
The name of the application to delete the
configuration template from.
Type: String
Default: None
Length Constraints: Minimum value of 1.
Maximum value of 100.
Yes
-t
--template-name
The name of the configuration template to delete.
Type: String
Default: None
Yes
API Version 2010-12-01
603

AWS Elastic Beanstalk Developer Guide
Operations
Name Description Required
Length Constraints: Minimum value of 1.
Maximum value of 100.
Output
The command returns the string Configuration template deleted.
Examples
Deleting a Configuration Template
This example shows how to delete a configuration template.
PROMPT> elastic-beanstalk-delete-configuration-template -a MySampleApp -t MyConfigTemplate
elastic-beanstalk-delete-environment-configuration
Description
Deletes the draft configuration associated with the running environment.
Note
Updating a running environment with any configuration changes creates a draft configuration
set. You can get the draft configuration using elastic-beanstalk-describe-
configuration-settings while the update is in progress or if the update fails. The
deployment status for the draft configuration indicates whether the deployment is in process or
has failed. The draft configuration remains in existence until it is deleted with this action.
Syntax
elastic-beanstalk-delete-environment-configuration -a [name] -e [name]
Options
Name Description Required
-a
--application-name name
The name of the application the environment is
associated with.
Type: String
Default: None
Length Constraints: Minimum value of 1.
Maximum value of 100.
Yes
-e
--environment-name name
The name of the environment to delete the draft
configuration from.
Type: String
Default: None
Length Constraints: Minimum value of 4.
Maximum value of 23.
Yes
API Version 2010-12-01
604

AWS Elastic Beanstalk Developer Guide
Operations
Output
The command returns the string Environment configuration deleted.
Examples
Deleting a Configuration Template
This example shows how to delete a configuration template.
PROMPT> elastic-beanstalk-delete-environment-configuration -a MySampleApp -e MyEnvConfig
elastic-beanstalk-describe-application-versions
Description
Returns information about existing application versions.
Syntax
elastic-beanstalk-describe-application-versions -a [name] -l [labels
[,label..]]
Options
Name Description Required
-a
--application-name value
The name of the application. If specified, Elastic
Beanstalk restricts the returned descriptions to
only include ones that are associated with the
specified application.
Type: String
Default: None
Length Constraints: Minimum value of 1.
Maximum value of 100.
No
-l
--version-label labels
Comma-delimited list of version labels. If
specified, restricts the returned descriptions to
only include ones that have the specified version
labels.
Type: String[]
Default: None
No
Output
The command returns a table with the following information:
•ApplicationName—The name of the application associated with this release.
•DateCreated—The date the application was created.
•DateUpdated—The date the application version was last updated.
•Description—The description of the application version.
API Version 2010-12-01
605
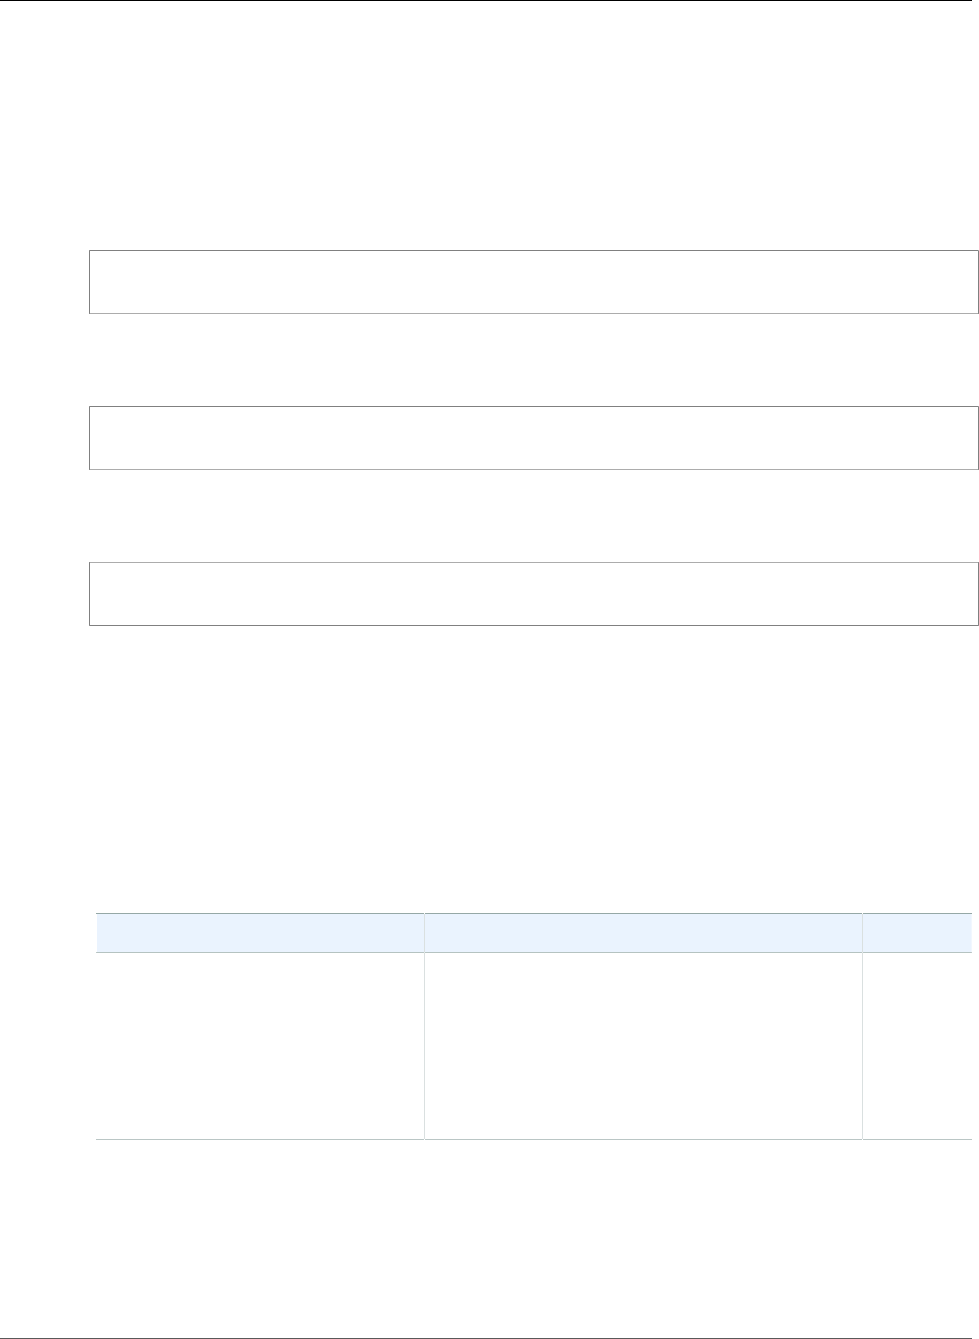
AWS Elastic Beanstalk Developer Guide
Operations
•SourceBundle—The location where the source bundle is located for this version.
•VersionLabel—A label uniquely identifying the version for the associated application.
Examples
Describing Application Versions
This example shows how to describe all application versions for this account.
PROMPT> elastic-beanstalk-describe-application-versions
Describing Application Versions for a Specified Application
This example shows how to describe application versions for a specific application.
PROMPT> elastic-beanstalk-describe-application-versions -a MyApplication
Describing Multiple Application Versions
This example shows how to describe multiple specified application versions.
PROMPT> elastic-beanstalk-describe-application-versions -l MyAppVersion1, MyAppVersion2
elastic-beanstalk-describe-applications
Description
Returns descriptions about existing applications.
Syntax
elastic-beanstalk-describe-applications -a [names [,name..]]
Options
Name Description Required
-a
--application-names name
The name of one or more applications, separated
by commas. If specified, Elastic Beanstalk restricts
the returned descriptions to only include those
with the specified names.
Type: String[]
Default: None
No
Output
The command returns a table with the following information:
•ApplicationName—The name of the application.
•ConfigurationTemplates—A list of the configuration templates used to create the application.
API Version 2010-12-01
606

AWS Elastic Beanstalk Developer Guide
Operations
•DateCreated—The date the application was created.
•DateUpdated—The date the application was last updated.
•Description—The description of the application.
•Versions—The names of the versions for this application.
Examples
Describing the Applications
This example shows how to describe all applications for this account.
PROMPT> elastic-beanstalk-describe-applications
Describing a Specific Application
This example shows how to describe a specific application.
PROMPT> elastic-beanstalk-describe-applications -a MyApplication
elastic-beanstalk-describe-configuration-options
Description
Describes the configuration options that are used in a particular configuration template or environment,
or that a specified solution stack defines. The description includes the values, the options, their default
values, and an indication of the required action on a running environment if an option value is changed.
Syntax
elastic-beanstalk-describe-configuration-options -a [name] -t [name] -e [name]
-s [stack] -f [filename]
Options
Name Description Required
-a
--application-name name
The name of the application associated with the
configuration template or environment. Only
needed if you want to describe the configuration
options associated with either the configuration
template or environment.
Type: String
Default: None
Length Constraints: Minimum value of 1.
Maximum value of 100.
No
-t
--template-name name
The name of the configuration template whose
configuration options you want to describe.
Type: String
Default: None
No
API Version 2010-12-01
607

AWS Elastic Beanstalk Developer Guide
Operations
Name Description Required
Length Constraints: Minimum value of 1.
Maximum value of 100.
-e
--environment-name name
The name of the environment whose
configuration options you want to describe.
Type: String
Length Constraints: Minimum value of 4.
Maximum value of 23.
No
-s
--solution-stack stack
The name of the solution stack whose
configuration options you want to describe.
Type: String
Default: None
Length Constraints: Minimum value of 0.
Maximum value of 100.
No
-f
--options-file filename
The name of a JSON file that contains the options
you want described.
Type: String
No
Output
The command returns a table with the following information:
•Options—A list of the configuration options.
•SolutionStackName—The name of the SolutionStack these configuration options belong to.
Examples
Describing Configuration Options for an Environment
This example shows how to describe configuration options for an environment.
PROMPT> elastic-beanstalk-describe-configuration-options -a MySampleApp -t myconfigtemplate
-e MySampleAppEnv
elastic-beanstalk-describe-configuration-settings
Description
Returns a description of the settings for the specified configuration set, that is, either a configuration
template or the configuration set associated with a running environment.
When describing the settings for the configuration set associated with a running environment, it is
possible to receive two sets of setting descriptions. One is the deployed configuration set, and the other
is a draft configuration of an environment that is either in the process of deployment or that failed to
deploy.
API Version 2010-12-01
608

AWS Elastic Beanstalk Developer Guide
Operations
Syntax
elastic-beanstalk-describe-configuration-settings -a [name] [-t [name] | -e
[name]]
Options
Name Description Required
-a
--application-name name
The application name for the environment or
configuration template.
Type: String
Default: None
Length Constraints: Minimum value of 1.
Maximum value of 100.
Yes
-t
--template-name name
The name of the configuration template to
describe. If no configuration template is found
with this name, Elastic Beanstalk returns an
InvalidParameterValue error.
Conditional: You must specify either this
parameter or an environment name, but not
both. If you specify both, Elastic Beanstalk returns
an InvalidParameterValue error. If you do
not specify either, Elastic Beanstalk returns a
MissingRequiredParameter error.
Type: String
Default: None
Length Constraints: Minimum value of 1.
Maximum value of 100.
Conditional
-e
--environment-name name
The name of the environment to describe.
Type: String
Default: None
Length Constraints: Minimum value of 4.
Maximum value of 23.
Conditional
Output
The command returns a table with the following information:
•ConfigurationSettings—A list of the configuration settings.
Examples
Describing Configuration Settings for an Environment
This example shows how to describe the configuration options for an environment.
API Version 2010-12-01
609

AWS Elastic Beanstalk Developer Guide
Operations
PROMPT> elastic-beanstalk-describe-configuration-settings -a MySampleApp -e MySampleAppEnv
Related Operations
•elastic-beanstalk-delete-environment-configuration (p. 604)
elastic-beanstalk-describe-environment-resources
Description
Returns AWS resources for this environment.
Syntax
elastic-beanstalk-describe-environment-resources [-e [name] | -E [id]]
Options
Name Description Required
-e
--environment-name name
The name of the environment to retrieve AWS
resource usage data.
Type: String
Default: None
Length Constraints: Minimum value of 4.
Maximum value of 23.
Conditional
-E
--environment-id id
The ID of the environment to retrieve AWS
resource usage data.
Type: String
Default: None
Conditional
Output
The command returns a table with the following information:
•AutoScalingGroups—A list of AutoScalingGroups used by this environment.
•EnvironmentName—The name of the environment.
•Instances—The Amazon EC2 instances used by this environment.
•LaunchConfigurations—The Auto Scaling launch configurations in use by this environment.
•LoadBalancers—The LoadBalancers in use by this environment.
•Triggers—The AutoScaling triggers in use by this environment.
Examples
Describing Environment Resources for an Environment
This example shows how to describe environment resources for an environment.
API Version 2010-12-01
610

AWS Elastic Beanstalk Developer Guide
Operations
PROMPT> elastic-beanstalk-describe-environment-resources -e MySampleAppEnv
elastic-beanstalk-describe-environments
Description
Returns descriptions for existing environments.
Syntax
elastic-beanstalk-describe-environments -e [names [,name...]] -E [ids [,id...]]
-a [name] -l [label] -d -D [timestamp]
Options
Name Description Required
-e
--environment-names names
A list of environment names.
Type: String[]
Default: None
No
-E
--environment-ids ids
A list of environment IDs.
Type: String[]
Default: None
No
-a
--application-name name
A list of descriptions associated with the
application.
Type: String
Default: None
Length Constraints: Minimum value of 1.
Maximum value of 100.
No
-l
--version-label >label
A list of descriptions associated with the
application version.
Type: String
Default: None
Length Constraints: Minimum value of 1.
Maximum value of 100.
No
-d
--include-deleted
Indicates whether to include deleted
environments.
true: Environments that have been deleted after
--include-deleted-back-to are displayed.
false: Do not include deleted environments.
Type: Boolean
No
API Version 2010-12-01
611

AWS Elastic Beanstalk Developer Guide
Operations
Name Description Required
Default: true
-D
--include-deleted-back-to
timestamp
If --include-deleted is set to true, then a list of
environments that were deleted after this date are
displayed.
Type: Date Time
Default: None
No
Output
The command returns a table with the following information:
•ApplicationName—The name of the application associated with this environment.
•CNAME—The URL to the CNAME for this environment.
•DateCreated—The date the environment was created.
•DateUpdated—The date the environment was last updated.
•Description—The description of the environment.
•EndpointURL—The URL to the LoadBalancer for this environment.
•EnvironmentID—The ID of this environment.
•EnvironmentName—The name of this environment.
•Health—Describes the health status of the environment. Elastic Beanstalk indicates the failure levels
for a running environment:
•Red: Indicates the environment is not responsive. Occurs when three or more consecutive failures
occur for an environment.
•Yellow: Indicates that something is wrong. Occurs when two consecutive failures occur for an
environment.
•Green: Indicates the environment is healthy and fully functional.
•Gray: Default health for a new environment. The environment is not fully launched and health
checks have not started or health checks are suspended during an UpdateEnvironment or
RestartEnvironmentrequest.
•Resources—A list of AWS resources used in this environment.
•SolutionStackName—The name of the SolutionStack deployed with this environment.
•Status—The current operational status of the environment:
•Launching: Environment is in the process of initial deployment.
•Updating: Environment is in the process of updating its configuration settings or application
version.
•Ready: Environment is available to have an action performed on it, such as update or terminate.
•Terminating: Environment is in the shut-down process.
•Terminated: Environment is not running.
•TemplateName—The name of the configuration template used to originally launch this environment.
•VersionLabel—The application version deployed in this environment.
Examples
Describing Environments
This example shows how to describe existing environments.
API Version 2010-12-01
612

AWS Elastic Beanstalk Developer Guide
Operations
PROMPT> elastic-beanstalk-describe-environments
elastic-beanstalk-describe-events
Description
Returns a list of event descriptions matching criteria up to the last 6 weeks.
Note
This action returns the most recent 1,000 events from the specified NextToken.
Syntax
elastic-beanstalk-describe-events -a [name] -e [name] -E [id] -l [label] -L
[timestamp] -m [count] -n [token] -r [id] -s [level] -S [timestamp] -t [name]
Options
Name Description Required
-a
--application-name name
The name of the application.
Type: String
Default: None
Length Constraints: Minimum value of 1.
Maximum value of 100.
No
-e
--environment-name name
The name of the environment.
Type: String
Default: None
Length Constraints: Minimum value of 4.
Maximum value of 23.
No
-E
--environment-id id
The ID of the environment.
Type: String
Default: None
No
-l
--version-label >label
The application version.
Type: String
Default: None
Length Constraints: Minimum value of 1.
Maximum value of 100.
No
-L
--end-time timestamp
If specified, a list of events that occurred up to but
not including the specified time is returned.
Type: Date Time
Default: None
No
API Version 2010-12-01
613

AWS Elastic Beanstalk Developer Guide
Operations
Name Description Required
-m
--max-records count
Specifies the maximum number of events that
can be returned, beginning with the most recent
event.
Type: Integer
Default: None
No
-n
--next-token token
Pagination token. Used to return the next batch of
results.
Type: String
Default: None
No
-r
--request-id id
The request ID.
Type: String
Default: None
No
-s
--severity level
If specified, a list of events with the specified
severity level or higher is returned.
Type: String
Valid Values: TRACE | DEBUG | INFO | WARN |
ERROR | FATAL
Default: None
No
-S
--start-time timestamp
If specified, a list of events that occurred after the
specified time is returned.
Type: Date Time
Default: None
No
-t
--template-name name
The name of the configuration template.
Type: String
Default: None
Length Constraints: Minimum value of 1.
Maximum value of 100.
No
Output
The command returns a table with the following information:
•ApplicationName—The name of the application associated with the event.
•EnvironmentName—The name of the environment associated with the event.
•EventDate—The date of the event.
•Message—The event's message.
•RequestID—The web service request ID for the activity of this event.
API Version 2010-12-01
614

AWS Elastic Beanstalk Developer Guide
Operations
•Severity—The severity level of the event.
•TemplateName—The name of the configuration associated with this event.
•VersionLabel—The release label for the application version associated with this event.
Examples
Describing Events for an Environment with a Security Level
This example shows how to describe events that have a severity level of WARN or higher for an
environment.
PROMPT> elastic-beanstalk-describe-events -e MySampleAppEnv -s WARN
elastic-beanstalk-list-available-solution-stacks
Description
Returns a list of available solution stack names.
Syntax
elastic-beanstalk-list-available-solution-stacks
Output
The command returns of available solution stack names.
Examples
Listing the Available Solution Stacks
This example shows how to get the list of available solution stacks.
PROMPT> elastic-beanstalk-list-available-solution-stacks
elastic-beanstalk-rebuild-environment
Description
Deletes and recreates all of the AWS resources (for example: the Auto Scaling group, LoadBalancer, etc.)
for a specified environment and forces a restart.
Syntax
elastic-beanstalk-rebuild-environment [-e [name] | -E [id]]
Options
Name Description Required
-e A name of the environment to rebuild. Conditional
API Version 2010-12-01
615

AWS Elastic Beanstalk Developer Guide
Operations
Name Description Required
--environment-name name Type: String
Default: None
Length Constraints: Minimum value of 4.
Maximum value of 23.
-E
--environment-id id
The ID of the environment to rebuild.
Type: String
Default: None
Conditional
Output
The command outputs Rebuilding environment.
Examples
Rebuilding an Environment
This example shows how to rebuild an environment.
PROMPT> elastic-beanstalk-rebuild-environment -e MySampleAppEnv
elastic-beanstalk-request-environment-info
Description
Initiates a request to compile the specified type of information of the deployed environment.
Setting the InfoType to tail compiles the last lines from the application server log files of every
Amazon EC2 instance in your environment. Use RetrieveEnvironmentInfo to access the compiled
information.
Syntax
elastic-beanstalk-request-environment-info [-e [name] | -E [id]] -i [type]
Options
Name Description Required
-e
--environment-name name
The name of the environment of the requested
data.
Type: String
Default: None
Length Constraints: Minimum value of 4.
Maximum value of 23.
Conditional
API Version 2010-12-01
616

AWS Elastic Beanstalk Developer Guide
Operations
Name Description Required
-E
--environment-id id
The ID of the environment of the requested data.
Type: String
Default: None
Conditional
-i
--info-type type
The type of information to request.
Type: String
Valid Values: tail
Default: None
Yes
Examples
Requesting Environment Information
This example shows how to request environment information.
PROMPT> elastic-beanstalk-request-environment-info -e MySampleAppEnv -i tail
Related Operations
•elastic-beanstalk-retrieve-environment-info (p. 618)
elastic-beanstalk-restart-app-server
Description
Causes the environment to restart the application container server running on each Amazon EC2
instance.
Syntax
elastic-beanstalk-restart-app-server [-e [name] | -E [id]]
Options
Name Description Required
-e
--environment-name name
The name of the environment to restart the server
for.
Type: String
Default: None
Length Constraints: Minimum value of 4.
Maximum value of 23.
Conditional
API Version 2010-12-01
617

AWS Elastic Beanstalk Developer Guide
Operations
Name Description Required
-E
--environment-id id
The ID of the environment to restart the server
for.
Type: String
Default: None
Conditional
Examples
Restarting the Application Server
This example shows how to restart the application server.
PROMPT> elastic-beanstalk-restart-app-server -e MySampleAppEnv
elastic-beanstalk-retrieve-environment-info
Description
Retrieves the compiled information from a RequestEnvironmentInfo request.
Syntax
elastic-beanstalk-retrieve-environment-info [-e [name] | -E [id]] -i [type]
Options
Name Description Required
-e
--environment-name name
The name of the data's environment. If no
environments are found, Elastic Beanstalk returns
an InvalidParameterValue error.
Type: String
Default: None
Length Constraints: Minimum value of 4.
Maximum value of 23.
Conditional
-E
--environment-id id
The ID of the data's environment.
The name of the data's environment. If no
environments are found, Elastic Beanstalk returns
an InvalidParameterValue error.
Type: String
Default: None
Conditional
-i
--info-type type
The type of information to retrieve.
Type: String
Valid Values: tail
Yes
API Version 2010-12-01
618

AWS Elastic Beanstalk Developer Guide
Operations
Name Description Required
Default: None
Output
The command returns a table with the following information:
•EC2InstanceId—The Amazon EC2 instance ID for this information.
•InfoType—The type of information retrieved.
•Message—The retrieved information.
•SampleTimestamp—The time stamp when this information was retrieved.
Examples
Retrieving Environment Information
This example shows how to retrieve environment information.
PROMPT> elastic-beanstalk-retrieve-environment-info -e MySampleAppEnv -i tail
Related Operations
•elastic-beanstalk-request-environment-info (p. 616)
elastic-beanstalk-swap-environment-cnames
Description
Swaps the CNAMEs of two environments.
Syntax
elastic-beanstalk-swap-environment-cnames [-s [name] | -S [desc]] [-d [desc] |
-D [desc]]
Options
Name Description Required
-s
--source-environment-name
name
The name of the source environment.
Type: String
Default: None
Conditional
-S
--source-environment-id id
The ID of the source environment.
Type: String
Default: None
Conditional
-d The name of the destination environment. Conditional
API Version 2010-12-01
619

AWS Elastic Beanstalk Developer Guide
Operations
Name Description Required
--destination-environment-
name name
Type: String
Default: None
-D
--destination-environment-id
id
The ID of the destination environment.
Type: String
Default: None
Conditional
Examples
Swapping Environment CNAMEs
This example shows how to swap the CNAME for two environments.
PROMPT> elastic-beanstalk-swap-environment-cnames -s MySampleAppEnv -d MySampleAppEnv2
elastic-beanstalk-terminate-environment
Description
Terminates the specified environment.
Syntax
elastic-beanstalk-terminate-environment [-e [name] | -E [id]] -t
Options
Name Description Required
-e
--environment-name name
The name of the environment to terminate.
Type: String
Default: None
Length Constraints: Minimum value of 4.
Maximum value of 23.
Conditional
-E
--environment-id id
The ID of the environment to terminate.
Type: String
Default: None
Conditional
-t
--terminate-resources
Indicates whether the associated AWS resources
should shut down when the environment is
terminated:
•true: The specified environment as well as the
associated AWS resources, such as Auto Scaling
group and LoadBalancer, are terminated.
No
API Version 2010-12-01
620

AWS Elastic Beanstalk Developer Guide
Operations
Name Description Required
•false: Elastic Beanstalk resource management
is removed from the environment, but the AWS
resources continue to operate.
Type: Boolean
Valid Values: true | false
Default: true
Note
You can specify this parameter (-t)
only for legacy environments because
only legacy environments can have
resources running when you terminate
the environment.
Output
The command returns a table with the following information:
•ApplicationName—The name of the application associated with this environment.
•CNAME—The URL to the CNAME for this environment.
•DateCreated—The date the environment was created.
•DateUpdated—The date the environment was last updated.
•Description—The description of the environment.
•EndpointURL—The URL to the LoadBalancer for this environment.
•EnvironmentID—The ID of this environment.
•EnvironmentName—The name of this environment.
•Health—Describes the health status of the environment. Elastic Beanstalk indicates the failure levels
for a running environment:
•Red: Indicates the environment is not responsive. Occurs when three or more consecutive failures
occur for an environment.
•Yellow: Indicates that something is wrong. Occurs when two consecutive failures occur for an
environment.
•Green: Indicates the environment is healthy and fully functional.
•Gray: Default health for a new environment. The environment is not fully launched and health
checks have not started or health checks are suspended during an UpdateEnvironment or
RestartEnvironmentrequest.
•Resources—A list of AWS resources used in this environment.
•SolutionStackName—The name of the SolutionStack deployed with this environment.
•Status—The current operational status of the environment:
•Launching: Environment is in the process of initial deployment.
•Updating: Environment is in the process of updating its configuration settings or application
version.
•Ready: Environment is available to have an action performed on it, such as update or terminate.
•Terminating: Environment is in the shut-down process.
•Terminated: Environment is not running.
•TemplateName—The name of the configuration template used to originally launch this environment.
API Version 2010-12-01
621

AWS Elastic Beanstalk Developer Guide
Operations
•VersionLabel—The application version deployed in this environment.
Examples
Terminating an Environment
This example shows how to terminate an environment.
PROMPT> elastic-beanstalk-terminate-environment -e MySampleAppEnv
elastic-beanstalk-update-application
Description
Updates the specified application to have the specified properties.
Note
If a property (for example, description) is not provided, the value remains unchanged. To
clear these properties, specify an empty string.
Syntax
elastic-beanstalk-update-application -a [name] -d [desc]
Options
Name Description Required
-a
--application-name name
The name of the application to update. If no such
application is found, Elastic Beanstalk returns an
InvalidParameterValue error.
Type: String
Default: None
Length Constraints: Minimum value of 1.
Maximum value of 100.
Yes
-d
--description desc
A new description for the application.
Type: String
Default: If not specified, Elastic Beanstalk does
not update the description.
Length Constraints: Minimum value of 0.
Maximum value of 200.
No
Output
The command returns a table with the following information:
•ApplicationName—The name of the application.
•ConfigurationTemplate—The names of the configuration templates associated with this application.
API Version 2010-12-01
622

AWS Elastic Beanstalk Developer Guide
Operations
•DateCreated—The date the environment was created.
•DateUpdated—The date the environment was last updated.
•Description—The description of the environment.
•Versions—The names of the versions for this application.
Examples
Updating an Application
This example shows how to update an application.
PROMPT> elastic-beanstalk-update-application -a MySampleApp -d "My new description"
elastic-beanstalk-update-application-version
Description
Updates the specified application version to have the specified properties.
Note
If a property (for example, description) is not provided, the value remains unchanged. To
clear these properties, specify an empty string.
Syntax
elastic-beanstalk-update-application-version -a [name] -l [label] -d [desc]
Options
Name Description Required
-a
--application-name name
The name of the application associated with this
version. If no such application is found, Elastic
Beanstalk returns an InvalidParameterValue
error.
Type: String
Default: None
Length Constraints: Minimum value of 1.
Maximum value of 100.
Yes
-l
--version-label
The name of the version to update.
If no application version is found with
this label, Elastic Beanstalk returns an
InvalidParaemterValue error.
Type: String
Length Constraints: Minimum value of 1.
Maximum value of 100.
Yes
-d A new description for the release. No
API Version 2010-12-01
623

AWS Elastic Beanstalk Developer Guide
Operations
Name Description Required
--description Type: String
Default: If not specified, Elastic Beanstalk does
not update the description.
Length Constraints: Minimum value of 0.
Maximum value of 200.
Output
The command returns a table with the following information:
•ApplicationName—The name of the application associated with this release.
•DateCreated—The creation date of the application version.
•DateUpdated—The last modified date of the application version.
•Description—The description of this application version.
•SourceBundle—The location where the source bundle is located for this version.
•VersionLabel—A label identifying the version for the associated application.
Examples
Updating an Application Version
This example shows how to update an application version.
PROMPT> elastic-beanstalk-update-application-version -a MySampleApp -d "My new version" -l
"TestVersion 1"
elastic-beanstalk-update-configuration-template
Description
Updates the specified configuration template to have the specified properties or configuration option
values.
Note
If a property (for example, ApplicationName) is not provided, its value remains unchanged. To
clear such properties, specify an empty string.
Syntax
elastic-beanstalk-update-configuration-template -a [name] -t [name] -d [desc] -
f [filename] -F [filename]
Options
Name Description Required
-a
--application-name name
The name of the application associated with
the configuration template to update. If no
application is found with this name, Elastic
Yes
API Version 2010-12-01
624

AWS Elastic Beanstalk Developer Guide
Operations
Name Description Required
Beanstalk returns an InvalidParameterValue
error.
Type: String
Default: None
Length Constraints: Minimum value of 1.
Maximum value of 100.
-t
--template-name name
The name of the configuration template to
update. If no configuration template is found with
this name, UpdateConfigurationTemplate returns
an InvalidParameterValue error.
Type: String
Default: None
Length Constraints: Minimum value of 1.
Maximum value of 100.
Yes
-d
--description desc
A new description for the configuration.
Type: String
Default: None
Length Constraints: Minimum value of 0.
Maximum value of 200.
No
-f
--options-file filename
The name of a JSON file that contains option
settings to update with the new specified option
value.
Type: String
No
-F
--options-to-remove-file
value
The name of a JSON file that contains
configuration options to remove.
Type: String
Default: None
No
Output
The command returns a table with the following information:
•ApplicationName—The name of the application associated with this configuration set.
•DateCreated—The date (in UTC time) when this configuration set was created.
•DateUpdated—The date (in UTC time) when this configuration set was last modified.
•DeploymentStatus—If this configuration set is associated with an environment, the DeploymentStatus
parameter indicates the deployment status of this configuration set:
•null: This configuration is not associated with a running environment.
•pending: This is a draft configuration that is not deployed to the associated environment but is in
the process of deploying.
API Version 2010-12-01
625

AWS Elastic Beanstalk Developer Guide
Operations
•deployed: This is the configuration that is currently deployed to the associated running
environment.
•failed: This is a draft configuration that failed to successfully deploy.
•Description—The description of the configuration set.
•EnvironmentName—If not null, the name of the environment for this configuration set.
•OptionSettings—A list of configuration options and their values in this configuration set.
•SolutionStackName—The name of the solution stack this configuration set uses.
•TemplateName—If not null, the name of the configuration template for this configuration set.
Examples
Updating a Configuration Template
This example shows how to update a configuration template. For a list of configuration settings, see
Configuration Options (p. 202).
PROMPT> elastic-beanstalk-update-configuration-template -a MySampleApp -t myconfigtemplate
-d "My updated configuration template" -f "options.txt"
options.txt
[
{
"Namespace": "aws:elasticbeanstalk:application:environment",
"OptionName": "my_custom_param_1",
"Value": "firstvalue"
},
{
"Namespace": "aws:elasticbeanstalk:application:environment",
"OptionName": "my_custom_param_2",
"Value": "secondvalue"
}
]
Related Operations
•elastic-beanstalk-describe-configuration-options (p. 607)
elastic-beanstalk-update-environment
Description
Updates the environment description, deploys a new application version, updates the configuration
settings to an entirely new configuration template, or updates select configuration option values in the
running environment.
Attempting to update both the release and configuration is not allowed and Elastic Beanstalk returns an
InvalidParameterCombination error.
When updating the configuration settings to a new template or individual settings, a draft configuration
is created and DescribeConfigurationSettings for this environment returns two setting
descriptions with different DeploymentStatus values.
API Version 2010-12-01
626

AWS Elastic Beanstalk Developer Guide
Operations
Syntax
elastic-beanstalk-update-environment [-e [name] | -E [id]] -l [label] -t [name]
-d [desc] -f [filename] -F [filename]
Options
Name Description Required
-e
--environment-name name
The name of the environment to update. If
no environment with this name exists, Elastic
Beanstalk returns an InvalidParameterValue
error.
Type: String
Default: None
Length Constraints: Minimum value of 4.
Maximum value of 23.
Conditional
-E
--environment-id id
The ID of the environment to update. If no
environment with this ID exists, Elastic Beanstalk
returns an InvalidParameterValue error.
Type: String
Default: None
Conditional
-l
--version-label >label
If this parameter is specified, Elastic Beanstalk
deploys the named application version to
the environment. If no such application
version is found, Elastic Beanstalk returns an
InvalidParameterValue error.
Type: String
Default: None
Length Constraints: Minimum value of 1.
Maximum value of 100.
No
-t
--template-name name
If this parameter is specified, Elastic Beanstalk
deploys this configuration template to
the environment. If no such configuration
template is found, Elastic Beanstalk returns an
InvalidParameterValue error.
Type: String
Default: None
Length Constraints: Minimum value of 1.
Maximum value of 100.
No
-d
--description desc
If this parameter is specified, Elastic Beanstalk
updates the description of this environment.
Type: String
No
API Version 2010-12-01
627

AWS Elastic Beanstalk Developer Guide
Operations
Name Description Required
Default: None
Length Constraints: Minimum value of 0.
Maximum value of 200.
-f
--options-file filename
A file containing option settings to update.
If specified, Elastic Beanstalk updates the
configuration set associated with the running
environment and sets the specified configuration
options to the requested values.
Type: String
Default: None
No
-F
--options-to-remove-file
filename
A file containing options settings to remove. If
specified, Elastic Beanstalk removes the option
settings from the configuration set associated
with the running environment.
Type: String
Default: None
No
Output
The command returns a table with the following information:
•ApplicationName—The name of the application associated with this environment.
•CNAME—The URL to the CNAME for this environment.
•DateCreated—The date the environment was created.
•DateUpdated—The date the environment was last updated.
•Description—The description of the environment.
•EndpointURL—The URL to the LoadBalancer for this environment.
•EnvironmentID—The ID of this environment.
•EnvironmentName—The name of this environment.
•Health—Describes the health status of the environment. Elastic Beanstalk indicates the failure levels
for a running environment:
•Red: Indicates the environment is not responsive. Occurs when three or more consecutive failures
occur for an environment.
•Yellow: Indicates that something is wrong. Occurs when two consecutive failures occur for an
environment.
•Green: Indicates the environment is healthy and fully functional.
•Gray: Default health for a new environment. The environment is not fully launched and health
checks have not started or health checks are suspended during an UpdateEnvironment or
RestartEnvironmentrequest.
•Resources—A list of AWS resources used in this environment.
•SolutionStackName—The name of the SolutionStack deployed with this environment.
•Status—The current operational status of the environment:
•Launching: Environment is in the process of initial deployment.
API Version 2010-12-01
628

AWS Elastic Beanstalk Developer Guide
Operations
•Updating: Environment is in the process of updating its configuration settings or application
version.
•Ready: Environment is available to have an action performed on it, such as update or terminate.
•Terminating: Environment is in the shut-down process.
•Terminated: Environment is not running.
•TemplateName—The name of the configuration template used to originally launch this environment.
•VersionLabel—The application version deployed in this environment.
Examples
Updating an Existing Environment
This example shows how to update an existing environment. It passes in a file called options.txt that
updates the size of the instance to a t1.micro and sets two environment variables. For a list of possible
configuration settings, see Configuration Options (p. 202).
PROMPT> elastic-beanstalk-update-environment -e MySampleAppEnv -f "options.txt"
options.txt
[
{
"Namespace": "aws:autoscaling:launchconfiguration",
"OptionName": "InstanceType",
"Value": "t1.micro"
},
{
"Namespace": "aws:elasticbeanstalk:application:environment",
"OptionName": "my_custom_param_1",
"Value": "firstvalue"
},
{
"Namespace": "aws:elasticbeanstalk:application:environment",
"OptionName": "my_custom_param_2",
"Value": "secondvalue"
}
]
elastic-beanstalk-validate-configuration-settings
Description
Takes a set of configuration settings and either a configuration template or environment, and determines
whether those values are valid.
This action returns a list of messages indicating any errors or warnings associated with the selection of
option values.
Syntax
elastic-beanstalk-validate-configuration-settings -a [name] -t [name] -e [name]
-f [filename]
API Version 2010-12-01
629

AWS Elastic Beanstalk Developer Guide
Operations
Options
Name Description Required
-a
--application-name name
The name of the application that the
configuration template or environment belongs
to.
Type: String
Default: None
Length Constraints: Minimum value of 1.
Maximum value of 100.
Yes
-t
--template-name name
The name of the configuration template to
validate the settings against.
Condition: You cannot specify both this and the
environment name.
Type: String
Default: None
Length Constraints: Minimum value of 1.
Maximum value of 100.
No
-e
--environment-name name
The name of the environment to validate the
settings against.
Type: String
Default: None
Length Constraints: Minimum value of 4.
Maximum value of 23.
No
-f
--options-file >filename
The name of a JSON file that contains a list of
options and desired values to evaluate.
Type: String
Yes
Output
The command returns a table with the following information:
•Message—A message describing the error or warning.
•Namespace
•OptionName
•Severity—An indication of the severity of this message:
•error: This message indicates that this is not a valid settings for an option.
•warning: This message provides information you should take into account.
API Version 2010-12-01
630

AWS Elastic Beanstalk Developer Guide
Operations
Examples
Validating Configuration Settings for an Environment
This example shows how to validate the configuration settings for an environment.
PROMPT> elastic-beanstalk-validate-configuration-settings -a MySampleApp -e MySampleAppEnv
-f MyOptionSettingsFile.json
API Version 2010-12-01
631

AWS Elastic Beanstalk Developer Guide
Docker Platform Configurations
Deploying Elastic Beanstalk
Applications from Docker Containers
Elastic Beanstalk supports the deployment of web applications from Docker containers. With Docker
containers, you can define your own runtime environment. You can choose your own platform,
programming language, and any application dependencies (such as package managers or tools),
that aren't supported by other platforms. Docker containers are self-contained and include all the
configuration information and software your web application requires to run.
By using Docker with Elastic Beanstalk, you have an infrastructure that automatically handles the details
of capacity provisioning, load balancing, scaling, and application health monitoring. You can manage
your web application in an environment that supports the range of services that are integrated with
Elastic Beanstalk, including but not limited to VPC, RDS, and IAM. For more information about Docker,
including how to install it, what software it requires, and how to use Docker images to launch Docker
containers, go to Docker: the Linux container engine.
Note
If a Docker container running in an Elastic Beanstalk environment crashes or is killed for any
reason, Elastic Beanstalk restarts it automatically.
The topics in this chapter assume some knowledge of Elastic Beanstalk environments. If you haven't used
Elastic Beanstalk before, try the getting started tutorial (p. 3) to learn the basics.
Docker Platform Configurations
The Docker platform for Elastic Beanstalk has two generic configurations (single container and
multicontainer), and several preconfigured containers.
See the Supported Platforms (p. 27) page for details on the currently supported version of each
configuration.
Single Container Docker
The single container configuration can be used to deploy a Docker image (described in a Dockerfile
or Dockerrun.aws.json definition) and source code to EC2 instances running in an Elastic Beanstalk
environment. Use the single container configuration when you only need to run one container per
instance.
For samples and help getting started with a single container Docker environment, see Single Container
Docker (p. 633). For detailed information on the container definition formats and their use, see Single
Container Docker Configuration (p. 634).
Multicontainer Docker
The other basic configuration, Multicontainer Docker, uses the Amazon Elastic Container Service to
coordinate a deployment of multiple Docker containers to an Amazon ECS cluster in an Elastic Beanstalk
API Version 2010-12-01
632

AWS Elastic Beanstalk Developer Guide
Preconfigured Docker Containers
environment. The instances in the environment each run the same set of containers, which are defined
in a Dockerrun.aws.json file. Use the multicontainer configuration when you need to deploy multiple
Docker containers to each instance.
For more details on the Multicontainer Docker configuration and its use, see Multicontainer Docker
Environments (p. 638). The Multicontainer Docker Configuration (p. 642) topic details version 2 of
the Dockerrun.aws.json format, which is similar to but not compatible with the version used with the
single container configuration. There is also a tutorial (p. 646) available that guides you through a from
scratch deployment of a multicontainer environment running a PHP website with an nginx proxy running
in front of it in a separate container.
Preconfigured Docker Containers
In addition to the two generic Docker configurations, there are several preconfigured Docker platform
configurations that you can use to run your application in a popular software stack such as Java with
Glassfish or Python with uWSGI. Use a preconfigured container if it matches the software used by your
application.
For more information, see Preconfigured Docker Containers (p. 652).
Single Container Docker Environments
Single container Docker environments can be launched from a Dockerfile (which describes an image
to build), a Dockerrun.aws.json file (which specifies an image to use and additional Elastic Beanstalk
configuration options), or both. These configuration files can be bundled with source code and deployed
in a ZIP file.
Get started with one of the following example applications, or see Single Container Docker
Configuration (p. 634) for details on authoring Docker configuration files for a single container
environment.
To launch an environment (console)
1. Open the Elastic Beanstalk console with this preconfigured link:
console.aws.amazon.com/elasticbeanstalk/home#/newApplication?
applicationName=tutorials&environmentType=LoadBalanced
2. For Platform, choose the platform that matches the language used by your application.
3. For App code, choose Upload.
4. Choose Local file, choose Browse, and open the source bundle.
5. Choose Upload.
6. Choose Review and launch.
7. Review the available settings and choose Create app.
For detailed instructions on configuring and using the EB CLI, see Configure the EB CLI (p. 489) and
Managing Elastic Beanstalk Environments with the EB CLI (p. 492).
Topics
•Sample PHP Application (p. 634)
•Sample Python Application (p. 634)
•Sample Dockerfile Application (p. 634)
•Single Container Docker Configuration (p. 634)
API Version 2010-12-01
633

AWS Elastic Beanstalk Developer Guide
Sample PHP Application
Sample PHP Application
GitHub link: awslabs/eb-demo-php-simple-app
This sample is a PHP application that runs on a custom Ubuntu image defined in a Dockerfile.
The PHP sample application uses Amazon RDS. You may be charged for using these services. If you are
a new customer, you can make use of the AWS Free Usage Tier. For more information about pricing, see
the following:
•Amazon Relational Database Service (RDS) Pricing
Sample Python Application
GitHub link: awslabs/eb-py-flask-signup
This sample is a Python application that runs on a custom Ubuntu image defined in a Dockerfile. It
also includes a Dockerrun.aws.json file that maps a storage volume on the container to a matching
path on the host instance.
The Python sample application uses Amazon DynamoDB, Amazon SQS, and Amazon SNS. You may be
charged for using these services. If you are a new customer, you can make use of the AWS Free Usage
Tier. For more information about pricing, see the following:
•Amazon DynamoDB Pricing
•Amazon SQS Pricing
•Amazon SNS Pricing
Sample Dockerfile Application
This sample is a Dockerfile configured to download the game 2048 from GitHub and run it on nginx.
Copy and paste the example into a file named Dockerfile and upload it instead of a source bundle when
creating the environment.
FROM ubuntu:12.04
RUN apt-get update
RUN apt-get install -y nginx zip curl
RUN echo "daemon off;" >> /etc/nginx/nginx.conf
RUN curl -o /usr/share/nginx/www/master.zip -L https://codeload.github.com/
gabrielecirulli/2048/zip/master
RUN cd /usr/share/nginx/www/ && unzip master.zip && mv 2048-master/* . && rm -rf 2048-
master master.zip
EXPOSE 80
CMD ["/usr/sbin/nginx", "-c", "/etc/nginx/nginx.conf"]
Single Container Docker Configuration
This section describes how to prepare your Docker image and container for uploading to Elastic
Beanstalk. Any web application that you deploy to Elastic Beanstalk in single-container Docker container
API Version 2010-12-01
634

AWS Elastic Beanstalk Developer Guide
Single Container Docker Configuration
must include a Dockerfile, which defines a custom image, a Dockerrun.aws.json file, which
specifies an existing image to use and environment configuration, or both. You can deploy your web
application from a Docker container to Elastic Beanstalk by doing one of the following:
• Create a Dockerfile to customize an image and to deploy a Docker container to Elastic Beanstalk.
• Create a Dockerrun.aws.json file to deploy a Docker container from an existing Docker image to
Elastic Beanstalk.
• Create a .zip file containing your application files, any application file dependencies, the
Dockerfile, and the Dockerrun.aws.json file.
If you use only a Dockerfile or only a Dockerrun.aws.json file to deploy your application, you do
not need to compress the file into a .zip file.
Sections
•Dockerrun.aws.json v1 (p. 635)
•Using Images from a Private Repository (p. 636)
•Building Custom Images with a Dockerfile (p. 637)
Dockerrun.aws.json v1
A Dockerrun.aws.json file describes how to deploy a Docker container as an Elastic Beanstalk
application. This JSON file is specific to Elastic Beanstalk. If your application runs on an image that is
available in a hosted repository, you can specify the image in a Dockerrun.aws.json file and omit the
Dockerfile.
Valid keys and values for the Dockerrun.aws.json file include the following:
AWSEBDockerrunVersion
(Required) Specifies the version number as the value 1 for single container Docker environments.
Authentication
(Required only for private repositories) Specifies the Amazon S3 object storing the .dockercfg file.
See Using Images from a Private Repository (p. 636).
Image
Specifies the Docker base image on an existing Docker repository from which you're building a
Docker container. Specify the value of the Name key in the format <organization>/<image
name> for images on Docker Hub, or <site>/<organization name>/<image name> for other
sites.
When you specify an image in the Dockerrun.aws.json file, each instance in your Elastic
Beanstalk environment will run docker pull on that image and run it. Optionally include the
Update key. The default value is "true" and instructs Elastic Beanstalk to check the repository, pull
any updates to the image, and overwrite any cached images.
Do not specify the Image key in the Dockerrun.aws.json file when using a Dockerfile. .Elastic
Beanstalk always builds and uses the image described in the Dockerfile when one is present.
Ports
(Required when you specify the Image key) Lists the ports to expose on the Docker container. Elastic
Beanstalk uses ContainerPort value to connect the Docker container to the reverse proxy running on
the host.
API Version 2010-12-01
635

AWS Elastic Beanstalk Developer Guide
Single Container Docker Configuration
You can specify multiple container ports, but Elastic Beanstalk uses only the first one to connect
your container to the host's reverse proxy and route requests from the public Internet.
Volumes
Map volumes from an EC2 instance to your Docker container. Specify one or more arrays of volumes
to map.
Logging
Specify the directory to which your application writes logs. Elastic Beanstalk uploads any logs in
this directory to Amazon S3 when you request tail or bundle logs. If you rotate logs to a folder
named rotated within this directory, you can also configure Elastic Beanstalk to upload rotated
logs to Amazon S3 for permanent storage. For more information, see Viewing Logs from Your Elastic
Beanstalk Environment's Amazon EC2 Instances (p. 369).
The following snippet is an example that illustrates the syntax of the Dockerrun.aws.json file for a
single container.
{
"AWSEBDockerrunVersion": "1",
"Image": {
"Name": "janedoe/image",
"Update": "true"
},
"Ports": [
{
"ContainerPort": "1234"
}
],
"Volumes": [
{
"HostDirectory": "/var/app/mydb",
"ContainerDirectory": "/etc/mysql"
}
],
"Logging": "/var/log/nginx"
}
You can provide Elastic Beanstalk with only the Dockerrun.aws.json file, or with a .zip archive
containing both the Dockerrun.aws.json and Dockerfile files. When you provide both files, the
Dockerfile describes the Docker image and the Dockerrun.aws.json file provides additional
information for deployment as described later in this section.
Note
The two files must be at the root, or top level, of the .zip archive. Do not build the archive
from a directory containing the files. Navigate into that directory and build the archive there.
Note
When you provide both files, do not specify an image in the Dockerrun.aws.json file. Elastic
Beanstalk builds and uses the image described in the Dockerfile and ignores the image
specified in the Dockerrun.aws.json file.
Using Images from a Private Repository
Add the information about the Amazon S3 bucket that contains the authentication file in the
Authentication parameter of the Dockerrun.aws.json file. Make sure that the Authentication
parameter contains a valid Amazon S3 bucket and key. The Amazon S3 bucket must be hosted in the
same region as the environment that is using it. Elastic Beanstalk will not download files from Amazon
S3 buckets hosted in other regions.
API Version 2010-12-01
636

AWS Elastic Beanstalk Developer Guide
Single Container Docker Configuration
For information about generating and uploading the authentication file, see Using Images From a Private
Repository (p. 657).
The following example shows the use of an authentication file named mydockercfg in a bucket named
my-bucket to use a private image in a third party registry.
{
"AWSEBDockerrunVersion": "1",
"Authentication": {
"Bucket": "my-bucket",
"Key": "mydockercfg"
},
"Image": {
"Name": "quay.io/johndoe/private-image",
"Update": "true"
},
"Ports": [
{
"ContainerPort": "1234"
}
],
"Volumes": [
{
"HostDirectory": "/var/app/mydb",
"ContainerDirectory": "/etc/mysql"
}
],
"Logging": "/var/log/nginx"
}
Building Custom Images with a Dockerfile
Docker uses a Dockerfile to create a Docker image that contains your source bundle. A Docker image
is the template from which you create a Docker container. Dockerfile is a plain text file that contains
instructions that Elastic Beanstalk uses to build a customized Docker image on each Amazon EC2
instance in your Elastic Beanstalk environment. Create a Dockerfile when you do not already have an
existing image hosted in a repository.
Include the following instructions in the Dockerfile:
FROM
(Required as the first instruction in the file) Specifies the base image from which to build the Docker
container and against which Elastic Beanstalk runs subsequent Dockerfile instructions.
The image can be hosted in a public repository, a private repository hosted by a third-party registry,
or a repository that you run on EC2.
EXPOSE
(Required) Lists the ports to expose on the Docker container. Elastic Beanstalk uses the port value to
connect the Docker container to the reverse proxy running on the host.
You can specify multiple container ports, but Elastic Beanstalk uses only the first one to connect
your container to the host's reverse proxy and route requests from the public Internet.
CMD
Specifies an executable and default parameters, which are combined into the command that the
container runs at launch. Use the following format:
CMD ["executable","param1","param2"]
API Version 2010-12-01
637

AWS Elastic Beanstalk Developer Guide
Multicontainer Docker
CMD can also be used to provide default parameters for an ENTRYPOINT command by omitting the
executable argument. An executable must be specified in either a CMD or an ENTRYPOINT, but not
both. For basic scenarios, use a CMD and omit the ENTRYPOINT.
ENTRYPOINT
Uses the same JSON format as CMD and, like CMD, specifies a command to run when the container is
launched. Also allows a container to be run as an executable with docker run.
If you define an ENTRYPOINT, you can use a CMD as well to specify default parameters that can be
overridden with docker run's -d option. The command defined by an ENTRYPOINT (including any
parameters) is combined with parameters from CMD or docker run when the container is run.
RUN
Specifies one or more commands that install packages and configure your web application inside the
image.
If you include RUN instructions in the Dockerfile, compress the file and the context used by RUN
instructions in the Dockerfile into a .zip file. Compress files at the top level of the directory.
The following snippet is an example of the Dockerfile. When you follow the instructions in Single
Container Docker Environments (p. 633), you can upload this Dockerfile as written. Elastic Beanstalk
runs the game 2048 when you use this Dockerfile.
FROM ubuntu:12.04
RUN apt-get update
RUN apt-get install -y nginx zip curl
RUN echo "daemon off;" >> /etc/nginx/nginx.conf
RUN curl -o /usr/share/nginx/www/master.zip -L https://codeload.github.com/
gabrielecirulli/2048/zip/master
RUN cd /usr/share/nginx/www/ && unzip master.zip && mv 2048-master/* . && rm -rf 2048-
master master.zip
EXPOSE 80
CMD ["/usr/sbin/nginx", "-c", "/etc/nginx/nginx.conf"]
For more information about instructions you can include in the Dockerfile, go to Dockerfile reference
on the Docker website.
Multicontainer Docker Environments
You can create docker environments that support multiple containers per Amazon EC2 instance with
multicontainer Docker platform for Elastic Beanstalk.
Elastic Beanstalk uses Amazon Elastic Container Service (Amazon ECS) to coordinate container
deployments to multicontainer Docker environments. Amazon ECS provides tools to manage a cluster of
instances running Docker containers. Elastic Beanstalk takes care of Amazon ECS tasks including cluster
creation, task definition and execution.
Note
Some regions don't offer Amazon ECS. Multicontainer Docker environments aren't supported in
these regions.
For information about the AWS services offered in each region, see Region Table.
Topics
API Version 2010-12-01
638

AWS Elastic Beanstalk Developer Guide
Multicontainer Docker Platform
•Multicontainer Docker Platform (p. 639)
•Dockerrun.aws.json File (p. 639)
•Docker Images (p. 640)
•Container Instance Role (p. 640)
•Amazon ECS Resources Created by Elastic Beanstalk (p. 641)
•Using Multiple Elastic Load Balancing Listeners (p. 641)
•Failed Container Deployments (p. 642)
•Multicontainer Docker Configuration (p. 642)
•Multicontainer Docker Environments with the AWS Management Console (p. 646)
Multicontainer Docker Platform
Standard generic and preconfigured Docker platforms on Elastic Beanstalk support only a single Docker
container per Elastic Beanstalk environment. In order to get the most out of Docker, Elastic Beanstalk
lets you create an environment where your Amazon EC2 instances run multiple Docker containers side by
side.
The following diagram shows an example Elastic Beanstalk environment configured with three Docker
containers running on each Amazon EC2 instance in an Auto Scaling group:
Dockerrun.aws.json File
Container instances—Amazon EC2 instances running Multicontainer Docker in an Elastic Beanstalk
environment—require a configuration file named Dockerrun.aws.json. This file is specific to Elastic
Beanstalk and can be used alone or combined with source code and content in a source bundle (p. 58) to
create an environment on a Docker platform.
Note
Version 1 of the Dockerrun.aws.json format is used to launch a single Docker container to
an Elastic Beanstalk environment. Version 2 adds support for multiple containers per Amazon
API Version 2010-12-01
639

AWS Elastic Beanstalk Developer Guide
Docker Images
EC2 instance and can only be used with the multicontainer Docker platform. The format
differs significantly from the previous version which is detailed under Single Container Docker
Configuration (p. 634)
See Dockerrun.aws.json v2 (p. 643) for details on the updated format and an example file.
Docker Images
The Multicontainer Docker platform for Elastic Beanstalk requires images to be prebuilt and stored in a
public or private online image repository.
Note
Building custom images during deployment with a Dockerfile is not supported by the
multicontainer Docker platform on Elastic Beanstalk. Build your images and deploy them to an
online repository before creating an Elastic Beanstalk environment.
Specify images by name in Dockerrun.aws.json. Note these conventions:
• Images in official repositories on Docker Hub use a single name (for example, ubuntu or mongo).
• Images in other repositories on Docker Hub are qualified with an organization name (for example,
amazon/amazon-ecs-agent).
• Images in other online registries are qualified further by a domain name (for example, quay.io/
assemblyline/ubuntu).
To configure Elastic Beanstalk to authenticate to a private repository, include the authentication
parameter in your Dockerrun.aws.json file.
Container Instance Role
Elastic Beanstalk uses an Amazon ECS-optimized AMI with an Amazon ECS container agent that runs in
a Docker container. The agent communicates with Amazon ECS to coordinate container deployments.
In order to communicate with Amazon ECS, each Amazon EC2 instance must have the corresponding
permissions in IAM. These permissions are attached to the default instance profile (p. 21) when you
create an environment in the Elastic Beanstalk Management Console:
{
"Version": "2012-10-17",
"Statement": [
{
"Sid": "ECSAccess",
"Effect": "Allow",
"Action": [
"ecs:Poll",
"ecs:StartTask",
"ecs:StopTask",
"ecs:DiscoverPollEndpoint",
"ecs:StartTelemetrySession",
"ecs:RegisterContainerInstance",
"ecs:DeregisterContainerInstance",
"ecs:DescribeContainerInstances",
"ecs:Submit*"
],
"Resource": "*"
}
]
}
If you create your own instance profile, you can attach the
AWSElasticBeanstalkMulticontainerDocker managed policy to make sure the permissions stay
API Version 2010-12-01
640

AWS Elastic Beanstalk Developer Guide
Amazon ECS Resources Created by Elastic Beanstalk
up-to-date. For instructions on creating policies and roles in IAM, see Creating IAM Roles in the IAM User
Guide.
Amazon ECS Resources Created by Elastic Beanstalk
When you create an environment using the multicontainer Docker platform, Elastic Beanstalk
automatically creates and configures several Amazon Elastic Container Service resources while building
the environment in order to create the necessary containers on each Amazon EC2 instance.
•Amazon ECS Cluster – Container instances in Amazon ECS are organized into clusters. When used with
Elastic Beanstalk, one cluster is always created for each multicontainer Docker environment.
•Amazon ECS Task Definition – Elastic Beanstalk uses the Dockerrun.aws.json file in your project
to generate the Amazon ECS task definition that is used to configure container instances in the
environment.
•Amazon ECS Task – Elastic Beanstalk communicates with Amazon ECS to run a task on every instance
in the environment to coordinate container deployment. In an autoscaling environment, Elastic
Beanstalk initiates a new task whenever an instance is added to the cluster. In rare cases you may have
to increase the amount of space reserved for containers and images. Learn more in the Configuring
Docker Environments (p. 655) section.
•Amazon ECS Container Agent – The agent runs in a Docker container on the instances in your
environment. The agent polls the Amazon ECS service and waits for a task to run.
•Amazon ECS Data Volumes – Elastic Beanstalk inserts volume definitions (in addition to the volumes
that you define in Dockerrun.aws.json) into the task definition to facilitate log collection.
Elastic Beanstalk creates log volumes on the container instance, one for each container, at /var/log/
containers/containername. These volumes are named awseb-logs-containername and are
provided for containers to mount. See Container Definition Format (p. 645) for details on how to
mount them.
Using Multiple Elastic Load Balancing Listeners
You can configure multiple Elastic Load Balancing listeners on a multicontainer Docker environment in
order to support inbound traffic for proxies or other services that don't run on the default HTTP port.
Create a .ebextensions folder in your source bundle and add a file with a .config file extension.
The following example shows a configuration file that creates an Elastic Load Balancing listener on port
8080.
.ebextensions/elb-listener.config
option_settings:
aws:elb:listener:8080:
ListenerProtocol: HTTP
InstanceProtocol: HTTP
InstancePort: 8080
If your environment is running in a custom VPC that you created, Elastic Beanstalk takes care of the rest.
In a default VPC, you need to configure your instance's security group to allow ingress from the load
balancer. Add a second configuration file that adds an ingress rule to the security group:
.ebextensions/elb-ingress.config
Resources:
port8080SecurityGroupIngress:
API Version 2010-12-01
641

AWS Elastic Beanstalk Developer Guide
Failed Container Deployments
Type: AWS::EC2::SecurityGroupIngress
Properties:
GroupId: {"Fn::GetAtt" : ["AWSEBSecurityGroup", "GroupId"]}
IpProtocol: tcp
ToPort: 8080
FromPort: 8080
SourceSecurityGroupName: { "Fn::GetAtt": ["AWSEBLoadBalancer",
"SourceSecurityGroup.GroupName"] }
For more information on the configuration file format, see Adding and Customizing Elastic Beanstalk
Environment Resources (p. 275) and Option Settings (p. 257)
In addition to adding a listener to the Elastic Load Balancing configuration and opening a port in the
security group, you need to map the port on the host instance to a port on the Docker container in the
containerDefinitions section of the Dockerrun.aws.json file. The following excerpt shows an
example:
"portMappings": [
{
"hostPort": 8080,
"containerPort": 8080
}
]
See Dockerrun.aws.json v2 (p. 643) for details on the Dockerrun.aws.json file format.
Failed Container Deployments
If an Amazon ECS task fails, one or more containers in your Elastic Beanstalk environment will not start.
Elastic Beanstalk does not roll back multicontainer environments due to a failed Amazon ECS task. If a
container fails to start in your environment, redeploy the current version or a previous working version
from the AWS Management Console.
To deploy an existing version
1. Open the Elastic Beanstalk console in your environment's region.
2. Click Actions to the right of your application name and then click View application versions.
3. Select a version of your application and click Deploy.
Multicontainer Docker Configuration
A Dockerrun.aws.json file is an Elastic Beanstalk–specific JSON file that describes how to deploy a set
of Docker containers as an Elastic Beanstalk application. You can use a Dockerrun.aws.json file for a
multicontainer Docker environment.
Dockerrun.aws.json describes the containers to deploy to each container instance (Amazon EC2
instance that hosts Docker containers) in the environment as well as the data volumes to create on the
host instance for the containers to mount.
A Dockerrun.aws.json file can be used on its own or zipped up with additional source code in a single
archive. Source code that is archived with a Dockerrun.aws.json is deployed to Amazon EC2 container
instances and accessible in the /var/app/current/ directory. Use the volumes section of the config
to provide file volumes for the Docker containers running on the host instance. Use the mountPoints
section of the embedded container definitions to map these volumes to mount points that applications
on the Docker containers can use.
API Version 2010-12-01
642

AWS Elastic Beanstalk Developer Guide
Multicontainer Docker Configuration
Topics
•Dockerrun.aws.json v2 (p. 643)
•Using Images from a Private Repository (p. 645)
•Container Definition Format (p. 645)
Dockerrun.aws.json v2
The Dockerrun.aws.json file includes three sections:
AWSEBDockerrunVersion
Specifies the version number as the value "2" for multicontainer Docker environments.
containerDefinitions
An array of container definitions, detailed below.
volumes
Creates volumes from folders in the Amazon EC2 container instance, or from your source bundle
(deployed to /var/app/current). Mount these volumes to paths within your Docker containers
using mountPoints in the container definition (p. 645).
Note
Elastic Beanstalk configures additional volumes for logs, one for each container. These
should be mounted by your Docker containers in order to write logs to the host instance.
See Container Definition Format (p. 645) for details.
Volumes are specified in the following format:
"volumes": [
{
"name": "volumename",
"host": {
"sourcePath": "/path/on/host/instance"
}
}
],
authentication
(optional) The location in Amazon S3 of a .dockercfg file that contains authentication data for a
private repository. Uses the following format:
"authentication": {
"bucket": "my-bucket",
"key": "mydockercfg"
},
See Using Images from a Private Repository (p. 645) for details.
The following snippet is an example that illustrates the syntax of the Dockerrun.aws.json file for an
instance with two containers.
{
"AWSEBDockerrunVersion": 2,
API Version 2010-12-01
643

AWS Elastic Beanstalk Developer Guide
Multicontainer Docker Configuration
"volumes": [
{
"name": "php-app",
"host": {
"sourcePath": "/var/app/current/php-app"
}
},
{
"name": "nginx-proxy-conf",
"host": {
"sourcePath": "/var/app/current/proxy/conf.d"
}
}
],
"containerDefinitions": [
{
"name": "php-app",
"image": "php:fpm",
"environment": [
{
"name": "Container",
"value": "PHP"
}
],
"essential": true,
"memory": 128,
"mountPoints": [
{
"sourceVolume": "php-app",
"containerPath": "/var/www/html",
"readOnly": true
}
]
},
{
"name": "nginx-proxy",
"image": "nginx",
"essential": true,
"memory": 128,
"portMappings": [
{
"hostPort": 80,
"containerPort": 80
}
],
"links": [
"php-app"
],
"mountPoints": [
{
"sourceVolume": "php-app",
"containerPath": "/var/www/html",
"readOnly": true
},
{
"sourceVolume": "nginx-proxy-conf",
"containerPath": "/etc/nginx/conf.d",
"readOnly": true
},
{
"sourceVolume": "awseb-logs-nginx-proxy",
"containerPath": "/var/log/nginx"
}
]
}
]
API Version 2010-12-01
644

AWS Elastic Beanstalk Developer Guide
Multicontainer Docker Configuration
}
Using Images from a Private Repository
Add the information about the Amazon S3 bucket that contains the authentication file in the
authentication parameter of the Dockerrun.aws.json file. Make sure that the authentication
parameter contains a valid Amazon S3 bucket and key. The Amazon S3 bucket must be hosted in the
same region as the environment that is using it. Elastic Beanstalk will not download files from Amazon
S3 buckets hosted in other regions.
For information about generating and uploading the authentication file, see Using Images From a Private
Repository (p. 657).
Container Definition Format
The container definition and volumes sections of Dockerrun.aws.json use the same formatting as the
corresponding sections of an Amazon ECS task definition file.
The following examples show a subset of parameters that are commonly used. More optional parameters
are available. For more information on the task definition format and a full list of task definition
parameters, see Amazon ECS Task Definitions in the Amazon ECS Developer Guide.
A Dockerrun.aws.json file contains an array of one or more container definition objects with the
following fields:
name
The name of the container. See Standard Container Definition Parameters for information about the
maximum length and allowed characters.
image
The name of a Docker image in an online Docker repository from which you're building a Docker
container. Note these conventions:
• Images in official repositories on Docker Hub use a single name (for example, ubuntu or mongo).
• Images in other repositories on Docker Hub are qualified with an organization name (for example,
amazon/amazon-ecs-agent.
• Images in other online repositories are qualified further by a domain name (for example,
quay.io/assemblyline/ubuntu).
environment
An array of environment variables to pass to the container.
For example, the following entry defines an environment variable with the name Container and
the value PHP:
"environment": [
{
"name": "Container",
"value": "PHP"
}
],
essential
True if the task should stop if the container fails. Nonessential containers can finish or crash without
affecting the rest of the containers on the instance.
API Version 2010-12-01
645

AWS Elastic Beanstalk Developer Guide
Tutorial - Multicontainer Docker
memory
Amount of memory on the container instance to reserve for the container.
mountPoints
Volumes from the Amazon EC2 container instance to mount, and the location on the Docker
container file system at which to mount them. When you mount volumes that contain application
content, your container can read the data you upload in your source bundle. When you mount log
volumes for writing log data, Elastic Beanstalk can gather log data from these volumes.
Elastic Beanstalk creates log volumes on the container instance, one for each Docker
container, at /var/log/containers/containername. These volumes are named awseb-
logs-containername and should be mounted to the location within the container file structure
where logs are written.
For example, the following mount point maps the nginx log location in the container to the Elastic
Beanstalk–generated volume for the nginx-proxy container.
{
"sourceVolume": "awseb-logs-nginx-proxy",
"containerPath": "/var/log/nginx"
}
portMappings
Maps network ports on the container to ports on the host.
links
List of containers to link to. Linked containers can discover each other and communicate securely.
volumesFrom
Mount all of the volumes from a different container. For example, to mount volumes from a
container named web:
"volumesFrom": [
{
"sourceContainer": "web"
}
],
Multicontainer Docker Environments with the AWS
Management Console
You can launch a cluster of multicontainer instances in a single-instance or autoscaling Elastic Beanstalk
environment using the AWS Management Console. This tutorial details container configuration and
source code preparation for an environment that uses two containers.
The containers, a PHP application and an nginx proxy, run side by side on each of the Amazon EC2
instances in an Elastic Beanstalk environment. After creating the environment and verifying that the
applications are running, you'll connect to a container instance to see how it all fits together.
Sections
•Define Docker Containers (p. 647)
API Version 2010-12-01
646

AWS Elastic Beanstalk Developer Guide
Tutorial - Multicontainer Docker
•Add Content (p. 649)
•Deploy to Elastic Beanstalk (p. 649)
•Connect to a Container Instance (p. 650)
•Inspect the Amazon ECS Container Agent (p. 651)
Define Docker Containers
The first step in creating a new Docker environment is to create a directory for your application data. This
folder can be located anywhere on your local machine and have any name you choose. In addition to a
container configuration file, this folder will contain the content that you will upload to Elastic Beanstalk
and deploy to your environment.
Note
All of the code for this tutorial is available in the awslabs repository on GitHub at https://
github.com/awslabs/eb-docker-nginx-proxy
The file that Elastic Beanstalk uses to configure the containers on an EC2 instance is a JSON-formatted
text file named Dockerrun.aws.json. Create a text file with this name at the root of your application
and add the following text:
{
"AWSEBDockerrunVersion": 2,
"volumes": [
{
"name": "php-app",
"host": {
"sourcePath": "/var/app/current/php-app"
}
},
{
"name": "nginx-proxy-conf",
"host": {
"sourcePath": "/var/app/current/proxy/conf.d"
}
}
],
"containerDefinitions": [
{
"name": "php-app",
"image": "php:fpm",
"essential": true,
"memory": 128,
"mountPoints": [
{
"sourceVolume": "php-app",
"containerPath": "/var/www/html",
"readOnly": true
}
]
},
{
"name": "nginx-proxy",
"image": "nginx",
"essential": true,
"memory": 128,
"portMappings": [
{
"hostPort": 80,
"containerPort": 80
}
API Version 2010-12-01
647
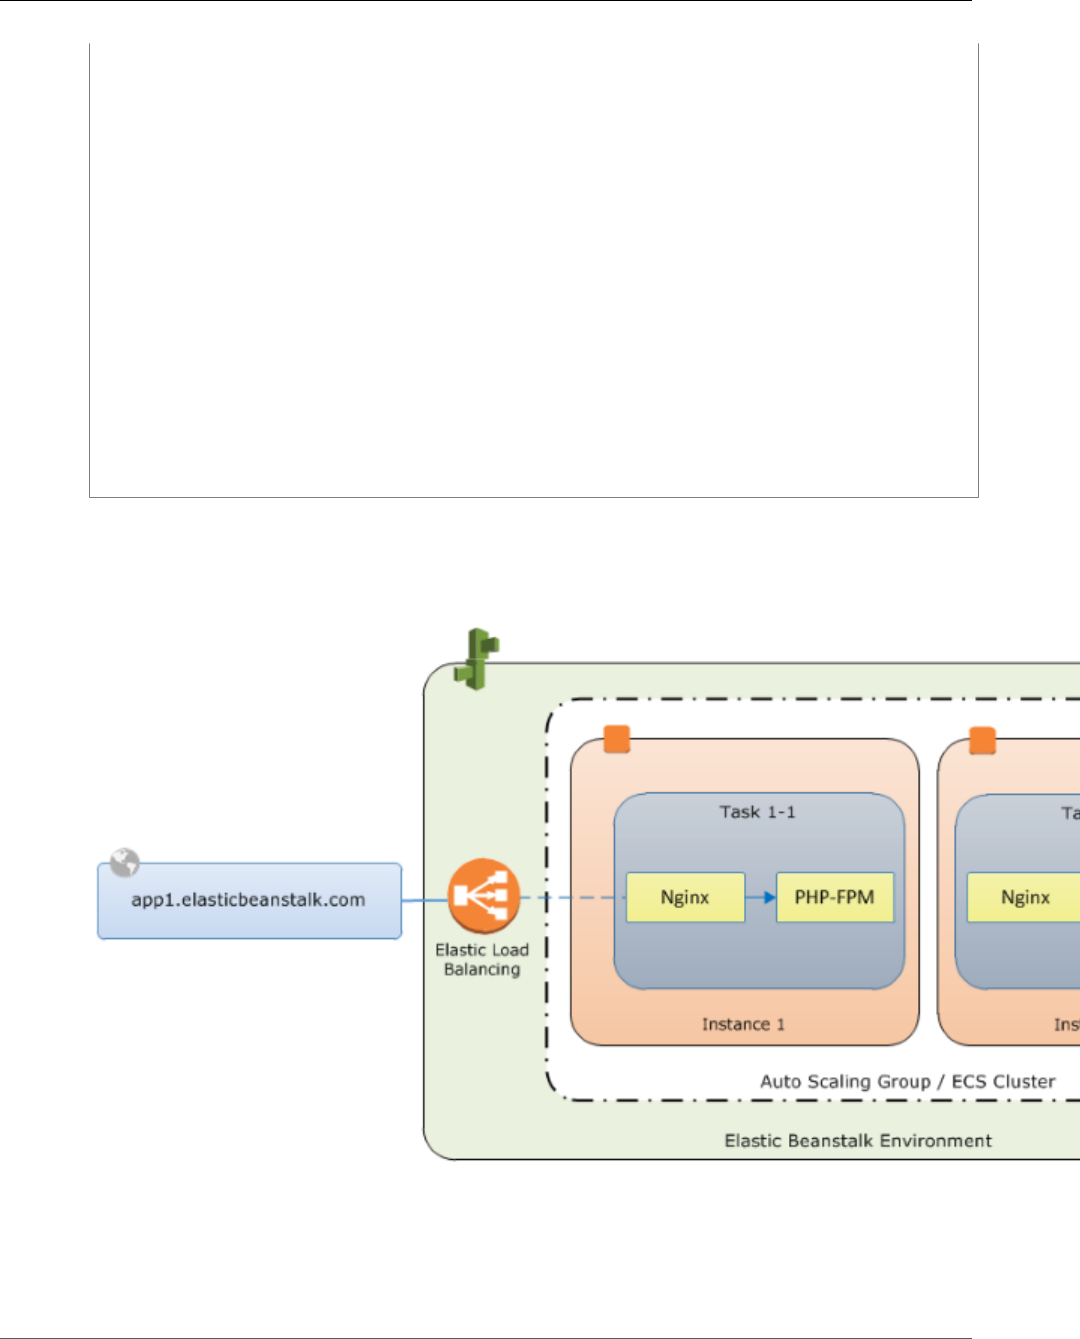
AWS Elastic Beanstalk Developer Guide
Tutorial - Multicontainer Docker
],
"links": [
"php-app"
],
"mountPoints": [
{
"sourceVolume": "php-app",
"containerPath": "/var/www/html",
"readOnly": true
},
{
"sourceVolume": "nginx-proxy-conf",
"containerPath": "/etc/nginx/conf.d",
"readOnly": true
},
{
"sourceVolume": "awseb-logs-nginx-proxy",
"containerPath": "/var/log/nginx"
}
]
}
]
}
This example configuration defines two containers, a PHP web site with an nginx proxy in front of it.
These two containers will run side by side in Docker containers on each instance in your Elastic Beanstalk
environment, accessing shared content (the content of the website) from volumes on the host instance,
which are also defined in this file. The containers themselves are created from images hosted in official
repositories on Docker Hub. The resulting environment looks like the following:
The volumes defined in the configuration correspond to the content that you will create next and upload
as part of your application source bundle. The containers access content on the host by mounting
volumes in the mountPoints section of the container definitions.
For more information on the format of Dockerrun.aws.config and its parameters, see Container
Definition Format (p. 645).
API Version 2010-12-01
648

AWS Elastic Beanstalk Developer Guide
Tutorial - Multicontainer Docker
Add Content
Next you will add some content for your PHP site to display to visitors, and a configuration file for the
nginx proxy.
php-app\index.php
<h1>Hello World!!!</h1>
<h3>PHP Version <pre><?= phpversion()?></pre></h3>
php-app\static.html
<h1>Hello World!</h1>
<h3>This is a static HTML page.</h3>
proxy\conf.d\default.conf
server {
listen 80;
server_name localhost;
root /var/www/html;
index index.php;
location ~ [^/]\.php(/|$) {
fastcgi_split_path_info ^(.+?\.php)(/.*)$;
if (!-f $document_root$fastcgi_script_name) {
return 404;
}
include fastcgi_params;
fastcgi_param SCRIPT_FILENAME $document_root$fastcgi_script_name;
fastcgi_param PATH_INFO $fastcgi_path_info;
fastcgi_param PATH_TRANSLATED $document_root$fastcgi_path_info;
fastcgi_pass php-app:9000;
fastcgi_index index.php;
}
}
Deploy to Elastic Beanstalk
Your application folder now contains the following files:
php-app\index.php
php-app\static.html
proxy\conf.d\default.conf
Dockerrun.aws.json
This is all you need to create the Elastic Beanstalk environment. Create a .zip archive of the above files
and folders (not including the top-level project folder). To create the archive in Windows explorer, select
the contents of the project folder, right-click, select Send To, and then click Compressed (zipped) Folder
Note
For information on the required file structure and instructions for creating archives in other
environments, see Create an Application Source Bundle (p. 58)
Next, upload the source bundle to Elastic Beanstalk and create your environment. When you are
prompted to select a platform, choose Multi-container Docker.
API Version 2010-12-01
649

AWS Elastic Beanstalk Developer Guide
Tutorial - Multicontainer Docker
To launch an environment (console)
1. Open the Elastic Beanstalk console with this preconfigured link:
console.aws.amazon.com/elasticbeanstalk/home#/newApplication?
applicationName=tutorials&environmentType=LoadBalanced
2. For Platform, choose the platform that matches the language used by your application.
3. For App code, choose Upload.
4. Choose Local file, choose Browse, and open the source bundle.
5. Choose Upload.
6. Choose Review and launch.
7. Review the available settings and choose Create app.
The AWS Management Console redirects you to the management dashboard for your new environment.
This screen shows the health status of the environment and events output by the Elastic Beanstalk
service. When the status is Green, click the URL next to the environment name to see your new website.
Connect to a Container Instance
So how does it all work? Next you will connect to an EC2 instance in your Elastic Beanstalk environment
to see some of the moving parts in action.
First, identify the instance and note its public IP address, which is available in the Amazon EC2 console
at https://console.aws.amazon.com/ec2/. If multiple instances are running and you have trouble
identifying the one the belongs to your environment, read through the events on the environment
dashboard and find the instance ID. This ID appears in an event listing when Elastic Beanstalk launches
an EC2 instance. Search for the instance ID in the Amazon EC2 console and view its details to find the
public IP address.
Next, use an SSH client and your private key file to connect to the instance. Use the following settings:
SSH Settings
•Address – The public IP address or DNS name of the EC2 instance.
•Port – 22. This port is opened for ingress by Elastic BeanstalkBeanstalk when you select an Amazon
EC2 key pair during environment configuration.
•User Name – ec2-user. This is the default user name for EC2 instances running Amazon Linux.
•Private Key – Your private key file.
For full instructions on using SSH to connect to an EC2 instance, see Connecting to Your Linux Instance
Using SSH in the Amazon EC2 User Guide for Linux Instances.
Now that your connected to the EC2 instance hosting your docker containers, you can see how things are
set up. Run ls on /var/app/current:
[ec2-user@ip-10-0-0-117 ~]$ ls /var/app/current
Dockerrun.aws.json php-app proxy
This directory contains the files from the source bundle that you uploaded to Elastic Beanstalk during
environment creation.
[ec2-user@ip-10-0-0-117 ~]$ ls /var/log/containers
API Version 2010-12-01
650

AWS Elastic Beanstalk Developer Guide
Tutorial - Multicontainer Docker
nginx nginx-proxy-ffffd873ada5-stdouterr.log rotated
nginx-66a4fd37eb63-stdouterr.log php-app
nginx-proxy php-app-b894601a1364-stdouterr.log
This is where logs are created on the container instance and collected by Elastic Beanstalk. Elastic
Beanstalk creates a volume in this directory for each container, which you mount to the container
location where logs are written.
You can also take a look at Docker to see the running containers with docker ps.
[ec2-user@ip-10-0-0-117 ~]$ sudo docker ps
CONTAINER ID IMAGE COMMAND CREATED
STATUS PORTS NAMES
ffffd873ada5 nginx:1.7 "nginx -g 'daemon of About an
hour ago Up About an hour 443/tcp, 0.0.0.0:80->80/tcp ecs-eb-dv-example-env-
ycmk5geqrm-2-nginx-proxy-90fce996cc8cbecb2800
b894601a1364 php:5-fpm "php-fpm" About an
hour ago Up About an hour 9000/tcp ecs-eb-dv-example-env-
ycmk5geqrm-2-php-app-cec0918ed1a3a49a8001
09fb19828e38 amazon/amazon-ecs-agent:latest "/agent" About an hour
ago Up About an hour 127.0.0.1:51678->51678/tcp ecs-agent
This shows the two running containers that you deployed, as well as the Amazon ECS container agent
that coordinated the deployment.
Inspect the Amazon ECS Container Agent
EC2 instances in a Multicontainer Docker environment on Elastic Beanstalk run an agent process in
a Docker container. This agent connects to the Amazon ECS service in order to coordinate container
deployments. These deployments run as tasks in Amazon ECS, which are configured in task definition
files. Elastic Beanstalk creates these task definition files based on the Dockerrun.aws.json that you
upload in a source bundle.
Check the status of the container agent with an HTTP get request to http://localhost:51678/v1/
metadata:
[ec2-user@ip-10-0-0-117 ~]$ curl http://localhost:51678/v1/metadata
{
"Cluster":"eb-dv-example-env-qpoxiguye24",
"ContainerInstanceArn":"arn:aws:ecs:us-east-2:123456789012:container-
instance/6a72af64-2838-400d-be09-3ab2d836ebcd"
}
This structure shows the name of the Amazon ECS cluster, and the ARN (Amazon Resource Name) of the
cluster instance (the EC2 instance that you are connected to).
For more information, make an HTTP get request to information is available at http://
localhost:51678/v1/tasks:
[ec2-user@ip-10-0-0-117 ~]$ curl http://localhost:51678/v1/tasks
{
"Tasks":[
{
"Arn":"arn:aws:ecs:us-east-2:123456789012:task/3ff2bf0f-790d-4f6d-affb-5b127b3b6e4a",
"DesiredStatus":"RUNNING",
"KnownStatus":"RUNNING",
"Family":"eb-dv-example-env-qpoxiguye24",
"Version":"2",
API Version 2010-12-01
651

AWS Elastic Beanstalk Developer Guide
Preconfigured Containers
"Containers":[
{
"DockerId":"b894601a1364a438156a239813c77cdef17040785bc4d5e49349470dc1556b15",
"DockerName":"ecs-eb-dv-example-env-qpoxiguye24-2-php-app-cec0918ed1a3a49a8001",
"Name":"php-app"
},
{
"DockerId":"ffffd873ada5f537c88862cce4e1de7ec3edf962645982fb236961c833a5d0fe",
"DockerName":"ecs-eb-dv-example-env-qpoxiguye24-2-nginx-
proxy-90fce996cc8cbecb2800",
"Name":"nginx-proxy"
}
]
}
]
}
This structure describes the task that is run to deploy the two docker containers from this tutorial's
example project. The following information is displayed:
•KnownStatus – The RUNNING status indicates that the containers are still active.
•Family – The name of the task definition that Elastic Beanstalk created from Dockerrun.aws.json.
•Version – The version of the task definition. This is incremented each time the task definition file is
updated.
•Containers – Information about the containers running on the instance.
Even more information is available from the Amazon ECS service itself, which you can call using the AWS
Command Line Interface. For instructions on using the AWS CLI with Amazon ECS, and information about
Amazon ECS in general, see the Amazon ECS User Guide.
Preconfigured Docker Containers
Elastic Beanstalk supports Docker containers that are based on the language stacks provided in the
Docker Official Repositories. You can use preconfigured Docker containers to develop and test your
application locally and then deploy the application in an Elastic Beanstalk environment that is identical
to your local environment.
For an end-to-end walkthrough about deploying an application to Elastic Beanstalk using a
preconfigured Docker container, see Getting Started with Preconfigured Docker Containers (p. 652).
For more information about supported platforms for preconfigured Docker containers, see Preconfigured
Docker (p. 28).
Topics
•Getting Started with Preconfigured Docker Containers (p. 652)
•Example: Using a Dockerfile to Customize and Configure a Preconfigured Docker Platform (p. 654)
Getting Started with Preconfigured Docker
Containers
This section walks you through how to develop a sample application locally and then deploy your
application to Elastic Beanstalk with a preconfigured Docker container.
API Version 2010-12-01
652

AWS Elastic Beanstalk Developer Guide
Getting Started with Preconfigured Docker Containers
Set Up Your Local Development Environment
For this walkthrough we will use a Python Flask “Hello World” application.
To set up your develop environment
1. Create a new folder for the sample application.
~$ mkdir eb-flask-sample
~$ cd eb-flask-sample
2. In the application's root folder, create an application.py file. In the file, include the following:
Example ~/eb-flask-sample/application.py
from flask import Flask
app = Flask(__name__)
@app.route('/')
def hello_world():
return 'Hello World!'
if __name__ == '__main__':
app.run()
3. In the application's root folder, create a requirements.txt file. In the file, include the following:
Example ~/eb-flask-sample/requirements.txt
flask
Develop and Test Locally
To develop a sample Python Flask application
1. Add a Dockerfile to your application’s root folder. In the file, specify the AWS Elastic Beanstalk
Docker base image to be used to run your local preconfigured Docker container and against which
Elastic Beanstalk runs any subsequent Dockerfile instructions by including the following:
Example ~/eb-flask-sample/Dockerfile
# For Python 3.4
FROM amazon/aws-eb-python:3.4.2-onbuild-3.5.1
AWS Elastic Beanstalk also supports Docker images for Glassfish 4.1 Java 8 and Glassfish 4.0 Java
7. For their Docker image names, see Elastic Beanstalk Supported Platforms (p. 26). For more
information about using a Dockerfile, see Single Container Docker Configuration (p. 634).
2. Build the Docker image.
~/eb-flask-sample$ docker build -t my-app-image .
3. Run the Docker container from the image.
Note
You must include the -p flag to map port 8080 on the container to the localhost port 3000.
Elastic Beanstalk Docker containers always expose the application on port 8080 on the
API Version 2010-12-01
653

AWS Elastic Beanstalk Developer Guide
Example: Customize and Configure
Preconfigured Docker Platforms
container. The -it flag runs the image as an interactive process. The -rm flag cleans up the
container file system when the container exits. You can optionally include the -d flag to run
the image as a daemon.
$ docker run -it --rm -p 3000:8080 my-app-image
4. To view the sample application, type the following URL into your web browser.
http://localhost:3000
Deploy to Elastic Beanstalk
After testing your application, you are ready to deploy it to Elastic Beanstalk.
To deploy your application to Elastic Beanstalk
1. In your application's root folder, rename the Dockerfile to Dockerfile.local. This step is
required for Elastic Beanstalk to use the Dockerfile that contains the correct instructions for
Elastic Beanstalk to build a customized Docker image on each Amazon EC2 instance in your Elastic
Beanstalk environment.
2. Create an application source bundle. For more information, see Create an Application Source
Bundle (p. 58).
3. To create a new Elastic Beanstalk application to which you can deploy your application, see
Managing and Configuring AWS Elastic Beanstalk Applications (p. 49). At the appropriate step, on
the Environment Type page, in the Predefined configuration list, under Preconfigured - Docker,
click Python.
Example: Using a Dockerfile to Customize and
Configure a Preconfigured Docker Platform
With preconfigured Docker platforms you cannot use a configuration file to customize and configure the
software that your application depends on. Instead, if you want to customize the preconfigured Docker
platform to install additional software packages that your application needs, you can add a Dockerfile
to your application's root folder.
You can include the following instructions in the Dockerfile:
•FROM – (required as the first instruction in the file) Specifies the base image from which to build the
Docker container and against which Elastic Beanstalk runs subsequent Dockerfile instructions.
The image can be hosted in a public repository, a private repository hosted by a third-party registry, or
a repository that you run on EC2.
•EXPOSE – (required) Lists the ports to expose on the Docker container. Elastic Beanstalk uses the port
value to connect the Docker container to the reverse proxy running on the host.
You can specify multiple container ports, but Elastic Beanstalk uses only the first one to connect your
container to the host's reverse proxy and route requests from the public Internet.
•CMD – Specifies an executable and default parameters, which are combined into the command that
the container runs at launch. Use the following format:
CMD ["executable","param1","param2"]
API Version 2010-12-01
654

AWS Elastic Beanstalk Developer Guide
Environment Configuration
CMD can also be used to provide default parameters for an ENTRYPOINT command by omitting the
executable argument. An executable must be specified in either a CMD or an ENTRYPOINT, but not
both. For basic scenarios, use a CMD and omit the ENTRYPOINT.
•ENTRYPOINT – Uses the same JSON format as CMD and, like CMD, specifies a command to run when
the container is launched. Also allows a container to be run as an executable with docker run.
If you define an ENTRYPOINT, you can use a CMD as well to specify default parameters that can be
overridden with docker run's -d option. The command defined by an ENTRYPOINT (including any
parameters) is combined with parameters from CMD or docker run when the container is run.
•RUN – Specifies one or more commands that install packages and configure your web application
inside the image.
If you include RUN instructions in the Dockerfile, compress the file and the context used by RUN
instructions in the Dockerfile into a .zip file. Compress files at the top level of the directory.
For more information about instructions you can include in the Dockerfile, go to Dockerfile Reference
on the Docker website.
The following snippet is an example of a Dockerfile. The instructions in the Dockerfile customize
the Python 3.4 platform by adding PostgreSQL dependencies and expose port 8080.
Note
Elastic Beanstalk preconfigured Docker platforms for Glassfish and Python require you to expose
port 8080. Elastic Beanstalk preconfigured Docker platforms for Go require you to expose port
3000.
# Use the AWS Elastic Beanstalk Python 3.4 image
FROM amazon/aws-eb-python:3.4.2-onbuild-3.5.1
# Exposes port 8080
EXPOSE 8080
# Install PostgreSQL dependencies
RUN apt-get update && \
apt-get install -y postgresql libpq-dev && \
rm -rf /var/lib/apt/lists/*
If you want to use additional AWS resources (such as Amazon DynamoDB or Amazon Simple Notification
Service), modify the proxy server or modify the operating system configuration for your Elastic
Beanstalk environment. For more information about using configuration files, see AWS Elastic Beanstalk
Environment Configuration (p. 164).
Configuring Docker Environments
You can use the Elastic Beanstalk Management Console to configure the software running on your
environment's EC2 instances.
To access the software configuration for your Elastic Beanstalk environment
1. Open the Elastic Beanstalk console.
2. Navigate to the management page (p. 65) for your environment.
3. Choose Configuration.
4. In theSoftware Configurationsection, choose the settings icon ( ).
API Version 2010-12-01
655

AWS Elastic Beanstalk Developer Guide
Docker Images
The Log Options section has two settings:
•Instance profile – Your environment's instance profile (p. 22), which must have write access to your
environment's Amazon S3 storage bucket in order to upload logs.
•Enable log file rotation to Amazon S3 – Configure the instances in your environment to upload
rotated logs (p. 369).
The Environment Properties section lets you specify environment variables that you can read from your
application code.
Sections
•Docker Images (p. 656)
•Configuring Additional Storage Volumes (p. 658)
•Reclaiming Docker Storage Space (p. 659)
Docker Images
The single container and multicontainer Docker configuration for Elastic Beanstalk support the use of
Docker images stored in a public or private online image repository.
Specify images by name in Dockerrun.aws.json. Note these conventions:
• Images in official repositories on Docker Hub use a single name (for example, ubuntu or mongo).
• Images in other repositories on Docker Hub are qualified with an organization name (for example,
amazon/amazon-ecs-agent).
• Images in other online repositories are qualified further by a domain name (for example,
quay.io/assemblyline/ubuntu or account-id.dkr.ecr.us-east-2.amazonaws.com/
ubuntu:trusty).
For single container environments only, you can also build your own image during environment creation
with a Dockerfile. See Building Custom Images with a Dockerfile (p. 637) for details.
Using Images from an Amazon ECR Repository
You can store your custom Docker images in AWS with Amazon Elastic Container Registry (Amazon ECR).
When you store your Docker images in Amazon ECR, Elastic Beanstalk automatically authenticates to the
Amazon ECR registry with your environment's instance profile (p. 22), so you don't need to generate an
authentication file (p. 657) and upload it to Amazon Simple Storage Service (Amazon S3).
You do, however, need to provide your instances with permission to access the images in your Amazon
ECR repository by adding permissions to your environment's instance profile. You can attach the
AmazonEC2ContainerRegistryReadOnly managed policy to the instance profile to provide read-only
access to all Amazon ECR repositories in your account, or grant access to single repository by using the
following template to create a custom policy:
{
"Version": "2008-10-17",
"Statement": [
{
"Sid": "AllowEbAuth",
"Effect": "Allow",
"Action": [
"ecr:GetAuthorizationToken"
],
"Resource": [
API Version 2010-12-01
656

AWS Elastic Beanstalk Developer Guide
Docker Images
"*"
]
},
{
"Sid": "AllowPull",
"Effect": "Allow",
"Resource": [
"arn:aws:ecr:us-east-2:account-id:repository/repository-name"
],
"Action": [
"ecr:GetAuthorizationToken",
"ecr:BatchCheckLayerAvailability",
"ecr:GetDownloadUrlForLayer",
"ecr:GetRepositoryPolicy",
"ecr:DescribeRepositories",
"ecr:ListImages",
"ecr:BatchGetImage"
]
}
]
}
Replace the Amazon Resource Name (ARN) in the above policy with the ARN of your repository.
In your Dockerrun.aws.json file, refer to the image by URL. For a single container
configuration (p. 634), the URL goes in the Image definition:
"Image": {
"Name": "account-id.dkr.ecr.us-east-2.amazonaws.com/repository-name:latest",
"Update": "true"
},
For a multicontainer configuration (p. 642), use the image key in a container definition object:
"containerDefinitions": [
{
"name": "my-image",
"image": "account-id.dkr.ecr.us-east-2.amazonaws.com/repository-name:latest",
Using Images From a Private Repository
To use a Docker image in a private repository hosted by an online registry, you must provide an
authentication file that contains information required to authenticate with the registry.
Generate an authentication file with the docker login command. For repositories on Docker Hub, run
docker login:
$ docker login
For other registries, include the URL of the registry server:
$ docker login registry-server-url
Important
Beginning with Docker version 1.7, the docker login command changed the name of
the authentication file, and the format of the file. Elastic Beanstalk requires the older
~/.dockercfg format configuration file.
With Docker version 1.7 and later, the docker login command creates the authentication file in
~/.docker/config.json in the following format:
API Version 2010-12-01
657

AWS Elastic Beanstalk Developer Guide
Configuring Additional Storage Volumes
{
"auths" :
{
"server" :
{
"auth" : "auth_token",
"email" : "email"
}
}
}
With Docker version 1.6.2 and earlier, the docker login command creates the authentication file
in ~/.dockercfg in the following format:
{
"server" :
{
"auth" : "auth_token",
"email" : "email"
}
}
To convert a config.json file, remove the outer auths key and flatten the JSON document to
match the old format.
Upload the authentication file to a secure Amazon S3 bucket. The Amazon S3 bucket must be hosted
in the same region as the environment that is using it. Elastic Beanstalk cannot download files from an
Amazon S3 bucket hosted in other regions. Grant permissions for the s3:GetObject operation to the
IAM role in the instance profile. For details, see Managing Elastic Beanstalk Instance Profiles (p. 388).
Include the Amazon S3 bucket information in the Authentication (v1) or authentication (v2)
parameter in your Dockerrun.aws.json file.
For more information about the Dockerrun.aws.json format for single container environments, see
Single Container Docker Configuration (p. 634). For multicontainer environments, see Multicontainer
Docker Configuration (p. 642).
For more information about the authentication file, see Store images on Docker Hub and docker login
on the Docker website.
Configuring Additional Storage Volumes
For improved performance, Elastic Beanstalk configures two Amazon EBS storage volumes for your
Docker environment's EC2 instances. In addition to the root volume provisioned for all Elastic Beanstalk
environments, a second 12GB volume named xvdcz is provisioned for image storage on Docker
environments.
If you need more storage space or increased IOPS for Docker images, you can customize
the image storage volume by using the BlockDeviceMapping configuration option in the
aws:autoscaling:launchconfiguration (p. 221) namespace.
For example, the following configuration file (p. 256) increases the storage volume's size to 100 GB with
500 provisioned IOPS:
Example .ebextensions/blockdevice-xvdcz.config
option_settings:
aws:autoscaling:launchconfiguration:
API Version 2010-12-01
658

AWS Elastic Beanstalk Developer Guide
Reclaiming Docker Storage Space
BlockDeviceMappings: /dev/xvdcz=:100::io1:500
If you use the BlockDeviceMappings option to configure additional volumes for your application, you
should include a mapping for xvdcz to ensure that it is created. The following example configures two
volumes, the image storage volume xvdcz with default settings and an additional 24 GB application
volume named sdh:
Example .ebextensions/blockdevice-sdh.config
option_settings:
aws:autoscaling:launchconfiguration:
BlockDeviceMappings: /dev/xvdcz=:12:true:gp2,/dev/sdh=:24
Note that when you change settings in this namespace, Elastic Beanstalk replaces all instances in your
environment with instances running the new configuration. See Configuration Changes (p. 133) for
details.
Reclaiming Docker Storage Space
Docker does not clean up (delete) the space used when a file is created and then deleted from within a
running container; the space is only returned to the pool once the container is deleted. This becomes an
issue if a container process creates and deletes many files, such as regularly dumping database backups,
filling up the application storage space.
One solution is to increase the size of the application storage space, as described in the previous section.
The other option is less-performant: run fstrim on the host OS periodically, such as using cron, against
container free space to reclaim the unused container data blocks.
docker ps -q | xargs docker inspect --format='{{ .State.Pid }}' | xargs -IZ sudo fstrim /
proc/Z/root/
Running a Docker Environment Locally with the EB
CLI
You can use the Elastic Beanstalk Command Line Interface (EB CLI) to run the Docker container(s)
configured in your AWS Elastic Beanstalk application locally. The EB CLI uses the Docker configuration
file (Dockerfile or Dockerrun.aws.json) and source code in your project directory to run your application
locally in Docker.
The EB CLI supports running single container, multicontainer, and preconfigured container applications
locally.
Topics
•Prerequisites for Running Docker Applications Locally (p. 659)
•Preparing a Docker Application for Use with the EB CLI (p. 660)
•Running a Docker Application Locally (p. 660)
•Cleaning Up After Running a Docker Application Locally (p. 662)
Prerequisites for Running Docker Applications Locally
• Linux OS or Mac OS X
API Version 2010-12-01
659

AWS Elastic Beanstalk Developer Guide
Preparing a Docker Application for Use with the EB CLI
•EB CLI version 3.3 or greater (p. 481)
Run eb init in your project directory to initialize an EB CLI repository. If you haven't used the EB CLI
before, see Managing Elastic Beanstalk Environments with the EB CLI (p. 492).
•Docker version 1.6 or greater
Add yourself to the docker group, log out, and then log back in to ensure that you can run Docker
commands without sudo:
$ sudo usermod -a -G docker $USER
Run docker ps to verify that the Docker daemon is up and running:
$ docker ps
CONTAINER ID IMAGE COMMAND CREATED STATUS
PORTS NAMES
• A Docker application
If you don't have a Docker application in a project folder on your local machine, see Deploying Elastic
Beanstalk Applications from Docker Containers (p. 632) for an introduction to using Docker with AWS
Elastic Beanstalk.
• Docker profile (optional)
If your application uses Docker images that are in a private repository, run docker login and follow
the prompts to create an authentication profile.
• w3m (optional)
W3m is a web browser that you can use to view your running web application within a command line
terminal with eb local run. If you are using the command line in a desktop environment, you don't
need w3m.
Docker containers run locally without emulating AWS resources that are provisioned when you deploy an
application to Elastic Beanstalk, including security groups and data or worker tiers.
You can configure your local containers to connect to a database by passing the necessary connection
string or other variables with the envvars option, but you must ensure that any resources in AWS are
accessible from your local machine by opening the appropriate ports in their assigned security groups or
attaching a default gateway or elastic IP address.
Preparing a Docker Application for Use with the EB
CLI
Prepare your Docker configuration file and source data as though you were deploying them to
Elastic Beanstalk. This topic uses the PHP and nginx proxy example from the Multicontainer Docker
tutorial (p. 646) earlier in this guide as an example, but you can use the same commands with any
single container, multicontainer, or preconfigured Docker application.
Running a Docker Application Locally
Run your Docker application locally with the eb local run command from within the project directory:
~/project$ eb local run
Creating elasticbeanstalk_phpapp_1...
API Version 2010-12-01
660

AWS Elastic Beanstalk Developer Guide
Running a Docker Application Locally
Creating elasticbeanstalk_nginxproxy_1...
Attaching to elasticbeanstalk_phpapp_1, elasticbeanstalk_nginxproxy_1
phpapp_1 | [23-Apr-2015 23:24:25] NOTICE: fpm is running, pid 1
phpapp_1 | [23-Apr-2015 23:24:25] NOTICE: ready to handle connections
The EB CLI reads the Docker configuration and executes the Docker commands necessary to run your
application. The first time you run a project locally, Docker downloads images from a remote repository
and stores them on your local machine. This process can take several minutes.
Note
The eb local run command takes two optional parameters, port and envvars.
To override the default port for a single container application, use the port option:
$ eb local run --port 8080
This command tells the EB CLI to use port 8080 on the host and map it to the exposed port on
the container. If you don't specify a port, the EB CLI uses the container's port for the host. This
option only works with single container applications
To pass environment variables to the application containers, use the envvars option:
$ eb local run --envvars RDS_HOST=$RDS_HOST,RDS_DB=$RDS_DB,RDS_USER=
$RDS_USER,RDS_PASS=$RDS_PASS
Use environment variables to configure a database connection, set debug options, or pass
secrets securely to your application. For more information on the options supported by the eb
local subcommands, see eb local (p. 536).
After the containers are up and running in Docker, they are ready to take requests from clients. The eb
local process stays open as long as the containers are running. If you need to stop the process and
containers, press Ctrl-C.
Open a second terminal to run additional commands while the eb local process is running. Use eb
local status to view your application's status:
~/project$ eb local status
Platform: 64bit Amazon Linux 2014.09 v1.2.1 running Multi-container Docker 1.3.3 (Generic)
Container name: elasticbeanstalk_nginxproxy_1
Container ip: 127.0.0.1
Container running: True
Exposed host port(s): 80
Full local URL(s): 127.0.0.1:80
Container name: elasticbeanstalk_phpapp_1
Container ip: 127.0.0.1
Container running: True
Exposed host port(s): None
Full local URL(s): None
You can use docker ps to see the status of the containers from Docker's point of view:
~/project$ docker ps
CONTAINER ID IMAGE COMMAND CREATED STATUS
PORTS NAMES
6a8e71274fed nginx:latest "nginx -g 'daemon of 9 minutes ago Up 9
minutes 0.0.0.0:80->80/tcp, 443/tcp elasticbeanstalk_nginxproxy_1
82cbf620bdc1 php:fpm "php-fpm" 9 minutes ago Up 9
minutes 9000/tcp elasticbeanstalk_phpapp_1
Next, view your application in action with eb local open:
API Version 2010-12-01
661

AWS Elastic Beanstalk Developer Guide
Cleaning Up After Running a Docker Application Locally
~/project$ eb local open
This command opens your application in the default web browser. If you are running a terminal in a
desktop environment, this may be Firefox, Safari, or Google Chrome. If you are running a terminal in a
headless environment or over an SSH connection, a command line browser, such as w3m, will be used if
one is available.
Switch back to the terminal running the application process for a moment and note the additional
output:
phpapp_1 | 172.17.0.36 - 21/Apr/2015:23:46:17 +0000 "GET /index.php" 200
This shows that the web application in the Docker container received an HTTP GET request for index.php
that was returned successfully with a 200 (non error) status.
Run eb local logs to see where the EB CLI writes the logs.
~/project$ eb local logs
Elastic Beanstalk will write logs locally to /home/user/project/.elasticbeanstalk/logs/
local.
Logs were most recently created 3 minutes ago and written to /home/user/
project/.elasticbeanstalk/logs/local/150420_234011665784.
Cleaning Up After Running a Docker Application
Locally
When you are done testing your application locally, you can stop the applications and remove the images
downloaded by Docker when you use eb local run. Removing the images is optional. You may want
to keep them for future use.
Return to the terminal running the eb local process and press Ctrl-Cto stop the application:
^CGracefully stopping... (press Ctrl+C again to force)
Stopping elasticbeanstalk_nginxproxy_1...
Stopping elasticbeanstalk_phpapp_1...
Aborting.
[1]+ Exit 5 eb local run
The EB CLI attempts to stop each running container gracefully with Docker commands. If you need to
stop a process immediately, press Ctrl-C again.
After you stop the applications, the Docker containers should also stop running. Verify this with docker
ps:
$ docker ps --all
CONTAINER ID IMAGE COMMAND CREATED STATUS
PORTS NAMES
73d515d99d2a nginx:latest "nginx -g 'daemon of 21 minutes ago Exited
(0) 11 minutes ago elasticbeanstalk_nginxproxy_1
7061c76220de php:fpm "php-fpm" 21 minutes ago Exited
(0) 11 minutes ago elasticbeanstalk_phpapp_1
The all option shows stopped containers (if you omitted this option, the output will be blank). In the
above example, Docker shows that both containers exited with a 0 (non-error) status.
API Version 2010-12-01
662

AWS Elastic Beanstalk Developer Guide
Cleaning Up After Running a Docker Application Locally
If you are done using Docker and EB CLI local commands, you can remove the Docker images from your
local machine to save space.
To remove Docker images from your local machine
1. View the images that you downloaded using docker images:
$ docker images
REPOSITORY TAG IMAGE ID CREATED VIRTUAL
SIZE
php fpm 68bc5150cffc 1 hour ago 414.1
MB
nginx latest 637d3b2f5fb5 1 hour ago 93.44
MB
2. Remove the two Docker containers with docker rm:
$ docker rm 73d515d99d2a 7061c76220de
73d515d99d2a
7061c76220de
3. Remove the images with docker rmi:
$ docker rmi 68bc5150cffc 637d3b2f5fb5
Untagged: php:fpm
Deleted: 68bc5150cffc0526c66b92265c3ed8f2ea50f3c71d266aa655b7a4d20c3587b0
Untagged: nginx:latest
Deleted: 637d3b2f5fb5c4f70895b77a9e76751a6e7670f4ef27a159dad49235f4fe61e0
API Version 2010-12-01
663

AWS Elastic Beanstalk Developer Guide
The Go Platform
Deploying Go Applications to Elastic
Beanstalk Applications
AWS Elastic Beanstalk supports applications that are developed using the Go programming language
(sometimes called Golang). Elastic Beanstalk supports both native Go environments and Docker
containers that are based on the language stacks provided in the Docker Official Repositories. You can
use either of these Elastic Beanstalk environments to develop and test your Go application locally,
and then deploy the application in an Elastic Beanstalk environment that is identical to your local
environment.
The topics in this chapter assume some knowledge of Elastic Beanstalk environments. If you haven't used
Elastic Beanstalk before, try the getting started tutorial (p. 3) to learn the basics.
Topics
•Using the AWS Elastic Beanstalk Go Platform (p. 664)
•Using the Elastic Beanstalk Docker-based Go Platform (p. 668)
Using the AWS Elastic Beanstalk Go Platform
You can use AWS Elastic Beanstalk to run, build, and configure Go-based applications. For simple Go
applications, there are two ways to deploy your application:
• Provide a source bundle with a source file at the root called application.go that contains the main
package for your application. Elastic Beanstalk builds the binary using the following command:
go build -o bin/application application.go
After the application is built, Elastic Beanstalk starts it on port 5000.
• Provide a source bundle with a binary file called application. The binary file can be located either
at the root of the source bundle or in the bin/ directory of the source bundle. If you place the
application binary file in both locations, Elastic Beanstalk uses the file in the bin/ directory.
Elastic Beanstalk launches this application on port 5000.
For more complex Go applications, there are two ways to deploy your application:
• Provide a source bundle that includes your application source files, along with a Buildfile (p. 667)
and a Procfile (p. 666). The Buildfile includes a command to build the application, and the Procfile
includes instructions to run the application.
• Provide a source bundle that includes your application binary files, along with a Procfile. The Procfile
includes instructions to run the application.
Execution Order
When you include multiple types of configuration in your application source bundle, they are
executed in the following order. Each step does not begin until the previous step completes.
• Step 1: commands, files and packages defined in configuration files (p. 256)
• Step 2: Buildfile command
API Version 2010-12-01
664

AWS Elastic Beanstalk Developer Guide
Configuring Your Go Environment
• Step 3: container_commands in configuration files
• Step 4: Procfile commands (all commands are run simultaneously)
For more information on using commands, files, packages and container_commands in
configuration files, see Customizing Software on Linux Servers (p. 258)
Configuring Your Go Environment
For Go platform configurations on Elastic Beanstalk, Elastic Beanstalk provides a few platform-specific
options in addition to the standard options it provides for all environments. These options let you
configure the nginx proxy that runs in front of your application to serve static files.
You can use the AWS Management Console to enable log rotation to Amazon S3 and configure variables
that your application can read from the environment.
To configure your Go environment in the Elastic Beanstalk console
1. Open the Elastic Beanstalk console.
2. Navigate to the management page (p. 65) for your environment.
3. Choose Configuration.
4. In theSoftware Configurationsection, choose the settings icon ( ).
Log Options
The Log Options section has two settings:
•Instance profile – Specifies the instance profile that has permission to access the Amazon S3 bucket
associated with your application.
•Enable log file rotation to Amazon S3 – Specifies whether log files for your application's Amazon EC2
instances should be copied to your Amazon S3 bucket associated with your application.
Environment Properties
The Environment Properties section lets you specify environment configuration settings on the Amazon
EC2 instances that are running your application. Environment properties are passed in as key-value pairs
to the application.
Inside the Go environment running in Elastic Beanstalk, environment variables are accessible using the
os.Getenv function. For example, you could read a property named API_ENDPOINT to a variable with
the following code:
endpoint := os.Getenv("API_ENDPOINT")
See Environment Properties and Other Software Settings (p. 189) for more information.
The aws:elasticbeanstalk:container:golang:staticfiles
Namespace
You can use a configuration file (p. 256) to set configuration options and perform other instance
configuration tasks during deployments. Configuration options can be defined by the Elastic Beanstalk
service or the platform that you use and are organized into namespaces.
API Version 2010-12-01
665

AWS Elastic Beanstalk Developer Guide
Procfile
The Go platform supports one platform-specific configuration namespace
in addition to the namespaces supported by all platforms (p. 220). The
aws:elasticbeanstalk:container:golang:staticfiles namespace lets you define options
that map paths on your web application to folders in your application source bundle that contain static
content.
For example, this configuration file (p. 256) tells the proxy server to serve files in the myimages folder at
the path /images:
Example .ebextensions/go-settings.config
option_settings:
aws:elasticbeanstalk:container:golang:staticfiles:
/images: myimages
Elastic Beanstalk provides many configuration options for customizing your environment. In addition to
configuration files, you can also set configuration options using the console, saved configurations, the EB
CLI, or the AWS CLI. See Configuration Options (p. 202) for more information.
Configuring the Application Process with a Procfile
To specify custom commands to start a Go application, include a file called Procfile at the root of your
source bundle. The file name is case sensitive. Use the following format for the Procfile:
<process_name>: <command>
Each line in your Procfile must conform to the following regular expression: ^[A-Za-z0-9_]+:\s*.+$.
Elastic Beanstalk expects processes run from the Procfile to run continuously. Elastic Beanstalk
monitors these applications and restarts any process that terminates. For short-running processes, use a
Buildfile (p. 667) command.
You can use any name for your Go application, as long as it conforms to the aforementioned regular
expression. You must call the main application web.
web: bin/server
queue_process: bin/queue_processor
foo: bin/fooapp
Elastic Beanstalk exposes the main web application on the root URL of the environment; for example,
http://my-go-env.elasticbeanstalk.com.
Elastic Beanstalk configures the nginx proxy to forward requests to your application on the port number
specified in the PORT environment variable for your application. Your application should always listen
on that port. You can access this variable within your application by calling the os.Getenv("PORT")
method.
Elastic Beanstalk uses the port number specified in the PORT option setting for the port for the first
application in the Procfile, and then increments the port number for each subsequent application in
the Procfile by 100. If the PORT option is not set, Elastic Beanstalk uses 5000 for the initial port.
In the preceding example, the PORT environment variable for the web application is 5000, the
queue_process application is 5100, and the foo application is 5200.
You can specify the initial port by setting the PORT option with the
aws:elasticbeanstalk:application:environment (p. 230) namespace, as shown in the following example.
option_settings:
API Version 2010-12-01
666

AWS Elastic Beanstalk Developer Guide
Buildfile
- namespace: aws:elasticbeanstalk:application:environment
option_name: PORT
value: <first_port_number>
For more information about setting environment variables for your application, see Option
Settings (p. 257).
Elastic Beanstalk also runs any application whose name does not have the web_ prefix, but these
applications are not available from outside of your instance.
Standard output and error streams from processes started with a Procfile are captured in log files
named after the process and stored in /var/log. For example, the web process in the preceding
example generates logs named web-1.log and web-1.error.log for stdout and stderr,
respectively.
All paths in the Procfile are relative to the root of the source bundle. If you know in advance where
the files reside on the instance, you can include absolute paths in the Procfile.
Building Executable On-Server with a Buildfile
To specify a custom build and configuration command for your Go application, include a file called
Buildfile at the root of your source bundle. The file name is case sensitive. Use the following format
for the Buildfile:
<process_name>: <command>
The command in your Buildfile must match the following regular expression: ^[A-Za-z0-9_]+:
\s*.+$.
Elastic Beanstalk doesn't monitor the application that is run with a Buildfile. Use a Buildfile for
commands that run for short periods and terminate after completing their tasks. For long-running
application processes that should not exit, use the Procfile (p. 666) instead.
In the following example of a Buildfile, build.sh is a shell script that is located at the root of the
source bundle:
make: ./build.sh
All paths in the Buildfile are relative to the root of the source bundle. If you know in advance where
the files reside on the instance, you can include absolute paths in the Buildfile.
Configuring the Reverse Proxy
Elastic Beanstalk uses nginx as the reverse proxy to map your application to your load balancer on port
80. If you want to provide your own nginx configuration, you can override the default configuration
provided by Elastic Beanstalk by including the .ebextensions/nginx/nginx.conf file in your source
bundle. If this file is present, Elastic Beanstalk uses it in place of the default nginx configuration file.
If you want to include directives in addition to those in the nginx.conf http block, you can also
provide additional configuration files in the .ebextensions/nginx/conf.d/ directory of your source
bundle. All files in this directory must have the .conf extension.
To take advantage of functionality provided by Elastic Beanstalk, such as Enhanced Health Reporting and
Monitoring (p. 336), automatic application mappings, and static files, you must include the following line
in the server block of your nginx configuration file:
include conf.d/elasticbeanstalk/*.conf;
API Version 2010-12-01
667

AWS Elastic Beanstalk Developer Guide
The Docker-based Go Platform
Using the Elastic Beanstalk Docker-based Go
Platform
Follow the steps here to walk you through the process of deploying a Go application to Elastic Beanstalk
with a preconfigured Docker container for Go.
Set Up Your Local Development Environment
This tutorial uses a Go “Hello World” application.
To set up your develop environment
1. Create a new folder for the sample application.
~$ mkdir eb-go-sample
~$ cd eb-go-sample
2. In the application's root folder, create a file with the name server.go. In the file, include the
following:
Example ~/eb-go-sample/server.go
package main
import "github.com/go-martini/martini"
func main() {
m := martini.Classic()
m.Get("/", func() string {
return "Hello world!"
})
m.Run()
}
Note
• The application source bundle must include a package called main. Within that package,
you must have a main function for the container to execute.
• Dependencies that need to be imported (for example, the Martini package, go-martini)
will be downloaded to the container and installed during deployment. Therefore, you do
not need to include the dependencies in the application source bundle that you upload to
Elastic Beanstalk.
• Elastic Beanstalk sets the container’s GOPATH environment variable to /go.
Develop and Test Locally Using Docker
With your environment set up, you're ready to create and test your Go application.
To develop a sample Go application
1. Add a Dockerfile to your application’s root folder. In the file, specify the Elastic Beanstalk Docker
base image to use to run your local preconfigured Docker container. Elastic Beanstalk uses this
image to run any subsequent Dockerfile instructions.
API Version 2010-12-01
668

AWS Elastic Beanstalk Developer Guide
Deploy to Elastic Beanstalk
Note
Include only the instruction with the Docker image name for your platform version. For
preconfigured Docker image names, see Elastic Beanstalk Supported Platforms (p. 26).
For more information about using a Dockerfile, see Single Container Docker
Configuration (p. 634). For an example Dockerfile for preconfigured Docker platforms,
see Example: Using a Dockerfile to Customize and Configure a Preconfigured Docker
Platform (p. 654).
You can use the following example:
Example ~/eb-go-sample/Dockerfile
# For Go 1.3
FROM golang:1.3.3-onbuild
# For Go 1.4
FROM golang:1.4.1-onbuild
2. Build the Docker image.
~/eb-go-sample$ docker build -t my-app-image .
3. Run the Docker container from the image.
Note
You must include the -p flag to map port 3000 on the container to the localhost port 8080.
Elastic Beanstalk preconfigured Docker containers for Go applications always expose the
application on port 3000 on the container. The -it flag runs the image as an interactive
process. The -rm flag cleans up the container file system when the container exits. You can
optionally include the -d flag to run the image as a daemon.
~/eb-go-sample$ docker run -it --rm -p 8080:3000 my-app-image
4. To view the sample application, type the following URL into your web browser.
http://localhost:8080
Deploy to Elastic Beanstalk
After testing your application, you are ready to deploy it to Elastic Beanstalk.
To deploy your application to Elastic Beanstalk
1. In your application's root folder, rename the Dockerfile to Dockerfile.local. This step is
required for Elastic Beanstalk to use the Dockerfile that contains the correct instructions for
Elastic Beanstalk to build a customized Docker image on each Amazon EC2 instance in your Elastic
Beanstalk environment.
Note
You do not need to perform this step if your Dockerfile includes instructions that modify
the base Go Docker image. You do not need to use a Dockerfile if your Dockerfile
includes only a FROM line to specify the base image from which to build the container. In
that situation, the Dockerfile is redundant.
2. Create an application source bundle. For more information, see Create an Application Source
Bundle (p. 58).
API Version 2010-12-01
669

AWS Elastic Beanstalk Developer Guide
Deploy to Elastic Beanstalk
3. Create an Elastic Beanstalk environment to which you can deploy your application. For step-by-
step instructions, see Managing and Configuring AWS Elastic Beanstalk Applications (p. 49). At
the appropriate step, on the Environment Type page, in the Predefined configuration list, under
Preconfigured - Docker, choose Go.
API Version 2010-12-01
670

AWS Elastic Beanstalk Developer Guide
Getting Started
Creating and Deploying Java
Applications on AWS Elastic
Beanstalk
AWS Elastic Beanstalk supports several platform configurations (p. 26) for Java applications, including
multiple versions of Java with the Tomcat application server and Java-only configurations for
applications that do not use Tomcat.
Apache Tomcat (p. 678) is an open source web container for applications that use Java servlets and
JavaServer Pages (JSPs) to serve HTTP requests. Tomcat facilitates web application development by
providing multithreading, declarative security configuration, and extensive customization. Platform
configurations are available for each of Tomcat's current major versions.
Java SE platform configurations (p. 686) (without Tomcat) are also provided for applications that don't
use a web container, or use one other than Tomcat, such as Jetty or GlassFish. You can include any library
Java Archives (JARs) used by your application in the source bundle that you deploy to Elastic Beanstalk.
AWS provides several tools for working with Java and Elastic Beanstalk. Regardless of the platform
configuration that you choose, you can use the AWS SDK for Java (p. 677) to use other AWS services
from within your Java application. The AWS SDK for Java is a set of libraries that allow you to use AWS
APIs from your application code without writing the raw HTTP calls from scratch.
If you use the Eclipse integrated development environment (IDE) to develop your Java application, you
can also get the AWS Toolkit for Eclipse (p. 696). The AWS Toolkit for Eclipse is an open source plug-
in that lets you manage AWS resources, including Elastic Beanstalk applications and environments, from
within the Eclipse IDE.
If the command line is more your style, install the Elastic Beanstalk Command Line Interface (p. 480) (EB
CLI) and use it to create, monitor, and manage your Elastic Beanstalk environments from the command
line. If you run multiple environments for your application, the EB CLI integrates with Git to let you
associate each of your environments with a different Git branch.
The topics in this chapter assume some knowledge of Elastic Beanstalk environments. If you haven't used
Elastic Beanstalk before, try the getting started tutorial (p. 3) to learn the basics.
Topics
•Getting Started with Java on Elastic Beanstalk (p. 671)
•Setting Up your Java Development Environment (p. 676)
•Using the AWS Elastic Beanstalk Tomcat Platform (p. 678)
•Using the AWS Elastic Beanstalk Java SE Platform (p. 686)
•Adding an Amazon RDS DB Instance to Your Java Application Environment (p. 690)
•Using the AWS Toolkit for Eclipse (p. 696)
•Resources (p. 709)
Getting Started with Java on Elastic Beanstalk
To get started with Java applications on AWS Elastic Beanstalk, all you need is an application source
bundle (p. 58) to upload as your first application version and to deploy to an environment. When you
create an environment, Elastic Beanstalk allocates all of the AWS resources needed to run a scalable web
application.
API Version 2010-12-01
671

AWS Elastic Beanstalk Developer Guide
Launching an Environment with a Sample Java Application
Launching an Environment with a Sample Java
Application
Elastic Beanstalk provides single page sample applications for each platform as well as more complex
examples that show the use of additional AWS resources such as Amazon RDS and language or platform-
specific features and APIs.
The single page samples are the same code that you get when you create an environment without
supplying your own source code. The more complex examples are hosted on GitHub and may need to be
compiled or built prior to deploying to an Elastic Beanstalk environment.
Samples
NameSupported Configurations Environment
Type
Source Description
Tomcat
Default
Tomcat 8 with Java 8
Tomcat 7 with Java 7
Tomcat 7 with Java 6
Web
Server
Worker
java-
tomcat-
v3.zip
Tomcat web application with
a single page (index.jsp)
configured to be displayed at the
website root.
For worker environments (p. 156),
this sample includes a
cron.yaml file that configures
a scheduled task that calls
scheduled.jsp once per
minute. When scheduled.jsp
is called, it writes to a log file at /
tmp/sample-app.log. Finally,
a configuration file is included in
.ebextensions that copies the
logs from /tmp/ to the locations
read by Elastic Beanstalk when
you request environment logs.
If you enable X-Ray
integration (p. 192) on an
environment running this sample,
the application shows additional
content regarding X-Ray and
provides an option to generate
debug information that you can
view in the X-Ray console.
Java
SE
Default
Java 8
Java 7
Web
Server
java-
se-
jetty-
gradle-
v3.zip
Jetty SE application with
Buildfile and Procfile
configuration files. The
Buildfile in this sample runs
a Gradle command to build the
application source on-instance.
If you enable X-Ray
integration (p. 192) on an
environment running this sample,
the application shows additional
content regarding X-Ray and
provides an option to generate
API Version 2010-12-01
672

AWS Elastic Beanstalk Developer Guide
Launching an Environment with a Sample Java Application
NameSupported Configurations Environment
Type
Source Description
debug information that you can
view in the X-Ray console.
ScorekeepJava 8 Web
Server
Clone
the
repo at
GitHub.com
Scorekeep is a RESTful web API
that uses the Spring framework
to provide an interface for
creating and managing users,
sessions, and games. The API is
bundles with an Angular 1.5 web
app that consumes the API over
HTTP.
The application uses features
of the Java SE platform to
download dependencies and
build on-instance, minimizing
the size of the souce bundle. The
application also includes nginx
configuration files that override
the default configuration to serve
the frontend web app statically
on port 80 through the proxy,
and route requests to paths
under /api to the API running on
localhost:5000.
Scorekeep also includes an
xray branch that shows how to
instrument a Java application
for use with AWS X-Ray. It shows
instrumentation of incoming
HTTP requests with a servlet
filter, automatic and manual
AWS SDK client instrumentation,
recorder configuration, and
instrumentation of outgoing
HTTP requests and SQL clients.
See the readme for instructions
or use the AWS X-Ray getting
started tutorial to try the
application with X-Ray.
API Version 2010-12-01
673

AWS Elastic Beanstalk Developer Guide
Launching an Environment with a Sample Java Application
NameSupported Configurations Environment
Type
Source Description
Does
it
Have
Snakes?
Tomcat 8 with Java 8 Web
Server
Clone
the
repo at
GitHub.com
Does it Have Snakes? is a Tomcat
web application that shows
the use of Elastic Beanstalk
configuration files, Amazon RDS,
JDBC, PostgreSQL, Servlets, JSPs,
Simple Tag Support, Tag Files,
Log4J, Bootstrap, and Jackson.
The source code for this project
includes a minimal build script
that compiles the servlets and
models into class files and
packages the required files into
a Web Archive that you can
deploy to an Elastic Beanstalk
environment. See the readme file
in the project repository for full
instructions.
Locust
Load
Generator
Java 8 Web
Server
Clone
the
repo at
GitHub.com
Web application that you can
use to load test another web
application running in a different
Elastic Beanstalk environment.
Shows the use of Buildfile
and Procfile files, DynamoDB,
and Locust, an open source load
testing tool.
Download any of the sample applications and deploy it to Elastic Beanstalk by following these steps:
To launch an environment with a sample application (console)
1. Open the Elastic Beanstalk console.
2. Choose an application or create a new one (p. 49).
3. In the upper right corner, choose Create New Environment from the Actions menu.
API Version 2010-12-01
674

AWS Elastic Beanstalk Developer Guide
Launching an Environment with a Sample Java Application
4. Choose between Web server and Worker environment tiers (p. 14). You cannot change an
environment's tier after creation.
Note
The .NET on Windows Server platform (p. 710) doesn't support the worker environment
tier.
5. For Platform, choose the platform that matches the language used by your application.
API Version 2010-12-01
675

AWS Elastic Beanstalk Developer Guide
Next Steps
Note
Elastic Beanstalk supports multiple configurations (p. 26) for most platforms listed. By
default, the console selects the latest version of the language, web container or framework
supported by Elastic Beanstalk (p. 26). If your application requires an older version, choose
Configure more options below.
6. For App code, choose Sample application.
7. If you would like to further customize your environment, choose Configure more options. The
following options can only be set during environment creation:
• Environment name
• Domain name
• Platform configuration
• VPC
• Tier
The following settings can be changed after environment creation, but require new instances or
other resources to be provisioned and can take a long time to apply:
• Instance type, root volume, key pair, and IAM role
• Internal RDS database
• Load balancer
For details on all available settings, see The Create New Environment Wizard (p. 78).
8. Choose Create environment.
Next Steps
After you have an environment running an application, you can deploy a new version (p. 124) of the
application or a completely different application at any time. Deploying a new application version is very
quick because it doesn't require provisioning or restarting EC2 instances.
After you've deployed a sample application or two and are ready to start developing and running Java
applications locally, see the next section (p. 676) to set up a Java development environment with all of
the tools and libraries that you will need.
Setting Up your Java Development Environment
Set up a Java development environment to test your application locally prior to deploying it to AWS
Elastic Beanstalk. This topic outlines development environment setup steps and links to installation
pages for useful tools.
For common setup steps and tools that apply to all languages, see Configuring your development
environment for use with AWS Elastic Beanstalk (p. 477)
Sections
•Installing the Java Development Kit (p. 677)
•Installing a Web Container (p. 677)
•Downloading Libraries (p. 677)
•Installing the AWS SDK for Java (p. 677)
API Version 2010-12-01
676

AWS Elastic Beanstalk Developer Guide
Installing the Java Development Kit
•Installing an IDE or Text Editor (p. 677)
•Installing the AWS Toolkit for Eclipse (p. 678)
Installing the Java Development Kit
Install the Java Development Kit (JDK). If you don't have a preference, get the latest version. Download
the JDK at oracle.com
The JDK includes the Java compiler, which you can use to build your source files into class files that can
be executed on an Elastic Beanstalk web server.
Installing a Web Container
If you don't already have another web container or framework, install the appropriate version of Tomcat:
•Download Tomcat 8 (requires Java 7 or later)
•Download Tomcat 7 (requires Java 6 or later)
Downloading Libraries
Elastic Beanstalk platform configurations include few libraries by default. Download libraries that your
application will use and save them in your project folder to deploy in your application source bundle.
If you've installed Tomcat locally, you can copy the servlet API and JavaServer Pages (JSP) API libraries
from the installation folder. If you deploy to a Tomcat platform configuration, you don't need to include
these files in your source bundle, but you do need to have them in your classpath to compile any
classes that use them.
JUnit, Google Guava, and Apache Commons provide several useful libraries. Visit their homepages to
learn more:
•Download JUnit
•Download Google Guava
•Download Apache Commons
Installing the AWS SDK for Java
If you need to manage AWS resources from within your application, install the AWS SDK for Java. For
example, with the AWS SDK for Java, you can use Amazon DynamoDB (DynamoDB) to share session
states of Apache Tomcat applications across multiple web servers. For more information, see Manage
Tomcat Session State with Amazon DynamoDB in the AWS SDK for Java documentation.
Visit the AWS SDK for Java homepage for more information and installation instructions.
Installing an IDE or Text Editor
Integrated development environments (IDEs) provide a wide range of features that facilitate application
development. If you haven't used an IDE for Java development, try Eclipse and IntelliJ and see which
works best for you.
•Install Eclipse IDE for Java EE Developers
•Install IntelliJ
API Version 2010-12-01
677

AWS Elastic Beanstalk Developer Guide
Installing the AWS Toolkit for Eclipse
Note
An IDE might add files to your project folder that you might not want to commit to source
control. To prevent committing these files to source control, use .gitignore or your source
control tool's equivalent.
If you just want to begin coding and don't need all of the features of an IDE, consider installing Sublime
Text.
Installing the AWS Toolkit for Eclipse
The AWS Toolkit for Eclipse (p. 696) is an open source plug-in for the Eclipse Java IDE that makes it
easier for developers to develop, debug, and deploy Java applications using AWS. Visit the AWS Toolkit
for Eclipse homepage for installation instructions.
Using the AWS Elastic Beanstalk Tomcat Platform
The AWS Elastic Beanstalk Tomcat platform is a set of environment configurations (p. 30) for Java web
applications that can run in a Tomcat web container. Each configuration corresponds to a major version
of Tomcat, including Java 8 with Tomcat 8 and Java 7 with Tomcat 7.
Platform-specific configuration options are available in the AWS Management Console for modifying the
configuration of a running environment (p. 213). To avoid losing your environment's configuration when
you terminate it, you can use saved configurations (p. 293) to save your settings and later apply them to
another environment.
To save settings in your source code, you can include configuration files (p. 256). Settings in
configuration files are applied every time you create an environment or deploy your application. You can
also use configuration files to install packages, run scripts, and perform other instance customization
operations during deployments.
Elastic Beanstalk Tomcat platform configurations include a reverse proxy that forwards requests to
your application. The default server is Apache HTTP Server (version 2.2) but you can use configuration
options to use nginx (p. 680) instead. Elastic Beanstalk also provides configuration options to configure
the proxy server to serve static assets from a folder in your source code to reduce the load on your
application. For advanced scenarios, you can include your own .conf files (p. 684) in your source
bundle to extend Elastic Beanstalk's proxy configuration or overwrite it completely.
You must package Java applications in a web application archive (WAR) file with a specific structure. For
information on the required structure and how it relates to the structure of your project directory, see
Structuring your Project Folder (p. 681).
To run multiple applications on the same web server, you can bundle multiple WAR files (p. 681) into
a single source bundle. Each application in a multiple WAR source bundle runs at either the root path
(ROOT.war runs at myapp.elasticbeanstalk.com/) or at a path directly beneath it (app2.war runs
at myapp.elasticbeanstalk.com/app2/, as determined by the name of the WAR. In a single WAR
source bundle, the application always runs at the root path.
Settings applied in the AWS Management Console override the same settings in configuration files, if
they exist. This lets you have default settings in configuration files, and override them with environment
specific settings in the console. For more information about precedence, and other methods of changing
settings, see Configuration Options (p. 202).
Configuring Your Tomcat Environment
For Tomcat platform configurations on Elastic Beanstalk, Elastic Beanstalk provides a few platform-
specific options in addition to the standard options it provides for all environments. These options let
API Version 2010-12-01
678

AWS Elastic Beanstalk Developer Guide
Configuring Your Tomcat Environment
you configure the Java virtual machine (JVM) that runs on your environment's web servers, and define
system properties that provide information configuration strings to your application.
You can use the AWS Management Console to enable log rotation to Amazon S3 and configure variables
that your application can read from the environment.
To configure your Tomcat environment in the Elastic Beanstalk console
1. Open the Elastic Beanstalk console.
2. Navigate to the management page (p. 65) for your environment.
3. Choose Configuration.
4. In theSoftware Configurationsection, choose the settings icon ( ).
JVM Container Options
The heap size in the Java virtual machine (JVM) determines how many objects your application can
create in memory before garbage collection occurs. You can modify the Initial JVM Heap Size (-Xms
argument) and a Maximum JVM Heap Size (-Xmx argument). A larger initial heap size allows more
objects to be created before garbage collection occurs, but it also means that the garbage collector will
take longer to compact the heap. The maximum heap size specifies the maximum amount of memory
the JVM can allocate when expanding the heap during heavy activity.
Note
The available memory depends on the EC2 instance type. For more information about the
EC2 instance types available for your Elastic Beanstalk environment, see Instance Types in the
Amazon Elastic Compute Cloud User Guide for Linux.
The permanent generation is a section of the JVM heap that stores class definitions and associated
metadata. To modify the size of the permanent generation, type the new size in the Maximum JVM
PermGen Size (-XX:MaxPermSize argument) field. This setting only applies to Java 7 and earlier.
Log Options
The Log Options section has two settings:
•Instance profile – Specifies the instance profile that has permission to access the Amazon S3 bucket
associated with your application.
•Enable log file rotation to Amazon S3 – Specifies whether log files for your application's Amazon EC2
instances should be copied to your Amazon S3 bucket associated with your application.
Environment Properties
The Environment Properties section lets you specify environment configuration settings on the Amazon
EC2 instances that are running your application. Environment properties are passed in as key-value pairs
to the application.
The Tomcat platform defines a placeholder property named JDBC_CONNECTION_STRING for Tomcat
environments for passing a connection string to an external database.
Note
If you attach an RDS DB instance to your environment, construct the JDBC connection
string dynamically from the RDS environment properties provided by Elastic Beanstalk. Use
JDBC_CONNECTION_STRING only for database instances that are not provisioned using Elastic
Beanstalk.
API Version 2010-12-01
679

AWS Elastic Beanstalk Developer Guide
Tomcat Configuration Namespaces
For more information about using Amazon Relational Database Service (Amazon RDS) with
your Java application, see Adding an Amazon RDS DB Instance to Your Java Application
Environment (p. 690)
Inside the Tomcat environment running in Elastic Beanstalk, environment variables are accessible using
the System.getProperty(). For example, you could read a property named API_ENDPOINT to a
variable with the following code:
String endpoint = System.getProperty("API_ENDPOINT");
See Environment Properties and Other Software Settings (p. 189) for more information.
Tomcat Configuration Namespaces
You can use a configuration file (p. 256) to set configuration options and perform other instance
configuration tasks during deployments. Configuration options can be defined by the Elastic Beanstalk
service or the platform that you use and are organized into namespaces.
The Tomcat platform supports options in the following namespaces in addition to the options supported
for all Elastic Beanstalk environments (p. 220):
•aws:elasticbeanstalk:container:tomcat:jvmoptions – Modify JVM settings. Options in this
namespace correspond to options in the management console as follows:
•Xms – JVM command line options
•Xmx – JVM command line options
•XX:MaxPermSize – Maximum JVM permanent generation size
•JVM Options – JVM command line options
•aws:elasticbeanstalk:environment:proxy – Choose the proxy server and configure response
compression.
•aws:elasticbeanstalk:environment:proxy:staticfiles – Configure the proxy to serve static
assets from a path in your source bundle.
The following example configuration file shows the use of the Tomcat-specific configuration options:
Example .ebextensions/tomcat-settings.config
option_settings:
aws:elasticbeanstalk:container:tomcat:jvmoptions:
Xms: 512m
Xmx: 512m
JVM Options: '-Xmn128m'
aws:elasticbeanstalk:application:environment:
API_ENDPOINT: mywebapi.zkpexsjtmd.us-west-2.elasticbeanstalk.com
aws:elasticbeanstalk:environment:proxy:
GzipCompression: 'true'
ProxyServer: nginx
aws:elasticbeanstalk:environment:proxy:staticfiles:
/pub: public
Elastic Beanstalk provides many configuration options for customizing your environment. In addition to
configuration files, you can also set configuration options using the console, saved configurations, the EB
CLI, or the AWS CLI. See Configuration Options (p. 202) for more information.
API Version 2010-12-01
680

AWS Elastic Beanstalk Developer Guide
Bundling WAR Files
Bundling Multiple WAR Files for Tomcat
Environments
If your web app comprises multiple web application components, you can simplify deployments and
reduce operating costs by running components in a single environment, instead of running a separate
environment for each component. This strategy is effective for lightweight applications that don't
require a lot of resources, and for development and test environments.
To deploy multiple web applications to your environment, combine each components web application
archive (WAR) files into a single source bundle (p. 58).
To create an application source bundle that contains multiple WAR files, organize the WAR files using the
following structure:
MyApplication.zip
### .ebextensions
### foo.war
### bar.war
### ROOT.war
When you deploy a source bundle containing multiple WAR files to an AWS Elastic Beanstalk
environment, each application is accessible from a different path off of the root domain name.
The preceding example includes three applications: foo, bar, and ROOT. ROOT.war is a special
filename that tells Elastic Beanstalk to run that application at the root domain, so that the
three applications are available at http://MyApplication.elasticbeanstalk.com/
foo, http://MyApplication.elasticbeanstalk.com/bar, and http://
MyApplication.elasticbeanstalk.com.
The source bundle can include only an optional .ebextensions folder and WAR files. The
.ebextensions folder can contain configuration files (p. 256) that customize the resources deployed to
your environment.
To launch an environment (console)
1. Open the Elastic Beanstalk console with this preconfigured link:
console.aws.amazon.com/elasticbeanstalk/home#/newApplication?
applicationName=tutorials&environmentType=LoadBalanced
2. For Platform, choose the platform that matches the language used by your application.
3. For App code, choose Upload.
4. Choose Local file, choose Browse, and open the source bundle.
5. Choose Upload.
6. Choose Review and launch.
7. Review the available settings and choose Create app.
For information about creating source bundles, see Create an Application Source Bundle (p. 58).
Structuring your Project Folder
To work when deployed to a Tomcat server, compiled Java Platform Enterprise Edition (Java EE) Web
application ARchives (WAR files) must be structured according to certain guidelines. Your project
directory does not have to meet the same standards, but it is a good idea to structure it in the same way
to simplify compiling and packaging. Structuring your project folder like the WAR file contents also helps
you understand how files are related and how they behave on a web server.
API Version 2010-12-01
681

AWS Elastic Beanstalk Developer Guide
Structuring your Project Folder
In the following recommended hierarchy, the source code for the web application is placed in a src
directory, to isolate it from the build script and the WAR file it generates:
~/workspace/my-app/
|-- build.sh - Build script that compiles classes and creates a WAR
|-- README.MD - Readme file with information about your project, notes
|-- ROOT.war - Source bundle artifact created by build.sh
`-- src - Source code folder
|-- WEB-INF - Folder for private supporting files
| |-- classes - Compiled classes
| |-- lib - JAR libraries
| |-- tags - Tag files
| |-- tlds - Tag Library Descriptor files
| `-- web.xml - Deployment Descriptor
|-- com - Uncompiled classes
|-- css - Stylesheets
|-- images - Image files
|-- js - JavaScript files
`-- default.jsp - JSP (JavaServer Pages) web page
The src folder contents match what you will package and deploy to the server, with the exception of the
com folder. The com folder contains your uncompiled classes (.java files), which need to be compiled
and placed in the WEB-INF/classes directory to be accessible from your application code.
The WEB-INF directory contains code and configurations that are not served publically on the web
server. The other folders at the root of the source directory (css, images, and js) are publically
available at the corresponding path on the web server.
The following example is identical to the preceding project directory, except that it contains more files
and subdirectories. This example project includes simple tags, model and support classes, and a Java
Server Pages (JSP) file for a record resource. It also includes a stylesheet and JavaScript for Bootstrap, a
default JSP file, and a an error page for 404 errors.
WEB-INF/lib includes a Java Archive (JAR) file containing the Java Database Connectivity (JDBC) driver
for PostgreSQL. WEB-INF/classes is empty because class files have not been compiled yet.
~/workspace/my-app/
|-- build.sh
|-- README.MD
|-- ROOT.war
`-- src
|-- WEB-INF
| |-- classes
| |-- lib
| | `-- postgresql-9.4-1201.jdbc4.jar
| |-- tags
| | `-- header.tag
| |-- tlds
| | `-- records.tld
| `-- web.xml
|-- com
| `-- myapp
| |-- model
| | `-- Record.java
| `-- web
| `-- ListRecords.java
|-- css
| |-- bootstrap.min.css
| `-- myapp.css
|-- images
| `-- myapp.png
|-- js
| `-- bootstrap.min.js
API Version 2010-12-01
682

AWS Elastic Beanstalk Developer Guide
Structuring your Project Folder
|-- 404.jsp
|-- default.jsp
`-- records.jsp
Building a WAR File With a Shell Script
build.sh is a very simple shell script that compiles Java classes, constructs a WAR file, and copies it to
Tomcat's webapps directory for local testing:
cd src
javac -d WEB-INF/classes com/myapp/model/Record.java
javac -classpath WEB-INF/lib/*:WEB-INF/classes -d WEB-INF/classes com/myapp/model/
Record.java
javac -classpath WEB-INF/lib/*:WEB-INF/classes -d WEB-INF/classes com/myapp/web/
ListRecords.java
jar -cvf ROOT.war *.jsp images css js WEB-INF .ebextensions
cp ROOT.war /Library/Tomcat/webapps
mv ROOT.war ../
Inside the WAR file, you'll find the same structure that exists in the src directory in the preceding
example, excluding the src/com folder. The jar command automatically creates the META-INF/
MANIFEST.MF file.
~/workspace/my-app/ROOT.war
|-- META-INF
| `-- MANIFEST.MF
|-- WEB-INF
| |-- classes
| | `-- com
| | `-- myapp
| | |-- model
| | | `-- Records.class
| | `-- web
| | `-- ListRecords.class
| |-- lib
| | `-- postgresql-9.4-1201.jdbc4.jar
| |-- tags
| | `-- header.tag
| |-- tlds
| | `-- records.tld
| `-- web.xml
|-- css
| |-- bootstrap.min.css
| `-- myapp.css
|-- images
| `-- myapp.png
|-- js
| `-- bootstrap.min.js
|-- 404.jsp
|-- default.jsp
`-- records.jsp
Using .gitignore
To avoid committing compiled class files and WAR files to your Git repository, or seeing message about
them appear when you run Git commands, add the relevant file types to a file named .gitignore in
your project folder:
~/workspace/myapp/.gitignore
API Version 2010-12-01
683

AWS Elastic Beanstalk Developer Guide
Proxy Configuration
*.zip
*.class
Configuring Your Tomcat Environment's Proxy Server
The Tomcat platform uses a reverse proxy to relay requests from port 80 on the instance to your Tomcat
web container listening on port 8080. Elastic Beanstalk provides a default proxy configuration that you
can either extend or override completely with your own configuration.
The Tomcat platform uses Apache 2.2 for the proxy by default. You can choose to use nginx by including
a configuration file (p. 256) in your source code:
Example .ebextensions/nginx-proxy.config
option_settings:
aws:elasticbeanstalk:environment:proxy:
ProxyServer: nginx
Sections
•Extending the Default Apache Configuration (p. 684)
•Extending the Default nginx Configuration (p. 685)
Extending the Default Apache Configuration
To extend Elastic Beanstalk's default Apache configuration, add .conf configuration files to a folder
named .ebextensions/httpd/conf.d in your application source bundle. Elastic Beanstalk's Apache
configuration includes .conf files in this folder automatically.
~/workspace/my-app/
|-- .ebextensions
| -- httpd
| -- conf.d
| -- myconf.conf
| -- ssl.conf
-- index.jsp
For example, the following configuration adds a listener on port 5000:
Example .ebextensions/httpd/conf.d/port5000.conf
listen 5000
<VirtualHost *:5000>
<Proxy *>
Order Allow,Deny
Allow from all
</Proxy>
ProxyPass / http://localhost:8080/ retry=0
ProxyPassReverse / http://localhost:8080/
ProxyPreserveHost on
ErrorLog /var/log/httpd/elasticbeanstalk-error_log
</VirtualHost>
To override Elastic Beanstalk's default Apache configuration completely, include a configuration in your
source bundle at .ebextensions/httpd/conf/httpd.conf:
API Version 2010-12-01
684

AWS Elastic Beanstalk Developer Guide
Proxy Configuration
~/workspace/my-app/
|-- .ebextensions
| `-- httpd
| `-- conf
| `-- httpd.conf
`-- index.jsp
If you override Elastic Beanstalk's Apache configuration, add the following lines to your httpd.conf
to pull in Elastic Beanstalk's configurations for Enhanced Health Reporting and Monitoring (p. 336),
response compression, and static files.
Include conf.d/*.conf
Include conf.d/elasticbeanstalk/*.conf
Note
To override the default listener on port 80, include a file named 00_application.conf at
.ebextensions/httpd/conf.d/elasticbeanstalk/ to overwrite Elastic Beanstalk's
configuration.
Take a look at Elastic Beanstalk's default configuration file at /etc/httpd/conf/httpd.conf on an
instance in your environment for a working example. All files in the .ebextensions/httpd folder in
your source bundle are copied to /etc/httpd during deployments.
Extending the Default nginx Configuration
To extend Elastic Beanstalk's default nginx configuration, add .conf configuration files to a folder
named .ebextensions/nginx/conf.d/ in your application source bundle. Elastic Beanstalk's nginx
configuration includes .conf files in this folder automatically.
~/workspace/my-app/
|-- .ebextensions
| `-- nginx
| `-- conf.d
| |-- elasticbeanstalk
| | `-- my-server-conf.conf
| `-- my-http-conf.conf
`-- index.jsp
Files with the .conf extension in the conf.d folder are included in the http block of the default
configuration. Files in the conf.d/elasticbeanstalk folder are included in the server block within
the http block.
To override Elastic Beanstalk's default nginx configuration completely, include a configuration in your
source bundle at .ebextensions/nginx/nginx.conf:
~/workspace/my-app/
|-- .ebextensions
| `-- nginx
| `-- nginx.conf
`-- index.jsp
If you override Elastic Beanstalk's nginx configuration, add the following line to your configuration's
server block to pull in Elastic Beanstalk's configurations for the port 80 listener, response compression,
and static files.
include conf.d/elasticbeanstalk/*.conf;
API Version 2010-12-01
685

AWS Elastic Beanstalk Developer Guide
The Java SE Platform
Note
To override the default listener on port 80, include a file named 00_application.conf at
.ebextensions/nginx/conf.d/elasticbeanstalk/ to overwrite Elastic Beanstalk's
configuration.
Also include the following line in your configuration's http block to pull in Elastic Beanstalk's
configurations for Enhanced Health Reporting and Monitoring (p. 336) and logging.
include conf.d/*.conf;
Take a look at Elastic Beanstalk's default configuration file at /etc/nginx/nginx.conf on an instance
in your environment for a working example. All files in the .ebextensions/nginx folder in your source
bundle are copied to /etc/nginx during deployments.
Using the AWS Elastic Beanstalk Java SE Platform
The AWS Elastic Beanstalk Java SE platform is a set of environment configurations (p. 29) for Java web
applications that can run on their own from a compiled JAR file. You can compile your application locally
or upload the source code with a build script to compile it on-instance. Each configuration corresponds
to a major version of Java, including Java 8 and Java 7.
Platform-specific configuration options are available in the AWS Management Console for modifying the
configuration of a running environment (p. 213). To avoid losing your environment's configuration when
you terminate it, you can use saved configurations (p. 293) to save your settings and later apply them to
another environment.
To save settings in your source code, you can include configuration files (p. 256). Settings in
configuration files are applied every time you create an environment or deploy your application. You can
also use configuration files to install packages, run scripts, and perform other instance customization
operations during deployments.
Elastic Beanstalk Java SE platform configurations include an nginx server that acts as a reverse
proxy, serving cached static content and passing requests to your application. The platform provides
configuration options to configure the proxy server to serve static assets from a folder in your source
code to reduce the load on your application. For advanced scenarios, you can include your own .conf
files (p. 689) in your source bundle to extend Elastic Beanstalk's proxy configuration or overwrite it
completely.
If you only have one JAR file, Elastic Beanstalk will run it with java -jar application_name.jar.
To configure the processes that run on the server instances in your environment, include an optional
Procfile (p. 688) in your source bundle. A Procfile is required if you have more than one JAR in your
source bundle root, or if you want to customize the java command to set JVM options.
To compile Java classes and run other build commands on the EC2 instances in your environment at
deploy time, include a Buildfile (p. 689) in your application source bundle. A Buildfile lets you
deploy your source code as-is and build on the server instead of compiling JARs locally. The Java SE
platform includes common build tools to let you build on-server.
Execution Order
When you include multiple types of configuration in your application source bundle, they are
executed in the following order. Each step does not begin until the previous step completes.
• Step 1: commands, files and packages defined in configuration files (p. 256)
• Step 2: Buildfile command
• Step 3: container_commands in configuration files
• Step 4: Procfile commands (all commands are run simultaneously)
API Version 2010-12-01
686

AWS Elastic Beanstalk Developer Guide
Configuring Your Java SE Environment
For more information on using commands, files, packages and container_commands in
configuration files, see Customizing Software on Linux Servers (p. 258)
Configuring Your Java SE Environment
For Java SE platform configurations on Elastic Beanstalk, Elastic Beanstalk provides a few platform-
specific options in addition to the standard options it provides for all environments. These options let
you configure the nginx proxy that runs in front of your application to serve static files.
You can use the AWS Management Console to enable log rotation to Amazon S3 and configure variables
that your application can read from the environment.
To configure your Java SE environment in the Elastic Beanstalk console
1. Open the Elastic Beanstalk console.
2. Navigate to the management page (p. 65) for your environment.
3. Choose Configuration.
4. In theSoftware Configurationsection, choose the settings icon ( ).
Log Options
The Log Options section has two settings:
•Instance profile – Specifies the instance profile that has permission to access the Amazon S3 bucket
associated with your application.
•Enable log file rotation to Amazon S3 – Specifies whether log files for your application's Amazon EC2
instances should be copied to your Amazon S3 bucket associated with your application.
Environment Properties
The Environment Properties section lets you specify environment configuration settings on the Amazon
EC2 instances that are running your application. Environment properties are passed in as key-value pairs
to the application.
Inside the Java SE environment running in Elastic Beanstalk, environment variables are accessible using
the System.getenv(). For example, you could read a property named API_ENDPOINT to a variable
with the following code:
String endpoint = System.getenv("API_ENDPOINT");
See Environment Properties and Other Software Settings (p. 189) for more information.
The aws:elasticbeanstalk:container:java:staticfiles
Namespace
You can use a configuration file (p. 256) to set configuration options and perform other instance
configuration tasks during deployments. Configuration options can be defined by the Elastic Beanstalk
service or the platform that you use and are organized into namespaces.
The Java SE platform supports one platform-specific configuration namespace
in addition to the namespaces supported by all platforms (p. 220). The
API Version 2010-12-01
687

AWS Elastic Beanstalk Developer Guide
Procfile
aws:elasticbeanstalk:container:java:staticfiles namespace lets you define options that
map paths on your web application to folders in your application source bundle that contain static
content.
For example, this option_settings (p. 257) snippet defines two options in the static files namespace. The
first maps the path /public to a folder named public, and the second maps the path /images to a
folder named img:
option_settings:
aws:elasticbeanstalk:container:java:staticfiles:
/public: public
/images: img
The folders that you map using this namespace must be actual folders in the root of your source bundle.
You cannot map a path to a folder in a JAR file.
Elastic Beanstalk provides many configuration options for customizing your environment. In addition to
configuration files, you can also set configuration options using the console, saved configurations, the EB
CLI, or the AWS CLI. See Configuration Options (p. 202) for more information.
Configuring the Application Process with a Procfile
If you have more than one JAR file in the root of your application source bundle, you must include a
Procfile file that tells Elastic Beanstalk which JAR(s) to run. You can also include a Procfile file for a
single JAR application to configure the Java virtual machine (JVM) that runs your application.
You must save the Procfile in your source bundle root. The file name is case sensitive. Format the Procfile
as follows: a process name, followed by a colon, followed by a Java command that runs a JAR. Each line
in your Procfile must match the following regular expression: ^[A-Za-z0-9_]+:\s*.+$.
Procfile
web: java -jar server.jar -Xmms:256m
cache: java -jar mycache.jar
web_foo: java -jar other.jar
The command that runs the main JAR in your application must be called web, and it must be the first
command listed in your Procfile. The nginx server forwards all HTTP requests that it receives from
your environment's load balancer to this application.
By default, Elastic Beanstalk configures the nginx proxy to forward requests to your application on port
5000. You can override the default port by setting the PORT environment property (p. 687) to the port
on which your main application listens.
Note
The port that your application listens on does not affect the port that the nginx server listens to
receive requests from the load balancer.
If you use a Procfile to run multiple applications, Elastic Beanstalk expects each additional application
to listen on a port 100 higher than the previous one. Elastic Beanstalk sets the PORT variable accessible
from within each application to the port that it expects the application to run on. You can access this
variable within your application code by calling System.getenv("PORT").
Note
In the preceding example, the web application listens on port 5000, cache listens on port
5100, and web_foo listens on port 5200. web configures its listening port by reading the PORT
variable, and adds 100 to that number to determine which port cache is listening on so that it
can send it requests.
API Version 2010-12-01
688

AWS Elastic Beanstalk Developer Guide
Buildfile
Standard output and error streams from processes started with a Procfile are captured in log files
named after the process and stored in /var/log. For example, the web process in the preceding
example generates logs named web-1.log and web-1.error.log for stdout and stderr,
respectively.
Elastic Beanstalk assumes that all entries in the Procfile should run at all times and automatically
restarts any application defined in the Procfile that terminates. To run commands that will terminate and
should not be restarted, use a Buildfile (p. 689).
Building JARs On-Server with a Buildfile
You can build your application's class files and JAR(s) on the EC2 instances in your environment by
invoking a build command from a Buildfile file in your source bundle.
A Buildfile file has the same syntax as a Procfile file, but commands in a Buildfile file are only
run once and must terminate upon completion, whereas commands in a Procfile file are expected
to run for the life of the application and will be restarted if they terminate. To run the JARs in your
application, use a Procfile instead.
Add a file named Buildfile (case sensitive) to the root of your source bundle and configure it to invoke
a build command in the following manner:
Buildfile
build: mvn assembly:assembly -DdescriptorId=jar-with-dependencies
The above example runs Apache Maven to build a web application from source code. Check out the Java
web application samples (p. 672) for a sample application that uses this feature.
The Java SE platform includes the following build tools, which you can invoke from your build script:
•javac – Java compiler
•ant – Apache Ant
•mvn – Apache Maven
•gradle – Gradle
Configuring the Reverse Proxy
Elastic Beanstalk uses nginx as the reverse proxy to map your application to your Elastic Load Balancing
load balancer on port 80. Elastic Beanstalk provides a default nginx configuration that you can either
extend or override completely with your own configuration.
To extend Elastic Beanstalk's default nginx configuration, add .conf configuration files to a folder
named .ebextensions/nginx/conf.d/ in your application source bundle. Elastic Beanstalk's nginx
configuration includes .conf files in this folder automatically.
~/workspace/my-app/
|-- .ebextensions
| `-- nginx
| `-- conf.d
| `-- myconf.conf
`-- web.jar
To override Elastic Beanstalk's default nginx configuration completely, include a configuration in your
source bundle at .ebextensions/nginx/nginx.conf:
API Version 2010-12-01
689
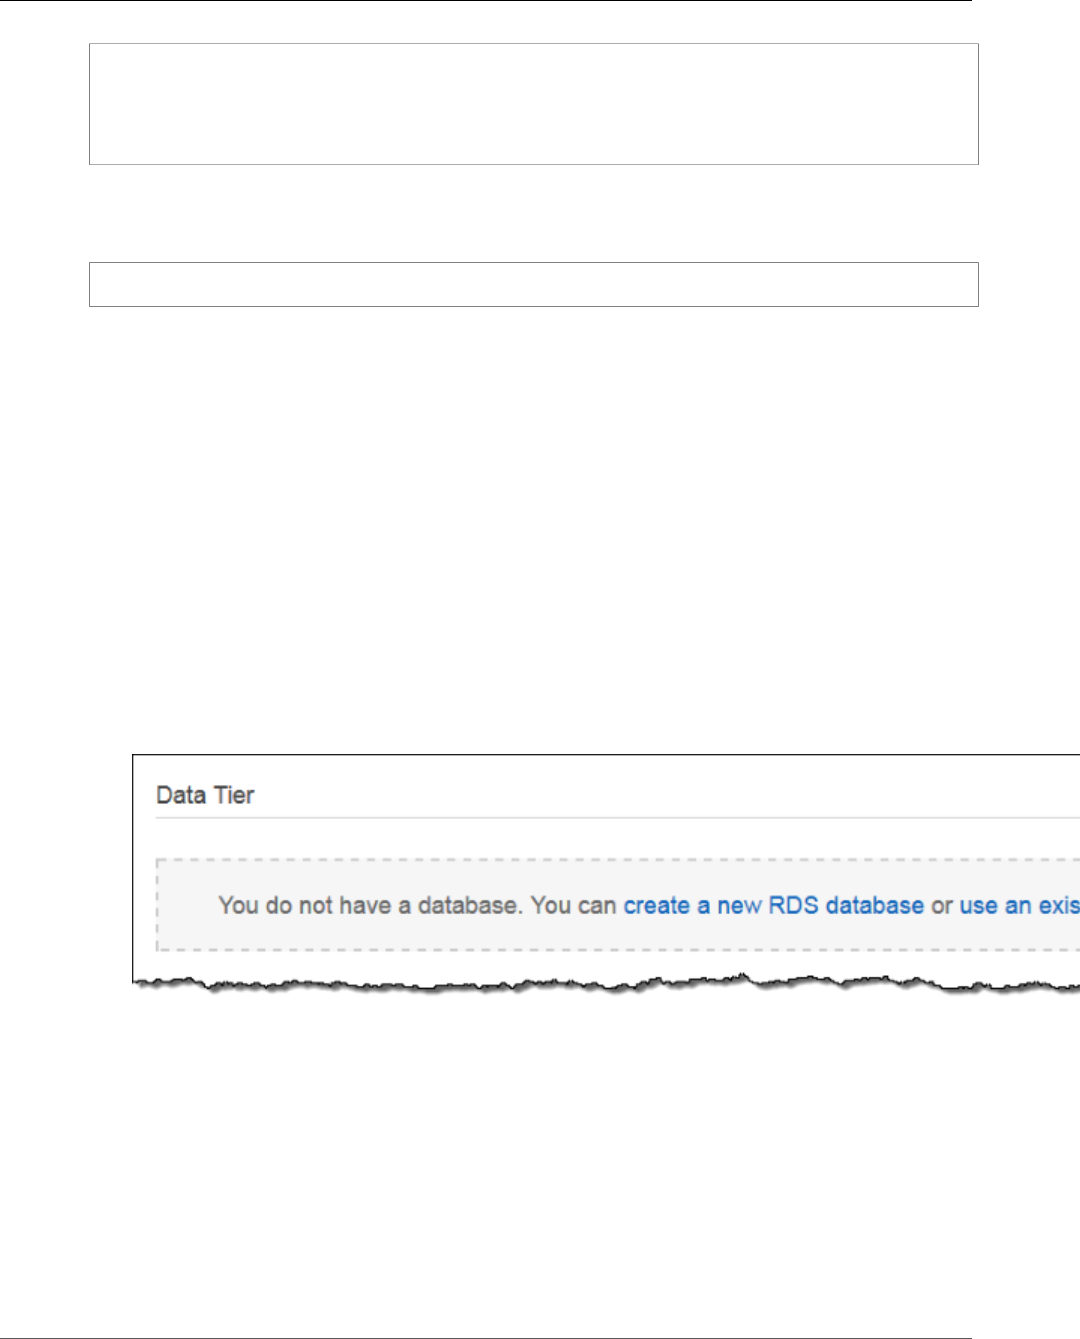
AWS Elastic Beanstalk Developer Guide
Adding a Database
~/workspace/my-app/
|-- .ebextensions
| `-- nginx
| `-- nginx.conf
`-- web.jar
If you override Elastic Beanstalk's nginx configuration, add the following line to your nginx.conf to pull
in Elastic Beanstalk's configurations for Enhanced Health Reporting and Monitoring (p. 336), automatic
application mappings, and static files.
include conf.d/elasticbeanstalk/*.conf;
Adding an Amazon RDS DB Instance to Your Java
Application Environment
You can use an Amazon Relational Database Service (Amazon RDS) DB instance to store data that your
application gathers and modifies. The database can be attached to your environment and managed by
Elastic Beanstalk, or created and managed externally.
If you are using Amazon RDS for the first time, add a DB instance to a test environment by using the
Elastic Beanstalk console and verify that your application can connect to it.
To add a DB instance to your environment
1. Open the Elastic Beanstalk console.
2. Navigate to the management page (p. 65) for your environment.
3. Choose Configuration.
4. Under Data Tier, choose Create a new RDS database.
5. Choose a DB engine, enter a user name and password, and then choose Apply.
Adding a DB instance takes about 10 minutes. When the environment update is complete, the DB
instance's hostname and other connection information are available to your application through the
following environment properties:
•RDS_HOSTNAME – The hostname of the DB instance.
Amazon RDS console label – Endpoint is the hostname.
•RDS_PORT – The port on which the DB instance accepts connections. The default value varies between
DB engines.
Amazon RDS console label – Port
API Version 2010-12-01
690

AWS Elastic Beanstalk Developer Guide
Downloading the JDBC Driver
•RDS_DB_NAME – The database name, ebdb.
Amazon RDS console label – DB Name
•RDS_USERNAME – The user name that you configured for your database.
Amazon RDS console label – Username
•RDS_PASSWORD – The password that you configured for your database.
For more information about configuring an internal DB instance, see Adding a Database to Your Elastic
Beanstalk Environment (p. 186). For instructions on configuring an external database for use with Elastic
Beanstalk, see Using Elastic Beanstalk with Amazon Relational Database Service (p. 439).
To connect to the database, add the appropriate driver JAR file to your application, load the driver
class in your code, and create a connection object with the environment properties provided by Elastic
Beanstalk.
Sections
•Downloading the JDBC Driver (p. 691)
•Connecting to a Database (Java SE Platforms) (p. 692)
•Connecting to a Database (Tomcat Platforms) (p. 692)
•Troubleshooting Database Connections (p. 694)
Downloading the JDBC Driver
You will need the JAR file of the JDBC driver for the DB engine that you chose. Save the JAR file in your
source code and include it in your classpath when you compile the class that creates connections to the
database.
You can find the latest driver for your DB engine in the following locations:
•MySQL – MySQL Connector/J
•Oracle SE-1 – Oracle JDBC Driver
•Postgres – PostgreSQL JDBC Driver
•SQL Server – Microsoft JDBC Driver
To use the JDBC driver, call Class.forName() to load it before creating the connection with
DriverManager.getConnection() in your code.
JDBC uses a connection string in the following format:
jdbc:driver://hostname:port/dbName?user=userName&password=password
You can retrieve the hostname, port, database name, user name, and password from the environment
variables that Elastic Beanstalk provides to your application. The driver name is specific to your database
type and driver version. The following are example driver names:
•mysql for MySQL
•postgresql for PostgreSQL
•oracle:thin for Oracle Thin
•oracle:oci for Oracle OCI
•oracle:oci8 for Oracle OCI 8
•oracle:kprb for Oracle KPRB
API Version 2010-12-01
691

AWS Elastic Beanstalk Developer Guide
Connecting to a Database (Java SE Platforms)
•sqlserver for SQL Server
Connecting to a Database (Java SE Platforms)
In a Java SE environment, use System.getenv() to read the connection variables from the
environment. The following example code shows a class that creates a connection to a PostgreSQL
database.
private static Connection getRemoteConnection() {
if (System.getenv("RDS_HOSTNAME") != null) {
try {
Class.forName("org.postgresql.Driver");
String dbName = System.getenv("RDS_DB_NAME");
String userName = System.getenv("RDS_USERNAME");
String password = System.getenv("RDS_PASSWORD");
String hostname = System.getenv("RDS_HOSTNAME");
String port = System.getenv("RDS_PORT");
String jdbcUrl = "jdbc:postgresql://" + hostname + ":" + port + "/" + dbName + "?
user=" + userName + "&password=" + password;
logger.trace("Getting remote connection with connection string from environment
variables.");
Connection con = DriverManager.getConnection(jdbcUrl);
logger.info("Remote connection successful.");
return con;
}
catch (ClassNotFoundException e) { logger.warn(e.toString());}
catch (SQLException e) { logger.warn(e.toString());}
}
return null;
}
Connecting to a Database (Tomcat Platforms)
In a Tomcat environment, environment properties are provided as system properties that are accessible
with System.getProperty().
The following example code shows a class that creates a connection to a PostgreSQL database.
private static Connection getRemoteConnection() {
if (System.getProperty("RDS_HOSTNAME") != null) {
try {
Class.forName("org.postgresql.Driver");
String dbName = System.getProperty("RDS_DB_NAME");
String userName = System.getProperty("RDS_USERNAME");
String password = System.getProperty("RDS_PASSWORD");
String hostname = System.getProperty("RDS_HOSTNAME");
String port = System.getProperty("RDS_PORT");
String jdbcUrl = "jdbc:postgresql://" + hostname + ":" + port + "/" + dbName + "?
user=" + userName + "&password=" + password;
logger.trace("Getting remote connection with connection string from environment
variables.");
Connection con = DriverManager.getConnection(jdbcUrl);
logger.info("Remote connection successful.");
return con;
}
catch (ClassNotFoundException e) { logger.warn(e.toString());}
catch (SQLException e) { logger.warn(e.toString());}
}
return null;
}
API Version 2010-12-01
692

AWS Elastic Beanstalk Developer Guide
Connecting to a Database (Tomcat Platforms)
If you have trouble getting a connection or running SQL statements, try placing the following code in a
JSP file. This code connects to a DB instance, creates a table, and writes to it.
<%@ page import="java.sql.*" %>
<%
// Read RDS connection information from the environment
String dbName = System.getProperty("RDS_DB_NAME");
String userName = System.getProperty("RDS_USERNAME");
String password = System.getProperty("RDS_PASSWORD");
String hostname = System.getProperty("RDS_HOSTNAME");
String port = System.getProperty("RDS_PORT");
String jdbcUrl = "jdbc:mysql://" + hostname + ":" +
port + "/" + dbName + "?user=" + userName + "&password=" + password;
// Load the JDBC driver
try {
System.out.println("Loading driver...");
Class.forName("com.mysql.jdbc.Driver");
System.out.println("Driver loaded!");
} catch (ClassNotFoundException e) {
throw new RuntimeException("Cannot find the driver in the classpath!", e);
}
Connection conn = null;
Statement setupStatement = null;
Statement readStatement = null;
ResultSet resultSet = null;
String results = "";
int numresults = 0;
String statement = null;
try {
// Create connection to RDS DB instance
conn = DriverManager.getConnection(jdbcUrl);
// Create a table and write two rows
setupStatement = conn.createStatement();
String createTable = "CREATE TABLE Beanstalk (Resource char(50));";
String insertRow1 = "INSERT INTO Beanstalk (Resource) VALUES ('EC2 Instance');";
String insertRow2 = "INSERT INTO Beanstalk (Resource) VALUES ('RDS Instance');";
setupStatement.addBatch(createTable);
setupStatement.addBatch(insertRow1);
setupStatement.addBatch(insertRow2);
setupStatement.executeBatch();
setupStatement.close();
} catch (SQLException ex) {
// Handle any errors
System.out.println("SQLException: " + ex.getMessage());
System.out.println("SQLState: " + ex.getSQLState());
System.out.println("VendorError: " + ex.getErrorCode());
} finally {
System.out.println("Closing the connection.");
if (conn != null) try { conn.close(); } catch (SQLException ignore) {}
}
try {
conn = DriverManager.getConnection(jdbcUrl);
readStatement = conn.createStatement();
resultSet = readStatement.executeQuery("SELECT Resource FROM Beanstalk;");
resultSet.first();
results = resultSet.getString("Resource");
API Version 2010-12-01
693

AWS Elastic Beanstalk Developer Guide
Troubleshooting Database Connections
resultSet.next();
results += ", " + resultSet.getString("Resource");
resultSet.close();
readStatement.close();
conn.close();
} catch (SQLException ex) {
// Handle any errors
System.out.println("SQLException: " + ex.getMessage());
System.out.println("SQLState: " + ex.getSQLState());
System.out.println("VendorError: " + ex.getErrorCode());
} finally {
System.out.println("Closing the connection.");
if (conn != null) try { conn.close(); } catch (SQLException ignore) {}
}
%>
To display the results, place the following code in the body of the HTML portion of the JSP file.
<p>Established connection to RDS. Read first two rows: <%= results %></p>
Troubleshooting Database Connections
If you run into issues connecting to a database from within your application, review the web container
log and database.
Reviewing Logs
You can view all the logs from your Elastic Beanstalk environment from within Eclipse. If you don't have
the AWS Explorer view open, choose the arrow next to the orange AWS icon in the toolbar, and then
choose Show AWS Explorer View. Expand AWS Elastic Beanstalk and your environment name, and then
open the context (right-click) menu for the server. Choose Open in WTP Server Editor.
Choose the Log tab of the Server view to see the aggregate logs from your environment. To open the
latest logs, choose the Refresh button at the upper right corner of the page.
Scroll down to locate the Tomcat logs in /var/log/tomcat7/catalina.out. If you loaded the
webpage from our earlier example several times, you might see the following.
-------------------------------------
/var/log/tomcat7/catalina.out
-------------------------------------
INFO: Server startup in 9285 ms
Loading driver...
Driver loaded!
SQLException: Table 'Beanstalk' already exists
SQLState: 42S01
VendorError: 1050
Closing the connection.
Closing the connection.
All information that the web application sends to standard output appears in the web container log. In
the previous example, the application tries to create the table every time the page loads. This results in
catching a SQL exception on every page load after the first one.
As an example, the preceding is acceptable. But in actual applications, keep your database definitions in
schema objects, perform transactions from within model classes, and coordinate requests with controller
servlets.
API Version 2010-12-01
694

AWS Elastic Beanstalk Developer Guide
Troubleshooting Database Connections
Connecting to an RDS DB Instance
You can connect directly to the RDS DB instance in your Elastic Beanstalk environment by using the
MySQL client application.
First, open the security group to your RDS DB instance to allow traffic from your computer.
1. Open the Elastic Beanstalk console.
2. Navigate to the management page (p. 65) for your environment.
3. Choose Configuration.
4. Under Network Tier, in the RDS section, choose (the gear icon).
5. Next to the DB endpoint, choose View in RDS Console.
6. On the RDS Dashboard instance details page, under Security and Network, choose the security
group starting with rds- next to Security Groups.
Note
The database might have multiple entries labeled Security Groups. Use the first, which
starts with awseb, only if you have an older account that doesn't have a default VPC.
7. In Security group details, choose the Inbound tab, and then choose Edit.
8. Add a rule for MySQL (port 3306) that allows traffic from your IP address, specified in CIDR format.
9. Choose Save. The changes take effect immediately.
Return to the Elastic Beanstalk configuration details for your environment and note the endpoint. You
will use the domain name to connect to the RDS DB instance.
Install the MySQL client and initiate a connection to the database on port 3306. On Windows, install
MySQL Workbench from the MySQL home page and follow the prompts.
On Linux, install the MySQL client using the package manager for your distribution. The following
example works on Ubuntu and other Debian derivatives.
// Install MySQL client
$ sudo apt-get install mysql-client-5.5
...
// Connect to database
$ mysql -h aas839jo2vwhwb.cnubrrfwfka8.us-west-2.rds.amazonaws.com -u username -ppassword
ebdb
Reading table information for completion of table and column names
You can turn off this feature to get a quicker startup with -A
Welcome to the MySQL monitor. Commands end with ; or \g.
Your MySQL connection id is 117
Server version: 5.5.40-log Source distribution
...
After you have connected, you can run SQL commands to see the status of the database, whether your
tables and rows were created, and other information.
mysql> SELECT Resource from Beanstalk;
+--------------+
| Resource |
+--------------+
| EC2 Instance |
| RDS Instance |
+--------------+
2 rows in set (0.01 sec)
API Version 2010-12-01
695

AWS Elastic Beanstalk Developer Guide
Eclipse Toolkit
Using the AWS Toolkit for Eclipse
The AWS Toolkit for Eclipse integrates AWS Elastic Beanstalk management features with your Tomcat
development environment to facilitate environment creation, configuration, and code deployment. The
toolkit includes support for multiple AWS accounts, managing existing environments, and connecting
directly to instances in your environment for troubleshooting.
Note
The AWS Toolkit for Eclipse only supports projects that use the Java with Tomcat platform, not
the Java SE platform.
For more information about prerequisites and installing the AWS Toolkit for Eclipse, go to http://
aws.amazon.com/eclipse. You can also check out the Using AWS Elastic Beanstalk with the AWS
Toolkit for Eclipse video. This topic also provides useful information covering tools, how-to topics, and
additional resources for Java developers.
Importing Existing Environments into Eclipse
You can import existing environments that you created in the AWS Management Console into Eclipse.
To import existing environments, expand the AWS Elastic Beanstalk node and double-click on an
environment in the AWS Explorer inside Eclipse. You can now deploy your Elastic Beanstalk applications
to this environment.
Managing Elastic Beanstalk Application Environments
Topics
•Changing Environment Configuration Settings (p. 696)
•Changing Environment Type (p. 697)
•Configuring EC2 Server Instances Using AWS Toolkit for Eclipse (p. 698)
•Configuring Elastic Load Balancing Using AWS Toolkit for Eclipse (p. 700)
•Configuring Auto Scaling Using AWS Toolkit for Eclipse (p. 703)
•Configuring Notifications Using AWS Toolkit for Eclipse (p. 705)
•Configuring Java Containers Using AWS Toolkit for Eclipse (p. 705)
•Setting System Properties with AWS Toolkit for Eclipse (p. 706)
With the AWS Toolkit for Eclipse, you can change the provisioning and configuration of the AWS
resources that are used by your application environments. For information on how to manage your
application environments using the AWS Management Console, see Managing Environments (p. 65).
This section discusses the specific service settings you can edit in the AWS Toolkit for Eclipse as part of
your application environment configuration. For more about AWS Toolkit for Eclipse, see AWS Toolkit for
Eclipse Getting Started Guide.
Changing Environment Configuration Settings
When you deploy your application, Elastic Beanstalk configures a number of AWS cloud computing
services. You can control how these individual services are configured using the AWS Toolkit for Eclipse.
To edit an application's environment settings
1. If Eclipse isn't displaying the AWS Explorer view, in the menu click Window > Show View > AWS
Explorer. Expand the Elastic Beanstalk node and your application node.
API Version 2010-12-01
696
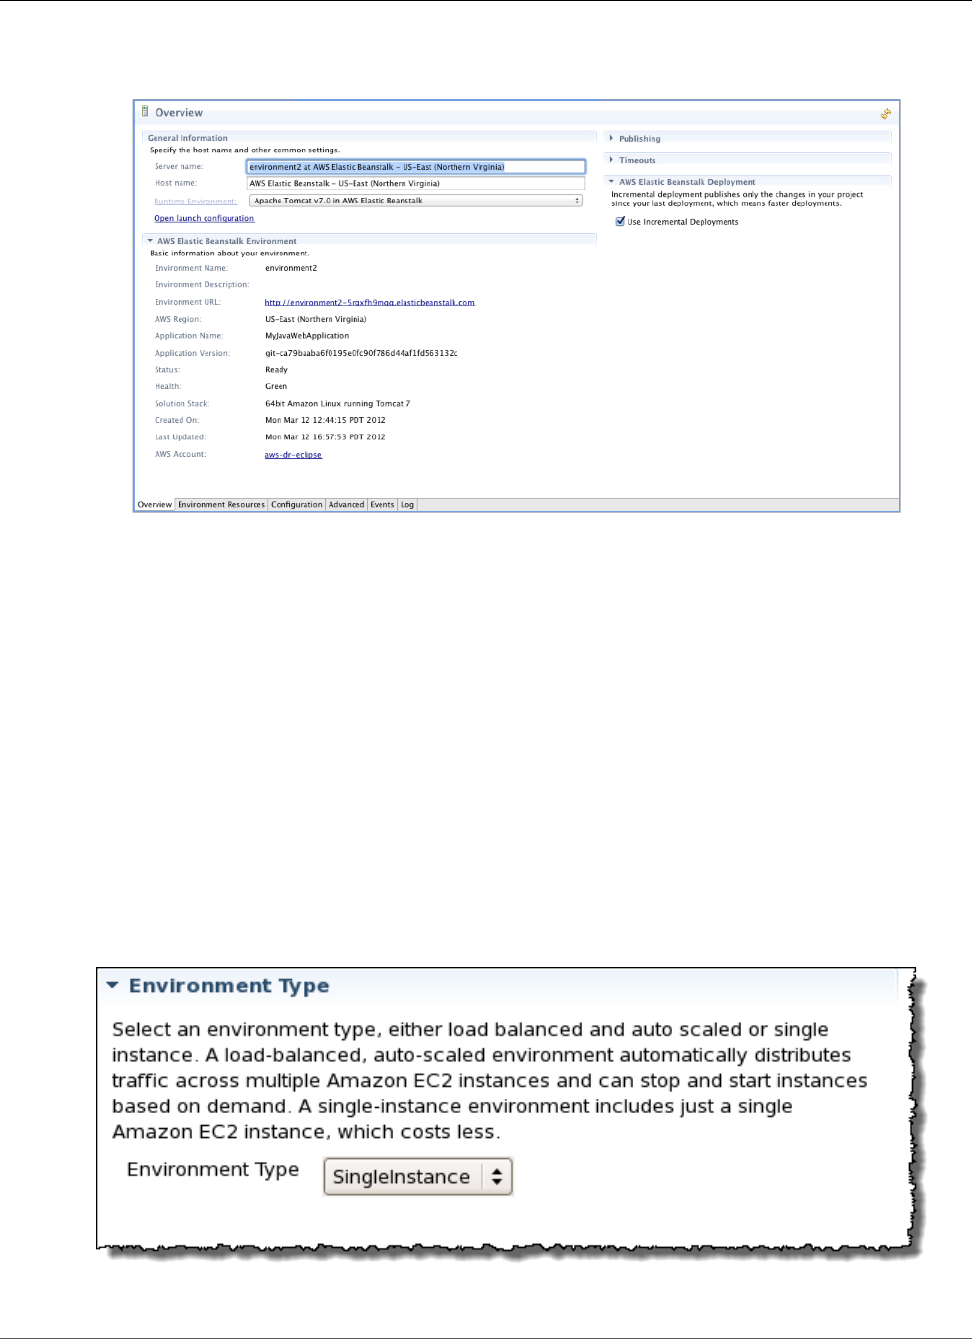
AWS Elastic Beanstalk Developer Guide
Managing Environments
2. In AWS Explorer, double-click your Elastic Beanstalk environment.
3. At the bottom of the pane, click the Configuration tab.
You can now configure settings for the following:
• EC2 server instances
• Load balancer
• Autoscaling
• Notifications
• Environment types
• Environment properties
Changing Environment Type
In AWS Toolkit for Eclipse, the Environment Type section of your environment's Configuration tab
lets you select either Load balanced, auto scaled or a Single instance environment, depending on the
requirements of the application that you deploy. For an application that requires scalability, select Load
balanced, auto scaled. For a simple, low traffic application, select Single instance. For more information,
see Environment Types (p. 154).
API Version 2010-12-01
697
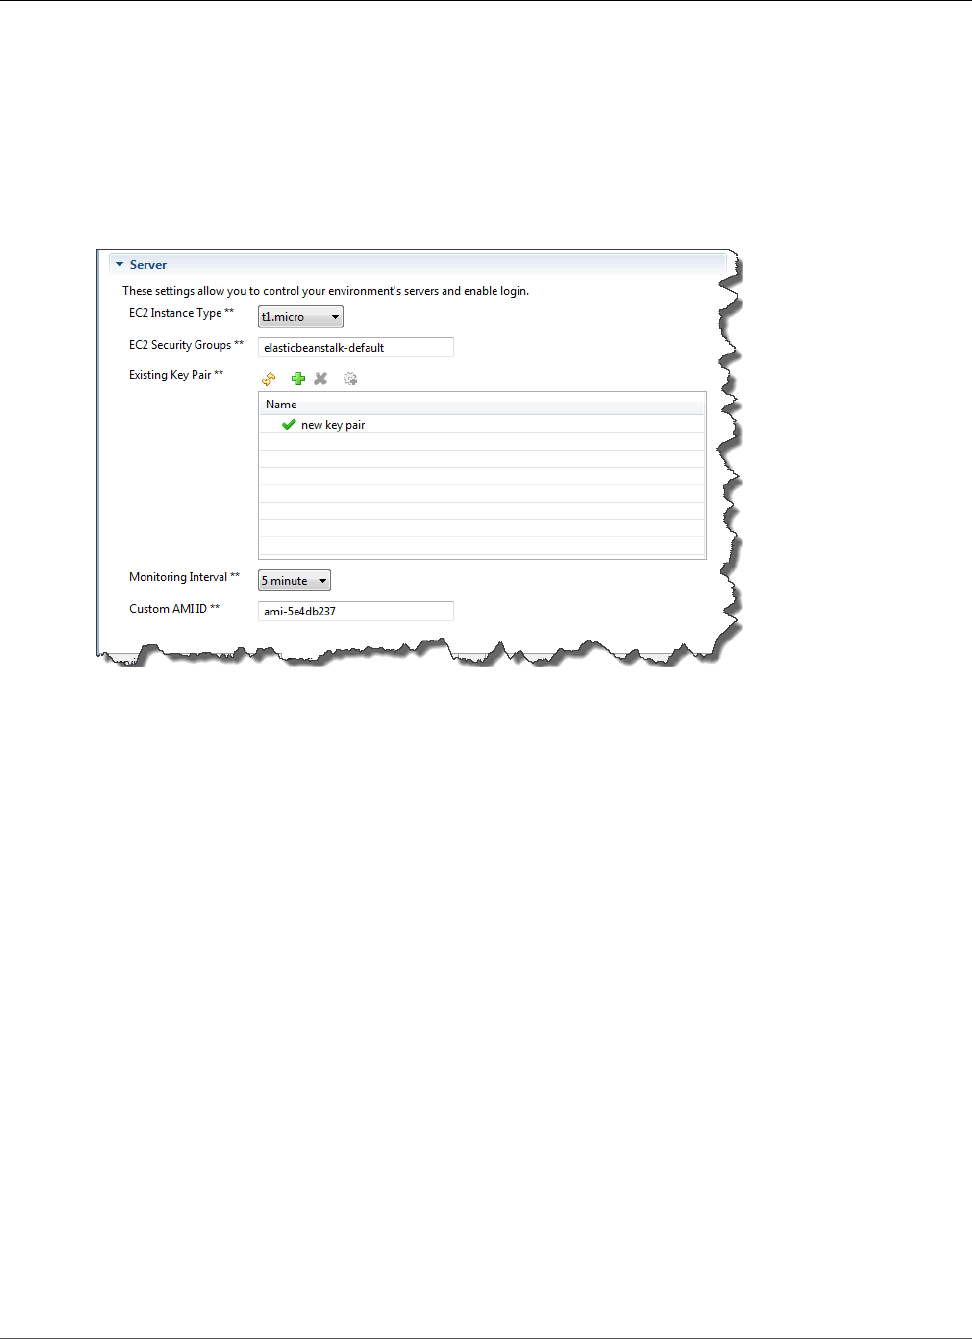
AWS Elastic Beanstalk Developer Guide
Managing Environments
Configuring EC2 Server Instances Using AWS Toolkit for Eclipse
Amazon Elastic Compute Cloud (EC2) is a web service for launching and managing server instances
in Amazon's data centers. You can use Amazon EC2 server instances at any time, for as long as you
need, and for any legal purpose. Instances are available in different sizes and configurations. For more
information, go to the Amazon EC2 product page.
Under Server, on your environment's Configuration tab inside the Toolkit for Eclipse, you can edit the
Elastic Beanstalk environment's Amazon EC2 instance configuration.
Amazon EC2 Instance Types
Instance type displays the instance types available to your Elastic Beanstalk application. Change the
instance type to select a server with the characteristics (including memory size and CPU power) that
are most appropriate to your application. For example, applications with intensive and long-running
operations may require more CPU or memory.
For more information about the Amazon EC2 instance types available for your Elastic Beanstalk
application, see Instance Types in the Amazon Elastic Compute Cloud User Guide.
Amazon EC2 Security Groups
You can control access to your Elastic Beanstalk application using an Amazon EC2 Security Group. A
security group defines firewall rules for your instances. These rules specify which ingress (i.e., incoming)
network traffic should be delivered to your instance. All other ingress traffic will be discarded. You can
modify rules for a group at any time. The new rules are automatically enforced for all running instances
and instances launched in the future.
You can set up your Amazon EC2 security groups using the AWS Management Console or by using
the AWS Toolkit for Eclipse. You can specify which Amazon EC2 security groups control access to your
Elastic Beanstalk application by entering the names of one or more Amazon EC2 security group names
(delimited by commas) into the EC2 Security Groups box.
Note
If you are running your application using a legacy container type, make sure port 80 (HTTP)
is accessible from 0.0.0.0/0 as the source CIDR range if you want to enable health checks for
your application. For more information about health checks, see Health Checks (p. 701).
To check if you are using a legacy container type, see Why are some container types marked
legacy? (p. 150).
API Version 2010-12-01
698

AWS Elastic Beanstalk Developer Guide
Managing Environments
To create a security group using the AWS Toolkit for Eclipse
1. In the AWS Toolkit for Eclipse, click AWS Explorer tab. Expand the Amazon EC2 node, and then
double-click Security Groups.
2. Right-click anywhere in the left table, and then click New Group.
3. In the Security Group dialog box, type the security group name and description and then click OK.
For more information on Amazon EC2 Security Groups, see Using Security Groups in the Amazon Elastic
Compute Cloud User Guide.
Amazon EC2 Key Pairs
You can securely log in to the Amazon EC2 instances provisioned for your Elastic Beanstalk application
with an Amazon EC2 key pair.
Important
You must create an Amazon EC2 key pair and configure your Elastic Beanstalk-provisioned
Amazon EC2 instances to use the Amazon EC2 key pair before you can access your Elastic
Beanstalk-provisioned Amazon EC2 instances. You can create your key pair using the Publish
to Beanstalk Wizard inside AWS Toolkit for Eclipse when you deploy your application to Elastic
Beanstalk. Alternatively, you can set up your Amazon EC2 key pairs using the AWS Management
Console. For instructions on creating a key pair for Amazon EC2, see the Amazon Elastic
Compute Cloud Getting Started Guide.
For more information on Amazon EC2 key pairs, go to Using Amazon EC2 Credentials in the Amazon
Elastic Compute Cloud User Guide. For more information on connecting to Amazon EC2 instances, go to
Connecting to Instances and Connecting to a Linux/UNIX Instance from Windows using PuTTY in the
Amazon Elastic Compute Cloud User Guide.
CloudWatch Metrics
By default, only basic Amazon CloudWatch metrics are enabled; they return data in five-minute periods.
You can enable more granular one-minute CloudWatch metrics by selecting 1 minute for the Monitoring
Interval in the Server section of the Configuration tab for your environment in the AWS Toolkit for
Eclipse.
Note
Amazon CloudWatch service charges can apply for one-minute interval metrics. See Amazon
CloudWatch for more information.
Custom AMI ID
You can override the default AMI used for your Amazon EC2 instances with your own custom AMI by
entering the identifier of your custom AMI into the Custom AMI ID box in the Server section of the
Configuration tab for your environment in the AWS Toolkit for Eclipse.
Important
Using your own AMI is an advanced task and should be done with care. If you need a custom
AMI, we recommend you start with the default Elastic Beanstalk AMI and then modify it.
To be considered healthy, Elastic Beanstalk expects Amazon EC2 instances to meet a set of
API Version 2010-12-01
699
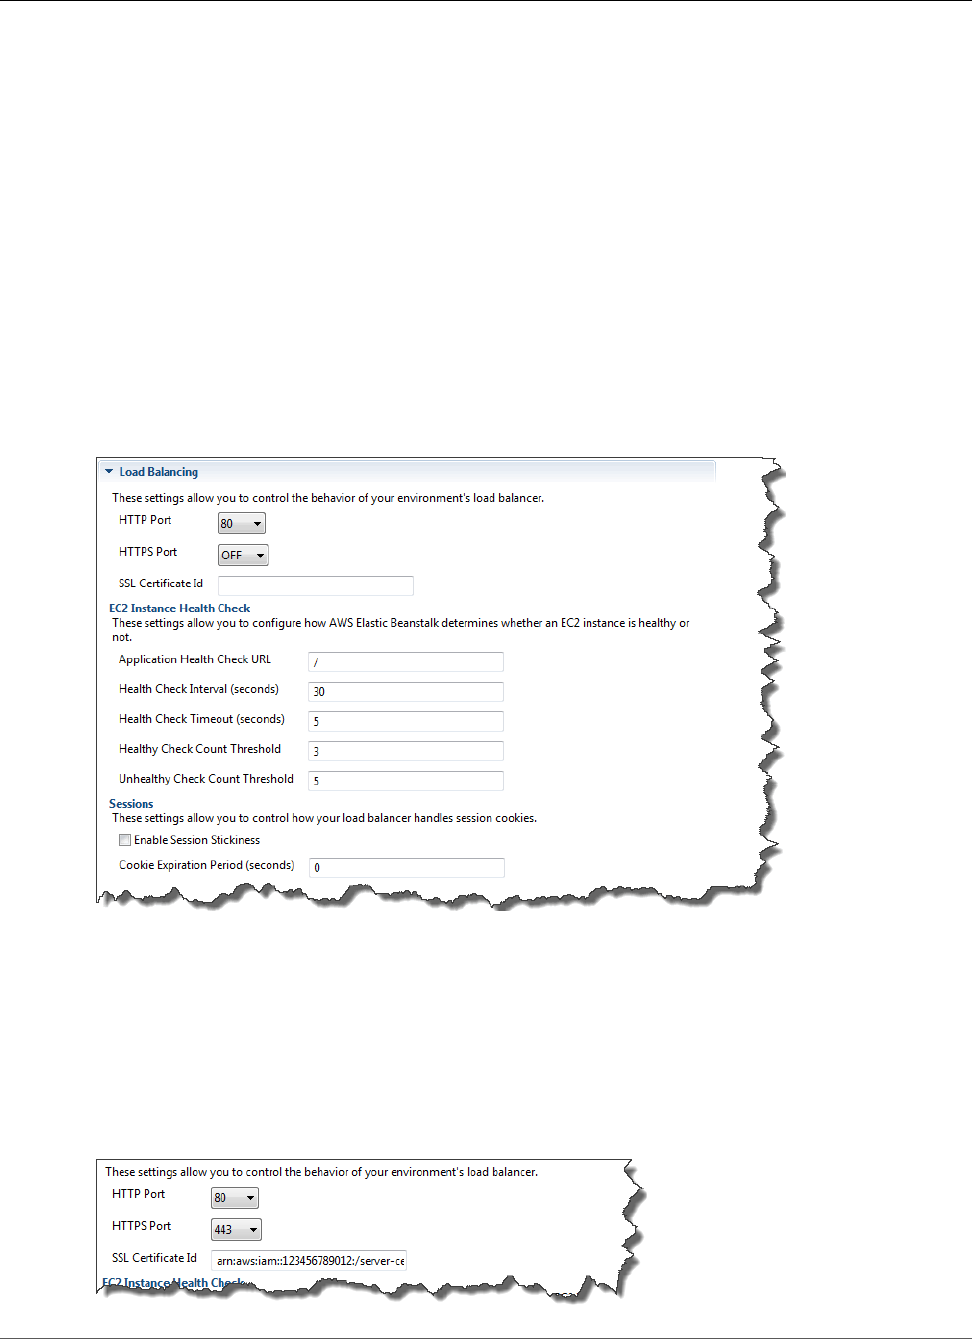
AWS Elastic Beanstalk Developer Guide
Managing Environments
requirements, including having a running host manager. If these requirements are not met, your
environment might not work properly.
Configuring Elastic Load Balancing Using AWS Toolkit for
Eclipse
Elastic Load Balancing is an Amazon web service that improves the availability and scalability of your
application. With Elastic Load Balancing, you can distribute application loads between two or more
Amazon EC2 instances. Elastic Load Balancing improves availability through redundancy, and it supports
traffic growth for your application.
Elastic Load Balancing automatically distributes and balances incoming application traffic among all the
EC2 server instances you are running. The service also makes it easy to add new instances when you need
to increase the capacity of your application.
Elastic Beanstalk automatically provisions Elastic Load Balancing when you deploy an application. Under
Load Balancing, on the Configuration tab for your environment inside the Toolkit for Eclipse, you can
edit the Elastic Beanstalk environment's load balancing configuration.
The following sections describe the Elastic Load Balancing parameters you can configure for your
application.
Ports
The load balancer provisioned to handle requests for your Elastic Beanstalk application sends requests to
the Amazon EC2 instances that are running your application. The provisioned load balancer can listen for
requests on HTTP and HTTPS ports and route requests to the Amazon EC2 instances in your AWS Elastic
Beanstalk application. By default, the load balancer handles requests on the HTTP port. At least one of
the ports (either HTTP or HTTPS) must be turned on.
API Version 2010-12-01
700

AWS Elastic Beanstalk Developer Guide
Managing Environments
Important
Make sure that the port you specified is not locked down; otherwise, users will not be able to
connect to your Elastic Beanstalk application.
Controlling the HTTP port
To turn off the HTTP port, you select OFF for HTTP Listener Port. To turn on the HTTP port, you select
an HTTP port (for example, 80).
Note
To access your environment using a port other than the default port 80, such as port 8080, add
a listener to the existing load balancer and configure the new listener to listen on that port.
For example, using the AWS CLI for Classic load balancers, type the following command,
replacing LOAD_BALANCER_NAME with the name of your load balancer for Elastic Beanstalk.
aws elb create-load-balancer-listeners --load-balancer-name LOAD_BALANCER_NAME
--listeners "Protocol=HTTP, LoadBalancerPort=8080, InstanceProtocol=HTTP,
InstancePort=80"
For example, using the AWS CLI for Application load balancers, type the following command,
replacing LOAD_BALANCER_ARN with the ARN of your load balancer for Elastic Beanstalk.
aws elbv2 create-listener --load-balancer-arn LOAD_BALANCER_ARN --protocol HTTP --
port 8080
If you want Elastic Beanstalk to monitor your environment, do not remove the listener on port
80.
Controlling the HTTPS port
Elastic Load Balancing supports the HTTPS/TLS protocol to enable traffic encryption for client
connections to the load balancer. Connections from the load balancer to the EC2 instances are done
using plain text. By default, the HTTPS port is turned off.
To turn on the HTTPS port
1. Create and upload a certificate and key to the AWS Identity and Access Management (IAM) service.
The IAM service will store the certificate and provide an Amazon Resource Name (ARN) for the SSL
certificate you've uploaded. For more information on creating and uploading certificates, see the
Managing Server Certificates section of Using AWS Identity and Access Management.
2. Specify the HTTPS port by selecting a port from the HTTPS Listener Port drop-down list.
3. In the SSL Certificate ID text box, enter the Amazon Resources Name (ARN) of your SSL certificate
(e.g., arn:aws:iam::123456789012:server-certificate/abc/certs/build). Use the SSL
certificate that you created and uploaded in step 1. For information on viewing the certificate's ARN,
see Verify the Certificate Object topic in the Creating and Uploading Server Certificates section of the
Using IAM Guide.
To turn off the HTTPS port, select OFF for HTTPS Listener Port.
Health Checks
You can control the settings for the health check using the EC2 Instance Health Check section of the
Load Balancing panel.
API Version 2010-12-01
701

AWS Elastic Beanstalk Developer Guide
Managing Environments
The following list describes the health check parameters you can set for your application.
• To determine instance health, Elastic Beanstalk looks for a 200 response code on a URL it queries. By
default, Elastic Beanstalk checks TCP:80 for nonlegacy containers and HTTP:80 for legacy containers.
You can override to match an existing resource in your application (e.g., /myapp/index.jsp) by
entering it in the Application Health Check URL box. If you override the default URL, Elastic Beanstalk
uses HTTP to query the resource. To check if you are using a legacy container type, see Why are some
container types marked legacy? (p. 150).
• For Health Check Interval (seconds), enter the number of seconds between your application's Amazon
EC2 instances health checks.
• For Health Check Timeout, specify the number of seconds for Elastic Load Balancing to wait for a
response before it considers an instance unresponsive.
• Use the Healthy Check Count Threshold and Unhealthy Check Count Threshold boxes, specify the
number of consecutive successful or unsuccessful URL probes before Elastic Load Balancing changes
the instance health status. For example, specifying 5 in the Unhealthy Check Count Threshold text
box means that the URL would have to return an error message or timeout five consecutive times
before Elastic Load Balancing considers the health check "failed."
Sessions
By default, a load balancer routes each request independently to the server instance with the smallest
load. By comparison, a sticky session binds a user's session to a specific server instance so that all
requests coming from the user during the session are sent to the same server instance.
Elastic Beanstalk uses load balancer–generated HTTP cookies when sticky sessions are enabled for an
application. The load balancer uses a special load balancer–generated cookie to track the application
instance for each request. When the load balancer receives a request, it first checks to see if this cookie
is present in the request. If so, the request is sent to the application instance specified in the cookie. If it
finds no cookie, the load balancer chooses an application instance based on the existing load balancing
algorithm. A cookie is inserted into the response for binding subsequent requests from the same user to
that application instance. The policy configuration defines a cookie expiry, which establishes the duration
of validity for each cookie.
Under Load Balancer in the Sessions section, specify whether or not the load balancer for your
application allows session stickiness and the duration for each cookie.
For more information on Elastic Load Balancing, go to the Elastic Load Balancing Developer Guide.
API Version 2010-12-01
702
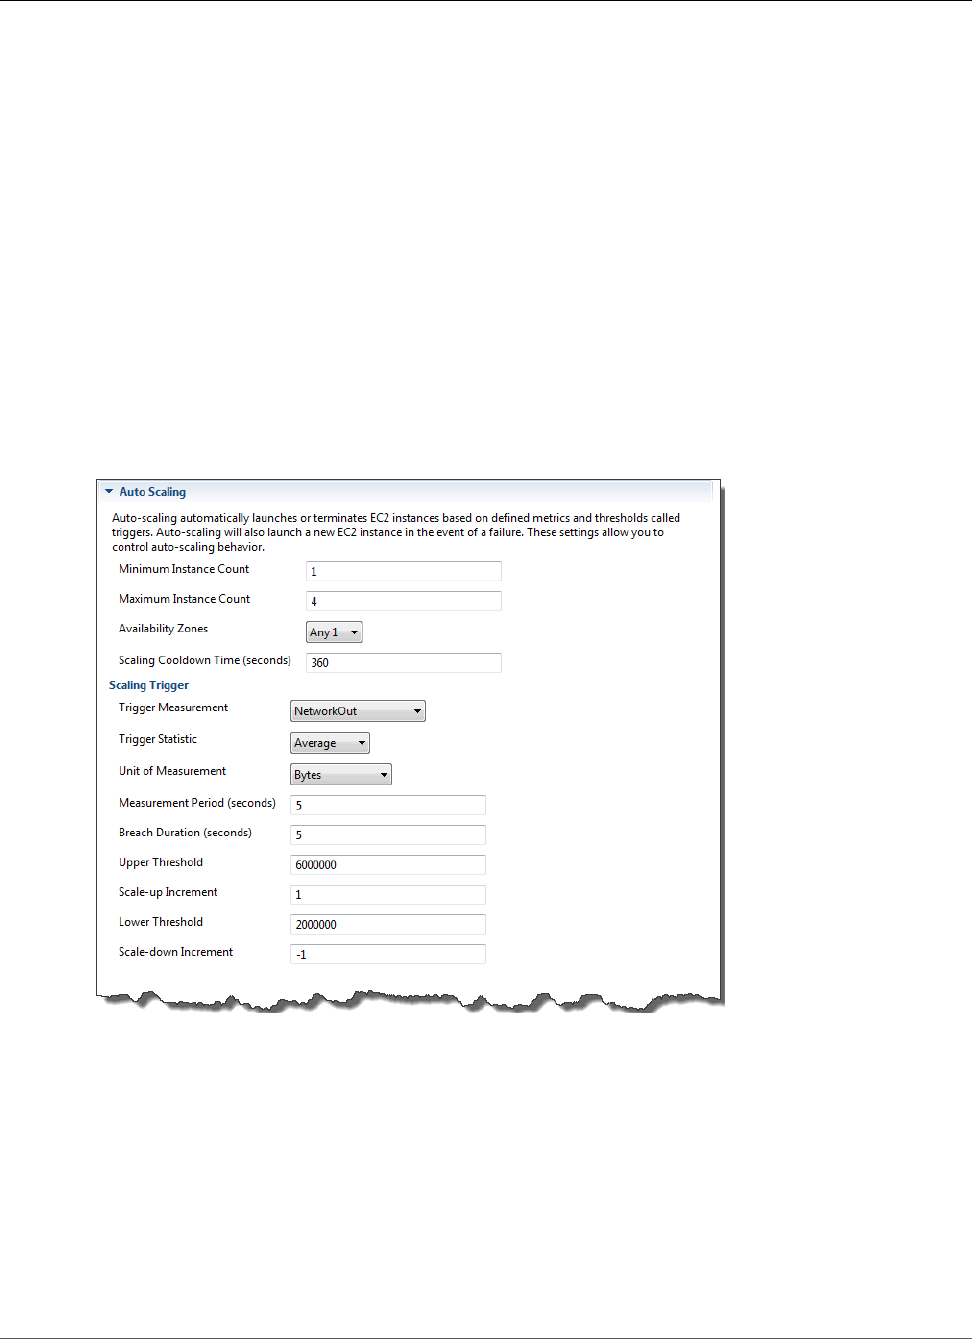
AWS Elastic Beanstalk Developer Guide
Managing Environments
Configuring Auto Scaling Using AWS Toolkit for Eclipse
Auto Scaling is an Amazon web service designed to automatically launch or terminate Amazon EC2
instances based on user-defined triggers. Users can set up Auto Scaling groups and associate triggers with
these groups to automatically scale computing resources based on metrics such as bandwidth usage or
CPU utilization. Auto Scaling works with Amazon CloudWatch to retrieve metrics for the server instances
running your application.
Auto Scaling lets you take a group of Amazon EC2 instances and set various parameters to have this
group automatically increase or decrease in number. Auto Scaling can add or remove Amazon EC2
instances from that group to help you seamlessly deal with traffic changes to your application.
Auto Scaling also monitors the health of each Amazon EC2 instance that it launches. If any instance
terminates unexpectedly, Auto Scaling detects the termination and launches a replacement instance.
This capability enables you to maintain a fixed, desired number of Amazon EC2 instances automatically.
Elastic Beanstalk provisions Auto Scaling for your application. Under Auto Scaling, on your
environment's Configuration tab inside the Toolkit for Eclipse, you can edit the Elastic Beanstalk
environment's Auto Scaling configuration.
The following sections discuss how to configure Auto Scaling parameters for your application.
Launch Configuration
You can edit the launch configuration to control how your Elastic Beanstalk application provisions Auto
Scaling resources.
Use the Minimum Instance Count and Maximum Instance Count settings to specify the minimum and
maximum size of the Auto Scaling group that your Elastic Beanstalk application uses.
API Version 2010-12-01
703
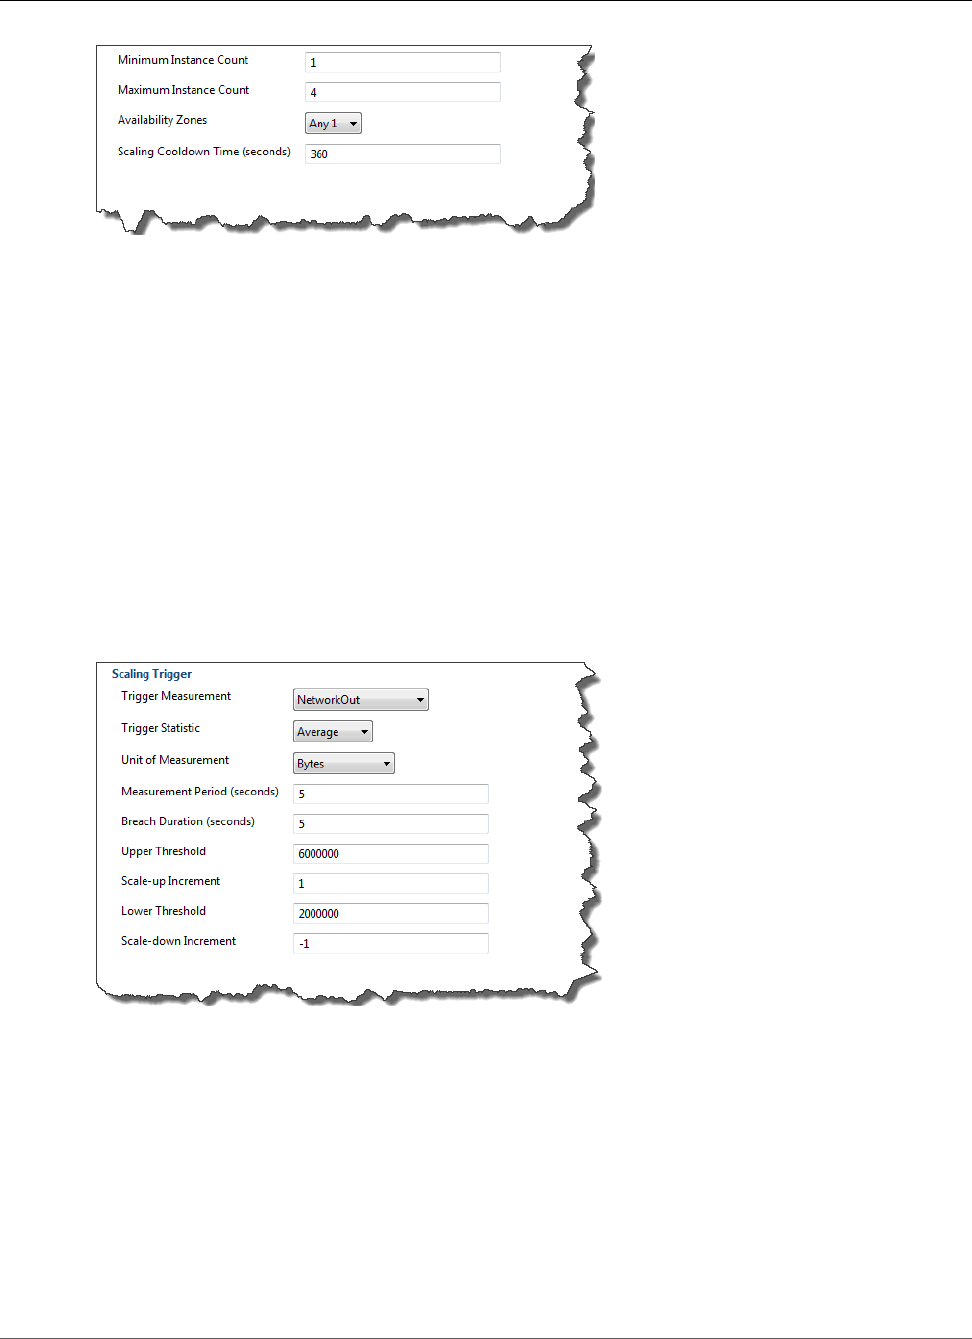
AWS Elastic Beanstalk Developer Guide
Managing Environments
Note
To maintain a fixed number of Amazon EC2 instances, set the Minimum Instance Count and
Maximum Instance Count text boxes to the same value.
For Availability Zones, specify the number of Availability Zones you want your Amazon EC2 instances to
be in. It is important to set this number if you want to build fault-tolerant applications: If one Availability
Zone goes down, your instances will still be running in your other Availability Zones.
Note
Currently, it is not possible to specify which Availability Zone your instance will be in.
Triggers
A trigger is an Auto Scaling mechanism that you set to tell the system when to increase (scale out) and
decrease (scale in) the number of instances. You can configure triggers to fire on any metric published to
Amazon CloudWatch, such as CPU utilization, and determine whether the specified conditions have been
met. When your upper or lower thresholds for the metric have been breached for the specified period of
time, the trigger launches a long-running process called a scaling activity.
You can define a scaling trigger for your Elastic Beanstalk application using the AWS Toolkit for Eclipse.
You can configure the following list of trigger parameters in the Scaling Trigger section of the
Configuration tab for your environment inside the Toolkit for Eclipse.
• For Trigger Measurement, specify the metric for your trigger.
• For Trigger Statistic, specify which statistic the trigger will use—Minimum, Maximum, Sum, or
Average.
• For Unit of Measurement, specify the units for the trigger measurement.
• For Measurement Period, specify how frequently Amazon CloudWatch measures the metrics for your
trigger. For Breach Duration, specify the amount of time a metric can be beyond its defined limit (as
specified for Upper Threshold and Lower Threshold) before the trigger fires.
• For Scale-up Increment and Scale-down Increment, specify how many Amazon EC2 instances to add
or remove when performing a scaling activity.
API Version 2010-12-01
704
AWS Elastic Beanstalk Developer Guide
Managing Environments
For more information on Auto Scaling, go to the Auto Scaling documentation.
Configuring Notifications Using AWS Toolkit for Eclipse
Elastic Beanstalk uses the Amazon Simple Notification Service (Amazon SNS) to notify you of important
events affecting your application. To enable Amazon SNS notifications, simply enter your email address
in the Email Address text box under Notifications on the Configuration tab for your environment inside
the Toolkit for Eclipse. To disable Amazon SNS notifications, remove your email address from the text
box.
Configuring Java Containers Using AWS Toolkit for Eclipse
The Container/JVM Options panel lets you fine-tune the behavior of the Java Virtual Machine on your
Amazon EC2 instances and enable or disable Amazon S3 log rotation. You can use the AWS Toolkit
for Eclipse to configure your container information. For more information on the options available for
Tomcat environments, see Configuring Your Tomcat Environment (p. 678)
Note
You can modify your configuration settings with zero downtime by swapping the CNAME for
your environments. For more information, see Blue/Green Deployments with AWS Elastic
Beanstalk (p. 129).
To access the Container/JVM Options panel for your Elastic Beanstalk application
1. If Eclipse isn't displaying the AWS Explorer view, in the menu click Window > Show View > AWS
Explorer. Expand the Elastic Beanstalk node and your application node.
2. In the AWS Explorer, double-click your Elastic Beanstalk environment.
3. At the bottom of the pane, click the Configuration tab.
4. Under Container, you can configure container options.
Remote Debugging
To test your application remotely, you can run your application in debug mode.
API Version 2010-12-01
705

AWS Elastic Beanstalk Developer Guide
Managing Multiple AWS Accounts
To enable remote debugging
1. Select Enable remote debugging.
2. For Remote debugging port, specify the port number to use for remote debugging.
The Additional Tomcat JVM command line options setting is filled automatically.
To start remote debugging
1. In the AWS Toolkit for Eclipse menu, click Window > Show View > Other.
2. Expand the Server folder, and then click Servers. Click OK.
3. In the Servers pane, right-click the server your application is running on, and then click Restart in
Debug.
Setting System Properties with AWS Toolkit for Eclipse
The following example sets the JDBC_CONNECTION_STRING system property in the AWS Toolkit for
Eclipse. After you set this properties, it becomes available to your Elastic Beanstalk application as system
properties called JDBC_CONNECTION_STRING.
Note
The AWS Toolkit for Eclipse does not yet support modifying environment configuration,
including system properties, for environments in a VPC. Unless you have an older account using
EC2 Classic, you must use the AWS Management Console (described in the next section) or the
EB CLI (p. 480)
Note
Environment configuration settings can contain any printable ASCII character except the grave
accent (`, ASCII 96) and cannot exceed 200 characters in length.
To set system properties for your Elastic Beanstalk application
1. If Eclipse isn't displaying the AWS Explorer view, choose Window, Show View, Other. Expand AWS
Toolkit and then click AWS Explorer.
2. In the AWS Explorer pane, expand Elastic Beanstalk, expand the node for your application, and
then double-click your Elastic Beanstalk environment.
3. At the bottom of the pane for your environment, click the Advanced tab.
4. Under aws:elasticbeanstalk:application:environment, click JDBC_CONNECTION_STRING and
then type a connection string. For example, the following JDBC connection string would connect to
a MySQL database instance on port 3306 of localhost, with a user name of me and a password of
mypassword:
jdbc:mysql://localhost:3306/mydatabase?user=me&password=mypassword
This will be accessible to your Elastic Beanstalk application as a system property called
JDBC_CONNECTION_STRING.
5. Press Ctrl-C on the keyboard or choose File, Save to save your changes to the environment
configuration. Changes are reflected in about one minute.
Managing Multiple AWS Accounts
You might want to set up different AWS accounts to perform different tasks, such as testing, staging, and
production. You can use the AWS Toolkit for Eclipse to add, edit, and delete accounts easily.
API Version 2010-12-01
706
AWS Elastic Beanstalk Developer Guide
Viewing Events
To add an AWS account with the AWS Toolkit for Eclipse
1. In Eclipse, make sure the toolbar is visible. On the toolbar, click the arrow next to the AWS icon and
select Preferences.
2. Click Add account.
3. In the Account Name text box, type the display name for the account.
4. In the Access Key ID text box, type your AWS access key ID.
5. In the Secret Access Key text box, type your AWS secret key.
For API access, you need an access key ID and secret access key. Use IAM user access keys instead
of AWS account root user access keys. IAM lets you securely control access to AWS services and
resources in your AWS account. For more information about creating access keys, see How Do I Get
Security Credentials? in the AWS General Reference.
6. Click OK.
To use a different account to deploy an application to Elastic Beanstalk
1. In the Eclipse toolbar, click the arrow next to the AWS icon and select Preferences.
2. For Default Account, select the account you want to use to deploy applications to Elastic Beanstalk.
3. Click OK.
4. In the Project Explorer pane, right-click the application you want to deploy, and then select Amazon
Web Services > Deploy to Elastic Beanstalk.
Viewing Events
You can use the AWS Toolkit for Eclipse to access events and notifications associated with your
application.
To view application events
API Version 2010-12-01
707
AWS Elastic Beanstalk Developer Guide
Listing and Connecting to Server Instances
1. If Eclipse isn't displaying the AWS Explorer view, in the menu click Window > Show View > AWS
Explorer. Expand the Elastic Beanstalk node and your application node.
2. In the AWS Explorer, double-click your Elastic Beanstalk environment.
3. At the bottom of the pane, click the Events tab.
A list of the events for all environments for your application is displayed.
Listing and Connecting to Server Instances
You can view a list of Amazon EC2 instances running your Elastic Beanstalk application environment
through the AWS Toolkit for Eclipse or from the AWS Management Console. You can connect to these
instances using Secure Shell (SSH). For information about listing and connecting to your server instances
using the AWS Management Console, see Listing and Connecting to Server Instances (p. 367). The
following section steps you through viewing and connecting you to your server instances using the AWS
Toolkit for Eclipse.
To view and connect to Amazon EC2 instances for an environment
1. In the AWS Toolkit for Eclipse, click AWS Explorer. Expand the Amazon EC2 node, and then double-
click Instances.
2. In the Amazon EC2 Instances window, in the Instance ID column, right-click the Instance ID for the
Amazon EC2 instance running in your application's load balancer. Then click Open Shell.
Eclipse automatically opens the SSH client and makes the connection to the EC2 instance.
API Version 2010-12-01
708

AWS Elastic Beanstalk Developer Guide
Terminating an Environment
For more information on connecting to an Amazon EC2 instance, see the Amazon Elastic Compute
Cloud Getting Started Guide.
Terminating an Environment
To avoid incurring charges for unused AWS resources, you can use the AWS Toolkit for Eclipse to
terminate a running environment.
Note
You can always launch a new environment using the same version later.
To terminate an environment
1. In the AWS Toolkit for Eclipse, click the AWS Explorer pane. Expand the Elastic Beanstalk node.
2. Expand the Elastic Beanstalk application and right-click on the Elastic Beanstalk environment.
3. Click Terminate Environment. It will take a few minutes for Elastic Beanstalk to terminate the AWS
resources running in the environment.
Resources
There are several places you can go to get additional help when developing your Java applications.
Resource Description
The AWS Java Development Forum Post your questions and get feedback.
Java Developer Center One-stop shop for sample code, documentation, tools, and
additional resources.
API Version 2010-12-01
709

AWS Elastic Beanstalk Developer Guide
Getting Started
Creating and Deploying Elastic
Beanstalk Applications in .NET Using
AWS Toolkit for Visual Studio
Elastic Beanstalk for .NET makes it easier to deploy, manage, and scale your ASP.NET web applications
that use Amazon Web Services. Elastic Beanstalk for .NET is available to anyone who is developing or
hosting a web application that uses IIS.
Get started now: To get started with a tutorial, you can go directly to Tutorial: How to Deploy a .NET
Sample Application Using AWS Elastic Beanstalk (p. 720). In this tutorial, you will deploy a sample
ASP.NET Web Application to an AWS Elastic Beanstalk application container.
The rest of this section presents instructions for creating, testing, deploying, and redeploying your
ASP.NET web application to Elastic Beanstalk using the AWS Toolkit for Visual Studio. The second part
explains how to manage and configure your applications and environments using the AWS Toolkit for
Visual Studio. For more information about prerequisites, installation instructions, and running code
samples, go to the AWS Toolkit for Microsoft Visual Studio. This site also provides useful information
about tools, how-to topics, and additional resources for ASP.NET developers.
Note
This platform does not support worker environments, enhanced health reporting, managed
updates, bundle logs or immutable updates.
The topics in this chapter assume some knowledge of Elastic Beanstalk environments. If you haven't used
Elastic Beanstalk before, try the getting started tutorial (p. 3) to learn the basics.
Topics
•Getting Started with .NET on Elastic Beanstalk (p. 710)
•Setting Up your .NET Development Environment (p. 713)
•Using the AWS Elastic Beanstalk .NET Platform (p. 713)
•Tutorial: How to Deploy a .NET Sample Application Using AWS Elastic Beanstalk (p. 720)
•Deploying an ASP.NET Core Application with AWS Elastic Beanstalk (p. 734)
•Adding an Amazon RDS DB Instance to Your .NET Application Environment (p. 742)
•The AWS Toolkit for Visual Studio (p. 744)
•Resources (p. 770)
Getting Started with .NET on Elastic Beanstalk
To get started with .NET applications on AWS Elastic Beanstalk, all you need is an application source
bundle (p. 58) to upload as your first application version and to deploy to an environment. When you
create an environment, Elastic Beanstalk allocates all of the AWS resources needed to run a highly
scalable web application.
API Version 2010-12-01
710
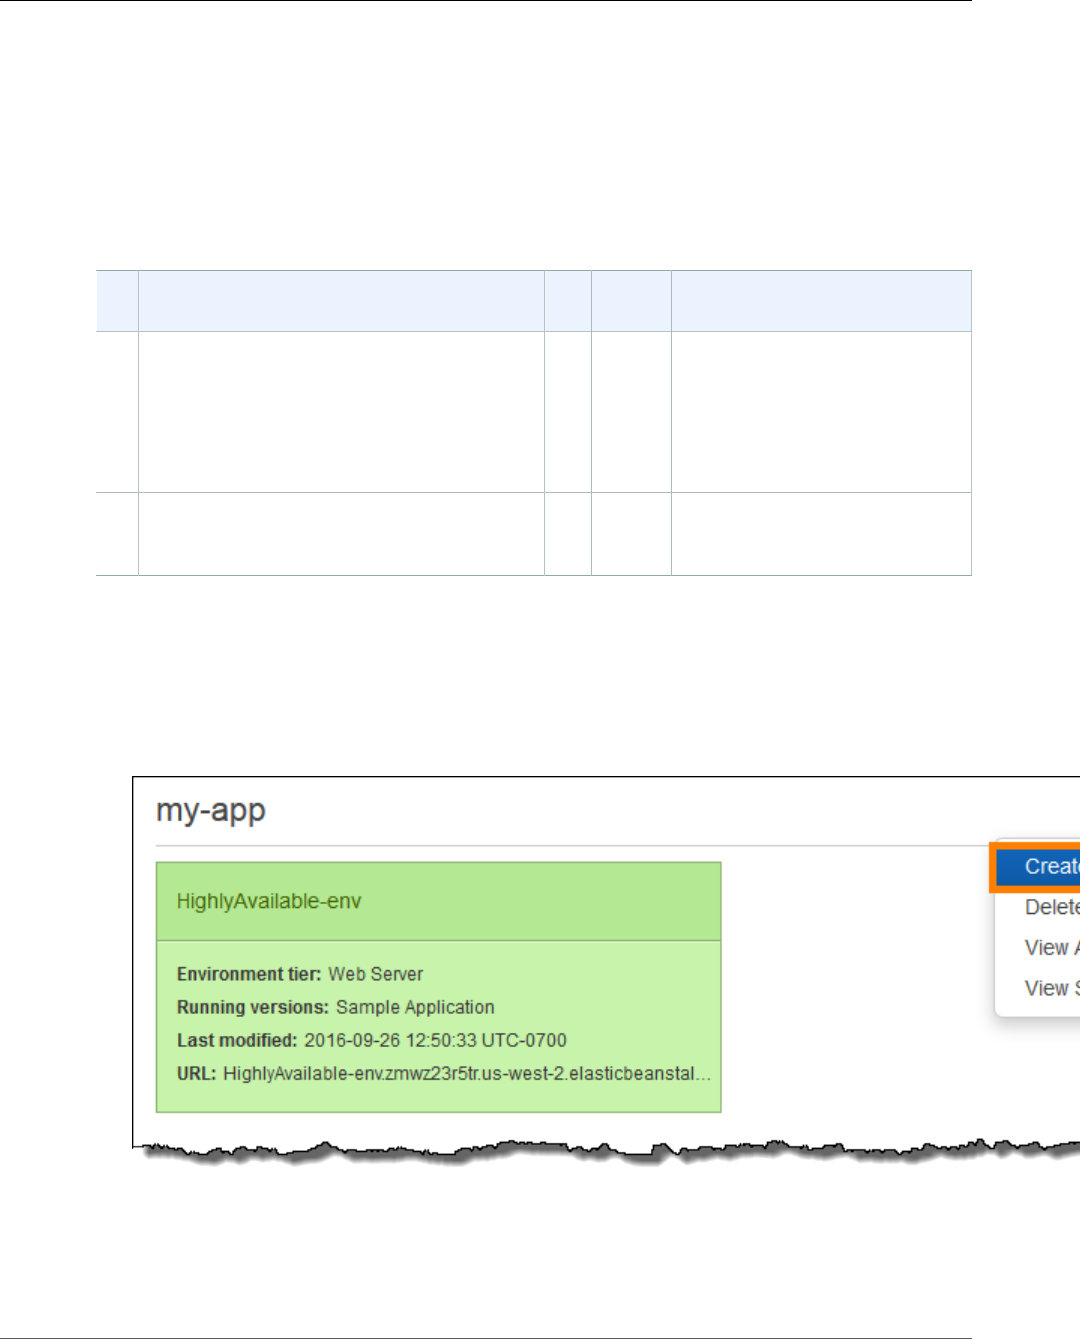
AWS Elastic Beanstalk Developer Guide
Launching an Environment with a Sample .NET Application
Launching an Environment with a Sample .NET
Application
Elastic Beanstalk provides single page sample applications for each platform as well as more complex
examples that show the use of additional AWS resources such as Amazon RDS and language or platform-
specific features and APIs.
Samples
NameSupported Configurations Environment
Type
Source Description
.NET
Default
WS 2012 R2
WS 2012 R2 Server Core
WS 2012
WS 2008 R2
Web
Server
dotnet-
asp-
v1.zip
ASP.NET web application with
a single page configured to be
displayed at the website root.
ASP.NET
MVC5
WS 2012 R2 Web
Server
dotnet-
aspmvc5-
v1.zip
ASP.NET web application with
a classic model-view-control
architecture.
Download any of the sample applications and deploy it to Elastic Beanstalk by following these steps:
To launch an environment with a sample application (console)
1. Open the Elastic Beanstalk console.
2. Choose an application or create a new one (p. 49).
3. In the upper right corner, choose Create New Environment from the Actions menu.
4. Choose between Web server and Worker environment tiers (p. 14). You cannot change an
environment's tier after creation.
Note
The .NET on Windows Server platform (p. 710) doesn't support the worker environment
tier.
API Version 2010-12-01
711
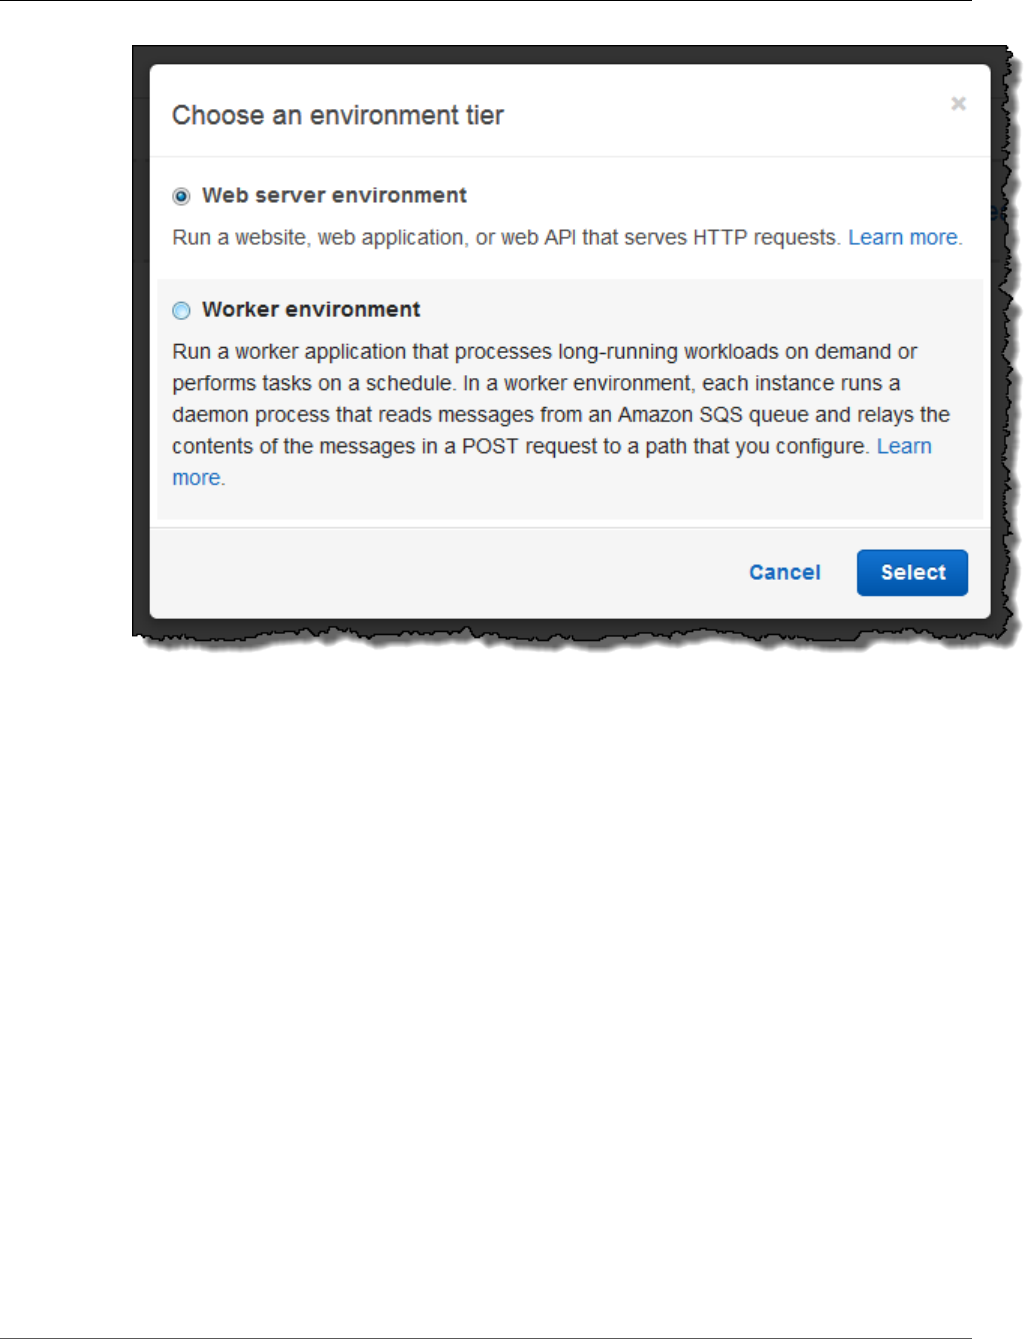
AWS Elastic Beanstalk Developer Guide
Launching an Environment with a Sample .NET Application
5. For Platform, choose the platform that matches the language used by your application.
Note
Elastic Beanstalk supports multiple configurations (p. 26) for most platforms listed. By
default, the console selects the latest version of the language, web container or framework
supported by Elastic Beanstalk (p. 26). If your application requires an older version, choose
Configure more options below.
6. For App code, choose Sample application.
7. If you would like to further customize your environment, choose Configure more options. The
following options can only be set during environment creation:
• Environment name
• Domain name
• Platform configuration
• VPC
• Tier
The following settings can be changed after environment creation, but require new instances or
other resources to be provisioned and can take a long time to apply:
• Instance type, root volume, key pair, and IAM role
• Internal RDS database
• Load balancer
For details on all available settings, see The Create New Environment Wizard (p. 78).
API Version 2010-12-01
712

AWS Elastic Beanstalk Developer Guide
Next Steps
8. Choose Create environment.
Next Steps
After you have an environment running an application, you can deploy a new version (p. 124) of the
application or a completely different application at any time. Deploying a new application version is very
quick because it doesn't require provisioning or restarting EC2 instances.
After you've deployed a sample application or two and are ready to start developing locally, see the next
section (p. 713) to set up a .NET development environment.
Setting Up your .NET Development Environment
Set up a .NET development environment to test your application locally prior to deploying it to AWS
Elastic Beanstalk. This topic outlines development environment setup steps and links to installation
pages for useful tools.
For common setup steps and tools that apply to all languages, see Configuring your development
environment for use with AWS Elastic Beanstalk (p. 477).
Sections
•Installing an IDE (p. 713)
•Installing the AWS Toolkit for Visual Studio (p. 713)
If you need to manage AWS resources from within your application, install the AWS SDK for .NET. For
example, you can use Amazon S3 to store and retrieve data.
With the AWS SDK for .NET, you can get started in minutes with a single, downloadable package
complete with Visual Studio project templates, the AWS .NET library, C# code samples, and
documentation. Practical examples are provided in C# for how to use the libraries to build applications.
Online video tutorials and reference documentation are provided to help you learn how to use the
libraries and code samples.
Visit the AWS SDK for .NET homepage for more information and installation instructions.
Installing an IDE
Integrated development environments (IDEs) provide a wide range of features that facilitate application
development. If you haven't used an IDE for .NET development, try Visual Studio Community to get
started.
Visit the Visual Studio Community homepage to download and install Visual Studio Community.
Installing the AWS Toolkit for Visual Studio
The AWS Toolkit for Visual Studio (p. 744) is an open source plug-in for the Visual Studio IDE that
makes it easier for developers to develop, debug, and deploy .NET applications using AWS. Visit the
Toolkit for Visual Studio homepage for installation instructions.
Using the AWS Elastic Beanstalk .NET Platform
AWS Elastic Beanstalk supports a number of platforms for different versions of the .NET programming
framework and Windows Server. See Supported Platforms (p. 30) for a full list.
API Version 2010-12-01
713

AWS Elastic Beanstalk Developer Guide
Configuring your .NET Environment
in the AWS Management Console
Elastic Beanstalk provides configuration options (p. 202) that you can use to customize the software
that runs on the EC2 instances in your Elastic Beanstalk environment. You can configure environment
variables needed by your application, enable log rotation to Amazon S3, and set .NET framework
settings.
Platform-specific configuration options are available in the AWS Management Console for modifying the
configuration of a running environment (p. 213). To avoid losing your environment's configuration when
you terminate it, you can use saved configurations (p. 293) to save your settings and later apply them to
another environment.
To save settings in your source code, you can include configuration files (p. 256). Settings in
configuration files are applied every time you create an environment or deploy your application. You can
also use configuration files to install packages, run scripts, and perform other instance customization
operations during deployments.
Settings applied in the AWS Management Console override the same settings in configuration files, if
they exist. This lets you have default settings in configuration files, and override them with environment
specific settings in the console. For more information about precedence, and other methods of changing
settings, see Configuration Options (p. 202).
Configuring your .NET Environment in the AWS
Management Console
You can use the AWS Management Console to enable log rotation to Amazon S3, configure variables that
your application can read from the environment, and change .NET framework settings.
To configure your .NET environment in the Elastic Beanstalk console
1. Open the Elastic Beanstalk console.
2. Navigate to the management page (p. 65) for your environment.
3. Choose Configuration.
4. In theSoftware Configurationsection, choose the settings icon ( ).
Container Options
•Target .NET runtime – Set to 2.0 to run CLR v2.
•Enable 32-bit applications – Set to True to run 32-bit applications.
Log Options
The Log Options section has two settings:
•Instance profile – Specifies the instance profile that has permission to access the Amazon S3 bucket
associated with your application.
•Enable log file rotation to Amazon S3 – Specifies whether log files for your application's Amazon EC2
instances should be copied to your Amazon S3 bucket associated with your application.
Environment Properties
The Environment Properties section lets you specify environment configuration settings on the Amazon
EC2 instances that are running your application. These settings are passed in as key-value pairs to the
application.
API Version 2010-12-01
714

AWS Elastic Beanstalk Developer Guide
The aws:elasticbeanstalk:container:dotnet:apppool
Namespace
NameValueCollection appConfig = ConfigurationManager.AppSettings;
string endpoint = appConfig["API_ENDPOINT"];
See Environment Properties and Other Software Settings (p. 189) for more information.
The aws:elasticbeanstalk:container:dotnet:apppool
Namespace
You can use a configuration file (p. 256) to set configuration options and perform other instance
configuration tasks during deployments. Configuration options can be defined by the Elastic Beanstalk
service or the platform that you use and are organized into namespaces.
The .NET platform defines options in the aws:elasticbeanstalk:container:dotnet:apppool
namespace that you can use to configure the .NET runtime.
The following example configuration file shows settings for each of the options available in this
namespace:
Example .ebextensions/dotnet-settings.config
option_settings:
aws:elasticbeanstalk:container:dotnet:apppool:
Target Runtime: 2.0
Enable 32-bit Applications: True
Elastic Beanstalk provides many configuration options for customizing your environment. In addition to
configuration files, you can also set configuration options using the console, saved configurations, the EB
CLI, or the AWS CLI. See Configuration Options (p. 202) for more information.
Migrating to v1 Elastic Beanstalk Windows Server
Platforms
Version 1.0.0 of AWS Elastic Beanstalk's Windows Server based platforms was released in October
2015. This version changes the order in which Elastic Beanstalk processes commands in (configuration
files (p. 256)) during environment creation and updates.
Previous platform versions do not have a version number in the solution stack name:
• 64bit Windows Server 2012 R2 running IIS 8.5
• 64bit Windows Server Core 2012 R2 running IIS 8.5
• 64bit Windows Server 2012 running IIS 8
• 64bit Windows Server 2008 R2 running IIS 7.5
In previous versions, the processing order for configuration files is inconsistent. During environment
creation, Container Commands run after the application source is deployed to IIS. During a deployment
to a running environment, container commands run before the new version is deployed. During a scale
up, configuration files are not processed at all.
In addition to this, IIS starts up before container commands run. This behavior has led some customers to
implement workarounds in container commands, pausing the IIS server prior to commands running and
starting it again after they complete.
Version 1 fixes the inconsistency and brings the Windows Server platforms' behavior in line with Elastic
Beanstalk's Linux-based platforms. In v1 platforms, Elastic Beanstalk always runs container commands
prior to starting the IIS server.
API Version 2010-12-01
715

AWS Elastic Beanstalk Developer Guide
Deployment Manifest
Version 1 platforms have a v1 after the Windows Server version:
• 64bit Windows Server 2012 R2 v1.1.0 running IIS 8.5
• 64bit Windows Server Core 2012 R2 v1.1.0 running IIS 8.5
• 64bit Windows Server 2012 v1.1.0 running IIS 8
• 64bit Windows Server 2008 R2 v1.1.0 running IIS 7.5
Additionally, v1 platforms extract the contents of your application source bundle to C:\staging\ prior
to running container commands. After container commands complete, the contents of this folder are
zipped up and deployed to IIS. This workflow allows you to modify the contents of your application
source bundle with commands or a script prior to deployment.
If you currently use container commands on an older platform, remove any commands that you added
to work around the processing inconsistencies when you move to v1. In v1, container commands are
guaranteed to run completely prior to the application source being deployed and IIS starting up, so
you can make any changes to source in C:\staging and modify IIS configuration files during this step
without issue.
For example, you can use the AWS CLI to download a DLL file to your application source from Amazon
S3:
.ebextensions\copy-dll.config
container_commands:
copy-dll:
command: aws s3 cp s3://my-bucket/dlls/large-dll.dll .\lib\
For more information on using configuration files, see Advanced Environment Customization with
Configuration Files (.ebextensions) (p. 256).
Running Multiple Applications and ASP.NET Core
Applications with a Deployment Manifest
You can use a deployment manifest to tell Elastic Beanstalk how to deploy your application. For example,
instead of using MSDeploy to generate a source bundle for a single ASP.NET application that runs at
the root path of your website, you can use a manifest file to run multiple applications at different paths,
or tell Elastic Beanstalk to deploy and run the app with ASP.NET Core. You can also use a deployment
manifest to configure an application pool in which to run your applications.
Deployment manifests add support for .NET Core applications (p. 717) to Elastic Beanstalk. You can
deploy a .NET Standard application without a deployment manifest, but .NET Core applications require a
deployment manifest to run on Elastic Beanstalk. When you use a deployment manifest, you create a site
archive for each application and then bundle the site archives in a second ZIP archive that contains the
deployment manifest.
Deployment manifests also add the ability to run multiple applications at different paths (p. 718). A
deployment manifest defines an array of deployment targets, each with a site archive and a path at
which IIS should run it. For example, you could run a web API at the /api path to serve asynchronous
requests, and a web app at the root path that consumes the API.
You can also use a deployment manifest to create application pools in IIS (p. 719) in which to run one
or more applications. You can configure an application pool to restart your applications periodically, run
32-bit applications, or use a specific version of the .NET Framework runtime.
For full customization, you can write your own deployment scripts (p. 719) in Windows PowerShell and
tell Elastic Beanstalk which scripts to run to install, uninstall, and restart your application.
API Version 2010-12-01
716

AWS Elastic Beanstalk Developer Guide
Deployment Manifest
Deployment manifests and related features require a Windows Server platform configuration version
1.2.0 or newer (p. 715).
Sections
•.NET Core Apps (p. 717)
•Run Multiple Applications (p. 718)
•Configure Application Pools (p. 719)
•Define Custom Deployments (p. 719)
.NET Core Apps
You can use a deployment manifest to run .NET Core applications on Elastic Beanstalk. .NET Core is
a cross-platform version of .NET that comes with a commandline tool (dotnet) that you can use to
generate an application, run it locally, and prepare it for publishing.
Note
See Deploying an ASP.NET Core Application with AWS Elastic Beanstalk (p. 734) for a tutorial
and sample application that use a deployment manifest to run a .NET Core application on Elastic
Beanstalk.
To run a .NET Core application on Elastic Beanstalk, run dotnet publish and package the output in
a ZIP archive, not including any containing directories. Place the site archive in a source bundle with a
deployment manifest with a deployment target of type aspNetCoreWeb.
The following deployment manifest runs a .NET Core application from a site archive named dotnet-
core-app.zip at the root path.
Example aws-windows-deployment-manifest.json - .NET Core
{
"manifestVersion": 1,
"deployments": {
"aspNetCoreWeb": [
{
"name": "my-dotnet-core-app",
"parameters": {
"archive": "dotnet-core-app.zip",
"iisPath": "/"
}
}
]
}
}
Bundle the manifest and site archive in a ZIP archive to create a source bundle.
Example dotnet-core-bundle.zip
.
|-- aws-windows-deployment-manifest.json
`-- dotnet-core-app.zip
The site archive contains the compiled application code, dependencies, and web.config file.
Example dotnet-core-app.zip
.
|-- Microsoft.AspNetCore.Hosting.Abstractions.dll
API Version 2010-12-01
717

AWS Elastic Beanstalk Developer Guide
Deployment Manifest
|-- Microsoft.AspNetCore.Hosting.Server.Abstractions.dll
|-- Microsoft.AspNetCore.Hosting.dll
|-- Microsoft.AspNetCore.Http.Abstractions.dll
|-- Microsoft.AspNetCore.Http.Extensions.dll
|-- Microsoft.AspNetCore.Http.Features.dll
|-- Microsoft.AspNetCore.Http.dll
|-- Microsoft.AspNetCore.HttpOverrides.dll
|-- Microsoft.AspNetCore.Server.IISIntegration.dll
|-- Microsoft.AspNetCore.Server.Kestrel.dll
|-- Microsoft.AspNetCore.WebUtilities.dll
|-- Microsoft.Extensions.Configuration.Abstractions.dll
|-- Microsoft.Extensions.Configuration.EnvironmentVariables.dll
|-- Microsoft.Extensions.Configuration.dll
|-- Microsoft.Extensions.DependencyInjection.Abstractions.dll
|-- Microsoft.Extensions.DependencyInjection.dll
|-- Microsoft.Extensions.FileProviders.Abstractions.dll
|-- Microsoft.Extensions.FileProviders.Physical.dll
|-- Microsoft.Extensions.FileSystemGlobbing.dll
|-- Microsoft.Extensions.Logging.Abstractions.dll
|-- Microsoft.Extensions.Logging.dll
|-- Microsoft.Extensions.ObjectPool.dll
|-- Microsoft.Extensions.Options.dll
|-- Microsoft.Extensions.PlatformAbstractions.dll
|-- Microsoft.Extensions.Primitives.dll
|-- Microsoft.Net.Http.Headers.dll
|-- System.Diagnostics.Contracts.dll
|-- System.Net.WebSockets.dll
|-- System.Text.Encodings.Web.dll
|-- dotnet-core-app.deps.json
|-- dotnet-core-app.dll
|-- dotnet-core-app.pdb
|-- dotnet-core-app.runtimeconfig.json
`-- web.config
See the tutorial (p. 734) for a full example.
Run Multiple Applications
You can run multiple applications with a deployment manifest by defining multiple deployment targets.
The following deployment manifest runs a .NET Standard web application at the root path using MS
Deploy, and an ASP.NET Core web application at /admin. The front-end web application is a standard MS
Deploy source bundle (p. 63) named webapp.zip, and the admin application is a .NET Core site archive
named admin.zip.
Example aws-windows-deployment-manifest.json - multiple apps
{
"manifestVersion": 1,
"deployments":
{
"msDeploy":
[{
"name": "Web app",
"parameters":
{
"appBundle": "webapp.zip",
"iisPath": "/",
"iisWebSite": "Default Web Site"
}
}],
"aspNetCoreWeb":
[{
API Version 2010-12-01
718

AWS Elastic Beanstalk Developer Guide
Deployment Manifest
"name": "Admin app",
"parameters":
{
"appBundle": "admin.zip",
"iisPath": "/admin",
"iisWebSite": "Default Web Site"
}
}]
}
}
A sample application with multiple applications is available here:
•Deployable source bundle - dotnet-multiapp-sample-bundle-v1.zip
•Source code - dotnet-multiapp-sample-source-v1.zip
Configure Application Pools
You can use a deployment manifest to configure an application pool in IIS and use it to run one or more
applications.
The following deployment manifest configures an application pool that restarts its applications every 10
minutes, and attaches it to a .NET Standard web application that runs at the root path.
Example aws-windows-deployment-manifest.json - app pool
{
"manifestVersion": 1,
"iisConfig": {
"appPools": [
{
"name": "App pool",
"recycling": {
"regularTimeInterval": 10
}
}
]
},
"deployments": {
"msDeploy": [
{
"name": "Web app",
"parameters": {
"archive": "site.zip",
"iisPath": "/",
"appPool": "MyPool"
}
}
]
}
}
The appPools block under iisConfig defines the application pool.
Each deployment in the deployments block specifies an archive, a path to run it at, and an appPool in
which to run it.
Define Custom Deployments
For even more control, you can completely customize an application deployment by defining a custom
deployment.
API Version 2010-12-01
719

AWS Elastic Beanstalk Developer Guide
Tutorial - ASP.NET MVC5
The following deployment manifest tells Elastic Beanstalk to run an install script named
siteInstall.ps1 to install the website during instance launch and deployments, run an uninstall
script prior to installing a new version during a deployment, and a restart script to restart the
application when you choose Restart App Server (p. 68) in the management console.
Example aws-windows-deployment-manifest.json - custom deployment
{
"manifestVersion": 1,
"deployments": {
"custom": [
{
"name": "Custom site",
"scripts": {
"install": {
"file": "siteInstall.ps1"
},
"restart": {
"file": "siteRestart.ps1"
},
"uninstall": {
"file": "siteUninstall.ps1"
}
}
}
]
}
}
Include any artifacts required to run the application in your source bundle with the manifest and scripts.
Example custom-site-bundle.zip
.
|-- aws-windows-deployment-manifest.json
|-- siteInstall.ps1
|-- siteRestart.ps1
|-- siteUninstall.ps1
`-- site-contents.zip
Tutorial: How to Deploy a .NET Sample Application
Using AWS Elastic Beanstalk
In this tutorial, you will learn how to deploy a .NET sample application to AWS Elastic Beanstalk using the
AWS Toolkit for Visual Studio.
Note
This tutorial uses a sample ASP.NET Web application that you can download here. It also uses
the Toolkit for Visual Studio and was tested using Visual Studio Professional 2012.
Create the Environment
First, use the Create New Application wizard in the Elastic Beanstalk console to create the application
environment.
API Version 2010-12-01
720
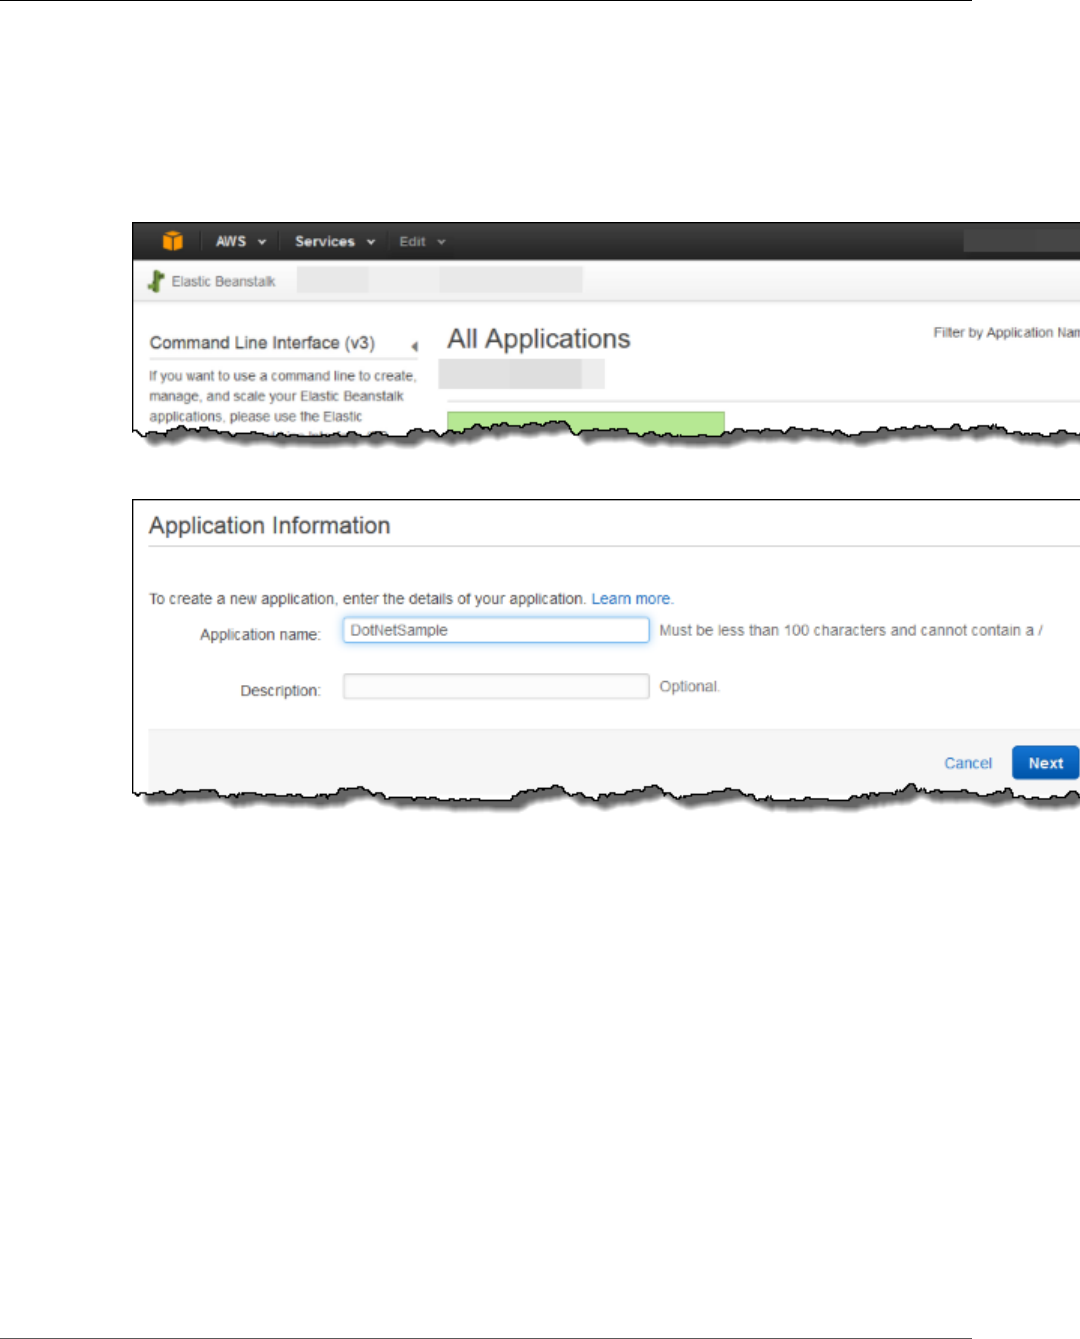
AWS Elastic Beanstalk Developer Guide
Create the Environment
To create the environment
1. Open the Elastic Beanstalk console.
Note
If the New Environment wizard does not show the screens described below, see The Old
New Environment Wizard (p. 101).
2. Choose Create New Application.
3. On the Application Information page, enter an Application name, and then choose Next.
4. On the New Environment page, choose Create web server.
API Version 2010-12-01
721
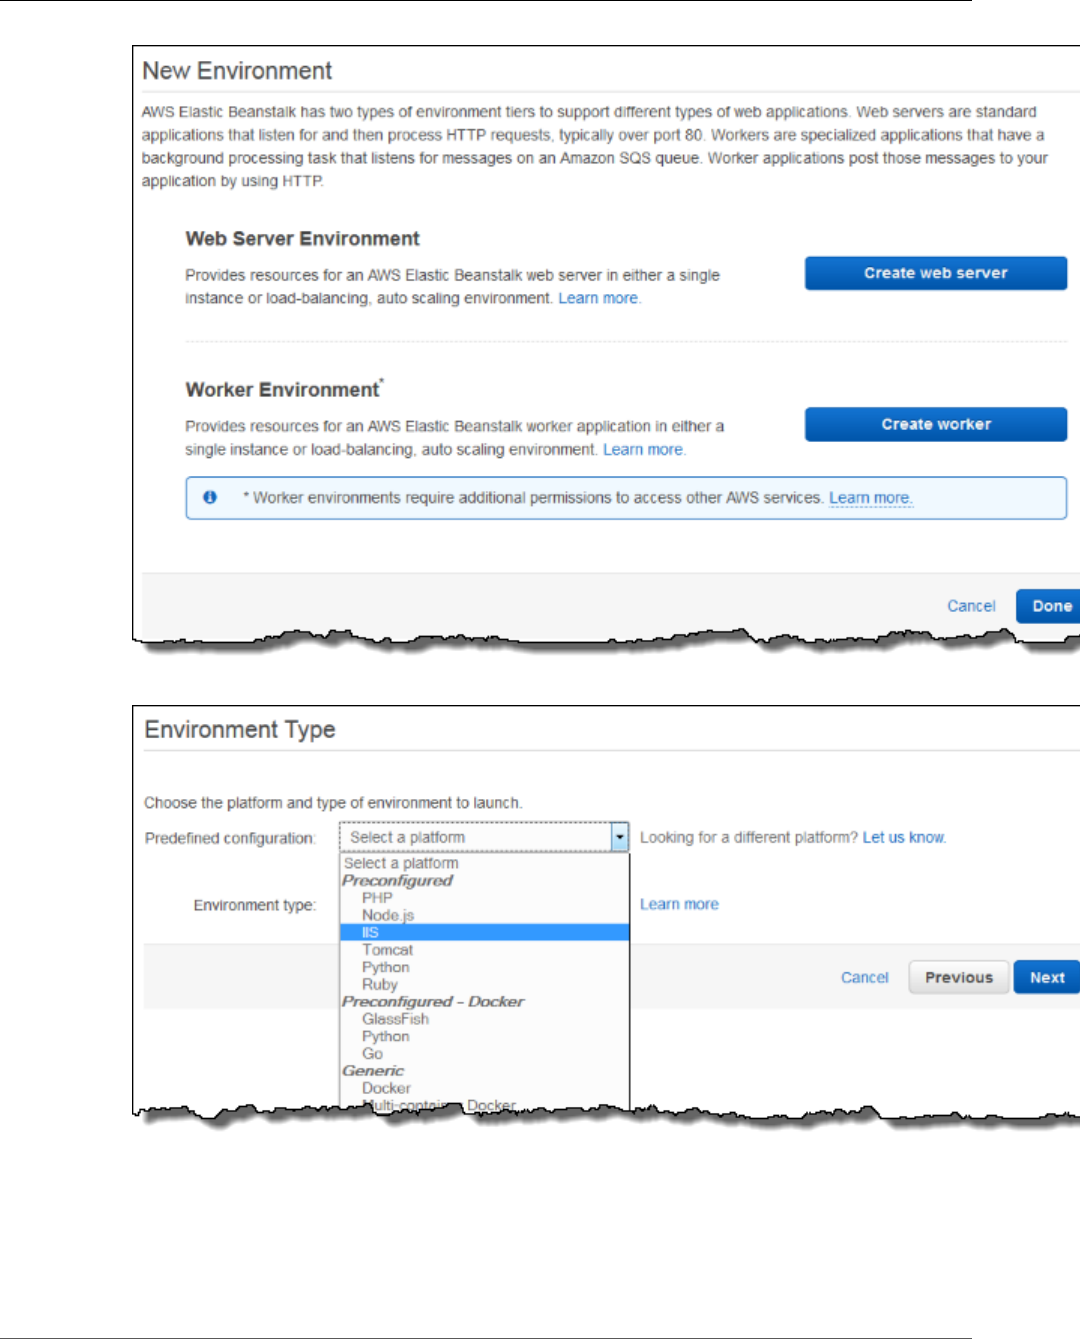
AWS Elastic Beanstalk Developer Guide
Create the Environment
5. On the Environment Type page, for Predefined configuration, choose IIS.
6. For Environment type, accept the default, Load balancing, auto scaling, and then choose Next.
API Version 2010-12-01
722
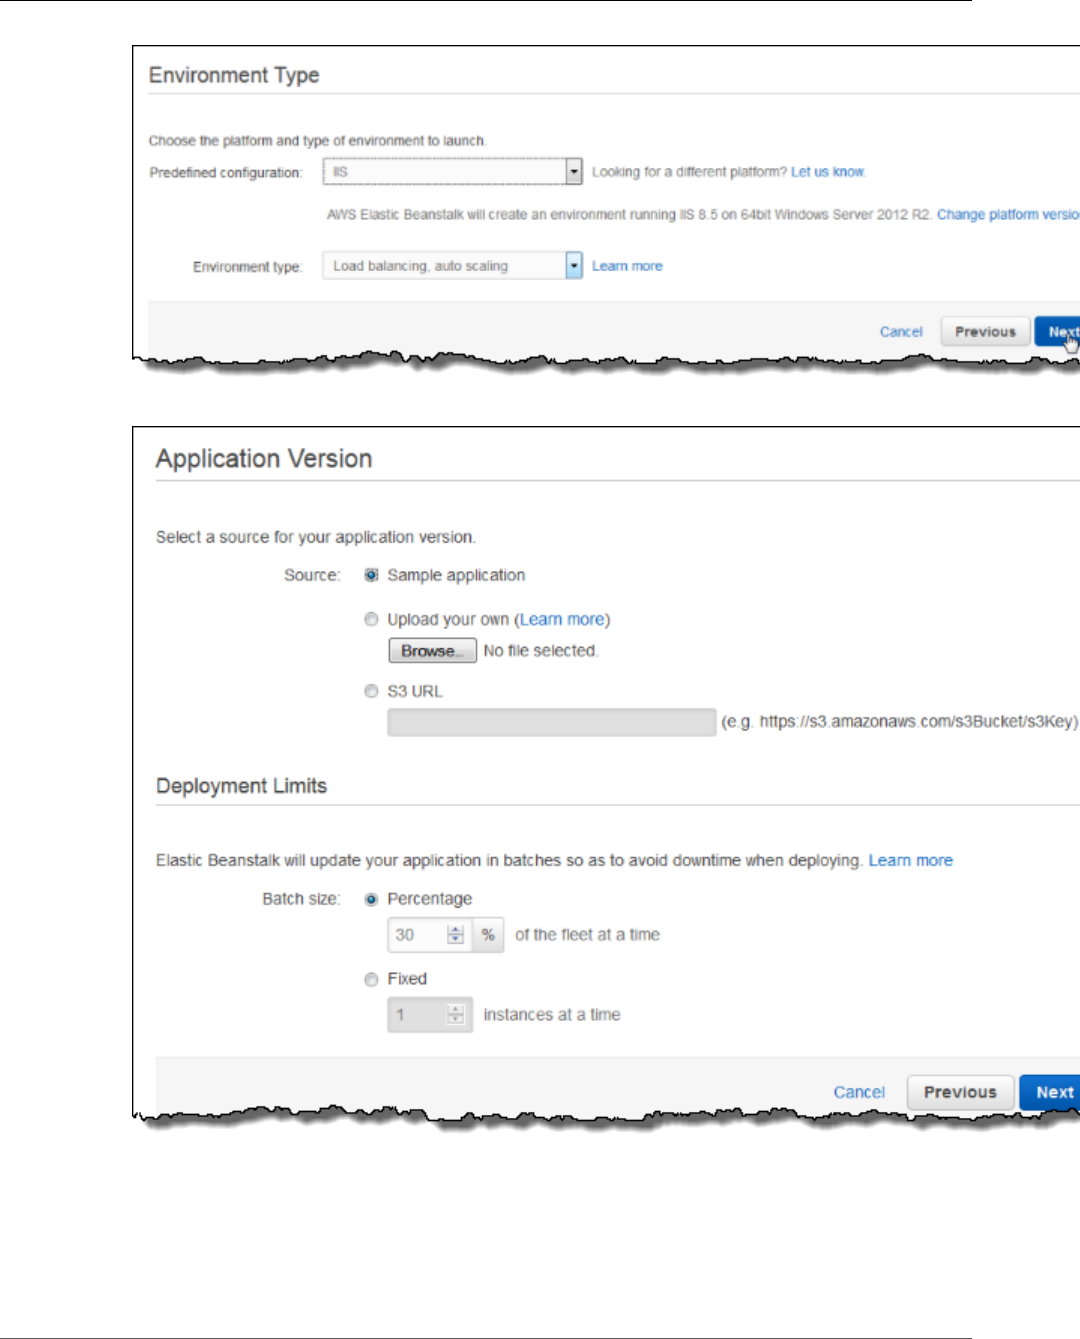
AWS Elastic Beanstalk Developer Guide
Create the Environment
7. On the Application Version page, for Source, choose Sample application, and then choose Next.
8. On the Environment Information page, accept all defaults, and then choose Next.
API Version 2010-12-01
723

AWS Elastic Beanstalk Developer Guide
Create the Environment
9. On the Additional Resources page, choose Create an RDS DB instance with this environment, and
then choose Next.
10. On the Configuration Details page, for Instance type, choose t2.micro.
Accept the default values for the other fields, and then choose Next.
API Version 2010-12-01
724

AWS Elastic Beanstalk Developer Guide
Create the Environment
11. On the Environment Tags page, leave both the Key and the Value fields blank, and then choose
Next.
12. Choose Next on the Permissions page. If you don't have a default instance profile and service
role (p. 21), Elastic Beanstalk creates them for you.
13. On the RDS Configuration page, for DB engine, choose sqlserver-ex. For Instance class, choose
db.t2.micro, and then increase the Allocated storage to 20 GB.
API Version 2010-12-01
725
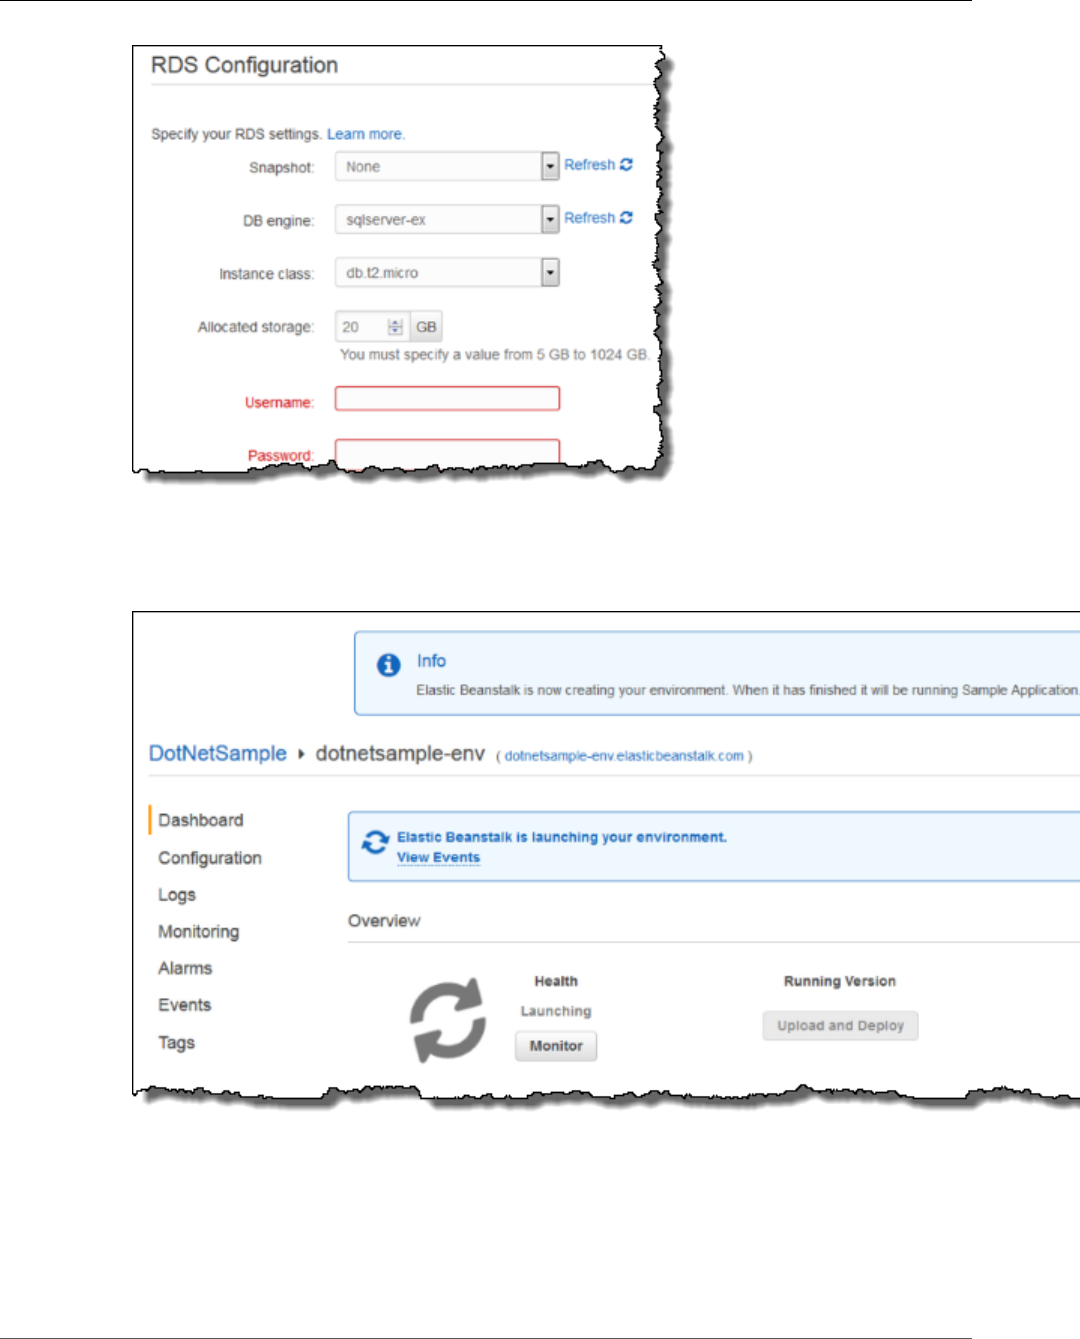
AWS Elastic Beanstalk Developer Guide
Publish Your Application to Elastic Beanstalk
14. Create a Username and Password, and then choose Next.
15. On the Review Information page, review the settings, and then choose Launch.
To check launch status, see the Dashboard page in the Elastic Beanstalk console.
Publish Your Application to Elastic Beanstalk
Use the AWS Toolkit for Visual Studio to publish your application to Elastic Beanstalk.
API Version 2010-12-01
726
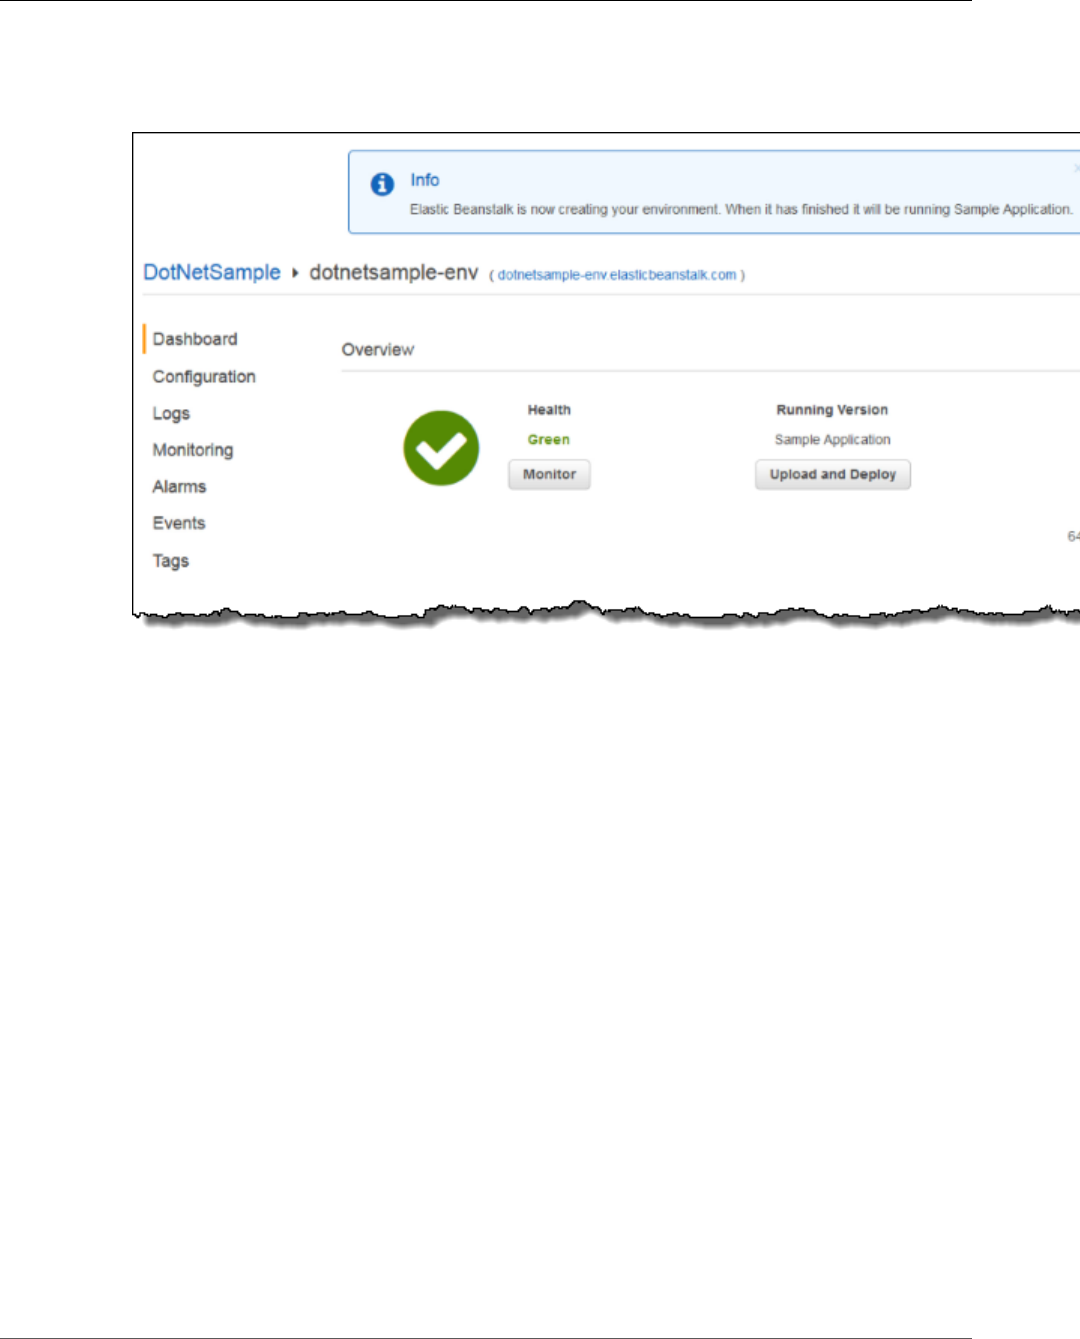
AWS Elastic Beanstalk Developer Guide
Publish Your Application to Elastic Beanstalk
To publish your application to Elastic Beanstalk
1. Ensure that your environment launched successfully by checking the Health status in the Elastic
Beanstalk console. It should be Green.
2. In Visual Studio, open BeanstalkDotNetSample.sln.
Note
If you haven't done so already, you can get the sample here.
3. On the View menu, choose Solution Explorer.
4. Expand Solution ‘BeanstalkDotNetSample’ (2 projects).
5. Open the context (right-click) menu for MVC5App, and then choose Publish to AWS.
API Version 2010-12-01
727
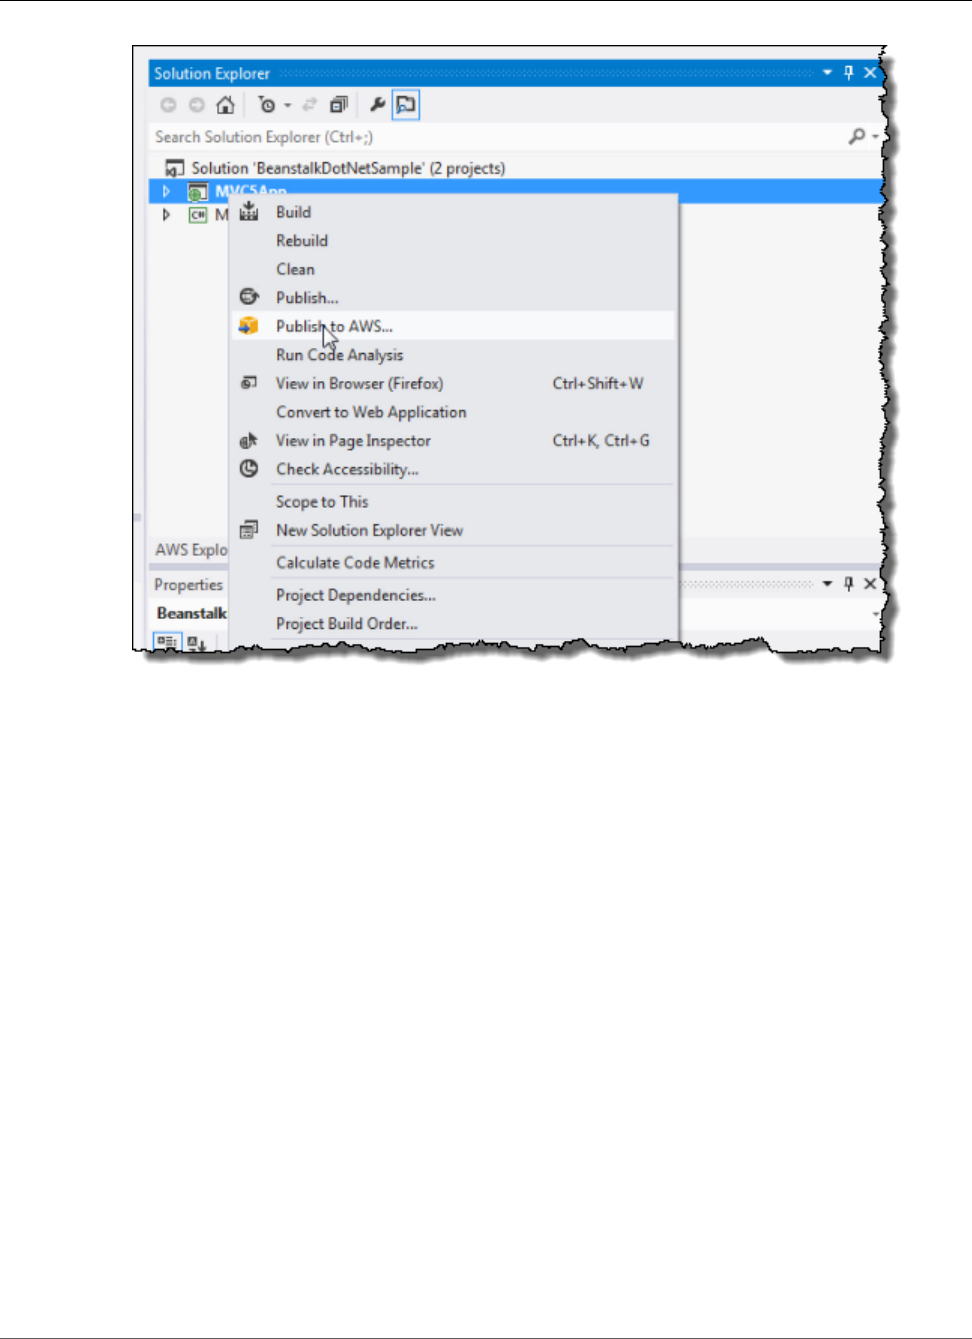
AWS Elastic Beanstalk Developer Guide
Publish Your Application to Elastic Beanstalk
6. On the Publish to AWS Elastic Beanstalk page, for Deployment Target, choose the environment
that you just created, and then choose Next.
API Version 2010-12-01
728
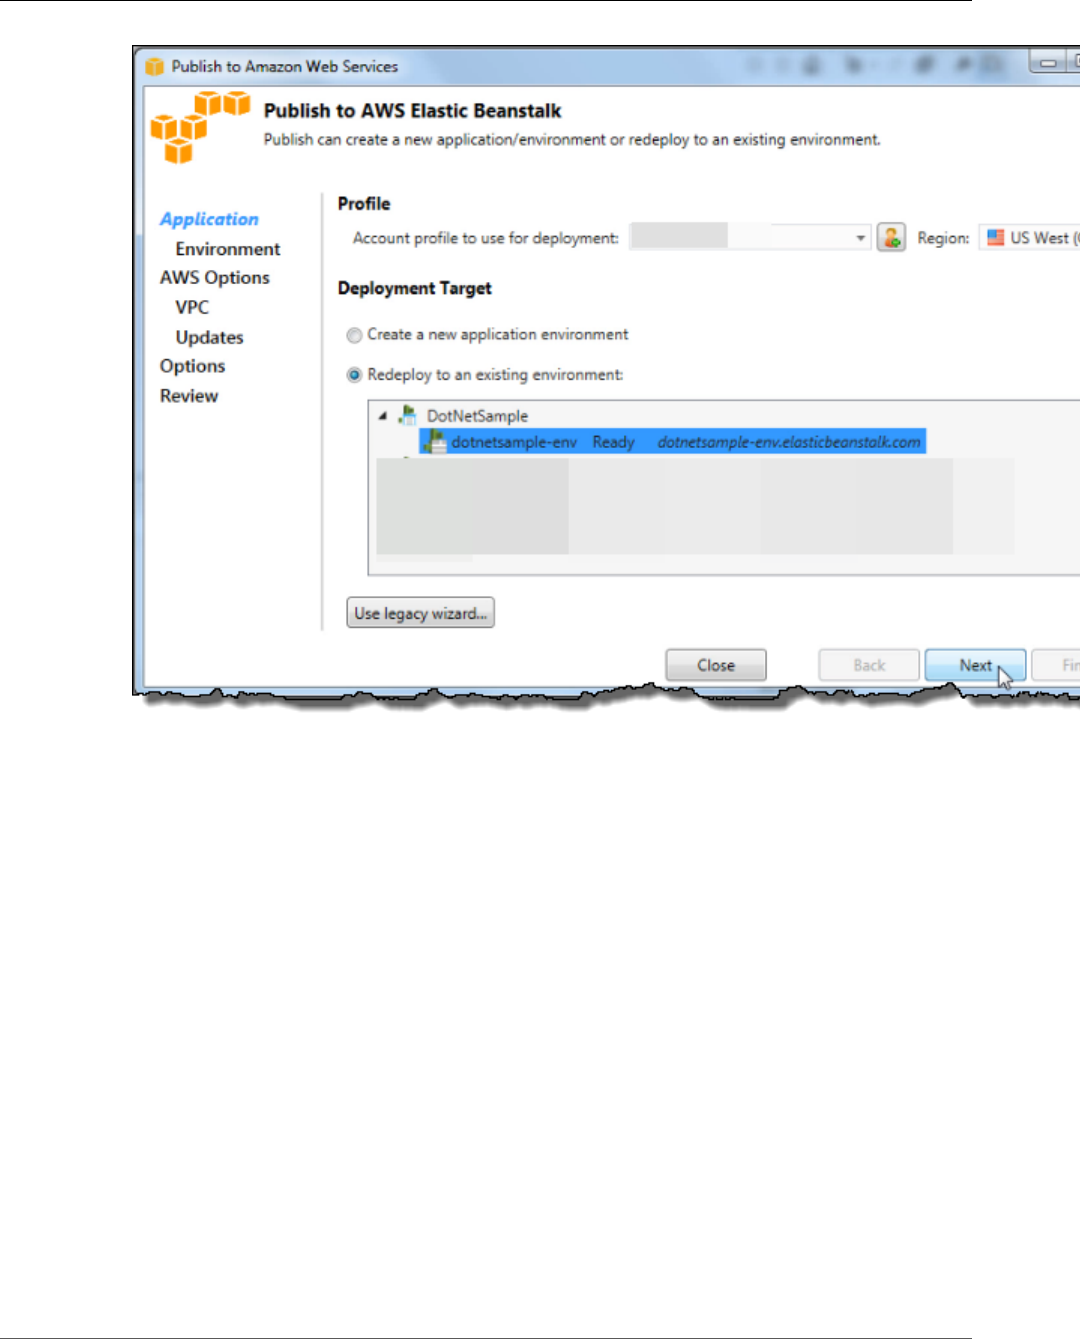
AWS Elastic Beanstalk Developer Guide
Publish Your Application to Elastic Beanstalk
7. On the Application Options page, accept all of the defaults, and then choose Next.
API Version 2010-12-01
729
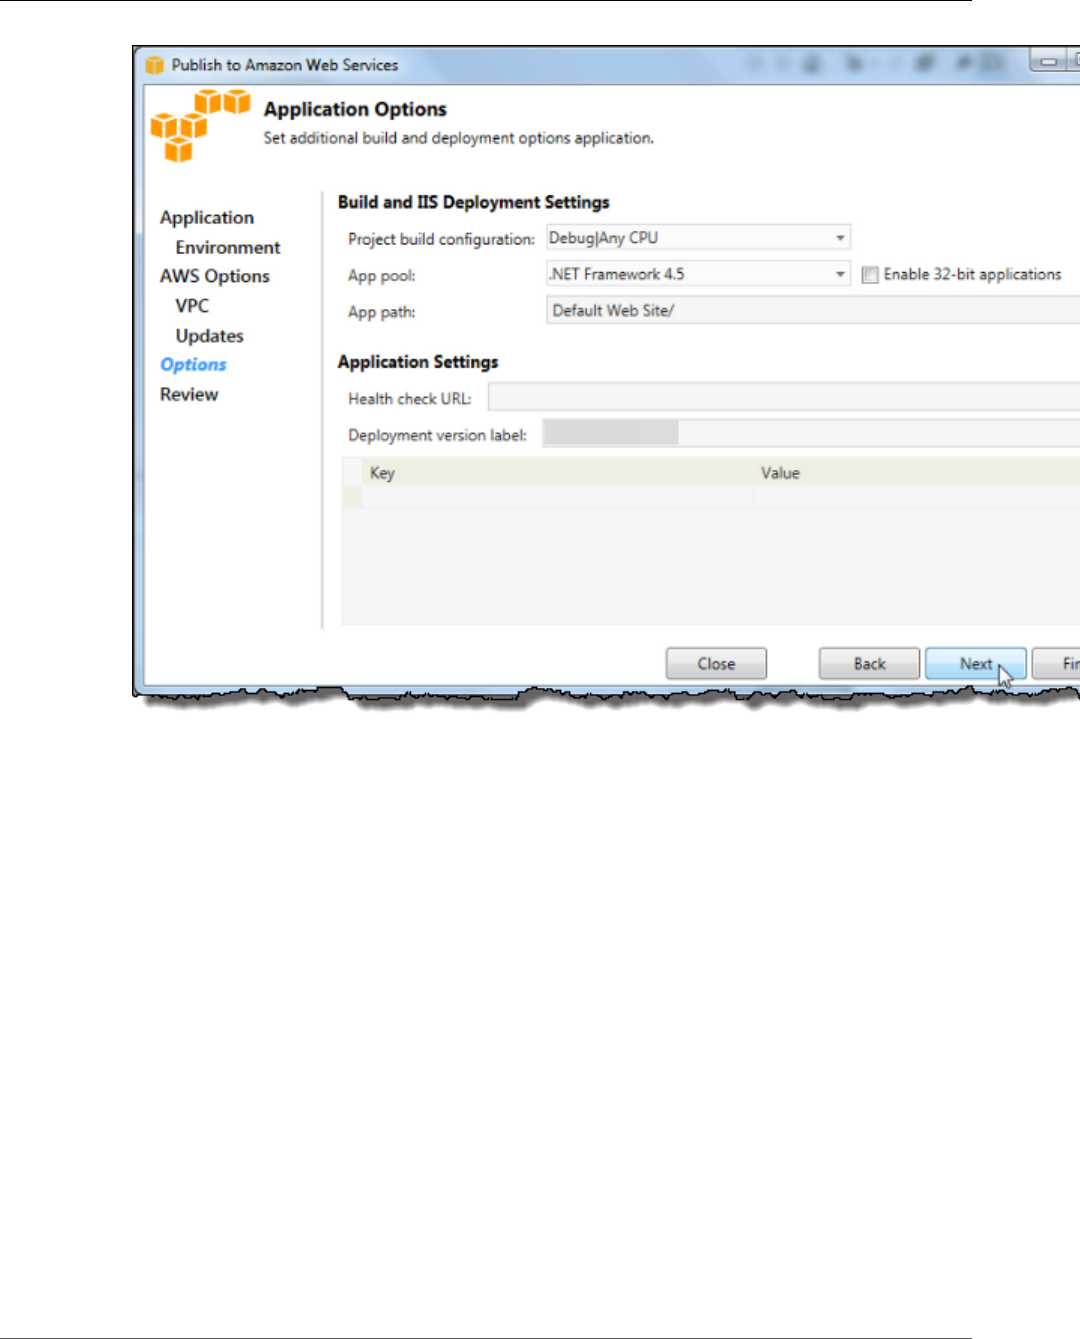
AWS Elastic Beanstalk Developer Guide
Publish Your Application to Elastic Beanstalk
8. On the Review page, choose Deploy.
API Version 2010-12-01
730
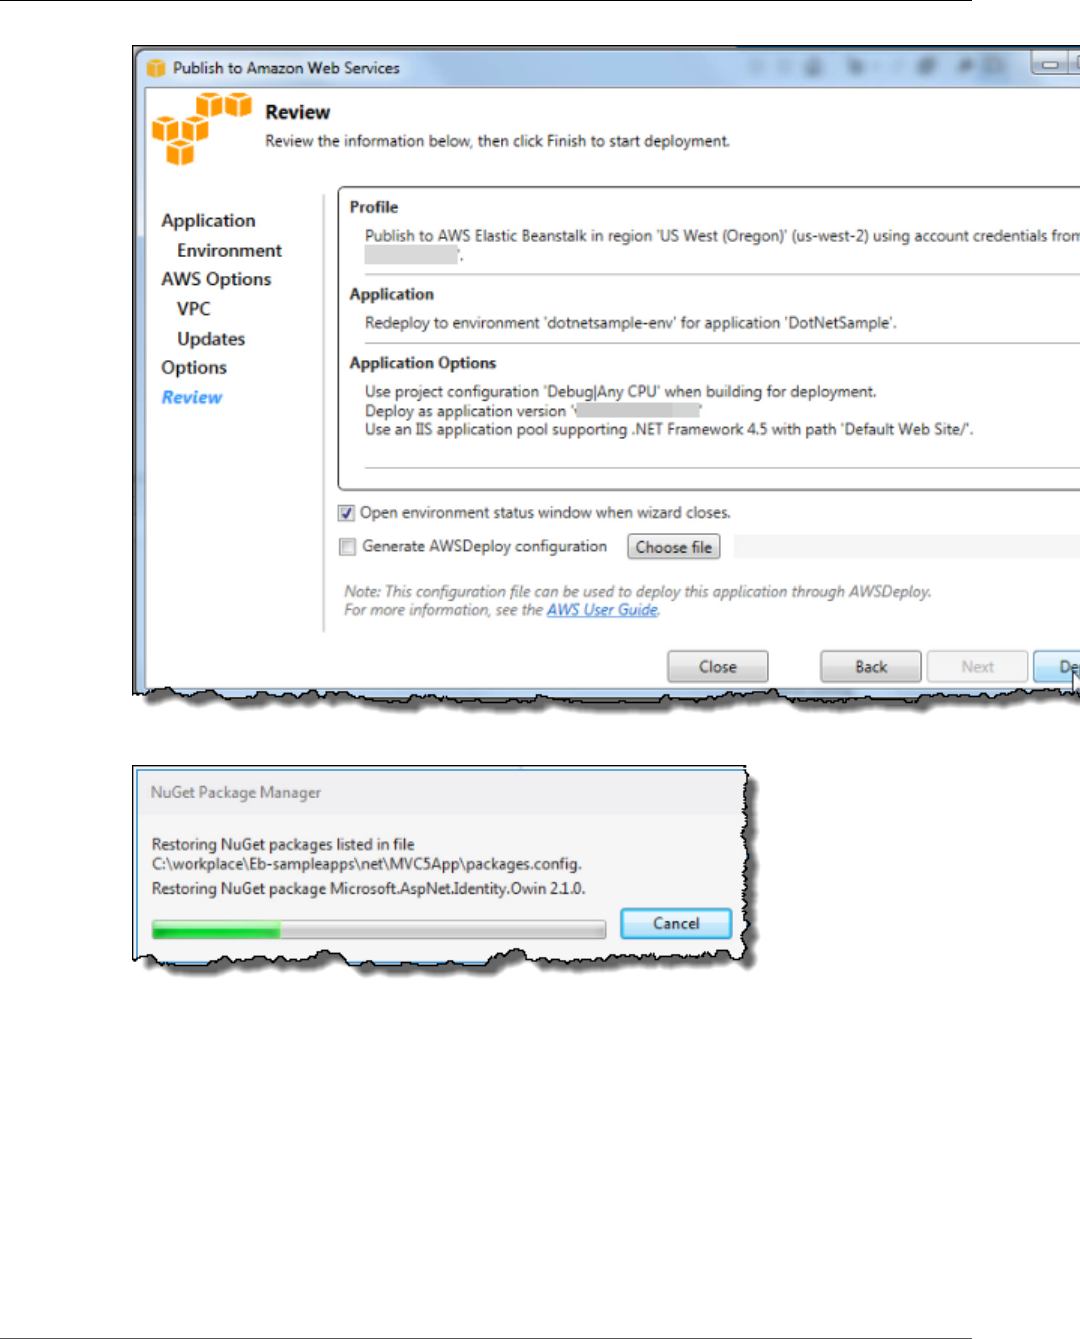
AWS Elastic Beanstalk Developer Guide
Publish Your Application to Elastic Beanstalk
9. If you want to monitor deployment status, use the NuGet Package Manager in Visual Studio.
When the application has successfully been deployed, the Output box displays completed
successfully.
API Version 2010-12-01
731
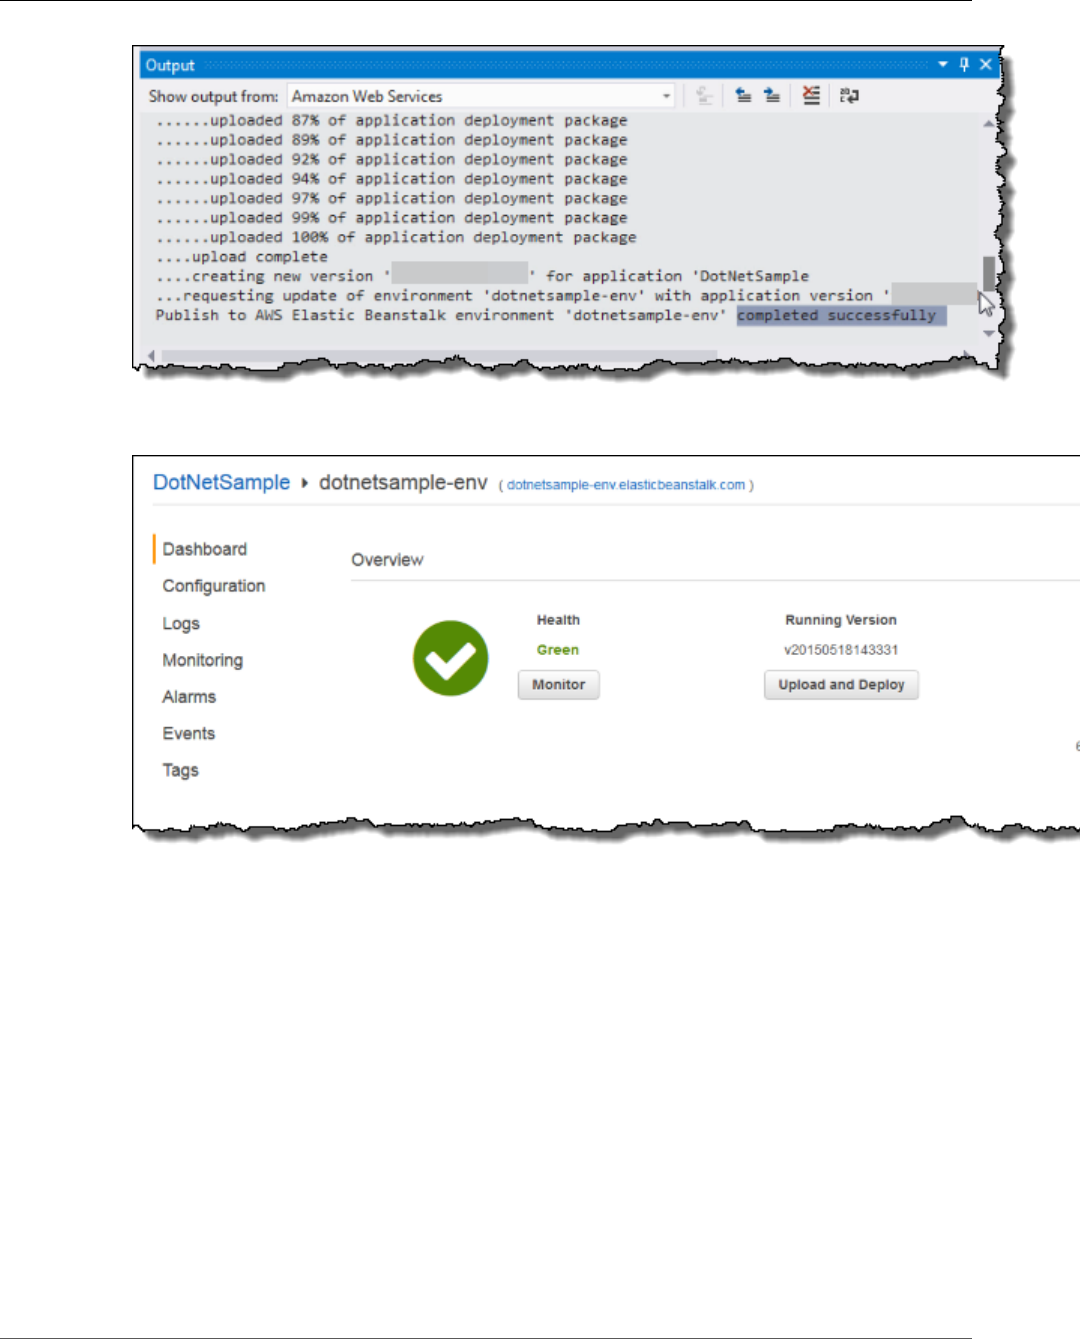
AWS Elastic Beanstalk Developer Guide
Publish Your Application to Elastic Beanstalk
10. Return to the Elastic Beanstalk console and choose the name of the application, which appears next
to the environment name.
Your ASP.NET application opens in a new tab.
API Version 2010-12-01
732
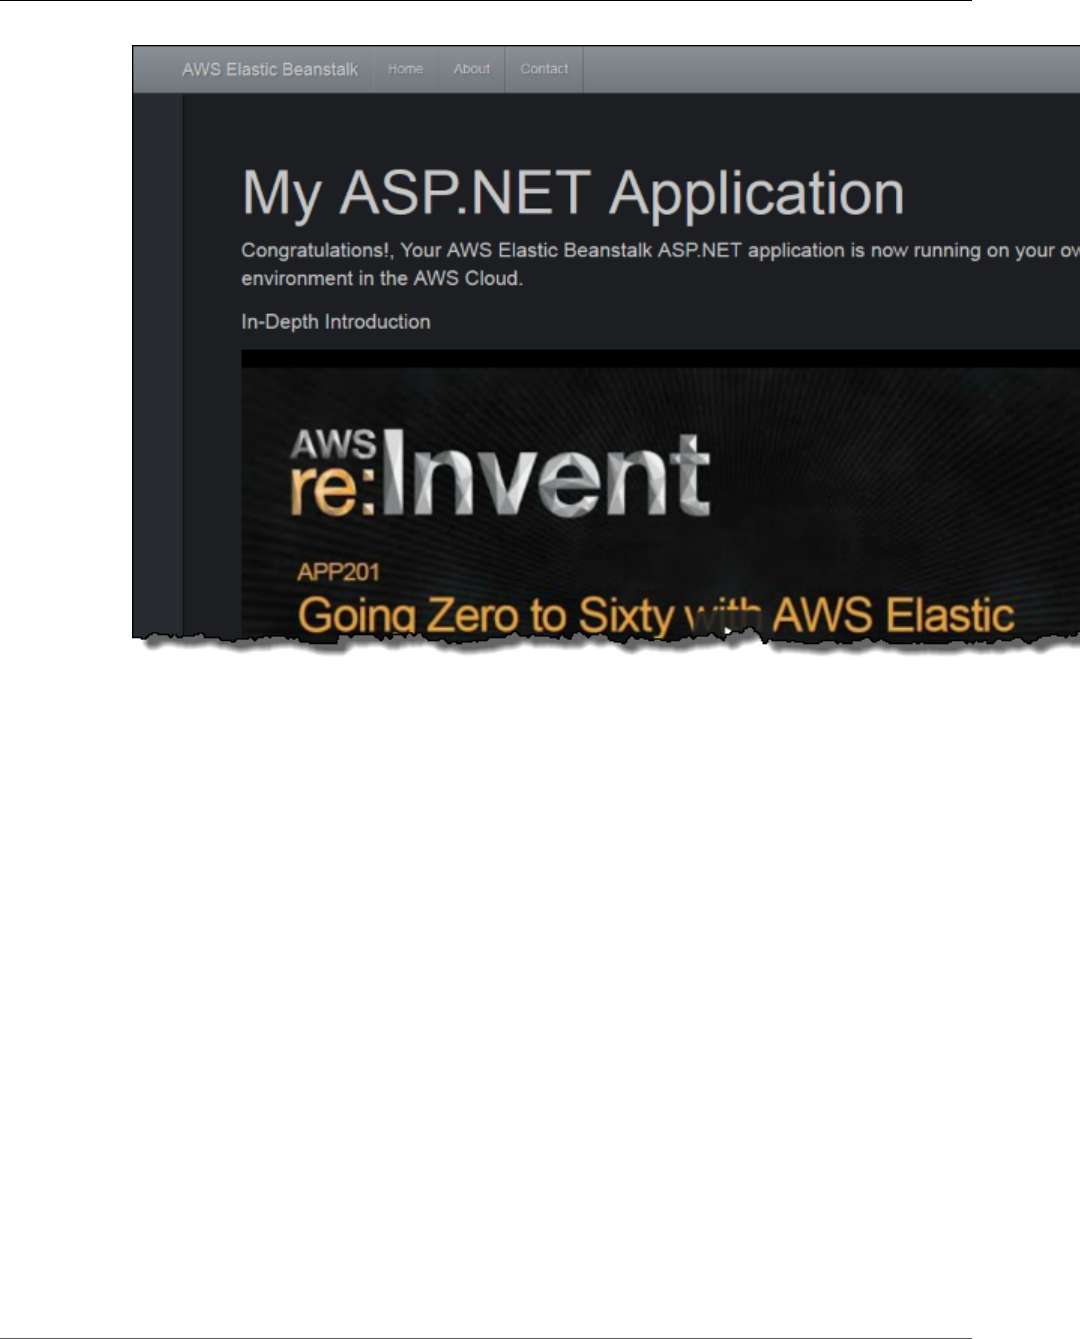
AWS Elastic Beanstalk Developer Guide
Clean Up Your AWS Resources
Clean Up Your AWS Resources
After your application has deployed successfully, learn more about Elastic Beanstalk by watching the
video in the application.
If you are done working with Elastic Beanstalk for now, you can terminate your .NET environment.
To terminate your Elastic Beanstalk environment
1. Open the Elastic Beanstalk console.
2. Navigate to the management page (p. 65) for your environment.
3. Choose Actions and then choose Terminate Environment.
Elastic Beanstalk cleans up all AWS resources associated with your environment, including EC2 instances,
DB instance, load balancer, security groups, CloudWatch alarms, etc.
For more information, see Creating and Deploying Elastic Beanstalk Applications in .NET Using
AWS Toolkit for Visual Studio (p. 710), the AWS .NET Development Blog , or the AWS Application
Management Blog.
API Version 2010-12-01
733

AWS Elastic Beanstalk Developer Guide
Tutorial - .NET Core
Deploying an ASP.NET Core Application with AWS
Elastic Beanstalk
In this tutorial, you walk through the process of building a new ASP.NET Core application and deploying
it to Elastic Beanstalk. You use the .NET Core SDK's dotnet command line tool to generate a basic
command line .NET Core application, install dependencies, compile code, and run applications locally.
Next, you modify the default Program class, and add an ASP.NET Startup class and configuration
files to make an application that serves HTTP requests with ASP.NET and IIS. The dotnet publish
command generates compiled classes and dependencies that you can bundle with a web.config file to
create a site archive that you can deploy to an Elastic Beanstalk environment.
Elastic Beanstalk uses a deployment manifest (p. 716) to configure deployments for .NET Core
applications, custom applications, and multiple .NET Core or MSBuild applications on a single server.
To deploy a .NET Core application to a Windows Server environment, you add the site archive to an
application source bundle with a deployment manifest. The deployment manifest tells Elastic Beanstalk
the path at which the site should run and can be used to configure application pools and run multiple
applications at different paths.
Note
The application source code is available here: dotnet-core-tutorial-source.zip
The deployable source bundle is available here: dotnet-core-tutorial-bundle.zip
Sections
•Prerequisites (p. 734)
•Generate a .NET Core Project (p. 735)
•Launch an Elastic Beanstalk Environment (p. 736)
•Update the Source Code (p. 736)
•Deploy Your Application (p. 739)
•Clean Up (p. 741)
•Next Steps (p. 741)
Prerequisites
This tutorial uses the .NET Core SDK to generate a basic .NET Core application, run it locally, and build a
deployable package.
Requirements
• .NET Core (x64) 1.0.1, 2.0.0, or newer
To install the .NET Core SDK
1. Download the installer from microsoft.com/net/core. Choose Windows, then under Select your
environment choose Command line / other. Choose Download .NET Core SDK.
2. Run the installer and follow the instructions.
This tutorial uses a command line ZIP utility to create a source bundle that you can deploy to Elastic
Beanstalk. To use the zip command in Windows, you can install UnxUtils, a lightweight collection of
useful command line utilities like zip and ls. (Alternatively, you can use Windows Explorer (p. 59) or any
other ZIP utility to create source bundle archives.)
API Version 2010-12-01
734

AWS Elastic Beanstalk Developer Guide
Generate a .NET Core Project
To install UnxUtils
1. Download UnxUtils.
2. Extract the archive to a local directory. For example, C:\Program Files (x86).
3. Add the path to the binaries to your Windows PATH user variable. For example, C:\Program Files
(x86)\UnxUtils\usr\local\wbin.
4. Open a new command prompt window and run the zip command to verify that it works:
> zip
Copyright (C) 1990-1999 Info-ZIP
Type 'zip "-L"' for software license.
...
Generate a .NET Core Project
Use the dotnet command line tool to generate a new C# .NET Core project and run it locally. The
default .NET Core application is a command line utility that prints Hello World! and then exits.
To generate a new .NET Core project
1. Open a new command prompt window and navigate to your user folder.
> cd %USERPROFILE%
2. Use the dotnet new command to generate a new .NET Core project.
C:\Users\username> dotnet new console -o dotnet-core-tutorial
Content generation time: 65.0152 ms
The template "Console Application" created successfully.
C:\Users\username> cd dotnet-core-tutorial
3. Use the dotnet restore command to install dependencies.
C:\Users\username\dotnet-core-tutorial> dotnet restore
Restoring packages for C:\Users\username\dotnet-core-tutorial\dotnet-core-
tutorial.csproj...
Generating MSBuild file C:\Users\username\dotnet-core-tutorial\obj\dotnet-core-
tutorial.csproj.nuget.g.props.
Generating MSBuild file C:\Users\username\dotnet-core-tutorial\obj\dotnet-core-
tutorial.csproj.nuget.g.targets.
Writing lock file to disk. Path: C:\Users\username\dotnet-core-tutorial\obj
\project.assets.json
Restore completed in 1.25 sec for C:\Users\username\dotnet-core-tutorial\dotnet-core-
tutorial.csproj.
NuGet Config files used:
C:\Users\username\AppData\Roaming\NuGet\NuGet.Config
C:\Program Files (x86)\NuGet\Config\Microsoft.VisualStudio.Offline.config
Feeds used:
https://api.nuget.org/v3/index.json
C:\Program Files (x86)\Microsoft SDKs\NuGetPackages\
4. Use the dotnet run command to build and run the application locally.
C:\Users\username\dotnet-core-tutorial> dotnet run
Hello World!
API Version 2010-12-01
735

AWS Elastic Beanstalk Developer Guide
Launch an Elastic Beanstalk Environment
The default application prints Hello World! to the console and exits. Before you deploy the
application to Elastic Beanstalk, you update it to serve HTTP requests with ASP.NET and IIS.
Launch an Elastic Beanstalk Environment
Use the AWS Management Console to launch an Elastic Beanstalk environment. Choose the Windows
Server 2012R2 v1.2.0 platform configuration and accept the default settings and sample code. After you
launch and configure your environment, you can deploy new source code at any time.
To launch an environment (console)
1. Open the Elastic Beanstalk console using this preconfigured link:
console.aws.amazon.com/elasticbeanstalk/home#/newApplication?
applicationName=tutorials&environmentType=LoadBalanced
2. For Platform, choose the platform that matches the language used by your application.
3. For Application code, choose Sample application.
4. Choose Review and launch.
5. Review all options. When you're satisfied with them, choose Create app.
Environment creation takes about 10 minutes. During this time you can update your source code.
Update the Source Code
Update the default application to use ASP.NET and IIS. ASP.NET is the website framework for .NET. IIS is
the web server that runs the application on the EC2 instances in your Elastic Beanstalk environment.
Note
The source code is available here: dotnet-core-tutorial-source.zip
To add ASP.NET and IIS support to your code
1. Update Program.cs to run a web host builder.
Example c:\users\username\dotnet-core-tutorial\Program.cs
using System;
using Microsoft.AspNetCore.Hosting;
using System.IO;
namespace aspnetcoreapp
{
public class Program
{
public static void Main(string[] args)
{
var host = new WebHostBuilder()
.UseKestrel()
.UseContentRoot(Directory.GetCurrentDirectory())
.UseIISIntegration()
.UseStartup<Startup>()
.Build();
host.Run();
}
}
}
2. Add a Startup.cs file to run an ASP.NET website.
API Version 2010-12-01
736

AWS Elastic Beanstalk Developer Guide
Update the Source Code
Example c:\users\username\dotnet-core-tutorial\Startup.cs
using System;
using Microsoft.AspNetCore.Builder;
using Microsoft.AspNetCore.Hosting;
using Microsoft.AspNetCore.Http;
namespace aspnetcoreapp
{
public class Startup
{
public void Configure(IApplicationBuilder app)
{
app.Run(context =>
{
return context.Response.WriteAsync("Hello from ASP.NET Core!");
});
}
}
}
3. Add a web.config file to configure the IIS server.
Example c:\users\username\dotnet-core-tutorial\web.config
<?xml version="1.0" encoding="utf-8"?>
<configuration>
<system.webServer>
<handlers>
<add name="aspNetCore" path="*" verb="*" modules="AspNetCoreModule"
resourceType="Unspecified" />
</handlers>
<aspNetCore processPath="dotnet" arguments=".\dotnet-core-
tutorial.dll" stdoutLogEnabled="false" stdoutLogFile=".\logs\stdout"
forwardWindowsAuthToken="false" />
</system.webServer>
</configuration>
4. Update dotnet-core-tutorial.csproj to include IIS middleware and include the web.config
file in the output of dotnet publish.
Example c:\users\username\dotnet-core-tutorial\dotnet-core-tutorial.csproj
<Project Sdk="Microsoft.NET.Sdk">
<PropertyGroup>
<OutputType>Exe</OutputType>
<TargetFramework>netcoreapp1.1</TargetFramework>
</PropertyGroup>
<ItemGroup>
<PackageReference Include="Microsoft.AspNetCore.Server.Kestrel" />
</ItemGroup>
<ItemGroup>
<PackageReference Include="Microsoft.AspNetCore.Server.IISIntegration" />
</ItemGroup>
<ItemGroup>
<None Include="web.config" CopyToPublishDirectory="Always" />
</ItemGroup>
API Version 2010-12-01
737

AWS Elastic Beanstalk Developer Guide
Update the Source Code
</Project>
Next, you install the new dependencies and run the ASP.NET website locally.
To run the website locally
1. Use the dotnet restore command to install dependencies.
2. Use the dotnet run command to build and run the app locally.
3. Open localhost:5000 to view the site.
To run the application on a web server, you need to bundle the compiled source code with a
web.config configuration file and runtime dependencies. The dotnet tool provides a publish
command that gathers these files in a directory based on the configuration in dotnet-core-
tutorial.csproj.
To build your website
• Use the dotnet publish command to output compiled code and dependencies to a folder named
site.
C:\users\username\dotnet-core-tutorial> dotnet publish -o site
To deploy the application to Elastic Beanstalk, bundle the site archive with a deployment
manifest (p. 716) that tells Elastic Beanstalk how to run it.
To create a source bundle
1. Add the files in the site folder to a ZIP archive.
C:\users\username\dotnet-core-tutorial> cd site
C:\users\username\dotnet-core-tutorial\site> zip ../site.zip *
adding: dotnet-core-tutorial.deps.json (164 bytes security) (deflated 81%)
adding: dotnet-core-tutorial.dll (164 bytes security) (deflated 58%)
adding: dotnet-core-tutorial.pdb (164 bytes security) (deflated 30%)
adding: dotnet-core-tutorial.runtimeconfig.json (164 bytes security) (deflated 25%)
adding: Microsoft.AspNetCore.Hosting.Abstractions.dll (164 bytes security) (deflated
48%)
adding: Microsoft.AspNetCore.Hosting.dll (164 bytes security) (deflated 54%)
adding: Microsoft.AspNetCore.Hosting.Server.Abstractions.dll (164 bytes security)
(deflated 45%)
adding: Microsoft.AspNetCore.Http.Abstractions.dll (164 bytes security) (deflated
52%)
adding: Microsoft.AspNetCore.Http.dll (164 bytes security) (deflated 55%)
adding: Microsoft.AspNetCore.Http.Extensions.dll (164 bytes security) (deflated 50%)
adding: Microsoft.AspNetCore.Http.Features.dll (164 bytes security) (deflated 50%)
adding: Microsoft.AspNetCore.HttpOverrides.dll (164 bytes security) (deflated 47%)
adding: Microsoft.AspNetCore.Server.IISIntegration.dll (164 bytes security) (deflated
47%)
adding: Microsoft.AspNetCore.Server.Kestrel.dll (164 bytes security) (deflated 62%)
adding: Microsoft.AspNetCore.WebUtilities.dll (164 bytes security) (deflated 55%)
adding: Microsoft.Extensions.Configuration.Abstractions.dll (164 bytes security)
(deflated 48%)
adding: Microsoft.Extensions.Configuration.dll (164 bytes security) (deflated 45%)
adding: Microsoft.Extensions.Configuration.EnvironmentVariables.dll (164 bytes
security) (deflated 47%)
adding: Microsoft.Extensions.DependencyInjection.Abstractions.dll (164 bytes
security) (deflated 55%)
API Version 2010-12-01
738

AWS Elastic Beanstalk Developer Guide
Deploy Your Application
adding: Microsoft.Extensions.DependencyInjection.dll (164 bytes security) (deflated
50%)
adding: Microsoft.Extensions.FileProviders.Abstractions.dll (164 bytes security)
(deflated 46%)
adding: Microsoft.Extensions.FileProviders.Physical.dll (164 bytes security)
(deflated 46%)
adding: Microsoft.Extensions.FileSystemGlobbing.dll (164 bytes security) (deflated
48%)
adding: Microsoft.Extensions.Logging.Abstractions.dll (164 bytes security) (deflated
55%)
adding: Microsoft.Extensions.Logging.dll (164 bytes security) (deflated 43%)
adding: Microsoft.Extensions.ObjectPool.dll (164 bytes security) (deflated 45%)
adding: Microsoft.Extensions.Options.dll (164 bytes security) (deflated 46%)
adding: Microsoft.Extensions.PlatformAbstractions.dll (164 bytes security) (deflated
45%)
adding: Microsoft.Extensions.Primitives.dll (164 bytes security) (deflated 49%)
adding: Microsoft.Net.Http.Headers.dll (164 bytes security) (deflated 52%)
adding: System.Diagnostics.Contracts.dll (164 bytes security) (deflated 46%)
adding: System.Diagnostics.StackTrace.dll (164 bytes security) (deflated 45%)
adding: System.Net.WebSockets.dll (164 bytes security) (deflated 47%)
adding: System.Runtime.CompilerServices.Unsafe.dll (164 bytes security) (deflated
42%)
adding: System.Text.Encodings.Web.dll (164 bytes security) (deflated 57%)
adding: web.config (164 bytes security) (deflated 39%)
C:\users\username\dotnet-core-tutorial\site> cd ../
2. Add a deployment manifest that points to the site archive.
Example c:\users\username\dotnet-core-tutorial\aws-windows-deployment-
manifest.json
{
"manifestVersion": 1,
"deployments": {
"aspNetCoreWeb": [
{
"name": "test-dotnet-core",
"parameters": {
"appBundle": "site.zip",
"iisPath": "/",
"iisWebSite": "Default Web Site"
}
}
]
}
}
3. Use the zip command to create a source bundle named dotnet-core-tutorial.zip.
C:\users\username\dotnet-core-tutorial> zip dotnet-core-tutorial.zip site.zip aws-
windows-deployment-manifest.json
adding: site.zip (164 bytes security) (stored 0%)
adding: aws-windows-deployment-manifest.json (164 bytes security) (deflated 50%)
Deploy Your Application
Deploy the source bundle to the Elastic Beanstalk environment that you created earlier.
Note
You can download the source bundle here: dotnet-core-tutorial-bundle.zip
API Version 2010-12-01
739

AWS Elastic Beanstalk Developer Guide
Deploy Your Application
To deploy a source bundle
1. Open the Elastic Beanstalk console.
2. Navigate to the management page (p. 65) for your environment.
3. Choose Upload and Deploy.
4. Choose Choose File and use the dialog box to select the source bundle.
5. Choose Deploy.
6. When the deployment completes, choose the site URL to open your website in a new tab.
The application simply writes Hello from ASP.NET Core! to the response and returns.
Launching an environment creates the following resources:
•EC2 instance – An Amazon Elastic Compute Cloud (Amazon EC2) virtual machine configured to run
web apps on the platform that you choose.
Each platform runs a different set of software, configuration files, and scripts to support a specific
language version, framework, web container, or combination thereof. Most platforms use either
Apache or nginx as a reverse proxy that sits in front of your web app, forwards requests to it, serves
static assets, and generates access and error logs.
•Instance security group – An Amazon EC2 security group configured to allow ingress on port 80. This
resource lets HTTP traffic from the load balancer reach the EC2 instance running your web app. By
default, traffic is not allowed on other ports.
•Load balancer – An Elastic Load Balancing load balancer configured to distribute requests to the
instances running your application. A load balancer also eliminates the need to expose your instances
directly to the Internet.
•Load balancer security group – An Amazon EC2 security group configured to allow ingress on port
80. This resource lets HTTP traffic from the Internet reach the load balancer. By default, traffic is not
allowed on other ports.
•Auto Scaling group – An Auto Scaling group configured to replace an instance if it is terminated or
becomes unavailable.
•Amazon S3 bucket – A storage location for your source code, logs, and other artifacts that are created
when you use Elastic Beanstalk.
•Amazon CloudWatch alarms – Two CloudWatch alarms that monitor the load on the instances in your
environment and are triggered if the load is too high or too low. When an alarm is triggered, your Auto
Scaling group scales up or down in response.
•AWS CloudFormation stack – Elastic Beanstalk uses AWS CloudFormation to launch the resources in
your environment and propagate configuration changes. The resources are defined in a template that
you can view in the AWS CloudFormation console.
•Domain name – A domain name that routes to your web app in the form
subdomain.region.elasticbeanstalk.com.
All of these resources are managed by Elastic Beanstalk. When you terminate your environment, Elastic
Beanstalk terminates all the resources that it contains.
Note
The S3 bucket that Elastic Beanstalk creates is shared between environments and is not deleted
during environment termination. For more information, see Using Elastic Beanstalk with
Amazon Simple Storage Service (p. 451).
API Version 2010-12-01
740

AWS Elastic Beanstalk Developer Guide
Clean Up
Clean Up
When you finish working with Elastic Beanstalk, you can terminate your environment. Elastic Beanstalk
terminates all AWS resources associated with your environment, such as Amazon EC2 instances (p. 167),
database instances (p. 186), load balancers (p. 176), security groups, and alarms (p. ).
To terminate your Elastic Beanstalk environment
1. Open the Elastic Beanstalk console.
2. Navigate to the management page (p. 65) for your environment.
3. Choose Actions, and then choose Terminate Environment.
4. In the Confirm Termination dialog box, type the environment name, and then choose Terminate.
In addition, you can terminate database resources that you created outside of your Elastic Beanstalk
environment. When you terminate an Amazon RDS database instance, you can take a snapshot and
restore the data to another instance later.
To terminate your RDS DB instance
1. Open the Amazon RDS console.
2. Choose Instances.
3. Choose your DB instance.
4. Choose Instance Actions, and then choose Delete.
5. Choose whether to create a snapshot, and then choose Delete.
To delete a DynamoDB table
1. Open the Tables page in the DynamoDB console.
2. Select a table.
3. Choose Actions, and then choose Delete table.
4. Choose Delete.
Next Steps
As you continue to develop your application, you'll probably want to manage environments and deploy
your application without manually creating a .zip file and uploading it to the Elastic Beanstalk console.
The Elastic Beanstalk Command Line Interface (p. 480) (EB CLI) provides easy-to-use commands for
creating, configuring, and deploying applications to Elastic Beanstalk environments from the command
line.
If you use Visual Studio to develop your application, you can also use the AWS Toolkit for Visual Studio
to deploy changed, manage your Elastic Beanstalk environments, and manage other AWS resources. See
The AWS Toolkit for Visual Studio (p. 744) for more information.
For developing and testing, you might want to use Elastic Beanstalk's functionality for adding a
managed DB instance directly to your environment. For instructions on setting up a database inside your
environment, see Adding a Database to Your Elastic Beanstalk Environment (p. 186).
Finally, if you plan to use your application in a production environment, configure a custom domain
name (p. 199) for your environment and enable HTTPS (p. 299) for secure connections.
API Version 2010-12-01
741
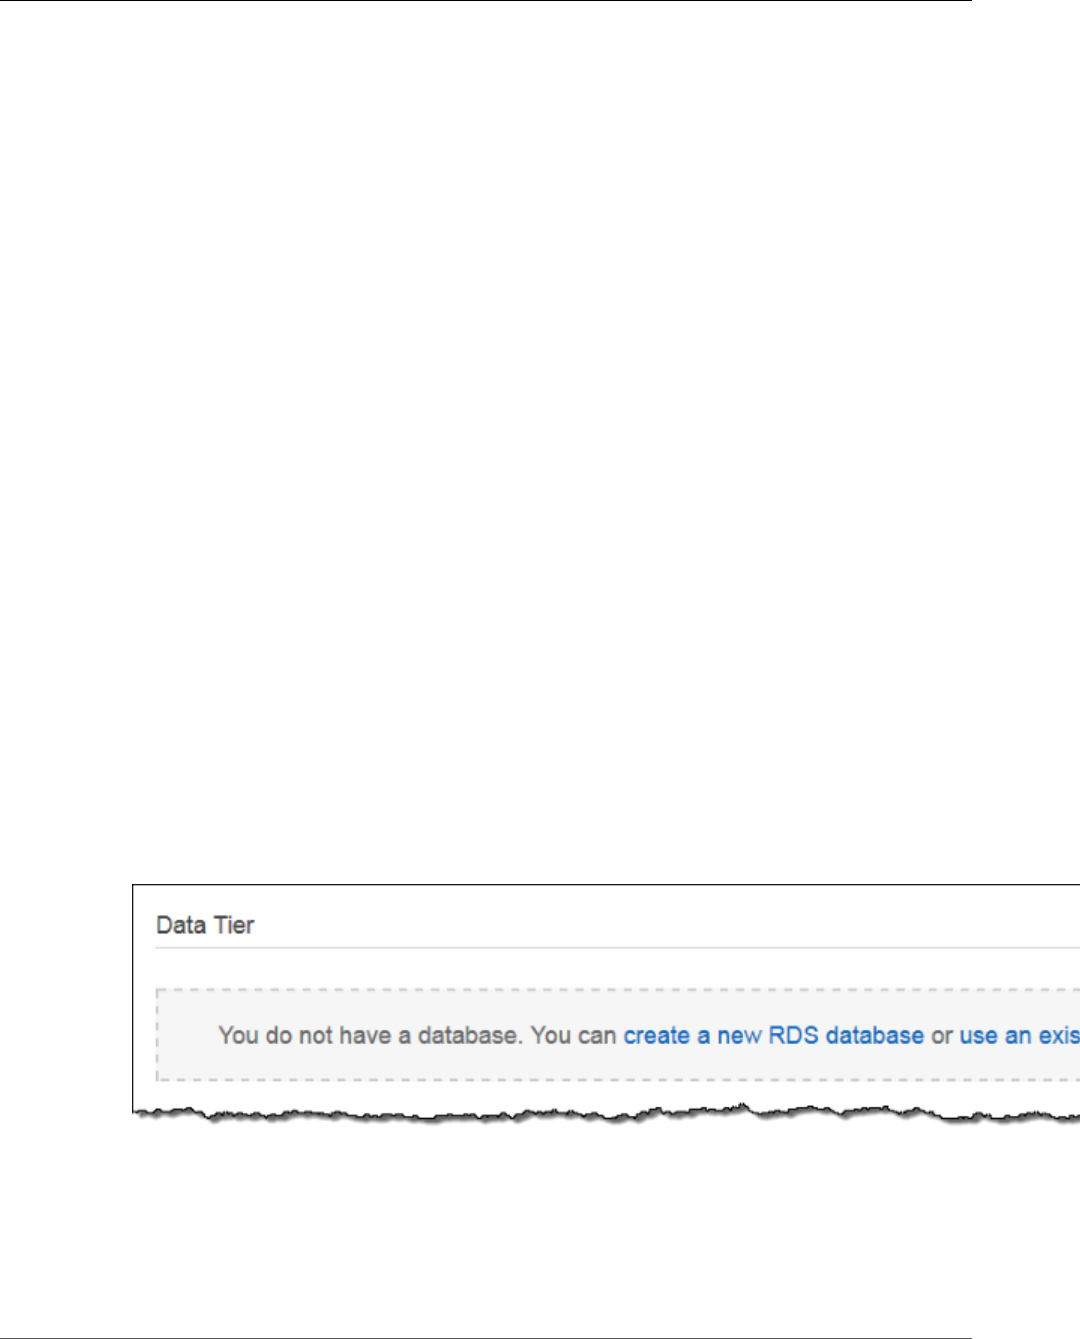
AWS Elastic Beanstalk Developer Guide
Adding a Database
Adding an Amazon RDS DB Instance to Your .NET
Application Environment
You can use an Amazon Relational Database Service (Amazon RDS) DB instance to store data gathered
and modified by your application. The database can be attached to your environment and managed by
Elastic Beanstalk, or created and managed externally.
If you are using Amazon RDS for the first time, add a DB instance (p. 742) to a test environment with
the Elastic Beanstalk console and verify that your application can connect to it.
To connect to a database, add the driver (p. 743) to your application, load the driver class in your code,
and create a connection string (p. 743) with the environment properties provided by Elastic Beanstalk.
The configuration and connection code vary depending on the database engine and framework that you
use.
For production environments, create a DB instance outside of your Elastic Beanstalk environment to
decouple your environment resources from your database resources. Using an external DB instance lets
you connect to the same database from multiple environments and perform blue-green deployments.
For instructions, see Using Elastic Beanstalk with Amazon Relational Database Service (p. 439).
Sections
•Adding a DB Instance to Your Environment (p. 742)
•Downloading a Driver (p. 743)
•Connecting to a Database (p. 743)
Adding a DB Instance to Your Environment
To add a DB instance to your environment
1. Open the Elastic Beanstalk console.
2. Navigate to the management page (p. 65) for your environment.
3. Choose Configuration.
4. Under Data Tier, choose Create a new RDS database.
5. Choose a DB engine, enter a user name and password, and then choose Apply.
Adding a DB instance takes about 10 minutes. When the environment update is complete, the DB
instance's hostname and other connection information are available to your application through the
following environment properties:
•RDS_HOSTNAME – The hostname of the DB instance.
API Version 2010-12-01
742

AWS Elastic Beanstalk Developer Guide
Downloading a Driver
Amazon RDS console label – Endpoint is the hostname.
•RDS_PORT – The port on which the DB instance accepts connections. The default value varies between
DB engines.
Amazon RDS console label – Port
•RDS_DB_NAME – The database name, ebdb.
Amazon RDS console label – DB Name
•RDS_USERNAME – The user name that you configured for your database.
Amazon RDS console label – Username
•RDS_PASSWORD – The password that you configured for your database.
For more information about configuring an internal DB instance, see Adding a Database to Your Elastic
Beanstalk Environment (p. 186).
Downloading a Driver
Download and install the EntityFramework package and a database driver for your development
environment with NuGet.
Common Entity Framework Database Providers for .NET
•SQL Server – Microsoft.EntityFrameworkCore.SqlServer
•MySQL – Pomelo.EntityFrameworkCore.MySql
•PostgreSQL – Npgsql.EntityFrameworkCore.PostgreSQL
Connecting to a Database
Elastic Beanstalk provides connection information for attached DB instances in environment properties.
Use ConfigurationManager.AppSettings to read the properties and configure a database
connection.
Example Helpers.cs - Connection String Method
using System;
using System.Collections.Generic;
using System.Configuration;
using System.Linq;
using System.Web;
namespace MVC5App.Models
{
public class Helpers
{
public static string GetRDSConnectionString()
{
var appConfig = ConfigurationManager.AppSettings;
string dbname = appConfig["RDS_DB_NAME"];
if (string.IsNullOrEmpty(dbname)) return null;
string username = appConfig["RDS_USERNAME"];
API Version 2010-12-01
743

AWS Elastic Beanstalk Developer Guide
The AWS Toolkit for Visual Studio
string password = appConfig["RDS_PASSWORD"];
string hostname = appConfig["RDS_HOSTNAME"];
string port = appConfig["RDS_PORT"];
return "Data Source=" + hostname + ";Initial Catalog=" + dbname + ";User ID=" +
username + ";Password=" + password + ";";
}
}
}
Use the connection string to initialize your database context.
Example DBContext.cs
using System.Data.Entity;
using System.Security.Claims;
using System.Threading.Tasks;
using Microsoft.AspNet.Identity;
using Microsoft.AspNet.Identity.EntityFramework;
namespace MVC5App.Models
{
public class RDSContext : DbContext
{
public RDSContext()
: base(GetRDSConnectionString())
{
}
public static RDSContext Create()
{
return new RDSContext();
}
}
}
The AWS Toolkit for Visual Studio
Visual Studio provides templates for different programming languages and application types. You
can start with any of these templates. The AWS Toolkit for Visual Studio also provides three project
templates that bootstrap development of your application: AWS Console Project, AWS Web Project, and
AWS Empty Project. For this example, you'll create a new ASP.NET Web Application.
To create a new ASP.NET Web Application project
1. In Visual Studio, on the File menu, click New and then click Project.
2. In the New Project dialog box, click Installed Templates, click Visual C#, and then click Web. Click
ASP.NET Empty Web Application, type a project name, and then click OK.
To run a project
Do one of the following:
1. Press F5.
2. Select Start Debugging from the Debug menu.
API Version 2010-12-01
744

AWS Elastic Beanstalk Developer Guide
Test Locally
Test Locally
Visual Studio makes it easy for you to test your application locally. To test or run ASP.NET web
applications, you need a web server. Visual Studio offers several options, such as Internet Information
Services (IIS), IIS Express, or the built-in Visual Studio Development Server. To learn about each of these
options and to decide which one is best for you, go to Web Servers in Visual Studio for ASP.NET Web
Projects .
Create an Elastic Beanstalk Environment
After testing your application, you are ready to deploy it to Elastic Beanstalk.
Note
Configuration file (p. 256) needs to be part of the project to be included in the archive.
Alternatively, instead of including the configuration files in the project, you can use Visual
Studio to deploy all files in the project folder. In Solution Explorer, right-click the project name,
and then click Properties. Click the Package/Publish Web tab. In the Items to deploy section,
select All Files in the Project Folder in the drop-down list.
To deploy your application to Elastic Beanstalk using the AWS Toolkit for Visual Studio
1. In Solution Explorer, right-click your application and then select Publish to AWS.
2. In the Publish to AWS wizard, enter your account information.
a. For AWS account to use for deployment, select your account or select Other to enter new
account information.
b. For Region, select the region where you want to deploy your application. For information
about this product's regions, go to Regions and Endpoints in the Amazon Web Services General
Reference. If you select a region that is not supported by Elastic Beanstalk, then the option to
deploy to Elastic Beanstalk will become unavailable.
c. Click Deploy new application with template and select Elastic Beanstalk. Then click Next.
API Version 2010-12-01
745
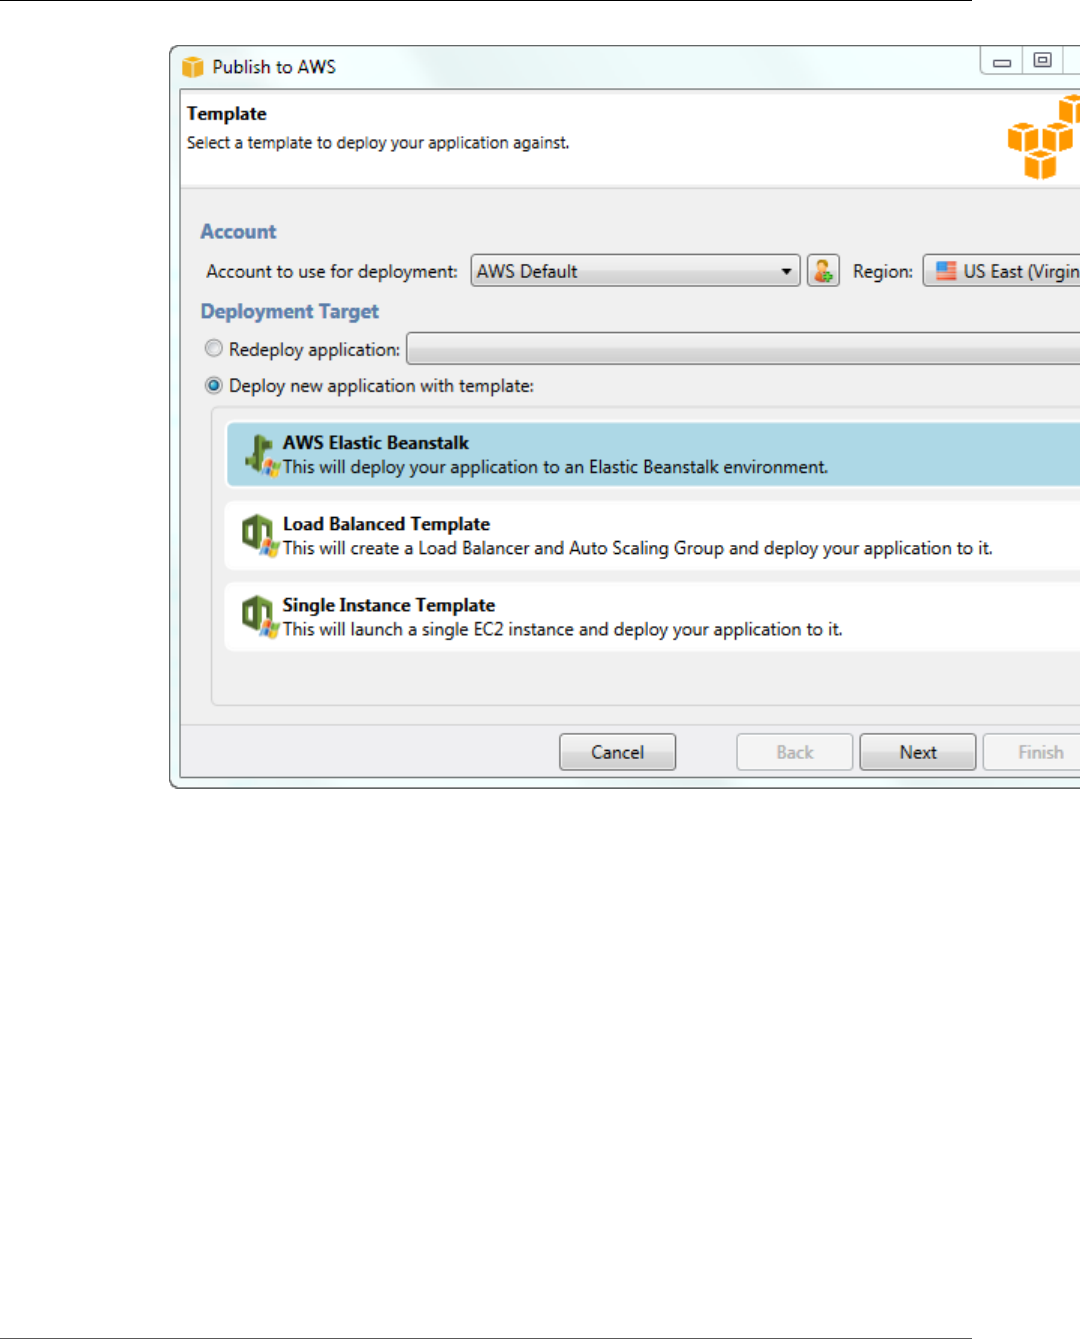
AWS Elastic Beanstalk Developer Guide
Create an Elastic Beanstalk Environment
3. On the Application page, enter your application details.
a. For Name, type the name of the application.
b. For Description, type a description of the application. This step is optional.
c. The version label of the application automatically appears in the Deployment version label
d. Select Deploy application incrementally to deploy only the changed files. An incremental
deployment is faster because you are updating only the files that changed instead of all the
files. If you choose this option, an application version will be set from the Git commit ID. If you
choose to not deploy your application incrementally, then you can update the version label in
the Deployment version label box.
API Version 2010-12-01
746
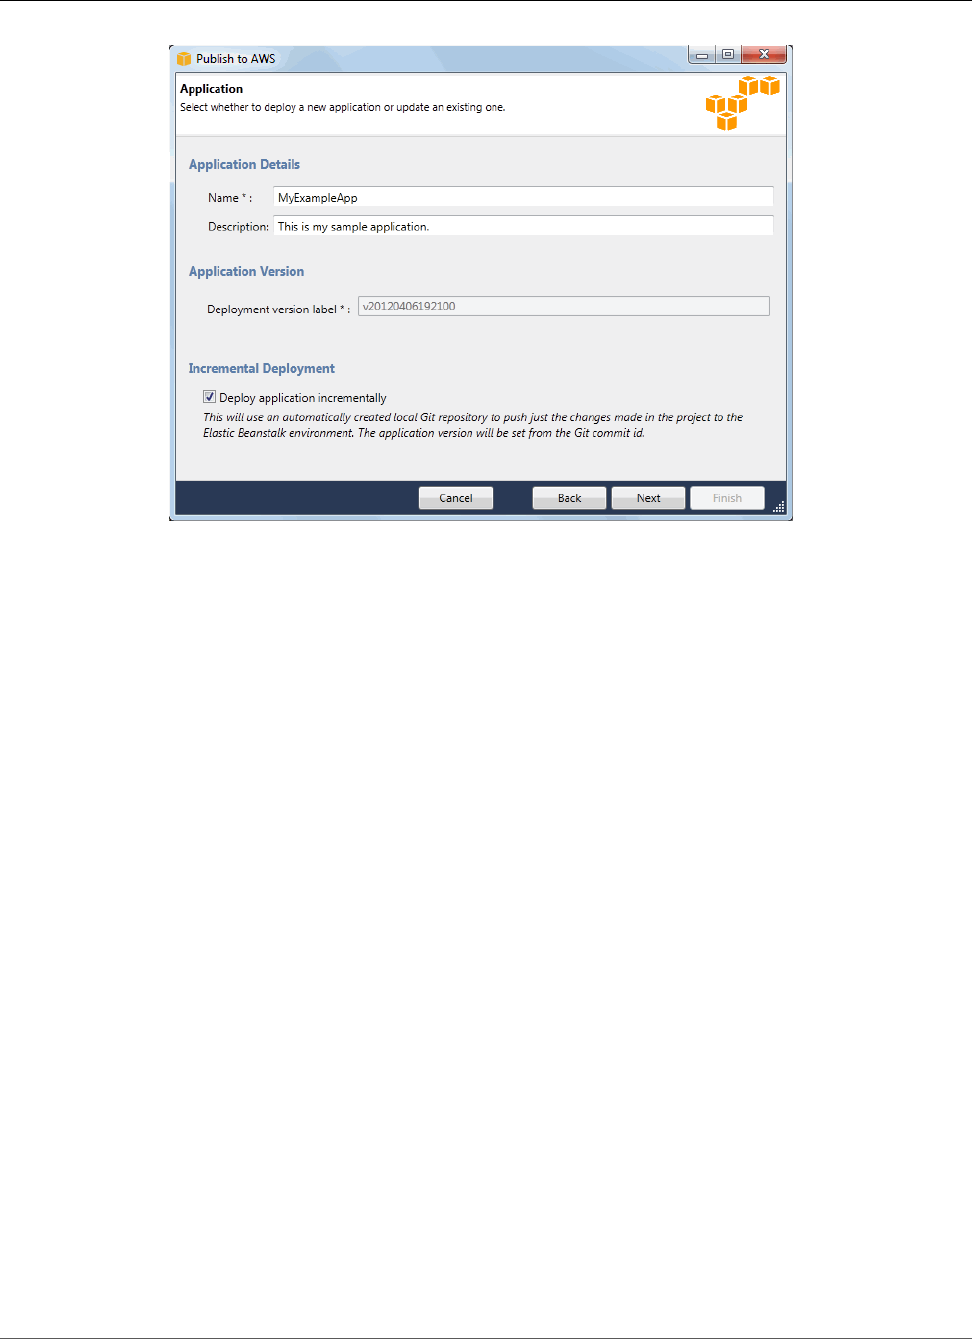
AWS Elastic Beanstalk Developer Guide
Create an Elastic Beanstalk Environment
e. Click Next.
4. On the Environment page, describe your environment details.
a. Select Create a new environment for this application.
b. For Name, type a name for your environment.
c. For Description, characterize your environment. This step is optional.
d. Select the Type of environment that you want.
You can select either Load balanced, auto scaled or a Single instance environment. For more
information, see Environment Types (p. 154).
Note
For single-instance environments, load balancing, autoscaling, and the health check
URL settings don't apply.
e. The environment URL automatically appears in the Environment URL once you move your
cursor to that box.
f. Click Check availability to make sure the environment URL is available.
API Version 2010-12-01
747

AWS Elastic Beanstalk Developer Guide
Create an Elastic Beanstalk Environment
g. Click Next.
5. On the AWS Options page, configure additional options and security information for your
deployment.
a. For Container Type, select 64bit Windows Server 2012 running IIS 8 or 64bit Windows Server
2008 running IIS 7.5.
b. For Instance Type, select Micro.
c. For Key pair, select Create new key pair. Type a name for the new key pair—in this example, we
use myuswestkeypair—and then click OK. A key pair enables remote-desktop access to your
Amazon EC2 instances. For more information on Amazon EC2 key pairs, see Using Credentials in
the Amazon Elastic Compute Cloud User Guide.
d. Select an instance profile.
If you do not have an instance profile, select Create a default instance profile. For information
about using instance profiles with Elastic Beanstalk, see Managing Elastic Beanstalk Instance
Profiles (p. 388).
e. If you have a custom VPC that you would like to use with your environment, click Launch
into VPC. You can configure the VPC information on the next page. For more information
about Amazon VPC, go to Amazon Virtual Private Cloud (Amazon VPC). For a list of supported
nonlegacy container types, see Why are some container types marked legacy? (p. 150).
API Version 2010-12-01
748
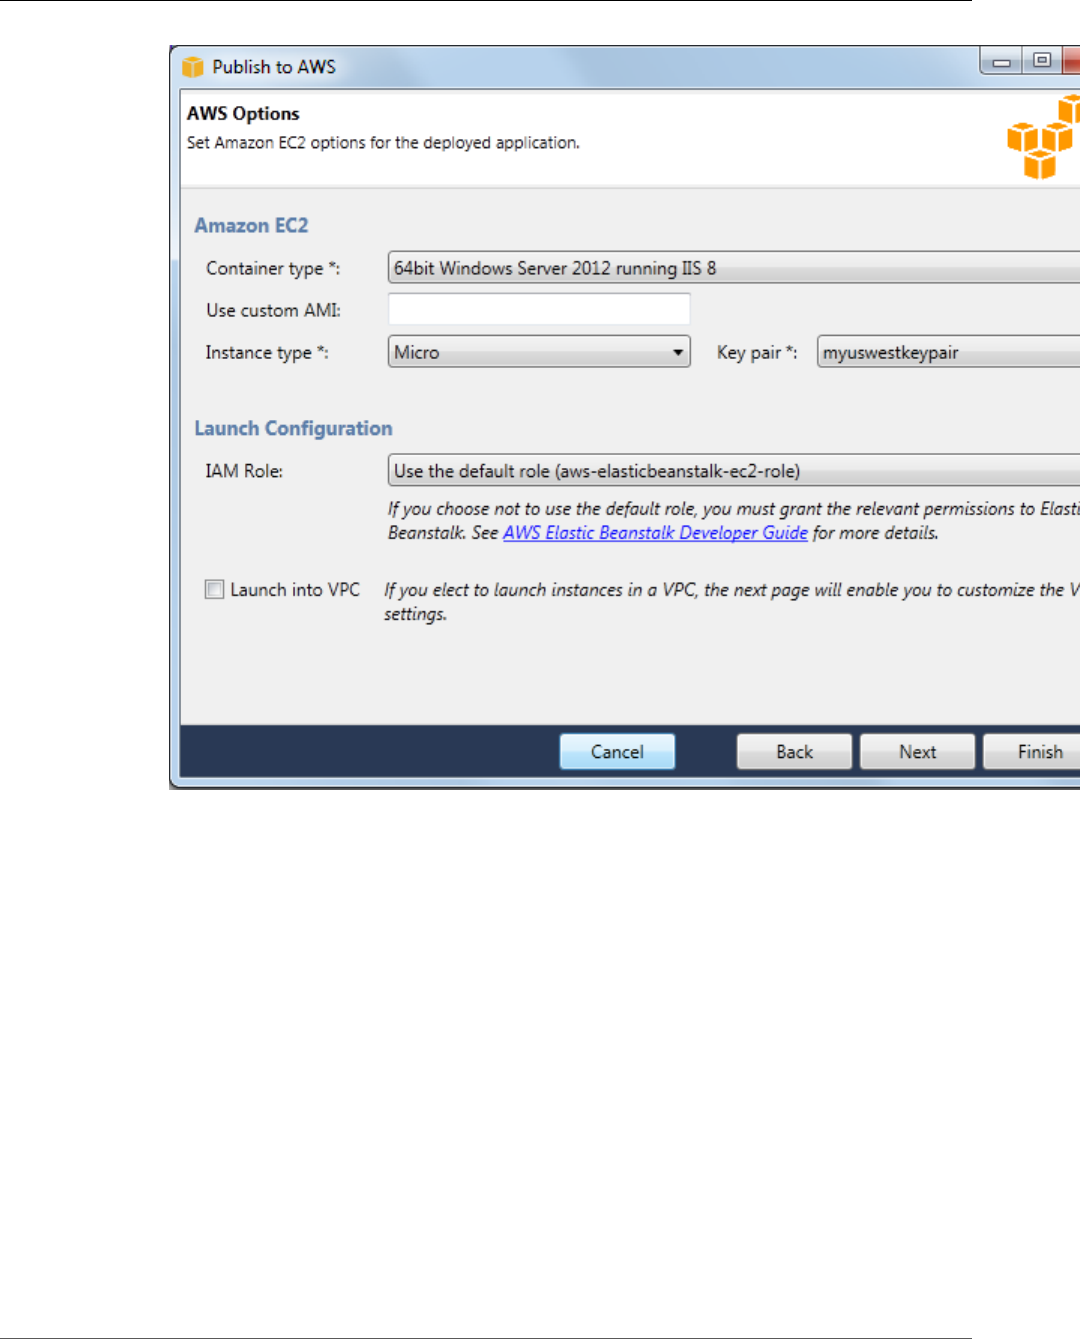
AWS Elastic Beanstalk Developer Guide
Create an Elastic Beanstalk Environment
f. Click Next.
6. If you selected to launch your environment inside a VPC, the VPC Options page appears; otherwise,
the Additional Options page appears. Here you'll configure your VPC options.
API Version 2010-12-01
749

AWS Elastic Beanstalk Developer Guide
Create an Elastic Beanstalk Environment
API Version 2010-12-01
750
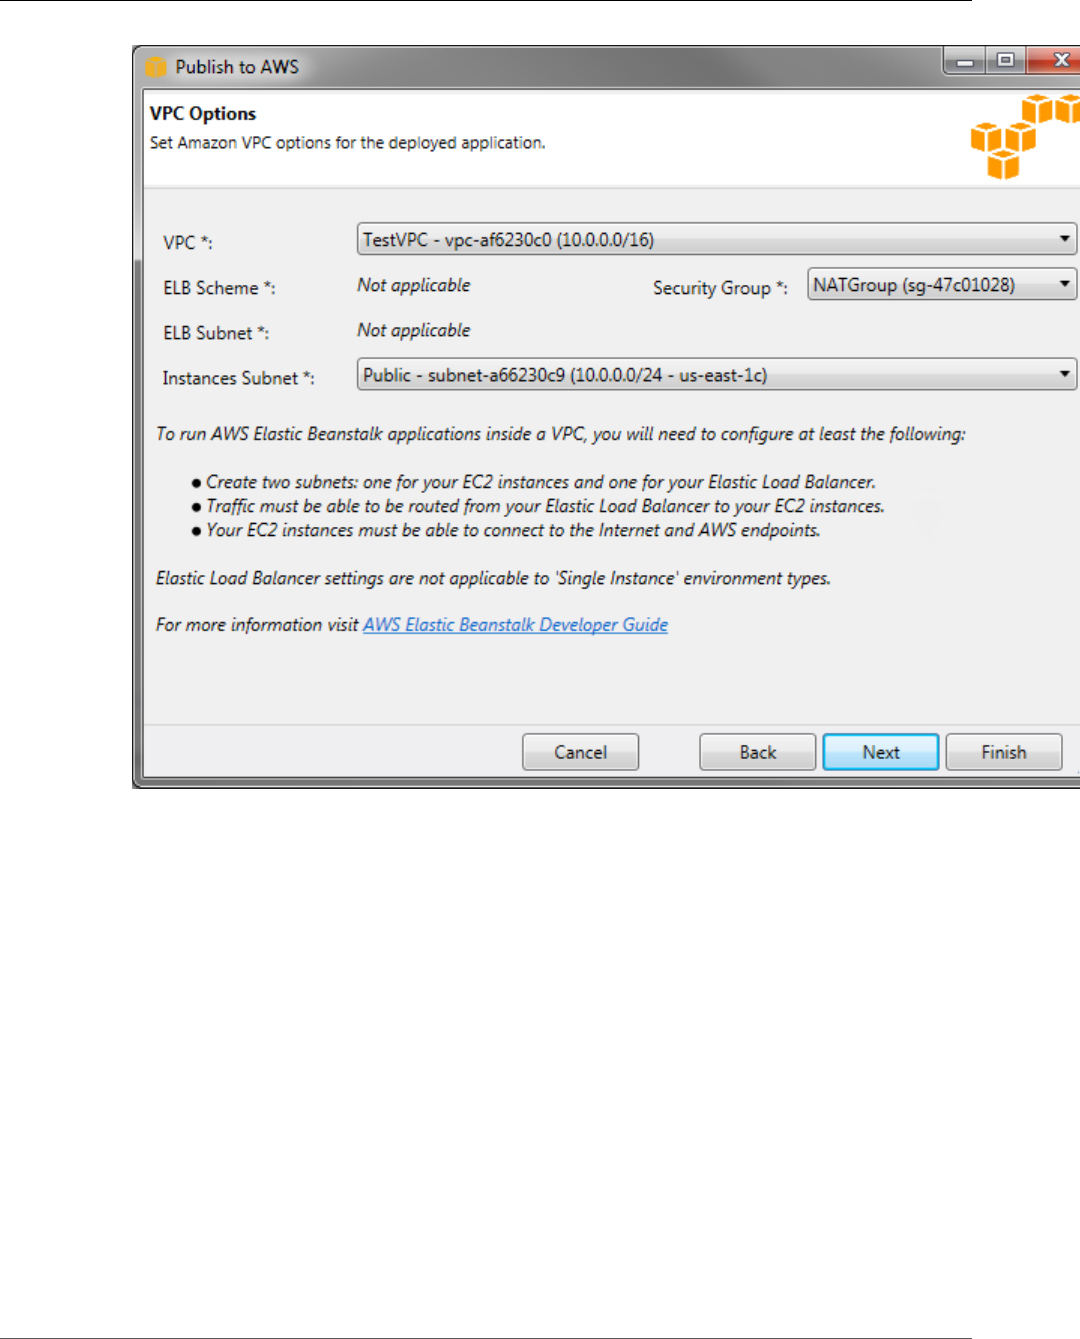
AWS Elastic Beanstalk Developer Guide
Create an Elastic Beanstalk Environment
a. Select the VPC ID of the VPC in which you would like to launch your environment.
b. For a load-balanced, autoscaled environment, select private for ELB Scheme if you do not want
your elastic load balancer to be available to the Internet.
For a single-instance environment, this option is not applicable because the environment
doesn't have a load balancer. For more information, see Environment Types (p. 154).
c. For a load-balanced, autoscaled environment, select the subnets for the elastic load balancer
and the EC2 instances. If you created public and private subnets, make sure the elastic load
balancer and the EC2 instances are associated with the correct subnet. By default, Amazon VPC
creates a default public subnet using 10.0.0.0/24 and a private subnet using 10.0.1.0/24. You
can view your existing subnets in the Amazon VPC console at https://console.aws.amazon.com/
vpc/.
For a single-instance environment, your VPC only needs a public subnet for the instance.
Selecting a subnet for the load balancer is not applicable because the environment doesn't have
a load balancer. For more information, see Environment Types (p. 154).
d. For a load-balanced, autoscaled environment, select the security group you created for
your instances, if applicable. For more information, see Create a Security Group for Your
Instances (p. 459).
API Version 2010-12-01
751
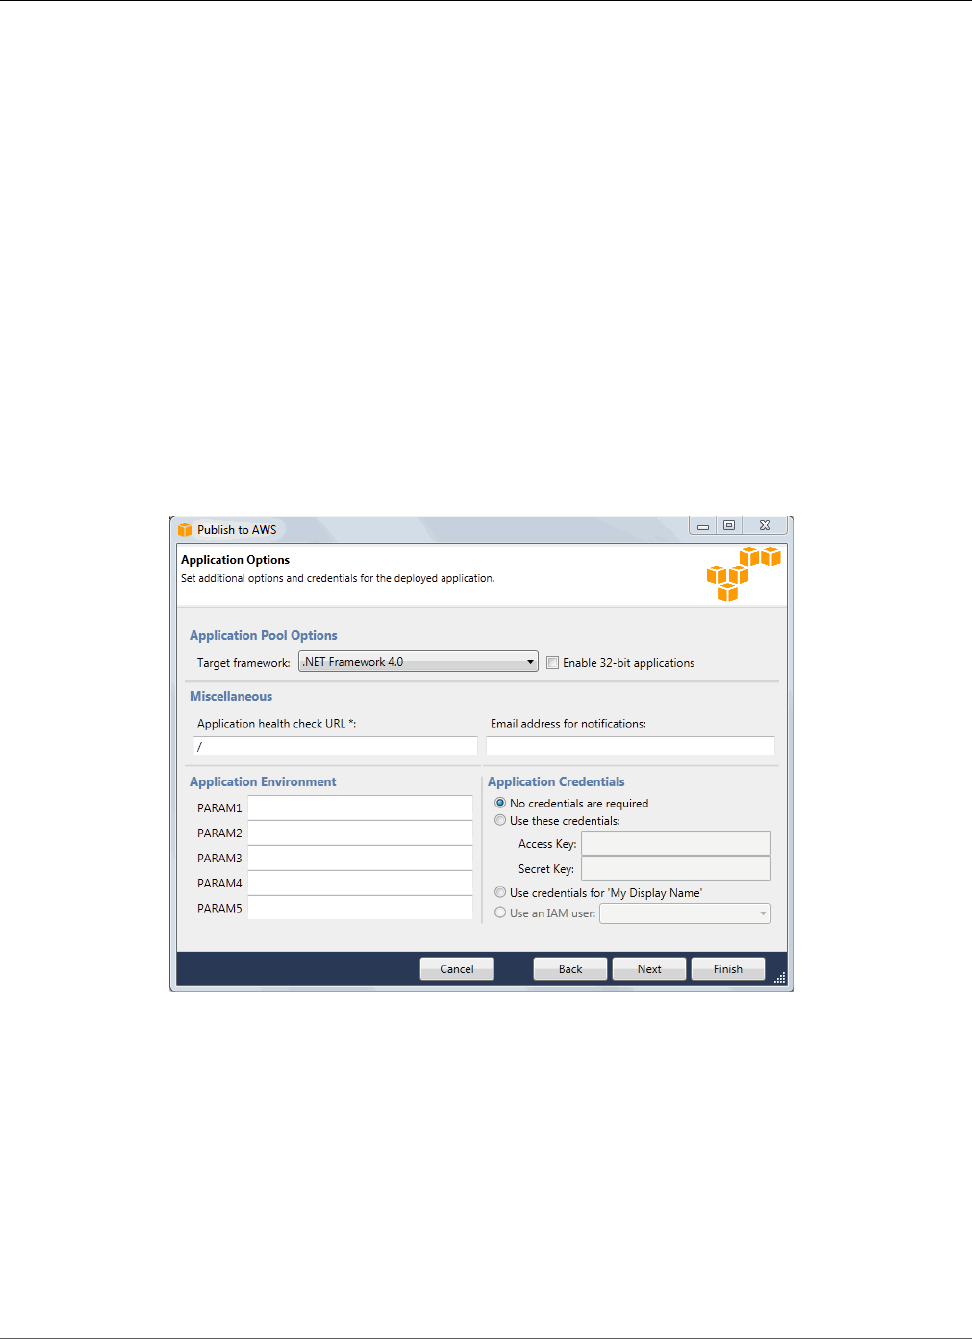
AWS Elastic Beanstalk Developer Guide
Create an Elastic Beanstalk Environment
For a single-instance environment, you don't need a NAT device. Select the default security
group. Elastic Beanstalk assigns an Elastic IP address to the instance that lets the instance access
the Internet.
e. Click Next.
7. On the Application Options page, configure your application options.
a. For Target framework, select .NET Framework 4.0.
b. Elastic Load Balancing uses a health check to determine whether the Amazon EC2 instances
running your application are healthy. The health check determines an instance's health status by
probing a specified URL at a set interval. You can override the default URL to match an existing
resource in your application (e.g., /myapp/index.aspx) by entering it in the Application
health check URL box. For more information about application health checks, see Health
Check (p. 179).
c. Type an email address if you want to receive Amazon Simple Notification Service (Amazon SNS)
notifications of important events affecting your application.
d. The Application Environment section lets you specify environment variables on the Amazon
EC2 instances that are running your application. This setting enables greater portability by
eliminating the need to recompile your source code as you move between environments.
e. Select the application credentials option you want to use to deploy your application.
f. Click Next.
8. If you have previously set up an Amazon RDS database, the Amazon RDS DB Security Group
page appears. If you want to connect your Elastic Beanstalk environment to your Amazon RDS DB
Instance, then select one or more security groups. Otherwise, go on to the next step. When you're
ready, click Next.
API Version 2010-12-01
752

AWS Elastic Beanstalk Developer Guide
Create an Elastic Beanstalk Environment
9. Review your deployment options. If everything is as you want, click Deploy.
Your ASP.NET project will be exported as a web deploy file, uploaded to Amazon S3, and registered
as a new application version with Elastic Beanstalk. The Elastic Beanstalk deployment feature
will monitor your environment until it becomes available with the newly deployed code. On the
env:<environment name> tab, you will see status for your environment.
API Version 2010-12-01
753
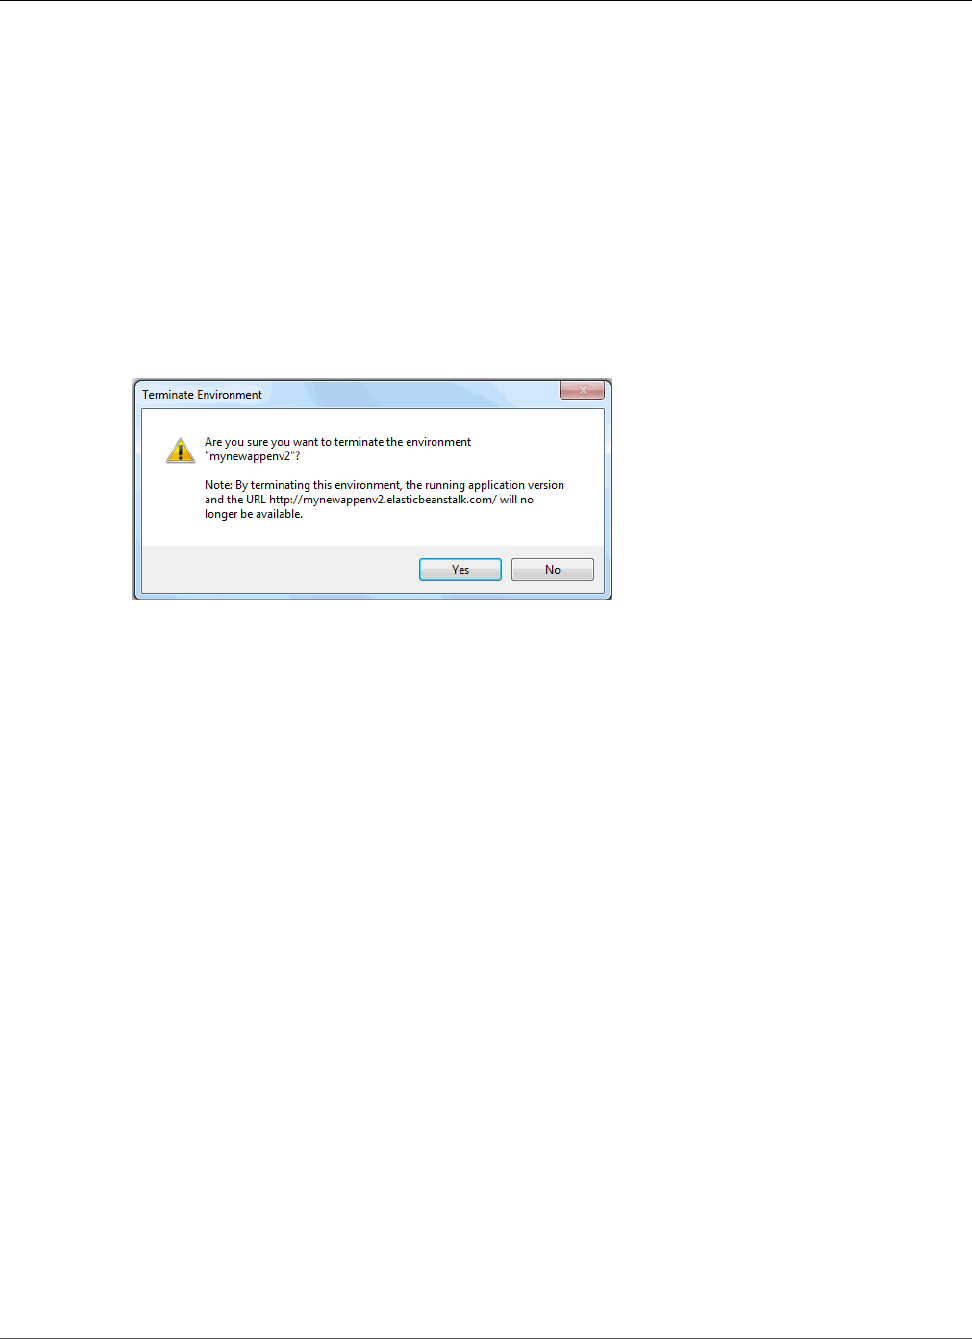
AWS Elastic Beanstalk Developer Guide
Terminating an Environment
Terminating an Environment
To avoid incurring charges for unused AWS resources, you can terminate a running environment using
the AWS Toolkit for Visual Studio.
Note
You can always launch a new environment using the same version later.
To terminate an environment
1. Expand the Elastic Beanstalk node and the application node in AWS Explorer. Right-click your
application environment and select Terminate Environment.
2. When prompted, click Yes to confirm that you want to terminate the environment. It will take a few
minutes for Elastic Beanstalk to terminate the AWS resources running in the environment.
Note
When you terminate your environment, the CNAME associated with the terminated
environment becomes available for anyone to use.
Deploying to Your Environment
Now that you have tested your application, it is easy to edit and redeploy your application and see the
results in moments.
To edit and redeploy your ASP.NET web application
1. In Solution Explorer, right-click your application, and then click Republish to Environment <your
environment name>. The Re-publish to AWS Elastic Beanstalk wizard opens.
API Version 2010-12-01
754
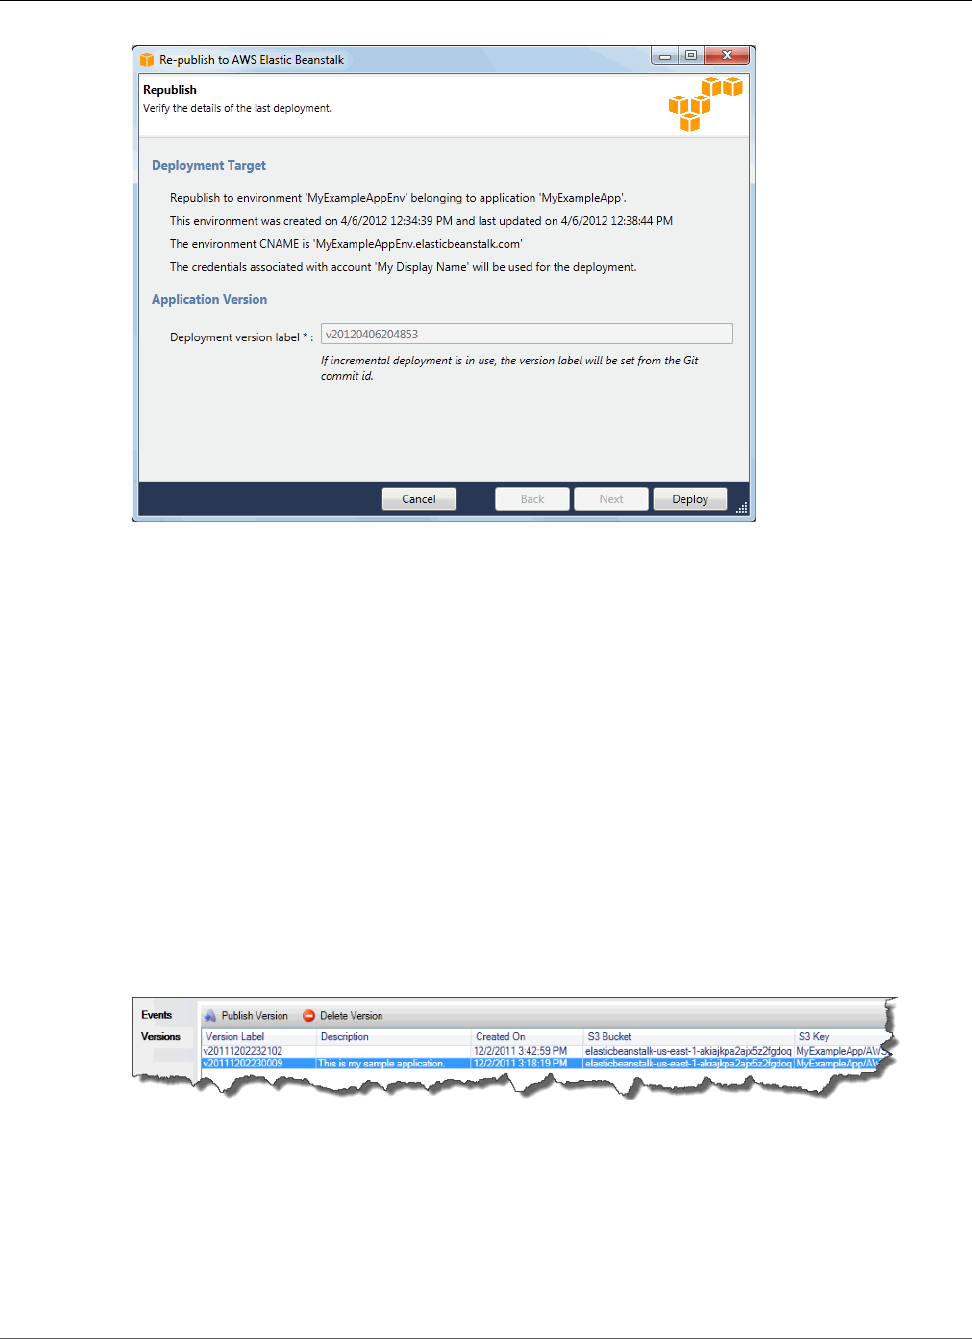
AWS Elastic Beanstalk Developer Guide
Deploy
2. Review your deployment details and click Deploy.
Note
If you want to change any of your settings, you can click Cancel and use the Publish to AWS
wizard instead. For instructions, see Create an Elastic Beanstalk Environment (p. 745).
Your updated ASP.NET web project will be exported as a web deploy file with the new version label,
uploaded to Amazon S3, and registered as a new application version with Elastic Beanstalk. The
Elastic Beanstalk deployment feature monitors your existing environment until it becomes available
with the newly deployed code. On the env:<environment name> tab, you will see the status of
your environment.
You can also deploy an existing application to an existing environment if, for instance, you need to roll
back to a previous application version.
To deploy an application version to an existing environment
1. Right-click your Elastic Beanstalk application by expanding the Elastic Beanstalk node in AWS
Explorer. Select View Status.
2. In the App: <application name> tab, click Versions.
3. Click the application version you want to deploy and click Publish Version.
4. In the Publish Application Version wizard, click Next.
API Version 2010-12-01
755

AWS Elastic Beanstalk Developer Guide
Deploy
5. Review your deployment options, and click Deploy.
Your ASP.NET project will be exported as a web deploy file and uploaded to Amazon S3. The Elastic
Beanstalk deployment feature will monitor your environment until it becomes available with
the newly deployed code. On the env:<environment name> tab, you will see status for your
environment.
API Version 2010-12-01
756

AWS Elastic Beanstalk Developer Guide
Managing Environments
Managing Your Elastic Beanstalk Application
Environments
With the AWS Toolkit for Visual Studio and the AWS Management Console, you can change the
provisioning and configuration of the AWS resources used by your application environments. For
information on how to manage your application environments using the AWS Management Console, see
Managing Environments (p. 65). This section discusses the specific service settings you can edit in the
AWS Toolkit for Visual Studio as part of your application environment configuration.
Changing Environment Configurations Settings
When you deploy your application, Elastic Beanstalk configures a number of AWS cloud computing
services. You can control how these individual services are configured using the AWS Toolkit for Visual
Studio.
To edit an application's environment settings
• Expand the Elastic Beanstalk node and your application node. Then right-click your Elastic Beanstalk
environment in AWS Explorer. Select View Status.
You can now configure settings for the following:
• Server
• Load balancing
• Autoscaling
• Notifications
• Environment properties
Configuring EC2 Server Instances Using the AWS Toolkit for
Visual Studio
Amazon Elastic Compute Cloud (Amazon EC2) is a web service that you use to launch and manage server
instances in Amazon's data centers. You can use Amazon EC2 server instances at any time, for as long
as you need, and for any legal purpose. Instances are available in different sizes and configurations. For
more information, go to Amazon EC2.
You can edit the Elastic Beanstalk environment's Amazon EC2 instance configuration with the Server tab
inside your application environment tab in the AWS Toolkit for Visual Studio.
API Version 2010-12-01
757
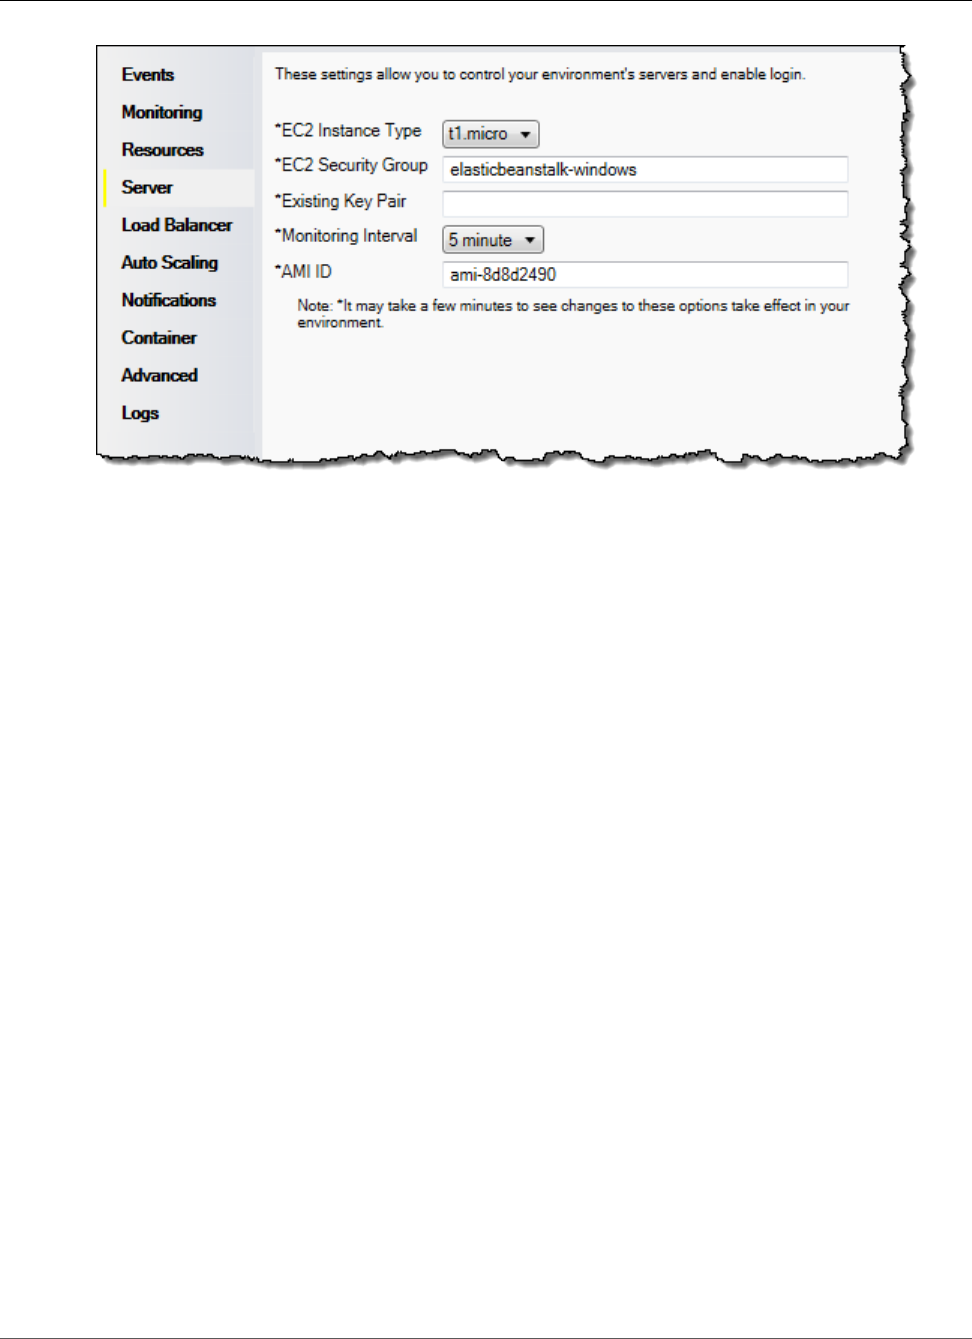
AWS Elastic Beanstalk Developer Guide
Managing Environments
Amazon EC2 Instance Types
Instance type displays the instance types available to your Elastic Beanstalk application. Change the
instance type to select a server with the characteristics (including memory size and CPU power) that
are most appropriate to your application. For example, applications with intensive and long-running
operations may require more CPU or memory.
For more information about the Amazon EC2 instance types available for your Elastic Beanstalk
application, see Instance Types in the Amazon Elastic Compute Cloud User Guide.
Amazon EC2 Security Groups
You can control access to your Elastic Beanstalk application using an Amazon EC2 Security Group. A
security group defines firewall rules for your instances. These rules specify which ingress (i.e., incoming)
network traffic should be delivered to your instance. All other ingress traffic will be discarded. You can
modify rules for a group at any time. The new rules are automatically enforced for all running instances
and instances launched in the future.
You can set up your Amazon EC2 security groups using the AWS Management Console or by using the
AWS Toolkit for Visual Studio. You can specify which Amazon EC2 Security Groups control access to your
Elastic Beanstalk application by entering the names of one or more Amazon EC2 security group names
(delimited by commas) into the EC2 Security Groups text box.
Note
Make sure port 80 (HTTP) is accessible from 0.0.0.0/0 as the source CIDR range if you want to
enable health checks for your application. For more information about health checks, see Health
Checks (p. 761).
To create a security group using the AWS Toolkit for Visual Studio
1. In Visual Studio, in AWS Explorer, expand the Amazon EC2 node, and then double-click Security
Groups.
2. Click Create Security Group, and enter a name and description for your security group.
3. Click OK.
For more information on Amazon EC2 Security Groups, see Using Security Groups in the Amazon Elastic
Compute Cloud User Guide.
API Version 2010-12-01
758

AWS Elastic Beanstalk Developer Guide
Managing Environments
Amazon EC2 Key Pairs
You can securely log in to the Amazon EC2 instances provisioned for your Elastic Beanstalk application
with an Amazon EC2 key pair.
Important
You must create an Amazon EC2 key pair and configure your Elastic Beanstalk–provisioned
Amazon EC2 instances to use the Amazon EC2 key pair before you can access your Elastic
Beanstalk–provisioned Amazon EC2 instances. You can create your key pair using the Publish to
AWS wizard inside the AWS Toolkit for Visual Studio when you deploy your application to Elastic
Beanstalk. If you want to create additional key pairs using the Toolkit, follow the steps below.
Alternatively, you can set up your Amazon EC2 key pairs using the AWS Management Console.
For instructions on creating a key pair for Amazon EC2, see the Amazon Elastic Compute Cloud
Getting Started Guide.
The Existing Key Pair text box lets you specify the name of an Amazon EC2 key pair you can use to
securely log in to the Amazon EC2 instances running your Elastic Beanstalk application.
To specify the name of an Amazon EC2 key pair
1. Expand the Amazon EC2 node and double-click Key Pairs.
2. Click Create Key Pair and enter the key pair name.
3. Click OK.
For more information about Amazon EC2 key pairs, go to Using Amazon EC2 Credentials in the Amazon
Elastic Compute Cloud User Guide. For more information about connecting to Amazon EC2 instances, see
Listing and Connecting to Server Instances (p. 767).
Monitoring Interval
By default, only basic Amazon CloudWatch metrics are enabled; they return data in five-minute periods.
You can enable more granular one-minute CloudWatch metrics by selecting 1 minute for the Monitoring
Interval in the Server section of the Configuration tab for your environment in the AWS Toolkit for
Eclipse.
Note
Amazon CloudWatch service charges can apply for one-minute interval metrics. See Amazon
CloudWatch for more information.
Custom AMI ID
You can override the default AMI used for your Amazon EC2 instances with your own custom AMI by
entering the identifier of your custom AMI into the Custom AMI ID box in the Server section of the
Configuration tab for your environment in the AWS Toolkit for Eclipse.
Important
Using your own AMI is an advanced task and should be done with care. If you need a custom
AMI, we recommend you start with the default Elastic Beanstalk AMI and then modify it.
To be considered healthy, Elastic Beanstalk expects Amazon EC2 instances to meet a set of
requirements, including having a running host manager. If these requirements are not met, your
environment might not work properly.
Configuring Elastic Load Balancing Using the AWS Toolkit for
Visual Studio
Elastic Load Balancing is an Amazon web service that helps you improve the availability and scalability of
your application. This service makes it easy for you to distribute application loads between two or more
API Version 2010-12-01
759
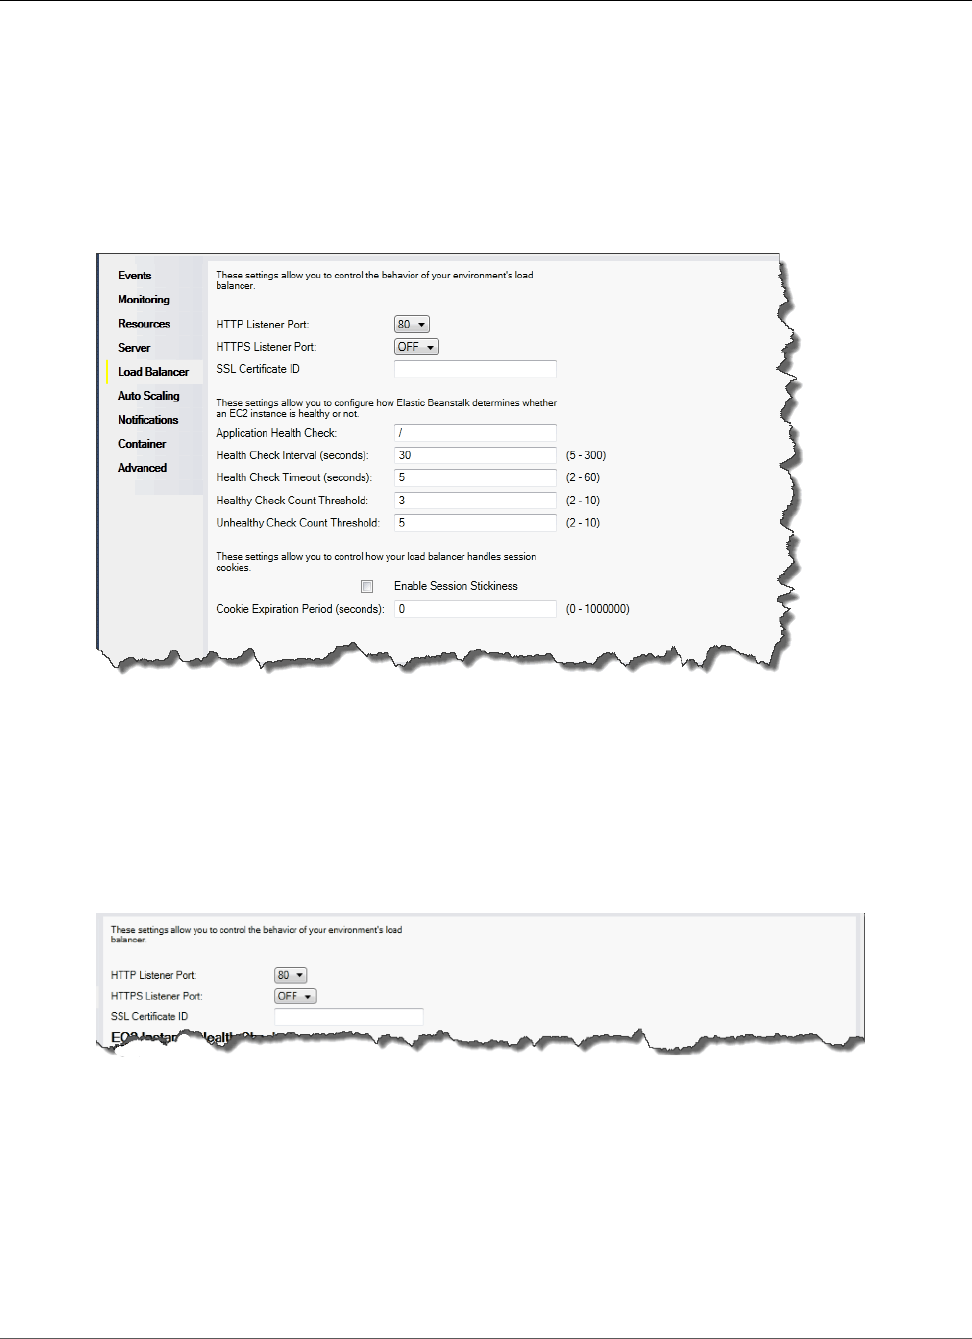
AWS Elastic Beanstalk Developer Guide
Managing Environments
Amazon EC2 instances. Elastic Load Balancing enables availability through redundancy and supports
traffic growth for your application.
Elastic Load Balancing lets you automatically distribute and balance the incoming application traffic
among all the instances you are running. The service also makes it easy to add new instances when you
need to increase the capacity of your application.
Elastic Beanstalk automatically provisions Elastic Load Balancing when you deploy an application. You
can edit the Elastic Beanstalk environment's Amazon EC2 instance configuration with the Load Balancer
tab inside your application environment tab in AWS Toolkit for Visual Studio.
The following sections describe the Elastic Load Balancing parameters you can configure for your
application.
Ports
The load balancer provisioned to handle requests for your Elastic Beanstalk application sends requests to
the Amazon EC2 instances that are running your application. The provisioned load balancer can listen for
requests on HTTP and HTTPS ports and route requests to the Amazon EC2 instances in your AWS Elastic
Beanstalk application. By default, the load balancer handles requests on the HTTP port. At least one of
the ports (either HTTP or HTTPS) must be turned on.
Important
Make sure that the port you specified is not locked down; otherwise, users will not be able to
connect to your Elastic Beanstalk application.
Controlling the HTTP Port
To turn off the HTTP port, select OFF for HTTP Listener Port. To turn on the HTTP port, you select an
HTTP port (for example, 80) from the list.
Note
To access your environment using a port other than the default port 80, such as port 8080, add
a listener to the existing load balancer and configure the new listener to listen on that port.
API Version 2010-12-01
760
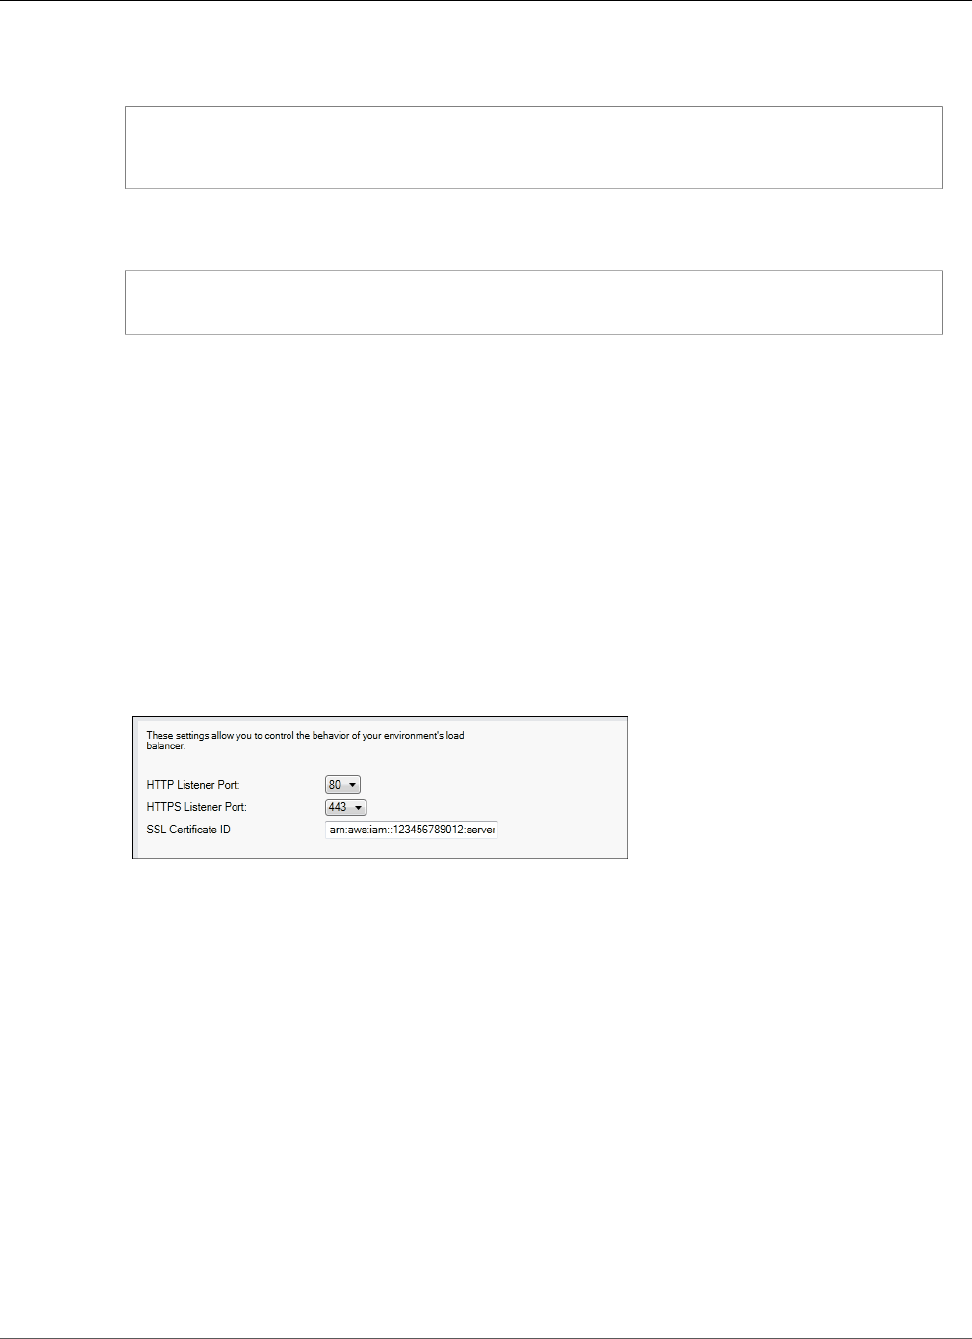
AWS Elastic Beanstalk Developer Guide
Managing Environments
For example, using the AWS CLI for Classic load balancers, type the following command,
replacing LOAD_BALANCER_NAME with the name of your load balancer for Elastic Beanstalk.
aws elb create-load-balancer-listeners --load-balancer-name LOAD_BALANCER_NAME
--listeners "Protocol=HTTP, LoadBalancerPort=8080, InstanceProtocol=HTTP,
InstancePort=80"
For example, using the AWS CLI for Application load balancers, type the following command,
replacing LOAD_BALANCER_ARN with the ARN of your load balancer for Elastic Beanstalk.
aws elbv2 create-listener --load-balancer-arn LOAD_BALANCER_ARN --protocol HTTP --
port 8080
If you want Elastic Beanstalk to monitor your environment, do not remove the listener on port
80.
Controlling the HTTPS Port
Elastic Load Balancing supports the HTTPS/TLS protocol to enable traffic encryption for client
connections to the load balancer. Connections from the load balancer to the EC2 instances use plaintext
encryption. By default, the HTTPS port is turned off.
To turn on the HTTPS port
1. Create and upload a certificate and key to the AWS Identity and Access Management (IAM) service.
The IAM service will store the certificate and provide an Amazon Resource Name (ARN) for the SSL
certificate you've uploaded. For more information about creating and uploading certificates, see the
Managing Server Certificates section of Using AWS Identity and Access Management.
2. Specify the HTTPS port by selecting a port for HTTPS Listener Port.
3. For SSL Certificate ID, enter the Amazon Resources Name (ARN) of your SSL certificate (e.g.,
arn:aws:iam::123456789012:server-certificate/abc/certs/build). Use the SSL
certificate that you created and uploaded in step 1. For information on viewing the certificate's ARN,
see Verify the Certificate Object topic in the Creating and Uploading Server Certificates section of the
Using IAM Guide.
To turn off the HTTPS port, select OFF for HTTPS Listener Port.
Health Checks
The health check definition includes a URL to be queried for instance health. By default, Elastic Beanstalk
uses TCP:80 for nonlegacy containers and HTTP:80 for legacy containers. You can override the default
URL to match an existing resource in your application (e.g., /myapp/default.aspx) by entering
it in the Application Health Check URL box. If you override the default URL, then Elastic Beanstalk
uses HTTP to query the resource. To check if you are using a legacy container type, see Why are some
container types marked legacy? (p. 150).
You can control the settings for the health check using the EC2 Instance Health Check section of the
Load Balancing panel.
API Version 2010-12-01
761
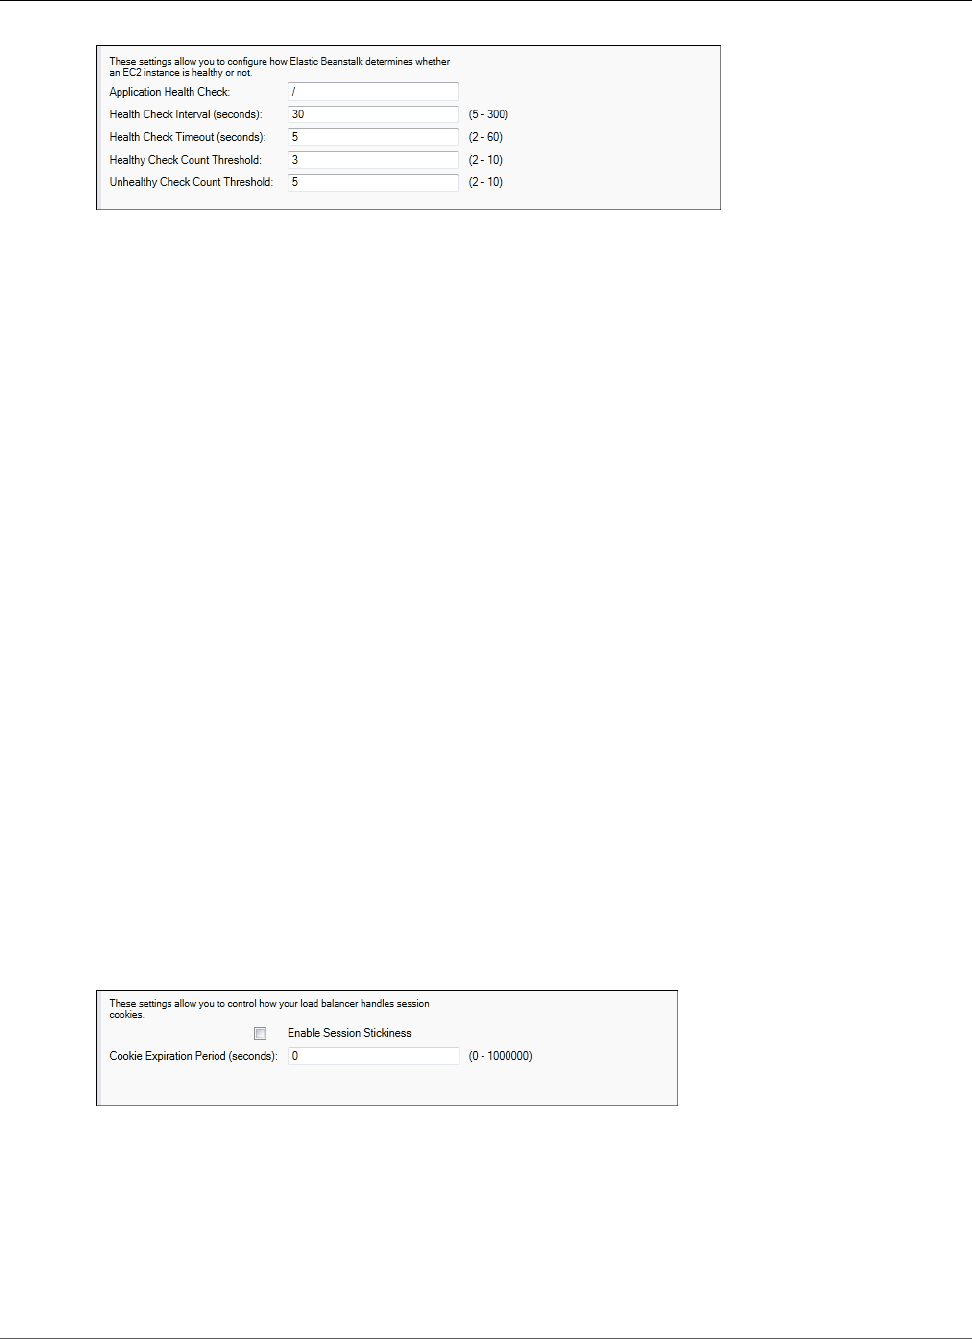
AWS Elastic Beanstalk Developer Guide
Managing Environments
The health check definition includes a URL to be queried for instance health. Override the default
URL to match an existing resource in your application (e.g., /myapp/index.jsp) by entering it in the
Application Health Check URL box.
The following list describes the health check parameters you can set for your application.
• For Health Check Interval (seconds), enter the number of seconds Elastic Load Balancing waits
between health checks for your application's Amazon EC2 instances.
• For Health Check Timeout (seconds), specify the number of seconds Elastic Load Balancing waits for a
response before it considers the instance unresponsive.
• For Healthy Check Count Threshold and Unhealthy Check Count Threshold, specify the number of
consecutive successful or unsuccessful URL probes before Elastic Load Balancing changes the instance
health status. For example, specifying 5 for Unhealthy Check Count Threshold means that the URL
would have to return an error message or timeout five consecutive times before Elastic Load Balancing
considers the health check failed.
Sessions
By default, a load balancer routes each request independently to the server instance with the smallest
load. By comparison, a sticky session binds a user's session to a specific server instance so that all
requests coming from the user during the session are sent to the same server instance.
Elastic Beanstalk uses load balancer–generated HTTP cookies when sticky sessions are enabled for an
application. The load balancer uses a special load balancer–generated cookie to track the application
instance for each request. When the load balancer receives a request, it first checks to see if this cookie
is present in the request. If so, the request is sent to the application instance specified in the cookie.
If there is no cookie, the load balancer chooses an application instance based on the existing load
balancing algorithm. A cookie is inserted into the response for binding subsequent requests from
the same user to that application instance. The policy configuration defines a cookie expiry, which
establishes the duration of validity for each cookie.
You can use the Sessions section on the Load Balancer tab to specify whether or not the load balancer
for your application allows session stickiness.
For more information on Elastic Load Balancing, go to the Elastic Load Balancing Developer Guide.
Configuring Auto Scaling Using the AWS Toolkit for Visual
Studio
Auto Scaling is an Amazon web service designed to automatically launch or terminate Amazon EC2
instances based on user-defined triggers. Users can set up Auto Scaling groups and associate triggers with
API Version 2010-12-01
762
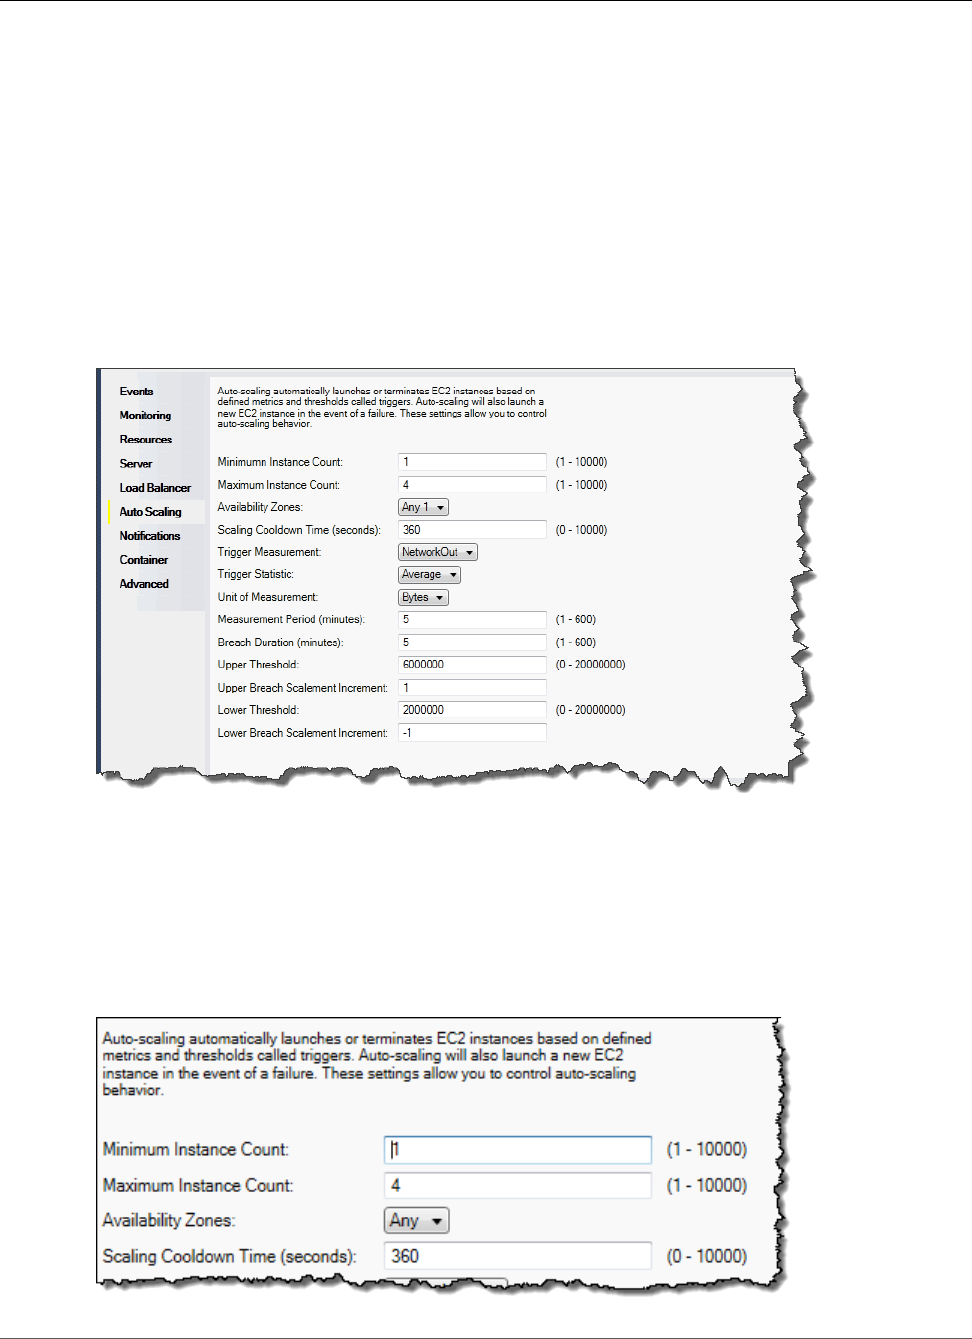
AWS Elastic Beanstalk Developer Guide
Managing Environments
these groups to automatically scale computing resources based on metrics such as bandwidth usage or
CPU utilization. Auto Scaling works with Amazon CloudWatch to retrieve metrics for the server instances
running your application.
Auto Scaling lets you take a group of Amazon EC2 instances and set various parameters to have this
group automatically increase or decrease in number. Auto Scaling can add or remove Amazon EC2
instances from that group to help you seamlessly deal with traffic changes to your application.
Auto Scaling also monitors the health of each Amazon EC2 instance that it launches. If any instance
terminates unexpectedly, Auto Scaling detects the termination and launches a replacement instance.
This capability enables you to maintain a fixed, desired number of Amazon EC2 instances automatically.
Elastic Beanstalk provisions Auto Scaling for your application. You can edit the Elastic Beanstalk
environment's Amazon EC2 instance configuration with the Auto Scaling tab inside your application
environment tab in the AWS Toolkit for Visual Studio.
The following section discusses how to configure Auto Scaling parameters for your application.
Launch the Configuration
You can edit the launch configuration to control how your Elastic Beanstalk application provisions Auto
Scaling resources.
The Minimum Instance Count and Maximum Instance Count boxes let you specify the minimum and
maximum size of the Auto Scaling group that your Elastic Beanstalk application uses.
API Version 2010-12-01
763
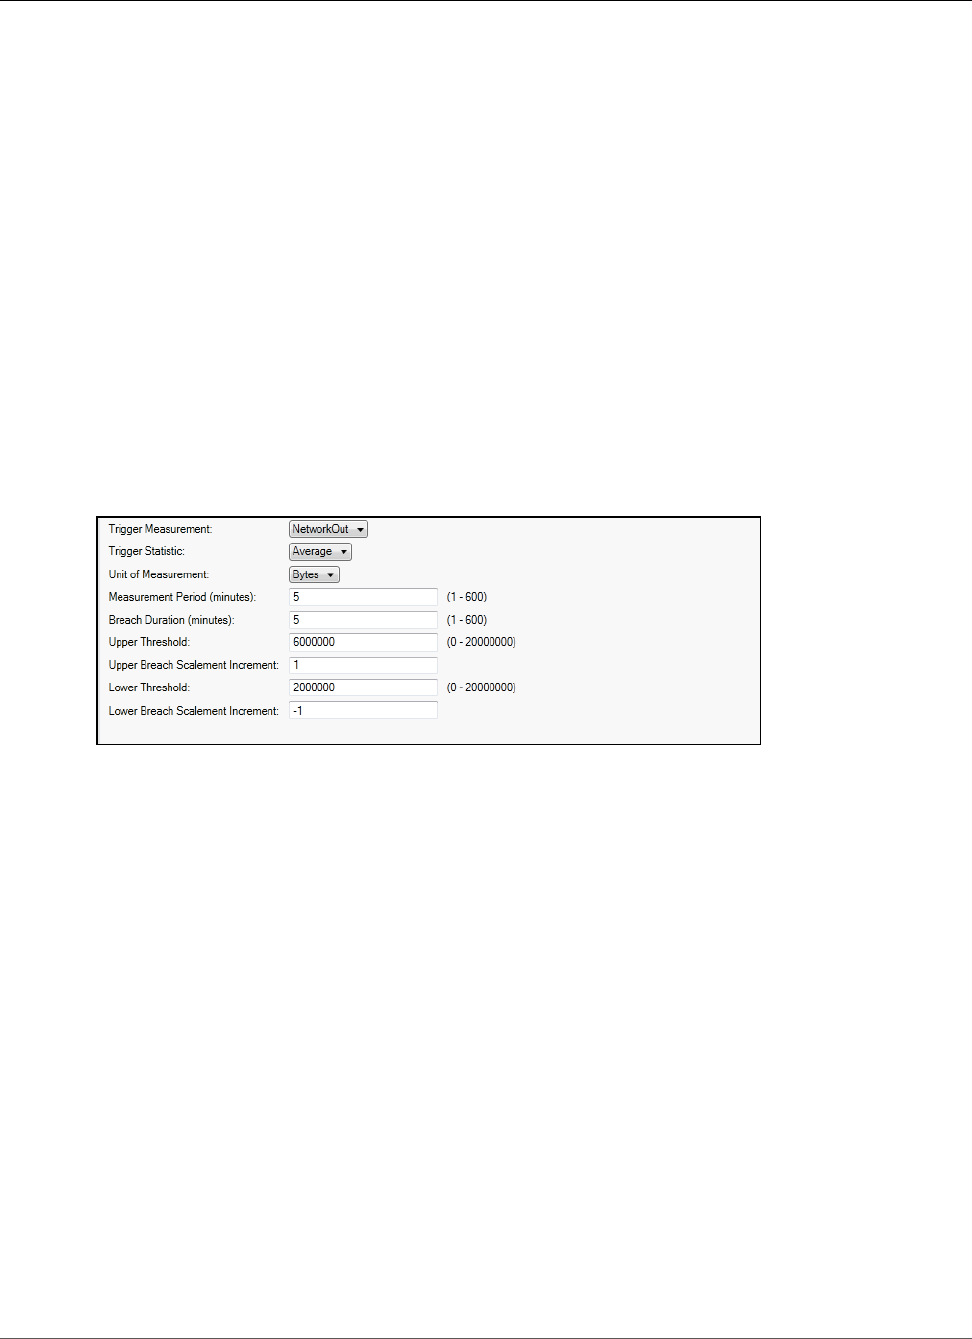
AWS Elastic Beanstalk Developer Guide
Managing Environments
Note
To maintain a fixed number of Amazon EC2 instances, set Minimum Instance Count and
Maximum Instance Count to the same value.
The Availability Zones box lets you specify the number of Availability Zones you want your Amazon EC2
instances to be in. It is important to set this number if you want to build fault-tolerant applications. If
one Availability Zone goes down, your instances will still be running in your other Availability Zones.
Note
Currently, it is not possible to specify which Availability Zone your instance will be in.
Triggers
A trigger is an Auto Scaling mechanism that you set to tell the system when you want to increase (scale
out) the number of instances, and when you want to decrease (scale in) the number of instances. You
can configure triggers to fire on any metric published to Amazon CloudWatch, such as CPU utilization,
and determine if the conditions you specified have been met. When the upper or lower thresholds of the
conditions you have specified for the metric have been breached for the specified period of time, the
trigger launches a long-running process called a Scaling Activity.
You can define a scaling trigger for your Elastic Beanstalk application using AWS Toolkit for Visual
Studio.
Auto Scaling triggers work by watching a specific Amazon CloudWatch metric for an instance. Triggers
include CPU utilization, network traffic, and disk activity. Use the Trigger Measurement setting to select
a metric for your trigger.
The following list describes the trigger parameters you can configure using the AWS Management
Console.
• You can specify which statistic the trigger should use. You can select Minimum, Maximum, Sum, or
Average for Trigger Statistic.
• For Unit of Measurement, specify the unit for the trigger measurement.
• The value in the Measurement Period box specifies how frequently Amazon CloudWatch measures the
metrics for your trigger. The Breach Duration is the amount of time a metric can be beyond its defined
limit (as specified for the Upper Threshold and Lower Threshold) before the trigger fires.
• For Upper Breach Scale Increment and Lower Breach Scale Increment, specify how many Amazon
EC2 instances to add or remove when performing a scaling activity.
For more information on Auto Scaling, go to the Auto Scaling documentation.
Configuring Notifications Using AWS Toolkit for Visual Studio
Elastic Beanstalk uses the Amazon Simple Notification Service (Amazon SNS) to notify you of important
events affecting your application. To enable Amazon SNS notifications, simply enter your email address
in the Email Address box. To disable these notifications, remove your email address from the box.
API Version 2010-12-01
764
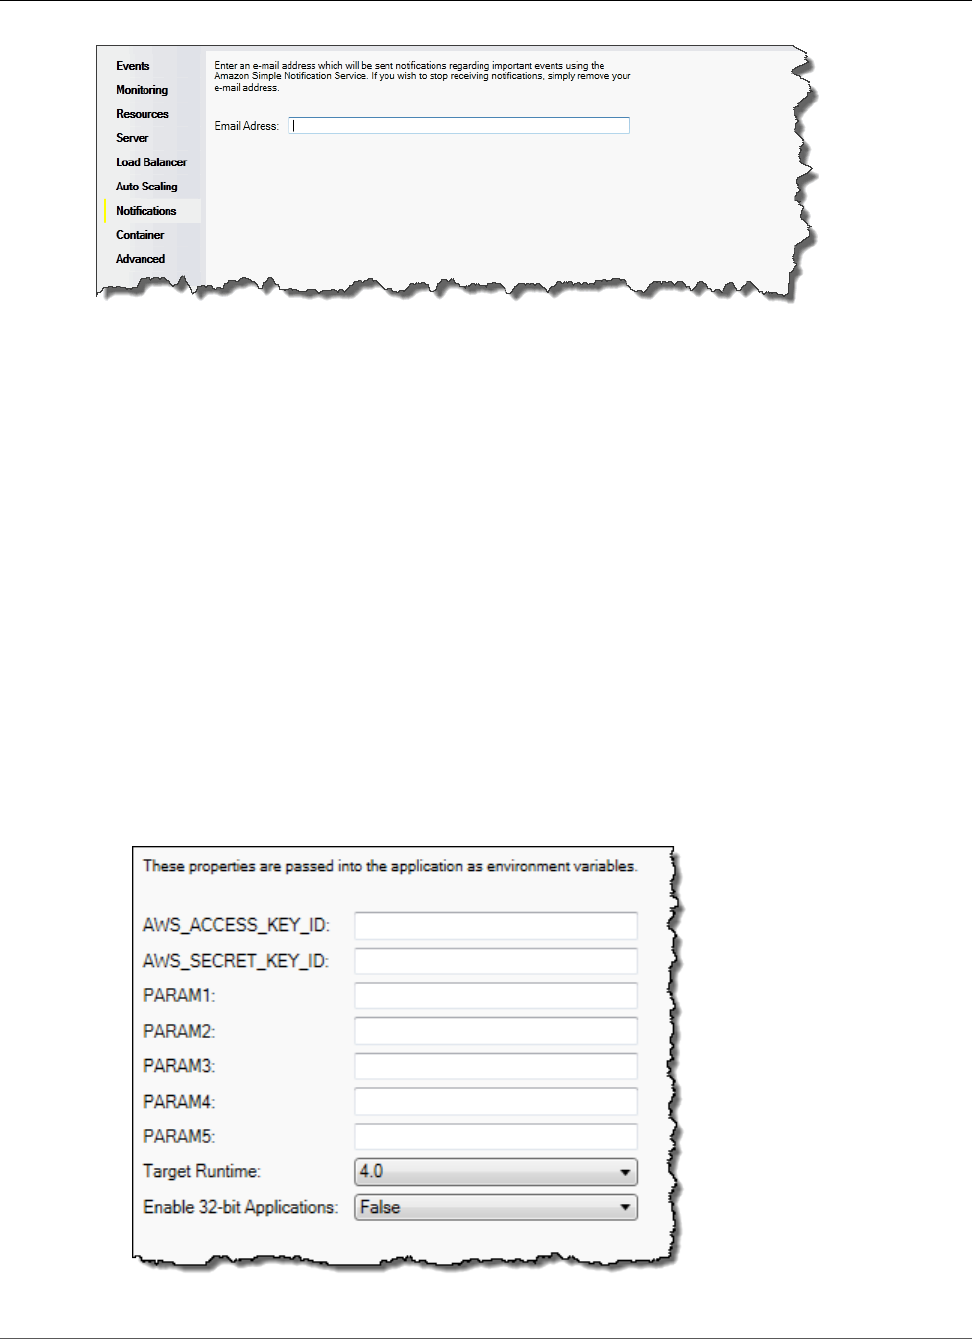
AWS Elastic Beanstalk Developer Guide
Managing Environments
Configuring .NET Containers Using the AWS Toolkit for Visual
Studio
The Container/.NET Options panel lets you fine-tune the behavior of your Amazon EC2 instances and
enable or disable Amazon S3 log rotation. You can use the AWS Toolkit for Visual Studio to configure
your container information.
Note
You can modify your configuration settings with zero downtime by swapping the CNAME for
your environments. For more information, see Blue/Green Deployments with AWS Elastic
Beanstalk (p. 129).
If you want to, you can extend the number of parameters. For information about extending parameters,
see Option Settings (p. 257).
To access the Container/.NET Options panel for your Elastic Beanstalk application
1. In AWS Toolkit for Visual Studio, expand the Elastic Beanstalk node and your application node.
2. In AWS Explorer, double-click your Elastic Beanstalk environment.
3. At the bottom of the Overview pane, click the Configuration tab.
4. Under Container, you can configure container options.
API Version 2010-12-01
765
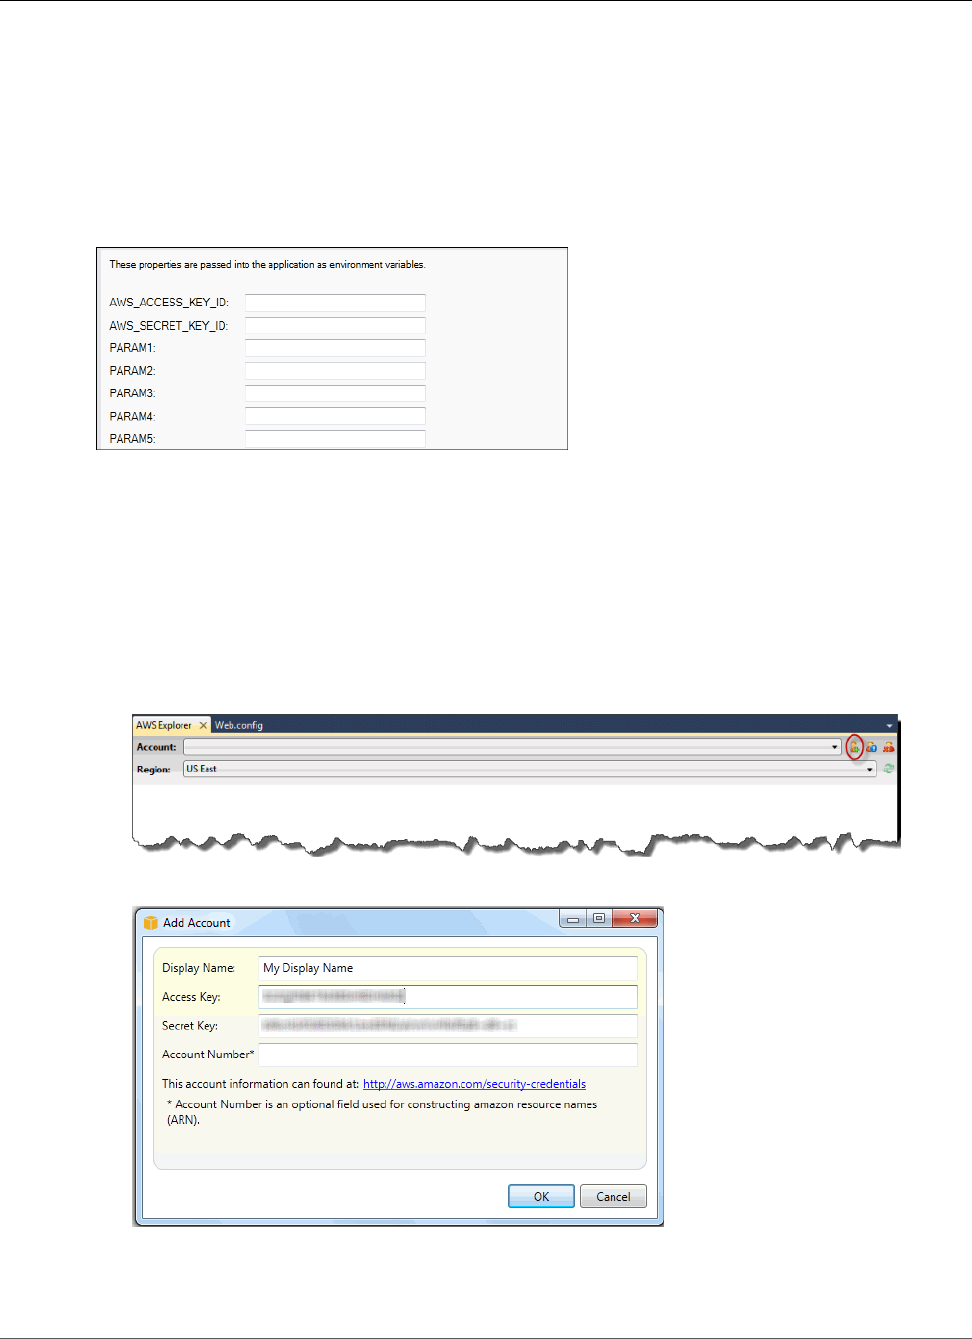
AWS Elastic Beanstalk Developer Guide
Managing Accounts
.NET Container Options
You can choose the version of .NET Framework for your application. Choose either 2.0 or 4.0 for Target
runtime. Select Enable 32-bit Applications if you want to enable 32-bit applications.
Application Settings
The Application Settings section lets you specify environment variables that you can read from your
application code.
Managing Accounts
If you want to set up different AWS accounts to perform different tasks, such as testing, staging, and
production, you can add, edit, and delete accounts using the AWS Toolkit for Visual Studio.
To manage multiple accounts
1. In Visual Studio, on the View menu, click AWS Explorer.
2. Beside the Account list, click the Add Account button.
The Add Account dialog box appears.
3. Fill in the requested information.
4. Your account information now appears on the AWS Explorer tab. When you publish to Elastic
Beanstalk, you can select which account you would like to use.
API Version 2010-12-01
766
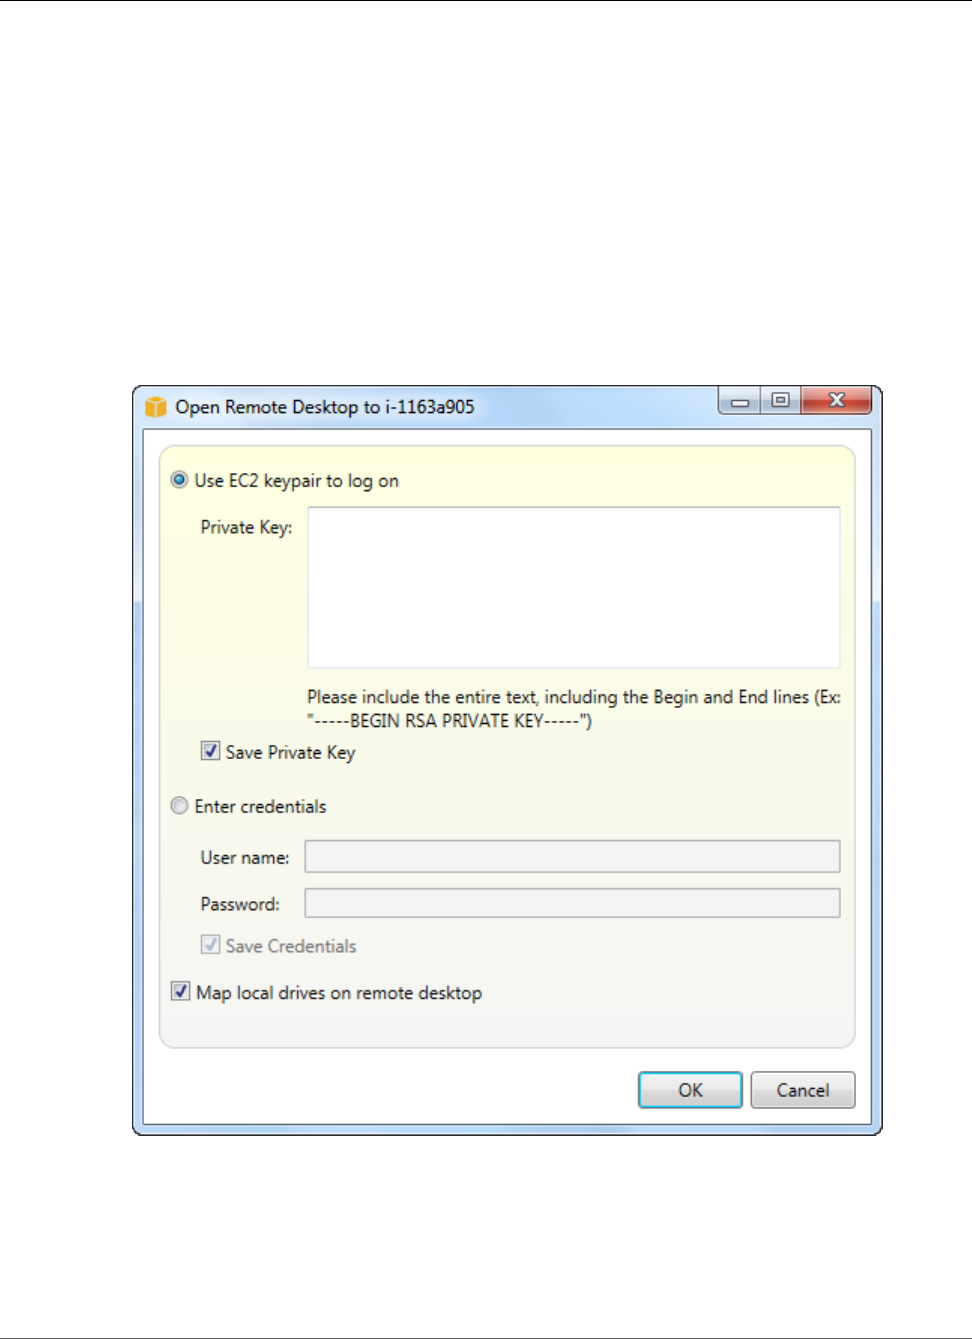
AWS Elastic Beanstalk Developer Guide
Debug
Listing and Connecting to Server Instances
You can view a list of Amazon EC2 instances running your Elastic Beanstalk application environment
through the AWS Toolkit for Visual Studio or from the AWS Management Console. You can connect
to these instances using Remote Desktop Connection. For information about listing and connecting
to your server instances using the AWS Management Console, see Listing and Connecting to Server
Instances (p. 367). The following section steps you through viewing and connecting you to your server
instances using the AWS Toolkit for Visual Studio.
To view and connect to Amazon EC2 instances for an environment
1. In Visual Studio, in AWS Explorer, expand the Amazon EC2 node and double-click Instances.
2. Right-click the instance ID for the Amazon EC2 instance running in your application's load balancer
in the Instance column and select Open Remote Desktop from the context menu.
3. Select Use EC2 keypair to log on and paste the contents of your private key file that you used to
deploy your application in the Private key box. Alternatively, enter your user name and password in
the User name and Password text boxes.
Note
If the key pair is stored inside the Toolkit, the text box does not appear.
4. Click OK.
API Version 2010-12-01
767
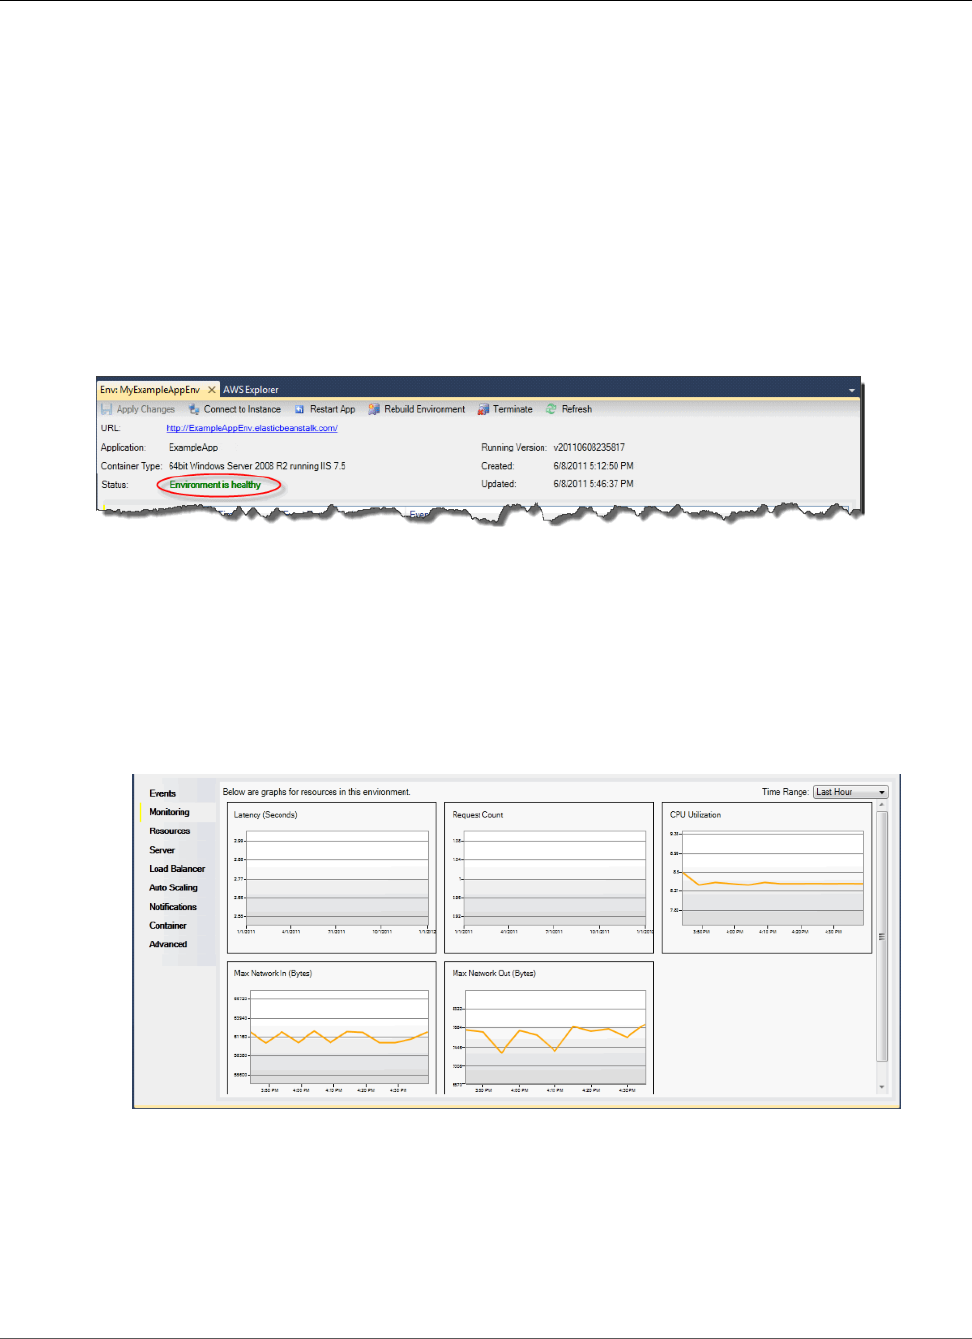
AWS Elastic Beanstalk Developer Guide
Monitor
Monitoring Application Health
When you are running a production website, it is important to know that your application is available
and responding to requests. To assist with monitoring your application’s responsiveness, Elastic
Beanstalk provides features where you can monitor statistics about your application and create alerts
that trigger when thresholds are exceeded.
For information about the health monitoring provided by Elastic Beanstalk, see Basic Health
Reporting (p. 333).
You can access operational information about your application by using either the AWS Toolkit for Visual
Studio or the AWS Management Console.
The toolkit displays your environment's status and application health in the Status field.
To monitor application health
1. In the AWS Toolkit for Visual Studio, in AWS Explorer, expand the Elastic Beanstalk node, and then
expand your application node.
2. Right-click your Elastic Beanstalk environment, and then click View Status.
3. On your application environment tab, click Monitoring.
The Monitoring panel includes a set of graphs showing resource usage for your particular
application environment.
Note
By default, the time range is set to the last hour. To modify this setting, in the Time Range
list, click a different time range.
You can use the AWS Toolkit for Visual Studio or the AWS Management Console to view events
associated with your application.
API Version 2010-12-01
768

AWS Elastic Beanstalk Developer Guide
Deployment Tool
To view application events
1. In the AWS Toolkit for Visual Studio, in AWS Explorer, expand the Elastic Beanstalk node and your
application node.
2. Right-click your Elastic Beanstalk environment in AWS Explorer and then click View Status.
3. In your application environment tab, click Events.
Deploying Elastic Beanstalk Applications in .NET
Using the Deployment Tool
The AWS Toolkit for Visual Studio includes a deployment tool, a command line tool that provides the
same functionality as the deployment wizard in the AWS Toolkit. You can use the deployment tool in
your build pipeline or in other scripts to automate deployments to Elastic Beanstalk.
The deployment tool supports both initial deployments and redeployments. If you previously deployed
your application using the deployment tool, you can redeploy using the deployment wizard within Visual
Studio. Similarly, if you have deployed using the wizard, you can redeploy using the deployment tool.
Note
The deployment tool does not apply recommended values (p. 203) for configuration options like
the console or EB CLI. Use configuration files (p. 256) to ensure that any settings that you need
are configured when you launch your environment.
This chapter walks you through deploying a sample .NET application to Elastic Beanstalk using the
deployment tool, and then redeploying the application using an incremental deployment. For a more in-
depth discussion about the deployment tool, including the parameter options, see Deployment Tool.
Prerequisites
To use the deployment tool, you need to install the AWS Toolkit for Visual Studio. For information on
prerequisites and installation instructions, see AWS Toolkit for Microsoft Visual Studio.
The deployment tool is typically installed in one of the following directories on Windows:
32-bit 64-bit
C:\Program Files\AWS Tools
\Deployment Tool\awsdeploy.exe
C:\Program Files (x86)\AWS Tools\Deployment Tool
\awsdeploy.exe
API Version 2010-12-01
769

AWS Elastic Beanstalk Developer Guide
Resources
Deploy to Elastic Beanstalk
To deploy the sample application to Elastic Beanstalk using the deployment tool, you first need to
modify the ElasticBeanstalkDeploymentSample.txt configuration file, which is provided in the
Samples directory. This configuration file contains the information necessary to deploy your application,
including the application name, application version, environment name, and your AWS access credentials.
After modifying the configuration file, you then use the command line to deploy the sample application.
Your web deploy file is uploaded to Amazon S3 and registered as a new application version with Elastic
Beanstalk. It will take a few minutes to deploy your application. Once the environment is healthy, the
deployment tool outputs a URL for the running application.
To deploy a .NET application to Elastic Beanstalk
1. From the Samples subdirectory where the deployment tool is installed, open
ElasticBeanstalkDeploymentSample.txt and enter your AWS access key and AWS secret key
as in the following example.
### AWS Access Key and Secret Key used to create and deploy the application instance
AWSAccessKey = AKIAIOSFODNN7EXAMPLE
AWSSecretKey = wJalrXUtnFEMI/K7MDENG/bPxRfiCYEXAMPLEKEY
Note
For API access, you need an access key ID and secret access key. Use IAM user access keys
instead of AWS account root user access keys. IAM lets you securely control access to AWS
services and resources in your AWS account. For more information about creating access
keys, see How Do I Get Security Credentials? in the AWS General Reference.
2. At the command line prompt, type the following:
C:\Program Files (x86)\AWS Tools\Deployment Tool>awsdeploy.exe /w Samples
\ElasticBeanstalkDeploymentSample.txt
It takes a few minutes to deploy your application. If the deployment succeeds, you will see the
message, Application deployment completed; environment health is Green.
Note
If you receive the following error, the CNAME already exists.
[Error]: Deployment to AWS Elastic Beanstalk failed with exception: DNS name
(MyAppEnv.elasticbeanstalk.com) is not available.
Because a CNAME must be unique, you need to change Environment.CNAME in
ElasticBeanstalkDeploymentSample.txt.
3. In your web browser, navigate to the URL of your running application. The URL will be in the form
<CNAME.elasticbeanstalk.com> (e.g., MyAppEnv.elasticbeanstalk.com).
Resources
There are several places you can go to get additional help when developing your .NET applications:
Resource Description
.NET Development Forum Post your questions and get feedback.
API Version 2010-12-01
770

AWS Elastic Beanstalk Developer Guide
Resources
Resource Description
.NET Developer Center One-stop shop for sample code, documentation, tools, and
additional resources.
AWS SDK for .NET Documentation Read about setting up the SDK and running code samples,
features of the SDK, and detailed information about the API
operations for the SDK.
API Version 2010-12-01
771

AWS Elastic Beanstalk Developer Guide
Getting Started
Deploying Node.js Applications to
AWS Elastic Beanstalk
Topics
•Getting Started with Node.js on Elastic Beanstalk (p. 772)
•Setting Up your Node.js Development Environment (p. 775)
•Using the AWS Elastic Beanstalk Node.js Platform (p. 777)
•Deploying an Express Application to Elastic Beanstalk (p. 782)
•Deploying a Node.js Application with DynamoDB to Elastic Beanstalk (p. 786)
•Deploying a Geddy Application with Clustering to Elastic Beanstalk (p. 795)
•Adding an Amazon RDS DB Instance to your Node.js Application Environment (p. 805)
•Resources (p. 807)
Elastic Beanstalk for Node.js makes it easy to deploy, manage, and scale your Node.js web applications
using Amazon Web Services. Elastic Beanstalk for Node.js is available to anyone developing or hosting a
web application using Node.js. This chapter provides step-by-step instructions for deploying your Node.js
web application to Elastic Beanstalk using the Elastic Beanstalk management console, and provides
walkthroughs for common frameworks such as Express and Geddy.
After you deploy your Elastic Beanstalk application, you can continue to use EB CLI to manage your
application and environment, or you can use the Elastic Beanstalk console, AWS CLI, or the APIs.
Note
When support for the version of Node.js that you are using is removed from the platform
configuration, you must change or remove the version setting prior to doing a platform
upgrade (p. 143). This may occur when a security vulnerability is identified for one or more
versions of Node.js
When this occurs, attempting to upgrade to a new version of the platform that does not support
the configured NodeVersion (p. 251) fails. To avoid needing to create a new environment,
change the NodeVersion configuration option to a version that is supported by both the old
configuration version and the new one, or remove the option setting (p. 213), and then perform
the platform upgrade.
The topics in this chapter assume some knowledge of Elastic Beanstalk environments. If you haven't used
Elastic Beanstalk before, try the getting started tutorial (p. 3) to learn the basics.
Getting Started with Node.js on Elastic Beanstalk
To get started with Node.js applications on AWS Elastic Beanstalk, all you need is an application source
bundle (p. 58) to upload as your first application version and to deploy to an environment. When you
create an environment, Elastic Beanstalk allocates all of the AWS resources needed to run a highly
scalable web application.
Launching an Environment with a Sample Node.js
Application
Elastic Beanstalk provides single page sample applications for each platform as well as more complex
examples that show the use of additional AWS resources such as Amazon RDS and language or platform-
specific features and APIs.
API Version 2010-12-01
772
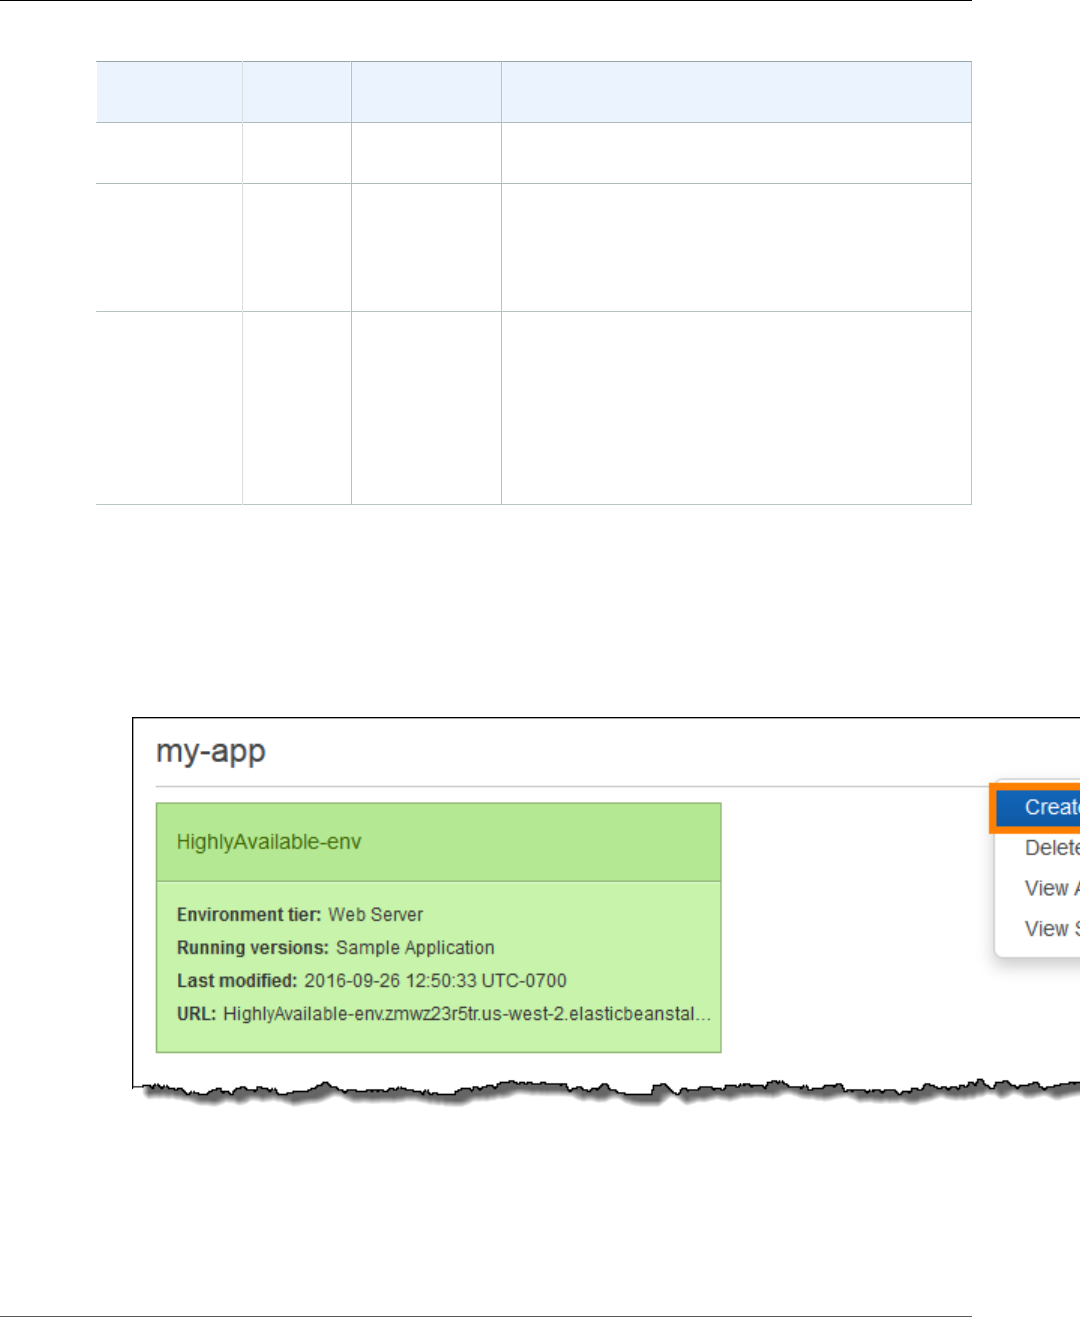
AWS Elastic Beanstalk Developer Guide
Launching an Environment with
a Sample Node.js Application
Samples
Supported
Configurations
Environment
Type
Source Bundle Description
Node.js Web
Server
nodejs-v1.zip Single page express application.
Node.js Web
Server
with
Amazon
RDS
nodejs-express-
hiking-v1.zip
Hiking log application that uses the Express
framework and an RDS database.
Tutorial (p. 782)
Node.js Web
Server
with
DynamoDB,
Amazon
SNS and
Amazon
SQS
eb-node-
express-
sample-v1.0.zip
Clone the repo
at GitHub.com
Express web site that collects user contact
information for a new company's marketing
campaign. Uses the AWS SDK for JavaScript in Node.js
to write entries to a DynamoDB table, and Elastic
Beanstalk configuration files to create resources in
DynamoDB, Amazon SNS and Amazon SQS.
Tutorial (p. 786)
Download any of the sample applications and deploy it to Elastic Beanstalk by following these steps:
To launch an environment with a sample application (console)
1. Open the Elastic Beanstalk console.
2. Choose an application or create a new one (p. 49).
3. In the upper right corner, choose Create New Environment from the Actions menu.
4. Choose between Web server and Worker environment tiers (p. 14). You cannot change an
environment's tier after creation.
Note
The .NET on Windows Server platform (p. 710) doesn't support the worker environment tier.
API Version 2010-12-01
773
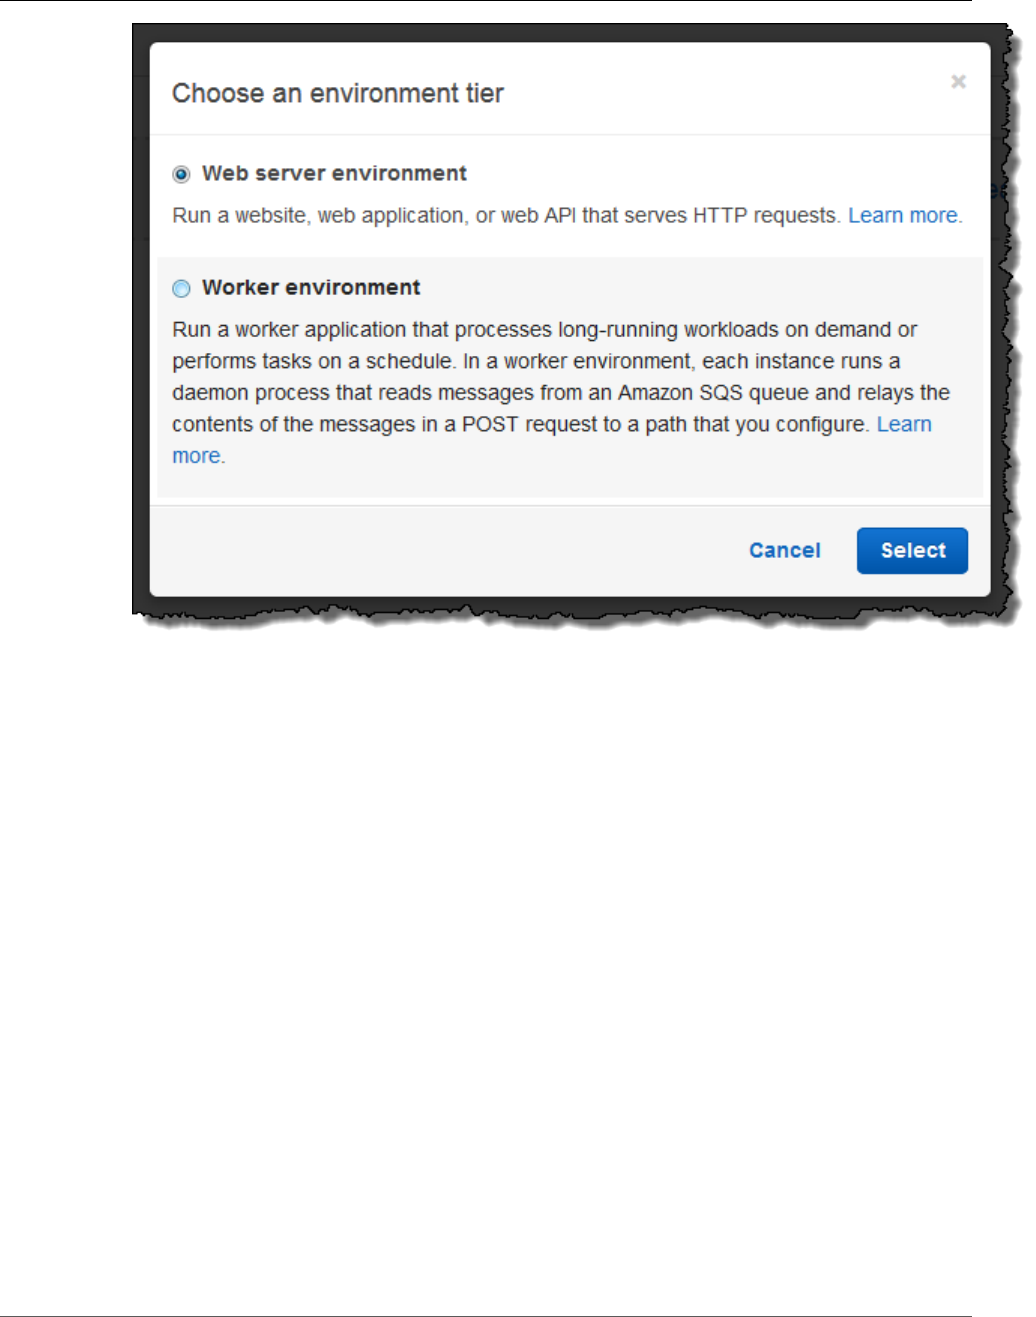
AWS Elastic Beanstalk Developer Guide
Launching an Environment with
a Sample Node.js Application
5. For Platform, choose the platform that matches the language used by your application.
Note
Elastic Beanstalk supports multiple configurations (p. 26) for most platforms listed. By
default, the console selects the latest version of the language, web container or framework
supported by Elastic Beanstalk (p. 26). If your application requires an older version, choose
Configure more options below.
6. For App code, choose Sample application.
7. If you would like to further customize your environment, choose Configure more options. The
following options can only be set during environment creation:
• Environment name
• Domain name
• Platform configuration
• VPC
• Tier
The following settings can be changed after environment creation, but require new instances or
other resources to be provisioned and can take a long time to apply:
• Instance type, root volume, key pair, and IAM role
• Internal RDS database
• Load balancer
For details on all available settings, see The Create New Environment Wizard (p. 78).
API Version 2010-12-01
774

AWS Elastic Beanstalk Developer Guide
Next Steps
8. Choose Create environment.
Next Steps
After you have an environment running an application, you can deploy a new version of the application
or a completely different application at any time. Deploying a new application version is very quick
because it doesn't require provisioning or restarting EC2 instances.
After you've deployed a sample application or two and are ready to start developing and running Node.js
applications locally, see the next section (p. 775) to set up a Node.js development environment with all
of the tools that you will need.
Setting Up your Node.js Development
Environment
Set up a Node.js development environment to test your application locally prior to deploying it to AWS
Elastic Beanstalk. This topic outlines development environment setup steps and links to installation
pages for useful tools.
For common setup steps and tools that apply to all languages, see Configuring your development
environment for use with AWS Elastic Beanstalk (p. 477)
Topics
•Installing Node.js (p. 775)
•Installing npm (p. 775)
•Installing the AWS SDK for Node.js (p. 776)
•Installing Express (p. 776)
•Installing Geddy (p. 776)
Installing Node.js
Install Node.js to run Node.js applications locally. If you don't have a preference, get the latest version
supported by Elastic Beanstalk. See Node.js (p. 32) on the supported platforms page for a list of
supported versions.
Download Node.js at nodejs.org.
Note
When support for the version of Node.js that you are using is removed from the platform
configuration, you must change or remove the version setting prior to doing a platform
upgrade (p. 143). This may occur when a security vulnerability is identified for one or more
versions of Node.js
When this occurs, attempting to upgrade to a new version of the platform that does not support
the configured NodeVersion (p. 251) fails. To avoid needing to create a new environment,
change the NodeVersion configuration option to a version that is supported by both the old
configuration version and the new one, or remove the option setting (p. 213), and then perform
the platform upgrade.
Installing npm
Node.js uses the npm package manager to helps you install tools and frameworks for use in your
application. Download npm at npmjs.com.
API Version 2010-12-01
775

AWS Elastic Beanstalk Developer Guide
Installing the AWS SDK for Node.js
Installing the AWS SDK for Node.js
If you need to manage AWS resources from within your application, install the AWS SDK for JavaScript in
Node.js. Install the SDK with npm:
$ npm install aws-sdk
Visit the AWS SDK for JavaScript in Node.js homepage for more information.
Installing Express
Express is a web application framework that runs on Node.js.
To set up your Express development environment on your local computer
1. Install Express globally so that you have access to the express command.
~/node-express$ npm install -g express-generator
2. Depending on your operating system, you may need to set your path to run the express command.
If you need to set your path, use the output from the previous step when you installed Express. The
following is an example.
~/node-express$ export PATH=$PATH:/usr/local/share/npm/bin/express
3. Run the express command. This generates package.json.
~/node-express$ express
When prompted if you want to continue, type y.
4. Set up local dependencies.
~/node-express$ npm install
5. Verify it works.
~/node-express$ npm start
You should see output similar to the following:
Express server listening on port 3000
Press Ctrl+C to stop the server.
Installing Geddy
Geddy is another web application framework that runs on Node.js.
To set up your Geddy development environment on your local computer
1. Install Geddy globally so that you have geddy generators or start the server.
API Version 2010-12-01
776

AWS Elastic Beanstalk Developer Guide
The Node.js Platform
~/node-geddy$ npm install -g geddy
2. Depending on your operating system, you may need to set your path to run the geddycode>
command. If you need to set your path, use the output from the previous step when you installed
Geddy. The following is an example.
~/node-geddy$ export:PATH=$PATH:/usr/local/share/npm/bin/geddy
3. Create the directory for your application.
~/node-geddy$ geddy app myapp
~/node-geddy$ cd myapp
4. Start the server. Verify everything is working, and then stop the server.
~/node-geddy/myapp$ geddy
~/node-geddy/myapp$ curl localhost:4000
Press Ctrl+C to stop the server.
Using the AWS Elastic Beanstalk Node.js Platform
The AWS Elastic Beanstalk Node.js platform is a platform configuration (p. 32) for Node.js web
applications that can run behind an nginx proxy server, behind an Apache server, or standalone.
Elastic Beanstalk provides configuration options (p. 202) that you can use to customize the software that
runs on the EC2 instances in your Elastic Beanstalk environment. You can choose which proxy server to
run in front of your application, choose a specific version of Node.js to run, and choose the command
used to run your application. You can also configure environment variables needed by your application
and enable log rotation to Amazon S3.
Platform-specific configuration options are available in the AWS Management Console for modifying the
configuration of a running environment (p. 213). To avoid losing your environment's configuration when
you terminate it, you can use saved configurations (p. 293) to save your settings and later apply them to
another environment.
To save settings in your source code, you can include configuration files (p. 256). Settings in
configuration files are applied every time you create an environment or deploy your application. You can
also use configuration files to install packages, run scripts, and perform other instance customization
operations during deployments.
You can include a Package.json file (p. 779) in your source bundle to install packages during
deployment, and an npm-shrinkwrap.json file (p. 780) to lock down dependency versions.
The Node.js platform includes a proxy server to serve static assets, forward traffic to your application,
and compress responses. You can extend or override the default proxy configuration (p. 780) for
advanced scenarios.
Settings applied in the AWS Management Console override the same settings in configuration files, if
they exist. This lets you have default settings in configuration files, and override them with environment
specific settings in the console. For more information about precedence, and other methods of changing
settings, see Configuration Options (p. 202).
API Version 2010-12-01
777

AWS Elastic Beanstalk Developer Guide
Configuring Your Node.js Environment
Configuring Your Node.js Environment
The Node.js settings lets you fine-tune the behavior of your Amazon EC2 instances and enable or
disable Amazon S3 log rotation. You can edit the Elastic Beanstalk environment's Amazon EC2 instance
configuration using the AWS Management Console.
To configure your Node.js environment in the Elastic Beanstalk console
1. Open the Elastic Beanstalk console.
2. Navigate to the management page (p. 65) for your environment.
3. Choose Configuration.
4. In theSoftware Configurationsection, choose the settings icon ( ).
Container Options
On the configuration page, specify the following:
•Proxy Server– Specifies which web server to use to proxy connections to Node.js. By default, nginx is
used. If you select none, static file mappings do not take effect, and gzip compression is disabled.
•Node Version– Specifies the version of Node.js. For information about what versions are supported,
see Elastic Beanstalk Supported Platforms (p. 26).
Note
When support for the version of Node.js that you are using is removed from the platform
configuration, you must change or remove the version setting prior to doing a platform
upgrade (p. 143). This may occur when a security vulnerability is identified for one or more
versions of Node.js
When this occurs, attempting to upgrade to a new version of the platform that does
not support the configured NodeVersion (p. 251) fails. To avoid needing to create a new
environment, change the NodeVersion configuration option to a version that is supported by
both the old configuration version and the new one, or remove the option setting (p. 213),
and then perform the platform upgrade.
•Gzip Compression– Specifies whether gzip compression is enabled. By default, gzip compression is
enabled.
•Node Command–Lets you enter the command used to start the Node.js application. An empty string
(the default) means Elastic Beanstalk will use app.js, then server.js, and then npm start in that
order.
Log Options
The Log Options section has two settings:
•Instance profile– Specifies the instance profile that has permission to access the Amazon S3 bucket
associated with your application.
•Enable log file rotation to Amazon S3–Specifies whether log files for your application's Amazon EC2
instances should be copied to your Amazon S3 bucket associated with your application.
Static Files
To improve performance, you may want to configure nginx or Apache to server static files (for example,
HTML or images) from a set of directories inside your web application. You can set the virtual path and
API Version 2010-12-01
778

AWS Elastic Beanstalk Developer Guide
Node.js Configuration Namespaces
directory mapping on the Container tab in the Static Files section. To add multiple mappings, click Add
Path. To remove a mapping, click Remove.
Environment Properties
The Environment Properties section lets you specify environment configuration settings on the Amazon
EC2 instances that are running your application. These settings are passed in as key-value pairs to the
application.
Inside the Node.js environment running in AWS Elastic Beanstalk, you can access the environment
variables using process.env.ENV_VARIABLE similar to the following example.
var endpoint = process.env.API_ENDPOINT
The Node.js platform sets the PORT environment variable to the port to which the proxy server passes
traffic. See Configuring the Proxy Server (p. 780).
See Environment Properties and Other Software Settings (p. 189) for more information.
Node.js Configuration Namespaces
You can use a configuration file (p. 256) to set configuration options and perform other instance
configuration tasks during deployments. Configuration options can be defined by the Elastic Beanstalk
service or the platform that you use and are organized into namespaces.
The Node.js platform defines options in the
aws:elasticbeanstalk:container:nodejs:staticfiles and
aws:elasticbeanstalk:container:nodejs namespaces.
The following configuration file tells Elastic Beanstalk to use npm start to run the application, sets the
proxy type to Apache, enables compression, and configures the proxy to serve static images from the
myimages directory at the /images path.
Example .ebextensions/node-settings.config
option_settings:
aws:elasticbeanstalk:container:nodejs:
NodeCommand: "npm start"
ProxyServer: apache
GzipCompression: true
aws:elasticbeanstalk:container:nodejs:staticfiles:
/images: myimages
Elastic Beanstalk provides many configuration options for customizing your environment. In addition to
configuration files, you can also set configuration options using the console, saved configurations, the EB
CLI, or the AWS CLI. See Configuration Options (p. 202) for more information.
Installing Packages with a Package.json File
Use a package.json file in the root of your project source to use npm to install packages that your
application requires.
Example package.json – Express
{
"name": "my-app",
"version": "0.0.1",
"private": true,
API Version 2010-12-01
779

AWS Elastic Beanstalk Developer Guide
Locking Dependencies with npm shrinkwrap
"dependencies": {
"ejs": "latest",
"aws-sdk": "latest",
"express": "latest",
"body-parser": "latest"
},
"scripts": {
"start": "node app.js"
}
}
When a package.json file is present, Elastic Beanstalk runs npm install to install dependencies.
Locking Dependencies with npm shrinkwrap
The Node.js platform runs npm install each time you deploy. When new versions of your
dependencies are available, they will be installed when you deploy your application, potentially causing
the deployment to take a long time.
You can avoid upgrading dependencies by creating an npm-shrinkwrap.json file that locks down your
application's dependencies to the current version.
$ npm install
$ npm shrinkwrap
wrote npm-shrinkwrap.json
Include this file in your source bundle to ensure that dependencies are only installed once.
Configuring the Proxy Server
The Node.js platform uses a reverse proxy to relay requests from port 80 on the instance to your
application listening on port 8081. Elastic Beanstalk provides a default proxy configuration that you can
either extend or override completely with your own configuration.
To extend the default configuration, add .conf files to /etc/nginx/conf.d with a configuration file.
See Terminating HTTPS on EC2 Instances Running Node.js (p. 310) for an example.
The Node.js platform sets the PORT environment variable to the port to which the proxy server passes
traffic. Read this variable in your code to configure your application's port.
var port = process.env.PORT || 3000;
var server = app.listen(port, function () {
console.log('Server running at http://127.0.0.1:' + port + '/');
});
The default nginx configuration forwards traffic to an upstream server named nodejs at
127.0.0.1:8081. It is possible to remove the default configuration and provide your own in a
configuration file (p. 256).
Example .ebextensions/proxy.config
The following example removes the default configuration and adds a custom configuration that forwards
traffic to port 5000 instead of 8081.
files:
/etc/nginx/conf.d/proxy.conf:
mode: "000644"
owner: root
API Version 2010-12-01
780

AWS Elastic Beanstalk Developer Guide
Configuring the Proxy Server
group: root
content: |
upstream nodejs {
server 127.0.0.1:5000;
keepalive 256;
}
server {
listen 8080;
if ($time_iso8601 ~ "^(\d{4})-(\d{2})-(\d{2})T(\d{2})") {
set $year $1;
set $month $2;
set $day $3;
set $hour $4;
}
access_log /var/log/nginx/healthd/application.log.$year-$month-$day-$hour healthd;
access_log /var/log/nginx/access.log main;
location / {
proxy_pass http://nodejs;
proxy_set_header Connection "";
proxy_http_version 1.1;
proxy_set_header Host $host;
proxy_set_header X-Real-IP $remote_addr;
proxy_set_header X-Forwarded-For $proxy_add_x_forwarded_for;
}
gzip on;
gzip_comp_level 4;
gzip_types text/html text/plain text/css application/json application/x-javascript
text/xml application/xml application/xml+rss text/javascript;
location /static {
alias /var/app/current/static;
}
}
/opt/elasticbeanstalk/hooks/configdeploy/post/99_kill_default_nginx.sh:
mode: "000755"
owner: root
group: root
content: |
#!/bin/bash -xe
rm -f /etc/nginx/conf.d/00_elastic_beanstalk_proxy.conf
service nginx stop
service nginx start
container_commands:
removeconfig:
command: "rm -f /tmp/deployment/config/
#etc#nginx#conf.d#00_elastic_beanstalk_proxy.conf /etc/nginx/
conf.d/00_elastic_beanstalk_proxy.conf"
The example configuration, /etc/nginx/conf.d/proxy.conf, uses the default configuration at /
etc/nginx/conf.d/00_elastic_beanstalk_proxy.conf as a base to include the default server
block with compression and log settings, and a static file mapping.
The removeconfig command removes the container's default configuration to make sure that the proxy
server uses the custom configuration. Elastic Beanstalk recreates the default configuration during every
configuration deployment. To account for that, the example adds a post-configuration-deployment
hook, /opt/elasticbeanstalk/hooks/configdeploy/post/99_kill_default_nginx.sh,
which removes the default configuration and restarts the proxy server.
API Version 2010-12-01
781

AWS Elastic Beanstalk Developer Guide
Tutorial - Express
Note
The default configuration may change in future versions of the Node.js platform. Use the latest
version of the configuration as a base for your customizations to ensure compatibility.
If you override the default configuration, you must define any static file mappings and gzip compression,
as the platform will not be able to apply the standard settings (p. 779).
Deploying an Express Application to Elastic
Beanstalk
This section walks you through deploying a sample application to Elastic Beanstalk using Elastic
Beanstalk Command Line Interface (EB CLI) and git, and then updating the application to use the Express
framework.
Prerequisites
This tutorial requires the Node.js language and its package manager, NPM. See Setting Up your Node.js
Development Environment (p. 775) for details on setting up your local development environment.
Install Express and Generate a Project
Set up Express and create the project structure. The following walks you through setting up Express on a
Linux operating system.
To set up your Express development environment on your local computer
1. Create a directory for your Express application.
~$ mkdir node-express
~$ cd node-express
2. Install Express globally so that you have access to the express command.
~/node-express$ npm install -g express-generator
3. Depending on your operating system, you may need to set your path to run the express command.
If you need to set your path, use the output from the previous step when you installed Express. The
following is an example.
~/node-express$ export:PATH=$PATH:/usr/local/share/npm/bin/express
4. Run the express command. This generates package.json.
~/node-express$ express
When prompted if you want to continue, type y.
5. Set up local dependencies.
~/node-express$ npm install
6. Verify it works.
~/node-express$ npm start
API Version 2010-12-01
782

AWS Elastic Beanstalk Developer Guide
Create an Elastic Beanstalk Environment
You should see output similar to the following:
> nodejs@0.0.0 start /home/local/user/node-express
> node ./bin/www
Press Ctrl+c to stop the server.
7. Initialize the Git repository. If you don't have Git installed, download it from the Git downloads site.
~/node-express$ git init
8. Create a file named .gitignore and add the following files and directories to it. These files will be
excluded from being added to the repository. This step is not required, but it is recommended.
node-express/.gitignore
node_modules/
.gitignore
.elasticbeanstalk/
Create an Elastic Beanstalk Environment
Configure an EB CLI repository for your application and create an Elastic Beanstalk environment running
the Node.js platform.
1. Create a repository with the eb init command.
~/node-express$ eb init --platform node.js --region us-west-2
Application node-express has been created.
This command creates a configuration file in a folder named .elasticbeanstalk that specifies
settings for creating environments for your application, and creates an Elastic Beanstalk application
named after the current folder.
2. Create an environment running a sample application with the eb create command.
~/node-express$ eb create --sample node-express-env
This command creates a load balanced environment with the default settings for the Node.js
platform and the following resources:
•EC2 instance – An Amazon Elastic Compute Cloud (Amazon EC2) virtual machine configured to
run web apps on the platform that you choose.
Each platform runs a different set of software, configuration files, and scripts to support a specific
language version, framework, web container, or combination thereof. Most platforms use either
Apache or nginx as a reverse proxy that sits in front of your web app, forwards requests to it,
serves static assets, and generates access and error logs.
•Instance security group – An Amazon EC2 security group configured to allow ingress on port 80.
This resource lets HTTP traffic from the load balancer reach the EC2 instance running your web
app. By default, traffic is not allowed on other ports.
•Load balancer – An Elastic Load Balancing load balancer configured to distribute requests to
the instances running your application. A load balancer also eliminates the need to expose your
instances directly to the Internet.
API Version 2010-12-01
783

AWS Elastic Beanstalk Developer Guide
Update the Application
•Load balancer security group – An Amazon EC2 security group configured to allow ingress on
port 80. This resource lets HTTP traffic from the Internet reach the load balancer. By default,
traffic is not allowed on other ports.
•Auto Scaling group – An Auto Scaling group configured to replace an instance if it is terminated
or becomes unavailable.
•Amazon S3 bucket – A storage location for your source code, logs, and other artifacts that are
created when you use Elastic Beanstalk.
•Amazon CloudWatch alarms – Two CloudWatch alarms that monitor the load on the instances in
your environment and are triggered if the load is too high or too low. When an alarm is triggered,
your Auto Scaling group scales up or down in response.
•AWS CloudFormation stack – Elastic Beanstalk uses AWS CloudFormation to launch the resources
in your environment and propagate configuration changes. The resources are defined in a
template that you can view in the AWS CloudFormation console.
•Domain name – A domain name that routes to your web app in the form
subdomain.region.elasticbeanstalk.com.
3. When environment creation completes, use the eb open command to open the environment's URL
in the default browser.
~/node-express$ eb open
Update the Application
After you have created an environment with a sample application, you can update it with your own
application. In this step, we update the sample application to use the Express framework.
To update your application to use Express
1. Add a configuration file that sets the Node Command to "npm start":
node-express/.ebextensions/nodecommand.config
option_settings:
aws:elasticbeanstalk:container:nodejs:
NodeCommand: "npm start"
For more information, see Advanced Environment Customization with Configuration Files
(.ebextensions) (p. 256).
2. Stage the files:
~/node-express$ git add .
~/node-express$ git commit -m "First express app"
3. Deploy the changes:
~/node-express$ eb deploy
4. Once the environment is green and ready, refresh the URL to verify it worked. You should see a web
page that says Welcome to Express.
Next, let's update the Express application to serve static files and add a new page.
API Version 2010-12-01
784

AWS Elastic Beanstalk Developer Guide
Update the Application
To configure static files and add a new page to your Express application
1. Add a second configuration file with the following content:
node-express/.ebextensions/staticfiles.config
option_settings:
aws:elasticbeanstalk:container:nodejs:staticfiles:
/public: public
This setting configures the proxy server to serve files in the public folder at the /public path
of the application. Serving files statically (p. 779) from the proxy reduces the load on your
application.
2. Comment out the static mapping in node-express/app.js. This step is not required, but it is a
good test to confirm that static mappings are configured correctly.
// app.use(express.static(path.join(__dirname, 'public')));
3. Add your updated files to your local repository and commit your changes.
~/node-express$ git add .ebextensions/ app.js
~/node-express$ git commit -m "Serve stylesheets statically with nginx."
4. Add node-express/routes/hike.js. Type the following:
exports.index = function(req, res) {
res.render('hike', {title: 'My Hiking Log'});
};
exports.add_hike = function(req, res) {
};
5. Update node-express/app.js to include three new lines.
First, add the following line to add a require for this route:
hike = require('./routes/hike');
Your file should look similar to the following snippet:
var express = require('express');
var path = require('path');
var hike = require('./routes/hike');
Then, add the following two lines to node-express/app.js after var app = express();
app.get('/hikes', hike.index);
app.post('/add_hike', hike.add_hike);
Your file should look similar to the following snippet:
var app = express();
app.get('/hikes', hike.index);
app.post('/add_hike', hike.add_hike);
6. Copy node-express/views/index.jade to node-express/views/hike.jade.
API Version 2010-12-01
785

AWS Elastic Beanstalk Developer Guide
Clean Up
~/node-express$ cp views/index.jade views/hike.jade
7. Add your files to the local repository, commit your changes, and deploy your updated application.
~/node-express$ git add .
~/node-express$ git commit -m "Add hikes route and template."
~/node-express$ eb deploy
8. Your environment will be updated after a few minutes. After your environment is green and ready,
verify it worked by refreshing your browser and appending hikes at the end of the URL (e.g.,
http://node-express-env-syypntcz2q.elasticbeanstalk.com/hikes).
You should see a web page titled My Hiking Log.
Clean Up
If you are done working with Elastic Beanstalk, you can terminate your environment.
• Use the eb terminate command to terminate your environment and all of the resources that it
contains.
~/node-express$ eb terminate
The environment "node-express-env" and all associated instances will be terminated.
To confirm, type the environment name: node-express-env
INFO: terminateEnvironment is starting.
...
Deploying a Node.js Application with DynamoDB
to Elastic Beanstalk
This tutorial and sample application walks you through the process of deploying a Node.js application
that uses the AWS SDK for JavaScript in Node.js to interact with Amazon DynamoDB. You'll create
a DynamoDB table that is external to the AWS Elastic Beanstalk environment, and configure the
application to use this external table instead of creating one in the environment. In a production
environment, you keep the table independent of the Elastic Beanstalk environment to protect against
accidental data loss and enable you to perform blue/green deployments (p. 129).
The tutorial's sample application uses a DynamoDB table to store user-provided text data. The sample
application uses configuration files (p. 256) to create the table and an Amazon Simple Notification
Service topic. It also shows how to use a package.json file (p. 810) to install packages during
deployment.
Sections
•Prerequisites (p. 787)
•Launch an Elastic Beanstalk Environment (p. 787)
•Add Permissions to Your Environment's Instances (p. 788)
•Deploy the Sample Application (p. 789)
•Create a DynamoDB Table (p. 791)
•Update the Application's Configuration Files (p. 791)
API Version 2010-12-01
786

AWS Elastic Beanstalk Developer Guide
Prerequisites
•Configure Your Environment for High Availability (p. 794)
•Clean Up (p. 794)
•Next Steps (p. 795)
Prerequisites
• Before you start, download the sample application source bundle from GitHub: eb-node-express-
sample-v1.1.zip.
• You will also need a command line terminal or shell to run the commands in the procedures. Example
commands are preceded by a prompt symbol ($) and the name of the current directory, when
appropriate:
~/eb-project$ this is a command
this is output
Note
You can run all commands in this tutorial on a Linux virtual machine, and OS X machine, or
an Amazon EC2 instance running Amazon Linux. If you need a development environment, you
can launch a single-instance Elastic Beanstalk environment and connect to it with SSH.
• This tutorial uses a command line ZIP utility to create a source bundle that you can deploy to Elastic
Beanstalk. To use the zip command in Windows, you can install UnxUtils, a lightweight collection of
useful command-line utilities like zip and ls. (Alternatively, you can use Windows Explorer (p. 59) or
any other ZIP utility to create source bundle archives.)
To install UnxUtils
1. Download UnxUtils.
2. Extract the archive to a local directory. For example, C:\Program Files (x86).
3. Add the path to the binaries to your Windows PATH user variable. For example, C:\Program
Files (x86)\UnxUtils\usr\local\wbin.
4. Open a new command prompt window and run the zip command to verify that it works:
> zip
Copyright (C) 1990-1999 Info-ZIP
Type 'zip "-L"' for software license.
...
Launch an Elastic Beanstalk Environment
You use the Elastic Beanstalk console to launch an Elastic Beanstalk environment. You'll choose the
Node.js platform configuration and accept the default settings and sample code. After you configure the
environment's permissions, you deploy the sample application that you downloaded from GitHub.
To launch an environment (console)
1. Open the Elastic Beanstalk console using this preconfigured link:
console.aws.amazon.com/elasticbeanstalk/home#/newApplication?
applicationName=tutorials&environmentType=LoadBalanced
2. For Platform, choose the platform that matches the language used by your application.
3. For Application code, choose Sample application.
4. Choose Review and launch.
API Version 2010-12-01
787

AWS Elastic Beanstalk Developer Guide
Add Permissions to Your Environment's Instances
5. Review all options. When you're satisfied with them, choose Create app.
Elastic Beanstalk takes about five minutes to create the environment with the following resources:
•EC2 instance – An Amazon Elastic Compute Cloud (Amazon EC2) virtual machine configured to run
web apps on the platform that you choose.
Each platform runs a different set of software, configuration files, and scripts to support a specific
language version, framework, web container, or combination thereof. Most platforms use either
Apache or nginx as a reverse proxy that sits in front of your web app, forwards requests to it, serves
static assets, and generates access and error logs.
•Instance security group – An Amazon EC2 security group configured to allow ingress on port 80. This
resource lets HTTP traffic from the load balancer reach the EC2 instance running your web app. By
default, traffic is not allowed on other ports.
•Load balancer – An Elastic Load Balancing load balancer configured to distribute requests to the
instances running your application. A load balancer also eliminates the need to expose your instances
directly to the Internet.
•Load balancer security group – An Amazon EC2 security group configured to allow ingress on port
80. This resource lets HTTP traffic from the Internet reach the load balancer. By default, traffic is not
allowed on other ports.
•Auto Scaling group – An Auto Scaling group configured to replace an instance if it is terminated or
becomes unavailable.
•Amazon S3 bucket – A storage location for your source code, logs, and other artifacts that are created
when you use Elastic Beanstalk.
•Amazon CloudWatch alarms – Two CloudWatch alarms that monitor the load on the instances in your
environment and are triggered if the load is too high or too low. When an alarm is triggered, your Auto
Scaling group scales up or down in response.
•AWS CloudFormation stack – Elastic Beanstalk uses AWS CloudFormation to launch the resources in
your environment and propagate configuration changes. The resources are defined in a template that
you can view in the AWS CloudFormation console.
•Domain name – A domain name that routes to your web app in the form
subdomain.region.elasticbeanstalk.com.
Elastic Beanstalk manages all of these resources. When you terminate your environment, Elastic
Beanstalk terminates all of the resources that it contains.
Note
The S3 bucket that Elastic Beanstalk creates is shared between environments and is not deleted
during environment termination. For more information, see Using Elastic Beanstalk with
Amazon Simple Storage Service (p. 451).
Add Permissions to Your Environment's Instances
Your application runs on one or more EC2 instances behind a load balancer, serving HTTP requests from
the Internet. When it receives a request that requires it to use AWS services, the application uses the
permissions of the instance it runs on to access those services.
The sample application uses instance permissions to write data to a DynamoDB table, and to send
notifications to an Amazon SNS topic with the SDK for JavaScript in Node.js. Add the following managed
policies to the default instance profile (p. 22) to grant the EC2 instances in your environment permission
to access DynamoDB and Amazon SNS:
•AmazonDynamoDBFullAccess
•AmazonSNSFullAccess
API Version 2010-12-01
788

AWS Elastic Beanstalk Developer Guide
Deploy the Sample Application
To add policies to the default instance profile
1. Open the Roles page in the IAM console.
2. Choose aws-elasticbeanstalk-ec2-role.
3. On the Permissions tab, under Managed Policies, choose Attach Policy.
4. Select the managed policy for the additional services that your application uses. For example,
AmazonSNSFullAccess or AmazonDynamoDBFullAccess.
5. Choose Attach Policies.
See Managing Elastic Beanstalk Instance Profiles (p. 388) for more on managing instance profiles.
Deploy the Sample Application
Now your environment is ready for you to deploy the sample application to it and then run it.
Note
Download the source bundle from GitHub if you haven't already: eb-node-express-sample-
v1.1.zip.
To deploy a source bundle
1. Open the Elastic Beanstalk console.
2. Navigate to the management page (p. 65) for your environment.
3. Choose Upload and Deploy.
4. Choose Choose File and use the dialog box to select the source bundle.
5. Choose Deploy.
6. When the deployment completes, choose the site URL to open your website in a new tab.
The site collects user contact information and uses a DynamoDB table to store the data. To add an entry,
choose Sign up today, enter a name and email address, and then choose Sign Up!. The web app writes
the form contents to the table and triggers an Amazon SNS email notification.
API Version 2010-12-01
789

AWS Elastic Beanstalk Developer Guide
Deploy the Sample Application
Right now, the Amazon SNS topic is configured with a placeholder email for notifications. You will
update the configuration soon, but in the meantime you can verify the DynamoDB table and Amazon
SNS topic in the AWS Management Console.
To view the table
1. Open the Tables page in the DynamoDB console.
2. Find the table that the application created. The name starts with awseb and contains
StartupSignupsTable.
3. Select the table, choose Items, and then choose Start search to view all items in the table.
API Version 2010-12-01
790

AWS Elastic Beanstalk Developer Guide
Create a DynamoDB Table
The table contains an entry for every email address submitted on the signup site. In addition to writing
to the table, the application sends a message to an Amazon SNS topic that has two subscriptions, one
for email notifications to you, and another for an Amazon Simple Queue Service queue that a worker
application can read from to process requests and send emails to interested customers.
To view the topic
1. Open the Topics page in the Amazon SNS console.
2. Find the topic that the application created. The name starts with awseb and contains
NewSignupTopic.
3. Choose the topic to view its subscriptions.
The application (app.js) defines two routes. The root path (/) returns a webpage rendered from an
Embedded JavaScript (EJS) template with a form that the user fills out to register their name and email
address. Submitting the form sends a POST request with the form data to the /signup route, which
writes an entry to the DynamoDB table and publishes a message to the Amazon SNS topic to notify the
owner of the signup.
The sample application includes configuration files (p. 256) that create the DynamoDB table, Amazon
SNS topic, and Amazon SQS queue used by the application. This lets you create a new environment
and test the functionality immediately, but has the drawback of tying the DynamoDB table to the
environment. For a production environment, you should create the DynamoDB table outside of your
environment to avoid losing it when you terminate the environment or update its configuration.
Create a DynamoDB Table
To use an external DynamoDB table with an application running in Elastic Beanstalk, first create a
table in DynamoDB. When you create a table outside of Elastic Beanstalk, it is completely independent
of Elastic Beanstalk and your Elastic Beanstalk environments, and will not be terminated by Elastic
Beanstalk.
Create a table with the following settings:
•Table name – nodejs-tutorial
•Primary key – email
• Primary key type – String
To create a DynamoDB table
1. Open the Tables page in the DynamoDB management console.
2. Choose Create table.
3. Type a Table name and Primary key.
4. Choose the primary key type.
5. Choose Create.
Update the Application's Configuration Files
Update the configuration files (p. 256) in the application source to use the nodejs-tutorial table instead
of creating a new one.
To update the sample application for production use
1. Extract the project files from the source bundle:
API Version 2010-12-01
791

AWS Elastic Beanstalk Developer Guide
Update the Application's Configuration Files
~$ mkdir nodejs-tutorial
~$ cd nodejs-tutorial
~/nodejs-tutorial$ unzip ~/Downloads/eb-node-express-sample-v1.0.zip
2. Open .ebextensions/options.config and change the values of the following settings:
•NewSignupEmail – Your email address.
•STARTUP_SIGNUP_TABLE – nodejs-tutorial
Example .ebextensions/options.config
option_settings:
aws:elasticbeanstalk:customoption:
NewSignupEmail: you@example.com
aws:elasticbeanstalk:application:environment:
THEME: "flatly"
AWS_REGION: '`{"Ref" : "AWS::Region"}`'
STARTUP_SIGNUP_TABLE: nodejs-tutorial
NEW_SIGNUP_TOPIC: '`{"Ref" : "NewSignupTopic"}`'
aws:elasticbeanstalk:container:nodejs:
ProxyServer: nginx
aws:elasticbeanstalk:container:nodejs:staticfiles:
/static: /static
aws:autoscaling:asg:
Cooldown: "120"
aws:autoscaling:trigger:
Unit: "Percent"
Period: "1"
BreachDuration: "2"
UpperThreshold: "75"
LowerThreshold: "30"
MeasureName: "CPUUtilization"
This configures the application to use the nodejs-tutorial table instead of the one created by
.ebextensions/create-dynamodb-table.config, and sets the email address that the Amazon
SNS topic uses for notifications.
3. Remove .ebextensions/create-dynamodb-table.config.
~/nodejs-tutorial$ rm .ebextensions/create-dynamodb-table.config
The next time you deploy the application, the table created by this configuration file will be deleted.
4. Create a source bundle from the modified code.
~/nodejs-tutorial$ zip nodejs-tutorial.zip -r * .[^.]*
adding: LICENSE (deflated 65%)
adding: README.md (deflated 56%)
adding: app.js (deflated 63%)
adding: iam_policy.json (deflated 47%)
adding: misc/ (stored 0%)
adding: misc/theme-flow.png (deflated 1%)
adding: npm-shrinkwrap.json (deflated 87%)
adding: package.json (deflated 40%)
adding: static/ (stored 0%)
adding: static/bootstrap/ (stored 0%)
adding: static/bootstrap/css/ (stored 0%)
adding: static/bootstrap/css/jumbotron-narrow.css (deflated 59%)
adding: static/bootstrap/css/theme/ (stored 0%)
adding: static/bootstrap/css/theme/united/ (stored 0%)
API Version 2010-12-01
792

AWS Elastic Beanstalk Developer Guide
Update the Application's Configuration Files
adding: static/bootstrap/css/theme/united/bootstrap.css (deflated 86%)
adding: static/bootstrap/css/theme/amelia/ (stored 0%)
adding: static/bootstrap/css/theme/amelia/bootstrap.css (deflated 86%)
adding: static/bootstrap/css/theme/slate/ (stored 0%)
adding: static/bootstrap/css/theme/slate/bootstrap.css (deflated 87%)
adding: static/bootstrap/css/theme/default/ (stored 0%)
adding: static/bootstrap/css/theme/default/bootstrap.css (deflated 86%)
adding: static/bootstrap/css/theme/flatly/ (stored 0%)
adding: static/bootstrap/css/theme/flatly/bootstrap.css (deflated 86%)
adding: static/bootstrap/LICENSE (deflated 65%)
adding: static/bootstrap/js/ (stored 0%)
adding: static/bootstrap/js/bootstrap.min.js (deflated 74%)
adding: static/bootstrap/fonts/ (stored 0%)
adding: static/bootstrap/fonts/glyphicons-halflings-regular.eot (deflated 1%)
adding: static/bootstrap/fonts/glyphicons-halflings-regular.svg (deflated 73%)
adding: static/bootstrap/fonts/glyphicons-halflings-regular.woff (deflated 1%)
adding: static/bootstrap/fonts/glyphicons-halflings-regular.ttf (deflated 44%)
adding: static/jquery/ (stored 0%)
adding: static/jquery/jquery-1.11.3.min.js (deflated 65%)
adding: static/jquery/MIT-LICENSE.txt (deflated 41%)
adding: views/ (stored 0%)
adding: views/index.ejs (deflated 67%)
adding: .ebextensions/ (stored 0%)
adding: .ebextensions/options.config (deflated 47%)
adding: .ebextensions/create-sns-topic.config (deflated 56%)
Deploy the nodejs-tutorial.zip source bundle to your environment.
To deploy a source bundle
1. Open the Elastic Beanstalk console.
2. Navigate to the management page (p. 65) for your environment.
3. Choose Upload and Deploy.
4. Choose Choose File and use the dialog box to select the source bundle.
5. Choose Deploy.
6. When the deployment completes, choose the site URL to open your website in a new tab.
When you deploy, Elastic Beanstalk updates the configuration of the Amazon SNS topic and deletes the
DynamoDB table that it created when you deployed the first version of the application.
Now, when you terminate the environment, the nodejs-tutorial table will not be deleted. This lets you
perform blue/green deployments, modify configuration files, or take down your website without risking
data loss.
Open your site in a browser and verify that the form works as you expect. Create a few entries, and then
check the DynamoDB console to verify the table.
To view the table
1. Open the Tables page in the DynamoDB console.
2. Find the nodejs-tutorial table.
3. Select the table, choose Items, and then choose Start search to view all items in the table.
You can also see that Elastic Beanstalk deleted the table that it created previously.
API Version 2010-12-01
793

AWS Elastic Beanstalk Developer Guide
Configure Your Environment for High Availability
Configure Your Environment for High Availability
Finally, configure your environment's Auto Scaling group with a higher minimum instance count. Run at
least two instances at all times to prevent the web servers in your environment from being a single point
of failure, and to allow you to deploy changes without taking your site out of service.
To configure your environment's Auto Scaling group for high availability
1. Open the Elastic Beanstalk console.
2. Navigate to the management page (p. 65) for your environment.
3. Choose Configuration.
4. In theScalingsection, choose the settings icon ( ).
5. Under Auto Scaling, set Minimum instance count to 2 and the Maximum instance count to a value
greater than 2.
6. Choose Apply.
Clean Up
When you finish working with Elastic Beanstalk, you can terminate your environment. Elastic Beanstalk
terminates all AWS resources associated with your environment, such as Amazon EC2 instances (p. 167),
database instances (p. 186), load balancers (p. 176), security groups, and alarms (p. ).
To terminate your Elastic Beanstalk environment
1. Open the Elastic Beanstalk console.
2. Navigate to the management page (p. 65) for your environment.
3. Choose Actions, and then choose Terminate Environment.
4. In the Confirm Termination dialog box, type the environment name, and then choose Terminate.
In addition, you can terminate database resources that you created outside of your Elastic Beanstalk
environment. When you terminate an Amazon RDS database instance, you can take a snapshot and
restore the data to another instance later.
To terminate your RDS DB instance
1. Open the Amazon RDS console.
2. Choose Instances.
3. Choose your DB instance.
4. Choose Instance Actions, and then choose Delete.
5. Choose whether to create a snapshot, and then choose Delete.
To delete a DynamoDB table
1. Open the Tables page in the DynamoDB console.
2. Select a table.
3. Choose Actions, and then choose Delete table.
4. Choose Delete.
API Version 2010-12-01
794

AWS Elastic Beanstalk Developer Guide
Next Steps
Next Steps
As you continue to develop your application, you'll probably want to manage environments and deploy
your application without manually creating a .zip file and uploading it to the Elastic Beanstalk console.
The Elastic Beanstalk Command Line Interface (p. 480) (EB CLI) provides easy-to-use commands for
creating, configuring, and deploying applications to Elastic Beanstalk environments from the command
line.
The sample application uses configuration files to configure software settings and create AWS resources
as part of your environment. See Advanced Environment Customization with Configuration Files
(.ebextensions) (p. 256) for more information about configuration files and their use.
The sample application for this tutorial uses the Express web framework for Node.js. For more
information about Express, see the official documentation at expressjs.com.
Finally, if you plan on using your application in a production environment, configure a custom domain
name (p. 199) for your environment and enable HTTPS (p. 299) for secure connections.
Deploying a Geddy Application with Clustering to
Elastic Beanstalk
This section walks you through deploying a sample application to Elastic Beanstalk using the Elastic
Beanstalk Command Line Interface (EB CLI) and Git, and then updating the application to use the Geddy
framework and Amazon ElastiCache for clustering. Clustering enhances your web application's high
availability, performance, and security. To learn more about Amazon ElastiCache, go to Introduction to
ElastiCache in the Amazon ElastiCache User Guide.
Note
This example creates AWS resources, which you may be charged for. For more information about
AWS pricing, go to http://aws.amazon.com/pricing/. Some services are part of the AWS Free
Usage Tier. If you are a new customer, you may test drive these services for free. Go to http://
aws.amazon.com/free/ for more information.
Step 1: Set Up Your Git Repository
EB CLI is a command line interface that you can use with Git to deploy applications quickly and more
easily. EB is available as part of the Elastic Beanstalk command line tools package. For instructions to
install EB CLI, see Install the Elastic Beanstalk Command Line Interface (EB CLI) (p. 481).
Initialize your Git repository. After you run the following command, when you run eb init, EB CLI
recognizes that your application is set up with Git.
git init .
Step 2: Set Up Your Geddy Development
Environment
Set up Geddy and create the project structure. The following steps walk you through setting up Geddy
on a Linux operating system.
To set up your Geddy development environment on your local computer
1. Install Node.js. For instructions, go to http://nodejs.org/. Verify you have a successful installation
before proceeding to the next step.
API Version 2010-12-01
795

AWS Elastic Beanstalk Developer Guide
Step 3: Configure Elastic Beanstalk
$ node -v
Note
For information about what Node.js versions are supported, see Elastic Beanstalk Supported
Platforms (p. 26).
2. Create a directory for your Geddy application.
$ mkdir node-geddy
$ cd node-geddy
3. Install npm.
node-geddy$ cd . && yum install npm
4. Install Geddy globally so that you have geddy generators or start the server.
node-geddy$ npm install -g geddy
5. Depending on your operating system, you may need to set your path to run the geddycode>
command. If you need to set your path, use the output from the previous step when you installed
Geddy. The following is an example.
node-geddy$ export:PATH=$PATH:/usr/local/share/npm/bin/geddy
6. Create the directory for your application.
node-geddy$ geddy app myapp
node-geddy$ cd myapp
7. Start the server. Verify everything is working, and then stop the server.
myapp$ geddy
myapp$ curl localhost:4000 (or use web browser)
Press Ctrl+C to stop the server.
8. Initialize the Git repository.
myapp$ git init
9. Exclude the following files from being added to the repository. This step is not required, but it is
recommended.
myapp$ cat > .gitignore <<EOT
log/
.gitignore
.elasticbeanstalk/
EOT
Step 3: Configure Elastic Beanstalk
The following instructions use the Elastic Beanstalk command line interface (p. 480) (EB CLI) to configure
an Elastic Beanstalk application repository in your local project directory.
API Version 2010-12-01
796

AWS Elastic Beanstalk Developer Guide
Step 3: Configure Elastic Beanstalk
To configure Elastic Beanstalk
1. From the directory where you created your local repository, type the following command:
eb init
2. When you are prompted for the Elastic Beanstalk region, type the number of the region. For
information about this product's regions, go to Regions and Endpoints in the Amazon Web Services
General Reference. For this example, we'll use US West (Oregon).
3. When you are prompted for the Elastic Beanstalk application to use, type the number corresponding
to the option Create new Application. Elastic Beanstalk generates an application name based on the
current directory name if an application name has not been previously configured. In this example,
we use geddyapp.
Enter an AWS Elastic Beanstalk application name (auto-generated value is "myapp"):
geddyapp
Note
If you have a space in your application name, make sure you do not use quotation marks.
4. Type y if Elastic Beanstalk correctly detected the correct platform you are using. Type n if not, and
then specify the correct platform.
5. When prompted, type y if you want to set up Secure Shell (SSH) to connect to your instances. Type n
if you do not want to set up SSH. In this example, we will type n.
Do you want to set up SSH for your instances?
(y/n): n
6. Create your running environment.
eb create
7. When you are prompted for the Elastic Beanstalk environment name, type the name of the
environment. Elastic Beanstalk automatically creates an environment name based on your
application name. If you want to accept the default, press Enter.
Enter Environment Name
(default is HelloWorld-env):
Note
If you have a space in your application name, make sure you do not have a space in your
environment name.
8. When you are prompted to provide a CNAME prefix, type the CNAME prefix you want to use. Elastic
Beanstalk automatically creates a CNAME prefix based on the environment name. If you want to
accept the default, press Enter.
Enter DNS CNAME prefix
(default is HelloWorld):
After configuring Elastic Beanstalk, you are ready to deploy a sample application.
If you want to update your Elastic Beanstalk configuration, you can use the init command again. When
prompted, you can update your configuration options. If you want to keep any previous settings, press
the Enter key.
API Version 2010-12-01
797

AWS Elastic Beanstalk Developer Guide
Step 5: View the Application
Step 5: View the Application
To view the application
• To open your application in a browser window, type the following:
eb open
Step 6: Update the Application
After you have deployed a sample application, you can update it with your own application. In this step,
we update the sample application to use the Geddy framework. You can download the final source code
from http://elasticbeanstalk-samples-us-east-2.s3.amazonaws.com/nodejs-example-geddy.zip.
To update your application to use Geddy
1. On your local computer, create a file called node-geddy/myapp/package.json. This file contains
the necessary dependencies.
{
"name": "Elastic_Beanstalk_Geddy",
"version": "0.0.1",
"dependencies": {
"geddy": "0.6.x"
}
}
2. On your local computer, create a file called node-geddy/maypp/app.js as an entry point to the
program.
var geddy = require('geddy');
geddy.startCluster({
hostname: '0.0.0.0',
port: process.env.PORT || '3000',
environment: process.env.NODE_ENV || 'development'
});
The preceding snippet uses an environment variable for the environment setting. You can manually
set the environment to production (environment: 'production'), or you can create an
environment variable and use it like in the above example. We'll create an environment variable and
set the environment to production in the next procedure.
3. Test locally.
myapp$ npm install
myapp$ node app
The server should start. Press Ctrl+C to stop the server.
4. Deploy to Elastic Beanstalk.
myapp$ git add .
myapp$ git commit -m "First Geddy app"
myapp$ eb deploy
API Version 2010-12-01
798
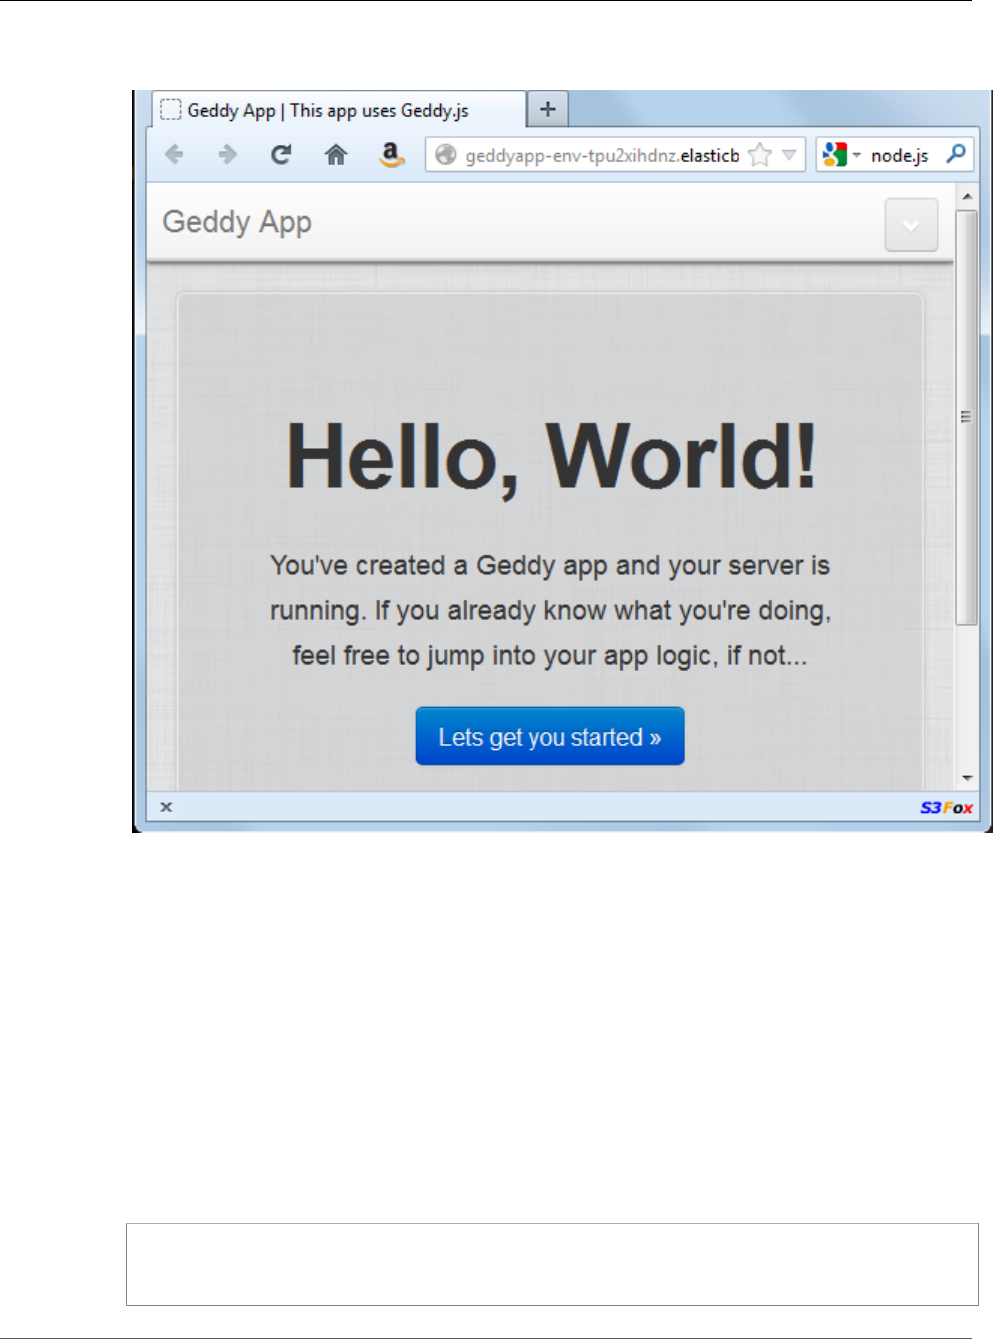
AWS Elastic Beanstalk Developer Guide
Step 6: Update the Application
5. Your environment will be updated after a few minutes. Once the environment is green and ready,
refresh the URL to verify it worked. You should see a web page that says "Hello, World!".
You can access the logs for your EC2 instances running your application. For instructions on accessing
your logs, see Viewing Logs from Your Elastic Beanstalk Environment's Amazon EC2 Instances (p. 369).
Next, let's create an environment variable and set the environment to production.
To create an environment variable
1. On your local computer in your project directory (e.g., myapp/), create a directory called
.ebextensions.
2. On your local computer, create a file called node-geddy/myapp/.ebextensions/myapp.config
with the following snippet to set the environment to production.
Note
YAML relies on consistent indentation. Match the indentation level when replacing content
in an example configuration file and make sure that your text editor uses spaces, not tab
characters, to indent.
option_settings:
- option_name: NODE_ENV
value: production
API Version 2010-12-01
799

AWS Elastic Beanstalk Developer Guide
Step 6: Update the Application
For more information about the configuration file, see Node.js Configuration Namespaces (p. 779)
3. Run "geddy secret" to get the secret value. You'll need the secret value to successfully deploy your
application.
myapp$ geddy secret
You can add node-geddy/myapp/config/secrets.json to .gitignore, or you can put the
secret value in an environment variable and create a command to write out the contents. For this
example, we'll use a command.
4. Add the secret value from node-geddy/myapp/config/secrets.json to the node-geddy/
myapp/.elasticbeanstalk/optionsettings.gettyapp-env file. (The name of the
optionsettings file contains the same extension as your environment name). Your file should
look similar to the following:
[aws:elasticbeanstalk:application:environment]
secret=your geddy secret
PARAM1=
5. Update your Elastic Beanstalk environment with your updated option settings.
myapp$ eb update
Verify that your environment is green and ready before proceeding to the next step.
6. On your local computer, create a configuration file node-geddy/myapp/.ebextensions/write-
secret.config with the following command.
container_commands:
01write:
command: |
cat > ./config/secrets.json << SEC_END
{ "secret": "`{ "Fn::GetOptionSetting": {"OptionName": "secret",
"Namespace":"aws:elasticbeanstalk:application:environment"}}`" }
SEC_END
7. Add your files to the local repository, commit your changes, and deploy your updated application.
myapp$ git add .
myapp$ git commit -m "added config files"
myapp$ eb deploy
Your environment will be updated after a few minutes. After your environment is green and ready,
refresh your browser to make sure it worked. You should still see "Hello, World!".
Next, let's update the Geddy application to use Amazon ElastiCache.
To updated your Geddy application to use Amazon ElastiCache
1. On your local computer, create a configuration file node-geddy/myapp/.ebextensions/
elasticache-iam-with-script.config with the following snippet. This configuration file adds
the elasticache resource to the environment and creates a listing of the nodes in the elasticache
on disk at /var/nodelist. You can also copy the file from http://elasticbeanstalk-samples-us-
east-2.s3.amazonaws.com/nodejs-example-geddy.zip. For more information on the ElastiCache
properties, see Example Snippets: ElastiCache (p. 281).
API Version 2010-12-01
800

AWS Elastic Beanstalk Developer Guide
Step 6: Update the Application
Resources:
MyElastiCache:
Type: AWS::ElastiCache::CacheCluster
Properties:
CacheNodeType:
Fn::GetOptionSetting:
OptionName : CacheNodeType
DefaultValue: cache.m1.small
NumCacheNodes:
Fn::GetOptionSetting:
OptionName : NumCacheNodes
DefaultValue: 1
Engine:
Fn::GetOptionSetting:
OptionName : Engine
DefaultValue: memcached
CacheSecurityGroupNames:
- Ref: MyCacheSecurityGroup
MyCacheSecurityGroup:
Type: AWS::ElastiCache::SecurityGroup
Properties:
Description: "Lock cache down to webserver access only"
MyCacheSecurityGroupIngress:
Type: AWS::ElastiCache::SecurityGroupIngress
Properties:
CacheSecurityGroupName:
Ref: MyCacheSecurityGroup
EC2SecurityGroupName:
Ref: AWSEBSecurityGroup
AWSEBAutoScalingGroup :
Metadata :
ElastiCacheConfig :
CacheName :
Ref : MyElastiCache
CacheSize :
Fn::GetOptionSetting:
OptionName : NumCacheNodes
DefaultValue: 1
WebServerUser :
Type : AWS::IAM::User
Properties :
Path : "/"
Policies:
-
PolicyName: root
PolicyDocument :
Statement :
-
Effect : Allow
Action :
- cloudformation:DescribeStackResource
- cloudformation:ListStackResources
- elasticache:DescribeCacheClusters
Resource : "*"
WebServerKeys :
Type : AWS::IAM::AccessKey
Properties :
UserName :
Ref: WebServerUser
Outputs:
WebsiteURL:
Description: sample output only here to show inline string function parsing
Value: |
API Version 2010-12-01
801

AWS Elastic Beanstalk Developer Guide
Step 6: Update the Application
http://`{ "Fn::GetAtt" : [ "AWSEBLoadBalancer", "DNSName" ] }`
MyElastiCacheName:
Description: Name of the elasticache
Value:
Ref : MyElastiCache
NumCacheNodes:
Description: Number of cache nodes in MyElastiCache
Value:
Fn::GetOptionSetting:
OptionName : NumCacheNodes
DefaultValue: 1
files:
"/etc/cfn/cfn-credentials" :
content : |
AWSAccessKeyId=`{ "Ref" : "WebServerKeys" }`
AWSSecretKey=`{ "Fn::GetAtt" : ["WebServerKeys", "SecretAccessKey"] }`
mode : "000400"
owner : root
group : root
"/etc/cfn/get-cache-nodes" :
content : |
# Define environment variables for command line tools
export AWS_ELASTICACHE_HOME="/home/ec2-user/elasticache/$(ls /home/ec2-user/
elasticache/)"
export AWS_CLOUDFORMATION_HOME=/opt/aws/apitools/cfn
export PATH=$AWS_CLOUDFORMATION_HOME/bin:$AWS_ELASTICACHE_HOME/bin:$PATH
export AWS_CREDENTIAL_FILE=/etc/cfn/cfn-credentials
export JAVA_HOME=/usr/lib/jvm/jre
# Grab the Cache node names and configure the PHP page
cfn-list-stack-resources `{ "Ref" : "AWS::StackName" }` --region `{ "Ref" :
"AWS::Region" }` | grep MyElastiCache | awk '{print $3}' | xargs -I {} elasticache-
describe-cache-clusters {} --region `{ "Ref" : "AWS::Region" }` --show-cache-node-
info | grep CACHENODE | awk '{print $4 ":" $6}' > `{ "Fn::GetOptionSetting" :
{ "OptionName" : "NodeListPath", "DefaultValue" : "/var/www/html/nodelist" } }`
mode : "000500"
owner : root
group : root
"/etc/cfn/hooks.d/cfn-cache-change.conf" :
"content": |
[cfn-cache-size-change]
triggers=post.update
path=Resources.AWSEBAutoScalingGroup.Metadata.ElastiCacheConfig
action=/etc/cfn/get-cache-nodes
runas=root
sources :
"/home/ec2-user/elasticache" : "https://s3.amazonaws.com/elasticache-downloads/
AmazonElastiCacheCli-latest.zip"
commands:
make-elasticache-executable:
command: chmod -R ugo+x /home/ec2-user/elasticache/*/bin/*
packages :
"yum" :
"aws-apitools-cfn" : []
container_commands:
initial_cache_nodes:
command: /etc/cfn/get-cache-nodes
API Version 2010-12-01
802

AWS Elastic Beanstalk Developer Guide
Step 6: Update the Application
2. On your local computer, create a configuration file node-geddy/myapp/.ebextensions/
elasticache_settings.config with the following snippet.
option_settings:
"aws:elasticbeanstalk:customoption" :
CacheNodeType : cache.m1.small
NumCacheNodes : 1
Engine : memcached
NodeListPath : /var/nodelist
3. On your local computer, update node-geddy/myapp/config/production.js. Add the following
line to the top of the file (just below the header).
var fs = require('fs')
Then, add the following snippet just above modules.exports.
var data = fs.readFileSync('/var/nodelist', 'UTF8', function(err) {
if (err) throw err;
});
var nodeList = [];
if (data) {
var lines = data.split('\n');
for (var i = 0 ; i < lines.length ; i++) {
if (lines[i].length > 0) {
nodeList.push(lines[i]);
}
}
}
if (nodeList) {
config.sessions = {
store: 'memcache',
servers: nodeList,
key: 'sid',
expiry: 14*24*60*60
}
}
4. On your local computer, update node-geddy/myapp/package.json to include memcached.
{
"name": "Elastic_Beanstalk_Geddy",
"version": "0.0.1",
"dependencies": {
"geddy": "0.6.x",
"memcached": "*"
}
}
5. Add your files to the local repository, commit your changes, and deploy your updated application.
myapp$ git add .
myapp$ git commit -m "added elasticache functionality"
myapp$ git aws.push
6. Your environment will be updated after a few minutes. After your environment is green and ready,
verify everything worked.
API Version 2010-12-01
803
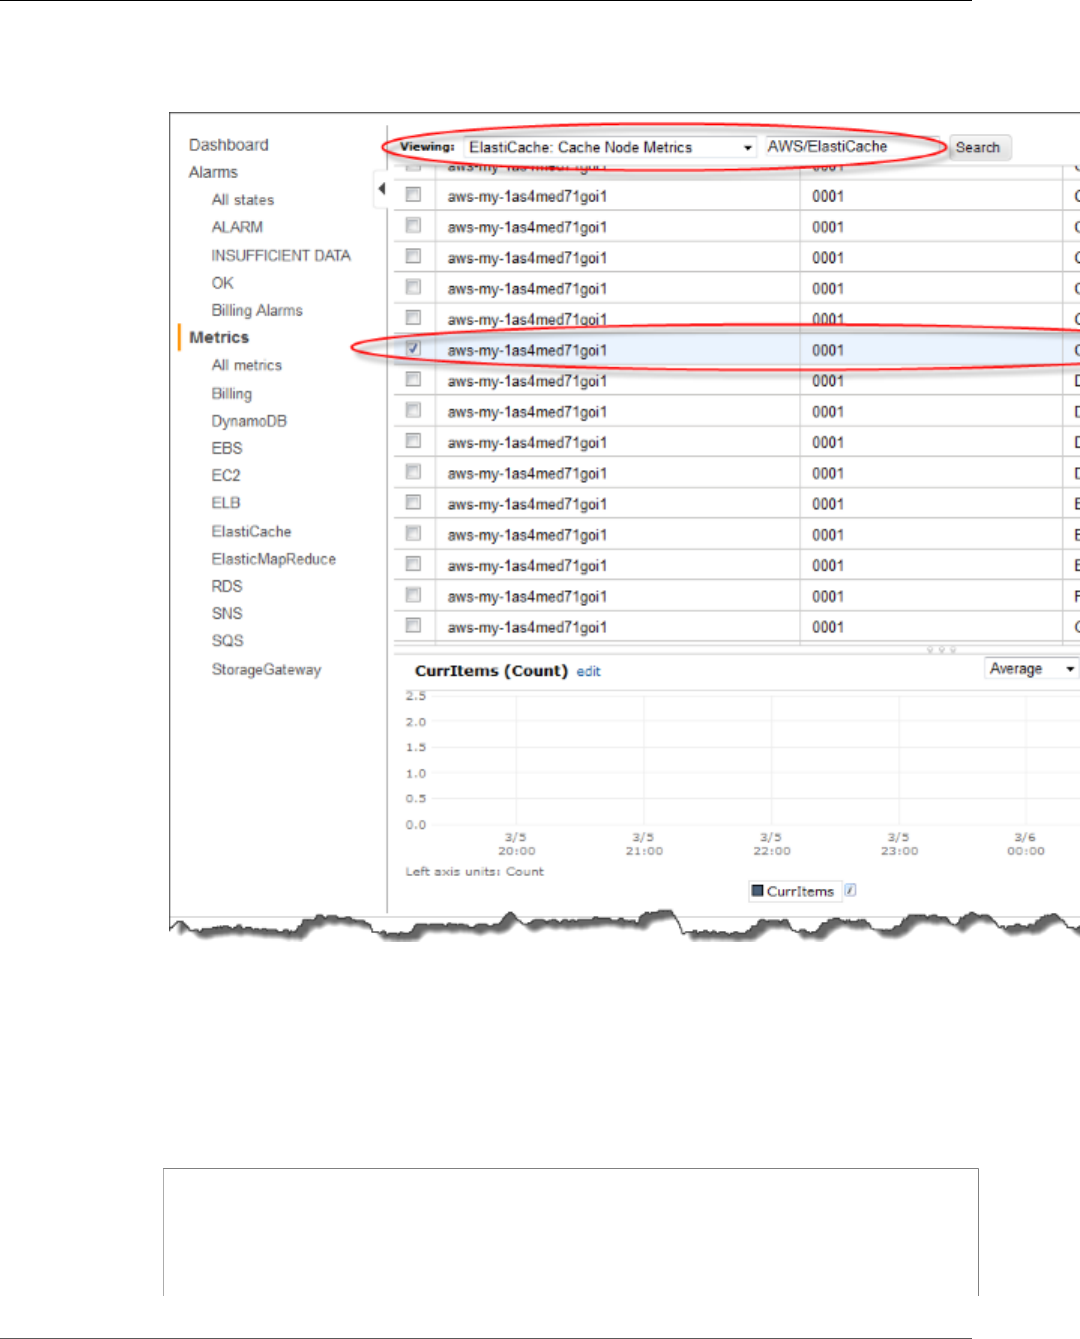
AWS Elastic Beanstalk Developer Guide
Step 6: Update the Application
a. Check the Amazon CloudWatch console to view your ElastiCache metrics. To view your
ElastiCache metrics, click ElastiCache in the left pane, and then select ElastiCache: Cache Node
Metrics from the Viewing list.
Note
Make sure you are looking at the same region that you deployed your application to.
If you copy and paste your application URL into another web browser, you should see your
CurrItem count go up to 2 after 5 minutes.
b. Take a snapshot of your logs, and look in /var/log/nodejs/nodejs.log. For more
information about logs, see Viewing Logs from Your Elastic Beanstalk Environment's Amazon
EC2 Instances (p. 369). You should see something similar to the following:
"sessions": {
"key": "sid",
"expiry": 1209600,
"store": "memcache",
"servers": [
"aws-my-1awjsrz10lnxo.ypsz3t.0001.usw2.cache.amazonaws.com:11211"
API Version 2010-12-01
804

AWS Elastic Beanstalk Developer Guide
Step 7: Clean Up
]
},
Step 7: Clean Up
If you no longer want to run your application, you can clean up by terminating your environment and
deleting your application.
Use the terminate command to terminate your environment and the delete command to delete your
application.
To terminate your environment and delete the application
• From the directory where you created your local repository, run eb terminate:
$ eb terminate
This process may take a few minutes. Elastic Beanstalk displays a message once the environment has
been successfully terminated.
Adding an Amazon RDS DB Instance to your
Node.js Application Environment
You can use an Amazon Relational Database Service (Amazon RDS) DB instance to store data gathered
and modified by your application. The database can be attached to your environment and managed by
Elastic Beanstalk, or created and managed externally.
If you are using Amazon RDS for the first time, add a DB instance (p. 805) to a test environment with
the Elastic Beanstalk Management Console and verify that your application is able to connect to it.
To connect to a database, add the driver (p. 806) to your application, load the driver in your code, and
create a connection object (p. 807) with the environment properties provided by Elastic Beanstalk. The
configuration and connection code vary depending on the database engine and framework that you use.
For production environments, create a DB instance outside of your Elastic Beanstalk environment to
decouple your environment resources from your database resources. Using an external DB instance lets
you connect to the same database from multiple environments and perform blue-green deployments.
For instructions, see Using Elastic Beanstalk with Amazon Relational Database Service (p. 439).
Sections
•Adding a DB Instance to Your Environment (p. 805)
•Downloading a Driver (p. 806)
•Connecting to a Database (p. 807)
Adding a DB Instance to Your Environment
To add a DB instance to your environment
1. Open the Elastic Beanstalk console.
2. Navigate to the management page (p. 65) for your environment.
API Version 2010-12-01
805
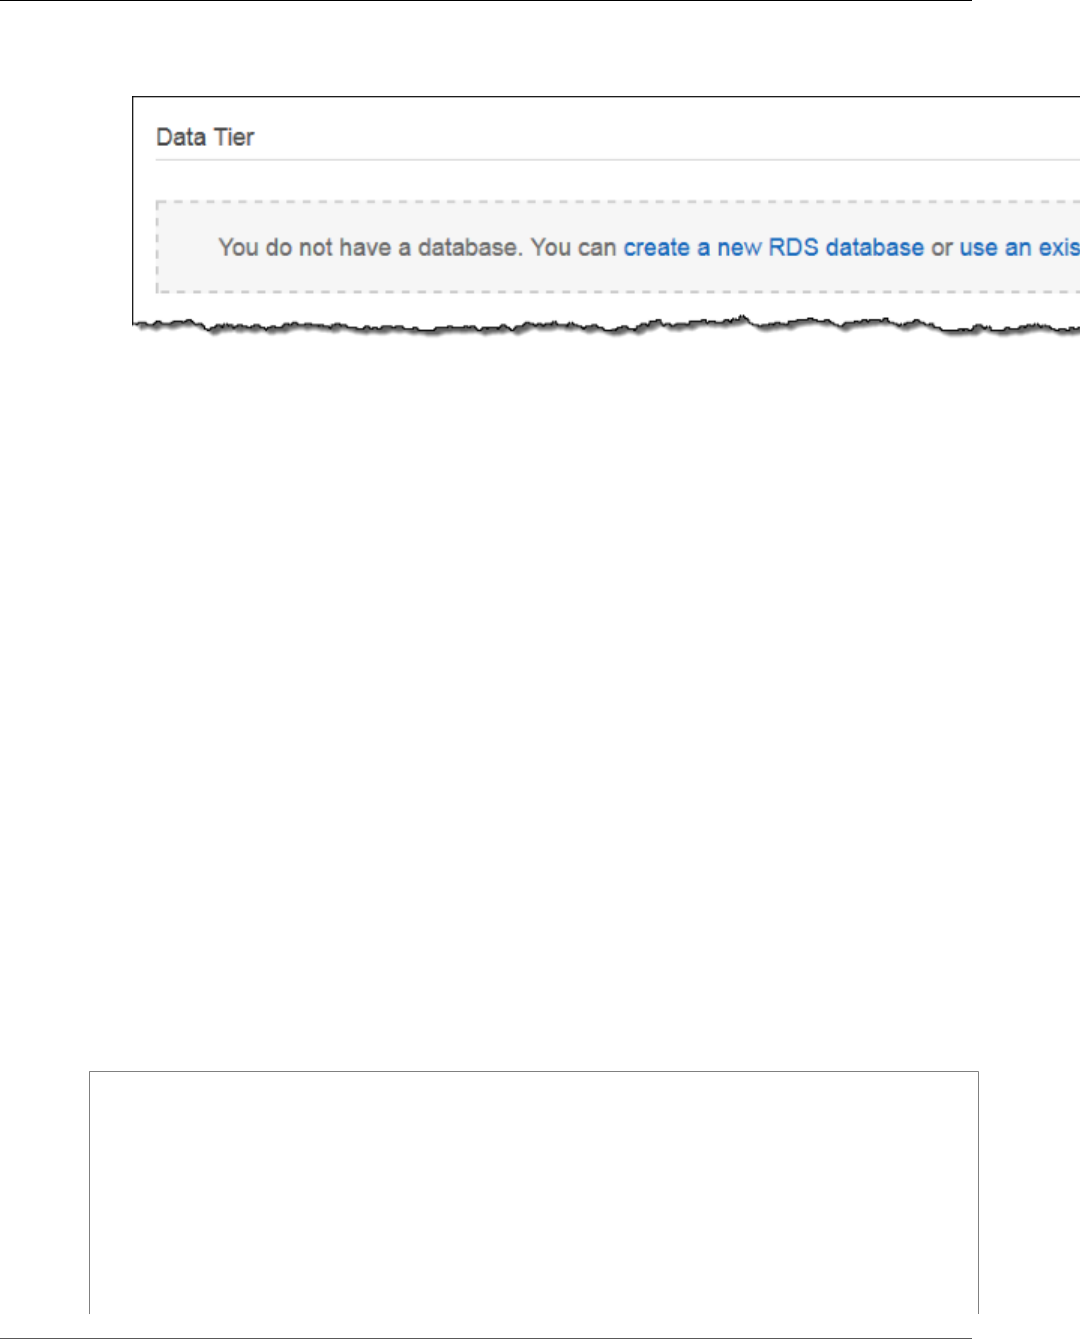
AWS Elastic Beanstalk Developer Guide
Downloading a Driver
3. Choose Configuration.
4. Under Data Tier, choose Create a new RDS database.
5. Choose a DB engine, enter a user name and password, and then choose Apply.
Adding a DB instance takes about 10 minutes. When the environment update is complete, the DB
instance's hostname and other connection information are available to your application through the
following environment properties:
•RDS_HOSTNAME – The hostname of the DB instance.
Amazon RDS console label – Endpoint is the hostname.
•RDS_PORT – The port on which the DB instance accepts connections. The default value varies between
DB engines.
Amazon RDS console label – Port
•RDS_DB_NAME – The database name, ebdb.
Amazon RDS console label – DB Name
•RDS_USERNAME – The user name that you configured for your database.
Amazon RDS console label – Username
•RDS_PASSWORD – The password that you configured for your database.
For more information about configuring an internal DB instance, see Adding a Database to Your Elastic
Beanstalk Environment (p. 186).
Downloading a Driver
Add the database driver to your project's package.json file (p. 779) under dependencies.
Example package.json – Express with MySQL
{
"name": "my-app",
"version": "0.0.1",
"private": true,
"dependencies": {
"ejs": "latest",
"aws-sdk": "latest",
"express": "latest",
"body-parser": "latest",
"mysql": "latest"
},
"scripts": {
API Version 2010-12-01
806

AWS Elastic Beanstalk Developer Guide
Connecting to a Database
"start": "node app.js"
}
}
Common Driver Packages for Node.js
•MySQL – mysql
•PostgreSQL – pg
•Oracle – oracle
•SQL Server – mssql
Connecting to a Database
Elastic Beanstalk provides connection information for attached DB instances in environment properties.
Use os.environ['VARIABLE'] to read the properties and configure a database connection.
Example app.js – MySQL Database Connection
var mysql = require('mysql');
var connection = mysql.createConnection({
host : process.env.RDS_HOSTNAME,
user : process.env.RDS_USERNAME,
password : process.env.RDS_PASSWORD,
port : process.env.RDS_PORT
});
connection.connect(function(err) {
if (err) {
console.error('Database connection failed: ' + err.stack);
return;
}
console.log('Connected to database.');
});
connection.end();
For more information about constructing a connection string using node-mysql, see npmjs.org/package/
mysql.
Resources
There are several places you can go to get additional help when developing your Node.js applications:
Resource Description
GitHub Install the AWS SDK for Node.js using GitHub.
Node.js Development Forum Post your questions and get feedback.
AWS SDK for Node.js (Developer
Preview)
One-stop shop for sample code, documentation, tools, and
additional resources.
API Version 2010-12-01
807

AWS Elastic Beanstalk Developer Guide
The PHP Platform
Creating and Deploying PHP
Applications on AWS Elastic
Beanstalk
Elastic Beanstalk for PHP makes it easy to deploy, manage, and scale your PHP web applications using
Amazon Web Services. Elastic Beanstalk for PHP is available to anyone developing or hosting a web
application using PHP. This section provides instructions for deploying your PHP web application to
Elastic Beanstalk. You can deploy your application in just a few minutes using the Elastic Beanstalk
Command Line Interface (EB CLI) or by using the Elastic Beanstalk Management Console. It also provides
walkthroughs for common frameworks such as CakePHP and Symfony2.
The topics in this chapter assume some knowledge of Elastic Beanstalk environments. If you haven't used
Elastic Beanstalk before, try the getting started tutorial (p. 3) to learn the basics.
Topics
•Using the AWS Elastic Beanstalk PHP Platform (p. 808)
•Deploying a Laravel Application to Elastic Beanstalk (p. 811)
•Deploying a CakePHP Application to Elastic Beanstalk (p. 818)
•Deploying a Symfony2 Application to Elastic Beanstalk (p. 825)
•Deploying a High-Availability PHP Application with an External Amazon RDS Database to Elastic
Beanstalk (p. 829)
•Deploying a High-Availability WordPress Website with an External Amazon RDS Database to Elastic
Beanstalk (p. 837)
•Deploying a High-Availability Drupal Website with an External Amazon RDS Database to Elastic
Beanstalk (p. 847)
•Adding an Amazon RDS DB Instance to Your PHP Application Environment (p. 856)
•Resources (p. 859)
Using the AWS Elastic Beanstalk PHP Platform
AWS Elastic Beanstalk supports a number of platforms for different versions of the PHP programming
language. These platforms support PHP web applications that can run alone or under Composer. Learn
more at the Supported Platforms (p. 33) topic.
Elastic Beanstalk provides configuration options (p. 202) that you can use to customize the software
that runs on the EC2 instances in your Elastic Beanstalk environment. You can configure environment
variables needed by your application, enable log rotation to Amazon S3, and set common PHP
initialization settings.
Platform-specific configuration options are available in the AWS Management Console for modifying the
configuration of a running environment (p. 213). To avoid losing your environment's configuration when
you terminate it, you can use saved configurations (p. 293) to save your settings and later apply them to
another environment.
To save settings in your source code, you can include configuration files (p. 256). Settings in
configuration files are applied every time you create an environment or deploy your application. You can
also use configuration files to install packages, run scripts, and perform other instance customization
operations during deployments.
API Version 2010-12-01
808

AWS Elastic Beanstalk Developer Guide
Configuring your PHP Environment
If you use Composer, you can include a composer.json file (p. 810) in your source bundle to install
packages during deployment.
For advanced PHP configuration and PHP settings that are not provided as configuration options, you
can use configuration files to provide an INI file (p. 811) that can extend and override the default
settings applied by Elastic Beanstalk, or install additional extensions.
Settings applied in the AWS Management Console override the same settings in configuration files, if
they exist. This lets you have default settings in configuration files, and override them with environment
specific settings in the console. For more information about precedence, and other methods of changing
settings, see Configuration Options (p. 202).
Configuring your PHP Environment
You can use the AWS Management Console to enable log rotation to Amazon S3, configure variables that
your application can read from the environment, and change PHP settings.
To configure your PHP environment in the Elastic Beanstalk console
1. Open the Elastic Beanstalk console.
2. Navigate to the management page (p. 65) for your environment.
3. Choose Configuration.
4. In theSoftware Configurationsection, choose the settings icon ( ).
PHP Settings
•Document root – The folder that contains your site's default page. If your welcome page is not at the
root of your source bundle, specify the folder that contains it relative to the root path. For example, /
public if the welcome page is in a folder named public.
•Memory limit – The maximum amount of memory that a script is allowed to allocate. For example,
512M.
•Zlib output compression – Set to On to compress responses.
•Allow URL fopen – Set to Off to prevent scripts from downloading files from remote locations.
•Display errors – Set to On to show internal error messages for debugging.
•Max execution time – The maximum time in seconds that a script is allowed to run before the
environment terminates it.
Log Options
The Log Options section has two settings:
•Instance profile– Specifies the instance profile that has permission to access the Amazon S3 bucket
associated with your application.
•Enable log file rotation to Amazon S3 – Specifies whether log files for your application's Amazon EC2
instances should be copied to your Amazon S3 bucket associated with your application.
Environment Properties
The Environment Properties section lets you specify environment configuration settings on the Amazon
EC2 instances that are running your application. These settings are passed in as key-value pairs to the
application.
API Version 2010-12-01
809

AWS Elastic Beanstalk Developer Guide
The aws:elasticbeanstalk:container:php:phpini Namespace
Inside the PHP environment running in Elastic Beanstalk, these values are written to /etc/php.d/
environment.ini and are accessible using $_SERVER or the get_cfg_var function.
$endpoint = $_SERVER['API_ENDPOINT'];
See Environment Properties and Other Software Settings (p. 189) for more information.
The aws:elasticbeanstalk:container:php:phpini
Namespace
You can use a configuration file (p. 256) to set configuration options and perform other instance
configuration tasks during deployments. Configuration options can be defined by the Elastic Beanstalk
service or the platform that you use and are organized into namespaces.
The PHP platform defines options in the aws:elasticbeanstalk:container:php:phpini
namespace, including one that is not available in the AWS Management Console. composer_options
sets custom options to use when installing dependencies using Composer through composer.phar
install. For more information including available options, go to http://getcomposer.org/doc/03-
cli.md#install.
The following example configuration file (p. 256) shows settings for each of the options available in this
namespace:
Example .ebextensions/php-settings.config
option_settings:
aws:elasticbeanstalk:container:php:phpini:
document_root: /public
memory_limit: 128M
zlib.output_compression: "Off"
allow_url_fopen: "On"
display_errors: "Off"
max_execution_time: 60
composer_options: vendor/package
Elastic Beanstalk provides many configuration options for customizing your environment. In addition to
configuration files, you can also set configuration options using the console, saved configurations, the EB
CLI, or the AWS CLI. See Configuration Options (p. 202) for more information.
Composer File
Use a composer.json file in the root of your project source to use composer to install packages that
your application requires.
Example composer.json
{
"require": {
"monolog/monolog": "1.0.*"
}
}
When a composer.json file is present, Elastic Beanstalk runs composer.phar install to install
dependencies. You can add options to append to the command by setting the composer_options
option (p. 810) in the aws:elasticbeanstalk:container:php:phpini namespace.
API Version 2010-12-01
810

AWS Elastic Beanstalk Developer Guide
Update Composer
Update Composer
PHP platform configurations (p. 33) ship with the latest version of Composer available at the time of
release. To keep Composer, PHP, and other libraries up to date, upgrade your environment (p. 143)
whenever a platform update is available.
Between platform updates, you can use a configuration file (p. 256) to update Composer on the
instances in your environment. You may need to update Composer if you see an error when you try to
install packages with a Composer file, or if you are unable to use the latest platform version.
Example .ebextensions/composer.config
commands:
01updateComposer:
command: export COMPOSER_HOME=/root && /usr/bin/composer.phar self-update 1.4.1
option_settings:
- namespace: aws:elasticbeanstalk:application:environment
option_name: COMPOSER_HOME
value: /root
This configuration file configures composer to update itself to version 1.4.1. Check the Composer
releases page on GitHub to find the latest version.
Note
If you omit the version number from the composer.phar self-update command, Composer
will update to the latest version available every time you deploy your source code, and
when new instances are provisioned by Auto Scaling. This could cause scaling operations
and deployments to fail if a version of Composer is released that is incompatible with your
application.
Extending php.ini
Use a configuration file with a files block to add a .ini file to /etc/php.d/ on the instances in
your environment. The main configuration file, php.ini, pulls in settings from files in this folder in
alphabetical order. Many extensions are enabled by default by files in this folder.
Example .ebextensions/mongo.config
files:
"/etc/php.d/99mongo.ini" :
mode: "000755"
owner: root
group: root
content: |
extension=mongo.so
Deploying a Laravel Application to Elastic
Beanstalk
Laravel is an open source, model-view-controller (MVC) framework for PHP. This tutorial walks you
through the process of generating a Laravel application, deploying it to an AWS Elastic Beanstalk
environment, and configuring it to connect to an Amazon Relational Database Service (Amazon RDS)
database instance.
API Version 2010-12-01
811

AWS Elastic Beanstalk Developer Guide
Prerequisites
Sections
•Prerequisites (p. 812)
•Install Composer (p. 812)
•Install Laravel and Generate a Website (p. 813)
•Create an Elastic Beanstalk Environment and Deploy Your Application (p. 813)
•Add a Database to Your Environment (p. 815)
•Clean Up (p. 817)
•Next Steps (p. 818)
Prerequisites
This tutorial assumes that you have some knowledge of basic Elastic Beanstalk operations and the
Elastic Beanstalk console. If you haven't already, follow the instructions in Getting Started Using Elastic
Beanstalk (p. 3) to launch your first Elastic Beanstalk environment.
To follow the procedures in this guide, you will need a command line terminal or shell to run commands.
Commands are shown in listings proceded by a prompt symbol ($) and the name of the current directory,
when appropriate:
~/eb-project$ this is a command
this is output
Note
You can run all commands in this tutorial on a Linux virtual machine, OS X, or an Amazon Linux
EC2 instance. If you need a development environment, you can launch a single-instance Elastic
Beanstalk environment and connect to it with SSH.
Laravel requires PHP 5.5.9 or later and the mbstring extension for PHP. In this tutorial we use PHP 5.6
and the corresponding Elastic Beanstalk platform configuration.
Install PHP 5.6 and the required extensions. Depending on your platform and package manager, the
steps will vary.
On Amazon Linux, use yum:
$ sudo yum install php56 --skip-broken
$ sudo yum install php56-mbstring
On OS X, use Homebrew:
$ brew install php56
On Windows, go to the download page at windows.php.net to get PHP, and read the Windows extensions
page for information about extensions.
After installing PHP, reopen your terminal and run php --version to ensure that the new version has
been installed and is the default.
Install Composer
Composer is a dependency management tool for PHP. It is the preferred tool for installing Laravel and its
dependencies and generating a Laravel application.
Install Composer by downloading the installer and running it with PHP. The installer generates a Phar file
that you can invoke with PHP to generate a Laravel project n the current directory.
API Version 2010-12-01
812

AWS Elastic Beanstalk Developer Guide
Install Laravel and Generate a Website
~$ curl -s https://getcomposer.org/installer | php
All settings correct for using Composer
Downloading...
Composer successfully installed to: /home/ec2-user/composer.phar
Use it: php composer.phar
If you run into issues installing Composer, go to the official documentation: https://getcomposer.org/
Install Laravel and Generate a Website
Composer can install Laravel and create a working project with one command:
~$ php composer.phar create-project --prefer-dist laravel/laravel eb-laravel
Installing laravel/laravel (v5.2.15)
- Installing laravel/laravel (v5.2.15)
Downloading: 100%
Created project in eb-laravel
> php -r "copy('.env.example', '.env');"
Loading composer repositories with package information
Installing dependencies (including require-dev)
- Installing vlucas/phpdotenv (v2.2.0)
Downloading: 100%
- Installing symfony/polyfill-mbstring (v1.1.0)
Loading from cache
...
Composer installs Laravel and its dependencies, and generates a default project.
If you run into any issues installing Laravel, go to the installation topic in the official documentation:
https://laravel.com/docs/5.2
Create an Elastic Beanstalk Environment and Deploy
Your Application
Create a source bundle (p. 58) containing the files created by Composer. You can use any program to
create the .zip file, as long as it allows hidden files. On the command line, use the zip command:
~$ cd eb-laravel
~/eb-laravel$ zip ../laravel-default.zip -r * .[^.]*
Save the .zip archive in a location that you can access. This is the source bundle that you will upload to
Elastic Beanstalk when you create an environment.
Note
If you are working remotely in an Elastic Beanstalk environment, you can upload the archive to
your Elastic Beanstalk storage bucket in Amazon Simple Storage Service (Amazon S3) with the
AWS CLI aws cp command:
~$ aws s3 cp laravel-default.zip s3://elasticbeanstalk-us-west-2-123456789012
Elastic Beanstalk creates this bucket the first time you create an environment. To upload files to
Amazon S3, you have to give your environment's instance profile (p. 22) permission to write to
the bucket.
API Version 2010-12-01
813
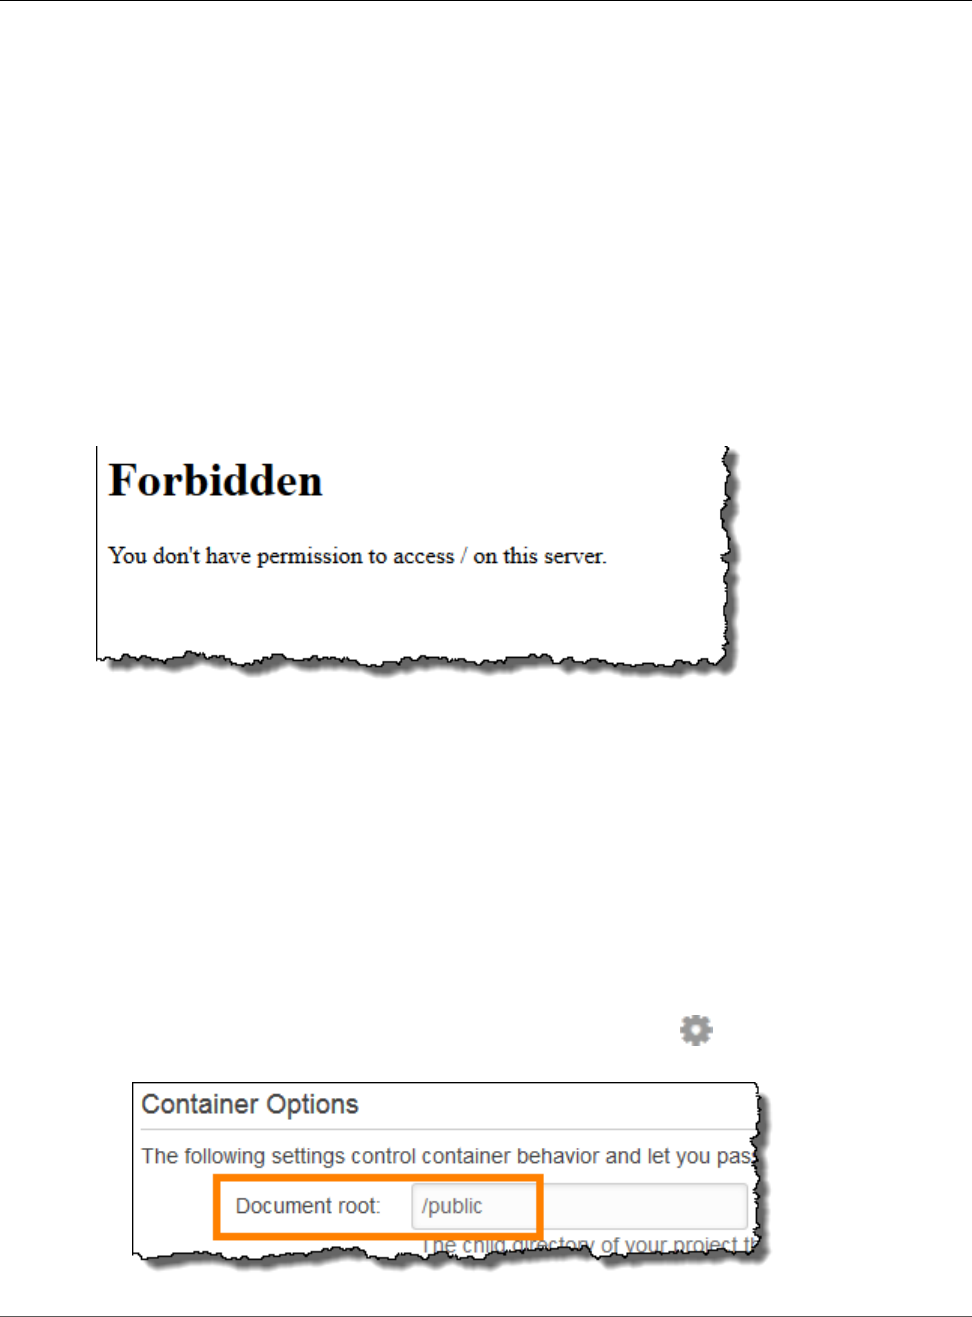
AWS Elastic Beanstalk Developer Guide
Create an Elastic Beanstalk Environment
and Deploy Your Application
Use the AWS Management Console to create an Elastic Beanstalk environment running your application.
Choose the PHP 5.6 platform configuration and upload your source bundle when prompted:
To launch an environment (console)
1. Open the Elastic Beanstalk console with this preconfigured link:
console.aws.amazon.com/elasticbeanstalk/home#/newApplication?
applicationName=tutorials&environmentType=LoadBalanced
2. For Platform, choose the platform that matches the language used by your application.
3. For App code, choose Upload.
4. Choose Local file, choose Browse, and open the source bundle.
5. Choose Upload.
6. Choose Review and launch.
7. Review the available settings and choose Create app.
Environment creation takes about 5 minutes. When the process completes, click the URL to open your
Laravel application in the browser:
What's this? By default, Elastic Beanstalk serves the root of your project at the root path of the
web site. In this case, though, the default page (index.php) is one level down in the public
folder. You can verify this by adding /public to the URL. For example, http://laravel.us-
east-2.elasticbeanstalk.com/public.
To allow access to this folder, use the Elastic Beanstalk console to configure the document root for the
web site.
To configure your web site's document root
1. Open the Elastic Beanstalk console.
2. Navigate to the management page (p. 65) for your environment.
3. Choose Configuration.
4. In theSoftware Configurationsection, choose the settings icon ( ).
5. For Document Root, type /public.
API Version 2010-12-01
814
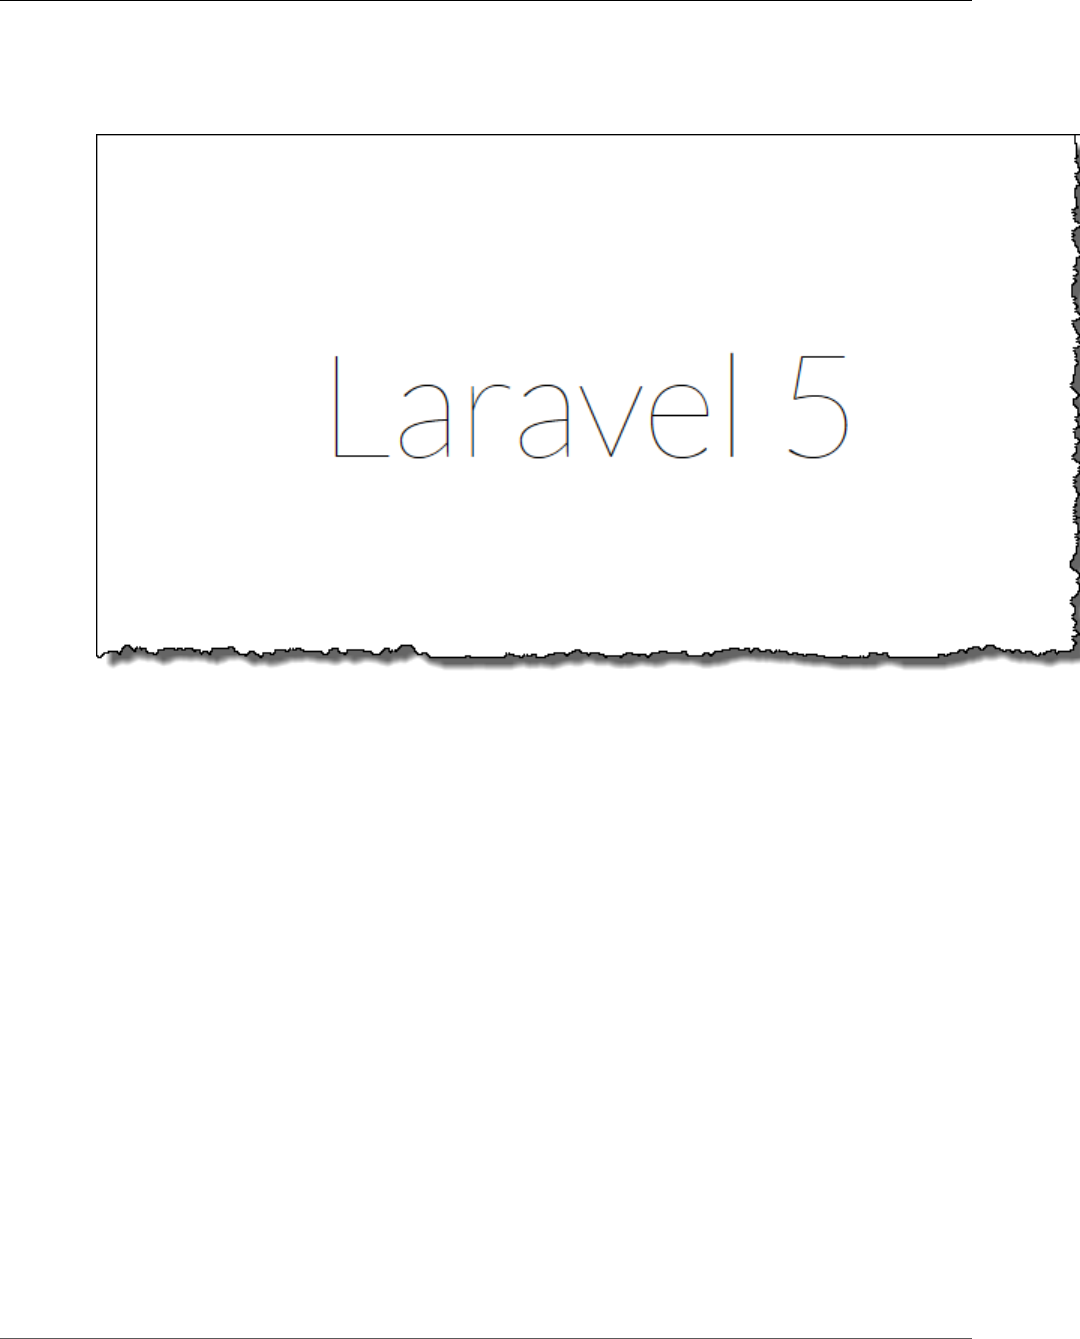
AWS Elastic Beanstalk Developer Guide
Add a Database to Your Environment
6. Choose Apply.
7. When the update is complete, click the URL to reopen your site in the browser.
So far, so good. Next you'll add a database to your environment and configure Laravel to connect to it.
Add a Database to Your Environment
Launch an RDS DB instance in your Elastic Beanstalk environment. You can use MySQL, SQLServer, or
PostgreSQL databases with Laravel on Elastic Beanstalk. For this example, we'll use MySQL.
To add an RDS DB instance to your Elastic Beanstalk environment
1. Open the Elastic Beanstalk console.
2. Navigate to the management page (p. 65) for your environment.
3. Choose Configuration.
4. In the Data Tier section, choose create a new RDS database.
5. For DB engine, choose mysql.
6. Type a master username and password. Elastic Beanstalk will provide these values to your
application using environment properties.
7. Choose Apply.
Creating a database instance takes about 10 minutes. In the meantime, you can update your source code
to read connection information from the environment. Elastic Beanstalk provides connection details
using environment variables, such as RDS_HOSTNAME, that you can access from your application.
Laravel's database configuration is stored in a file named database.php in the config folder in your
project code. Open this file and add code that reads the environment variables from $_SERVER and
API Version 2010-12-01
815

AWS Elastic Beanstalk Developer Guide
Add a Database to Your Environment
assigns them to local variables by inserting the highlighted lines in the following example after the first
line (<?php):
Example ~/eb-laravel/config/database.php
<?php
if (!defined('RDS_HOSTNAME')) {
define('RDS_HOSTNAME', $_SERVER['RDS_HOSTNAME']);
define('RDS_USERNAME', $_SERVER['RDS_USERNAME']);
define('RDS_PASSWORD', $_SERVER['RDS_PASSWORD']);
define('RDS_DB_NAME', $_SERVER['RDS_DB_NAME']);
}
return [
...
The database connection is configured further down in database.php file. Find the following section
and modify the default datasources configuration with the name of the driver that matches your
database engine (Mysql, Sqlserver, or Postgres), and set the host, database, username, and
password variables to read the corresponding values from Elastic Beanstalk:
Example ~/eb-laravel/config/database.php
...
'connections' => [
'sqlite' => [
'driver' => 'sqlite',
'database' => database_path('database.sqlite'),
'prefix' => '',
],
'mysql' => [
'driver' => 'mysql',
'host' => RDS_HOSTNAME,
'database' => RDS_DB_NAME,
'username' => RDS_USERNAME,
'password' => RDS_PASSWORD,
'charset' => 'utf8',
'collation' => 'utf8_unicode_ci',
'prefix' => '',
'strict' => false,
'engine' => null,
],
...
To verify that the database connection is configured correctly, add code to index.php to connect to the
database and add some code to the default response:
Example ~/eb-laravel/public/index.php
...
if(DB::connection()->getDatabaseName())
{
echo "Connected to database ".DB::connection()->getDatabaseName();
}
$response->send();
...
When the DB instance has finished launching, bundle and deploy the updated application to your
environment.
API Version 2010-12-01
816
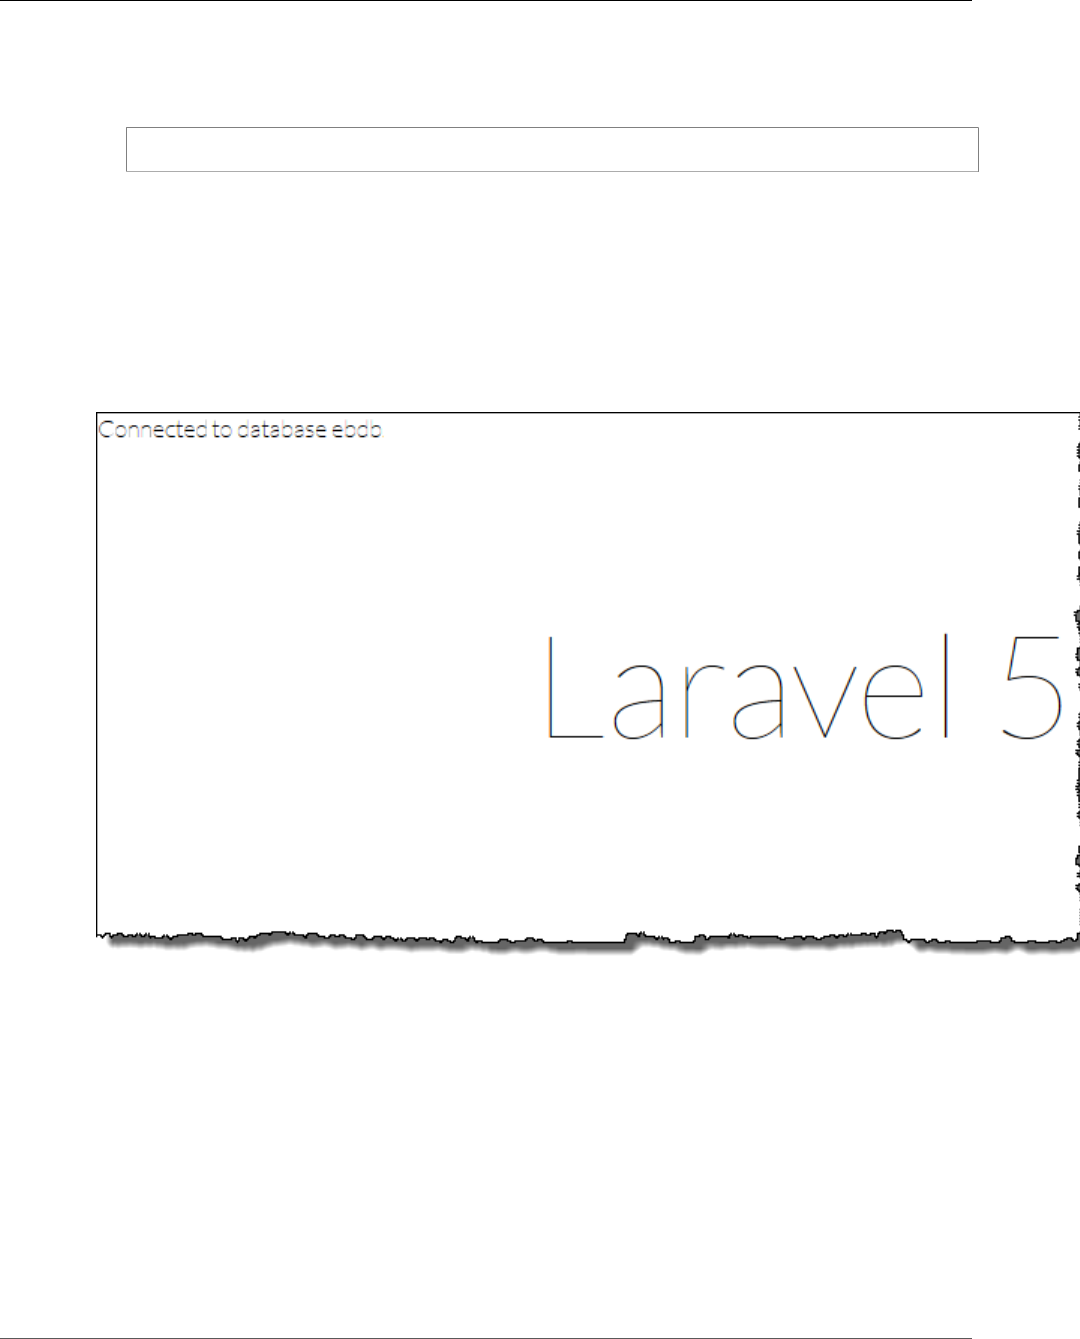
AWS Elastic Beanstalk Developer Guide
Clean Up
To update your Elastic Beanstalk environment
1. Create a new source bundle:
~/eb-laravel$ zip ../laravel-v2-rds.zip -r * .[^.]*
2. Open the Elastic Beanstalk console.
3. Navigate to the management page (p. 65) for your environment.
4. Choose Upload and Deploy.
5. Choose Browse, and upload laravel-v2-rds.zip.
6. Choose Deploy.
Deploying a new version of your application takes less than a minute. When the deployment is complete,
refresh the web page again to verify that the database connection succeeded:
Clean Up
When you finish working with Elastic Beanstalk, you can terminate your environment. Elastic Beanstalk
terminates all AWS resources associated with your environment, such as Amazon EC2 instances (p. 167),
database instances (p. 186), load balancers (p. 176), security groups, and alarms (p. ).
To terminate your Elastic Beanstalk environment
1. Open the Elastic Beanstalk console.
2. Navigate to the management page (p. 65) for your environment.
3. Choose Actions, and then choose Terminate Environment.
4. In the Confirm Termination dialog box, type the environment name, and then choose Terminate.
API Version 2010-12-01
817

AWS Elastic Beanstalk Developer Guide
Next Steps
In addition, you can terminate database resources that you created outside of your Elastic Beanstalk
environment. When you terminate an Amazon RDS database instance, you can take a snapshot and
restore the data to another instance later.
To terminate your RDS DB instance
1. Open the Amazon RDS console.
2. Choose Instances.
3. Choose your DB instance.
4. Choose Instance Actions, and then choose Delete.
5. Choose whether to create a snapshot, and then choose Delete.
To delete a DynamoDB table
1. Open the Tables page in the DynamoDB console.
2. Select a table.
3. Choose Actions, and then choose Delete table.
4. Choose Delete.
Next Steps
As you continue to develop your application, you'll probably want a way to manage environments and
deploy your application without manually creating a .zip file and uploading it to the Elastic Beanstalk
console. The Elastic Beanstalk Command Line Interface (p. 480) (EB CLI) provides easy-to-use commands
for creating, configuring, and deploying applications to Elastic Beanstalk environments from the
command line.
In this tutorial, you configured a document root for your application. When you launch more
environments, it's impractical to manually configure this setting on each environment. You can use
configuration files (p. 256) to store this and other settings in your source code, so that they are applied
automatically.
Running an RDS DB instance in your Elastic Beanstalk environment is great for development and testing,
but it ties the life cycle of your database to your environment. For instructions on connecting to a
database running outside of your environment, see Adding an Amazon RDS DB Instance to Your PHP
Application Environment (p. 856) .
Finally, if you plan on using your application in a production environment, you will want to configure a
custom domain name (p. 199) for your environment and enable HTTPS (p. 299) for secure connections.
For more information about Laravel, go to the tutorial at laravel.com.
Deploying a CakePHP Application to Elastic
Beanstalk
CakePHP is an open source, MVC framework for PHP. This tutorial walks you through the process of
generating a CakePHP project, deploying it to an Elastic Beanstalk environment, and configuring it to
connect to an Amazon RDS database instance.
Sections
•Prerequisites (p. 819)
API Version 2010-12-01
818

AWS Elastic Beanstalk Developer Guide
Prerequisites
•Install Composer (p. 819)
•Install CakePHP and Generate a Website (p. 820)
•Create an Elastic Beanstalk Environment and Deploy Your Application (p. 820)
•Add a Database to Your Environment (p. 823)
•Clean Up (p. 824)
•Next Steps (p. 825)
Prerequisites
To follow the procedures in this guide you will need a command line terminal or shell to run commands.
Commands are shown in listings like the following, preceded by a prompt symbol ('$') and the name of
the current directory, when appropriate:
~/eb-project$ this is a command
this is output
Note
All commands in this tutorial can be run on an Amazon Linux EC2 instance. If you need a
development environment, you can launch a single instance Elastic Beanstalk environment and
connect to it with SSH.
CakePHP requires PHP 5.5.9 or newer, and the mbstring and intl extensions for PHP. In this tutorial
we use PHP 5.6 and the corresponding Elastic Beanstalk platform configuration.
Install PHP 5.6 and the required extensions. Depending on your platform and available package
manager, the steps will vary.
On Amazon Linux, use yum:
$ sudo yum install php56 --skip-broken
$ sudo yum install php56-mbstring
$ sudo yum install php56-intl
On OS-X, use brew:
$ brew install php56
$ brew install php56-intl
On Windows, visit the download page at windows.php.net to get PHP, and read this page for information
about extensions.
After installing PHP, reopen your terminal and run php --version to ensure that the new version has
been installed and is the default.
Install Composer
Composer is a dependency management tool for PHP. It is the preferred method for installing CakePHP
and its dependencies and generating the a CakePHP project.
Install Composer by downloading the installer and running it with PHP. The installer generates a PHAR
file in the current directory that you can invoke with PHP to generate a CakePHP project.
~$ curl -s https://getcomposer.org/installer | php
API Version 2010-12-01
819

AWS Elastic Beanstalk Developer Guide
Install CakePHP and Generate a Website
All settings correct for using Composer
Downloading...
Composer successfully installed to: /home/ec2-user/composer.phar
Use it: php composer.phar
If you run into issues installing Composer, visit the official documentation: https://getcomposer.org/
Install CakePHP and Generate a Website
Composer can install CakePHP and create a working project with one command:
~$ php composer.phar create-project --prefer-dist cakephp/app eb-cake
Installing cakephp/app (3.2.0)
- Installing cakephp/app (3.2.0)
Downloading: 100%
Created project in eb-cake
Loading composer repositories with package information
Installing dependencies (including require-dev)
- Installing aura/installer-default (1.0.0)
Downloading: 100%
- Installing cakephp/plugin-installer (0.0.12)
Downloading: 100%
- Installing psr/log (1.0.0)
Downloading: 100%
...
Composer installs CakePHP and around 20 dependencies, and generates a default project.
If you run into any issues installing CakePHP, visit the installation topic in the official documentation:
http://book.cakephp.org/3.0/en/installation.html
Create an Elastic Beanstalk Environment and Deploy
Your Application
Create a source bundle (p. 58) containing the files created by Composer. You can use any program to
create the ZIP file, as long as it includes hidden files. On the command line, use the zip command:
~$ cd eb-cake
~/eb-cake$ zip ../cake-default.zip -r * .[^.]*
Save the ZIP archive in a location that you can access. This is the source bundle that you will upload to
Elastic Beanstalk when you create an environment.
Note
If you are working remotely in an Elastic Beanstalk environment, you can upload the archive to
your Elastic Beanstalk storage bucket in Amazon S3 with the AWS CLI aws cp command:
~$ aws s3 cp cake-default.zip s3://elasticbeanstalk-us-west-2-123456789012
Elastic Beanstalk creates this bucket the first time you create an environment. To upload files
to Amazon S3, your environment's instance profile (p. 22) must have permission to write to the
bucket.
API Version 2010-12-01
820

AWS Elastic Beanstalk Developer Guide
Create an Elastic Beanstalk Environment
and Deploy Your Application
Use the AWS Management Console to create an Elastic Beanstalk environment running your application.
Choose the PHP 5.6 platform configuration and upload your source bundle when prompted:
To launch an environment (console)
1. Open the Elastic Beanstalk console with this preconfigured link:
console.aws.amazon.com/elasticbeanstalk/home#/newApplication?
applicationName=tutorials&environmentType=LoadBalanced
2. For Platform, choose the platform that matches the language used by your application.
3. For App code, choose Upload.
4. Choose Local file, choose Browse, and open the source bundle.
5. Choose Upload.
6. Choose Review and launch.
7. Review the available settings and choose Create app.
Environment creation takes about 5 minutes. When the process completes, click the URL to open your
CakePHP application in the browser:
API Version 2010-12-01
821
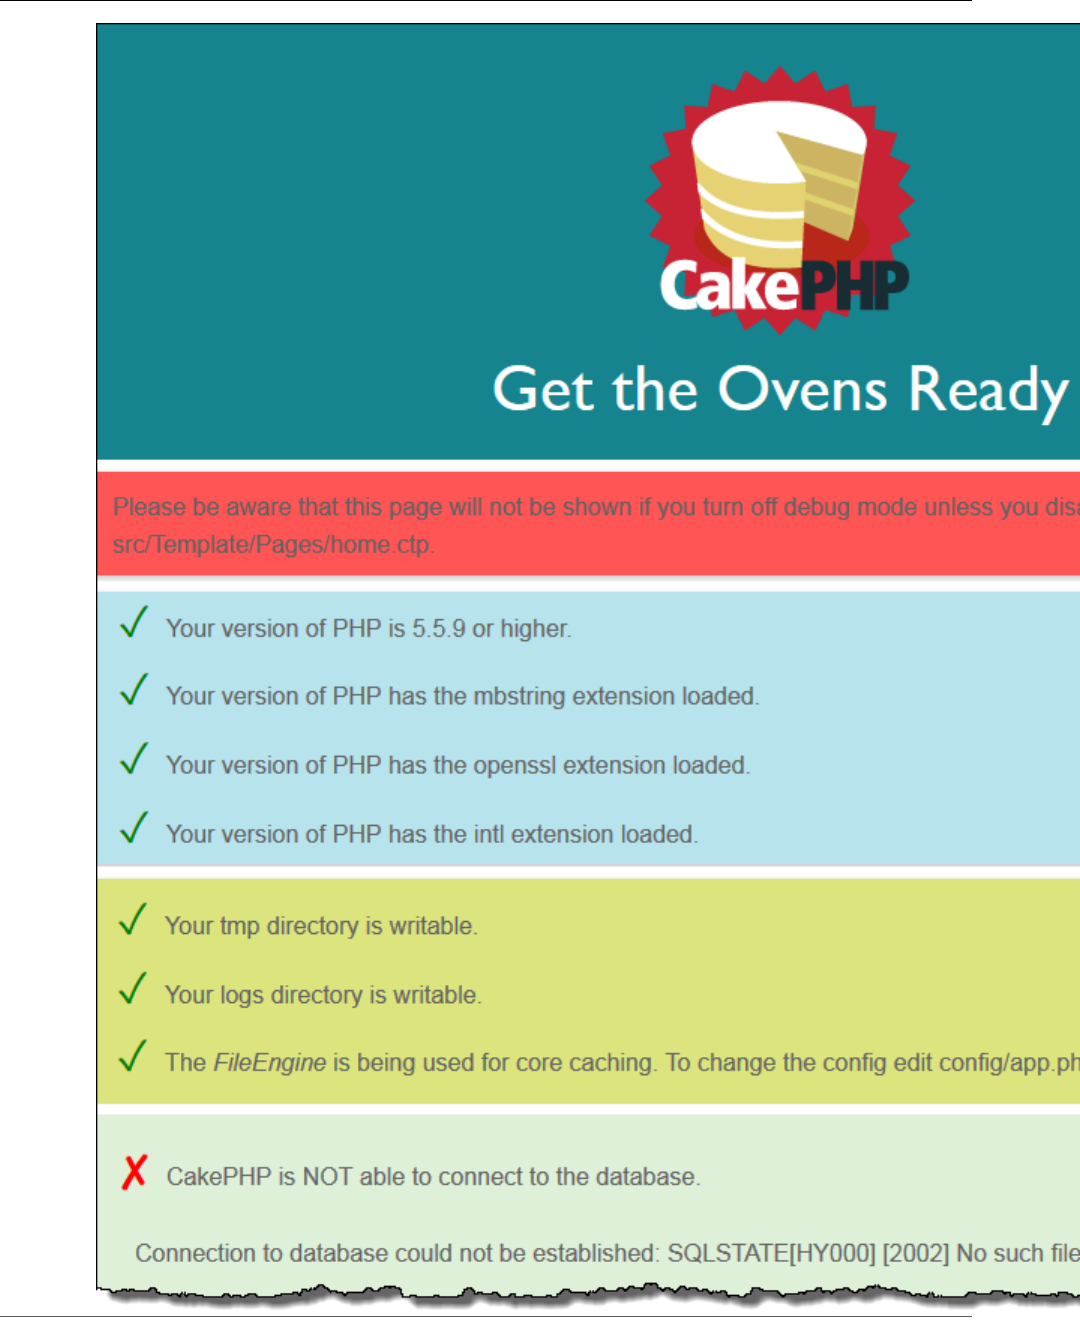
AWS Elastic Beanstalk Developer Guide
Create an Elastic Beanstalk Environment
and Deploy Your Application
API Version 2010-12-01
822

AWS Elastic Beanstalk Developer Guide
Add a Database to Your Environment
So far, so good. Next you'll add a database to your environment and configure CakePHP to connect to it.
Add a Database to Your Environment
Launch an Amazon RDS database instance in your Elastic Beanstalk environment. You can use MySQL,
SQLServer, or PostgreSQL databases with CakePHP on Elastic Beanstalk. For this example, we'll use
PostgreSQL.
To add an Amazon RDS DB instance to your Elastic Beanstalk environment
1. Open the Elastic Beanstalk console.
2. Navigate to the management page (p. 65) for your environment.
3. Choose Configuration.
4. In the Data Tier section, choose create a new RDS database.
5. For DB engine, choose postgres.
6. Type a master username and password. Elastic Beanstalk will provide these values to your
application using environment properties.
7. Choose Apply.
Creating a database instance takes about 10 minutes. In the meantime, you can update your source code
to read connection information from the environment. Elastic Beanstalk provides connection details
using environment variables such as RDS_HOSTNAME that you can access from your application.
CakePHP's database configuration is in a file named app.php in the config folder in your project code.
Open this file and add some code that reads the environment variables from $_SERVER and assigns
them to local variables. Insert the highlighted lines in the below example after the first line (<?php):
Example ~/eb-cake/config/app.php
<?php
if (!defined('RDS_HOSTNAME')) {
define('RDS_HOSTNAME', $_SERVER['RDS_HOSTNAME']);
define('RDS_USERNAME', $_SERVER['RDS_USERNAME']);
define('RDS_PASSWORD', $_SERVER['RDS_PASSWORD']);
define('RDS_DB_NAME', $_SERVER['RDS_DB_NAME']);
}
return [
...
The database connection is configured further down in app.php. Find the following section and modify
the default datasources configuration with the name of the driver that matches your database engine
(Mysql, Sqlserver, or Postgres), and set the host, username, password and database variables to
read the corresponding values from Elastic Beanstalk:
Example ~/eb-cake/config/app.php
...
/**
* Connection information used by the ORM to connect
* to your application's datastores.
* Drivers include Mysql Postgres Sqlite Sqlserver
* See vendor\cakephp\cakephp\src\Database\Driver for complete list
*/
'Datasources' => [
'default' => [
'className' => 'Cake\Database\Connection',
'driver' => 'Cake\Database\Driver\Postgres',
API Version 2010-12-01
823
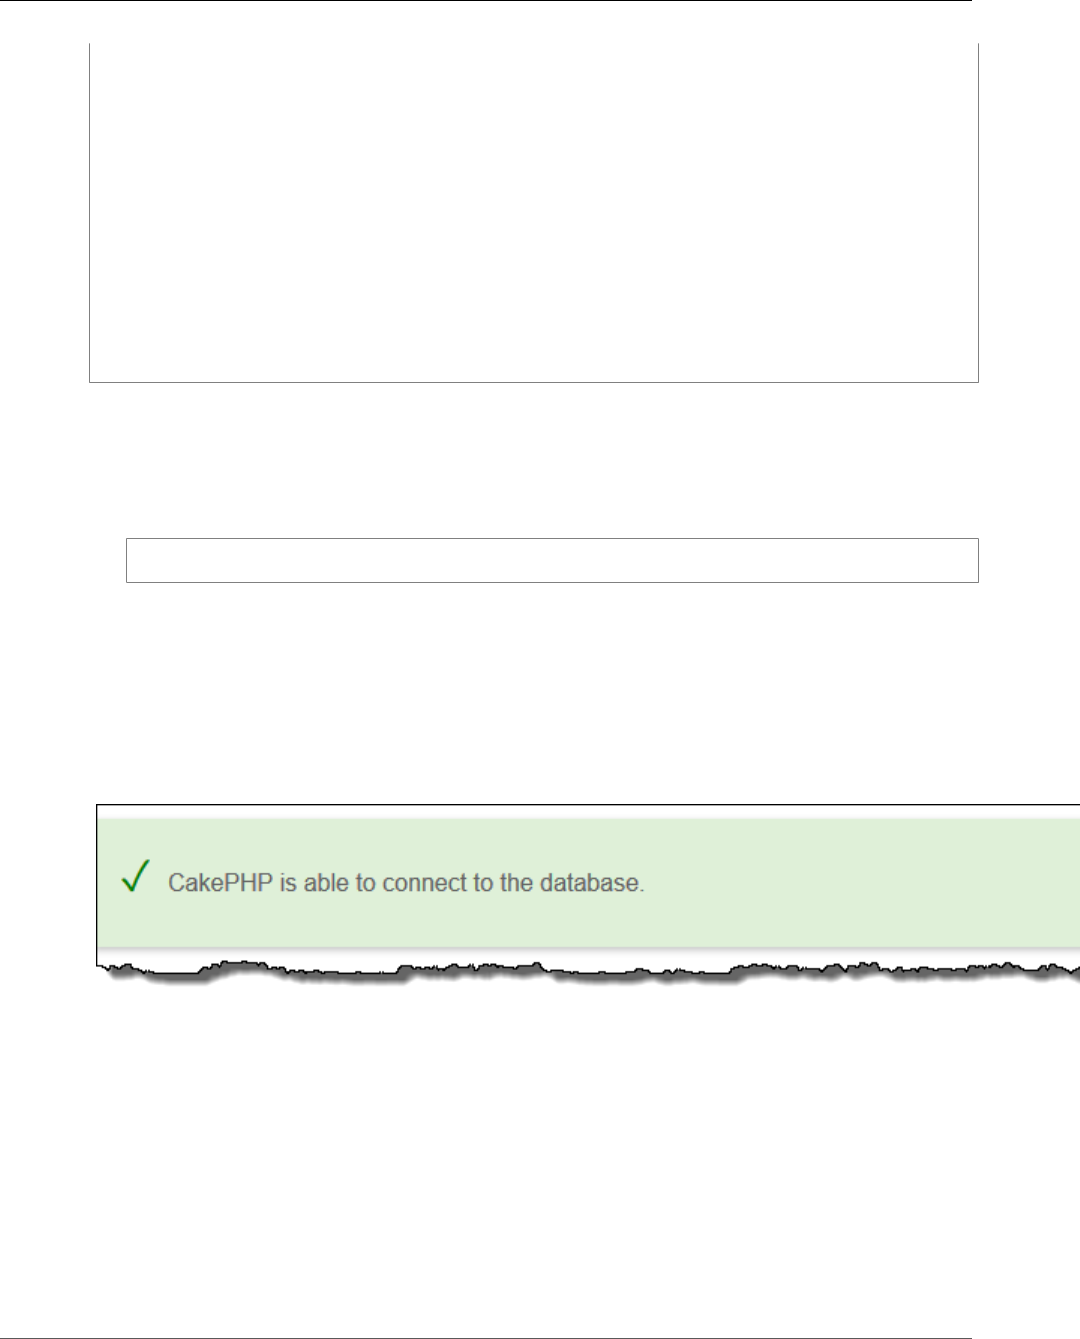
AWS Elastic Beanstalk Developer Guide
Clean Up
'persistent' => false,
'host' => RDS_HOSTNAME,
/**
* CakePHP will use the default DB port based on the driver selected
* MySQL on MAMP uses port 8889, MAMP users will want to uncomment
* the following line and set the port accordingly
*/
//'port' => 'non_standard_port_number',
'username' => RDS_USERNAME,
'password' => RDS_PASSWORD,
'database' => RDS_DB_NAME,
'encoding' => 'utf8',
'timezone' => 'UTC',
'flags' => [],
'cacheMetadata' => true,
'log' => false,
...
When the DB instance has finished launching, bundle up and deploy the updated application to your
environment:
To update your Elastic Beanstalk environment
1. Create a new source bundle:
~/eb-cake$ zip ../cake-v2-rds.zip -r * .[^.]*
2. Open the Elastic Beanstalk console.
3. Navigate to the management page (p. 65) for your environment.
4. Choose Upload and Deploy.
5. Choose Browse and upload cake-v2-rds.zip.
6. Choose Deploy.
Deploying a new version of your application takes less than a minute. When the deployment is complete,
refresh the web page again to verify that the database connection succeeded:
Clean Up
When you finish working with Elastic Beanstalk, you can terminate your environment. Elastic Beanstalk
terminates all AWS resources associated with your environment, such as Amazon EC2 instances (p. 167),
database instances (p. 186), load balancers (p. 176), security groups, and alarms (p. ).
To terminate your Elastic Beanstalk environment
1. Open the Elastic Beanstalk console.
2. Navigate to the management page (p. 65) for your environment.
3. Choose Actions, and then choose Terminate Environment.
4. In the Confirm Termination dialog box, type the environment name, and then choose Terminate.
API Version 2010-12-01
824

AWS Elastic Beanstalk Developer Guide
Next Steps
In addition, you can terminate database resources that you created outside of your Elastic Beanstalk
environment. When you terminate an Amazon RDS database instance, you can take a snapshot and
restore the data to another instance later.
To terminate your RDS DB instance
1. Open the Amazon RDS console.
2. Choose Instances.
3. Choose your DB instance.
4. Choose Instance Actions, and then choose Delete.
5. Choose whether to create a snapshot, and then choose Delete.
To delete a DynamoDB table
1. Open the Tables page in the DynamoDB console.
2. Select a table.
3. Choose Actions, and then choose Delete table.
4. Choose Delete.
Next Steps
For more information about CakePHP, read the book at book.cakephp.org.
As you continue to develop your application, you'll probably want a way to manage environments and
deploy your application without creating a ZIP file manually and uploading it to the Elastic Beanstalk
console. The Elastic Beanstalk Command Line Interface (p. 480) (EB CLI) provides easy to use commands
for creating, configuring, and deploying to Elastic Beanstalk environments from the command line.
Running an Amazon RDS DB instance in your Elastic Beanstalk environment is great for development and
testing, but it ties the lifecycle of your database to your environment. See Adding an Amazon RDS DB
Instance to Your PHP Application Environment (p. 856) for instructions on connecting to a database
running outside of your environment.
Finally, if you plan on using your application in a production environment, you will want to configure a
custom domain name (p. 199) for your environment and enable HTTPS (p. 299) for secure connections.
Deploying a Symfony2 Application to Elastic
Beanstalk
https://github.com/awslabs/elastic-beanstalk-docs/blob/master/tutorials/php/symfony2/tutorial-
deploy-symfony2-application-aws-elastic-beanstalk.md
Contribute to this article by editing the source directly on GitHub
This section walks you through deploying a sample application to Elastic Beanstalk using the Elastic
Beanstalk Command Line Interface (EB CLI) and Git, and then updating the application to use the
Symfony2 framework.
Sections
•Set Up Your Symfony2 Development Environment (p. 826)
•Configure Elastic Beanstalk (p. 827)
•View the Application (p. 828)
API Version 2010-12-01
825

AWS Elastic Beanstalk Developer Guide
Set Up Your Symfony2 Development Environment
•Update the Application (p. 829)
•Clean Up (p. 829)
Set Up Your Symfony2 Development Environment
Set up Symfony2 and create the project structure. The following walks you through setting up
Symfony2 on a Linux operating system. For more information, go to http://symfony.com/download.
For information on running Symfony2 behind a load balancer, see How to Configure Symfony to Work
behind a Load Balancer or a Reverse Proxy.
To set up your PHP development environment on your local computer
1. Download and install composer from getcomposer.org. For more information, go to http://
getcomposer.org/download/.
curl -s https://getcomposer.org/installer | php
2. Install Symfony2 Standard Edition with Composer. Check http://symfony.com/download for the
latest available version. Using the following command, composer will install the vendor libraries for
you.
php composer.phar create-project symfony/framework-standard-edition
symfony2_example/ <version number>
cd symfony2_example
Note
You may need to set the date.timezone in the php.ini to successfully complete installation.
Also provide parameters for Composer, as needed.
3. Initialize the Git repository.
git init
4. Update the .gitignore file to ignore vendor, cache, logs, and composer.phar. These files do not need
to get pushed to the remote server.
cat > .gitignore <<EOT
app/bootstrap.php.cache
app/cache/*
app/logs/*
vendor
composer.phar
EOT
5. Generate the hello bundle.
php app/console generate:bundle --namespace=Acme/HelloBundle --format=yml
When prompted, accept all defaults. For more information, go to Creating Pages in Symfony2.
Next, set some configuration options. Composer dependencies require that you set the HOME or
COMPOSER_HOME environment variable. Also configure Composer to self-update so that you always use
the latest version.
In addition, set the root directory for your application.
API Version 2010-12-01
826

AWS Elastic Beanstalk Developer Guide
Configure Elastic Beanstalk
To configure Composer and the root directory
1. Create a configuration file with the extension .config (e.g., composer.config) and place it
in an .ebextensions directory at the top level of your source bundle. You can have multiple
configuration files in your .ebextensions directory. For information about the file format
of configuration files, see Advanced Environment Customization with Configuration Files
(.ebextensions) (p. 256).
Note
Configuration files should conform to YAML or JSON formatting standards. For more
information, go to http://www.yaml.org/start.html or http://www.json.org, respectively.
2. In the .config file, type the following.
commands:
01updateComposer:
command: export COMPOSER_HOME=/root && /usr/bin/composer.phar self-update 1.0.0-
alpha11
option_settings:
- namespace: aws:elasticbeanstalk:application:environment
option_name: COMPOSER_HOME
value: /root
- namespace: aws:elasticbeanstalk:container:php:phpini
option_name: document_root
value: /web
Replace 1.0.0-alpha11 with your preferred version of composer. See getcomposer.org/download
for a list of available versions.
Configure Elastic Beanstalk
The following instructions use the Elastic Beanstalk command line interface (p. 480) (EB CLI) to configure
an Elastic Beanstalk application repository in your local project directory.
To configure Elastic Beanstalk
1. From the directory where you created your local repository, type the following command:
eb init
2. When you are prompted for the Elastic Beanstalk region, type the number of the region. For
information about this product's regions, go to Regions and Endpoints in the Amazon Web Services
General Reference. For this example, we'll use US West (Oregon).
3. When you are prompted for the Elastic Beanstalk application to use, type the number corresponding
to the option Create new Application. Elastic Beanstalk generates an application name based on the
current directory name if an application name has not been previously configured. In this example,
we use symfony2app.
Enter an AWS Elastic Beanstalk application name (auto-generated value is "windows"):
symfony2app
Note
If you have a space in your application name, make sure you do not use quotation marks.
4. Type y if Elastic Beanstalk correctly detected the correct platform you are using. Type n if not, and
then specify the correct platform.
API Version 2010-12-01
827

AWS Elastic Beanstalk Developer Guide
View the Application
5. When prompted, type y if you want to set up Secure Shell (SSH) to connect to your instances. Type n
if you do not want to set up SSH. In this example, we will type n.
Do you want to set up SSH for your instances?
(y/n): n
6. Create your running environment.
eb create
7. When you are prompted for the Elastic Beanstalk environment name, type the name of the
environment. Elastic Beanstalk automatically creates an environment name based on your
application name. If you want to accept the default, press Enter.
Enter Environment Name
(default is HelloWorld-env):
Note
If you have a space in your application name, make sure you do not have a space in your
environment name.
8. When you are prompted to provide a CNAME prefix, type the CNAME prefix you want to use. Elastic
Beanstalk automatically creates a CNAME prefix based on the environment name. If you want to
accept the default, press Enter.
Enter DNS CNAME prefix
(default is HelloWorld):
After configuring Elastic Beanstalk, you are ready to deploy a sample application.
If you want to update your Elastic Beanstalk configuration, you can use the init command again. When
prompted, you can update your configuration options. If you want to keep any previous settings, press
the Enter key.
To deploy a sample application
• From the directory where you created your local repository, type the following command:
eb deploy
This process may take several minutes to complete. Elastic Beanstalk provides status updates during
the process. If at any time you want to stop polling for status updates, press Ctrl+C. Once the
environment status is Green, Elastic Beanstalk outputs a URL for the application. Copy and paste the
URL into your web browser to view the application.
View the Application
To view the application
• To open your application in a browser window, type the following:
eb open
API Version 2010-12-01
828

AWS Elastic Beanstalk Developer Guide
Update the Application
Update the Application
After you have deployed a sample application, you can update it with your own application. In this step,
we update the sample application with a simple "Hello World" Symfony2 application.
To update the sample application
1. Add your files to your local Git repository, and then commit your change.
git add -A && git commit -m "Initial commit"
Note
For information about Git commands, go to Git - Fast Version Control System.
2. Create an application version matching your local repository and deploy to the Elastic Beanstalk
environment if specified.
eb deploy
You can also configure Git to push from a specific branch to a specific environment. For more
information, see "Using Git with EB CLI" in the topic Managing Elastic Beanstalk Environments with
the EB CLI (p. 492).
3. After your environment is Green and Ready, append /web/hello/AWS to the URL of your
application. The application should write out "Hello AWS!"
You can access the logs for your EC2 instances running your application. For instructions on accessing
your logs, see Viewing Logs from Your Elastic Beanstalk Environment's Amazon EC2 Instances (p. 369).
Clean Up
If you no longer want to run your application, you can clean up by terminating your environment and
deleting your application.
Use the terminate command to terminate your environment and the delete command to delete your
application.
To terminate your environment and delete the application
• From the directory where you created your local repository, run eb terminate:
$ eb terminate
This process may take a few minutes. Elastic Beanstalk displays a message once the environment has
been successfully terminated.
Deploying a High-Availability PHP Application
with an External Amazon RDS Database to Elastic
Beanstalk
This tutorial walks you through the process of launching an RDS DB instance (p. 439) external to AWS
Elastic Beanstalk, and configuring a high-availability environment running a PHP application to connect
API Version 2010-12-01
829

AWS Elastic Beanstalk Developer Guide
Prerequisites
to it. Running a DB instance external to Elastic Beanstalk decouples the database from the lifecycle of
your environment. This lets you connect to the same database from multiple environments, swap out
one database for another, or perform a blue/green deployment without affecting your database.
The tutorial uses a sample PHP application that uses a MySQL database to store user-provided text data.
The sample application uses configuration files (p. 256) to configure PHP settings (p. 810) and to create
a table in the database for the application to use. It also shows how to use a Composer file (p. 810) to
install packages during deployment.
Sections
•Prerequisites (p. 830)
•Launch a DB Instance in Amazon RDS (p. 830)
•Launch an Elastic Beanstalk Environment (p. 832)
•Configure Security Groups, Environment Properties, and Scaling (p. 833)
•Deploy the Sample Application (p. 834)
•Clean Up (p. 836)
•Next Steps (p. 837)
Prerequisites
Before you start, download the sample application source bundle from GitHub: eb-demo-php-simple-
app-1.1.zip
The procedures in this tutorial for Amazon Relational Database Service (Amazon RDS) tasks assume that
you are launching resources in a default VPC. All new accounts include a default VPC in each region.
If you don't have a default VPC, the procedures will vary. See Using Elastic Beanstalk with Amazon
Relational Database Service (p. 439) for instructions for EC2-Classic and custom VPC platforms.
Launch a DB Instance in Amazon RDS
To use an external database with an application running in Elastic Beanstalk, first launch a DB instance
with Amazon RDS. When you launch an instance with Amazon RDS, it is completely independent of
Elastic Beanstalk and your Elastic Beanstalk environments, and will not be terminated or monitored by
Elastic Beanstalk.
Use the Amazon RDS console to launch a Multi-AZ MySQL DB instance. Choosing a Multi-AZ deployment
ensures that your database will fail over and continue to be available if the master DB instance goes out
of service.
To launch an RDS DB instance in a default VPC
1. Open the RDS console.
2. Choose Instances in the navigation pane.
3. Choose Launch DB Instance.
4. Choose a DB Engine and preset configuration.
5. Under Specify DB Details, choose a DB Instance Class. For high availability, set Multi-AZ
Deployment to Yes.
6. Under Settings, enter values for DB Instance Identifier, Master Username, and Master Password
(and Confirm Password). Note the values that you entered for later.
7. Choose Next.
8. For Network and Security settings, choose the following:
•VPC – Default VPC
API Version 2010-12-01
830
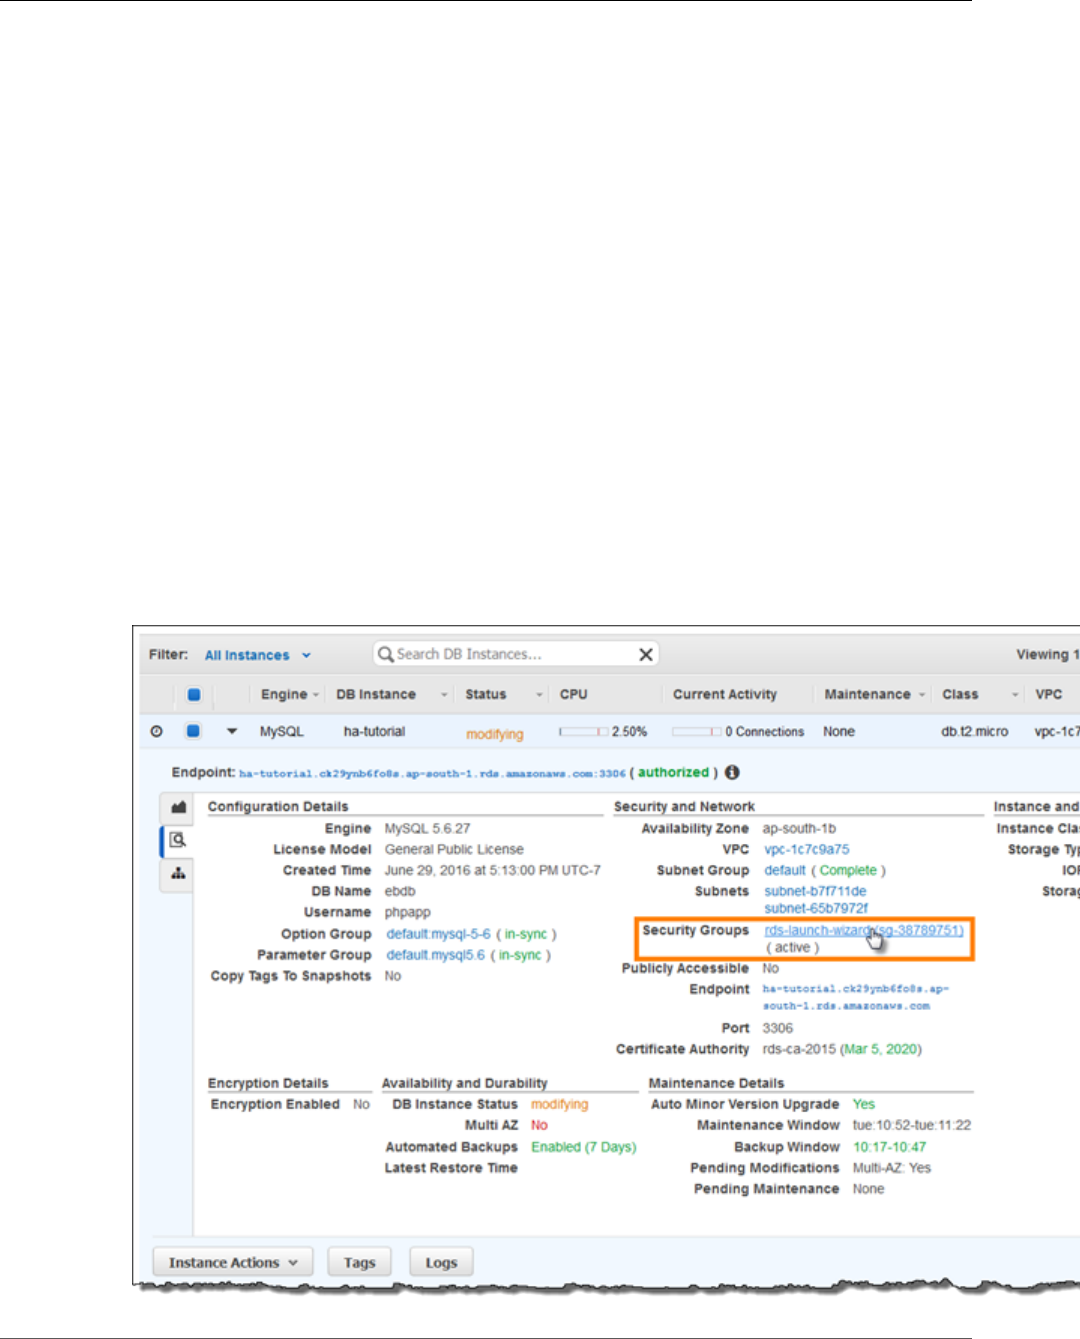
AWS Elastic Beanstalk Developer Guide
Launch a DB Instance in Amazon RDS
•Subnet Group – default
•Publicly Accessible – No
•Availability Zone – No Preference
•VPC Security Groups – Default VPC Security Group
9. For Database Name, type ebdb, and verify the default settings for the remaining options. Note the
values of the following options:
•Database Name
•Database Port
10. Choose Launch DB Instance.
Next, modify the security group attached to your DB instance to allow inbound traffic on the appropriate
port. This is the same security group that you will attach to your Elastic Beanstalk environment later, so
the rule that you add will grant ingress permission to other resources in the same security group.
To modify the ingress rules on your RDS instance's security group
1. Open the Amazon RDS console.
2. Choose Instances.
3. Choose the arrow next to the entry for your DB instance to expand the view.
4. Choose the Details tab.
5. In the Security and Network section, the security group associated with the DB instance is shown.
Open the link to view the security group in the Amazon EC2 console.
API Version 2010-12-01
831
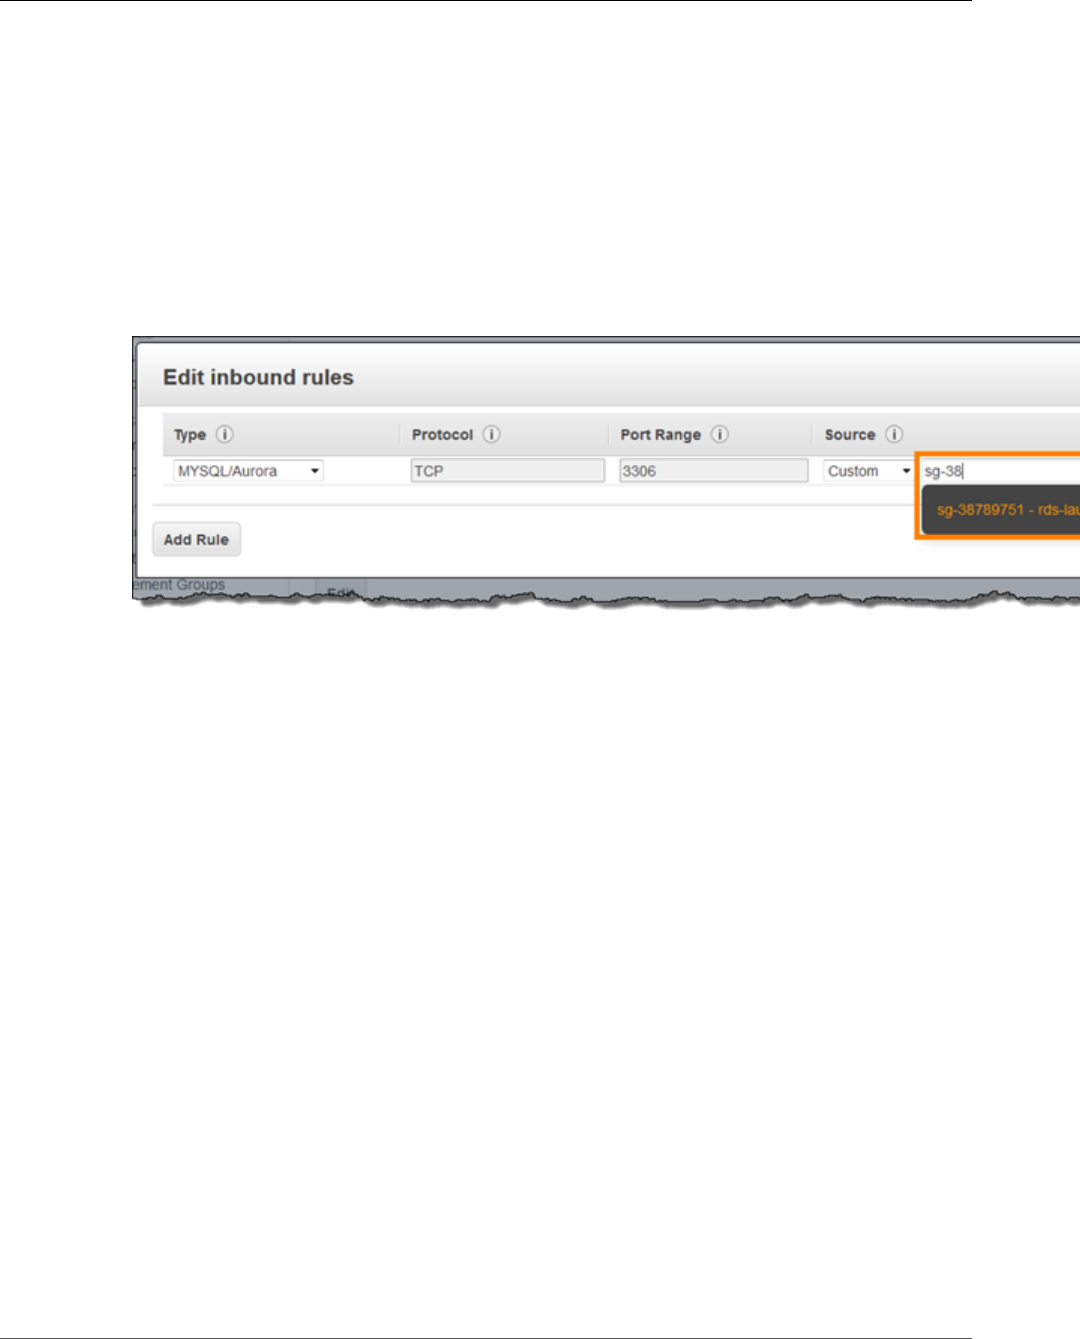
AWS Elastic Beanstalk Developer Guide
Launch an Elastic Beanstalk Environment
Note
While you have the Details tab open, note the Endpoint and security group name shown on
this page for use later.
The security group name is the first value of the link shown in Security Groups, before the
parentheses. The second value, in parentheses, is the security group ID.
6. In the security group details, choose the Inbound tab.
7. Choose Edit.
8. Choose Add Rule.
9. For Type, choose the DB engine that your application uses.
10. For Source, choose Custom, and then type the group ID of the security group. This allows resources
in the security group to receive traffic on the database port from other resources in the same group.
11. Choose Save.
Creating a DB instance takes about 10 minutes. In the meantime, launch your Elastic Beanstalk
environment.
Launch an Elastic Beanstalk Environment
Use the AWS Management Console to launch an Elastic Beanstalk environment. Choose the PHP 5.6
platform configuration and accept the default settings and sample code. After you configure the
environment to connect to the database, you deploy the sample application that you downloaded from
GitHub.
To launch an environment (console)
1. Open the Elastic Beanstalk console using this preconfigured link:
console.aws.amazon.com/elasticbeanstalk/home#/newApplication?
applicationName=tutorials&environmentType=LoadBalanced
2. For Platform, choose the platform that matches the language used by your application.
3. For Application code, choose Sample application.
4. Choose Review and launch.
5. Review all options. When you're satisfied with them, choose Create app.
Environment creation takes about 5 minutes.
API Version 2010-12-01
832

AWS Elastic Beanstalk Developer Guide
Configure Security Groups,
Environment Properties, and Scaling
Configure Security Groups, Environment Properties,
and Scaling
Next, add the security group of your DB instance to your running environment. This procedure causes
Elastic Beanstalk to reprovision all instances in your environment with the additional security group
attached.
To add a security group to your environment
1. Open the Elastic Beanstalk console.
2. Navigate to the management page (p. 65) for your environment.
3. Choose Configuration.
4. In theInstancessection, choose the settings icon ( ).
5. For EC2 security groups, type a comma after the name of the autogenerated security group
followed by the name of the RDS DB instance's security group. It is the name you noted while
configuring the security group earlier.
6. Choose Apply.
7. Read the warning, and then choose Save.
Next, use environment properties to pass the connection information to your environment. The sample
application uses a default set of properties that match the ones that Elastic Beanstalk configures when
you provision a database within your environment.
To configure environment properties for an Amazon RDS DB instance
1. Open the Elastic Beanstalk console.
2. Navigate to the management page (p. 65) for your environment.
3. Choose Configuration.
4. In theSoftware Configurationsection, choose the settings icon ( ).
5. In the Environment Properties section, define the variables that your application reads to construct
a connection string. For compatibility with environments that have an integrated RDS DB instance,
use the following:
•RDS_HOSTNAME – The hostname of the DB instance.
Amazon RDS console label – Endpoint is the hostname.
•RDS_PORT – The port on which the DB instance accepts connections. The default value varies
between DB engines.
Amazon RDS console label – Port
•RDS_DB_NAME – The database name, ebdb.
Amazon RDS console label – DB Name
•RDS_USERNAME – The user name that you configured for your database.
Amazon RDS console label – Username
•RDS_PASSWORD – The password that you configured for your database.
Choose the plus symbol (+) to add additional properties.
API Version 2010-12-01
833
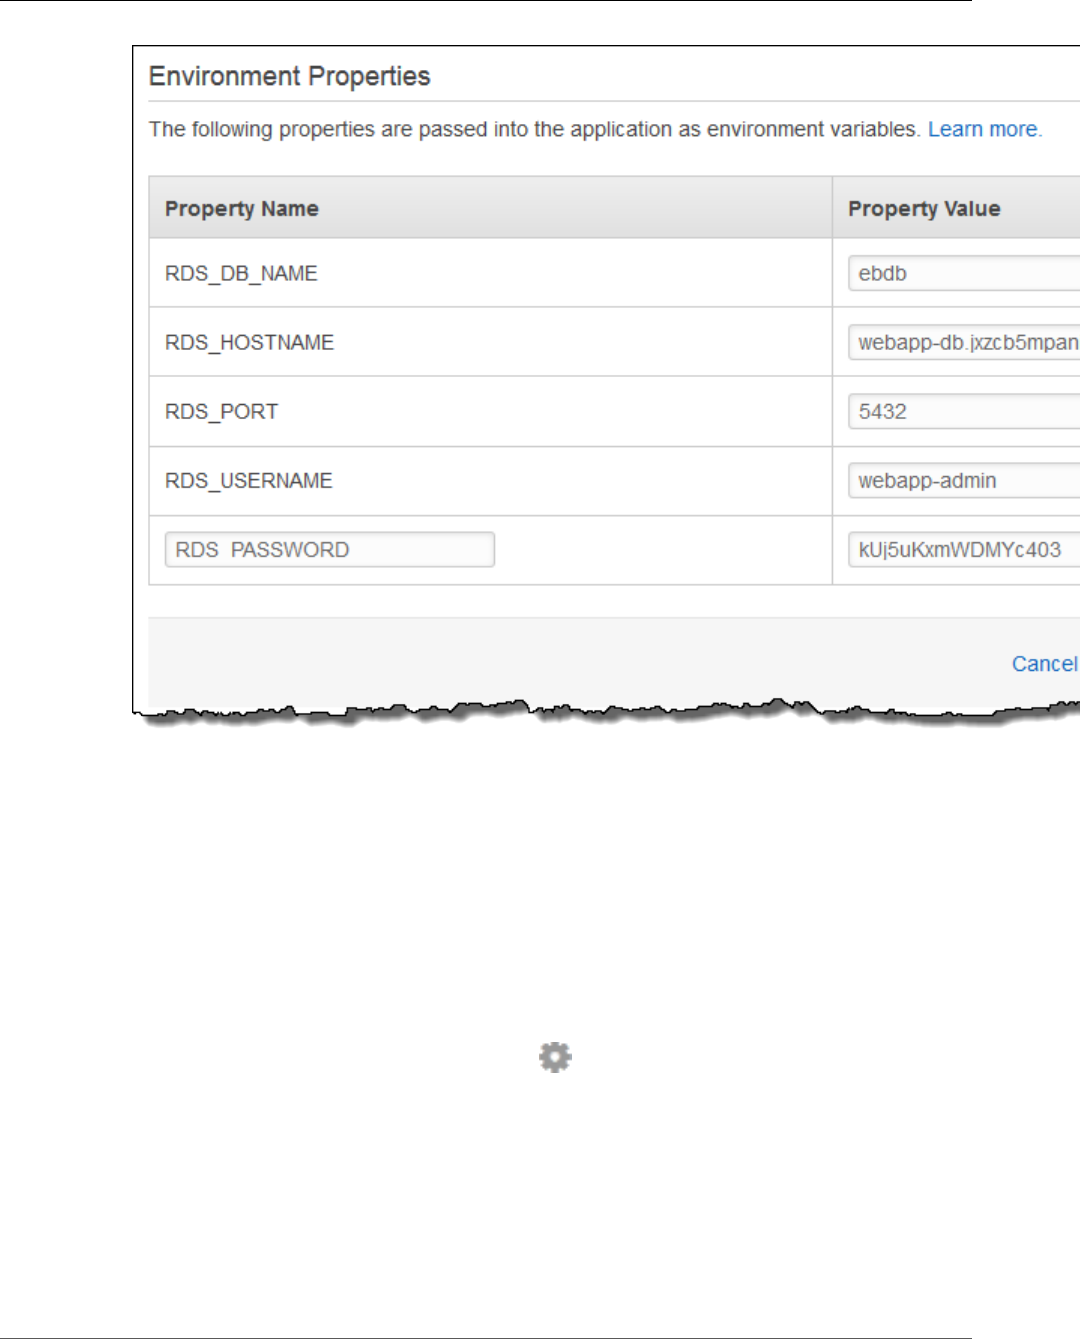
AWS Elastic Beanstalk Developer Guide
Deploy the Sample Application
6. Choose Apply.
Finally, configure your environment's Auto Scaling group with a higher minimum instance count. Run at
least two instances at all times to prevent the web servers in your environment from being a single point
of failure, and to allow you to deploy changes without taking your site out of service.
To configure your environment's Auto Scaling group for high availability
1. Open the Elastic Beanstalk console.
2. Navigate to the management page (p. 65) for your environment.
3. Choose Configuration.
4. In theScalingsection, choose the settings icon ( ).
5. Under Auto Scaling, set Minimum instance count to 2 and the Maximum instance count to a value
greater than 2.
6. Choose Apply.
Deploy the Sample Application
Now your environment is ready to run the sample application and connect to Amazon RDS. Deploy the
sample application to your environment.
API Version 2010-12-01
834
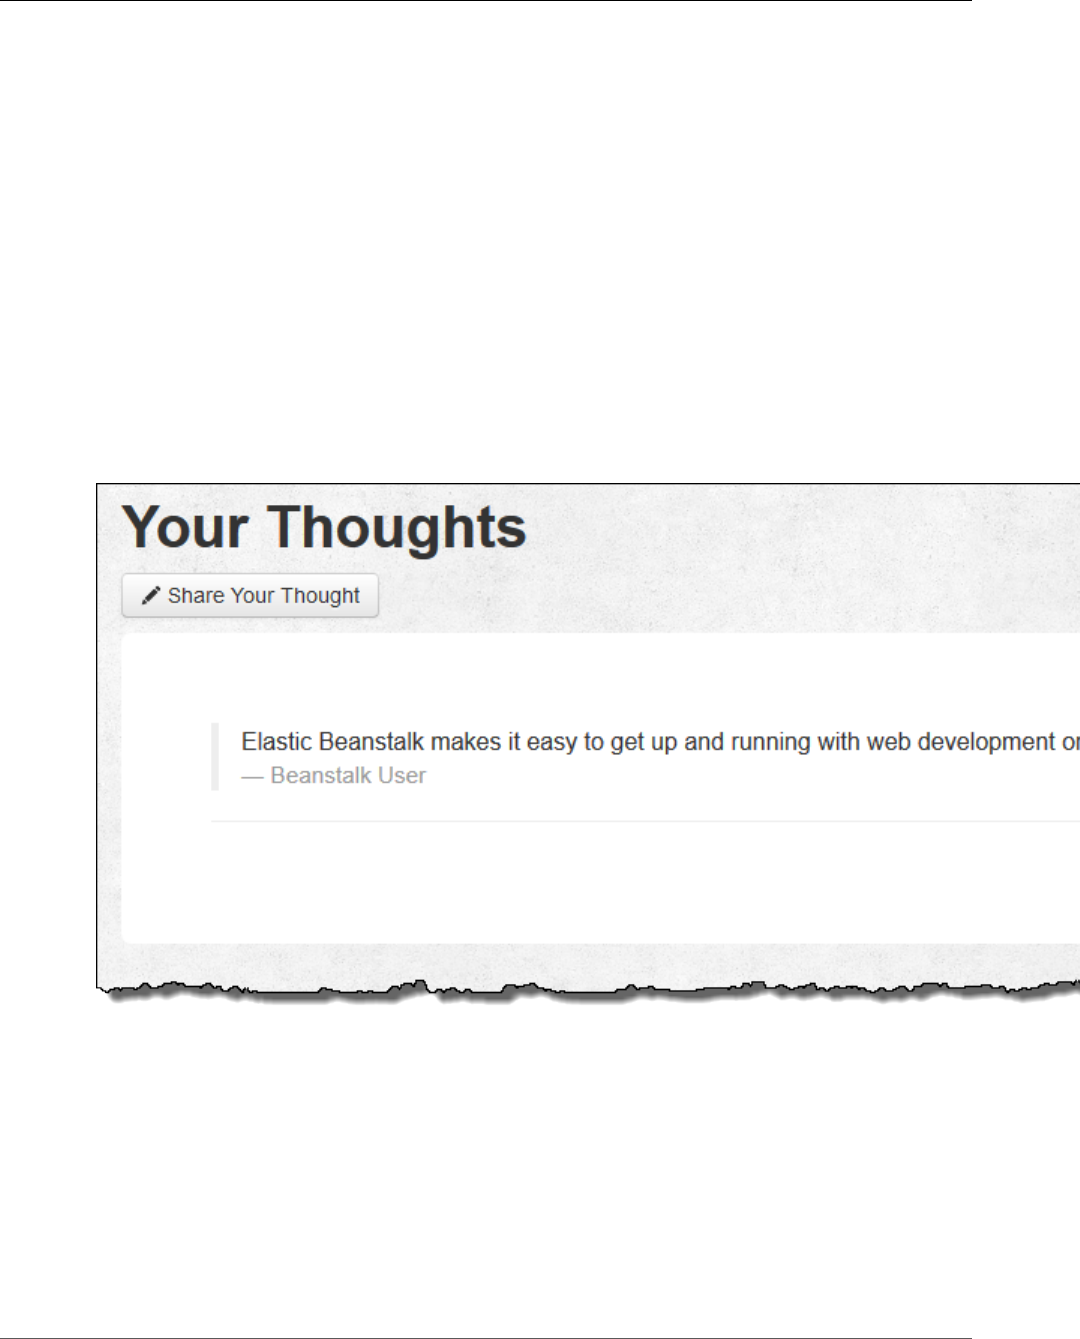
AWS Elastic Beanstalk Developer Guide
Deploy the Sample Application
Note
Download the source bundle from GitHub, if you haven't already: eb-demo-php-simple-
app-1.1.zip
To deploy a source bundle
1. Open the Elastic Beanstalk console.
2. Navigate to the management page (p. 65) for your environment.
3. Choose Upload and Deploy.
4. Choose Choose File and use the dialog box to select the source bundle.
5. Choose Deploy.
6. When the deployment completes, choose the site URL to open your website in a new tab.
The site collects user comments and uses a MySQL database to store the data. To add a comment,
choose Share Your Thought, enter a comment, and then choose Submit Your Thought. The web app
writes the comment to the database so that any instance in the environment can read it, and it won't be
lost if instances go out of service.
Launching an environment creates the following resources:
•EC2 instance – An Amazon Elastic Compute Cloud (Amazon EC2) virtual machine configured to run
web apps on the platform that you choose.
Each platform runs a different set of software, configuration files, and scripts to support a specific
language version, framework, web container, or combination thereof. Most platforms use either
Apache or nginx as a reverse proxy that sits in front of your web app, forwards requests to it, serves
static assets, and generates access and error logs.
•Instance security group – An Amazon EC2 security group configured to allow ingress on port 80. This
resource lets HTTP traffic from the load balancer reach the EC2 instance running your web app. By
default, traffic is not allowed on other ports.
API Version 2010-12-01
835

AWS Elastic Beanstalk Developer Guide
Clean Up
•Load balancer – An Elastic Load Balancing load balancer configured to distribute requests to the
instances running your application. A load balancer also eliminates the need to expose your instances
directly to the Internet.
•Load balancer security group – An Amazon EC2 security group configured to allow ingress on port
80. This resource lets HTTP traffic from the Internet reach the load balancer. By default, traffic is not
allowed on other ports.
•Auto Scaling group – An Auto Scaling group configured to replace an instance if it is terminated or
becomes unavailable.
•Amazon S3 bucket – A storage location for your source code, logs, and other artifacts that are created
when you use Elastic Beanstalk.
•Amazon CloudWatch alarms – Two CloudWatch alarms that monitor the load on the instances in your
environment and are triggered if the load is too high or too low. When an alarm is triggered, your Auto
Scaling group scales up or down in response.
•AWS CloudFormation stack – Elastic Beanstalk uses AWS CloudFormation to launch the resources in
your environment and propagate configuration changes. The resources are defined in a template that
you can view in the AWS CloudFormation console.
•Domain name – A domain name that routes to your web app in the form
subdomain.region.elasticbeanstalk.com.
All of these resources are managed by Elastic Beanstalk. When you terminate your environment, Elastic
Beanstalk terminates all of resources that it contains. The RDS DB instance that you launched is outside
of your environment, so you are responsible for managing its lifecycle.
Note
The Amazon S3 bucket that Elastic Beanstalk creates is shared between environments and is not
deleted during environment termination. For more information, see Using Elastic Beanstalk with
Amazon Simple Storage Service (p. 451).
Clean Up
When you finish working with Elastic Beanstalk, you can terminate your environment. Elastic Beanstalk
terminates all AWS resources associated with your environment, such as Amazon EC2 instances (p. 167),
database instances (p. 186), load balancers (p. 176), security groups, and alarms (p. ).
To terminate your Elastic Beanstalk environment
1. Open the Elastic Beanstalk console.
2. Navigate to the management page (p. 65) for your environment.
3. Choose Actions, and then choose Terminate Environment.
4. In the Confirm Termination dialog box, type the environment name, and then choose Terminate.
In addition, you can terminate database resources that you created outside of your Elastic Beanstalk
environment. When you terminate an Amazon RDS database instance, you can take a snapshot and
restore the data to another instance later.
To terminate your RDS DB instance
1. Open the Amazon RDS console.
2. Choose Instances.
3. Choose your DB instance.
4. Choose Instance Actions, and then choose Delete.
5. Choose whether to create a snapshot, and then choose Delete.
API Version 2010-12-01
836

AWS Elastic Beanstalk Developer Guide
Next Steps
To delete a DynamoDB table
1. Open the Tables page in the DynamoDB console.
2. Select a table.
3. Choose Actions, and then choose Delete table.
4. Choose Delete.
Next Steps
As you continue to develop your application, you'll probably want to manage environments and deploy
your application without manually creating a .zip file and uploading it to the Elastic Beanstalk console.
The Elastic Beanstalk Command Line Interface (p. 480) (EB CLI) provides easy-to-use commands for
creating, configuring, and deploying applications to Elastic Beanstalk environments from the command
line.
The sample application uses configuration files to configure PHP settings and create a table in the
database if it doesn't already exist. You can also use a configuration file to configure the security group
settings of your instances during environment creation to avoid time-consuming configuration updates.
See Advanced Environment Customization with Configuration Files (.ebextensions) (p. 256) for more
information.
For development and testing, you might want to use the Elastic Beanstalk functionality for adding a
managed DB instance directly to your environment. For instructions on setting up a database inside your
environment, see Adding a Database to Your Elastic Beanstalk Environment (p. 186).
If you need a high-performance database, consider using Amazon Aurora. Amazon Aurora is a MySQL-
compatible database engine that offers commercial database features at low cost. To connect your
application to a different database, repeat the security group configuration (p. 830) steps and update
the RDS-related environment properties (p. 833).
Finally, if you plan on using your application in a production environment, configure a custom domain
name (p. 199) for your environment and enable HTTPS (p. 299) for secure connections.
Deploying a High-Availability WordPress Website
with an External Amazon RDS Database to Elastic
Beanstalk
This tutorial walks you through the process of launching an RDS DB instance (p. 439) external to AWS
Elastic Beanstalk, and configuring a high-availability environment running a WordPress website to
connect to it. Running a DB instance external to Elastic Beanstalk decouples the database from the
lifecycle of your environment, and lets you connect to the same database from multiple environments,
swap out one database for another, or perform a blue/green deployment without affecting your
database.
Sections
•Launch a DB Instance in Amazon RDS (p. 838)
•Download WordPress (p. 840)
•Launch an Elastic Beanstalk Environment (p. 841)
•Configure Security Groups and Environment Properties (p. 842)
•Install WordPress (p. 843)
•Updating keys and salts (p. 843)
API Version 2010-12-01
837

AWS Elastic Beanstalk Developer Guide
Launch a DB Instance in Amazon RDS
•Update the Environment (p. 844)
•Configure Autoscaling (p. 845)
•Review (p. 845)
•Clean Up (p. 846)
•Next Steps (p. 846)
Launch a DB Instance in Amazon RDS
To use an external database with an application running in Elastic Beanstalk, first launch a DB instance
with Amazon RDS. When you launch an instance with Amazon RDS, it is completely independent of
Elastic Beanstalk and your Elastic Beanstalk environments, and will not be terminated or monitored by
Elastic Beanstalk.
Use the Amazon RDS console to launch a Multi-AZ MySQL DB instance. Choosing a Multi-AZ deployment
ensures that your database will failover and continue to be available if the master DB instance goes out
of service.
To launch an RDS DB instance in a default VPC
1. Open the RDS console.
2. Choose Instances in the navigation pane.
3. Choose Launch DB Instance.
4. Choose a DB Engine and preset configuration.
5. Under Specify DB Details, choose a DB Instance Class. For high availability, set Multi-AZ
Deployment to Yes.
6. Under Settings, enter values for DB Instance Identifier, Master Username, and Master Password
(and Confirm Password). Note the values that you entered for later.
7. Choose Next.
8. For Network and Security settings, choose the following:
•VPC – Default VPC
•Subnet Group – default
•Publicly Accessible – No
•Availability Zone – No Preference
•VPC Security Groups – Default VPC Security Group
9. For Database Name, type ebdb, and verify the default settings for the remaining options. Note the
values of the following options:
•Database Name
•Database Port
10. Choose Launch DB Instance.
Next, modify the security group attached to your DB instance to allow inbound traffic on the appropriate
port. This is the same security group that you will attach to your Elastic Beanstalk environment later, so
the rule that you add will grant ingress permission to other resources in the same security group.
To modify the ingress rules on your RDS instance's security group
1. Open the Amazon RDS console.
2. Choose Instances.
3. Choose the arrow next to the entry for your DB instance to expand the view.
API Version 2010-12-01
838
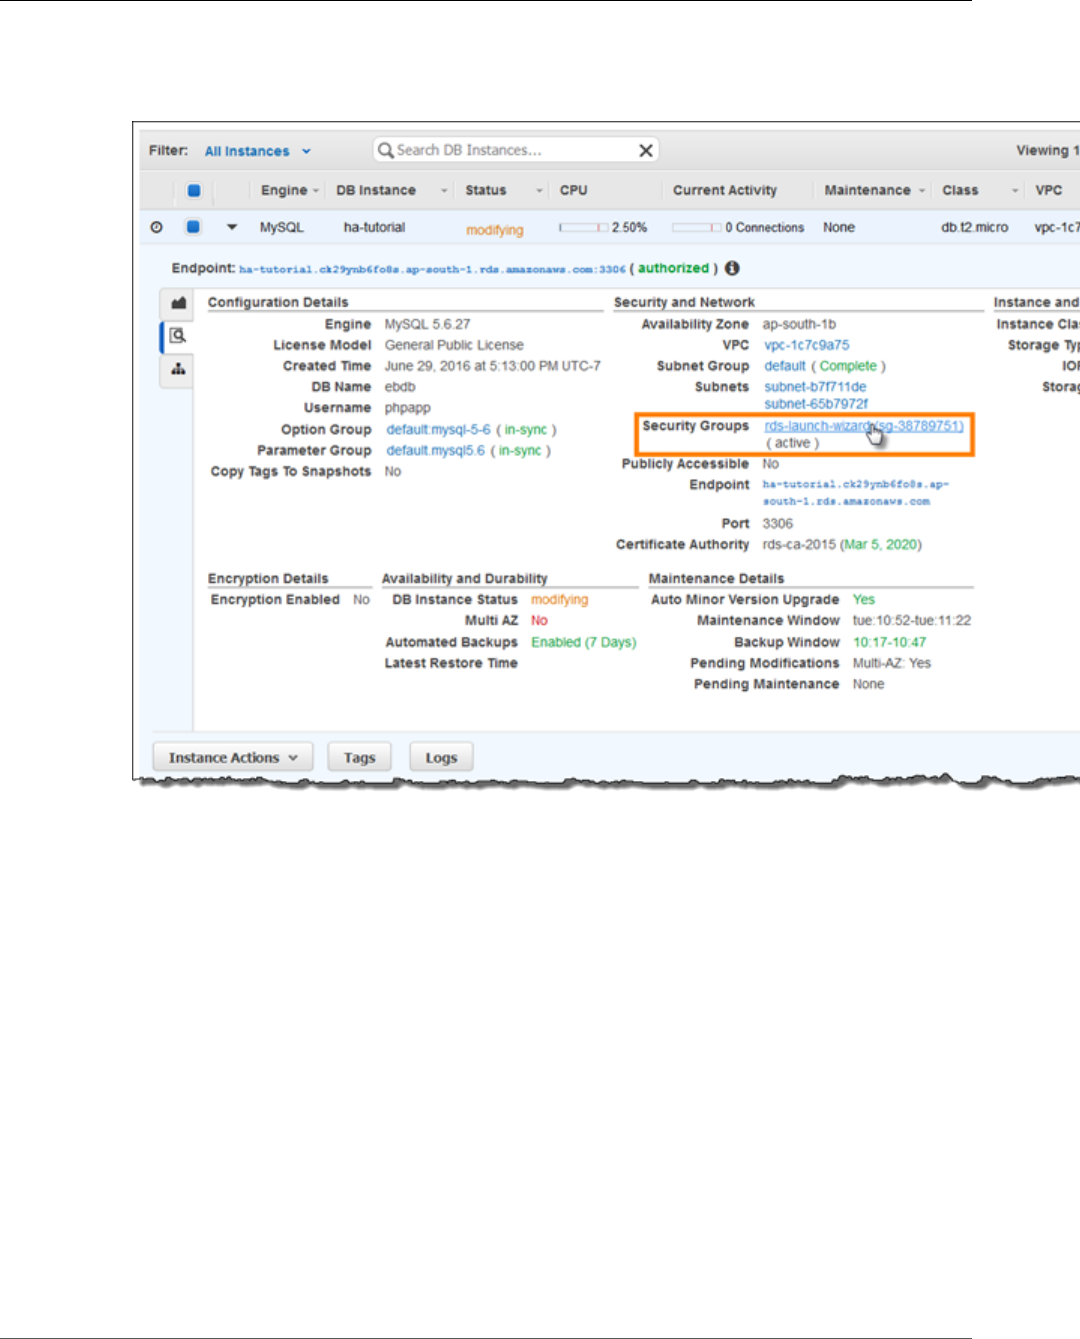
AWS Elastic Beanstalk Developer Guide
Launch a DB Instance in Amazon RDS
4. Choose the Details tab.
5. In the Security and Network section, the security group associated with the DB instance is shown.
Open the link to view the security group in the Amazon EC2 console.
Note
While you have the Details tab open, note the Endpoint and security group name shown on
this page for use later.
The security group name is the first value of the link shown in Security Groups, before the
parentheses. The second value, in parentheses, is the security group ID.
6. In the security group details, choose the Inbound tab.
7. Choose Edit.
8. Choose Add Rule.
9. For Type, choose the DB engine that your application uses.
10. For Source, choose Custom, and then type the group ID of the security group. This allows resources
in the security group to receive traffic on the database port from other resources in the same group.
API Version 2010-12-01
839

AWS Elastic Beanstalk Developer Guide
Download WordPress
11. Choose Save.
Creating a DB instance takes about 10 minutes. In the meantime, download WordPress and launch your
Elastic Beanstalk environment.
Download WordPress
To prepare to deploy WordPress using AWS Elastic Beanstalk, you must copy the WordPress files to your
computer and provide some configuration information. AWS Elastic Beanstalk requires a source bundle,
in the format of a ZIP or WAR file.
To download WordPress and create a source bundle
1. Open http://wordpress.org/download/.
2. Download the latest release.
3. Extract the WordPress files from the download to a folder on your local computer, which you should
rename to wordpress-beanstalk.
4. Download the configuration files in the following repository:
https://github.com/awslabs/eb-php-wordpress/releases/download/v1.0/eb-php-wordpress-
v1.zip
5. Extract the configuration files into your wordpress-beanstalk folder.
6. Verify that the structure of your wordpress-beanstalk folder is correct.
### .ebextensions
### wp-admin
# ### css
# ### images
# ### includes
# ### js
# ### maint
# ### network
# ### user
### wp-content
# ### plugins
# ### themes
### wp-includes
# ### certificates
# ### css
# ### customize
# ### fonts
# ### ID3
# ### images
API Version 2010-12-01
840

AWS Elastic Beanstalk Developer Guide
Launch an Elastic Beanstalk Environment
# ### js
# ### pomo
# ### random_compat
# ### Requests
# ### rest-api
# ### SimplePie
# ### Text
# ### theme-compat
# ### widgets
7. Modify the configuration files in the .ebextensions folder with the IDs of your default VPC and
subnets, and your public IP address.
8. The .ebextensions/efs-create.config file creates an EFS file system and mount points in
each Availability Zone/subnet in your VPC. Identify your default VPC and subnet IDs in the Amazon
VPC console.
The .ebextensions/dev.config file restricts access to your environment to your IP address to
protect it during the WordPress installation process. Replace the placeholder IP address near the top
of the file with your public IP address.
9. Create a ZIP file from the files and folders in the wordpress-beanstalk folder (not the parent
directory), using one of the following methods, depending on your operating system:
10. Windows — In Windows Explorer, select the files and folders, right-click, and then choose Send to,
Compressed (zipped) Folder. Name the file wordpress-x.y.z.zip, where x.y.z is the version of
WordPress.
--OR--
Mac OS X and Linux — Use the following command, where x.y.z is the version of WordPress:
zip -r ../wordpress-x.y.z.zip .
Launch an Elastic Beanstalk Environment
Use the AWS Management Console to launch an Elastic Beanstalk environment.
1. Open the Elastic Beanstalk console with this preconfigured link: console.aws.amazon.com/
elasticbeanstalk/home#/newApplication?applicationName=wordpress-
beanstalk&environmentType=LoadBalanced
2. For Platform, choose PHP.
3. For App code, choose Upload your code.
4. Choose Upload and navigate to the ZIP file you created for your WordPress files.
5. Choose Upload to select your application code.
6. Choose Configure more options.
7. For Configuration presets, select Custom configuration.
8. Choose Change platform configuration and select 64bit Amazon Linux 2016.09 v2.3.1 running
PHP 5.6 from the drop down menu and then choose Save.
9. Review all options and once you are satisfied with those options choose Create app.
Environment creation takes about 5 minutes.
API Version 2010-12-01
841

AWS Elastic Beanstalk Developer Guide
Configure Security Groups and Environment Properties
Configure Security Groups and Environment
Properties
Next, add the DB instance's security group to your running environment. This procedure causes Elastic
Beanstalk to reprovision all instances in your environment with the additional security group attached.
To add a security group to your environment
1. Open the Elastic Beanstalk console.
2. Navigate to the management page (p. 65) for your environment.
3. Choose Configuration.
4. In theInstancessection, choose the settings icon ( ).
5. For EC2 security groups, type a comma after the name of the autogenerated security group
followed by the name of the RDS DB instance's security group. It is the name you noted while
configuring the security group earlier.
6. Choose Apply.
7. Read the warning, and then choose Save.
Next, pass the connection information to your environment by using environment properties. The sample
application uses a default set of properties that match the ones that Elastic Beanstalk configures when
you provision a database within your environment.
To configure environment properties for an Amazon RDS DB instance
1. Open the Elastic Beanstalk console.
2. Navigate to the management page (p. 65) for your environment.
3. Choose Configuration.
4. In theSoftware Configurationsection, choose the settings icon ( ).
5. In the Environment Properties section, define the variables that your application reads to construct
a connection string. For compatibility with environments that have an integrated RDS DB instance,
use the following:
•RDS_HOSTNAME – The hostname of the DB instance.
Amazon RDS console label – Endpoint is the hostname.
•RDS_PORT – The port on which the DB instance accepts connections. The default value varies
between DB engines.
Amazon RDS console label – Port
•RDS_DB_NAME – The database name, ebdb.
Amazon RDS console label – DB Name
•RDS_USERNAME – The user name that you configured for your database.
Amazon RDS console label – Username
•RDS_PASSWORD – The password that you configured for your database.
Choose the plus symbol (+) to add additional properties.
API Version 2010-12-01
842
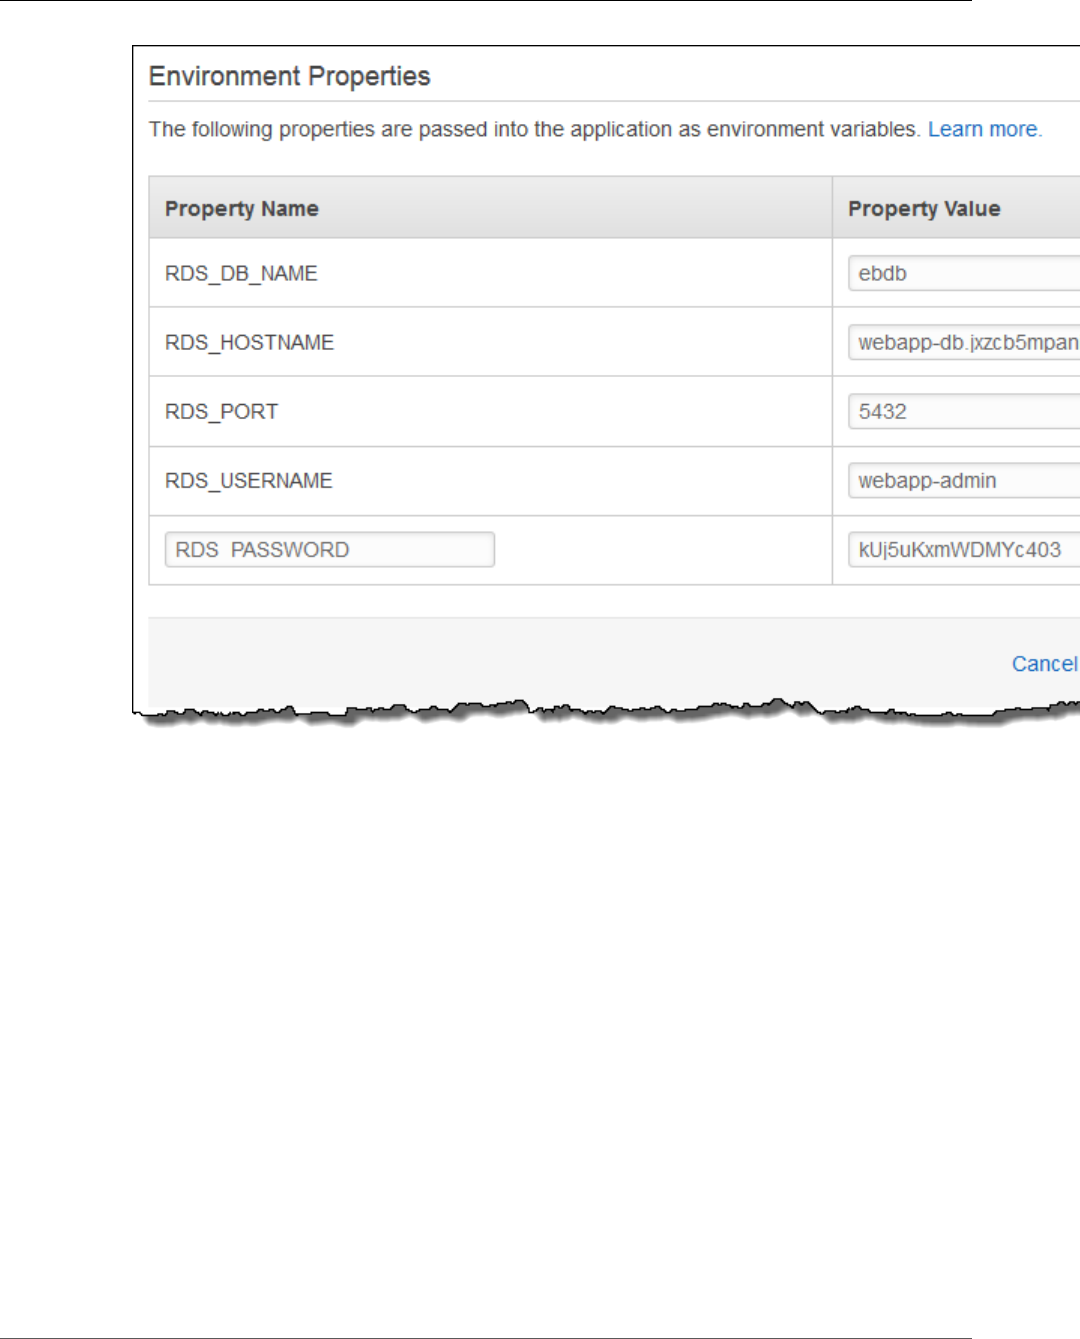
AWS Elastic Beanstalk Developer Guide
Install WordPress
6. Choose Apply.
Install WordPress
To complete your WordPress installation
1. Open the Elastic Beanstalk console.
2. Navigate to the management page (p. 65) for your environment.
3. Choose the environment URL to open your site in a browser. You are redirected to a WordPress
installation wizard because the site has not been configured yet.
4. Perform a standard installation. The wp-config.php file is already present in the source code and
configured to read the database connection information from the environment, so you shouldn't be
prompted to configure the connection.
Installation takes about a minute to complete.
Updating keys and salts
The WordPress configuration file wp-config.php also reads values for keys and salts from environment
properties. Currently, these properties are all set to test by the wordpress.config file in the
.ebextensions folder.
API Version 2010-12-01
843

AWS Elastic Beanstalk Developer Guide
Update the Environment
The hash salt can be any value but it should not be stored in source control. Use the Elastic Beanstalk
console to set these properties directly on the environment.
To add environment properties
1. Open the Elastic Beanstalk console.
2. Navigate to the management page (p. 65) for your environment.
3. On the navigation pane, choose Configuration.
4. For Software Configuration, choose the gear icon.
5. For Environment Properties, define the following authentication settings:
•AUTH_KEY — The value chosen for AUTH_KEY.
•SECURE_AUTH_KEY — The value chosen for SECURE_AUTH_KEY.
•LOGGED_IN_KEY — The value chosen for LOGGED_IN_KEY.
•NONCE_KEY — The value chosen for NONCE_KEY.
•AUTH_SALT — The value chosen for AUTH_SALT.
•SECURE_AUTH_SALT — The value chosen for SECURE_AUTH_SALT.
•LOGGED_IN_SALT — The value chosen for LOGGED_IN_SALT.
•NONCE_SALT — The value chosen for NONCE_SALT.
Setting the properties on the environment directly overrides the values in wordpress.config.
Update the Environment
This tutorial includes a configuration file (loadbalancer-sg.config) that creates a security group and
assigns it to the environment's load balancer, using the IP address that you configured in dev.config
to restrict HTTP access over port 80 to connections from your network. This prevents an outside party
from potentially connecting to your site before you have completed your WordPress installation and
configured your admin account. To remove this restriction from your load balancer configuration and
open the site to the Internet you can use the following steps.
To remove the restriction and update your environment
1. On your local computer, delete the .ebextensions/loadbalancer-sg-config file from the
wordpress-beanstalk folder.
2. Create a ZIP file from the files and folders in the wordpress-beanstalk folder (not the parent
directory), using one of the following methods, depending on your operating system:
3. Windows — In Windows Explorer, select the files and folders, right-click, and then choose Send to,
Compressed (zipped) Folder. Name the file using the following format, where x.y.z is the version
of WordPress.
wordpress-x.y.z-v2.zip
--OR--
Mac OS X and Linux — Use the following command, where x.y.z is the version of WordPress:
zip -r ../wordpress-x.y.z-v2.zip .
4. Open the Elastic Beanstalk console.
5. Navigate to the management page (p. 65) for your environment.
6. Choose Upload and Deploy.
API Version 2010-12-01
844

AWS Elastic Beanstalk Developer Guide
Configure Autoscaling
7. Choose Choose File and navigate to the ZIP file you created for your WordPress files.
8. Enter a Version label that distinguishes this updated version from your previous version.
9. Choose Deploy.
Configure Autoscaling
Finally, configure your environment's Auto Scaling group with a higher minimum instance count. Run at
least two instances at all times to prevent the web servers in your environment from being a single point
of failure, and to allow you to deploy changes without taking your site out of service.
To configure your environment's Auto Scaling group for high availability
1. Open the Elastic Beanstalk console.
2. Navigate to the management page (p. 65) for your environment.
3. Choose Configuration.
4. In theScalingsection, choose the settings icon ( ).
5. Under Auto Scaling, set Minimum instance count to 2 and the Maximum instance count to a value
greater than 2.
6. Choose Apply.
Review
Launching an environment creates the following resources:
•EC2 instance – An Amazon Elastic Compute Cloud (Amazon EC2) virtual machine configured to run
web apps on the platform that you choose.
Each platform runs a different set of software, configuration files, and scripts to support a specific
language version, framework, web container, or combination thereof. Most platforms use either
Apache or nginx as a reverse proxy that sits in front of your web app, forwards requests to it, serves
static assets, and generates access and error logs.
•Instance security group – An Amazon EC2 security group configured to allow ingress on port 80. This
resource lets HTTP traffic from the load balancer reach the EC2 instance running your web app. By
default, traffic is not allowed on other ports.
•Load balancer – An Elastic Load Balancing load balancer configured to distribute requests to the
instances running your application. A load balancer also eliminates the need to expose your instances
directly to the Internet.
•Load balancer security group – An Amazon EC2 security group configured to allow ingress on port
80. This resource lets HTTP traffic from the Internet reach the load balancer. By default, traffic is not
allowed on other ports.
•Auto Scaling group – An Auto Scaling group configured to replace an instance if it is terminated or
becomes unavailable.
•Amazon S3 bucket – A storage location for your source code, logs, and other artifacts that are created
when you use Elastic Beanstalk.
•Amazon CloudWatch alarms – Two CloudWatch alarms that monitor the load on the instances in your
environment and are triggered if the load is too high or too low. When an alarm is triggered, your Auto
Scaling group scales up or down in response.
•AWS CloudFormation stack – Elastic Beanstalk uses AWS CloudFormation to launch the resources in
your environment and propagate configuration changes. The resources are defined in a template that
you can view in the AWS CloudFormation console.
API Version 2010-12-01
845

AWS Elastic Beanstalk Developer Guide
Clean Up
•Domain name – A domain name that routes to your web app in the form
subdomain.region.elasticbeanstalk.com.
All of these resources are managed by Elastic Beanstalk. When you terminate your environment, Elastic
Beanstalk terminates all of resources that it contains. The RDS DB instance that you launched is outside
of your environment, so you are responsible for managing its lifecycle.
Note
The S3 bucket that Elastic Beanstalk creates is shared between environments and is not deleted
during environment termination. For more information, see Using Elastic Beanstalk with
Amazon Simple Storage Service (p. 451).
Clean Up
When you finish working with Elastic Beanstalk, you can terminate your environment. Elastic Beanstalk
terminates all AWS resources associated with your environment, such as Amazon EC2 instances (p. 167),
database instances (p. 186), load balancers (p. 176), security groups, and alarms (p. ).
To terminate your Elastic Beanstalk environment
1. Open the Elastic Beanstalk console.
2. Navigate to the management page (p. 65) for your environment.
3. Choose Actions, and then choose Terminate Environment.
4. In the Confirm Termination dialog box, type the environment name, and then choose Terminate.
In addition, you can terminate database resources that you created outside of your Elastic Beanstalk
environment. When you terminate an Amazon RDS database instance, you can take a snapshot and
restore the data to another instance later.
To terminate your RDS DB instance
1. Open the Amazon RDS console.
2. Choose Instances.
3. Choose your DB instance.
4. Choose Instance Actions, and then choose Delete.
5. Choose whether to create a snapshot, and then choose Delete.
To delete a DynamoDB table
1. Open the Tables page in the DynamoDB console.
2. Select a table.
3. Choose Actions, and then choose Delete table.
4. Choose Delete.
Next Steps
As you continue to develop your application, you'll probably want to manage environments and deploy
your application without manually creating a .zip file and uploading it to the Elastic Beanstalk console.
The Elastic Beanstalk Command Line Interface (p. 480) (EB CLI) provides easy-to-use commands for
creating, configuring, and deploying applications to Elastic Beanstalk environments from the command
line.
API Version 2010-12-01
846

AWS Elastic Beanstalk Developer Guide
Tutorial - HA Drupal
The sample application uses configuration files to configure PHP settings and create a table in the
database if it doesn't already exist. You can also use a configuration file to configure your instances'
security group settings during environment creation to avoid time-consuming configuration updates.
See Advanced Environment Customization with Configuration Files (.ebextensions) (p. 256) for more
information.
For development and testing, you might want to use Elastic Beanstalk's functionality for adding a
managed DB instance directly to your environment. For instructions on setting up a database inside your
environment, see Adding a Database to Your Elastic Beanstalk Environment (p. 186).
If you need a high-performance database, consider using Amazon Aurora. Amazon Aurora is a MySQL-
compatible database engine that offers commercial database features at low cost. To connect your
application to a different database, repeat the security group configuration (p. 838) steps and update
the RDS-related environment properties (p. 842).
If you plan on using your application in a production environment, configure a custom domain
name (p. 199) for your environment.
If you wish to enable HTTPS (p. 299) for secure connections there are WordPress plugins available to
assist. One example is the Really Simple SSL plugin.
Deploying a High-Availability Drupal Website
with an External Amazon RDS Database to Elastic
Beanstalk
This tutorial walks you through the process of launching an RDS DB instance (p. 439) external to AWS
Elastic Beanstalk, and configuring a high-availability environment running a Drupal website to connect
to it. Running a DB instance external to Elastic Beanstalk decouples the database from the lifecycle of
your environment, and lets you connect to the same database from multiple environments, swap out one
database for another, or perform a blue/green deployment without affecting your database.
Sections
•Launch a DB Instance in Amazon RDS (p. 847)
•Download Drupal (p. 850)
•Launch an Elastic Beanstalk Environment (p. 851)
•Configure Security Groups and Environment Properties (p. 851)
•Install Drupal (p. 853)
•Update the Environment (p. 854)
•Configure Autoscaling (p. 854)
•Review (p. 855)
•Clean Up (p. 855)
•Next Steps (p. 856)
Launch a DB Instance in Amazon RDS
To use an external database with an application running in Elastic Beanstalk, first launch a DB instance
with Amazon RDS. When you launch an instance with Amazon RDS, it is completely independent of
Elastic Beanstalk and your Elastic Beanstalk environments, and will not be terminated or monitored by
Elastic Beanstalk.
API Version 2010-12-01
847

AWS Elastic Beanstalk Developer Guide
Launch a DB Instance in Amazon RDS
Use the Amazon RDS console to launch a Multi-AZ MySQL DB instance. Choosing a Multi-AZ deployment
ensures that your database will failover and continue to be available if the master DB instance goes out
of service.
To launch an RDS DB instance in a default VPC
1. Open the RDS console.
2. Choose Instances in the navigation pane.
3. Choose Launch DB Instance.
4. Choose a DB Engine and preset configuration.
5. Under Specify DB Details, choose a DB Instance Class. For high availability, set Multi-AZ
Deployment to Yes.
6. Under Settings, enter values for DB Instance Identifier, Master Username, and Master Password
(and Confirm Password). Note the values that you entered for later.
7. Choose Next.
8. For Network and Security settings, choose the following:
•VPC – Default VPC
•Subnet Group – default
•Publicly Accessible – No
•Availability Zone – No Preference
•VPC Security Groups – Default VPC Security Group
9. For Database Name, type ebdb, and verify the default settings for the remaining options. Note the
values of the following options:
•Database Name
•Database Port
10. Choose Launch DB Instance.
Next, modify the security group attached to your DB instance to allow inbound traffic on the appropriate
port. This is the same security group that you will attach to your Elastic Beanstalk environment later, so
the rule that you add will grant ingress permission to other resources in the same security group.
To modify the ingress rules on your RDS instance's security group
1. Open the Amazon RDS console.
2. Choose Instances.
3. Choose the arrow next to the entry for your DB instance to expand the view.
4. Choose the Details tab.
5. In the Security and Network section, the security group associated with the DB instance is shown.
Open the link to view the security group in the Amazon EC2 console.
API Version 2010-12-01
848
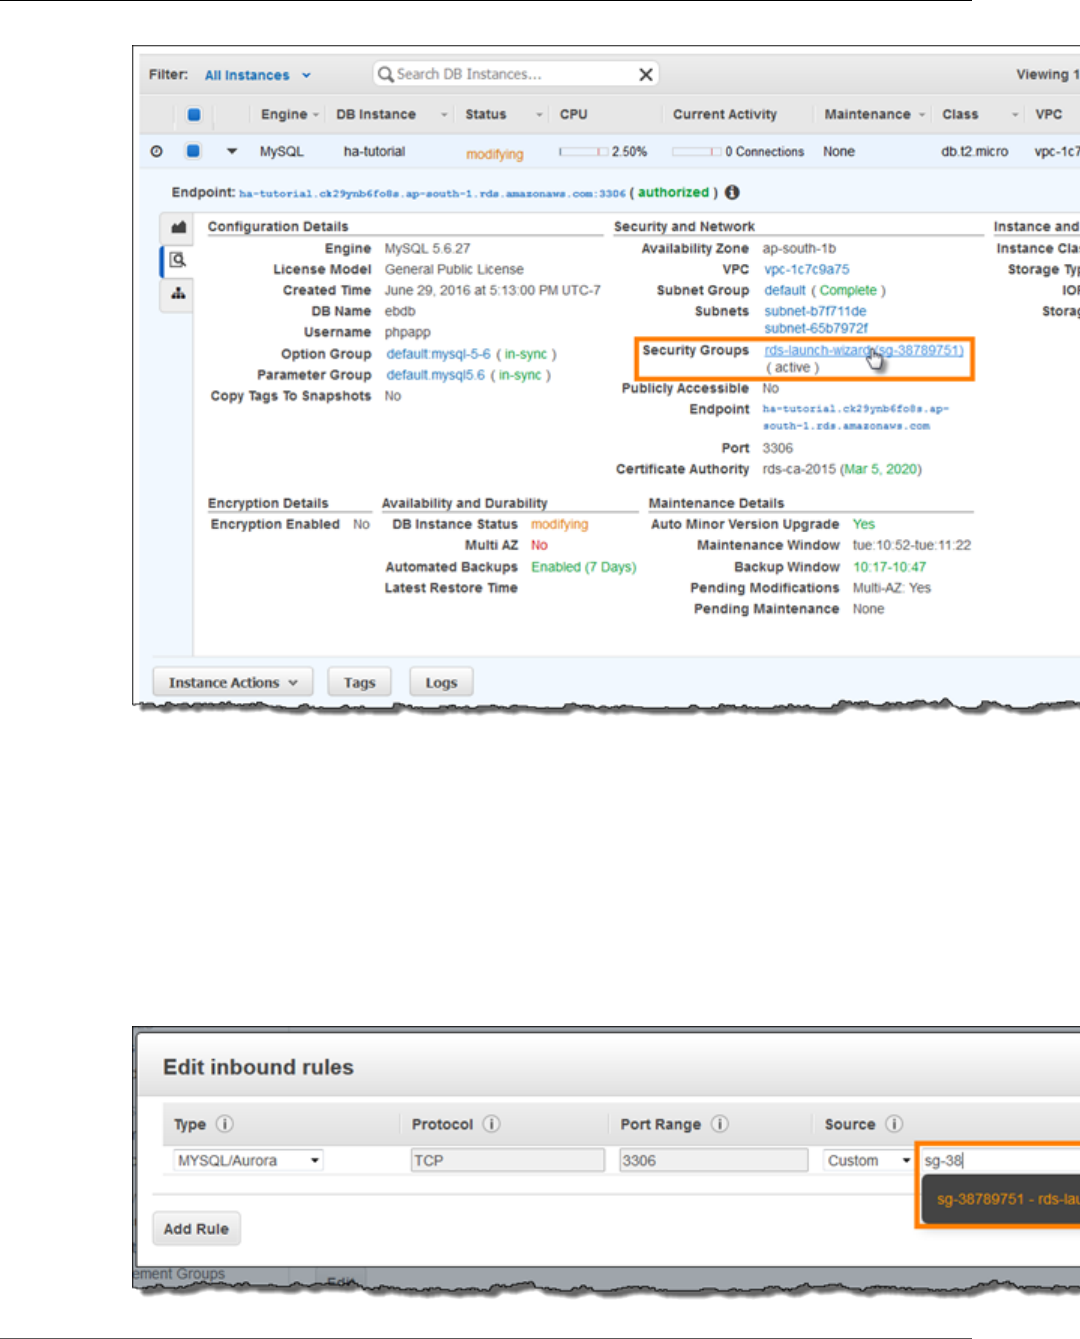
AWS Elastic Beanstalk Developer Guide
Launch a DB Instance in Amazon RDS
Note
While you have the Details tab open, note the Endpoint and security group name shown on
this page for use later.
The security group name is the first value of the link shown in Security Groups, before the
parentheses. The second value, in parentheses, is the security group ID.
6. In the security group details, choose the Inbound tab.
7. Choose Edit.
8. Choose Add Rule.
9. For Type, choose the DB engine that your application uses.
10. For Source, choose Custom, and then type the group ID of the security group. This allows resources
in the security group to receive traffic on the database port from other resources in the same group.
API Version 2010-12-01
849

AWS Elastic Beanstalk Developer Guide
Download Drupal
11. Choose Save.
Creating a DB instance takes about 10 minutes. In the meantime, download Drupal and launch your
Elastic Beanstalk environment.
Download Drupal
To prepare to deploy Drupal using AWS Elastic Beanstalk, you must copy the Drupal files to your
computer and provide some configuration information. AWS Elastic Beanstalk requires a source bundle,
in the format of a ZIP or WAR file.
To download Drupal and create a source bundle
1. Open https://www.drupal.org/download.
2. Download the latest release.
3. Extract the Drupal files from the download to a folder on your local computer, which you should
rename to drupal-beanstalk.
4. Download the configuration files in the following repository:
https://github.com/awslabs/eb-php-drupal/releases/download/v1.0/eb-php-drupal-v1.zip
5. Extract the configuration files into your drupal-beanstalk folder.
6. Verify that the structure of your drupal-beanstalk folder is correct.
### .ebextensions
### core
# ### assets
# ### config
# ### includes
# ### lib
# ### misc
# ### modules
# ### profiles
# ### scripts
# ### tests
# ### themes
### modules
### profiles
### sites
# ### default
### themes
### vendor
# ### asm89
# ### composer
# ### doctrine
# ### easyrdf
# ### egulias
# ### guzzlehttp
# ### ircmaxwell
# ### masterminds
# ### paragonie
# ### psr
# ### stack
# ### symfony
# ### symfony-cmf
# ### twig
# ### wikimedia
# ### zendframework
API Version 2010-12-01
850

AWS Elastic Beanstalk Developer Guide
Launch an Elastic Beanstalk Environment
7. Modify the configuration files in the .ebextensions folder with the IDs of your default VPC and
subnets, and your public IP address.
8. The .ebextensions/efs-create.config file creates an EFS file system and mount points in
each Availability Zone/subnet in your VPC. Identify your default VPC and subnet IDs in the Amazon
VPC console.
--OR--
The .ebextensions/dev.config file restricts access to your environment to your IP address to
protect it during the Drupal installation process. Replace the placeholder IP address near the top of
the file with your public IP address.
9. Create a ZIP file from the files and folders in the drupal-beanstalk folder (not the parent
directory), using one of the following methods, depending on your operating system:
10. Windows — In Windows Explorer, select the files and folders, right-click, and then choose Send to,
Compressed (zipped) Folder. Name the file drupal-x.y.z.zip, where x.y.z is the version of
Drupal.
--OR--
Mac OS X and Linux — Use the following command, where x.y.z is the version of Drupal:
zip -r ../drupal-x.y.z.zip .
Launch an Elastic Beanstalk Environment
Use the AWS Management Console to launch an Elastic Beanstalk environment.
1. Open the Elastic Beanstalk console with this preconfigured link: console.aws.amazon.com/
elasticbeanstalk/home#/newApplication?applicationName=drupal-
beanstalk&environmentType=LoadBalanced
2. For Platform, choose PHP.
3. For App code, choose Upload your code.
4. Choose Upload and navigate to the ZIP file you created for your Drupal files.
5. Choose Upload to select your application code.
6. Choose Configure more options.
7. For Configuration presets, select Custom configuration.
8. Choose Change platform configuration and select 64bit Amazon Linux 2016.09 v2.3.1 running
PHP 5.6 from the drop down menu and then choose Save.
9. Review all options and once you are satisfied with those options choose Create app.
Environment creation takes about 5 minutes.
Configure Security Groups and Environment
Properties
Next, add the DB instance's security group to your running environment. This procedure causes Elastic
Beanstalk to reprovision all instances in your environment with the additional security group attached.
To add a security group to your environment
1. Open the Elastic Beanstalk console.
API Version 2010-12-01
851

AWS Elastic Beanstalk Developer Guide
Configure Security Groups and Environment Properties
2. Navigate to the management page (p. 65) for your environment.
3. Choose Configuration.
4. In theInstancessection, choose the settings icon ( ).
5. For EC2 security groups, type a comma after the name of the autogenerated security group
followed by the name of the RDS DB instance's security group. It is the name you noted while
configuring the security group earlier.
6. Choose Apply.
7. Read the warning, and then choose Save.
Next, pass the connection information to your environment by using environment properties. The sample
application uses a default set of properties that match the ones that Elastic Beanstalk configures when
you provision a database within your environment.
To configure environment properties for an Amazon RDS DB instance
1. Open the Elastic Beanstalk console.
2. Navigate to the management page (p. 65) for your environment.
3. Choose Configuration.
4. In theSoftware Configurationsection, choose the settings icon ( ).
5. In the Environment Properties section, define the variables that your application reads to construct
a connection string. For compatibility with environments that have an integrated RDS DB instance,
use the following:
•RDS_HOSTNAME – The hostname of the DB instance.
Amazon RDS console label – Endpoint is the hostname.
•RDS_PORT – The port on which the DB instance accepts connections. The default value varies
between DB engines.
Amazon RDS console label – Port
•RDS_DB_NAME – The database name, ebdb.
Amazon RDS console label – DB Name
•RDS_USERNAME – The user name that you configured for your database.
Amazon RDS console label – Username
•RDS_PASSWORD – The password that you configured for your database.
Choose the plus symbol (+) to add additional properties.
API Version 2010-12-01
852

AWS Elastic Beanstalk Developer Guide
Install Drupal
6. Choose Apply.
Install Drupal
To complete your Drupal installation
1. Open the Elastic Beanstalk console.
2. Navigate to the management page (p. 65) for your environment.
3. Choose the environment URL to open your site in a browser. You are redirected to a Drupal
installation wizard because the site has not been configured yet.
4. Perform a standard installation with the following settings for the database:
•Database name – The DB Name shown in the Amazon RDS console.
•Database username and password – The Master Username and Master Password values you
entered when creating your database.
•Advanced Options > Host – The Endpoint of the DB instance shown in the Amazon RDS console.
Installation takes about a minute to complete.
API Version 2010-12-01
853

AWS Elastic Beanstalk Developer Guide
Update the Environment
Update the Environment
This tutorial includes a configuration file (loadbalancer-sg.config) that creates a security group and
assigns it to the environment's load balancer, using the IP address that you configured in dev.config to
restrict HTTP access over port 80 to connections from your network. This prevents an outside party from
potentially connecting to your site before you have completed your Drupal installation and configured
your admin account. To remove this restriction from your load balancer configuration and open the site
to the Internet you can use the following steps.
To remove the restriction and update your environment
1. On your local computer, delete the .ebextensions/loadbalancer-sg-config file from the
drupal-beanstalk folder.
2. Create a ZIP file from the files and folders in the drupal-beanstalk folder (not the parent
directory), using one of the following methods, depending on your operating system:
3. Windows — In Windows Explorer, select the files and folders, right-click, and then choose Send to,
Compressed (zipped) Folder. Name the file using the following format, where x.y.z is the version
of Drupal.
drupal-x.y.z-v2.zip
--OR--
Mac OS X and Linux — Use the following command, where x.y.z is the version of Drupal:
zip -r ../drupal-x.y.z-v2.zip .
4. Open the Elastic Beanstalk console.
5. Navigate to the management page (p. 65) for your environment.
6. Choose Upload and Deploy.
7. Choose Choose File and navigate to the ZIP file you created for your Drupal files.
8. Enter a Version label that distinguishes this updated version from your previous version.
9. Choose Deploy.
Configure Autoscaling
Finally, configure your environment's Auto Scaling group with a higher minimum instance count. Run at
least two instances at all times to prevent the web servers in your environment from being a single point
of failure, and to allow you to deploy changes without taking your site out of service.
To configure your environment's Auto Scaling group for high availability
1. Open the Elastic Beanstalk console.
2. Navigate to the management page (p. 65) for your environment.
3. Choose Configuration.
4. In theScalingsection, choose the settings icon ( ).
5. Under Auto Scaling, set Minimum instance count to 2 and the Maximum instance count to a value
greater than 2.
6. Choose Apply.
API Version 2010-12-01
854

AWS Elastic Beanstalk Developer Guide
Review
Review
Launching an environment creates the following resources:
•EC2 instance – An Amazon Elastic Compute Cloud (Amazon EC2) virtual machine configured to run
web apps on the platform that you choose.
Each platform runs a different set of software, configuration files, and scripts to support a specific
language version, framework, web container, or combination thereof. Most platforms use either
Apache or nginx as a reverse proxy that sits in front of your web app, forwards requests to it, serves
static assets, and generates access and error logs.
•Instance security group – An Amazon EC2 security group configured to allow ingress on port 80. This
resource lets HTTP traffic from the load balancer reach the EC2 instance running your web app. By
default, traffic is not allowed on other ports.
•Load balancer – An Elastic Load Balancing load balancer configured to distribute requests to the
instances running your application. A load balancer also eliminates the need to expose your instances
directly to the Internet.
•Load balancer security group – An Amazon EC2 security group configured to allow ingress on port
80. This resource lets HTTP traffic from the Internet reach the load balancer. By default, traffic is not
allowed on other ports.
•Auto Scaling group – An Auto Scaling group configured to replace an instance if it is terminated or
becomes unavailable.
•Amazon S3 bucket – A storage location for your source code, logs, and other artifacts that are created
when you use Elastic Beanstalk.
•Amazon CloudWatch alarms – Two CloudWatch alarms that monitor the load on the instances in your
environment and are triggered if the load is too high or too low. When an alarm is triggered, your Auto
Scaling group scales up or down in response.
•AWS CloudFormation stack – Elastic Beanstalk uses AWS CloudFormation to launch the resources in
your environment and propagate configuration changes. The resources are defined in a template that
you can view in the AWS CloudFormation console.
•Domain name – A domain name that routes to your web app in the form
subdomain.region.elasticbeanstalk.com.
All of these resources are managed by Elastic Beanstalk. When you terminate your environment, Elastic
Beanstalk terminates all of resources that it contains. The RDS DB instance that you launched is outside
of your environment, so you are responsible for managing its lifecycle.
Note
The S3 bucket that Elastic Beanstalk creates is shared between environments and is not deleted
during environment termination. For more information, see Using Elastic Beanstalk with
Amazon Simple Storage Service (p. 451).
Clean Up
When you finish working with Elastic Beanstalk, you can terminate your environment. Elastic Beanstalk
terminates all AWS resources associated with your environment, such as Amazon EC2 instances (p. 167),
database instances (p. 186), load balancers (p. 176), security groups, and alarms (p. ).
To terminate your Elastic Beanstalk environment
1. Open the Elastic Beanstalk console.
2. Navigate to the management page (p. 65) for your environment.
3. Choose Actions, and then choose Terminate Environment.
4. In the Confirm Termination dialog box, type the environment name, and then choose Terminate.
API Version 2010-12-01
855

AWS Elastic Beanstalk Developer Guide
Next Steps
In addition, you can terminate database resources that you created outside of your Elastic Beanstalk
environment. When you terminate an Amazon RDS database instance, you can take a snapshot and
restore the data to another instance later.
To terminate your RDS DB instance
1. Open the Amazon RDS console.
2. Choose Instances.
3. Choose your DB instance.
4. Choose Instance Actions, and then choose Delete.
5. Choose whether to create a snapshot, and then choose Delete.
To delete a DynamoDB table
1. Open the Tables page in the DynamoDB console.
2. Select a table.
3. Choose Actions, and then choose Delete table.
4. Choose Delete.
Next Steps
As you continue to develop your application, you'll probably want to manage environments and deploy
your application without manually creating a .zip file and uploading it to the Elastic Beanstalk console.
The Elastic Beanstalk Command Line Interface (p. 480) (EB CLI) provides easy-to-use commands for
creating, configuring, and deploying applications to Elastic Beanstalk environments from the command
line.
The sample application uses configuration files to configure PHP settings and create a table in the
database if it doesn't already exist. You can also use a configuration file to configure your instances'
security group settings during environment creation to avoid time-consuming configuration updates.
See Advanced Environment Customization with Configuration Files (.ebextensions) (p. 256) for more
information.
For development and testing, you might want to use Elastic Beanstalk's functionality for adding a
managed DB instance directly to your environment. For instructions on setting up a database inside your
environment, see Adding a Database to Your Elastic Beanstalk Environment (p. 186).
If you need a high-performance database, consider using Amazon Aurora. Amazon Aurora is a MySQL-
compatible database engine that offers commercial database features at low cost. To connect your
application to a different database, repeat the security group configuration (p. 847) steps and update
the RDS-related environment properties (p. 851).
Finally, if you plan on using your application in a production environment, configure a custom domain
name (p. 199) for your environment and enable HTTPS (p. 299) for secure connections.
Adding an Amazon RDS DB Instance to Your PHP
Application Environment
You can use an Amazon Relational Database Service (Amazon RDS) DB instance to store data gathered
and modified by your application. The database can be attached to your environment and managed by
Elastic Beanstalk, or created and managed externally.
API Version 2010-12-01
856
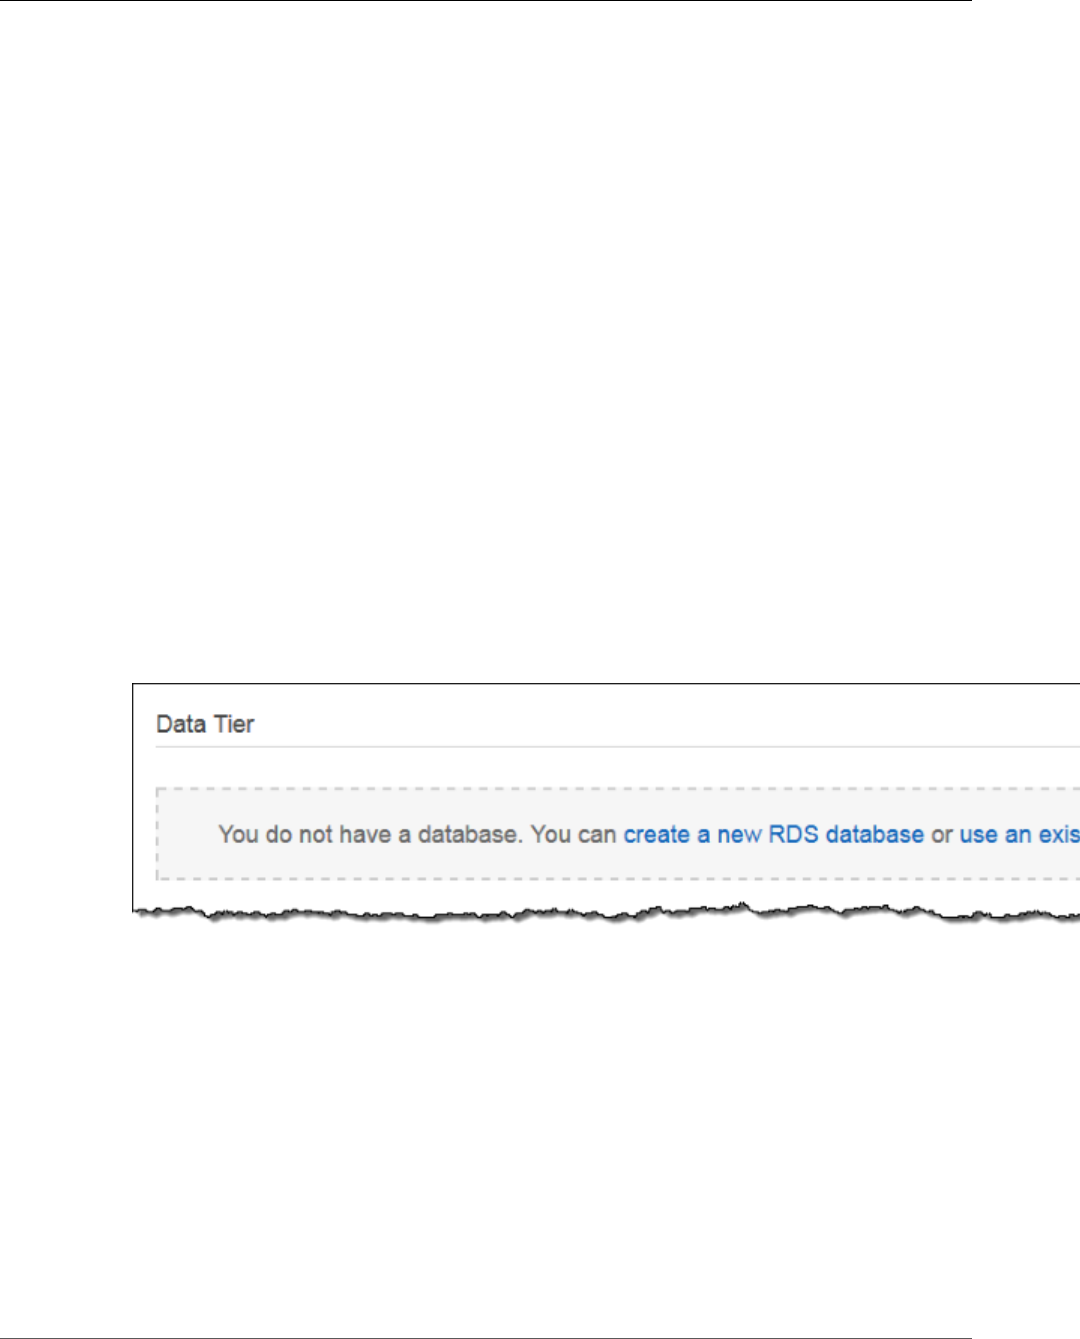
AWS Elastic Beanstalk Developer Guide
Adding a DB Instance to Your Environment
If you are using Amazon RDS for the first time, add a DB instance (p. 857) to a test environment with
the Elastic Beanstalk console and verify that your application can connect to it.
To connect to a database, add the driver (p. 858) to your application, load the driver class in your code,
and create a connection object (p. 858) with the environment properties provided by Elastic Beanstalk.
The configuration and connection code vary depending on the database engine and framework that you
use.
For production environments, create a DB instance outside of your Elastic Beanstalk environment to
decouple your environment resources from your database resources. Using an external DB instance lets
you connect to the same database from multiple environments and perform blue-green deployments.
For instructions, see Using Elastic Beanstalk with Amazon Relational Database Service (p. 439).
Sections
•Adding a DB Instance to Your Environment (p. 857)
•Downloading a Driver (p. 858)
•Connecting to a Database with a PDO or MySQLi (p. 858)
Adding a DB Instance to Your Environment
To add a DB instance to your environment
1. Open the Elastic Beanstalk console.
2. Navigate to the management page (p. 65) for your environment.
3. Choose Configuration.
4. Under Data Tier, choose Create a new RDS database.
5. Choose a DB engine, enter a user name and password, and then choose Apply.
Adding a DB instance takes about 10 minutes. When the environment update is complete, the DB
instance's hostname and other connection information are available to your application through the
following environment properties:
•RDS_HOSTNAME – The hostname of the DB instance.
Amazon RDS console label – Endpoint is the hostname.
•RDS_PORT – The port on which the DB instance accepts connections. The default value varies between
DB engines.
Amazon RDS console label – Port
•RDS_DB_NAME – The database name, ebdb.
Amazon RDS console label – DB Name
API Version 2010-12-01
857

AWS Elastic Beanstalk Developer Guide
Downloading a Driver
•RDS_USERNAME – The user name that you configured for your database.
Amazon RDS console label – Username
•RDS_PASSWORD – The password that you configured for your database.
For more information about configuring an internal DB instance, see Adding a Database to Your Elastic
Beanstalk Environment (p. 186).
Downloading a Driver
To use PHP Data Objects (PDO) to connect to the database, install the driver that matches the database
engine that you chose.
•MySQL – PDO_MYSQL
•PostgreSQL – PDO_PGSQL
•Oracle – PDO_OCI
•SQL Server – PDO_SQLSRV
For more information, see php.net/manual/en/pdo.installation.php.
Connecting to a Database with a PDO or MySQLi
You can use $_SERVER[`VARIABLE`] to read connection information from the environment.
For a PDO, create a Data Source Name (DSN) from the host, port, and name. Pass the DSN to the
constructor for the PDO with the database user name and password.
Example Connect to an RDS database with PDO - MySQL
<?php
$dbhost = $_SERVER['RDS_HOSTNAME'];
$dbport = $_SERVER['RDS_PORT'];
$dbname = $_SERVER['RDS_DB_NAME'];
$charset = 'utf8' ;
$dsn = "mysql:host={$dbhost};port={$dbport};dbname={$dbname};charset={$charset}";
$username = $_SERVER['RDS_USERNAME'];
$password = $_SERVER['RDS_PASSWORD'];
$pdo = new PDO($dsn, $username, $password);
?>
For other drivers, replace mysql with the name of your driver – pgsql, oci, or sqlsrv.
For MySQLi, pass the hostname, user name, password, database name, and port to the mysql_connect
function.
Example Connect to an RDS database with mysqli_connect()
$link = mysqli_connect($_SERVER['RDS_HOSTNAME'], $_SERVER['RDS_USERNAME'],
$_SERVER['RDS_PASSWORD'], $_SERVER['RDS_DB_NAME'], $_SERVER['RDS_PORT']);
API Version 2010-12-01
858

AWS Elastic Beanstalk Developer Guide
Resources
Resources
With the AWS SDK for PHP, you can get started in minutes with a single, downloadable package
complete with the AWS PHP library, code samples, and documentation. You can build PHP applications
on top of APIs that take the complexity out of coding directly against web services interfaces. The all-in-
one library provides PHP developer-friendly APIs that hide much of the lower-level tasks associated with
programming for the AWS cloud, including authentication, request retries, and error handling. Practical
examples are provided in PHP for how to use the libraries to build applications. Online video tutorials
and reference documentation are provided to help you learn how to use the libraries and code samples.
For more information about the AWS SDK for PHP, go to http://aws.amazon.com/sdkforphp/.
There are several places you can go to get additional help when developing your PHP applications:
Resource Description
GitHub Install the AWS SDK for PHP using GitHub.
PHP Development Forum Post your questions and get feedback.
PHP Developer Center One-stop shop for sample code, documentation, tools, and
additional resources.
AWS SDK for PHP FAQs Get answers to commonly asked questions.
API Version 2010-12-01
859

AWS Elastic Beanstalk Developer Guide
Development Environment
Working with Python
This section provides tutorials and information about deploying Python applications using AWS Elastic
Beanstalk.
The topics in this chapter assume some knowledge of Elastic Beanstalk environments. If you haven't used
Elastic Beanstalk before, try the getting started tutorial (p. 3) to learn the basics.
Topics
•Setting Up Your Python Development Environment (p. 860)
•Using the AWS Elastic Beanstalk Python Platform (p. 862)
•Deploying a Flask Application to AWS Elastic Beanstalk (p. 865)
•Deploying a Django Application to Elastic Beanstalk (p. 870)
•Adding an Amazon RDS DB Instance to Your Python Application Environment (p. 881)
•Python Tools and Resources (p. 883)
Setting Up Your Python Development
Environment
AWS Elastic Beanstalk provides a consistent interface for deploying Python applications, so there are
common procedures to follow regardless of the application framework you're using, or whether you're
using one at all.
Sections
•Common Prerequisites (p. 860)
•Setting up a virtual Python environment (p. 861)
•Configuring a Python project for Elastic Beanstalk (p. 861)
Common Prerequisites
For all Python applications that you'll deploy with Elastic Beanstalk, these prerequisites are common:
1. Python 2.7 or 3.4
2. The pip utility, matching your Python version. This is used to install and list dependencies for your
project, so that Elastic Beanstalk knows how to set up your application's environment.
3. The virtualenv package. This is used to create an environment used to develop and test your
application, so that the environment can be replicated by Elastic Beanstalk without installing extra
packages that aren't needed by your application.
4. The awsebcli package. This is used to initialize your application with the files necessary for
deploying with Elastic Beanstalk.
5. A working ssh installation. This is used to connect with your running instances when you need to
examine or debug a deployment.
For instructions on installing Python, pip, and the EB CLI, see Install the Elastic Beanstalk Command Line
Interface (EB CLI) (p. 481).
API Version 2010-12-01
860

AWS Elastic Beanstalk Developer Guide
Setting up a virtual Python environment
Setting up a virtual Python environment
Once you have the prerequisites installed, set up a virtual environment with virtualenv to install your
application's dependencies. By using a virtual environment, you can discern exactly which packages are
needed by your application so that the required packages are installed on the EC2 instances that are
running your application.
To set up a virtual environment
1. Open a command-line window and type:
virtualenv -p python2.7 /tmp/eb_python_app
Replace eb_python_app with a name that makes sense for your application (using your application's
name or directory name is a good idea). The virtualenv command creates a virtual environment
for you and prints the results of its actions:
Running virtualenv with interpreter /usr/bin/python2.7
New python executable in /tmp/eb_python_app/bin/python2.7
Also creating executable in /tmp/eb_python_app/bin/python
Installing setuptools, pip...done.
2. Once your virtual environment is ready, start it by running the activate script located in the
environment's bin directory. For example, to start the eb_python_app environment created in the
previous step, you would type:
. /tmp/eb_python_app/bin/activate
The virtual environment prints its name (for example: (eb_python_app)) at the beginning of each
command prompt, reminding you that you're in a virtual Python environment.
Note
Once created, you can restart the virtual environment at any time by running its activate
script again.
Configuring a Python project for Elastic Beanstalk
You can use the Elastic Beanstalk CLI to prepare your Python applications for deployment with Elastic
Beanstalk.
To configure a Python application for deployment with Elastic Beanstalk
1. From within your virtual environment (p. 861), return to the top of your project's directory tree
(python_eb_app), and type:
pip freeze >requirements.txt
This command copies the names and versions of the packages that are installed in your virtual
environment to requirements.txt, For example, if the PyYAML package, version 3.11 is installed in
your virtual environment, the file will contain the line:
PyYAML==3.11
API Version 2010-12-01
861

AWS Elastic Beanstalk Developer Guide
The Python Platform
This allows Elastic Beanstalk to replicate your application's Python environment using the same
packages and same versions that you used to develop and test your application.
2. Configure the EB CLI repository with the eb init command. Follow the prompts to choose a
region, platform and other options. For detailed instructions, see Managing Elastic Beanstalk
Environments with the EB CLI (p. 492).
By default, Elastic Beanstalk looks for a file called application.py to start your application. If
this doesn't exist in the Python project that you've created, some adjustment of your application's
environment is necessary. You will also need to set environment variables so that your application's
modules can be loaded. See Using the AWS Elastic Beanstalk Python Platform (p. 862) for more
information.
Using the AWS Elastic Beanstalk Python Platform
The AWS Elastic Beanstalk Python platform is a set of environment configurations (p. 34) for Python web
applications that can run behind an Apache proxy server with WSGI. Each configuration corresponds to a
version of Python, including Python 2.6, Python 2.7, and Python 3.4.
Elastic Beanstalk provides configuration options (p. 202) that you can use to customize the software
that runs on the EC2 instances in your Elastic Beanstalk environment. You can configure environment
variables needed by your application, enable log rotation to Amazon S3, and map folders in your
application source that contain static files to paths served by the proxy server.
Platform-specific configuration options are available in the AWS Management Console for modifying the
configuration of a running environment (p. 213). To avoid losing your environment's configuration when
you terminate it, you can use saved configurations (p. 293) to save your settings and later apply them to
another environment.
To save settings in your source code, you can include configuration files (p. 256). Settings in
configuration files are applied every time you create an environment or deploy your application. You can
also use configuration files to install packages, run scripts, and perform other instance customization
operations during deployments.
For Python packages available from pip, you can also include a requirements file (p. 864) named
requirements.txt in the root of your application source code. Elastic Beanstalk installs any packages
specified in a requirements file during deployment.
Settings applied in the AWS Management Console override the same settings in configuration files, if
they exist. This lets you have default settings in configuration files, and override them with environment
specific settings in the console. For more information about precedence, and other methods of changing
settings, see Configuration Options (p. 202).
Configuring Your Python Environment
You can use the AWS Management Console to enable log rotation to Amazon S3, configure variables that
your application can read from the environment, and map folders in your application source that contain
static files to paths served by the proxy server.
To configure your Python environment in the Elastic Beanstalk console
1. Open the Elastic Beanstalk console.
2. Navigate to the management page (p. 65) for your environment.
3. Choose Configuration.
API Version 2010-12-01
862

AWS Elastic Beanstalk Developer Guide
Python Configuration Namespaces
4. In theSoftware Configurationsection, choose the settings icon ( ).
Log Options
The Log Options section has two settings:
•Instance profile– Specifies the instance profile that has permission to access the Amazon S3 bucket
associated with your application.
•Enable log file rotation to Amazon S3 – Specifies whether log files for your application's Amazon EC2
instances should be copied to your Amazon S3 bucket associated with your application.
Static Files
The Static Files section lets you configure the proxy server to serve static assets directly to the user
without hitting your Python application.
By default, the proxy server serves any files in a folder named static at the /static path. For
example, if your application source contains a file named logo.png in a folder named static, the
proxy server will serve it to users at subdomain.elasticbeanstalk.com/static/logo.png.
You can configure additional mappings by adding entries and choosing Apply. Each entry takes a key and
value that map a path in your application to a directory in your source code.
Environment Properties
You can use environment properties to provide information to your application and configure
environment variables. For example, you can create an environment property named
CONNECTION_STRING that specifies a connection string that your application can use to connect to a
database.
Inside the Python environment running in Elastic Beanstalk, these values are accessible using Python's
os.environ dictionary. For more information, go to http://docs.python.org/library/os.html.
You can use code that looks similar to the following to access the keys and parameters:
import os
endpoint = os.environ['API_ENDPOINT']
Environment properties can also provide information to a framework. For example, you can create a
property named DJANGO_SETTINGS_MODULE to configure Django to use a specific settings module.
Depending on the environment, the value could be development.settings, production.settings,
etc.
See Environment Properties and Other Software Settings (p. 189) for more information.
Python Configuration Namespaces
You can use a configuration file (p. 256) to set configuration options and perform other instance
configuration tasks during deployments. Configuration options can be defined by the Elastic Beanstalk
service or the platform that you use and are organized into namespaces.
The Python platform defines options in the
aws:elasticbeanstalk:container:python:staticfiles and
API Version 2010-12-01
863

AWS Elastic Beanstalk Developer Guide
Requirements File
aws:elasticbeanstalk:container:python namespaces. The following example
configuration file specifies configuration option settings to create an environment
property named DJANGO_SETTINGS_MODULE, a static files option that maps a
directory named staticimages to the path /images, and additional settings in the
aws:elasticbeanstalk:container:python (p. 253) namespace. This namespace contains
options that let you specify the location of the WSGI script in your source code, and the number of
threads and processes to run in WSGI.
option_settings:
aws:elasticbeanstalk:application:environment:
DJANGO_SETTINGS_MODULE: production.settings
aws:elasticbeanstalk:container:python:staticfiles:
"/images/": "staticimages/"
aws:elasticbeanstalk:container:python:
WSGIPath: ebdjango/wsgi.py
NumProcesses: 3
NumThreads: 20
Configuration files also support several keys to further modify the software on your environment's
instances (p. 258). This example uses the packages (p. 259) key to install Memcached with yum and
container commands (p. 265) to run commands that configure the server during deployment:
packages:
yum:
libmemcached-devel: '0.31'
container_commands:
collectstatic:
command: "django-admin.py collectstatic --noinput"
01syncdb:
command: "django-admin.py syncdb --noinput"
leader_only: true
02migrate:
command: "django-admin.py migrate"
leader_only: true
03wsgipass:
command: 'echo "WSGIPassAuthorization On" >> ../wsgi.conf'
99customize:
command: "scripts/customize.sh"
Elastic Beanstalk provides many configuration options for customizing your environment. In addition to
configuration files, you can also set configuration options using the console, saved configurations, the EB
CLI, or the AWS CLI. See Configuration Options (p. 202) for more information.
Requirements File
Create a requirements.txt file and place it in the top-level directory of your source bundle. A typical
Python application will have dependencies on other third-party Python packages. In Python, pip is
the standard way of installing packages. Pip has a feature that allows you to specify all the packages
you need (as well as their versions) in a single requirements file. For more information about the
requirements file, go to Requirements File Format. The following is an example requirements.txt file for
Django.
Django==1.11.3
MySQL-python==1.2.5
In your development environment, you can use the pip freeze command to generate your
requirements file.
API Version 2010-12-01
864

AWS Elastic Beanstalk Developer Guide
Tutorial - Flask 0.10
~/my-app$ pip freeze > requirements.txt
To ensure that your requirements file only contains packages that are actually used by your application,
use a virtual environment (p. 861) that only has those packages installed. Outside of a virtual
environment, the output of pip freeze will include all pip packages installed on your development
machine, including those that came with your operating system.
Deploying a Flask Application to AWS Elastic
Beanstalk
This tutorial walks through the deployment of a simple Flask website to an Elastic Beanstalk
environment running Python 2.7 or newer. The tutorial uses the EB CLI as a deployment mechanism, but
you can also use the AWS Management Console to deploy a ZIP file containing your project's contents.
The EB CLI is an interactive command line interface written in Python that uses the Python SDK for AWS
(boto).
Sections
•Prerequisites (p. 865)
•Set Up a Python Virtual Environment with Flask (p. 865)
•Create a Flask Application (p. 866)
•Configure Your Flask Application for Elastic Beanstalk (p. 868)
•Deploy Your Site With the EB CLI (p. 868)
•Clean Up and Next Steps (p. 870)
Prerequisites
To use any Amazon Web Service (AWS), including Elastic Beanstalk, you need to have an AWS account
and credentials. To learn more and to sign up, visit https://aws.amazon.com/.
To follow this tutorial, you should have all of the Common Prerequisites (p. 860) for Python installed,
including the following packages:
• Python 2.7 or newer
• pip
• virtualenv
• awsebcli
The Flask framework will be installed as part of the tutorial.
Note
Creating environments with the EB CLI requires a service role (p. 21). You can create a service
role by creating an environment in the Elastic Beanstalk console. If you don't have a service role,
the EB CLI attempts to create one when you run eb create.
Set Up a Python Virtual Environment with Flask
Create a virtual environment with virtualenv and use it to install Flask and its dependencies. By using
a virtual environment, you can discern exactly which packages are needed by your application so that the
required packages are installed on the EC2 instances that are running your application.
API Version 2010-12-01
865

AWS Elastic Beanstalk Developer Guide
Create a Flask Application
To set up your virtual environment
1. Create a virtual environment named eb-virt:
~$ virtualenv ~/eb-virt
2. Activate the virtual environment:
~$ source ~/eb-virt/bin/activate
(eb-virt) ~$
You will see (eb-virt) prepended to your command prompt, indicating that you're in a virtual
environment.
3. Use pip to install Flask by typing:
(eb-virt)~$ pip install flask==0.10.1
4. To verify that Flask has been installed, type:
(eb-virt)~$ pip freeze
Flask==0.10.1
itsdangerous==0.24
Jinja2==2.7.3
MarkupSafe==0.23
Werkzeug==0.10.1
This command lists all of the packages installed in your virtual environment. Later you will use the
output of this command to configure your project for use with Elastic Beanstalk.
Create a Flask Application
Next, create an application that you'll deploy using Elastic Beanstalk. We'll create a "Hello World" RESTful
web service.
To create the Hello World Flask application
1. Activate your virtual environment:
~$ source ~/eb-virt/bin/activate
2. Create a directory for your project named eb-flask:
(eb-virt) ~$ mkdir eb-flask
(eb-virt) ~$ cd eb-flask
3. Create a new text file in this directory named application.py with the following contents:
Example ~/eb-flask/application.py
from flask import Flask
# print a nice greeting.
def say_hello(username = "World"):
API Version 2010-12-01
866

AWS Elastic Beanstalk Developer Guide
Create a Flask Application
return '<p>Hello %s!</p>\n' % username
# some bits of text for the page.
header_text = '''
<html>\n<head> <title>EB Flask Test</title> </head>\n<body>'''
instructions = '''
<p><em>Hint</em>: This is a RESTful web service! Append a username
to the URL (for example: <code>/Thelonious</code>) to say hello to
someone specific.</p>\n'''
home_link = '<p><a href="/">Back</a></p>\n'
footer_text = '</body>\n</html>'
# EB looks for an 'application' callable by default.
application = Flask(__name__)
# add a rule for the index page.
application.add_url_rule('/', 'index', (lambda: header_text +
say_hello() + instructions + footer_text))
# add a rule when the page is accessed with a name appended to the site
# URL.
application.add_url_rule('/<username>', 'hello', (lambda username:
header_text + say_hello(username) + home_link + footer_text))
# run the app.
if __name__ == "__main__":
# Setting debug to True enables debug output. This line should be
# removed before deploying a production app.
application.debug = True
application.run()
This example prints a customized greeting that varies based on the path used to access the service.
Note
By adding application.debug = True before running the application, debug output
is enabled in case something goes wrong. It's a good practice for development, but you
should remove debug statements in production code, since debug output can reveal
internal aspects of your application.
Using application.py as the filename and providing a callable application object (the Flask
object, in this case) allows Elastic Beanstalk to easily find your application's code.
4. Run application.py with Python:
(eb-virt) ~/eb-flask$ python application.py
Flask will start a web server and display the URL to access your application with. For example:
* Running on http://127.0.0.1:5000/ (Press CTRL+C to quit)
* Restarting with stat
5. Open the URL in your web browser. You should see the application running, showing the index page:
API Version 2010-12-01
867
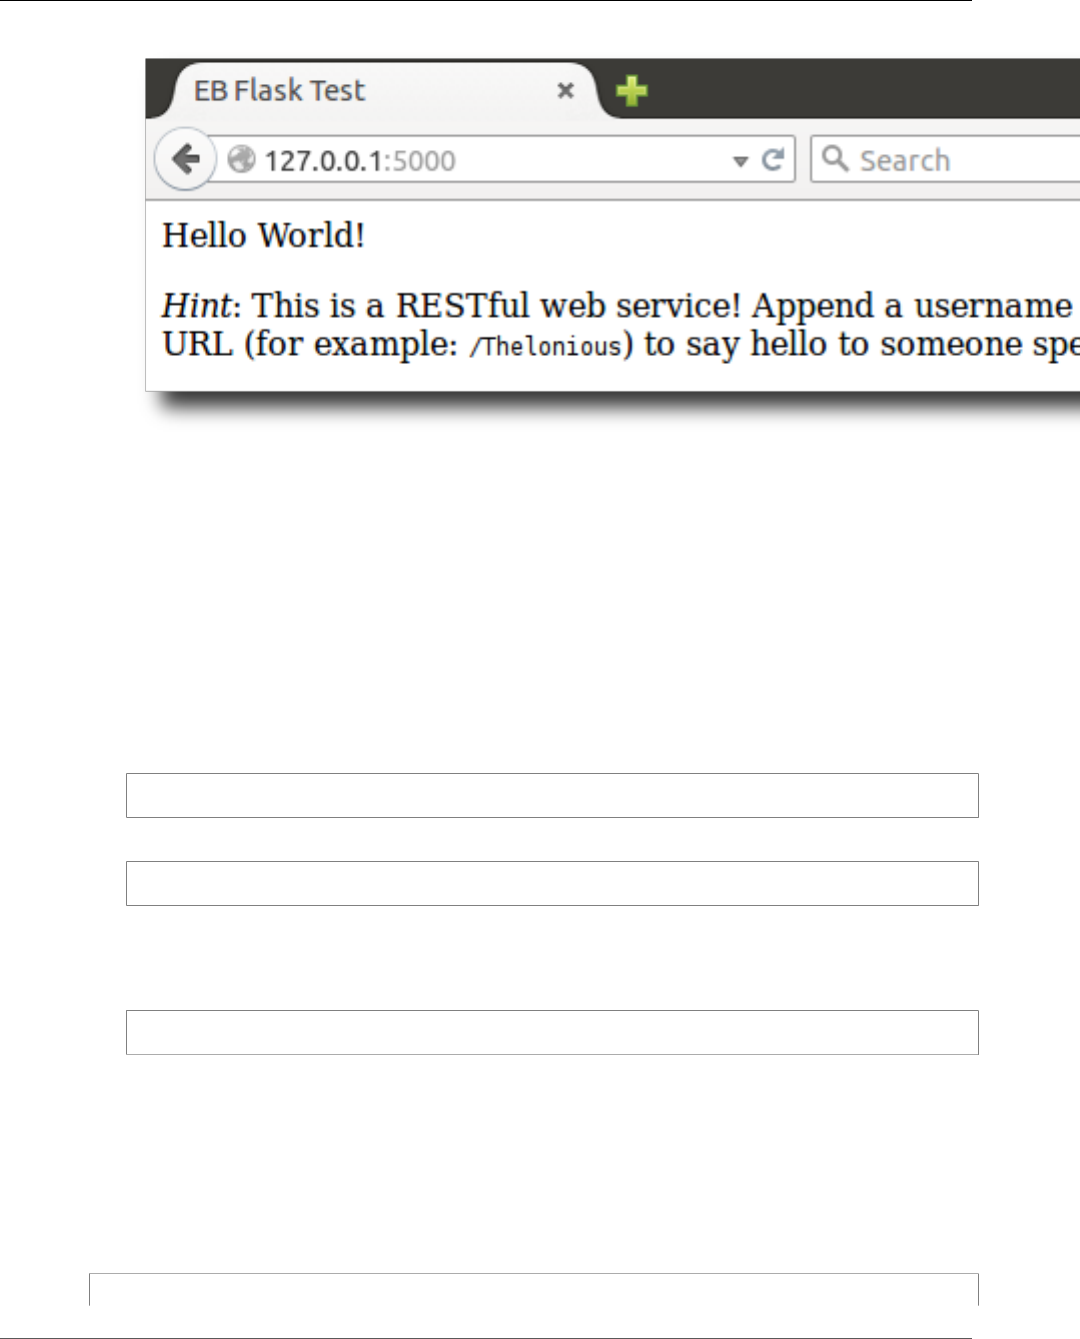
AWS Elastic Beanstalk Developer Guide
Configure Your Flask Application for Elastic Beanstalk
6. Check the server log to see the output from your request. You can stop the web server and return to
your virtual environment by typing Ctrl-C.
If you got debug output instead, fix the errors and make sure the application is running locally before
configuring it for Elastic Beanstalk.
Configure Your Flask Application for Elastic Beanstalk
With your application running locally, you're now ready to configure it to deploy with Elastic Beanstalk.
To configure your site for Elastic Beanstalk
1. Activate your virtual environment:
~$ source ~/eb-virt/bin/activate
2. Run pip freeze and save the output to a file named requirements.txt:
(eb-virt) ~/eb-flask$ pip freeze > requirements.txt
Elastic Beanstalk uses to requirements.txt to determine which package to install on the EC2
instances that run your application.
3. Deactivate your virtual environment by with the deactivate command:
(eb-virt) ~/eb-flask$ deactivate
Reactivate your virtual environment whenever you need to add additional packages to your
application or run your application locally.
Deploy Your Site With the EB CLI
You've added everything you need to deploy your application on Elastic Beanstalk. Your project directory
should now look like this:
~/eb-flask/
API Version 2010-12-01
868

AWS Elastic Beanstalk Developer Guide
Deploy Your Site With the EB CLI
|-- application.py
`-- requirements.txt
Next, you'll create your application environment and deploy your configured application with Elastic
Beanstalk.
To create an environment and deploy your Flask application
1. Initialize your EB CLI repository with the eb init command:
~/eb-flask$ eb init -p python2.7 flask-tutorial
Application flask-tutorial has been created.
This command creates a new application named flask-tutorial and configures your local
repository to create environments with the latest Python 2.7 platform configuration.
2. (optional) Run eb init again to configure a default keypair so that you can connect to the EC2
instance running your application with SSH:
~/eb-flask$ eb init
Do you want to set up SSH for your instances?
(y/n): y
Select a keypair.
1) my-keypair
2) [ Create new KeyPair ]
Select a key pair if you have one already, or follow the prompts to create a new one. If you don't see
the prompt or need to change your settings later, run eb init -i.
3. Create an environment and deploy your application to it with eb create:
~/eb-flask$ eb create flask-env
Note
If you see a "service role required" error message, run eb create interactively (without
specifying an environment name) and EB CLI creates the role for you.
This command creates a load balanced Elastic Beanstalk environment named flask-env. Creating
an environment takes about 5 minutes. As Elastic Beanstalk creates the resources necessary to run
your application, it outputs informational messages that the EB CLI relays to your terminal.
4. When the environment creation process completes, open your web site with eb open:
~/eb-flask$ eb open
This will open a browser window using the domain name created for your application. You should
see the same Flask website that you created and tested locally.
API Version 2010-12-01
869
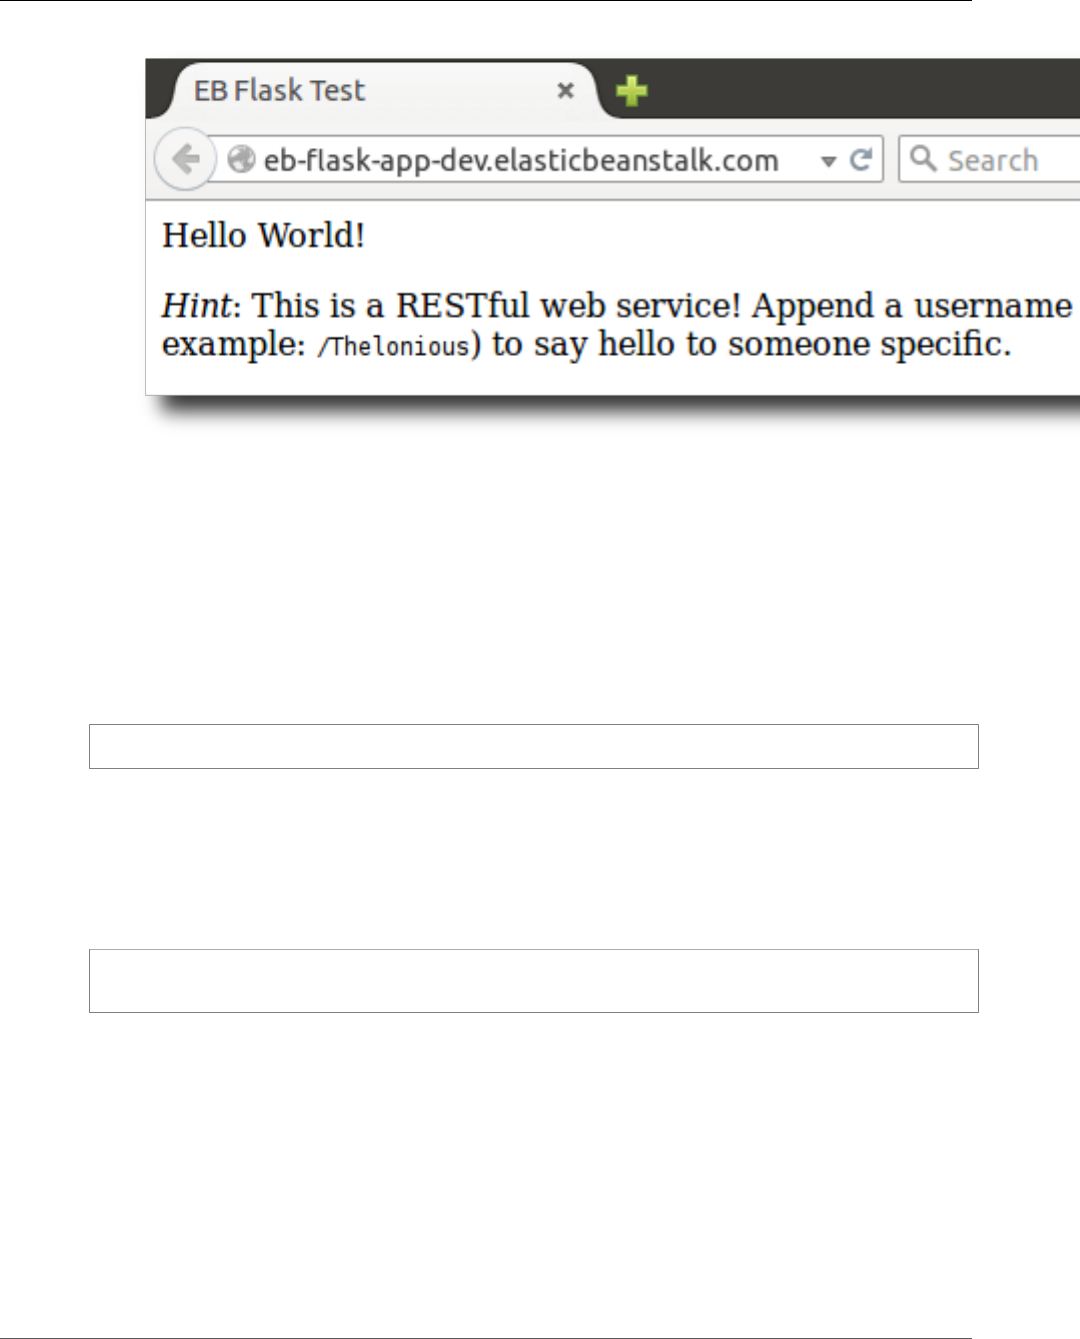
AWS Elastic Beanstalk Developer Guide
Clean Up and Next Steps
If you don't see your application running, or get an error message, see Troubleshooting
Deployments (p. 904) for help with how to determine the cause of the error.
If you do see your application running, then congratulations, you've deployed your first Flask application
with Elastic Beanstalk!
Clean Up and Next Steps
To save instance hours and other AWS resources between development sessions, terminate your Elastic
Beanstalk environment with eb terminate:
~/eb-flask$ eb terminate flask-env
This command terminates the environment and all of the AWS resources that run within it. It does
not delete the application, however, so you can always create more environments with the same
configuration by running eb create again. For more information on EB CLI commands, see Managing
Elastic Beanstalk Environments with the EB CLI (p. 492).
If you are done with the sample application, you can also remove the project folder and virtual
environment:
~$ rm -rf ~/eb-virt
~$ rm -rf ~/eb-flask
For more information about Flask, including an in-depth tutorial, visit the official documentation.
If you'd like to try out another Python web framework, check out Deploying a Django Application to
Elastic Beanstalk (p. 870).
Deploying a Django Application to Elastic
Beanstalk
This tutorial walks through the deployment of a default Django website to an Elastic Beanstalk
environment running Python 2.7. The tutorial uses the EB CLI as a deployment mechanism, but you can
API Version 2010-12-01
870

AWS Elastic Beanstalk Developer Guide
Prerequisites
also use the AWS Management Console to deploy a ZIP file containing your project's contents. The EB CLI
is an interactive command line interface written in Python that uses the Python SDK for AWS (boto).
Sections
•Prerequisites (p. 871)
•Set Up a Python Virtual Environment with Django (p. 871)
•Create a Django Project (p. 872)
•Configure Your Django Application for Elastic Beanstalk (p. 874)
•Deploy Your Site With the EB CLI (p. 875)
•Updating Your Application (p. 877)
•Clean Up and Next Steps (p. 880)
Prerequisites
To use any Amazon Web Service (AWS), including Elastic Beanstalk, you need to have an AWS account
and credentials. To learn more and to sign up, visit https://aws.amazon.com/.
To follow this tutorial, you should have all of the Common Prerequisites (p. 860) for Python installed,
including the following packages:
• Python 2.7
• pip
• virtualenv
• awsebcli
The Django framework will be installed as part of the tutorial.
Note
Creating environments with the EB CLI requires a service role (p. 21). You can create a service
role by creating an environment in the Elastic Beanstalk console. If you don't have a service role,
the EB CLI attempts to create one when you run eb create.
Set Up a Python Virtual Environment with Django
Create a virtual environment with virtualenv and use it to install Django and its dependencies. By
using a virtual environment, you can discern exactly which packages are needed by your application so
that the required packages are installed on the EC2 instances that are running your application.
To set up your virtual environment
1. Create a virtual environment named eb-virt.
On Unix-based systems, such as Linux or OS X, enter the following command:
~$ virtualenv ~/eb-virt
On Windows, enter the following command:
C:\> virtualenv %HOMEPATH%\eb-virt
2. Activate the virtual environment.
On Unix-based systems, enter the following command:
API Version 2010-12-01
871

AWS Elastic Beanstalk Developer Guide
Create a Django Project
~$ source ~/eb-virt/bin/activate
(eb-virt) ~$
On Windows, enter the following command:
C:\>%HOMEPATH%\eb-virt\Scripts\activate
(eb-virt) C:\>
You will see (eb-virt) prepended to your command prompt, indicating that you're in a virtual
environment.
Note
The remainder of these instructions show the Linux command prompt in your home
directory ~$. On Windows this is C:\Users\USERNAME>, where USERNAME is your
Windows login name.
3. Use pip to install Django.
(eb-virt)~$ pip install django==1.9.12
Note
The Django version you install must be compatible with the Python version on the Elastic
Beanstalk Python configuration that you choose for deploying your application. For
deployment details, see ??? (p. 875) in this topic.
For details on current Python configurations, see Python Configurations (p. 34).
For Django version compatibility with Python, see What Python version can I use with
Django?
4. To verify that Django has been installed, type:
(eb-virt)~$ pip freeze
Django==1.9.12
...
This command lists all of the packages installed in your virtual environment. Later you will use the
output of this command to configure your project for use with Elastic Beanstalk.
Create a Django Project
Now you are ready to create a Django project and run it on your machine, using the virtual environment.
To generate a Django application
1. Activate your virtual environment.
On Unix-based systems, enter the following command:
~$ source ~/eb-virt/bin/activate
(eb-virt) ~$
On Windows, enter the following command:
C:\>%HOMEPATH%\eb-virt\Scripts\activate
(eb-virt) C:\>
API Version 2010-12-01
872

AWS Elastic Beanstalk Developer Guide
Create a Django Project
You will see the (eb-virt) prefix to your command prompt, indicating that you're in a virtual
environment.
Note
The remainder of these instructions show the Linux command prompt ~$ in your home
directory and the Linux home directory ~/. On Windows these are C:\Users\USERNAME>,
where USERNAME is your Windows login name.
2. Use the django-admin startproject command to create a new Django project named
ebdjango:
(eb-virt)~$ django-admin startproject ebdjango
This command creates a standard Django site named ebdjango with the following directory
structure:
~/ebdjango
|-- ebdjango
| |-- __init__.py
| |-- settings.py
| |-- urls.py
| `-- wsgi.py
`-- manage.py
3. Run your Django site locally with manage.py runserver:
(eb-virt) ~$ cd ebdjango
(eb-virt) ~/ebdjango$ python manage.py runserver
4. Open http://127.0.0.1:8000/ in a web browser to view the site:
API Version 2010-12-01
873
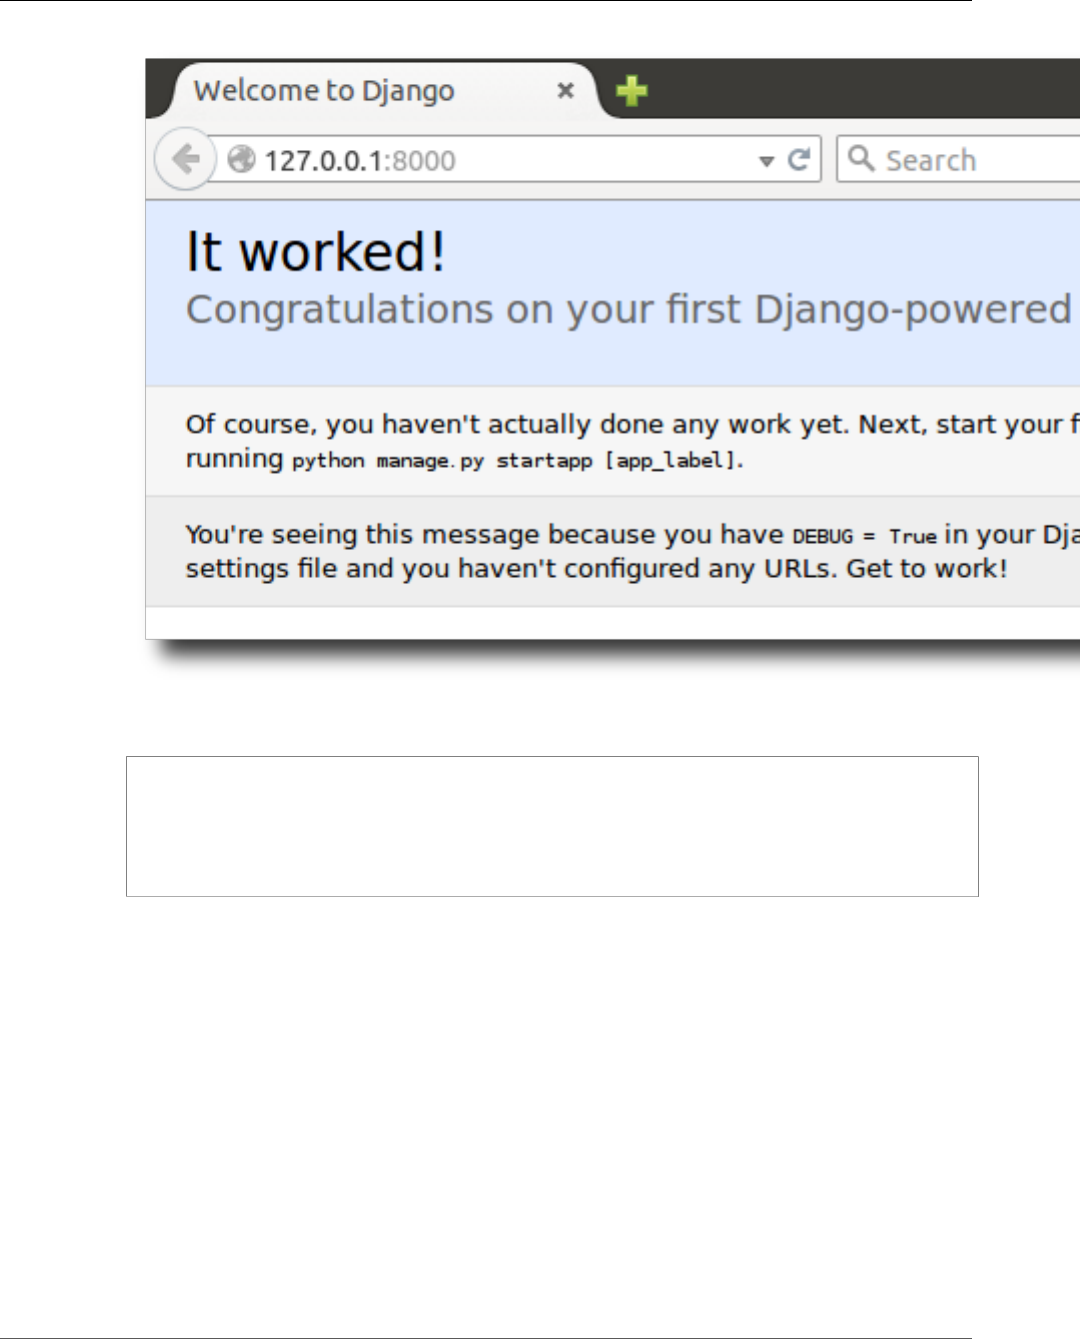
AWS Elastic Beanstalk Developer Guide
Configure Your Django Application for Elastic Beanstalk
5. Check the server log to see the output from your request. You can stop the web server and return to
your virtual environment by typing Ctrl-C:
Django version 1.9.12, using settings 'ebdjango.settings'
Starting development server at http://127.0.0.1:8000/
Quit the server with CONTROL-C.
Not Found: /
[15/Feb/2016 20:14:09] "GET / HTTP/1.1" 200 1767
Ctrl-C
Configure Your Django Application for Elastic
Beanstalk
Now that you have a Django-powered site on your local machine, you can configure it for deployment
with Elastic Beanstalk.
By default, Elastic Beanstalk looks for a file called application.py to start your application. Since
this doesn't exist in the Django project that you've created, some adjustment of your application's
environment is necessary. You will also need to set environment variables so that your application's
modules can be loaded.
To configure your site for Elastic Beanstalk
1. Activate your virtual environment.
On Linux-based systems, enter the following command:
API Version 2010-12-01
874

AWS Elastic Beanstalk Developer Guide
Deploy Your Site With the EB CLI
~/ebdjango$ source ~/eb-virt/bin/activate
On Windows, enter the following command:
C:\Users\USERNAME\ebdjango>%HOMEPATH%\eb-virt\Scripts\activate
2. Run pip freeze and save the output to a file named requirements.txt:
(eb-virt) ~/ebdjango$ pip freeze > requirements.txt
Elastic Beanstalk uses requirements.txt to determine which package to install on the EC2
instances that run your application.
3. Create a new directory, called .ebextensions:
(eb-virt) ~/ebdjango$ mkdir .ebextensions
4. Within the .ebextensions directory, add a configuration file (p. 256) named django.config with
the following text:
Example ~/ebdjango/.ebextensions/django.config
option_settings:
aws:elasticbeanstalk:container:python:
WSGIPath: ebdjango/wsgi.py
This setting, WSGIPath, specifies the location of the WSGI script that Elastic Beanstalk uses to start
your application.
5. Deactivate your virtual environment by with the deactivate command:
(eb-virt) ~/ebdjango$ deactivate
Reactivate your virtual environment whenever you need to add additional packages to your
application or run your application locally.
Deploy Your Site With the EB CLI
You've added everything you need to deploy your application on Elastic Beanstalk. Your project directory
should now look like this:
~/ebdjango/
|-- .ebextensions
| `-- django.config
|-- ebdjango
| |-- __init__.py
| |-- settings.py
| |-- urls.py
| `-- wsgi.py
|-- db.sqlite3
|-- manage.py
`-- requirements.txt
Next, you'll create your application environment and deploy your configured application with Elastic
Beanstalk.
API Version 2010-12-01
875

AWS Elastic Beanstalk Developer Guide
Deploy Your Site With the EB CLI
To create an environment and deploy your Django application
1. Initialize your EB CLI repository with the eb init command:
~/ebdjango$ eb init -p python2.7 django-tutorial
Application django-tutorial has been created.
This command creates a new application named django-tutorial and configures your local
repository to create environments with the latest Python 2.7 platform configuration.
2. (optional) Run eb init again to configure a default keypair so that you can connect to the EC2
instance running your application with SSH:
~/ebdjango$ eb init
Do you want to set up SSH for your instances?
(y/n): y
Select a keypair.
1) my-keypair
2) [ Create new KeyPair ]
Select a key pair if you have one already, or follow the prompts to create a new one. If you don't see
the prompt or need to change your settings later, run eb init -i.
3. Create an environment and deploy you application to it with eb create:
~/ebdjango$ eb create django-env
Note
If you see a "service role required" error message, run eb create interactively (without
specifying an environment name) and EB CLI creates the role for you.
This command creates a load balanced Elastic Beanstalk environment named django-env. Creating
an environment takes about 5 minutes. As Elastic Beanstalk creates the resources necessary to run
your application, it outputs informational messages that the EB CLI relays to your terminal.
4. When the environment creation process completes, open your web site with eb open:
~/ebdjango$ eb open
This will open a browser window using the domain name created for your application. You should
see the same Django website that you created and tested locally.
API Version 2010-12-01
876
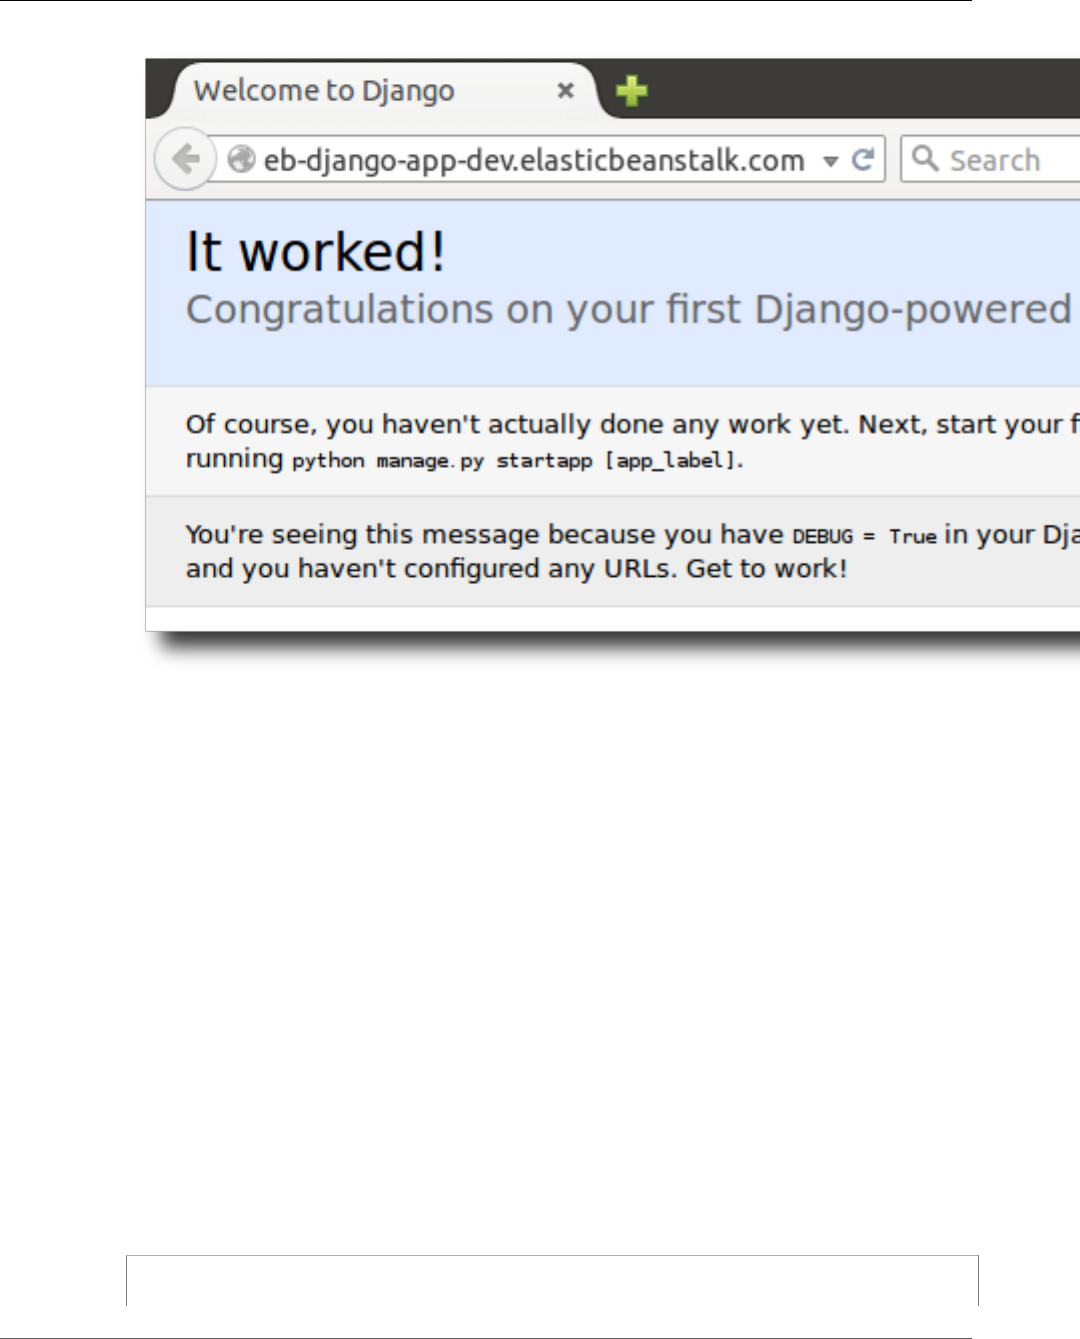
AWS Elastic Beanstalk Developer Guide
Updating Your Application
If you don't see your application running, or get an error message, see Troubleshooting
deployments (p. 904) for help with how to determine the cause of the error.
If you do see your application running, then congratulations, you've deployed your first Django
application with Elastic Beanstalk!
Updating Your Application
Now that you have a running application on Elastic Beanstalk, you can update and redeploy your
application or its configuration and Elastic Beanstalk will take care of the work of updating your
instances and starting your new application version.
For this example, we'll enable Django's admin console and configure a few other settings.
Modify Your Site Settings
By default, your Django web site uses the UTC time zone to display time. You can change this by
specifying a time zone in settings.py.
To change your site's time zone
1. Modify the TIME_ZONE setting in settings.py
Example ~/ebdjango/ebdjango/settings.py
...
# Internationalization
API Version 2010-12-01
877

AWS Elastic Beanstalk Developer Guide
Updating Your Application
LANGUAGE_CODE = 'en-us'
TIME_ZONE = 'US/Pacific'
USE_I18N = True
USE_L10N = True
USE_TZ = True
For a list of time zones, visit this page.
2. Deploy the application to your Elastic Beanstalk environment:
~/ebdjango/$ eb deploy
Create a Site Administrator
You can create a site administrator for your Django application to access the admin console directly from
the web site. Administrator login details are stored securely in the local database image included in the
default project that Django generates.
To create a site administrator
1. Initialize your Django application's local database:
~/ebdjango$ python manage.py migrate
Operations to perform:
Apply all migrations: admin, contenttypes, auth, sessions
Running migrations:
Rendering model states... DONE
Applying contenttypes.0001_initial... OK
Applying auth.0001_initial... OK
Applying admin.0001_initial... OK
Applying admin.0002_logentry_remove_auto_add... OK
Applying contenttypes.0002_remove_content_type_name... OK
Applying auth.0002_alter_permission_name_max_length... OK
Applying auth.0003_alter_user_email_max_length... OK
Applying auth.0004_alter_user_username_opts... OK
Applying auth.0005_alter_user_last_login_null... OK
Applying auth.0006_require_contenttypes_0002... OK
Applying auth.0007_alter_validators_add_error_messages... OK
Applying sessions.0001_initial... OK
2. Run manage.py createsuperuser to create an administrator:
~/ebdjango$ python manage.py createsuperuser
Username: admin
Email address: me@mydomain.com
Password: ********
Password (again): ********
Superuser created successfully.
3. To tell Django where to store static files, define STATIC_ROOT in settings.py:
Example ~/ebdjango/ebdjango/settings.py
# Static files (CSS, JavaScript, Images)
# https://docs.djangoproject.com/en/1.9/howto/static-files/
STATIC_URL = '/static/'
STATIC_ROOT = 'static'
4. Run manage.py collectstatic to populate the static directory with static assets (javascript,
CSS and images) for the admin site:
API Version 2010-12-01
878
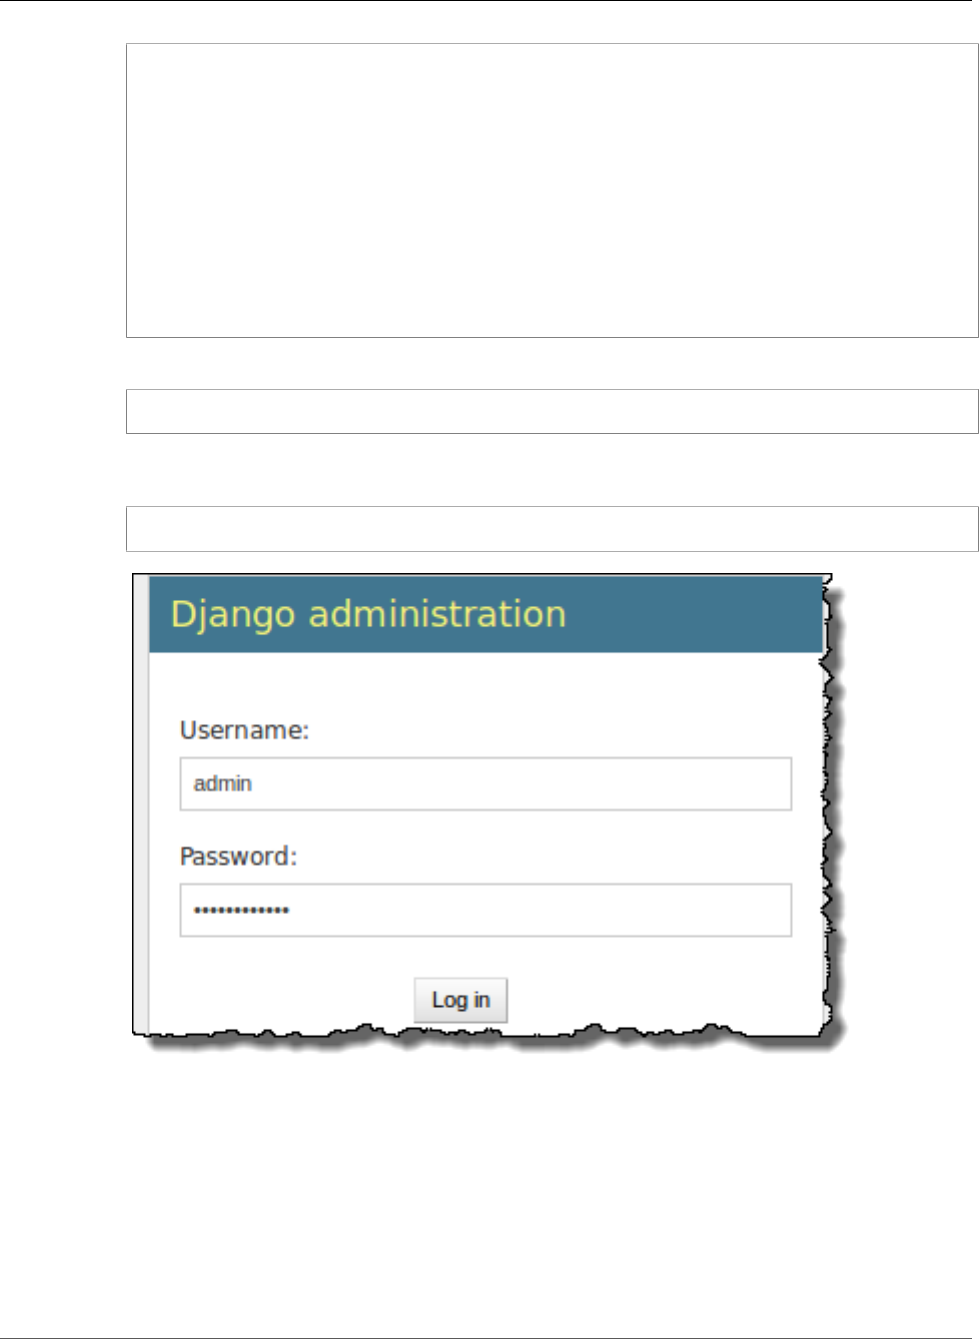
AWS Elastic Beanstalk Developer Guide
Updating Your Application
~/ebdjango$ python manage.py collectstatic
You have requested to collect static files at the destination
location as specified in your settings:
~/ebdjango/static
This will overwrite existing files!
Are you sure you want to do this?
Type 'yes' to continue, or 'no' to cancel: yes
Copying 'admin/static/adm/css/rtl.css'
Copying 'admin/static/adm/css/changelists.css'
Copying 'admin/static/adm/css/fonts.css'
...
5. Deploy your application:
~/ebdjango$ eb deploy
6. View the admin console by opening the local site in your browser, appending /admin/ to the site
URL, such as:
http://djang-env.p33kq46sfh.us-west-2.elasticbeanstalk.com/admin/
7. Log in with the username and password that you configured in step 2:
API Version 2010-12-01
879
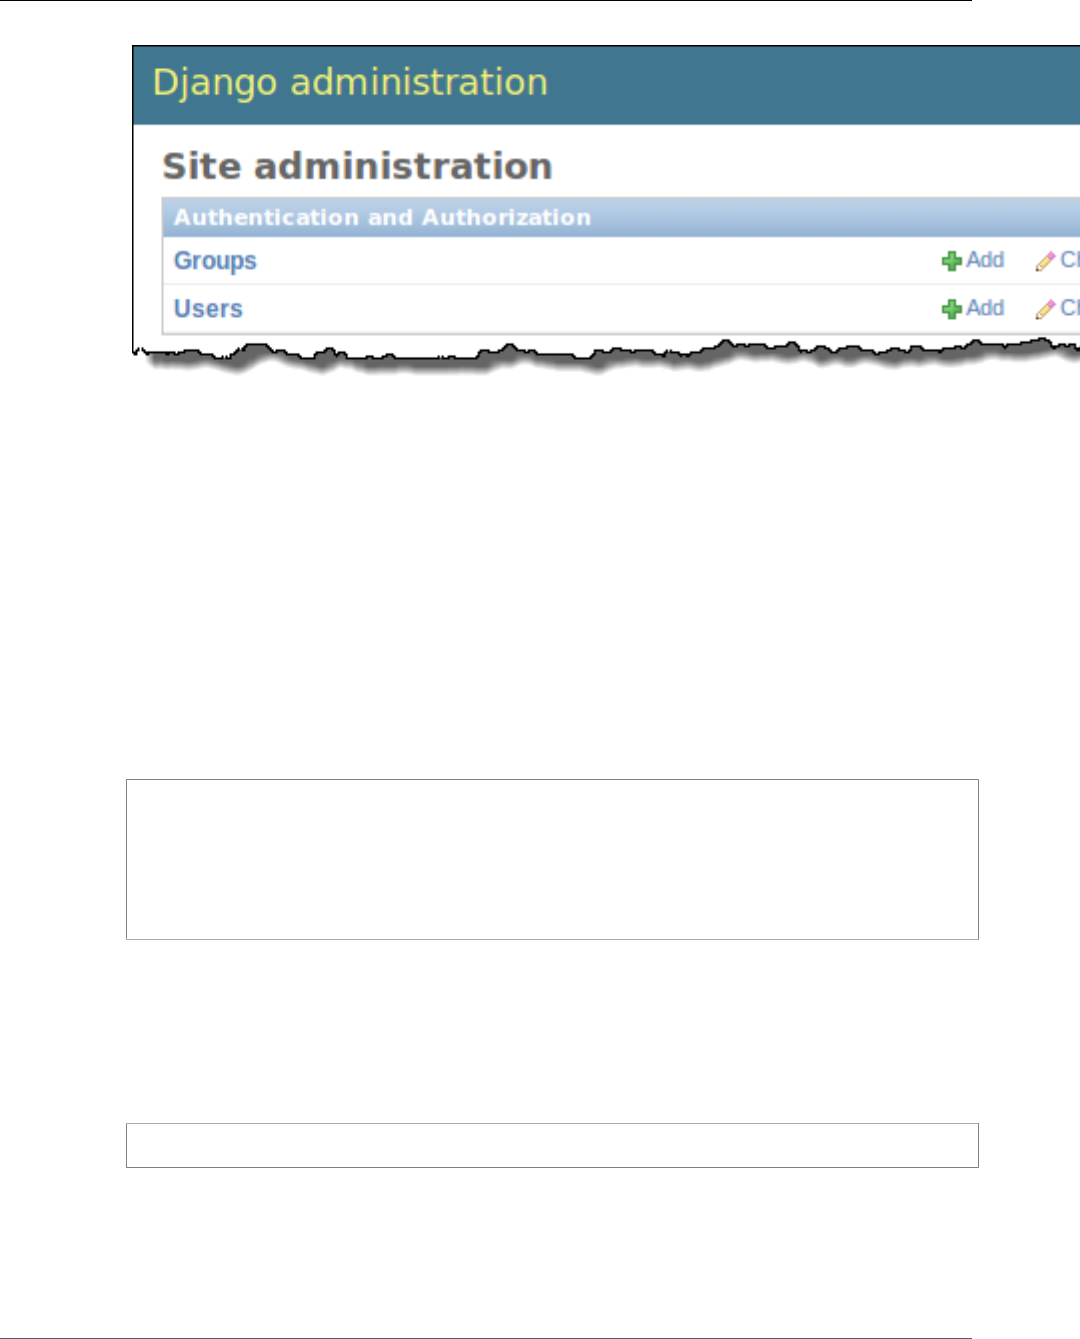
AWS Elastic Beanstalk Developer Guide
Clean Up and Next Steps
You can use a similar procedure of local updating/testing followed by eb deploy. Elastic Beanstalk
takes care of the work of updating your live servers, so you can focus on application development
instead of server administration!
Add a Database Migration Configuration File
You can add commands to your .ebextensions script that will be run when your site is updated. This
allows you to automatically generate database migrations.
To add a migrate step when your application is deployed
1. Create a new configuration file (p. 256) named db-migrate.config with the following content:
Example ~/ebdjango/.ebextensions/db-migrate.config
container_commands:
01_migrate:
command: "django-admin.py migrate"
leader_only: true
option_settings:
aws:elasticbeanstalk:application:environment:
DJANGO_SETTINGS_MODULE: ebdjango.settings
This configuration file runs the django-admin.py migrate command during the deployment
process, prior to starting your application. Because it runs prior to the application starting, you must
also configure the DJANGO_SETTINGS_MODULE environment variable explicitly (usually wsgi.py
takes care of this for you during startup). Specifying leader_only: true in the command ensures
that it is run only once when you're deploying to multiple instances.
2. Deploy your application:
~/ebdjango$ eb deploy
Clean Up and Next Steps
To save instance hours and other AWS resources between development sessions, terminate your Elastic
Beanstalk environment with eb terminate:
API Version 2010-12-01
880

AWS Elastic Beanstalk Developer Guide
Adding a Database
~/ebdjango$ eb terminate django-env
This command terminates the environment and all of the AWS resources that run within it. It does
not delete the application, however, so you can always create more environments with the same
configuration by running eb create again. For more information on EB CLI commands, see Managing
Elastic Beanstalk Environments with the EB CLI (p. 492).
If you are done with the sample application, you can also remove the project folder and virtual
environment:
~$ rm -rf ~/eb-virt
~$ rm -rf ~/ebdjango
For more information about Django, including an in-depth tutorial, visit the official documentation.
If you'd like to try out another Python web framework, check out Deploying a Flask Application to AWS
Elastic Beanstalk (p. 865).
Adding an Amazon RDS DB Instance to Your
Python Application Environment
You can use an Amazon Relational Database Service (Amazon RDS) DB instance to store data gathered
and modified by your application. The database can be attached to your environment and managed by
Elastic Beanstalk, or created and managed externally.
If you are using Amazon RDS for the first time, add a DB instance (p. 881) to a test environment with
the Elastic Beanstalk Management Console and verify that your application can connect to it.
To connect to a database, add the driver (p. 882) to your application, load the driver in your code, and
create a connection object (p. 883) with the environment properties provided by Elastic Beanstalk. The
configuration and connection code vary depending on the database engine and framework that you use.
For production environments, create a DB instance outside of your Elastic Beanstalk environment to
decouple your environment resources from your database resources. Using an external DB instance lets
you connect to the same database from multiple environments and perform blue-green deployments.
For instructions, see Using Elastic Beanstalk with Amazon Relational Database Service (p. 439).
Sections
•Adding a DB Instance to Your Environment (p. 881)
•Downloading a Driver (p. 882)
•Connecting to a Database (p. 883)
Adding a DB Instance to Your Environment
To add a DB instance to your environment
1. Open the Elastic Beanstalk console.
2. Navigate to the management page (p. 65) for your environment.
3. Choose Configuration.
4. Under Data Tier, choose Create a new RDS database.
API Version 2010-12-01
881

AWS Elastic Beanstalk Developer Guide
Downloading a Driver
5. Choose a DB engine, enter a user name and password, and then choose Apply.
Adding a DB instance takes about 10 minutes. When the environment update is complete, the DB
instance's hostname and other connection information are available to your application through the
following environment properties:
•RDS_HOSTNAME – The hostname of the DB instance.
Amazon RDS console label – Endpoint is the hostname.
•RDS_PORT – The port on which the DB instance accepts connections. The default value varies between
DB engines.
Amazon RDS console label – Port
•RDS_DB_NAME – The database name, ebdb.
Amazon RDS console label – DB Name
•RDS_USERNAME – The user name that you configured for your database.
Amazon RDS console label – Username
•RDS_PASSWORD – The password that you configured for your database.
For more information about configuring an internal DB instance, see Adding a Database to Your Elastic
Beanstalk Environment (p. 186).
Downloading a Driver
Add the database driver to your project's requirements file (p. 864).
Example requirements.txt – Django with MySQL
Django==1.4.1
MySQL-python==1.2.3
Common Driver Packages for Python
•MySQL – MySQL-python
•PostgreSQL – psycopg2
•Oracle – cx_Oracle
•SQL Server – adodbapi
API Version 2010-12-01
882

AWS Elastic Beanstalk Developer Guide
Connecting to a Database
Connecting to a Database
Elastic Beanstalk provides connection information for attached DB instances in environment properties.
Use os.environ['VARIABLE'] to read the properties and configure a database connection.
Example Django Settings File – DATABASES Dictionary
import os
if 'RDS_HOSTNAME' in os.environ:
DATABASES = {
'default': {
'ENGINE': 'django.db.backends.mysql',
'NAME': os.environ['RDS_DB_NAME'],
'USER': os.environ['RDS_USERNAME'],
'PASSWORD': os.environ['RDS_PASSWORD'],
'HOST': os.environ['RDS_HOSTNAME'],
'PORT': os.environ['RDS_PORT'],
}
}
Python Tools and Resources
There are several places you can go to get additional help when developing your Python applications:
Resource Description
Boto (the AWS SDK for Python) Install Boto using GitHub.
Python Development Forum Post your questions and get feedback.
Python Developer Center One-stop shop for sample code, documentation, tools, and
additional resources.
API Version 2010-12-01
883

AWS Elastic Beanstalk Developer Guide
The Ruby Platform
Deploying Elastic Beanstalk
Applications in Ruby Using EB CLI
and Git
Topics
•Using the AWS Elastic Beanstalk Ruby Platform (p. 884)
•Deploying a Rails Application to Elastic Beanstalk (p. 886)
•Deploying a Sinatra Application to AWS Elastic Beanstalk (p. 894)
•Adding an Amazon RDS DB Instance to Your Ruby Application Environment (p. 900)
•Tools (p. 902)
•Resources (p. 902)
Elastic Beanstalk for Ruby makes it easy to deploy, manage, and scale your Ruby web applications using
Amazon Web Services. Elastic Beanstalk is available to anyone developing or hosting a web application
using Ruby. This section provides step-by-step instructions for deploying a sample application to Elastic
Beanstalk using the Elastic Beanstalk command line interface (EB CLI), and then updating the application
to use the Rails and Sinatra web application frameworks.
The topics in this chapter assume some knowledge of Elastic Beanstalk environments. If you haven't used
Elastic Beanstalk before, try the getting started tutorial (p. 3) to learn the basics.
Using the AWS Elastic Beanstalk Ruby Platform
The AWS Elastic Beanstalk Ruby platform is a set of environment configurations (p. 34) for Ruby web
applications that can run behind an nginx proxy server under a Puma or Passenger application server.
Each configuration corresponds to a version of Ruby, including Ruby 1.9, Ruby 2.0, Ruby 2.1, Ruby 2.2
and Ruby 2.3.
Elastic Beanstalk provides configuration options (p. 202) that you can use to customize the software
that runs on the EC2 instances in your Elastic Beanstalk environment. You can configure environment
variables needed by your application and enable log rotation to Amazon S3. The platform also
predefines some common environment variables related to Rails and Rack for ease of discovery and use.
Platform-specific configuration options are available in the AWS Management Console for modifying the
configuration of a running environment (p. 213). To avoid losing your environment's configuration when
you terminate it, you can use saved configurations (p. 293) to save your settings and later apply them to
another environment.
To save settings in your source code, you can include configuration files (p. 256). Settings in
configuration files are applied every time you create an environment or deploy your application. You can
also use configuration files to install packages, run scripts, and perform other instance customization
operations during deployments.
API Version 2010-12-01
884

AWS Elastic Beanstalk Developer Guide
Configuring Your Ruby Environment
If you use RubyGems, you can include a Gemfile file (p. 886) in your source bundle to install packages
during deployment.
Settings applied in the AWS Management Console override the same settings in configuration files, if
they exist. This lets you have default settings in configuration files, and override them with environment
specific settings in the console. For more information about precedence, and other methods of changing
settings, see Configuration Options (p. 202).
Configuring Your Ruby Environment
You can use the AWS Management Console to enable log rotation to Amazon S3 and configure variables
that your application can read from the environment.
To access the software configuration settings for your environment
1. Open the Elastic Beanstalk console.
2. Navigate to the management page (p. 65) for your environment.
3. Choose Configuration.
4. In theSoftware Configurationsection, choose the settings icon ( ).
Log Options
The Log Options section has two settings:
•Instance profile– Specifies the instance profile that has permission to access the Amazon S3 bucket
associated with your application.
•Enable log file rotation to Amazon S3 – Specifies whether log files for your application's Amazon EC2
instances should be copied to your Amazon S3 bucket associated with your application.
Environment Properties
The Environment Properties section lets you specify environment configuration settings on the Amazon
EC2 instances that are running your application. Environment properties are passed in as key-value pairs
to the application.
The Ruby platform defines the following properties for environment configuration:
•BUNDLE_WITHOUT – A colon-separated list of groups to ignore when installing dependencies from a
Gemfile.
•RAILS_SKIP_ASSET_COMPILIATION – Set to true to skip running rake assets:precompile
during deployment.
•RAILS_SKIP_MIGRATIONS – Set to true to skip running rake db:migrate during deployment.
•RACK_ENV – Specify the environment stage for Rack. For example, development, production, or
test.
Inside the Ruby environment running in Elastic Beanstalk, environment variables are accessible using
the ENV object. For example, you could read a property named API_ENDPOINT to a variable with the
following code:
endpoint = ENV['API_ENDPOINT']
See Environment Properties and Other Software Settings (p. 189) for more information.
API Version 2010-12-01
885

AWS Elastic Beanstalk Developer Guide
Ruby Configuration Namespaces
Ruby Configuration Namespaces
You can use a configuration file (p. 256) to set configuration options and perform other instance
configuration tasks during deployments. Configuration options can be defined by the Elastic Beanstalk
service or the platform that you use and are organized into namespaces.
The Ruby platform doesn't define any additional namespaces. Instead, it defines environment properties
for common Rails and Rack options. The following configuration file sets each of the platform defined
environment properties, sets an additional environment property named LOGGING.
Example .ebextensions/ruby-settings.config
option_settings:
aws:elasticbeanstalk:application:environment:
BUNDLE_WITHOUT: test
RACK_ENV: development
RAILS_SKIP_ASSET_COMPILIATION: true
RAILS_SKIP_MIGRATIONS: true
LOGGING: debug
Elastic Beanstalk provides many configuration options for customizing your environment. In addition to
configuration files, you can also set configuration options using the console, saved configurations, the EB
CLI, or the AWS CLI. See Configuration Options (p. 202) for more information.
Installing Packages with a Gemfile
Use a Gemfile file in the root of your project source to use RubyGems to install packages that your
application requires.
Example Gemfile
source "https://rubygems.org"
gem 'sinatra'
gem 'json'
gem 'rack-parser'
When a Gemfile file is present, Elastic Beanstalk runs bundle install to install dependencies.
Deploying a Rails Application to Elastic Beanstalk
You can use the Elastic Beanstalk Command Line Interface (EB CLI) and Git to deploy a Rails application
to Elastic Beanstalk. This walkthrough shows you how. You'll also learn how to set up a Rails installation
from scratch in case you don't already have a development environment and application.
Software Versions
Many of the technologies presented here are under active development. For the best results, use
the same versions of each tool when possible. The versions used during the development of this
tutorial are listed below.
Ubuntu 14.04
RVM 1.26.3
Ruby 2.1.5p273
API Version 2010-12-01
886

AWS Elastic Beanstalk Developer Guide
Rails Development Environment Setup
Rails 4.1.8
Python 2.7.6
Platform 64bit Amazon Linux 2015.09 v2.0.6 running
Ruby 2.1 (Puma)
For the typographic conventions used in this tutorial, see Document Conventions in the General
Reference.
Sections
•Rails Development Environment Setup (p. 887)
•Install the EB CLI (p. 888)
•Set Up Your Git Repository (p. 889)
•Configure the EB CLI (p. 889)
•Create a Service Role and Instance Profile (p. 890)
•Update the Gemfile (p. 890)
•Deploy the Project (p. 890)
•Update the Application (p. 893)
•Clean Up (p. 894)
Rails Development Environment Setup
Read this section if you are setting up a Rails development environment from scratch. If you
have a development environment configured with Rails, Git and a working app, you can skip this
section (p. 888).
Getting an Ubuntu EC2 Instance
The following instructions were developed and tested using an Amazon EC2 instance running
Ubuntu 14.04. For instructions on configuring and connecting to an EC2 instance using the AWS
Management Console, read the Getting Started section of the Amazon EC2 User Guide for Linux.
If you don't have access to the AWS Management Console or prefer to use the command line,
check out the AWS CLI User Guide for instructions on installing the AWS CLI and using it to
configure security groups, create a key pair, and launch instances with the same credentials that
you will use with the EB CLI.
Install Rails
RVM, a popular version manager for Ruby, provides an option to install RVM, Ruby, and Rails with just a
few commands:
~$ gpg --keyserver hkp://keys.gnupg.net --recv-keys D39DC0E3
~$ curl -ssl https://raw.githubusercontent.com/rvm/rvm/master/binscripts/rvm-installer |
bash -s stable --rails
~$ source /home/ubuntu/.rvm/scripts/rvm
Install nodejs to allow the Rails server to run locally:
~$ sudo apt-get install nodejs
Note
For help installing rails on other operating systems, try http://installrails.com/.
API Version 2010-12-01
887

AWS Elastic Beanstalk Developer Guide
Install the EB CLI
Create a New Rails Project
Use rails new with the name of the application to create a new Rails project.
~$ rails new rails-beanstalk
Rails creates a directory with the name specified, generates all of the files needed to run a sample
project locally, and then runs bundler to install all of the dependencies (Gems) defined in the project's
Gemfile.
Run the Project Locally
Test your Rails installation by running the default project locally.
$ cd rails-beanstalk
rails-beanstalk $ rails server -d
=> Booting WEBrick
=> Rails 4.2.0 application starting in development on http://localhost:3000
=> Run `rails server -h` for more startup options
rails-beanstalk $ curl http://localhost:3000
<!DOCTYPE html>
<html>
<head>
<title>Ruby on Rails: Welcome aboard</title>
...
Note
Elastic Beanstalk precompiles Rails assets by default. For Ruby 2.1 container types, note the
following:
• The nginx web server is preconfigured to serve assets from the /public and /public/
assets folders.
• The Puma application requires that you add gem "puma" to your Gemfile for bundle exec
to run correctly.
Install the EB CLI
In this section you'll install the EB CLI, a few dependencies, and Git.
Note
Using Git or another form of revision control is recommended but also entirely optional when
using the EB CLI. Any of the steps in this tutorial that use Git can be skipped.
Install Git, Python Development Libraries and Pip
This tutorial uses Git for revision control and Pip to manage the EB CLI installation. In your Ubuntu
development environment, you can install all of them with the following sequence of commands:
~$ sudo apt-get install git
~$ sudo apt-get install python-dev
~$ curl "https://bootstrap.pypa.io/get-pip.py" -o "get-pip.py"
~$ sudo python get-pip.py
Windows Users
Install Python 3.4, which includes pip.
API Version 2010-12-01
888

AWS Elastic Beanstalk Developer Guide
Set Up Your Git Repository
Install the EB CLI
With Pip you can install the EB CLI with a single command:
Linux, macOS, or Unix
~$ sudo pip install awsebcli
Windows
> pip install awsebcli
Set Up Your Git Repository
If your Rails project is already in a local Git repository, continue to Configure the EB CLI (p. 889).
First, initiate the repository. From within the Rails project directory, type git init.
~/rails-beanstalk$ git init
Initialized empty Git repository in /home/ubuntu/rails-beanstalk/.git/
Next, add all of the project's files to the staging area and commit the change.
~/rails-beanstalk$ git add .
~/rails-beanstalk$ git commit -m "default rails project"
56 files changed, 896 insertions(+)
create mode 100644 .gitignore
create mode 100644 Gemfile
...
Configure the EB CLI
With the Git repository configured and all necessary tools installed, configuring the EB CLI project is as
simple as running eb init from within the project directory and following the prompts.
~/rails-beanstalk$ eb init
Select a default region
1) us-east-1 : US East (N. Virginia)
2) us-west-1 : US West (N. California)
3) us-west-2 : US West (Oregon)
...
The following values work for this tutorial, but feel free to use values that make sense for your
requirements. If you don't have access keys, see How Do I Get Security Credentials? in the AWS General
Reference.
Values
Region Enter (keep default)
AWS Access Key ID Your access key
AWS Secret Access Key Your secret key
Application Name Enter (keep default)
Using Ruby? y (yes)
API Version 2010-12-01
889

AWS Elastic Beanstalk Developer Guide
Create a Service Role and Instance Profile
Platform Version Ruby 2.1 (Puma)
Set up SSH? n (no)
In addition to configuring the environment for deployment, eb init sets up some Git extensions and
adds an entry to the .gitignore file in the project directory. Commit the change to .gitignore
before moving on.
~/rails-beanstalk$ git commit -am "updated .gitignore"
Create a Service Role and Instance Profile
Newer platform versions require a service role and instance profile. These roles allow Elastic Beanstalk to
monitor the resources in your environment and the instances in your environment to upload log files to
Amazon S3. For more information, see Service Roles, Instance Profiles, and User Policies (p. 21).
If you don't have a service role and instance profile already, use the Elastic Beanstalk Management
Console to create them now.
To create a service role and instance profile
1. Open the Elastic Beanstalk console.
2. Choose Create New Application.
3. Proceed through the wizard until you reach the Permissions page.
4. Choose Next to open the IAM console.
5. Choose Allow to create the roles.
Update the Gemfile
Prior to deploying your application to Elastic Beanstalk, we need to make a small change to the default
Gemfile generated by Rails. Add Puma to the list of gems to make sure that it is installed properly:
~/rails-beanstalk/Gemfile
source 'https://rubygems.org'
gem 'puma'
gem 'rails', '4.1.8'
gem 'sqlite3'
...
Commit the change with git commit:
~/rails-beanstalk$ git commit -am "Add Puma to Gemfile"
Deploy the Project
Next, create an Elastic Beanstalk environment and deploy your application to it with eb create:
~/rails-beanstalk$ eb create rails-beanstalk-env
Creating application version archive "app-150219_215138".
Uploading rails-beanstalk/app-150219_215138.zip to S3. This may take a while.
Upload Complete.
API Version 2010-12-01
890

AWS Elastic Beanstalk Developer Guide
Deploy the Project
Environment details for: rails-beanstalk-env
Application name: rails-beanstalk
Region: us-west-2
Deployed Version: app-150219_215138
Environment ID: e-pi3immkys7
Platform: 64bit Amazon Linux 2015.09 v2.0.6 running Ruby 2.1 (Puma)
Tier: WebServer-Standard
CNAME: UNKNOWN
Updated: 2015-02-19 21:51:40.686000+00:00
Printing Status:
INFO: createEnvironment is starting.
...
Note
If you see a "service role required" error message, run eb create interactively (without
specifying an environment name) and EB CLI creates the role for you.
With just one command, the EB CLI sets up all of the resources our application needs to run in AWS,
including the following:
• An Amazon S3 bucket to store environment data
• A load balancer to distribute traffic to the web server(s)
• A security group to allow incoming web traffic
• An Auto Scaling group to adjust the number of servers in response to load changes
• Amazon CloudWatch alarms that notify the Auto Scaling group when load is low or high
• An Amazon EC2 instance hosting our application
When the process is complete, the EB CLI outputs the public DNS name of the application server. Use eb
open to open the website in the default browser. In our Ubuntu environment the default browser is a
text based browser called W3M.
$ eb open
A really lowlevel plumbing error occured. Please contact your local Maytag(tm) repair man.
This is Puma's way of telling us that something went wrong. When an error like this occurs, you can check
out the logs using the eb logs command.
rails-beanstalk $ eb logs
INFO: requestEnvironmentInfo is starting.
INFO: [Instance: i-8cdc6480] Successfully finished tailing 5 log(s)
================ i-8cdc6480 =================
-------------------------------------
/var/log/eb-version-deployment.log
-------------------------------------
...
The error you're looking for is in the web container log, /var/log/puma/puma.log.
...
-------------------------------------
/var/log/puma/puma.log
-------------------------------------
=== puma startup: 2014-12-15 18:37:51 +0000 ===
=== puma startup: 2014-12-15 18:37:51 +0000 ===
[1982] + Gemfile in context: /var/app/current/Gemfile
[1979] - Worker 0 (pid: 1982) booted, phase: 0
2014-12-15 18:41:42 +0000: Rack app error: #<RuntimeError: Missing `secret_key_base` for
'production' environment, set this value in `config/secrets.yml`>
API Version 2010-12-01
891

AWS Elastic Beanstalk Developer Guide
Deploy the Project
/opt/rubies/ruby-2.1.4/lib/ruby/gems/2.1.0/gems/railties-4.1.8/lib/rails/
application.rb:462:in `validate_secret_key_config!'
/opt/rubies/ruby-2.1.4/lib/ruby/gems/2.1.0/gems/railties-4.1.8/lib/rails/
application.rb:195:in `env_config'
...
To get the application working, you need to configure a few environment variables. First is
SECRET_KEY_BASE, which is referred to by secrets.yml in the config folder of our project.
This variable is used to create keys and should be a secret, as the name suggests. This is why you don't
want it stored in source control where other people might see it. Set this to any value using eb setenv:
rails-beanstalk $ eb setenv SECRET_KEY_BASE=23098520lkjsdlkjfsdf
INFO: Environment update is starting.
INFO: Updating environment rails-beanstalk-env's configuration settings.
INFO: Successfully deployed new configuration to environment.
INFO: Environment update completed successfully.
The EB CLI automatically restarts the web server whenever you update configuration or deploy new
code. Try loading the site again.
$ eb open
The page you were looking for doesn't exist (404)
A 404 error may not look like much of an improvement, but it shows that the web container is working
and couldn't find a route to the page you're looking for.
So what happened to the welcome page you saw earlier? In this case the environment variable you need
is RACK_ENV. Right now it's set to production, suppressing the display of debug features as well as the
Welcome to Rails page.
View the current value of all environment variables using the eb printenv command.
rails-beanstalk $ eb printenv
Environment Variables:
AWS_SECRET_KEY = None
RAILS_SKIP_ASSET_COMPILATION = false
SECRET_KEY_BASE = 23098520lkjsdlkjfsdf
RACK_ENV = production
PARAM5 = None
PARAM4 = None
PARAM3 = None
PARAM2 = None
PARAM1 = None
BUNDLE_WITHOUT = test:development
RAILS_SKIP_MIGRATIONS = false
AWS_ACCESS_KEY_ID = None
The proper way to fix this is to add content and routes to the project. For the moment, though, we just
want to see our project working, so we'll set RACK_ENV to development.
rails-beanstalk $ eb setenv RACK_ENV=development
The next time you load the site it should succeed.
$ eb open
Ruby on Rails: Welcome aboard
...
API Version 2010-12-01
892

AWS Elastic Beanstalk Developer Guide
Update the Application
Now that you know it works, you can set RACK_ENV back to production and see about adding that
content.
rails-beanstalk $ eb setenv RACK_ENV=production
Update the Application
Now it's time to add some content to the front page to avoid the 404 error you saw in production mode.
First you'll use rails generate to create a controller, route, and view for your welcome page.
$ rails generate controller WelcomePage welcome
create app/controllers/welcome_page_controller.rb
route get 'welcome_page/welcome'
invoke erb
create app/views/welcome_page
create app/views/welcome_page/welcome.html.erb
...
This gives you all you need to access the page at rails-beanstalk-env-
kpvmmmqpbr.elasticbeanstalk.com/welcome_page/welcome. Before you publish the changes, however,
change the content in the view and add a route to make this page appear at the top level of the site.
Use your favorite text editor to edit the content in app/views/welcome_page/welcome.html.erb.
Nano and Vim are popular command line editors. For this example, you'll use cat to simply overwrite the
content of the existing file.
rails-beanstalk $ cat > app/views/welcome_page/welcome.html.erb
> <h1>Welcome!</h1>
> <p>This is the front page of my first Rails application on Elastic Beanstalk.</p>
Ctrl+D
Finally, add the following route to config/routes.rb:
Rails.application.routes.draw do
get 'welcome_page/welcome'
root 'welcome_page▼welcome'
end
This tells Rails to route requests to the root of the website to the welcome page controller's welcome
method, which renders the content in the welcome view (welcome.html.erb). Now we're ready to
commit the changes and update our environment using eb deploy.
rails-beanstalk $ git add .
rails-beanstalk $ git commit -m "welcome page controller, view and route"
rails-beanstalk $ eb deploy
INFO: Environment update is starting.
INFO: Deploying new version to instance(s).
INFO: New application version was deployed to running EC2 instances.
INFO: Environment update completed successfully.
The update process is fairly quick. Read the front page at the command line using Curl or navigate to the
type eb open to open the site in a web browser to see the results.
$ eb open
Welcome
This is the front page of my first Rails application on Elastic Beanstalk.
API Version 2010-12-01
893

AWS Elastic Beanstalk Developer Guide
Clean Up
Now you're ready to continue work on your Rails site. Whenever you have new commits to push, use eb
deploy to update your environment.
Clean Up
If you no longer want to run your application, you can clean up by terminating your environment and
deleting your application.
Use the terminate command to terminate your environment and the delete command to delete your
application.
To terminate your environment and delete the application
• From the directory where you created your local repository, run eb terminate:
$ eb terminate
This process may take a few minutes. Elastic Beanstalk displays a message once the environment has
been successfully terminated.
Don't hesitate to terminate an environment to save on resources while you continue to develop your site.
You can always recreate your Beanstalk environment using eb create.
Deploying a Sinatra Application to AWS Elastic
Beanstalk
This walkthrough shows how to deploy a simple Sinatra web application to AWS Elastic Beanstalk using
the Elastic Beanstalk Command Line Interface (EB CLI).
Note
Creating environments with the EB CLI requires a service role (p. 21). You can create a service
role by creating an environment in the Elastic Beanstalk console. If you don't have a service role,
the EB CLI attempts to create one when you run eb create.
Topics
•Prerequisites (p. 894)
•Step 1: Set Up Your Project (p. 895)
•Step 2: Create an Application (p. 896)
•Step 3: Create an Environment (p. 897)
•Step 4: Deploy a Simple Sinatra Application (p. 898)
•Step 5: Clean Up (p. 899)
•Related Resources (p. 899)
Prerequisites
This walkthrough requires a Linux, Windows or OS X workstation. Performing the walkthrough will
modify your workstation's Git and EB CLI configuration. If you do not want to modify your workstation's
configuration for the walkthrough, you can use one of the following:
• An instance running in a virtual machine on your workstation.
API Version 2010-12-01
894

AWS Elastic Beanstalk Developer Guide
Step 1: Set Up Your Project
This walkthrough was prepared using Vagrant to run a Ubuntu 14.04 LTS instance in VirtualBox.
• An Amazon Elastic Compute Cloud (Amazon EC2) instance.
Use SSH to log in to the instance. You can perform the entire walkthrough from the command line.
When you have finished, you can terminate the instance.
The following tools are required to complete this walkthrough:
• The EB CLI, installed as described in Install the Elastic Beanstalk Command Line Interface (EB
CLI) (p. 481).
This topic also describes how to sign up for an AWS account, if you do not have one.
• AWS credentials that have permissions to create the AWS resources that make up the application's
environment on your system.
These credentials allow the EB CLI to act on your behalf to create the environment's resources. If
you do not have stored credentials, the EB CLI prompts you for credentials when you create the
application. For more information on how to store credentials and how the EB CLI handles stored
credentials, see Configuration Settings and Precedence (p. 492). For more information on the required
permissions, see Using Elastic Beanstalk with AWS Identity and Access Management (p. 388).
• Git
For Linux systems, you can use the package manager to install Git. For example, the following
command installs Git on Debian-family Linux systems, such as Ubuntu.
$ sudo apt-get install git
For Red Hat-family systems, you can use the same command, but you use the package manager name
yum. For more information, including directions for installing Git on OS X systems, see git.
Step 1: Set Up Your Project
With the EB CLI, you can quickly create an Elastic Beanstalk environment (p. 65) and deploy applications
to that environment from a Git repository. Before starting your first project, set up the example project
for the walkthrough.
To set up the example project
1. Open a terminal window and create a directory for your project in a convenient location on your
system. This walkthrough assumes that the directory is named sinatraapp.
~$ mkdir sinatraapp
2. Move to the sinatraapp directory and initialize a Git repository.
~$ cd sinatraapp
~sinatraapp$ git init .
Note
You do not need to have access to a remote repository, such as GitHub, for this
walkthrough. The walkthrough uses a local Git repository.
3. If this is your first time using Git, add your user name and email address to the Git configuration so
you can commit changes.
API Version 2010-12-01
895

AWS Elastic Beanstalk Developer Guide
Step 2: Create an Application
$ git config --global user.email "you@example.com"
$ git config --global user.name "Username"
Step 2: Create an Application
Now create an application and its associated environment (p. 65).
To create an application
1. In the sinatraapp directory, create the application by running the following command.
~/sinatraapp$ eb init
2. Choose the default AWS region. For this walkthrough, choose US-West-2.
Select a default region
1) us-east-1 : US East (N. Virginia)
2) us-west-1 : US West (N. California)
3) us-west-2 : US West (Oregon)
4) eu-west-1 : EU (Ireland)
5) eu-central-1 : EU (Frankfurt)
6) ap-south-1 : Asia Pacific (Mumbai)
7) ap-southeast-1 : Asia Pacific (Singapore)
8) ap-southeast-2 : Asia Pacific (Sydney)
9) ap-northeast-1 : Asia Pacific (Tokyo)
10) ap-northeast-2 : Asia Pacific (Seoul)
11) sa-east-1 : South America (Sao Paulo)
12) cn-north-1 : China (Beijing)
13) us-east-2 : US East (Columbus)
14) ca-central-1 : Canada (Central)
15) eu-west-2 : EU (London)
(default is 3): 3
Note
If you have previously configured a default region with the EB CLI, the AWS CLI or an SDK,
the EB CLI skips this step and creates the application in the default region unless you
explicitly specify a region with the --region (p. 558) option.
3. Provide a set of AWS credentials with appropriate permissions (p. 388). If you have an appropriate
set of stored credentials (p. 492), the EB CLI uses them automatically and skips this step.
Important
We strongly recommend that you do not provide your account's root credentials to Elastic
Beanstalk. Instead, create an AWS Identity and Access Management (IAM) user with
appropriate permissions and provide those credentials. For more information on managing
AWS credentials, see Best Practices for Managing AWS Access Keys.
If you do not have stored credentials, or your stored credentials do not grant the correct
permissions, eb init prompts you for credentials, as follows:
You have not yet set up your credentials or your credentials are incorrect
You must provide your credentials.
(aws-access-id): AKIAIOSFODNN7EXAMPLE
(aws-secret-key): wJalrXUtnFEMI/K7MDENG/bPxRfiCYEXAMPLEKEY
Elastic Beanstalk then stores these credentials in the AWS CLI config file with a profile name of
eb-cli.
API Version 2010-12-01
896

AWS Elastic Beanstalk Developer Guide
Step 3: Create an Environment
4. Enter your application name. For this walkthrough, use the default value, which is the application's
root directory name.
Enter Application Name
(default is "sinatraapp"): sinatraapp
5. Specify your platform. For this walkthrough, use Ruby.
Select a platform.
1) Node.js
2) PHP
3) Python
4) Ruby
5) Tomcat
6) IIS
7) Docker
8) Multi-container Docker
9) GlassFish
10) Go
11) Java
(default is 1): 6
6. Specify the platform version. For this example, use Ruby 2.1 (Puma).
Select a platform version.1
1) Ruby 2.1 (Puma)
2) Ruby 2.1 (Passenger Standalone)
3) Ruby 2.0 (Puma)
4) Ruby 2.0 (Passenger Standalone)
5) Ruby 1.9.3
(default is 1): 1
7. Specify whether you want to use SSH to log in to your instances. You won't need to log in to your
instances for this walkthrough, so enter n.
Do you want to set up SSH for your instances?
(y/n): n
Step 3: Create an Environment
Next, create an Elastic Beanstalk environment and deploy a sample application to it with eb create:
~/sinatraapp$ eb create sinatraapp-dev --sample
Note
If you see a "service role required" error message, run eb create interactively (without
specifying an environment name) and EB CLI creates the role for you.
With just one command, the EB CLI sets up all of the resources our application needs to run in AWS,
including the following:
• An Amazon S3 bucket to store environment data
• A load balancer to distribute traffic to the web server(s)
• A security group to allow incoming web traffic
• An Auto Scaling group to adjust the number of servers in response to load changes
• Amazon CloudWatch alarms that notify the Auto Scaling group when load is low or high
API Version 2010-12-01
897

AWS Elastic Beanstalk Developer Guide
Step 4: Deploy a Simple Sinatra Application
• An Amazon EC2 instance hosting our application
When the process is complete, the EB CLI outputs the public DNS name of the application server. Use eb
open to open the website in the default browser:
~/sinatraapp$ eb open
Step 4: Deploy a Simple Sinatra Application
You can now create and deploy a Sinatra application. This step describes how to implement a simple
Sinatra application and deploy it to the environment that you created in the preceding step. Our example
implements a classic application that prints a simple text string, Hello World!. You can easily extend
this example to implement more complex classic applications or modular applications.
Note
Create all of the application files in the following procedure in the application's root directory,
sinatraapp.
To create and deploy a Sinatra application
1. Create a configuration file named config.ru with the following contents.
require './helloworld'
run Sinatra::Application
2. Create a Ruby code file named helloworld.rb with the following contents.
require 'sinatra'
get '/' do
"Hello World!"
end
3. Create a Gemfile with the following contents.
source 'https://rubygems.org'
gem 'sinatra'
4. Add your files to the Git repository and then commit your changes, as follows:
~/sinatraapp$ git add .
~/sinatraapp$ git commit -m "Add a simple Sinatra application"
You should see output similar to the following indicating that your files were successfully
committed.
[master (root-commit) dcdfe6c] Add a simple Sinatra application
4 files changed, 13 insertions(+)
create mode 100644 .gitignore
create mode 100644 Gemfile
create mode 100644 config.ru
create mode 100644 helloworld.rb
The files are committed to the current Git branch. Because you have not yet explicitly created any
branches, the files are committed to the default branch, which is named master. If the repository
has multiple branches, you can configure Git to push each branch to a different environment. For
more information, see Managing Elastic Beanstalk Environments with the EB CLI (p. 492).
API Version 2010-12-01
898

AWS Elastic Beanstalk Developer Guide
Step 5: Clean Up
5. Deploy the new Sinatra application to the environment.
~/sinatraapp$ eb deploy
The eb deploy command creates a bundle (p. 58) of the application code in the master branch and
deploys it to the environment, replacing the default application. The second deployment should be
much faster than the first because you have already created the environment's AWS resources.
6. Run the eb status --verbose command to check your environment status. You should see
output similar to the following.
~/sinatraapp$ eb status --verbose
Environment details for: sinatraapp-dev
Application name: sinatraapp
Region: us-west-2
Deployed Version: dcdf
Environment ID: e-kn7feaqre2
Platform: 64bit Amazon Linux 2014.09 v1.2.0 running Ruby 2.1 (Puma)
Tier: WebServer-Standard
CNAME: sinatraapp-dev.elasticbeanstalk.com
Updated: 2015-03-03 23:15:19.183000+00:00
Status: Ready
Health: Green
Running instances: 1
i-c2e712cf: InService
Repeat the command until Status is Ready and Health is Green. Then, refresh your browser or run
eb open again to view the updated application, which should display Hello World!.
Note
For a detailed description of the deployment, you can display the deployment log by running eb
logs.
Step 5: Clean Up
When you have finished, you can terminate the application's environment by running the following
command from the root directory, sinatraapp.
~/sinatraapp$ eb terminate
This command shuts down all of the environment's AWS resources, so you do not incur further charges.
It typically takes a few minutes. When the process is complete, Elastic Beanstalk displays the following
message.
INFO: terminateEnvironment completed successfully.
Note
If you have attached an Amazon Relational Database Service (Amazon RDS) database instance
to your environment, termination deletes the instance. If you want to save your data, create
a snapshot before terminating the environment. For more information, see Creating a DB
Snapshot. For more information about using Amazon RDS with Elastic Beanstalk, see Using
Amazon RDS with Ruby.
Related Resources
For more information about Git commands, see Git - Fast Version Control System.
API Version 2010-12-01
899
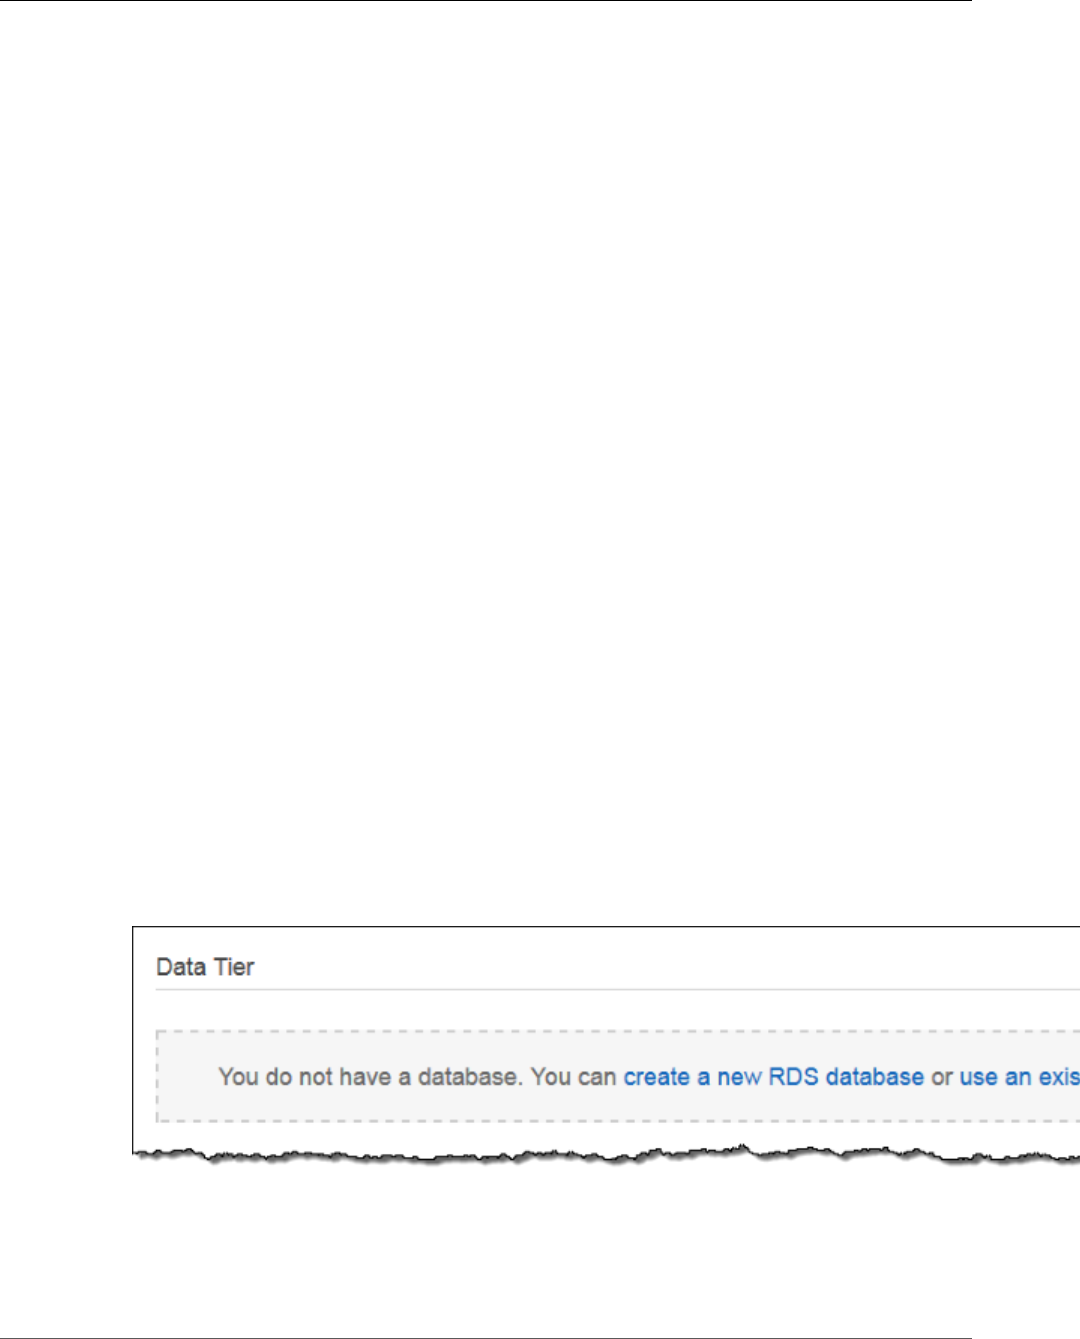
AWS Elastic Beanstalk Developer Guide
Adding a Database
This walkthrough uses only a few of the EB CLI commands. For a complete list run eb --help or see EB
CLI Command Reference (p. 511).
Adding an Amazon RDS DB Instance to Your Ruby
Application Environment
You can use an Amazon Relational Database Service (Amazon RDS) DB instance to store data gathered
and modified by your application. The database can be attached to your environment and managed by
Elastic Beanstalk, or created and managed externally.
If you are using Amazon RDS for the first time, add a DB instance (p. 900) to a test environment with
the Elastic Beanstalk Management Console and verify that your application can connect to it.
To connect to a database, add the adapter (p. 901) to your application and configure a
connection (p. 901) with the environment properties provided by Elastic Beanstalk. The configuration
and connection code vary depending on the database engine and framework that you use.
For production environments, create a DB instance outside of your Elastic Beanstalk environment to
decouple your environment resources from your database resources. Using an external DB instance lets
you connect to the same database from multiple environments and perform blue-green deployments.
For instructions, see Using Elastic Beanstalk with Amazon Relational Database Service (p. 439).
Sections
•Adding a DB Instance to Your Environment (p. 900)
•Downloading an Adapter (p. 901)
•Connecting to a Database (p. 901)
Adding a DB Instance to Your Environment
To add a DB instance to your environment
1. Open the Elastic Beanstalk console.
2. Navigate to the management page (p. 65) for your environment.
3. Choose Configuration.
4. Under Data Tier, choose Create a new RDS database.
5. Choose a DB engine, enter a user name and password, and then choose Apply.
Adding a DB instance takes about 10 minutes. When the environment update is complete, the DB
instance's hostname and other connection information are available to your application through the
following environment properties:
API Version 2010-12-01
900

AWS Elastic Beanstalk Developer Guide
Downloading an Adapter
•RDS_HOSTNAME – The hostname of the DB instance.
Amazon RDS console label – Endpoint is the hostname.
•RDS_PORT – The port on which the DB instance accepts connections. The default value varies between
DB engines.
Amazon RDS console label – Port
•RDS_DB_NAME – The database name, ebdb.
Amazon RDS console label – DB Name
•RDS_USERNAME – The user name that you configured for your database.
Amazon RDS console label – Username
•RDS_PASSWORD – The password that you configured for your database.
For more information about configuring an internal DB instance, see Adding a Database to Your Elastic
Beanstalk Environment (p. 186).
Downloading an Adapter
Add the database adapter to your project's gem file (p. 886).
Example Gemfile – Rails with MySQL
source 'https://rubygems.org'
gem 'puma'
gem 'rails', '4.1.8'
gem 'mysql2'
Common Adapter Gems for Ruby
•MySQL – mysql2
•PostgreSQL – pg
•Oracle – activerecord-oracle_enhanced-adapter
•SQL Server – sql_server
Connecting to a Database
Elastic Beanstalk provides connection information for attached DB instances in environment properties.
Use ENV['VARIABLE'] to read the properties and configure a database connection.
Example config/database.yml – Ruby on Rails Database Configuration (MySQL)
production:
adapter: mysql2
encoding: utf8
database: <%= ENV['RDS_DB_NAME'] %>
username: <%= ENV['RDS_USERNAME'] %>
password: <%= ENV['RDS_PASSWORD'] %>
host: <%= ENV['RDS_HOSTNAME'] %>
port: <%= ENV['RDS_PORT'] %>
API Version 2010-12-01
901

AWS Elastic Beanstalk Developer Guide
Tools
Tools
AWS SDK for Ruby
You can get started in minutes with a single, downloadable package complete with the AWS Ruby
library, code samples, and documentation. You can build Ruby applications on top of APIs that take the
complexity out of coding directly against web services interfaces. The all-in-one library provides Ruby
developer-friendly APIs that hide much of the lower-level tasks associated with programming for the
AWS cloud, including authentication, request retries, and error handling. Practical examples are provided
in Ruby for how to use the libraries to build applications. For information about the SDK, sample code,
documentation, tools, and additional resources, go to http://aws.amazon.com/ruby/.
Git Deployment Via EB CLI
EB CLI is an AWS Elastic Beanstalk that enables you to deploy applications quickly and more easily from
the command line. To learn how to get started deploying a Ruby application to Elastic Beanstalk using eb
and Git, see Deploying Elastic Beanstalk Applications in Ruby Using EB CLI and Git (p. 884).
Resources
There are several places you can go to get additional help when developing your Ruby applications:
Resource Description
AWS SDK for Ruby Install AWS SDK for Ruby.
Ruby Development Forum Post your questions and get feedback.
Ruby Developer Center One-stop shop for sample code, documentation, tools, and
additional resources.
API Version 2010-12-01
902

AWS Elastic Beanstalk Developer Guide
Connectivity
Troubleshooting
This chapter provides a table of the most common Elastic Beanstalk issues and how to resolve or work
around them. Error messages can appear as events on the environment Dashboard in the console, in
logs, or on the health page.
If the health of your environment changes to red, try the following:
• Review recent environment events (p. 365). Messages from Elastic Beanstalk about deployment, load,
and configuration issues often appear here.
•Pull logs (p. 369) to view recent log file entries. Web server logs contain information about incoming
requests and errors.
•Connect to an instance (p. 367) and check system resources.
•Roll back (p. 124) to a previous, working version of the application.
• Undo recent configuration changes or restore a saved configuration (p. 206).
• Deploy a new environment. If it appears healthy, perform a CNAME swap (p. 129) to route traffic to the
new environment and continue to debug the old one.
Topics
•Connectivity (p. 903)
•Environment Creation and Instance Launches (p. 904)
•Deployments (p. 904)
•Health (p. 904)
•Configuration (p. 905)
•Troubleshooting Docker Containers (p. 905)
•FAQ (p. 906)
Connectivity
Issue: Unable to connect to Amazon RDS from Elastic Beanstalk.
To connect RDS to your Elastic Beanstalk application, do the following:
• Make sure RDS is in the same Region as your Elastic Beanstalk application.
• Make sure the RDS security group for your instance has an authorization for the Amazon EC2 security
group you are using for your Elastic Beanstalk environment. For instructions on how to find the name
of your EC2 security group using the AWS Management Console, see Security Groups (p. 168). For
more information about configuring your EC2 security group, go to the "Authorizing Network Access to
an Amazon EC2 Security Group" section of Working with DB Security Groups in the Amazon Relational
Database Service User Guide.
• For Java, make sure the MySQL JAR file is in your WEB-INF/lib. See Adding an Amazon RDS DB Instance
to Your Java Application Environment (p. 690) for more details.
Issue: Servers that were created in the AWS Management Console do not appear in the Toolkit for Eclipse
You can manually import servers by following the instructions at Importing Existing Environments into
Eclipse (p. 696).
API Version 2010-12-01
903

AWS Elastic Beanstalk Developer Guide
Environment Creation
Environment Creation and Instance Launches
Event: Failed to Launch Environment
This event occurs when Elastic Beanstalk attempts to launch an environment and encounters failures
along the way. Previous events on the Events page will alert you to the root cause of this issue.
Event: Create environment operation is complete, but with command timeouts. Try increasing the timeout
period.
Your application may take a long time to deploy if you use configuration files that run commands on the
instance, download large files, or install packages. Increase the command timeout (p. 126) to give your
application more time to start running during deployments.
Event: The following resource(s) failed to create: [AWSEBInstanceLaunchWaitCondition]
This message indicates that your environment's Amazon EC2 instances did not communicate to Elastic
Beanstalk that they were launched successfully. This can occur if the instances do not have Internet
connectivity. If you configured your environment to launch instances in a private VPC subnet, ensure that
the subnet has a NAT (p. 458) to allow the instances to connect to Elastic Beanstalk.
Event: A Service Role is required in this region. Please add a Service Role option to the environment.
Elastic Beanstalk uses a service role to monitor the resources in your environment and support managed
platform updates (p. 145). See Managing Elastic Beanstalk Service Roles (p. 393) for more information.
Deployments
Issue: Application becomes unavailable during deployments
Because Elastic Beanstalk uses a drop-in upgrade process, there might be a few seconds of downtime.
Use rolling deployments (p. 125) to minimize the effect of deployments on your production
environments.
Event: Failed to create the AWS Elastic Beanstalk application version
Your application source bundle may be too large, or you may have reached the application version
limit (p. 53).
Event: Update environment operation is complete, but with command timeouts. Try increasing the timeout
period.
Your application may take a long time to deploy if you use configuration files that run commands on the
instance, download large files, or install packages. Increase the command timeout (p. 126) to give your
application more time to start running during deployments.
Health
Event: CPU Utilization Exceeds 95.00%
Try running more instances (p. 165), or choose a different instance type (p. 167).
Event: Elastic Load Balancer awseb-myapp Has Zero Healthy Instances
API Version 2010-12-01
904

AWS Elastic Beanstalk Developer Guide
Configuration
If your application appears to be working, make sure that your application’s health check URL is
configured correctly. If not, check the Health screen and environment logs for more information.
Event: Elastic Load Balancer awseb-myapp Cannot Be Found
Your environment's load balancer may have been removed out-of-band. Only make changes to your
environment's resources with the configuration options and extensibility (p. 256) provided by Elastic
Beanstalk. Rebuild your environment or launch a new one.
Event: EC2 Instance Launch Failure. Waiting for a New EC2 Instance to Launch...
Availability for your environment's instance type may be low, or you may have reached the instance limit
for your account. Check the service health dashboard to ensure that the Elastic Compute Cloud (Amazon
EC2) service is green, or request a limit increase.
Configuration
Event: You cannot configure an Elastic Beanstalk environment with values for both the Elastic Load
Balancing Target option and Application Healthcheck URL option
The Target option in the aws:elb:healthcheck namespace is deprecated. Remove the Target
option namespace) from your environment and try updating again.
Event: ELB cannot be attached to multiple subnets in the same AZ.
This message can be seen if you try to move a load balancer between subnets in the same Availability
Zone. Changing subnets on the load balancer requires moving it out of the original availability zone(s)
and then back into the original with the desired subnets. During the process, all of your instances will be
migrated between AZs, causing significant downtime. Instead, consider creating a new environment and
perform a CNAME swap (p. 129).
Troubleshooting Docker Containers
Event: Failed to pull Docker image :latest: Invalid repository name (), only [a-z0-9-_.] are allowed. Tail the
logs for more details.
Check the syntax of the dockerrun.aws.json file using a JSON validator. Also verify the dockerfile
contents against the requirements described in Single Container Docker Configuration (p. 634)
Event: No EXPOSE directive found in Dockerfile, abort deployment
The Dockerfile or the dockerrun.aws.json file does not declare the container port. Use the
EXPOSE instruction (Dockerfile) or Ports block (dockerrun.aws.json file) to expose a port for
incoming traffic.
Event: Failed to download authentication credentials repository from bucket name
The dockerrun.aws.json provides an invalid EC2 key pair and/or S3 bucket for the .dockercfg
file. Or, the instance profile does not have GetObject authorization for the S3 bucket. Verify that
the .dockercfg file contains a valid S3 bucket and EC2 key pair. Grant permissions for the action
s3:GetObject to the IAM role in the instance profile. For details, go to Managing Elastic Beanstalk
Instance Profiles (p. 388)
Event: Activity execution failed, because: WARNING: Invalid auth configuration file
Your authentication file (config.json) is not formatted correctly. See Using Images From a Private
Repository (p. 657)
API Version 2010-12-01
905

AWS Elastic Beanstalk Developer Guide
FAQ
FAQ
Question: How can I change my application URL from myapp.us-west-2.elasticbeanstalk.com to
www.myapp.com?
Register in a DNS server a CNAME record such as: www.mydomain.com CNAME
mydomain.elasticbeanstalk.com.
Question: How do I specify a specific Availability Zone for my Elastic Beanstalk application.
You can pick specific AZs using the APIs, CLI, Eclipse plug-in, or Visual Studio plug-in. For instructions
about using the AWS Management Console to specify an Availability Zone, see Your AWS Elastic
Beanstalk Environment's Auto Scaling Group (p. 165).
Question: How do I avoid getting charged for my applications?
The default set of resources used by an Elastic Beanstalk do not incur charges in the Free Tier. However,
if you change the Amazon EC2 instance type, add EC2 instances, or run resources outside of your
Elastic Beanstalk environment, charges may be accrued. For information about the free tier, see http://
aws.amazon.com/free. If you have questions about your account, contact our customer service team
directly.
Question: Can I receive notifications by SMS?
If you specify an SMS email address, such as one constructed on http://www.makeuseof.com/tag/email-
to-sms, you will receive the notifications by SMS. To subscribe to more than one email address, you can
use the Elastic Beanstalk command line to register an SNS topic with an environment.
Question: How do I change my environment's instance type?
In the Web Tier section of the environment configuration screen, choose the gear icon on the Instances
card. Select a new instance type and click Apply to update your environment. Elastic Beanstalk will
terminate all running instances and replace them with new ones.
Question: Can I prevent EBS volumes from being deleted when instances are terminated?
Instances in your environment use EBS for storage; however, the root volume is deleted when an instance
is terminated by Auto Scaling. It is not recommended to store state or other data on your instances.
If needed, you can prevent volumes from being deleted with the AWS CLI: $ aws ec2 modify-
instance-attribute -b '/dev/sdc=<vol-id>:false as described in the AWS CLI Reference.
API Version 2010-12-01
906

AWS Elastic Beanstalk Developer Guide
Sample Applications
Elastic Beanstalk Resources
The following related resources can help you as you work with this service.
•Elastic Beanstalk API Reference A comprehensive description of all SOAP and Query APIs.
Additionally, it contains a list of all SOAP data types.
•Elastic Beanstalk Sample Code and Libraries – A link to the command line tool as well as a sample
Java web application. See the links below for additional sample applications.
•elastic-beanstalk-docs on GitHub – A GitHub repository with Elastic Beanstalk tutorials and sample
configuration files (.ebextensions). The repository's README file has links to additional GitHub
repositories with sample applications.
•Elastic Beanstalk Technical FAQ – The top questions developers have asked about this product.
•Elastic Beanstalk Release Notes – A high-level overview of each release. These documents provide a
summary of new features, corrections, and known issues.
•Classes & Workshops – Links to role-based and specialty courses as well as self-paced labs to help
sharpen your AWS skills and gain practical experience.
•AWS Developer Tools – Links to developer tools, SDKs, IDE toolkits, and command line tools for
developing and managing AWS applications.
•AWS Whitepapers – Links to a comprehensive list of technical AWS whitepapers, covering topics such
as architecture, security, and economics and authored by AWS Solutions Architects or other technical
experts.
•AWS Support Center – The hub for creating and managing your AWS Support cases. Also includes
links to other helpful resources, such as forums, technical FAQs, service health status, and AWS Trusted
Advisor.
•AWS Support – The primary web page for information about AWS Support, a one-on-one, fast-
response support channel to help you build and run applications in the cloud.
•Contact Us – A central contact point for inquiries concerning AWS billing, account, events, abuse, and
other issues.
•AWS Site Terms – Detailed information about our copyright and trademark; your account, license, and
site access; and other topics.
Sample Applications
The following are download links to the sample applications that are deployed as part of Getting Started
Using Elastic Beanstalk (p. 3).
Note
Some samples use features that may have been released since the release of the platform you
are using. If the sample fails to run, try updating your platform to a current version, as described
in the section called “Supported Platforms” (p. 26).
•Single Container Docker – docker-singlecontainer-v1.zip
•Multicontainer Docker – docker-multicontainer-v2.zip
•Preconfigured Docker (Glassfish) – docker-glassfish-v1.zip
•Preconfigured Docker (Python 3) – docker-python-v1.zip
•Preconfigured Docker (Go) – docker-golang-v1.zip
•Go – go-v1.zip
API Version 2010-12-01
907

AWS Elastic Beanstalk Developer Guide
Sample Applications
•Java SE – java-se-jetty-gradle-v3.zip
•Tomcat – java-tomcat-v3.zip
•.NET – dotnet-asp-v1.zip
•Node.js – nodejs-v1.zip
•PHP – php-v1.zip
•Python – python-v1.zip
•Ruby (Passenger Standalone) – ruby-passenger-v2.zip
•Ruby (Puma) – ruby-puma-v2.zip
API Version 2010-12-01
908

AWS Elastic Beanstalk Developer Guide
Packer
Platform History
Topics
•Packer Platform History (p. 909)
•Single Container Docker Platform History (p. 912)
•Multicontainer Docker Platform History (p. 913)
•Docker Platform Earlier History (p. 914)
•Preconfigured Docker Platform History (p. 929)
•Go Platform History (p. 962)
•Tomcat Platform History (p. 967)
•Java SE Platform History (p. 990)
•.NET on Windows Server with IIS Platform History (p. 997)
•Node.js Platform History (p. 1030)
•PHP Platform History (p. 1045)
•Python Platform History (p. 1067)
•Ruby Platform History (p. 1085)
Packer Platform History
This page lists the previous versions of AWS Elastic Beanstalk's Packer platforms and the dates that each
version was current. Platform versions that you used to launch or update an environment in the last 30
days remain available (to the using account, in the used region) even after they are no longer current.
See the Supported Platforms (p. 26) page for information on the latest version of each platform
supported by Elastic Beanstalk. Detailed release notes are available for recent releases at
aws.amazon.com/releasenotes.
The following Elastic Beanstalk platform configurations for Packer were current between November 14,
2017 and December 19, 2017:
Configuration and Solution
Stack Name
AMI Packer Version
Elastic Beanstalk Packer Builder
version 2.4.0
64bit Amazon Linux 2017.09
v2.4.0 running Packer 1.0.3
2017.09.1 1.0.3
The following Elastic Beanstalk platform configurations for Packer were current between October 30,
2017 and November 13, 2017:
Configuration and Solution
Stack Name
AMI Packer Version
Elastic Beanstalk Packer Builder
version 2.3.4
2017.09.0 1.0.3
API Version 2010-12-01
909

AWS Elastic Beanstalk Developer Guide
Packer
Configuration and Solution
Stack Name
AMI Packer Version
64bit Amazon Linux 2017.09
v2.3.4 running Packer 1.0.3
The following Elastic Beanstalk platform configurations for Packer were current between September 25,
2017 and October 29, 2017:
Configuration and Solution
Stack Name
AMI Packer Version
Elastic Beanstalk Packer Builder
version 2.3.3
64bit Amazon Linux 2017.03
v2.3.3 running Packer 1.0.3
2017.03.1 1.0.3
The following Elastic Beanstalk platform configurations for Packer were current between August 30,
2017 and September 24, 2017:
Configuration and Solution
Stack Name
AMI Packer Version
Elastic Beanstalk Packer Builder
version 2.3.2
64bit Amazon Linux 2017.03
v2.3.2 running Packer 1.0.3
2017.03.1 1.0.3
The following Elastic Beanstalk platform configurations for Packer were current between August 11,
2017 and August 29, 2017:
Configuration and Solution
Stack Name
AMI Packer Version
Elastic Beanstalk Packer Builder
version 2.3.1
64bit Amazon Linux 2017.03
v2.3.1 running Packer 1.0.3
2017.03.1 1.0.3
The following Elastic Beanstalk platform configurations for Packer were current between July 20, 2017
and August 10, 2017:
Configuration and Solution
Stack Name
AMI Packer Version
Elastic Beanstalk Packer Builder
version 2.3.0
2017.03.1 1.0.0
API Version 2010-12-01
910

AWS Elastic Beanstalk Developer Guide
Packer
Configuration and Solution
Stack Name
AMI Packer Version
64bit Amazon Linux 2017.03
v2.3.0 running Packer 1.0.0
The following Elastic Beanstalk platform configurations for Packer were current between June 27, 2017
and July 19, 2017:
Configuration and Solution
Stack Name
AMI Packer Version
Elastic Beanstalk Packer Builder
version 2.2.2
64bit Amazon Linux 2017.03
v2.2.2 running Packer 1.0.0
2017.03.0 1.0.0
The following Elastic Beanstalk platform configurations for Packer were current between June 21, 2017
and June 26, 2017:
Configuration and Solution
Stack Name
AMI Packer Version
Elastic Beanstalk Packer Builder
version 2.2.1
64bit Amazon Linux 2017.03
v2.2.1 running Packer 1.0.0
2017.03.0 1.0.0
The following Elastic Beanstalk platform configurations for Packer were current between May 19, 2017
and June 20, 2017:
Configuration and Solution
Stack Name
AMI Packer Version
Elastic Beanstalk Packer Builder
version 2.2.0
64bit Amazon Linux 2017.03
v2.2.0 running Packer 1.0.0
2017.03.0 1.0.0
The following Elastic Beanstalk platform configurations for Packer were current between April 21, 2017
and May 18, 2017:
Configuration and Solution
Stack Name
AMI Packer Version
Elastic Beanstalk Packer Builder
version 2.1.0
2016.09.0 1.0.0
API Version 2010-12-01
911

AWS Elastic Beanstalk Developer Guide
Single Container Docker
Configuration and Solution
Stack Name
AMI Packer Version
64bit Amazon Linux 2016.09
v2.1.0 running Packer 1.0.0
The following Elastic Beanstalk platform configurations for Packer were current between April 5, 2017
and April 21, 2017:
Configuration and Solution
Stack Name
AMI Packer Version
Elastic Beanstalk Packer Builder
version 2.0.2
64bit Amazon Linux 2016.09
v2.0.2 running Packer 0.12.1
2016.09.0 0.12.1
The following Elastic Beanstalk platform configurations for Packer were current between March 8, 2017
and April 4, 2017:
Configuration and Solution
Stack Name
AMI Packer Version
Elastic Beanstalk Packer Builder
version 2.0.1
64bit Amazon Linux 2016.09
v2.0.1 running Packer 0.12.1
2016.09.0 0.12.1
The following Elastic Beanstalk platform configurations for Packer were current between February 22,
2017 and March 7, 2017:
Configuration and Solution
Stack Name
AMI Packer Version
Elastic Beanstalk Packer Builder
version 2.0.0
64bit Amazon Linux 2016.09
v2.0.0 running Packer 0.12.1
2016.09.0 0.12.1
Single Container Docker Platform History
This page lists the previous versions of AWS Elastic Beanstalk's Single Container Docker platform
configurations and the dates that each version was current. Configurations that you used to launch or
update an environment in the last 30 days remain available (to the using account, in the used region)
even after they are no longer current.
For Single Container Docker platform configurations that were current earlier than September 25, 2017,
see Docker Platform Earlier History (p. 914).
API Version 2010-12-01
912

AWS Elastic Beanstalk Developer Guide
Multicontainer Docker
See the Supported Platforms (p. 26) page for information on the latest version of each platform
supported by Elastic Beanstalk. Detailed release notes are available for recent releases at
aws.amazon.com/releasenotes.
The following Elastic Beanstalk platform configurations for Single Container Docker were current
between November 14, 2017 and December 19, 2017:
Configuration and Solution
Stack Name
AMI Docker Version Proxy Server
Single Container Docker 17.06
version 2.8.0
64bit Amazon Linux 2017.09
v2.8.0 running Docker 17.06.2-ce
2017.09.1 17.06.2-ce nginx 1.12.1
The following Elastic Beanstalk platform configurations for Single Container Docker were current
between September 25, 2017 and November 13, 2017:
Configuration and Solution
Stack Name
AMI Docker Version Proxy Server
Single Container Docker 17.03
version 2.7.4
64bit Amazon Linux 2017.03
v2.7.4 running Docker 17.03.2-ce
2017.03.1 17.03.2-ce nginx 1.12.1
Multicontainer Docker Platform History
This page lists the previous versions of AWS Elastic Beanstalk's Multicontainer Docker platform
configurations and the dates that each version was current. Configurations that you used to launch or
update an environment in the last 30 days remain available (to the using account, in the used region)
even after they are no longer current.
For Multicontainer Docker platform configurations that were current earlier than September 25, 2017,
see Docker Platform Earlier History (p. 914).
See the Supported Platforms (p. 26) page for information on the latest version of each platform
supported by Elastic Beanstalk. Detailed release notes are available for recent releases at
aws.amazon.com/releasenotes.
The following Elastic Beanstalk platform configurations for Multicontainer Docker were current between
December 4, 2017 and December 19, 2017:
Configuration and Solution
Stack Name
AMI Docker Version ECS Agent
Multicontainer Docker 17.06
version 2.8.0
64bit Amazon Linux 2017.09
v2.8.0 running Multi-container
Docker 17.06.2-ce (Generic)
2017.09.1 17.06.2-ce 1.15.2
API Version 2010-12-01
913

AWS Elastic Beanstalk Developer Guide
Docker
The following Elastic Beanstalk platform configurations for Multicontainer Docker were current between
September 25, 2017 and December 3, 2017:
Configuration and Solution
Stack Name
AMI Docker Version ECS Agent
Multicontainer Docker 17.03
version 2.7.5
64bit Amazon Linux 2017.03
v2.7.5 running Multi-container
Docker 17.03.2-ce (Generic)
2017.03.1 17.03.2-ce 1.14.4
Docker Platform Earlier History
This page lists earlier versions of AWS Elastic Beanstalk's Single Container Docker and Multicontainer
Docker platform configurations, before September 25, 2017, and the dates that each version was
current. Configurations that you used to launch or update an environment in the last 30 days remain
available (to the using account, in the used region) even after they are no longer current.
See the Supported Platforms (p. 26) page for information on the latest version of each platform
supported by Elastic Beanstalk. Detailed release notes are available for recent releases at
aws.amazon.com/releasenotes.
The following Elastic Beanstalk platform configurations for Docker were current between August 30,
2017 and September 24, 2017:
Configuration and Solution
Stack Name
AMI Docker Version Proxy Server
Single Container Docker 17.03
version 2.7.3
64bit Amazon Linux 2017.03
v2.7.3 running Docker 17.03.1-ce
2017.03.1 17.03.1-ce nginx 1.10.3
Configuration and Solution
Stack Name
AMI Docker Version ECS Agent
Multicontainer Docker 17.03
version 2.7.4
64bit Amazon Linux 2017.03
v2.7.4 running Multi-container
Docker 17.03.1-ce (Generic)
2017.03.1 17.03.1-ce 1.14.3
The following Elastic Beanstalk platform configurations for Docker were current between August 11,
2017 and August 29, 2017:
API Version 2010-12-01
914

AWS Elastic Beanstalk Developer Guide
Docker
Configuration and Solution
Stack Name
AMI Docker Version Proxy Server
Single Container Docker 17.03
version 2.7.2
64bit Amazon Linux 2017.03
v2.7.2 running Docker 17.03.1-ce
2017.03.1 17.03.1-ce nginx 1.10.3
Configuration and Solution
Stack Name
AMI Docker Version ECS Agent
Multicontainer Docker 17.03
version 2.7.3
64bit Amazon Linux 2017.03
v2.7.3 running Multi-container
Docker 17.03.1-ce (Generic)
2017.03.1 17.03.1-ce 1.14.3
The following Elastic Beanstalk platform configurations for Docker were current between July 20, 2017
and August 10, 2017:
Configuration and Solution
Stack Name
AMI Docker Version Proxy Server
Single Container Docker 17.03
version 2.7.1
64bit Amazon Linux 2017.03
v2.7.1 running Docker 17.03.1-ce
2017.03.1 17.03.1-ce nginx 1.10.3
Configuration and Solution
Stack Name
AMI Docker Version ECS Agent
Multicontainer Docker 17.03
version 2.7.2
64bit Amazon Linux 2017.03
v2.7.2 running Multi-container
Docker 17.03.1-ce (Generic)
2017.03.1 17.03.1-ce 1.14.3
The following Elastic Beanstalk platform configurations for Docker were current between June 27, 2017
and July 19, 2017:
Configuration and Solution
Stack Name
AMI Docker Version Proxy Server
Single Container Docker 17.03
version 2.7.0
2017.03.0 17.03.1-ce nginx 1.10.2
API Version 2010-12-01
915

AWS Elastic Beanstalk Developer Guide
Docker
Configuration and Solution
Stack Name
AMI Docker Version Proxy Server
64bit Amazon Linux 2017.03
v2.7.0 running Docker 17.03.1-ce
Configuration and Solution
Stack Name
AMI Docker Version ECS Agent
Multicontainer Docker 17.03
version 2.7.1
64bit Amazon Linux 2017.03
v2.7.1 running Multi-container
Docker 17.03.1-ce (Generic)
2017.03.0 17.03.1-ce 1.14.3
The following Elastic Beanstalk platform configurations for Docker were current between June 21, 2017
and June 26, 2017:
Configuration and Solution
Stack Name
AMI Docker Version ECS Agent
Multicontainer Docker 17.03
version 2.7.0
64bit Amazon Linux 2017.03
v2.7.0 running Multi-container
Docker 17.03.1-ce (Generic)
2017.03.0 17.03.1-ce 1.14.3
The following Elastic Beanstalk platform configurations for Docker were current between May 19, 2017
and June 26, 2017:
Configuration and Solution
Stack Name
AMI Docker Version Proxy Server
Single Container Docker 1.12
version 2.6.0
64bit Amazon Linux 2017.03
v2.6.0 running Docker 1.12.6
2017.03.0 1.12.6 nginx 1.10.2
The following Elastic Beanstalk platform configurations for Docker were current between May 19, 2017
and June 20, 2017:
Configuration and Solution
Stack Name
AMI Docker Version ECS Agent
Multicontainer Docker 1.12
version 2.6.0
2017.03.0 1.12.6 1.14.1
API Version 2010-12-01
916

AWS Elastic Beanstalk Developer Guide
Docker
Configuration and Solution
Stack Name
AMI Docker Version ECS Agent
64bit Amazon Linux 2017.09
v2.6.0 running Multi-container
Docker 1.12.6 (Generic)
The following Elastic Beanstalk platform configurations for Docker were current between April 5, 2017
and May 18, 2017:
Configuration and Solution
Stack Name
AMI Docker Version Proxy Server
Single Container Docker 1.12
version 2.5.2
64bit Amazon Linux 2016.09
v2.5.2 running Docker 1.12.6
2016.09.0 1.12.6 nginx 1.10.1
Configuration and Solution
Stack Name
AMI Docker Version ECS Agent
Multicontainer Docker 1.12
version 2.5.2
64bit Amazon Linux 2016.09
v2.5.2 running Multi-container
Docker 1.12.6 (Generic)
2016.09.0 1.12.6 1.14.0
The following Elastic Beanstalk platform configurations for Docker were current between March 8, 2017
and April 4, 2017:
Configuration and Solution
Stack Name
AMI Docker Version Proxy Server
Single Container Docker 1.12
version 2.5.1
64bit Amazon Linux 2016.09
v2.5.1 running Docker 1.12.6
2016.09.0 1.12.6 nginx 1.10.1
Configuration and Solution
Stack Name
AMI Docker Version ECS Agent
Multicontainer Docker 1.12
version 2.5.1
64bit Amazon Linux 2016.09
v2.5.1 running Multi-container
Docker 1.12.6 (Generic)
2016.09.0 1.12.6 1.13.0
API Version 2010-12-01
917

AWS Elastic Beanstalk Developer Guide
Docker
The following Elastic Beanstalk platform configurations for Docker were current between January 28,
2017 and March 7, 2017:
Configuration and Solution
Stack Name
AMI Docker Version Proxy Server
Single Container Docker 1.12
version 2.5.0
64bit Amazon Linux 2016.09
v2.5.0 running Docker 1.12.6
2016.09.0 1.12.6 nginx 1.10.1
Configuration and Solution
Stack Name
AMI Docker Version ECS Agent
Multicontainer Docker 1.12
version 2.5.0
64bit Amazon Linux 2016.09
v2.5.0 running Multi-container
Docker 1.12.6 (Generic)
2016.09.0 1.12.6 1.13.0
The following Elastic Beanstalk platform configurations for Docker were current between January 16,
2017 and January 27, 2017:
Configuration and Solution
Stack Name
AMI Docker Version Proxy Server
Single Container Docker 1.12
version 2.4.0
64bit Amazon Linux 2016.09
v2.4.0 running Docker 1.12.6
2016.09.0 1.12.6 nginx 1.10.1
Configuration and Solution
Stack Name
AMI Docker Version ECS Agent
Multicontainer Docker 1.12
version 2.4.0
64bit Amazon Linux 2016.09
v2.4.0 running Multi-container
Docker 1.12.6 (Generic)
2016.09.0 1.12.6 1.13.0
The following Elastic Beanstalk platform configurations for Docker were current between December 21,
2016 and January 15, 2017:
Configuration and Solution
Stack Name
AMI Docker Version Proxy Server
Single Container Docker 1.11
version 2.3.0
2016.09.0 1.11.2 nginx 1.10.1
API Version 2010-12-01
918

AWS Elastic Beanstalk Developer Guide
Docker
Configuration and Solution
Stack Name
AMI Docker Version Proxy Server
64bit Amazon Linux 2016.09
v2.3.0 running Docker 1.11.2
Configuration and Solution
Stack Name
AMI Docker Version ECS Agent
Multicontainer Docker 1.11
version 2.3.0
64bit Amazon Linux 2016.09
v2.3.0 running Multi-container
Docker 1.11.2 (Generic)
2016.09.0 1.11.2 1.13.0
The following Elastic Beanstalk platform configurations for Docker were current between December 12,
2016 and December 21, 2016:
Configuration and Solution
Stack Name
AMI Docker Version Proxy Server
Single Container Docker 1.11
version 2.2.2
64bit Amazon Linux 2016.09
v2.2.2 running Docker 1.11.2
2016.09.0 1.11.2 nginx 1.10.1
Configuration and Solution
Stack Name
AMI Docker Version ECS Agent
Multicontainer Docker 1.11
version 2.2.2
64bit Amazon Linux 2016.09
v2.2.2 running Multi-container
Docker 1.11.2 (Generic)
2016.09.0 1.11.2 1.11.2
The following Elastic Beanstalk platform configurations for Docker were current between October 28,
2016 and December 11, 2016:
Configuration and Solution
Stack Name
AMI Docker Version Proxy Server
Single Container Docker 1.11
version 2.2.0
64bit Amazon Linux 2016.09
v2.2.0 running Docker 1.11.2
2016.09.0 1.11.2 nginx 1.8.1
API Version 2010-12-01
919

AWS Elastic Beanstalk Developer Guide
Docker
Configuration and Solution
Stack Name
AMI Docker Version ECS Agent
Multicontainer Docker 1.11
version 2.2.0
64bit Amazon Linux 2016.09
v2.2.0 running Multi-container
Docker 1.11.2 (Generic)
2016.09.0 1.11.2 1.11.2
The following Elastic Beanstalk platform configurations for Docker were current between September 16,
2016 and October 27, 2016:
Configuration and Solution
Stack Name
AMI Docker Version Proxy Server
Single Container Docker 1.11
version 2.1.6
64bit Amazon Linux 2016.03
v2.1.6 running Docker 1.11.2
2016.03.3 1.11.2 nginx 1.8.1
Configuration and Solution
Stack Name
AMI Docker Version ECS Agent
Multicontainer Docker 1.11
version 2.1.7
64bit Amazon Linux 2016.03
v2.1.7 running Multi-container
Docker 1.11.2 (Generic)
2016.03.3 1.11.2 1.11.2
The following Elastic Beanstalk platform configurations for Docker were current between August 24,
2016 and September 15, 2016:
Configuration and Solution
Stack Name
AMI Docker Version Proxy Server
Single Container Docker 1.11
version 2.1.3
64bit Amazon Linux 2016.03
v2.1.3 running Docker 1.11.1
2016.03.2 1.11.1 nginx 1.8.1
Configuration and Solution
Stack Name
AMI Docker Version ECS Agent
Multicontainer Docker 1.11
version 2.1.6
2016.03.3 1.11.2 1.11.1
API Version 2010-12-01
920

AWS Elastic Beanstalk Developer Guide
Docker
Configuration and Solution
Stack Name
AMI Docker Version ECS Agent
64bit Amazon Linux 2016.03
v2.1.6 running Multi-container
Docker 1.11.2 (Generic)
The following Elastic Beanstalk platform configurations for Docker were current between June 26, 2016
and August 24, 2016:
Configuration and Solution
Stack Name
AMI Docker Version Proxy Server
Single Container Docker 1.11
version 2.1.3
64bit Amazon Linux 2016.03
v2.1.3 running Docker 1.11.1
2016.03.2 1.11.1 nginx 1.8.1
Configuration and Solution
Stack Name
AMI Docker Version ECS Agent
Multicontainer Docker 1.11
version 2.1.3
64bit Amazon Linux 2016.03
v2.1.3 running Multi-container
Docker 1.11.1 (Generic)
2016.03.2 1.11.1 1.10.0
The following Elastic Beanstalk platform configurations for Docker were current between May 9, 2016
and June 26, 2016:
Configuration and Solution
Stack Name
AMI Docker Version Proxy Server
Single Container Docker 1.9
version 2.1.0
64bit Amazon Linux 2016.03
v2.1.0 running Docker 1.9.1
2016.03 1.9.1 nginx 1.8.1
Configuration and Solution
Stack Name
AMI Docker Version ECS Agent
Multicontainer Docker 1.9
version 2.1.1
64bit Amazon Linux 2016.03
v2.1.1 running Multi-container
Docker 1.9.1 (Generic)
2016.03 1.9.1 1.8.2
API Version 2010-12-01
921

AWS Elastic Beanstalk Developer Guide
Docker
The following Elastic Beanstalk platform configurations for Docker were current between April 7, 2016
and May 9, 2016:
Configuration and Solution
Stack Name
AMI Docker Version Proxy Server
Single Container Docker 1.9
version 2.1.0
64bit Amazon Linux 2016.03
v2.1.0 running Docker 1.9.1
2016.03 1.9.1 nginx 1.8.1
Multicontainer Docker 1.9
version 2.1.0
64bit Amazon Linux 2016.03
v2.1.0 running Multi-container
Docker 1.9.1 (Generic)
2016.03 1.9.1 none
The following Elastic Beanstalk platform configurations for Docker were current between February 26,
2016 and April 7, 2016:
Configuration and Solution
Stack Name
AMI Docker Version Web Server
Single Container Docker 1.9
version 2.0.8
64bit Amazon Linux 2015.09
v2.0.8 running Docker 1.9.1
2015.09 1.9.1 nginx 1.8.0
Multicontainer Docker 1.9
version 2.0.8
64bit Amazon Linux 2015.09
v2.0.8 running Multi-container
Docker 1.9.1 (Generic)
2015.09 1.9.1 none
The following Elastic Beanstalk platform configurations for Docker were current between February 11,
2016 and February 26, 2016:
Configuration and Solution
Stack Name
AMI Docker Version Web Server
Single Container Docker 1.9
version 2.0.7
64bit Amazon Linux 2015.09
v2.0.7 running Docker 1.9.1
2015.09 1.9.1 nginx 1.8.0
Multicontainer Docker 1.9
version 2.0.7
2015.09 1.9.1 none
API Version 2010-12-01
922

AWS Elastic Beanstalk Developer Guide
Docker
Configuration and Solution
Stack Name
AMI Docker Version Web Server
64bit Amazon Linux 2015.09
v2.0.7 running Multi-container
Docker 1.9.1 (Generic)
The following Elastic Beanstalk platform configurations for Docker were current between January 11,
2016 and February 11, 2016:
Configuration and Solution
Stack Name
AMI Docker Version Web Server
Single Container Docker 1.7
version 2.0.6
64bit Amazon Linux 2015.09
v2.0.6 running Docker 1.7.1
2015.09 1.7.1 nginx 1.8.0
Multicontainer Docker 1.7
version 2.0.6
64bit Amazon Linux 2015.09
v2.0.6 running Multi-container
Docker 1.7.1 (Generic)
2015.09 1.7.1 none
The following Elastic Beanstalk platform configurations for Docker were current between November 4,
2015 and January 11, 2016:
Configuration and Solution
Stack Name
AMI Docker Version Web Server
Single Container Docker 1.7
version 2.0.4
64bit Amazon Linux 2015.09
v2.0.4 running Docker 1.7.1
2015.09 1.7.1 nginx 1.8.0
Multicontainer Docker 1.7
version 2.0.4
64bit Amazon Linux 2015.09
v2.0.4 running Multi-container
Docker 1.7.1 (Generic)
2015.09 1.7.1 none
The following Elastic Beanstalk platform configurations for Docker were current between September 25,
2015 and November 4, 2015:
Configuration and Solution
Stack Name
AMI Docker Version Web Server
Single Container Docker 1.7
version 2.0.2
2015.03 1.7.1 Nginx 1.6.2
API Version 2010-12-01
923

AWS Elastic Beanstalk Developer Guide
Docker
Configuration and Solution
Stack Name
AMI Docker Version Web Server
64bit Amazon Linux 2015.03
v2.0.2 running Docker 1.7.1
Multicontainer Docker 1.7
version 2.0.2
64bit Amazon Linux 2015.03
v2.0.2 running Multi-container
Docker 1.7.1 (Generic)
2015.03 1.7.1 none
The following Elastic Beanstalk platform configurations for Docker were current between September 18,
2015 and September 25, 2015:
Configuration and Solution
Stack Name
AMI Docker Version Web Server
Single Container Docker 1.6
version 2.0.1
64bit Amazon Linux 2015.03
v2.0.1 running Docker 1.6.2
2015.03 1.6.2 nginx 1.6.2
Multicontainer Docker 1.6
version 2.0.1
64bit Amazon Linux 2015.03
v2.0.1 running Multi-container
Docker 1.6.2 (Generic)
2015.03 1.6.2 none
The following Elastic Beanstalk platform configurations for Docker were current between August 11,
2015 and September 18, 2015:
Configuration and Solution
Stack Name
AMI Docker Version Web Server
Single Container Docker 1.6
version 2.0.0
64bit Amazon Linux 2015.03
v2.0.0 running Docker 1.6.2
2015.03 1.6.2 nginx 1.6.2
Multicontainer Docker 1.6
version 2.0.0
64bit Amazon Linux 2015.03
v2.0.0 running Multi-container
Docker 1.6.2 (Generic)
2015.03 1.6.2 none
The following Elastic Beanstalk platform configurations for Docker were current between August 3, 2015
and August 11, 2015:
API Version 2010-12-01
924

AWS Elastic Beanstalk Developer Guide
Docker
Configuration and Solution
Stack Name
AMI Docker Version Web Server
Single Container Docker 1.6
version 1.4.6
64bit Amazon Linux 2015.03
v1.4.6 running Docker 1.6.2
2015.03 1.6.2 nginx 1.6.2
Multicontainer Docker 1.6
version 1.4.6
64bit Amazon Linux 2015.03
v1.4.6 running Multi-container
Docker 1.6.2 (Generic)
2015.03 1.6.2 none
The following Elastic Beanstalk platform configurations for Docker were current between July 23, 2015
and August 3, 2015:
Configuration and Solution
Stack Name
AMI Docker Version Web Server
Single Container Docker 1.6
version 1.4.3
64bit Amazon Linux 2015.03
v1.4.3 running Docker 1.6.2
2015.03 1.6.2 nginx 1.6.2
Multicontainer Docker 1.6
version 1.4.5
64bit Amazon Linux 2015.03
v1.4.5 running Multi-container
Docker 1.6.2 (Generic)
2015.03 1.6.2 none
The following Elastic Beanstalk platform configurations for Docker were current between June 15, 2015
and July 23, 2015:
Configuration and Solution Stack Name AMI Docker Version
Single Container Docker 1.6 version
1.4.3
64bit Amazon Linux 2015.03 v1.4.3
running Docker 1.6.2
2015.03 1.6.2
Multicontainer Docker 1.6 version 1.4.3
64bit Amazon Linux 2015.03 v1.4.3
running Multi-container Docker 1.6.2
(Generic)
2015.03 1.6.2
The following Elastic Beanstalk platform configurations for Docker were current between May 27, 2015
and June 15, 2015:
API Version 2010-12-01
925

AWS Elastic Beanstalk Developer Guide
Docker
Docker Configurations
Name AMI Docker Version
64bit Amazon Linux 2015.03 v1.4.1 running
Single Container Docker 1.6.0
2015.03 1.6.0
64bit Amazon Linux 2015.03 v1.4.1 running
Multi-container Docker 1.6.0 (Generic)
2015.03 1.6.0
The following Elastic Beanstalk platform configurations for Docker were current between May 8, 2015
and May 26, 2015:
Docker Configurations
Name AMI Docker Version
64bit Amazon Linux 2015.03 v1.4.0 running
Docker 1.6.01
2015.03 1.6.0
64bit Amazon Linux 2015.03 v1.4.0 running
Multicontainer Docker 1.6.0 (Generic)1
2015.03 1.6.0
1ALAS-2015-522
The following Elastic Beanstalk platform configurations for Docker were current between April 22, 2015
and May 7, 2015:
Docker Configurations
Name AMI Docker Version
64bit Amazon Linux 2015.03 v1.3.1 running
Docker 1.5.0
2015.03 1.5.0
64bit Amazon Linux 2014.09 v1.2.1 running
Multicontainer Docker 1.3.3 (Generic)
2014.09 1.3.3
64bit Amazon Linux 2014.09 v1.2.0 running
Multicontainer Docker 1.3.3 (Generic)
2014.09 1.3.3
The following Elastic Beanstalk platform configurations for Docker were current between March 24,
2015 and April 21, 2015:
Docker Configurations
Name AMI Docker Version
64bit Amazon Linux 2014.09 v1.2.1 running
Docker 1.5.0
2014.09 1.5.0
64bit Amazon Linux 2014.09 v1.2.0 running
Multicontainer Docker 1.3.3 (Generic)
2014.09 1.3.3
API Version 2010-12-01
926

AWS Elastic Beanstalk Developer Guide
Docker
The following Elastic Beanstalk platform configurations for Docker were current between February 17,
2015 and March 23, 2015:
Docker Configurations
Name AMI Docker Version
64bit Amazon Linux 2014.09 v1.2.0 running
Docker 1.3.3
2014.09 1.3.3
The following Elastic Beanstalk platform configurations for Docker were current between January 28,
2015 and February 16, 2015:
Docker Configurations
Name AMI Docker Version
64bit Amazon Linux 2014.091 v1.1.0 running
Docker 1.3.3
2014.09 1.3.3
1CVE-2015-0235 Advisory (Ghost)
The following Elastic Beanstalk platform configurations for Docker were current between December 13,
2014 and January 27, 2015:
Docker Configurations
Name AMI Docker Version
64bit Amazon Linux 2014.091 v1.0.11 running
Docker 1.3.3
2014.09 1.3.3
1ALAS-2014-461
The following Elastic Beanstalk platform configurations for Docker were current between November 26,
2014 and December 12, 2014:
Docker Configurations
Name AMI Docker Version
64bit Amazon Linux 2014.09 v1.0.10 running
Docker 1.3.2
2014.09 1.3.2
The following Elastic Beanstalk platform configurations for Docker were current between October 16,
2014 and November 25, 2014:
Docker Configurations
Name AMI Docker Version
64bit Amazon Linux 2014.09 v1.0.91 running
Docker 1.2.0
2014.09 1.2.0
API Version 2010-12-01
927

AWS Elastic Beanstalk Developer Guide
Docker
Docker Configurations
64bit Amazon Linux 2014.03 v1.0.91 running
Docker 1.0.0
2014.03 1.0.0
1CVE-2014-3566 Advisory
The following Elastic Beanstalk platform configurations for Docker were current between October 9,
2014 and October 15, 2014:
Docker Configurations
Name AMI Docker Version
64bit Amazon Linux 2014.09 v1.0.8 running
Docker 1.2.0
2014.09 1.2.0
The following Elastic Beanstalk platform configurations for Docker were current between September 24,
2014 and October 8, 2014:
Docker Configurations
Name AMI Docker Version
64bit Amazon Linux 2014.03 v1.0.71 running
Docker 1.0.0
2014.03 1.0.0
1 CVE-2014-6271 Advisory and ALAS-2014-419
The following Elastic Beanstalk platform configurations for Docker were current between June 30, 2014
and September 23, 2014:
Docker Configurations
Name AMI Docker Version
64bit Amazon Linux 2014.03 v1.0.1 running
Docker 1.0.0
2014.03 1.0.0
The following Elastic Beanstalk platform configurations for Docker were current between June 16, 2014
and June 29, 2014:
Docker Configurations
Name AMI Docker Version
64bit Amazon Linux 2014.03 v1.0.0 running
Docker 1.0.0
2014.03 1.0.0
The following Elastic Beanstalk platform configurations for Docker were current between June 5, 2014
and June 15, 2014:
API Version 2010-12-01
928

AWS Elastic Beanstalk Developer Guide
Preconfigured Docker
Docker Configurations
Name AMI Docker Version
64bit Amazon Linux 2014.03 v1.0.51 running
Docker 0.9.0
2014.03 0.9.0
1 OpenSSL Security Advisory
The following Elastic Beanstalk platform configurations for Docker were current between May 5, 2014
and June 4, 2014:
Docker Configurations
Name AMI Docker Version
64bit Amazon Linux 2014.03 v1.0.4 running
Docker 0.9.0
2014.03 0.9.0
The following Elastic Beanstalk platform configurations for Docker were current between April 29, 2014
and May 4, 2014:
Docker Configurations
Name AMI Docker Version
64bit Amazon Linux 2014.03 v1.0.3 running
Docker 0.9.0
2014.03 0.9.0
The following Elastic Beanstalk Docker container types were current prior to April 28, 2014:
Docker Configurations
Name AMI Docker Version
64bit Amazon Linux 2014.03 v1.0.2 running
Docker 0.9.0
2014.03 0.9.0
Preconfigured Docker Platform History
This page lists the previous versions of AWS Elastic Beanstalk's preconfigured Docker platforms and the
dates that each version was current. Platform versions that you used to launch or update an environment
in the last 30 days remain available (to the using account, in the used region) even after they are no
longer current.
See the Supported Platforms (p. 26) page for information on the latest version of each platform
supported by Elastic Beanstalk. Detailed release notes are available for recent releases at
aws.amazon.com/releasenotes.
The following Elastic Beanstalk platform configurations for preconfigured Docker were current between
November 14, 2017 and December 19, 2017:
API Version 2010-12-01
929

AWS Elastic Beanstalk Developer Guide
Preconfigured Docker
Configuration and
Solution Stack Name
AMI PlatformContainer
OS
LanguageProxy
Server
Application
Server
Docker Image
Glassfish 4.1 (Docker)
version 2.8.0
64bit Debian jessie
v2.8.0 running
GlassFish 4.1 Java
8 (Preconfigured -
Docker)
2017.09.1Docker
17.06.2-
ce
Debian
Jessie
Java
8
nginx
1.12.1
Glassfish
4.1
amazon/aws-eb-
glassfish:4.1-jdk8-
onbuild-3.5.1
Glassfish 4.0 (Docker)
version 2.8.0
64bit Debian jessie
v2.8.0 running
GlassFish 4.0 Java
7 (Preconfigured -
Docker)
2017.09.1Docker
17.06.2-
ce
Debian
Jessie
Java
7
nginx
1.12.1
Glassfish
4.0
amazon/aws-eb-
glassfish:4.0-jdk7-
onbuild-3.5.1
Go 1.4 (Docker)
version 2.8.0
64bit Debian jessie
v2.8.0 running Go
1.4 (Preconfigured -
Docker)
2017.09.1Docker
17.06.2-
ce
Debian
Jessie
Go
1.4.2
nginx
1.12.1
none golang:1.4.2-onbuild
Go 1.3 (Docker)
version 2.8.0
64bit Debian jessie
v2.8.0 running Go
1.3 (Preconfigured -
Docker)
2017.09.1Docker
17.06.2-
ce
Debian
Jessie
Go
1.3.3
nginx
1.12.1
none golang:1.3.3-onbuild
Python 3.4 with
uWSGI 2 (Docker)
version 2.8.0
64bit Debian jessie
v2.8.0 running Python
3.4 (Preconfigured -
Docker)
2017.09.1Docker
17.06.2-
ce
Debian
Jessie
Python
3.4
nginx
1.12.1
uWSGI
2.0.8
amazon/aws-
eb-python:3.4.2-
onbuild-3.5.1
The following Elastic Beanstalk platform configurations for preconfigured Docker were current between
September 25, 2017 and November 13, 2017:
Configuration and
Solution Stack Name
AMI PlatformContainer
OS
LanguageProxy
Server
Application
Server
Docker Image
Glassfish 4.1 (Docker)
version 2.7.4
64bit Debian jessie
v2.7.4 running
2017.03.1Docker
17.03.2-
ce
Debian
Jessie
Java
8
nginx
1.12.1
Glassfish
4.1
amazon/aws-eb-
glassfish:4.1-jdk8-
onbuild-3.5.1
API Version 2010-12-01
930

AWS Elastic Beanstalk Developer Guide
Preconfigured Docker
Configuration and
Solution Stack Name
AMI PlatformContainer
OS
LanguageProxy
Server
Application
Server
Docker Image
GlassFish 4.1 Java
8 (Preconfigured -
Docker)
Glassfish 4.0 (Docker)
version 2.7.4
64bit Debian jessie
v2.7.4 running
GlassFish 4.0 Java
7 (Preconfigured -
Docker)
2017.03.1Docker
17.03.2-
ce
Debian
Jessie
Java
7
nginx
1.12.1
Glassfish
4.0
amazon/aws-eb-
glassfish:4.0-jdk7-
onbuild-3.5.1
Go 1.4 (Docker)
version 2.7.4
64bit Debian jessie
v2.7.4 running Go
1.4 (Preconfigured -
Docker)
2017.03.1Docker
17.03.2-
ce
Debian
Jessie
Go
1.4.2
nginx
1.12.1
none golang:1.4.2-onbuild
Go 1.3 (Docker)
version 2.7.4
64bit Debian jessie
v2.7.4 running Go
1.3 (Preconfigured -
Docker)
2017.03.1Docker
17.03.2-
ce
Debian
Jessie
Go
1.3.3
nginx
1.12.1
none golang:1.3.3-onbuild
Python 3.4 with
uWSGI 2 (Docker)
version 2.7.4
64bit Debian jessie
v2.7.4 running Python
3.4 (Preconfigured -
Docker)
2017.03.1Docker
17.03.2-
ce
Debian
Jessie
Python
3.4
nginx
1.12.1
uWSGI
2.0.8
amazon/aws-
eb-python:3.4.2-
onbuild-3.5.1
The following Elastic Beanstalk platform configurations for preconfigured Docker were current between
August 30, 2017 and September 24, 2017:
Configuration and
Solution Stack Name
AMI PlatformContainer
OS
LanguageProxy
Server
Application
Server
Docker Image
Glassfish 4.1 (Docker)
version 2.7.3
64bit Debian jessie
v2.7.3 running
GlassFish 4.1 Java
8 (Preconfigured -
Docker)
2017.03.1Docker
17.03.1-
ce
Debian
Jessie
Java
8
nginx
1.10.3
Glassfish
4.1
amazon/aws-eb-
glassfish:4.1-jdk8-
onbuild-3.5.1
API Version 2010-12-01
931

AWS Elastic Beanstalk Developer Guide
Preconfigured Docker
Configuration and
Solution Stack Name
AMI PlatformContainer
OS
LanguageProxy
Server
Application
Server
Docker Image
Glassfish 4.0 (Docker)
version 2.7.3
64bit Debian jessie
v2.7.3 running
GlassFish 4.0 Java
7 (Preconfigured -
Docker)
2017.03.1Docker
17.03.1-
ce
Debian
Jessie
Java
7
nginx
1.10.3
Glassfish
4.0
amazon/aws-eb-
glassfish:4.0-jdk7-
onbuild-3.5.1
Go 1.4 (Docker)
version 2.7.3
64bit Debian jessie
v2.7.3 running Go
1.4 (Preconfigured -
Docker)
2017.03.1Docker
17.03.1-
ce
Debian
Jessie
Go
1.4.2
nginx
1.10.3
none golang:1.4.2-onbuild
Go 1.3 (Docker)
version 2.7.3
64bit Debian jessie
v2.7.3 running Go
1.3 (Preconfigured -
Docker)
2017.03.1Docker
17.03.1-
ce
Debian
Jessie
Go
1.3.3
nginx
1.10.3
none golang:1.3.3-onbuild
Python 3.4 with
uWSGI 2 (Docker)
version 2.7.3
64bit Debian jessie
v2.7.3 running Python
3.4 (Preconfigured -
Docker)
2017.03.1Docker
17.03.1-
ce
Debian
Jessie
Python
3.4
nginx
1.10.3
uWSGI
2.0.8
amazon/aws-
eb-python:3.4.2-
onbuild-3.5.1
The following Elastic Beanstalk platform configurations for preconfigured Docker were current between
August 11, 2017 and August 29, 2017:
Configuration and
Solution Stack Name
AMI PlatformContainer
OS
LanguageProxy
Server
Application
Server
Docker Image
Glassfish 4.1 (Docker)
version 2.7.2
64bit Debian jessie
v2.7.2 running
GlassFish 4.1 Java
8 (Preconfigured -
Docker)
2017.03.1Docker
17.03.1-
ce
Debian
Jessie
Java
8
nginx
1.10.3
Glassfish
4.1
amazon/aws-eb-
glassfish:4.1-jdk8-
onbuild-3.5.1
Glassfish 4.0 (Docker)
version 2.7.2
64bit Debian jessie
v2.7.2 running
2017.03.1Docker
17.03.1-
ce
Debian
Jessie
Java
7
nginx
1.10.3
Glassfish
4.0
amazon/aws-eb-
glassfish:4.0-jdk7-
onbuild-3.5.1
API Version 2010-12-01
932

AWS Elastic Beanstalk Developer Guide
Preconfigured Docker
Configuration and
Solution Stack Name
AMI PlatformContainer
OS
LanguageProxy
Server
Application
Server
Docker Image
GlassFish 4.0 Java
7 (Preconfigured -
Docker)
Go 1.4 (Docker)
version 2.7.2
64bit Debian jessie
v2.7.2 running Go
1.4 (Preconfigured -
Docker)
2017.03.1Docker
17.03.1-
ce
Debian
Jessie
Go
1.4.2
nginx
1.10.3
none golang:1.4.2-onbuild
Go 1.3 (Docker)
version 2.7.2
64bit Debian jessie
v2.7.2 running Go
1.3 (Preconfigured -
Docker)
2017.03.1Docker
17.03.1-
ce
Debian
Jessie
Go
1.3.3
nginx
1.10.3
none golang:1.3.3-onbuild
Python 3.4 with
uWSGI 2 (Docker)
version 2.7.2
64bit Debian jessie
v2.7.2 running Python
3.4 (Preconfigured -
Docker)
2017.03.1Docker
17.03.1-
ce
Debian
Jessie
Python
3.4
nginx
1.10.3
uWSGI
2.0.8
amazon/aws-
eb-python:3.4.2-
onbuild-3.5.1
The following Elastic Beanstalk platform configurations for preconfigured Docker were current between
July 20, 2017 and August 10, 2017:
Configuration and
Solution Stack Name
AMI PlatformContainer
OS
LanguageProxy
Server
Application
Server
Docker Image
Glassfish 4.1 (Docker)
version 2.7.1
64bit Debian jessie
v2.7.1 running
GlassFish 4.1 Java
8 (Preconfigured -
Docker)
2017.03.1Docker
17.03.1-
ce
Debian
Jessie
Java
8
nginx
1.10.3
Glassfish
4.1
amazon/aws-eb-
glassfish:4.1-jdk8-
onbuild-3.5.1
Glassfish 4.0 (Docker)
version 2.7.1
64bit Debian jessie
v2.7.1 running
GlassFish 4.0 Java
7 (Preconfigured -
Docker)
2017.03.1Docker
17.03.1-
ce
Debian
Jessie
Java
7
nginx
1.10.3
Glassfish
4.0
amazon/aws-eb-
glassfish:4.0-jdk7-
onbuild-3.5.1
API Version 2010-12-01
933

AWS Elastic Beanstalk Developer Guide
Preconfigured Docker
Configuration and
Solution Stack Name
AMI PlatformContainer
OS
LanguageProxy
Server
Application
Server
Docker Image
Go 1.4 (Docker)
version 2.7.1
64bit Debian jessie
v2.7.1 running Go
1.4 (Preconfigured -
Docker)
2017.03.1Docker
17.03.1-
ce
Debian
Jessie
Go
1.4.2
nginx
1.10.3
none golang:1.4.2-onbuild
Go 1.3 (Docker)
version 2.7.1
64bit Debian jessie
v2.7.1 running Go
1.3 (Preconfigured -
Docker)
2017.03.1Docker
17.03.1-
ce
Debian
Jessie
Go
1.3.3
nginx
1.10.3
none golang:1.3.3-onbuild
Python 3.4 with
uWSGI 2 (Docker)
version 2.7.1
64bit Debian jessie
v2.7.1 running Python
3.4 (Preconfigured -
Docker)
2017.03.1Docker
17.03.1-
ce
Debian
Jessie
Python
3.4
nginx
1.10.3
uWSGI
2.0.8
amazon/aws-
eb-python:3.4.2-
onbuild-3.5.1
The following Elastic Beanstalk platform configurations for preconfigured Docker were current between
June 27, 2017 and July 19, 2017:
Configuration and
Solution Stack Name
AMI PlatformContainer
OS
LanguageProxy
Server
Application
Server
Docker Image
Glassfish 4.1
(Docker) version
2.7.0
64bit Debian jessie
v2.7.0 running
GlassFish 4.1 Java
8 (Preconfigured -
Docker)
2017.03.0Docker
17.03.1-
ce
Debian
Jessie
Java
8
nginx
1.10.2
Glassfish
4.1
amazon/aws-eb-
glassfish:4.1-jdk8-
onbuild-3.5.1
Glassfish 4.0
(Docker) version
2.7.0
64bit Debian jessie
v2.7.0 running
GlassFish 4.0 Java
7 (Preconfigured -
Docker)
2017.03.0Docker
17.03.1-
ce
Debian
Jessie
Java
7
nginx
1.10.2
Glassfish
4.0
amazon/aws-eb-
glassfish:4.0-jdk7-
onbuild-3.5.1
Go 1.4 (Docker)
version 2.7.0
2017.03.0Docker
17.03.1-
ce
Debian
Jessie
Go
1.4.2
nginx
1.10.2
none golang:1.4.2-onbuild
API Version 2010-12-01
934

AWS Elastic Beanstalk Developer Guide
Preconfigured Docker
Configuration and
Solution Stack Name
AMI PlatformContainer
OS
LanguageProxy
Server
Application
Server
Docker Image
64bit Debian jessie
v2.7.0 running Go
1.4 (Preconfigured -
Docker)
Go 1.3 (Docker)
version 2.7.0
64bit Debian jessie
v2.7.0 running Go
1.3 (Preconfigured -
Docker)
2017.03.0Docker
17.03.1-
ce
Debian
Jessie
Go
1.3.3
nginx
1.10.2
none golang:1.3.3-onbuild
Python 3.4 with
uWSGI 2 (Docker)
version 2.7.0
64bit Debian
jessie v2.7.0
running Python 3.4
(Preconfigured -
Docker)
2017.03.0Docker
17.03.1-
ce
Debian
Jessie
Python
3.4
nginx
1.10.2
uWSGI
2.0.8
amazon/aws-
eb-python:3.4.2-
onbuild-3.5.1
The following Elastic Beanstalk platform configurations for preconfigured Docker were current between
May 19, 2017 and June 26, 2017:
Configuration and
Solution Stack Name
AMI PlatformContainer
OS
LanguageProxy
Server
Application
Server
Docker Image
Glassfish 4.1
(Docker) version
2.6.0
64bit Debian jessie
v2.6.0 running
GlassFish 4.1 Java
8 (Preconfigured -
Docker)
2017.03.0Docker
1.12.6
Debian
Jessie
Java
8
nginx
1.10.2
Glassfish
4.1
amazon/aws-eb-
glassfish:4.1-jdk8-
onbuild-3.5.1
Glassfish 4.0
(Docker) version
2.6.0
64bit Debian jessie
v2.6.0 running
GlassFish 4.0 Java
7 (Preconfigured -
Docker)
2017.03.0Docker
1.12.6
Debian
Jessie
Java
7
nginx
1.10.2
Glassfish
4.0
amazon/aws-eb-
glassfish:4.0-jdk7-
onbuild-3.5.1
Go 1.4 (Docker)
version 2.6.0
64bit Debian jessie
v2.6.0 running Go
2017.03.0Docker
1.12.6
Debian
Jessie
Go
1.4.2
nginx
1.10.2
none golang:1.4.2-onbuild
API Version 2010-12-01
935

AWS Elastic Beanstalk Developer Guide
Preconfigured Docker
Configuration and
Solution Stack Name
AMI PlatformContainer
OS
LanguageProxy
Server
Application
Server
Docker Image
1.4 (Preconfigured -
Docker)
Go 1.3 (Docker)
version 2.6.0
64bit Debian jessie
v2.6.0 running Go
1.3 (Preconfigured -
Docker)
2016.09.0Docker
1.12.6
Debian
Jessie
Go
1.3.3
nginx
1.10.2
none golang:1.3.3-onbuild
Python 3.4 with
uWSGI 2 (Docker)
version 2.6.0
64bit Debian
jessie v2.6.0
running Python 3.4
(Preconfigured -
Docker)
2017.03.0Docker
1.12.6
Debian
Jessie
Python
3.4
nginx
1.10.2
uWSGI
2.0.8
amazon/aws-
eb-python:3.4.2-
onbuild-3.5.1
The following Elastic Beanstalk platform configurations for preconfigured Docker were current between
April 5, 2017 and May 18, 2017:
Configuration and
Solution Stack Name
AMI PlatformContainer
OS
LanguageProxy
Server
Application
Server
Docker Image
Glassfish 4.1
(Docker) version
2.5.2
64bit Debian jessie
v2.5.2 running
GlassFish 4.1 Java
8 (Preconfigured -
Docker)
2016.09.0Docker
1.12.6
Debian
Jessie
Java
8
nginx
1.10.1
Glassfish
4.1
amazon/aws-eb-
glassfish:4.1-jdk8-
onbuild-3.5.1
Glassfish 4.0
(Docker) version
2.5.2
64bit Debian jessie
v2.5.2 running
GlassFish 4.0 Java
7 (Preconfigured -
Docker)
2016.09.0Docker
1.12.6
Debian
Jessie
Java
7
nginx
1.10.1
Glassfish
4.0
amazon/aws-eb-
glassfish:4.0-jdk7-
onbuild-3.5.1
Go 1.4 (Docker)
version 2.5.2
64bit Debian jessie
v2.5.2 running Go
1.4 (Preconfigured -
Docker)
2016.09.0Docker
1.12.6
Debian
Jessie
Go
1.4.2
nginx
1.10.1
none golang:1.4.2-onbuild
API Version 2010-12-01
936

AWS Elastic Beanstalk Developer Guide
Preconfigured Docker
Configuration and
Solution Stack Name
AMI PlatformContainer
OS
LanguageProxy
Server
Application
Server
Docker Image
Go 1.3 (Docker)
version 2.5.2
64bit Debian jessie
v2.5.2 running Go
1.3 (Preconfigured -
Docker)
2016.09.0Docker
1.12.6
Debian
Jessie
Go
1.3.3
nginx
1.10.1
none golang:1.3.3-onbuild
Python 3.4 with
uWSGI 2 (Docker)
version 2.5.2
64bit Debian
jessie v2.5.2
running Python 3.4
(Preconfigured -
Docker)
2016.09.0Docker
1.12.6
Debian
Jessie
Python
3.4
nginx
1.10.1
uWSGI
2.0.8
amazon/aws-
eb-python:3.4.2-
onbuild-3.5.1
The following Elastic Beanstalk platform configurations for preconfigured Docker were current between
March 8, 2017 and April 4, 2017:
Configuration and
Solution Stack Name
AMI PlatformContainer
OS
LanguageProxy
Server
Application
Server
Docker Image
Glassfish 4.1
(Docker) version
2.5.1
64bit Debian jessie
v2.5.1 running
GlassFish 4.1 Java
8 (Preconfigured -
Docker)
2016.09.0Docker
1.12.6
Debian
Jessie
Java
8
nginx
1.10.1
Glassfish
4.1
amazon/aws-eb-
glassfish:4.1-jdk8-
onbuild-3.5.1
Glassfish 4.0
(Docker) version
2.5.1
64bit Debian jessie
v2.5.1 running
GlassFish 4.0 Java
7 (Preconfigured -
Docker)
2016.09.0Docker
1.12.6
Debian
Jessie
Java
7
nginx
1.10.1
Glassfish
4.0
amazon/aws-eb-
glassfish:4.0-jdk7-
onbuild-3.5.1
Go 1.4 (Docker)
version 2.5.1
64bit Debian jessie
v2.5.1 running Go
1.4 (Preconfigured -
Docker)
2016.09.0Docker
1.12.6
Debian
Jessie
Go
1.4.2
nginx
1.10.1
none golang:1.4.2-onbuild
Go 1.3 (Docker)
version 2.5.1
2016.09.0Docker
1.12.6
Debian
Jessie
Go
1.3.3
nginx
1.10.1
none golang:1.3.3-onbuild
API Version 2010-12-01
937

AWS Elastic Beanstalk Developer Guide
Preconfigured Docker
Configuration and
Solution Stack Name
AMI PlatformContainer
OS
LanguageProxy
Server
Application
Server
Docker Image
64bit Debian jessie
v2.5.1 running Go
1.3 (Preconfigured -
Docker)
Python 3.4 with
uWSGI 2 (Docker)
version 2.5.1
64bit Debian
jessie v2.5.1
running Python 3.4
(Preconfigured -
Docker)
2016.09.0Docker
1.12.6
Debian
Jessie
Python
3.4
nginx
1.10.1
uWSGI
2.0.8
amazon/aws-
eb-python:3.4.2-
onbuild-3.5.1
The following Elastic Beanstalk platform configurations for preconfigured Docker were current between
January 28, 2017 and March 7, 2017:
Configuration and
Solution Stack Name
AMI PlatformContainer
OS
LanguageProxy
Server
Application
Server
Docker Image
Glassfish 4.1
(Docker) version
2.5.0
64bit Debian jessie
v2.5.0 running
GlassFish 4.1 Java
8 (Preconfigured -
Docker)
2016.09.0Docker
1.12.6
Debian
Jessie
Java
8
nginx
1.10.1
Glassfish
4.1
amazon/aws-eb-
glassfish:4.1-jdk8-
onbuild-3.5.1
Glassfish 4.0
(Docker) version
2.5.0
64bit Debian jessie
v2.5.0 running
GlassFish 4.0 Java
7 (Preconfigured -
Docker)
2016.09.0Docker
1.12.6
Debian
Jessie
Java
7
nginx
1.10.1
Glassfish
4.0
amazon/aws-eb-
glassfish:4.0-jdk7-
onbuild-3.5.1
Go 1.4 (Docker)
version 2.5.0
64bit Debian jessie
v2.5.0 running Go
1.4 (Preconfigured -
Docker)
2016.09.0Docker
1.12.6
Debian
Jessie
Go
1.4.2
nginx
1.10.1
none golang:1.4.2-onbuild
Go 1.3 (Docker)
version 2.5.0
64bit Debian jessie
v2.5.0 running Go
2016.09.0Docker
1.12.6
Debian
Jessie
Go
1.3.3
nginx
1.10.1
none golang:1.3.3-onbuild
API Version 2010-12-01
938

AWS Elastic Beanstalk Developer Guide
Preconfigured Docker
Configuration and
Solution Stack Name
AMI PlatformContainer
OS
LanguageProxy
Server
Application
Server
Docker Image
1.3 (Preconfigured -
Docker)
Python 3.4 with
uWSGI 2 (Docker)
version 2.5.0
64bit Debian
jessie v2.5.0
running Python 3.4
(Preconfigured -
Docker)
2016.09.0Docker
1.12.6
Debian
Jessie
Python
3.4
nginx
1.10.1
uWSGI
2.0.8
amazon/aws-
eb-python:3.4.2-
onbuild-3.5.1
The following Elastic Beanstalk platform configurations for preconfigured Docker were current between
January 16, 2017 and January 27, 2017:
Configuration and
Solution Stack Name
AMI PlatformContainer
OS
LanguageProxy
Server
Application
Server
Docker Image
Glassfish 4.1
(Docker) version
2.4.0
64bit Debian jessie
v2.4.0 running
GlassFish 4.1 Java
8 (Preconfigured -
Docker)
2016.09.0Docker
1.12.6
Debian
Jessie
Java
8
nginx
1.10.1
Glassfish
4.1
amazon/aws-eb-
glassfish:4.1-jdk8-
onbuild-3.5.1
Glassfish 4.0
(Docker) version
2.4.0
64bit Debian jessie
v2.4.0 running
GlassFish 4.0 Java
7 (Preconfigured -
Docker)
2016.09.0Docker
1.12.6
Debian
Jessie
Java
7
nginx
1.10.1
Glassfish
4.0
amazon/aws-eb-
glassfish:4.0-jdk7-
onbuild-3.5.1
Go 1.4 (Docker)
version 2.4.0
64bit Debian jessie
v2.4.0 running Go
1.4 (Preconfigured -
Docker)
2016.09.0Docker
1.12.6
Debian
Jessie
Go
1.4.2
nginx
1.10.1
none golang:1.4.2-onbuild
Go 1.3 (Docker)
version 2.4.0
64bit Debian jessie
v2.4.0 running Go
1.3 (Preconfigured -
Docker)
2016.09.0Docker
1.12.6
Debian
Jessie
Go
1.3.3
nginx
1.10.1
none golang:1.3.3-onbuild
API Version 2010-12-01
939

AWS Elastic Beanstalk Developer Guide
Preconfigured Docker
Configuration and
Solution Stack Name
AMI PlatformContainer
OS
LanguageProxy
Server
Application
Server
Docker Image
Python 3.4 with
uWSGI 2 (Docker)
version 2.4.0
64bit Debian
jessie v2.4.0
running Python 3.4
(Preconfigured -
Docker)
2016.09.0Docker
1.12.6
Debian
Jessie
Python
3.4
nginx
1.10.1
uWSGI
2.0.8
amazon/aws-
eb-python:3.4.2-
onbuild-3.5.1
The following Elastic Beanstalk platform configurations for preconfigured Docker were current between
December 21, 2016 and January 15, 2017:
Configuration and
Solution Stack Name
AMI PlatformContainer
OS
LanguageProxy
Server
Application
Server
Docker Image
Glassfish 4.1
(Docker) version
2.3.0
64bit Debian jessie
v2.3.0 running
GlassFish 4.1 Java
8 (Preconfigured -
Docker)
2016.09.0Docker
1.11.2
Debian
Jessie
Java
8
nginx
1.10.1
Glassfish
4.1
amazon/aws-eb-
glassfish:4.1-jdk8-
onbuild-3.5.1
Glassfish 4.0
(Docker) version
2.3.0
64bit Debian jessie
v2.3.0 running
GlassFish 4.0 Java
7 (Preconfigured -
Docker)
2016.09.0Docker
1.11.2
Debian
Jessie
Java
7
nginx
1.10.1
Glassfish
4.0
amazon/aws-eb-
glassfish:4.0-jdk7-
onbuild-3.5.1
Go 1.4 (Docker)
version 2.3.0
64bit Debian jessie
v2.3.0 running Go
1.4 (Preconfigured -
Docker)
2016.09.0Docker
1.11.2
Debian
Jessie
Go
1.4.2
nginx
1.10.1
none golang:1.4.2-onbuild
Go 1.3 (Docker)
version 2.3.0
64bit Debian jessie
v2.3.0 running Go
1.3 (Preconfigured -
Docker)
2016.09.0Docker
1.11.2
Debian
Jessie
Go
1.3.3
nginx
1.10.1
none golang:1.3.3-onbuild
API Version 2010-12-01
940

AWS Elastic Beanstalk Developer Guide
Preconfigured Docker
Configuration and
Solution Stack Name
AMI PlatformContainer
OS
LanguageProxy
Server
Application
Server
Docker Image
Python 3.4 with
uWSGI 2 (Docker)
version 2.3.0
64bit Debian
jessie v2.3.0
running Python 3.4
(Preconfigured -
Docker)
2016.09.0Docker
1.11.2
Debian
Jessie
Python
3.4
nginx
1.10.1
uWSGI
2.0.8
amazon/aws-
eb-python:3.4.2-
onbuild-3.5.1
The following Elastic Beanstalk platform configurations for preconfigured Docker were current between
between December 12, 2016 and December 21, 2016:
Configuration and
Solution Stack Name
AMI PlatformContainer
OS
LanguageProxy
Server
Application
Server
Docker Image
Glassfish 4.1
(Docker) version
2.2.2
64bit Debian jessie
v2.2.2 running
GlassFish 4.1 Java
8 (Preconfigured -
Docker)
2016.09.0Docker
1.11.2
Debian
Jessie
Java
8
nginx
1.10.1
Glassfish
4.1
amazon/aws-eb-
glassfish:4.1-jdk8-
onbuild-3.5.1
Glassfish 4.0
(Docker) version
2.2.2
64bit Debian jessie
v2.2.2 running
GlassFish 4.0 Java
7 (Preconfigured -
Docker)
2016.09.0Docker
1.11.2
Debian
Jessie
Java
7
nginx
1.10.1
Glassfish
4.0
amazon/aws-eb-
glassfish:4.0-jdk7-
onbuild-3.5.1
Go 1.4 (Docker)
version 2.2.2
64bit Debian jessie
v22.2.2 running Go
1.4 (Preconfigured -
Docker)
2016.09.0Docker
1.11.2
Debian
Jessie
Go
1.4.2
nginx
1.10.1
none golang:1.4.2-onbuild
Go 1.3 (Docker)
version 2.2.2
64bit Debian jessie
v2.2.2 running Go
1.3 (Preconfigured -
Docker)
2016.09.0Docker
1.11.2
Debian
Jessie
Go
1.3.3
nginx
1.10.1
none golang:1.3.3-onbuild
API Version 2010-12-01
941

AWS Elastic Beanstalk Developer Guide
Preconfigured Docker
Configuration and
Solution Stack Name
AMI PlatformContainer
OS
LanguageProxy
Server
Application
Server
Docker Image
Python 3.4 with
uWSGI 2 (Docker)
version 2.2.2
64bit Debian
jessie v2.2.2
running Python 3.4
(Preconfigured -
Docker)
2016.09.0Docker
1.11.2
Debian
Jessie
Python
3.4
nginx
1.10.1
uWSGI
2.0.8
amazon/aws-
eb-python:3.4.2-
onbuild-3.5.1
The following Elastic Beanstalk platform configurations for preconfigured Docker were current between
between October 28, 2016 and December 11, 2016:
Configuration and
Solution Stack Name
AMI PlatformContainer
OS
LanguageProxy
Server
Application
Server
Docker Image
Glassfish 4.1
(Docker) version
2.2.0
64bit Debian jessie
v2.2.0 running
GlassFish 4.1 Java
8 (Preconfigured -
Docker)
2016.09.0Docker
1.11.2
Debian
Jessie
Java
8
nginx
1.10.1
Glassfish
4.1
amazon/aws-eb-
glassfish:4.1-jdk8-
onbuild-3.5.1
Glassfish 4.0
(Docker) version
2.2.0
64bit Debian jessie
v2.2.0 running
GlassFish 4.0 Java
7 (Preconfigured -
Docker)
2016.09.0Docker
1.11.2
Debian
Jessie
Java
7
nginx
1.10.1
Glassfish
4.0
amazon/aws-eb-
glassfish:4.0-jdk7-
onbuild-3.5.1
Go 1.4 (Docker)
version 2.2.0
64bit Debian jessie
v2.2.0 running Go
1.4 (Preconfigured -
Docker)
2016.09.0Docker
1.11.2
Debian
Jessie
Go
1.4.2
nginx
1.10.1
none golang:1.4.2-onbuild
Go 1.3 (Docker)
version 2.2.0
64bit Debian jessie
v2.2.0 running Go
1.3 (Preconfigured -
Docker)
2016.09.0Docker
1.11.2
Debian
Jessie
Go
1.3.3
nginx
1.10.1
none golang:1.3.3-onbuild
API Version 2010-12-01
942

AWS Elastic Beanstalk Developer Guide
Preconfigured Docker
Configuration and
Solution Stack Name
AMI PlatformContainer
OS
LanguageProxy
Server
Application
Server
Docker Image
Python 3.4 with
uWSGI 2 (Docker)
version 2.2.0
64bit Debian
jessie v2.2.0
running Python 3.4
(Preconfigured -
Docker)
2016.09.0Docker
1.11.2
Debian
Jessie
Python
3.4
nginx
1.10.1
uWSGI
2.0.8
amazon/aws-
eb-python:3.4.2-
onbuild-3.5.1
The following Elastic Beanstalk platform configurations for preconfigured Docker were current between
between August 24, 2016 and October 27, 2016:
Configuration and
Solution Stack Name
AMI PlatformContainer
OS
LanguageProxy
Server
Application
Server
Docker Image
Glassfish 4.1
(Docker) version
2.1.6
64bit Debian jessie
v2.1.6 running
GlassFish 4.1 Java
8 (Preconfigured -
Docker)
2016.03.3Docker
1.11.2
Debian
Jessie
Java
8
nginx
1.8.1
Glassfish
4.1
amazon/aws-eb-
glassfish:4.1-jdk8-
onbuild-3.5.1
Glassfish 4.0
(Docker) version
2.1.6
64bit Debian jessie
v2.1.6 running
GlassFish 4.0 Java
7 (Preconfigured -
Docker)
2016.03.3Docker
1.11.2
Debian
Jessie
Java
7
nginx
1.8.1
Glassfish
4.0
amazon/aws-eb-
glassfish:4.0-jdk7-
onbuild-3.5.1
Go 1.4 (Docker)
version 2.1.6
64bit Debian jessie
v2.1.6 running Go
1.4 (Preconfigured -
Docker)
2016.03.3Docker
1.11.2
Debian
Jessie
Go
1.4.2
nginx
1.8.1
none golang:1.4.2-onbuild
Go 1.3 (Docker)
version 2.1.6
64bit Debian jessie
v2.1.6 running Go
1.3 (Preconfigured -
Docker)
2016.03.3Docker
1.11.2
Debian
Jessie
Go
1.3.3
nginx
1.8.1
none golang:1.3.3-onbuild
API Version 2010-12-01
943

AWS Elastic Beanstalk Developer Guide
Preconfigured Docker
Configuration and
Solution Stack Name
AMI PlatformContainer
OS
LanguageProxy
Server
Application
Server
Docker Image
Python 3.4 with
uWSGI 2 (Docker)
version 2.1.6
64bit Debian
jessie v2.1.6
running Python 3.4
(Preconfigured -
Docker)
2016.03.3Docker
1.11.2
Debian
Jessie
Python
3.4
nginx
1.8.1
uWSGI
2.0.8
amazon/aws-
eb-python:3.4.2-
onbuild-3.5.1
The following Elastic Beanstalk platform configurations for preconfigured Docker were current between
between June 26, 2016 and August 24, 2016:
Configuration and
Solution Stack Name
AMI PlatformContainer
OS
LanguageProxy
Server
Application
Server
Docker Image
Glassfish 4.1
(Docker) version
2.1.3
64bit Debian jessie
v2.1.3 running
GlassFish 4.1 Java
8 (Preconfigured -
Docker)
2016.03.2Docker
1.11.1
Debian
Jessie
Java
8
nginx
1.8.1
Glassfish
4.1
amazon/aws-eb-
glassfish:4.1-jdk8-
onbuild-3.5.1
Glassfish 4.0
(Docker) version
2.1.3
64bit Debian jessie
v2.1.3 running
GlassFish 4.0 Java
7 (Preconfigured -
Docker)
2016.03.2Docker
1.11.1
Debian
Jessie
Java
7
nginx
1.8.1
Glassfish
4.0
amazon/aws-eb-
glassfish:4.0-jdk7-
onbuild-3.5.1
Go 1.4 (Docker)
version 2.1.3
64bit Debian jessie
v2.1.3 running Go
1.4 (Preconfigured -
Docker)
2016.03.2Docker
1.11.1
Debian
Jessie
Go
1.4.2
nginx
1.8.1
none golang:1.4.2-onbuild
Go 1.3 (Docker)
version 2.1.3
64bit Debian jessie
v2.1.3 running Go
1.3 (Preconfigured -
Docker)
2016.03.2Docker
1.11.1
Debian
Jessie
Go
1.3.3
nginx
1.8.1
none golang:1.3.3-onbuild
API Version 2010-12-01
944

AWS Elastic Beanstalk Developer Guide
Preconfigured Docker
Configuration and
Solution Stack Name
AMI PlatformContainer
OS
LanguageProxy
Server
Application
Server
Docker Image
Python 3.4 with
uWSGI 2 (Docker)
version 2.1.3
64bit Debian
jessie v2.1.3
running Python 3.4
(Preconfigured -
Docker)
2016.03.2Docker
1.11.1
Debian
Jessie
Python
3.4
nginx
1.8.1
uWSGI
2.0.8
amazon/aws-
eb-python:3.4.2-
onbuild-3.5.1
The following Elastic Beanstalk platform configurations for preconfigured Docker were current between
between April 7, 2016 and June 26, 2016:
Configuration and
Solution Stack Name
AMI PlatformContainer
OS
LanguageProxy
Server
Application
Server
Docker Image
Glassfish 4.1
(Docker) version
2.1.0
64bit Debian jessie
v2.1.0 running
GlassFish 4.1 Java
8 (Preconfigured -
Docker)
2016.03Docker
1.9.1
Debian
Jessie
Java
8
nginx
1.8.1
Glassfish
4.1
amazon/aws-eb-
glassfish:4.1-jdk8-
onbuild-3.5.1
Glassfish 4.0
(Docker) version
2.1.0
64bit Debian jessie
v2.1.0 running
GlassFish 4.0 Java
7 (Preconfigured -
Docker)
2016.03Docker
1.9.1
Debian
Jessie
Java
7
nginx
1.8.1
Glassfish
4.0
amazon/aws-eb-
glassfish:4.0-jdk7-
onbuild-3.5.1
Go 1.4 (Docker)
version 2.1.0
64bit Debian jessie
v2.1.0 running Go
1.4 (Preconfigured -
Docker)
2016.03Docker
1.9.1
Debian
Jessie
Go
1.4.2
nginx
1.8.1
none golang:1.4.2-onbuild
Go 1.3 (Docker)
version 2.1.0
64bit Debian jessie
v2.1.0 running Go
1.3 (Preconfigured -
Docker)
2016.03Docker
1.9.1
Debian
Jessie
Go
1.3.3
nginx
1.8.1
none golang:1.3.3-onbuild
API Version 2010-12-01
945

AWS Elastic Beanstalk Developer Guide
Preconfigured Docker
Configuration and
Solution Stack Name
AMI PlatformContainer
OS
LanguageProxy
Server
Application
Server
Docker Image
Python 3.4 with
uWSGI 2 (Docker)
version 2.1.0
64bit Debian
jessie v2.1.0
running Python 3.4
(Preconfigured -
Docker)
2016.03Docker
1.9.1
Debian
Jessie
Python
3.4
nginx
1.8.1
uWSGI
2.0.8
amazon/aws-
eb-python:3.4.2-
onbuild-3.5.1
The following Elastic Beanstalk platform configurations for preconfigured Docker were current between
February 26, 2016 and April 7, 2016:
Configuration and
Solution Stack Name
AMI PlatformContainer
OS
LanguageProxy
Server
Application
Server
Docker Image
Glassfish 4.1
(Docker) version
2.0.8
64bit Debian jessie
v2.0.8 running
GlassFish 4.1 Java
8 (Preconfigured -
Docker)
2015.09Docker
1.9.1
Debian
Jessie
Java
8
nginx
1.8.0
Glassfish
4.1
amazon/aws-eb-
glassfish:4.1-jdk8-
onbuild-3.5.1
Glassfish 4.0
(Docker) version
2.0.8
64bit Debian jessie
v2.0.8 running
GlassFish 4.0 Java
7 (Preconfigured -
Docker)
2015.09Docker
1.9.1
Debian
Jessie
Java
7
nginx
1.8.0
Glassfish
4.0
amazon/aws-eb-
glassfish:4.0-jdk7-
onbuild-3.5.1
Go 1.4 (Docker)
version 2.0.8
64bit Debian jessie
v2.0.8 running Go
1.4 (Preconfigured -
Docker)
2015.09Docker
1.9.1
Debian
Jessie
Go
1.4.1
nginx
1.8.0
none golang:1.4.1-onbuild
Go 1.3 (Docker)
version 2.0.8
64bit Debian jessie
v2.0.8 running Go
1.3 (Preconfigured -
Docker)
2015.09Docker
1.9.1
Debian
Jessie
Go
1.3.3
nginx
1.8.0
none golang:1.3.3-onbuild
API Version 2010-12-01
946

AWS Elastic Beanstalk Developer Guide
Preconfigured Docker
Configuration and
Solution Stack Name
AMI PlatformContainer
OS
LanguageProxy
Server
Application
Server
Docker Image
Python 3.4 with
uWSGI 2 (Docker)
version 2.0.8
64bit Debian
jessie v2.0.8
running Python 3.4
(Preconfigured -
Docker)
2015.09Docker
1.9.1
Debian
Jessie
Python
3.4
nginx
1.8.0
uWSGI
2.0.8
amazon/aws-
eb-python:3.4.2-
onbuild-3.5.1
The following Elastic Beanstalk platform configurations for preconfigured Docker were current between
February 11, 2016 and February 26, 2016:
Configuration and
Solution Stack Name
AMI PlatformContainer
OS
LanguageProxy
Server
Application
Server
Docker Image
Glassfish 4.1
(Docker) version
2.0.7
64bit Debian jessie
v2.0.7 running
GlassFish 4.1 Java
8 (Preconfigured -
Docker)
2015.09Docker
1.9.1
Debian
Jessie
Java
8
nginx
1.8.0
Glassfish
4.1
amazon/aws-eb-
glassfish:4.1-jdk8-
onbuild-3.5.1
Glassfish 4.0
(Docker) version
2.0.7
64bit Debian jessie
v2.0.7 running
GlassFish 4.0 Java
7 (Preconfigured -
Docker)
2015.09Docker
1.9.1
Debian
Jessie
Java
7
nginx
1.8.0
Glassfish
4.0
amazon/aws-eb-
glassfish:4.0-jdk7-
onbuild-3.5.1
Go 1.4 (Docker)
version 2.0.7
64bit Debian jessie
v2.0.7 running Go
1.4 (Preconfigured -
Docker)
2015.09Docker
1.9.1
Debian
Jessie
Go
1.4.1
nginx
1.8.0
none golang:1.4.1-onbuild
Go 1.3 (Docker)
version 2.0.7
64bit Debian jessie
v2.0.7 running Go
1.3 (Preconfigured -
Docker)
2015.09Docker
1.9.1
Debian
Jessie
Go
1.3.3
nginx
1.8.0
none golang:1.3.3-onbuild
API Version 2010-12-01
947

AWS Elastic Beanstalk Developer Guide
Preconfigured Docker
Configuration and
Solution Stack Name
AMI PlatformContainer
OS
LanguageProxy
Server
Application
Server
Docker Image
Python 3.4 with
uWSGI 2 (Docker)
version 2.0.7
64bit Debian
jessie v2.0.7
running Python 3.4
(Preconfigured -
Docker)
2015.09Docker
1.9.1
Debian
Jessie
Python
3.4
nginx
1.8.0
uWSGI
2.0.8
amazon/aws-
eb-python:3.4.2-
onbuild-3.5.1
The following Elastic Beanstalk platform configurations for preconfigured Docker were current between
January 11, 2016 and February 11, 2016:
Configuration and
Solution Stack Name
AMI PlatformContainer
OS
LanguageProxy
Server
Application
Server
Docker Image
Glassfish 4.1
(Docker) version
2.0.6
64bit Debian jessie
v2.0.6 running
GlassFish 4.1 Java
8 (Preconfigured -
Docker)
2015.09Docker
1.7.1
Debian
Jessie
Java
1.8.0_40
nginx
1.8.0
Glassfish
4.1
amazon/aws-eb-
glassfish:4.1-jdk8-
onbuild-3.5.1
Glassfish 4.0
(Docker) version
2.0.6
64bit Debian jessie
v2.0.6 running
GlassFish 4.0 Java
7 (Preconfigured -
Docker)
2015.09Docker
1.7.1
Debian
Jessie
Java
1.7.0_65
nginx
1.8.0
Glassfish
4.0
amazon/aws-eb-
glassfish:4.0-jdk7-
onbuild-3.5.1
Go 1.4 (Docker)
version 2.0.6
64bit Debian jessie
v2.0.6 running Go
1.4 (Preconfigured -
Docker)
2015.09Docker
1.7.1
Debian
Jessie
Go
1.4.1
nginx
1.8.0
none golang:1.4.1-onbuild
Go 1.3 (Docker)
version 2.0.6
64bit Debian jessie
v2.0.6 running Go
1.3 (Preconfigured -
Docker)
2015.09Docker
1.7.1
Debian
Jessie
Go
1.3.3
nginx
1.8.0
none golang:1.3.3-onbuild
API Version 2010-12-01
948

AWS Elastic Beanstalk Developer Guide
Preconfigured Docker
Configuration and
Solution Stack Name
AMI PlatformContainer
OS
LanguageProxy
Server
Application
Server
Docker Image
Python 3.4 with
uWSGI 2 (Docker)
version 2.0.6
64bit Debian
jessie v2.0.6
running Python 3.4
(Preconfigured -
Docker)
2015.09Docker
1.7.1
Debian
Jessie
Python
3.4
nginx
1.8.0
uWSGI
2.0.8
amazon/aws-
eb-python:3.4.2-
onbuild-3.5.1
The following Elastic Beanstalk platform configurations for preconfigured Docker were current between
November 4, 2015 and January 11, 2016:
Configuration and
Solution Stack Name
AMI PlatformContainer
OS
LanguageProxy
Server
Application
Server
Docker Image
Glassfish 4.1
(Docker) version
2.0.4
64bit Debian jessie
v2.0.4 running
GlassFish 4.1 Java
8 (Preconfigured -
Docker)
2015.09Docker
1.7.1
Debian
Jessie
Java
1.8.0_40
nginx
1.8.0
Glassfish
4.1
amazon/aws-eb-
glassfish:4.1-jdk8-
onbuild-3.5.1
Glassfish 4.0
(Docker) version
2.0.4
64bit Debian jessie
v2.0.4 running
GlassFish 4.0 Java
7 (Preconfigured -
Docker)
2015.09Docker
1.7.1
Debian
Jessie
Java
1.7.0_65
nginx
1.8.0
Glassfish
4.0
amazon/aws-eb-
glassfish:4.0-jdk7-
onbuild-3.5.1
Go 1.4 (Docker)
version 2.0.4
64bit Debian jessie
v2.0.4 running Go
1.4 (Preconfigured -
Docker)
2015.09Docker
1.7.1
Debian
Jessie
Go
1.4.1
nginx
1.8.0
none golang:1.4.1-onbuild
Go 1.3 (Docker)
version 2.0.4
64bit Debian jessie
v2.0.4 running Go
1.3 (Preconfigured -
Docker)
2015.09Docker
1.7.1
Debian
Jessie
Go
1.3.3
nginx
1.8.0
none golang:1.3.3-onbuild
API Version 2010-12-01
949

AWS Elastic Beanstalk Developer Guide
Preconfigured Docker
Configuration and
Solution Stack Name
AMI PlatformContainer
OS
LanguageProxy
Server
Application
Server
Docker Image
Python 3.4 with
uWSGI 2 (Docker)
version 2.0.4
64bit Debian
jessie v2.0.4
running Python 3.4
(Preconfigured -
Docker)
2015.09Docker
1.7.1
Debian
Jessie
Python
3.4
nginx
1.8.0
uWSGI
2.0.8
amazon/aws-
eb-python:3.4.2-
onbuild-3.5.1
The following Elastic Beanstalk platform configurations for preconfigured Docker were current between
September 25, 2015 and November 4, 2015:
Configuration and
Solution Stack Name
AMI PlatformContainer
OS
LanguageProxy
Server
Application
Server
Docker Image
Glassfish 4.1
(Docker) version
2.0.2
64bit Debian jessie
v2.0.2 running
GlassFish 4.1 Java
8 (Preconfigured -
Docker)
2015.03Docker
1.7.1
Debian
Jessie
Java
1.8.0_40
Nginx
1.6.2
Glassfish
4.1
amazon/aws-eb-
glassfish:4.1-jdk8-
onbuild-3.5.1
Glassfish 4.0
(Docker) version
2.0.2
64bit Debian jessie
v2.0.2 running
GlassFish 4.0 Java
7 (Preconfigured -
Docker)
2015.03Docker
1.7.1
Debian
Jessie
Java
1.7.0_65
Nginx
1.6.2
Glassfish
4.0
amazon/aws-eb-
glassfish:4.0-jdk7-
onbuild-3.5.1
Go 1.4 (Docker)
version 2.0.2
64bit Debian jessie
v2.0.2 running Go
1.4 (Preconfigured -
Docker)
2015.03Docker
1.7.1
Debian
Jessie
Go
1.4.1
Nginx
1.6.2
none golang:1.4.1-onbuild
Go 1.3 (Docker)
version 2.0.2
64bit Debian jessie
v2.0.2 running Go
1.3 (Preconfigured -
Docker)
2015.03Docker
1.7.1
Debian
Jessie
Go
1.3.3
Nginx
1.6.2
none golang:1.3.3-onbuild
API Version 2010-12-01
950

AWS Elastic Beanstalk Developer Guide
Preconfigured Docker
Configuration and
Solution Stack Name
AMI PlatformContainer
OS
LanguageProxy
Server
Application
Server
Docker Image
Python 3.4 with
uWSGI 2 (Docker)
version 2.0.2
64bit Debian
jessie v2.0.2
running Python 3.4
(Preconfigured -
Docker)
2015.03Docker
1.7.1
Debian
Jessie
Python
3.4
Nginx
1.6.2
uWSGI
2.0.8
amazon/aws-
eb-python:3.4.2-
onbuild-3.5.1
The following Elastic Beanstalk platform configurations for preconfigured Docker were current between
September 18, 2015 and September 25, 2015:
Configuration and
Solution Stack Name
AMI PlatformContainer
OS
LanguageProxy
Server
Application
Server
Docker Image
Glassfish 4.1
(Docker) version
2.0.1
64bit Debian jessie
v2.0.1 running
GlassFish 4.1 Java
8 (Preconfigured -
Docker)
2015.03Docker
1.6.2
Debian
Jessie
Java
1.8.0_40
nginx
1.6.2
Glassfish
4.1
amazon/aws-eb-
glassfish:4.1-jdk8-
onbuild-3.5.1
Glassfish 4.0
(Docker) version
2.0.1
64bit Debian jessie
v2.0.1 running
GlassFish 4.0 Java
7 (Preconfigured -
Docker)
2015.03Docker
1.6.2
Debian
Jessie
Java
1.7.0_65
nginx
1.6.2
Glassfish
4.0
amazon/aws-eb-
glassfish:4.0-jdk7-
onbuild-3.5.1
Go 1.4 (Docker)
version 2.0.1
64bit Debian jessie
v2.0.1 running Go
1.4 (Preconfigured -
Docker)
2015.03Docker
1.6.2
Debian
Jessie
Go
1.4.1
nginx
1.6.2
none golang:1.4.1-onbuild
Go 1.3 (Docker)
version 2.0.1
64bit Debian jessie
v2.0.1 running Go
1.3 (Preconfigured -
Docker)
2015.03Docker
1.6.2
Debian
Jessie
Go
1.3.3
nginx
1.6.2
none golang:1.3.3-onbuild
API Version 2010-12-01
951

AWS Elastic Beanstalk Developer Guide
Preconfigured Docker
Configuration and
Solution Stack Name
AMI PlatformContainer
OS
LanguageProxy
Server
Application
Server
Docker Image
Python 3.4 with
uWSGI 2 (Docker)
version 2.0.1
64bit Debian
jessie v2.0.1
running Python 3.4
(Preconfigured -
Docker)
2015.03Docker
1.6.2
Debian
Jessie
Python
3.4
nginx
1.6.2
uWSGI
2.0.8
amazon/aws-
eb-python:3.4.2-
onbuild-3.5.1
The following Elastic Beanstalk platform configurations for preconfigured Docker were current between
August 11, 2015 and September 18, 2015:
Configuration and
Solution Stack Name
AMI PlatformContainer
OS
LanguageProxy
Server
Application
Server
Docker Image
Glassfish 4.1
(Docker) version
2.0.0
64bit Debian jessie
v2.0.0 running
GlassFish 4.1 Java
8 (Preconfigured -
Docker)
2015.03Docker
1.6.2
Debian
Jessie
Java
1.8.0_40
nginx
1.6.2
Glassfish
4.1
amazon/aws-eb-
glassfish:4.1-jdk8-
onbuild-3.5.1
Glassfish 4.0
(Docker) version
2.0.0
64bit Debian jessie
v2.0.0 running
GlassFish 4.0 Java
7 (Preconfigured -
Docker)
2015.03Docker
1.6.2
Debian
Jessie
Java
1.7.0_65
nginx
1.6.2
Glassfish
4.0
amazon/aws-eb-
glassfish:4.0-jdk7-
onbuild-3.5.1
Go 1.4 (Docker)
version 2.0.0
64bit Debian jessie
v2.0.0 running Go
1.4 (Preconfigured -
Docker)
2015.03Docker
1.6.2
Debian
Jessie
Go
1.4.1
nginx
1.6.2
none golang:1.4.1-onbuild
Go 1.3 (Docker)
version 2.0.0
64bit Debian jessie
v2.0.0 running Go
1.3 (Preconfigured -
Docker)
2015.03Docker
1.6.2
Debian
Jessie
Go
1.3.3
nginx
1.6.2
none golang:1.3.3-onbuild
API Version 2010-12-01
952

AWS Elastic Beanstalk Developer Guide
Preconfigured Docker
Configuration and
Solution Stack Name
AMI PlatformContainer
OS
LanguageProxy
Server
Application
Server
Docker Image
Python 3.4 with
uWSGI 2 (Docker)
version 2.0.0
64bit Debian
jessie v2.0.0
running Python 3.4
(Preconfigured -
Docker)
2015.03Docker
1.6.2
Debian
Jessie
Python
3.4
nginx
1.6.2
uWSGI
2.0.8
amazon/aws-
eb-python:3.4.2-
onbuild-3.5.1
The following Elastic Beanstalk platform configurations for preconfigured Docker were current between
August 3, 2015 and August 11, 2015:
Configuration and
Solution Stack Name
AMI PlatformContainer
OS
LanguageProxy
Server
Application
Server
Docker Image
Glassfish 4.1
(Docker) version
1.4.6
64bit Debian jessie
v1.4.6 running
GlassFish 4.1 Java
8 (Preconfigured -
Docker)
2015.03Docker
1.6.2
Debian
Jessie
Java
1.8.0_40
nginx
1.6.2
Glassfish
4.1
amazon/aws-eb-
glassfish:4.1-jdk8-
onbuild-3.5.1
Glassfish 4.0
(Docker) version
1.4.6
64bit Debian jessie
v1.4.6 running
GlassFish 4.0 Java
7 (Preconfigured -
Docker)
2015.03Docker
1.6.2
Debian
Jessie
Java
1.7.0_65
nginx
1.6.2
Glassfish
4.0
amazon/aws-eb-
glassfish:4.0-jdk7-
onbuild-3.5.1
Go 1.4 (Docker)
version 1.4.6
64bit Debian jessie
v1.4.6 running Go
1.4 (Preconfigured -
Docker)
2015.03Docker
1.6.2
Debian
Jessie
Go
1.4.1
nginx
1.6.2
none golang:1.4.1-onbuild
Go 1.3 (Docker)
version 1.4.6
64bit Debian jessie
v1.4.6 running Go
1.3 (Preconfigured -
Docker)
2015.03Docker
1.6.2
Debian
Jessie
Go
1.3.3
nginx
1.6.2
none golang:1.3.3-onbuild
API Version 2010-12-01
953

AWS Elastic Beanstalk Developer Guide
Preconfigured Docker
Configuration and
Solution Stack Name
AMI PlatformContainer
OS
LanguageProxy
Server
Application
Server
Docker Image
Python 3.4 with
uWSGI 2 (Docker)
version 1.4.6
64bit Debian
jessie v1.4.6
running Python 3.4
(Preconfigured -
Docker)
2015.03Docker
1.6.2
Debian
Jessie
Python
3.4
nginx
1.6.2
uWSGI
2.0.8
amazon/aws-
eb-python:3.4.2-
onbuild-3.5.1
The following Elastic Beanstalk platform configurations for preconfigured Docker were current between
June 15, 2015 and August 3, 2015:
Configuration and
Solution Stack Name
AMI PlatformContainer
OS
LanguageProxy
Server
Application
Server
Docker Image
Glassfish 4.1
(Docker) version
1.4.3
64bit Debian jessie
v1.4.3 running
GlassFish 4.1 Java
8 (Preconfigured -
Docker)
2015.03Docker
1.6.2
Debian
Jessie
Java
1.8.0_40
nginx
1.6.2
Glassfish
4.1
amazon/aws-eb-
glassfish:4.1-jdk8-
onbuild-3.5.1
Glassfish 4.0
(Docker) version
1.4.3
64bit Debian jessie
v1.4.3 running
GlassFish 4.0 Java
7 (Preconfigured -
Docker)
2015.03Docker
1.6.2
Debian
Jessie
Java
1.7.0_65
nginx
1.6.2
Glassfish
4.0
amazon/aws-eb-
glassfish:4.0-jdk7-
onbuild-3.5.1
Go 1.4 (Docker)
version 1.4.3
64bit Debian jessie
v1.4.3 running Go
1.4 (Preconfigured -
Docker)
2015.03Docker
1.6.2
Debian
Jessie
Go
1.4.1
nginx
1.6.2
none golang:1.4.1-onbuild
Go 1.3 (Docker)
version 1.4.3
64bit Debian jessie
v1.4.3 running Go
1.3 (Preconfigured -
Docker)
2015.03Docker
1.6.2
Debian
Jessie
Go
1.3.3
nginx
1.6.2
none golang:1.3.3-onbuild
API Version 2010-12-01
954

AWS Elastic Beanstalk Developer Guide
Preconfigured Docker
Configuration and
Solution Stack Name
AMI PlatformContainer
OS
LanguageProxy
Server
Application
Server
Docker Image
Python 3.4 with
uWSGI 2 (Docker)
version 1.4.3
64bit Debian
jessie v1.4.3
running Python 3.4
(Preconfigured -
Docker)
2015.03Docker
1.6.2
Debian
Jessie
Python
3.4
nginx
1.6.2
uWSGI
2.0.8
amazon/aws-
eb-python:3.4.2-
onbuild-3.5.1
The following Elastic Beanstalk platform configurations for preconfigured Docker were current between
May 27, 2015 and June 15, 2015:
Preconfigured Docker Configurations
Name AMI Container
Operating
System
Docker
Version
Language Proxy
Server
Application
Server
Docker
Image
Name
64bit Debian
Jessie v1.4.1
running
Glassfish
4.1 Java 8
(Preconfigured
- Docker)
2015.03Debian
Jessie
1.6.0 Java 8 nginx 1.6.2 Glassfish
4.1
amazon/
aws-eb-
glassfish:4.1-
jdk8-
onbuild-3.5.1
64bit Debian
Jessie v1.4.1
running
Glassfish
4.0 Java 7
(Preconfigured
- Docker)
2015.03Debian
Jessie
1.6.0 Java 7 nginx 1.6.2 Glassfish
4.0
amazon/
aws-eb-
glassfish:4.0-
jdk7-
onbuild-3.5.1
64bit Debian
Jessie v1.4.1
running Go 1.4
(Preconfigured
- Docker)
2015.03Debian
Jessie
1.6.0 Go 1.4.1 nginx 1.6.2 golang:1.4.1-
onbuild
64bit Debian
Jessie v1.4.1
running Go 1.3
(Preconfigured
- Docker)
2015.03Debian
Jessie
1.6.0 Go 1.3.3 nginx 1.6.2 golang:1.3.3-
onbuild
64bit Debian
Jessie v1.4.1
running
Python 3.4
(Preconfigured
- Docker)
2015.03Debian
Jessie
1.6.0 Python 3.4 nginx 1.6.2 uWSGI
2.0.8
amazon/
aws-eb-
python:3.4.2-
onbuild-3.5.1
API Version 2010-12-01
955

AWS Elastic Beanstalk Developer Guide
Preconfigured Docker
The following Elastic Beanstalk platform configurations for preconfigured Docker were current between
May 8, 2015 and May 26, 2015:
Preconfigured Docker Container Types
Name AMI Container
Operating
System
Docker
Version
Language Proxy
Server
Application
Server
Docker
Image
Name
64bit Debian
Jessie v1.4.0
running
Glassfish
4.1 Java 8
(Preconfigured
- Docker)1
2015.03Debian
Jessie
1.6.0 Java 8 nginx 1.6.2 Glassfish
4.1
amazon/
aws-eb-
glassfish:4.1-
jdk8-
onbuild-3.5.1
64bit Debian
Jessie v1.4.0
running
Glassfish
4.0 Java 7
(Preconfigured
- Docker)1
2015.03Debian
Jessie
1.6.0 Java 7 nginx 1.6.2 Glassfish
4.0
amazon/
aws-eb-
glassfish:4.0-
jdk7-
onbuild-3.5.1
64bit Debian
Jessie v1.4.0
running Go 1.4
(Preconfigured
- Docker)1
2015.03Debian
Jessie
1.6.0 Go 1.4.1 nginx 1.6.2 golang:1.4.1-
onbuild
64bit Debian
Jessie v1.4.0
running Go 1.3
(Preconfigured
- Docker)1
2015.03Debian
Jessie
1.6.0 Go 1.3.3 nginx 1.6.2 golang:1.3.3-
onbuild
64bit Debian
Jessie v1.3.1
running
Python 3.4
(Preconfigured
- Docker)1
2015.03Debian
Jessie
1.6.0 Python 3.4 nginx 1.6.2 uWSGI
2.0.8
amazon/
aws-eb-
python:3.4.2-
onbuild-3.5.1
1ALAS-2015-522
The following Elastic Beanstalk platform configurations for preconfigured Docker were current between
April 22, 2015 and May 7, 2015:
Preconfigured Docker Container Types
Name AMI Container
Operating
System
Docker
Version
Language Proxy
Server
Application
Server
Docker
Image
Name
64bit Debian
Jessie v1.3.1
2015.03Debian
Jessie
1.5.0 Java 8 nginx 1.6.2 Glassfish
4.1
amazon/
aws-eb-
API Version 2010-12-01
956

AWS Elastic Beanstalk Developer Guide
Preconfigured Docker
Preconfigured Docker Container Types
running
Glassfish
4.1 Java 8
(Preconfigured
- Docker)
glassfish:4.1-
jdk8-
onbuild-3.5.1
64bit Debian
Jessie v1.3.1
running
Glassfish
4.0 Java 7
(Preconfigured
- Docker)
2015.03Debian
Jessie
1.5.0 Java 7 nginx 1.6.2 Glassfish
4.0
amazon/
aws-eb-
glassfish:4.0-
jdk7-
onbuild-3.5.1
64bit Debian
Jessie v1.3.1
running Go 1.4
(Preconfigured
- Docker)
2015.03Debian
Jessie
1.5.0 Go 1.4.1 nginx 1.6.2 golang:1.4.1-
onbuild
64bit Debian
Jessie v1.3.1
running Go 1.3
(Preconfigured
- Docker)
2015.03Debian
Jessie
1.5.0 Go 1.3.3 nginx 1.6.2 golang:1.3.3-
onbuild
64bit Debian
Jessie v1.3.1
running
Python 3.4
(Preconfigured
- Docker)
2015.03Debian
Jessie
1.5.0 Python 3.4 nginx 1.6.2 uWSGI
2.0.8
amazon/
aws-eb-
python:3.4.2-
onbuild-3.5.1
The following Elastic Beanstalk platform configurations for preconfigured Docker were current between
March 24, 2015 and April 21, 2015:
Preconfigured Docker Container Types
Name AMI Container
Operating
System
Docker
Version
Language Proxy
Server
Application
Server
Docker
Image
Name
64bit Debian
Jessie v1.2.1
running
Glassfish
4.1 Java 8
(Preconfigured
- Docker)
2014.09Debian
Jessie
1.5.0 Java 8 nginx 1.6.2 Glassfish
4.1
amazon/
aws-eb-
glassfish:4.1-
jdk8-
onbuild-3.5.1
64bit Debian
Jessie v1.2.1
running
Glassfish
4.0 Java 7
2014.09Debian
Jessie
1.5.0 Java 7 nginx 1.6.2 Glassfish
4.0
amazon/
aws-eb-
glassfish:4.0-
jdk7-
onbuild-3.5.1
API Version 2010-12-01
957

AWS Elastic Beanstalk Developer Guide
Preconfigured Docker
Preconfigured Docker Container Types
(Preconfigured
- Docker)
64bit Debian
Jessie v1.2.1
running Go 1.4
(Preconfigured
- Docker)
2014.09Debian
Jessie
1.5.0 Go 1.4.1 nginx 1.6.2 golang:1.4.1-
onbuild
64bit Debian
Jessie v1.2.1
running Go 1.3
(Preconfigured
- Docker)
2014.09Debian
Jessie
1.5.0 Go 1.3.3 nginx 1.6.2 golang:1.3.3-
onbuild
64bit Debian
Jessie v1.2.1
running
Python 3.4
(Preconfigured
- Docker)
2014.09Debian
Jessie
1.5.0 Python 3.4 nginx 1.6.2 uWSGI
2.0.8
amazon/
aws-eb-
python:3.4.2-
onbuild-3.5.1
The following Elastic Beanstalk platform configurations for preconfigured Docker were current between
February 17, 2015 and March 23, 2015:
Preconfigured Docker Container Types
Name AMI Container
Operating
System
Docker
Version
Language Proxy
Server
Application
Server
Docker
Image
Name
64bit Debian
Jessie v1.2.0
running
Glassfish
4.1 Java 8
(Preconfigured
- Docker)
2014.09Debian
Jessie
1.3.3 Java 8 nginx 1.6.2 Glassfish
4.1
amazon/
aws-eb-
glassfish:4.1-
jdk8-
onbuild-3.5.1
64bit Debian
Jessie v1.2.0
running
Glassfish
4.0 Java 7
(Preconfigured
- Docker)
2014.09Debian
Jessie
1.3.3 Java 7 nginx 1.6.2 Glassfish
4.0
amazon/
aws-eb-
glassfish:4.0-
jdk7-
onbuild-3.5.1
64bit Debian
Jessie v1.2.0
running Go 1.4
(Preconfigured
- Docker)
2014.09Debian
Jessie
1.3.3 Go 1.4.1 nginx 1.6.2 golang:1.4.1-
onbuild
64bit Debian
Jessie v1.2.0
2014.09Debian
Jessie
1.3.3 Go 1.3.3 nginx 1.6.2 golang:1.3.3-
onbuild
API Version 2010-12-01
958

AWS Elastic Beanstalk Developer Guide
Preconfigured Docker
Preconfigured Docker Container Types
running Go 1.3
(Preconfigured
- Docker)
64bit Debian
Jessie v1.2.0
running
Python 3.4
(Preconfigured
- Docker)
2014.09Debian
Jessie
1.3.3 Python 3.4 nginx 1.6.2 uWSGI
2.0.8
amazon/
aws-eb-
python:3.4.2-
onbuild-3.5.1
The following Elastic Beanstalk platform configurations for preconfigured Docker were current between
February 6, 2015 and February 16, 2015:
Preconfigured Docker Container Types
Name AMI Container
Operating
System
Docker
Version
Language Proxy
Server
Docker
Image
Name
64bit Debian
Jessie v1.1.0
running Go 1.3
(Preconfigured
- Docker)
2014.09Debian
Jessie
1.3.3 Go 1.3.3 nginx 1.6.2 golang:1.3.3-
onbuild
64bit Debian
Jessie v1.1.0
running Go 1.4
(Preconfigured
- Docker)
2014.09Debian
Jessie
1.3.3 Go 1.4.1 nginx 1.6.2 golang:1.4.1-
onbuild
The following Elastic Beanstalk platform configurations for preconfigured Docker were current between
January 28, 2015 and February 5, 2015:
Preconfigured Docker Container Types
Name AMI Container
Operating
System
Docker
Version
Language Proxy
Server
Application
Server
Docker
Image
Name
64bit Debian
Jessie v1.1.01
running
Glassfish
4.1 Java 8
(Preconfigured
- Docker)
2014.09Debian
Jessie
1.3.3 Java 8 nginx 1.6.2 Glassfish
4.1
amazon/
aws-eb-
glassfish:4.1-
jdk8-
onbuild-3.5.1
64bit Debian
Jessie v1.1.01
running
Glassfish
4.0 Java 7
2014.09Debian
Jessie
1.3.3 Java 7 nginx 1.6.2 Glassfish
4.0
amazon/
aws-eb-
glassfish:4.0-
jdk7-
onbuild-3.5.1
API Version 2010-12-01
959

AWS Elastic Beanstalk Developer Guide
Preconfigured Docker
Preconfigured Docker Container Types
(Preconfigured
- Docker)
64bit Debian
Jessie v1.1.01
running
Python 3.4
(Preconfigured
- Docker)
2014.09Debian
Jessie
1.3.3 Python 3.4 nginx 1.6.2 uWSGI
2.0.8
amazon/
aws-eb-
python:3.4.2-
onbuild-3.5.1
1CVE-2015-0235 Advisory (Ghost)
The following Elastic Beanstalk platform configurations for preconfigured Docker were current between
December 13, 2014 and January 27, 2015:
Preconfigured Docker Container Types
Name AMI Container
Operating
System
Docker
Version
Language Proxy
Server
Application
Server
Docker
Image
Name
64bit Debian
Jessie v1.0.2
running
Glassfish
4.1 Java 8
(Preconfigured
- Docker)
2014.09Debian
Jessie
1.3.31 Java 8 nginx 1.6.2 Glassfish
4.1
amazon/
aws-eb-
glassfish:4.1-
jdk8-
onbuild-3.5.1
64bit Debian
Jessie v1.0.2
running
Glassfish
4.0 Java 7
(Preconfigured
- Docker)
2014.09Debian
Jessie
1.3.31 Java 7 nginx 1.6.2 Glassfish
4.0
amazon/
aws-eb-
glassfish:4.0-
jdk7-
onbuild-3.5.1
64bit Debian
Jessie v1.0.2
running
Python 3.4
(Preconfigured
- Docker)
2014.09Debian
Jessie
1.3.31 Python 3.4 nginx 1.6.2 uWSGI
2.0.8
amazon/
aws-eb-
python:3.4.2-
onbuild-3.5.1
1ALAS-2014-461
The following Elastic Beanstalk platform configurations for preconfigured Docker were current between
November 26, 2014 and December 12, 2014:
Preconfigured Docker Container Types
Name AMI Container
Operating
System
Docker
Version
Language Proxy
Server
Application
Server
Docker
Image
Name
API Version 2010-12-01
960

AWS Elastic Beanstalk Developer Guide
Preconfigured Docker
Preconfigured Docker Container Types
64bit Debian
Jessie v1.0.1
running
Glassfish
4.1 Java 8
(Preconfigured
- Docker)
2014.09Debian
Jessie
1.3.2 Java 8 nginx 1.6.2 Glassfish
4.1
amazon/
aws-eb-
glassfish:4.1-
jdk8-
onbuild-3.5.1
64bit Debian
Jessie v1.0.1
running
Glassfish
4.0 Java 7
(Preconfigured
- Docker)
2014.09Debian
Jessie
1.3.2 Java 7 nginx 1.6.2 Glassfish
4.0
amazon/
aws-eb-
glassfish:4.0-
jdk7-
onbuild-3.5.1
64bit Debian
Jessie v1.0.1
running
Python 3.4
(Preconfigured
- Docker)
2014.09Debian
Jessie
1.3.2 Python 3.4 nginx 1.6.2 uWSGI
2.0.8
amazon/
aws-eb-
python:3.4.2-
onbuild-3.5.1
The following Elastic Beanstalk preconfigured Docker container types were current prior to November
25, 2014:
Preconfigured Docker Container Types
Name AMI Container
Operating
System
Docker
Version
Language Proxy
Server
Application
Server
Docker
Image
Name
64bit Debian
Jessie v1.0.0
running
Glassfish
4.1 Java 8
(Preconfigured
- Docker)
2014.09Debian
Jessie
1.2.0 Java 8 nginx 1.6.2 Glassfish
4.1
amazon/
aws-eb-
glassfish:4.1-
jdk8-
onbuild-3.5.1
64bit Debian
Jessie v1.0.0
running
Glassfish
4.0 Java 7
(Preconfigured
- Docker)
2014.09Debian
Jessie
1.2.0 Java 7 nginx 1.6.2 Glassfish
4.0
amazon/
aws-eb-
glassfish:4.0-
jdk7-
onbuild-3.5.1
64bit Debian
Jessie v1.0.0
running
Python 3.4
(Preconfigured
- Docker)
2014.09Debian
Jessie
1.2.0 Python 3.4 nginx 1.6.2 uWSGI
2.0.8
amazon/
aws-eb-
python:3.4.2-
onbuild-3.5.1
API Version 2010-12-01
961

AWS Elastic Beanstalk Developer Guide
Go
Go Platform History
This page lists the previous versions of AWS Elastic Beanstalk's Go platforms and the dates that each
version was current. Platform versions that you used to launch or update an environment in the last 30
days remain available (to the using account, in the used region) even after they are no longer current.
See the Supported Platforms (p. 26) page for information on the latest version of each platform
supported by Elastic Beanstalk. Detailed release notes are available for recent releases at
aws.amazon.com/releasenotes.
The following Elastic Beanstalk platform configurations for Go were current between November 14,
2017 and December 19, 2017:
Configuration and Solution Stack
Name
AMI Language Proxy Server
Go 1.9 version 2.7.1
64bit Amazon Linux 2017.09
v2.7.1 running Go 1.9
2017.09.1 Go 1.9.1 nginx 1.12.1
The following Elastic Beanstalk platform configurations for Go were current between October 19, 2017
and November 13, 2017:
Configuration and Solution Stack
Name
AMI Language Proxy Server
Go 1.9 version 2.7.0
64bit Amazon Linux 2017.09
v2.7.0 running Go 1.9
2017.09.0 Go 1.9.1 nginx 1.12.1
The following Elastic Beanstalk platform configurations for Go were current between September 25,
2017 and October 18, 2017:
Configuration and Solution Stack
Name
AMI Language Proxy Server
Go 1.8 version 2.6.1
64bit Amazon Linux 2017.03
v2.6.1 running Go 1.8
2017.03.1 Go 1.8.3 nginx 1.12.1
The following Elastic Beanstalk platform configurations for Go were current between August 30, 2017
and September 24, 2017:
Configuration and Solution Stack
Name
AMI Language Proxy Server
Go 1.8 version 2.6.0
64bit Amazon Linux 2017.03
v2.6.0 running Go 1.8
2017.03.1 Go 1.8.3 nginx 1.10.3
API Version 2010-12-01
962

AWS Elastic Beanstalk Developer Guide
Go
The following Elastic Beanstalk platform configurations for Go were current between August 11, 2017
and August 29, 2017:
Configuration and Solution Stack
Name
AMI Language Proxy Server
Go 1.8 version 2.5.1
64bit Amazon Linux 2017.03
v2.5.1 running Go 1.8
2017.03.1 Go 1.8.3 nginx 1.10.3
The following Elastic Beanstalk platform configurations for Go were current between July 20, 2017 and
August 10, 2017:
Configuration and Solution Stack
Name
AMI Language Proxy Server
Go 1.8 version 2.5.0
64bit Amazon Linux 2017.03
v2.5.0 running Go 1.8
2017.03.1 Go 1.8.3 nginx 1.10.3
The following Elastic Beanstalk platform configurations for Go were current between June 27, 2017 and
July 19, 2017:
Configuration and Solution Stack
Name
AMI Language Proxy Server
Go 1.7 version 2.4.2
64bit Amazon Linux 2017.03
v2.4.2 running Go 1.7
2017.03.0 Go 1.7.5 nginx 1.10.2
The following Elastic Beanstalk platform configurations for Go were current between June 21, 2017 and
June 26, 2017:
Configuration and Solution Stack
Name
AMI Language Proxy Server
Go 1.7 version 2.4.1
64bit Amazon Linux 2017.03
v2.4.1 running Go 1.7
2017.03.0 Go 1.7.5 nginx 1.10.2
The following Elastic Beanstalk platform configurations for Go were current between May 19, 2017 and
June 20, 2017:
Configuration and Solution Stack
Name
AMI Language Proxy Server
Go 1.7 version 2.4.0 2017.03.0 Go 1.7.5 nginx 1.10.2
API Version 2010-12-01
963

AWS Elastic Beanstalk Developer Guide
Go
Configuration and Solution Stack
Name
AMI Language Proxy Server
64bit Amazon Linux 2017.03
v2.4.0 running Go 1.7
The following Elastic Beanstalk platform configurations for Go were current between April 5, 2017 and
May 18, 2017:
Configuration and Solution Stack
Name
AMI Language Proxy Server
Go 1.6 version 2.3.3
64bit Amazon Linux 2016.09
v2.3.3 running Go 1.6
2016.09.0 Go 1.6.3 nginx 1.10.1
The following Elastic Beanstalk platform configurations for Go were current between March 8, 2017 and
April 4, 2017:
Configuration and Solution Stack
Name
AMI Language Proxy Server
Go 1.6 version 2.3.2
64bit Amazon Linux 2016.09
v2.3.2 running Go 1.6
2016.09.0 Go 1.6.3 nginx 1.10.1
The following Elastic Beanstalk platform configurations for Go were current between January 28, 2017
and March 7, 2017:
Configuration and Solution Stack
Name
AMI Language Proxy Server
Go 1.6 version 2.3.1
64bit Amazon Linux 2016.09
v2.3.1 running Go 1.6
2016.09.0 Go 1.6.3 nginx 1.10.1
The following Elastic Beanstalk platform configurations for Go were current between December 22, 2016
and January 27, 2017:
Configuration and Solution Stack
Name
AMI Language Proxy Server
Go 1.5 version 2.3.0
64bit Amazon Linux 2016.09
v2.3.0 running Go 1.5
2016.09.0 Go 1.5.3 nginx 1.10.1
The following Elastic Beanstalk platform configurations for Go were current between December 12, 2016
and December 21, 2016:
API Version 2010-12-01
964

AWS Elastic Beanstalk Developer Guide
Go
Configuration and Solution Stack
Name
AMI Language Proxy Server
Go 1.5 version 2.2.2
64bit Amazon Linux 2016.09
v2.2.2 running Go 1.5
2016.09.0 Go 1.5.3 nginx 1.10.1
The following Elastic Beanstalk platform configurations for Go were current between October 28, 2016
and December 11, 2016:
Configuration and Solution Stack
Name
AMI Language Proxy Server
Go 1.5 version 2.2.0
64bit Amazon Linux 2016.09
v2.2.0 running Go 1.5
2016.09.0 Go 1.5.3 nginx 1.10.1
The following Elastic Beanstalk platform configurations for Go were current between August 24, 2016
and October 27, 2016:
Configuration and Solution Stack
Name
AMI Language Proxy Server
Go 1.5 version 2.1.6
64bit Amazon Linux 2016.03
v2.1.6 running Go 1.5
2016.03.3 Go 1.5.3 nginx 1.8.1
The following Elastic Beanstalk platform configurations for Go were current between June 26, 2016 and
August 24, 2016:
Configuration and Solution Stack
Name
AMI Language Proxy Server
Go 1.5 version 2.1.3
64bit Amazon Linux 2016.03
v2.1.3 running Go 1.5
2016.03.2 Go 1.5.3 nginx 1.8.1
The following Elastic Beanstalk platform configurations for Go were current between April 7, 2016 and
June 26, 2016:
Configuration and Solution Stack
Name
AMI Language Proxy Server
Go 1.4 version 2.1.0
64bit Amazon Linux 2016.03
v2.1.0 running Go 1.4
2016.03 Go 1.4.2 nginx 1.8.1
API Version 2010-12-01
965

AWS Elastic Beanstalk Developer Guide
Go
The following Elastic Beanstalk platform configurations for Go were current between February 26, 2016
and April 7, 2016:
Configuration and Solution Stack
Name
AMI Language Web Server
Go 1.4 version 2.0.8
64bit Amazon Linux 2015.09
v2.0.8 running Go 1.4
2015.09 Go 1.4.2 nginx 1.8.0
The following Elastic Beanstalk platform configurations for Go were current between February 11, 2016
and February 26, 2016:
Configuration and Solution Stack
Name
AMI Language Web Server
Go 1.4 version 2.0.7
64bit Amazon Linux 2015.09
v2.0.7 running Go 1.4
2015.09 Go 1.4.2 nginx 1.8.0
The following Elastic Beanstalk platform configurations for Go were current between January 11, 2016
and February 11, 2016:
Configuration and Solution Stack
Name
AMI Language Web Server
Go 1.4 version 2.0.6
64bit Amazon Linux 2015.09
v2.0.6 running Go 1.4
2015.09 Go 1.4.2 nginx 1.8.0
The following Elastic Beanstalk platform configurations for Go were current between November 3, 2015
and January 11, 2016:
Configuration and Solution Stack
Name
AMI Language Web Server
Go 1.4 version 2.0.4
64bit Amazon Linux 2015.09
v2.0.4 running Go 1.4
2015.09 Go 1.4.2 nginx 1.8.0
The following Elastic Beanstalk platform configurations for Go were current between September 28,
2015 and November 3, 2015:
Configuration and Solution Stack
Name
AMI Language Web Server
Go 1.4 version 2.0.3 2015.03 Go 1.4.2 nginx 1.6.2
API Version 2010-12-01
966

AWS Elastic Beanstalk Developer Guide
Tomcat
Configuration and Solution Stack
Name
AMI Language Web Server
64bit Amazon Linux 2015.03
v2.0.3 running Go 1.4
Tomcat Platform History
This page lists the previous versions of AWS Elastic Beanstalk's Tomcat platform configurations and the
dates that each version was current. Platform versions that you used to launch or update an environment
in the last 30 days remain available (to the using account, in the used region) after they are no longer
current.
See the Supported Platforms (p. 26) page for information on the latest version of each platform
supported by Elastic Beanstalk. Detailed release notes are available for recent releases at
aws.amazon.com/releasenotes.
The following Elastic Beanstalk platform configurations for Tomcat were current between November 20,
2017 and December 19, 2017:
Configuration and
Solution Stack Name
AMI Language AWS X‑Ray Application
Server
Proxy Server
Java 8 with Tomcat
8 version 2.7.1
64bit Amazon Linux
2017.09 v2.7.1
running Tomcat 8
Java 8
2017.09.1Java 1.8.0_151 2.0.0 Tomcat 8.0.47 Apache 2.2.34
Java 7 with Tomcat
7 version 2.7.1
64bit Amazon Linux
2017.09 v2.7.1
running Tomcat 7
Java 7
2017.09.1Java 1.7.0_151 2.0.0 Tomcat 7.0.82 Apache 2.2.34
Java 6 with Tomcat
7 version 2.7.1
64bit Amazon Linux
2017.09 v2.7.1
running Tomcat 7
Java 6
2017.09.1Java 1.6.0_41 2.0.0 Tomcat 7.0.82 Apache 2.2.34
The following Elastic Beanstalk platform configurations for Tomcat were current between November 14,
2017 and November 19, 2017:
Configuration and
Solution Stack Name
AMI Language AWS X‑Ray Application
Server
Proxy Server
Java 8 with Tomcat
8 version 2.7.0
2017.09.1Java 1.8.0_151 2.0.0 Tomcat 8.0.47 Apache 2.2.34
API Version 2010-12-01
967

AWS Elastic Beanstalk Developer Guide
Tomcat
Configuration and
Solution Stack Name
AMI Language AWS X‑Ray Application
Server
Proxy Server
64bit Amazon Linux
2017.09 v2.7.0
running Tomcat 8
Java 8
Java 7 with Tomcat
7 version 2.7.0
64bit Amazon Linux
2017.09 v2.7.0
running Tomcat 7
Java 7
2017.09.1Java 1.7.0_151 2.0.0 Tomcat 7.0.82 Apache 2.2.34
Java 6 with Tomcat
7 version 2.7.0
64bit Amazon Linux
2017.09 v2.7.0
running Tomcat 7
Java 6
2017.09.1Java 1.6.0_41 2.0.0 Tomcat 7.0.82 Apache 2.2.34
The following Elastic Beanstalk platform configurations for Tomcat were current between September 25,
2017 and November 13, 2017:
Configuration and
Solution Stack Name
AMI Language AWS X‑Ray Application
Server
Proxy Server
Java 8 with Tomcat
8 version 2.6.5
64bit Amazon Linux
2017.03 v2.6.5
running Tomcat 8
Java 8
2017.03.1Java 1.8.0_141 2.0.0 Tomcat 8.0.45 Apache 2.2.34
Java 7 with Tomcat
7 version 2.6.5
64bit Amazon Linux
2017.03 v2.6.5
running Tomcat 7
Java 7
2017.03.1Java 1.7.0_151 2.0.0 Tomcat 7.0.79 Apache 2.2.34
Java 6 with Tomcat
7 version 2.6.5
64bit Amazon Linux
2017.03 v2.6.5
running Tomcat 7
Java 6
2017.03.1Java 1.6.0_41 2.0.0 Tomcat 7.0.79 Apache 2.2.34
The following Elastic Beanstalk platform configurations for Tomcat were current between August 30,
2017 and September 24, 2017:
API Version 2010-12-01
968

AWS Elastic Beanstalk Developer Guide
Tomcat
Configuration and
Solution Stack Name
AMI Language AWS X‑Ray Application
Server
Proxy Server
Java 8 with Tomcat
8 version 2.6.4
64bit Amazon Linux
2017.03 v2.6.4
running Tomcat 8
Java 8
2017.03.1Java 1.8.0_141 2.0.0 Tomcat 8.0.45 Apache 2.2.32
Java 7 with Tomcat
7 version 2.6.4
64bit Amazon Linux
2017.03 v2.6.4
running Tomcat 7
Java 7
2017.03.1Java 1.7.0_151 2.0.0 Tomcat 7.0.79 Apache 2.2.32
Java 6 with Tomcat
7 version 2.6.4
64bit Amazon Linux
2017.03 v2.6.4
running Tomcat 7
Java 6
2017.03.1Java 1.6.0_41 2.0.0 Tomcat 7.0.79 Apache 2.2.32
The following Elastic Beanstalk platform configurations for Tomcat were current between August 11,
2017 and August 29, 2017:
Configuration and
Solution Stack Name
AMI Language AWS X‑Ray Application
Server
Proxy Server
Java 8 with Tomcat
8 version 2.6.3
64bit Amazon Linux
2017.03 v2.6.3
running Tomcat 8
Java 8
2017.03.1Java 1.8.0_141 2.0.0 Tomcat 8.0.45 Apache 2.2.32
Java 7 with Tomcat
7 version 2.6.3
64bit Amazon Linux
2017.03 v2.6.3
running Tomcat 7
Java 7
2017.03.1Java 1.7.0_141 2.0.0 Tomcat 7.0.78 Apache 2.2.32
Java 6 with Tomcat
7 version 2.6.3
64bit Amazon Linux
2017.03 v2.6.3
running Tomcat 7
Java 6
2017.03.1Java 1.6.0_41 2.0.0 Tomcat 7.0.78 Apache 2.2.32
API Version 2010-12-01
969

AWS Elastic Beanstalk Developer Guide
Tomcat
The following Elastic Beanstalk platform configurations for Tomcat were current between July 20, 2017
and August 10, 2017:
Configuration and
Solution Stack Name
AMI Language AWS X-Ray Application
Server
Proxy Server
Java 8 with Tomcat
8 version 2.6.2
64bit Amazon Linux
2017.03 v2.6.2
running Tomcat 8
Java 8
2017.03.1Java 1.8.0_131 2.0.0 Tomcat 8.0.44 Apache 2.2.32
Java 7 with Tomcat
7 version 2.6.2
64bit Amazon Linux
2017.03 v2.6.2
running Tomcat 7
Java 7
2017.03.1Java 1.7.0_141 2.0.0 Tomcat 7.0.78 Apache 2.2.32
Java 6 with Tomcat
7 version 2.6.2
64bit Amazon Linux
2017.03 v2.6.2
running Tomcat 7
Java 6
2017.03.1Java 1.6.0_41 2.0.0 Tomcat 7.0.78 Apache 2.2.32
The following Elastic Beanstalk platform configurations for Tomcat were current between June 27, 2017
and July 19, 2017:
Configuration and
Solution Stack Name
AMI Language AWS X-Ray Application
Server
Proxy Server
Java 8 with Tomcat
8 version 2.6.1
64bit Amazon Linux
2017.03 v2.6.1
running Tomcat 8
Java 8
2017.03.0Java 1.8.0_121 2.0.0 Tomcat 8.0.43 Apache 2.2.32
Java 7 with Tomcat
7 version 2.6.1
64bit Amazon Linux
2017.03 v2.6.1
running Tomcat 7
Java 7
2017.03.0Java 1.7.0_131 2.0.0 Tomcat 7.0.77 Apache 2.2.32
Java 6 with Tomcat
7 version 2.6.1
64bit Amazon Linux
2017.03 v2.6.1
2017.03.0Java 1.6.0_41 2.0.0 Tomcat 7.0.77 Apache 2.2.32
API Version 2010-12-01
970

AWS Elastic Beanstalk Developer Guide
Tomcat
Configuration and
Solution Stack Name
AMI Language AWS X-Ray Application
Server
Proxy Server
running Tomcat 7
Java 6
The following Elastic Beanstalk platform configurations for Tomcat were current between May 19, 2017
and June 26, 2017:
Configuration and
Solution Stack Name
AMI Language AWS X-Ray Application
Server
Proxy Server
Java 8 with Tomcat
8 version 2.6.0
64bit Amazon Linux
2017.03 v2.6.0
running Tomcat 8
Java 8
2017.03.0Java 1.8.0_121 2.0.0 Tomcat 8.0.43 Apache 2.2.31
Java 7 with Tomcat
7 version 2.6.0
64bit Amazon Linux
2017.03 v2.6.0
running Tomcat 7
Java 7
2017.03.0Java 1.7.0_131 2.0.0 Tomcat 7.0.77 Apache 2.2.31
Java 6 with Tomcat
7 version 2.6.0
64bit Amazon Linux
2017.03 v2.6.0
running Tomcat 7
Java 6
2017.03.0Java 1.6.0_41 2.0.0 Tomcat 7.0.77 Apache 2.2.31
The following Elastic Beanstalk platform configurations for Tomcat were current between May 2, 2017
and May 18, 2017:
Configuration and
Solution Stack Name
AMI Language AWS X-Ray Application
Server
Proxy Server
Java 8 with Tomcat
8 version 2.5.5
64bit Amazon Linux
2016.09 v2.5.5
running Tomcat 8
Java 8
2016.09.0Java 1.8.0_121 1.0.0 Tomcat 8.0.41 Apache 2.2.31
Java 7 with Tomcat
7 version 2.5.5
64bit Amazon Linux
2016.09 v2.5.5
2016.09.0Java 1.7.0_131 1.0.0 Tomcat 7.0.75 Apache 2.2.31
API Version 2010-12-01
971

AWS Elastic Beanstalk Developer Guide
Tomcat
Configuration and
Solution Stack Name
AMI Language AWS X-Ray Application
Server
Proxy Server
running Tomcat 7
Java 7
Java 6 with Tomcat
7 version 2.5.5
64bit Amazon Linux
2016.09 v2.5.5
running Tomcat 7
Java 6
2016.09.0Java 1.6.0_41 1.0.0 Tomcat 7.0.75 Apache 2.2.31
The following Elastic Beanstalk platform configurations for Tomcat were current between April 5, 2017
and May 1, 2017:
Configuration and
Solution Stack Name
AMI Language AWS X-Ray Application
Server
Proxy Server
Java 8 with Tomcat
8 version 2.5.4
64bit Amazon Linux
2016.09 v2.5.4
running Tomcat 8
Java 8
2016.09.0Java 1.8.0_121 1.0.0 Tomcat 8.0.41 Apache 2.2.31
Java 7 with Tomcat
7 version 2.5.4
64bit Amazon Linux
2016.09 v2.5.4
running Tomcat 7
Java 7
2016.09.0Java 1.7.0_131 1.0.0 Tomcat 7.0.75 Apache 2.2.31
Java 6 with Tomcat
7 version 2.5.4
64bit Amazon Linux
2016.09 v2.5.4
running Tomcat 7
Java 6
2016.09.0Java 1.6.0_41 1.0.0 Tomcat 7.0.75 Apache 2.2.31
The following Elastic Beanstalk platform configurations for Tomcat were current between March 8, 2017
and April 4, 2017:
Configuration and
Solution Stack Name
AMI Language AWS X-Ray Application
Server
Proxy Server
Java 8 with Tomcat
8 version 2.5.3
64bit Amazon Linux
2016.09 v2.5.3
2016.09.0Java 1.8.0_121 1.0.0 Tomcat 8.0.41 Apache 2.2.31
API Version 2010-12-01
972

AWS Elastic Beanstalk Developer Guide
Tomcat
Configuration and
Solution Stack Name
AMI Language AWS X-Ray Application
Server
Proxy Server
running Tomcat 8
Java 8
Java 7 with Tomcat
7 version 2.5.3
64bit Amazon Linux
2016.09 v2.5.3
running Tomcat 7
Java 7
2016.09.0Java 1.7.0_131 1.0.0 Tomcat 7.0.75 Apache 2.2.31
Java 6 with Tomcat
7 version 2.5.3
64bit Amazon Linux
2016.09 v2.5.3
running Tomcat 7
Java 6
2016.09.0Java 1.6.0_41 1.0.0 Tomcat 7.0.75 Apache 2.2.31
The following Elastic Beanstalk platform configurations for Tomcat were current between January 28,
2017 and March 7, 2017:
Configuration and
Solution Stack Name
AMI Language Application
Server
Proxy Server AWS
X-Ray
Java 8 with Tomcat 8
version 2.5.1
64bit Amazon Linux
2016.09 v2.5.1 running
Tomcat 8 Java 8
2016.09.0Java 1.8.0_111 Tomcat 8.0.38 Apache 2.2.31 1.1.0
Java 7 with Tomcat 7
version 2.5.1
64bit Amazon Linux
2016.09 v2.5.1 running
Tomcat 7 Java 7
2016.09.0Java 1.7.0_121 Tomcat 7.0.72 Apache 2.2.31 1.1.0
Java 6 with Tomcat 7
version 2.5.1
64bit Amazon Linux
2016.09 v2.5.1 running
Tomcat 7 Java 6
2016.09.0Java 1.6.0_40 Tomcat 7.0.72 Apache 2.2.31 1.1.0
The following Elastic Beanstalk platform configurations for Tomcat were current between December 22,
2016 and January 27, 2017:
API Version 2010-12-01
973

AWS Elastic Beanstalk Developer Guide
Tomcat
Configuration and
Solution Stack Name
AMI Language Application
Server
Proxy Server AWS
X-Ray
Java 8 with Tomcat 8
version 2.5.0
64bit Amazon Linux
2016.09 v2.5.0 running
Tomcat 8 Java 8
2016.09.0Java 1.8.0_111 Tomcat 8.0.38 Apache 2.2.31 1.1.0
Java 7 with Tomcat 7
version 2.5.0
64bit Amazon Linux
2016.09 v2.5.0 running
Tomcat 7 Java 7
2016.09.0Java 1.7.0_121 Tomcat 7.0.72 Apache 2.2.31 1.1.0
Java 6 with Tomcat 7
version 2.5.0
64bit Amazon Linux
2016.09 v2.5.0 running
Tomcat 7 Java 6
2016.09.0Java 1.6.0_40 Tomcat 7.0.72 Apache 2.2.31 1.1.0
The following Elastic Beanstalk platform configurations for Tomcat were current between December 9,
2016 and December 21, 2016:
Configuration and
Solution Stack Name
AMI Language Application Server Proxy Server
Java 8 with Tomcat 8
version 2.4.0
64bit Amazon Linux
2016.09 v2.4.0 running
Tomcat 8 Java 8
2016.09.0Java 1.8.0_111 Tomcat 8.0.38 Apache 2.2.31
Java 7 with Tomcat 7
version 2.4.0
64bit Amazon Linux
2016.09 v2.4.0 running
Tomcat 7 Java 7
2016.09.0Java 1.7.0_121 Tomcat 7.0.72 Apache 2.2.31
Java 6 with Tomcat 7
version 2.4.0
64bit Amazon Linux
2016.09 v2.4.0 running
Tomcat 7 Java 6
2016.09.0Java 1.6.0_40 Tomcat 7.0.72 Apache 2.2.31
The following Elastic Beanstalk platform configurations for Tomcat were current between November 2,
2016 and December 8, 2016:
API Version 2010-12-01
974

AWS Elastic Beanstalk Developer Guide
Tomcat
Configuration and
Solution Stack Name
AMI Language Application Server Proxy Server
Java 8 with Tomcat 8
version 2.3.1
64bit Amazon Linux
2016.09 v2.3.1 running
Tomcat 8 Java 8
2016.09.0Java 1.8.0_101 Tomcat 8.0.36 Apache 2.2.31
The following Elastic Beanstalk platform configurations for Tomcat were current between October 28,
2016 and Dec 9, 2016:
Configuration and
Solution Stack Name
AMI Language Application Server Proxy Server
Java 7 with Tomcat 7
version 2.3.0
64bit Amazon Linux
2016.09 v2.3.0 running
Tomcat 7 Java 7
2016.09.0Java 1.7.0_111 Tomcat 7.0.70 Apache 2.2.31
Java 6 with Tomcat 7
version 2.3.0
64bit Amazon Linux
2016.09 v2.3.0 running
Tomcat 7 Java 6
2016.09.0Java 1.6.0_39 Tomcat 7.0.70 Apache 2.2.31
The following Elastic Beanstalk platform configurations for Tomcat were current between October 28,
2016 and November 2, 2016:
Configuration and
Solution Stack Name
AMI Language Application Server Proxy Server
Java 8 with Tomcat 8
version 2.3.0
64bit Amazon Linux
2016.09 v2.3.0 running
Tomcat 8 Java 8
2016.09.0Java 1.8.0_101 Tomcat 8.0.36 Apache 2.2.31
The following Elastic Beanstalk platform configurations for Tomcat were current between August 24,
2016 and October 27, 2016:
Configuration and
Solution Stack Name
AMI Language Application Server Proxy Server
Java 8 with Tomcat 8
version 2.2.0
2016.03.3Java 1.8.0_101 Tomcat 8.0.36 Apache 2.2.31
API Version 2010-12-01
975

AWS Elastic Beanstalk Developer Guide
Tomcat
Configuration and
Solution Stack Name
AMI Language Application Server Proxy Server
64bit Amazon Linux
2016.03 v2.2.0 running
Tomcat 8 Java 8
Java 7 with Tomcat 7
version 2.2.0
64bit Amazon Linux
2016.03 v2.2.0 running
Tomcat 7 Java 7
2016.03.3Java 1.7.0_111 Tomcat 7.0.70 Apache 2.2.31
Java 6 with Tomcat 7
version 2.2.0
64bit Amazon Linux
2016.03 v2.2.0 running
Tomcat 7 Java 6
2016.03.3Java 1.6.0_39 Tomcat 7.0.70 Apache 2.2.31
The following Elastic Beanstalk platform configurations for Tomcat were current between June 26, 2016
and August 24, 2016:
Configuration and
Solution Stack Name
AMI Language Application Server Proxy Server
Java 8 with Tomcat 8
version 2.1.3
64bit Amazon Linux
2016.03 v2.1.3 running
Tomcat 8 Java 8
2016.03.2Java 1.8.0_91 Tomcat 8.0.35 Apache 2.2.31
Java 7 with Tomcat 7
version 2.1.3
64bit Amazon Linux
2016.03 v2.1.3 running
Tomcat 7 Java 7
2016.03.2Java 1.7.0_101 Tomcat 7.0.69 Apache 2.2.31
Java 6 with Tomcat 7
version 2.1.3
64bit Amazon Linux
2016.03 v2.1.3 running
Tomcat 7 Java 6
2016.03.2Java 1.6.0_38 Tomcat 7.0.69 Apache 2.2.31
The following Elastic Beanstalk platform configurations for Tomcat were current between May 6, 2016
and June 26, 2016:
Configuration and
Solution Stack Name
AMI Language Application Server Proxy Server
Java 8 with Tomcat 8
version 2.1.1
2016.03 Java 1.8.0_91 Tomcat 8.0.32 Apache 2.2.31
API Version 2010-12-01
976

AWS Elastic Beanstalk Developer Guide
Tomcat
Configuration and
Solution Stack Name
AMI Language Application Server Proxy Server
64bit Amazon Linux
2016.03 v2.1.1 running
Tomcat 8 Java 8
Java 7 with Tomcat 7
version 2.1.1
64bit Amazon Linux
2016.03 v2.1.1 running
Tomcat 7 Java 7
2016.03 Java 1.7.0_101 Tomcat 7.0.68 Apache 2.2.31
Java 6 with Tomcat 7
version 2.1.1
64bit Amazon Linux
2016.03 v2.1.1 running
Tomcat 7 Java 6
2016.03 Java 1.6.0_38 Tomcat 7.0.68 Apache 2.2.31
The following Elastic Beanstalk platform configurations for Tomcat were current between April 7, 2016
and May 6, 2016:
Configuration and
Solution Stack Name
AMI Language Application Server Proxy Server
Java 8 with Tomcat 8
version 2.1.0
64bit Amazon Linux
2016.03 v2.1.0 running
Tomcat 8 Java 8
2016.03 Java 1.8.0_71 Tomcat 8.0.30 Apache 2.2.31
Java 7 with Tomcat 7
version 2.1.0
64bit Amazon Linux
2016.03 v2.1.0 running
Tomcat 7 Java 7
2016.03 Java 1.7.0_95 Tomcat 7.0.67 Apache 2.2.31
Java 6 with Tomcat 7
version 2.1.0
64bit Amazon Linux
2016.03 v2.1.0 running
Tomcat 7 Java 6
2016.03 Java 1.6.0_38 Tomcat 7.0.67 Apache 2.2.31
The following Elastic Beanstalk platform configurations for Tomcat were current between February 26,
2016 and April 7, 2016:
Configuration and
Solution Stack Name
AMI Language Application Server Web Server
Java 8 with Tomcat 8
version 2.0.8
2015.09 Java 1.8.0_71 Tomcat 8.0.30 Apache 2.2.31
API Version 2010-12-01
977

AWS Elastic Beanstalk Developer Guide
Tomcat
Configuration and
Solution Stack Name
AMI Language Application Server Web Server
64bit Amazon Linux
2015.09 v2.0.8 running
Tomcat 8 Java 8
Java 7 with Tomcat 7
version 2.0.8
64bit Amazon Linux
2015.09 v2.0.8 running
Tomcat 7 Java 7
2015.09 Java 1.7.0_95 Tomcat 7.0.67 Apache 2.2.31
Java 6 with Tomcat 7
version 2.0.8
64bit Amazon Linux
2015.09 v2.0.8 running
Tomcat 7 Java 6
2015.09 Java 1.6.0_38 Tomcat 7.0.67 Apache 2.2.31
The following Elastic Beanstalk platform configurations for Tomcat were current between January 11,
2016 and February 11, 2016:
Configuration and
Solution Stack Name
AMI Language Application Server Web Server
Java 8 with Tomcat 8
version 2.0.7
64bit Amazon Linux
2015.09 v2.0.7 running
Tomcat 8 Java 8
2015.09 Java 1.8.0_65 Tomcat 8.0.28 Apache 2.2.31
Java 7 with Tomcat 7
version 2.0.7
64bit Amazon Linux
2015.09 v2.0.7 running
Tomcat 7 Java 7
2015.09 Java 1.7.0_91 Tomcat 7.0.65 Apache 2.2.31
Java 6 with Tomcat 7
version 2.0.7
64bit Amazon Linux
2015.09 v2.0.7 running
Tomcat 7 Java 6
2015.09 Java 1.6.0_37 Tomcat 7.0.65 Apache 2.2.31
The following Elastic Beanstalk platform configurations for Tomcat were current between February 11,
2016 and February 26, 2016:
Configuration and
Solution Stack Name
AMI Language Application Server Web Server
Java 8 with Tomcat 8
version 2.0.6
2015.09 Java 1.8.0_65 Tomcat 8.0.28 Apache 2.2.31
API Version 2010-12-01
978

AWS Elastic Beanstalk Developer Guide
Tomcat
Configuration and
Solution Stack Name
AMI Language Application Server Web Server
64bit Amazon Linux
2015.09 v2.0.6 running
Tomcat 8 Java 8
Java 7 with Tomcat 7
version 2.0.6
64bit Amazon Linux
2015.09 v2.0.6 running
Tomcat 7 Java 7
2015.09 Java 1.7.0_91 Tomcat 7.0.65 Apache 2.2.31
Java 6 with Tomcat 7
version 2.0.6
64bit Amazon Linux
2015.09 v2.0.6 running
Tomcat 7 Java 6
2015.09 Java 1.6.0_37 Tomcat 7.0.65 Apache 2.2.31
The following Elastic Beanstalk platform configurations for Tomcat were current between November 3,
2015 and January 11, 2016:
Configuration and
Solution Stack Name
AMI Language Application Server Web Server
Java 8 with Tomcat 8
version 2.0.4
64bit Amazon Linux
2015.09 v2.0.4 running
Tomcat 8 Java 8
2015.09 Java 1.8.0_65 Tomcat 8.0.23 Apache 2.2.31
Java 7 with Tomcat 7
version 2.0.4
64bit Amazon Linux
2015.09 v2.0.4 running
Tomcat 7 Java 7
2015.09 Java 1.7.0_91 Tomcat 7.0.62 Apache 2.2.31
Java 6 with Tomcat 7
version 2.0.4
64bit Amazon Linux
2015.09 v2.0.4 running
Tomcat 7 Java 6
2015.09 Java 1.6.0_36 Tomcat 7.0.62 Apache 2.2.31
The following Elastic Beanstalk platform configurations for Tomcat were current between September 18,
2015 and November 3, 2015:
Configuration and
Solution Stack Name
AMI Language Application Server Web Server
Java 8 with Tomcat 8
version 2.0.1
2015.03 Java 1.8.0_51 Tomcat 8.0.20 Apache 2.2.29
API Version 2010-12-01
979

AWS Elastic Beanstalk Developer Guide
Tomcat
Configuration and
Solution Stack Name
AMI Language Application Server Web Server
64bit Amazon Linux
2015.03 v2.0.1 running
Tomcat 8 Java 8
Java 7 with Tomcat 7
version 2.0.1
64bit Amazon Linux
2015.03 v2.0.1 running
Tomcat 7 Java 7
2015.03 Java 1.7.0_85 Tomcat 7.0.62 Apache 2.2.29
Java 6 with Tomcat 7
version 2.0.1
64bit Amazon Linux
2015.03 v2.0.1 running
Tomcat 7 Java 6
2015.03 Java 1.6.0_35 Tomcat 7.0.62 Apache 2.2.29
The following Elastic Beanstalk platform configurations for Tomcat were current between August 11,
2015 and September 18, 2015:
Configuration and
Solution Stack Name
AMI Language Application Server Web Server
Java 8 with Tomcat 8
version 2.0.0
64bit Amazon Linux
2015.03 v2.0.0 running
Tomcat 8 Java 8
2015.03 Java 1.8.0_51 Tomcat 8.0.20 Apache 2.2.29
Java 7 with Tomcat 7
version 2.0.0
64bit Amazon Linux
2015.03 v2.0.0 running
Tomcat 7 Java 7
2015.03 Java 1.7.0_85 Tomcat 7.0.62 Apache 2.2.29
Java 6 with Tomcat 7
version 2.0.0
64bit Amazon Linux
2015.03 v2.0.0 running
Tomcat 7 Java 6
2015.03 Java 1.6.0_35 Tomcat 7.0.62 Apache 2.2.29
The following Elastic Beanstalk platform configurations for Tomcat were current between July 31, 2015
and August 11, 2015:
Configuration and
Solution Stack Name
AMI Language Application Server Web Server
Java 8 with Tomcat 8
version 1.4.5
2015.03 Java 1.8.0_51 Tomcat 8.0.20 Apache 2.2.29
API Version 2010-12-01
980

AWS Elastic Beanstalk Developer Guide
Tomcat
Configuration and
Solution Stack Name
AMI Language Application Server Web Server
64bit Amazon Linux
2015.03 v1.4.5 running
Tomcat 8 Java 8
Java 7 with Tomcat 7
version 1.4.5
64bit Amazon Linux
2015.03 v1.4.5 running
Tomcat 7 Java 7
2015.03 Java 1.7.0_85 Tomcat 7.0.62 Apache 2.2.29
Java 6 with Tomcat 7
version 1.4.5
64bit Amazon Linux
2015.03 v1.4.5 running
Tomcat 7 Java 6
2015.03 Java 1.6.0_35 Tomcat 7.0.62 Apache 2.2.29
The following Elastic Beanstalk platform configurations for Tomcat were current between July 7, 2015
and July 31, 2015:
Configuration and
Solution Stack Name
AMI Language Application Server Web Server
Java 8 with Tomcat 8
version 1.4.4
64bit Amazon Linux
2015.03 v1.4.4 running
Tomcat 8 Java 8
2015.03 Java 1.8.0_45 Tomcat 8.0.20 Apache 2.2.29
Java 7 with Tomcat 7
version 1.4.4
64bit Amazon Linux
2015.03 v1.4.4 running
Tomcat 7 Java 7
2015.03 Java 1.7.0_79 Tomcat 7.0.62 Apache 2.2.29
Java 6 with Tomcat 7
version 1.4.4
64bit Amazon Linux
2015.03 v1.4.4 running
Tomcat 7 Java 6
2015.03 Java 1.6.0_35 Tomcat 7.0.62 Apache 2.2.29
The following Elastic Beanstalk platform configurations for Tomcat were current between June 15, 2015
and July 7, 2015:
API Version 2010-12-01
981

AWS Elastic Beanstalk Developer Guide
Tomcat
Configuration and
Solution Stack
Name
AMI Language Application
Server
Web Server
Java 8 with
Tomcat 8 version
1.4.3
64bit Amazon
Linux 2015.03
v1.4.3 running
Tomcat 8 Java 8
2015.03 Java 1.8.0_45 Tomcat 8.0.20 Apache 2.2.29
Java 7 with
Tomcat 7 version
1.4.3
64bit Amazon
Linux 2015.03
v1.4.3 running
Tomcat 7 Java 7
2015.03 Java 1.7.0_79 Tomcat 7.0.62 Apache 2.2.29
Java 6 with
Tomcat 7 version
1.4.3
64bit Amazon
Linux 2015.03
v1.4.3 running
Tomcat 7 Java 6
2015.03 Java 1.6.0_35 Tomcat 7.0.62 Apache 2.2.29
The following Elastic Beanstalk platform configurations for Tomcat were current between May 27, 2015
and June 15, 2015:
Java Configurations
Name AMI Language Application Server Web Server
64bit Amazon Linux
2015.03 v1.4.1 running
Tomcat 8 Java 8
2015.03 Java 1.8.0_31 Tomcat 8.0.20 Apache 2.2.29
64bit Amazon Linux
2015.03 v1.4.1 running
Tomcat 7 Java 7
2015.03 Java 1.7.0_75 Tomcat 7.0.59 Apache 2.2.29
64bit Amazon Linux
2015.03 v1.4.1 running
Tomcat 7 Java 6
2015.03 Java 1.6.0_34 Tomcat 7.0.59 Apache 2.2.29
The following Elastic Beanstalk platform configurations for Tomcat were current between April 22, 2015
and May 26, 2015:
API Version 2010-12-01
982

AWS Elastic Beanstalk Developer Guide
Tomcat
Java Configurations
Name AMI Language Application Server Web Server
64bit Amazon Linux
2015.03 v1.3.1 running
Tomcat 8 Java 8
2015.03 Java 1.8.0_31 Tomcat 8.0.20 Apache 2.2.29
64bit Amazon Linux
2015.03 v1.3.1 running
Tomcat 7 Java 7
2015.03 Java 1.7.0_75 Tomcat 7.0.59 Apache 2.2.29
64bit Amazon Linux
2015.03 v1.3.1 running
Tomcat 7 Java 6
2015.03 Java 1.6.0_34 Tomcat 7.0.59 Apache 2.2.29
The following Elastic Beanstalk platform configurations for Tomcat were current between April 8, 2015
and April 21, 2015:
Java Configurations
Name AMI Language Application Server Web Server
64bit Amazon Linux
2015.03 v1.3.0 running
Tomcat 8 Java 8
2015.03 Java 1.8.0_31 Tomcat 8.0.20 Apache 2.2.29
64bit Amazon Linux
2015.03 v1.3.0 running
Tomcat 7 Java 7
2015.03 Java 1.7.0_75 Tomcat 7.0.59 Apache 2.2.29
64bit Amazon Linux
2015.03 v1.3.0 running
Tomcat 7 Java 6
2015.03 Java 1.6.0_34 Tomcat 7.0.59 Apache 2.2.29
The following Elastic Beanstalk platform configurations for Tomcat were current between February 17,
2015 and April 7, 2015:
Java Configurations
Name AMI Language Application Server Web Server
64bit Amazon Linux
2014.09 v1.2.0 running
Tomcat 8 Java 8
2014.09 Java 1.8.0_31 Tomcat 8.0.15 Apache 2.2.29
64bit Amazon Linux
2014.09 v1.2.0 running
Tomcat 7 Java 7
2014.09 Java 1.7.0.75 Tomcat 7.0.57 Apache 2.2.29
64bit Amazon Linux
2014.09 v1.2.0 running
Tomcat 7 Java 6
2014.09 Java 1.6.0_33 Tomcat 7.0.57 Apache 2.2.29
API Version 2010-12-01
983

AWS Elastic Beanstalk Developer Guide
Tomcat
Java Configurations
32bit Amazon Linux
2014.03 v1.0.91 running
Tomcat 7 Java 7
2014.03 Java 1.7.0.51 Tomcat 7.0.55 Apache 2.2.26
32bit Amazon Linux
2014.03 v1.0.91 running
Tomcat 7 Java 6
2014.03 Java 1.6.0_24 Tomcat 7.0.55 Apache 2.2.26
The following Elastic Beanstalk platform configurations for Tomcat were current between January 28,
2015 and February 16, 2015:
Java Configurations
Name AMI Language Application Server Web Server
64bit Amazon Linux
2014.09 v1.1.01 running
Tomcat 8 Java 8
2014.09 Java 1.8.0_31 Tomcat 8 Apache 2.2.29
64bit Amazon Linux
2014.09 v1.1.01 running
Tomcat 7 Java 7
2014.09 Java 1.7.0.51 Tomcat 7.0.55 Apache 2.2.26
64bit Amazon Linux
2014.09 v1.1.01 running
Tomcat 7 Java 6
2014.09 Java 1.6.0_24 Tomcat 7.0.55 Apache 2.2.26
32bit Amazon Linux
2014.03 v1.1.01 running
Tomcat 7 Java 7
2014.03 Java 1.7.0.71 Tomcat 7.0.55 Apache 2.2.29
64bit Amazon Linux
2014.03 v1.1.01 running
Tomcat 7 Java 7
2014.03 Java 1.7.0.71 Tomcat 7.0.55 Apache 2.2.29
32bit Amazon Linux
2014.03 v1.1.01 running
Tomcat 7 Java 6
2014.03 Java 1.6.0_33 Tomcat 7.0.55 Apache 2.2.29
64bit Amazon Linux
2014.03 v1.1.01 running
Tomcat 7 Java 6
2014.03 Java 1.6.0_33 Tomcat 7.0.55 Apache 2.2.29
1CVE-2015-0235 Advisory (Ghost)
The following Elastic Beanstalk platform configurations for Tomcat were current between November 6,
2014 and January 27, 2015:
Java Configurations
Name AMI Language Application Server Web Server
API Version 2010-12-01
984

AWS Elastic Beanstalk Developer Guide
Tomcat
Java Configurations
64bit Amazon Linux
2014.09 v1.0.0 running
Tomcat 8 Java 8
2014.09 Java 1.8.0_25 Tomcat 8 Apache 2.2.29
64bit Amazon Linux
2014.09 v1.0.91 running
Tomcat 7 Java 7
2014.09 Java 1.7.0.51 Tomcat 7.0.55 Apache 2.2.26
64bit Amazon Linux
2014.09 v1.0.91 running
Tomcat 7 Java 6
2014.09 Java 1.6.0_24 Tomcat 7.0.55 Apache 2.2.26
32bit Amazon Linux
2014.03 v1.0.91 running
Tomcat 7 Java 7
2014.03 Java 1.7.0.51 Tomcat 7.0.55 Apache 2.2.26
64bit Amazon Linux
2014.03 v1.0.91 running
Tomcat 7 Java 7
2014.03 Java 1.7.0.51 Tomcat 7.0.55 Apache 2.2.26
32bit Amazon Linux
2014.03 v1.0.91 running
Tomcat 7 Java 6
2014.03 Java 1.6.0_24 Tomcat 7.0.55 Apache 2.2.26
64bit Amazon Linux
2014.03 v1.0.91 running
Tomcat 7 Java 6
2014.03 Java 1.6.0_24 Tomcat 7.0.55 Apache 2.2.26
The following Elastic Beanstalk platform configurations for Tomcat were current between October 16,
2014 and November 5, 2014:
Java Configurations
Name AMI Language Application Server Web Server
64bit Amazon Linux
2014.09 v1.0.91 running
Tomcat 7 Java 7
2014.09 Java 1.7.0.51 Tomcat 7.0.55 Apache 2.2.26
64bit Amazon Linux
2014.09 v1.0.91 running
Tomcat 7 Java 6
2014.09 Java 1.6.0_24 Tomcat 7.0.55 Apache 2.2.26
32bit Amazon Linux
2014.03 v1.0.91 running
Tomcat 7 Java 7
2014.03 Java 1.7.0.51 Tomcat 7.0.55 Apache 2.2.26
64bit Amazon Linux
2014.03 v1.0.91 running
Tomcat 7 Java 7
2014.03 Java 1.7.0.51 Tomcat 7.0.55 Apache 2.2.26
32bit Amazon Linux
2014.03 v1.0.91 running
Tomcat 7 Java 6
2014.03 Java 1.6.0_24 Tomcat 7.0.55 Apache 2.2.26
API Version 2010-12-01
985

AWS Elastic Beanstalk Developer Guide
Tomcat
Java Configurations
64bit Amazon Linux
2014.03 v1.0.91 running
Tomcat 7 Java 6
2014.03 Java 1.6.0_24 Tomcat 7.0.55 Apache 2.2.26
1CVE-2014-3566 Advisory
The following Elastic Beanstalk platform configurations for Tomcat were current between October 9,
2014 and October 15, 2014:
Java Configurations
Name AMI Language Application Server Web Server
32bit Amazon Linux
2014.09 v1.0.8 running
Tomcat 7 Java 7
2014.09 Java 1.7.0.51 Tomcat 7.0.47 Apache 2.2.26
64bit Amazon Linux
2014.09 v1.0.8 running
Tomcat 7 Java 7
2014.09 Java 1.7.0.51 Tomcat 7.0.47 Apache 2.2.26
32bit Amazon Linux
2014.09 v1.0.8 running
Tomcat 7 Java 6
2014.09 Java 1.6.0_24 Tomcat 7.0.47 Apache 2.2.26
64bit Amazon Linux
2014.09 v1.0.8 running
Tomcat 7 Java 6
2014.09 Java 1.6.0_24 Tomcat 7.0.47 Apache 2.2.26
The following Elastic Beanstalk platform configurations for Tomcat were current between September 24,
2014 and October 8, 2014:
Java Configurations
Name AMI Language Application Server Web Server
32bit Amazon Linux
2014.03 v1.0.71 running
Tomcat 7 Java 7
2014.03 Java 1.7.0.51 Tomcat 7.0.47 Apache 2.2.26
64bit Amazon Linux
2014.03 v1.0.71 running
Tomcat 7 Java 7
2014.03 Java 1.7.0.51 Tomcat 7.0.47 Apache 2.2.26
32bit Amazon Linux
2014.03 v1.0.71 running
Tomcat 7 Java 6
2014.03 Java 1.6.0_24 Tomcat 7.0.47 Apache 2.2.26
64bit Amazon Linux
2014.03 v1.0.71 running
Tomcat 7 Java 6
2014.03 Java 1.6.0_24 Tomcat 7.0.47 Apache 2.2.26
1 CVE-2014-6271 Advisory and ALAS-2014-419
API Version 2010-12-01
986

AWS Elastic Beanstalk Developer Guide
Tomcat
The following Elastic Beanstalk platform configurations for Tomcat were current between June 30, 2014
and September 23, 2014:
Java Configurations
Name AMI Language Application Server Web Server
64bit Amazon Linux
2014.03 v1.0.4 running
Tomcat 7 Java 7
2014.03 Java 1.7.0.51 Tomcat 7.0.47 Apache 2.2.26
64bit Amazon Linux
2014.03 v1.0.4 running
Tomcat 7 Java 6
2014.03 Java 1.6.0_24 Tomcat 7.0.47 Apache 2.2.26
The following Elastic Beanstalk platform configurations for Tomcat were current between June 5, 2014
and June 29, 2014:
Java Configurations
Name AMI Language Application Server Web Server
32bit Amazon Linux
2014.03 v1.0.31 running
Tomcat 7 Java 7
2014.03 Java 1.7.0.51 Tomcat 7.0.47 Apache 2.2.26
64bit Amazon Linux
2014.03 v1.0.31 running
Tomcat 7 Java 7
2014.03 Java 1.7.0.51 Tomcat 7.0.47 Apache 2.2.26
32bit Amazon Linux
2014.03 v1.0.31 running
Tomcat 7 Java 6
2014.03 Java 1.6.0_24 Tomcat 7.0.47 Apache 2.2.26
64bit Amazon Linux
2014.03 v1.0.31 running
Tomcat 7 Java 6
2014.03 Java 1.6.0_24 Tomcat 7.0.47 Apache 2.2.26
1 OpenSSL Security Advisory
The following Elastic Beanstalk platform configurations for Tomcat were current between May 5, 2014
and June 4, 2014:
Java Configurations
Name AMI Language Application Server Web Server
32bit Amazon Linux
2014.03 v1.0.2 running
Tomcat 7 Java 7
2014.03 Java 1.7.0.51 Tomcat 7.0.47 Apache 2.2.26
64bit Amazon Linux
2014.03 v1.0.2 running
Tomcat 7 Java 7
2014.03 Java 1.7.0.51 Tomcat 7.0.47 Apache 2.2.26
API Version 2010-12-01
987

AWS Elastic Beanstalk Developer Guide
Tomcat
Java Configurations
32bit Amazon Linux
2014.03 v1.0.2 running
Tomcat 7 Java 6
2014.03 Java 1.6.0_24 Tomcat 7.0.47 Apache 2.2.26
64bit Amazon Linux
2014.03 v1.0.2 running
Tomcat 7 Java 6
2014.03 Java 1.6.0_24 Tomcat 7.0.47 Apache 2.2.26
The following Elastic Beanstalk platform configurations for Tomcat were current between April 7, 2014
and May 4, 2014:
Java Configurations
Name AMI Language Application Server Web Server
32bit Amazon Linux
2014.02 v1.0.11 running
Tomcat 7 Java 7
2013.09 Java 1.7.0.51 Tomcat 7.0.47 Apache 2.2.26
64bit Amazon Linux
2014.02 v1.0.11 running
Tomcat 7 Java 7
2013.09 Java 1.7.0.51 Tomcat 7.0.47 Apache 2.2.26
32bit Amazon Linux
2014.02 v1.0.11 running
Tomcat 7 Java 6
2013.09 Java 1.6.0_24 Tomcat 7.0.47 Apache 2.2.26
64bit Amazon Linux
2014.02 v1.0.11 running
Tomcat 7 Java 6
2013.09 Java 1.6.0_24 Tomcat 7.0.47 Apache 2.2.26
32bit Amazon Linux
2013.09 v1.0.11 running
Tomcat 7 Java 7
2013.09 Java 1.7.0_25 Tomcat 7.0.47 Apache 2.2.26
64bit Amazon Linux
2013.09 v1.0.11 running
Tomcat 7 Java 7
2013.09 Java 1.7.0_25 Tomcat 7.0.47 Apache 2.2.26
32bit Amazon Linux
2013.09 v1.0.11 running
Tomcat 7 Java 6
2013.09 Java 1.6.0_62 Tomcat 7.0.47 Apache 2.2.26
64bit Amazon Linux
2013.09 v1.0.11 running
Tomcat 7 Java 6
2013.09 Java 1.6.0_62 Tomcat 7.0.47 Apache 2.2.26
32bit Amazon Linux
running Tomcat 6
2012.09 Java 1.6.0_24 Tomcat 6.0.35 Apache 2.2.22
64bit Amazon Linux
running Tomcat 6
2012.09 Java 1.6.0_24 Tomcat 6.0.35 Apache 2.2.22
1 openssl-1.0.1e-4.58.amzn1
API Version 2010-12-01
988

AWS Elastic Beanstalk Developer Guide
Tomcat
The following Elastic Beanstalk platform configurations for Tomcat were current between March 18,
2014 and April 6, 2014:
Java Configurations
Name AMI Language Application Server Web Server
32bit Amazon Linux
2014.02 running Tomcat
7 Java 7
2013.09 Java 1.7.0.51 Tomcat 7.0.47 Apache 2.2.26
64bit Amazon Linux
2014.02 running Tomcat
7 Java 7
2013.09 Java 1.7.0.51 Tomcat 7.0.47 Apache 2.2.26
32bit Amazon Linux
2014.02 running Tomcat
7 Java 6
2013.09 Java 1.6.0_24 Tomcat 7.0.47 Apache 2.2.26
64bit Amazon Linux
2014.02 running Tomcat
7 Java 6
2013.09 Java 1.6.0_24 Tomcat 7.0.47 Apache 2.2.26
32bit Amazon Linux
2013.09 running Tomcat
7 Java 7
2013.09 Java 1.7.0_25 Tomcat 7.0.47 Apache 2.2.26
64bit Amazon Linux
2013.09 running Tomcat
7 Java 7
2013.09 Java 1.7.0_25 Tomcat 7.0.47 Apache 2.2.26
32bit Amazon Linux
2013.09 running Tomcat
7 Java 6
2013.09 Java 1.6.0_62 Tomcat 7.0.47 Apache 2.2.26
64bit Amazon Linux
2013.09 running Tomcat
7 Java 6
2013.09 Java 1.6.0_62 Tomcat 7.0.47 Apache 2.2.26
32bit Amazon Linux
running Tomcat 6
2012.09 Java 1.6.0_24 Tomcat 6.0.35 Apache 2.2.22
64bit Amazon Linux
running Tomcat 6
2012.09 Java 1.6.0_24 Tomcat 6.0.35 Apache 2.2.22
The following Elastic Beanstalk platform configurations for Tomcat were current between November 7,
2013 and March 17, 2014:
Java Configurations
Name AMI Language Application Server Web Server
32bit Amazon Linux
2013.09 running Tomcat
7 Java 7
2013.09 Java 1.7.0_25 Tomcat 7.0.47 Apache 2.2.26
API Version 2010-12-01
989

AWS Elastic Beanstalk Developer Guide
Java SE
Java Configurations
64bit Amazon Linux
2013.09 running Tomcat
7 Java 7
2013.09 Java 1.7.0_25 Tomcat 7.0.47 Apache 2.2.26
32bit Amazon Linux
2013.09 running Tomcat
7 Java 6
2013.09 Java 1.6.0_62 Tomcat 7.0.47 Apache 2.2.26
64bit Amazon Linux
2013.09 running Tomcat
7 Java 6
2013.09 Java 1.6.0_62 Tomcat 7.0.47 Apache 2.2.26
32bit Amazon Linux
running Tomcat 6
2012.09 Java 1.6.0_24 Tomcat 6.0.35 Apache 2.2.22
64bit Amazon Linux
running Tomcat 6
2012.09 Java 1.6.0_24 Tomcat 6.0.35 Apache 2.2.22
The following Elastic Beanstalk platform configurations for Tomcat were current prior to November 6,
2013:
Java Configurations
Name AMI Language Application Server Web Server
32bit Amazon Linux
running Tomcat 7
2012.09 Java 1.6.0_24 Tomcat 7.0.27 Apache 2.2.22
64bit Amazon Linux
running Tomcat 7
2012.09 Java 1.6.0_24 Tomcat 7.0.27 Apache 2.2.22
Java SE Platform History
This page lists the previous versions of AWS Elastic Beanstalk's Java platforms and the dates that each
version was current. Platform versions that you used to launch or update an environment in the last 30
days remain available (to the using account, in the used region) even after they are no longer current.
See the Supported Platforms (p. 26) page for information on the latest version of each platform
supported by Elastic Beanstalk. Detailed release notes are available for recent releases at
aws.amazon.com/releasenotes.
The following Elastic Beanstalk platform configurations for Java SE were current between November 14,
2017 and December 19, 2017:
Configuration and Solution
Stack Name
AMI Language Tools AWS
X‑Ray
Proxy Server
Java 8 version 2.6.0
64bit Amazon Linux 2017.09
v2.6.0 running Java 8
2017.09.1Java
1.8.0_151
Ant 1.9.6, Gradle
2.7, Maven 3.3.3
2.0.0 nginx 1.12.1
API Version 2010-12-01
990

AWS Elastic Beanstalk Developer Guide
Java SE
Configuration and Solution
Stack Name
AMI Language Tools AWS
X‑Ray
Proxy Server
Java 7 version 2.6.0
64bit Amazon Linux 2017.09
v2.6.0 running Java 7
2017.09.1Java
1.7.0_151
Ant 1.9.6, Gradle
2.7, Maven 3.3.3
2.0.0 nginx 1.12.1
The following Elastic Beanstalk platform configurations for Java SE were current between September 25,
2017 and November 13, 2017:
Configuration and Solution
Stack Name
AMI Language Tools AWS
X‑Ray
Proxy Server
Java 8 version 2.5.5
64bit Amazon Linux 2017.03
v2.5.5 running Java 8
2017.03.1Java
1.8.0_141
Ant 1.9.6, Gradle
2.7, Maven 3.3.3
2.0.0 nginx 1.12.1
Java 7 version 2.5.5
64bit Amazon Linux 2017.03
v2.5.5 running Java 7
2017.03.1Java
1.7.0_151
Ant 1.9.6, Gradle
2.7, Maven 3.3.3
2.0.0 nginx 1.12.1
The following Elastic Beanstalk platform configurations for Java SE were current between August 30,
2017 and September 24, 2017:
Configuration and Solution
Stack Name
AMI Language Tools AWS
X‑Ray
Proxy Server
Java 8 version 2.5.4
64bit Amazon Linux 2017.03
v2.5.4 running Java 8
2017.03.1Java
1.8.0_141
Ant 1.9.6, Gradle
2.7, Maven 3.3.3
2.0.0 nginx 1.10.3
Java 7 version 2.5.4
64bit Amazon Linux 2017.03
v2.5.4 running Java 7
2017.03.1Java
1.7.0_151
Ant 1.9.6, Gradle
2.7, Maven 3.3.3
2.0.0 nginx 1.10.3
The following Elastic Beanstalk platform configurations for Java SE were current between August 11,
2017 and August 29, 2017:
Configuration and Solution
Stack Name
AMI Language Tools AWS
X‑Ray
Proxy Server
Java 8 version 2.5.3
64bit Amazon Linux 2017.03
v2.5.3 running Java 8
2017.03.1Java
1.8.0_141
Ant 1.9.6, Gradle
2.7, Maven 3.3.3
2.0.0 nginx 1.10.3
Java 7 version 2.5.3 2017.03.1Java
1.7.0_141
Ant 1.9.6, Gradle
2.7, Maven 3.3.3
2.0.0 nginx 1.10.3
API Version 2010-12-01
991

AWS Elastic Beanstalk Developer Guide
Java SE
Configuration and Solution
Stack Name
AMI Language Tools AWS
X‑Ray
Proxy Server
64bit Amazon Linux 2017.03
v2.5.3 running Java 7
The following Elastic Beanstalk platform configurations for Java SE were current between July 20, 2017
and August 10, 2017:
Configuration and Solution
Stack Name
AMI Language Tools AWS
X-Ray
Proxy Server
Java 8 version 2.5.2
64bit Amazon Linux 2017.03
v2.5.2 running Java 8
2017.03.1Java
1.8.0_131
Ant 1.9.6, Gradle
2.7, Maven 3.3.3
2.0.0 nginx 1.10.3
Java 7 version 2.5.2
64bit Amazon Linux 2017.03
v2.5.2 running Java 7
2017.03.1Java
1.7.0_141
Ant 1.9.6, Gradle
2.7, Maven 3.3.3
2.0.0 nginx 1.10.3
The following Elastic Beanstalk platform configurations for Java SE were current between June 27, 2017
and July 19, 2017:
Configuration and Solution
Stack Name
AMI Language Tools AWS
X-Ray
Proxy Server
Java 8 version 2.5.1
64bit Amazon Linux 2017.03
v2.5.1 running Java 8
2017.03.0Java
1.8.0_121
Ant 1.9.6, Gradle
2.7, Maven 3.3.3
2.0.0 nginx 1.10.2
Java 7 version 2.5.1
64bit Amazon Linux 2017.03
v2.5.1 running Java 7
2017.03.0Java
1.7.0_131
Ant 1.9.6, Gradle
2.7, Maven 3.3.3
2.0.0 nginx 1.10.2
The following Elastic Beanstalk platform configurations for Java SE were current between May 19, 2017
and June 26, 2017:
Configuration and Solution
Stack Name
AMI Language Tools AWS
X-Ray
Proxy Server
Java 8 version 2.5.0
64bit Amazon Linux 2017.03
v2.5.0 running Java 8
2017.03.0Java
1.8.0_121
Ant 1.9.6, Gradle
2.7, Maven 3.3.3
2.0.0 nginx 1.10.2
Java 7 version 2.5.0
64bit Amazon Linux 2017.03
v2.5.0 running Java 7
2017.03.0Java
1.7.0_131
Ant 1.9.6, Gradle
2.7, Maven 3.3.3
2.0.0 nginx 1.10.2
API Version 2010-12-01
992

AWS Elastic Beanstalk Developer Guide
Java SE
The following Elastic Beanstalk platform configurations for Java SE were current between April 5, 2017
and May 18, 2017:
Configuration and Solution
Stack Name
AMI Language Tools AWS
X-Ray
Proxy Server
Java 8 version 2.4.4
64bit Amazon Linux 2016.09
v2.4.4 running Java 8
2016.09.0Java
1.8.0_121
Ant 1.9.6, Gradle
2.7, Maven 3.3.3
1.0.0 nginx 1.10.1
Java 7 version 2.4.4
64bit Amazon Linux 2016.09
v2.4.4 running Java 7
2016.09.0Java
1.7.0_131
Ant 1.9.6, Gradle
2.7, Maven 3.3.3
1.0.0 nginx 1.10.1
The following Elastic Beanstalk platform configurations for Java SE were current between March 8, 2017
and April 4, 2017:
Configuration and Solution
Stack Name
AMI Language Tools AWS
X-Ray
Proxy Server
Java 8 version 2.4.3
64bit Amazon Linux 2016.09
v2.4.3 running Java 8
2016.09.0Java
1.8.0_121
Ant 1.9.6, Gradle
2.7, Maven 3.3.3
1.0.0 nginx 1.10.1
Java 7 version 2.4.3
64bit Amazon Linux 2016.09
v2.4.3 running Java 7
2016.09.0Java
1.7.0_131
Ant 1.9.6, Gradle
2.7, Maven 3.3.3
1.0.0 nginx 1.10.1
The following Elastic Beanstalk platform configurations for Java SE were current between January 28
and March 7, 2017:
Configuration and Solution
Stack Name
AMI Language Tools Proxy Server AWS
X-Ray
Java 8 version 2.4.1
64bit Amazon Linux 2016.09
v2.4.1 running Java 8
2016.09.0Java
1.8.0_111
Ant 1.9.6, Gradle
2.7, Maven 3.3.3
nginx 1.10.1 1.0.0
Java 7 version 2.4.1
64bit Amazon Linux 2016.09
v2.4.1 running Java 7
2016.09.0Java
1.7.0_121
Ant 1.9.6, Gradle
2.7, Maven 3.3.3
nginx 1.10.1 1.1.0
The following Elastic Beanstalk platform configurations for Java SE were current between December 22,
2016 and January 27, 2017:
API Version 2010-12-01
993

AWS Elastic Beanstalk Developer Guide
Java SE
Configuration and Solution
Stack Name
AMI Language Tools Proxy Server AWS
X-Ray
Java 8 version 2.4.0
64bit Amazon Linux 2016.09
v2.4.0 running Java 8
2016.09.0Java
1.8.0_111
Ant 1.9.6, Gradle
2.7, Maven 3.3.3
nginx 1.10.1 1.0.0
Java 7 version 2.4.0
64bit Amazon Linux 2016.09
v2.4.0 running Java 7
2016.09.0Java
1.7.0_121
Ant 1.9.6, Gradle
2.7, Maven 3.3.3
nginx 1.10.1 1.1.0
The following Elastic Beanstalk platform configurations for Java SE were current between December 9,
2016 and December 21, 2016:
Configuration and Solution
Stack Name
AMI Language Tools Proxy Server
Java 8 version 2.3.0
64bit Amazon Linux 2016.09
v2.3.0 running Java 8
2016.09.0Java
1.8.0_101
Ant 1.9.6, Gradle
2.7, Maven 3.3.3
nginx 1.10.1
Java 7 version 2.3.0
64bit Amazon Linux 2016.09
v2.3.0 running Java 7
2016.09.0Java
1.7.0_121
Ant 1.9.6, Gradle
2.7, Maven 3.3.3
nginx 1.10.1
The following Elastic Beanstalk platform configurations for Java SE were current between October 28,
2016 and December 8, 2016:
Configuration and Solution
Stack Name
AMI Language Tools Proxy Server
Java 8 version 2.2.0
64bit Amazon Linux 2016.09
v2.2.0 running Java 8
2016.09.0Java
1.8.0_101
Ant 1.9.6, Gradle
2.7, Maven 3.3.3
nginx 1.10.1
Java 7 version 2.2.0
64bit Amazon Linux 2016.09
v2.2.0 running Java 7
2016.09.0Java
1.7.0_111
Ant 1.9.6, Gradle
2.7, Maven 3.3.3
nginx 1.10.1
The following Elastic Beanstalk platform configurations for Java SE were current between August 24,
2016 and October 27, 2016:
Configuration and Solution
Stack Name
AMI Language Tools Proxy Server
Java 8 version 2.1.6 2016.03.3Java
1.8.0_101
Ant 1.9.6, Gradle
2.7, Maven 3.3.3
nginx 1.8.1
API Version 2010-12-01
994

AWS Elastic Beanstalk Developer Guide
Java SE
Configuration and Solution
Stack Name
AMI Language Tools Proxy Server
64bit Amazon Linux 2016.03
v2.1.6 running Java 8
Java 7 version 2.1.6
64bit Amazon Linux 2016.03
v2.1.6 running Java 7
2016.03.3Java
1.7.0_111
Ant 1.9.6, Gradle
2.7, Maven 3.3.3
nginx 1.8.1
The following Elastic Beanstalk platform configurations for Java SE were current between June 26, 2016
and August 24, 2016:
Configuration and Solution
Stack Name
AMI Language Tools Proxy Server
Java 8 version 2.1.3
64bit Amazon Linux 2016.03
v2.1.3 running Java 8
2016.03.2Java
1.8.0_91
Ant 1.9.6, Gradle
2.7, Maven 3.3.3
nginx 1.8.1
Java 7 version 2.1.3
64bit Amazon Linux 2016.03
v2.1.3 running Java 7
2016.03.2Java
1.7.0_101
Ant 1.9.6, Gradle
2.7, Maven 3.3.3
nginx 1.8.1
The following Elastic Beanstalk platform configurations for Java SE were current between May 6, 2016
and June 26, 2016:
Configuration and Solution
Stack Name
AMI Language Tools Proxy Server
Java 8 version 2.1.1
64bit Amazon Linux 2016.03
v2.1.1 running Java 8
2016.03 Java
1.8.0_91
Ant 1.9.6, Gradle
2.7, Maven 3.3.3
nginx 1.8.1
Java 7 version 2.1.1
64bit Amazon Linux 2016.03
v2.1.1 running Java 7
2016.03 Java
1.7.0_101
Ant 1.9.6, Gradle
2.7, Maven 3.3.3
nginx 1.8.1
The following Elastic Beanstalk platform configurations for Java SE were current between and April 7,
2016 and May 6, 2016:
Configuration and Solution
Stack Name
AMI Language Tools Proxy Server
Java 8 version 2.1.0
64bit Amazon Linux 2016.03
v2.1.0 running Java 8
2016.03 Java
1.8.0_71
Ant 1.9.6
Gradle 2.7
Maven 3.3.3
nginx 1.8.1
API Version 2010-12-01
995

AWS Elastic Beanstalk Developer Guide
Java SE
Configuration and Solution
Stack Name
AMI Language Tools Proxy Server
Java 7 version 2.1.0
64bit Amazon Linux 2016.03
v2.1.0 running Java 7
2016.03 Java
1.7.0_95
Ant 1.9.6
Gradle 2.7
Maven 3.3.3
nginx 1.8.1
The following Elastic Beanstalk platform configurations for Java SE were current between February 26,
2016 and April 7, 2016:
Configuration and Solution
Stack Name
AMI Language Tools Web Server
Java 8 version 2.0.8
64bit Amazon Linux 2015.09
v2.0.8 running Java 8
2015.09 Java
1.8.0_71
Ant 1.9.6
Gradle 2.7
Maven 3.3.3
nginx 1.8.0
Java 7 version 2.0.8
64bit Amazon Linux 2015.09
v2.0.8 running Java 7
2015.09 Java
1.7.0_95
Ant 1.9.6
Gradle 2.7
Maven 3.3.3
nginx 1.8.0
The following Elastic Beanstalk platform configurations for Java SE were current between February 11,
2016 and February 26, 2016:
Configuration and Solution
Stack Name
AMI Language Tools Web Server
Java 8 version 2.0.7
64bit Amazon Linux 2015.09
v2.0.7 running Java 8
2015.09 Java
1.8.0_65
Ant 1.9.6
Gradle 2.7
Maven 3.3.3
nginx 1.8.0
Java 7 version 2.0.7
64bit Amazon Linux 2015.09
v2.0.7 running Java 7
2015.09 Java
1.7.0_91
Ant 1.9.6
Gradle 2.7
Maven 3.3.3
nginx 1.8.0
The following Elastic Beanstalk platform configurations for Java SE were current between January 11,
2016 and February 11, 2016:
Configuration and Solution
Stack Name
AMI Language Tools Web Server
Java 8 version 2.0.6 2015.09 Java
1.8.0_65
Ant 1.9.6
Gradle 2.7
nginx 1.8.0
API Version 2010-12-01
996

AWS Elastic Beanstalk Developer Guide
.NET on Windows Server
Configuration and Solution
Stack Name
AMI Language Tools Web Server
64bit Amazon Linux 2015.09
v2.0.6 running Java 8
Maven 3.3.3
Java 7 version 2.0.6
64bit Amazon Linux 2015.09
v2.0.6 running Java 7
2015.09 Java
1.7.0_91
Ant 1.9.6
Gradle 2.7
Maven 3.3.3
nginx 1.8.0
The following Elastic Beanstalk platform configurations for Java SE were current between November 3,
2015 and January 11, 2016:
Configuration and Solution
Stack Name
AMI Language Tools Web Server
Java 8 version 2.0.4
64bit Amazon Linux 2015.09
v2.0.4 running Java 8
2015.09 Java
1.8.0_65
Ant 1.9.6
Gradle 2.7
Maven 3.3.3
nginx 1.8.0
Java 7 version 2.0.4
64bit Amazon Linux 2015.09
v2.0.4 running Java 7
2015.09 Java
1.7.0_91
Ant 1.9.6
Gradle 2.7
Maven 3.3.3
nginx 1.8.0
The following Elastic Beanstalk platform configurations for Java SE were current between September 28,
2015 and November 3, 2015:
Configuration and Solution
Stack Name
AMI Language Tools Web Server
Java 8 version 2.0.2
64bit Amazon Linux 2015.03
v2.0.2 running Java 8
2015.03 Java
1.8.0_51
Ant 1.9.6
Gradle 2.7
Maven 3.3.3
nginx 1.6.2
Java 7 version 2.0.2
64bit Amazon Linux 2015.03
v2.0.2 running Java 7
2015.03 Java
1.7.0_85
Ant 1.9.6
Gradle 2.7
Maven 3.3.3
nginx 1.6.2
.NET on Windows Server with IIS Platform History
This page lists the previous versions of AWS Elastic Beanstalk's .NET platforms and the dates that each
version was current. Platform versions that you used to launch or update an environment in the last 30
days remain available (to the using account, in the used region) even after they are no longer current.
API Version 2010-12-01
997

AWS Elastic Beanstalk Developer Guide
November 20, 2017 – December 18, 2017
See the Supported Platforms (p. 26) page for information on the latest version of each platform
supported by Elastic Beanstalk. Detailed release notes are available for recent releases at
aws.amazon.com/releasenotes.
November 20, 2017 – December 18, 2017
The following Elastic Beanstalk platform configurations for .NET were current during this date range:
Configuration basics
Configuration Solution Stack Name Framework Proxy
Server
Windows Server 2016 with
IIS 10.0 version 1.2.0
64bit Windows Server 2016
v1.2.0 running IIS 10.0
.NET Core 2.0, supports 1.1.x,
1.0.x
.NET Framework 4.7,
supports 4.x, 2.0, 1.x
IIS 10.0
Windows Server Core 2016
with IIS 10.0 version 1.2.0
64bit Windows Server Core
2016 v1.2.0 running IIS 10.0
.NET Core 2.0, supports 1.1.x,
1.0.x
.NET Framework 4.7,
supports 4.x, 2.0, 1.x
IIS 10.0
Windows Server 2012 R2
with IIS 8.5 version 1.2.0
64bit Windows Server 2012
R2 v1.2.0 running IIS 8.5
.NET Core 2.0, supports 1.1.x,
1.0.x
.NET Framework 4.7,
supports 4.x, 2.0, 1.x
IIS 8.5
Windows Server 2012 R2
Server Core with IIS 8.5
version 1.2.0
64bit Windows Server Core
2012 R2 v1.2.0 running IIS
8.5
.NET Core 2.0, supports 1.1.x,
1.0.x
.NET Framework 4.7,
supports 4.x, 2.0, 1.x
IIS 8.5
Windows Server 2012 with
IIS 8 version 1.2.0
64bit Windows Server 2012
v1.2.0 running IIS 8
.NET Core 2.0, supports 1.1.x,
1.0.x
.NET Framework 4.7,
supports 4.x, 2.0, 1.x
IIS 8
Windows Server 2008 R2
with IIS 7.5 version 1.2.0
64bit Windows Server 2008
R2 v1.2.0 running IIS 7.5
.NET Core 2.0, supports 1.1.x,
1.0.x
.NET Framework 4.7,
supports 4.x, 2.0, 1.x
IIS 7.5
Windows Server 2012 R2
with IIS 8.5
64bit Windows Server 2012
R2 running IIS 8.5
.NET Framework 4.7,
supports 4.x, 2.0, 1.x
IIS 8.5
Windows Server 2012 R2
Server Core with IIS 8.5
64bit Windows Server Core
2012 R2 running IIS 8.5
.NET Framework 4.7,
supports 4.x, 2.0, 1.x
IIS 8.5
Windows Server 2012 with
IIS 8
64bit Windows Server 2012
running IIS 8
.NET Framework 4.7,
supports 4.x, 2.0, 1.x
IIS 8
API Version 2010-12-01
998

AWS Elastic Beanstalk Developer Guide
August 28, 2017 – November 19, 2017
Configuration Solution Stack Name Framework Proxy
Server
Windows Server 2008 R2
with IIS 7.5
64bit Windows Server 2008
R2 running IIS 7.5
.NET Framework 4.7,
supports 4.x, 2.0, 1.x
IIS 7.5
More details
Configuration AMI
version
AWS SDK
for .NET
EC2Config SSM
Agent
Web
Deploy
AWS
X‑Ray
Windows Server 2016 with
IIS 10.0 version 1.2.0
2017.10.13 3.15.172.0 SSM only 2.2.30.0 3.6 1.0.0
Windows Server Core 2016
with IIS 10.0 version 1.2.0
2017.10.13 3.15.172.0 SSM only 2.2.30.0 3.6 1.0.0
Windows Server 2012 R2
with IIS 8.5 version 1.2.0
2017.10.13 3.15.172.0 4.9.2188.0 2.2.30.0 3.6 1.0.0
Windows Server 2012 R2
Server Core with IIS 8.5
version 1.2.0
2017.10.13 3.15.172.0 4.9.2188.0 2.2.30.0 3.6 1.0.0
Windows Server 2012 with
IIS 8 version 1.2.0
2017.10.13 3.15.172.0 4.9.2188.0 2.2.30.0 3.6 1.0.0
Windows Server 2008 R2
with IIS 7.5 version 1.2.0
2017.10.13 3.15.172.0 4.9.2188.0 2.2.30.0 3.6 1.0.0
Windows Server 2012 R2
with IIS 8.5
2017.10.13 3.15.172.0 4.9.2188.0 2.2.30.0 3.6 1.0.0
Windows Server 2012 R2
Server Core with IIS 8.5
2017.10.13 3.15.172.0 4.9.2188.0 2.2.30.0 3.6 1.0.0
Windows Server 2012 with
IIS 8
2017.10.13 3.15.172.0 4.9.2188.0 2.2.30.0 3.6 1.0.0
Windows Server 2008 R2
with IIS 7.5
2017.10.13 3.15.172.0 4.9.2188.0 2.2.30.0 3.6 1.0.0
August 28, 2017 – November 19, 2017
The following Elastic Beanstalk platform configurations for .NET were current during this date range:
Configuration basics
Configuration Solution Stack Name Framework Proxy
Server
Windows Server 2016 with
IIS 10.0 version 1.2.0
64bit Windows Server 2016
v1.2.0 running IIS 10.0
.NET Core 2.0, supports 1.1.x,
1.0.x
IIS 10.0
API Version 2010-12-01
999

AWS Elastic Beanstalk Developer Guide
August 28, 2017 – November 19, 2017
Configuration Solution Stack Name Framework Proxy
Server
.NET Framework 4.7,
supports 4.x, 2.0, 1.x
Windows Server Core 2016
with IIS 10.0 version 1.2.0
64bit Windows Server Core
2016 v1.2.0 running IIS 10.0
.NET Core 2.0, supports 1.1.x,
1.0.x
.NET Framework 4.7,
supports 4.x, 2.0, 1.x
IIS 10.0
Windows Server 2012 R2
with IIS 8.5 version 1.2.0
64bit Windows Server 2012
R2 v1.2.0 running IIS 8.5
.NET Core 2.0, supports 1.1.x,
1.0.x
.NET Framework 4.7,
supports 4.x, 2.0, 1.x
IIS 8.5
Windows Server 2012 R2
Server Core with IIS 8.5
version 1.2.0
64bit Windows Server Core
2012 R2 v1.2.0 running IIS
8.5
.NET Core 2.0, supports 1.1.x,
1.0.x
.NET Framework 4.7,
supports 4.x, 2.0, 1.x
IIS 8.5
Windows Server 2012 with
IIS 8 version 1.2.0
64bit Windows Server 2012
v1.2.0 running IIS 8
.NET Core 2.0, supports 1.1.x,
1.0.x
.NET Framework 4.7,
supports 4.x, 2.0, 1.x
IIS 8
Windows Server 2008 R2
with IIS 7.5 version 1.2.0
64bit Windows Server 2008
R2 v1.2.0 running IIS 7.5
.NET Core 2.0, supports 1.1.x,
1.0.x
.NET Framework 4.7,
supports 4.x, 2.0, 1.x
IIS 7.5
Windows Server 2012 R2
with IIS 8.5
64bit Windows Server 2012
R2 running IIS 8.5
.NET Framework 4.7,
supports 4.x, 2.0, 1.x
IIS 8.5
Windows Server 2012 R2
Server Core with IIS 8.5
64bit Windows Server Core
2012 R2 running IIS 8.5
.NET Framework 4.7,
supports 4.x, 2.0, 1.x
IIS 8.5
Windows Server 2012 with
IIS 8
64bit Windows Server 2012
running IIS 8
.NET Framework 4.7,
supports 4.x, 2.0, 1.x
IIS 8
Windows Server 2008 R2
with IIS 7.5
64bit Windows Server 2008
R2 running IIS 7.5
.NET Framework 4.7,
supports 4.x, 2.0, 1.x
IIS 7.5
More details
Configuration AMI
version
AWS SDK
for .NET
EC2Config SSM
Agent
Web
Deploy
AWS
X‑Ray
Windows Server 2016 with
IIS 10.0 version 1.2.0
2017.08.09 3.3.103.0 SSM only 2.0.879.0 3.6 1.0.0
Windows Server Core 2016
with IIS 10.0 version 1.2.0
2017.08.09 3.3.103.0 SSM only 2.0.879.0 3.6 1.0.0
API Version 2010-12-01
1000

AWS Elastic Beanstalk Developer Guide
July 24, 2017 – Aug 27, 2017
Configuration AMI
version
AWS SDK
for .NET
EC2Config SSM
Agent
Web
Deploy
AWS
X‑Ray
Windows Server 2012 R2
with IIS 8.5 version 1.2.0
2017.08.09 3.3.58.0 4.9.2016 2.0.879.0 3.6 1.0.0
Windows Server 2012 R2
Server Core with IIS 8.5
version 1.2.0
2017.08.09 3.3.58.0 4.9.2016 2.0.879.0 3.6 1.0.0
Windows Server 2012 with
IIS 8 version 1.2.0
2017.08.09 3.3.102.0 4.9.2016 2.0.879.0 3.6 1.0.0
Windows Server 2008 R2
with IIS 7.5 version 1.2.0
2017.08.09 3.3.102.0 4.9.1981 2.0.847.0 3.6 1.0.0
Windows Server 2012 R2
with IIS 8.5
2017.08.09 3.3.58.0 4.9.2016 2.0.879.0 3.6 1.0.0
Windows Server 2012 R2
Server Core with IIS 8.5
2017.08.09 3.3.58.0 4.9.2016 2.0.879.0 3.6 1.0.0
Windows Server 2012 with
IIS 8
2017.08.09 3.3.102.0 4.9.2016 2.0.879.0 3.6 1.0.0
Windows Server 2008 R2
with IIS 7.5
2017.08.09 3.3.102.0 4.9.1981 2.0.847.0 3.6 1.0.0
July 24, 2017 – Aug 27, 2017
The following Elastic Beanstalk platform configurations for .NET were current during this date range:
Configuration basics
Configuration Solution Stack Name Framework Proxy
Server
Windows Server 2016 with
IIS 10.0 version 1.2.0
64bit Windows Server 2016
v1.2.0 running IIS 10.0
.NET v4.7, supports runtimes
4, 2.0, 1.1 and 1.0
ASP.NET Core v1.1.2, 1.0.5
IIS 10.0
Windows Server Core 2016
with IIS 10.0 version 1.2.0
64bit Windows Server Core
2016 v1.2.0 running IIS 10.0
.NET v4.7, supports runtimes
4, 2.0, 1.1 and 1.0
ASP.NET Core v1.1.2, 1.0.5
IIS 10.0
Windows Server 2012 R2
with IIS 8.5 version 1.2.0
64bit Windows Server 2012
R2 v1.2.0 running IIS 8.5
.NET v4.7, supports runtimes
4, 2.0, 1.1 and 1.0
ASP.NET Core v1.1.2, 1.0.5
IIS 8.5
Windows Server 2012 R2
Server Core with IIS 8.5
version 1.2.0
64bit Windows Server Core
2012 R2 v1.2.0 running IIS
8.5
.NET v4.7, supports runtimes
4, 2.0, 1.1 and 1.0
ASP.NET Core v1.1.2, 1.0.5
IIS 8.5
API Version 2010-12-01
1001

AWS Elastic Beanstalk Developer Guide
July 24, 2017 – Aug 27, 2017
Configuration Solution Stack Name Framework Proxy
Server
Windows Server 2012 with
IIS 8 version 1.2.0
64bit Windows Server 2012
v1.2.0 running IIS 8
.NET v4.7, supports runtimes
4, 2.0, 1.1 and 1.0
ASP.NET Core v1.1.2, 1.0.5
IIS 8
Windows Server 2008 R2
with IIS 7.5 version 1.2.0
64bit Windows Server 2008
R2 v1.2.0 running IIS 7.5
.NET v4.7, supports runtimes
4, 2.0, 1.1 and 1.0
ASP.NET Core v1.1.2, 1.0.5
IIS 7.5
Windows Server 2012 R2
with IIS 8.5
64bit Windows Server 2012
R2 running IIS 8.5
.NET v4.7, supports runtimes
4, 2.0, 1.1 and 1.0
IIS 8.5
Windows Server 2012 R2
Server Core with IIS 8.5
64bit Windows Server Core
2012 R2 running IIS 8.5
.NET v4.7, supports runtimes
4, 2.0, 1.1 and 1.0
IIS 8.5
Windows Server 2012 with
IIS 8
64bit Windows Server 2012
running IIS 8
.NET v4.7, supports runtimes
4, 2.0, 1.1 and 1.0
IIS 8
Windows Server 2008 R2
with IIS 7.5
64bit Windows Server 2008
R2 running IIS 7.5
.NET v4.7, supports runtimes
4, 2.0, 1.1 and 1.0
IIS 7.5
More details
Configuration AMI
version
AWS SDK
for .NET
EC2Config SSM
Agent
Web
Deploy
AWS
X‑Ray
Windows Server 2016 with
IIS 10.0 version 1.2.0
2017.07.13 3.3.103.0 SSM only 2.0.847.0 3.6 1.0.0
Windows Server Core 2016
with IIS 10.0 version 1.2.0
2017.07.13 3.3.103.0 SSM only 2.0.847.0 3.6 1.0.0
Windows Server 2012 R2
with IIS 8.5 version 1.2.0
2017.07.13 3.3.102.0 4.9.1981 2.0.847.0 3.6 1.0.0
Windows Server 2012 R2
Server Core with IIS 8.5
version 1.2.0
2017.07.13 3.3.102.0 4.9.1981 2.0.847.0 3.6 1.0.0
Windows Server 2012 with
IIS 8 version 1.2.0
2017.07.13 3.3.102.0 4.9.1981 2.0.847.0 3.6 1.0.0
Windows Server 2008 R2
with IIS 7.5 version 1.2.0
2017.07.13 3.3.102.0 4.9.1981 2.0.847.0 3.6 1.0.0
Windows Server 2012 R2
with IIS 8.5
2017.07.13 3.3.102.0 4.9.1981 2.0.847.0 3.6 1.0.0
Windows Server 2012 R2
Server Core with IIS 8.5
2017.07.13 3.3.102.0 4.9.1981 2.0.847.0 3.6 1.0.0
Windows Server 2012 with
IIS 8
2017.07.13 3.3.102.0 4.9.1981 2.0.847.0 3.6 1.0.0
API Version 2010-12-01
1002

AWS Elastic Beanstalk Developer Guide
July 17, 2017 – July 23, 2017
Configuration AMI
version
AWS SDK
for .NET
EC2Config SSM
Agent
Web
Deploy
AWS
X‑Ray
Windows Server 2008 R2
with IIS 7.5
2017.07.13 3.3.102.0 4.9.1981 2.0.847.0 3.6 1.0.0
July 17, 2017 – July 23, 2017
The following Elastic Beanstalk platform configurations for .NET were current during this date range:
Configuration basics
Configuration Solution Stack Name Framework Proxy
Server
Windows Server 2016 with
IIS 10.0 version 1.2.0
64bit Windows Server 2016
v1.2.0 running IIS 10.0
.NET v4.7, supports runtimes
4, 2.0, 1.1 and 1.0
ASP.NET Core v1.1.2, 1.0.5
IIS 10.0
Windows Server Core 2016
with IIS 10.0 version 1.2.0
64bit Windows Server Core
2016 v1.2.0 running IIS 10.0
.NET v4.7, supports runtimes
4, 2.0, 1.1 and 1.0
ASP.NET Core v1.1.2, 1.0.5
IIS 10.0
Windows Server 2012 R2
with IIS 8.5 version 1.2.0
64bit Windows Server 2012
R2 v1.2.0 running IIS 8.5
.NET v4.7, supports runtimes
4, 2.0, 1.1 and 1.0
ASP.NET Core v1.1.2, 1.0.5
IIS 8.5
Windows Server 2012 R2
Server Core with IIS 8.5
version 1.2.0
64bit Windows Server Core
2012 R2 v1.2.0 running IIS
8.5
.NET v4.7, supports runtimes
4, 2.0, 1.1 and 1.0
ASP.NET Core v1.1.2, 1.0.5
IIS 8.5
Windows Server 2012 with
IIS 8 version 1.2.0
64bit Windows Server 2012
v1.2.0 running IIS 8
.NET v4.7, supports runtimes
4, 2.0, 1.1 and 1.0
ASP.NET Core v1.1.2, 1.0.5
IIS 8
Windows Server 2008 R2
with IIS 7.5 version 1.2.0
64bit Windows Server 2008
R2 v1.2.0 running IIS 7.5
.NET v4.7, supports runtimes
4, 2.0, 1.1 and 1.0
ASP.NET Core v1.1.2, 1.0.5
IIS 7.5
Windows Server 2012 R2
with IIS 8.5
64bit Windows Server 2012
R2 running IIS 8.5
.NET v4.7, supports runtimes
4, 2.0, 1.1 and 1.0
IIS 8.5
Windows Server 2012 R2
Server Core with IIS 8.5
64bit Windows Server Core
2012 R2 running IIS 8.5
.NET v4.7, supports runtimes
4, 2.0, 1.1 and 1.0
IIS 8.5
Windows Server 2012 with
IIS 8
64bit Windows Server 2012
running IIS 8
.NET v4.7, supports runtimes
4, 2.0, 1.1 and 1.0
IIS 8
Windows Server 2008 R2
with IIS 7.5
64bit Windows Server 2008
R2 running IIS 7.5
.NET v4.7, supports runtimes
4, 2.0, 1.1 and 1.0
IIS 7.5
API Version 2010-12-01
1003

AWS Elastic Beanstalk Developer Guide
June 26, 2017 – July 16, 2017
More details
Configuration AMI
version
AWS SDK
for .NET
EC2Config SSM
Agent
Web
Deploy
AWS
X‑Ray
Windows Server 2016 with
IIS 10.0 version 1.2.0
2017.06.14 3.3.103.0 SSM only 2.0.805.0 3.6 1.0.0
Windows Server Core 2016
with IIS 10.0 version 1.2.0
2017.06.14 3.3.103.0 SSM only 2.0.805.0 3.6 1.0.0
Windows Server 2012 R2
with IIS 8.5 version 1.2.0
2017.06.14 3.3.102.0 4.9.1900.0 2.0.805.0 3.6 1.0.0
Windows Server 2012 R2
Server Core with IIS 8.5
version 1.2.0
2017.06.14 3.3.102.0 4.9.1900.0 2.0.805.0 3.6 1.0.0
Windows Server 2012 with
IIS 8 version 1.2.0
2017.06.14 3.3.102.0 4.9.1900.0 2.0.682.0 3.6 1.0.0
Windows Server 2008 R2
with IIS 7.5 version 1.2.0
2017.06.14 3.3.102.0 4.9.1900.0 2.0.805.0 3.6 1.0.0
Windows Server 2012 R2
with IIS 8.5
2017.06.14 3.3.102.0 4.9.1900.0 2.0.805.0 3.6 1.0.0
Windows Server 2012 R2
Server Core with IIS 8.5
2017.06.14 3.3.102.0 4.9.1900.0 2.0.805.0 3.6 1.0.0
Windows Server 2012 with
IIS 8
2017.06.14 3.3.102.0 4.9.1900.0 2.0.805.0 3.6 1.0.0
Windows Server 2008 R2
with IIS 7.5
2017.06.14 3.3.102.0 4.9.1900.0 2.0.805.0 3.6 1.0.0
June 26, 2017 – July 16, 2017
The following Elastic Beanstalk platform configurations for .NET were current during this date range:
Configuration basics
Configuration Solution Stack Name Framework Proxy
Server
Windows Server 2016 with
IIS 10.0 version 1.2.0
64bit Windows Server 2016
v1.2.0 running IIS 10.0
.NET v4.7, supports runtimes
4, 2.0, 1.1 and 1.0
ASP.NET Core v1.1.2, 1.0.5
IIS 10.0
Windows Server Core 2016
with IIS 10.0 version 1.2.0
64bit Windows Server Core
2016 v1.2.0 running IIS 10.0
.NET v4.7, supports runtimes
4, 2.0, 1.1 and 1.0
ASP.NET Core v1.1.2, 1.0.5
IIS 10.0
API Version 2010-12-01
1004

AWS Elastic Beanstalk Developer Guide
May 16, 2017 – July 16, 2017
More details
Configuration AMI
version
AWS SDK
for .NET
EC2Config SSM
Agent
Web
Deploy
AWS
X‑Ray
Windows Server 2016 with
IIS 10.0 version 1.2.0
2017.05.10 3.14.61.0 SSM only 2.0.767.0 3.6 1.0.0
Windows Server Core 2016
with IIS 10.0 version 1.2.0
2017.05.10 3.14.61.0 SSM only 2.0.767.0 3.6 1.0.0
May 16, 2017 – July 16, 2017
The following Elastic Beanstalk platform configurations for .NET were current during this date range:
Configuration basics
Configuration Solution Stack Name Framework Proxy
Server
Windows Server 2012 R2
with IIS 8.5 version 1.2.0
64bit Windows Server 2012
R2 v1.2.0 running IIS 8.5
.NET v4.7, supports runtimes
4, 2.0, 1.1 and 1.0
ASP.NET Core v1.1.2, 1.0.5
IIS 8.5
Windows Server 2012 R2
Server Core with IIS 8.5
version 1.2.0
64bit Windows Server Core
2012 R2 v1.2.0 running IIS
8.5
.NET v4.7, supports runtimes
4, 2.0, 1.1 and 1.0
ASP.NET Core v1.1.2, 1.0.5
IIS 8.5
Windows Server 2012 with
IIS 8 version 1.2.0
64bit Windows Server 2012
v1.2.0 running IIS 8
.NET v4.7, supports runtimes
4, 2.0, 1.1 and 1.0
ASP.NET Core v1.1.2, 1.0.5
IIS 8
Windows Server 2008 R2
with IIS 7.5 version 1.2.0
64bit Windows Server 2008
R2 v1.2.0 running IIS 7.5
.NET v4.7, supports runtimes
4, 2.0, 1.1 and 1.0
ASP.NET Core v1.1.2, 1.0.5
IIS 7.5
Windows Server 2012 R2
with IIS 8.5
64bit Windows Server 2012
R2 running IIS 8.5
.NET v4.7, supports runtimes
4, 2.0, 1.1 and 1.0
IIS 8.5
Windows Server 2012 R2
Server Core with IIS 8.5
64bit Windows Server Core
2012 R2 running IIS 8.5
.NET v4.7, supports runtimes
4, 2.0, 1.1 and 1.0
IIS 8.5
Windows Server 2012 with
IIS 8
64bit Windows Server 2012
running IIS 8
.NET v4.7, supports runtimes
4, 2.0, 1.1 and 1.0
IIS 8
Windows Server 2008 R2
with IIS 7.5
64bit Windows Server 2008
R2 running IIS 7.5
.NET v4.7, supports runtimes
4, 2.0, 1.1 and 1.0
IIS 7.5
API Version 2010-12-01
1005

AWS Elastic Beanstalk Developer Guide
May 4, 2017 – May 15, 2017
More details
Configuration AMI
version
AWS SDK
for .NET
EC2Config SSM
Agent
Web
Deploy
AWS
X‑Ray
Windows Server 2012 R2
with IIS 8.5 version 1.2.0
2017.04.12 3.14.61.0 4.9.1775.0 2.0.761.0 3.6 1.0.0
Windows Server 2012 R2
Server Core with IIS 8.5
version 1.2.0
2017.04.12 3.14.61.0 4.9.1775.0 2.0.761.0 3.6 1.0.0
Windows Server 2012 with
IIS 8 version 1.2.0
2017.04.12 3.14.61.0 4.9.1775.0 2.0.682.0 3.6 1.0.0
Windows Server 2008 R2
with IIS 7.5 version 1.2.0
2017.04.12 3.14.61.0 4.9.1775.0 2.0.761.0 3.6 1.0.0
Windows Server 2012 R2
with IIS 8.5
2017.04.12 3.14.61.0 4.9.1775.0 2.0.761.0 3.6 1.0.0
Windows Server 2012 R2
Server Core with IIS 8.5
2017.04.12 3.14.61.0 4.9.1775.0 2.0.761.0 3.6 1.0.0
Windows Server 2012 with
IIS 8
2017.04.12 3.14.61.0 4.9.1775.0 2.0.682.0 3.6 1.0.0
Windows Server 2008 R2
with IIS 7.5
2017.04.12 3.14.61.0 4.9.1775.0 2.0.761.0 3.6 1.0.0
May 4, 2017 – May 15, 2017
The following Elastic Beanstalk platform configurations for .NET were current during this date range:
Configuration and
Solution Stack Name
AMI
version
Framework AWS
SDK
for .NET
EC2ConfigWebDeployAWS X-Ray Proxy Server
Windows Server 2012 R2
with IIS 8.5 version 1.2.0
64bit Windows Server
2012 R2 v1.2.0 running
IIS 8.5
2017.04.12.NET
v4.6.2,
Supports
runtimes
4, 2.0, 1.1
and 1.0
ASP.NET
Core
v1.1.1,
1.0.4
3.14.61.04.9.1775.03.6 1.0.0 IIS 8.5
Windows Server 2012 R2
Server Core with IIS 8.5
version 1.2.0
2017.04.12.NET
v4.6.2,
Supports
runtimes
4, 2.0, 1.1
and 1.0
3.14.61.04.9.1775.03.6 1.0.0 IIS 8.5
API Version 2010-12-01
1006

AWS Elastic Beanstalk Developer Guide
May 4, 2017 – May 15, 2017
Configuration and
Solution Stack Name
AMI
version
Framework AWS
SDK
for .NET
EC2ConfigWebDeployAWS X-Ray Proxy Server
64bit Windows Server
Core 2012 R2 v1.2.0
running IIS 8.5
ASP.NET
Core
v1.1.1,
1.0.4
Windows Server 2012
with IIS 8 version 1.2.0
64bit Windows Server
2012 v1.2.0 running IIS 8
2017.04.12.NET
v4.6.2,
Supports
runtimes
4, 2.0, 1.1
and 1.0
ASP.NET
Core
v1.1.1,
1.0.4
3.14.61.04.9.1775.03.6 1.0.0 IIS 8
Windows Server 2008 R2
with IIS 7.5 version 1.2.0
64bit Windows Server
2008 R2 v1.2.0 running
IIS 7.5
2017.04.12.NET
v4.6.2,
Supports
runtimes
4, 2.0, 1.1
and 1.0
ASP.NET
Core
v1.1.1,
1.0.4
3.14.61.04.9.1775.03.6 1.0.0 IIS 7.5
Windows Server 2012 R2
with IIS 8.5
64bit Windows Server
2012 R2 running IIS 8.5
2017.04.12.NET
v4.6.2,
Supports
runtimes
4, 2.0, 1.1
and 1.0
3.14.61.04.9.1775.03.6 1.0.0 IIS 8.5
Windows Server 2012 R2
Server Core with IIS 8.5
64bit Windows Server
Core 2012 R2 running IIS
8.5
2017.04.12.NET
v4.6.2,
Supports
runtimes
4, 2.0, 1.1
and 1.0
3.14.61.04.9.1775.03.6 1.0.0 IIS 8.5
Windows Server 2012
with IIS 8
64bit Windows Server
2012 running IIS 8
2017.04.12.NET
v4.6.2,
Supports
runtimes
4, 2.0, 1.1
and 1.0
3.14.61.04.9.1775.03.6 1.0.0 IIS 8
API Version 2010-12-01
1007

AWS Elastic Beanstalk Developer Guide
April 4, 2017 – May 3, 2017
Configuration and
Solution Stack Name
AMI
version
Framework AWS
SDK
for .NET
EC2ConfigWebDeployAWS X-Ray Proxy Server
Windows Server 2008 R2
with IIS 7.5
64bit Windows Server
2008 R2 running IIS 7.5
2017.04.12.NET
v4.6.2,
Supports
runtimes
4, 2.0, 1.1
and 1.0
3.14.61.04.9.1775.03.6 1.0.0 IIS 7.5
April 4, 2017 – May 3, 2017
The following Elastic Beanstalk platform configurations for .NET were current during this date range:
Configuration and
Solution Stack Name
AMI
version
Framework AWS
SDK
for .NET
EC2ConfigWebDeployAWS X-Ray Proxy Server
Windows Server 2012 R2
with IIS 8.5 version 1.2.0
64bit Windows Server
2012 R2 v1.2.0 running
IIS 8.5
2017.03.15.NET
v4.6.2,
Supports
runtimes
4, 2.0, 1.1
and 1.0
ASP.NET
Core
v1.1.1,
1.0.4
3.13.767.04.7.16313.6 1.0.0 IIS 8.5
Windows Server 2012 R2
Server Core with IIS 8.5
version 1.2.0
64bit Windows Server
Core 2012 R2 v1.2.0
running IIS 8.5
2017.03.15.NET
v4.6.2,
Supports
runtimes
4, 2.0, 1.1
and 1.0
ASP.NET
Core
v1.1.1,
1.0.4
3.13.767.04.7.16313.6 1.0.0 IIS 8.5
Windows Server 2012
with IIS 8 version 1.2.0
64bit Windows Server
2012 v1.2.0 running IIS 8
2017.03.15.NET
v4.6.2,
Supports
runtimes
4, 2.0, 1.1
and 1.0
ASP.NET
Core
v1.1.1,
1.0.4
3.13.767.04.7.16313.6 1.0.0 IIS 8
API Version 2010-12-01
1008

AWS Elastic Beanstalk Developer Guide
January 16, 2017 – Apr 3, 2017
Configuration and
Solution Stack Name
AMI
version
Framework AWS
SDK
for .NET
EC2ConfigWebDeployAWS X-Ray Proxy Server
Windows Server 2008 R2
with IIS 7.5 version 1.2.0
64bit Windows Server
2008 R2 v1.2.0 running
IIS 7.5
2017.03.15.NET
v4.6.2,
Supports
runtimes
4, 2.0, 1.1
and 1.0
ASP.NET
Core
v1.1.1,
1.0.4
3.13.767.04.7.16313.6 1.0.0 IIS 7.5
Windows Server 2012 R2
with IIS 8.5
64bit Windows Server
2012 R2 running IIS 8.5
2017.03.15.NET
v4.6.2,
Supports
runtimes
4, 2.0, 1.1
and 1.0
3.13.767.04.7.16313.6 1.0.0 IIS 8.5
Windows Server 2012 R2
Server Core with IIS 8.5
64bit Windows Server
Core 2012 R2 running IIS
8.5
2017.03.15.NET
v4.6.2,
Supports
runtimes
4, 2.0, 1.1
and 1.0
3.13.767.04.7.16313.6 1.0.0 IIS 8.5
Windows Server 2012
with IIS 8
64bit Windows Server
2012 running IIS 8
2017.03.15.NET
v4.6.2,
Supports
runtimes
4, 2.0, 1.1
and 1.0
3.13.767.04.7.16313.6 1.0.0 IIS 8
Windows Server 2008 R2
with IIS 7.5
64bit Windows Server
2008 R2 running IIS 7.5
2017.03.15.NET
v4.6.2,
Supports
runtimes
4, 2.0, 1.1
and 1.0
3.13.767.04.7.16313.6 1.0.0 IIS 7.5
January 16, 2017 – Apr 3, 2017
The following Elastic Beanstalk platform configurations for .NET were current during this date range:
Configuration and
Solution Stack Name
AMI
version
Framework AWS
SDK
for .NET
EC2ConfigWebDeployAWS X-Ray Proxy Server
Windows Server 2012 R2
with IIS 8.5 version 1.2.0
2016.12.14.NET
v4.6.2,
Supports
runtimes
3.9.621.04.1.1396.03.6 1.0.0 IIS 8.5
API Version 2010-12-01
1009

AWS Elastic Beanstalk Developer Guide
January 16, 2017 – Apr 3, 2017
Configuration and
Solution Stack Name
AMI
version
Framework AWS
SDK
for .NET
EC2ConfigWebDeployAWS X-Ray Proxy Server
64bit Windows Server
2012 R2 v1.2.0 running
IIS 8.5
4, 2.0, 1.1
and 1.0
ASP.NET
Core
v1.1.0,
1.03
Windows Server 2012 R2
Server Core with IIS 8.5
version 1.2.0
64bit Windows Server
Core 2012 R2 v1.2.0
running IIS 8.5
2016.12.14.NET
v4.6.2,
Supports
runtimes
4, 2.0, 1.1
and 1.0
ASP.NET
Core
v1.1.0,
1.03
3.9.621.04.1.1396.03.6 1.0.0 IIS 8.5
Windows Server 2012
with IIS 8 version 1.2.0
64bit Windows Server
2012 v1.2.0 running IIS 8
2016.12.14.NET
v4.6.2,
Supports
runtimes
4, 2.0, 1.1
and 1.0
ASP.NET
Core
v1.1.0,
1.03
3.9.621.04.1.1396.03.6 1.0.0 IIS 8
Windows Server 2008 R2
with IIS 7.5 version 1.2.0
64bit Windows Server
2008 R2 v1.2.0 running
IIS 7.5
2016.12.14.NET
v4.6.2,
Supports
runtimes
4, 2.0, 1.1
and 1.0
ASP.NET
Core
v1.1.0,
1.03
3.9.621.04.1.1396.03.6 1.0.0 IIS 7.5
Windows Server 2012 R2
with IIS 8.5
64bit Windows Server
2012 R2 running IIS 8.5
2016.12.14.NET
v4.6.2,
Supports
runtimes
4, 2.0, 1.1
and 1.0
3.9.621.04.1.1396.03.6 1.0.0 IIS 8.5
API Version 2010-12-01
1010

AWS Elastic Beanstalk Developer Guide
December 18, 2016 – January 15, 2017
Configuration and
Solution Stack Name
AMI
version
Framework AWS
SDK
for .NET
EC2ConfigWebDeployAWS X-Ray Proxy Server
Windows Server 2012 R2
Server Core with IIS 8.5
64bit Windows Server
Core 2012 R2 running IIS
8.5
2016.12.14.NET
v4.6.2,
Supports
runtimes
4, 2.0, 1.1
and 1.0
3.9.621.04.1.1396.03.6 1.0.0 IIS 8.5
Windows Server 2012
with IIS 8
64bit Windows Server
2012 running IIS 8
2016.12.14.NET
v4.6.2,
Supports
runtimes
4, 2.0, 1.1
and 1.0
3.9.621.04.1.1396.03.6 1.0.0 IIS 8
Windows Server 2008 R2
with IIS 7.5
64bit Windows Server
2008 R2 running IIS 7.5
2016.12.14.NET
v4.6.2,
Supports
runtimes
4, 2.0, 1.1
and 1.0
3.9.621.04.1.1396.03.6 1.0.0 IIS 7.5
1 Microsoft Security Bulletin Summary for January 2017
December 18, 2016 – January 15, 2017
The following Elastic Beanstalk platform configurations for .NET were current during this date range:
Configuration and
Solution Stack Name
AMI
version
Framework AWS
SDK
for .NET
EC2ConfigWebDeployAWS X-Ray Proxy Server
Windows Server 2012 R2
with IIS 8.5 version 1.2.0
64bit Windows Server
2012 R2 v1.2.0 running
IIS 8.5
2016.11.09.NET
v4.6.2,
Supports
runtimes
4, 2.0, 1.1
and 1.0
ASP.NET
Core v1.1.0
3.9.560.03.19.1153.03.6 1.0.0 IIS 8.5
Windows Server 2012 R2
Server Core with IIS 8.5
version 1.2.0
64bit Windows Server
Core 2012 R2 v1.2.0
running IIS 8.5
2016.11.09.NET
v4.6.2,
Supports
runtimes
4, 2.0, 1.1
and 1.0
ASP.NET
Core v1.1.0
3.9.560.03.19.1153.03.6 1.0.0 IIS 8.5
API Version 2010-12-01
1011

AWS Elastic Beanstalk Developer Guide
November 16, 2016 – December 18, 2016
Configuration and
Solution Stack Name
AMI
version
Framework AWS
SDK
for .NET
EC2ConfigWebDeployAWS X-Ray Proxy Server
Windows Server 2012
with IIS 8 version 1.2.0
64bit Windows Server
2012 v1.2.0 running IIS 8
2016.11.09.NET
v4.6.2,
Supports
runtimes
4, 2.0, 1.1
and 1.0
ASP.NET
Core v1.1.0
3.9.560.03.19.1153.03.6 1.0.0 IIS 8
Windows Server 2008 R2
with IIS 7.5 version 1.2.0
64bit Windows Server
2008 R2 v1.2.0 running
IIS 7.5
2016.11.09.NET
v4.6.2,
Supports
runtimes
4, 2.0, 1.1
and 1.0
ASP.NET
Core v1.1.0
3.9.560.03.19.1153.03.6 1.0.0 IIS 7.5
Windows Server 2012 R2
with IIS 8.5
64bit Windows Server
2012 R2 running IIS 8.5
2016.11.09.NET
v4.6.2,
Supports
runtimes
4, 2.0, 1.1
and 1.0
3.9.560.03.19.1153.03.6 1.0.0 IIS 8.5
Windows Server 2012 R2
Server Core with IIS 8.5
64bit Windows Server
Core 2012 R2 running IIS
8.5
2016.11.09.NET
v4.6.2,
Supports
runtimes
4, 2.0, 1.1
and 1.0
3.9.560.03.19.1153.03.6 1.0.0 IIS 8.5
Windows Server 2012
with IIS 8
64bit Windows Server
2012 running IIS 8
2016.11.09.NET
v4.6.2,
Supports
runtimes
4, 2.0, 1.1
and 1.0
3.9.560.03.19.1153.03.6 1.0.0 IIS 8
Windows Server 2008 R2
with IIS 7.5
64bit Windows Server
2008 R2 running IIS 7.5
2016.11.09.NET
v4.6.2,
Supports
runtimes
4, 2.0, 1.1
and 1.0
3.9.560.03.19.1153.03.6 1.0.0 IIS 7.5
1 Microsoft Security Bulletin Summary for December 2016
November 16, 2016 – December 18, 2016
The following Elastic Beanstalk platform configurations for .NET were current during this date range:
API Version 2010-12-01
1012

AWS Elastic Beanstalk Developer Guide
November 16, 2016 – December 18, 2016
Configuration and Solution
Stack Name
AMI
version
Framework AWS
SDK
for .NET
EC2ConfigWebDeployProxy Server
Windows Server 2012 R2
with IIS 8.5 version 1.2.0
64bit Windows Server 2012 R2
v1.2.0 running IIS 8.5
2016.10.12.NET v4.6.2,
Supports
runtimes 4,
2.0, 1.1 and
1.0
ASP.NET Core
v1.0.1
3.9.520.03.19.1153.03.6 IIS 8.5
Windows Server 2012 R2
Server Core with IIS 8.5
version 1.2.0
64bit Windows Server Core
2012 R2 v1.2.0 running IIS 8.5
2016.10.12.NET v4.6.2,
Supports
runtimes 4,
2.0, 1.1 and
1.0
ASP.NET Core
v1.0.1
3.9.520.03.19.1153.03.6 IIS 8.5
Windows Server 2012 with
IIS 8 version 1.2.0
64bit Windows Server 2012
v1.2.0 running IIS 8
2016.10.12.NET v4.6.2,
Supports
runtimes 4,
2.0, 1.1 and
1.0
ASP.NET Core
v1.0.1
3.9.520.03.19.1153.03.6 IIS 8
Windows Server 2008 R2
with IIS 7.5 version 1.2.0
64bit Windows Server 2008 R2
v1.2.0 running IIS 7.5
2016.10.12.NET v4.6.2,
Supports
runtimes 4,
2.0, 1.1 and
1.0
ASP.NET Core
v1.0.1
3.9.520.03.19.1153.03.6 IIS 7.5
Windows Server 2012 R2
with IIS 8.5
64bit Windows Server 2012 R2
running IIS 8.5
2016.10.12.NET v4.6.2,
Supports
runtimes 4,
2.0, 1.1 and
1.0
3.9.520.03.19.1153.03.6 IIS 8.5
Windows Server 2012 R2
Server Core with IIS 8.5
64bit Windows Server Core
2012 R2 running IIS 8.5
2016.10.12.NET v4.6.2,
Supports
runtimes 4,
2.0, 1.1 and
1.0
3.9.520.03.19.1153.03.6 IIS 8.5
Windows Server 2012 with
IIS 8
64bit Windows Server 2012
running IIS 8
2016.10.12.NET v4.6.2,
Supports
runtimes 4,
2.0, 1.1 and
1.0
3.9.520.03.19.1153.03.6 IIS 8
API Version 2010-12-01
1013

AWS Elastic Beanstalk Developer Guide
October 21, 2016 – November 16, 2016
Configuration and Solution
Stack Name
AMI
version
Framework AWS
SDK
for .NET
EC2ConfigWebDeployProxy Server
Windows Server 2008 R2
with IIS 7.5
64bit Windows Server 2008 R2
running IIS 7.5
2016.10.12.NET v4.6.2,
Supports
runtimes 4,
2.0, 1.1 and
1.0
3.9.520.03.19.1153.03.6 IIS 7.5
1 Microsoft Security Bulletin Summary for November 2016
October 21, 2016 – November 16, 2016
The following Elastic Beanstalk platform configurations for .NET were current during this date range:
Configuration and Solution
Stack Name
AMI
version
Framework AWS
SDK
for .NET
EC2ConfigWebDeployProxy Server
Windows Server 2012 R2
with IIS 8.5 version 1.2.0
64bit Windows Server 2012 R2
v1.2.0 running IIS 8.5
2016.09.14.NET v4.6.2,
Supports
runtimes 4,
2.0, 1.1 and
1.0
ASP.NET Core
v1.0.1
3.9.459.03.19.1153.03.6 IIS 8.5
Windows Server 2012 R2
Server Core with IIS 8.5
version 1.2.0
64bit Windows Server Core
2012 R2 v1.2.0 running IIS 8.5
2016.09.14.NET v4.6.2,
Supports
runtimes 4,
2.0, 1.1 and
1.0
ASP.NET Core
v1.0.1
3.9.459.03.19.1153.03.6 IIS 8.5
Windows Server 2012 with
IIS 8 version 1.2.0
64bit Windows Server 2012
v1.2.0 running IIS 8
2016.09.14.NET v4.6.2,
Supports
runtimes 4,
2.0, 1.1 and
1.0
ASP.NET Core
v1.0.1
3.9.459.03.19.1153.03.6 IIS 8
Windows Server 2008 R2
with IIS 7.5 version 1.2.0
64bit Windows Server 2008 R2
v1.2.0 running IIS 7.5
2016.09.14.NET v4.6.2,
Supports
runtimes 4,
2.0, 1.1 and
1.0
ASP.NET Core
v1.0.1
3.9.459.03.19.1153.03.6 IIS 7.5
API Version 2010-12-01
1014

AWS Elastic Beanstalk Developer Guide
September 26, 2016 – October 21, 2016
Configuration and Solution
Stack Name
AMI
version
Framework AWS
SDK
for .NET
EC2ConfigWebDeployProxy Server
Windows Server 2012 R2
with IIS 8.5
64bit Windows Server 2012 R2
running IIS 8.5
2016.09.14.NET v4.6.2,
Supports
runtimes 4,
2.0, 1.1 and
1.0
3.9.459.03.19.1153.03.6 IIS 8.5
Windows Server 2012 R2
Server Core with IIS 8.5
64bit Windows Server Core
2012 R2 running IIS 8.5
2016.09.14.NET v4.6.2,
Supports
runtimes 4,
2.0, 1.1 and
1.0
3.9.459.03.19.1153.03.6 IIS 8.5
Windows Server 2012 with
IIS 8
64bit Windows Server 2012
running IIS 8
2016.09.14.NET v4.6.2,
Supports
runtimes 4,
2.0, 1.1 and
1.0
3.9.459.03.19.1153.03.6 IIS 8
Windows Server 2008 R2
with IIS 7.5
64bit Windows Server 2008 R2
running IIS 7.5
2016.09.14.NET v4.6.2,
Supports
runtimes 4,
2.0, 1.1 and
1.0
3.9.459.03.19.1153.03.6 IIS 7.5
1 Microsoft Security Bulletin Summary for October 2016
September 26, 2016 – October 21, 2016
The following Elastic Beanstalk platform configurations for .NET were current during this date range:
Configuration and Solution
Stack Name
AMI
version
Framework AWS
SDK
for .NET
EC2ConfigWebDeployProxy Server
Windows Server 2012 R2
with IIS 8.5 version 1.2.0
64bit Windows Server 2012 R2
v1.2.0 running IIS 8.5
2016.09.14.NET v4.6.2,
Supports
runtimes 4,
2.0, 1.1 and
1.0
ASP.NET Core
v1.0.1
3.9.459.03.19.1153.03.6 IIS 8.5
Windows Server 2012 R2
Server Core with IIS 8.5
version 1.2.0
64bit Windows Server Core
2012 R2 v1.2.0 running IIS 8.5
2016.09.14.NET v4.6.2,
Supports
runtimes 4,
2.0, 1.1 and
1.0
ASP.NET Core
v1.0.1
3.9.459.03.19.1153.03.6 IIS 8.5
API Version 2010-12-01
1015

AWS Elastic Beanstalk Developer Guide
August 23, 2016 – September 26, 2016
Configuration and Solution
Stack Name
AMI
version
Framework AWS
SDK
for .NET
EC2ConfigWebDeployProxy Server
Windows Server 2012 with
IIS 8 version 1.2.0
64bit Windows Server 2012
v1.2.0 running IIS 8
2016.09.14.NET v4.6.2,
Supports
runtimes 4,
2.0, 1.1 and
1.0
ASP.NET Core
v1.0.1
3.9.459.03.19.1153.03.6 IIS 8
Windows Server 2008 R2
with IIS 7.5 version 1.2.0
64bit Windows Server 2008 R2
v1.2.0 running IIS 7.5
2016.09.14.NET v4.6.2,
Supports
runtimes 4,
2.0, 1.1 and
1.0
ASP.NET Core
v1.0.1
3.9.459.03.19.1153.03.6 IIS 7.5
Windows Server 2012 R2
with IIS 8.5
64bit Windows Server 2012 R2
running IIS 8.5
2016.09.14.NET v4.6.2,
Supports
runtimes 4,
2.0, 1.1 and
1.0
3.9.459.03.19.1153.03.6 IIS 8.5
Windows Server 2012 R2
Server Core with IIS 8.5
64bit Windows Server Core
2012 R2 running IIS 8.5
2016.09.14.NET v4.6.2,
Supports
runtimes 4,
2.0, 1.1 and
1.0
3.9.459.03.19.1153.03.6 IIS 8.5
Windows Server 2012 with
IIS 8
64bit Windows Server 2012
running IIS 8
2016.09.14.NET v4.6.2,
Supports
runtimes 4,
2.0, 1.1 and
1.0
3.9.459.03.19.1153.03.6 IIS 8
Windows Server 2008 R2
with IIS 7.5
64bit Windows Server 2008 R2
running IIS 7.5
2016.09.14.NET v4.6.2,
Supports
runtimes 4,
2.0, 1.1 and
1.0
3.9.459.03.19.1153.03.6 IIS 7.5
1 Microsoft Security Bulletin Summary for September 2016
August 23, 2016 – September 26, 2016
The following Elastic Beanstalk platform configurations for .NET were current during this date range:
API Version 2010-12-01
1016

AWS Elastic Beanstalk Developer Guide
August 23, 2016 – September 26, 2016
Configuration and Solution
Stack Name
AMI
version
Framework AWS
SDK
for .NET
EC2ConfigWebDeployProxy Server
Windows Server 2012 R2
with IIS 8.5 version 1.2.0
64bit Windows Server 2012 R2
v1.2.0 running IIS 8.5
2016.07.26.NET v4.6.2,
Supports
runtimes 4,
2.0, 1.1 and
1.0
ASP.NET Core
v1.0
3.9.406.03.18.11183.6 IIS 8.5
Windows Server 2012 R2
Server Core with IIS 8.5
version 1.2.0
64bit Windows Server Core
2012 R2 v1.2.0 running IIS 8.5
2016.07.26.NET v4.6.2,
Supports
runtimes 4,
2.0, 1.1 and
1.0
ASP.NET Core
v1.0
3.9.406.03.18.11183.6 IIS 8.5
Windows Server 2012 with
IIS 8 version 1.2.0
64bit Windows Server 2012
v1.2.0 running IIS 8
2016.07.26.NET v4.6.2,
Supports
runtimes 4,
2.0, 1.1 and
1.0
ASP.NET Core
v1.0
3.9.406.03.18.11183.6 IIS 8
Windows Server 2008 R2
with IIS 7.5 version 1.2.0
64bit Windows Server 2008 R2
v1.2.0 running IIS 7.5
2016.07.26.NET v4.6.2,
Supports
runtimes 4,
2.0, 1.1 and
1.0
ASP.NET Core
v1.0
3.9.406.03.18.11183.6 IIS 7.5
Windows Server 2012 R2
with IIS 8.5
64bit Windows Server 2012 R2
running IIS 8.5
2016.07.26.NET v4.6.2,
Supports
runtimes 4,
2.0, 1.1 and
1.0
3.9.406.03.18.11183.6 IIS 8.5
Windows Server 2012 R2
Server Core with IIS 8.5
64bit Windows Server Core
2012 R2 running IIS 8.5
2016.07.26.NET v4.6.2,
Supports
runtimes 4,
2.0, 1.1 and
1.0
3.9.406.03.18.11183.6 IIS 8.5
Windows Server 2012 with
IIS 8
64bit Windows Server 2012
running IIS 8
2016.07.26.NET v4.6.2,
Supports
runtimes 4,
2.0, 1.1 and
1.0
3.9.406.03.18.11183.6 IIS 8
API Version 2010-12-01
1017

AWS Elastic Beanstalk Developer Guide
June 21, 2016 – August 23, 2016
Configuration and Solution
Stack Name
AMI
version
Framework AWS
SDK
for .NET
EC2ConfigWebDeployProxy Server
Windows Server 2008 R2
with IIS 7.5
64bit Windows Server 2008 R2
running IIS 7.5
2016.07.26.NET v4.6.2,
Supports
runtimes 4,
2.0, 1.1 and
1.0
3.9.406.03.18.11183.6 IIS 7.5
1 Microsoft Security Bulletin Summary for July 2016, Microsoft Security Bulletin Summary for August
2016
June 21, 2016 – August 23, 2016
The following Elastic Beanstalk platform configurations for .NET were current during this date range:
Configuration and Solution
Stack Name
AMI
version
Framework AWS
SDK
for .NET
EC2ConfigWebDeployProxy Server
Windows Server 2012 R2
with IIS 8.5 version 1.1.0
64bit Windows Server 2012 R2
v1.1.0 running IIS 8.5
2016.05.11.NET v4.6.1,
Supports
runtimes 4,
2.0, 1.1 and
1.0
3.9.329.03.15.8803.6 IIS 8.5
Windows Server 2012 R2
Server Core with IIS 8.5
version 1.1.0
64bit Windows Server Core
2012 R2 v1.1.0 running IIS 8.5
2016.05.11.NET v4.6.1,
Supports
runtimes 4,
2.0, 1.1 and
1.0
3.9.329.03.15.8803.6 IIS 8.5
Windows Server 2012 with
IIS 8 version 1.1.0
64bit Windows Server 2012
v1.1.0 running IIS 8
2016.05.11.NET v4.6.1,
Supports
runtimes 4,
2.0, 1.1 and
1.0
3.9.329.03.15.8803.6 IIS 8
Windows Server 2008 R2
with IIS 7.5 version 1.1.0
64bit Windows Server 2008 R2
v1.1.0 running IIS 7.5
2016.05.11.NET v4.6.1,
Supports
runtimes 4,
2.0, 1.1 and
1.0
3.9.329.03.15.8803.6 IIS 7.5
Windows Server 2012 R2
with IIS 8.5
64bit Windows Server 2012 R2
running IIS 8.5
2016.05.11.NET v4.6.1,
Supports
runtimes 4,
2.0, 1.1 and
1.0
3.9.329.03.15.8803.6 IIS 8.5
Windows Server 2012 R2
Server Core with IIS 8.5
64bit Windows Server Core
2012 R2 running IIS 8.5
2016.05.11.NET v4.6.1,
Supports
runtimes 4,
3.9.329.03.15.8803.6 IIS 8.5
API Version 2010-12-01
1018

AWS Elastic Beanstalk Developer Guide
May 25, 2016 – June 21, 2016
Configuration and Solution
Stack Name
AMI
version
Framework AWS
SDK
for .NET
EC2ConfigWebDeployProxy Server
2.0, 1.1 and
1.0
Windows Server 2012 with
IIS 8
64bit Windows Server 2012
running IIS 8
2016.05.11.NET v4.6.1,
Supports
runtimes 4,
2.0, 1.1 and
1.0
3.9.329.03.15.8803.6 IIS 8
Windows Server 2008 R2
with IIS 7.5
64bit Windows Server 2008 R2
running IIS 7.5
2016.05.11.NET v4.6.1,
Supports
runtimes 4,
2.0, 1.1 and
1.0
3.9.329.03.15.8803.6 IIS 7.5
1 Microsoft Security Bulletin Summary for June 2016
May 25, 2016 – June 21, 2016
The following Elastic Beanstalk platform configurations for .NET were current during this date range:
Configuration and Solution
Stack Name
AMI
version
Framework AWS
SDK
for .NET
EC2ConfigWebDeployProxy Server
Windows Server 2012 R2
with IIS 8.5 version 1.1.0
64bit Windows Server 2012 R2
v1.1.0 running IIS 8.5
2016.05.11.NET v4.6.1,
Supports
runtimes 4,
2.0, 1.1 and
1.0
3.9.329.03.15.8803.6 IIS 8.5
Windows Server 2012 R2
Server Core with IIS 8.5
version 1.1.0
64bit Windows Server Core
2012 R2 v1.1.0 running IIS 8.5
2016.05.11.NET v4.6.1,
Supports
runtimes 4,
2.0, 1.1 and
1.0
3.9.329.03.15.8803.6 IIS 8.5
Windows Server 2012 with
IIS 8 version 1.1.0
64bit Windows Server 2012
v1.1.0 running IIS 8
2016.05.11.NET v4.6.1,
Supports
runtimes 4,
2.0, 1.1 and
1.0
3.9.329.03.15.8803.6 IIS 8
Windows Server 2008 R2
with IIS 7.5 version 1.1.0
64bit Windows Server 2008 R2
v1.1.0 running IIS 7.5
2016.05.11.NET v4.6.1,
Supports
runtimes 4,
2.0, 1.1 and
1.0
3.9.329.03.15.8803.6 IIS 7.5
Windows Server 2012 R2
with IIS 8.5
2016.05.11.NET v4.6.1,
Supports
runtimes 4,
3.9.329.03.15.8803.6 IIS 8.5
API Version 2010-12-01
1019

AWS Elastic Beanstalk Developer Guide
April 25, 2016 – May 25, 2016
Configuration and Solution
Stack Name
AMI
version
Framework AWS
SDK
for .NET
EC2ConfigWebDeployProxy Server
64bit Windows Server 2012 R2
running IIS 8.5
2.0, 1.1 and
1.0
Windows Server 2012 R2
Server Core with IIS 8.5
64bit Windows Server Core
2012 R2 running IIS 8.5
2016.05.11.NET v4.6.1,
Supports
runtimes 4,
2.0, 1.1 and
1.0
3.9.329.03.15.8803.6 IIS 8.5
Windows Server 2012 with
IIS 8
64bit Windows Server 2012
running IIS 8
2016.05.11.NET v4.6.1,
Supports
runtimes 4,
2.0, 1.1 and
1.0
3.9.329.03.15.8803.6 IIS 8
Windows Server 2008 R2
with IIS 7.5
64bit Windows Server 2008 R2
running IIS 7.5
2016.05.11.NET v4.6.1,
Supports
runtimes 4,
2.0, 1.1 and
1.0
3.9.329.03.15.8803.6 IIS 7.5
1 Microsoft Security Bulletin Summary for May 2016
April 25, 2016 – May 25, 2016
The following Elastic Beanstalk platform configurations for .NET were current during this date range:
Configuration and Solution
Stack Name
AMI
version
Framework AWS
SDK
for .NET
EC2ConfigWebDeployProxy Server
Windows Server 2012 R21
with IIS 8.5 version 1.1.0
64bit Windows Server 2012 R2
v1.1.0 running IIS 8.5
2016.03.09.NET v4.6.1
Supports
runtimes 4,
2.0, 1.1 and
1.0
3.8.306.03.14.7863.6 IIS 8.5
Windows Server 2012 R21
Server Core with IIS 8.5
version 1.1.0
64bit Windows Server Core
2012 R2 v1.1.0 running IIS 8.5
2016.03.09.NET v4.6.1
Supports
runtimes 4,
2.0, 1.1 and
1.0
3.8.306.03.14.7863.6 IIS 8.5
Windows Server 20121 with
IIS 8 version 1.1.0
64bit Windows Server 2012
v1.1.0 running IIS 8
2016.03.09.NET v4.6.1
Supports
runtimes 4,
2.0, 1.1 and
1.0
3.8.306.03.14.7863.6 IIS 8
API Version 2010-12-01
1020

AWS Elastic Beanstalk Developer Guide
March 23, 2016 – April 25, 2016
Configuration and Solution
Stack Name
AMI
version
Framework AWS
SDK
for .NET
EC2ConfigWebDeployProxy Server
Windows Server 2008 R21
with IIS 7.5 version 1.1.0
64bit Windows Server 2008 R2
v1.1.0 running IIS 7.5
2016.03.09.NET v4.6.1
Supports
runtimes 4,
2.0, 1.1 and
1.0
3.8.306.03.14.7863.6 IIS 7.5
Windows Server 2012 R21
with IIS 8.5
64bit Windows Server 2012 R2
running IIS 8.5
2016.03.09.NET v4.6.1
Supports
runtimes 4,
2.0, 1.1 and
1.0
3.8.306.03.14.7863.6 IIS 8.5
Windows Server 2012 R21
Server Core with IIS 8.5
64bit Windows Server Core
2012 R2 running IIS 8.5
2016.03.09.NET v4.6.1
Supports
runtimes 4,
2.0, 1.1 and
1.0
3.8.306.03.14.7863.6 IIS 8.5
Windows Server 20121 with
IIS 8
64bit Windows Server 2012
running IIS 8
2016.03.09.NET v4.6.1
Supports
runtimes 4,
2.0, 1.1 and
1.0
3.8.306.03.14.7863.6 IIS 8
Windows Server 2008 R21
with IIS 7.5
64bit Windows Server 2008 R2
running IIS 7.5
2016.03.09.NET v4.6.1
Supports
runtimes 4,
2.0, 1.1 and
1.0
3.8.306.03.14.7863.6 IIS 7.5
1Microsoft Security Bulletin Summary for April 2016
March 23, 2016 – April 25, 2016
The following Elastic Beanstalk platform configurations for .NET were current during this date range:
Configuration and Solution
Stack Name
AMI
version
Framework AWS
SDK
for .NET
EC2ConfigProxy Server
Windows Server 2012 R21 with
IIS 8.5 version 1.1.0
64bit Windows Server 2012 R2
v1.1.0 running IIS 8.5
2016.02.10.NET v4.6.1
Supports
runtimes 4,
2.0, 1.1 and
1.0
v3.1.36.13.12.649IIS 8.5
API Version 2010-12-01
1021

AWS Elastic Beanstalk Developer Guide
February 29, 2016 – March 23, 2016
Configuration and Solution
Stack Name
AMI
version
Framework AWS
SDK
for .NET
EC2ConfigProxy Server
Windows Server 2012 R21
Server Core with IIS 8.5 version
1.1.0
64bit Windows Server Core 2012
R2 v1.1.0 running IIS 8.5
2016.02.10.NET v4.6.1
Supports
runtimes 4,
2.0, 1.1 and
1.0
v3.1.36.13.12.649IIS 8.5
Windows Server 20121 with IIS
8 version 1.1.0
64bit Windows Server 2012 v1.1.0
running IIS 8
2016.02.10.NET v4.6.1
Supports
runtimes 4,
2.0, 1.1 and
1.0
v3.1.36.13.12.649IIS 8
Windows Server 2008 R21 with
IIS 7.5 version 1.1.0
64bit Windows Server 2008 R2
v1.1.0 running IIS 7.5
2016.02.10.NET v4.6.1
Supports
runtimes 4,
2.0, 1.1 and
1.0
v3.1.36.13.12.649IIS 7.5
Windows Server 2012 R21 with
IIS 8.5
64bit Windows Server 2012 R2
running IIS 8.5
2016.02.10.NET v4.6.1
Supports
runtimes 4,
2.0, 1.1 and
1.0
v3.1.36.13.12.649IIS 8.5
Windows Server 2012 R21
Server Core with IIS 8.5
64bit Windows Server Core 2012
R2 running IIS 8.5
2016.02.10.NET v4.6.1
Supports
runtimes 4,
2.0, 1.1 and
1.0
v3.1.36.13.12.649IIS 8.5
Windows Server 20121 with IIS
8
64bit Windows Server 2012
running IIS 8
2016.02.10.NET v4.6.1
Supports
runtimes 4,
2.0, 1.1 and
1.0
v3.1.36.13.12.649IIS 8
Windows Server 2008 R21 with
IIS 7.5
64bit Windows Server 2008 R2
running IIS 7.5
2016.02.10.NET v4.6.1
Supports
runtimes 4,
2.0, 1.1 and
1.0
v3.1.36.13.12.649IIS 7.5
1Microsoft Security Bulletin Summary for March 2016
February 29, 2016 – March 23, 2016
The following Elastic Beanstalk platform configurations for .NET were current during this date range:
API Version 2010-12-01
1022

AWS Elastic Beanstalk Developer Guide
February 29, 2016 – March 23, 2016
Configuration and Solution
Stack Name
AMI
version
Framework AWS
SDK
for .NET
EC2ConfigWeb Server
Windows Server 2012 R21 with
IIS 8.5 version 1.1.0
64bit Windows Server 2012 R2
v1.1.0 running IIS 8.5
2016.01.25.NET v4.6.1
Supports
runtimes 4,
2.0, 1.1 and
1.0
v3.1.36.13.12.649IIS 8.5
Windows Server 2012 R21
Server Core with IIS 8.5 version
1.1.0
64bit Windows Server Core 2012
R2 v1.1.0 running IIS 8.5
2016.01.25.NET v4.6.1
Supports
runtimes 4,
2.0, 1.1 and
1.0
v3.1.36.13.12.649IIS 8.5
Windows Server 20121 with IIS
8 version 1.1.0
64bit Windows Server 2012 v1.1.0
running IIS 8
2016.01.25.NET v4.6.1
Supports
runtimes 4,
2.0, 1.1 and
1.0
v3.1.36.13.12.649IIS 8
Windows Server 2008 R21 with
IIS 7.5 version 1.1.0
64bit Windows Server 2008 R2
v1.1.0 running IIS 7.5
2016.01.25.NET v4.6.1
Supports
runtimes 4,
2.0, 1.1 and
1.0
v3.1.36.13.12.649IIS 7.5
Windows Server 2012 R21 with
IIS 8.5
64bit Windows Server 2012 R2
running IIS 8.5
2016.01.25.NET v4.6.1
Supports
runtimes 4,
2.0, 1.1 and
1.0
v3.1.36.13.12.649IIS 8.5
Windows Server 2012 R21
Server Core with IIS 8.5
64bit Windows Server Core 2012
R2 running IIS 8.5
2016.01.25.NET v4.6.1
Supports
runtimes 4,
2.0, 1.1 and
1.0
v3.1.36.13.12.649IIS 8.5
Windows Server 20121 with IIS
8
64bit Windows Server 2012
running IIS 8
2016.01.25.NET v4.6.1
Supports
runtimes 4,
2.0, 1.1 and
1.0
v3.1.36.13.12.649IIS 8
Windows Server 2008 R21 with
IIS 7.5
64bit Windows Server 2008 R2
running IIS 7.5
2016.01.25.NET v4.6.1
Supports
runtimes 4,
2.0, 1.1 and
1.0
v3.1.36.13.12.649IIS 7.5
API Version 2010-12-01
1023

AWS Elastic Beanstalk Developer Guide
January 28, 2016 – February 29, 2016
1Microsoft Security Bulletin Summary for February 2016
January 28, 2016 – February 29, 2016
The following Elastic Beanstalk platform configurations for .NET were current during this date range:
Configuration and Solution Stack
Name
AMI
version
Framework AWS
SDK
for .NET
Web Server
Windows Server 2012 R21 with IIS
8.5 version 1.1.0
64bit Windows Server 2012 R2 v1.1.0
running IIS 8.5
2015.12.31.NET v4.6.1
Supports
runtimes 4, 2.0,
1.1 and 1.0
v3.1.36.1 IIS 8.5
Windows Server 2012 R21 Server
Core with IIS 8.5 version 1.1.0
64bit Windows Server Core 2012 R2
v1.1.0 running IIS 8.5
2015.12.31.NET v4.6.1
Supports
runtimes 4, 2.0,
1.1 and 1.0
v3.1.36.1 IIS 8.5
Windows Server 20121 with IIS 8
version 1.1.0
64bit Windows Server 2012 v1.1.0
running IIS 8
2015.12.31.NET v4.6.1
Supports
runtimes 4, 2.0,
1.1 and 1.0
v3.1.36.1 IIS 8
Windows Server 2008 R21 with IIS
7.5 version 1.1.0
64bit Windows Server 2008 R2 v1.1.0
running IIS 7.5
2015.12.31.NET v4.6.1
Supports
runtimes 4, 2.0,
1.1 and 1.0
v3.1.36.1 IIS 7.5
Windows Server 2012 R21 with IIS
8.5
64bit Windows Server 2012 R2
running IIS 8.5
2015.12.31.NET v4.6.1
Supports
runtimes 4, 2.0,
1.1 and 1.0
v3.1.36.1 IIS 8.5
Windows Server 2012 R21 Server
Core with IIS 8.5
64bit Windows Server Core 2012 R2
running IIS 8.5
2015.12.31.NET v4.6.1
Supports
runtimes 4, 2.0,
1.1 and 1.0
v3.1.36.1 IIS 8.5
Windows Server 20121 with IIS 8
64bit Windows Server 2012 running
IIS 8
2015.12.31.NET v4.6.1
Supports
runtimes 4, 2.0,
1.1 and 1.0
v3.1.36.1 IIS 8
Windows Server 2008 R21 with IIS
7.5
64bit Windows Server 2008 R2
running IIS 7.5
2015.12.31.NET v4.6.1
Supports
runtimes 4, 2.0,
1.1 and 1.0
v3.1.36.1 IIS 7.5
API Version 2010-12-01
1024

AWS Elastic Beanstalk Developer Guide
December 15, 2015 – January 28, 2016
1Microsoft Security Bulletin Summary for January 2016
December 15, 2015 – January 28, 2016
The following Elastic Beanstalk platform configurations for .NET were current during this date range:
Configuration and Solution Stack Name Framework Web Server
Windows Server 2012 R21 with IIS 8.5
version 1.1.0
64bit Windows Server 2012 R2 v1.1.0
running IIS 8.5
.NET v4.6
Supports runtimes 4, 2.0, 1.1 and 1.0
IIS 8.5
Windows Server 2012 R21 Server Core
with IIS 8.5 version 1.1.0
64bit Windows Server Core 2012 R2 v1.1.0
running IIS 8.5
.NET v4.6
Supports runtimes 4, 2.0, 1.1 and 1.0
IIS 8.5
Windows Server 20121 with IIS 8 version
1.1.0
64bit Windows Server 2012 v1.1.0 running
IIS 8
.NET v4.6
Supports runtimes 4, 2.0, 1.1 and 1.0
IIS 8
Windows Server 2008 R21 with IIS 7.5
version 1.1.0
64bit Windows Server 2008 R2 v1.1.0
running IIS 7.5
.NET v4.5
Supports runtimes 4, 2.0, 1.1 and 1.0
IIS 7.5
Windows Server 2012 R21 with IIS 8.5
64bit Windows Server 2012 R2 running IIS
8.5
.NET v4.6
Supports runtimes 4, 2.0, 1.1 and 1.0
IIS 8.5
Windows Server 2012 R21 Server Core
with IIS 8.5
64bit Windows Server Core 2012 R2 running
IIS 8.5
.NET v4.6
Supports runtimes 4, 2.0, 1.1 and 1.0
IIS 8.5
Windows Server 20121 with IIS 8
64bit Windows Server 2012 running IIS 8
.NET v4.6
Supports runtimes 4, 2.0, 1.1 and 1.0
IIS 8
Windows Server 2008 R21 with IIS 7.5
64bit Windows Server 2008 R2 running IIS
7.5
.NET v4.5
Supports runtimes 4, 2.0, 1.1 and 1.0
IIS 7.5
1Microsoft Security Bulletin Summary for November 2015, Microsoft Security Bulletin Summary for
December 2015
October 21, 2015 – December 15, 2015
The following Elastic Beanstalk platform configurations for .NET were current during this date range:
API Version 2010-12-01
1025

AWS Elastic Beanstalk Developer Guide
September 14, 2015 – October 21, 2015
Configuration and Solution Stack Name Framework Web Server
Windows Server 2012 R21 with IIS 8.5
version 1.0.0
64bit Windows Server 2012 R2 v1.0.0
running IIS 8.5
.NET v4.6
Supports runtimes 4, 2.0, 1.1 and 1.0
IIS 8.5
Windows Server 2012 R21 Server Core
with IIS 8.5 version 1.0.0
64bit Windows Server Core 2012 R2 v1.0.0
running IIS 8.5
.NET v4.6
Supports runtimes 4, 2.0, 1.1 and 1.0
IIS 8.5
Windows Server 20121 with IIS 8 version
1.0.0
64bit Windows Server 2012 v1.0.0 running
IIS 8
.NET v4.6
Supports runtimes 4, 2.0, 1.1 and 1.0
IIS 8
Windows Server 2008 R21 with IIS 7.5
version 1.0.0
64bit Windows Server 2008 R2 v1.0.0
running IIS 7.5
.NET v4.5
Supports runtimes 4, 2.0, 1.1 and 1.0
IIS 7.5
Windows Server 2012 R21 with IIS 8.5
64bit Windows Server 2012 R2 running IIS
8.5
.NET v4.6
Supports runtimes 4, 2.0, 1.1 and 1.0
IIS 8.5
Windows Server 2012 R21 Server Core
with IIS 8.5
64bit Windows Server Core 2012 R2 running
IIS 8.5
.NET v4.6
Supports runtimes 4, 2.0, 1.1 and 1.0
IIS 8.5
Windows Server 20121 with IIS 8
64bit Windows Server 2012 running IIS 8
.NET v4.6
Supports runtimes 4, 2.0, 1.1 and 1.0
IIS 8
Windows Server 2008 R21 with IIS 7.5
64bit Windows Server 2008 R2 running IIS
7.5
.NET v4.5
Supports runtimes 4, 2.0, 1.1 and 1.0
IIS 7.5
September 14, 2015 – October 21, 2015
The following Elastic Beanstalk platform configurations for .NET were current during this date range:
Configuration and Solution
Stack Name
Framework Web Server
Windows Server 2012 R21 with
IIS 8.5
.NET v4.5
Also supports 4.0, 3.5, 3.0, 2.0,
1.1 and 1.0
IIS 8.5
API Version 2010-12-01
1026

AWS Elastic Beanstalk Developer Guide
August 20, 2015 – September 14, 2015
Configuration and Solution
Stack Name
Framework Web Server
64bit Windows Server 2012 R2
running IIS 8.5
Windows Server 2012 R21
Server Core with IIS 8.5
64bit Windows Server Core 2012
R2 running IIS 8.5
.NET v4.5
Also supports 4.0, 3.5, 3.0, 2.0,
1.1 and 1.0
IIS 8.5
Windows Server 20121 with IIS
8
64bit Windows Server 2012
running IIS 8
.NET v4.5
Also supports 4.0, 3.5, 3.0, 2.0,
1.1 and 1.0
IIS 8
Windows Server 2008 R21 with
IIS 7.5
64bit Windows Server 2008 R2
running IIS 7.5
.NET v4.5
Also supports 4.0, 3.5, 3.0, 2.0,
1.1 and 1.0
IIS 7.5
1Microsoft Security Bulletin Summary for September 2015
August 20, 2015 – September 14, 2015
The following Elastic Beanstalk platform configurations for .NET were current during this date range:
Configuration and Solution
Stack Name
Framework Web Server
Windows Server 2012 R21 with
IIS 8.5
64bit Windows Server 2012 R2
running IIS 8.5
.NET v4.5
Also supports 4.0, 3.5, 3.0, 2.0,
1.1 and 1.0
IIS 8.5
Windows Server 2012 R21
Server Core with IIS 8.5
64bit Windows Server Core 2012
R2 running IIS 8.5
.NET v4.5
Also supports 4.0, 3.5, 3.0, 2.0,
1.1 and 1.0
IIS 8.5
Windows Server 20121 with IIS
8
64bit Windows Server 2012
running IIS 8
.NET v4.5
Also supports 4.0, 3.5, 3.0, 2.0,
1.1 and 1.0
IIS 8
Windows Server 2008 R21 with
IIS 7.5
64bit Windows Server 2008 R2
running IIS 7.5
.NET v4.5
Also supports 4.0, 3.5, 3.0, 2.0,
1.1 and 1.0
IIS 7.5
API Version 2010-12-01
1027

AWS Elastic Beanstalk Developer Guide
July 21, 2015 – August 20, 2015
1Microsoft Security Bulletin Summary for August 2015
July 21, 2015 – August 20, 2015
The following Elastic Beanstalk platform configurations for .NET were current during this date range:
Configuration and Solution Stack Name Framework Web Server
Windows Server 2012 R21 with IIS 8.5
64bit Windows Server 2012 R2 running IIS
8.5
.NET v4.5
Also supports 4.0, 3.5, 3.0, 2.0, 1.1 and
1.0
IIS 8.5
Windows Server 2012 R21 Server Core
with IIS 8.5
64bit Windows Server Core 2012 R2 running
IIS 8.5
.NET v4.5
Also supports 4.0, 3.5, 3.0, 2.0, 1.1 and
1.0
IIS 8.5
Windows Server 20121 with IIS 8
64bit Windows Server 2012 running IIS 8
.NET v4.5
Also supports 4.0, 3.5, 3.0, 2.0, 1.1 and
1.0
IIS 8
Windows Server 2008 R21 with IIS 7.5
64bit Windows Server 2008 R2 running IIS
7.5
.NET v4.5
Also supports 4.0, 3.5, 3.0, 2.0, 1.1 and
1.0
IIS 7.5
1Microsoft Security Bulletin Summary for July 2015
June 12, 2015 – July 21, 2015
The following Elastic Beanstalk platform configurations for .NET were current during this date range:
Configuration and Solution Stack Name Framework Web Server
Windows Server 2012 R21 with IIS 8.5
64bit Windows Server 2012 R2 running IIS
8.5
.NET v4.5
Also supports 4.0, 3.5, 3.0, 2.0, 1.1 and
1.0
IIS 8.5
Windows Server 2012 R21 Server Core
with IIS 8.5
64bit Windows Server Core 2012 R2 running
IIS 8.5
.NET v4.5
Also supports 4.0, 3.5, 3.0, 2.0, 1.1 and
1.0
IIS 8.5
Windows Server 20121 with IIS 8
64bit Windows Server 2012 running IIS 8
.NET v4.5
Also supports 4.0, 3.5, 3.0, 2.0, 1.1 and
1.0
IIS 8
Windows Server 2008 R21 with IIS 7.5
64bit Windows Server 2008 R2 running IIS
7.5
.NET v4.5
Also supports 4.0, 3.5, 3.0, 2.0, 1.1 and
1.0
IIS 7.5
API Version 2010-12-01
1028

AWS Elastic Beanstalk Developer Guide
April 16, 2015 – June 12, 2015
1Microsoft Security Bulletin Summary for June 2015
April 16, 2015 – June 12, 2015
The following Elastic Beanstalk platform configurations for .NET were current during this date range:
IIS Configurations
Name AMI Language Web Server
64bit Windows Server
2012 R21 running IIS 8.5
Custom .NET v4.5
Also supports 4.0,
3.5, 3.0, 2.0, 1.1 and
1.0
IIS 8.5
64bit Windows Server
Core 2012 R21 running
IIS 8.5
Custom .NET v4.5
Also supports 4.0,
3.5, 3.0, 2.0, 1.1 and
1.0
IIS 8.5
64bit Windows Server
20121 running IIS 8
Custom .NET v4.5
Also supports 4.0,
3.5, 3.0, 2.0, 1.1 and
1.0
IIS 8
64bit Windows Server
2008 R21 running IIS 7.5
Custom .NET v4.5
Also supports 4.0,
3.5, 3.0, 2.0, 1.1 and
1.0
IIS 7.5
1Microsoft Security Bulletin Summary for May 2015
August 6, 2014 – April 16, 2015
The following Elastic Beanstalk platform configurations for .NET were current during this date range:
IIS Configurations
Name AMI Language Web Server
64bit Windows Server
2012 R21 running IIS 8.5
Custom .NET v4.5
Also supports 4.0,
3.5, 3.0, 2.0, 1.1 and
1.0
IIS 8.5
64bit Windows Server
Core 2012 R21 running
IIS 8.5
Custom .NET v4.5
Also supports 4.0,
3.5, 3.0, 2.0, 1.1 and
1.0
IIS 8.5
API Version 2010-12-01
1029

AWS Elastic Beanstalk Developer Guide
Prior to August 6, 2014
IIS Configurations
64bit Windows Server
20121 running IIS 8
Custom .NET v4.5
Also supports 4.0,
3.5, 3.0, 2.0, 1.1 and
1.0
IIS 8
64bit Windows Server
2008 R21 running IIS 7.5
Custom .NET v4.5
Also supports 4.0,
3.5, 3.0, 2.0, 1.1 and
1.0
IIS 7.5
1Microsoft Security Bulletin MS14-066 - Critical
Prior to August 6, 2014
The following Elastic Beanstalk platform configurations for .NET were current prior to August 6, 2014:
IIS Configurations
Name AMI Language Web Server
64bit Windows Server
20121 running IIS 8
Custom .NET v4.5
Also supports 4.0,
3.5, 3.0, 2.0, 1.1 and
1.0
IIS 8
64bit Windows Server
2008 R21 running IIS 7.5
Custom .NET v4.5
Also supports 4.0,
3.5, 3.0, 2.0, 1.1 and
1.0
IIS 7.5
1Microsoft Security Bulletin MS14-066 - Critical
Node.js Platform History
This page lists the previous versions of AWS Elastic Beanstalk's Node.js platforms and the dates that each
version was current. Platform versions that you used to launch or update an environment in the last 30
days remain available (to the using account, in the used region) even after they are no longer current.
See the Supported Platforms (p. 26) page for information on the latest version of each platform
supported by Elastic Beanstalk. Detailed release notes are available for recent releases at
aws.amazon.com/releasenotes.
The following Elastic Beanstalk platform configurations for Node.js were current between November 14,
2017 and December 19, 2017:
API Version 2010-12-01
1030

AWS Elastic Beanstalk Developer Guide
Node.js
Configuration and
Solution Stack Name
AMI Node.js version (npm version) Proxy Server Git AWS
X‑Ray
Node.js version 4.4.0
64bit Amazon Linux
2017.09 v4.4.0
running Node.js
2017.09.18.8.1 (5.4.2), 8.4.0 (5.3.0),
7.10.1 (4.2.0), 6.11.5 (3.10.10),
6.11.1 (3.10.10), 5.12.0 (3.8.6),
4.8.5 (2.15.11), 4.8.4 (2.15.11)
Default platform: 6.11.5
nginx 1.12.1,
Apache 2.4.27
2.13.6 2.0.0
The following Elastic Beanstalk platform configurations for Node.js were current between September 25,
2017 and November 13, 2017:
Configuration and
Solution Stack Name
AMI Node.js version (npm version) Proxy Server Git AWS
X‑Ray
Node.js version 4.3.0
64bit Amazon Linux
2017.03 v4.3.0
running Node.js
2017.03.18.4.0 (5.3.0), 8.1.4 (5.0.3),
7.10.1 (4.2.0), 7.6.0 (4.1.2),
6.11.1 (3.10.10), 6.10.0
(3.10.10), 5.12.0 (3.8.6), 4.8.4
(2.15.11)
Default platform: 6.11.1
nginx 1.12.1,
Apache 2.4.27
2.13.5 2.0.0
The following Elastic Beanstalk platform configurations for Node.js were current between August 30,
2017 and September 24, 2017:
Configuration and
Solution Stack Name
AMI Platform (Package Manager
— npm)
Proxy Server Git AWS
X‑Ray
Node.js version 4.2.2
64bit Amazon Linux
2017.03 v4.2.2
running Node.js
2017.03.18.1.4 (5.0.3), 7.10.1 (4.2.0),
7.6.0 (4.1.2), 6.11.1 (3.10.10),
6.10.0 (3.10.10), 5.12.0 (3.8.6),
4.8.4 (2.15.11), 4.8.0 (2.15.11)
Default platform: 6.11.1
nginx 1.10.3,
Apache 2.4.27
2.7.4 2.0.0
The following Elastic Beanstalk platform configurations for Node.js were current between August 11,
2017 and August 29, 2017:
Configuration and
Solution Stack Name
AMI Platform (Package Manager
— npm)
Proxy Server Git AWS
X‑Ray
Node.js version 4.2.1
64bit Amazon Linux
2017.03 v4.2.1
running Node.js
2017.03.18.1.4 (5.0.3), 7.10.1 (4.2.0),
7.6.0 (4.1.2), 6.11.1 (3.10.10),
6.10.0 (3.10.10), 5.12.0 (3.8.6),
4.8.4 (2.15.11), 4.8.0 (2.15.11)
Default platform: 6.11.1
nginx 1.10.3,
Apache 2.4.27
2.7.4 2.0.0
The following Elastic Beanstalk platform configurations for Node.js were current between July 15, 2017
and August 10, 2017:
API Version 2010-12-01
1031

AWS Elastic Beanstalk Developer Guide
Node.js
Configuration and
Solution Stack Name
AMI Platform (Package Manager
— npm)
Proxy Server Git AWS X-
Ray
Node.js version 4.2.0
64bit Amazon Linux
2017.03 v4.2.0
running Node.js
2017.03.18.1.4 (5.0.3), 7.10.1 (4.2.0),
7.6.0 (4.1.2), 6.11.1
(3.10.10), 6.10.0 (3.10.10),
5.12.0 (3.8.6), 4.8.4
(2.15.11), 4.8.0 (2.15.11)
nginx 1.10.3,
Apache 2.4.25
2.7.4 2.0.0
The following Elastic Beanstalk platform configurations for Node.js were current between June 27, 2017
and July 14, 2017:
Configuration and
Solution Stack Name
AMI Platform Package
Manager
Proxy Server Git AWS X-
Ray
Node.js version 4.1.1
64bit Amazon Linux
2017.03 v4.1.1
running Node.js
2017.03.0Node.js 6.10.0,
Also supports
7.6.0, 6.9.1, 5.12.0,
4.8.0, 4.6.1
NPM
3.9.5
nginx 1.10.2,
Apache 2.4.25
2.7.4 2.0.0
The following Elastic Beanstalk platform configurations for Node.js were current between May 19, 2017
and June 26, 2017:
Configuration and
Solution Stack Name
AMI Platform Package
Manager
Proxy Server Git AWS X-
Ray
Node.js version 4.1.0
64bit Amazon Linux
2017.03 v4.1.0
running Node.js
2017.03.0Node.js 6.10.0,
Also supports
7.6.0, 6.9.1, 5.12.0,
4.8.0, 4.6.1
NPM
3.9.5
nginx 1.10.2,
Apache 2.4.25
2.7.4 2.0.0
The following Elastic Beanstalk platform configurations for Node.js were current between April 5, 2017
and May 18, 2017:
Configuration and
Solution Stack Name
AMI Platform Package
Manager
Proxy Server Git AWS X-
Ray
Node.js version 4.0.1
64bit Amazon Linux
2016.09 v4.0.1
running Node.js
2016.09.0Node.js 6.10.0,
Also supports
7.6.0, 6.9.1, 5.12.0,
4.8.0, 4.6.1
NPM
3.9.5
nginx 1.10.1,
Apache 2.4.25
2.7.4 1.0.0
The following Elastic Beanstalk platform configurations for Node.js were current between March 8, 2017
and April 4, 2017:
API Version 2010-12-01
1032

AWS Elastic Beanstalk Developer Guide
Node.js
Configuration and
Solution Stack Name
AMI Platform Package
Manager
Proxy Server Git AWS X-
Ray
Node.js version 4.0.0
64bit Amazon Linux
2016.09 v4.0.0
running Node.js
2016.09.0Node.js 6.10.0,
Also supports
7.6.0, 6.9.1, 5.12.0,
4.8.0, 4.6.1
NPM
3.9.5
nginx 1.10.1,
Apache 2.4.25
2.7.4 1.0.0
The following Elastic Beanstalk platform configurations for Node.js were current between February 9,
2017 and March 7, 2017:
Configuration and
Solution Stack Name
AMI Platform Package
Manager
Proxy Server Git AWS X-
Ray
Node.js version 3.3.1
64bit Amazon Linux
2016.09 v3.3.1
running Node.js
2016.09.0Node.js 6.9.1, Also
supports 6.2.2,
5.12.0, 4.6.1, 4.4.6,
0.12.17, 0.12.15,
0.10.48, 0.10.46
NPM
3.9.5
nginx 1.10.1,
Apache 2.4.23
2.7.4 1,0.0
The following Elastic Beanstalk platform configurations for Node.js were current between December 22,
2016 and February 8, 2017:
Configuration and
Solution Stack Name
AMI Platform Package
Manager
Proxy Server Git AWS X-
Ray
Node.js version 3.3.0
64bit Amazon Linux
2016.09 v3.3.0
running Node.js
2016.09.0Node.js 6.9.1, Also
supports 6.2.2,
5.12.0, 4.6.1, 4.4.6,
0.12.17, 0.12.15,
0.10.48, 0.10.46
NPM
3.9.5
nginx 1.10.1,
Apache 2.4.23
2.7.4 1.0.0
The following Elastic Beanstalk platform configurations for Node.js were current between December 9,
2016 and December 21, 2016:
Configuration and
Solution Stack Name
AMI Platform Package
Manager
Proxy Server Git
Node.js version 3.2.0
64bit Amazon Linux
2016.09 v3.2.0 running
Node.js
2016.09.0 Node.js 6.9.1, Also
supports 6.2.2,
5.12.0, 4.6.1, 4.4.6,
0.12.17, 0.12.15,
0.10.48, 0.10.46
NPM
3.10.8*
nginx 1.10.1,
Apache 2.4.23
2.7.4
* Depending upon the version of Node.js that you are using.
The following Elastic Beanstalk platform configurations for Node.js were current between October 28,
2016 and December 8, 2016:
API Version 2010-12-01
1033

AWS Elastic Beanstalk Developer Guide
Node.js
Configuration and
Solution Stack Name
AMI Platform Package
Manager
Proxy Server Git
Node.js version 3.1.0
64bit Amazon Linux
2016.09 v3.1.0 running
Node.js
2016.09.0 Node.js 6.9.1, Also
supports 6.9.1, 6.2.2,
5.12.0, 4.6.1, 4.4.6,
0.12.17, 0.12.15,
0.10.48, 0.10.46
NPM
2.15.5
nginx 1.10.1,
Apache 2.4.18
2.7.4
The following Elastic Beanstalk platform configurations for Node.js were current between June 26, 2016
and October 27, 2016:
Configuration and
Solution Stack Name
AMI Platform Package
Manager
Proxy Server Git
Node.js version 2.1.3
64bit Amazon Linux
2016.03 v2.1.3 running
Node.js
2016.03.2 Node.js 4.4.6, Also
supports 6.2.2,
5.12.0, 0.12.15,
0.10.46, 0.8.28
NPM
2.15.5
nginx 1.8.1,
Apache 2.4.18
2.7.4
The following Elastic Beanstalk platform configurations for Node.js were current between May 9, 2016
and June 26, 2016:
Configuration and
Solution Stack Name
AMI Platform Package
Manager
Proxy Server Git
Node.js version 2.1.1
64bit Amazon Linux
2016.03 v2.1.1 running
Node.js
2016.03 Node.js 4.4.3, Also
supports 0.12.13,
0.10.44, 0.8.28
NPM
2.15.1
nginx 1.8.1,
Apache 2.4.18
2.7.4
The following Elastic Beanstalk platform configurations for Node.js were current between April 7, 2016
and May 9, 2016:
Configuration and
Solution Stack Name
AMI Platform Package
Manager
Proxy Server Git
Node.js version 2.1.0
64bit Amazon Linux
2016.03 v2.1.0 running
Node.js
2016.03 Node.js 4.3.0
Also supports
0.12.10, 0.10.42,
0.8.28
NPM
2.14.7
nginx 1.8.1 or
Apache 2.4.18
Git 2.7.4
The following Elastic Beanstalk platform configurations for Node.js were current between February 26,
2016 and April 7, 2016:
API Version 2010-12-01
1034

AWS Elastic Beanstalk Developer Guide
Node.js
Configuration and
Solution Stack Name
AMI Platform Package
Manager
Web Server Git
Node.js version 2.0.8
64bit Amazon Linux
2015.09 v2.0.8 running
Node.js
2015.09 Node.js 4.3.0
Also supports
0.12.10, 0.10.42,
0.8.28
NPM
2.14.7
nginx 1.8.0 or
Apache 2.4.16
Git 2.4.3
The following Elastic Beanstalk platform configurations for Node.js were current between February 11,
2016 and February 26, 2016:
Configuration and
Solution Stack Name
AMI Platform Package
Manager
Web Server Git
Node.js version 2.0.7
64bit Amazon Linux
2015.09 v2.0.7 running
Node.js
2015.09 Node.js 4.2.3
Also supports 0.12.9,
0.10.41, 0.8.28
NPM
2.14.7
nginx 1.8.0 or
Apache 2.4.16
Git 2.4.3
The following Elastic Beanstalk platform configurations for Node.js were current between January 11,
2016 and February 11, 2016:
Configuration and
Solution Stack Name
AMI Platform Package
Manager
Web Server Git
Node.js version 2.0.6
64bit Amazon Linux
2015.09 v2.0.6 running
Node.js
2015.09 Node.js 4.2.3
Also supports 0.12.9,
0.10.41, 0.8.28
NPM
2.14.7
nginx 1.8.0 or
Apache 2.4.16
Git 2.1.0
The following Elastic Beanstalk platform configurations for Node.js were current between December 18,
2015 and January 11, 2016:
Configuration and
Solution Stack Name
AMI Platform Package
Manager
Web Server Git
Node.js version 2.0.5
64bit Amazon Linux
2015.09 v2.0.5 running
Node.js
2015.09 Node.js 4.2.3
Also supports 0.12.9,
0.10.41, 0.8.28
NPM
2.14.7
nginx 1.8.0 or
Apache 2.4.16
Git 2.1.0
The following Elastic Beanstalk platform configurations for Node.js were current between November 2,
2015 and December 18, 2015:
API Version 2010-12-01
1035

AWS Elastic Beanstalk Developer Guide
Node.js
Configuration and
Solution Stack Name
AMI Platform Package
Manager
Web Server Git
Node.js version 2.0.4
64bit Amazon Linux
2015.09 v2.0.4 running
Node.js
2015.09 Node.js 4.2.1
Also supports 0.12.7,
0.12.6, 0.10.39,
0.10.38, 0.10.31,
0.8.28
NPM
2.14.7
nginx 1.8.0 or
Apache 2.4.16
Git 2.1.0
The following Elastic Beanstalk platform configurations for Node.js were current between September 18,
2015 and November 2, 2015:
Configuration and Solution
Stack Name
AMI Platform Web Server Git
Node.js version 2.0.1
64bit Amazon Linux 2015.03
v2.0.1 running Node.js
2015.03 Node.js 0.12.6
Also supports 0.10.39,
0.10.38, 0.10.31, 0.8.28
Nginx 1.6.2 or
Apache 2.4.12
Git 2.1.0
The following Elastic Beanstalk platform configurations for Node.js were current between August 11,
2015 and September 18, 2015:
Configuration and Solution
Stack Name
AMI Platform Web Server Git
Node.js version 2.0.0
64bit Amazon Linux 2015.03
v2.0.0 running Node.js
2015.03 Node.js 0.12.6
Also supports 0.10.39,
0.10.38, 0.10.31, 0.8.28
nginx 1.6.2 or
Apache 2.4.12
Git 2.1.0
The following Elastic Beanstalk platform configurations for Node.js were current between August 3,
2015 and August 11, 2015:
Configuration and Solution
Stack Name
AMI Platform Web Server Git
Node.js version 1.4.6
64bit Amazon Linux 2015.03
v1.4.6 running Node.js
2015.03 Node.js 0.12.6
Also supports 0.10.39,
0.10.38, 0.10.31, 0.8.28
nginx 1.6.2 or
Apache 2.4.12
Git 2.1.0
The following Elastic Beanstalk platform configurations for Node.js were current between July 7, 2015
and August 3, 2015:
Configuration and Solution
Stack Name
AMI Platform Web Server
Node.js version 1.4.4 2015.03 Node.js 0.12.6 nginx 1.6.2 or
API Version 2010-12-01
1036

AWS Elastic Beanstalk Developer Guide
Node.js
Configuration and Solution
Stack Name
AMI Platform Web Server
64bit Amazon Linux 2015.03
v1.4.4 running Node.js
Also supports 0.10.39,
0.10.38, 0.10.31, 0.8.28
Apache 2.4.12
The following Elastic Beanstalk platform configurations for Node.js were current between June 15, 2015
and July 7, 2015:
Configuration and Solution
Stack Name
AMI Platform Web Server
Node.js version 1.4.3
64bit Amazon Linux 2015.03
v1.4.3 running Node.js
2015.03 Node.js 0.12.4
Also supports 0.12.2,
0.12.0, 0.10.38, 0.10.31,
0.8.28
nginx 1.6.2 or
Apache 2.4.12
The following Elastic Beanstalk platform configurations for Node.js were current between May 27, 2015
and June 15, 2015:
Node.js Configurations
Name AMI Language Node.js Version Web Server
64bit Amazon Linux
2015.03 v1.4.1 running
Node.js
2015.03 JavaScript 0.8.26
0.8.28
0.10.21
0.10.26
0.10.31
0.10.38
0.12.0
0.12.2
nginx 1.6.2 or
Apache 2.4.12
The following Elastic Beanstalk platform configurations for Node.js were current between April 22, 2015
and May 26, 2015:
Node.js Configurations
Name AMI Language Node.js Version Web Server
64bit Amazon Linux
2015.03 v1.3.1 running
Node.js
2015.03 JavaScript 0.8.26
0.8.28
0.10.21
0.10.26
nginx 1.6.2 or
Apache 2.4.12
API Version 2010-12-01
1037

AWS Elastic Beanstalk Developer Guide
Node.js
Node.js Configurations
0.10.31
0.10.38
0.12.0
0.12.2
The following Elastic Beanstalk platform configurations for Node.js were current between April 8, 2015
and April 21, 2015:
Node.js Configurations
Name AMI Language Node.js Version Web Server
64bit Amazon Linux
2015.03 v1.3.1 running
Node.js
2015.03 JavaScript 0.8.26
0.8.28
0.10.21
0.10.26
0.10.31
0.10.38
0.12.0
0.12.2
nginx 1.6.2 or
Apache 2.4.10
The following Elastic Beanstalk platform configurations for Node.js were current between March 24,
2015 and April 7, 2015:
Node.js Configurations
Name AMI Language Node.js Version Web Server
64bit Amazon Linux
2014.09 v1.2.1 running
Node.js
2014.09 JavaScript 0.8.26
0.8.28
0.10.21
0.10.26
0.10.31
0.12.0
nginx 1.6.2 or
Apache 2.4.10
The following Elastic Beanstalk platform configurations for Node.js were current between February 17,
2015 and March 23, 2015:
API Version 2010-12-01
1038

AWS Elastic Beanstalk Developer Guide
Node.js
Node.js Configurations
Name AMI Language Node.js Version Web Server
64bit Amazon Linux
2014.09 v1.2.0 running
Node.js
2014.09 JavaScript 0.8.26
0.8.28
0.10.21
0.10.26
0.10.31
nginx 1.6.2 or
Apache 2.4.10
The following Elastic Beanstalk platform configurations for Node.js were current between January 28,
2015 and February 16, 2015:
Node.js Configurations
Name AMI Language Node.js Version Web Server
64bit Amazon Linux
2014.09 v1.1.01 running
Node.js
2014.09 JavaScript 0.8.26
0.8.28
0.10.21
0.10.26
0.10.31
nginx 1.6.2 or
Apache 2.4.6
32bit Amazon Linux
2014.03 v1.1.01 running
Node.js
2014.03 JavaScript 0.8.26
0.8.28
0.10.21
0.10.26
0.10.31
nginx 1.4.7 or
Apache 2.4.10
64bit Amazon Linux
2014.03 v1.1.01 running
Node.js
2014.03 JavaScript 0.8.26
0.8.28
0.10.21
0.10.26
0.10.31
nginx 1.4.7 or
Apache 2.4.10
1CVE-2015-0235 Advisory (Ghost)
The following Elastic Beanstalk platform configurations for Node.js were current between October 16,
2014 and January 27, 2015:
API Version 2010-12-01
1039

AWS Elastic Beanstalk Developer Guide
Node.js
Node.js Configurations
Name AMI Language Node.js Version Web Server
64bit Amazon Linux
2014.09 v1.0.91 running
Node.js
2014.09 JavaScript 0.8.26
0.8.28
0.10.21
0.10.26
0.10.31
nginx 1.6.2 or
Apache 2.4.6
32bit Amazon Linux
2014.03 v1.0.91 running
Node.js
2014.03 JavaScript 0.8.26
0.8.28
0.10.21
0.10.26
0.10.31
nginx 1.6.2 or
Apache 2.4.6
64bit Amazon Linux
2014.03 v1.0.91 running
Node.js
2014.03 JavaScript 0.8.26
0.8.28
0.10.21
0.10.26
0.10.31
nginx 1.6.2 or
Apache 2.4.6
1CVE-2014-3566 Advisory
The following Elastic Beanstalk platform configurations for Node.js were current between October 9,
2014 and October 15, 2014:
Node.js Configurations
Name AMI Language Node.js Version Web Server
64bit Amazon Linux
2014.09 v1.0.8 running
Node.js
2014.09 JavaScript 0.8.6 through 0.8.21
0.8.24
0.8.26
0.10.10
0.10.21
0.10.26
nginx 1.4.7 or
Apache 2.4.6
The following Elastic Beanstalk platform configurations for Node.js were current between September 24,
2014 and October 8, 2014:
API Version 2010-12-01
1040

AWS Elastic Beanstalk Developer Guide
Node.js
Node.js Configurations
Name AMI Language Node.js Version Web Server
32bit Amazon Linux
2014.03 v1.0.71 running
Node.js
2014.03 JavaScript 0.8.6 through 0.8.21
0.8.24
0.8.26
0.10.10
0.10.21
0.10.26
nginx 1.4.7 or
Apache 2.4.6
64bit Amazon Linux
2014.03 v1.0.71 running
Node.js
2014.03 JavaScript 0.8.6 through 0.8.21
0.8.24
0.8.26
0.10.10
0.10.21
0.10.26
nginx 1.4.7 or
Apache 2.4.6
1 CVE-2014-6271 Advisory and ALAS-2014-419
The following Elastic Beanstalk platform configurations for Node.js were current between June 30, 2014
and September 23, 2014:
Node.js Configurations
Name AMI Language Node.js Version Web Server
64bit Amazon Linux
2014.03 v1.0.4 running
Node.js
2014.03 JavaScript 0.8.6 through 0.8.21
0.8.24
0.8.26
0.10.10
0.10.21
0.10.26
nginx 1.4.7 or
Apache 2.4.6
The following Elastic Beanstalk platform configurations for Node.js were current between June 5, 2014
and June 29, 2014:
Node.js Configurations
Name AMI Language Node.js Version Web Server
API Version 2010-12-01
1041

AWS Elastic Beanstalk Developer Guide
Node.js
Node.js Configurations
32bit Amazon Linux
2014.03 v1.0.31 running
Node.js
2014.03 JavaScript 0.8.6 through 0.8.21
0.8.24
0.8.26
0.10.10
0.10.21
0.10.26
nginx 1.4.7 or
Apache 2.4.6
64bit Amazon Linux
2014.03 v1.0.31 running
Node.js
2014.03 JavaScript 0.8.6 through 0.8.21
0.8.24
0.8.26
0.10.10
0.10.21
0.10.26
nginx 1.4.7 or
Apache 2.4.6
1 OpenSSL Security Advisory
The following Elastic Beanstalk platform configurations for Node.js were current between May 5, 2014
and June 4, 2014:
Node.js Configurations
Name AMI Language Node.js Version Web Server
32bit Amazon Linux
2014.03 v1.0.2 running
Node.js
2014.03 JavaScript 0.8.6 through 0.8.21
0.8.24
0.8.26
0.10.10
0.10.21
0.10.26
nginx 1.4.7 or
Apache 2.4.6
64bit Amazon Linux
2014.03 v1.0.2 running
Node.js
2014.03 JavaScript 0.8.6 through 0.8.21
0.8.24
0.8.26
0.10.10
0.10.21
0.10.26
nginx 1.4.7 or
Apache 2.4.6
API Version 2010-12-01
1042

AWS Elastic Beanstalk Developer Guide
Node.js
The following Elastic Beanstalk platform configurations for Node.js were current between April 7, 2014
and May 4, 2014:
Node.js Configurations
Name AMI Language Node.js Version Web Server
32bit Amazon Linux
2014.02 v1.0.11 running
Node.js
2013.09 JavaScript 0.8.6 through 0.8.21
0.8.24
0.8.26
0.10.10
0.10.21
0.10.26
nginx 1.4.3 or
Apache 2.4.6
64bit Amazon Linux
2014.02 v1.0.11 running
Node.js
2013.09 JavaScript 0.8.6 through 0.8.21
0.8.24
0.8.26
0.10.10
0.10.21
0.10.26
nginx 1.4.3 or
Apache 2.4.6
32bit Amazon Linux
2013.09 v1.0.11 running
Node.js
2013.09 JavaScript 0.8.6 through 0.8.21
0.8.24
0.10.10
0.10.21
nginx 1.4.3 or
Apache 2.4.6
64bit Amazon Linux
2013.09 v1.0.11 running
Node.js
2013.09 JavaScript 0.8.6 through 0.8.21
0.8.24
0.10.10
0.10.21
nginx 1.4.3 or
Apache 2.4.6
1 openssl-1.0.1e-4.58.amzn1
The following Elastic Beanstalk platform configurations for Node.js were current between March 18,
2014 and April 6, 2014:
Node.js Configurations
Name AMI Language Node.js Version Web Server
32bit Amazon Linux
2014.02 running Node.js
2013.09 JavaScript 0.8.6 through 0.8.21
0.8.24
nginx 1.4.3 or
Apache 2.4.6
API Version 2010-12-01
1043

AWS Elastic Beanstalk Developer Guide
Node.js
Node.js Configurations
0.8.26
0.10.10
0.10.21
0.10.26
64bit Amazon Linux
2014.02 running Node.js
2013.09 JavaScript 0.8.6 through 0.8.21
0.8.24
0.8.26
0.10.10
0.10.21
0.10.26
nginx 1.4.3 or
Apache 2.4.6
32bit Amazon Linux
2013.09 running Node.js
2013.09 JavaScript 0.8.6 through 0.8.21
0.8.24
0.10.10
0.10.21
nginx 1.4.3 or
Apache 2.4.6
64bit Amazon Linux
2013.09 running Node.js
2013.09 JavaScript 0.8.6 through 0.8.21
0.8.24
0.10.10
0.10.21
nginx 1.4.3 or
Apache 2.4.6
The following Elastic Beanstalk platform configurations for Node.js were current between October 29,
2013 and March 17, 2014:
Node.js Configurations
Name AMI Language Node.js Version Web Server
32bit Amazon Linux
2013.09 running Node.js
2013.09 JavaScript 0.8.6 through 0.8.21
0.8.24
0.10.10
0.10.21
nginx 1.4.3 or
Apache 2.4.6
64bit Amazon Linux
2013.09 running Node.js
2013.09 JavaScript 0.8.6 through 0.8.21
0.8.24
0.10.10
0.10.21
nginx 1.4.3 or
Apache 2.4.6
API Version 2010-12-01
1044

AWS Elastic Beanstalk Developer Guide
PHP
The following Elastic Beanstalk platform configurations for Node.js were current between August 15,
2013 and October 28, 2013:
Node.js Configurations
Name AMI Language Node.js Version Web Server
32bit Amazon Linux
running Node.js
2013.03 JavaScript 0.8.6 through 0.8.21
0.8.24
0.10.10
nginx 1.2.9 or
Apache 2.4.4
64bit Amazon Linux
running Node.js
2013.03 JavaScript 0.8.6 through 0.8.21
0.8.24
0.10.10
nginx 1.2.9 or
Apache 2.4.4
The following Elastic Beanstalk platform configurations for Node.js were current prior to August 15,
2013:
Node.js Configurations
Name AMI Language Node.js Version Web Server
32bit Amazon Linux
2012.09 running Node.js
2012.09 JavaScript 0.8.6 through 0.8.21
0.8.24
nginx 1.2.6 or
Apache 2.4.3
64bit Amazon Linux
2012.09 running Node.js
2012.09 JavaScript 0.8.6 through 0.8.21
0.8.24
nginx 1.2.6 or
Apache 2.4.3
PHP Platform History
This page lists the previous versions of AWS Elastic Beanstalk's PHP platforms and the dates that each
version was current. Platform versions that you used to launch or update an environment in the last 30
days remain available (to the using account, in the used region) even after they are no longer current.
See the Supported Platforms (p. 26) page for information on the latest version of each platform
supported by Elastic Beanstalk. Detailed release notes are available for recent releases at
aws.amazon.com/releasenotes.
The following Elastic Beanstalk platform configurations for PHP were current between November 14,
2017 and December 19, 2017:
Configuration and
Solution Stack Name
AMI Language Composer Proxy Server
PHP 7.1 version 2.6.0
64bit Amazon Linux
2017.09 v2.6.0 running
PHP 7.1
2017.09.1 PHP 7.1.7 1.4.2 Apache 2.4.27
API Version 2010-12-01
1045

AWS Elastic Beanstalk Developer Guide
PHP
Configuration and
Solution Stack Name
AMI Language Composer Proxy Server
PHP 7.0 version 2.6.0
64bit Amazon Linux
2017.09 v2.6.0 running
PHP 7.0
2017.09.1 PHP 7.0.21 1.4.2 Apache 2.4.27
PHP 5.6 version 2.6.0
64bit Amazon Linux
2017.09 v2.6.0 running
PHP 5.6
2017.09.1 PHP 5.6.31 1.4.2 Apache 2.4.27
PHP 5.5 version 2.6.0
64bit Amazon Linux
2017.09 v2.6.0 running
PHP 5.5
2017.09.1 PHP 5.5.38 1.4.2 Apache 2.4.27
PHP 5.4 version 2.6.0
64bit Amazon Linux
2017.09 v2.6.0 running
PHP 5.4
2017.09.1 PHP 5.4.45 1.4.2 Apache 2.4.27
The following Elastic Beanstalk platform configurations for PHP were current between September 25,
2017 and November 13, 2017:
Configuration and
Solution Stack Name
AMI Language Composer Proxy Server
PHP 7.1 version 2.5.0
64bit Amazon Linux
2017.03 v2.5.0 running
PHP 7.1
2017.03.1 PHP 7.1.7 1.4.2 Apache 2.4.27
PHP 7.0 version 2.5.0
64bit Amazon Linux
2017.03 v2.5.0 running
PHP 7.0
2017.03.1 PHP 7.0.21 1.4.2 Apache 2.4.27
PHP 5.6 version 2.5.0
64bit Amazon Linux
2017.03 v2.5.0 running
PHP 5.6
2017.03.1 PHP 5.6.31 1.4.2 Apache 2.4.27
PHP 5.5 version 2.5.0
64bit Amazon Linux
2017.03 v2.5.0 running
PHP 5.5
2017.03.1 PHP 5.5.38 1.4.2 Apache 2.4.27
PHP 5.4 version 2.5.0 2017.03.1 PHP 5.4.45 1.4.2 Apache 2.4.27
API Version 2010-12-01
1046

AWS Elastic Beanstalk Developer Guide
PHP
Configuration and
Solution Stack Name
AMI Language Composer Proxy Server
64bit Amazon Linux
2017.03 v2.5.0 running
PHP 5.4
The following Elastic Beanstalk platform configurations for PHP were current between August 30, 2017
and September 24, 2017:
Configuration and
Solution Stack Name
AMI Language Composer Proxy Server
PHP 7.0 version 2.4.4
64bit Amazon Linux
2017.03 v2.4.4 running
PHP 7.0
2017.03.1 PHP 7.0.21 1.4.1 Apache 2.4.27
PHP 5.6 version 2.4.4
64bit Amazon Linux
2017.03 v2.4.4 running
PHP 5.6
2017.03.1 PHP 5.6.31 1.4.1 Apache 2.4.27
PHP 5.5 version 2.4.4
64bit Amazon Linux
2017.03 v2.4.4 running
PHP 5.5
2017.03.1 PHP 5.5.38 1.4.1 Apache 2.4.27
PHP 5.4 version 2.4.4
64bit Amazon Linux
2017.03 v2.4.4 running
PHP 5.4
2017.03.1 PHP 5.4.45 1.4.1 Apache 2.4.27
The following Elastic Beanstalk platform configurations for PHP were current between August 11, 2017
and August 29, 2017:
Configuration and
Solution Stack Name
AMI Language Composer Proxy Server
PHP 7.0 version 2.4.3
64bit Amazon Linux
2017.03 v2.4.3 running
PHP 7.0
2017.03.1 PHP 7.0.21 1.4.1 Apache 2.4.27
PHP 5.6 version 2.4.3
64bit Amazon Linux
2017.03 v2.4.3 running
PHP 5.6
2017.03.1 PHP 5.6.30 1.4.1 Apache 2.4.27
PHP 5.5 version 2.4.3 2017.03.1 PHP 5.5.38 1.4.1 Apache 2.4.27
API Version 2010-12-01
1047

AWS Elastic Beanstalk Developer Guide
PHP
Configuration and
Solution Stack Name
AMI Language Composer Proxy Server
64bit Amazon Linux
2017.03 v2.4.3 running
PHP 5.5
PHP 5.4 version 2.4.3
64bit Amazon Linux
2017.03 v2.4.3 running
PHP 5.4
2017.03.1 PHP 5.4.45 1.4.1 Apache 2.4.27
The following Elastic Beanstalk platform configurations for PHP were current between July 20, 2017 and
August 10, 2017:
Configuration and
Solution Stack Name
AMI Language Composer Proxy Server
PHP 7.0 version 2.4.2
64bit Amazon Linux
2017.03 v2.4.2 running
PHP 7.0
2017.03.1 PHP 7.0.16 1.4.1 Apache 2.4.25
PHP 5.6 version 2.4.2
64bit Amazon Linux
2017.03 v2.4.2 running
PHP 5.6
2017.03.1 PHP 5.6.30 1.4.1 Apache 2.4.25
PHP 5.5 version 2.4.2
64bit Amazon Linux
2017.03 v2.4.2 running
PHP 5.5
2017.03.1 PHP 5.5.38 1.4.1 Apache 2.4.25
PHP 5.4 version 2.4.2
64bit Amazon Linux
2017.03 v2.4.2 running
PHP 5.4
2017.03.1 PHP 5.4.45 1.4.1 Apache 2.4.25
The following Elastic Beanstalk platform configurations for PHP were current between June 27, 2017
and July 19, 2017:
Configuration and
Solution Stack Name
AMI Language Composer Proxy Server
PHP 7.0 version 2.4.1
64bit Amazon Linux
2017.03 v2.4.1 running
PHP 7.0
2017.03.0 PHP 7.0.16 1.4.1 Apache 2.4.25
PHP 5.6 version 2.4.1 2017.03.0 PHP 5.6.30 1.4.1 Apache 2.4.25
API Version 2010-12-01
1048

AWS Elastic Beanstalk Developer Guide
PHP
Configuration and
Solution Stack Name
AMI Language Composer Proxy Server
64bit Amazon Linux
2017.03 v2.4.1 running
PHP 5.6
PHP 5.5 version 2.4.1
64bit Amazon Linux
2017.03 v2.4.1 running
PHP 5.5
2017.03.0 PHP 5.5.38 1.4.1 Apache 2.4.25
PHP 5.4 version 2.4.1
64bit Amazon Linux
2017.03 v2.4.1 running
PHP 5.4
2017.03.0 PHP 5.4.45 1.4.1 Apache 2.4.25
The following Elastic Beanstalk platform configurations for PHP were current between May 19, 2017 and
June 26, 2017:
Configuration and
Solution Stack Name
AMI Language Composer Proxy Server
PHP 7.0 version 2.4.0
64bit Amazon Linux
2017.03 v2.4.0 running
PHP 7.0
2016.09.0 PHP 7.0.16 1.4.1 Apache 2.4.25
PHP 5.6 version 2.4.0
64bit Amazon Linux
2017.03 v2.4.0 running
PHP 5.6
2017.03.0 PHP 5.6.30 1.4.1 Apache 2.4.25
PHP 5.5 version 2.4.0
64bit Amazon Linux
2017.03 v2.4.0 running
PHP 5.5
2017.03.0 PHP 5.5.38 1.4.1 Apache 2.4.25
PHP 5.4 version 2.4.0
64bit Amazon Linux
2017.03 v2.4.0 running
PHP 5.4
2017.03.0 PHP 5.4.45 1.4.1 Apache 2.4.25
The following Elastic Beanstalk platform configurations for PHP were current between April 5, 2017 and
May 18, 2017:
Configuration and
Solution Stack Name
AMI Language Composer Proxy Server
PHP 7.0 version 2.3.3 2016.09.0 PHP 7.0.16 1.3.2 Apache 2.4.25
API Version 2010-12-01
1049

AWS Elastic Beanstalk Developer Guide
PHP
Configuration and
Solution Stack Name
AMI Language Composer Proxy Server
64bit Amazon Linux
2016.09 v2.3.3 running
PHP 7.0
PHP 5.6 version 2.3.3
64bit Amazon Linux
2016.09 v2.3.3 running
PHP 5.6
2016.09.0 PHP 5.6.30 1.3.2 Apache 2.4.25
PHP 5.5 version 2.3.3
64bit Amazon Linux
2016.09 v2.3.3 running
PHP 5.5
2016.09.0 PHP 5.5.38 1.3.2 Apache 2.4.25
PHP 5.4 version 2.3.3
64bit Amazon Linux
2016.09 v2.3.3 running
PHP 5.4
2016.09.0 PHP 5.4.45 1.3.2 Apache 2.4.25
The following Elastic Beanstalk platform configurations for PHP were current between March 8, 2017
and April 4, 2017:
Configuration and
Solution Stack Name
AMI Language Composer Proxy Server
PHP 7.0 version 2.3.2
64bit Amazon Linux
2016.09 v2.3.2 running
PHP 7.0
2016.09.0 PHP 7.0.14 1.3.2 Apache 2.4.25
PHP 5.6 version 2.3.2
64bit Amazon Linux
2016.09 v2.3.2 running
PHP 5.6
2016.09.0 PHP 5.6.29 1.3.2 Apache 2.4.25
PHP 5.5 version 2.3.2
64bit Amazon Linux
2016.09 v2.3.2 running
PHP 5.5
2016.09.0 PHP 5.5.38 1.3.2 Apache 2.4.25
PHP 5.4 version 2.3.2
64bit Amazon Linux
2016.09 v2.3.2 running
PHP 5.4
2016.09.0 PHP 5.4.45 1.3.2 Apache 2.4.25
The following Elastic Beanstalk platform configurations for PHP were current between January 28, 2017
and March 7, 2017:
API Version 2010-12-01
1050

AWS Elastic Beanstalk Developer Guide
PHP
Configuration and
Solution Stack Name
AMI Language Composer Proxy Server
PHP 7.0 version 2.3.1
64bit Amazon Linux
2016.09 v2.3.1 running
PHP 7.0
2016.09.0 PHP 7.0.11 1.2.0 Apache 2.4.23
PHP 5.6 version 2.3.1
64bit Amazon Linux
2016.09 v2.3.1 running
PHP 5.6
2016.09.0 PHP 5.6.26 1.2.0 Apache 2.4.23
PHP 5.5 version 2.3.1
64bit Amazon Linux
2016.09 v2.3.1 running
PHP 5.5
2016.09.0 PHP 5.5.38 1.2.0 Apache 2.4.23
PHP 5.4 version 2.3.1
64bit Amazon Linux
2016.09 v2.3.1 running
PHP 5.4
2016.09.0 PHP 5.4.45 1.2.0 Apache 2.4.23
The following Elastic Beanstalk platform configurations for PHP were current between December 22,
2016 and March 7, 2017:
Configuration and
Solution Stack Name
AMI Language Composer Proxy Server
PHP 7.0 version 2.3.0
64bit Amazon Linux
2016.09 v2.3.0 running
PHP 7.0
2016.09.0 PHP 7.0.11 1.2.0 Apache 2.4.23
PHP 5.6 version 2.3.0
64bit Amazon Linux
2016.09 v2.3.0 running
PHP 5.6
2016.09.0 PHP 5.6.26 1.2.0 Apache 2.4.23
PHP 5.5 version 2.3.0
64bit Amazon Linux
2016.09 v2.3.0 running
PHP 5.5
2016.09.0 PHP 5.5.38 1.2.0 Apache 2.4.23
PHP 5.4 version 2.3.0
64bit Amazon Linux
2016.09 v2.3.0 running
PHP 5.4
2016.09.0 PHP 5.4.45 1.2.0 Apache 2.4.23
API Version 2010-12-01
1051

AWS Elastic Beanstalk Developer Guide
PHP
The following Elastic Beanstalk platform configurations for PHP were current between October 28, 2016
and December 21, 2016:
Configuration and
Solution Stack Name
AMI Language Composer Proxy Server
PHP 7.0 version 2.2.0
64bit Amazon Linux
2016.09 v2.2.0 running
PHP 7.0
2016.09.0 PHP 7.0.11 1.2.0 Apache 2.4.23
PHP 5.6 version 2.2.0
64bit Amazon Linux
2016.09 v2.2.0 running
PHP 5.6
2016.09.0 PHP 5.6.26 1.2.0 Apache 2.4.23
PHP 5.5 version 2.2.0
64bit Amazon Linux
2016.09 v2.2.0 running
PHP 5.5
2016.09.0 PHP 5.5.38 1.2.0 Apache 2.4.23
PHP 5.4 version 2.2.0
64bit Amazon Linux
2016.09 v2.2.0 running
PHP 5.4
2016.09.0 PHP 5.4.45 1.2.0 Apache 2.4.23
The following Elastic Beanstalk platform configurations for PHP were current between September 6,
2016 and October 27, 2016:
Configuration and
Solution Stack Name
AMI Language Composer Proxy Server
PHP 7.0 version 2.1.7
64bit Amazon Linux
2016.03 v2.1.7 running
PHP 7.0
2016.03.3 PHP 7.0.9 1.2.0 Apache 2.4.23
PHP 5.6 version 2.1.7
64bit Amazon Linux
2016.03 v2.1.7 running
PHP 5.6
2016.03.3 PHP 5.6.25 1.2.0 Apache 2.4.23
PHP 5.5 version 2.1.7
64bit Amazon Linux
2016.03 v2.1.7 running
PHP 5.5
2016.03.3 PHP 5.5.38 1.2.0 Apache 2.4.23
PHP 5.4 version 2.1.7 2016.03.3 PHP 5.4.45 1.2.0 Apache 2.4.23
API Version 2010-12-01
1052

AWS Elastic Beanstalk Developer Guide
PHP
Configuration and
Solution Stack Name
AMI Language Composer Proxy Server
64bit Amazon Linux
2016.03 v2.1.7 running
PHP 5.4
The following Elastic Beanstalk platform configurations for PHP were current between August 24, 2016
and September 6, 2016:
Configuration and
Solution Stack Name
AMI Language Composer Proxy Server
PHP 7.0 version 2.1.6
64bit Amazon Linux
2016.03 v2.1.6 running
PHP 7.0
2016.03.3 PHP 7.0.9 1.2.0 Apache 2.4.23
PHP 5.6 version 2.1.6
64bit Amazon Linux
2016.03 v2.1.6 running
PHP 5.6
2016.03.3 PHP 5.6.24 1.2.0 Apache 2.4.23
PHP 5.5 version 2.1.6
64bit Amazon Linux
2016.03 v2.1.6 running
PHP 5.5
2016.03.3 PHP 5.5.38 1.2.0 Apache 2.4.23
PHP 5.4 version 2.1.6
64bit Amazon Linux
2016.03 v2.1.6 running
PHP 5.4
2016.03.3 PHP 5.4.45 1.2.0 Apache 2.4.23
The following Elastic Beanstalk platform configurations for PHP were current between August 8, 2016
and August 24, 2016:
Configuration and
Solution Stack Name
AMI Language Composer Proxy Server
PHP 7.0 version 2.1.5
64bit Amazon Linux
2016.03 v2.1.5 running
PHP 7.0
2016.03.2 PHP 7.0.9 1.2.0 Apache 2.4.23
PHP 5.6 version 2.1.5
64bit Amazon Linux
2016.03 v2.1.5 running
PHP 5.6
2016.03.2 PHP 5.6.24 1.2.0 Apache 2.4.23
PHP 5.5 version 2.1.5 2016.03.2 PHP 5.5.38 1.2.0 Apache 2.4.23
API Version 2010-12-01
1053

AWS Elastic Beanstalk Developer Guide
PHP
Configuration and
Solution Stack Name
AMI Language Composer Proxy Server
64bit Amazon Linux
2016.03 v2.1.5 running
PHP 5.5
PHP 5.4 version 2.1.5
64bit Amazon Linux
2016.03 v2.1.5 running
PHP 5.4
2016.03.2 PHP 5.4.45 1.2.0 Apache 2.4.23
The following Elastic Beanstalk platform configurations for PHP were current between July 18, 2016 and
August 8, 2016:
Configuration and
Solution Stack Name
AMI Language Composer Proxy Server
PHP 5.6 version 2.1.4
64bit Amazon Linux
2016.03 v2.1.4 running
PHP 5.6
2016.03.2 PHP 5.6.22 1.1.2 Apache 2.4.18
PHP 5.5 version 2.1.4
64bit Amazon Linux
2016.03 v2.1.4 running
PHP 5.5
2016.03.2 PHP 5.5.36 1.1.2 Apache 2.4.18
PHP 5.4 version 2.1.4
64bit Amazon Linux
2016.03 v2.1.4 running
PHP 5.4
2016.03.2 PHP 5.4.45 1.1.2 Apache 2.4.18
The following Elastic Beanstalk platform configurations for PHP were current between June 26, 2016
and July 18, 2016:
Configuration and
Solution Stack Name
AMI Language Composer Proxy Server
PHP 5.6 version 2.1.3
64bit Amazon Linux
2016.03 v2.1.3 running
PHP 5.6
2016.03.2 PHP 5.6.22 1.1.2 Apache 2.4.18
PHP 5.5 version 2.1.3
64bit Amazon Linux
2016.03 v2.1.3 running
PHP 5.5
2016.03.2 PHP 5.5.36 1.1.2 Apache 2.4.18
PHP 5.4 version 2.1.3 2016.03.2 PHP 5.4.45 1.1.2 Apache 2.4.18
API Version 2010-12-01
1054

AWS Elastic Beanstalk Developer Guide
PHP
Configuration and
Solution Stack Name
AMI Language Composer Proxy Server
64bit Amazon Linux
2016.03 v2.1.3 running
PHP 5.4
The following Elastic Beanstalk platform configurations for PHP were current between May 13, 2016 and
June 26, 2016:
Configuration and
Solution Stack Name
AMI Language Composer Proxy Server
PHP 5.6 version 2.1.2
64bit Amazon Linux
2016.03 v2.1.2 running
PHP 5.6
2016.03 PHP 5.6.21 1.1.0 Apache 2.4.18
PHP 5.5 version 2.1.2
64bit Amazon Linux
2016.03 v2.1.2 running
PHP 5.5
2016.03 PHP 5.5.35 1.1.0 Apache 2.4.18
PHP 5.4 version 2.1.2
64bit Amazon Linux
2016.03 v2.1.2 running
PHP 5.4
2016.03 PHP 5.4.45 1.1.0 Apache 2.4.18
The following Elastic Beanstalk platform configurations for PHP were current between May 9, 2016 and
May 13, 2016:
Configuration and
Solution Stack Name
AMI Language Composer Proxy Server
PHP 5.6 version 2.1.1
64bit Amazon Linux
2016.03 v2.1.1 running
PHP 5.6
2016.03 PHP 5.6.21 1.1.0-RC Apache 2.4.18
PHP 5.5 version 2.1.1
64bit Amazon Linux
2016.03 v2.1.1 running
PHP 5.5
2016.03 PHP 5.5.35 1.1.0-RC Apache 2.4.18
PHP 5.4 version 2.1.1
64bit Amazon Linux
2016.03 v2.1.1 running
PHP 5.4
2016.03 PHP 5.4.45 1.1.0-RC Apache 2.4.18
API Version 2010-12-01
1055

AWS Elastic Beanstalk Developer Guide
PHP
The following Elastic Beanstalk platform configurations for PHP were current between April 7, 2016 and
May 9, 2016:
Configuration and
Solution Stack Name
AMI Language Composer Proxy Server
PHP 5.6 version 2.1.0
64bit Amazon Linux
2016.03 v2.1.0 running
PHP 5.6
2016.03 PHP 5.6.17 1.0.0-alpha11 Apache 2.4.18
PHP 5.5 version 2.1.0
64bit Amazon Linux
2016.03 v2.1.0 running
PHP 5.5
2016.03 PHP 5.5.31 1.0.0-alpha11 Apache 2.4.18
PHP 5.4 version 2.1.0
64bit Amazon Linux
2016.03 v2.1.0 running
PHP 5.4
2016.03 PHP 5.4.45 1.0.0-alpha11 Apache 2.4.18
The following Elastic Beanstalk platform configurations for PHP were current between February 26,
2016 and April 7, 2016:
Configuration and
Solution Stack Name
AMI Language Composer Web Server
PHP 5.6 version 2.0.8
64bit Amazon Linux
2015.09 v2.0.8 running
PHP 5.6
2015.09 PHP 5.6.17 1.0.0-alpha11 Apache 2.4.16
PHP 5.5 version 2.0.8
64bit Amazon Linux
2015.09 v2.0.8 running
PHP 5.5
2015.09 PHP 5.5.31 1.0.0-alpha11 Apache 2.4.16
PHP 5.4 version 2.0.8
64bit Amazon Linux
2015.09 v2.0.8 running
PHP 5.4
2015.09 PHP 5.4.45 1.0.0-alpha11 Apache 2.4.16
The following Elastic Beanstalk platform configurations for PHP were current between February 11,
2016 and February 26, 2016:
Configuration and
Solution Stack Name
AMI Language Composer Web Server
PHP 5.6 version 2.0.7 2015.09 PHP 5.6.17 1.0.0-alpha11 Apache 2.4.16
API Version 2010-12-01
1056

AWS Elastic Beanstalk Developer Guide
PHP
Configuration and
Solution Stack Name
AMI Language Composer Web Server
64bit Amazon Linux
2015.09 v2.0.7 running
PHP 5.6
PHP 5.5 version 2.0.7
64bit Amazon Linux
2015.09 v2.0.7 running
PHP 5.5
2015.09 PHP 5.5.31 1.0.0-alpha11 Apache 2.4.16
PHP 5.4 version 2.0.7
64bit Amazon Linux
2015.09 v2.0.7 running
PHP 5.4
2015.09 PHP 5.4.45 1.0.0-alpha11 Apache 2.4.16
The following Elastic Beanstalk platform configurations for PHP were current between January 11, 2016
and February 11, 2016:
Configuration and
Solution Stack Name
AMI Language Composer Web Server
PHP 5.6 version 2.0.6
64bit Amazon Linux
2015.09 v2.0.6 running
PHP 5.6
2015.09 PHP 5.6.13 1.0.0-alpha10 Apache 2.4.16
PHP 5.5 version 2.0.6
64bit Amazon Linux
2015.09 v2.0.6 running
PHP 5.5
2015.09 PHP 5.5.29 1.0.0-alpha10 Apache 2.4.16
PHP 5.4 version 2.0.6
64bit Amazon Linux
2015.09 v2.0.6 running
PHP 5.4
2015.09 PHP 5.4.45 1.0.0-alpha10 Apache 2.4.16
The following Elastic Beanstalk platform configurations for PHP were current between November 2,
2015 and January 11, 2016:
Configuration and
Solution Stack Name
AMI Language Composer Web Server
PHP 5.6 version 2.0.4
64bit Amazon Linux
2015.09 v2.0.4 running
PHP 5.6
2015.09 PHP 5.6.13 1.0.0-alpha10 Apache 2.4.16
PHP 5.5 version 2.0.4 2015.09 PHP 5.5.29 1.0.0-alpha10 Apache 2.4.16
API Version 2010-12-01
1057

AWS Elastic Beanstalk Developer Guide
PHP
Configuration and
Solution Stack Name
AMI Language Composer Web Server
64bit Amazon Linux
2015.09 v2.0.4 running
PHP 5.5
PHP 5.4 version 2.0.4
64bit Amazon Linux
2015.09 v2.0.4 running
PHP 5.4
2015.09 PHP 5.4.45 1.0.0-alpha10 Apache 2.4.16
The following Elastic Beanstalk platform configurations for PHP were current between September 18,
2015 and November 2, 2015:
Configuration and
Solution Stack Name
AMI Language Composer Web Server
PHP 5.6 version 2.0.1
64bit Amazon Linux
2015.03 v2.0.1 running
PHP 5.6
2015.03 PHP 5.6.9 1.0.0-alpha10 Apache 2.4.12
PHP 5.5 version 2.0.1
64bit Amazon Linux
2015.03 v2.0.1 running
PHP 5.5
2015.03 PHP 5.5.25 1.0.0-alpha10 Apache 2.4.12
PHP 5.4 version 2.0.1
64bit Amazon Linux
2015.03 v2.0.1 running
PHP 5.4
2015.03 PHP 5.4.41 1.0.0-alpha10 Apache 2.4.12
The following Elastic Beanstalk platform configurations for PHP were current between August 11, 2015
and September 18, 2015:
Configuration and
Solution Stack Name
AMI Language Composer Web Server
PHP 5.6 version 2.0.0
64bit Amazon Linux
2015.03 v2.0.0 running
PHP 5.6
2015.03 PHP 5.6.9 1.0.0-alpha10 Apache 2.4.12
PHP 5.5 version 2.0.0
64bit Amazon Linux
2015.03 v2.0.0 running
PHP 5.5
2015.03 PHP 5.5.25 1.0.0-alpha10 Apache 2.4.12
PHP 5.4 version 2.0.0 2015.03 PHP 5.4.41 1.0.0-alpha10 Apache 2.4.12
API Version 2010-12-01
1058

AWS Elastic Beanstalk Developer Guide
PHP
Configuration and
Solution Stack Name
AMI Language Composer Web Server
64bit Amazon Linux
2015.03 v2.0.0 running
PHP 5.4
The following Elastic Beanstalk platform configurations for PHP were current between August 3, 2015
and August 11, 2015:
Configuration and
Solution Stack Name
AMI Language Composer Web Server
PHP 5.6 version 1.4.6
64bit Amazon Linux
2015.03 v1.4.6 running
PHP 5.6
2015.03 PHP 5.6.9 1.0.0-alpha10 Apache 2.4.12
PHP 5.5 version 1.4.6
64bit Amazon Linux
2015.03 v1.4.6 running
PHP 5.5
2015.03 PHP 5.5.25 1.0.0-alpha10 Apache 2.4.12
PHP 5.4 version 1.4.6
64bit Amazon Linux
2015.03 v1.4.6 running
PHP 5.4
2015.03 PHP 5.4.41 1.0.0-alpha10 Apache 2.4.12
The following Elastic Beanstalk platform configurations for PHP were current between June 15, 2015
and August 3, 2015:
Configuration and
Solution Stack Name
AMI Language Composer Web Server
PHP 5.6 version 1.4.3
64bit Amazon Linux
2015.03 v1.4.3 running
PHP 5.6
2015.03 PHP 5.6.9 1.0.0-alpha10 Apache 2.4.12
PHP 5.5 version 1.4.3
64bit Amazon Linux
2015.03 v1.4.3 running
PHP 5.5
2015.03 PHP 5.5.25 1.0.0-alpha10 Apache 2.4.12
PHP 5.4 version 1.4.3
64bit Amazon Linux
2015.03 v1.4.3 running
PHP 5.4
2015.03 PHP 5.4.41 1.0.0-alpha10 Apache 2.4.12
API Version 2010-12-01
1059

AWS Elastic Beanstalk Developer Guide
PHP
The following Elastic Beanstalk platform configurations for PHP were current between May 29, 2015 and
June 15, 2015:
PHP Configurations
Name AMI Language Web Server Composer
64bit Amazon Linux
2015.03 v1.4.2 running
PHP 5.6
2015.03 PHP 5.6.8 Apache 2.4.12 1.0.0-alpha10
64bit Amazon Linux
2015.03 v1.4.2 running
PHP 5.5
2015.03 PHP 5.5.24 Apache 2.4.12 1.0.0-alpha10
64bit Amazon Linux
2015.03 v1.4.2 running
PHP 5.4
2015.03 PHP 5.4.40 Apache 2.4.12 1.0.0-alpha10
The following Elastic Beanstalk platform configurations for PHP were current between May 27, 2015 and
May 28, 2015:
PHP Container Types
Name AMI Language Web Server
64bit Amazon Linux
2015.03 v1.4.1 running
PHP 5.6
2015.03 PHP 5.6.8 Apache 2.4.12
64bit Amazon Linux
2015.03 v1.4.1 running
PHP 5.5
2015.03 PHP 5.5.24 Apache 2.4.12
64bit Amazon Linux
2015.03 v1.4.1 running
PHP 5.4
2015.03 PHP 5.4.40 Apache 2.4.12
The following Elastic Beanstalk platform configurations for PHP were current between May 1, 2015 and
May 26, 2015:
PHP Container Types
Name AMI Language Web Server
64bit Amazon Linux
2015.03 v1.3.2 running
PHP 5.6
2015.03 PHP 5.6.8 Apache 2.4.12
64bit Amazon Linux
2015.03 v1.3.2 running
PHP 5.5
2015.03 PHP 5.5.24 Apache 2.4.12
64bit Amazon Linux
2015.03 v1.3.2 running
PHP 5.4
2015.03 PHP 5.4.40 Apache 2.4.12
API Version 2010-12-01
1060

AWS Elastic Beanstalk Developer Guide
PHP
The following Elastic Beanstalk platform configurations for PHP were current between April 22, 2015
and April 30, 2015:
PHP Container Types
Name AMI Language Web Server
64bit Amazon Linux
2015.03 v1.3.1 running
PHP 5.5
2015.03 PHP 5.5.22 Apache 2.4.12
64bit Amazon Linux
2015.03 v1.3.1 running
PHP 5.4
2015.03 PHP 5.4.38 Apache 2.4.12
The following Elastic Beanstalk platform configurations for PHP were current between April 8, 2015 and
April 21, 2015:
PHP Container Types
Name AMI Language Web Server
64bit Amazon Linux
2015.03 v1.3.0 running
PHP 5.5
2015.03 PHP 5.5.22 Apache 2.4.12
64bit Amazon Linux
2015.03 v1.3.0 running
PHP 5.4
2015.03 PHP 5.4.38 Apache 2.4.12
The following Elastic Beanstalk platform configurations for PHP were current between February 17,
2015 and April 7, 2015:
PHP Container Types
Name AMI Language Web Server
64bit Amazon Linux
2014.09 v1.2.0 running
PHP 5.5
2014.09 PHP 5.5.20 Apache 2.4.10
64bit Amazon Linux
2014.09 v1.2.0 running
PHP 5.4
2014.09 PHP 5.4.36 Apache 2.4.10
The following Elastic Beanstalk platform configurations for PHP were current between January 28, 2015
and February 16, 2015:
PHP Container Types
Name AMI Language Web Server
API Version 2010-12-01
1061

AWS Elastic Beanstalk Developer Guide
PHP
PHP Container Types
64bit Amazon Linux
2014.09 v1.1.01 running
PHP 5.5
2014.09 PHP 5.5.7 Apache 2.4.6
64bit Amazon Linux
2014.09 v1.1.01 running
PHP 5.4
2014.09 PHP 5.4.20 Apache 2.4.6
32bit Amazon Linux
2014.03 v1.1.01 running
PHP 5.5
2014.03 PHP 5.5.14 Apache 2.4.10
64bit Amazon Linux
2014.03 v1.1.01 running
PHP 5.5
2014.03 PHP 5.5.14 Apache 2.4.10
32bit Amazon Linux
2014.03 v1.1.01 running
PHP 5.4
2014.03 PHP 5.4.30 Apache 2.4.10
64bit Amazon Linux
2014.03 v1.1.01 running
PHP 5.4
2014.03 PHP 5.4.30 Apache 2.4.10
1CVE-2015-0235 Advisory (Ghost)
The following Elastic Beanstalk platform configurations for PHP were current between October 16, 2014
and January 27, 2015:
PHP Container Types
Name AMI Language Web Server
64bit Amazon Linux
2014.09 v1.0.91 running
PHP 5.5
2014.09 PHP 5.5.7 Apache 2.4.6
64bit Amazon Linux
2014.09 v1.0.91 running
PHP 5.4
2014.09 PHP 5.4.20 Apache 2.4.6
32bit Amazon Linux
2014.03 v1.0.91 running
PHP 5.5
2014.03 PHP 5.5.7 Apache 2.4.6
64bit Amazon Linux
2014.03 v1.0.91 running
PHP 5.5
2014.03 PHP 5.5.7 Apache 2.4.6
32bit Amazon Linux
2014.03 v1.0.91 running
PHP 5.4
2014.03 PHP 5.4.20 Apache 2.4.6
64bit Amazon Linux
2014.03 v1.0.91 running
PHP 5.4
2014.03 PHP 5.4.20 Apache 2.4.6
API Version 2010-12-01
1062

AWS Elastic Beanstalk Developer Guide
PHP
1CVE-2014-3566 Advisory
The following Elastic Beanstalk platform configurations for PHP were current between October 9, 2014
and October 15, 2014:
PHP Container Types
Name AMI Language Web Server
32bit Amazon Linux
2014.09 v1.0.8 running
PHP 5.5
2014.09 PHP 5.5.7 Apache 2.4.6
64bit Amazon Linux
2014.09 v1.0.8 running
PHP 5.5
2014.09 PHP 5.5.7 Apache 2.4.6
32bit Amazon Linux
2014.09 v1.0.8 running
PHP 5.4
2014.09 PHP 5.4.20 Apache 2.4.6
64bit Amazon Linux
2014.09 v1.0.8 running
PHP 5.4
2014.09 PHP 5.4.20 Apache 2.4.6
The following Elastic Beanstalk platform configurations for PHP were current between September 24,
2014 and October 8, 2014:
PHP Container Types
Name AMI Language Web Server
32bit Amazon Linux
2014.03 v1.0.71 running
PHP 5.5
2014.03 PHP 5.5.7 Apache 2.4.6
64bit Amazon Linux
2014.03 v1.0.71 running
PHP 5.5
2014.03 PHP 5.5.7 Apache 2.4.6
32bit Amazon Linux
2014.03 v1.0.71 running
PHP 5.4
2014.03 PHP 5.4.20 Apache 2.4.6
64bit Amazon Linux
2014.03 v1.0.71 running
PHP 5.4
2014.03 PHP 5.4.20 Apache 2.4.6
1 CVE-2014-6271 Advisory and ALAS-2014-419
The following Elastic Beanstalk platform configurations for PHP were current between June 30, 2014
and September 23, 2014:
PHP Container Types
Name AMI Language Web Server
API Version 2010-12-01
1063

AWS Elastic Beanstalk Developer Guide
PHP
PHP Container Types
64bit Amazon Linux
2014.03 v1.0.4 running
PHP 5.5
2014.03 PHP 5.5.7 Apache 2.4.6
64bit Amazon Linux
2014.03 v1.0.4 running
PHP 5.4
2014.03 PHP 5.4.20 Apache 2.4.6
The following Elastic Beanstalk platform configurations for PHP were current between June 5, 2014 and
June 29, 2014:
PHP Container Types
Name AMI Language Web Server
32bit Amazon Linux
2014.03 v1.0.31 running
PHP 5.5
2014.03 PHP 5.5.7 Apache 2.4.6
64bit Amazon Linux
2014.03 v1.0.31 running
PHP 5.5
2014.03 PHP 5.5.7 Apache 2.4.6
32bit Amazon Linux
2014.03 v1.0.31 running
PHP 5.4
2014.03 PHP 5.4.20 Apache 2.4.6
64bit Amazon Linux
2014.03 v1.0.31 running
PHP 5.4
2014.03 PHP 5.4.20 Apache 2.4.6
1 OpenSSL Security Advisory
The following Elastic Beanstalk platform configurations for PHP were current between May 5, 2014 and
June 4, 2014:
PHP Container Types
Name AMI Language Web Server
32bit Amazon Linux
2014.03 v1.0.2 running
PHP 5.5
2014.03 PHP 5.5.7 Apache 2.4.6
64bit Amazon Linux
2014.03 v1.0.2 running
PHP 5.5
2014.03 PHP 5.5.7 Apache 2.4.6
32bit Amazon Linux
2014.03 v1.0.2 running
PHP 5.4
2014.03 PHP 5.4.20 Apache 2.4.6
API Version 2010-12-01
1064

AWS Elastic Beanstalk Developer Guide
PHP
PHP Container Types
64bit Amazon Linux
2014.03 v1.0.2 running
PHP 5.4
2014.03 PHP 5.4.20 Apache 2.4.6
The following Elastic Beanstalk platform configurations for PHP were current between April 7, 2014 and
May 4, 2014:
PHP Container Types
Name AMI Language Web Server
32bit Amazon Linux
2014.02 v1.0.11 running
PHP 5.5
2013.09 PHP 5.5.7 Apache 2.4.6
64bit Amazon Linux
2014.02 v1.0.11 running
PHP 5.5
2013.09 PHP 5.5.7 Apache 2.4.6
32bit Amazon Linux
2014.02 v1.0.11 running
PHP 5.4
2013.09 PHP 5.4.20 Apache 2.4.6
64bit Amazon Linux
2014.02 v1.0.11 running
PHP 5.4
2013.09 PHP 5.4.20 Apache 2.4.6
32bit Amazon Linux
2013.09 v1.0.11 running
PHP 5.5
2013.09 PHP 5.5 Apache 2.4.6
64bit Amazon Linux
2013.09 v1.0.11 running
PHP 5.5
2013.09 PHP 5.5 Apache 2.4.6
32bit Amazon Linux
2013.09 v1.0.11 running
PHP 5.4
2013.09 PHP 5.4 Apache 2.4.6
64bit Amazon Linux
2013.09 v1.0.11 running
PHP 5.4
2013.09 PHP 5.4 Apache 2.4.6
32bit Amazon Linux
running PHP 5.3
2013.03 PHP 5.3 Apache 2.4.6
64bit Amazon Linux
running PHP 5.3
2013.03 PHP 5.3 Apache 2.4.6
1 openssl-1.0.1e-4.58.amzn1
The following Elastic Beanstalk platform configurations for PHP were current between March 18, 2014
and April 6, 2014:
API Version 2010-12-01
1065

AWS Elastic Beanstalk Developer Guide
PHP
PHP Container Types
Name AMI Language Web Server
32bit Amazon Linux
2014.02 running PHP 5.5
2013.09 PHP 5.5.7 Apache 2.2.26
64bit Amazon Linux
2014.02 running PHP 5.5
2013.09 PHP 5.5.7 Apache 2.2.26
32bit Amazon Linux
2014.02 running PHP 5.4
2013.09 PHP 5.4.20 Apache 2.2.26
64bit Amazon Linux
2014.02 running PHP 5.4
2013.09 PHP 5.4.20 Apache 2.2.26
32bit Amazon Linux
2013.09 running PHP 5.5
2013.09 PHP 5.5 Apache 2.4.6
64bit Amazon Linux
2013.09 running PHP 5.5
2013.09 PHP 5.5 Apache 2.4.6
32bit Amazon Linux
2013.09 running PHP 5.4
2013.09 PHP 5.4 Apache 2.4.6
64bit Amazon Linux
2013.09 running PHP 5.4
2013.09 PHP 5.4 Apache 2.4.6
32bit Amazon Linux
running PHP 5.3
2013.03 PHP 5.3 Apache 2.4.6
64bit Amazon Linux
running PHP 5.3
2013.03 PHP 5.3 Apache 2.4.6
The following Elastic Beanstalk platform configurations for PHP were current between October 30, 2013
and March 17, 2014:
PHP Container Types
Name AMI Language Web Server
32bit Amazon Linux
2013.09 running PHP 5.5
2013.09 PHP 5.5 Apache 2.4.6
64bit Amazon Linux
2013.09 running PHP 5.5
2013.09 PHP 5.5 Apache 2.4.6
32bit Amazon Linux
2013.09 running PHP 5.4
2013.09 PHP 5.4 Apache 2.4.6
64bit Amazon Linux
2013.09 running PHP 5.4
2013.09 PHP 5.4 Apache 2.4.6
32bit Amazon Linux
running PHP 5.3
2013.03 PHP 5.3 Apache 2.4.6
64bit Amazon Linux
running PHP 5.3
2013.03 PHP 5.3 Apache 2.4.6
API Version 2010-12-01
1066

AWS Elastic Beanstalk Developer Guide
Python
The following Elastic Beanstalk platform configurations for PHP were current between August 29, 2013
and October 29, 2013:
PHP Container Types
Name AMI Language Web Server
32bit Amazon Linux
running PHP 5.4
2013.03 PHP 5.4 Apache 2.4.6
64bit Amazon Linux
running PHP 5.4
2013.03 PHP 5.4 Apache 2.4.6
The following Elastic Beanstalk platform configurations for PHP were current prior to August 29, 2013:
PHP Container Types
Name AMI Language Web Server
32bit Amazon Linux
2012.09 running PHP 5.4
2012.09 PHP 5.4 Apache 2.4.3
64bit Amazon Linux
2012.09 running PHP 5.4
2012.09 PHP 5.4 Apache 2.4.3
32bit Amazon Linux
2012.09 running PHP 5.3
2012.09 PHP 5.3 Apache 2.4.3
64bit Amazon Linux
2012.09 running PHP 5.3
2012.09 PHP 5.3 Apache 2.4.3
Python Platform History
This page lists the previous versions of AWS Elastic Beanstalk's Python platforms and the dates that each
version was current. Platform versions that you used to launch or update an environment in the last 30
days remain available (to the using account, in the used region) even after they are no longer current.
See the Supported Platforms (p. 26) page for information on the latest version of each platform
supported by Elastic Beanstalk. Detailed release notes are available for recent releases at
aws.amazon.com/releasenotes.
The following Elastic Beanstalk platform configurations for Python were current between November 14,
2017 and December 19, 2017:
Configuration
and Solution
Stack Name
AMI Language Package
Manager
Packager meld3 AWS
X‑Ray
Proxy
Server
Python 3.6
version 2.6.0
64bit Amazon
Linux 2017.09
2017.09.1Python 3.6.2 pip 9.0.1 setuptools
28.8.0
meld3
1.0.2
2.0.0 Apache
2.4.27
with
mod_wsgi
3.5
API Version 2010-12-01
1067

AWS Elastic Beanstalk Developer Guide
Python
Configuration
and Solution
Stack Name
AMI Language Package
Manager
Packager meld3 AWS
X‑Ray
Proxy
Server
v2.6.0 running
Python 3.4
Python 3.4
version 2.6.0
64bit Amazon
Linux 2017.09
v2.6.0 running
Python 3.4
2017.09.1Python 3.4.3 pip 9.0.1 setuptools
28.8.0
meld3
1.0.2
2.0.0 Apache
2.4.27
with
mod_wsgi
3.5
Python 2.7
version 2.6.0
64bit Amazon
Linux 2017.09
v2.6.0 running
Python 2.7
2017.09.1Python 2.7.12 pip 9.0.1 setuptools
28.8.0
meld3
1.0.2
2.0.0 Apache
2.4.27
with
mod_wsgi
3.5
Python 2.6
version 2.6.0
64bit Amazon
Linux 2017.09
v2.6.0 running
Python
2017.09.1Python 2.6.9 pip 9.0.1 setuptools
28.8.0
meld3
1.0.2
2.0.0 Apache
2.4.27
with
mod_wsgi
3.5
The following Elastic Beanstalk platform configurations for Python were current between September 25,
2017 and November 13, 2017:
Configuration
and Solution
Stack Name
AMI Language Package
Manager
Packager meld3 AWS
X‑Ray
Proxy
Server
Python 3.4
version 2.5.2
64bit Amazon
Linux 2017.03
v2.5.2 running
Python 3.4
2017.03.1Python 3.4.3 pip 7.1.2 setuptools
18.4
meld3
1.0.2
2.0.0 Apache
2.4.27
with
mod_wsgi
3.5
Python 2.7
version 2.5.2
64bit Amazon
Linux 2017.03
v2.5.2 running
Python 2.7
2017.03.1Python 2.7.12 pip 7.1.2 setuptools
18.4
meld3
1.0.2
2.0.0 Apache
2.4.27
with
mod_wsgi
3.5
Python 2.6
version 2.5.2
2017.03.1Python 2.6.9 pip 7.1.2 setuptools
18.4
meld3
1.0.2
2.0.0 Apache
2.4.27
with
API Version 2010-12-01
1068

AWS Elastic Beanstalk Developer Guide
Python
Configuration
and Solution
Stack Name
AMI Language Package
Manager
Packager meld3 AWS
X‑Ray
Proxy
Server
64bit Amazon
Linux 2017.03
v2.5.2 running
Python
mod_wsgi
3.5
The following Elastic Beanstalk platform configurations for Python were current between August 30,
2017 and September 24, 2017:
Configuration
and Solution
Stack Name
AMI Language Package
Manager
Packager meld3 AWS
X‑Ray
Proxy
Server
Python 3.4
version 2.5.1
64bit Amazon
Linux 2017.03
v2.5.1 running
Python 3.4
2017.03.1Python 3.4.3 pip 7.1.2 setuptools
18.4
meld3
1.0.2
2.0.0 Apache
2.4.27
with
mod_wsgi
3.5
Python 2.7
version 2.5.1
64bit Amazon
Linux 2017.03
v2.5.1 running
Python 2.7
2017.03.1Python 2.7.12 pip 7.1.2 setuptools
18.4
meld3
1.0.2
2.0.0 Apache
2.4.27
with
mod_wsgi
3.5
Python 2.6
version 2.5.1
64bit Amazon
Linux 2017.03
v2.5.1 running
Python
2017.03.1Python 2.6.9 pip 7.1.2 setuptools
18.4
meld3
1.0.2
2.0.0 Apache
2.4.27
with
mod_wsgi
3.5
The following Elastic Beanstalk platform configurations for Python were current between August 11,
2017 and August 29, 2017:
Configuration
and Solution
Stack Name
AMI Language Package
Manager
Packager meld3 AWS
X‑Ray
Proxy
Server
Python 3.4
version 2.5.0
64bit Amazon
Linux 2017.03
v2.5.0 running
Python 3.4
2017.03.1Python 3.4.3 pip 7.1.2 setuptools
18.4
meld3
1.0.2
2.0.0 Apache
2.4.27
with
mod_wsgi
3.5
API Version 2010-12-01
1069

AWS Elastic Beanstalk Developer Guide
Python
Configuration
and Solution
Stack Name
AMI Language Package
Manager
Packager meld3 AWS
X‑Ray
Proxy
Server
Python 2.7
version 2.5.0
64bit Amazon
Linux 2017.03
v2.5.0 running
Python 2.7
2017.03.1Python 2.7.12 pip 7.1.2 setuptools
18.4
meld3
1.0.2
2.0.0 Apache
2.4.27
with
mod_wsgi
3.5
Python 2.6
version 2.5.0
64bit Amazon
Linux 2017.03
v2.5.0 running
Python
2017.03.1Python 2.6.9 pip 7.1.2 setuptools
18.4
meld3
1.0.2
2.0.0 Apache
2.4.27
with
mod_wsgi
3.5
The following Elastic Beanstalk platform configurations for Python were current between July 20, 2017
and August 10, 2017:
Configuration and
Solution Stack
Name
AMI Language Package
Manager
Packager meld3 Proxy
Server
Python 3.4
version 2.4.2
64bit Amazon
Linux 2017.03
v2.4.2 running
Python 3.4
2017.03.1Python 3.4.3 pip 7.1.2 setuptools
18.4
meld3
1.0.2
Apache
2.4.25
with
mod_wsgi
3.5
Python 2.7
version 2.4.2
64bit Amazon
Linux 2017.03
v2.4.2 running
Python 2.7
2017.03.1Python 2.7.12 pip 7.1.2 setuptools
18.4
meld3
1.0.2
Apache
2.4.25
with
mod_wsgi
3.5
Python 2.6
version 2.4.2
64bit Amazon
Linux 2017.03
v2.4.2 running
Python
2017.03.1Python 2.6.9 pip 7.1.2 setuptools
18.4
meld3
1.0.2
Apache
2.4.25
with
mod_wsgi
3.5
The following Elastic Beanstalk platform configurations for Python were current between June 27, 2017
and July 19, 2017:
API Version 2010-12-01
1070

AWS Elastic Beanstalk Developer Guide
Python
Configuration and
Solution Stack
Name
AMI Language Package
Manager
Packager meld3 Proxy
Server
Python 3.4
version 2.4.1
64bit Amazon
Linux 2017.03
v2.4.1 running
Python 3.4
2017.03.0Python 3.4.3 pip 7.1.2 setuptools
18.4
meld3
1.0.2
Apache
2.4.25
with
mod_wsgi
3.5
Python 2.7
version 2.4.1
64bit Amazon
Linux 2017.03
v2.4.1 running
Python 2.7
2017.03.0Python 2.7.12 pip 7.1.2 setuptools
18.4
meld3
1.0.2
Apache
2.4.25
with
mod_wsgi
3.5
Python 2.6
version 2.4.1
64bit Amazon
Linux 2017.03
v2.4.1 running
Python
2017.03.0Python 2.6.9 pip 7.1.2 setuptools
18.4
meld3
1.0.2
Apache
2.4.25
with
mod_wsgi
3.5
The following Elastic Beanstalk platform configurations for Python were current between May 19, 2017
and June 26, 2017:
Configuration and
Solution Stack
Name
AMI Language Package
Manager
Packager meld3 Proxy
Server
Python 3.4
version 2.4.0
64bit Amazon
Linux 2017.03
v2.4.0 running
Python 3.4
2017.03.0Python 3.4.3 pip 7.1.2 setuptools
18.4
meld3
1.0.2
Apache
2.4.25
with
mod_wsgi
3.5
Python 2.7
version 2.4.0
64bit Amazon
Linux 2017.03
v2.4.0 running
Python 2.7
2017.03.0Python 2.7.12 pip 7.1.2 setuptools
18.4
meld3
1.0.2
Apache
2.4.25
with
mod_wsgi
3.5
Python 2.6
version 2.4.0
64bit Amazon
Linux 2017.03
2017.03.0Python 2.6.9 pip 7.1.2 setuptools
18.4
meld3
1.0.2
Apache
2.4.25
with
mod_wsgi
3.5
API Version 2010-12-01
1071

AWS Elastic Beanstalk Developer Guide
Python
Configuration and
Solution Stack
Name
AMI Language Package
Manager
Packager meld3 Proxy
Server
v2.4.0 running
Python
The following Elastic Beanstalk platform configurations for Python were current between April 5, 2017
and May 18, 2017:
Configuration and
Solution Stack
Name
AMI Language Package
Manager
Packager meld3 Proxy
Server
Python 3.4
version 2.3.3
64bit Amazon
Linux 2016.09
v2.3.3 running
Python 3.4
2016.09.0Python 3.4.3 pip 7.1.2 setuptools
18.4
meld3
1.0.2
Apache
2.4.18
with
mod_wsgi
3.5
Python 2.7
version 2.3.3
64bit Amazon
Linux 2016.09
v2.3.3 running
Python 2.7
2016.09.0Python 2.7.10 pip 7.1.2 setuptools
18.4
meld3
1.0.2
Apache
2.4.18
with
mod_wsgi
3.5
Python 2.6
version 2.3.3
64bit Amazon
Linux 2016.09
v2.3.3 running
Python
2016.09.0Python 2.6.9 pip 7.1.2 setuptools
18.4
meld3
1.0.2
Apache
2.4.18
with
mod_wsgi
3.5
The following Elastic Beanstalk platform configurations for Python were current between March 8, 2017
and April 4, 2017:
Configuration and
Solution Stack
Name
AMI Language Package
Manager
Packager meld3 Proxy
Server
Python 3.4
version 2.3.2
64bit Amazon
Linux 2016.09
v2.3.2 running
Python 3.4
2016.09.0Python 3.4.3 pip 7.1.2 setuptools
18.4
meld3
1.0.2
Apache
2.4.18
with
mod_wsgi
3.5
Python 2.7
version 2.3.2
2016.09.0Python 2.7.10 pip 7.1.2 setuptools
18.4
meld3
1.0.2
Apache
2.4.18
with
API Version 2010-12-01
1072

AWS Elastic Beanstalk Developer Guide
Python
Configuration and
Solution Stack
Name
AMI Language Package
Manager
Packager meld3 Proxy
Server
64bit Amazon
Linux 2016.09
v2.3.2 running
Python 2.7
mod_wsgi
3.5
Python 2.6
version 2.3.2
64bit Amazon
Linux 2016.09
v2.3.2 running
Python
2016.09.0Python 2.6.9 pip 7.1.2 setuptools
18.4
meld3
1.0.2
Apache
2.4.18
with
mod_wsgi
3.5
The following Elastic Beanstalk platform configurations for Python were current between January 28,
2017 and March 7, 2017:
Configuration and
Solution Stack
Name
AMI Language Package
Manager
Packager meld3 Proxy
Server
Python 3.4
version 2.3.1
64bit Amazon
Linux 2016.09
v2.3.1 running
Python 3.4
2016.09.0Python 3.4.3 pip 7.1.2 setuptools
18.4
meld3
1.0.2
Apache
2.4.18
with
mod_wsgi
3.5
Python 2.7
version 2.3.1
64bit Amazon
Linux 2016.09
v2.3.1 running
Python 2.7
2016.09.0Python 2.7.10 pip 7.1.2 setuptools
18.4
meld3
1.0.2
Apache
2.4.18
with
mod_wsgi
3.5
Python 2.6
version 2.3.1
64bit Amazon
Linux 2016.09
v2.3.1 running
Python
2016.09.0Python 2.6.9 pip 7.1.2 setuptools
18.4
meld3
1.0.2
Apache
2.4.18
with
mod_wsgi
3.5
The following Elastic Beanstalk platform configurations for Python were current between December 22,
2016 and January 27, 2017:
API Version 2010-12-01
1073

AWS Elastic Beanstalk Developer Guide
Python
Configuration and
Solution Stack
Name
AMI Language Package
Manager
Packager meld3 Proxy
Server
Python 3.4
version 2.3.0
64bit Amazon
Linux 2016.09
v2.3.0 running
Python 3.4
2016.09.0Python 3.4.3 pip 7.1.2 setuptools
18.4
meld3
1.0.2
Apache
2.4.18
with
mod_wsgi
3.5
Python 2.7
version 2.3.0
64bit Amazon
Linux 2016.09
v2.3.0 running
Python 2.7
2016.09.0Python 2.7.10 pip 7.1.2 setuptools
18.4
meld3
1.0.2
Apache
2.4.18
with
mod_wsgi
3.5
Python 2.6
version 2.3.0
64bit Amazon
Linux 2016.09
v2.3.0 running
Python
2016.09.0Python 2.6.9 pip 7.1.2 setuptools
18.4
meld3
1.0.2
Apache
2.4.18
with
mod_wsgi
3.5
The following Elastic Beanstalk platform configurations for Python were current between October 28,
2016 and December 21, 2016:
Configuration and
Solution Stack
Name
AMI Language Package
Manager
Packager meld3 Proxy
Server
Python 3.4
version 2.2.0
64bit Amazon
Linux 2016.09
v2.2.0 running
Python 3.4
2016.09.0Python 3.4.3 pip 7.1.2 setuptools
18.4
meld3
1.0.2
Apache
2.4.18
with
mod_wsgi
3.5
Python 2.7
version 2.2.0
64bit Amazon
Linux 2016.09
v2.2.0 running
Python 2.7
2016.09.0Python 2.7.10 pip 7.1.2 setuptools
18.4
meld3
1.0.2
Apache
2.4.18
with
mod_wsgi
3.5
Python 2.6
version 2.2.0
64bit Amazon
Linux 2016.09
2016.09.0Python 2.6.9 pip 7.1.2 setuptools
18.4
meld3
1.0.2
Apache
2.4.18
with
mod_wsgi
3.5
API Version 2010-12-01
1074

AWS Elastic Beanstalk Developer Guide
Python
Configuration and
Solution Stack
Name
AMI Language Package
Manager
Packager meld3 Proxy
Server
v2.2.0 running
Python
The following Elastic Beanstalk platform configurations for Python were current between August 24,
2016 and October 27, 2016:
Configuration and
Solution Stack
Name
AMI Language Package
Manager
Packager meld3 Proxy
Server
Python 3.4
version 2.1.6
64bit Amazon
Linux 2016.03
v2.1.6 running
Python 3.4
2016.03.3Python 3.4.3 pip 7.1.2 setuptools
18.4
meld3
1.0.2
Apache
2.4.18
with
mod_wsgi
3.5
Python 2.7
version 2.1.6
64bit Amazon
Linux 2016.03
v2.1.6 running
Python 2.7
2016.03.3Python 2.7.10 pip 7.1.2 setuptools
18.4
meld3
1.0.2
Apache
2.4.18
with
mod_wsgi
3.5
Python 2.6
version 2.1.6
64bit Amazon
Linux 2016.03
v2.1.6 running
Python
2016.03.3Python 2.6.9 pip 7.1.2 setuptools
18.4
meld3
1.0.2
Apache
2.4.18
with
mod_wsgi
3.5
The following Elastic Beanstalk platform configurations for Python were current between June 26, 2016
and August 24, 2016:
Configuration and
Solution Stack
Name
AMI Language Package
Manager
Packager meld3 Proxy
Server
Python 3.4
version 2.1.3
64bit Amazon
Linux 2016.03
v2.1.3 running
Python 3.4
2016.03.2Python 3.4.3 pip 7.1.2 setuptools
18.4
meld3
1.0.2
Apache
2.4.18
with
mod_wsgi
3.5
Python 2.7
version 2.1.3
2016.03.2Python 2.7.10 pip 7.1.2 setuptools
18.4
meld3
1.0.2
Apache
2.4.18
with
API Version 2010-12-01
1075

AWS Elastic Beanstalk Developer Guide
Python
Configuration and
Solution Stack
Name
AMI Language Package
Manager
Packager meld3 Proxy
Server
64bit Amazon
Linux 2016.03
v2.1.3 running
Python 2.7
mod_wsgi
3.5
Python 2.6
version 2.1.3
64bit Amazon
Linux 2016.03
v2.1.3 running
Python
2016.03.2Python 2.6.9 pip 7.1.2 setuptools
18.4
meld3
1.0.2
Apache
2.4.18
with
mod_wsgi
3.5
The following Elastic Beanstalk platform configurations for Python were current between April 7, 2016
and June 26, 2016:
Configuration and
Solution Stack
Name
AMI Language Package
Manager
Packager meld3 Proxy
Server
Python 3.4
version 2.1.0
64bit Amazon
Linux 2016.03
v2.1.0 running
Python 3.4
2016.03Python 3.4.3 pip 7.1.2 setuptools
18.4
meld3
1.0.2
Apache
2.4.18
with
mod_wsgi
3.5
Python 2.7
version 2.1.0
64bit Amazon
Linux 2016.03
v2.1.0 running
Python 2.7
2016.03Python 2.7.10 pip 7.1.2 setuptools
18.4
meld3
1.0.2
Apache
2.4.18
with
mod_wsgi
3.5
Python 2.6
version 2.1.0
64bit Amazon
Linux 2016.03
v2.1.0 running
Python
2016.03Python 2.6.9 pip 7.1.2 setuptools
18.4
meld3
1.0.2
Apache
2.4.18
with
mod_wsgi
3.5
The following Elastic Beanstalk platform configurations for Python were current between February 26,
2016 and April 7, 2016:
Configuration and Solution
Stack Name
AMI Language Web Server
Python 3.4 version 2.0.8 2015.09 Python 3.4.3 Apache 2.4.16 with
mod_wsgi 3.5
API Version 2010-12-01
1076

AWS Elastic Beanstalk Developer Guide
Python
Configuration and Solution
Stack Name
AMI Language Web Server
64bit Amazon Linux 2015.09
v2.0.8 running Python 3.4
Python 2.7 version 2.0.8
64bit Amazon Linux 2015.09
v2.0.8 running Python 2.7
2015.09 Python 2.7.10 Apache 2.4.16 with
mod_wsgi 3.5
Python 2.6 version 2.0.8
64bit Amazon Linux 2015.09
v2.0.8 running Python
2015.09 Python 2.6.9 Apache 2.4.16 with
mod_wsgi 3.5
The following Elastic Beanstalk platform configurations for Python were current between February 11,
2016 and February 26, 2016:
Configuration and Solution
Stack Name
AMI Language Web Server
Python 3.4 version 2.0.7
64bit Amazon Linux 2015.09
v2.0.7 running Python 3.4
2015.09 Python 3.4.3 Apache 2.4.16 with
mod_wsgi 3.5
Python 2.7 version 2.0.7
64bit Amazon Linux 2015.09
v2.0.7 running Python 2.7
2015.09 Python 2.7.10 Apache 2.4.16 with
mod_wsgi 3.5
Python 2.6 version 2.0.7
64bit Amazon Linux 2015.09
v2.0.7 running Python
2015.09 Python 2.6.9 Apache 2.4.16 with
mod_wsgi 3.5
The following Elastic Beanstalk platform configurations for Python were current between January 11,
2016 and February 11, 2016:
Configuration and Solution
Stack Name
AMI Language Web Server
Python 3.4 version 2.0.6
64bit Amazon Linux 2015.09
v2.0.6 running Python 3.4
2015.09 Python 3.4.3 Apache 2.4.16 with
mod_wsgi 3.5
Python 2.7 version 2.0.6
64bit Amazon Linux 2015.09
v2.0.6 running Python 2.7
2015.09 Python 2.7.10 Apache 2.4.16 with
mod_wsgi 3.5
Python 2.6 version 2.0.6
64bit Amazon Linux 2015.09
v2.0.6 running Python
2015.09 Python 2.6.9 Apache 2.4.16 with
mod_wsgi 3.5
API Version 2010-12-01
1077

AWS Elastic Beanstalk Developer Guide
Python
The following Elastic Beanstalk platform configurations for Python were current between November 2,
2015 and January 11, 2016:
Configuration and Solution
Stack Name
AMI Language Web Server
Python 3.4 version 2.0.4
64bit Amazon Linux 2015.09
v2.0.4 running Python 3.4
2015.09 Python 3.4.3 Apache 2.4.16 with
mod_wsgi 3.5
Python 2.7 version 2.0.4
64bit Amazon Linux 2015.09
v2.0.4 running Python 2.7
2015.09 Python 2.7.10 Apache 2.4.16 with
mod_wsgi 3.5
Python 2.6 version 2.0.4
64bit Amazon Linux 2015.09
v2.0.4 running Python
2015.09 Python 2.6.9 Apache 2.4.16 with
mod_wsgi 3.5
The following Elastic Beanstalk platform configurations for Python were current between September 18,
2015 and November 2, 2015:
Configuration and Solution
Stack Name
AMI Language Web Server
Python 3.4 version 2.0.1
64bit Amazon Linux 2015.03
v2.0.1 running Python 3.4
2015.03 Python 3.4.3 Apache 2.4.12 with
mod_wsgi 3.5
Python 2.7 version 2.0.1
64bit Amazon Linux 2015.03
v2.0.1 running Python 2.7
2015.03 Python 2.7.9 Apache 2.4.12 with
mod_wsgi 3.5
Python 2.6 version 2.0.1
64bit Amazon Linux 2015.03
v2.0.1 running Python
2015.03 Python 2.6.9 Apache 2.4.12 with
mod_wsgi 3.5
The following Elastic Beanstalk platform configurations for Python were current between August 11,
2015 and September 18, 2015:
Configuration and Solution
Stack Name
AMI Language Web Server
Python 3.4 version 2.0.0
64bit Amazon Linux 2015.03
v2.0.0 running Python 3.4
2015.03 Python 3.4.3 Apache 2.4.12 with
mod_wsgi 3.5
Python 2.7 version 2.0.0 2015.03 Python 2.7.9 Apache 2.4.12 with
mod_wsgi 3.5
API Version 2010-12-01
1078

AWS Elastic Beanstalk Developer Guide
Python
Configuration and Solution
Stack Name
AMI Language Web Server
64bit Amazon Linux 2015.03
v2.0.0 running Python 2.7
Python 2.6 version 2.0.0
64bit Amazon Linux 2015.03
v2.0.0 running Python
2015.03 Python 2.6.9 Apache 2.4.12 with
mod_wsgi 3.5
The following Elastic Beanstalk platform configurations for Python were current between August 3, 2015
and August 11, 2015:
Configuration and Solution
Stack Name
AMI Language Web Server
Python 3.4 version 1.4.6
64bit Amazon Linux 2015.03
v1.4.6 running Python 3.4
2015.03 Python 3.4.3 Apache 2.4.12 with
mod_wsgi 3.5
Python 2.7 version 1.4.6
64bit Amazon Linux 2015.03
v1.4.6 running Python 2.7
2015.03 Python 2.7.9 Apache 2.4.12 with
mod_wsgi 3.5
Python 2.6 version 1.4.6
64bit Amazon Linux 2015.03
v1.4.6 running Python
2015.03 Python 2.6.9 Apache 2.4.12 with
mod_wsgi 3.5
The following Elastic Beanstalk platform configurations for Python were current between June 15, 2015
and August 3, 2015:
Configuration and Solution
Stack Name
AMI Language Web Server
Python 3.4 version 1.4.3
64bit Amazon Linux 2015.03
v1.4.3 running Python 3.4
2015.03 Python 3.4.3 Apache 2.4.12 with
mod_wsgi 3.5
Python 2.7 version 1.4.3
64bit Amazon Linux 2015.03
v1.4.3 running Python 2.7
2015.03 Python 2.7.9 Apache 2.4.12 with
mod_wsgi 3.5
Python 2.6 version 1.4.3
64bit Amazon Linux 2015.03
v1.4.3 running Python
2015.03 Python 2.6.9 Apache 2.4.12 with
mod_wsgi 3.5
The following Elastic Beanstalk platform configurations for Python were current between May 27, 2015
and June 15, 2015:
API Version 2010-12-01
1079

AWS Elastic Beanstalk Developer Guide
Python
Python Configurations
Name AMI Language Web Server
64bit Amazon Linux
2015.03 v1.4.1 running
Python 3.4
2015.03 Python 3.4.3 Apache 2.4.12 with
mod_wsgi 3.5
64bit Amazon Linux
2015.03 v1.4.1 running
Python 2.7
2015.03 Python 2.7.9 Apache 2.4.12 with
mod_wsgi 3.5
64bit Amazon Linux
2015.03 v1.4.1 running
Python 2.6
2015.03 Python 2.6.9 Apache 2.4.12 with
mod_wsgi 3.5
The following Elastic Beanstalk platform configurations for Python were current between April 22, 2015
and May 26, 2015:
Python Container Types
Name AMI Language Web Server
64bit Amazon Linux
2015.03 v1.3.1 running
Python 3.4
2015.03 Python 3.4.3 Apache 2.4.12 with
mod_wsgi 3.5
64bit Amazon Linux
2015.03 v1.3.1 running
Python 2.7
2015.03 Python 2.7.9 Apache 2.4.12 with
mod_wsgi 3.5
64bit Amazon Linux
2015.03 v1.3.1 running
Python 2.6
2015.03 Python 2.6.9 Apache 2.4.12 with
mod_wsgi 3.5
The following Elastic Beanstalk platform configurations for Python were current between April 8, 2015
and April 21, 2015:
Python Container Types
Name AMI Language Web Server
64bit Amazon Linux
2015.03 v1.3.0 running
Python 3.4
2015.03 Python 3.4.3 Apache 2.4.12 with
mod_wsgi 3.5
64bit Amazon Linux
2015.03 v1.3.0 running
Python 2.7
2015.03 Python 2.7.9 Apache 2.4.12 with
mod_wsgi 3.5
64bit Amazon Linux
2015.03 v1.3.0 running
Python 2.6
2015.03 Python 2.6.9 Apache 2.4.12 with
mod_wsgi 3.5
API Version 2010-12-01
1080

AWS Elastic Beanstalk Developer Guide
Python
The following Elastic Beanstalk platform configurations for Python were current between February 17,
2015 and April 7, 2015:
Python Container Types
Name AMI Language Web Server
64bit Amazon Linux
2014.09 v1.2.0 running
Python 2.7
2014.09 Python 2.7.8 Apache 2.4.10 with
mod_wsgi 3.5
64bit Amazon Linux
2014.09 v1.2.0 running
Python 2.6
2014.09 Python 2.6.9 Apache 2.4.10 with
mod_wsgi 3.5
The following Elastic Beanstalk platform configurations for Python were current between January 28,
2015 and February 16, 2015:
Python Container Types
Name AMI Language Web Server
64bit Amazon Linux
2014.09 v1.1.01 running
Python 2.7
2014.09 Python 2.7.5 Apache 2.4.10 with
mod_wsgi 3.5
64bit Amazon Linux
2014.09 v1.1.01 running
Python
2014.09 Python 2.6.9 Apache 2.4.10 with
mod_wsgi 3.5
32bit Amazon Linux
2014.03 v1.1.01 running
Python 2.7
2014.03 Python 2.7.5 Apache 2.4.10 with
mod_wsgi 3.2
64bit Amazon Linux
2014.03 v1.1.01 running
Python 2.7
2014.03 Python 2.7.5 Apache 2.4.10 with
mod_wsgi 3.2
32bit Amazon Linux
2014.03 v1.1.01 running
Python
2014.03 Python 2.6.9 Apache 2.4.10 with
mod_wsgi 3.2
64bit Amazon Linux
2014.03 v1.1.01 running
Python
2014.03 Python 2.6.9 Apache 2.4.10 with
mod_wsgi 3.2
1CVE-2015-0235 Advisory (Ghost)
The following Elastic Beanstalk platform configurations for Python were current between October 31,
2014 and January 27, 2015:
Python Container Types
Name AMI Language Web Server
API Version 2010-12-01
1081

AWS Elastic Beanstalk Developer Guide
Python
Python Container Types
64bit Amazon Linux
2014.09 v1.0.9 running
Python 2.7
2014.09 Python 2.7.5 Apache 2.4.10 with
mod_wsgi 3.5
64bit Amazon Linux
2014.09 v1.0.9 running
Python
2014.09 Python 2.6.9 Apache 2.4.10 with
mod_wsgi 3.5
The following Elastic Beanstalk platform configurations for Python were current between October 16,
2014 and October 30, 2014:
Python Container Types
Name AMI Language Web Server
32bit Amazon Linux
2014.03 v1.0.91 running
Python 2.7
2014.03 Python 2.7 Apache with
mod_wsgi 3.2
64bit Amazon Linux
2014.03 v1.0.91 running
Python 2.7
2014.03 Python 2.7 Apache with
mod_wsgi 3.2
32bit Amazon Linux
2014.03 v1.0.91 running
Python
2014.03 Python 2.6 Apache with
mod_wsgi 3.2
64bit Amazon Linux
2014.03 v1.0.91 running
Python
2014.03 Python 2.6 Apache with
mod_wsgi 3.2
1CVE-2014-3566 Advisory
The following Elastic Beanstalk platform configurations for Python were current between September 24,
2014 and October 15, 2014:
Python Container Types
Name AMI Language Web Server
32bit Amazon Linux
2014.03 v1.0.71 running
Python 2.7
2014.03 Python 2.7 Apache with
mod_wsgi 3.2
64bit Amazon Linux
2014.03 v1.0.71 running
Python 2.7
2014.03 Python 2.7 Apache with
mod_wsgi 3.2
32bit Amazon Linux
2014.03 v1.0.71 running
Python
2014.03 Python 2.6 Apache with
mod_wsgi 3.2
API Version 2010-12-01
1082

AWS Elastic Beanstalk Developer Guide
Python
Python Container Types
64bit Amazon Linux
2014.03 v1.0.71 running
Python
2014.03 Python 2.6 Apache with
mod_wsgi 3.2
1 CVE-2014-6271 Advisory and ALAS-2014-419
The following Elastic Beanstalk platform configurations for Python were current between June 30, 2014
and September 23, 2014:
Python Container Types
Name AMI Language Web Server
64bit Amazon Linux
2014.03 v1.0.4 running
Python 2.7
2014.03 Python 2.7 Apache with
mod_wsgi 3.2
64bit Amazon Linux
2014.03 v1.0.4 running
Python
2014.03 Python 2.6 Apache with
mod_wsgi 3.2
The following Elastic Beanstalk platform configurations for Python were current between June 5, 2014
and June 29, 2014:
Python Container Types
Name AMI Language Web Server
32bit Amazon Linux
2014.03 v1.0.31 running
Python 2.7
2014.03 Python 2.7 Apache with
mod_wsgi 3.2
64bit Amazon Linux
2014.03 v1.0.31 running
Python 2.7
2014.03 Python 2.7 Apache with
mod_wsgi 3.2
32bit Amazon Linux
2014.03 v1.0.31 running
Python
2014.03 Python 2.6 Apache with
mod_wsgi 3.2
64bit Amazon Linux
2014.03 v1.0.31 running
Python
2014.03 Python 2.6 Apache with
mod_wsgi 3.2
1 OpenSSL Security Advisory
The following Elastic Beanstalk platform configurations for Python were current between May 5, 2014
and June 4, 2014:
Python Container Types
Name AMI Language Web Server
API Version 2010-12-01
1083

AWS Elastic Beanstalk Developer Guide
Python
Python Container Types
32bit Amazon Linux
2014.03 v1.0.2 running
Python 2.7
2014.03 Python 2.7 Apache with
mod_wsgi 3.2
64bit Amazon Linux
2014.03 v1.0.2 running
Python 2.7
2014.03 Python 2.7 Apache with
mod_wsgi 3.2
32bit Amazon Linux
2014.03 v1.0.2 running
Python
2014.03 Python 2.6 Apache with
mod_wsgi 3.2
64bit Amazon Linux
2014.03 v1.0.2 running
Python
2014.03 Python 2.6 Apache with
mod_wsgi 3.2
The following Elastic Beanstalk platform configurations for Python were current between April 7, 2014
and May 4, 2014:
Python Container Types
Name AMI Language Web Server
32bit Amazon Linux
2013.09 v1.0.11 running
Python 2.7
2013.09 Python 2.7 Apache with
mod_wsgi 3.2
64bit Amazon Linux
2013.09 v1.0.11 running
Python 2.7
2013.09 Python 2.7 Apache with
mod_wsgi 3.2
32bit Amazon Linux
2013.09 v1.0.11 running
Python
2013.09 Python 2.6 Apache with
mod_wsgi 3.2
64bit Amazon Linux
2013.09 v1.0.11 running
Python
2013.09 Python 2.6 Apache with
mod_wsgi 3.2
1 openssl-1.0.1e-4.58.amzn1
The following Elastic Beanstalk platform configurations for Python were current between November 7,
2013 and April 6, 2014:
Python Container Types
Name AMI Language Web Server
32bit Amazon Linux
2013.09 running Python
2.7
2013.09 Python 2.7 Apache with
mod_wsgi 3.2
API Version 2010-12-01
1084

AWS Elastic Beanstalk Developer Guide
Ruby
Python Container Types
64bit Amazon Linux
2013.09 running Python
2.7
2013.09 Python 2.7 Apache with
mod_wsgi 3.2
32bit Amazon Linux
2013.09 running Python
2013.09 Python 2.6 Apache with
mod_wsgi 3.2
64bit Amazon Linux
2013.09 running Python
2013.09 Python 2.6 Apache with
mod_wsgi 3.2
The following Elastic Beanstalk platform configurations for Python were current prior to November 7,
2013:
Python Container Types
Name AMI Language Web Server
32bit Amazon Linux
running Python
2012.09 Python 2.6 Apache with
mod_wsgi 3.2
64bit Amazon Linux
running Python
2012.09 Python 2.6 Apache with
mod_wsgi 3.2
Ruby Platform History
This page lists the previous versions of AWS Elastic Beanstalk's Ruby platforms and the dates that each
version was current. Platform versions that you used to launch or update an environment in the last 30
days remain available (to the using account, in the used region) even after they are no longer current.
See the Supported Platforms (p. 26) page for information on the latest version of each platform
supported by Elastic Beanstalk. Detailed release notes are available for recent releases at
aws.amazon.com/releasenotes.
The following Elastic Beanstalk platform configurations for Ruby were current between November 14,
2017 and December 19, 2017:
Configuration and
Solution Stack
Name
AMI Language Package
Manager
Application Server Proxy
Server
Ruby 2.4 with
Puma version 2.6.1
64bit Amazon Linux
2017.09 v2.6.1
running Ruby 2.4
(Puma)
2017.09.1Ruby
2.4.2-p198
RubyGems
2.6.13
Puma 2.16.0 nginx
1.12.1
Ruby 2.4 with
Passenger version
2.6.1
2017.09.1Ruby
2.4.2-p198
RubyGems
2.6.13
Passenger 4.0.60 nginx
1.12.1
API Version 2010-12-01
1085

AWS Elastic Beanstalk Developer Guide
Ruby
Configuration and
Solution Stack
Name
AMI Language Package
Manager
Application Server Proxy
Server
64bit Amazon
Linux 2017.09
v2.6.1 running
Ruby 2.4 (Passenger
Standalone)
Ruby 2.3 with
Puma version 2.6.1
64bit Amazon Linux
2017.09 v2.6.1
running Ruby 2.3
(Puma)
2017.09.1Ruby
2.3.5-p376
RubyGems
2.6.13
Puma 2.16.0 nginx
1.12.1
Ruby 2.3 with
Passenger version
2.6.1
64bit Amazon
Linux 2017.09
v2.6.1 running
Ruby 2.3 (Passenger
Standalone)
2017.09.1Ruby
2.3.5-p376
RubyGems
2.6.13
Passenger 4.0.60 nginx
1.12.1
Ruby 2.2 with
Puma version 2.6.1
64bit Amazon Linux
2017.09 v2.6.1
running Ruby 2.2
(Puma)
2017.09.1Ruby
2.2.8-p477
RubyGems
2.6.13
Puma 2.16.0 nginx
1.12.1
Ruby 2.2 with
Passenger version
2.6.1
64bit Amazon
Linux 2017.09
v2.6.1 running
Ruby 2.2 (Passenger
Standalone)
2017.09.1Ruby
2.2.8-p477
RubyGems
2.6.13
Passenger 4.0.60 nginx
1.12.1
Ruby 2.1 with
Puma version 2.6.1
64bit Amazon Linux
2017.09 v2.6.1
running Ruby 2.1
(Puma)
2017.09.1Ruby
2.1.10-
p492
RubyGems
2.6.13
Puma 2.16.0 nginx
1.12.1
API Version 2010-12-01
1086

AWS Elastic Beanstalk Developer Guide
Ruby
Configuration and
Solution Stack
Name
AMI Language Package
Manager
Application Server Proxy
Server
Ruby 2.1 with
Passenger version
2.6.1
64bit Amazon
Linux 2017.09
v2.6.1 running
Ruby 2.1 (Passenger
Standalone)
2017.09.1Ruby
2.1.10-
p492
RubyGems
2.6.13
Passenger 4.0.60 nginx
1.12.1
Ruby 2.0 with
Puma version 2.6.1
64bit Amazon Linux
2017.09 v2.6.1
running Ruby 2.0
(Puma)
2017.09.1Ruby
2.0.0-p648
RubyGems
2.6.13
Puma 2.16.0 nginx
1.12.1
Ruby 2.0 with
Passenger version
2.6.1
64bit Amazon
Linux 2017.09
v2.6.1 running
Ruby 2.0 (Passenger
Standalone)
2017.09.1Ruby
2.0.0-p648
RubyGems
2.6.13
Passenger 4.0.60 nginx
1.12.1
Ruby 1.9 with
Passenger version
2.6.1
64bit Amazon Linux
2017.09 v2.6.1
running Ruby 1.9.3
2017.09.1Ruby
1.9.3-p551
RubyGems
2.6.13
Passenger 4.0.60 nginx
1.12.1
The following Elastic Beanstalk platform configurations for Ruby were current between October 19,
2017 and November 13, 2017:
Configuration and
Solution Stack
Name
AMI Language Package
Manager
Application Server Proxy
Server
Ruby 2.4 with
Puma version 2.6.0
64bit Amazon Linux
2017.09 v2.6.0
running Ruby 2.4
(Puma)
2017.09.0Ruby
2.4.2-p198
RubyGems
2.6.13
Puma 2.16.0 nginx
1.12.1
API Version 2010-12-01
1087

AWS Elastic Beanstalk Developer Guide
Ruby
Configuration and
Solution Stack
Name
AMI Language Package
Manager
Application Server Proxy
Server
Ruby 2.4 with
Passenger version
2.6.0
64bit Amazon
Linux 2017.09
v2.6.0 running
Ruby 2.4 (Passenger
Standalone)
2017.09.0Ruby
2.4.2-p198
RubyGems
2.6.13
Passenger 4.0.60 nginx
1.12.1
Ruby 2.3 with
Puma version 2.6.0
64bit Amazon Linux
2017.09 v2.6.0
running Ruby 2.3
(Puma)
2017.09.0Ruby
2.3.5-p376
RubyGems
2.6.13
Puma 2.16.0 nginx
1.12.1
Ruby 2.3 with
Passenger version
2.6.0
64bit Amazon
Linux 2017.09
v2.6.0 running
Ruby 2.3 (Passenger
Standalone)
2017.09.0Ruby
2.3.5-p376
RubyGems
2.6.13
Passenger 4.0.60 nginx
1.12.1
Ruby 2.2 with
Puma version 2.6.0
64bit Amazon Linux
2017.09 v2.6.0
running Ruby 2.2
(Puma)
2017.09.0Ruby
2.2.8-p477
RubyGems
2.6.13
Puma 2.16.0 nginx
1.12.1
Ruby 2.2 with
Passenger version
2.6.0
64bit Amazon
Linux 2017.09
v2.6.0 running
Ruby 2.2 (Passenger
Standalone)
2017.09.0Ruby
2.2.8-p477
RubyGems
2.6.13
Passenger 4.0.60 nginx
1.12.1
Ruby 2.1 with
Puma version 2.6.0
64bit Amazon Linux
2017.09 v2.6.0
running Ruby 2.1
(Puma)
2017.09.0Ruby
2.1.10-
p492
RubyGems
2.6.13
Puma 2.16.0 nginx
1.12.1
API Version 2010-12-01
1088

AWS Elastic Beanstalk Developer Guide
Ruby
Configuration and
Solution Stack
Name
AMI Language Package
Manager
Application Server Proxy
Server
Ruby 2.1 with
Passenger version
2.6.0
64bit Amazon
Linux 2017.09
v2.6.0 running
Ruby 2.1 (Passenger
Standalone)
2017.09.0Ruby
2.1.10-
p492
RubyGems
2.6.13
Passenger 4.0.60 nginx
1.12.1
Ruby 2.0 with
Puma version 2.6.0
64bit Amazon Linux
2017.09 v2.6.0
running Ruby 2.0
(Puma)
2017.09.0Ruby
2.0.0-p648
RubyGems
2.6.13
Puma 2.16.0 nginx
1.12.1
Ruby 2.0 with
Passenger version
2.6.0
64bit Amazon
Linux 2017.09
v2.6.0 running
Ruby 2.0 (Passenger
Standalone)
2017.09.0Ruby
2.0.0-p648
RubyGems
2.6.13
Passenger 4.0.60 nginx
1.12.1
Ruby 1.9 with
Passenger version
2.6.0
64bit Amazon Linux
2017.09 v2.6.0
running Ruby 1.9.3
2017.09.0Ruby
1.9.3-p551
RubyGems
2.6.13
Passenger 4.0.60 nginx
1.12.1
The following Elastic Beanstalk platform configurations for Ruby were current between September 25,
2017 and October 18, 2017:
Configuration and
Solution Stack
Name
AMI Language Package
Manager
Application Server Proxy
Server
Ruby 2.4 with
Puma version 2.5.0
64bit Amazon Linux
2017.03 v2.5.0
running Ruby 2.4
(Puma)
2017.03.1Ruby
2.4.1-p111
RubyGems
2.6.13
Puma 2.16.0 nginx
1.12.1
API Version 2010-12-01
1089

AWS Elastic Beanstalk Developer Guide
Ruby
Configuration and
Solution Stack
Name
AMI Language Package
Manager
Application Server Proxy
Server
Ruby 2.4 with
Passenger version
2.5.0
64bit Amazon
Linux 2017.03
v2.5.0 running
Ruby 2.4 (Passenger
Standalone)
2017.03.1Ruby
2.4.1-p111
RubyGems
2.6.13
Passenger 4.0.60 nginx
1.10.2
Ruby 2.3 with
Puma version 2.5.0
64bit Amazon Linux
2017.03 v2.5.0
running Ruby 2.3
(Puma)
2017.03.1Ruby
2.3.4-p301
RubyGems
2.6.13
Puma 2.16.0 nginx
1.12.1
Ruby 2.3 with
Passenger version
2.5.0
64bit Amazon
Linux 2017.03
v2.5.0 running
Ruby 2.3 (Passenger
Standalone)
2017.03.1Ruby
2.3.4-p301
RubyGems
2.6.13
Passenger 4.0.60 nginx
1.10.2
Ruby 2.2 with
Puma version 2.5.0
64bit Amazon Linux
2017.03 v2.5.0
running Ruby 2.2
(Puma)
2017.03.1Ruby
2.2.7-p470
RubyGems
2.6.13
Puma 2.16.0 nginx
1.12.1
Ruby 2.2 with
Passenger version
2.5.0
64bit Amazon
Linux 2017.03
v2.5.0 running
Ruby 2.2 (Passenger
Standalone)
2017.03.1Ruby
2.2.7-p470
RubyGems
2.6.13
Passenger 4.0.60 nginx
1.10.2
Ruby 2.1 with
Puma version 2.5.0
64bit Amazon Linux
2017.03 v2.5.0
running Ruby 2.1
(Puma)
2017.03.1Ruby
2.1.10-
p492
RubyGems
2.6.13
Puma 2.16.0 nginx
1.12.1
API Version 2010-12-01
1090

AWS Elastic Beanstalk Developer Guide
Ruby
Configuration and
Solution Stack
Name
AMI Language Package
Manager
Application Server Proxy
Server
Ruby 2.1 with
Passenger version
2.5.0
64bit Amazon
Linux 2017.03
v2.5.0 running
Ruby 2.1 (Passenger
Standalone)
2017.03.1Ruby
2.1.10-
p492
RubyGems
2.6.13
Passenger 4.0.60 nginx
1.10.2
Ruby 2.0 with
Puma version 2.5.0
64bit Amazon Linux
2017.03 v2.5.0
running Ruby 2.0
(Puma)
2017.03.1Ruby
2.0.0-p648
RubyGems
2.6.13
Puma 2.16.0 nginx
1.12.1
Ruby 2.0 with
Passenger version
2.5.0
64bit Amazon
Linux 2017.03
v2.5.0 running
Ruby 2.0 (Passenger
Standalone)
2017.03.1Ruby
2.0.0-p648
RubyGems
2.6.13
Passenger 4.0.60 nginx
1.10.2
Ruby 1.9 with
Passenger version
2.5.0
64bit Amazon Linux
2017.03 v2.5.0
running Ruby 1.9.3
2017.03.1Ruby
1.9.3-p551
RubyGems
2.6.13
Passenger 4.0.60 nginx
1.10.2
The following Elastic Beanstalk platform configurations for Ruby were current between August 30, 2017
and September 24, 2017:
Configuration and
Solution Stack
Name
AMI Language Package
Manager
Application Server Proxy
Server
Ruby 2.3 with
Puma version 2.4.4
64bit Amazon Linux
2017.03 v2.4.4
running Ruby 2.3
(Puma)
2017.03.1Ruby
2.3.4-p301
RubyGems
2.5.1
Puma 2.16.0 nginx
1.10.3
API Version 2010-12-01
1091

AWS Elastic Beanstalk Developer Guide
Ruby
Configuration and
Solution Stack
Name
AMI Language Package
Manager
Application Server Proxy
Server
Ruby 2.3 with
Passenger version
2.4.4
64bit Amazon
Linux 2017.03
v2.4.4 running
Ruby 2.3 (Passenger
Standalone)
2017.03.1Ruby
2.3.4-p301
RubyGems
2.5.1
Passenger 4.0.60 nginx
1.10.2
Ruby 2.2 with
Puma version 2.4.4
64bit Amazon Linux
2017.03 v2.4.4
running Ruby 2.2
(Puma)
2017.03.1Ruby
2.2.7-p470
RubyGems
2.4.5.1
Puma 2.16.0 nginx
1.10.3
Ruby 2.2 with
Passenger version
2.4.4
64bit Amazon
Linux 2017.03
v2.4.4 running
Ruby 2.2 (Passenger
Standalone)
2017.03.1Ruby
2.2.7-p470
RubyGems
2.4.5.1
Passenger 4.0.60 nginx
1.10.2
Ruby 2.1 with
Puma version 2.4.4
64bit Amazon Linux
2017.03 v2.4.4
running Ruby 2.1
(Puma)
2017.03.1Ruby
2.1.10-
p492
RubyGems
2.2.5
Puma 2.16.0 nginx
1.10.3
Ruby 2.1 with
Passenger version
2.4.4
64bit Amazon
Linux 2017.03
v2.4.4 running
Ruby 2.1 (Passenger
Standalone)
2017.03.1Ruby
2.1.10-
p492
RubyGems
2.2.5
Passenger 4.0.60 nginx
1.10.2
Ruby 2.0 with
Puma version 2.4.4
64bit Amazon Linux
2017.03 v2.4.4
running Ruby 2.0
(Puma)
2017.03.1Ruby
2.0.0-p648
RubyGems
2.0.14.1
Puma 2.16.0 nginx
1.10.3
API Version 2010-12-01
1092

AWS Elastic Beanstalk Developer Guide
Ruby
Configuration and
Solution Stack
Name
AMI Language Package
Manager
Application Server Proxy
Server
Ruby 2.0 with
Passenger version
2.4.4
64bit Amazon
Linux 2017.03
v2.4.4 running
Ruby 2.0 (Passenger
Standalone)
2017.03.1Ruby
2.0.0-p648
RubyGems
2.0.14.1
Passenger 4.0.60 nginx
1.10.2
Ruby 1.9 with
Passenger version
2.4.4
64bit Amazon Linux
2017.03 v2.4.4
running Ruby 1.9.3
2017.03.1Ruby
1.9.3-p551
RubyGems
1.8.23.2
Passenger 4.0.60 nginx
1.10.2
The following Elastic Beanstalk platform configurations for Ruby were current between August 11, 2017
and August 29, 2017:
Configuration and
Solution Stack
Name
AMI Language Package
Manager
Application Server Proxy
Server
Ruby 2.3 with
Puma version 2.4.3
64bit Amazon Linux
2017.03 v2.4.3
running Ruby 2.3
(Puma)
2017.03.1Ruby
2.3.4-p301
RubyGems
2.5.1
Puma 2.16.0 nginx
1.10.3
Ruby 2.3 with
Passenger version
2.4.3
64bit Amazon
Linux 2017.03
v2.4.3 running
Ruby 2.3 (Passenger
Standalone)
2017.03.1Ruby
2.3.4-p301
RubyGems
2.5.1
Passenger 4.0.60 nginx
1.10.2
Ruby 2.2 with
Puma version 2.4.3
64bit Amazon Linux
2017.03 v2.4.3
running Ruby 2.2
(Puma)
2017.03.1Ruby
2.2.7-p470
RubyGems
2.4.5.1
Puma 2.16.0 nginx
1.10.3
API Version 2010-12-01
1093

AWS Elastic Beanstalk Developer Guide
Ruby
Configuration and
Solution Stack
Name
AMI Language Package
Manager
Application Server Proxy
Server
Ruby 2.2 with
Passenger version
2.4.3
64bit Amazon
Linux 2017.03
v2.4.3 running
Ruby 2.2 (Passenger
Standalone)
2017.03.1Ruby
2.2.7-p470
RubyGems
2.4.5.1
Passenger 4.0.60 nginx
1.10.2
Ruby 2.1 with
Puma version 2.4.3
64bit Amazon Linux
2017.03 v2.4.3
running Ruby 2.1
(Puma)
2017.03.1Ruby
2.1.10-
p492
RubyGems
2.2.5
Puma 2.16.0 nginx
1.10.3
Ruby 2.1 with
Passenger version
2.4.3
64bit Amazon
Linux 2017.03
v2.4.3 running
Ruby 2.1 (Passenger
Standalone)
2017.03.1Ruby
2.1.10-
p492
RubyGems
2.2.5
Passenger 4.0.60 nginx
1.10.2
Ruby 2.0 with
Puma version 2.4.3
64bit Amazon Linux
2017.03 v2.4.3
running Ruby 2.0
(Puma)
2017.03.1Ruby
2.0.0-p648
RubyGems
2.0.14.1
Puma 2.16.0 nginx
1.10.3
Ruby 2.0 with
Passenger version
2.4.3
64bit Amazon
Linux 2017.03
v2.4.3 running
Ruby 2.0 (Passenger
Standalone)
2017.03.1Ruby
2.0.0-p648
RubyGems
2.0.14.1
Passenger 4.0.60 nginx
1.10.2
Ruby 1.9 with
Passenger version
2.4.3
64bit Amazon Linux
2017.03 v2.4.3
running Ruby 1.9.3
2017.03.1Ruby
1.9.3-p551
RubyGems
1.8.23.2
Passenger 4.0.60 nginx
1.10.2
API Version 2010-12-01
1094

AWS Elastic Beanstalk Developer Guide
Ruby
The following Elastic Beanstalk platform configurations for Ruby were current between July 20, 2017
and August 10, 2017:
Configuration and
Solution Stack
Name
AMI Language Package
Manager
Application Server Proxy
Server
Ruby 2.3 with
Puma version 2.4.2
64bit Amazon Linux
2017.03 v2.4.2
running Ruby 2.3
(Puma)
2017.03.1Ruby
2.3.4-p301
RubyGems
2.5.1
Puma 2.16.0 nginx
1.10.3
Ruby 2.3 with
Passenger version
2.4.2
64bit Amazon
Linux 2017.03
v2.4.2 running
Ruby 2.3 (Passenger
Standalone)
2017.03.1Ruby
2.3.4-p301
RubyGems
2.5.1
Passenger 4.0.60 nginx
1.10.2
Ruby 2.2 with
Puma version 2.4.2
64bit Amazon Linux
2017.03 v2.4.2
running Ruby 2.2
(Puma)
2017.03.1Ruby
2.2.7-p470
RubyGems
2.4.5.1
Puma 2.16.0 nginx
1.10.3
Ruby 2.2 with
Passenger version
2.4.2
64bit Amazon
Linux 2017.03
v2.4.2 running
Ruby 2.2 (Passenger
Standalone)
2017.03.1Ruby
2.2.7-p470
RubyGems
2.4.5.1
Passenger 4.0.60 nginx
1.10.2
Ruby 2.1 with
Puma version 2.4.2
64bit Amazon Linux
2017.03 v2.4.2
running Ruby 2.1
(Puma)
2017.03.1Ruby
2.1.10-
p492
RubyGems
2.2.5
Puma 2.16.0 nginx
1.10.3
Ruby 2.1 with
Passenger version
2.4.2
64bit Amazon
Linux 2017.03
v2.4.2 running
2017.03.1Ruby
2.1.10-
p492
RubyGems
2.2.5
Passenger 4.0.60 nginx
1.10.2
API Version 2010-12-01
1095

AWS Elastic Beanstalk Developer Guide
Ruby
Configuration and
Solution Stack
Name
AMI Language Package
Manager
Application Server Proxy
Server
Ruby 2.1 (Passenger
Standalone)
Ruby 2.0 with
Puma version 2.4.2
64bit Amazon Linux
2017.03 v2.4.2
running Ruby 2.0
(Puma)
2017.03.1Ruby
2.0.0-p648
RubyGems
2.0.14.1
Puma 2.16.0 nginx
1.10.3
Ruby 2.0 with
Passenger version
2.4.2
64bit Amazon
Linux 2017.03
v2.4.2 running
Ruby 2.0 (Passenger
Standalone)
2017.03.1Ruby
2.0.0-p648
RubyGems
2.0.14.1
Passenger 4.0.60 nginx
1.10.2
Ruby 1.9 with
Passenger version
2.4.2
64bit Amazon Linux
2017.03 v2.4.2
running Ruby 1.9.3
2017.03.1Ruby
1.9.3-p551
RubyGems
1.8.23.2
Passenger 4.0.60 nginx
1.10.2
The following Elastic Beanstalk platform configurations for Ruby were current between June 27, 2017
and July 19, 2017:
Configuration and
Solution Stack
Name
AMI Language Package
Manager
Application Server Proxy
Server
Ruby 2.3 with
Puma version 2.4.1
64bit Amazon Linux
2017.03 v2.4.1
running Ruby 2.3
(Puma)
2017.03.0Ruby
2.3.1-p112
RubyGems
2.5.1
Puma 2.16.0 nginx
1.10.2
Ruby 2.3 with
Passenger version
2.4.1
64bit Amazon
Linux 2017.03
v2.4.1 running
Ruby 2.3 (Passenger
Standalone)
2017.03.0Ruby
2.3.1-p112
RubyGems
2.5.1
Passenger 4.0.60 nginx 1.8.1
API Version 2010-12-01
1096

AWS Elastic Beanstalk Developer Guide
Ruby
Configuration and
Solution Stack
Name
AMI Language Package
Manager
Application Server Proxy
Server
Ruby 2.2 with
Puma version 2.4.1
64bit Amazon Linux
2017.03 v2.4.1
running Ruby 2.2
(Puma)
2017.03.0Ruby
2.2.5-p319
RubyGems
2.4.5.1
Puma 2.16.0 nginx
1.10.2
Ruby 2.2 with
Passenger version
2.4.1
64bit Amazon
Linux 2017.03
v2.4.1 running
Ruby 2.2 (Passenger
Standalone)
2017.03.0Ruby
2.2.5-p319
RubyGems
2.4.5.1
Passenger 4.0.60 nginx 1.8.1
Ruby 2.1 with
Puma version 2.4.1
64bit Amazon Linux
2017.03 v2.4.1
running Ruby 2.1
(Puma)
2017.03.0Ruby
2.1.9-p490
RubyGems
2.2.5
Puma 2.16.0 nginx
1.10.2
Ruby 2.1 with
Passenger version
2.4.1
64bit Amazon
Linux 2017.03
v2.4.1 running
Ruby 2.1 (Passenger
Standalone)
2017.03.0Ruby
2.1.9-p490
RubyGems
2.2.5
Passenger 4.0.60 nginx 1.8.1
Ruby 2.0 with
Puma version 2.4.1
64bit Amazon Linux
2017.03 v2.4.1
running Ruby 2.0
(Puma)
2017.03.0Ruby
2.0.0-p648
RubyGems
2.0.14.1
Puma 2.16.0 nginx
1.10.2
Ruby 2.0 with
Passenger version
2.4.1
64bit Amazon
Linux 2017.03
v2.4.1 running
Ruby 2.0 (Passenger
Standalone)
2017.03.0Ruby
2.0.0-p648
RubyGems
2.0.14.1
Passenger 4.0.60 nginx 1.8.1
API Version 2010-12-01
1097

AWS Elastic Beanstalk Developer Guide
Ruby
Configuration and
Solution Stack
Name
AMI Language Package
Manager
Application Server Proxy
Server
Ruby 1.9 with
Passenger version
2.4.1
64bit Amazon Linux
2017.03 v2.4.1
running Ruby 1.9.3
2017.03.0Ruby
1.9.3-p551
RubyGems
1.8.23.2
Passenger 4.0.60 nginx 1.8.1
The following Elastic Beanstalk platform configurations for Ruby were current between May 19, 2017
and June 26, 2017:
Configuration and
Solution Stack
Name
AMI Language Package
Manager
Application Server Proxy
Server
Ruby 2.3 with
Puma version 2.4.0
64bit Amazon Linux
2017.03 v2.4.0
running Ruby 2.3
(Puma)
2017.03.0Ruby
2.3.1-p112
RubyGems
2.5.1
Puma 2.16.0 nginx
1.10.2
Ruby 2.3 with
Passenger version
2.4.0
64bit Amazon
Linux 2017.03
v2.4.0 running
Ruby 2.3 (Passenger
Standalone)
2017.03.0Ruby
2.3.1-p112
RubyGems
2.5.1
Passenger 4.0.60 nginx 1.8.1
Ruby 2.2 with
Puma version 2.4.0
64bit Amazon Linux
2017.03 v2.4.0
running Ruby 2.2
(Puma)
2017.03.0Ruby
2.2.5-p319
RubyGems
2.4.5.1
Puma 2.16.0 nginx
1.10.2
Ruby 2.2 with
Passenger version
2.4.0
64bit Amazon
Linux 2017.03
v2.4.0 running
Ruby 2.2 (Passenger
Standalone)
2017.03.0Ruby
2.2.5-p319
RubyGems
2.4.5.1
Passenger 4.0.60 nginx 1.8.1
Ruby 2.1 with
Puma version 2.4.0
2017.03.0Ruby
2.1.9-p490
RubyGems
2.2.5
Puma 2.16.0 nginx
1.10.2
API Version 2010-12-01
1098

AWS Elastic Beanstalk Developer Guide
Ruby
Configuration and
Solution Stack
Name
AMI Language Package
Manager
Application Server Proxy
Server
64bit Amazon Linux
2017.03 v2.4.0
running Ruby 2.1
(Puma)
Ruby 2.1 with
Passenger version
2.4.0
64bit Amazon
Linux 2017.03
v2.4.0 running
Ruby 2.1 (Passenger
Standalone)
2017.03.0Ruby
2.1.9-p490
RubyGems
2.2.5
Passenger 4.0.60 nginx 1.8.1
Ruby 2.0 with
Puma version 2.4.0
64bit Amazon Linux
2017.03 v2.4.0
running Ruby 2.0
(Puma)
2017.03.0Ruby
2.0.0-p648
RubyGems
2.0.14.1
Puma 2.16.0 nginx
1.10.2
Ruby 2.0 with
Passenger version
2.4.0
64bit Amazon
Linux 2017.03
v2.4.0 running
Ruby 2.0 (Passenger
Standalone)
2017.03.0Ruby
2.0.0-p648
RubyGems
2.0.14.1
Passenger 4.0.60 nginx 1.8.1
Ruby 1.9 with
Passenger version
2.4.0
64bit Amazon Linux
2017.03 v2.4.0
running Ruby 1.9.3
2017.03.0Ruby
1.9.3-p551
RubyGems
1.8.23.2
Passenger 4.0.60 nginx 1.8.1
The following Elastic Beanstalk platform configurations for Ruby were current between April 5, 2017 and
May 18, 2017:
Configuration and
Solution Stack
Name
AMI Language Package
Manager
Application Server Proxy
Server
Ruby 2.3 with
Puma version 2.3.3
64bit Amazon Linux
2016.09 v2.3.1
2016.09.0Ruby
2.3.1-p112
RubyGems
2.5.1
Puma 2.16.0 nginx
1.10.1
API Version 2010-12-01
1099

AWS Elastic Beanstalk Developer Guide
Ruby
Configuration and
Solution Stack
Name
AMI Language Package
Manager
Application Server Proxy
Server
running Ruby 2.3
(Puma)
Ruby 2.3 with
Passenger version
2.3.3
64bit Amazon
Linux 2016.09
v2.3.1 running
Ruby 2.3 (Passenger
Standalone)
2016.09.0Ruby
2.3.1-p112
RubyGems
2.5.1
Passenger 4.0.60 nginx
1.10.1
Ruby 2.2 with
Puma version 2.3.3
64bit Amazon Linux
2016.09 v2.3.1
running Ruby 2.2
(Puma)
2016.09.0Ruby
2.2.5-p319
RubyGems
2.4.5.1
Puma 2.16.0 nginx
1.10.1
Ruby 2.2 with
Passenger version
2.3.3
64bit Amazon
Linux 2016.09
v2.3.1 running
Ruby 2.2 (Passenger
Standalone)
2016.09.0Ruby
2.2.5-p319
RubyGems
2.4.5.1
Passenger 4.0.60 nginx
1.10.1
Ruby 2.1 with
Puma version 2.3.3
64bit Amazon Linux
2016.09 v2.3.1
running Ruby 2.1
(Puma)
2016.09.0Ruby
2.1.9-p490
RubyGems
2.2.5
Puma 2.16.0 nginx
1.10.1
Ruby 2.1 with
Passenger version
2.3.3
64bit Amazon
Linux 2016.09
v2.3.1 running
Ruby 2.1 (Passenger
Standalone)
2016.09.0Ruby
2.1.9-p490
RubyGems
2.2.5
Passenger 4.0.60 nginx
1.10.1
API Version 2010-12-01
1100

AWS Elastic Beanstalk Developer Guide
Ruby
Configuration and
Solution Stack
Name
AMI Language Package
Manager
Application Server Proxy
Server
Ruby 2.0 with
Puma version 2.3.3
64bit Amazon Linux
2016.09 v2.3.1
running Ruby 2.0
(Puma)
2016.09.0Ruby
2.0.0-p648
RubyGems
2.0.14.1
Puma 2.16.0 nginx
1.10.1
Ruby 2.0 with
Passenger version
2.3.3
64bit Amazon
Linux 2016.09
v2.3.1 running
Ruby 2.0 (Passenger
Standalone)
2016.09.0Ruby
2.0.0-p648
RubyGems
2.0.14.1
Passenger 4.0.60 nginx
1.10.1
Ruby 1.9 with
Passenger version
2.3.3
64bit Amazon Linux
2016.09 v2.3.1
running Ruby 1.9.3
2016.09.0Ruby
1.9.3-p551
RubyGems
1.8.23.2
Passenger 4.0.60 nginx
1.10.1
The following Elastic Beanstalk platform configurations for Ruby were current between March 8, 2017
and April 4, 2017:
Configuration and
Solution Stack
Name
AMI Language Package
Manager
Application Server Proxy
Server
Ruby 2.3 with
Puma version 2.3.2
64bit Amazon Linux
2016.09 v2.3.1
running Ruby 2.3
(Puma)
2016.09.0Ruby
2.3.1-p112
RubyGems
2.5.1
Puma 2.16.0 nginx
1.10.1
Ruby 2.3 with
Passenger version
2.3.2
64bit Amazon
Linux 2016.09
v2.3.1 running
Ruby 2.3 (Passenger
Standalone)
2016.09.0Ruby
2.3.1-p112
RubyGems
2.5.1
Passenger 4.0.60 nginx
1.10.1
Ruby 2.2 with
Puma version 2.3.2
2016.09.0Ruby
2.2.5-p319
RubyGems
2.4.5.1
Puma 2.16.0 nginx
1.10.1
API Version 2010-12-01
1101

AWS Elastic Beanstalk Developer Guide
Ruby
Configuration and
Solution Stack
Name
AMI Language Package
Manager
Application Server Proxy
Server
64bit Amazon Linux
2016.09 v2.3.1
running Ruby 2.2
(Puma)
Ruby 2.2 with
Passenger version
2.3.2
64bit Amazon
Linux 2016.09
v2.3.1 running
Ruby 2.2 (Passenger
Standalone)
2016.09.0Ruby
2.2.5-p319
RubyGems
2.4.5.1
Passenger 4.0.60 nginx
1.10.1
Ruby 2.1 with
Puma version 2.3.2
64bit Amazon Linux
2016.09 v2.3.1
running Ruby 2.1
(Puma)
2016.09.0Ruby
2.1.9-p490
RubyGems
2.2.5
Puma 2.16.0 nginx
1.10.1
Ruby 2.1 with
Passenger version
2.3.2
64bit Amazon
Linux 2016.09
v2.3.1 running
Ruby 2.1 (Passenger
Standalone)
2016.09.0Ruby
2.1.9-p490
RubyGems
2.2.5
Passenger 4.0.60 nginx
1.10.1
Ruby 2.0 with
Puma version 2.3.2
64bit Amazon Linux
2016.09 v2.3.1
running Ruby 2.0
(Puma)
2016.09.0Ruby
2.0.0-p648
RubyGems
2.0.14.1
Puma 2.16.0 nginx
1.10.1
Ruby 2.0 with
Passenger version
2.3.2
64bit Amazon
Linux 2016.09
v2.3.1 running
Ruby 2.0 (Passenger
Standalone)
2016.09.0Ruby
2.0.0-p648
RubyGems
2.0.14.1
Passenger 4.0.60 nginx
1.10.1
API Version 2010-12-01
1102

AWS Elastic Beanstalk Developer Guide
Ruby
Configuration and
Solution Stack
Name
AMI Language Package
Manager
Application Server Proxy
Server
Ruby 1.9 with
Passenger version
2.3.2
64bit Amazon Linux
2016.09 v2.3.1
running Ruby 1.9.3
2016.09.0Ruby
1.9.3-p551
RubyGems
1.8.23.2
Passenger 4.0.60 nginx
1.10.1
The following Elastic Beanstalk platform configurations for Ruby were current between January 28, 2017
and March 7, 2017:
Configuration and
Solution Stack
Name
AMI Language Package
Manager
Application Server Proxy
Server
Ruby 2.3 with
Puma version 2.3.1
64bit Amazon Linux
2016.09 v2.3.1
running Ruby 2.3
(Puma)
2016.09.0Ruby
2.3.1-p112
RubyGems
2.5.1
Puma 2.16.0 nginx
1.10.1
Ruby 2.3 with
Passenger version
2.3.1
64bit Amazon
Linux 2016.09
v2.3.1 running
Ruby 2.3 (Passenger
Standalone)
2016.09.0Ruby
2.3.1-p112
RubyGems
2.5.1
Passenger 4.0.60 nginx
1.10.1
Ruby 2.2 with
Puma version 2.3.1
64bit Amazon Linux
2016.09 v2.3.1
running Ruby 2.2
(Puma)
2016.09.0Ruby
2.2.5-p319
RubyGems
2.4.5.1
Puma 2.16.0 nginx
1.10.1
Ruby 2.2 with
Passenger version
2.3.1
64bit Amazon
Linux 2016.09
v2.3.1 running
Ruby 2.2 (Passenger
Standalone)
2016.09.0Ruby
2.2.5-p319
RubyGems
2.4.5.1
Passenger 4.0.60 nginx
1.10.1
Ruby 2.1 with
Puma version 2.3.1
2016.09.0Ruby
2.1.9-p490
RubyGems
2.2.5
Puma 2.16.0 nginx
1.10.1
API Version 2010-12-01
1103

AWS Elastic Beanstalk Developer Guide
Ruby
Configuration and
Solution Stack
Name
AMI Language Package
Manager
Application Server Proxy
Server
64bit Amazon Linux
2016.09 v2.3.1
running Ruby 2.1
(Puma)
Ruby 2.1 with
Passenger version
2.3.1
64bit Amazon
Linux 2016.09
v2.3.1 running
Ruby 2.1 (Passenger
Standalone)
2016.09.0Ruby
2.1.9-p490
RubyGems
2.2.5
Passenger 4.0.60 nginx
1.10.1
Ruby 2.0 with
Puma version 2.3.1
64bit Amazon Linux
2016.09 v2.3.1
running Ruby 2.0
(Puma)
2016.09.0Ruby
2.0.0-p648
RubyGems
2.0.14.1
Puma 2.16.0 nginx
1.10.1
Ruby 2.0 with
Passenger version
2.3.1
64bit Amazon
Linux 2016.09
v2.3.1 running
Ruby 2.0 (Passenger
Standalone)
2016.09.0Ruby
2.0.0-p648
RubyGems
2.0.14.1
Passenger 4.0.60 nginx
1.10.1
Ruby 1.9 with
Passenger version
2.3.1
64bit Amazon Linux
2016.09 v2.3.1
running Ruby 1.9.3
2016.09.0Ruby
1.9.3-p551
RubyGems
1.8.23.2
Passenger 4.0.60 nginx
1.10.1
The following Elastic Beanstalk platform configurations for Ruby were current between December 22,
2016 and January 27, 2017:
Configuration and
Solution Stack
Name
AMI Language Package
Manager
Application Server Proxy
Server
Ruby 2.3 with
Puma version 2.3.0
64bit Amazon Linux
2016.09 v2.3.0
2016.09.0Ruby
2.3.1-p112
RubyGems
2.5.1
Puma 2.16.0 nginx
1.10.1
API Version 2010-12-01
1104

AWS Elastic Beanstalk Developer Guide
Ruby
Configuration and
Solution Stack
Name
AMI Language Package
Manager
Application Server Proxy
Server
running Ruby 2.3
(Puma)
Ruby 2.3 with
Passenger version
2.3.0
64bit Amazon
Linux 2016.09
v2.3.0 running
Ruby 2.3 (Passenger
Standalone)
2016.09.0Ruby
2.3.1-p112
RubyGems
2.5.1
Passenger 4.0.60 nginx
1.10.1
Ruby 2.2 with
Puma version 2.3.0
64bit Amazon Linux
2016.09 v2.3.0
running Ruby 2.2
(Puma)
2016.09.0Ruby
2.2.5-p319
RubyGems
2.4.5.1
Puma 2.16.0 nginx
1.10.1
Ruby 2.2 with
Passenger version
2.3.0
64bit Amazon
Linux 2016.09
v2.3.0 running
Ruby 2.2 (Passenger
Standalone)
2016.09.0Ruby
2.2.5-p319
RubyGems
2.4.5.1
Passenger 4.0.60 nginx
1.10.1
Ruby 2.1 with
Puma version 2.3.0
64bit Amazon Linux
2016.09 v2.3.0
running Ruby 2.1
(Puma)
2016.09.0Ruby
2.1.9-p490
RubyGems
2.2.5
Puma 2.16.0 nginx
1.10.1
Ruby 2.1 with
Passenger version
2.3.0
64bit Amazon
Linux 2016.09
v2.3.0 running
Ruby 2.1 (Passenger
Standalone)
2016.09.0Ruby
2.1.9-p490
RubyGems
2.2.5
Passenger 4.0.60 nginx
1.10.1
API Version 2010-12-01
1105

AWS Elastic Beanstalk Developer Guide
Ruby
Configuration and
Solution Stack
Name
AMI Language Package
Manager
Application Server Proxy
Server
Ruby 2.0 with
Puma version 2.3.0
64bit Amazon Linux
2016.09 v2.3.0
running Ruby 2.0
(Puma)
2016.09.0Ruby
2.0.0-p648
RubyGems
2.0.14.1
Puma 2.16.0 nginx
1.10.1
Ruby 2.0 with
Passenger version
2.3.0
64bit Amazon
Linux 2016.09
v2.3.0 running
Ruby 2.0 (Passenger
Standalone)
2016.09.0Ruby
2.0.0-p648
RubyGems
2.0.14.1
Passenger 4.0.60 nginx
1.10.1
Ruby 1.9 with
Passenger version
2.3.0
64bit Amazon Linux
2016.09 v2.3.0
running Ruby 1.9.3
2016.09.0Ruby
1.9.3-p551
RubyGems
1.8.23.2
Passenger 4.0.60 nginx
1.10.1
The following Elastic Beanstalk platform configurations for Ruby were current between October 28,
2016 and December 21, 2016:
Configuration and
Solution Stack
Name
AMI Language Package
Manager
Application Server Proxy
Server
Ruby 2.3 with
Puma version 2.2.0
64bit Amazon Linux
2016.09 v2.2.0
running Ruby 2.3
(Puma)
2016.09.0Ruby
2.3.1-p112
RubyGems
2.5.1
Puma 2.16.0 nginx
1.10.1
Ruby 2.3 with
Passenger version
2.2.0
64bit Amazon
Linux 2016.09
v2.2.0 running
Ruby 2.3 (Passenger
Standalone)
2016.09.0Ruby
2.3.1-p112
RubyGems
2.5.1
Passenger 4.0.60 nginx
1.10.1
Ruby 2.2 with
Puma version 2.2.0
2016.09.0Ruby
2.2.5-p319
RubyGems
2.4.5.1
Puma 2.16.0 nginx
1.10.1
API Version 2010-12-01
1106

AWS Elastic Beanstalk Developer Guide
Ruby
Configuration and
Solution Stack
Name
AMI Language Package
Manager
Application Server Proxy
Server
64bit Amazon Linux
2016.09 v2.2.0
running Ruby 2.2
(Puma)
Ruby 2.2 with
Passenger version
2.2.0
64bit Amazon
Linux 2016.09
v2.2.0 running
Ruby 2.2 (Passenger
Standalone)
2016.09.0Ruby
2.2.5-p319
RubyGems
2.4.5.1
Passenger 4.0.60 nginx
1.10.1
Ruby 2.1 with
Puma version 2.2.0
64bit Amazon Linux
2016.09 v2.2.0
running Ruby 2.1
(Puma)
2016.09.0Ruby
2.1.9-p490
RubyGems
2.2.5
Puma 2.16.0 nginx
1.10.1
Ruby 2.1 with
Passenger version
2.2.0
64bit Amazon
Linux 2016.09
v2.2.0 running
Ruby 2.1 (Passenger
Standalone)
2016.09.0Ruby
2.1.9-p490
RubyGems
2.2.5
Passenger 4.0.60 nginx
1.10.1
Ruby 2.0 with
Puma version 2.2.0
64bit Amazon Linux
2016.09 v2.2.0
running Ruby 2.0
(Puma)
2016.09.0Ruby
2.0.0-p648
RubyGems
2.0.14.1
Puma 2.16.0 nginx
1.10.1
Ruby 2.0 with
Passenger version
2.2.0
64bit Amazon
Linux 2016.09
v2.2.0 running
Ruby 2.0 (Passenger
Standalone)
2016.09.0Ruby
2.0.0-p648
RubyGems
2.0.14.1
Passenger 4.0.60 nginx
1.10.1
API Version 2010-12-01
1107

AWS Elastic Beanstalk Developer Guide
Ruby
Configuration and
Solution Stack
Name
AMI Language Package
Manager
Application Server Proxy
Server
Ruby 1.9 with
Passenger version
2.2.0
64bit Amazon Linux
2016.09 v2.2.0
running Ruby 1.9.3
2016.09.0Ruby
1.9.3-p551
RubyGems
1.8.23.2
Passenger 4.0.60 nginx
1.10.1
The following Elastic Beanstalk platform configurations for Ruby were current between August 24, 2016
and October 27, 2016:
Configuration and
Solution Stack
Name
AMI Language Package
Manager
Application Server Proxy
Server
Ruby 2.3 with
Puma version 2.1.6
64bit Amazon Linux
2016.03 v2.1.6
running Ruby 2.3
(Puma)
2016.03.3Ruby
2.3.1-p112
RubyGems
2.5.1
Puma 2.16.0 nginx 1.8.1
Ruby 2.3 with
Passenger version
2.1.6
64bit Amazon
Linux 2016.03
v2.1.6 running
Ruby 2.3 (Passenger
Standalone)
2016.03.3Ruby
2.3.1-p112
RubyGems
2.5.1
Passenger 4.0.60 nginx 1.8.1
Ruby 2.2 with
Puma version 2.1.6
64bit Amazon Linux
2016.03 v2.1.6
running Ruby 2.2
(Puma)
2016.03.3Ruby
2.2.5-p319
RubyGems
2.4.5.1
Puma 2.16.0 nginx 1.8.1
Ruby 2.2 with
Passenger version
2.1.6
64bit Amazon
Linux 2016.03
v2.1.6 running
Ruby 2.2 (Passenger
Standalone)
2016.03.3Ruby
2.2.5-p319
RubyGems
2.4.5.1
Passenger 4.0.60 nginx 1.8.1
Ruby 2.1 with
Puma version 2.1.6
2016.03.3Ruby
2.1.9-p490
RubyGems
2.2.5
Puma 2.16.0 nginx 1.8.1
API Version 2010-12-01
1108

AWS Elastic Beanstalk Developer Guide
Ruby
Configuration and
Solution Stack
Name
AMI Language Package
Manager
Application Server Proxy
Server
64bit Amazon Linux
2016.03 v2.1.6
running Ruby 2.1
(Puma)
Ruby 2.1 with
Passenger version
2.1.6
64bit Amazon
Linux 2016.03
v2.1.6 running
Ruby 2.1 (Passenger
Standalone)
2016.03.3Ruby
2.1.9-p490
RubyGems
2.2.5
Passenger 4.0.60 nginx 1.8.1
Ruby 2.0 with
Puma version 2.1.6
64bit Amazon Linux
2016.03 v2.1.6
running Ruby 2.0
(Puma)
2016.03.3Ruby
2.0.0-p648
RubyGems
2.0.14.1
Puma 2.16.0 nginx 1.8.1
Ruby 2.0 with
Passenger version
2.1.6
64bit Amazon
Linux 2016.03
v2.1.6 running
Ruby 2.0 (Passenger
Standalone)
2016.03.3Ruby
2.0.0-p648
RubyGems
2.0.14.1
Passenger 4.0.60 nginx 1.8.1
Ruby 1.9 with
Passenger version
2.1.6
64bit Amazon Linux
2016.03 v2.1.6
running Ruby 1.9.3
2016.03.3Ruby
1.9.3-p551
RubyGems
1.8.23.2
Passenger 4.0.60 nginx 1.8.1
The following Elastic Beanstalk platform configurations for Ruby were current between June 26, 2016
and August 24, 2016:
Configuration and
Solution Stack
Name
AMI Language Package
Manager
Application Server Proxy
Server
Ruby 2.3 with
Puma version 2.1.3
64bit Amazon Linux
2016.03 v2.1.3
2016.03.2Ruby
2.3.1-p112
RubyGems
2.5.1
Puma 2.16.0 nginx 1.8.1
API Version 2010-12-01
1109

AWS Elastic Beanstalk Developer Guide
Ruby
Configuration and
Solution Stack
Name
AMI Language Package
Manager
Application Server Proxy
Server
running Ruby 2.3
(Puma)
Ruby 2.3 with
Passenger version
2.1.3
64bit Amazon
Linux 2016.03
v2.1.3 running
Ruby 2.3 (Passenger
Standalone)
2016.03.2Ruby
2.3.1-p112
RubyGems
2.5.1
Passenger 4.0.60 nginx 1.8.1
Ruby 2.2 with
Puma version 2.1.3
64bit Amazon Linux
2016.03 v2.1.3
running Ruby 2.2
(Puma)
2016.03.2Ruby
2.2.5-p319
RubyGems
2.4.5.1
Puma 2.16.0 nginx 1.8.1
Ruby 2.2 with
Passenger version
2.1.3
64bit Amazon
Linux 2016.03
v2.1.3 running
Ruby 2.2 (Passenger
Standalone)
2016.03.2Ruby
2.2.5-p319
RubyGems
2.4.5.1
Passenger 4.0.60 nginx 1.8.1
Ruby 2.1 with
Puma version 2.1.3
64bit Amazon Linux
2016.03 v2.1.3
running Ruby 2.1
(Puma)
2016.03.2Ruby
2.1.9-p490
RubyGems
2.2.5
Puma 2.16.0 nginx 1.8.1
Ruby 2.1 with
Passenger version
2.1.3
64bit Amazon
Linux 2016.03
v2.1.3 running
Ruby 2.1 (Passenger
Standalone)
2016.03.2Ruby
2.1.9-p490
RubyGems
2.2.5
Passenger 4.0.60 nginx 1.8.1
API Version 2010-12-01
1110

AWS Elastic Beanstalk Developer Guide
Ruby
Configuration and
Solution Stack
Name
AMI Language Package
Manager
Application Server Proxy
Server
Ruby 2.0 with
Puma version 2.1.3
64bit Amazon Linux
2016.03 v2.1.3
running Ruby 2.0
(Puma)
2016.03.2Ruby
2.0.0-p648
RubyGems
2.0.14.1
Puma 2.16.0 nginx 1.8.1
Ruby 2.0 with
Passenger version
2.1.3
64bit Amazon
Linux 2016.03
v2.1.3 running
Ruby 2.0 (Passenger
Standalone)
2016.03.2Ruby
2.0.0-p648
RubyGems
2.0.14.1
Passenger 4.0.60 nginx 1.8.1
Ruby 1.9 with
Passenger version
2.1.3
64bit Amazon Linux
2016.03 v2.1.3
running Ruby 1.9.3
2016.03.2Ruby
1.9.3-p551
RubyGems
1.8.23.2
Passenger 4.0.60 nginx 1.8.1
The following Elastic Beanstalk platform configurations for Ruby were current between May 13, 2016
and June 26, 2016:
Configuration and
Solution Stack
Name
AMI Language Package
Manager
Application Server Proxy
Server
Ruby 2.3 with
Puma version 2.1.2
64bit Amazon Linux
2016.03 v2.1.2
running Ruby 2.3
(Puma)
2016.03 Ruby 2.3 RubyGems
2.5.1
Puma 2.10.2 nginx 1.8.1
Ruby 2.3 with
Passenger version
2.1.2
64bit Amazon
Linux 2016.03
v2.1.2 running
Ruby 2.3 (Passenger
Standalone)
2016.03 Ruby 2.3 RubyGems
2.5.1
Passenger 4.0.59 nginx 1.8.1
Ruby 2.2 with
Puma version 2.1.2
2016.03 Ruby
2.2.4-p230
RubyGems
2.4.5.1
Puma 2.10.2 nginx 1.8.1
API Version 2010-12-01
1111

AWS Elastic Beanstalk Developer Guide
Ruby
Configuration and
Solution Stack
Name
AMI Language Package
Manager
Application Server Proxy
Server
64bit Amazon Linux
2016.03 v2.1.2
running Ruby 2.2
(Puma)
Ruby 2.2 with
Passenger version
2.1.2
64bit Amazon
Linux 2016.03
v2.1.2 running
Ruby 2.2 (Passenger
Standalone)
2016.03 Ruby
2.2.4-p230
RubyGems
2.4.5.1
Passenger 4.0.59 nginx 1.8.1
Ruby 2.1 with
Puma version 2.1.2
64bit Amazon Linux
2016.03 v2.1.2
running Ruby 2.1
(Puma)
2016.03 Ruby
2.1.8-p440
RubyGems
2.2.5
Puma 2.10.2 nginx 1.8.1
Ruby 2.1 with
Passenger version
2.1.2
64bit Amazon
Linux 2016.03
v2.1.2 running
Ruby 2.1 (Passenger
Standalone)
2016.03 Ruby
2.1.8-p440
RubyGems
2.2.5
Passenger 4.0.59 nginx 1.8.1
Ruby 2.0 with
Puma version 2.1.2
64bit Amazon Linux
2016.03 v2.1.2
running Ruby 2.0
(Puma)
2016.03 Ruby
2.0.0-p648
RubyGems
2.0.14.1
Puma 2.10.2 nginx 1.8.1
Ruby 2.0 with
Passenger version
2.1.2
64bit Amazon
Linux 2016.03
v2.1.2 running
Ruby 2.0 (Passenger
Standalone)
2016.03 Ruby
2.0.0-p648
RubyGems
2.0.14.1
Passenger 4.0.59 nginx 1.8.1
API Version 2010-12-01
1112

AWS Elastic Beanstalk Developer Guide
Ruby
Configuration and
Solution Stack
Name
AMI Language Package
Manager
Application Server Proxy
Server
Ruby 1.9 with
Passenger version
2.1.2
64bit Amazon Linux
2016.03 v2.1.2
running Ruby 1.9.3
2016.03 Ruby
1.9.3-p551
RubyGems
1.8.23.2
Passenger 4.0.59 nginx 1.8.1
The following Elastic Beanstalk platform configurations for Ruby were current between April 7, 2016 and
May 13, 2016:
Configuration and
Solution Stack
Name
AMI Language Package
Manager
Application Server Proxy
Server
Ruby 2.3 with
Puma version 2.1.0
64bit Amazon Linux
2016.03 v2.1.0
running Ruby 2.3
(Puma)
2016.03 Ruby 2.3 RubyGems
2.5.1
Puma 2.10.2 nginx 1.8.1
Ruby 2.3 with
Passenger version
2.1.0
64bit Amazon
Linux 2016.03
v2.1.0 running
Ruby 2.3 (Passenger
Standalone)
2016.03 Ruby 2.3 RubyGems
2.5.1
Passenger 4.0.59 nginx 1.8.1
Ruby 2.2 with
Puma version 2.1.0
64bit Amazon Linux
2016.03 v2.1.0
running Ruby 2.2
(Puma)
2016.03 Ruby
2.2.4-p230
RubyGems
2.4.5.1
Puma 2.10.2 nginx 1.8.1
Ruby 2.2 with
Passenger version
2.1.0
64bit Amazon
Linux 2016.03
v2.1.0 running
Ruby 2.2 (Passenger
Standalone)
2016.03 Ruby
2.2.4-p230
RubyGems
2.4.5.1
Passenger 4.0.59 nginx 1.8.1
Ruby 2.1 with
Puma version 2.1.0
2016.03 Ruby
2.1.8-p440
RubyGems
2.2.5
Puma 2.10.2 nginx 1.8.1
API Version 2010-12-01
1113

AWS Elastic Beanstalk Developer Guide
Ruby
Configuration and
Solution Stack
Name
AMI Language Package
Manager
Application Server Proxy
Server
64bit Amazon Linux
2016.03 v2.1.0
running Ruby 2.1
(Puma)
Ruby 2.1 with
Passenger version
2.1.0
64bit Amazon
Linux 2016.03
v2.1.0 running
Ruby 2.1 (Passenger
Standalone)
2016.03 Ruby
2.1.8-p440
RubyGems
2.2.5
Passenger 4.0.59 nginx 1.8.1
Ruby 2.0 with
Puma version 2.1.0
64bit Amazon Linux
2016.03 v2.1.0
running Ruby 2.0
(Puma)
2016.03 Ruby
2.0.0-p648
RubyGems
2.0.14.1
Puma 2.10.2 nginx 1.8.1
Ruby 2.0 with
Passenger version
2.1.0
64bit Amazon
Linux 2016.03
v2.1.0 running
Ruby 2.0 (Passenger
Standalone)
2016.03 Ruby
2.0.0-p648
RubyGems
2.0.14.1
Passenger 4.0.59 nginx 1.8.1
Ruby 1.9 with
Passenger version
2.1.0
64bit Amazon Linux
2016.03 v2.1.0
running Ruby 1.9.3
2016.03 Ruby
1.9.3-p551
RubyGems
1.8.23.2
Passenger 4.0.59 nginx 1.8.1
The following Elastic Beanstalk platform configurations for Ruby were current between February 26,
2016 and April 7, 2016:
Configuration and
Solution Stack
Name
AMI Language Package
Manager
Application Server Web
Server
Ruby 2.2 with
Puma version 2.0.8
64bit Amazon Linux
2015.09 v2.0.8
2015.09 Ruby
2.2.4-p230
RubyGems
2.4.5.1
Puma 2.10.2 nginx 1.8.0
API Version 2010-12-01
1114

AWS Elastic Beanstalk Developer Guide
Ruby
Configuration and
Solution Stack
Name
AMI Language Package
Manager
Application Server Web
Server
running Ruby 2.2
(Puma)
Ruby 2.2 with
Passenger version
2.0.8
64bit Amazon
Linux 2015.09
v2.0.8 running
Ruby 2.2 (Passenger
Standalone)
2015.09 Ruby
2.2.4-p230
RubyGems
2.4.5.1
Passenger 4.0.59 nginx 1.8.0
Ruby 2.1 with
Puma version 2.0.8
64bit Amazon Linux
2015.09 v2.0.8
running Ruby 2.1
(Puma)
2015.09 Ruby
2.1.8-p440
RubyGems
2.2.5
Puma 2.10.2 nginx 1.8.0
Ruby 2.1 with
Passenger version
2.0.8
64bit Amazon
Linux 2015.09
v2.0.8 running
Ruby 2.1 (Passenger
Standalone)
2015.09 Ruby
2.1.8-p440
RubyGems
2.2.5
Passenger 4.0.59 nginx 1.8.0
Ruby 2.0 with
Puma version 2.0.8
64bit Amazon Linux
2015.09 v2.0.8
running Ruby 2.0
(Puma)
2015.09 Ruby
2.0.0-p648
RubyGems
2.0.14.1
Puma 2.10.2 nginx 1.8.0
Ruby 2.0 with
Passenger version
2.0.8
64bit Amazon
Linux 2015.09
v2.0.8 running
Ruby 2.0 (Passenger
Standalone)
2015.09 Ruby
2.0.0-p648
RubyGems
2.0.14.1
Passenger 4.0.59 nginx 1.8.0
API Version 2010-12-01
1115

AWS Elastic Beanstalk Developer Guide
Ruby
Configuration and
Solution Stack
Name
AMI Language Package
Manager
Application Server Web
Server
Ruby 1.9 with
Passenger version
2.0.8
64bit Amazon Linux
2015.09 v2.0.8
running Ruby 1.9.3
2015.09 Ruby
1.9.3-p551
RubyGems
1.8.23.2
Passenger 4.0.59 nginx 1.8.0
The following Elastic Beanstalk platform configurations for Ruby were current between January 11, 2016
and February 26, 2016:
Configuration and
Solution Stack
Name
AMI Language Package
Manager
Application Server Web
Server
Ruby 2.2 with
Puma version 2.0.6
64bit Amazon Linux
2015.09 v2.0.6
running Ruby 2.2
(Puma)
2015.09 Ruby 2.2.3 RubyGems
2.4.5.1
Puma 2.10.2 nginx 1.8.0
Ruby 2.2 with
Passenger version
2.0.6
64bit Amazon
Linux 2015.09
v2.0.6 running
Ruby 2.2 (Passenger
Standalone)
2015.09 Ruby 2.2.3 RubyGems
2.4.5.1
Passenger 4.0.59 nginx 1.8.0
Ruby 2.1 with
Puma version 2.0.6
64bit Amazon Linux
2015.09 v2.0.6
running Ruby 2.1
(Puma)
2015.09 Ruby 2.1.7 RubyGems
2.2.5
Puma 2.10.2 nginx 1.8.0
Ruby 2.1 with
Passenger version
2.0.6
64bit Amazon
Linux 2015.09
v2.0.6 running
Ruby 2.1 (Passenger
Standalone)
2015.09 Ruby 2.1.7 RubyGems
2.2.5
Passenger 4.0.59 nginx 1.8.0
Ruby 2.0 with
Puma version 2.0.6
2015.09 Ruby
2.0.0-p647
RubyGems
2.0.14.1
Puma 2.10.2 nginx 1.8.0
API Version 2010-12-01
1116

AWS Elastic Beanstalk Developer Guide
Ruby
Configuration and
Solution Stack
Name
AMI Language Package
Manager
Application Server Web
Server
64bit Amazon Linux
2015.09 v2.0.6
running Ruby 2.0
(Puma)
Ruby 2.0 with
Passenger version
2.0.6
64bit Amazon
Linux 2015.09
v2.0.6 running
Ruby 2.0 (Passenger
Standalone)
2015.09 Ruby
2.0.0-p647
RubyGems
2.0.14.1
Passenger 4.0.59 nginx 1.8.0
Ruby 1.9 with
Passenger version
2.0.6
64bit Amazon Linux
2015.09 v2.0.6
running Ruby 1.9.3
2015.09 Ruby
1.9.3-p551
RubyGems
1.8.23.2
Passenger 4.0.59 nginx 1.8.0
The following Elastic Beanstalk platform configurations for Ruby were current between November 4,
2015 and January 11, 2016:
Configuration and
Solution Stack
Name
AMI Language Package
Manager
Application Server Web
Server
Ruby 2.2 with
Puma version 2.0.4
64bit Amazon Linux
2015.09 v2.0.4
running Ruby 2.2
(Puma)
2015.09 Ruby 2.2.3 RubyGems
2.4.5.1
Puma 2.10.2 nginx 1.8.0
Ruby 2.2 with
Passenger version
2.0.4
64bit Amazon
Linux 2015.09
v2.0.4 running
Ruby 2.2 (Passenger
Standalone)
2015.09 Ruby 2.2.3 RubyGems
2.4.5.1
Passenger 4.0.59 nginx 1.8.0
Ruby 2.1 with
Puma version 2.0.4
64bit Amazon Linux
2015.09 v2.0.4
2015.09 Ruby 2.1.7 RubyGems
2.2.5
Puma 2.10.2 nginx 1.8.0
API Version 2010-12-01
1117

AWS Elastic Beanstalk Developer Guide
Ruby
Configuration and
Solution Stack
Name
AMI Language Package
Manager
Application Server Web
Server
running Ruby 2.1
(Puma)
Ruby 2.1 with
Passenger version
2.0.4
64bit Amazon
Linux 2015.09
v2.0.4 running
Ruby 2.1 (Passenger
Standalone)
2015.09 Ruby 2.1.7 RubyGems
2.2.5
Passenger 4.0.59 nginx 1.8.0
Ruby 2.0 with
Puma version 2.0.4
64bit Amazon Linux
2015.09 v2.0.4
running Ruby 2.0
(Puma)
2015.09 Ruby
2.0.0-p647
RubyGems
2.0.14.1
Puma 2.10.2 nginx 1.8.0
Ruby 2.0 with
Passenger version
2.0.4
64bit Amazon
Linux 2015.09
v2.0.4 running
Ruby 2.0 (Passenger
Standalone)
2015.09 Ruby
2.0.0-p647
RubyGems
2.0.14.1
Passenger 4.0.59 nginx 1.8.0
Ruby 1.9 with
Passenger version
2.0.4
64bit Amazon Linux
2015.09 v2.0.4
running Ruby 1.9.3
2015.09 Ruby
1.9.3-p551
RubyGems
1.8.23.2
Passenger 4.0.59 nginx 1.8.0
The following Elastic Beanstalk platform configurations for Ruby were current between September 18,
2015 and November 4, 2015:
Configuration and
Solution Stack Name
AMI Language Application Server Web Server
Ruby 2.2 with Puma
version 2.0.1
64bit Amazon Linux
2015.03 v2.0.1
running Ruby 2.2
(Puma)
2015.03 Ruby 2.2.2 Puma 2.10.2 Nginx 1.6.2
API Version 2010-12-01
1118

AWS Elastic Beanstalk Developer Guide
Ruby
Configuration and
Solution Stack Name
AMI Language Application Server Web Server
Ruby 2.2 with
Passenger version
2.0.1
64bit Amazon Linux
2015.03 v2.0.1
running Ruby 2.2
(Passenger Standalone)
2015.03 Ruby 2.2.2 Passenger 4.0.59 Nginx 1.6.2
Ruby 2.1 with Puma
version 2.0.1
64bit Amazon Linux
2015.03 v2.0.1
running Ruby 2.1
(Puma)
2015.03 Ruby 2.1.5-
p273
Puma 2.10.2 Nginx 1.6.2
Ruby 2.1 with
Passenger version
2.0.1
64bit Amazon Linux
2015.03 v2.0.1
running Ruby 2.1
(Passenger Standalone)
2015.03 Ruby 2.1.5-
p273
Passenger 4.0.59 Nginx 1.6.2
Ruby 2.0 with Puma
version 2.0.1
64bit Amazon Linux
2015.03 v2.0.1
running Ruby 2.0
(Puma)
2015.03 Ruby 2.0.0-
p598
Puma 2.10.2 Nginx 1.6.2
Ruby 2.0 with
Passenger version
2.0.1
64bit Amazon Linux
2015.03 v2.0.1
running Ruby 2.0
(Passenger Standalone)
2015.03 Ruby 2.0.0-
p598
Passenger 4.0.59 Nginx 1.6.2
Ruby 1.9 with
Passenger version
2.0.1
64bit Amazon Linux
2015.03 v2.0.1
running Ruby 1.9.3
2015.03 Ruby 1.9.3-
p551
Passenger 4.0.59 Nginx 1.6.2
The following Elastic Beanstalk platform configurations for Ruby were current between August 11, 2015
and September 18, 2015:
API Version 2010-12-01
1119

AWS Elastic Beanstalk Developer Guide
Ruby
Configuration and
Solution Stack Name
AMI Language Application Server Web Server
Ruby 2.2 with Puma
version 2.0.0
64bit Amazon Linux
2015.03 v2.0.0
running Ruby 2.2
(Puma)
2015.03 Ruby 2.2.2 Puma 2.10.2 nginx 1.6.2
Ruby 2.2 with
Passenger version
2.0.0
64bit Amazon Linux
2015.03 v2.0.0
running Ruby 2.2
(Passenger Standalone)
2015.03 Ruby 2.2.2 Passenger 4.0.59 nginx 1.6.2
Ruby 2.1 with Puma
version 2.0.0
64bit Amazon Linux
2015.03 v2.0.0
running Ruby 2.1
(Puma)
2015.03 Ruby 2.1.5-
p273
Puma 2.10.2 nginx 1.6.2
Ruby 2.1 with
Passenger version
2.0.0
64bit Amazon Linux
2015.03 v2.0.0
running Ruby 2.1
(Passenger Standalone)
2015.03 Ruby 2.1.5-
p273
Passenger 4.0.59 nginx 1.6.2
Ruby 2.0 with Puma
version 2.0.0
64bit Amazon Linux
2015.03 v2.0.0
running Ruby 2.0
(Puma)
2015.03 Ruby 2.0.0-
p598
Puma 2.10.2 nginx 1.6.2
Ruby 2.0 with
Passenger version
2.0.0
64bit Amazon Linux
2015.03 v2.0.0
running Ruby 2.0
(Passenger Standalone)
2015.03 Ruby 2.0.0-
p598
Passenger 4.0.59 nginx 1.6.2
Ruby 1.9 with
Passenger version
2.0.0
2015.03 Ruby 1.9.3-
p551
Passenger 4.0.59 nginx 1.6.2
API Version 2010-12-01
1120

AWS Elastic Beanstalk Developer Guide
Ruby
Configuration and
Solution Stack Name
AMI Language Application Server Web Server
64bit Amazon Linux
2015.03 v2.0.0
running Ruby 1.9.3
The following Elastic Beanstalk platform configurations for Ruby were current between August 3, 2015
and August 11, 2015:
Configuration and
Solution Stack Name
AMI Language Application Server Web Server
Ruby 2.2 with Puma
version 1.4.6
64bit Amazon Linux
2015.03 v1.4.6
running Ruby 2.2
(Puma)
2015.03 Ruby 2.2.2 Puma 2.10.2 nginx 1.6.2
Ruby 2.2 with
Passenger version
1.4.6
64bit Amazon Linux
2015.03 v1.4.6
running Ruby 2.2
(Passenger Standalone)
2015.03 Ruby 2.2.2 Passenger 4.0.59 nginx 1.6.2
Ruby 2.1 with Puma
version 1.4.6
64bit Amazon Linux
2015.03 v1.4.6
running Ruby 2.1
(Puma)
2015.03 Ruby 2.1.5-
p273
Puma 2.10.2 nginx 1.6.2
Ruby 2.1 with
Passenger version
1.4.6
64bit Amazon Linux
2015.03 v1.4.6
running Ruby 2.1
(Passenger Standalone)
2015.03 Ruby 2.1.5-
p273
Passenger 4.0.59 nginx 1.6.2
Ruby 2.0 with Puma
version 1.4.6
64bit Amazon Linux
2015.03 v1.4.6
running Ruby 2.0
(Puma)
2015.03 Ruby 2.0.0-
p598
Puma 2.10.2 nginx 1.6.2
Ruby 2.0 with
Passenger version
1.4.6
2015.03 Ruby 2.0.0-
p598
Passenger 4.0.59 nginx 1.6.2
API Version 2010-12-01
1121

AWS Elastic Beanstalk Developer Guide
Ruby
Configuration and
Solution Stack Name
AMI Language Application Server Web Server
64bit Amazon Linux
2015.03 v1.4.6
running Ruby 2.0
(Passenger Standalone)
Ruby 1.9 with
Passenger version
1.4.6
64bit Amazon Linux
2015.03 v1.4.6
running Ruby 1.9.3
2015.03 Ruby 1.9.3-
p551
Passenger 4.0.59 nginx 1.6.2
The following Elastic Beanstalk platform configurations for Ruby were current between June 15, 2015
and August 3, 2015:
Configuration and
Solution Stack Name
AMI Language Application Server Web Server
Ruby 2.2 with Puma
version 1.4.3
64bit Amazon Linux
2015.03 v1.4.3
running Ruby 2.2
(Puma)
2015.03 Ruby 2.2.2 Puma 2.10.2 nginx 1.6.2
Ruby 2.2 with
Passenger version
1.4.3
64bit Amazon Linux
2015.03 v1.4.3
running Ruby 2.2
(Passenger Standalone)
2015.03 Ruby 2.2.2 Passenger 4.0.59 nginx 1.6.2
Ruby 2.1 with Puma
version 1.4.3
64bit Amazon Linux
2015.03 v1.4.3
running Ruby 2.1
(Puma)
2015.03 Ruby 2.1.5-
p273
Puma 2.10.2 nginx 1.6.2
Ruby 2.1 with
Passenger version
1.4.3
64bit Amazon Linux
2015.03 v1.4.3
running Ruby 2.1
(Passenger Standalone)
2015.03 Ruby 2.1.5-
p273
Passenger 4.0.59 nginx 1.6.2
Ruby 2.0 with Puma
version 1.4.3
2015.03 Ruby 2.0.0-
p598
Puma 2.10.2 nginx 1.6.2
API Version 2010-12-01
1122

AWS Elastic Beanstalk Developer Guide
Ruby
Configuration and
Solution Stack Name
AMI Language Application Server Web Server
64bit Amazon Linux
2015.03 v1.4.3
running Ruby 2.0
(Puma)
Ruby 2.0 with
Passenger version
1.4.3
64bit Amazon Linux
2015.03 v1.4.3
running Ruby 2.0
(Passenger Standalone)
2015.03 Ruby 2.0.0-
p598
Passenger 4.0.59 nginx 1.6.2
Ruby 1.9 with
Passenger version
1.4.3
64bit Amazon Linux
2015.03 v1.4.3
running Ruby 1.9.3
2015.03 Ruby 1.9.3-
p551
Passenger 4.0.59 nginx 1.6.2
The following Elastic Beanstalk platform configurations for Ruby were current between May 27, 2015
and June 15, 2015:
Ruby Configurations
Name AMI Language Application/Web
Server
64bit Amazon Linux
2015.03 v1.4.1 running
Ruby 2.2 (Puma)
2015.03 Ruby 2.2.2 Puma 2.10.2 and
nginx 1.6.2
64bit Amazon Linux
2015.03 v1.4.1 running
Ruby 2.2 (Passenger
Standalone)
2015.03 Ruby 2.2.2 Passenger 4.0.59 and
nginx 1.6.2
64bit Amazon Linux
2015.03 v1.4.1 running
Ruby 2.1 (Puma)
2015.03 Ruby 2.1.5-p273 Puma 2.10.2 and
nginx 1.6.2
64bit Amazon Linux
2015.03 v1.4.1 running
Ruby 2.1 (Passenger
Standalone)
2015.03 Ruby 2.1.5-p273 Passenger 4.0.59 and
nginx 1.6.2
64bit Amazon Linux
2015.03 v1.4.1 running
Ruby 2.0 (Puma)
2015.03 Ruby 2.0.0-p598 Puma 2.10.2 and
nginx 1.6.2
64bit Amazon Linux
2015.03 v1.4.1 running
2015.03 Ruby 2.0.0-p598 Passenger 4.0.59 and
nginx 1.6.2
API Version 2010-12-01
1123

AWS Elastic Beanstalk Developer Guide
Ruby
Ruby Configurations
Ruby 2.0 (Passenger
Standalone)
64bit Amazon Linux
2015.03 v1.4.1 running
Ruby 1.9.3
2015.03 Ruby 1.9.3-p551 Passenger 4.0.59 and
nginx 1.6.2
The following Elastic Beanstalk platform configurations for Ruby were current between April 22, 2015
and May 26, 2015:
Ruby Container Types
Name AMI Language Application/Web
Server
64bit Amazon Linux
2015.03 v1.3.1 running
Ruby 2.2 (Puma)
2015.03 Ruby 2.2.2 Puma 2.10.2 and
nginx 1.6.2
64bit Amazon Linux
2015.03 v1.3.1 running
Ruby 2.2 (Passenger
Standalone)
2015.03 Ruby 2.2.2 Passenger 4.0.59 and
nginx 1.6.2
64bit Amazon Linux
2015.03 v1.3.1 running
Ruby 2.1 (Puma)
2015.03 Ruby 2.1.5-p273 Puma 2.10.2 and
nginx 1.6.2
64bit Amazon Linux
2015.03 v1.3.1 running
Ruby 2.1 (Passenger
Standalone)
2015.03 Ruby 2.1.5-p273 Passenger 4.0.59 and
nginx 1.6.2
64bit Amazon Linux
2015.03 v1.3.1 running
Ruby 2.0 (Puma)
2015.03 Ruby 2.0.0-p598 Puma 2.10.2 and
nginx 1.6.2
64bit Amazon Linux
2015.03 v1.3.1 running
Ruby 2.0 (Passenger
Standalone)
2015.03 Ruby 2.0.0-p598 Passenger 4.0.59 and
nginx 1.6.2
64bit Amazon Linux
2015.03 v1.3.1 running
Ruby 1.9.3
2015.03 Ruby 1.9.3-p551 Passenger 4.0.59 and
nginx 1.6.2
The following Elastic Beanstalk platform configurations for Ruby were current between April 8, 2015 and
April 21, 2015:
Ruby Container Types
Name AMI Language Application/Web
Server
API Version 2010-12-01
1124

AWS Elastic Beanstalk Developer Guide
Ruby
Ruby Container Types
64bit Amazon Linux
2015.03 v1.3.1 running
Ruby 2.2 (Puma)
2015.03 Ruby 2.2.2 Puma 2.9.1 and
nginx 1.6.2
64bit Amazon Linux
2015.03 v1.3.1 running
Ruby 2.2 (Passenger
Standalone)
2015.03 Ruby 2.2.2 Passenger 4.0.59 and
nginx 1.6.2
64bit Amazon Linux
2015.03 v1.3.1 running
Ruby 2.1 (Puma)
2015.03 Ruby 2.1.5-p273 Puma 2.9.1 and
nginx 1.6.2
64bit Amazon Linux
2015.03 v1.3.1 running
Ruby 2.1 (Passenger
Standalone)
2015.03 Ruby 2.1.5-p273 Passenger 4.0.59 and
nginx 1.6.2
64bit Amazon Linux
2015.03 v1.3.1 running
Ruby 2.0 (Puma)
2015.03 Ruby 2.0.0-p598 Puma 2.9.1 and
nginx 1.6.2
64bit Amazon Linux
2015.03 v1.3.1 running
Ruby 2.0 (Passenger
Standalone)
2015.03 Ruby 2.0.0-p598 Passenger 4.0.59 and
nginx 1.6.2
64bit Amazon Linux
2015.03 v1.3.1 running
Ruby 1.9.3
2015.03 Ruby 1.9.3-p551 Passenger 4.0.59 and
nginx 1.6.2
The following Elastic Beanstalk platform configurations for Ruby were current between March 24, 2015
and April 7, 2015:
Ruby Container Types
Name AMI Language Application/Web
Server
64bit Amazon Linux
2014.09 v1.2.1 running
Ruby 2.2 (Puma)
2014.09 Ruby 2.2.0 Puma 2.9.1 and
nginx 1.6.2
64bit Amazon Linux
2014.09 v1.2.1 running
Ruby 2.2 (Passenger
Standalone)
2014.09 Ruby 2.2.0 Passenger 4.0.59 and
nginx 1.6.2
64bit Amazon Linux
2014.09 v1.2.0 running
Ruby 2.1 (Puma)
2014.09 Ruby 2.1.5-p273 Puma 2.9.1 and
nginx 1.6.2
64bit Amazon Linux
2014.09 v1.2.0 running
2014.09 Ruby 2.1.5-p273 Passenger 4.0.53 and
nginx 1.6.2
API Version 2010-12-01
1125

AWS Elastic Beanstalk Developer Guide
Ruby
Ruby Container Types
Ruby 2.1 (Passenger
Standalone)
64bit Amazon Linux
2014.09 v1.2.0 running
Ruby 2.0 (Puma)
2014.09 Ruby 2.0.0-p598 Puma 2.9.1 and
nginx 1.6.2
64bit Amazon Linux
2014.09 v1.2.0 running
Ruby 2.0 (Passenger
Standalone)
2014.09 Ruby 2.0.0-p598 Passenger 4.0.53 and
nginx 1.6.2
64bit Amazon Linux
2014.09 v1.2.0 running
Ruby 1.9.3
2014.09 Ruby 1.9.3-p551 Passenger 4.0.53 and
nginx 1.6.2
The following Elastic Beanstalk platform configurations for Ruby were current between February 17,
2015 and March 23, 2015:
Ruby Container Types
Name AMI Language Application/Web
Server
64bit Amazon Linux
2014.09 v1.2.0 running
Ruby 2.1 (Puma)
2014.09 Ruby 2.1.5-p273 Puma 2.9.1 and
nginx 1.6.2
64bit Amazon Linux
2014.09 v1.2.0 running
Ruby 2.1 (Passenger
Standalone)
2014.09 Ruby 2.1.5-p273 Passenger 4.0.53 and
nginx 1.6.2
64bit Amazon Linux
2014.09 v1.2.0 running
Ruby 2.0 (Puma)
2014.09 Ruby 2.0.0-p598 Puma 2.9.1 and
nginx 1.6.2
64bit Amazon Linux
2014.09 v1.2.0 running
Ruby 2.0 (Passenger
Standalone)
2014.09 Ruby 2.0.0-p598 Passenger 4.0.53 and
nginx 1.6.2
64bit Amazon Linux
2014.09 v1.2.0 running
Ruby 1.9.3
2014.09 Ruby 1.9.3-p551 Passenger 4.0.53 and
nginx 1.6.2
The following Elastic Beanstalk platform configurations for Ruby were current between January 28, 2015
and February 16, 2015:
Ruby Container Types
Name AMI Language Application/Web
Server
API Version 2010-12-01
1126

AWS Elastic Beanstalk Developer Guide
Ruby
Ruby Container Types
64bit Amazon Linux
2014.09 v1.1.01 running
Ruby 2.1 (Puma)
2014.09 Ruby 2.1.4 Puma 2.9.1 and
nginx 1.6.2
64bit Amazon Linux
2014.09 v1.1.01 running
Ruby 2.1 (Passenger
Standalone)
2014.09 Ruby 2.1.4 Passenger 4.0.53
64bit Amazon Linux
2014.09 v1.1.01 running
Ruby 2.0 (Puma)
2014.09 Ruby 2.0.0-p594 Puma 2.9.1 and
nginx 1.6.2
64bit Amazon Linux
2014.09 v1.1.01 running
Ruby 2.0 (Passenger
Standalone)
2014.09 Ruby 2.0.0-p594 Passenger 4.0.53
64bit Amazon Linux
2014.09 v1.1.01 running
Ruby 1.9.3
2014.09 Ruby 1.9.3-p550 Passenger 4.0.53
64bit Amazon Linux
2014.03 v1.1.01 running
Ruby 2.1 (Puma)
2014.03 Ruby 2.1.2-p95 Puma 2.8.1 and
nginx 1.4.7
64bit Amazon Linux
2014.03 v1.1.01 running
Ruby 2.1 (Passenger
Standalone)
2014.03 Ruby 2.1.2 Passenger 4.0.37
64bit Amazon Linux
2014.03 v1.1.01 running
Ruby 2.0 (Puma)
2014.03 Ruby 2.0.0-p481 Puma 2.8.1 and
nginx 1.4.7
64bit Amazon Linux
2014.03 v1.1.01 running
Ruby 2.0 (Passenger
Standalone)
2014.03 Ruby 2.0.0 Passenger 4.0.37
32bit Amazon Linux
2014.03 v1.1.01 running
Ruby 1.9.3
2014.03 Ruby 1.9.3 Passenger 4.0.37
64bit Amazon Linux
2014.03 v1.1.01 running
Ruby 1.9.3
2014.03 Ruby 1.9.3 Passenger 4.0.37
The following Elastic Beanstalk platform configurations for Ruby were current between October 31,
2014 and January 27, 2015:
Ruby Container Types
Name AMI Language Application/Web
Server
API Version 2010-12-01
1127

AWS Elastic Beanstalk Developer Guide
Ruby
Ruby Container Types
64bit Amazon Linux
2014.09 v1.0.9 running
Ruby 2.1 (Puma)
2014.09 Ruby 2.1.4 Puma 2.9.1 and
nginx 1.6.2
64bit Amazon Linux
2014.09 v1.0.9 running
Ruby 2.1 (Passenger
Standalone)
2014.09 Ruby 2.1.4 Passenger 4.0.53
64bit Amazon Linux
2014.09 v1.0.9 running
Ruby 2.0 (Puma)
2014.09 Ruby 2.0.0-p594 Puma 2.9.1 and
nginx 1.6.2
64bit Amazon Linux
2014.09 v1.0.9 running
Ruby 2.0 (Passenger
Standalone)
2014.09 Ruby 2.0.0-p594 Passenger 4.0.53
64bit Amazon Linux
2014.09 v1.0.9 running
Ruby 1.9.3
2014.09 Ruby 1.9.3-p550 Passenger 4.0.53
The following Elastic Beanstalk platform configurations for Ruby were current between October 16,
2014 and October 30, 2014:
Ruby Container Types
Name AMI Language Application/Web
Server
64bit Amazon Linux
2014.03 v1.0.91 running
Ruby 2.1 (Puma)
2014.03 Ruby 2.1.2 Puma 2.8.1 and
nginx 1.4.7
64bit Amazon Linux
2014.03 v1.0.91 running
Ruby 2.1 (Passenger
Standalone)
2014.03 Ruby 2.1.2 Passenger 4.0.37
64bit Amazon Linux
2014.03 v1.0.91 running
Ruby 2.0 (Puma)
2014.03 Ruby 2.0.0 Puma 2.8.1 and
nginx 1.4.7
64bit Amazon Linux
2014.03 v1.0.91 running
Ruby 2.0 (Passenger
Standalone)
2014.03 Ruby 2.0.0 Passenger 4.0.37
32bit Amazon Linux
2014.03 v1.0.91 running
Ruby 1.9.3
2014.03 Ruby 1.9.3 Passenger 4.0.37
64bit Amazon Linux
2014.03 v1.0.91 running
Ruby 1.9.3
2014.03 Ruby 1.9.3 Passenger 4.0.37
API Version 2010-12-01
1128

AWS Elastic Beanstalk Developer Guide
Ruby
1CVE-2014-3566 Advisory
The following Elastic Beanstalk platform configurations for Ruby were current between September 24,
2014 and October 15, 2014:
Ruby Container Types
Name AMI Language Application/Web
Server
64bit Amazon Linux
2014.03 v1.0.71 running
Ruby 2.1 (Puma)
2014.03 Ruby 2.1.2 Puma 2.8.1 and
nginx 1.4.7
64bit Amazon Linux
2014.03 v1.0.71 running
Ruby 2.1 (Passenger
Standalone)
2014.03 Ruby 2.1.2 Passenger 4.0.37
64bit Amazon Linux
2014.03 v1.0.71 running
Ruby 2.0 (Puma)
2014.03 Ruby 2.0.0 Puma 2.8.1 and
nginx 1.4.7
64bit Amazon Linux
2014.03 v1.0.71 running
Ruby 2.0 (Passenger
Standalone)
2014.03 Ruby 2.0.0 Passenger 4.0.37
32bit Amazon Linux
2014.03 v1.0.71 running
Ruby 1.9.3
2014.03 Ruby 1.9.3 Passenger 4.0.37
64bit Amazon Linux
2014.03 v1.0.71 running
Ruby 1.9.3
2014.03 Ruby 1.9.3 Passenger 4.0.37
1 CVE-2014-6271 Advisory and ALAS-2014-419
The following Elastic Beanstalk platform configurations for Ruby were current between August 14, 2014
and September 23, 2014:
Ruby Container Types
Name AMI Language Application/Web
Server
64bit Amazon Linux
2014.03 v1.0.0 running
Ruby 2.1 (Puma)
2014.03 Ruby 2.1.2 Puma 2.8.1 and
nginx 1.4.7
64bit Amazon Linux
2014.03 v1.0.0 running
Ruby 2.1 (Passenger
Standalone)
2014.03 Ruby 2.1.2 Passenger 4.0.37
64bit Amazon Linux
2014.03 v1.0.5 running
Ruby 2.0 (Puma)
2014.03 Ruby 2.0.0 Puma 2.8.1 and
nginx 1.4.7
API Version 2010-12-01
1129

AWS Elastic Beanstalk Developer Guide
Ruby
Ruby Container Types
64bit Amazon Linux
2014.03 v1.0.4 running
Ruby 2.0 (Passenger
Standalone)
2014.03 Ruby 2.0.0 Passenger 4.0.37
64bit Amazon Linux
2014.03 v1.0.4 running
Ruby 1.9.3
2014.03 Ruby 1.9.3 Passenger 4.0.37
The following Elastic Beanstalk platform configurations for Ruby were current between June 30, 2014
and August 13, 2014:
Ruby Container Types
Name AMI Language Application/Web
Server
64bit Amazon Linux
2014.03 v1.0.5 running
Ruby 2.0 (Puma)
2014.03 Ruby 2.0.0 Puma 2.8.1 and
nginx 1.4.7
64bit Amazon Linux
2014.03 v1.0.4 running
Ruby 2.0 (Passenger
Standalone)
2014.03 Ruby 2.0.0 Passenger 4.0.37
64bit Amazon Linux
2014.03 v1.0.4 running
Ruby 1.9.3
2014.03 Ruby 1.9.3 Passenger 4.0.37
The following Elastic Beanstalk platform configurations for Ruby were current between June 5, 2014 and
June 29, 2014:
Ruby Container Types
Name AMI Language Application/Web
Server
64bit Amazon Linux
2014.03 v1.0.41 running
Ruby 2.0 (Puma)
2014.03 Ruby 2.0.0 Puma 2.8.1 and
nginx 1.4.7
64bit Amazon Linux
2014.03 v1.0.31 running
Ruby 2.0 (Passenger
Standalone)
2014.03 Ruby 2.0.0 Passenger 4.0.37
32bit Amazon Linux
2014.03 v1.0.31 running
Ruby 1.9.3
2014.03 Ruby 1.9.3 Passenger 4.0.37
64bit Amazon Linux
2014.03 v1.0.31 running
Ruby 1.9.3
2014.03 Ruby 1.9.3 Passenger 4.0.37
API Version 2010-12-01
1130

AWS Elastic Beanstalk Developer Guide
Ruby
1 OpenSSL Security Advisory
The following Elastic Beanstalk platform configurations for Ruby were current between May 14, 2014
and June 4, 2014:
Ruby Container Types
Name AMI Language Application/Web
Server
64bit Amazon Linux
2014.03 v1.0.3 running
Ruby 2.0 (Puma)
2014.03 Ruby 2.0.0 Puma 2.8.1 and
nginx 1.4.7
The following Elastic Beanstalk platform configurations for Ruby were current between May 5, 2014 and
May 13, 2014:
Ruby Container Types
Name AMI Language Application/Web
Server
64bit Amazon Linux
2014.03 v1.0.2 running
Ruby 2.0 (Puma)
2014.03 Ruby 2.0.0 Puma 2.8.1 and
nginx 1.4.7
64bit Amazon Linux
2014.03 v1.0.2 running
Ruby 2.0 (Passenger
Standalone)
2014.03 Ruby 2.0.0 Passenger 4.0.37
32bit Amazon Linux
2014.03 v1.0.2 running
Ruby 1.9.3
2014.03 Ruby 1.9.3 Passenger 4.0.37
64bit Amazon Linux
2014.03 v1.0.2 running
Ruby 1.9.3
2014.03 Ruby 1.9.3 Passenger 4.0.37
The following Elastic Beanstalk platform configurations for Ruby were current between April 7, 2014 and
May 4, 2014:
Ruby Container Types
Name AMI Language Application/Web
Server
64bit Amazon Linux
2014.03 v1.0.12 running
Ruby 2.0 (Puma)
2014.03 Ruby 2.0.0 Puma 2.8.1 and
nginx 1.4.7
64bit Amazon Linux
2014.03 v1.0.12 running
Ruby 2.0 (Passenger
Standalone)
2014.03 Ruby 2.0.0 Passenger 4.0.37
API Version 2010-12-01
1131

AWS Elastic Beanstalk Developer Guide
Ruby
Ruby Container Types
32bit Amazon Linux
2014.02 v1.0.11 running
Ruby 1.9.3
2013.09 Ruby 1.9.3 Passenger 4.0.37
64bit Amazon Linux
2014.02 v1.0.11 running
Ruby 1.9.3
2013.09 Ruby 1.9.3 Passenger 4.0.37
32bit Amazon Linux
2014.02 v1.0.11 running
Ruby 1.8.7
2013.09 Ruby 1.8.7 Passenger 4.0.37
64bit Amazon Linux
2014.02 v1.0.11 running
Ruby 1.8.7
2013.09 Ruby 1.8.7 Passenger 4.0.37
32bit Amazon Linux
2013.09 v1.0.11 running
Ruby 1.9.3
2013.09 Ruby 1.9.3 Passenger 4.0.20
64bit Amazon Linux
2013.09 v1.0.11 running
Ruby 1.9.3
2013.09 Ruby 1.9.3 Passenger 4.0.20
32bit Amazon Linux
2013.09 v1.0.11 running
Ruby 1.8.7
2013.09 Ruby 1.8.7 Passenger 4.0.20
64bit Amazon Linux
2013.09 v1.0.11 running
Ruby 1.8.7
2013.09 Ruby 1.8.7 Passenger 4.0.20
1 openssl-1.0.1e-4.58.amzn1
2 openssl-1.0.1e-37.66.amzn1
The following Elastic Beanstalk platform configurations for Ruby were current between April 2, 2014 and
April 6, 2014:
Ruby Container Types
Name AMI Language Application/Web
Server
64bit Amazon Linux
2014.03 running Ruby 2.0
(Puma)
2014.03 Ruby 2.0.0 Puma 2.8.1 and
nginx 1.4.7
64bit Amazon Linux
2014.03 running Ruby 2.0
(Passenger Standalone)
2014.03 Ruby 2.0.0 Passenger 4.0.37
32bit Amazon Linux
2014.02 running Ruby
1.9.3
2013.09 Ruby 1.9.3 Passenger 4.0.37
API Version 2010-12-01
1132

AWS Elastic Beanstalk Developer Guide
Ruby
Ruby Container Types
64bit Amazon Linux
2014.02 running Ruby
1.9.3
2013.09 Ruby 1.9.3 Passenger 4.0.37
32bit Amazon Linux
2014.02 running Ruby
1.8.7
2013.09 Ruby 1.8.7 Passenger 4.0.37
64bit Amazon Linux
2014.02 running Ruby
1.8.7
2013.09 Ruby 1.8.7 Passenger 4.0.37
32bit Amazon Linux
2013.09 running Ruby
1.9.3
2013.09 Ruby 1.9.3 Passenger 4.0.20
64bit Amazon Linux
2013.09 running Ruby
1.9.3
2013.09 Ruby 1.9.3 Passenger 4.0.20
32bit Amazon Linux
2013.09 running Ruby
1.8.7
2013.09 Ruby 1.8.7 Passenger 4.0.20
64bit Amazon Linux
2013.09 running Ruby
1.8.7
2013.09 Ruby 1.8.7 Passenger 4.0.20
The following Elastic Beanstalk platform configurations for Ruby were current between March 18, 2014
and April 1, 2014:
Ruby Container Types
Name AMI Language Application/Web
Server
32bit Amazon Linux
2014.02 running Ruby
1.9.3
2013.09 Ruby 1.9.3 Passenger 4.0.37
64bit Amazon Linux
2014.02 running Ruby
1.9.3
2013.09 Ruby 1.9.3 Passenger 4.0.37
32bit Amazon Linux
2014.02 running Ruby
1.8.7
2013.09 Ruby 1.8.7 Passenger 4.0.37
64bit Amazon Linux
2014.02 running Ruby
1.8.7
2013.09 Ruby 1.8.7 Passenger 4.0.37
32bit Amazon Linux
2013.09 running Ruby
1.9.3
2013.09 Ruby 1.9.3 Passenger 4.0.20
API Version 2010-12-01
1133

AWS Elastic Beanstalk Developer Guide
Ruby
Ruby Container Types
64bit Amazon Linux
2013.09 running Ruby
1.9.3
2013.09 Ruby 1.9.3 Passenger 4.0.20
32bit Amazon Linux
2013.09 running Ruby
1.8.7
2013.09 Ruby 1.8.7 Passenger 4.0.20
64bit Amazon Linux
2013.09 running Ruby
1.8.7
2013.09 Ruby 1.8.7 Passenger 4.0.20
The following Elastic Beanstalk platform configurations for Ruby were current between November 9,
2013 and March 17, 2014:
Ruby Container Types
Name AMI Language Application/Web
Server
32bit Amazon Linux
2013.09 running Ruby
1.9.3
2013.09 Ruby 1.9.3 Passenger 4.0.20
64bit Amazon Linux
2013.09 running Ruby
1.9.3
2013.09 Ruby 1.9.3 Passenger 4.0.20
32bit Amazon Linux
2013.09 running Ruby
1.8.7
2013.09 Ruby 1.8.7 Passenger 4.0.20
64bit Amazon Linux
2013.09 running Ruby
1.8.7
2013.09 Ruby 1.8.7 Passenger 4.0.20
The following Elastic Beanstalk platform configurations for Ruby were current prior to November 9,
2013:
Ruby Container Types
Name AMI Language Application/Web
Server
32bit Amazon Linux
running Ruby 1.9.3
2012.09 Ruby 1.9.3 Passenger 3.0.17
64bit Amazon Linux
running Ruby 1.9.3
2012.09 Ruby 1.9.3 Passenger 3.0.17
32bit Amazon Linux
running Ruby 1.8.7
2012.09 Ruby 1.8.7 Passenger 3.0.17
API Version 2010-12-01
1134

AWS Elastic Beanstalk Developer Guide
Ruby
Ruby Container Types
64bit Amazon Linux
running Ruby 1.8.7
2012.09 Ruby 1.8.7 Passenger 3.0.17
API Version 2010-12-01
1135
